Contents
1.
Environmentally Friendly Waste Disposal
.......
3
2.
Hints and Tips for Eco-friendly Washing
.........
3
3. Safety Instructions ......................................
3
4. Parts and Accessories .................................
6
5. Install the Washing Machine ........................
7
6. Control Panel and Display ............................
12
7. Preparation Before Use ................................
14
8. Using the Washing Machine .........................
14
9. Program Overview .......................................
20
10. Care and Maintenance ...............................
27
11. Troubleshooting ........................................
30
12. Error Codes ...............................................
31
13. Specications ..............................................
14. Service .....................................................
32
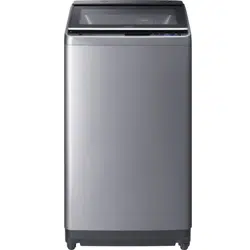
10kg Washing Machine
Fully Automatic
Model
LTL10PMVJWT
Instruction Manual
Thank you for purchasing a Hitachi fully automatic washing
machine.
■ Please read this Instruction Manual carefully for proper
operation of the machine.
■ Please keep this Instruction Manual for future reference.
■ MaximumMassofDryWeight–10kg.
For household use only
32
EN
AU Only
2 / EN
Washing Machine / Instruction manual
Please read this instruction manual first!
Danger that could result in death or injury.
Important information or useful hints about usage.
Read the instruction manual.
Recyclable materials.
Hot surface warning.
WARNING Danger that may result in property damage to the product or its environment.
Dear Customer,
Thank you for choosing Hitachi product. We hope that you get the best results from your
product which has been manufactured with high quality and state-of-the-art technology.
Therefore, please read this entire instruction manual and all other accompanying
documents carefully before using the product.
Follow all warnings and information in the instruction manual. Thus, you protect yourself
and your product against possible dangers.
Keep the instruction manual. If you hand over the product to someone else, provide the
Instruction manual as well. Warranty terms, usage and troubleshooting methods of your
product are in instruction manual.
Symbols and Definitions
The following symbols are used in the instruction manual:
Washing Machine / Instruction manual
3 / EN
1. Environmentally Friendly
Waste Disposal
Disposing of the packaging
The shipping package has protected your new
washing machine on its way to your home. All
materials are ecologically harmless and recyclable.
Please contribute to a better environment
by disposing of packaging materials in an
environmentally conscious manner.
Ask your dealer about current means of disposal.
Risk of choking!
Do not let children play with packaging and
associated parts.
There is a risk of suffocating with plastic bags and
collapsible boxes.
Disposing of your old appliance
You can dispose your old appliances. Environment-
conscious recycling can reclaim them to valuable
new materials.
Risk of death!
To dispose the old appliances:
1. Unplug the power plug from appliances you
are no longer using.
2. Cut off the power cord and dispose of it with
the plug.
If you wish to discard this product, contact your
local authorities or dealer and ask for the correct
method of disposal.
2 Hints and Tips for Eco-friendly
Washing
• Keep the load limit of each program.
• This washing machine features power-saving
operations with a built-in inverter controller which
enables the machine to optimize operations
according to the conditions of your clothes.
• Add detergent according to the degree of soiling,
laundry size, and water hardness. Follow the
detergent manufacturer’s instructions regarding
the amount of detergent to use.
• You can use further enhanced water-saving
technology such as “Spin Shower Rinse”. Water
consumption is less than the former models.
3. Safety Instructions
• This appliance is intended to be used in
household and similar applications such as:
(IEC 60335-2-7)
‒ Staff kitchen areas in shops, oces and other
working environments;
‒ Farm houses;
‒ By clients in hotels, motels and other
residential type environments;
‒ Bed and breakfast type environments;
‒ Areas for communal use in blocks of ats or in
launderettes.
WARNING!
• Issueswhichmaycausedeathorserious
injury.
General safety
• Do not dismantle, repair or modify the washing
machine.This could cause malfunction, re,
electric shock or injury. Contact your local
service center for repairs.
• Do not put re sources or anything inammable
in or near the washing machine (gas, diesel,
petroleum, thinner, alcohol, or clothes stained
with these substances). This could cause an
explosion or re.
• Do not pour water on the washing machine
during operation. This could cause an electric
shock.
• Do not climb on the washing machine. Do not
place heavy object, drop any object or apply
impact on the lid glass.This could cause lid glass
breakage. If any scratch or breakage is found
on lid glass, stop using the washing machine
and contact your local service center to request
inspection and repair.
• Do not forcibly open the lid during operation:
Lid Lock Switch is designed to prevent from
opening the lid during operation. This is because
touching the washing tub while it is spinning may
result in serious injury. If you can open the lid
during operation, please stop using the Washing
Machine immediately and refrain from touching
the inside. Contact your local service center for
repair.
• This appliance is not intended for use by persons
with reduced physical, sensory or mental
capabilities, or lack of experience and knowledge
(including children) unless they have been given
supervision or instruction concerning use of
the appliance by a person responsible for their
safety.
• If there is a water outage or if you are removing
the water supply hose to reattach it, close the tap
and press the Start/Pause button, then wait 40
seconds and slowly open the tap. Air pressure
from a large amount of air in the water pipes
4 / EN
Washing Machine / Instruction manual
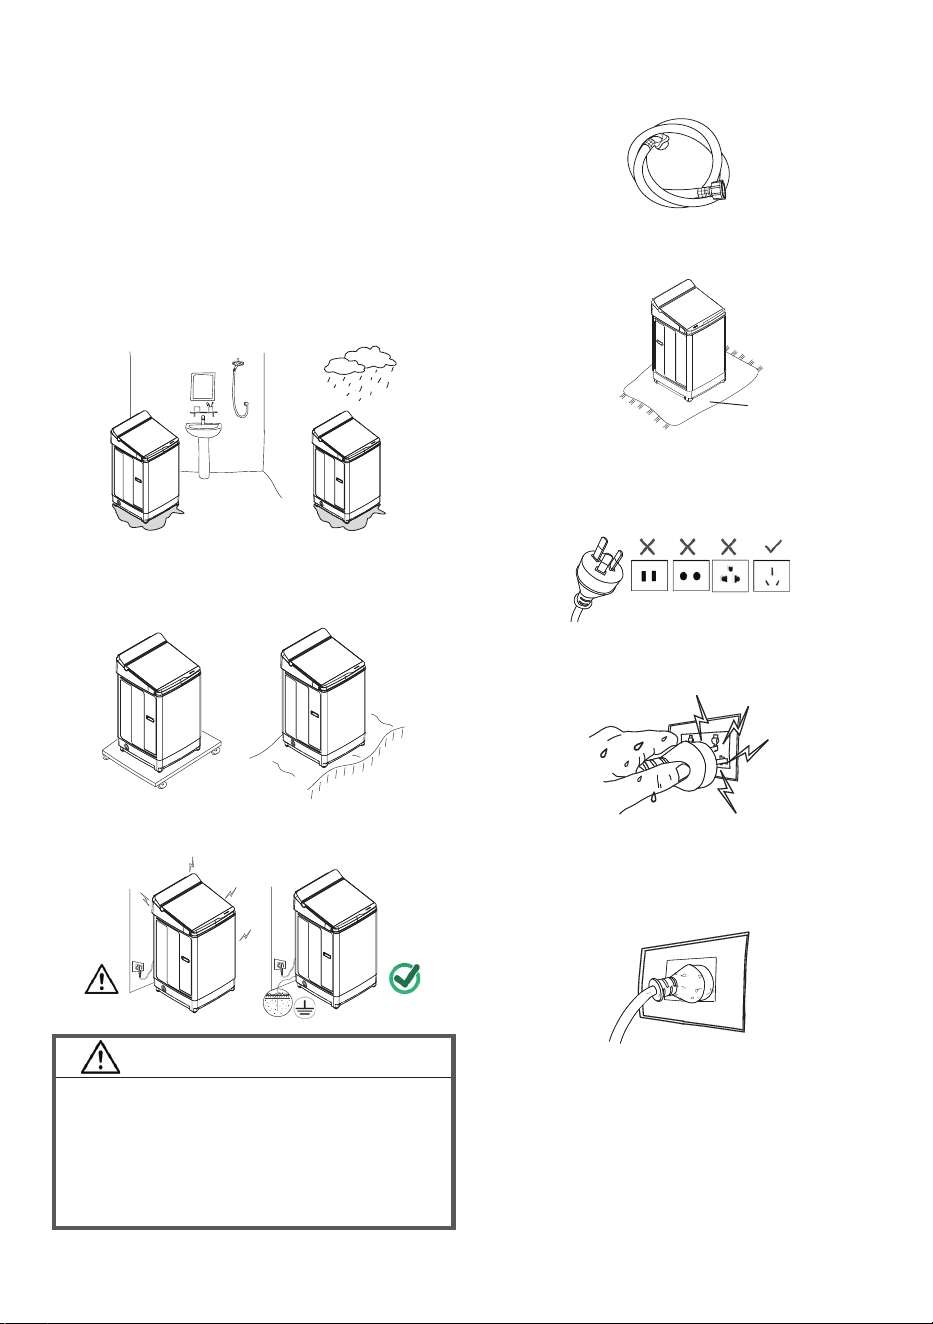
Installation
• Do not install it in a bathroom or a place exposed
to rain.
(This may cause corrosion, or current leakage
and electric shock to the product)
• Do not install it on a board with castors or an
uneven surface.
(This may cause vibration and noise)
• Grounding must always be performed.
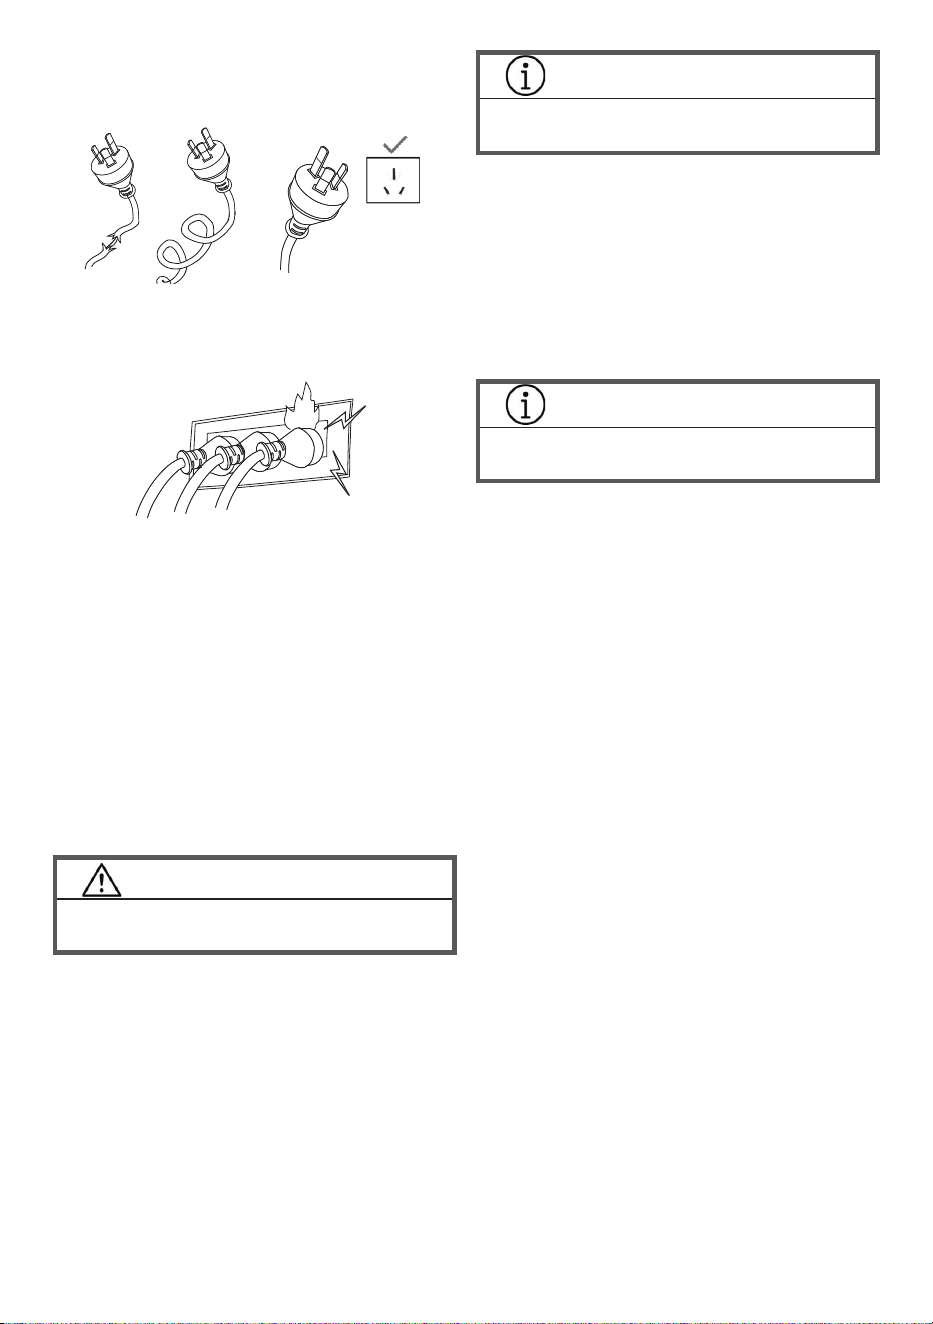
WARNING!
• Ifnotgrounded,currentleakage,electric
shockandproductdamagemightoccur.
• Usea3-pinsocket(Line,NeutralandGround)
forconnection.
• Donotuseanextensioncordordouble
adapter.
• Use the accessory hoses provided with the
machine.
(Reusing old hoses can cause water
leakage and property damage)
• T
he opening must not be obstructed by carpeting
if the washing machine is installed on a carpeted
oor.
Power source and cord
• Use an outlet and a rated voltage
may damage the washing machine.
• Periodically check that the union nut on the
water supply hose is tight. A loose nut may
cause a water leak.
• Remove the power plug from the outlet and close
the water tap if you will not use the washing
machine for a long time.
Carpet
• Do not insert or remove the power plug with wet
hands. (This could cause an electric shock)
• Clean off any dust on the power plug. (It may
cause a re)
Washing Machine / Instruction manual
5 / EN
Child safety
• Keep packaging out of reach of children and
infants. Danger of suffocation.
• Do not let children climb onto the washing
machine or to get into the tub. Do not leave
boxes or chairs near the washing machine that
children could use to climb onto it. This may
cause injury.
• Children should be supervised to ensure that
they do not play with the appliance.
CAUTION!
• Issues which may cause injury or damage
property.
Use
• All packaging materials must be removed before
using the washing machine. This may cause
malfunction or abnormal vibration.
• Check inside the tub before operating the
washing machine. Check that no pets or small
animals are in the tub.
• Do not wash items through which water does not
ow easily such as raincoats, wet suits, ski suits,
sleeping bags, cushions, pillows, shoes, shower
curtain. The washing machine may not work
properly, or it may cause injury or damage the
washing machine.
INFORMATION
• For more information, refer section 2 on
page 14 “WARNING!”
• Do not fold and stack large items such as
blankets together when washing them.
• Do not use a laundry net that is larger than 40cm
on a side. The clothes may become off balance
and cause abnormal vibration during the spin
cycle.
• Do not load laundry over the lower part of the
liquid load balancer (dashed line). This may
cause laundry to y out of the tub during the spin
cycle and damage the clothes or the washing
machine, or cause a water leak.
INFORMATION
• For more information, refer on page 14 “Sort
the laundry”
• Always put detergent into the detergent
dispenser when washing laundry.
• Do not wash items together with coins, pins, or
stones. This may damage clothes or the washing
machine, or cause a water leak.
Check inside pockets before washing.
• Do not press the buttons with sharp pointed
objects.
• Do not put heavy objects, liquid-lled containers
or equipment which produces heat on the
washing machine. This may damage the washing
machine or its top.
Care and maintenance
• If detergent, fabric softener or bleach spills on
the surface of the machine, clean it up with a
damp cloth immediately. The plastic or steel
parts of the washing machine may be damaged.
• Do not place equipment that produces heat
near the washing machine. This may cause
deformation of the washing machine.
• Do not tear, cut, modify, bend, pull or fold the
power cord, etc. The damaged power cord can
cause re, electric shock.
• Do not connect plugs to the same outlet and a
loose, damaged one. (This may cause a short
circuit or re)
* If the power cord is damaged, contact a dealer
or repair shop authorized by the manufacturer to
replace it to avoid risks.
6 / EN
Washing Machine / Instruction manual
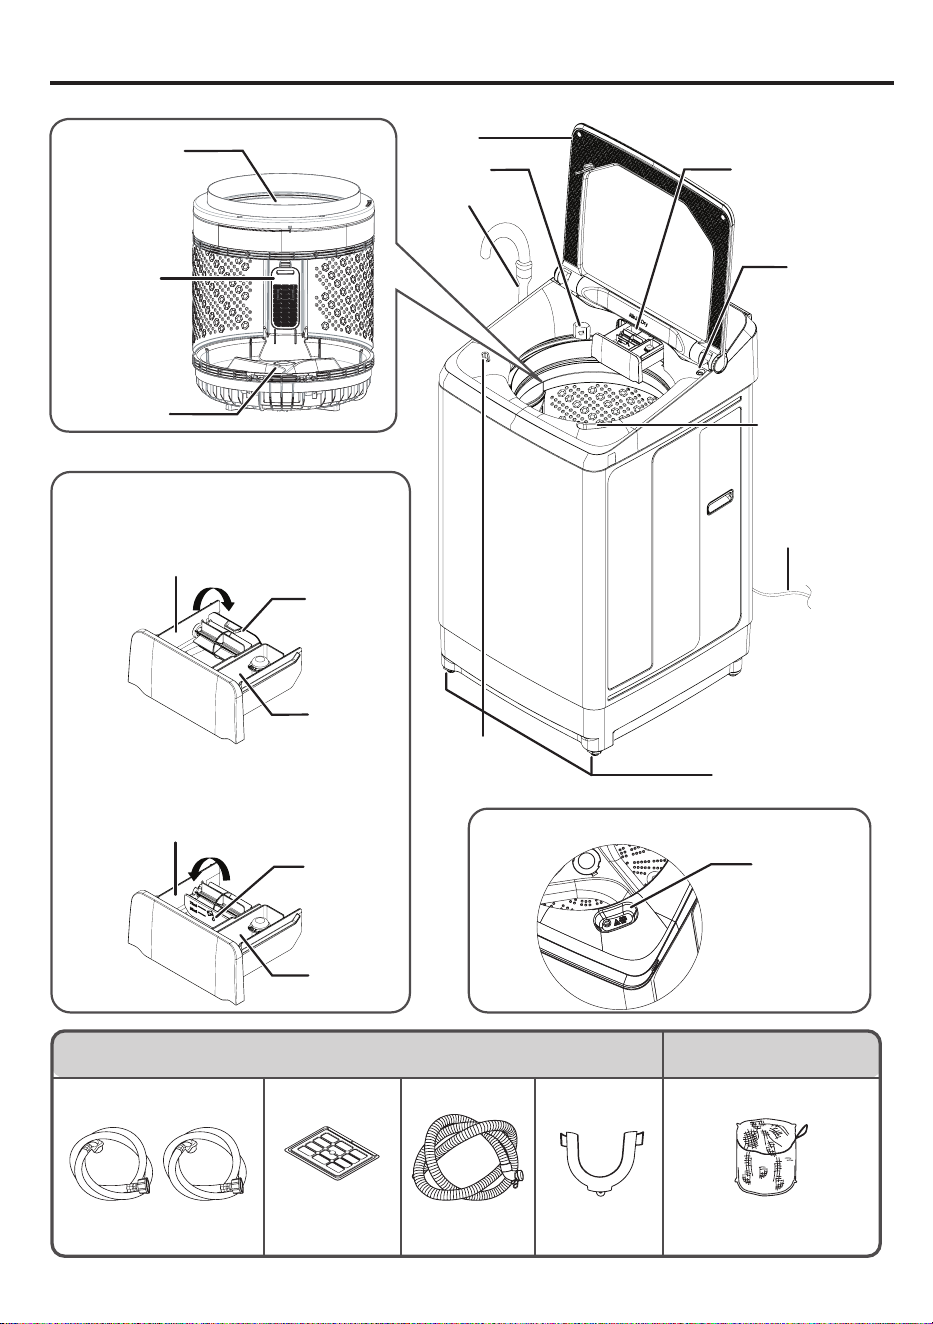
Dispenser
Tub
4. Parts and Accessories
Drain Hose
Lid
Dispenser
(For detergent/
bleach/softener)
Lid Lock
Adjustable Leg
Power
Cord
Pulsator
Lint Filter
(cassette
type)
Liquid Load
Balancer
Accessories Optional accessories
Water Supply Hose
Hot and Cool
(2 Sets)
Rat Guard
(1 Piece)
Drain Hose
(1 Piece)
U Shape Holder
(1 Piece)
Laundry Net
Refer to page 18
Part number PTSF-140JJS 001
Water Level
Liquid Bleach
Port
When you use Liquid Bleach
Liquid Bleach
Port
Dispenser
Powder Detergent/Powder Bleach
Dispenser
Liquid Detergent Dispenser
Softener
Dispenser
Detergent
Trap
Detergent
Trap
When you use Powder Detergent
When you use Liquid Detergent
Move the detergent trap to the rear position
as shown below.
Move the detergent trap to the front position
as shown below.
Softener
Dispenser
Jet Spray
Washing Machine / Instruction manual
7 / EN
5. Install the Washing Machine
Safety precautions
• Do not use a damaged power plug for your
safety. Contact a repair center that is certied by
the manufacturer to replace the plug.
• If the outlet you are using is a 2-pin outlet, use an
adapter to change from three pins to two pins.
When you do this, be sure to connect an earth
wire. There are risk of electric shock, electronic
substrate and electronic parts damage if you do
not connect an earth wire.
• Do not connect an earth wire to a gas pipe,
telephone wire, water pipe, or lightning rod.
Remove the power plug from the electric outlet
when you are attaching an earth wire.
• You do not need to attach an earth wire if the
electric outlet is a 3-pin type with earth terminal.
Where to install the washing machine
• The hoses may be damaged if they are frozen.
Do not install the washing machine outside or
any other place with a risk of freezing.
• Install the washing machine on a solid level oor
to avoid excessive vibration and noise.
• Do not install the washing machine in an
extremely humid place, such as a bathroom or a
place exposed to rain.
• Do not install the washing machine in a slippery
or unstable location. Doing so could cause
abnormal vibration.
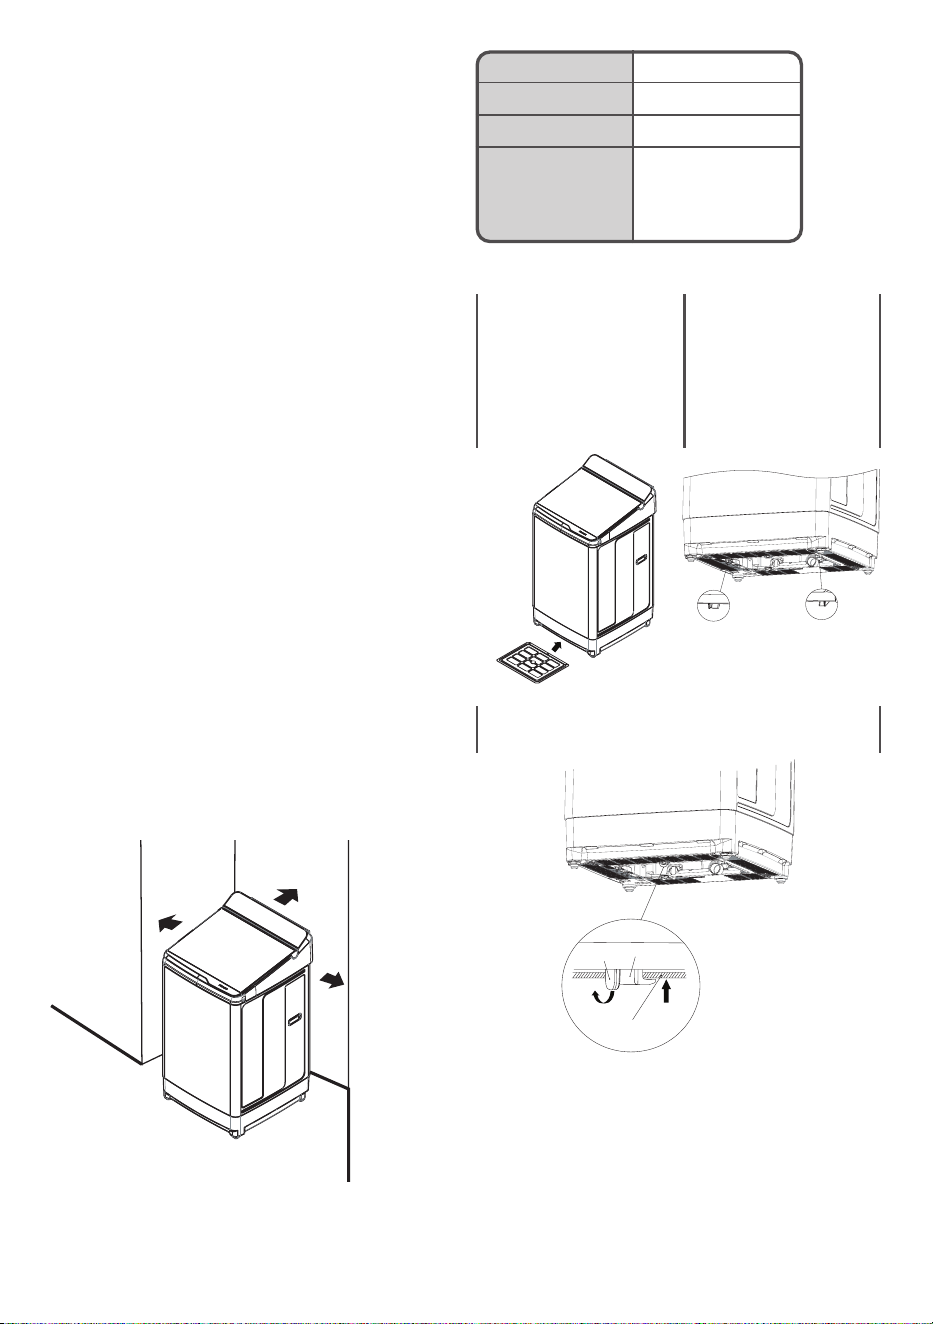
• Install the washing machine away from walls
as shown below to avoid abnormal noise and
vibration.
• Drain Hose can be moved by the pressure of
drain water or the vibration. If the drain port is
big or shallow, please x drain hose so that it
does not come off.
Rear side
Left side
Right side
No obstructions in front
Area Gap
Left At least 9 cm
Right At least 9 cm
Rear Should be 10 cm
or more for the
rear with the Water
Supply Hose.
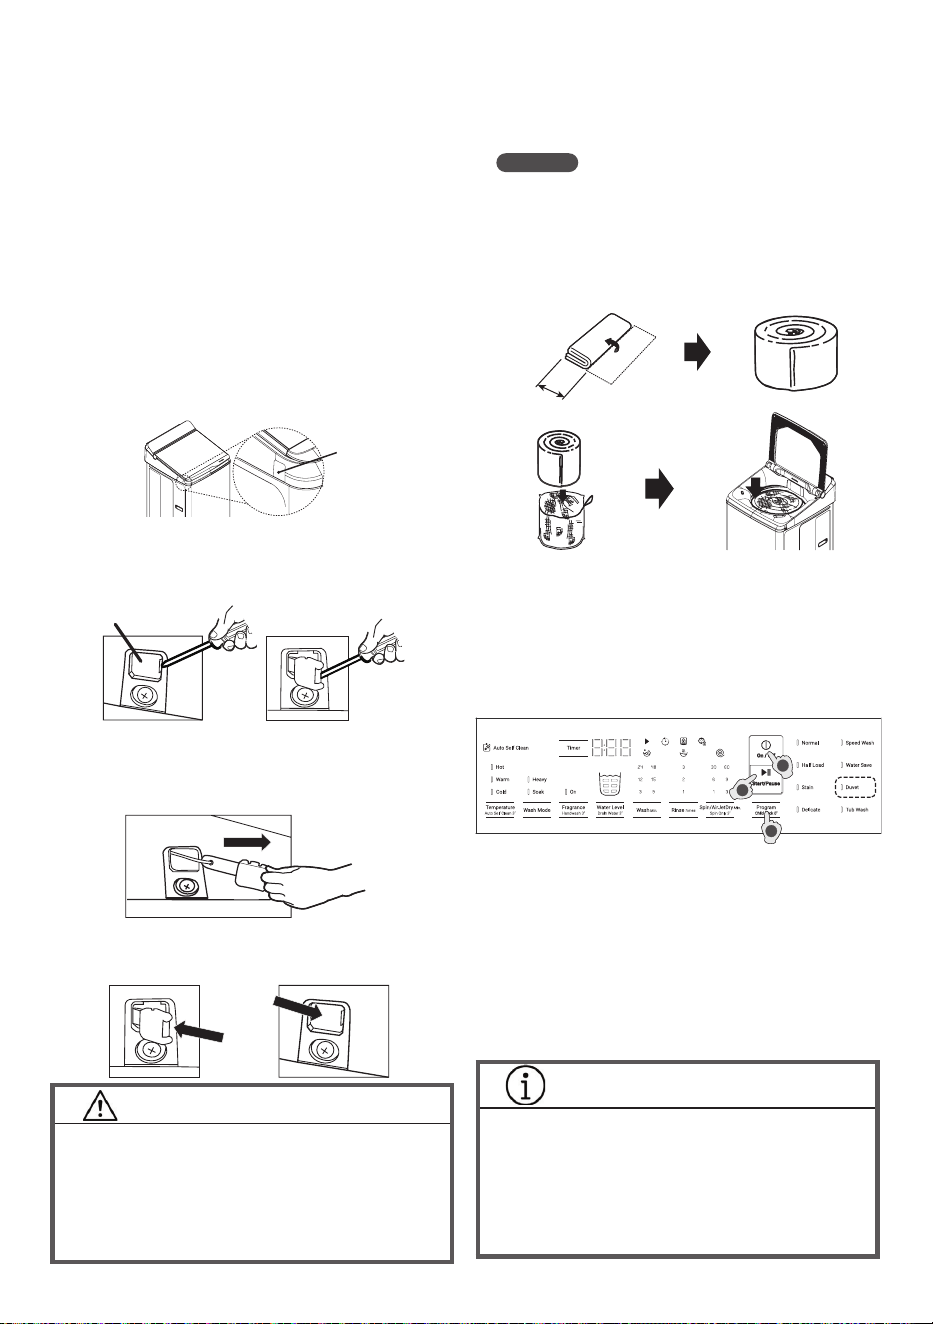
Install The Rat Guard
1. Before inserting “Rat
Guard”, Please check
that it is as shown in
the gure below.
2. Tilt the machine
back approximately
30 degrees. Set
this parts into the
guide at front side of
body and push into
forward.
Guide Guide
3. Use the knob of hook lock to bend and push
“Rat Guard” in.
Rat Guard
(Bend) (Push)
Knob
Hook
lock
8 / EN
Washing Machine / Instruction manual
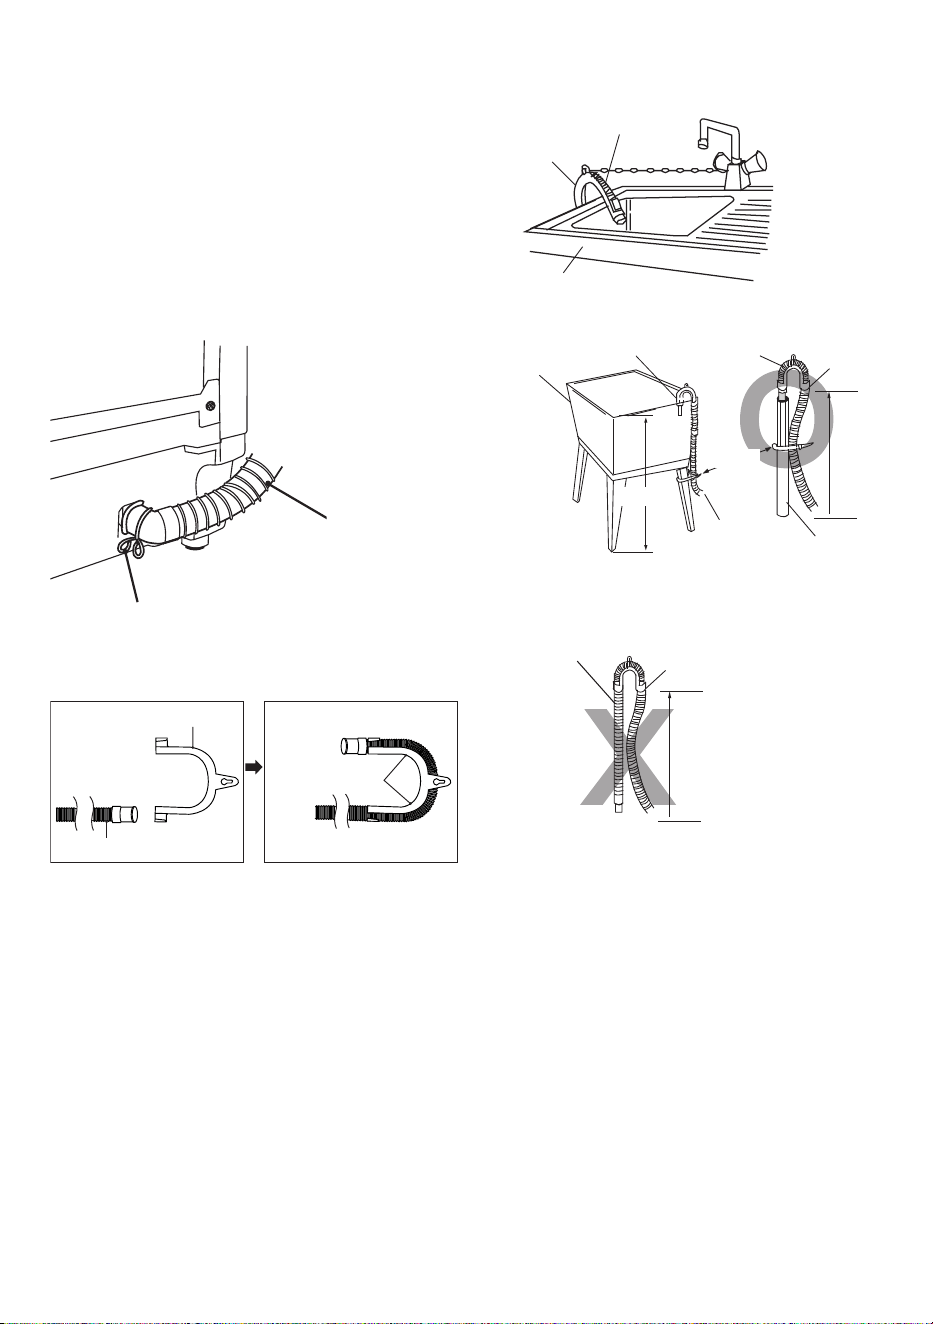
Installing the drain hose
1. Connect the drain hose to drain outlet and clamp
tightly by the hose clamp.
2. Hook the U Shape holder end of the drain hose
over the rim of a sink to drain.
• Never lay down the drain hose, as water will be
discharged.
• The discharge height should be approx. 100cm
above the base of the Washing machine.
• Be sure the drain hose is properly routed so it will
not kink or lift from the sink.
Drain hose
Hose clamp
● Note : Check how to set the “U Shape Holder” to
“Water drain hose”.
U Shape Holder
Water drain hose
Locking position
Note : Check how to place the drain hose
– Place at rim of a sink
Sink
Drain hose
U Shape Holder
– Place at equipment drain support
Drain hose
Drain pipe
Drain hoseU Shape Holder
100cm
Bind
100cm
U Shape
Holder
Trough
– In case of the discharge height less than 100 cm,
the water will be discharged all the time and the
C1 error will be displayed.
Drain hose
Less than 100cm
U Shape Holder
Washing Machine / Instruction manual
9 / EN
CAUTION!
The following conditions require adjustment
Installation of Washing Machine
• Move the Washing Machine to the setting area.
• Connect the Washing Machine correctly to a
grounded AC power supply.
• The voltage of the power supply must match the
voltage rating of the Washing Machine.
• Do not use extension cords or overload the
power outlet by using power strips.
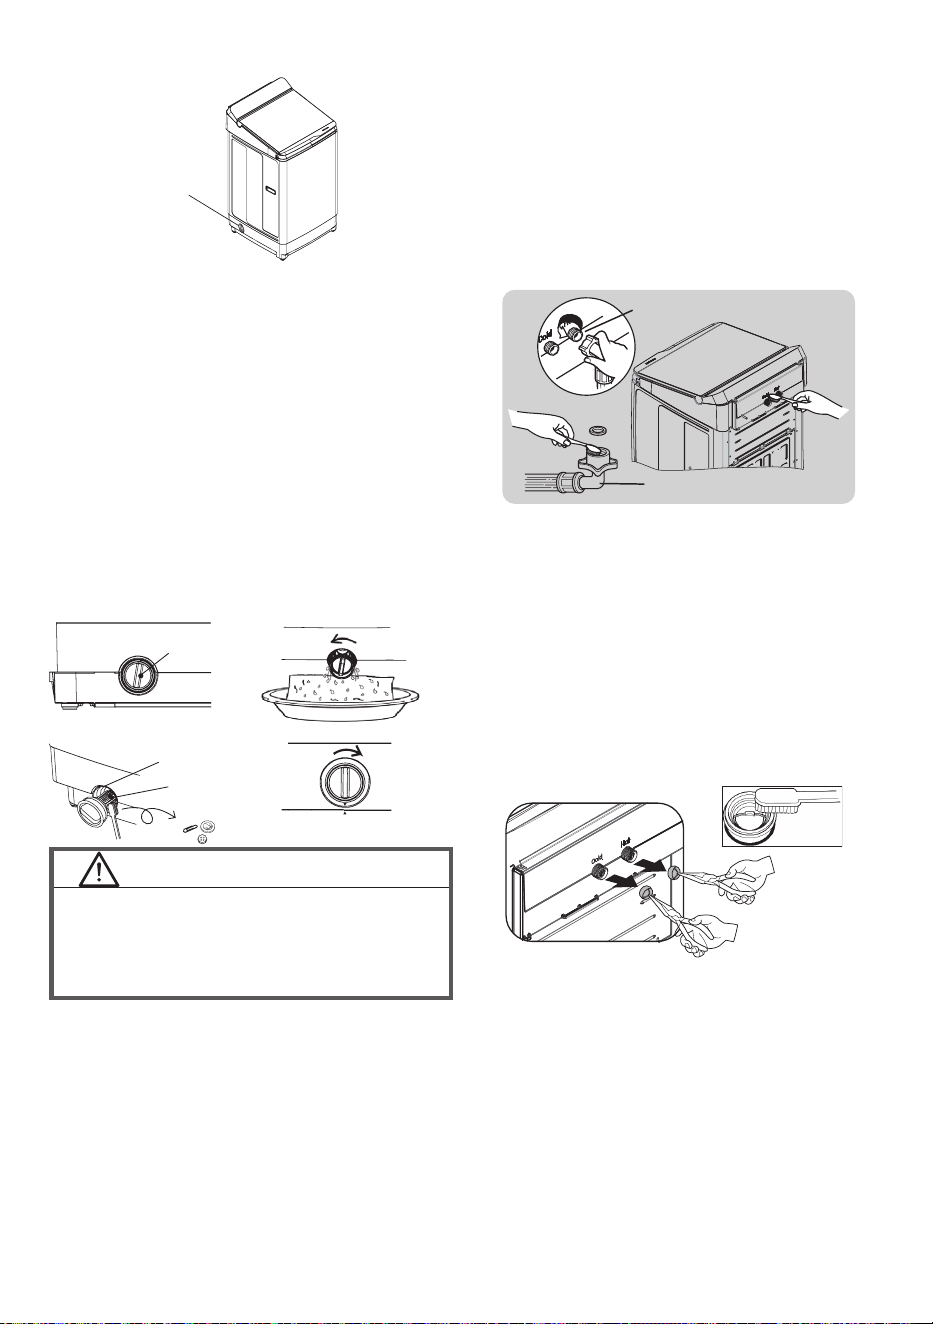
Check the horizontal level
Check the “Water Level” to make sure it is level.
Adjust the following condition for details how to
adjust, please refer to the next section,
“Adjust the level”
Adjust the back
higher
Adjust the front
higher
Adjust the right
side higher
Adjust the left
side higher
The water level is in the center position.
Water Level
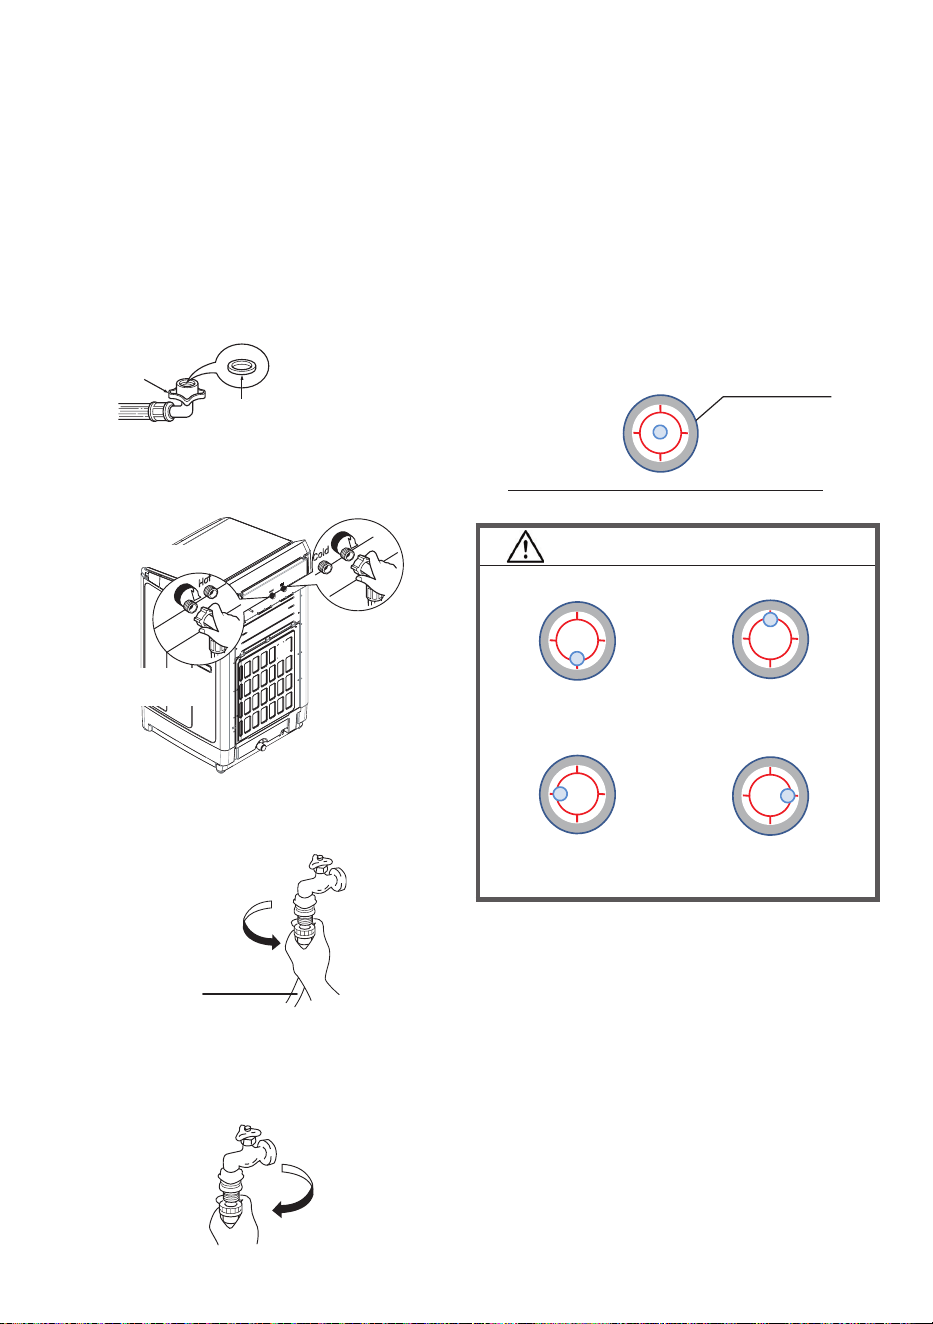
Connecting the water supply hose
1. Connect the water supply hose to the Cold and
Hot water supply inlet on the washing machine.
2. Screw the union nut to arrow direction to rmly
attach the water supply opening.
3. Make sure that the union nut between the water
supply hose and main unit is tightly screwed.
• The optimum water pressure is 0.03 to 0.8MPa.
• Water leakage may occur if union nut is
loosened.
• Unscrew the union nut when dismantling.
Rubber seal
Hose connector
– Check that the rubber seal is in the
hose connector.
Cold water inlet valve
Hot water supply hose
(Gray hose color)
Cold water supply hose
(White hose color)
Hot water inlet valve
Connecting water supply hose to the tap
1. Tighten the water supply hose to water tap.
Water supply hose
• When dismantling, after turn off water tap, press
start button and run for 10 seconds for prevent
water from spilling out during dismantling then
dismantle the water supply hose.
10 / EN
Washing Machine / Instruction manual
Check the center of tub
• When the Washing Machine is leveled, please
also make sure that the washing tub is
positioned approximately in the center.
Check the difference
between left and right
Adjustable
leg
Raise this
leg (CW)
Lower this
leg (CCW)
Adjustable leg
Adjust the level
• If the Washing Machine is not stable or when the
oor itself is not leveled, please adjust the leg to
stabilize the washing machine.
CAUTION!
Perform “Trial operation” before the rst wash.
Trial Operation Procedure:
After installation is completed, perform a trial
operation following the procedure below and
conrm that there is no unusual sound or water
leakage and that water drains smoothly, Perform a
test run for approximately 10 minutes.
1. Close the faucet of water supply hose.
2. Press On/Off
3. Press and hold the “Temperature” button and
the“Program” button together.
4. “777” is displayed on the operation time display.
5. Press the Start/Pause button to start operation.
6. Open the faucet of water supply hose.
NOTES
‒ If the Washing Machine is not stable or
the oor itself is not leveled may cause a
vibration or abnormal operation and code
“C04” show on display.
Checking after installation
If any of the following problems or other
abnormalities occur, immediately unplug the power
plug and contact your local service center.
• The Washing Machine does not operate when
the power is turned on.
• The power cord is damaged.
• There are abnormal vibrations or sounds during
operation.
• There is a smell of burning.
Washing Machine / Instruction manual
11 / EN
7. The following steps are performed:
(a) Sensing => (b) Water supply => (c) Stirring =>
(d) Drain => (e) Spin
Check item at each process
• Conrm that “35L” is displayed in the sensing
result.
- Check if there is no abnormal noise while the
pulsator is rotating.
• When water is supplied, check if water is leaking
at the water supply hose or its connection.
• Check that there is no water dripping, except
from the main body of the washing machine
• Check that water is owing from the drainage
hose
• Make sure that the drainage hose is not crawling
in such a way that it obstructs the drainage
• Check for any unusual noises or vibrations
during dehydration.
Customer Service
If the washing machine malfunctions, check the
Instruction Manual thoroughly before you call for
repairs.
If you are unable to identify or solve the problem,
contact your local service center.
When you call the service center, you will need
to tell them the model of the washing machine,
describe the malfunction, and give them your
address and phone number.
12 / EN
Washing Machine / Instruction manual
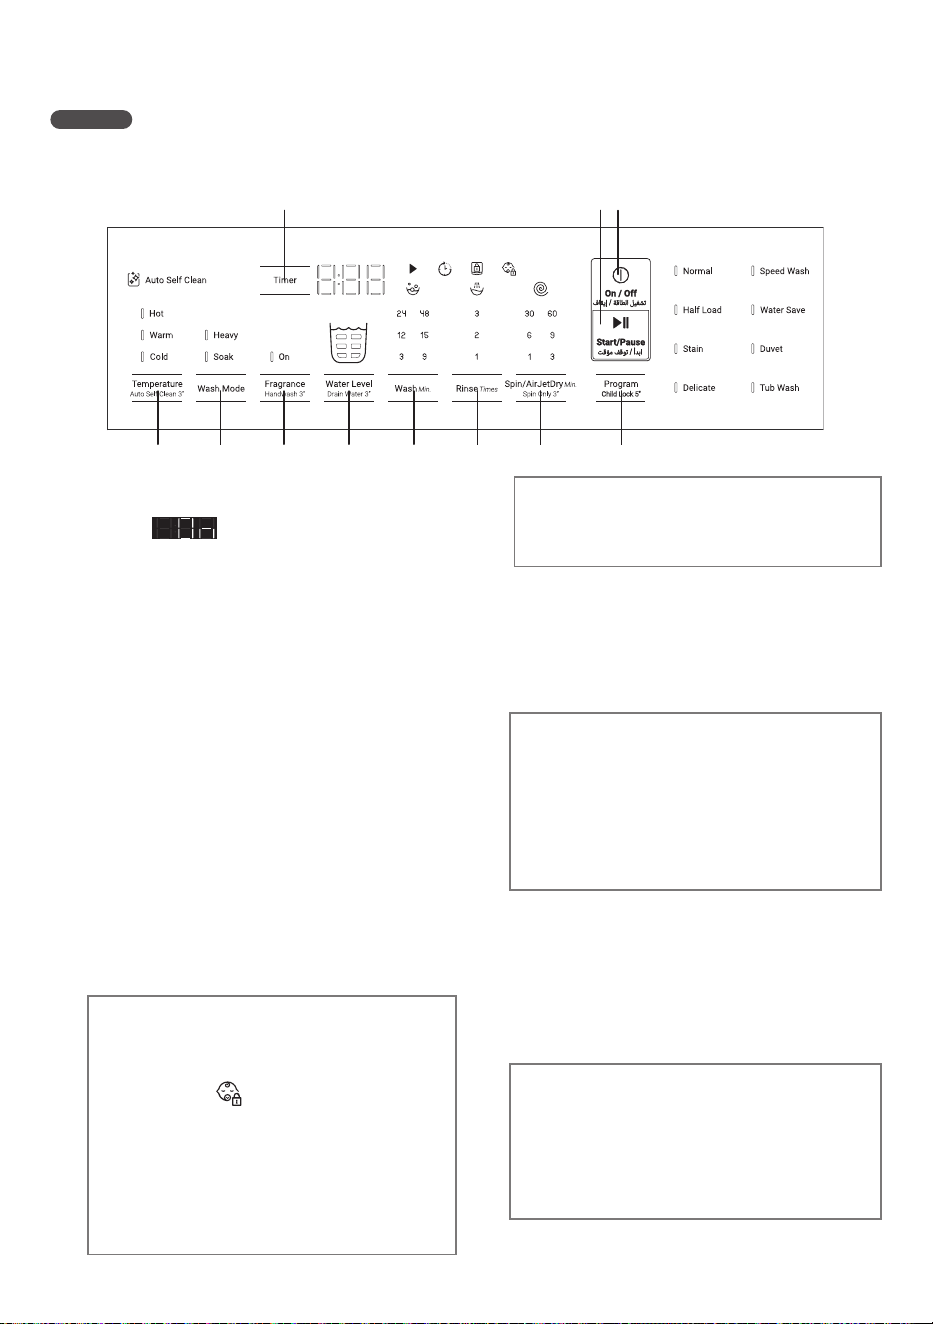
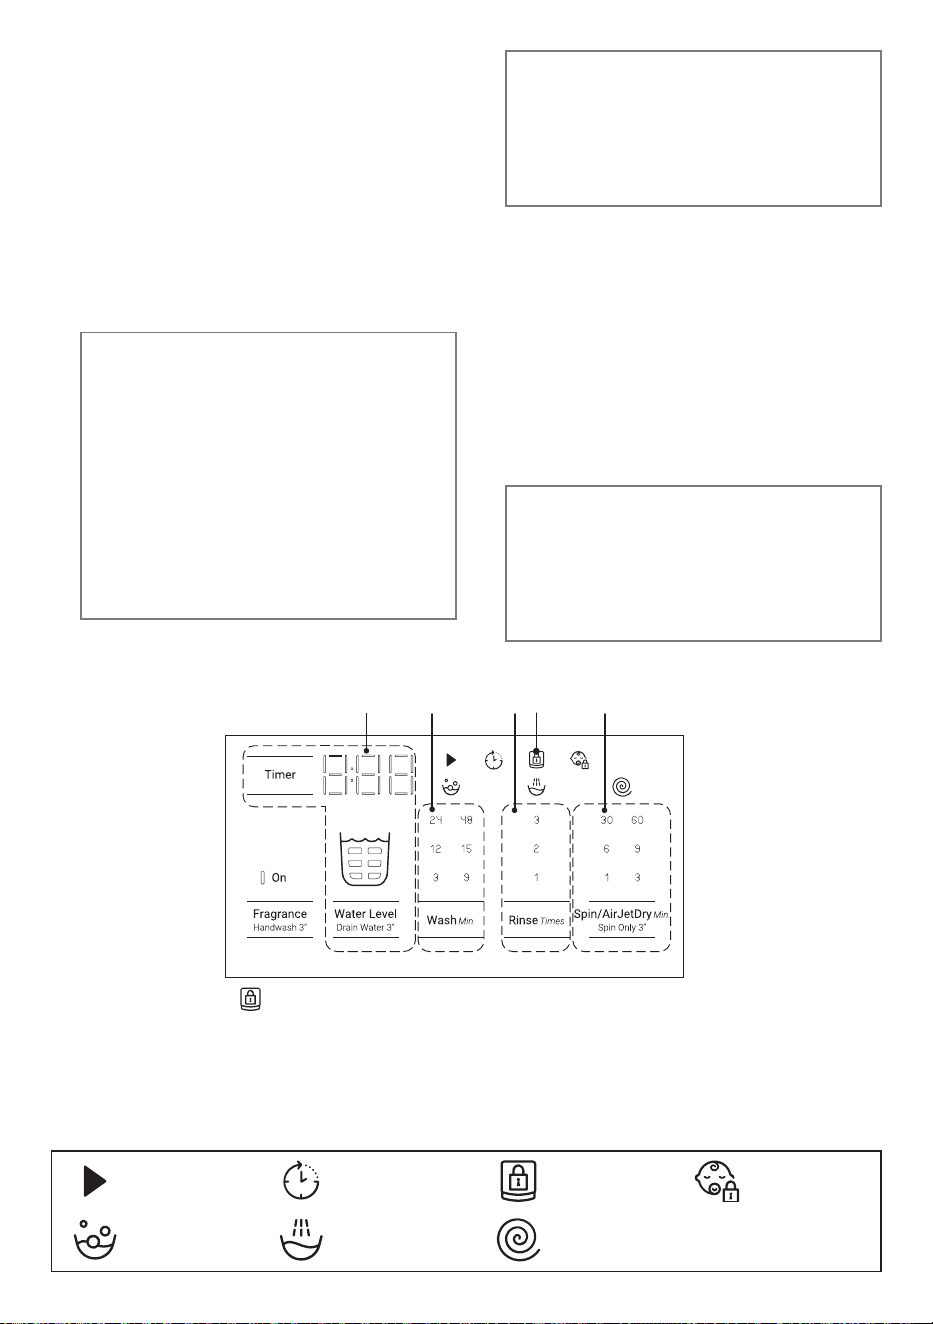
6. Control Panel and Display
During Operation (lid closed)
NOTES
• Directly press the buttons on the Control Panel.
1. On/Off button: To switch power on and off,
press this button. (when power on, 1 time and
display is on). The washing machine
automatically switches off when operations
are nished. The washing machine turns
off automatically if it is not operated for 10
minutes after the power has been turned on.
2. Start/Pause button: To start or pause the
operation, press this button. When the
washing machine is paused for over
24 hours without any operations, it turns off
automatically.
3. Timer button: The operation select the time
to nish washing.You can choose from 3 to
12 hours.This cannot be set in the Tub Wash
program. After setting is complete, you can
reconrm your settings by pressing “Timer”
Note : It is recommended to use powder
detergent instead of liquid detergent for this
function. cc
4. Program button: To select a program, press
this button. The program changes each time
you press the button.
5. Spin/AirJetDry button: To change the spin
time, press this button. You can set the spin
time between 1 and 60 minutes.
Tips :
AirJetDry 30 min : For synthetic clothes
AirJetDry 60 min : For cotton clothes
3
1
2
11 10
9
8
7 6 5 4
Child lock button (Hold5s): To prevent
accidental operation by children, the unit
always lock the lid. Press the Program button
hold 5 seconds to activate this option. The
symbolis show on the display.
Press Program button hold 5 seconds again
to cancel the child lock.
While the machine is running, to cancel the
Child Lock. Press the stop button (Start/
Pause) rst and then press and hold the
“Program” button for 5 seconds to cancel the
Child Lock function.
Spin Only button (Hold3s): Shortcut key for
dehydration alone operation. After pressing
and holding, the display will show dehydration
only. Select the desired dewatering time and
start.
Note : Make sure that the clothes are not
unbalanced. An error will occur if the balance
is not right.
9. Fragrance button: This function is designed to
make the fabric softener more effective.
Drain Water button (Hold3s): If you only want
to drain water, use “Drain Water”. After setting
“Drain Water”, press the Start button to start
draining. Unlike Spin, the basket does not
rotate. When the machine stops draining, the
end sound will be heard and the power will be
turned off.
6. Rinse button: To change the rinse times, press
this button.
7. Wash button: To change the washing time,
press this button.
8. Water Level button: You can set the amount
of Water each time you press the Water Level
button.
Note : The lid lock remains ON even if the
machine is stopped or operation is terminated
during operation, unless the Child lock is
released.
Washing Machine / Instruction manual
13 / EN
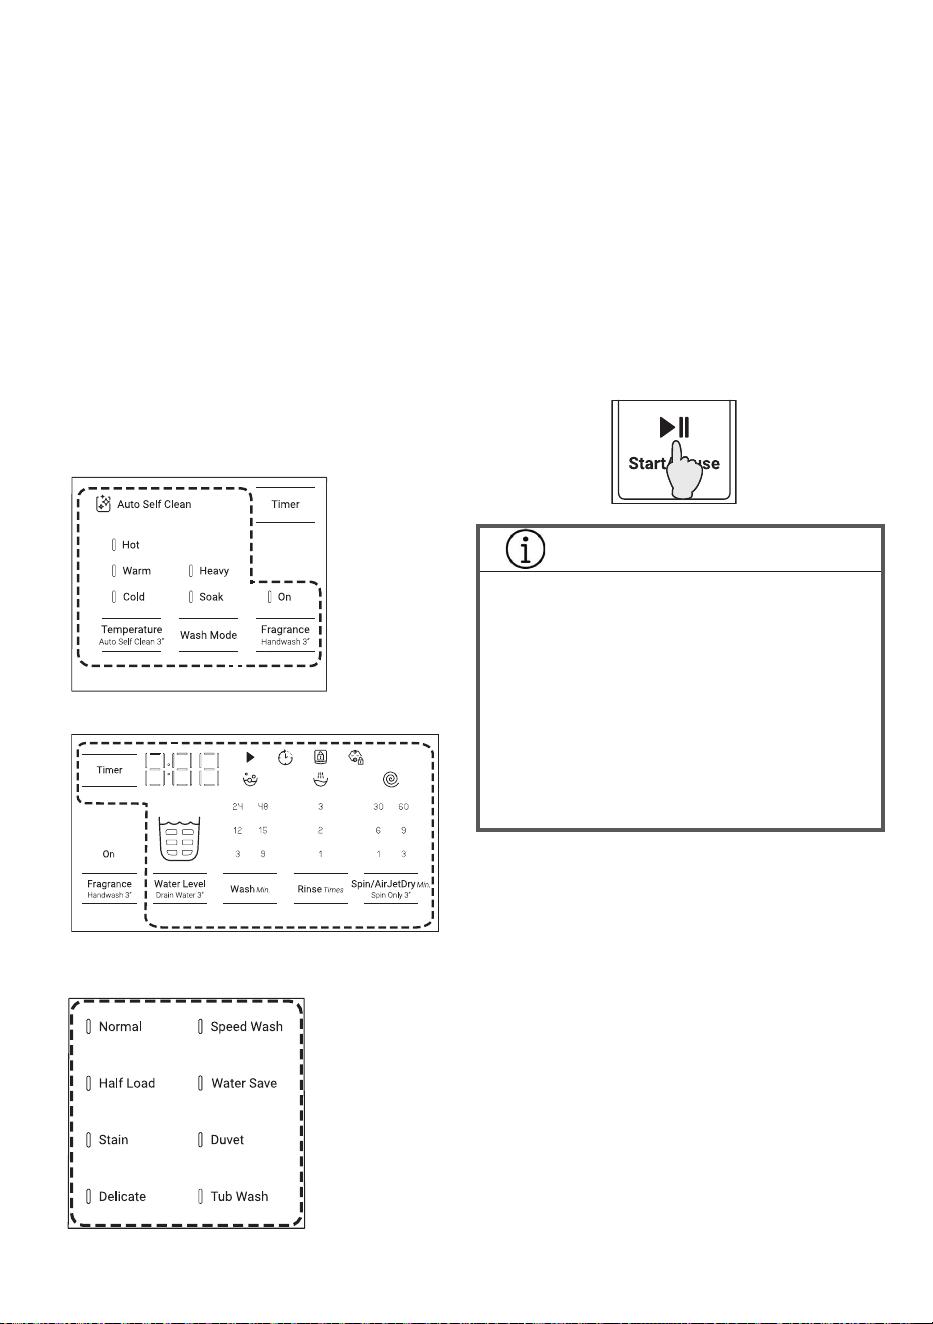
Auto Self Clean button (Hold3s): Each time
the machine is operated, it performs an
automatic washing operation of the tub.
The operation is performed after the rinse is
completed.
Note : This function is not available for some
programs: Delicate, Duvet, Tub Wash.
This function is recommended for those who
want to soften clothes and retain some of the
fabric softener’s scent.
This cannot be set in the Tub Wash program.
Note 1: The operation time varies depending
on the program and the amount of clothes.
Note 2: The dewatering speed is lower than
normal operation, so some water will be left
on the clothes.
Note 3: If unbalance occurs during nal
spin, water will not be supplied to balance
the clothes : if a C4 error code occurs, please
make sure the clothes are evened out.
10. Wash Mode button: You can freely change the
mode of agitation.
Select “Heavy” for strong washing.
Select “Soak” for a gentle washing.
Note : For function “Heavy” is not available for
programs : Powerful, Duvet and Tub Wash.
11. Temparature button: Toselectthewater
temperaturebutton,pressthisbutton.The
watertemperaturechangeseachtimethis
buttonispressed.(Warm→Hot→Cold)
Note : This function is not available for
program : Duvet
Displays all cycle Information, remaining time and error codes.
A. Lid lock : The Lid is locked
when this symbol is lighted.
B. Adjust the “Water Level” of
program (shown as ‘Water Level’)
Remaining time of the program
(shown as ‘Time Left’)
C. Washing time
D. Rinse times
E. Spin time
B
A
C D E
Symbols on control panel
: Wash : Rinse : Spin
: Time Delay
: Lid Lock : Child Lock
: Start/Pause
Handwash button (Hold3s): Use this function
when you want to handwash your own
clothes. As soon as “Handwash” is set, the
water supply starts.
When the water level reaches 33L, it will start
draining.
Draining continues until the water level
reaches 25L
In the meantime, water supply continues.
Press and hold “Handwash” again to stop
water supply.
Note 1: This function automatically stops
after 1 hour.
Note 2: The water does not drain
automatically. If you only want to drain the
water, use “Drain Water”.
You can use the water in the tub for other
programs, but if the water already contains
detergent, please reduce the amount of
detergent.

14 / EN
Washing Machine / Instruction manual
7. Preparation Before Use
1. Preparing the laundry
• Remove foreign objects, if any (coins, safety
pins, etc.).
• Put delicate clothes (knits, lingerie, etc.) in a net.
• Remove large lumps of lint, mud, sand, hair, and
pet hair from laundry, if any.
• Tie strings and close fasteners, if applicable.
2. Sorting the laundry
• Sort laundry according to the fabric type and
care label symbols (cottons, blended fabrics,
synthetics, wool, hand washable items, etc.).
• Do not wash extremely small loads, such as only
a pair of jeans.
‒ This may cause abnormal vibration during the
spin cycle.
• Separate colored and white items.
WARNING!
Do not wash the following items through which
water does not ow easily, because doing so
creates abnormal vibration during the spin cycle
and may cause injury or malfunction.
– Waterproof items, such as wetsuit, ski suit,
shower curtain, sleeping bag, raincoats,
diapers, diaper covers, bicycle covers,
motorcycle covers, car covers, carpets,
waterproof seat cushions, waterproof bedding
cover, foot pads and other hard and thick
items, (Even though “the care label” mentions
that it can be washed by the washing machine,
but please do not put them in the washing
machine for washing).
– Anti-slip treated items with rubber bottoms
such as a doormat.
– Cushions, pillows, shoes, etc.
Detergents and additives
• Use an appropriate amount of detergent
according to the detergent indicator of the
washing machine. The type and amount of
detergent vary depend on the fabric type, volume,
load size, degree of soiling, and hardness of the
water used.
Use less detergent if:
– The load is small.
– The laundry is not very dirty.
• Too much detergent may result in excess foam,
which reduces rinse eciency or may cause a
water leak.
• Depending on the detergent brand, detergent
may not dissolve completely in the detergent tray
8. Using the Washing Machine
1. Sort the laundry
• Sort the laundry according to the type of fabric,
care label symbol, and degree of soiling.
‒ Page 14: Preparing the laundry
• Do not exceed the maximum load.
• Laundry shall not exceed this dashed line.
Otherwise, laundry may jump out from the
washing tub while spinning
and it may cause damage.
Max
LTL10PMVJWT
2. Press the Power button to turn on the
power
if the water pressure is low or the water is too
cold.
‒ Page 27: Care and Maintenance
• When using softeners or bleaches, follow the
instructions on the package.
INFORMATION
• If the following happens, detergent may remain
undissolved and remain on your clothes.
- If you have too much laundry
- If the amount of detergent is too much
- When the water temperature is low
• If you wish to use powdered detergent, we
recommend that you dissolve the powdered
detergent in water before using to avoid this.
• If you dissolve powdered detergent in water,
you should pour it directly into the tub, as it
won’t t in a regular dispenser.
• If water pressure is unstable during operation,
it may cause the water remaining in Detergent
and Softener box.
• If no program is selected within 10 minutes, the
washing machine automatically switches itself off.
Press the Power button again to turn on the
power.
Washing Machine / Instruction manual
15 / EN
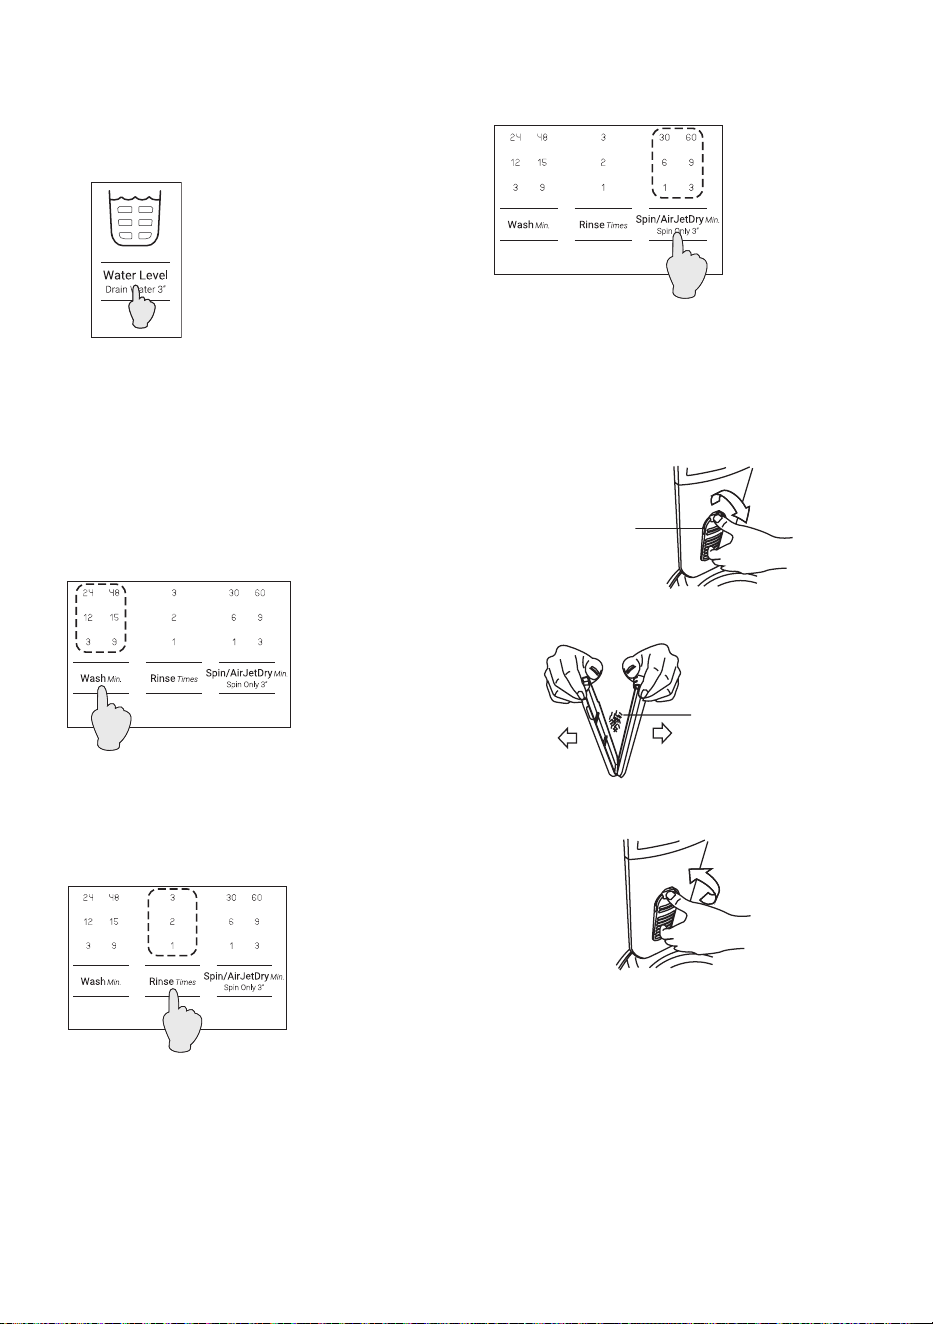
Set the operations
Select a function.
Change the pattern or settings of Wash, Rinse, Spin
and others.
INFORMATION
• If the following happens, detergent may remain
undissolved and remain on your clothes.
- If you have too much laundry
- If the amount of detergent is too much
- When the water temperature is low
• If you wish to use powdered detergent, we
recommend that you dissolve the powdered
detergent in water before using to avoid this.
• If you dissolve powdered detergent in water,
you should pour it directly into the tub, as it
won’t t in a regular dispenser.
• For liquid detergent, follow the instructions on
the package and add it to the liquid detergent
dispenser.
• Add softener to the softener dispenser according
to the instructions on the package of softener.
Then, softener shall be added to the tub
automatically during the nal rinse.
• The speed at which the lid is locked may vary,
depending on the temperature; however, this is
not an abnormality.
5.1 Pausing a program
Press the Start/Pause button. The washing
machine will switch itself off if it is not restarted
within 24 hours.
3. Select and adjust the program
• Select a program with the Program button.
‒ Page 21: List of Programs
• You can change the pattern or settings of wash,
rinse, and spin operations by the Wash, Rinse,
and Spin buttons.
• You can activate the “Auto Self Clean” function
by press and hold the “Temperature” button for
3 sec.
‒ Page 16: How to use the “Auto Self Clean”
function
‒ Once switched on, the “Auto Self Clean”
function operates every time you do your
laundry. To deactivate, press the same button
again while the power is on.
‒ Refer “6. Control Panel and Display” on page
12 for on overview of other functions.
4. Put detergent into the detergent dispenser
and close the lid
• Open the detergent dispenser, add the amount of
detergent shown on the package, and then close
the detergent dispenser.
• The amount of detergent is based on a single
35-gram scoop of powder detergent. Since the
required amount of detergent varies depending
on the type of detergent, follow the instructions
on the package of detergent.
5. Press the Start/Pause button
• Before operation starts, the laundry is weighted.
Then, the necessary amount of water shall be
displayed.
Select a program.
16 / EN
Washing Machine / Instruction manual
5.2 Adding clothes partway through a
program
Press the Start/Pause button to pause operation
and add your clothes. The lid is locked while the tub
is spinning, so wait until the tub stops completely
and the lid lock is automatically released. After
adding the clothes, close the lid and press the
Start/Pause button to restart the operation.
* Note : It is not recommended to add a large
amount of clothes as the washing machine rst
measures the load size to determine optimum
operation.
5.3 Terminating a program
Press the Start/Pause button, then press the Power
button to turn off the power.
6. Take out the laundry (End of the program)
• The alarm sounds when a program ends.
• The washing machine automatically switches off
when the operations are nished. Open the lid
and take out the laundry to dry.
‒ The alarm can be deactivated or the sound
can be changed press and hold “Wash” button
to change the melody sound at the end.
When you press and hold the “Wash” button,
the demo sound at the end will be played.
It is also possible to set the “Mute” setting. If
you set to “Mute”, all sounds except the error
sound will be silent.
Melody1(Default) -> Melody2 -> Melody3
-> Mono sound1 -> Mono sound2 -> Mute
mode(pip sound) -> Return to Melody1
Using the Functions and Programs
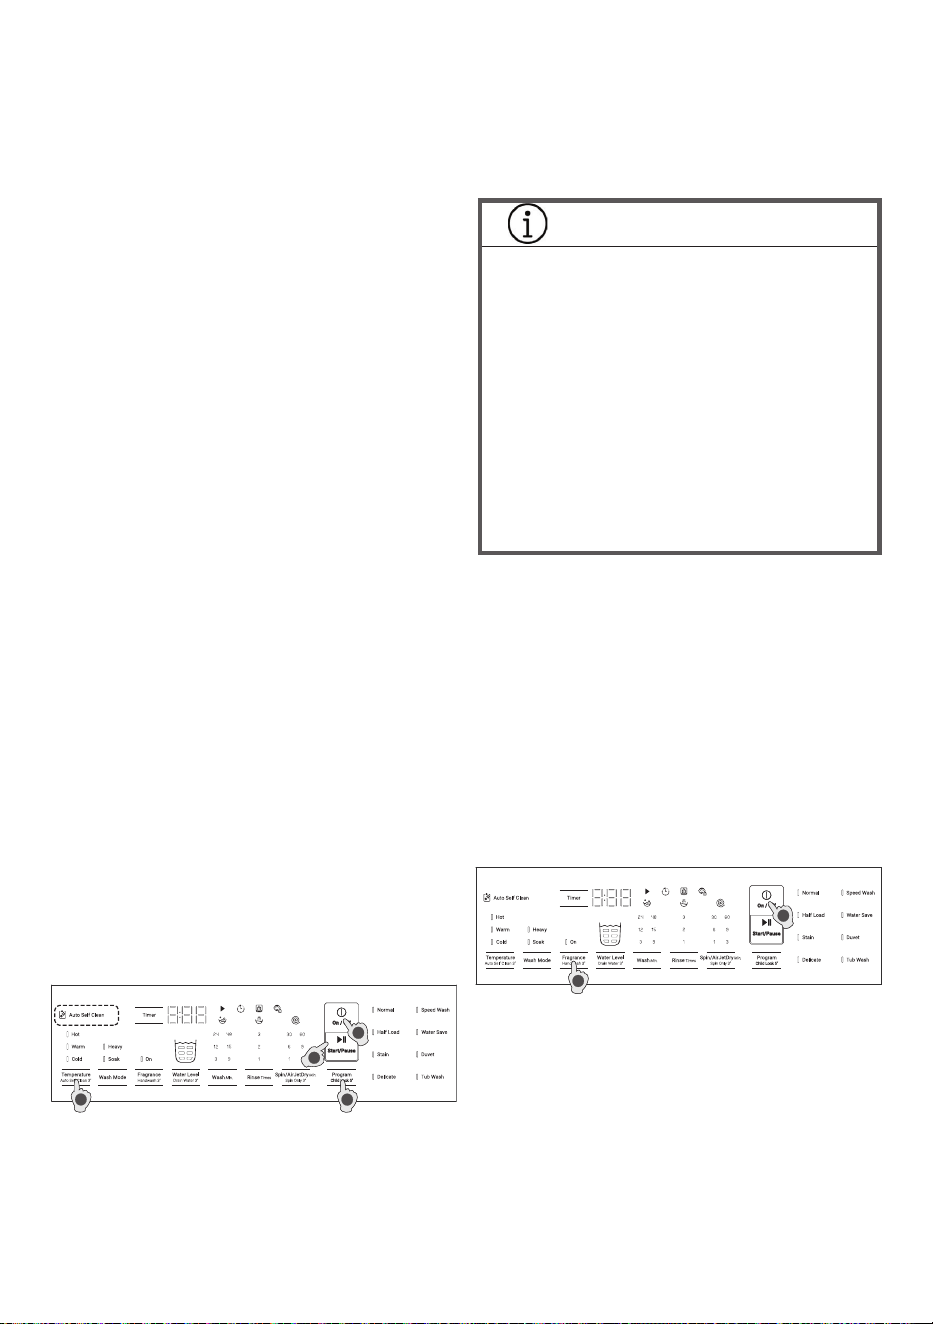
Auto Self Clean function
1. To turn on the power, press the On/Off button.
2. Select a program.
3. Press and hold the “Temperature” button for 3
sec.
4. Press the Start/Pause button.
• This setting is switched off at the time of
shipment from factory. Once activated, the “Auto
Self Clean” function operates every time you do
your laundry.
• Prior to the nal spin cycle, the outside of the
tub, the back side of the pulsator, and the inside
of the outer tub are washed to eliminate dirt and
mold.
• To deactivate the “Auto Self Clean” function,
press and hold the “Temperature” button for 3
sec again while the power is on.
INFORMATION
• Runs just before the spin cycle begins in each
program,
• Runs even when the washing machine has
started operation from rinsing,
• Cannot be set or cancelled during operation,
• Automatically cancelled when:
– No washing and no rinsing are set.
– No rinsing is set.
– No spinning is set.
• May not wash some dirt depending on the type
and degree of dirt,
• May not wash some dirt If the washing
machine is seldom used.
• To clean the tub more completely, we recommend
using the Tub Wash program along with the “Auto
Self Clean” function.
• The “Auto Self Clean” function is deactivated
when one of the following programs is selected.
– Duvet
– Tub Wash
– Delicate
3
4
1
2
Handwash function
First, do not put detergent or fabric softener in
dispenser as water will ow into it.
1. To turn on the power, press the On/Off button.
2. Press and hold the “Fragrance” button for 3 sec.
1
2
3. The water supply start.
4. You can open lid and wash.
5. After use, wipe gently with a dry cloth to remove
any splashes.
• When nished washing and want to stop the
handwash fuction, press and hold the Fragrance
button for 3 seconds to stop the operation.
Note 1 : Once a certain water level is reached, it will
start draining, but this is not malfunction. If drainage
is not possible for some reason, “C2” error will be
displayed.
Note 2 : The water does not drain automatically. If
Washing Machine / Instruction manual
17 / EN
CAUTION!
• While this function is in use, some amount of
water will accumulate. Do not allow children to
use this function to avoid chocking by falling
into the tub.
you only want to drain the water, use “Drain Water”
funtion.
You can use the water in the tub for other programs,
but if the water already contains detergent, please
reduce the amount of detergent.
1
3
2
Drain Water function
1. To turn on the power, press the On/Off button.
2. Press and hold the “Water Level” button for 3 sec.
3. Press the Start/Pause button to start draining.
• Unlike Spin, the basket does not rotate. When the
machine stops draining, a sound will be heard.
4. After the drainage is nished, the end sound is
heard
Timer Function
1. To turn on the power, press the On/Off button.
2. Select a program.
3. Press the Timer button and select the time to
nish washing. Each press of the button starting
from 3 hours to 12 hours later.
4. Press the Start/Pause button.
5. Add detergent and close the lid. The power turns
off after a short time.
6. Operations nish at the set time.
• The Timer is unavailable for the Tub Wash
programs.
• To change the setting, press the On/Off button
and do the settings again.
• If there is a power outage while the timer is set,
the timer setting is cancelled. If this happens,
press the Power button again and reset the timer.
• To prevent your laundry from wrinkling, take them
out from the Washing Machine to dry once the
operation is completed.
Note : It is recommended to use powder detergent
instead of liquid detergent for this function.
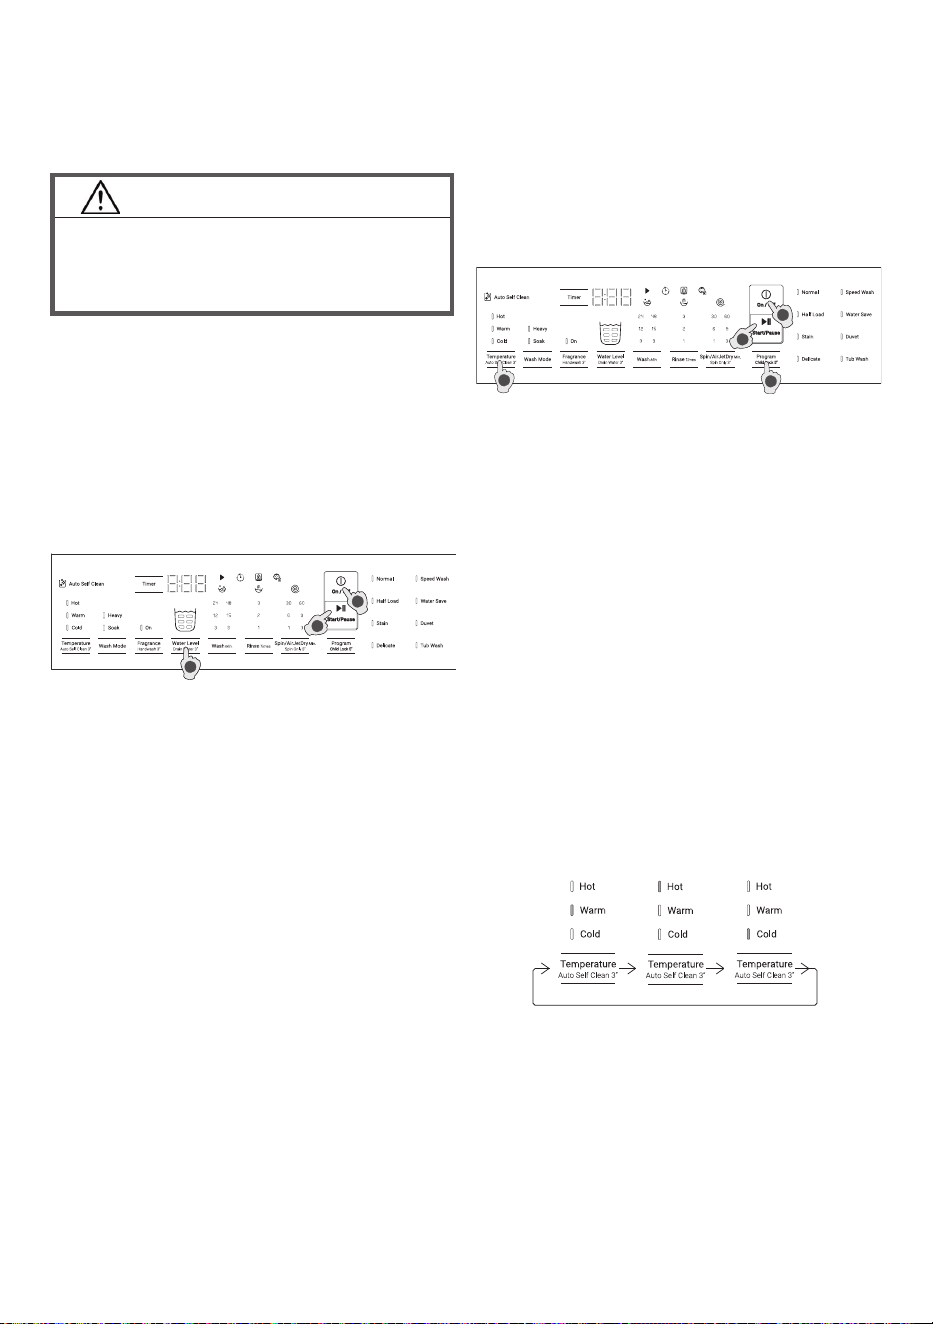
Temperature function
1. Toturnonthepower,pressthePower
button.
2. Selectyourdesiredprogram.
3. Tosetthewatertemperature,pressthe
Temperaturebutton.
4. Tostartyourselectedprogram,pressthe
Start/Pausebutton.
Others:
Werecommendtousewarm/hot/coldwaterforthe
followingcases:
• Warmwater:Defaultwatertemperaturesetting
iswarm.
Whenyourlaundryisheavilysoiled,warmwater
washingisrecommended,Warmwatercanalso
beusedforcolorfastfabrics,darkfabrics,white
andcoloredsynthetics,permanentpressclothes
orwoolenitems.
• HotWater:Towashsoiledwhiteorcolorfast
cottons,linens,permanentpresssynthetics,we
recommendtousehotwater.
• ColdWater:Thisissuitableforlightlysoiledor
normallysoileditems.
• Watertemperatureselection
– Thewatertemperaturecanbechanged
manuallywitheveryprogram(Thisfunctionis
notavailableforprograms:Duvet).
Press
1 time
Warm
(Default)
Press
2 times
Hot
Press
3 times
Cold
1
4
3
2
18 / EN
Washing Machine / Instruction manual
2
5
3
Stain program
1. To turn on the power, press the On/Off button.
2. Select the Stain program.
You can select the operation time by pressing
“Wash Mode” button.
3h mode : for removing stains that are generally
dicule to remove.
7h mode : for removing yellow stains.
INFORMATION
• When using the 7h mode, add twice the
amount of powdered detergent recommended
by the detergent package.
• If the normal amount of detergent is added, or
if liquid detergent is added, the cleaning effect
will be reduced.
(Laundry net: Product number PTSF-140JJS 001)
2. To turn on the power, press the On/Off
button.
3. Select the Duvet program.
4. Add detergent and close the lid.
5. Press the Start/Pause button.
Duvet program
1. Prepare the laundry.
• Use a laundry net for blankets when washing
large items such as quilts, blankets, and sheets.
Auto Restart Function
If there is a power outage
The washing machine is equipped with a restart
function.
If a power outage occurs while the washing machine
is operating, the cycle (i.e., wash, rinse, or spin) at
that time is saved, and when the power is restored,
automatically restart from the interrupted cycle.
If there is a power outage during the spin cycle, the
lid is locked and cannot be opened. After the power
is restored, the lock is released.
How to unlock the lid
In case of the lid does not unlock can not open
operation normally, please the following step.
1. Pull the screw sheet out of the top cover.
Screw sheet
Unlock cap
2. Remove the unlock cap from the top cover.
• Insert the tip of the screwdriver into the unlock port.
• Pry up to release the unlock cap.
3. When the unlock cap is released from the top
cover, pull the unlock cap parallel to the machine
body towards the front as directed by the arrow to
unlock the lock switch of the lid.
4. After unlocking the lid, install the unlock cap and
the screw sheet to the top cover by reversing the
order from (3) to (1).
CAUTION!
• Whenpress-ttingtheunlockcapbackinto
itsport,ensurethatitisproperlyandtightly
attachedtothetopcover.
• Tore-installtheunlockcap,makesureitis
re-installedproperly,otherwiselidlocksmay
notworkcorrectly.
30 cm
NOTES
‒ If you do not use the laundry net for washing,
it may damage your clothes or damage the
washing machine, household goodsand code
“C04” show on display.
• Fold large items such as quilts, blankets, and
sheets as follows and put them in the laundry net.
Washing Machine / Instruction manual
19 / EN
Tub Wash program
INFORMATION
• Use this program separately from other
washing programs. Do not put laundry into
the tub.
1. To turn on the power, press the On/Off button.
2. Select the Tub Wash program.
3. Close the lid, and press the Start/Pause button.
The washing machine starts pouring water into
the tub.
4. When the water reaches about half the tub, press
the Start/Pause button and open the lid, add tub
cleaner to the tub by following the instruction
given on its package.
• The Tub Wash program can be set to 3 or 11
hours. At rst, “3 hours” is set. Press the “Wash
Mode” button again to set “11 hours”.
• Water is added to the maximum level to wash
away invisible dirt from both outer and inner
tubs. Then, normal rinse operation will be
performed twice to ush out any remaining dirt
and tub cleaner.
Using liquid detergent and bleach
Liquid detergent
• Dilute liquid detergent and gently pour into the
dispenser.
‒ When using washer timer, dilute liquid
detergent twice.
Bleach
• Dilute bleach with water and gently pour into
dispenser before washing starts.
INFORMATION
• Follow the instructions on package of liquid
detergent or bleach for directions and usage
amount.
• Do not put bleach directly onto laundry, it may
lead to damages to the texture or discoloring.
1
4
2

20 / EN
Washing Machine / Instruction manual
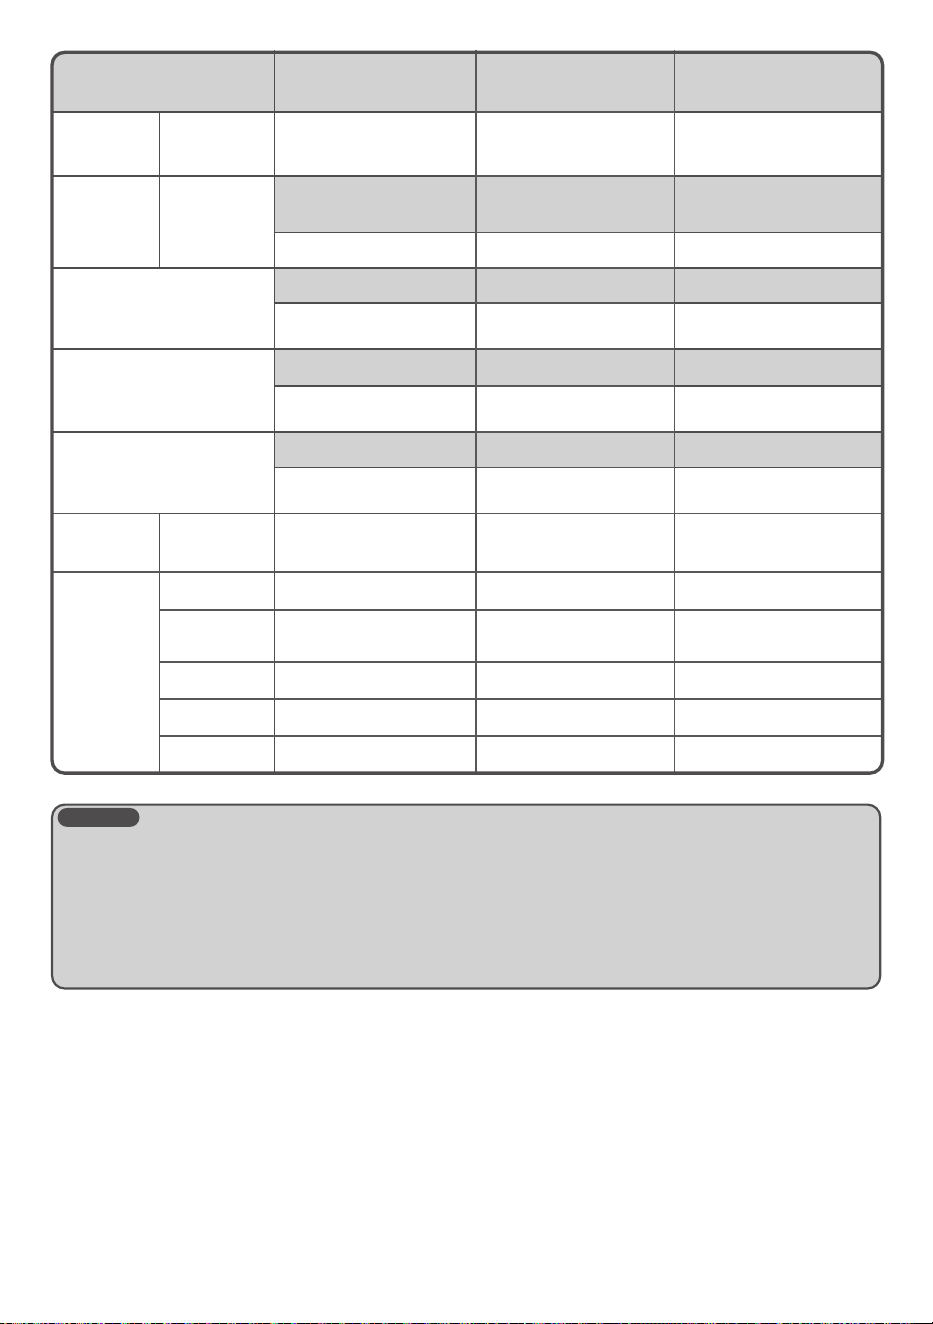
9. Program Overview
Program Type of Laundry / Notes
Model / Max Load
LTL10PMVJWT
Normal
For daily washing of cotton and linen items such as shirts,
underwear, towels, bed linen and table linen.
*Jet spray function will operation when default settings
(Adjusted auto) only and load weight 6 kg or less than.
10 kg
Half Load
This program is controlled to wash less than half loads of clothing.
This program is recommended for those who have less dirt but
need a quick wash.
*Jet spray function will operation when default settings (Adjusted
auto) only.
5 kg
Stain
Wash clothes with a highly concentrated detergent solution using
a small amount od water. This program is controlled to remove
stains that are dicult to remove with regular laundry programs.
2 modes of operation are available. (3h mode and 7h mode)
5/2.5 kg
Delicate
This is a gentle wash program for delicate items such as lingerie
and thin lace curtains.
5 kg
Speedwash
This program lets you wash small loads of lightly soiled clothes
and small items such as underwear.
*Jet spray function will operation when default settings (Adjusted
auto) only.
2 kg
Water Save
This program is designed to save water.
Only shower rinse is performed for rinsing. Therefore, fabric
softener cannot be used.
10 kg
Duvet
For washable large items such as duvets, blankets, bedspreads,
etc.
3 kg
Tub Wash
This program is a maintenance program for washing tub. (3h mode
and 11h mode)
-
* Jet spray function automatic at washing process only to reduce washing time and save energy.
Jet spray function automatic at nal rinse process to clean the Jet spray system.
Washing Machine / Instruction manual
21 / EN
: Default settings : Changeable settings (via corresponding button)
List of Programs
Program
Normal Half Load
Stain
3 hrs 7 hrs
Maximum
load
LTL10PMVJWT
10 kg 5 kg 5 kg 2.5 kg
Amount of
water
LTL10PMVJWT
35 to 60 L
(Adjusted auto)
50 L
35 to 50 L
(Adjusted auto)
35 to 87 L 35 to 60 L -
Wash
15 min 3 min 2 hrs 6 hrs
3, 9, 12, 15, 24 min
or none
3, 9, 12, 15, 24 min
or none
- -
Rinse
2 times 1 time 2 times
1, 2, 3 times
or none
1, 2, 3 times
or none
1, 2, 3 times or none
Spin
6 min 3 min 6 min
1, 3, 6, 9 30 60 min
or none
1, 3, 6, 9 30 60 min
or none
1, 3, 6, 9 30 60 min
or none
Required
time (guide)
LTL10PMVJWT
36 to 57 min 34 min 3 hrs 7 hrs
Option
settings
Timer O O O O
Auto Self
Clean
O O O O
Wash Mode O O
Use to select Wash mode and Time
(3 hrs, 3 hrs + Heavy,
Soak 7 hrs, Soak 7 hrs + Heavy)
Fragrance O O O O
Temperature Warm, Hot, Cold Warm, Hot, Cold Warm, Hot, Cold Warm, Hot, Cold
22 / EN
Washing Machine / Instruction manual
Program Delicate Speedwash Water Save
Maximum
load
LTL10PMVJWT
5 kg 2 kg 10 kg
Amount of
water
LTL10PMVJWT
55 L 35 L
35 to 60 L
(Adjusted auto)
45 to 77 L 35 to 45 L 35 to 87 L
Wash
9 min 3 min 15 min
- -
3, 9, 12, 15, 24, 48 min
or none
Rinse
1 time 1 time Shower rinse
1, 2, 3 times
or none
-
Deep 1, 2, 3 times
or none
Spin
3 min 1 min 6 min
1, 3, 6, 9 30 60 min
or none
-
1, 3, 6, 9 30 60 min
or none
Required
time (guide)
LTL10PMVJWT
40 min 24 min 44 to 73 min
Option
settings
Timer O O O
Auto Self
Clean
X O O
Wash Mode O O O
Fragrance O O O
Temperature Warm, Hot, Cold Warm, Hot, Cold Warm, Hot, Cold
NOTES
● The energy test program setting
Please select a program and change wash and spin time as follows.
Program “Water Save”, Wash time 48 minutes, Spin time 9 minutes.
Detergent : Type: Drum type
Quantity: 93.75 grams
Adding method: In detergent dispenser (Dry powder)
Washing Machine / Instruction manual
23 / EN
Program
Duvet
Tub Wash
3 hrs 11 hrs
Maximum
load
LTL10PMVJWT
3 kg *Do not put clothing in tub
Amount of
water
LTL10PMVJWT
90 L - (93 L)
74 to 90 L - (93 L)
Wash
24 min 2 hrs 10 hrs
- -
Rinse
2 times 2 times
- -
Spin
9 min - (30 min)
1, 3, 6, 9 min
or none
-
Required
time (guide)
LTL10PMVJWT
96 min 225 min 720 min
Option
settings
Timer O X X
Auto Self
Clean
X X X
Wash Mode O
Use to select Wash mode and Time
(3 hrs or Soak 11 hrs)
Fragrance O X X
Temperature - Warm, Hot, Cold
24 / EN
Washing Machine / Instruction manual
List of Programs
• The wash time and the spin time may change
during the program depending on the weight and
type of laundry being washed.
• The displayed times are guidelines. More
time may be required depending on the water
pressure and the type of laundry.
• Programs cannot be changed once they are
started. To change them, turn the power off and
then on again to re-select a program.
• The clear part of the lid and control panel may
become foggy or may form dew on the edge of
lid if you use hot water to wash your laundry;
however, this is not an abnormality. Wipe it off
after washing your laundry.
• Depending on the type of clothes, maximum
loading amount may differ.
• Even if you set the delay timer, it may start soon
according to the required time of the program.
• Water ow is adjusted automatically according
to the amount of load and water level. When
loads are heavy and water level is high, water
ow is adjusted at slower rate to maintain the
performance of washer.
• Amount of detergent is indicated according to
following table as a guide.
* The amount of detergent is based on a type of
“20-gram per 30-liter”.
Since the required amount of detergent varies
depending on the type of detergent, follow the
instructions on the package of detergent.
• We do not recommend using fabric softener
when the Water Save program is selected.
INFORMATION
• If the following happens, detergent may remain
undissolved and remain on your clothes.
- If you have too much laundry
- If the amount of detergent is too much
- When the water temperature is low
• If you wish to use powdered detergent, we
recommend that you dissolve the powdered
detergent in water before using to avoid this.
• If you dissolve powdered detergent in water,
you should pour it directly into the tub, as it
won’t t in a regular dispenser.
Load (guide) Water Level Amount of detergent Model
8~10 kg 74~87 L 46-60 g
LTL10PMVJWT4~7 kg 55~70 L 36~47 g
0~3 kg 35~50 L 23~34 g
Washing Machine / Instruction manual
25 / EN
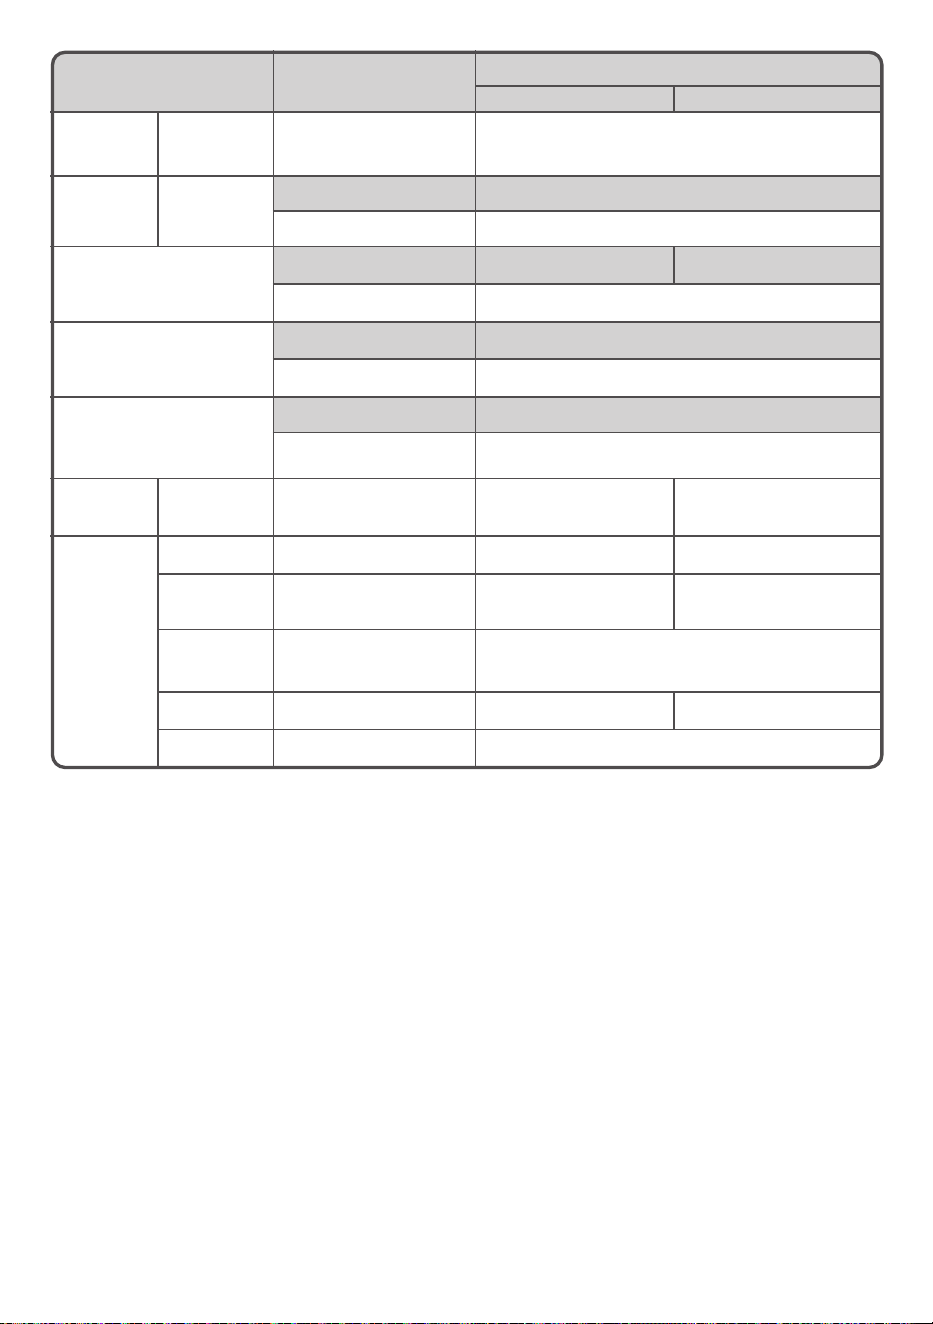
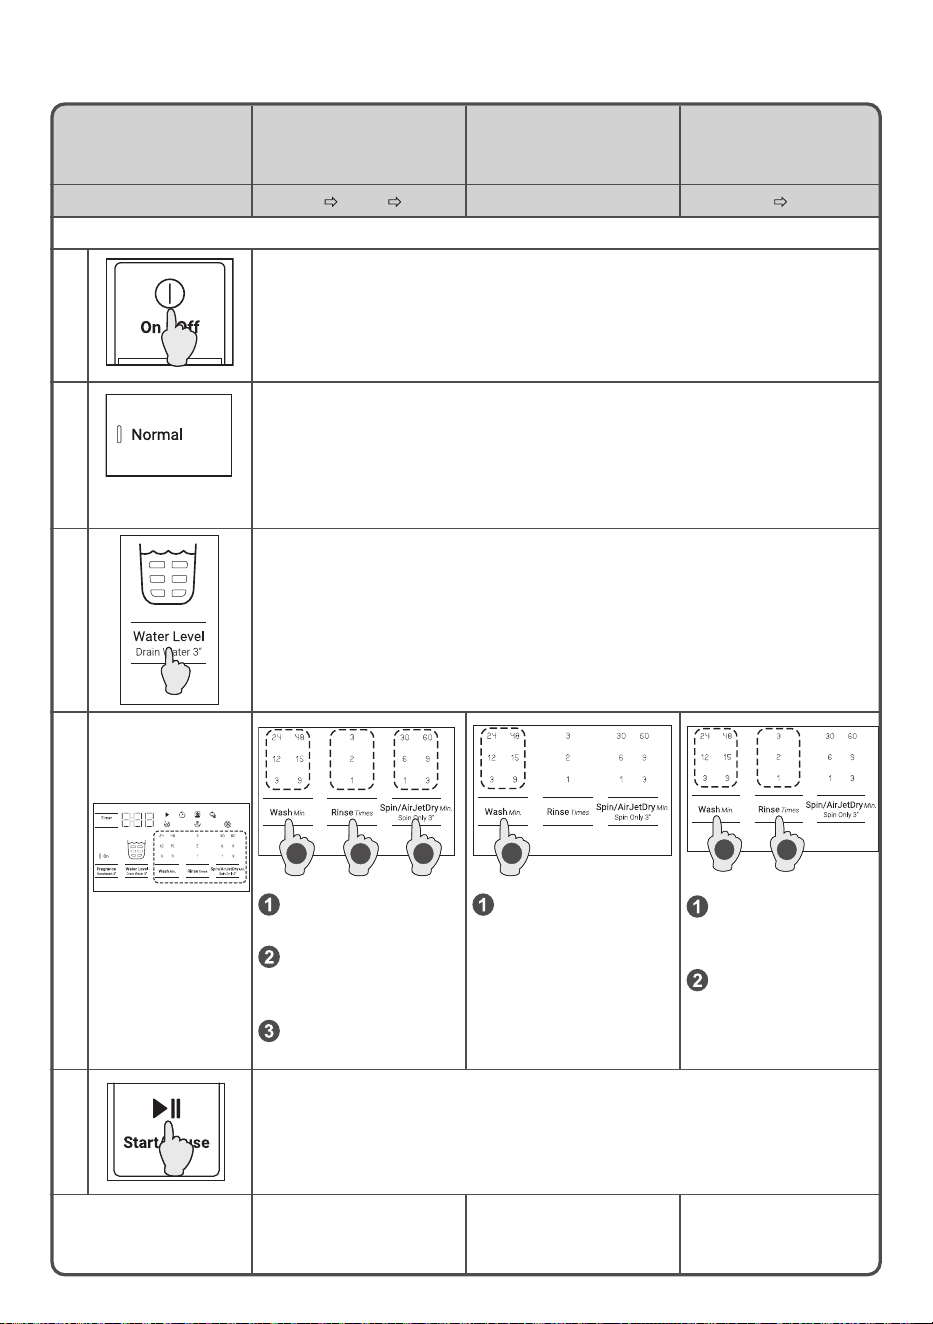
If you want...
To customize
the wash program
To reuse the wash water
and separate your laundry
To not spin the laundry
because you are worried
about wrinkles
Operations Wash Rinse Spin Wash only Wash Rinse
Setting method
1. Turn on the power.
2. Select the Normal program.
3.
Set the amount of water.
If you do not set the amount of water, it is set automatically based on the
weight of the laundry.
4.
Set the operations
1 3
2
Set the wash time
with the Wash button.
Set the number of
rinses with the Rinse
button.
Set the spin time with
the Spin button.
13
Set the wash time
with the Wash button.
1
2
Set the wash time
with the Wash
button.
Set the number
of rinses with the
Rinse button.
5. To start, press the Start/Pause button.
Remarks
Operates according to
the wash, rinse, and spin
settings.
Stops while the wash
water is still in the tub.
Stops while the rinse
water is still in the tub.
Customizing the Program
26 / EN
Washing Machine / Instruction manual
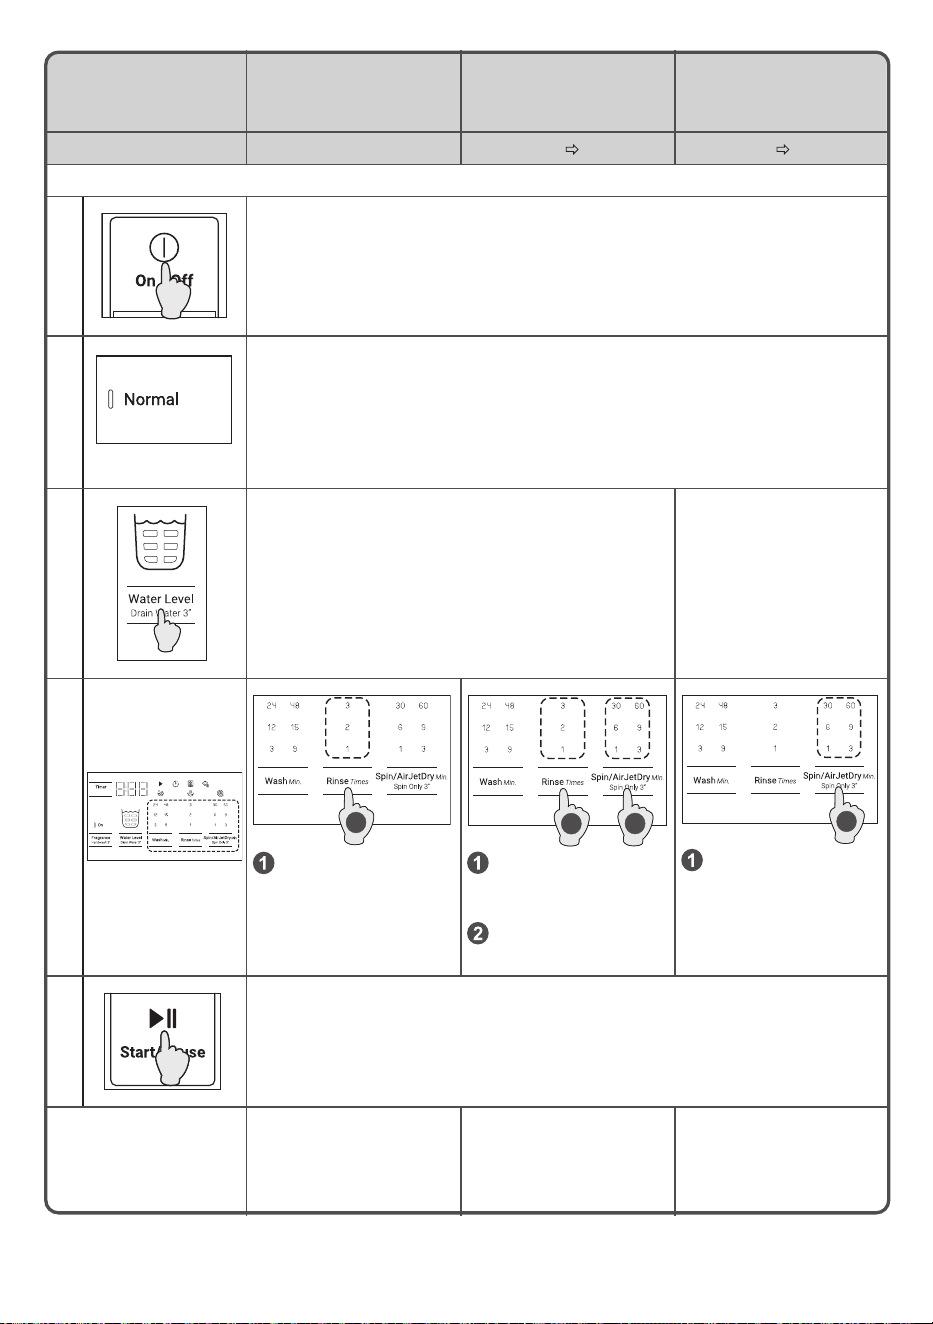
If you want... To rinse only To rinse and spin To drain and spin
Operations Rinse only Rinse Spin Drain Spin
Setting method
1. Turn on the power.
2. Select the Normal program.
3.
Set the amount of water.
If the amount of water is not set, then maximum water
level is used.
Cannot be used.
4.
Set the operations
1
Set the number of
rinses with the Rinse
button.
2
1
Set the number of
rinses with the Rinse
button.
Set the spin time with
the Spin button.
1
Set the spin time with
the Spin button.
5. To start, press the Start/Pause button.
Remarks
Drains water and spins
before rinsing. Stops while
the rinse water is still in
the tub.
Drains water and spins
before rinsing.
Drains water and spins.
Washing Machine / Instruction manual
27 / EN
Water Level
• Press the Water Level button until your desired
setting of wash, rinse and spin are displayed.
If the indicator is not lit, that operation is not
performed.
• You can set the amount of water each time you
press the Water Level button.
LTL10PMVJWT : 35 to 87 L
Washing Time
• You can set the wash time each time you press
the Wash button in a range from 3 to 48 minutes
and no washing. You can choose the time for
each program.
• You can set the number of rinses by pressing
the Rinse button. Each time you press the Rinse
button the setting changes in sequence, from
Rinse 2 times, Rinse 3 times, no rinsing,
Rinse 1 time.
• You can set the spin time each time you press
the Spin button in a range of 1 to 60 minutes and
no spinning.
10. Care and Maintenance
Cleaning the lint lter (cassette type)
1. Press down on the knob on the top of the lint
lter (cassette type) and pull it towards you.
2. Open the lint lter (cassette type) to the sides
and remove the lint that is inside.
3. Reverse the procedure to replace the lint lter
(cassette type).
Lint filter
Remove lint
28 / EN
Washing Machine / Instruction manual
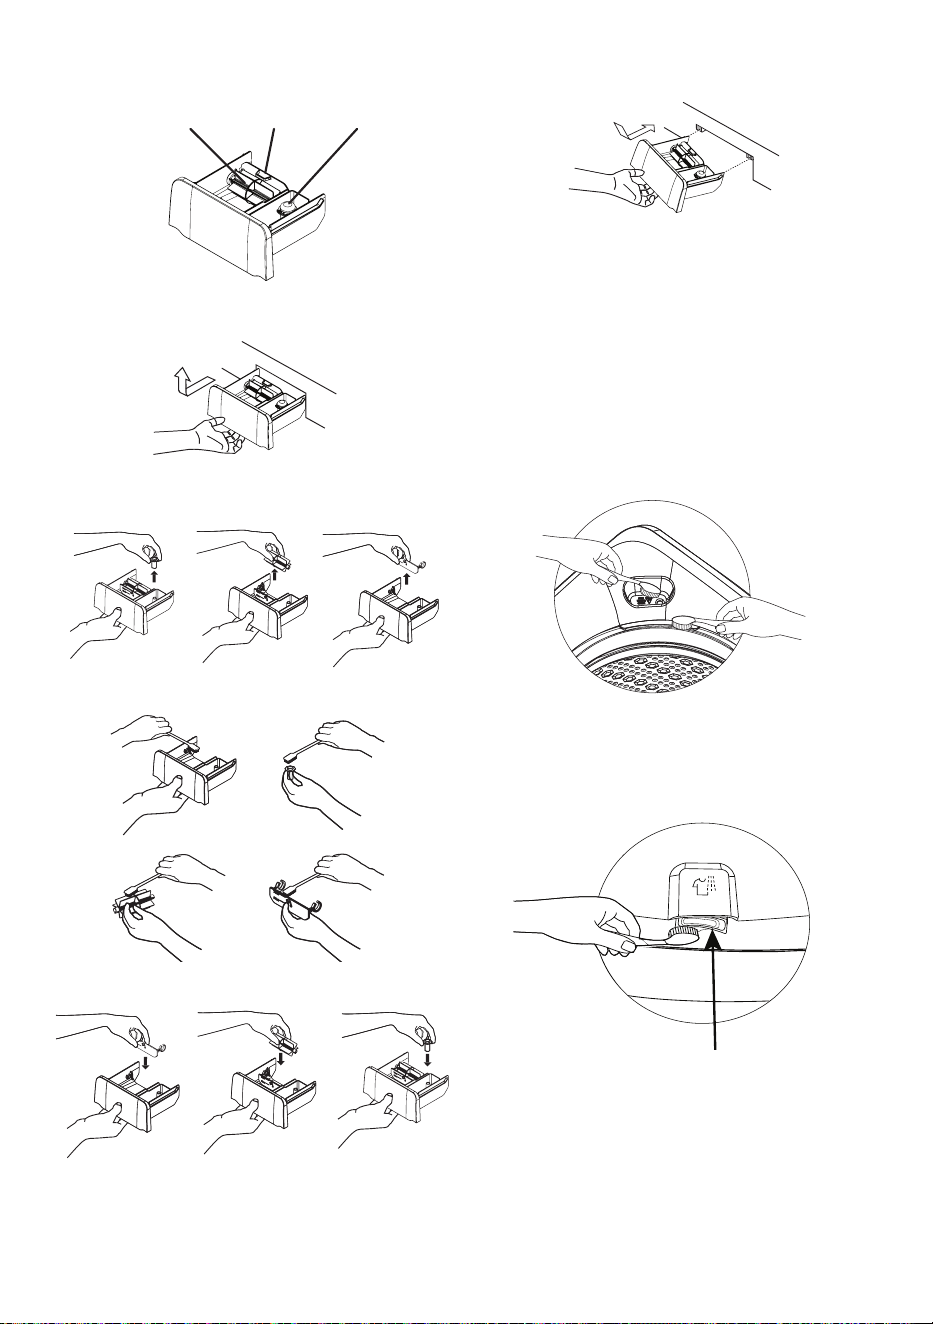
Cleaning the dispenser
1. Pull the dispenser and tilt it upwards to remove
it.
2. Pull off the caps, turbo dissolver and
3. Clean with some tool such as brush.
4. Put the caps, turbo dissolver and detergent trap.
5. To remount, tilt the dispenser, align the rib to
guide and insert it.
• When you replace the caps, press it until it stops
completely. If it is not pressed all the way in, the
softener will not be added to the tub completely
and some will remain in the dispenser.
detergent trap.
Cleaning the liquid bleach port on Top cover
or Outer tub
• Use a brush or something to clean the liquid
bleach port of the washing machine.
Cleaning the jet spray on Top cover
• Use a brush or something to clean the jet spray
of the washing machine.
Jet spray nozzle
Cleaning the dispenser
CapsTurbo Dissolver Detergent Trap
Washing Machine / Instruction manual
29 / EN
Cleaning the drain lter
1. Select the Spin program and start to drain
remaining water in the Tub. Make sure to drain
the water rst, otherwise a lot of hot water may
come out.
2. Place a piece of cloth under the lter case. Turn
the drain lter counterclockwise slowly and
remove it.
3. Make sure to open the drain lter slowly as hot
water may come out.
4. Remove foreign objects such as coins or pins.
Clean inside the drain lter with a brush.
5. Insert the drain lter into lter case and turn it
clockwise until it locks and and the symbols must
align.
Drain filter
Drain filter
Filter case
Remove
Drain filter
Cleaning the water supply inlet
1. Close the tap.
2. Disconnect the water supply hose from the top
of the washing machine. (Water in the hose may
be drained when you disconnect the hose.)
3. Use a brush or something to clean the water
supply inlet of the washing machine.
4. To replace the water supply hose reverse the
procedure.
To make it even cleaner, follow these steps.
• Cleaning “Mesh lter”
1. Use pliers to pull out the mesh lter from inside
the water inlet as shown.
2. Use a soft brush to clean the mesh lter by
running water through to help remove various
stains and sediments.
3. Reinsert the lter. Make sure it is tightened
against water leaks.
Water Inlet valve
Water supply hose
Care and maintenance of the washing
machine
• Clean the machine body.
• Wipe the outside of the washing machine with a
soft cloth. Do not use solvents such as alcohol
or benzine.
• If you use a chemically treated cloth, use it
according to the instructions given for the
product.
• If detergent or softener gets on the washing
machine, quickly wipe it off. The surface could
be damaged.
CAUTION!
Hot water may come out from the drain tube and
drain lter.
• Do not open the drain lter when a program is
running.
Clockwise
Mesh lter

30 / EN
Washing Machine / Instruction manual
11. Troubleshooting
Washing Machine fails to operate.
• Is the power plug not inserted in the power
outlet?
‒ Insert in the power outlet.
• Is there a power outage?
‒ Check your other product in your home.
• Is the Timer function set?
‒ Please check this function.
Washing Machine is wet, even though it is the rst
time to use it (drain hose, tub, etc.)
• At factory, we are checking the actual
performance of each product before shipment.
Some water drops might remain in the product,
but this is not a malfunction. We ask for your
kind understanding.
The remaining time increases during operation
• Final spin process, There may be an imbalance
of the cloth inside the tub?
‒ The operation will resume the rinsing and spin
process again.
Water is added again during the washing process
• Is water added automatically up to the set water
level if the water level falls because water is
absorbed by the laundry?
‒ To keep the preset water level, water may be
added during operation.
Wash time is longer than the time that was set
manually
• Is the water pressure low?
‒ The operating time may increase due to a
longer water supply time, depending on the
pressure level of tap water.
The lid does not open
• Is the lid locked?
‒ When the lid lock indicator is on, lid is still
locked for your safety.
‒ Cannot be opened because there was a power
outage or the power was turned off while the
lid lock indicator was lit. Turn on the power
and wait for the lock to be released.
‒ How to unlock the lid, please refer to page 18.
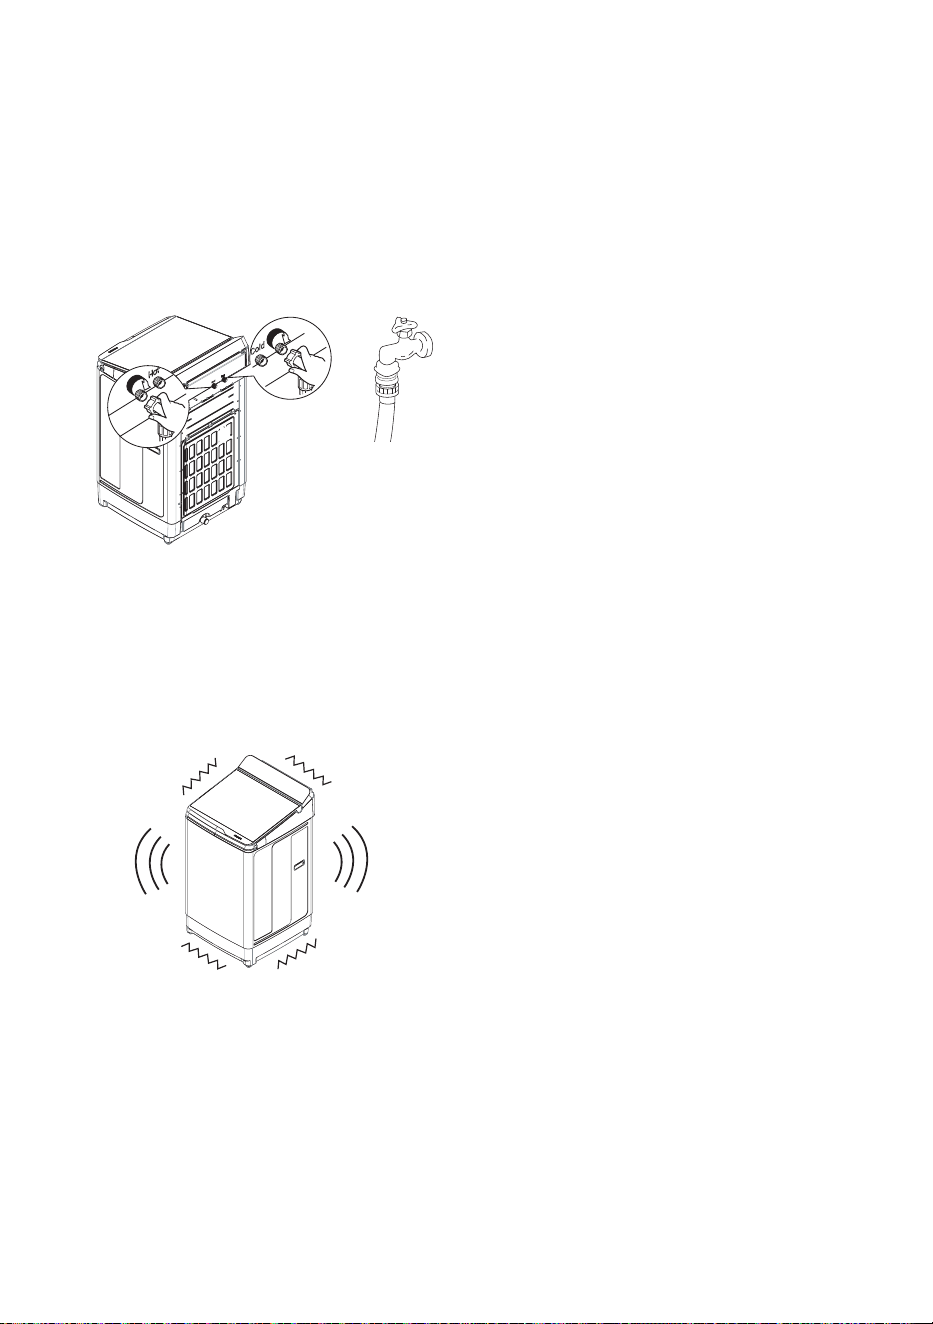
Washing Machine is a vibration and noise.
• WashingMachineisnotstableortheooritself
isnotleveled.
‒ Pleasecheckthelevel,pleaserefertopage9.
Error code does not disappear
• Are you taking appropriate action?
‒ Various causes are possible, please refer to
page 31.
Washing Machine / Instruction manual
31 / EN
Error code Things to check and solutions
Overloaded Laundry
- Check if the laundry is overloaded.
• Decrease the amount of laundry.
Water cannot supplied
- CheckthewaterInletvalve.
- Checkandcleanthemeshfilter.
- Checkwatersupplyhose.
Openthefaucet?
- Checkthedrainhoseposition
isheightlessthan100cm.
Water cannot drain
- Check the drain hose and its end.
Thetubunbalanced
- Checkifthelaundryisallon
onesideofthetub.
• Balancethelaundryevenly.
- Checkifthemachineison
aslanted,unleveledfloor.
• AdjuStitslegs,pleaserefer
topage9.
- Check that there are no obstructions to drainage.
“The C2 Error describes in detail how to deal with this.”
The lid cannot be locked
- Checkifthelidisopen.
• Closeitcompletely.
- Checkiftheswitchispressed.
The lid lock cannot be
released
The spinning speed does
not reach the specied
value.
- Checkifthedrainhoseisclogged,
Installthedrainhosecorrectly.
- Checkifthereistoomuch
detergentfoam.
• Rinseonceanddehydrate
bymanual.
Drain lter no locks
- Check that the Drain lter enters clockwise 1 turn.
- Check the symbols are must align.
- Checkthelimitswitchoperation.
Whentouchingwiththehandlefilter.
12. Error Codes
• If warning sign such as “F0”, “F9”…etc. are shown in the display, stop operating the washer immediately
and contact an authorized service dealer or a service agent for inspection and repairing.
Water Inlet valve
(Hot)
(Cold)
Mesh filter
Lid open Lid lock switch
Detergent foam
32 / EN
Washing Machine / Instruction manual
Arcelik Hitachi Home Appliances (Thailand) Ltd.
2WPL19042A
Power supply See the rating plate on the back of the washing machine.
Standard water level
(maximum water level)
87 L (LTL10PMVJWT)
Standard amount of water used
(Normal program)
190 L (LTL10PMVJWT)
Water pressure 0.03 to 0.8 MPa (0.3 to 8 Kgf/cm
2
)
Dimensions Width 590 mm x Depth 656 mm x Height 1088 mm
Weight 39 kg (LTL10PMVJWT)
13. Specications
Service Center
Beko A&NZ Pty Ltd.
55 Blanck Street, Ormeau QLD 4208
Ocial Distributor of Hitachi Home Appliances
Phone : 1300 470 552
Web: https://www.hitachi-homeappliances.com/au-en/
14. Service
• Before you request repair, please check the trouble shooting on page 30 and error codes on page
number 31. If it is still abnormal, please contact the retailer of purchase or the following service center.
• Telephone number is subject to change without notice.