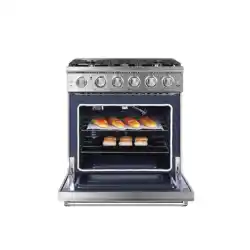
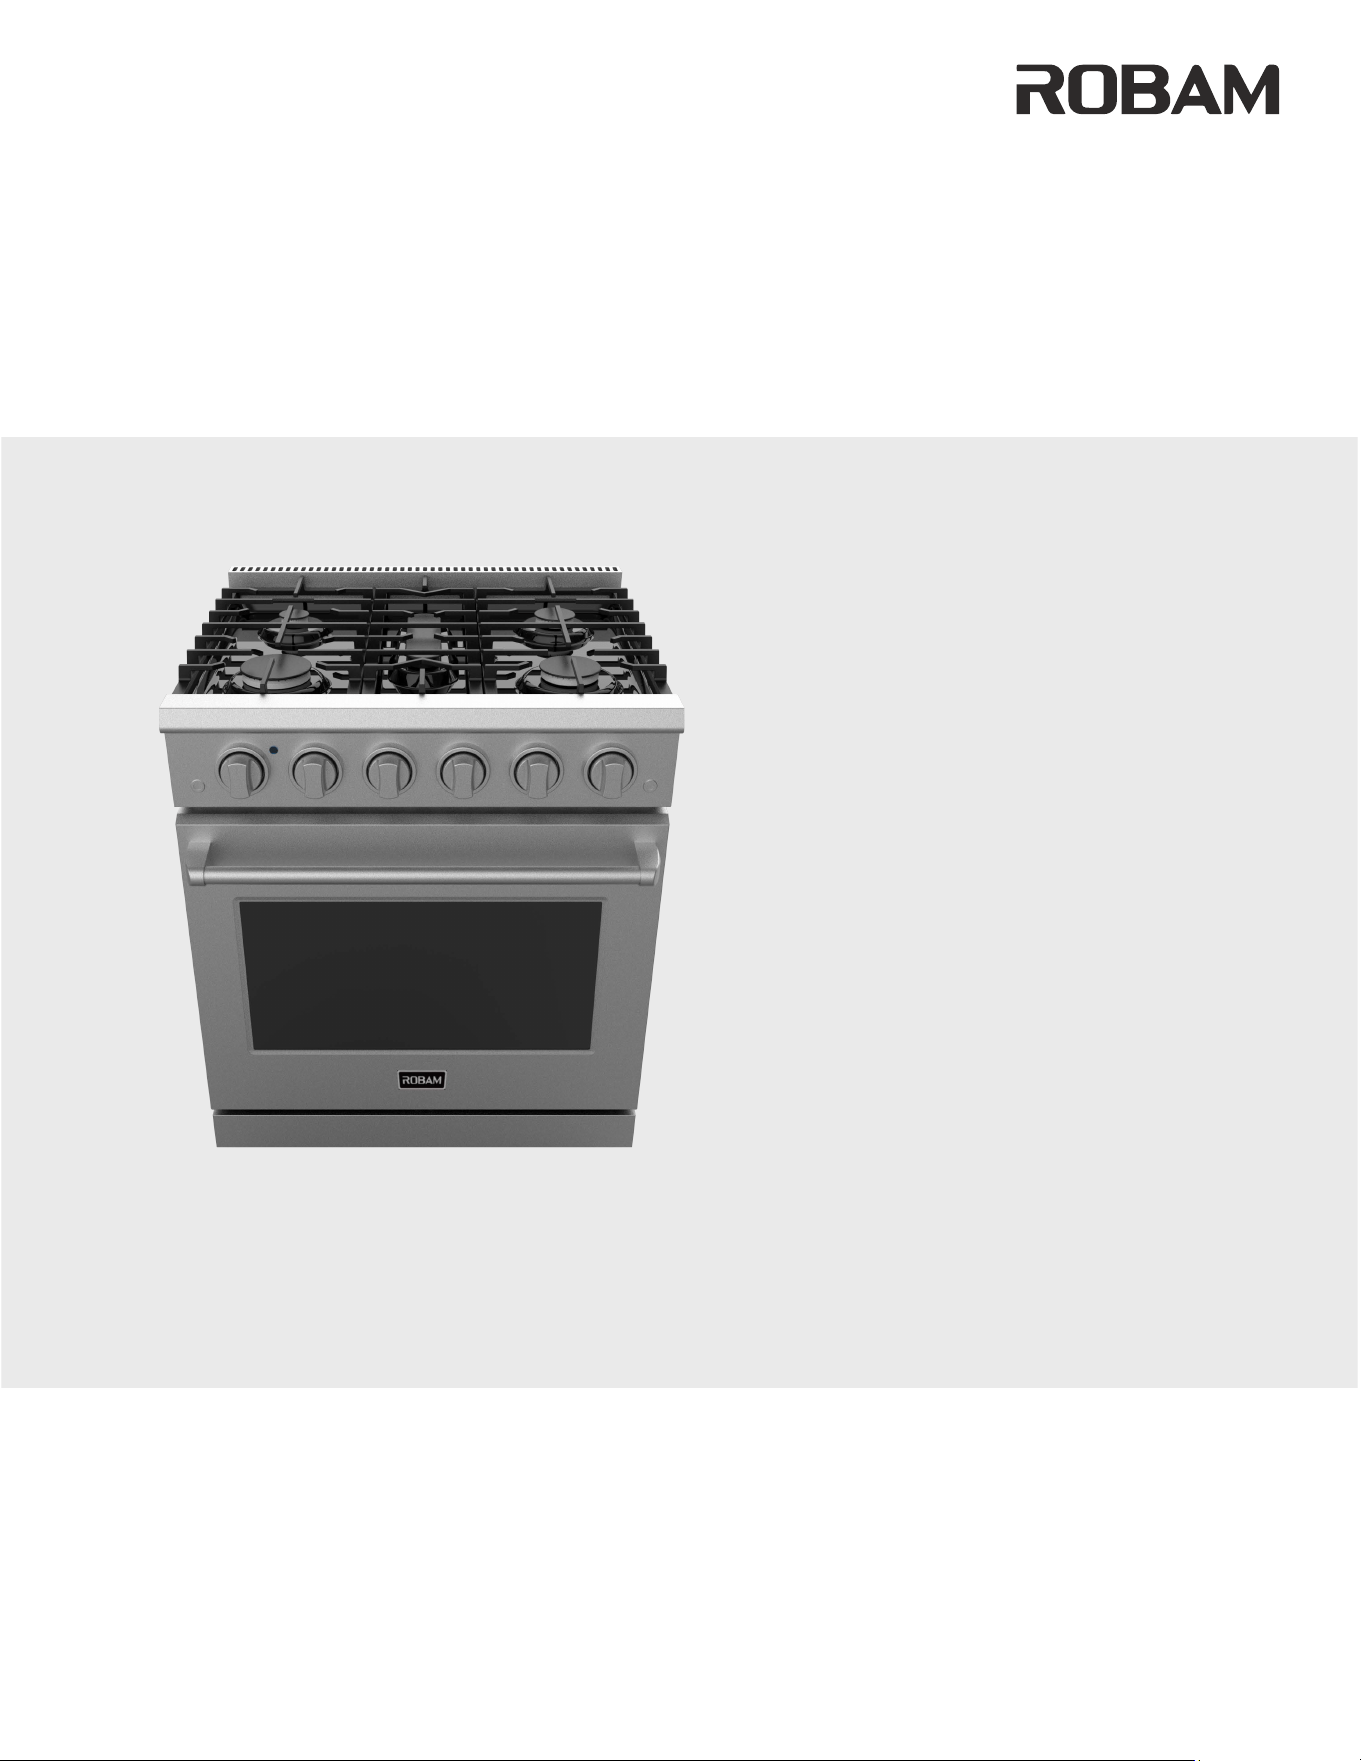
USE AND CARE MANUAL
USE AND CARE MANUAL
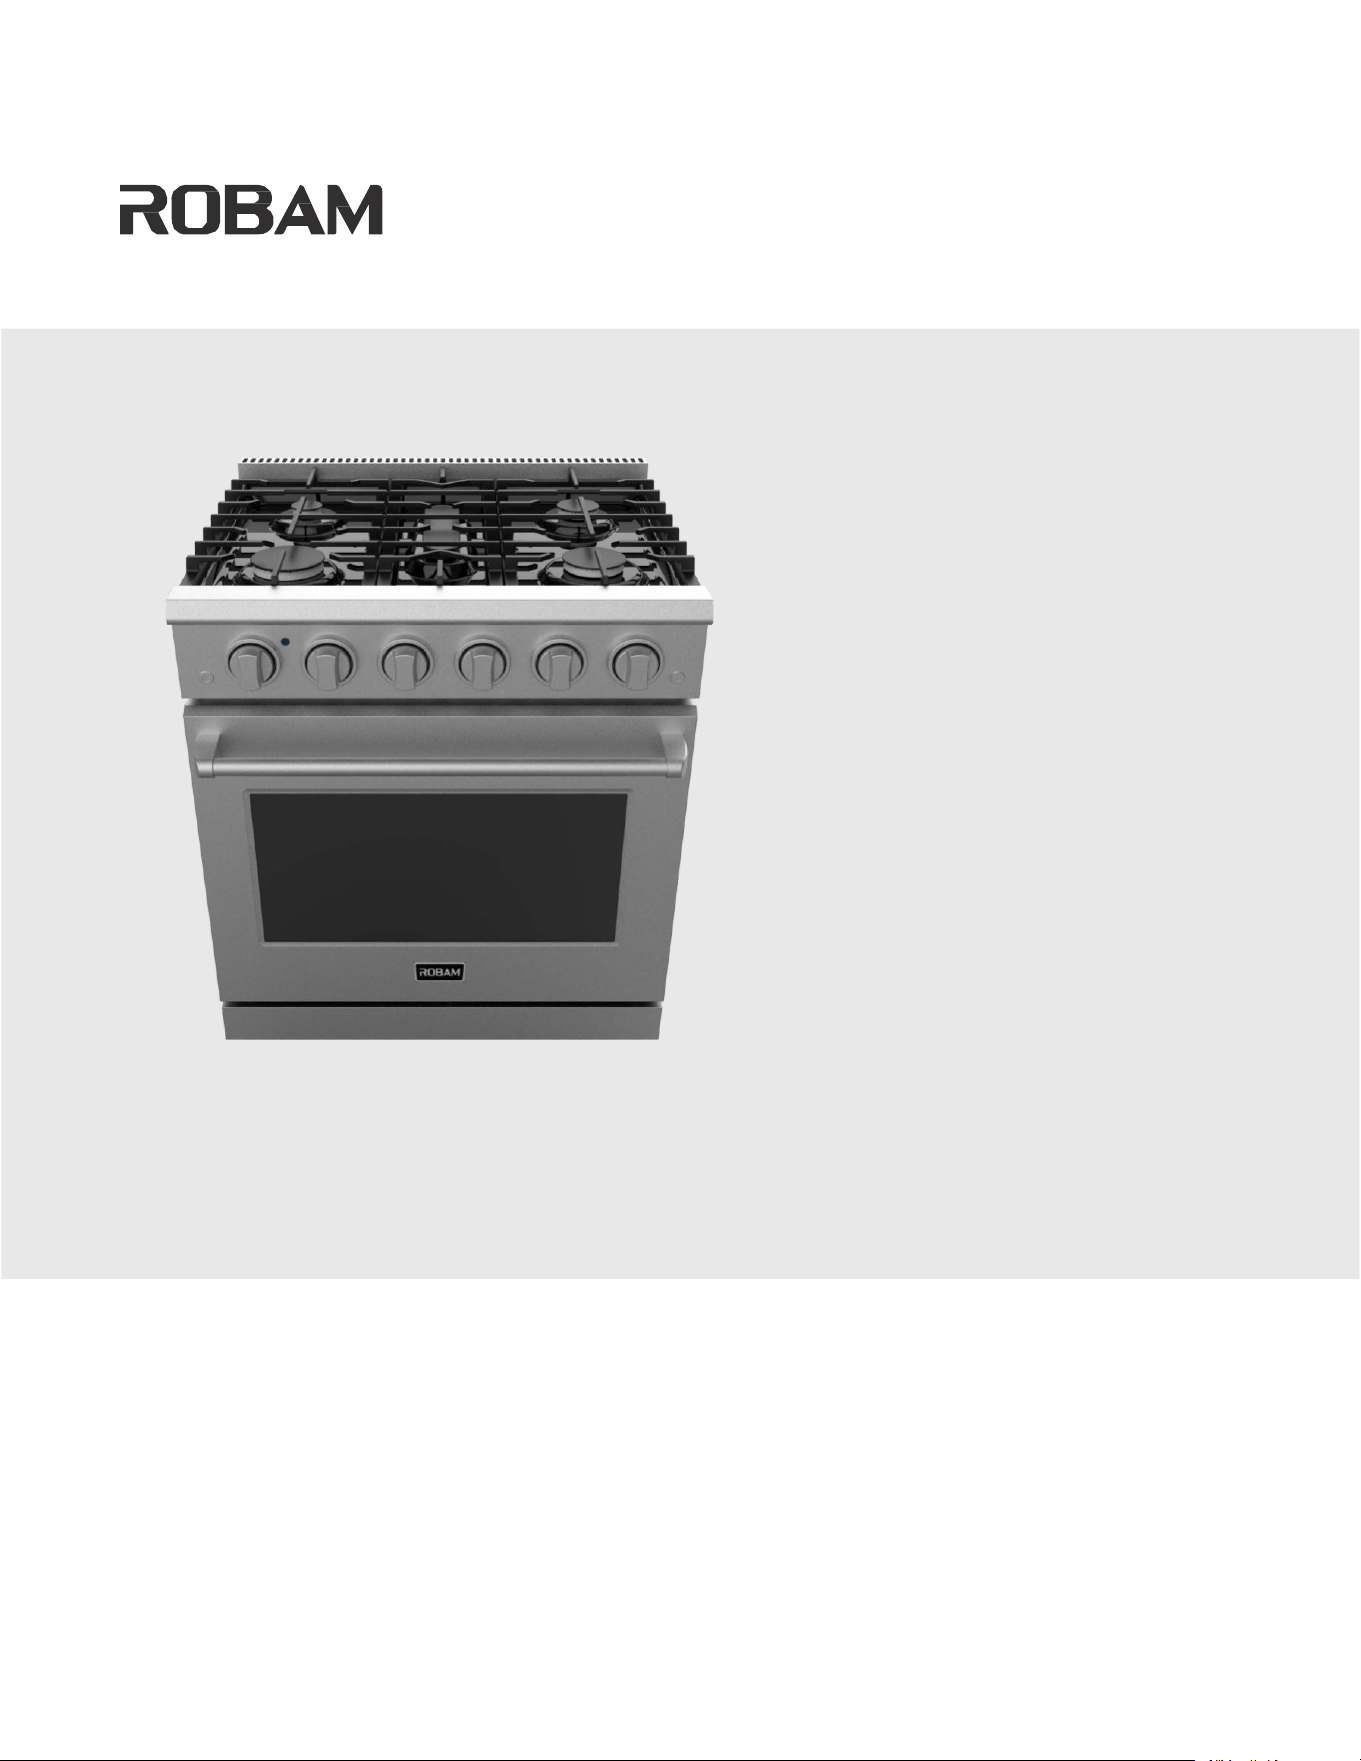
JJZ(Y/T)-7GG11
Full Gas Range
Before operating this unit, please read the user manual completely and keep it. If the manual is lost, you can send e-mail to
[email protected], request for an electronic manual.

GAS RANGES
USE AND CARE MANUAL

Safety and warnings
1
Table of Contents
1.
WARNINGS
........................................................................................................................................................................
3
2.
WELCOME..........................................................................................................................................................................4
3.
BEFORE YOU START...............................................................................................................................................................4
4.
SAFETY AND WARNINGS
...................................................................................................................................................
5
SAFETY SYMBOLS
....................................................................................................................................................................
5
ELECTRICAL SHOCK HAZARD
.....................................................................................................................................................
6
TIPPING HAZARD
....................................................................................................................................................................
6
EXPLOSION HAZARD
................................................................................................................................................................
7
FIRE HAZARD
.........................................................................................................................................................................
7
POISONING HAZARD
................................................................................................................................................................
8
HOT SURFACE HAZARD
............................................................................................................................................................
8
OTHER SAFETY TIPS
.................................................................................................................................................................
8
5.
GAS SUPPLY REQUIREMENTS......................................................................................................................................... 11
SAFETY TIPS FOR GAS OPERATION
...........................................................................................................................................
11
6.
DIMENSIONS AND CLEARANCES..................................................................................................................................... 12
TOP HOOD AND CABINET SPECIFICATIONS
.................................................................................................................................
15
7.
ELECTRIC POWER SUPPLY REQUIREMENTS................................................................................................................... 16
8.
ELECTRICAL GROUNDING INSTRUCTIONS
....................................................................................................................................
20
9.
CONNECT RANGE TO GAS SUPPLY
..................................................................................................................................
20
AFTER INSTALLATION
.............................................................................................................................................................
21
10
FIRST USE........................................................................................................................................................................... 22
CONDITIONING THE OVEN
.......................................................................................................................................................
22
11.
COOKTOP SAFETY GUIDELINES
........................................................................................................................................
22
SURFACE BURNER IGNITION
....................................................................................................................................................
23
SIMMER AND BOIL
................................................................................................................................................................
24
FLAME SIZE
.........................................................................................................................................................................
24
POWER FAILURE
...................................................................................................................................................................
24
COOKTOP
............................................................................................................................................................................
24
BURNER GRATES
...................................................................................................................................................................
24
OVEN BURNER USE
................................................................................................................................................................
25
BROIL BURNER USE
...............................................................................................................................................................
25
OVEN COOKING GUIDELINES
....................................................................................................................................................
25
12.
OVEN FUNCTION
................................................................................................................................................................
27
NATURAL AIRFLOW BAKE
.......................................................................................................................................................
27
BROIL
.................................................................................................................................................................................
27
CONVECTION BAKE
...............................................................................................................................................................
27
CONVECTION ROAST
.............................................................................................................................................................
28
CONVECTION DEFROST
..........................................................................................................................................................
28
Full Gas Range

Safety and warnings
2
DEFROSTING
........................................................................................................................................................................
Ϯϴ
CONVECTION DEHYDRATION
...................................................................................................................................................
Ϯϴ
13 BROILER OPERATION....................................................................................................................................................... Ϯϵ
PREHEATING
........................................................................................................................................................................
Ϯϵ
TO BROIL
............................................................................................................................................................................
Ϯϵ
SETTING BROIL
.....................................................................................................................................................................
Ϯϵ
BROILING GUIDELINES
............................................................................................................................................................
ϯϬ
14.
CLEANING INSTRUCTIONS................................................................................................................................................. ϯϭ
DO’S
..................................................................................................................................................................................
ϯϭ
DON’TS
...............................................................................................................................................................................
ϯϭ
CLEANING BURNER CAPS AND BRASS FLAME SPREADERS
..............................................................................................................
ϯϭ
CLEANING SIDE RACKS
............................................................................................................................................................
ϯϮ
CLEANING OVEN SHELVES
.......................................................................................................................................................
ϯϮ
CLEANING BROIL/ROAST PAN AND SLOTTED GRID
........................................................................................................................
ϯϮ
CLEANING BAKE AND BROIL BURNERS
.......................................................................................................................................
ϯϯ
CLEANING PORCELAIN SURFACES
..............................................................................................................................................
ϯϯ
CLEANING THE OVEN GLASS WINDOW
.......................................................................................................................................
ϯϯ
CLEANING THE OVEN DOOR GASKET
..........................................................................................................................................
ϯϯ
CLEANING STAINLESS STEEL SURFACES
.......................................................................................................................................
ϯϯ
15.
REMOVING AND REPLACING THE OVEN DOOR
............................................................................................................
ϯϰ
REMOVING THE OVEN DOOR
...................................................................................................................................................
ϯϰ
REPLACING THE OVEN DOOR................................................................................................................................................... ϯϱ
16.
TROUBLESHOOTING GUIDE
............................................................................................................................................
ϯϲ
COOKTOP
............................................................................................................................................................................
ϯϲ
Oven
.................................................................................................................................................................................
ϯϴ
Appendix 1 Oven Knob Installation................................................................................................................................ ϰϬ
Appendix 2 Oven Handle Installation
.............................................................................................................................
ϰϯ
Appendix 3 Rubber Pad Installation on Back Panel
.......................................................................................................
ϰϱ
Full Gas Range
Safety and warnings
3
1.
Warnings
These are the most critical warnings summarized below.
If the instructions in this manual are not followed exactly, a
fire or explosion may result, causing property damage,
personal injury or death.
Do not store or use gasoline or other flammable substances
and liquids near this or other appliance,
Never use this appliance as a space heater to warm a room.
Installation of this appliance must be done by a qualified,
service agency or gas supplier.
What to do if you smell gas
Do not light any appliance
Do not touch an electrical switch
Immediately call the gas supplier from a neighbor’s phone
Open a window and leave the area
Follow the gas supplier’s instructions
If you cannot reach the gas supplier, call the fire department
Full Gas Range

Safety and warnings
4
2.
Welcome
Thank you for purchasing ROBAM range. We appreciate your business and we recommend that
you read this entire User’s Manual before operating your new appliance for the first time.
This manual contains instructions on how to properly install and set up your new range, as well as
insights into the unique features that our product offers. Please keep this manual for future
reference, as it contains answers to questions that you might have as you begin to cook.
Thank you
ROBAM
3.
Before you start
✓ Make sure that the anti-tip of the range has been properlyinstalled.
✓ Find the model and serial numbers on the CSA label in the bottom right-hand corner of the
backboard. Note these numbers down for future reference in the space provided in section
‘Warranty and service’.
✓ Read this guide, taking special note of the ‘Safety and warnings’ section.
✓ Remove all the packaging from the oven(s) and cooktop. Recycle items that you can. If any
adhesive residue is left on surfaces, remove this using dish washing liquid on a soft cloth.Do
not use any harsh or abrasive cleaners.
✓ Make sure you follow the instructions under ‘First use’ before using your range forcooking.
✓ To reduce the risk of fire, electrical shock, injury to persons, or damage when usingthe
appliance, follow the important safety instructions listed below:
Full Gas Range
Safety and warnings
5
4.
Safety and Warnings
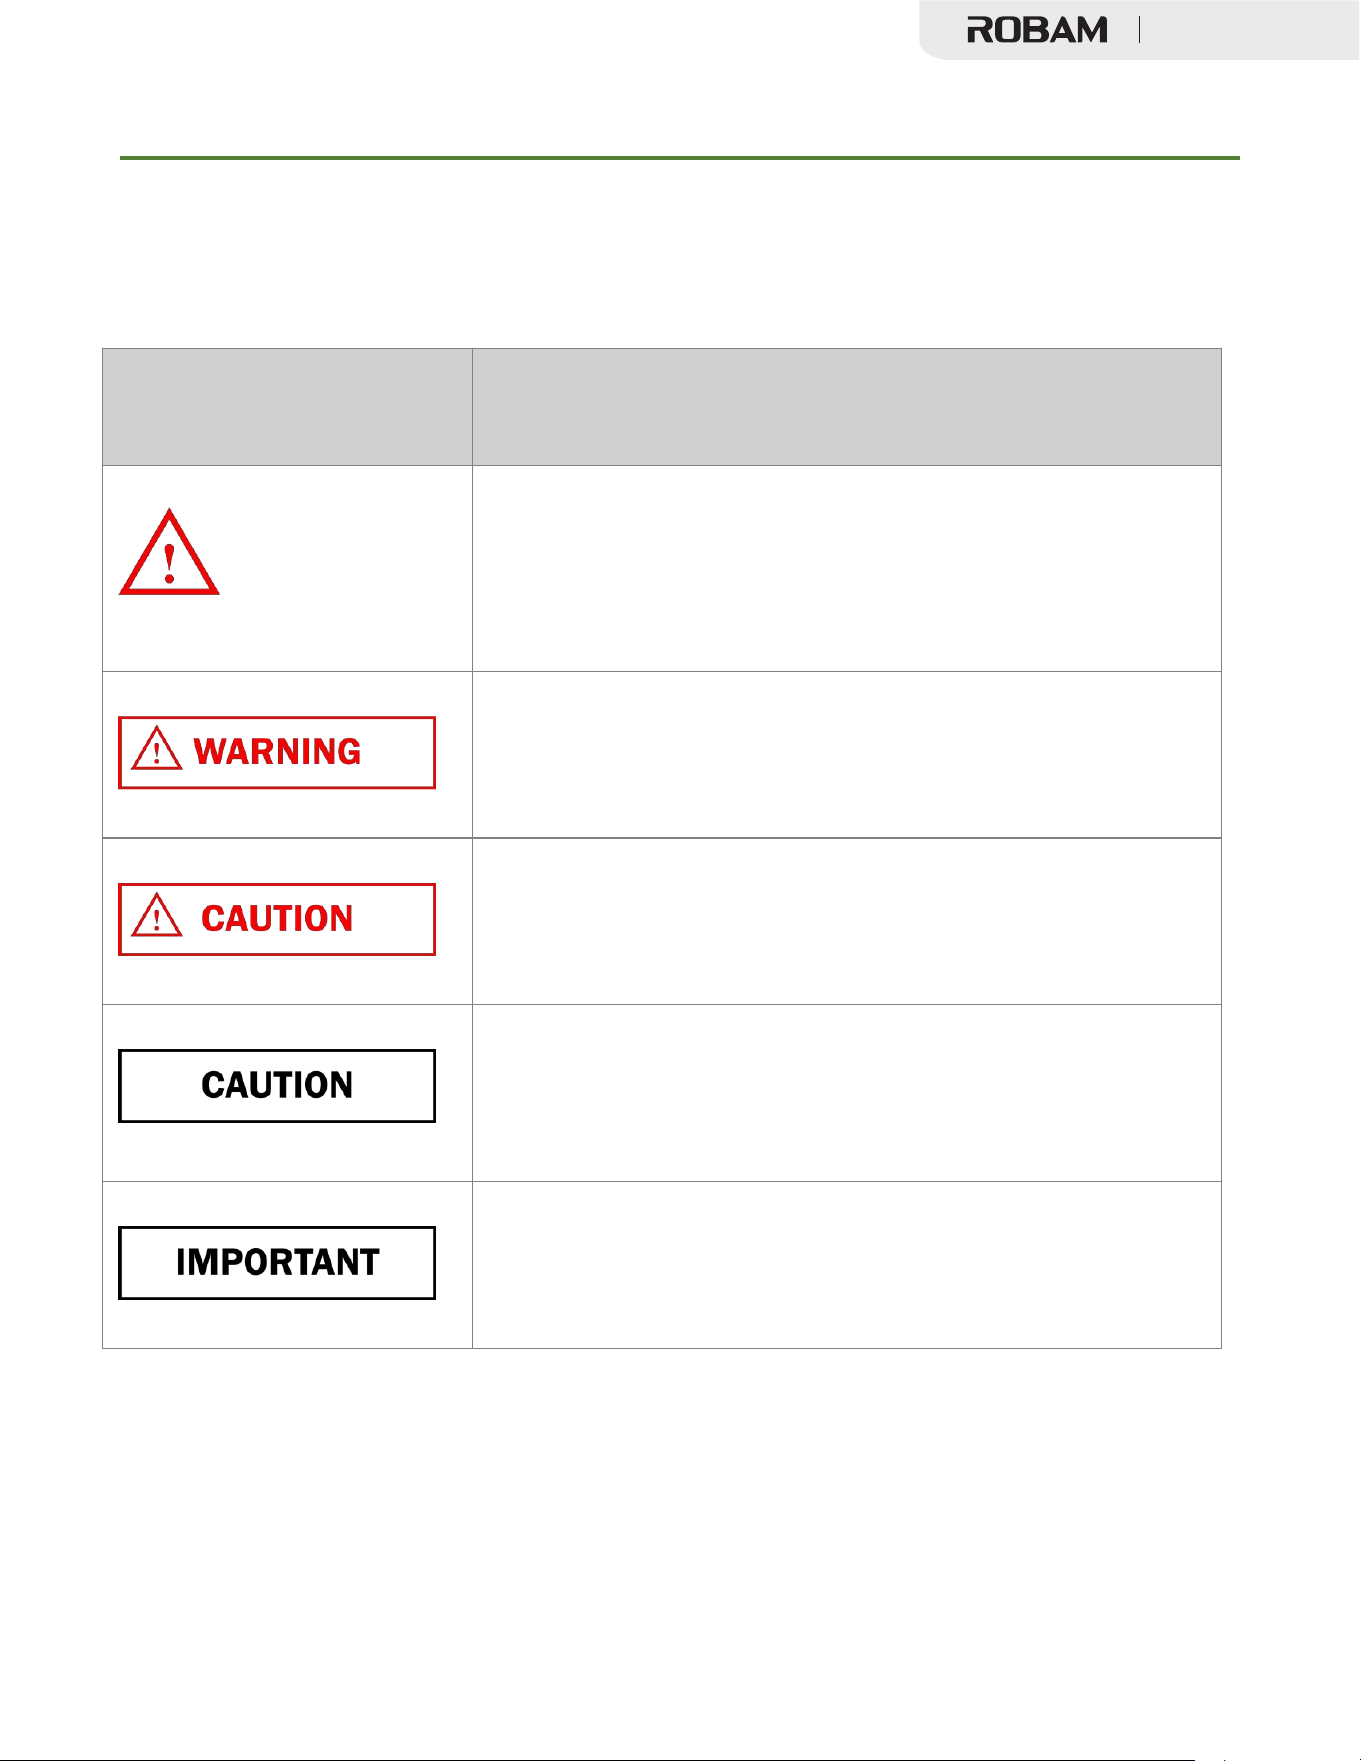
Safety Symbols
Symbol
Definition
This will alert you to potential personal or property safety
hazards. Obey all safety rules to avoid any property damage,
personal injury or death
WARNING indicates a potentially hazardous situation, which, if
not avoided, could result in serious injury or death
CAUTION indicates a moderate hazardous situation, which, if
not avoided, could result in minor or moderate injury
CAUTION – when used without the safety alert symbol, indicates
a potentially hazardous situation, which, if not avoided, could
result in property damage
IMPORTANT used for installation, operation and maintenance
information that are not related to safety.
Full Gas Range
Safety and warnings
6
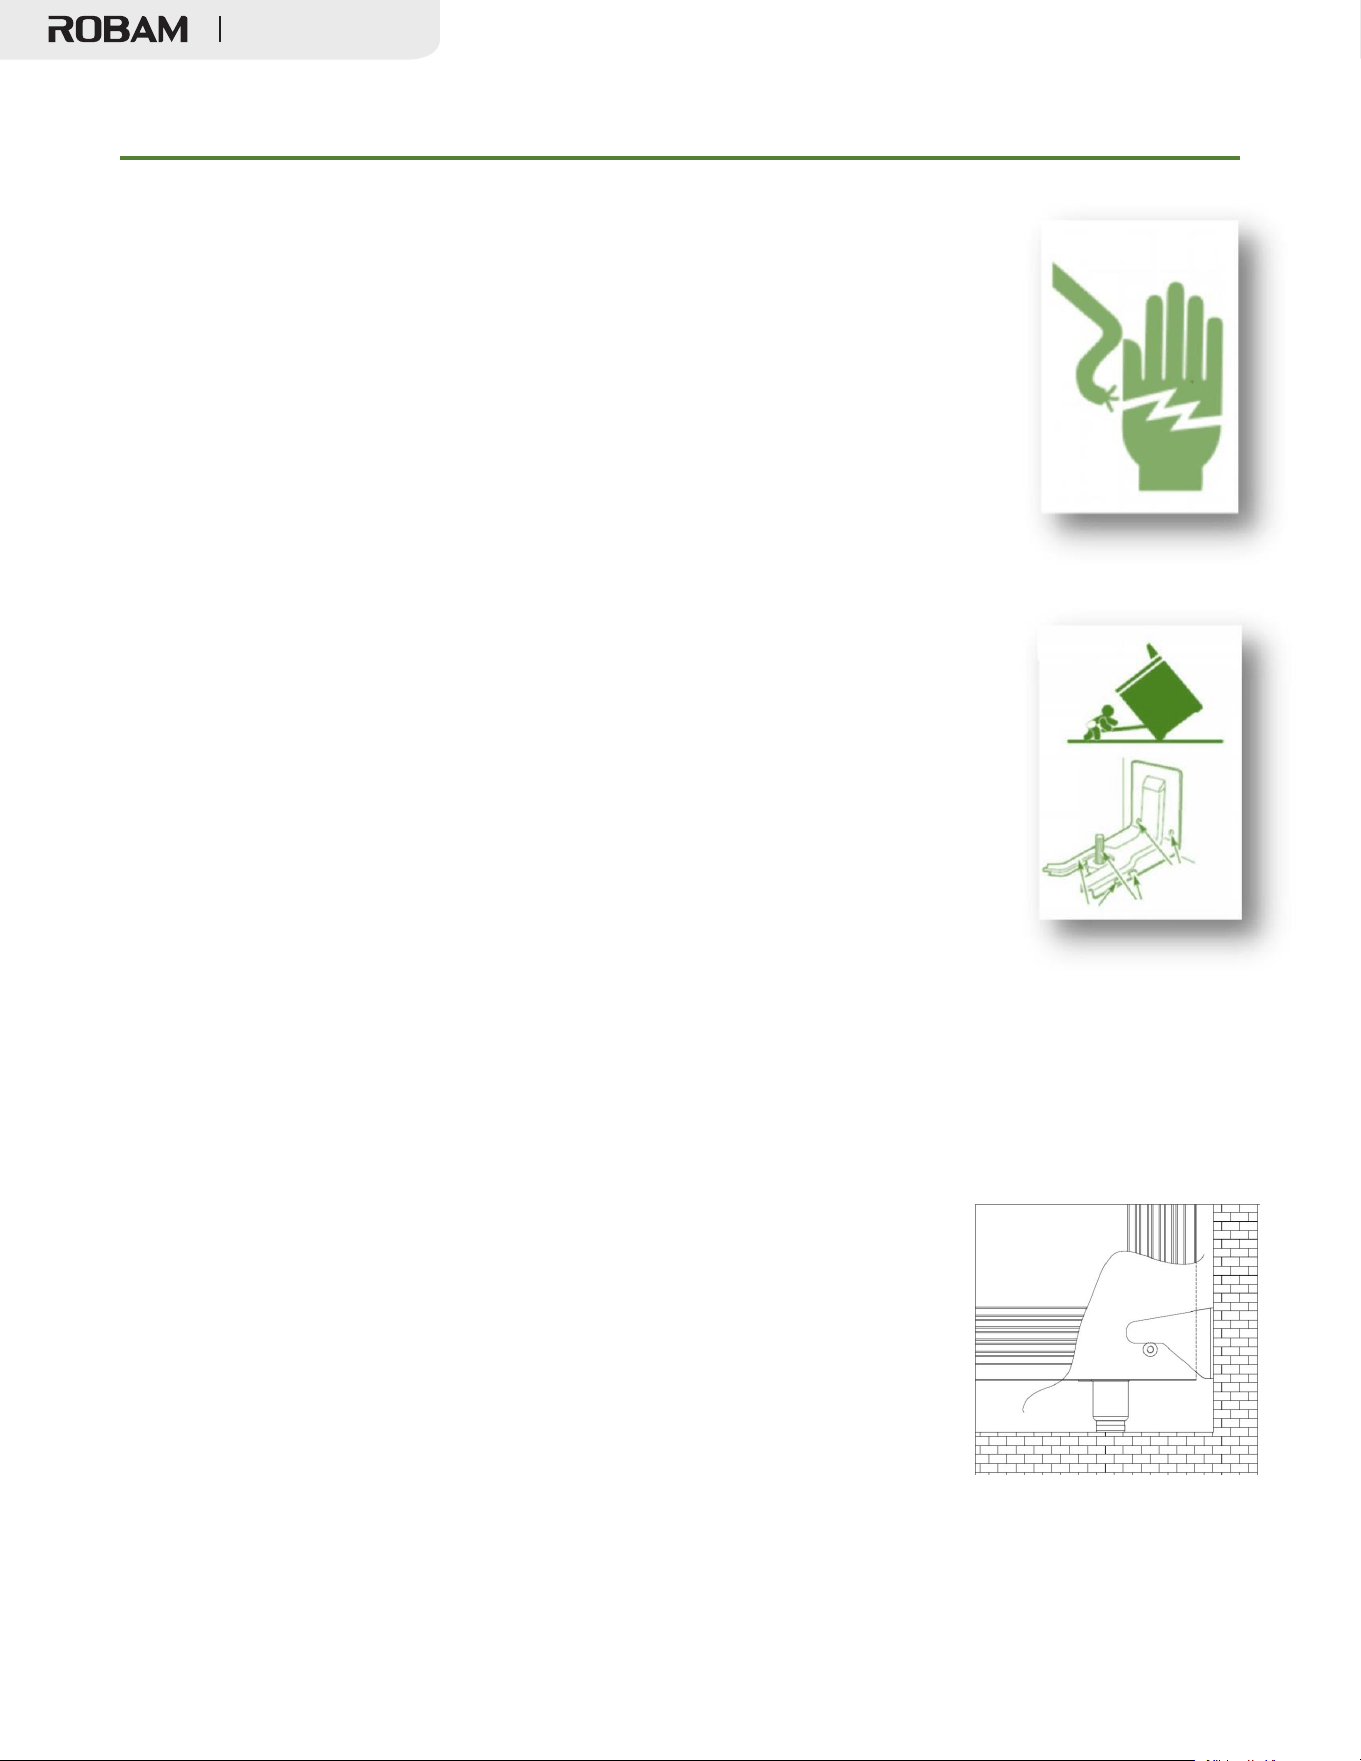
Electrical Shock Hazard
✓
Before removing a faulty oven light bulb, make sure you turn OFF the
power to the range at the main fuse or circuit breaker panel. If youdon’t
know how to do this, contact an electrician.
✓
Do not remove the kick panel or the back panel. Due to electrical wires
behind it, both panels should only be removed by a qualifiedtechnician.
✓
This appliance is equipped with a three-prong grounding plug for your
protection against shock hazard and should be plugged directly into a
properly grounded power outlet. Do not under any circumstances cutor
remove the grounding prong from this plug.
Failure to follow this advice may result in death or electrical shock.
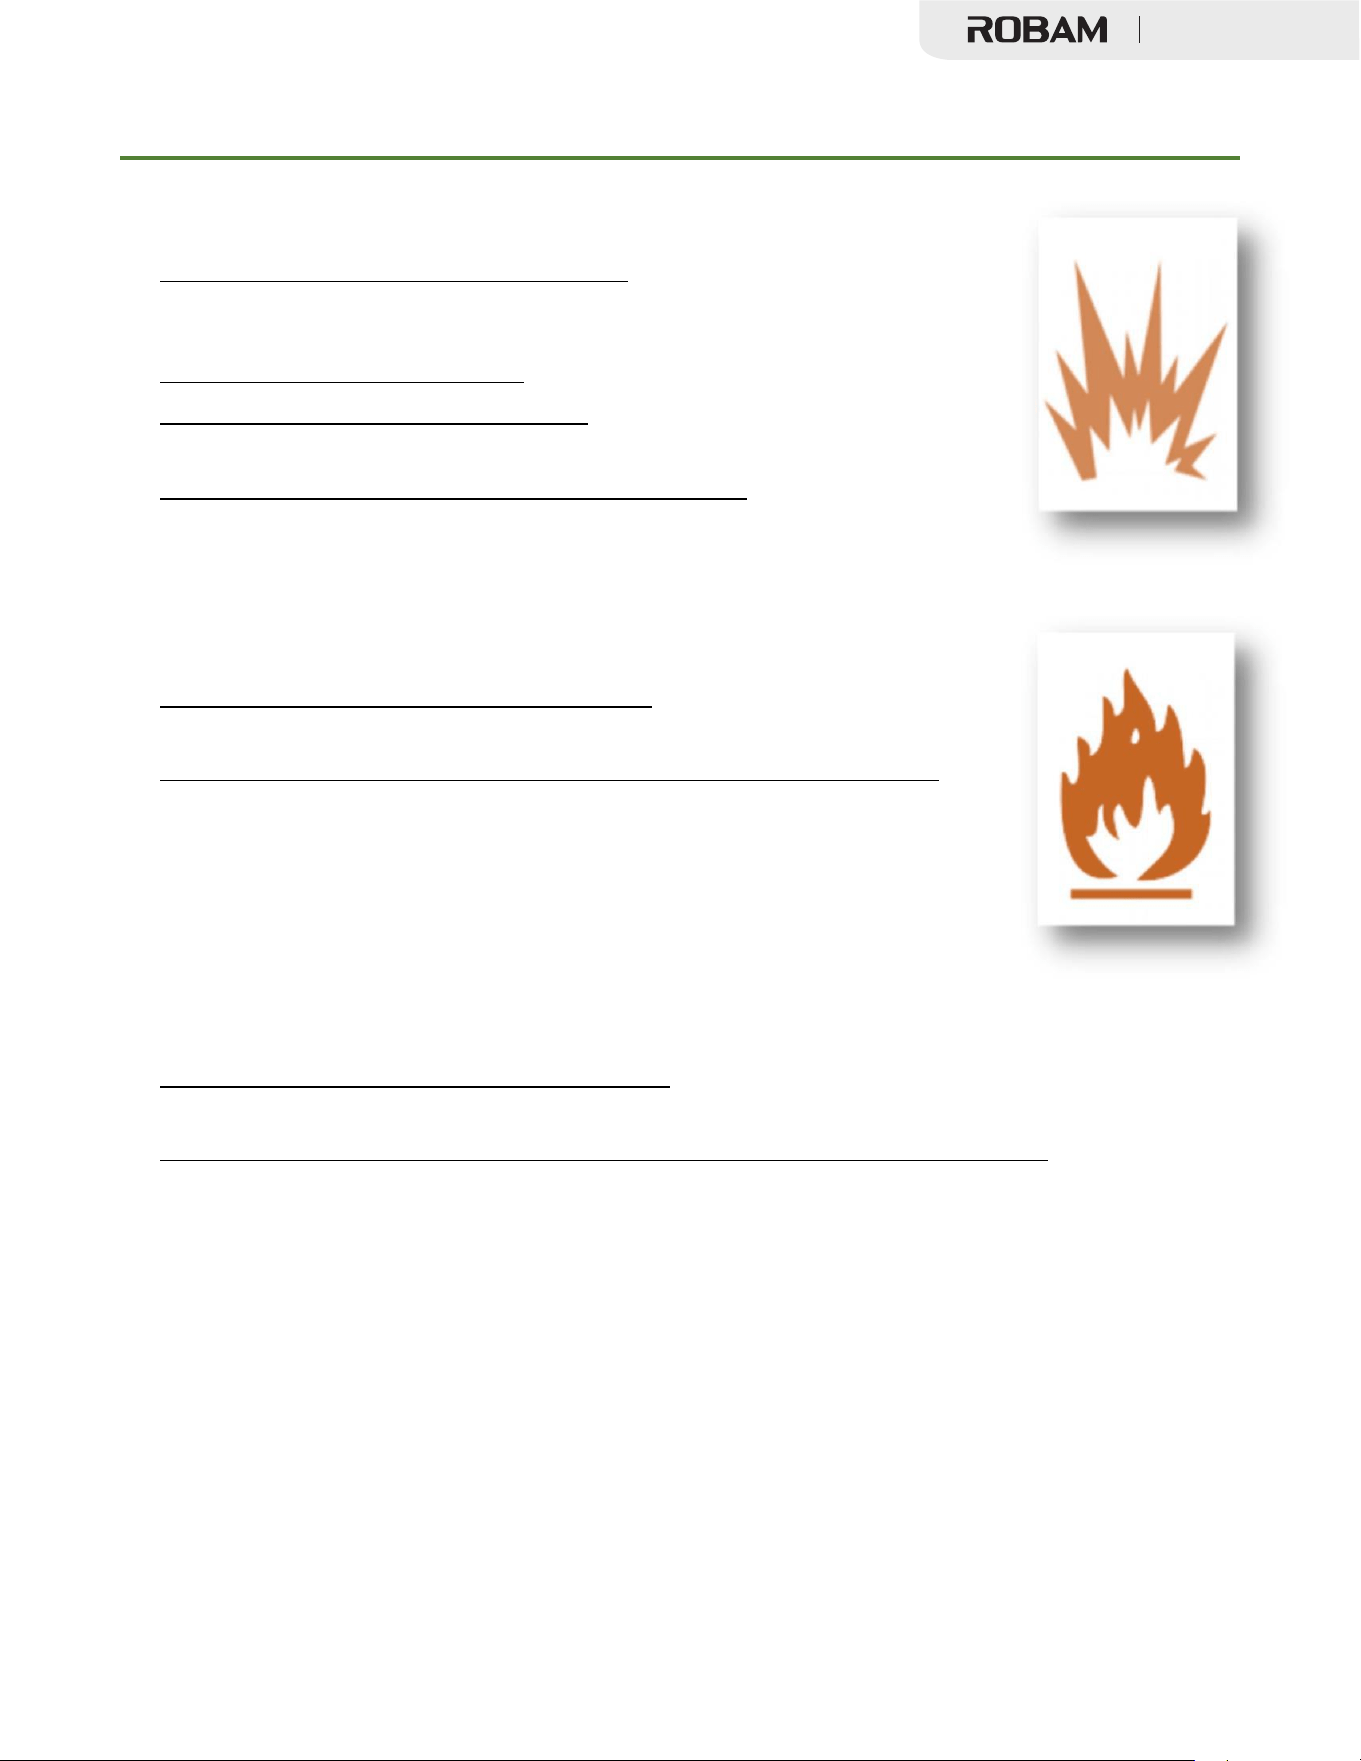
Tipping Hazard
All ranges can tip and cause injuries to adults and children. To prevent
tipping, install the anti-tip device supplied with your range. Follow all
installation instructions.
✓ Even after the safety device is installed, do not step, lean or sit on the
oven door or place any heavy objects on it. Doing so may result in
personal injury.
Make sure anti-tip device is installed as follows:
1.
Slide the range forward.
2.
Install the anti-tip device as described in the instruction sheet
3.
Safely tilt the front section of the range and slide the range slowly back against thewall.
4.
The rear pins should slide under the bracket.
Do not use the appliance until it has been secured.
Failure to follow this advice may result in serious injury.
Anti-tip device for JJZ(Y/T)-7GG11
Full Gas Range
Safety and warnings
7
Explosion Hazard
✓
If you smell gas, do not use the appliance. Open a window or door to let
the gas escape, then follow the instructions on the inside front cover of
this manual.
✓
Do not use water on grease fires. A violent steam explosion may result.
✓
Turn all burners off, then smother fire or flame with a dry chemical or
foam-type extinguisher. Do not try to smother with flammable blankets.
✓
Do not heat unopened food containers such as cans. Build-up of
pressure may cause container to burst and result ininjury.
Failure to follow this advice may result in injury or death
Fire Hazard
✓
Never use your appliance as a space heater. Persons could be injured or
a fire could start.
✓
Keep the area around the appliance free from combustible materials (e.g.
wall coverings, curtains, drapes), gasoline and other flammable vapors
and liquids.
✓
Clean the stove and burners regularly.
Do not let cooking grease or other flammable materials accumulate on the
surfaces or near the appliance.
✓
Do not hang any articles (e.g. dish towels) off the oven handle. Some fabrics may ignite ormelt
from the heat.
✓
Never leave the cooktop burners unattended when in use. Boil over causes smoking and greasy
spillovers that may ignite.
✓
Never spray an aerosol cleaner on or around the appliance while burners are lit, Be sure all the
controls are turned off and the appliance is cool. The aerosol gas and chemicals in such
cleaners could, in the presence of heat, ignite or cause metal parts tocorrode.
✓
Do not store flammables near cooktop
Flammable materials should not be stored in an oven or near the cooktop. An accident could
cause a serious fire.
Full Gas Range
Safety and warnings
8
Poisoning Hazard
✓
Never cover any slots, holes or passages in the oven bottom or cover an
entire rack or the oven floor with materials such as aluminum foil. Doing
so blocks airflow through the oven and may cause carbon monoxide
poisoning. Aluminum foil linings may also trap heat, causing a firehazard.
✓
Clean the appliance with caution. If a wet sponge or cloth is used to wipe
spills on a hot cooking area, be careful to avoid steam burn. Some
cleaners can produce noxious fumes if applied to a hot surface. Follow
the directions of the cleaner manufacturer.
✓
Never use this appliance as a space heater to heat or warm the room. Doing so may result in
carbon monoxide poisoning and overheating of theappliance.
Failure to follow this advice may result in poisoning or death.
Hot Surface Hazard
Accessible parts may become hot during use.
✓
Do not touch burners, areas near burners, the grill, griddle, grease drip-
pans, heating elements or interior surfaces of oven. These may be hot
enough to cause burns even though they are dark in color. During and
after use, do not touch, or let clothing or other flammable materials
contact these parts and surfaces until they have had sufficient time to
cool. Other parts and surfaces of the appliance may become hot enough
to cause burns - among these areas are the grates, back trim and oven
vents at the back of the cooktop, front edge, surfaces adjacent to the
cooktop, and the oven door.
✓
Use only dry potholders. Moist or damp potholders on hot surfaces may result in burns from
steam. Do not let potholder touch hot heating elements. Do not use a towel or other bulky cloth.
✓
Let hot grease cool before attempting to handle it.
Failure to follow this advice could result in burns andscalds.
Other Safety Tips
✓ Read instructions before use
Read all the instructions before using theappliance.
Use the appliance only for its intended purpose as
described in theseinstructions.
✓ Install the stove properly
Be sure your stove is properly installed and
grounded by a qualified technician.
Full Gas Range

Safety and warnings
9
✓
Do not install or operate stove if damaged.
Do not operate the appliance if it is damaged or not
working properly. If you received a damaged product,
contact your dealer or installer immediately.
✓ Know how to turn off power in emergency
Be sure to have the installer show you where and
how to turn off the power supply to the range (i.e.
location of the main fuse or circuit breaker panel)
and where and how to turn off the gas supply to the
range in an emergency.
✓ Do not leave children alone near stove
Children should not be left al
one or unattended in
the a
rea where the appliance is in use. They should
never be allowed to play with the appliance or to sit
or stand on any part of the appliance.
✓ Do not store toys or candy over the stove
For safety reasons, do not store items of interest to
children in cabinets above a range or at the back of
the range – children climbing on the range to reach
items could be seriously injured.
✓ Don’t wear lose clothing that could catch fire
Loose-fitting or hanging garments should
never be
worn while us
ing the appliance.
✓ Do not repair or replace parts yourself (unless
recommended)
Do not repair or replace any part of the appliance
unless specifically recommended in the manual. All
other servicing should be referred to a qualified
technician. Technicians must disconnect the
appliance from the power supply before any
servicing.
✓ Careful opening oven door
Use care when opening the oven door by allowing
warm air or steam escape before removing or
rep
lacing food.
✓ Keep
oven vent ductsunobstructed.
✓ Do not touch hot oven shelves
Protect your hands from burning by making sure the
oven is cool before sliding oven shelves into oven. If
a shelf must be removed while the oven is hot, do
not let oven mitts or potholder contact the base of
the oven or hot heating elements in the oven.
✓ Protect oven gasket
Do not clean the oven gasket or use any oven-
cleaning products on it. It is essential for a good seal,
which ensures that the oven oper
ates efficiently.
Care s
hould be taken not to rub, damage or move it.
✓ Protect glass oven doors
Do not use harsh/abrasive cleaners, scourers or
sharp metal scrapers to clean the oven door glass
since they scratch the surface, which may result in
the glass shattering.
✓ Never step on oven door or place a heavy object
(like a Turkey) on it
✓ Check for gas leaks
When the appliance installed, check for gas leaks
according to the instruction before use.
✓ Ventilation hood is mandatory
This appliance should not be operated without a
properly sized and operational ventilation hood.
✓ Use proper gas conversion kit
This stove might be used for natural gas or liquid
propane. If you are not sure whether the unit is used
for NG or LP, please contact your dealer for
verification. For LP
conversion, please use conversion
kit for your
certain model. Please have
a certified
technician
install the unit and kit (technical support
is available during normal business hours). If
planning to resell unit, please indicate whether it is
natural gas or has LP kit installed.
✓ Do not reach for items over the stove when it is lit Be
careful when reaching for items stored in cabinets
above theappliance.
✓ Read all instructions before using the product to
ensure proper and safe operation. Install or locate
the product only in accordance with the provided
Installation Instructions.
✓ Do not attempt to adjust, repair, service orreplace
any part of your appliance unless it is specifically
recommended in this guide.
✓ Do not use the range as a spaceheater.
✓ Do not leave children unattended in the area where
the range is in use. Never allow children to sit or
stand on any part of the range. Do not let children
play with the range.
✓ All servicing should be referred to aqualified
technician.
✓ Have the technician show you the location of the gas
shut off valve and how to shut it off in anemergency.
Full Gas Range

Safety and warnings
10
✓ Always disconnect power to appliance before any
type of servicing.
✓ Do not use abrasive or caustic cleaners or
detergents on this appliance. They may cause
permanent damage to the surface.
✓ When cooking, set the burner controls so that the
flame heats only the bottom of the utensil anddoes
not overlap at the sides of the utensil.
✓ Utensils (pots and pans) that conduct heat slowly, i.e.
glass pots, should be used in conjunctionwith
burner flames at a low or medium setting.
✓ Turn off all controls and wait for appliance parts to
cool down before touching them. Do not touch the
burner grates or surrounding areas untilcool.
✓ Do not use water on grease fires.
✓ Clean appliance with caution.
✓ Always turn pot handles to the side or back of the
range. Do not turn handles towards the area where
they are easily burned. Handles should not extend
over the adjacent burners.
✓ Use the range only for cooking tasks as outlined in
this manual. When using the range, do not touch the
grates, burner caps, burner bases, or any other
parts in proximity to the flame. These components
may be hot enough to cause burns.
✓ Use dry pot holders. Moist or damp pot holders on
hot surfaces may result in burns from steam
✓ Do not use a towel or other bulky cloth.
✓ Do not heat unopened food containers.
Buildup of pressure may cause the containerto
explode and result in injury.
✓ During and after use, do not touch interiorsurfaces
of the oven until cool
✓ Do not let pot holder touch hot surfaceareas
Full Gas Range
Dimension and Clearance
11
5.
Gas SupplyRequirements
Installation of this range must conform with local codes, or in the absence of local codes, with
national Fuel Gas Code
,
ANSIZ223.1 / NFPA 54.
In Canada, installation must conform to the current natural Gas Installation /code, CAN 1-1.1-M81
and with local codes where applicable.
This range has been design-certified according to ANSIZ21.1a, latest edition.
Reading
LP in. w.c.
NG (Natural Gas)
in. w.c,
Maximum gas pressure
13.0.
10.0
Appliance Regulator Setting for outlet
pressure
10.0
5.0
Safety Tips for Gas Operation
✓ Keep appliance area clear and free from combustible materials, gasoline, and otherflammable
vapors.
✓ Do not obstruct the flow of combustion air into the range and ventilation air away from the
range.
✓ Ventilation: it is a must that the unit be set under a powered, vented exhaust hood of
sufficient size and capacity.
✓ Before installing the range, you must locate and secure the included anti-tip bracket to thewall
for your range.
✓ The use of cabinets for storage above the appliance may result in a potential burn hazard.
Combustible items may ignite; metallic items may become hot and cause burns. If a cabinet
storage is to be provided, the risk can be reduced by installing a range hood that projects
horizontally a minimum of 5" (12.7cm) beyond the bottom of the cabinets.
Full Gas Range
Dimension and Clearance
12
✓ The appliance shall not be used for space heating. This information is based onsafety
considerations.
✓ All openings in the wall behind the appliance and in the floor under the appliance shallbe
sealed.
6.
Dimensions and Clearances
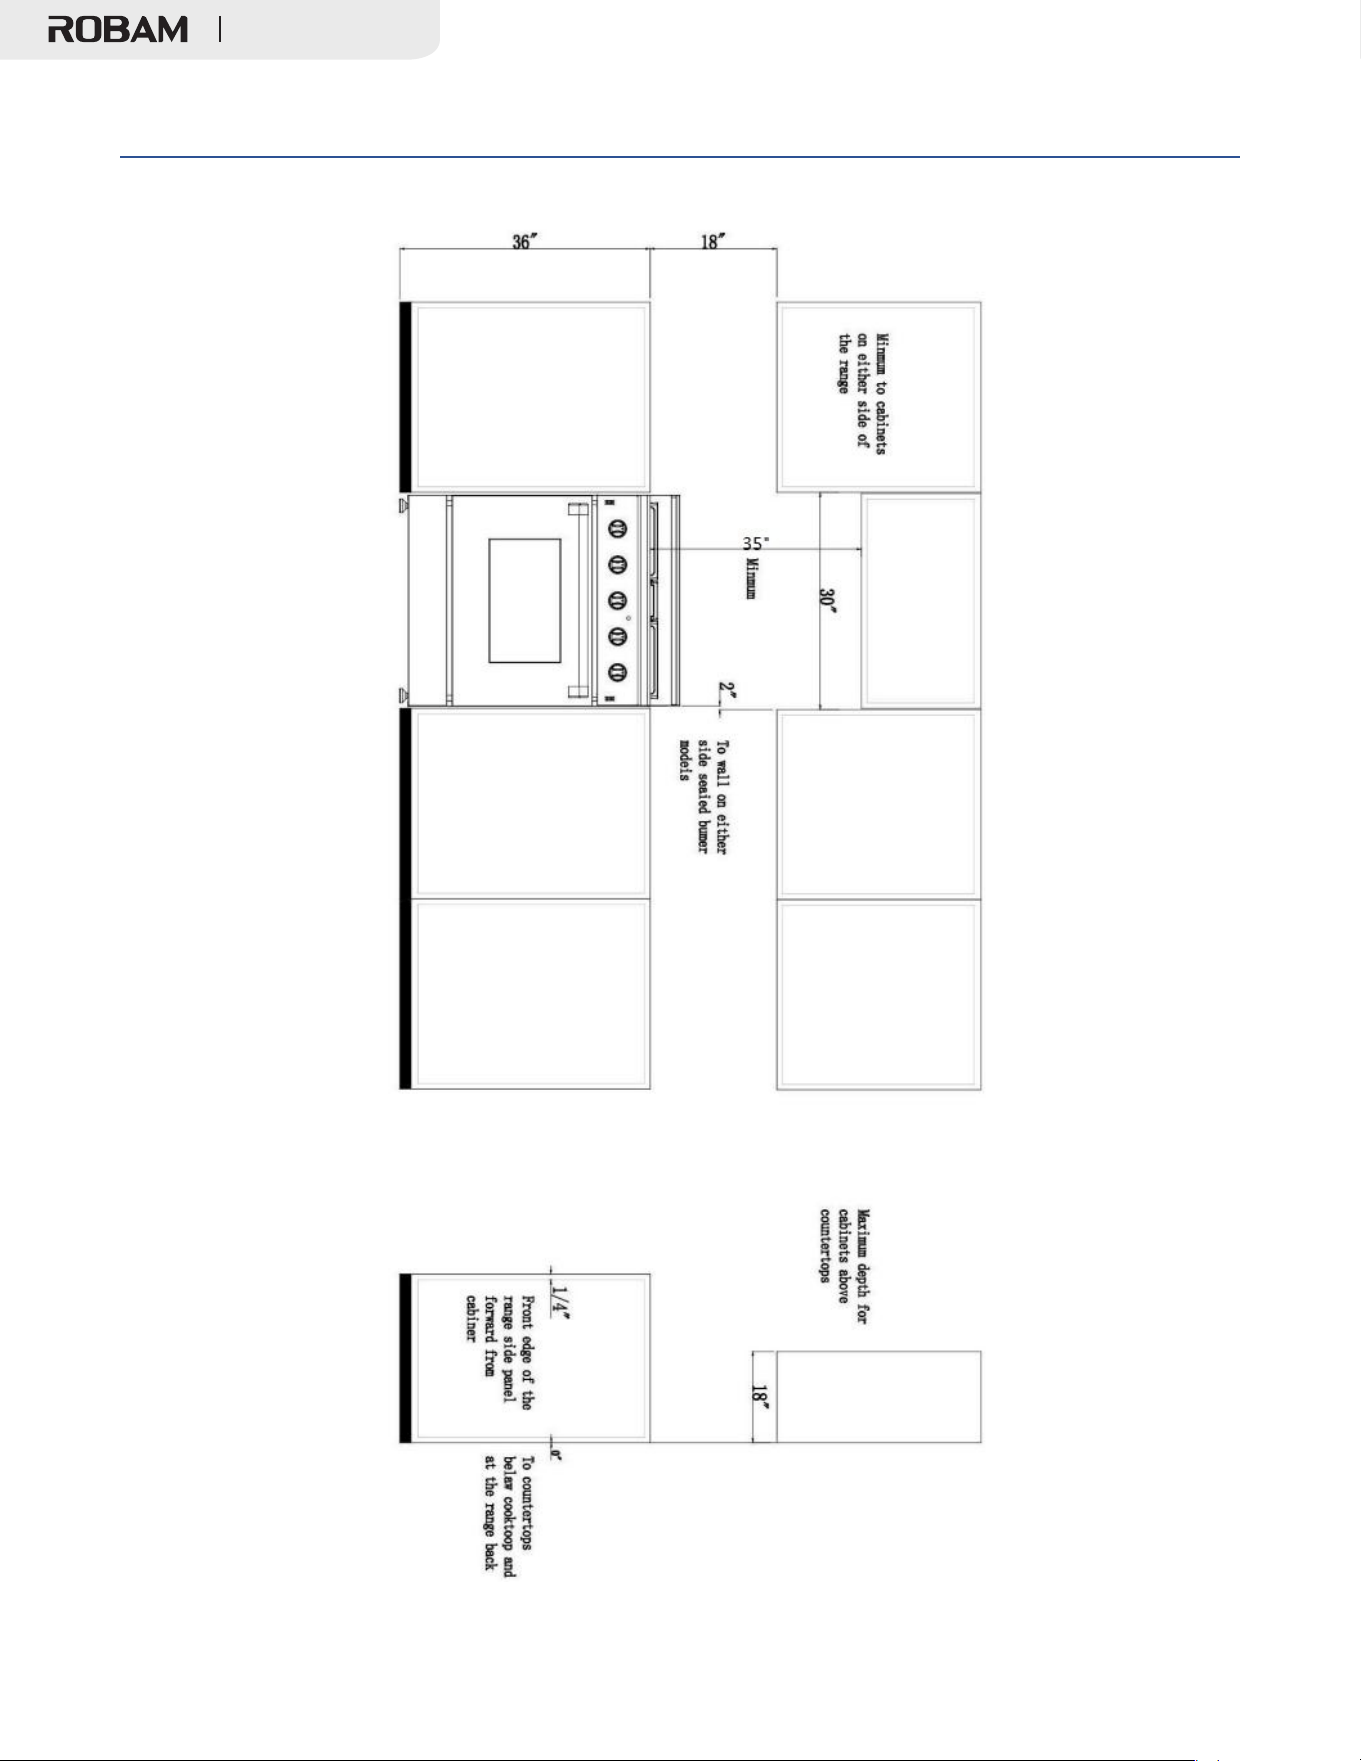
✓ The range may be installed flush to the rear wall.
✓ You may install a non-combustible material, such as tile, on the rear wall above the range and
up the vent hood.
✓ It is not necessary to install non-combustible materials behind the range below the countertop
height.
✓ The minimum distance from the side of the range above the counter top to combustible
sidewalls must be at least 10 inches.
Full Gas Range
Dimension and Clearance
13
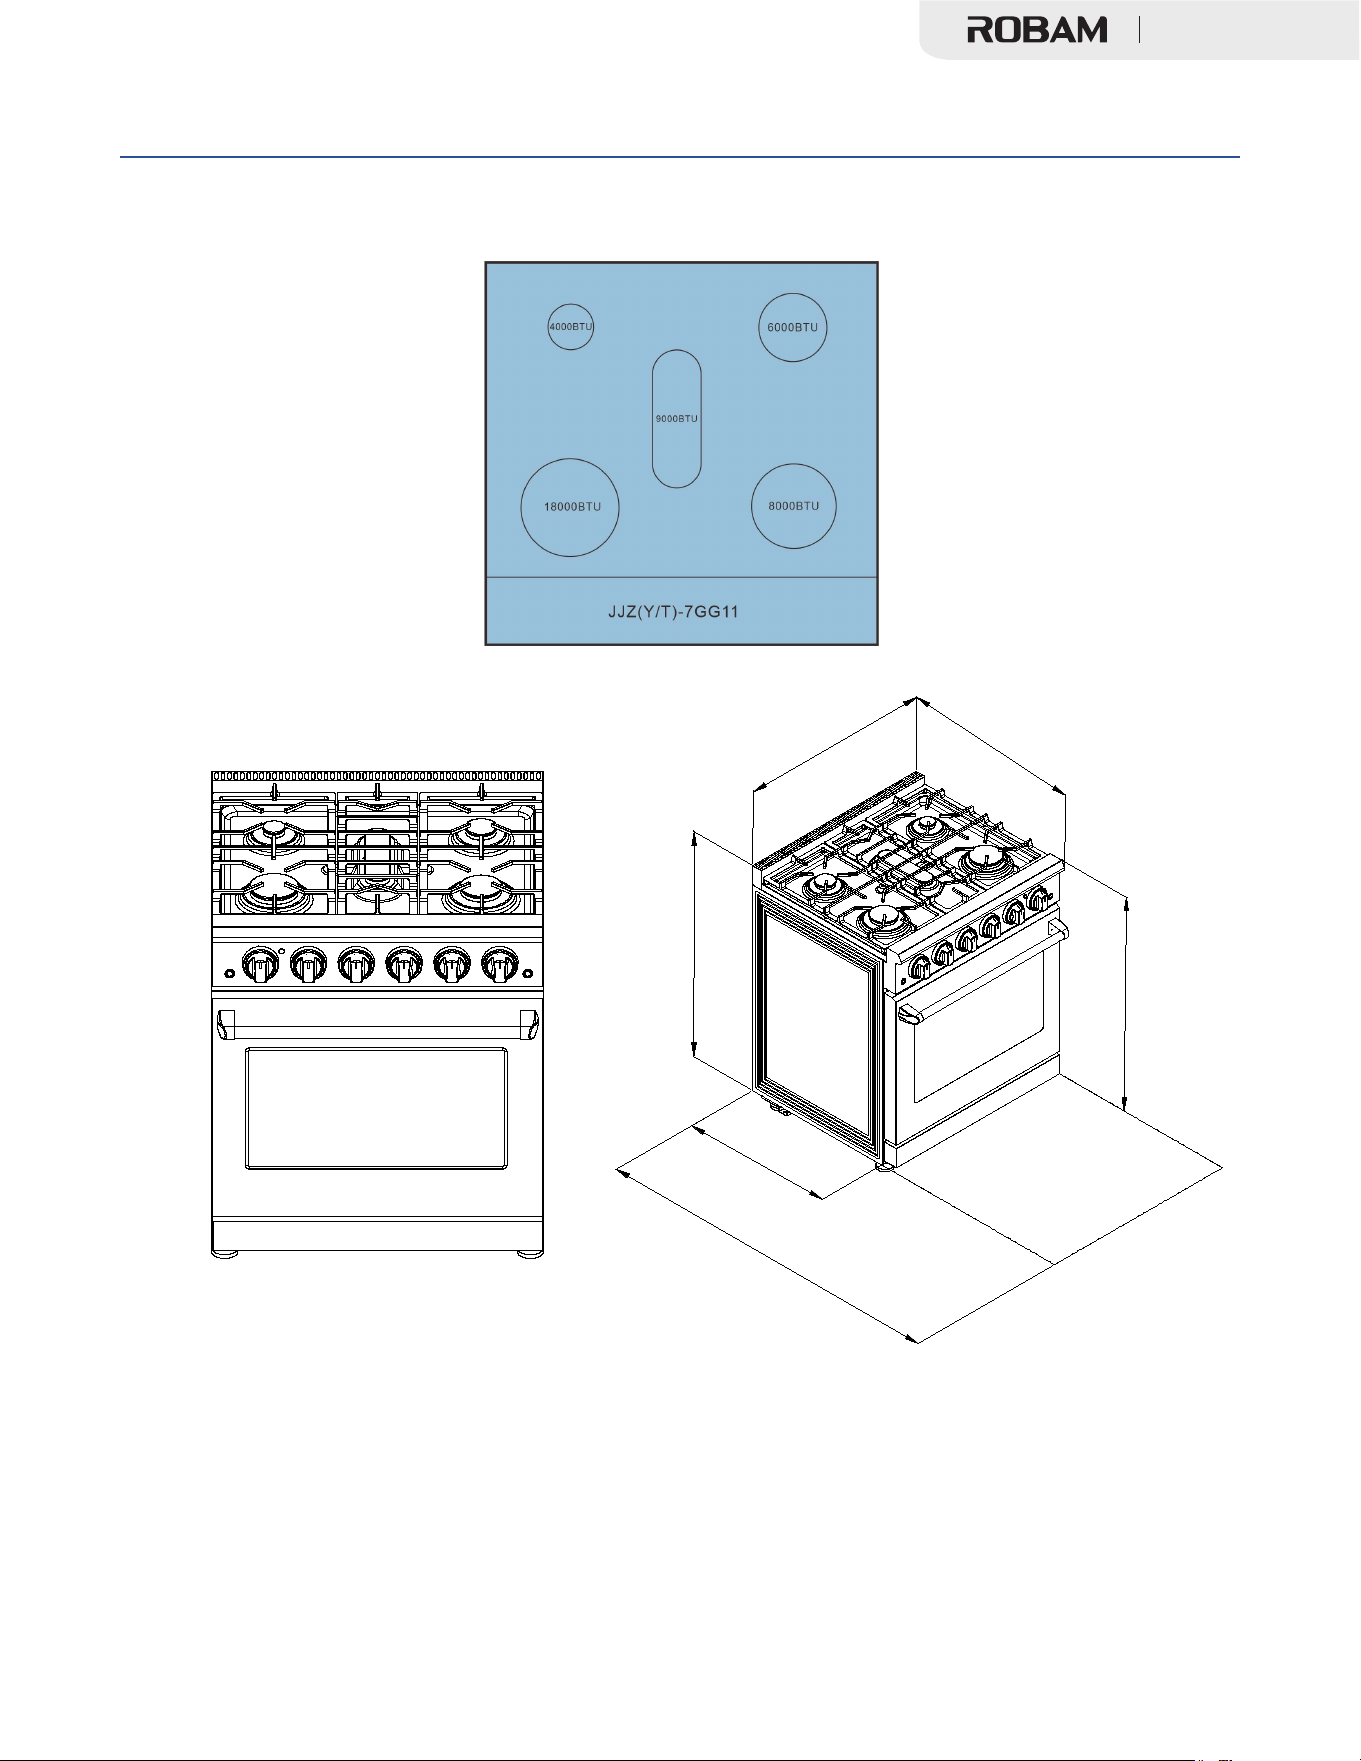
BTU Design
JJZ(Y/T)-7GG11
The maximum depth of cabinets installed above cooking tops be 13 in (330mm).
30"
35 3/4"
24"
47 3/8"
34 1/8"
27 1/4"
Full Gas Range
14
Dimension and Clearance
30” Gas Range Clearance
Full Gas Range

Dimension and Clearance
15
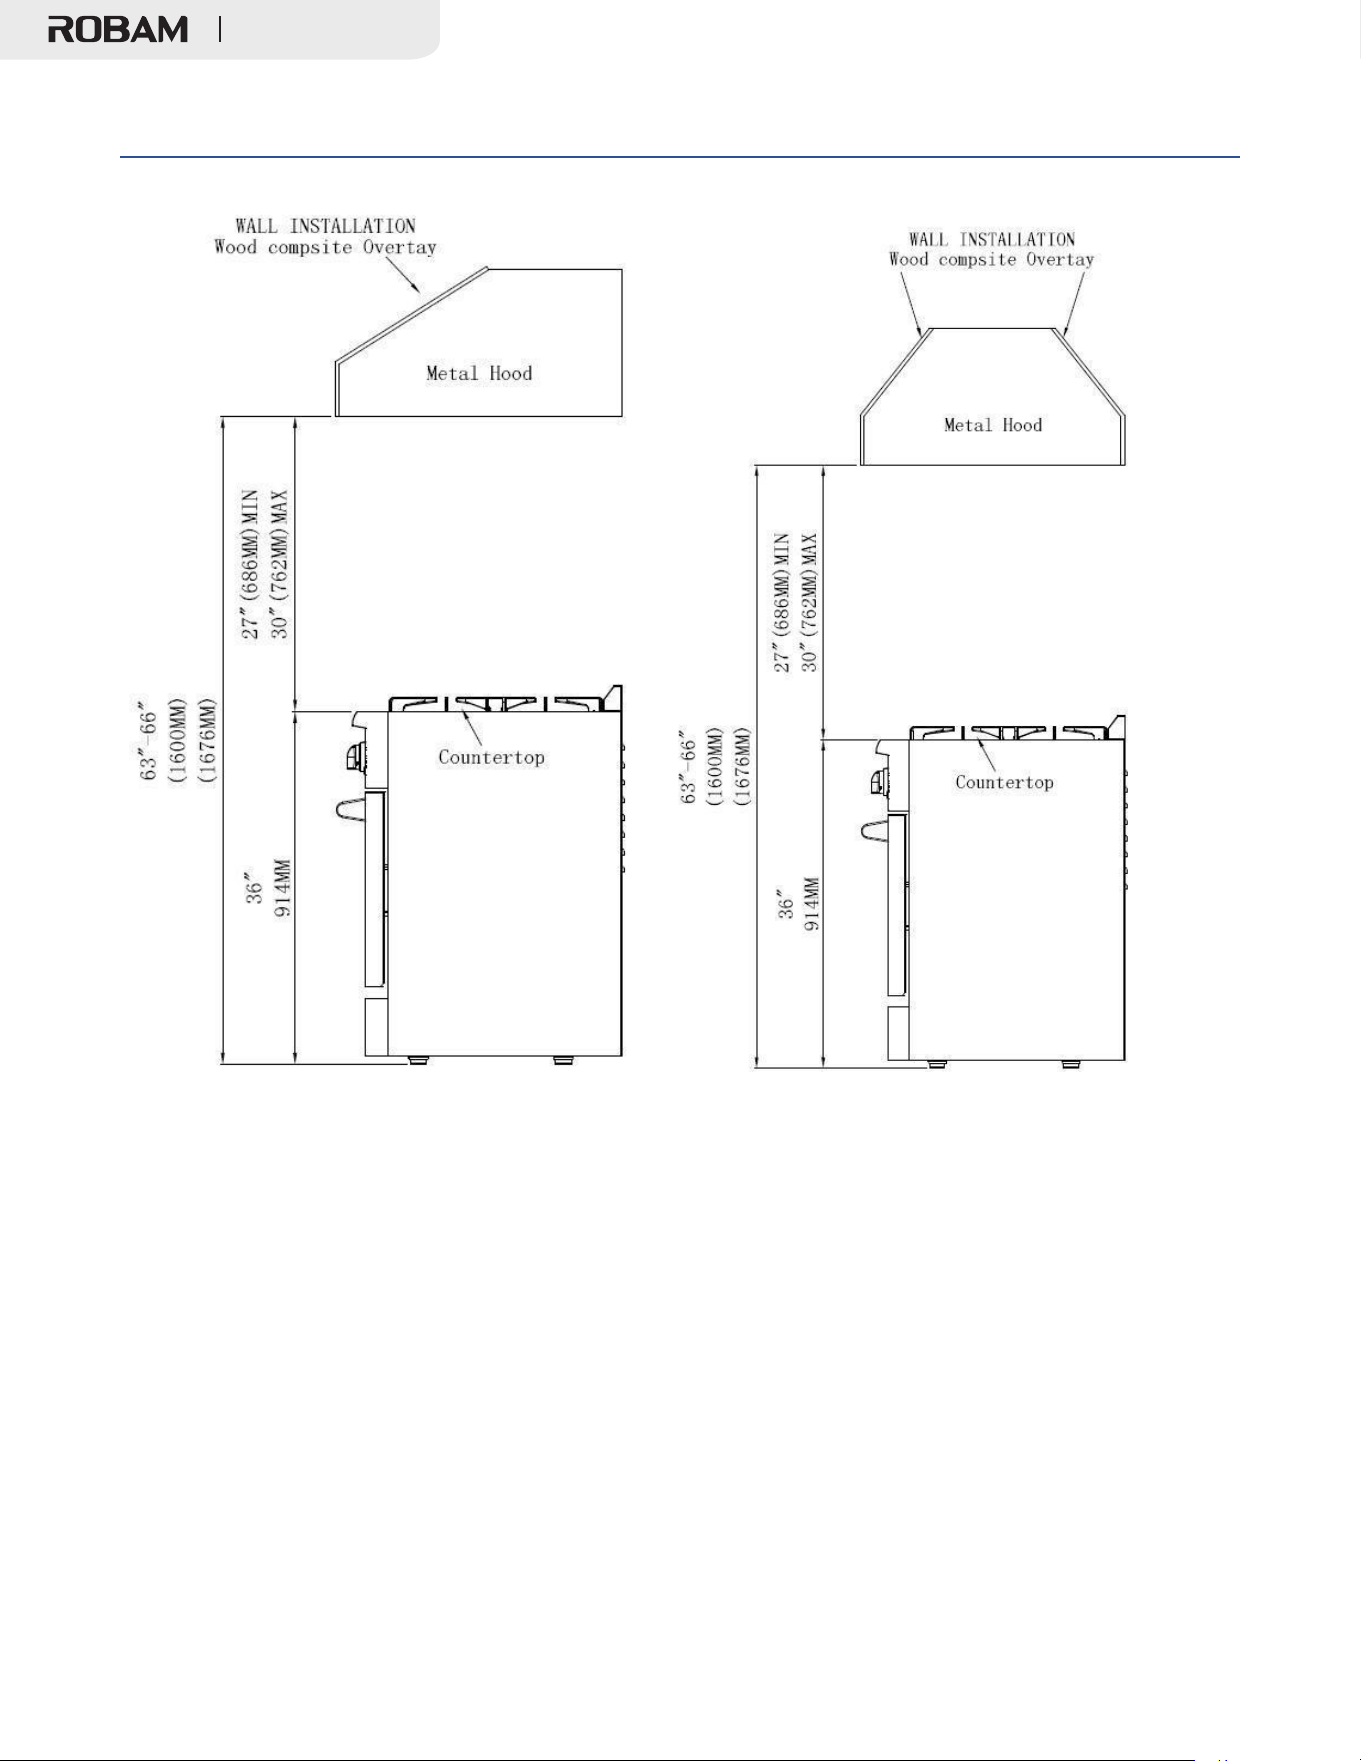
Top Hood and cabinet specifications
Condition
Minimum
clearance allowed
Clearance between the top of the cooking surface and the bottom of an
unprotected wood or metal cabinet .
35”
Clearance between the top of the cooking surface and the bottom wood
or metal cabinet that is protected by not less than:
1/4-inch-thick flame-retardant mill-
board covered with not less than:
o
No. 28 MSG sheet steel or
o
0.015-inch-thick stainless steel or
o
0.024-inch-thick aluminum or
o
0.020-inch-thick copper
24”
Duel fuel ranges clearance between the top of the cooking surface and the
bottom of an unprotected wood or metal cabinet .
40”
Full Gas Range
Dimension and Clearance
16
7.
Electric Power Supply Requirements
Your range must be electrically grounded in accordance with local codes or, in the absence of local
codes, in accordance with the National Electrical Code (ANSI/NFPA 70, latest edition).
In Canada, electrical grounding must be in accordance with the current CSA C22.1 Canadian
Electrical Code Part 1 and/or local codes. A copy of this standard may be obtained from: National
Fire Protection Association, 1 Battery march Park, Quincy, Massachusetts 02269-9101.
The power supply must be the correct polarity. Reverse polarity will result in continuous sparking of
the electrodes, even after flame ignition. If there is any doubt as to whether the power supply has
the correct polarity or grounded, have it checked by a qualified electrician.
Use 120V, 60Hz, and properly grounded branch circuit protected by a 15-amp or 20-amp circuit
Full Gas Range
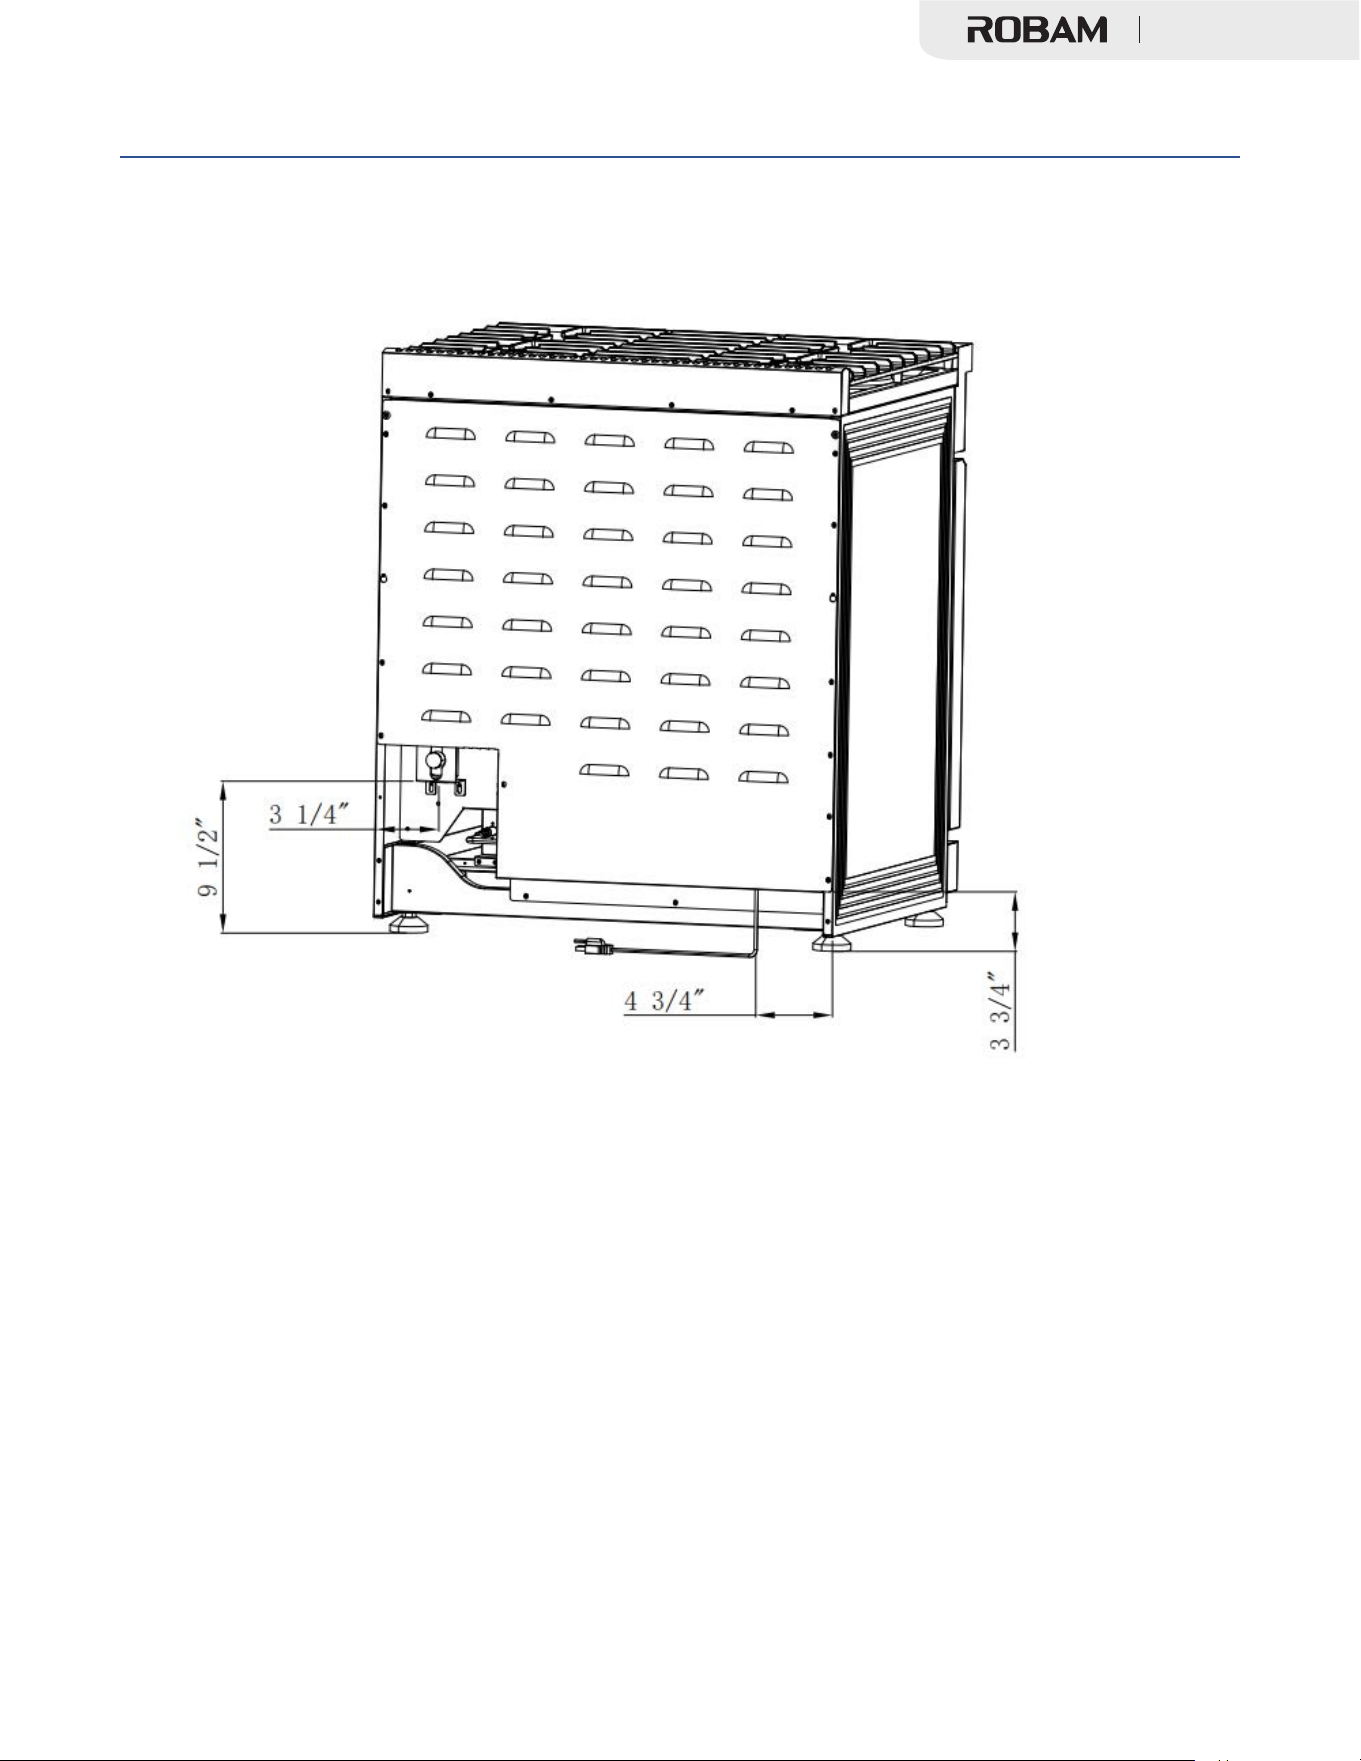
Dimension and Clearance
Installation for JJZ(Y/T)-7GG11 Gas Range
17
Full Gas Range
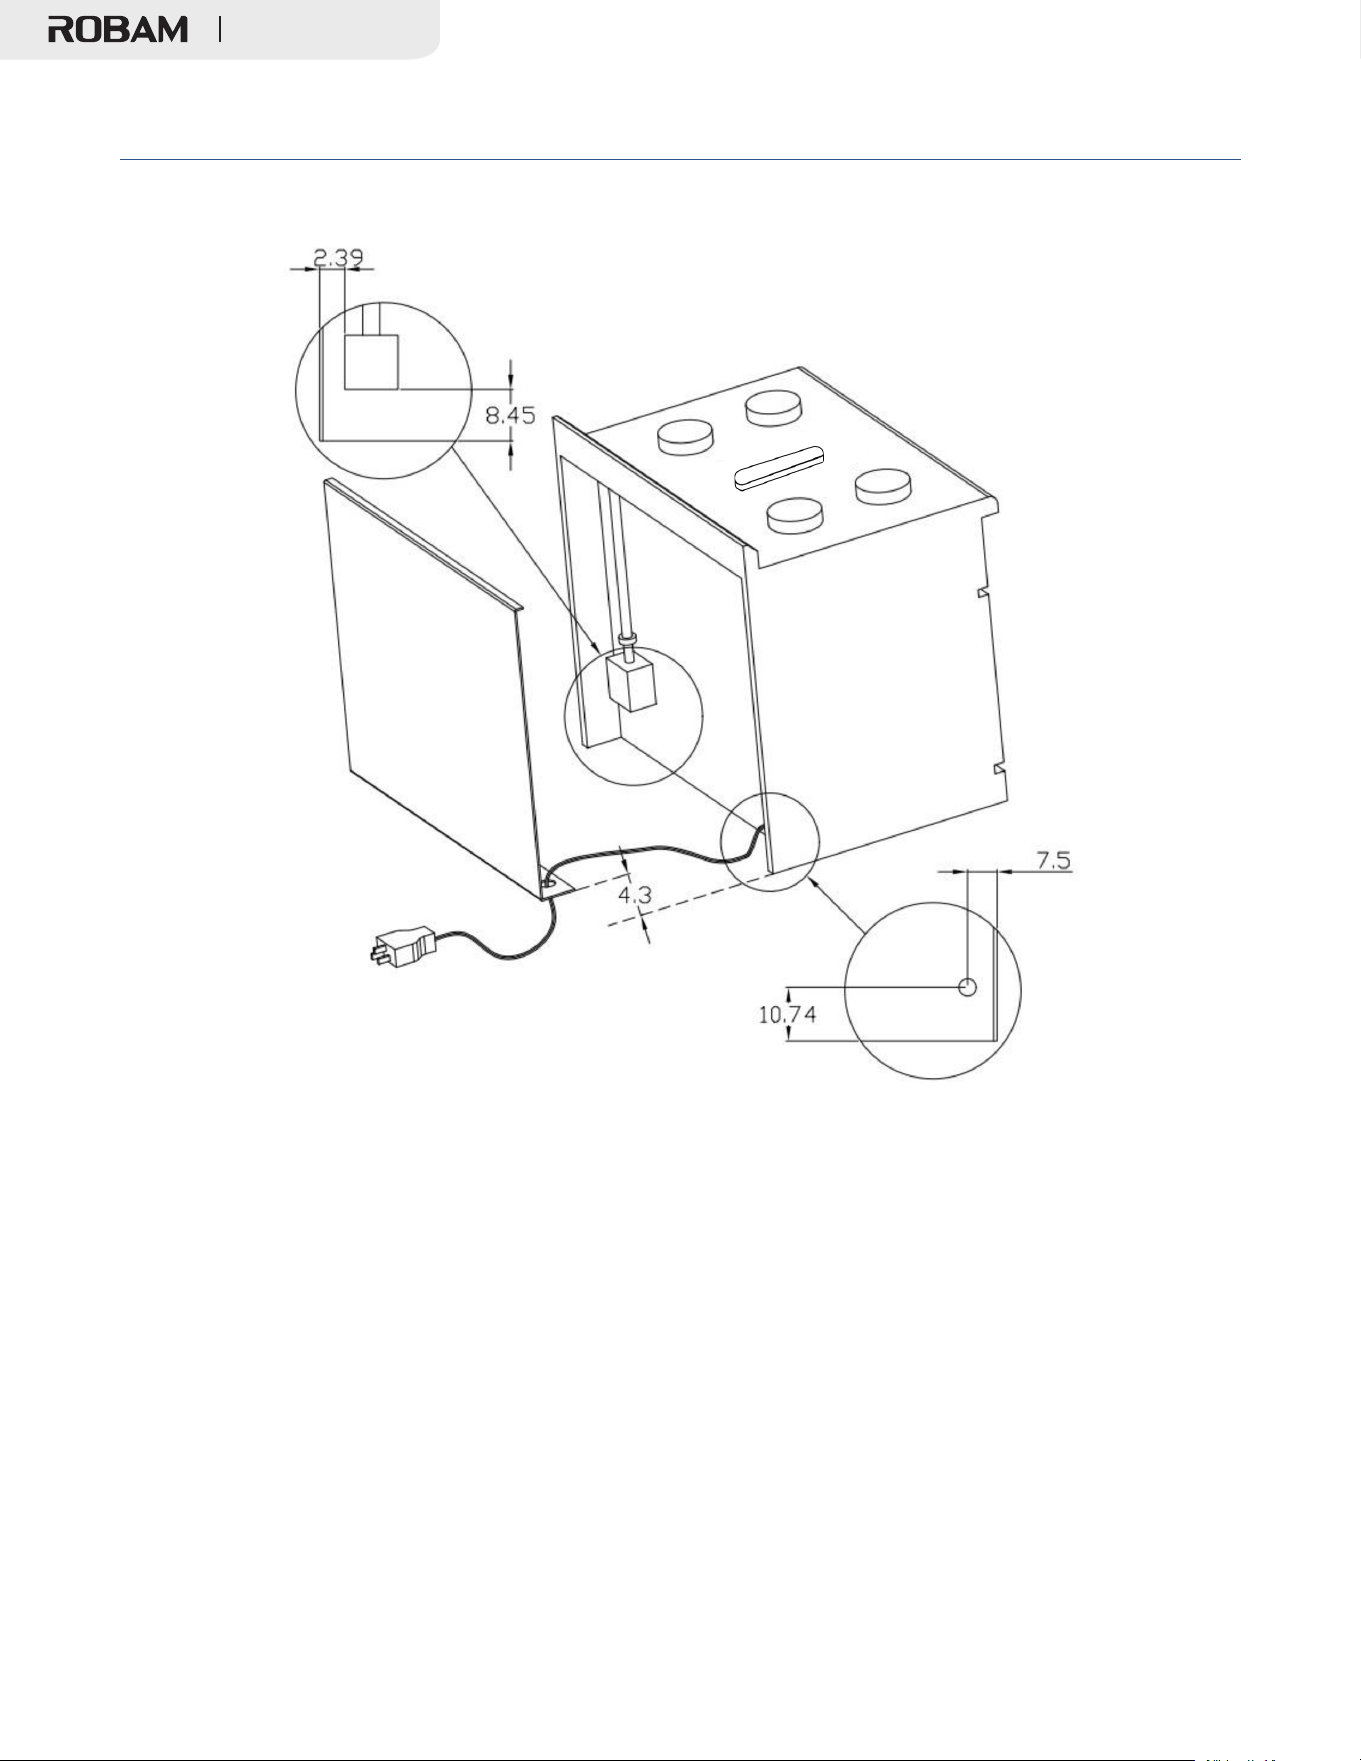
18
Dimension and Clearance
Installation for JJZ(Y/T)-7GG11 Gas Range
Full Gas Range
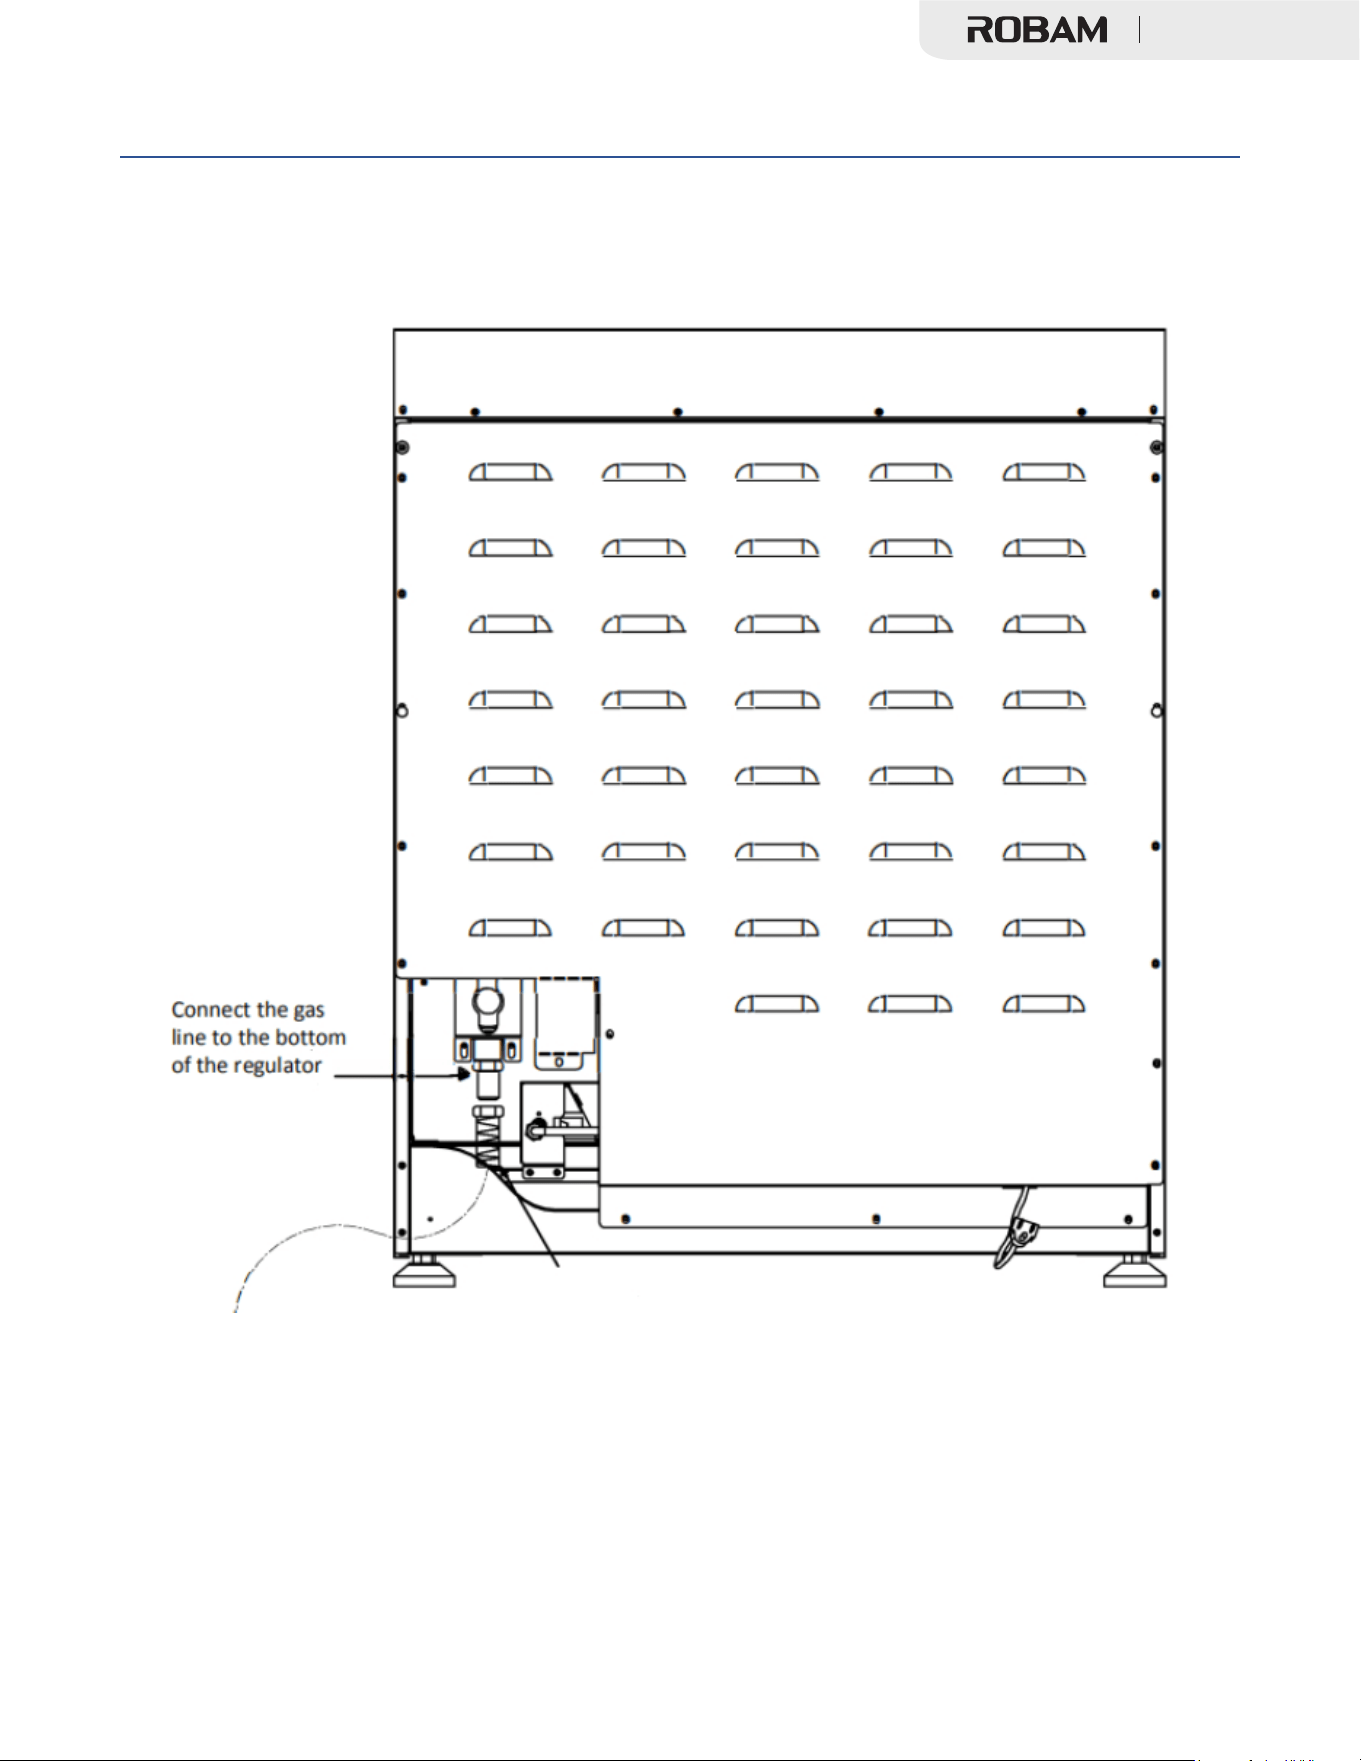
Dimension and Clearance
Gas Line Connection
19
Full Gas Range
20
Connect range to gas supply
8.
Electrical Grounding Instructions
This indoor gas cooking appliance is equipped with a three-prong (grounding) plug for your
protection against shock hazard and should be plugged directly into a properly grounded three-
pronged receptacle.
Where a standard two-prong wall receptacle is encountered, it is the responsibility and obligationof
the customer to have it replaced with a properly grounded three-prong wall receptacle.
Do not cut or remove the grounding prong from the power cord.
Before connecting plug to the cord, disconnect the electrical supply.
Label all wires prior to disconnection when servicing controls. Wiring errors can cause improper and
dangerous operation. Verify proper operation after servicing.
9.
Connect Range to Gas Supply
Most localities will require that the stove shutoff valve and gas connections be installed by a
certified technician or plumber. These instructions are for a professional. Gas installation
specifications and regulations may vary so please consult your local codes before proceeding.
1.
Install a manual gas line shut-off valve in the gas line asfollows:
a.
in an easily accessed location outside the range
b.
in the gas piping external to the appliance
2.
Install male
1
/
2
” flare union adapter to
1
/
2
” NPT internal thread elbow at inlet of regulator.
On models equipped with standard twin burners, install the male pipe thread end of the
1
/
2
” flare
union adapter to the
1
/
2
” NPT internal thread at inlet of pressure regulator.
Use a wrench on the regulator fitting to avoid damage.
Full Gas Range

21
Connect range to gas supply
1.
Install male
1
/
2
” or
3
/
4
” (
3
/
4
” refers to 48-inch gas range) flare union adapter to the NPT
internal thread of the manual shut-off valve, taking care to secure the shut-off valve to keep it
from turning.
2.
The gas supply pressure for checking the regulator setting is 6 in.w.c. (Nature Gas) and 11
inch.w.c. (LP gas) connect flexible gas line connector to the regulator on the range. Position
range to permit connection at the shut-off valve.
3.
When all connections have been made, make sure all range controls are in the positionand
turn on main gas supply valve.
4.
Leak testing of the appliance shall be conducted according to the manufacturer’sinstructions.
Use some soap water (50% water and 50% soap) or a leak detector at all joints and
connections to check for leaks in the system. Do not use a flame to check for gasleaks.
5.
The appliance must be isolated from the building’s gas supply piping system by closing its
individual manual shut-off valve during any pressure testing of the gas supply piping system at
test pressure equal to or less than
1
/
2
psig(3.5kPa).
After installation:
1.
Check ignition of cooktop burners.
2.
Check ignition of oven burner.
3.
Visually check tubular burner (oven burner) re-ignition to be sure both rows of burner ports are
relighting each time.
4.
Check for gas leaks at all gas connections (using a gas detector, never aflame).
5.
Check oven bake and convection bake function.
Full Gas Range

22
Cook Top Safety Guidelines
10. First Use
Conditioning the oven
Conditioning will burn off any manufacturing residues and ensure that you get the best results right
from the start.
Follow these steps to condition your new stove’s oven:
1.Insert all the shelves. See ‘Positioning the shelves’ for instructions.
2.Turn on the ventilation hood above your range on high.
3.
Heat the empty oven at the highest temperature for:
a.
30 minutes using BAKE
b.
30 minutes using BROIL (some ovens only).
4.
There will be a distinctive smell while you are conditioning the oven. This is normal, but make
sure the kitchen is well ventilated during the conditioning.
5.
Once cooled, wipe out the oven with a damp cloth and mild detergent, and drythoroughly.
6.Positioning the shelves
7.
Both the sides panel and shelves with safety stop to keep them sliding out of the ovenwhen
pulled forward;
8.
And the front stop prevents the shelves from against hitting the back of theoven
11.
Cooktop Safety Guidelines
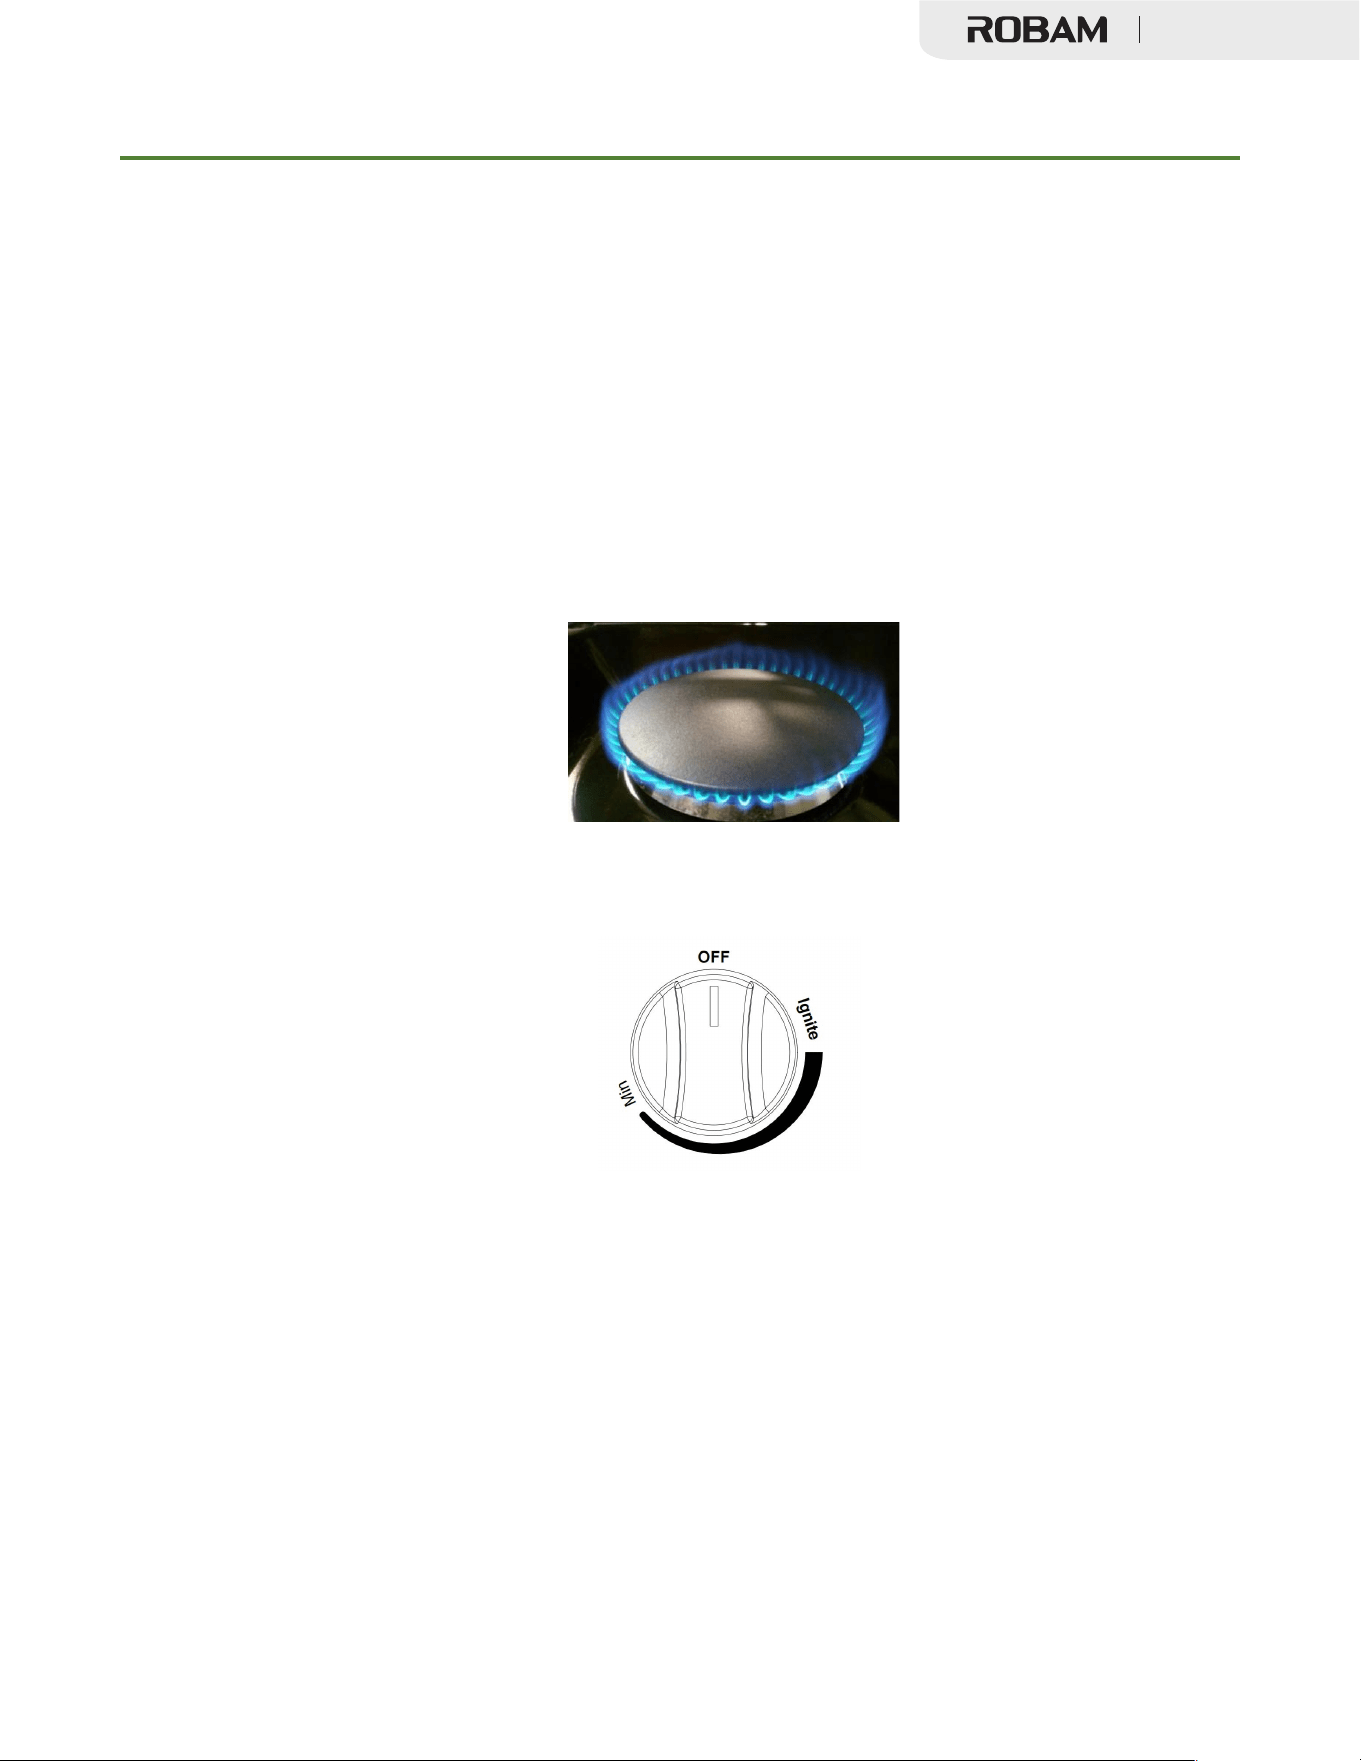
There are dual burners have the same low turn-down setting (SIM) for gentle simmering (620
BTU/hr.). Use the SIM setting for melting chocolate and butter, cooking rice and delicate sauces,
simmering soups and stews, and keeping cooked food hot.
✓ Never leave the cooktop unattended when in use. Boil over causes smoking and greasy spills
that may ignite.
✓ Never allow flames to extend beyond cookware or curl up on sides. This could discolor and
damage the utensil and you may get burned touching the hothandle.
Full Gas Range
23
Cook Top Safety Guidelines
✓ Keep handles out of the way. Turn handles so that they don’t extend over the edge of the range
or on a burner that is on.
✓ Take care when deep-frying. Oil or fat can overheat very quickly, particularly on a high setting.
✓ Make sure that all burner parts are properly in place. Incorrectly or incompletely assembled
burners may produce dangerous flames. See ‘Replacing the burner parts’ in ‘Care and cleaning’.
✓ Keep the burners clean, especially after a spill or boil over, make sure you clean the affected
burners before using them again. Food residue may clog the igniter and the notches of the
flame spreader, stopping the burner from functioning correctly. See ‘Care and cleaning’ for
instructions.
✓ Check that the burner flames. They should be blue with no yellow tipping, and burn without
fluttering all around the burner cap. If not, see ‘Troubleshooting’ for advice.
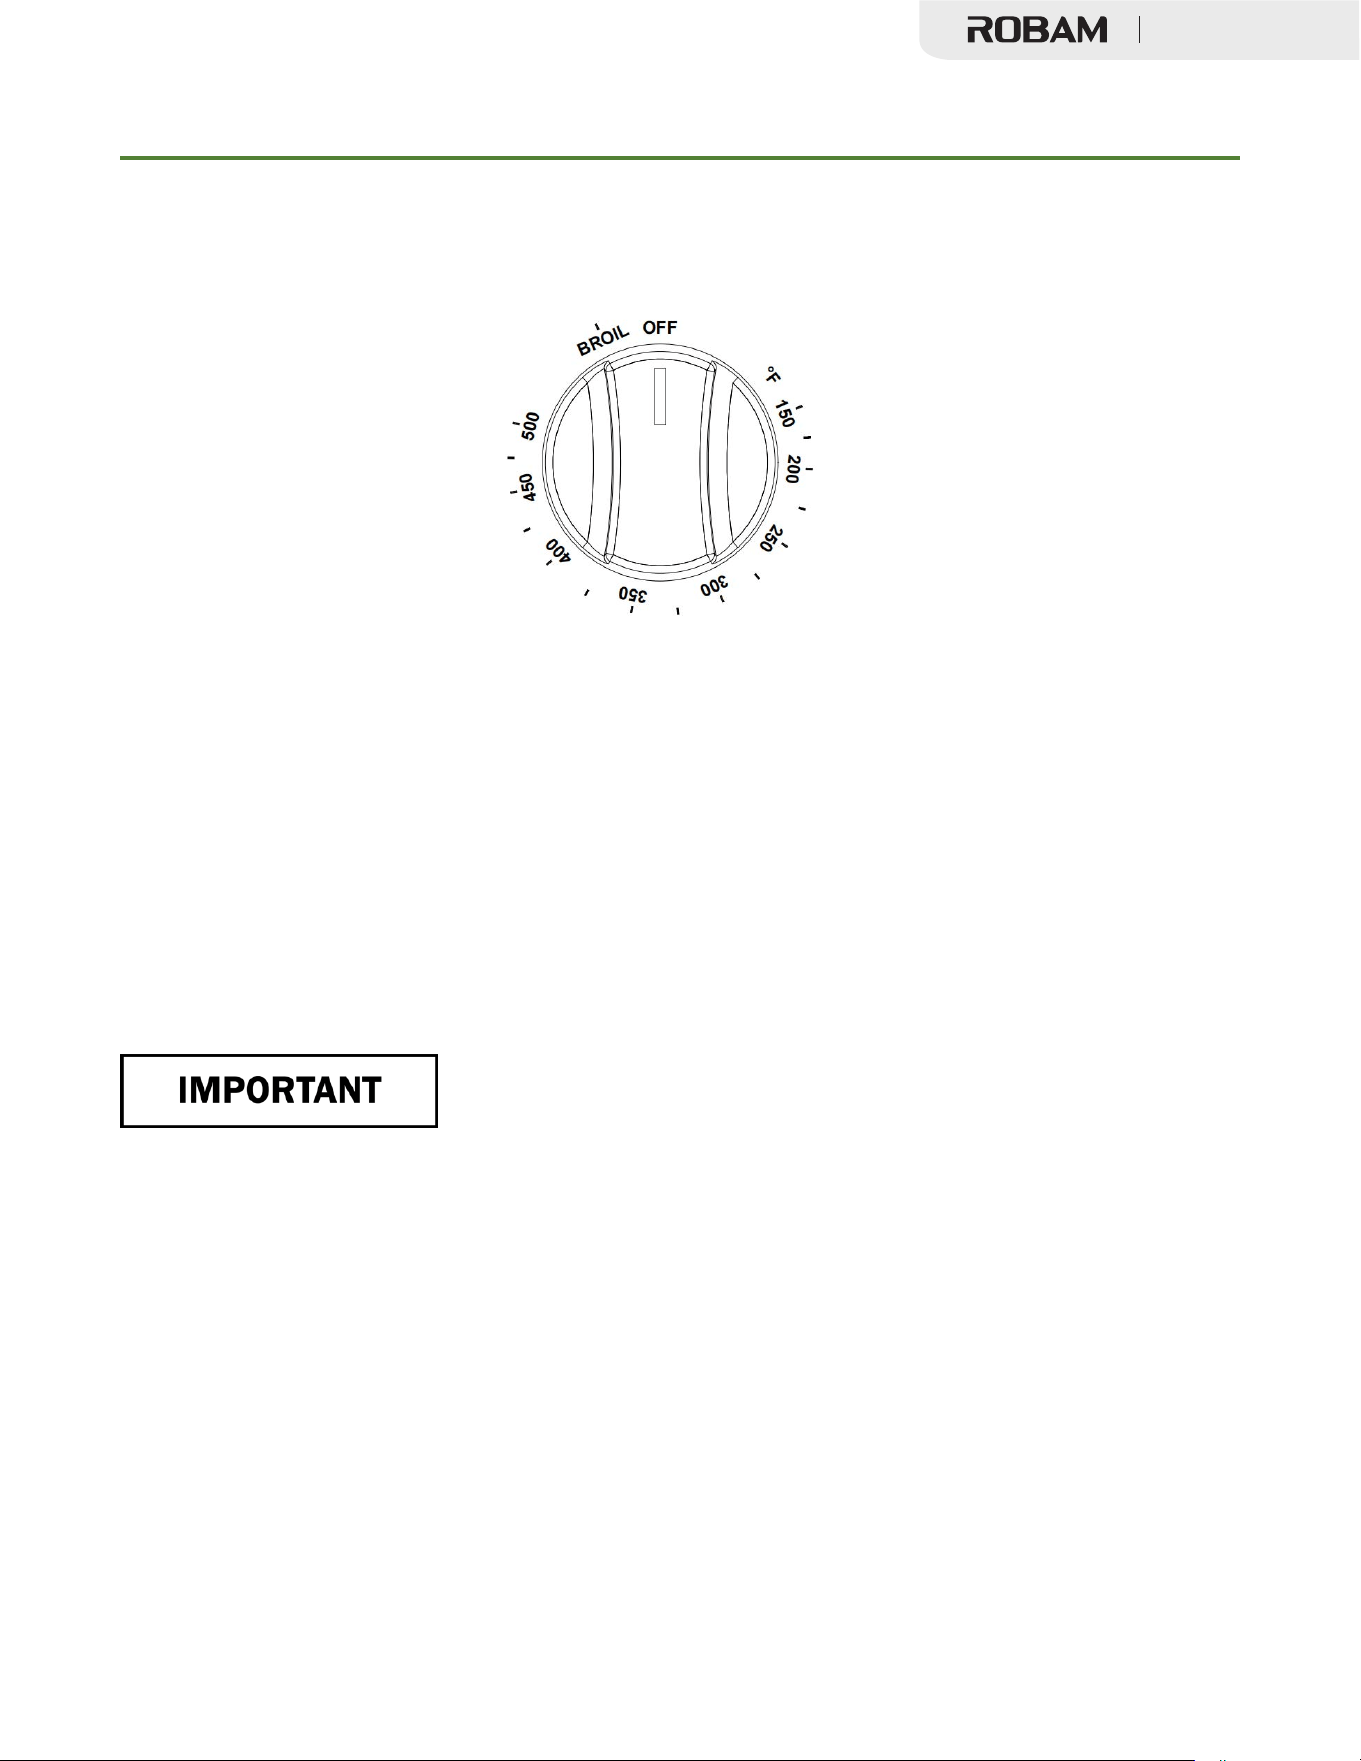
Surface Burner Ignition
To light the top burners, push and turn the appropriate control knob counter clockwise to the “HI”
position. You will hear a clicking noise – the sound of the electric spark igniting the burner. Once
burner ignition has been achieved, then turn the burner control knob to adjust the desired heat
setting.
Full Gas Range

Cook Top Safety Guidelines
NOTE: When one burner is turned to the “HI” position, the burner igniters will park. Do not
attempt to disassemble or clean around any burner while another burner is on. Do not touch any
burner cap, burner base, or igniter while the igniters are sparking.
Simmer and Boil
A smaller flame will give the best simmer results. Small flames offer precise cooking performance
for delicate foods, keeping food warm, melting chocolate or butter, and for cooking that need to
cook over low heat for a long time.
2The highest flame settings provides the maximum heat that is available on your range. This setting
should be used for heavy cooking loads such as water boiling or pasta cooking.
Flame Size
When you select the flame size, watch the flame when you turn the knob.
Any flame larger than the bottom of the cookware is wasted.The flame should be steady and blue in
color. Foreign material in the gas line may cause an orange flame during initial operation.
Power Failure
If the gas does not ignite within four seconds, turn off the valve and allow at least five minutes for
any gas to dissipate. Repeat the lighting procedure.
If the power fails, it is not capable of being safely placed in operation and user that no attempt
should be made to operate during power failure.
Cooktop
To prevent the cooktop from discoloring or staining, clean cooktop after each use, and wipe up
acidic or sugary spills as soon as the cooktop has cooled.
The sealed burners of your range are not sealed to your cooktop and are designed to be removed.
Boil overs or spills will not seep underneath the cooktop. The burners should be cleaned after each
use.
Burner Grates
The grates must be properly positioned before cooking. Improper installation of the grates may
result in scratching of the cooktop and / or poor combustion.
24
Full Gas Range
Cook Top Safety Guidelines
25
Oven burner use
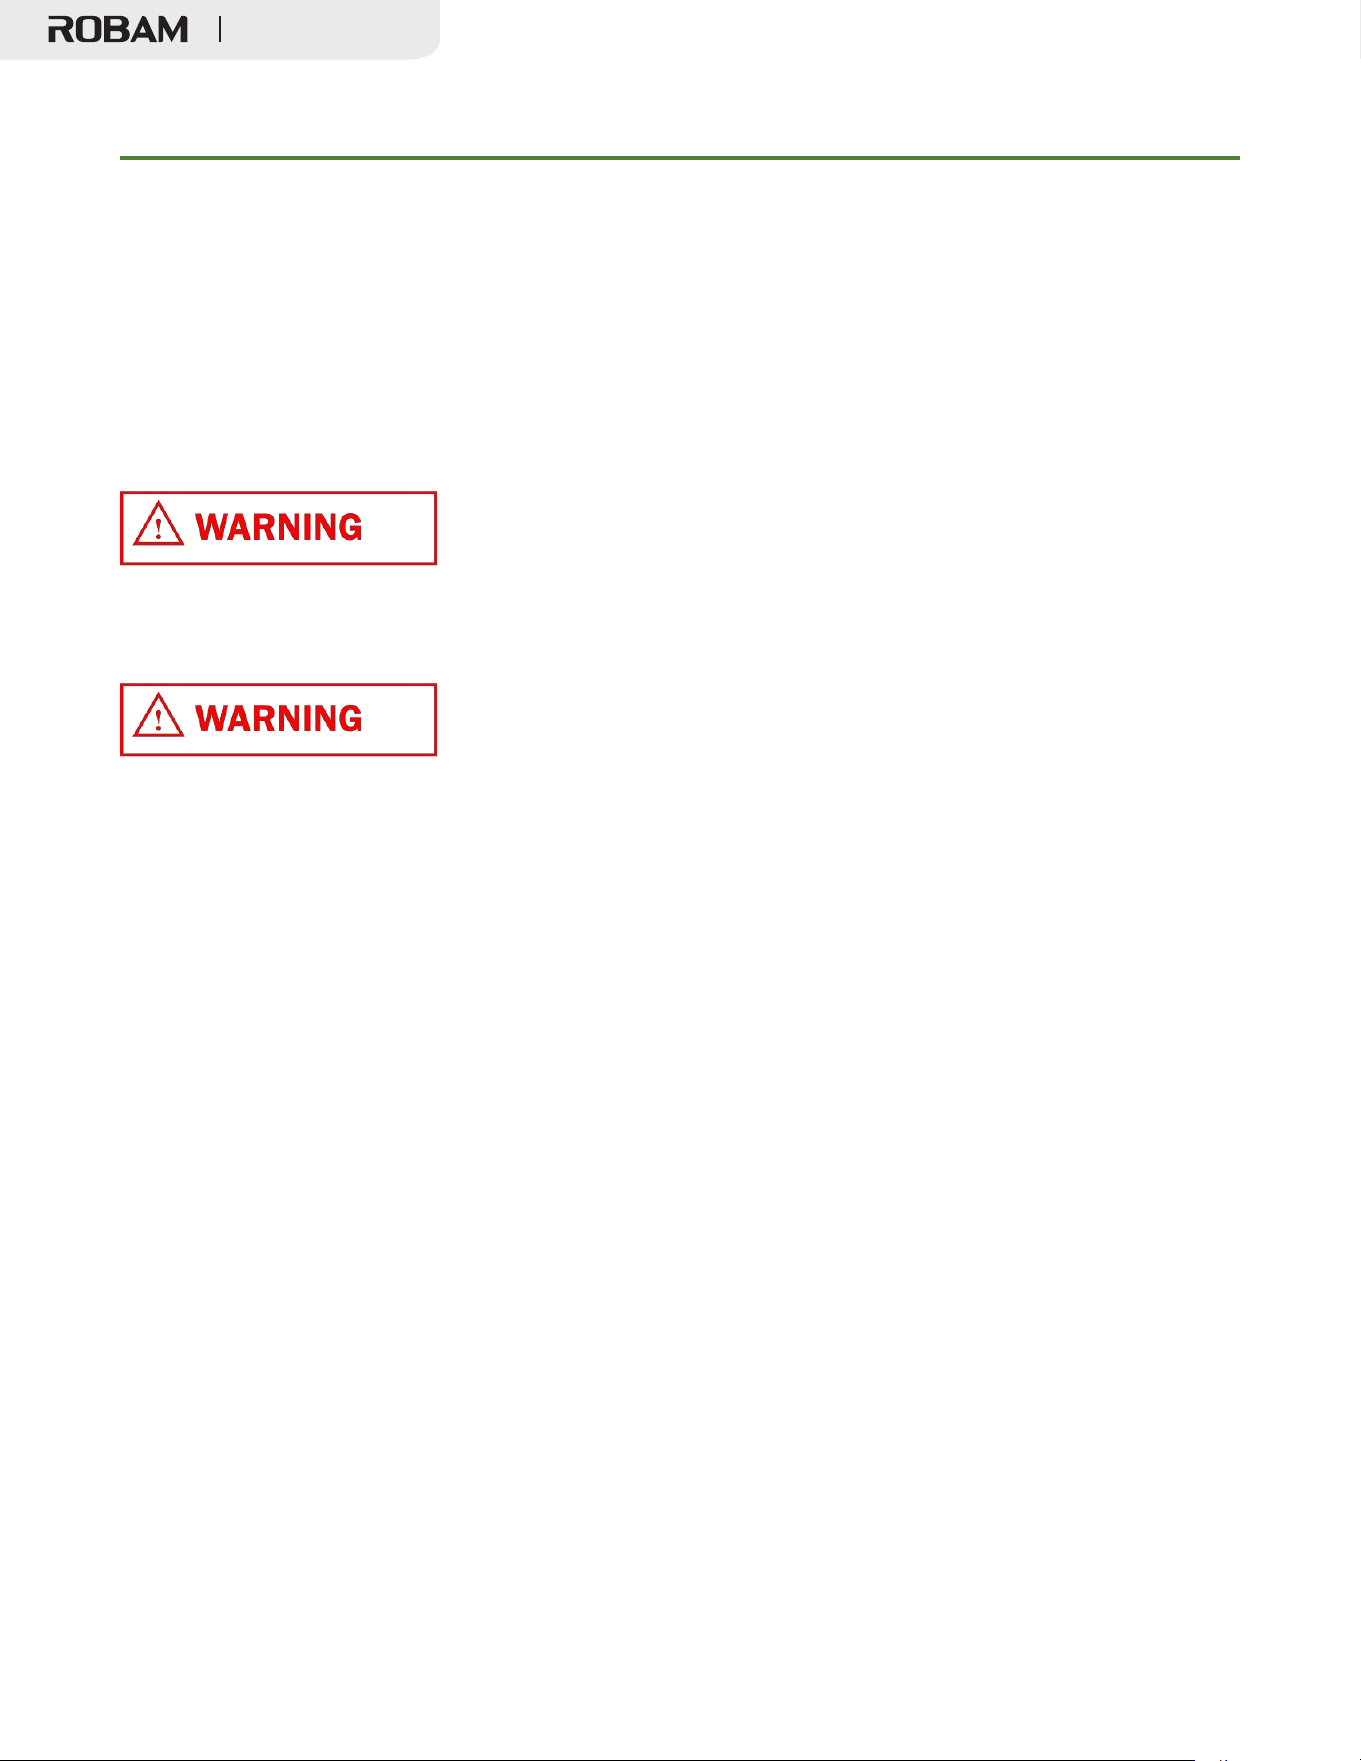
To light the oven burner, push and turn the appropriate control knob counter clockwise to the (150
℉~500℉)
position. You will hear a clicking noise – the sound of the electric spark igniting the
burner. Once burner ignition has been achieved, then turn the burner control knob to adjust the
desired heat setting.
Broil burner use
To light the broiler burner, push and turn the appropriate control knob clockwise to the broil
position. You will hear a clicking noise – the sound of the electric spark igniting the burner. Keep
pressing about 4 seconds until the burner ignition has been achieved.
Oven cooking guidelines
✓ Do not block the ducts on the rear of the range when cooking in the oven. It is important that
the flow of warm air from the oven and fresh air into the oven burner never be interrupted. Avoid
touching the vent opening or nearby surfaces during oven or broiler operation because they are
hot.
✓ Use all the oven modes with the oven door closed.
✓ Never use aluminum foil to cover the oven shelves or to line the floor of the oven. Thetrapped
heat can irreversibly damage the enamel and may even cause fire.
Full Gas Range
Cook Top Safety Guidelines
26
✓ Do not place water, ice, or any dish or tray directly on the oven floor, as this will irreversibly
damage the enamel.
✓ Do not cover the slotted grid of the broil/roast pan with aluminum foil. This will catch the grease
and could cause fire.
✓ Do not use plastic wrap or wax paper in the oven.
✓ For food safety reasons, do not leave food in the oven for longer than two hours before and
after cooking or defrosting. This is to avoid contamination by organisms which may causefood
poisoning. Take care during warmer weather.
According to the United Sates Department of Agriculture: DO NOT hold foods at temperatures
between 40ºF to 140ºF more than 2 hours. Cooking raw foods below 275ºF is not recommended.
Never cover any slots, holes or passages in the oven bottom or cover an entire rack with materials
such as aluminum foil. Doing so blocks air flow through the oven and may cause carbon monoxide
poisoning.
Aluminum foil lining may also trap heat, causing a fire hazard.
Full Gas Range

27
Oven Function
12.
Oven Function
Natural Airflow Bake
Occurs when heat is transferred into the oven from the bake burners in the bottom of the oven
cavity. Heat is then circulated by natural airflow. This is a traditional bake setting.
Broil
The broil burner is located at the top of the oven. This burner produces the heat, searing the
outside of broiled foods and sealing in juices.
Convection Bake
The oven convection fan circulates and distributes the heat in the oven for faster and even cooking.
Convection cooking allows you to bake more items on multiple racks.
To bake using the convection fan:
1.Position the oven bottom cover and the oven shelves before using oven.
2.Remove any unused shelves and baking utensils from the oven.
3.
Preheat the oven to the temperature stated in the recipe. Depending on the temperature andthe
size of the oven, preheating will take around 15-20minutes.
4.
Arrange pans and food items evenly on the shelves. Make sure pans do not touch each other or
the sides of the oven. When baking a single item, always center the item on the oven shelf. If
baking on multiple shelves, make sure you stagger items on the shelves so that one is never
directly above another.
5.
When baking using convection, either reduce the temperature stated in the recipe and leave the
baking time unchanged, or reduce the baking time by several minutes and leave the temperature
unchanged. For foods with a baking time of over an hour, reducing both the temperature and time
slightly may give the best results.
6.
Dark metal baking pans or those with a dull finish absorb heat faster than shiny pans, andare
excellent for pies and breads, or anything that needs browning or a crispercrust.
7.
A shiny finish may work best for foods that require lighter, delicate browning (e.g. cakes and
cookies), as it reflects some heat and gives a less intense bakingsurface.
8.
Avoid opening the oven door frequently during baking.
Full Gas Range

28
Oven Function
Convection Roast
For best results use the broiler pan. The pan is used to catch grease spills and has a cover to
prevent grease splatter.
The convection fan circulates heated air over the around the food being roasted, sealing juices
quickly for a moist and tender product while, at the same time, creating a rich golden-brown exterior.
Use the broil/roast pan and slotted grid supplied with the range when roasting in order to elevate
the meat on a metal roasting rack. This allows hot air to circulate around the meat, browning it more
evenly like a rotisserie.
When roasting larger items like a whole turkey, use only the pan and grid for greater stability.
Convection Defrost
With temperature control off, a motorized fan in the rear of the oven circulates air. The fan
accelerates natural defrosting of the food without heat. To avoid illness and food waste, do not allow
defrost food to remain in the oven for more than two hours without being cooked.
Defrosting
To thaw uncooked frozen food, set the oven temperature to 100-150°F . Once thawed, cook the
food immediately and do not refreeze.
To prevent liquid from thawing food dripping on the oven floor, be sure any uncooked food is tightly
wrapped in foil and/or placed in a container.
Convection Dehydration
。
With the temperature control on 175 F
,
warm air is radiated from the bake burners on the
bottom of the oven cavity and is circulated by a motorized fan in the rear of the oven.
Over a period of time, the water is removed from the food by evaporation. Removal of water
increases growth of microorganisms and detains the activity of enzymes.
Full Gas Range

29
Broiler Operation
13. Broiler Operation
Note: Door must be closed during broiler operation.
Broiling is a method of cooking tender cuts of meat directly under the infrared broiler in the oven.
Broiling in the oven is accomplished with the oven door closed. It is normal and necessary for some
smoke to be present to give the food a broiled flavor.
If you open the oven door to check the food, have it open for as short a time as possible. This is to
prevent the control panel from overheating and prevents melted knobs.
Use both the broil/roast pan and slotted grid supplied. The grid helps to reduce smoking and
splatter by letting grease drip into the bottom of the pan, away from intense heat. To prevent food
sticking, spray the grid with a light coating of non-stick cooking spray.
Preheating
Preheating is suggested when searing rare steaks (Remove the broiler pan before preheating with
the infrared broiler. Foods will stick to hard metal). To preheat, turn the “Oven” selector knob to the
“Broil” position. Wait for the burner to become hot, approximately 2 minutes. Preheating is not
necessary when broiling meat well-done.
To Broil
Broil one side until the food is browned; turn and cook on the second side. Season and serve.
Always pull the rack out to the “stop” position before turning or removing food.
Setting Broil
The “Oven” selector knob controls the Broil feature. When broiling, heat radiates downward from
。
the oven broiler for even coverage. The Broil feature temperature is 500 F (260℃).
The broil pan and insert used together allow dripping grease to drain and be kept away from the
high heat of the oven broiler. DO NOT use the broil pan without the insert.
DO NOT cover the broil pan insert with foil. The exposed grease could catch fire.
Full Gas Range
30
Broiler Operation
To set the oven to Broil:
1.
Place the broiler pan insert on the broiler pan. Then place the food on the broiler pan insert.
2.
Arrange the interior oven rack and place the broiler pan on the rack. Be sure to center thebroiler
pan and position directly under the broil burner. If preheating the broil burner first, position the
broiler pan after the broil burner is preheated.
3.
Turn selector knob to Broil.
The oven indicator light will remain on until the selector knob is turned to the off position or the
temperature control cycles off.
Broiling guidelines
Choose a suitable shelf position. To ensure that meat is cooked through rather than just browned
on the outside, broil thick pieces of meat and poultry on shelf positions 2 or 3. Use shelf position 4
for thinner items that need less cooking time like steaks, chops, or hamburger patties.
When finishing off meals by browning the top under the broiler, use metal or glass-ceramic
bakeware. Do not use heatproof glass or earthenware, as these cannot withstand the intense heat
of the broiler.
Center the item in the oven, so that it is directly under the broiler.
✓
When using the appliance or the first time. The oven and broiler burners should be turned on to
burn off the manufacturing oils. Turn the oven on to 450。F(230。
C) for 20 to 30minutes.
Then turn the oven control knob to “Broil” for the same length of time. It is recommended to
turn on the ventilator above the range at this time.
✓
Must disconnect the electrical supply before servicing or cleaning the appliance. Failure to
follow this advice may result in injury or death.
Full Gas Range

31
Cleaning Instructions
14. Cleaning Instructions
Do’s
✓ Read these cleaning instructions and the ‘Safety and warnings’ section before youstart
cleaning your range.
✓ Before cleaning or removing any part, make sure that everything on the range has beenturned
off.
✓ Unless suggested otherwise in the following chart, allow any part to cool to a safe temperature
before cleaning. If you do need to handle a warm or hot part (e.g. grill or griddle), take extreme
care. Wear long protective mitts to avoid burns from steam or hotsurfaces.
✓ Try using any cleaner on a small area first, to ensure it does notstain.
✓ See the pages following this chart for instructions on removing and replacing various parts of
the range for cleaning or maintenance.
✓ To help you identify any parts, see illustrations in section ‘Introduction’ and after thiscleaning
chart.
Don’ts
✓ Do not use aerosol cleaners until the range has completely cooled. The propellant substance in
these cleaners could catch fire in the presence of heat.
✓ Do not let soiling or grease accumulate anywhere in or on the range. This will makefuture
cleaning more difficult and may present a fire hazard.
✓ Do not use any abrasive or harsh cleaners, cloths, scouring pads or steel wool. Thesewill
scratch your range and damage its appearance.
✓ Do not use a steam cleaner to clean any part of the range.
✓ Do not lift the black grill and griddle frames off thecooktop.
Cleaning Burner caps and brass flame spreaders
1.
Check that the burner is turned OFF and allow it to cool. Lift off the burner cap and brass flame
spreader. Wash them in hot soapy water, rinse, and dry.
2.
Use a stiff nylon brush or straight-ended paper clip to clear the notches of a flame spreader.
Replace the flame spreader and burner cap correctly.
Full Gas Range

32
Cleaning Instructions
3.
Before cleaning the cooktop, ensure that all burners are turned off and that all components are
cool enough to safely touch
4.
To avoid electrical shock or burns, turn off controls and ensure the cooktop is cool before
cleaning.
5.
Do not use harsh or abrasive cleaning detergents, waxes, polishes, or commercial cooktop
cleaners to clean the cooktop.
6.
Use only a sponge, soft cloth, fibrous or plastic brush, and nylon pad forcleaning.
7.
Always dry components completely before using the cooktop.
8.
Control Panel, Door Handle, ControlHousing
Clean the control panel, door handle and control housing with a solution of mild detergent and
warm water.
9.
Do not use abrasive cleaners or scrubbers; they may permanently damage thefinish.
10.
Dry the components with a soft, lint-free cloth.
Cleaning side racks
1.
Pre-soak any stubborn, burnt-on soiling, then clean with a solution of mild detergent and hot
water and wipe dry with a microfiber cloth.
2.
Alternatively, clean these in the dishwasher.
Cleaning oven shelves
1.
To remove stubborn or ‘baked-on’ soiling, scrub with a dampened, soap-filled, non-
2.
metal, non-abrasive pad, then wipe dry.
3.
Apply a chrome cleaner with a damp sponge or cloth following manufacturer’sinstructions.
4.
Wipe and dry.
Cleaning broil/roast pan and slotted grid
✓ Pre-soak any stubborn soiling in a solution of mild detergent and hotwater.
✓ Wash by hand or in a dishwasher.
Full Gas Range

33
Cleaning Instructions
Cleaning bake and broil burners
✓ Do not clean these parts. They self-clean during normal use.
Cleaning porcelain surfaces
Clean oven interior and inner door liners with a solution of mild detergents and hot water. Rinse
and dry with a soft, lint-free cloth. Do not use abrasives or commercial oven cleaners.
Cleaning the oven glass window
✓ Clean all glass surfaces with a solution of mild detergent and hot water. Use a mild glass
cleaner to remove fingerprint or smears.
✓ Dry completely with a soft, lint-free cloth.
Cleaning the oven door gasket
Avoid cleaning this part. If you need to remove large food particles off it, proceed as follows:
1.
Dampen a sponge with clean hot water.
2.
Gently wipe off the soiling, but do not rub.
3.Press a dry towel gently on the gasket to dry.
Do not use any cleaning detergents on the gasket. The gasket is essential for a good seal.
CAUTION: Do not scratch, displace, or damage it.
Cleaning stainless steel surfaces
✓
Do not use any cleaning product with chlorine bleach.
✓ Do not use a steel wool pad; it will scratch the surface.
✓ Use a hot, damp cloth with a mild detergent.
✓
Use a clean, hot, damp cloth to remove soap. Dry with a dry, clean cloth.
Full Gas Range
34
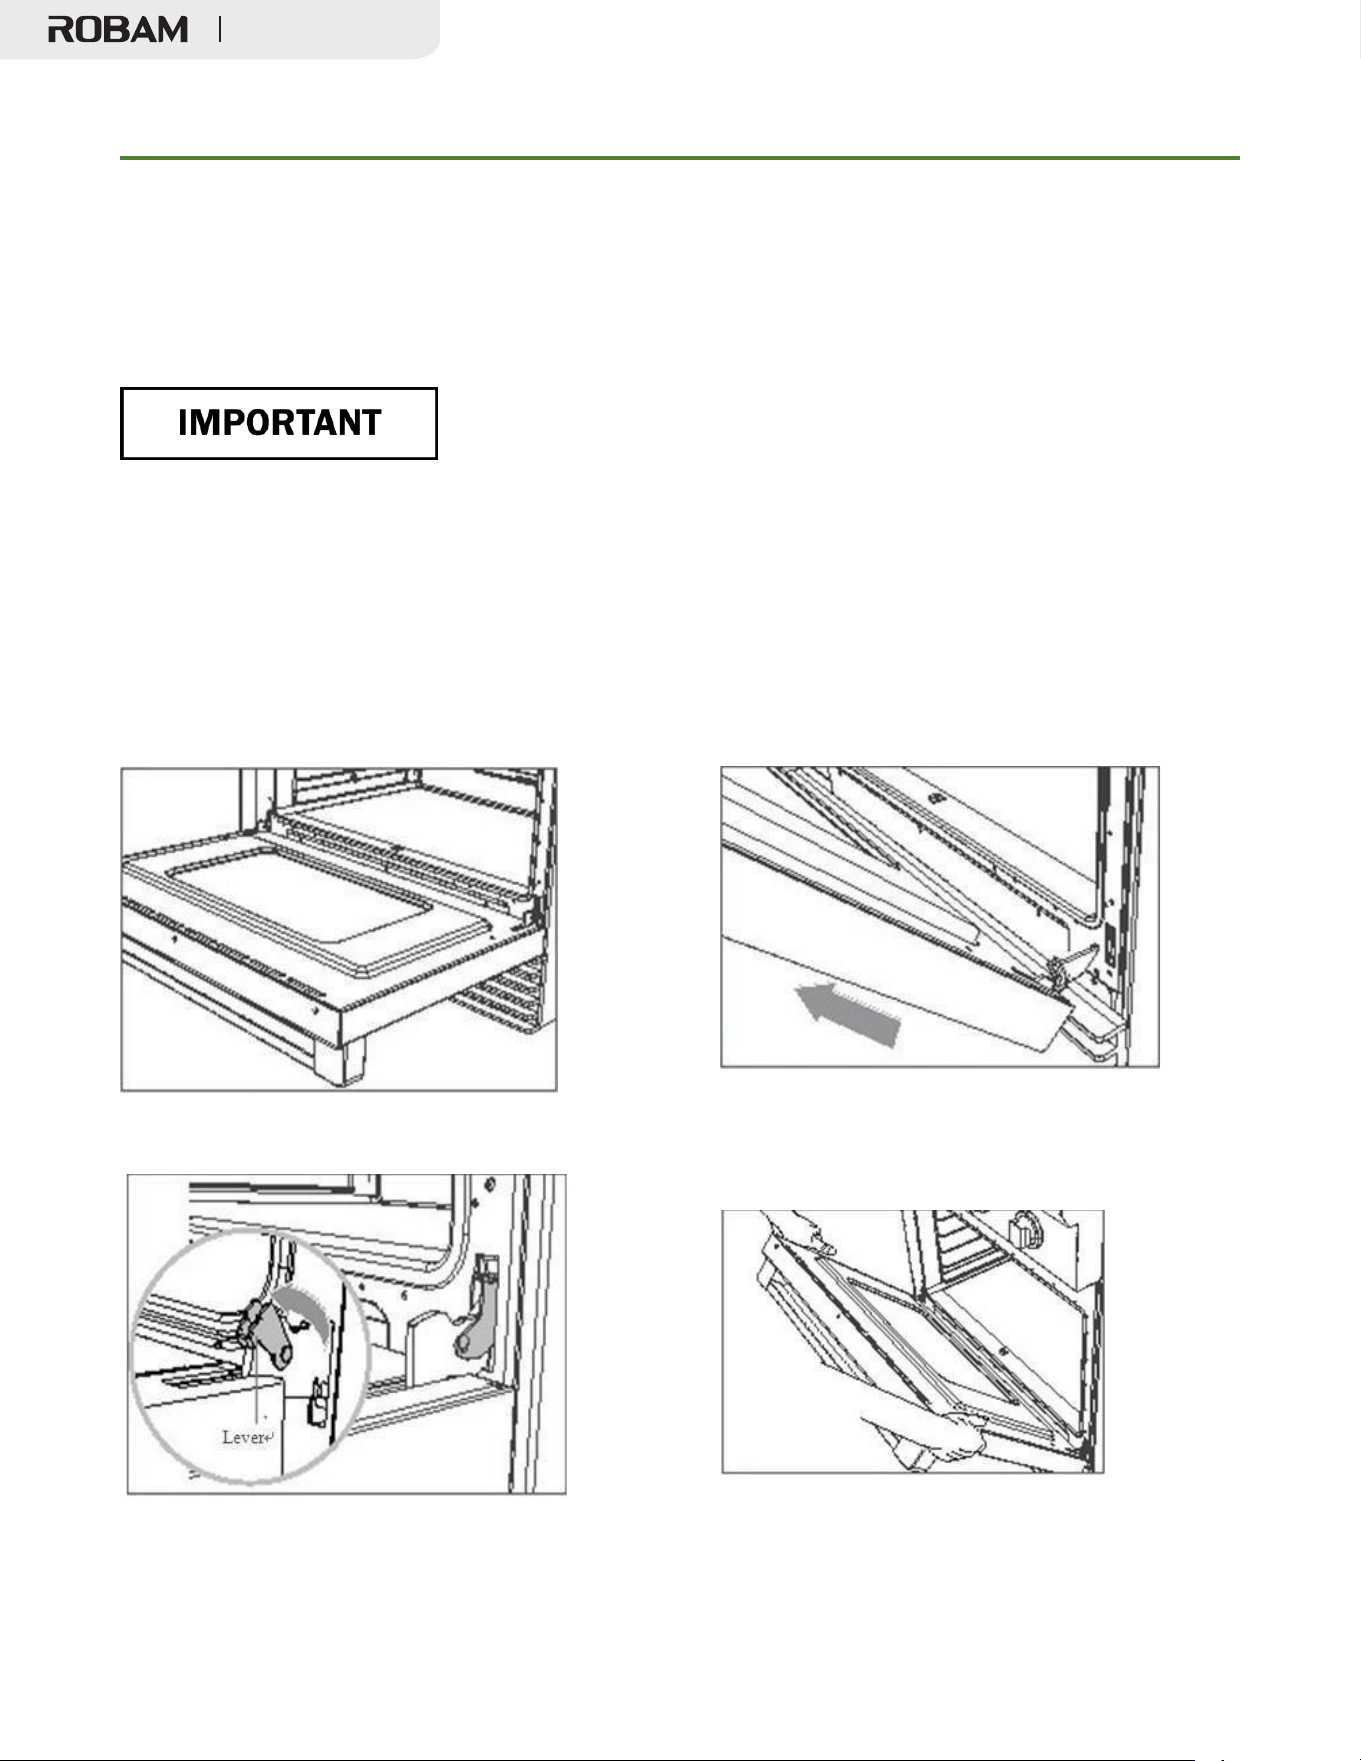
Removing the Oven Door
15. Removing and replacing the oven door
Do not lift the oven door by its handle. Doing so may damage the door.
Make sure the oven and the door are cool before you begin to remove the door.
Before removing the door, make sure there is a large enough clear, protected surface in the kitchen
to rest the door on.
The oven door is heavy!
Removing the oven door
1.
Open the door very carefully
2.
Open the levers fully on both sides.
3.
Holding the door firmly on both sides
4.
Disengage the hinges and remove the
gently close it about halfway. door, place on
a protected surface.
..
Full Gas Range
35
Removing the Oven Door
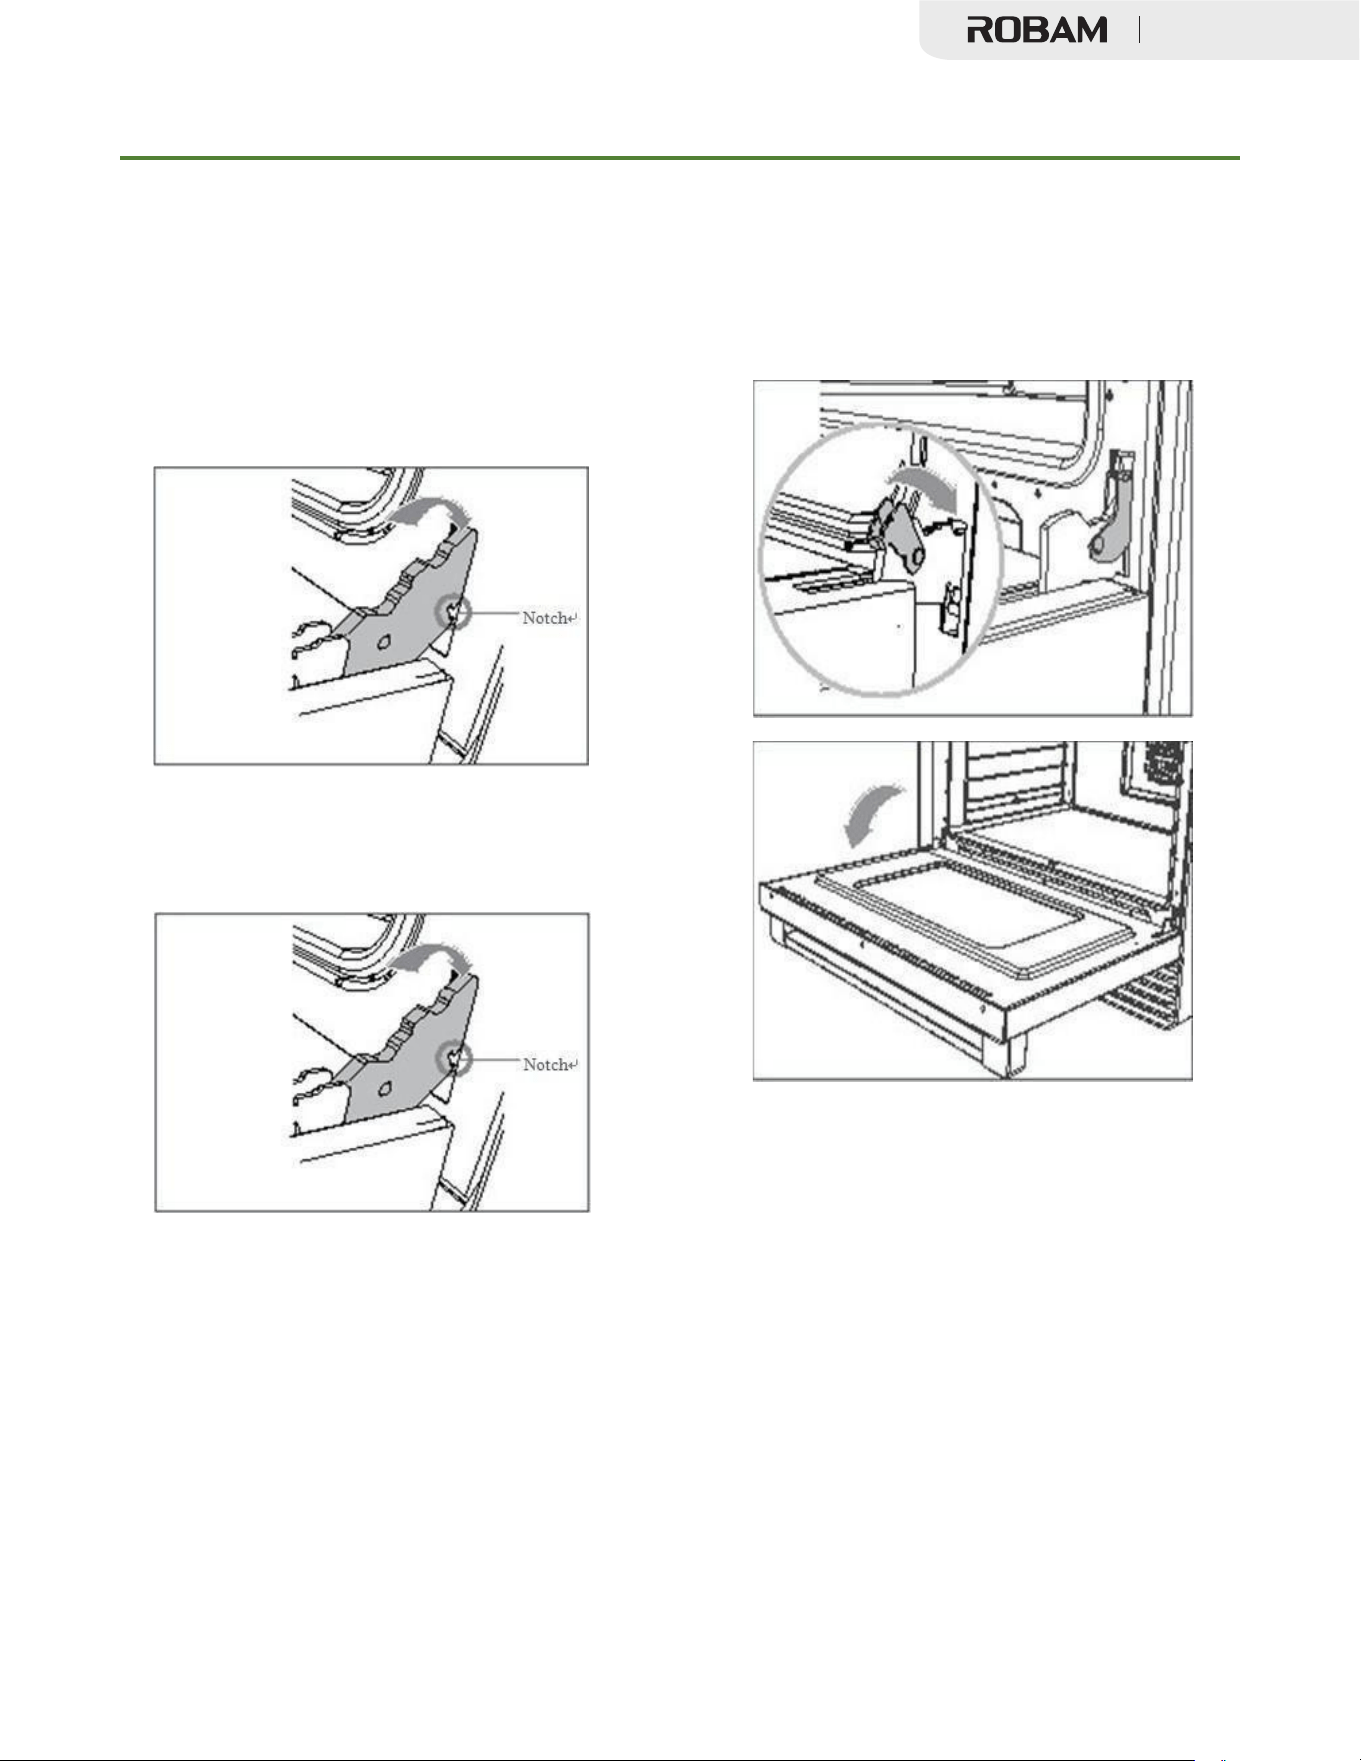
Replacing the oven door
1.
Hold the door firmly in an approximately
open position
2.
Insert the hinge tongues into the slots
making sure that the notches on both sides
drop into place as shown.
3.
Open the door fully as shown,
4.
Fully close the levers on the left and right
hinges, as shown, then close the door.
Full Gas Range

36
Troubleshooting Guide
16.
Troubleshooting Guide
If you can’t find an answer to your problem in the chart below, or if the problem cannot be fixed, you
will need technical help. Contact your Authorized Service Center or Customer Care.
Problem
Probable causes
What to do
Cooktop
Some burners will not
Burner parts or igniters may be
Check that the burner parts are
light.
clean, dry, and correctly assembled.
wet, dirty, or misaligned.
Check that the igniters are clean
Flames do not burn all
and dry. See ‘Care and cleaning’ for
around the burner
instructions.
cap.
Burner flames very
large and yellow.
Burner bezel ports are clogged.
Burner ports or burner caps are
not positioned properly. Cooktop
is being operated with the wrong
type of gas. Regulator is not
installed, is faulty, or is set for the
wrong type of gas.
Clean burner bezel ring ports with
straightened paper clip, needle, or
wire. Remove and carefully re-
install burner bezel and caps.
Ensure that the type of cooktop
matches the natural gas supply.
Check installation, replace
regulator, or set regulator for proper
gas.
Sparking but no flame
ignition.
Gas shut-off valve is in the ‘OFF’
position.
Turn shut-off valve to the ‘ON’
position.
Igniters spark
continuously after
flame ignition.
Power supply polarity is reversed.
Igniters are wet or dirty.
Have polarity corrected. Dry or
clean igniters.
Burner flame goes out
at low setting.
Low gas supply pressure. Air
intake holes around knobs are
obstructed.
Contact gas company. Remove
obstruction.
Full Gas Range

37
Troubleshooting Guide
The flames have
suddenly gone out.
A draft or a spill has extinguished
the flame.
No action required. The burner will
detect this and automatically
relight. However,
if there has been a large spill, we
recommend turning the burners off
and cleaning the burners and sump
area. See
‘Care and cleaning’ for instructions.
There is a power
failure – can I still use
the cooktop burners?
Power outage in your area.
The cooktop burners can still be
used. To light them:
1.
Holding a lighted match to the
flame spreader, push in on the
control knob and turn
counterclockwise to LITE.
2.
When the flame is burning all the
way around the burner, you may
adjust the heat.
Important!
If the flame is blown out during a
power failure, turn the knob
immediately to OFF, as the burner
will not automatically relight and
gas may escape.
Full Gas Range

38
Trouble Shooting Guide
Problem
Possible causes
What to do
Oven
The oven doesn’t work
(no heating).
No power supply (oven light and
halos do not come on either).
No gas supply (gas ovens).
Check that the circuit breaker hasn’t
tripped and there is no power outage
in your area. If there is a power
outage, you cannot use the oven
until power has been restored.
The supply to the house may not be
working or there may be an outage.
Contact your local gas supplier.
One of the oven lights
does not come on, but
the oven works.
The light bulb is loose.
The light bulb has blown.
See instructions for ‘Replacing the
oven light bulb’ in section ‘Care and
cleaning’. Instead of replacing the
bulb, simply ensure that it is secure
in its socket.
Replace the bulb. See instructions
for ‘Replacing the oven light bulb’ in
section ‘Care and cleaning.’
Condensation around
oven (e.g. on control
panel or top of oven
door.)
Food has high moisture content
or local climate (temperature,
humidity) is contributing to
condensation.
Condensation is normal. You can
wipe the drops off the control panel.
If there is frequent or excessive
condensation, make sure that
cabinetry around the range is
moisture-proofed.
Steam coming from
oven vents at the back
of the range.
Moisture from food evaporating
during cooking.
This is normal, especially if you are
cooking large quantities of food in
the oven using a CONVECTION
mode.
The convection fan
does not come on in a
Technical fault.
Contact your Authorized Service
Center or Customer Care.
Full Gas Range

39
Trouble Shooting Guide
CONVECTION mode.
Oven will not heat
Oven settings are not corrected
Follow mode selection and clock
settings as specified in Oven
Operation section of the manual.
Foods over-cooked or
under-cooked
Incorrect cooking time or
temperature.
Adjust time, temperature, or rack
position.
‘Cracking’ or ‘Popping’
sound.
This is the sound of metal
heating and cooling.
This is normal.
There is a power
failure – can I still use
the oven?
Power outage in your home or
neighborhood.
The oven cannot be used until power
is restored.
Full Gas Range
Appendix 1
40
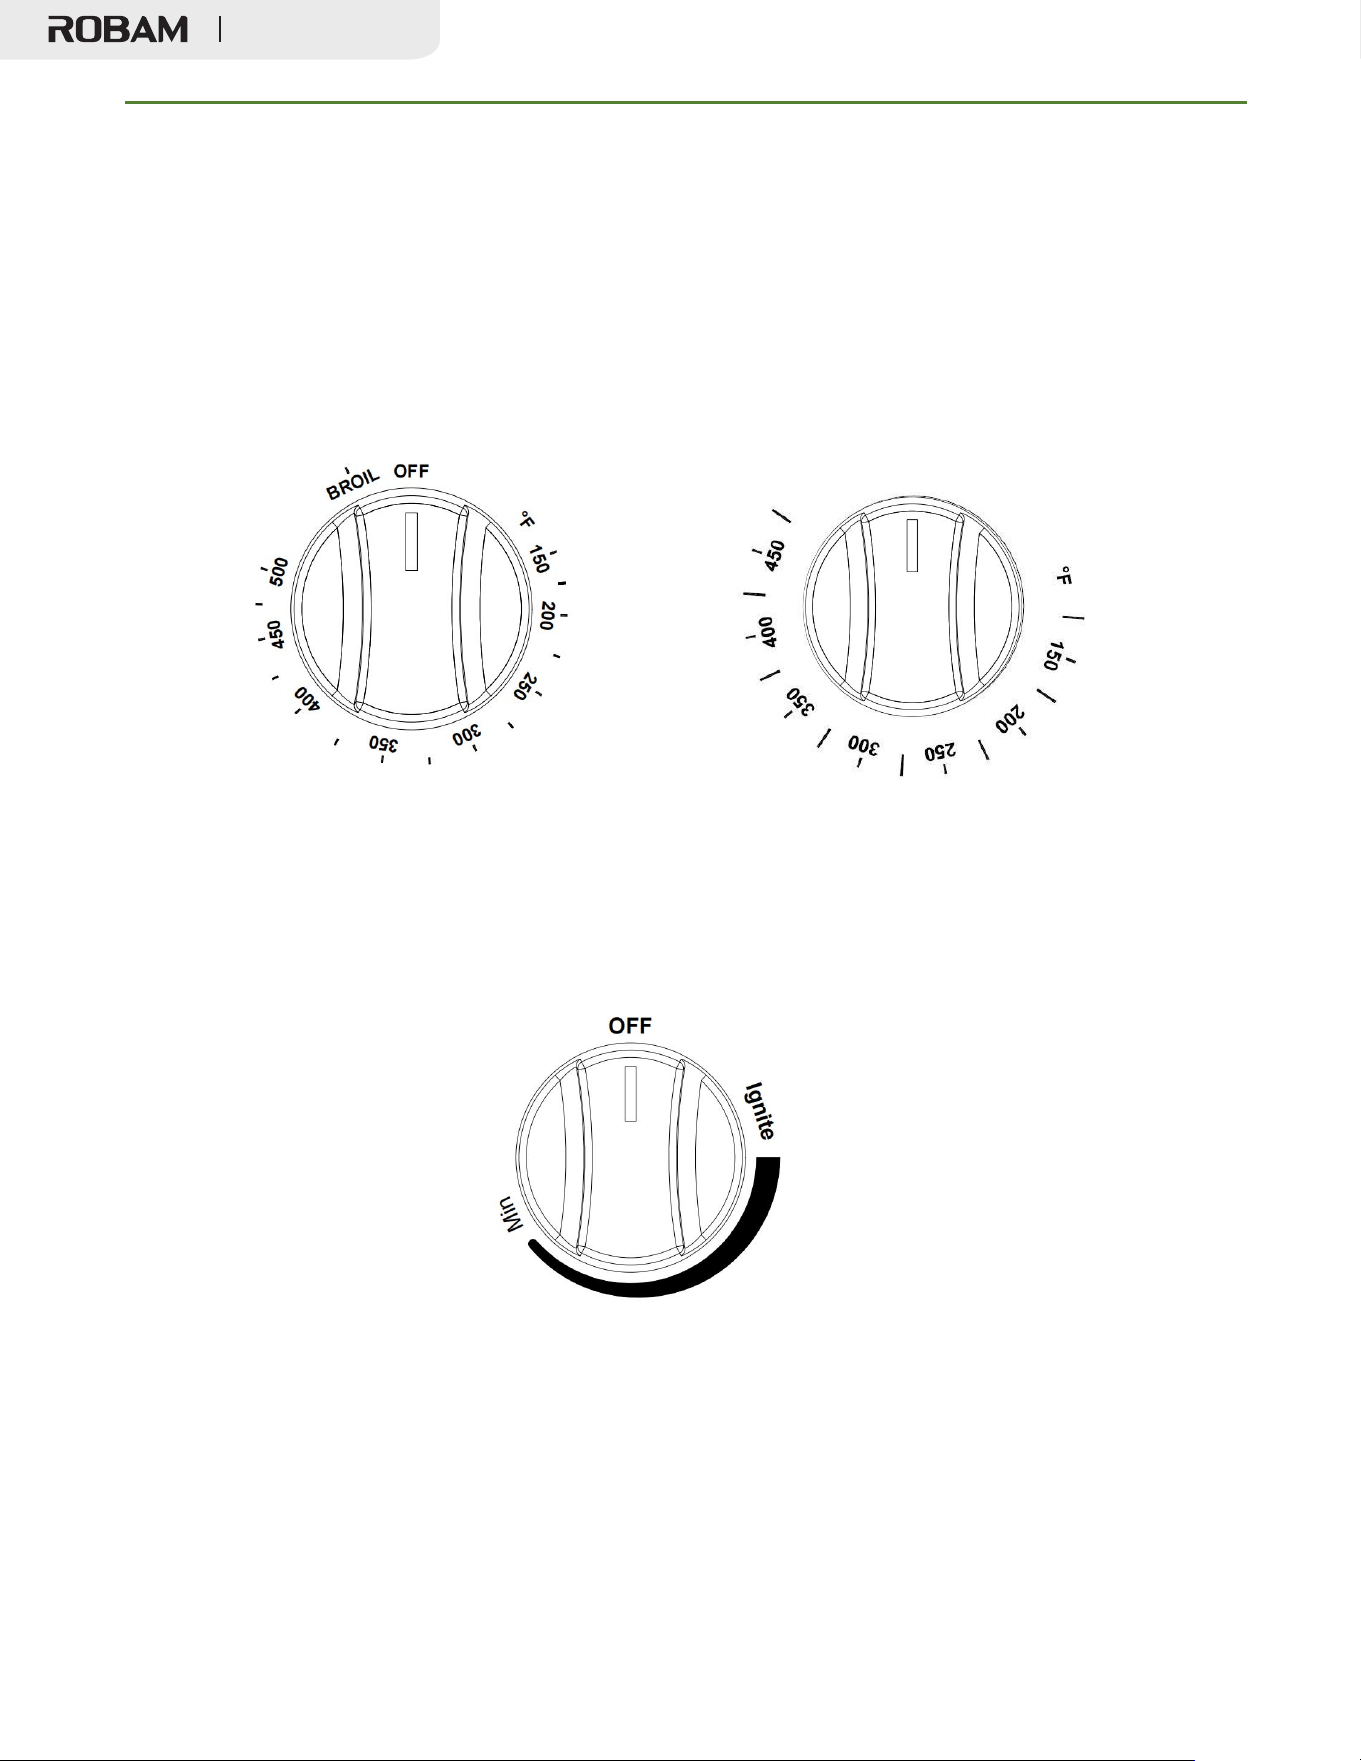
Oven Knob Installation
1.
Check the design
①
Big Oven Thermostat Knob
②
Griddle/Small Oven Thermostat Knob
③Surface Valve Knob
Full Gas Range
Appendix 1
41
Oven Knob Installation
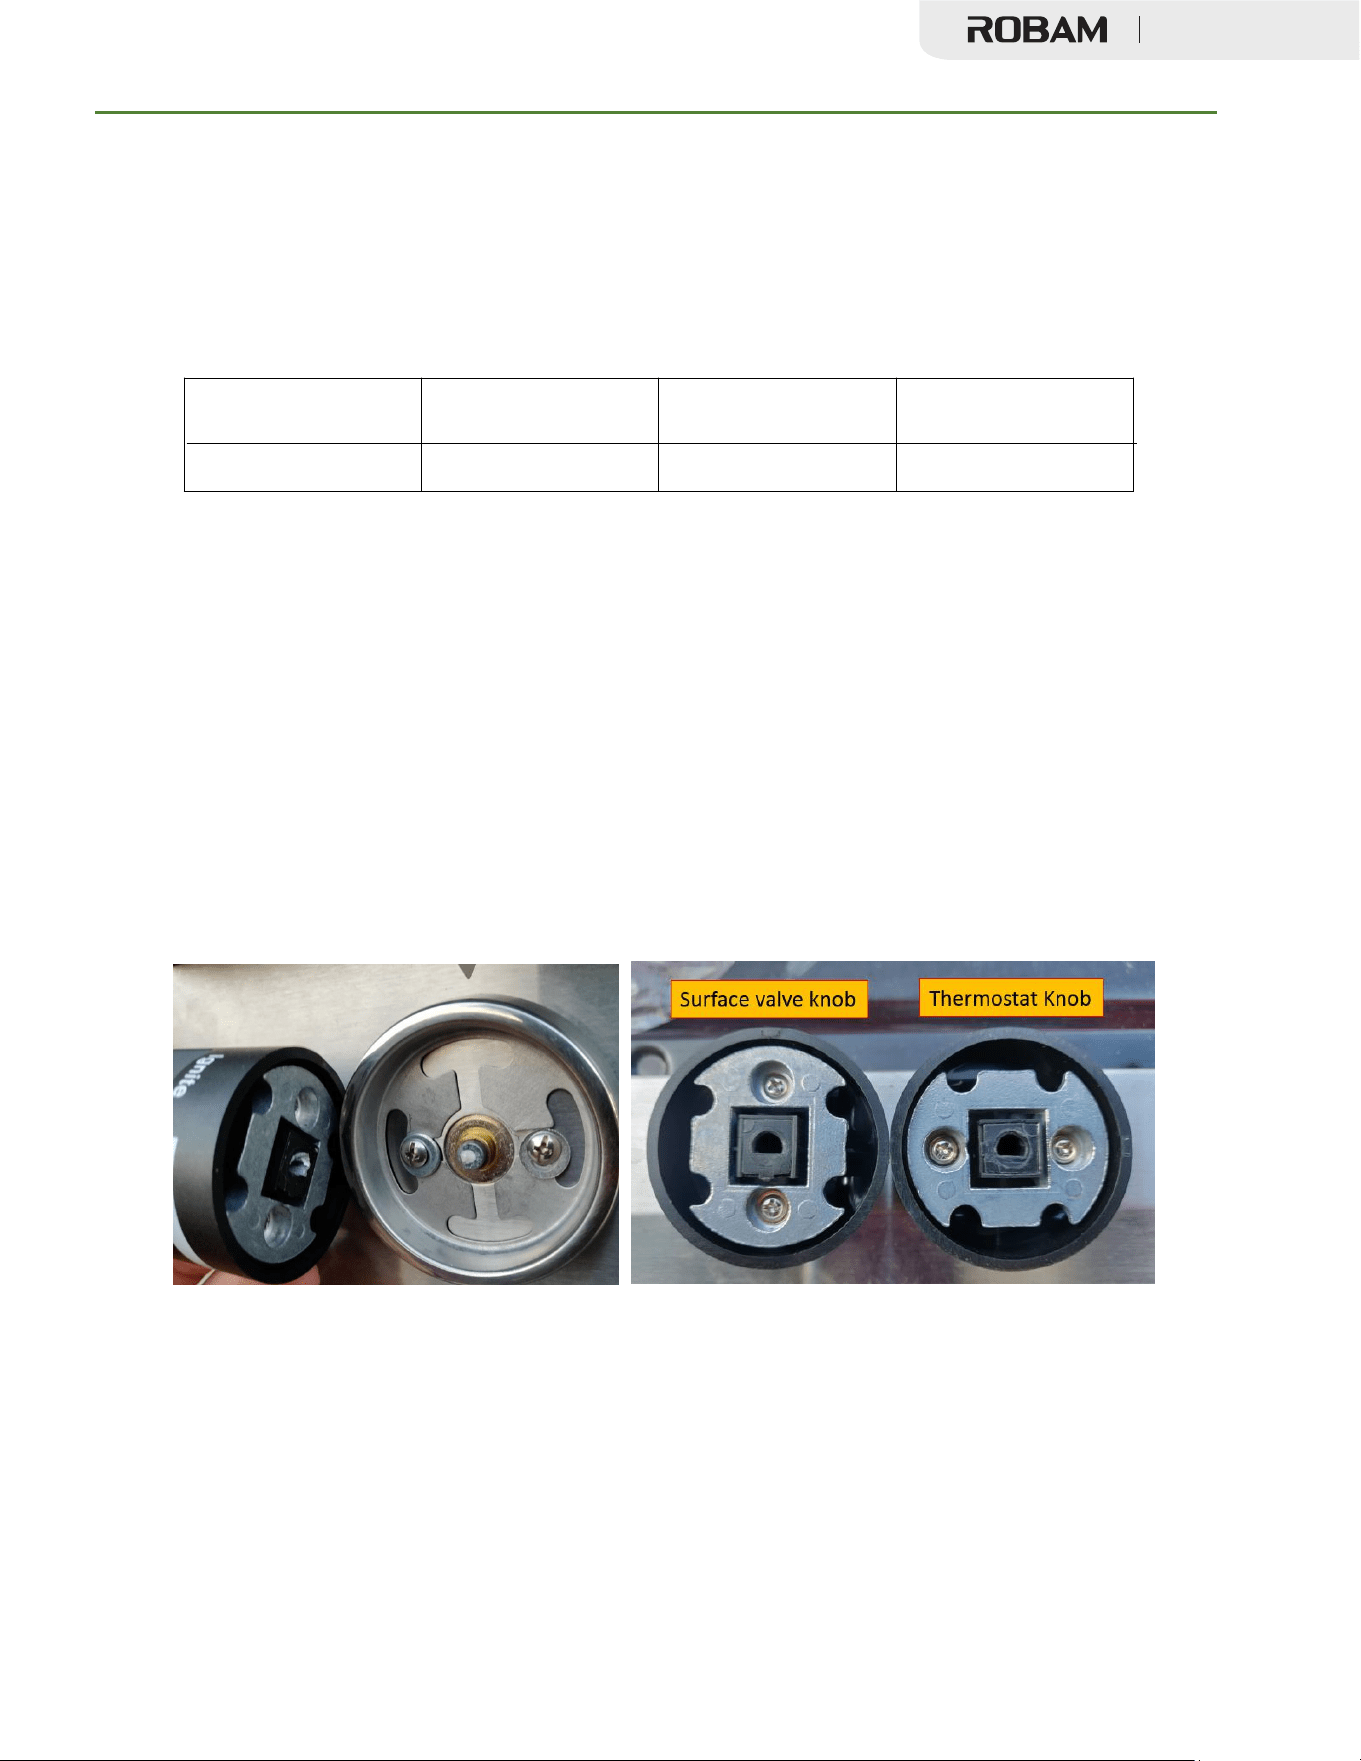
1. Check the sheet for the quantity of each knobs
Model #
Big Oven Thermostat
Knob
Griddle/Small Oven
Thermostat Knob
Surface Valve Knob
JJZ(Y/T)-7GG11
1
0
5
2. Find the right knob for each shaft on the range. Push the
knob in to fully attach the shaft and make sure there’s no
friction between knobs and bezels.
****In correct Knob Installation will cause the damage of the oven
thermostat / burner valve****
(Incorrect knob caused broken thermostat shaft)
Full Gas Range
Appendix 1
42
Oven Knob Installation
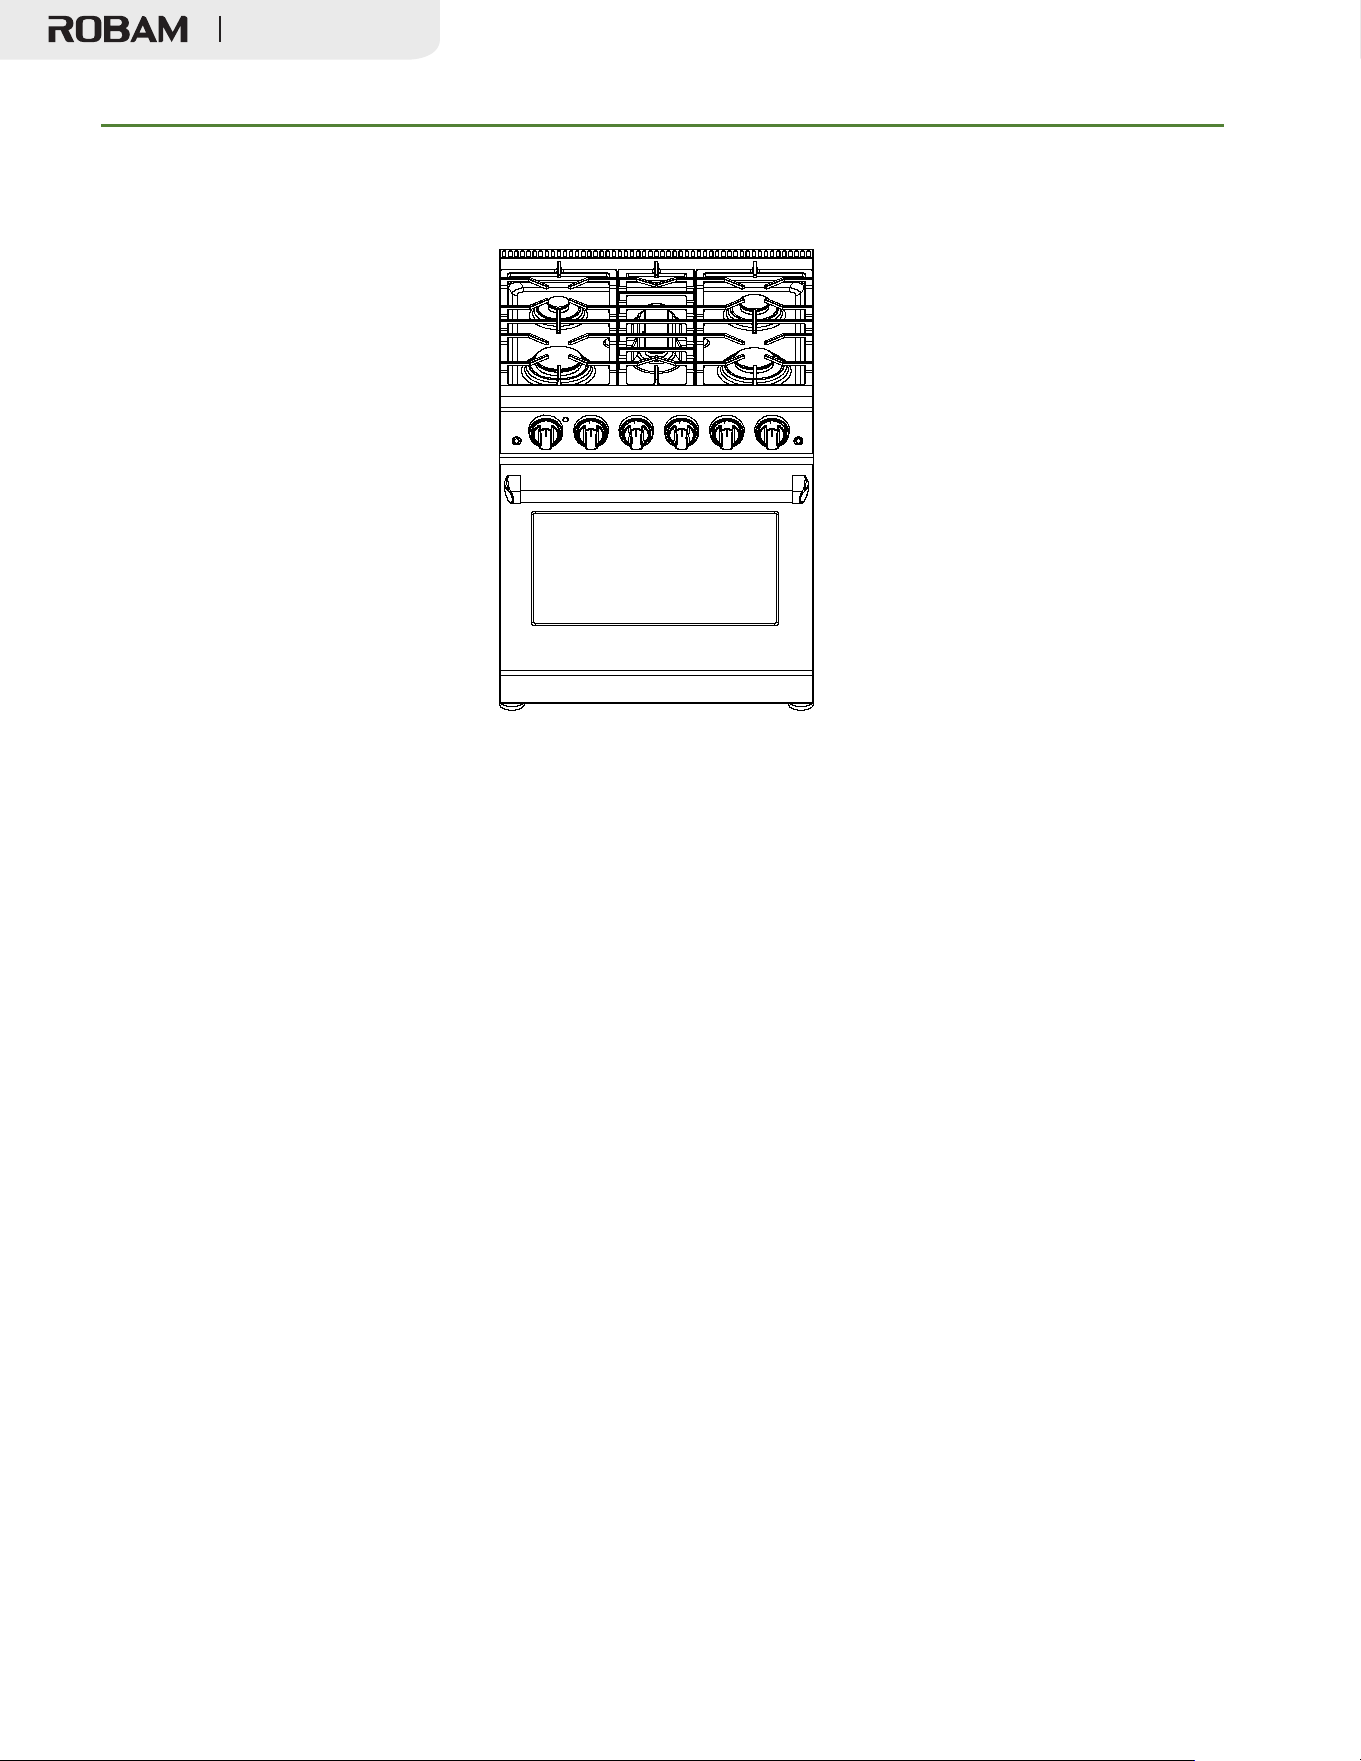
JJZ(Y/T)-7GG11
① ②③④⑤⑥
JJZ(Y/T)-7GG11 Knobs (From Left to Right):
①: Big Oven Thermostat
Knob
②③④⑤⑥: Surface Valve Knob
Your range might have a KD handle that
needs to be installed. Please Follow up the
following procedures for the oven door handle
installation.
Full Gas Range
43
Appendix 2
Oven Handle Installation
3.1
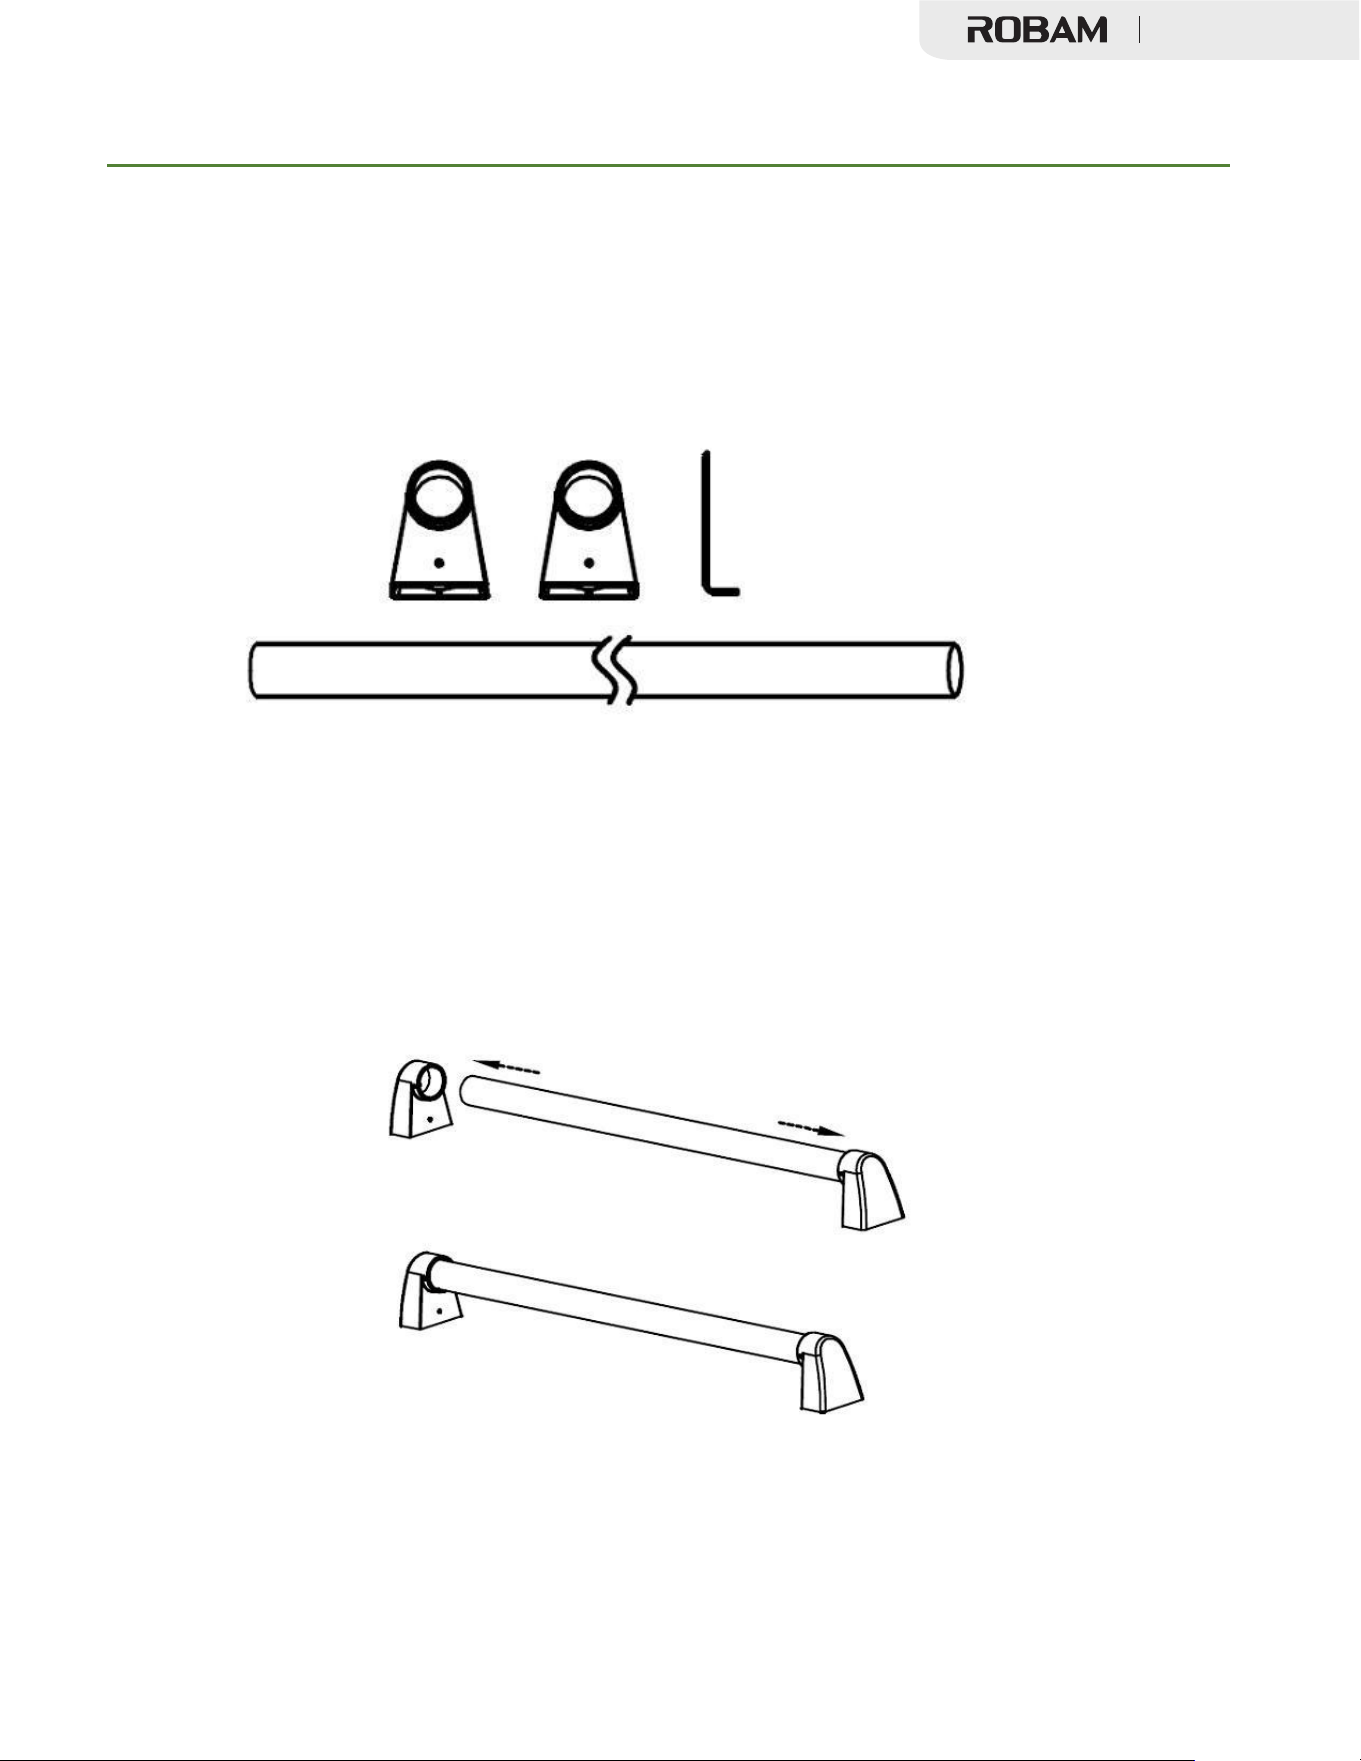
Check your Installation Kits for Door Handles
2 * Handle Holders, 1 * Installation Wrench,
1 * Handle (For 18”, 30” or 36” Oven)
3.2
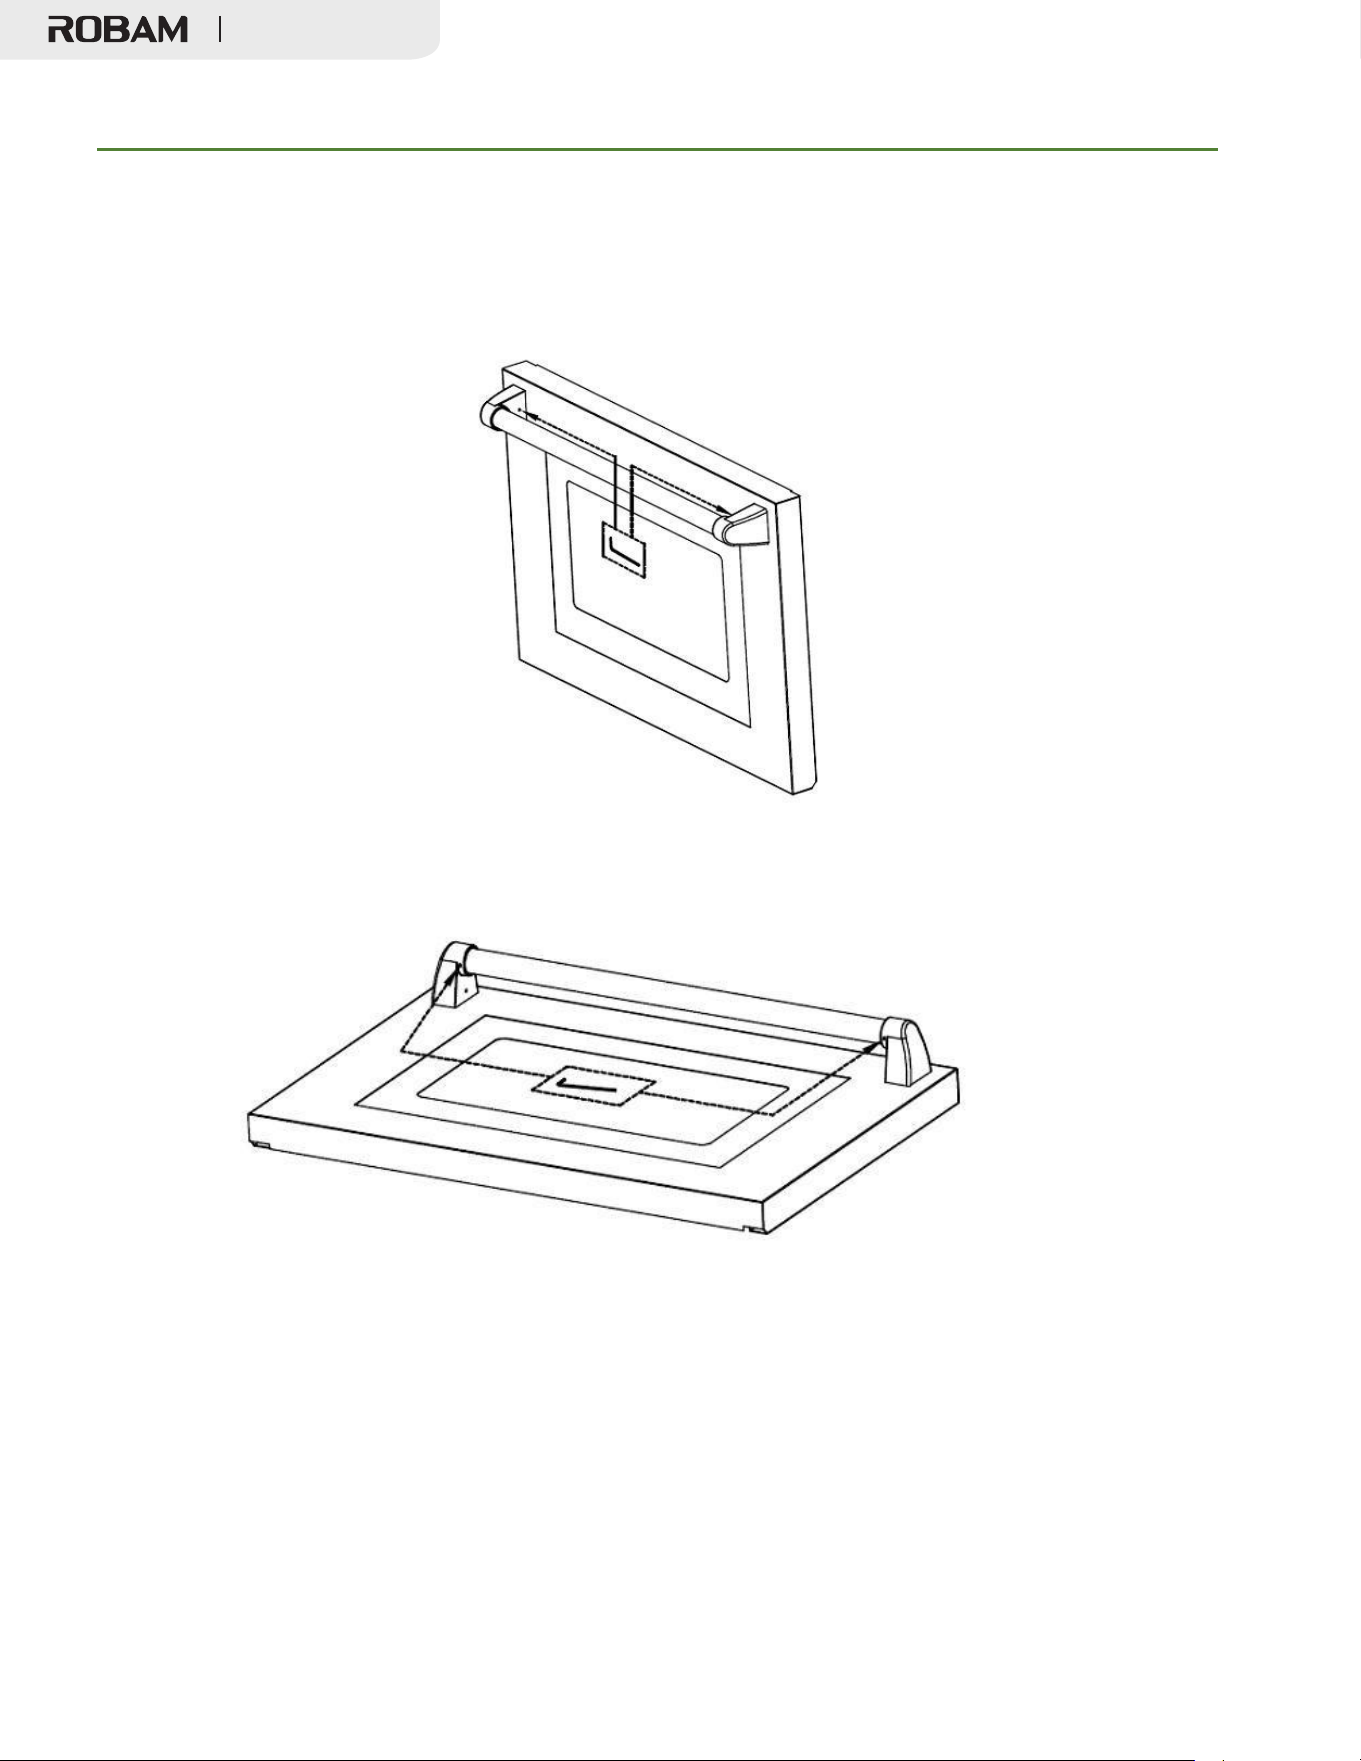
Connect door handle holders to each side of the handle
3.3
Lay the door handle against to the oven door and fit it on
the connection part, and use the wrench to get the door handle
holder tight;
Full Gas Range
Appendix 2
44
Oven Handle Installation
3.4
Use the wrench to tighten the door handle holders.
3.5
Check if the oven door handle is level and stable.
Full Gas Range
Appendix 3
Rubber Pad Installation on Back Panel
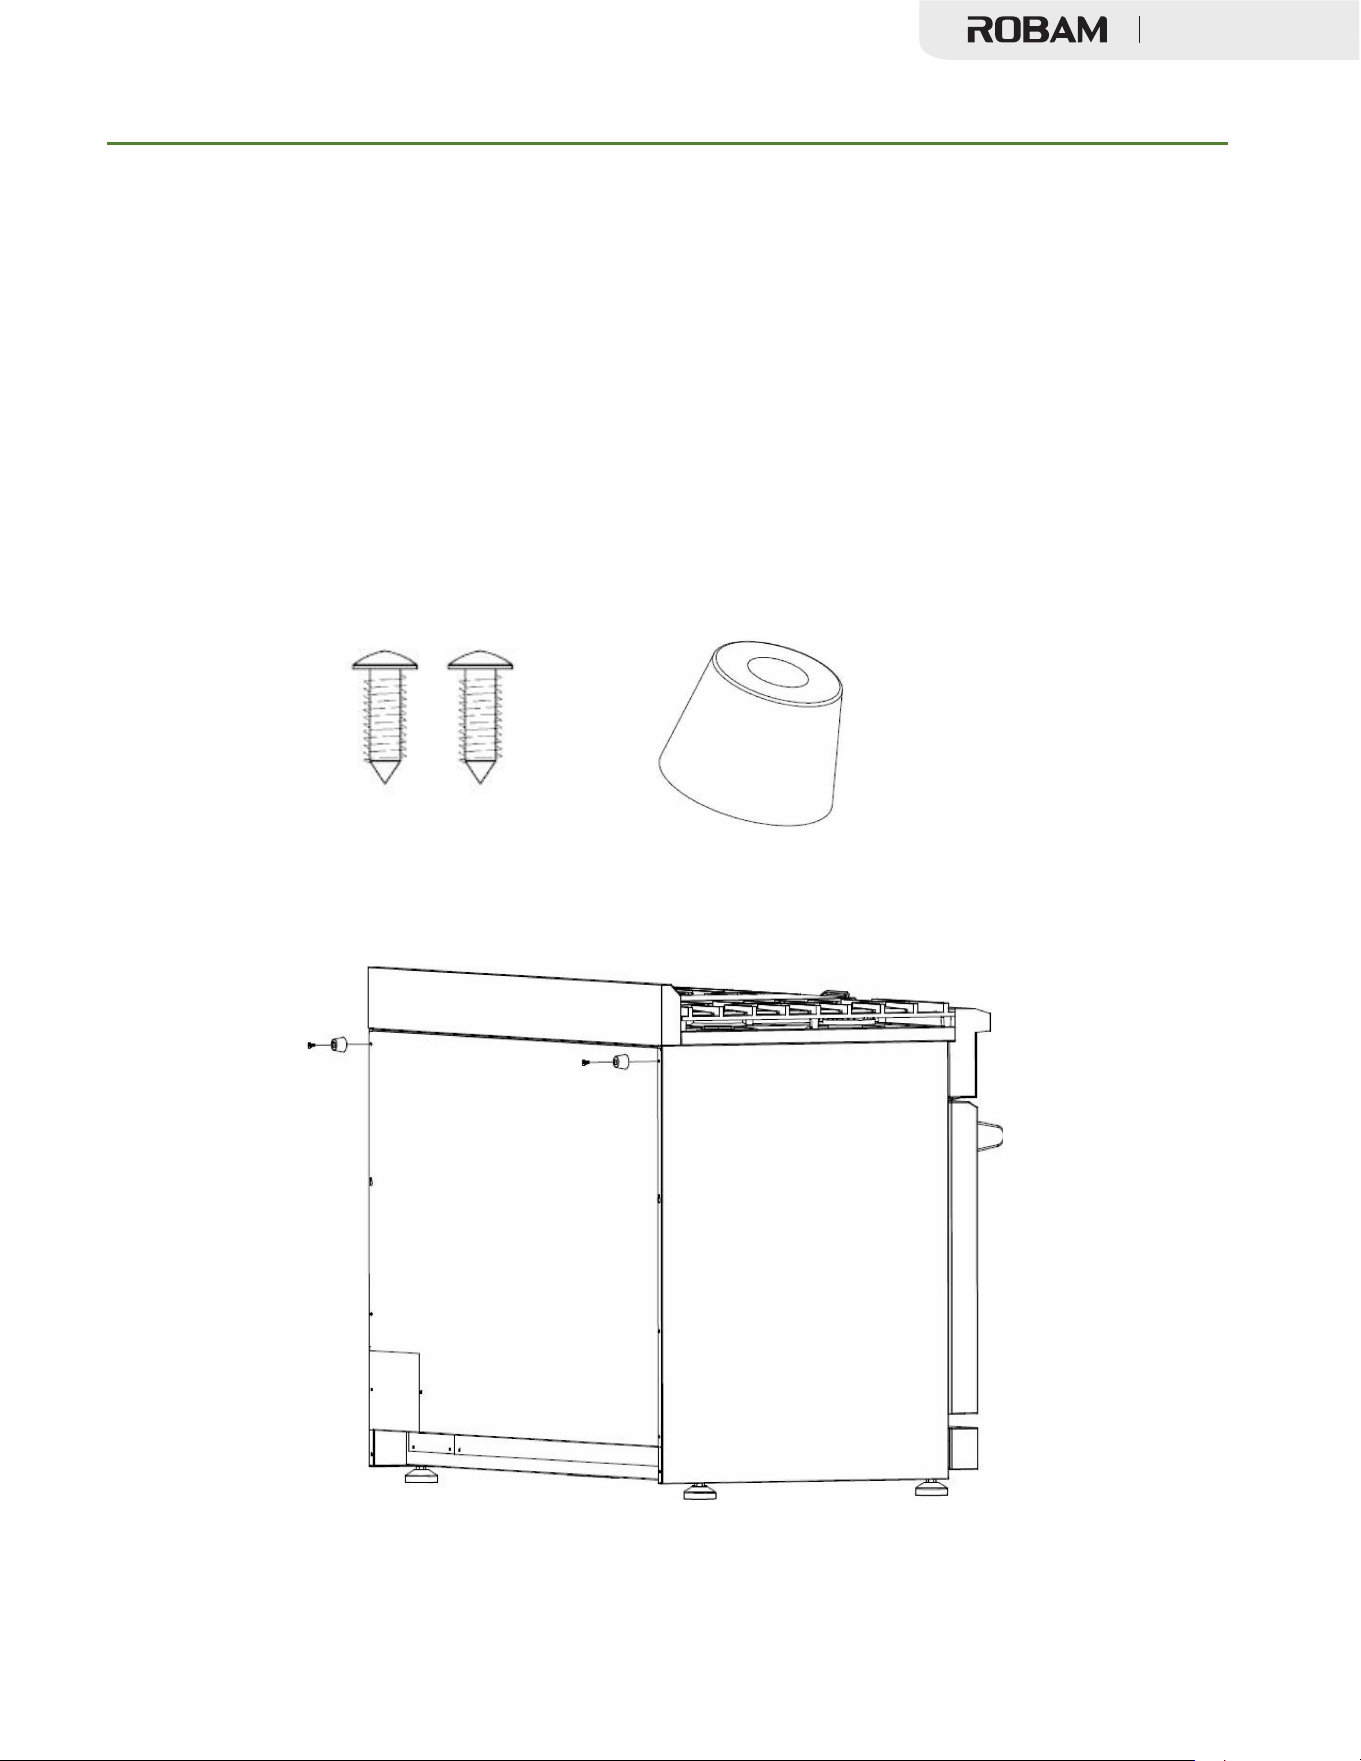
In order to meet the requirement for the clearance for the back of
your Range, please install 2 pcs Rubber Pad provided in the
manual package Please find the accessories and follow the
below steps:
1.
check the installation kit included in the manual package;
2* screws
2* rubber pad
2.
Install 2 pcs rubber pad shown above.
45
Full Gas Range

Model: JJZ(Y/T)-7GG11
Edition: A/0
Publication Date: September,20,2024

使用和维护说明书
燃气烤箱

全燃气烤箱
1
目录
1. 警告 .................................................................................................................................................................................3
2. 欢迎 .................................................................................................................................................................................4
3. 开始使用前 .....................................................................................................................................................................4
4. 安全和警告 .....................................................................................................................................................................5
安全符号 .................................................................................................................................................................................... 5
触电危险 .................................................................................................................................................................................... 6
倾倒危险 .................................................................................................................................................................................... 6
爆炸危险 .................................................................................................................................................................................... 7
火灾危险 .................................................................................................................................................................................... 7
中毒危险 .................................................................................................................................................................................... 8
高温表面危险............................................................................................................................................................................ 8
其他安全提示............................................................................................................................................................................ 8
5. 燃气供应要求 ...............................................................................................................................................................11
燃气操作安全提示 .................................................................................................................................................................. 11
6. 尺寸和间距 ...................................................................................................................................................................12
顶部烟机和橱柜规格 .............................................................................................................................................................. 15
7. 电力供应要求 ...............................................................................................................................................................16
8. 电气接地说明 ...............................................................................................................................................................20
9. 将燃气烤箱连接至燃气供应 .......................................................................................................................................20
安装后: .................................................................................................................................................................................. 21
调节烤箱 .................................................................................................................................................................................. 22
11. 炉灶安全指南 ...............................................................................................................................................................22
炉头点火 .................................................................................................................................................................................. 23
煨煮 .......................................................................................................................................................................................... 24
火力大小 .................................................................................................................................................................................. 24
电源故障 .................................................................................................................................................................................. 24
炉灶 .......................................................................................................................................................................................... 24
燃烧器炉头支撑架 .................................................................................................................................................................. 24
烤箱燃烧器的使用 .................................................................................................................................................................. 25
烤炉燃烧器的使用 .................................................................................................................................................................. 25
烤箱烹饪指南.......................................................................................................................................................................... 25
12. 烤箱功能.......................................................................................................................................................................27
自然气流烘烤.......................................................................................................................................................................... 27
烧烤 .......................................................................................................................................................................................... 27
对流烘烤 .................................................................................................................................................................................. 27
对流烘焙 .................................................................................................................................................................................. 28
对流解冻 .................................................................................................................................................................................. 28
解冻 .......................................................................................................................................................................................... 28

全燃气烤箱
2
对流脱水 .................................................................................................................................................................................. 28
13.
Broiler
操作 ..................................................................................................................................................................29
预热 .......................................................................................................................................................................................... 29
调至“Broil” ................................................................................................................................................................................29
Broil 设置 ..................................................................................................................................................................................29
烧烤指南 .................................................................................................................................................................................. 30
14. 清洁说明.......................................................................................................................................................................31
应采取的措施.......................................................................................................................................................................... 31
不应采取的措施...................................................................................................................................................................... 31
炉头顶盖和喷火圈清洁 .......................................................................................................................................................... 31
侧架清洁 .................................................................................................................................................................................. 32
烤箱烤架清洁.......................................................................................................................................................................... 32
烤盘和开槽烤网清洁 .............................................................................................................................................................. 32
烘烤和烤炉燃烧器清洁 .......................................................................................................................................................... 33
内胆搪瓷表面清洁 .................................................................................................................................................................. 33
烤箱门密封垫清洁 .................................................................................................................................................................. 33
不锈钢表面清洁...................................................................................................................................................................... 33
15. 烤箱门拆卸和更换 .......................................................................................................................................................34
烤箱门拆卸 .............................................................................................................................................................................. 34
烤箱门更换 .............................................................................................................................................................................. 35
16. 故障排除指南 ...............................................................................................................................................................36
炉灶 .......................................................................................................................................................................................... 36
烤箱 .......................................................................................................................................................................................... 37
附录 1 烤箱旋钮安装 .............................................................................................................................................................. 38
附录 2 烤箱把手安装 .............................................................................................................................................................. 41
附录 3 后板橡胶垫安装.......................................................................................................................................................... 43
全燃气烤箱
3
安全和警告
1. 警告
以下警告极为重要,务必遵守。
● 如果未能正确遵守说明书中的信息,可能火灾或爆
炸会导致财产损失、人身伤害或死亡。
● 切勿在本产品或其他产品邻近使用、存放汽油或其
他可燃气体及和液体。
●
切勿将此产品用作局部供热装置,以给房间供暖。
● 务必由合格服务机构或燃气供应商安装本产品。
如果您闻到燃气味怎么办
● 不要试图点燃任何产品
●
不要触摸任何电器开关
● 立即让邻居致电燃气供应商
●
打开窗户并离开该区域
●
遵循燃气供应商的指示
● 如果未能联系您的燃气供应商,请致电消防部门
警告

全燃气烤箱
4
安全和警告
2. 欢迎
感谢您购买老板牌燃气烤箱。感谢您的惠顾,首次操作新产品之前,建议您阅读本用户说明书中
的全部内容。
本说明书包含新燃气烤箱的正确安装和设置说明,以及我们产品的独特功能介绍。请妥善保存本
说明书,以备将来参考,说明书中包含您开始烹饪时可能遇到的问题的答案。
谢谢
ROBAM
老板
3.
开始使用前
✓ 请确保正确安装燃气烤箱的防倾倒装置。
✓ 在背板右下角的 CSA 标签上找到型号和序列号。在“保修和服务”部分的空白处记下这些
编号,以备将来参考。
✓ 请阅读本指南,需特别注意
“
安全和警告
”
一节。
✓ 拆除烤箱和炉灶上的所有包装。回收能够二次利用的物品。如果表面残留粘胶,请用软布
沾洗碗液清除。不要使用刺激性或磨蚀性清洁剂。
✓ 使用燃气烤箱进行烹饪之前,请务必按照“首次使用 ”中的说明进行操作。
✓ 使用产品时,为减少火灾、触电、人身伤害或损坏风险,请遵守以下重要安全说明:
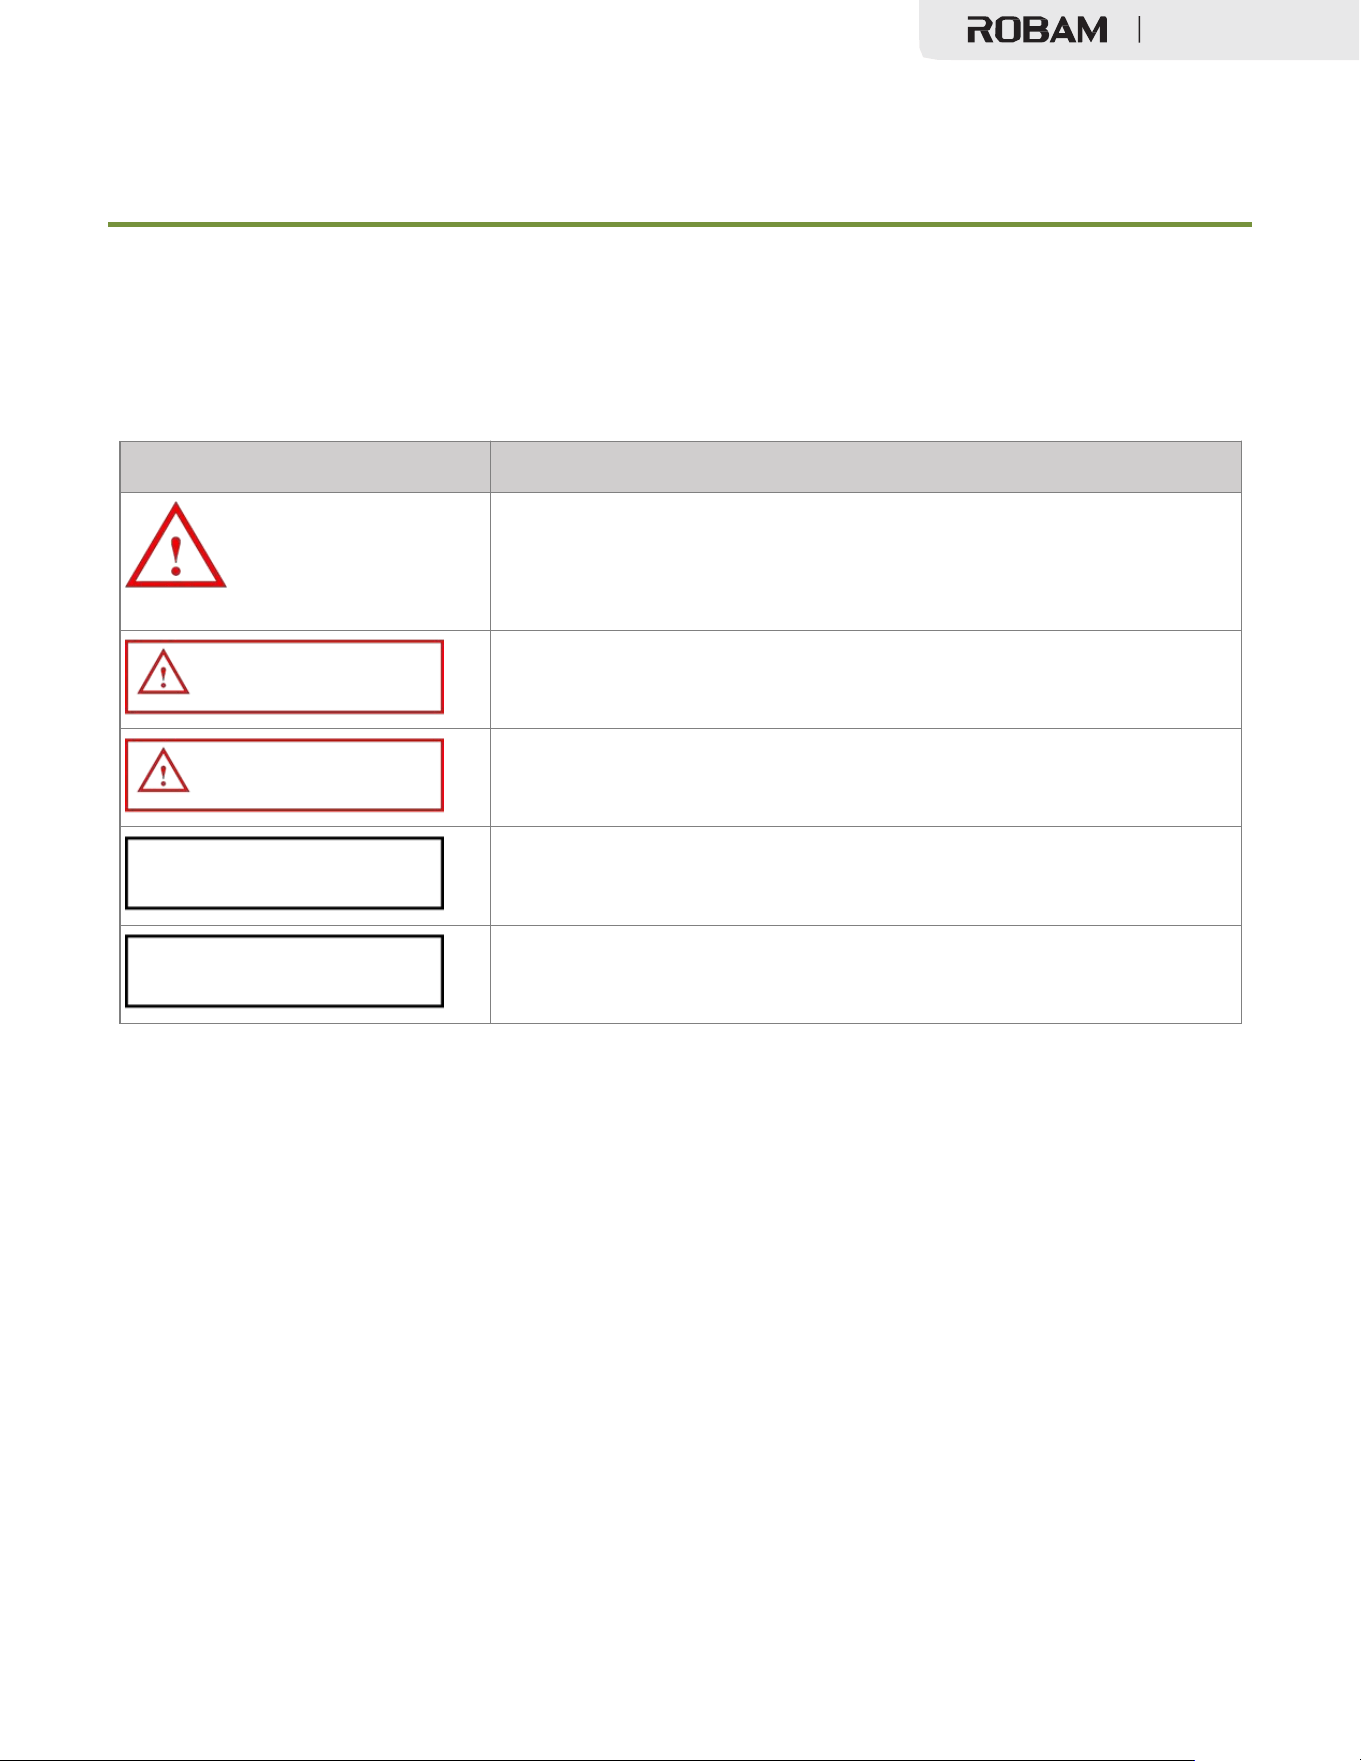
全燃气烤箱
5
安全和警告
4.
安全和警告
安全符号
符号
定义
这些说明将提醒您潜在的危险,可能导致人身伤害或财产损
失。请遵守所有安全规则,以避免任何财产损失、人身伤害或
死亡。
“
警告
”
表示潜在危险情况,如不避免可能导致重伤或死亡。
“小心”表示如不避免可造成轻伤或中度受伤的危险情形。
“小心”——在没有安全警告符号的情况下使用时,表示存在潜在
的危险情况,如果不避免,可能会导致财产损失。
“
重要
”
——用于提供与安全无关的安装、操作和维护信息。
警告
小心
小心
重要
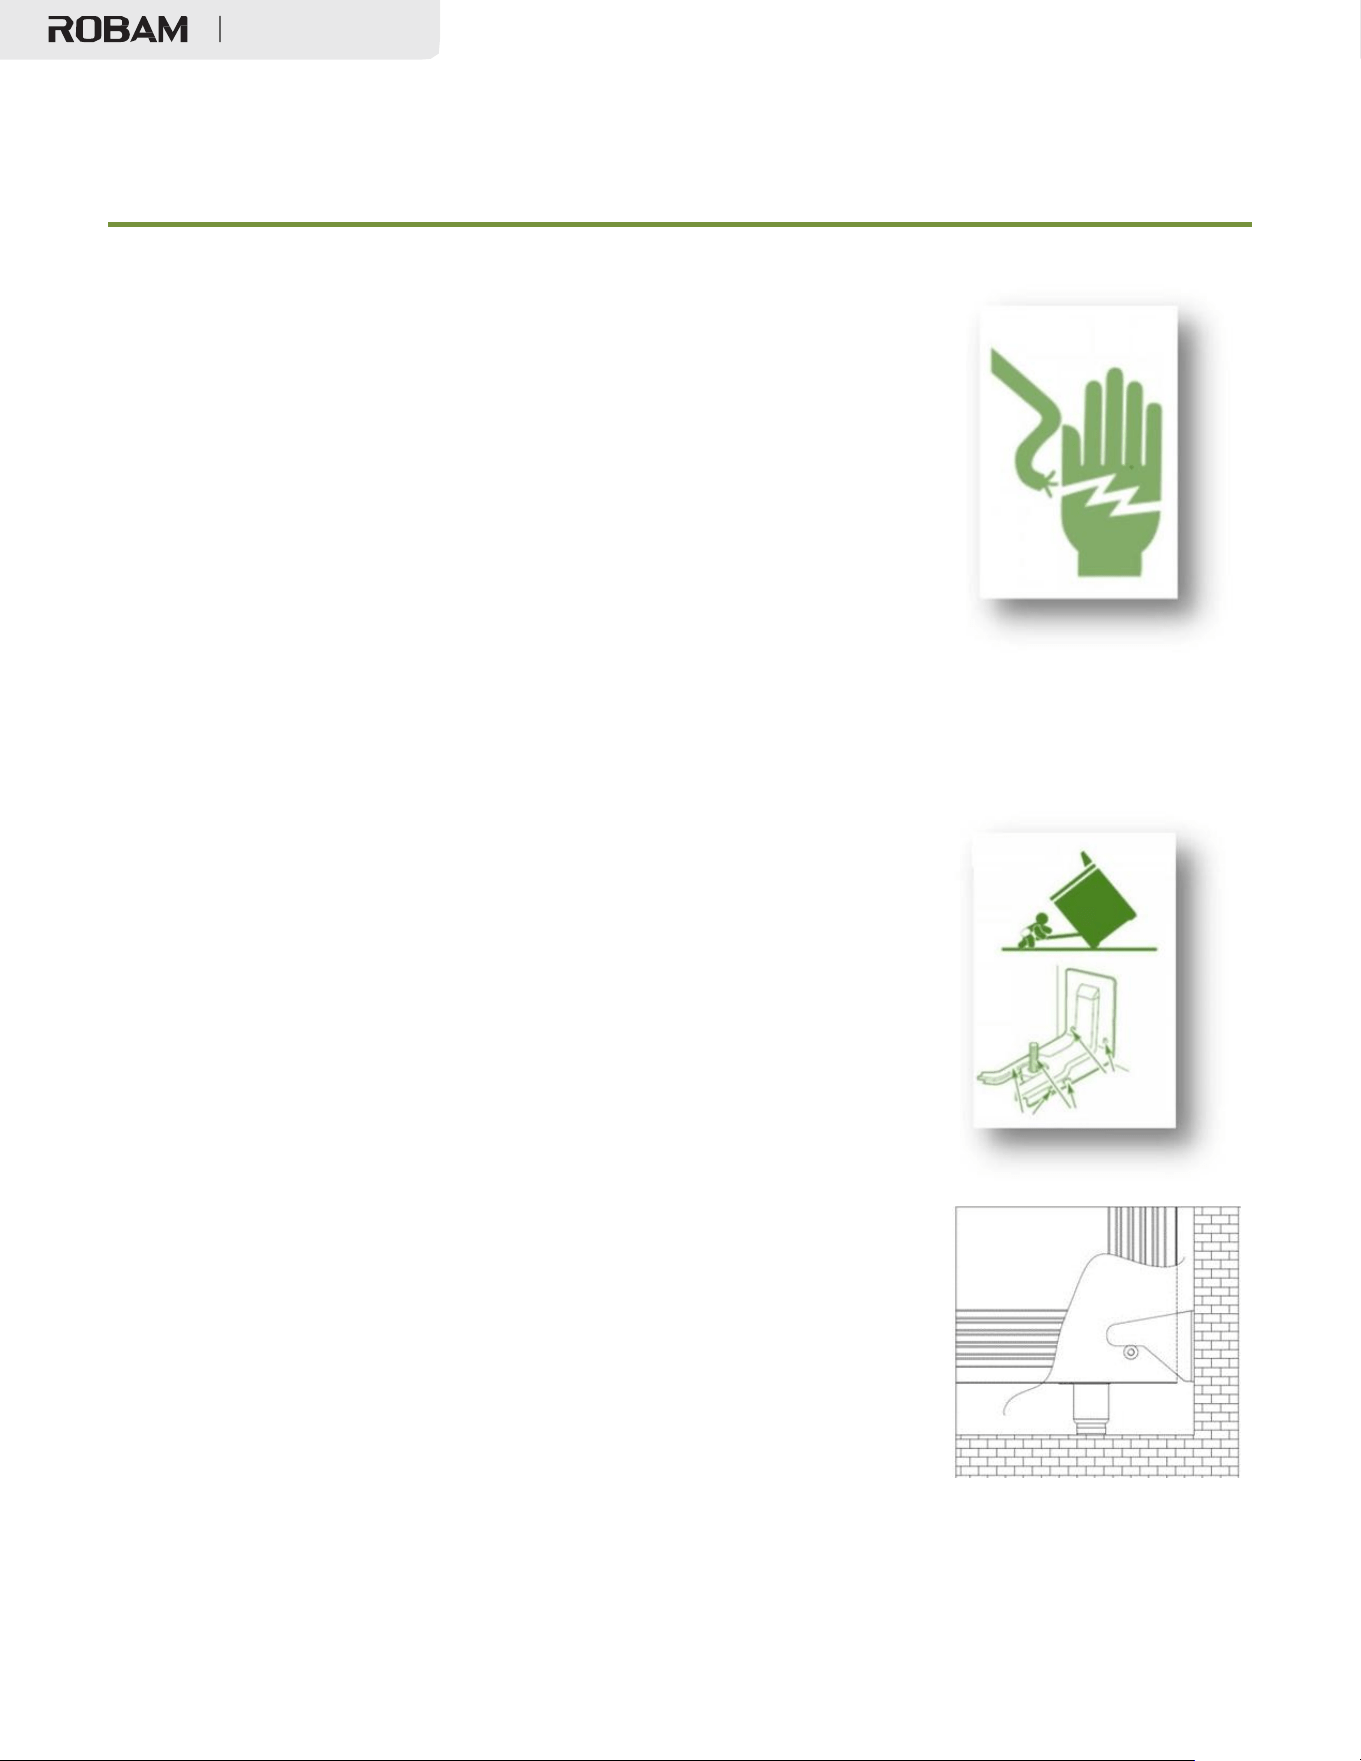
全燃气烤箱
6
安全和警告
触电危险
✓ 拆卸故障的烤箱灯泡之前,请确保在电源保险丝或断路
器面板上,断开燃气烤箱电源。如您不知道如何操作,请联系
电工。
✓ 不要取下踢脚板或背板。这两块面板后侧铺设有电线,
只能由合格技术人员拆卸。
✓ 本产品配有三脚接地插头,为防止电击,应直接插入正
确接地的电源插座中。不论任何情况下,均不得剪断或拔掉该
插头的接地插脚。
如不遵守本建议,可能导致死亡或触电。
倾倒危险
所有燃气烤箱均可能倾倒,对成人和儿童造成伤害。为防止倾
倒,请安装燃气烤箱随附的防倾倒装置。请遵守所有安装说
明。
✓ 即使已安装安全装置,也不要踩踏、倚靠或坐在烤箱门
上,亦不得在其上方放置任何重物。否则可能导致人身伤害。
确保按以下方式安装防倾倒装置:
1
、将燃气烤箱向前推。
2、按照说明书中所述安装防倾倒装置
3
、安全倾斜燃气烤箱前部,然后将燃气烤箱缓慢推至墙壁处。
4
、后销应推至支架下方。
固定后销之前,不要使用产品。
否则可能造成严重伤害。
JJZ(Y/T)-7GG11 防倾倒装置
全燃气烤箱
7
安全和警告
爆炸危险
✓ 如果闻到燃气气味,不要使用产品。打开门窗,使燃气排
出,然后按说明书封面内页上的说明进行操作。
✓ 切勿用水扑灭油脂火。否则可能导致剧烈的蒸汽爆炸。
✓ 关闭所有燃烧器,然后,使用干粉灭火器或泡沫灭火器熄灭
火苗或火焰。不要试图用易燃毯子使之闷烧。
✓ 不要加热罐头等未开封的食品容器。压力升高可能导致容器
爆裂并造成伤害。
如不遵守本建议,可能导致人员伤亡。
火灾危险
✓ 切勿将本产品用作空间加热器。否则可能造成人员受伤或引
发火灾。
✓ 保持产品周围无可燃材料(例如,墙面装饰、窗帘、帷
幔)、汽油及其他易燃蒸汽和液体。
✓ 定期清洁炉头和燃烧器。
不要将烹饪油脂或其他易燃物堆放在燃气烤箱表面或附近。
✓ 不要在烤箱手柄上悬挂任何物品(例如,洗碗巾)。有些织
物可能受热点燃或融化。
✓ 切勿在无人看管的情况下使用炉灶燃烧器。沸腾会导致冒烟
和油脂溢出,并可能点燃。
✓ 燃烧器点火时,切勿在产品表面或周围喷洒气雾清洁剂。确
保关闭所有控制装置,且产品处于冷却状态。此类清洁剂中的喷雾
气体和化学物质遇热可能点燃或导致金属部件腐蚀。
✓ 不要在炉灶附近存放易燃物
不要在烤箱内部或炉灶附近存放易燃物。一旦发生意外,可能引起
严重火灾。
全燃气烤箱
8
安全和警告
中毒危险
✓ 切勿用铝箔等材料覆盖烤箱底部的任何槽、孔或通道,或者覆
盖整个机架或烤箱底板。其会阻碍空气流经烤箱,并可能导致一氧化
碳中毒。铝箔衬里也可能会产生热量,从而引发火灾。
✓ 小心清洁产品。如果使用湿海绵或抹布擦拭高温烹饪区的溢出
物,务必小心,避免被蒸汽灼伤。某些清洁剂在用于高温表面时会产
生有毒气体。请遵循清洁剂制造商的说明。
✓ 切勿将此产品用作局部供热装置,以给房间供暖。其可能会导
致一氧化碳中毒和产品过热。
如不遵守本建议,可能导致中毒或死亡。
高温表面危险
在使用过程中,可触及部件可能发热。
✓ 不要触摸燃烧器、燃烧器附近区域、烤架、烤板、滴油盘、加
热元件或烤箱内表面。尽管这些表面的颜色较深,其温度也可能足以
导致烫伤。在使用过程中和使用之后,不要触摸这些部件和表面,亦
勿使衣物或其他易燃物接触这些部件和表面,直至等待足够长时间获
得冷却。产品的其他部件和表面可能发热导致烫伤,其中包括炉篦、
背面装饰和炉灶背面的烤箱通风口、前缘、炉灶附近表面以及烤箱
门。
✓ 只能使用干燥锅垫。在高温表面放置湿润或潮湿锅垫可能导致
蒸汽烫伤。不要让锅垫接触高温加热元件。不要使用毛巾或其他大块
布料。
✓ 处理热油脂之前,请先等待其冷却。
如不遵守这些建议,可能导致烧伤和烫伤。
其他安全提示
✓ 使用前阅读说明
使用产品之前,请阅读所有说明。只能将产品用于说明
书中所述的预期用途。
✓ 正确安装炉头
务必确保由合格技术人员正确安装炉头并接地。

全燃气烤箱
9
安全和警告
✓ 如果炉头损坏,不要安装或操作。
如果产品损坏或工作不正常,不要操作。如果收到损坏
的产品,请立即联系经销商或安装人员。
✓ 了解如何在紧急情况下关闭电源
务必让安装人员告诉您在何处以及如何关闭燃气烤箱的
电源(即,电源保险丝或断路器面板的位置),以及在
紧急情况下,在何处以及如何关闭燃气烤箱的燃气供
应。
✓ 不要将儿童单独留在炉头附近
不得将儿童独留在正在使用产品的区域或无人看管。切
勿让儿童玩弄产品或者坐/站在产品的任何部位。
✓ 不要将玩具或糖果置于炉头上
出于安全考虑,不要将儿童感兴趣的物品置于燃气烤箱
上方的橱柜内或燃气烤箱后面-儿童爬上燃气烤箱拿取物
品可能遭受严重受伤。
✓ 不要穿戴可能着火的衣物。使用产品时,不要穿
戴宽松衣物或挂装。
✓ 不要自行维修或更换部件(除非有建议)
不要自行维修或更换产品的任何部件(除非说明书中特
别推荐)。所有其他维修均应交由合格的技术人员处
理。技术人员在进行任何维修之前,必须切断产品电
源。
✓ 小心打开烤箱门
打开烤箱门时务必小心,取出或更换食物之前,务必等
待热空气或蒸汽排出。
✓ 保持烤箱通风管道畅通。
✓ 不要触摸烤箱的高温烤架
将烤箱烤架滑入烤箱之前,请确保烤箱冷却,以免手被
烫伤。如果必须在烤箱加热期间取出烤架,不要使烤箱
手套或锅垫接触烤箱底部或高温加热元件。
✓ 保护烤箱密封垫
不要清洁烤箱密封垫或在其上使用任何烤箱清洁产品。
烤箱密封垫是保持良好密封性的关键所在,可确保烤箱
高效运行。应注意不要摩擦、损坏或移动烤箱密封
垫。
✓ 保护烤箱玻璃门
不要使用刺激性/磨蚀性清洁剂、刮板或锋利的金属刮刀
清洁烤箱门玻璃,否则会刮伤表面,导致玻璃破碎。
✓ 切勿踩踏烤箱门或在上面放置重物(例如,火
鸡)。
✓ 检查燃气泄漏
产品安装完毕后,请在使用前按说明检查燃气是否泄
漏。
✓ 必须安装通风罩
如未安装适当尺寸且可正常使用的通风罩,不要操作本
产品。
✓ 使用适当的燃气转换套件
炉头适于搭配天然气或液化丙烷一起使用。如果您不确
定产品适用于 NG 或 LP,请联系经销商进行确认。如需
转换 LP,请使用特定型号的转换套件。请联系认证技术
人员安装产品和套件(在正常营业时间内提供技术支
持)。如果计划转售产品,请注明安装有天然气还是 LP
套件。
✓ 炉头燃烧时,不要在炉头上方拿取物品。拿取产
品上方橱柜中存放的物品时,务必小心。
✓ 使用本产品前,请阅读所有说明,以确保正确和
安全操作。只能按照提供的安装说明安装或放置产品。
✓ 除非本指南特别建议,否则不要尝试调整、维
修、检修或更换产品的任何部件。
✓ 不要将燃气烤箱用作空间加热器。
✓ 不要让儿童在无人看管的情况下,进入燃气烤箱
使用区域。切勿让儿童坐/站在燃气烤箱的任何部位。切
勿让儿童玩弄燃气烤箱。
✓ 所有检修工作均应交由认证技术人员进行。
✓ 让技术人员向您说明燃气安全阀的位置以及在紧
急情况下如何关闭燃气安全阀。

全燃气烤箱
10
安全和警告
✓ 进行任何类型的检修之前,请务必切断产品电
源。
✓ 不要在本产品上使用磨蚀性或腐蚀性清洁剂或洗
涤剂。否则可能对表面造成永久性损坏。
✓ 烹饪时,适当设置燃烧器控制器,使火焰仅加热
烹饪产品底部,而不覆盖烹饪产品两侧。
✓ 导热缓慢的产品(锅和平底锅),即玻璃锅,
应与低中档火力的燃烧器火焰一起使用。
✓ 关闭所有控制装置,等待产品部件冷却后再触
摸。冷却前,不要触摸燃烧器炉架或周围区域。
✓ 切勿用水扑灭油脂火。
✓ 小心清洁产品。
✓ 始终将锅柄转到燃气烤箱的侧面或背面。不要将
锅柄转向容易烫伤的地方。锅柄不应伸出邻近的燃烧
器。
✓ 燃气烤箱只能用于本说明书概述的烹饪任务。使
用燃气烤箱时,不要触摸炉架、燃烧器盖、燃烧器底座
或靠近火焰的任何其他部件。这些组件的温度可能足以
导致烫伤。
✓ 使用干燥锅架。在高温表面放置湿润或潮湿锅垫
可能导致蒸汽烫伤。
✓ 不要使用毛巾或其他大块布料。
✓ 不要加热未开封的食物容器。
压力积聚可能导致容器爆炸并造成伤害。
✓ 使用过程中和使用后,冷却前不要触摸烤箱内表
面
✓ 不要让锅架接触高温表面
全燃气烤箱
11
尺寸和间距
5. 燃气供应要求
本燃气烤箱的安装必须符合当地规范,或者如果没有当地规范,则必须符合国家燃气规范
(
ANSIZ223.1/NFPA 54
)。
在加拿大,安装必须符合现行天然气安装/规范 CAN 1-1.1-M81 以及适用的当地规范。
本燃气烤箱已通过 ANSIZ21.1a 最新版本的设计认证。
读数
LP (液化石油气),w.c.
NG(天然气),w.c.
最大燃气压力
13.0.
10.0
出口压力的设备调节器设置
10.0
5.0
燃气操作安全提示
✓ 保持设备区域畅通,远离可燃物、汽油和其他易燃蒸汽。
✓ 不要堵塞进入燃气烤箱的助燃空气流和离开燃气烤箱的通风空气流。
✓ 通风:必须将装置安装在足够大小和容量的电动通风排气罩下。
✓ 在安装燃气烤箱之前,必须找到附带的防倾倒支架,并将其固定在燃气烤箱壁上。
✓ 在产品上方使用橱柜存放物品可能会导致潜在的燃烧危险。易燃物品可能会引燃;金属物
品可能会变热并导致烧伤。如果要使用橱柜存放物品,可通过安装一个水平伸出橱柜底部至少 5
英寸(12.7 厘米)的燃气烤箱来降低风险。
小心

全燃气烤箱
12
尺寸和间距
✓ 该产品不得用于空间加热。此信息基于安全考虑。
✓ 产品后面墙壁以及产品下方地板中的所有开口应密封。
6.
尺寸和间距
✓ 燃气烤箱可与后墙齐平安装。
✓ 您可以在燃气烤箱上方的后墙上和通风罩上方安装不可燃材料,如瓷砖。
✓ 在台面高度以下的燃气烤箱后方不一定要安装不燃材料。
✓ 燃气烤箱台面以上一侧到可燃侧墙的最小距离必须至少为 10 英寸。
警告
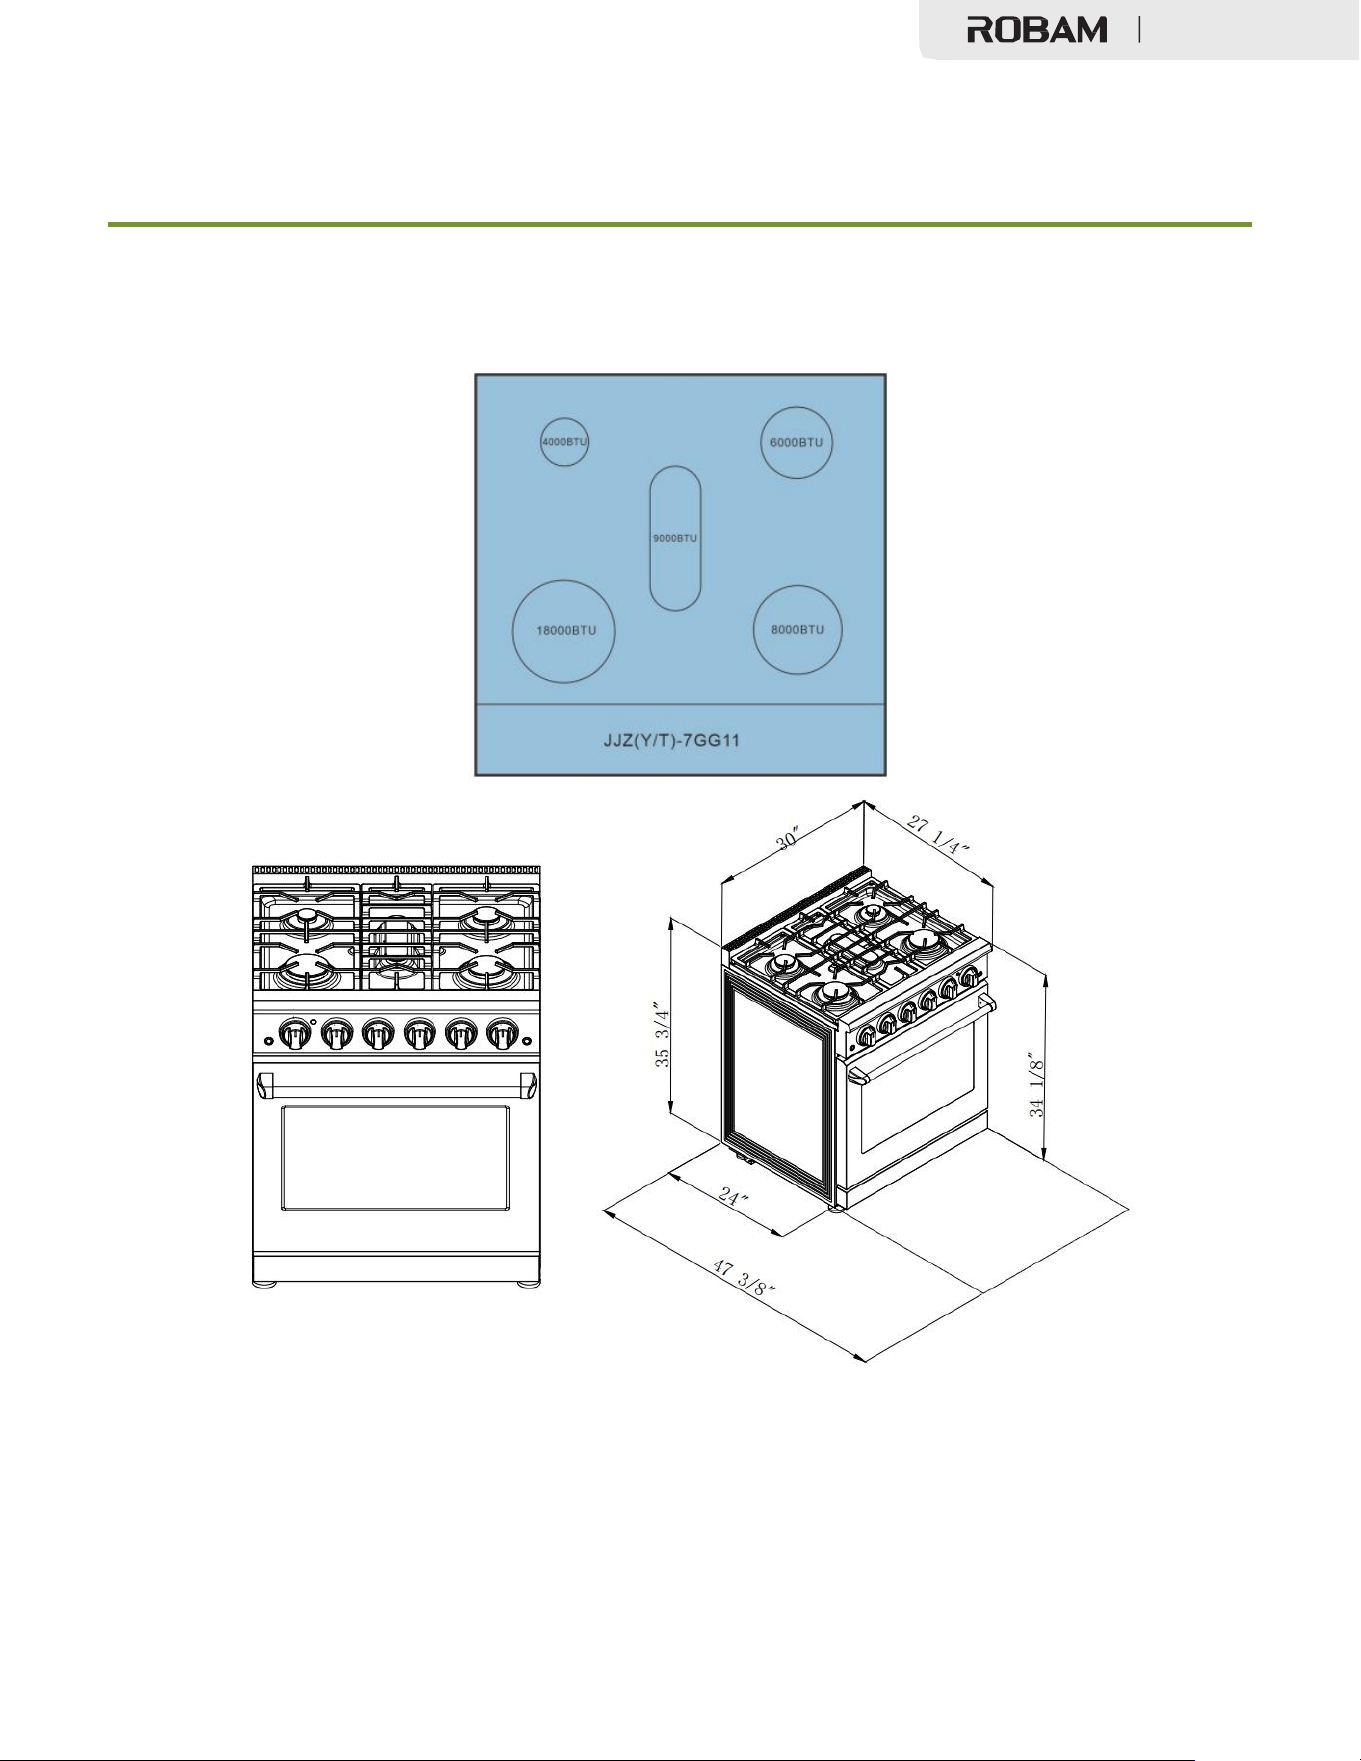
全燃气烤箱
13
尺寸和间距
BTU 设计
JJZ(Y/T)-7GG11
灶台上方安装橱柜的最大深度为 13 英寸(330 mm)。
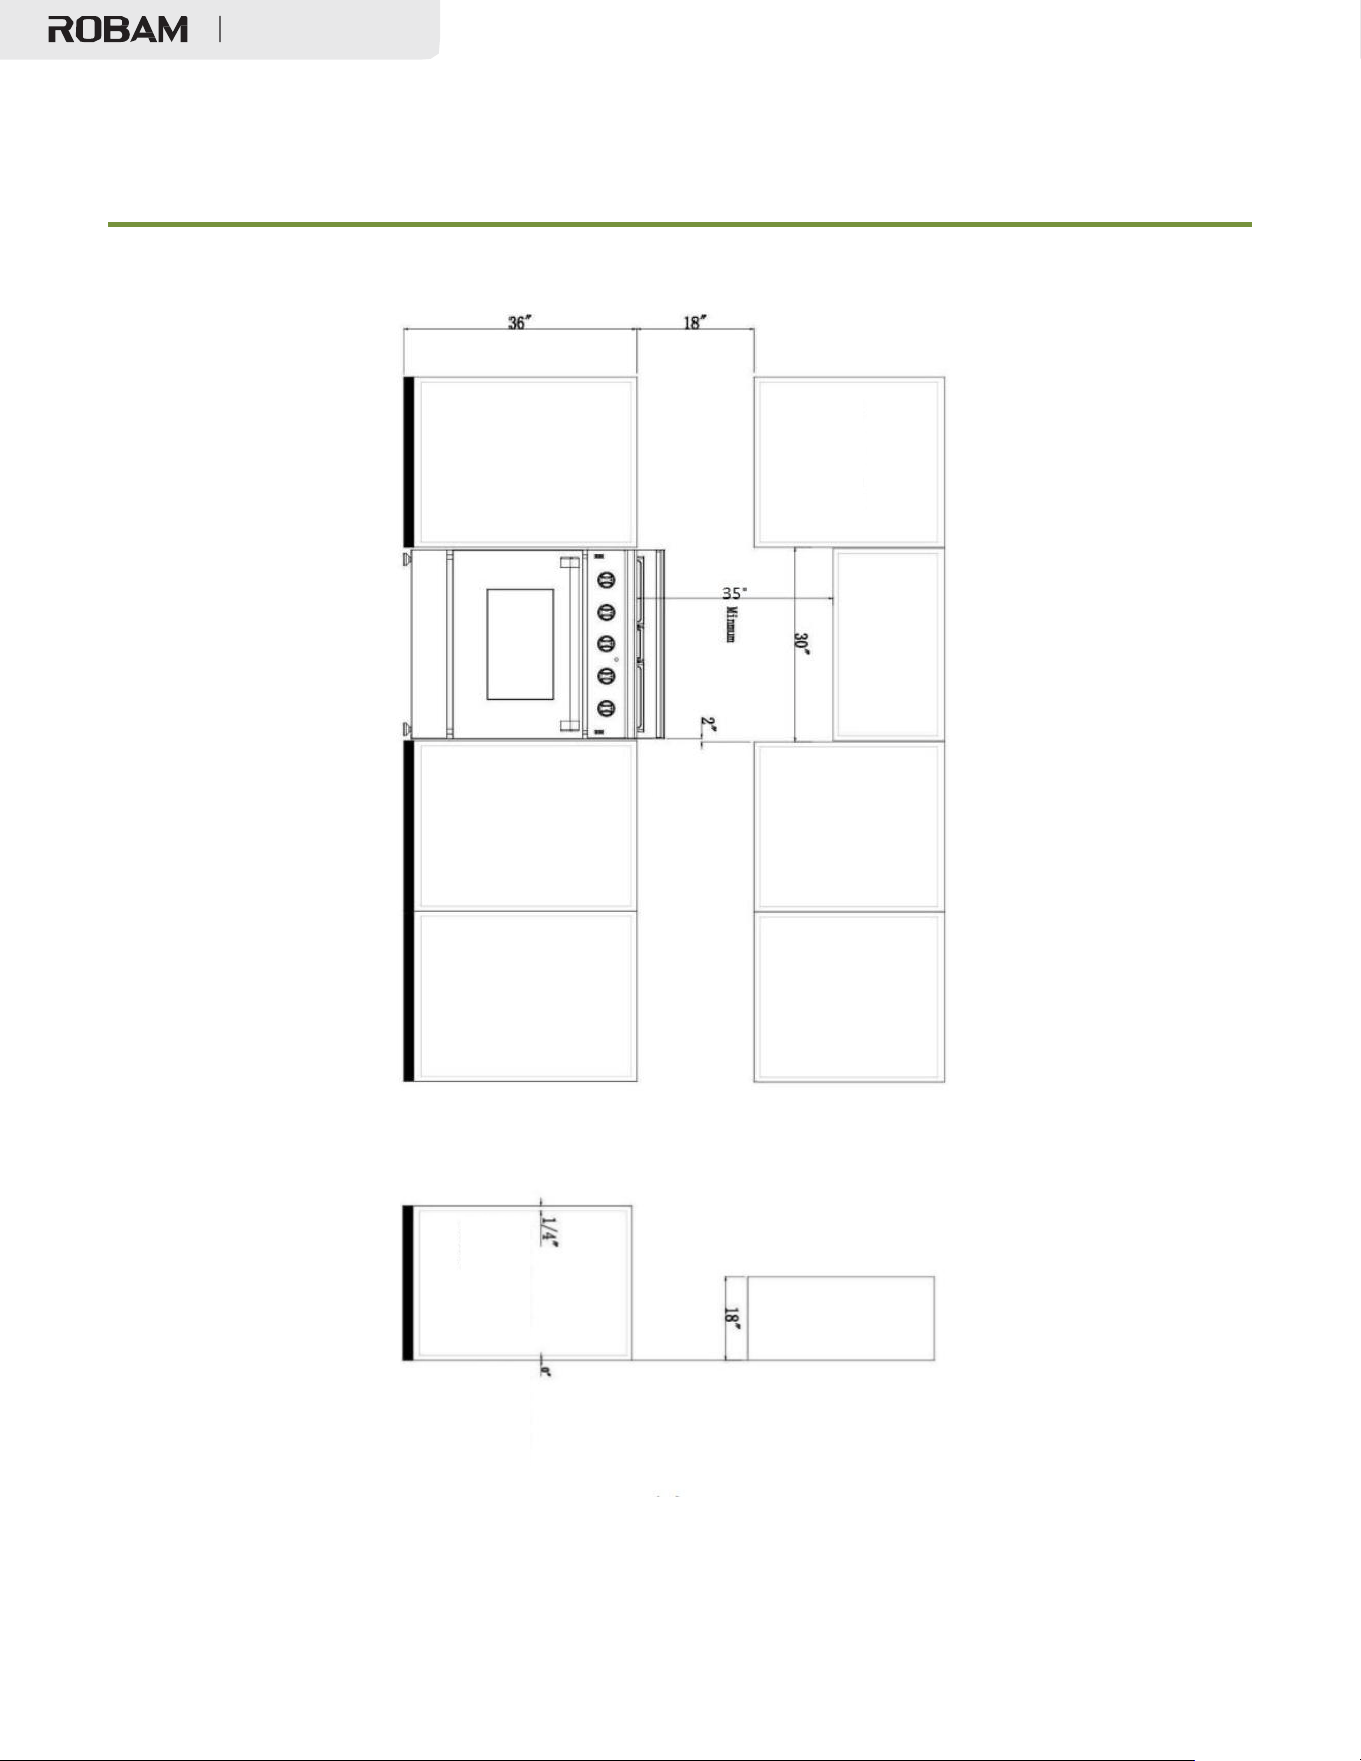
全燃气烤箱
14
尺寸和间距
30 英寸燃气烤箱间距
与燃气烤箱两侧墙壁的
最小距离
与燃气烤箱两侧
橱柜的最小距离
台面上方橱柜的
最大深度
燃气烤箱侧板前
缘与橱柜的距离
至炉灶下方的台
面和燃气烤箱背
面

全燃气烤箱
15
尺寸和间距
顶部烟机和橱柜规格
条件
允许的最小间距
烹饪面顶部与未受保护的木质或金属橱柜底部之间的间距。
35
英寸
烹饪表面顶部和底部木质或金属橱柜之间的间距,通过不小于以下规格的
物体保护:
● 1/4 英寸厚的阻燃木板,外层覆盖不小于:
o 28 号 MSG 钢板或
o
0.015
英寸厚的不锈钢或
o 0.024 英寸厚的铝或
o
0.020
英寸厚的铜
24 英寸
烹饪面顶部与未受保护的木质或金属橱柜底部之间的双燃气烤箱间距。
40
英寸
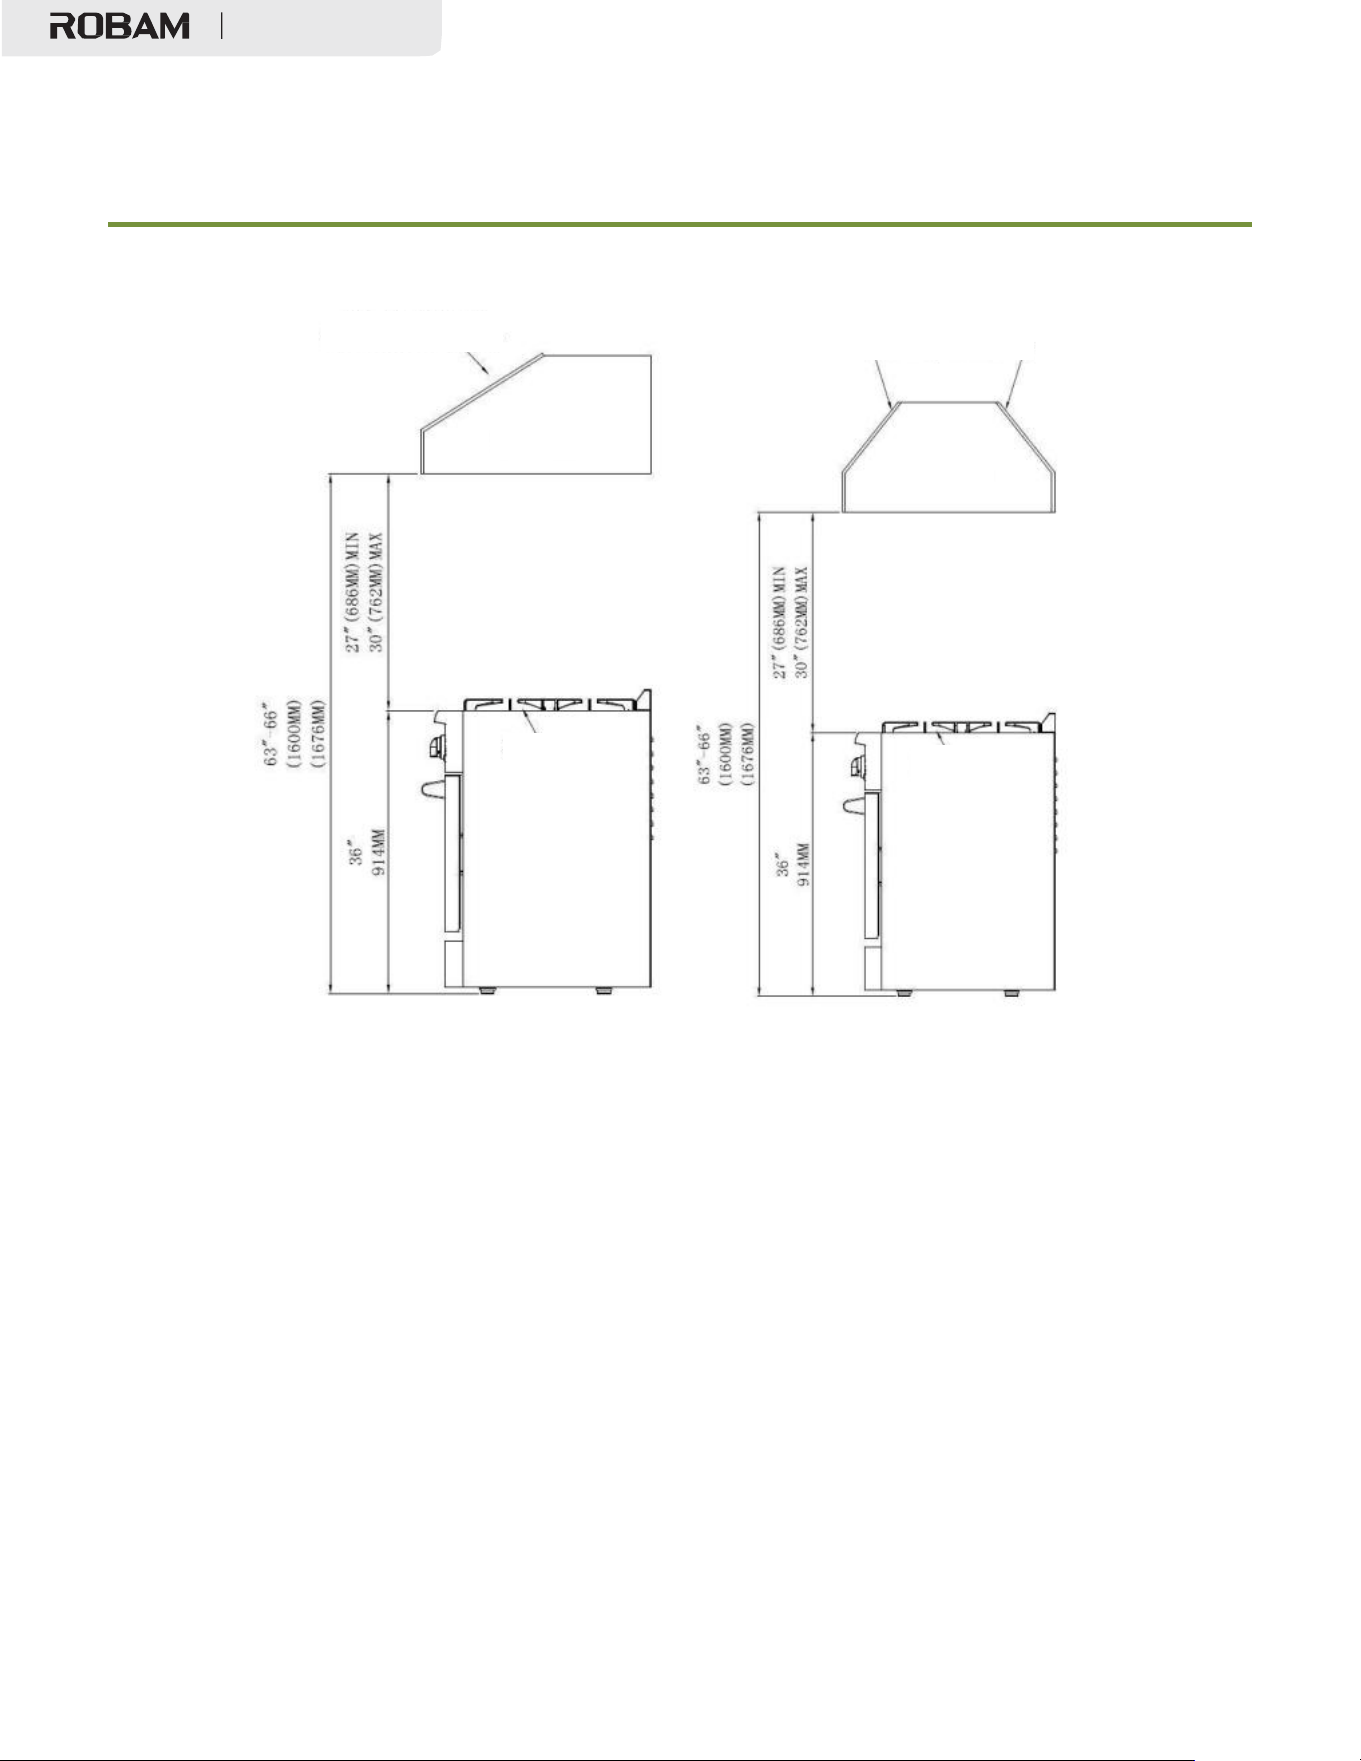
全燃气烤箱
16
尺寸和间距
7.
电力供应要求
燃气烤箱必须按照当地法规进行电气接地,如果没有当地法规,则必须按照国家电气法规
(ANSI/NFPA 70,最新版本)进行电气接地。
在加拿大,电气接地必须符合现行
CSA C22.1
加拿大电气规范第
1
部分和
/
或当地规范。该标准
副本可从以下地址获取:国家防火协会,1 Battery march Park, Quincy, Massachusetts 02269-9101。
电源极性必须正确。极性相反会导致电极持续产生火花,甚至在火焰点燃后也会出现这种情况。
如果对电源极性或接地是否正确有任何疑问,请由合格电工进行检查。
使用
120V
、
60Hz
和由
15A
或
20A
电路保护的正确接地的分支电路
工作台面
金属罩
金属罩
墙壁安装
木质复合材料覆盖层
墙壁安装
木质复合材料覆盖层
工作台面
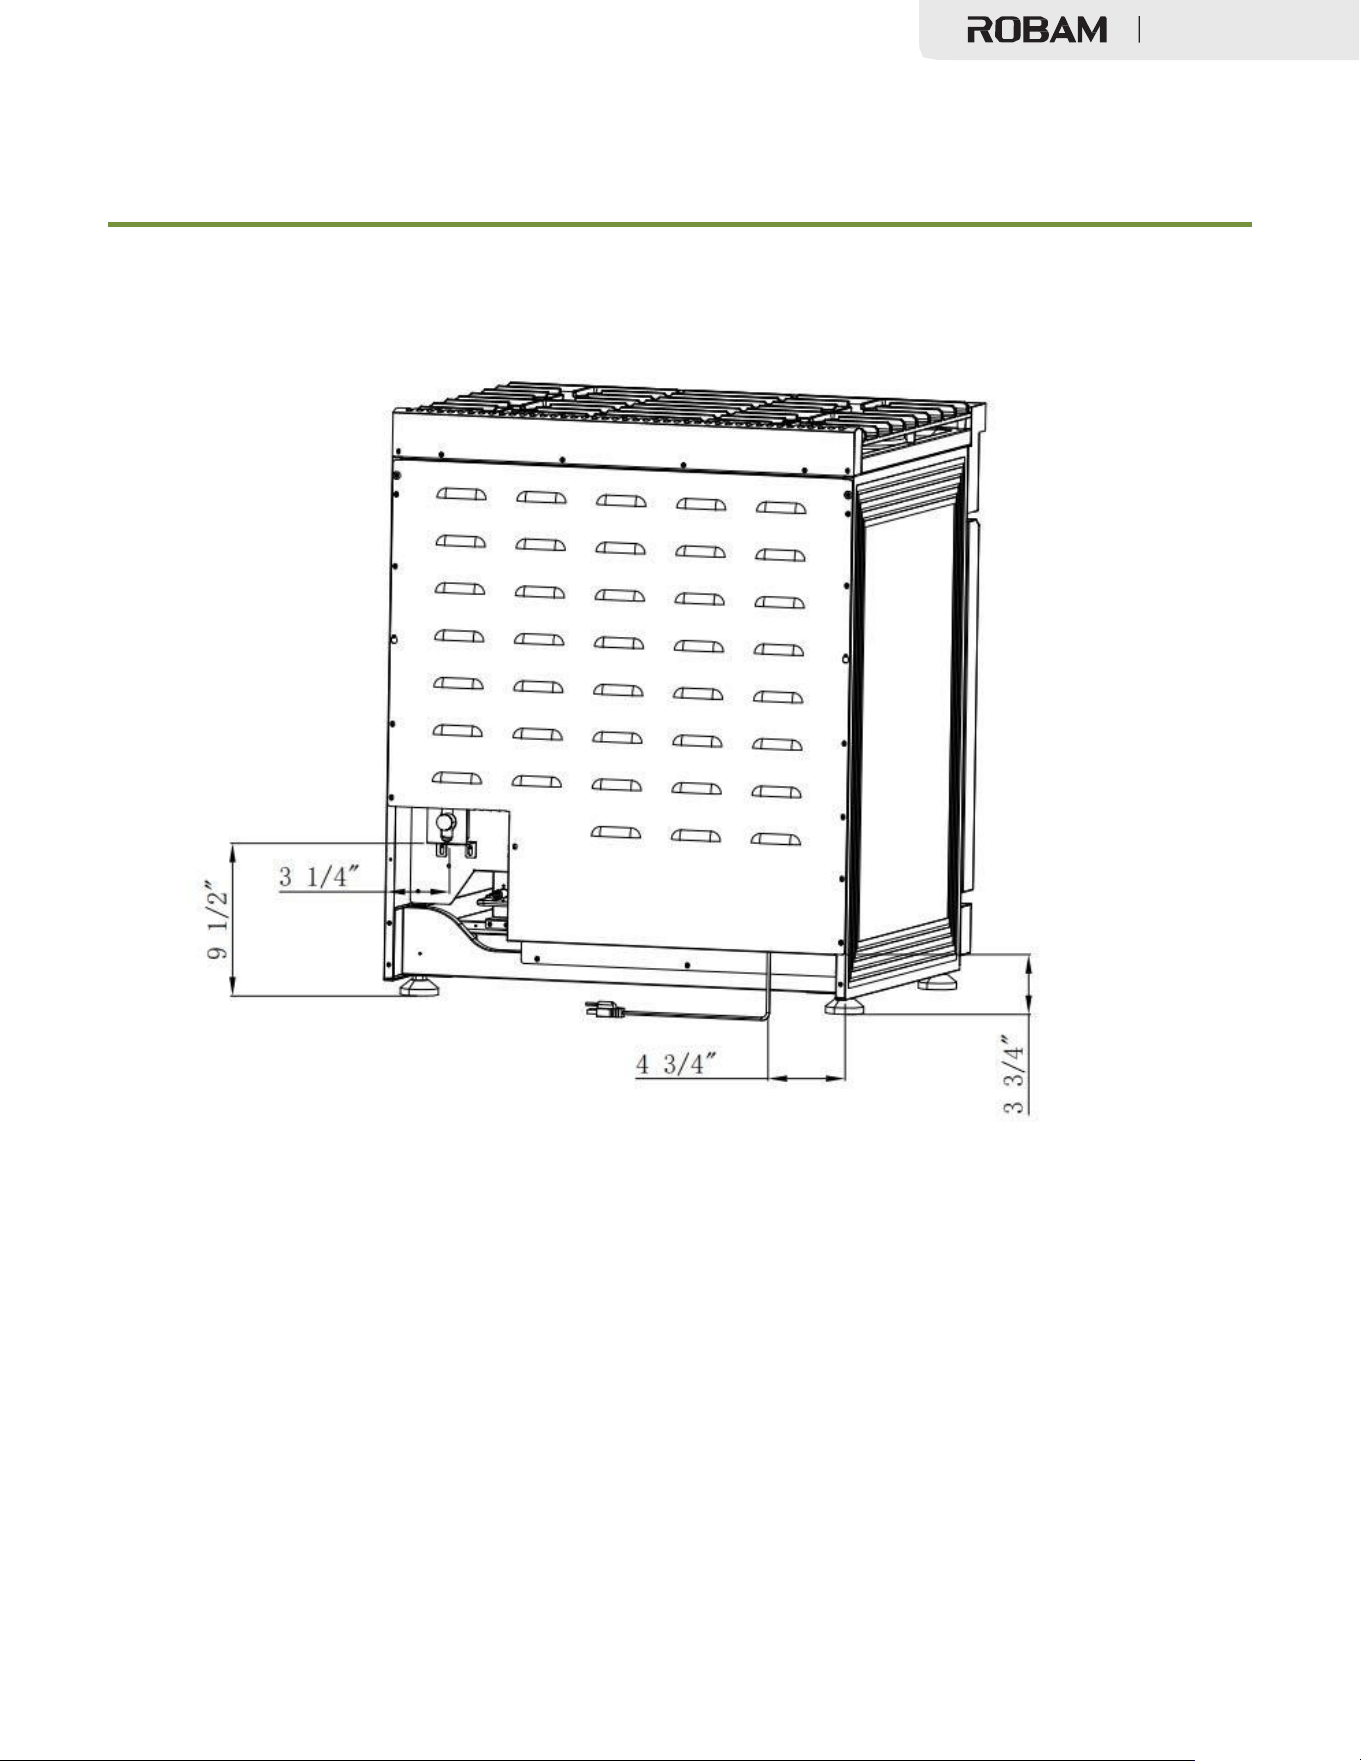
全燃气烤箱
17
尺寸和间距
JJZ(Y/T)-7GG11 燃气烤箱安装
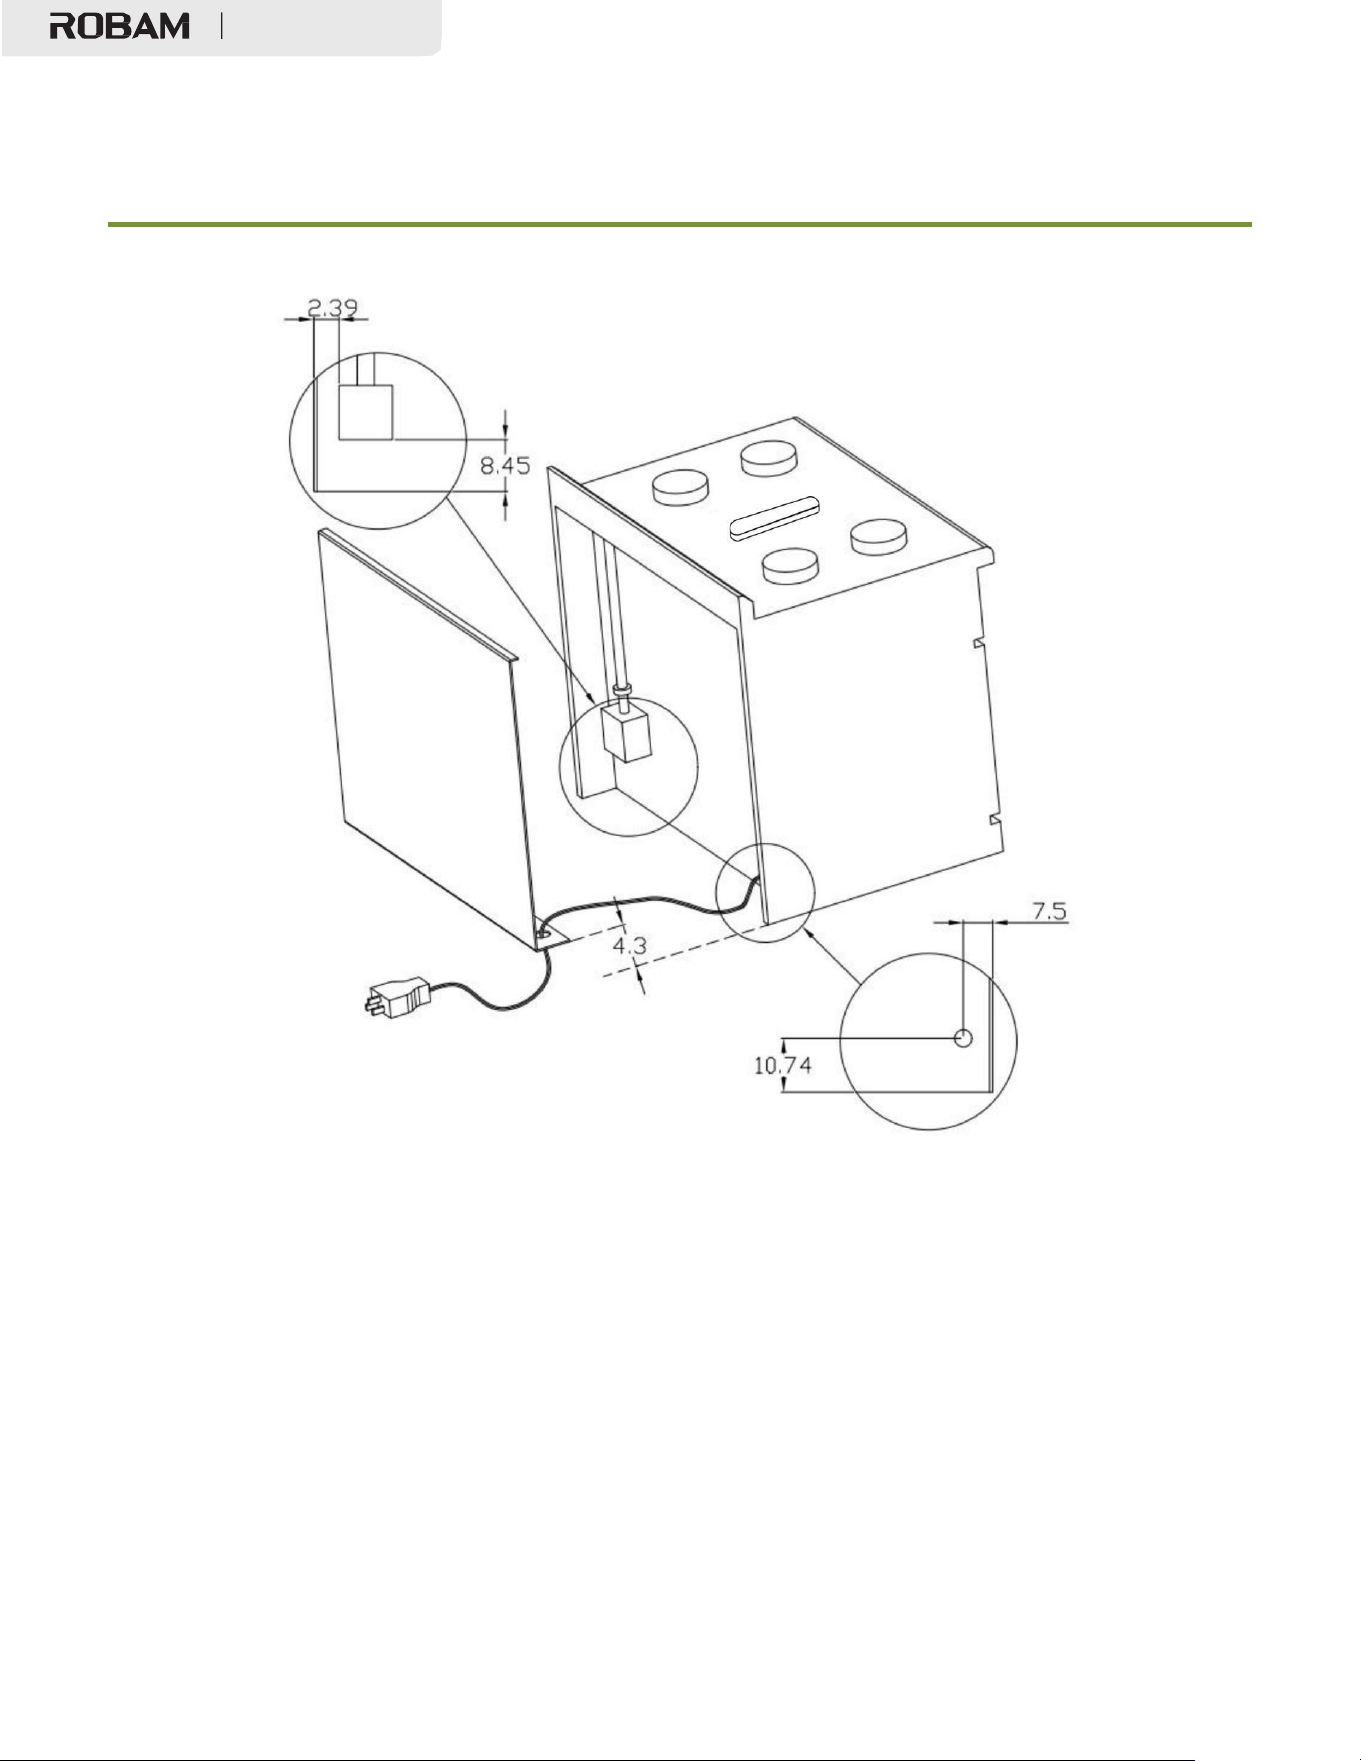
全燃气烤箱
18
尺寸和间距
JJZ(Y/T)-7GG11
燃气烤箱安装
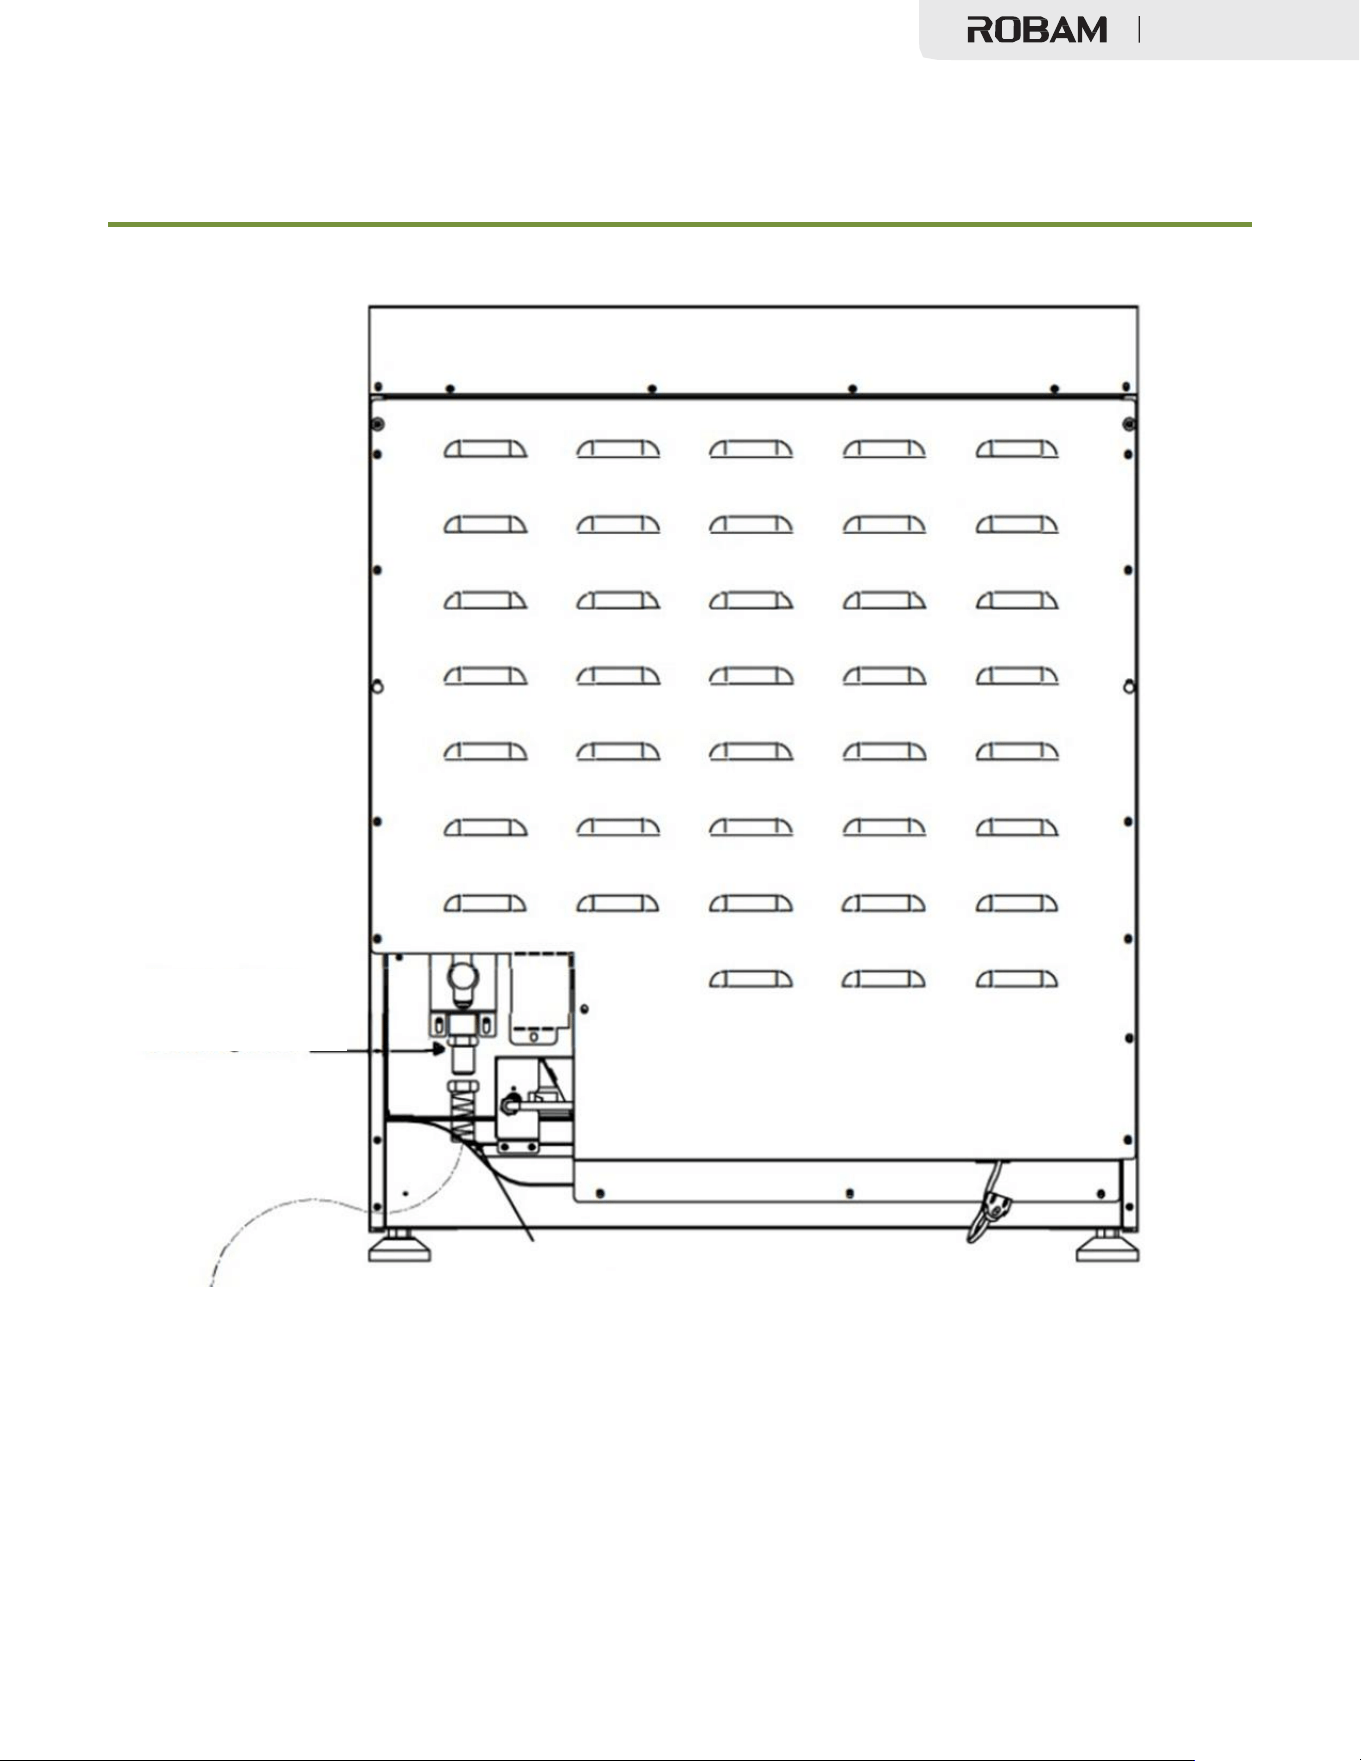
全燃气烤箱
19
尺寸和间距
燃气管线连接
将燃气管线连接到调节
器底部
全燃气烤箱
20
将燃气烤箱连接至燃气供应
8. 电气接地说明
本室内燃气烹饪产品配有一个三脚(接地)插头,用于防止触电危险,应直接插入正确接地的三
脚插座。
如果是标准的两脚壁式插座,用户有责任和义务将其更换为正确接地的三脚壁式插座。
不要剪断或拔掉电源线上的接地插脚。
在将插头连接到电源线之前,请断开电源。
维修控制器时,在断开连接之前标记所有电线。接线错误可能导致不正确和危险的操作。维修后
确认操作正确。
9. 将燃气烤箱连接至燃气供应
大多数地方都要求由经认证的技术人员或管道工安装燃气烤箱安全阀和燃气连接。这些说明适用
于专业人员。燃气安装规范和规定可能有所不同,因此在进行安装之前,请查阅当地规范。
1
、在燃气管线上安装手动燃气管道安全阀,具体方法如下所示:
a、安装在燃气烤箱外易于触及的位置
b、安装在产品外部的燃气管道中
2、在调节器入口处安装外螺纹 1/2 英寸扩口联合转换接头和 1/2 英寸 NPT 内螺纹弯头。
在配有标准双燃烧器的型号上,将
1/2
英寸扩口联合转换接头的外管螺纹端安装到压力调节器入
口处的 1/2 英寸 NPT 内螺纹上。
用扳手拧紧调节器接头以避免损坏。
小心
警告

全燃气烤箱
21
将燃气烤箱连接至燃气供应
1、将 1/2 英寸或 3/4 英寸(3/4 英寸是指 48 英寸燃气烤箱)扩口外螺纹接头安装到手动安全阀的
NPT 内螺纹上,注意固定安全阀,以防止其转动。
2、检查调节器设置的供气压力为 6 英寸 w.c.(天然气)和 11 英寸 w.c.(液化石油气),将软燃
气管线连接器连接到燃气烤箱上的调节器。调整燃气烤箱位置,以便在安全阀处进行连接。
3、完成所有连接后,确保所有燃气烤箱控制装置均已就位,并打开主供气阀门。
4、产品泄漏测试应按照制造商说明进行。在所有接头和连接处使用肥皂水(50%水和 50%肥皂)
或检漏仪检查系统是否泄漏。不要用火焰检查燃气泄漏。
5、在测试压力等于或小于 1/2 psi(3.5 kPa)的任何楼宇燃气供应管道系统压力测试期间,必须
关闭产品单独的手动安全阀将产品与供气管道系统隔离。
安装后:
1、检查炉灶燃烧器的点火情况。
2
、检查烤箱燃烧器的点火情况。
3、目视检查管状燃烧器(烤箱燃烧器)的重新点火情况,确保每次都能重新点燃两排燃烧器端
口。
4
、检查所有燃气连接处是否有燃气泄漏(使用燃气探测器,切勿点火)。
5、检查烤箱烘烤和对流烘烤功能。

全燃气烤箱
22
将燃气烤箱连接至燃气供应
10.
首次使用
调节烤箱
调温可以烧掉任何生产残留物,确保您从一开始就能获得最佳效果。
请按照以下步骤调节新燃气烤箱的烤箱:
1
、插入所有烤架。有关说明,请参见
“
放置烤架
”
。
2
、将燃气烤箱上方的通风罩开到最大。
3、将空烘箱加热至最高温度:
a、使用“烘烤”功能加热 30 分钟
b
、使用
“
烧烤
”
功能加热
30
分钟(仅限某些烤箱)。
4
、调节烤箱温度时,会有一股特殊的气味。这是正常现象,但请确保在调节期间厨房通风良好。
5、冷却后,用湿布和温和清洁剂擦拭烤箱,然后彻底擦干。
6
、放置烤架
7、两侧面板和烤板都带有安全挡块,以防止向前拉时滑出烤箱;
8、前挡板可防止烤板撞击烤箱背面
11. 炉灶安全指南
双燃烧产品有相同的小火慢炖的低档设置(SIM)(620 BTU/小时)。使用 SIM 设置可融化巧
克力和黄油、烹饪米饭和美味酱汁、煨汤和炖菜以及保持熟食的热度。
✓ 切勿在无人看管的情况下使用炉灶。沸腾会导致冒烟和油脂溢出,并可能点燃。
✓ 切勿让火焰超出炊具或卷曲在炊具侧面。这可能会使器皿褪色或损坏,而且您可能会在触
摸热把手时被烫伤。
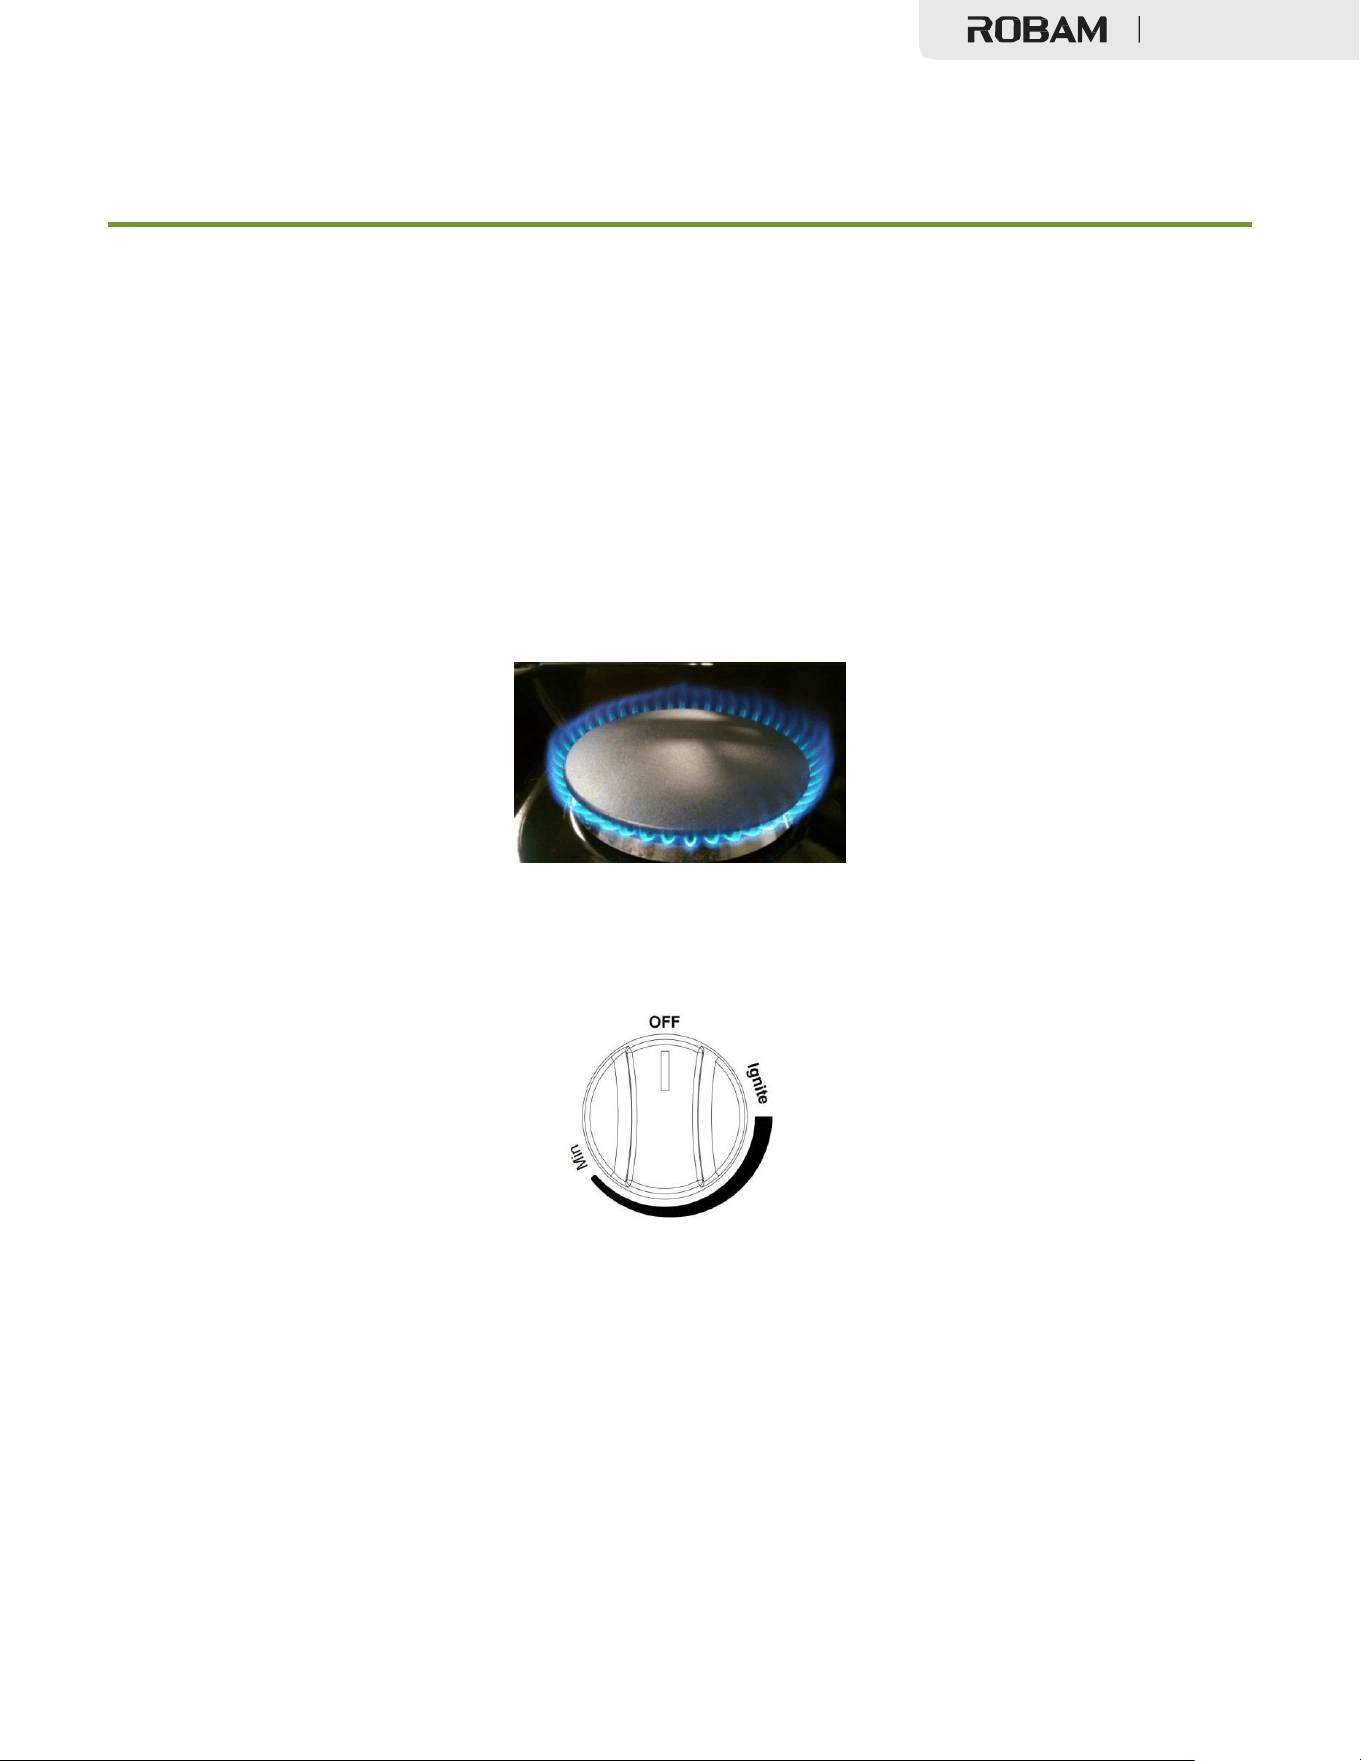
全燃气烤箱
23
将燃气烤箱连接至燃气供应
✓ 把手不能阻挡操作。转动把手时,使其不会伸出燃气烤箱边缘或放在打开的燃烧器上。
✓ 油炸时要小心。油或脂肪会很快过热,尤其是在高温下。
✓ 确保所有燃烧器部件均正确安装。安装错误或未完全组装的燃烧器可能会产生危险的火焰。
请参见“保养和清洁”中的 “更换燃烧器部件”。
✓ 保持燃烧器清洁,特别是在发生溢出或沸腾后,确保在再次使用前清洁受影响的燃烧器。
食物残渣可能会堵塞点火器和喷火圈,导致燃烧器无法正常工作。有关说明,请参见
“
保养和清
洁”。
✓ 检查燃烧器是否着火。火焰应为蓝色,无黄色倾角,燃烧时不会在燃烧器盖周围翻腾。如
果没有着火,请参见
“
故障排除
”
获得建议。
炉头点火
如需点燃顶部燃烧器,请将相应的控制旋钮逆时针推转到“HI”位置。您会听到咔哒声——这是电
火花点燃燃烧器的声音。燃烧器点火后,转动燃烧器控制旋钮以调节所需的热量设置。

全燃气烤箱
24
将燃气烤箱连接至燃气供应
注意:当其中一个燃烧器转到
“HI”
位置时,燃烧器点火器将停止工作。当另一个燃烧器打开时,
不要试图拆卸或清洁任何燃烧器周围。当点火器点火时,不要触摸任何燃烧器盖、燃烧器底座或
点火器。
煨煮
小火可以获得最佳的煨煮效果。小火可为清淡食物、食物保温、融化巧克力或黄油以及需要长时
间小火烹饪的食物提供精确的烹饪效果。
最高火力设置可提供燃气烤箱上的最大热量。该设置适用于重负荷烹饪,如烧水或烹饪意大利面。
火力大小
在选择火力大小时,请在转动旋钮时观察火焰。
任何超过炊具底部范围的火焰都会被浪费。火焰应稳定且呈蓝色。在初始操作期间,燃气管线中
的异物可能会导致橙色火焰。
电源故障
如果燃气在 4 秒钟内没有点燃,请关闭阀门并至少等待 5 分钟让燃气消散。重复点火步骤。
如果电源故障,则无法安全运行,用户不得尝试在电源故障期间操作。
炉灶
为防止炉灶变色或染色,每次使用后都要清洁炉灶,并在炉灶冷却后立即擦掉酸性或含糖的溢出
物。
燃气烤箱的密封燃烧器没有与炉灶密封在一起,而是可拆卸的。沸腾或溢出物不会渗入炉灶下方。
每次使用后都应清洁燃烧器。
燃烧器炉头支撑架
烹饪前,必须正确放置炉架。炉架安装不当可能导致炉灶刮伤和
/
或燃烧不良。
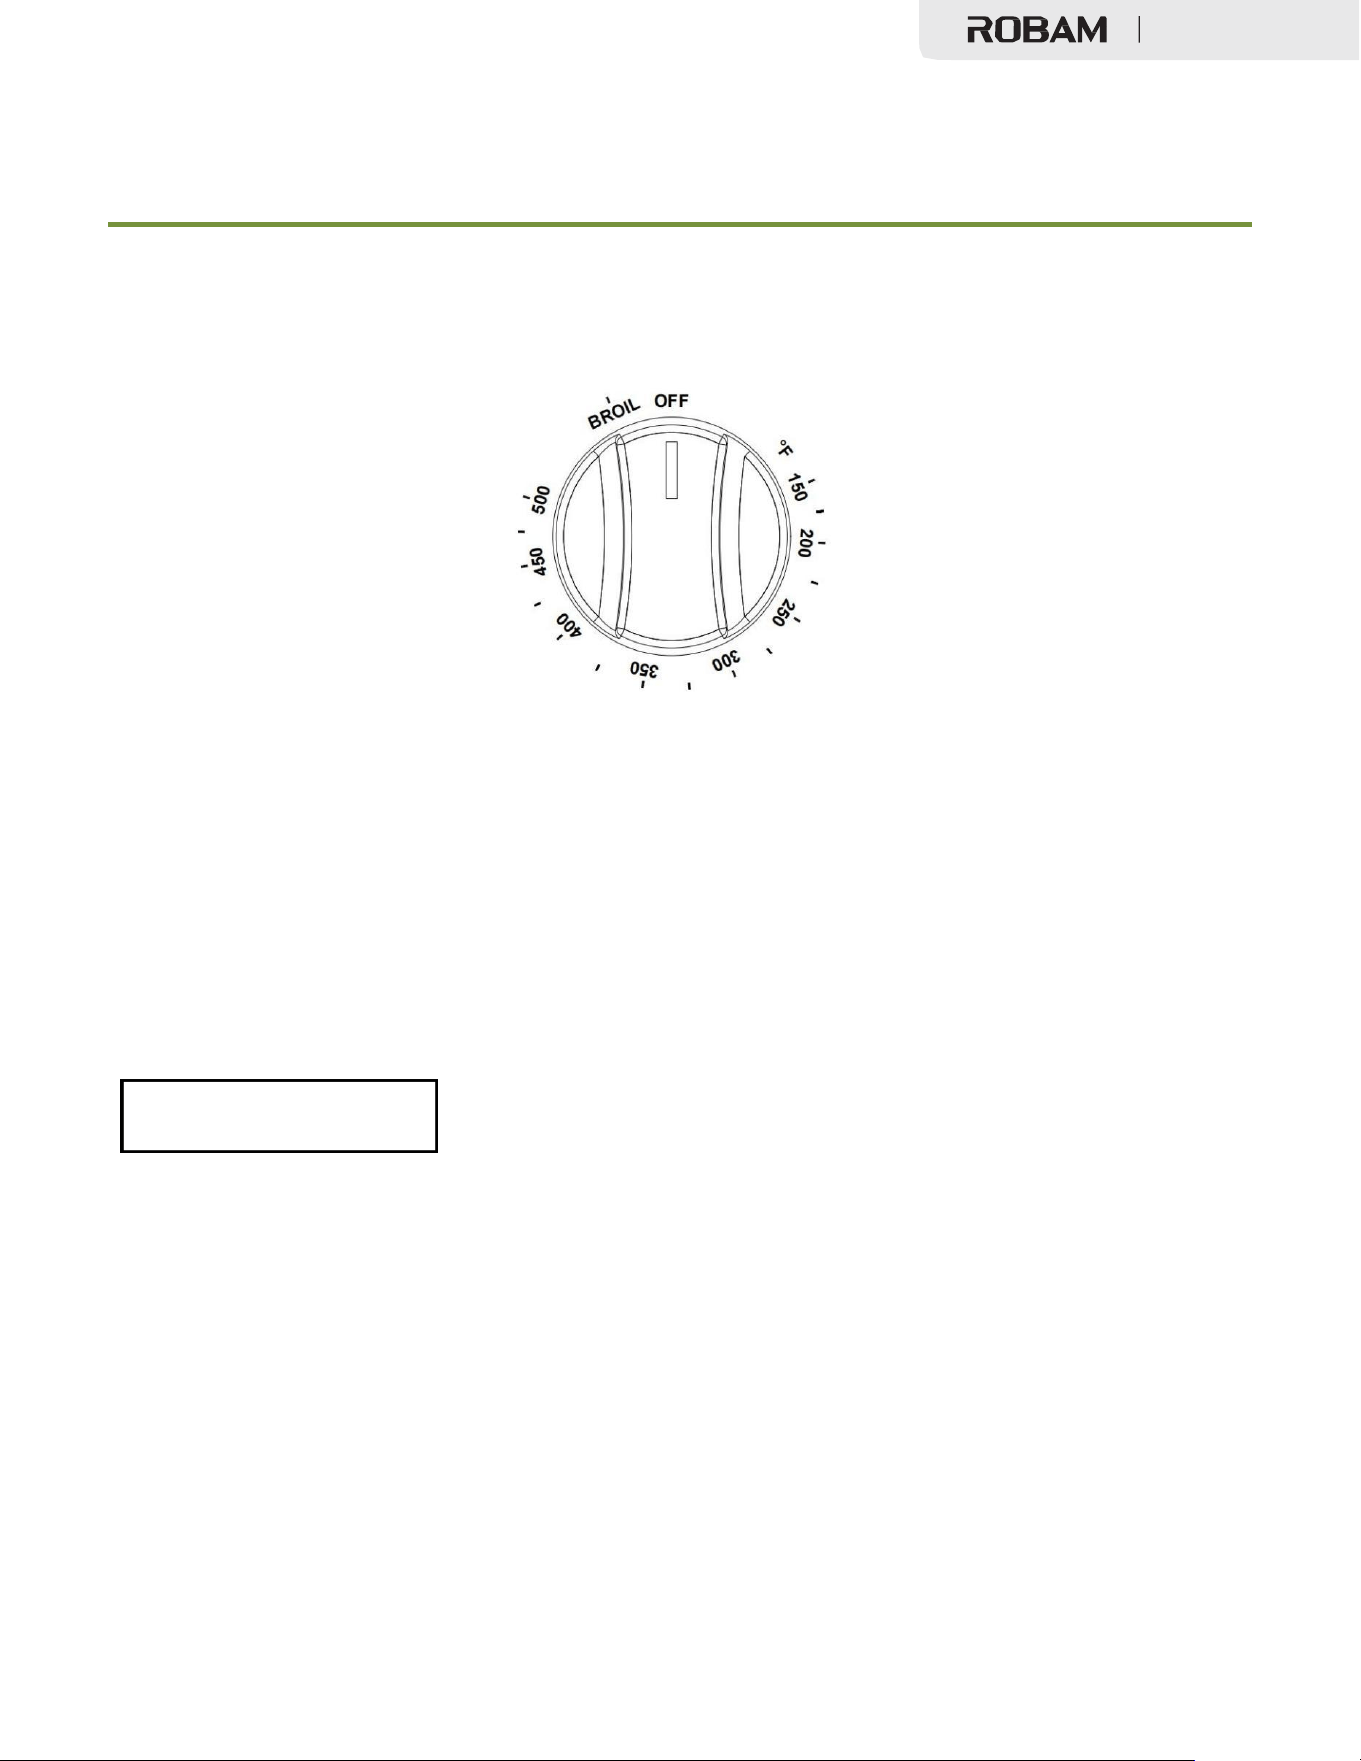
全燃气烤箱
25
炉灶安全指南
烤箱燃烧器的使用
如需点燃烤箱燃烧器,请将相应的控制旋钮逆时针转到合适(
150 ℉~500 ℉
)位置。您会听到咔
哒声——这是电火花点燃燃烧器的声音。燃烧器点火后,转动燃烧器控制旋钮以调节所需的热量
设置。
烤炉燃烧器的使用
如需点燃烤炉燃烧器,请将相应的控制旋钮顺时针转到“Broil”位置。您会听到咔哒声——这是电
火花点燃燃烧器的声音。持续按压约 4 秒钟,直到燃烧器点燃。
烤箱烹饪指南
✓ 在烤箱中烹饪时,不要堵塞燃气烤箱后方的管道。重要的是,从烤箱排出的热空气和进入
烤箱燃烧器的新鲜气流不可在烤箱或者烤炉工作期间中断,避免接触通风口或附近的表面,因为
这些区域温度很高。
✓ 所有烤箱模式均在关闭烤箱门的情况下使用。
✓ 切勿使用铝箔纸覆盖烤箱烤板或将其铺在烤箱底板上。残留热量会对珐琅造成不可逆转的
损坏,甚至可能引起火灾。
重要
全燃气烤箱
26
炉灶安全指南
✓ 不要将水、冰或任何盘子或托盘直接放在烤箱底板上,否则会对珐琅造成不可逆转的损坏。
✓ 不要用铝箔覆盖烤盘的开槽烤网。这样会吸附油脂并可能引起火灾。
✓ 不要在烤箱中使用保鲜膜或蜡纸。
✓ 出于食品安全考虑,在烹饪或解冻前后,不要将在烤箱中放置食物超过两小时。这是为了
避免生物体污染,以免引起食物中毒。天气转暖时要特别注意。
根据美国农业部的规定:不要在 40 ℉至 140 ℉的温度下保存食物超过 2 小时。不建议在低于
275 ℉的温度下烹饪生鲜食品。
切勿用铝箔等材料覆盖烤箱底部的任何槽、孔或通道,或者覆盖整个机架。其会阻碍空气流经烤
箱,并可能导致一氧化碳中毒。
铝箔衬里也可能会产生热量,从而引发火灾。
警告
警告

全燃气烤箱
27
烤箱功能
12. 烤箱功能
自然气流烘烤
当热量从烤箱炉腔底部的烘烤燃烧器传入烤箱时,就会产生自然气流烘烤。热量随后通过自然气
流循环。这是一种传统的烘烤设置。
烧烤
烤炉燃烧器位于烤箱顶部。该燃烧器点燃后会产生热量,烧烤食物的外部并锁住汁液。
对流烘烤
烤箱对流风扇可在烤箱中循环和分配热量,从而实现更快、更均匀的烹饪。您可以使用对流烹饪
在多个烤架上烘烤更多食物。
使用对流风扇烘烤:
1
、使用烤箱前,先将烤箱底盖和烤架放好。
2、从烤箱中取出未使用的烤架和烘焙用具。
3、将烤箱预热至食谱中规定的温度。根据烤箱的温度和尺寸,预热大约需要 15-20 分钟。
4、将烤盘和食物均匀地摆放在烤架上。确保烤盘不会相互接触,也不会接触烤箱的两侧。烘烤
单件食物时,请务必将食物放在烤箱烤架中央。如果在多个烤架上烘烤,请确保烤架上的食物错
开,以使食物之间不会相互堆叠。
5
、使用对流烘烤时,可以降低食谱中规定的温度,保持烘烤时间不变,或者将烘烤时间缩短几
分钟,保持温度不变。对于烘烤时间超过一小时的食物,稍微降低温度和时间可能会达到最佳效
果。
6、深色金属烤盘或表面无光泽的烤盘比亮面烤盘吸热更快,非常适合制作馅饼、面包或任何需
要褐变或表皮酥脆的食物。
7
、亮面烤盘可能最适合制作需要轻薄、细腻褐变的食物(如蛋糕和饼干),因为它能反射一些
热量,减少烘烤表面的强烈加热。
8
、烘烤过程中避免频繁打开烤箱门。

全燃气烤箱
28
烤箱功能
对流烘焙
为达到最佳效果,请使用烤盘。烤盘用来接住溢出的油脂,并有一个盖子防止油脂飞溅。
对流风扇使加热空气在烤制食物周围循环,迅速封住汁液,使食物湿润鲜嫩,同时烤出金黄色的
外皮。
烤肉时,请使用与炉灶一起提供的烤盘和开槽烤网,以便将肉放在金属烤架上。这样可以使热空
气在肉周围循环,像旋转烤架一样使肉更均匀地烤焦。
当烘烤整只火鸡等较大的食物时,只需使用烤盘和烤网,以提高稳定性。
对流解冻
关闭温度控制后,烤箱后部的电动风扇会使空气循环。风扇可在不加热的情况下加速食物的自然
解冻。为避免疾病和食物浪费,不要在不烹饪的情况下让解冻食物在烤箱中停留超过两小时。
解冻
如需解冻未煮熟的冷冻食物,请将烤箱温度调至 100-150 ℉。解冻后,立即烹煮食物,不要再冷
冻。
为防止解冻食物的液体滴在烤箱底板上,请确保所有未烹饪的食物均使用铝箔纸紧紧包裹和/或
放在容器中。
对流脱水
当温度控制在 175 ℉时,热空气从烤箱炉腔底部的烘烤燃烧器辐射出来,并通过烤箱后部的电动
风扇循环。
经过一段时间后,食物中的水分会被蒸发掉。水分去除会增加微生物的生长并抑制酶的活性。

全燃气烤箱
29
烤炉操作
13. Broiler 操作
注意:烤箱操作时必须关闭烤箱门。
烧烤是一种直接在烤箱的红外线烤炉下烹饪嫩肉的方法。烤箱中的烧烤是在烤箱门关闭的情况下
完成的。为使食物具有烧烤的风味,出现一些烟雾属于正常现象,也是必要出现的现象。
如果要打开烤箱门检查食物,请尽量缩短开门时间。这是为了防止控制面板过热和旋钮熔化。
使用提供的烤盘和开槽烤网。格网可以让油脂滴入烤盘,远离高温,从而减少冒烟和飞溅。为防
止食物粘连,可在网格上喷一层薄薄的不粘烹饪喷雾。
预热
烤制生牛排时建议进行预热(在使用红外线烤炉进行预热前,请取下烤盘。食物会粘在硬金属
上)。如需预热,将
“
烤箱
”
选择旋钮转到
“Broil”
位置。等待燃烧器变热,大约需要
2
分钟。烤全
熟肉类时无需预热。
调至“Broil”
将一面烤至食物变色,翻面再烤第二面。调味即可食用。在翻转或取出食物之前,请务必要将烤
架拉到“OFF”位置。
Broil 设置
“烤箱”选择旋钮控制烧烤功能。烧烤时,热量从烤箱烤炉向下辐射,以达到均匀覆盖的效果。烧
烤功能的温度为
500 ℉
(
260 ℃
)。
烤盘和内胆一起使用时,可将滴落的油脂排出,并远离烤箱烤炉的高温。不要在没有内胆的情况
下使用烤盘。
不要用铝箔覆盖烤盘内胆。外露油脂可能会着火。

全燃气烤箱
30
烤炉操作
将烤箱设置为“Broil”:
1、将烤盘内胆放在烤盘上。然后将食物放在烤盘内胆上。
2、摆放烤箱内部烤架,然后将烤盘放在烤架上。请务必要将烤盘放在正中间,并置于烤炉燃烧
器的正下方。如果先预热烤炉燃烧器,则在烤炉燃烧器预热后再放置烤盘。
3、将选择旋钮转到“Broil”。
烤箱指示灯将一直亮着,直到选择旋钮转到关闭位置或温度控制器循环关闭。
烧烤指南
选择合适的烤架位置。为确保肉类完全烤熟,而不仅仅是外焦,请将厚肉片和家禽放在烤架的 2
号或 3 号位置烧烤。对于牛排、排骨或汉堡肉饼等需要较少烹饪时间的薄肉类,可使用烤架位置
4。
当在烤炉下煎烤食物表面时,应使用金属或玻璃陶瓷烤盘。不要使用耐热玻璃或陶器,因为它们
无法承受烤炉的高温。
将食物放在烤箱的正中间,使其位于烤炉的正下方。
✓ 当使用产品或第一次使用时。应打开烤箱和烤炉燃烧器,以燃烧制造油。将烤箱温度调至
450 ℉(230 ℃)20 至 30 分钟。然后将烤箱控制旋钮转到“Broil”位置,持续同样的时间。建议
此时打开燃气烤箱上方的通风装置。
✓ 在维修或清洁产品前,必须断开电源。如不遵守本建议,可能导致人员伤亡。
小心

全燃气烤箱
31
清洁说明
14. 清洁说明
应采取的措施
✓ 开始清洁燃气烤箱前,请阅读本清洁说明和“安全和警告”部分。
✓ 在清洁或拆卸任何部件之前,请确保燃气烤箱上的所有设备均已关闭。
✓ 除非下表中另有建议,否则在清洁前应让任何部件冷却至安全温度。如果您确实需要处理
温热或炙热部件(如烤架或烤板),请务必小心。戴上长防护手套,以免被蒸汽或热表面烫伤。
✓ 先在小范围内尝试使用任何清洁剂,以确保不会弄脏。
✓ 有关拆卸和更换燃气烤箱各个部件以进行清洁或维护的说明,请参见本图表后面的各页。
✓ 为帮助您识别任何部件,请参阅“介绍”部分和本清洁图后的插图。
不应采取的措施
✓ 在燃气烤箱完全冷却之前,不要使用喷雾清洁剂。这些清洁剂中的推进剂遇热可能会起火。
✓ 不要让污垢或油脂积聚在炉灶内或燃气烤箱上的任何地方。这将增加以后清洁的难度,并
可能造成火灾危险。
✓ 不要使用任何研磨性或刺激性清洁剂、抹布、百洁布或钢丝球。这些物品会划伤您的燃气
烤箱并损坏其外观。
✓ 不要使用蒸汽清洁器清洁燃气烤箱的任何部件。
✓ 不要从炉灶上提起黑色炉架和烤板框架。
炉头顶盖和喷火圈清洁
1、检查燃烧器是否关闭,并使其冷却。取下炉头顶盖和喷火圈。用热肥皂水清洗、冲洗并擦干。
2
、使用硬尼龙刷或直头回形针清理喷火圈。正确更换喷火圈和炉头顶盖。

全燃气烤箱
32
清洁说明
3、在清洁炉灶之前,确保所有燃烧器均已关闭,并且所有部件均已冷却到可以安全触摸的程度。
4、为避免触电或烧伤,请在清洁前关闭控制装置并确保炉灶冷却。
5、不要使用刺激性或研磨性清洁剂、蜡、抛光剂或商用炉灶清洁剂清洁炉灶。
6
、仅使用海绵、软布、纤维刷或塑料刷以及尼龙垫进行清洁。
7、使用炉灶前,请务必将部件完全擦干。
8、控制面板、门把手、控制外壳
用温和清洁剂和温水溶液清洁控制面板、门把手和控制外壳。
9、不要使用擦洗剂或洗涤剂;这些化学品可能会永久损坏表面。
10、用柔软的无绒布擦干组件。
侧架清洁
1
、预浸泡任何顽固的烧焦污垢,然后用温和洗涤剂和热水溶液清洁,并用超细纤维布擦干。
2、也可以用洗碗机清洗。
烤箱烤架清洁
1
、如需清除顽固或
“
烤焦
”
污垢,可使用浸湿的肥皂水
2、金属、非研磨垫,然后擦干。
3、按照制造商说明,用湿海绵或布涂抹铬清洁剂。
4
、擦拭并擦干。
烤盘和开槽烤网清洁
✓ 将任何顽固污垢预先浸泡在温和清洁剂和热水溶液中。
✓ 手洗或用洗碗机清洗。

全燃气烤箱
33
清洁说明
烘烤和烤炉燃烧器清洁
✓ 不要清洁这些部件。它们在正常使用时会自动清洁。
内胆搪瓷表面清洁
用温和清洁剂和热水溶液清洁烤箱内部和内门衬里。冲洗并用柔软的无绒布擦干。不要使用研磨
剂或商用烤箱清洁剂。
烤箱玻璃窗清洁
✓ 用温和清洁剂和热水溶液清洁所有玻璃表面。用温和的玻璃清洁剂去除指纹或污渍。
✓ 用柔软的无绒布完全擦干。
烤箱门密封垫清洁
避免清洁此部件。如果需要清除上面的大食物颗粒,请按以下步骤操作:
1、用干净的热水浸湿海绵。
2
、轻轻擦去污垢,但不要揉搓。
3、用干毛巾轻轻按在密封垫上擦干。
不要在密封垫上使用任何清洁剂。密封垫对良好的密封至关重要。
注:不要刮擦、移位或损坏。
不锈钢表面清洁
✓ 不要使用任何含氯漂白剂的清洁产品。
✓ 不要使用钢丝棉垫;其会刮伤表面。
✓ 使用蘸有温和性清洁剂的湿热抹布。
✓ 用干净的热湿布擦去肥皂。用干净的干布擦干。
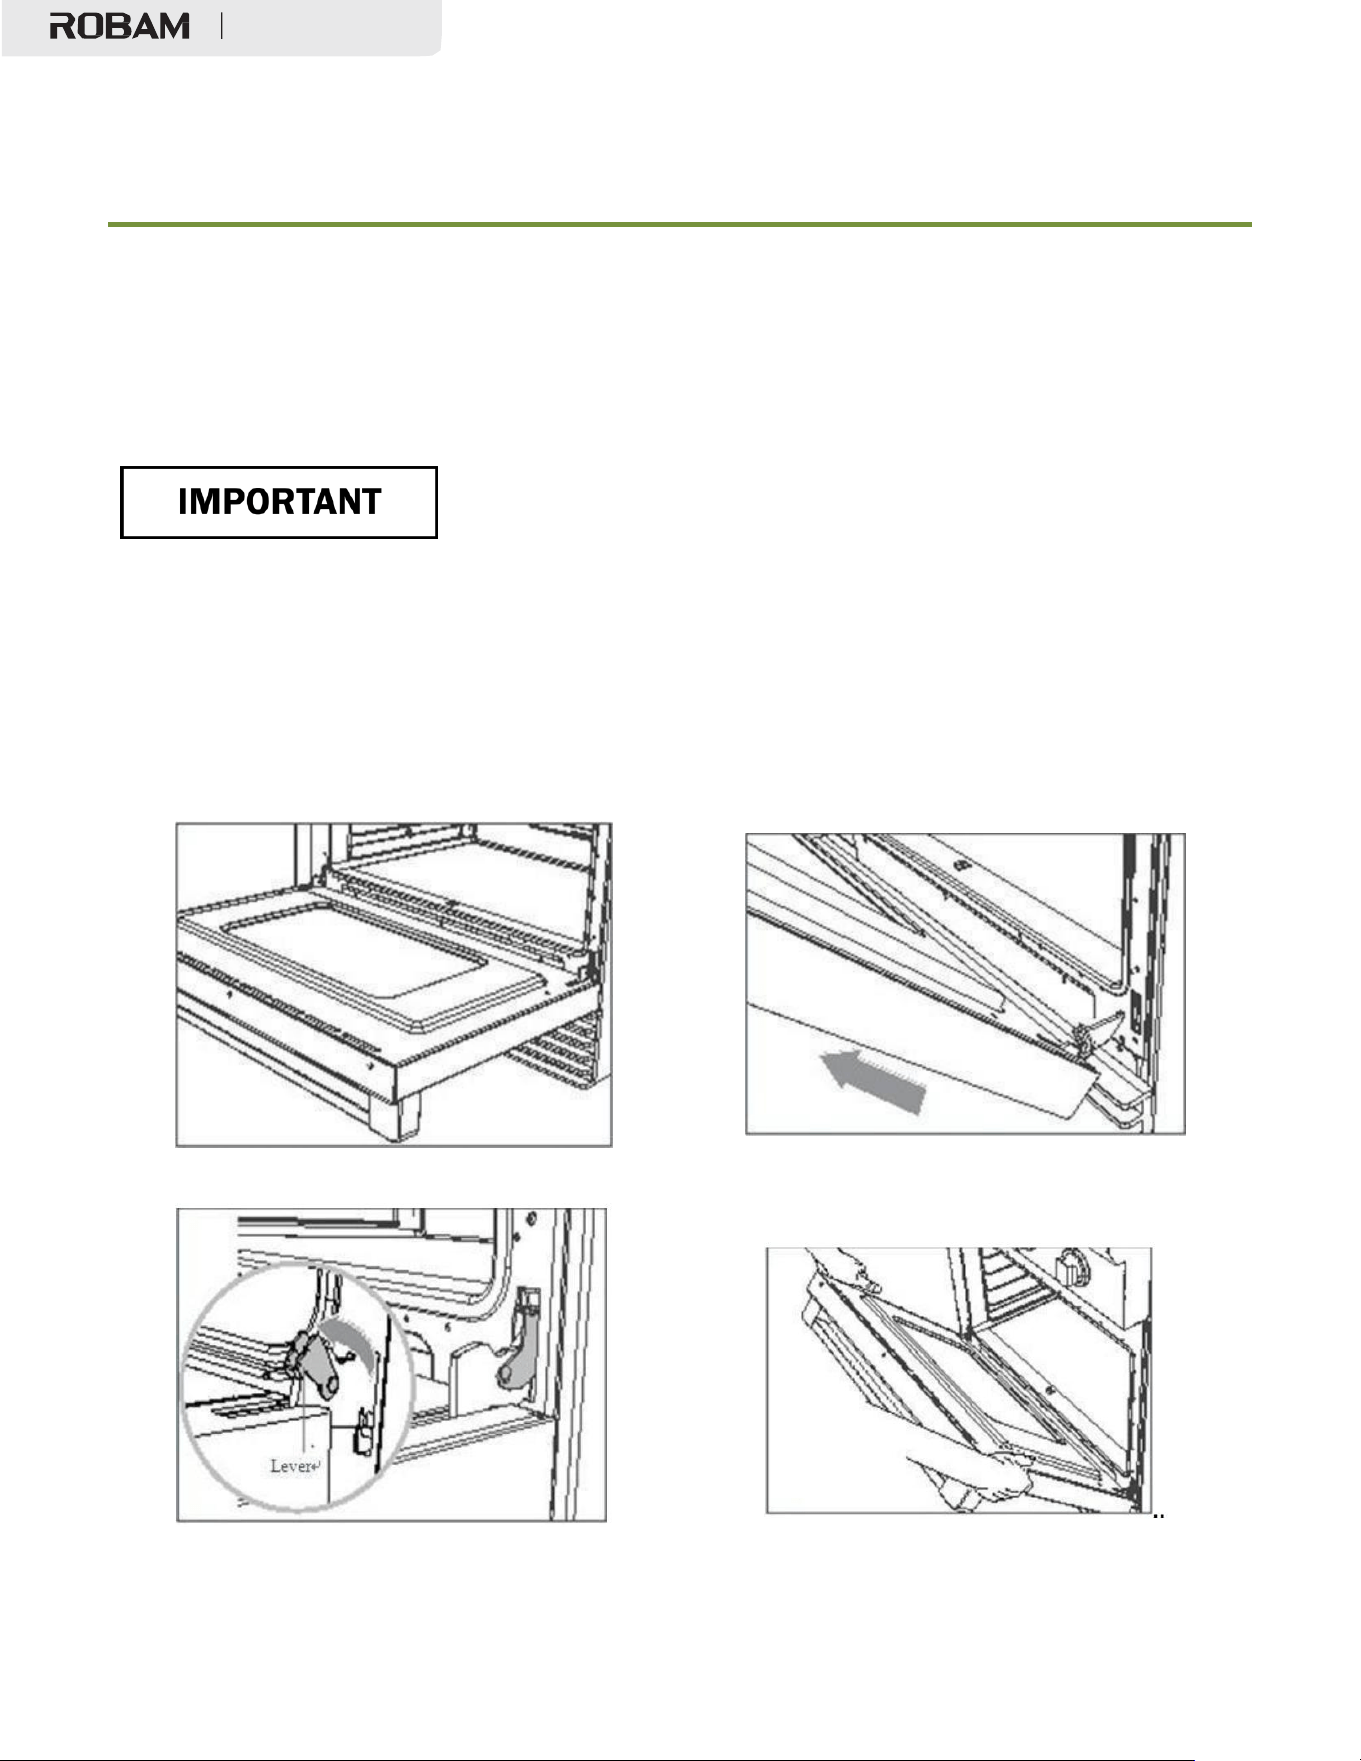
全燃气烤箱
34
烤箱门拆卸
15. 烤箱门拆卸和更换
不要用把手提起烤箱门。否则可能会损坏烤箱门。
在开始取下烤箱门之前,请确保烤箱和烤箱门已经冷却。
在拆卸烤箱门之前,请确保厨房内有足够大的干净、受保护表面来放置炉门。
烤箱门很重!
烤箱门拆卸
1、小心打开烤箱门
3
、牢牢握住烤箱门两侧
2、完全打开两侧的控制杆。
4
、将门小心地关闭到大约一半的位置,解开铰链
并取下烤箱门,然后将其放在受保护的表面上。
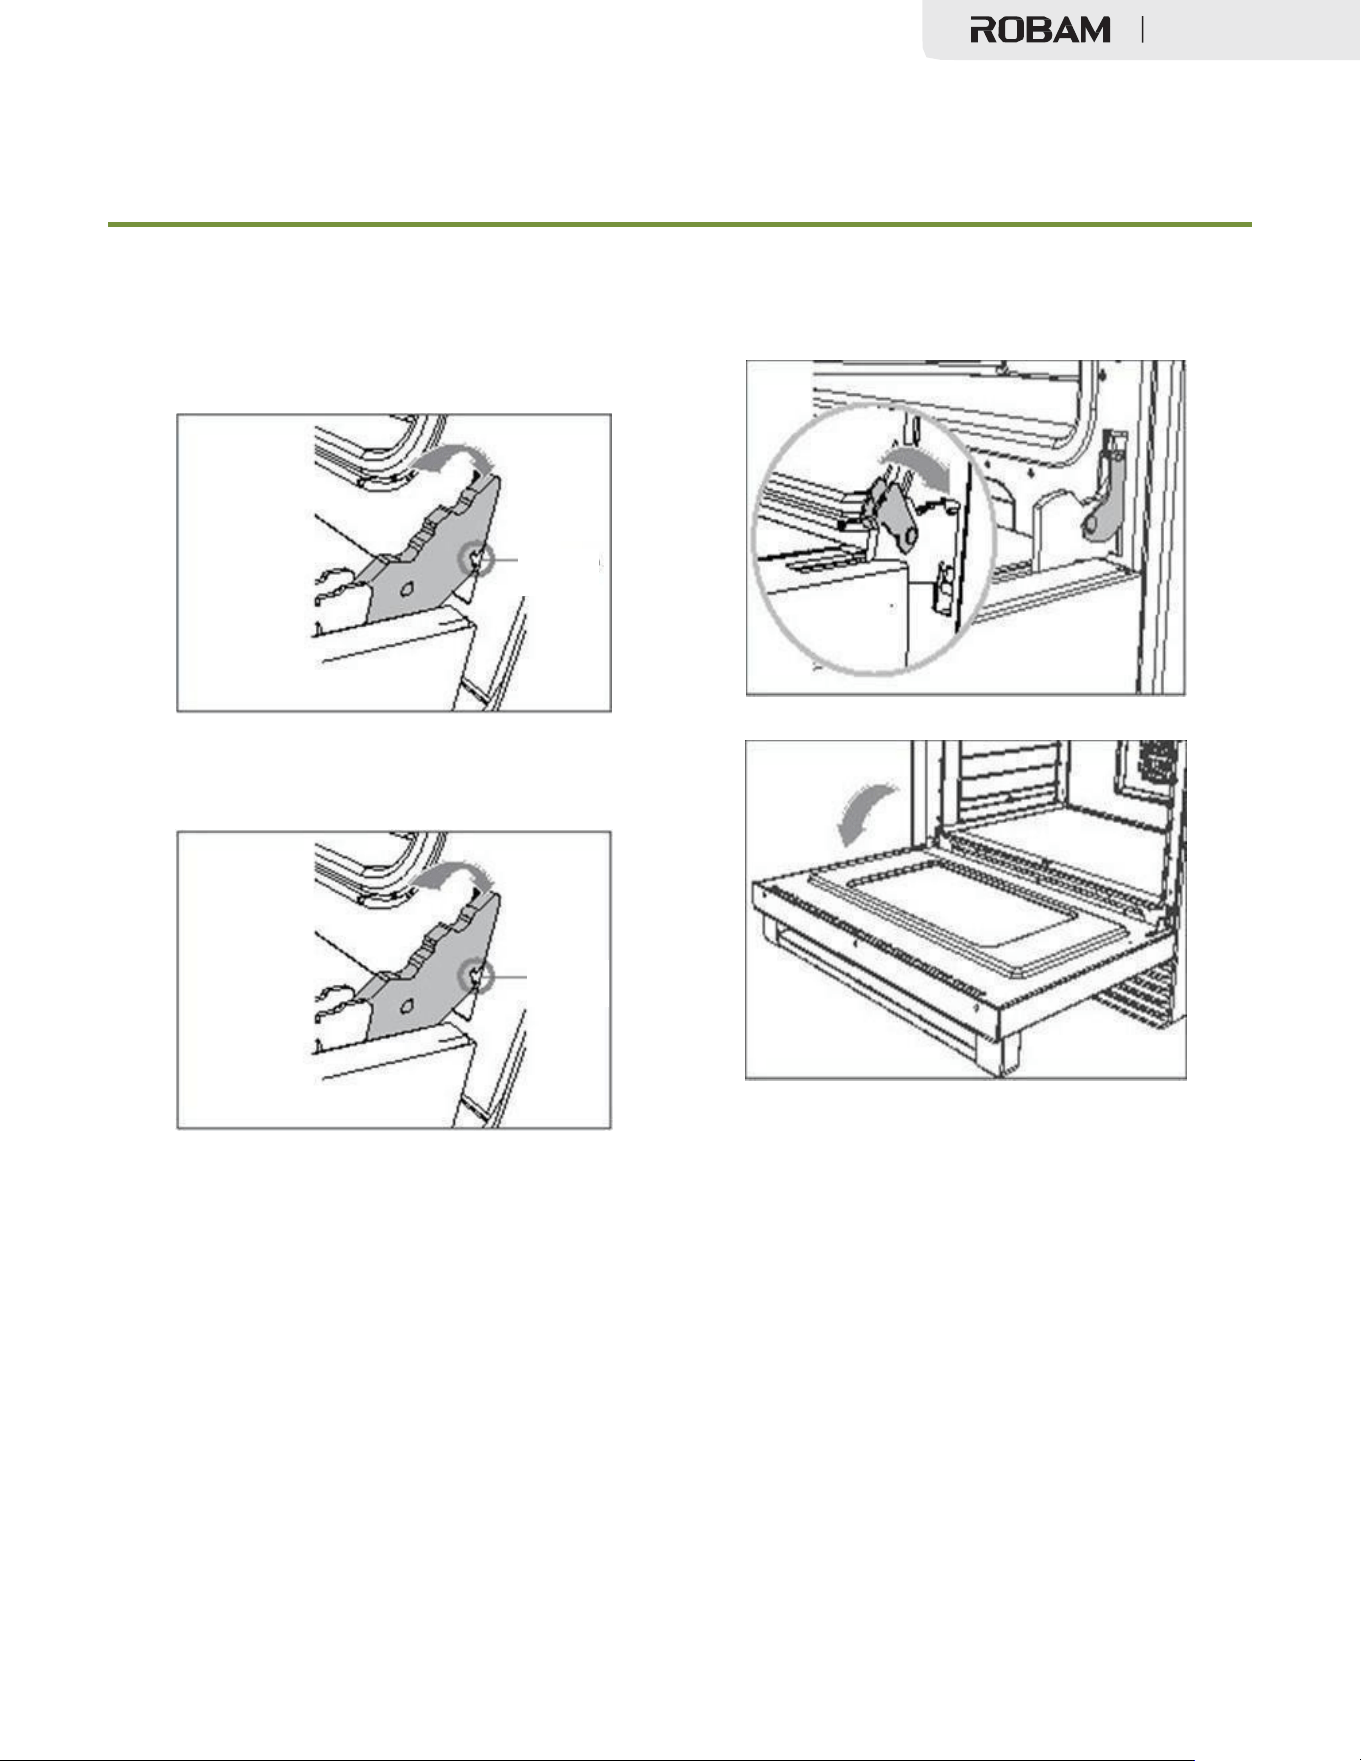
全燃气烤箱
35
烤箱门拆卸
烤箱门更换
1、牢牢地握住烤箱门,使其保持在近似打开的位
置。
2、如图所示,将铰链舌插入槽中,确保两侧的凹
口对准位置。
3
、如图所示,将烤箱门完全打开,
4
、如图所示,完全关闭左右铰链上的控制杆,然
后关闭烤箱门。
凹口
凹口

全燃气烤箱
36
故障排除指南
16. 故障排除指南
如果在下表中找不到问题的答案,或者问题无法解决,则需要技术援助。请联系授权服务中心或
客户服务部。
问题
可能的原因
解决方案
炉灶
某些燃烧器无法点燃。
火焰不会在燃烧器盖周
围燃烧。
燃烧器部件或点火器可能潮湿、
脏污或错位。
检查燃烧器部件是否清洁、干燥和正确
组装。检查点火器是否清洁干燥。有关
说明,请参见
“
保养和清洁
”
。
燃烧器火焰很大且呈黄
色。
燃烧器挡板端口堵塞。燃烧器端
口或燃烧器盖位置不正确。炉灶
使用了错误的燃气类型。调节器
未安装、有故障或设置为错误的
燃气类型。
用直回形针、针或金属丝清洁燃烧器挡
板环端口。拆卸并小心地重新安装燃烧
器挡板和盖。确保炉灶类型与燃气供应
一致。检查安装情况,更换调节器或将
调节器设置为适当的燃气。
有火花但没有火焰点
燃。
燃气安全阀处于
“
关闭
”
位置。
将安全阀转到
“
打开
”
位置。
点火器在火焰点燃后持
续出现火花。
电源极性接反。点火器潮湿或脏
污。
纠正极性。干燥或清洁点火器。
燃烧器火焰在低档时熄
灭。
燃气供气压力低。旋钮周围的进
气孔堵塞。
联系燃气公司。清除堵塞物。
火焰突然熄灭。
气流或泄漏会导致火焰熄灭。
无需采取措施。燃烧器会检测到这一点
并自动重新点燃。然而,
如果发生大量泄漏,建议关闭燃烧器并
清洁燃烧器和底盘区域。参见
有关说明请参见“保养和清洁”。
如果电源故障
-
我还能
否使用炉灶燃烧器?
您所在地区停电。
炉灶燃烧器仍可以使用。点燃炉灶:
1、将点燃的火柴对准扩焰器,按下控
制旋钮并逆时针旋转至“点燃”。
2
、当火焰在燃烧器周围燃烧时,可以
调节火力。
注意!
如果电源故障时火焰熄灭,请立即将旋
钮转到“关闭”位置,因为燃烧器不会自
动重新点燃,燃气可能会泄漏。

全燃气烤箱
37
故障排除指南
问题
可能的原因
解决方案
烤箱
烤箱不工作(不加
热)。
无电源(烤箱灯和光环也不
亮)。
无燃气供应(燃气烤箱)。
检查断路器是否跳闸,所在地区是否
停电。如果停电,在恢复供电之前不
能使用烤箱。
房屋的供电系统可能无法正常工作,
或者可能发生了停电。请联系当地的
燃气供应商。
烤 箱 的 一 个 指 示 灯 不
亮,但烤箱可以工作。
灯泡松动。
灯泡烧坏。
请参见
“
保养和清洁
”
部分中的
“
更换烤
箱灯泡”说明。无需更换灯泡,只需
确保灯泡固定在插座中即可。
更换灯泡。请参见“保养和清洁”部分
中的
“
更换烤箱灯泡
”
说明。
烤箱周围出现冷凝(例
如控制面板或烤箱门顶
部。)
食物水分含量高或当地气候(温
度、湿度)导致冷凝。
冷凝是正常现象。您可以擦去控制面
板上的水滴。如果经常出现冷凝现象
或冷凝现象过多,请确保燃气烤箱周
围的橱柜有防潮措施。
蒸汽从烤箱后部的通风
口排出。
烹饪过程中食物蒸发的水分。
这是正常现象,尤其是使用对流模式
在烤箱中烹饪大量食物时。
在对流模式下,对流风扇
不开启。
技术故障。
请联系授权服务中心或客户服务部。
烤箱不加热
烤箱设置未校正
按照说明书“烤箱操作”部分规定的模
式选择和时钟设置进行操作。
食物过熟或未熟
烹饪时间或温度不正确。
调整时间、温度或烤架位置。
“噼啪”或“砰”声。
这是金属加热和冷却的声音。计
这是正常现象。
电源故障——我还能否
使用烤箱?
家中或附近停电。
在恢复供电之前不能使用烤箱。
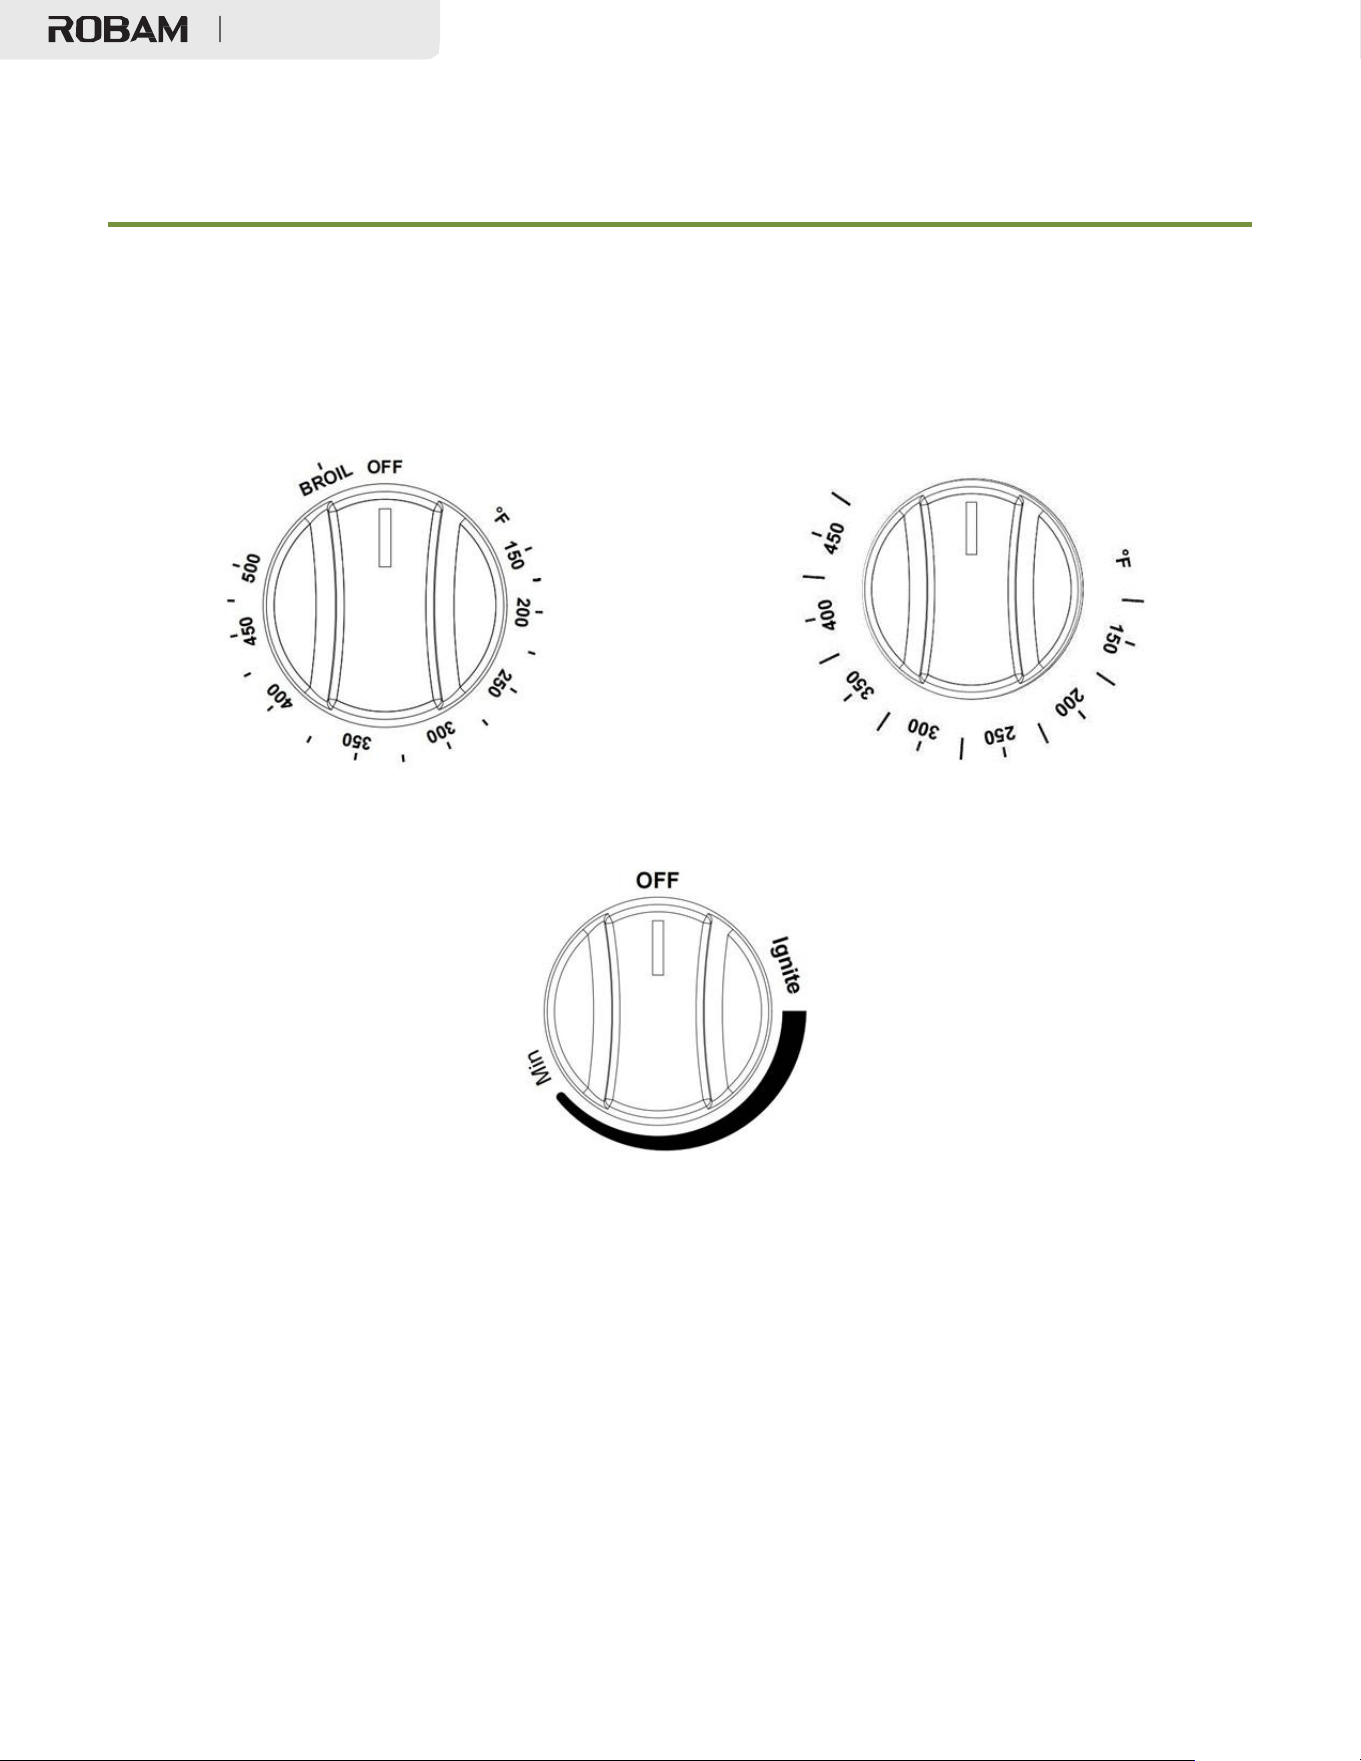
全燃气烤箱
38
附录 1
烤箱旋钮安装
1
、 检查设计
① 大烤箱温控旋钮
② 煎锅/小烤箱温控旋钮
③ 主气阀旋钮
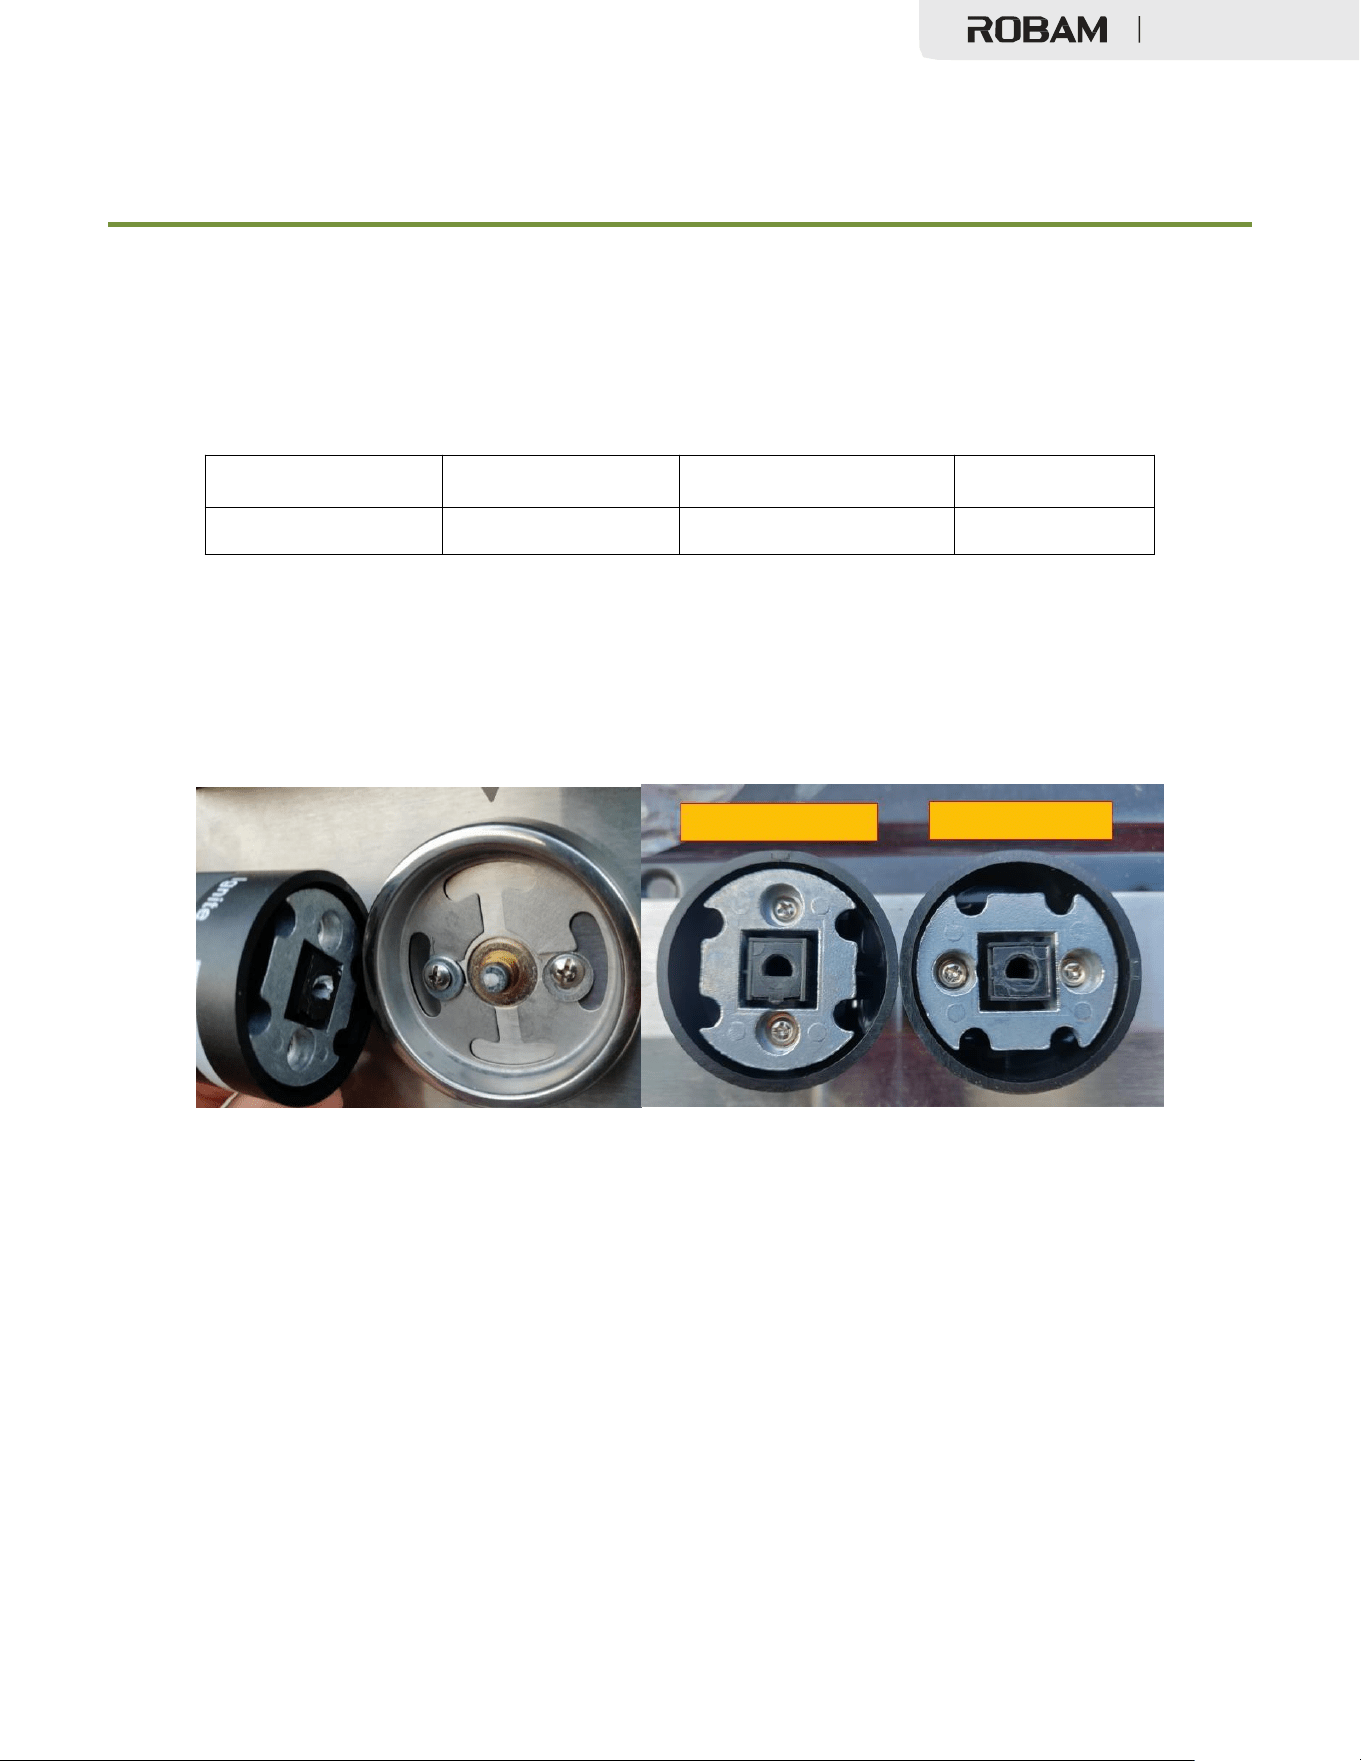
全燃气烤箱
39
附录 1
烤箱旋钮安装
1
、查看表中各旋钮的数量
型号
大烤箱温控旋钮
②
烤板
/
小烤箱温控旋钮
主气阀旋钮
JJZ(Y/T)-7GG11
1
0
5
2
、为燃气烤箱上的每个阀杆找到合适的旋钮。将旋钮推入以完全连接阀杆,并确
保旋钮与面板之间没有摩擦。
****
旋钮安装不正确会导致烤箱恒温器
/
燃烧器阀损坏
****
(错误的旋钮会导致恒温器阀杆断裂)
主气阀旋钮
温控旋钮
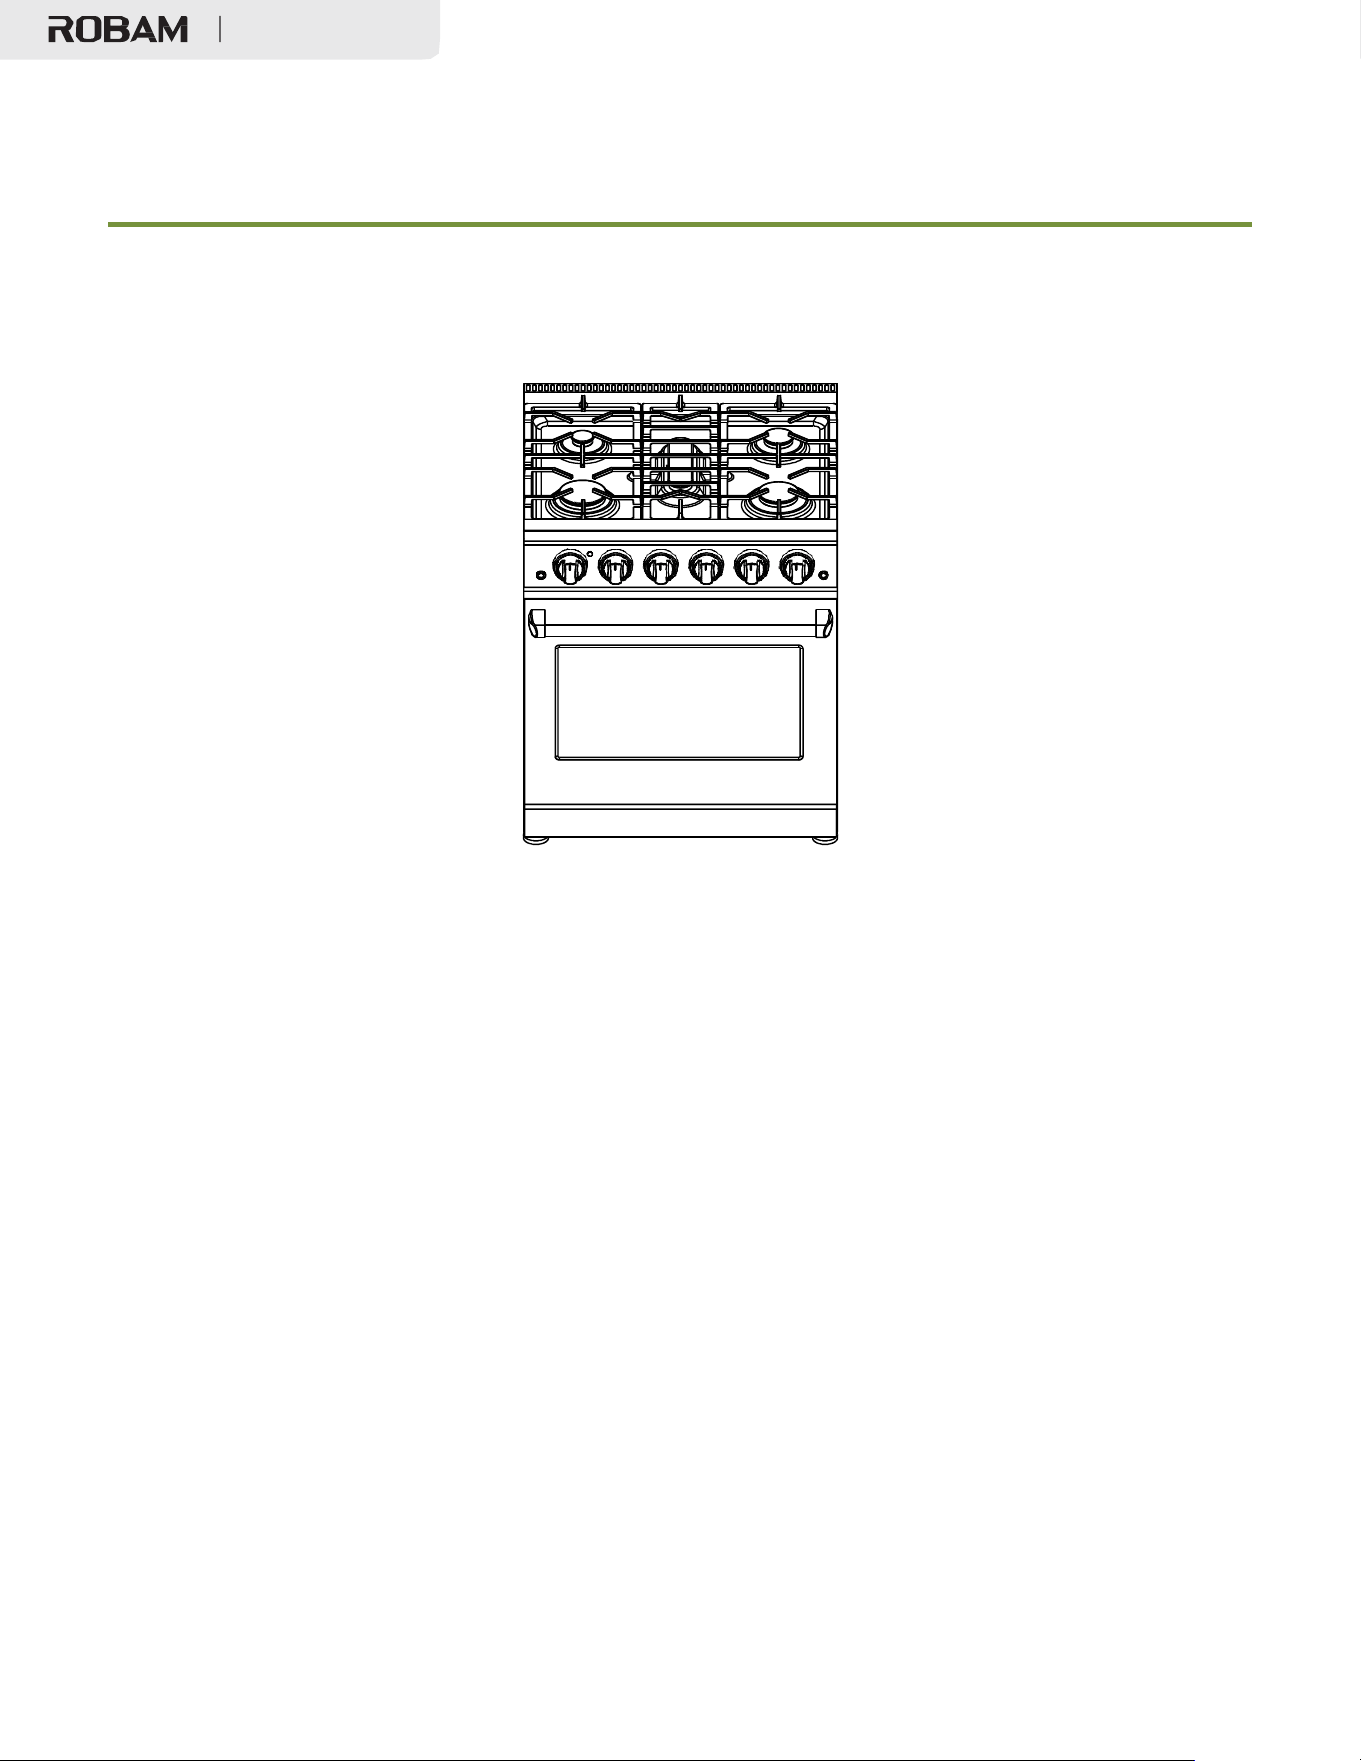
全燃气烤箱
40
附录 1
烤箱旋钮安装
JJZ(Y/T)-7GG11
① ② ③ ④ ⑤ ⑥
JJZ(Y/T)-7GG11 旋钮(从左到右):
①:大烤箱温控旋钮
②③④⑤⑥
:主气阀旋钮
燃气烤箱有一个需要安装的 KD 把手。请按照以下步骤安装烤箱门把手。
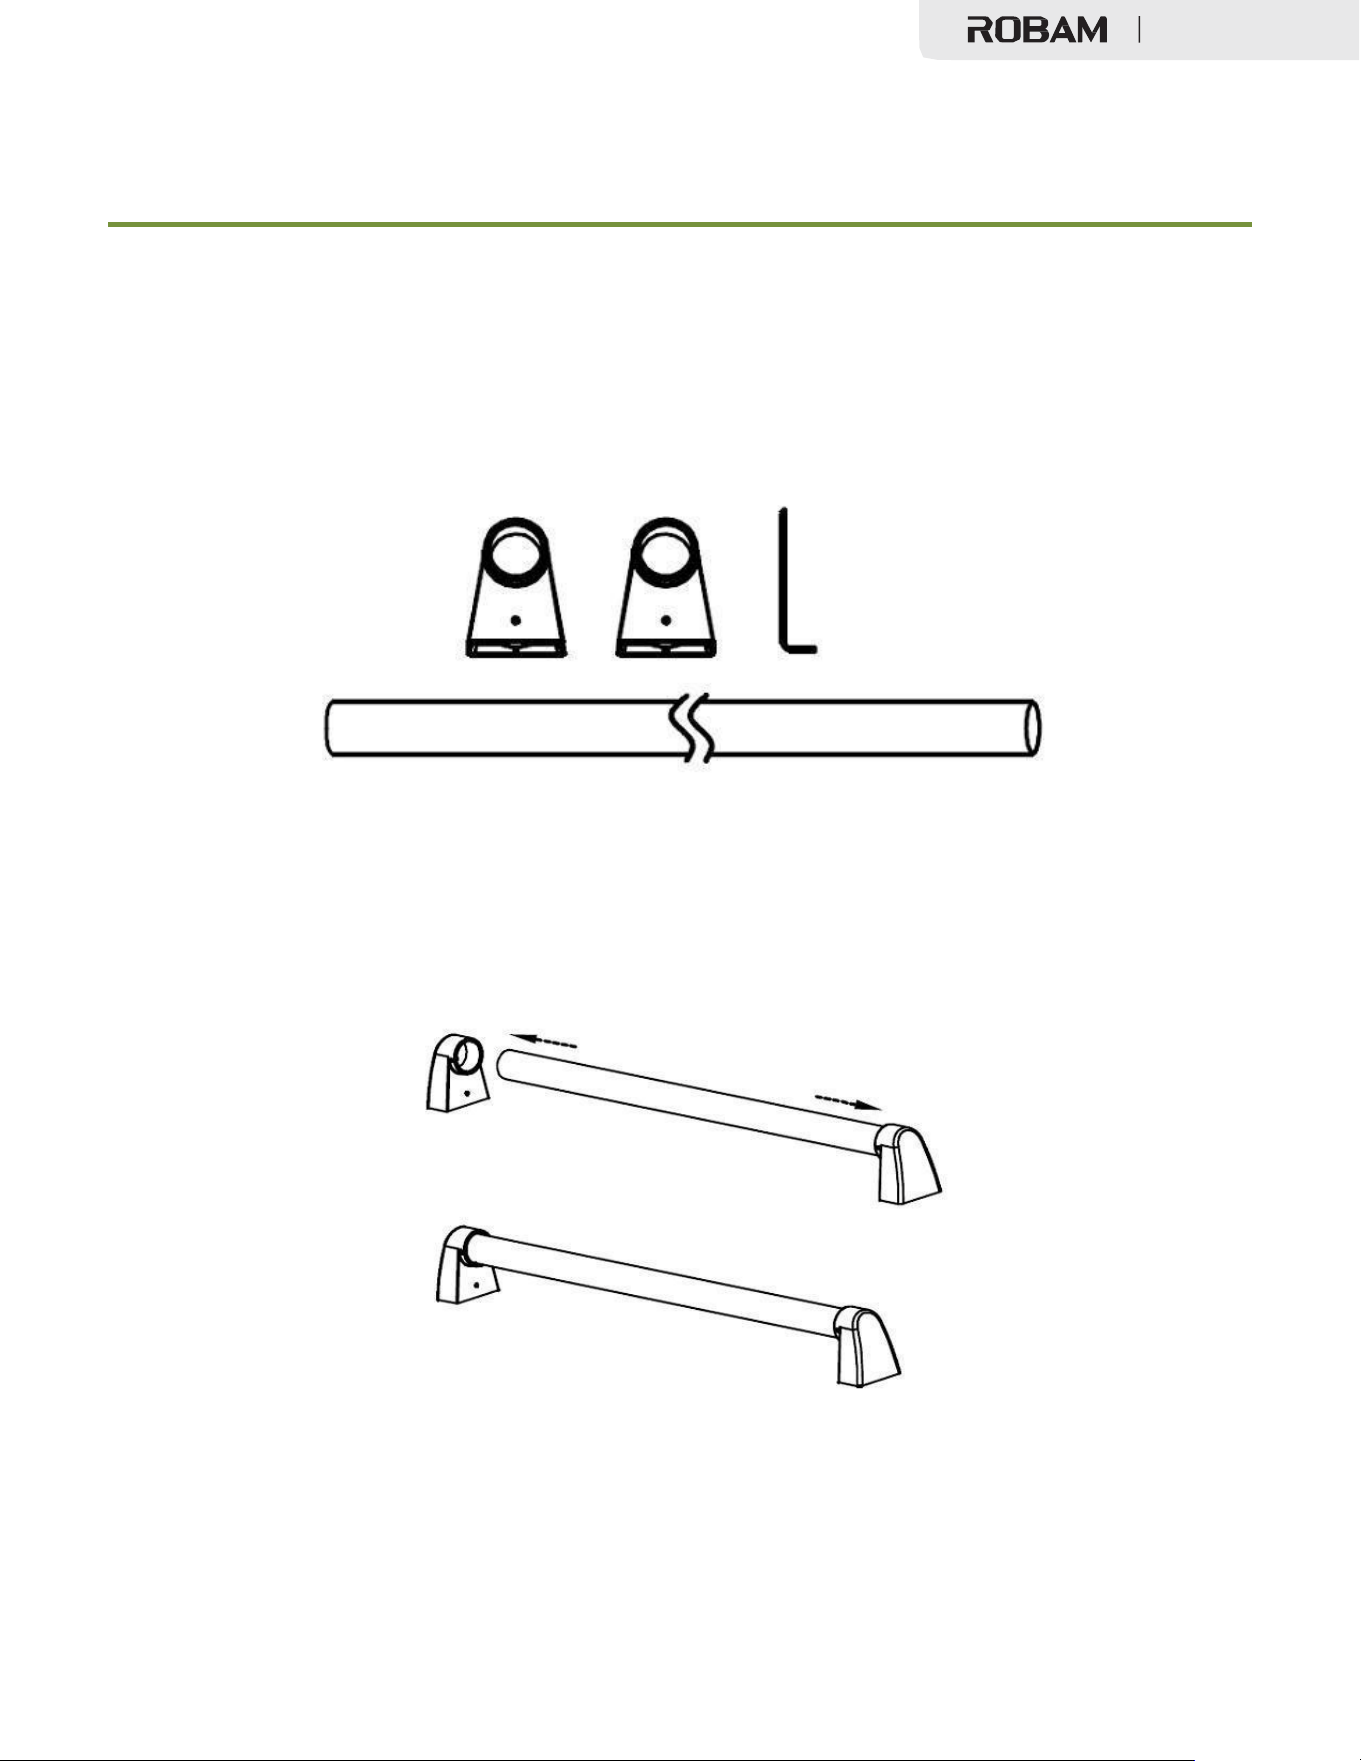
全燃气烤箱
41
附录 2
烤箱把手安装
3.1 检查烤箱门把手安装套件
2*把手座、1*安装扳手、1*把手(适用于 18 英寸、30 英寸或 36 英寸烤
箱)
3.2 将烤箱门把手座连接到把手两侧
3.3 将门把手放在烤箱门上,对准连接部分,然后用扳手拧紧门把手底座;
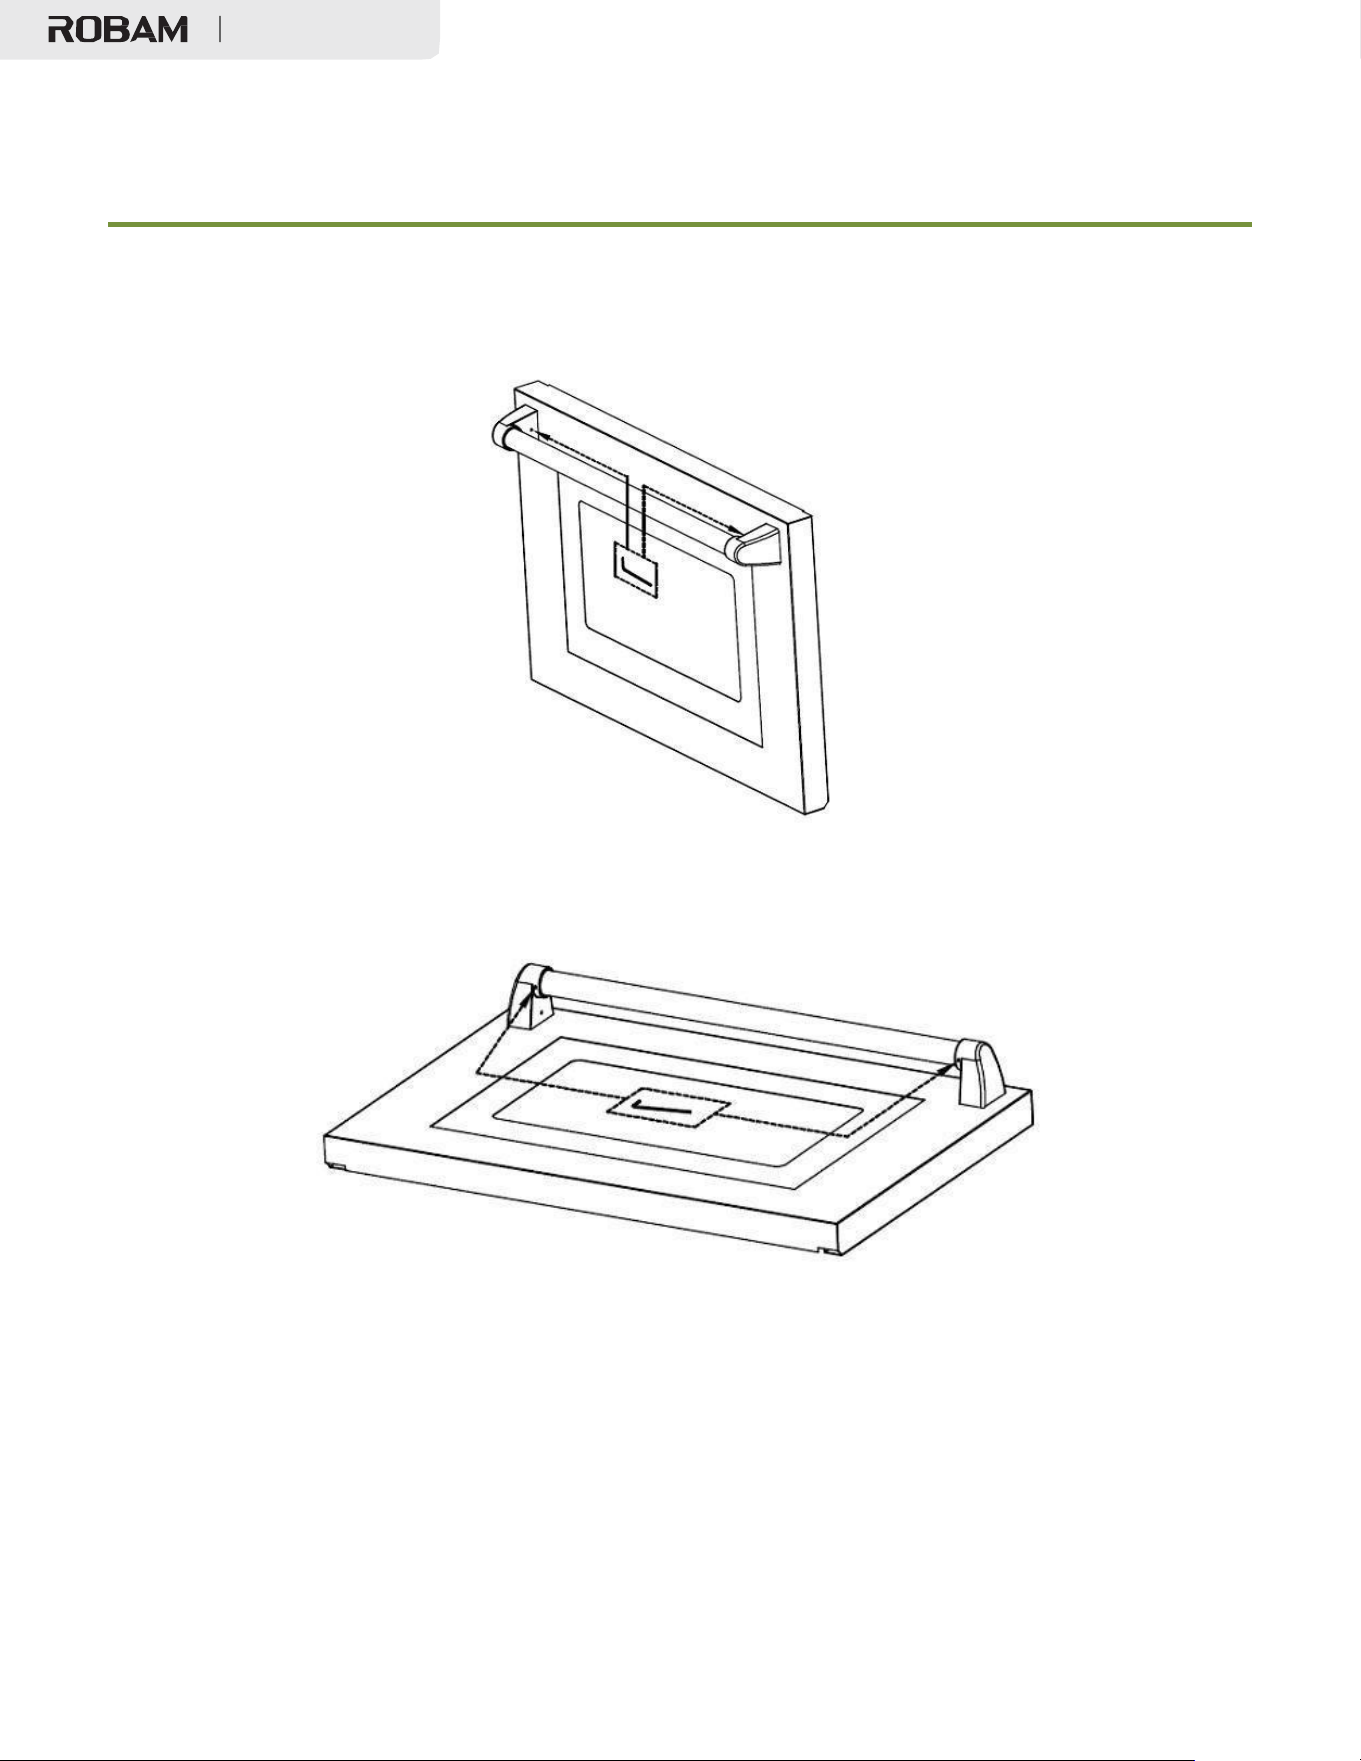
全燃气烤箱
42
附录 2
烤箱把手安装
3.4 用扳手拧紧烤箱门把手座。
3.5 检查烤箱门把手是否水平和稳固。
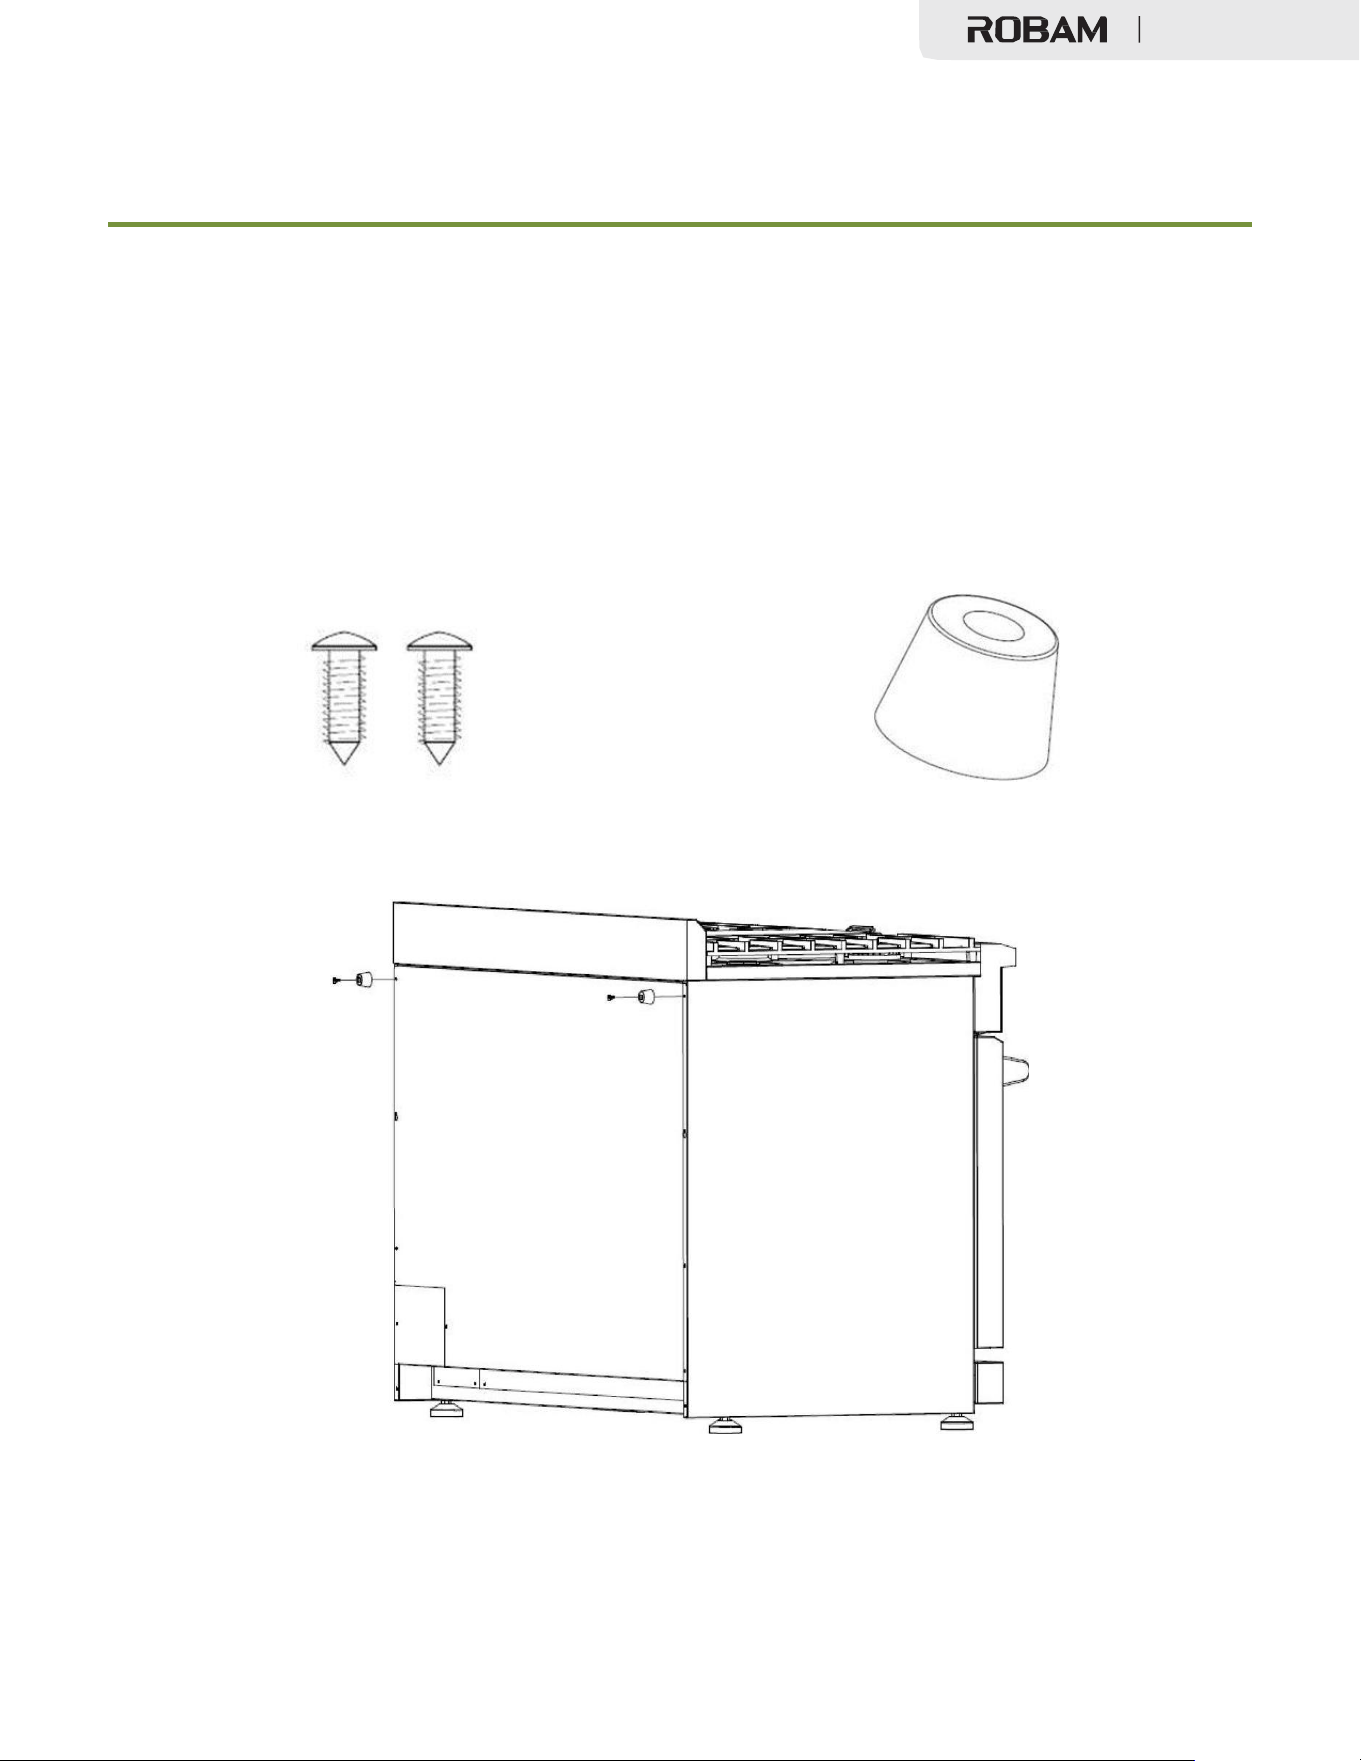
全燃气烤箱
43
附录 3
后板橡胶垫安装
为了符合对燃气烤箱背面间距的要求,请安装说明书工具包中提供的 2 块橡胶垫。请找到配件并
按照以下步骤操作:
1
、检查说明书工具包包含的安装套件;
2*
螺钉
2*
橡胶垫
2、安装上图所示的 2 块橡胶垫。

型号:JJZ(Y/T)-7GG11
版次:
A/0
出版日期:2024 年 9 月 20 日