USER GUIDE
9-IN-1 AIR FRY OVEN

2
IMPORTANT
SAFEGUARDS
When using your electrical appliances, basic
safety precautions should always be followed
to reduce the risk of fire, electric hazard and
injury to persons, including the following.
1. Read all instructions.
2. Parts except handles and knob will be very
hot during use. Do not touch hot surfaces.
Use handles or knobs. Always wear oven
mitts or use the fetch tool when handling hot
components. Wear oven mitts when handling
hot surfaces.
3. To protect against electrical shock, fire, or
personal injury, do not immerse the cord, plugs,
or the appliance in water or other liquid. Do
not plug in the power cord or operate the unit
controls with wet hands.
4. Close supervision is necessary when any
appliance is used by or near children. As a rule,
this appliance is not intended to be used by
children or incapacitated individuals.
5. Unplug from outlet when not in use and before
cleaning. Allow to cool before cleaning
the appliance.
6. DO NOT operate this appliance when
the power cord or plug damaged or if the
appliance malfunctions, is dropped or has
been damaged in any manner. Return it to the
Authorized Service Station for examination,
repair, electric or mechanical adjustment.
7. DO NOT use attachments not recommended by
the manufacturer; they may cause fire, electric
shock or personal injury.
8. DO NOT use outdoors or for
commercial purposes.
9. DO NOT use appliance for other than
intended use.
10. DO NOT let cord hang over edge of table or
counter, or touch hot surfaces.
11. DO NOT place on or near a hot gas or electric
burner, or in a heated oven.
12. Always attach plug to appliance first, then plug
cord into the wall outlet. To disconnect, turn any
control to “off”, and ensure the indicating lamp
is turn off before remove plug from wall outlet.
13. The appliance has a polarized plug (one blade
is wider than the other). To reduce the risk of
electric shock, this plug is intended to fit into a
polarized outlet only one way. If the plug does
not fit fully into the outlet, reverse the plug. If it
still does not fit, contact a qualified electrician.
Do not attempt to modify the plug in any way.
14. Oversized foods, metal foil packages, or
utensils must not be inserted in a toaster
oven as they may involve a risk of fire or
electric shock.
15. A fire may occur if the appliance is
covered or touching flammable material,
including curtains, draperies, walls, and
the like, when in operation. Do not store
any item on top of the appliance when
in operation.
16. DO NOT clean with metal scouring pads.
Pieces can break off the pad and touch
electrical parts involving a risk of
electric shock.
17. Extreme caution should be exercised when
using containers constructed of materials
other than metal or glass.
18. DO NOT store any materials, other than
manufacturers recommended accessories,
in this oven when not in use.
19. DO NOT place any flammable materials
in oven, such as paper, cardboard, plastic
or any materials that may catch
fire or melt.
20. DO NOT cover crumb tray or any part of
the oven with metal foil. This will cause
overheating of the oven.
21. DO NOT place the backing pan or
broiling tray on the lower heating
element directly.
22. Use extreme caution when removing tray
or disposing of hot grease or hot oil or
other hot liquids.
23. Make sure the appliance is plugged into
a dedicated wall socket. Always make
sure that the plug is inserted into the wall
socket properly and without any other
appliances on the same outlet.
24. Never connect this appliance to an
external timer switch or separate remote-
control system.
25. Never immerse the unit’s housing in water
or rinse it under the tap.
26. During hot air frying, hot steam is
released through the air outlet openings.
Keep your hands and face at a safe
distance from the steam and from the
air outlet openings. Also, be careful of
hot steam and air when you remove the
cooking accessories from the appliance.
27. Immediately switch off and unplug the
appliance if you see dark smoke coming
out of the appliance. Wait for the smoke
emission to stop before you remove the
pan from the appliance.

3
Introduction
Parts & Features
Before First Use
Operating Instructions
Tips & Hints
Cleaning &
Maintenance
Troubleshooting
Warranty
HEALTHY
COOKING
STARTS WITH
GREENPAN
Since inventing healthy ceramic
nonstick in 2007, we’ve
dedicated ourselves to unique
advances that make cooking
better for everyone. From healthy
ceramic nonstick cookware to
revolutionary home appliances,
our groundbreaking designs
deliver remarkable performance
so you can focus on the flavor.
Enjoy!
CONTENTS
4
4
5
5
8
8
9
11
28. DO NOT place the appliance against a
wall or against other appliances. Leave at
least 6 inches (15 cm) of free space on all
side of appliance.
29. This appliance is not intended for use by
persons (including children) with reduced
physical, sensory or mental capabilities,
or lack of experience and knowledge,
unless they have been given supervision or
instruction concerning use of the appliance
by a person responsible for their safety.
Children should be supervised to ensure
that they do not play with the appliance.
SAVE THESE
INSTRUCTIONS
Please read and keep these instructions
readily available. These instructions will
help you use your Convection Air Fry
Oven properly, so that you will achieve
optimal results.
FOR HOUSEHOLD
USE ONLY
SPECIAL CORD SET
INSTRUCTIONS
A short power-supply cord is provided to reduce
the risks resulting from becoming entangled in
or tripping over a longer cord. Longer extension
cords may be used if care is exercised.
If an extension cord is used, the marked
electrical rating of the extension cord should
be at least as great as the electrical rating of
the appliance, and the longer cord should
be arranged so that it will not drape over the
countertop or tabletop where it can be pulled on
by children or animals, or tripped over.
NOTICE
This appliance has a polarized plug (one blade
is wider than the other). To reduce the risk of
electric shock, this plug is intended to fit into a
polarized outlet only one way. If the plug does
not fit fully into the outlet, reverse the plug. If it
still does not fit, contact a qualified electrician.
Do not attempt to modify the plug in any way.
4
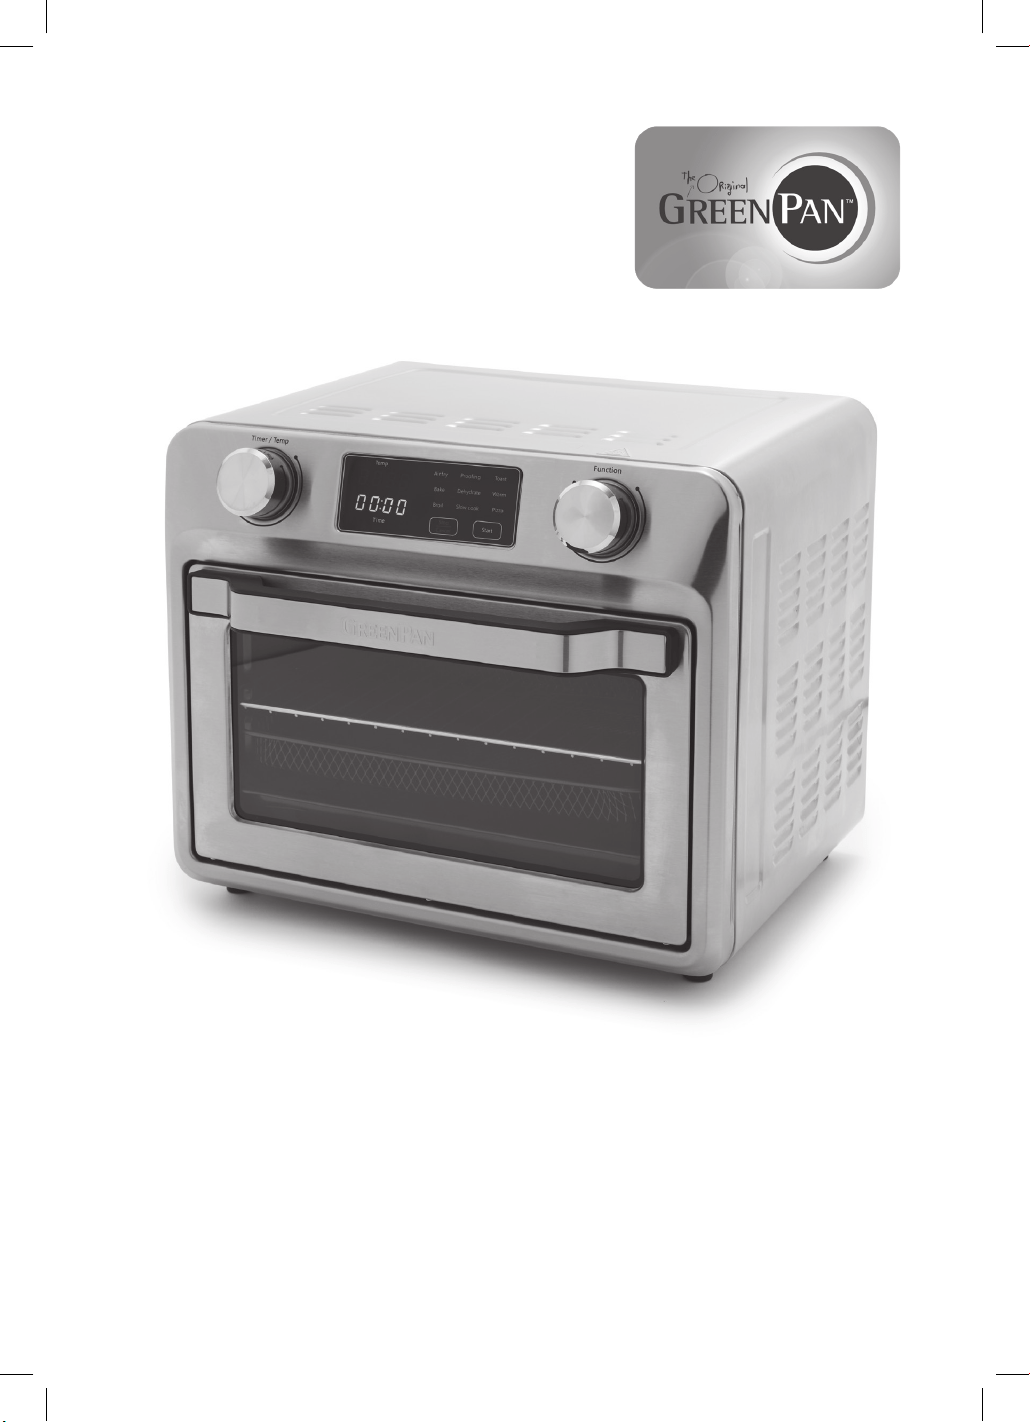
FEATURES &
BENEFITS
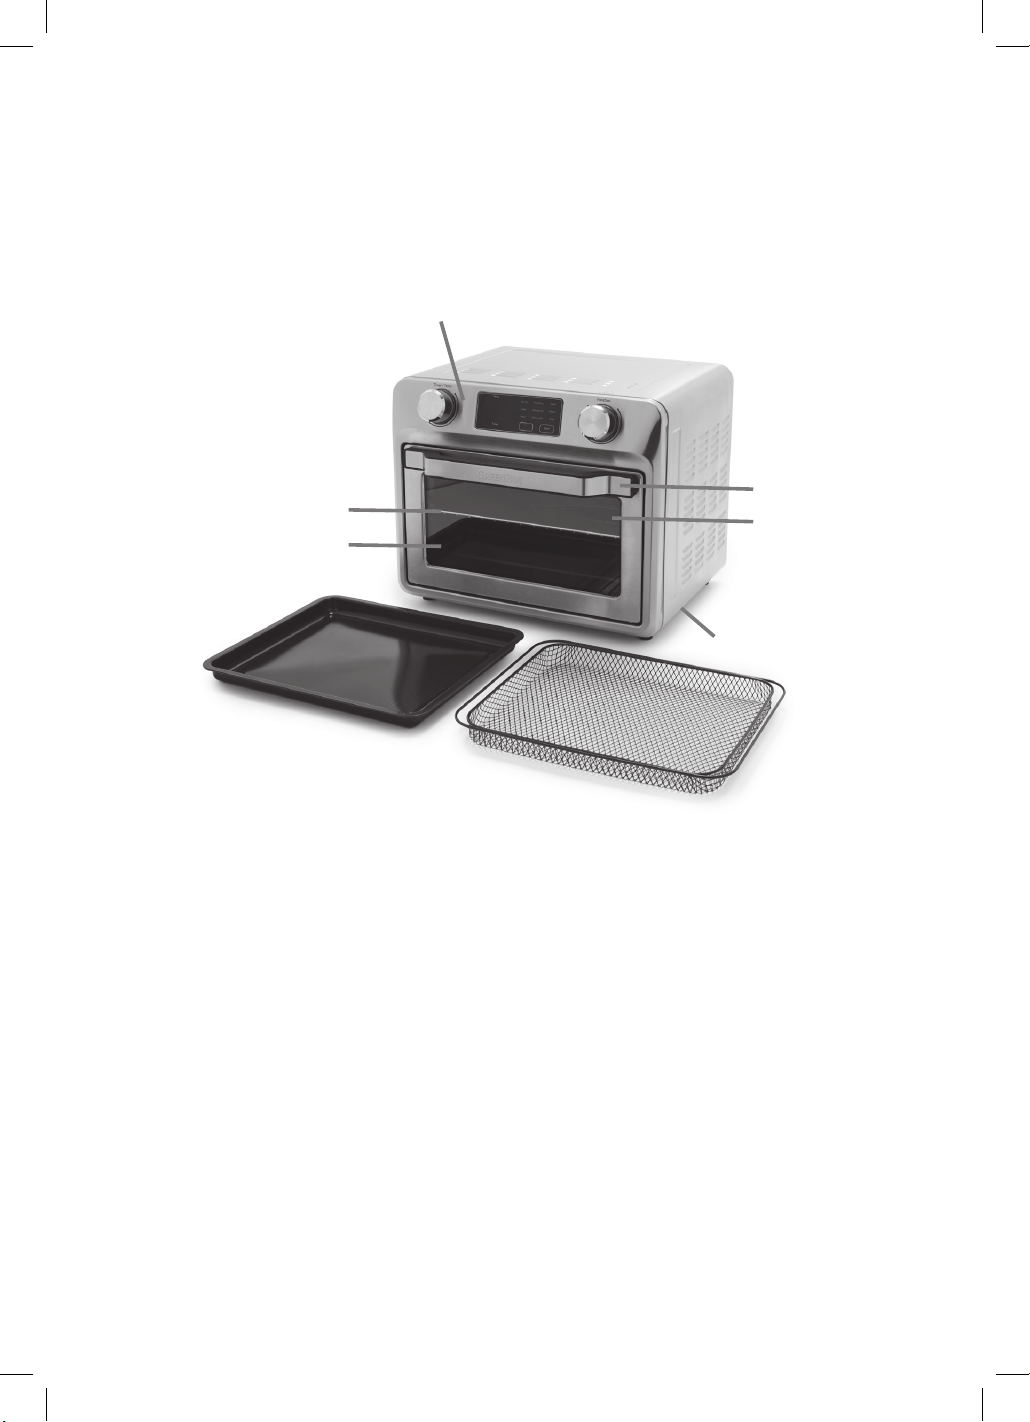
1. Control Panel
LED display, dials, and buttons make it very
simple to use.
2. Cool-Touch Handle
Handle designed to stay cool during cooking.
3. Window
Large window for clear view
of cooking progress.
4. Oven Rack
Oven Rack is included and can be used
in multiple positions.
5. Easy-Clean Interior
The interior walls of the oven are coated in
a nontoxic nonstick for easy cleaning and
healthy cooking.
6. Crumb Tray
The Crumb Tray is removable from the bottom
front of the oven and is coated in a healthy,
nontoxic nonstick for easy cleaning.
7. Baking Pan
A Baking Pan is included for multiple purposes.
Use it to place food in when Baking, Roasting,
Broiling, etc. Or use it as the drip tray
underneath the Air Fry Basket when Air Frying,
Broiling or Dehydrating. The Baking Pan is
coated in a nontoxic nonstick for easy cleaning
and healthy cooking.
8. Air Fry Basket
Use the basket when using the Air Fry or
Dehydrate functions to optimize your cooking
results. Use the Air Fry Basket in the Baking
Pan. The Air Fry Basket is coated in a nontoxic
nonstick for easy cleaning and
healthy cooking.
9. Interior Light (Not Shown)
Light will automatically turn on:
1) After touching “Start” and will automatically
turn off after 5 minutes.
2) After using dials or touching “Start/Stop”
and will automatically turn off after 5 minutes.
INTRODUCTION
Thank you for bringing home the GreenPan Air Fry Oven. This is the easiest, fastest, and best way
to take your cooking to the counter. It’s a powerful air fryer, consummate baker, and a handy toaster
oven all in one. Whether you need to bake cookies, roast a whole chicken, or just make a personal
pizza, this spacious oven delivers the power and precision needed to take on any task.
1.
2.
3.
4.
5.
6.
8.
7.
5
BEFORE FIRST USE
1. Place your Air Fry Oven on a flat,
level surface.
2. Move oven 2 to 4 inches away from the wall
or any objects on the countertop. Do not use
on or near heat-sensitive surfaces.
OPERATION
This multi-functional Air Fry Oven is equipped
with all the options of a full-size oven in a
countertop appliance; it can use for air fry, bake,
broil, proof, toast, dehydrate, warm, slow cook,
and cook pizza.
NOTE: Initial startup operation may result in
minimal smell and smoke (about 15 min.),
this is normal.
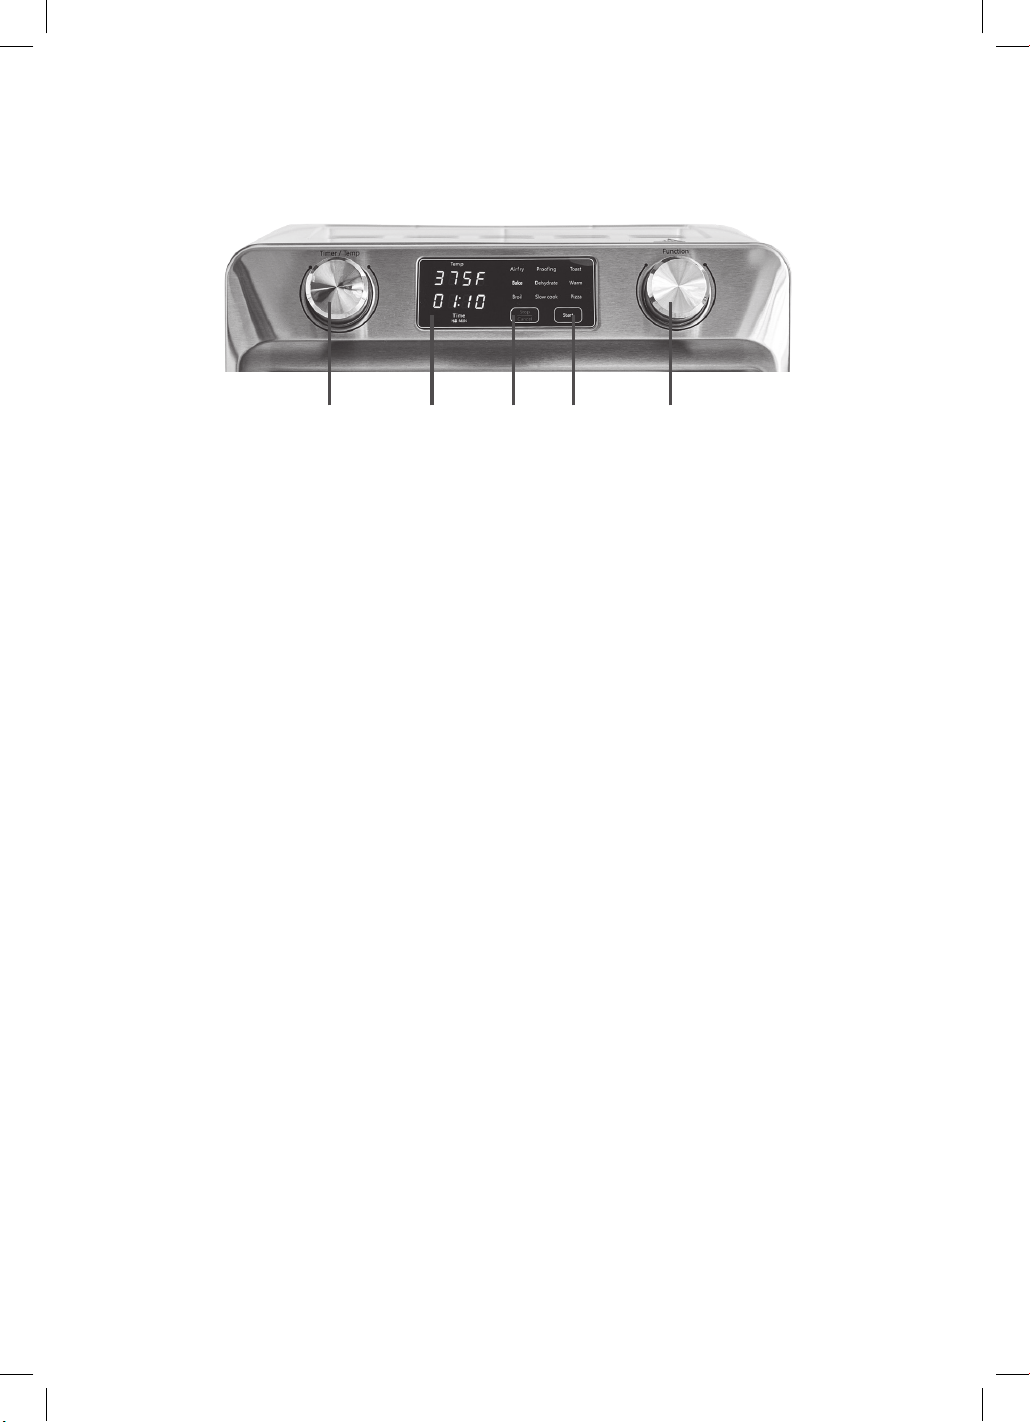
Knobs and Control Panel/Display Screen
1. Rotate the Function knob to select the function,
related function light will flash.
2. Rotate the Timer/Temp knob to set the
temperature (the temperature shown on display
screen will flash). Press the Timer/Temp knob
down, then rotate the knob to set the timer; the
time shown on display panel will flash). If you
need to change temperature, press this knob
down again, until the temperature shown on
display screen flashes.
3. Tap-touch Start key to start the toaster oven.
The function light will be solid, and oven light
will be ON. The timer starts to count down,
except for Bake and Pizza mode since there is
a Preheat function first cooking (Note: There is
no timer shown for Toast function.)
4. If need, tap-touch the Stop/Cancel key shortly
to pause the cooking, or tap-touch and hold
the Stop/Cancel key to stop the cooking
manually. While cooking is paused, tap-touch
Start key to resume cooking.
5. When the timer expires, the unit will stop
cooking automatically.
CONTROL PANEL
A. Start Button
Use to start cooking.
B. Stop/Cancel Button
Use to stop or pause cooking.
C. Function Dial
Turn Function Dial to scroll through the
functions on the LED screen. Function dial is
for Air Fry, Bake, Broil, Proofing, Dehydrate,
Slow Cook, Toast, Warm or Pizza.
D. Time/Temperature Dial
Depress Time/Temperature Dial to select TIME
or Temperature mode; then turn the dial scroll
through the selections.
E. LED Screen
Displays cooking functions, time,
and temperature.
A.B. C.D. E.

6
AIR FRY
1. Place the food on the Air Fry Basket and then
place the frying basket in the oven. Close the
oven door.
2. Select Air Fry function, default setting is 450°F,
30 minutes.
a) The temperature can be adjusted between
350ºF-450ºF.
b) The timer can be adjusted between
1 to 90 minutes.
3. Tap-touch Start key to start cooking.
Note: In this cycle, the top heating elements
operate and glow red/ orange, and the top
convection fan will work in high speed.
BAKE
1. Place the food on the Baking Pan and then
place the pan in the oven. Close the oven door.
NOTE: We suggest to always preheat the oven
at this setting before placing the
food inside.
2. Select Bake function, default setting is 350°F,
30 minutes.
a) The temperature can be adjusted between
150ºF-450ºF.
i. After Baking function is selected, preheat
will begin and “PrE” will be displayed on
the screen. When preheating is complete,
the oven will beep three times and “Add
Food” will be displayed on the screen.
Open the door to add food and close the
door, then press “Start” for the timer to
begin counting down.
b) The timer can be adjusted between
1 to 90 minutes.
3. Tap-touch Start key to start cooking.
Note: In this cycle, both the top and bottom
heating elements operate and glow red/
orange, and the top convection fan will work in
low speed.
BROIL
1. Place the food on the Baking Pan and then
place the Pan in the oven. Close the oven door.
2. Select Broil function, default setting is 450°F,
15 minutes.
a) The timer can be adjusted between
1 to 90 minutes.
3. Tap-touch Start key to start cooking.
Note:
• In this cycle only the upper heating elements
operate and glow red/orange, and the top
convection fan will work in low speed.
• When broiling turn food over during cooking.
Food should not be placed directly on the
Oven Rack.
• For top browning simply broil as long as
desired. Do not allow the aluminum foil to
touch the heating elements.
• Do not preheat.
TOAST
1. Open the Oven Door and place the bread on
the Oven Rack, up to 6 slices.
–Remove the Baking Pan/Frying Basket at first.
2. Select Toast function, default setting is 03, for
medium shading.
a) The shade settings can be adjusted between
01 to 06, light to dark.
Note:
• Choose your shading preference by adjusting
the setting. To test the toasting of your type
of bread, we suggest to start at medium
setting as bread varies according to humidity,
thickness, and texture. Each type of bread
will toast differently according
to these properties.
• 6 slices will be lighter than 1 slice-adjust
setting accordingly.
• Place 1 slice of bread in center of Oven Rack,
6 slices side by side
• In this cycle, both the top and bottom heating
elements operate and glow red/orange,
and the top convection fan will work
in low speed.

7
PROOF
1. Place the food in the Baking Pan and then
place the Baking Pan in the oven. Close the
oven door.
2. Select Proof function, default setting is 80°F
(not shown), 4 hours.
a) The timer can be adjusted between
1 to 12 hours.
3. Tap-touch Start key to start cooking.
Note: In this cycle, the bottom heating
elements operate and glow red/orange, and
the top convection fan will work in low speed.
DEHYDRATE
1. Place the food on the Frying Basket and then
place the frying basket in the oven. Close the
oven door.
2. Select Dehydrate function, default setting is
150°F (not shown), 4 hours.
a) The timer can be adjusted between
1 to 20 hours.
3. Tap-touch Start key to start cooking.
CAUTION: In this cycle, the top heating
elements operate and glow red/orange, and
the top convection fan will work in low speed.
WARM
1. Place the food on the Baking Pan and then
place the Pan in the oven. Close the oven door.
2. Select Warm function, default setting is 175°F
(not shown), 30 minutes.
a) The timer can be adjusted between
1 to 90 minutes.
3. Tap-touch Start key to start cooking.
CAUTION: In this cycle, the top heating
elements operate and glow red/orange, and
the top convection fan will work in low speed.
SLOW COOK
1. Place food on the Baking Pan, then place the
Baking Pan into oven (lower rack position)
carefully. Close the oven door.
Note: the maximum size (L x W x H) of
cooking vessel is 12.4 x 11.2 x 5.2 inches
2. Select Slow Cook function, default setting is Hi,
3 hours.
a) The temperature can be adjusted to Lo.
b) The timer can be adjusted between
0.5 to 8 hours.
3. Tap-touch Start key to start cooking.
CAUTION: In this cycle, the top heating
elements operate and glow red/ orange, and
the top convection fan will work in low speed.
PIZZA
1. Place the pizza on the on top of the Oven Rack
in the oven. Close the oven door.
2. Select Pizza function, default setting is 400°F
(not shown), 20 minutes.
a) The timer can be adjusted between
1 to 90 minutes.
i. After Pizza function is selected, preheat
will begin and “PrE” will be displayed on
the screen. When preheating is complete,
the oven will beep three times and “Add
Food” will be displayed on the screen.
Open the door to add food and close the
door, then press “Start” for the timer to
begin counting down.
3. Tap-touch Start key to start cooking.
Note: In this cycle, both the top and bottom
heating elements operate and glow
red/orange, and the top convection
fan will work in low speed.

8
TIPS AND HINTS
1. For best results always use the Baking Pan
under the Air Fry Basket.
2. Condensation will appear on the oven door
for some foods and then disappear.
This is normal.
3. Cook food immediately after defrosting.
4. Frozen foods and thick meat will take
longer to cook.
5. When defrosting, do not place food in layers-
place as a single layer on Baking Pan.
6. Avoid opening the Oven Door too frequently
to prevent heat loss.
7. When toasting, frozen bread or many slices
should be at a darker setting than regular slice.
8. When broiling, smoke will likely appear.
Removing excess fat prior to broiling can
reduce this. Always use the Baking Pan.
REPLACING THE
OVEN LIGHT
The oven has the lamp, and the instruction of
replacement is as follows:
Always unplug oven and let cool before replacing
bulb. Only use a 15 Watt, 120V, E14 type
oven bulb.
1. Remove the Oven Rack from the oven before
replacing the light.
2. The light is positioned on the right-hand side
of the oven cavity. Position your fingers on the
outside of the light cap and gently unscrew it
and set it down gently.
3. Remove the used bulb by gently unscrewing it.
4. Use a soft cloth to gently re-screw the new
bulb. Do not directly touch the surface of the
bulb with your fingers as oil from your skin
can damage the bulb.
5. Re-screw the light cap on.
CLEANING AND
MAINTENANCE
Always unplug the oven from the electrical outlet
and allow it to cool completely before cleaning.
• Do not use abrasive cleaners, as they will
damage the finish. Simply wipe the exterior
with a clean, damp cloth and dry thoroughly.
Apply the cleansing agent to a cloth, not
directly onto the oven, before cleaning.
• To clean interior walls, use a damp cloth and a
mild liquid soap solution or a spray solution on
a sponge. Remove any residue from cleaners
with a clean, damp cloth. Never use harsh
abrasives or corrosive products. These could
damage the oven surface. Never use steel wool
pads, etc. on interior of oven.
• Cleaning the accessories:
– Crumb Tray should be hand washed in hot,
soapy water, or with a nylon scouring pad or
nylon brush, and thoroughly rinsed. This item
is NOT dishwasher safe.
– Baking Pan, Oven Racks and Air Fry Basket
are dishwasher safe or can be hand washed in
hot, soapy water, or with a nylon scouring pad
or nylon brush, and thoroughly rinsed.
• After cooking greasy foods and once your oven
has cooled, always clean top of oven interior.
If this is done on a regular basis, your oven will
perform like new. Removing the grease will help
to keep toasting consistent, cycle after cycle.
• To remove crumbs, slide out the front Crumb
Tray and discard crumbs. Wipe clean and
replace. To remove baked-on grease, soak the
tray in hot, soapy water or use nonabrasive
cleaners. Never operate the oven without the
Crumb Tray in place.
• We recommend using plastic, silicone, or
wooden utensils to prolong the life and protect
the coating.
• Never leave plastic utensils in contact with
hot surfaces.
• Any other servicing should be performed by an
authorized service representative.
9
TROUBLESHOOTING
Issue Cause Solution
Unit won't
turn on
An issue with the
power plug.
Make sure your unit is plugged into a functional outlet.
Light turns off Standard
procedure.
After pressing START or STOP/CANCEL, the light will automatically turn
off after 5 minutes.
Light turns off
while cooking
Standard
procedure.
After pressing any button or turning the dial during cooking, the light will
automatically turn off after 5 minutes.
What oils
can I use?
Oils with high smoke points, like canola oil and grapeseed oils, are best.
If you use Extra Virgin Olive Oil, cook on moderate heat settings
to prevent it from burning onto your cooking surface.
Can I use
spray oils?
Avoid all oils in spray form as they may damage the nonstick coating
of your cooking surface.
Difficulties
changing
cooking
function
when the unit
is already
cooking
Unit does not allow
user to change
cooking function
when the unit is
already cooking.
You need to first interrupt the current cooking function by tap-touching
STOP/CANCEL for 1 second. Then unit will go back to standby mode and
desired cooking function can be chosen.
Need to
change
the time or
temperature
during
cooking
You need to first interrupt the current cooking function by tap-touching
STOP/CANCEL. Then change the time or temperature as desired, and tap
touch START to continue cooking.
Do I need to
use the default
time and
temperature?
No. Use the time and temperature dials to customize your settings.
Timer starts to
count down
Standard
procedure.
The timer starts to count down in each mode, except for Bake and Pizza
mode since there is a Preheat function first.
Unsure when
preheating is
complete
After Bake function is selected, Preheat will begin and "PrE" will be
displayed on the screen. When preheating is complete, the oven will beep
three times and "Add Food" will be displayed on the screen.
Condensation
and steam
comes out of
the unit
When preparing
greasy foods, oil
may leak into the
tray and produce
steam.
The viewing window may fog up on the sides or in the corners, but
cooking results will not be affected.
Condensation
and steam
comes out of
the unit
When preparing
foods with a
high moisture
content, the water
evaporates from the
food and causes
condensation.
The viewing window may fog up on the sides or in the corners, but
cooking results will not be affected.
Condensation
and steam
comes out of
the unit
The Crumb Tray,
Air Fry Basket, or
bottom of oven
may contain grease
residue from
previous use.
Make sure to clean thoroughly after each use.
10
TROUBLESHOOTING (CONT.)
Issue Cause Solution
Food is not
crispy or fried
evenly
Some foods may
require more oil
than others.
If not crispy enough, brush some oil on the food. Do not use cooking
sprays or low smoke point oils.
Food is not
crispy or fried
evenly
An issue with food
placement.
Make sure food is spread evenly in a single layer in the Air Fry Basket
with no overlap. If food still overlaps, toss or flip food halfway through
cooking cycle.
Food is not
crispy or fried
evenly
Cooking time. Put the food in for additional cooking time. Make sure to check
periodically until food reaches desired brownness. Do not leave oven
unattended.
Food is
undercooked
There may be too
much food in the
basket.
Cook smaller batches of food in a single layer. Avoid overlapping food.
Food is
undercooked
The temperature
might be too low.
Use the Temperature Dial to increase temperature.
Fan remains
on after
cooking
Standard
procedure.
This is normal. The fan remains on for a few minutes for cooling purposes.
Uncertain
about which
accessories
are
dishwasher
safe
Baking Pan, Oven Rack and the Air Fry Basket are dishwasher safe. DO
NOT put the Crumb Tray in the dishwasher. Instead, hand wash with
warm, soapy water.
The drippings
from the air
fry basket
made a mess/
smoke in the
oven
Did not use Baking
Pan with Air Fry
Basket.
Be sure to always use the Baking Pan underneath the Air Fry Basket.
When air
frying, food
is unevenly
cooked
Not flipping
larger items while
cooking.
Most foods do not need to be flipped during cooking, but larger items,
like chicken cutlets, should be turned halfway through cooking cycle to
ensure evenly cooked and browned result.
When air
frying, food
is unevenly
cooked
Pieces are too
large, so cooking
time takes longer.
Foods will cook more evenly if they are cut into the same sized pieces.
Interior walls
get dirty after
cooking
Everyday use. Use a damp cloth and a mild liquid soap solution or spray solution on
a sponge. Remove any residue from cleaners with a clean, damp cloth.
Never use harsh abrasives or corrosive products.
Oven light
stopped
working
Intensive use. Replace the used bulb with a new 15 Watt, 120V, E14 type oven bulb.
Please refer to the manual for instructions on how to replace the light.

11
LIMITED WARRANTY
GreenPan Electrics are covered by a limited
warranty against defects in materials and
workmanship, beginning on the date of purchase
and lasting for two years. If your GreenPan
Electrics product has a defect during the warranty
period, The Cookware Company (USA), LLC
will either repair or replace the product. Further
information on the warranty claim process,
exclusions from warranty coverage, and other
terms can be found in the complete limited
warranty for this product, available online at
greenpan.us/warranty.
TERMS OF SALE;
ARBITRATION
The terms on which The Cookware Company
(USA), LLC sells GreenPan Electrics are available
online at greenpan.us/pages/terms of-sale
(the “Terms”). The Terms contain very important
information regarding your rights and obligations,
as well as conditions, limitations, and exclusions
that may apply to you. Please read them carefully.
In particular, the Terms provide that, by your
purchase of this product, you and The Cookware
Company (USA), LLC are agreeing to give up
any rights to litigate in a court or before a jury, or
to participate in a class action or representative
action with respect to a claim. Other rights that
you would have if you went to court may also be
unavailable or limited in arbitration. Any claim,
dispute, or controversy between you and The
Cookware Company (USA), LLC arising from or
relating in any way to your purchase of products
or services will be resolved exclusively and finally
by binding arbitration.
The arbitration will be administered by the
American Arbitration Association (“AAA”) in
accordance with the Consumer Arbitration
Rules (the “AAA Rules”) then in effect, except as
modified hereby. (The AAA Rules are available
at adr.org or by calling the AAA at 1-800-778-
7879.) The Federal Arbitration Act will govern the
interpretation and enforcement of this arbitration
and waiver provision.
The Cookware Company (USA), LLC will be
responsible for the AAA filing fee of any such
proceeding. Other than your right to pursue a
claim in small claims court, as described in the
Terms, the arbitrator will have exclusive authority
to resolve any dispute relating to arbitrability
and/or enforceability of this arbitration provision,
including any unconscionability challenge or
any other challenge that the arbitration provision
or these Terms are void, voidable or otherwise
invalid. The arbitrator will be empowered to grant
whatever relief would be available in court under
law or in equity. Any award of the arbitrator(s)
will be final and binding on each of the parties
and may be entered as a judgment in any court
of competent jurisdiction. Attorney fee shifting
in this case is governed by the Terms. You agree
to an arbitration on an individual basis. In any
dispute, NEITHER YOU NOR THE COOKWARE
COMPANY (USA), LLC WILL BE ENTITLED
TO JOIN OR CONSOLIDATE CLAIMS BY OR
AGAINST OTHER CUSTOMERS IN COURT OR
IN ARBITRATION OR OTHERWISE PARTICIPATE
IN ANY CLAIM AS A CLASS REPRESENTATIVE,
CLASS MEMBER OR IN A PRIVATE ATTORNEY
GENERAL CAPACITY. The arbitral tribunal may
not consolidate more than one person’s claims
and may not otherwise preside over any form
of a representative or class proceeding. The
arbitral tribunal has no power to consider the
enforceability of this class arbitration waiver and
any challenge to the class arbitration waiver may
only be raised in a court of competent jurisdiction.
If any provision of the arbitration agreement
described herein and in the Terms is found
unenforceable, the unenforceable provision will be
severed and the remaining arbitration terms will
be enforced.

1400026505