字 体:
Microsoft YaHei UI
A 5
Introduction
Thank you for choosing the Flatsons Crush20 rechargeable multi-function portable guitar amplifier.
To ensure optimal use of all features and understanding of safety precautions, please read this manual
thoroughly before operation. For inquiries or suggestions, contact us at: +86 40071 66908.
Product Features
1. Portable Design
Maintains a compact form factor while delivering extended battery life.
2. High-Efficiency Amplification
Employs a powerful Class D amplifier and optimized power management, delivering 20W RMS efficiently
while minimizing weight.
3. Studio-Grade Sound Processing
Guitar Channel offers faithful sound reproduction with dedicated reverb; Microphone Channel features
dual-band EQ (Bass/Treble) and reverb for vocal enhancement.
Package Contents
1. Crush20 Guitar Amplifier ×1
2. USB-C Charging Cable (5V/2A) ×1
3. User's Manual ×1
Specifications
Model
Rated Power
Peak Power
Speaker
Battery
Charging Time
Playback Time
Channel 1 (Mic)
Channel 2 (Guitar)
EQ Controls
Connectivity
Net Weight
B.T Name
Gross Weight
Product Dimensions
Crush20
20W
30W
5.5" Full Range
7.4V/3000mAh lithium-ion battery
1.5–2 hours (USB-C 5V/2A)
4–8 hours (70% volume)
SNR 85dB / Impedance 10kΩ
SNR 95dB / Impedance 2kΩ
Bass: ±12dB@125Hz, Treble: ±12dB@8kHz
B.T Version 5.3 (15m range)
Crush20
4.19 lbs (1.9 kg)
4.72 lbs (2.14 kg)
8.5" L × 6.4" W × 6.5" H (215 × 163 × 166 mm)
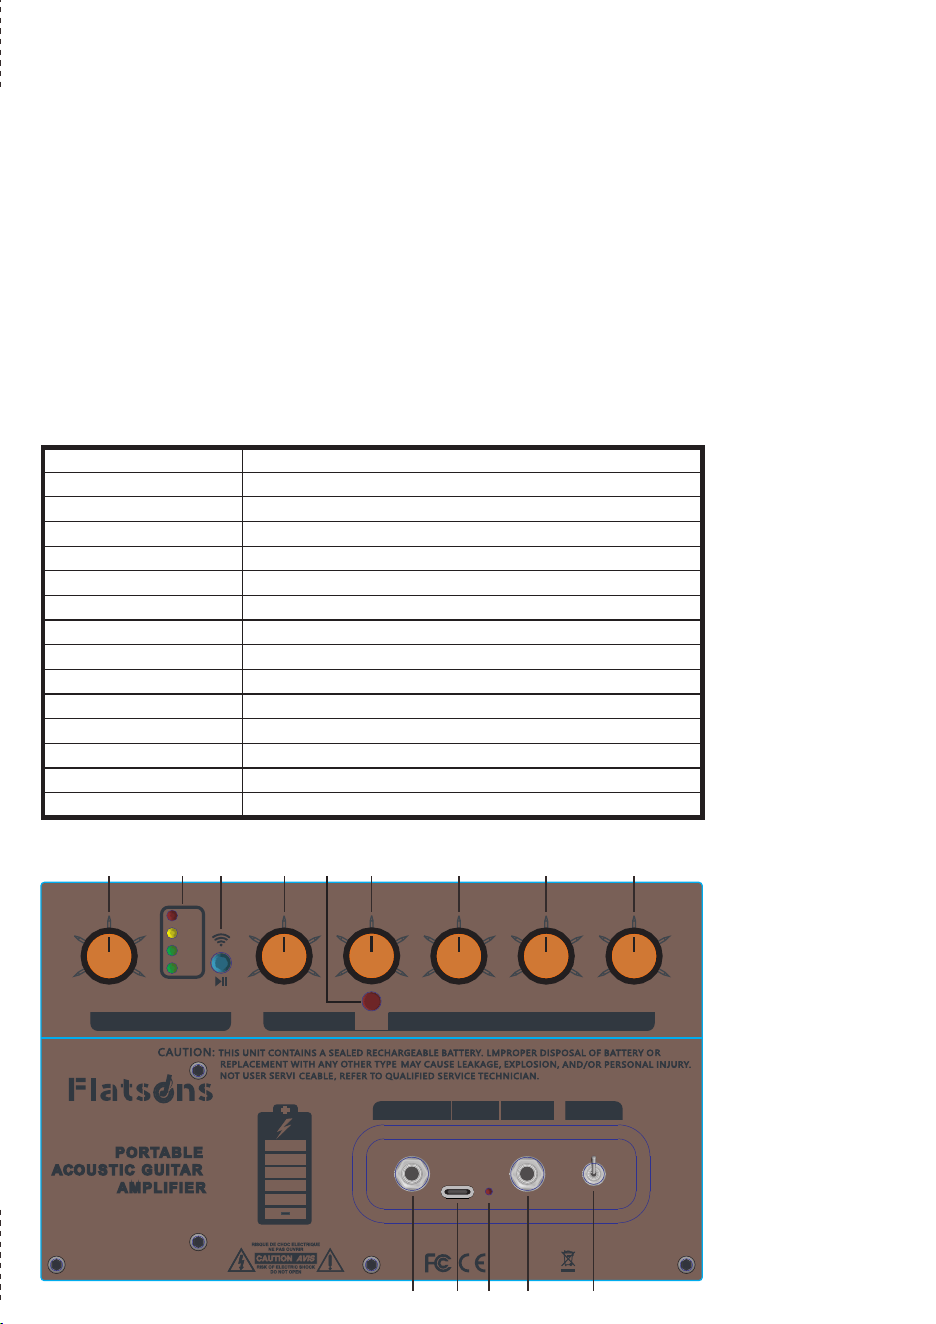
Panel Shows
Channel 1: Microphone / Active Guitar Input
1. Volume
Adjust the volume of channel 1.
2. Bass
Adjusts low-frequency gain of channel 1.
3. Treble
Adjusts high-frequency gain of channel 1.
4. Reverb
Adjust the intensity of the reverb effect.
Channel 2: Passive Guitar Input
5. Guitar EFX
Dedicated reverb switch for channel 2 (passive guitar). Press to activate reverb effect on Channel 2;
release to disable.
Note: Microphone channel reverb is always active.
6. Volume
Adjust the volume of channel 2.
Channel 3: B.T Wireless System
7. B.T Function
Short Press:
When B.T is disconnected, short press to activate pairing mode (LED flashes rapidly); when connected,
short press to play/pause music.
Pairing Process:
Use B.T search to find device named "Crush20" and connect. After successful pairing, LED stays solid
with confirmation tone.
Long Press (2s):
Disable B.T function.
8. Battery Indicator
Four LEDs display battery level (each 25% capacity); when the red light turns off, the amplifier enters
standby mode and ceases audio output.
9. Master Volume
Adjust final output volume for all channels.
10. Channel 2 Input Jack
Standard 1/4" (6.35mm) input interface. Connect passive guitars or dynamic microphones.
11. USB-C Charging Port
Recharge using included cable with 5V/2A charger (charger not included).
12. Charging Status Light
Illuminates solid red during charging, and turns off when fully charged or not being charged.
13. Channel 1 Input Jack
Standard 1/4" (6.35mm) input interface. Connect dynamic microphones or active guitar.
14. Power Switch
Toggle upward to power on, toggle downward to power off.
Tips
Active Guitar :
Require battery-powered pickups with built-in preamps, delivering strong signals that need connect to
Channel 1's low-impedance input to prevent distortion from overload.
Passive Guitar:
Use non-powered magnetic pickups generating weaker signals, requiring Channel 2's high-impedance
input to avoid volume loss and noise interference.
MADE IN CHINA
2
4
6
8
0 10
-4
-2
2
4
-8 8
2
4
6
8
0 10
2
4
6
8
0 10
-4
-2
2
4
-8 8
VOLUMEBASSTREBLE
RE VER B
VOLUMEMASTER
MICGUITAR
GUI TAR EF X
POWER AMP
GUITAR IN MIC IN POWER
DC IN
US B 5 V2 A
Cr ush2 0
20WATT
Bui l t-in
2
4
6
8
0 10
25%
50%
75%
100%
BAT
RoHS
MA DE IN C HI NA
FCC ID : 2B HA E-CRUS H2 0
1
2
3
4
5
6
7
8
9
14
13
1211
10
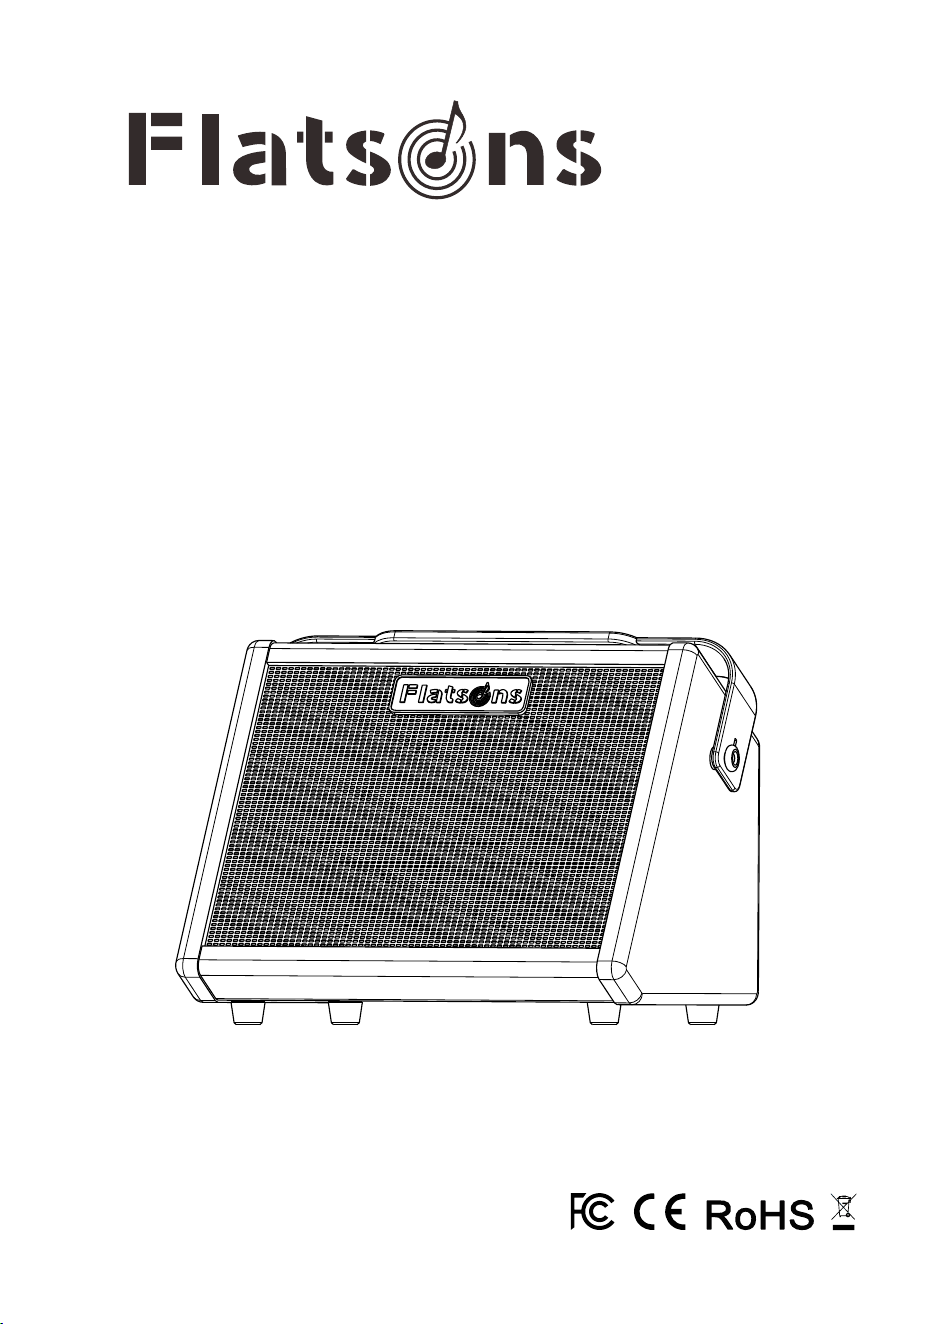
Crush20
User’s Manual
Portable Acoustic Guitar Amplifier
字 体:
Microsoft YaHei UI
A 5
Introduction
Thank you for choosing the Flatsons Crush20 rechargeable multi-function portable guitar amplifier.
To ensure optimal use of all features and understanding of safety precautions, please read this manual
thoroughly before operation. For inquiries or suggestions, contact us at: +86 40071 66908.
Product Features
1. Portable Design
Maintains a compact form factor while delivering extended battery life.
2. High-Efficiency Amplification
Employs a powerful Class D amplifier and optimized power management, delivering 20W RMS efficiently
while minimizing weight.
3. Studio-Grade Sound Processing
Guitar Channel offers faithful sound reproduction with dedicated reverb; Microphone Channel features
dual-band EQ (Bass/Treble) and reverb for vocal enhancement.
Package Contents
1. Crush20 Guitar Amplifier ×1
2. USB-C Charging Cable (5V/2A) ×1
3. User's Manual ×1
Specifications
Model
Rated Power
Peak Power
Speaker
Battery
Charging Time
Playback Time
Channel 1 (Mic)
Channel 2 (Guitar)
EQ Controls
Connectivity
Net Weight
B.T Name
Gross Weight
Product Dimensions
Crush20
20W
30W
5.5" Full Range
7.4V/3000mAh lithium-ion battery
1.5–2 hours (USB-C 5V/2A)
4–8 hours (70% volume)
SNR 85dB / Impedance 10kΩ
SNR 95dB / Impedance 2kΩ
Bass: ±12dB@125Hz, Treble: ±12dB@8kHz
B.T Version 5.3 (15m range)
Crush20
4.19 lbs (1.9 kg)
4.72 lbs (2.14 kg)
8.5" L × 6.4" W × 6.5" H (215 × 163 × 166 mm)
Panel Shows
Channel 1: Microphone / Active Guitar Input
1. Volume
Adjust the volume of channel 1.
2. Bass
Adjusts low-frequency gain of channel 1.
3. Treble
Adjusts high-frequency gain of channel 1.
4. Reverb
Adjust the intensity of the reverb effect.
Channel 2: Passive Guitar Input
5. Guitar EFX
Dedicated reverb switch for channel 2 (passive guitar). Press to activate reverb effect on Channel 2;
release to disable.
Note: Microphone channel reverb is always active.
6. Volume
Adjust the volume of channel 2.
Channel 3: B.T Wireless System
7. B.T Function
Short Press:
When B.T is disconnected, short press to activate pairing mode (LED flashes rapidly); when connected,
short press to play/pause music.
Pairing Process:
Use B.T search to find device named "Crush20" and connect. After successful pairing, LED stays solid
with confirmation tone.
Long Press (2s):
Disable B.T function.
8. Battery Indicator
Four LEDs display battery level (each 25% capacity); when the red light turns off, the amplifier enters
standby mode and ceases audio output.
9. Master Volume
Adjust final output volume for all channels.
10. Channel 2 Input Jack
Standard 1/4" (6.35mm) input interface. Connect passive guitars or dynamic microphones.
11. USB-C Charging Port
Recharge using included cable with 5V/2A charger (charger not included).
12. Charging Status Light
Illuminates solid red during charging, and turns off when fully charged or not being charged.
13. Channel 1 Input Jack
Standard 1/4" (6.35mm) input interface. Connect dynamic microphones or active guitar.
14. Power Switch
Toggle upward to power on, toggle downward to power off.
Tips
Active Guitar :
Require battery-powered pickups with built-in preamps, delivering strong signals that need connect to
Channel 1's low-impedance input to prevent distortion from overload.
Passive Guitar:
Use non-powered magnetic pickups generating weaker signals, requiring Channel 2's high-impedance
input to avoid volume loss and noise interference.
MADE IN CHINA
2
4
6
8
0 10
-4
-2
2
4
-8 8
2
4
6
8
0 10
2
4
6
8
0 10
-4
-2
2
4
-8 8
VOLUMEBASSTREBLE
RE VER B
VOLUMEMASTER
MICGUITAR
GUI TAR EF X
POWER AMP
GUITAR IN MIC IN POWER
DC IN
US B 5 V2 A
Cr ush2 0
20WATT
Bui l t-in
2
4
6
8
0 10
25%
50%
75%
100%
BAT
RoHS
MA DE IN C HI NA
FCC ID : 2B HA E-CRUS H2 0
1
2
3
4
5
6
7
8
9
14
13
1211
10
Crush20
User’s Manual
Portable Acoustic Guitar Amplifier

Getting Started
Your new Flatsons Crush20 is a portable amplifier designed to faithfully reproduce the sound of acoustic
instruments and a diverse assortment of vocals.
With the addition of B.T wireless connectivity, you can now easily add backing tracks or other accompaniment
to your performance.
Here are some basic setup tips to help get you going. To operate Crush20 safely, please read the entire
manual.
1. Battery Charging
Fully charge the battery via USB-C (5V/2A) before use.
2. Initial Tone & Effect Setup
Set bass and treble to 12 o'clock position, reverb to 9 o'clock position, turn all volumes down for neutral
baseline.
3. Connect Instrument
Connect your instrument or microphones to channel 1/ channel 2 input with shielded 6.35mm cables.
4. Set Tone & Effect
Turn on the power switch. While playing, adjust bass, treble and reverb, then calibrate channel volume
by playing intensely and reducing volume when distortion occurs.
5. Volume Optimization
Slowly raise master volume to desired level.
Tips
Always minimize master volume before power-on to prevent speaker damage from power surge and
avoid hearing injury from unexpected loud sounds
Troubleshooting
1. Can't Turn on the Machine
A. Check the battery level to ensure that it is sufficiently charged.
B. Check that the power switch is in upward position.
2. Unable to Charge
A. Use only the included 5V/2A USB-C cable.
B. Ensure power source is 5V/2A DC.
C. If left unused for months, recharge every 3 months to maintain battery health.
3. B.T Cannot Connect
A. Check whether B.T can be turned on normally.
B. If the B.T indicator light does not flash but remains lit, it is possible that another device is connected,
please disconnect from the other device and then retr y pairing.
4. Audio Distortion/Low Volume
A. If using a passive guitar, ensure it is connected to Channel 2 input.
B. If using an active guitar or microphone, connect to Channel 1 input.
C. Reduce the channel volume if distortion occurs during playback.
5. No Sound from Microphone
A. Confirm the microphone is a dynamic type, condenser microphones are not supported.
B. Ensure the microphone is properly connected to Channel 1.
C. If the microphone requires a battery, check that it is functioning.
6. Hum or Noise Interference
A. Use high-quality shielded cables to minimize interference.
B. Relocate away from WiFi routers/electronic devices
Maintenance
1. Battery Maintenance
For long-term storage, maintain battery health by keeping the charge level between 50-60%, replenishing
it every 3 months if unused. After extended storage, the initial full charge may take 3-5 hours to recalibrate
the battery management system for optimal performance.
2. Surface Cleaning
Regularly clean the amplifier using a soft, dry cloth. For tougher stains, lightly dampen the cloth with
water or a non-corrosive cleaning solution, then gently wipe the surface - avoid excessive moisture and
always dry immediately.
3. Handling Precautions
Always handle the amplifier with care, lifting and carr ying it gently to avoid impacts or drops that could
damage internal components.
4. Environmental Protection
Store and use the device in dry environments between 0°C to 40°C (32°F to 104°F), keeping it away from
direct sunlight, heat sources, and areas with high humidity or dust accumulation.
Safety Precautions
1. Always retain this manual for reference and carefully follow all warnings and instructions before use.
2. Do not use or store the amplifier near water sources such as bathtubs, wet basements, or outdoors in
rainy conditions.
3. Place the product in a dry, stable location away from flammable materials and heat sources, especially
during charging.
4. Gently wipe the surface with a slightly damp cloth-never submerge,spray liquids,or use harsh chemicals.
5. Only connect the provided cables to avoid damage or hazards.
6. This amplifier can produce high sound pressure-start with low volume and adjust gradually to avoid
hearing damage.
7. If the product malfunctions, contact authorized service personnel immediately—do not attempt self-
repair.
8. Avoid extreme temperatures,physical damage,or improper disposal of the lithium-ion battery to prevent
fire risks.
https://flatsonsaudio.com
service@flatsonsaudio.com