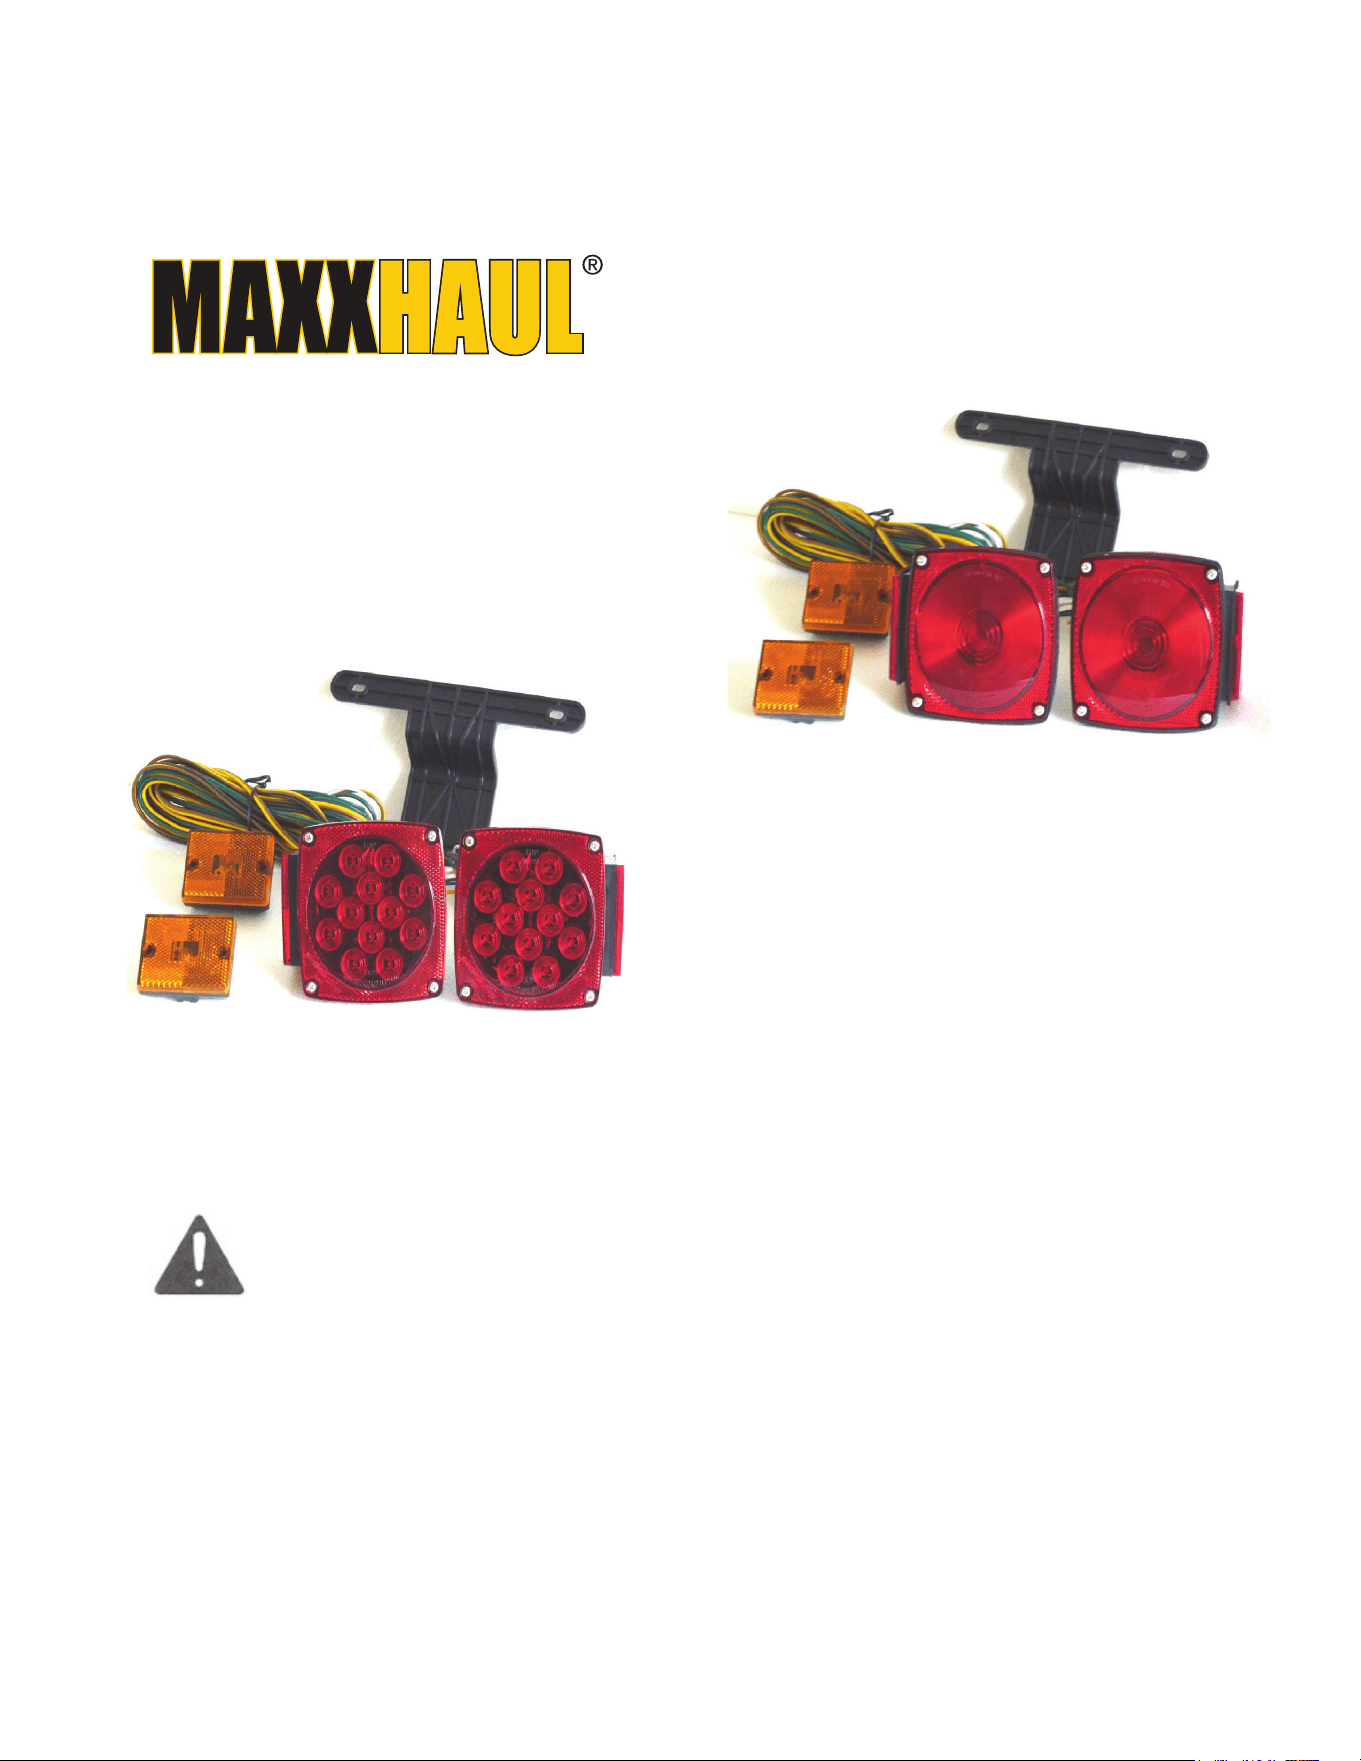
12V Trailer Light Kit
Incandescent
Model 70094
Read and understand this entire manual before assembling,
installing, operating, or servicing this product.
SAVE THIS MANUAL
Instruction Manual
&
Parts Catalog
12V Trailer Light Kit
LED
Model 70205
Copyright
c
2014 by MAXXHAUL . All rights reserved. No portion of this manual or any artwork contained
Due to continuing improvements, actual product may differ slightly from the product described herein.
Tools
required for assembly and maintenance may not be included.
herein may be reproduced in any shape or form without the express written consent of MAXXHAUL
IMPORTANT SAFETY
INFORMATION
This is a SAFETY ALERT symbol.
It is used to alert you to
potential personal
injury hazards. Obey all
safety messages that follow
this symbol to avoid possible injury or death.
DANGER indicates a
hazardous situation which, if not avoided,
will result in death or injury.
WARNING indicates a
hazardous situation which, if not avoided,
could result in death or serious injury.
CAUTION indicates a
hazardous situation which, if not avoided,
could result in minor or moderate injury.
NOTICE indicates
important information which, if not followed,
may cause damage to equipment.
SAVE THIS MANUAL
Keep this manual for the safety warnings and
precautions. The manual offers important infor-
mation on how to assemble, use and maintain
this product.
Write the product’s model number and purchase
date on the cover page of this manual.
Keep this manual (and your purchase receipt) in
a safe place.
UNPACKING
The shipment should be thoroughly inspected as
soon as it is received. The signed “bill of lad-
ing” is acknowledgement by the carrier of receipt
in good condition or shipment covered by our
invoice. For your own protection, if any of the
goods called for on the bill of lading are shorted
or damaged, do not accept them until the carrier
makes a notation on the freight bill of the shorted
or damaged goods.
DANGER
WARNING
CAUTION
NOTICE
INSTRUCTION
MANUAL
WARNING concerning Risk of Eye
Injury. Wear ANSI approved eye
protection.
WARNING concerning Risk of
Hearing Loss. Wear hearing pro-
tection.
IMPORTANT SAFETY
INSTRUCTIONS
1. Read and understand all
safety warnings and instruc-
tions. Failure to follow the warnings and in-
structions may result in serious injury or death.
Save all warnings and instructions for future
reference.
2. Personal and Work Area Safety
A. Always wear ANSI approved
safety goggles.
B. Always wear hearing protec-
tection when working in noisy
environments. Prolonged exposure to high
intensity noise can cause hearing loss.
C. Use safety equipment. Safe-
ty shoes, hard hat and work
gloves must be used for applicable conditions.
Model 70094/70205 Page 2
D. Dress appropriately. -
ting clothing or jewelry when working. Contain
long hair, and keep hair, clothing and gloves
away from moving parts.
E. Use common sense when working. Stay
alert and concentrate when setting up and using
the 12V Trailer Light Kit. Never work while under
F. While assembling and using the 12V Trailer
Light Kit keep work area clean and well lighted.
Keep spectators and children out of the work
area.
Notify MAXXHAUL immediately if any hidden
loss or damage is discovered after receipt.
Model 70094/70205 Page 3
3. Use of the 12V Trailer Light Kit
A. This 12V Trailer Light Kit is designed
for trailers less than 80 inches in width. It
complies with Department of Transportation
(DOT) standards. Do not modify the Light
Kit and do not use this product for pur-
poses that it was not designed for.
B. As pertaining to lights on trailers, read
and adhere to all safety guidelines and in-
structions provided by the manufacturer
of the trailer.
C. If you are not experienced in assembly-
ing electrical products such as this one, the
service technician.
D. Keep children and spectators well clear
when setting up this product and when ma-
neuvering a trailer.
E. If trailer is over 80 inches wide, additional
red marker lights, which are not included,
must be set up at the back of the trailer.
F. People with pacemak-
ers should consult their physician(s) before
using this product. Operation of electrical
equipment in close proximity to a heart pace-
maker could cause interference to, or failure
of, the pacemaker.
G. To verify that the correct wire has been
located on the tow vehicle’s wiring harness,
it is recommended that a circuit tester be
used.
Keep in mind that the warnings, cautions,
and instuctions previously discussed
cannot cover all possible events and
circumstances. It is important that the
person setting up and using using this
product use common sense and caution
at all times.
WARNING
Limited Warranty. MAXXHAUL warrants to
the original retail purchaser that the product
is free of defects in material and workman-
ship at the time of shipment. This product
is warranteed for 90 days from the date of
purchase. This warranty is expressly in lieu
of all other warranties, express or implied.
Proof of purchase is required for warranty
transactions; a copy of the original invoice
or sales receipt is required.
MAXXHAUL is not responsible for the at-
tachment or the installation of this prod-
uct. The attachment of this product is
critical and beyond the control of MAXX-
HAUL. It neither guarantees, nor will it be
liable for any damage resulting from
its attachment or improper use.
Assembling and Setting Up
the 12V Trailer Light Kit
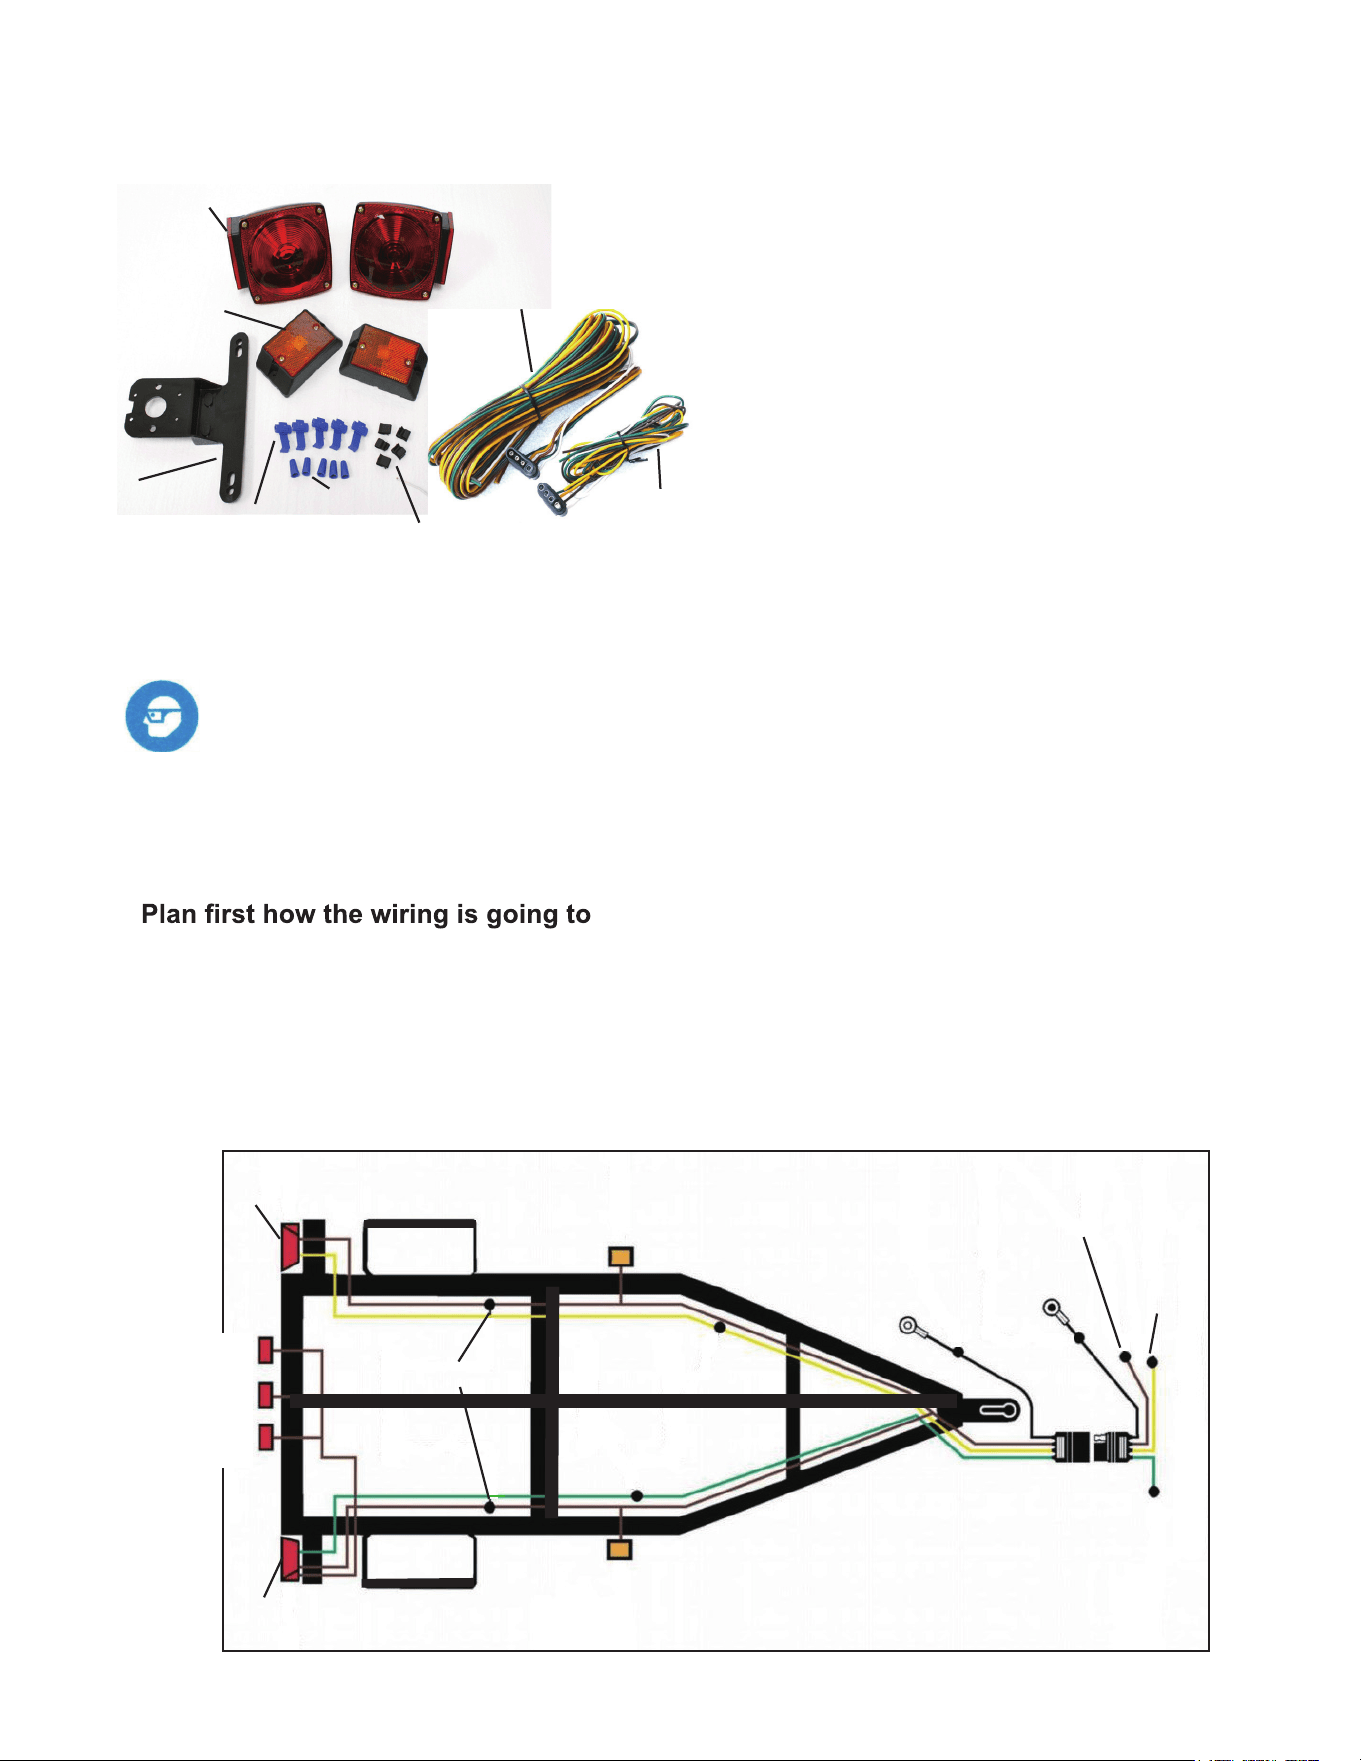
1. Refer to photo above of all components
included in the kit.
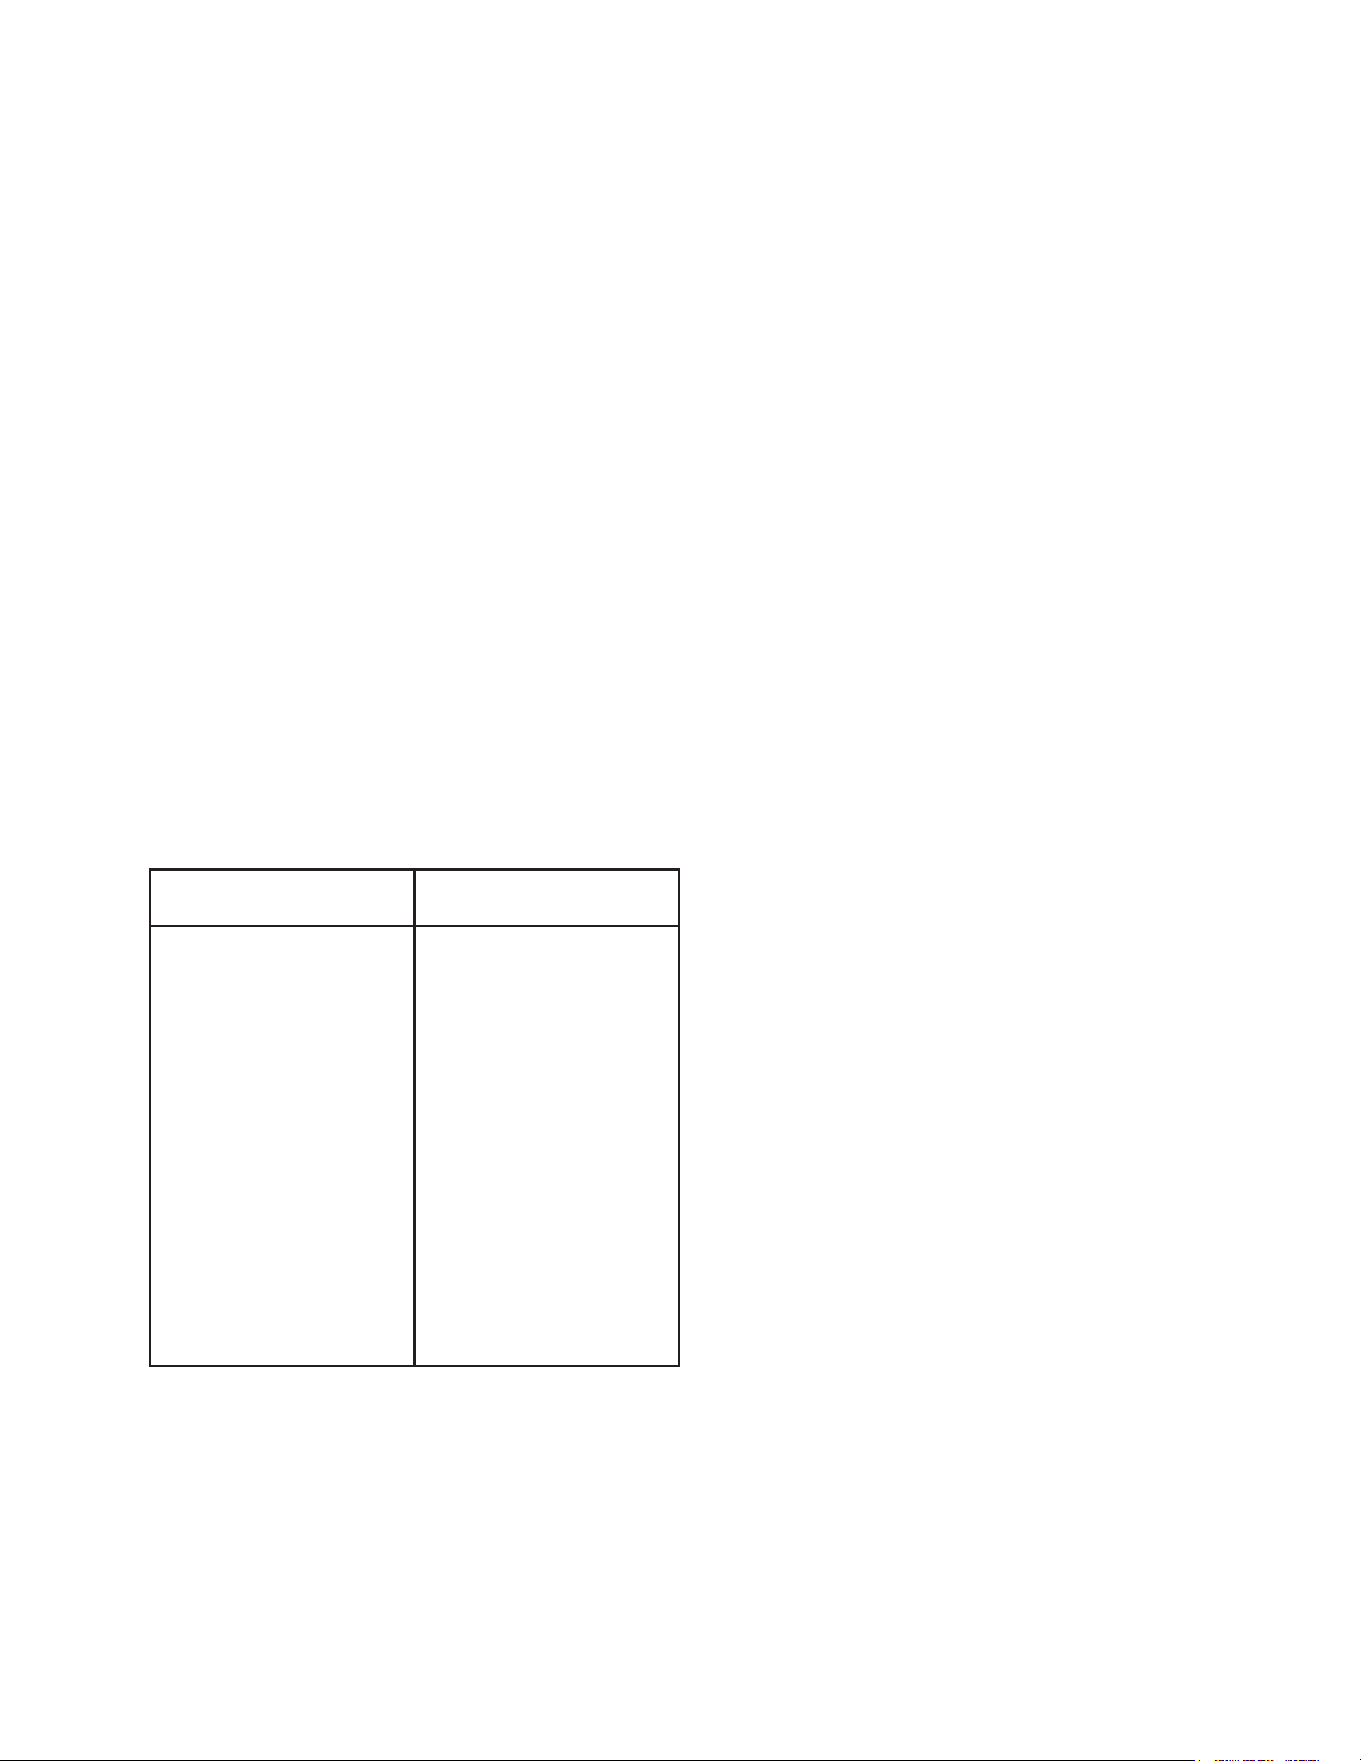
2. Refer to the Wiring Illustration below
when planning and setting-up the Trailer
Light Kit.
3.
be routed to the tail lights. Some trailers
have a hollow center frame tube from front
to back. Wiring can be located through this
tube and “T” off to the sides near the tail-
light area.
Always wear ANSI approved
safety goggles.
Model 70094/70205 Page 4
Fender
Fender
Side Amber
Clearance Light
Side Amber
Clearance Light
White - Ground
to Trailer
White - Ground
to Tow Vehicle
Yellow
Left/Stop
and Turn
Brown - Tail Light
Green-Right/Stop
and Turn
Green
Yellow
Brown
Left Rear Light with
License Plate Bracket
Right Rear Light
3 Additional
Rear Lights
(not included)
are required
if trailer is
over 80” wide
Wiring Illustration
Stop, Tail and Turn
Signal Lights
Side Amber
Clearance Lights
License Plate
Bracket
Frame Clips
Wire
Connectors
Wire Caps
On other trailers, it may be best to posi-
tion wires along the outer edge of the trailer
frame. The harness is designed with a
single ground wire. Running wire and right
turn wire is combined, with running wire and
left turn wire combined, so that they can be
“T” off and split down each side of the trailer
(as shown in the example illustration below).
4. Stop, Tail and Turn Signal lights get mo-
ounted on brackets at the rear of trailer. Side
Amber Clearance Lights get mounted on the
sides of the trailer as shown in the illustration
below.
5. Position the 4-Way Flat Trailer Connector
near the tongue of trailer and feed the wires
to the rear of trailer.
6. Attach the WHITE ground wire to the side
of the trailer tongue on a clean, bare metal
surface. Attach a ring terminal to the end of
the ground wire and secure it to the trailer
surface with a self tapping screw.
7. Separate the other wires so that the
YELLOW and BROWN wires run down the
left side (road side) of trailer. GREEN and
BROWN wires run down the right side (curb
side).
4-Way Flat
Vehicle Connector
4-Way Flat
Trailer Connector
Model 70094 shown

8. Note that Side Amber Clearance Lights
on sides of trailer get connected to BROWN
wires. Use a separate short length of
BROWN wire and a Wire Connector to splice
it into the BROWN wire of the Trailer Connec-
tor harness to connect each Clearance Light.
9. Mount the Side Amber Clearance Lights to
the side frame of trailer. If an existing mount-
ing hole is not available, holes will have to be
drilled.
10. To ground each Side Amber Clearance
Light, secure a ring terminal at the end of
each white ground wire to the trailer frame
by using a self tapping screw.
11. Use Frame Clips to secure the Trailer
Connector harness wires to the trailer frame
as wires run from front to back of trailer.
12. Connecting wires to Tail Lights: On the
back of each Tail Light is printed either “Road
Side” or “Curb Side”.
The “Road Side” light will connect to the
License Plate Bracket, and to the trailer light
bracket.
Connect BROWN wire from “Road Side” light
to BROWN wire on Trailer Connector har-
ness.
Connect YELLOW wire from “Road Side” light
to YELLOW wire on Trailer Connector har-
ness. Use wire connectors to splice these
wires together.
To ground this light, attach the WHITE ground
wire to the trailer frame (see instructions #10,
in bold,above).
The “Curb Side” light will connect to the
trailer’s light bracket in the same manner:
BROWN “Curb Side” wire attaches to
BROWN wire on Trailer Connector harness.
13. Now secure the License Plate Bracket
and Left Rear Light to the left trailer bracket.
Do the same to secure the Right Rear Light to
the right trailer bracket.
14. Connecting 4-Way Flat Vehicle Con-
nector wiring to the tow vehicle:
The Vehicle Connector wiring needs to be po-
sitioned near the Trailer Connector wiring, as
both will be connected together near the trailer
tongue.
Connect the WHITE ground wire of Vehicle
Connector wiring harness to a clean, bare
metal surface on the towing vehicle. Attach
a ring terminal to the end of the ground wire
and secure it to the vehicle surface with a self
tapping screw.
Use wire connectors to make the following
wire connections from the Vehicle Connector
harness:
BROWN wire to towing vehicle’s tail light wire.
YELLOW wire to towing vehicle’s left hand,
stop and turn light wire.
GREEN wire to towing vehicle’s right hand
stop and turn light wire.
15. With wiring now complete, connect the
4-Way Flat Trailer Connector plug to the plug
of the 4-Way Flat Vehicle Connector.
16. Check the trailer lights. Turn on the tow-
ing vehicle’s head lights. With a spotter to as-
sist, check that the trailer’s stop/turn/tail lights
come on. Check that the two
Model 70094/70205 Page 5
REV 11/14, 01/16
GREEN “Curb Side” wire attaches to GREEN
wire on Trailer Connector harness.
To ground this light, attach the WHITE ground
wire to the trailer frame (see instructions #10,
in bold, in column to the left).
16. (continued)
Clearance Lights come on.
Press the brake pedal; the brighter stop
lights should turn on while the pedal is de-
pressed. Check the turn signal; the blinking
turn signal light should turn on.
17. If all the trailer lights do not work prop-
erly, re-check all connections, including
ground connections. Make sure attachment
hardware is tight.
18. Periodically check all wiring for proper
connections and to make sure that no wire
deterioration has occured. Check for burned
out bulbs.
SPECIFICATIONS
For Both Model 70094 and 70205
Electrical Source 12 Volt DC / Negative
Ground
Included Components Stop/Tail/Turn Lights,
Class A - Qty = 2;
Side Clearance Lights,
Qty = 2;
License Plate Bracket;
4-Way Flat Trailer Con-
nector, color coded
wiring;
4-Way Flat Vehicle Con-
nector, color coded
wiring;
Hardware Package;
Model 70094/70205 Page 6