INSTALLATION, OPERATING AND MAINTENANCE
INSTRUCTIONS FOR COOKER HOODS MODEL:
120V - 60HZ
UL 507
INSERT

2
ENGLISH
INSTALLATION, OPERATING AND MAINTENANCE INSTRUCTIONS FOR COOKER HOODS:
120V – 60HZ
READ AND SAVE THESE INSTRUCTIONS
I WARNINGS
CAUTION: Automatically Operated Device – To Reduce The Risk Of Injury Disconnect From
Power Supply Before Servicing.
WARNING: To Reduce The Risk Of Fire Or Electric Shock, Do Not Use This Fan With Any Solid-State Speed Control Device.
PAY ATTENTION TO:
A) THE NEED F
OR FREQUENT CLEANING OF ALL GREASE FROM THE FAN AND FROM ALL OTHER GREASE-LADEN SURFACES;
B)
THE NEED F
OR FREQUENT REMOVAL AND CLEANING OF ANY FILTER UNIT PROVIDED; AND
C)
T
H
E NEED TO EXERCISE CARE WHEN USING CLEANING AGENTS OR DETERGENTS
WARNING: To provide protection against electric shock, connect to properly grounded outlets only.
For Residential Use Only
WARNING: GROUNDING INSTRUCTIONS
Th
is appliance must be grounded. In the event of an electrical short circuit, grounding reduces the risk of electric shock by providing an
escape wire for the electric current. This appliance is equipped with a cord having a grounding wire with a grounding plug. The plug must be
plugged into an outlet that is properly installed and grounded.
WARNING – Improper grounding can result in a risk of electric shock.
Consult a qualified electrician if the grounding instructions are not completely understood, or if doubt exists as to whether the ap
plian
ce is
properly grounded. Do not use an extension cord. If the power supply cord is too short, have a qualified electrician install an outlet near the
appliance.
WARNING – TO REDUCE THE RISK OF FIRE, USE ONLY METAL DUCTWORK.
WARNING – TO REDUCE THE RISK OF A RANGE TOP GREASE FIRE:
a) Never leave surface u
nits unattended at high settings. Boilovers cause smoking and greasy spillovers that may ignite. Heat oils slowly on
low or medium settings.
b)
Al
ways
turn hood ON when cooking at high heat or when flambeing food (i.e. Crepes Suzette, Cherries Jubilee, Peppercorn Beef Flambe’).
c)
Clean ven
tilating fans frequently. Grease should not be allowed to accumulate on fan or filter.
d)
Use pro
per pan size. Always use cookware appropriate for the size of the surface element.
WARNING – TO REDUCE THE RISK OF INJURY TO PERSONS IN THE EVENT OF A RANGE TOP GREASE
FIRE, OBSERVE THE FOLLOWING:
a) SMOTHER FLAMES with a close-fitting lid, cookie sheet, or metal tray, then turn off the
burner. BE CAREFUL TO PREVENT BURNS. If the flames do not go out immedi
ately,
EVACUATE AND CALL THE FIRE DEPARTMENT.
b)
NEVER PICK
UP A FLAMING PAN – You may be burned.
c) D
O NOT USE WATER, including wet dishcloths or towels – a violent steam explosion will re
sult.
d)
Use
an ex
tinguisher ONLY if:
1)
You
kno
w you have a Class ABC extinguisher, and you already know how to operate it.
2)
Th
e fire is small and contained in the area where it started.
3) The fire department is being called.
4)
You
can
fight the fire with your back to an ex
it.
SUITABLE FOR USE IN A HOUSEHOLD COOKING AREA
CONVIENT À L’EMPLOI DANS UNE ZONE DE CUISSON MÉNAGÈRE
THE MINIMUM DISTANCE BETWEEN THE SUPPORTING SURFACE OF THE COOKING HOB AND
THE LOWEST PART OF THE RANGE HOOD
MUST BE NOT LESS THAN 26IN (65 CM) WITH A GAS HOB.
WARNING: TO PROVIDE PROTECTION AGAIN
S
T ELECTRIC SHOCK, CONNECT TO PROPERLY GROUNDED OUTLETS ONLY
AVERTISSEMENT: POUR ASSURER LA PROTECTION CONTRE LES CHOCS ÉLECTRIQUES, BRANCHER SUR UNE PRISE CORRECTEMENT
MISE À LA TERRE
WARNING: GROUNDING INSTRUCTIONS
Th
is appliance must be grounded. In the event of an electrical short-circuit, grounding reduces the risk of electric shock by providing an
escape wire for the electric current. This appliance is equipped with a cord having a grounding wire with a grounding plug. The plug must be
plugged into an outlet that is properly installed and grounded.
WARNING - Improper grounding can result in a risk of electric shock.
Consult a qualified electrician if the grounding instructions are not completely understood, or if doubt exists as to whether the appliance is
properly grounded. Do not use an extension cord. If the power supply cord is too short, have a qualified electrician install an outlet near the
appliance.
AVERTISSEMENT: CONSIGNES DE MISE À LA TERRE
Cet ap
pareil
doit être mis à la terre. En cas de court-circuit, le fil de mise à la terre limite le risque de choc électrique parce qu’il assure le
retour du courant à la terre. L’appareil est livré avec un cordon muni d’un fil de terre et d’une fiche de mise à la terre, qui doit être branchée
sur une prise mise à la terre correctement installée.
AVERTISSEMENT - Une mise à la terre incorrecte peut entraîner des risques de choc électrique.
Consulter un électricien compétent en cas de doute sur ces consignes de mise à la terre ou en cas d’incertitude concernant la mise à la terre
correcte du circuit sur lequel l’appareil est branché. Ne pas utiliser de cordon de rallonge. Si le cordon d’alimentation est trop court, faire
installer une prise par un électricien compétent à proximité de l’appareil.

3
READ AND SAVE THESE INSTRUCTIONS
Keep these instructions in a safe place and pass them on to any fu
ture user. Read these instructions carefully before installing or using the range hood.
Before connecting the appliance to the power supply make sure that the voltage (V) and frequency (Hz) listed on the data plate correspond with the
household electrical supply. This data must correspond to prevent appliance damage.
Installation work and repairs should only be performed by a qualified technician under all applicable codes and standards. Repairs and other work by
unqualified persons could be dangerous.
In the event of a fault, please contact the Technical Service authorized to provide genuine parts. When contacting the Technical Service, please quote
the model and the serial number of your appliance. These are shown on the data plate.
Ensure that power to the appliance is OFF while the appliance is not in use.
During thunderstorms switch-off the main switch of the house electrical system or if the device is equipped with a plug, simply unplug it.
Use this appliance only in the manner intended by the manufacturer and no other than exhausting cooking fumes on domestic kitchens.
The manufacturer does not accept any liability for damages caused by people, animals, or things, by installation and maintenance mistakes, or by any
illegitimate use.
Observe the following essential safety instructions during the use of any electrical appliance:
This appliance is not intended for use by persons (including children) with reduced physical, sensory or mental capabilities,
or lack of experience and
knowledge unless they have been
given supervision or instruction concerning the use of the appliance by a person responsible for their safety. Children
should be supervised to ensure that they do not play
with the appliance.
To prevent the risk of fire it is compulsory to disconnect the appliance from the power supply before cleaning or servicing the hood;
Do not pull, take off, or twist the cable coming out from the appliance, even though this has been disconnected from the main power
supply.
Do not sprinkle or throw any water
directly on the appliance.
Do not stick any sharp tool inside the exhausting holes and into the
air outlet.
Do not take out the filters to reach the internal sides of the appliance in case the main switch of the house electrical syste
m is not off.
Do not flambé or grill with an open flame beneath the hood. Flames could be drawn up into the hood by the suction and the filt
ers may ignite.
Pay particular attention while frying. Heat oils slowly on low or medi
um settings.
CAUTION: Accessible parts may become hot when used with
cooking appliances.
It is forbidden to use the hood as a support surface unless it is ex
pressly indicated.
Only use the fixing screws supplied with the pro
duct for installation.
II USE
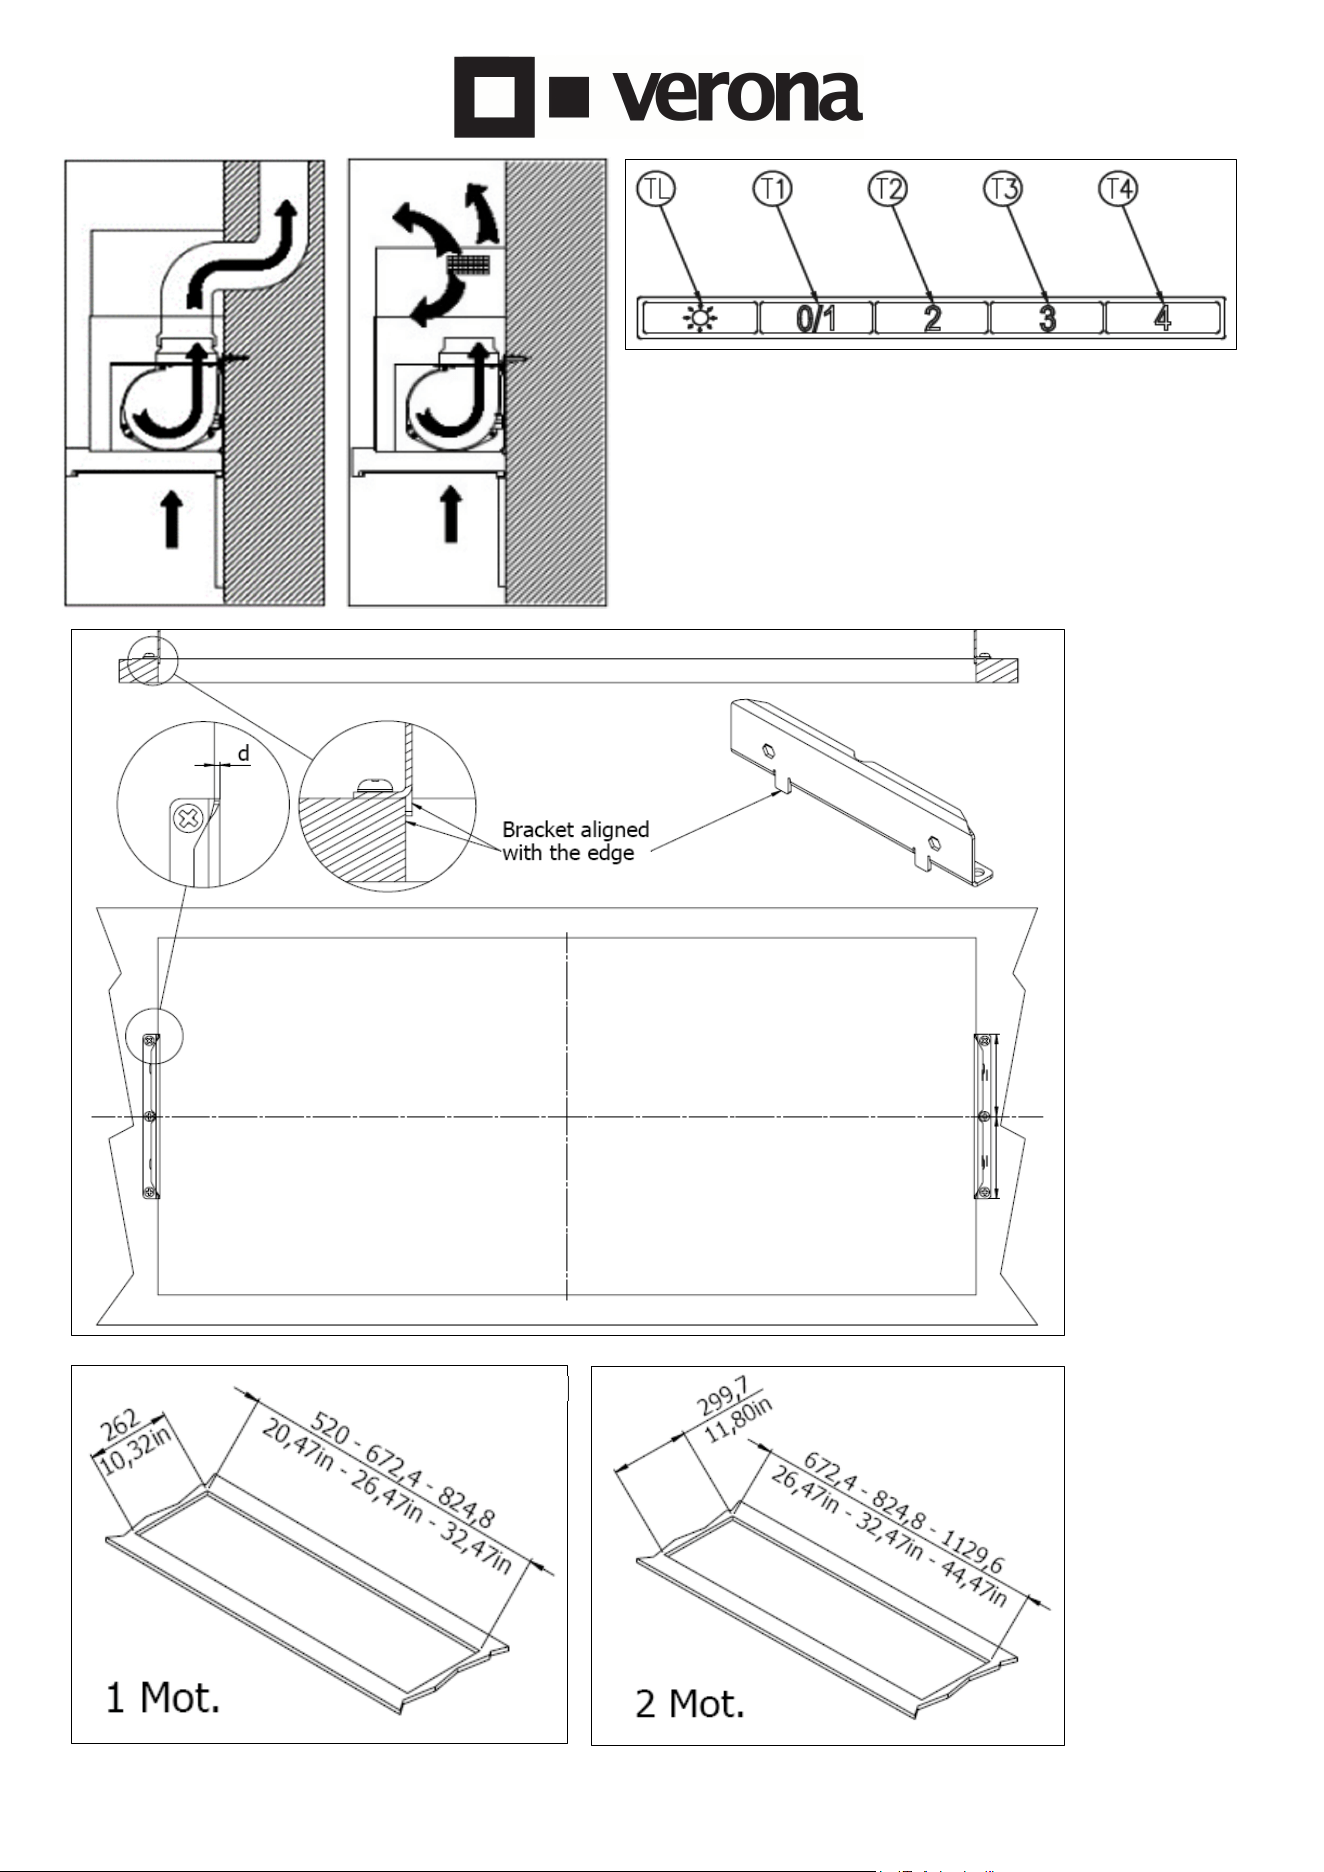
This range hoo
d can be installed in ducted or non-ducted / recirculating mode of operation:
Ducted (external evacuation – Fig. 2A). Remove any charcoal filters if present. Kitchen smokes are vented to the outdoors through a flue (not provided
with the hood) joined to the exhaust pipe flue connector.
Never connect an exhaust hood to an active chimney, boiler, burner exhaust pipes, dryer vent, vent flue, or room ventilating ductwork, etc.
The use of pipes and holes on the wall with a smaller diameter than the output of the motor will cause a decrease in suction performance and an increase
in the noise level.
Use as short as possible tubes and with few curves. Use pipes with smooth internal surfaces.
Non-ducted / recirculating (Fig. 2B). The cooking fumes pass through activated charcoal filters (available as an accessory) to be purified and recycled
into the kitchen.
III INSTALLATION
Read the instruct
ion manual before installing and/or using the hood.
The minimum distance between the supporting surface of the cooktop and the bottom of the hood must be not less than 26in (65cm) with a gas hob. If
the mounting instructions of the gas hob indicate a larger distance, respect it. Do not install this hood over stoves with an upper radiating plate.
Respect all the air discharge regulations.
The air must not be discharged in a pipe used to discharge exhaust fumes produced by gas-fed equipment or fuel-fed equipment (this does not apply
to recirculating hoods).
The room must be adequately ventilated when the hood is used together with other gas or fuel equipment.
The hood placed above an induction hob can cause condensation, this is a normal physical phenomenon and does not mean any malfunctioning of the
product.
For easy access, it is advisable to move any piece of furniture under the installation area.
The hood is equipped with all the necessary fastenings for its installation, which are suitable for most surfaces. Verify that the installation surface is strong.
Installation must be carried out by qualified installers according to present regulations.
Before proceeding with the installation, turn the main switch of the system to "off".
Follow the hood assembly instructions indicated below:
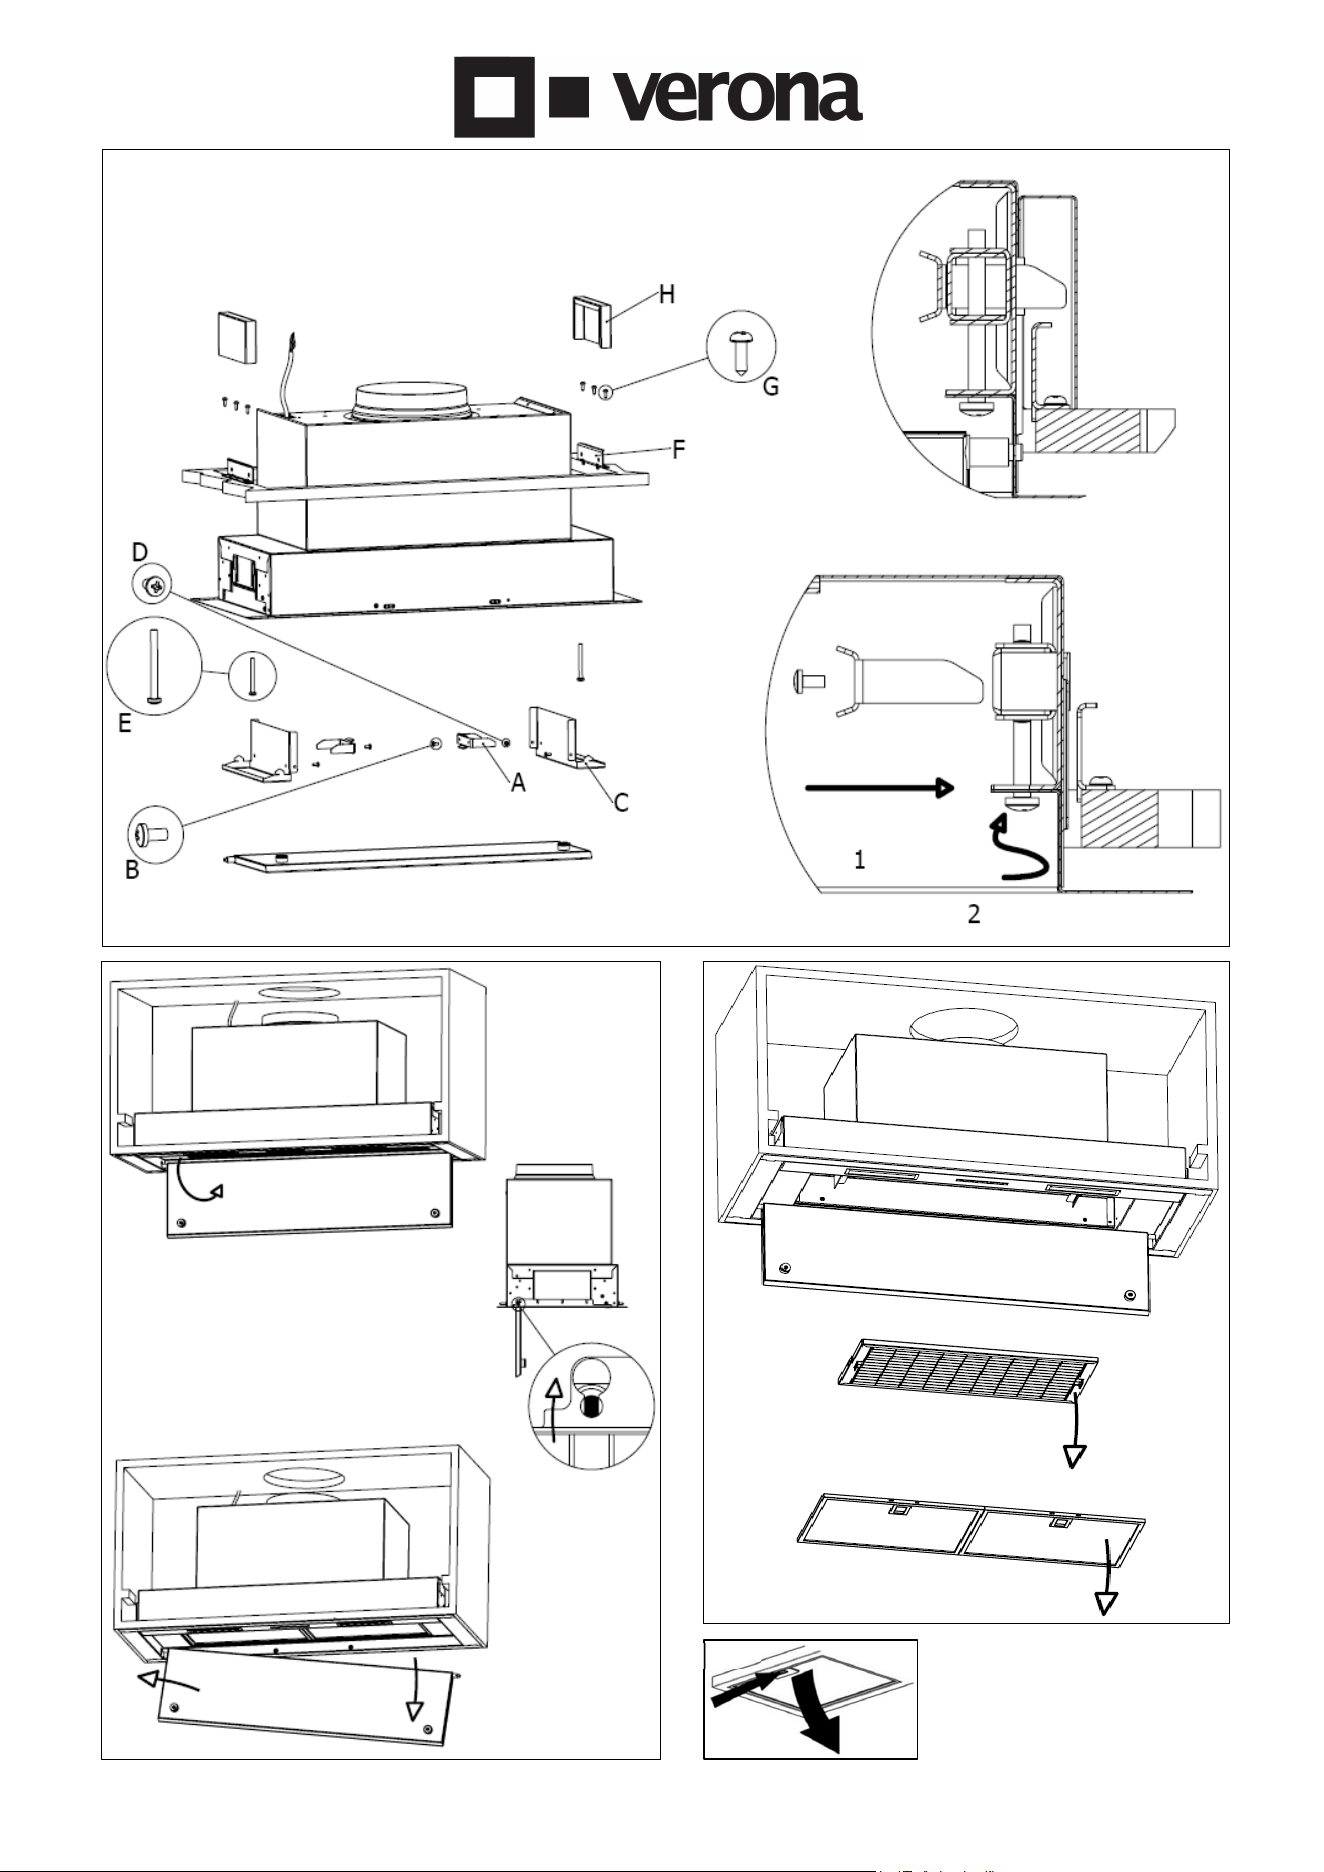
MOD. RADIANTE
This type of hood must be installed inside a wall unit. Prepare the cabinet to install the hood by drilling a housing hole on the wall unit, as indicated in Fig.
3.1, 3.2 and Fig. 3.3, 3.4. Fix the two anchoring brackets supplied (Fig. 3.6-F) with the screws (Fig. 3.6-G) on the two short sides of the cabinet, aligning
them with the cut made (Fig. 3.5). Remove the hooks and their covers on both sides (Fig. 3.6-C). Open the removable panel (Fig. 3.7), push it upwards
from the bottom, where the insertion hole is wider. Move the panel to the left so that it can be released from the right. Remove the metal filters (Fig.6.1).
Insert the hood, from bottom to top, until you reach the pre-installed anchoring brackets. Insert the supplied bar (Fig. 3.6-A) in the appropriate seat (Fig.
3.6-1) to hook the anchoring brackets. Do the same thing on the opposite short side of the hood. Slowly lower the hood until it is completely supported by
the anchoring brackets. Secure the two bars from the inside with the supplied safety screws (Fig. 3.6-B). Use the screws (Fig. 3.6-E) of the internal clip to
align the hood to the cabinet (Fig. 3.6-2). Electrically connect the hood. Refit the right and left covers (Fig. 3.6-C) with the appropriate screws (Fig. 3.6-D),
reinstall the metal filters (Fig. 6.1) and the removable panel (Fig. 3.7). Finally, cover the side anchoring brackets by inserting the special protections
supplied (Fig. 3.6-H).

4
IV ELECTRICAL CONNECTION
This equipment
must be connected to a grounding plant.
Two types of electrical connection can be used:
1. Using a standard plug to be connected to the power cable and inserted in a mains socket which must be accessible (so that the plug can be disconnected
when servicing is carried out). Make sure that the plug is accessible also after the complete installation of the equipm
ent.
2.
Using a fixed mains connection, fitting a bipolar switch, which ensures the disconnection, with an opening distance of the contacts allowing a complete
disconnection on the conditions of the overvoltage III category, according to installation regulations. The ground connection (yellow-green wire) must not
be interrupted.
Refer to the data plate inside the hood for the mains voltage and frequency ratings. If the power cable is damaged, it must be replaced by the manufacturer
or by its service agent, or a trained professional to avoid any risk.
V OPERATION
The hood h
as a multispeed blower. Select one of the four power levels according to the intensity of the cooking vapors. Typically, levels "1" to "3" are
sufficient for normal cooking needs. It is recommended to turn the ventilation on while cooking and leave it after you have finished cooking until fumes
have been eliminated.
V.1 Hood controls operation (Fig. 5.1):
- TL butt
on: turning the light on an
d off.
- T1 butt
on: switching on the hood, set the first blower pow
er level, switching off the blower.
- T2-
T3-T4 button: selection of the second, third and fourth blower
power levels.
The LED of t
he key in function remains steady. To turn the blower off when you are
not at the first level, press T1 twice.
V.2 Adju
stable and delayed self-switching off
With the hood in operation select the desired power level, then keep the TL button pressed for a few seconds until all the LEDs start to
flash (T1, T2, T3,
T4). By pressing one of the button
s (T1, T2, T3, T4) you can program the delayed auto-off time, as follows: T1 corresponds to 5 minutes; T2 corresponds
to 10 minutes; T3 corresponds to 15 minutes; T4 corresponds to 20 minutes. During the auto-off operation, the set speed can be changed. If the selection
of the switch-off time corresponds to the speed set, the speed LED flashes; if the choice is different, the speed LED remains fixed. During the auto-off
operation, it is possible to deactivate the delayed switch-off by keeping the hood operating, by keeping pressed the button corresponding to the selected
delayed time. During the auto power-off function, it is still possible to turn off the hood by pressing T1 tw
ice.
V.3 Mainte
nance warning for anti-grease
filter
Every 30 hou
rs of operation of the hood, when the hood is turned off, all the LEDs of the hood speed buttons light up for 30 seconds to alert the necessary
cleaning of the metal anti-grease filter. To reset the timer simply press and hold the T4 button with the blower off. If the ti
mer is not reset, all the LEDs will
light up again ea
ch time the hood
is switched off again.
V.4 Lon
g-Life anti-odor filter (for ductless hoods)
Every 120 hours of operation of the hood, when the hood is switched off, all the LEDs of the speed buttons turn on with a flashing light for 30 sec. as
a
reminder of the
necessity to regenerate the Long-Life filter and the cleaning of the anti-grease filters. To reset the timer, simply keep pressing the T4
button with the blower off, if the reset procedure is not carried out the alarm will keep showing every time the hood is turned
on.
VI MAINTENANCE
Before cleaning
or servicing the hood, disconnect it from the power supply
The anti-grease filters in the hood remove solid particles from the vented kitchen air (grease, dust, etc) and prevent soiling of the ventilation system. The
anti-grease filters should be cleaned every 3-4 weeks.
The metallic anti-grease filters must be washed with detergent in hot water (or in the dish-washer). The filters may discolor after a few washes. This is
normal and does not mean they have to be replaced. To remove the anti-grease filters, open the removable panel and pull them from the handle (Fig. 6.1
and Fig. 6.2).
It is recommended to refit the metal grease filters only if they are perfectly dry.
ATTENTION: A dirty filter is a fire hazard! It is, therefore, necessary to regularly clean the filters as per instructions.
The Long-Life anti-odor filter, where present, captures all the odors present in the cooking fumes, guaranteeing pure air in your kitchen. It does not have
to be replaced frequently like an ordinary activated charcoal filter, it can be regenerated every 3-4 months, or according to the frequency of use of the
hood, by a normal washing cycle in the dishwasher at about 70°C without any detergent, followed by drying in the oven for 30 minutes at 70°C. To keep
its efficiency high, it is recommended to replace the Long-Life filter after 6/8 regeneration cycles.
To remove the Long-Life odor filter, simply open the removable panel and remove the metal grease filter using the handle (Fig. 6.1 and Fig. 6.2). Then
pull out the Long-Life odor filter from its handle (Fig. 6.1) and regenerate it. To install a new Long-Life filter, open the removable panel, remove the metal
filter (Fig. 6.1 and Fig. 6.2), and replace the Long-Life filter, the filter is fixed thanks to its magnets. Reinstall the metal grease filter and close the panel.
The hood features LED light that, in addition to offering good lighting and significant energy savings, are guaranteed to last about 10 times more than
traditional lights.
Replacement filters and spare-parts are available through your local dealer.
To remove the remaining glue or any impurity, the cooker hood must be cleaned immediately after installation and after having removed the protective
film.
The cooker hood must be cleaned frequently both internally and externally (at least once a month).
Do not allow an excessive accumulation of grease on the inner and outer surfaces of the hood.
To clean the exterior of the hood do not use either acid or basic products, or abrasive sponges.
All external surfaces can be cleaned with a mild solution of warm water and liquid dish soap applied with a soft sponge.
Rinse with a damp cloth, removing all the detergent carefully, following the satin finish direction on the steel surface.
Drying is very important, especially in areas where water is particularly hard and leaves limestone.
It is not needed to remove the hood from the cabinet for ordinary and extraordinary maintenance.
5
2A
2B
5.1
3.5
3.4_2 Motor
3.3_1 Motor
6
3.1_1 Motor
3.2_2 Motor
7
6.2
3.7
6
.1
3.
6

8
395.870.1
Range Hood Warranty
All warranty service is provided by our Factory Service Centers, or an authorized Customer Care
technician. To schedule service online, visit us at www.savalo.com, or call Savalo Factory at
908.836.7949. Please have your serial number and your model number available when calling for
service.
Servicing your appliance may require the use of the onboard data port for diagnostics. This gives a
Savalo factory service technician the ability to quickly diagnose any issues with your appliance and
helps Savalo improve its products by providing information on your appliance. If you do not want your
appliance data to be sent to Savalo, please advice your technician not to submit the data at the
time of service.
Your Range Hood has been inspected and tested and is warranted subject to following for a period
of 24 months from the date of purchase against defects in workmanship and materials. During this
period, we undertake to repair or replace any defective part which was originally defective in our
opinion. This warranty is null and void if the appliance is used for commercial purposes.
What Savalo will not cover:
•
Service trips to your home to teach you how
to use the product.
•
Improper Installation, delivery, or
maintenance.
•
Failure of the product if it is abused,
misused, modi
fied,
or used for other
than the in
tended purpose or
used
commer
cially.
•
Replacement of house fuses or resetting of
circuit breakers.
•
Damage to the product caused by accident,
fi
re, floods, or acts of God.
E
XCLUSION OF IMPLIED WARRANTIES
•
Damage to finish such as surfact rust,
t
arnish, or small blemishes not reported
within 48 hours of delivery
.
•
Incidental or consequential damage caused
by possible defects with this appliance.
•
Damage caused after delivery.
•
Product not accessible to provide required
service.
•
Service to repair or replace light bulbs,
except for LED lamps.
Your sole and exclusive remedy is product repair as provided in this Limited Warranty. Any implied
warranties, including the implied warranties of merchantability or fitness for a particular purpose,
are limited to two years or the shortest period allowed by law.
This warranty is extended to the original purchaser and any succeeding owner for products purchased
for home use within the USA. If the product is located in an area where service by a Savalo Authorized
Servicer is not available, you may be responsible for a trip charge or you may be required to bring the
product to an Authorized Savalo Service location for service. In Alaska, the warranty excludes the cost
of shipping or service calls to your home. Some states do not allow the exclusion or limitation of
incidental or consequential damages. This warranty gives you specific legal rights, and you may also
have other rights which vary from state to state. To know what your legal rights are, consult your local
or state consumer affairs office or your state’s Attorney General.