
Technical Support and E-Warranty Certificate
www.vevor.com/support
HUNTING GAME VEHICLE
MODEL: YL1401
We continue to be committed to provide you tools with competitive price.
"Save Half", "Half Price" or any other similar expressions used by us only
represents an estimate of savings you might benefit from buying certain tools
with us compared to the major top brands and does not necessarily mean to
cover all categories of tools offered by us. You are kindly reminded to verify
carefully when you are placing an order with us if you are actually saving half
in comparison with the top major brands.

1
MODEL: YL1401
Have product questions? Need technical support? Please feel free to
contact us:
Technical Support and E-Warranty Certificate
www.vevor.com/support
NEED HELP? CONTACT US!
This is the original instruction, please read all manual instructions
carefully before operating. VEVOR reserves a clear interpretation of our
user manual. The appearance of the product shall be subject to the
product you received. Please forgive us that we won't inform you again if
there are any technology or software updates on our product.
HUNTING GAME VEHICLE

2
INSTRUCTIONS
Preface
First of all, let us express our heartfelt thanks to our customers who have
purchased our equipment This manual is for customer service to make
better Written with this equipment.Hope the company's products and
services to bring you the canal courtesy.
Pay attention
This product must be used in strict accordance with the use method of this
manual, misuse of any other methods caused by misuse The Company
does not give any guarantee of any kind,including (but not limited to) the
marketability offered to the Company for a particular purpose Implied
warranties with fitness.
The company accepts no liability. The Company shall not be liable for any
errors contained in this material, or for any accidental or consequential
damages resulting from the provision, actual performance or use of this
manual.
This manual contains proprietary information protected by patent law. All
rights reserved. Without the written consent of the Company, this manual is
not allowed to be photocopied, copied, or translated any part into another
language.
The content contained in the manual may be changed without the user's
notice.
Manufacturer's liability
The Company shall be held responsible for the safety and reliability of the
performance of the equipment only if the assembly operation, returning,
improvement and maintenance are carried out by personnel approved by
the Company, the electrical equipment concerned conforms to national
standards, and the equipment is used in accordance with the operating
instructions.

3
Guarantee
Manufacturing process and raw materials: The Company guarantees that
the Equipment(except parts) are in regular use and repair condition, free of
manufacturing process and raw materials faults for one year from the date
of shipment. None of our inspections is perfect.
PRECAUTIONS
Precautions for use
Warning:
1. If the equipment feels loose, falls or is damaged, please contact the
company in time;
2. Keep work area clean and well lit. Cluttered or dark areas invite
accidents.
3. Keep children and bystanders away while operating, distractions will
cause you to lose control.
4. Reasonably use according to one's own situation, and do not overuse
when the body is not in a timely manner.
SAVE THESE INSTRUCTIONS
PRODUCT PARAMETERS
Product Name
Hunting game vehicle
model
YL1401
Load bearing capacity/lb
500lbs
Shelf size
800x500mm

4
PRODUCT COMPONENTS
Part number
Part Name
Qty
1
Mainframe Assembly
1
2
Rear Frame
1
3
Axle
6
4
Wheel
4
5
Wheel Bar
2
6
Handle Bar
1
7
Instruction Manual
1
8
[A]1/4" x1 1/4" Hex Bolt
2
9
[B] 5/16" x 2" Hex Bolt
2
10
[C] 5/16"x 2 1/4" Carriage Bolt
2
11
[D]1/4" x2" Hex Bolt
4
12
1/4" Nylock Nut
6
13
5/16" Nylock Nut
2
14
1/4" Steel Washer
12
15
5/16" Steel Washer
4
16
5/16" Delta Nut
2
17
M16 Nylock Nut
6
18
M16 Steel Washer
6
19
Wheel Spacer
4
ASSEMBLYINSTRUCTIONS
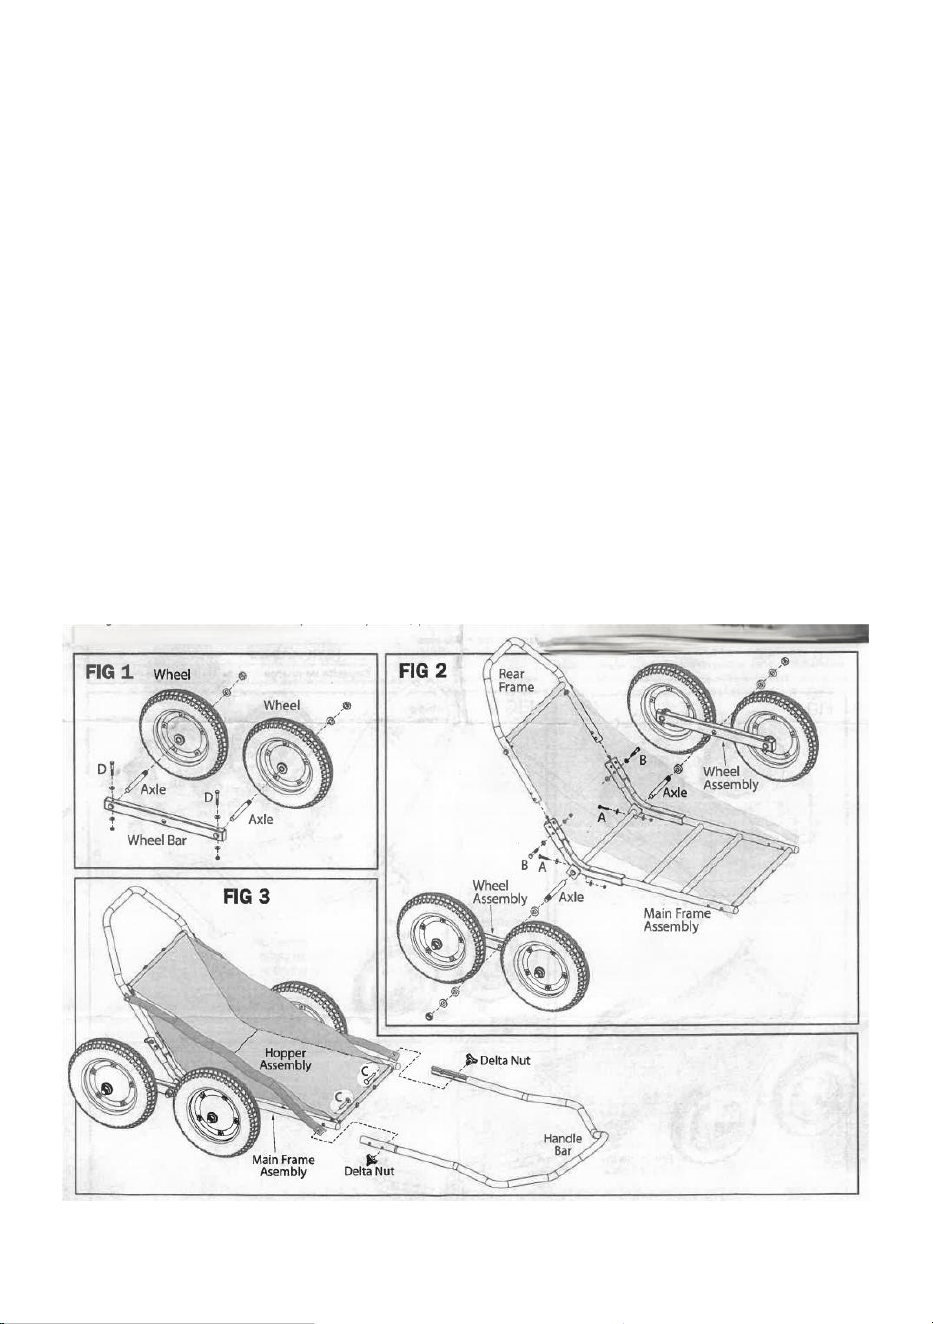
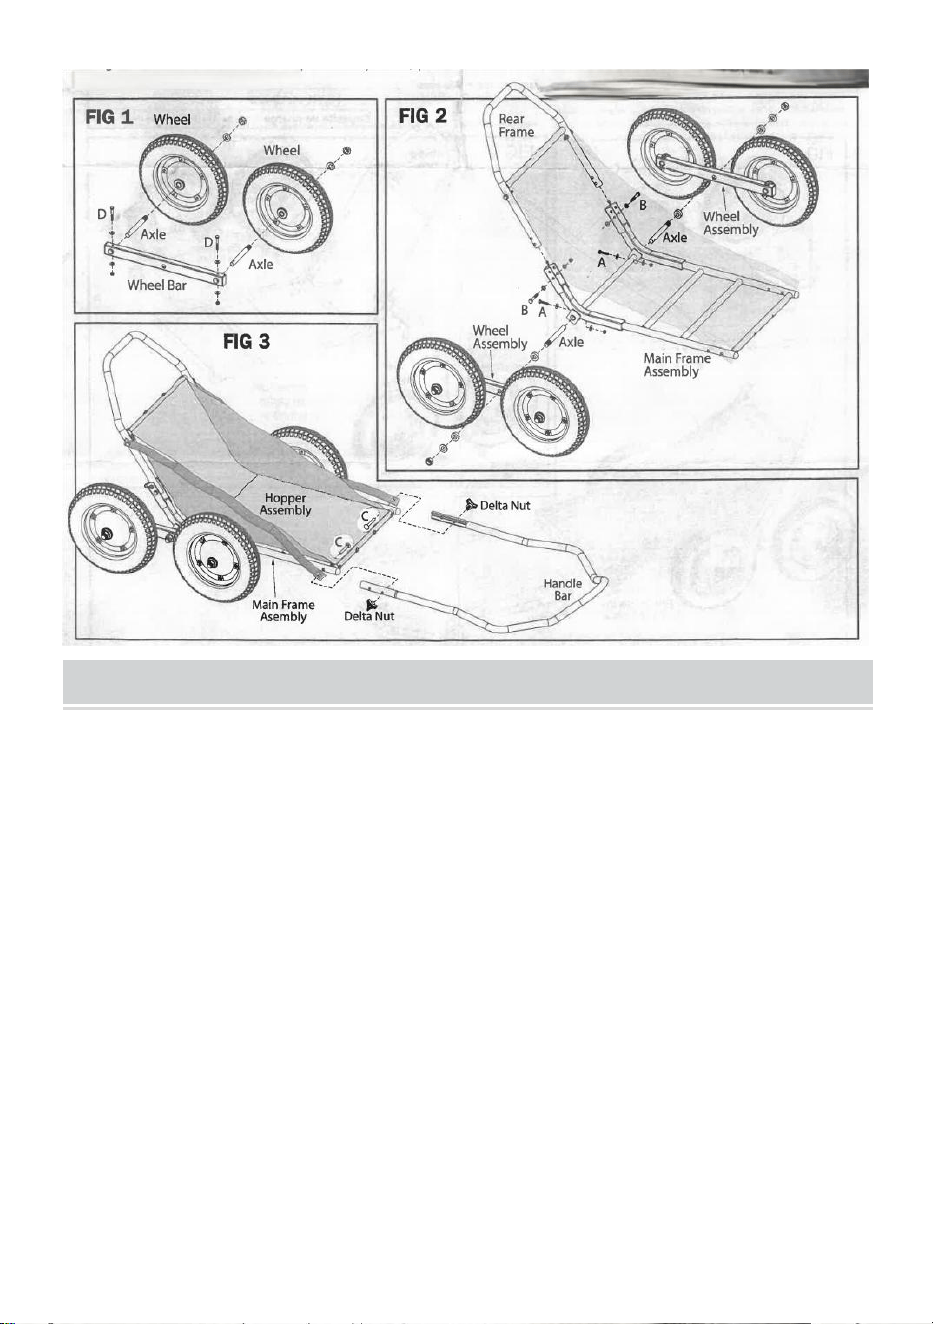
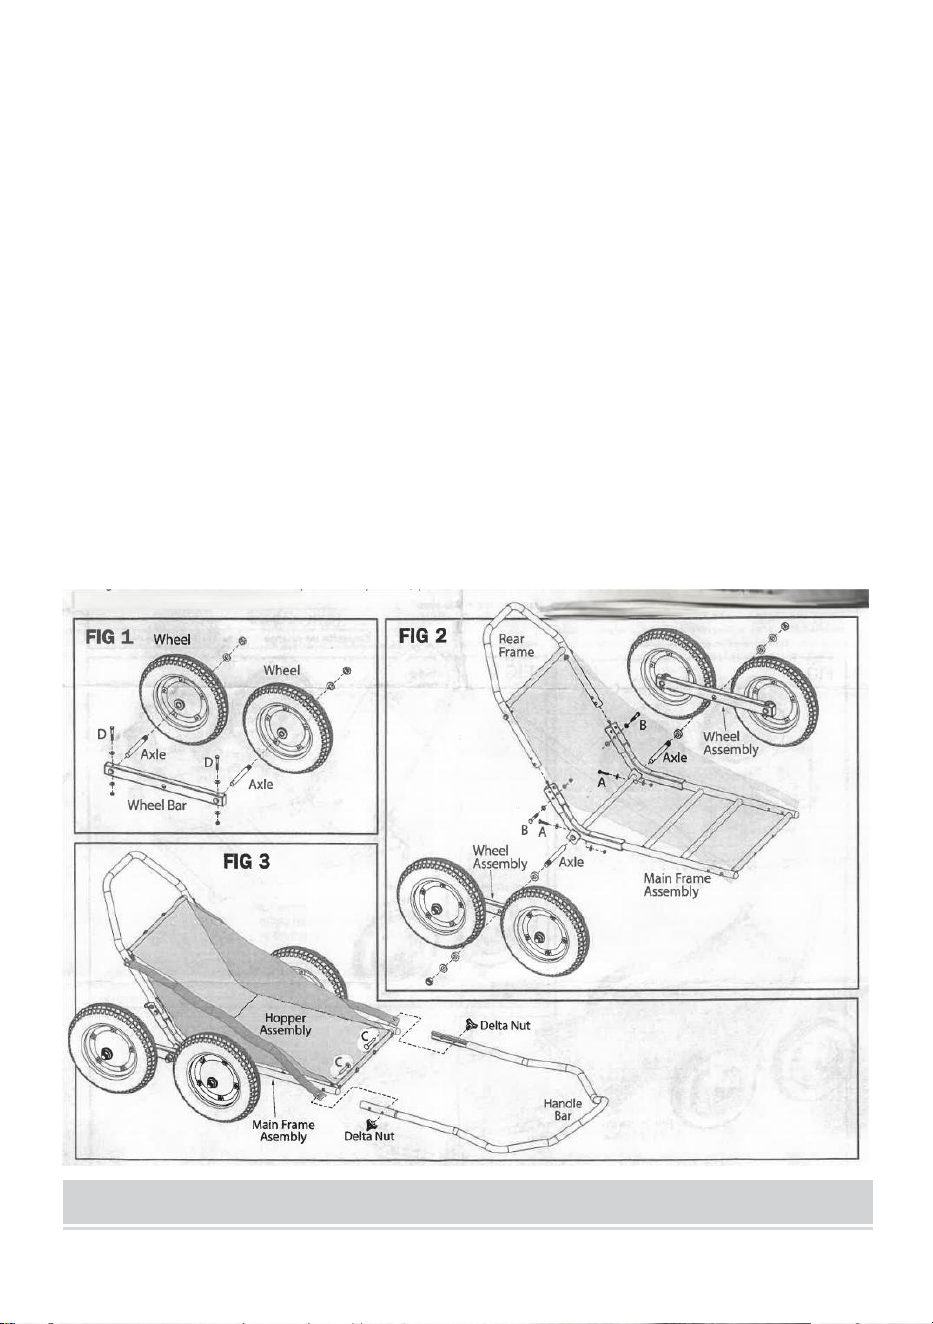
STEP 1. Secure (2) axles to each wheel bar using (4) 1/4" x 2" he; bolts [D],(8) 1/4"
steel washers and (4) 1/4" nylock nuts. Next, secure the wheels to thewheel
assemblies using (4) M16 steel washers and (4) M16 nylock nuts. (Fig. 1)
5
STEP 2. Insert the axles into the mainframe assembly aligning holes and secure
using (2)1/4"x1 1/4"hex bolts [A], (4)1/4"steel washers and (2) 1/4'nylock nuts.
Tighten securely.(Fig. 2)
STEP 3. Using (4) wheel spacers, (2) M16 steel washers and (2) M16 nylock
nutsattach the wheel assemblies to the axles. Tighten securely. (Fig.2)
STEP 4. Next, attach the rear frame to the main frame assembly using (2)5/16"x 2"
hex bolts [B], (4) 5/16" steel washers, (2) 5/16" nylock nuts.Tighten securely.(Fig.
2)
STEP 5. Secure the hopper straps to the mainframe assembly and handlebar
using (2)5/16"x2 1/4"carriage bolts [C] and (2) 5/16"delta nuts. (Fig. 3)
Check to make sure you have all the required parts and hardware. lf you find
damaged or missing parts in a newly purchased product, please return this
product to the retailer for replacement.

6
RETURN /DAMAGE CLAIM INSTRUCTIONS
DO NOT discard the box /original packaging.
In case a return is required, the item must be returned in original box. Without this
your return will not be accepted.
Take a photo of the box markings.
A photo of the markings (text) on the side of the box is required in case a part is
needed for replacement. This helps our staff identify your product number to
ensure you receive the correct parts.
Take a photo of the damaged part (if applicable).
A photo of the damage is always required to file a claim and get your replacement
or refund processed quickly. Please make sure you have the box even if it is
damaged.
Send us an email with the images requested.
Email us directly from marketplace where your item was purchased with the
attached images and a description of your claim.
BEFORE YOU START
Please read all instructions carefully.
Retain instructions for future reference.
Separate and count all parts and hardware.
Read through each step carefully and follow the proper order.
We recommend that, where possible, all items are assembled near to the
area in which they will be placed in use, to avoid moving the product
unnecessarily once assembled.
Always place the product on a flat, steady and stable surface.
Keep all small parts and packaging materials for this product away from
babies and children as they potentially pose a serious choking hazard.

1
Address: Shuangchenglu 803nong11hao1602A-1609shi, baoshanqu,
shanghai 200000 CN.
Imported to AUS: SIHAO PTY LTD, 1 ROKEVA STREETEASTWOOD
NSW 2122 Australia
Imported to USA: Sanven Technology Ltd., Suite 250, 9166 Anaheim
Place, Rancho Cucamonga, CA 91730
REP
EC
E-CrossStu GmbH
Mainzer Landstr.69, 60329 Frankfurt am Main.
REP
UK
YH CONSULTING LIMITED.
C/O YH Consulting Limited Office 147, Centurion House,
London Road, Staines-upon-Thames, Surrey, TW18 4AX
Technical Support and E-Warranty Certificate
www.vevor.com/support

2
Technique Assistance et certificat de garantie électronique
www.vevor.com/support
VÉHICULE DE CHASSE
MODÈLE : YL1401
We continue to be committed to provide you tools with competitive price.
"Save Half", "Half Price" or any other similar expressions used by us only
represents an estimate of savings you might benefit from buying certain tools
with us compared to the major top brands and does not necessarily mean to
cover all categories of tools offered by us. You are kindly reminded to verify
carefully when you are placing an order with us if you are actually saving half
in comparison with the top major brands.

1
MODÈLE : YL1401
Have product questions? Need technical support? Please feel free to
contact us:
Technical Support and E-Warranty Certificate
www.vevor.com/support
NEED HELP? CONTACT US!
This is the original instruction, please read all manual instructions
carefully before operating. VEVOR reserves a clear interpretation of our
user manual. The appearance of the product shall be subject to the
product you received. Please forgive us that we won't inform you again if
there are any technology or software updates on our product.
HUNTING GAME VEHICLE

2
INSTRUCTIONS
Préface
Tout d'abord, exprimons nos plus sincères remerciements à nos clients qui
ont acheté notre équipement . Ce manuel est destiné au service client pour
améliorer Écrit avec cet équipement . J'espère que les produits et services
de l'entreprise vous apporteront la courtoisie du canal.
Faites attention
Ce produit doit être utilisé en stricte conformité avec la méthode
d'utilisation de ce manuel, une mauvaise utilisation de toute autre méthode
causée par une mauvaise utilisation La Société ne donne aucune garantie
d'aucune sorte, y compris (mais sans s'y limiter) la qualité marchande
offerte à la Société dans un but particulier. Garanties implicites avec
remise en forme.
La société décline toute responsabilité. La Société ne sera pas
responsable des erreurs contenues dans ce matériel, ni de tout dommage
accidentel ou consécutif résultant de la fourniture, de l' exécution réelle ou
utilisation de ce manuel.
Ce manuel contient des informations exclusives protégées par le droit des
brevets. Tous droits réservés. Sans le consentement écrit de la Société, ce
manuel ne peut être photocopié, copié ou traduit en partie dans une autre
langue.
Le contenu contenu dans le manuel peut être modifié sans préavis de
l'utilisateur.
Responsabilité du fabricant
La Société ne sera tenue responsable de la sécurité et de la fiabilité des
performances du matériel que si l'opération d'assemblage, de retour ,
l'amélioration et l'entretien sont effectués par du personnel agréé par la
Société, le matériel électrique concerné est conforme aux normes
nationales et le matériel est utilisé conformément aux instructions

3
d'utilisation.
Garantie
Processus de fabrication et matières premières : La Société garantit que
les Équipements (à l'exception des pièces) sont en état d'utilisation et de
réparation réguliers, exempts de processus de fabrication et de matières
premières. défauts de matériaux pendant un an à compter de la date
d'expédition. Aucune de nos inspections n’est parfaite.
PRECAUTIONS
Précautions d'emploi
Avertissement:
5. Si l' équipement semble desserré, tombe ou est endommagé, veuillez
contacter l'entreprise à temps ;
6. Gardez la zone de travail propre et bien éclairée. Les zones
encombrées ou sombres sont propices aux accidents.
7. Éloignez les enfants et les passants pendant le fonctionnement, les
distractions vous feront perdre le contrôle.
8. Utiliser raisonnablement en fonction de sa propre situation et ne pas en
abuser lorsque le corps n'est pas disponible à temps.
CONSERVEZ CES INSTRUCTIONS
PRODUCT PARAMETERS
Nom du produit
Véhicule de chasse
modèle
YL1401
Capacité de charge/lb
500 livres
Taille de l'étagère
800x500mm

4
PRODUCT COMPONENTS
Numéro
d'article
Nom de la pièce
Quantité
1
Assemblage de l'ordinateur central
1
2
Cadre arrière
1
3
Essieu
6
4
Roue
4
5
Barre de roue
2
6
Guidon
1
7
Manuel d'instructions
1
8
[A]Boulon hexagonal 1/4" x 1 1/4"
2
9
[B] Boulon hexagonal 5/16" x 2"
2
dix
[C] Boulon de carrosserie 5/16" x 2 1/4"
2
11
[D]Boulon hexagonal 1/4" x 2"
4
12
Écrou Nylock 1/4"
6
13
Écrou Nylock 5/16"
2
14
Rondelle en acier 1/4"
12
15
Rondelle en acier 5/16"
4
16
Écrou Delta 5/16"
2
17
Écrou Nylock M16
6
18
Rondelle en acier M16
6
19
Entretoise de roue
4
ASSEMBLYINSTRUCTIONS
ÉTAPE 1. Fixez (2) essieux à chaque barre de roue à l'aide de (4) 1/4" x 2" he ;

5
boulons [D], (8) rondelles en acier 1/4" et (4) écrous nylock 1/4". Ensuite, fixez les
roues aux ensembles de roues à l'aide de (4) rondelles en acier M16 et (4) écrous
nylock M16. (Fig. 1)
ÉTAPE 2. Insérez les essieux dans l'assemblage du châssis principal en
alignant les trous et Fixez à l'aide de (2) boulons hexagonaux 1/4" x 1 1/4" [A], (4)
rondelles en acier 1/4" et (2) écrous Nylock 1/4'. Serrez fermement. (Fig. 2)
ÉTAPE 3. À l'aide de (4) entretoises de roue, (2) rondelles en acier M16 et (2)
écrous nylock M16, fixez les ensembles de roues aux essieux. Serrez fermement.
(Fig.2)
ÉTAPE 4. Ensuite, fixez le cadre arrière à l'ensemble du cadre principal à l'aide de
(2) boulons hexagonaux 5/16" x 2" [B], (4) rondelles en acier 5/16", (2) écrous
nylock 5/16". Serrez en toute sécurité.(Fig. 2)
ÉTAPE 5. Fixez les sangles de la trémie à l'ensemble du châssis principal et au
guidon à l'aide de (2) boulons de carrosserie 5/16" x 2 1/4" [C] et (2) écrous delta
5/16". (Fig. 3).
Vérifiez que vous disposez de toutes les pièces et du matériel requis. Si tu
trouves pièces endommagées ou manquantes dans un produit
nouvellement acheté, veuillez le retourner produit au détaillant pour
remplacement.

6
RETURN /DAMAGE CLAIM INSTRUCTIONS
NE PAS jeter la boîte/l’emballage d’origine.
Dans le cas où un retour est requis, l'article doit être retourné dans sa boîte
d'origine. Sans cela votre retour ne sera pas accepté.
Prenez une photo des marquages de la boîte.
Une photo des marquages (texte) sur le côté de la boîte est obligatoire dans le cas
où une pièce est nécessaire au remplacement. Cela aide notre personnel à
identifier votre numéro de produit pour assurez-vous de recevoir les bonnes
pièces.
Prenez une photo de la pièce endommagée (le cas échéant).
Une photo des dommages est toujours requise pour déposer une réclamation et
obtenir votre remplacement ou remboursement traité rapidement. Veuillez vous
assurer d'avoir la boîte même si elle l'est endommagé.
Envoyez-nous un email avec les images demandées.
Envoyez-nous un e-mail directement depuis le marché où votre article a été

7
acheté avec le images ci-jointes et une description de votre réclamation.
BEFORE YOU START
Veuillez lire attentivement toutes les instructions.
Conserver les instructions pour référence future.
Séparez et comptez toutes les pièces et le matériel.
Lisez attentivement chaque étape et suivez l’ordre approprié.
Nous recommandons que, dans la mesure du possible, tous les éléments
soient assemblés à proximité de la zone dans laquelle lequel ils seront
utilisés, pour éviter de déplacer inutilement le produit une fois assemblé.
Placez toujours le produit sur une surface plane, stable et stable.
Gardez toutes les petites pièces et matériaux d'emballage de ce produit hors
de portée des bébés. et les enfants car ils présentent potentiellement un
grave risque d'étouffement.

1
Adresse : Shuangchenglu 803nong11hao1602A-1609shi, baoshanqu,
Shanghai 200000 CN.
Importé en Australie : SIHAO PTY LTD, 1 ROKEVA STREETASTWOOD
NSW 2122 Australie
Importé aux États-Unis : Sanven Technology Ltd., Suite 250, 9166
Anaheim Place, Rancho Cucamonga, CA 91730
REP
EC
E-CrossStu GmbH
Mainzer Landstr.69, 60329 Frankfurt am Main.
REP
UK
YH CONSULTING LIMITED.
C/O YH Consulting Limited Office 147, Centurion House,
London Road, Staines-upon-Thames, Surrey, TW18 4AX
Technique Assistance et certificat de garantie électronique
www.vevor.com/support

2
Technisch Support und E-Garantie-Zertifikat
www.vevor.com/support
JAGDFAHRZEUG
MODELL: YL1401
We continue to be committed to provide you tools with competitive price.
"Save Half", "Half Price" or any other similar expressions used by us only
represents an estimate of savings you might benefit from buying certain tools
with us compared to the major top brands and does not necessarily mean to
cover all categories of tools offered by us. You are kindly reminded to verify
carefully when you are placing an order with us if you are actually saving half
in comparison with the top major brands.

1
MODELL: YL1401
Have product questions? Need technical support? Please feel free to
contact us:
Technical Support and E-Warranty Certificate
www.vevor.com/support
NEED HELP? CONTACT US!
This is the original instruction, please read all manual instructions
carefully before operating. VEVOR reserves a clear interpretation of our
user manual. The appearance of the product shall be subject to the
product you received. Please forgive us that we won't inform you again if
there are any technology or software updates on our product.
HUNTING GAME VEHICLE

2
INSTRUCTIONS
Vorwort
Zunächst möchten wir unseren herzlichsten Dank an unsere Kunden
aussprechen, die unsere Geräte gekauft haben. Dieses Handbuch dient
dem Kundendienst, um Geschrieben mit dieser Ausrüstung . Hoffe, dass
die Produkte und Dienstleistungen des Unternehmens Ihnen den Kanal mit
freundlicher Genehmigung bieten.
Passt auf
Dieses Produkt muss in strikter Übereinstimmung mit der
Verwendungsmethode dieses Handbuchs verwendet werden, Missbrauch
von alle anderen Methoden, die durch Missbrauch verursacht werden Das
Unternehmen übernimmt keinerlei Garantien, einschließlich (jedoch nicht
beschränkt auf) die dem Unternehmen angebotene Marktgängigkeit für
einen bestimmten Zweck. Stillschweigende Gewährleistung bezüglich
Eignung.
Das Unternehmen übernimmt keine Haftung. Das Unternehmen haftet
nicht für Fehler in diesem Material oder für zufällige oder Folgeschäden,
die sich aus der Bereitstellung, der tatsächlichen Leistung oder Gebrauch
von dieses Handbuch.
Dieses Handbuch enthält patentrechtlich geschützte Informationen. Alle
Rechte vorbehalten. Ohne schriftliche Zustimmung des Unternehmens ist
es nicht gestattet, dieses Handbuch zu fotokopieren, zu vervielfältigen
oder Teile davon in eine andere Sprache zu übersetzen.
Der Inhalt dieses Handbuchs kann ohne Vorankündigung an den Benutzer
geändert werden.
Herstellerhaftung
Das Unternehmen ist nur dann für die Sicherheit und Zuverlässigkeit der
Leistung der Ausrüstung verantwortlich , wenn die Montage, die
Rückgabe , Verbesserungen und Wartungen werden von durch das

3
Unternehmen autorisiertem Personal durchgeführt , die betreffenden
elektrischen Geräte entsprechen den nationalen Normen und die Geräte
werden entsprechend der Betriebsanleitung verwendet.
Garantie
Herstellungsverfahren und Rohstoffe: Das Unternehmen garantiert, dass
die Ausrüstung (außer Teile) in einem normalen Gebrauchs- und
Reparaturzustand ist, frei von Herstellungsverfahren und Rohstoffen
Materialfehler für ein Jahr ab Versanddatum. Keine unserer Inspektionen
ist perfekt.
PRECAUTIONS
Vorsichtsmaßnahmen für die Anwendung
Warnung:
9. Wenn sich das Gerät locker anfühlt, herunterfällt oder beschädigt ist,
wenden Sie sich bitte rechtzeitig an das Unternehmen.
10.Halten Sie Ihren Arbeitsbereich sauber und gut beleuchtet. Unordnung
oder dunkle Bereiche führen zu Unfällen.
11.Halten Sie während des Betriebs Kinder und Zuschauer fern. Durch
Ablenkung verlieren Sie die Kontrolle.
12.Verwenden Sie es vernünftig und entsprechend Ihrer eigenen Situation
und übertreiben Sie es nicht, wenn der Körper nicht rechtzeitig dazu in der
Lage ist.
ANLEITUNG AUFBEWAHREN
PRODUCT PARAMETERS
Produktname
Jagdfahrzeug
Modell
YL1401

4
Tragfähigkeit/lb
500 Pfund
Regalgröße
800 x 500 mm
PRODUCT COMPONENTS
Artikelnummer
Teilname
Menge
1
Mainframe-Montage
1
2
Hinterer Rahmen
1
3
Achse
6
4
Rad
4
5
Radstange
2
6
Lenker
1
7
Bedienungsanleitung
1
8
[A]1/4" x1 1/4" Sechskantschraube
2
9
[B] 5/16" x 2" Sechskantschraube
2
10
[C] 5/16" x 2 1/4" Schlossschraube
2
11
[D]1/4" x 2" Sechskantschraube
4
12
1/4" Nylock-Mutter
6
13
5/16" Nylock-Mutter
2
14
1/4" Stahlscheibe
12
15
5/16" Stahlscheibe
4
16
5/16" Delta-Mutter
2
17
M16 Nylock-Mutter
6
18
M16 Stahlscheibe
6
19
Spurverbreiterung
4

5
ASSEMBLYINSTRUCTIONS
SCHRITT 1. Befestigen Sie (2) Achsen an jeder Radstange mit (4) 1/4" x 2"
He;-Schrauben [D], (8) 1/4" Stahlscheiben und (4) 1/4" Nylock-Muttern. Befestigen
Sie als nächstes die Räder an den Radbaugruppen mit (4) M16 Stahlscheiben und
(4) M16 Nylock-Muttern. (Abb. 1)
SCHRITT 2. Die Achsen in die Ausrichtungslöcher des Hauptrahmens
einsetzen und Mit (2) 1/4"x1 1/4" Sechskantschrauben [A], (4) 1/4" Stahlscheiben
und (2) 1/4" Nylock-Muttern sichern. Gut festziehen. (Abb. 2)
SCHRITT 3. Befestigen Sie die Radbaugruppen mit (4) Spurverbreiterungen, (2)
M16-Stahlscheiben und (2) M16-Nylock-Muttern an den Achsen. Ziehen Sie sie
fest an. (Abb. 2)
SCHRITT 4. Befestigen Sie anschließend den hinteren Rahmen mit (2) 5/16" x 2"
Sechskantschrauben [B], (4) 5/16" Stahlscheiben und (2) 5/16" Nylock-Muttern an
der Hauptrahmenbaugruppe. sicher. (Abb. 2)
SCHRITT 5. Befestigen Sie die Trichterbänder mit (2) 5/16"x2 1/4"
Schlossschrauben [C] und (2) 5/16" Deltamuttern an der Hauptrahmenbaugruppe
und dem Lenker. (Abb. 3)
Überprüfen Sie, ob Sie alle erforderlichen Teile und Hardware haben. Wenn
Sie finden beschädigte oder fehlende Teile in einem neu gekauften Produkt,
bitte geben Sie dieses Senden Sie das Produkt zum Umtausch an den
Händler.

6
RETURN /DAMAGE CLAIM INSTRUCTIONS
Werfen Sie den Karton/die Originalverpackung NICHT weg.
Falls eine Rücksendung erforderlich ist, muss der Artikel in der
Originalverpackung zurückgesandt werden. Ohne diese Ihre Rücksendung wird
nicht akzeptiert.
Machen Sie ein Foto von den Kartonmarkierungen.
Ein Foto der Markierungen (Text) auf der Seite der Schachtel ist erforderlich, falls
ein Teil für den Austausch erforderlich. Dies hilft unseren Mitarbeitern, Ihre
Produktnummer zu identifizieren, um Stellen Sie sicher, dass Sie die richtigen
Teile erhalten.
Machen Sie ein Foto des beschädigten Teils (falls zutreffend).
Um einen Anspruch geltend zu machen und Ersatz zu erhalten, ist immer ein Foto
des Schadens erforderlich. oder Rückerstattung schnell bearbeitet. Bitte stellen
Sie sicher, dass Sie die Box haben, auch wenn sie beschädigt.
Senden Sie uns eine E-Mail mit den gewünschten Bildern.
Senden Sie uns eine E-Mail direkt vom Marktplatz, auf dem Ihr Artikel gekauft

7
wurde, mit dem angehängte Bilder und eine Beschreibung Ihres Anspruchs.
BEFORE YOU START
Bitte lesen Sie alle Anweisungen sorgfältig durch.
Bewahren Sie die Anleitung zum späteren Nachschlagen auf.
Trennen und zählen Sie alle Teile und die Hardware.
Lesen Sie jeden Schritt sorgfältig durch und halten Sie die richtige
Reihenfolge ein.
Wir empfehlen, alle Artikel möglichst in der Nähe des Bereichs zu montieren,
in dem in dem sie eingesetzt werden, um das Produkt nicht unnötig zu
bewegen, sobald gebaut.
Stellen Sie das Produkt immer auf eine ebene, stabile und stabile Oberfläche.
Bewahren Sie alle Kleinteile und Verpackungsmaterialien dieses Produkts
außerhalb der Reichweite von Babys auf. und Kinder, da sie möglicherweise
eine ernsthafte Erstickungsgefahr darstellen.

1
Adresse : Shuangchenglu 803nong11hao1602A-1609shi, Baoshanqu,
Shanghai 200000 CN.
Nach AUS importiert: SIHAO PTY LTD, 1 ROKEVA
STREETEASTWOOD NSW 2122 Australien
Importiert in die USA: Sanven Technology Ltd., Suite 250, 9166 Anaheim
Place, Rancho Cucamonga, CA 91730
REP
EC
E-CrossStu GmbH
Mainzer Landstr.69, 60329 Frankfurt am Main.
REP
UK
YH CONSULTING LIMITED.
C/O YH Consulting Limited Office 147, Centurion House,
London Road, Staines-upon-Thames, Surrey, TW18 4AX
Technisch Support und E-Garantie-Zertifikat
www.vevor.com/support

2
Tecnico Supporto e certificato di garanzia elettronica
www.vevor.com/support
VEICOLO DA CACCIA
MODELLO: YL1401
We continue to be committed to provide you tools with competitive price.
"Save Half", "Half Price" or any other similar expressions used by us only
represents an estimate of savings you might benefit from buying certain tools
with us compared to the major top brands and does not necessarily mean to
cover all categories of tools offered by us. You are kindly reminded to verify
carefully when you are placing an order with us if you are actually saving half
in comparison with the top major brands.

1
MODELLO: YL1401
Have product questions? Need technical support? Please feel free to
contact us:
Technical Support and E-Warranty Certificate
www.vevor.com/support
NEED HELP? CONTACT US!
This is the original instruction, please read all manual instructions
carefully before operating. VEVOR reserves a clear interpretation of our
user manual. The appearance of the product shall be subject to the
product you received. Please forgive us that we won't inform you again if
there are any technology or software updates on our product.
HUNTING GAME VEHICLE

2
INSTRUCTIONS
Prefazione
Innanzitutto, esprimiamo i nostri più sentiti ringraziamenti ai nostri clienti
che hanno acquistato la nostra attrezzatura . Questo manuale serve per
migliorare il servizio clienti Scritto con questa attrezzatura . Spero che i
prodotti e i servizi dell'azienda vi offrano la cortesia del canale.
Fai attenzione
Questo prodotto deve essere utilizzato in stretta conformità con il metodo
di utilizzo di questo manuale, uso improprio qualsiasi altro metodo causato
da un uso improprio La Società non fornisce alcuna garanzia di alcun tipo,
inclusa (ma non limitata a) la commerciabilità offerta alla Società per uno
scopo particolare Garanzie implicite con l'idoneità.
La società non si assume alcuna responsabilità. La Società non sarà
responsabile per eventuali errori contenuti in questo materiale o per
eventuali danni accidentali o consequenziali risultanti dalla fornitura, dalla
prestazione effettiva o uso di questo manuale.
Questo manuale contiene informazioni proprietarie protette dalla legge sui
brevetti. Tutti i diritti riservati. Senza il consenso scritto della Società,
questo manuale non può essere fotocopiato, copiato o tradotto in qualsiasi
sua parte in un'altra lingua.
Il contenuto contenuto nel manuale può essere modificato senza preavviso
da parte dell'utente.
La responsabilità del produttore
La Società sarà ritenuta responsabile della sicurezza e dell'affidabilità delle
prestazioni dell'attrezzatura solo se l'operazione di assemblaggio,
restituzione , il miglioramento e la manutenzione sono eseguiti da
personale approvato dalla Società, l'attrezzatura elettrica interessata è
conforme agli standard nazionali e l' attrezzatura viene utilizzata in
conformità con le istruzioni operative.

3
Garanzia
Processo di produzione e materie prime: la Società garantisce che le
Attrezzature (eccetto le parti) sono in condizioni di uso e riparazione
regolari, prive di processi di fabbricazione e materie prime difetti dei
materiali per un anno dalla data di spedizione. Nessuna delle nostre
ispezioni è perfetta.
PRECAUTIONS
Precauzioni per l'uso
Avvertimento:
13.Se l' attrezzatura sembra allentata, cade o è danneggiata, contattare
l'azienda in tempo;
14.Mantenere l'area di lavoro pulita e ben illuminata. Le aree disordinate o
buie favoriscono gli incidenti.
15.Tenere lontani i bambini e gli astanti durante il funzionamento, le
distrazioni potrebbero farvi perdere il controllo.
16.Utilizzare ragionevolmente in base alla propria situazione e non
abusarne quando il corpo non è in tempo.
CONSERVA QUESTE ISTRUZIONI
PRODUCT PARAMETERS
nome del prodotto
Veicolo da caccia
modello
YL1401
Capacità di carico/libbre
500 libbre
Dimensioni dello scaffale
800x500 mm

4
PRODUCT COMPONENTS
Numero di
parte
Nome della parte
Qtà
1
Assemblaggio del mainframe
1
2
Telaio posteriore
1
3
Asse
6
4
Ruota
4
5
Barra della ruota
2
6
Manubrio
1
7
Manuale di istruzioni
1
8
[A]Bullone esagonale da 1/4" x 1 1/4".
2
9
[B] Bullone esagonale da 5/16" x 2".
2
10
[C] Bullone di trasporto 5/16"x 2 1/4".
2
11
[D]Bullone esagonale da 1/4" x 2".
4
12
Dado Nylock da 1/4".
6
13
Dado autobloccante in nylon da 5/16".
2
14
Rondella in acciaio da 1/4".
12
15
Rondella in acciaio da 5/16".
4
16
Dado Delta da 5/16".
2
17
Dado autobloccante M16
6
18
Rondella in acciaio M16
6
19
Distanziale ruota
4
ASSEMBLYINSTRUCTIONS
FARE UN PASSO 1. Fissare (2) assi a ciascuna barra della ruota utilizzando (4)
1/4" x 2" he; bulloni [D], (8) rondelle in acciaio da 1/4" e (4) dadi Nylock da 1/4".

5
Quindi, fissare le ruote ai gruppi ruota utilizzando (4) rondelle in acciaio M16 e (4)
dadi Nylock M16. (Fig. 1)
FARE UN PASSO 2. Inserire gli assi nel gruppo del telaio principale allineando i
fori e fissarlo utilizzando (2) bulloni esagonali da 1/4"x1 1/4" [A], (4) rondelle in
acciaio da 1/4" e (2) dadi autobloccanti da 1/4". Stringere saldamente. (Fig. 2)
FARE UN PASSO 3. Utilizzando (4) distanziali ruota, (2) rondelle in acciaio M16 e
(2) dadi autobloccanti M16, fissare i gruppi ruota agli assi. Stringere saldamente.
(Fig.2)
FARE UN PASSO 4. Successivamente, fissare il telaio posteriore al gruppo del
telaio principale utilizzando (2) bulloni esagonali da 5/16" x 2" [B], (4) rondelle in
acciaio da 5/16", (2) dadi Nylock da 5/16". saldamente.(Fig. 2)
FARE UN PASSO 5. Fissare le cinghie della tramoggia al gruppo del telaio
principale e al manubrio utilizzando (2) bulloni di trasporto da 5/16"x2 1/4" [C] e (2)
dadi delta da 5/16". (Fig. 3)
Assicurati di avere tutte le parti e l'hardware necessari. Se trovi parti
danneggiate o mancanti in un prodotto appena acquistato, restituirlo
prodotto al rivenditore per la sostituzione.

6
RETURN /DAMAGE CLAIM INSTRUCTIONS
NON smaltire la scatola/confezione originale.
Nel caso in cui sia richiesto un reso, l'articolo deve essere restituito nella scatola
originale. Senza questo il tuo reso non sarà accettato.
Scatta una foto dei contrassegni della scatola.
Nel caso in cui una parte lo sia, è richiesta una foto dei contrassegni (testo) sul
lato della scatola necessario per la sostituzione. Questo aiuta il nostro personale a
identificare il numero del tuo prodotto assicurati di ricevere le parti corrette.
Scatta una foto della parte danneggiata (se applicabile).
Una foto del danno è sempre necessaria per presentare un reclamo e ottenere la
sostituzione o rimborso elaborato rapidamente. Assicurati di avere la scatola
anche se lo è danneggiato.
Inviaci una email con le immagini richieste.
Inviaci un'e-mail direttamente dal marketplace in cui è stato acquistato il tuo
articolo con immagini allegate e una descrizione del tuo reclamo.

7
BEFORE YOU START
Si prega di leggere attentamente tutte le istruzioni.
Conservare le istruzioni per riferimento futuro.
Separare e contare tutte le parti e l'hardware.
Leggi attentamente ogni passaggio e segui l'ordine corretto.
Si consiglia, ove possibile, di assemblare tutti gli articoli in prossimità dell'area
in cui si trovano cui verranno messi in uso, per evitare di spostare inutilmente
il prodotto una volta assemblato.
Posizionare sempre il prodotto su una superficie piana, stabile e stabile.
Tenere tutte le piccole parti e i materiali di imballaggio di questo prodotto
lontano dalla portata dei bambini e bambini poiché potenzialmente
rappresentano un grave rischio di soffocamento.

1
Indirizzo : Shuangchenglu 803nong11hao1602A-1609shi, baoshanqu,
shanghai 200000 CN.
Importato in AUS: SIHAO PTY LTD, 1 ROKEVA STREETEASTWOOD
NSW 2122 Australia
Importato negli Stati Uniti: Sanven Technology Ltd., Suite 250, 9166
Anaheim Place, Rancho Cucamonga, CA 91730
REP
EC
E-CrossStu GmbH
Mainzer Landstr.69, 60329 Frankfurt am Main.
REP
UK
YH CONSULTING LIMITED.
C/O YH Consulting Limited Office 147, Centurion House,
London Road, Staines-upon-Thames, Surrey, TW18 4AX
Tecnico Supporto e certificato di garanzia elettronica
www.vevor.com/support

2
Técnico Certificado de soporte y garantía electrónica
www.vevor.com/support
VEHÍCULO DE CAZA
MODELO: YL1401
We continue to be committed to provide you tools with competitive price.
"Save Half", "Half Price" or any other similar expressions used by us only
represents an estimate of savings you might benefit from buying certain tools
with us compared to the major top brands and does not necessarily mean to
cover all categories of tools offered by us. You are kindly reminded to verify
carefully when you are placing an order with us if you are actually saving half
in comparison with the top major brands.

1
MODELO: YL1401
Have product questions? Need technical support? Please feel free to
contact us:
Technical Support and E-Warranty Certificate
www.vevor.com/support
NEED HELP? CONTACT US!
This is the original instruction, please read all manual instructions
carefully before operating. VEVOR reserves a clear interpretation of our
user manual. The appearance of the product shall be subject to the
product you received. Please forgive us that we won't inform you again if
there are any technology or software updates on our product.
HUNTING GAME VEHICLE

2
INSTRUCTIONS
Prefacio
En primer lugar, expresemos nuestro más sincero agradecimiento a
nuestros clientes que han adquirido nuestro equipo . Este manual es para
que el servicio al cliente mejore Escrito con este equipo . Espero que los
productos y servicios de la empresa le traigan el canal de cortesía.
Prestar atención
Este producto debe usarse estrictamente de acuerdo con el método de
uso de este manual, el mal uso de cualquier otro método causado por el
mal uso La Compañía no ofrece ninguna garantía de ningún tipo, incluida
(pero no limitada a) la comerciabilidad ofrecida a la Compañía para un
propósito particular. Garantías implícitas con aptitud.
La empresa no acepta ninguna responsabilidad. La Compañía no será
responsable de ningún error contenido en este material, ni de ningún daño
accidental o consecuente que resulte de la provisión, desempeño real o
uso de este manual.
Este manual contiene información patentada protegida por la ley de
patentes. Reservados todos los derechos. Sin el consentimiento por
escrito de la Compañía, no se permite fotocopiar, copiar ni traducir
ninguna parte de este manual a otro idioma.
El contenido del manual puede modificarse sin previo aviso por parte del
usuario.
Responsabilidad del fabricante
La Compañía será responsable de la seguridad y confiabilidad del
desempeño del equipo solo si la operación de ensamblaje, devolución , las
mejoras y el mantenimiento son realizados por personal aprobado por la
Compañía, el equipo eléctrico en cuestión cumple con las normas
nacionales y el equipo se utiliza de acuerdo con las instrucciones de
funcionamiento.

3
Garantizar
Proceso de fabricación y materias primas: La Compañía garantiza que los
Equipos (excepto piezas) se encuentran en condiciones regulares de uso
y reparación, libres de procesos de fabricación y materias primas. fallas de
materiales durante un año a partir de la fecha de envío. Ninguna de
nuestras inspecciones es perfecta.
PRECAUTIONS
Precauciones de uso
Advertencia:
17.Si el equipo se siente flojo, se cae o se daña, comuníquese con la
empresa a tiempo;
18.Mantener el área de trabajo limpia y bien iluminada. Las zonas
desordenadas u oscuras invitan a los accidentes.
19.Mantenga alejados a los niños y a otras personas mientras opera; las
distracciones le harán perder el control.
20.Úselo razonablemente de acuerdo con la propia situación y no lo use
en exceso cuando el cuerpo no esté en el momento oportuno.
GUARDA ESTAS INSTRUCCIONES
PRODUCT PARAMETERS
nombre del producto
Vehículo de caza
modelo
YL1401
Capacidad de carga/lb
500 libras
Tamaño del estante
800x500mm

4
PRODUCT COMPONENTS
Número de
pieza
Nombre de la pieza
Cantidad
1
Ensamblaje de la computadora central
1
2
Marco trasero
1
3
Eje
6
4
Rueda
4
5
Barra de rueda
2
6
Manillar
1
7
Manual de instrucciones
1
8
[A]Perno hexagonal de 1/4" x 1 1/4"
2
9
[B] Perno hexagonal de 5/16" x 2"
2
10
[C] Perno de cuello de 5/16" x 2 1/4"
2
11
[D]Perno hexagonal de 1/4" x 2"
4
12
Tuerca Nylock de 1/4"
6
13
Tuerca Nylock de 5/16"
2
14
Arandela de acero de 1/4"
12
15
Arandela de acero de 5/16"
4
dieciséis
Tuerca delta de 5/16"
2
17
Tuerca de nailon M16
6
18
Arandela de acero M16
6
19
Espaciador de rueda
4
ASSEMBLYINSTRUCTIONS
PASO 1. Asegure (2) ejes a cada barra de rueda usando (4) tornillos de 1/4" x 2";
pernos [D], (8) arandelas de acero de 1/4" y (4) tuercas Nylock de 1/4". Luego, fije

5
las ruedas a los conjuntos de ruedas usando (4) arandelas de acero M16 y (4)
tuercas nylock M16. (Figura 1)
PASO 2. Inserte los ejes en el conjunto del bastidor principal alineando los
orificios y asegúrelo usando (2) pernos hexagonales de 1/4"x1 1/4" [A], (4)
arandelas de acero de 1/4" y (2) tuercas Nylock de 1/4'. Apriete firmemente. (Fig.
2)
PASO 3. Usando (4) espaciadores de ruedas, (2) arandelas de acero M16 y (2)
tuercas Nylock M16, fije los conjuntos de ruedas a los ejes. Apriete firmemente.
(Figura 2)
PASO 4. Luego, fije el marco trasero al conjunto del marco principal usando (2)
pernos hexagonales de 5/16" x 2" [B], (4) arandelas de acero de 5/16", (2) tuercas
Nylock de 5/16". de forma segura. (Fig. 2)
PASO 5. Asegure las correas de la tolva al conjunto del bastidor principal y al
manillar usando (2) pernos de carro de 5/16"x2 1/4" [C] y (2) tuercas delta de 5/16".
(Fig. 3)
Verifique para asegurarse de tener todas las piezas y el hardware necesarios.
si encuentras piezas dañadas o faltantes en un producto recién comprado,
devuelva este producto al minorista para su reemplazo.

6
RETURN /DAMAGE CLAIM INSTRUCTIONS
NO deseche la caja/embalaje original.
En caso de que se requiera una devolución, el artículo debe devolverse en su caja
original. Sin esto Su devolución no será aceptada.
Tome una fotografía de las marcas de la caja.
Se requiere una foto de las marcas (texto) en el costado de la caja en caso de que
una pieza sea necesario para el reemplazo. Esto ayuda a nuestro personal a
identificar el número de su producto para asegúrese de recibir las piezas
correctas.
Tome una fotografía de la pieza dañada (si corresponde).
Siempre se requiere una foto del daño para presentar un reclamo y obtener su
reemplazo. o reembolso procesado rápidamente. Por favor asegúrese de tener la
caja incluso si es dañado.
Envíanos un correo electrónico con las imágenes solicitadas.
Envíenos un correo electrónico directamente desde el mercado donde compró su
artículo con el Imágenes adjuntas y una descripción de su reclamo.

7
BEFORE YOU START
Lea atentamente todas las instrucciones.
Conserve las instrucciones para referencia futura.
Separe y cuente todas las piezas y herrajes.
Lea atentamente cada paso y siga el orden correcto.
Recomendamos que, siempre que sea posible, todos los elementos se
monten cerca del área en que serán puestos en uso, para evitar mover el
producto innecesariamente una vez ensamblado.
Coloque siempre el producto sobre una superficie plana, firme y estable.
Mantenga todas las piezas pequeñas y materiales de embalaje de este
producto fuera del alcance de los bebés. y niños, ya que potencialmente
representan un grave peligro de asfixia.

1
Dirección : Shuangchenglu 803nong11hao1602A-1609shi, baoshanqu,
shanghai 200000 CN.
Importado a AUS: SIHAO PTY LTD, 1 ROKEVA STREETEASTWOOD
NSW 2122 Australia
Importado a EE. UU.: Sanven Technology Ltd., Suite 250, 9166 Anaheim
Place, Rancho Cucamonga, CA 91730
REP
EC
E-CrossStu GmbH
Mainzer Landstr.69, 60329 Frankfurt am Main.
REP
UK
YH CONSULTING LIMITED.
C/O YH Consulting Limited Office 147, Centurion House,
London Road, Staines-upon-Thames, Surrey, TW18 4AX
Técnico Certificado de soporte y garantía electrónica
www.vevor.com/support

2
Techniczny Certyfikat wsparcia i e-gwarancji
www.vevor.com/support
POJAZD MYŚLIWSKI
MODEL: YL1401
We continue to be committed to provide you tools with competitive price.
"Save Half", "Half Price" or any other similar expressions used by us only
represents an estimate of savings you might benefit from buying certain tools
with us compared to the major top brands and does not necessarily mean to
cover all categories of tools offered by us. You are kindly reminded to verify
carefully when you are placing an order with us if you are actually saving half
in comparison with the top major brands.

1
MODEL: YL1401
Have product questions? Need technical support? Please feel free to
contact us:
Technical Support and E-Warranty Certificate
www.vevor.com/support
NEED HELP? CONTACT US!
This is the original instruction, please read all manual instructions
carefully before operating. VEVOR reserves a clear interpretation of our
user manual. The appearance of the product shall be subject to the
product you received. Please forgive us that we won't inform you again if
there are any technology or software updates on our product.
HUNTING GAME VEHICLE

2
INSTRUCTIONS
Przedmowa
Przede wszystkim chcielibyśmy wyrazić nasze serdeczne podziękowania
naszym klientom, którzy kupili nasz sprzęt . Niniejsza instrukcja ma na celu
poprawę obsługi klienta Napisane przy użyciu tego sprzętu . Mamy
nadzieję, że produkty i usługi firmy umożliwią Państwu skorzystanie z
kanału.
Zwróć uwagę
Ten produkt musi być używany ściśle według metody użycia opisanej w tej
instrukcji, niewłaściwego użycia wszelkie inne metody spowodowane
niewłaściwym użyciem Firma nie udziela żadnej gwarancji, w tym (ale nie
wyłącznie) zbywalności oferowanej Spółce w określonym celu
Dorozumiane gwarancje dotyczące sprawności.
Firma nie ponosi żadnej odpowiedzialności. Spółka nie ponosi
odpowiedzialności za jakiekolwiek błędy zawarte w tym materiale ani za
jakiekolwiek przypadkowe lub wtórne szkody powstałe na skutek
dostarczenia, faktycznego wykonania lub zastosowanie ten podręcznik.
Niniejsza instrukcja zawiera informacje zastrzeżone, chronione prawem
patentowym. Wszelkie prawa zastrzeżone. Bez pisemnej zgody Firmy
zabrania się kopiowania, kopiowania lub tłumaczenia jakiejkolwiek części
tej instrukcji na inny język.
Treść zawarta w instrukcji może ulec zmianie bez powiadomienia
użytkownika.
Odpowiedzialność producenta
Spółka ponosi odpowiedzialność za bezpieczeństwo i niezawodność
działania sprzętu tylko wtedy, gdy operacja montażu, zwrot , ulepszenia i
konserwacja są przeprowadzane przez personel zatwierdzony przez Firmę,
dany sprzęt elektryczny jest zgodny z normami krajowymi , a sprzęt jest
używany zgodnie z instrukcją obsługi.

3
Gwarancja
Proces produkcyjny i surowce: Firma gwarantuje, że Sprzęt (z wyjątkiem
części) jest w stanie normalnego użytkowania i naprawy, jest wolny od
procesu produkcyjnego i surowy wad materiałowych przez okres jednego
roku od daty wysyłki. Żadna z naszych inspekcji nie jest doskonała.
PRECAUTIONS
Środki ostrożności dotyczące stosowania
Ostrzeżenie:
21.Jeśli sprzęt poluzuje się, spadnie lub ulegnie uszkodzeniu, prosimy o
niezwłoczny kontakt z firmą;
22.Utrzymuj miejsce pracy w czystości i dobrze oświetlone. Zagracone lub
ciemne obszary sprzyjają wypadkom.
23.Trzymaj dzieci i osoby postronne z daleka podczas obsługi, ponieważ
rozproszenie uwagi spowoduje utratę kontroli.
24.Używaj rozsądnie, stosownie do własnej sytuacji i nie nadużywaj, gdy
organizm nie jest w odpowiednim czasie.
ZACHOWAJ TE INSTRUKCJE
PRODUCT PARAMETERS
Nazwa produktu
Pojazd myśliwski
Model
YL1401
Nośność/funt
500 funtów
Rozmiar półki
800x500mm

4
PRODUCT COMPONENTS
Numer części
Częściowe imię
Ilość
1
Zespół komputera głównego
1
2
Rama tylna
1
3
Oś
6
4
Koło
4
5
Pasek koła
2
6
Kierownica
1
7
Instrukcja obsługi
1
8
[A] Śruba sześciokątna 1/4" x1 1/4".
2
9
[B] Śruba sześciokątna 5/16" x 2".
2
10
[C] Śruba nośna 5/16" x 2 1/4".
2
11
[D] Śruba sześciokątna 1/4" x 2".
4
12
Nakrętka nylonowa 1/4".
6
13
Nakrętka nylonowa 5/16".
2
14
Podkładka stalowa 1/4".
12
15
Podkładka stalowa 5/16 cala
4
16
Nakrętka Delta 5/16".
2
17
Nakrętka nylonowa M16
6
18
Podkładka stalowa M16
6
19
Dystans koła
4
ASSEMBLYINSTRUCTIONS
KROK 1. Przymocuj (2) osie do każdego drążka koła za pomocą (4) 1/4" x 2" he;
śruby [D], (8) podkładki stalowe 1/4
”
i (4) nakrętki zabezpieczające 1/4
”
.
Następnie przymocuj koła do zespołów kół za pomocą (4) stalowych podkładek

5
M16 i (4) nakrętek nylonowych M16. (ryc. 1)
STE P 2. Włóż osie do otworów w zespole ramy głównej, wyrównując otwory i
zabezpiecz za pomocą (2)1/4" x1 1/4" śrub sześciokątnych [A], (4)1/4" podkładek
stalowych i (2) nakrętek zabezpieczających 1/4'. Dokręć mocno. (Rys. 2)
KROK 3. Za pomocą (4) elementów dystansowych kół, (2) podkładek stalowych
M16 i (2) nakrętek samozabezpieczających M16 przymocuj zespoły kół do osi.
Dokręć mocno. (ryc. 2)
KROK 4. Następnie przymocuj ramę tylną do zespołu ramy głównej za pomocą (2)
śrub sześciokątnych 5/16" x 2" [B], (4) podkładek stalowych 5/16", (2) nakrętek
zabezpieczających 5/16". Dokręć bezpiecznie. (Rys. 2)
KROK 5. Przymocuj paski zbiornika do ramy głównej i kierownicy za pomocą (2)
śrub nośnych 5/16" x 2 1/4" [C] i (2) nakrętek delta 5/16". (Rys. 3).
Sprawdź, czy masz wszystkie wymagane części i sprzęt. Jeśli znajdziesz
uszkodzonych lub brakujących części nowo zakupionego produktu, prosimy
o jego zwrócenie produkt do sprzedawcy w celu wymiany.
6
RETURN /DAMAGE CLAIM INSTRUCTIONS
NIE wyrzucaj pudełka/oryginalnego opakowania.
W przypadku konieczności zwrotu, przedmiot musi zostać zwrócony w
oryginalnym pudełku. Bez tego Twój zwrot nie zostanie przyjęty.
Zrób zdjęcie oznaczeń na pudełku.
W przypadku części wymagane jest zdjęcie oznacze ń (tekstu) z boku pudełka
potrzebne do wymiany. Pomoże to naszym pracownikom zidentyfikować numer
Twojego produktu upewnij się, że otrzymasz właściwe części.
Zrób zdjęcie uszkodzonej części (jeśli dotyczy).
Aby złożyć reklamację i otrzymać produkt zastępczy, zawsze wymagane jest
zdjęcie uszkodzenia lub zwrot pieniędzy zrealizowany szybko. Upewnij się, że
masz pudełko, nawet jeśli tak jest uszkodzony.
Wyślij nam e-mail z żądanymi zdjęciami.
Wyślij do nas e-mail bezpośrednio z rynku, na którym zakupiono Twój przedmiot

7
za pomocą załączone zdjęcia i opis roszczenia.
BEFORE YOU START
Proszę uważnie przeczytać wszystkie instrukcje.
Zachowaj instrukcje do wykorzystania w przyszłości.
Oddziel i policz wszystkie części i osprzęt.
Przeczytaj uważnie każdy krok i postępuj zgodnie z odpowiednią kolejnością.
Zalecamy, aby w miarę możliwości wszystkie elementy były montowane w
pobliżu obszaru w którym będą używane, aby uniknąć niepotrzebnego
jednorazowego przenoszenia produktu zmontowane.
Zawsze umieszczaj produkt na płaskiej, stabilnej i stabilnej powierzchni.
Wszystkie małe części i materiały opakowaniowe tego produktu należy
trzymać z dala od dzieci i dzieci, ponieważ mogą one stwarzać poważne
ryzyko zadławienia.

1
Adres : Shuangchenglu 803nong11hao1602A-1609shi, baoshanqu,
szanghaj 200000 CN.
Import do AUS: SIHAO PTY LTD, 1 ROKEVA STREETEASTWOOD NSW
2122 Australia
Import do USA: Sanven Technology Ltd., Suite 250, 9166 Anaheim Place,
Rancho Cucamonga, CA 91730
REP
EC
E-CrossStu GmbH
Mainzer Landstr.69, 60329 Frankfurt am Main.
REP
UK
YH CONSULTING LIMITED.
C/O YH Consulting Limited Office 147, Centurion House,
London Road, Staines-upon-Thames, Surrey, TW18 4AX
Techniczny Certyfikat wsparcia i e-gwarancji
www.vevor.com/support

2
Technisch Ondersteuning en e-garantiecertificaat
www.vevor.com/support
VOERTUIG VOOR JACHTSPEL
MODEL: YL1401
We continue to be committed to provide you tools with competitive price.
"Save Half", "Half Price" or any other similar expressions used by us only
represents an estimate of savings you might benefit from buying certain tools
with us compared to the major top brands and does not necessarily mean to
cover all categories of tools offered by us. You are kindly reminded to verify
carefully when you are placing an order with us if you are actually saving half
in comparison with the top major brands.

1
MODEL: YL1401
Have product questions? Need technical support? Please feel free to
contact us:
Technical Support and E-Warranty Certificate
www.vevor.com/support
NEED HELP? CONTACT US!
This is the original instruction, please read all manual instructions
carefully before operating. VEVOR reserves a clear interpretation of our
user manual. The appearance of the product shall be subject to the
product you received. Please forgive us that we won't inform you again if
there are any technology or software updates on our product.
HUNTING GAME VEHICLE

2
INSTRUCTIONS
Voorwoord
Laten we allereerst onze oprechte dank betuigen aan onze klanten die
onze apparatuur hebben gekocht. Deze handleiding is bedoeld om de
klantenservice te verbeteren Geschreven met deze apparatuur . Ik hoop
dat de producten en diensten van het bedrijf u het kanaal hoffelijk zullen
brengen.
Let op
Dit product moet worden gebruikt in strikte overeenstemming met de
gebruiksmethode van deze handleiding, misbruik ervan alle andere
methoden veroorzaakt door misbruik Het Bedrijf geeft geen enkele
garantie van welke aard dan ook, inclusief (maar niet beperkt tot) de
verkoopbaarheid die aan het Bedrijf wordt aangeboden voor een bepaald
doel Impliciete garanties met geschiktheid.
Het bedrijf aanvaardt geen aansprakelijkheid. Het Bedrijf is niet
aansprakelijk voor eventuele fouten in dit materiaal, of voor eventuele
accidentele schade of gevolgschade die voortvloeit uit de levering,
daadwerkelijke uitvoering of gebruik van deze handleiding.
Deze handleiding bevat bedrijfseigen informatie die beschermd wordt door
de patentwetgeving. Alle rechten voorbehouden. Zonder schriftelijke
toestemming van het bedrijf mag deze handleiding niet worden
gefotokopieerd, gekopieerd of enig onderdeel in een andere taal worden
vertaald.
De inhoud van de handleiding kan zonder voorafgaande kennisgeving van
de gebruiker worden gewijzigd.
Aansprakelijkheid van de fabrikant
Het Bedrijf kan alleen verantwoordelijk worden gehouden voor de
veiligheid en betrouwbaarheid van de prestaties van de apparatuur als de
montage, het retourneren , verbetering en onderhoud worden uitgevoerd

3
door personeel dat door het bedrijf is goedgekeurd, de betreffende
elektrische apparatuur voldoet aan de nationale normen en de apparatuur
wordt gebruikt in overeenstemming met de bedieningsinstructies.
Garantie
Productieproces en grondstoffen: Het Bedrijf garandeert dat de Apparatuur
(behalve onderdelen) in normale gebruiks- en reparatieconditie verkeert,
vrij is van fabricageprocessen en onbewerkte materialen. materiaalfouten
gedurende één jaar vanaf de datum van verzending. Geen van onze
inspecties is perfect.
PRECAUTIONS
Voorzorgsmaatregelen voor gebruik
Waarschuwing:
25.Als de apparatuur los voelt, valt of beschadigd is, neem dan tijdig
contact op met het bedrijf;
26.Houd de werkplek schoon en goed verlicht. Rommelige of donkere
ruimtes nodigen uit tot ongelukken.
27.Houd kinderen en omstanders uit de buurt tijdens het gebruik. Door
afleiding kunt u de controle verliezen.
28.Redelijk gebruiken in overeenstemming met de eigen situatie, en niet
overmatig gebruiken als het lichaam niet op tijd is.
BEWAAR DEZE INSTRUCTIES
PRODUCT PARAMETERS
productnaam
Voertuig voor jachtspel
model
YL1401
Draagvermogen/lb
500 pond

4
Plankgrootte
800x500mm
PRODUCT COMPONENTS
Onderdeel
nummer
Onderdeelnaam
Aantal
1
Mainframe-assemblage
1
2
Achterframe
1
3
As
6
4
Wiel
4
5
Wielstang
2
6
Stuurstang
1
7
Handleiding
1
8
[A]1/4" x1 1/4" zeskantbout
2
9
[B] 5/16" x 2" zeskantbout
2
10
[C] 5/16"x 2 1/4" slotbout
2
11
[D]1/4" x2" zeskantbout
4
12
1/4" Nylock-moer
6
13
5/16" Nylock-moer
2
14
1/4" stalen ring
12
15
5/16" stalen ring
4
16
5/16" Deltamoer
2
17
M16 Nylock-moer
6
18
M16 stalen sluitring
6
19
Wielafstandhouder
4

5
ASSEMBLYINSTRUCTIONS
STAP 1. Bevestig (2) assen aan elke wielstang met behulp van (4) 1/4" x 2" hij;
bouten [D], (8) 1/4" stalen ringen en (4) 1/4" nylon borgmoeren. Bevestig
vervolgens de wielen aan de wielconstructies met behulp van (4) stalen M16
ringen en (4) M16 borgmoeren. (Figuur 1)
STAP P 2. Steek de assen in de uitlijngaten van het hoofdframe en zet vast met
behulp van (2)1/4"x1 1/4" zeskantbouten [A], (4)1/4"stalen ringen en (2) 1/4'nylock
moeren. Draai stevig vast.(Fig. 2)
STAP 3. Gebruik (4) wielafstandhouders, (2) stalen M16 ringen en (2) M16
borgmoeren om de wielconstructies aan de assen te bevestigen. Veilig
vastdraaien. (Fig. 2)
STAP 4. Bevestig vervolgens het achterframe aan het hoofdframe met behulp van
(2) 5/16" x 2" zeskantbouten [B], (4) 5/16" stalen ringen, (2) 5/16"
nylonborgmoeren. Draai vast veilig. (Fig. 2)
STAP 5. Bevestig de hopperriemen aan het hoofdframe en het stuur met behulp
van (2) 5/16"x2 1/4" slotbouten [C] en (2) 5/16" deltamoeren. (Fig. 3)
Controleer of u over alle benodigde onderdelen en hardware beschikt. Als je
vindt beschadigde of ontbrekende onderdelen in een nieuw gekocht product,
retourneer dit dan product naar de detailhandelaar voor vervanging.

6
RETURN /DAMAGE CLAIM INSTRUCTIONS
Gooi de doos/originele verpakking NIET weg.
Als retourneren nodig is, moet het artikel in de originele doos worden
geretourneerd. Zonder dit uw retourzending wordt niet geaccepteerd.
Maak een foto van de doosmarkeringen.
Voor het geval er sprake is van een onderdeel is een foto van de markeringen
(tekst) op de zijkant van de doos vereist nodig voor vervanging. Hierdoor kunnen
onze medewerkers uw productnummer identificeren Zorg ervoor dat u de juiste
onderdelen ontvangt.
Maak een foto van het beschadigde onderdeel (indien van toepassing).
Een foto van de schade is altijd vereist om een claim in te dienen en uw
vervanging te krijgen of terugbetaling snel verwerkt. Zorg ervoor dat u de doos
heeft, ook al is deze aanwezig beschadigd.
Stuur ons een e-mail met de gevraagde afbeeldingen.
E-mail ons rechtstreeks vanaf de marktplaats waar uw artikel is gekocht met de
bijgevoegde afbeeldingen en een beschrijving van uw claim.

7
BEFORE YOU START
Lees alle instructies aandachtig door.
Bewaar de instructies voor toekomstig gebruik.
Scheid en tel alle onderdelen en hardware.
Lees elke stap aandachtig door en volg de juiste volgorde.
Wij raden aan dat, waar mogelijk, alle artikelen dichtbij de locatie worden
gemonteerd waar ze in gebruik zullen worden genomen, om te voorkomen
dat het product een keer onnodig wordt verplaatst gemonteerd.
Plaats het product altijd op een vlakke, stabiele en stabiele ondergrond.
Houd alle kleine onderdelen en verpakkingsmaterialen van dit product uit de
buurt van baby's en kinderen, aangezien deze mogelijk een ernstig
verstikkingsgevaar vormen.

1
Adres : Shuangchenglu 803nong11hao1602A-1609shi, baoshanqu,
shanghai 200000 CN.
Geïmporteerd naar AUS: SIHAO PTY LTD, 1 ROKEVA
STREETEASTWOOD NSW 2122 Australië
Geïmporteerd naar de VS: Sanven Technology Ltd., Suite 250, 9166
Anaheim Place, Rancho Cucamonga, CA 91730
REP
EC
E-CrossStu GmbH
Mainzer Landstr.69, 60329 Frankfurt am Main.
REP
UK
YH CONSULTING LIMITED.
C/O YH Consulting Limited Office 147, Centurion House,
London Road, Staines-upon-Thames, Surrey, TW18 4AX
Technisch Ondersteuning en e-garantiecertificaat
www.vevor.com/support

2
Teknisk Support och e-garanticertifikat
www.vevor.com/support
JAKTBIL
MODELL: YL1401
We continue to be committed to provide you tools with competitive price.
"Save Half", "Half Price" or any other similar expressions used by us only
represents an estimate of savings you might benefit from buying certain tools
with us compared to the major top brands and does not necessarily mean to
cover all categories of tools offered by us. You are kindly reminded to verify
carefully when you are placing an order with us if you are actually saving half
in comparison with the top major brands.

1
MODELL: YL1401
Have product questions? Need technical support? Please feel free to
contact us:
Technical Support and E-Warranty Certificate
www.vevor.com/support
NEED HELP? CONTACT US!
This is the original instruction, please read all manual instructions
carefully before operating. VEVOR reserves a clear interpretation of our
user manual. The appearance of the product shall be subject to the
product you received. Please forgive us that we won't inform you again if
there are any technology or software updates on our product.
HUNTING GAME VEHICLE

2
INSTRUCTIONS
Förord
Låt oss först och främst uttrycka vårt hjärtliga tack till våra kunder som har
köpt vår utrustning . Denna manual är till för att kundtjänst ska göra bättre
Skrivet med denna utrustning .Hoppas företagets produkter och tjänster för
att ge dig kanalen artighet.
Var uppmärksam
Denna produkt måste användas i strikt överensstämmelse med
användningsmetoden i denna manual, felaktig användning av andra
metoder orsakade av felaktig användning Bolaget ger ingen garanti av
något slag, inklusive (men inte begränsat till) den säljbarhet som erbjuds
Bolaget för ett visst syfte Underförstådda garantier med fitness.
Bolaget tar inget ansvar. Företaget ska inte hållas ansvarigt för eventuella
fel i detta material eller för oavsiktliga skador eller följdskador till följd av
tillhandahållandet, faktiska prestanda eller användning av denna manual.
Denna handbok innehåller patentskyddad information. Alla rättigheter
förbehållna. Utan företagets skriftliga medgivande är denna manual inte
tillåten att fotokopieras, kopieras eller översätta någon del till ett annat
språk.
Innehållet i manualen kan ändras utan användarens meddelande.
Tillverkarens ansvar
Företaget ska hållas ansvarigt för säkerheten och tillförlitligheten av
utrustningens prestanda endast om monteringen, återlämnande ,
förbättring och underhåll utförs av personal som godkänts av företaget,
den berörda elektriska utrustningen överensstämmer med nationella
standarder och utrustningen används i enlighet med bruksanvisningen.
Garanti
Tillverkningsprocess och råmaterial: Företaget garanterar att Utrustningen

3
(förutom delar) är i regelbunden användning och reparationsskick, fri från
tillverkningsprocess och råvara materialfel för ett år från leveransdatum.
Ingen av våra inspektioner är perfekta.
PRECAUTIONS
Försiktighetsåtgärder för användning
Varning:
29.Om utrustningen känns lös, faller eller är skadad, kontakta företaget i
tid;
30.Håll arbetsområdet rent och väl upplyst. Röriga eller mörka områden
leder till olyckor.
31.Håll barn och åskådare borta medan du kör, distraktioner gör att du
tappar kontrollen.
32.Använd rimligtvis efter din egen situation, och överanvänd inte när
kroppen inte är i rätt tid.
SPARA DESSA INSTRUKTIONER
PRODUCT PARAMETERS
produktnamn
Jaktbil
modell
YL1401
Bärförmåga/lb
500 pund
Hyllstorlek
800x500mm

4
PRODUCT COMPONENTS
Artikelnummer
Delnamn
Antal
1
Montering av stordatorer
1
2
Bakre ram
1
3
Axel
6
4
Hjul
4
5
Hjulstång
2
6
Handtag
1
7
Instruktionsmanual
1
8
[A]1/4" x1 1/4" sexkantsbult
2
9
[B] 5/16" x 2" sexkantsbult
2
10
[C] 5/16" x 2 1/4" vagnsbult
2
11
[D]1/4" x2" sexkantsbult
4
12
1/4" nylåsmutter
6
13
5/16" nylåsmutter
2
14
1/4" stålbricka
12
15
5/16" stålbricka
4
16
5/16" deltamutter
2
17
M16 nylåsmutter
6
18
M16 stålbricka
6
19
Hjulmellanlägg
4
ASSEMBLYINSTRUCTIONS
STEG 1. Fäst (2) axlar till varje hjulstång med (4) 1/4" x 2" he; bultar [D],(8) 1/4"
stålbrickor och (4) 1/4" nylåsmuttrar. Fäst sedan hjulen på hjulenheterna med (4)
M16 stålbrickor och (4) M16 nylåsmuttrar. (Figur 1)
STE P 2. Sätt in axlarna i huvudramsenhetens inriktningshål och säkra med
5
(2)1/4"x1 1/4" sexkantsbultar [A], (4)1/4" stålbrickor och (2) 1/4"nylockmuttrar. Dra
åt ordentligt.(Fig. 2)
STEG 3. Använd (4) hjuldistanser, (2) M16 stålbrickor och (2) M16 nylåsmutter för
att fästa hjulenheterna på axlarna. Dra åt ordentligt. (Fig.2)
STEG 4. Fäst sedan den bakre ramen på huvudramen med (2)5/16"x 2"
sexkantsbultar [B], (4) 5/16" stålbrickor, (2) 5/16" nylockmuttrar. Dra åt säkert. (Fig.
2)
STEG 5. Fäst behållaren på huvudramen och styret med hjälp av (2)5/16"x2 1/4"
vagnbultar [C] och (2) 5/16" deltamuttrar. (Fig. 3)
Kontrollera att du har alla nödvändiga delar och hårdvara. Om du hittar
skadade eller saknade delar i en nyinköpt produkt, vänligen returnera denna
produkten till återförsäljaren för utbyte.
RETURN /DAMAGE CLAIM INSTRUCTIONS

6
Kassera INTE kartongen/originalförpackningen.
Om retur krävs ska varan returneras i originalkartong. Utan detta din retur kommer
inte att accepteras.
Ta ett foto av lådmarkeringarna.
Ett foto av markeringarna (texten) på sidan av lådan krävs om en del är det behövs
för ersättning. Detta hjälper vår personal att identifiera ditt produktnummer till se till
att du får rätt delar.
Ta ett foto av den skadade delen (om tillämpligt).
Ett foto av skadan krävs alltid för att göra en reklamation och få din ersättning eller
återbetalning behandlas snabbt. Se till att du har lådan även om den är det
skadad.
Skicka ett mejl till oss med de bilder som efterfrågas.
Maila oss direkt från marknadsplatsen där din vara köptes med bifogade bilder och
en beskrivning av ditt krav.
BEFORE YOU START
Läs alla instruktioner noggrant.
Spara instruktionerna för framtida referens.
Separera och räkna alla delar och hårdvara.
Läs igenom varje steg noggrant och följ rätt ordning.
Vi rekommenderar att, där det är möjligt, alla föremål monteras nära området i
som de kommer att tas i bruk för att undvika att produkten flyttas i onödan en
gång monterade.
Placera alltid produkten på en plan, stadig och stabil yta.
Håll alla små delar och förpackningsmaterial för denna produkt borta från
spädbarn och barn eftersom de potentiellt utgör en allvarlig kvävningsrisk.

Adress : Shuangchenglu 803nong11hao1602A-1609shi, baoshanqu,
shanghai 200000 CN.
Importerad till AUS: SIHAO PTY LTD, 1 ROKEVA STREETEASTWOOD
NSW 2122 Australien
Importerad till USA: Sanven Technology Ltd., Suite 250, 9166 Anaheim
Place, Rancho Cucamonga, CA 91730
REP
EC
E-CrossStu GmbH
Mainzer Landstr.69, 60329 Frankfurt am Main.
REP
UK
YH CONSULTING LIMITED.
C/O YH Consulting Limited Office 147, Centurion House,
London Road, Staines-upon-Thames, Surrey, TW18 4AX
Teknisk Support och e-garanticertifikat
www.vevor.com/support
