1
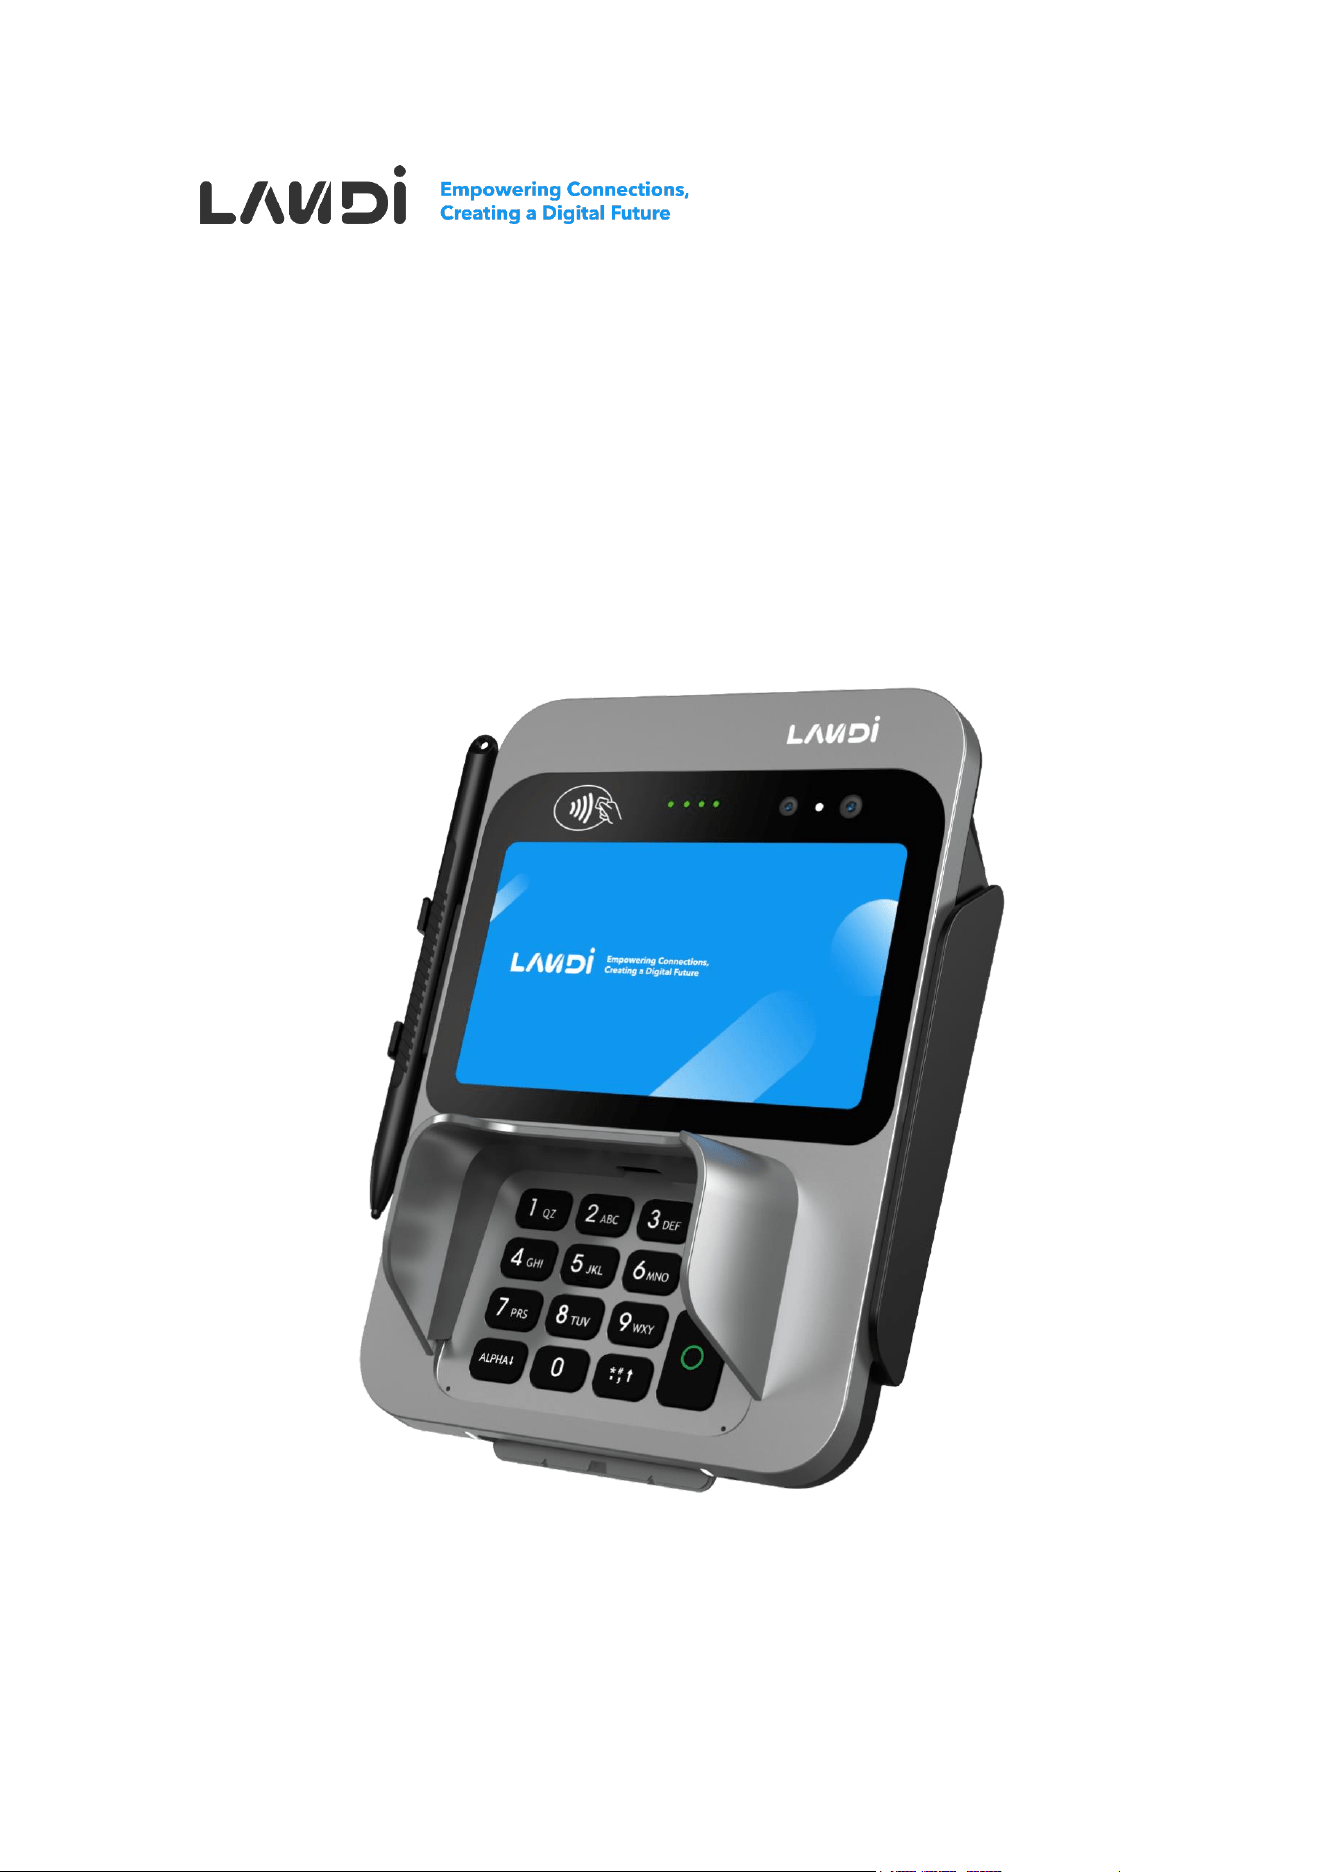
User Guide
P20-R
Payment Terminal
Model:P20R01

2
Disclaimer
- This guide is the sole property of Fujian LANDI Commercial Equipment Co., Ltd.
(“LANDI”). Unauthorized reproduction, distribution, transfer, or sale of this document
or any part thereof is strictly prohibited without explicit authorization from LANDI.
LANDI reserves the right to take legal action for any infringement according to law.
- Every effort has been made to ensure the accuracy and completeness of the
information in this user guide. However, errors or omissions may exist.
- LANDI reserves the right to modify product software, hardware or documentation
without notice.
- Product details in this guide may differ from the actual product due to updates. Refer
to the physical product for authoritative information.
- LANDI shall not be held liable for damages, malfunctions, data loss or accessory
loss caused by operations not complying with instructions in this guide.
3
Use this Manual
Legend
Danger
Indicates a potentially hazardous situation which, if not
avoided, could result in death or serious injury.
Warning
Indicates a potentially hazardous situation which, if not
avoided, may result in equipment damage, data loss,
performance degradation, or unexpected results.
Notes
Indicates important information that helps make better use of
the device and features.

4
Important Safety Information
Safety Rules
⚫ Power Supply
- Use only provided LANDI power adapter.
- Maintenance restricted to authorized LANDI technicians.
- Connect to properly rated electrical outlet.
- Ensure outlet is easily accessible and meets local regulations.
- Disconnect adapter from electrical mains network to power off.
- Shut down terminal after daily operations to save energy.
- Avoid connecting or disconnecting components while powered on.
⚫ Battery Safety
- Use only LANDI-approved batteries and chargers.
- Internal lithium button battery: service by qualified technician only.
- Avoid short-circuiting, crushing, puncturing, or dismantling the battery.
- Replacing the battery with an incorrect type can defeat its safeguards and risk
explosion.
- Disposing of a battery in fire or a hot oven can cause an explosion.
- Leaving a battery in extreme heat may cause an explosion or leakage of
flammable substances.
- Subjecting a battery to extremely low air pressure may cause an explosion or
leakage.
- Properly dispose of used batteries according to local environmental regulations.

5
⚫ Environmental Restrictions
- Avoid use in explosion-risk areas (chemical plants, fuel depots).
- Suspend use during thunderstorms.
- Use certified protective cover near fuel pumps.
- Remove battery when on aircraft.
- Avoid harsh environments with direct sunlight, high temperatures, humidity, or
dust.
- Operate and store the terminal only within the specified environmental limits:
◼ Operating Temperature:
Non-Battery Version (Without PSU): -10°C to +50°C (14°F to 122°F)
Non-Battery Version (With PSU): 0°C to +40°C (32°F to 104°F)
Battery Version: -10°C to +50°C (14°F to 122°F) for discharging; 0°C to
+45°C (32°F to 113°F) for charging
◼ Storage Temperature:
Without PSU: -20°C to +70°C (-4°F to 158°F)
With PSU: -20°C to +60°C (-4°F to 140°F)
◼ Operating Humidity: 10% to 90% non-condensing
⚫ Health and Safety
- Radio transmission may interfere with medical devices.
- Consult healthcare providers regarding potential interference.
Usage Instructions
⚫ Terminal Security
- Verify PCI PTS security compliance.
- Regular inspection for tampering signs:
◼ Keypad integrity
◼ Unauthorized wire connections

6
◼ Card reader condition
- Report "Warning Detected" messages immediately.
- Restrict access to verified trustworthy staff.
⚫ Customer Protection
- Never request PIN disclosure.
- Advise customers on PIN privacy.
- Maintain terminal visibility at all times.
- Secure terminal against theft or replacement.
⚫ Component Guidelines
- Keep SAM/SIM reader compartment cover in place.
⚫ Network Compliance
- Follow cellular network regulations.
- Non-compliance may result in service ban or legal action.
⚫ Abnormal Conditions
If any of the following phenomena occur during work:
- Stop operation immediately.
- Cut off power supply.
- Promptly report to service provider when:
1. Hearing sharp noises during operation
2. Impurities or water enter terminal
3. Unpleasant odors emit during operation

7
Contents
Disclaimer ....................................................................................................... 2
Use this Manual .............................................................................................. 3
Legend ........................................................................................................................... 3
Important Safety Information ........................................................................ 4
Safety Rules .................................................................................................................. 4
Usage Instructions ......................................................................................................... 5
1. Product Profile ................................................................................... 8
1.1. Introduction ........................................................................................................ 8
1.2. Unboxing Inspection .......................................................................................... 8
1.3. Overview ............................................................................................................ 9
2. Product Technical Features ............................................................ 14
3. Product Installation ......................................................................... 16
3.1. Power Connection ........................................................................................... 16
3.2. SAM/SIM Cards ............................................................................................... 17
3.3. MicroSD Memory Card .................................................................................... 18
3.4. Privacy Shield .................................................................................................. 19
4. Usage................................................................................................ 20
4.1. Power Operations ............................................................................................ 20
4.2. Card Reading................................................................................................... 20
4.3. Using the Camera ............................................................................................ 21
5. Maintenance ..................................................................................... 22
6. Transportation and Storage ............................................................ 23
7. FAQs ................................................................................................. 24
8. Frequency Bands and RF Output Power ....................................... 25
9. Standards ......................................................................................... 27
10. Customer Support ........................................................................... 31
8
1. Product Profile
1.1. Introduction
The LANDI P20-R is a high-performance payment terminal featuring an integrated PIN pad
for a faster, more secure checkout. It combines PCI 7.0 certified security with the versatility
to accept every payment method—from Chip & PIN and contactless to QR codes.
Featuring a large 5" ergonomic display and a durable, spill-resistant design, the P20-R
ensures a seamless and reliable experience for both merchants and customers.
1.2. Unboxing Inspection
Upon opening, inspect the terminal and optional accessories for any signs of disassembly
or transit damage. Check for:
- Terminal main unit
- USB cable
- (Optional) Battery pack
- (Optional) Stylus
- Privacy shield
- Quick start guide
- Screwdriver
- Screw pack
Remove all plastic packaging from the terminal and accessories. Peel off the protective
film from the LCD screen. Retain the transit packaging for future transportation of the
terminal.
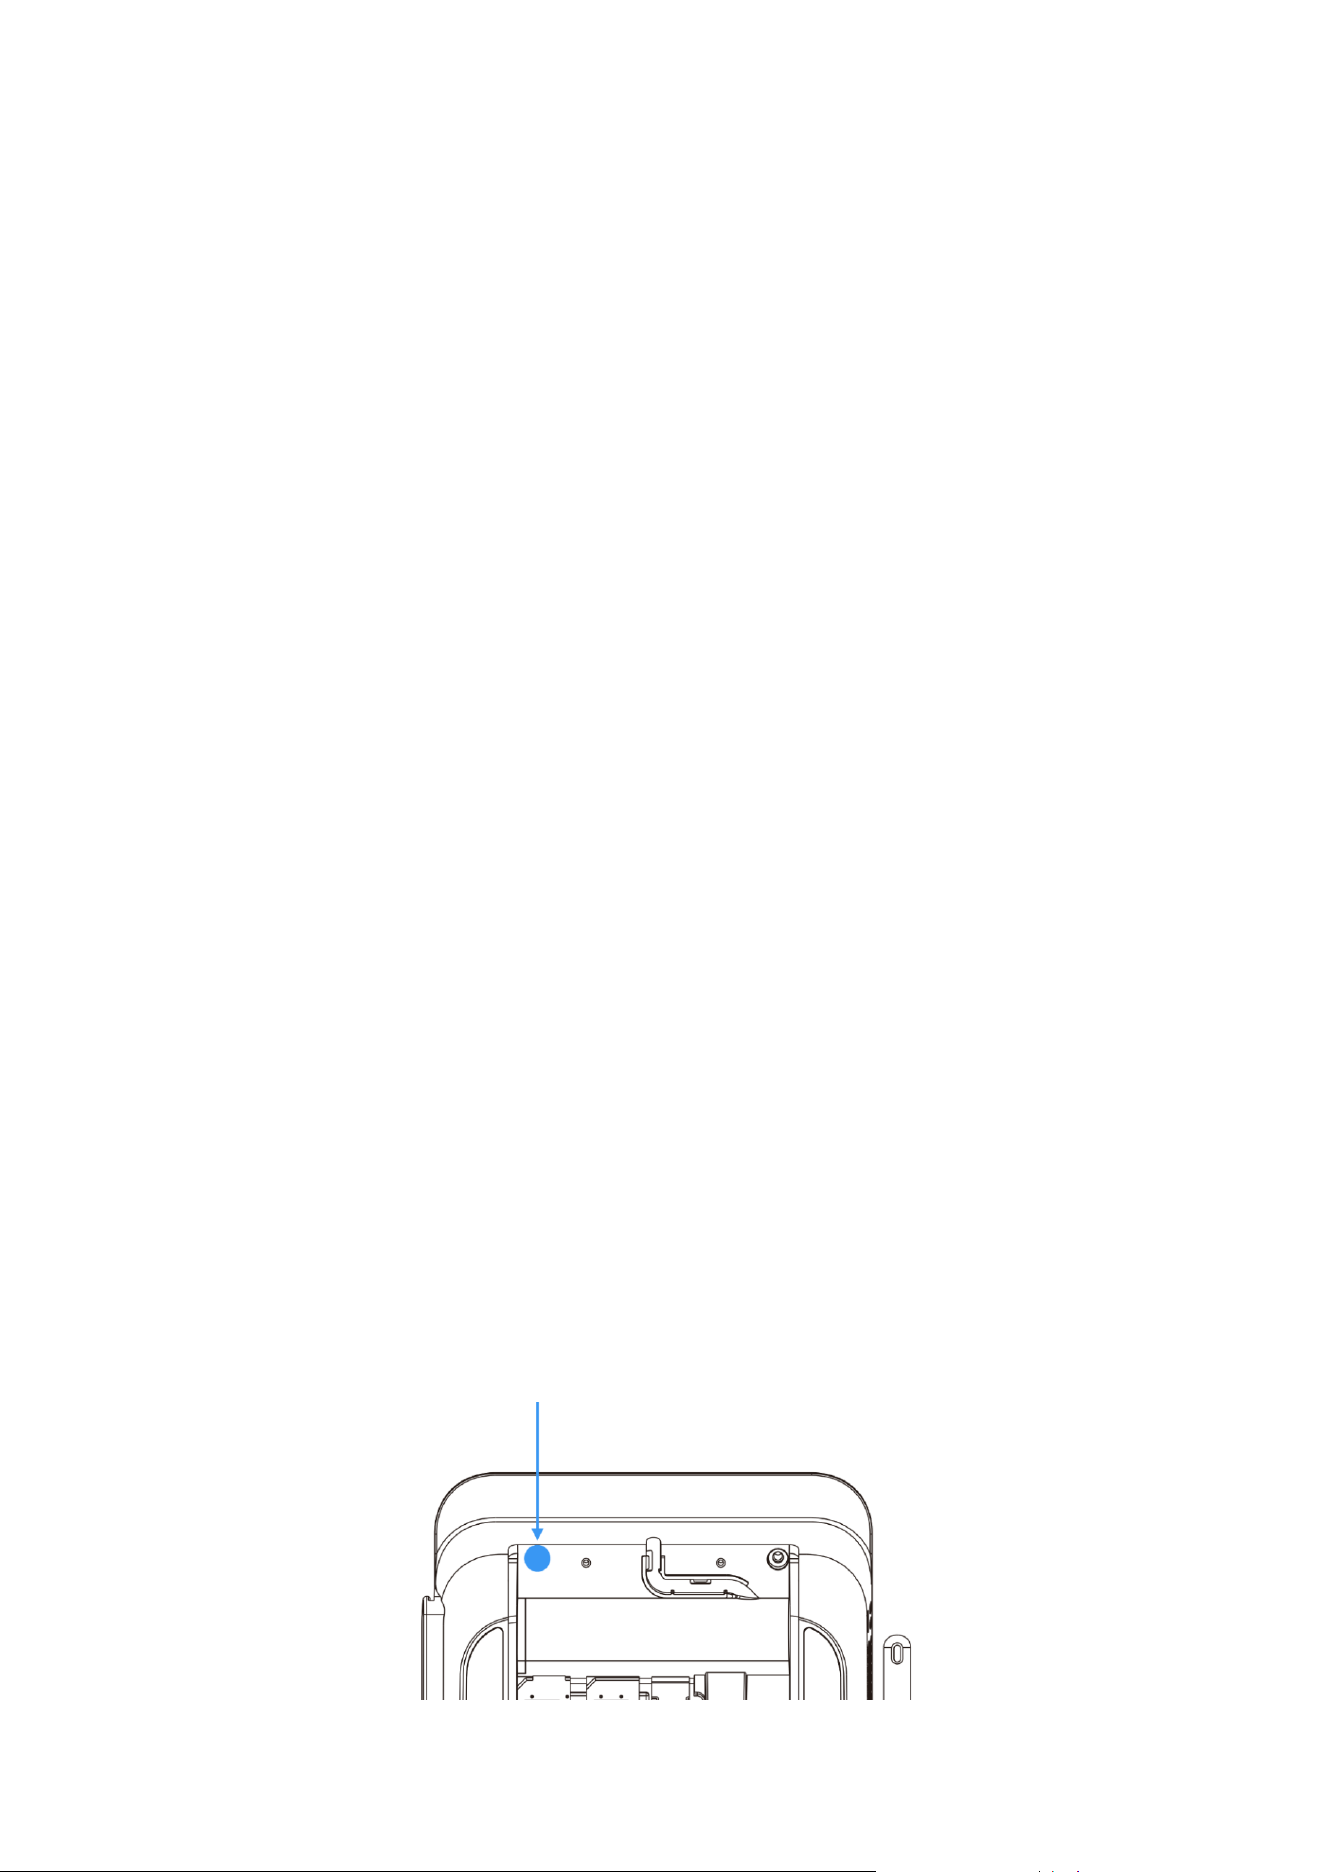
Locate the warranty seal on the top of the back cover. Please be aware that if this seal is
torn, damaged, or removed, the product warranty will be voided.
9
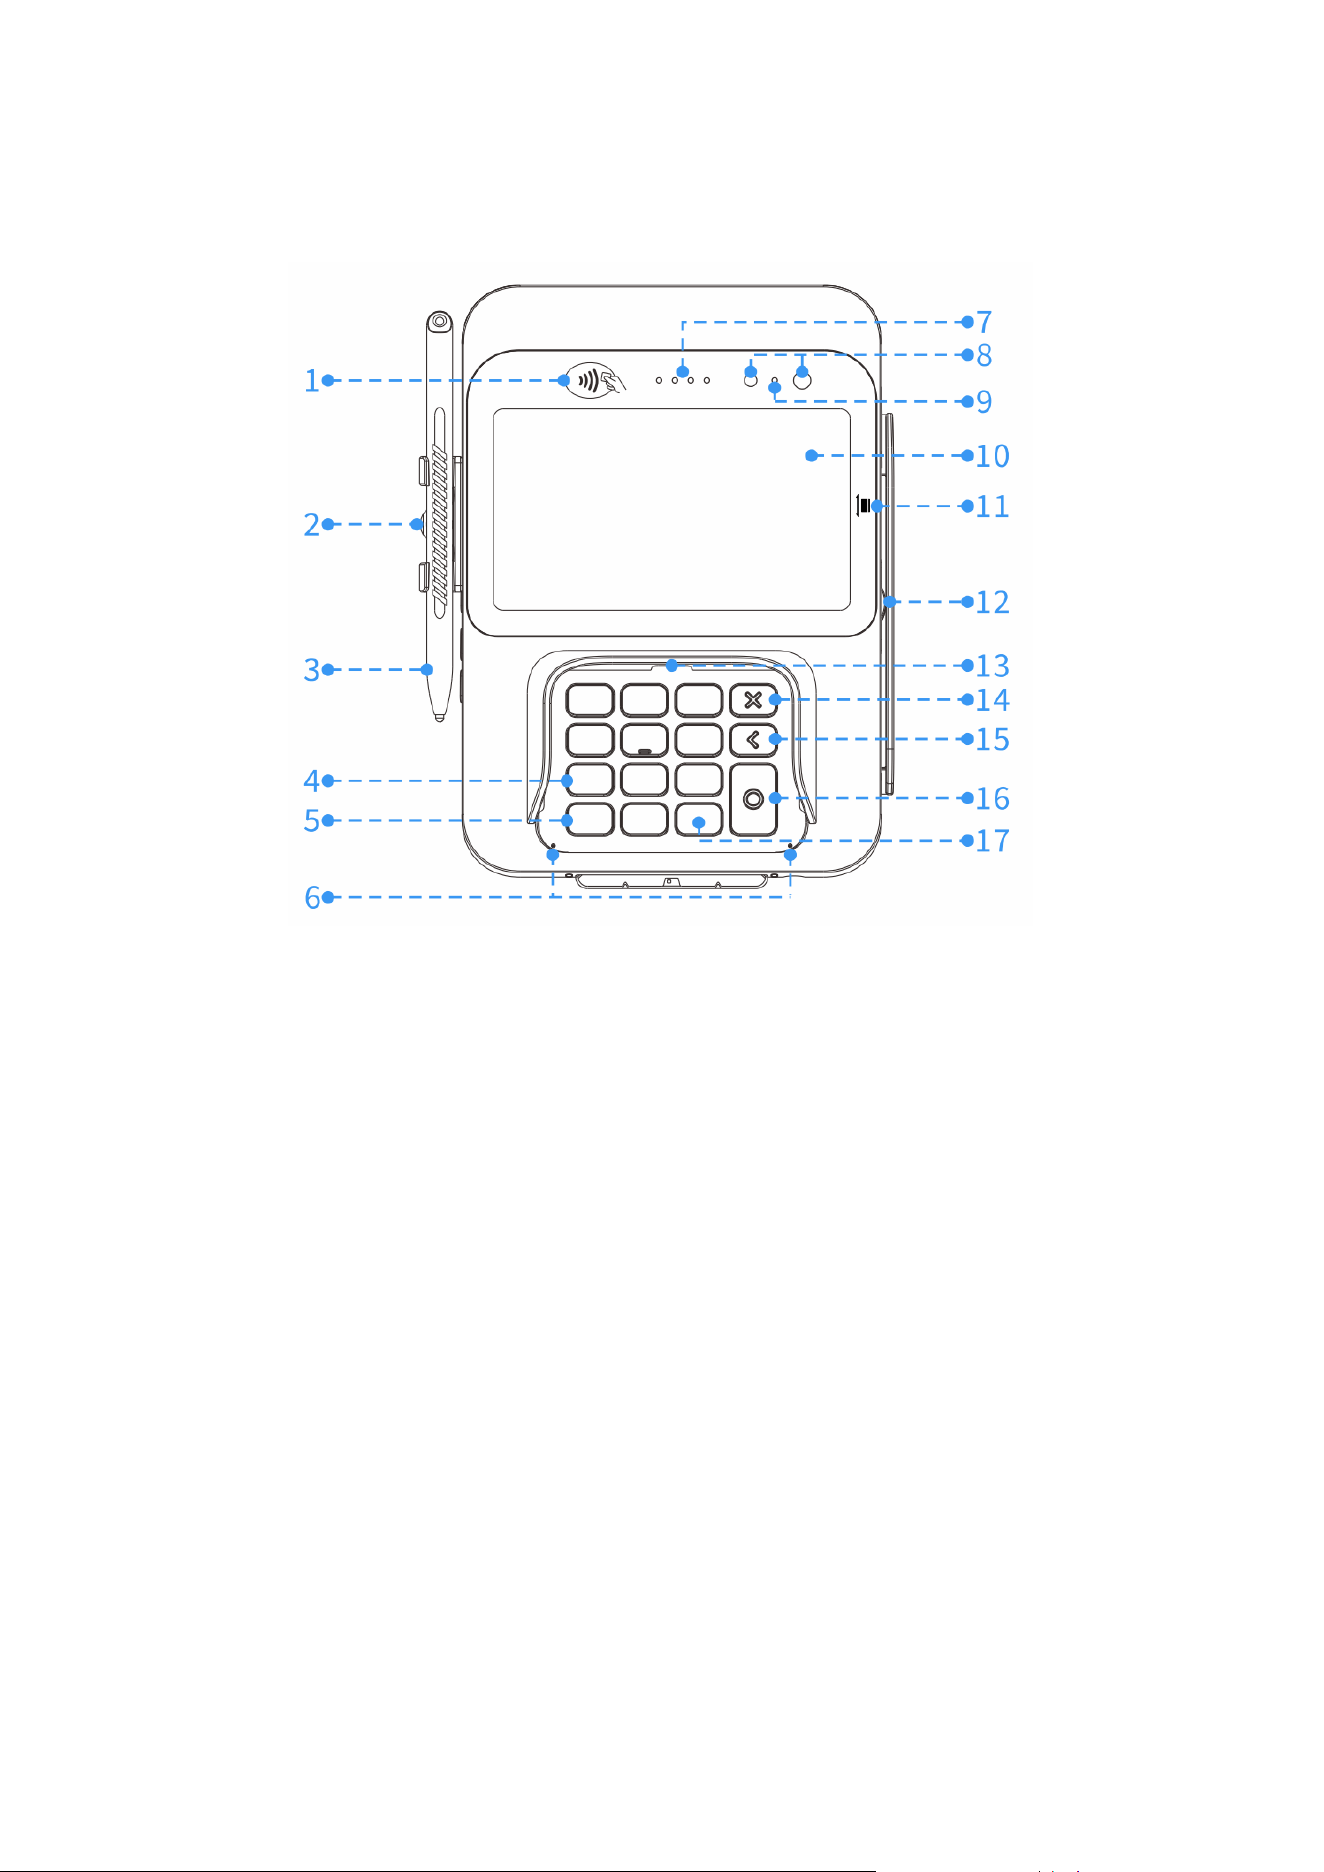
1.3. Overview
1. Contactless Reader
Reads contactless cards (including membership cards).
2. Pen Holder
Stores the passive stylus when not in use.
3. Stylus
Performs touch inputs and captures digital signatures.
4. Number Button
Inputs numbers.
5. Letters Button
Switches between numbers and letters.
6. Microphone
Provides clear voice input.
7. LEDs for Contactless Reader
Indicate contactless transaction status.

10
8. Front Camera
Scans barcodes and takes photos.
9. Camera Guide LED
Indicates the active scanning area to help with positioning.
10. LCD and Touch Screen
Displays content and accepts touch input.
11. LED for Magnetic Stripe Reader
Guides the user during a magnetic stripe card swipe.
12. Magnetic Stripe Reader
Reads magnetic stripe cards (stripe facing the terminal).
13. Skimming Detection
Detects unauthorized keyboards in real time to prevent data theft.
14. Cancel Button
Returns to previous menu or cancels operation.
15. Clear Button
Clears input content.
16. Confirm Button
Confirms current operation.
17. Punctuation Button
Inputs punctuation.
11
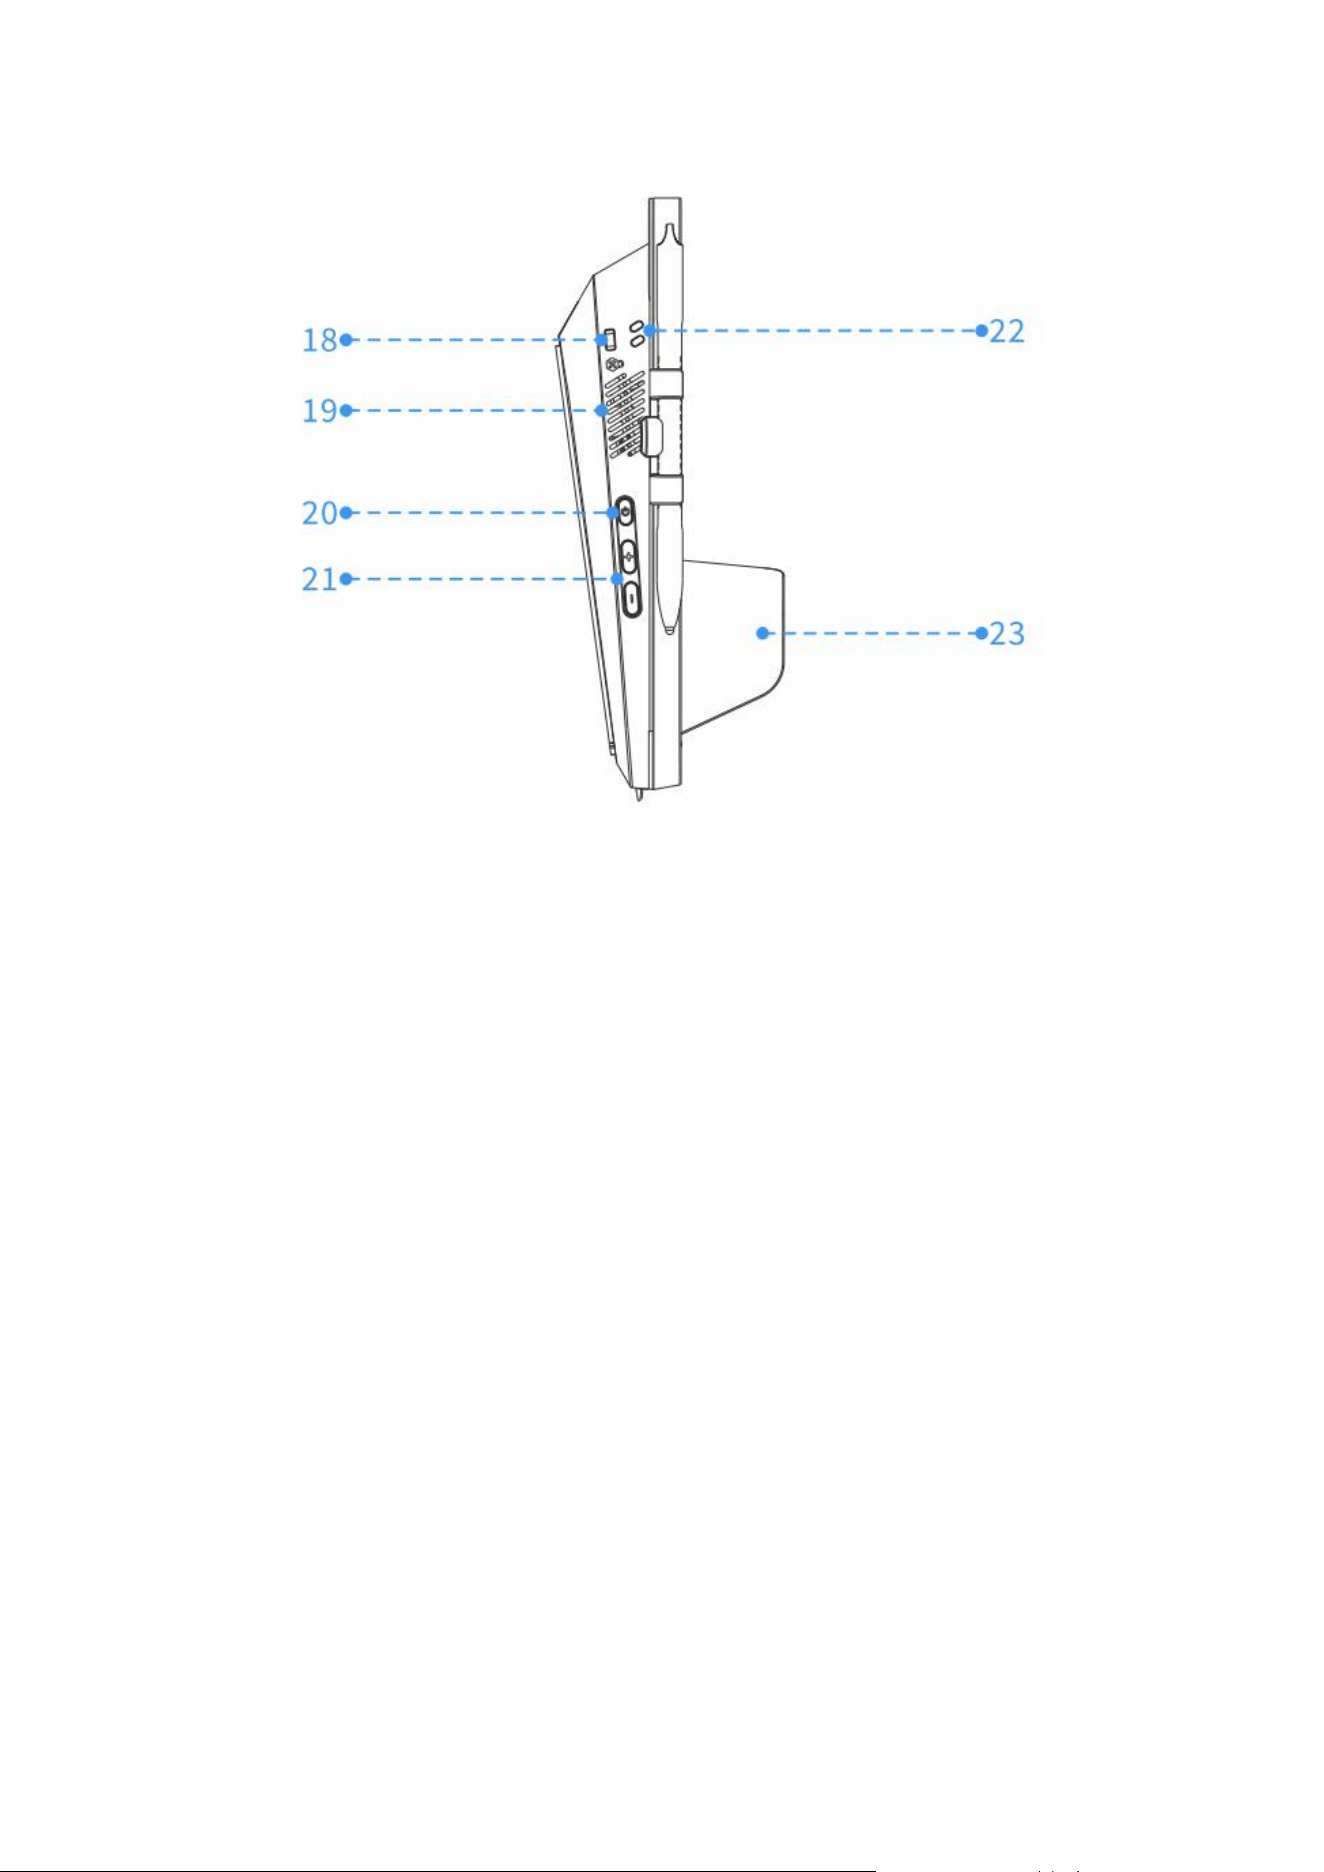
18. Anti-Theft Hole
Secures an anti-theft lock or cable.
19. Speaker
Outputs audio.
20. Power Button
Powers the terminal on (long press) or wakes/locks the screen (short press).
21. Volume Buttons
Adjust the system volume up or down.
22. Lanyard Hole
Attaches a lanyard or wrist strap.
23. Privacy Shield
Shields the keypad to protect PlN entry.
12
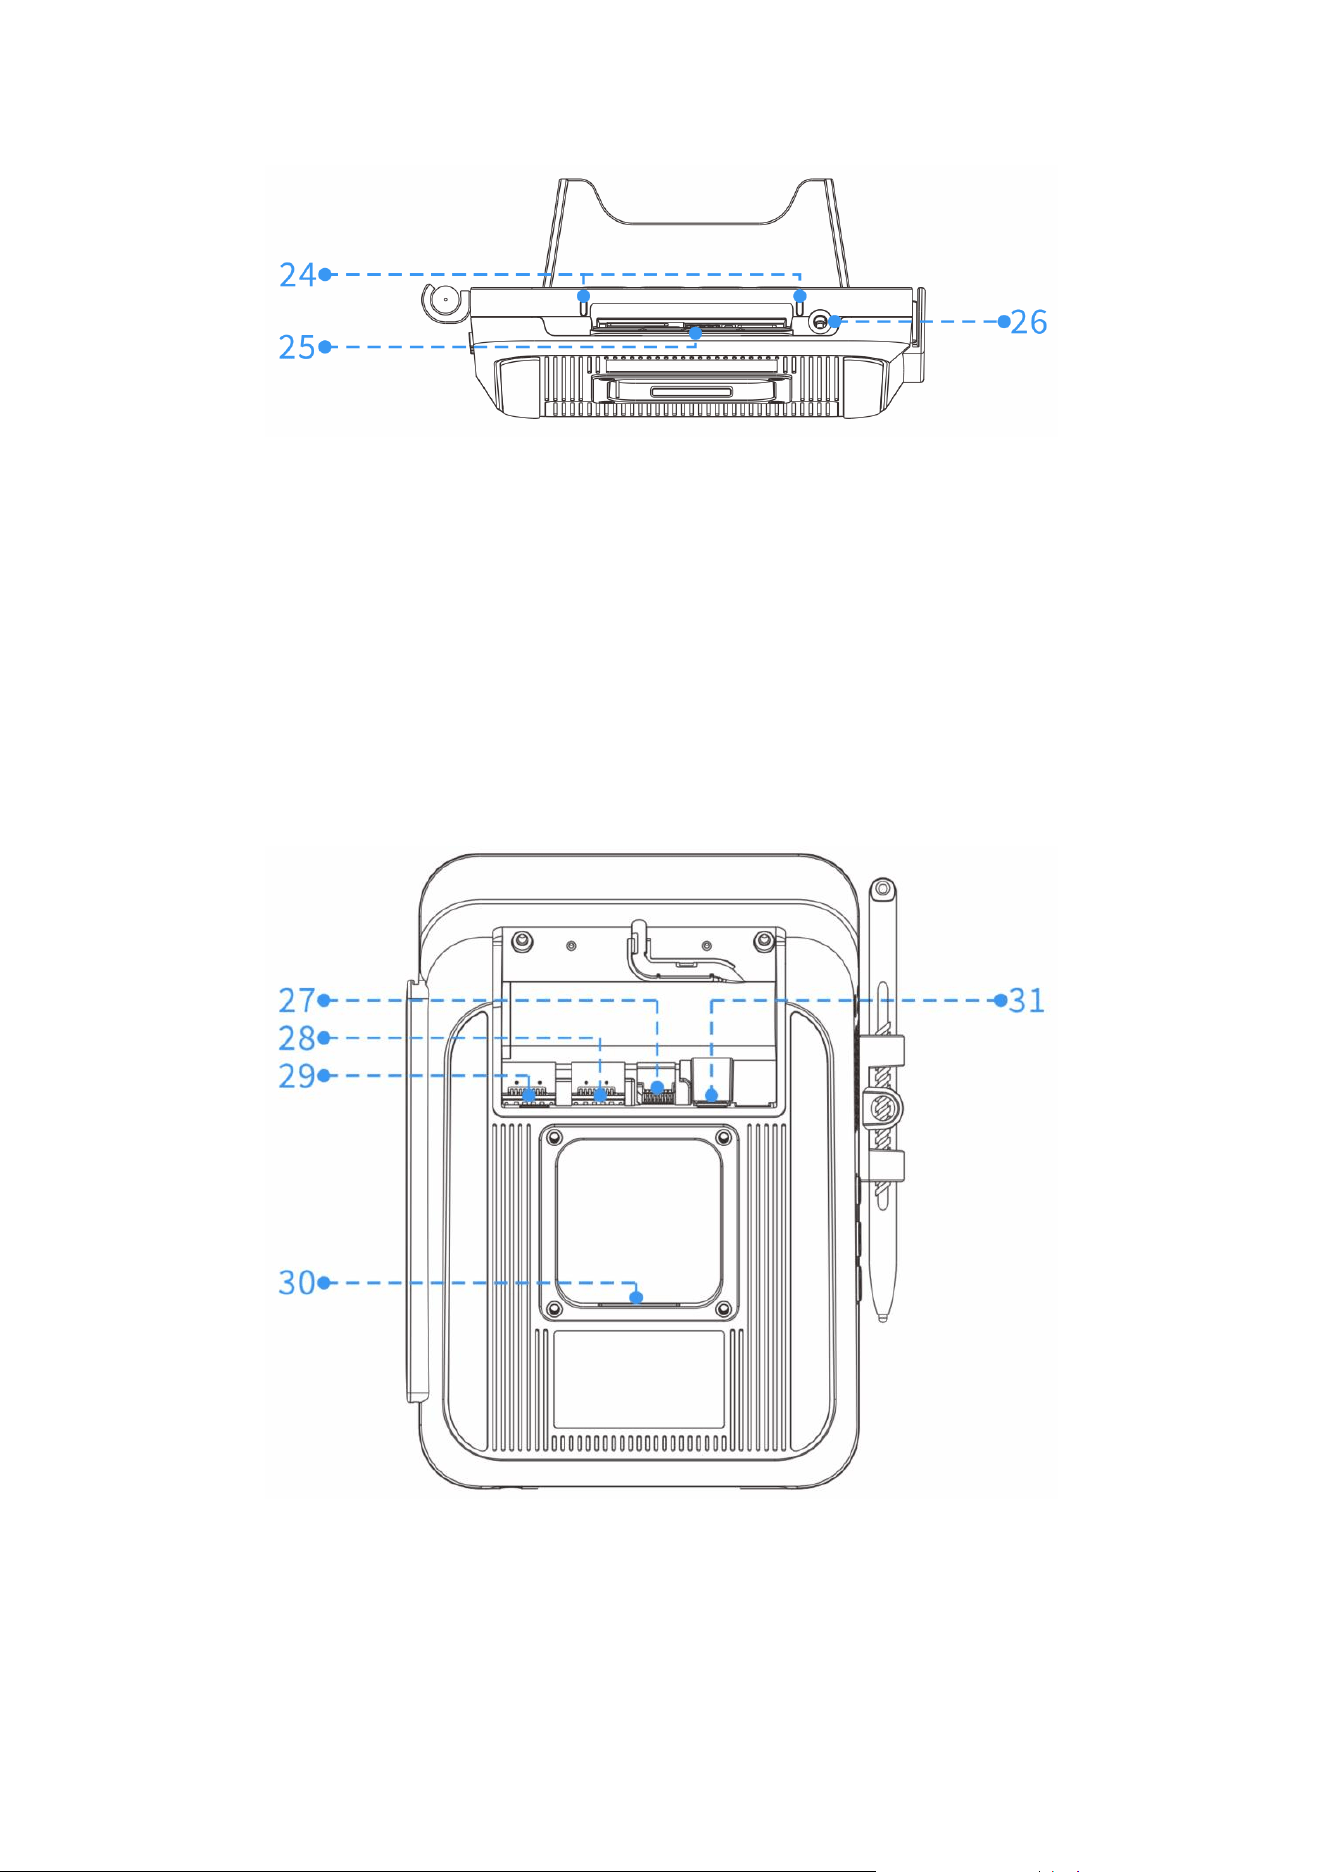
24. LEDs for Smart Card Reader
Indicate the status of a smart card transaction.
25. Smart Card Reader
Insert card vertically, chip facing up.
26. Headset Jack
Connects to a standard headset for audio.
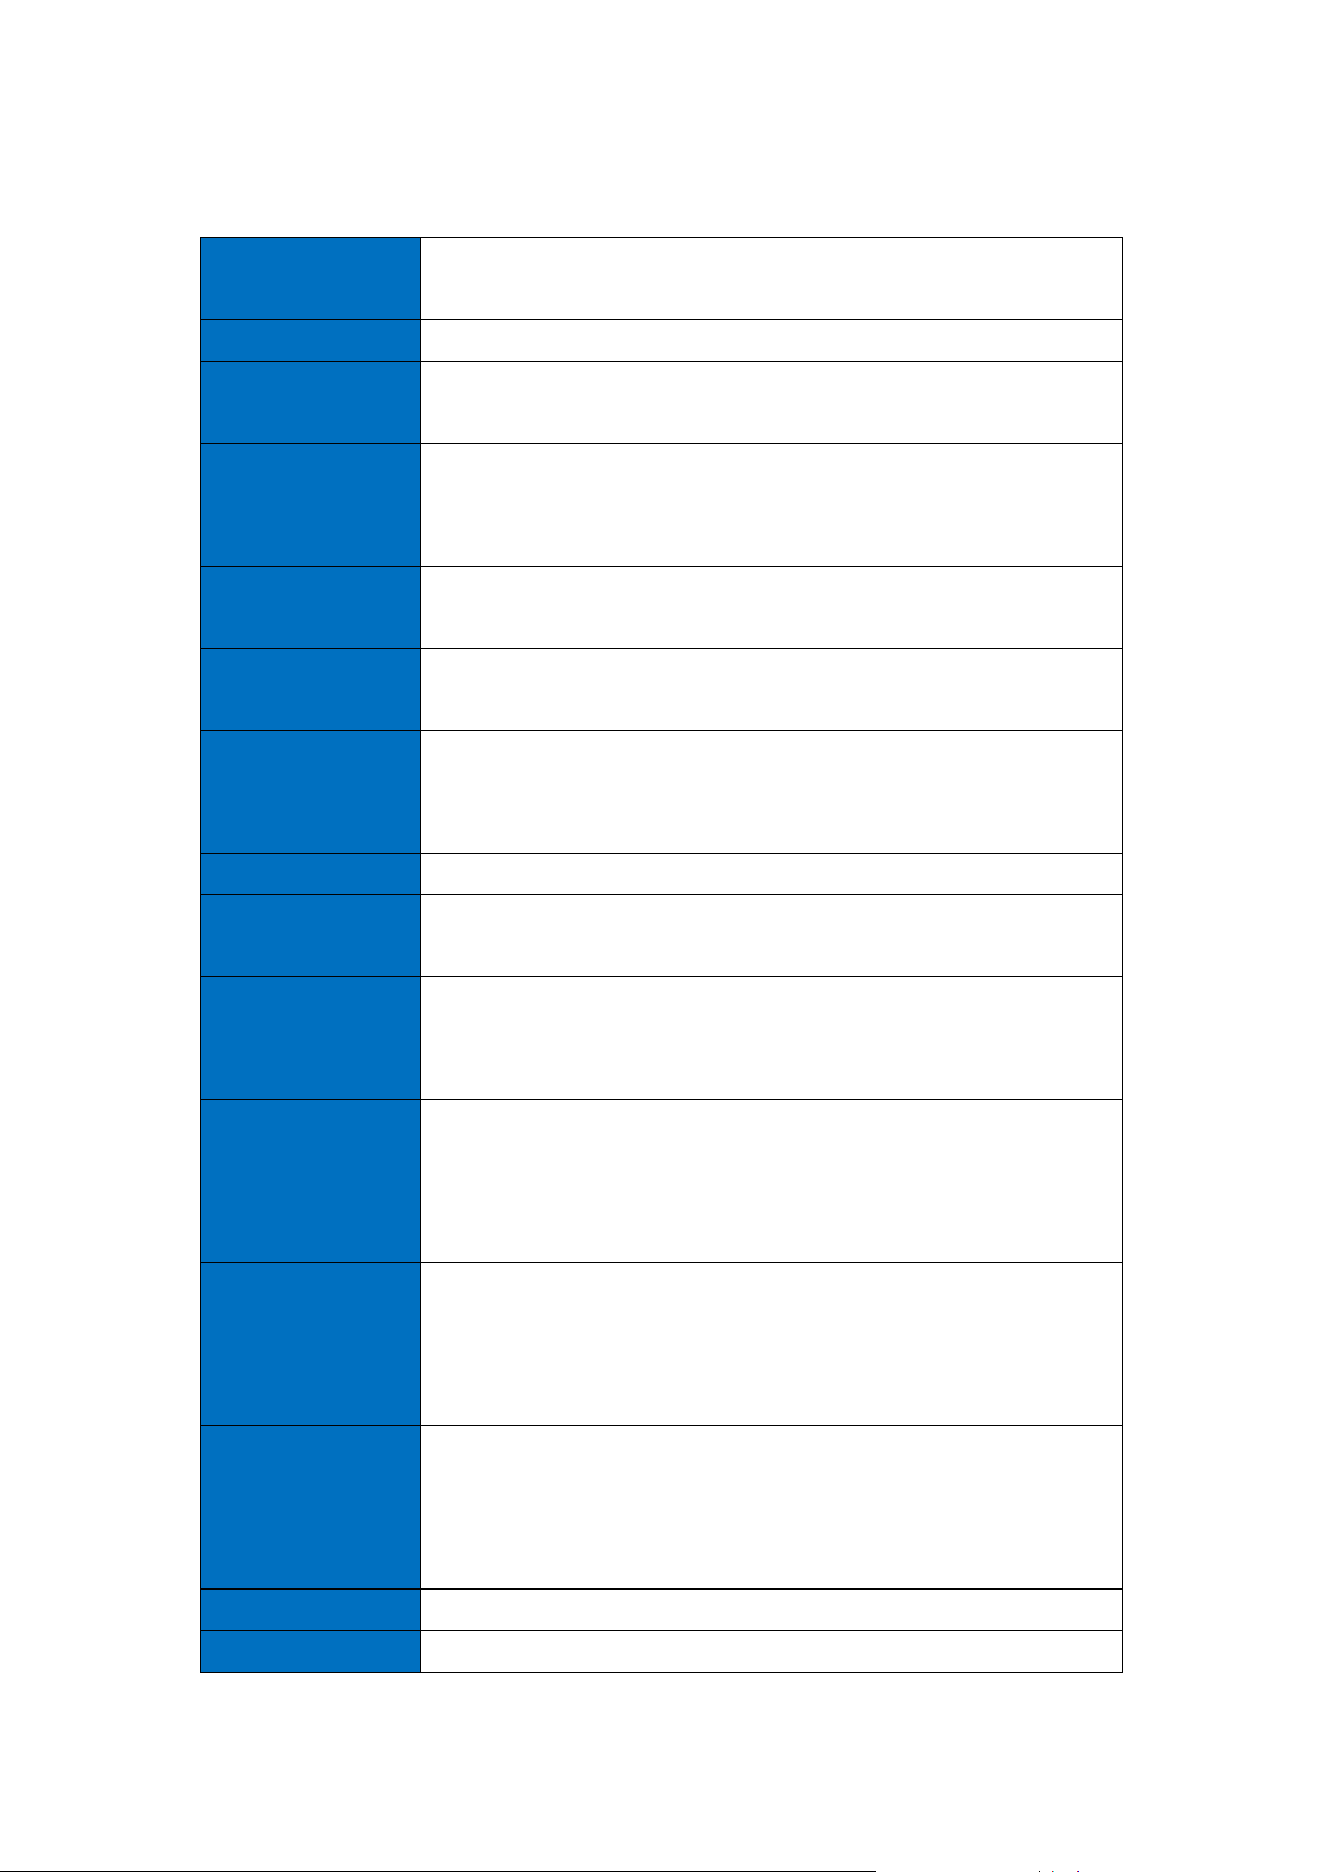
27. MicroSD Card Slot
Accepts the MicroSD card.
28. SAM Card Slot
Accepts the SAM card.

13
29. SIM Card Slot
Accepts the SIM card.
30. Mounting Bracket
Connects the terminal to a mounting stand.
31. USB Type-C Port
Used for power supply, developer debugging, and Magic Hub connection.
14
2. Product Technical Features
Processor
⚫ Qualcomm 2290 (4x A53 @ 2.0GHz)
⚫ (Optional) Qualcomm SM6225 (4x A73 + 4x A53 @ 2.4GHz)
OS
Android 14
Secure Element
TMC THM3654 with 32-bit ARM SC300 core (up to 192MHz),
256KB SRAM, 512KB Flash
Memory
⚫ Internal: 2GB LPDDR4x RAM + 32GB Emmc
(Optional) 4GB LPDDR4x RAM + 64GB eMMC
⚫ Expansion: MicroSD card (up to 256GB)
Magnetic Stripe
Reader
⚫ ISO 1/2/3 track, bi-directional
⚫ White LED guide light * 1
Smart Card
Reader
⚫ EMV L1 & ISO 7816 compliant
⚫ White LED guide light * 2
Contactless
Reader
⚫ EMV Contactless L1 v3.2a
⚫ Supports ISO/IEC 14443 Type A/B, FeliCa
⚫ LED status indicator * 4
Display
5", 480×854, capacitive multi-touch
Buttons
⚫ Physical: Power, Volume+, Volume-
⚫ Virtual: Menu, Home, Back
Keypad
⚫ Numeric key * 10
⚫ Function key * 5
⚫ (Optional) Keypad backlight
Audio
⚫ Speaker: 30×20mm miniature oval audio speaker, 1W rated
power, 8Ω
⚫ Headset: 3.5 mm audio jack
⚫ MIC: Dual microphone
Connectivity
⚫ Wi-Fi: IEEE802.11 a/b/g/n/ac, 2.4G/5G
⚫ ETH: 10/100 Mbps (via optional Magic Hub)
⚫ Bluetooth: Bluetooth 5.0, support BLE
⚫ (Optional) Cellular: 4G LTE
SAM/SIM/eSIM
⚫ SAM slot * 2 (Accommodates a 3rd SAM by using a SIM
slot)
⚫ SIM slot * 2 (Supports Dual SIM, Dual Standby)
⚫ Built-in eSIM (Mutually exclusive with the 2nd SIM slot)
Positioning
(Optional) GPS, GLONASS, BeiDou, Galileo
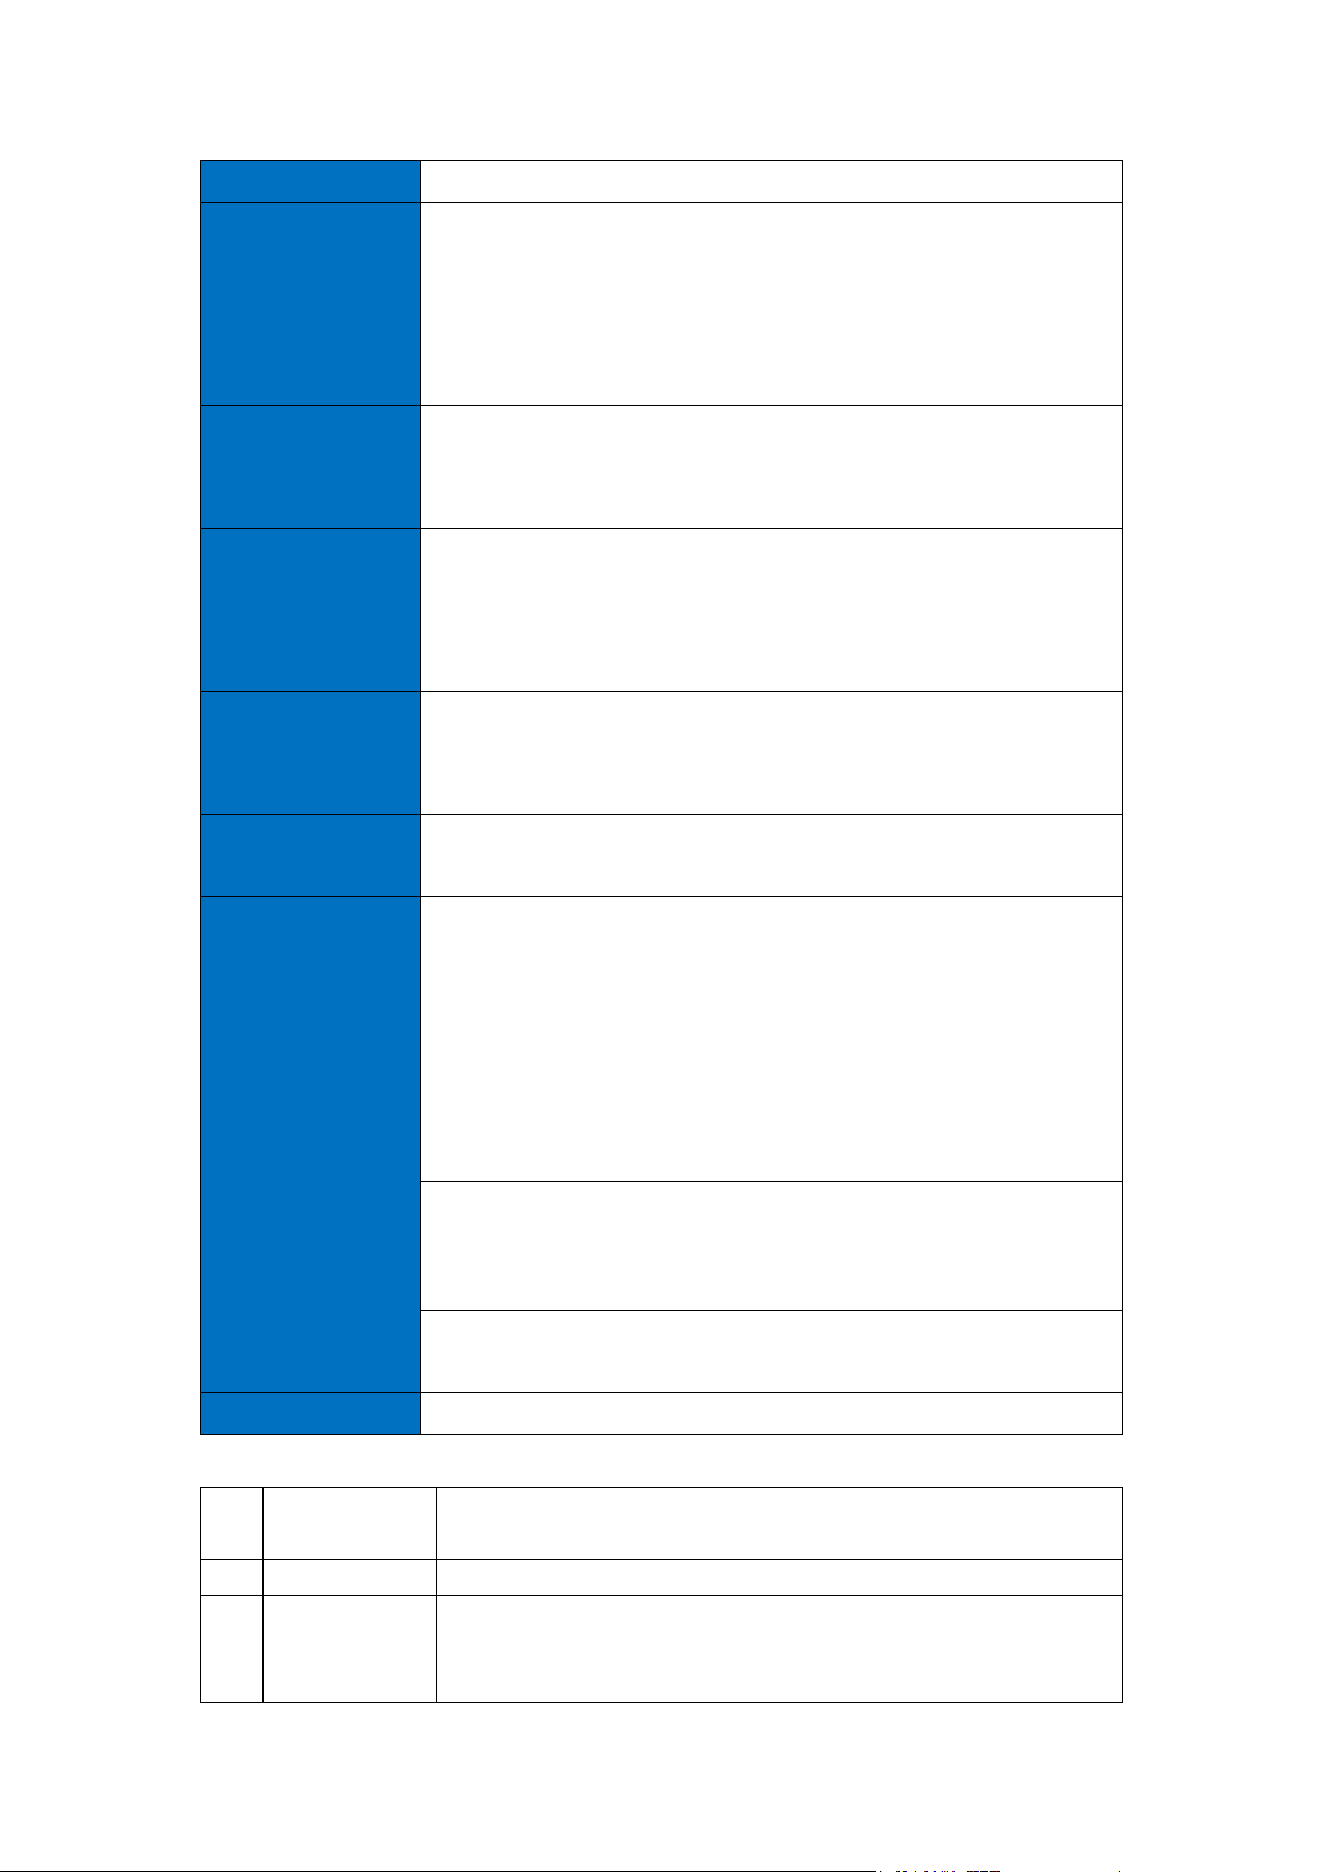
Onboard Ports
⚫ USB Type-C * 1
15
⚫ Battery connector * 1
Magic Hub
(Optional) Provides charging and extends connectivity with:
⚫ USB Host Type-A 2.0 * 2
⚫ USB Device Type-C * 1
⚫ RJ45 Ethernet port * 1
⚫ RJ22 serial port * 1
Front Camera
⚫ 0.3MP fixed-focus (for barcode scanning)
⚫ 5MP autofocus (for photo/video capture)
⚫ (Optional) White LED guide light * 1
Security
⚫ PCI PTS 7.x compliant
⚫ Anti-removal & Skimming detection
⚫ Kensington security slot
⚫ Integrated physical privacy shield
PSU
⚫ 5V/4A USB-C power adapter (includes 1.5m cable)
⚫ (Optional) Power over Ethernet (PoE) supported via optional
Magic Hub
Signature
Capture
(Optional) Passive stylus supported
Environment
Operating Temperature:
⚫ Non-Battery Version (Without PSU): -10°C to +50°C (14°F
to 122°F)
⚫ Non-Battery Version (With PSU): 0°C to +40°C (32°F to
104°F)
⚫ Battery Version: -10°C to +50°C (14°F to 122°F) for
discharging; 0°C to +45°C (32°F to 113°F) for charging
Storage Temperature:
⚫ Without PSU: -20°C to +70°C (-4°F to 158°F)
⚫ With PSU: -20°C to +60°C (-4°F to 140°F)
Operating Humidity:
10% to 90% non-condensing
Certification
CE, CB, FCC, IC, RCM, RoHS, WEEE
1.
HVIN:P2R-A
No external backup power function - the device will shut down
immediately after the adapter is unplugged.
2.
HVIN:P2R-C
With built in super capacitor backup power function.
3.
HVIN:P2R-B
With external battery backup power function - the device will continue
to work as intended for several minutes after the adapter in unplugged.
It’s the same design with HVIN:P2R-A, only add external battery.
16
3. Product Installation
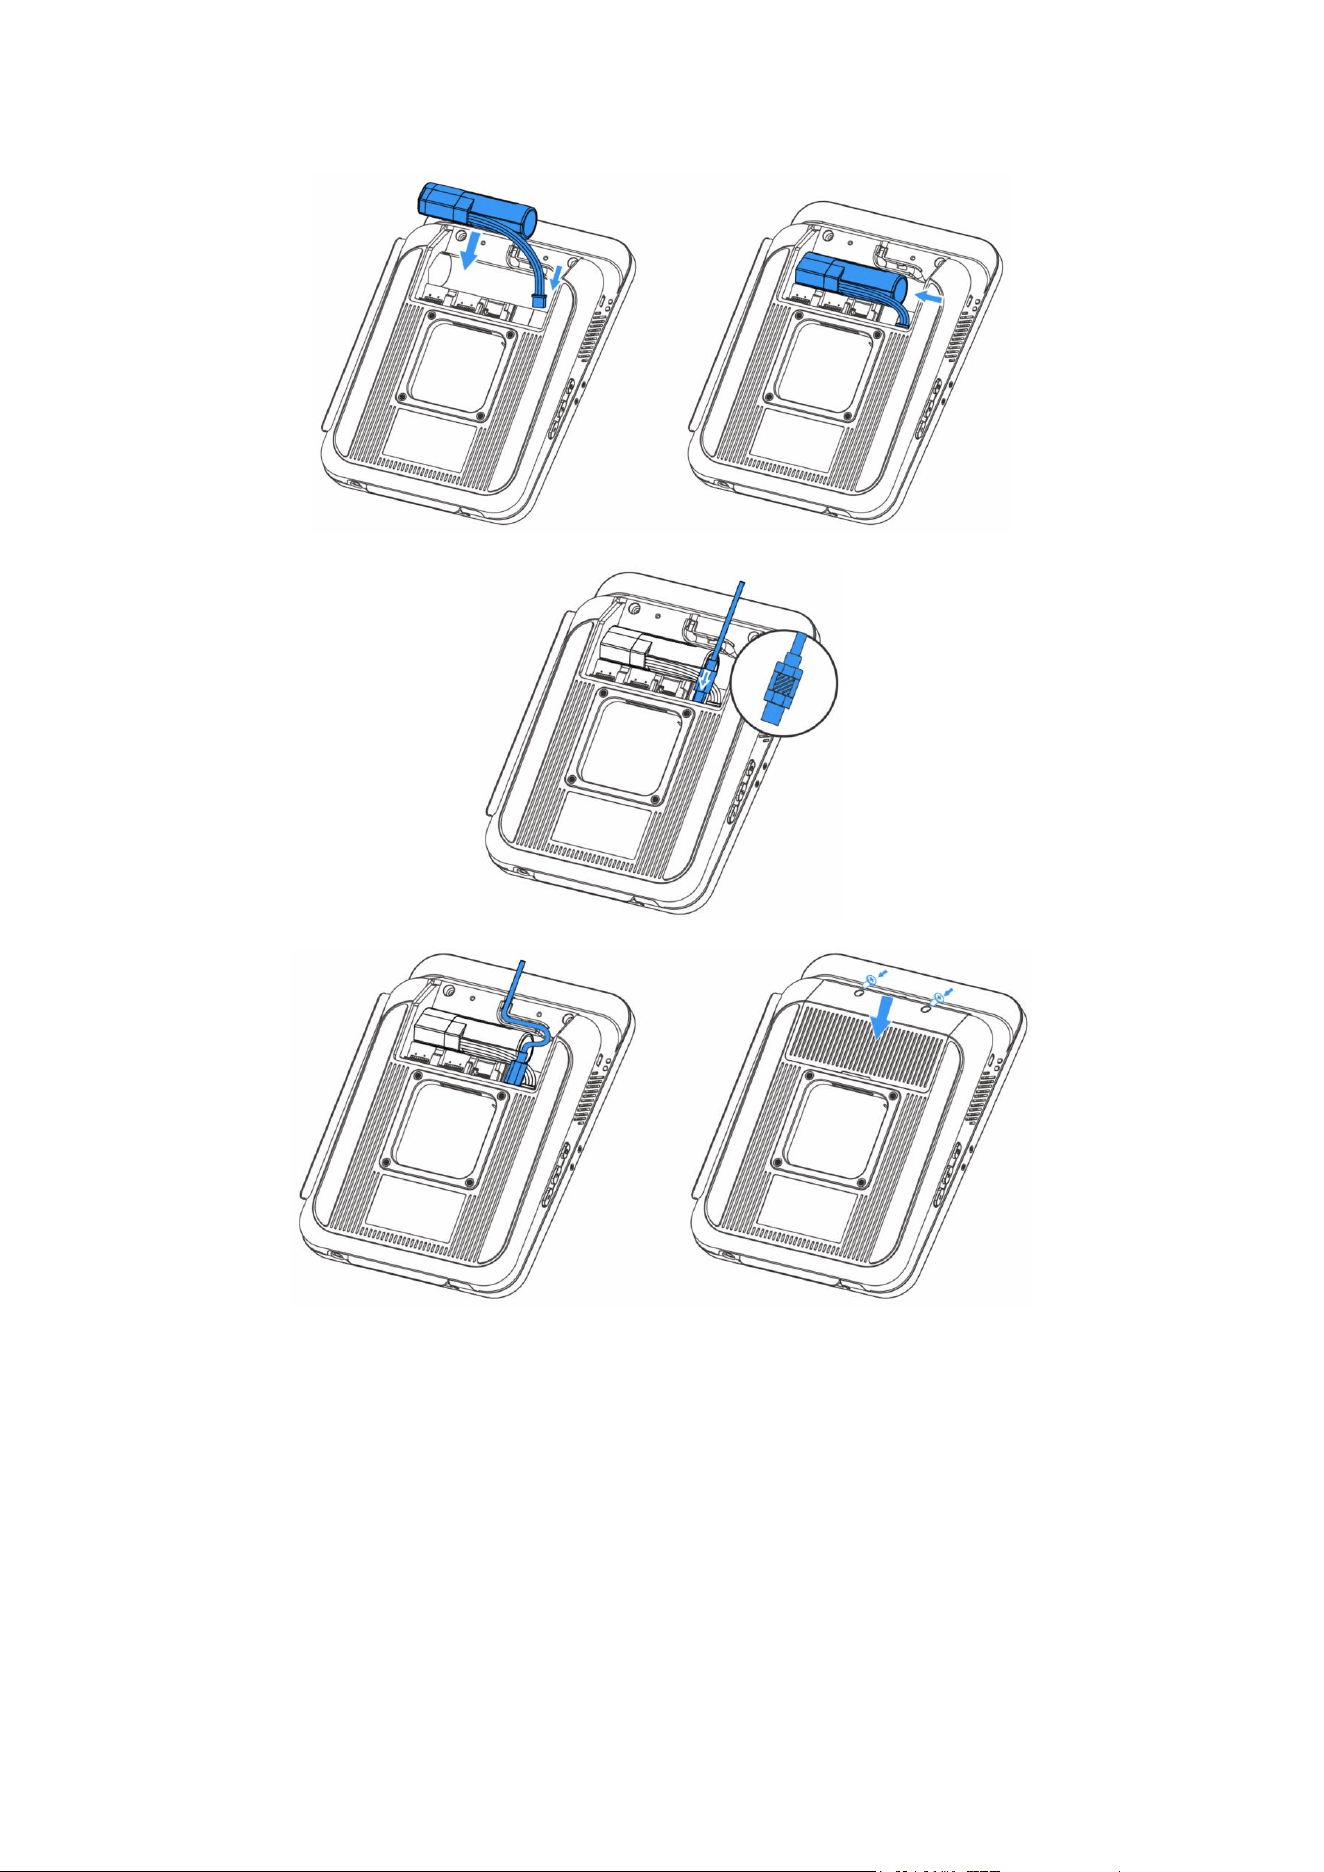
The module connectors are located in a sealed compartment beneath the back cover. To
access:
1. Turn the terminal face down.
2. Push the back cover in the direction indicated by the arrow as shown in the diagram
and remove it.
3.1. Power Connection
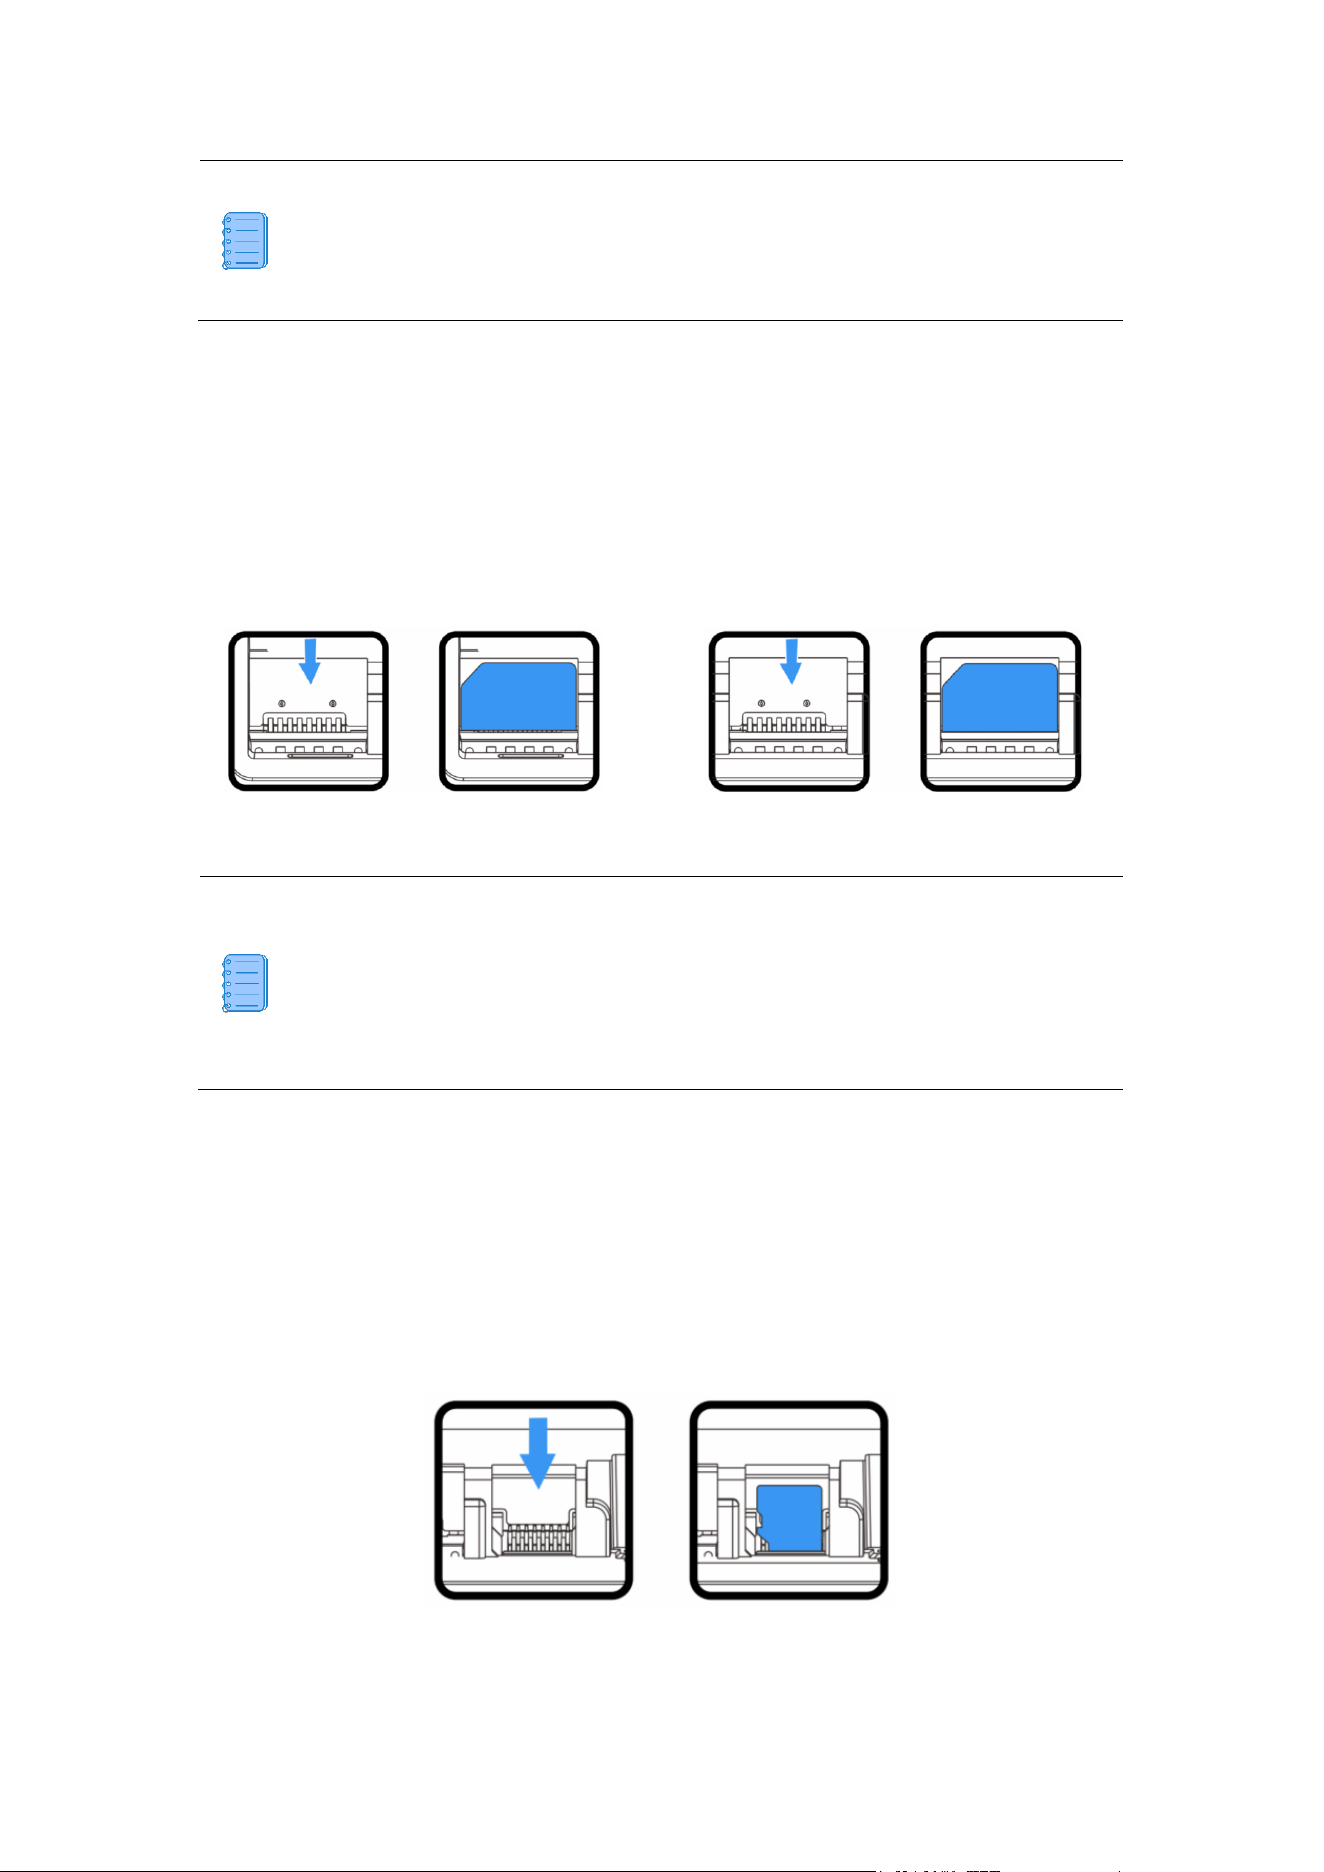
The battery pack is an optional component. If your terminal does not include a
battery, please proceed directly to Step 3.
1. Connect the battery plug, then place the battery into its compartment.
2. Push the battery in the direction indicated by the arrows to secure it in place.
3. Connect the cable to the USB Type-C port. Ensure that the black, textured side of the
connector is facing upwards upon insertion.
4. Arrange the cable and tuck it into the designated cable channel as shown in the
diagram.
5. Replace the back cover by sliding it in the direction indicated by the arrows. Then,
secure it by tightening the two M2*5 screws.
17
3.2. SAM/SIM Cards
SAM/SIM Card Slots
⚫ Upper slots: SAM2 and SIM2
⚫ Lower slots: SAM1 and SIM1
18
SIM and SAM slots appear identical - verify correct position before insertion. To
distinguish between the two slots, refer to the markings located above them on
the physical terminal.
Installation Steps
1. Orient the card according to diagram.
2. Insert it into the slot until firmly seated.
3. For single card use, prefer bottom slots (SAM1/SIM1).
SAM
SIM
⚫ 3-SAM Mode: To use a third SAM card, it must occupy one of the SIM slots.
This leaves only one physical SIM slot available for use.
⚫ eSIM Mode: Activating the eSIM disables the physical SIM2 slot. The
device supports a "single physical SIM (SIM1) + eSIM" combination..
3.3. MicroSD Memory Card
1. Orient the card according to the diagram.
2. Insert it into the slot until firmly seated.
19
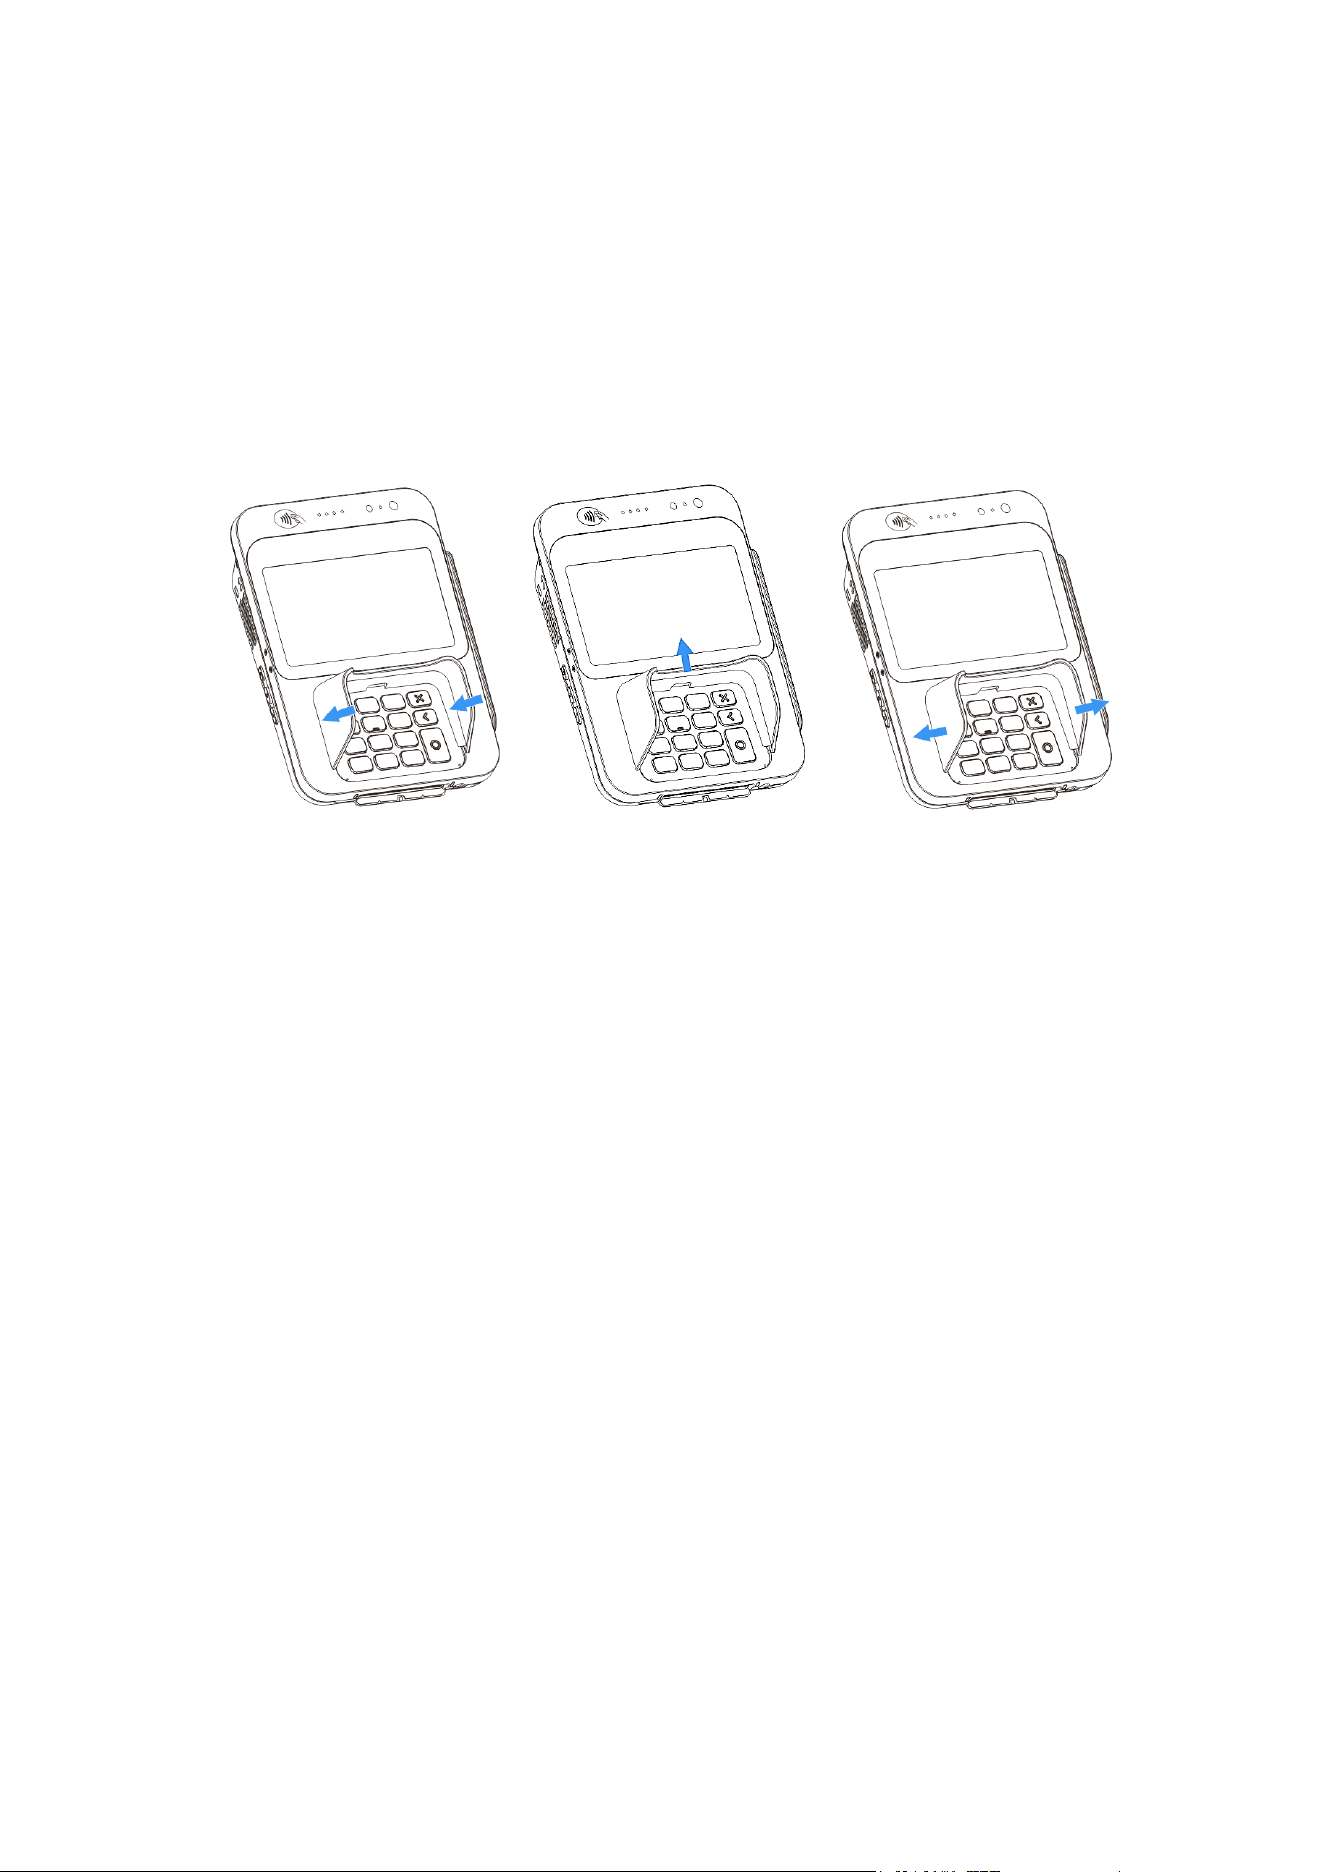
3.4. Privacy Shield
1. Press the privacy shield into the recessed slot on the upper casing.
2. Push it upwards in the direction indicated by the arrows.
3. Flex both sides of the privacy shield outwards in the direction of the arrows until it
clicks securely into place.
20
4. Usage
4.1. Power Operations
⚫ Power On
With the cables correctly connected as described in Section 3.1, the device will
automatically power on when the other end of the cable is connected to a power source.
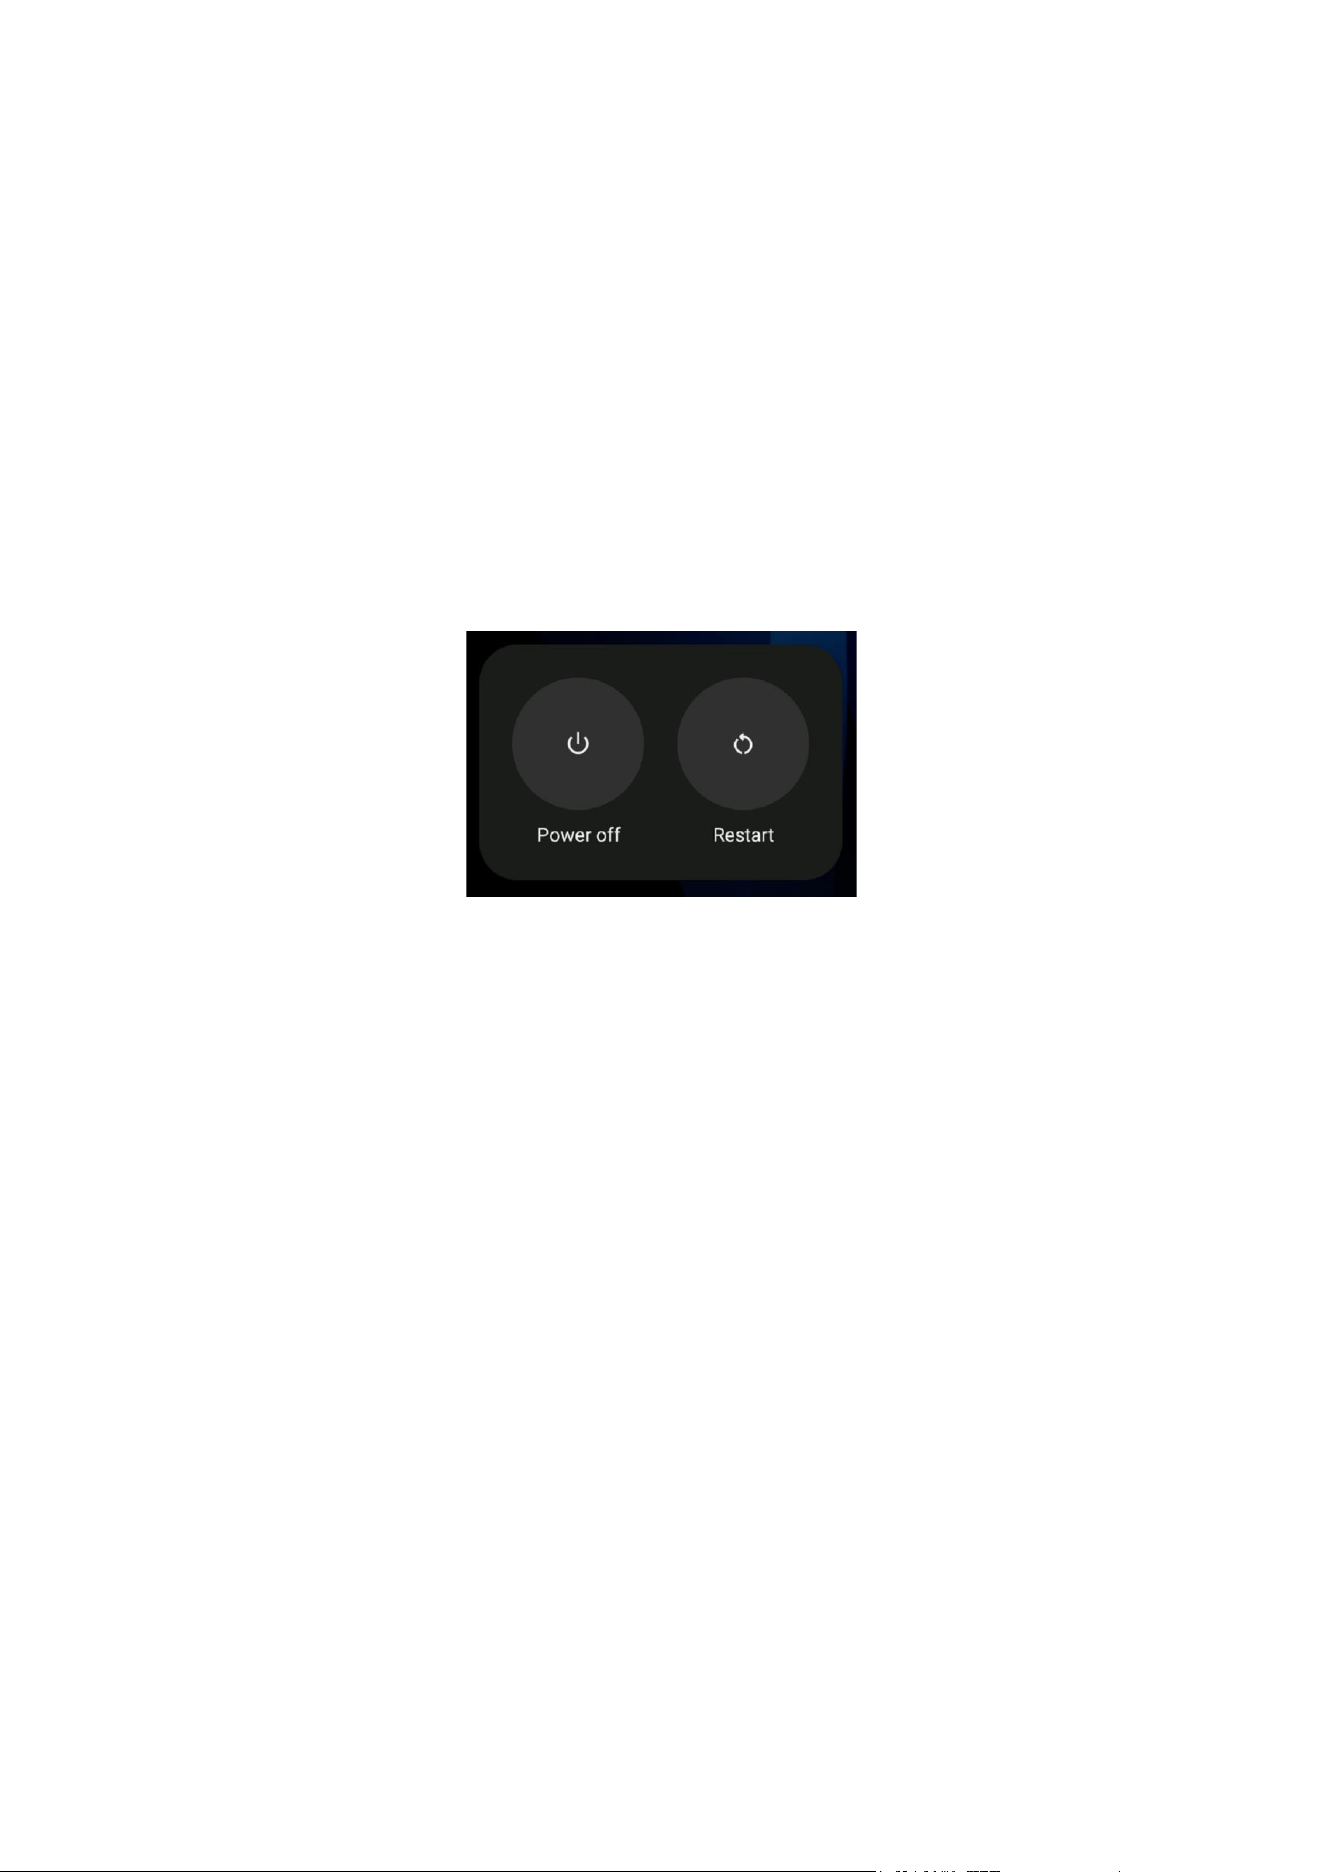
⚫ Power Off/Restart
Press the power button 2–3 seconds, select
Power off
or
Restart
from menu.
⚫ Screen Control
Short press the power button for 0.5 seconds to turn the display on or off.
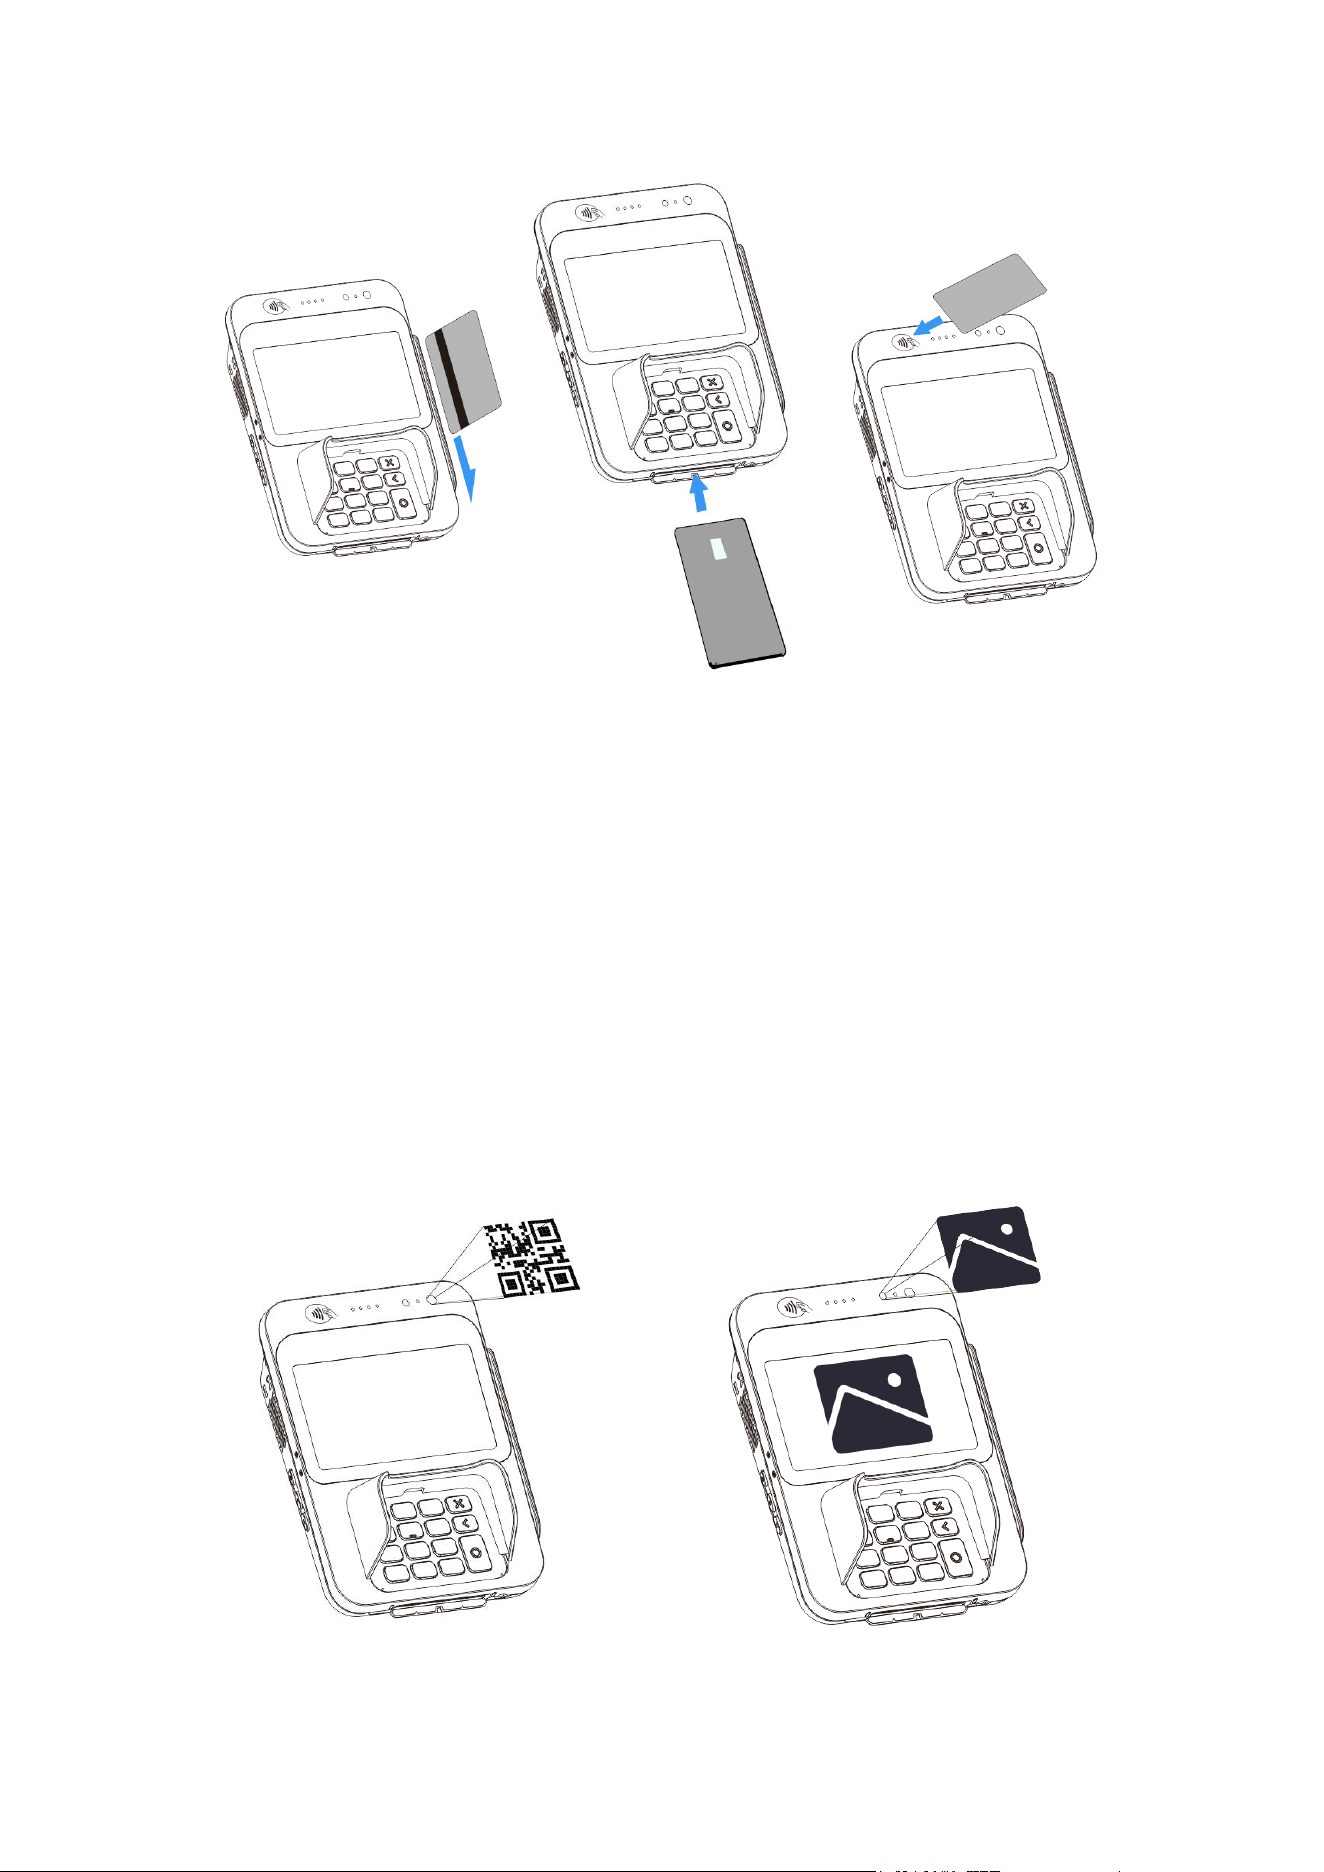
4.2. Card Reading
⚫ Magnetic Stripe Card
Swipe in either direction with magnetic stripe facing terminal.
⚫ Smart Card
Insert vertically, chip facing up; keep inserted during transaction.
⚫ Contactless Card
Hold card steady against reader area until transaction completes.
21
Magnetic Strip Card
Smart Card
Contactless Card
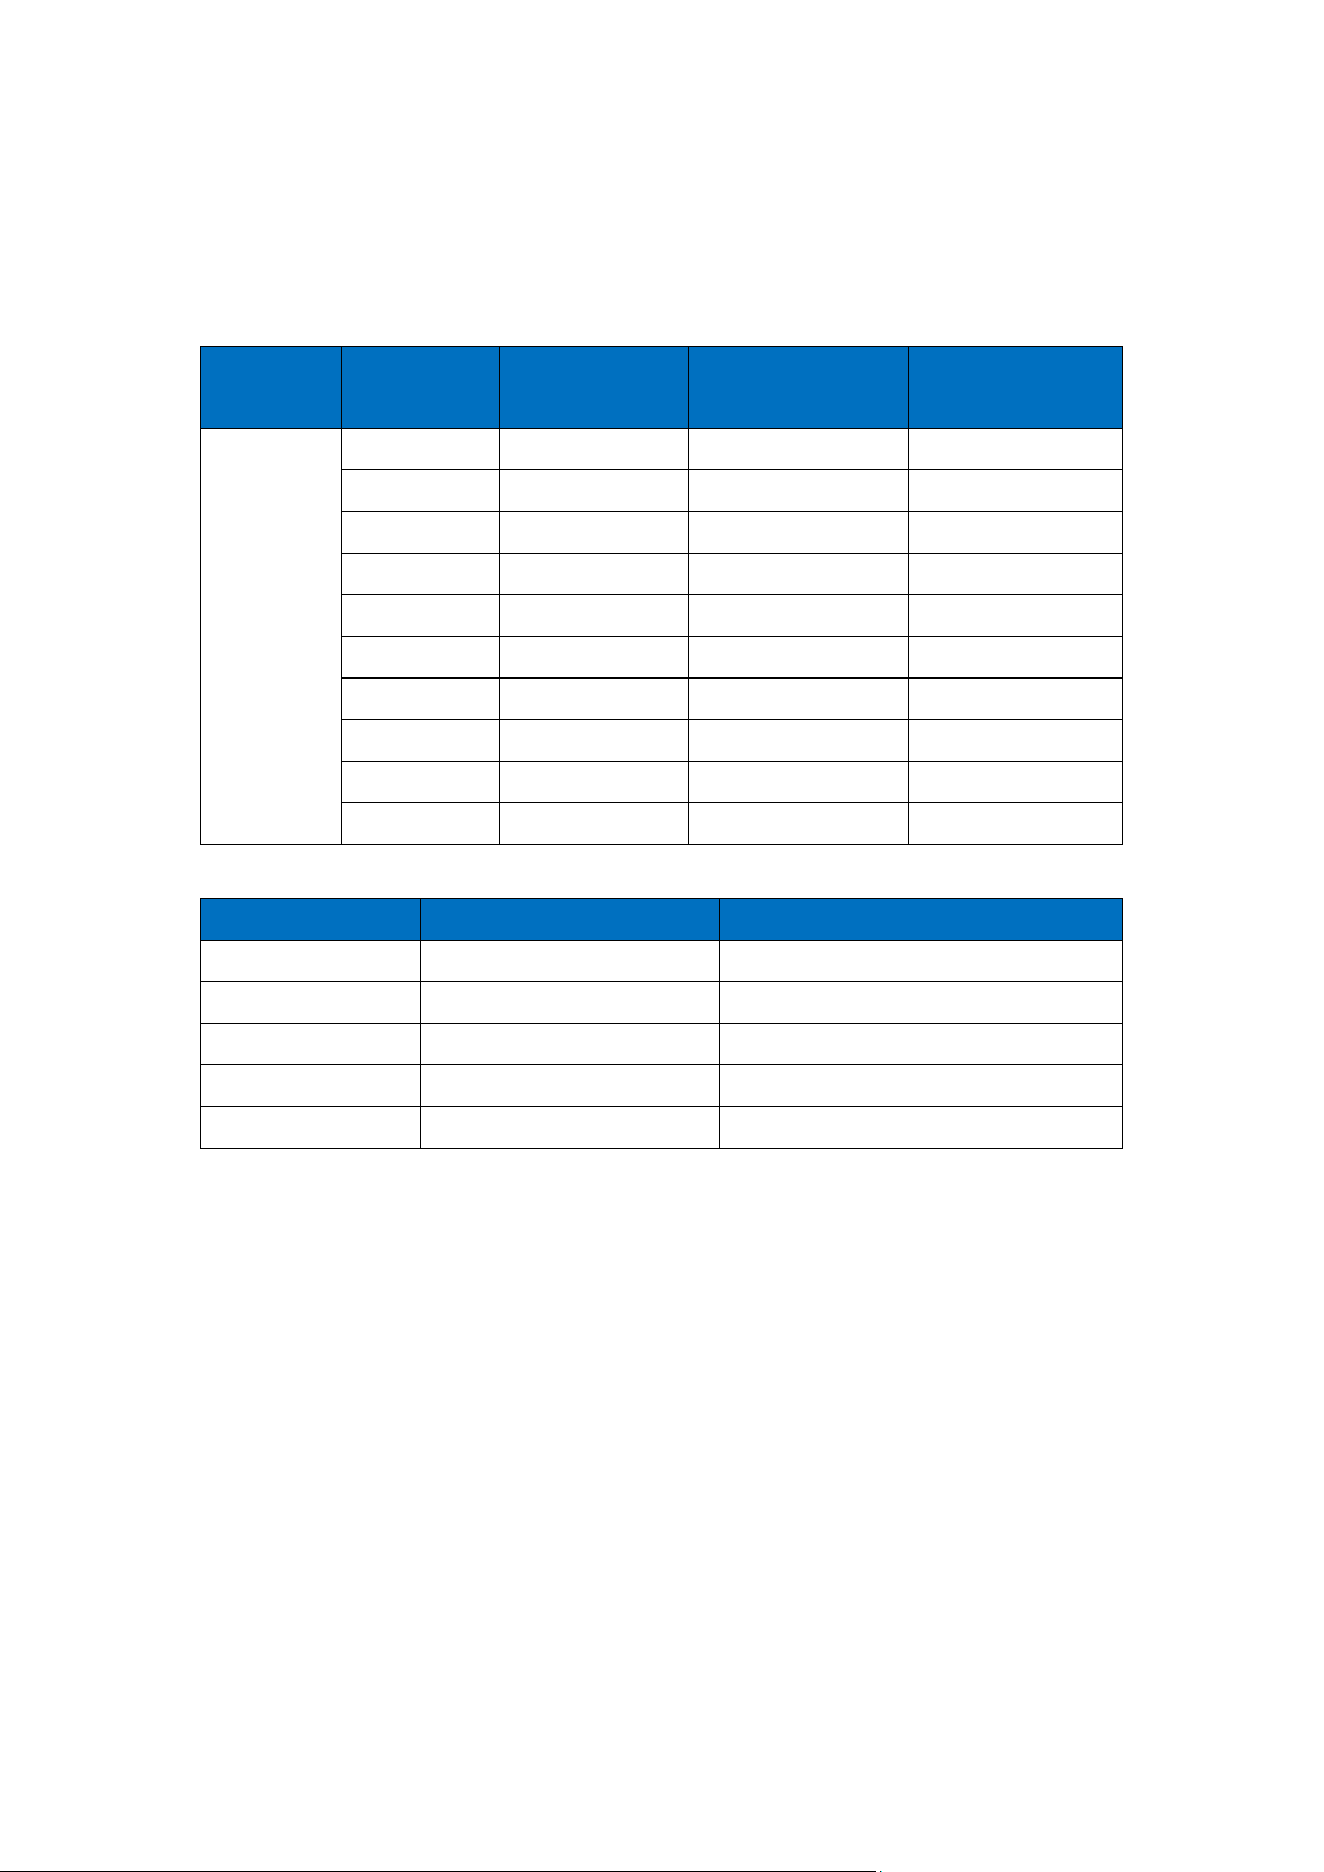
4.3. Using the Camera
The terminal is equipped with a dual front-facing camera system:
⚫ Scanning Camera (0.3MP, Fixed-
Focus): Optimized for fast and
reliable barcode and QR code
scanning.
⚫ Main Camera (5.0MP, Autofocus):
Designed for capturing high-quality
photos and videos.

22
5. Maintenance
When cleaning, always disconnect the power source first. Wipe the exterior surfaces with
a soft, dry cloth.
⚫ For light dirt, dampen a clean cloth with 1–2 drops of mild, neutral cleaner. Never spray
cleaners or liquids directly onto the display screen and do not use an overly wet cloth.
⚫ For stubborn stains, gently wipe with isopropyl alcohol or an alcohol-based cleaner.
Do not use diluent thinners, trichloroethylene, ketone-based solvents or other strong
chemicals as these may damage plastic or rubber parts.

23
6. Transportation and Storage
⚫ Transportation
The terminal should be handled carefully to prevent damage from rain, snow, sunlight,
mechanical impacts, or dropping. The packaging must prevent crushing during transit to
avoid damage.
⚫ Storage
Store the product in its original packaging box. The storage area should be free of
hazardous gases, flammables, explosives, corrosives, strong vibrations, impacts, or
magnetic fields. Place the box at least 15 cm off the ground and 50 cm away from walls,
heat/cold sources, windows, or air intakes.

24
7. FAQs
Question: Why won’t my terminal start?
Answer:
1. Verify power supply level.
2. Restart terminal.
3. If problem persists, contact customer service.
Question: Why did my transaction fail to process?
Answer:
1. Test multiple contactless cards.
2. Verify proper card swiping technique.
3. Try manual transaction mode.
4. Check card components:
⚫ SAM card installation
⚫ SIM card placement
5. Verify network connection.
6. Contact customer service if unresolved.
25
8. Frequency Bands and RF Output Power
The P20-R terminal supports the following wireless specifications:
Network
Type
Band
TX Frequency
(MHz)
RX Frequency
(MHz)
Max RF Output
Power (dBm)
LTE
B1
1920 - 1980
2110 - 2170
25
B3
1710 - 1785
1805 - 1880
25
B5
824 - 849
869 - 894
25
B7
2500 - 2570
2620 - 2690
25
B8
880 - 915
925 - 960
25
B20
832 - 862
791 - 821
24
B28
703 - 748
758 - 803
25
B38
2570 - 2620
2570 - 2620
25
B40
2300 - 2400
2300 - 2400
25
B41
2496 - 2690
2496 - 2690
25
Wireless Type
Frequency Range (MHz)
Max RF Output Power (dBm)
Bluetooth
2402-2480
4
2.4 GHz Wi-Fi
2412-2472
18.08
5 GHz Wi-Fi
5150-5700
16.63
5.8 GHz Wi-Fi
5745-5825
13.08
NFC
13.56
-2.81 dBuA/m@10m
* For EU Compliance
ATTENTION
⚫ The device for operation in the band 5150-5250 MHz is only for indoor use to reduce
the potential for harmful interference to co-channel mobile satellite systems.
⚫ The maximum antenna gain permitted for devices in the bands 5250-5350 MHz and
5470-5725 MHz shall comply with the e.i.r.p. Limit.
⚫ The maximum antenna gain permitted for devices in the band 5725-5825 MHz shall
comply with the e.i.r.p. Limits specified for point-to-point and non point-to-point
operation as appropriate.

26
⚫ Users should also be advised that high-power radars are allocated as primary users
(i.e. priority users) of the bands 5250-5350 MHz and 5650-5850 MHz and that these
radars could cause interference and or damage to LE-LAN devices.
⚫ L'appareil fonctionnant dans la bande 5150-5250 MHz est destiné uniquement à une
utilisation en intérieur afin de réduire les risques d'interférences nuisibles aux
systèmes satellites mobiles utilisant le même canal.
⚫ Le gain maximal d'antenne autorisé pour les appareils fonctionnant dans les bandes
5250-5350 MHz et 5470-5725 MHz doit être conforme à la limite de p.i.r.e.
⚫ Le gain maximal d'antenne autorisé pour les appareils fonctionnant dans la bande
5725-5825 MHz doit être conforme aux limites de p.i.r.e. spécifiées pour
l'exploitation point à point et non point à point, selon le cas.
⚫ Les utilisateurs doivent également être informés que les radars de haute puissance
sont désignés comme utilisateurs principaux (c'est-à-dire utilisateurs prioritaires) des
bandes 5250-5350 MHz et 5650-5850 MHz, et que ces radars peuvent causer des
interférences et/ou endommager les appareils LE-LAN.

27
9. Standards
FCC Compliance Statement
This device complies with Part 15 of the FCC Rules. Operation is subject to the following
two conditions:
⚫ This device may not cause harmful interference
⚫ This device must accept any interference received, including interference that may
cause undesired operation.
Changes or modifications not expressly approved by the party responsible for compliance
could void the user’s authority to operate the equipment.
This equipment has been tested and found to comply with the limits for a Class B digital
device, pursuant to Part 15 of the FCC Rules. These limits are designed to provide
reasonable protection against harmful interference in a residential installation. This
equipment generates, uses and can radiate radio frequency energy and, if not installed
and used in accordance with the instructions, may cause harmful interference to radio
communications. However, there is no guarantee that interference will not occur in a
particular installation.
If this equipment does cause harmful interference to radio or television reception, which
can be determined by turning the equipment off and on, the user is encouraged to try to
correct the interference by one or more of the following measures:
⚫ Reorient or relocate the receiving antenna.
⚫ Increase the separation between the equipment and receiver.
⚫ Connect the equipment into an outlet on a circuit different from that to which the
receiver is connected.
⚫ Consult the dealer or an experienced radio/TV technician for help.
FCC Radiation Exposure Statement
This equipment complies with FCC radiation exposure limits set forth for an uncontrolled
environment. This equipment should be installed and operated with minimum distance

28
20cm between the radiator and your body. This transmitter must not be co-located or
operating in conjunction with any other antenna or transmitter.
ISED Compliance Statement
This device contains license-exempt transmitter(s)/receiver(s) that comply with Innovation,
Science and Economic Development Canada’s license-exempt RSS(s). Operation is
subject to the following two conditions:
⚫ This device may not cause interference.
⚫ This device must accept any interference, including interference that may cause
undesired operation of the device.
L’émetteur/récepteur exempt de licence contenu dans le présent appareil est conforme
aux CNR d’Innovation, Sciences et Développement économique Canada applicables aux
appareils radio exempts de licence. L’exploitation est autorisée aux deux conditions
suivantes:
⚫ L’appareil ne doit pas produire de brouillage
⚫ L’appareil doit accepter tout brouillage radioélectrique subi, même si le brouillage est
susceptible d’en compromettre le fonctionnement.
ISED Radiation Exposure Statement
This equipment complies with IC RSS-102 radiation exposure limits set forth for an
uncontrolled environment. This equipment should be installed and operated with minimum
distance 20cm between the radiator and your body.
Cet équipement est conforme aux limites d'exposition aux radiations IC CNR-102 établies
pour un environnement non contrôlé. Cet équipement doit être installé et utilisé avec une
distance minimale de 20cm entre le radiateur et votre corps.
29
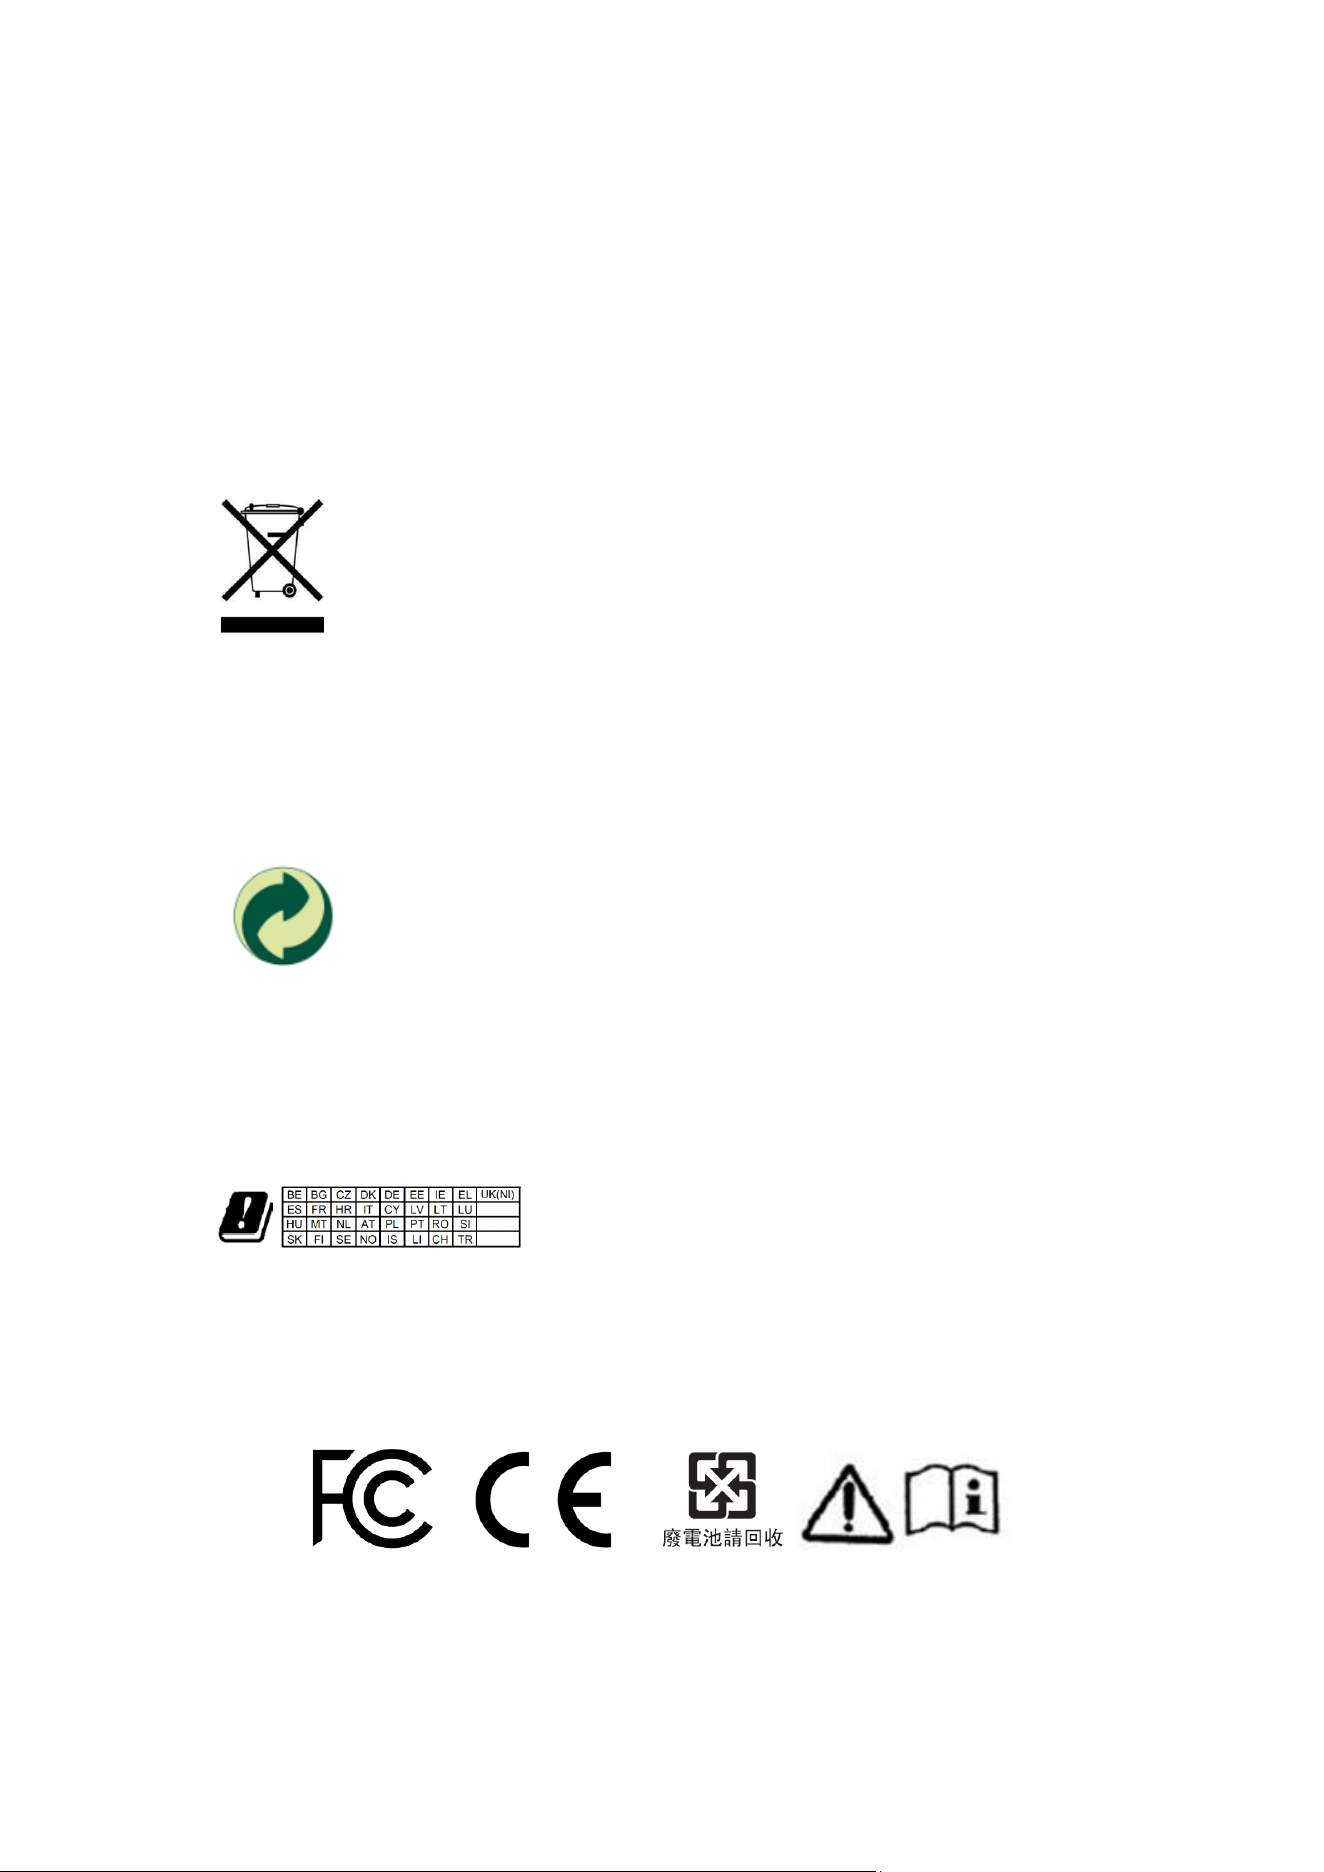
Environmental Compliance (WEEE and Packaging)
LANDI P20-R is labeled in accordance with European Directives 2012/19/EU concerning
Waste Electrical and Electronic Equipment (WEEE) and 2013/56/EC concerning Batteries
and Accumulators. Those provisions are requiring producers and manufacturers to become
liable for take-back, treatment and recycling upon end of life of equipment and batteries.
The crossed-out wheeled bin symbol on the product or accessories
indicates it is considered electronic equipment waste (WEEE) which
must be properly disposed of and should not be thrown away. Spent
batteries must also be collected separately for recycling.
Please contact your retailer for more details on the take-back and recycling program in
place for disposing of old equipment and batteries. Participating ensures their responsible
re-use and recycling, which benefits both the environment and human health.
The Green Dot symbol on the packaging confirms it complies with
Directive 94/62/EC concerning packaging and packaging waste.
Packaging bearing this symbol must be returned through collection
schemes managed by accredited Green Dot organizations for recovery
and recycling.
RF Compliance
The functions of Wireless Access Systems including
Radio Local Area Networks (WAS/RLANs) within the
band 5150-5350 MHz for this device are restricted to
indoor use only within all European Union countries
30
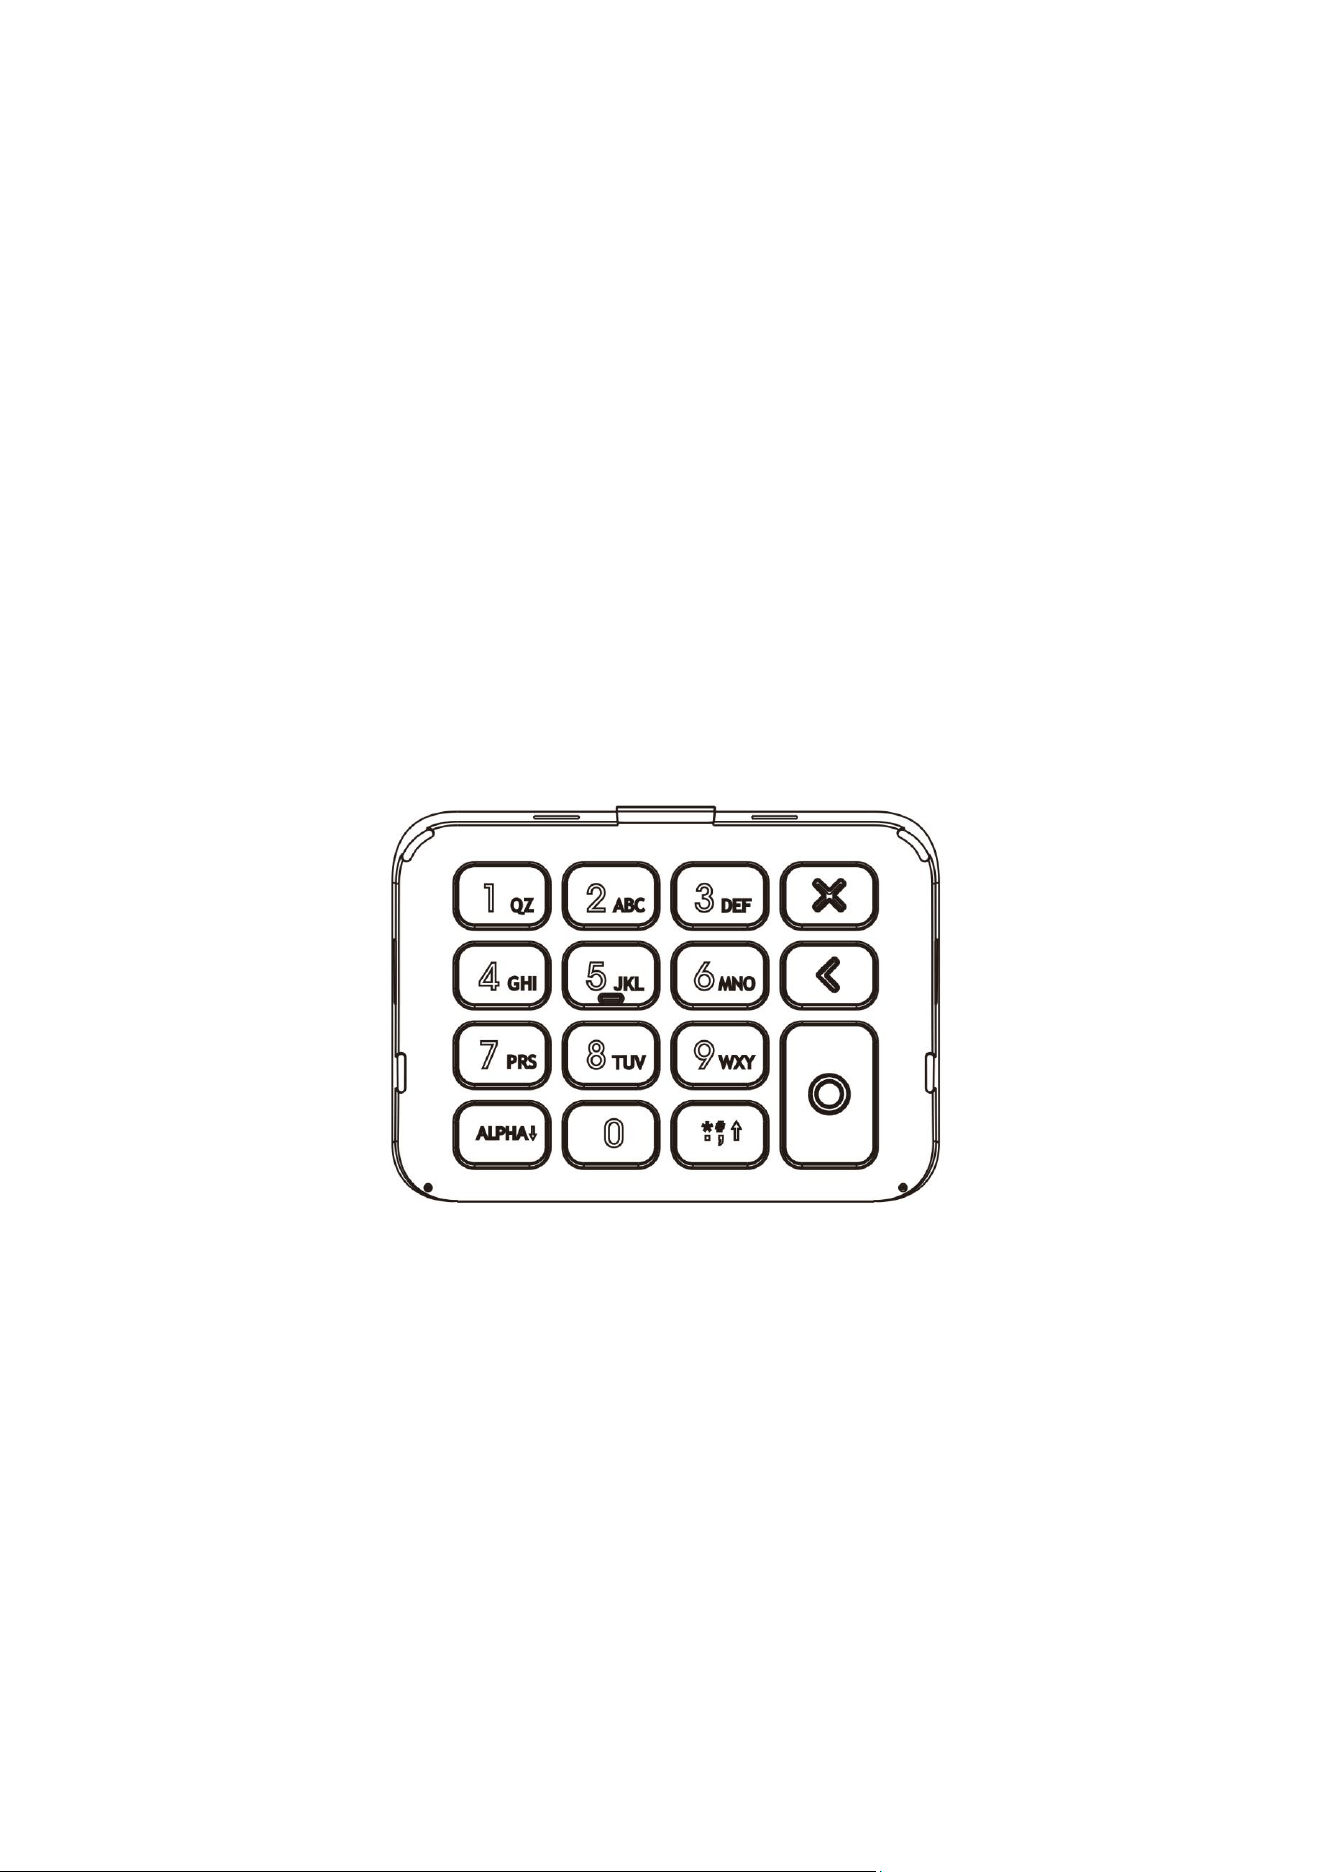
Accessibility Compliance
The physical keyboard features a 12-key layout complemented by three function keys. The
number 5 key, positioned at the center of the keypad, is equipped with a prominent Tactile
Bump to enhance the user's tactile recognition capabilities, ensuring compliance with
Accessibility standards.
This design provides excellent Tactile Recognizability. The bumped center key serves as
a physical reference point, helping users quickly differentiate the function keys. This fulfills
the requirement for "tactile discernibility" as stipulated in accessibility directives EN 301
549 and EU 2019/882. As a result, this design enables users with visual impairments or
low vision to accurately identify key positions by touch, eliminating the need for visual
operation and thereby enhancing the product's operability and inclusivity.

31
10. Customer Support
⚫ Data Backup
Please back up all terminal data before requesting any after-sales support. LANDI does
not back up data directly from terminals received for service work. We are not responsible
for any data loss or deletion that may occur.
⚫ Repairs
Please contact local distributors or LANDI after-sales team to arrange a repair. Be sure to
keep your invoice or other valid proof of purchase documentation and present it when
necessary.
⚫ Manufacturer
Fujian LANDI Commercial Equipment Co., Ltd.
Correspondence Address: 5th
& 6th Floor, Building 3A, Area A, Software Park, No.89,
Software Avenue, Gulou District, Fuzhou, Fujian, 350001, China
Registered Address: Building 17, Area A, Software Park, No.89, Software Avenue, Gulou
District, Fuzhou, Fujian, 350003, China
Phone: +86 0591-88077077, +86 400-658-0616
Fax: +86 0591-88077085
Website: http://www.landicorp.com

