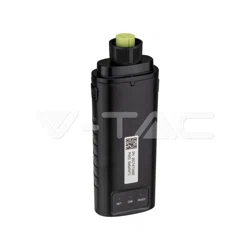
Stick Logger Quick Guide
Model:LSE-�W
Notice:
Please read this manual carefully before using products and keep it in the place
where O&M providers can easily find.
Due to product upgrade and other factors, the content of this manual might change
from time to time. Please take actual product as standard and get latest manual from
the sales department. Unless otherwise agreed herein, this manual will only be used
as guidance. Any statement, information or suggestion in this manual will not take
any form of responsibility.
Without written permission, any content of this document (partly or entirely) cannot
be extracted, copied or transmitted in any form by any company or individual.
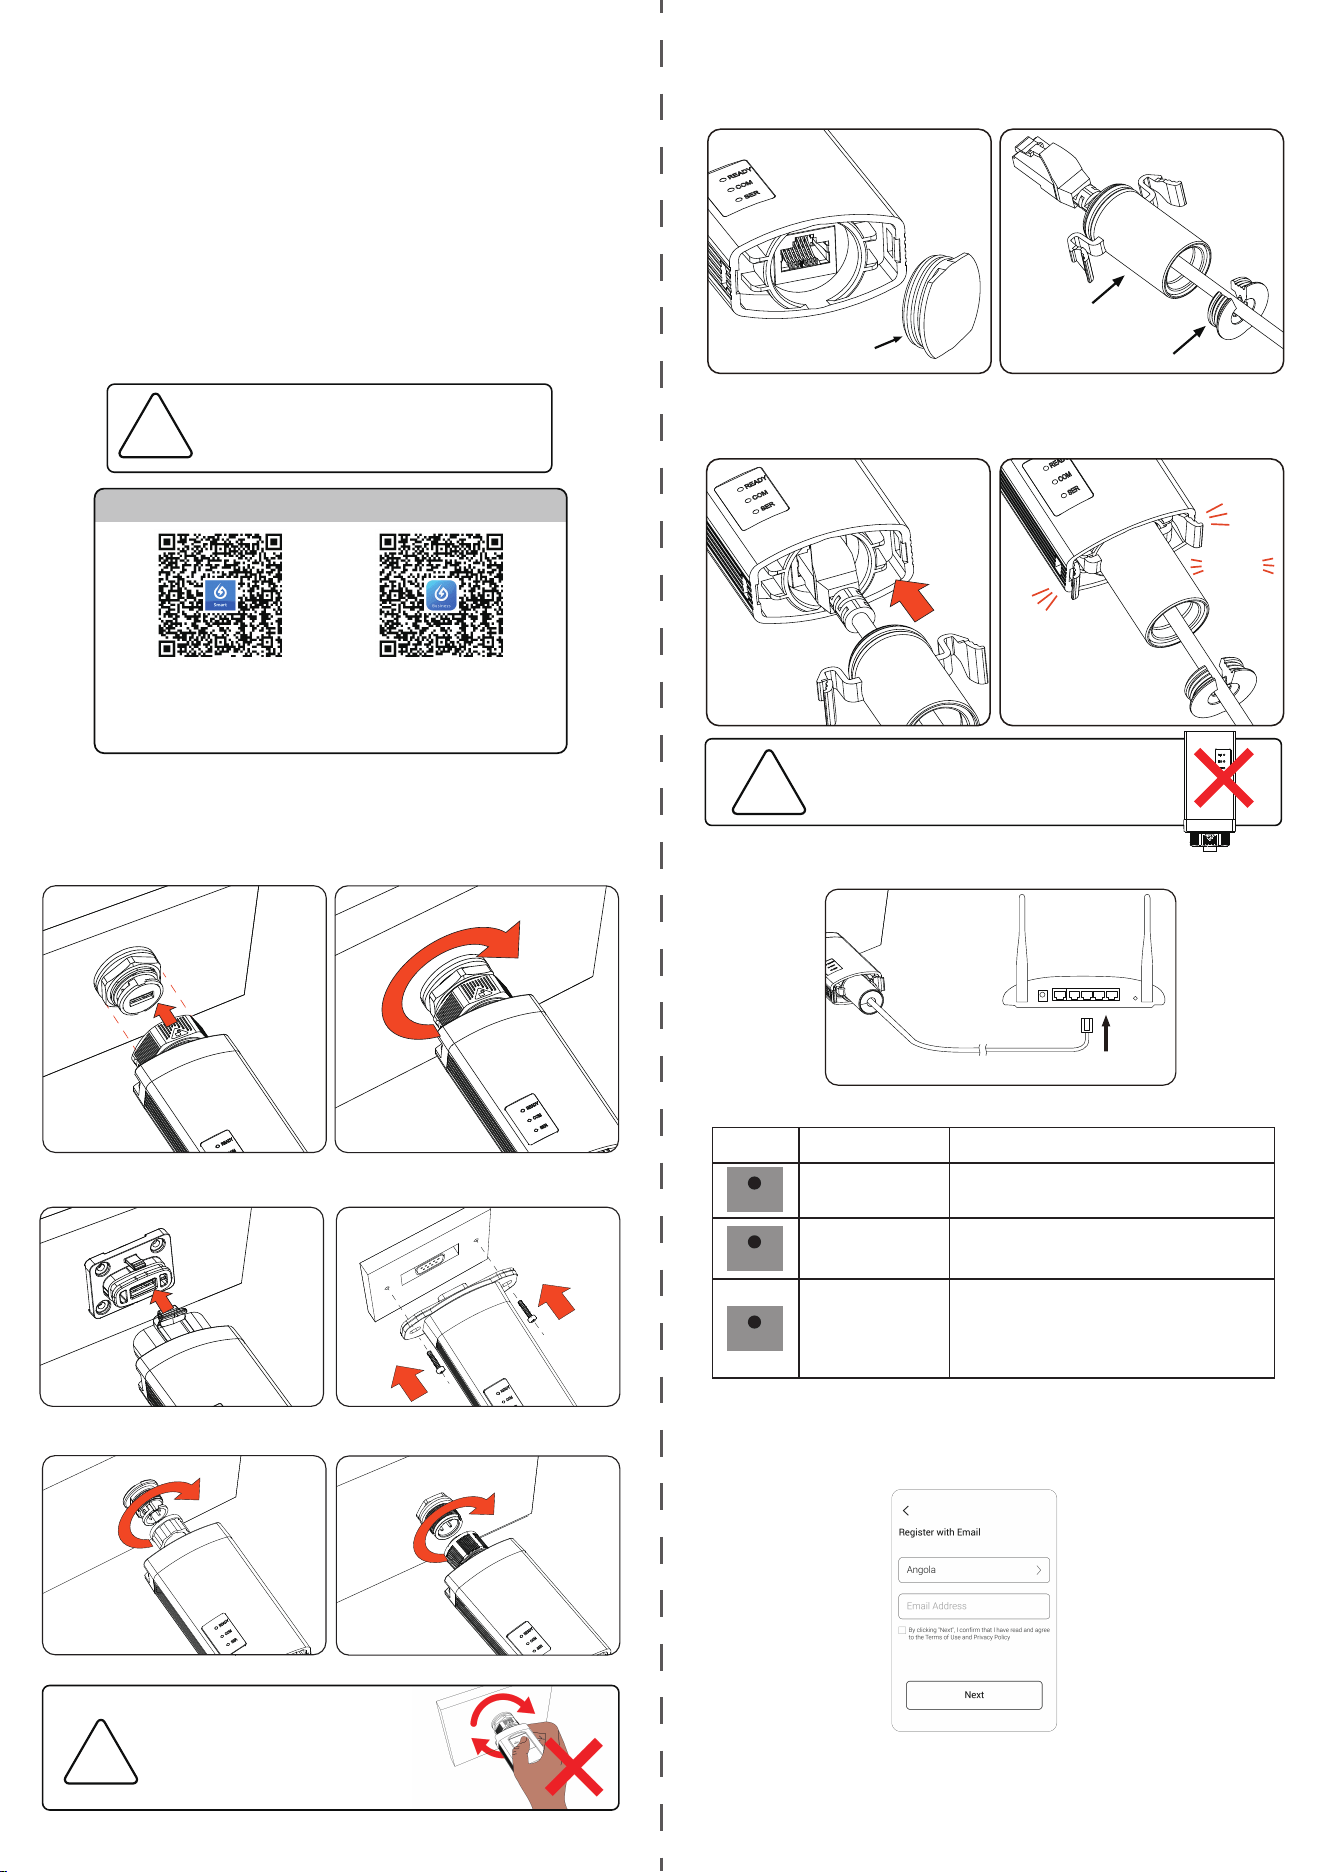
�. Stick Logger Installation
Step �: Remove the bottom plug of the stick logger's main housing,thread the
Ethernet cable through the accessory and the sealing ring.
Step �: Insert the RJ�� connector into the main housing, then snap the accessory
and the main housing together until a "click" is heard, then press the sealing ring
tightly into place at the bottom.
�. Logger Status
Indicator Implication Status Description
Logger running status
Communication with
inverter
Communication with
server
�. Light stays on/off: Running abnormally.
�. On �s/Off �s (Slow flash): Running normally.
�. Light stays on: Logger connected to the inverter.
�. Light off: Connection to the inverter failed.
�. On �s/Off �s: Communicating with inverter.
�. On ���ms/Off �s (Slow flash): Connection to the
router failed.
�. On �s/Off �s: Connection to the router succeeded.
�. Light stays on: Connection to the server
succeeded.
READY
COM
SER
�. Registration
APP USER MANUAL
Click "Register" to create new account. You can use email to register.
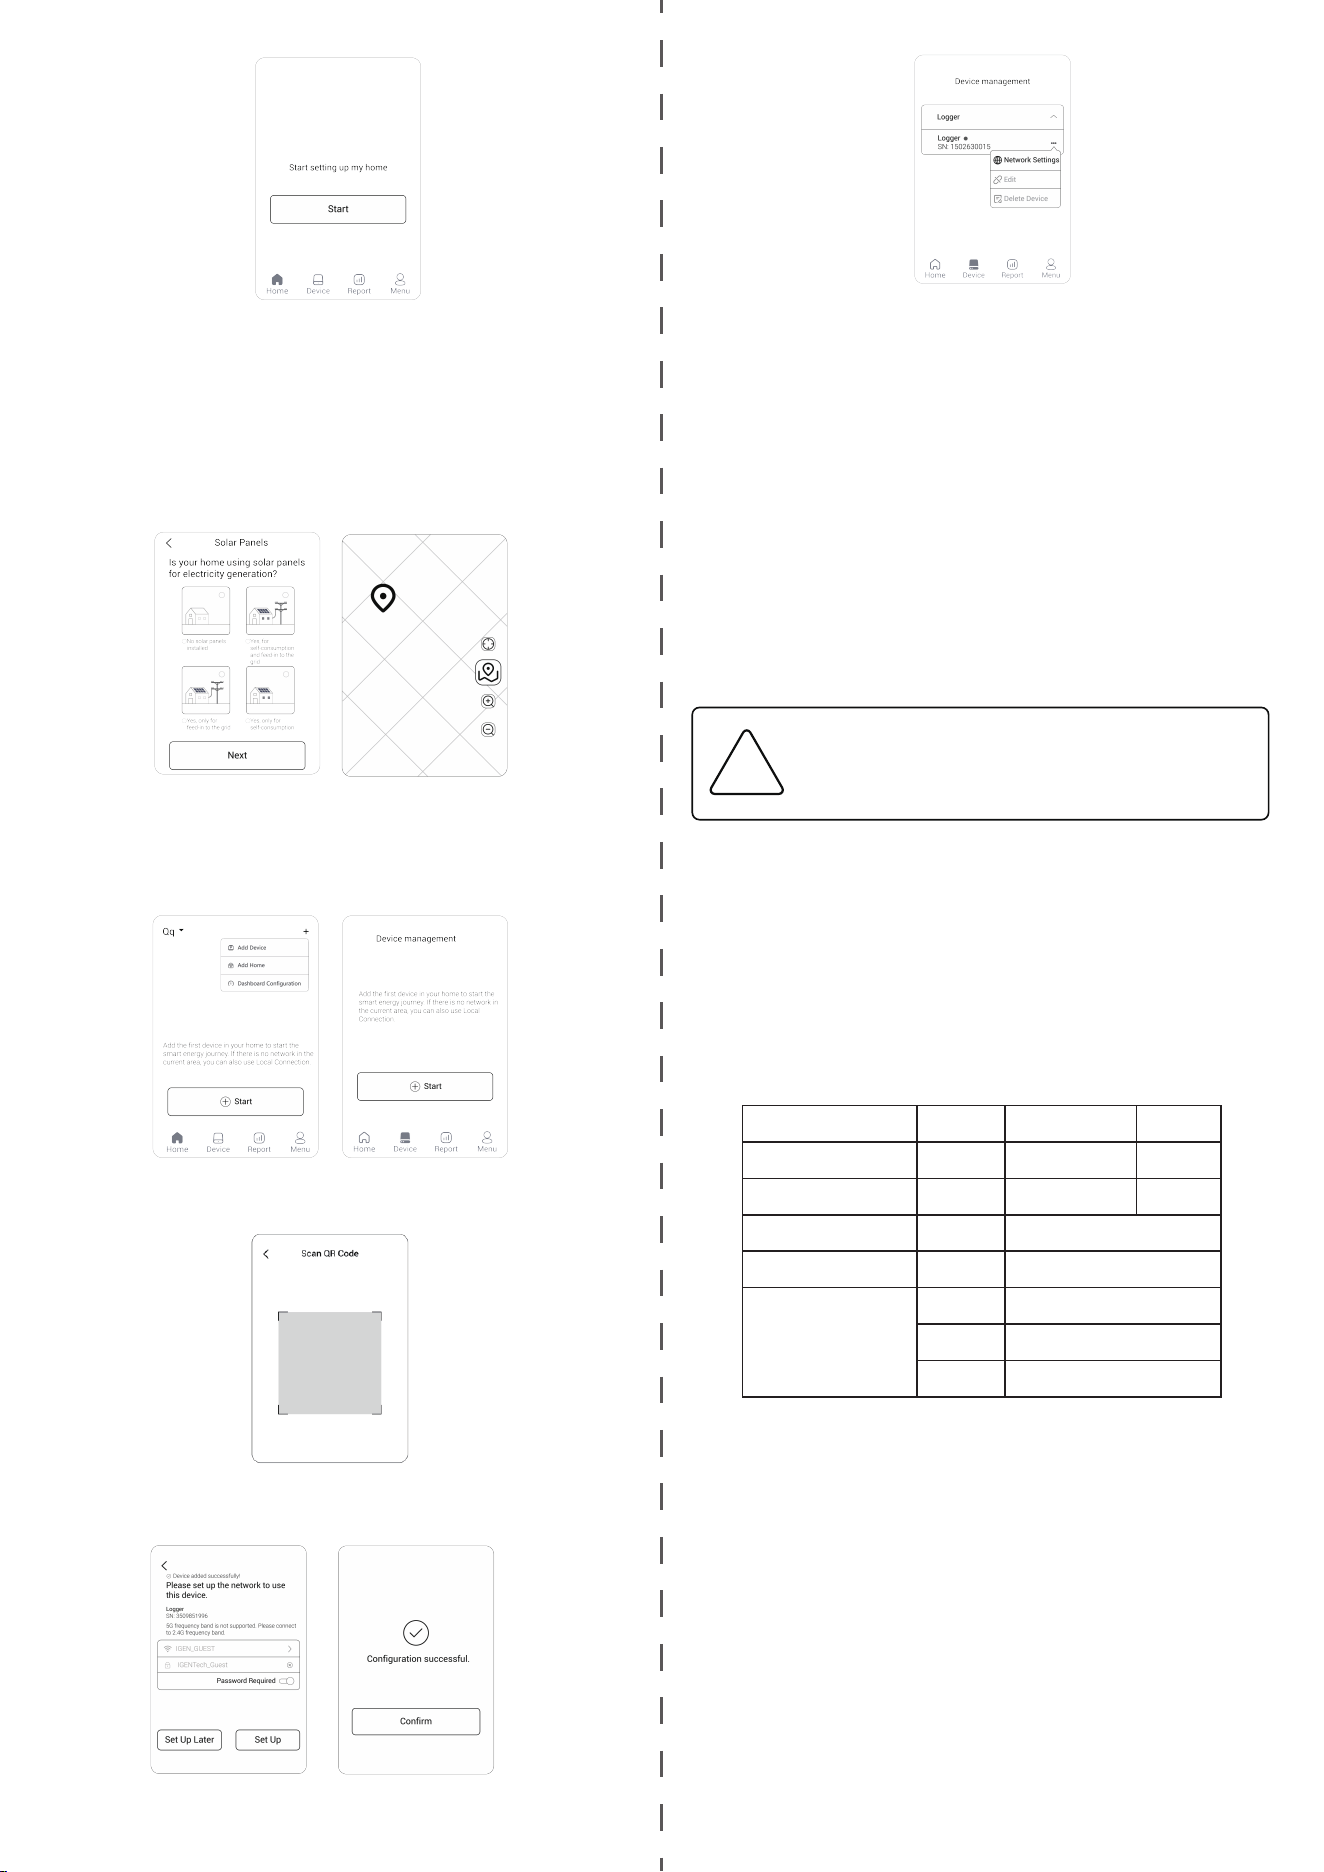
�.� Click "Start" to create your home on SOLARMAN Smart. If you have already
created a home, you will not see the following page. And if you wish to create
another home, please click "+" in the upper-right corner and select "Add Home".
�. Create a home
17000184
Warning:
Please remove the logger after powering it off.
!
�. Network cable installation
Bottom Plug
Accessory
Sealing Ring
iPhone: Search "SOLARMAN Smart" or "SOLARMAN Business" in APP Store.
Android: Search "SOLARMAN Smart" or "SOLARMAN Business" in Google Play.
Download APP
SOLARMAN Smart for end user SOLARMAN Business for O&M
provider and installer
Type �: USB port �
Assemble the logger to the inverter communication interface as shown in the
diagram.
!
Warning:
Please do not hold the logger body to
rotate it while installing or removing it.
click !
�.Connect to Router
Connect another end of network line to LAN Interface.
DHCP:Obtain IP address automatically
WAN LAN
Type �: Small and large aviation connector port
Small aviation
connector port
Large aviation
connector port
Type �: USB port � Type �: DB� port
!
Warning:
Do not invert the stick logger during installation.
WARRANTY CARD
�.� Enter Home Details
Please enter detailed home information according to your actual situation. System
will create an unique home for you.
In order to calculate plant data precisely, please enter
● Home Name,
● Home Type,
● Grid Type,
● Home Location,
● Other information.
You can click the right icon to switch between �D Plan and Satellite Map.
�. Add a Logger
�.� Select a home
�)Go to the"Home"page , select a home according to your actual situation in the
upper-left corner, then click "+" in the upper-right corner, select "Add device".
�)Go to the"Device"page , click "Start" to add a logger to the target home.
�.� Enter Logger SN
Users can enter the logger SN manually or click icon to scan the SN.
!
Warning: Please make sure the stick logger is working properly
before you leave the site. If there is anything abnormal, please do
not leave the site and contact customer service as soon as
possible.
If you have any technical queries about our products, please contact us and
provide the following information:
�. Product model and serial number of the stick logger.
�. Product model and serial number of the connected inverter.
Thank you for your support and cooperation!
Dear Customers,
Thank you very much for using our products. In order to provide you with
better service, please fill in the warranty card and reserve it carefully.
User Name Customer Name
Customer Phone
Product SN
Purchase Date
Product Name &Model
Customer Address
Order No.
Maintenance
Records
Date Failure Cause and Treatment
Warranty Policy
If there is any breakdown which caused by the product's own quality. customers
can send the warranty card with the product to our Customer Service Center.
Notice
�. According to the prescription, the warranty period is � years (From the day when
you receive the product). During the warranty period, we provide free maintenance
service to solve all non-artificial quality problems if the product is under normal
usage circumstance. If the product exceeds the warranty period, only maintenance
cost will be charged.
�. If the failure of the product is not due to quality problems (such as improper use,
improper storage, unauthorized disassembly, etc.), maintenance cost will be
charged.
�. Please pay for back goods freight in advance. Freight collect is not accepted.
Support Email: customerservice@solarmanpv.com
Customer Hotline: +�� ��� ��� ����
Company Address: Building H�, China IoT International Innovation Park, No. �,
Jingxian Road, Wuxi, Jiangsu, P. R. China
�. WiFi Connection Configuration
Scan the logger SN, then connect it to the same WiFi network as the mobile
phone. Click "Set Up" and wait for the configuration to complete.
If "Set Up Later" is selected, you can go to the device page later to configure the device.
If configuration failure occurs, please check the following reasons and
try it again.
�. Make sure WLAN is ON;
�. Make sure WiFi is normal;
�. Make sure wireless router does not implement the white-black list;
�. Shorten the distance between the phone and device;
�. Try to connect to other WiFi;
�. Remove the special characters(,;‘ ’=“ ”`) in WiFi network;
�. Check if the router's AP (Access Point) is operating in the �G frequency band.
If you encounter following situations, please reconfigure logger
network:
�. Change router;
�. Change WiFi password;
�. Change router's SSID;
�. Enterprise routers may restrict WiFi connectivity;
�. Connect to a router whose AP (Access Point) operates in the �.�G frequency band.

FCC Warning
This device complies with part 15 of the FCC Rules. Operation is subject to the following two conditions: (1)
This device may not cause harmful interference, and (2) this device must accept any interference received,
including interference that may cause undesired operation.
Note: This equipment has been tested and found to comply with the limits for a Class B digital device,
pursuant to part 15 of the FCC Rules. These limits are designed to provide reasonable protection against
harmful interference in a residential installation. This equipment generates, uses and can radiate radio
frequency energy and, if not installed and used in accordance with the instructions, may cause harmful
interference to radio communications. However, there is no guarantee that interference will not occur in a
particular
installation. If this equipment does cause harmful interference to radio or television reception, which can be
determined by turning the equipment off and on, the user is encouraged to try to correct the interference by
one or more of the following measures:
—Reorient or relocate the receiving antenna.
—Increase the separation between the equipment and receiver.
—Connect the equipment into an outlet on a circuit different from that to which the receiver is connected.
—Consult the dealer or an experienced radio/TV technician for help.
Note: The Grantee is not responsible for any changes or modifications not expressly approved by the party
responsible for compliance. such modifications could void the user's authority to operate the equipment.
The device has been evaluated to meet general RF exposure requirement.
To maintain compliance with FCC's RF exposure guidelines, the distance must be at least 20 cm
between the radiator and your body, and fully supported by the operating and installation