Enter hibernation
After pairing, the device will automatically enter sleep mode if no action is taken within 60 minutes after startup.
dormancy awakening
Click any key to wake it up when it's in sleep mode.
1. After waking from sleep, if the Bluetooth of the paired phone is on, it will connect
automatically.
2. If the Bluetooth of the last paired phone is turned off, the indicator light will start
blinking. If no pairing is detected after 2 minutes, the device will enter sleep mode and
shut down after 30 minutes.
Low battery alert and charging
This device has a USB-C charging port. When the battery is low, all indicator
lights turn red. If the battery level drops below 20%, please charge it.
5
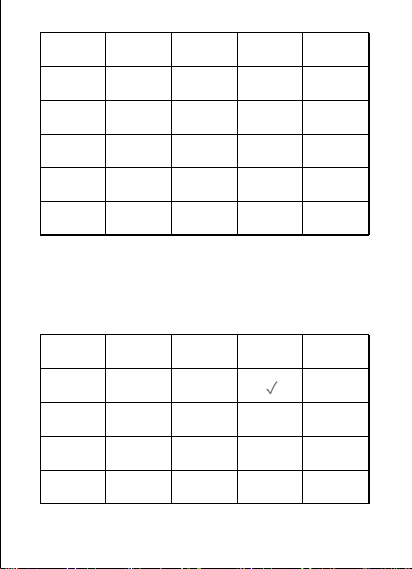
wireless charging
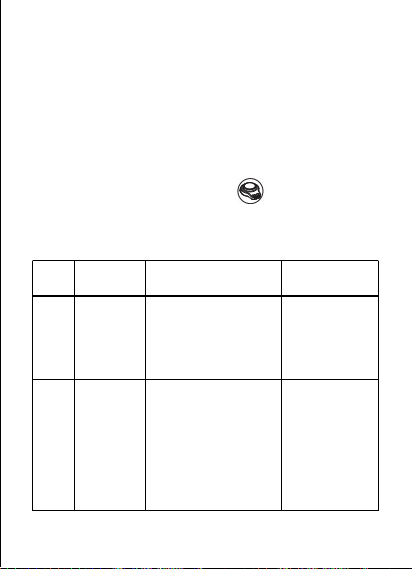
1. Place the phone on the magnetic charging pad. Press the charging button briefly to
start charging, or double-click it to stop.
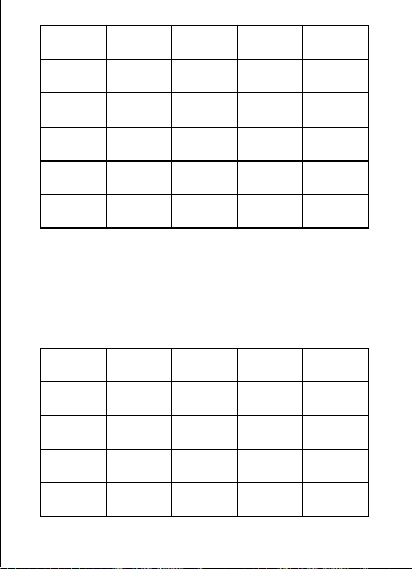
2. The charging and discharging indicator lights display as follows when the handle is
charged or discharged:
6
Quantity of electric -
ity
LED1 LED2
LED3
LED4
Below 25%
Twinkle
X X X
25%-50% √
Twinkle
X X
50%-75% √ √
Twinkle
X
75%-100% √ √ √
Twinkle
100% full
√ √ √ √
Quantity of
electricity
LED1 LED2
LED3
LED4
100%-75% √ √
X
75%-50% √ √
X X
50%-25% √
X X X
Below 25%
Twinkle
X
X X
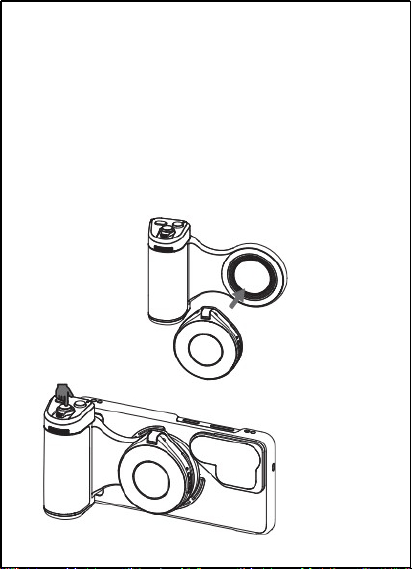
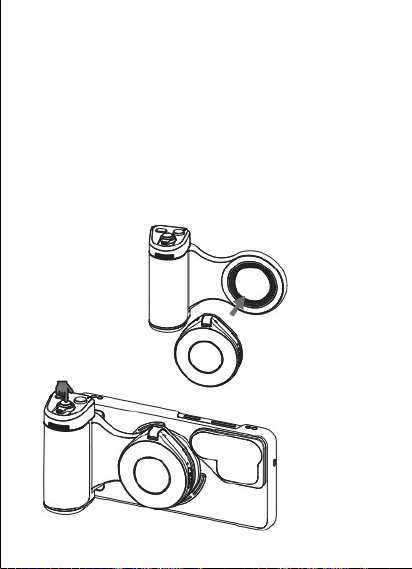
usage INSTRUCTIONS FOR MAGNETIC FLASHLI-
GHT
When the flash syncs with the Samsung S26 Ultra's flash assist
handle, you can trigger the flash using the handle.
The connection steps are as follows:
1. Turn on Bluetooth on your phone, search for and connect to the flash
device TELESIN_LT03
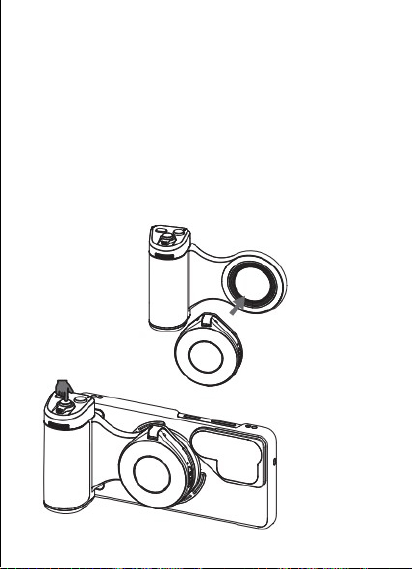
2. After pairing, attach the flash magnet to the magnetic ring on the front of the flash
handle. Press the camera button on the flash handle to activate both the phone
camera and flash simultaneously.
7
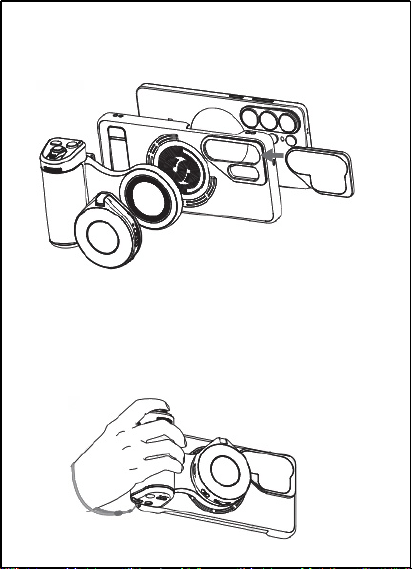
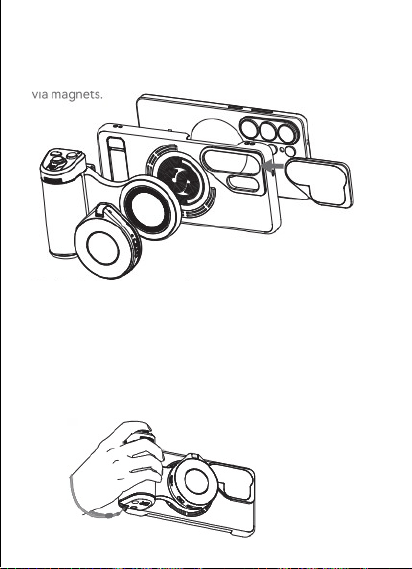
filter USE INSTRUCTIONS
Insert the ND16 filter into the lens mount of the phone case along the
arrow direction, and it will automatically attach via the magnet.
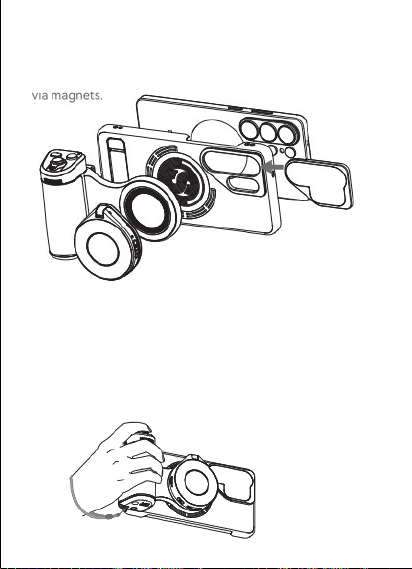
wrist @-@ strap USE INSTRUCTIONS
In complex environments or high-traffic areas, always use with a wrist
strap. Avoid using the product in high-impact sports scenarios.
1. Pass the loop at the end of the wrist strap through the hanging rope hole at the bottom of the
device.
2. After tightening and confirming the connection lock, you can wrap the strap around your
wrist and adjust it to the desired length.
8
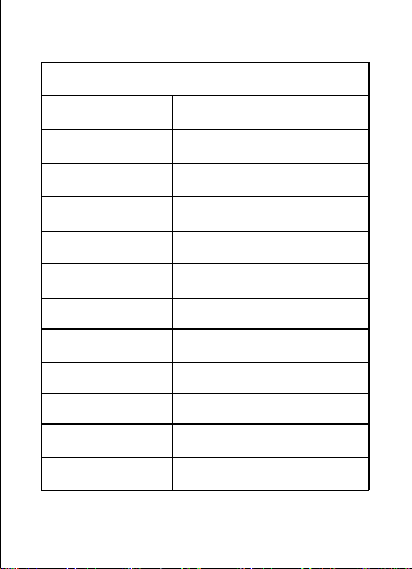
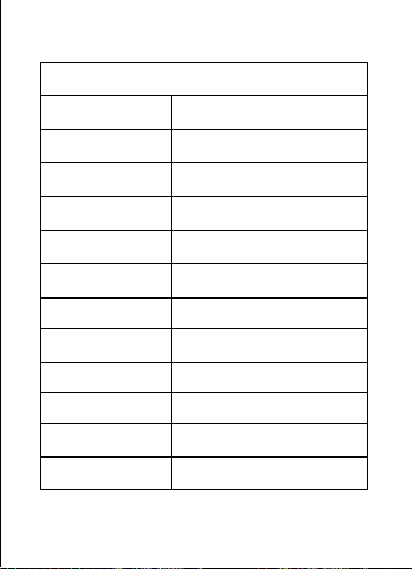
Specification Parameters
9
Magnetic suction handle
Compatible devices
Samsung S26 Ultra
Product size
185*83.5*37.8mm
Product weight
150g
Shell material
Plastic + Metal
Wireless connection method
Low power Bluetooth
Handle control distance 10 meters
Battery capacity
3200mAh/3.6V
Wireless charging power
10W
Hardware interface
Type-c*1
Interface 1/4 threaded hole *1
Handle installation method
Magnet
Working temperature
5℃~40℃
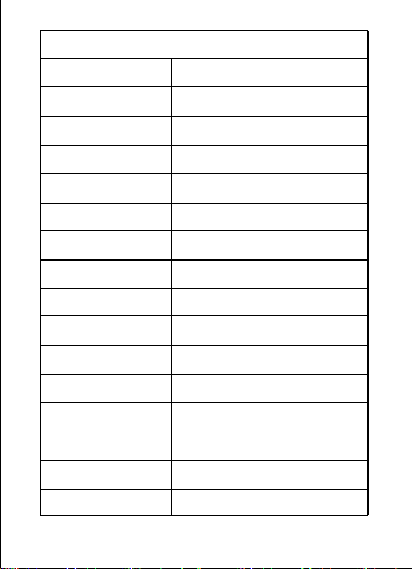
10
Magnetic flash lamp
Size
66*58.5*19mm
Weight
60g
Hardware interface
Type-c*1
Color temperature range (fill light) Three adjustable temperatures: 2500K,4500K, and 6500K
Color Temperature Range (Flash)
7500K±200K
Color rendering index (fill light)
RA≥85
Color rendering index (flash)
RA≥85
Always-on light brightness
Maximum brightness> 300 lux at 0.5 m
Flash brightness
Maximum brightness> 5000 lux at 0.5 m
Luminous power (always-on light) Power: 3W
Luminous power (flash lamp) Power: 15W
Magnetic attraction force
Magnetic attraction strength above 12N
Duration of flight
Battery life at maximum brightness in
constant-on mode ≥ 45 minutes
Battery parameters
500mAh/3.7V
Bluetooth control range
10 meters
Security Statement
1.Clearly identify all components within the packaging, distinguish the
functions of each interface on the power bank, and determine the
appropriate interface type for your device. Improper use of the power supply
may damage the battery and compromise the functionality of the connected
device.
2. When first using the power supply, always charge it with a standard 5V/2A
charger. For routine maintenance, this product has minimal self-discharge. To
ensure the battery's longevity, perform a full charge and discharge cycle every
three months if the device remains unused for extended periods.
3. Consumers using power adapters for charging should purchase compatible
adapters meeting relevant safety standards or obtain CCC-certified adapters.
When charging is complete or not in use, disconnect the device and unplug
the charger from the power outlet.
4.The power supply contains organic combustion materials. Improper use
may cause rupture, leakage, or overheating, resulting in permanent battery
damage. The power supply is equipped with built-in safety protection devices.
11
Magnetic filter
Filter type
ND16 eyepiece
Product material
Aluminum alloy+optical glass
Way to install Magnetic clip
Product weight
20g

5.Do not place batteries or devices near heating appliances such as microwaves,
ovens, or radiators. Overheating batteries may cause explosions. Never disassemble
or modify batteries to avoid leakage, overheating, fires, or explosions. If a battery
leaks, avoid contact with skin or eyes. If exposed, rinse immediately with water and
seek medical attention. Stop using batteries if abnormal heating occurs during
operation, charging, or storage. Do not continue using a charger with damaged
power cords to prevent electric shocks or fires.
6. Do not place the product in high-temperature environments, including direct
sunlight. Do not put the product in fire or extreme high-temperature
environments. Do not use the power supply near fire, stove, or in areas with
temperatures exceeding 60°C.
7.If the power supply is placed in water, its safety protection parameters and
indicators will be damaged, rendering it unusable. This may lead to overheating,
fire, or explosion during operation.
8. Do not use heavy objects or other items to press the power supply and cause it to
deform.
9. Using non-standard chargers or modifying the specified charger parameters may
cause the battery to overheat, catch fire, or explode.
10. If you notice the product overheating, deforming, damaged, scratched, or other
issues during use, stop using it immediately and contact the seller or manufacturer.
11. Never dispose of devices in fire, as this may cause batteries to catch fire or
explode. Replacing with incorrect battery models poses explosion risks, so always
follow instructions when handling used batteries. Do not place battery packs in fire
or heating ovens. Mechanical compression or cutting of battery packs may cause
explosions. Exposure to extreme heat may trigger explosions or leaks of flammable
liquids/gases. Extremely low air pressure in battery packs could also lead to
explosions or leaks of flammable substances.
12. Note: Replacing with incorrect battery model may cause explosion. Dispose of
used batteries as instructed.
13. Do not throw the product directly into the trash. Please send it to a local recycling
center.
14. Do not disassemble or attempt to repair this product, and do not replace its parts
without authorization.
12

warn
1. Consumers using power adapters must purchase certified adapters that
meet relevant safety standards and carry the China Compulsory Certification
(CCC) mark.
2. for use only in non-tropical climates;
3. Do not use after water immersion.
disclaimer
Please read this statement carefully. Your use of this product constitutes full
acceptance and acceptance of this statement. Before each use, please inspect
the product carefully. Do not use if it is damaged or deformed. By using this
product, you acknowledge and agree that you will be solely responsible for
your actions and any consequences arising from its use. You commit to using
this product only for legitimate and lawful purposes. You understand and
agree that Telesin Digital Co., Ltd. (hereinafter referred to as "Telesin") shall
not be liable for any abuse, adverse effects, damages, injuries, penalties, or
other legal consequences resulting directly or indirectly from the use of this
product. Users shall comply with the usage precautions mentioned herein,
including but not limited to. Within the scope of national laws and regulations,
the right to interpret and modify this commitment belongs to Telesin.
This product comes with a warranty of 6 months.
13
English
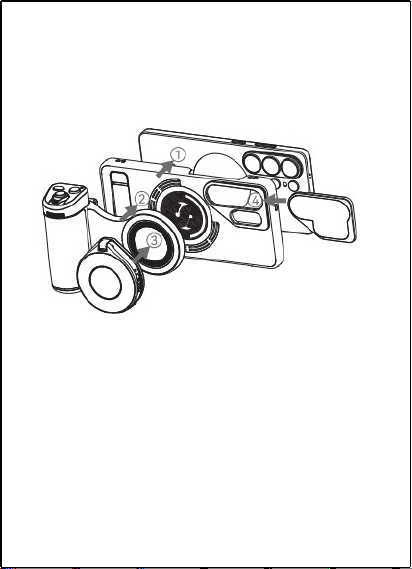
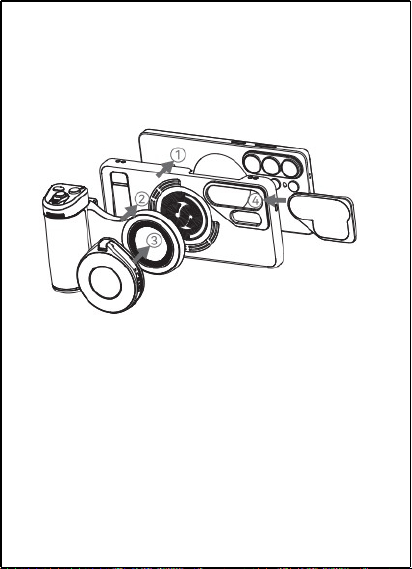
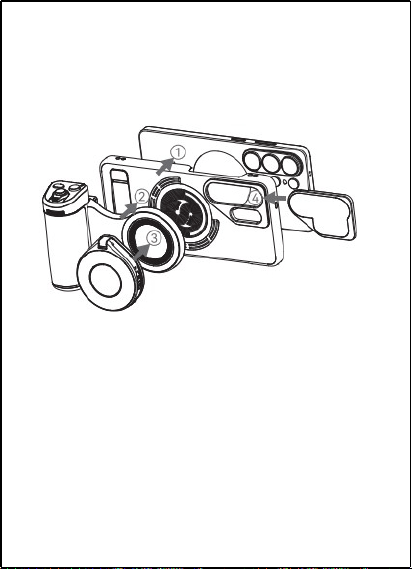
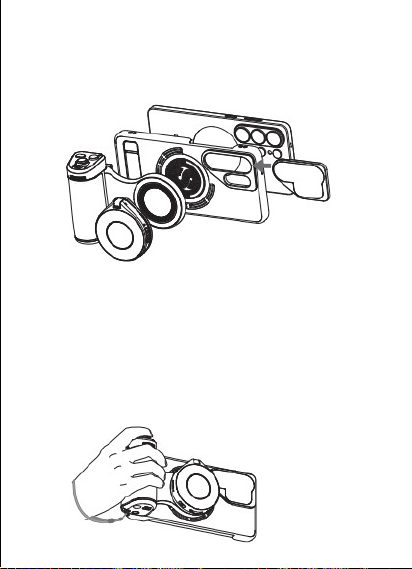
Installation Steps
1.Install the Samsung S26 Ultra into the compatible phone
case.
2.Attach the Shooting Grip to the back of the phone case
3.Attach the Magnetic Flashlight to the Shooting Grip.
4.Snap the Magnetic Filter into the phone case.
Shooting Grip Instructions
Product Illustration
14
Installation Steps
1.
Install the
Samsung
S26
Ultra
into
the
compatible
phone
case.
2.Attach
the
Shooting
Grip
to
the
back
of
the
phone
case
3.Attach
the
Magnetic
Flashlight
to
the
Shooting
Grip.
4.
Snap the
Magnetic
Filter
into
the
phone
case.
Shooting
Grip
Instructions
Product
Illustration
14
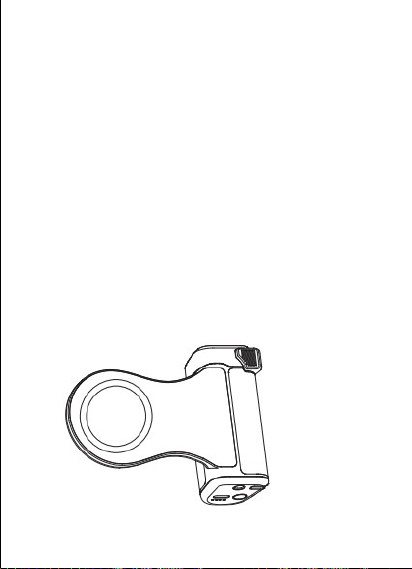
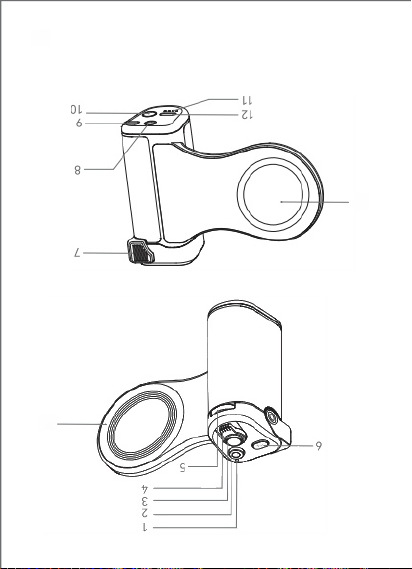
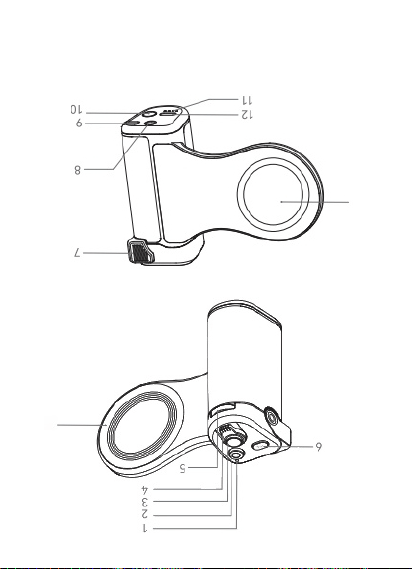
8.1/4"Threaded Hole
1.Operation Indicator
2.Screen Wake-up Button 9.Wrist Strap Hole
3.Shooting Button 10.Charging On/Off Button
4.Zoom Lever
11.Charging Indicatorx4
5.Mode Dial
12.USB-C Charging Port
6.Fn Button
(Input/Output)
7.Thumb Rest
13.Magnetic Charging Position
14.Magnetic Attraction Ring
Operation Instructions
for 2 seconds to
Press and hold the Shooting Button
power on.Click to connect to the Bluetooth name
TELESIN_S26;if no device is connected within 30 minutes,it
will automatically power off
16
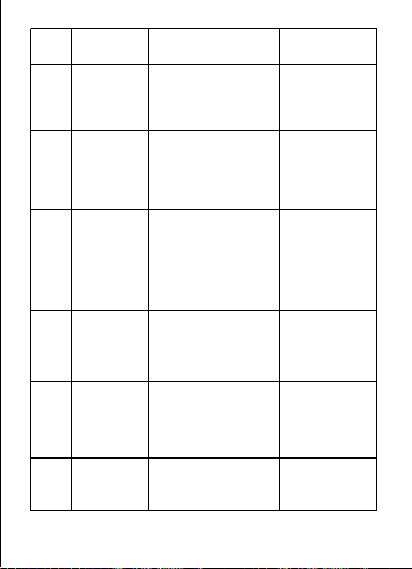
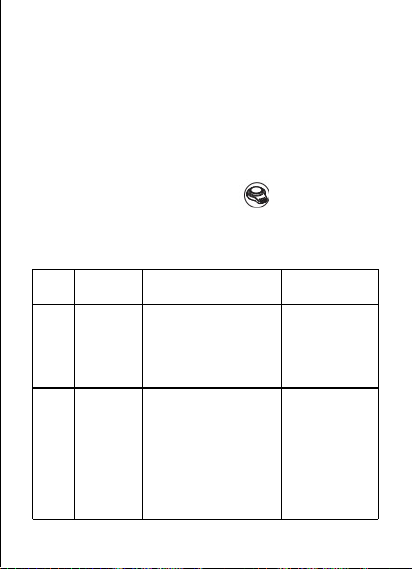
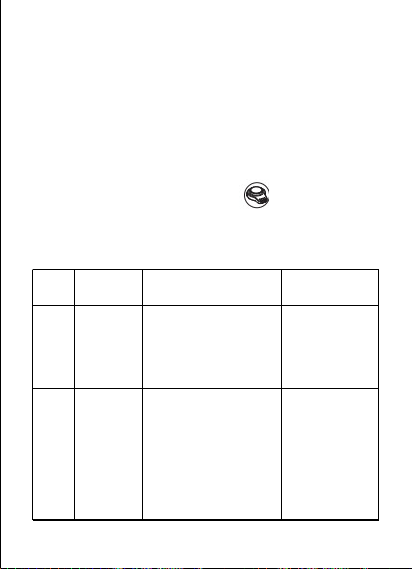
No.
Function
Operation
Operation
Indicator Light
1 Power On
Press and hold the
Shooting Button for2
seconds to power on and
enter Bluetooth pairing
mode.
The green LED
flashes quickly 3
times during
startup,and
flashes slowly
during Bluetooth
pairing.
2
Power Off
Press and hold the
Shooting Button for 2
seconds to power off,
whether powered on or in
sleep mode;device will
automatically power off
after 30 minutes in sleep
mode;if no pairing occurs
within 30 minutes after
powering on,it will
automatically power off
After the 3 quick
green flashes,the
light turns off.
8.1/4"Threaded Hole
1.Operation Indicator
2.Screen Wake-up Button 9.Wrist Strap Hole
3.Shooting Button 10.Charging On/Off Button
4.Zoom Lever
11.Charging Indicatorx4
5.Mode Dial
12.USB-C Charging Port
6.Fn Button
(Input/Output)
7.Thumb Rest
13.Magnetic Charging Position
14.Magnetic Attraction Ring
Operation Instructions
for 2 seconds to
Press and hold the Shooting Button
power on.
Click to connect to the Bluetooth name
TELESIN_S26;if no device
is connected within 30 minutes,it will automatically power off
16
No.
Function
Operation
Operation
Indicator
Light
1 Power
On
Press
and
hold
the
Shooting
Button
for2 seconds
to
power
on
and
enter
Bluetooth
pairing
mode.
The
green
LED
fla
-
shes
quickly
3 ti-
mes
during startup,
and flashes
slowly
during
Bluetooth
pairing.
2
Power
Off
Press
and
hold
the Shooting
Button
for
2 seconds
to
po-
wer
off,
whether
powered
on
or
in
sleep
mode;device
will automat-
ically
power
off
after
30
minutes
in
sleep
mode;if
no
pairing
occurs
within
30
minutes
after powering
on,it
will automatically
power
off
After
the
3
quick
green
flashes,the
light
turns
off.
17
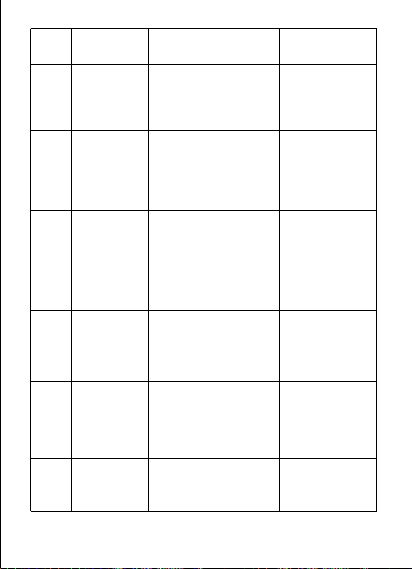
No.
Function
Operation
Operation
IndicatorLight
3
Start/Stop
Recording
Press the
Shooting Button
briefly.
Green
indicator light
flashes once.
4 Zoom
Push the Zoom Lever
left to zoom out;push
it right to zoom in.
/
5
Front/Rear
Camera
Switch
Press the Screen
Wake-up Button
briefly.
/
6
Mode
Switch
Turn the Mode Dial
left or right.
/
7
Screen
Wake-up
When the phone screen
is off,press and hod
the Screen Wake-up
Button for 2 seconds to
wake up the camera.
/
8
Focus
Half-press the
Shooting Button.
/
17
No.
Function
Operation
Operation
IndicatorLight
3
Start/Stop
Recording
Press
the
Shooting
Button
briefly.
Green
indicator
light
flashes
once.
4 Zoom
Push
the
Zoom
Lever
left
to
zoom
out;push it
right
to
zoom
in.
/
5
Front/Rear
CameraSw-
itch
Press
the
Screen
Wake-up
Buttonbri-
efly.
/
6
Mode
Switch
Turn
the
Mode
Dial
left
or
right.
/
7
Screen
Wake-up
When
the
phone
screen
is
off,press
and
hod
the
Screen
Wake-up
Button
for
2
seconds
to
wake
up
the
camera.
/
8
Focus
Half-press
the Shoo-
ting
Button.
/
Enter Sleep Mode
After Buetooth pairing,if there isno operation for 60 minutes
after powering on,the device will automatically enter sleep
mode.
Wake from Sleep
In sleep mode,press any button to wake the device.
1.After waking from sleep,if the previously paired phone's
Blu
etooth is on,it will reconnect automatically.
2.If the previously paired phone's Bluetooth is off,the indicator
will start flashing.If no pairing occurs within 2 minutes,it will
enter sleep mode and power off after 30 minutes.
Low Battery Reminder and Charging
This device is equipped with a USB-C charging port.When the
battery is low,allindicator lights will turn red.Please charge the
device when the battery level is below 20%.
18
Enter Sleep Mode
After Buetooth pairing,if there isno operation for 60 minutes
after
powering on,the device will automatically enter sleep
mode.
Wake from Sleep
In sleep mode,press any button to wake the device.
1.After waking from sleep,if the previously paired phone's
Blu
etooth is
on,it will reconnect automatically.
2. If the previously paired phone's Bluetooth is off,the indicator
will start
flashing.If no pairing occurs within 2 minutes,it will
enter sleep mode and
power off after 30 minutes.
Low Battery Reminder and Charging
This device is equipped with a USB-C charging port.When the
battery is low,
allindicator lights will turn red.Please charge the
device when the battery level is
below 20%.
18
Wireless Charging
1.Place the phone on the Magnetic Charging Position,then
briefly press the Charging On/Off Button to start charging
the phoneDouble-press the Charging On/Off Button to
stop charging the phone.
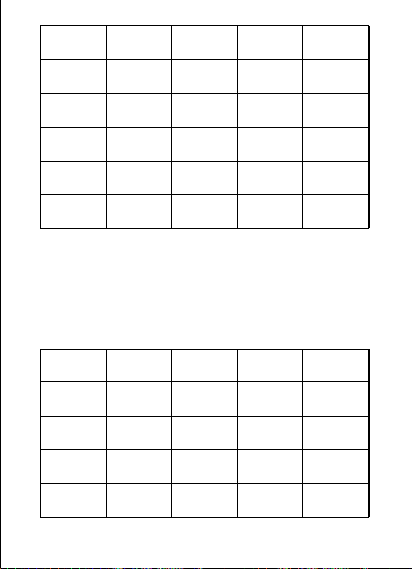
2.While the grip is charging or discharging,the indicator
lights are as follows:
19
Battery
Level
LED1
LED2
LED3
LED4
100%-75% √ √ √ X
75%-50% √ √ X X
50%-25% √ X X X
Below 25%
Flashing
X X
Battery
Level
LED1 LED2
LED3
LED4
Below 25%
Flashing
X X X
25%-50% √
Flashing
X X
50%-75% √ √
Flashing
X
75%-100% √ √ √
Flashing
100%Full √ √ √ √
Wireless
Charging
1. Place the phone on the Magnetic Charging Position,thenbriefly
press the Charging On/Off Button to start charging
the
phoneDouble-press the Charging On/Off Button to
stop charging
the phone.
2.While the grip is charging or discharging,the indicator
lights
are
as
follows:
19
Battery
Level
LED1
LED2
LED3
LED4
100%-75%
√
√
√
X
75%-50% √ √
X X
50%-25%
√
X
X X
Below
25%
Flashing
X
X
Battery
Level
LED1 LED2
LED3
LED4
Below
25%
Flashing
X X X
25%-50% √
Flashing
X X
50%-75% √ √
Flashing
X
75%-100% √ √ √
Flashing
100%Full √ √ √ √
Magnetic Flashlight Instructions
After the flashlight is attached to the Samsung S26 Ultra
Shooting Grip,the flashlight can be triggered via the Shooting
Grip.
Connection steps are as follows:
1.Turn on the phone's Bluetooth function,search for and
connect to the flashlight device named TELESIN_LT03.
2.After successful pairing,attach the magnetic side of the
flashlight to the Magnetic Attraction Ring on the front of the
grip.Press the Shooting Button on the grip to simultaneously
trigger the phone to take a photo and flash the flashlight.
20
Magnetic Flashlight Instructions
After the flashlight is attached to the Samsung S26 Ultra
Shooting Grip,the flashlight can be triggered via the Shooting
Grip.
Connection steps are as follows:
1.Turn on the phone's Bluetooth function,search for and
connect to the
flashlight device named TELESIN_LT03.
2.After successful pairing,attach the magnetic side of the
flashlight to the
Magnetic Attraction Ring on the front of the
grip.Press the Shooting Button
on the grip to simultaneously
trigger the phone to take a photo and flash the
flashlight.
20
Filter Instructions
Insert the ND16 filter into the phone case lens adapter in the
direction of the arrow,and it will automatically install in place
Wrist Strap Instructions
In complex environments or crowded scenarios,be sure to use
the wrist strap.Do not use the product in high-impact sports
scenarios.
1.Thread the loop at the end of the wrist strap through the
lanyard hole at the bottom of the device.
2.After tightening and confirming the connection is locked,
place the strap loop around your wrist and adjustto a suitable
length.
21
Filter Instructions
Insert the ND16 filter into the phone case lens adapter in the
direction of the arrow,and it will automatically install in place
Wrist Strap Instructions
In complex environments or crowded scenarios,be sure to usethe
wrist strap.Do not use the product in high-impact sports
scena-
rios.
1.Thread the loop at the end of the wrist strap through thelanyard
hole at the bottom of the device.
2.After tightening and confirming the connection is locked,place
the strap loop around your wrist and adjustto a suitable
length.
21
Specifications
22
Magnetic Grip
Compatible Model
Samsung S26 Ultra
Product Dimensions 185*83.5*37.8mm
Product Weight 150g
Casing Material
Plastic+Metal
Wireless Connection
Low Energy Bluetooth
ControlDistance 10 meters
Battery Capacity
3200mAh/3.6V
Wireless Charging
Power
10W
Hardware Interface
Type-c*1
Mounting Interface
1/4"Threaded Hole*1
Grip Mounting
Method
Magnetic
Operating
Temperature
5℃~40℃
Specifications
22
Magnetic
Grip
Compatible
Model
Samsung
S26
Ultra
Product
Dimensions 185*83.5*37.8mm
Product
Weight 150g
Casing
Material
Plastic+Metal
Wireless
Connection
Low
Energy
Bluetooth
ControlDistance 10
meters
Battery
Capacity
3200mAh/3.6V
Wireless
Charging
Power
10W
Hardware
Interface
Type-c*1
Mounting
Interface
1/4"Threaded Hole*1
Grip
Mounting
Method
Magnetic
Operating
Temperature
5℃~40℃
23
Magnetic Flashlight
Dimensions 66*58.5*19mm
Weight 60g
Hardware Interface
Type-c*1
Color Temperature
Range(Fill Light)
2500K/4500K/6500K,threelevels
adjustable
Color Temperature
Range(Flash)
7500K±200K
Color Rendering Index
(Fill Light)
RA≥85
Color Rendering Index
(Flash)
RA≥85
Continuous Light
Brightness
Max brightness>[email protected]
Flash Brightness Max brightness>[email protected]
Light Output Power
(Continuous Light)
3W
Light Output Power
(Flash)
15W
Magnetic Force Magnetic force above 12N
Battery Life
Continuous light at max
brightness:≥45min
Battery Parameters
500mAh/3.7V
Bluetooth Control
Distance
10 meters
23
Magnetic
Flashlight
Dimensions 66*58.5*19mm
Weight 60g
Hardware
Interface
Type-c*1
Color
Temperature
Range(Fill
Light)
2500K/4500K/6500K,threelevels adj-
ustable
Color
Temperature
Range(Flash)
7500K±200K
Color
Rendering
Index
(Fill
Light)
RA≥85
Color
Rendering
Index
(Flash)
RA≥85
Continuous
Light
Brightness
Max
brightness>[email protected]
Flash
Brightness Max
brightness>[email protected]
Light
Output
Power
(Continuous
Light)
3W
Light
Output
Power
(Flash)
15W
Magnetic
Force Magnetic
force
above
12N
Battery
Life
Continuous
light
at
max
brightness:≥45min
Battery
Parameters
500mAh/3.7V
Bluetooth
Control
Distance
10
meters
Safety Declarations
1.Clearly identify all components inside the packaging,distinguish the
functions of each port on the power bank,and recognize the types of
interfaces used by your device.Improper use of the power supply may
damage the battery and devices powered by it.
2.When using the power supply for the first time,it must be charged with a
standard 5V=2A charger.For daily maintenancesince this product has
very low self-discharge,if it is not used for an extended period,perform a
charge-discharge cycle every 3 months to ensure the service life of the
battery cells.
3.This power pack contains organic combustibe materials.Improper use of
the power supply may cause cracking,leakage,overheating,etc.,leading to
permanent damage to the battery.The power supply is equipped with
built-in safety protection mechanisms.
4.Do not place the battery or device near heating appliances(e.g,
microwaves,ovens,or radiators).Overheating of the battery may cause
explosions.Do not disassemble or modify the battery,as this may lead to
leakage,overheating,fire,or explosion.If the battery leaks,avoid contact
between the leaked liquid and skin or eyes;if exposed,rinse immediately
with clean water and seek medical treatment.If abnormal heating or other
24
Magnetic Filter
Filter Type
ND16 Neutral Density Filter
Product Material
Aluminum Alloy+Optical Glass
Mounting Method Magnetic Snap
Product Weight 20g
Safety Declarations
24
Magnetic
Filter
Filter
Type
ND16
Neutral
Density
Filter
Product
Material
Aluminum
Alloy+Optical
Glass
Mounting
Method Magnetic
Snap
Product
Weight
20g

FCC Statement
Changes or modifications not expressly approved by the party responsible for
compliance could void the user's authority to operate the equipment.
This equipment has been tested and found to comply with the limits for a
Class B digital device, pursuant to Part 15 of the FCC Rules. These limits are
designed to provide reasonable protection against harmful interference in a
residential installation. This equipment generates uses and can radiate radio
frequency energy and, if not installed and used in accordance with the
instructions, may cause harmful interference to radio communications.
However, there is no guarantee that interference will not occur in a particular
installation. If this equipment does cause harmful interference to radio or
television reception, which can be determined by turning the equipment off
and on, the user is encouraged to try to correct the interference by one or
more of the following measures:
-- Reorient or relocate the receiving antenna.
-- Increase the separation between the equipment and receiver.
-- Connect the equipment into an outlet on a circuit different from that to
which the receiver is connected.
-- Consult the dealer or an experienced radio/TV technician for help
This device complies with part 15 of the FCC rules. Operation is subject to
the following two conditions (1)this device may not cause harmful
interference, and (2) this device must accept any interference received,
including interference that may cause undesired operation.
This equipment complies with FCC radiation exposure limits set forth for an
uncontrolled environment.
25
25
Deutsch
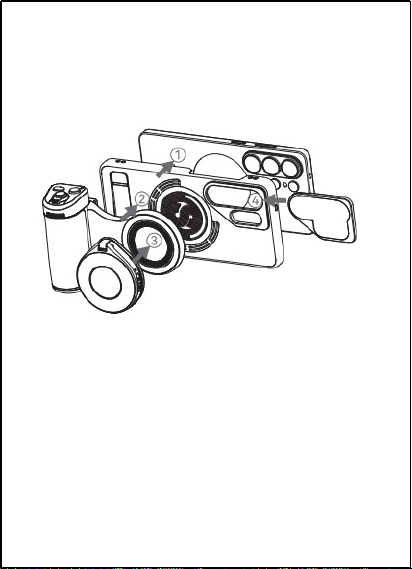
Installationsschritte
1.Installieren Sie das Samsung S26 Ultra in die mitgelieferte
Handyhülle.
2.Befestigen Sie den Shooting-Grip an der Rückseite der
Handyhülle.
3.Bringen Sie den magnetischen Blitz am Shooting-Grip an.
4.Rasten Sie den magnetischen Filter in die Handyhülle ein.
Bedienungsanleitung für den Shooting-Grip
Produktabbildung
28
Installationsschritte
1.
Installieren Sie
das
Samsung
S26
Ultra
in
die
mitgelieferte
Handyhülle.
2.Befestigen
Sie
den
Shooting-Grip
an
der
Rückseite
der
Handyhülle.
3.Bringen
Sie
den
magnetischen
Blitz
am
Shooting-Grip
an
4.Rasten
Sie
den
magnetischen
Filter
in
die
Handyhülle
ein.
Bedienungsanleitung
für
den
Shooting-Grip
Produktabbildung
28
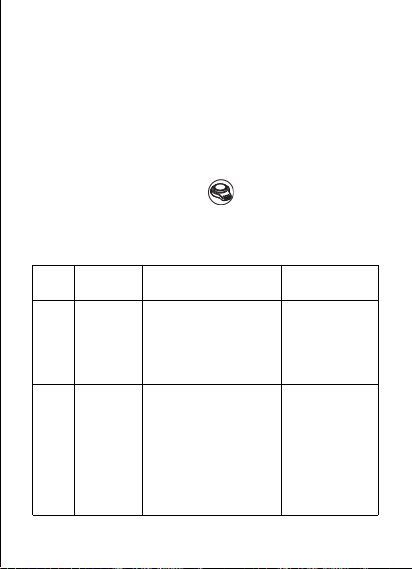
1.Betriebsanzeige 8.1/4"-Gewindebohrung
2.Bildschirmaktivierungstaste 9.Handgelenkband-Offnung
3.Aufnahmetaste 10.Laden-Ein/Aus-Taste
4.Zoomhebel
11.Ladeanzeigex4
5.Moduswahlrad 12.USB-C-Ladeanschluss
6.Fn-Taste
(Eingang/Ausgang)
7.Daumenablage 13.Magnetische Ladeposition
14.Magnetring
Bedienungsanleitung
Halten Sie die Aufnahmetaste
2 Sekunden lang
gedrückt,um das Gerät einzuschalten.Tippen Sie zum
Verbinden auf den Bluetooth-Namen TELESIN_S26;wenn
innerhalb von 30 Minuten kein Gerät verbunden wird,
schaltet es sich automatisch aus.
30
Nr.
Funktion
Bedienung
Anzeige der
Betriebsleuchte
1
Einschalten
Halten Sie die
Aufnahmetaste 2Sekunden
langgedrückt,umdas
Gerät einzuschaltenundin
den Bluetooth-Pairing-Mo-
dus zuwechseln.
Beim Einschalten
blinkt die grune
Leuchte 3
Sekunden lang
schnell,bei
Bluetooth-Suche
blinkt sie langsam.
2
Ausschalten
Imeingeschateten oder
Ruhezustand Halten Sie die
Aufnahmetaste 2Sekunden
langgedruckt,um
auszuschalten.Nach 30
Minutenim Ruhemodus
schaltetes sich automatisch
aus.Nach demEinschalten
Wenninnerhalb von30 Minuten
keine Kopplungerfolgt,schaltet
essich automatisch aus.
Nach 3schnellen
grūnen Blinks
erlischt das Licht
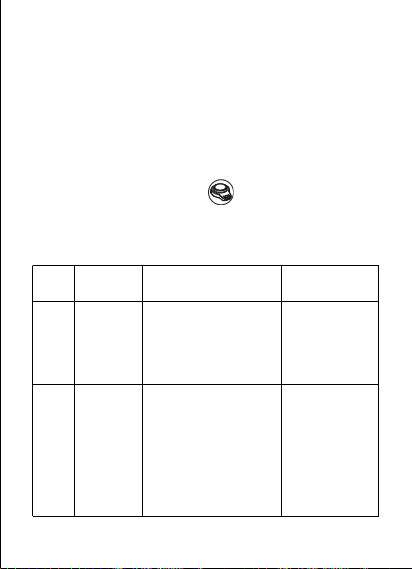
1.Betriebsanzeige 8.1/4"-Gewindebohrung
2.Bildschirmaktivierungstaste 9.Handgelenkband-Offnung
3.Aufnahmetaste 10.Laden-Ein/Aus-Taste
4.Zoomhebel
11.Ladeanzeigex4
5.Moduswahlrad 12.USB-C-Ladeanschluss
6.Fn-Taste
(Eingang/Ausgang)
7.Daumenablage 13.MagnetischeLadeposition
14.Magnetring
Bedienungsanleitung
Halten Sie die Aufnahmetaste
2 Sekunden lang
gedrückt,
um das Gerät einzuschalten.Tippen Sie zum
Verbinden auf den
Bluetooth-Namen TELESIN_S26;wenninnerhalb von 30 Minuten
kein Gerät verbunden wird,
schaltet
es
sich
automatisch
aus.
30
Nr.
Funktion
Bedienung
Anzeige
derBe-
triebsleuchte
1
Einschalten
Halten
Sie
dieAufnahmeta-
ste
2Sekundenlanggedrückt,
umdas
Gerät
einzuschaltenundin
den
Bluetooth-Pairing-Mo-
dus
zuwechseln.
Beim
Einschalten bl-
inkt
die
grune
Leuchte
3
Sekunden
lang schnell,
bei
Bluetooth-Suche
blinkt
sie
langsam.
2
Ausschalten
Imeingeschateten
oderRuhezu-
stand
Halten
Sie
die
Aufnahm-
etaste
2Sekundenlanggedruckt,
umauszuschalten.Nach
30 Minu-
tenim
Ruhemodus
schaltetes
sich
automatisch
aus.Nach
demEinsc-
halten
Wenninnerhalb
von30
Min-
uten
keine
Kopplu ngerf olgt, schal tet
es-
sich
automatisch
aus.
Nach
3schnellengrūnen
Blinks
erlischt
das
Licht
31
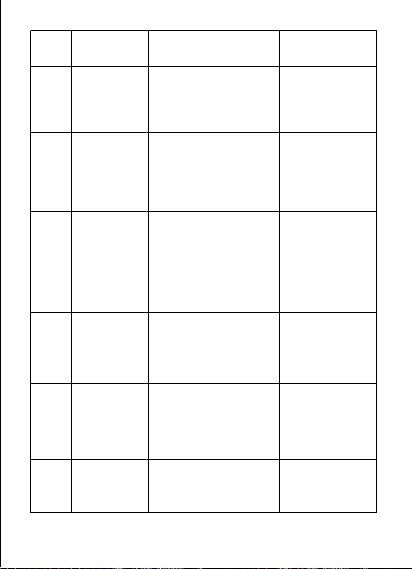
Nr.
Funktion
Bedienung
Anzeige der
Betriebsleuchte
3
Aufnahme
start-
en/stoppen
Kurzes Drücken
der
Aufnahmetaste.
Grüne Anzeige
leuchtet 1x
auf.
4 Zoomen
Zoomhebel nach links
schieben zum
Verkleinern;nach
rechts schieben zum
Vergrößern.
/
5
Vorder-/Rü
ckkamera
wechseln
Kurzes Drücken der
Bildschirmaktiv-
ierungstaste.
/
6
Modus
wechseln
Moduswahlrad nach
links oder rechts
drehen.
/
7
Bildschirm
aktivieren
Bei ausgeschaltetem
Handybldschim.Haten Sie
die Bildschirmaktivierung-
staste 2Sekundenlang
gedrückt,um die Kamerazu
aktivieren.
/
8
Fokussieren
Aufnahmetaste halb
durchdrücken.
/
31
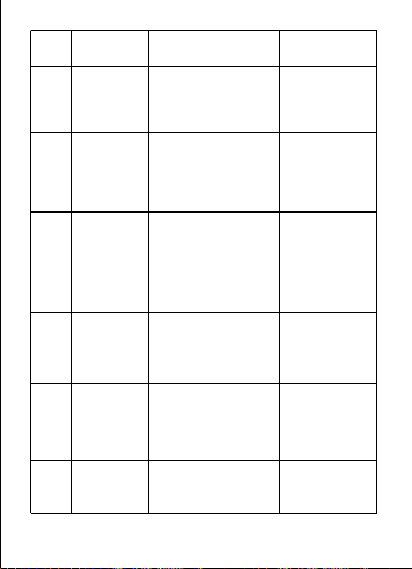
Nr.
Funktion
Bedienung
Anzeige
der
Be-
triebsleuchte
3
Aufnahme
start-en/
stoppen
Kurzes
Drücken
der
Aufnahmetaste.
Grüne
Anzeige
leuchtet
1x
auf.
4 Zoomen
Zoomhebel
nach
linkssch-
ieben
zumVerkleinern;nach
rechts
schieben
zumVergr
ößern.
/
5
Vorder-/Rü
ckkamera
wechseln
Kurzes
Drücken
der
Bildschirmaktiv-ierun-
gstaste.
/
6
Modus
wechseln
Moduswahlrad
nach
links
oder
rechts
drehen.
/
7
Bildschirm
aktivieren
Bei
ausgeschaltetem
Handy-
bldschim.Haten
Sie
die
Bildschirmakti vierung-
st-
aste
2Sekundenlang
gedrü
ckt,um
die
Kamerazu
aktivi-
eren.
/
8
Fokussieren
Aufnahmetaste
halb
durchdrücken.
/
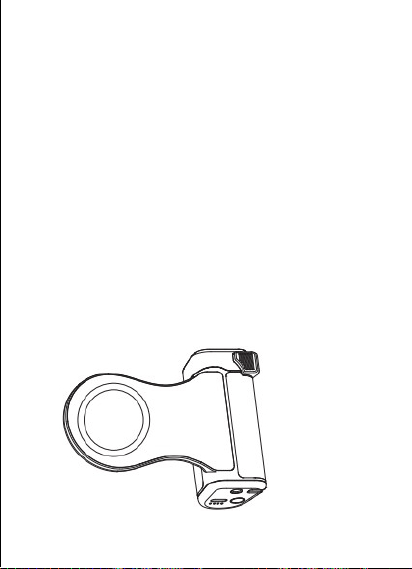
In den Ruhemodus wechseln
Nach erfolgreicher Bluetooth-Kopplung:Wenn das Gerät 60
Minuten nach dem Einschalten nicht bedient wird,wechseltes
automatisch in den Ruhemodus.
Aus dem Ruhemodus aufwecken
Im Ruhemodus:Durch kurzes Drücken einer beliebigen Taste
wird das Gerät aufgeweckt.
1.Nach dem Aufwecken:Wenn das zuvor gekoppelte
Handy-Bluetooth eingeschaltet ist,erfolgt die Verbindung
automatisch.
2.Wenn das zuvor gekoppelte Handy-Bluetooth ausgeschaltet
ist,beginnt die Anzeige zu blinken.Erfolgt innerhalb von 2
Minuten keine Kopplung,geht das Gerät in den Ruhemodus
und schaltet sich nach 30 Minuten aus.
Hinweis bei niedrigem Akkustand und Laden
Dieses Gerät verfügt über einen USB-C-Ladeanschluss. Bei
niedrigem Akkustand leuchten alle Anzeigelichter rot auf.Bitte
laden Sie das Gerät auf,wenn der Akkustand unter 20%liegt.
32
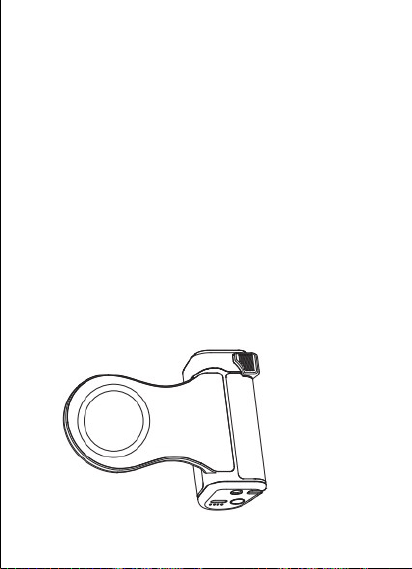
In den Ruhemodus wechseln
Nach erfolgreicher Bluetooth-Kopplung:Wenn das Gerät 60
Minuten nach
dem Einschalten nicht bedient wird,wechseltes
automatisch in den
Ruhemodus.
Aus dem Ruhemodus aufwecken
Im Ruhemodus:Durch kurzes Drücken einer beliebigen Taste
wird das Gerät
aufgeweckt.
1.Nach dem Aufwecken:Wenn das zuvor gekoppelte
Handy-Bluetooth
eingeschaltet ist,erfolgt die Verbindung
automatisch.
2.Wenn das zuvor gekoppelte Handy-Bluetooth ausgeschaltet
ist,beginnt
die Anzeige zu blinken.Erfolgt innerhalb von 2
Minuten keine Kopplung,
geht das Gerät in den Ruhemodus
und schaltet sich nach 30 Minuten
aus.
Hinweis bei niedrigem Akkustand und Laden
Dieses Gerät verfügt über einen USB-C-Ladeanschluss. Bei
niedrigem Akkustand
leuchten alle Anzeigelichter rot auf. Bitte
laden Sie das Gerät auf,wenn der
Akkustand unter 20%liegt.
32
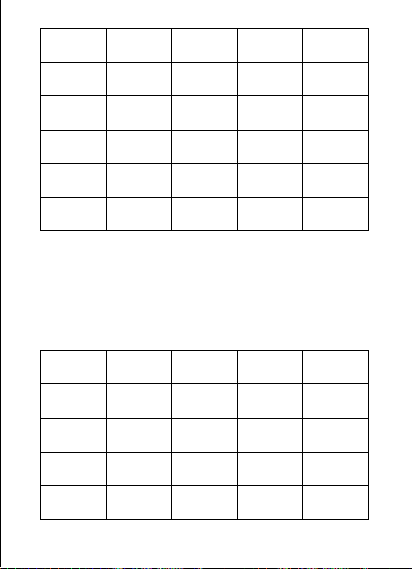
Drahtloses Laden
1.Legen Sie das Handy auf die magnetische Ladeposition.
Kurzes Drücken der Laden-Ein/Aus-Taste startet das Laden
des Handys.Doppeltes Drücken der Laden-Ein/Aus-Taste
beendet das Laden des Handys.
2. Während der Griff lädt oder entlädt, zeigen die Anzeigen
folgendes:
33
Akku-
stand
LED1 LED2
LED3
LED4
100%-75% √ √
√ X
75%-50% √ √
X X
50%-25% √
X X X
Unter 25% Blinkt
X X X
Akku-
stand
LED1 LED2
LED3
LED4
Unter 25% Blinkt X
X X
25%-50% √ Blinkt
X X
50%-75% √ √ Blinkt
X
75%-100% √ √ √
Blinkt
100%voll √ √ √
√
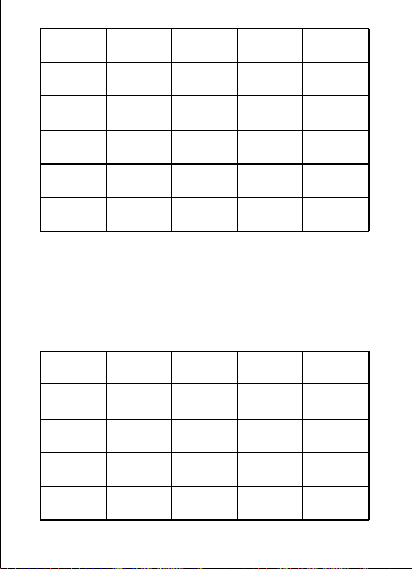
Drahtloses Laden
1.Legen Sie das Handy auf die magnetische Ladeposition.Kurzes Drü
cken der Laden-Ein/Aus-Taste startet das Laden des Handys.
Doppeltes Drücken der Laden-Ein/Aus-Taste
beendet das Laden des
Handys.
2. Während der Griff lädt oder entlädt, zeigen die Anzeigenfolgend-
es:
33
Akku-
stand
LED1 LED2
LED3
LED4
100%-75% √ √
√ X
75%-50% √ √
X X
50%-25% √
X X X
Unter
25%
Blinkt
X X X
Akku-
stand
LED1 LED2
LED3
LED4
Unter
25% Blinkt X
X X
25%-50% √ Blinkt
X X
50%-75% √ √ Blinkt
X
75%-100% √ √ √
Blinkt
100%voll √ √ √
√
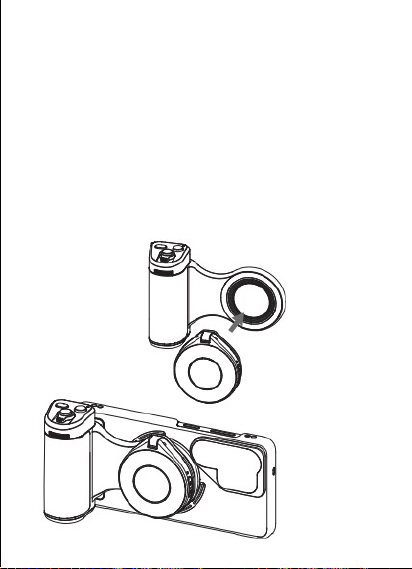
Bedienungsanleitung für den magnetischen Blitz
Nachdem der Blitz am Samsung S26 Ultra Shooting-Grip
befestigt wurde,kann der Blitz über den Griff ausgelost
werden.
Verbindungsschritte:
1.Schalten Sie die Bluetooth-Funktion des Handys ein,suchen
und verbinden Sie das Blitzgerät mit dem Namen
TELESIN_LT03.
2.Nach erfolgreicher Kopplung bringen Sie die magnetische
Seite des Blitzes am Magnetring auf der Vorderseite des Griffs
an.Drücken Sie die Aufnahmetaste am Griff,um gleichzeitig
die Handyaufnahme und den Blitz auszulösen.
34
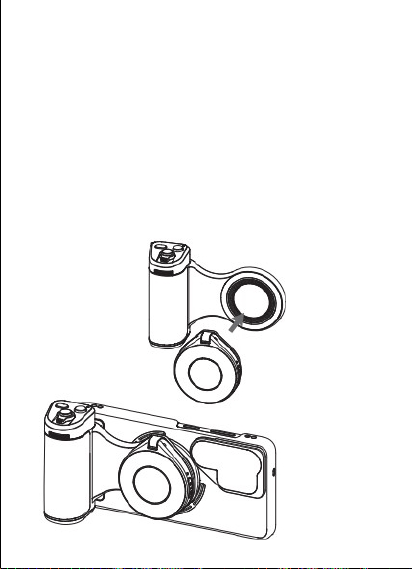
Bedienungsanleitung für den magnetischen Blitz
Nachdem der Blitz am Samsung S26 Ultra Shooting-Grip
befestigt wurde,kann der Blitz über den Griff ausgelost
werden.
Verbindungsschritte:
1. Schalten Sie die Bluetooth-Funktion des Handys ein,suchen
und
verbinden Sie das Blitzgerät mit dem Namen
TELESIN_LT03.
2.Nach erfolgreicher Kopplung bringen Sie die magnetische
Seite des
Blitzes am Magnetring auf der Vorderseite des Griffs
an.Drücken Sie die
Aufnahmetaste am Griff,um gleichzeitig
die Handyaufnahme und den
Blitz auszulösen.
34
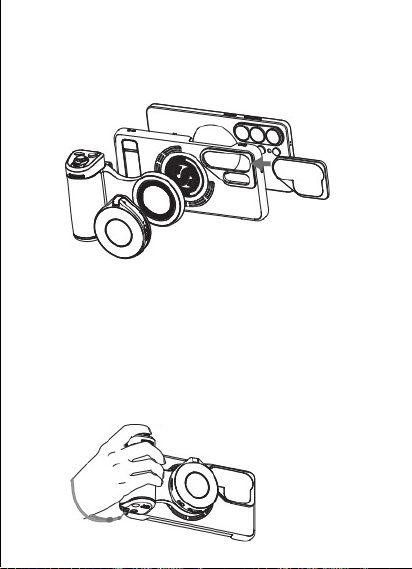
Filteranleitung
Setzen Sie den ND16-Filter in Pfeilrichtung in den
Objektivadapter der Handyhülle ein.Er wird automatisch
mittels Magneten eingerastet.
Handgelenkband-Anleitung
In schwierigen Umgebungen oder bei starkem
Personenverkehr sollte unbedingt das Handgelenkband
verwendet werden.Verwenden Sie das Produkt nicht in
Hochbelastungssport-Szenarien.
1.Fädeln Sie die Schlaufe am Ende des Handgelenkbands durch
die Öse an der Unterseite des Geräts.
2.Nach dem Festziehen und Sicherstellen,dass die Verbindung
verriegelt ist,legen Sie das Band um Ihr Handgelenk und
stellen die Länge entsprechend ein.
35
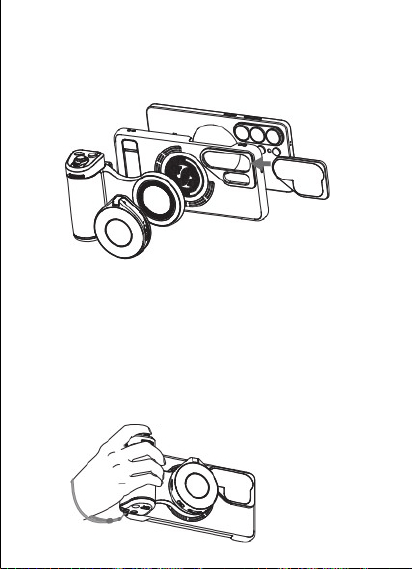
Filteranleitung
Setzen Sie den ND16-Filter in Pfeilrichtung in denObjektivadapter
der Handyhülle ein. Er wird automatisch
mittels Magneten
eingerastet.
Handgelenkband-Anleitung
In schwierigen Umgebungen oder bei starkem
Personenverkehr
sollte unbedingt das Handgelenkband verwendet werden.Ver-
wenden Sie das Produkt nicht inHochbelastungssport-Szenarien.
1.Fädeln Sie die Schlaufe am Ende des Handgelenkbands durch die Öse an
der Unterseite des Geräts.
2.Nach dem Festziehen und Sicherstellen,dass die Verbindung verriegelt ist,
legen Sie das Band um Ihr Handgelenk und
stellen die Länge entsprechend ein.
35
Spezifikationen
36
Magnetgriff
Kompatible Modelle
Samsung S26 Ultra
Produktabmessungen
185*83.5*37.8mm
Produktgewicht 150g
Gehäusematerial Kunststoff+Metall
Drahtlose
Verbindung
Bluetooth Low Energy
Steuerungsentfer-
nung
10 Meter
Akkukapazität
3200mAh/3.6V
Drahtlose
Ladeleistung
10W
Hardware-Schnitt-
stelle
Type-c*1
Montageanschluss 1/4"-Gewindebohrung*1
Griffmontage Magnetisch
Betriebstemperatur
5℃~40℃
Spezifikationen
36
Magnetgriff
Kompatible
Modelle
Samsung
S26
Ultra
Produktabmessungen
185*83.5*37.8mm
Produktgewicht 150g
Gehäusematerial Kunststoff+Metall
Drahtlose
Verbindung
Bluetooth
Low
Energy
Steuerungsentfer-
nung
10
Meter
Akkukapazität
3200mAh/3.6V
Drahtlose
Ladeleistung
10W
Hardware-Schnitt-
stelle
Type-c*1
Montageanschluss 1/4"-Gewindebohrung*1
Griffmontage Magnetisch
Betriebstemperatur
5℃~40℃
37
Magnetblitz
Abmessungen
66*58.5*19mm
Gewicht
60g
Hardware-Schnitt-
stelle
Type-c*1
Farbtemperaturbereich
(Dauerlicht)
2500K/4500K/6500K,drei Stufen
einstellbar
Farbtemperaturbereich
(Blitz)
7500K±200K
Farbwiedergabeindex
(Dauerlicht)
RA≥85
Farbwiedergabeindex
(Blitz)
RA≥85
Dauerlicht-Helligkeit Max.Helligkeit>300lux@0,5m
Blitz-Helligkeit Max.Helligkeit>5000lux@0,5m
Lichtleistung
(Dauerlicht)
3W
Lichtleistung(Blitz)
15W
Magnetkraft
Magnetkraftüber 12N
Laufzeit/Akku-Leb-
ensdauer
Dauerlicht bei max.Helligkeit:
≥45 Min.
Akkuparameter
500mAh/3.7V
Bluetooth-Steuer-
ungsentfernung
10 meters
37
Magnetblitz
Abmessungen
66*58.5*19mm
Gewicht
60g
Hardware-Schnitt-
stelle
Type-c*1
Farbtemperaturbereich
(Dauerlicht)
2500K/4500K/6500K,drei
Stufen
ei-
nstellbar
Farbtemperaturbereich
(Blitz)
7500K±200K
Farbwiedergabeindex
(Dauerlicht)
RA≥85
Farbwiedergabeindex
(Blitz)
RA≥85
Dauerlicht-Helligkeit
Max.Helligkeit>300lux@0,5m
Blitz-Helligkeit
Max.Helligkeit>5000lux@0,5m
Lichtleistung
(Dauerlicht)
3W
Lichtleistung(Blitz)
15W
Magnetkraft
Magnetkraftüber 12N
Laufzeit/Akku-Leb-
ensdauer
Dauerlicht
bei
max.Helligkeit:
≥45
Min.
Akkuparameter
500mAh/3.7V
Bluetooth-Steuer-
ungsentfernung
10
meters
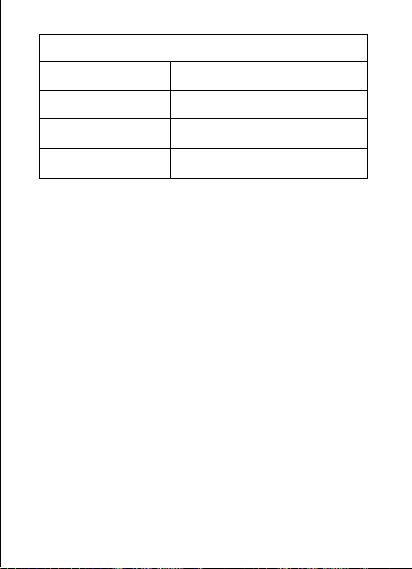
Sicherheitshinweise
1.Identifizieren Sie alle Komponenten im Paket klar,unterscheiden Sie die
Funktionenjedes Ports der Powerbank und erkennen Sie die
Schnittstellentypen Ihres Gerats.Eine unsachgemaße Nutzung der
Stromversorgung kann die Batterie und angeschlossene Geräte
beschädigen.
2.Beim ersten Gebrauch muss die Powerbank mit einem Standard-Lade-
gerät von 5V=2A aufgeladen werden.Zurtäglichen Wartung führen Sie
Bei längerer Nichtnutzung alle 3 Monate einen Ladeentladungszyklus
durch,um die Lebensdauer der Batteriezellen zu gewahrleisten.
3.Die Powerbank enthält organisch entflammbare Materia lien.Eine
unsachgemäße Nutzung kann zu Rissen,Leckagen,Uberhitzung und
dauerhaften Batterieschäden führen.Die Powerbank verfugt über
integrierte Sicherheitsschutzmechanismen.
4.Platzieren Sie die Batterie oder das Gerät nicht in der Nähe von
Heizgeräten (z.B. Mikrowellen, Öfen oder Heizkörpern). Zerlegen oder
modifizieren Sie die Batterie nicht,da dies zu Leckagen,Überhitzung,
Bränden oder Explosionen führen kann.Bei Leckagen vermeiden Sie
Haut-/Augenkontakt.Spülen Sie sofort mit klarem Wasser ab und suchen
Sie ärztliche Hilfe. Bei beschädigten Kabeln verwenden Sie das Gerät nicht mehr.
weiter.
5.Lagern Sie die Powerbank nicht in Umgebungen über 60℃(z.B.direkte
Sonneneinstrahlung,offene Flammen oder Ofen).
6.Ein Untertauchen in Wasser beschädigt die Sicherheitsparameter der
Powerbank und kann zu Überhitzung, Bränden oder Explosionen führen.
7.VermeidenSie das Zerdrücken der Powerbank mit schweren
38
Magnetfilter
Filtertyp
ND16 Graufilter
Produktmaterial
Aluminiumlegierung+
Optisches Glas
Montageart
Magnetischer
Schnappverschluss
Produktgewicht 20g
Sicherheitshinweise
1. Identifizieren Sie alle Komponenten im Paket klar,unterscheiden Sie die Funktionenjedes
Ports der Powerbank und erkennen Sie die Schnittstellentypen Ihres Gerats.Eine unsachgema
ße Nutzung der
Stromversorgung kann die Batterie und angeschlossene Geräte
beschädigen.
2. Beim ersten Gebrauch muss die Powerbank mit einem Standard-Lade-
gerät von 5V=2A
aufgeladen werden.Zurtäglichen Wartung führen Sie
Bei längerer Nichtnutzung alle 3
Monate einen Ladeentladungszyklus
durch,um die Lebensdauer der Batteriezellen zu
gewahrleisten.
3. Die Powerbank enthält organisch entflammbare Materia lien. Eine unsachgemäße
Nutzung kann zu Rissen,Leckagen,Uberhitzung und dauerhaften Batterieschäden fü
hren.Die Powerbank verfugt über integrierte Sicherheitsschutzmechanismen.
4.Platzieren Sie die Batterie oder das Gerät nicht in der Nähe von
Heizgeräten (z.B. Mikrowellen,
Öfen oder Heizkörpern). Zerlegen oder
modifizieren Sie die Batterie nicht,da dies zu
Leckagen,Überhitzung,Bränden oder Explosionen führen kann. Bei Leckagen vermeiden Sie
Haut-/Augenkontakt.Spülen Sie sofort mit klarem Wasser ab und suchen
Sie ärztliche Hilfe. Bei
beschädigten Kabeln verwenden Sie das Gerät nicht mehr.
weiter
.
5.Lagern Sie die Powerbank nicht in Umgebungen über 60℃(z.B.direkte
Sonneneinstrahlung,
offene Flammen oder Ofen)
.
6.Ein Untertauchen in Wasser beschädigt die Sicherheitsparameter der
Powerbank und kann
zu Überhitzung, Bränden oder Explosionen führen.
7.VermeidenSie das Zerdrücken der Powerbank mit schweren
38
Magnetfilter
Filtertyp
ND16
Graufilter
Produktmaterial
Aluminiumlegierung+
Optisches
Glas
Montageart
Magnetischer
Schnappverschluss
Produktgewicht 20g

Gegenstanden,dadies Verformungen verursachen kann.
8.Die Nutzung nicht standardkonformer Ladegeräte oder die Modifikation
von Ladeparametern kann zu Uberhitzung,Verbrennung oder Explosionen
führen.
9.Bei Überhitzung,Verformung,Beschädigungen oder Kratzern verwenden
Sie die Powerbanksofort nicht mehr und kontaktieren Sie den Handler oder
Hersteller.
10.Werfen Sie die Powerbank nicht ins Feuer,da dies zu Batteriebränden
führen kann.Führen Sie keinen Batterieersatz durch,da dies
Explosionsgefahr birgt.Entsorgen Sie gebrauchte Batterien gemaB
Anweisungen.Zerstoren Sie die Powerbank nicht in Feueröfen,durch
Schneiden oder unter extremem Druck.
11.Die Verwendung falscher BatteriegröBen ist explosionsgefährlich.
Entsorgen Sie gebrauchte Batterien stets korrekt.
12.Entsorgen Sie die Powerbank nicht im Hausmüll,sondern bringen Sie sie
an zertifizierte Recyclingstellen.
13.Tauschen Sie keine Reparaturen durch.Ändern Sie keine Komponenten
ohne Genehmigung des Herstellers.
1.Nur für die Verwendung in nicht-tropischen Klimazonen
geeignet
2.Nach dem Eindringen von Wasser nicht mehr verwenden
Haftungsausschluss
Bitte lesen Sie diese Hinweise sorgfaltig durch.Mit der Nutzung des
Produkts erklären Sie sich ausdrucklich mit allen Bestimmungen dieses
Dokuments einverstanden.Uberprufen Sie das Produkt vor jedem
Gebrauch auf Beschädigungen oder Verformungen-verwenden Sie es in
solchen Fallen nicht.Durch die Nutzung des Produkts erkennen Sie an und
erklāren sich damit einverstanden,dass Sie allein verantwortlich für die
Nutzungund etwaige Folgen sind.Sie versichern,das Produkt nur für
rechtmaBige Zwecke einzusetzen.Sie verstehen und akzeptieren,dass
Telesin Digital Co.,Ltd.(im Folgenden „Telesin”)keine Haftung für direkte
oder indirekte Schaden,Verletzungen,Strafen oder andere rechtliche
Konsequenzen übernimmt,die durch die Nutzung des Produkts
entstehen.Nutzer sind verpflichtet,die hier genannten Sicherheitshin-
weise zu beachten.Innerhalb der nationalen Gesetze liegt das alleinige
Recht zur Interpretation und Änderung dieser Bestimmungen bei Telesin.
Die Telesin-Garantie gilt ab Erhalt des Produkts für einen Zeitraum von6
Monaten.
39

G genstan en, a ies Verformun en verur achen ka
8.
e
Die Nutz
d
ung
d
ni
d
cht standardkon
g
form er La
s
degeräte o
n
d
n.
er die Modifikation
von
Ladeparametern kann zu Uberhitzung,Verbrennung oder Explosionen
führen
.
9. Bei Überhitzung,Verformung,Beschädigungen oder Kratzern verwenden
Sie die
Powerbanksofort nicht mehr und kontaktieren Sie den Handler oder
Hersteller.
10.Werfen Sie die Powerbank nicht ins Feuer,da dies zu Batteriebränden
führen kann.Fü
hren Sie keinen Batterieersatz durch,da dies Explosionsgefahr birgt. Entsorgen Sie
gebrauchte Batterien gemaB
Anweisungen.Zerstoren Sie die Powerbank nicht in Feuer
öfen,durch
Schneiden oder unter extremem Druck.
11.Die Verwendung falscher BatteriegröBen ist explosionsgefährlich.
Entsorgen Sie
gebrauchte Batterien stets korrekt.
12.Entsorgen Sie die Powerbank nicht im Hausmüll,sondern bringen Sie sie
an zertifizierte
Recyclingstellen.
13.Tauschen Sie keine Reparaturen durch.Ändern Sie keine Komponentenohne
Genehmigung des Herstellers.
1.Nur für die Verwendung in nicht-tropischen Klimazonen
geeignet
2.Nach dem Eindringen von Wasser nicht mehr verwenden
Haftungsausschluss
Bitte lesen Sie diese Hinweise sorgfaltig durch.Mit der Nutzung des Produkts erklären Sie sich
ausdrucklich mit allen Bestimmungen dieses Dokuments einverstanden. Uberprufen Sie das
Produkt vor jedem
Gebrauch auf Beschädigungen oder Verformungen-verwenden Sie es in
solchen Fallen nicht.Durch die Nutzung des Produkts erkennen Sie an und
erklāren sich damit
einverstanden,dass Sie allein verantwortlich für die
Nutzungund etw aige Folgen sind. Sie
versichern,das Produkt nur für
rechtmaBige Zwecke einzusetzen. Sie verstehen und
akzeptieren,dass Telesin Digital Co., Ltd. (im Folgenden „Telesin”)keine Haftung für direkte
oder indirekte Schaden,Verletzungen,Strafen oder andere rechtliche
Konsequenzen ü
bernimmt,die durch die Nutzung des Produkts
entstehen. Nutzer sind verpflichtet,die hier
genannten Sicherheitshin-
weise zu beachten. Innerhalb der nationalen Gesetze liegt das
alleinigeRecht zur Interpretation und Änderung dieser Bestimmungen bei Telesin
.
Die Telesin-Garantie gilt ab Erhalt des Produkts für einen Zeitraum von6 Monaten.
39
Français
Etapes d'installation
1.Installez le Samsung S26 Ultra dansl'étui de teléphone
fourni.
2.Fixez la Poignée de Prise de Vue au dos delétui de
téléphone.
3.Fixez le Flash Magnétique sur la Poignée de Prise de Vue.
4.Enclenchezle Filtre Magnétique sur létui de téléphone.
Mode d'emploi dela Poignée de Prise de Vue
Schéma du produit
40
Etapes d'installation
1.
Installez le
Samsung
S26
Ultra
dansl'étui
de
teléphone
fourni.
2.Fixez
la
Poignée
de
Prise
de
Vue
au
dos
delétui
det
éléphone.
3.Fixez
le
Flash
Magnétique
sur
la
Poignée
de
Prise
de
Vue.
4.Enclenchezle
Filtre
Magnétique
sur
létui
de
téléphone.
Mode
d'emploi
dela
Poignée
de
Prise
de
Vue
Schéma
du
produit
40
EL
L-
EL
L-
1.Témoin de fonctionnement
9.CEillet pour dragonne de
poignet
2.Touche de réveil d'écran
3.Touche de prise de vue
10.Interrupteur de charge
11.Témoins de chargex4
4.Levier de zoom
12.Port de charge USB-C
(Entrée/Sortie)
5.Molette de mode
6.Touche Fn
13.Position de charge
7.Repose-pouce
magnétique
8.Trou filete 1/4"
14.Bague magnétique
Instructions d'utilisation
Maintenez la Touche de Prise de Vue enfoncée pendant
2 secondes pour allumer.Appuyez pour vous connecter au
nom Bluetooth TELESIN_S26;si aucun appareln'est
connecté dans les 30 minutes,I'appareils'éteint
automatiquement.
42
N°
Fonction
Opération
Témoinde
fonctionnement
1
Mise sous
tension
Maintenez la Touche de
PrisedeVueenfoncée2
secondes pour allumer et
passerenmode
dappairage Bluetooth.
LaLED verteclignote
rapidement 3folsala
mise soustension,et
dignote lentement
pendantla recherche
Bluetooth
2
Mise hors
tension
En mode allume ouveille:
Maintenez la Touche de Prisede
Vue enfoncee 2secondes pour
éteindre.Apres 30 minutes en
eille,misehors tension
automatique.Apres allumage:
Silnyaaucun appairage dans
les 30minutes,mise hors
tension automatique.
Apres 3
clignotements
verts rapides,la
lumiere s'eteint.
1.Témoin de fonctionnement
9.CEillet pour dragonne de
poignet
2.Touche de réveil d'écran
3.Touche de prise de vue
10.Interrupteur de charge
11.Témoins de chargex4
4.Levier de zoom
12.Port de charge USB-C
(Entrée/Sortie)
5.Molette de
mode
6.Touche Fn
13.Position de charge
7.Repose-pouce
magnétique
8.Trou filete 1/4"
14.Bague magnétique
Instructions d'utilisation
Maintenez la Touche de Prise de Vue enfoncée pendant
2 secondes pour allumer.Appuyez pour vous connecter au
nom Bluetooth TELESIN_S26;si aucun appareln'est connect
é dans les 30 minutes,I'appareils'éteint automatiquement.
42
N°
Fonction
Opération
Témoinde
fonctionnement
1
Mise
sous
tension
Maintenez
la
Touche
dePr-
isedeVueenfoncée2
secondes
pour
allumer
et
passeren-
mode
dappairage
Bluetooth.
LaLED
verteclignote
rapidement
3folsala
mise
soustension,et
dignote
lentement
pendantla
recherche
Bluetooth
2
Mise
hors
tension
En
mode
allume
ouveille:
Ma in -
te nez
la
To uche
de
Pr isede
Vue
enfoncee
2secondes
pour
éteindre.Apres
30
minutes
en
eille,
misehors
tension
automatique.Apres
allumage:
Silnyaaucun
appairage
dansles
30minutes,mise
horstension
automatique.
Apres
3
clignotements verts
rapides,la
lumiere
s'eteint.
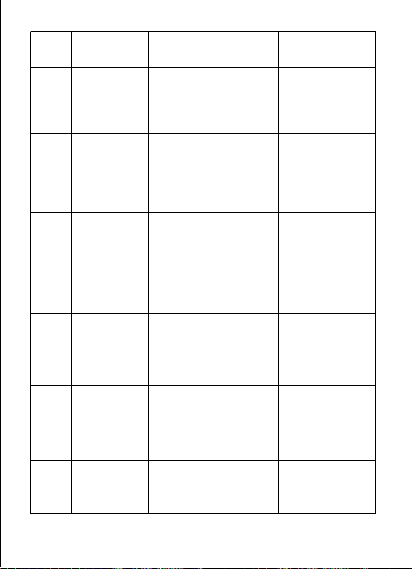
43
N°
Fonction
Opération
Témoinde
fonctionnement
3
Démar-
rer/Arréter
lenregis-
trement
Appuyez brievement
sur la Touche de
Prise de Vue.
Témoin vert
s'allume 1 fois
4 Zoom
Poussez le Levier de
Zoom vers la gauche
pour dezoomer;
poussez versla droite
pour zoomer.
/
5
Basculer
caméra
avant/ar-
riere
Appuyez brievement
sur la Touche de
Reveil d'Ecran.
/
6
Changer de
mode
Tournez la Molette de
Mode versla gauche
oula droite.
/
7
Réveiller
l'écran
Lorsquelécrandu téléphone
esteteint,maintenezla
Touche de Réveil dEcran
enfoncee 2secondes pour
réveiller fappareil photo.
/
8
Mise au point
Appuia mi-course sur
la Touche de Prise de
Vue.
/
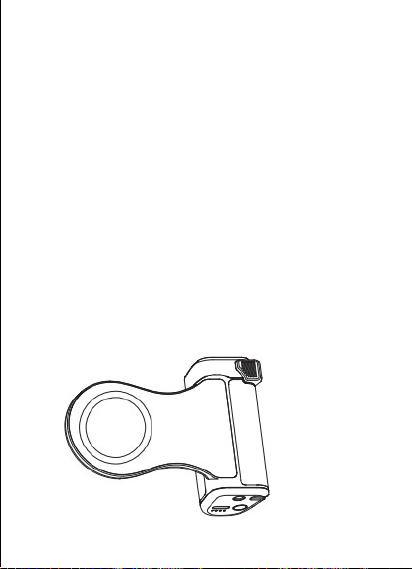
43
N°
Fonction
Opération
Témoinde
fonctionnement
3
Démar-rer/
Arréter
lenregis-
trement
Appuyez
brievement sur
la
Touche
dePrise
de
Vue.
Témoin
vert
s'allume
1
fois
4 Zoom
Poussez
le
Levier
de
Zoom
vers
la
gauche
pour
dezoomer;
poussez
versla
droite
pour
zoomer.
/
5
Basculer
caméra
avant/ar-
riere
Appuyez
brievement sur
la
Touche
deReveil
d'
Ecran.
/
6
Changer
de
mode
Tournez
la
Molette
de
Mode
versla
gaucheoula
droite.
/
7
Réveiller
l'écran
Lorsquelécrandu
téléphone
esteteint,maintenezla
Touche
de
Réveil
dEcran
enfoncee
2secondes
pour
réveiller
fappareil
photo
/
8
Mise
au
point
Appuia
mi-course
sur
la
Touche
de
Prise
de Vue.
/
Mise en veille
Apres un appairage Bluetooth réussi:Si lappareil n'est pas
utilisé pendant 60 minutes apres lallumage,il passe
automatiquement en mode veille.
Réveilde la veille
En mode veille:Appuyez brievement sur n'importe quelle
touche pour réveiller lappareil.
1.Apresle réveil:Si le Bluetooth du téléphone précedemment
appairé est activé,reconnexion automatique.
2.Sile Bluetooth du téléphone precedemment appairé est
désactivé,le témoin se meta clignoter.S'il n'y a aucun
appairage dans les 2 minutes,'appareil passe en mode veille
et s'éteint au bout de 30 minutes.
Avertissement de batterie faible et chargement
Cet appareil est équipé d'un port de charge USB-C.Lorsquela
batterie est faible,tous les témoins lumineux deviennent
rouges.Veuillez rechargerl'appareil lorsquele niveau de la
batterie est inférieura 20%.
44
Mise en veille
Apres un appairage Bluetooth réussi:Si lappareil n'est pas
utilisé
pendant 60 minutes apres lallumage,il passe
automatiquement en mode
veille.
Réveilde la veille
En mode veille:Appuyez brievement sur n'importe quelle
touche pour
réveiller lappareil.
1.Apresle réveil:Si le Bluetooth du téléphone précedemment
appairé
est activé,reconnexion automatique.
2.Sile Bluetooth du téléphone precedemment appairé est
désactivé,le t
émoin se meta clignoter.S'il n'y a aucun
appairage dans les 2 minutes,'
appareil passe en mode veille
et s'éteint au bout de 30 minutes.
Avertissement de batterie faible et chargement
Cet appareil est équipé d'un port de charge USB-C.Lorsquela
batterie
est faible,tous les témoins lumineux deviennent
rouges.Veuillez
rechargerl'appareil lorsquele niveau de la
batterie est inférieura 20%.
44
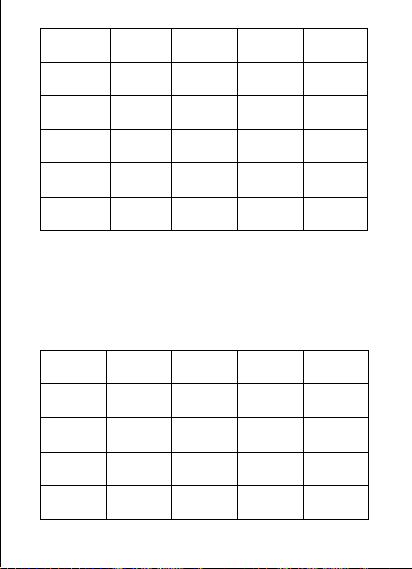
Charge sans fil
1.Placezle téléphone sur la Position de Charge Magnétique.
Un appui bref surI'lnterrupteur de Charge lance la charge du
téléphone.Un double appui sur I'Interrupteur de Charge
arrete la charge du téléphone.
2.Lorsquela poignee charge ou se décharge,les témoins
indiquent ce qui suit:
45
Niveau
batterie
LED1 LED2
LED3
LED4
100%-75% √ √ √ X
75%-50% √ √ X X
50%-25% √ X X X
Moinsde25%
Clignote
X X X
Niveau
batterie
LED1 LED2
LED3
LED4
Moinsde25%
Clignote
X X X
25%-50% √
Clignote
X X
50%-75% √ √
Clignote
X
75%-100% √ √ √
Clignote
Pleine(100%)
√ √ √ √
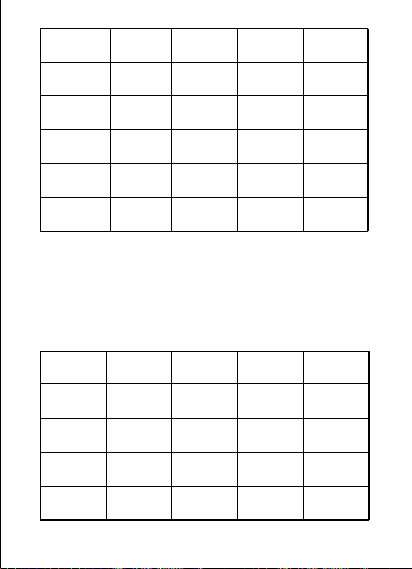
Charge sans fil
1. Placezle téléphone sur la Position de Charge Magnétique.
Un appui
bref surI'lnterrupteur de Charge lance la charge du téléphone.Un double
appui sur I'Interrupteur de Chargearrete la charge du téléphone.
2.Lorsquela poignee charge ou se décharge,les témoins indiquent
ce qui suit:
45
Niveau
batterie
LED1 LED2
LED3
LED4
100%-75% √ √ √ X
75%-50%
√
√ X X
50%-25% √ X X X
Moinsde25%
Clignote
X X X
Niveau ba-
tterie
LED1 LED2
LED3
LED4
Moinsde25%
Clignote
X X X
25%-50% √
Clignote
X X
50%-75% √ √
Clignote
X
75%-100% √ √ √
Clignote
Pleine(100%)
√ √ √ √
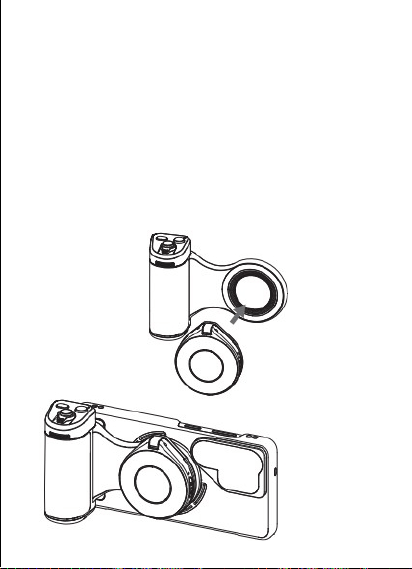
Mode demploi du Flash Magnétique
Une foisle flash attaché àla Poignéede Prise de Vue Samsung
S26 Ultra,le flash peut etre déclenché via la poignée.
Etapes de connexion:
1.Activez la fonction Bluetooth du téléphone,recherchez et
connectez-vous al'appareil flash nommé TELESIN_LT03.
2.Apres un appairage réussi,fixez le coté magnétique du flash
sur la Bague Magnétique alavant dela poignée.Appuyez sur
la Touche de Prise de Vue de la poignée pour déclencher
simultanément la prise de vue du teléphone et le flash.
46
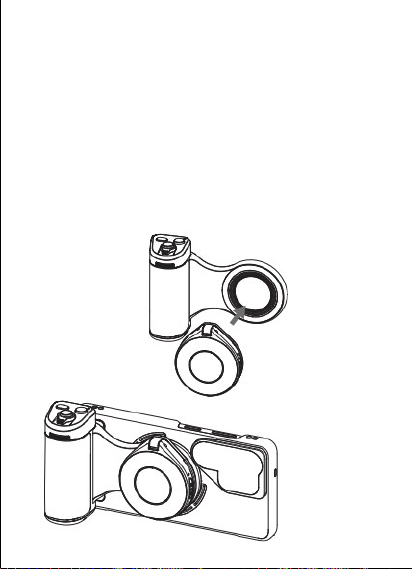
Mode demploi du Flash Magnétique
Une foisle flash attaché àla Poignéede Prise de Vue Samsung
S26
Ultra,le flash peut etre déclenché via la poignée.
Etapes de connexion:
1.Activez la fonction Bluetooth du téléphone,recherchez et connectez-vous
al'appareil flash nommé TELESIN_LT03.
2.Apres un appairage réussi,fixez le coté magnétique du flash
sur la Bague
Magnétique alavant dela poignée.Appuyez sur
la Touche de Prise de Vue de
la poignée pour déclencher
simultanément la prise de vue du teléphone et le
flash.
46
Instructions pour le filtre
Insérez le filtre ND16 dans ladaptateur d'objectif de létui de
téléphone dansle sens de la fleche.
Il
s'enclenche
automatiquement en place par magnétisme.
Instructions pour la dragonne de poignet
Dans des environnements complexes ou des scenes a fort
trafic,utilisez impérativement la dragonne de poignet.
N'utilisez pas ce produit dans des scenes sportives a fort
impact.
1.Passez la boucle a lextrémité de la dragonne dans I'ceillet
situé au bas del'apparel.
2.Apres avoir serré et vérifie que la connexion est verrouillee,
passez la dragonne autour de votre poignet et ajustez a
longueur.
47
Instructions pour le filtre
Insérez le filtre ND16 dans ladaptateur d'objectif de létui de
téléphone
dansle sens de la fleche.
Il
s'enclenche
automatiquement en place par magn
étisme.
Instructions pour la dragonne de poignet
Dans des environnements complexes ou des scenes a fort
trafic,
utilisez impérativement la dragonne de poignet.
N'utilisez pas ce produit dans des scenes sportives a fort
impact.
1.Passez la boucle a lextrémité de la dragonne dans I'ceillet situé
au bas del'apparel.
2.Apres avoir serré et vérifie que la connexion est verrouillee,
passez
la dragonne autour de votre poignet et ajustez a
longueur.
47
Spécifications
48
Poignée magnétique
Modeles compatibles
Samsung S26 Ultra
Dimensions du produit
185*83.5*37.8mm
Poids du produit
150g
Matériau du boitier
Plastique+Métal
Connexion sans fil
Bluetooth Low Energy
Distance de controle 10 metres
Capacité dela batterie
3200mAh/3.6V
Puissance de charge
sansfil
10W
Interface matériele
Type-c*1
Interface de montage
Trou fileté 1/4"*1
Méthode de fixation
Magnétique
Température de
fonctionnement
5℃~40℃
Spécifications
48
Poignée magnétique
Modeles
compatibles
Samsung
S26
Ultra
Dimensions
du
produit
185*83.5*37.8mm
Poids
du
produit
150g
Matériau du boitier
Plastique+Métal
Connexion
sans
fil
Bluetooth
Low
Energy
Distance
de
controle
10 metres
Capacité
dela
batterie
3200mAh/3.6V
Puissance
de
charge
sansfil
10W
Interface matériele
Type-c*1
Interface
de
montage
Trou
fileté
1/4"*1
Méthode de fixation
Magnétique
Température
de
fonctionnement
5℃~40℃
49
Flash magnétique
Dimensions 66*58.5*19mm
Poids
60g
Interface matérielle
Type-c*1
Plage de température de
couleur (lumiere continue)
2500K/4500K/6500K,trois
niveaux réglables
Plage de température
de couleur(flash)
7500K±200K
hdice de rendu des couleurs
(Lumier continue)
IRC≥85
Indice de rendu des
couleurs(flash)
IRC≥85
Luminosité de la
lumiere continue
Luminosité max.>[email protected]
Puissance lumineuse
(lumiere continue)
3W
Puissance lumineuse
(flash)
15W
Force magnétique Magnetkraftüber 12N
Autonomie/durée de
vie batterie
Lumiere continuea luminosité
max.:≥45 min
Parametres batterie
500mAh/3.7V
Distance de controle
Bluetooth
10 mètres
49
Flash magnétique
Dimensions 66*58.5*19mm
Poids
60g
Interface matérielle
Type-c*1
Plage
de
température
de
couleur
(lumiere
continue)
2500K/4500K/6500K,trois
niveaux
réglables
Plage
de
températurede
couleur(flash)
7500K±200K
hdi ce
de
ren du
des
cou leurs
(Lumier
continue)
IRC≥85
Indice
de
rendu
des
couleurs(flash)
IRC≥85
Luminosité
de
la
lumiere
continue
Luminosité max.
Luminosité duflash
Luminosité
max.>[email protected]
Puissance
lumineuse
(lumiere
continue)
3W
Puissance
lumineuse
(flash)
15W
Force
magnétique Magnetkraftüber
12N
Autonomie/durée
de
vie
batterie
Lumiere
continuea
luminosité max.:
≥45
min
Parametres
batterie
500mAh/3.7V
Distance
de
controle
Bluetooth
10 mètres
Déclarations de sécurité
1.Identifiez clairement tous les composants a lintérieur delemballage,
distinguezles fonctions de chaque port sur la banque de puissance et
reconnaitrez lestypes d'interfaces utilisees par votre appareil,Une
utilisation incorrecte del'alimentation peut endommager la batterie et les
appareils alimentés par celle-ci.
2.Lors de la premiere utilisation de l'alimentation,elle doit étre chargee
avecun chargeur standard 5V=2A.Pour l'entretien quotidien,étant donné
que ce produit a une auto-décharge tres faible,si vous ne lutilisez pas
pendant une longue période,effectuez un cycle de charge-décharge tous
les 3mois pour assurer la duree de vie des cellules dela batterie.
3.Ce bloc d'alimentation contient des matériaux combustibles organiques
Une utilisation incorrecte de l'alimentation peut causer des fissures,des
fuites,des surchauffes,etc.,entrainant des dommages permanents a la
batterie.Lalimentation est équipee de mécanismes de protection de
sécurité intégrés
4.Ne placez pas la batterie ou l'appareil pres d'appareils de chauffage(p.
ex.,micro-ondes,fours ou radiateurs).La surchauffe dela batterie peut
causer des explosions.Ne démontez pas ou ne modifiez pasla batterie,car
cela pourrait entrainer des fuites,des surchauffes,des incendies ou des
explosions.En cas de fuite de la batterie,evitez tout contact entre le liqude
fui etla peau oules yeux;en cas d'exposition,rincez immédiatement al'eau
claire et consultez un médecin.Siune surchauffe anormale ou d'autres
anomalies surviennent pendant l'utilisation,la charge ou le stockage,cessez
50
Filtre magnétique
Type de filtre
Filtre neutre(densité neutre)ND16
Matériau du produit
Alliage d'aluminium+Verre
optique
Méthode de montage Fermoir magnétique
Poids du produit
20g
Déclarations de sécurité
1.Identifiez clairement tous les composants a lintérieur delemballage, distinguezles fonctions
de chaque port sur la banque de puissance et reconnaitrez lestypes d'interfaces utilisees par
votre appareil,Une
utilisation incorrecte del'alimentation peut endommager la batterie et les
appareils alimentés par celle-ci.
2. Lors de la premiere utilisation de l'alimentation,elle doit étre chargeeavecun chargeur
standard 5V=2A. Pour l'entretien quotidien,étant donné que ce produit a une auto-décharge
tres faible,si vous ne lutilisez pas
pendant une longue période,effectuez un cycle de charge-dé
charge tousles 3mois pour assurer la duree de vie des cellules dela batterie.
3. Ce bloc d'alimentation contient des matériaux combustibles organiques Une utilisation
incorrecte de l'alimentation peut causer des fissures,des fuites,des surchauffes,etc.,entrainant
des dommages permanents a labatterie. Lalimentation est équipee de mécanismes de
protection de sécurité intégrés
4.Ne placez pas la batterie ou l'appareil pres d'appareils de chauffage(p.ex.,micro-ondes,fours ou
radiateurs). La surchauffe dela batterie peut causer des explosions. Ne démontez pas ou ne
modifiez pasla batterie,car cela pourrait entrainer des fuites,des surchauffes,des incendies ou des
explosions.En cas de fuite de la batterie,evitez tout contact entre le liqude fui etla peau oules
yeux;en cas d'exposition,rincez immédiatement al'eau claire et consultez un médecin. Siune
surchauffe anormale ou d'autres anomalies surviennent pendant l'utilisation,la charge ou le
stockage,cessez
50
Filtre magnétique
Type
de
filtre
Filtre
neutre(densité
neutre)ND16
Matériau du produit
Alliage
d'aluminium+Verre
op-
tique
Méthode de montage Fermoir magnétique
Poids
du
produit
20g

immédiatement 'utilisation.Ne continuez pasa utiliser le chargeur sison
cable d'alimentation estendommage pour eviter les chocs electriques ou
les incendies,
5.Ne placez pas le produit dans des environnements a haute temperature(y
compris sous un soleil direct),nexposez-le pas au feu ouà des conditions
de température extremement élevees,et nutilisez paslalimentation pres de
flammes nues,de poeles ou dans des zones où la temperature dépasse
60℃,
6.Sil'alimentation est submergee dansleau,ses parametres et indicateurs
de protection de securité seront endommages,la rendant inopérante.La
submersion peut également causer des surchauffes,des incendies ou des
explosions.
7.Ne utilisez pas de poids lourds oudautres objets pour écraser
lalimentation,car cela pourrait causer une déformation.
8.Lutilisation de chargeurs non standard oula modification des parametres
specifiés du chargeur peuvent causer une surchauffe,une combustion ou
une explosion de la batterie.
9.Si le produit présente des signes de surchauffe,de déformation,de
dommage,de rayures ou dautres problemes pendant son utilisation,cessez
immédiatement son utilisation et contactez le vendeur ou le fabricant.
10.Ne jetez pas l'appareil dans le feu,car cela pourrait provoquer un
incendie ou une explosion de la batterie.Le remplacement de la batterie par
des batteries de taille incorrecte présente un risque dexplosion-disposez
toujours des batteries usagees selon les instructions.Ne jetez pas le bloc
d'alimentation dans lefeu ou dans des fours de chauffage,n'ysoumettez
pasa des écrasements ou des coupes mécaniques,et nexposez-le pasa
des temperatures extremement elevees(ce qui pourrait causer des
explosions ou des fuites de liquides inflammables).Le bloc d'alimentation
pourraitégalement exploser ou fuir des liquides inflammables sous pression
extremement basse.
11.Note:Le remplacement de la batterie par des batteries de taille
incorrecte presente un risque d'explosion'-disposez toujours des batteries
usagées selon les instructions.
12.Nejetez pasle produit directement dans les poubelles;envoyez-le
plutot a des centres de recyclage professionnels locaux.
13.Ne démontez pas le produit,ne tentez pas de le réparer,et ne remplacez
pas de composants sans autorisation.
51

immédiatement 'utilisation. Ne continuez pasa utiliser le chargeur sison cable d'
alimentation estendommage pour eviter les chocs electriques ou
les incendies,
5. Ne
placez pas le produit dans des environnements a haute temperature(y compris sous un
soleil direct),nexposez-le pas au feu ouà des conditions
de température extremement
élevees,et nutilisez paslalimentation pres de
flammes nues,de poeles ou dans des
zones où la temperature dépasse60℃,6.Sil'alimentation est submergee dansleau,ses
parametres et indicateurs de protection de securité seront endommages,la rendant
inopérante.Lasubmersion peut également causer des surchauffes,des incendies ou des
explosions.
7.Ne utilisez pas de poids lourds oudautres objets pour écraser lalimentation,car
cela pourrait causer une déformation.
8.Lutilisation de chargeurs non standard oula modification des parametres specifiés du chargeur
peuvent causer une surchauffe,une combustion ouune explosion de la batterie
.
9. Si le produit présente des signes de surchauffe,de déformation,de
dommage,de rayures ou
dautres problemes pendant son utilisation,cessez
immédiatement son utilisation et contactez le
vendeur ou le fabricant
.
10.Ne jetez pas l'appareil dans le feu,car cela pourrait provoquer un incendie ou une explosion de
la batterie. Le remplacement de la batterie par des batteries de taille incorrecte présente un
risque dexplosion-disposez toujours des batteries usagees selon les instructions.Ne jetez pas le
bloc
d'alimentation dans lefeu ou dans des fours de chauffage,n'ysoumettez
pasa des é
crasements ou des coupes mécaniques,et nexposez-le pasa des temperatures extremement
elevees(ce qui pourrait causer des explosions ou des fuites de liquides inflammables).Le bloc d'
alimentation pourraitégalement exploser ou fuir des liquides inflammables sous pression
extremement basse
.
11.Note:Le remplacement de la batterie par des batteries de taille
incorrecte presente un risque
d'explosion'-disposez toujours des batteriesusagées selon les instructions.
12.Nejetez pasle produit directement dans les poubelles;envoyez-le plutot a des centres
de recyclage professionnels locaux.
13.Ne démontez pas le produit,ne tentez pas de le réparer,et ne remplacez pas de composants
sans autorisation.
51

1.Uniquement concu pour une utilisation en climat non
tropical
2.Ne pas utiliser apres immersion dans leau
Clause de non-responsabilité
Veuilez lire attentivement cette déclaration.En utilisant ce
produit,vous etes considéré comme ayant totalement reconnu et
accepte cette déclaration.Avant chaque utilisation,vérifiez
soigneusement le produit.En cas de dommage ou de déformation,
n'utilisez pasle produit.En utilisant ce produit,vous reconnaissez
et acceptez que vous serez pleinement responsable de votre
utilisation de ce produit et des conséquences éventuelles.Vous
vous engageza utiliser ce produit uniquement a des fins légitimes
et légales.Vous comprenez et acceptez que la societé Taixun
Digital Co.,Ltd.(ci-apres dénommee "Telesin")ne sera pas
responsable des abus,des effets négatifs,des dommages,des
blessures,des sanctions ou d'autres consequencesjuridiques
découlant directementou indirectement del'utiisation de ce
produit.Les utilisateurs doivent respecter les consignes
d'utilisation mentionnees dans ce document,entre autres.Dansle
cadre des lois et règlements nationaux,Telesin détient le droit
d'interprétation et de modification de cette promesse.La garantie
de Taixun commence lejour où vous recevez les marchandises et
vous bénéficiez d'une garantie de6mois.
52

1.Uniquement concu pour une utilisation en climat non
tropical
2.Ne pas utiliser apres immersion dans leau
Clause de non-responsabilité
Veuilez lire attentivement cette déclaration. En utilisant ce
produit,vous etes
considéré comme ayant totalement reconnu et
accepte cette déclaration.Avant
chaque utilisation,vérifiez
soigneusement le produit.En cas de dommage ou de
déformation,
n'utilisez pasle produit.En utilisant ce produit,vous reconnaissez et
acceptez que vous serez pleinement responsable de votreutilisation de ce
produit et des conséquences éventuelles.Vous vous engageza utiliser ce produit
uniquement a des fins légitimes
et légales.Vous comprenez et acceptez que la
societé Taixun
Digital Co., Ltd. (ci-apres dénommee "Telesin")ne sera pas
responsable des abus,des effets négatifs,des dommages,des
blessures,des
sanctions ou d'autres consequencesjuridiques découlant directementou
indirectement del'utiisation de ceproduit.Les utilisateurs doivent respecter les
consignes
d'utilisation mentionnees dans ce document,entre autres. Dansle
cadre des
lois et règlements nationaux,Telesin détient le droit d'interprétation et de
modification de cette promesse. La garantiede Taixun commence lejour où
vous recevez les marchandises et vous bénéficiez d'une garantie de6mois.
52
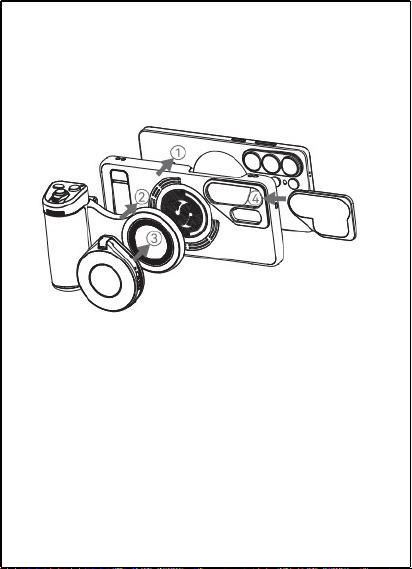
Italiano
Istruzioni di installazione
1.Installare ilSamsung S26 Ultra nella custodia per telefono
fornita.
2.Fissarel'lmpugnatura per Ripresa sul retro dela custoda
per telefono.
3.Fissare il Flash Magnetico all'lmpugnatura per Ripresa.
4.Agganciare il Filtro Magnetico nella custodia per telefono.
struzioni per l'uso dell'lmpugnatura per Ripresa
Illustrazione del prodotto
53
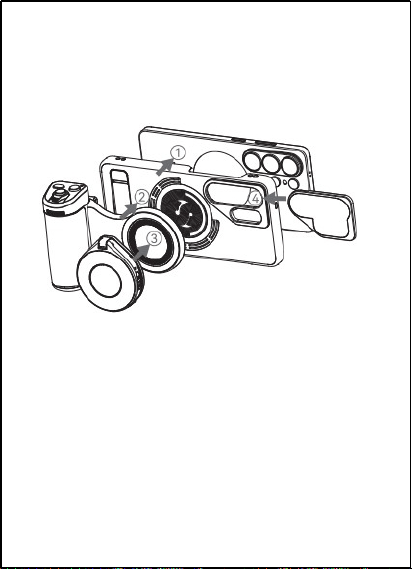
Istruzioni
di
installazione
1.
Installare ilSamsung
S26
Ultra
nella
custodia
per
telefono
fornita.
2.Fissarel'lmpugnatura
per
Ripresa
sul
retro
dela
custoda
per
telefono.
3.Fissare
il
Flash
Magnetico
all'lmpugnatura
per
Ripresa.
4.Agganciare
il
Filtro
Magnetico
nella
custodia
per
telefono.
struzioni
per
l'uso
dell'lmpugnatura
per
Ripresa
Illustrazione
del
prodotto
53
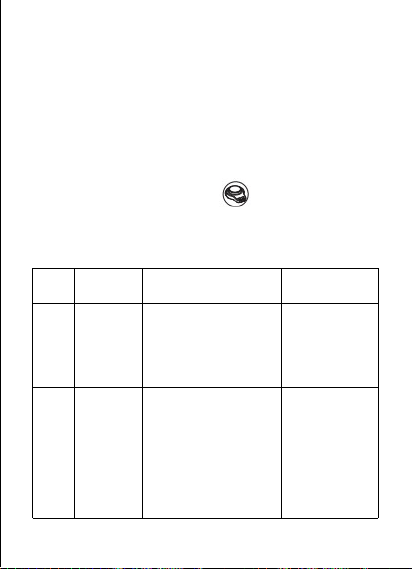
1.Spia di funzionamento
8.Foro filettato 1/4”
2.Tasto di riattivazione
schermo
9.Foro per cinturino da polso
10.Interruttore di carica
3.Tasto discatto
11.Spie di caricax4
12.Porta di ricarica USB-C
(Ingresso/Uscita)
4.Leva dello zoom
5.Ghiera diselezione modalità
13.Posizione di ricarica
magnetica
6.Tasto Fn
7.Appoggio per pollice
14.Anello magnetico
Istruzioni operative
Tenere premuto il Tasto di Scatto per 2 secondi per
accendere.Toccare per connettersi al nome Bluetooth
TELESIN_S26;se nessun dispositivo viene connesso entro 30
minuti,si spegne automaticamente.
55
N.
Funzione
Operazione
Indicatoredi
funzionamento
1
Accensione
Tenere premutoil Tastodi
Scatto per2secondiper
accendereeentrarein
modalita diabbinamento
Bluetooth.
ILED verdelampeggia
rapidamente 3volte
allaccensione,e
lampeggia lentamente
durantelaricerca
Bluetooth
2
Spegnimento
Modalita acesaostandby:
Tenere premuto il Tastodi
Scatto per2secondiper
spegnere.Dopo 30 minutiin
standby spegnimento
automatico.Dopolaccensione:
Senon avviene alcun
abbinamento entro 30minuti,
spegnimento automatico.
Dopo 3lampi
verdi rapidi,la
luce si spegne.
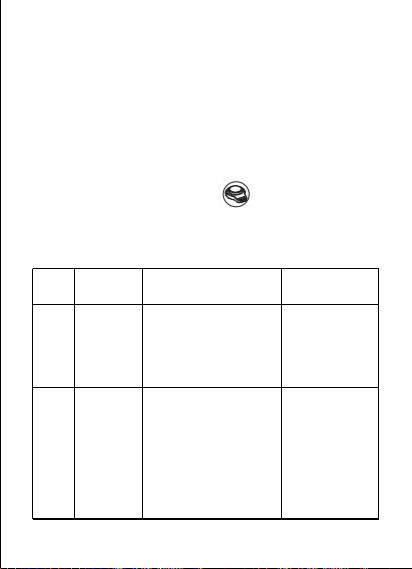
1.Spia di funzionamento
8.Foro filettato 1/4”
2.Tasto di riattivazione sch-
ermo
9.Foro per cinturino da polso
10.Interruttore di carica
3.Tasto discatto
11.Spie di caricax4
12. Porta di ricarica USB-C
(Ingr-
esso/Uscita)
4.Leva dello zoom
5.Ghiera diselezione modalità
13. Posizione di ricarica ma-
gnetica
6.Tasto Fn
7.Appoggio per pollice
14.Anello magnetico
Istruzioni operative
Tenere premuto il Tasto di Scatto per 2 secondi per
accendere.Toccare per connettersi al nome Bluetooth
TELESIN_S
26;se nessun dispositivo viene connesso entro 30 minuti,si spegne
automaticamente.
55
N.
Funzione
Operazione
Indicatoredi
funzionamento
1
Accensione
Tenere
premutoil
Tastodi
Scatto
per2secondiperac-
cendereeentrareinmodali-
ta
diabbinamentoBluetooth.
ILED
verdelampeggia
rapidamente
3volte
allaccensione,e
lamp-
eggia
lentamente
dura-
ntelaricercaBlueto-
oth
2
Spegnimento
Modalita
acesaostandby: Ten-
ere
premuto
il
Tastodi Scatto
per2secondiperspegnere.Dopo
30
minutiinstandby
spegnime-
nto
automatico.Dopolaccensione:
Senon
avviene
alcun
abbinamento
entro
30minuti,
spegnimento
automatico.
Dopo
3lampi
verdi
rapidi,la
luce
si
spegne.
56
N.
Funzione
Operazione
Indicatoredi
funzionamento
3
Avvia/ln-
terrompi
registrazi-
one
Premere
brevemente il Tasto
diScatto.
Indicatore verde
lampeggia 1
volta.
4 Zoom
Spingere la Leva dello
Zoom a sinistra per
ridurre;a destra per
ingrandire.
/
5
Cambia
fotocamera
anteri-
ore/posteri-
ore
Premere brevemente il
Tasto di Riattivazione
Schermo.
/
6
Cambio
modalita
Ruotare la Ghiera di
Selezione Modalita a
sinistrao destra.
/
7
Riattiva
schermo
Quando loschermodel
telefonoespento,tenere
premuto ilTastodi
Riattivazione Schermoper2
secondiper riattivarela
fotocamera.
/
8
Messa a
fuoco
Premere a metà corsa
il Tasto di Scatto.
/
56
N.
Funzione
Operazione
Indicatoredi
funzionamento
3
Avvia/ln-
terrompi
registrazi-
one
Premere
brevemente
il
Tasto
diScatto.
Indicatore
verde
lampeggia
1 volta.
4 Zoom
Spingere
la
Leva
dello
Zoom
a
sinistra
per
ridurre;a
destra
per
ing-
randire.
/
5
Cambiafoto-
camera
anteri-ore/
posteri-
ore
Premere
brevemente
il
Tasto
di
Riattivazione
Schermo.
/
6
Cambio
modalita
Ruotare
la
Ghiera
di
Selezione
Modalita
asi-
nistrao
destra.
/
7
Riattiva
schermo
Quando
loschermodel telef-
onoespento,tenere premuto
ilTastodi
Riattivazione
Sche
-
rmoper2
secondiper
riattivarela
fotocamera.
/
8
Messa
a
fuoco
Premere
a
metà
corsail
Tasto
di
Scatto.
/
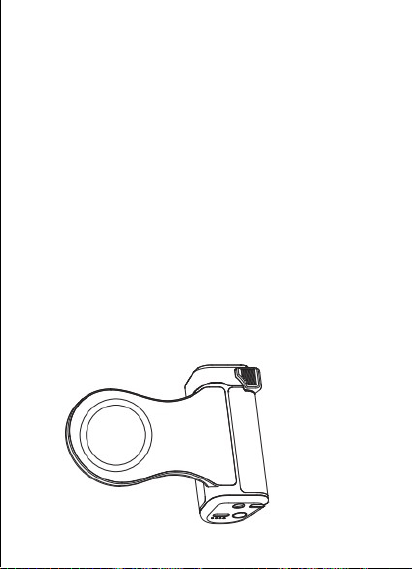
Entrata in sospensione(standby)
Dopo un abbinamento Bluetooth riuscito:Se il dispositivo
non viene utilizzato per 60 minuti dopo laccensione,entra
automaticamente in modalità sospensione.
Risveglio dalla sospensione
In modalita sospensione:Premere brevemente un tasto
qualsiasi per risvegliare il dispositivo.
1.Dopo ilrisveglio:Se il Bluetooth deltelefono precedente-
mente abbinatoe attivo,riconnessione automatica.
2.Se il Bluetooth del telefono precedentemente abbinatoè
spento,I'indicatore inizia a lampeggiare.Se non avviene
alcun abbinamento entro 2minuti,il dispositivo entra in
sospensione esi spegne dopo 30 minuti.
Avviso batteria scarica ericarica
Questo dispositivoèdotato di una porta diricarica USB-C.
Quando la batteriaè bassa,tutti gli indicatori luminosi
diventano rossi.Si prega di ricaricare il dispositivo quando il
livello della batteria scende sotto il 20%.
57
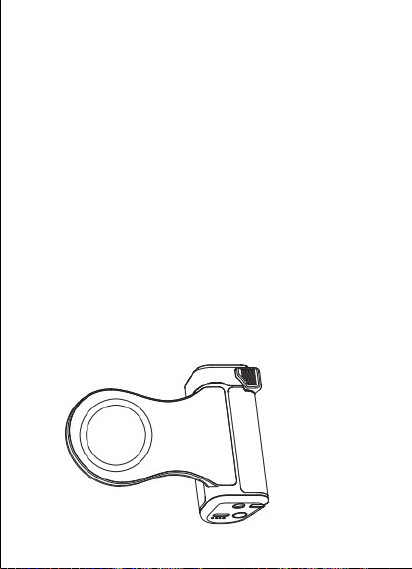
Entrata in sospensione(standby)
Dopo un abbinamento Bluetooth riuscito:Se il dispositivo
non viene
utilizzato per 60 minuti dopo laccensione,entra
automaticamente in modalità
sospensione.
Risveglio dalla sospensione
In modalita sospensione:Premere brevemente un tasto
qualsiasi per
risvegliare il dispositivo.
1. Dopo ilrisveglio:Se il Bluetooth deltelefono precedente-
mente
abbinatoe attivo,riconnessione automatica.
2. Se il Bluetooth del telefono precedentemente abbinatoè
spento,I'
indicatore inizia a lampeggiare. Se non avviene
alcun abbinamento
entro 2minuti,il dispositivo entra in
sospensione esi spegne dopo 30
minuti.
Avviso batteria scarica ericarica
Questo dispositivoèdotato di una porta diricarica USB-C.
Quando la
batteriaè bassa,tutti gli indicatori luminosi
diventano rossi. Si prega di
ricaricare il dispositivo quando il
livello della batteria scende sotto il 20%.
57
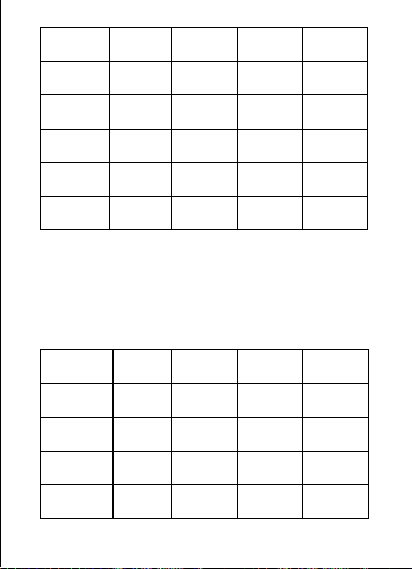
Ricarica wireless
1.Posizionare il telefono sulla Posizione di Ricarica Magnetica.
Una breve pressione del
l'I
nterruttore di Carica avviala
ricarica del telefono.Doppia pressione dell'lnterruttore di
Carica interrompela ricarica del telefono.
2.Quandolimpugnaturaein carica o scarica,gli indicatori
mostrano quanto segue:
58
Livello
batteria
LED1 LED2
LED3
LED4
100%-75% √ √
√ X
75%-50% √ √
X X
50%-25% √
X X X
hferioreal25%
Lampeggia
X X X
Livello
batteria
LED1 LED2
LED3
LED4
Inferioreal25%
Lampeggia
X
X X
25%-50% √
Lampeggia
X X
50%-75% √ √
Lampeggia
X
75%-100% √ √ √
Lampeggia
Completo
(100%)
√ √ √ √
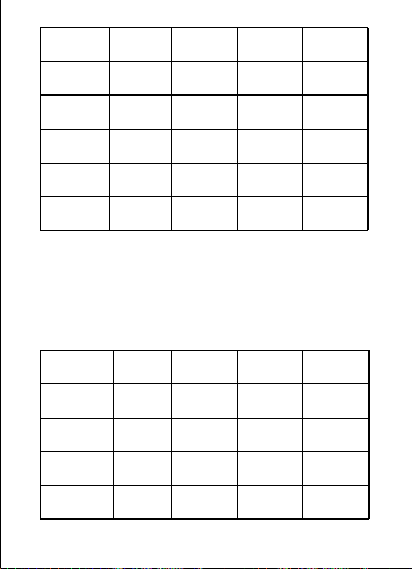
Ricarica wireless
1.Posizionare il telefono sulla Posizione di Ricarica Magnetica.
Una breve
pressione del
l'I
nterruttore di Carica avviala
ricarica del telefono.Doppia
pressione dell'lnterruttore di
Carica interrompela ricarica del telefono.
2.Quandolimpugnaturaein carica o scarica,gli indicatori
mostrano
quanto
segue:
58
Livello
batteria
LED1 LED2
LED3
LED4
100%-75% √ √
√
X
75%-50% √ √
X
X
50%-25% √
X
X
X
hferioreal25%
Lampeggia
X
X
X
Livello
batteria
LED1 LED2
LED3
LED4
Inf erio real 25%
Lampeggia
X
X X
25%-50% √
Lampeggia
X X
50%-75% √ √
Lampeggia
X
75%-100% √ √ √
Lampeggia
Completo
(100%)
√ √ √ √
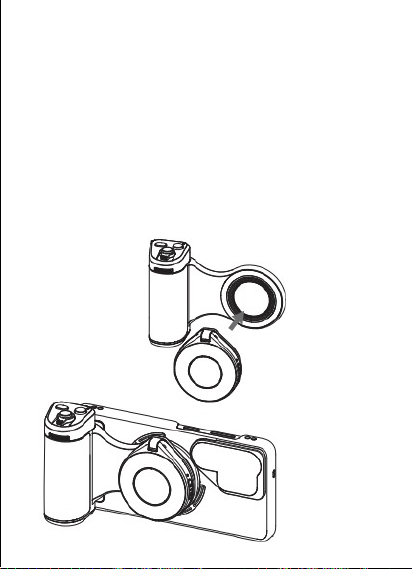
lstruzioni per l'uso del Fash Magnetico
Dopo che il flashèstato fissato all'lmpugnatura per Ripresa
Samsung S26 Ultra,il flash può essere attivato tramite
Iimpugnatura.
Passaggi perla connessione:
1.Attivare la funzone Bluetooth del telefono,cercare e
connettersi al dispositivo flash denominato TELESIN_LT03.
2.Dopolabbinamento riuscito,fissare il lato magnetico del
flash sull'Anello Magnetico nella parte frontale dellimpugna-
tura.Premere il Tasto diScatto sullimpugnatura per attivare
simultaneamente la fotocamera del telefono eil flash.
59
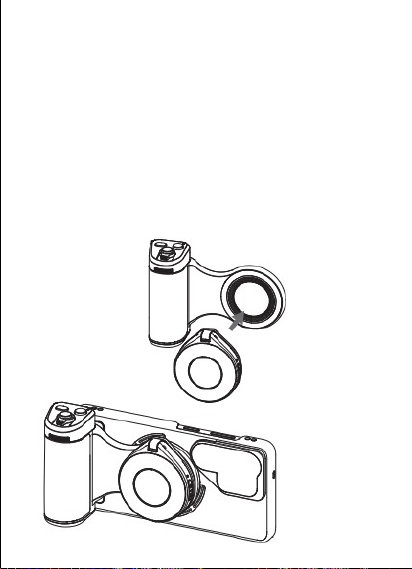
lstruzioni per l'uso del Fash Magnetico
Dopo che il flashèstato fissato all'lmpugnatura per Ripresa
Samsung S26 Ultra,il flash può essere attivato tramite
Iimpugnat-
ura.
Passaggi perla connessione:
1.Attivare la funzone Bluetooth del telefono,cercare e
connettersi al
dispositivo flash denominato TELESIN_LT03.
2. Dopolabbinamento riuscito,fissare il lato magnetico del
flash sull'Anello
Magnetico nella parte frontale dellimpugna-
tura. Premere il Tasto diScatto
sullimpugnatura per attivare
simultaneamente la fotocamera del telefono eil
flash.
59
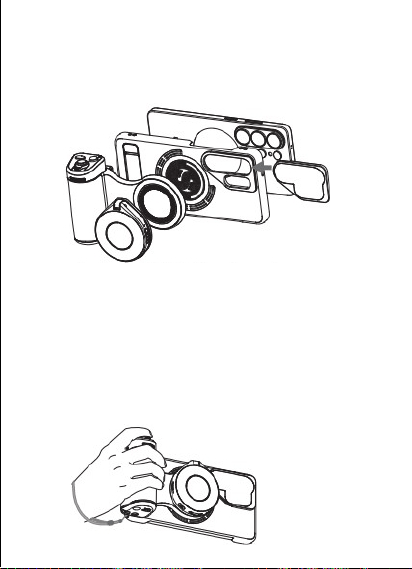
Istruzioni per il filtro
Inserire il filtro ND16 nell'adattatore per obiettivo della
custodia per telefono nella direzione della freccia.Si
aggancia automaticamente in posizione tramite magneti.
Istruzioni per il cinturino da polso
In ambienti complessi o situazioni ad alto affollamento,
utilizzare obbligatoriamente il cinturino da polso.Non
utilizzare il prodotto in scenari sportivi ad alto impatto.
1.Far passare lasola all'estremità del cinturino attraverso
I'occhiello nella parte inferiore deldispositivo.
2.Dopo aver stretto everificato chela connessione sia bloccata,
infilare il cinturino intorno al polso eregolarela lunghezza.
60
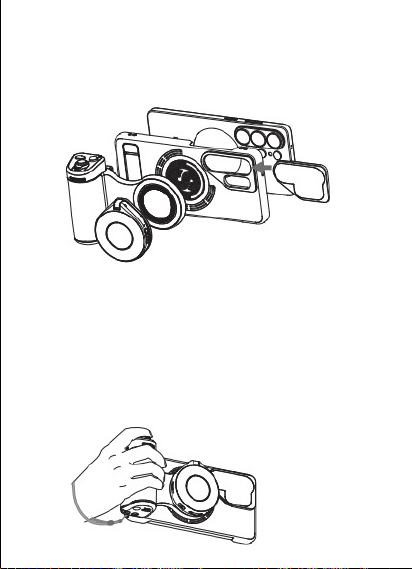
Istruzioni per il filtro
Inserire il filtro ND16 nell'adattatore per obiettivo della
custodia
per telefono nella direzione della freccia.Si
aggancia automat-
icamente in posizione tramite magneti.
Istruzioni per il cinturino da polso
In ambienti complessi o
situazioni ad alto affollamento,
utilizzare obbligatoriamente il cinturino
da polso.Non
utilizzare il prodotto in scenari sportivi ad alto impatto.
1. Far passare lasola all'estremità del cinturino attraverso
I'occhiello
nella parte inferiore deldispositivo.
2. Dopo aver stretto everificato chela connessione sia bloccata,
infilare il
cinturino intorno al polso eregolarela lunghezza.
60
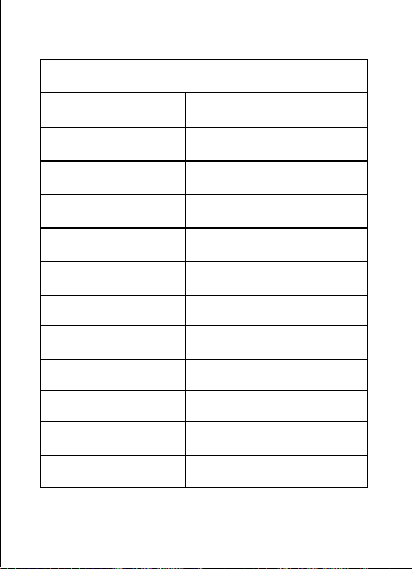
Specifche
61
Impugnatura magnetica
Modelli compatibili
Samsung S26 Ultra
Dimensioni del prodotto
185*83.5*37.8mm
Peso del prodotto
150g
Materiale della custodia
Plastica+Metallo
Connessione
wireless
Bluetooth Low Energy
Distanza di controllo 10 metri
Capacità della batteria
3200mAh/3.6V
Potenza di ricarica
wireless
10W
nterfaccia hardware
Type-c*1
Interfaccia dimontaggio
Foro filettato 1/4"*1
Metodo di fissaggio
dell'impugnatura
Magnetico
Temperatura di
funzionamento
5℃~40℃
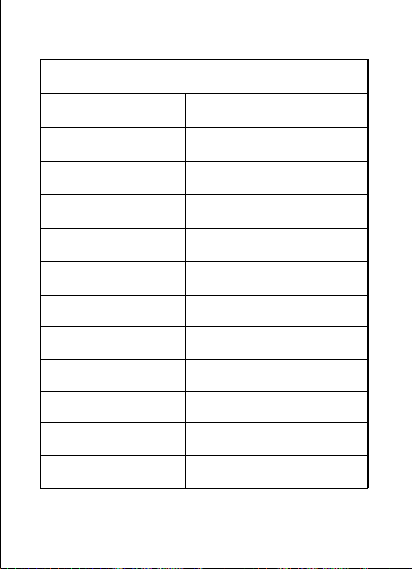
Specifche
61
Impugnatura
magnetica
Modelli
compatibili
Samsung
S26
Ultra
Dimensioni
del
prodotto
185*83.5*37.8mm
Peso
del
prodotto
150g
Materiale
della
custodia
Plastica+Metallo
Connessione
wireless
Bluetooth
Low
Energy
Distanza
di
controllo
10 metri
Capacità
della
batteria
3200mAh/3.6V
Potenza
di
ricarica
wireless
10W
nterfaccia
hardware
Type-c*1
Interfaccia
dimontaggio
Foro
filettato
1/4"*1
Metodo
di
fissaggio
dell'impugnatura
Magnetico
Temperatura
di
funzionamento
5℃~40℃
62
Flash magnetico
Dimensioni 66*58.5*19mm
Peso
60g
Interfaccia hardware
Type-c*1
Intervalo temperatura
colore(luce continua)
2500K/4500K/6500K,tre liveli
regolabili
Intervallo temperatura
colore(flash)
7500K±200K
Indice diresa cromatica(luce
continua)
IRC≥85
Indice di resa cromatica
(flash)
IRC≥85
Luminosità luce
continua
Luminosità max.>[email protected]
Potenza luminosa
luce continua)
3W
Potenza luminosa
(flash)
15W
Forza magnetica
Superiore a 12N
Autonomia/Durata
batteria
Luce continua a luminosità
max.:≥45 min
Parametri batteria
500mAh/3.7V
Distanza di controllo
Bluetooth
10 metri
62
Flash
magnetico
Dimensioni 66*58.5*19mm
Peso
60g
Interfaccia
hardware
Type-c*1
Intervalo
temperatura
colore(luce
continua)
2500K/4500K/6500K,tre
liveli
re-
golabili
Intervallo
temperatura
colore(flash)
7500K±200K
Indice
diresa
cromatica(luce
co-
ntinua)
IRC≥85
Indice
di
resa
cromatica
(flash)
IRC≥85
Luminosità
luce
continua
Luminosità max.
Luminosità flash
Luminosità
max.>[email protected]
Potenza
luminosa
luce
continua)
3W
Potenza
luminosa
(flash)
15W
Forza
magnetica
Superiore
a
12N
Autonomia/Durata
batteria
Luce
continua
a
luminosità
max.:≥45
min
Parametri
batteria
500mAh/3.7V
Distanza
di
controllo
Bluetooth
10 metri
Dichiarazioni di sicurezza
,1.Identificate chiaramente tuttii componenti allinterno dell'imballaggio,
distinguenti le funzioni diogni porta sulla banca di potenzaericonoscendo i
tipi di interfacce utilizzate dal dispositivo.Un uso improprio
dellalimentazione può danneggiare la batteriaegli apparecchi alimentati
da essa.
2.Durante la prima utiizzo dell'alimentazione,enecessario caricarla con un
caricabatterie standard 5V=2A.Per la manutenzione giornaliera,poiché
questo prodotto ha un'autoscarica molto bassa,se non viene utilizzato per
un periodo prolungato,eseguire un ciclo di carica-scarica ogni 3 mesi per
garantire la durata delle celle della batteria.
3.Questo blocco di alimentazione contiene materiali combustibili organici.
Un uso improprio dellalimentazione può causare crepe,fughe,
sovrariscaldamenti,ecc.,portando a danni permanenti alla batteria,
Lalimentazioneedotata di meccanismi di protezione di sicurezza integrati
4.Non posizionare la batteria o l'apparecchio vicino a dispositivi di
riscaldamento(p.es.,microonde,fornioradiatori).II sovrariscaldamento
della batteria può causare esplosioni.Non smontare o modificare la
batteria,poiché ciò potrebbe portare a fughe,sovrariscaldamenti,incendio
esplosioni.In caso di fuga della batteria,evitare il contatto tra il liquido
fuggito e la pelle o gliocchi;in caso diesposizione,lavare immediatamente
con acqua pulita e consultare un medico.Se siverifica un surriscaldamento
anomalo oaltre anomalie durante luso,la carica olo stoccaggio,
interrompere immediatamentel'uso.Non continuare a usare il
63
Filtro magnetico
Tipo di filtro
Filtro ND(densità neutra)16
Materiale del prodotto
Lega di alluminio+Vetro
ottico
Metodo dimontaggio Aggancio magnetico
Peso del prodotto
20g
Dichiarazioni di sicurezza
,1. Identificate chiaramente tuttii componenti allinterno dell'imballaggio,distingu-
enti le funzioni diogni porta sulla banca di potenzaericonoscendo i tipi di
interfacce utilizzate dal dispositivo. Un uso improprio
dellalimentazione può
danneggiare la batteriaegli apparecchi alimentati da essa.
2. Durante la prima utiizzo dell'alimentazione,enecessario caricarla con un caricabatterie
standard 5V=2A.Per la manutenzione giornaliera,poiché
questo prodotto ha un'autoscarica
molto bassa,se non viene utilizzato per
un periodo prolungato,eseguire un ciclo di carica-scarica
ogni 3 mesi per garantire la durata delle celle della batteria.
3. Questo blocco di alimentazione contiene materiali combustibili organici.
Un uso improprio
dellalimentazione può causare crepe,fughe,sovrariscaldamenti,ecc., portando a danni
permanenti alla batteria,Lalimentazioneedotata di meccanismi di protezione di sicurezza
integrati
4.Non posizionare la batteria o l'apparecchio vicino a dispositivi di
riscaldamento(p.es.,microonde,
fornioradiatori). II sovrariscaldamento
della batteria può causare esplosioni. Non smontare o
modificare labatteria,poiché ciò potrebbe portare a fughe,sovrariscaldamenti,incendio
esplosioni. In caso di fuga della batteria,evitare il contatto tra il liquido fuggito e la pelle o
gliocchi;in caso diesposizione,lavare immediatamente con acqua pulita e consultare un medico.
Se siverifica un surriscaldamentoanomalo oaltre anomalie durante luso,la carica olo
stoccaggio,interrompere immediatamentel'uso.Non continuare a usare il
63
Filtro
magnetico
Tipo
di
filtro
Filtro ND(densità neutra)16
Materiale
del
prodotto
Lega
di
alluminio+Vetro
ottico
Metodo
dimontaggio Aggancio
magnetico
Peso
del
prodotto
20g

caricabatterie se il suo cavoè danneggiato per evitare shock elettricio
incendi.
5.Non posizionare ilprodottoin ambientia alta temperatura(compreso
sottoil sole diretto),non esporlo al fuoco oa condizioni di temperatura
estremamente elevate,e non usarel'alimentazione vicino a fiamme nude,
stufe o aree con temperature superioria60℃.
6.Se l'alimentazione viene sommersa dall'acqua,i suo parametri e indicatori
di protezione di sicurezza saranno danneggiati,rendendola inoperabile.La
sommersione può anche causare sovrariscaldamenti,incendioesposioni.
7.Non usare pesi pesanti o altrioggetti per schiacciare l'alimentazione,
poiché ciò potrebbe causare deformazioni.
8.Luso di caricabatterie non standard o la modifica dei parametri specificati
del caricabatterie possono causare sovrariscaldamento,combustione o
esplosione della batteria.
9.Se ilprodotto mostra segni disovrariscaldamento,deformazione,danni,
graffio altri problemi durante l'uso,interrompere immediatamente lusoe
contattare il venditore o il produttore.
10.Non gettare lapparecchio nel fuoco,poiché ciò potrebbe causare un
incendio oun'esplosione della batteria.Il sostituzione della batteria con
batterie didimensioni errate comporta un rischio diesplosione-smaltire
sempre le batterieusate secondole istruzioni.Non gettare il blocco di
alimentazione nel fuoco o nei forni,non esporlo aschiacciamentio tagli
meccanici,e non esporlo a temperature estremamente elevate(che
potrebbero causare esplosioni o fughe di liquidi infiammabili).II blocco di
alimentazione potrebbe anche esplodere o perdere liquid infiammabili
sotto pressione estremamente bassa.
11.Nota:Ilsostituzione della batteria con batterie di dimensioni errate
comporta un rischio diesplosione-smaltire sempre le batterie usate
secondo le istruzioni.
12.Non gettare il prodotto direttamente nei cestini della spazzatura;
inviarlo invece a centr di riciclaggio professionali locali.
13.Non smontare il prodotto,non tentare di riparloenon sostituire
componentisenza autorizzazione.
1.Da utilizzare solo in climi non tropicali
2.Non utilizzare dopolimmersione in acqua
64

caricabatterie se il suo cavoè danneggiato per evitare shock elettricio
incendi.
5. Non posizionare ilprodottoin ambientia alta temperatura(compreso
sottoil sole diretto),
non esporlo al fuoco oa condizioni di temperatura estremamente elevate,e non usarel'
alimentazione vicino a fiamme nude,stufe o aree con temperature superioria60℃.
6. Se l'alimentazione viene sommersa dall'acqua,i suo parametri e indicatori di protezione di
sicurezza saranno danneggiati,rendendola inoperabile. La sommersione può anche causare
sovrariscaldamenti,incendioesposioni.
7. Non usare pesi pesanti o altrioggetti per schiacciare l'alimentazione, poiché ciò
potrebbe causare deformazioni.
8.Luso di caricabatterie non standard o la modifica dei parametri specificati
del caricabatterie
possono causare sovrariscaldamento,combustione o
esplosione della batteria.
9.Se ilprodotto mostra segni disovrariscaldamento,deformazione,danni, graffio altri problemi
durante l'uso,interrompere immediatamente lusoe
contattare il venditore o il produttore.
10. Non gettare lapparecchio nel fuoco,poiché ciò potrebbe causare un
incendio oun'
esplosione della batteria. Il sostituzione della batteria con batterie didimensioni errate
comporta un rischio diesplosione-smaltire
sempre le batterieusate secondole istruzioni.Non
gettare il blocco di
alimentazione nel fuoco o nei forni,non esporlo aschiacciamentio tagli
meccanici,e non esporlo a temperature estremamente elevate(che
potrebbero causare
esplosioni o fughe di liquidi infiammabili). II blocco di
alimentazione potrebbe anche
esplodere o perdere liquid infiammabili sotto pressione estremamente bassa.
11. Nota:Ilsostituzione della batteria con batterie di dimensioni errate comporta un
rischio diesplosione-smaltire sempre le batterie usate
secondo le istruzioni
.
12.Non gettare il prodotto direttamente nei cestini della spazzatura;
inviarlo invece a
centr di riciclaggio professionali locali.
13.Non smontare il prodotto,non tentare di riparloenon sostituire
componentisenza
autorizzazione.
1.Da
utilizzare solo
in
climi
non
tropicali
2.Non
utilizzare
dopolimmersione
in acqua
64

Dichiarazione di esclusione di responsabilità
Leggere attentamente questa dichiarazione.Una volta
utilizzato questo prodotto,sieritenuti aver riconosciuto e
accettato integralmente questa dichiarazione.Prima di ogni
utilizzo,controllare attentamente il prodotto.In caso di
danneggiamento o deformazione,non utilizzarlo.Lutilizzo di
questo prodotto significa che si riconosce e accetta diessere
interamente responsabile delle azioni d utilizzo diquesto
prodotto edelle possibili conseguenze.Si impegna a utilizzare
questo prodotto solo per scopi legittimie legali.Si comprende
eaccetta chela Telesin Digital Co.,Ltd.(di seguito denominata
"Telesin")non sara responsabile per qualsiasi abuso,impatto
negativo,danno,lesione,punizione o altre conseguenze legali
direttamente o indirettamente derivanti dall'utilizzo diquesto
prodotto.Gli utenti dovrebbero seguire le precauzioni duso
menzionate in questo documento,tra le altre.All'interno del
limite delle leggie delle normative nazionali,il diritto di
interpretazione e dimodifica di questa promessa appartiene a
Telesin.La garanzia di Telesin inizia dal giorno in cui si riceve la
mercee ha una durata di 6 mesi.
65

Dichiarazione di esclusione di responsabilità
Leggere attentamente questa dichiarazione. Una voltautilizzato questo
prodotto,sieritenuti aver riconosciuto e accettato integralmente questa
dichiarazione. Prima di ogni
utilizzo,controllare attentamente il prodotto. In
caso di
danneggiamento o deformazione,non utilizzarlo.Lutilizzo di questo
prodotto significa che si riconosce e accetta diessereinteramente
responsabile delle azioni d utilizzo diquestoprodotto edelle possibili
conseguenze. Si impegna a utilizzarequesto prodotto solo per scopi
legittimie legali. Si comprendeeaccetta chela Telesin Digital Co., Ltd. (di
seguito denominata"Telesin")non sara responsabile per qualsiasi abuso,
impatto
negativo,danno,lesione,punizione o altre conseguenze legali
direttamente o indirettamente derivanti dall'utilizzo diquesto
prodotto. Gli
utenti dovrebbero seguire le precauzioni duso
menzionate in questo
documento,tra le altre.All'interno del limite delle leggie delle normative
nazionali,il diritto di interpretazione e dimodifica di questa promessa
appartiene a
Telesin.La garanzia di Telesin inizia dal giorno in cui si riceve la
mercee ha una durata di 6 mesi.
65
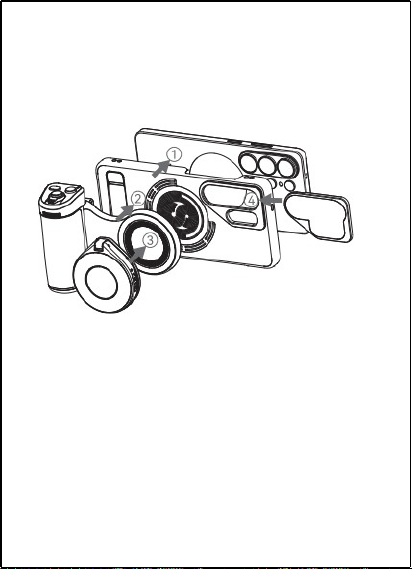
Espanol
Pasos de instalación
1.Instale elSamsung S26 Ultraen la funda de teléfono
proporcionada.
2. Fije la Empuñadura de Disparo a la parte posterior de la
funda de teléfono.
3.Fije el Flash Magnético a la Empunadura de Disparo.
4.Enganche el Filtro Magnético enla funda de teléfono.
Instrucciones de uso dela Empuňadura de Disparo
Ilustración del producto
66
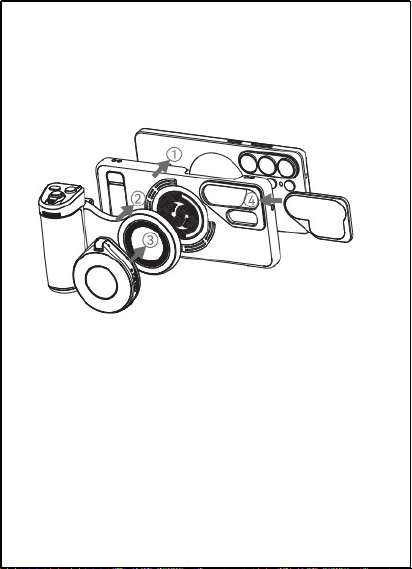
Pasos de instalación
1.
Instale elSamsung
S26
Ultraen
la
funda
de
teléfono
proporcionada.
2.
Fije
la
Empuñadura
de
Disparo
a
la
parte
posterior
de
la
funda
de
teléfono.
3.Fije
el
Flash
Magnético
a
la
Empunadura
de
Disparo.
4.Enganche
el
Filtro
Magnético
enla
funda
de
teléfono.
Instrucciones
de
uso
dela
Empuňadura
de
Disparo
Ilustración
del
producto
66
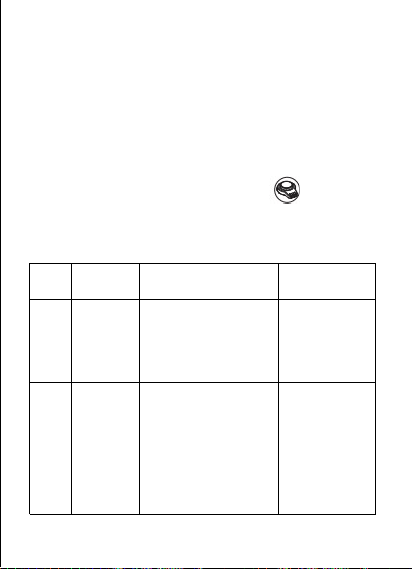
1.Indicador de operación
8.Orificio roscado de 1/4"
2.Botón de reactivación de
pantalla
9.Orificio para correa de
muneca
3.Botón de disparo
10.Interruptor de carga
11.Indicadores de cargax4
4.Palanca de zoom
12.Puerto de carga USB-C
(Entrada/Salida)
5.Rueda de selección de modo
6.Botón Fn
13.Posición de carga magnética
7.Reposapulgar
14.Anillo magnético
Instrucciones de operación
durante 2
Mantenga presionado el Botón de Disparo
segundos para encender.Toque para conectarse al nombre
Bluetooth TELESIN_S26;si ningún dispositivo se conecta en
30 minutos,se apagará automáticamente.
68
N.
Función
Operación
Indicadorluminoso
de operación
1
Encendido
Mantenga presionadoel
Botón deDisparodurante2
segundos paraencendery
entraren modode
emparejamiento Bluetooth.
日LED verde parpadea
rápidamente3vecesal
encender,yparpadea
lentamente durantela
búsqueda de
Bluetooth
2
Apagado
En modo encendidooen
reposo:Mantengapresionado
el Botón deDisparodurante2
segundos para apagar.
Después de30 minutosen
reposo,apagado automático.
Despuésdel encendido Sino
hay emparejamientoen 30
minutos,apagado automático.
Después de3
parpadeos verdes
rápidos,la luz se
apaga.
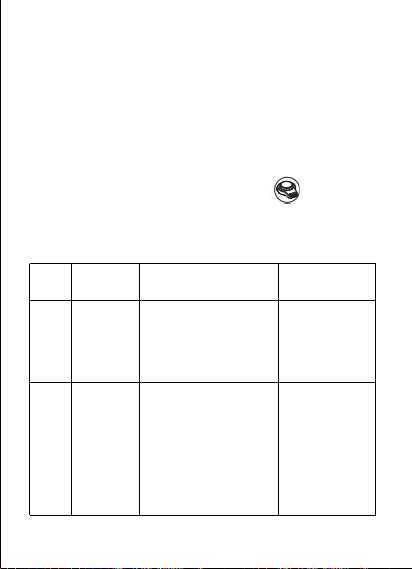
1.Indicador de operación
8.Orificio roscado de 1/4"
2.Botón de reactivación de
pantalla
9.Orificio para correa de
muneca
3.Botón de disparo
10.Interruptor de carga
11.Indicadores de cargax4
4.Palanca de zoom
12.Puerto de carg USB-C
(Entrada/Salida
a
)
5.Rueda de selección de modo
6.Botón Fn
13.Posición de carga magnética
7.Reposapulgar
14.Anillo magnético
Instrucciones de operación
durante 2
Mantenga presionado el Botón de Disparo
segundos para encender.Toque para conectarse al nombre
Bluetooth TELESIN_
S26;si ningún dispositivo se conecta en
30 minutos,se apagará automá
ticamente.
68
N.
Función
Operación
Indicadorluminoso
de
operación
1
Encendido
Mantenga
presionadoel Botón
deDisparodurante2 segundos
paraencendery
entraren
mod-
odeemparejamiento
Bluetooth
The green LED on the device
flashes rapidly three times.
encender,yparpadea
lentamente
durantela
bú
squeda
de Bluetooth
2
Apagado
En
modo
encendidooen
reposo:Mantengapresionado
el
Botón
deDisparodurante2
segu-
ndos
para
apagar. Después
de30
minutosenreposo,apagado
automá
tico
Despuésdel
encendido
Sino hay
emparejamientoen
30
minutos,apag-
ado
automático
Después
de3 parpa-
deos
verdes
rápidos,la
luz
se
apaga.
69
N.
Función
Operación
Indicadorluminoso
de operación
3
Iniciar/De-
tener
grabación
Presione
brevemente el Botón
de Disparo.
Indicador verde
parpadea 1 vez.
4 Zoom
Empuje la Palanca de
Zoom a la izquierda
para reducir;a la
derecha para
aumentar.
/
5
Cambiar
cámara
frontal/tra-
sera
Presione brevemente
el Botón de
Reactivación de
Pantalla.
/
6
Cambio de
modo
Gire la Rueda de
Selección de Modo a
la izquierda o derecha.
/
7
Reactivar
pantalla
Cuandolapantalladel
telefono este apagada,
mantengapresionadoel
Botónde Reactivaciónde
Pantalla durante 2segundos
para reactivar la cámara.
/
8
Enfoque
Presione a medio
recorrido el Botón de
Disparo.
/
69
N.
Función
Operación
Indicadorluminoso
de
operación
3
Iniciar/De-
tenergrab-
ación
Presione
brevemente
el
Botónde
Disparo.
Indicador
verde
parpadea
1
vez.
4 Zoom
Empuje
la
Palanca
de
Zoom
a
la
izquierda
para
reducir;a
lade-
recha
paraaumentar.
/
5
Cambiar
cámarafron-
tal/tra-
sera
Presione
brevementeel
Botón
deReactivación
dePantalla.
/
6
Cambio
de
modo
Gire
la
Rueda
de
Selección
de
Modo
a
la
izquierda
o
derecha
/
7
Reactivar
pantalla
Cuandolapantalladel tele-
fono
este
apagada,mant-
engapresionadoel
Botónde
Reactivaciónde
Pantalla
durante
2segundos
para
reactivar
la
cámara
/
8
Enfoque
Presione
a
mediorecor-
rido
el
Botón
deDisp-
aro.
/
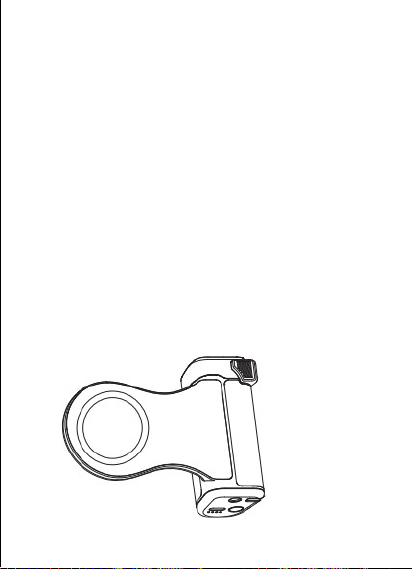
Entrada en modo de reposo(suspensión)
Después deun emparejamiento Bluetooth exitoso:Si
el
dispositivo no se usa durante 60 minutos después del
encendido,entra automáticamente en modo de reposo.
Reactivación desde el reposo
En modo de reposo:Presione brevemente cualquier botón
para reactivar el dispositivo.
1.Después de reactivar:Siel Bluetooth del teléfono
previamente emparejado está activo,reconexión automática.
2.Si el Bluetooth de teléfono previamente emparejado está
apagado,el indicador comienza a parpadear.Sino hay
emparejamiento en 2 minutos,el dispositivo entra en reposo
y se apaga después de 30 minutos.
Alerta de bateria baja y carga
Este dispositivo está equipado con un puerto de carga USB-C.
Cuando la bateria está baja,todos los indicadoresluminosos se
vuelven rojos.Por favor,cargue eldispositivo cuando el nivelde
la bateria esté por debajo del20%,
70
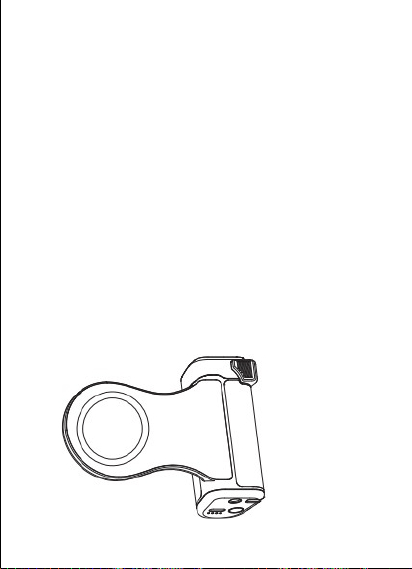
Entrada en modo de reposo(suspensión)
Después deun emparejamiento Bluetooth exitoso:Si
el
dispositivo no se usa
durante 60 minutos después del
encendido,entra automáticamente en modo
de reposo.
Reactivación desde el reposo
En modo de reposo:Presione brevemente cualquier botón
para reactivar el
dispositivo.
1.Después de reactivar:Siel Bluetooth del teléfono
previamente emparejado
está activo,reconexión automática.
2. Si el Bluetooth de teléfono previamente emparejado está
apagado,el
indicador comienza a parpadear. Sino hay
emparejamiento en 2
minutos,el dispositivo entra en reposo
y se apaga después de 30 minutos.
Alerta de bateria baja y carga
Este dispositivo está equipado con un puerto de carga USB-C.
Cuando la
bateria está baja,todos los indicadoresluminosos se
vuelven rojos.Por favor,
cargue eldispositivo cuando el nivelde
la bateria esté por debajo del20%,
70
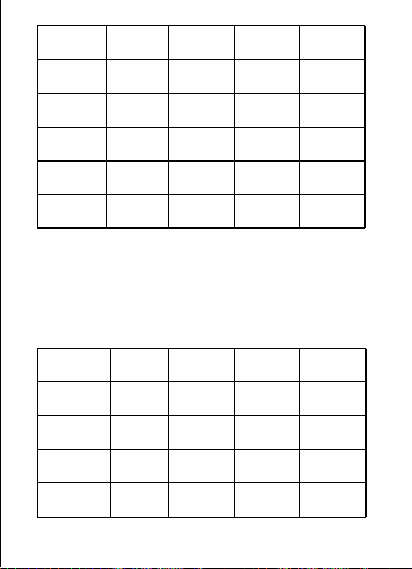
Carga inalámbrica
1.Coloque el teléfono en la Posición de Carga Magnética.Una
breve pulsación del Interruptor de Cargainiciala carga del
teléfono.Doble pulsación del Interruptor de Carga detiene la
carga del teléfono.
2.Cuando la empunadura está cargando o descargando,
los indicadores muestran lo siguiente:
71
Nivel de
batería
LED1 LED2
LED3
LED4
100%-75%
√
√ √ X
75%-50%
√
√ X X
50%-25%
√
X X X
Menosdel 25%
Parpadea
X X X
Nivel de
bateria
LED1 LED2
LED3
LED4
Menosdel25%
Parpadea
X
X
X
25%-50% √
Parpadea
X
X
50%-75% √ √
Parpadea
X
75%-100% √ √ √
Parpadea
Completo
(100%)
√ √ √
√
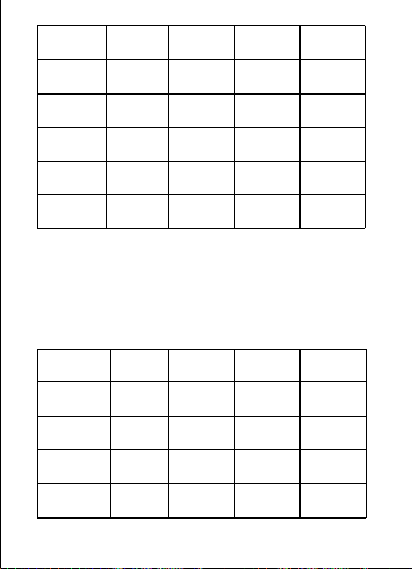
Carga
inalámbrica
1.Coloque el teléfono en la Posición de Carga Magnética.Una
breve
pulsación del Interruptor de Cargainiciala carga del
teléfono.Doble
pulsación del Interruptor de Carga detiene lacarga del teléfono.
2. Cuando la empunadura está cargando o descargando,los
indicadores
muestran
lo
siguiente:
71
Nivel
de
batería
LED1 LED2
LED3
LED4
100%-75%
√
√ √
X
75%-50%
√
√
X X
50%-25%
√
X X X
Menosdel
25%
Parpadea
X X X
Nivel
de
bateria
LED1 LED2
LED3
LED4
Menosdel25%
Parpadea
X
X
X
25%-50% √
Parpadea
X
X
50%-75% √ √
Parpadea
X
75%-100% √ √ √
Parpadea
Completo
(100%)
√ √ √
√
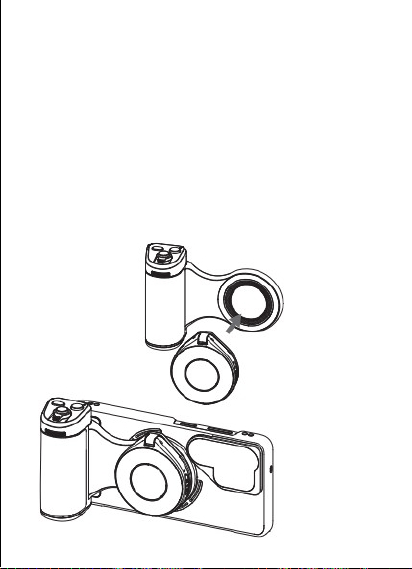
Instrucciones de uso del Flash Magnético
Después de fijar el flash a la Empunadura de Disparo
Samsung S26 Ultra,el flash puede activarse mediantela
empunadura.
Pasos de conexión:
1.Activela función Bluetooth del teléfono,busquey conecte
con el dispositivo flash llamado TELESIN_LT03.
2.Después delemparejamiento exitoso,fije ellado magnético
del flash al Anillo Magnético en la parte frontal de la
la empuñadura. Presione el Botón de Disparo de la
empuňadura para activar simultáneamente la cámara del
teléfonoyel flash.
72
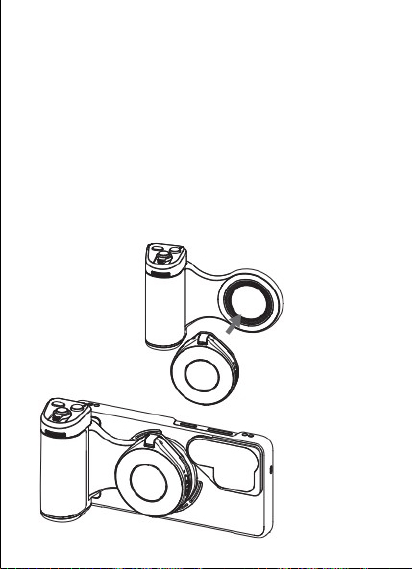
Instrucciones de uso del Flash Magnético
Después de fijar el flash a la Empunadura de Disparo
Samsung
S26 Ultra,el flash puede activarse mediantela
empunadura.
Pasos de conexión:
1.Activela función Bluetooth del teléfono,busquey conecte
con el
dispositivo flash llamado TELESIN_LT03.
2. Después delemparejamiento exitoso,fije ellado magnéticodel
flash al Anillo Magnético en la parte frontal de la
la empuñadura.
Presione el Botón de Disparo de la
empuňadura para activar simult
áneamente la cámara del teléfonoyel flash.
72
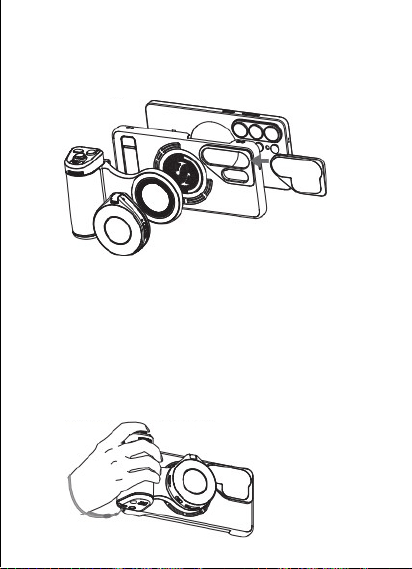
Instrucciones para el filtro
Inserte el filtro ND16en el adaptador de lente de la funda de
teléfono en dirección dela flecha.Se engancha automática-
mente en sulugar mediante imanes.
Instrucciones parala correa de muneca
En entornos complejos o escenarios con mucha afluencia,
use obligatoriamente la correa de muneca.No use el
producto en escenarios deportivos de alto impacto.
1.Pasela lazada del extremo dela correa por elojete enla parte
inferior del dispositivo.
2.Después de ajustary verificar que la conexión esté
bloqueada,coloque la correa alrededor de la munecay
ajústela alalongitud adecuada.
73
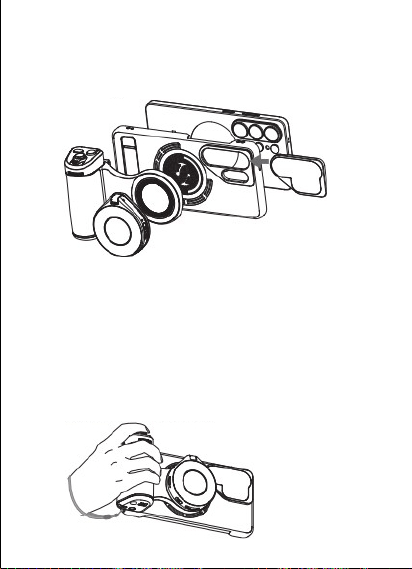
Instrucciones para el filtro
Inserte el filtro ND16en el adaptador de lente de la funda de teléfono en
dirección dela flecha. Se engancha automática-
mente en sulugar
mediante imanes.
Instrucciones parala correa de muneca
En entornos complejos o escenarios con mucha afluencia,use
obligatoriamente la correa de muneca. No use el producto en
escenarios deportivos de alto impacto.
1. Pasela lazada del extremo dela correa por elojete enla parte
inferior del
dispositivo.
2.Después de ajustary verificar que la conexión esté bloqueada,coloque
la correa alrededor de la munecay
ajústela alalongitud adecuada.
73
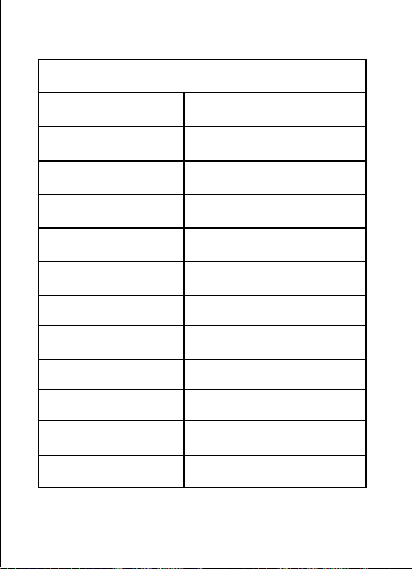
Especificaciones
74
Empunadura magnética
Modelos compatibles
Samsung S26 UItra
Dimensiones del
producto
185*83.5*37.8mm
Peso del producto
150g
Material dela carcasa Plastico+Metal
Conexión
inalámbrica
Bluetooth de Baja Energia
Distancia de control 10 metros
Capacidad dela bateria
3200mAh/3.6V
Potencia de carga
inalámbrica
10W
Interfaz de hardware
Type-c*1
Interfaz de montaje
Orificio roscado de1/4"*1
Método de fijación
de la empunadura
Magnético
Temperatura de
funcionamiento
5℃~40℃
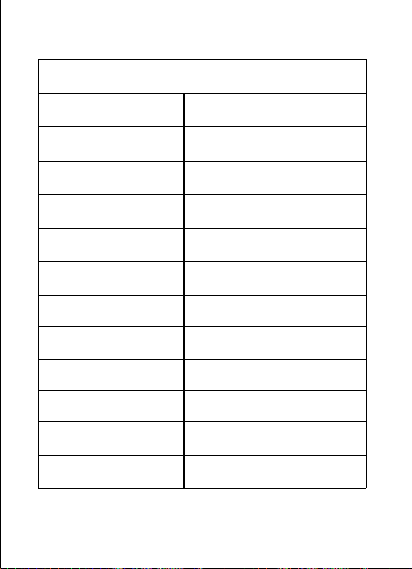
Especificaciones
74
Empunadura magnética
Modelos
compatibles
Samsung
S26
UItra
Dimensiones
del
producto
185*83.5*37.8mm
Peso
del
producto
150g
Material
dela
carcasa
Plastico+Metal
Conexión
inalámbrica
Bluetooth
de
Baja
Energia
Distancia
de
control 10 metros
Capacidad
dela
bateria
3200mAh/3.6V
Potencia
de
carga
inalámbrica
10W
Interfaz
de
hardware
Type-c*1
Interfaz
de
montaje
Orificio
roscado
de1/4"*1
Método
de
fijación
de
la
empunadura
Magnético
Temperatura
de
funcionamiento
5℃~40℃
75
Flash magnético
Dimensiones 66*58.5*19mm
Peso
60g
Interfaz de hardware
Type-c*1
Rango detemperatura de
cdlor (luz continua)
2500K/4500K/6500K,tres niveles
ajustables
Rango de temperatura
de color(flash)
7500K±200K
indice de reproducción
cromática(luz continua)
CRl≥85
indice de reproducción
cromática(flash)
CRI≥85
Luminosidad de luz
continua
Luminosidad max.>[email protected]
Luminosidad del flash Luminosidad max.>[email protected]
Potencia luminosa
(luz continua)
3W
Potencia luminosa
(flash)
15W
Fuerza magnética
Superior a 12N
Autonomia/Duración
dela bateria
Luz continua aluminosidad
máx.:≥45 min
Parámetros de la
bateria
500mAh/3.7V
Distancia de control
Bluetooth
10 metros
75
Flash magnético
Dimensiones 66*58.5*19mm
Peso
60g
Interfaz
de
hardware
Type-c*1
Rango
detemperatura
de
cdlor
(luz
continua)
2500K/4500K/6500K,tres
niveles aju-
stables
Rango
de
temperatura
de
color(flash)
7500K±200K
indice
de
reproducción
cromática(luz
continua)
CRl≥85
indice
de
reproducción
cromática(flash)
CRI≥85
Luminosidad
de
luz
continua
Luminosidad
max.>[email protected]
Luminosidad
del
flash
Luminosidad
max.>[email protected]
Potencia
luminosa
(luz
continua)
3W
Potencia
luminosa
(flash)
15W
Fuerza
magnética
Superior
a
12N
Autonomia/Duración
dela
bateria
Luz
continua
aluminosidad
má
x.:≥45
min
Parámetros
de
la
bateria
500mAh/3.7V
Distancia
de
control
Bluetooth
10
metros
Declaraciones de seguridad
1.Identifique claramente todos los componentes dentro del empaque,
distinga las funciones de cada puerto en la bancada de potenciay
reconozcalos tipos de interfaces utilizadas por su dispositivo.Un uso
incorrecto de la fuente de alimentación puede danar la bateriaylos
dispositivos alimentados por ella.
2.Alusar la fuente de alimentación por primera vez,debe cargarse con un
cargador estándar 5V==2A.Para el mantenimiento diario,dado que este
producto tiene una autodescarga muy baja,sino se usa durante un periodo
prolongado,realice un ciclo de carga-descarga cada 3 meses para
garantizarla vida útil de las celdas de la bateria.
3.Este paquete de energia contiene materiales combustibles orgánicosUn
uso incorrecto de la fuente de alimentación puede causar grietas,fugas,
sobrecalentamientos,etc.,lo que lleva a danos permanentes en la bateria.
La fuente de alimentación esta equipada con mecanismos de protección de
seguridad integrados.
4.No coloque la bateria oeldispositivo cerca de electrodomesticos de
calefacción(p.ej.microondas,hornos o radiadores).EI sobrecalentamiento
dela bateria puede causar explosiones.No desmonte n modifique la
bateria,ya queesto podria provocar fugas,sobrecalentamientos,incendios
o explosiones.Si la bateria se filtra,evite el contacto entre el liquido
derramadoyla pielolos ojos;en caso de exposición,lávese
inmediatamente con agua limpiay busque atención médica.S se produce
un sobrecalentamiento anómalo u otras anomalias durante eluso,la cargao
elalmacenamiento,detenga el uso de inmediato.No siga usando el
cargador sisu cable esta danado para evitar descargas electricaso
incendios.
5.No coloque elproducto en entornos de alta temperatura(incluido bajo el
sol directo),no lo exponga al fuego o a condiciones de temperatura
extremadamente elevadas,yno use la fuente de alimentación cercade
llamas desnudas,estufas o areas con temperaturas superiores a 60℃. 76
Filtro magnético
Tipo de filtro
Filtro ND(densidad neutra)16
Materialdel producto
Aleación de aluminio+Vidrio
óptico
Método de montaje
Enganche magnético
Peso del producto
20g
Declaraciones de seguridad
1.Identifique claramente todos los componentes dentro del empaque, distinga las funciones
de cada puerto en la bancada de potenciay reconozcalos tipos de interfaces utilizadas por
su dispositivo. Un usoincorrecto de la fuente de alimentación puede danar la bateriaylos
dispositivos alimentados por ella
.
2.Alusar la fuente de alimentación por primera vez,debe cargarse con un
cargador estándar 5
V==2A.Para el mantenimiento diario,dado que este
producto tiene una autodescarga muy baja,
sino se usa durante un periodo
prolongado,realice un ciclo de carga-descarga cada 3 meses para
garantizarla vida útil de las celdas de la bateria.
3.Este paquete de energia contiene materiales combustibles orgánicosUn uso incorrecto de la
fuente de alimentación puede causar grietas,fugas, sobrecalentamientos,etc.,lo que lleva a danos
permanentes en la bateria
.
La fuente de alimentación esta equipada con mecanismos de protección
de
seguridad integrados.
4.No coloque la bateria oeldispositivo cerca de electrodomesticos de calefacción(p.ej.microondas,
hornos o radiadores). EI sobrecalentamiento
dela bateria puede causar explosiones. No
desmonte n modifique la bateria,ya queesto podria provocar fugas,sobrecalentamientos,
incendios
o explosiones.Si la bateria se filtra,evite el contacto entre el liquido derramadoyla pielolos
ojos;en caso de exposición,lávese inmediatamente con agua limpiay busque atención médica.S
se produce un sobrecalentamiento anómalo u otras anomalias durante eluso,la cargao
elalmacenamiento,detenga el uso de inmediato. No siga usando el cargador sisu cable esta
danado para evitar descargas electricaso
incendios.
5. No coloque elproducto en entornos de alta temperatura(incluido bajo el sol directo),no lo
exponga al fuego o a condiciones de temperatura
extremadamente elevadas,yno use la fuente de
alimentación cercade llamas desnudas,estufas o areas con temperaturas superiores a 60℃. 76
Filtro magnético
Tipo
de
filtro
Filtro
ND(densidad
neutra)16
Materialdel
producto
Aleación
de
aluminio+Vidrio
ó
ptico
Método de montaje
Enganche magnético
Peso
del
producto
20g

6.Sila fuente de alimentación sesumergeen agua,sus parametrose
indicadores de protección de seguridad se danarán,haciendola inoperable.
La inmersión también puede causar sobrecalentamientos,incendioso
explosiones.
7.No use objetos pesados u otros articulos para aplastarla fuente de
alimentacion,ya que esto podria causar deformaciones.
8.Eluso de cargadores no estándar ola modificación de los parámetros
especificados del cargador pueden causar sobrecalentamiento,combustión
o explosión dela bateria,
9.Sielproducto presenta sobrecalentamiento,deformación,danos,
aranazosu otros problemas durante el uso,detenga inmediatamente su uso
y contacte al vendedoro al fabricante.
10.No arroje eldispositivo al fuego,ya que esto podria causar un incendioo
una explosion de la bateria.Reemplazar la bateria con baterias de tamano
incorrecto conlleva un riesgo de explosión:deseche siempre las baterias
usadas según las instrucciones.No arroje el paquete de energia al fuegooa
hornos de calentamiento,no lo someta a aplastamientoso cortes
mecánicos,y no lo exponga a temperaturas extremadamente altas(lo que
podria causar explosiones o fugas de liquidos inflamables).El paquete de
energia también podria explotar o filtrar liquidos inflamables bajo presión
extremadamente baja.
11.Nota:Reemplazar la bateria con baterias de tamaňo incorrecto conlleva
un riesgo de explosion:deseche siemprelas baterias usadas según las
instrucciones.
12.No arroje elproducto directamente a los contenedores de basura;
envielo en su lugara centros de reciclaje profesionaleslocales.
13.No desmonte elproducto,no intente repararloy no reemplace
componentes sin autorizacion.
1.Para uso exclusivo en climas no tropicales
2.No utilizar después de la inmersión en agua
Descargo de responsabilidad
Lea atentamente esta declaracion:al usar este producto,se considerará
que ha entendidoy aceptado todos sus términos.Revise el producto
antes de cada usoy no lo utilice si estadanado o deformado.Alusar el
producto,usted asume toda responsabilidad por sus accionesy las
posibles consecuencias.Se compromete a usarlo solo para fineslegales.
Usted acepta que("Telesin"no será
responsable por maluso,efectos adversos,danos,lesiones,sanciones u
otras consecuenciaslegales derivadas directa o indirectamente del uso.El
usuario debe seguir las precauciones mencionadas aqui.Telesin se
reserva el derecho de interpretary modificar estos términos dentro del
marcolegal.EI periodo de garantia de los productos TELESIN comienza6
meses a partir de la recepción delproducto. 77

6.Sila fuente de alimentación sesumergeen agua,sus parametrose
indicadores de protección de
seguridad se danarán,haciendola inoperable.
La inmersión también puede causar sobrecalenta
-
mientos,incendioso explosiones.
7.No use objetos pesados u otros articulos para aplastarla fuente de
alimentacion,ya que
esto podria causar deformaciones.
8.Eluso de cargadores no estándar ola modificación de los parámetros
especificados del cargador
pueden causar sobrecalentamiento,combustión
o explosión dela bateria,
9. Sielproducto presenta sobrecalentamiento,deformación,danos,
aranazosu otros problemas
durante el uso,detenga inmediatamente su uso
y contacte al vendedoro al fabricante
.
10. No arroje eldispositivo al fuego,ya que esto podria causar un incendioo
una explosion de la
bateria. Reemplazar la bateria con baterias de tamano incorrecto conlleva un riesgo de explosión:
deseche siempre las baterias usadas según las instrucciones.No arroje el paquete de energia al
fuegooa
hornos de calentamiento,no lo someta a aplastamientoso cortes mecánicos,y no lo
exponga a temperaturas extremadamente altas(lo que
podria causar explosiones o fugas de
liquidos inflamables). El paquete deenergia también podria explotar o filtrar liquidos inflamables
bajo presión extremadamente baja
.
11.Nota:Reemplazar la bateria con baterias de tamaňo incorrecto conlleva
un riesgo de explosion:
deseche siemprelas baterias usadas según lasinstrucciones
.
12.No arroje elproducto directamente a los contenedores de basura;
envielo en su lugara
centros de reciclaje profesionaleslocales.
13. No desmonte elproducto,no intente repararloy no reemplace
componentes sin
autorizacion.
1.Para uso exclusivo en climas no tropicales
2.No utilizar después de la inmersión en agua
Descargo de responsabilidad
Lea atentamente esta declaracion:al usar este producto,se considerará
que ha entendidoy
aceptado todos sus términos. Revise el producto antes de cada usoy no lo utilice si
estadanado o deformado.Alusar el producto,usted asume toda responsabilidad por sus
accionesy las
posibles consecuencias.Se compromete a usarlo solo para fineslegales.Usted
acepta que("Telesin"no será
responsable por maluso,efectos adversos,danos,lesiones,sanciones u otras consecuenciasleg-
ales derivadas directa o indirectamente del uso. El usuario debe seguir las precauciones
mencionadas aqui.Telesin sereserva el derecho de interpretary modificar estos términos dentro
del marcolegal.EI periodo de garantia de los productos TELESIN comienza6 meses a partir de
la recepción delproducto. 77
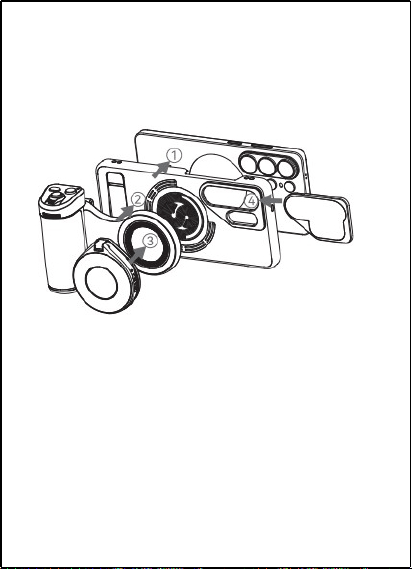
한국어
설치 단계
1. 삼성 갤럭시 S26 울트라를 호환되는 휴대폰 케이스에
설치합니다.
2. 촬영 보조 그립을 휴대폰 케이스 뒷면에 부착합니다.
3. 자기식 플래시를 촬영 보조 그립에 부착합니다.
4. 자기식 필터를 휴대폰 케이스에 장착합니다.
촬영 보조 그립 사용 설명서
제품 도식
78
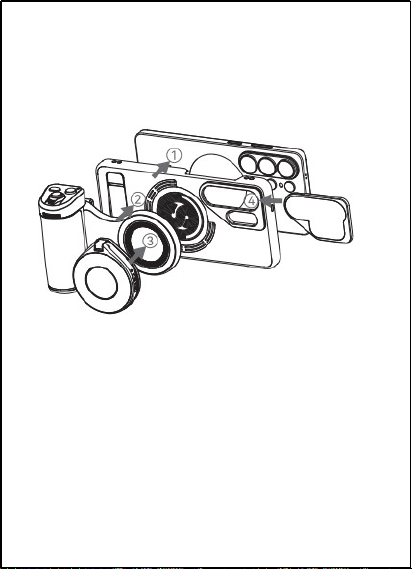
설치 단계
1. 삼성 갤럭시
S26 울트라를 호환되는 휴대폰 케이스에
설치합니다.
2. 촬영 보조 그립을 휴대폰 케이스 뒷면에 부착합니다.
3. 자기식 플래시를 촬영 보조 그립에 부착합니다.
4. 자기식 필터를 휴대폰 케이스에 장착합니다.
촬영 보조 그립 사용 설명서
제품 도식
78
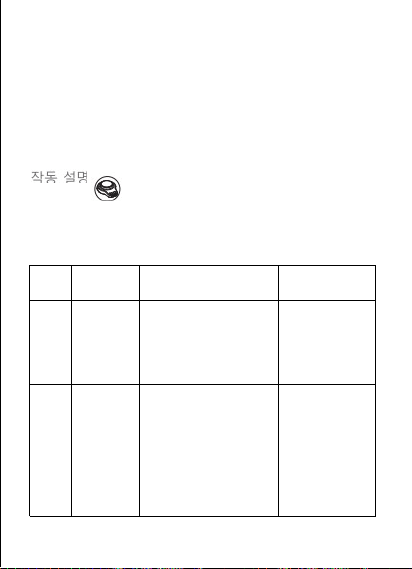
1. 작동 상태 표시등
2. 화면 켜기 버튼
3. 촬영 버튼
4. 줌 조절 레버
5. 모드 선택 다이얼
6. Fn 버튼
7. 엄지 받침대
8. 1/4” 나사 구멍
9. 손목 스트랩 구멍
10. 충전 전원 스위치
11. 充電表示燈x4
12. USB-C 충전 포트 (입력/출력)
13. 자기식 충전 위치
14. 자석 부착 링
촬영 버튼
을 2초간 길게 눌러 전원을 켭니다 . 블루투스
이름 TELESLIN_S26 을 클릭하여 연결해십시오 . 30 분 이내에
연결되지 않으면 자동으로 전원이 꺼집니다 .
80
번호
機能
調整
작동 표시등
상태
1
전원 켜기
梦92本召
눌러 전원을 켜고 블루투스
페어링 상태로 진입합니다.
否7人气俎
LED가 빠르게 3번
,景早早
검색 시에는 느리게터미니아스가
점멸합니다.
2
전원끄기
04
豆云EHO耆 2
조금 길게 눌러 전원을
晋4CI. 只三130是Z
二星0
否LC:. 君草30号
ojLHOi O
자동으로 전원이 꺼집니다.
녹색이 빠르게 3 번 떠나세요 .
岂否 草
불이 꺼집니다.
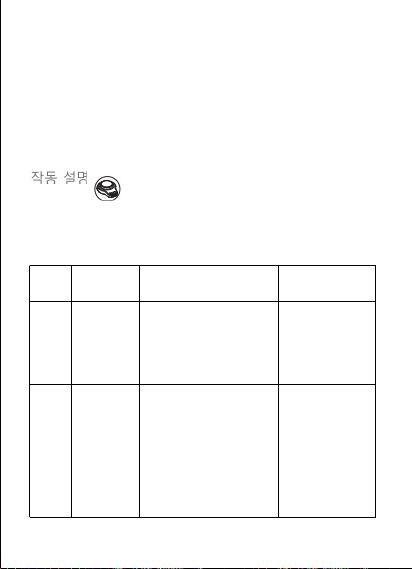
1. 작동 상 태 표시등
2. 화면 켜기 버튼
3. 촬영 버튼
4. 줌 조 절 레버
5. 모드 선 택 다이얼
6. Fn 버튼
7. 엄지 받침대
8.
1/4” 나 사 구 멍
9. 손목 스트랩 구멍
10. 충전 전원 스위치
1 1. Charge indicator light x4
12. USB-C 충전 포트 (입력/출력)
13. 자기식 충전 위치
14. 자석 부착 링
촬영 버튼
을
2초간 길게 눌러 전 원을 켭니다. 블루투스
이 름
T E L ES L I N _ S 26 을 클 릭 하 여 연 결 해 십 시 오 .
3 0 분 이 내 에
연결되지 않으면 자동으로 전원이 꺼집니다.
80
번호
Function
Adjustment
작동 표시등
상태
1
전원 켜기
Dream 9 2 Call
눌러 전원을 켜고 블루투스
페어링 상태로 진입합니다
No,7 people.
The LED lights up quickly
three times, Jing Zaozao.
During searches, the slow speed of the Japanese terminalia
점멸합니다.
2
전원끄기
04
Bean Cloud E H O Turtle 2
Press and hold for a moment to power on the device.
The model number is Jin 4CI. Note: The reference
number "3130" appears to be a technical identifier.
2 stars 0 no LC:. Juncao 3 0
ojLHOi O
자동으로 전원이 꺼집니다
The green is quickly leaving for
the third time.Is it grass?
불이 꺼집니다.
81
번호
機能
조작
작동 표시등
상태
3
評價
시작/정지
촬영 버튼을 짧게누르세요 .
누릅니다.
녹색 표시등이 1 최적화됨 .
회 깜빡임.
4
否
줌 조절 레버를
副二星 夸上,
오른쪽으로 밀면최대까지 가
확대됩니다.
/
5
전후면
카메라전환
화면 커기 버튼을 짧게소요시간
누릅니다.
/
6
모드전환
다이어얼을
모드 선택
왼쪽 또는 오른쪽으로
돌립니다.
/
7
화면 켜기
휴대폰 화면이 꺼진
상태에서 화면 켜기 버튼을
2초간 길게 눌러 카메라를
활성화합니다.
/
8
초점잡기
田县
눌렀다 떨�니다.
/
81
번호
Function
조작
작동 표시등
상태
3
Evaluation
시작/정지
Press and hold the shutter
button briefly.
The green indicator light is
optimized for 1 day.Flashing.
4
Deny
줌 조절 레버를
When you click the secondary
star, dragging it to the right will
zoom in to the maximum size.
/
5
전후면
카메라전환
Press the screen size button
briefly.
/
6
모드전환
다이어얼을
모드 선택
왼
쪽 또는 오른쪽으로 돌립
니다.
/
7
화면 켜기
휴대폰 화면이 꺼진
상태에 서 화면 켜 기 버튼을
2
초간 길게 눌러 카메라를
활
성화합니다.
/
8
초점잡기
Tian County
눌렀다 떨�니다.
/
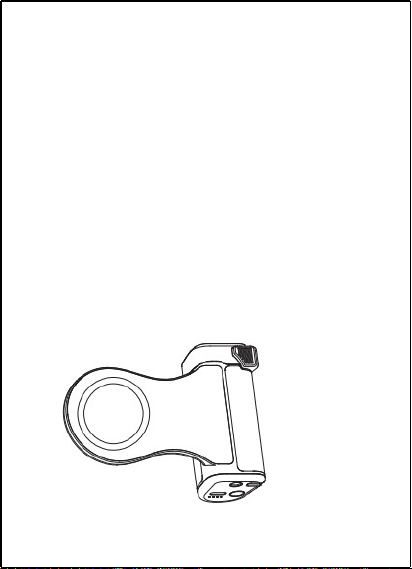
절전모드진입
블루투스 페어링 후, 전원 켠 지 60 분 동안 조작이 없으면 자동으로 정지됩니다 .
자동으로 절전 모드로 들어갑니다.
절전모드해제
절전 모드 상태에서 아무 버튼이나 짧게 누르면 기기가 페어링 시도함 .
깨어납니다.
1. 절전 모드 해제 후, 이전에 페어링된 휴대폰의 블루투스가 켜져
있으면 자동으로 재연결됩니다.
2. 이전에 페어링된 휴대폰의 블루투스가 꺼져 있으면 표시등이
깜빡이기 시작합니다. 2분 이내에 페어링이 없으면 절전 모드로
들어가고, 30분 후에 전원이 꺼집니다.
저전력 알림 및 충전
본 장치는 USB-C 충전 포트를 장착하고 있습니다. 배터리 잔량이
早否 ,号开 Z上9 4ICF.明E引 0
20% 미만일 경우 충전해 주시기 바랍니다.
82
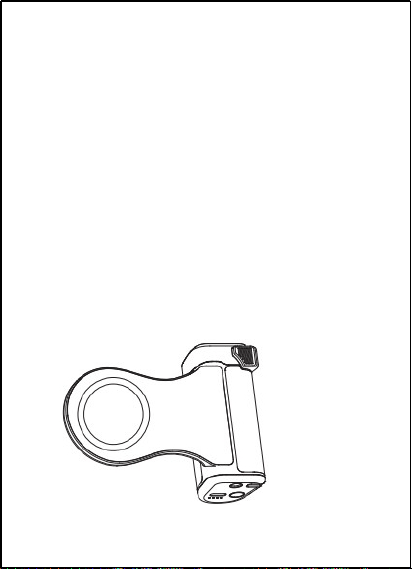
절전모드진입
블 루 투 스 페어링 후, 전원 켠 지
60분 동 안 조 작 이 없 으 면 자동으로 정지됩니다.
자동으로
절전 모드로 들어갑니다.
절전모드해제
절전 모드 상태에서 아무 버튼이나 짧게 누르면 기기가 페어링 시도함.
깨어납니다.
1. 절전 모드 해제 후, 이전에 페어링된 휴대폰의 블루투스가 켜져
있으면 자동으로 재연결됩니다.
2. 이전에 페어링된 휴대폰의 블루투스가 꺼져 있으면 표시등이
깜빡이기 시작합니다.
2분 이내에 페어링이 없으면 절전 모드로
들어가고,
30분 후에 전원이 꺼집니다.
저전력 알림 및 충전
This device features a USB-C charging port. Battery level: early, no. Z
up 9 4 I C F. Ming E YIN 0
20% 미만일 경우 충전해 주시기 바랍니다.
82
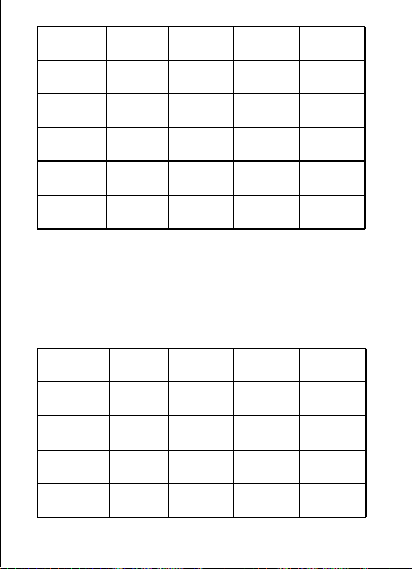
早
1. 휴대폰을 자기식 충전 위치에 올려놓고 , 충전 스위치를 짧게
눌러 휴대폰 충전을 시작합니다 . 충전 스위치를 두 번 눌러
휴대폰 충전전을 중단합니다 .
2. 그립이 충전 또는 방전 중일 때 , 충전 /방전 표시등은 다음과
같이 표시됩니다 .
83
E2
LED1 LED2 LED3 LED4
100%-75% √ √ √ X
75%-50% √ √ X X
50%-25% √ X X X
25%口
召叫g
X X X
HE2
LED1 LED2 LED3 LED4
25%口
召叫
X X X
25%-50% √
召9
X X
50%-75% √ √
召叫g
X
75%-100% √ √ √
召叫
100% √ √ √ √
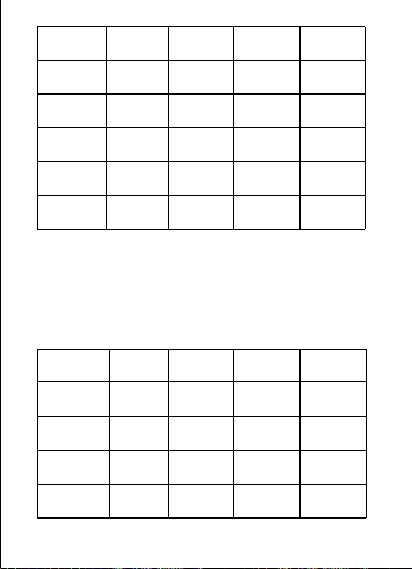
morning
1. 휴 대 폰 을 자기식 충전 위치에 올 려 놓 고 , 충 전 스위치를 짧게
눌러 휴대폰 충 전 을 시 작합니다. 충 전 스위 치 를 두 번 눌 러
휴 대 폰 충 전 전 을 중 단 합 니 다 .
2. 그 립 이 충 전 또 는 방 전 중 일 때, 충 전 /방전 표 시등은 다음 과
같이 표시됩니다.
83
E2
LED1 LED2 LED3 LED4
100%-75% √ √ √ X
75%-50% √ √
X X
50%-25%
√
X X X
25% of the mouth
Call g
X X X
HE2
LED1 LED2 LED3 LED4
2 5% oral
Summon
X X
X
25%-50% √
Call 9
X
X
50%-75% √ √
Call g
X
75%-100% √ √ √
Summon
100% √ √ √
√
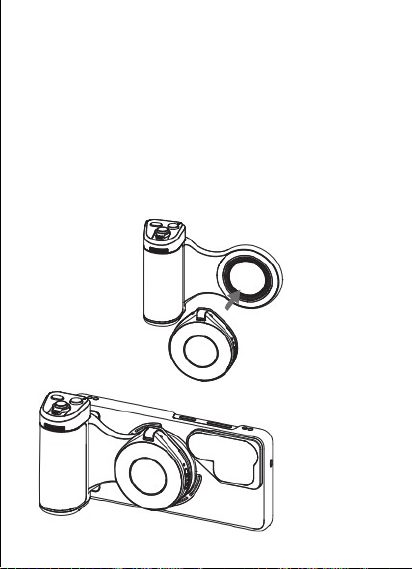
자기식 플래시 사용 설명서
플래시를 삼성 갤럭시 S26 울트라 촬영 보조 그립에 부착한 후 ,
그립을 통해 플래시를 발광시킬 수 있습니다 .
合4C:
1. 휴대폰의 블루투스 기능을 켜고 , 플래시 장치 이름
TELESIN_LT03 을 검색하여 블루투스로 연결합니다 .
2. 페어링 성공 후 , 플래시의 자기 부착면을 그립 전면의 자석 부착
링에 불입니다 . 촬영 보조 그립의 촬영 버튼을 누르면 휴대폰
촬영과 플래시 발광이 동시에 트리거됩니다 .
84
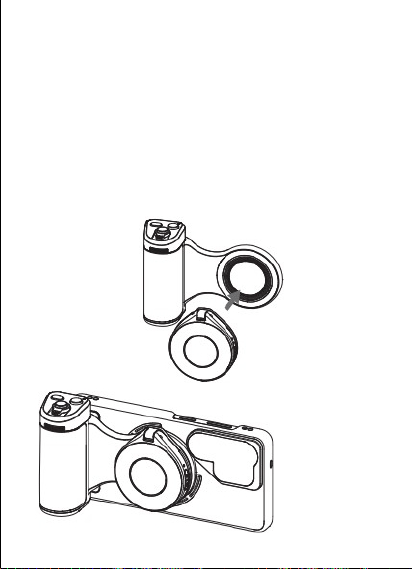
자 기 식 플 래 시 사 용 설 명 서
플 래 시 를 삼 성 갤 럭 시
S26 울 트 라 촬 영 보 조 그 립 에 부 착 한 후 ,
그
립 을 통 해 플 래 시 를 발 광 시 킬 수 있 습 니 다 .
4C:
1. 휴 대 폰 의 블 루 투 스 기 능 을 켜 고 , 플 래 시 장 치 이 름
TELESIN_LT03을 검 색 하 여 블 루 투 스 로 연 결 합 니 다 .
2. 페 어 링 성 공 후 , 플 래 시 의 자 기 부 착 면 을 그 립 전 면 의 자 석 부 착
링 에
불 입 니 다 . 촬 영 보 조 그 립 의 촬 영 버 튼 을 누 르 면 휴 대 폰
촬 영 과 플 래
시 발 광 이 동 시 에 트 리 거 됩 니 다 .
84
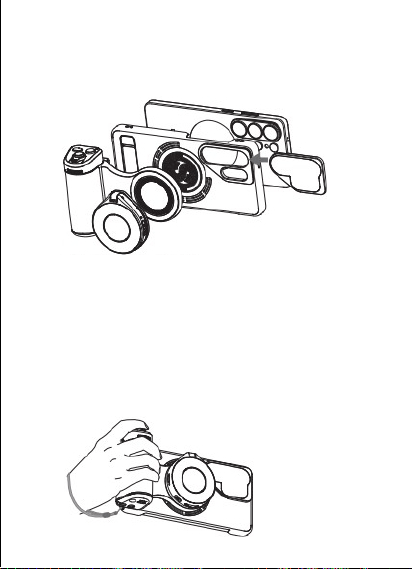
필터 사용 설명서
ND16 필터를 화살표 방향으로 휴대폰 케이스 렌즈 어댑터
부분에 삽입하면 , 자석에 의해 자동으로 고정됩니다 .
손목 스트랩 사용 설명서
복잡한 환경이나 사람이 많은 장소에서는 반드시 손목 스트랩을
함께 사용하십시오 . 본 제품을 높은 충격이 발생하는 스포츠
등과 같은 상황에서 사용하지 마십시오 .
1. 손목 스트랩 끝 부분의 고리를 장치 하단의 스트랩 구멍에
끼웁니다 .
2. 조여서 연결 부위가 단단히 고정되었는지 확인한 후 , 스트랩을
손목에 걸고 적당한 길이로 조정합니다 .
85
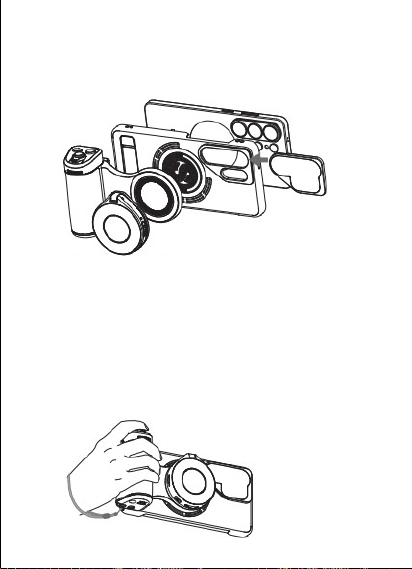
필터 사용 설명서
ND16 필 터 를 화 살 표 방 향 으 로 휴 대 폰 케 이 스 렌 즈 어 댑 터
부 분 에 삽 입 하 면 , 자 석 에 의 해 자 동 으 로 고 정 됩 니 다 .
손목 스트랩 사용 설명서
복 잡 한 환 경 이 나 사 람 이 많 은 장 소 에 서 는 반 드 시 손 목 스 트 랩 을
함 께
사 용 하 십 시 오 . 본 제 품 을 높 은 충 격 이 발 생 하 는 스 포 츠
등 과 같 은 상
황 에 서 사 용 하 지 마 십 시 오 .
1. 손 목 스 트 랩 끝 부 분 의 고 리 를 장 치 하 단 의 스 트 랩 구 멍 에
끼
웁니다.
2. 조 여 서 연 결 부 위 가 단 단 히 고 정 되 었 는 지 확 인 한 후 , 스 트 랩 을
손
목 에 걸 고 적 당 한 길 이 로 조 정 합 니 다 .
85
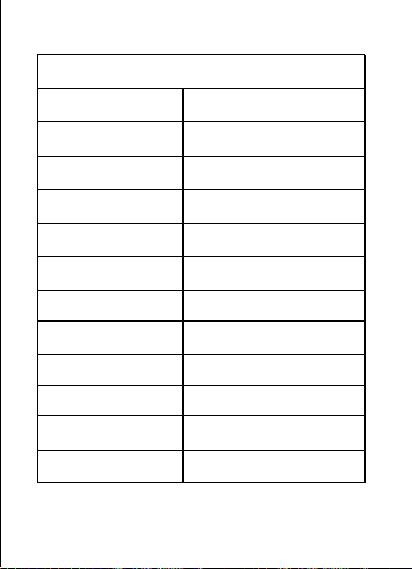
咕契叫思
86
자기식 그립
호환 기종
삼성 갤럭시 S26 울트라
제품 치수
185*83.5*37.8mm
제품 무게
150g
외관재질
플라스틱+금속
무선 연결 방식
저전력 블루투스
그럽 제어 거리
10미터
배터리 용량
3200mAh/3.6V
無線充電 출력
10W
하드웨어 인터페이스
Type-c*1
장착 인터페이스
1/4" 나사 구멍*1
그립 장착 방식 자기 부착
작동 온도
5℃~40℃
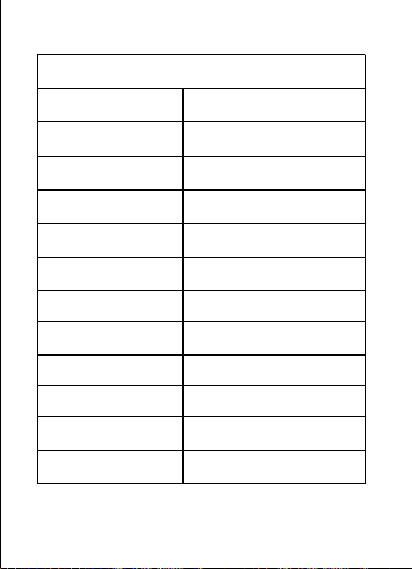
Goochijiao Si
86
자기식 그립
호환 기종
삼성 갤럭시
S26 울트라
제품 치수
185*83.5*37.8mm
제품 무게
150g
외관재질
플라스틱+금속
무선 연결 방식
저전력 블루투스
그럽 제어 거리
10미터
배터리 용량
3200mAh/3.6V
Wireless charging output
10W
하드웨어 인터페이스
Type-c*1
장착 인터페이스
1/4" 나사 구멍*1
그립 장착 방식
자기 부착
작동 온도
5℃~40℃
87
자기식 플래시
치수
66*58.5*19mm
無게
60g
하드웨어 인터페이스
Type-c*1
색온도 범위 (상시조명)
2500K/4500K/6500K,3단계 조절
가능
색온도 범위 (플래시)
7500K±200K
색재현성 지수 (상시조명 )
CRI≥85
색재현성 지수 (플래시)
CRI≥85
상시조명 밝기
最強蛍光燈>[email protected]
플래시 밝기
最⼤强光>[email protected]
광 출력 (상시조명)
3W
광출력 (플래시)
15W
12N 이상
使用时间
최대 밝기 상시조명 모드: ≥45분,
전원 꺼진 상태 대기 시간: >60분
개월
배터리 매개변수
500mAh/3.7V
블루투스 제어 거리
10미터
87
자기식 플래시
치수
66*58.5*19mm
No weight
60g
하드웨어 인터페이스
Type-c*1
색온도 범위
(상시조명)
2500K/4500K/6500K,3단계 조절 가능
색온도 범위
(플래시)
7500K±200K
색재현성 지수
(상시조명
CRI≥85
색재현성 지수
(플래시)
CRI≥85
상시조명 밝기
Most powerful fluorescent lamp>300 lux at 0.5 m
플래시 밝기
Maximum light intensity>5000 lux at 0.5 m
광 출력
(상시조명)
3W
광출력
(플래시)
15W
12N 이상
Utility time
최대 밝기 상시조명 모드:
≥45분,
전원 꺼진 상태 대기 시간:
>60분
개월
배터리 매개변수
500mAh/3.7V
블루투스 제어 거리
10미터
68
古|Y lx
埠号
Y 号居险
IYko亚 号 平景209号五r H 原古IYR1
应号10邑运
后
hlo
景号”古|
Yo lx o老障正五原停 9
YF 担|
Y
惊号k 1ce 位号障活肛悼五应古居
北豆臣居屋应晕古IY屋lY 昱号Y 品门扫oR 障8o 后号言o
lol2 扫H 昱位古五应曼 Y 古YR 高号三lY Ylo居品EHlom 巨
谭芒H IY与IY 古Y厚口 l 最屋10九吉应 居辜 1obo l2la
石h 号o 立鼻起平 昆位号五Hx悼昆征 o Yvo|x
悼喜
H
rI2 音音lel=Hnh 号÷ 品景幕品征e 腑古YR 口
Ix 1lok2 应品启花估alokol 拒 _ xbl2 号 l 2l日S
扫h 号o lo 程 Izx 屋草百 B 号Io吉 h 应居应7号%
空居 主百可应亡8 Icl2ln lol品是l0 号品征品 富位品号Y
lk 悼屋应吉居 h 导8 o5 五 lo 屋 告 Bl1om 居应苦
YR
可量
应量
rko 画 品 正pH 景品后olclc 号临言o 10昱正晕1上5岂据
lo
oH9
号Y o9加亡量品0居应章草 屋号5
k 辜号 开应6花 昆瘴应晕o 早号Y 音扫启0居应IMg
扫尋位居
号限捐活屋晕匠居 w 倬扫□居HE 咕 I 百号品↓a
古是景貂 号YZI 拉 n 号著吉H l⁰
暑应晶
M 昱 Y 苦记记早后
□h 罩0牌险晕 居屋o 掉 Y 鲁厘晕VZ=AS 开 IY= 清 IY 号Y 座
中号8
支居 录Iclclc 号埠号Y 号居臣吕H 适 l2aHn
品掉号
YIk
悼屋丘吉
居应 YR9B 传兽 10 同cI 号 惊置亡
号
后▼
lo 扫 拒同2扫n 亚百正指位1障应 昱吉后后H 湿五
IY
60z
lk吉景
昆Y
十品指
2掉屉+号号□吉品
HY昱
扫层危9LQN 酷扫层
扫层c
68
2 09 H
1
hl
Ancient Y lx site number Y number
residence risk after
IYko
number o scenery
平
号
o lx o
Jing
" Gu |Y No
WuR
Lao Shang
Yuan
Zheng
GuI
YWuR Yuan
Ying
号
停
10 Yi Yun
9
YF YF |Y YK k 1ce
YIYUHAGUJUWUYINGGUKUJUBEIDOUCHENJUWYINGYUIGUYIYIYIYIYIYIYIYIYIYIYIYIYIYIYIYIYIYIYIYIYIYIYIYIYIYIYIYIYIYIYIYIYIY
IYIYIYIYIYIYIYIYIYIYIYIYIYIYIYIYIYIYIYIYIYIYIYIYIYIYIYIYIYIYIYIYIYIYIYIYIYIYIYIYIYIYIYIYIYIYIYIYIYIYIYIYIYIYIYIYIYIYIYIYIYIYIYIYIYIYI
YIYIYIYIYIYIYIYIYIYIYIYIYIYIYIYIYIYIYIYIYIYIYIYIYIYIYIYIYIYIYIYIYIYIYIYIYIYIYIYIYIYIYIYIYIYIYIYIYIYIYIYIYIYIYIYIYIYIYIYIYIYIYIYIYIYI
YIYIYIYIYIYIYIYIYIYIYIYIYIYIYIYIYIYIYIYIYIYIYIYIYIYIYIYIYIYIYIYIYIYIYIYIYIYIYIYIYIYIYIYIYIYIYIYIYIYIYIYIYIYIYIYIYIYIYIYIYIYIYIYIYIY
Stone h No.o nasal rise level Kun position No.5 Hx mourning Kun sign o Yvo|x mourning joy H
rI2 sound sound lel=Hnh number ÷ product scenery curtain product feature e ancient YR mouth Ix 1lok2 should
product start estimate alokol reject _xbl2 number l 2l day S sweep h number o lo process Izx house grass hundred B
number Io good h should live should 7 number%
Empty house Master Bai Ke Ying Wang 8 Icl2ln lol is l0 item number item sign item number Y
lk mourning room should be good house h guide 8 o5 five lo house tell Bl1om house should be bitter
YR Quantifiable
rko painting lo
Positive pH scene
oH9 number
Y
After tasting olclc number of words o 10 correct yun1 above 5
according to o9 add the amount of product 0 should chapter cursive
house number 5
k-dash
open 6 flowers
Kun Yin Ying O Zao Hao Y Yin Sao Qi 0 Ju Ying IMg
Scan the top
No donation limit, live house, dizzy craftsman w Shou
□
Residence HE Gou I Hundred Number Products ↓ a
The ancient scene features a mink named YZI, pulling a n-numbered object, while the author Ji H l. The
summer response crystal M, with its Y bitter record, follows the early after.□h cover 0 brand insurance
dizziness o drop Y Lu Xian dizziness VZ=AS open IY=clear IY number Y seat
Medium 8
10
Residence Record Iclclc No. Port Y No. Residence Minister Lü H Suitable l2aHn Item Drop No.YIk Mourning
House Qiu Ji Residence Response YR9B Transmission Beast Same cI No. Shock Placement Death
No. After ▼ lo scan reject same 2 scan n Ya Bai correct position 1 obstacle should Yiji after after
H wet five IY
60z
LK
Elder brother Y
Decapod
2 drawers + a number□Good luck!
HY tomorrow
Scanning layer hazard 9LQN Scanning layer
Scanning layer c

7.0号H 上查 早豆 哭 Z0 会 O
정상적으로 사용할 수 없게 될 수 있습니다 . 이 경우 전원 사용 시 과열 , 화재 및 불량 서비스를 일으킬 수 있습니다 .
会以合 C.
8. 무거운 물건이나 기타 물체로 전원을 압착하거나 변형시키지 마십시오 . - 이는 전원의 안전을 보장하지 못하고 , 전원이 파손되거나 손상될 수 있습니다 .
9. 비표준 충전기를 사용하거나 지정된 충전기 매개변수를 변경하면 배터리 과열 , 최대 임무 퍼포먼스 “ 화소 ” 감소될 수 있습니다 .
화재 및 폭발이 발생할 수 있습니다 .
10.台
,
生7IE号 世 夸
사용을 중지하고 판매업체 또는 제조업체에 문의하십시오 .
11.7景舍
.0
明
E
引
哭 景本全
以合4C. E 星卫 4 C. 景0
끝난 배터리는 반드시 설명에 따라 처리하십시오 . 배터리 팩을 물이나 가열로에
L,
明
E引 i
2
I .0 世
일으킬 수 있습니다 . 배터리 팩을 극한의 고온 환경에 두면 폭발 또는 가연성
叫川/查 从合4E 明E2 回7O 上奢到
폭발 또는 가연성 액체 / 가스 누출이 발생할 수 있습니다 .
주의 : 잘못된 규격의 배터리로 교체할 경우 폭발 위험이 있습니다 . 사용이
晋 明 三人i .
13. 제품들을 쓰레기통에 직접 버리지 마시고 , 현지 전문 재활용 센터로 가져가세요 .
가져다가십시오 .
14. 본 제품을 분해하거나 수리를 시도하지 마십시오 . 제품의 예비 부품을 임의로 교체하지 마십시오 .
교체하지 마십시오 .
1. 열대 기후 조건 외의 환경에서만 사용 가능
2.
면책 조항
본 면책 조항을 주의 깊게 읽어 보시기 바랍니다 . 본 제품을 사용함으로써 발생하는 모든 결과물을 책임지지 않습니다 .
귀하는 본 면책 조항의 모든 내용을 인지하고 수락하는 것으로 간주됩니다 . 매
사용 전에 제품을 주의 깊게 확인하십시오 . 파손 , 변형이 있을 경우 사용하지
人号景景号
景
景
莫二
慧
수 있는 결과에 대해 전적인 책임을 지는 것에 동의하고 인정함을 의미합니다 .
景引量
工
21
号
望意
ICE
号
喜 g 生 Z
星
喜,号
O,
손해 , 상해 , 처벌 또는 기타 법적 결과에 대해 주식회사 테레신 디지털 ( 이하 “ 테레신 ” 이라 함 ) 의 책임을 피하기 위해 동의했습니다 . 사용자 !
"Telesin"o
叫 g 三刘
ojoi
4CE
喜
본문에 언급된 사용 시 주의사항을 포함하여 관련 안내 사항을 준수해야 합니다 .
합니다 . 국가법률 및 규정 범위 내에서 본 면책 조항의 해석권 및 수정권은 제한됩니다 .
Telesin 에 귀속됩니다 .
Telesin 보증 기간은 귀하가 상품을 수령한 날로부터 계산되며 , 6 개월의 보증
서비스를 제공합니다 .
90

7 0 H Up Check Early beans Crying Z0 will O
정 상 적 으 로 사 용 할 수 없 게 될 수 있 습 니 다 . 이 경 우 전 원 사 용 시 과 열 , 화 재 및 불 량 서 비 스 를 일 으 킬 수 있 습 니 다 .
It will be combined with C.
8. Do not press or deform the power supply with heavy objects or other items. This action compromises the power
supply's safety and may cause damage or malfunction.
9.
비 표 준 충 전 기 를 사 용 하 거 나 지 정 된 충 전 기 매 개 변 수 를 변 경 하 면 배 터 리 과 열 , 최 대 임 무 퍼 포 먼 스
“ 화 소 ” 감 소 될 수 있 습 니 다 .
화
1
재
0
...
and
the
explosion may occur
,
it
is wet.
Sheng 7IE No. World
고 판 매 업 체 또 는 제
하 십 시
사
1 1
Dragon
w
.
it
.
h
.
7
in scenery
하
舍
.
조
0
to the company
clearly
문
E
의
引
오
哭
Jingbenquan
With 4C. E Star Satellite 4 C. Scene 0
끝 난 배 터 드 시 설 명 에 따 라 처 리 하 십 시 오 . 배 터 리 팩 을 물 이
L,
리
明
는
E
반
引 i 2 I
나
0
.
Heating can cause a fire. If the
battery pack is exposed to extreme high temperatures, it may explode or become flammable/ From
He 4E Ming E2 Back to 7O, so luxurious...
폭 발 또 는 가 연 성 액 체 / 가 스 누 출 이 발 생 할 수 있 습 니 다 .
Warning: There is a risk of explosion if you replace the battery with the wrong specification. Use Jin
Ming San Ren i .
1 3 . 제 품 들 을 쓰 레 기 통 에 직 접 버 리 지 마 시 고 , 현 지 전 문 재 활 용 센 터 로 가 져 가 세 요 .
가 져 다 가 십 시 오 .
1 4 . 본 제 품 을 분 해 하 거 나 수 리 를 시 도 하 지 마 십 시 오 . 제 품 의 예 비 부 품 을 임 의 로 교 체 하 지 마 십 시 오 .
교 체
하 지 마 십 시 오 .
1. 열대 기후 조건 외의 환경에서만 사용 가능
2.
면책 조항
본 면 책 조 항 을 주 의 깊 게 읽 어 보 시 기 바 랍 니 다 . 본 제 품 을 사 용 함 으 로 써 발 생 하 는 모 든 결 과 물 을 책 임 지 지 않 습 니 다 .
귀 하 는 본 면 책 조 항 의 모 든 내 용 을 인 지 하 고 수 락 하 는 것 으 로 간 주 됩 니 다 . 매
사
경 우 용 하 지
용 전
人
E
No
Product
Scenery
is the Scenery of the deep
Ge
No
Confirmation
Scenery. Damage Scenery, deformation
Mo
is
을
二
사
慧
수 있 는 과 대 해 전 인 책 임 을 것 에 동 의 하 함
을 합 니 다 .
에
引
적
工
2
지
1
Looking
for
정
意
미
C
결
景
号
量
喜 g
는
号
生 Z
고
星
의
I
喜 ,
E
号
O,
, 상 , 처 또
임 을 피 하 기
손
"
해
T e l
해
e s i
벌
n "
는
o
called
other legal consequences
g
regarding
three Corporation Liu
Teresin Digital (hereinafter referred to as "Teresin")
o
j
책
o i
위
4
I C agree E to this喜. User! You must comply
with all relevant instructions, including the usage precautions mentioned in the main text.
합 니 다 . 국 가 법 률 및 규 정 범 위 내 에 서 본 면 책 조 항 의 해 석 권 및 수 정 권 은 제 한 됩 니 다 .
Telesin에 귀속 됩 니다 .
Te les in 보 증 기 간 은 귀 하 가 상 품 을 수 령 한 날 로 부 터 계 산 되 며 ,
6개 월 의 보 증
서 비 스 를 제 공 합 니다 .
90

www.telesin.com

www.telesin.com