NEED HELP? CONTACT US!
Have product questions? Need technical support?
Please feel free to contact us:
Technical Support and E-Warranty Certificate
www.vevor.com/support
This is the original instruction, please read all manual instructions carefully before operating.
VEVOR reserves clear interpretation of our user manual. The appearance of the product shall
be subject to the product you received. Please forgive us that we won't inform you again if
there is any technology or software updates on our product.
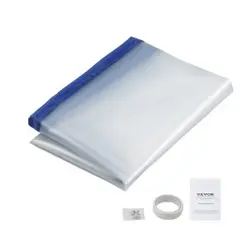
Dust Barrier System
TOUGH TOOLS, HALF PRICE
030201
Safety Notice
Model:RECHMDOOR1/RECHMDOOR2
WARNING:
1.Read this material before using this product.
2. Flammable: Keep away from open flame. This
product will ignite and burn if brought into contact with
an open flame.
3. Keep away from sharp points,blades and other
items,so as not to scratch the product.
4. This product is not a toy, Dust barrier system cannot
be used as toys for children to play with.
5. Test the tape on a discrete surface before using. Use
on clean, dry surface. Don’t intended to use with
lacqurers, wall paper, unpainted wallboard, surface with
dust.
Assembly precautions
1.Assemble only according to these instructions.
2. Wear ANSI-approved safety goggles and heavy-duty
work gloves during assembly.
3.Keep assembly area clean and well lit.
4.Keep bystanders out of the area during assembly.
SAVE THESE INSTRUCTIONS
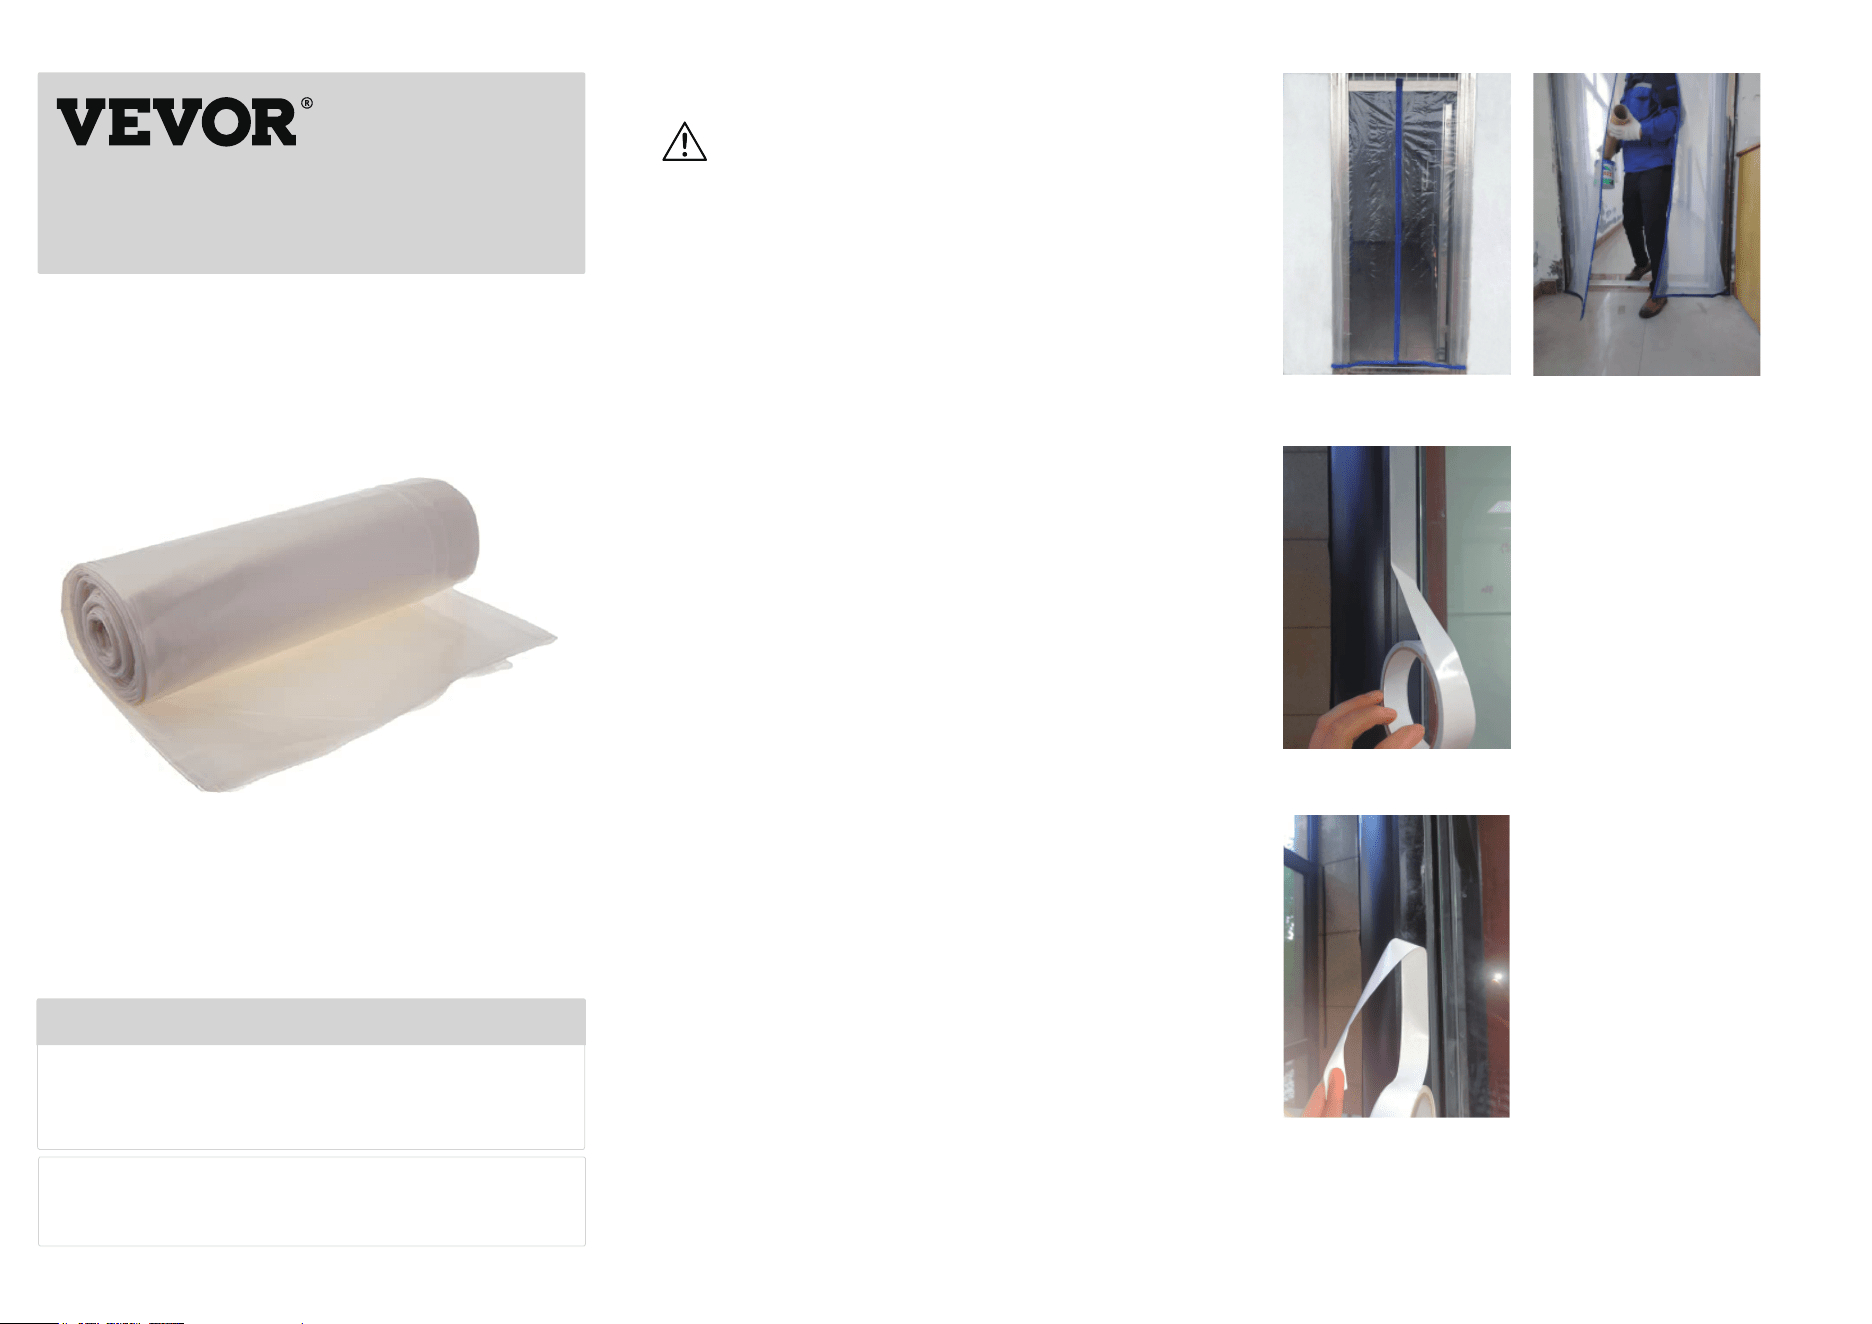
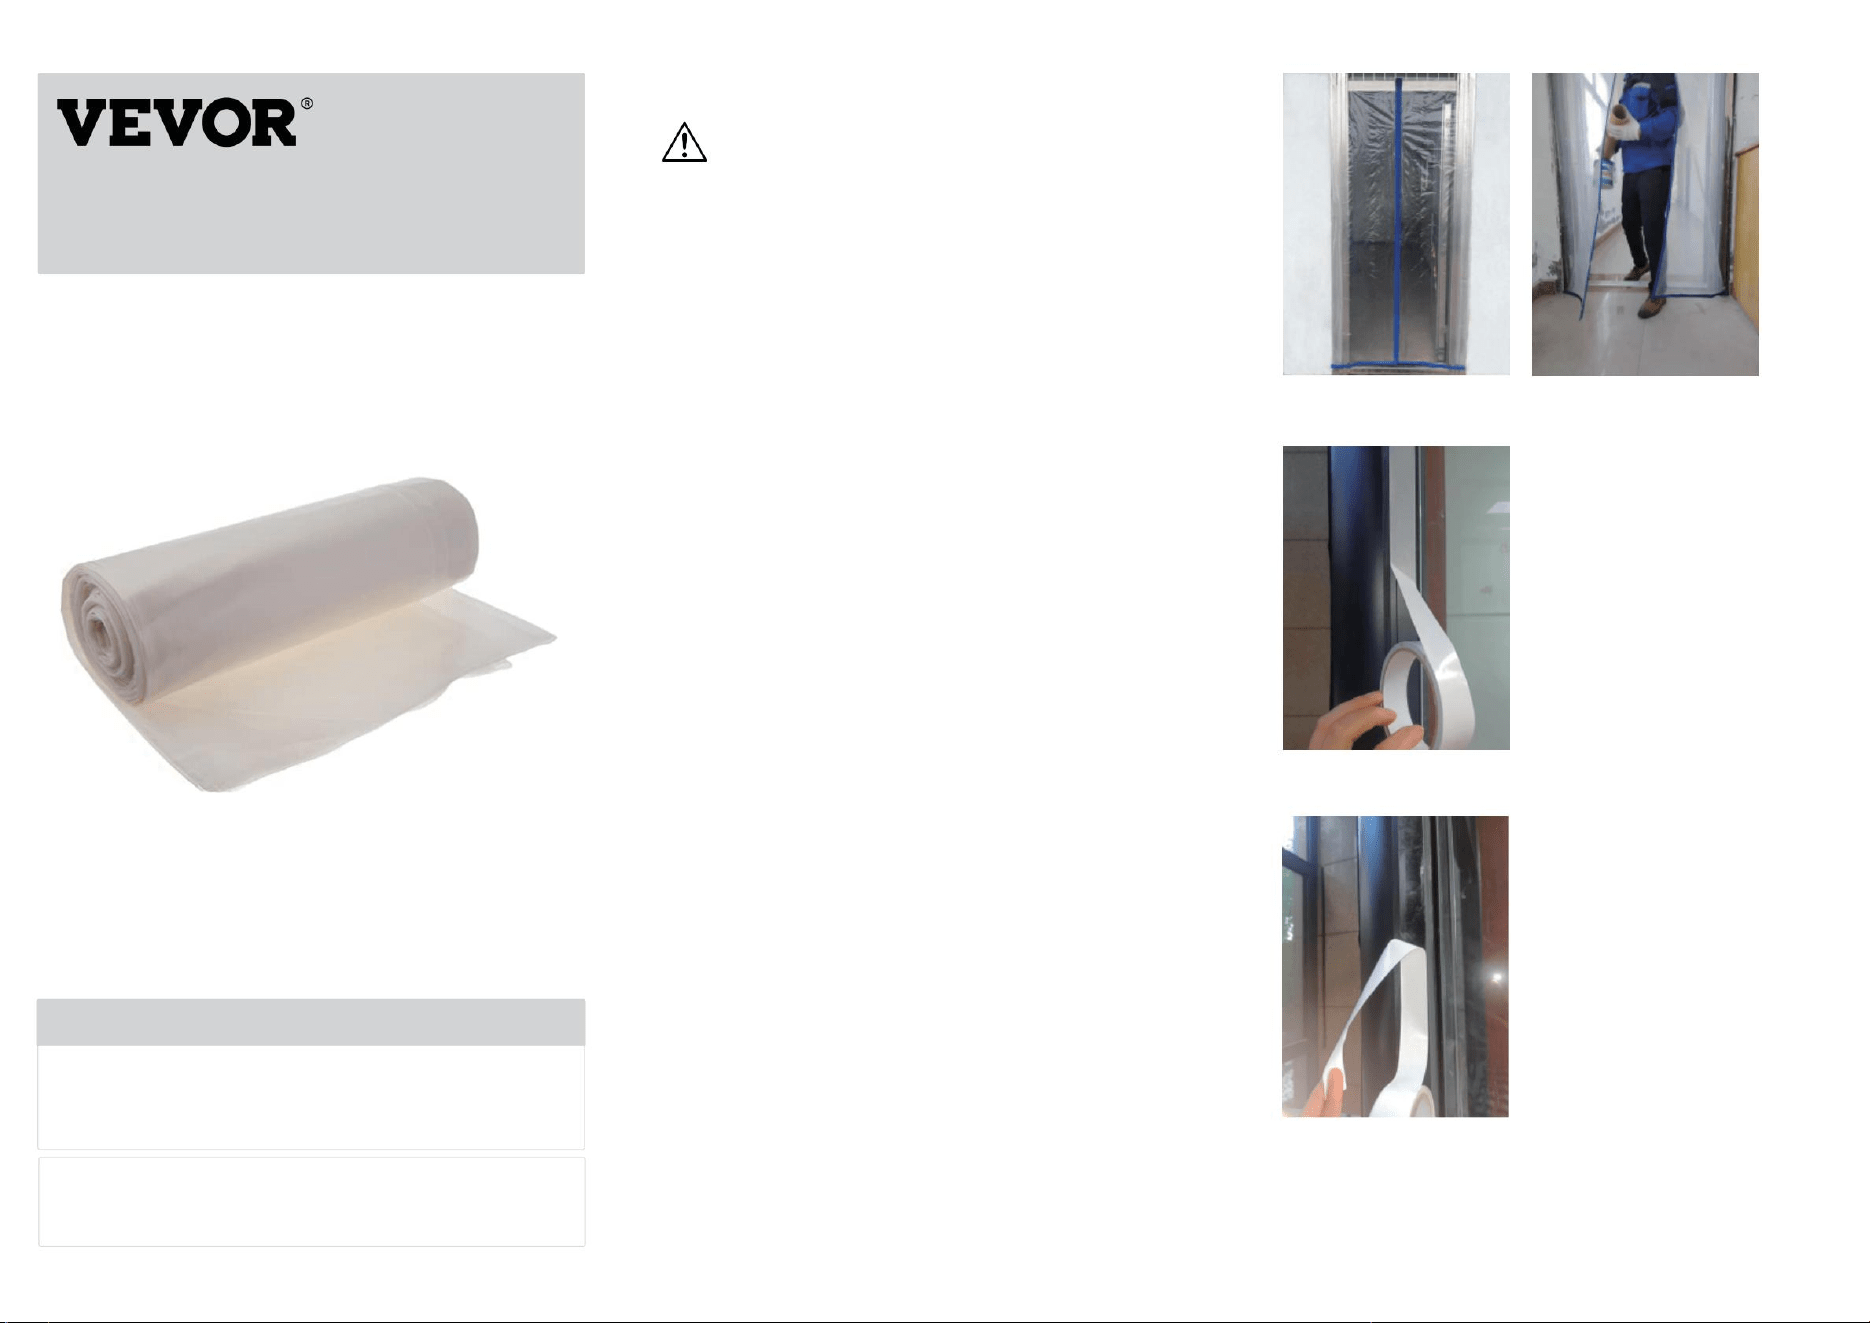
Assembly Instruction
1. Clean off doorway and door frame prior to installation
2. Stick the double sided tape on the door frame
3. Recognize the top and bottom side of door sheet.
4. Peel off the release paper from the tape and stick the
magnetic door sheet onto the frame. Please be noted
that sticking the tape on the plastic sheet instead on the
blue fabric. There is stick here sign on the top of the
sheet, follow the sign.
5. Press the film to the tape firmly to make sure door
sheeting is tightly taped.
6. When removing the door sheet, peel off the tape
slowly to avoid damage to the surface.
Attention
If the magnetic is not closing properly, adjust the
tightness of film sheeting.
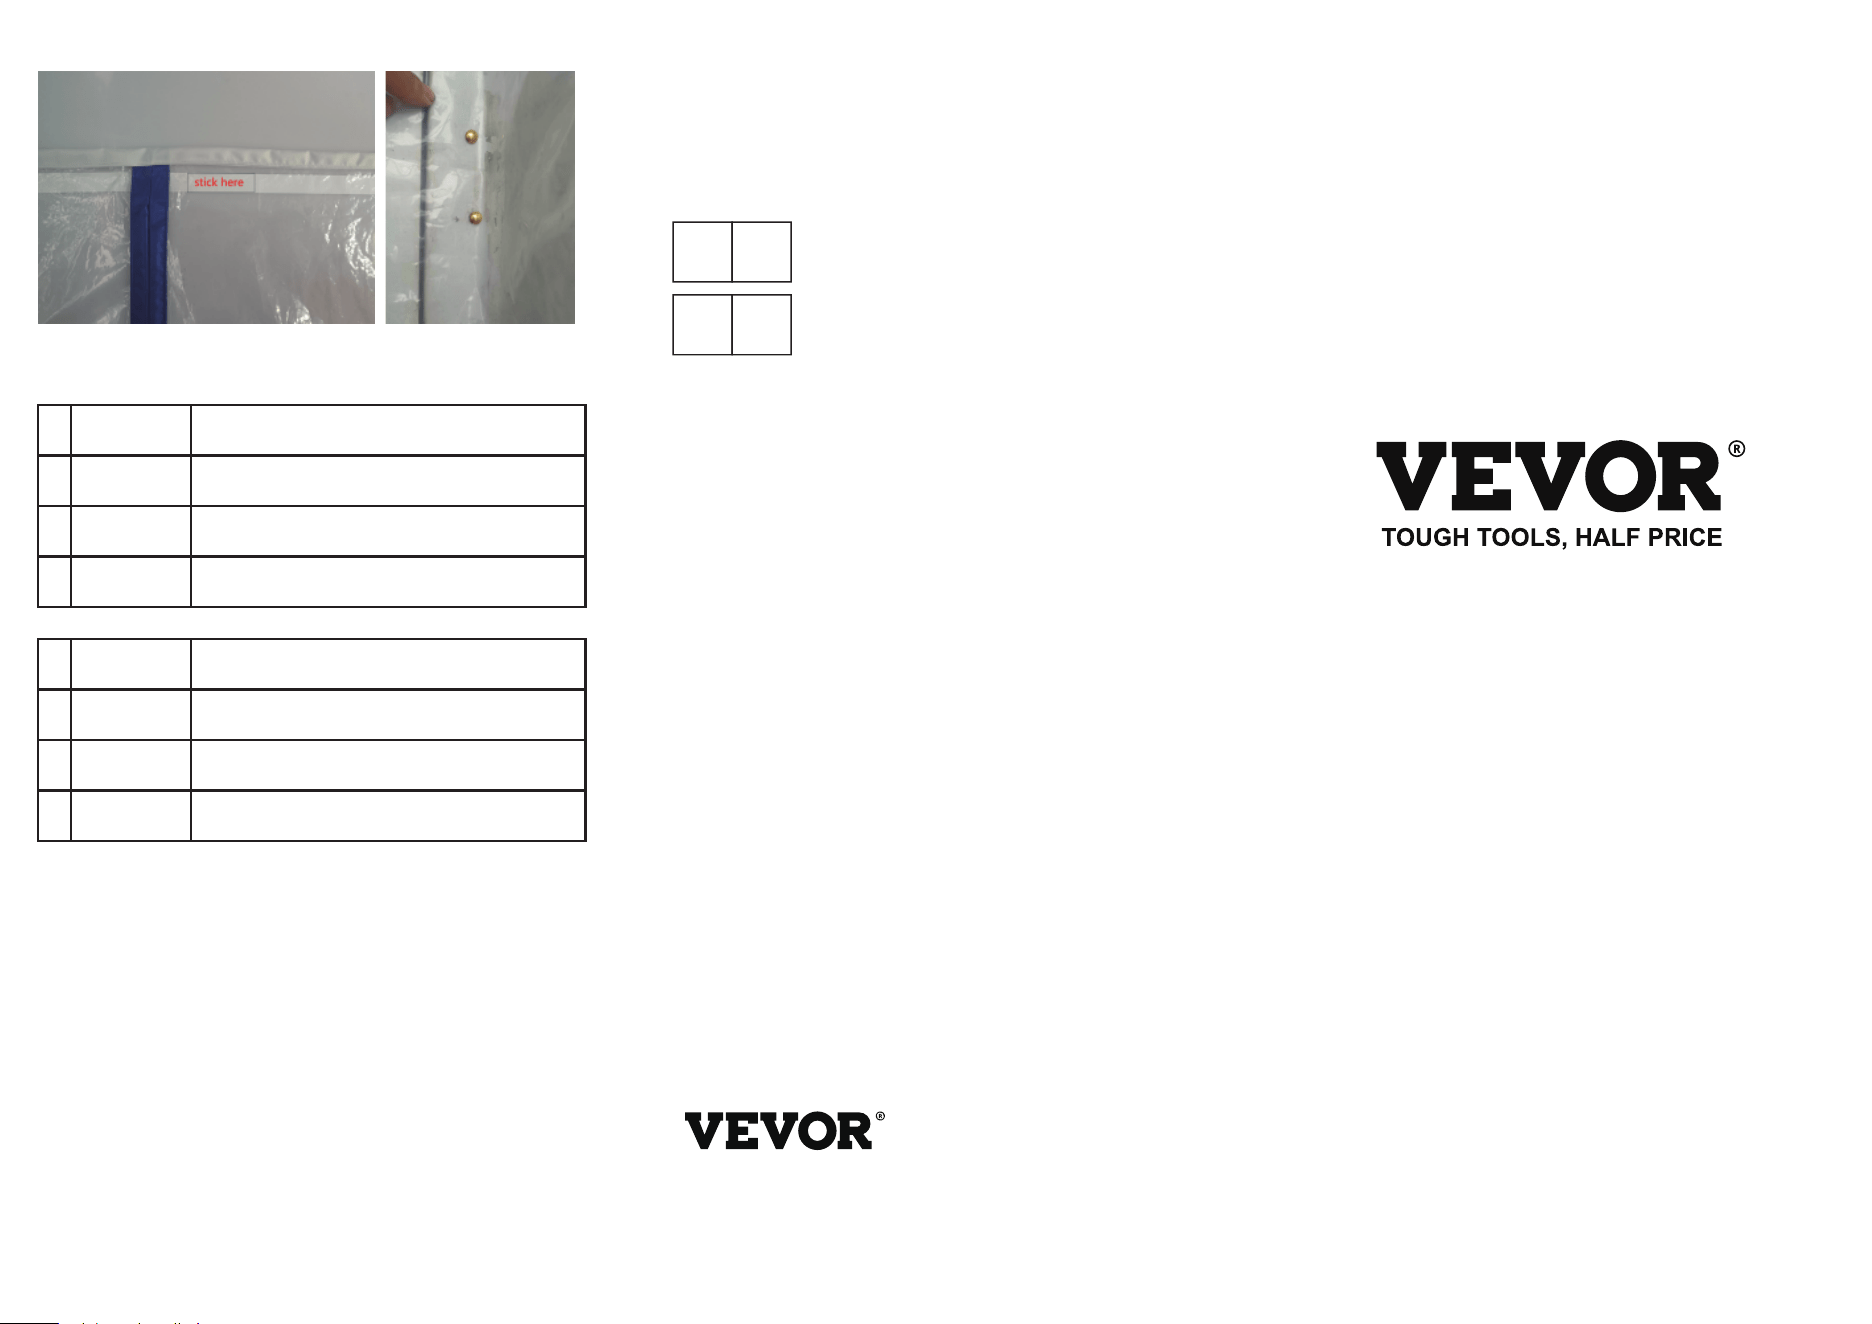
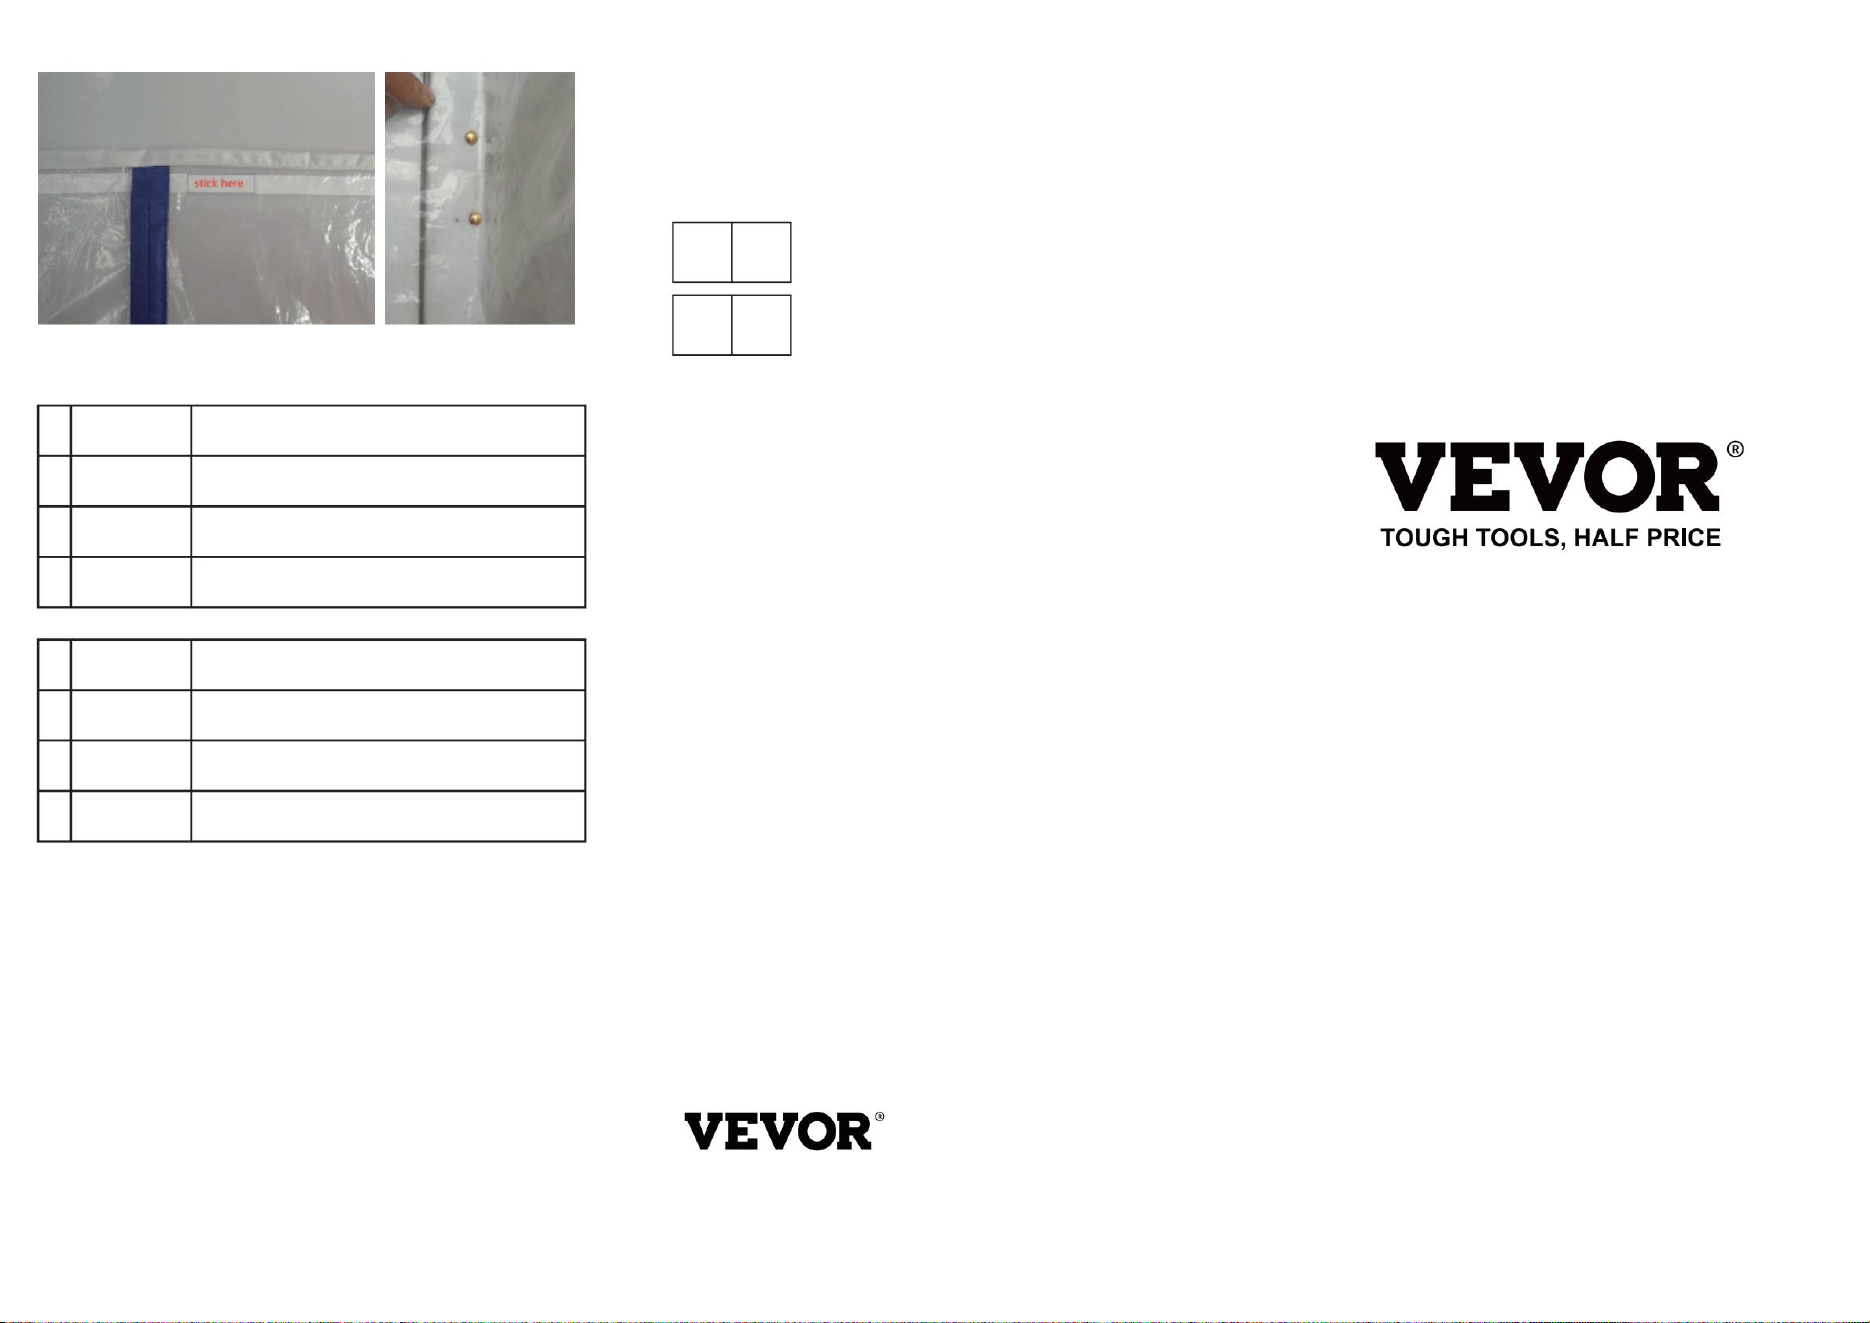
Stick the top side of door sheet correctly.
1. Stick double sided tape on the surface
2. Peel off the release paper
3. Find the right place to stick the door sheet, especially
the top side. Stick the magnetic door sheeting and
press tightly.
Attention:Follow the stick here sign
04
TOUGH TOOLS, HALF PRICE
Technical Support and E-Warranty Certificate
www.vevor.com/support
Dust Barrier System
We continue to be committed to provide you tools with competitive price.
"Save Half", "Half Price" or any other similar expressions used by us only
represents an estimate of savings you might benefit from buying certain tools
with us compared to the major top brands and does not necessarily mean to
cover all categories of tools offered by us.
You are kindly reminded to verify carefully when you are placing an order with
us if you are actually saving half in comparison with the top major brands.
Technical Support and E-Warranty Certificate
www.vevor.com/support
4. Use the push pin to reinforce the door sheet
1
2
3
Items
Name
Model
Parameter
Description
Dust Barrier System
RECHMDOOR1
Dust Barrier size:7.5ft x 4ft
1
2
3
Items
Name
Model
Parameter
Description
Dust Barrier System
RECHMDOOR2
Dust Barrier size:8.5ft x 5ft
$GGUHVV 6KXDQJFKHQJOX QRQJKDR$VKL EDRVKDQTX
VKDQJKDL &1
,PSRUWHG WR $86 6,+$2 37< /7' 52.(9$ 675((7($67:22'
16: $XVWUDOLD
,PSRUWHG WR 86$ 6DQYHQ 7HFKQRORJ\ /WG 6XLWH $QDKHLP
3ODFH 5DQFKR &XFDPRQJD &$
ZW
(&URVV6WX *PE+
0DLQ]HU /DQGVWU )UDQNIXUW DP 0DLQ
ZWh<
<+ &2168/7,1* /,0,7('
&2 <+ &RQVXOWLQJ /LPLWHG 2IILFH &HQWXULRQ +RXVH
/RQGRQ 5RDG 6WDLQHVXSRQ7KDPHV 6XUUH\ 7: $;

POTRZEBUJESZ POMOCY? SKONTAKTUJ SIĘ Z NAMI!
Model:RECHMDOOR1/RECHMDOOR2
System barier przeciwpyłowych
Zapraszamy do kontaktu z nami:
Wsparcie techniczne i certyfikat e-gwarancji
Masz pytania dotyczące produktu? Potrzebujesz wsparcia technicznego?
www.vevor.com/support
Środki ostrożności podczas montażu
2. Przyklej taśmę dwustronną do ościeżnicy drzwi
3. Rozpoznaj górną i dolną stronę płyty drzwiowej.
1. Montaż należy wykonywać wyłącznie zgodnie z niniejszą instrukcją.
1. Przed użyciem produktu należy zapoznać się z treścią niniejszego dokumentu.
2. Podczas montażu należy nosić okulary ochronne z atestem ANSI oraz
wytrzymałe rękawice robocze.
2. Łatwopalny: Trzymać z dala od otwartego ognia. Ten produkt zapali
się i spali, jeśli zostanie doprowadzony do kontaktu z otwartym ogniem.
4. Odklej papier zabezpieczający od taśmy i przyklej magnetyczną folię drzwiową
do ramy. Należy pamiętać, aby przykleić taśmę do folii plastikowej zamiast
do niebieskiej tkaniny. Na górze folii znajduje się znak „stick here”, postępuj
zgodnie ze znakiem.
5. Dociśnij folię do taśmy, aby upewnić się, że okładzina drzwi jest ściśle
zaklejona.
3. Trzymaj z dala od ostrych punktów, ostrzy i innych przedmiotów,
aby nie porysować produktu.
3. Utrzymuj miejsce zgromadzenia w czystości i zapewnij dobre oświetlenie.
3. Znajdź odpowiednie miejsce do przyklejenia arkusza drzwi, szczególnie górną
stronę. Przyklej magnetyczny arkusz drzwi i mocno dociśnij.
Uwaga: Postępuj zgodnie ze znakiem „tutaj”
4. Ten produkt nie jest zabawką. Systemu bariery przeciwpyłowej nie można
używać jako zabawki dla dzieci.
4. Podczas montażu nie dopuszczać osób postronnych na teren montażu.
6. Podczas zdejmowania folii drzwiowej taśmę należy odklejać powoli,
aby uniknąć uszkodzenia powierzchni.
5. Przed użyciem przetestuj taśmę na dyskretnej powierzchni. Używaj na
czystej, suchej powierzchni. Nie należy używać jej na lakierach,
tapetach, niepomalowanych płytach gipsowo-kartonowych, powierzchniach
pokrytych kurzem.
Przyklej prawidłowo górną stronę płyty drzwiowej.
2. Odklej papier zabezpieczający
1. Przyklej taśmę dwustronną do powierzchni
1. Przed montażem należy oczyścić otwór drzwiowy i ościeżnicę.
VEVOR zastrzega sobie prawo do jasnej interpretacji naszej instrukcji obsługi. Wygląd produktu będzie zależał od
produktu, który otrzymałeś. Prosimy o wybaczenie, że nie poinformujemy Cię ponownie, jeśli w naszym
produkcie pojawią się jakiekolwiek aktualizacje technologiczne lub oprogramowania.
To jest oryginalna instrukcja, przed rozpoczęciem użytkowania należy uważnie przeczytać wszystkie instrukcje.
WYTRZYMAŁE NARZĘDZIA, POŁOWA CENY
OSTRZEŻENIE:
Instrukcja montażu
ZAPISZ TE INSTRUKCJE
Informacja o bezpieczeństwie
Uwaga Jeśli
magnes nie zamyka się prawidłowo, należy
wyregulować naprężenie folii.
03
01 02
Machine Translated by Google

Wsparcie techniczne i certyfikat gwarancji
elektronicznej www.vevor.com/support
04
System barier przeciwpyłowych
Rozmiar bariery przeciwpyłowej: 7,5 stopy x 4 stopy
Opis
3
Parametr
1
System barier przeciwpyłowych
Nazwa
Rzeczy
RECHMDROOR1
2
Model
1
Opis
Nazwa
System barier przeciwpyłowych
RECHMDOR2
2
4. Za pomocą szpilki wzmocnij płytę drzwiową
3
Model
Parametr
Rzeczy
Rozmiar bariery przeciwpyłowej: 8,5 stopy x 5 stóp
WYTRZYMAŁE NARZĘDZIA, POŁOWA CENY
„Oszczędź połowę”, „Połowa ceny” lub inne podobne wyrażenia używane przez nas
stanowią jedynie szacunek oszczędności, jakie możesz uzyskać kupując u nas określone
narzędzia w porównaniu do wiodących marek i niekoniecznie oznaczają, że obejmują
wszystkie kategorie narzędzi oferowanych przez nas.
Nadal staramy się oferować Państwu narzędzia w konkurencyjnych cenach.
Przypominamy, że przy składaniu u nas zamówienia należy dokładnie sprawdzić, czy
faktycznie oszczędzasz połowę ceny w porównaniu z produktami wiodących marek.
Wsparcie techniczne i certyfikat gwarancji
elektronicznej www.vevor.com/support
Machine Translated by Google

Modello:RECHMDOOR1/RECHMDOOR2
Sistema di barriera antipolvere
HAI BISOGNO DI AIUTO? CONTATTACI!
VEVOR si riserva la chiara interpretazione del nostro manuale utente. L'aspetto del prodotto sarà soggetto al prodotto
ricevuto. Vi preghiamo di perdonarci se non vi informeremo di nuovo se ci saranno aggiornamenti tecnologici o
software sul nostro prodotto.
Queste sono le istruzioni originali, leggere attentamente tutte le istruzioni del manuale prima di utilizzare il prodotto.
0201
03
3. Mantenere l'area di assemblaggio pulita e ben illuminata.
3. Tenere lontano da punte affilate, lame e altri oggetti, per non
graffiare il prodotto.
Attenzione: seguire il cartello "Bastone qui"
4. Questo prodotto non è un giocattolo. Il sistema di barriera antipolvere
non può essere utilizzato come giocattolo per i bambini.
4. Tenere gli astanti fuori dall'area durante l'assemblaggio.
6. Quando si rimuove il telo della porta, staccare lentamente il nastro
per evitare di danneggiare la superficie.
5. Prima dell'uso, testare il nastro su una superficie discreta. Utilizzare
su superfici pulite e asciutte. Non utilizzare con vernici, carta
da parati, pannelli di cartongesso non verniciati, superfici polverose.
2. Staccare la carta protettiva
Incollare correttamente il lato superiore del foglio della porta.
1. Attaccare il nastro biadesivo sulla superficie
1. Pulire la porta e il telaio della porta prima dell'installazione
Precauzioni di montaggio
2. Attaccare il nastro biadesivo sul telaio della porta
1. Leggere attentamente il presente materiale prima di utilizzare il prodotto.
1. Montare solo seguendo queste istruzioni.
3. Riconoscere il lato superiore e inferiore del telo della porta.
2. Durante il montaggio, indossare occhiali di sicurezza omologati ANSI e
guanti da lavoro resistenti.
4. Staccare la carta protettiva dal nastro e attaccare il foglio magnetico
della porta al telaio. Si prega di notare che attaccare il nastro sul foglio
di plastica invece che sul tessuto blu. C'è un cartello "attacca qui" sulla
parte superiore del foglio, seguire il cartello.
2. Infiammabile: tenere lontano da fiamme libere. Questo prodotto
si accenderà e brucerà se portato a contatto con una fiamma libera.
5. Premere con decisione la pellicola sul nastro per assicurarsi che il
telo della porta sia ben fissato.
3. Trova il punto giusto per attaccare il foglio della porta, in particolare il
lato superiore. Attacca il foglio magnetico della porta e premi con
forza.
Supporto tecnico e certificato di garanzia elettronica
www.vevor.com/support
Non esitate a contattarci:
Hai domande sui prodotti? Hai bisogno di supporto tecnico?
UTENSILI RESISTENTI, A METÀ PREZZO
SALVA QUESTE ISTRUZIONI
Istruzioni di montaggio
AVVERTIMENTO:
Avviso di sicurezza
Attenzione
Se il magnete non si chiude correttamente,
regolare la tenuta della pellicola.
Machine Translated by Google

Sistema di barriera antipolvere
Supporto tecnico e certificato di garanzia
elettronica www.vevor.com/support
Supporto tecnico e certificato di garanzia
elettronica www.vevor.com/support
1
Descrizione
Nome
Sistema di barriera antipolvere
2
PORTARECCHIO2
4. Utilizzare la puntina per rinforzare il foglio della porta
Modello
3
Dimensioni della barriera antipolvere: 8,5 piedi x 5 piedi
Elementi
Parametro
3
Descrizione
Dimensioni della barriera antipolvere: 7,5 piedi x 4 piedi
Parametro
1
Sistema di barriera antipolvere
Nome
Elementi
2
PORTA DI RICAMBIO1
Modello
"Risparmia la metà", "Metà prezzo" o altre espressioni simili da noi utilizzate
rappresentano solo una stima del risparmio che potresti ottenere acquistando determinati
utensili da noi rispetto ai principali marchi più prestigiosi e non intendono
necessariamente coprire tutte le categorie di utensili da noi offerti.
Continuiamo a impegnarci per fornirvi strumenti a prezzi competitivi.
Ti ricordiamo gentilmente di verificare attentamente quando effettui un ordine con noi se
stai effettivamente risparmiando la metà rispetto ai marchi più importanti.
UTENSILI RESISTENTI, A METÀ PREZZO
04
Machine Translated by Google

¿NECESITAAYUDA?¡CONTÁCTENOS!
Nodudeenponerseencontactoconnosotros:
Soportetécnicoycertificadodegarantíaelectrónica
¿Tienepreguntassobreelproducto?¿Necesitaasistenciatécnica?
www.vevor.com/support
VEVORsereservaelderechodeinterpretarnuestromanualdeusuario.Laaparienciadelproducto
dependerádelproductoquehayarecibido.Lerogamosquenosdisculpepornoinformarlenuevamente
sihayactualizacionestecnológicasodesoftwareennuestroproducto.
Estassonlasinstruccionesoriginales,leaatentamentetodaslasinstruccionesdelmanualantesdeoperar.
03
01 02
4.Esteproductonoesunjuguete.Elsistemadebarreracontraelpolvonose
puedeutilizarcomojugueteparaquelosniñosjueguen.
4.Mantengaalostranseúntesfueradeláreaduranteelmontaje.
5.Presionelapelículacontralacintaconfirmezaparaasegurarsedequela
láminadelapuertaestébienpegada.
6.Alretirarlahojadelapuerta,retirelacintalentamenteparaevitar
dañarlasuperficie.
3.Busqueellugaradecuadoparapegarlaláminadelapuerta,especialmente
lapartesuperior.Peguelaláminamagnéticadelapuertaypresione
firmemente.
5.Pruebelacintaenunasuperficiediscretaantesdeusarla.Utilícela
sobresuperficieslimpiasysecas.Nolautiliceconlacas,papel
tapiz,panelesdeyesosinpintarnisuperficiesconpolvo.
Atención:sigalaseñalqueindicaelpaloaquí
Peguecorrectamentelapartesuperiordelahojadelapuerta.
2.Retireelpapelprotector.
1.Peguecintadedoblecaraenlasuperficie.
1.Limpielapuertayelmarcodelapuertaantesdelainstalación.
Precaucionesdemontaje
2.Peguelacintadedoblecaraenelmarcodelapuerta.
3.Reconozcaelladosuperioreinferiordelahojadelapuerta.
1.Leaestematerialantesdeusaresteproducto.
2.Inflamable:Manteneralejadodelfuego.Esteproductopuede
encenderseyardersientraencontactoconelfuego.
1.Realiceelmontajeúnicamentedeacuerdoconestasinstrucciones.
2.UsegafasdeseguridadaprobadasporANSIyguantesdetrabajoresistentes
duranteelmontaje.
3.Mantengaeláreadereuniónlimpiaybieniluminada.
3.Manteneralejadodepuntasafiladas,cuchillasyotroselementos,
paranorayarelproducto.
4.Retireelpapelprotectordelacintaypeguelaláminamagnéticadelapuerta
enelmarco.Tengaencuentaquedebepegarlacintaenlaláminade
plásticoenlugardeenlatelaazul.Hayuncartelquedice"Pegaraquí"enla
partesuperiordelalámina,sigaelcartel.
Modelo:RECHMDOOR1/RECHMDOOR2
Sistemadebarreracontraelpolvo
HERRAMIENTASRESISTENTESAMITADDEPRECIO
GUARDEESTASINSTRUCCIONES
Instruccionesdemontaje
ADVERTENCIA:
Avisodeseguridad
AtenciónSi
elimánnocierracorrectamente,ajustelatensión
delaláminadepelícula.
Machine Translated by Google

Sistemadebarreracontraelpolvo
"Ahorralamitad","mitaddeprecio"ocualquierotraexpresiónsimilarutilizadapornosotros
solorepresentaunaestimacióndelosahorrosquepodríaobteneralcomprarciertasherramientas
connosotrosencomparaciónconlasprincipalesmarcaslíderesynonecesariamentesignifica
cubrirtodaslascategoríasdeherramientasqueofrecemos.
Seguimoscomprometidosabrindarleherramientasaprecioscompetitivos.
Lerecordamosquecuandorealiceunpedidoconnosotrosdebeverificarcuidadosamentesi
realmenteestáahorrandolamitadencomparaciónconlasprincipalesmarcas.
Soportetécnicoycertificadodegarantía
electrónicawww.vevor.com/support
Nombre
Sistemadebarreracontraelpolvo
Modelo RECHMDOOR2
2
Modelo
4.Utiliceelpasadordeempujeparareforzarlahojadelapuerta.
3
Tamañodelabarreracontraelpolvo:8,5piesx5pies
3
Elementos
Parámetro
Parámetro
Tamañodelabarreracontraelpolvo:7,5piesx4pies
Descripción
1
Nombre
Sistemadebarreracontraelpolvo
RECHMDOOR1
Elementos
1
Descripción
2
HERRAMIENTASRESISTENTESAMITADDEPRECIO
Soportetécnicoycertificadodegarantía
electrónicawww.vevor.com/support
04
Machine Translated by Google

Dammbarriärsystem
Modell: RECHMDOOR1/RECHMDOOR2
BEHÖVER HJÄLP? KONTAKTA OSS!
Detta är den ursprungliga instruktionen, läs alla instruktioner noggrant innan du använder den.
VEVOR reserverar sig för en tydlig tolkning av vår användarmanual. Utseendet på produkten är
beroende av den produkt du fått. Ursäkta oss att vi inte kommer att informera dig igen om det
finns någon teknik eller mjukvaruuppdateringar på vår produkt.
0201
03
3. Håll monteringsområdet rent och väl upplyst.
3. Håll dig borta från vassa spetsar, knivar och andra
föremål för att inte repa produkten.
Observera: Följ pinnen här-skylten
4. Denna produkt är inte en leksak, dammbarriärsystem kan inte
användas som leksaker för barn att leka med.
4. Håll åskådare borta från området under monteringen.
6. När du tar bort dörrarket, dra av tejpen långsamt för att
undvika skador på ytan.
5. Testa tejpen på en diskret yta före användning. Använd på ren, torr yta.
Ej avsedd att användas med lacker, tapeter, omålad väggskiva,
yta med damm.
2. Dra av släpppapperet
Stick fast ovansidan av dörrarket korrekt.
1. Fäst dubbelhäftande tejp på ytan
1. Rengör dörröppningen och dörrkarmen före installation
Försiktighetsåtgärder vid montering
2. Fäst dubbelhäftande tejp på dörrkarmen
1. Läs detta material innan du använder denna produkt.
1. Montera endast enligt dessa instruktioner.
3. Känn igen den övre och nedre sidan av dörrarket.
2. Bär ANSI-godkända skyddsglasögon och kraftiga arbetshandskar
vid montering.
4. Dra av lossningspapperet från tejpen och fäst det magnetiska
dörrarket på ramen. Observera att du fäster tejpen på plastduken
istället på det blå tyget. Det finns en stick här-skylt på toppen av
arket, följ skylten.
2. Brandfarligt: Förvaras åtskilt från öppen låga. Denna
produkt kommer att antändas och brinna om den kommer i
kontakt med öppen låga.
5. Tryck fast filmen ordentligt mot tejpen för att säkerställa att
dörren är ordentligt tejpad.
3. Hitta rätt ställe att fästa dörrarket, speciellt ovansidan. Stick fast
den magnetiska dörren och tryck till ordentligt.
Teknisk support och e-garanticertifikat
www.vevor.com/support
Kontakta oss gärna:
Har du produktfrågor? Behöver du teknisk support?
TÅRA VERKTYG, HALVA PRISET
VARNING:
Monteringsanvisning
SPARA DESSA INSTRUKTIONER
Säkerhetsmeddelande
Observera
Om magneten inte stängs ordentligt, justera
tätheten på filmfolien.
Machine Translated by Google
Dammbarriärsystem
Teknisk support och e-garanticertifikat
www.vevor.com/support
Teknisk support och e-garanticertifikat
www.vevor.com/support
1
Beskrivning
Namn
Dammbarriärsystem
2
RECHMDOOR2
4. Använd tryckstiftet för att förstärka dörrplåten
3
Modell
Dammbarriärstorlek: 8,5 fot x 5 fot
Föremål
Parameter
3
Beskrivning
Dammbarriärstorlek: 7,5 fot x 4 fot
Parameter
1
Dammbarriärsystem
Namn
Föremål
2
RECHMDOOR1
Modell
"Spara hälften", "halva priset" eller andra liknande uttryck som används av oss
representerar bara en uppskattning av besparingar du kan dra nytta av att köpa vissa
verktyg hos oss jämfört med de stora toppmärkena och betyder inte nödvändigtvis att
täcka alla kategorier av verktyg som erbjuds av oss.
Vi fortsätter att vara engagerade i att ge dig verktyg till konkurrenskraftiga priser.
Du påminns vänligen om att noggrant kontrollera när du gör en beställning hos oss om
du faktiskt sparar hälften i jämförelse med de främsta stora varumärkena.
TÅRA VERKTYG, HALVA PRISET
04
Machine Translated by Google
Technische ondersteuning en e-garantiecertificaat
www.vevor.com/support
Neem gerust contact met ons op:
Heeft u vragen over het product? Heeft u technische ondersteuning nodig?
HULP NODIG? NEEM CONTACT MET ONS OP!
Dit zijn de originele instructies. Lees de volledige handleiding zorgvuldig door voordat u het product gebruikt.
VEVOR behoudt zich een duidelijke interpretatie van onze gebruikershandleiding voor. Het uiterlijk van het
product is afhankelijk van het product dat u hebt ontvangen. Vergeef ons dat we u niet opnieuw zullen
informeren als er technologie- of software-updates voor ons product zijn.
0201
03
5. Test de tape op een discreet oppervlak voordat u deze gebruikt.
Gebruik op een schoon, droog oppervlak. Niet bedoeld voor
gebruik met lakken, behang, ongeverfde gipsplaat, oppervlakken met
stof.
4. Trek het beschermpapier van de tape en plak het magnetische deurblad
op het frame. Let op dat u de tape op het plastic vel plakt in plaats van
op de blauwe stof. Er staat een plak hier-teken op de bovenkant van het vel,
volg het teken.
4. Dit product is geen speelgoed. Het stofwerende systeem mag niet als
speelgoed voor kinderen worden gebruikt.
4. Houd omstanders uit de buurt tijdens de montage.
6. Verwijder het deurpaneel voorzichtig, zodat u het oppervlak niet
beschadigt.
Let op: Volg hier het stokbord
1. Plak dubbelzijdig plakband op het oppervlak
2. Trek het beschermpapier eraf
1. Maak de deuropening en het deurkozijn schoon vóór de installatie
Plak de bovenkant van het deurpaneel correct vast.
1. Lees dit materiaal voordat u dit product gebruikt.
1. Monteer het geheel uitsluitend volgens deze instructies.
3. Herken de boven- en onderkant van het deurpaneel.
Voorzorgsmaatregelen bij de montage
2. Plak de dubbelzijdige tape op het deurkozijn
3. Houd het product uit de buurt van scherpe punten, messen en andere
voorwerpen om krassen op het product te voorkomen.
3. Zorg dat de montageplek schoon en goed verlicht is.
5. Druk de folie stevig op de tape, zodat de deurbekleding goed vastzit.
3. Zoek de juiste plek om het deurblad te plakken, vooral de bovenkant.
Plak het magnetische deurblad en druk het stevig aan.
2. Ontvlambaar: Uit de buurt van open vuur houden. Dit product
zal ontbranden en verbranden als het in contact komt met een open vlam.
2. Draag tijdens de montage een ANSI-goedgekeurde veiligheidsbril en
stevige werkhandschoenen.
Stofbarrièresysteem
Model:RECHMDOOR1/RECHMDOOR2
ROBUUSTE GEREEDSCHAPPEN, HALVE PRIJS
WAARSCHUWING:
Let op: Als
de magneet niet goed sluit, pas dan de strakheid
van de folie aan.
BEWAAR DEZE INSTRUCTIES
Veiligheidsmededeling
Montage-instructies
Machine Translated by Google

Stofbarrièresysteem
"Bespaar de helft", "halve prijs" of andere soortgelijke uitdrukkingen die wij gebruiken, geven
slechts een schatting van de besparingen die u kunt behalen door bepaalde gereedschappen bij ons
te kopen in vergelijking met de grote topmerken. Dit betekent niet noodzakelijkerwijs dat alle
categorieën gereedschappen die wij aanbieden, hieronder vallen.
Wij streven er voortdurend naar om u gereedschappen tegen concurrerende prijzen te leveren.
Wij willen u erop attenderen dat u bij het plaatsen van een bestelling zorgvuldig moet controleren of u
daadwerkelijk de helft bespaart in vergelijking met de grote topmerken.
Technische ondersteuning en e-
garantiecertificaat www.vevor.com/support
2
RECHMDOOR2
2
Naam
Stofbarrièresysteem
3
Parameter
Artikelen
Model
Afmetingen stofbarrière: 8,5 ft x 5 ft
4. Gebruik de punaise om het deurblad te verstevigen
3
Parameter
Stofbarrièresysteem
Naam
Beschrijving
Afmetingen stofbarrière: 7,5 ft x 4 ft
1
1
Beschrijving
Model
RECHMDOOR1
Artikelen
Technische ondersteuning en e-
garantiecertificaat www.vevor.com/support
ROBUUSTE GEREEDSCHAPPEN, HALVE PRIJS
04
Machine Translated by Google

BESOIND'AIDE?CONTACTEZNOUS!
Assistancetechniqueetcertificatdegarantieélectronique
N'hésitezpasànouscontacter:
Vousavezdesquestionssurlesproduits?Vousavezbesoind'assistancetechnique?
www.vevor.com/support
VEVORseréserveledroitd'interpréterclairementnotremanueld'utilisation.L'apparenceduproduitdépenddu
produitquevousavezreçu.Veuilleznousexcuser,nousnevousinformeronsplussidesmisesàjour
technologiquesoulogiciellessontdisponiblessurnotreproduit.
Ils'agitdesinstructionsd'origine,veuillezlireattentivementtouteslesinstructionsdumanuelavantdel'utiliser.
2.Inflammable:Teniràl'écartdesflammesnues.Ceproduit
s'enflammeetbrûles'ilentreencontactavecuneflammenue.
2.PortezdeslunettesdesécuritéapprouvéesANSIetdesgantsdetravail
robustespendantl'assemblage.
3.Gardezlazonedemontagepropreetbienéclairée.
3.Teniràl'écartdesobjetspointus,deslamesetautresobjets,afinde
nepasrayerleproduit.
4.Décollezlepapierprotecteurdurubanadhésifetcollezlafeuilledeporte
magnétiquesurlecadre.Veuilleznoterquevousdevezcollerlerubanadhésif
surlafeuilledeplastiqueplutôtquesurletissubleu.Ilyaunpanneau«coller
ici»surledessusdelafeuille,suivezlepanneau.
5.Appuyezfermementlefilmsurlerubanadhésifpourvousassurerquele
revêtementdelaporteestbienfixé.
3.Trouvezlebonendroitpourcollerlafeuilledeporte,enparticulierlapartie
supérieure.Collezlafeuilledeportemagnétiqueetappuyezfermement.
Précautionsdemontage
2.Collezlerubanadhésifdoublefacesurlecadredelaporte
3.Reconnaissezlecôtésupérieuretinférieurdelatôledeporte.
1.Lisezcedocumentavantd’utiliserceproduit.
1.Assemblezuniquementseloncesinstructions.
2.Décollezlepapierdeprotection
Collezcorrectementlapartiesupérieuredelatôledeporte.
1.Collezdurubanadhésifdoublefacesurlasurface
1.Nettoyezlaporteetlecadredelaporteavantl'installation
4.Ceproduitn'estpasunjouet.Lesystèmedebarrièreantipoussièrenepeut
pasêtreutilisécommejouetpourlesenfants.
4.Gardezlesspectateurshorsdelazonependantl’assemblage.
6.Lorsquevousretirezlatôledeporte,retirezlentementlerubanadhésif
pouréviterd'endommagerlasurface.
Attention:suivezlepanneauindiquantici
5.Testezlerubansurunesurfacediscrèteavantdel'utiliser.Utilisezle
surunesurfacepropreetsèche.Nel'utilisezpasavecdes
laques,dupapierpeint,despanneauxmurauxnonpeintsoudessurfaces
poussiéreuses.
Modèle:RECHMDOOR1/RECHMDOOR2
Systèmedebarrièreantipoussière
OUTILSROBUSTES,MOITIÉPRIX
CONSERVEZCESINSTRUCTIONS
Instructionsdemontage
AVERTISSEMENT:
Avisdesécurité
AttentionSi
lemagnétiquenesefermepascorrectement,
ajustezl'étanchéitédufilm.
0201
03
Machine Translated by Google
Assistancetechniqueetcertificatdegarantie
électroniquewww.vevor.com/support
«Économisezlamoitié»,«Moitiéprix»outouteautreexpressionsimilaireutiliséepar
nousnereprésentequ'uneestimationdeséconomiesdontvouspourriezbénéficierenachetant
certainsoutilscheznousparrapportauxgrandesmarquesetnesignifiepasnécessairement
couvrirtouteslescatégoriesd'outilsproposésparnous.
Nouscontinuonsànousengageràvousfournirdesoutilsàdesprixcompétitifs.
Nousvousrappelonsdebienvouloirvérifierattentivementlorsquevouspassezunecommande
cheznoussivouséconomisezréellementlamoitiéparrapportauxgrandesmarques.
Systèmedebarrièreantipoussière
RECHMDOOR1
Articles
1
Description
2
Modèle
Tailledelabarrièreantipoussière:7,5piedsx4pieds
Description
1
Nom
Systèmedebarrièreantipoussière
Modèle
4.Utilisezlapunaisepourrenforcerlatôledelaporte
3
Tailledelabarrièreantipoussière:8,5piedsx5pieds
3
Paramètre
Articles
Nom
Systèmedebarrièreantipoussière
Paramètre
RECHMDOOR2
2
OUTILSROBUSTES,MOITIÉPRIX
Assistancetechniqueetcertificatdegarantie
électroniquewww.vevor.com/support
04
Machine Translated by Google

Technischer Support und E-Garantie-Zertifikat
www.vevor.com/support
Nehmen Sie gerne Kontakt mit uns auf:
Sie haben Fragen zu Produkten? Benötigen Sie technischen Support?
Brauchen Sie Hilfe? Kontaktieren Sie uns!
Dies ist die Originalanleitung. Lesen Sie vor der Inbetriebnahme bitte alle Anweisungen im Handbuch sorgfältig durch.
VEVOR behält sich die genaue Auslegung unseres Benutzerhandbuchs vor. Das Erscheinungsbild des Produkts richtet
sich nach dem Produkt, das Sie erhalten haben. Bitte verzeihen Sie uns, dass wir Sie nicht erneut informieren,
wenn es Technologie- oder Software-Updates für unser Produkt gibt.
0201
03
5. Testen Sie das Klebeband vor der Verwendung auf einer unauffälligen Oberfläche.
Verwenden Sie es auf einer sauberen, trockenen Oberfläche. Nicht für die
Verwendung auf Lacken, Tapeten, unbemalten Wandplatten oder staubigen Oberflächen
geeignet.
4. Ziehen Sie das Schutzpapier vom Klebeband ab und kleben Sie die magnetische
Türfolie auf den Rahmen. Bitte beachten Sie, dass Sie das Klebeband auf die
Plastikfolie kleben und nicht auf den blauen Stoff. Auf der Oberseite der Folie
befindet sich ein Schild mit der Aufschrift „Hier ankleben“. Folgen Sie diesem
Schild.
4. Dieses Produkt ist kein Spielzeug. Das Staubbarrieresystem kann nicht als
Spielzeug für Kinder verwendet werden.
4. Halten Sie während der Montage unbeteiligte Zuschauer vom Bereich fern.
6. Ziehen Sie beim Entfernen des Türblatts das Klebeband langsam ab, um
eine Beschädigung der Oberfläche zu vermeiden.
Achtung: Folgen Sie dem Schild „Stock hier“.
1. Kleben Sie doppelseitiges Klebeband auf die Oberfläche
2. Trennpapier abziehen
1. Türöffnung und Türrahmen vor der Montage reinigen
Kleben Sie die Oberseite des Türblattes richtig auf.
1.Lesen Sie dieses Material, bevor Sie dieses Produkt verwenden.
1. Nur gemäß dieser Anleitung zusammenbauen.
3. Erkennen Sie die Ober- und Unterseite des Türblatts.
Vorsichtsmaßnahmen bei der Montage
2. Kleben Sie das doppelseitige Klebeband auf den Türrahmen
3. Halten Sie das Produkt von scharfen Spitzen, Klingen und anderen
Gegenständen fern, um Kratzer am Produkt zu vermeiden.
3. Halten Sie den Versammlungsbereich sauber und gut beleuchtet.
5. Drücken Sie die Folie fest auf das Klebeband, um sicherzustellen, dass die
Türfolie fest verklebt ist.
3. Finden Sie die richtige Stelle zum Aufkleben der Türfolie, insbesondere auf die
Oberseite. Kleben Sie die magnetische Türfolie auf und drücken Sie sie
fest an.
2. Entzündlich: Von offenem Feuer fernhalten. Dieses Produkt entzündet
sich und brennt, wenn es mit offenem Feuer in Kontakt kommt.
2. Tragen Sie während der Montage eine ANSI-geprüfte Schutzbrille und
strapazierfähige Arbeitshandschuhe.
Staubbarrieresystem
Modell:RECHMDOOR1/RECHMDOOR2
ROBUSTE WERKZEUGE ZUM HALBEN PREIS
WARNUNG:
Achtung:
Sollte der Magnet nicht richtig schließen, muss die
Spannung der Folie angepasst werden.
BEWAHREN SIE DIESE ANWEISUNGEN AUF
Sicherheitshinweis
Montageanleitung
Machine Translated by Google

Technischer Support und E-Garantie-Zertifikat
www.vevor.com/support
Wir bitten Sie höflich, bei Ihrer Bestellung bei uns sorgfältig zu prüfen, ob Sie im Vergleich zu den
großen Topmarken tatsächlich die Hälfte sparen.
Wir sind weiterhin bestrebt, Ihnen Werkzeuge zu wettbewerbsfähigen Preisen anzubieten.
„Sparen Sie die Hälfte“, „Halber Preis“ oder andere ähnliche Ausdrücke, die wir verwenden,
stellen lediglich eine Schätzung der Ersparnis dar, die Sie erzielen können, wenn Sie bestimmte
Werkzeuge bei uns im Vergleich zu den großen Top-Marken kaufen, und müssen nicht zwangsläufig
alle von uns angebotenen Werkzeugkategorien abdecken.
Staubbarrieresystem
2
RECHMDOOR2
2
Name
Staubbarrieresystem
3
Artikel
Modell
Parameter
Größe der Staubbarriere: 2,6 m x 1,5 m
4. Verwenden Sie die Reißzwecke, um das Türblatt zu verstärken
3
Parameter
Staubbarrieresystem
Name
Beschreibung
Größe der Staubbarriere: 7,5 Fuß x 4 Fuß
1
1
Beschreibung
Modell
RECHMDOOR1
Artikel
Technischer Support und E-Garantie-Zertifikat
www.vevor.com/support
ROBUSTE WERKZEUGE ZUM HALBEN PREIS
04
Machine Translated by Google
