
V1.6 0725
Installation + User Manual
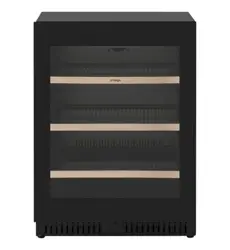
OCB140SB
Designed to Enhance
EST. �98�
140 Can
Beverage Centre
Single Zone
omegaappliances.com.au
02
User Manual
Beverage Centre
Contents
03
04
09
11
12
14
16
18
19
20
21
22
Welcome
Safety Information
Your Beverage Centre
Installation Preparation
Installing Your Beverage Centre
Operating Instructions
Reversing the Door Hinge
Cleaning & Maintenance
Troubleshooting
Technical Specifications
Purchase Details
Warranty Information
03
User ManualDesigned to Enhance
Beverage Centre
Congratulations on purchasing your new
Beverage Centre!
Omega appliances are proudly owned, distributed, designed and engineered
in Australia by Residentia Group Pty Ltd.
Please refer to the warranty chapter at the rear of this manual for information
regarding your product’s parts and labour warranty, or visit us online at:
→ www.residentiagroup.com.au
Here at Residentia Group, we are customer obsessed and our Support Team are
there to ensure you get the most out of your appliance. Should you want to learn
more about your unit, and importantly, taking care of the appliance, our Support Team
are here to help. You can use our online Support Centre at any time by visiting:
→ www.support.residentiagroup.com.au
Or you can contact us by dialling: 1300 11 HELP (4357)
It is important that you read through the following user manual thoroughly, in order
to familiarise yourself with the installation and operation requirements of your
appliance, and to ensure optimum performance.
Again, thank you for choosing an Omega appliance and we look forward to being
of service to you.
Kind Regards,
The Residentia Team
Residentia Group
Office 165 Barkly Avenue Burnley
Victoria Australia 3121
ACN 70 600 546 656
Online residentia.group
omegaappliances.com.au
Post PO BOX 5177 Burnley
Victoria Australia 3121
Phone 1300 11 4357
Email support@residentia.group
Welcome
Customer Care
At Residentia Group, we strongly encourage the use of authentic spare parts to guarantee the best results. When contacting our spare
parts team through 1300 11 HELP, or by emailing parts@residentiagroup.com.au, please ensure that you have the model and serial
numbers on hand, which are found on your appliances’ rating plate.
04
User Manual
Beverage Centre
Safety Information
Important Safety Instructions
Read Carefully and Keep for Future Reference
Read this manual thoroughly before first use, even if you
are familiar with this type of product. The safety precautions
enclosed herein reduce the risk of fire, electric shock and injury
when correctly adhered to. Make sure you understand
all instructions and warnings.
Keep the manual in a safe place for future reference, along with
the completed warranty card and purchase receipt. If you sell
or transfer ownership of this product, pass on these instructions
to the new owner.
Always follow basic safety precautions and accident prevention
measures when using an electrical appliance. The following
statements you will see in this booklet have these meanings:
WARNING: Indicating information concerning your personal
safety.
CAUTION: Indicating information on how to avoid damaging
the appliance or cabinetry.
IMPORTANT: Indicating tips and information about use of the
appliance.
Usage Conditions and Restrictions
• Domestic use only: This appliance is intended for indoor
household use only. It is not intended for commercial, industrial
or outdoor use. It is not intended for use in a recreational vehicle.
• Purpose: Do not use this appliance for anything other than its
intended purpose. Other uses are not recommended and may
cause fire, electric shock or personal injury.
• Attachments: The use of attachments is not recommended
by the appliance manufacturer and distributor as they may be
hazardous.
• Improper use: Damage due to improper use, or repairs made
by unqualified personnel will void your warranty. We assume
no liability for any eventual damages caused by misuse of the
product or non-compliance with these instructions.
Before Using Your Appliance
This manual explains the proper use of your Omega
Beverage Centre. Please read this manual carefully before using
the product.
This manual should be kept in a safe place for handy reference.
This Beverage Centre is a domestic appliance which has been
manufactured and tested to comply with Australian and
New Zealand Standards.
This Beverage Centre must only be installed in accordance with
the instructions provided. Incorrect installation may cause harm
to persons, damage property and void the product’s warranty.
Read the following carefully to avoid damage or injury.
IMPORTANT: Check for any damage or marks. If you find the
appliance is damaged or marked, you must report it within 7 days
if you wish to claim for damage/ marks under the manufacturer’s
warranty. This does not affect your statutory rights.
Safety Instructions
• Before the installation and use of the appliance, carefully read
the supplied instructions.
• The manufacturer is not responsible if an incorrect installation
and use causes injuries and damages.
• Always keep the instructions with your appliance for future
reference.
• If you will not use the appliance for a long time, it is advised to
turn the plug off.
WARNING: To prevent any damages to your and others’ life
or property, you have to follow these safety instructions.
WARNING: When positioning the appliance, ensure the supply
cord is not trapped or damaged.
WARNING: Do not locate multiple portable socket-outlets
or portable power supplies at the rear of the appliance.
05
User ManualDesigned to Enhance
Beverage Centre
Safety Information
Children & Vulnerable People Safety
WARNING: Risk of suffocation, injury or permanent disability.
This appliance is not intended for use by persons (including
children) with reduced physical, sensory or mental capabilities,
or lack of experience and knowledge, unless they have been
given supervision or instruction concerning use of the appliance
by a person responsible for their safety.
• Children should be supervised to ensure that they do not play
with the appliance.
• Keep all packaging away from children.
• Cleaning and user maintenance shall not be made by children
without supervision.
Unpacking
• During transportation, protective packaging was used to protect
the appliance against any damage. After unpacking, please
dispose of all elements of packaging in a way that will not cause
damage to the environment.
• All materials used for packaging the appliance are
environmentally friendly; they are 100% recyclable and
are marked with the appropriate symbol.
• Remove all the packaging.
CAUTION: During unpacking, the packaging materials
(polythene bags, polystyrene pieces, etc.) should be kept out
of reach of children.
• Always move the appliance cautiously. Do not use the machine
door to lift the appliance.
WARNING: Do not damage the refrigerant circuit at the rear.
WARNING: If you suspect refrigerant leakage, avoid touching
the unit or power outlet. Ventilate the room and, if possible, turn
off the unit using the circuit breaker. Contact the manufacturer
immediately. Refrigerant can cause serious injury upon contact
with skin or eyes; seek medical treatment promptly if exposed.
• Do not install or use a damaged appliance.
• Before installation or cleaning, disconnect the appliance from
the power source and reset temperature controls. Reconnect
and reset after completing tasks.
• Please contact 1300 11 HELP (4357) to arrange an authorised
technician if you need assistance with installing the appliance.
Electrical Connection
CAUTION: Risk of fire and electrical shock!
• Ensure the appliance's plug is easily accessible.
• Ensure proper grounding of the appliance before operation.
The appliance must be earthed.
WARNING: If you are unsure about grounding instructions,
consult a qualified electrician or service person. Wait at least
5 minutes before reconnecting the power cord to prevent
freezer failure.
• Make sure that the electrical information on the rating plate
agrees with the power supply. If not, contact an electrician.
• Always use a correctly installed shockproof socket.
• Do not use any multi-plug adapters or extension cables.
WARNING: Incorrect grounding may lead to breakdowns or
electric shocks. Use a dedicated outlet; using multiple devices on
one outlet may cause fire hazards. Avoid positioning the power
plug upwards or in a squeezed space at the back of the fridge to
prevent water damage or fire risk.
• Ensure the supply cord is not trapped or damaged during
positioning.
• Connect the mains plug to the mains socket only at the end of
the installation. Make sure that there is access to the mains plug
after the installation. Do not connect the appliance plug with a
power connection board.
• Do not pull the mains cable to disconnect the appliance.
Always pull the mains plug.
• Do not touch the mains cable or the mains plug with
wet hands.
WARNING: If the supply cord is damaged, it must be replaced
by the manufacturer or its service agent or similarly qualified
person in order to avoid a hazard.
WARNING: All electrical work must be done in accordance
with local and national electrical codes as applicable and
should be undertaken by licenced and qualified persons only.
Failure to follow these instructions can result in death, fire or
electrical shock.
This product operates on 220-240V/50Hz only.
It cannot be used with frequencies other than 50Hz.
To ensure safety, the socket and its cable must be capable
of withstanding a current of above 13A.
06
User Manual
Beverage Centre
Appliance Placement
• Use this appliance in a domestic household only.
• Avoid installing it in wet or high humidity environments to
prevent deterioration and electrical hazards.
• Install the appliance in a dry, well-ventilated room close
to a wall outlet for easy access to power supply in case of
accidents.
• Avoid exposing the unit to extreme heat or open flame, and
ensure adequate airflow around the unit to prevent electric
shock or injury.
• Do not cover or obstruct the ventilation area at the front of the
unit to avoid electric shock or injury.
Care & Cleaning
CAUTION: Risk of injury or damage to the Beverage Centre.
• Before installation or cleaning, disconnect the appliance from
the power source and reset temperature controls. Reconnect
and reset after completing tasks.
• Unplug the power cord when cleaning or handling the interior
lamp to prevent electric shock or injury. Use a dry, clean cloth
to remove water or dust from the power plug; do not touch it
with wet hands. Ensure the power cord is not bent or pressed by
heavy objects to avoid damage.
• Do not use a steam cleaner on the appliance.
• Avoid spraying water inside or outside the fridge or cleaning
it with benzene or thinner.
• Use caution with cleaning agents; acidic cleaners, abrasive
brushes, sharp tools, or those containing benzene should not
be used.
• Clean the appliance with a moist soft cloth. Only use neutral
detergents. Do not use abrasive products, abrasive cleaning
pads, solvents or metal objects.
Appliance Use
WARNING: Risk of fire, explosion, electric shock or damage
to the appliance.
WARNING: Keep ventilation openings, in the appliance
enclosure or in the built-in structure, clear of obstruction.
WARNING: This appliance is not suitable for food storage and
must not be used to store food inside.
• Do not change the specification of this appliance.
• Do not store explosive substances such as aerosol cans with
a flammable propellant in this appliance.
• Please do not close the appliance door with excessive force
• Avoid placing heavy or dangerous objects inside the
appliance, as they may cause injury, fire, or electric shock.
• Do not use a dryer or light a candle inside the unit, as it may
cause explosion or fire.
• Avoid clinging to the door, especially for children, to
prevent the appliance from falling and causing serious
injuries or death.
• This appliance contains the coolant lsobutane (R600a), a
natural gas which is environmentally friendly. Although it
is flammable, it does not damage the ozone layer and does
not increase the greenhouse effect. The use of this coolant
has, however, led to a slight increase in the noise level of the
appliance. In addition to the noise of the compressor, you
might be able to hear the coolant flowing around the system.
This is unavoidable, but does not have any adverse effect on
the performance of the appliance.
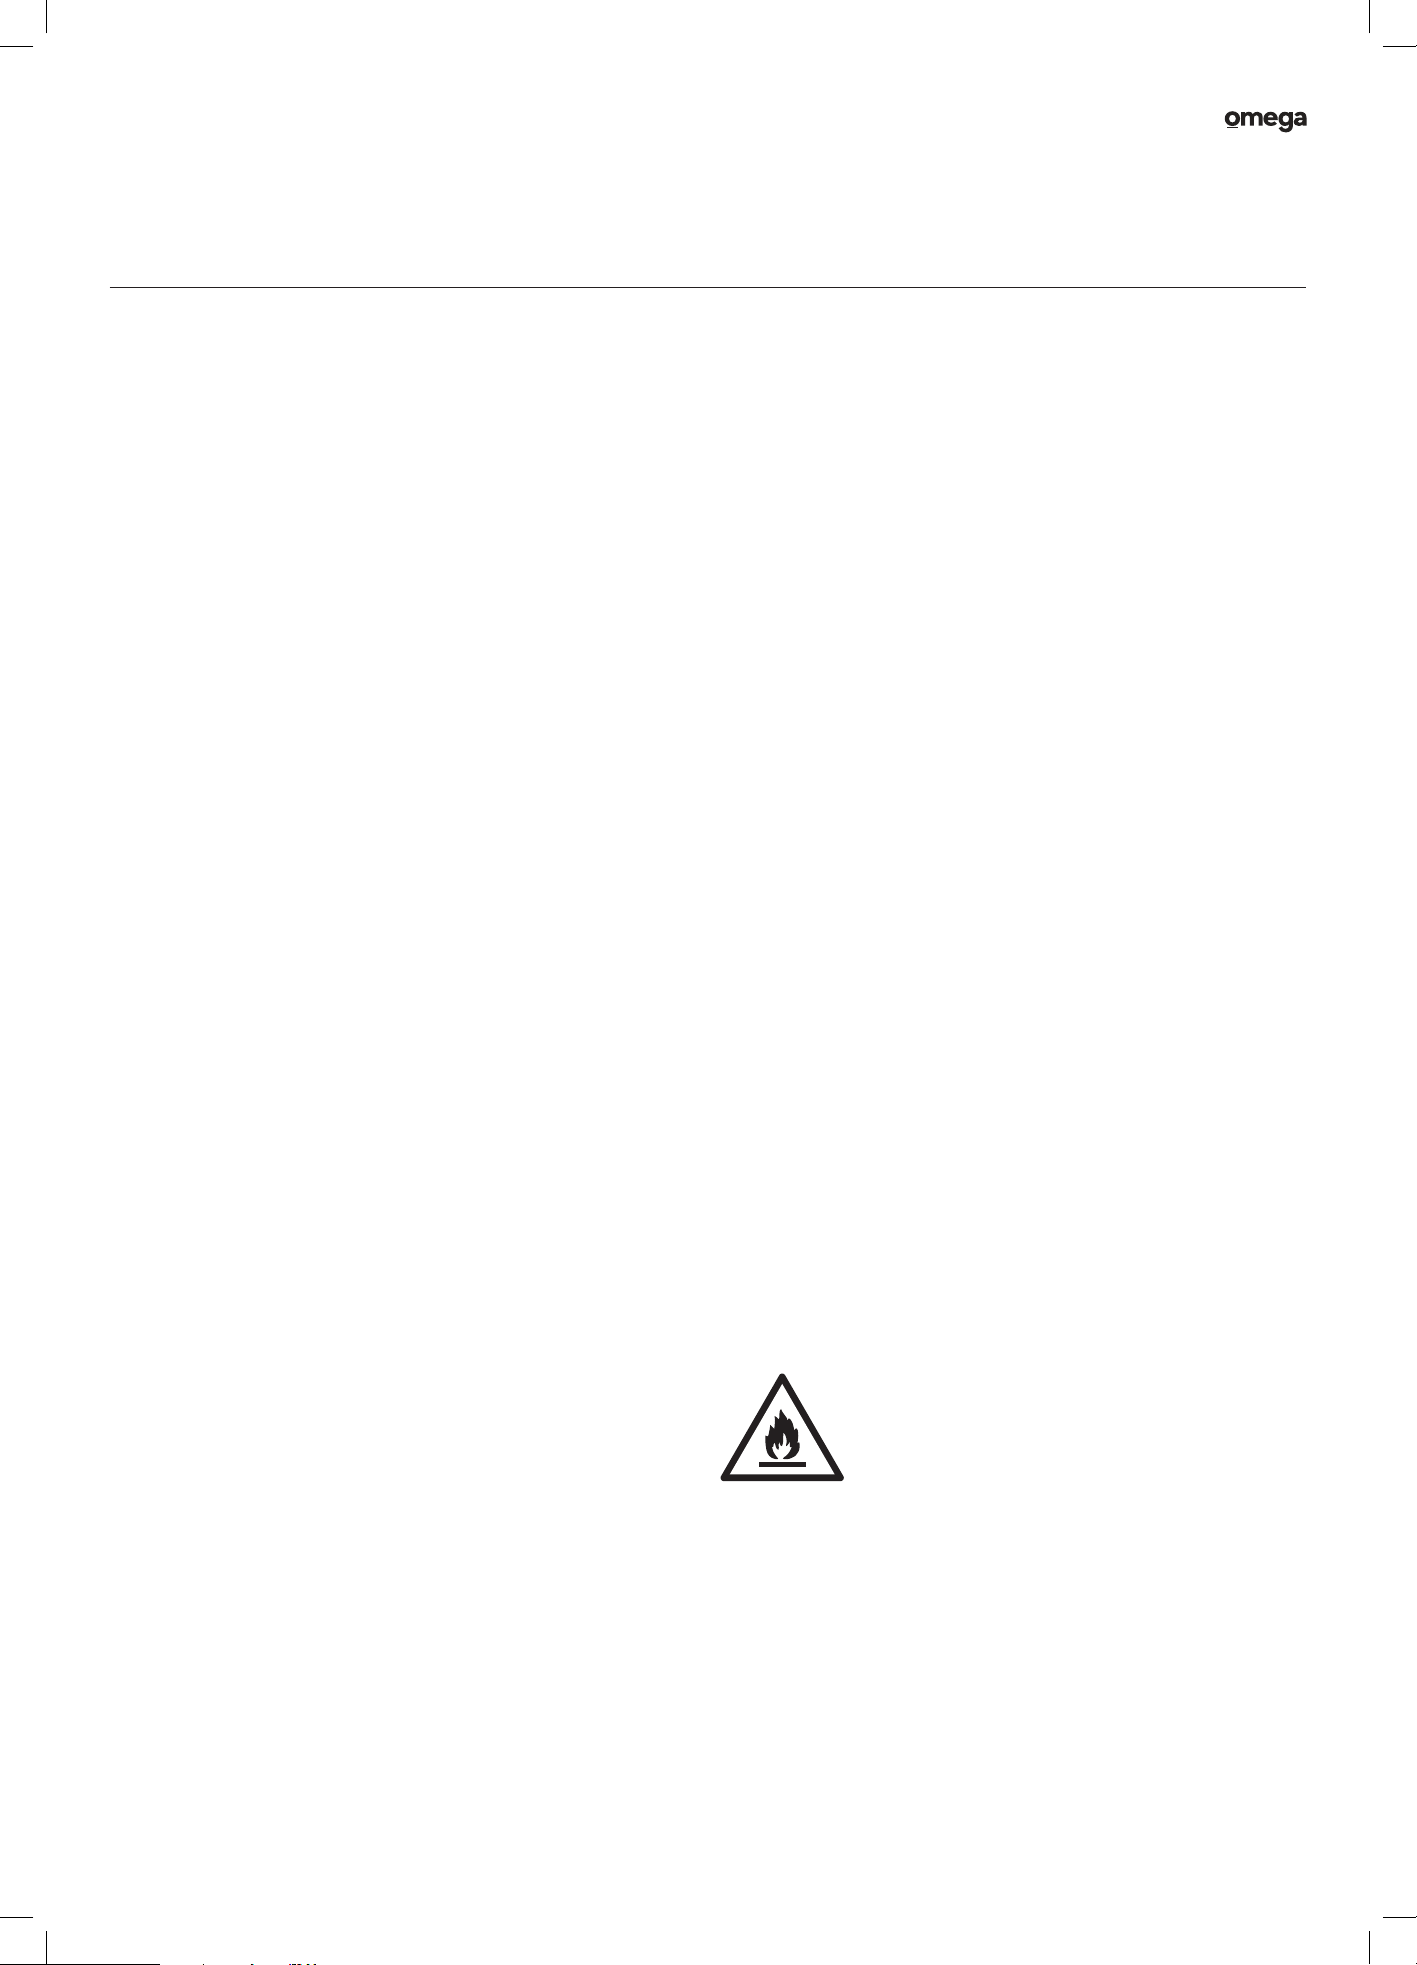
The refrigerant (R600a) is flammable.
Symbol ISO 7010 W021
WARNING: Risk of fire/flammable materials!
Safety Information
07
User ManualDesigned to Enhance
Beverage Centre
Safety Information
To avoid contamination of drinks, pay attention to the following:
• Opening the door for long periods of time can cause a
significant increase in the temperature in the compartments
of the appliance.
• Only store beverages in sealed containers.
• Do not overload the cabinet.
• Only open the door when necessary.
• This is a self-defrosting appliance. The compressor
will not run during the twenty minutes defrost cycle.
• Do not pull the shelves beyond the anti-stop position
when fully loaded.
• This appliance is intended to be used exclusively
for the storage of beverages.
• In the event of a power failure, leave the door closed as much as
possible to maintain the internal working temperature. Should
the power failure continue for a prolonged period, you should
take steps to protect the contents of the Beverage Centre
against a rise in temperature. The Beverage Centre will
remember the selected temperature setting and revert to these
setting once the power is restored.
Disposal of the Appliance
• Disconnect the appliance from the mains supply, cut off the
mains cable and discard it.
• Remove the doors and secure shelves before discarding
old refrigerators or freezers to prevent injury or children and
pet entrapment.
• When discarding the unit, keep it away from extreme heat
sources due to flammable refrigerant and foaming agent.
• Adhere to local laws and regulations when discarding
the appliance.
• Old appliances should not simply be disposed of with normal
household waste and should be delivered to a collection and
recycling centre for electric and electronic equipment. A symbol
shown on the product, the instruction manual or the packaging
shows that it is suitable for recycling.
• Dispose of refrigerant and insulation blowing gas at authorised
waste disposal centers. Avoid exposing them to extreme heat or
open flames.
• The packaging is designed to protect the appliance from
damage during transportation. The packaging materials are
environmentally friendly and should be recycled. Recycling
the packaging can reduce the use of raw materials in the
manufacturing process and the amount of waste in landfill sites
• Packaging materials of the product are manufactured
from recyclable materials in accordance with our National
Environment Regulations. Do not dispose of the packaging
materials together with the domestic or other wastes. Take them
to the packaging material collection points designated by the
local authorities.
• Materials used inside the appliance are recyclable and are
labelled with information concerning this. By recycling materials
or other parts from used devices you are making a significant
contribution to the protection of our environment.
• Information on appropriate disposal centres for used devices
can be provided by your local authority.
08
User Manual
Beverage Centre
Safety Information
Unpacking
• During transportation, protective packaging was used to
protect the appliance against any damage. After unpacking,
please dispose of all elements of packaging in a way that
will not cause damage to the environment.
• Remove the packaging box and take off the top foam.
• Remove the protective foam from the sides and inside
the Beverage Centre.
• Lift the Beverage Centre with assistance to remove the
foam pad underneath.
• Open the Beverage Centre door and take out the installation
accessories and other items stored inside.
• All materials used for packaging the appliance are
environmentally friendly; they are 100% recyclable and
are marked with the appropriate symbol.
• Before switching on your appliance for the first time, ensure it
is positioned in it's desired final location and is in it's upright
position for at least 24 hours before plugging in and switching
on the power, otherwise you may damage the compressor.
• You may experience an odour from the appliance when it is
operated for the first time. This is normal and will fade when your
appliance starts to cool.
• It is recommended that you remove all the internal and
external packaging and clean the interior of the appliance
prior to first use. We recommend you wipe all parts with warm
water, then rise and dry. Place all parts back into the appliance
after cleaning.
CAUTION: During unpacking, the packaging materials
(polythene bags, polystyrene pieces, etc.) should be kept out
of reach of children.
Declaration of Compliance
When you have unpacked the appliance, make sure that it has
not been damaged in any way. If you have any doubts at all,
do not use it: contact a professionally qualified person. Keep
packing materials such as plastic bags, polystyrene, or nails out
of the reach of children because these are dangerous to children.
Climate Classes
Each appliance has a climate class (shown on the rating label)
where it indicates the temperature range of the appliance
operation in place. The appliance may not work properly it is left
for a long period at a temperature outside the specified range.
• Extended temperature (SN):
This refrigerating appliance is intended to be used at ambient
temperatures ranging from 10°C to 32°C.
• Temperate (N):
This refrigerating appliance is intended to be used at ambient
temperatures ranging from 16°C to 32°C.
• Subtropical (ST):
This refrigerating appliance is intended to be used at ambient
temperatures ranging from 16°C to 38°C.
• Tropical ( T):
This refrigerating appliance is intended to be used at ambient
temperatures ranging
Refer to the Operating Instructions section of this user manual
on how to set temperature of your unit.
09
User ManualDesigned to Enhance
Beverage Centre
I
F
A
F
G
DH D
Your Beverage Centre
C
C
C
E
B
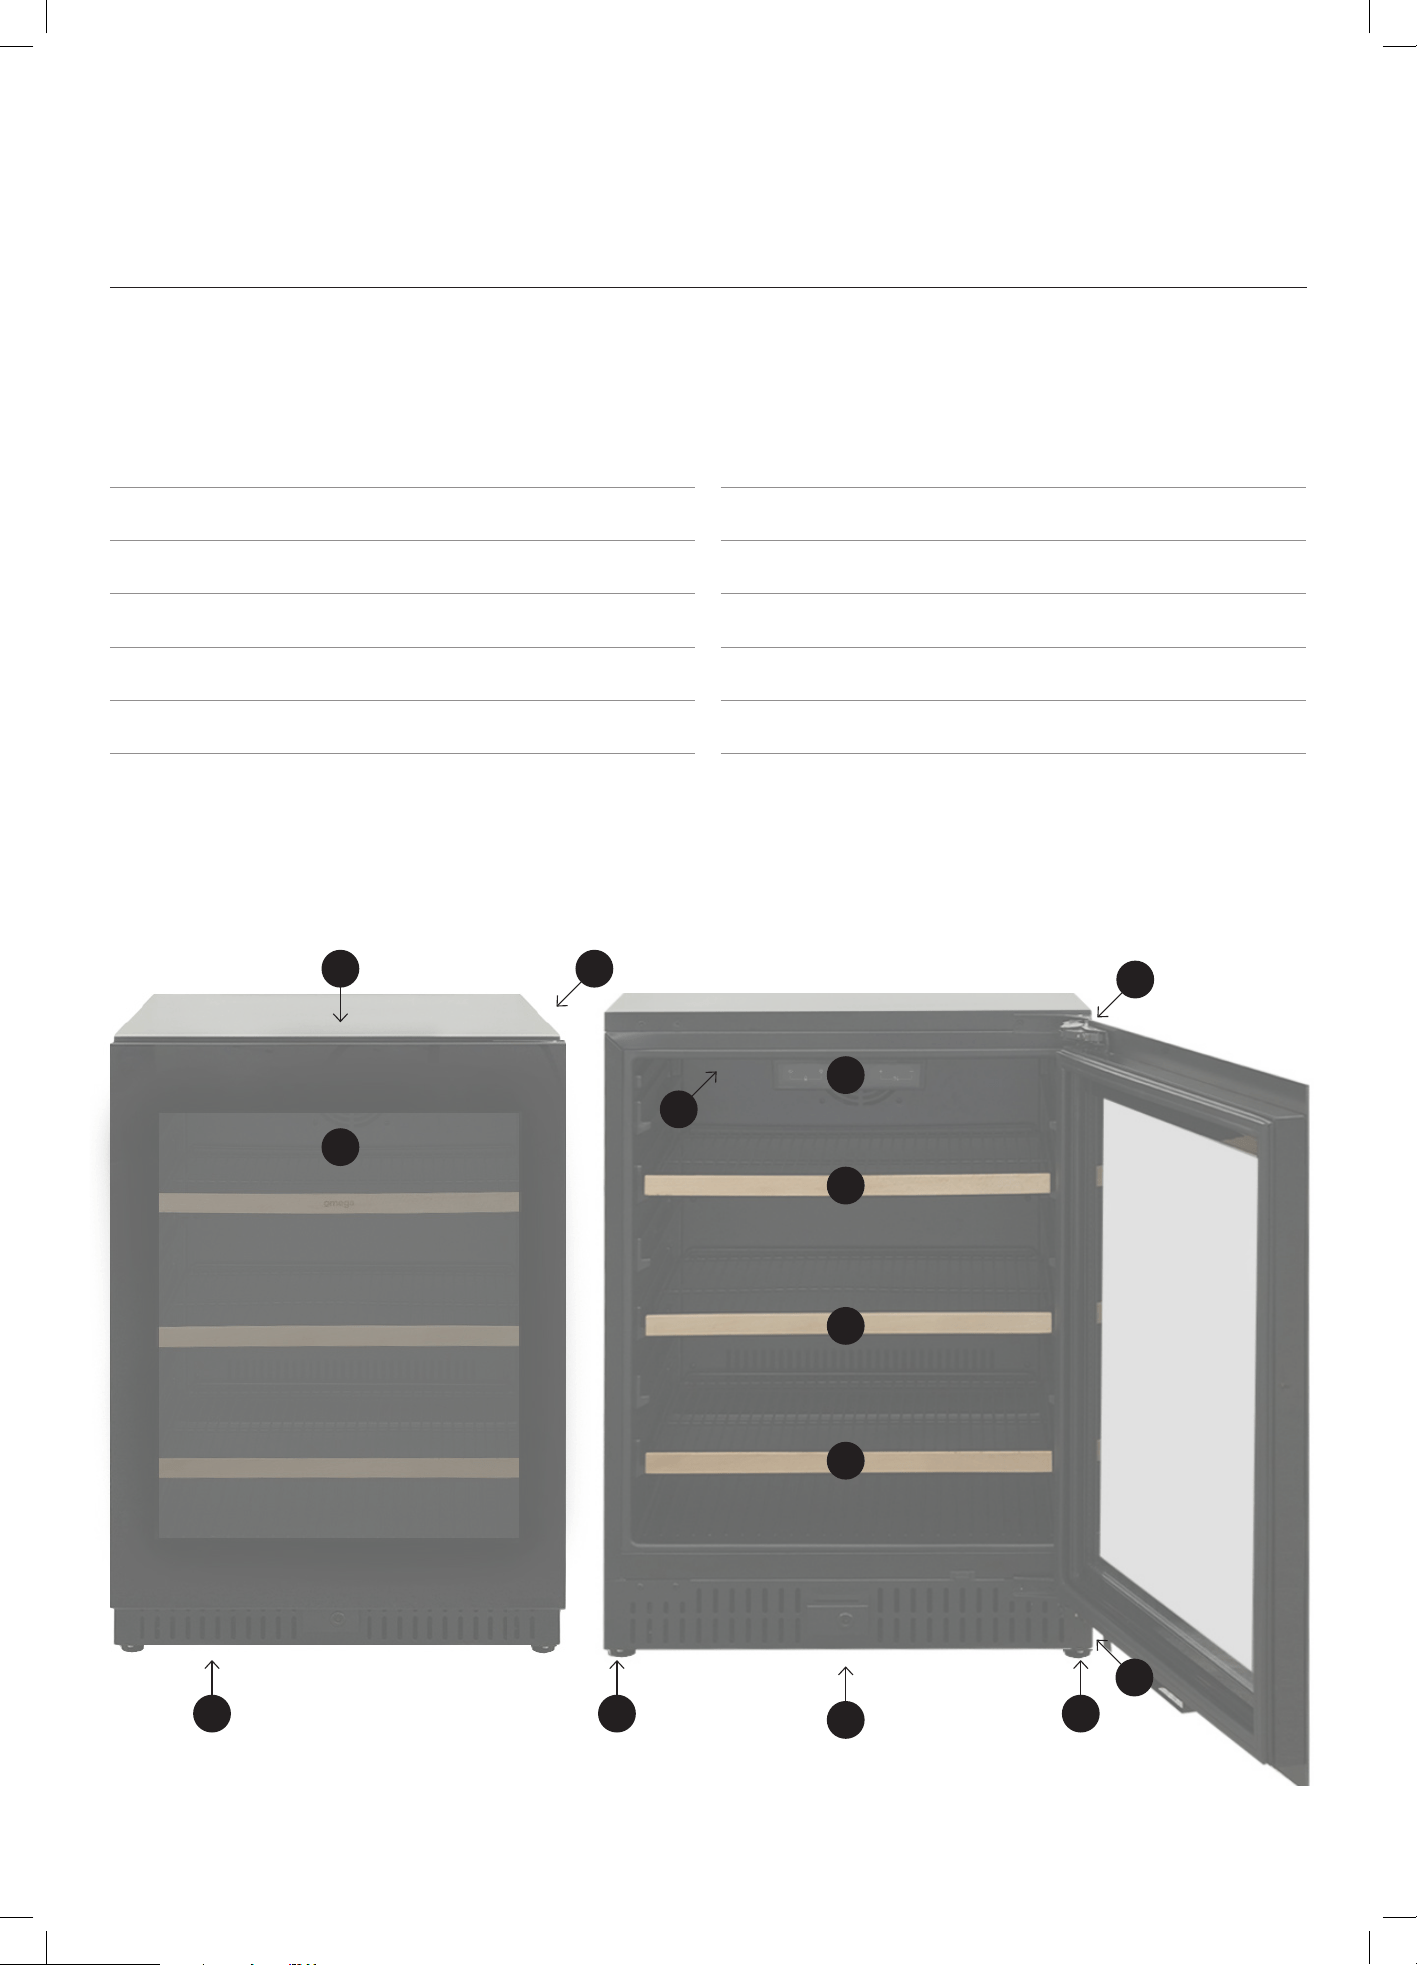
Components, Parts and Accessories
Model: OCB140SB
A. Cabinet
B. Digital Touch Controls
C. Wire Shelves with Timber Trim (×3)
D. Levelling Feet (×4)
E. Triple glazed, Black UV Tinted Glass Door
F. Zero Clearance Hinge (×2)
G. LED Internal Lighting
H. Front Ventilation Grilles
I. Recessed Handle
J. Door Lock
* User Manual (×1)
* Quick Start Guide (×1)
* Not pictured, also available online: www.omegaapliances.com.au
Note: The diagrams and images in this user manual are for explanatory purposes only. Your appliance may appear differently.
J
10
User Manual
Beverage Centre
A
F
G
H
J
I
B
E
D
C
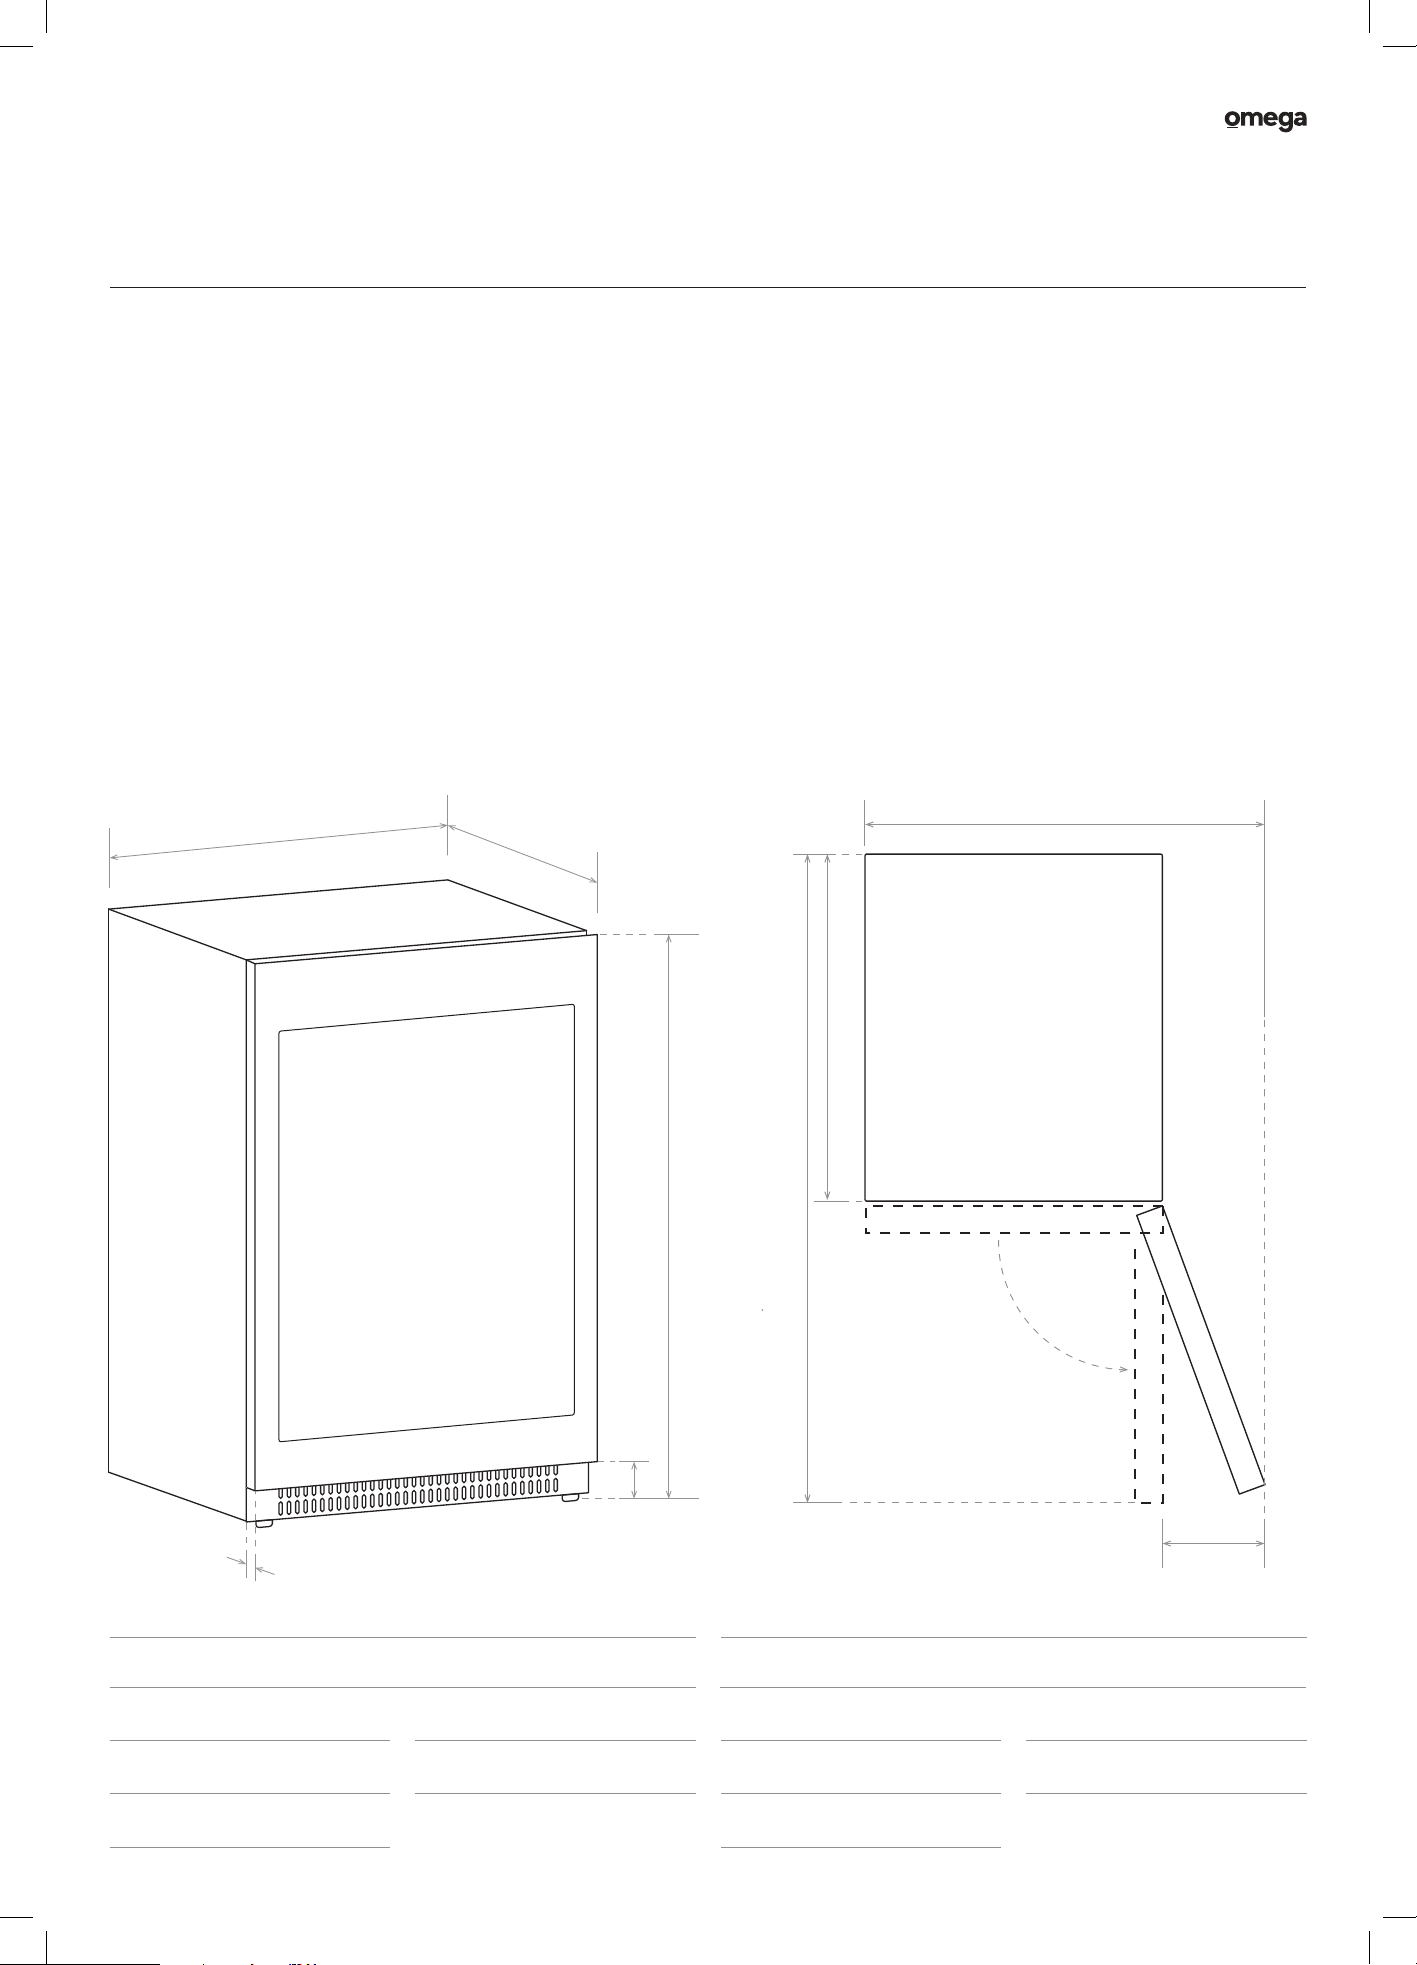
A 595
B 580
C 846–876
D 85
E 46
F 840
G 1190
H 531
I 245
J 115°
Dimensions (mm) Dimensions (mm)
Your Beverage Centre
Product Dimensions
The dimensional diagrams for this appliance provide essential information about its size and layout.
These diagrams detail the fridge's measurements enabling you to plan its placement effectively.
Note: The diagrams and images in this user manual are for explanatory purposes only. Your appliance may appear differently.
11
User ManualDesigned to Enhance
Beverage Centre
Installation Preparation
Transportation
• Avoid transporting the Beverage Centre horizontally or laying it
down. Keep it upright during transportation to prevent damage.
• When moving the Beverage Centre, refrain from holding onto
the door. Always lift the appliance from the bottom to ensure
safe handling.
• Never attempt to move the unit alone. It is essential to have
at least two people to safely lift or move the Beverage Centre.
This precaution helps prevent injury and ensures the unit
remains intact during transportation.
Built-in Installation
This unit can be either built-in or freestanding.
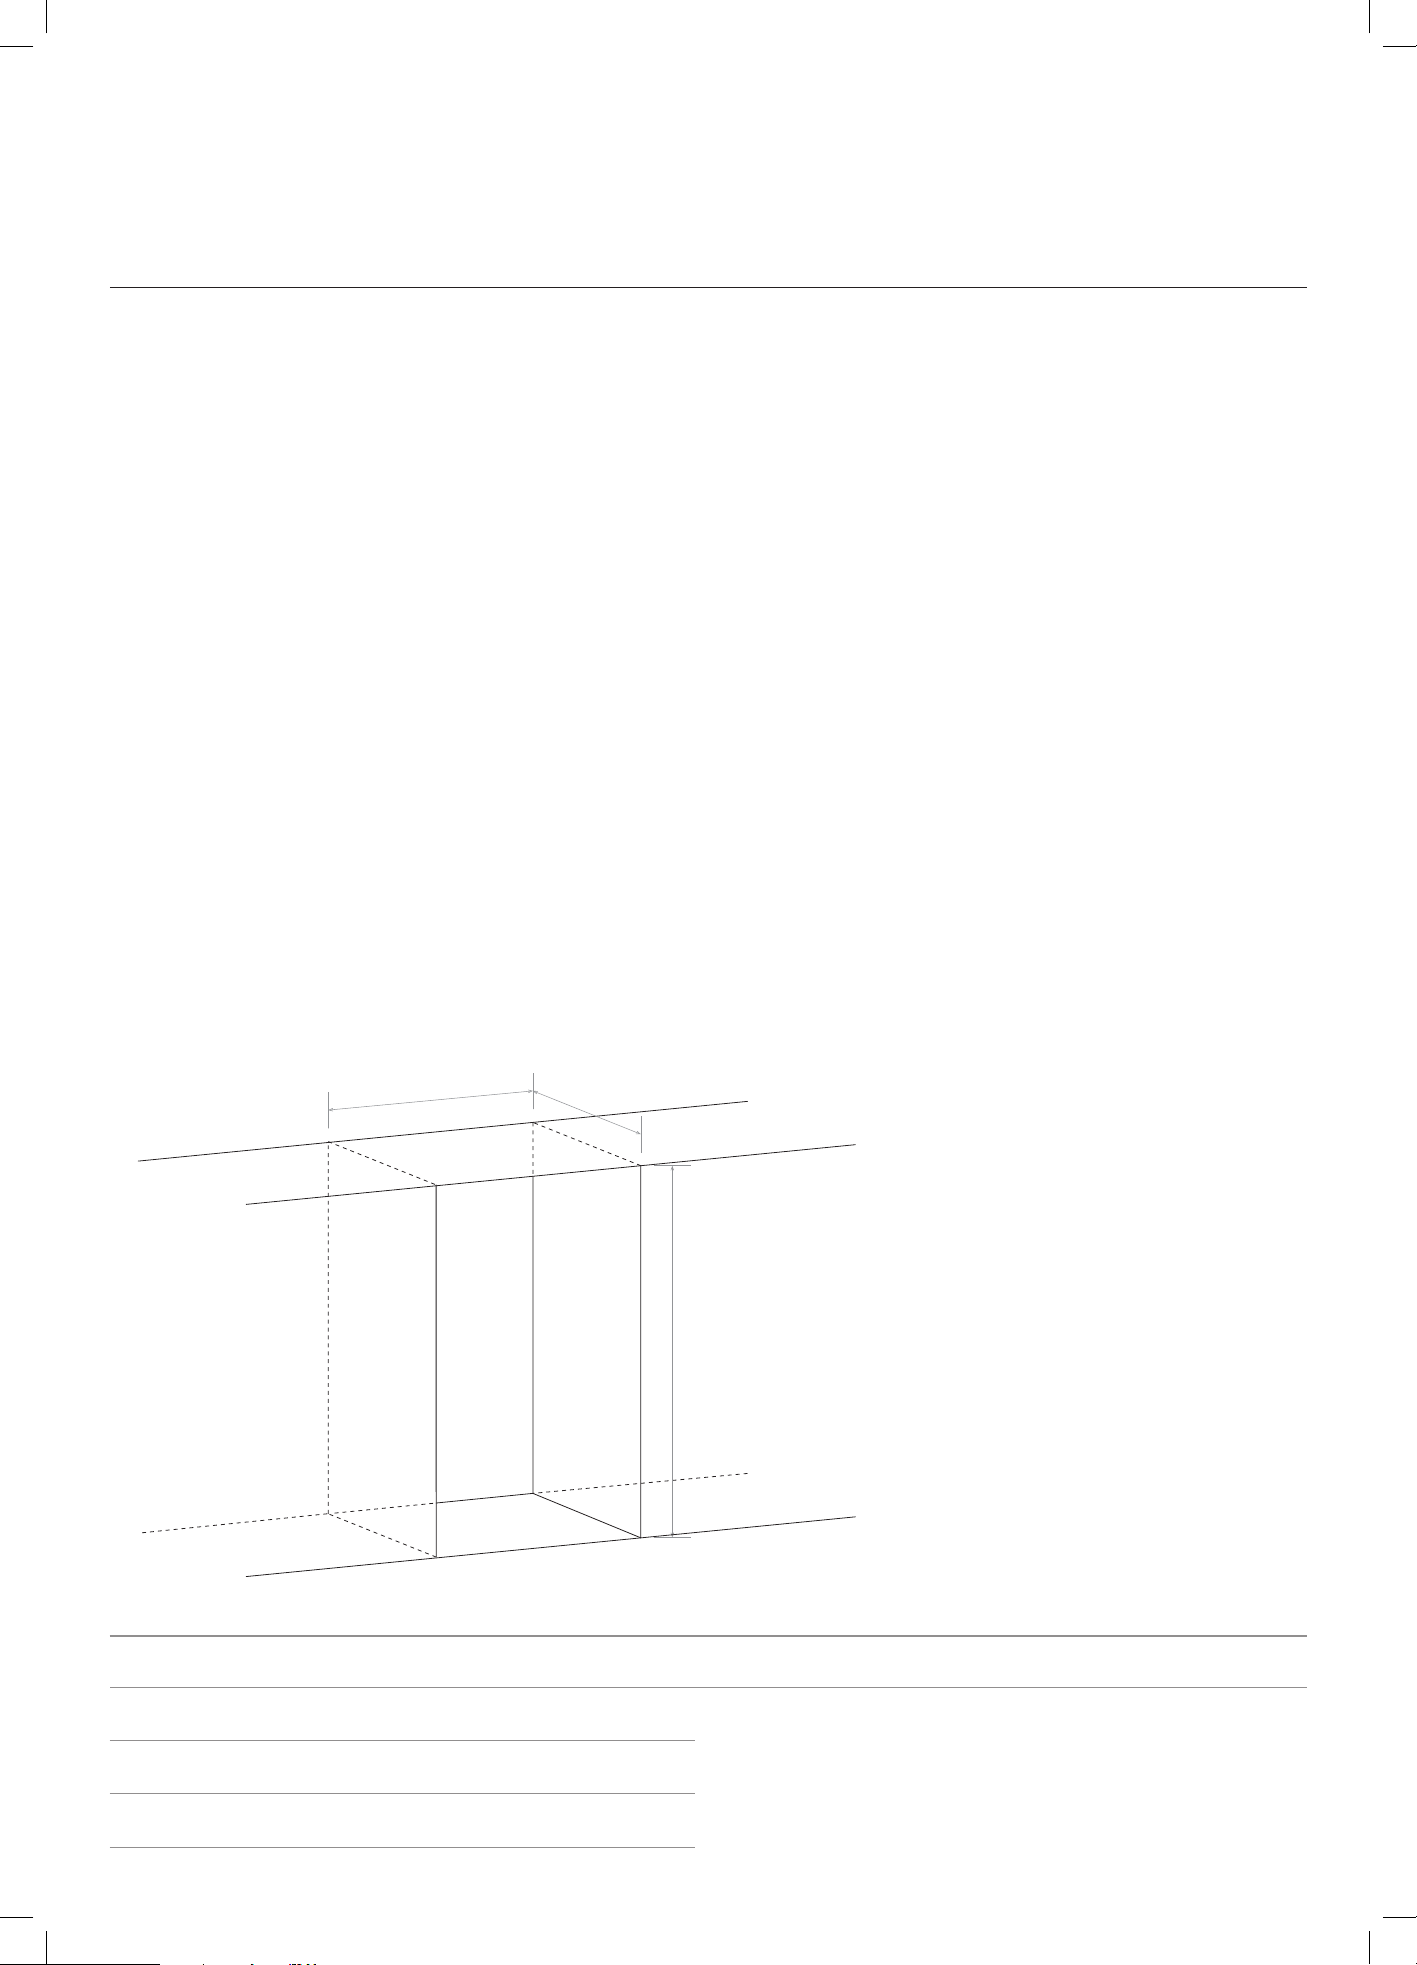
For built-in installation, ensure the cabinet dimensions meet the
specifications below. The diagram below gives the dimensions
of the cut-out for installation and required clearances.
WARNING: Please take note of the side gap allowances
and also top finger gap access notes at the bottom of this
page before preparing the cabinetry.
• Ensure the mains connection is easily accessible.
• The hole for the power cable can be drilled on either side,
depending on your setup. The hole diameter must be equal
or larger than 50mm.
• The power socket should be located in an adjacent cabinet
for easy access.
• The installation of this appliance is best carried out by 2 people.
K
L
M
K 595–600*
L 580
M 871–901†
Minimum inside cavity (mm)
† Leave a minimum 25mm gap at the top of the cavity for finger access
to the recessed handle and ensure easy door operation
* Whilst the appliance features a Zero Clearance Hinge allowing 0mm gaps
between the unit and cabinetry, we recommend allowing small gaps on
the side to prevent contact with cabinetry whilst also accommodating for
minor variances in cabinet dimensions or floor levelness.
12
User Manual
Beverage Centre
Installing Your Beverage Centre
Unpacking
• During transportation, protective packaging was used to
protect the appliance against any damage. After unpacking,
please dispose of all elements of packaging in a way that
will not cause damage to the environment.
• Remove the packaging box and remove the protective foam.
CAUTION: During unpacking, the packaging materials
(polythene bags, polystyrene pieces, etc.) should be kept out
of reach of children.
Positioning Your Beverage Centre
This Beverage Centre features a front ventilation system
designed to offer both Freestanding use or Integrated (Built-in)
installation for seamless airflow.
• The Beverage Centre must be positioned on a firm, solid, level
surface
to ensure the appliance operates efficiently and doesn't wobble.
• Keep the Beverage Centre away from damp areas where water
is present. Promptly remove any water or dirt from the surfaces
using a soft cloth to prevent rust and maintain optimal efficiency.
• Keep the Beverage Centre away from heat sources like stoves,
ovens,
and direct sunlight. Heat can affect the performance and energy
consumption.
• Do not place your appliance in direct sunlight.
• Your appliance should be at least 50 cm away from stoves,
gas ovens and heaters, and should be at least 5 cm away from
electrical ovens.
• Your Beverage Centre should never be used outdoors or left out
in the rain.
• If your Beverage Centre is placed next to a deep freezer, there
should be at least 2 cm between each other to prevent humidity
on the outer surface.
Electrical Connection
• Ensure the product is installed in a way that allows easy access
to plug or unplug the power cord.
• Insert the product’s plug into a dedicated socket to prevent
accidental power disconnection. Avoid plugging other
appliances into this socket, and do not use extension cords or
multiport adapters, as their combined weight may cause them
to fall from the wall.
• Refer to the product’s rating label to ensure it meets the
necessary power supply requirements.
• The product must be properly grounded for safety.
• Operating voltage for your Beverage Centre is 220-240V at
50Hz.
• The manufacturer does not take the responsibility of the
damages that occur due to ungrounded usage.
• Any electrical work that is required to install this appliance must
be carried out by a qualified electrician.
• WARNING: THIS APPLIANCE MUST BE EARTHED
• Before making any electrical connections, ensure that:
• Electrical safety is only guaranteed when the earth system of
your house in accordance with the related local regulations.
• Do not bend, stretch or pull the supply cable to avoid electric
shock.
• Ensure the power socket is suitable for the Maximum power of
the machine (fuses in the power circuit must be 10 amp).
• The supply voltage should be the same as that indicated in the
technical specifications and the appliance rating plate.
• The appliance should be earthed and in compliance with the
applicable law.
• When installed, the power socket must be within easy reach.
• If the socket outlets in your home are not suitable for the
plug supplied with this unit check with a qualified electrician
for a replacement.
• To avoid the risk of overloading your plug socket, the use of
adapters, multiple connectors or extension cables are not
recommended. The appliance must be connected to a 220-240
volt 50Hz AC supply by mean of a three pin socket, suitably
earthed and protected by a 10 amp fuse.
13
User ManualDesigned to Enhance
Beverage Centre
Installing Your Beverage Centre
• The plug contains a removable fuse cover that must be refitted
when the fuse is replaced. If the fuse cover is lost or damaged,
the plug must not be used until a replacement cover has been
fitted or the plug is replaced.
• A damaged plug should be cut off as close to the plug body
as possible, the fuse should be removed and the plug disposed
of safely.
• When positioning the appliance, ensure the supply cord is not
trapped or damaged.
• Do not locate multiple portable socket-outlets or portable power
supplies at the rear of the appliance.
• If power supply cord is damaged, it must replaced by the
manufacturer or its service agent or a similar qualified person in
order to avoid a hazard.
• The appliance is designed for indoor use only and must be
protected from rain, moisture and extreme temperature
variations.
• This appliance is designed for household use only.
Do not use the appliance for industrial and commercial use, or
any other purpose.
Cabinet Inspection:
• Ensure the cabinet dimensions and door panel match the
specifications (refer to the dimension drawing on page 11).
• Verify the position and routing of the power cable (refer to the
dimension drawing on page 11).
• Check that the power socket has a normal power supply.
The socket should be located outside the appliance cabinet
and near the cabinet opening for easy access.
• Ensure the ground is level.
NOTE: Make sure all the above requirements are met before
proceeding to the installation.
Levelling feet
• The appliance must be installed level in order to work properly.
If the unit is not level, the doors and magnetic seal alignments
will not be covered properly.
• To level the unit, adjust one or both levelling feet at the base
of the unit.
• Adjust the appliance’s adjustable feet to align it with
the height of the recess.
• This appliance comes with height adjustable feet which
allows the appliance to be installed under bench and ensures
the appliance is stable and level. Just screw the bottom feet
anticlockwise to raise the height up to 890mm or clockwise to
lower the height to 820mm.
Placing into to the Cabinet
• Plug in the power cord.
• Carefully slide the appliance into the recess, ensuring the
power cord is not pinched or wedged. Avoid direct contact
between the appliance and the floor during installation to
prevent floor damage.
14
User Manual
Beverage Centre
Control Panel
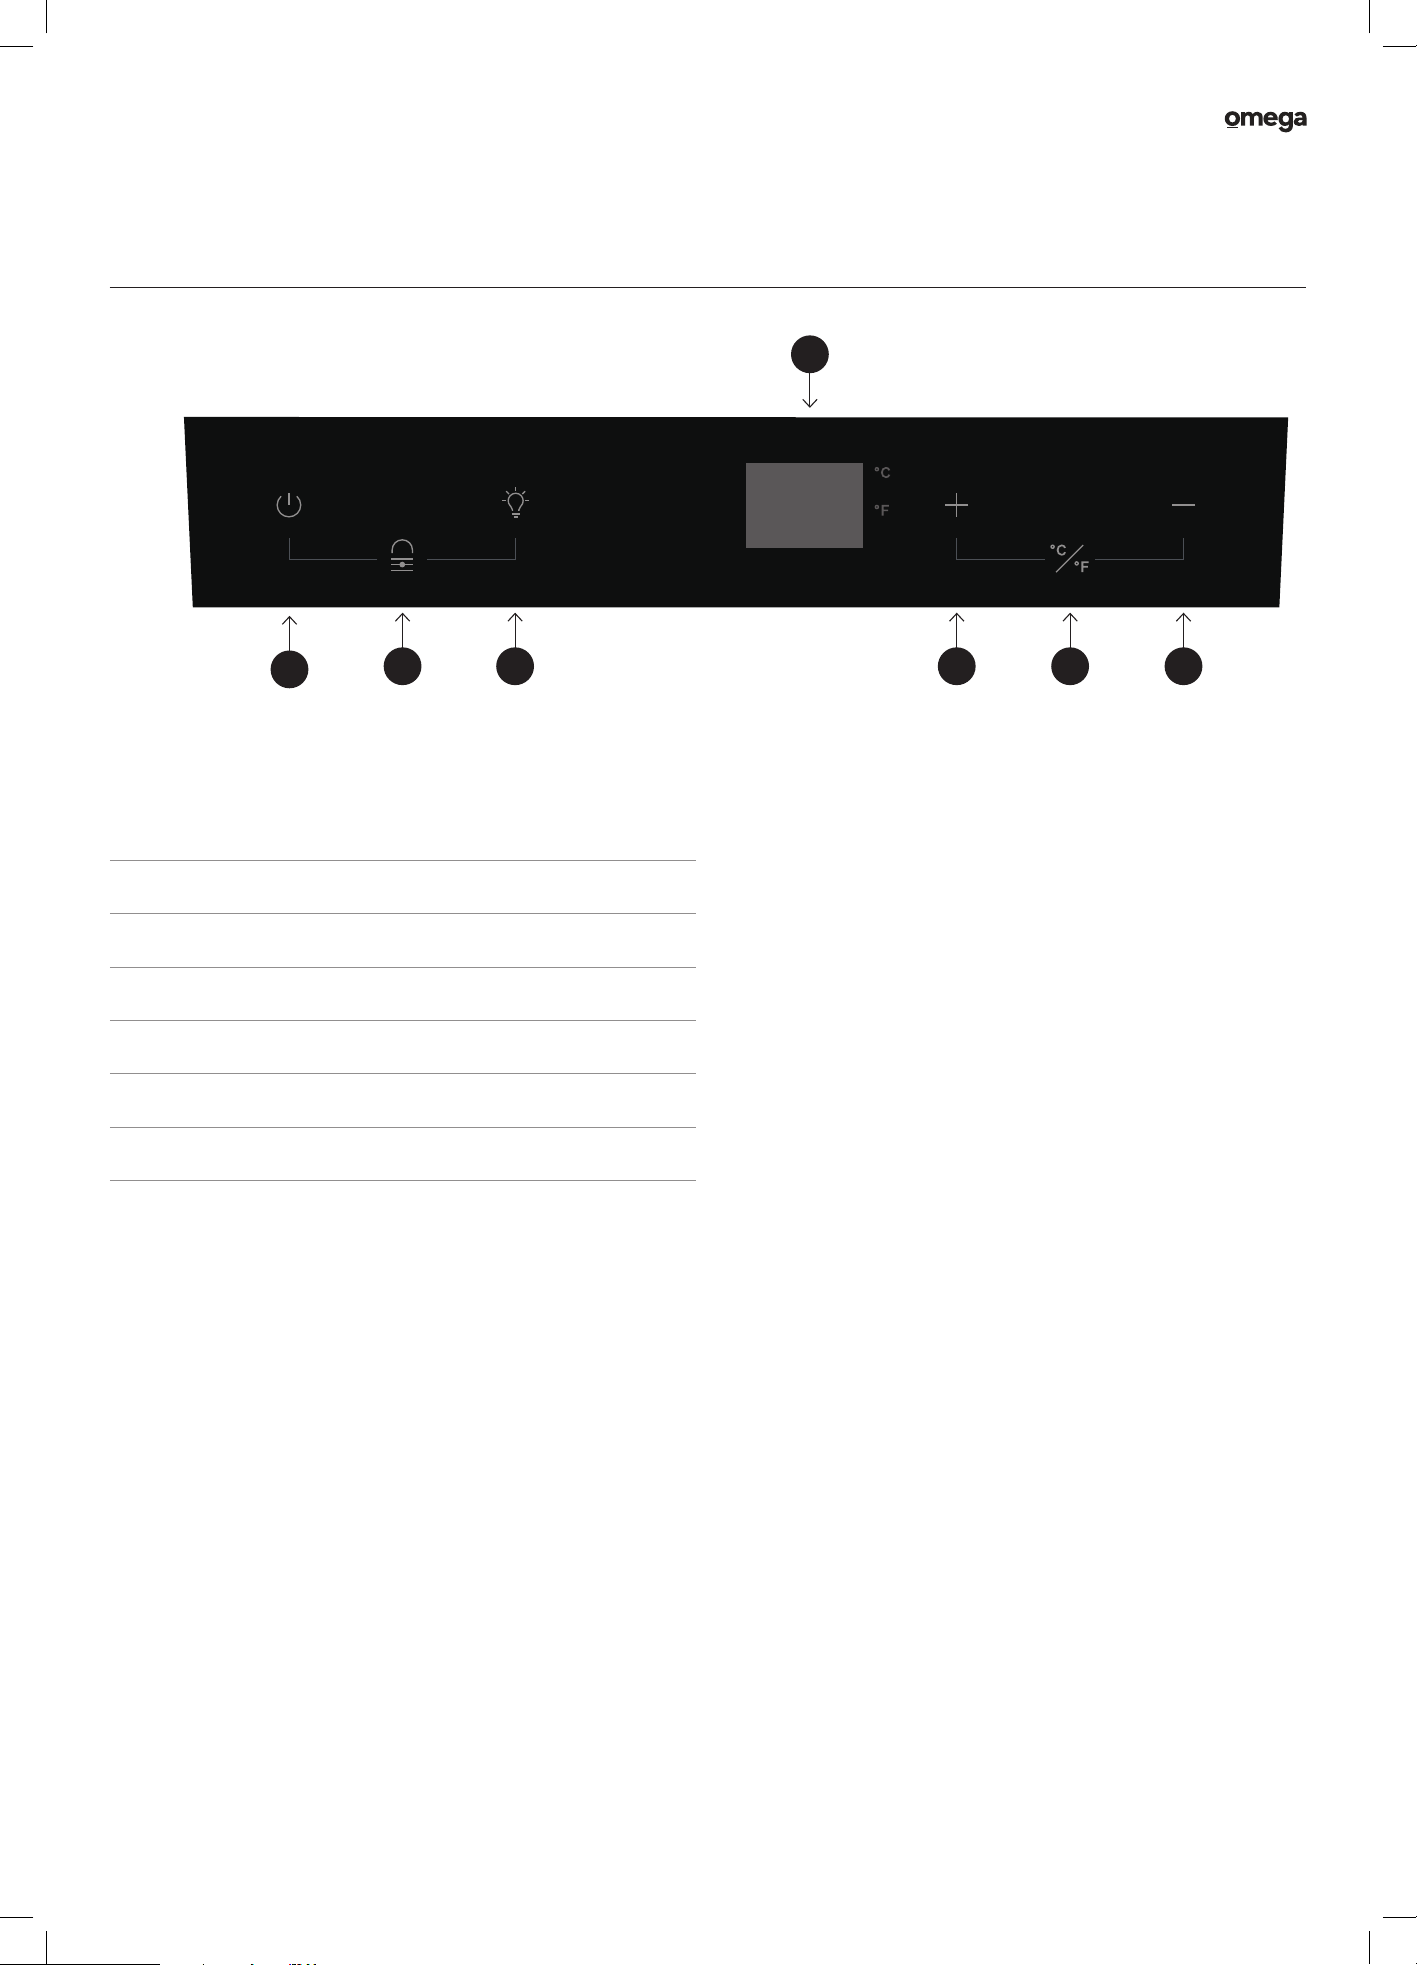
A. Temperature Display
B. Power Button
C. Child Lock Button Combination
D. Light Button
E. Plus / Increase Button
F. Temperature Display Button Combination
G. Minus / Decrease Button
Before First Use
• Ensure that the Beverage Centre is correctly installed following
the Installing Your Beverage Centre section.
• Remove all packaging, including foam backing and tape
securing shelves.
• Before use, wipe all parts of the unit with a warm, soapy cloth,
and rinse and dry thoroughly. Place all parts back in the
appliance after cleaning.
• To avoid damaging the compressor, before switching on
the appliance for the first time, ensure it is positioned in it's
desired final location and it is in an upright position for at least
24 hours before plugging in and switching on the power.
• You may experience an odour from the appliance when it is
powered on for the first time. This is normal and will fade when
your appliance starts to cool.
Switching the Power On/Off
To turn on the Beverage Centre, press and hold the power button
for 6 seconds.
To turn off the Beverage Centre, press and hold the power button
again for 6 seconds.
NOTE: When powering on the appliance, the LED display may
not immediately show the selected temperature as the appliance
works to reach the correct temperature. This is normal and will
automatically update after a few hours.
CAUTION: If the appliance has been switched off, wait at
least 5 minutes before turning it back on to avoid unnecessary
damage to the compressor.
Adjusting the Temperature
Use the Plus / Increase (+) or the Minus / Decrease (–)
adjustment buttons to set the desired temperature.
The temperature range is 0° – 22°C.
The preset temperature is 4°C (39°F).
To switch between Celsius and Fahrenheit temperature display,
press the Plus / Increase (+) and the Minus / Decrease (–)
buttons simultaneously for 2 seconds. The display will update
with the set temperature symbol (°C/°F).
The display shows the current internal temperature when the
Beverage Centre, is on.
NOTE: The appliance will run continuously until it reaches the
set temperature. Continuous noise from the compressor and
refrigeration system is normal and not a defect.
Operating Instructions
B
C D E
A
F G
15
User ManualDesigned to Enhance
Beverage Centre
Operating Instructions
Using the Internal Light
To turn the light on or off, press the Light button.
To enable door-controlled light, press and hold the Light button
for 6 seconds. The display will show then show 'OP', meaning the
light turns on when the door opens.
To disable the door-controlled light, press and hold the Light
button for 6 seconds. The display will show 'CL', turning off the
door light function.
Locking the Control Panel
To lock all buttons, press and hold the Power button
and the Light button simultaneously for 1 second.
To unlock the buttons, repeat the same action by pressing the
Power button and the Light button simultaneously for 1 second.
Automatic Defrosting
The appliance automatically defrosts every 4 hours, with each
defrost cycle lasting 20 minutes.
During the defrost cycle, the compressor stops while the fan
continues running to maintain airflow.
Door Alarm
A built-in alarm will sound if the door is left open for more than
60 seconds.
To silence the alarm, close the door or press any button.
Operating Conditions
For optimal performance, install the appliance in an area where
the ambient temperature is between 16°C and 32°C.
Placing the unit in environments outside this range (extremely
hot or cold) may cause temperature fluctuations and prevent the
unit from reaching its specified operating temperature range.
Button Failure
If you experience button failure, please check the control
panel to see if the fridge is in Child Lock mode. When the
Beverage Centre is in Lock mode, all buttons are disabled and
won't function.
Noise
Initially, the Beverage Centre may operate at a higher speed
to cool quickly, resulting in louder sounds. Once the internal
temperature reaches a certain level, the noise will decrease.
Various sounds, such as those from the compressor starting or
ending its operation, parts expanding or contracting, or control
devices operating, are normal.
Beverage Storage Advice
Prepare the Shelves: Ensure all shelves are correctly installed
before placing items inside.
Set the Temperature: Adjust the Beverage Centre to the desired
temperature and allow several hours for cans to reach this
temperature.
Beverage Arrangement: To maintain good air circulation in
the Beverage Centre, do not let any bottles or cans touch the back
wall of the cabinet.
The capacity for storage in the Beverage Chiller may be different
due to bottles and cans of different shapes and sizes.
Storing large bottles will reduce the maximum capacity.
NOTE: Shelves may need to be removed for larger bottles.
Do Not Overload: Avoid exceeding the appliance's maximum
capacity, as this could affect performance.
Condensation on Glass
CAUTION: During summer or in humid conditions, condensation
may form on the glass door. This is normal and can be wiped off
with a damp cloth.
Removing the Shelves
1. Remove all bottles or cans from the shelf before attempting
to remove it.
2. Lift the inner end of the shelf upward.
3. Pull the shelf out of the Beverage Centre completely.
16
User Manual
Beverage Centre
Reversing the Door Hinge
If you need the Beverage Centre door to open from the opposite
side, follow these step-by-step instructions to reverse the door
hinge. This process involves removing the door, rotating it, and
reinstalling key components on the opposite side.
NOTE: The diagrams provided in these steps are for instructional
purposes only. The appearance of your appliance may vary.
NOTE: For safety, ensure the Beverage Centre is unplugged
before starting.
Tools Required:
• Phillips-head screwdriver
• Soft surface or towel (to place the door on while working)
Instructions
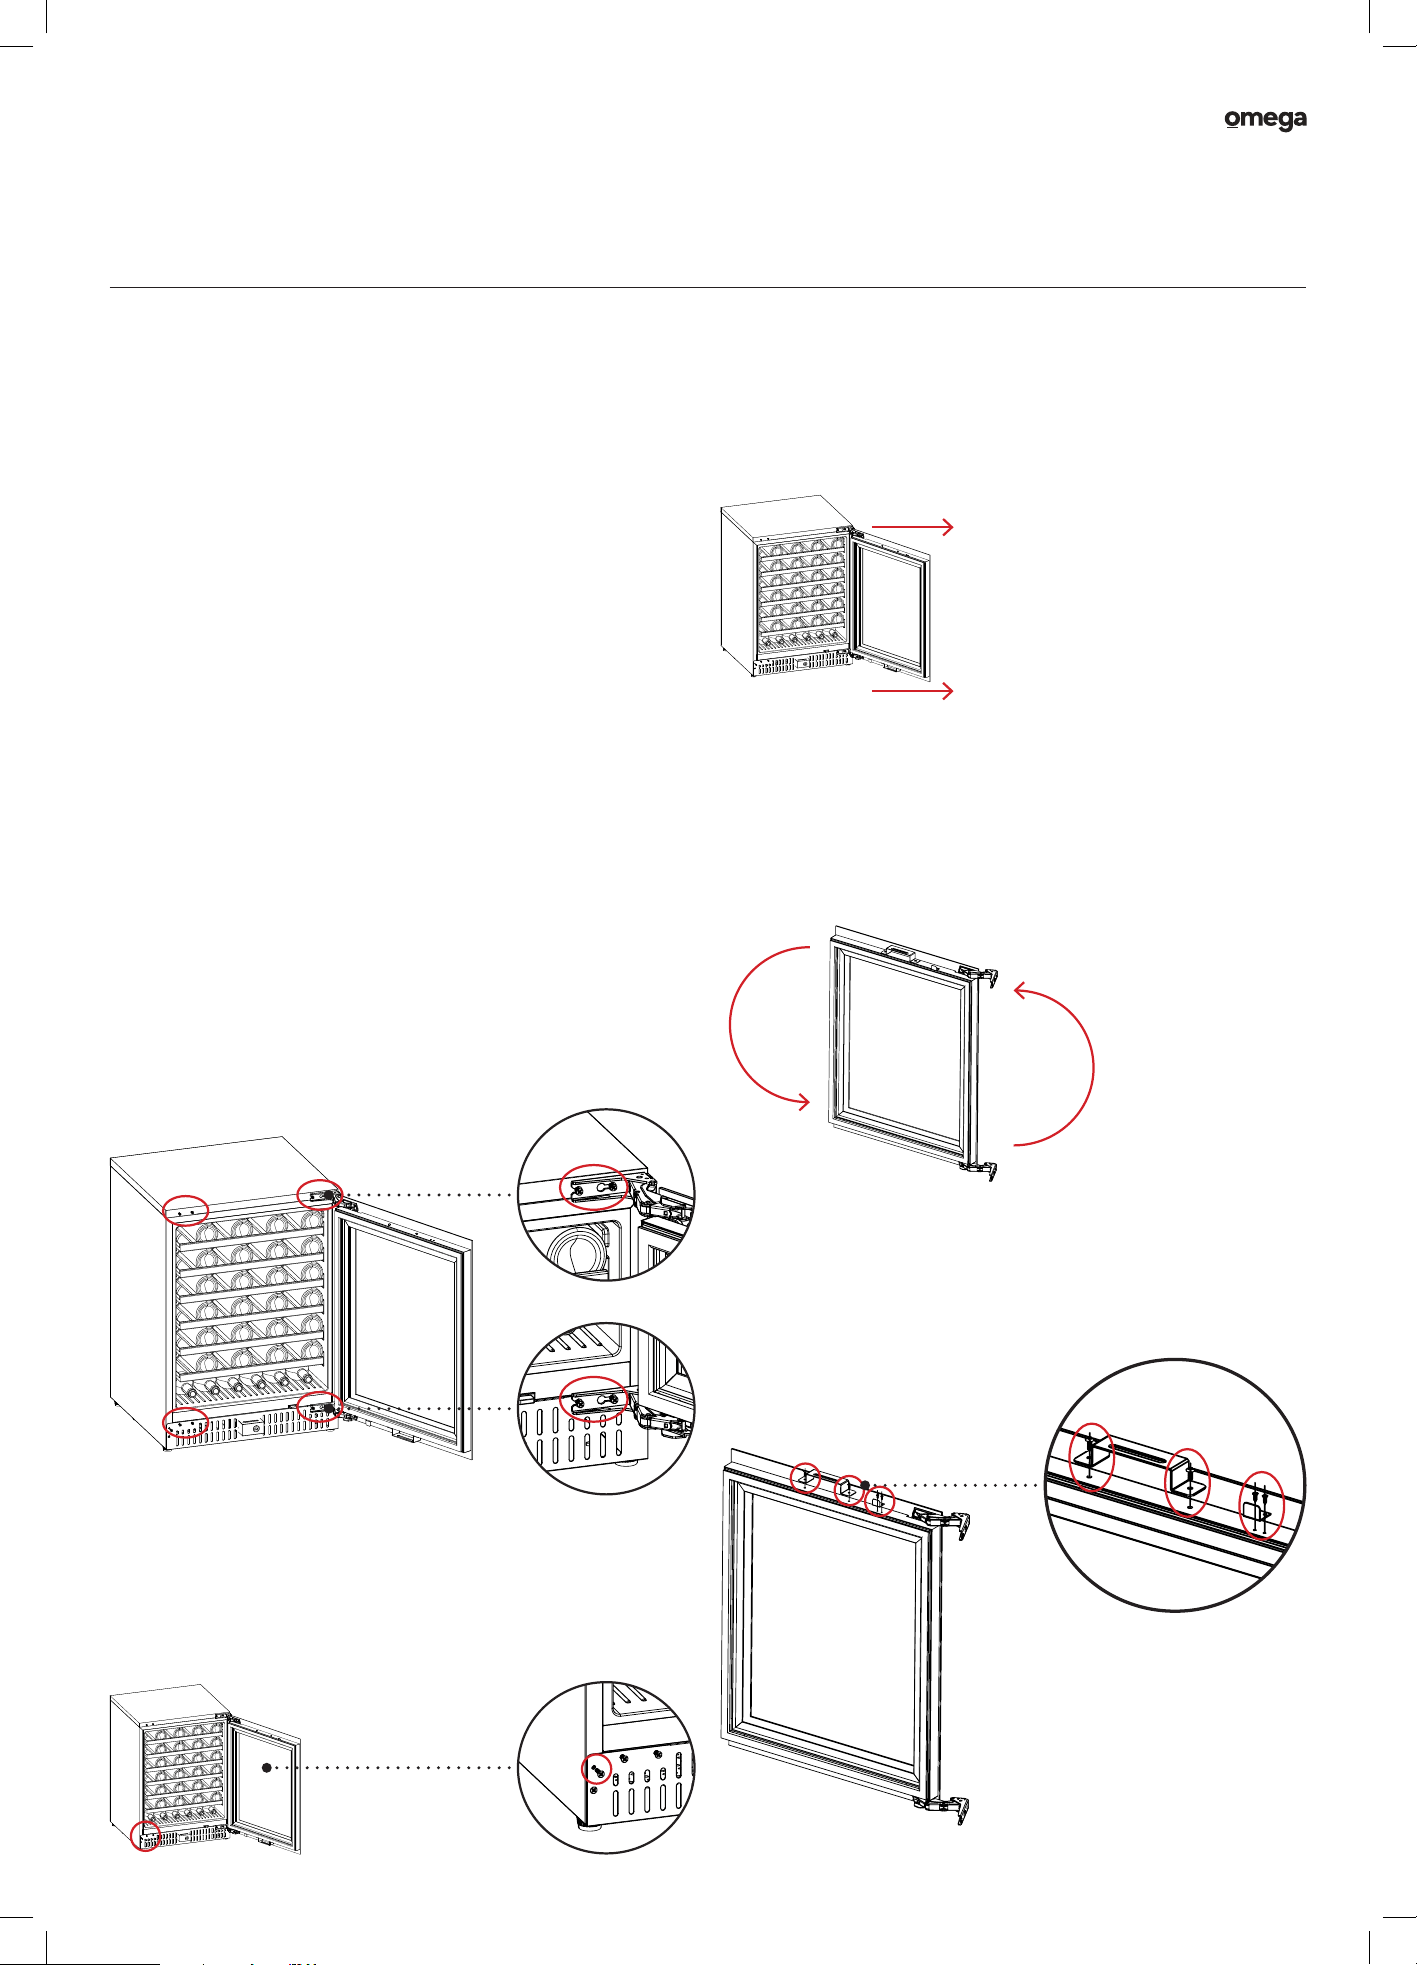
Step 1: Open the Door
Open the appliance door to an angle of approximately 120°.
This position gives you enough space to access the hinge screws
without applying too much pressure on the door.
Step 2: Loosen the Hinge Screws
Using a Phillips-head screwdriver, slightly loosen the eight
screws (about 5–10 mm) securing the door hinges at the top
and bottom of the unit.
NOTE: Do not fully remove the screws at this stage
—just loosen them enough to allow movement of the door.
Step 3: Remove the Kick Plate Screw
Remove the single screw on the left-hand side of the kick plate
and set it aside safely.
Step 4: Detach the Door from the Right Hinge
Carefully move the glass door to the right, applying gentle,
steady pressure. As you shift the door, the loosened hinge
screws on the right side will disengage, allowing you to lift the
door free.
CAUTION: Support the door with both hands to avoid dropping
or damaging it.
Step 5: Rotate the Door Vertically
Place the door on a flat, protected surface (e.g., a towel,
cardboard or a soft mat). Then, rotate the door 180° so that
the bottom edge of the door now faces upward.
Step 6: Remove the Lock Fix Plate and Door Switch Plate
Locate the lock fix plate and door switch plate. Using your
screwdriver, remove the screws securing these components.
NOTE: Keep the screws and plates safely aside for reinstallation
on the opposite side.
17
User ManualDesigned to Enhance
Beverage Centre
Reversing the Door Hinge
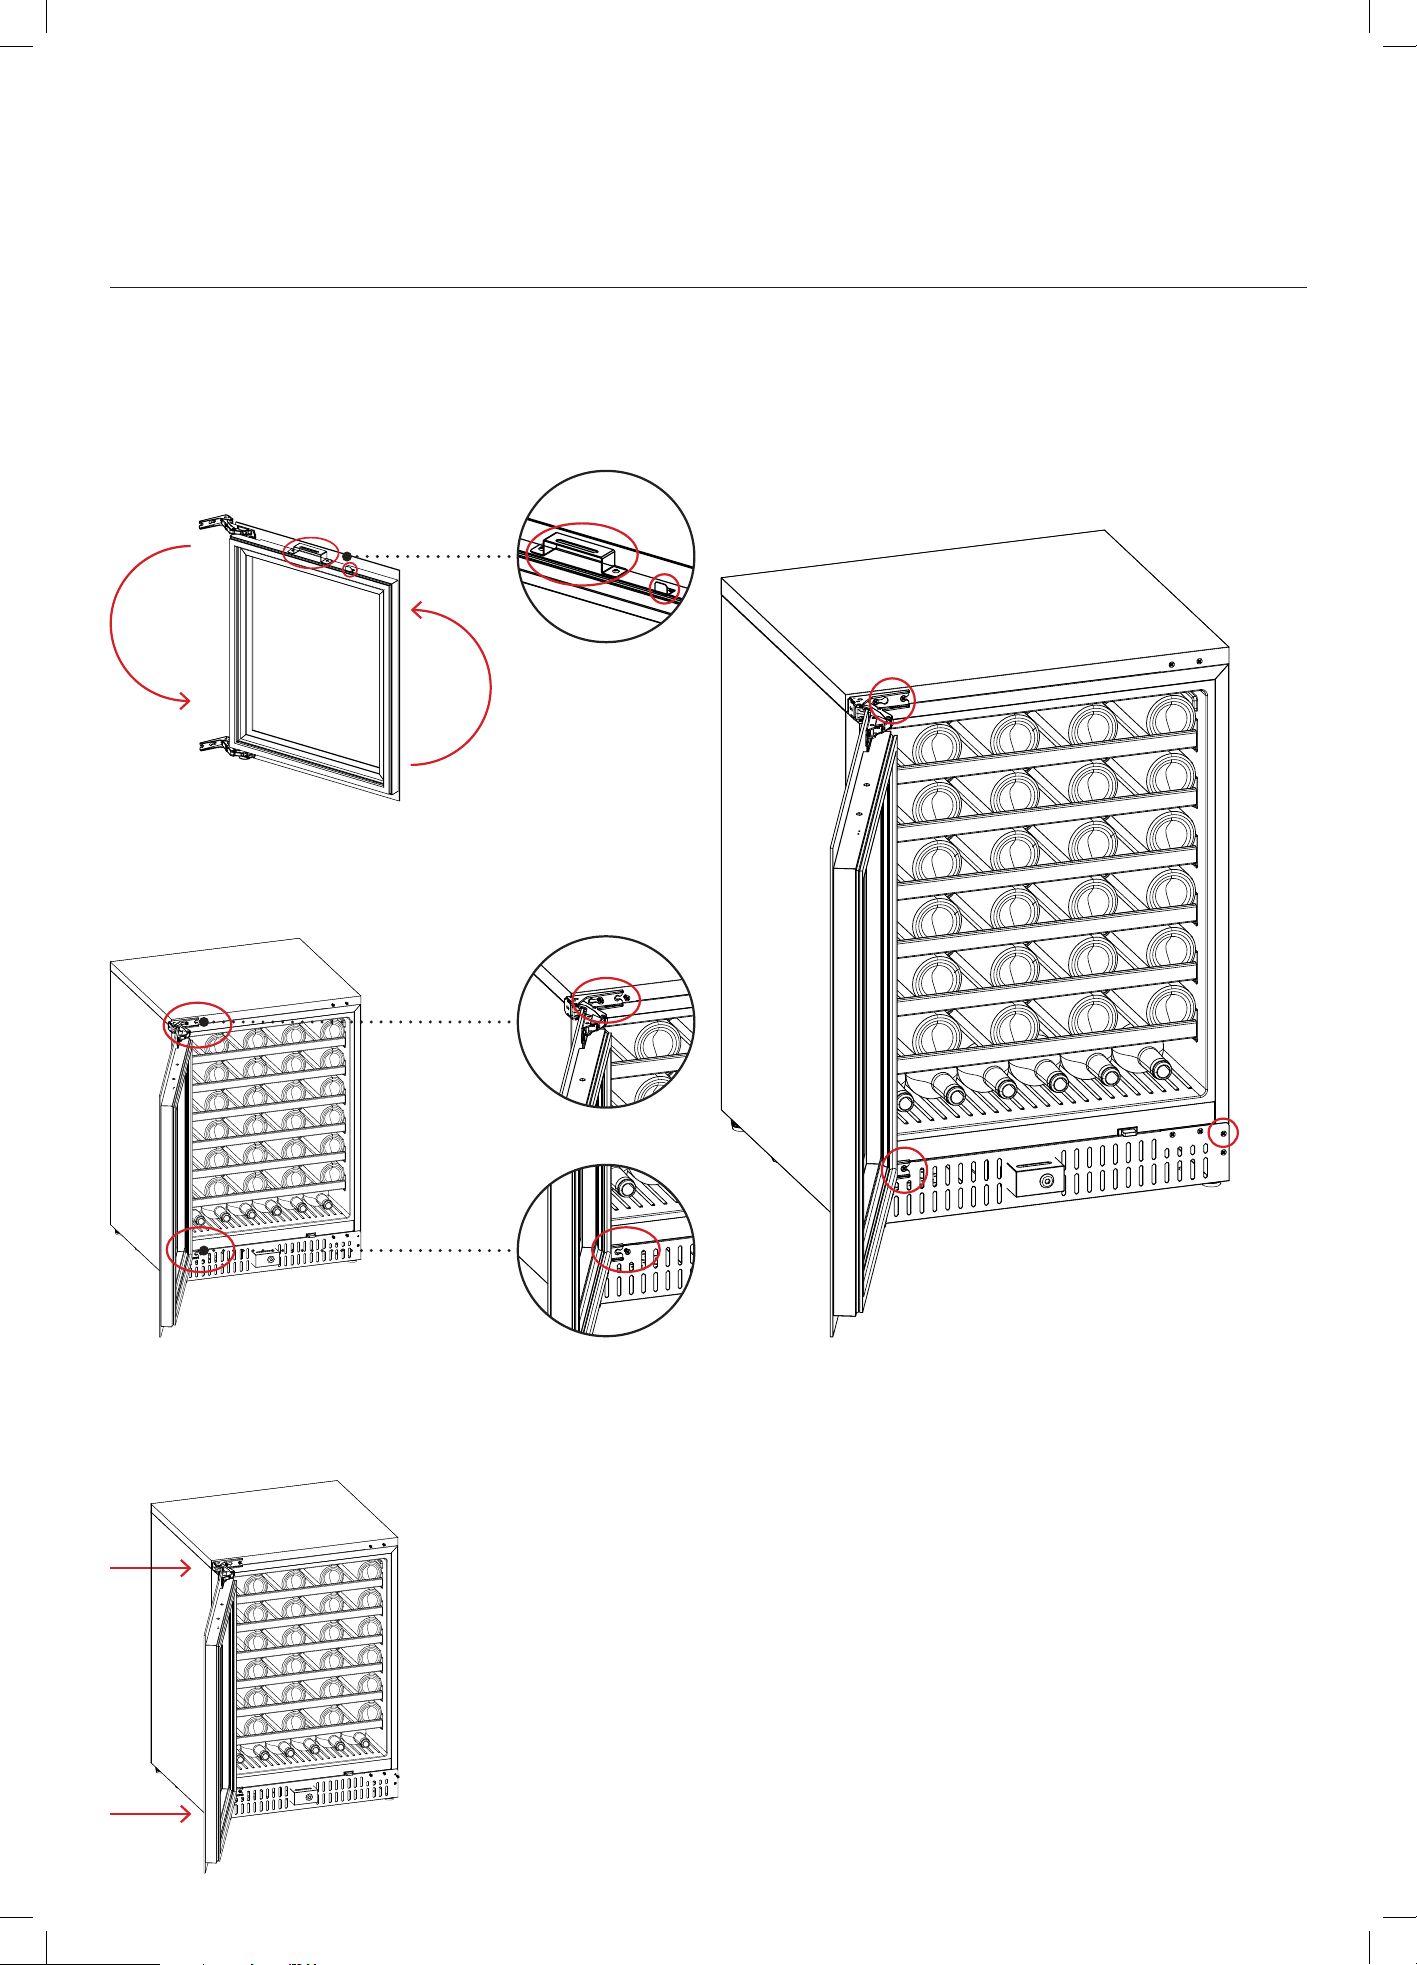
Step 7: Reinstall Plates on the Opposite Side
Rotate the door again by 180° so the edge is ready to receive
the plates on the new side. Install the lock fix plate and door
switch plate on the opposite side using the original screws. Make
sure all parts are securely fastened.
Step 8: Prepare for Reinstallation
With the plates reinstalled, rotate the door a final 180° to align
the door’s hinge holes with the hinge brackets now on the left
side of the unit.
Step 9: Reattach the Door to the Left Hinge
Carefully move the door toward the right, aligning it with the
hinge holes. Once the holes are aligned with the previously
loosened screws, the door will sit in place.
Step 10: Secure the Door
Fully tighten all eight hinge screws on the top and bottom hinges
to securely fix the door in its new position.
Reinstall the kick plate screw on the right-hand side
(opposite the original position).
Final Check
Open and close the door a few times to ensure it operates
smoothly.
Confirm that all screws are tight and components are securely
in place.
18
User Manual
Beverage Centre
Cleaning & Maintenance
Defrosting
Automatic Defrosting: With a built-in program, the unit controls
the frequency and duration of freezer defrosting, eliminating the
need to manually defrost the freezer. For more information, please
see page 15.
Prior to Cleaning Your Beverage Centre
• Before cleaning, always turn off the power switch and
disconnect the power plug.
• Ensure no water enters the switch, control panel, door lamp, or
top control box during cleaning.
LED Light Replacement
Only a professional should replace the LED light source
in this product.
Cleaning Instructions
General Precautions
• Always turn off the power and unplug the appliance before
performing any cleaning.
• Remove all shelves and parts before cleaning.
• Never flush the Beverage Centre with water or pour water
directly over it, as this may compromise electrical insulation.
Cleaning the Exterior
1. Use a mild cleaner to remove dirt from the exterior.
2. Wipe with a clean, soft cloth and allow the surface to dry
naturally.
3. Dust behind the Beverage Centre and on the ground regularly to
improve cooling efficiency and energy savings.
Cleaning the Door Seal
• Use clean water and a soft cloth to wipe the door sealing strip.
• Allow it to dry naturally.
Cleaning the Interior
1. Use a soft cloth with warm water or a neutral cleaner to wipe
the interior surfaces (excluding the door seal).
2. Clean shelves and frames with a mild detergent,
then dry them with a soft cloth.
3. Avoid using soap, detergent, scrub powders, or spray cleaners
inside, as these can cause odors.
4. Clean the interior regularly to prevent odours from developing.
Cleaning the Shelves and Parts
• Wash removable parts individually with soapy water by hand.
WARNING: Do not place them in a dishwasher.
• Dry thoroughly before reinserting into the Beverage Centre.
Cleaning Materials to Avoid
• Do not use hard brushes, steel wool, wire brushes, abrasives, or
solvents such as alcohol, acetone, acids, or alkaline cleaners.
• Avoid boiling water or flammable, explosive, or corrosive
materials. These may damage or deform the appliance.
After Cleaning
Reconnect the power plug and turn the Beverage Centre back on.
On Vacation
Short Vacations (up to 3 weeks)
• Keep the Beverage Centre running continuously. Ensure the
door is securely closed to maintain proper conditions for your
beverages.
Long Vacations (3 weeks or more)
• Remove all beverages, unplug the appliance, and leave the
doors open to allow air circulation, preventing odour and mould.
NOTE: If the Beverage Centre will be empty for an extended
period, switch it off, defrost, clean, dry thoroughly, and leave the
door open to prevent mould from developing.
Power failure
Short-term power failures usually do not significantly affect the
Beverage Centre's temperature. However during prolonged
power outages it is advised to empty the Beverage Centre
compartment.
19
User ManualDesigned to Enhance
Beverage Centre
Troubleshooting
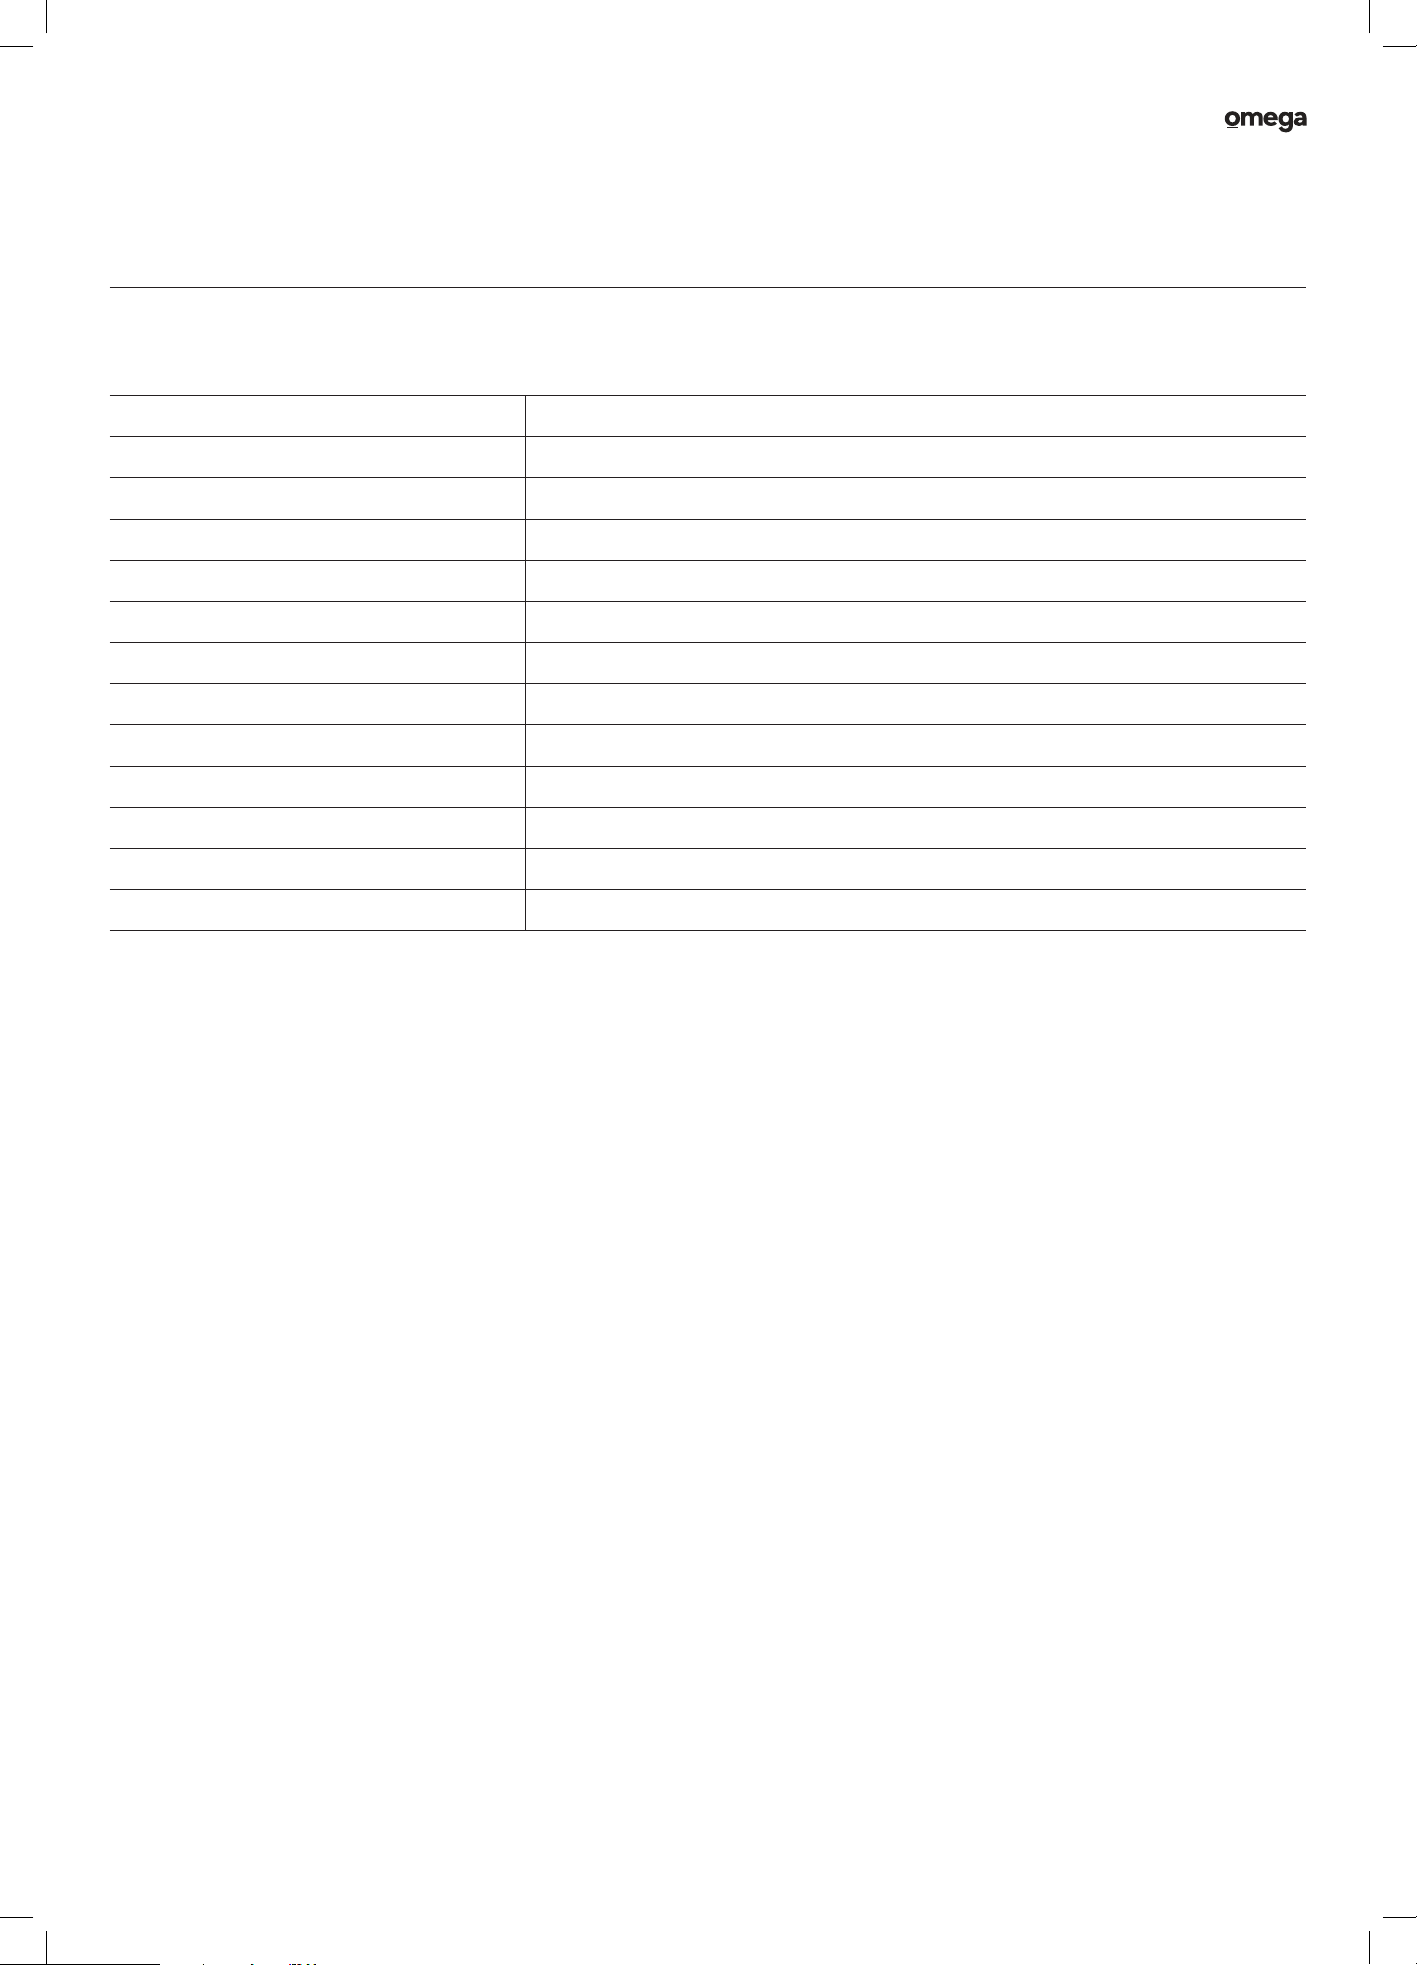
For Minor Faults
Problem Solution
The Door Does Not Close Properly • Remove obstructions preventing closure.
• Ensure door compartments and shelves are correctly placed.
• Inspect door seal for warping or tears.
• Check that the appliance is level.
Unusual Noises • Ensure the appliance is on a flat, stable surface.
• Verify adequate spacing to prevent contact with other items.
• Bubbling and gurgling sounds are normal coolant noises.
• Popping and cracking sounds are due to interior wall expansion and contraction.
The Beverage Centre Door Will Not Open • Wait a few minutes after opening to allow air pressure to equalise
before trying again.
The Compressor Runs Constantly • Adjust temperature to a warmer setting.
• Check for open or obstructed doors.
• Ensure the room temperature is not unusually high.
The External Beverage Centre Surface Is
Warm
• Warm exterior walls are normal due to the compressor
transferring heat from inside.
Smells/Odours • Check for spoiled drinks and remove if necessary.
• Clean up spillages promptly following the manufacturer’s instructions.
Button Failure • Check for if the Lock function is activated.
For Serious Faults
Some minor faults can be fixed by referring to the table above,
however if an emergency or serious fault occurs, immediately
set all controls to their off positions and disconnect the power
from the source.
If a serious fault occurs, DO NOT attempt to repair the
Beverage Centre yourself, instead wait for a service agent
to do so.
For assistance or to organise an authorised service agent
contact our After Sales Support by calling 1300 11 4357, or by
emailing support@residentiagroup.com.au.
Please note that if a service agent is asked to attend whilst the
product is under warranty and finds that the problem is not the
result of an appliance fault, then you may be liable for the cost
of the call out charge.
The appliance must be accessible for the service agent to
perform any necessary repair. If your appliance is installed in
such a way that a service agent is concerned that damage will
be caused to the appliance or your kitchen, then they will not
complete a repair.
Please refer to the Warranty Information to learn more.
20
User Manual
Beverage Centre
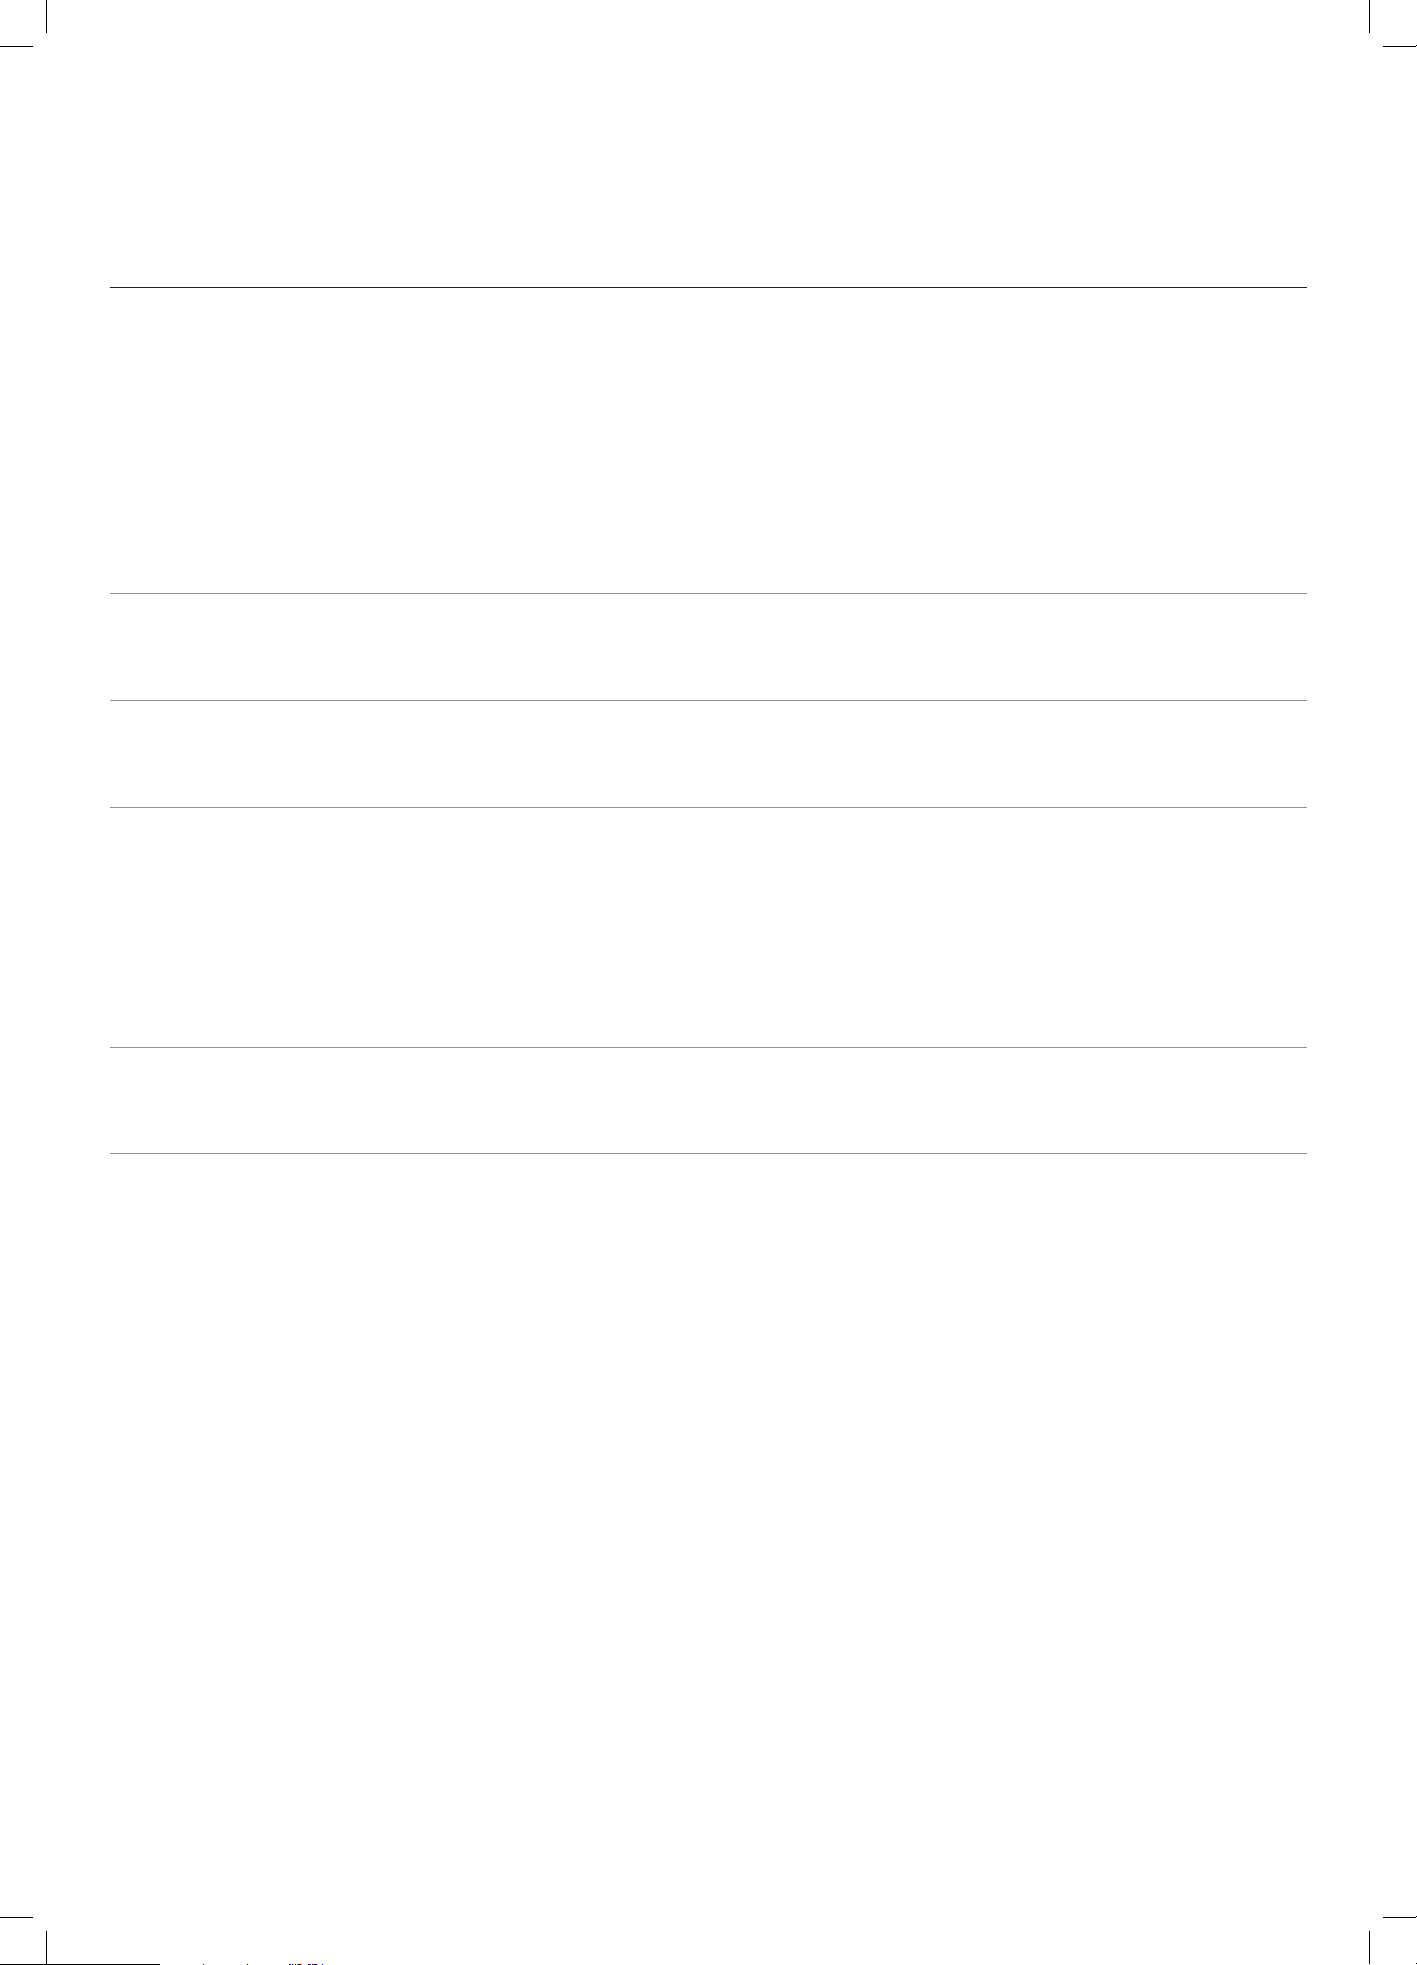
Technical Specifications
Product Specifications
Model OCB140SB
Capacity (Cans) 140
Capacity (Litres) 142L
Installation Freestanding or Built-in
Dimensions (W × D × H mm) 595 × 580 × 846–876
Rated Voltage / Frequency AC 220–240V/50Hz
Protection Class I
Climate Class T
Rated Current 0.9A
Rated Lamp Power 1W
Refrigerant R600a/25g
Max Noise Level 39 dB(A)
Humidity Control 50-80%
21
User ManualDesigned to Enhance
Beverage Centre
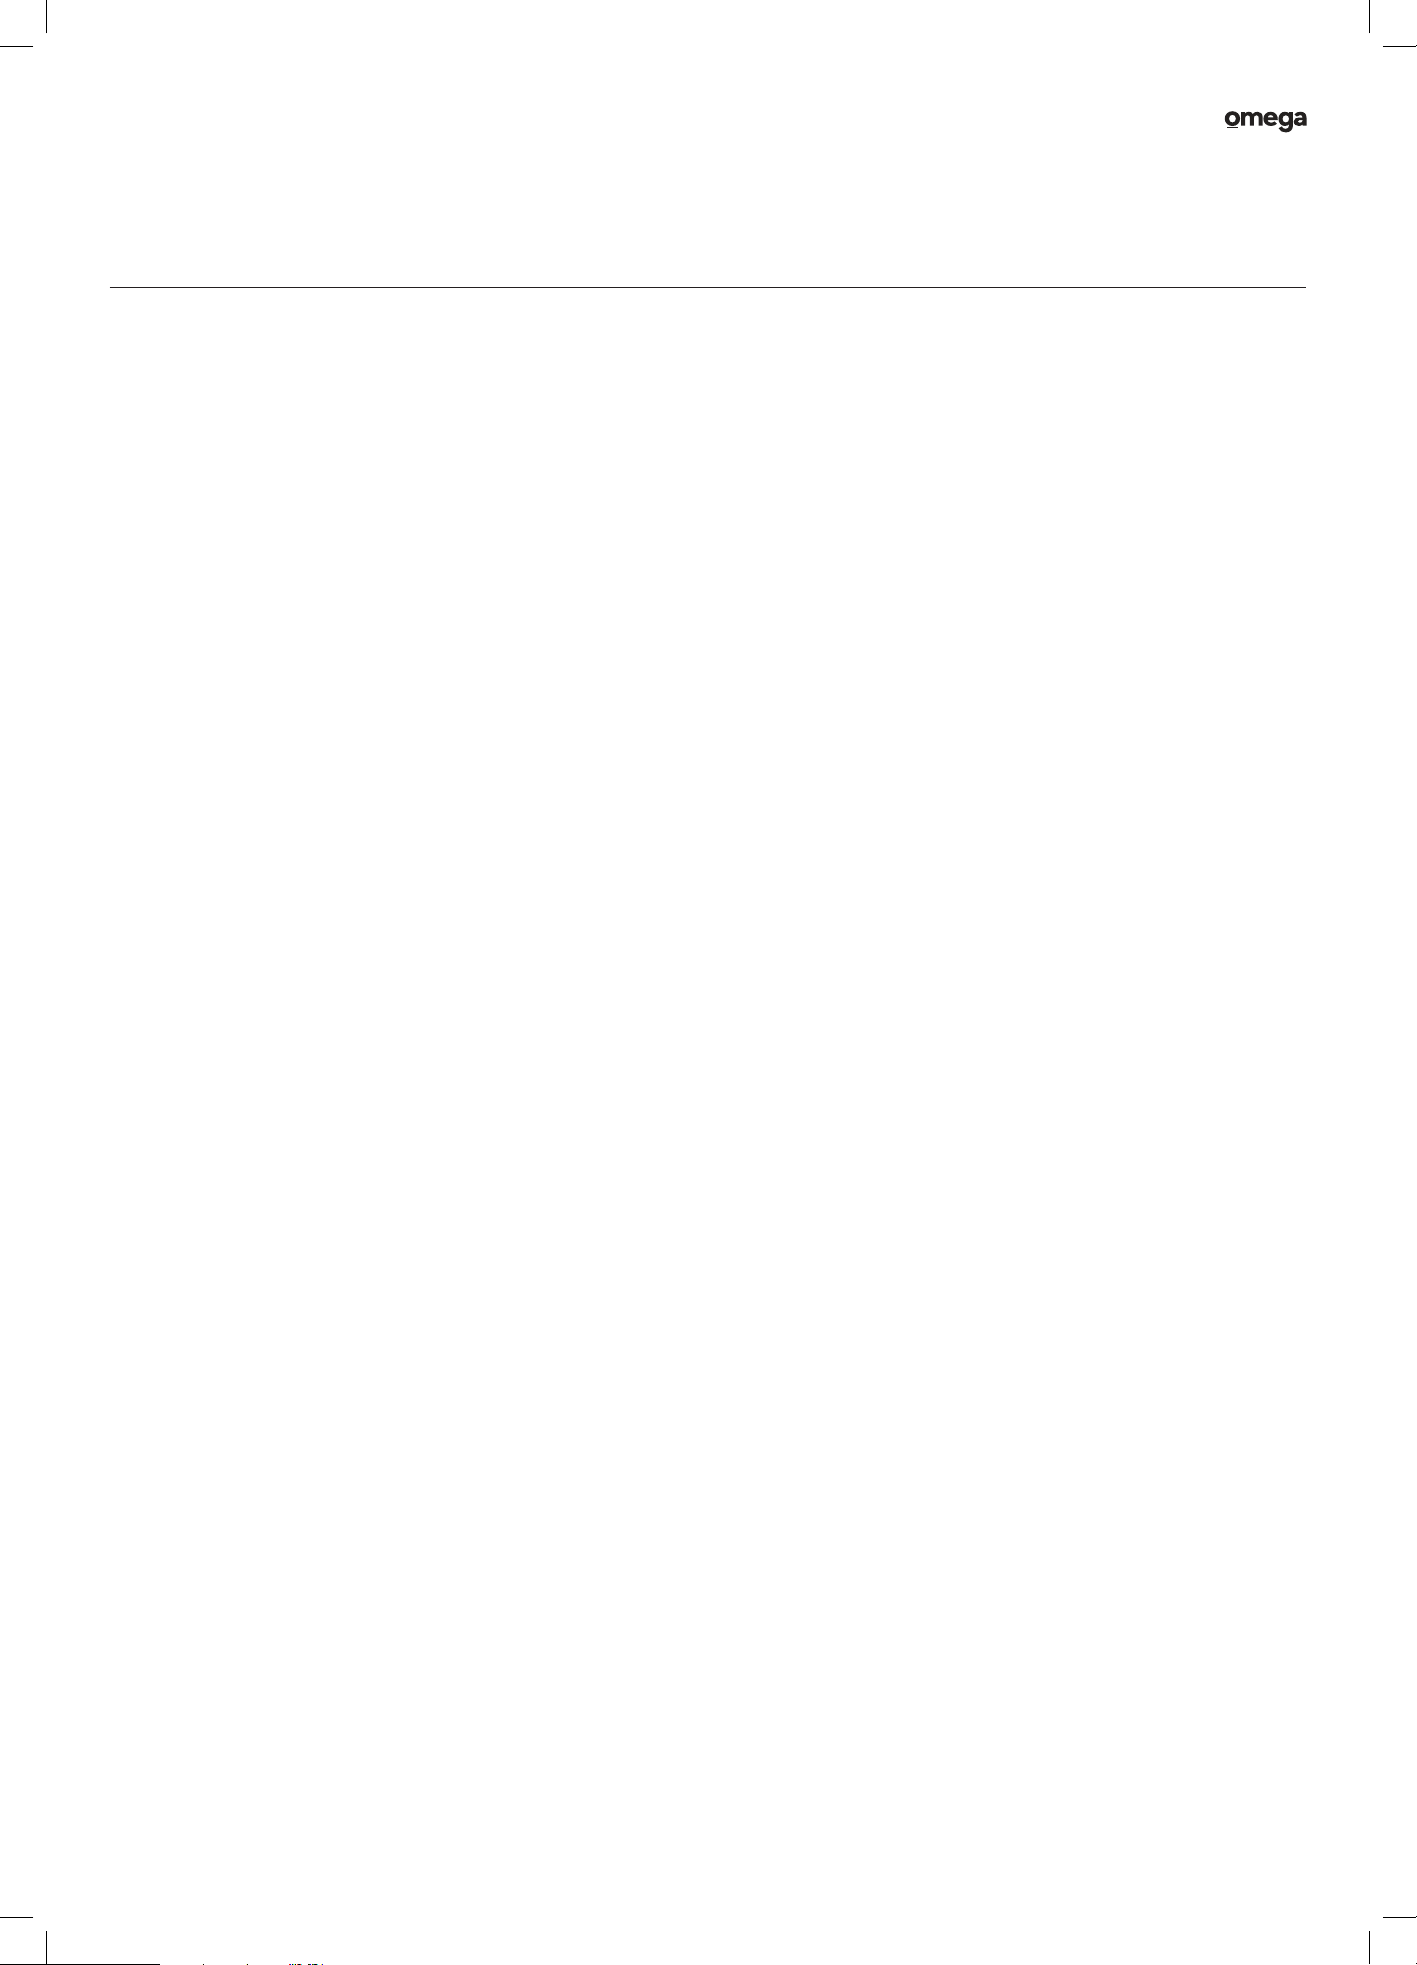
Attach your receipt to this page
For future reference, please record the following information which can be found
on the rating plate and the date of purchase which can be found on your sales invoice.
Store Details
Store Name
Address
Telephone | Purchase Date
Product Details
Model No.
Serial No.
Purchase Details
22
User Manual
Beverage Centre
WARRANTY TERMS AND CONDITIONS
BEVERAGE CENTRES
This document sets out the terms and conditions of the product
warranties for Residentia Group Appliances. It is an important
document. Please keep it with your proof of purchase documents
in a safe place for future reference should you require service
for your Appliance.
1. In this warranty
(a) ‘acceptable quality’ as referred to in clause 10 of this warranty
has the same meaning referred to in the ACL;
(b) ‘ACL’ means Trade Practices Amendment (Australian
Consumer Law) Act (No.2) 2010;
(c) ‘Appliance’ means any Residentia Group product
purchased by you accompanied by this document;
(d) ‘ASR’ means Residentia Group authorised service
representative;
(e) ‘Residentia Group’ means Residentia Group Pty Ltd
of 165 Barkly Ave, Burnley VIC 3121, ACN 70 600 546 656
in respect of Appliances purchased in Australia;
(f ) ‘major failure’ as referred to in clause 10 of this warranty
has the same meaning referred to in the ACL and includes
a situation when an Appliance cannot be repaired or it is
uneconomic for Residentia Group, at its discretion, to repair
an Appliance during the Warranty Period;
(g) ‘Warranty Period’ means:
(i) where the Appliance is used for personal, domestic
or household use (i.e. normal single family use)
as set out in the instruction manual, the Appliance
is warranted against manufacturing defects for
36 months, following the date of original purchase
of the Appliance;
(h) ‘you’ means the purchaser of the Appliance not having
purchased the Appliance for re-sale, and ‘your’ has a
corresponding meaning.
2. This warranty only applies to Appliances purchased and
used in Australia and is in addition to (and does not exclude,
restrict, or modify in any way) any non-excludable statutory
warranties in Australia.
3. During the Warranty Period Residentia Group or its ASR
will, at no extra charge if your Appliance is readily accessible
for service, without special equipment and subject to these
terms and conditions, repair or replace any parts which it
considers to be defective. Residentia Group or its ASR may
use remanufactured parts to repair your Appliance. You
agree that any replaced Appliances or parts become the
property of Residentia Group. This warranty does not apply
to light globes, batteries, seals, filters or similar perishable
parts.
4. Parts and Appliances not supplied by Residentia Group
are not covered by this warranty.
Warranty Information
23
User ManualDesigned to Enhance
Beverage Centre
5. You will bear the cost of transportation, travel and delivery of
the Appliance to and from Residentia Group or its ASR. If you
reside outside of the service area, you will bear the cost of:
(a) travel of an authorised representative;
(b) transportation and delivery of the Appliance to and from
Residentia Group or its ASR, in all instances, unless the
Appliance is transported by Residentia Group or its ASR,
the Appliance is transported at the owner’s cost and risk
while in transit to and from Residentia Group or its ASR.
6. Proof of purchase is required before you can make a claim
under this warranty.
7. You may not make a claim under this warranty unless
the defect claimed is due to faulty or defective parts or
workmanship. Residentia Group is not liable in the following
situations (which are not exhaustive):
(a) the Appliance is damaged by:
(i) accident
(ii) misuse or abuse, including failure to properly
maintain or service
(iii) normal wear and tear
(iv) power surges, electrical storm damage or incorrect
power supply
(v) incomplete or improper installation
(vi) incorrect, improper or inappropriate operation
(vii) insect or vermin infestation
(viii) failure to comply with any additional instructions
supplied with the Appliance;
(b) the Appliance is modified without authority from Residentia
Group in writing;
(c) the Appliance’s serial number or warranty seal has been
removed or defaced;
(d) the Appliance was serviced or repaired by anyone other than
Residentia Group, an authorised repairer or ASR.
8. This warranty, the contract to which it relates and the
relationship between you and Residentia Group are governed
by the law applicable where the Appliance was purchased.
9. To the extent permitted by law, Residentia Group excludes
all warranties and liabilities (other than as contained in this
document) including liability for any loss or damage whether
direct or indirect arising from your purchase, use or non use
of the Appliance.
10. For Appliances and services provided by Residentia
Group in Australia, the Appliances come with a guarantee
by Residentia Group that cannot be excluded under the
Australian Consumer Law. You are entitled to a replacement
or refund for a major failure and for compensation for any
other reasonably foreseeable loss or damage. You are also
entitled to have the Appliance repaired or replaced if the
Appliance fails to be of acceptable quality and the failure
does not amount to a major failure. The benefits to you
given by this warranty are in addition to your other rights
and remedies under a law in relation to the Appliances or
services to which the warranty relates.
11. At all times during the Warranty Period, Residentia Group
shall, at its discretion, determine whether repair, replacement
or refund will apply if an Appliance has a valid warranty claim
applicable to it.
12. Missing parts are not covered by warranty. Residentia Group
reserves the right to assess each request for missing parts
in a case by case basis. Any parts that are not reported
missing in the first week after purchase will not provide free
of charge.
13. To enquire about claiming under this warranty, please follow
these steps:
(a) carefully check the operating instructions, user manual and
the terms of this warranty;
(b) have the model and serial number of the Appliance available;
(c) have the proof of purchase (e.g. an invoice) available;
(d) telephone the numbers shown below.
14. You accept that if you make a warranty claim, Residentia
Group and its ASR may exchange information in relation
to you, in order to enable Residentia Group to meet its
obligations under this warranty.
IMPORTANT
Before calling for service, please ensure that the steps in point 13
have been followed.
Contact Service: Please call 1300 11 HELP (4357)
Our goods come with guarantees that cannot be excluded under the Australian Consumer Law.
You are entitled to a replacement or refund for a major failure and for compensation for any other
reasonably foreseeable loss or damage. You are also entitled to have the goods repaired or replaced
if the goods fail to be of acceptable quality and the failure does not amount to a major failure.
The Australian Consumer Law requires
the inclusion of the following statement with
this warranty:
Warranty Information
Omega is proudly owned, designed and engineered
in Australia by Residentia Group Pty. Ltd.
@residentia.group
www.residentia.group
EST. 1981
Designed to Enhance