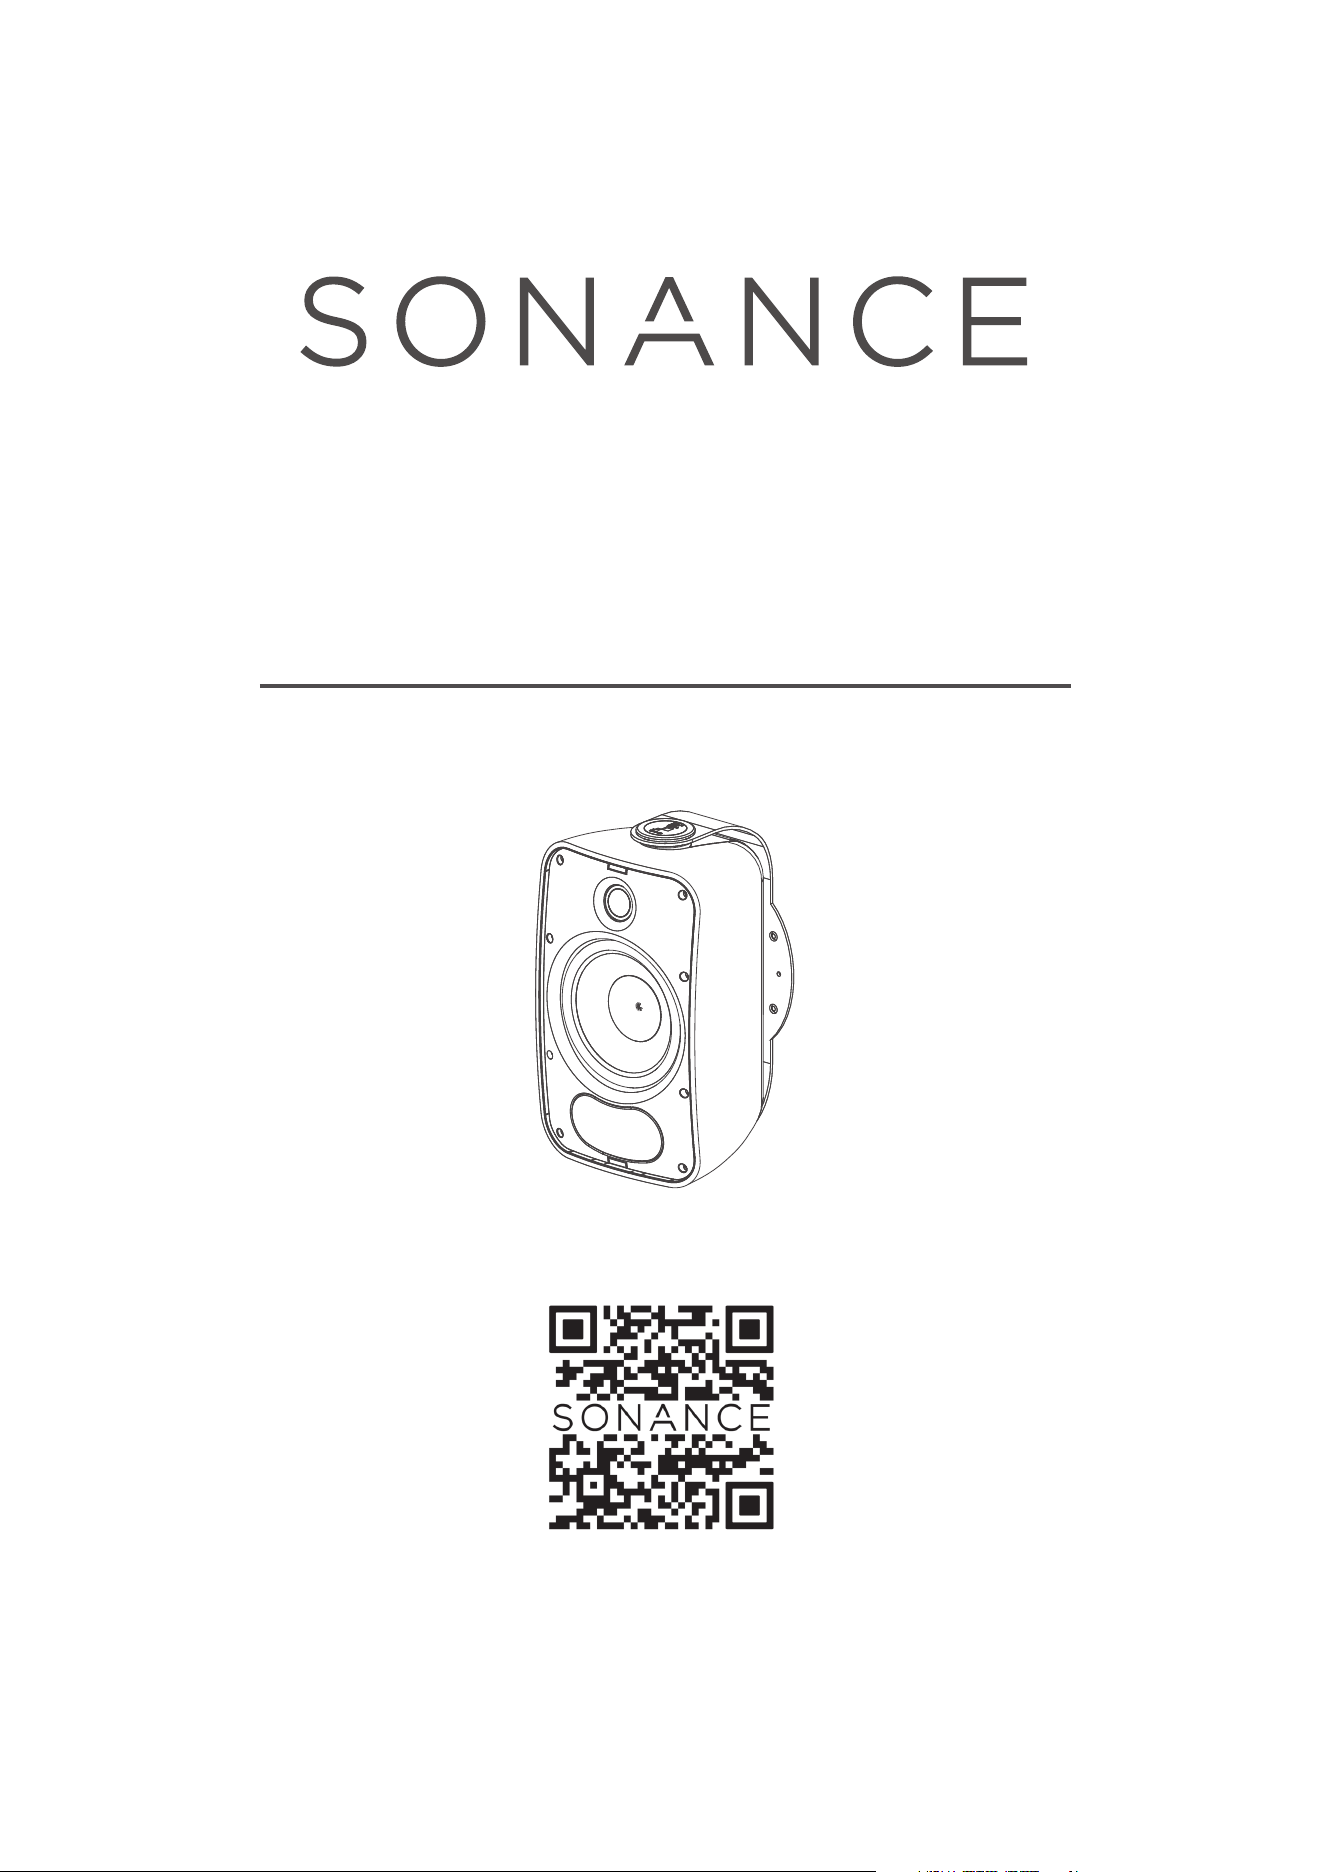
MAG06V3
OUTDOOR SPEAKER
INSTRUCTION MANUAL
Scan QR Code
for product
installation video
INTRODUCTION
Thank you for purchasing Sonance MAGO6V3 speakers.
When properly installed, these speakers will give you
many years of outdoor entertainment pleasure. To get the
most out of your new speakers, please read this manual
thoroughly before you begin installation.
SONANCE OUTDOOR SPEAKER
MAGO6V3 INSTRUCTION MANUAL
BOX & CONTENTS
(2) Sonance MAGO6V3 speakers
(2) Speaker grilles
(2) Mounting brackets
(2) Wire terminal covers
(1) Set of mounting hardware
CONNECTING & ASSEMBLING
WARNING: TURN THE AMPLIFIER’S POWER OFF UNTIL YOU
HAVE COMPLETED ALL OF THE CONNECTIONS AND HAVE
DETERMINED THAT THEY ARE CORRECT. (IF THE AMP’S AC
PLUG IS ACCESSIBLE WE RECOMMEND THAT YOU UNPLUG
IT FROM THE WALL OUTLET TO AVOID ACCIDENTAL
TURN-ON AND POSSIBLE DAMAGE TO THE AMPLIFIER.)
SPEAKER PLACEMENT
Sonance MAGO6V3 Speakers are highly weather-resistant,
and when mounted outdoors will perform exceptionally well
for years even under adverse weather conditions.
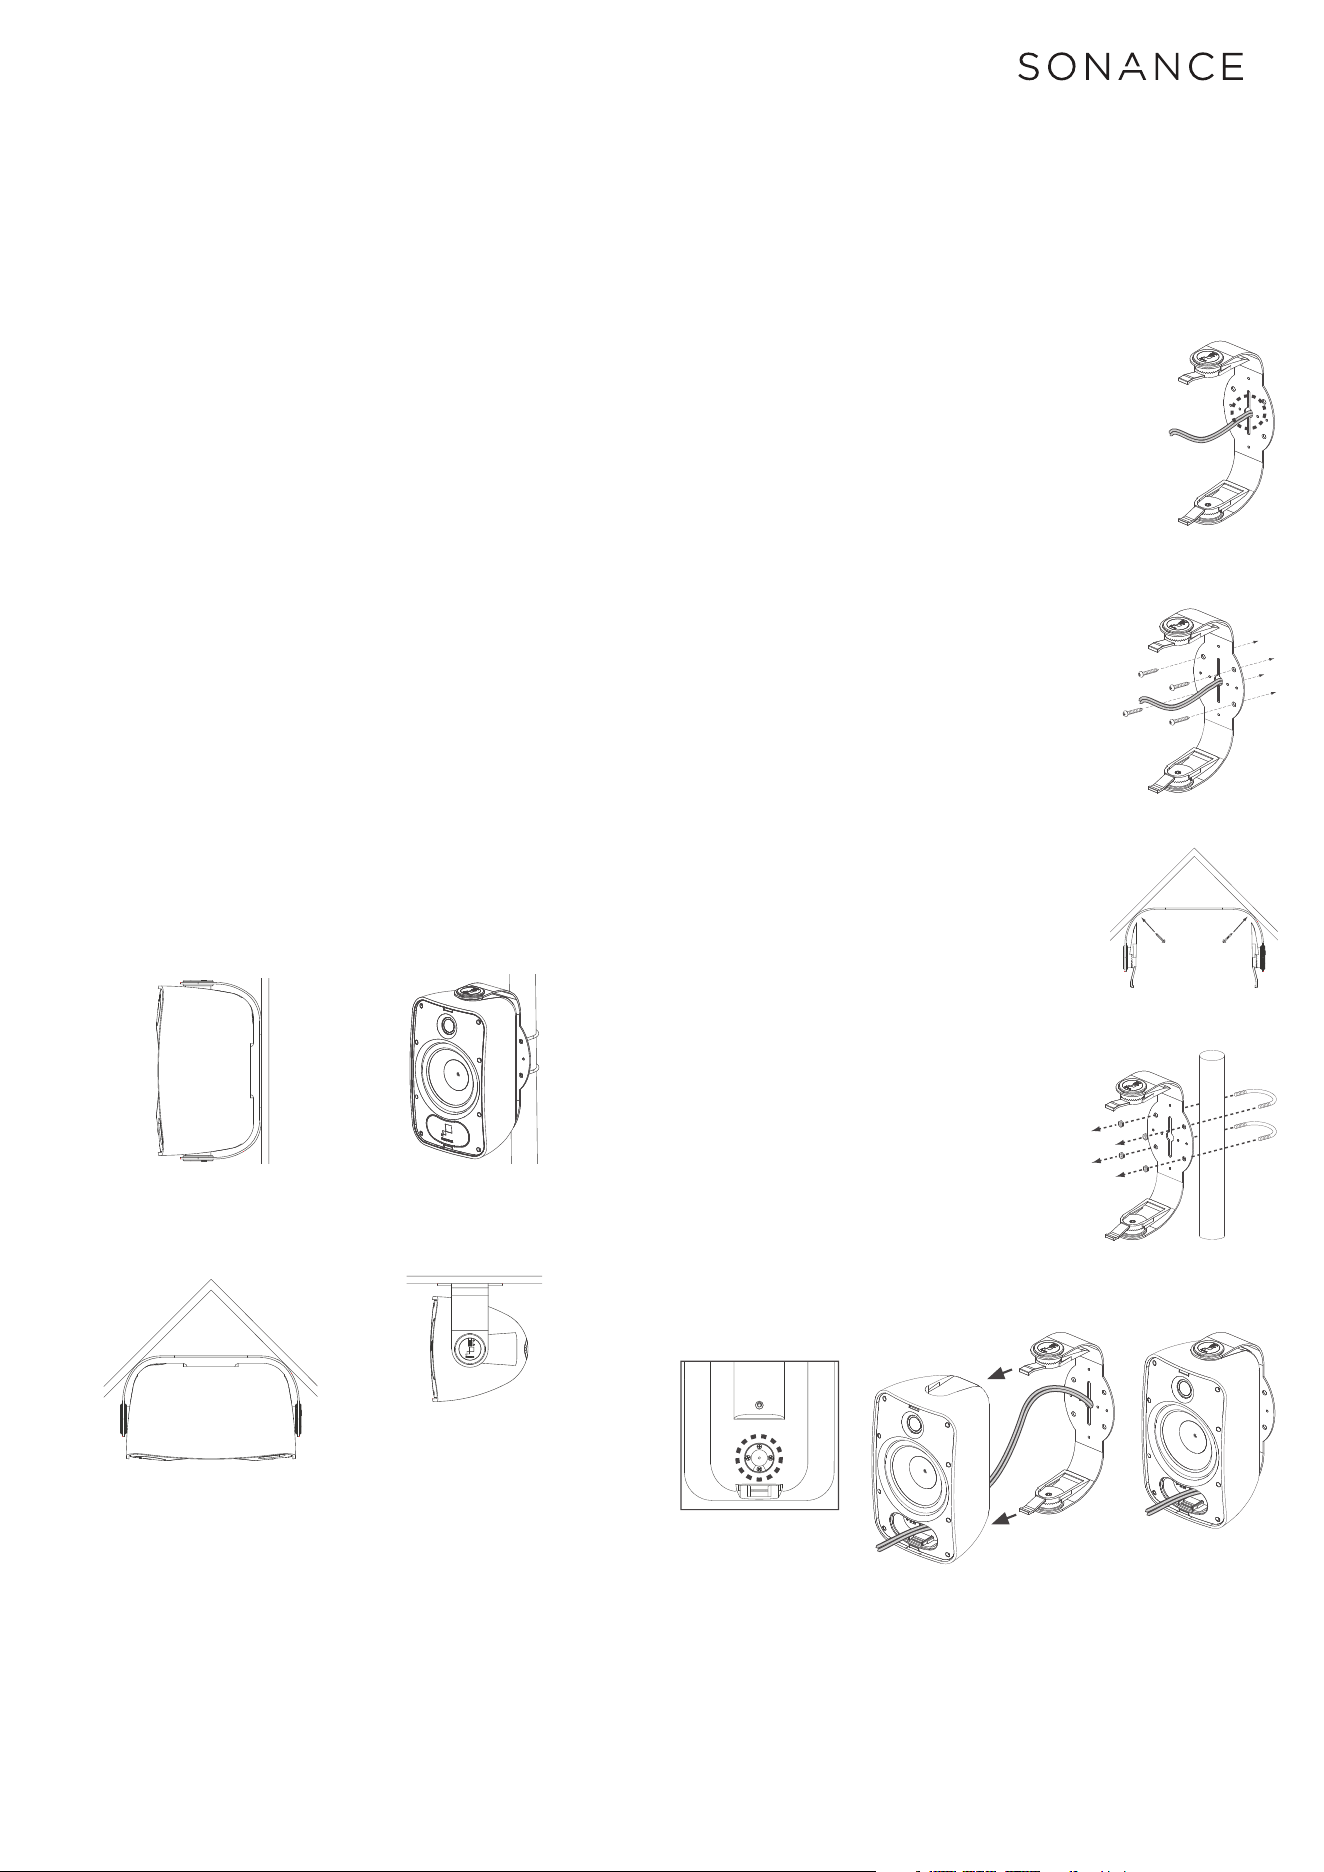
The Sonance FastMount
®
bracket system makes it easy to
mount the speakers in a variety of positions and locations:
(see figure 1).
The best performance is obtained by placing the speakers at
ear level, facing the listeners.
• If you are mounting the speakers above or below ear level,
pivot them up or down to direct the sound towards the listeners.
Under an eave
Against a wall
(flush)
In a corner
Pole mount
(hardware sold separately)
FIGURE 1:
SPEAKER PLACEMENT
FIGURE 2:
PASS WIRE
THROUGH HOLE
1. In most cases you will be able to attach the
FastMount brackets directly to the mounting
surface. Run the speaker wires from the
amplifier to the speaker locations and through
the holes in the brackets (see figure 2).
2. Attach the FastMount brackets to the
mounting surface using the included
hardware that is appropriate for the type
of surface (see figure 3).
If the installation requires that the speaker
be mounted in a corner, attach the bracket
with hardware through the slots in the
angled corners (see figure 4).
3. If the installation requires that the speaker
be mounted on a pole you can attach the
FastMount brackets to the pole using 2.5”
U-bolts (not included) (see figure 5).
4. Feed the speaker wires from the bracket
into the wire entry grommet on the back
of the speaker, through the wire tunnel
and out the opening on the speaker’s
front panel (see figure 6).
5. Slide the speaker onto the bracket until
the locks snap into place. Pull enough
wire through the front of the speaker to
allow connection to the terminals
(see figure 7).
NOTE: TO INCREASE WATER RESISTANCE AND
MAKE INSTALLATION EASIER, THE SPEAKER
WIRE TERMINALS ARE LOCATED ON THE
MAGO6 SPEAKERS’ FRONT PANEL. BE SURE
TO LEAVE ENOUGH WIRE AT THE SPEAKER
LOCATION TO FEED THROUGH THE TUNNEL
IN THE SPEAKER ENCLOSURE AND CONNECT
TO THE TERMINALS ON THE FRONT.
FIGURE 3:
ATTACH BRACKET
FIGURE 4:
CORNER MOUNTING
• The grommet forms a water-resistant
seal around the speaker wire.
• Make sure there is enough slack in
the wire to allow the speaker to
pivot on the bracket.
FIGURE 5:
ATTACHING THE
BRACKET TO A POLE
FIGURE 6:
WIRE ENTRY
GROMMET
FIGURE 7:
ATTACH SPEAKERS
TO BRACKETS
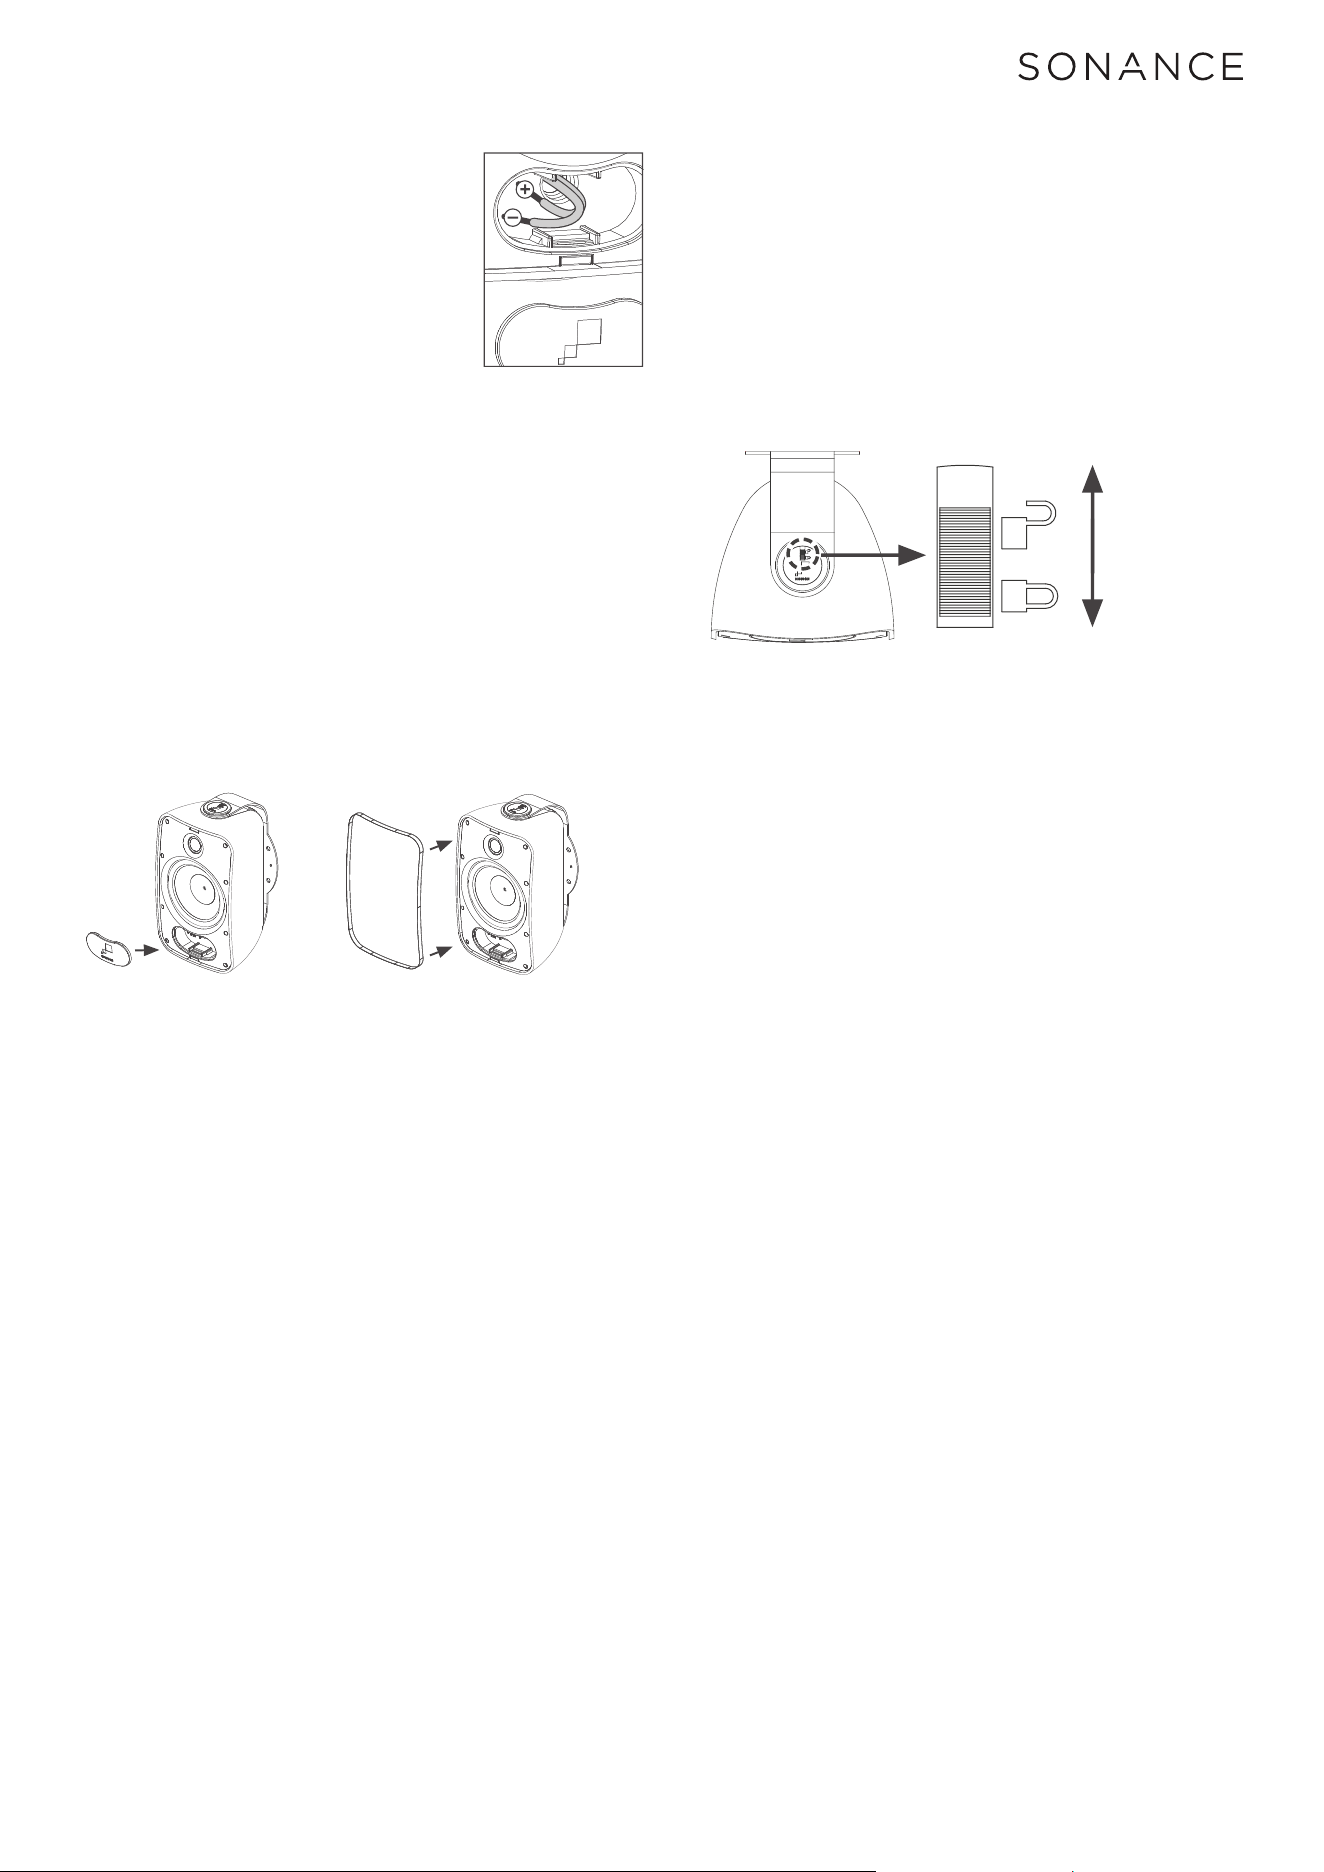
7. Fit the wiring connector cover into the recess in the
speaker’s front panel. The cover should fit tightly but can
be removed and replaced if the speaker needs to be
disconnected (see figure 9).
8. Fit the grille onto the speaker (see figure 10).
FIGURE 9:
ATTACH THE
CONNECTOR COVER
FIGURE 10:
ATTACH THE GRILLE
UNLOCK
(towards rear
of speaker)
LOCK
(towards front
of speaker)
UNLOCK (toward rear of speaker)
LOCK (toward front of speaker)
FIGURE 11:
LOCK AND
UNLOCK
SLIDE LOCKS
TO PIVOT
SPEAKER
PIVOTING THE SPEAKER
You can rotate the speaker in the bracket to direct the sound
toward the listeners.
1. Unlock the slide locks on the speaker pivots by moving
them toward the rear of the speaker (see figure 11).
2. Rotate the speakers to the desired position.
3. Lock the slide locks by moving them toward the front of
the speaker.
IMPORTANT: BE SURE NOT TO LET ANY STRAY ‘+’ AND ‘–’
WIRES TOUCH EACH OTHER. TOUCHING WIRES CAN CAUSE
A SHORT- CIRCUIT THAT COULD DAMAGE YOUR AMPLIFIER.
• The spring connectors can accept wire up to 14 gauge.
• Double-check that you connected all of the wires
properly (amplifier ‘+’ to speaker ‘+’; amplifier ‘–’
to speaker ‘–’) at all connections.
SPECIFICATIONS
MAGO6V3 Speakers
Tweeter: 1” (25mm) cloth dome, Ferrofluid cooled,
in acoustic back chamber
Woofer: 6.5” (165mm) glass fiber cone
with a Santoprene surround
Frequency Response: 65Hz - 30kHz
±
3dB
Impedance: 8 ohms nominal; 6 ohms minimum
Power Handling: 5 watts minimum; 80 watts maximum
Sensitivity: 89dB SPL (2.83V/1 meter)
Environmental: Conforms to Mil Spec 810 for humidity, salt spray,
temperature and UV, IP-66 waterproof rating
Environment Temp: -13º - 149ºF (-25ºC - 65ºC)
Dimensions (WxHxD): 7.51” x 12.14” x 6.86” (191mm x 308mm x 174mm)
Grille: Perforated aluminum
Shipping Weight: 14 lbs. (6.4kg) pair
6. Connect the speaker wires to the
speaker’s terminals:
A. Strip about .5” of insulation from
each conductor and twist the strands
together or tin them with solder.
B. Press-down on the tops of the
connectors to open them.
C. Insert the wires into the connector
holes (see figure 8).
D. Release the connectors.
FIGURE 8:
CONNECTION TERMINALS
©2020 Sonance. All rights reserved.
Due to continuous product improvement, all features and specifications are subject to change without notice.
For the latest Sonance product specification information visit our website: www.sonance.com
SONANCE • 991 Calle Amanecer • San Clemente, CA 92673 USA
(949) 492-7777 • FAX: (949) 361-5151 • Technical Support: (949) 492-7777
www.sonance.com
LIMITED ONE (1) YEAR WARRANTY
Sonance warrants to the first end-user purchaser that this Sonance-brand product (product), when purchased from
an authorized Sonance Dealer/Distributor, will be free from defective workmanship and materials for the period stated
above. Sonance will at its option and expense during the warranty period, either repair the defect or replace the Product
with a new or remanufactured Product or a reasonable equivalent.
EXCLUSIONS
TO THE EXTENT PERMITTED BY LAW, THE WARRANTY SET FORTH ABOVE IS IN LIEU OF, AND EXCLUSIVE OF,
ALL OTHER WARRANTIES, EXPRESS OR IMPLIED, AND IS THE SOLE AND EXCLUSIVE WARRANTY PROVIDED
BY SONANCE. ALL OTHER EXPRESS AND IMPLIED WARRANTIES, INCLUDING THE IMPLIED WARRANTIES OF
MERCHANTABILITY, IMPLIED WARRANTY OF FITNESS FOR USE, AND IMPLIED WARRANTY OF FITNESS FOR A
PARTICULAR PURPOSE ARE SPECIFICALLY EXCLUDED.
No one is authorized to make or modify any warranties on behalf of Sonance. The warranty stated above is the sole and
exclusive remedy and Sonance’s performance shall constitute full and final satisfaction of all obligations, liabilities and
claims with respect to the Product.
IN ANY EVENT, SONANCE SHALL NOT BE LIABLE FOR CONSEQUENTIAL, INCIDENTAL, ECONOMIC, PROPERTY,
BODILY INJURY, OR PERSONAL INJURY DAMAGES ARISING FROM THE PRODUCT, ANY BREACH OF THIS
WARRANTY OR OTHERWISE.
This warranty statement gives you specific legal rights, and you may have other rights which vary from state to state.
Some states do not allow the exclusion of implied warranties or limitations of remedies, so the above exclusions and
limitations may not apply. If your state does not allow disclaimer of implied warranties, the duration of such implied
warranties is limited to period of Sonance’s express warranty.
Your Product Model and Description: Sonance MAG06V3 speakers
Warranty Period for this Product: One (1) year from the date on the original sales receipt or invoice or other satisfactory
proof of purchase.
ADDITIONAL LIMITATIONS AND EXCLUSIONS FROM WARRANTY COVERAGE
The warranty described above is non-transferable, applies only to the initial installation of the Product, does not include
installation of any repaired or replaced Product, does not include damage to allied or associated equipment which
may result for any reason from use with this Product, and does not include labor or parts caused by accident, disaster,
negligence, improper installation, misuse (e.g. overdriving the amplifier or speaker, excessive heat, cold or humidity), or
from service or repair which has not been authorized by Sonance.
OBTAINING AUTHORIZED SERVICE
To qualify for the warranty, you must contact your authorized Sonance Dealer/Installer or call Sonance Customer Service
at (949) 492-7777 within the warranty period, must obtain a return merchandise number (RMA), and must deliver the
Product to Sonance shipping prepaid during the warranty period, together with the original sales receipt, or invoice or
other satisfactory proof of purchase.
4.28.25