CAUTION
INSPECT CONTENTS IMMEDIATELY AND FILE CLAIM WITH DELIVERING
CARRIER FOR ANY DAMAGE.
SAVE YOUR BOX AND ALL PACKING MATERIALS.
YOU ARE RESPONSIBLE FOR DAMAGE TO YOUR UNIT IF RETURNED IMPROPERLY PACKED.
EG10004 Revised 09/23
(continued on back page)
ASSEMBLY INSTRUCTIONS
Cold Pan Units
MAINTENANCE FOR ICED COLD PANS
Proper cleaning of the unit is required. When rubbing or scouring, always move gently in the direction of the polish lines (grains).
A Scotch-Brite™ general purpose pad may be used. DO NOT USE STEEL WOOL.
CAUTION:
1. This equipment is designed and sold for commercial use only by personnel trained and experienced in its operation and is not sold
for consumer use in and around the home nor for use directly by the general public in foodservice locations.
2. Do not immerse unit in water.
3. All repairs should be done by an authorized service center.
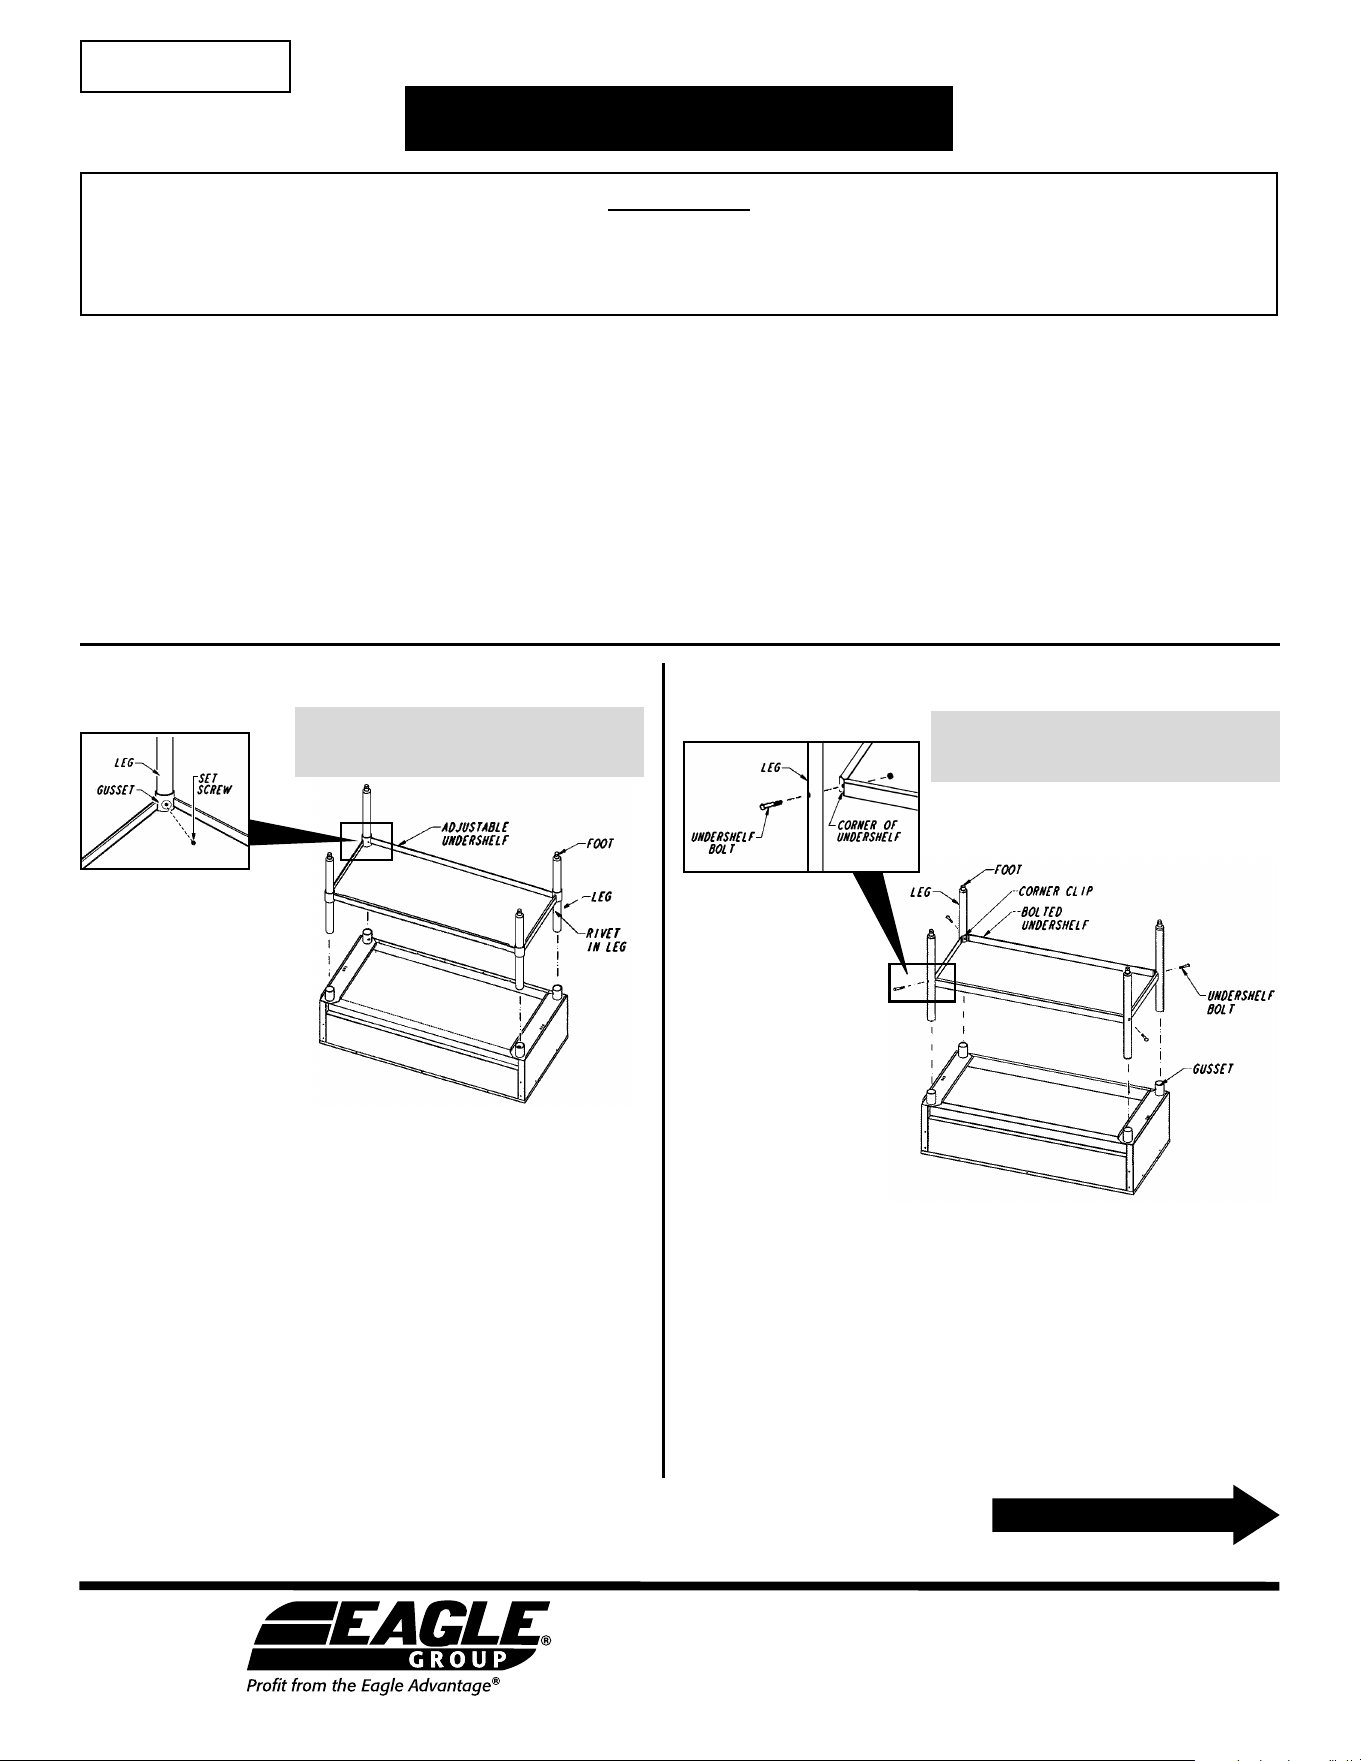
NOTE: Legs and undershelf must be
assembled BEFORE securing legs to unit.
1. Place unit upside-down with gussets facing up.
Caution: Use cardboard or other material to prevent scratching top.
2. Install legs into gussets.
3. Mount undershelf to legs by inserting bolt thru hole in leg and
thru hole in corner of undershelf, and tighten with hex nut
(see Figure 1).
4. Tighten set screws in gussets to secure legs.
5. Place unit on its back.
6. See applicable cutting board mounting instructions on back page.
Figure 1
To assemble Unit with Bolted Undershelf (optional):To assemble Unit with Adjustable Undershelf:
1. Place unit upside-down with gussets facing up.
Caution: Use cardboard or other material to prevent
scratching top.
2. Install legs into gussets. Make sure rivet in leg is closer to
gusset than to the foot end.
3. Align undershelf gussets with legs, and slide undershelf down
legs to desired position. Do not force or beat corners as
damage could occur.
4. Tighten set screws in undershelf gussets to secure undershelf
(see Figure 1) and install feet into legs, using a rubber mallet.
5. Tighten set screws in gussets to secure legs to table.
6. Place unit on its back.
7. See applicable cutting board mounting instructions on back page.
NOTE: Legs and undershelf must be
assembled BEFORE securing legs to unit.
Figure 1
Eagle Foodservice Equipment, Eagle MHC, and SpecFAB
®
are divisions of Eagle Group. ©2023 by the Eagle Group
• 100 Industrial Boulevard, Clayton, Delaware 19938-8903 U.S.A.
• Phone: 302/653-3000 • 800/441-8440 • Fax: 302/653-2065
• www.eaglegrp.com • www.eaglegrpnews.com • www.eaglemhc.com
INSTRUCTION SHEET
#358057
(End)
drop
bracket
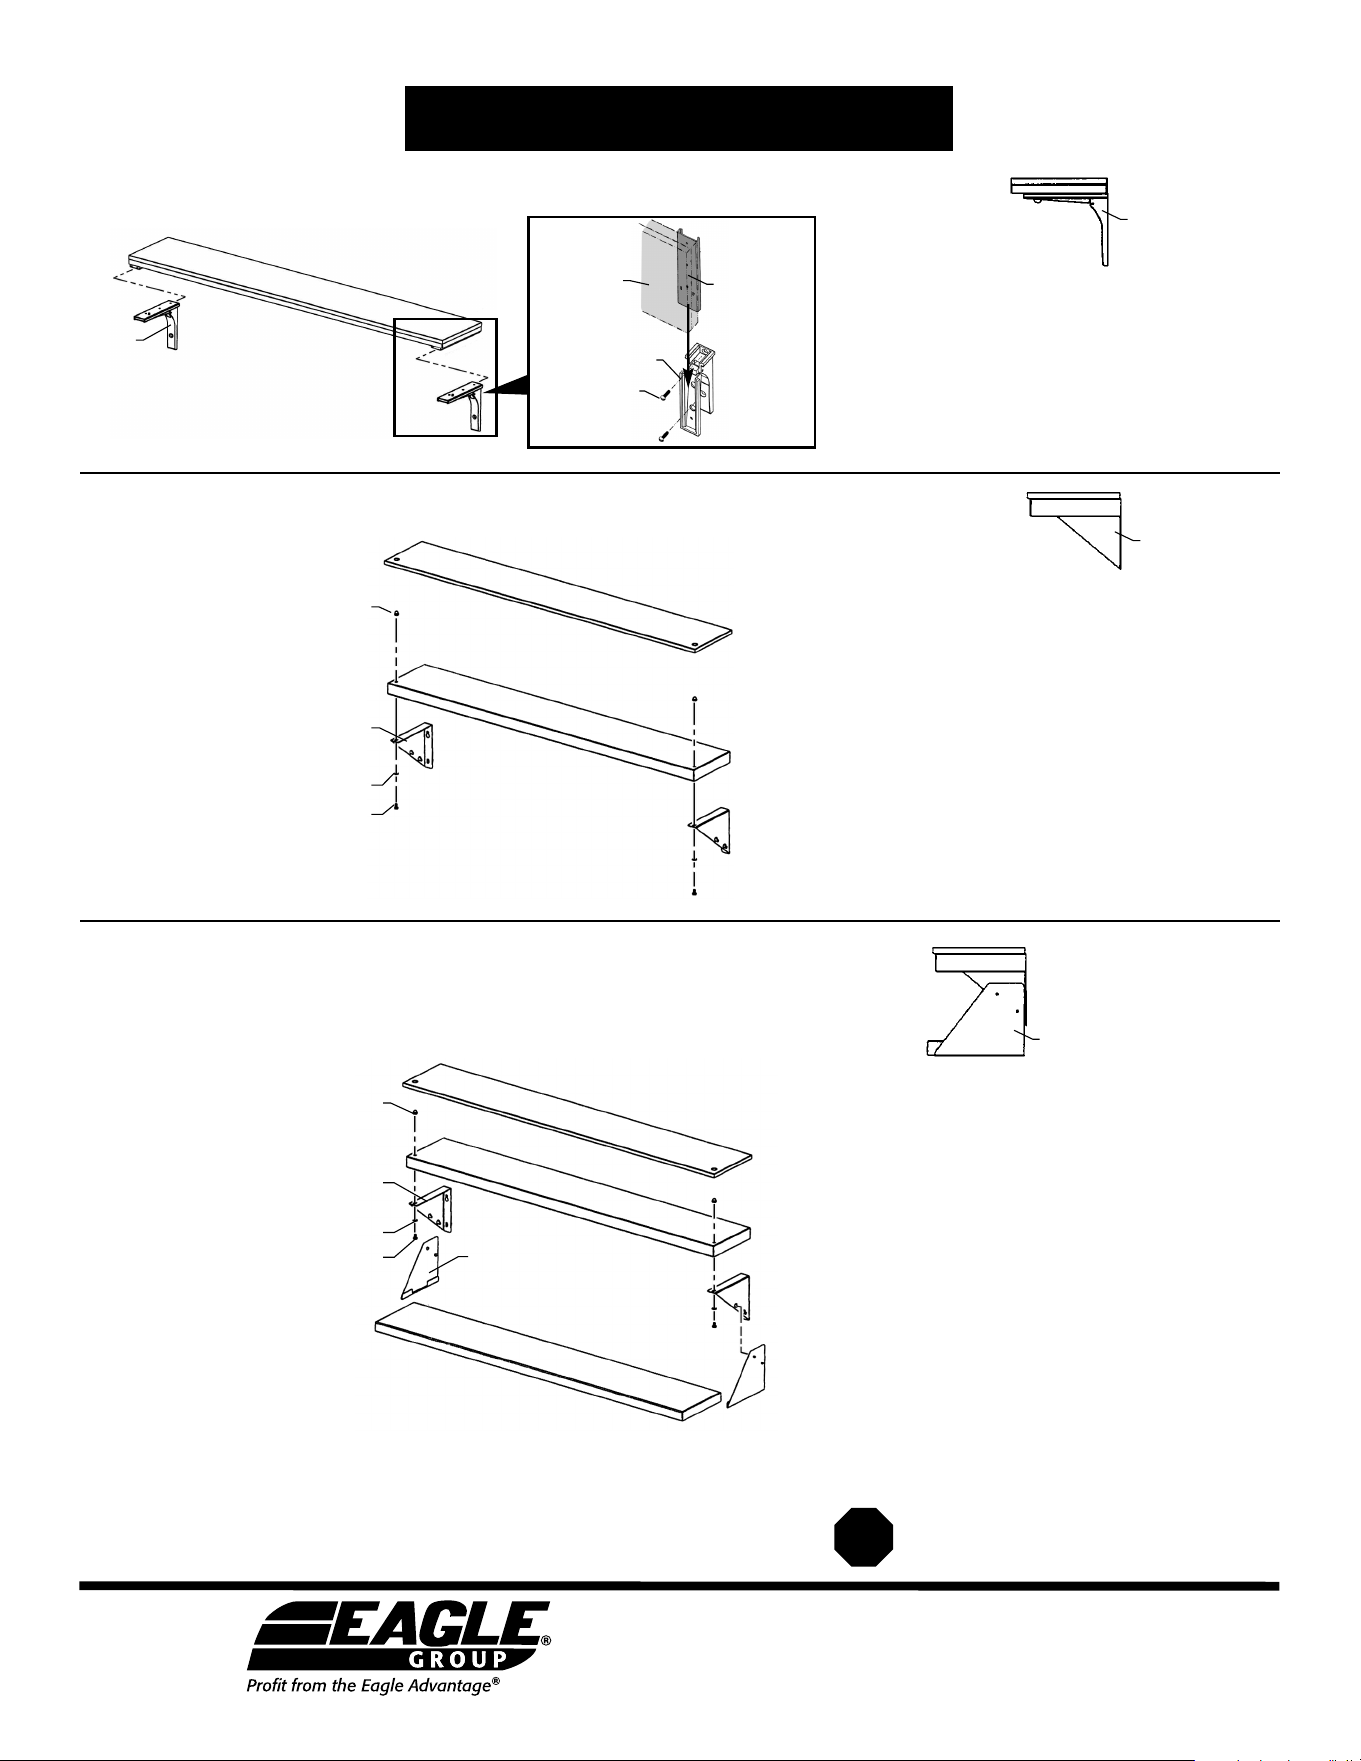
cutting board assembly
1. Mount drop brackets to unit, using machine
screws and threaded fasteners on table.
2. Mount cutting board assembly to drop brackets
on unit.
3. Raise cutting board up until it is in horizontal
position, and slide toward unit.
support shelf
bracket
plate shelf
bracket
washer
hex bolt
acorn nut
Cutting Board with Drop Brackets (for portable units)
Cutting Board with Stationary Brackets (for stationary units)
Cutting Board with Optional Plate Shelf
mounting
bracket
washer
hex bolt
acorn
nut
stainless steel support shelf
stainless steel support shelf
metal plate shelf
cutting board
cutting board
1. Attach support shelf brackets to support shelf,
using acorn nuts, washers, bolts and predrilled
holes. Note: acorn nuts must be at the top.
2. Install machine screws into threaded fasteners
on unit. Do not tighten.
3. Align keyholes in mounting brackets with
screws and mount support shelf/bracket
assembly to unit. Tighten screws.
4. Hook metal plate shelf into bottom flange of
plate shelf brackets.
5. Using keyholes on support shelf brackets,
mount plate shelf/bracket assembly onto
support shelf/bracket assembly.
6. Align holes in cutting board with acorn nuts, and
place cutting board onto support shelf.
1. Attach mounting brackets to support shelf,
using acorn nuts, washers, bolts and predrilled
holes. Note: acorn nuts must be at the top.
2. Install machine screws into threaded fasteners
on unit. Do not tighten.
3. Align keyholes in mounting brackets with
screws and mount support shelf/bracket
assembly to unit. Tighten screws.
4. Align holes in cutting board with acorn nuts,
and place cutting board onto support shelf.
cutting board
assembly
drop bracket
machine screws
to screw
into unit
channel (inside
cutting board
assembly)
side view of
drop bracket
ASSEMBLY INSTRUCTIONS
Cold Pan Units
side view of
stationary bracket
side view of
plate shelf bracket
Eagle Foodservice Equipment, Eagle MHC, and SpecFAB
®
are divisions of Eagle Group. ©2023 by the Eagle Group
• 100 Industrial Boulevard, Clayton, Delaware 19938-8903 U.S.A.
• Phone: 302/653-3000 • 800/441-8440 • Fax: 302/653-2065
• www.eaglegrp.com • www.eaglegrpnews.com • www.eaglemhc.com