
Warning notices: Before using this product, please read this manual carefully and keep it for future reference.
The design and specifications are subject to change without prior notice for product improvement.
Consult with your dealer or manufacturer for details.
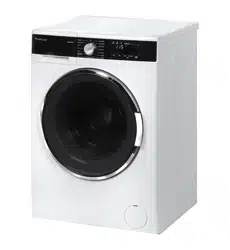
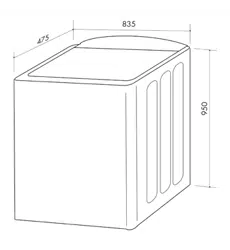
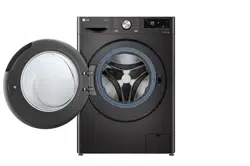
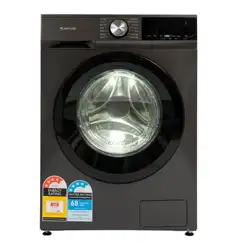
The diagram above is just for reference. Please take the appearance of the actual product as the standard.
USER MANUAL
Washer
AWM8000W
AWM8000GB
CONTENTS
1
SAFETY INSTRUCTIONS
Safety Instructions ..................................................
INSTALLATION
Product Description ................................................
Installation ...........................................................
OPERATION
Quick Start .............................................................
Before Each Washing ..............................................
Detergent Dispenser ...............................................
Control Panel .........................................................
Programmes............................................................
......................................
MAINTENANCE
Cleaning and Care .................................................
Trouble Shooting ....................................................
Customer Service ....................................................
Technical Specifications .........................................
......................................................
Option.......... .........................................................
Washing Programmes Table
Testing Methods
2
9
10
13
15
16
17
18
21
22
23
26
27
28
29
SAFETY INSTRUCTIONS
Safety Instructions
2
Please read the following safety information thoroughly and follow it
strictly to minimize the risk of fire or explosion, electric shock and to
prevent property damage, personal injury or loss of life. Failing to follow
these instructions shall void any warranty.
its service agent or similarly qualified persons in order to avoid a hazard.
•If the machine is damaged, it must not be operated unless repaired by
the manufacturer, its service agent or similarly qualified persons.
Risk of electric shock!
•If the supply cord is damaged, it must be replaced by the manufacturer,
ELECTRIC SHOCK HAZARD
a potentially dangerous situation which may result in
death or serious injuries unless it’s avoided.
This combination of symbol and signal word indicates
Warning!
!
a potentially dangerous situation which may result in
slight or minor injuries.
This combination of symbol and signal word indicates
Note!
a potentially dangerous situation which may result in
slight or minor injuries or damage to property and the
environment.
This combination of symbol and signal word indicates
Caution!
Warning!
!
This appliance is not intended for use by persons (including
children) with reduced physical, sensory or mental capabilities, or
lack of experience and knowledge, unless they have been given
supervision or instruction concerning use of the appliance by a
person responsible for their safety.

SAFETY INSTRUCTIONS
•The appliance can be used by children aged from 8 years and above
and persons with reduced physical, sensory or mental capabilities or
lack of experience and knowledge if they have been given
supervision or instruction concerning use of the appliance in a safe
way and understand the hazards involved. Children shall not play
with the appliance. Cleaning and user maintenance shall not be
made by children without supervision.
•Children should be supervised that they do not play with the
appliance.
•Children 3 years and under shall be kept away from the appliance
or continuously supervised.
•Animals and children may climb into the machine. Check the
machine before every operation.
•Do not climb or sit on the appliance.
INSTALLATION LOCATION AND SURROUNDING
•All washing and additional substances are to be kept in a safe place
out of the reach of children.
•Do not install the machine on a carpet floor. The obstruction of the
openings by a carpet can damage the machine.
•Keep the appliance clear from heating sources and direct sunlight
to avoid plastic and rubber parts to corrode.
•Do not use the appliance in humid environments or rooms
containing explosive or caustic gas. In case of water leakage or
water splashes let the appliance dry in the open air.
•The appliance must not be installed behind a lockable door, a
sliding door or a door with a hinge on the opposite side to that of the
washing machine.
3
SAFETY INSTRUCTIONS
•Do not operate the machine in rooms with a temperature of below
5°C. This can cause damages to parts of it. If it is unavoidable, make
sure to drain the water completely from the appliance after every
use (see „Maintenance - Cleaning of drain pump filter“) to avoid
damages caused by frost.
•Never use flammable sprays or substances in the immediate
proximity of the appliance.
INSTALLATION
•Remove all packaging material and transport bolts before using the
appliance. Otherwise, serious damage may result.
•This appliance is equipped with a single inlet valve and can be
connected to the cold water supply only.
•Mains plug must be accessible after installation.
•Before washing clothes for the first time, the product shall be
operated once throughout all the procedures without any clothes
inside.
•Before using the washing machine, the product shall be calibrated.
•Do not put any excessively heavy objects on the appliance, like
water containers or heating devices.
•The new hose-sets supplied with the appliance are to be used and
that old hose-sets should not be reused.
•Max. Inlet water pressure 1 MPa. Min. inlet water pressure 0.05
MPa.
ELECTRICAL CONNECTION
•Make sure the supply cable is not trapped by the machine, it can get
damaged.
•Connect the product to a grounded outlet protected by a fuse
complying with the values in the “ Technical specifications“ table.
The grounding installation has to be made by a qualified electrician.
Ensure that the machine is installed in accordance with the local
regulations.
4
SAFETY INSTRUCTIONS
•Water and electrical connections must be carried out by a qualified
technician in accordance with the manufacturer‘s instructions and
local safety regulations.
•Don´t use multiple plugs or extension cords.
•The appliance must not have an external switching device such as a timer or
connected to a circuit that is regularly switched on and off.
•Do not pull the plug out of the mains outlet if there is flammable gas around.
•Never pull out power plug with wet hands.
•Always pull at the plug, not at the cable.
•Always unplug the appliance if it is not being used.
Warning!
!
WATER CONNECTIONS
•Check the connections of the water inlet tubes, the water tap and
the outlet hose for possible problems due to changes of water
pressure. If the connections loosen or leak close the water tap and
get it repaired. Do not use the appliance before the pipes and hoses
are installed properly by qualified persons.
•Glass door may become very hot during the operation. Keep
children and pets far away from the machine while it is operating.
•The water inlet and outlet hoses have to be safely installed and
remain undamaged. Otherwise, water leakage can occur.
•Do not remove the drain pump filter while there is still water in the
appliance. Big quantities of water can leak out, and there is a risk of
scalding due to hot water.
5

SAFETY INSTRUCTIONS
OPERATION AND MAINTENANCE
•Never use any flammable, explosive or toxic solvents. Do not use
gasoline and alcohol etc. as detergents. Only select detergents that
are suitable for machine washing.
•Make sure that all pockets are emptied. Sharp and rigid items such
as coins, brooches, nails, screws, stones etc. may cause serious
damages to this machine.
•Remove all objects from pockets such as lighters and matches
before use the appliance.
•Thoroughly rinse items that have been washed by hand.
•Items that have been soiled with substances such as cooking oil,
acetone, alcohol, petrol, kerosene, spot removers, turpentine, wax
and wax removers should be washed in hot with an extra amount of
detergent before being dried in the appliance.
•Items containing foam rubber (latex foam), shower caps, water
proof textiles, rubber backed articles and clothes or pillows fitted
with foam rubber pads should not be dried in the machine
•Fabric softeners or similar products should be used as
recommended in their instructions.
•Never try to open the door forcefully. The door will unlock shortly
after the end of a cycle.
•Please do not close the door with excessive force. If it is found
difficult to close the door, please check if the clothes are properly
inserted and distributed.
6
SAFETY INSTRUCTIONS
•Always unplug the appliance and close the water tap before
cleaning and maintenance and after each use.
•Never pour water over the appliance for cleaning purpose. Risk of
electric shock!
•Repairs shall only be carried out by the manufacturer, its service
agent or similarly qualified persons in order to avoid a hazard. The
producer will not be responsible for damages caused by the
intervention of not authorized persons.
TRANSPORT
•Before Transport:
-Bolts shall be reinstalled to the machine by a specialized person
-Accumulated water shall be drained out of the machine
•This appliance is heavy. Transport with care. Never hold any
protruding part of the machine when lifting. The machine door
cannot be used as a handle.
INTENDED USE
The product is intended only for home use and for textiles in
household amounts suitable for machine washing and drying. This
appliance is for indoor use only and not intended for built in use.
Only use according to these instructions. The appliance is not
intended for commercial use.
Any other use is considered as improper use. The producer is not
responsible for any damage or injuries that may result of it.
•This appliance is intended to be used in household and similar
applications such as:
-Staff kitchen areas in shops, offices and other working environments;
-Farm houses;
-By clients in hotels, motels and other residential type environments;
-Bed and breakfast type environments;
-Areas for communal use in blocks of flats or in launderettes.
7
SAFETY INSTRUCTIONS
This marking indicates that this product should not be
disposed with other household wastes throughout the
EU.To prevent possible harm to the environment or
human health from uncontrolled waste disposal,recycle
it responsibly to promote the sustainable reuse of
material resources.To return your used device, please use
the collection systems or contact the retailer where the
product was purchased. They return and can take this
product for environmental safe recycling.
Packaging/Old appliance
8
Model Washing Capacity
8.0kg
AWM8000W / AWM8000GB
INSTALLATION
Accessories
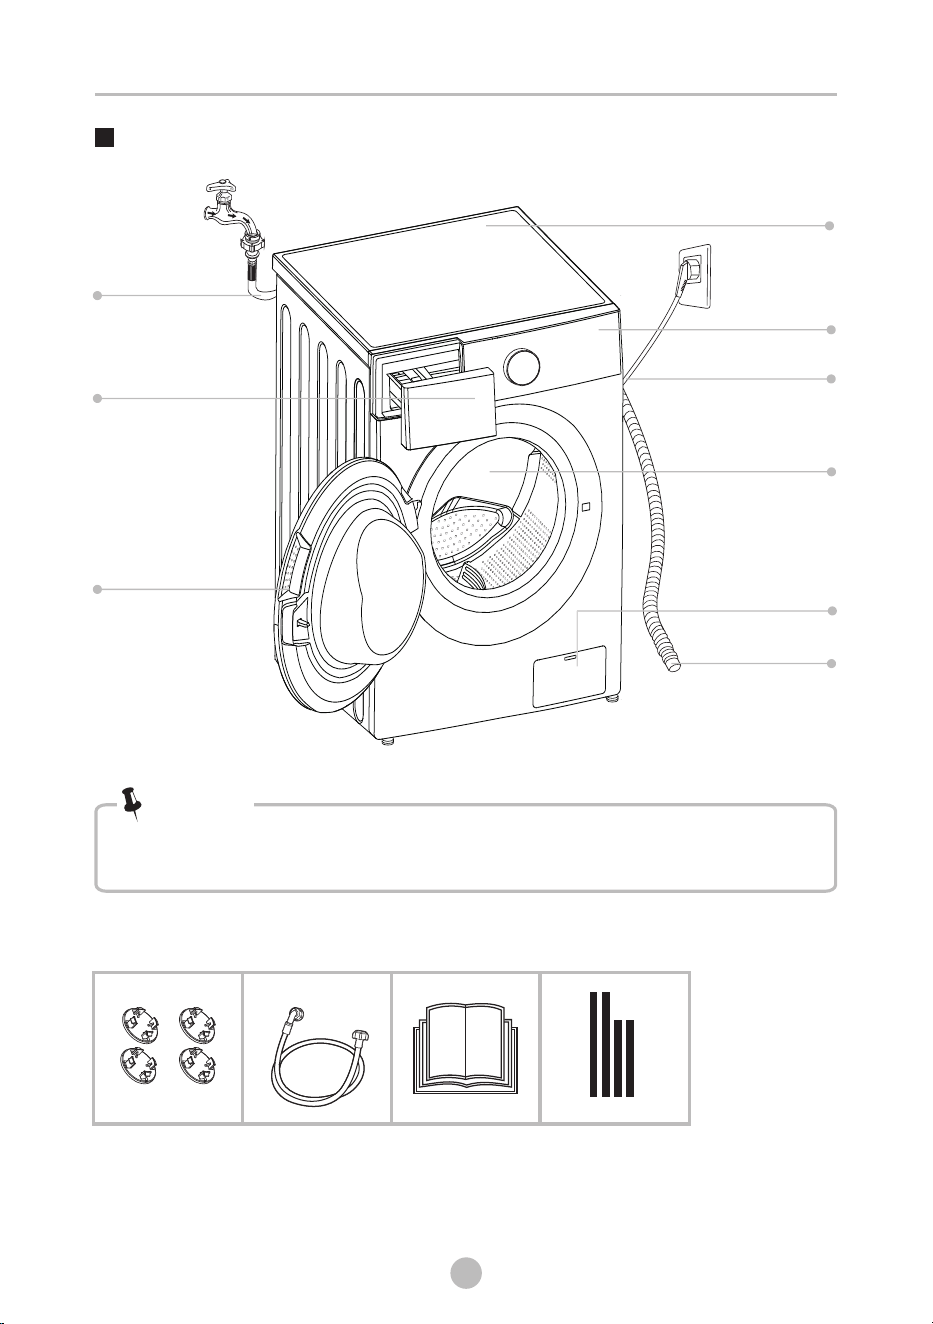
Product Description
4 x Cover caps
1 x Supply hose
cold water
• The product picture is for illustration only, please refer to real product as
reference.
Note!
Drum
Power supply cord
Control panel
Detergent dispenser
Service flap
Door
Water supply hose
Top cover
Drain hose
1 x Owner’s manual
9
Acoustic sponge
(optional)
INSTALLATION
Installation
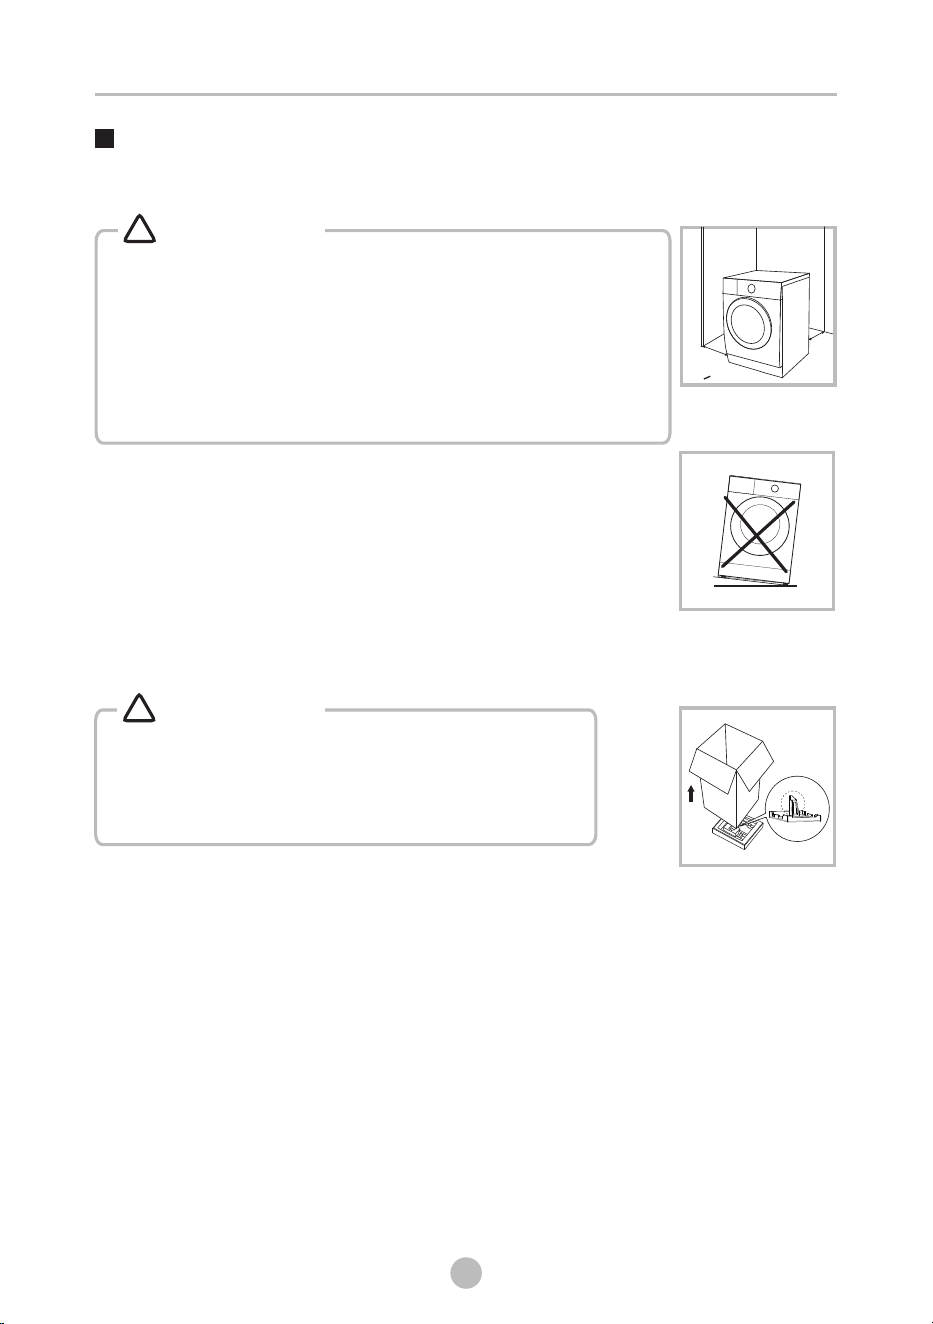
Before installing the machine, the location characterized
as follows shall be selected:
1.Rigid, dry, and level surface
2.Avoid direct sunlight
3.Sufficient ventilation
4.Room temperature is above 5°C
5.Keep far away from the heat sources such as coal or gas burning appliances.
Unpacking the washing machine
1. Remove the cardboard box and styrofoam packing.
2. Lift the washing machine and remove the base packaging.Make sure the small triangle
foam (a) is removed with the bottom packaging together. If not, lay the unit down on
the side surface and remove it manually.
4. Remove the inlet hose from the drum.
3. Remove the tape securing the power supply cord and drain hose.
• Stability is important to prevent the product from
wandering! Make sure the machine is standing leveled and
stable.
• Make sure that the product does not stand onto the power
cord.
• Make sure to maintain the minimum distances from the
walls as shown in the picture
Warning!
!
• Packaging material (e.g. Films, Styrofoam) can be
dangerous for children.
• There is a risk of suffocation ! Keep all packaging
well away from children.
Warning!
!
w
w
W> 20mm
Installation area
a
10
INSTALLATION
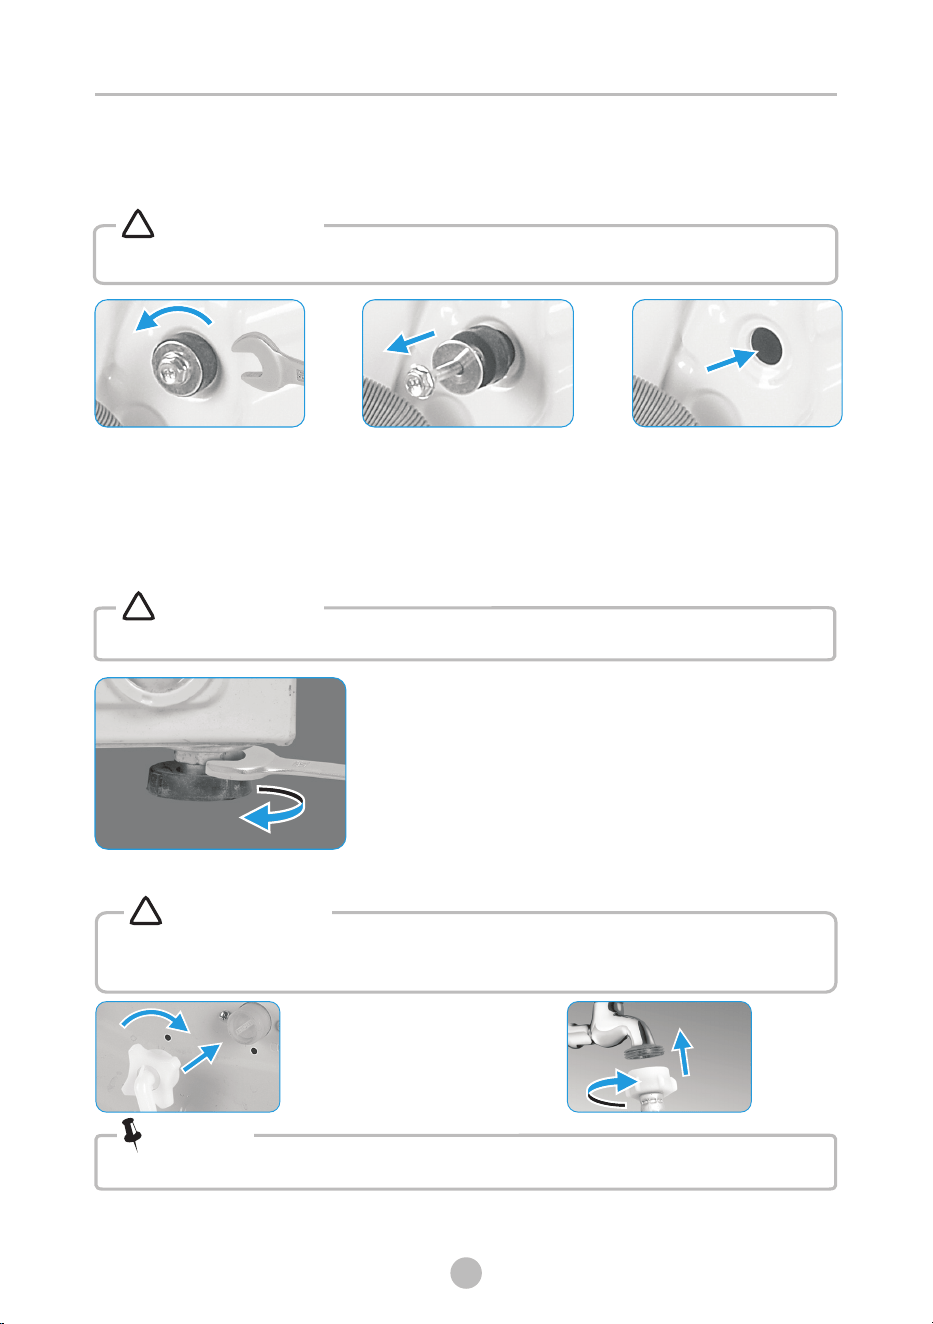
Remove transport bolts
• You must remove the transport bolts from the backside before using the product.
Warning!
!
Loosen the 4 transport
bolts with a spanner.
Remove the bolts
including the rubber parts
and keep them for future
use.
Close the holes using the
cover caps.
Levelling the washing machine
• The lock nuts on all four feet must be screwed tightly against the housing.
Warning!
!
1. Loosen the lock nut.
2. Turn the foot until it reaches the floor.
3. Adjust the legs and lock the nuts with a
spanner. Make sure the machine is level and
steady.
Connect the water supply hose
To prevent leakage or water damage, follow the instructions in this chapter
• Do not kink, crush or modify water inlet hose.
Warning!
!
Connect the water supply hose
to the water inlet valve and a
water tap with cold water as
indicated.
• Connect manually, do not use tools. Check if the connections are tight.
Note!
11
INSTALLATION
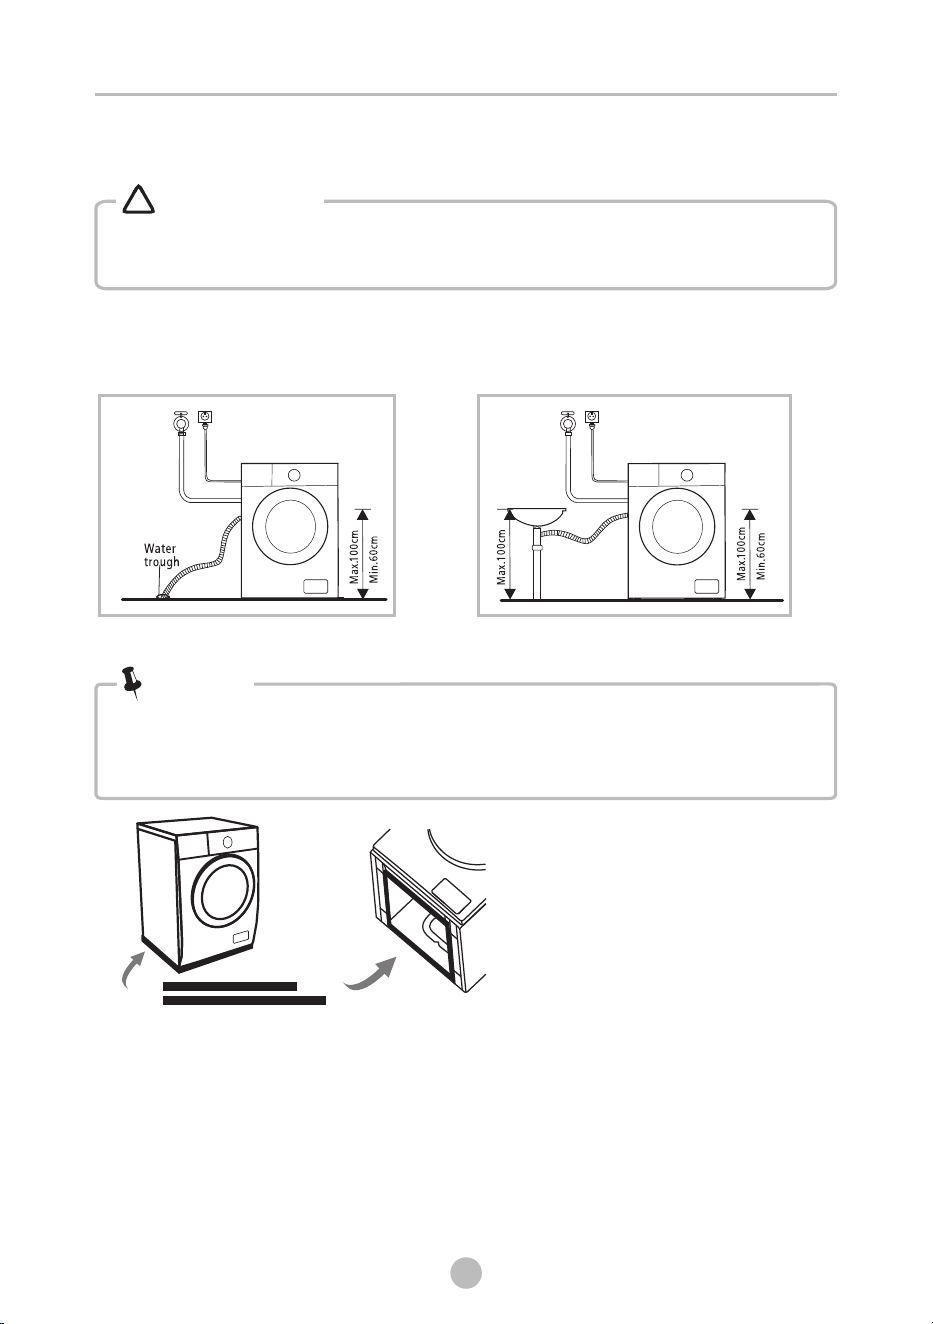
Drain Hose
There are two ways to place the end of drain hose:
1.Put it into the water trough. 2.Connect it to the branch drain pipe of
the trough.
•
• Position drain hose properly ,otherwise damage might result of water leakage.
Do not kink or protract the drain hose.
Warning!
!
Warning!
!
12
• Please make sure to assemble the acoustic sponges/panel, which can
effectively reduce the noise caused by the machine while working, in order
to provide you with a more peaceful and quiet living environment.
Note!
Acoustic Sponge
2x
2x
1. Get the machine laid on the floor, using some soft material like foam or clothes
between the machine and floor for a protection;
2. Stick the longer sponges to the longer bottom edges of machine, and the shorter
sponges to the shorter bottom edges.
Quick Start
OPERATION
• Before washing, please make sure the washing machine is installed properly.
• Your appliance was thoroughly checked before it left the factory. To remove
any residual water and to neutralize potential odors, it’s recommended to
clean your appliance before first use. For this reason, start the Drum Clean
without laundry and detergent.
Caution!
13
It’s recommended to calibrate the machine, so that provide the best performance.
The appliance is able to detect the amount of laundry loaded. This function is
optimizing the product performance by minimizing energy and water
consumption, saving you money and time. For this reason it’s recommended to
calibrate the appliance for best use.
1- Remove all accessories from the drum and close the door;
2- Insert the mains plug to the socket;
3- Switch on the washing machine and within 10 seconds, press “ ” and
“Boost” simultaneously until “t19” is displayed;
NOTE: Before calibration, .
4- Press [ ] to start the appliance and wait till “****” is displayed.
Temp.
Ensure that there is no load or water inside the drum
Calibration
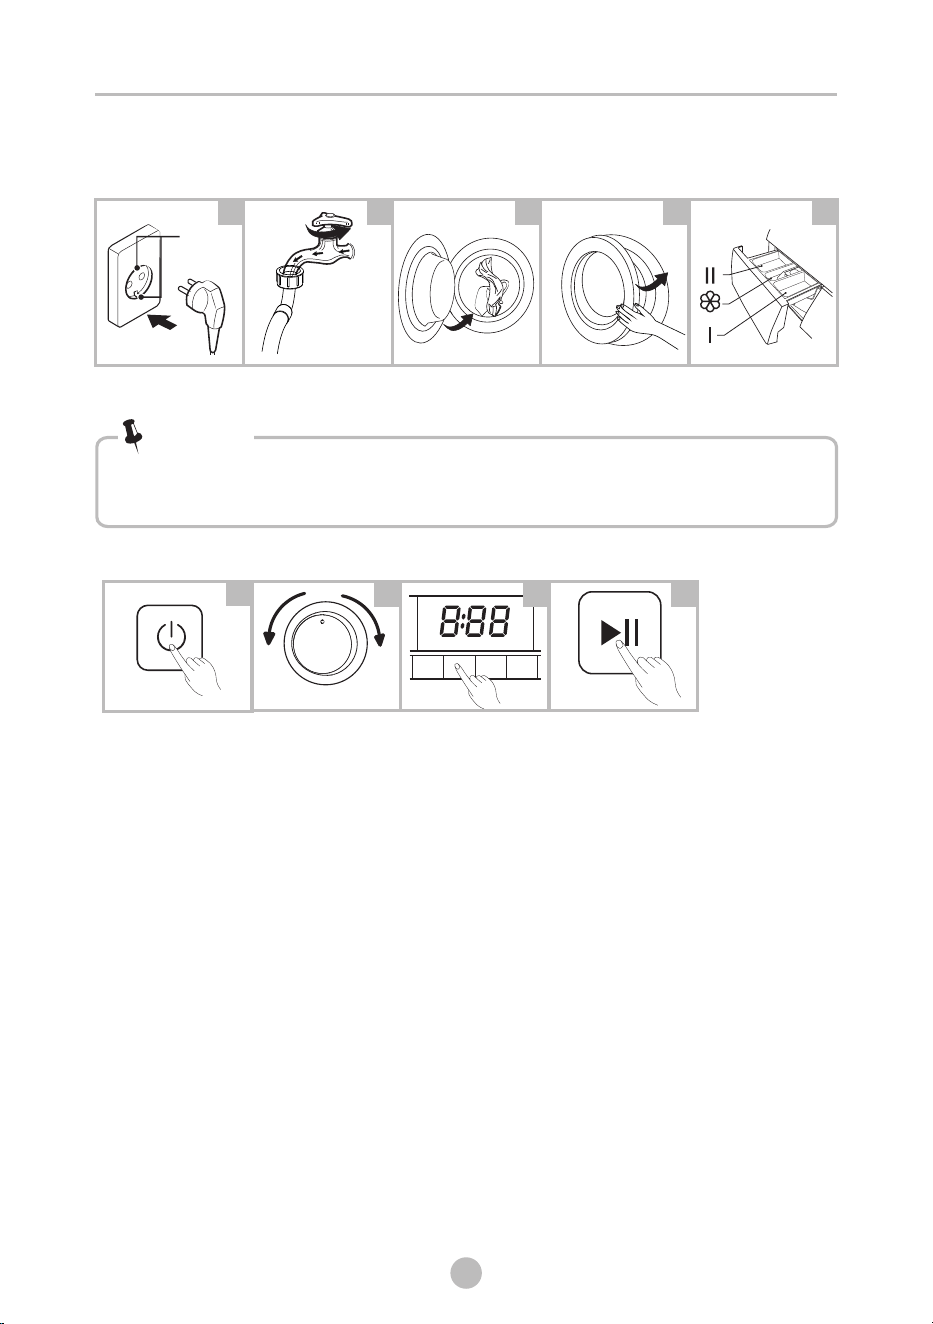
OPERATION
14
2. Washing
Select programme
Select function or
remain default
settings
Press
Start/Pause to
start the program
2 3 4
Buzzer beep and “End” on display.
3. After Washing
1. Before Washing
Open tap
Load
Close door
Plug in
Add detergent
• Detergent need to be added in compartment I if the Pre Wash function is selected.
• Do not put laundry beads into the detergent dispenser.
1 2 3 4 5
Note!
Main
wash
Prewash
Softener
ear th
terminal
Power On
1
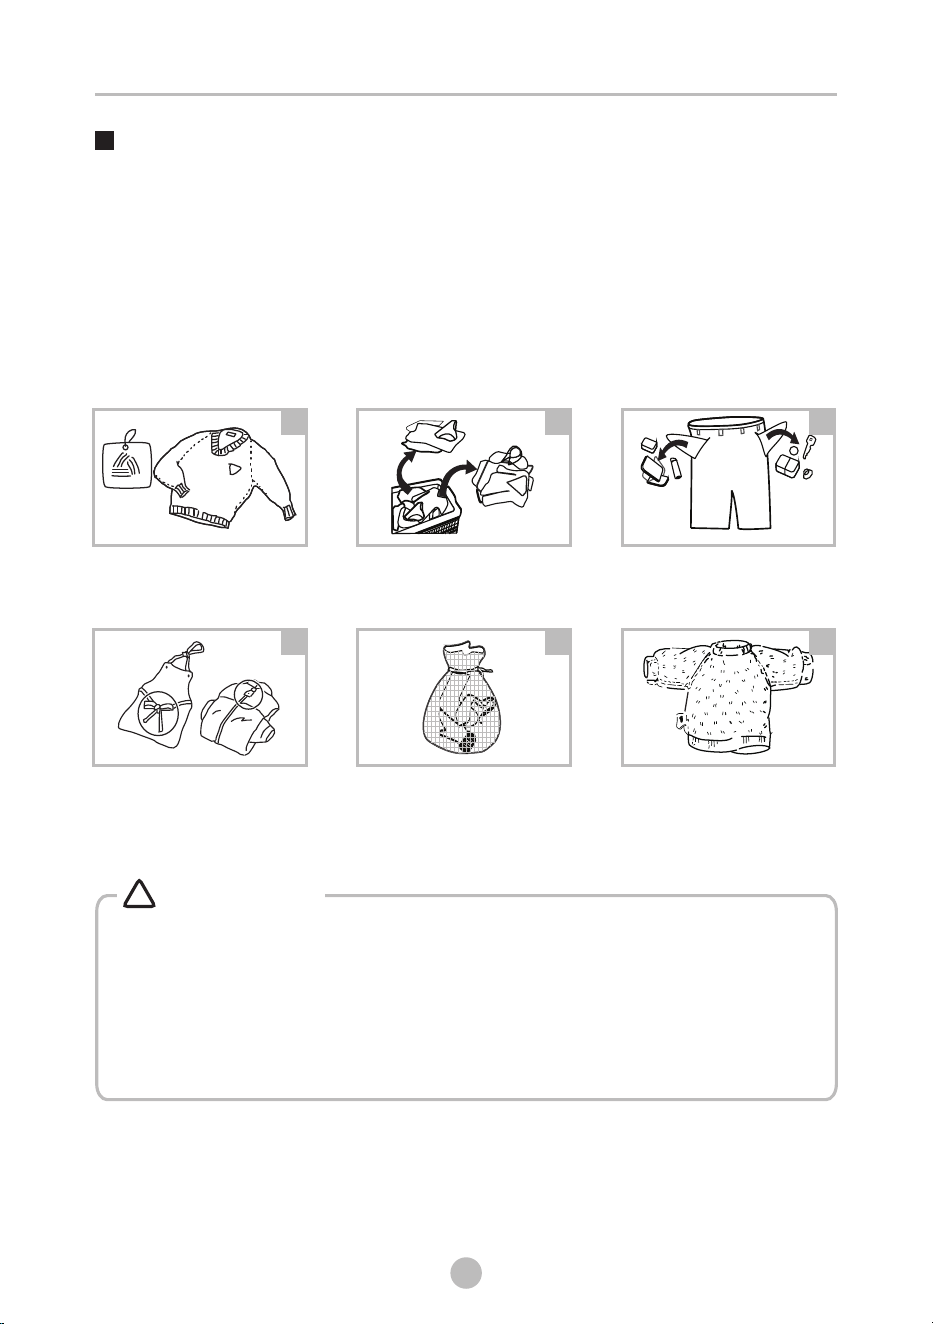
• The ambient temperature of the washing machine should be 5 -40°C. If used under
0°C, the inlet valve and draining system may be damaged. If the machine is
installed under freezing conditions, it should be transferred to normal ambient
temperature to ensure the water supply hose and drain hose can unfreeze before
use.
• Please check your laundry care labels and the detergent use instructions before
wash. Use non-foaming or less-foaming detergent suitable for machine
washing properly.
°C
Tie together long textile
strips and belts, close zips
and button
Take all items out of the
pockets
Put small items into a
laundry bag
Check the care label
Before Each Washing
Turn easy-pilling and
long-pile fabric inside out
Sort laundry according to
color and textile type
OPERATION
1 2 3
4 5 6
15
Do not wash, or spin water-proof seats, mats or clothing.
• When washing a single clothes, it may easily cause great eccentricity and give
alarm due to great unbalance. Therefore it is suggested to add one or two
more clothes to be washed together so that draining can be done smoothly.
• Don’t washing the clothes touching with kerosene, gasoline, alcohol and
other flammable materials.
•
Warning!
!
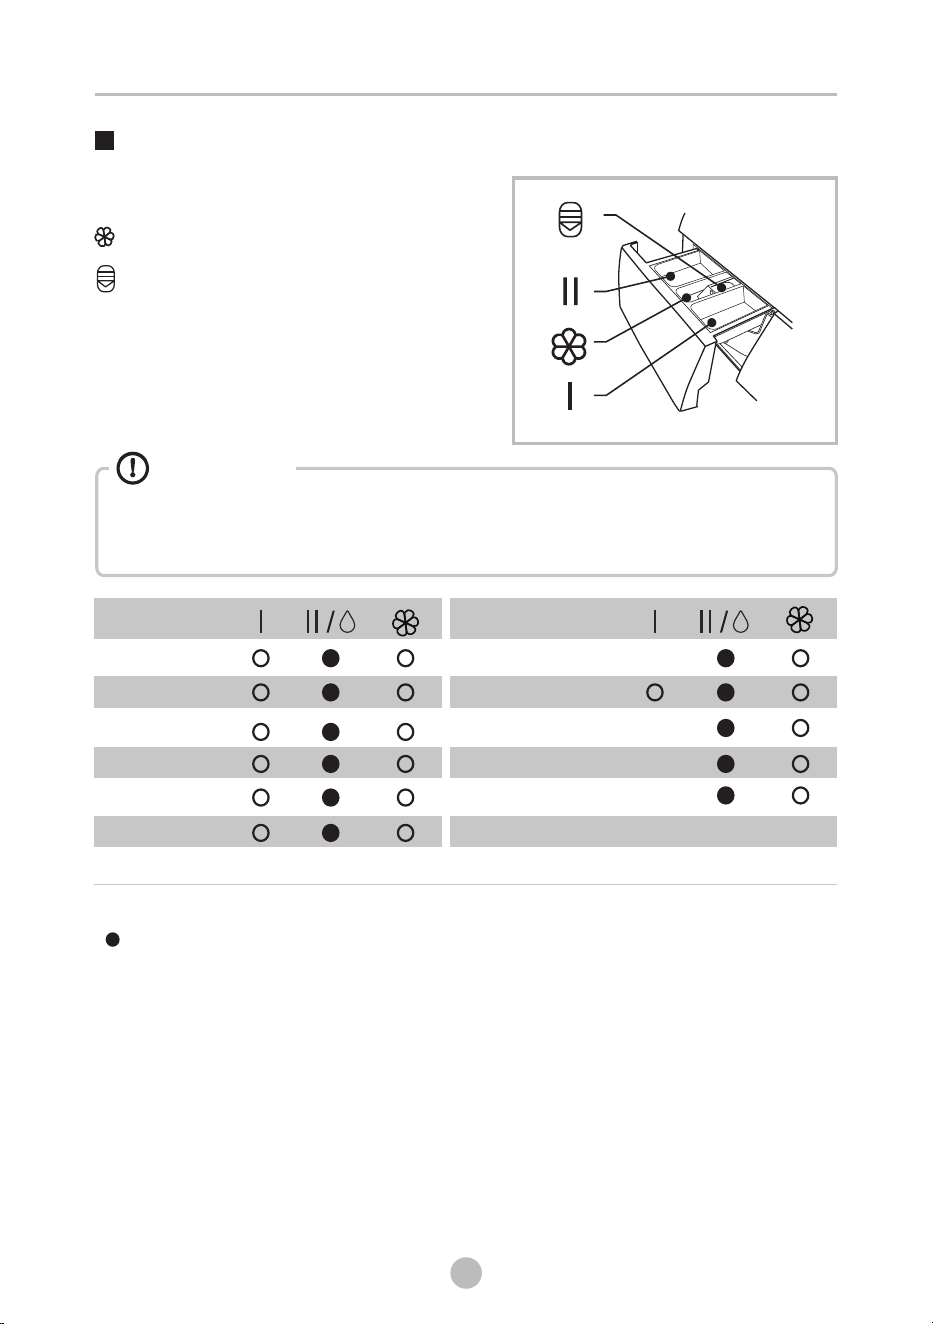
Detergent Dispenser
OPERATION
Pre Wash
Main Wash
Softener
II
I
Release button to
pull out the dispenser
Programme
Cotton
Mix
Baby Care
Synthetic
Sports
Jeans
Programme
Steam Hygiene
Wool
Quick 45'/15'
ECO Wash
20℃
Spin Only
Drum Clean
Means must ○ Means optional
16
Caution!
Caution!
• Detergent only need to be added in compartment I ”after selecting Pre Wash
function.
Do not put laundry beads into the detergent dispenser.
“
•
OPERATION
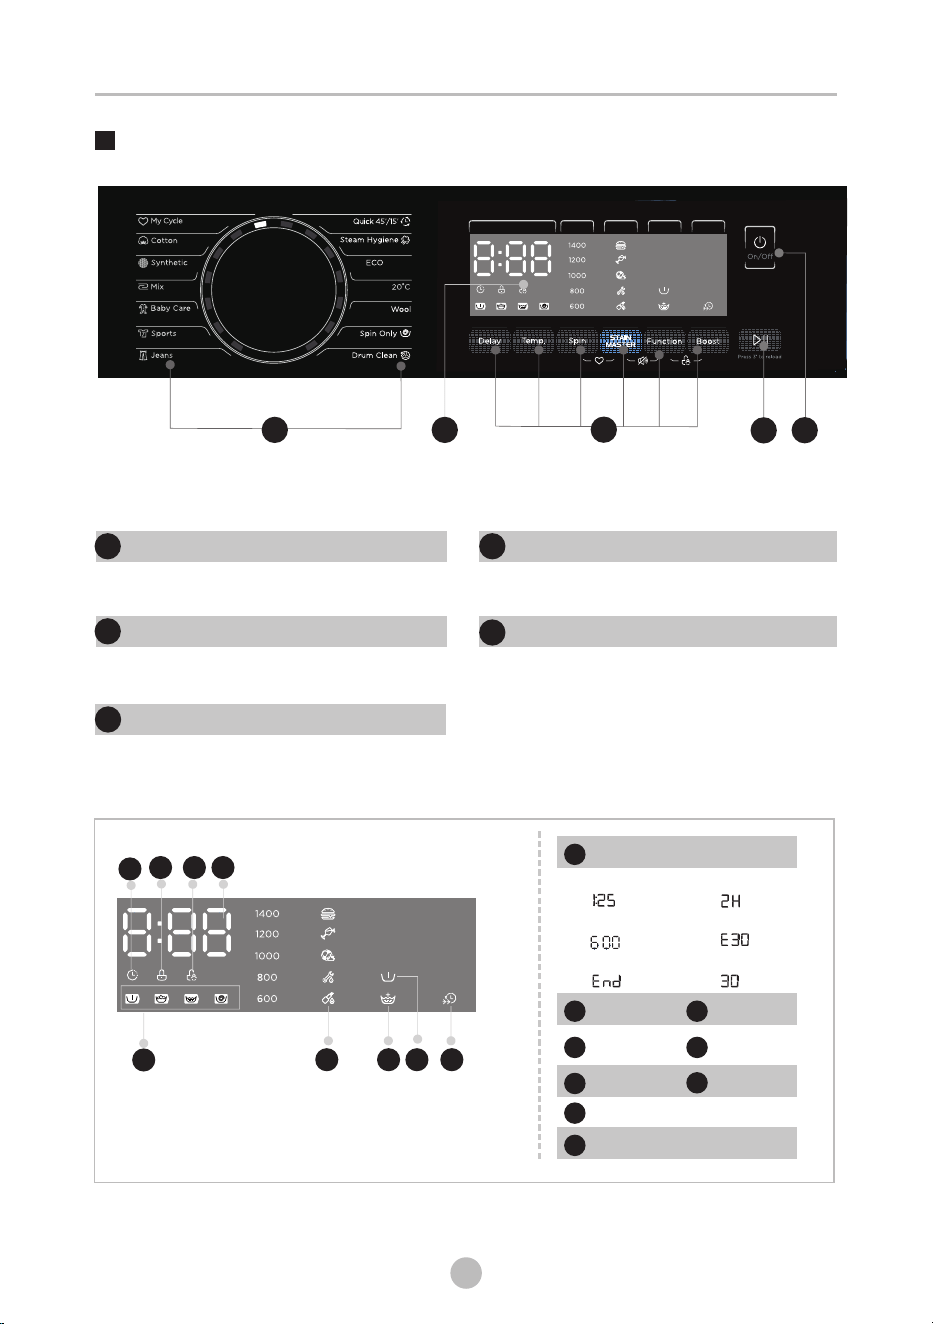
Control Panel
Power
Product is on/off.
Start/Pause
Press the button to start or pause the
washing cycle.
Programmes
Available according to the laundry type.
Option
This allows you to select an additional
function.
1
1
3
1
2
4
Display
The display shows the settings, estimated time remaining, options, and status messages
for your washer. The display will remain on through the cycle.
5
Pre Wash
B
Child Lock
D
Display
A
Wash Time Delay Time
Speed Error
End Temp.
A
I
C
Door Lock
C
Delay
E
H
Boost
F
Stain Master
G
Extra Rinse
H
Pre Wash-Wash-Rinse-Spin
I
B
D
E
F
17
3
2
1
4
5
G
Wash
OPERATION
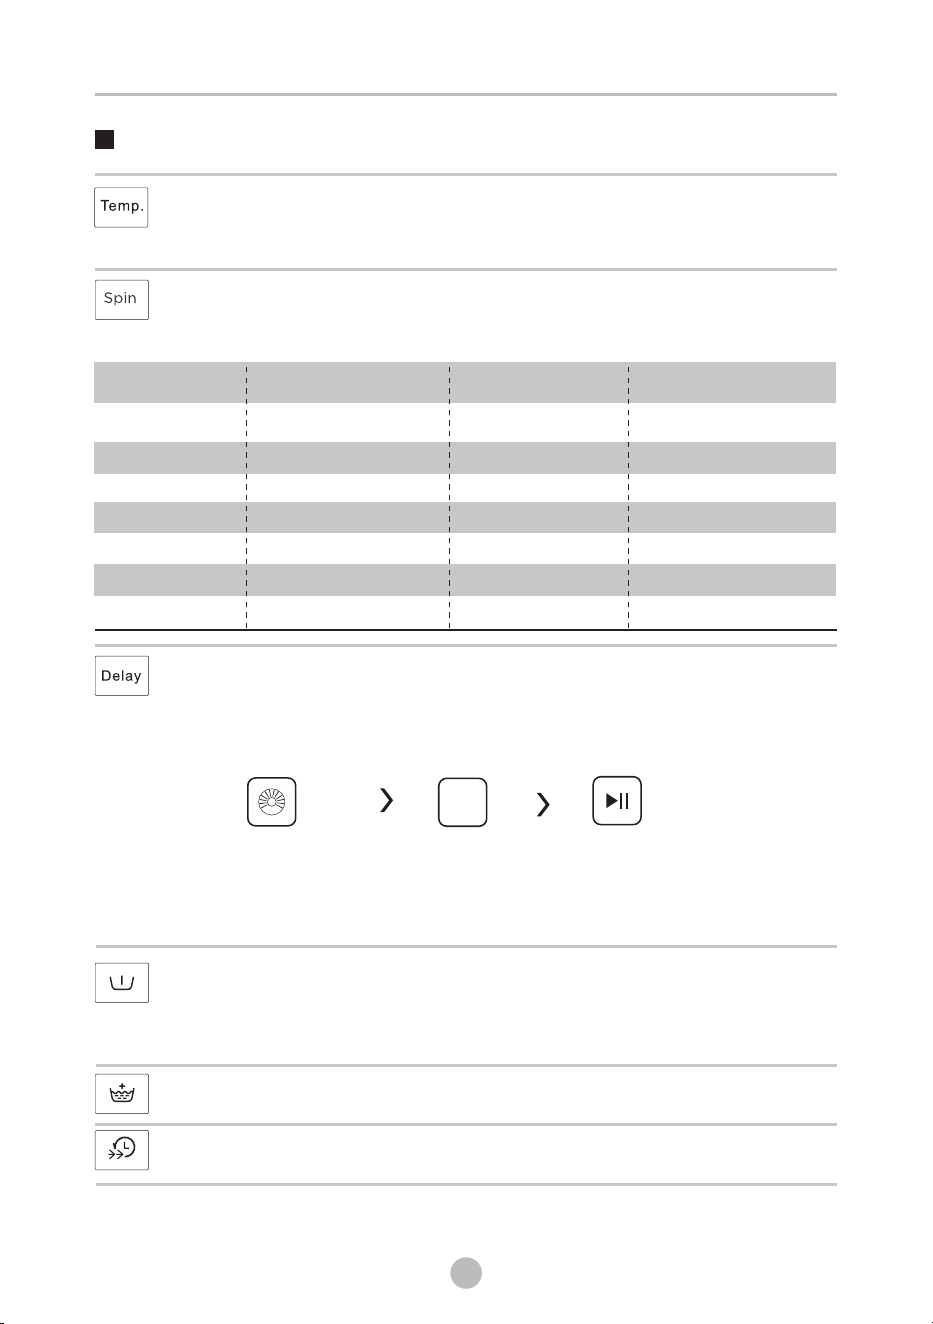
Spin
When needed, the spinning speed can be adjusted pressing the Speed button in the
following steps: 1400:0-600-800-1000-1200-1400
Delay
2.Press the Delay button to choose the delaying time 0-24H
3.Press [Start/Pause] to start the delay operation
1. Select a programme
Choose programme
Start
Setting time
Delay
To cancel the Delay function, press the “Delay” button before starting the program
until the display shows 0 H. If the program has already started, switch the appliance
off and afterwards on and select a new programme.
Pre Wash
Extra washing function before the main washing cycle starts to increase the washing
performance.
Note: Detergent needs to be added to the compartment I.
Extra Rinse
The laundry will undergo an extra rinse after selecting this function.
Boost
The function can decrease the washing time.
Temp.
When needed, the washing temperature can be adjusted by pressing the temperature
button in the following steps: Cold - 20°C - 30°C - 40°C - 60°C - 90°C.
18
STAIN MASTER
scenarios Wash Cycles Typical stain
图标 1 Food
Cotton,Synthetic,Mix,Baby
Care,Jeans
xxxx
图标 2 Drinks Cotton,Synthetic,Mix,Baby Care xxxx
图标 3 Sports & Fitness Cotton,Synthetic,Mix,Sports xxxx
图标 4 Outdoor & Workers
Cotton,Synthetic,Mix,Sports,
Jeans
xxxx
图标 5 Health & Beauty Cotton,Synthetic,Mix xxxx
STAIN MASTER
scenarios
Wash Cycles
Typical stain
图标 1
Food
Cotton,Synthetic,Mix,Baby
Care,Jeans
xxxx
图标 2
Drinks
Cotton,Synthetic,Mix,Baby Care
xxxx
图标 3
Sports & Fitness
Cotton,Synthetic,Mix,Sports
xxxx
图标 4
Outdoor & Workers
Cotton,Synthetic,Mix,Sports,
Jeans
xxxx
图标 5
Health & Beauty
Cotton,Synthetic,Mix
xxxx
Option
Quick 45’/15’
Steam Hygiene
ECO Wash
20°C
Wool
Spin Only
Drum Clean
Jeans
Sports
Baby Care
Mix
Synthetic
Cotton
800
1000
1000
1000
600
1000
--
800
800
1000
1000
1000
1000
Programme Default Speed(rpm) Programme Default Speed(rpm)
OPERATION
When the Child Lock is activated, the display will alternately show “CL” and the
remaining time.
Pressing any other button will cause the Child Lock indicator to flash.
When the program ends, “End” will alternate on the display.
The Child Lock deactivates the function of all buttons except the On/Off button and
the Child lock button!
Only the simultaneous pressing of the two buttons can
deactivate the Child Lock!
Please deactivate the Child Lock before selecting a new program!
“CL” and
[Function] and [Boost]
Caution!
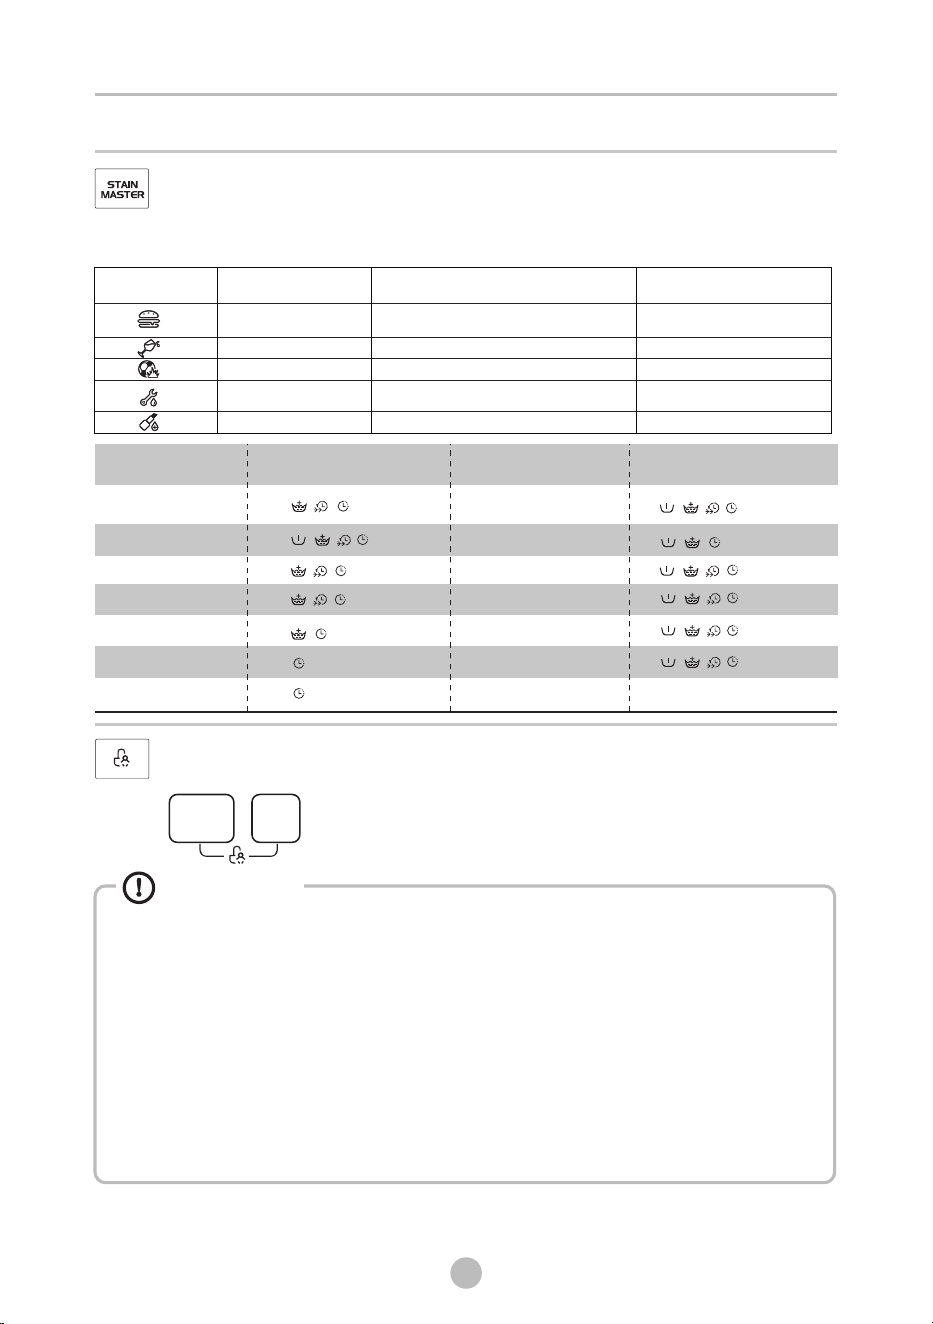
Child Lock
This function is meant to keep children from misusing the controls.
Press [Function] and [ ] simultaneously for 3 sec
until the buzzer beep. The child lock indicator switches on.
Boost
Boost
Function
19
STAIN MASTER
STAIN MASTER offers specific treatments for five scenarios(Food, Drinks, Sports &
Fitness, Outdoor & Workers, Health & Beauty) to professionally solve according
to laundry problems.
STAIN MASTER
scenarios
Wash Cycles Typical stain
Food
Cotton,Synthetic,Mix ,Baby Care,Jeans
Fresh Vegetables, Fresh Juice,
Food Sauce
Drinks
Cotton,Synthetic,Mix,Baby Care
Red wine, hot drink, soft drink
Sports & Fitness
Cotton,Synthetic,Mix,Sports
Grass Stains, Dust, Sweat Stains
Outdoor & Workers
Cotton,Synthetic,Mix,Sports,Jeans
Grease, Mud Stain, Carbon
Pigment
Health & Beauty
Cotton,Synthetic,Mix
Cosmetics, Blood, Drugs
Programme
Additional functions
Programme
Additional functions
Quick 45’/15’
Steam Hygiene
ECO Wash
20°C
Wool
Spin Only
Drum Clean
Jeans
Sports
Baby Care
Mix
Synthetic
Cotton
OPERATION
• Don't use the Reload function when the water level over the edge of the
inner tub or the temperature is higher.
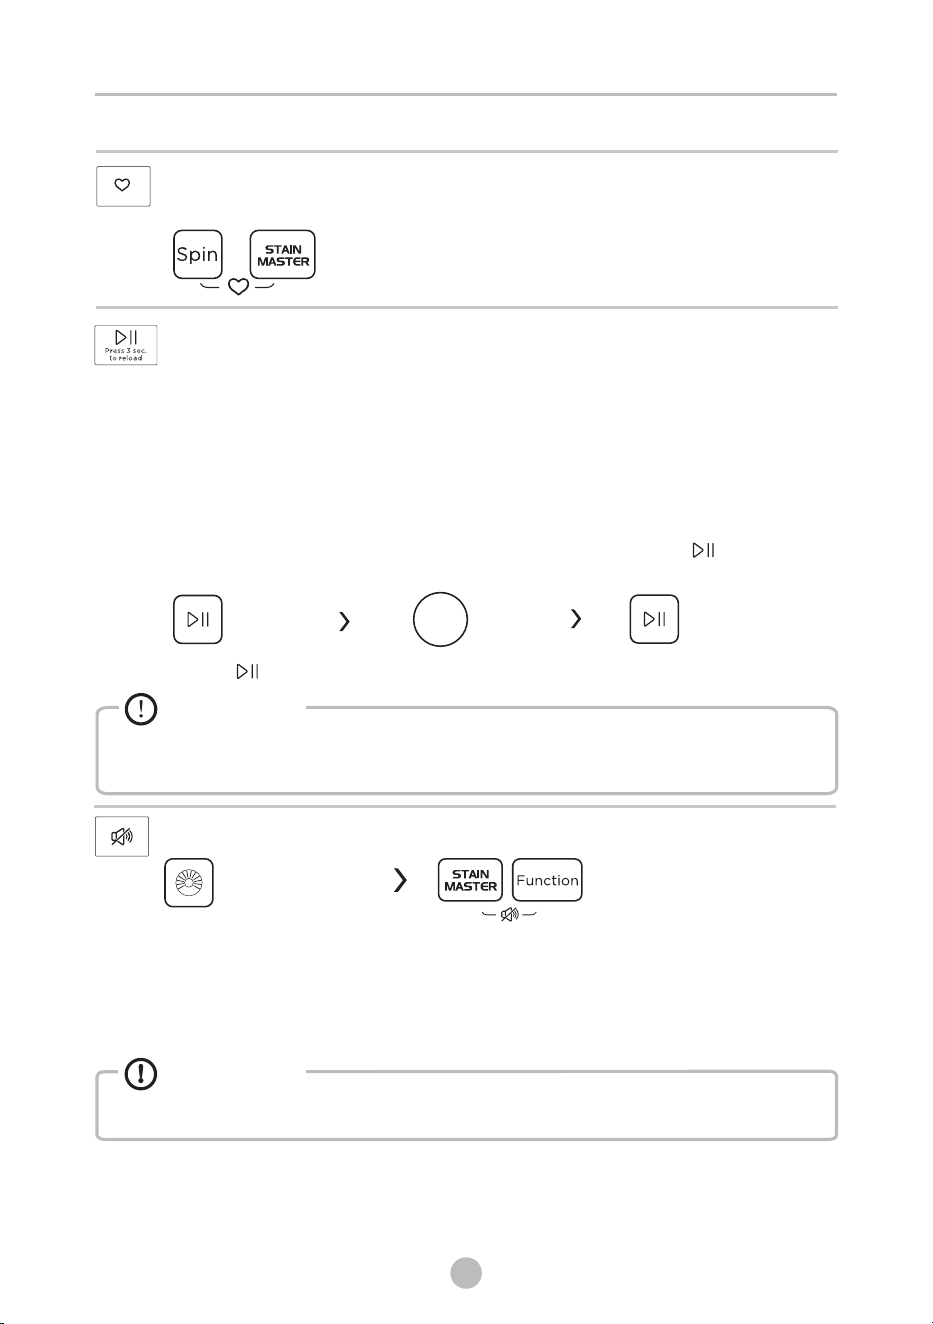
Reload
This operation can be executed during the washing progress. When the drum is
still rolling and there is large amount of water with high temperature in the drum.
The state is unsafe and the door cannot be opened forcefully. To press
[Start/Pause] for 3 sec. to reload, and start the clothes adding in the midway
function. Please follow the steps as bellow:
1.Wait until the drum stops rotation.
2.The door lock is unlocked.
3.Close the door when the clothes are reloaded and press the [ ]
button.
Start
P 3sress[ ] ec.
Clothes
Reload the clothes
Caution!
20
My Cycle
To memory the frequently used programme.
After choosing the programme and setting the options, press
[Spin] and [STAIN MASTER] button 3 sec. before start to wash.
The default setting course is Cotton.
Mute the buzzer
To act the buzzer function, press the button again for 3 seconds. The setting
until the next reset.
will be kept
• MuAfter ting the buzzer function, the sounds will not be activated any more.
Caution!
Press the [STAIN MASTER] and
button for 3sec.,the buzzer is mute.
[Function]
Choose the Programme
OPERATION
Programmes
Programmes are available according to the laundry type.
Programmes
Mix
Cotton
Hard-wearing textiles, heat-resistant textiles made of cotton or linen.
Wash synthetic articles, for example: shirts, coats, blending.
While washing the knitting textiles, detergent quantity shall be
reduced due to its loose string construction and easily forming
bubbles.
Washing the baby’s clothes, it can make the baby's wear cleaner
and make the rinse performance better to protect the baby skin.
Mixed load consisting of textiles made of cotton and synthetics.
Able to clean lightly soiled cotton laundry, at a nominal temperature
of 20 °C.
The standard washing programs,they are suitable to clean
normally soiled cotton laundry efficiently.
Steam is applicable for daily laundries.
The steam can deeply penetrate the fiber, which effectively
eliminate bacterias and germs, preventing odors and protecting
your health.
Specially for jeans.
Washing the activewear.
Hand or machine-washable wool or richwool textiles.Especially
gentle wash programme to prevent shrinkage, longer
programme pauses (textiles rest in wash liquor).
Spins and drains the water.
This procedure defaults to 45’, press the “Boost” to switch to 15’,
which is suitable for washing few and not very dirty clothes
quickly. Sometimes, after the Quick 15’ procedure is completed,
the moisture content of clothes is high.
Specially set in this machine to clean the drum and tube. It
applys 90 °C high temperature sterilization to make the
clothes washing more green. When this programme is
performed, the clothes or other washing cannot be added.
When proper amount of chlorine bleaching agent is put in,
the barrel cleaning effect will be better. The customer can use
this programme regularly according to the need.
Baby Care
20℃
Synthetic
Drum Clean
ECO Wash
21
Jeans
Sports
Steam Hygiene
Quick 45 /15’ ’
Wool
Spin Only
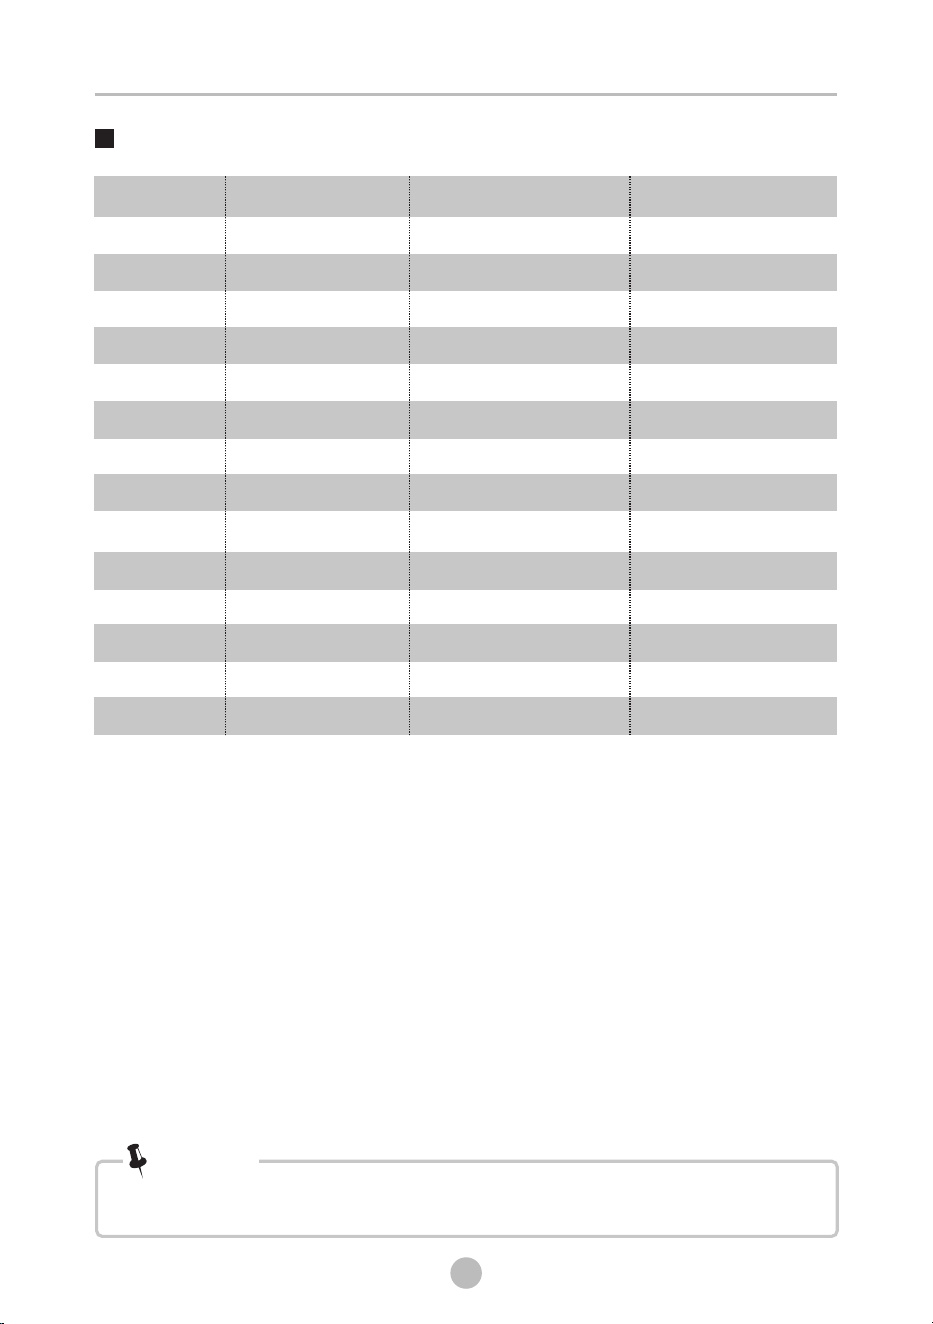
Programme
Load(kg)
Default Time
8.0
8.0
8.0
4.0
8.0
4.0
–
8.0
4.0
4.0
8.0
OPERATION
22
Quick 45’/15’
Steam Hygiene
ECO Wash
20°C
Wool
Spin Only
Drum Clean
Jeans
Sports
Baby Care
Mix
Synthetic
Cotton
2.0
0:45
2:28
0:59
1:01
2.0
1:07
0:12
1:18
8.0
1:35
0:47
2:01
0:58
1:25
1:28
Cotton, Mix, Synthetic are auto Weighting programs. When these 3 programs are
selected, the washing machine will automatically adjust the appropriate water level
and wash time according to the weight of the laundry during the washing process.
•
Default Temp.(℃)
20
60
30
20
40
–
90
30
20
60
40
40
40
• Energy test program: ECO Wash .
Speed: the highest speed; Temp. : 60℃,Other as the default.
Half load for 8.0kg machine:4.0kg.
• “ECO Wash ” is the standard washing programs to which the information in the
label and the fiche relates, and they are suitable to clean normally soiled
cotton laundry and that they are the most efficient programmes in terms of
combined energy and water consumptions for washing that type of cotton laundry,
that the actual water temperature may differ from the declared cycle temperature.
Washing Programmes Table
maybe different with the parameters in above mentioned table.
• The parameters in this table are only for user's reference. The actual parameters
Note!
• Always unplug the appliance and close the water tap before cleaning and
maintenance.
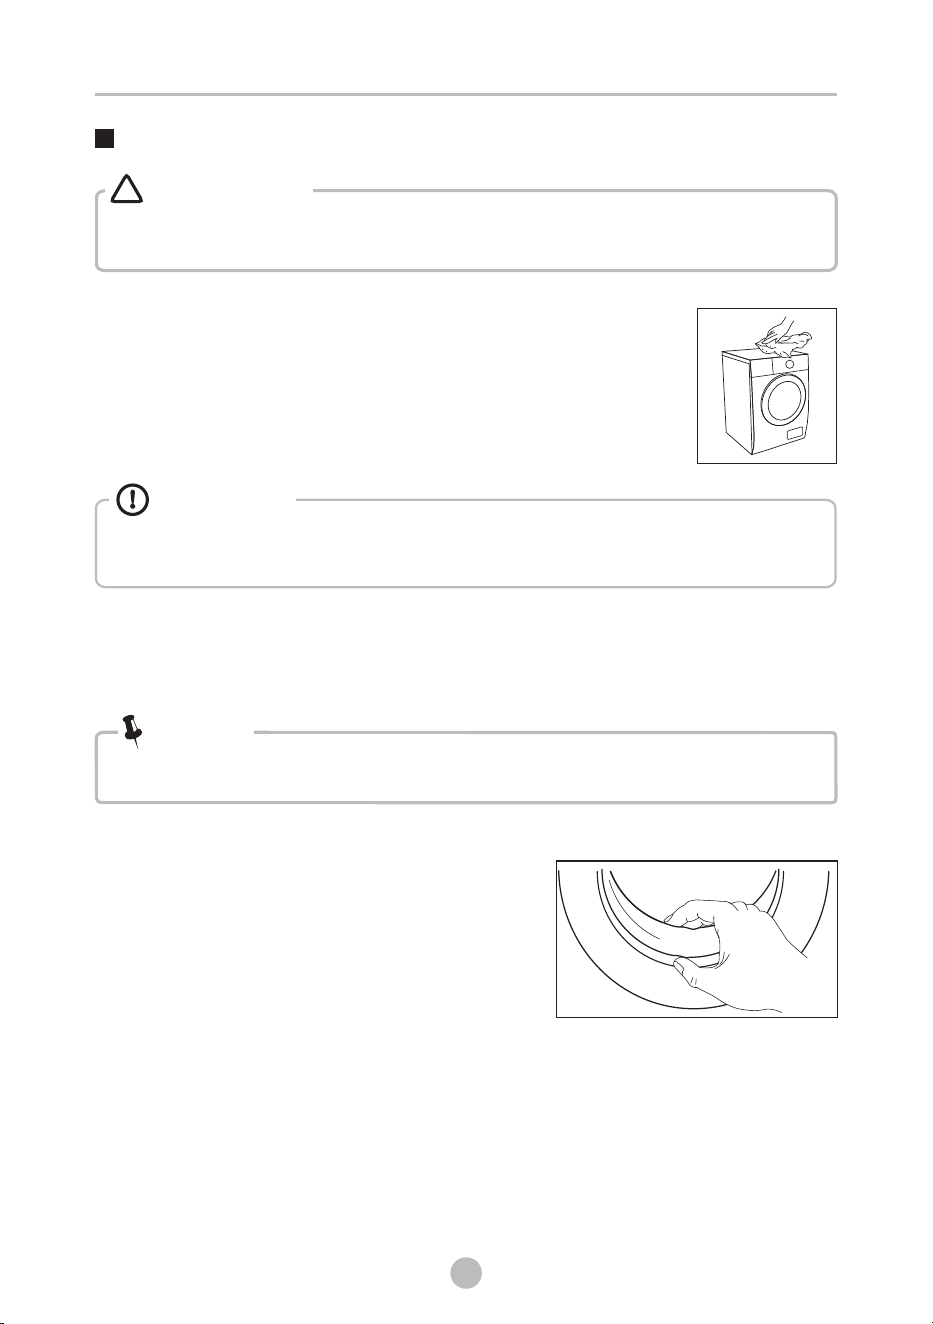
Cleaning the Cabinet
Cleaning the Drum
• Keep any laundry away from the machine while cleaning the drum.
Cleaning the Door Seal and Glass
Warning!
!
Note!
Cleaning and Care
Any rust stains left inside the drum by metal articles must be removed immediately
using chlorine-free detergents. Never use steel wool for cleaning the drum!
Proper maintenance on the washing machine can extend its
working life. The surface can be cleaned with diluted
non-abrasive neutral detergents when necessary. If there is
any water overflow, use a cloth to wipe it off immediately.
Never use sharp items to clean the appliance.
MAINTENANCE
Caution!
• Never use abrasive or caustic agents. formic acids or its diluted solvents or
similar substances, like alcohol or chemical products.
Wipe the glass and seal after each wash
to remove lint and stains. If lint builds up it
can cause leakages.
Remove any coins, buttons and other objects
from the seal after each wash.
Clean the Door Seal and Glass every month to
ensure the normal operation of the appliance.
23
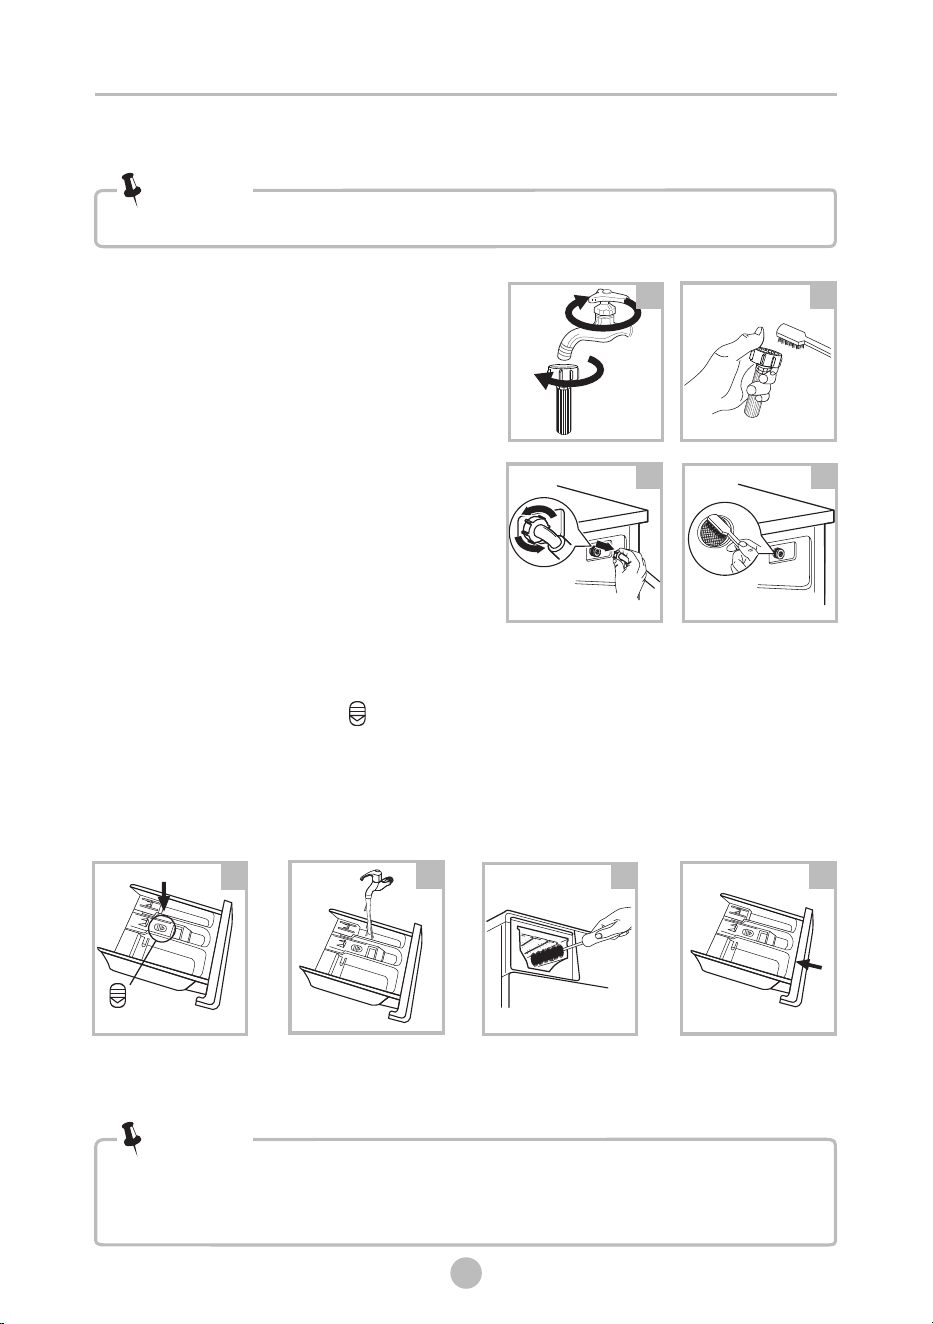
1. Close the tap and remove the water supply
hose from it.
2. Clean the filter with a brush.
3. Unscrew the water supply hose from the
backside of the machine. Pull out the filter
with long nose pliers.
4. Use a brush to clean the filter.
5. Reinstall the filter to the water inlet and
reconnect the water supply hose.
6. Clean the Inlet filter every 3 months
to ensure the normal operation of the
appliance.
Cleaning the Inlet Filter
• Diminishing water flow is a sign that the filter need to be cleaned.
Note!
Clean The Detergent Dispenser
• Do not use abrasive or caustic agents to clean plastic parts.
• Clean the detergent dispenser every 3 months to ensure the normal operation of the
appliance.
Press the release and
remove the dispenser
drawer
Clean the dispenser
drawer and the softener
cover under water
Clean the recess with
an soft brush
Insert the dispenser
drawer
Note!
1. Press down the release [ ] on the softener cover and pull the dispenser
drawer out of the recess. Clean the inside of the recess with a brush.
2. Lift the softener cover off the dispenser drawer and wash both items with water.
3. Restore the softener cover and push the drawer back into the recess.
1
3
4
2
1 2
3 4
MAINTENANCE
24
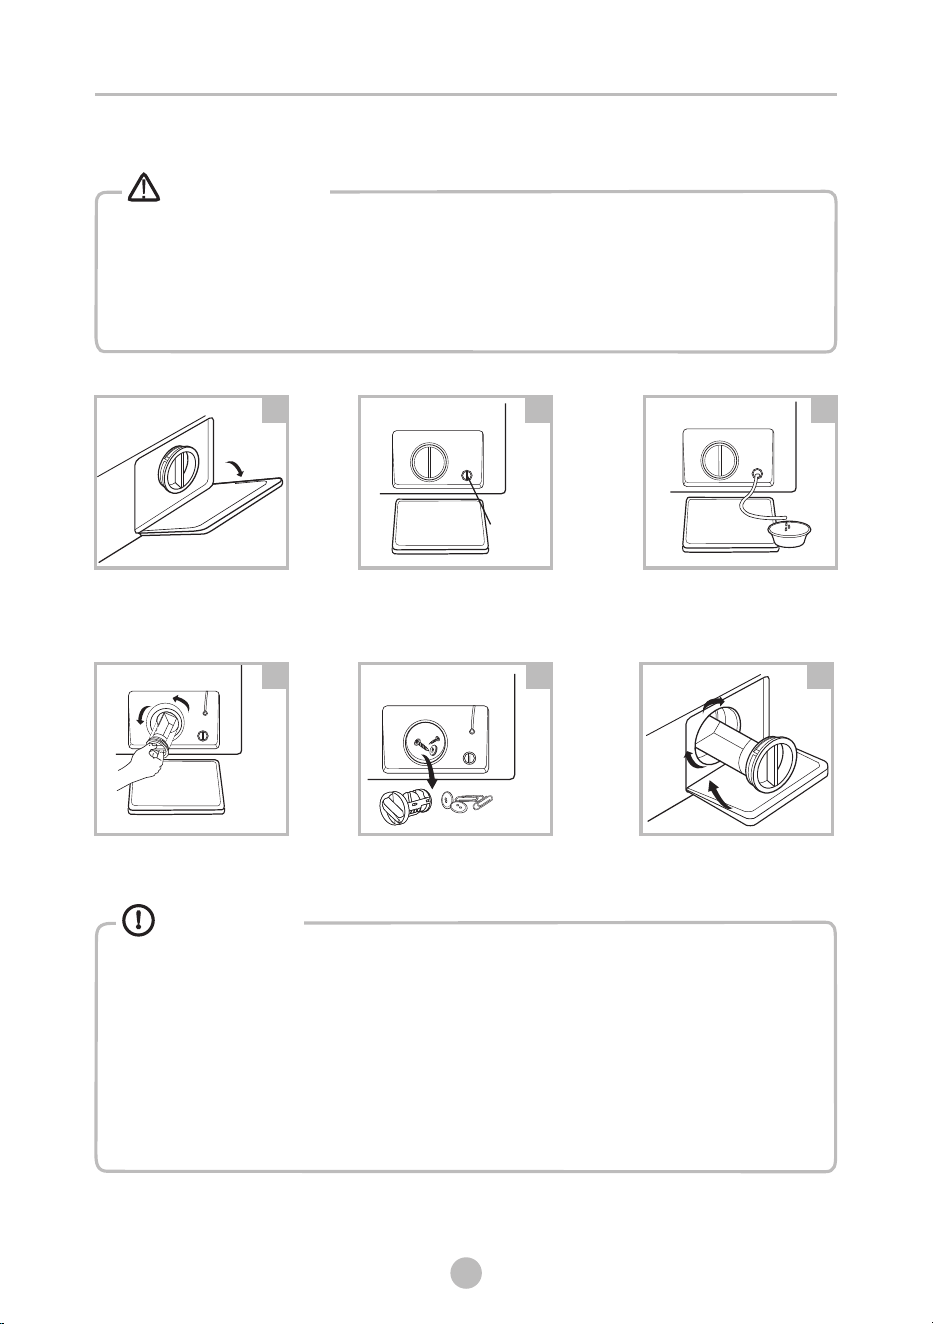
Cleaning the Drain Pump Filter
•
and unplug it before cleaning the drain pump filter.
• Be careful of hot water. Allow the water to cool down. Risk of scalding!
• Clean the filter periodically every 3 months to ensure the normal operation of the
appliance.
Make sure that the machine has finished the washing cycle and is empty. Switch it off
Warning!
MAINTENANCE
25
• Make sure that valve cap and emergency drain hose are reinstalled properly, cap
plates should be inserted aligning to hole plates otherwise water may leak.
• Some machines don’t have emergency drain hose, so step 2 and step 3 can be skipped.
Rotate lower cover cap directly to make water run into basin.
• When the appliance is in use and depending on the programme selected there can
be hot water in the pump. Never remove the pump cover during a wash cycle, always
wait until the appliance has finished the cycle, and is empty. When replacing the
cover, ensure it is securely re-tightened.
Caution!
Open the lower cover cap
Rotate 90°C and pull out
the emergency drain hose,
and take off the hose cap
Open the filter by turning
to the counter clockwise
Remove extraneous matter
1
2
3
Close the lower cover cap
6
5
4
Emergency
drain hose
After water runs out,reset
the drain hose
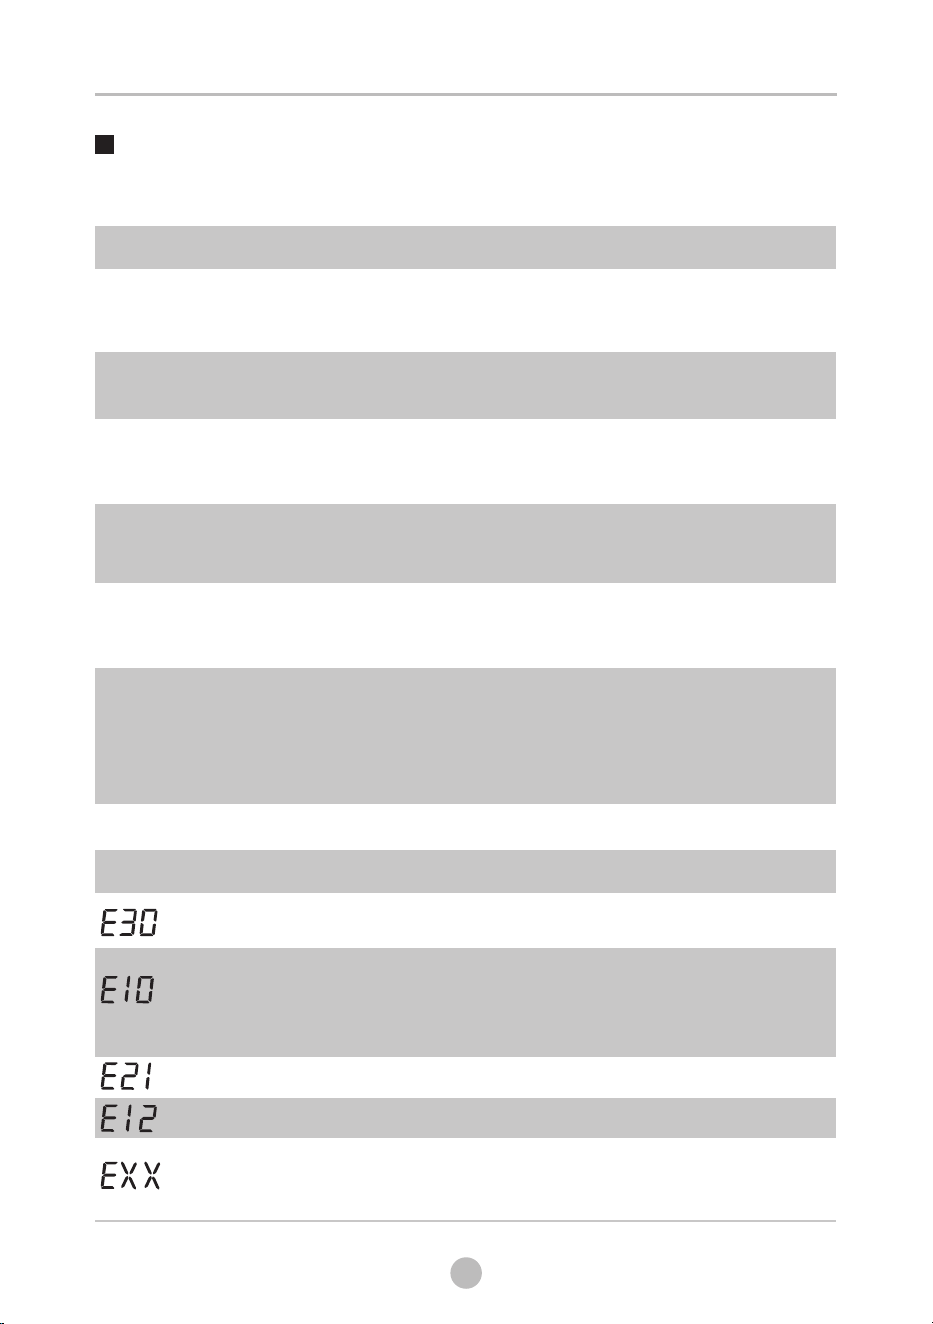
Description
Possible cause
Solution
Check if the water pressure
is high enough.
Straighten the water pipe.
Clean the inlet valve filter.
Check the drain hose for blockage.
Water injecting
problem during
wash cycle.
Overtime water draining
Restart the appliance. If problem
persists, please contact the
customer service.
Others
Water overflow
Restart the appliance.
Close the door properly and
restart.
Door is not closed properly
Trouble Shooting
Whenever there is a problem with the appliance, check if you can solve it following
the tables below. If the problem persists, please contact the customer service.
Description
Possible cause
Solution
Close the door properly and
restart.
Check the laundry.
Door is not closed properly.
Clothes are stuck.
Safety protection
is activated.
Disconnect the power and
restart.
Water leakage
Connections are
not tight enough.
Check and fasten the water inlet
pipe.
Check and clean the outlet hose.
Clean and wipe the detergent
dispenser dry.
Abnormal noise
Check if the fixing bolts have
been removed
Make sure the appliance is
installed on a solid and level
floor.
Indicator or display
does not work
PC board or harness have
connection problems.
Switch off the power and check
if the mains plug is connected
properly.
Appliance does
not start
Detergent residues
in the detergent
dispenser
Detergent is damp
and/or clotted.
Door can´t be
opened
Fixing bolts still in place.
Floor is not solid or level.
Error Codes
MAINTENANCE
26
Customer Service
In case of questions please contact our customer service at:
Risk of electric shock
• Never try repair an appliance which is defective of presumed to be defective.
You may put your own and future users' lives in danger.Only authorised specialists are
allowed to carry out this repair work.
• Improper repair will void the warranty and subsequent damages can't be recogniced!
Warning!
!
Spare part for your appliance are available for a minimum of 10 years.
Transport
IMPORTANT STEPS WHEN MOVING THE APPLIANCE
•
• Check, if the door and the detergent dispenser are closed properly.
• Remove the water inlet pipe and the outlet hose from the house installations.
• Let the water drain completely from the appliance (see “Maintenance Cleaning the
drain pump filter”)
• Important: Re-install the 4 transport bolts in the back of the appliance.
• This appliance is heavy. Transport with care. Never hold any protruding part of the
machine when lifting. The machine door cannot be used as a handle.
Unplug the appliance and close the water inlet tap.
MAINTENANCE
27
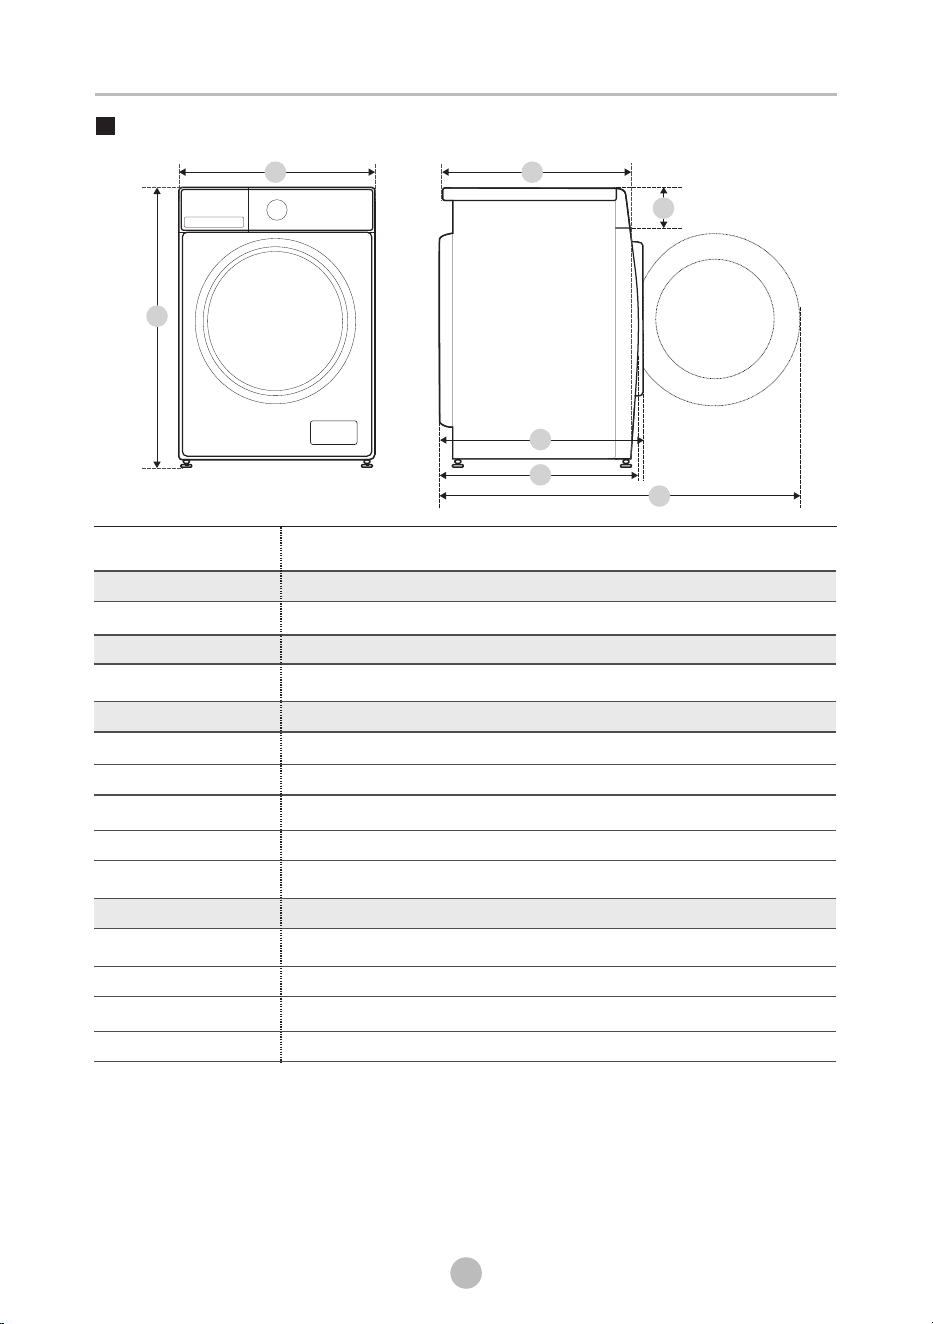
Model
Technical Specifications
AWM8000W/ AWM8000GB
MAX.Current
Standard Water Pressure
Power Supply
220-240V~,50Hz
0.05MPa~1MPa
10A
Washing Capacity
Dimension
A
B
C
Weight
Rated Power
Reference Dimension
D
E
F
G
8.0kg
595mm
850mm
475mm
63kg
1950W
540mm
521mm
985mm
135mm
MAINTENANCE
28
A
B
E
F
D
G
C

MAINTENANCE
29
Testing Methods
Model: AWM8000W/ AWM8000GB
ADDITIONAL INFORMATION FOR Standard performance TESTING:(
)
1. Water connections:Cold water connection
2. Water supply pressure: 320 kPa
3. Energy Warm wash Program: ECO Wash, Display:6:29
4. Detergent type: Drum detergent
5. Detergent quantity: Default
6. Adding detergent:
The detergent is dissolved and added as Paragraph B7.3 of AS/NZS 2040.1
The detergent shall be dissolved in 1 L of water
7. Anti-sudsing agent: Max
8. Test load mass: 8.0kg
9. Water consumption: 68L
10.Test Voltage:220-240V~,50Hz
AS/NZS 2040.1:2021
+A1:2025
60℃, Speed 1400,

Rev.13052026
Warranty Card
Worldwide Appliances Pty Limited
A.B.N. 45868077422
48-50 Moore Street, Leichhardt N.S.W 2040
Post:
Locked Bag 3000, Annandale, N.S.W 2038
P: 1300 694 583
WARRANTY REGISTRATION
Your ongoing satisfaction with your artusi
product is important to us. We ask that you
complete the enclosed Warranty Registration
Card and return it to us so that we have a record
of the artusi product purchased by you.
PRIVACY
Worldwide Appliances respects your
privacy and is committed to handling your
personal information in accordance with the
National Privacy Principles and the Privacy Act
1988 (Cth). A copy of the Worldwide Appliances
Privacy Policy is available at
www.artusi.com.au. Worldwide Appliances will
not disclose any personal information set out in
the Warranty Registration Card (“Personal
Information”) without your consent unless
required by:
1. law;
2. any Worldwide Appliances related company;
3. any service provider which provide services
to artusi or assist artusi in providing services
(including repair and warranty services) to
customers. Our purpose in collecting the
Personal Information is
to keep a record of the artusi product purchased
by you, in order to provide a better warranty
service to you in the unlikely event that there is
a problem with your artusi product. Worldwide
Appliances may contact you at any one or more
of the address, email address or telephone
numbers set out in the Warranty Registration
Card. Please contact artusi on 1300 694
583 should you not wish to be contacted by
Worldwide Appliances.
WARRANTY
1. Warranty
Worldwide Appliances warrants that each artusi
product will remain, for a period of either 12
months or 24 months of warranty. All Warranties
are valid from the original date of purchase, And
warranty claims must be accompanied by the
proof of purchase.
24 months warranty products:
All Built-in Appliances – Limited to Ovens,
Gas, Induction and Electric Cooktops, and All
Rangehoods. Freestanding Cookers - Gas and
Electric Models (900mm Width).
artusi.com.au
Dishwashers - Freestanding, Fully Integrated,
Semi Integrated and built-in. All Wine coolers. All
Dryers. Freestanding Cookers - Gas and Electric
Models in 50cm, 54cm and 60cm Widths
Portable Appliances* – Benchtop Models and
Portable Gas Models
2. What is not Covered by the Warranty.
The Warranty does not apply if an artusi product
is defective by a factor other than a defect arising
in the manufacture of the artusi product, including
but not limited to:
(a) damage through misuse (including failure
to maintain, service or use with proper care),
neglect, accident or ordinary wear and tear
(including deterioration of parts and accessories
and glass breakage);
(b) use for purpose for which the artusi product
was not sold or designed;
(c) use or installation which is not in accordance
with any specied instructions for use or
installation;
(d) use or operation after a defect has occurred or
been discovered;
(e) damage through freight, transportation or
handling in transit (other than when Worldwide
Appliances is responsible);
(f) damage through exposure to chemicals, dusts,
residues, excessive voltage, heat, atmospheric
conditions or other forces or environmental
factors outside the control or Worldwide
Appliances;
(g) repair, modication or tampering by the
purchaser or any person other than Worldwide
Appliances, an employee of Worldwide
Appliances or an authorised artusi service
contractor*;
(h) use of parts, components or accessories
which have not been supplied or specically
approved by artusi.
(i) damage to surface coatings caused by cleaning
or maintenance using products not recommended
in the artusi product handbook provided to the
purchaser upon purchase of the artusi product;
(j) damage to the base of an electric oven due to
items having been placed on the base of the oven
cavity or covering the base, such as aluminium
foil (this impedes the transfer of heat from the
element to the oven cavity and can result in
irreparable damage); or
(k) damages, dents or other cosmetic
imperfections not aecting the performance of the
artusi in respect of an artusi product purchased
as a “factory second” or from display
The Warranty does not extend to light globes
used in artusi products.
3. Domestic Use
Each artusi product is made for domestic use.
This Warranty may not extend to artusi products
used for commercial purposes.
Continued over...

DON’T FORGET TO REGISTER YOUR
WARRANTY ONLINE NOW AT:
wwa.com.au/warranty-registration
Rev.13052026
artusi.com.au
4. Time for Claim under the Warranty
You must make any claim under this Warranty
within twenty eight (28) days after the occurrence
of an event which gives rise to a claim pursuant
to the Warranty, by booking a service call on the
telephone number below.
5. Proof of Purchase
Customers must retain proof of purchase in order
to be eligible to make a warranty claim in respect
of an artusi product.
6. Claiming under the Warranty
Customers will bear the cost of claiming under
this Warranty unless Worldwide Appliances
determines the expenses are reasonable, in which
case the customer must claim those expenses
by providing written evidence of each expense
to Worldwide Appliances at the address on the
Warranty Registration Card.
7. Statutory Rights
(a) These terms and conditions do not a ect your
statutory rights.
(b) The limitations on the Warranty set out in this
document do not exclude or limit the application
of the consumer guarantees set out in the Act or
any other equivalent or corresponding legislation
in the relevant jurisdiction where to do so would:
(i) contravene the law of the relevant jurisdiction;
or
(ii) cause any part of the Warranty to be void.
(c) Worldwide Appliances excludes indirect or
consequential loss of any kind (including, without
limitation, loss of use of the artusi product) and
(other than expressly provided for in these terms
and conditions) subject to all terms,
conditions and warranties implied by custom, the
general law, the Act or other statute.
(d) The liability of Worldwide Appliances to you
for a breach of any express or non-excludable
implied term, condition or warranty is limited at
the option of Worldwide Appliances to:
(i) replacing or repairing the defective part of the
artusi product;
(ii) paying the cost of replacing or repairing the
defective part of the artusi product;
(iii) replacing the artusi product; or
(iv) paying the cost of replacing the artusi
product.
(e)
Our goods come with guarantees that cannot
be excluded under the Australian Consumer
Law. You are entitled to a replacement or refund
for a major failure and for compensation for any
other reasonably foreseeable loss or damage.
You are also entitled to have the goods repaired
or replaced if the goods fail to be of acceptable
quality and the failure does not amount to a
major failure.
8. Defects
Any part of an artusi product deemed to be
defective and replaced by Worldwide Appliances
is the property of Worldwide Appliances.
Worldwide Appliances reserves the right to
inspect and test artusi products in order to
determine the extent of any defect and the
validity of a claim under the Warranty.
All warranty service calls must be booked via
the online service request form:
wwa.com.au/#asr
01082016
Warranty Card continued
Rev.13052026
NOTES
NOTES
DISCLAIMER
Worldwide Appliances PTY LTD, trading as ARTUSI, is continually seeking ways to improve the design specications, aesthetics and production tech-
niques of its products. As a result alterations to our products and designs take place continually. Whilst every effort is made to produce information
and literature that is up to date, this brochure should not be regarded as an infallible guide to the current specications, nor does it constitute an offer
for the sale of any particular product. Product dimensions indicated in our literature is indicative only. Actual product only should be used to dene
dimension cutouts. Distributors, and retailers are not agents of ARTUSI and are not authorised to bind ARTUSI by any express or implied undertaking
or representation.
artusi.com.au
FOLLOW US ON:
NSW & ACT (Head Of!ce)
48-50 Moore Street
Leichhardt
Victoria
2r/131 Church Street
Hawthorn
QLD
Contact
head ofce
WA & NT
Contact
head ofce
Australia National Telephone Number 1300 694 583
Our showrooms opening hours in each state are available on our website
/artusi_kitchen_laundry_outdoor
/au.linkedin.com/c
ompany/worldwideappliances