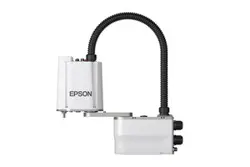

Industrial Robot: SCARA Robots
GX series Manual
Original instructions
©Seiko Epson Corporation 2021-2025
Rev.11
ENM253R7146F

Table of Contents
1. Introduction
13
1.1 Introduction
14
1.2 Trademarks
14
1.3 Terms of Use
14
1.4 Manufacturer
14
1.5 Contact Information
14
1.6 Disposal
15
1.7 Before Use
15
1.8 Manual Types for This Product
15
2. GX1 Manipulator
17
2.1 Safety
18
2.1.1 Conventions Used in This Manual
18
2.1.2 Design and Installation Safety
19
2.1.2.1 Strength of the Ball Screw Spline
19
2.1.3 Operation Safety
20
2.1.4 Emergency Stop
21
2.1.5 Safeguard (SG)
21
2.1.6 Arm Movement Method in the Emergency Stop State
22
2.1.7 ACCELS Setting for CP Motion
24
2.1.8 Warning Labels
25
2.1.8.1 Warning Labels
25
2.1.8.2 Information Labels
25
2.1.8.3 Labelled Locations
26
2.1.9 Responses for Emergencies or Malfunctions
27
2.1.9.1 When a Collision with the Manipulator Occurs
27
2.1.9.2 Entanglement with the Manipulator
27
2.2 Specifications
29
2.2.1 Model Name GX1-C
29
2.2.2 Names of Parts and Their Dimensions
31
2.2.2.1 4-Axis specifications
31
2.2.2.2 3-Axis specifications
35
2.2.3 Specifications Table
38
Industrial Robot: SCARA Robots GX series Manual Rev.11
2

2.2.4 How to Set the Model
38
2.3 Environment and Installation
39
2.3.1 Environment
39
2.3.2 Base Table
40
2.3.3 Manipulator Mounting Dimensions
42
2.3.4 From Unpacking to Installation
43
2.3.4.1 Safety Information for the Flow from Unpacking to Installation
43
2.3.4.1.1 Standard specifications
44
2.3.4.2 Cleanroom & ESD specifications
46
2.3.5 Connecting the Cables
46
2.3.6 User Wires and Pneumatic Tubes
48
2.3.6.1 Electrical Wires
48
2.3.6.2 Pneumatic Tubes
48
2.3.7 Relocation and Storage
50
2.3.7.1 Safety Information for Relocation and Storage
50
2.4 Setting the Hand
53
2.4.1 Installing the Hand
53
2.4.2 Weight and Inertia Settings
54
2.4.2.1 Weight Setting
54
2.4.2.1.1 Weight of Load Attached to Shaft
55
2.4.2.1.2 Weight of Load Attached to Arm
55
2.4.2.1.3 Automatic Speed Correction at Weight Setting
55
2.4.2.1.4 Automatic Acceleration/Deceleration Correction at Weight Setting
56
2.4.2.2 Inertia Setting
56
2.4.2.2.1 Moment of Inertia and Inertia Setting
56
2.4.2.2.2 Moment of Inertia of Load Attached to Shaft
56
2.4.2.2.3 Automatic Acceleration/Deceleration Correction of Joint #4 at Inertia (Moment of Inertia)
Setting
57
2.4.2.2.4 Eccentricity and Inertia Setting
57
2.4.2.2.5 Eccentricity of Load Attached to Shaft
58
2.4.2.2.6 Automatic Acceleration/Deceleration Correction at Inertia (Eccentricity) Setting
58
2.4.2.2.7 Calculating the Moment of Inertia
58
2.4.3 Safety Information for Auto Acceleration of Joint #3
59
2.4.3.1 Automatic Acceleration/Deceleration Correction by Shaft Position
60
Industrial Robot: SCARA Robots GX series Manual Rev.11
3

2.5 Work Envelope
60
2.5.1 Work Envelope Setting by Pulse Range
61
2.5.1.1 Joint #1 Maximum Pulse Range
61
2.5.1.2 Joint #2 Maximum Pulse Range
62
2.5.1.3 Joint #3 Maximum Pulse Range
62
2.5.1.3.1 Joint #4 Maximum Pulse Range
63
2.5.2 Setting the Work Envelope by Mechanical Stops
63
2.5.2.1 Setting the Mechanical Stops of Joints #1 and #2
64
2.5.2.2 Setting the Mechanical Stop of Joint #3
67
2.5.3 Setting the Rectangular Range in the XY Coordinate System of the Manipulator
67
2.5.4 Standard Work Envelope
67
3. GX4 Manipulator
72
3.1 Safety
73
3.1.1 Conventions Used in This Manual
73
3.1.2 Design and Installation Safety
74
3.1.2.1 Strength of the Ball Screw Spline
74
3.1.3 Operation Safety
75
3.1.4 Emergency Stop
76
3.1.5 Safeguard (SG)
77
3.1.6 Arm Movement Method in the Emergency Stop State
78
3.1.7 ACCELS Setting for CP Motion
79
3.1.8 Warning Labels
81
3.1.8.1 Warning Labels
81
3.1.8.2 Information Labels
81
3.1.8.3 Labelled Locations
82
3.1.9 Responses for Emergencies or Malfunctions
84
3.1.9.1 When a Collision with the Manipulator Occurs
84
3.1.9.2 Entanglement with the Manipulator
84
3.2 Specifications
86
3.2.1 Model Name GX4-A
86
3.2.2 Model Name GX4-B
90
3.2.3 Model Name GX4-C
93
3.2.4 Names of Parts and Their Dimensions
96
3.2.4.1 Table Top Mounting Specifications
96
3.2.4.1.1 Cable Mounting Direction: Standard
96
Industrial Robot: SCARA Robots GX series Manual Rev.11
4

3.2.4.1.2 Cable Mounting Direction: Cable Routing from Bottom Side
103
3.2.4.2 Multiple Mounting Specifications
109
3.2.5 Specifications Table
115
3.2.6 How to Set the Model
115
3.3 Environment and Installation
116
3.3.1 Environment
116
3.3.2 Base Table
117
3.3.3 Manipulator Mounting Dimensions
119
3.3.4 From Unpacking to Installation
121
3.3.4.1 Safety Information for the Flow from Unpacking to Installation
121
3.3.4.2 Table Top Mounting Specifications
123
3.3.4.3 Multiple Mounting Specifications
124
3.3.4.4 Cleanroom & ESD Specifications
126
3.3.5 Connecting the Cables
127
3.3.6 User Wires and Pneumatic Tubes
129
3.3.6.1 Electrical Wires
130
3.3.6.2 Pneumatic Tubes
130
3.3.7 Relocation and Storage
134
3.3.7.1 Safety Information for Relocation and Storage
134
3.3.7.2 Table Top Mounting Specifications
135
3.3.7.3 Multiple Mounting Specifications
138
3.4 Setting the Hand
140
3.4.1 Installing the Hand
140
3.4.2 Attaching Cameras and Valves
141
3.4.3 Weight and Inertia Settings
143
3.4.3.1 Weight Setting
143
3.4.3.1.1 Weight of Load Attached to Shaft
144
3.4.3.1.2 Weight of Load Attached to Arm
144
3.4.3.1.3 Automatic Speed Correction at Weight Setting
145
3.4.3.1.4 Automatic Acceleration/Deceleration Correction at Weight Setting
146
3.4.3.2 Inertia Setting
148
3.4.3.2.1 Moment of Inertia and Inertia Setting
148
3.4.3.2.2 Moment of Inertia of Load Attached to Shaft
149
3.4.3.2.3 Automatic Acceleration/Deceleration Correction of Joint #4 at Inertia (Moment of Inertia)
Setting
150
Industrial Robot: SCARA Robots GX series Manual Rev.11
5

3.4.3.2.4 Eccentricity and Inertia Setting
150
3.4.3.2.5 Eccentricity of Load Attached to Shaft
151
3.4.3.2.6 Automatic Acceleration/Deceleration Correction at Inertia (Eccentricity) Setting
151
3.4.3.2.7 Calculating the Moment of Inertia
151
3.4.4 Safety Information for Auto Acceleration of Joint #3
153
3.4.4.1 Automatic Acceleration/Deceleration Correction by Shaft Position
153
3.5 Work Envelope
154
3.5.1 Work Envelope Setting by Pulse Range
155
3.5.1.1 Joint #1 Maximum Pulse Range
155
3.5.1.2 Joint #2 Maximum Pulse Range
157
3.5.1.3 Joint #3 Maximum Pulse Range
159
3.5.1.3.1 Joint #4 Maximum Pulse Range
159
3.5.2 Setting the Work Envelope by Mechanical Stops
160
3.5.2.1 Setting the Mechanical Stops of Joints #1 and #2
161
3.5.2.2 Setting the Mechanical Stop of Joint #3
165
3.5.3 Setting the Rectangular Range in the XY Coordinate System of the Manipulator
168
3.5.4 Standard Work Envelope
168
4. GX8 Manipulator
174
4.1 Safety
175
4.1.1 Conventions Used in This Manual
175
4.1.2 Design and Installation Safety
176
4.1.2.1 Strength of the Ball Screw Spline
176
4.1.3 Operation Safety
177
4.1.4 Emergency Stop
178
4.1.5 Safeguard (SG)
178
4.1.6 Arm Movement Method in the Emergency Stop State
179
4.1.7 ACCELS Setting for CP Motion
181
4.1.8 Warning Labels
182
4.1.8.1 Warning Labels
182
4.1.8.2 Information Labels
182
4.1.8.3 Labelled Locations
182
4.1.9 Responses for Emergencies or Malfunctions
184
4.1.9.1 When a Collision with the Manipulator Occurs
184
4.1.9.2 Entanglement with the Manipulator
184
Industrial Robot: SCARA Robots GX series Manual Rev.11
6

4.2 Specifications
186
4.2.1 Model Name GX8-A
186
4.2.2 Model Name GX8-B
193
4.2.3 Model Name GX8-C
200
4.2.4 Names of Parts and Their Dimensions
206
4.2.4.1 Table Top Mounting Specifications
206
4.2.4.1.1 Cable Mounting Direction: Standard
206
4.2.4.1.2 Cable Mounting Direction: Cable Routing from Bottom Side
215
4.2.4.2 Wall Mounting Specifications
223
4.2.4.3 Ceiling Mounting Specifications
232
4.2.5 Specifications Table
241
4.2.6 How to Set the Model
241
4.3 Environment and Installation
241
4.3.1 Environment
241
4.3.2 Base Table
243
4.3.3 Manipulator Mounting Dimensions
245
4.3.4 From Unpacking to Installation
247
4.3.4.1 Safety Information for the Flow from Unpacking to Installation
247
4.3.4.2 Table Top Mounting Specifications
250
4.3.4.3 Wall Mounting Specifications
253
4.3.4.4 Ceiling Mounting Specifications
254
4.3.4.5 Cleanroom & ESD-Model
257
4.3.4.6 Protected-Model
257
4.3.5 Connecting the Cables
257
4.3.6 User Wires and Pneumatic Tubes
261
4.3.6.1 Electrical Wires
261
4.3.6.2 Pneumatic Tubes
262
4.3.7 Relocation and Storage
265
4.3.7.1 Safety Information for Relocation and Storage
265
4.3.7.2 Table Top Mounting Specifications
266
4.3.7.3 Wall Mounting Specifications
269
4.3.7.4 Ceiling Mounting Specifications
273
4.4 Setting the Hand
277
4.4.1 Installing the Hand
277
4.4.2 Attaching Cameras and Valves
278
Industrial Robot: SCARA Robots GX series Manual Rev.11
7

4.4.3 Weight and Inertia Settings
281
4.4.3.1 Weight Setting
281
4.4.3.1.1 Weight of Load Attached to Shaft
282
4.4.3.1.2 Weight of Load Attached to Arm
282
4.4.3.1.3 Automatic Speed Correction at Weight Setting
283
4.4.3.1.4 Automatic Acceleration/Deceleration Correction at Weight Setting
285
4.4.3.2 Inertia Setting
287
4.4.3.2.1 Moment of Inertia and Inertia Setting
287
4.4.3.2.2 Moment of Inertia of Load Attached to Shaft
288
4.4.3.2.3 Automatic Acceleration/Deceleration Correction of Joint #4 at Inertia (Moment of Inertia)
Setting
288
4.4.3.2.4 Eccentricity and Inertia Setting
288
4.4.3.2.5 Eccentricity of Load Attached to Shaft
289
4.4.3.2.6 Automatic Acceleration/Deceleration Correction at Inertia (Eccentricity) Setting
289
4.4.3.2.7 Calculating the Moment of Inertia
289
4.4.4 Safety Information for Auto Acceleration of Joint #3
291
4.4.4.1 Automatic Acceleration/Deceleration Correction by Shaft Position
291
4.5 Work Envelope
292
4.5.1 Work Envelope Setting by Pulse Range
293
4.5.1.1 Joint #1 Maximum Pulse Range
293
4.5.1.2 Joint #2 Maximum Pulse Range
294
4.5.1.3 Joint #3 Maximum Pulse Range
296
4.5.1.4 Joint #4 Maximum Pulse Range
297
4.5.2 Setting the Work Envelope by Mechanical Stops
298
4.5.2.1 Setting the Mechanical Stops of Joints #1 and #2
299
4.5.2.2 Setting the Mechanical Stop of Joint #3
305
4.5.3 Setting the Rectangular Range in the XY Coordinate System of the Manipulator
308
4.5.4 Standard Work Envelope
308
5. GX10 GX20 Manipulators
316
5.1 Safety
317
5.1.1 Conventions Used in This Manual
317
5.1.2 Design and Installation Safety
318
5.1.2.1 Strength of the Ball Screw Spline
318
5.1.3 Operation Safety
318
Industrial Robot: SCARA Robots GX series Manual Rev.11
8

5.1.4 Emergency Stop
319
5.1.5 Safeguard (SG)
320
5.1.6 Arm Movement Method in the Emergency Stop State
321
5.1.7 ACCELS Setting for CP Motion
322
5.1.8 Warning Labels
323
5.1.8.1 Warning Labels
324
5.1.8.2 Information Labels
324
5.1.8.3 Labelled Locations
324
5.1.9 Responses for Emergencies or Malfunctions
326
5.1.9.1 When a Collision with the Manipulator Occurs
326
5.1.9.2 Entanglement with the Manipulator
326
5.2 Specifications
328
5.2.1 Model Name GX10-B/GX20-B
328
5.2.2 Model Name GX10-C/GX20-C
333
5.2.3 Names of Parts and Their Dimensions
338
5.2.3.1 Table Top Mounting Specifications
338
5.2.3.2 Wall Mounting Specifications
344
5.2.3.3 Ceiling Mounting Specifications
351
5.2.4 Specifications Table
358
5.2.5 How to Set the Model
358
5.3 Environment and Installation
358
5.3.1 Environment
358
5.3.2 Base Table
360
5.3.3 Manipulator Mounting Dimensions
362
5.3.4 From Unpacking to Installation
364
5.3.4.1 Safety Information for the Flow from Unpacking to Installation
364
5.3.4.2 Table Top Mounting Specifications
367
5.3.4.3 Wall Mounting Specifications
369
5.3.4.4 Ceiling Mounting Specifications
370
5.3.4.5 Cleanroom & ESD-Model
372
5.3.4.6 Protected-Model
372
5.3.5 Connecting the Cables
372
5.3.6 User Wires and Pneumatic Tubes
375
5.3.6.1 Electrical Wires
376
5.3.6.2 Pneumatic Tubes
376
Industrial Robot: SCARA Robots GX series Manual Rev.11
9

5.3.7 Relocation and Storage
379
5.3.7.1 Safety Information for Relocation and Storage
379
5.3.7.2 Table Top Mounting Specifications
380
5.3.7.3 Wall Mounting Specifications
382
5.3.7.4 Ceiling Mounting Specifications
385
5.4 Setting the Hand
388
5.4.1 Installing the Hand
388
5.4.2 Attaching Cameras and Valves
390
5.4.3 Weight and Inertia Settings
392
5.4.3.1 Weight Setting
392
5.4.3.1.1 Weight of Load Attached to Shaft
392
5.4.3.1.2 Weight of Load Attached to Arm
392
5.4.3.1.3 Automatic Speed Correction at Weight Setting
394
5.4.3.1.4 Automatic Acceleration/Deceleration Correction at Weight Setting
394
5.4.3.2 Inertia Setting
395
5.4.3.2.1 Moment of Inertia and Inertia Setting
395
5.4.3.2.2 Moment of Inertia of Load Attached to Shaft
395
5.4.3.2.3 Automatic Acceleration/Deceleration Correction of Joint #4 at Inertia (Moment of Inertia)
Setting
396
5.4.3.2.4 Eccentricity and Inertia Setting
396
5.4.3.2.5 Eccentricity of Load Attached to Shaft
397
5.4.3.2.6 Automatic Acceleration/Deceleration Correction at Inertia (Eccentricity) Setting
397
5.4.3.2.7 Calculating the Moment of Inertia
397
5.4.4 Safety Information for Auto Acceleration of Joint #3
399
5.4.4.1 Automatic Acceleration/Deceleration Correction by Shaft Position
399
5.5 Work Envelope
399
5.5.1 Work Envelope Setting by Pulse Range
400
5.5.1.1 Joint #1 Maximum Pulse Range
401
5.5.1.2 Joint #2 Maximum Pulse Range
401
5.5.1.3 Joint #3 Maximum Pulse Range
403
5.5.1.4 Joint #4 Maximum Pulse Range
404
5.5.2 Setting the Work Envelope by Mechanical Stops
405
5.5.2.1 Setting the Mechanical Stops of Joints #1 and #2
406
5.5.2.2 Setting the Mechanical Stop of Joint #3
410
5.5.3 Setting the Rectangular Range in the XY Coordinate System of the Manipulator
416
Industrial Robot: SCARA Robots GX series Manual Rev.11
10

5.5.4 Standard Work Envelope
416
6. Periodic Inspection
423
6.1 GX1 Manipulator Periodic Inspection
424
6.1.1 Inspection
424
6.1.1.1 Inspection Schedule
424
6.1.1.2 Inspection Details
426
6.1.2 Overhaul (Parts Replacement)
427
6.1.3 Applying Grease
427
6.1.4 Tightening the Hexagon Socket Head Cap Bolts
432
6.2 GX4 Manipulator Periodic Inspection
432
6.2.1 Inspection
432
6.2.1.1 Inspection Schedule
432
6.2.1.2 Inspection Details
434
6.2.2 Overhaul (Parts Replacement)
435
6.2.3 Applying Grease
435
6.2.4 Tightening the Hexagon Socket Head Cap Bolts
440
6.3 GX8 Manipulator Periodic Inspection
441
6.3.1 Inspection
441
6.3.1.1 Inspection Schedule
441
6.3.1.2 Inspection Details
443
6.3.2 Overhaul (Parts Replacement)
444
6.3.3 Applying Grease
444
6.3.4 Tightening the Hexagon Socket Head Cap Bolts
449
6.4 GX10/GX20 Manipulator Periodic Inspection
450
6.4.1 Inspection
450
6.4.1.1 Inspection Schedule
450
6.4.1.2 Inspection Details
452
6.4.2 Overhaul (Parts Replacement)
453
6.4.3 Applying Grease
453
6.4.4 Tightening the Hexagon Socket Head Cap Bolts
458
7. Appendix
459
7.1 Appendix A: Specifications Table
460
7.1.1 GX1
460
7.1.2 GX4
463
Industrial Robot: SCARA Robots GX series Manual Rev.11
11

7.1.3 GX8
470
7.1.4 GX10/20
476
7.2 Appendix B: Stopping Time and Stopping Distance at Emergency Stop
482
7.2.1 GX1 Stopping Time and Stopping Distance at Emergency Stop
484
7.2.2 GX4 Stopping Time and Stopping Distance at Emergency Stop
488
7.2.3 GX8 Stopping Time and Stopping Distance at Emergency Stop
494
7.2.4 GX10 Stopping Time and Stopping Distance at Emergency Stop
500
7.2.5 GX20 Stopping Time and Stopping Distance at Emergency Stop
502
7.2.6 Supplementary Information regarding the Stopping Time and Stopping Distance at Emergency Stop
504
7.2.6.1 How to check the stopping time and stopping distance in the customer’s environment
504
7.2.6.2 Commands that can be useful when measuring stopping time and stopping distance
505
7.3 Appendix C: Stopping Time and Stopping Distance When Safeguard is Open
506
7.3.1 GX1 Stopping Time and Stopping Distance When Safeguard is Open
508
7.3.2 GX4 Stopping Time and Stopping Distance When Safeguard is Open
512
7.3.3 GX8 Stopping Time and Stopping Distance When Safeguard is Open
518
7.3.4 GX10 Stopping Time and Stopping Distance When Safeguard is Open
524
7.3.5 GX20 Stopping Time and Stopping Distance When Safeguard is Open
526
7.3.6 Supplementary Information regarding the Stopping Time and Stopping Distance when the Safeguard is
Open
528
7.3.6.1 How to check the stopping time and stopping distance in the customer’s environment
528
7.3.6.2 Commands that can be useful when measuring stopping time and stopping distance
529
7.4 Appendix D: Correction Area for Arm Length Correction
530
7.4.1 GX4 Series
530
7.4.2 GX8 Series
531
7.5 Appendix E: Included Items
532
7.5.1 GX1 series
532
7.5.2 GX4 series
532
7.5.3 GX8 series
532
7.5.4 GX10/20 series
533
Industrial Robot: SCARA Robots GX series Manual Rev.11
12

1. Introduction
Industrial Robot: SCARA Robots GX series Manual Rev.11
13
1.1 Introduction
Thank you for purchasing this Epson robot system. This manual provides the information necessary for correctly using the
robot system.
Before using the system, please read this manual and related manuals to ensure correct use.
After reading this manual, store it in an easily accessible location for future reference.
Epson conducts rigorous testing and inspection to ensure that the performance of our robot systems meets our standards. Please
note that if the Epson robot system is used outside the operating conditions described in the manual, the product will not
perform up to its basic performance.
This manual describes potential hazards and problems that are foreseen. To use the Epson robot system safely and correctly, be
sure to follow the safety information contained in this manual.
1.2 Trademarks
Microsoft, Windows, and the Windows logo are either registered trademarks or trademarks of Microsoft Corporation in the
United States and/or other countries. All other company names, brand names, and product names are registered trademarks or
trademarks of their respective companies.
1.3 Terms of Use
No part of this instruction manual may be reproduced or reprinted in any form without express written permission.
The information in this document is subject to change without notice.
Please contact us if you find any errors in this document or if you have any questions about the information in this document.
1.4 Manufacturer
1.5 Contact Information
Contact information details are listed in the "Supplier" section in the following manual.
Note that the contact information may vary depending on your region.
"Safety Manual - Contact Information"
The Safety Manual is also available at the following site.
URL: https://download.epson.biz/robots/
Industrial Robot: SCARA Robots GX series Manual Rev.11
14
1.6 Disposal
When disposing of this product, please do so in accordance with the laws and regulations of your country.
1.7 Before Use
Before using this manual, be sure that you understand the following information.
Control system configuration
The GX Manipulator is made up of a combination of the following Controller and software.
Manipulator Controller Software
GX-A series RC700-D
EPSON RC+ 7.0 Ver. 7.5.1B or later
Epson RC+ 8.0
GX4-B, GX8-B series
RC700-E
EPSON RC+ 7.0 Ver.7.5.4 or later
Epson RC+ 8.0
GX10-B, GX20-B series
EPSON 7.0 Ver.7.5.4A or later
Epson RC+ 8.0
GX1-C, GX4-C, GX8-C, GX10-C, GX20-C series RC800-A Epson RC+ 8.0
Setting from the software
This manual contains the procedures for configuring the settings from the software.
Use of this software is indicated by the above mark.
Controller power on (off)
In this manual, an instruction to "Turn on (off) the Controller power" means to turn on the power for the hardware that makes
up your Controller.
Images used in this manual
The photos and illustrations of the Manipulators shown in this manual may differ in shape and appearance from your
Manipulator due to the time it was shipped, specifications, and other factors.
1.8 Manual Types for This Product
This describes the typical types of manuals for this product and presents an overview of their content.
Safety Manual
This manual contains safety-related information intended for all people who use this product. It also guides the user
through the process from unpacking to usage and the manuals that should be referred to next.
Please read this manual first.
Safety information and residual risks of robot systems
Declaration of Conformity
Training
Process from unpacking to usage
Industrial Robot: SCARA Robots GX series Manual Rev.11
15
Robot Controller Safety Function Manual
This describes the procedures for configuring the safety functions of this product and the configuration software. It is
primarily intended for those who design robot systems.
RC700-D Manual, RC700-E Manual, RC800-A Manual
This manual describes the installation of the entire robot system and explains the specifications and functions of the
Controller. It is primarily intended for those who design robot systems.
Robot system installation procedure (specific details on the process from unpacking to usage)
Controller daily inspection points
Controller specifications and basic functions
GX Series Manual
This manual describes the specifications and functions of the Manipulator. It is primarily intended for those who design
robot systems.
Manipulator installation, technical information needed for design, function and specification tables, etc.
Manipulator daily inspection points
Status Code/Error Code List
This provides the code numbers displayed on the Controller and messages displayed in the message area of the software. It
is primarily intended for those who design and program robot systems.
Epson RC+ User's Guide
This manual presents an overview of the program development software.
Epson SPEL+ Language Reference
This manual explains the robot programming language SPEL+.
Other manuals
Manuals are available for each option.
Maintenance and servicing manuals
Manuals for maintenance and servicing are not included with the product.
Maintenance should be performed by people who have received maintenance training provided by Epson and the suppliers. For
more information, please contact the supplier.
Industrial Robot: SCARA Robots GX series Manual Rev.11
16

2. GX1 Manipulator
This chapter contains information for setup and operation of the Manipulators. Please read this chapter thoroughly before
setting up and operating the Manipulators.
Industrial Robot: SCARA Robots GX series Manual Rev.11
17
2.1 Safety
The Manipulator and its related equipment should be unpacked and transported by people who have received installation
training provided by Epson and the suppliers. Also, the laws and regulations of the installation country must be followed.
Before use, please read this manual and other related manuals to ensure correct use.
After reading this manual, store it in an easily accessible location for future reference.
This product is intended for transporting and assembling parts in a safely isolated area.
2.1.1 Conventions Used in This Manual
The following symbols are used in this manual to indicate important safety information. Be sure to read the descriptions shown
with each symbol.
WARNING
This symbol indicates an imminently hazardous situation which, if operation is not performed properly, will result
in death or serious injury.
WARNING
This symbol indicates a potentially hazardous situation which, if operation is not performed properly, could result
in an injury due to electric shock.
CAUTION
This symbol indicates a potentially hazardous situation which, if operation is not performed properly, may result in
an injury or in property damage only.
Industrial Robot: SCARA Robots GX series Manual Rev.11
18
2.1.2 Design and Installation Safety
The robot system should be designed and installed by people who have received installation training provided by Epson and
the suppliers.
Design personnel should refer to the following manuals:
"Safety Manual"
"Controller Manual"
"Manipulator Manual"
Refer to the following section for the installation safety information.
Environment and Installation
Be sure to read this section and follow the safety information before installation to ensure that the installation work is
performed safely.
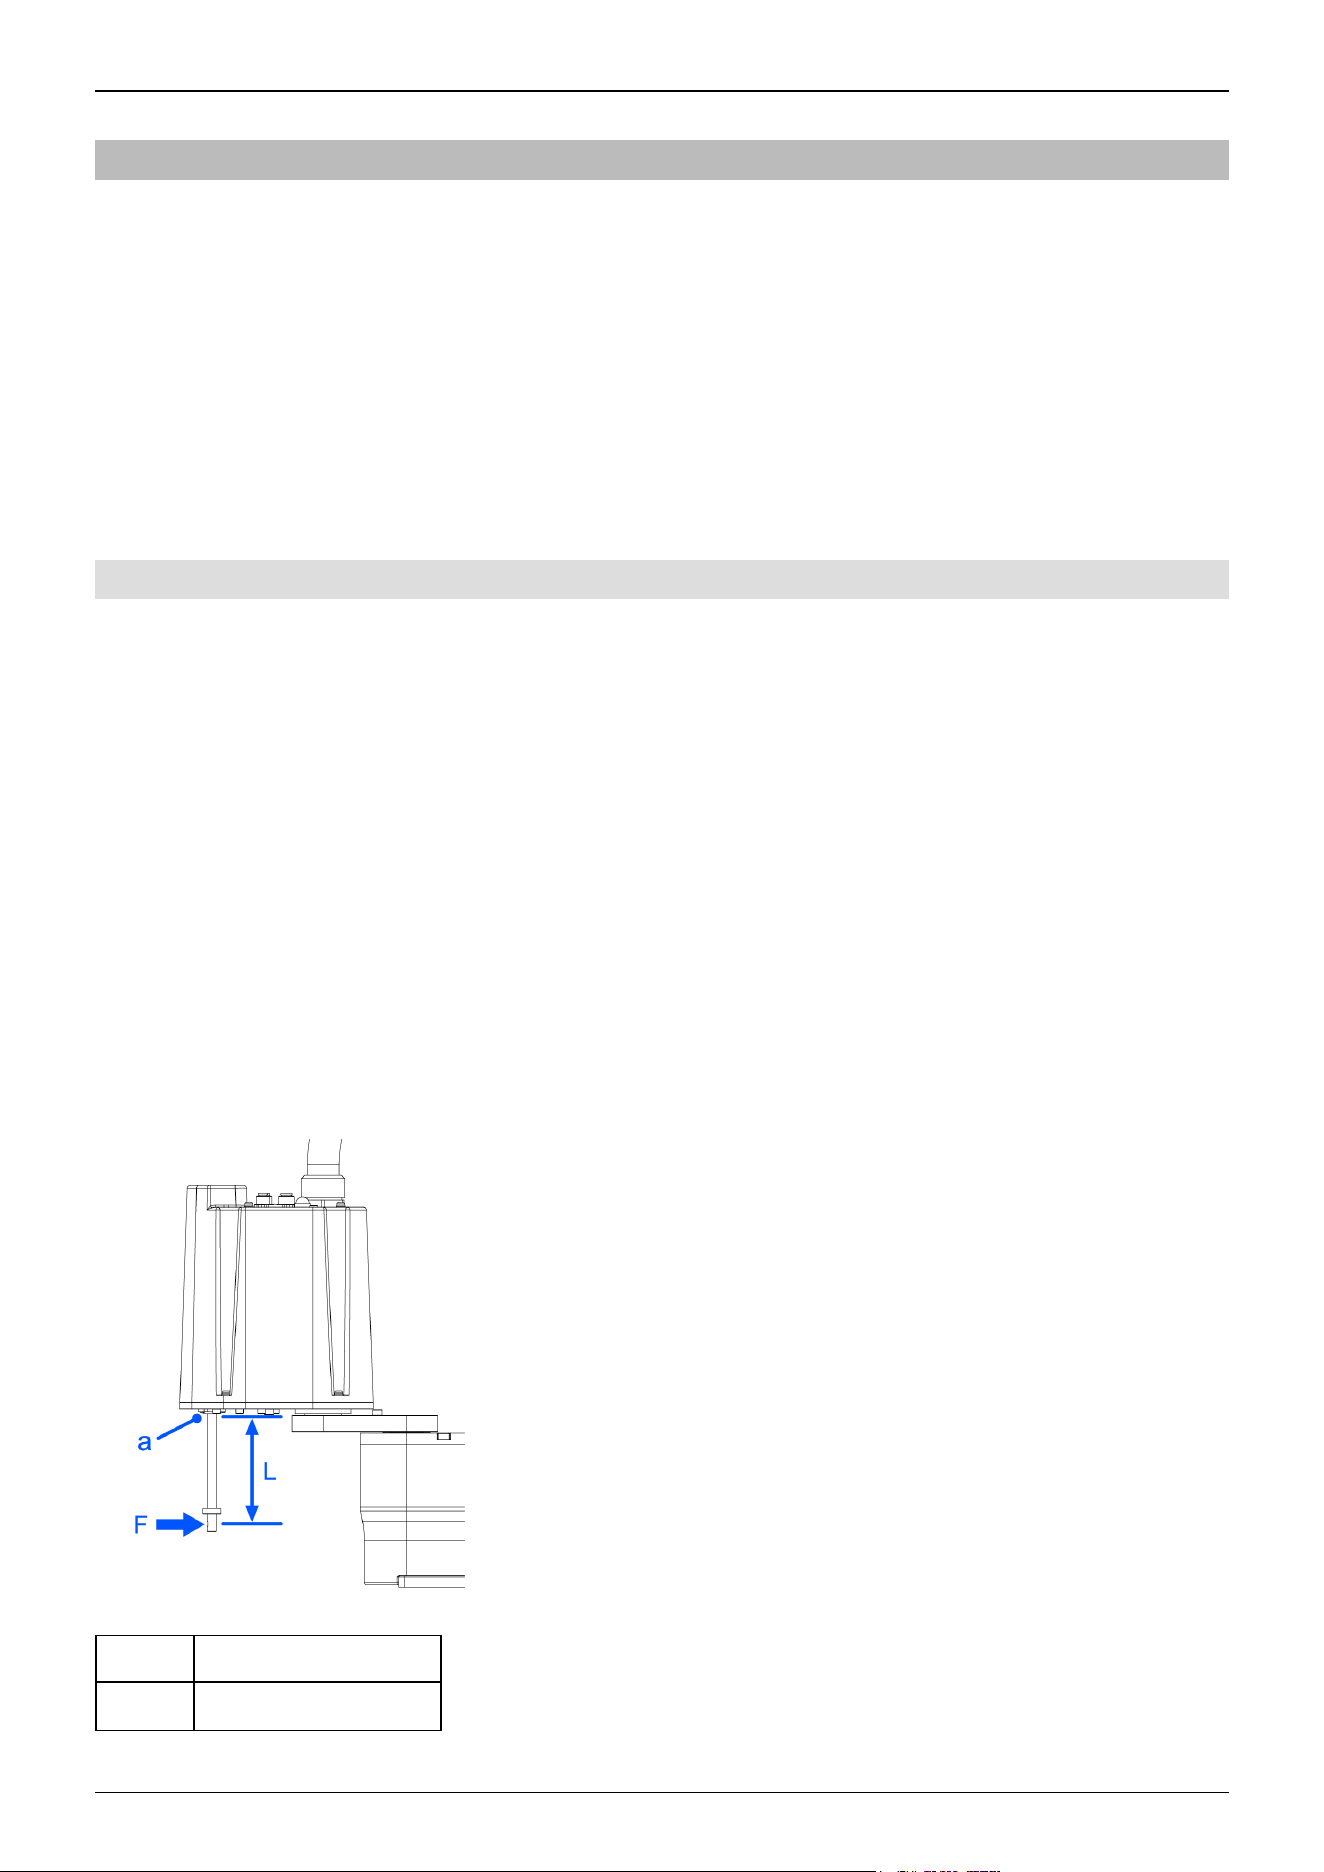
2.1.2.1 Strength of the Ball Screw Spline
If a load exceeding the allowable bending load is applied to the ball screw spline, it may not work properly due to deformation
or breakage of the shaft.
If a load exceeding the allowable value is applied to the ball screw spline, the ball screw spline unit must be replaced.
The allowable load varies depending on the distance over which the load is applied. To calculate the allowable load, refer to
the formula below.
Allowable bending moment
GX1: M=2,500 N∙mm
Example of calculation:
From the end of the spline nut
At a position of 100 mm
If a load of 25 N is applied
Moment
M=F∙L=100∙25=2,500 N∙mm
Symbol Description
a The end of the spline nut
Industrial Robot: SCARA Robots GX series Manual Rev.11
19
2.1.3 Operation Safety
The following items are safety precautions for operating personnel:
WARNING
Be sure to read the Safety Manual before use. Operating the robot system without understanding the safety
information can be extremely dangerous and may result in serious injury or severe equipment damage.
Before operating the robot system, make sure that no one is inside the safety barriers. The robot system can
be operated in the teaching operation mode even when someone is inside the safety barriers. Even though
the motion of the Manipulator is always restricted (low speed and low power) to ensure operator safety, an
unexpected movement by the Manipulator can be extremely dangerous and may cause serious safety
problems.
If the Manipulator makes any abnormal movements during operation of the robot system, do not hesitate to
immediately press the emergency stop switch.
WARNING
To perform the power supply lockout, remove the power plug. Be sure to connect the AC power cable to a
power outlet. Do not connect it directly to a factory power source.
Before performing any replacement work, inform others in the area that you are working, and then turn off the
Controller and related equipment, and unplug the power cable from the power source. Performing any work
procedure with the power turned on is extremely dangerous and may result in electric shock and/or
malfunction of the robot system.
Do not connect or disconnect the connector of the M/C cable while the Controller is turned on. There is a risk
the Manipulator may malfunction, which is extremely hazardous. Also, performing any work procedure with
the power turned on may result in electric shock and/or malfunction of the robot system.
CAUTION
As a general rule, the robot system should be operated by only one person. If it is necessary to operate with
more than one person, ensure that all personnel communicate with each other and take all necessary safety
precautions.
Joints #1, #2, and #4:
If the Manipulator is operated repeatedly with an operating angle of 5° or less, the bearings used in the joints
are likely to cause oil film shortage. Repeated operation may cause premature damage. To prevent premature
damage, operate the Manipulator to move each joint to an angle of 50° or more about once per hour.
Joint #3:
If the up-and-down motion of the hand is 10 mm or less, move the hand about half or more of its maximum
stroke about once per hour.
When the robot is operating at low speed (Speed: 5 to 20%), vibration (resonance) may occur continuously
during operation depending on the combination of the arm orientation and hand load. Vibration occurs due to
the natural vibration frequency of the arm and can be reduced by taking the following measures:
Changing the robot speed
Changing the teach points
Changing the hand load
Industrial Robot: SCARA Robots GX series Manual Rev.11
20
2.1.4 Emergency Stop
Each robot system needs equipment that will allow the operator to immediately stop the system's operation. Install an
emergency stop device by using emergency stop input from the Controller or other equipment.
Before using the emergency stop switch, be aware of the following points.
The emergency stop switch should be used to stop the Manipulator only in case of emergencies.
Besides pressing the emergency stop switch when an emergency occurs, to stop the Manipulator during program operation,
use the Pause or STOP (program stop) statements assigned to a standard I/O.
The Pause and STOP statements do not turn off motor energization, and so the brake is not locked.
To place the robot system in emergency stop mode in a non-emergency (normal) situation, press the emergency stop switch
while the Manipulator is not operating.
Do not press the emergency stop switch unnecessarily while the Manipulator is operating normally.
It could shorten the lifespan of the following components.
Brakes
The brakes will be locked, which will shorten the lifespan of the brakes due to worn brake friction plates.
Normal brake lifespan:
About 2 years (when the brakes are used 100 times/day)
or about 20,000 times
Reduction gears
An emergency stop applies an impact to the reduction gear, which can shorten its life.
If the Manipulator is stopped by turning off the Controller while it is operating, the following problems may occur.
Reduced life and damage to reduction gear
Position shift at the joints
If a power outage or other unavoidable Controller power-off occurs during Manipulator operation, check the following points
after power is restored.
Damage in reduction gear
Shifting of the joints from their proper positions
If there was any shifting, maintenance is required. For more information, please contact the supplier.
Stopping distance of emergency stop
The Manipulator during operation cannot stop immediately after the emergency stop switch is pressed. Also, the stopping time
and movement distance vary depending on the following factors.
Hand weight, WEIGHT setting, ACCEL setting
workpiece weight, SPEED setting, movement posture, etc.
For the stopping time and movement distance of the Manipulator, refer to the following section.
Appendix B: Stopping Time and Stopping Distance at Emergency Stop
2.1.5 Safeguard (SG)
To maintain a safe working zone, safety barriers must be set up around the Manipulator, and safeguards must be installed at the
entrance and exit of the safety barriers.
The term "safeguard" as used in this manual refers to a safety device with an interlock that allows entry into the safety barriers.
Specifically, this includes safety door switches, safety barriers, light curtains, safety gates, safety floor mats, and so on. The
Industrial Robot: SCARA Robots GX series Manual Rev.11
21
safeguard is an input that informs the Robot Controller that an operator may be inside the safeguard area. You must assign at
least one Safeguard (SG) in Safety Function Manager.
When the safeguard is opened, Protective Stop operates to change to the safeguard open state (display: SO).
Safeguard open
Operations are prohibited. Further robot operation is not possible until either the safeguard is closed, the latched state is
released, and a command is executed, or the TEACH or TEST operation mode is turned on and the enable circuit is
activated.
Safeguard closed
The robot can operate automatically in an unrestricted (high power) state.
WARNING
If a third party accidentally releases the safeguard while an operator is working inside the safety barriers, this
may result in a hazardous situation. To protect the operator working inside the safety barriers, implement
measures to lock out or tag out the latch release switch.
To protect operators working near the robot, be sure to connect a safeguard switch and make sure that it
works properly.
Installing safety barriers
When installing safety barriers within the maximum range of the Manipulator, combine safety functions such as SLP. Carefully
take into account the size of the hand and the workpieces to be held so that no interference occurs between the operating parts
and the safety barriers.
Installing safeguards
Design the safeguards so that they satisfy the following requirements:
When using a key switch type safety device, use a switch that forcibly opens the interlock contacts. Do not use switches
that open their contacts using the spring force of the interlock.
When using an interlock mechanism, do not disable the interlock mechanism.
Considering the stopping distance
During operation, the Manipulator cannot stop immediately even if the safeguard is opened. Also, the stopping time and
movement distance vary depending on the following factors.
Hand weight, WEIGHT setting, ACCEL setting, workpiece weight, SPEED setting, movement posture, etc.
For the stopping time and movement distance of the Manipulator, refer to the following section.
Appendix C: Stopping Time and Stopping Distance When Safeguard is Open
Precautions for safeguard operation
Do not open the safeguard unnecessarily while the motor is energized. Frequent safeguard inputs will reduce the life of the
relay.
Normal relay lifespan: About 20,000 times
2.1.6 Arm Movement Method in the Emergency Stop State
In the emergency stop state, move the Manipulator joints directly by hand as shown below.
Joint #1:
Push Arm #1 by hand.
Industrial Robot: SCARA Robots GX series Manual Rev.11
22
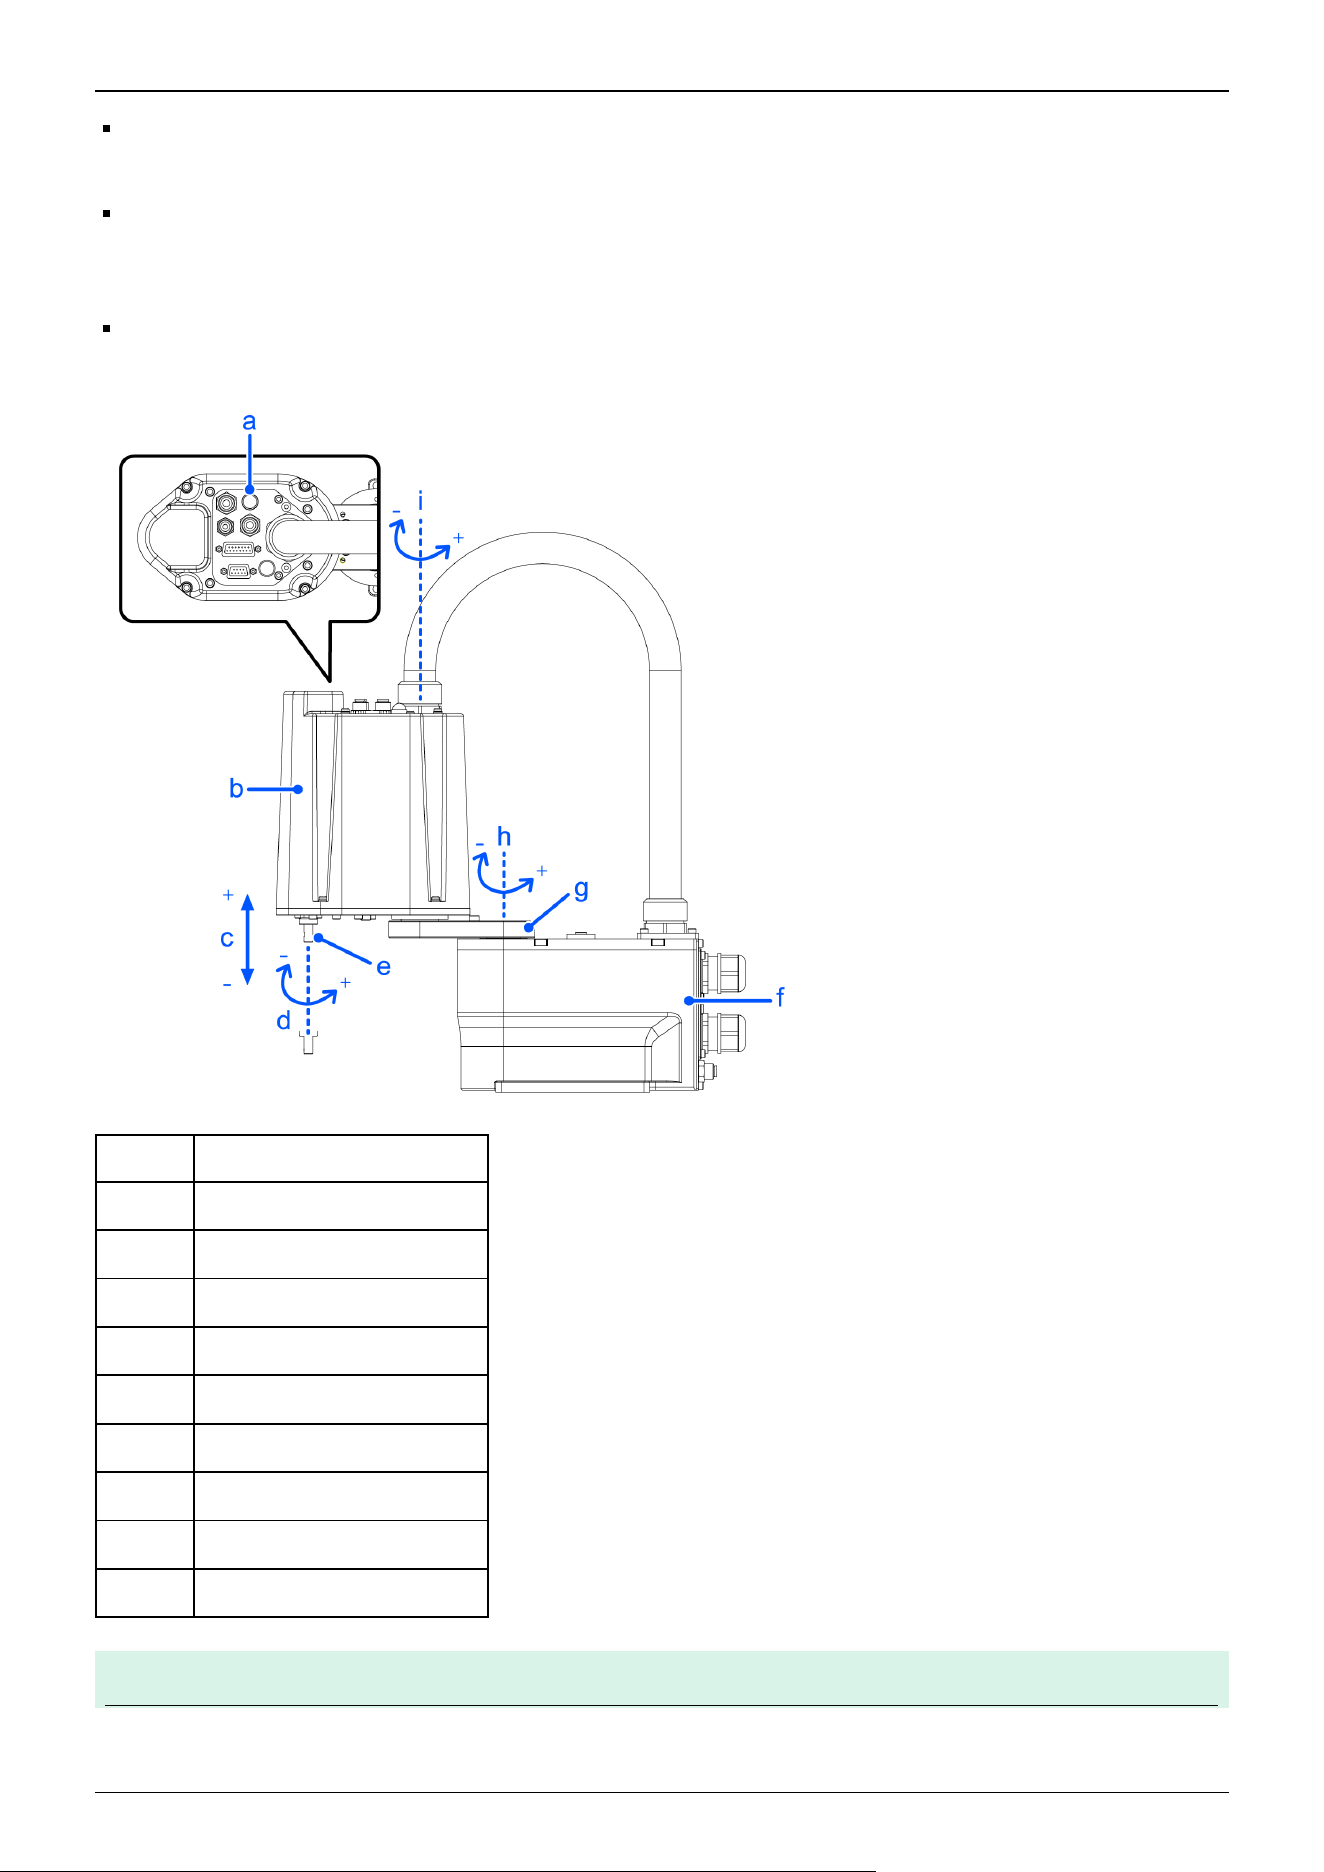
Joint #2:
Push Arm #2 by hand.
Joint #3:
The joint cannot be moved up or down by hand because the electromagnetic brake is activated.
Move the joint while pressing down the brake release switch.
Joint #4:
Rotate the shaft by hand.
Symbol Description
a Joint #3 brake release switch
b Arm2
c Joint #3 (up/down movement)
d Joint #4 (rotation)
e Shaft
f Base
g Arm1
h Joint #1 (rotation)
i Joint #2 (rotation)
Note
✏
Industrial Robot: SCARA Robots GX series Manual Rev.11
23
When the brake release switch is pressed in emergency mode, the brake for Joint #3 is released. Be careful of
the shaft while the brake release switch is pressed because the shaft may be lowered by the weight of an end
effector.
When pressing the brake release switch, watch for the shaft descending or rotating under the weight of the hand.
2.1.7 ACCELS Setting for CP Motion
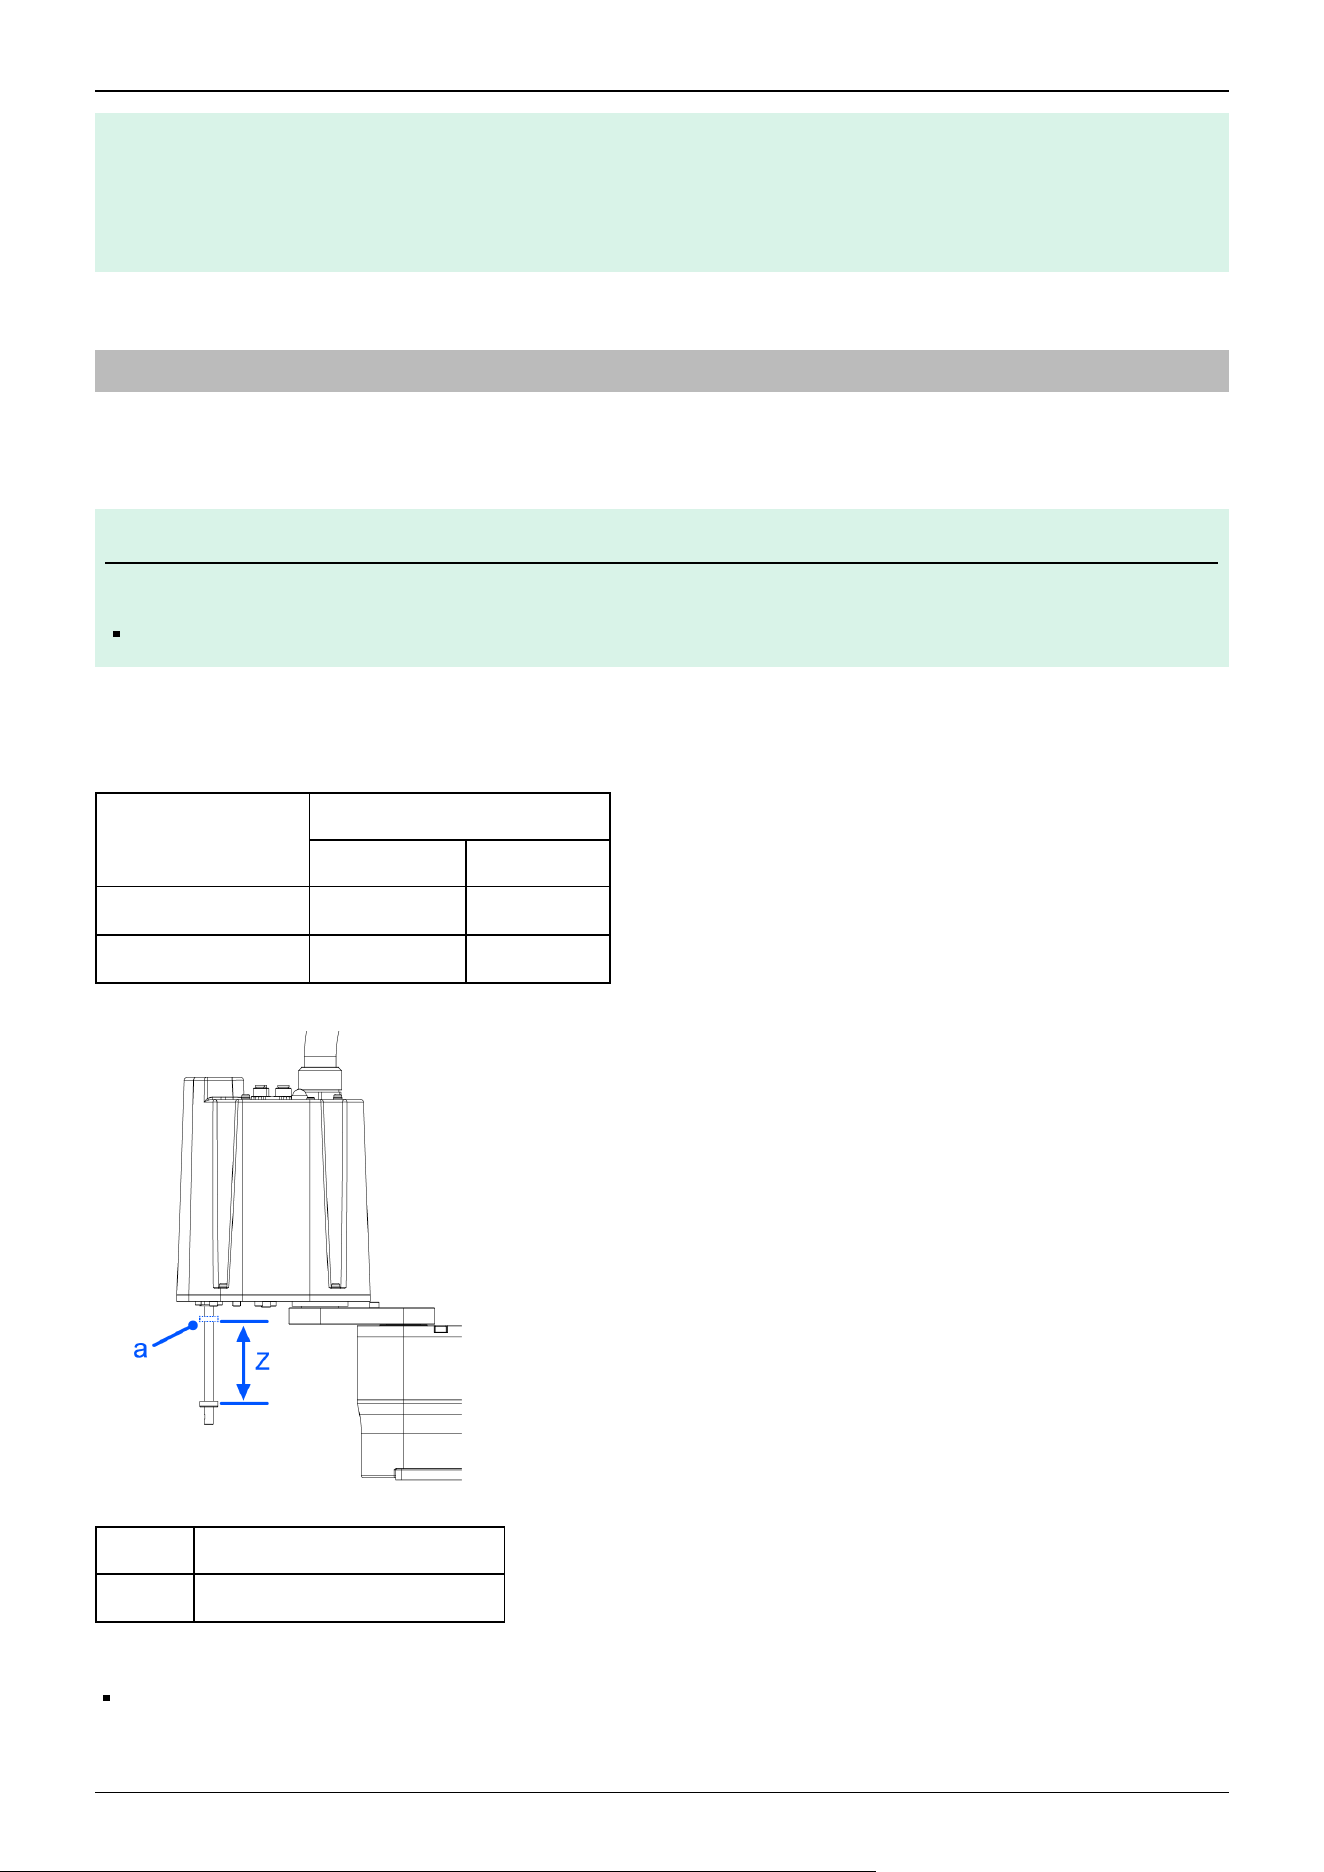
To make the Manipulator move in a CP motion, make the appropriate ACCELS settings in the SPEL program based on the tip
load and Z-axis height.
Note
If the ACCELS settings are not properly configured, the following problem may occur.
Shortened lifespan and damage to the ball screw spline
Set ACCELS as shown below based on the Z-axis height.
ACCELS setting values by the Z-axis height and tip load
Z-axis Height (mm)
Tip load
0.5 kg or less 1 kg or less
- 0 > Z ≥ - 50 25000 or less 18000 or less
- 50 > Z ≥ - 100 22000 or less 11000 or less
Symbol Description
a Z-axis height 0 (origin position)
Also, if a CP motion was performed with incorrect values set, check the following point.
No deformation or bending of the shaft of the ball screw spline
✏
Industrial Robot: SCARA Robots GX series Manual Rev.11
24
2.1.8 Warning Labels
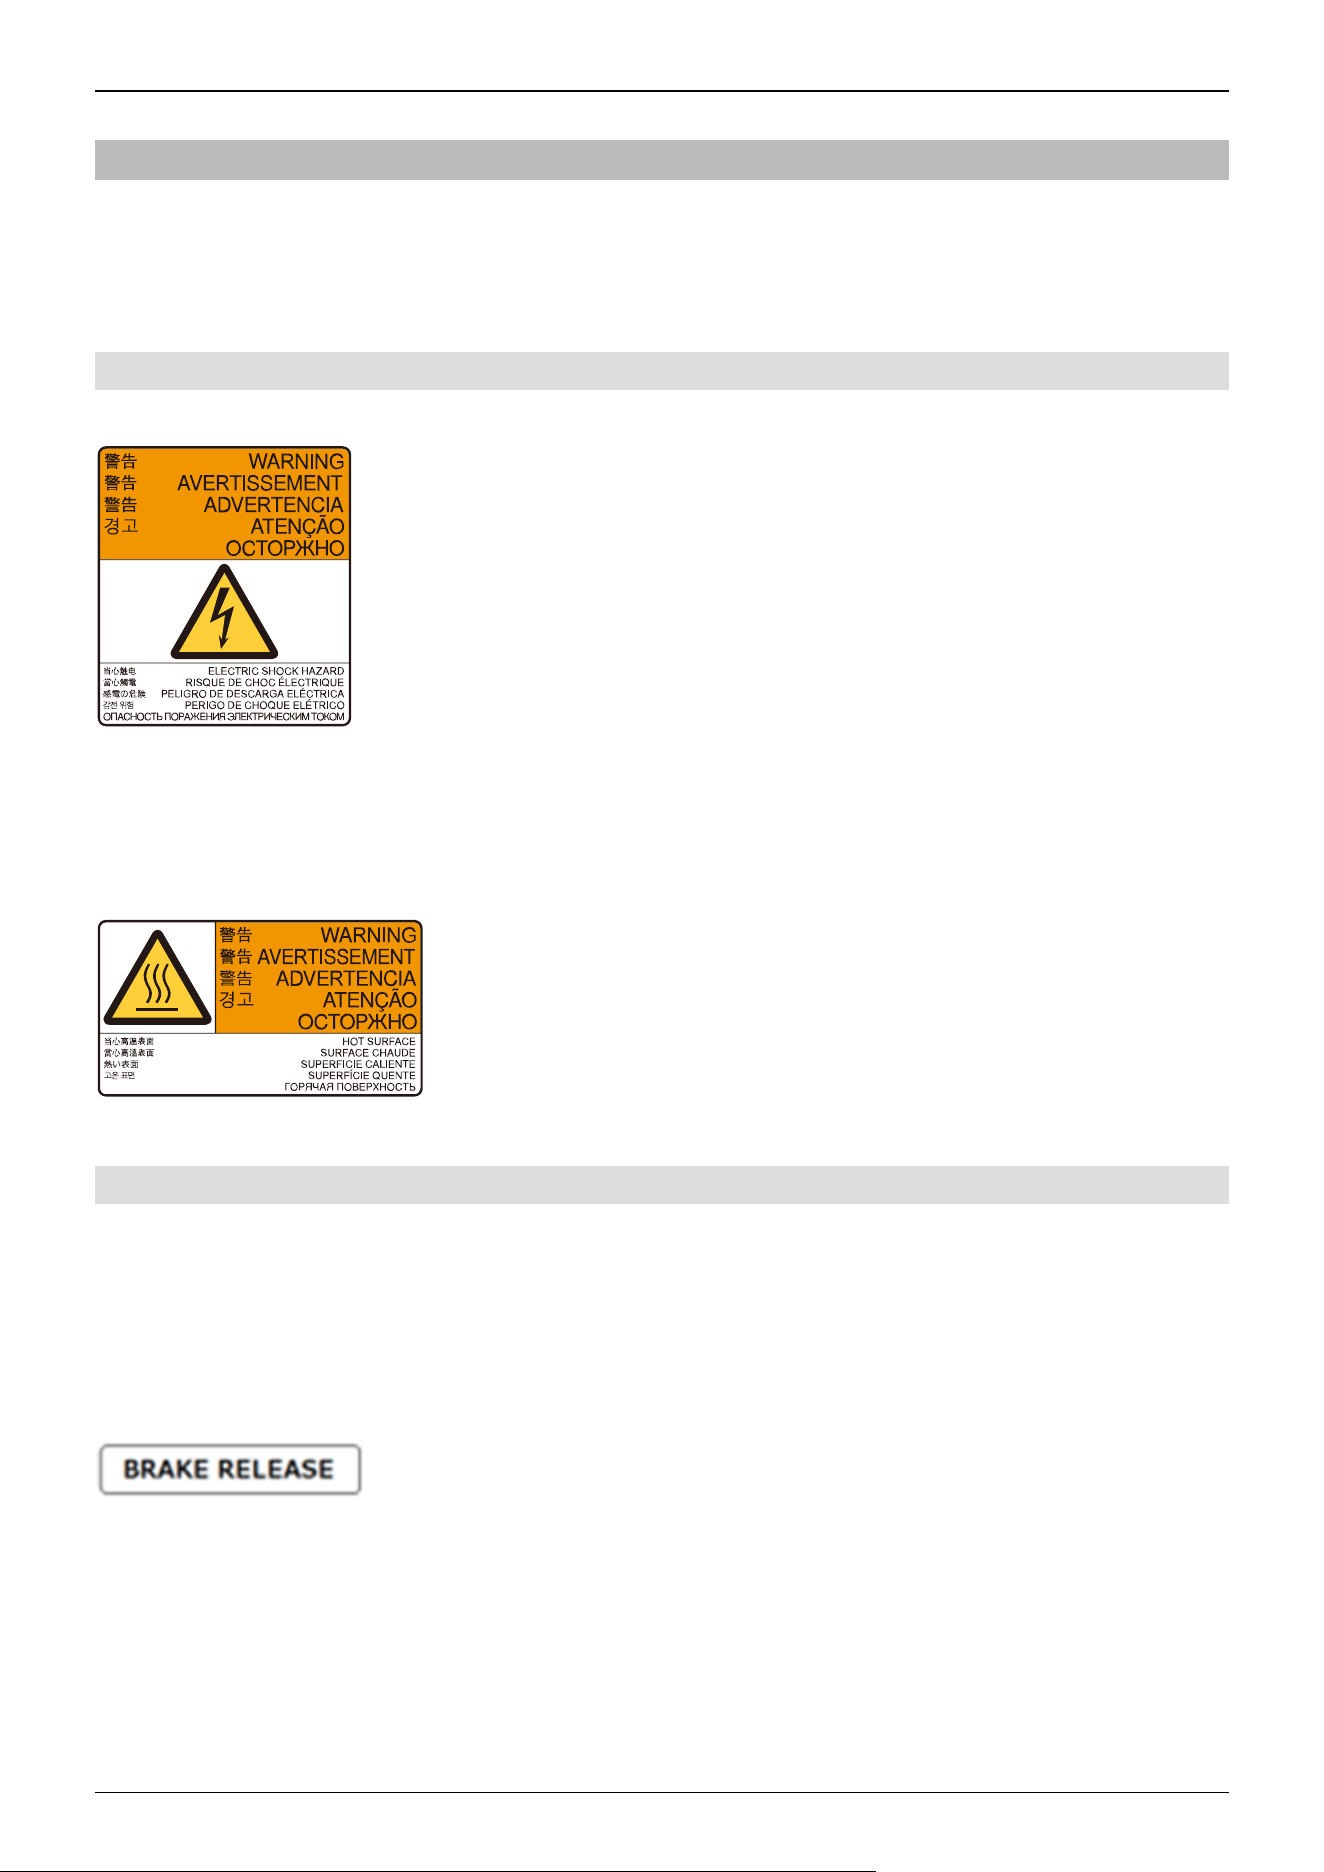
The Manipulator has the following warning labels.
Specific hazards exist in the vicinity of areas with the warning labels. Be thoroughly careful in handling.
To ensure that the Manipulator is operated and maintained safely, be sure to follow the safety information and warnings
indicated on the warning labels. Also, do not tear, damage, or remove these warning labels.
2.1.8.1 Warning Labels
A
Touching any internal electrified parts while the power is turned on may cause electric shock.
Also, regarding the Cleanroom & ESD specifications, if the cables inside the Manipulator wear down over a long period of
operation and cause an internal short circuit, the conduit tube may be electrified. Touching the conduit tube while the power is
turned on may cause electric shock.
B
The surface of the Manipulator is hot during and after operation, and there is a risk of burns.
2.1.8.2 Information Labels
1
This indicates the product name, model name, serial number, information of supported laws and regulations, product
specifications (Weight, MAX.REACH, MAX.PAYLOAD, AIR PRESSURE, Motor Power), Main document No.,
manufacturer, importer, date of manufacture, country of manufacture, and the like.
For details, see the label affixed to the product.
2
Indicates the position of a brake release button.
Industrial Robot: SCARA Robots GX series Manual Rev.11
25
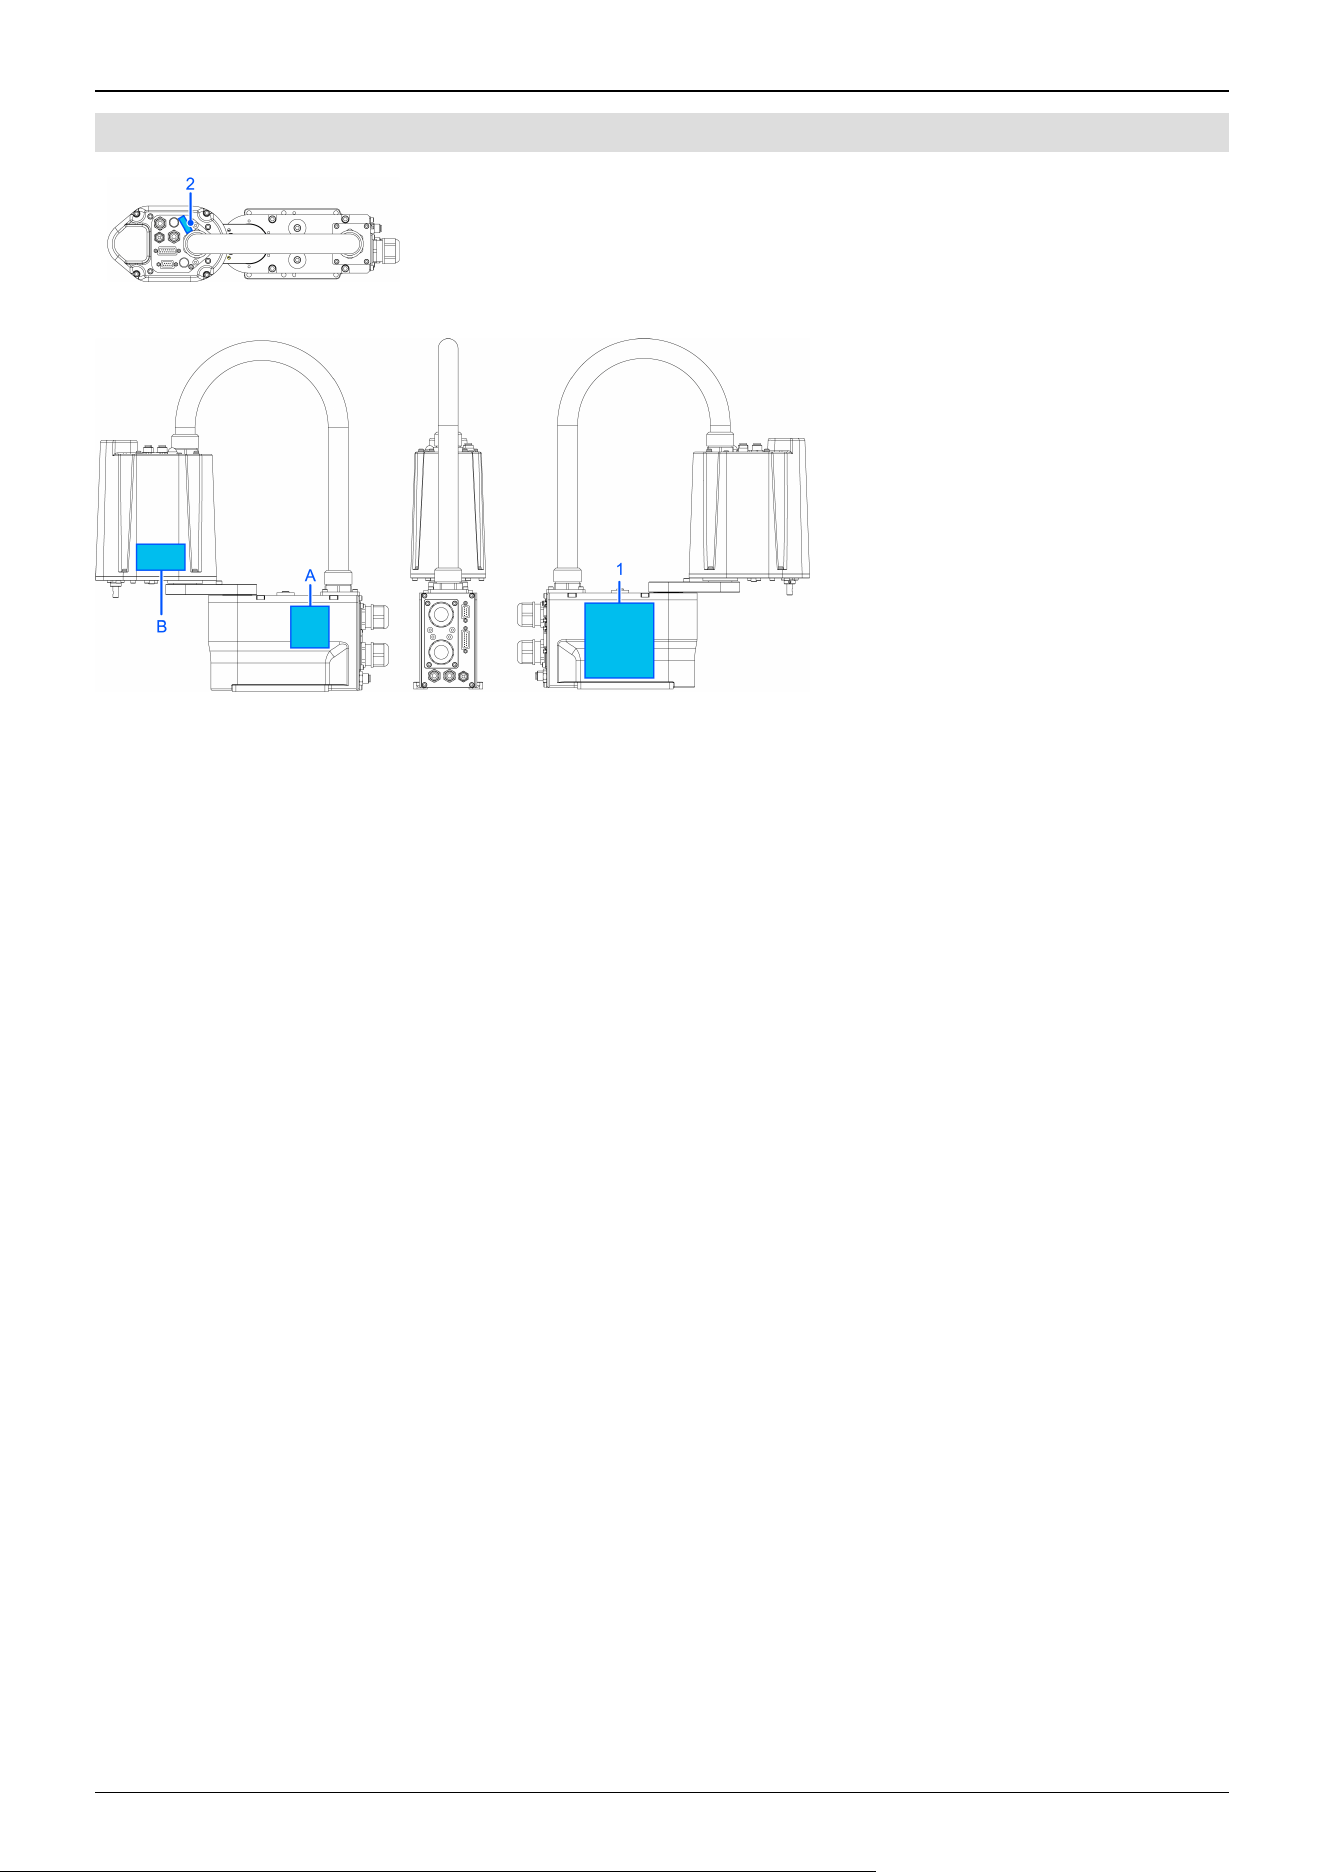
2.1.8.3 Labelled Locations
Industrial Robot: SCARA Robots GX series Manual Rev.11
26
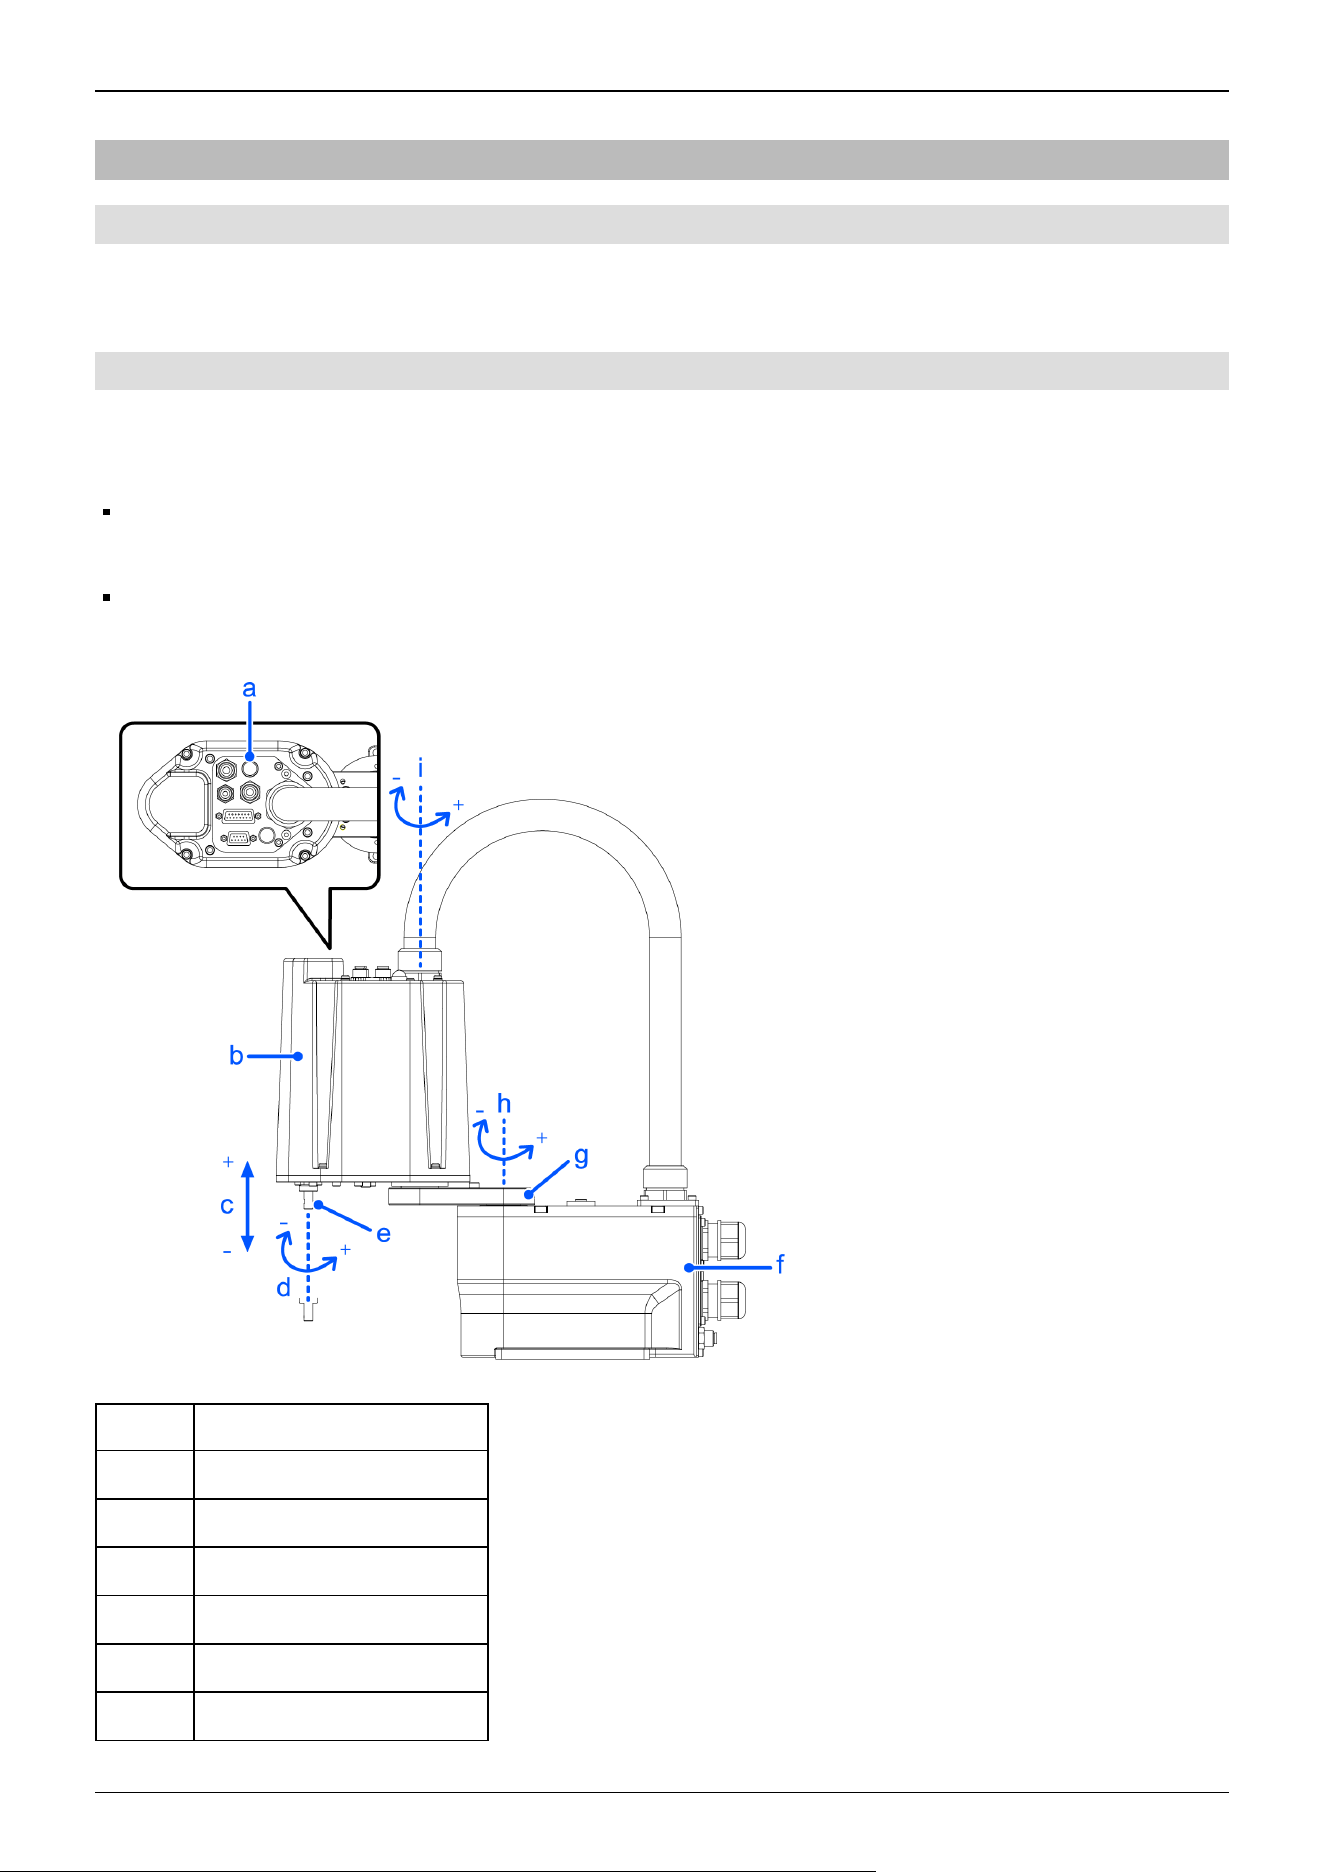
2.1.9 Responses for Emergencies or Malfunctions
2.1.9.1 When a Collision with the Manipulator Occurs
If the Manipulator has collided with a mechanical stop, peripheral device, or other object, discontinue use and contact the
supplier.
2.1.9.2 Entanglement with the Manipulator
If an operator gets caught between the Manipulator and a mechanical part such as a base table, press the emergency stop switch
to release the operator by using the following method.
Operator body is entangled with a robot arm
The brake is not functioning. Move the arm manually.
Operator body is entangled with the shaft
The brake is functioning. Press the brake release switch, and move the shaft.
Symbol Description
a Joint #3 brake release switch
b Arm2
c Joint #3 (up/down movement)
d Joint #4 (rotation)
e Shaft
f Base
Industrial Robot: SCARA Robots GX series Manual Rev.11
27
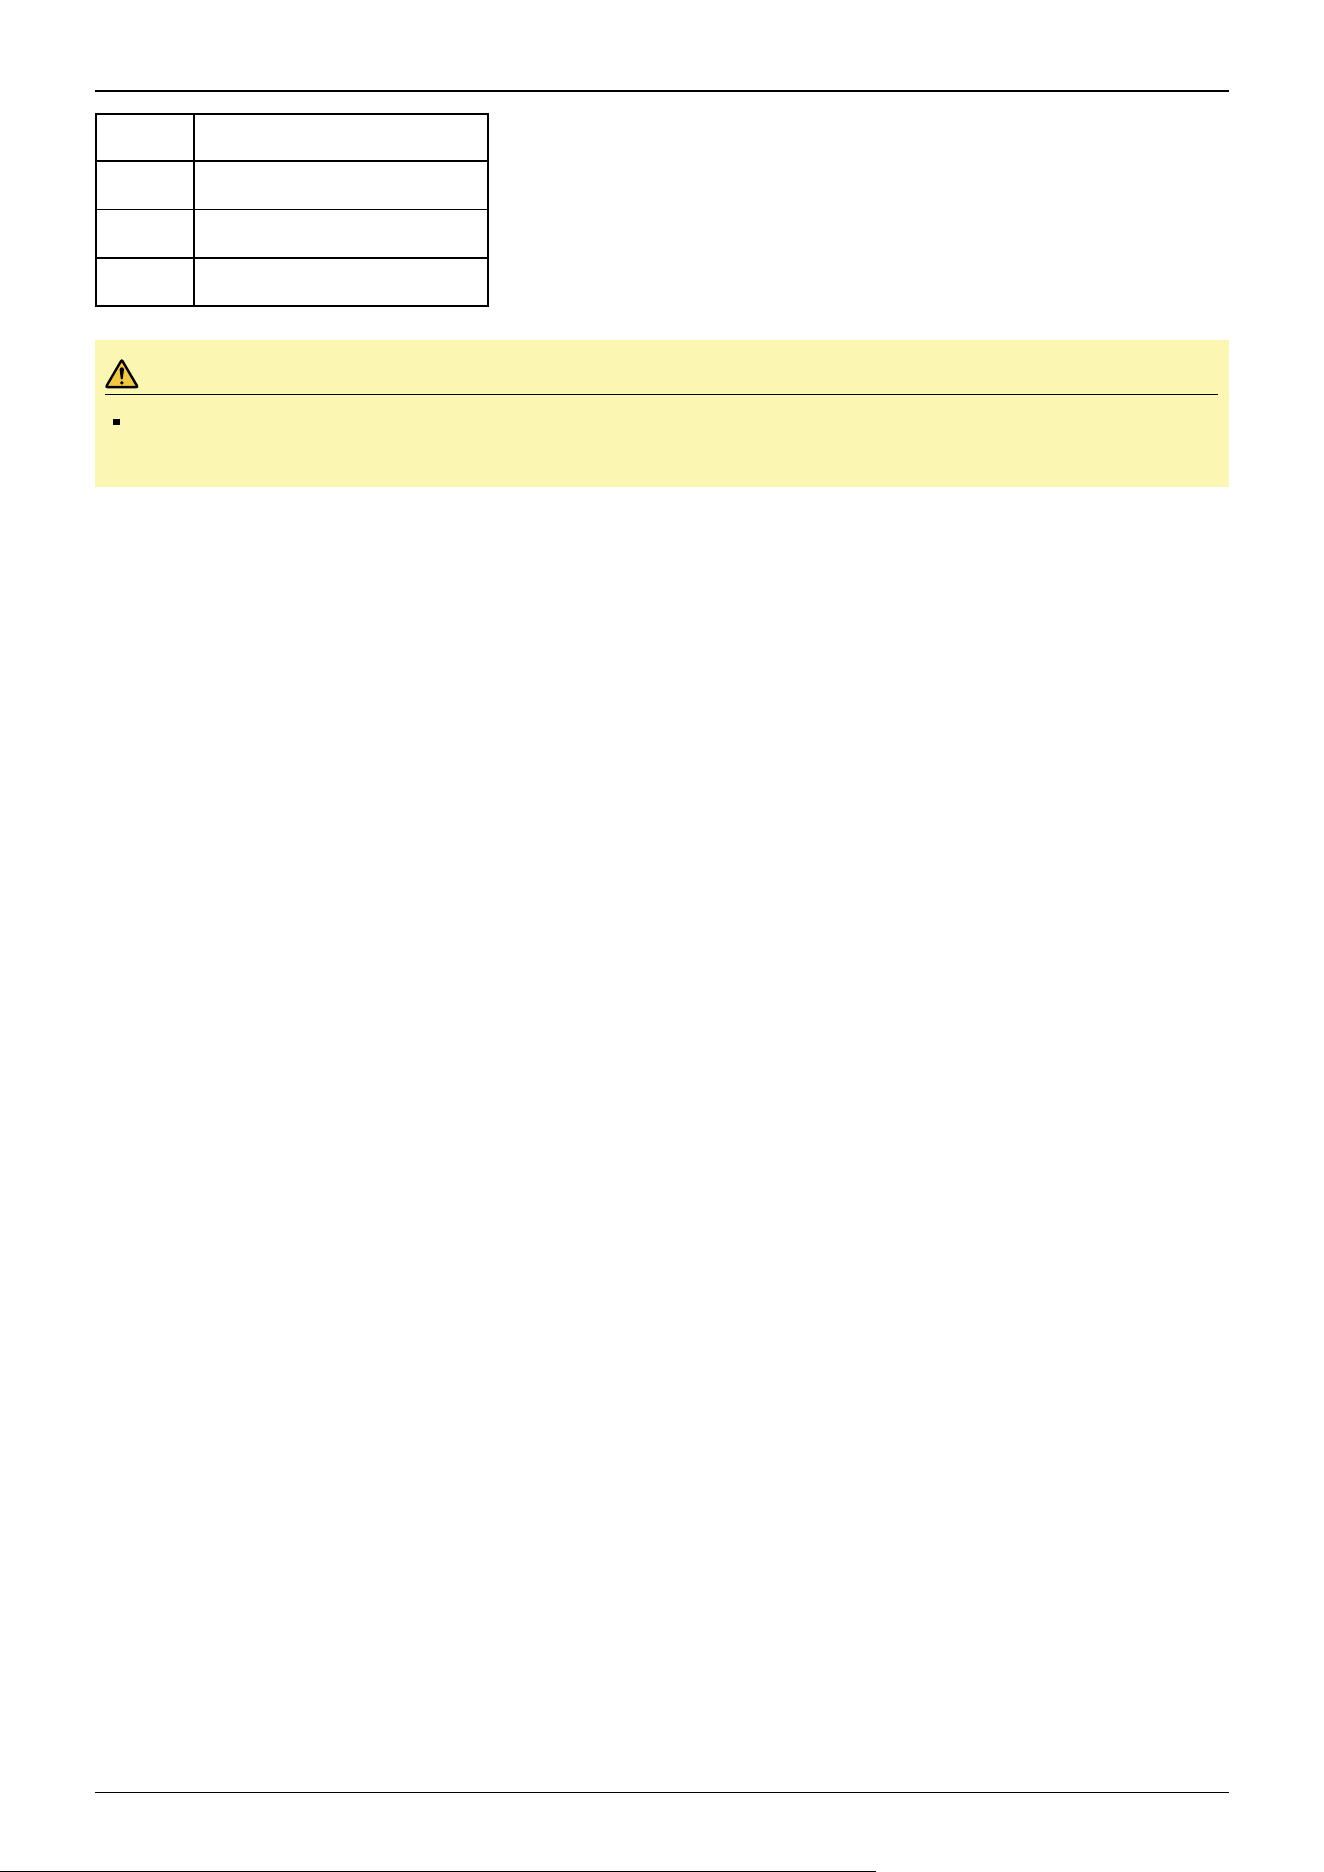
Symbol Description
g Arm1
h Joint #1 (rotation)
i Joint #2 (rotation)
CAUTION
While the brake release switch is being pressed, in addition to Joint #3, Joint #4 may also move due to its
own weight. Be careful of the shaft descending and rotating.
Industrial Robot: SCARA Robots GX series Manual Rev.11
28
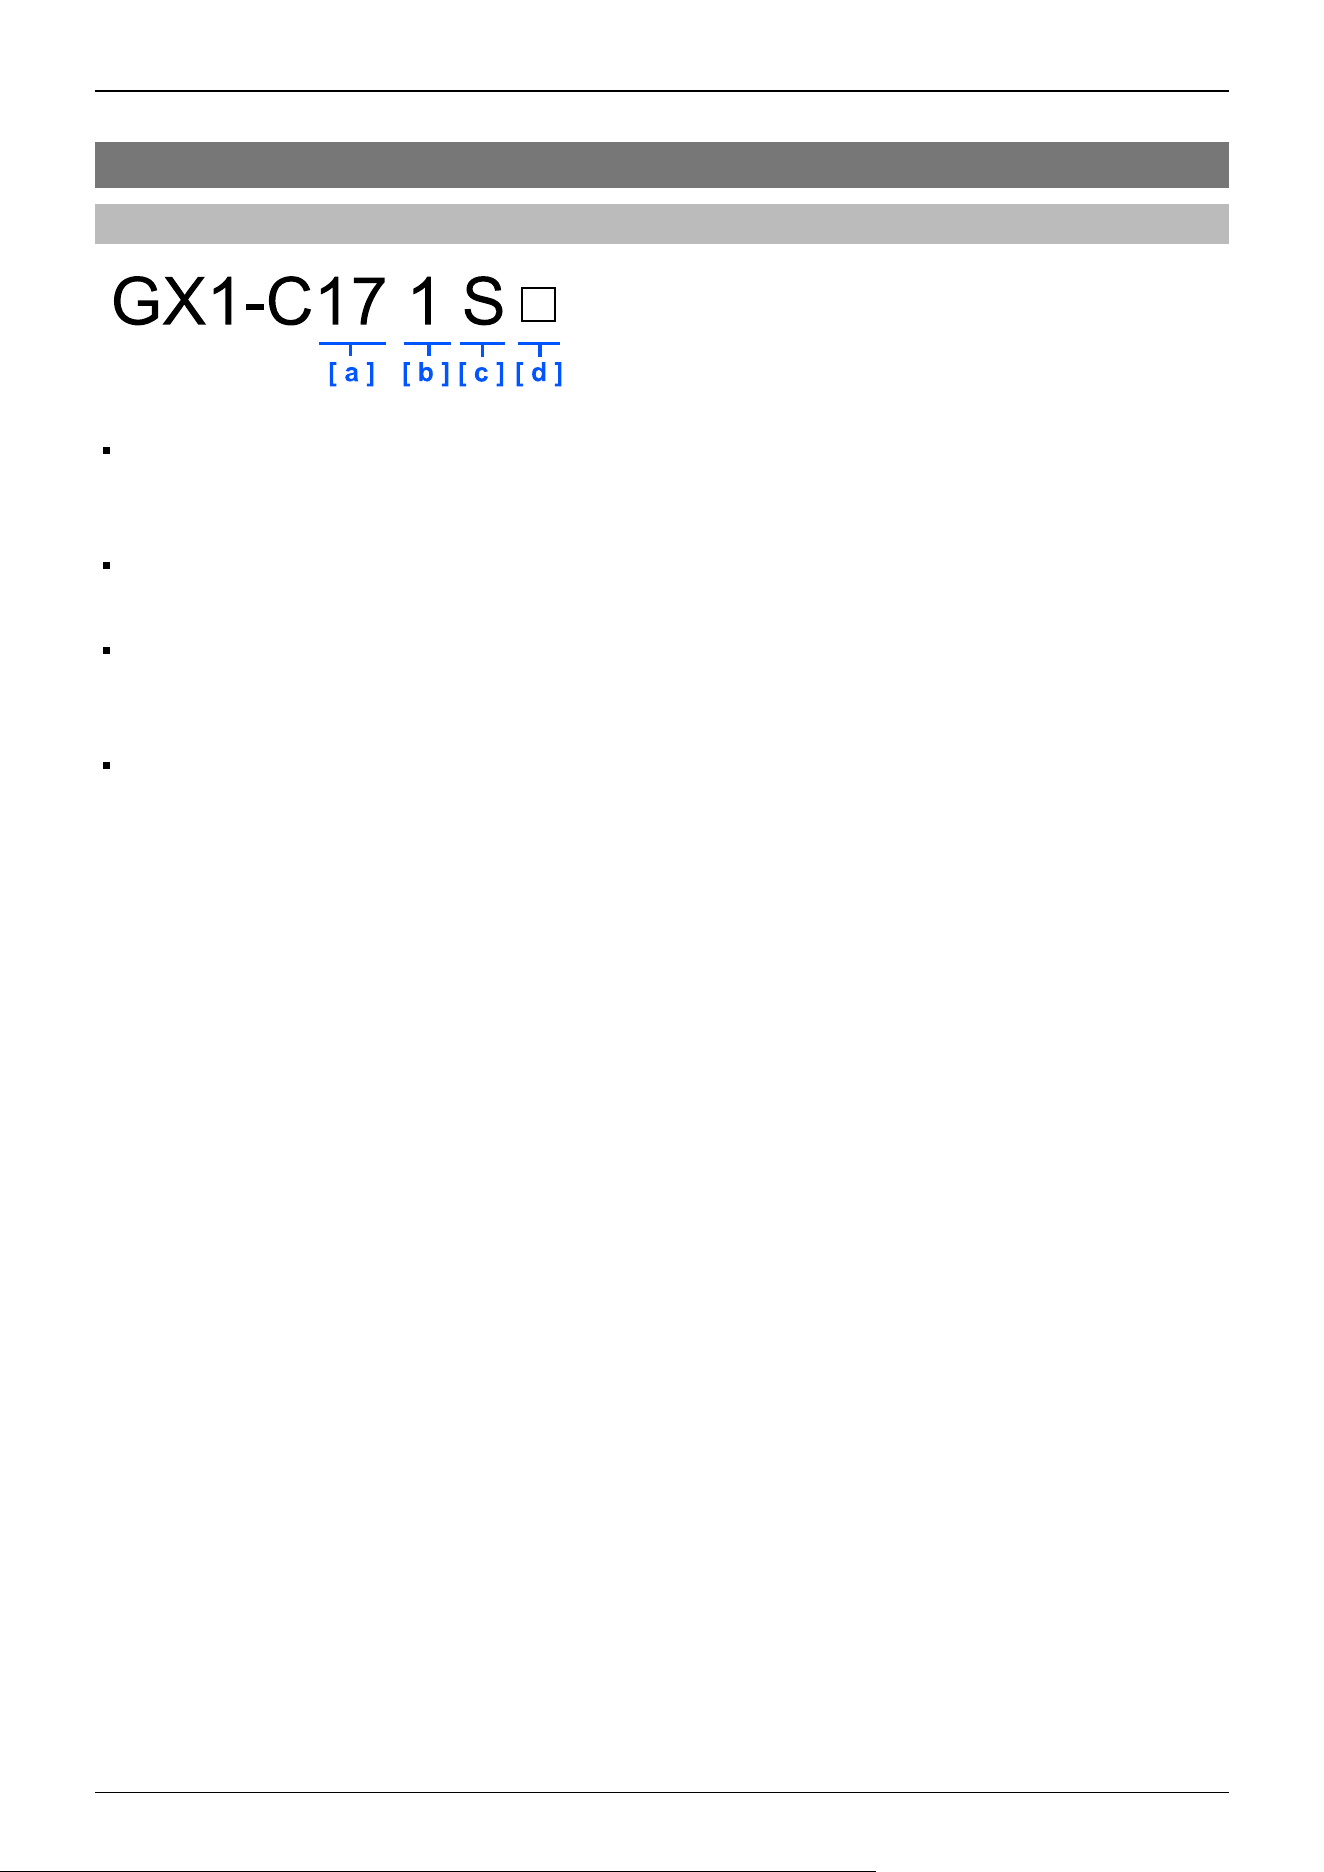
2.2 Specifications
2.2.1 Model Name GX1-C
a: Arm length
17: 175 mm
22: 225 mm
b: Joint #3 stroke
1: 100 mm (Cleanroom & ESD: 80mm)
c: Environmental specifications
S: Standard
C: Cleanroom & ESD (anti-static)
d: Axis type
□: 4-Axis type
Z: 3-Axis type
Environmental specifications
Cleanroom & ESD (anti-static) specifications: GX1-C**1C
Manipulators with cleanroom & ESD (anti-static) specifications have a base design with the standard specifications, but as an
additional feature, have reduced dust emissions from the Manipulator to enable use in cleanroom environments.
We have confirmed that the Manipulator tip (tool mounting section) is at ±5 V or less, even directly after the measuring
operation according to Seiko Epson standards.
If you need any other detailed information, please contact the supplier. Also, please check the amount of charge on any hand,
wiring, or the like that you will attach to the robot on your own before use.
For details on the specifications, refer to the following section.
Appendix A: Specifications Table
Industrial Robot: SCARA Robots GX series Manual Rev.11
29
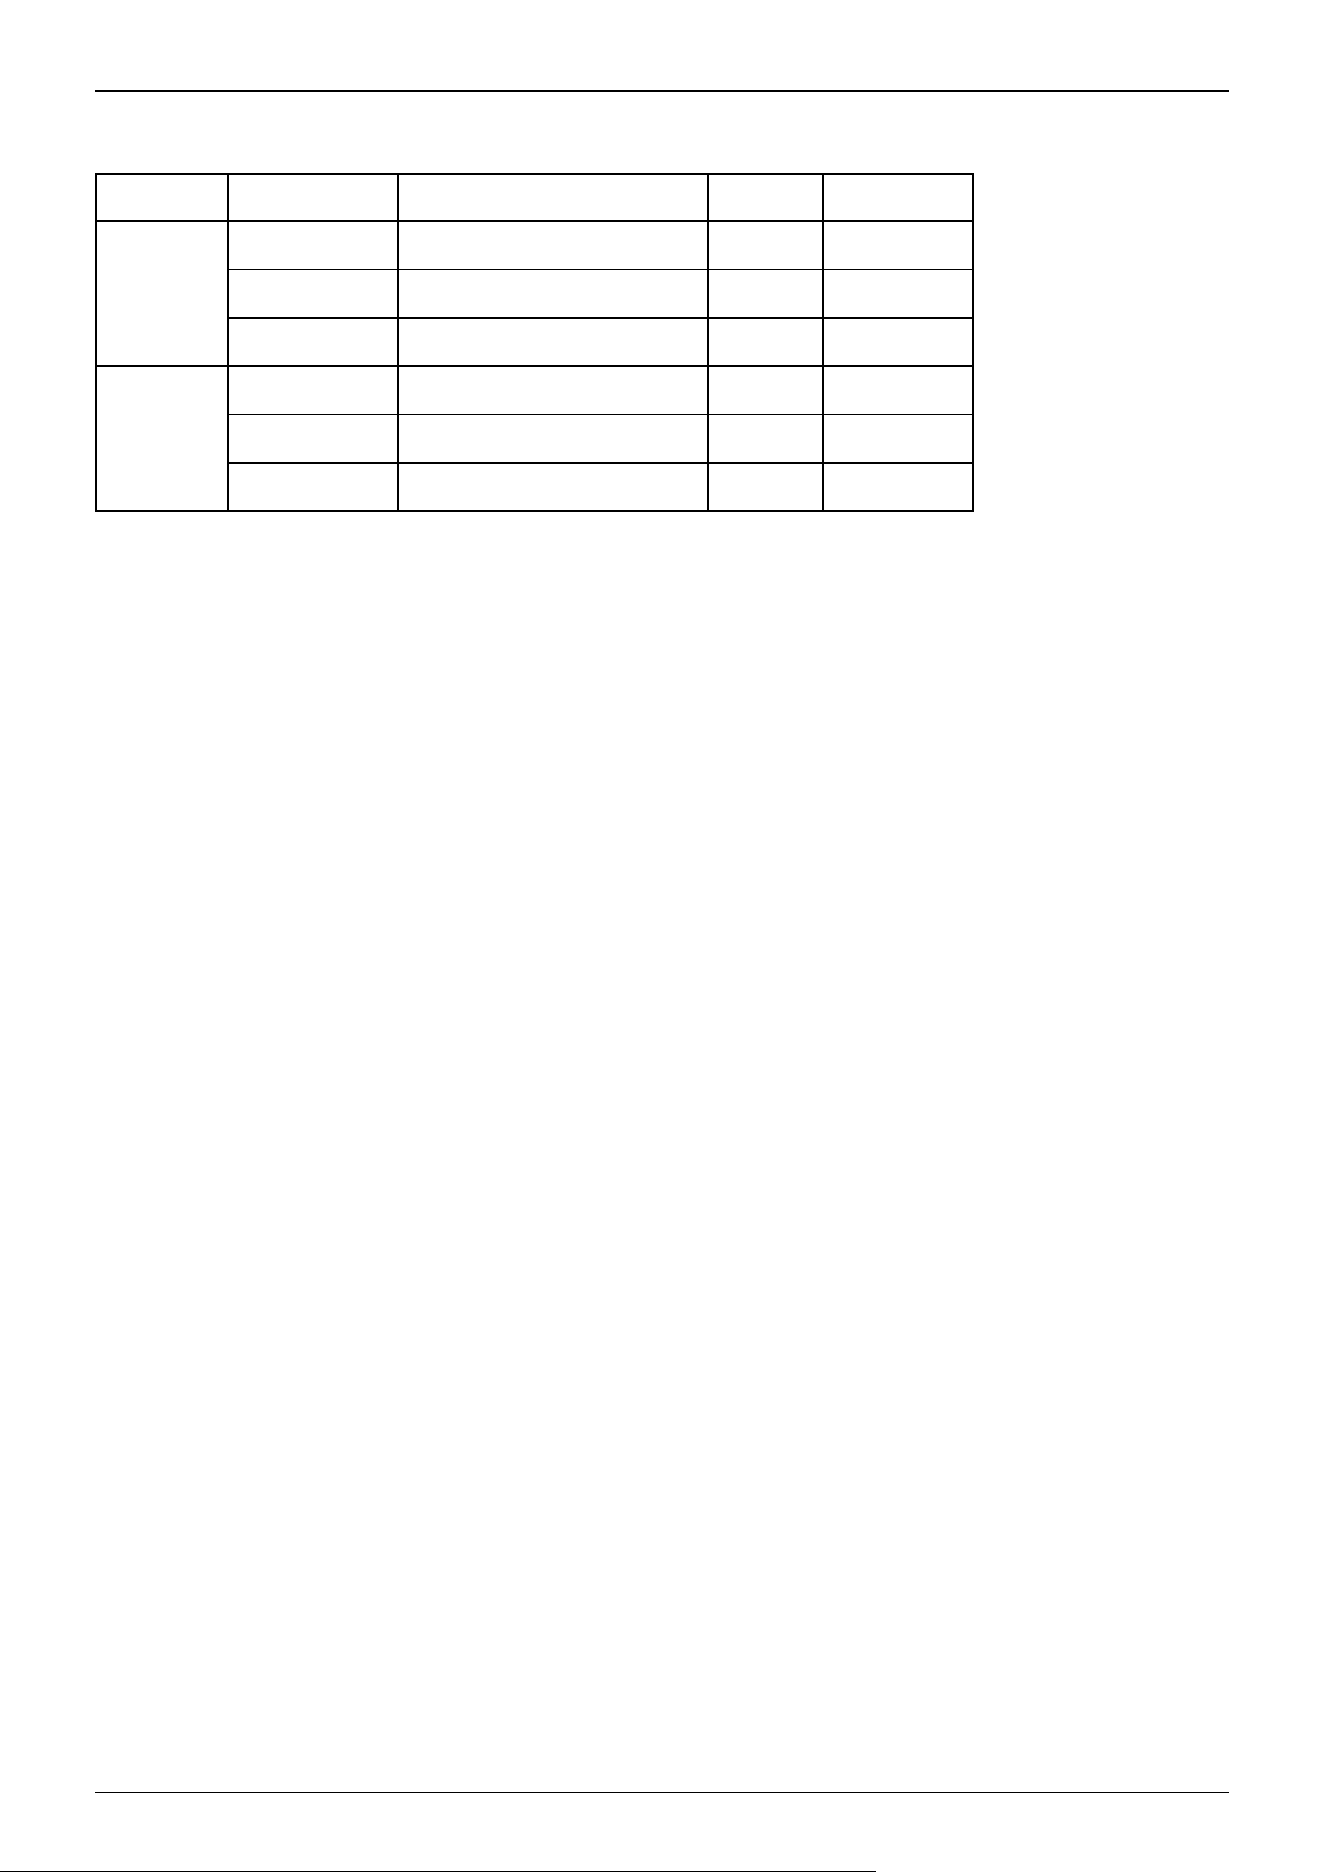
Model list
Arm length Joint #3 stroke Environmental Specifications Axis type Model name
175
100 Standard 4-Axis GX1-C171S
80 Cleanroom & ESD 4-Axis GX1-C171C
100 Standard 3-Axis GX1-C171SZ
225
100 Standard 4-Axis GX1-C221S
80 Cleanroom & ESD 4-Axis GX1-C221C
100 Standard 3-Axis GX1-C221SZ
(Units: mm)
Industrial Robot: SCARA Robots GX series Manual Rev.11
30
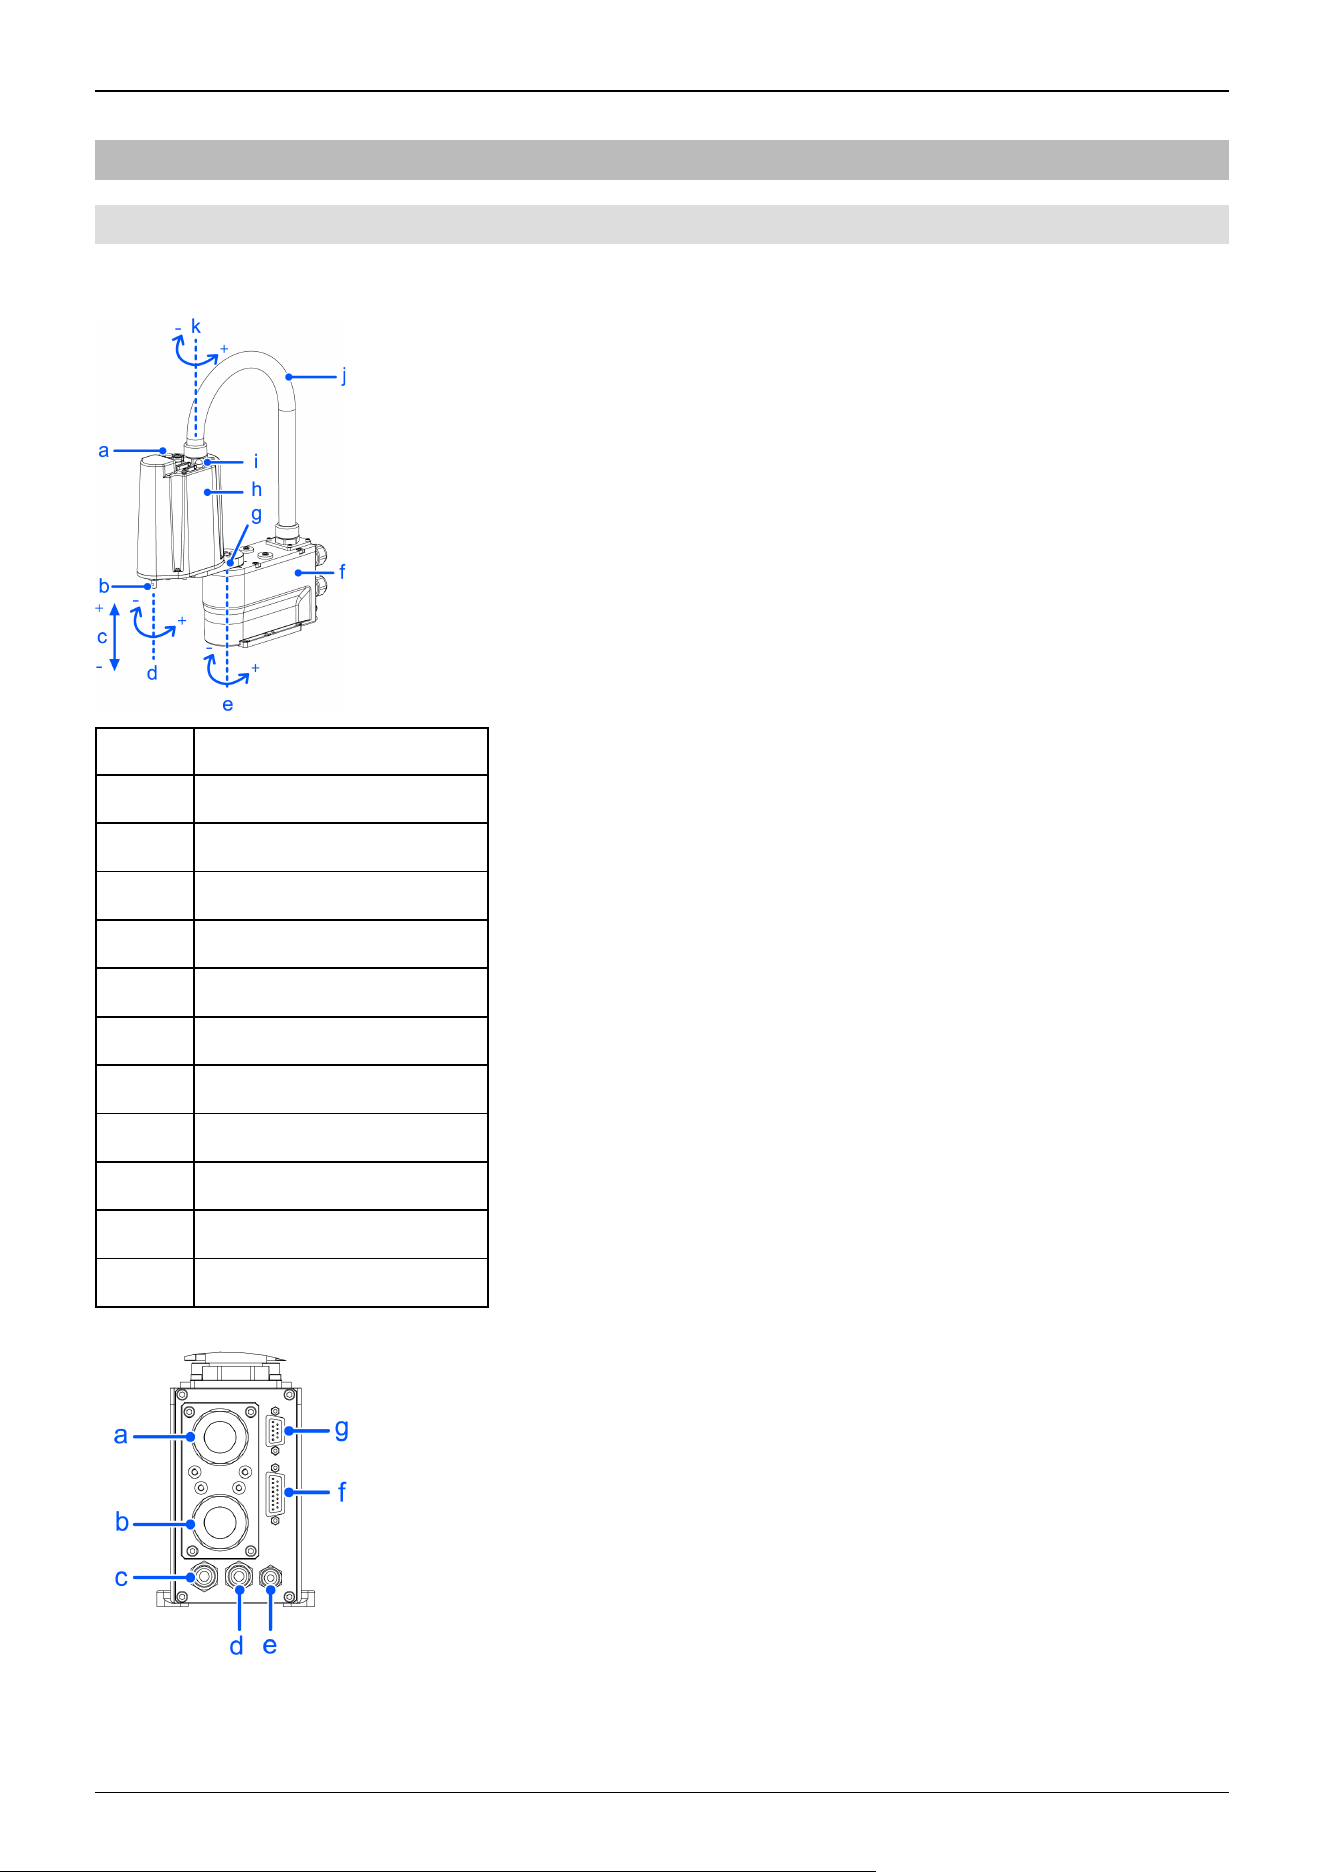
2.2.2 Names of Parts and Their Dimensions
2.2.2.1 4-Axis specifications
Standard specifications GX1-C** 1S
Symbol Description
a Joint #3 brake release switch
b Shaft
c Joint #3 (up/down movement)
d Joint #1 (rotation)
e Joint #2 (rotation)
f Base
g Arm1
h Arm #2
i Indicating lamp
j Conduit tube
K Joint #3 (rotation)
Industrial Robot: SCARA Robots GX series Manual Rev.11
31
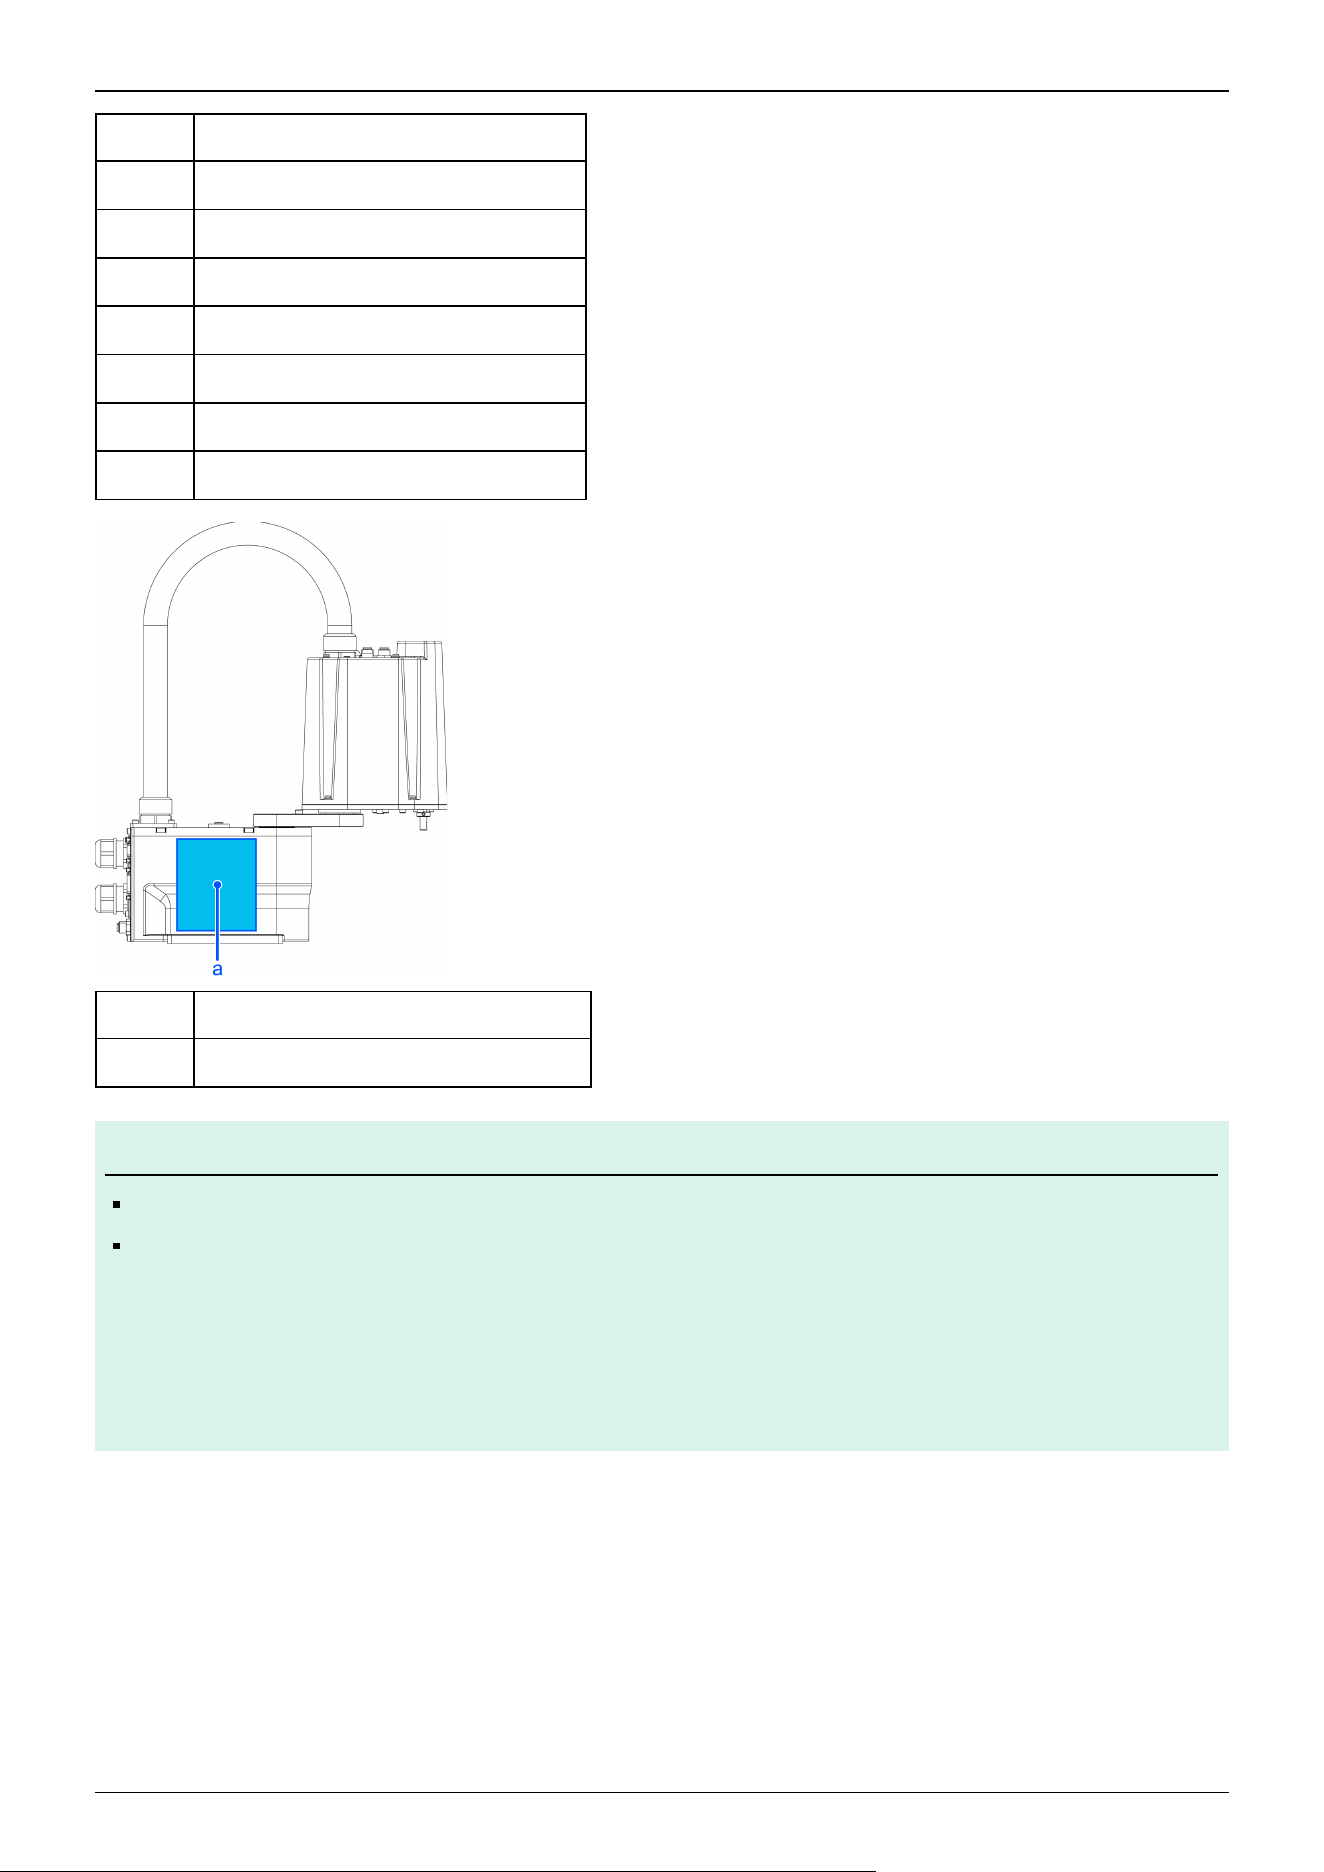
Symbol Description
a Power cable
b Signal cable
c Fitting for ø6 mm tube (white)
d Fitting for ø6 mm tube (blue)
e Fitting for ø4 mm tube (blue)
f User connector (15-pin D-sub connector)
g User connector (9-pin D-sub connector)
Symbol Description
a Face plate (serial number of Manipulator)
Note
When the brake release switch is pressed in emergency mode, the brake for Joint #3 is released.
When the LED lamp is on or the Controller is power is on, current is being applied to the Manipulator.
Performing any work procedure with the power turned on is extremely dangerous and may result in electric
shock and/or malfunction of the robot system.
Before starting any maintenance work, be sure to turn off the Controller and inform others in the surrounding
area that work is in progress. Performing any work procedure with the power turned on is extremely
dangerous and may result in electric shock and/or malfunction of the robot system.
✏
Industrial Robot: SCARA Robots GX series Manual Rev.11
32
Industrial Robot: SCARA Robots GX series Manual Rev.11
33
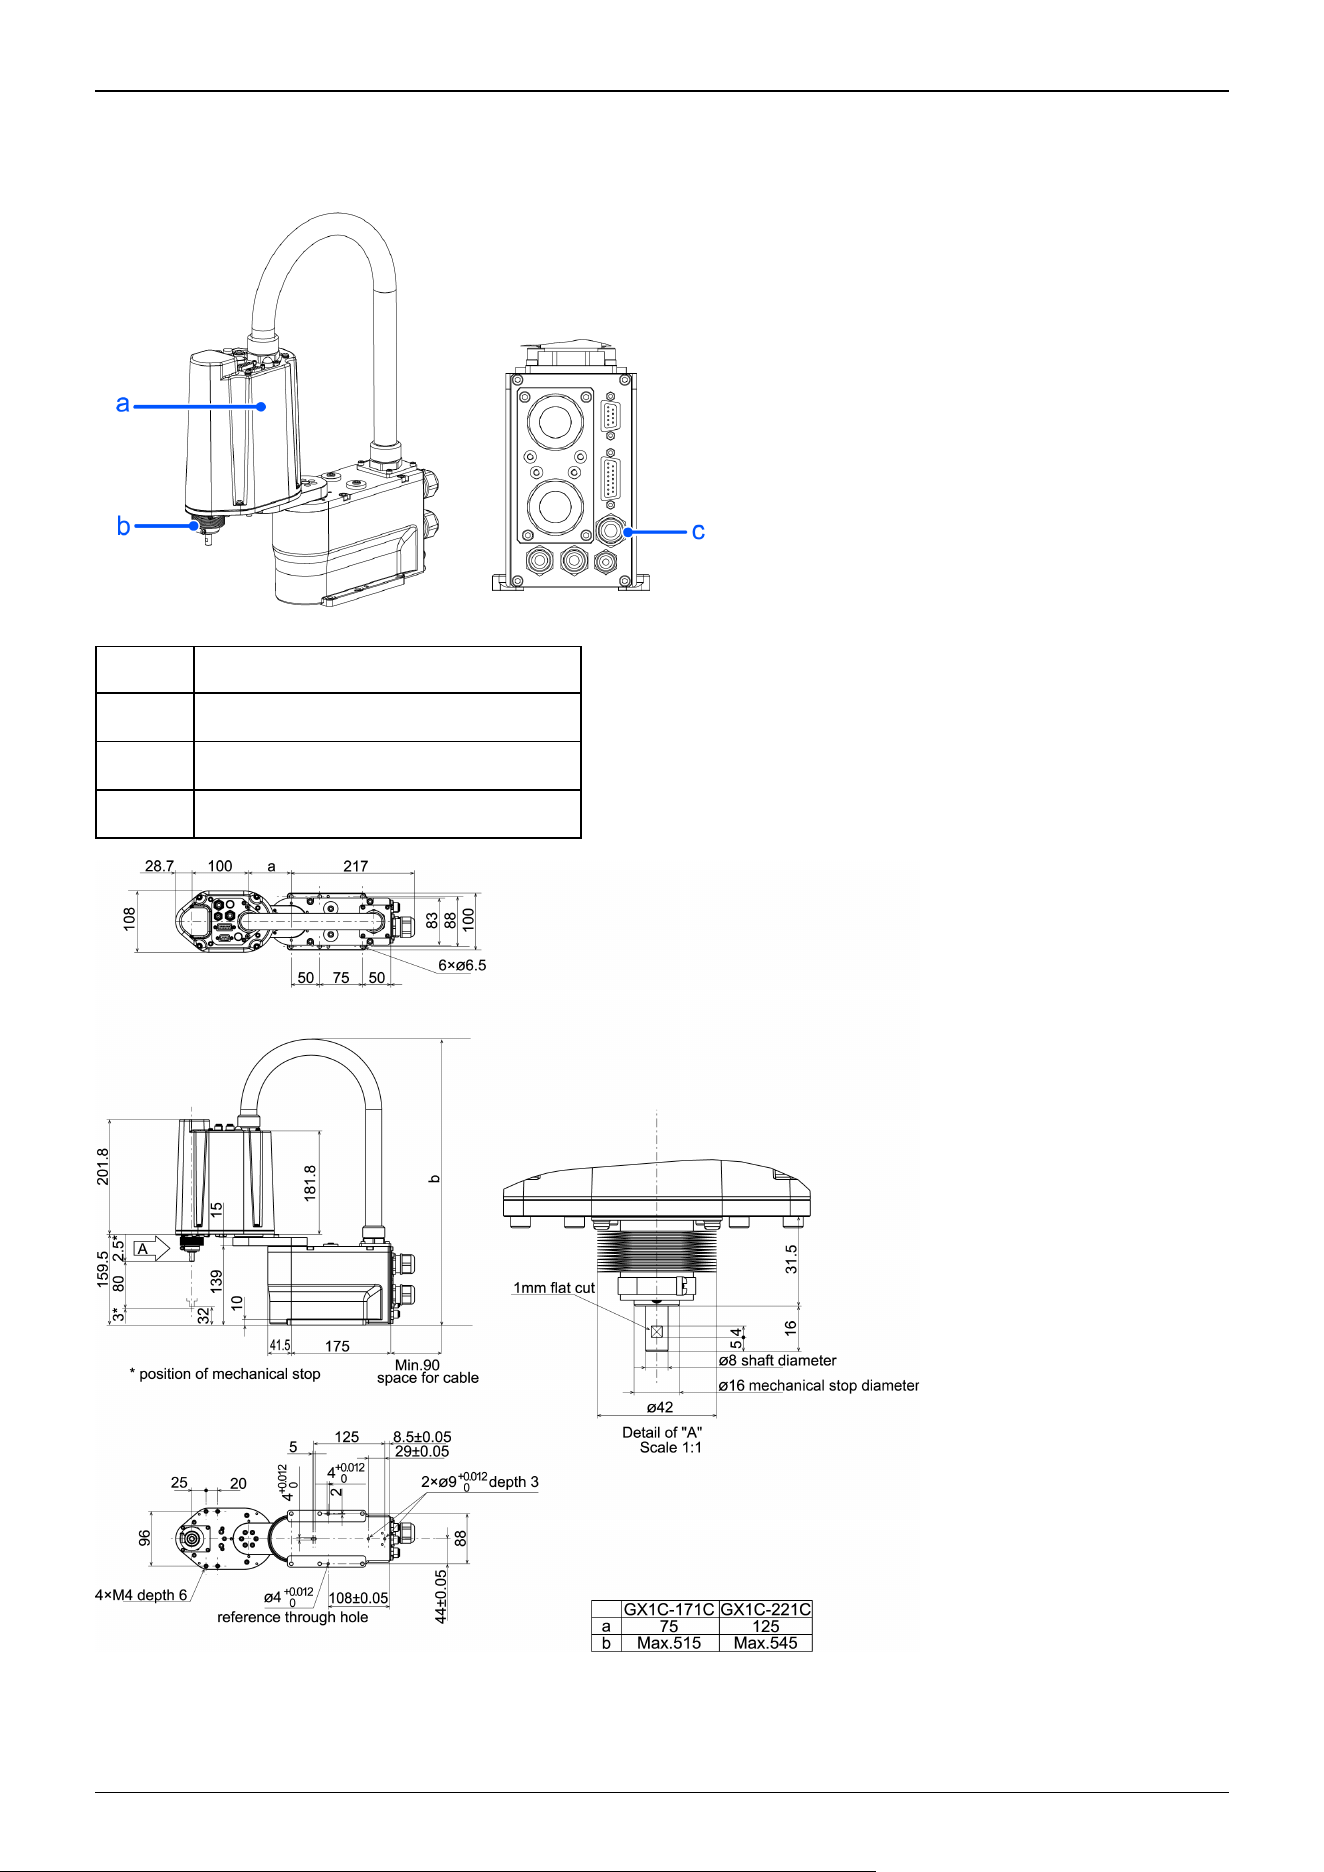
Cleanroom & ESD specifications GX1-C** 1C
The parts shown below differ from the standard specifications.
Symbol Description
a Plating covers (anti-static specifications)
b Lower bellows
c Exhaust port
Industrial Robot: SCARA Robots GX series Manual Rev.11
34
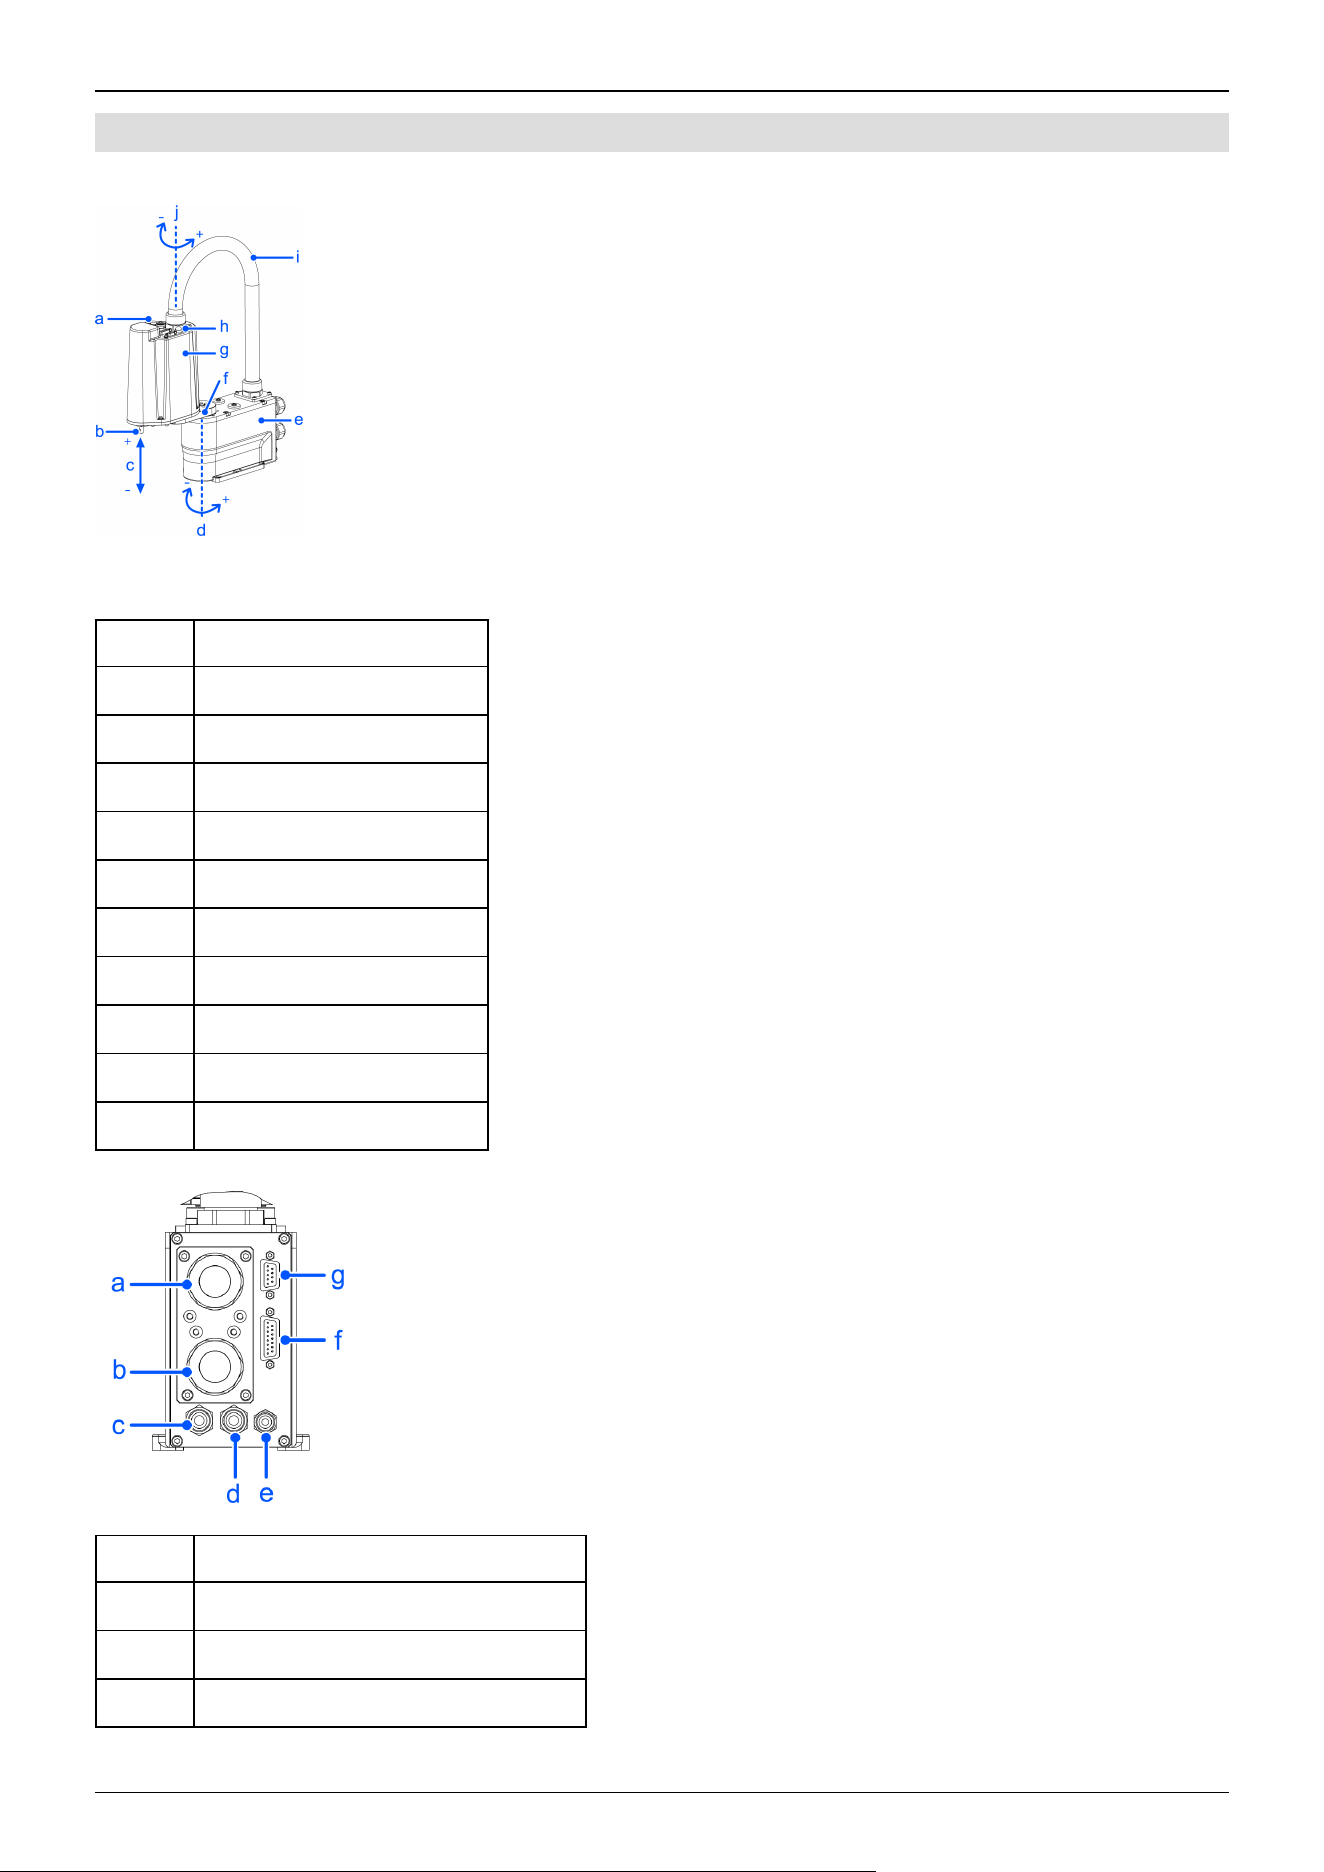
2.2.2.2 3-Axis specifications
Standard specifications GX1-C** SZ
Symbol Description
a Joint #3 brake release switch
b Shaft
c Joint #3 (up/down movement)
d Joint #1 (rotation)
e Base
f Arm #1
g Arm2
h Indicating lamp
i Conduit tube
j Joint #2 (rotation)
Symbol Description
a Power cable
b Signal cable
c Fitting for ø6 mm tube (white)
Industrial Robot: SCARA Robots GX series Manual Rev.11
35
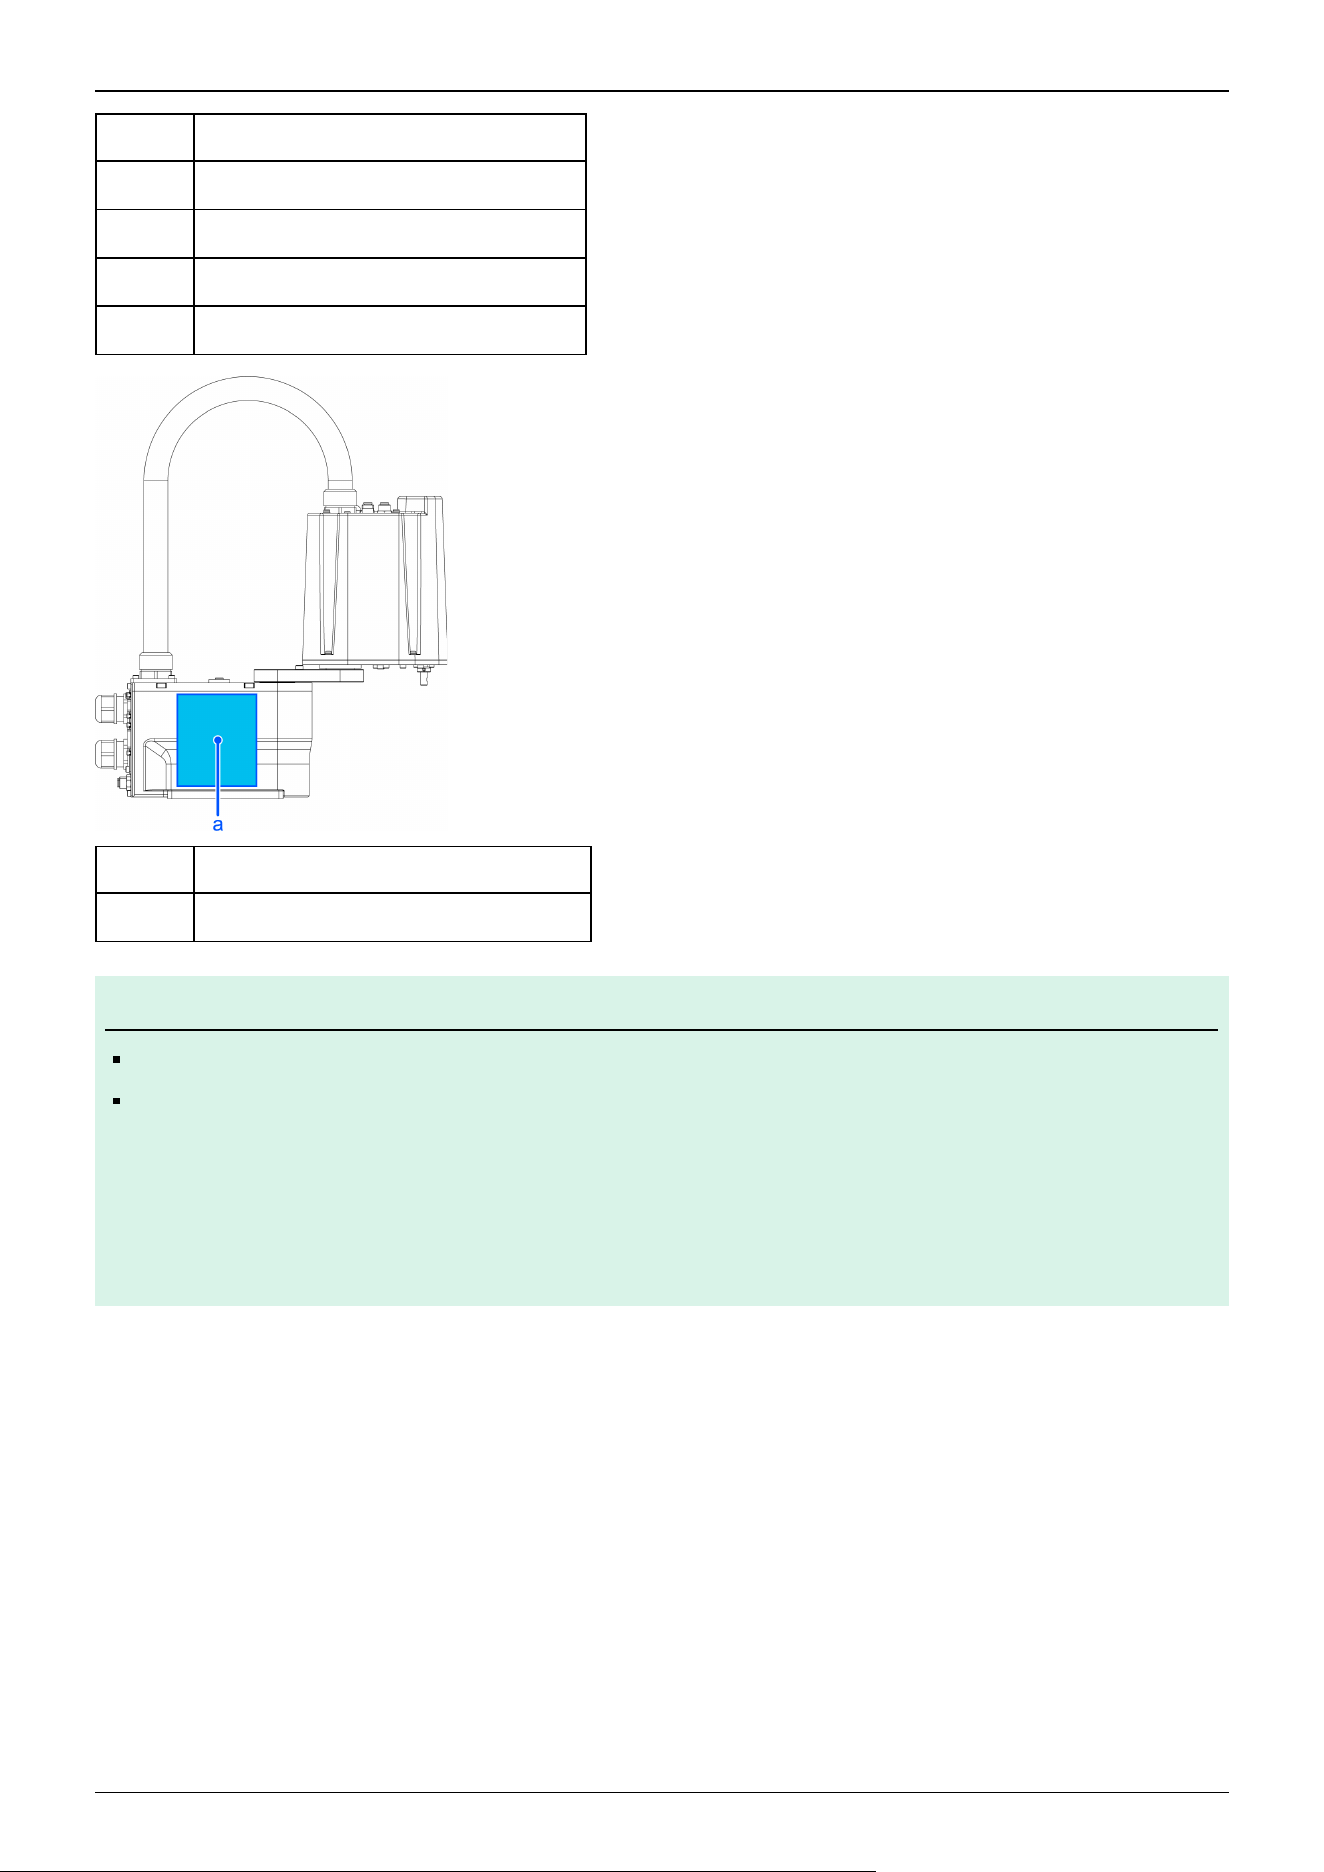
Symbol Description
d Fitting for ø6 mm tube (blue)
e Fitting for ø4 mm tube (blue)
f User connector (15-pin D-sub connector)
g User connector (9-pin D-sub connector)
Symbol Description
a Face plate (serial number of Manipulator)
Note
When the brake release switch is pressed in emergency mode, the brake for Joint #3 is released.
When the LED lamp is on or the Controller is power is on, current is being applied to the Manipulator.
Performing any work procedure with the power turned on is extremely dangerous and may result in electric
shock and/or malfunction of the robot system.
Before starting any maintenance work, be sure to turn off the Controller and inform others in the surrounding
area that work is in progress. Performing any work procedure with the power turned on is extremely
dangerous and may result in electric shock and/or malfunction of the robot system.
✏
Industrial Robot: SCARA Robots GX series Manual Rev.11
36
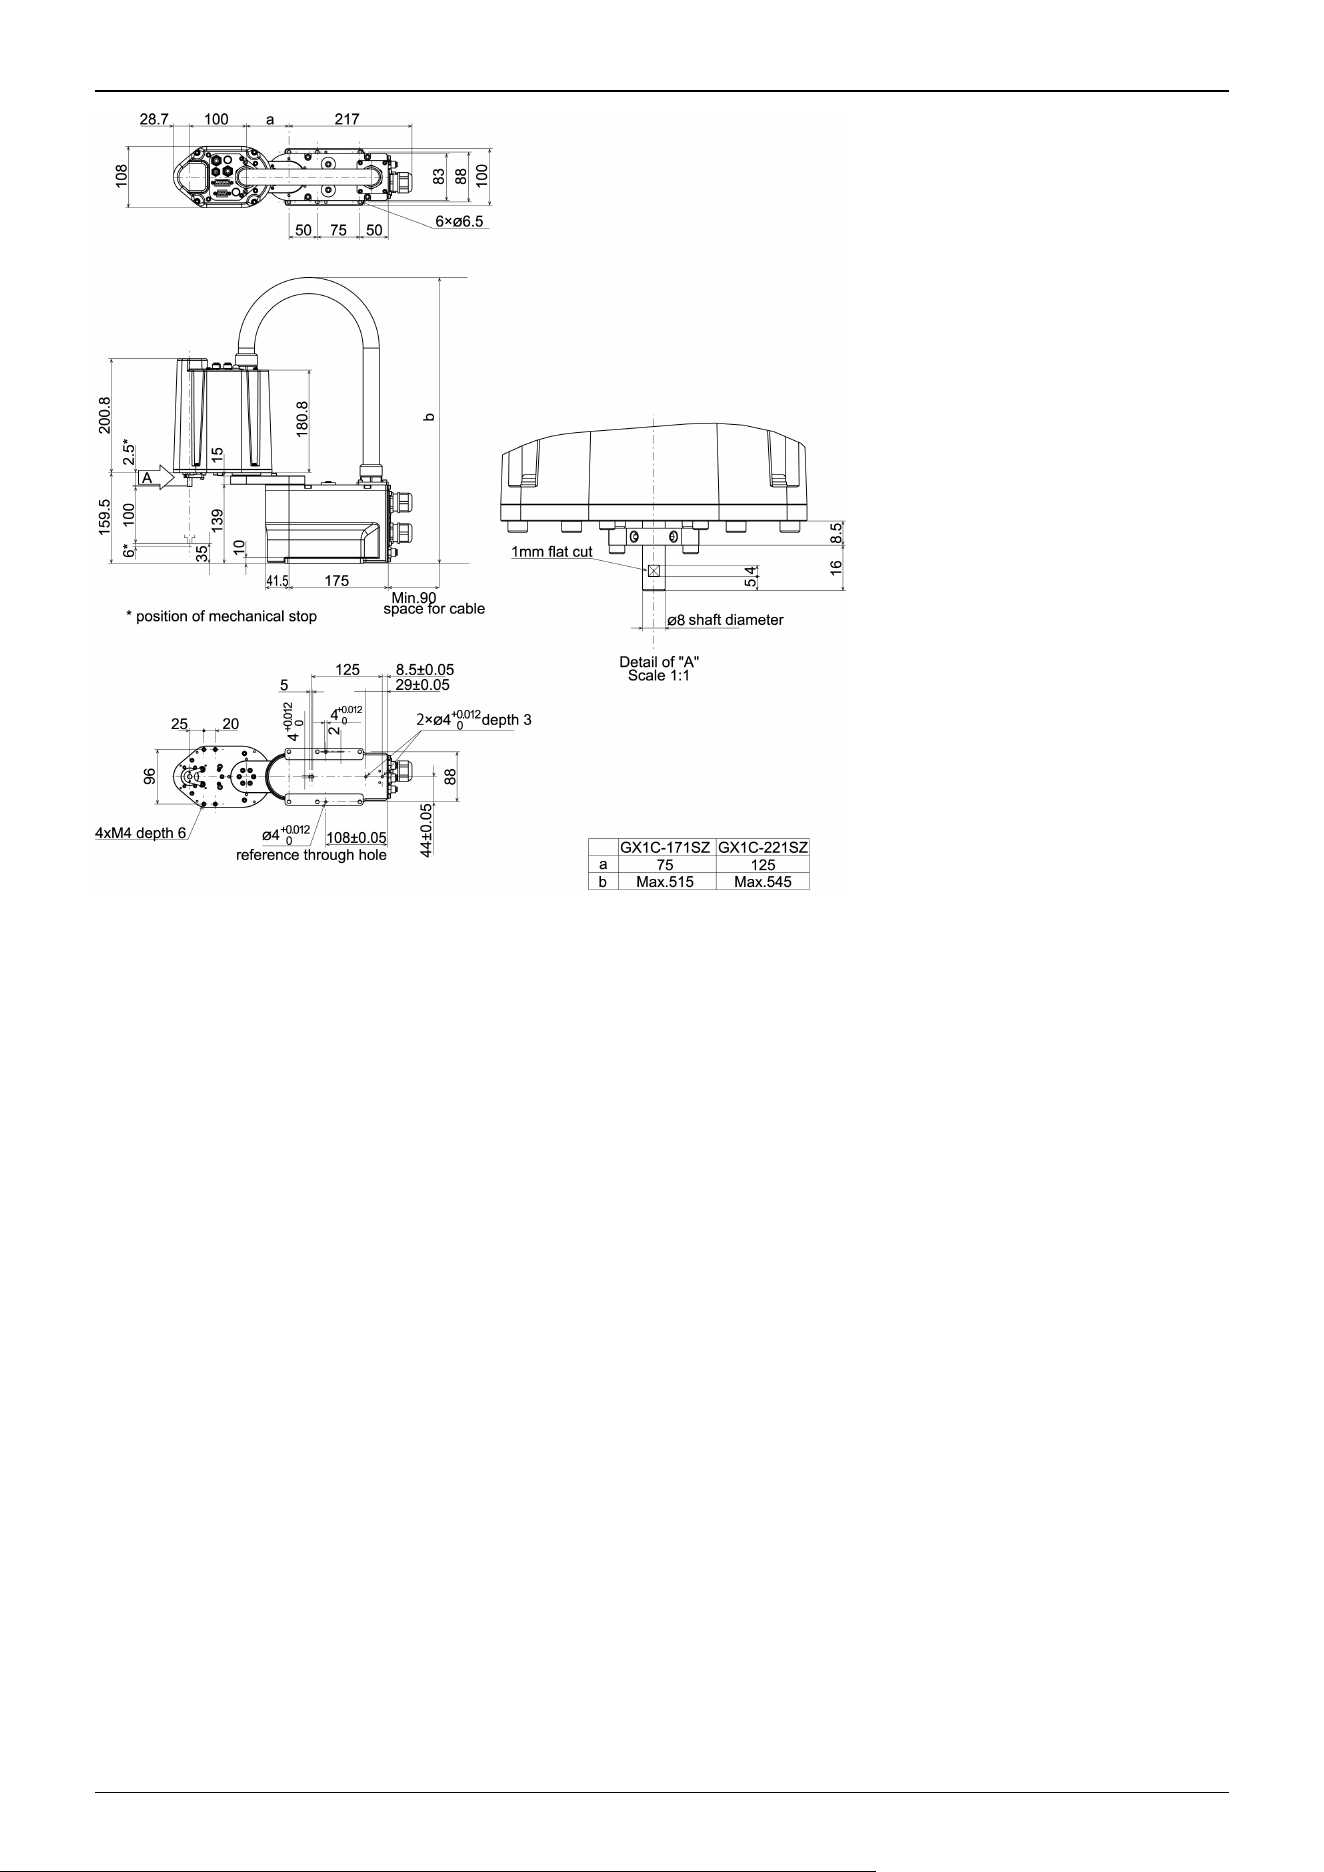
Industrial Robot: SCARA Robots GX series Manual Rev.11
37
2.2.3 Specifications Table
For the specifications tables of each model, refer to the following section.
Appendix A: Specifications Table
2.2.4 How to Set the Model
The Manipulator model for your system has been set before shipment from the factory.
Normally, the model does not need to be changed when you receive your system.
CAUTION
If changing the setting of the Manipulator model, be responsible and absolutely certain that the wrong
Manipulator model is not set. Incorrect setting of the Manipulator model may result in abnormal or no
operation by the Manipulator and could even cause safety problems.
Note
If the Manipulator has custom specifications, a custom specification number (MT*** or X***) will be listed on
the face plate (serial number label).
Models with custom specifications may require a different setting procedure. Check the custom specifications
number, and contact the supplier for more information.
The Manipulator model is set from software. For details, refer to the following manual.
"Epson RC+ User's Guide - Robot Settings"
✏
Industrial Robot: SCARA Robots GX series Manual Rev.11
38
2.3 Environment and Installation
The robot system should be designed and installed by people who have received installation training provided by Epson and
the suppliers. Also, the laws and regulations of the installation country must be followed.
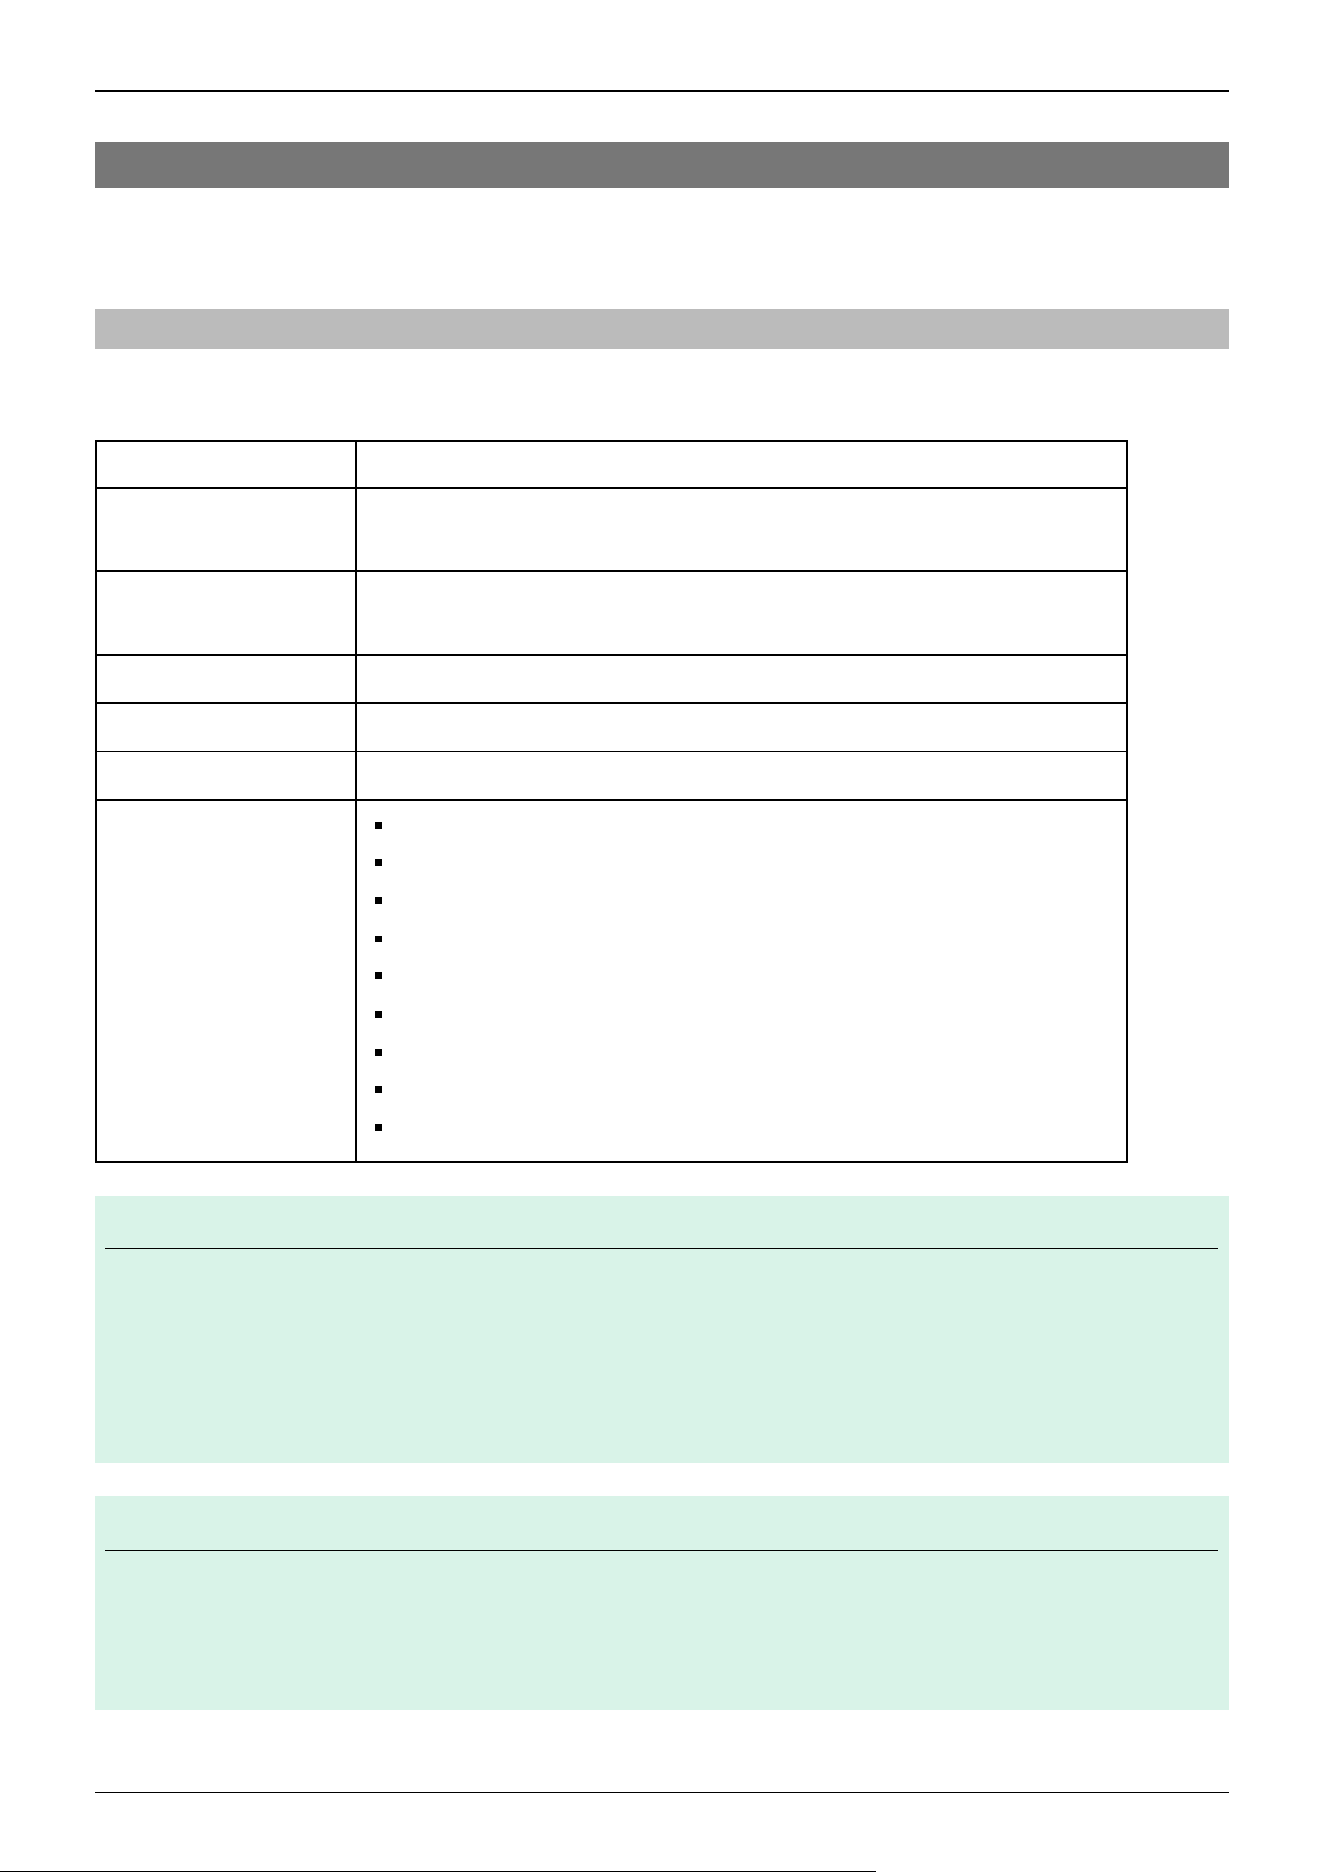
2.3.1 Environment
To ensure that the robot system operates and maintains maximum performance and to ensure its safe use, the robot system
should be installed in an environment that meets the following requirements.
Item Conditions
Ambient temperature
*1
Installation temperature: 5 to 40°C
Transportation and storage temperature:– 20 to 60°C
Ambient relative humidity
Installation: 10 to 80% (no condensation)
Transport, storage: 10 to 90% (no condensation)
Fast transient burst noise 1 kV or less (Signal wire)
Electrostatic noise 4 kV or less
Altitude 1000 m or less
Environment
Install indoors
Keep away from direct sunlight
Keep away from dust, oily smoke, salinity, metal powder, or other contaminants
Keep away from flammable or corrosive liquids and gases
Keep dry
Keep away from shocks or vibrations
Keep away from sources of electric noise
Keep away from explosive materials
Keep away from high amounts of radiation
Note
Manipulators are not designed for use in adverse environments. If the Manipulator will be used in a location that
does not meet the above requirements, please contact the supplier.
*1 The ambient temperature requirement is for the Manipulator only. For details on the environment requirements
for the connected Controller, refer to the following manual.
"Controller Manual"
Note
When used in a low-temperature environment near the minimum temperature specified in the product
specifications, or when the unit is idle for a long period of time during holidays or at night, a collision detection
error or similar error may occur immediately after the start of operation due to high resistance in the drive unit. In
such cases, warm-up operation for about 10 minutes is recommended.
✏
✏
Industrial Robot: SCARA Robots GX series Manual Rev.11
39
Note
If there are conductive objects such as fences or ladders within 2.5 m of the Manipulator, these objects must be
grounded.
Special environmental requirements
Manipulator surfaces are generally oil-resistant, but if special oils are to be used, oil resistance should be checked before use.
For more information, please contact the supplier.
In environments with rapid changes in temperature and humidity, condensation may form inside the Manipulator.
When handling food directly, it is necessary to make sure that the Manipulator is not likely to contaminate the food. For more
information, please contact the supplier.
The Manipulator cannot be used in corrosive environments where acids or alkalis are present. In environments where rust can
easily form, such as those exposed to salt, rust may also form on the Manipulator.
WARNING
Always use a circuit breaker for the Controller's power supply. Failure to use a circuit breaker may result in an
electrical shock hazard or malfunction due to an electrical leakage.
Select the correct circuit breaker based on the Controller that you are using. For more information, refer to the
following manual.
"Controller Manual"
CAUTION
When cleaning the Manipulator, do not rub it strongly with alcohol or benzene. Coated surfaces may lose their
luster.
2.3.2 Base Table
A base table for anchoring the Manipulator is not supplied. The base table must be fabricated or obtained by the customer.
The shape and size of the base table vary depending on the application of the robot system. As a reference when designing the
base table, the requirements from the Manipulator side are shown here.
The base table must not only be able to bear the weight of the Manipulator but also be able to withstand the dynamic
movement of the Manipulator when it operates at maximum acceleration/deceleration. Ensure that the base table has enough
strength by using reinforcing materials such as crossbeams.
The torque and reaction force produced by the movement of the Manipulator are as follows:
Maximum torque on horizontal surface: 100 N·m
Maximum reaction force in horizontal direction: 200 N
Maximum reaction force in vertical direction: 300 N
M6 threaded holes are used for mounting the Manipulator on the base table. Use bolts for mounting the Manipulator that have
a strength compliant with ISO 898-1 property class 10.9 or 12.9.
✏
Industrial Robot: SCARA Robots GX series Manual Rev.11
40
Names of Parts and Their Dimensions
Manipulator Mounting Dimensions
The plate for the Manipulator mounting face should be at least 15 mm thick and made of steel for reducing vibrations. A
surface roughness with a maximum height of 25 µm or less is appropriate.
The base table must be secured to the floor or wall to prevent it from moving.
The Manipulator mounting surface should have a flatness of 0.5 mm or less and an inclination of 0.5° or less to a horizontal or
vertical surface. If the installation surface does not have the proper flatness, the base of the Manipulator may be damaged or
the robot may be unable to operate at maximum performance.
When using a leveler to adjust the height of the base table, use a screw with M8 diameter or more.
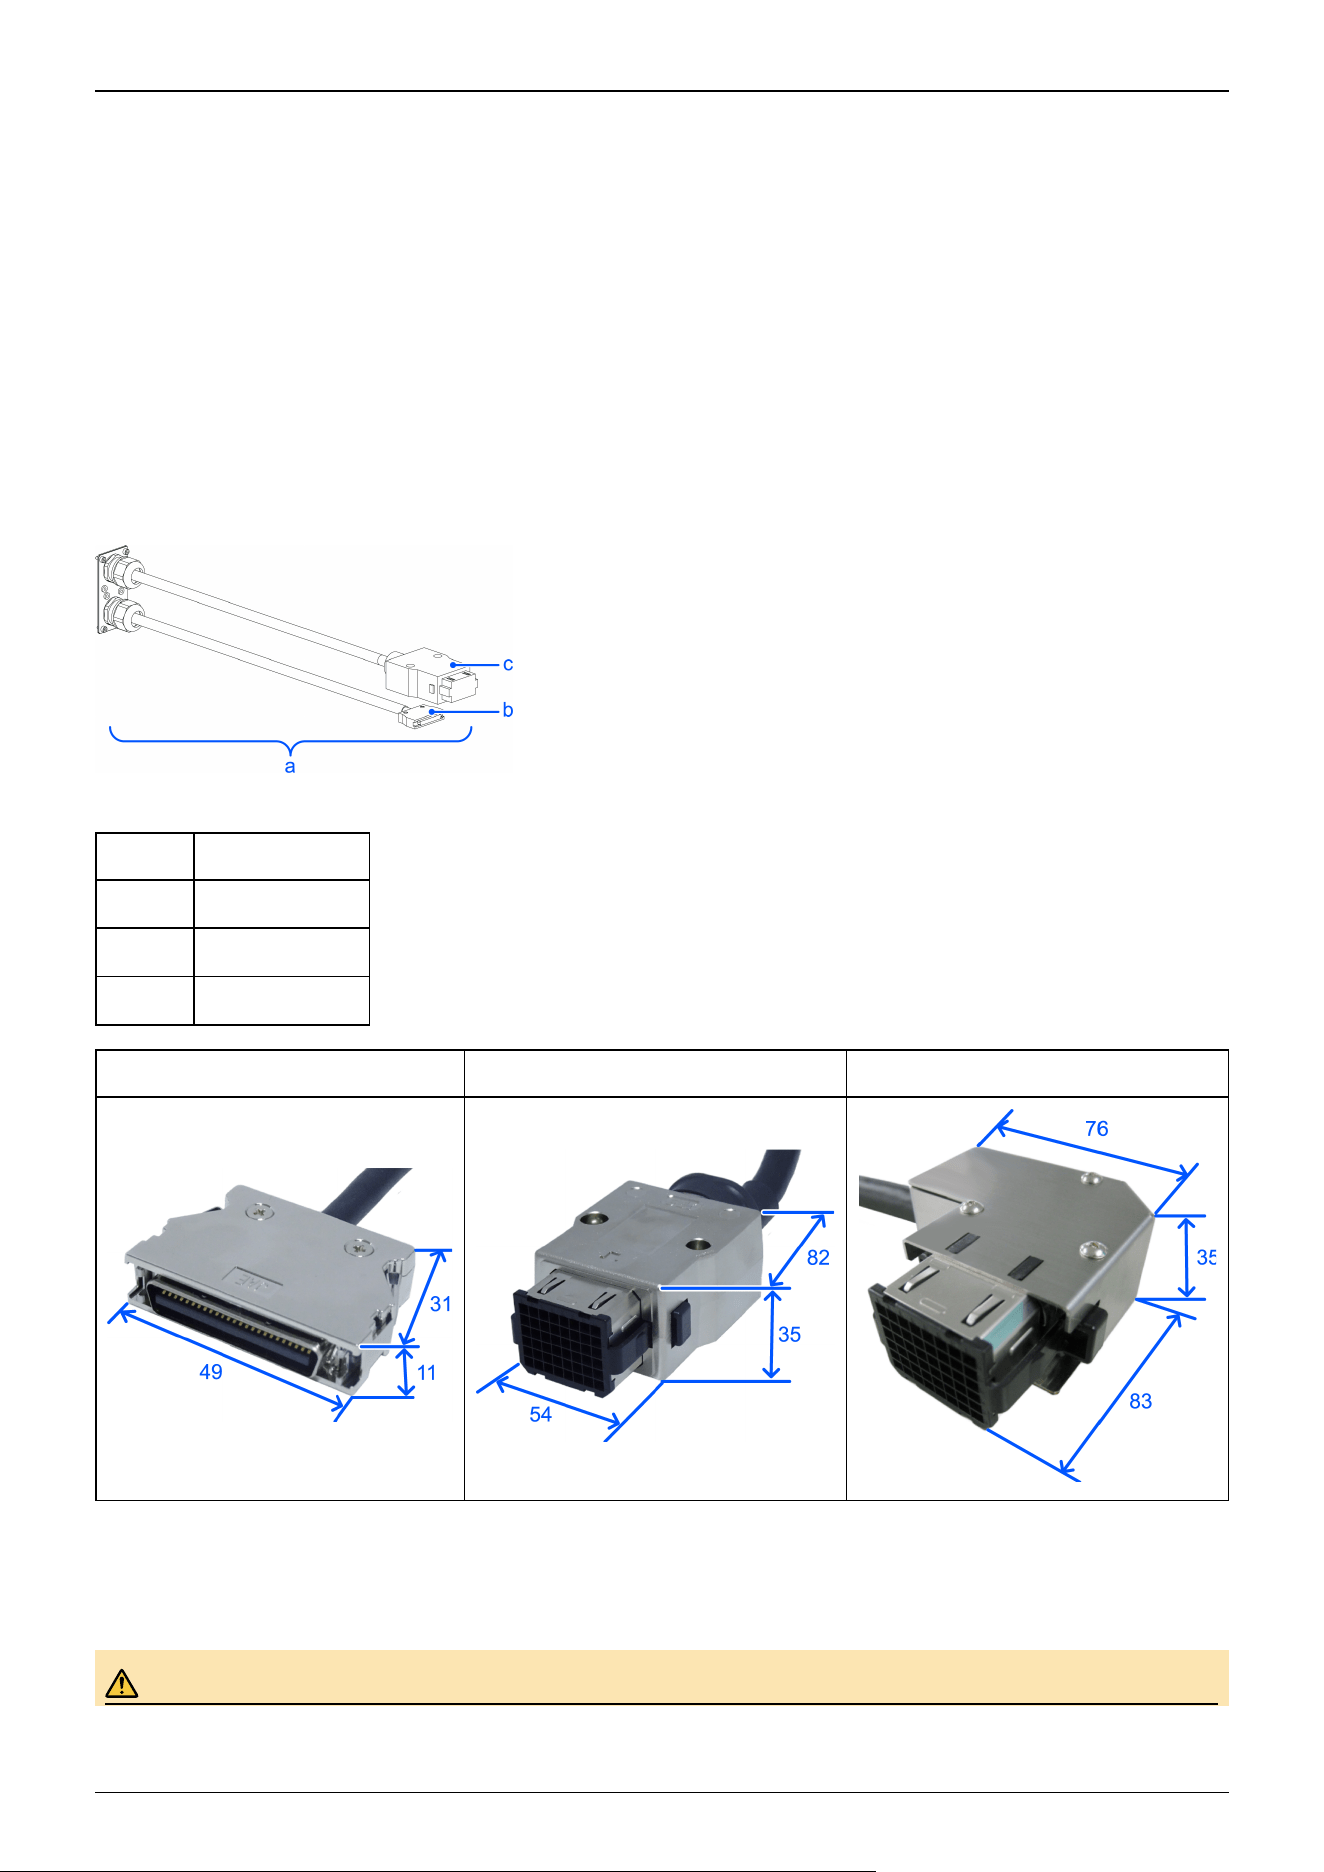
If passing cables through the holes in the base table, refer to the connector dimensions in the figures below.
(Units: mm)
Symbol Description
a M/C cable
b Signal connector
c Power connector
Signal connector Power connector (Straight) Power connector (L-shaped)
For details on the environmental requirements for the space when housing the Controller in the base table, refer to the
following manual.
"Controller Manual"
WARNING
Industrial Robot: SCARA Robots GX series Manual Rev.11
41
To ensure safety, be sure to install safety barriers for the robot system. For details, refer to the following
section.
Safeguard (SG)
2.3.3 Manipulator Mounting Dimensions
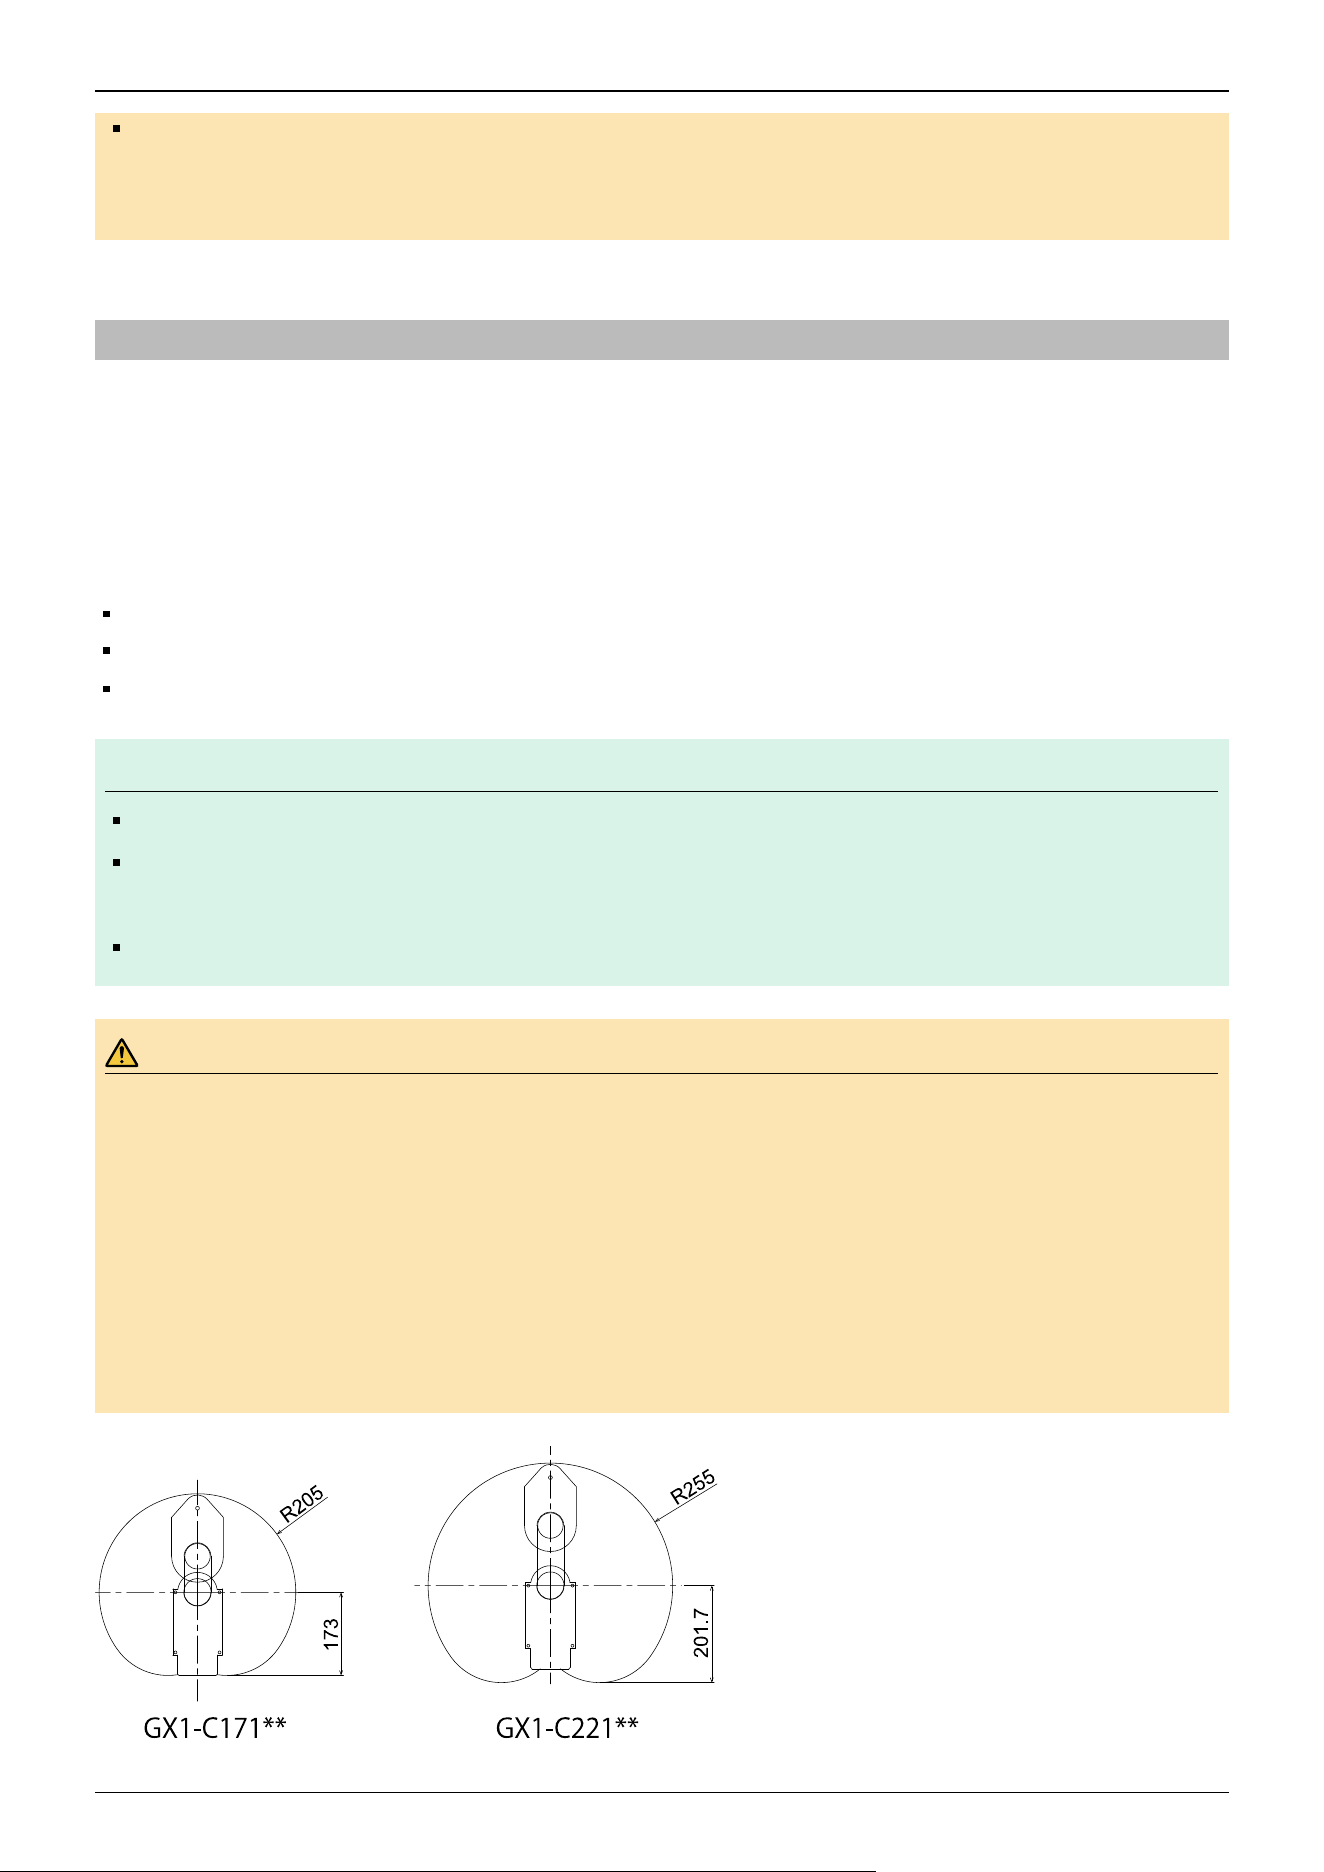
The maximum envelope of the Manipulator is shown in the figures below. The maximum envelope shown in each figure
includes the 30 mm radius of the hand. If the radius of the hand exceeds 30 mm, define the radius as the distance to the outer
edge of the maximum envelope. In addition to the hand, if a camera, solenoid valve, or other component attached to the arm is
large, set the maximum envelope to include the range that the component may reach.
Also, besides the area required for installation of the Manipulator, Controller, peripheral equipment, and other devices, the
following space should be provided at a minimum.
Space for teaching
Space for maintenance and inspection (Space for working safely in the safety barriers)
Space for cables
Note
When installing the cables, be sure to maintain sufficient distance from obstacles.
For the minimum bend radius of the M/C cables, refer to the following.
GX1
Also, leave enough space for other cables so that they are not forced to bend at extreme angles.
WARNING
Install the Manipulator in a location with enough space so that a tool or a workpiece tip does not reach a wall or
safety barriers when the Manipulator extends its arm while holding a workpiece.
If the tool or the workpiece tip reaches a wall or safety barriers, it is extremely hazardous and may result in
serious bodily injury to operators and/or severe equipment damage.
The distance between the safety barriers and the tool or workpiece should be set according to ISO 10218-2.
For the stopping time and stopping distance, refer to the following sections.
Appendix B: Stopping Time and Stopping Distance at Emergency Stop
Appendix C: Stopping Time and Stopping Distance When Safeguard is Open
✏
Industrial Robot: SCARA Robots GX series Manual Rev.11
42
2.3.4 From Unpacking to Installation
2.3.4.1 Safety Information for the Flow from Unpacking to Installation
Transportation and installation of the Manipulator and related equipment should be performed by people who have received
installation training provided by Epson and the suppliers. Also, the laws and regulations of the installation country must be
followed.
WARNING
Only qualified personnel should perform sling work and operate a crane or a forklift. When these operations
are performed by unqualified personnel, it is extremely hazardous and may result in serious bodily injury to
operators and/or severe equipment damage.
CAUTION
Use a cart or the like to transport the Manipulator in the same status as it was delivered.
After removing the fixing bolts securing the Manipulator to the transportation pallet, the Manipulator can fall.
Be careful not to get your hands or feet caught in between the Manipulator.
The Manipulator should be transported by two or more people, either secured to transporting equipment or
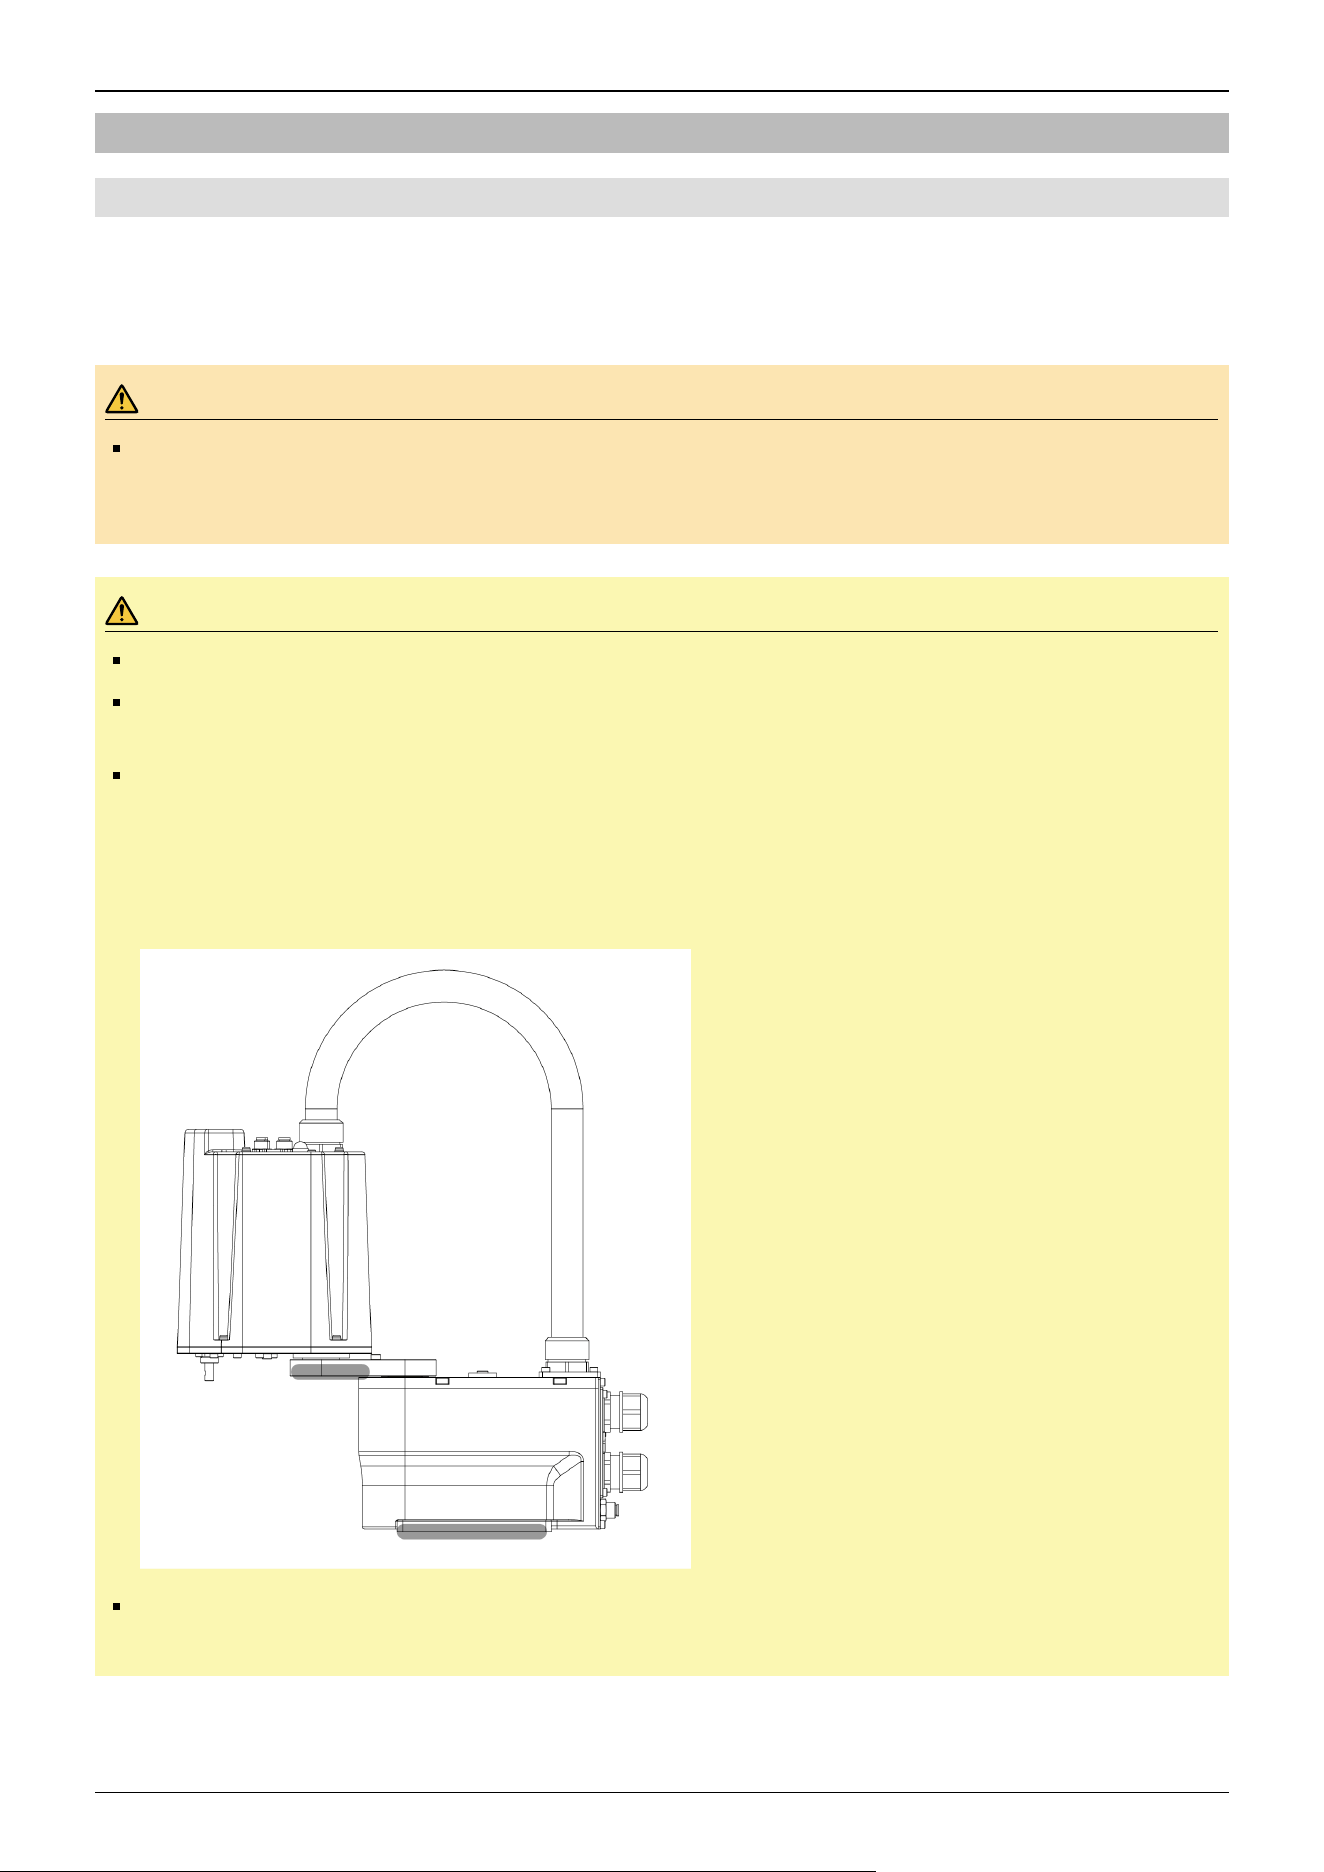
carried by placing their hands under Arm #1 or the bottom of the base. Do not put your hands on the duct. It
may damage the duct or cause the cables to become disconnected.
When holding the bottom of the base by hand, be extremely careful not to get your hands or fingers caught.
GX1-C*** : Approx. 8 kg (18 lb)
When transporting the Manipulator over long distances, secure it directly to transporting equipment so that it
will not fall. If necessary, pack the Manipulator using the same packaging as delivery.
Industrial Robot: SCARA Robots GX series Manual Rev.11
43
CAUTION
The Manipulator must be installed in such a way that avoids interference with surrounding buildings,
structures, and other machines and equipment. If not properly installed, it may collide with other machines or
create a trapping hazard.
Resonance (resonating sound or minute vibrations) may occur during Manipulator operation depending on
the rigidity of the base table. If the resonance occurs, improve the rigidity of the base table or change the
speed or acceleration and deceleration settings of the Manipulator.
For details on the Manipulator installation procedure for models with standard specifications, refer to the following sections.
For Manipulator models with cleanroom & ESD specifications, refer to the following section.
Cleanroom & ESD Specifications
2.3.4.1.1 Standard specifications
CAUTION
Be sure to always use two or more people when installing or relocating the model with table top mounting
specifications. The Manipulator weights are as follows. Be careful not to get hands or feet caught or have
equipment damaged due to dropping of the Manipulator.
GX1-C***: Approx. 8 kg (18 lb)
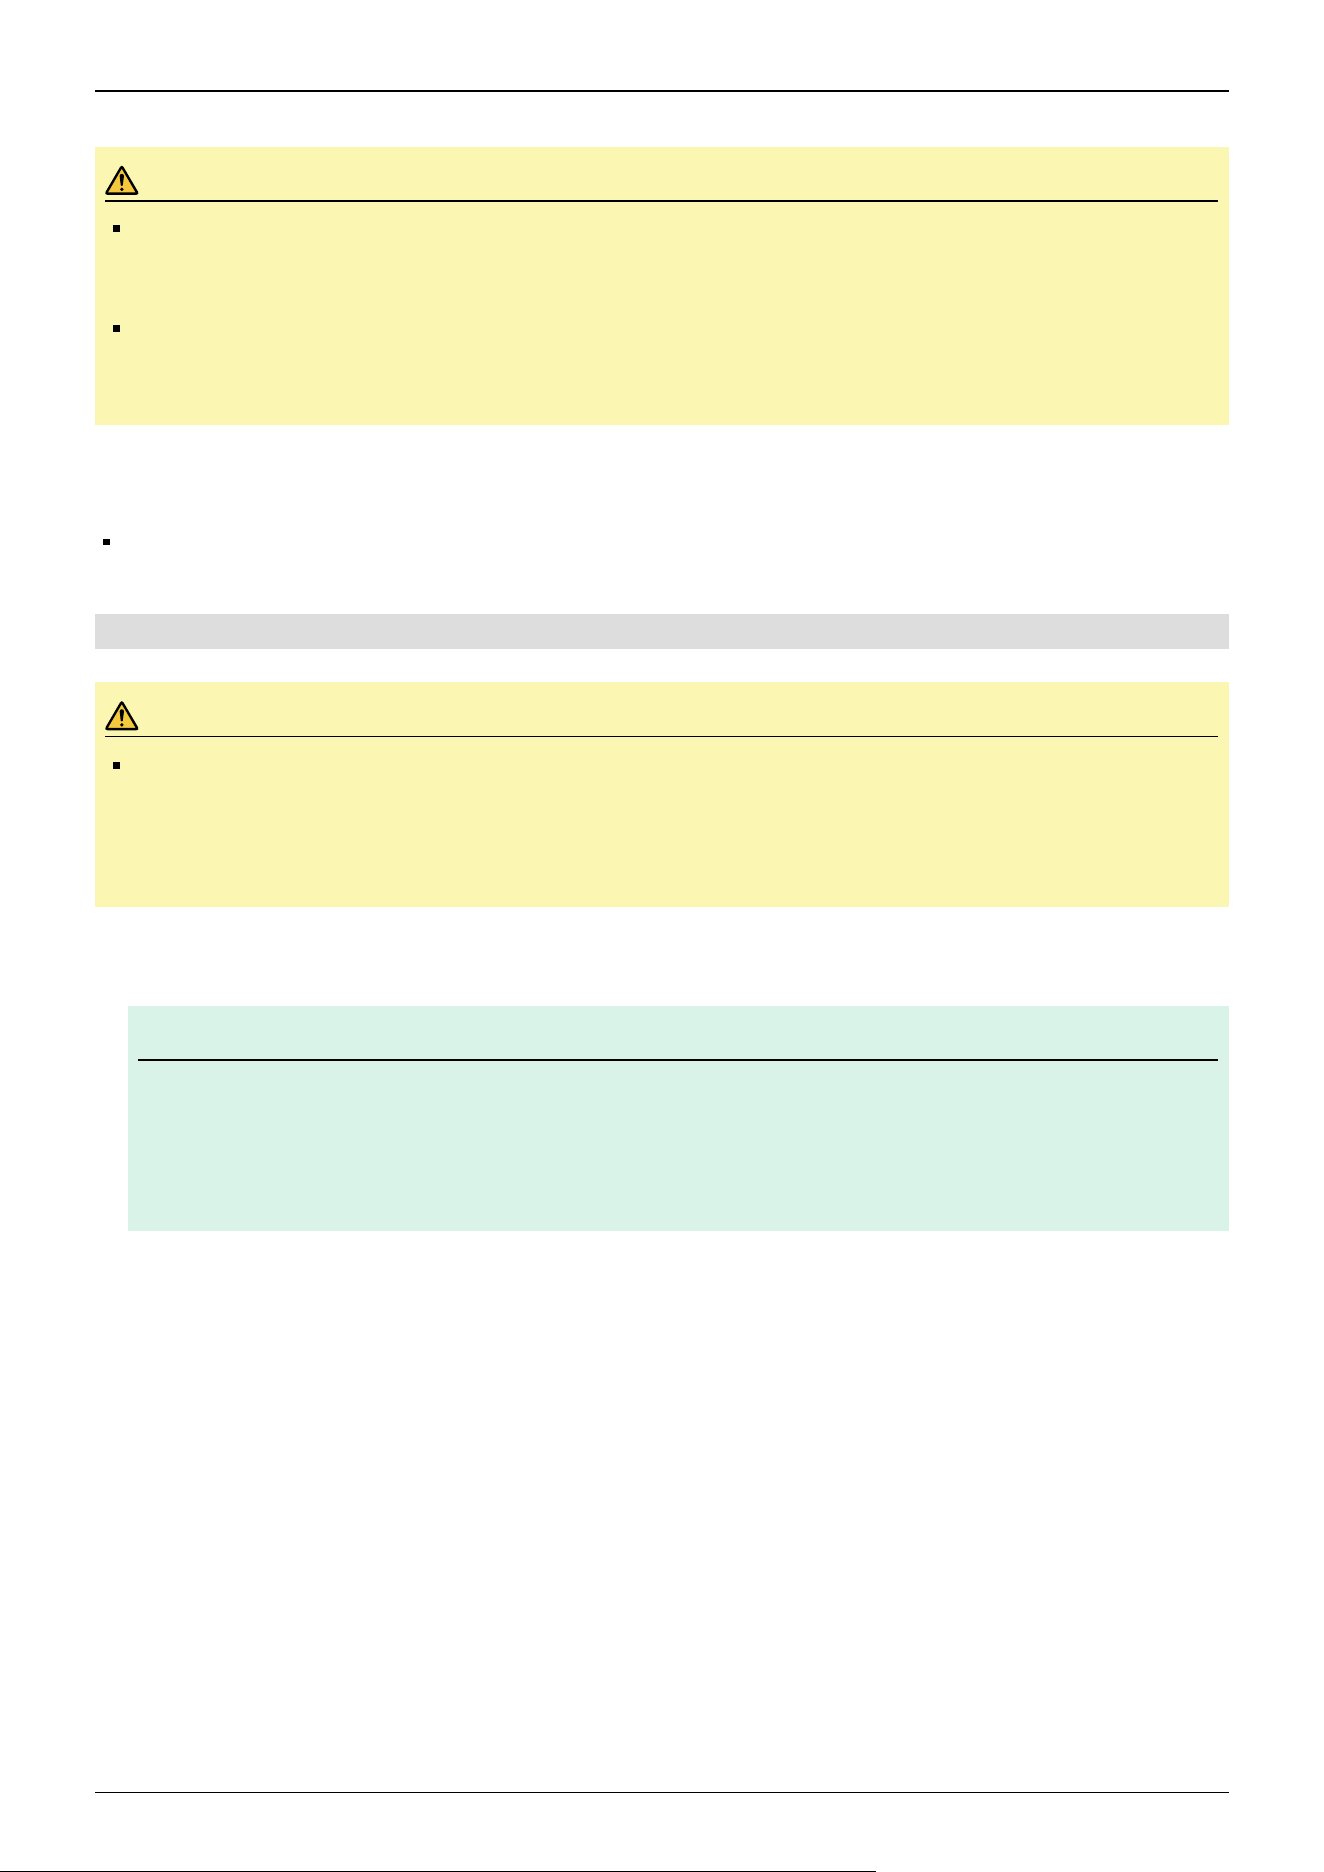
1. With the arm extended, take out the Manipulator from the packing box.
Note
The Manipulator is not fastened to anything. When taking the Manipulator out of the packing box, be careful
not to let it drop or fall.
The joints of the Manipulator may rotate due to their own weight. Be careful not to get your hands or fingers
caught.
✏
Industrial Robot: SCARA Robots GX series Manual Rev.11
44
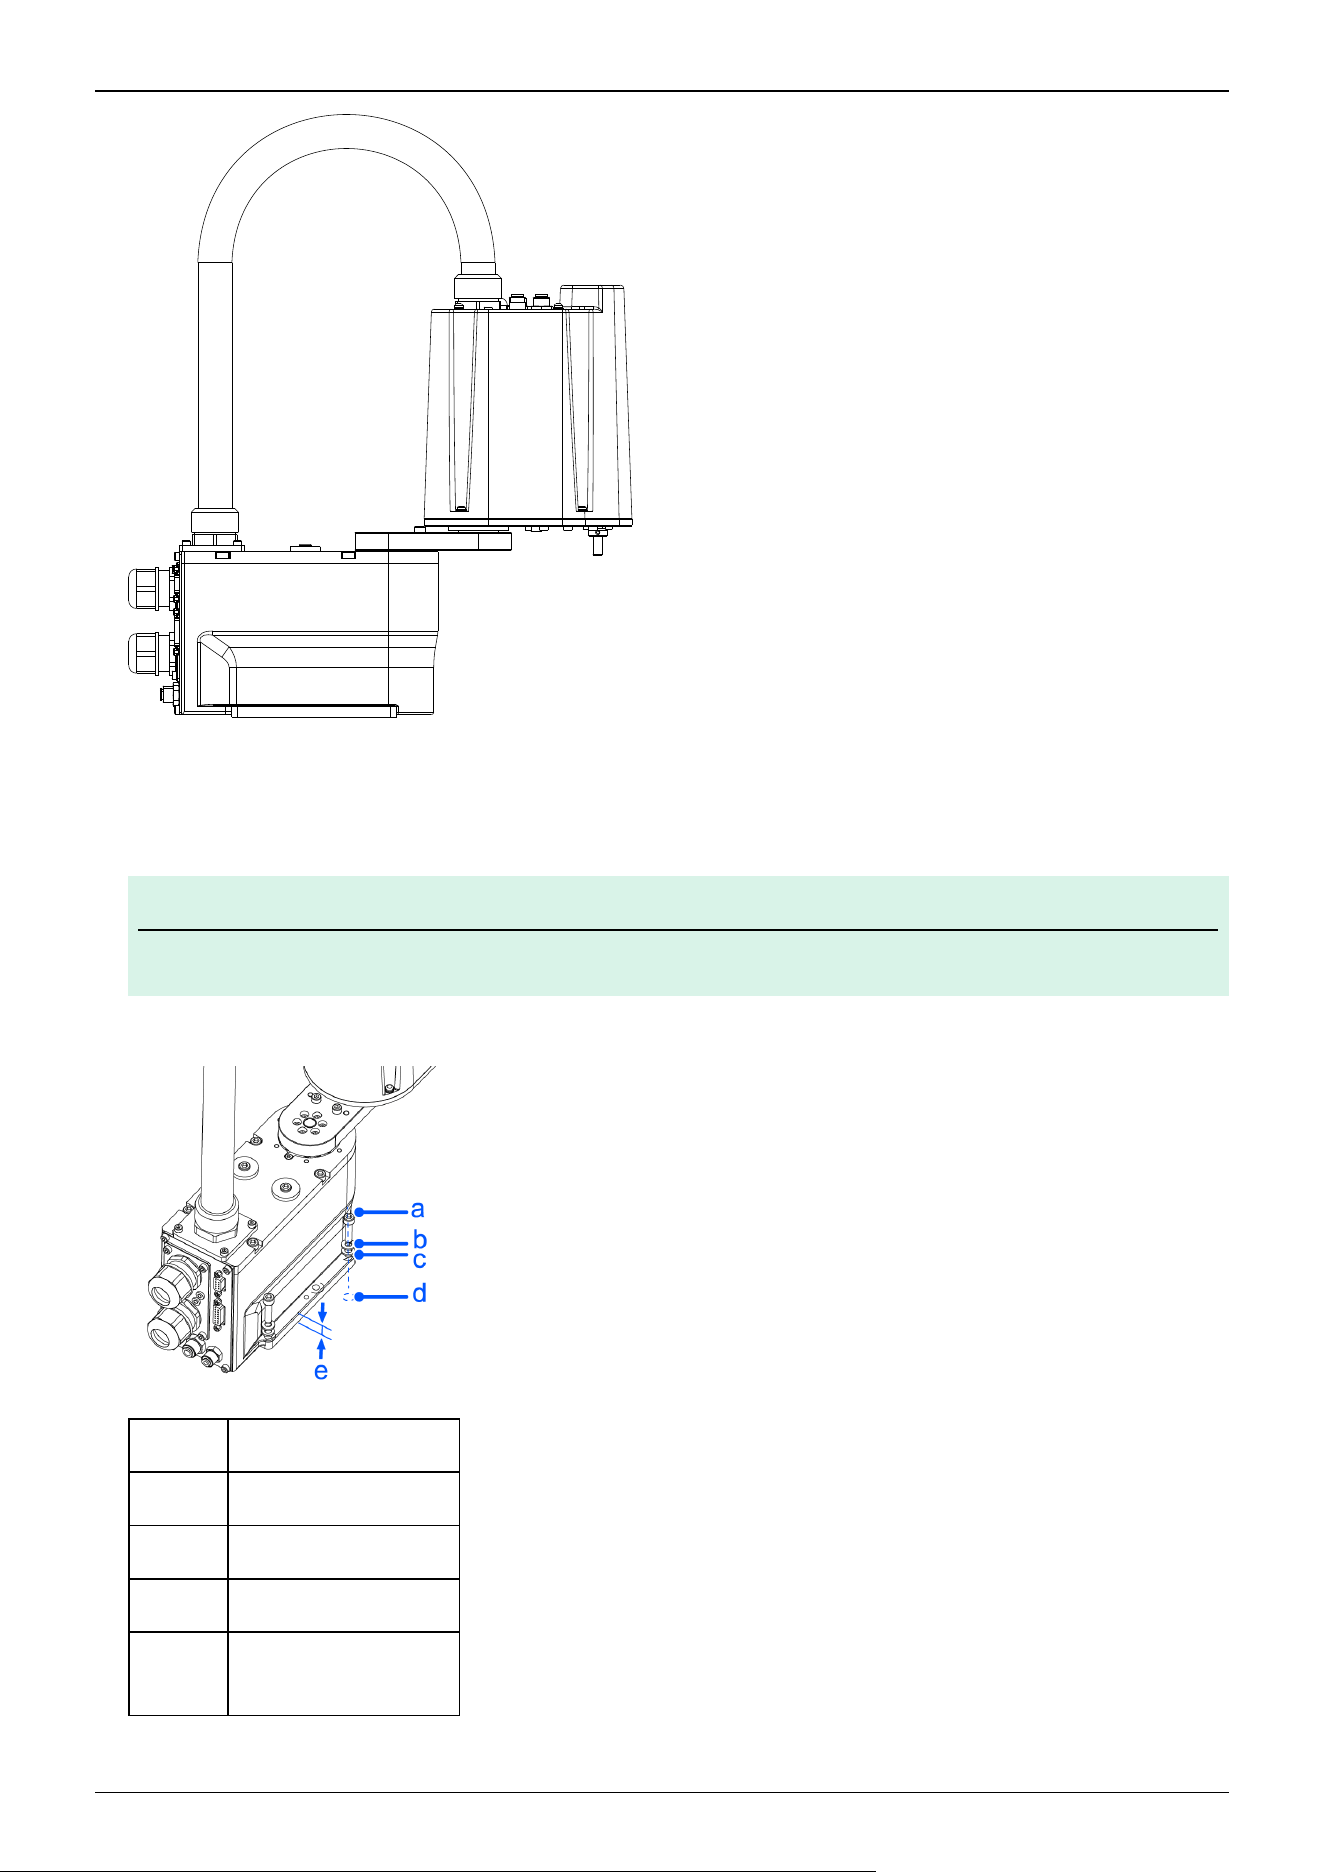
2. Secure the base to the base table.
Bolt (4-M6×25) + spring washer + plain washer
Tightening torque: 13 N·m (133 kgf·cm)
Note
Use bolts with strength specifications compliant with ISO 898-1 property class: 10.9 or 12.9.
Symbol Description
a 4 × M6 × 25
b Spring washer
c Flat washer
d
4 × M6 threaded hole
(15 mm or more depth)
✏
Industrial Robot: SCARA Robots GX series Manual Rev.11
45
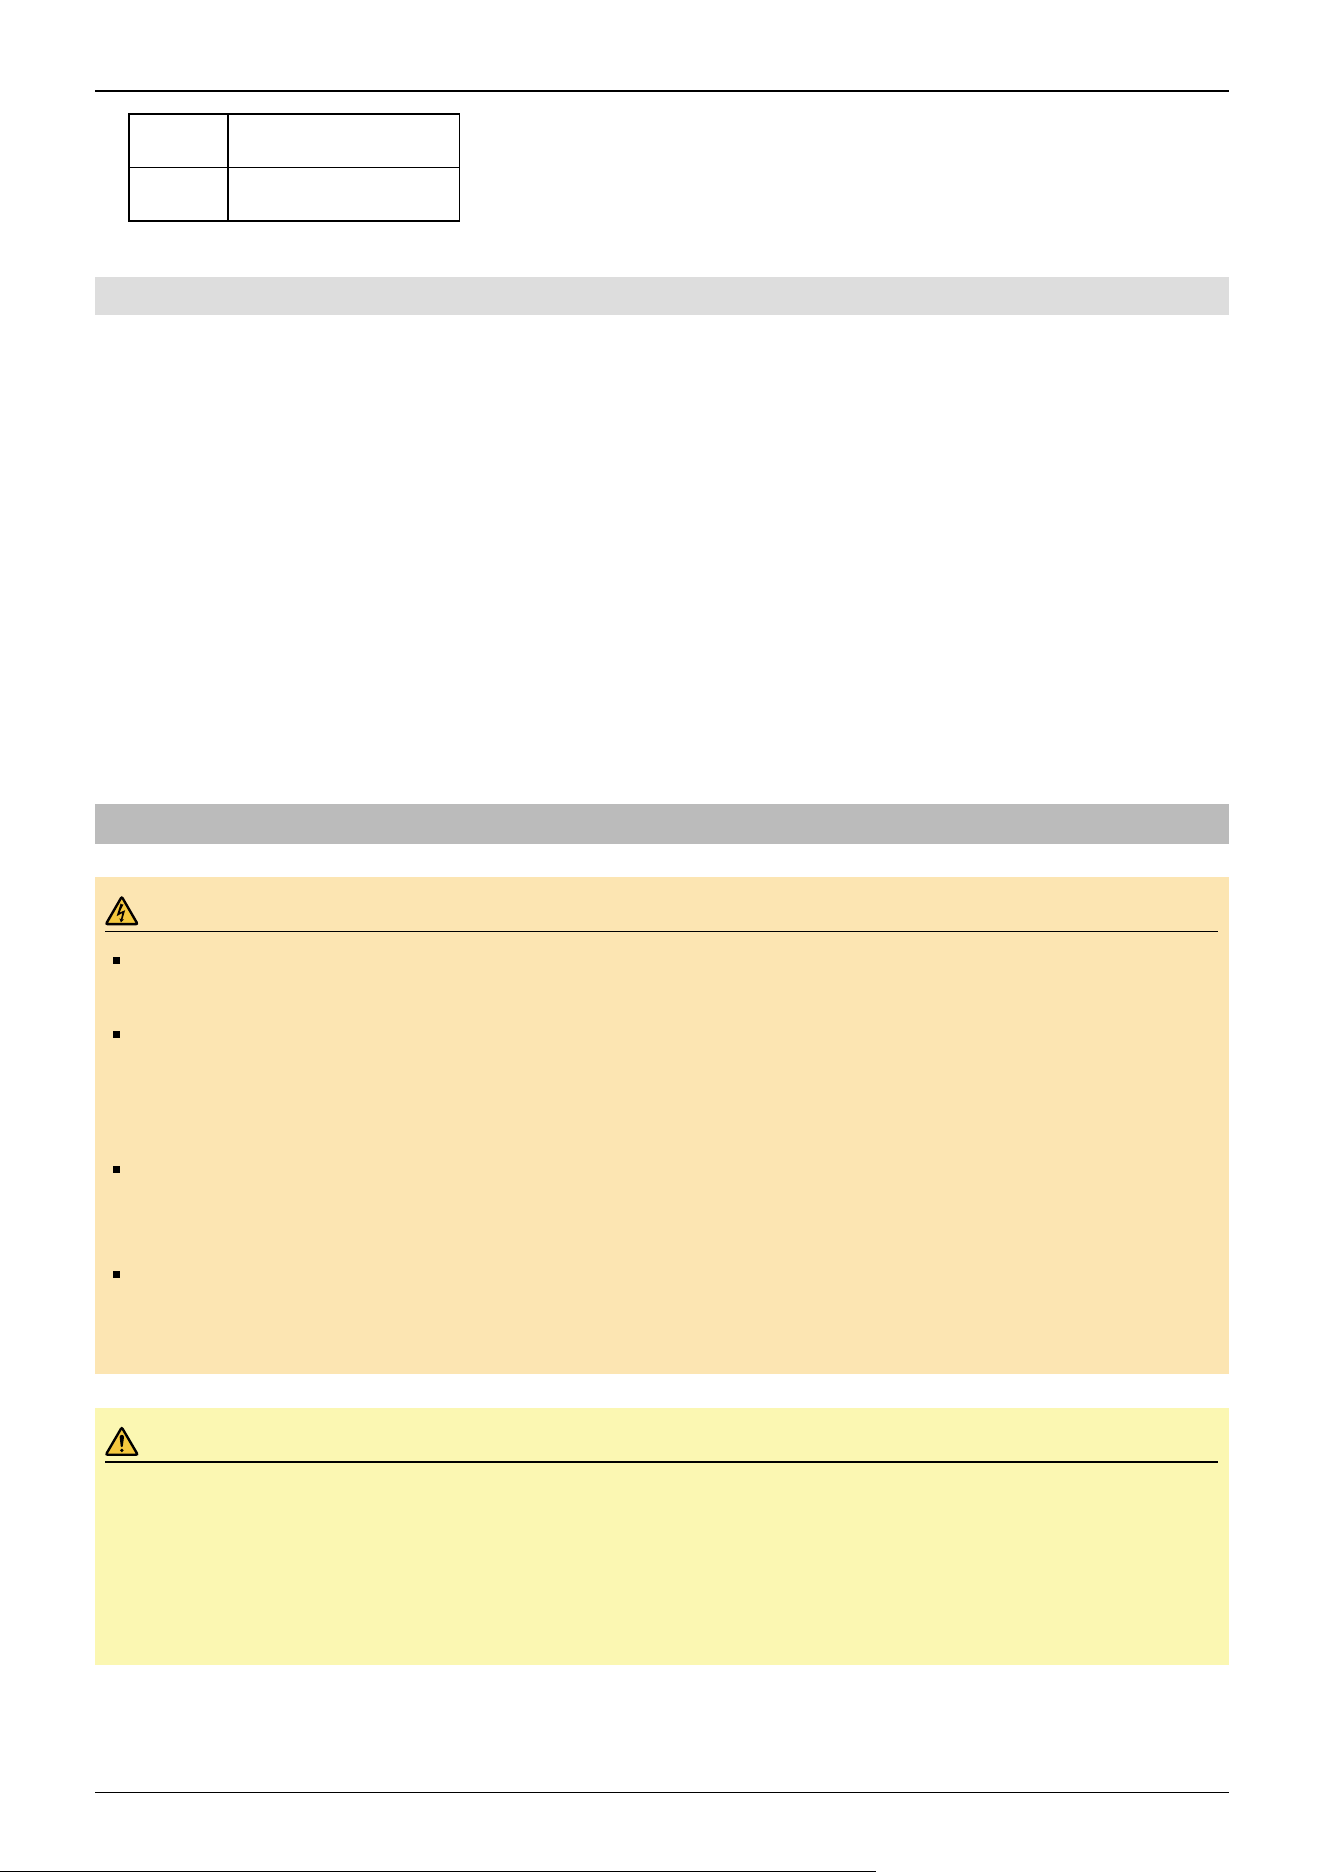
Symbol Description
e 10 mm
2.3.4.2 Cleanroom & ESD specifications
1. Unpack the Manipulator outside of the cleanroom.
2. Secure the Manipulator to transporting equipment (or a pallet) with bolts so that the Manipulator does not fall down.
3. Wipe off any dust on the Manipulator using a lint-free cloth that was dipped in ethyl alcohol or distilled water.
4. Carry the Manipulator into the cleanroom.
5. Referring to the standard specification’s installation procedure, install the Manipulator.
6. Connect an exhaust tube to the exhaust port.
When the Manipulator is a model with cleanroom & ESD specifications, an exhaust system must be connected. The
exhaust system is described in the following section.
Appendix A: Specifications Table
2.3.5 Connecting the Cables
WARNING
To perform the power supply lockout, remove the power plug. Be sure to connect the AC power cable to a
power outlet. Do not connect it directly to a factory power source.
Before performing any replacement work, inform others in the area that you are working, and then turn off the
Controller and related equipment, and unplug the power cable from the power source. Performing any work
procedure with the power turned on is extremely dangerous and may result in electric shock and/or
malfunction of the robot system.
Be sure to connect the cables properly. Do not put heavy objects on the cables, bend or pull on the cables
forcibly, or allow the cables to be pinched. Damaged cables, broken wires, or contact failure is extremely
hazardous and may result in electric shock and/or malfunction of the robot system.
The Manipulator is grounded by connecting it to the Controller. Ensure that the Controller is grounded and the
cables are correctly connected. If the ground wire is improperly connected to ground, it may result in the fire
or electric shock.
CAUTION
When connecting the Manipulator and the Controller, check that the serial numbers match for each device.
Improper connection between the Manipulator and the Controller may not only lead to malfunction of the robot
system but also serious safety problems. The connection method between the Manipulator and the Controller
varies depending on the Controller. For details on the connections, refer to the following manual.
"Controller Manual"
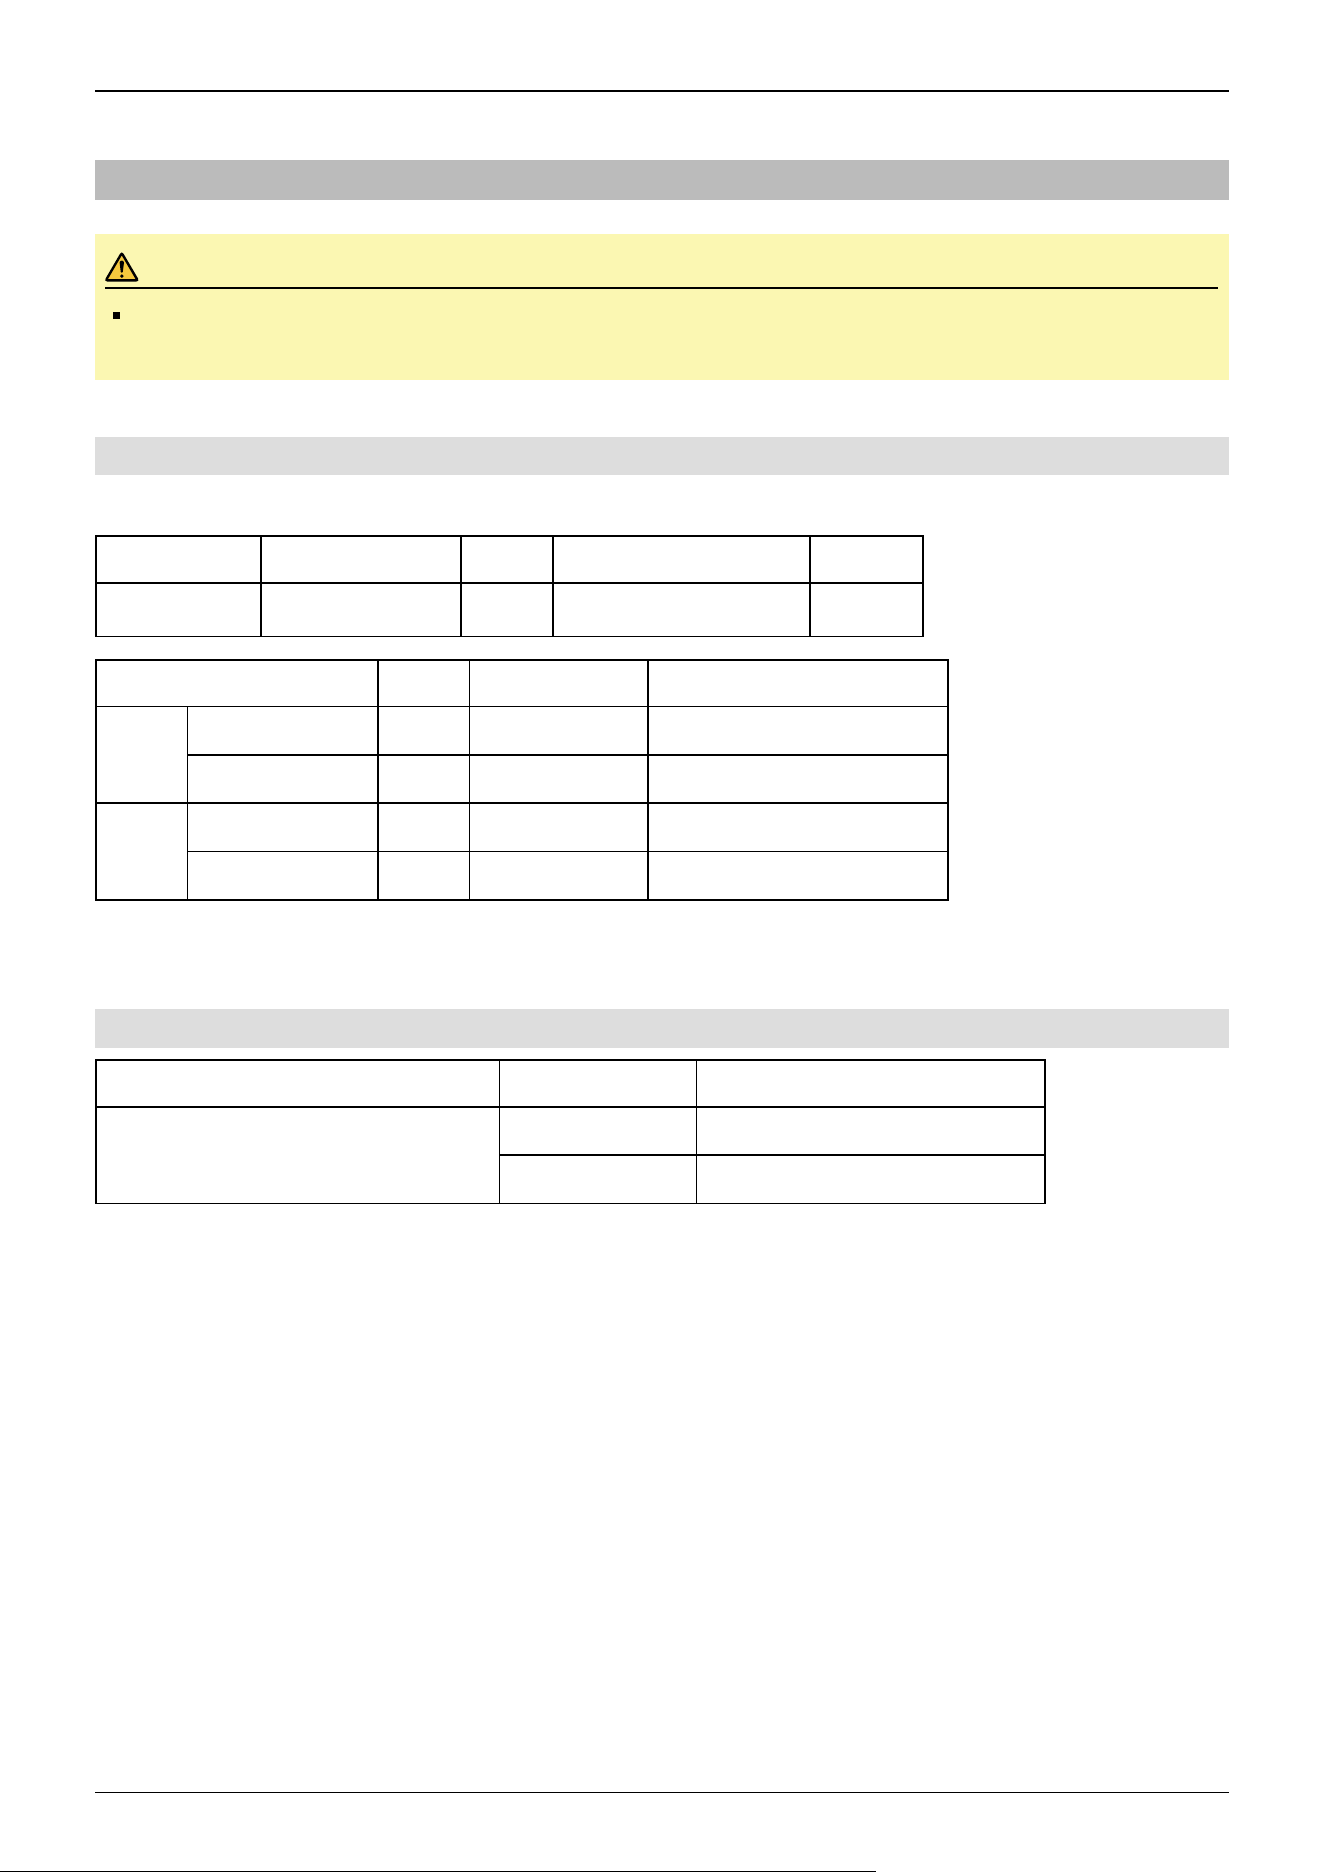
When the Manipulator is a model with cleanroom & ESD specifications, please note the following points.
Industrial Robot: SCARA Robots GX series Manual Rev.11
46

2.3.6 User Wires and Pneumatic Tubes
CAUTION
Only authorized or certified staff should be allowed to perform wiring. Wiring by unauthorized or uncertified
staff may result in bodily injury and/or malfunction of the robot system.
2.3.6.1 Electrical Wires
Connect the following connectors and cables to the user connector of the Manipulator.
Rated Voltage Allowable Current Wires Nominal Sectional Area Note
AC/DC 30V 1.0A 9+15
0.211 mm
2
Twist pair
Maker Model Number Standard
9 pin
Suitable connector JAE DE-9PF-N Solder type
Clamp hood JAE DE-C8-J9-F2-1R Connector setscrew: #4-40 NC
15 pin
Suitable connector JAE DA-15PF-N Solder type
Clamp hood JAE DA-C8-J10-F2-1 Connector setscrew: #4-40 NC
Pins with the same number, indicated on the connectors on both ends of the cables, are connected. When doing wiring, prepare
D-sub connectors.
2.3.6.2 Pneumatic Tubes
Maximum Usable Pneumatic Pressure Pneumatic Tubes Outer Diameter × Inner Diameter
0.59 MPa (6 kgf/cm
2
: 86 psi)
2 ø6 mm × ø4 mm
1 ø4 mm × ø2.5 mm
Fittings for ø4 mm / ø6 mm (outer diameter) pneumatic tubes are included for both ends of the pneumatic tubes.
Inside the Manipulator, fittings of the same size and tip color (blue/white) are connected between the air fitting on the base side
and the air fitting on the Arm #2 side.
Industrial Robot: SCARA Robots GX series Manual Rev.11
48
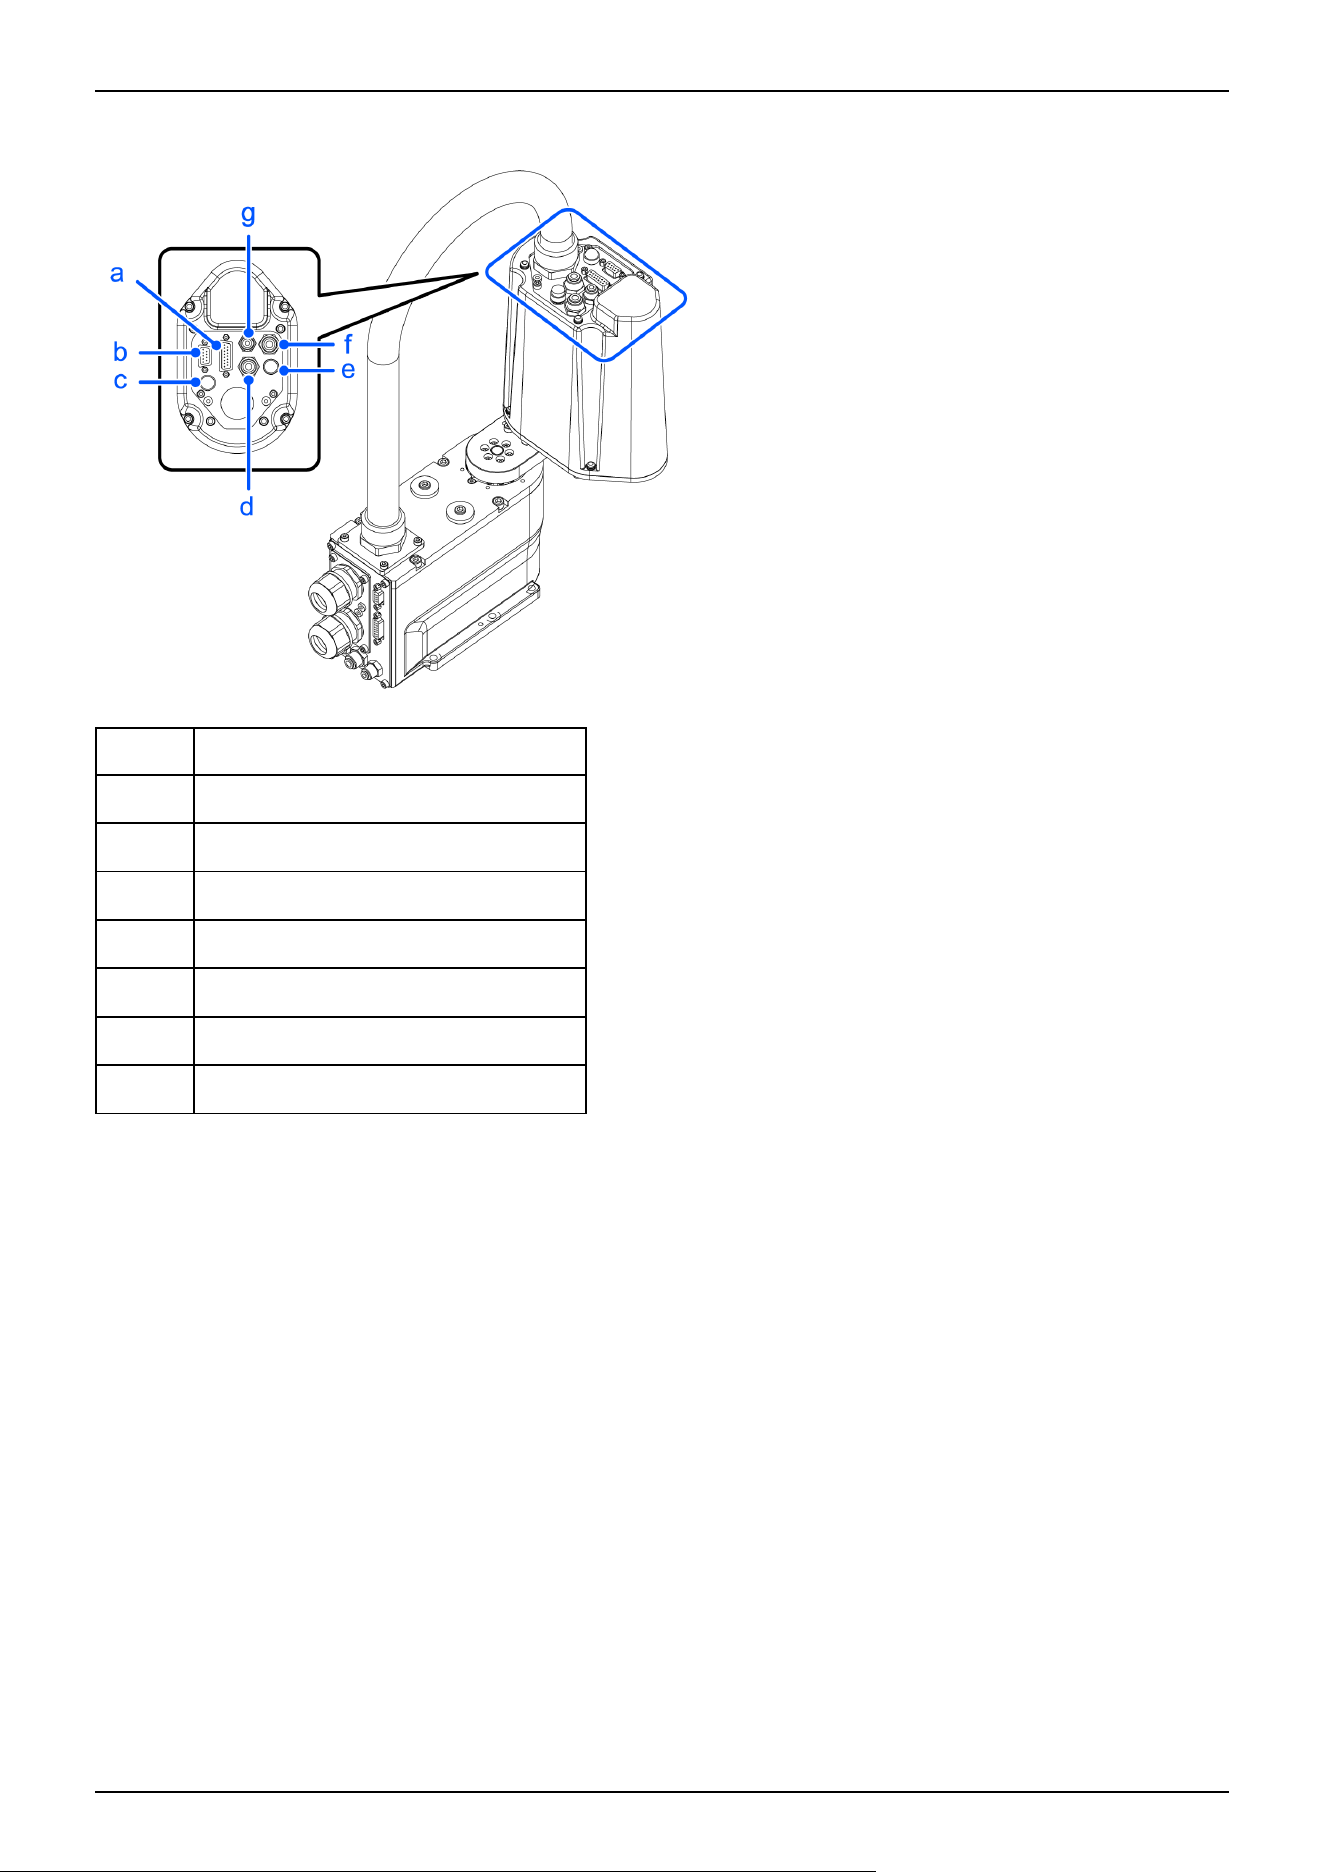
Arm #2 side (common to GX1 series)
Symbol Description
a User connector (15-pin D-sub connector)
b User connector (9-pin D-sub connector)
c LED
d Fitting for ø6 mm tube (white)
e Brake release switch
f Fitting for ø6 mm tube (blue)
g Fitting for ø4 mm tube (blue)
Industrial Robot: SCARA Robots GX series Manual Rev.11
49
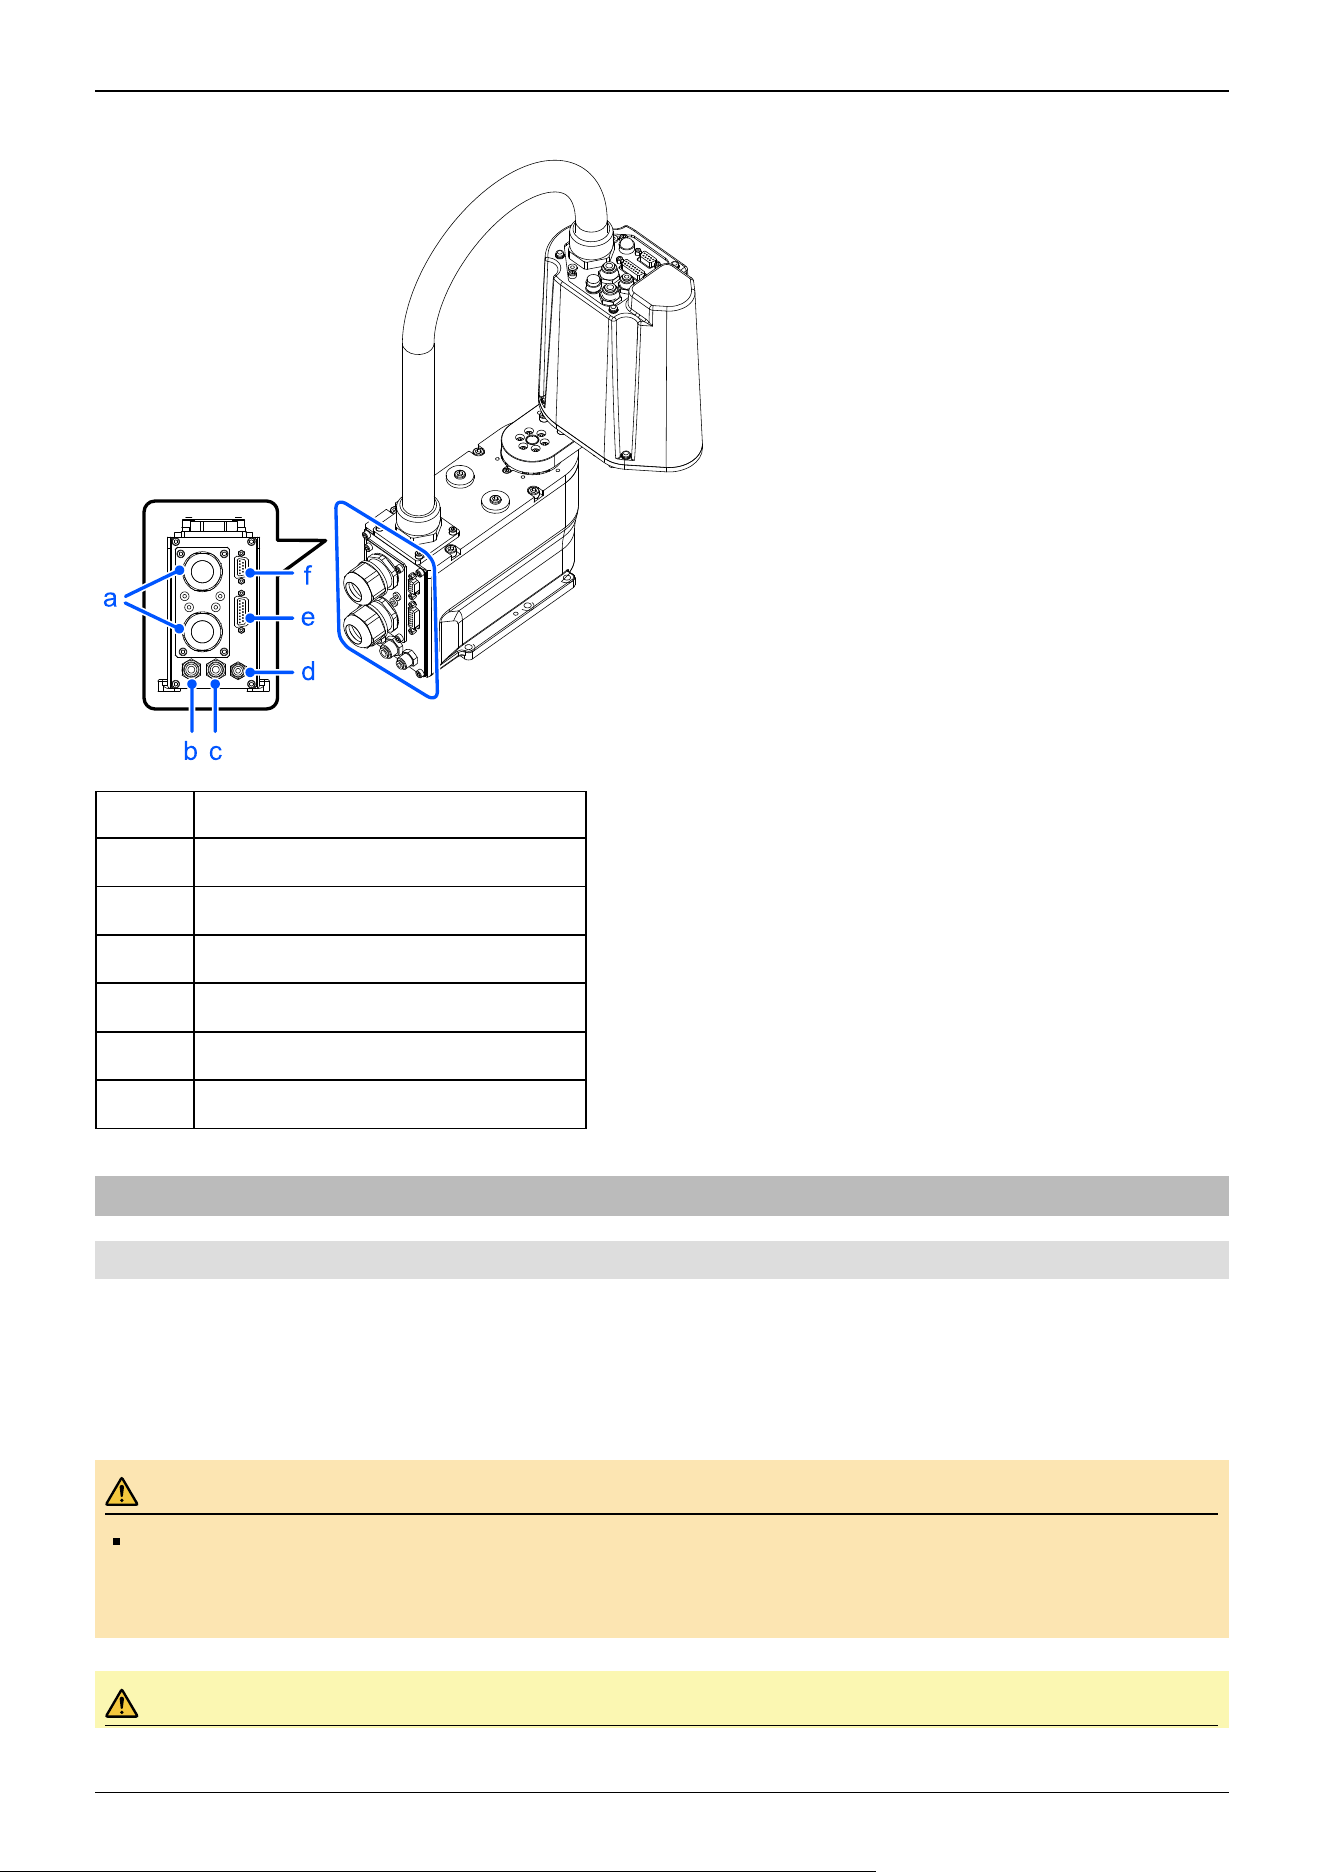
Base side
Symbol Description
a MC Cables
b Fitting for ø6 mm tube (white)
c Fitting for ø6 mm tube (blue)
d Fitting for ø4 mm tube (blue)
e User connector (15-pin D-sub connector)
f User connector (9-pin D-sub connector)
2.3.7 Relocation and Storage
2.3.7.1 Safety Information for Relocation and Storage
Pay attention to the following requirements when relocating, storing, and transporting the Manipulators.
Transportation and installation of the Manipulator and related equipment should be performed by people who have received
installation training provided by Epson and the suppliers. Also, the laws and regulations of the installation country must be
followed.
WARNING
Only qualified personnel should perform sling work and operate a crane or a forklift. When these operations
are performed by unqualified personnel, it is extremely hazardous and may result in serious bodily injury to
operators and/or severe equipment damage.
CAUTION
Industrial Robot: SCARA Robots GX series Manual Rev.11
50

Before relocating, fold the arm and secure it tightly with a cable tie to prevent hands or fingers from getting
caught in the Manipulator.
When removing the anchor bolts, support the Manipulator so that it does not fall. Removing the anchor bolts
without supporting the Manipulator can cause it to fall, causing hands or feet to get caught.
The Manipulator should be transported by two or more people, either secured to transporting equipment or
carried by placing their hands under Arm #1 or the bottom of the base. When holding the bottom of the base
by hand, be extremely careful not to get your hands or fingers caught.
Be sure to always use two or more people when installing or relocating the Manipulator. The Manipulator
weights are as follows. Be careful not to get hands or feet caught or have equipment damaged due to
dropping of the Manipulator.
GX1-C***: Approx. 8 kg (18 lb)
When transporting the Manipulator over long distances, secure it directly to transporting equipment so that it will not fall. If
necessary, pack the Manipulator using the same packaging as delivery.
When the Manipulator is reassembled and used for a robot system again after an extended period of storage, perform a test run
to verify that it works properly before starting the main operation.
Manipulators should be transported and stored under the following conditions: Temperature: -20 to +60°C, Humidity: 10 to
90% (no condensation).
If condensation has formed on the Manipulator during transportation or storage, do not turn on the power until the
condensation is removed.
Do not subject the Manipulator to excessive impacts or vibrations during the transportation process.
1. Turn off all power, and remove the wiring and tubes connected to the Manipulator.
Note
If using variable mechanical stops for Joints #1 and #2 and the operating angle is limited, change to the
mechanical stop positions at factory shipping.
Setting the Work Envelope by Mechanical Stops
2. While supporting the bottom of Arm #1 by hand so that the Manipulator does not fall over, remove the anchor bolts. Then,
remove the Manipulator from the base table.
GX1-C171**
✏
Industrial Robot: SCARA Robots GX series Manual Rev.11
51
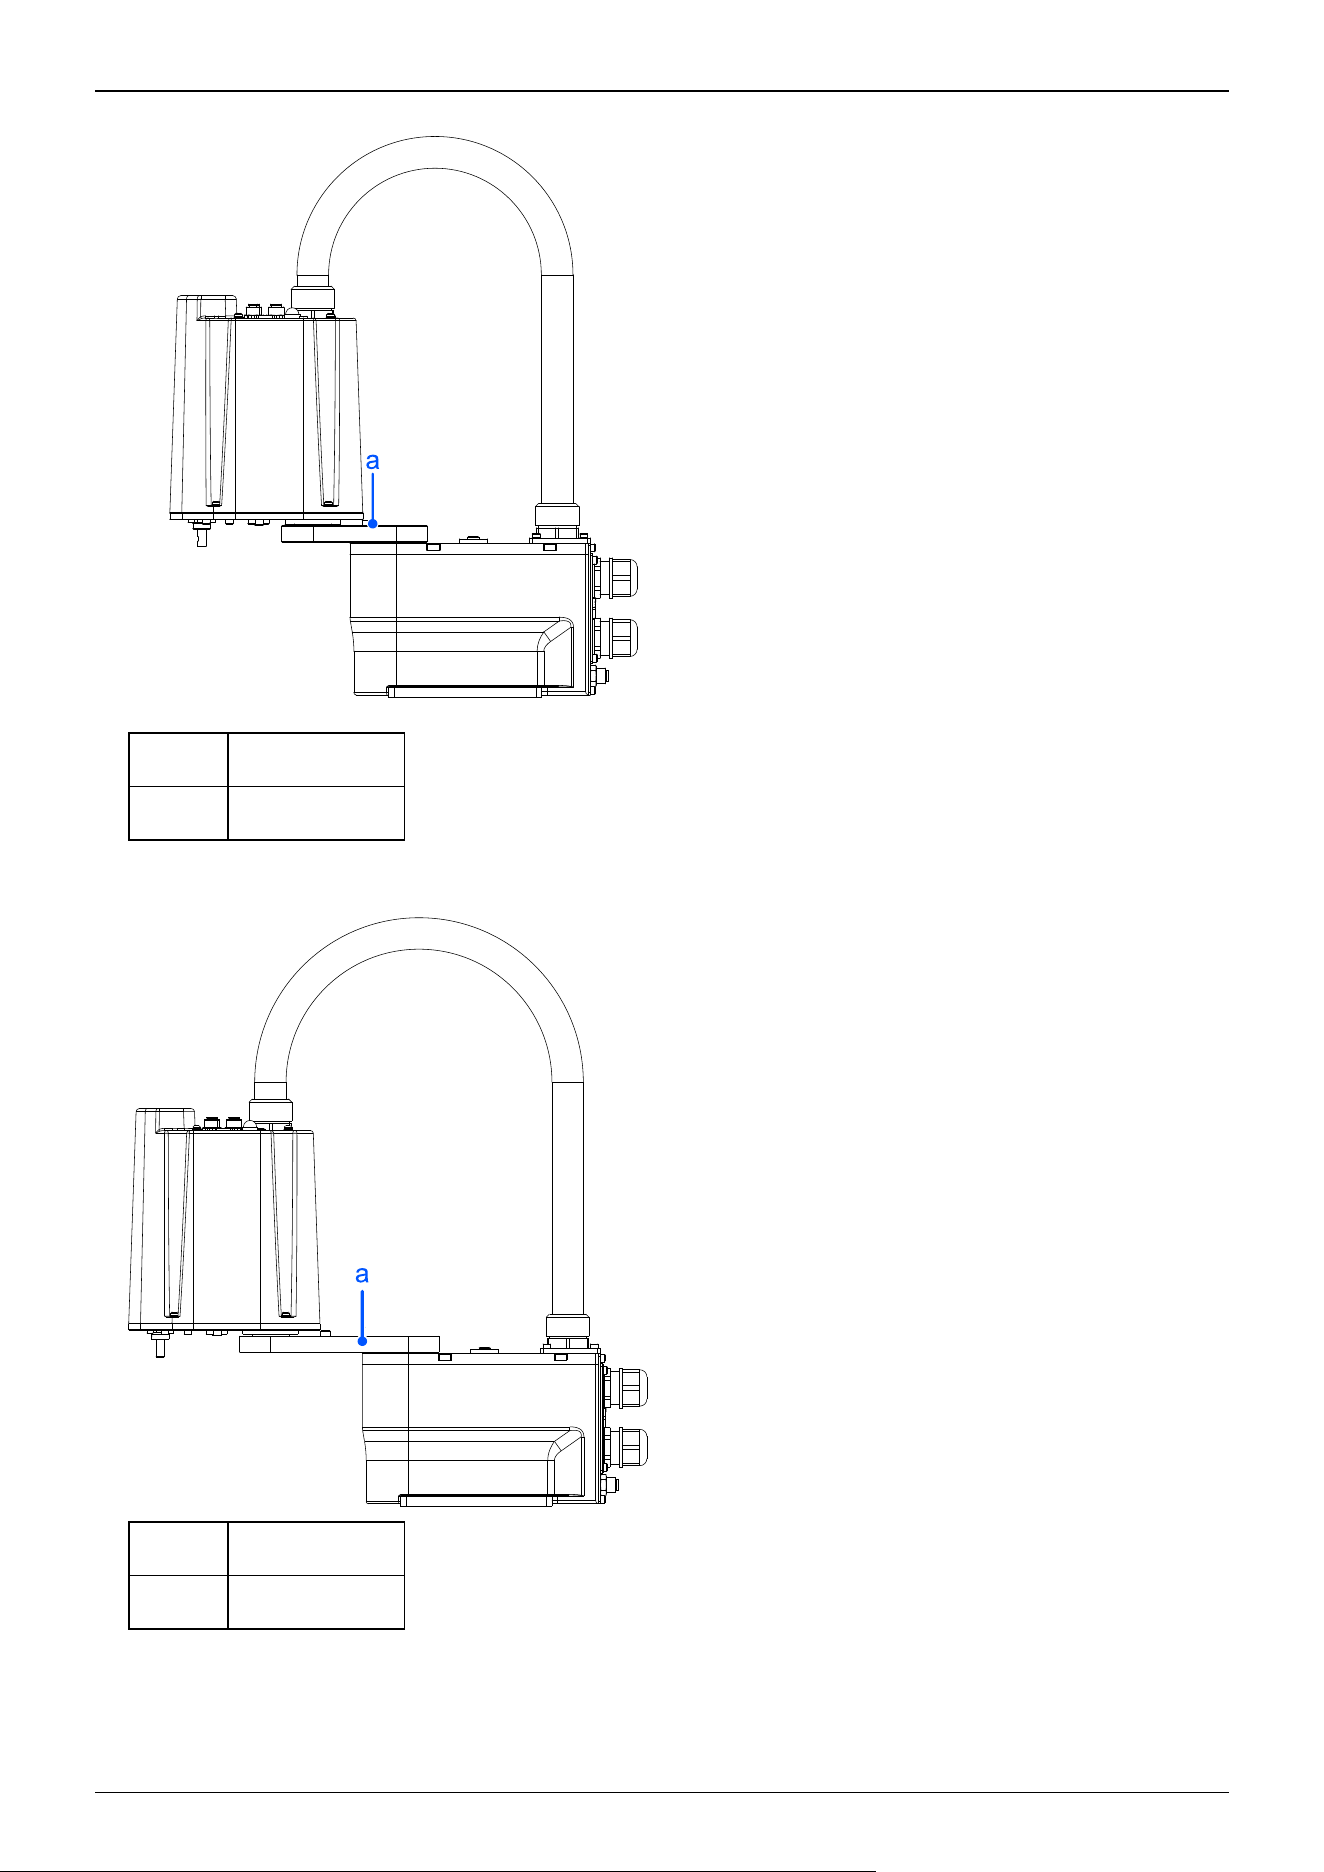
Symbol Description
a Center of gravity
GX1-C221**
Symbol Description
a Center of gravity
Industrial Robot: SCARA Robots GX series Manual Rev.11
52
2.4 Setting the Hand
2.4.1 Installing the Hand
The hand (end effector) must be prepared by the customer. When installing the hand, take note of the following. For details on
attaching the hand, refer to the following manual.
"Hand Function Manual"
WARNING
Before attaching a hand or peripheral equipment, be sure to always turn off the Controller and related
equipment and unplug the power cables. Performing any work procedure with the power turned on is
extremely dangerous and may result in electric shock and/or malfunction of the robot system.
CAUTION
When the hand is equipped with a workpiece gripping mechanism, ensure that the wiring and pneumatic tubes
do not cause the hand to release the workpiece when the power is turned off. When the wiring and pneumatic
tubes are not designed for the hand to maintain its grip on the workpiece when the power is turned off, pressing
the emergency stop switch releases the workpiece, which may damage the robot system and the workpiece.
By default, all I/Os are designed to automatically turn off (0) when the power is shut off, when an emergency stop
is triggered, or by the robot system's safety function.
However, I/Os set with the Hand function does not turn off (0) when executing the Reset statement, or when
performing an emergency stop.
For the risk of the residual air pressure, conduct a risk assessment on the equipment and take the necessary
protective measures.
Shaft
Attach the hand to the lower end of the shaft.
For the layout dimensions in the area around the shaft and the overall dimensions of the Manipulator, refer to the following
section.
Names of Parts and Their Dimensions
Do not move the upper limit mechanical stop on the lower side of the shaft. When performing a Jump operation, the upper
limit mechanical stop may come into contact with the Manipulator body, which may cause the Manipulator to stop
functioning properly.
When attaching the hand to the shaft, have the hand hold the shaft using M4 or larger screws.
Brake release switch
Joint #3 cannot be moved up/down by hand because the electromagnetic brake is applied to the joint while power to the
robot system is turned OFF.
This is to prevent the shaft from descending due to the weight of the end effector or hitting peripheral equipment in the
event that the power is disconnected during operation, or the motor is turned OFF even while the power is turned ON.
To move Joint #3 up/down while attaching an end effector, turn ON the Controller and press the brake release switch.
This switch is a momentary-type; the brake is released only while the button is being pressed.
Industrial Robot: SCARA Robots GX series Manual Rev.11
53
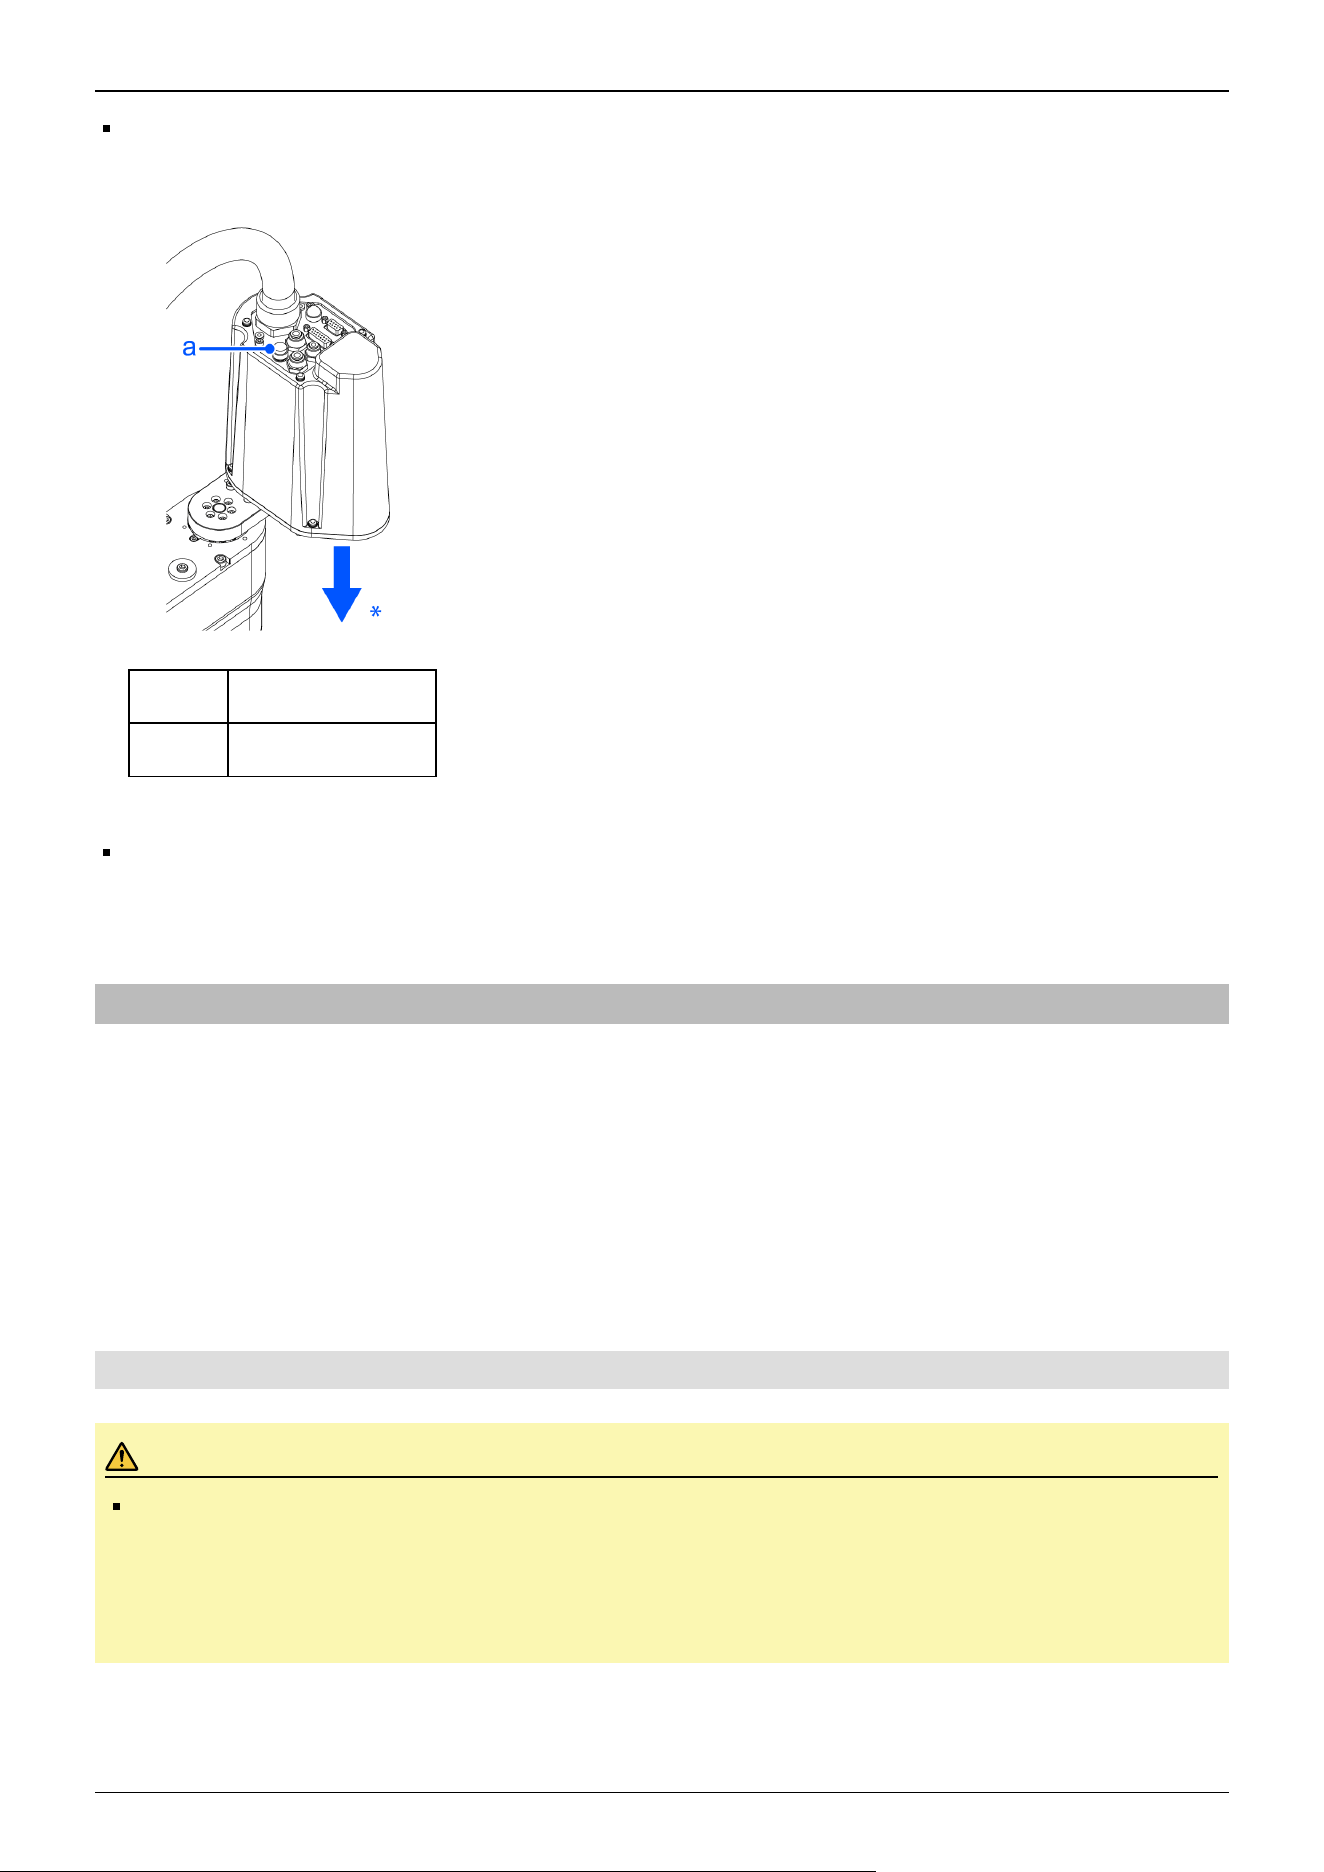
When pressing the brake release switch, watch for the shaft descending or rotating under the weight of the hand.
*: The shaft may drop due to the weight of the hand or other object.
Symbol Description
a Brake release switch
Layout
When attaching and operating a hand, the hand may come into contact with the Manipulator body due to the outer diameter
of the hand, the size of the workpiece, or the position of the arm. Carefully consider the interference area of the hand when
designing the system layout.
2.4.2 Weight and Inertia Settings
To ensure that the Manipulator is functioning properly, keep the load (the sum of the weights of the hand and workpiece) and
the moment of inertia of the load within the rated values, and do not allow for eccentricity from the center of Joint #4. If, for
some unavoidable reason, the load or moment of inertia exceeds the rated value, or if eccentricity occurs, configure parameters
as described in the "Weight setting" and "Inertia setting."
These settings optimize the Manipulator's PTP motion, reduce vibration, and shorten operation times. This also works to curb
any persistent vibration that may occur when the hand and workpiece have a large moment of inertia.
You can also perform settings using the "Weight, Inertia, and Eccentricity/Offset Measurement Utility."
For details, refer to the following manual:
"Epson RC+ User's Guide - Weight, Inertia, and Eccentricity/Offset Measurement Utility"
2.4.2.1 Weight Setting
CAUTION
The total weight of the hand and the workpiece must not exceed 1 kg (3-axis specification: 1.5 kg). The GX1
series Manipulators are not designed to work with loads exceeding 1 kg (3-axis specification: 1.5 kg). Always
set the value according to the load. Setting the hand weight parameter to a value smaller than the actual
weight may cause errors or impact that not only impair full functionality but also shorten the life of the
mechanical components.
For the GX1 series, the allowable load (hand weight and workpiece weight) is as shown below.
Industrial Robot: SCARA Robots GX series Manual Rev.11
54
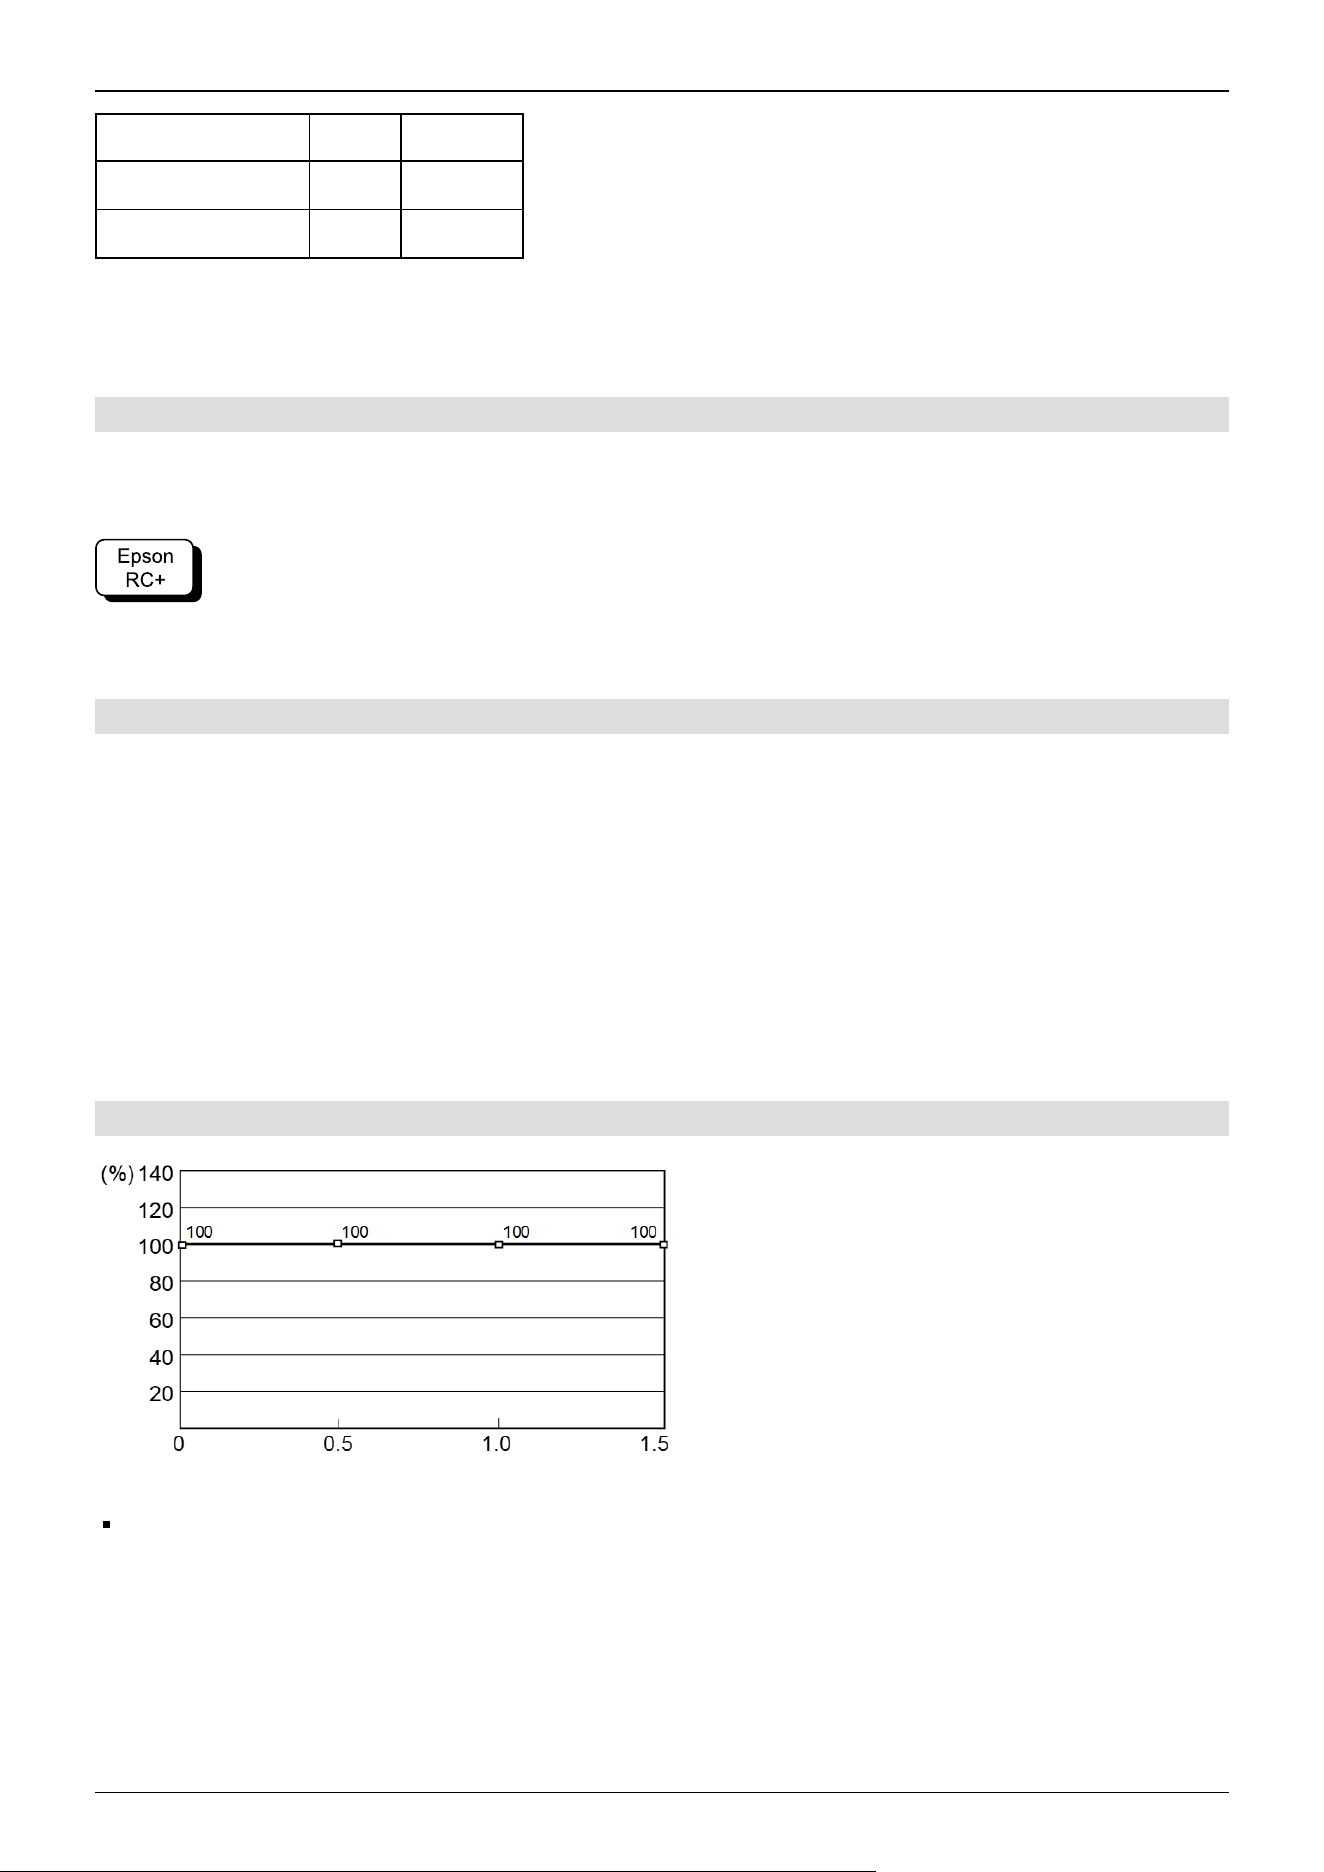
Rated Maximum
4-Axis specifications 0.5 kg 1 kg
3-Axis specifications 0.5 kg 1.5 kg
In the Weight statement, adjust the setting for the hand weight parameter as needed in accordance with the load weight. After
the setting is changed, the maximum speed and acceleration/deceleration of the Manipulator during PTP motion that
correspond to the "Hand Weight" are corrected automatically.
2.4.2.1.1 Weight of Load Attached to Shaft
The weight of the load (hand + workpiece) attached to the shaft can be set by the "Hand Weight" parameter in the Weight
statement.
Go to [Tools] - [Robot Manager] - [Weight] panel, and enter the value in the [Weight] text box. (This can also be set using the
Weight statement in [Command Window].)
2.4.2.1.2 Weight of Load Attached to Arm
When a camera, valve, or other object is attached to the arm, its weight is converted to the equivalent weight of the shaft and
added to the Attached to Shaft load weight to set the "Hand Weight" parameter.
Equivalent weight formula
W
M
=M×(L
M
+L
1
)
2
/(L
1
+L
2
)
2
W
M
: Equivalent weight
M: Weight of Load Attached to Arm
L
1
: Length of Arm #1
L
2
: Length of Arm #2
L
M
: Distance from rotation center of Joint #2 to the center of gravity of the load attached to the arm
2.4.2.1.3 Automatic Speed Correction at Weight Setting
The percentages on the graph are ratios based on 100% as the speed at the rated (2 kg) setting.
4-Axis specifications can work with loads up to 1.0 kg (1.5 kg loads are for 3-axis specifications only)
(kg)
Industrial Robot: SCARA Robots GX series Manual Rev.11
55
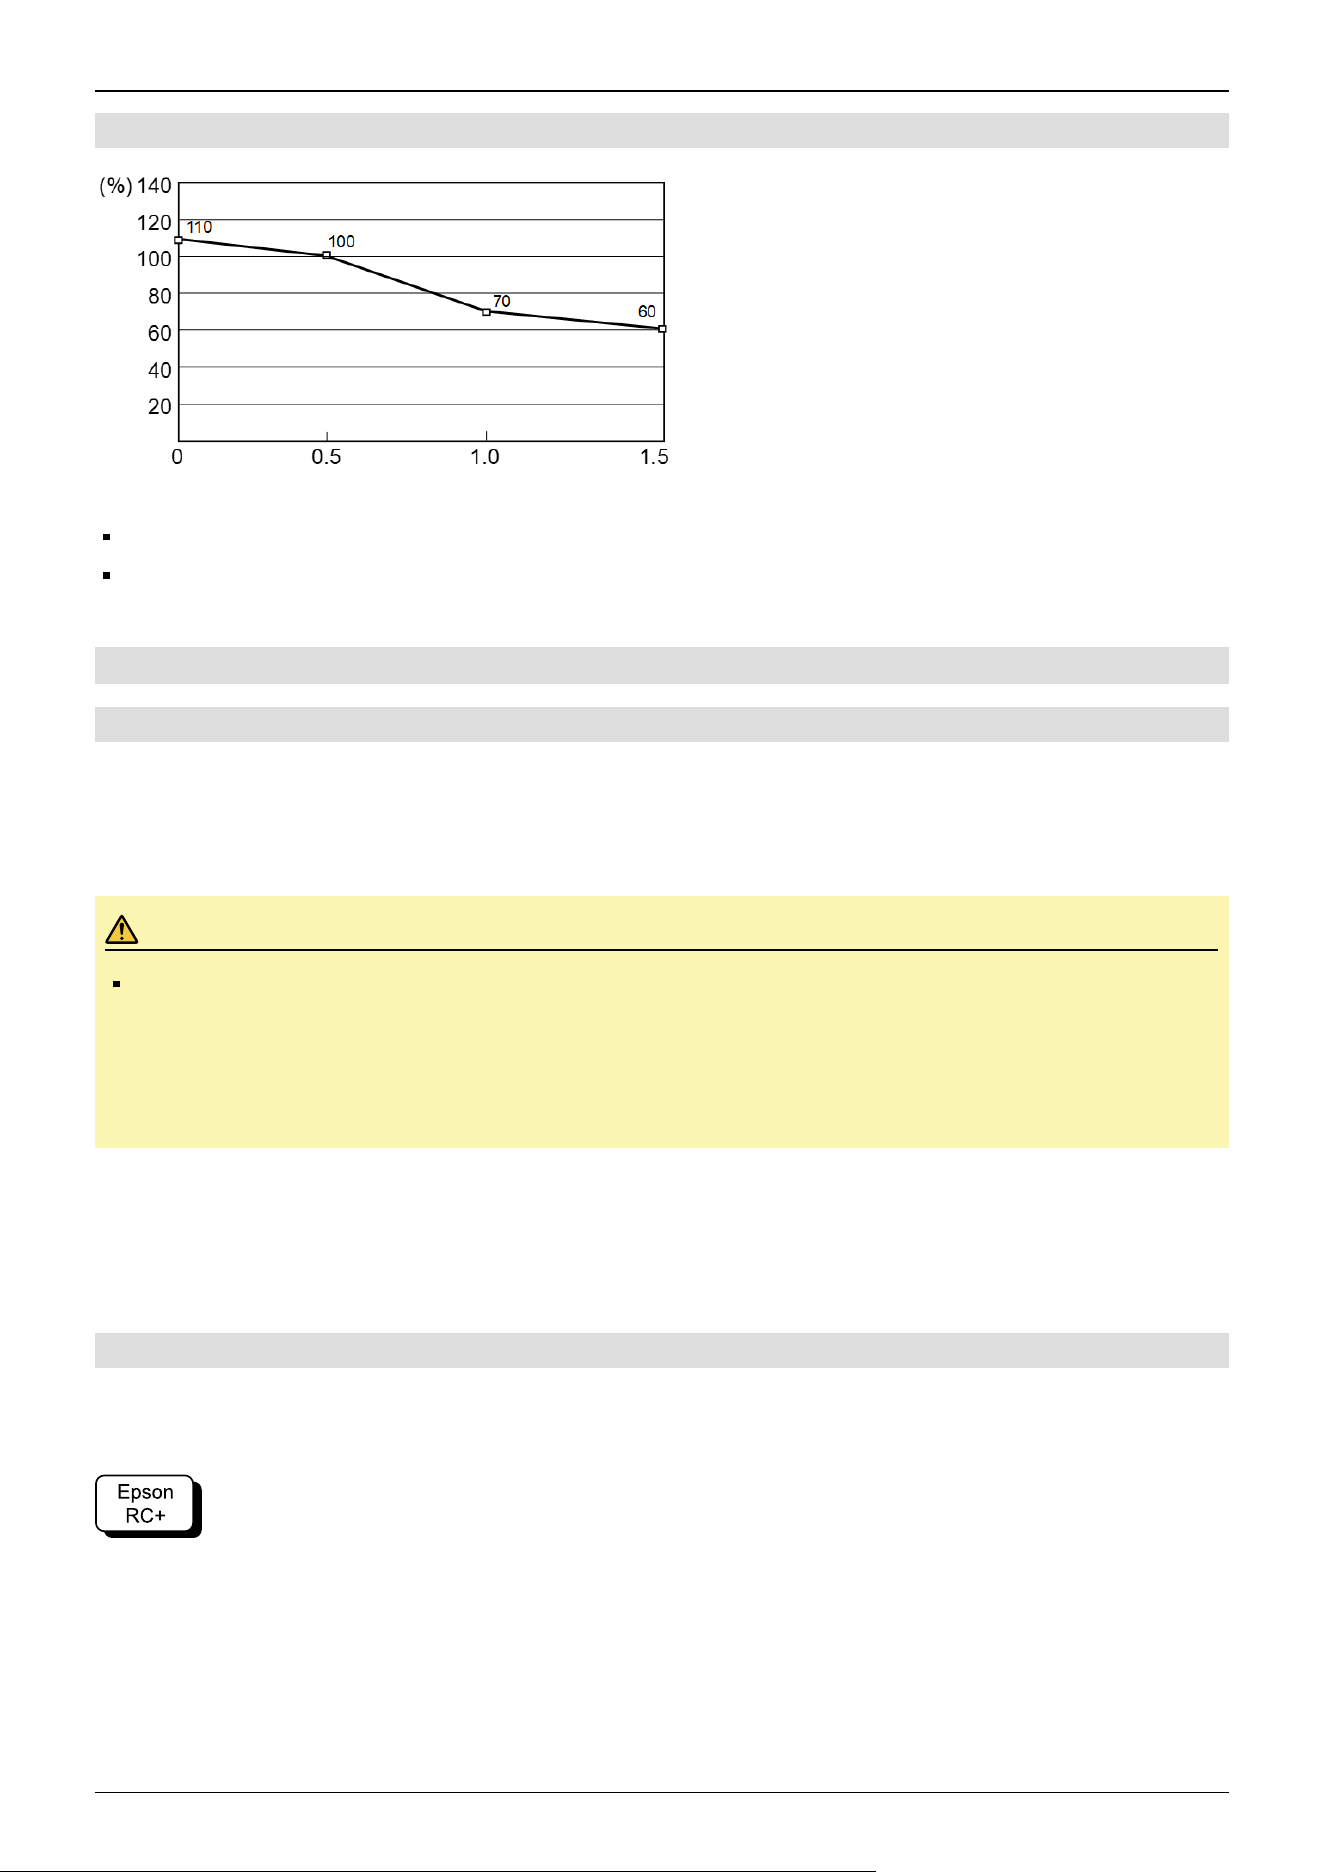
2.4.2.1.4 Automatic Acceleration/Deceleration Correction at Weight Setting
The percentages on the graph are ratios based on 100% as the acceleration/deceleration at the rated (2 kg) setting.
4-Axis specifications can work with loads up to 1.0 kg (1.5 kg loads are for 3-axis specifications only)
Joint #3 on 3-Axis specifications only: With loads of 1.0 to 1.5 kg, acceleration/deceleration is 70% of usual.
2.4.2.2 Inertia Setting
2.4.2.2.1 Moment of Inertia and Inertia Setting
The moment of inertia is a quantity that expresses how hard it is for an object to turn, and it is expressed in terms of values for
the moment of inertia, inertia, or GD
2
. When a hand or other object is attached to a shaft for operation, the moment of inertia
of the load must be taken into consideration.
CAUTION
The moment of inertia of the load (weight of the hand and workpiece) must be 0.004 kg·m
2
or less. The GX1
series Manipulators are not designed to work with a moment of inertia exceeding 0.004 kg·m
2
. Always set the
value corresponding to the moment of inertia. Setting a parameter value that is smaller than the actual
moment of inertia may cause errors or impact, may prevent the Manipulator from working at full functionality,
and may shorten the lifespan of mechanical parts.
The allowable moment of inertia of a load for GX1 series Manipulators is 0.0003 kg·m
2
at the default rating and 0.004 kg·m
2
at the maximum. In the Inertia statement, adjust the setting of the moment of inertia parameter for the load as needed, in
accordance with the load’s moment of inertia. After the setting is changed, the maximum acceleration/deceleration of Joint #4
during PTP motion that corresponds to the "Inertia" value is corrected automatically.
2.4.2.2.2 Moment of Inertia of Load Attached to Shaft
The moment of inertia of the load (hand + workpiece) attached to the shaft can be set by the "Inertia" parameter in the Inertia
statement.
Go to [Tools] - [Robot Manager] - [Inertia] panel, and enter the value in [Inertia]. (This can also be set using the Inertia
statement in [Command Window].)
(kg)
Industrial Robot: SCARA Robots GX series Manual Rev.11
56
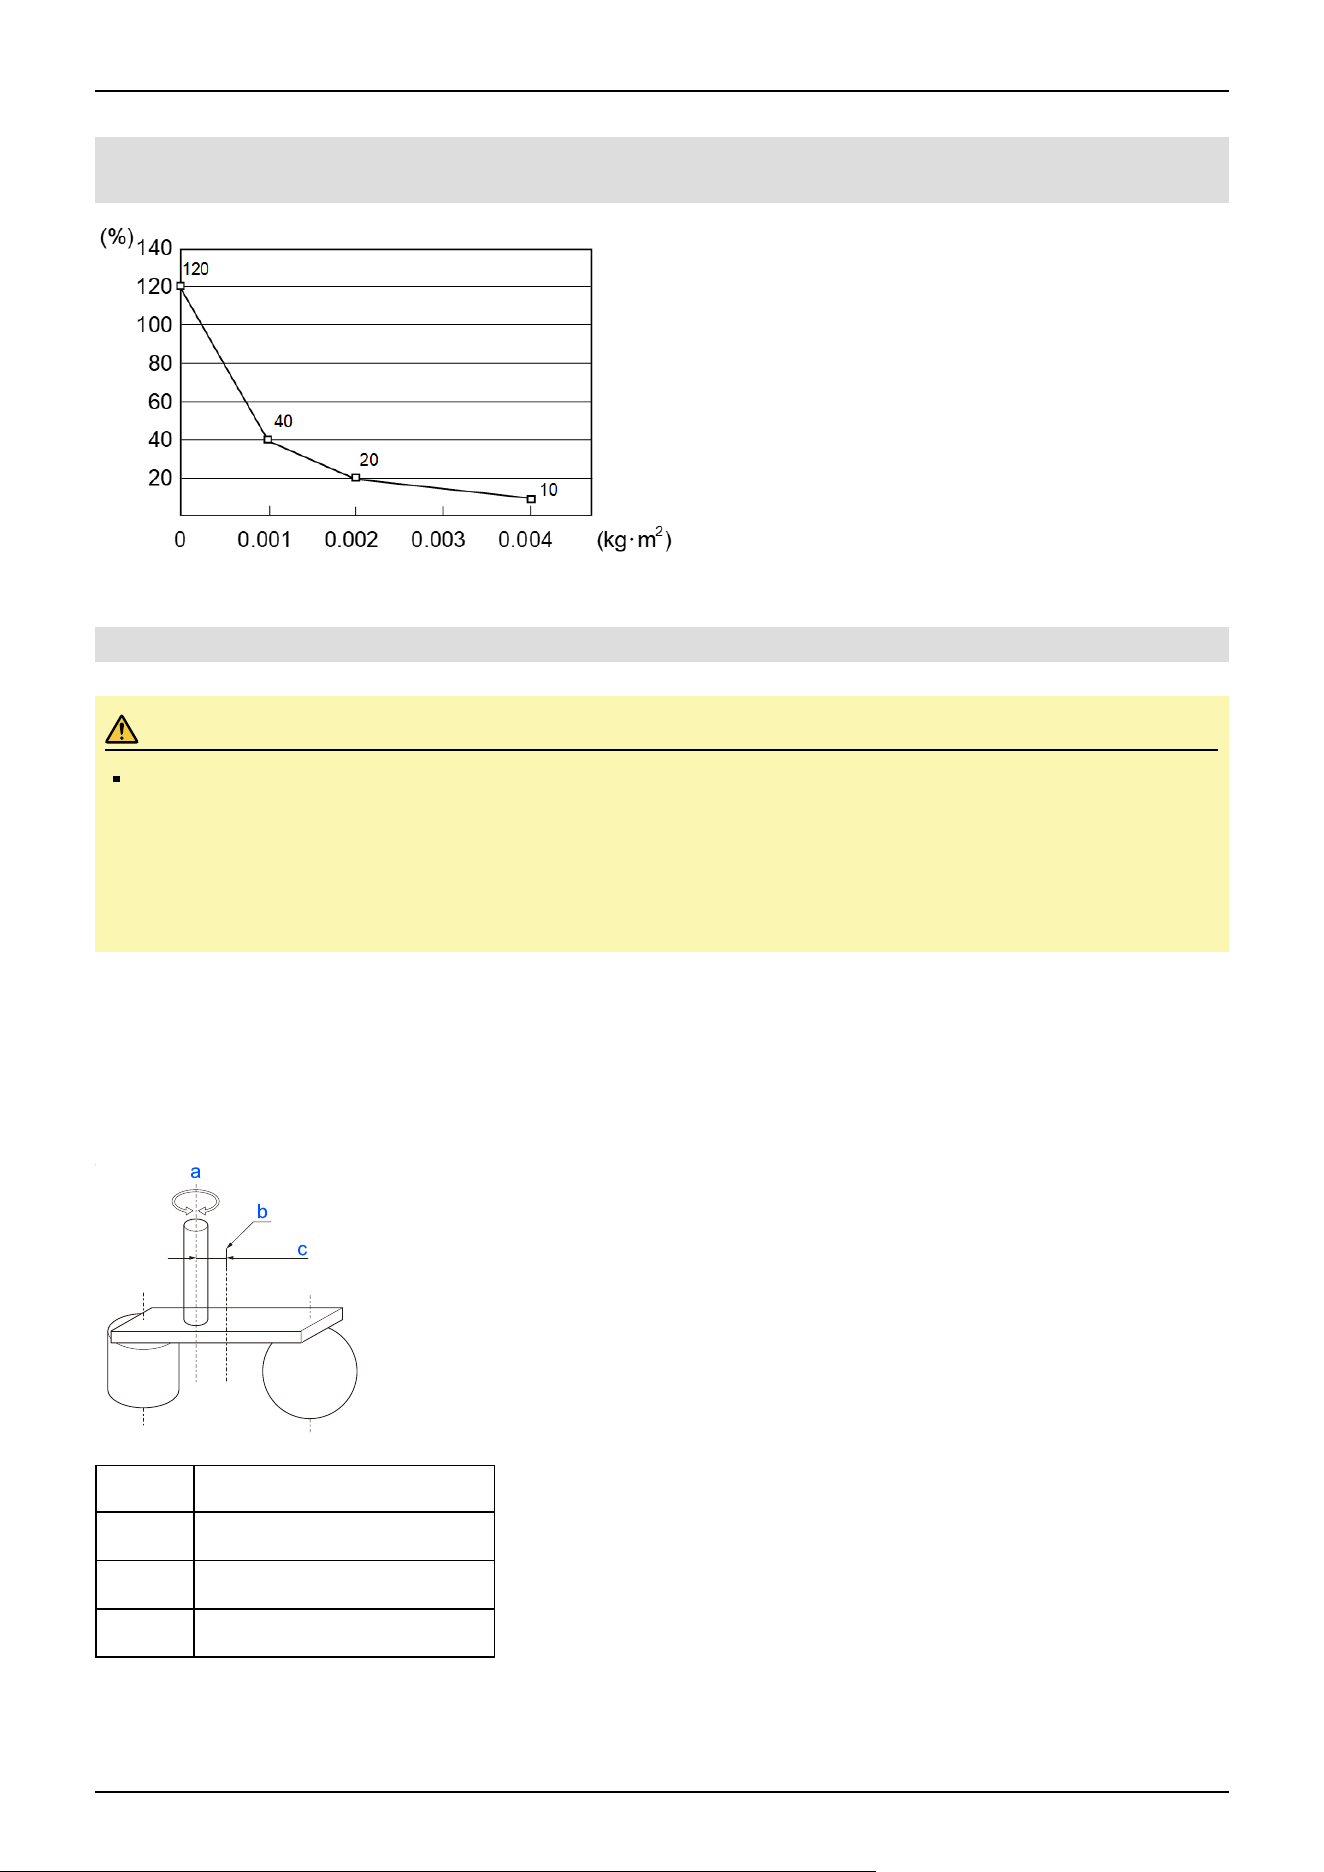
2.4.2.2.3 Automatic Acceleration/Deceleration Correction of Joint #4 at Inertia (Moment
of Inertia) Setting
The percentages on the graph are ratios based on 100% as the acceleration/deceleration at the rated (0.0003 kg·m
2
) setting.
2.4.2.2.4 Eccentricity and Inertia Setting
CAUTION
The eccentricity of the load (hand and workpiece) must be 50 mm or less.
The GX1 series Manipulators are not designed to work with eccentricities exceeding 50 mm. Always set the
value based on the eccentricity. Setting the eccentricity parameter to a value smaller than the actual
eccentricity may cause errors or impact that not only impair full functionality but also shorten the life of the
mechanical components.
The allowable eccentricity of load for GX1 series Manipulators is 0 mm at the default rating and 50 mm at the maximum. In
the Inertia statement, adjust the setting for the eccentricity parameter as needed according to the load eccentricity. After the
setting is changed, the maximum acceleration/deceleration of the Manipulator during PTP motion that corresponds to the
"Eccentricity" is corrected automatically.
Eccentricity
Symbol Description
a Rotation axis
b Load center of gravity position
c Eccentricity (50 mm or less)
Industrial Robot: SCARA Robots GX series Manual Rev.11
57
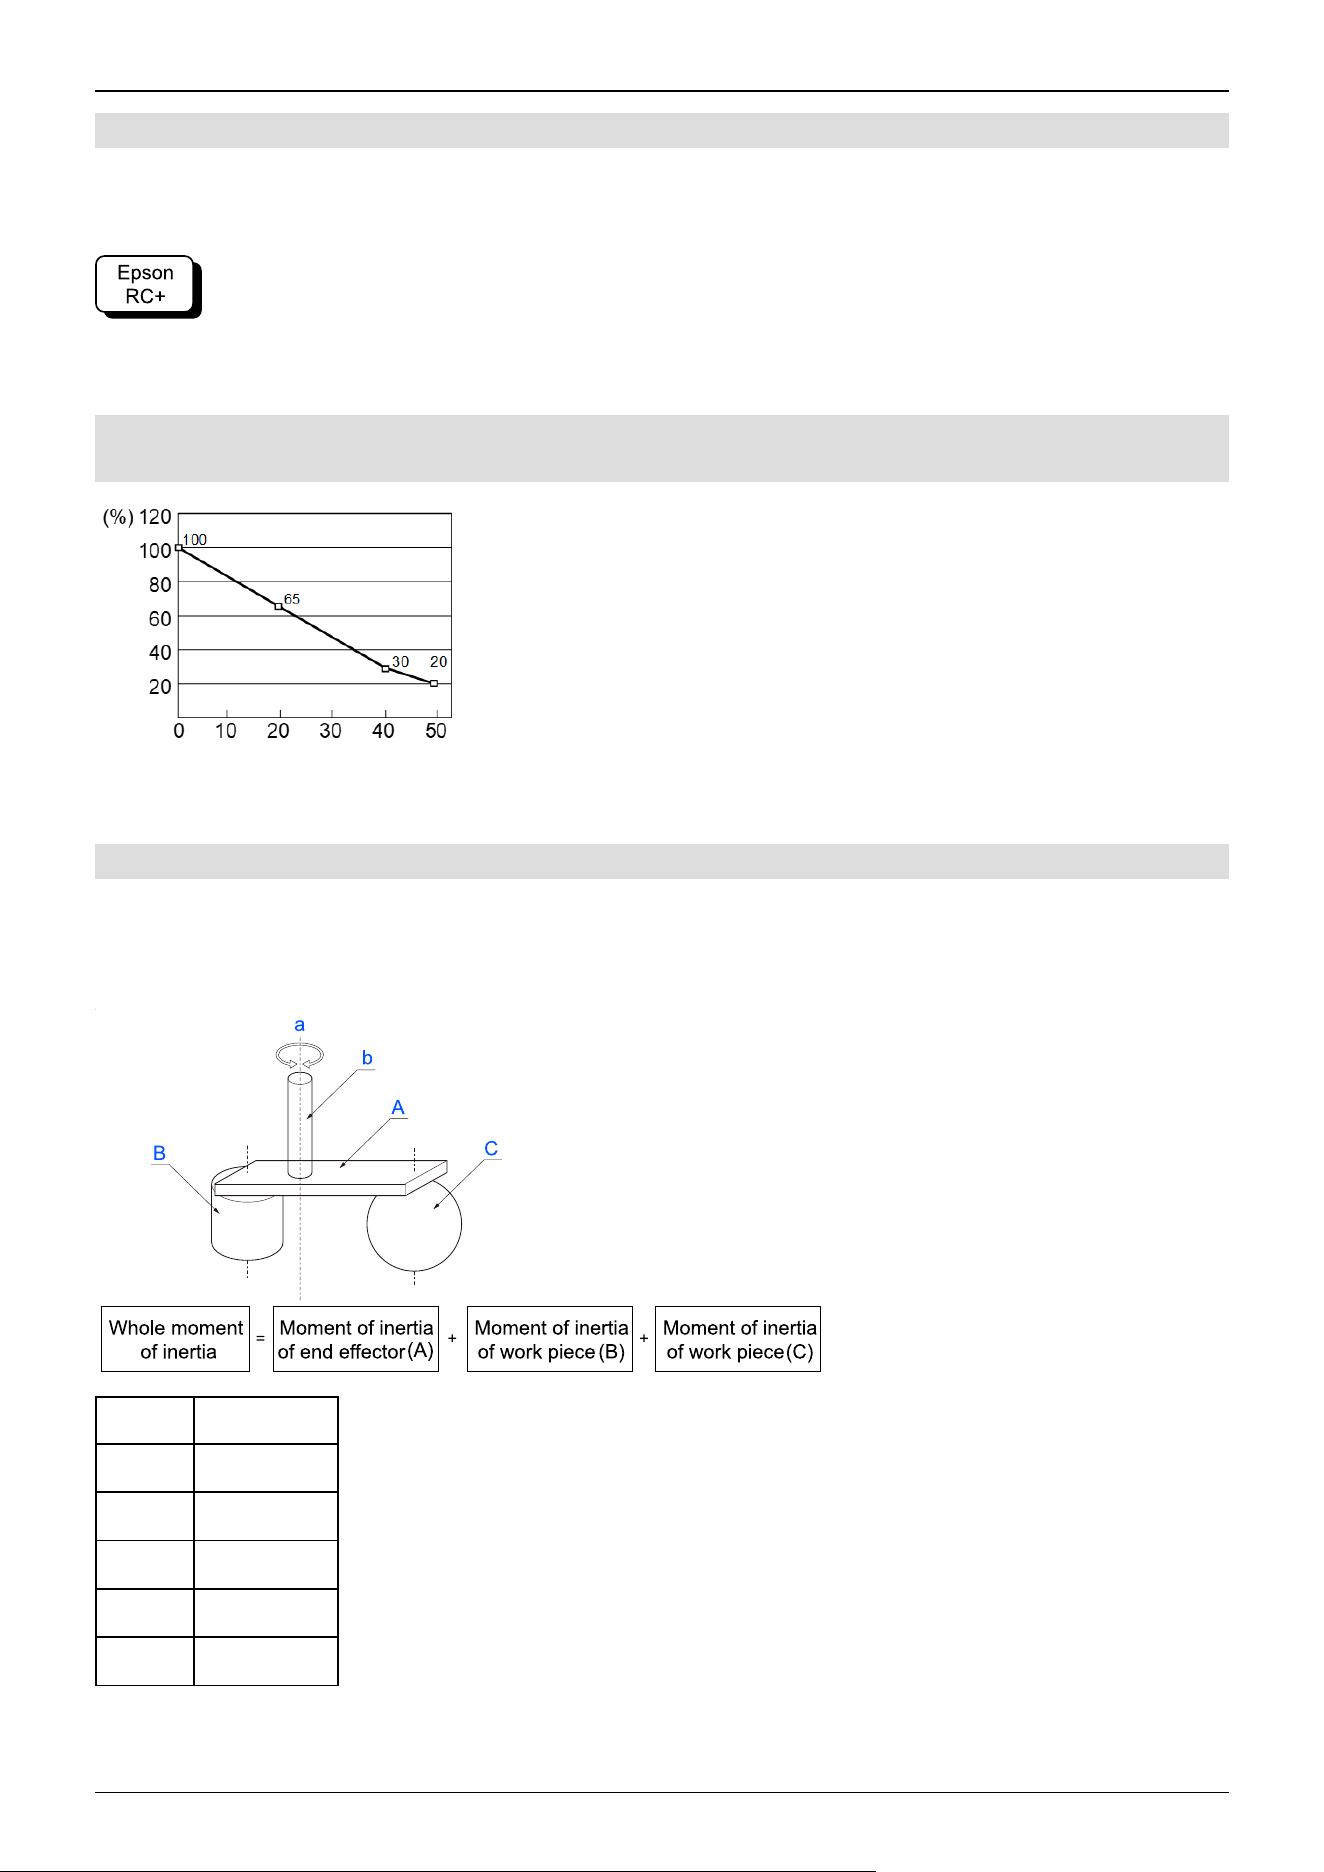
2.4.2.2.5 Eccentricity of Load Attached to Shaft
The eccentricity of the load (hand + workpiece) attached to the shaft can be set by the "Eccentricity" parameter in the Inertia
statement.
Go to [Tools] - [Robot Manager] - [Inertia] panel, and enter the value in [Eccentricity]. (This can also be set using the Inertia
statement in [Command Window].)
2.4.2.2.6 Automatic Acceleration/Deceleration Correction at Inertia (Eccentricity)
Setting
The percentages on the graph are ratios based on 100% as the acceleration/deceleration at the 0 mm setting. If it exceeds 50
mm, please contact the supplier.
2.4.2.2.7 Calculating the Moment of Inertia
An example of calculating the moment of inertia of a load (hand holding a workpiece) is shown below.
The moment of inertia of the entire load is calculated by the sum of individual parts (A), (B), and (C).
Symbol Description
a Rotation axis
b Shaft
A Hand
B Workpiece
C Workpiece
(mm)
Industrial Robot: SCARA Robots GX series Manual Rev.11
58
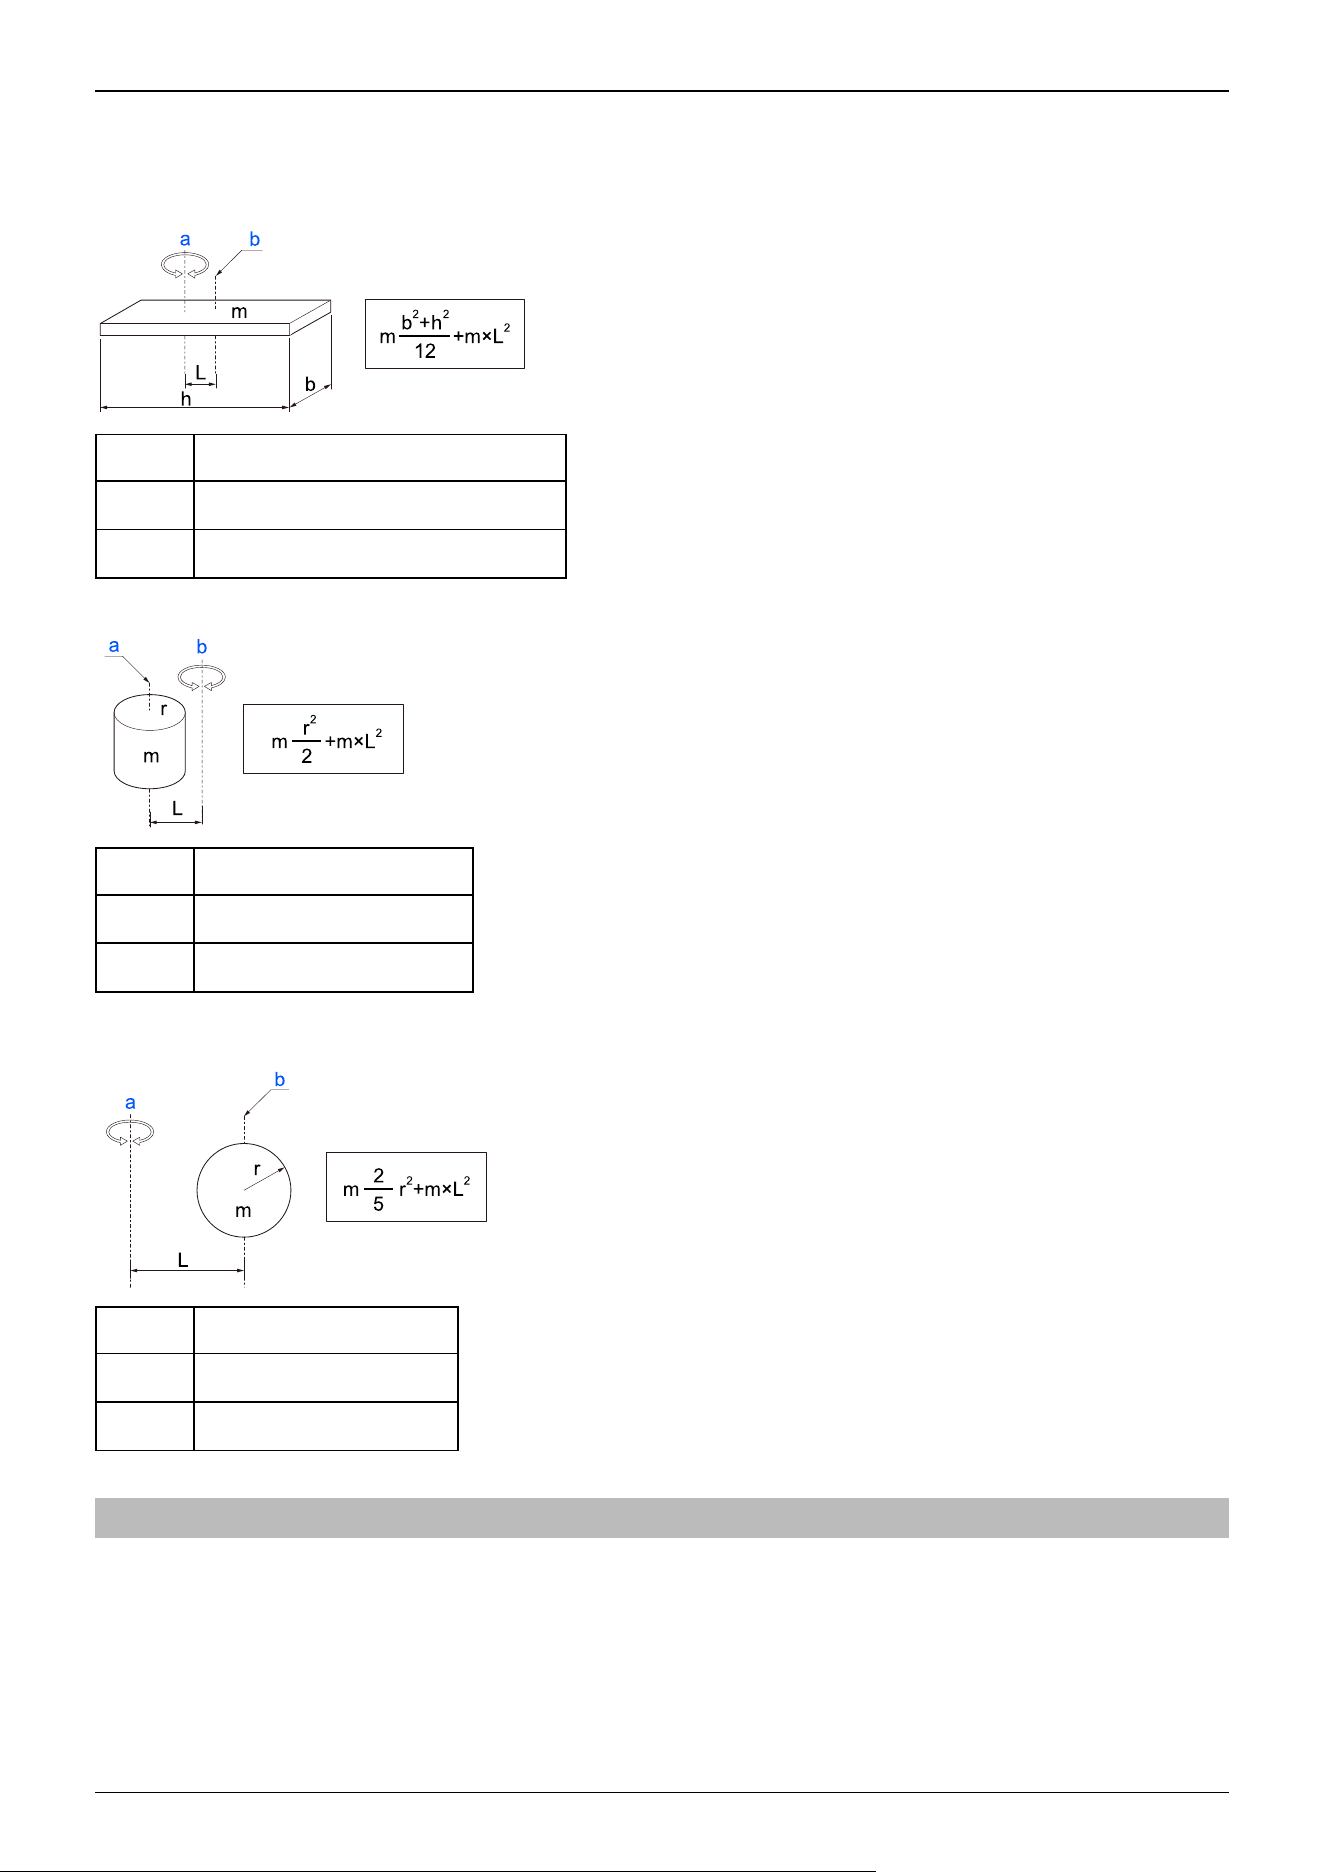
The methods for calculating the moment of inertia for (A), (B), and (C) are shown below. Use the moment of inertia of these
basic shapes as a reference to find the moment of inertia of the entire load.
(A) Moment of inertia of a rectangular parallelepiped
Symbol Description
a Rotation axis
b Center of gravity of rectangular cuboid
(B) Moment of inertia of a cylinder
Symbol Description
a Center of gravity of cylinder
b Rotation axis
(C) Moment of inertia of a sphere
Symbol Description
a Rotation axis
b Center of gravity of sphere
2.4.3 Safety Information for Auto Acceleration of Joint #3
When performing horizontal movement in PTP motion, the operation time can be shorted by setting the shaft to a high
position.
When performing horizontal movement in PTP motion, if the shaft height is less than a certain value, the auto acceleration
function is activated, and the acceleration/deceleration of the movement is set slower for lower shaft heights. A higher shaft
position results in a faster acceleration/deceleration for the movement, but the up movement time and down movement time of
the shaft are also required.
Industrial Robot: SCARA Robots GX series Manual Rev.11
59
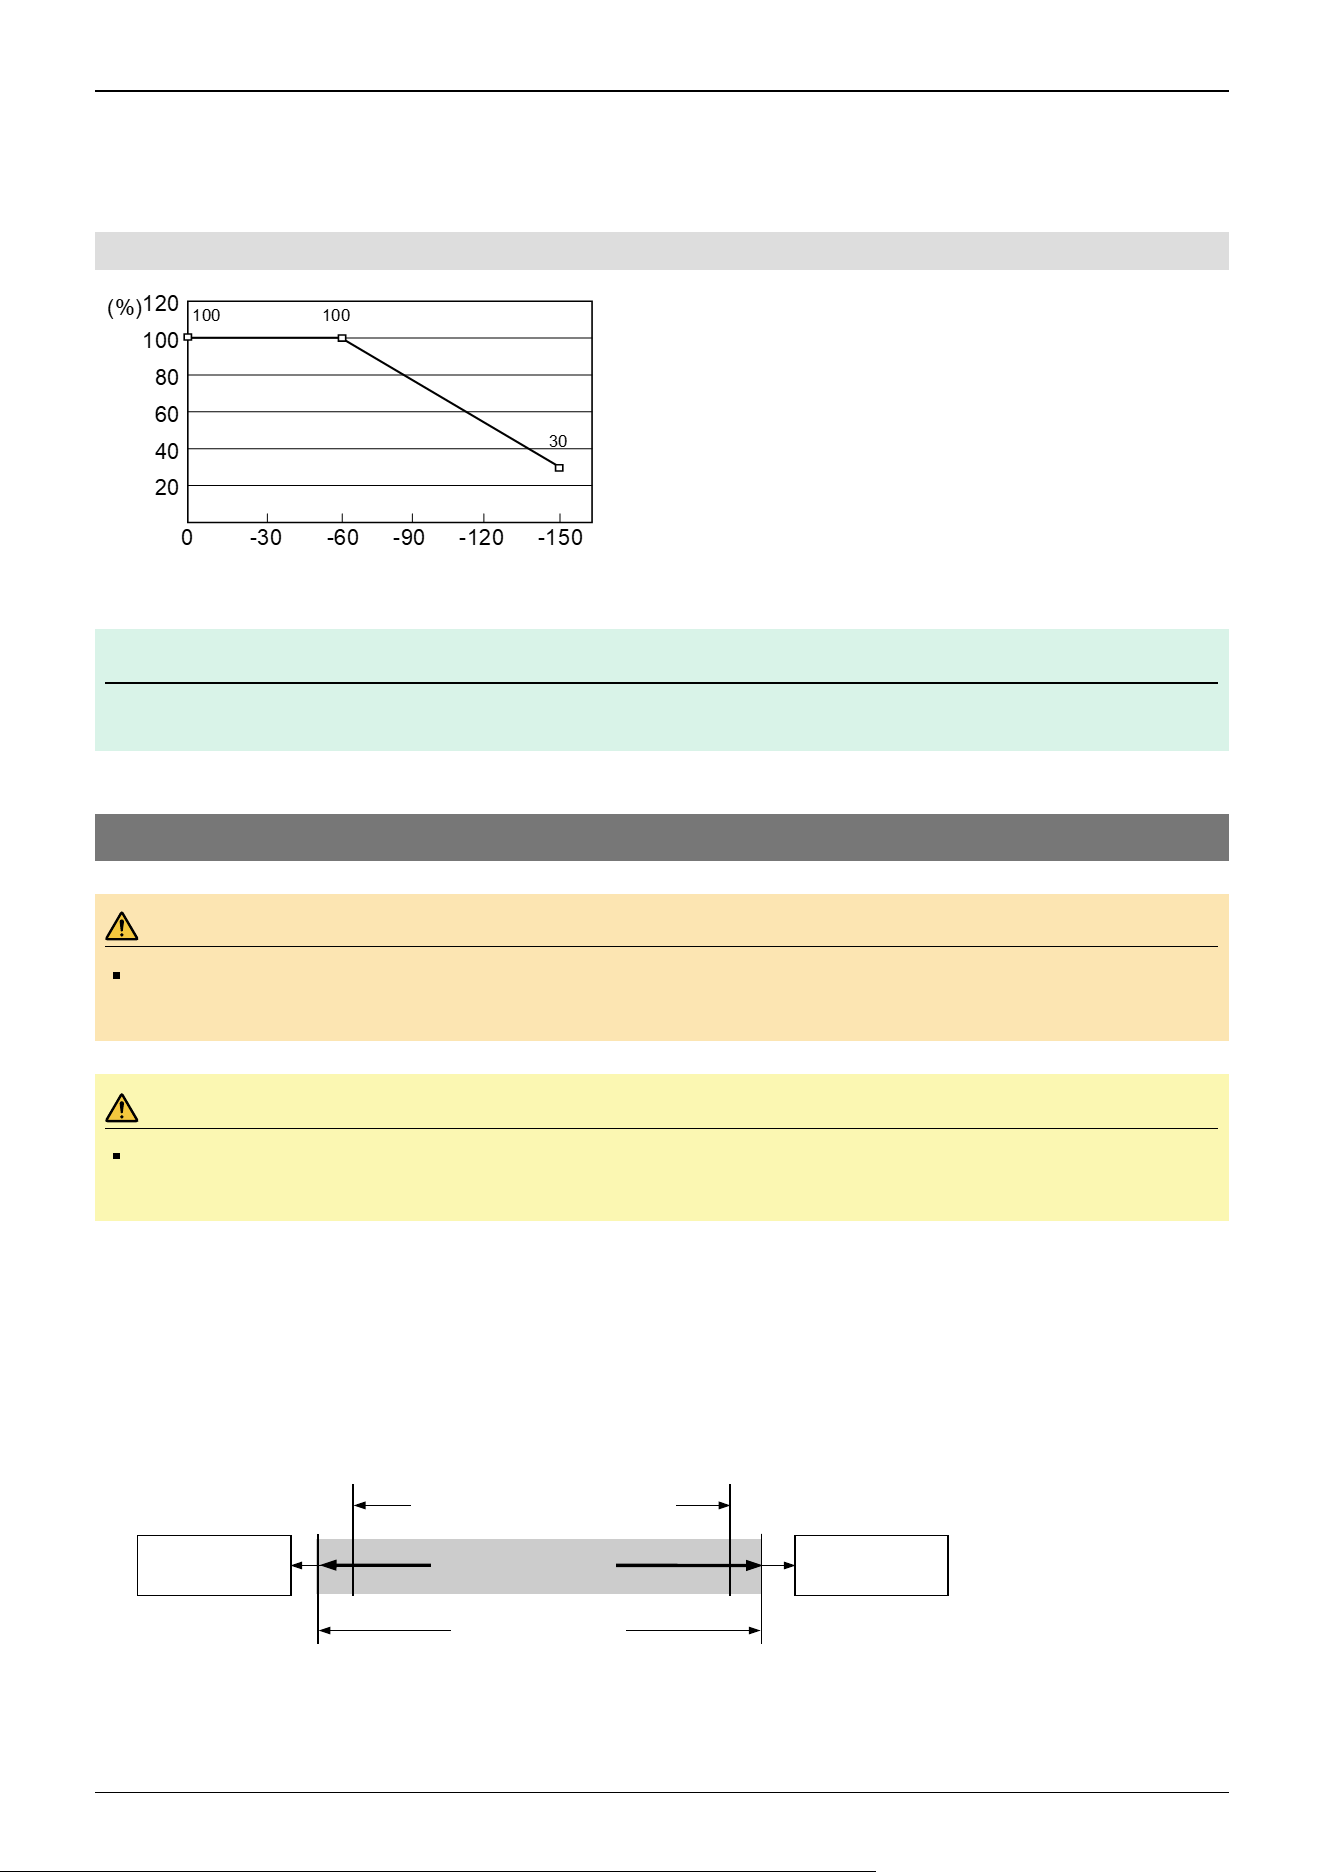
Adjust the shaft height by taking into consideration the positional relationship between the current position and the target
position.
The shaft height at the time of horizontal movement for the Jump statement can be set by the LimZ statement.
2.4.3.1 Automatic Acceleration/Deceleration Correction by Shaft Position
The percentages on the graph are ratios based on 100% as the acceleration/deceleration at the shaft upper limit position.
Note
Horizontal movement with the shaft lowered may cause overshooting during positioning.
2.5 Work Envelope
WARNING
Do not operate the Manipulator with the mechanical stop removed. Removing the mechanical stop is
extremely dangerous because the Manipulator may move to a position outside its normal work envelope.
CAUTION
When restricting the work envelope for safety reasons, be sure to make settings using both the pulse range
and mechanical stop.
The work envelope is preset at the factory as explained in the following section.
Standard Work Envelope
The work envelope can be set by one of the following three methods.
1. Setting by pulse range (for all joints)
2. Setting by mechanical stops (for Joints #1 to #3)
3. Setting the rectangular range in the XY coordinate system of the Manipulator (for Joints #1 and #2)
To limit the work envelope for layout efficiency or safety reasons, make the settings as explained in the following sections.
Work Envelope Setting by Pulse Range
(mm)
✏
Pulse range
Work Envelope
Mechanical
Stop
Mechanical
Stop
Rectangular range setting
Industrial Robot: SCARA Robots GX series Manual Rev.11
60
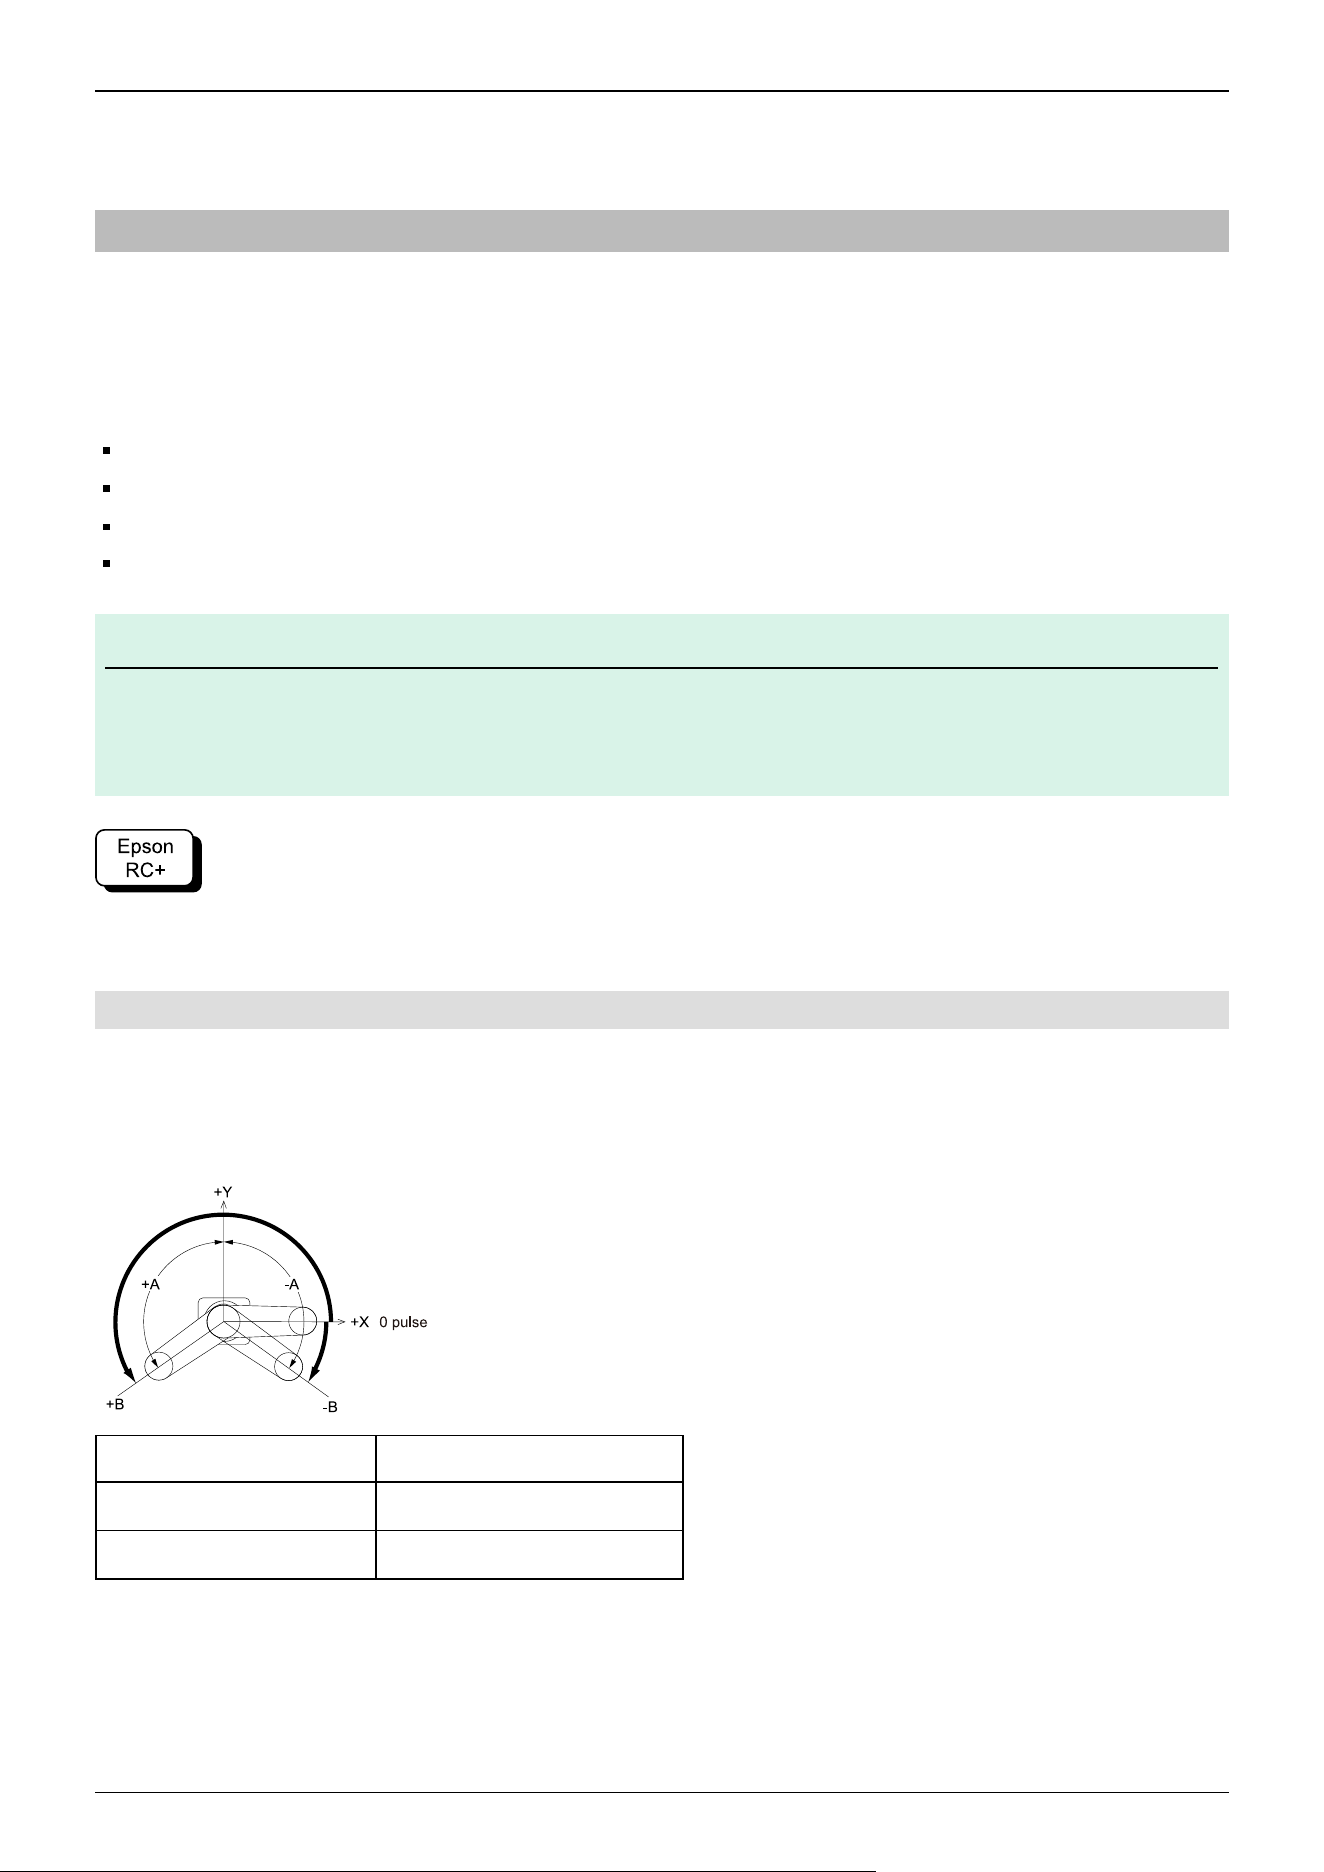
Setting the Work Envelope by Mechanical Stops
Setting the Rectangular Range in the XY Coordinate System of the Manipulator
2.5.1 Work Envelope Setting by Pulse Range
Pulses are the basic unit of Manipulator motion. The motion range (work envelope) of the Manipulator is set by the pulse
lower limit value and pulse upper limit value (pulse range) for each joint.
Pulse values are read from the encoder output of the servomotor.
For the maximum pulse range, refer to the following sections.
The pulse range must be set inside the mechanical stop settings.
Joint #1 Maximum Pulse Range
Joint #2 Maximum Pulse Range
Joint #3 Maximum Pulse Range
Joint #4 Maximum Pulse Range
Note
Once the Manipulator receives a motion command, it checks whether the target position specified by the
command is within the pulse range before operating. If the target position is outside of the pulse range that was
set, an error occurs and the Manipulator does not move.
Go to [Tools] - [Robot Manager] - [Range] panel, and make the setting.
This can also be set using the Range statement in [Command Window].
2.5.1.1 Joint #1 Maximum Pulse Range
The 0 (zero) pulse position of Joint #1 is the position where Arm #1 is facing the positive (+) direction on the X-coordinate
axis.
With the 0 pulse as a starting point, the counterclockwise pulse value is defined as positive (+), and the clockwise pulse value
is defined as negative (-).
Common to all specifications
A: Max. motion range (deg.) ±125
B: Max. pulse range (pulse) -1019449 to 6262329
✏
Industrial Robot: SCARA Robots GX series Manual Rev.11
61
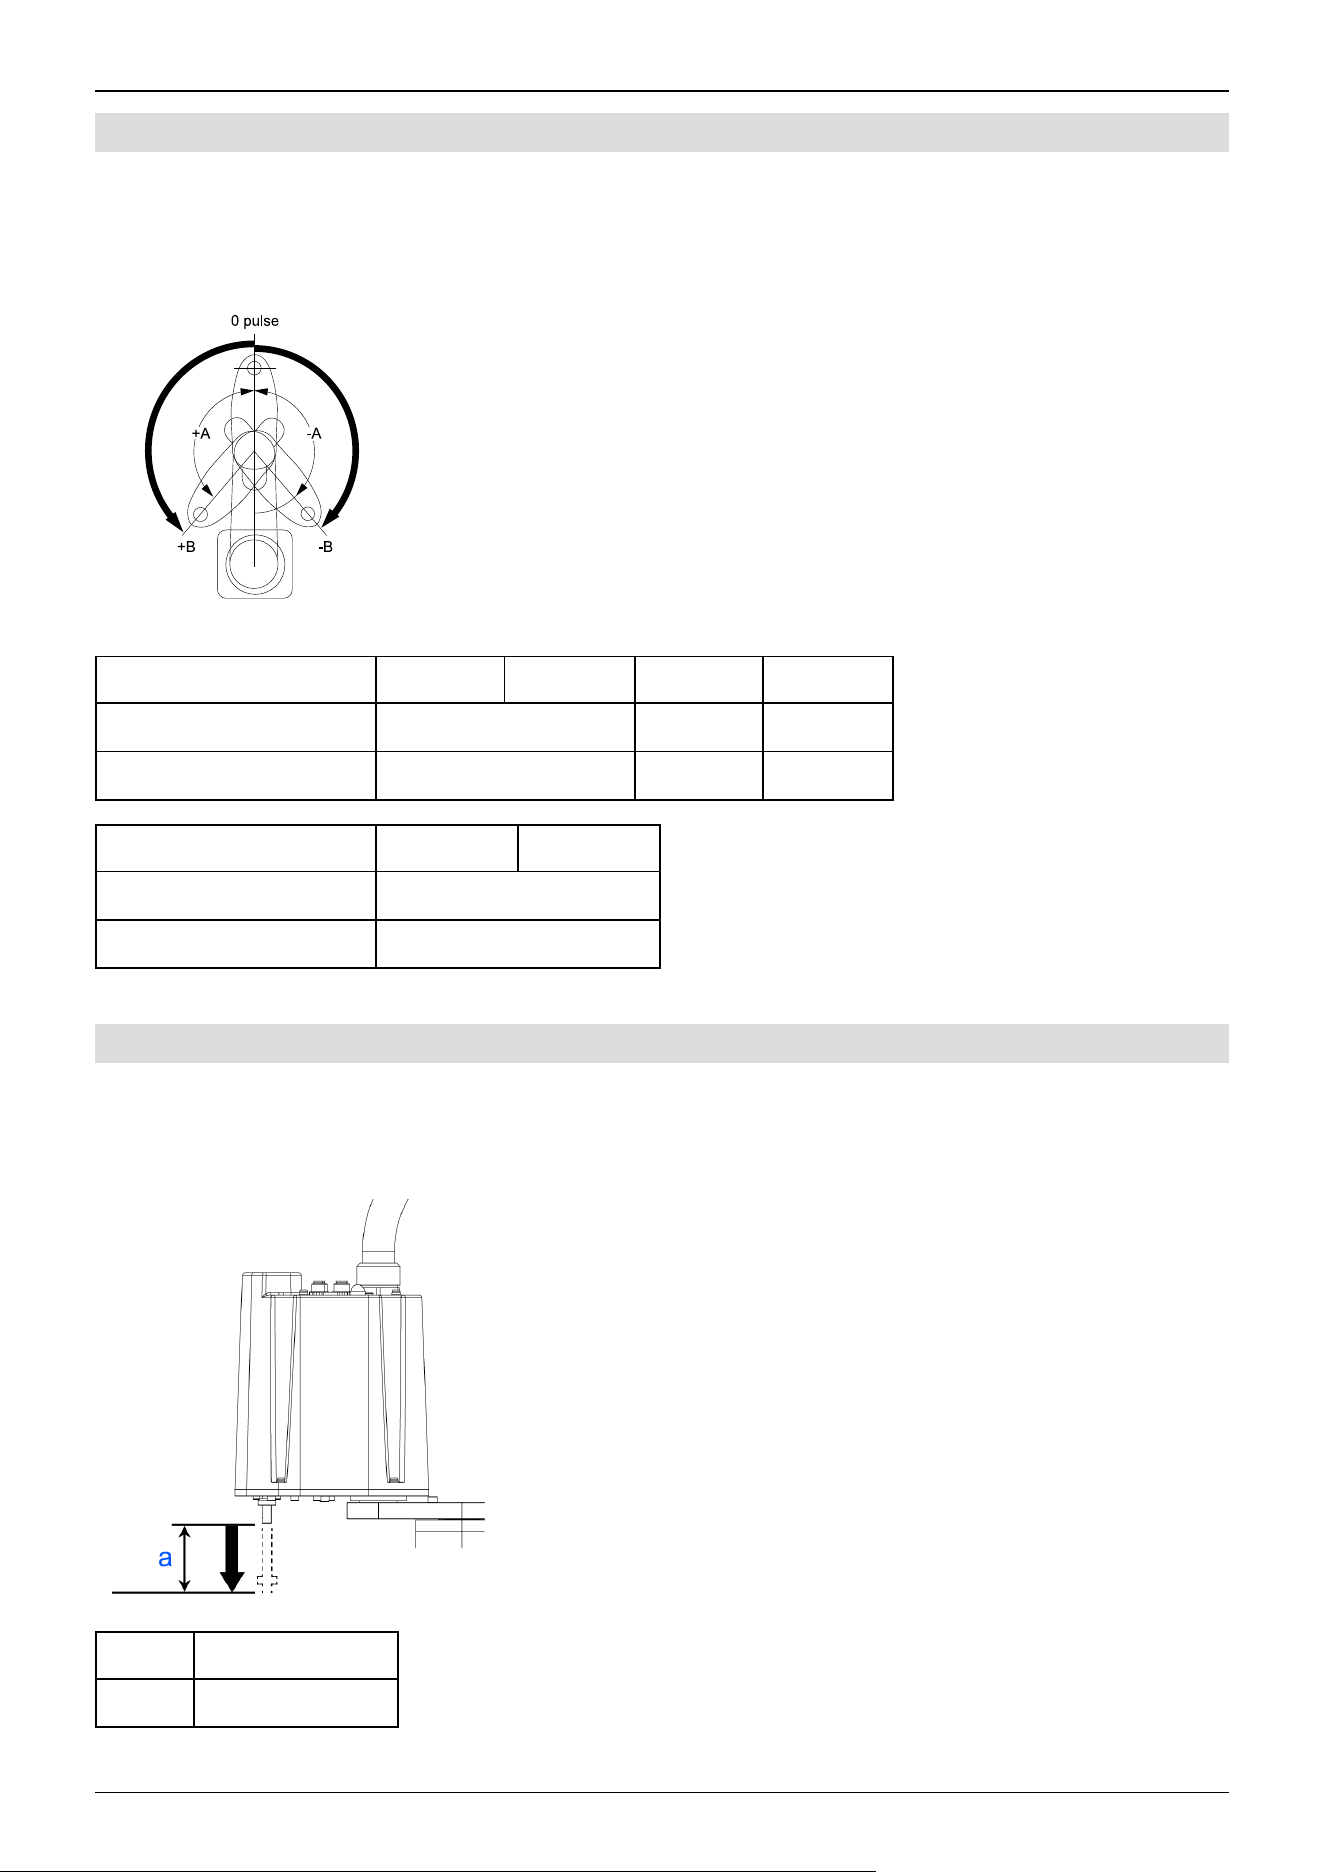
2.5.1.2 Joint #2 Maximum Pulse Range
The 0 (zero) pulse position of Joint #2 is the position where Arm #2 is aligned with Arm #1. (The orientation of Arm #1 does
not matter.) With the 0 pulse as a starting point, the counterclockwise pulse value is defined as positive (+), and the clockwise
pulse value is defined as negative (-).
4-Axis specifications GX1-171S GX1-171C GX1-221S GX1-221C
A: Max. motion range (deg.) ±140 ±152 ±149
B: Max. pulse range (pulse) ±2548623 ±2767076 ±2712463
3-Axis specifications GX1-171SZ GX1-221SZ
A: Max. motion range (deg.) ±135
B: Max. pulse range (pulse) ±2457600
2.5.1.3 Joint #3 Maximum Pulse Range
The 0 (zero) pulse position of Joint #3 is the position where the shaft is at its upper limit. The pulse value is always negative
because Joint #3 moves down from the 0 pulse position.
Symbol Description
a Upper limit: 0 pulse
Industrial Robot: SCARA Robots GX series Manual Rev.11
62
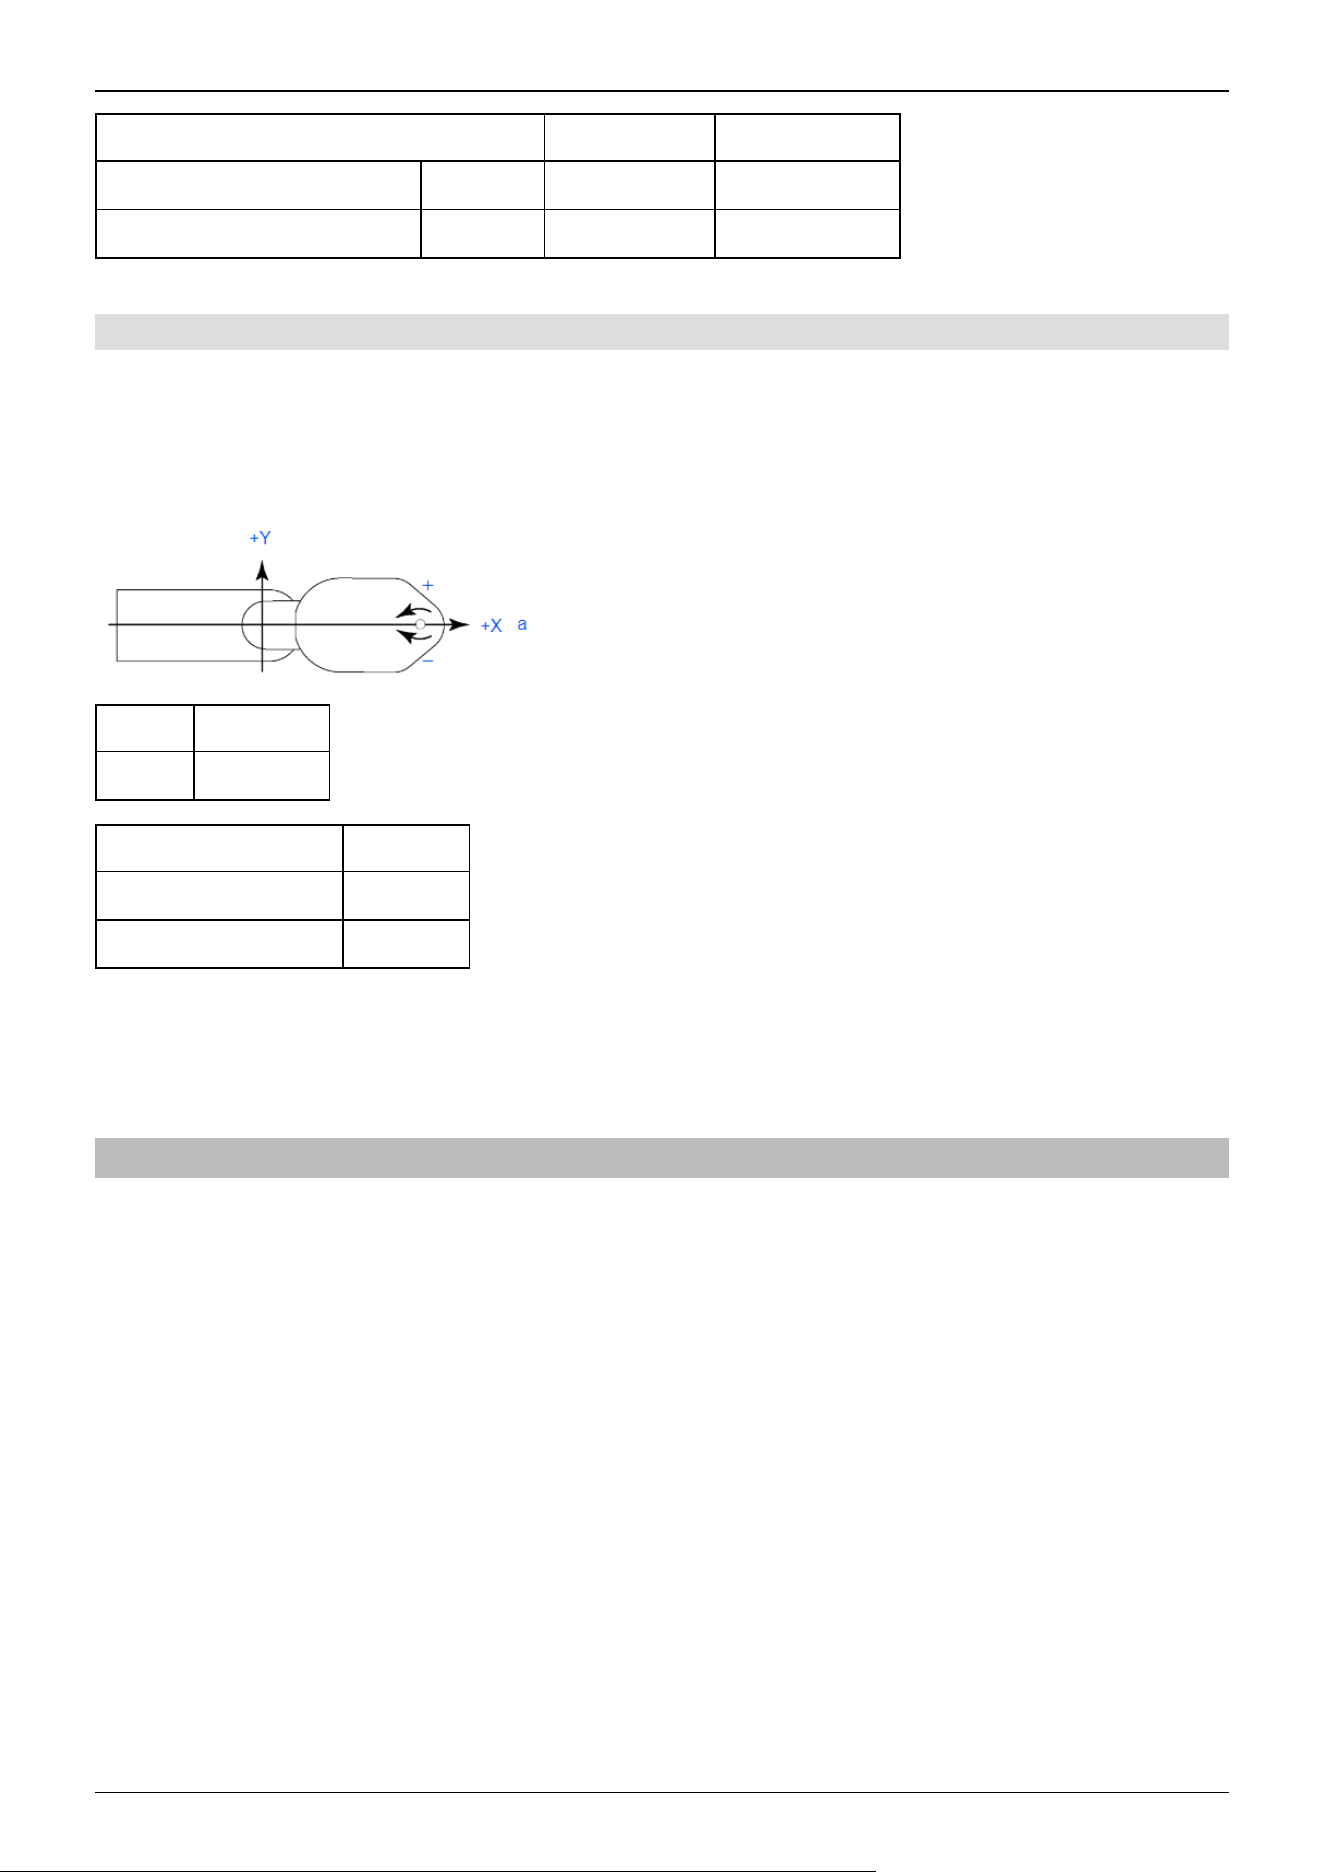
Type Joint #3 stroke Min. pulse value
Standard specifications GX1-**1S 100 mm -1092267
Cleanroom & ESD Specifications GX1-**1C 80 mm -873813
2.5.1.3.1 Joint #4 Maximum Pulse Range
The 0 (zero) pulse position of Joint #4 is the position where the flat surface near the end of the shaft faces toward the end of
Arm #2. (The orientation of Arm #2 does not matter.)
With the 0 pulse as a starting point, the counterclockwise pulse value is defined as positive (+), and the clockwise pulse value
is defined as negative (-).
Symbol Description
a 0 pulse
All Models
Max. pulse range (pulse) ±393216
Max. motion range (deg) ±360°*
* The motion range ±360 of J4 can be changed.
For details, refer to the following section.
GX1
2.5.2 Setting the Work Envelope by Mechanical Stops
Mechanical stops set the absolute work envelope that physically limits where the Manipulator can move.
Both Joints #1 and #2 have threaded holes in positions corresponding to angles for the setting area. The positions of the
mechanical stops (variable) set the work envelope. Install the bolts in the threaded holes corresponding to the angles to be set.
Joint #3 can be set to any length less than the maximum stroke.
Industrial Robot: SCARA Robots GX series Manual Rev.11
63
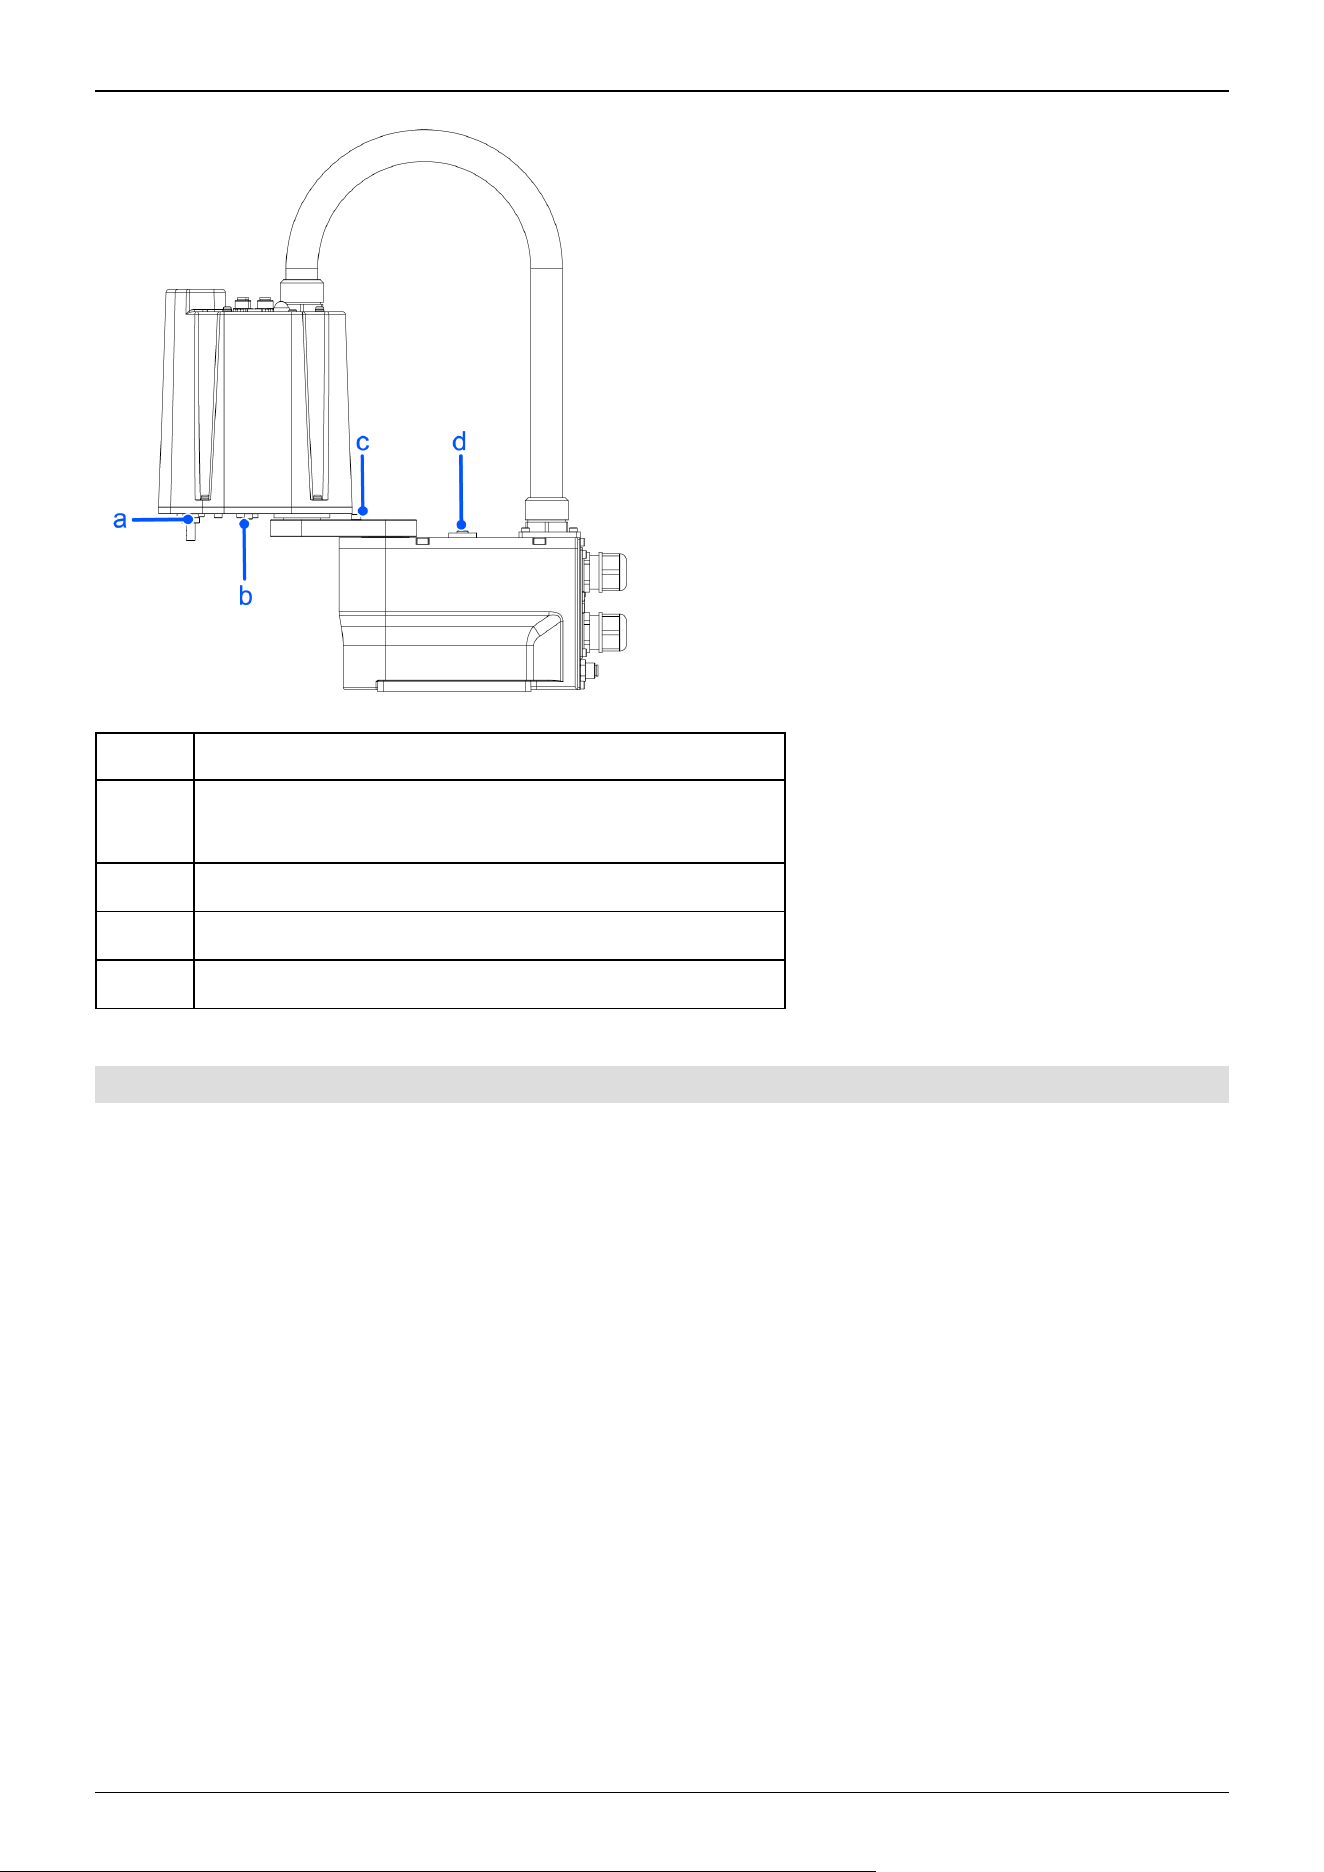
Symbol Description
a
Joint #3 mechanical stop (upper limit mechanical stop)
*Do not change the position of the upper limit mechanical stop.
b Joint #2 mechanical stop (adjustable)
c Joint #2 mechanical stop (adjustable)
d Joint #1 mechanical stop (adjustable)
2.5.2.1 Setting the Mechanical Stops of Joints #1 and #2
Both Joints #1 and #2 have threaded holes in positions corresponding to angles for the setting area. The positions of the
mechanical stops (variable) set the work envelope. Install the bolts in the threaded holes corresponding to the angles to be set.
Joint #1:
Industrial Robot: SCARA Robots GX series Manual Rev.11
64
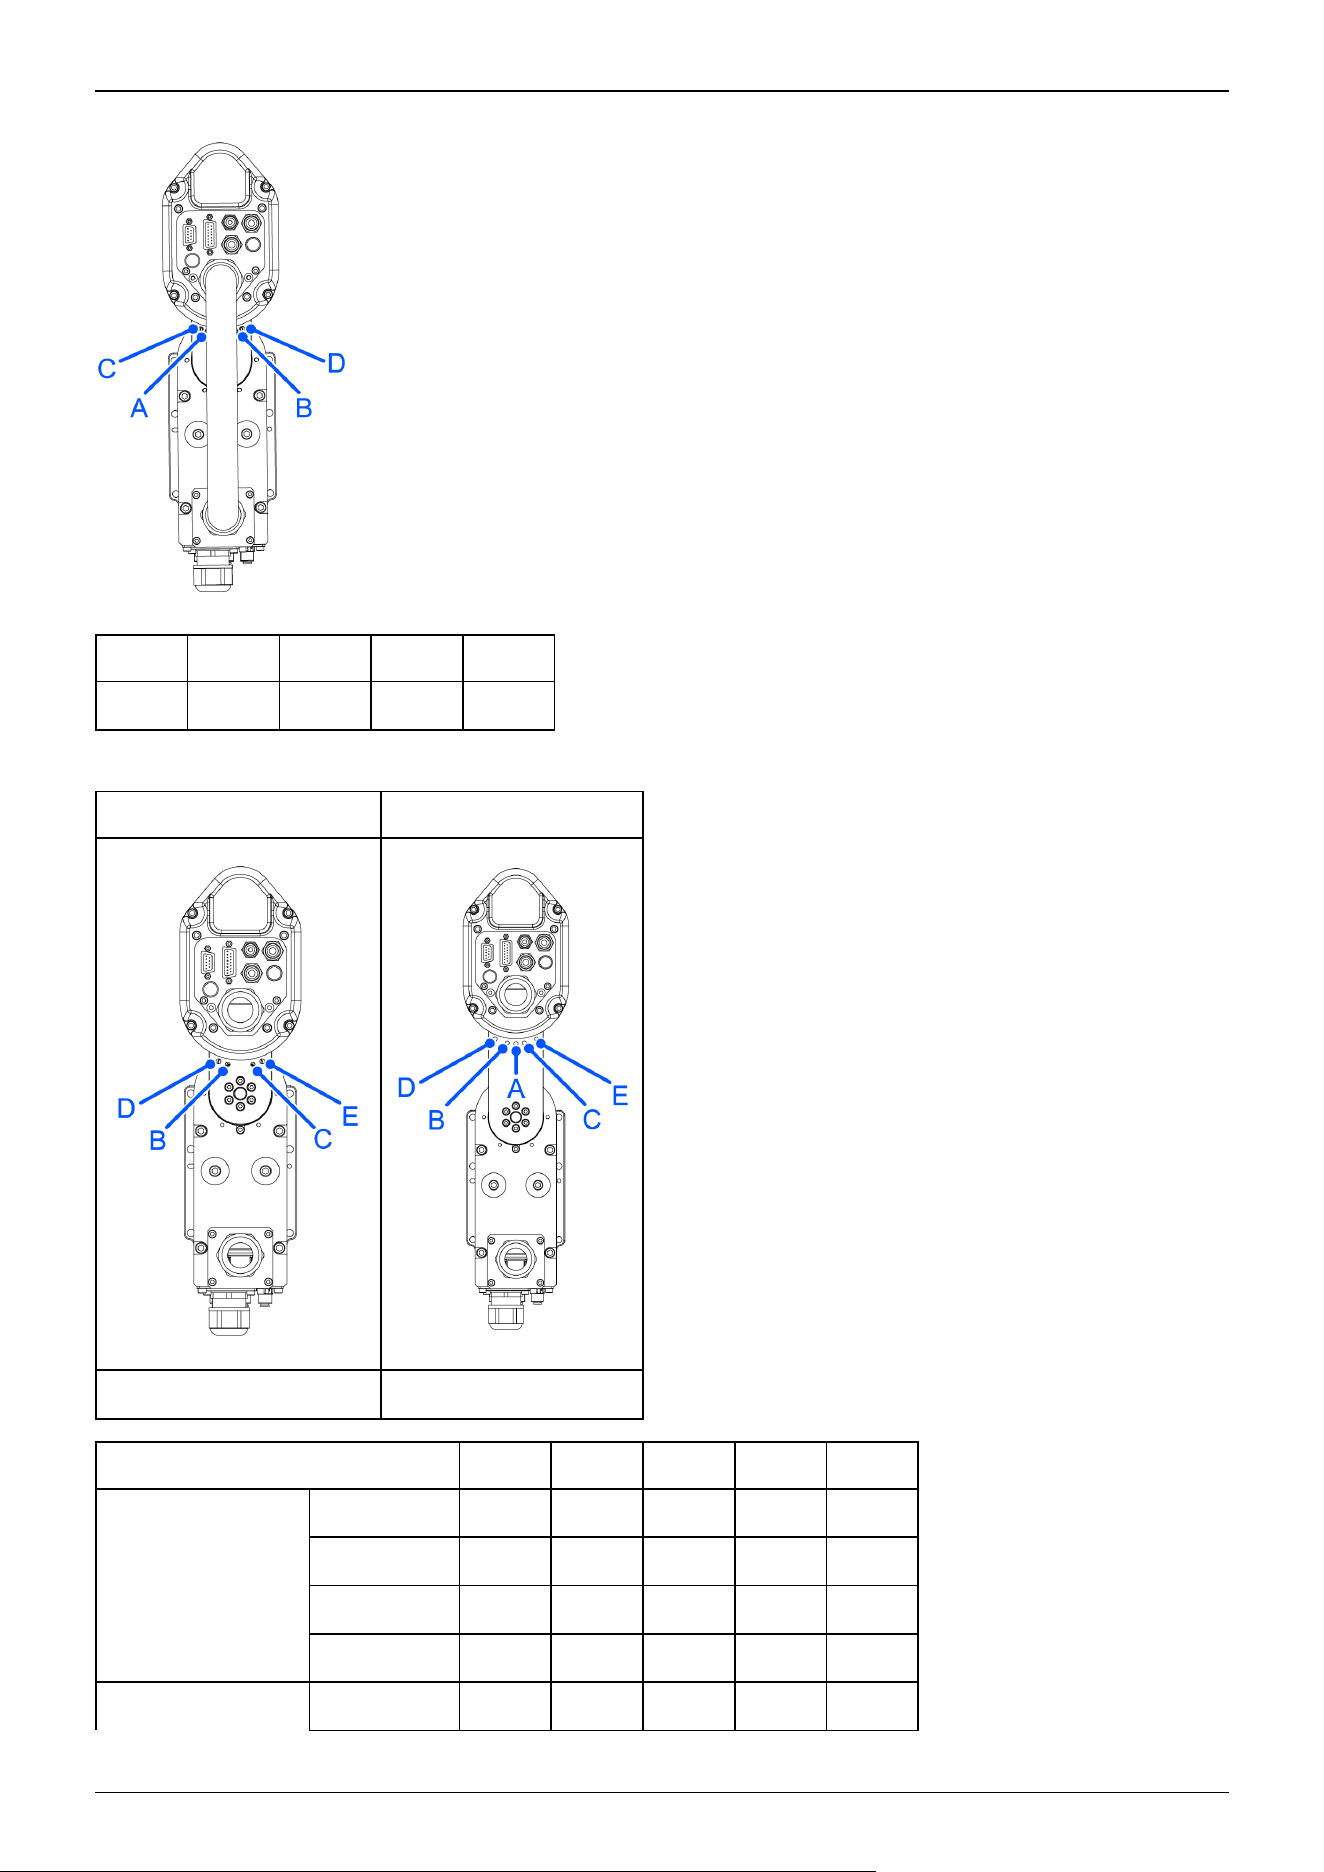
Model A B C D
All +125° -125° +120° -120°
Joint #2:
GX1-C171 * GX1-C221*
Top Top
Model A B * C * D E
4-Axis specifications
GX1-C171S - +140° -140° +130° -130°
GX1-C171C - +140° -140° +130° -130°
GX1-C221S ±152 +140° -140° +125° -125°
GX1-C221C ±149 +140° -140° +125° -125°
3-Axis specifications
GX1-C171SZ - +135° -135° +125° -125°
Industrial Robot: SCARA Robots GX series Manual Rev.11
65
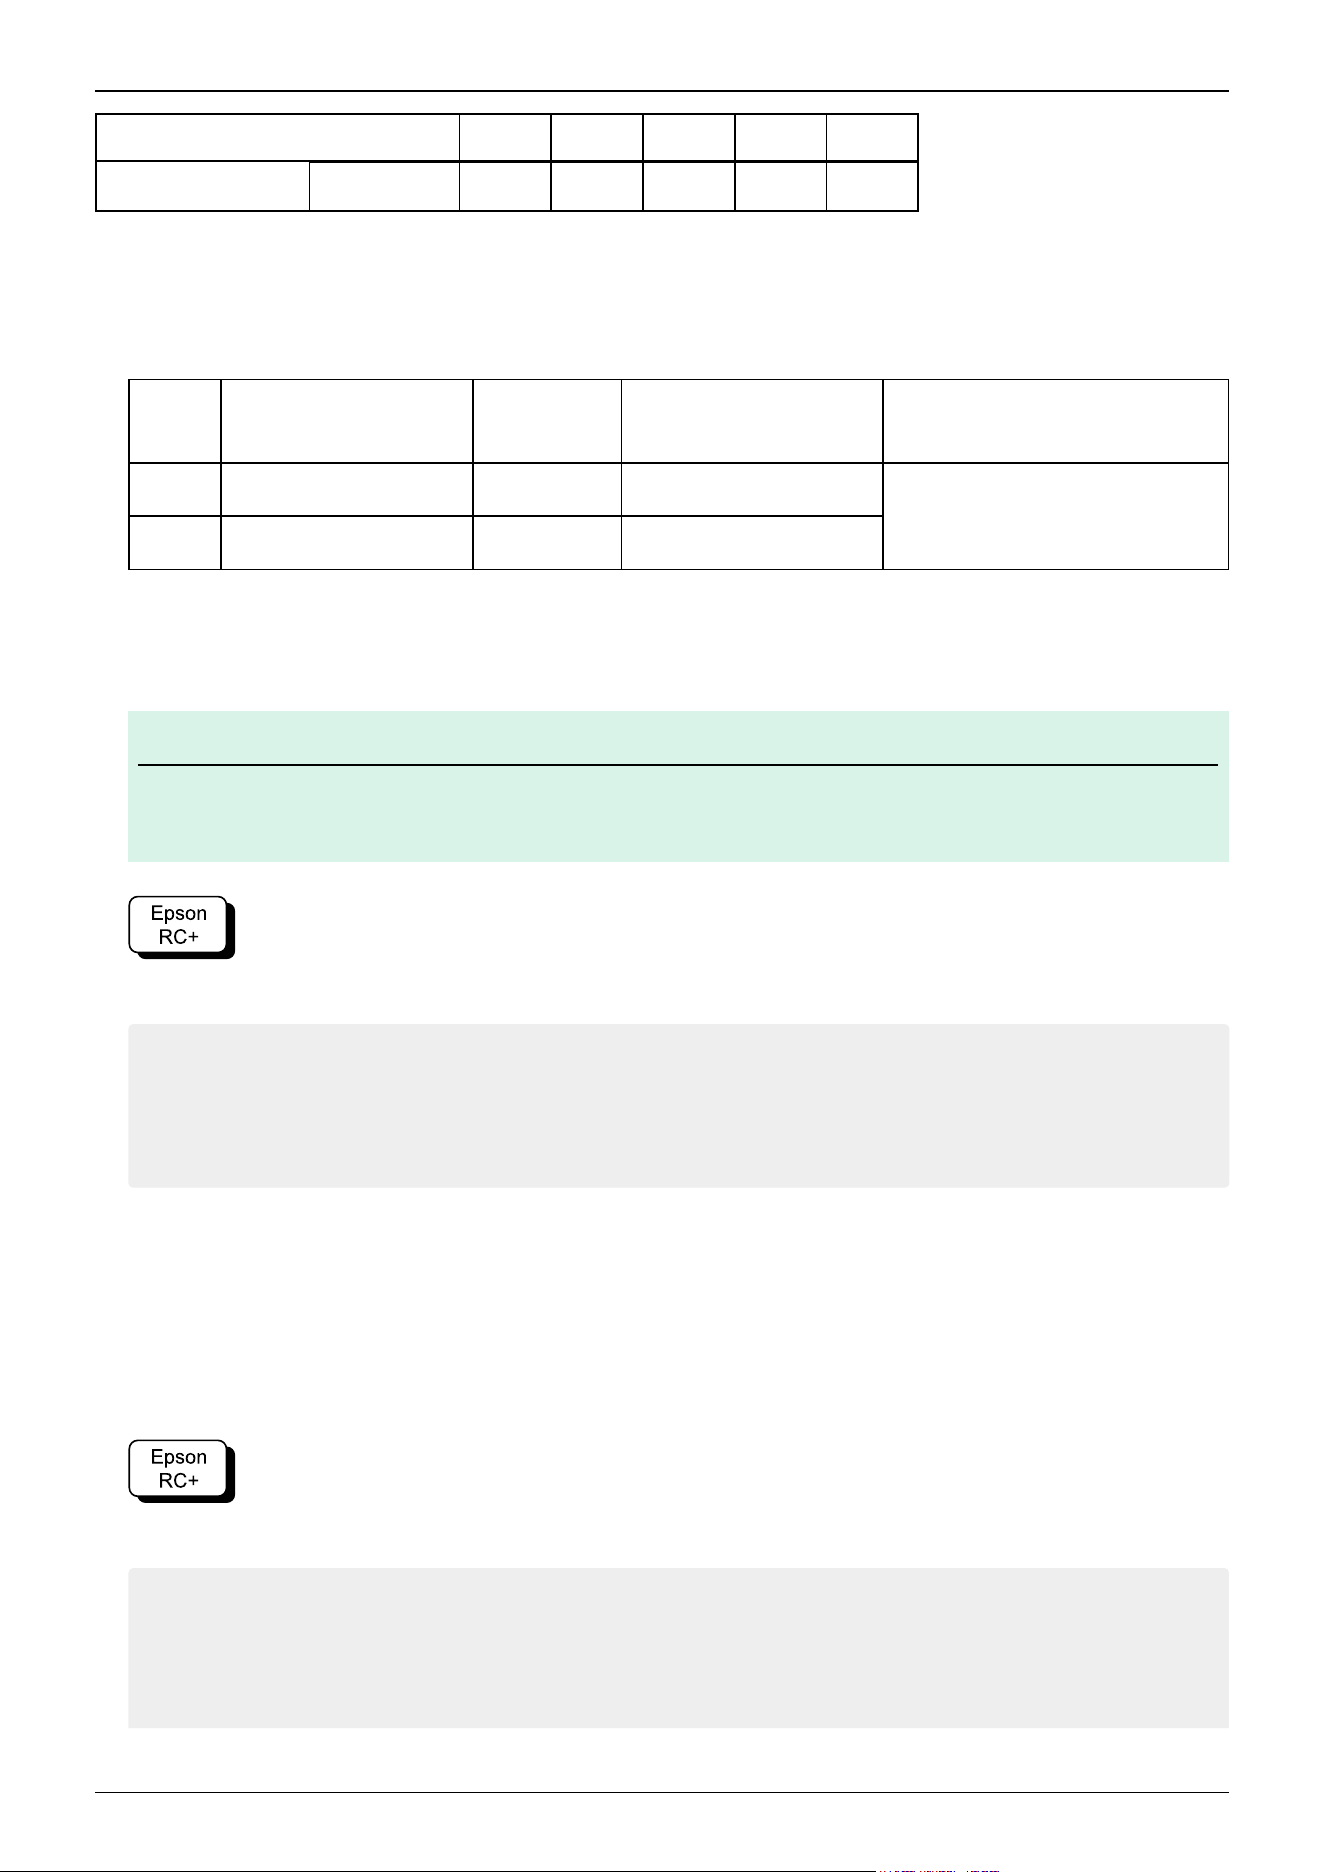
Model A B * C * D E
GX1-C221SZ - +135° -135° +120° -120°
*Standard position of the mechanical stop
1. Turn off the Controller.
2. Install a hexagon socket head cap bolt into the threaded hole corresponding to the setting angle, and tighten it.
Joint
Hexagon socket head
cap bolts
Pneumatic
Tubes
Recommended
tightening torque
Strength
1 M6 × 10 full thread 2 17.6 N·m (180 kgf·cm)
ISO898-1 property class 10.9 or
12.9 equivalent
2 M5 × 10 full thread 2 9.8 N·m (100 kgf·cm)
3. Turn on the Controller.
4. Set the pulse range corresponding to the new positions of the mechanical stops.
POINTS
Be sure to set the pulse range inside the positions of the mechanical stop range.
< Example: Setting Joint #1 to -120° to +120° and Joint #2 to -130° to +130° for the G1X-C171S>
Execute the following command in [Command Window].
>JRANGE 1,-873814,6116694 ' Sets the pulse range of Joint #1
>JRANGE 2,-2366578,2366578 ' Sets the pulse range of Joint #2
>RANGE ' Confirms the setting value using the Range statement
-873814, 6116694, -2366578, 2366578, -1092267
,0, -393216, 393216
5. Move the arm by hand until it touches the mechanical stops to check that nothing will hinder the arm motion during
operation, such as by hitting peripheral equipment.
6. Operate the joint with the new settings at low speeds until it reaches the positions of the minimum and maximum values of
the pulse range. Check that the arm does not hit any mechanical stops.
(Check the position of the mechanical stops and the motion range that were set.)
< Example: Setting Joint #1 to -120° to +120° and Joint #2 to -130° to +130° for the GX1-C171S*> In case>
Execute the following command in [Command Window].
>MOTOR ON ' Turns on the motor
>POWER LOW ' Sets to low power mode
>SPEED 5 ' Sets to low speed
>PULSE -873814,0,0,0 ' Moves to the minimum pulse position of Joint #1
>PULSE 6116694,0,0,0 ' Moves to the maximum pulse position of Joint #1
✏
Industrial Robot: SCARA Robots GX series Manual Rev.11
66
>PULSE 2621440,-2366578,0,0 ' Moves to the minimum pulse position of Joint #2
>PULSE 2621440,2366578,0,0 ' Moves to the maximum pulse position of Joint #2
The Pulse statement (Go Pulse statement) moves all joints to the specified positions at the same time. Set safe positions
after taking into consideration the motion of the joints whose pulse range have been changed and also the other joints. In
this example, when checking Joint #2, Joint #1 is moved to the 0 position (pulse value: 2621440) near the center of its
work envelope.
If the arm is hitting the mechanical stops or if an error occurs after the arm hits the mechanical stops, either reset the pulse
range to a narrower setting or extend the positions of the mechanical stops within the limit.
2.5.2.2 Setting the Mechanical Stop of Joint #3
The mechanical stop of Joint #3 must be set only by someone who has received proper training.
For details, refer to the Manipulator Maintenance Manual.
2.5.3 Setting the Rectangular Range in the XY Coordinate System of the
Manipulator
(For Joints #1 and #2)
Use this procedure to set the upper and lower limits of the X and Y coordinates.
This setting is a software-based limit only, and so it does not change the maximum physical range. The maximum physical
range is based on the position of the mechanical stops.
Go to [Tools] - [Robot Manager] - [XYZ Limits] panel, and make the setting. This can also be set using the XYLim statement
in [Command Window].
2.5.4 Standard Work Envelope
The following "work envelope" diagrams show the model with standard (maximum) specifications. When each joint motor is
under servo control, the center of the Manipulator shaft’s lowest point moves in the ranges shown in the figure.
Range to mechanical stop
This is the range where the center of shaft’s lowest point can be moved when each joint motor is not under servo control.
Mechanical stop
This is the stop that sets the absolute work envelope where the Manipulator cannot move beyond mechanically.
Maximum zone
This is the range that contains the farthest reach of the arms where interference can occur. If the maximum radius of the
hand exceeds 30 mm, add the "Range to mechanical stop" and the "Radius of the hand." The total value is specified as the
maximum zone.
4-Axis specifications - Standard specifications
Industrial Robot: SCARA Robots GX series Manual Rev.11
67
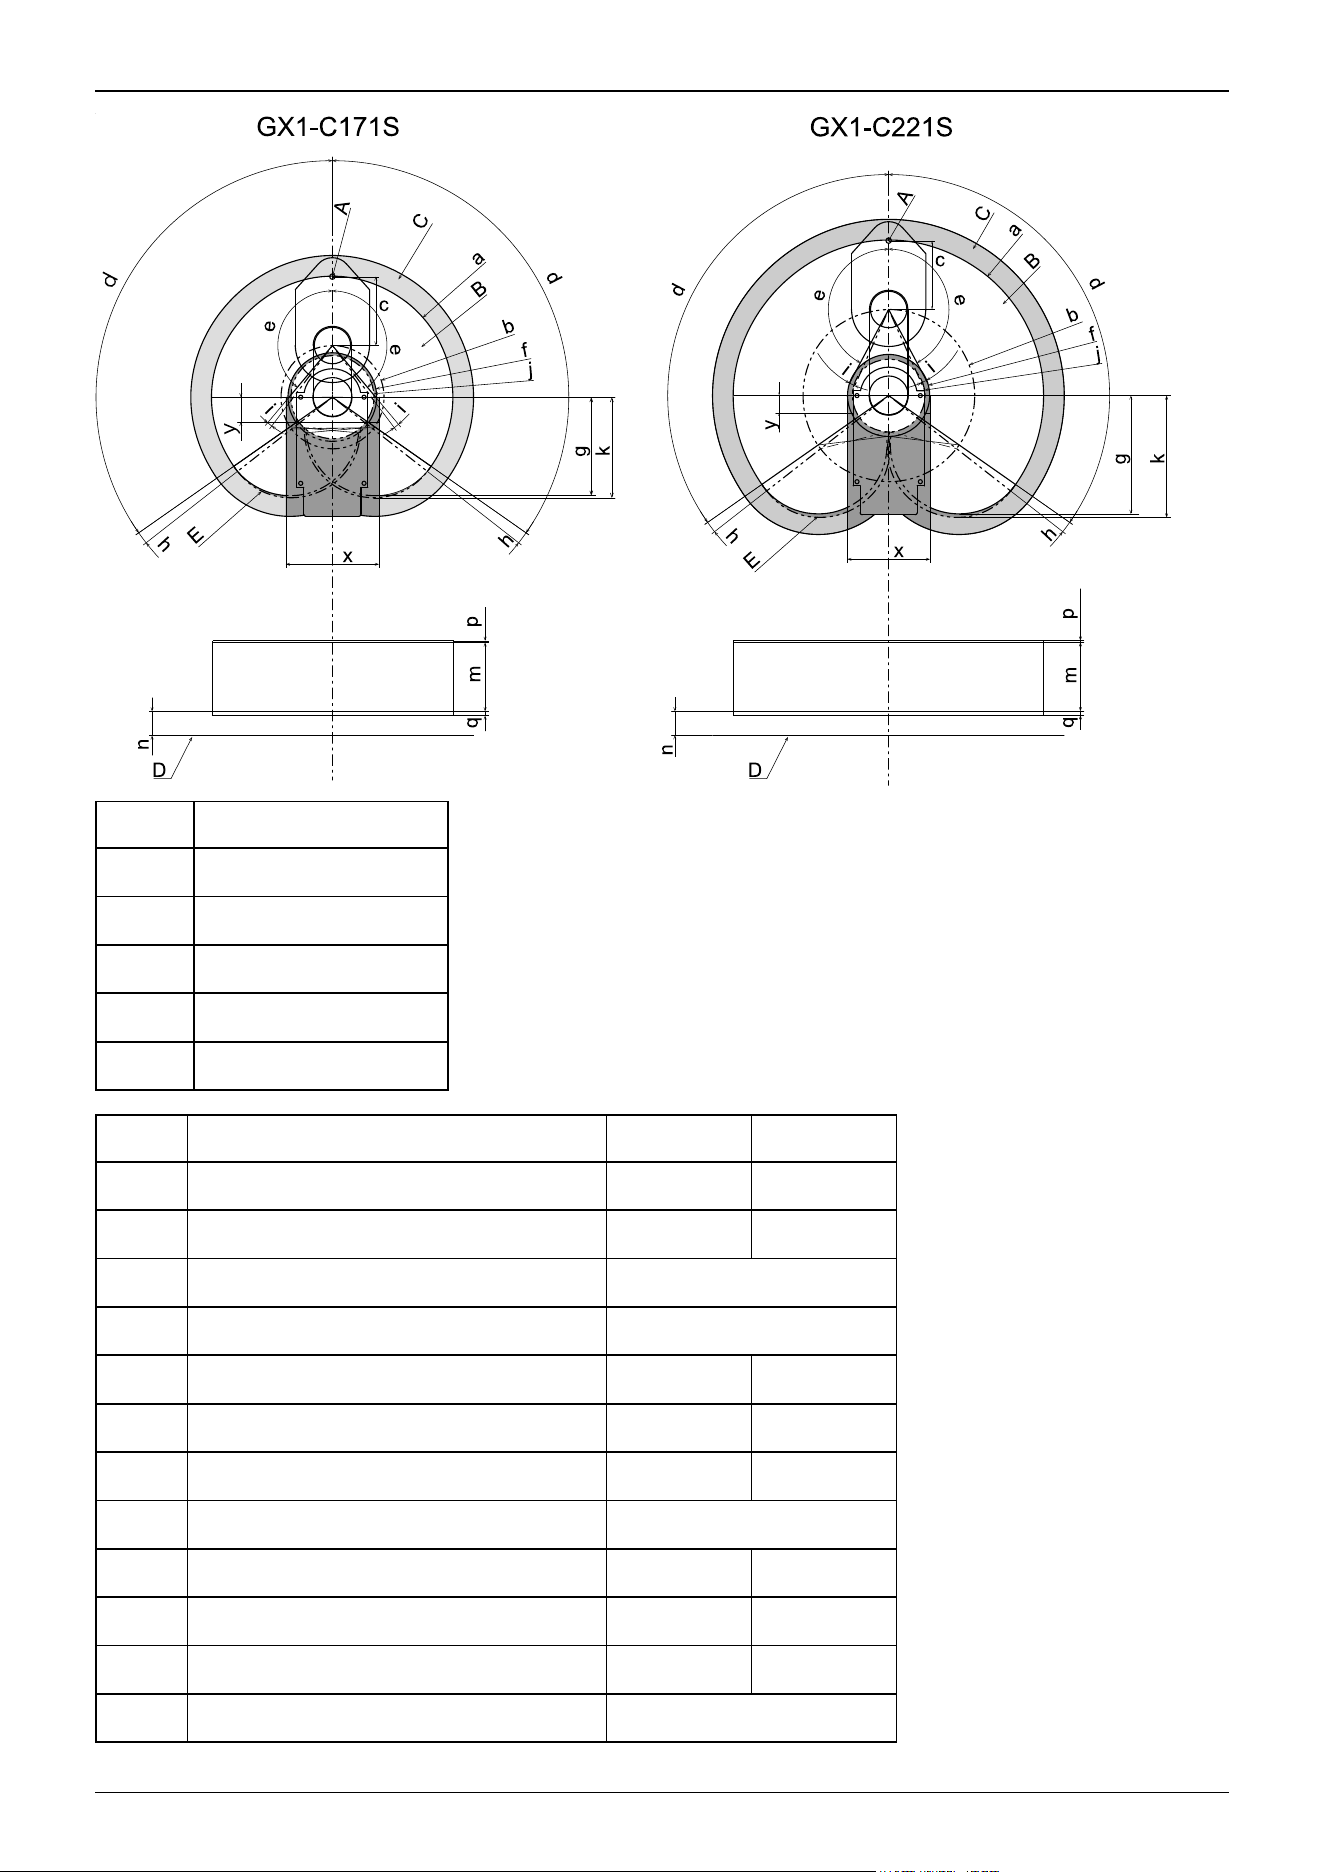
Symbol Description
A Center of Joint #3
B Work Envelope
C Maximum zone
D Base mounting surface
E Range to mechanical stop
GX1C-171S GX1C-221S
a Length of Arm #1 + Arm #2 (mm) 175 225
b Length of Arm #1 (mm) 75 125
c Length of Arm #2 (mm) 100
d Joint #1 motion (°) 125
e Joint #2 motion (°) 140 152
f Work envelope 64.3 59.6
g (Work envelope of the back side) 143 171.7
h Angle of Joint #1 mechanical stop (°) 3
i Angle of Joint #2 mechanical stop (°) 3 4
j (Mechanical stop area) 60.4 52.8
k (Mechanical stop area of the back side) 146.2 177
m Joint #3 motion stroke 100
Industrial Robot: SCARA Robots GX series Manual Rev.11
68
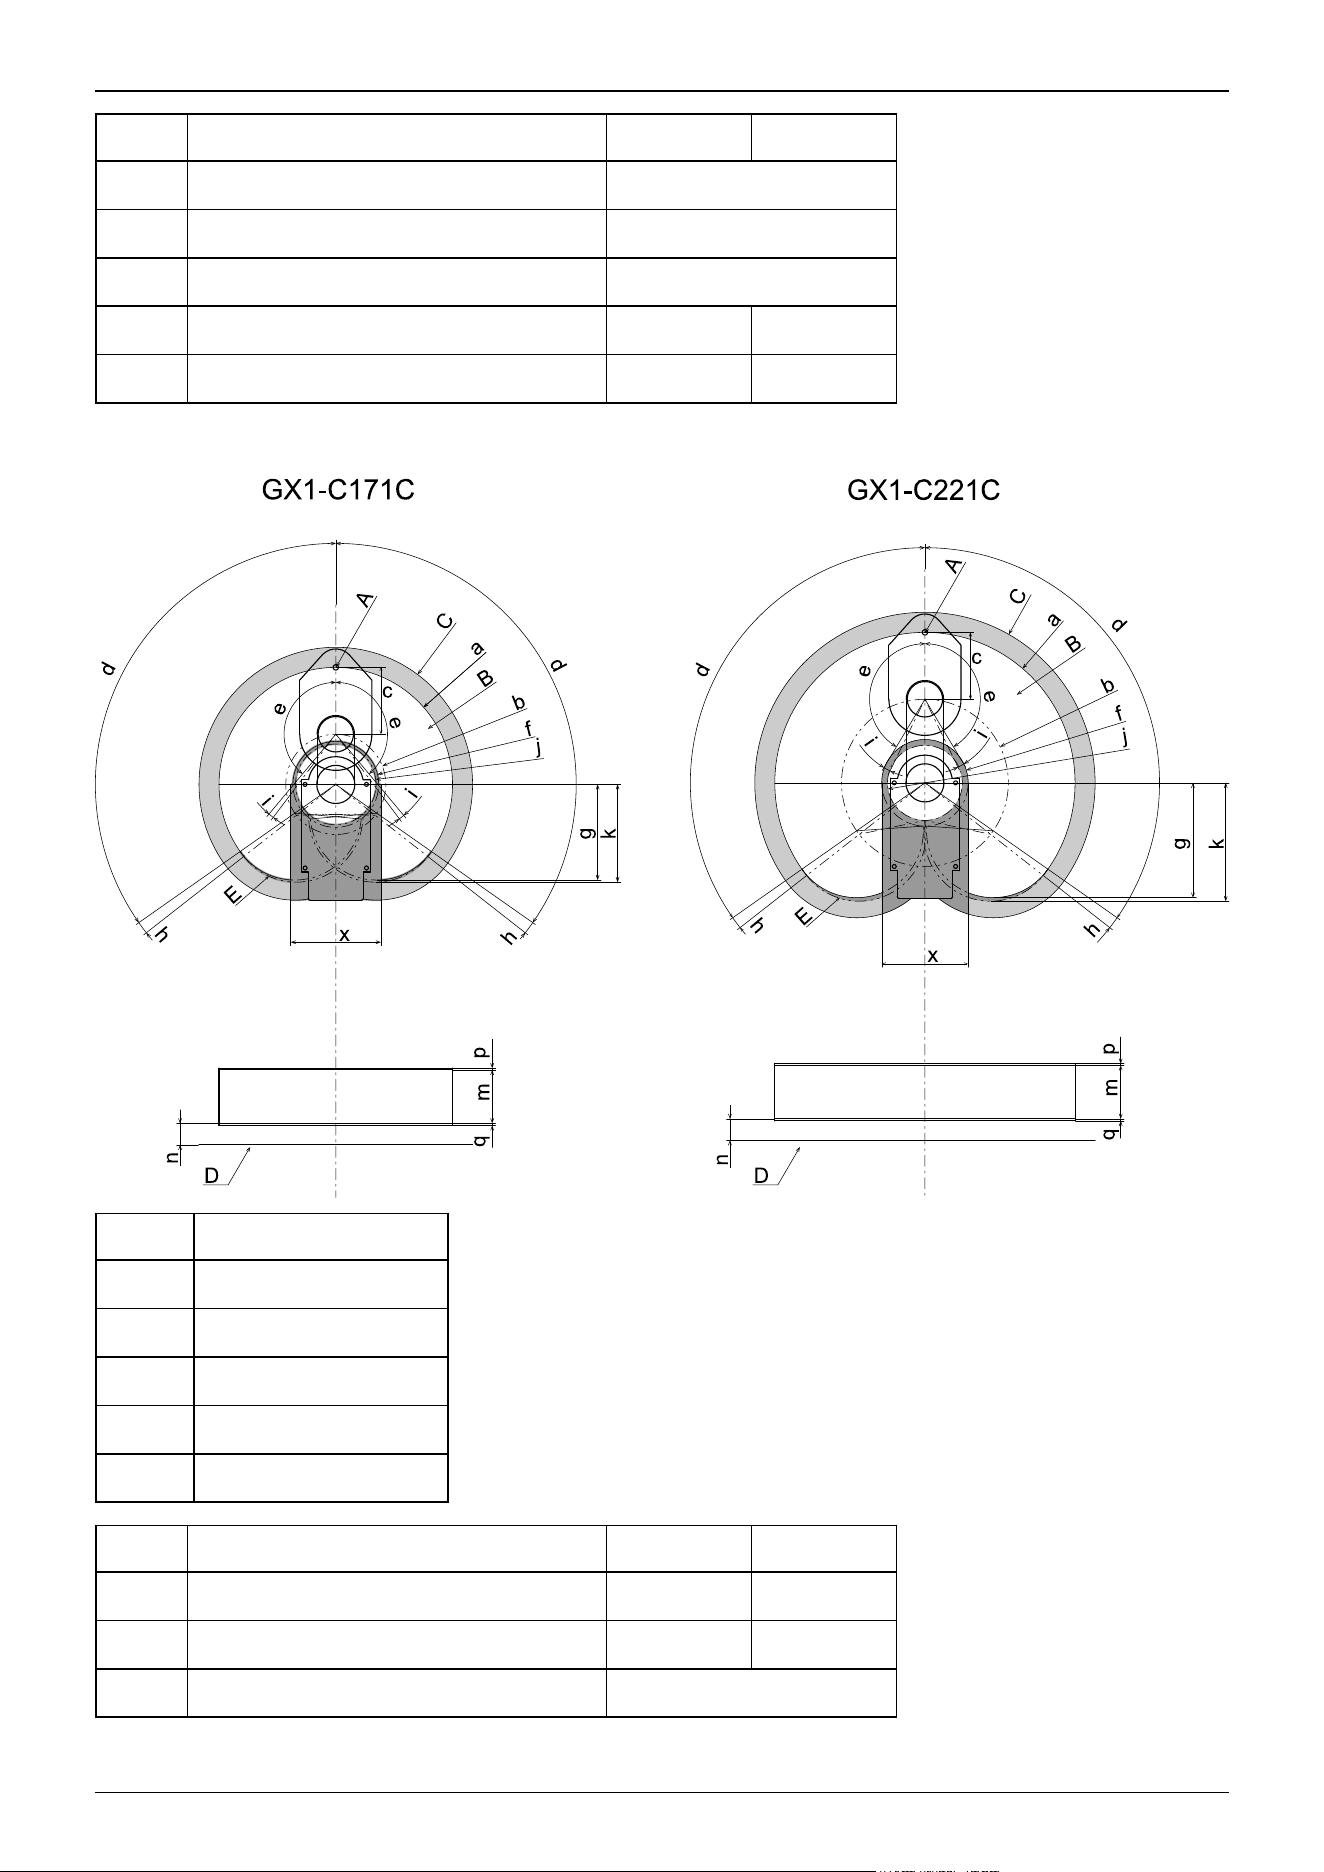
GX1C-171S GX1C-221S
n Distance from base mounting surface 35
p Joint #3 mechanical stop area top end 2.5
p Joint #3 mechanical stop area bottom end 6
x Dimensions of motion prohibited area (mm) 135 120
y Dimensions of motion prohibited area (mm) 0 to 36 0 to 25
4-Axis specifications - Cleanroom & ESD specifications
Symbol Description
A Center of Joint #3
B Work Envelope
C Maximum zone
D Base mounting surface
E Range to mechanical stop
GX1-C171C GX1-C221C
a Length of Arm #1 + Arm #2 (mm) 175 225
b Length of Arm #1 (mm) 75 125
c Length of Arm #2 (mm) 100
Industrial Robot: SCARA Robots GX series Manual Rev.11
69
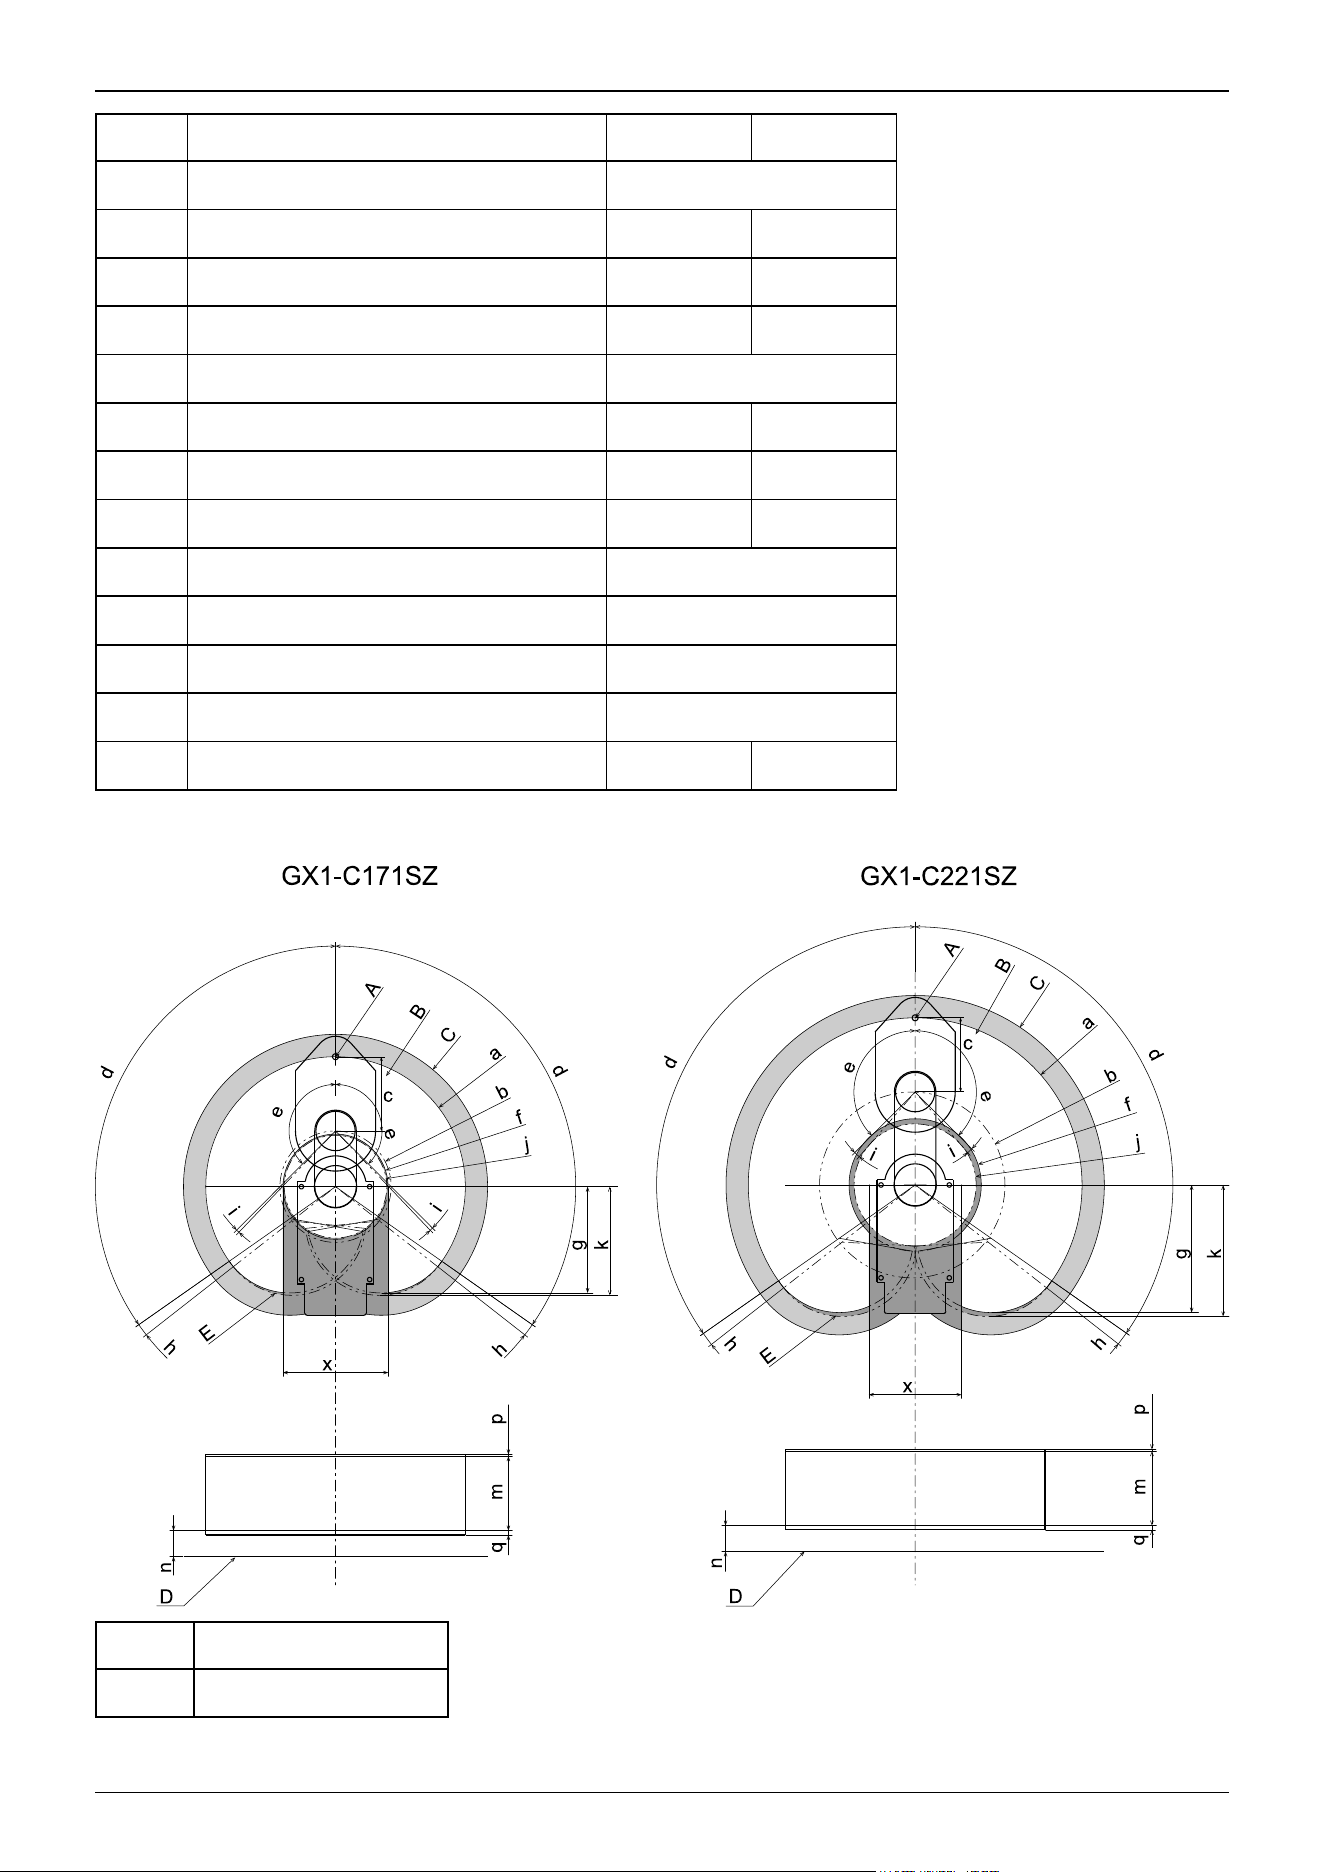
GX1-C171C GX1-C221C
d Joint #1 motion (°) 125
e Joint #2 motion (°) 140 149
f Work envelope 64.3 64.8
g (Work envelope of the back side) 143 171.7
h Angle of Joint #1 mechanical stop (°) 3
i Angle of Joint #2 mechanical stop (°) 3 5
j (Mechanical stop area) 60.4 56.2
k (Mechanical stop area of the back side) 146.2 177
m Joint #3 motion stroke 80
n Distance from base mounting surface 32
p Joint #3 mechanical stop area top end 2.5
p Joint #3 mechanical stop area bottom end 3
x Dimensions of motion prohibited area (mm) 135 129
3-Axis specifications - Standard specifications
Symbol Description
A Center of Joint #3
Industrial Robot: SCARA Robots GX series Manual Rev.11
70
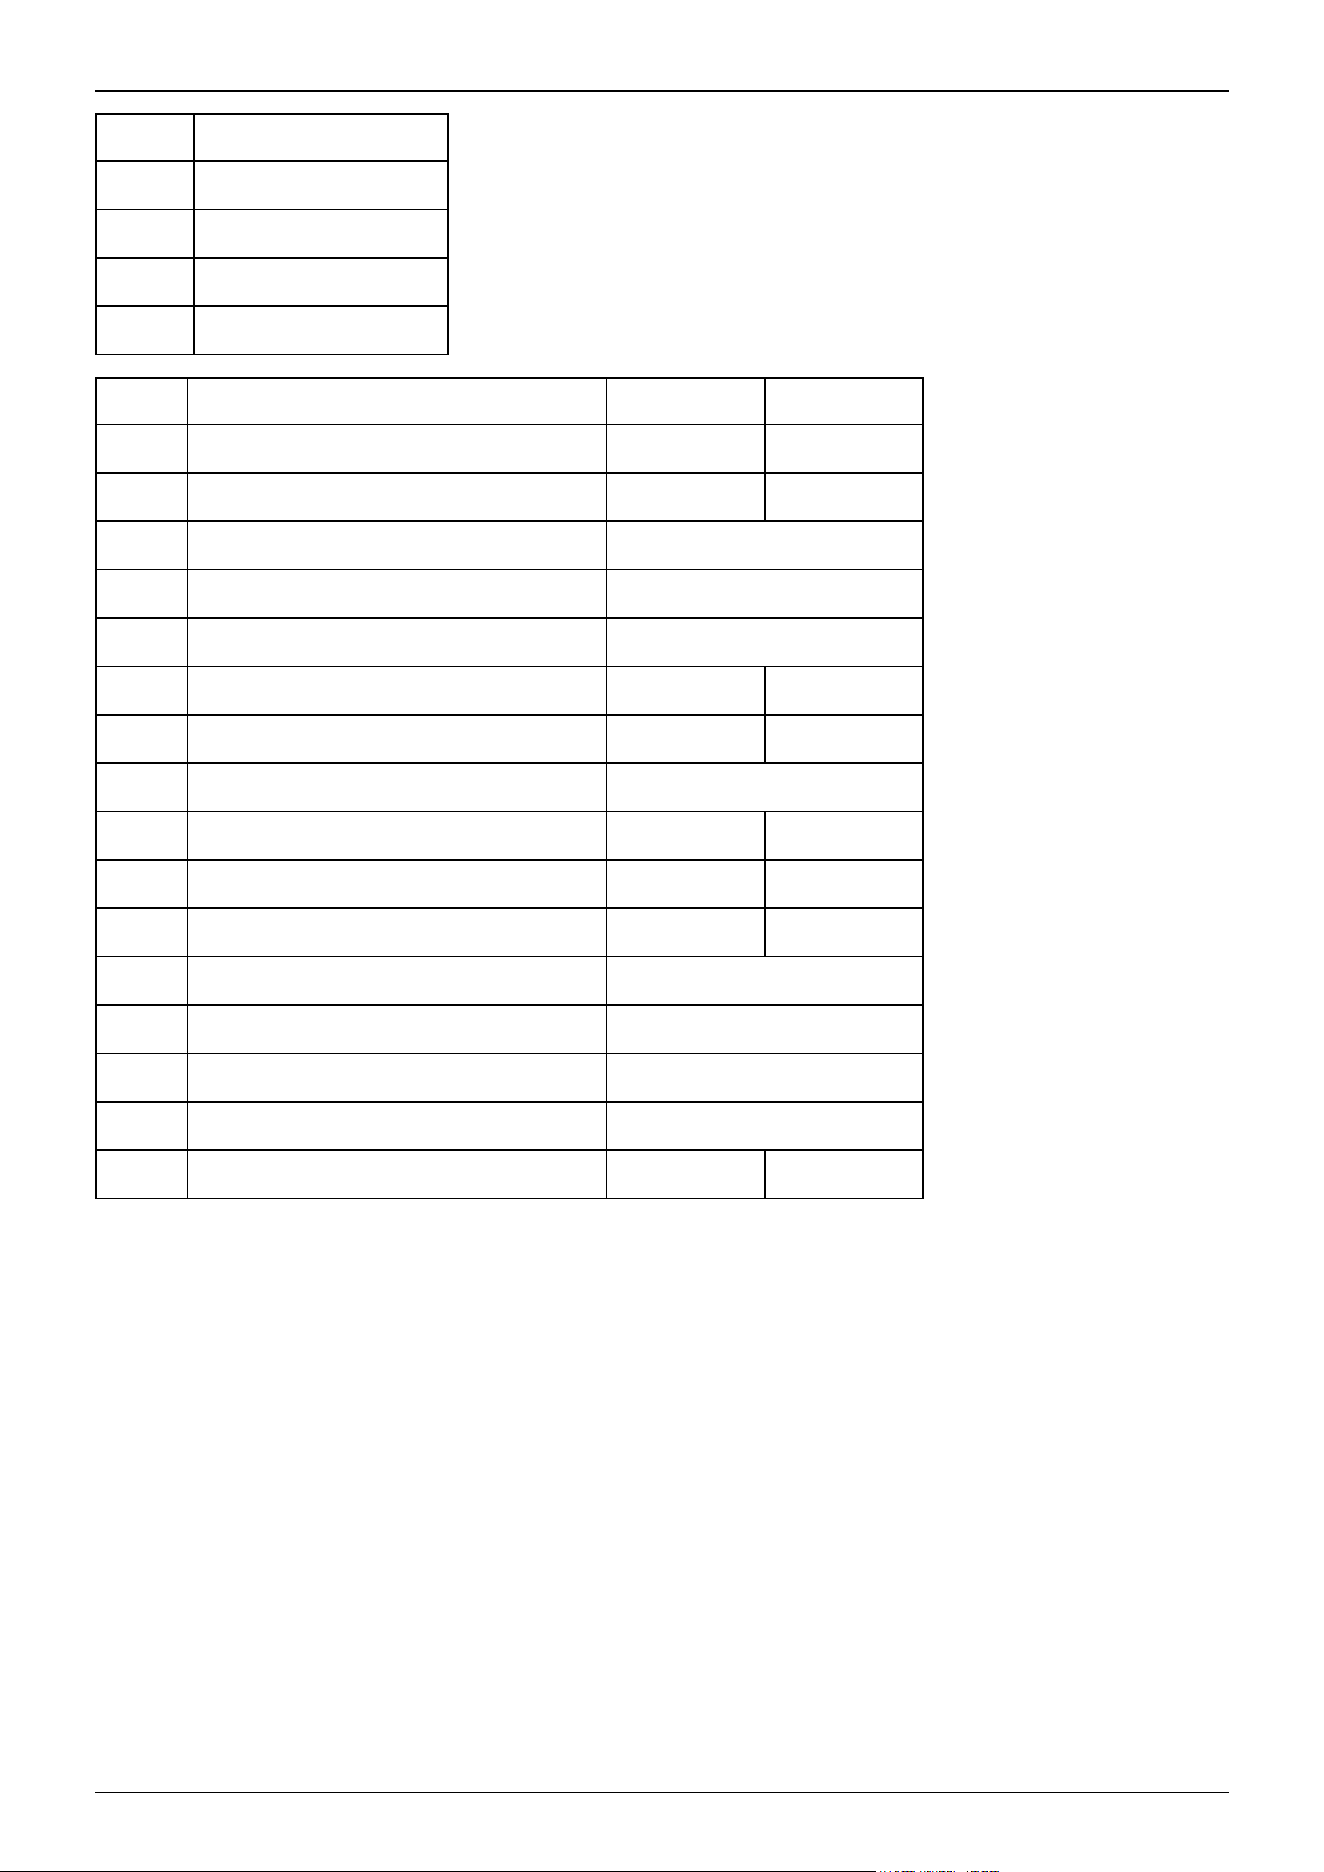
Symbol Description
B Work Envelope
C Maximum zone
D Base mounting surface
E Range to mechanical stop
GX1-C171SZ GX1-C221SZ
a Length of Arm #1 + Arm #2 (mm) 175 225
b Length of Arm #1 (mm) 75 125
c Length of Arm #2 (mm) 100
d Joint #1 motion (°) 125
e Joint #2 motion (°) 135
f Work envelope 70.8 89.1
g (Work envelope of the back side) 143 171.7
h Angle of Joint #1 mechanical stop (°) 3
i Angle of Joint #2 mechanical stop (°) 1.3 4
j (Mechanical stop area) 69.1 82.2
k (Mechanical stop area of the back side) 146.2 177
m Joint #3 motion stroke 100
n Distance from base mounting surface 35
p Joint #3 mechanical stop area top end 2.5
p Joint #3 mechanical stop area bottom end 6
x Dimensions of motion prohibited area (mm) 142 125
Industrial Robot: SCARA Robots GX series Manual Rev.11
71

3. GX4 Manipulator
This chapter contains information for setup and operation of the Manipulators. Please read this chapter thoroughly before
setting up and operating the Manipulators.
Industrial Robot: SCARA Robots GX series Manual Rev.11
72
3.1 Safety
The Manipulator and its related equipment should be unpacked and transported by people who have received installation
training provided by Epson and the suppliers. Also, the laws and regulations of the installation country must be followed.
Before use, please read this manual and other related manuals to ensure correct use.
After reading this manual, store it in an easily accessible location for future reference.
This product is intended for transporting and assembling parts in a safely isolated area.
3.1.1 Conventions Used in This Manual
The following symbols are used in this manual to indicate important safety information. Be sure to read the descriptions shown
with each symbol.
WARNING
This symbol indicates an imminently hazardous situation which, if operation is not performed properly, will result
in death or serious injury.
WARNING
This symbol indicates a potentially hazardous situation which, if operation is not performed properly, could result
in a serious injury due to electric shock.
CAUTION
This symbol indicates a potentially hazardous situation which, if operation is not performed properly, may result in
an injury or in property damage only.
Industrial Robot: SCARA Robots GX series Manual Rev.11
73
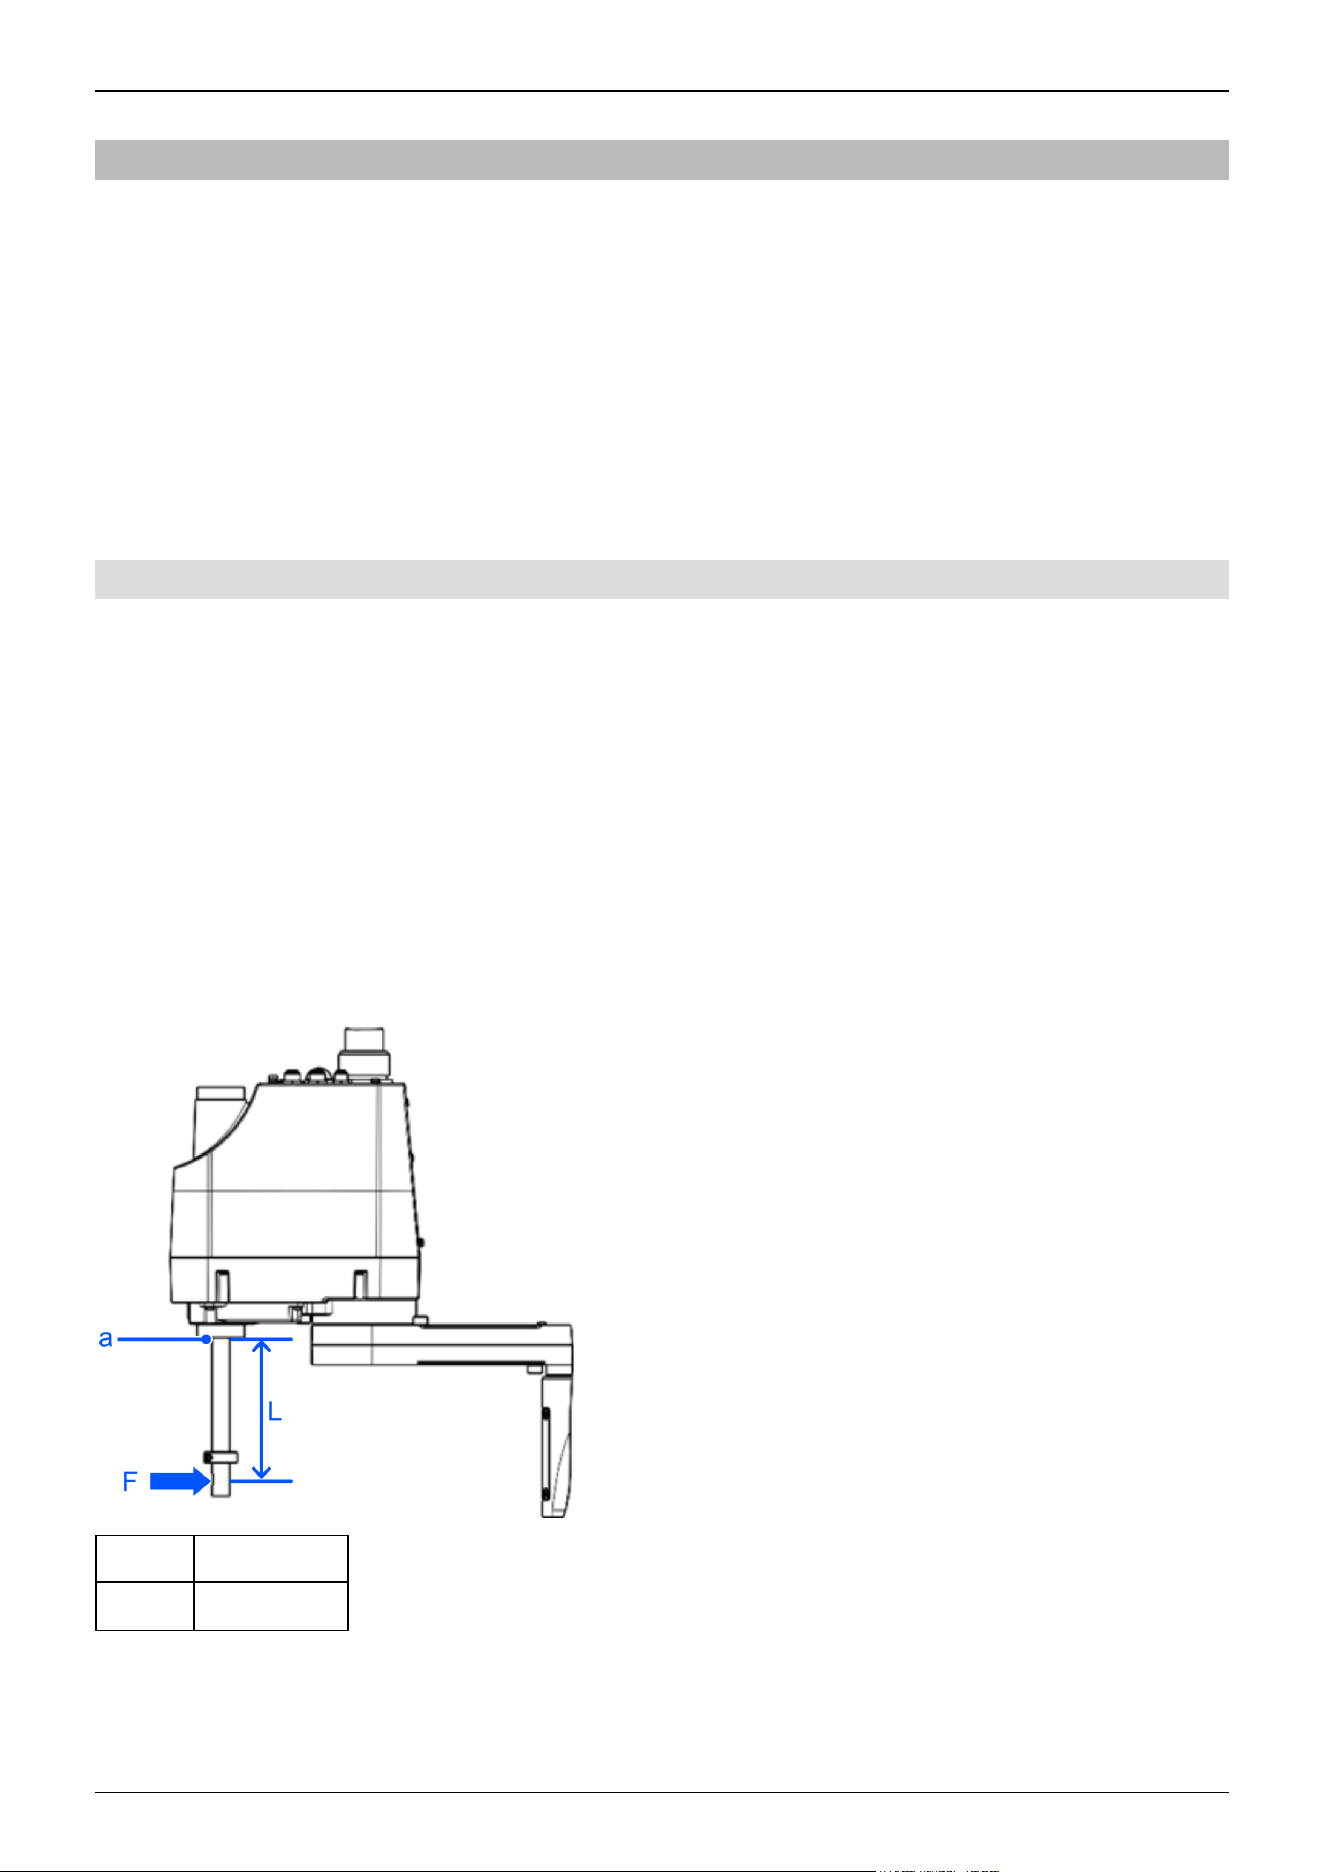
3.1.2 Design and Installation Safety
The robot system should be designed and installed by people who have received installation training provided by Epson and
the suppliers.
Design personnel should refer to the following manuals:
"Safety Manual"
"Controller Manual"
"Manipulator Manual"
Refer to the following section for the installation safety information.
Environment and Installation
Be sure to read this section and follow the safety information before installation to ensure that the installation work is
performed safely.
3.1.2.1 Strength of the Ball Screw Spline
If a load exceeding the allowable bending load is applied to the ball screw spline, it may not work properly due to deformation
or breakage of the shaft.
If a load exceeding the allowable value is applied to the ball screw spline, the ball screw spline unit must be replaced.
The allowable load varies depending on the distance over which the load is applied. To calculate the allowable load, refer to
the formula below.
Allowable bending moment
GX4: M=13,000 N∙mm
Calculation example: 130 N load applied at 100 mm from the end of the spline nut
Moment
M=F∙L=100∙130=13,000 N∙mm
Symbol Description
a Spline nut end
Industrial Robot: SCARA Robots GX series Manual Rev.11
74
3.1.3 Operation Safety
The following items are safety precautions for operating personnel:
WARNING
Be sure to read the Safety Manual before use. Operating the robot system without understanding the safety
information can be extremely dangerous and may result in serious injury or severe equipment damage.
Before operating the robot system, make sure that no one is inside the safety barriers. The robot system can
be operated in the teaching operation mode even when someone is inside the safety barriers. Even though
the motion of the Manipulator is always restricted (low speed and low power) to ensure operator safety, an
unexpected movement by the Manipulator can be extremely dangerous and may cause serious safety
problems.
If the Manipulator makes any abnormal movements during operation of the robot system, do not hesitate to
immediately press the emergency stop switch.
WARNING
To perform the power supply lockout, remove the power plug. Be sure to connect the AC power cable to a
power outlet. Do not connect it directly to a factory power source.
Before performing any replacement work, inform others in the area that you are working, and then turn off the
Controller and related equipment, and unplug the power cable from the power source. Performing any work
procedure with the power turned on is extremely dangerous and may result in electric shock and/or
malfunction of the robot system.
Do not connect or disconnect the connector of the M/C cable while the Controller is turned on. There is a risk
the Manipulator may malfunction, which is extremely hazardous. Also, performing any work procedure with
the power turned on may result in electric shock and/or malfunction of the robot system.
Be sure to turn off the power and tag out (e.g., with a "DO NOT TURN ON" sign) before performing wiring.
Performing any work procedure with the power turned on is extremely dangerous and may result in electric
shock and/or malfunction of the robot system.
CAUTION
As a general rule, the robot system should be operated by only one person. If it is necessary to operate with
more than one person, ensure that all personnel communicate with each other and take all necessary safety
precautions.
Joints #1, #2, and #4:
If the Manipulator is operated repeatedly with an operating angle of 5° or less, the bearings used in the joints
are likely to cause oil film shortage. Repeated operation may cause premature damage. To prevent premature
damage, operate the Manipulator to move each joint to an angle of 50° or more about once per hour.
Joint #3:
If the up-and-down motion of the hand is 10 mm or less, move the hand about half or more of its maximum
stroke about once per hour.
When the robot is operating at low speed (Speed: 5 to 20%), vibration (resonance) may occur continuously
during operation depending on the combination of the arm orientation and hand load. Vibration occurs due to
the natural vibration frequency of the arm and can be reduced by taking the following measures:
Changing the robot speed
Industrial Robot: SCARA Robots GX series Manual Rev.11
75
Changing the teach points
Changing the hand load
3.1.4 Emergency Stop
Each robot system needs equipment that will allow the operator to immediately stop the system's operation. Install an
emergency stop device by using emergency stop input from the Controller or other equipment.
Before using the emergency stop switch, be aware of the following points.
The emergency stop switch should be used to stop the Manipulator only in case of emergencies.
Besides pressing the emergency stop switch when an emergency occurs, to stop the Manipulator during program operation,
use the Pause or STOP (program stop) statements assigned to a standard I/O.
The Pause and STOP statements do not turn off motor energization, and so the brake is not locked.
To place the robot system in emergency stop mode in a non-emergency (normal) situation, press the emergency stop switch
while the Manipulator is not operating.
Do not press the emergency stop switch unnecessarily while the Manipulator is operating normally.
It could shorten the lifespan of the following components.
Brakes
The brakes will be locked, which will shorten the lifespan of the brakes due to worn brake friction plates.
Normal brake lifespan:
About 2 years (when the brakes are used 100 times/day)
or about 20,000 times
Reduction gears
An emergency stop applies an impact to the reduction gear, which can shorten its life.
If the Manipulator is stopped by turning off the Controller while it is operating, the following problems may occur.
Reduced life and damage to reduction gear
Position shift at the joints
If a power outage or other unavoidable Controller power-off occurs during Manipulator operation, check the following points
after power is restored.
Damage in reduction gear
Shifting of the joints from their proper positions
If there was any shifting, maintenance is required. For more information, please contact the supplier.
Stopping distance of emergency stop
The Manipulator during operation cannot stop immediately after the emergency stop switch is pressed. Also, the stopping time
and movement distance vary depending on the following factors.
Hand weight, WEIGHT setting, ACCEL setting, workpiece weight, SPEED setting, movement posture, etc.
For the stopping time and movement distance of the Manipulator, refer to the following section.
Appendix B: Stopping Time and Stopping Distance at Emergency Stop
Industrial Robot: SCARA Robots GX series Manual Rev.11
76
3.1.5 Safeguard (SG)
To maintain a safe working zone, safety barriers must be set up around the Manipulator, and safeguards must be installed at the
entrance and exit of the safety barriers.
The term "safeguard" as used in this manual refers to a safety device with an interlock that allows entry into the safety barriers.
Specifically, this includes safety door switches, safety barriers, light curtains, safety gates, safety floor mats, and so on. The
safeguard is an input that informs the Robot Controller that an operator may be inside the safeguard area. You must assign at
least one Safeguard (SG) in Safety Function Manager.
When the safeguard is opened, Protective Stop operates to change to the safeguard open state (display: SO).
Safeguard open
Operations are prohibited. Further robot operation is not possible until either the safeguard is closed, the latched state is
released, and a command is executed, or the TEACH or TEST operation mode is turned on and the enable circuit is
activated.
Safeguard closed
The robot can operate automatically in an unrestricted (high power) state.
WARNING
If a third party accidentally releases the safeguard while an operator is working inside the safety barriers, this
may result in a hazardous situation. To protect the operator working inside the safety barriers, implement
measures to lock out or tag out the latch release switch.
To protect operators working near the robot, be sure to connect a safeguard switch and make sure that it
works properly.
Installing safety barriers
When installing safety barriers within the maximum range of the Manipulator, combine safety functions such as SLP. Carefully
take into account the size of the hand and the workpieces to be held so that no interference occurs between the operating parts
and the safety barriers.
Installing safeguards
Design the safeguards so that they satisfy the following requirements:
When using a key switch type safety device, use a switch that forcibly opens the interlock contacts. Do not use switches
that open their contacts using the spring force of the interlock.
When using an interlock mechanism, do not disable the interlock mechanism.
Considering the stopping distance
During operation, the Manipulator cannot stop immediately even if the safeguard is opened. Also, the stopping time and
movement distance vary depending on the following factors.
Hand weight, WEIGHT setting, ACCEL setting, workpiece weight, SPEED setting, movement posture, etc.
For the stopping time and movement distance of the Manipulator, refer to the following section.
Appendix C: Stopping Time and Stopping Distance When Safeguard is Open
Precautions for safeguard operation
Do not open the safeguard unnecessarily while the motor is energized. Frequent safeguard inputs will reduce the life of the
relay.
Normal relay lifespan: About 20,000 times
Industrial Robot: SCARA Robots GX series Manual Rev.11
77
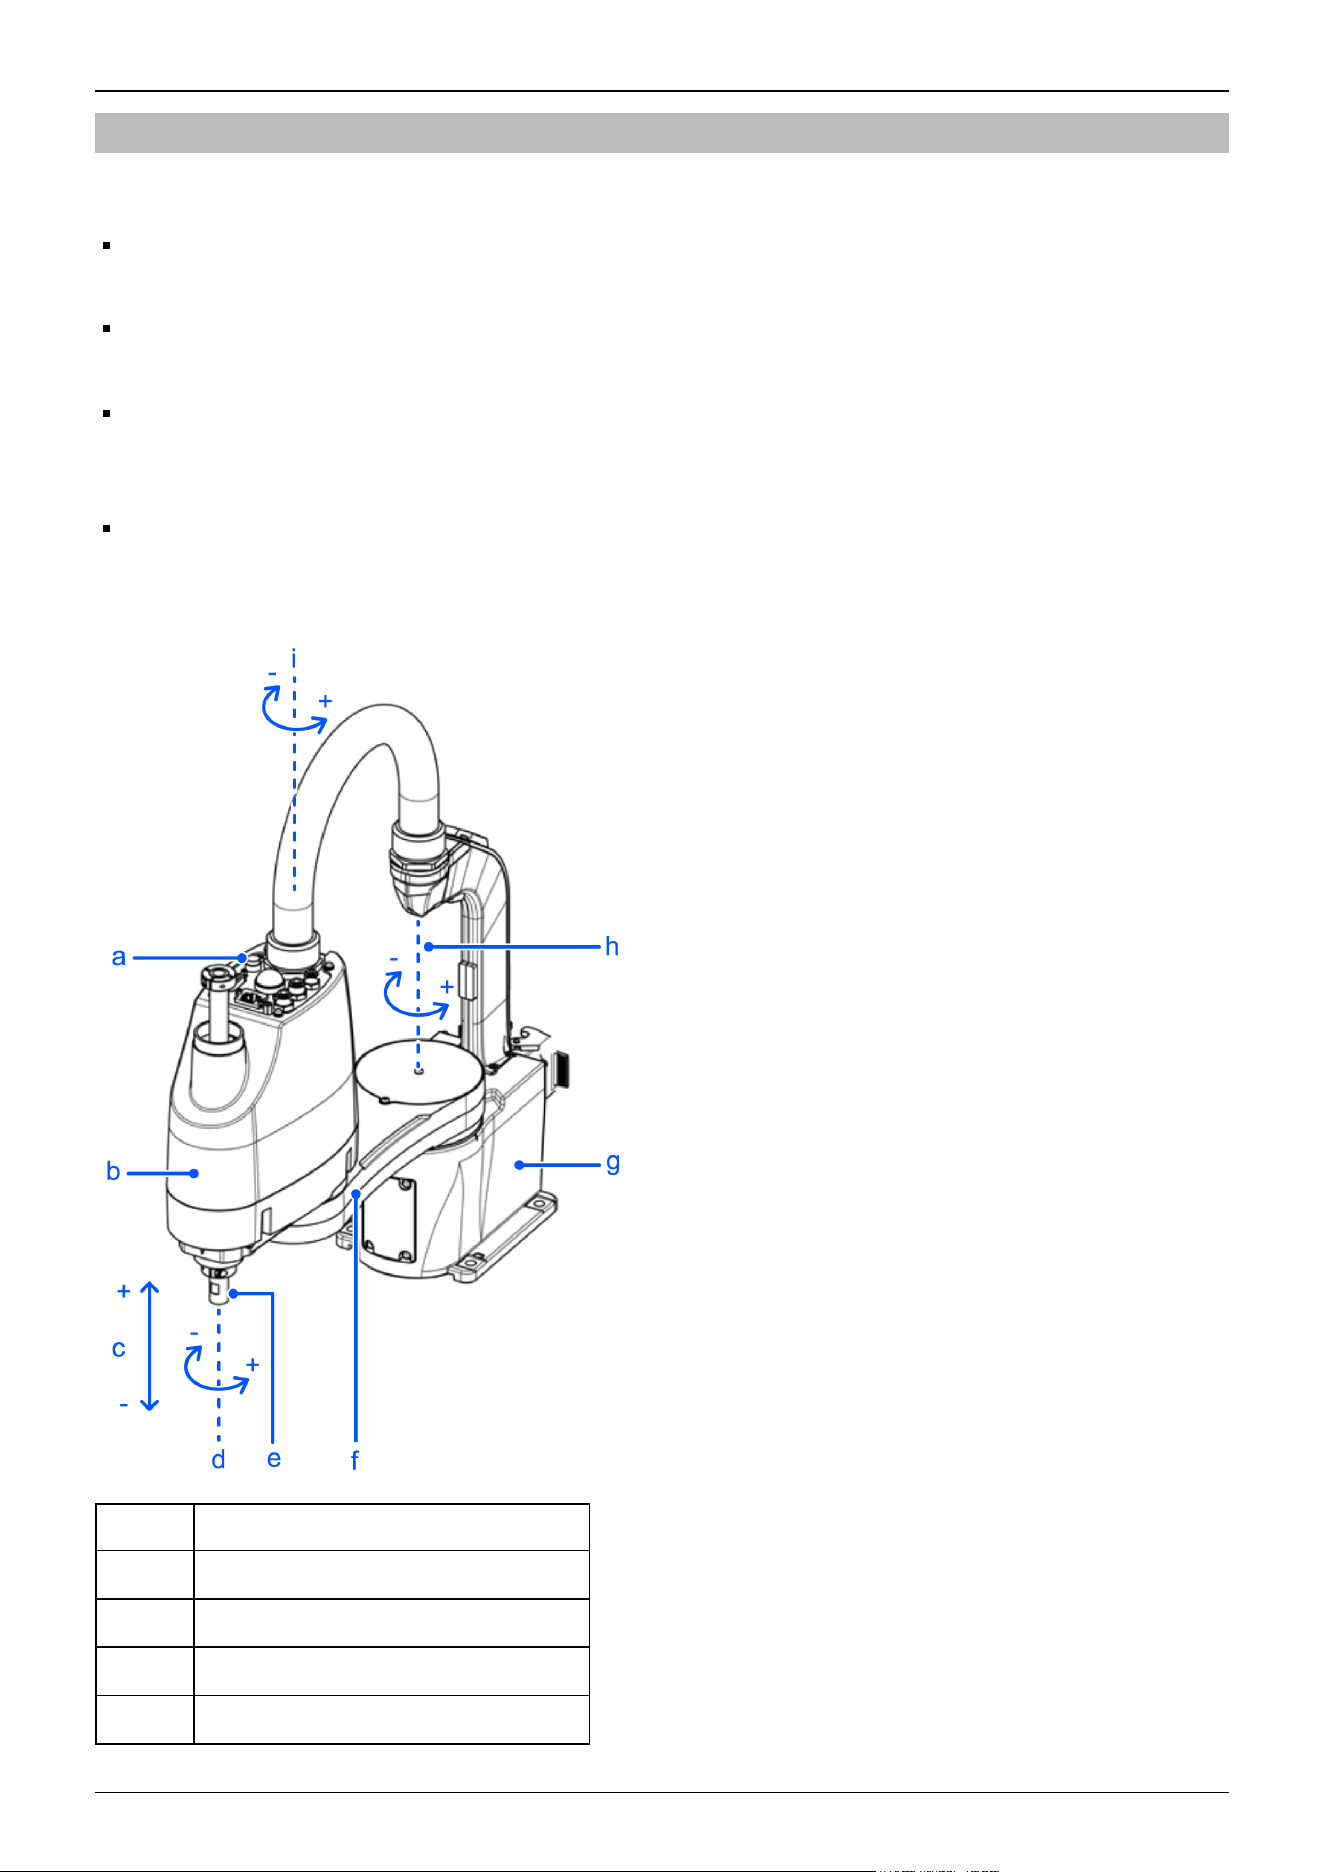
3.1.6 Arm Movement Method in the Emergency Stop State
In the emergency stop state, move the Manipulator joints directly by hand as shown below.
Joint #1:
Push Arm #1 by hand.
Joint #2:
Push Arm #2 by hand.
Joint #3:
The joint cannot be moved up or down by hand because the electromagnetic brake is activated.
Move the joint while pressing down the brake release switch.
Joint #4:
The joint cannot be rotated by hand because the electromagnetic brake is activated.
Move the joint while pressing down the brake release switch.
Symbol Description
a Joint #3 and Joint #4 brake release switch
b Arm #2
c Joint #3 (up/down movement)
d Joint #4 (rotation)
Industrial Robot: SCARA Robots GX series Manual Rev.11
78
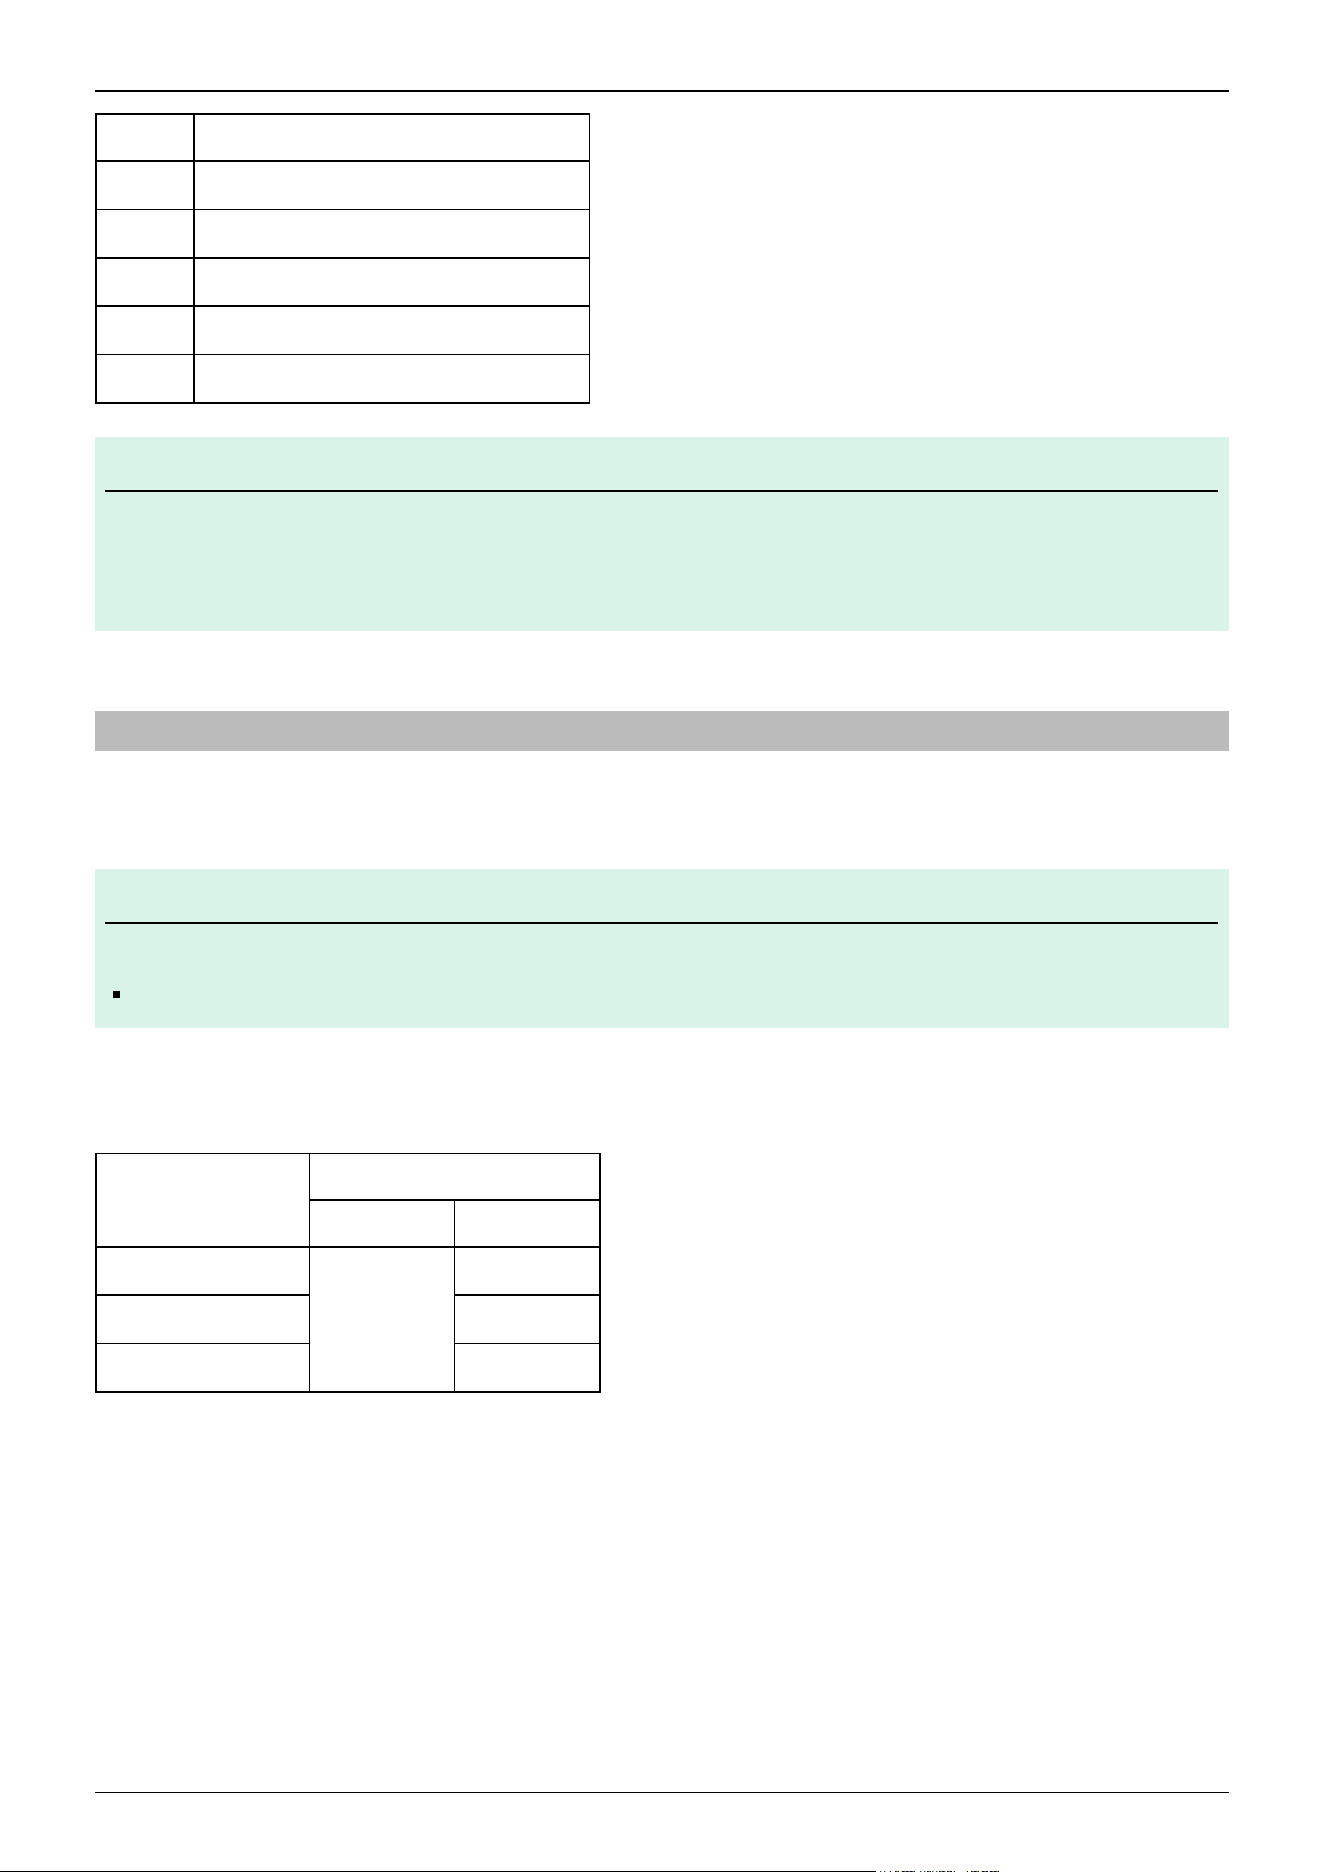
Symbol Description
e Shaft
f Arm #1
g Base
h Joint #1 (rotation)
i Joint #2 (rotation)
KEY POINTS
The brake release switch is used with both Joint #3 and Joint #4. Press the brake release switch while in the
emergency stop state to simultaneously release the brakes on Joint #3 and Joint #4.
When pressing the brake release switch, watch for the shaft descending or rotating under the weight of the hand.
3.1.7 ACCELS Setting for CP Motion
To make the Manipulator move in a CP motion, make the appropriate ACCELS settings in the SPEL program based on the tip
load and Z-axis height.
KEY POINTS
If the ACCELS settings are not properly configured, the following problem may occur.
Shortened lifespan and damage to the ball screw spline
Set ACCELS as shown below based on the Z-axis height.
ACCELS setting values by the Z-axis height and tip load
Z-axis Height (mm)
Tip Load
3 kg or Less 4 kg or Less
- 0 > Z ≥ - 50
25000 or less
25000 or less
- 50 > Z ≥ - 100 25000 or less
- 100 > Z ≥ - 150 21500 or less
✏
✏
Industrial Robot: SCARA Robots GX series Manual Rev.11
79
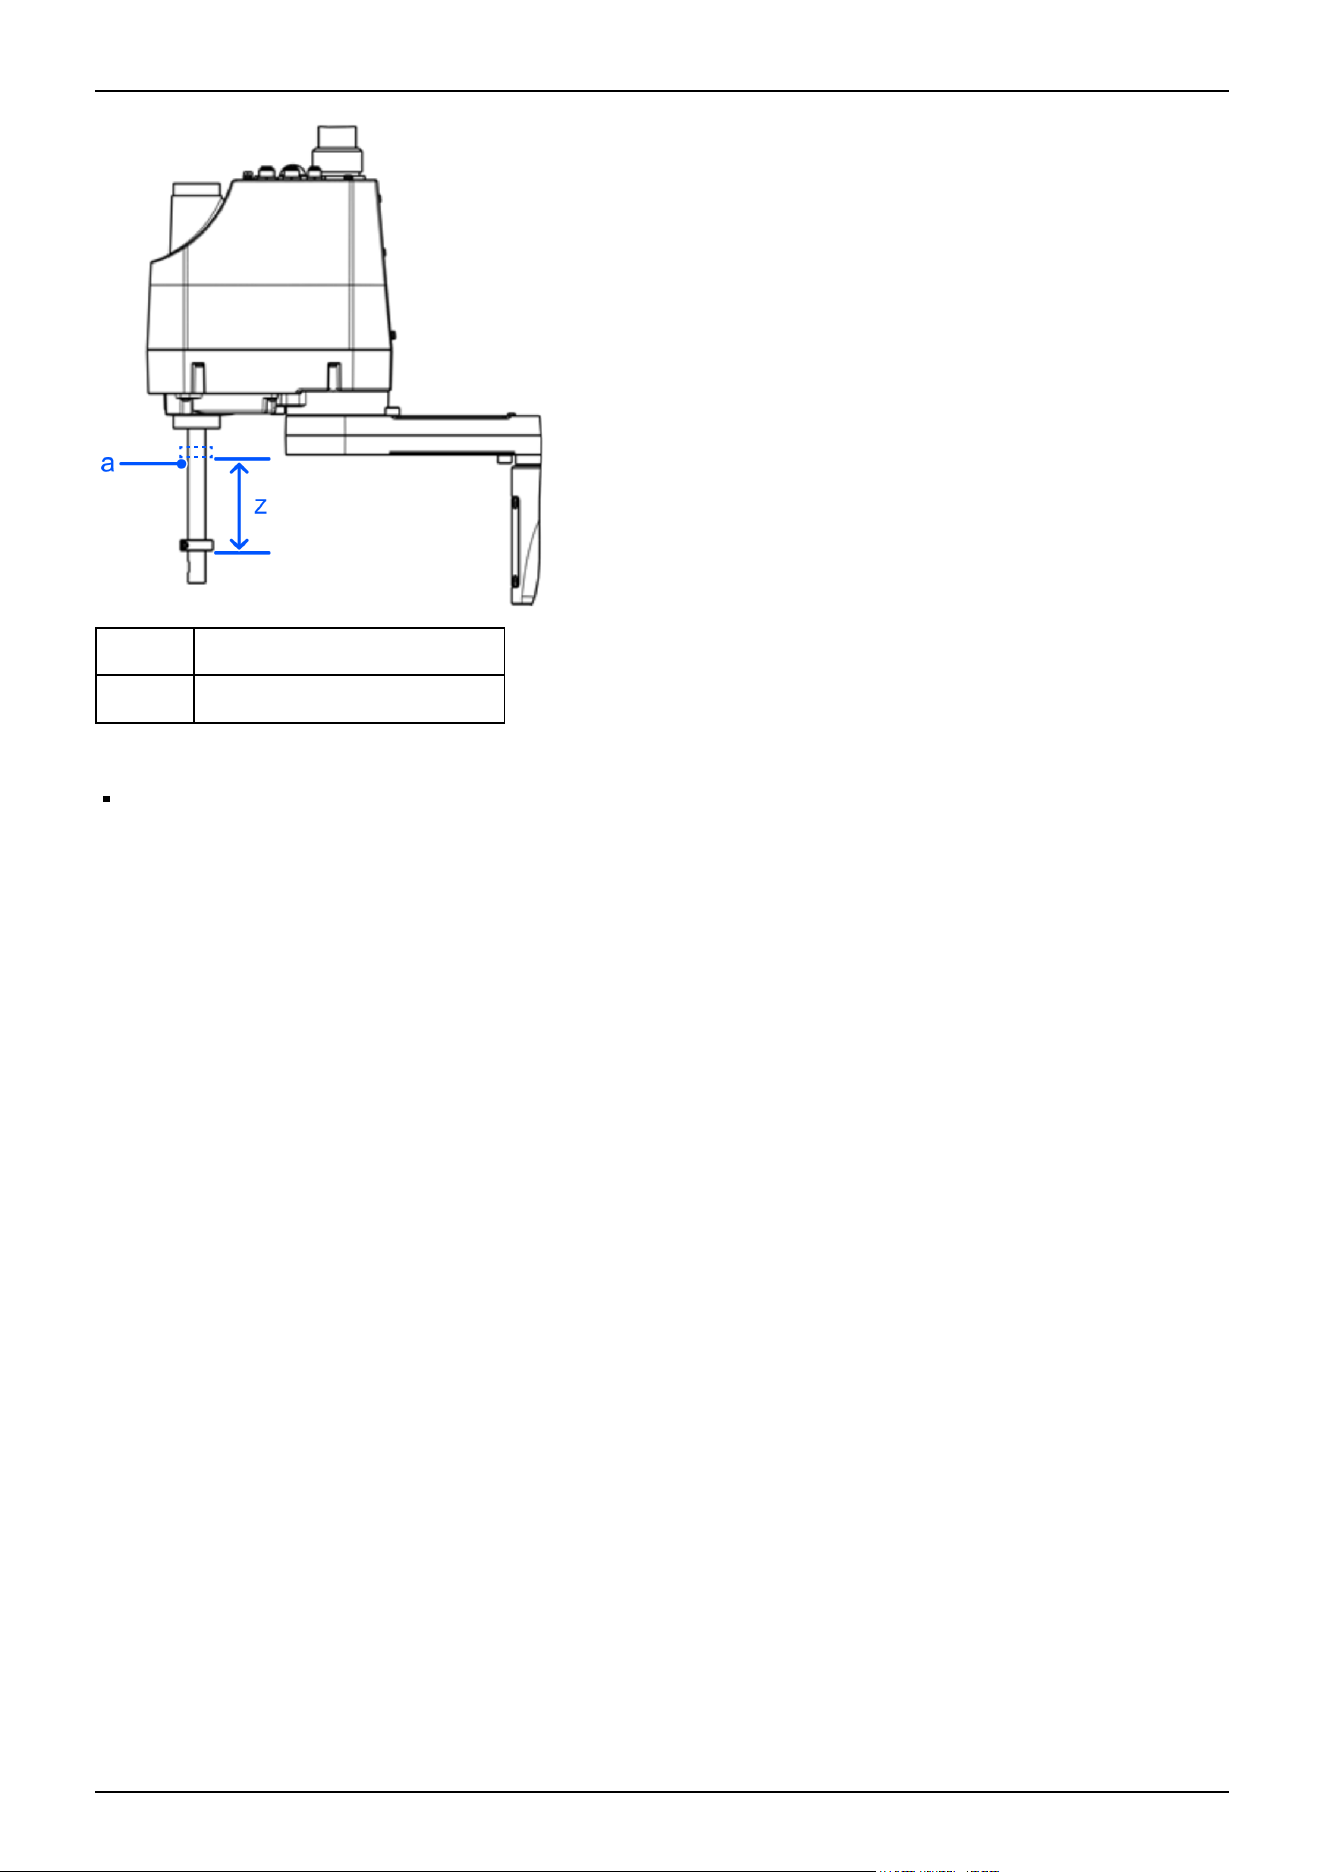
Symbol Description
a Z-axis height 0 (origin position)
Also, if a CP motion was performed with incorrect values set, check the following point.
No deformation or bending of the shaft of the ball screw spline
Industrial Robot: SCARA Robots GX series Manual Rev.11
80
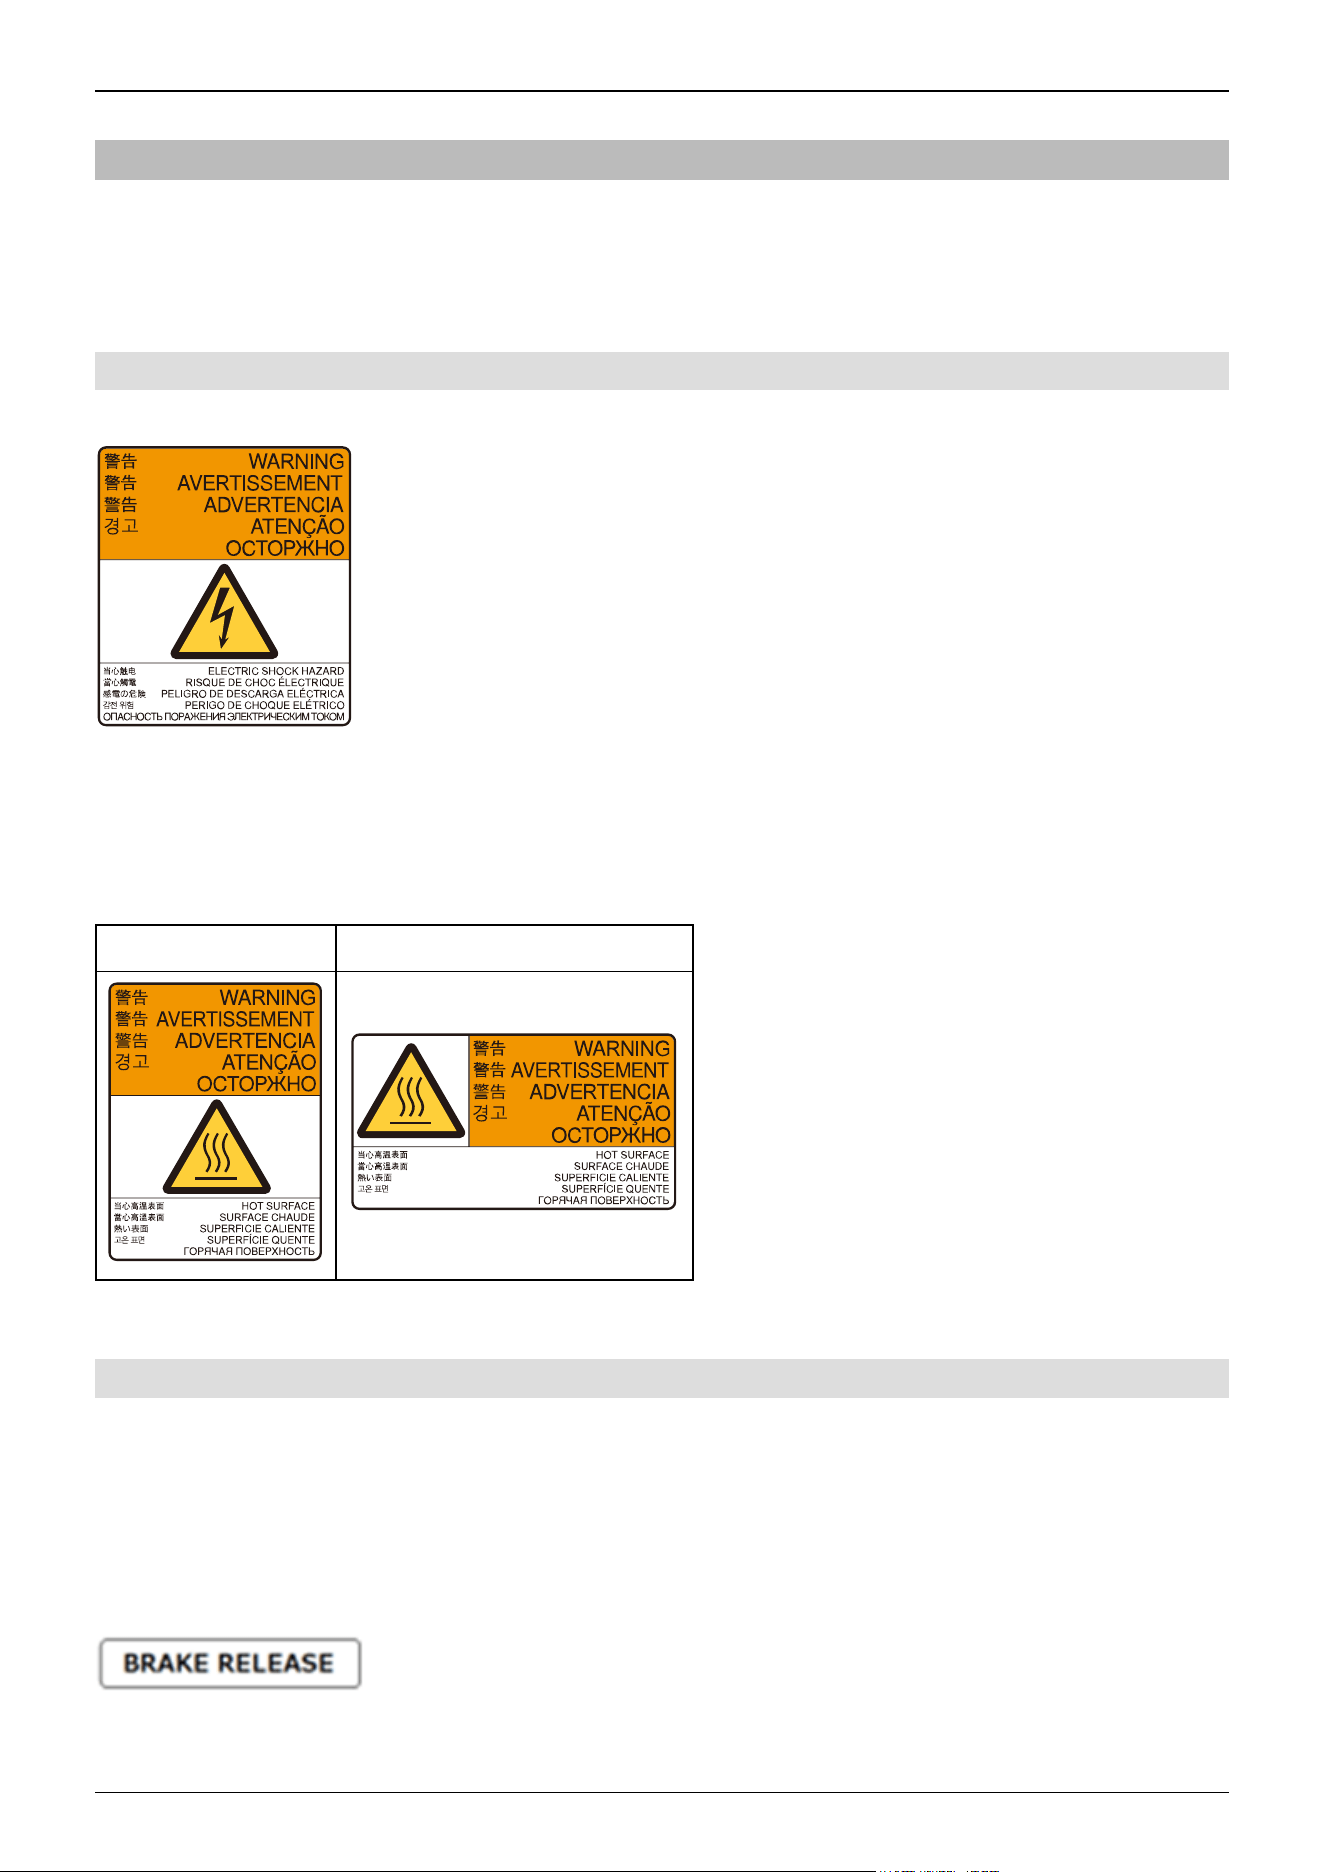
3.1.8 Warning Labels
The Manipulator has the following warning labels.
Specific hazards exist in the vicinity of areas with the warning labels. Be thoroughly careful in handling.
To ensure that the Manipulator is operated and maintained safely, be sure to follow the safety information and warnings
indicated on the warning labels. Also, do not tear, damage, or remove these warning labels.
3.1.8.1 Warning Labels
A
Touching any internal electrified parts while the power is turned on may cause electric shock.
Also, regarding the Cleanroom & ESD specifications and the ESD specifications, if the cables inside the Manipulator wear
down over a long period of operation and cause an internal short circuit, the conduit tube may be electrified. Touching the
conduit tube while the power is turned on may cause electric shock.
B
1 2
The surface of the Manipulator is hot during and after operation, and there is a risk of burns.
3.1.8.2 Information Labels
1
This indicates the product name, model name, serial number, information of supported laws and regulations, product
specifications (Weight, MAX.REACH, MAX.PAYLOAD, AIR PRESSURE, Motor Power), Main document No.,
manufacturer, importer, date of manufacture, country of manufacture, and the like.
For details, see the label affixed to the product.
2
Indicates the position of a brake release button.
Industrial Robot: SCARA Robots GX series Manual Rev.11
81
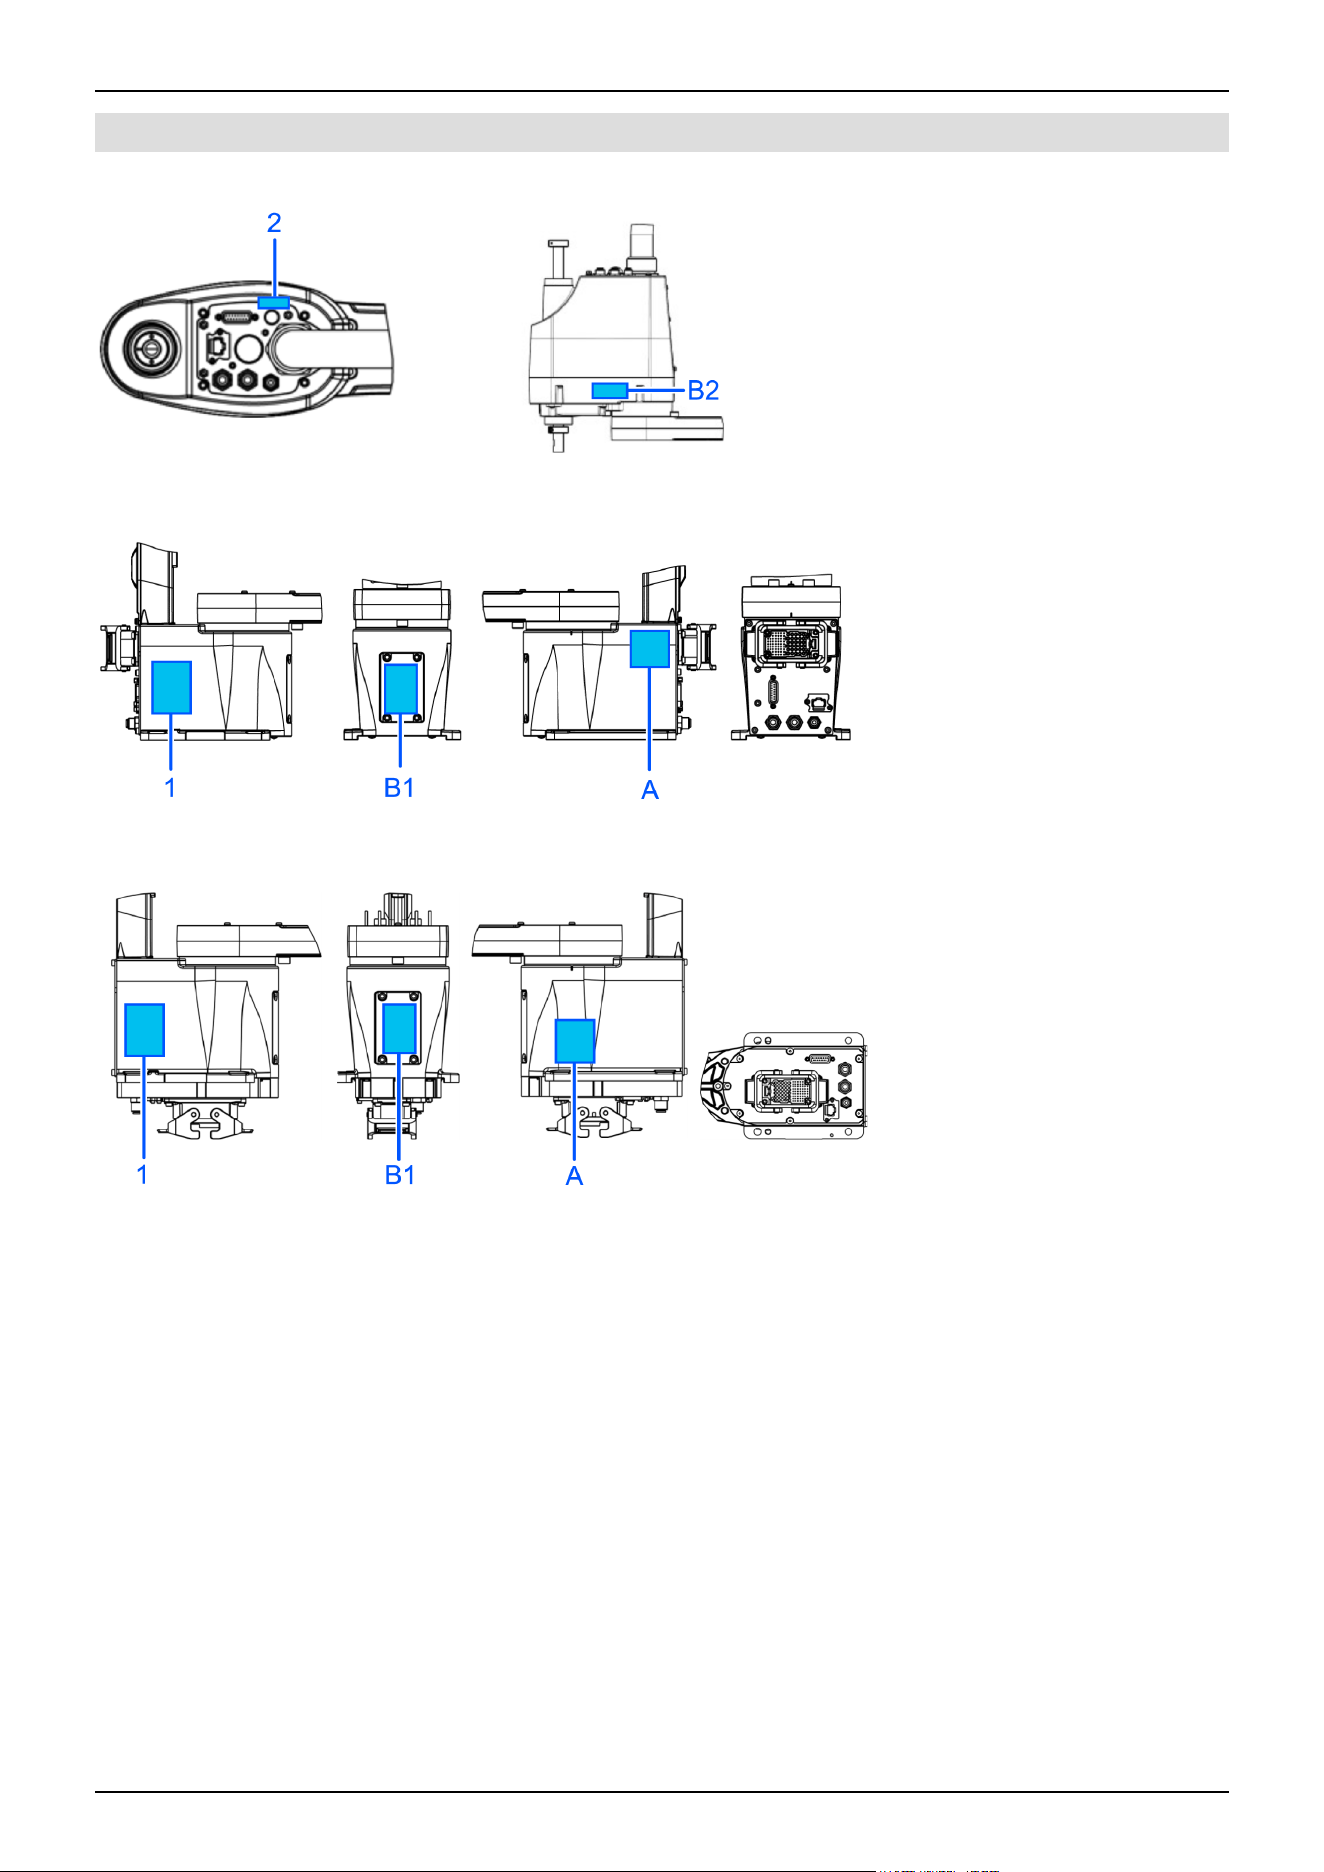
3.1.8.3 Labelled Locations
Common (Arm #2)
Table top mounting specifications
Table top mounting specifications (cable routing from bottom side)
Industrial Robot: SCARA Robots GX series Manual Rev.11
82
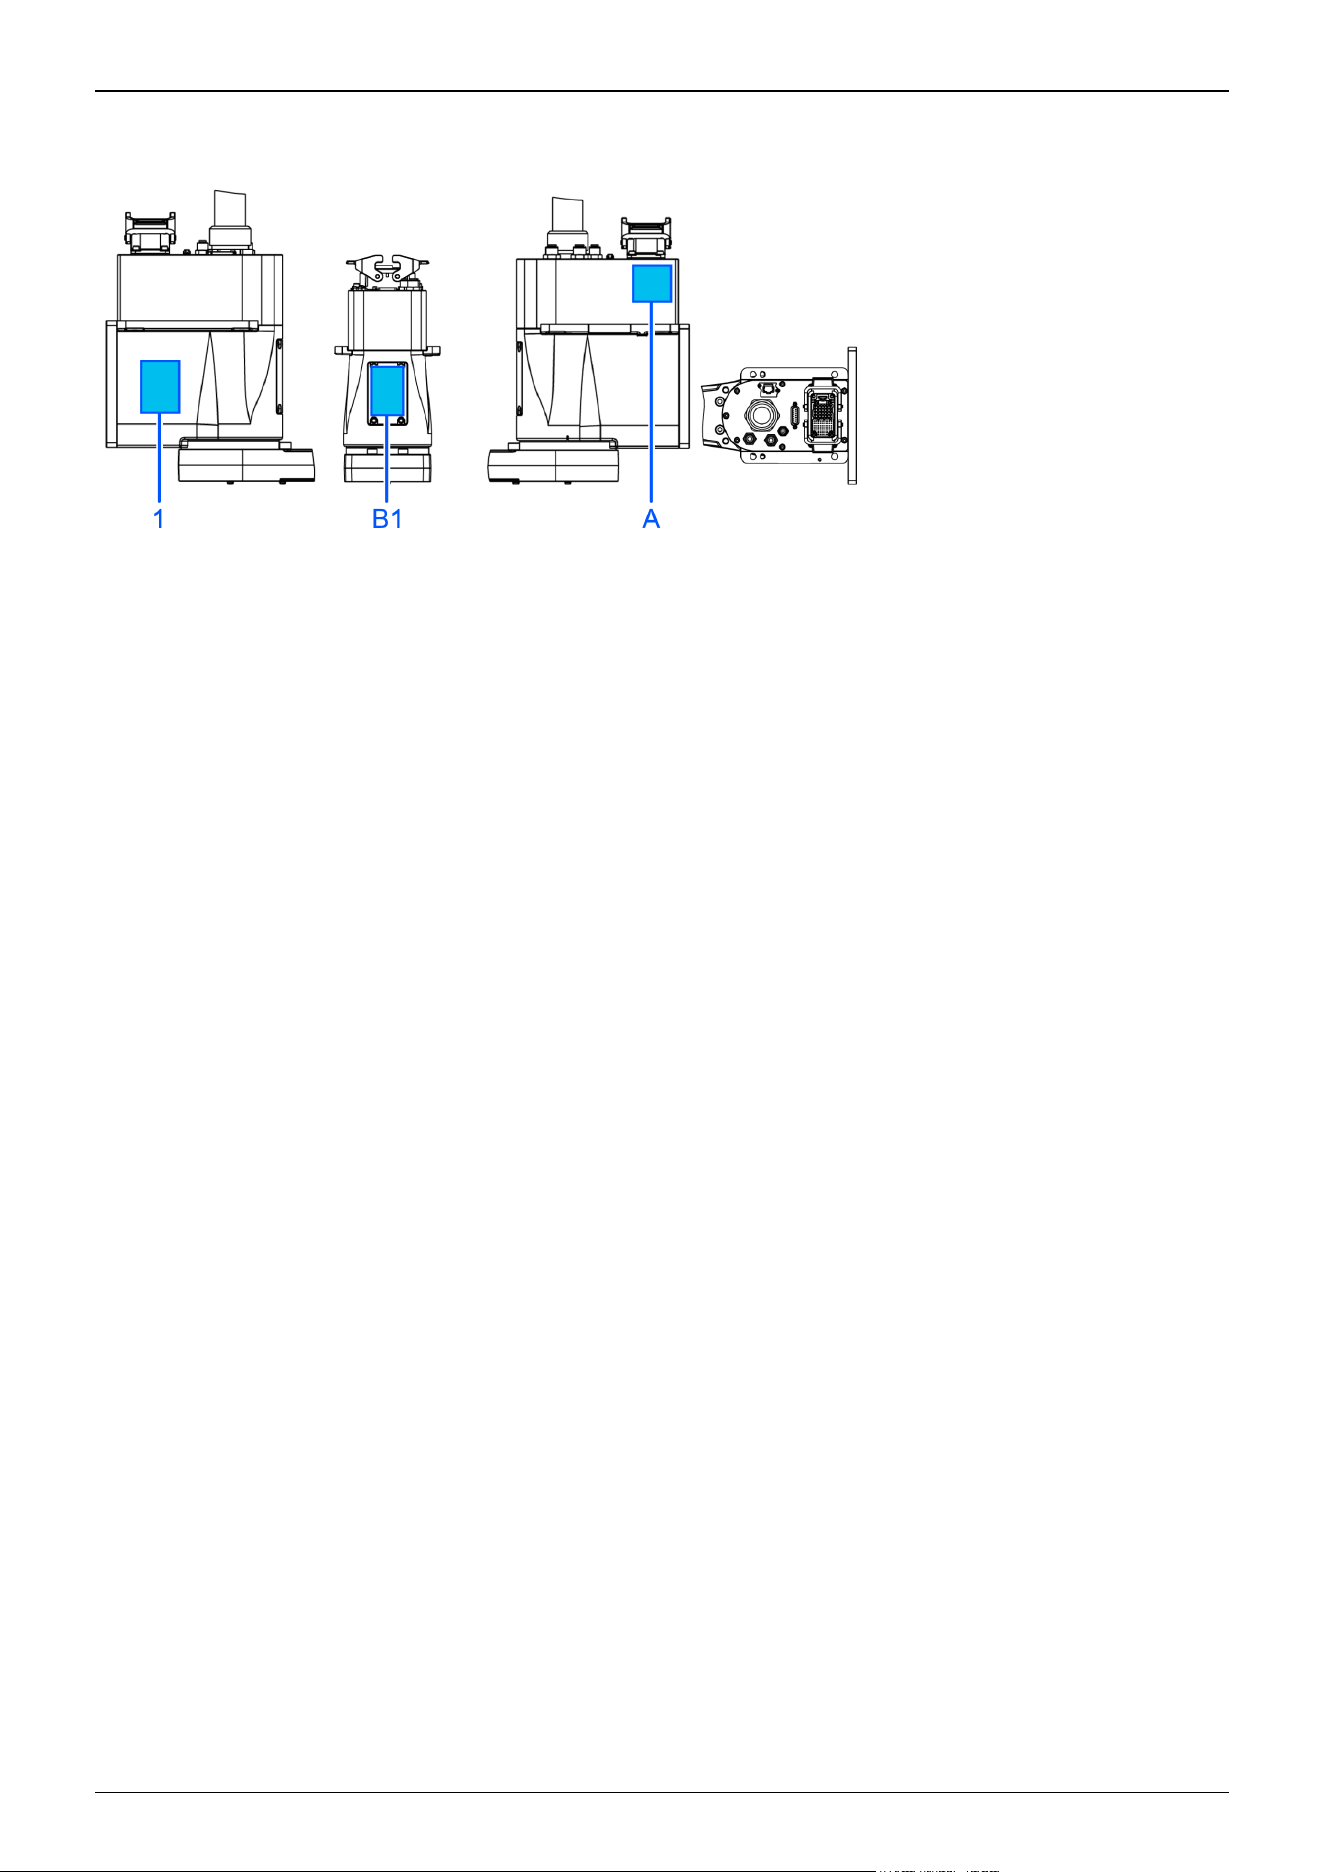
Multiple mounting specifications
Industrial Robot: SCARA Robots GX series Manual Rev.11
83
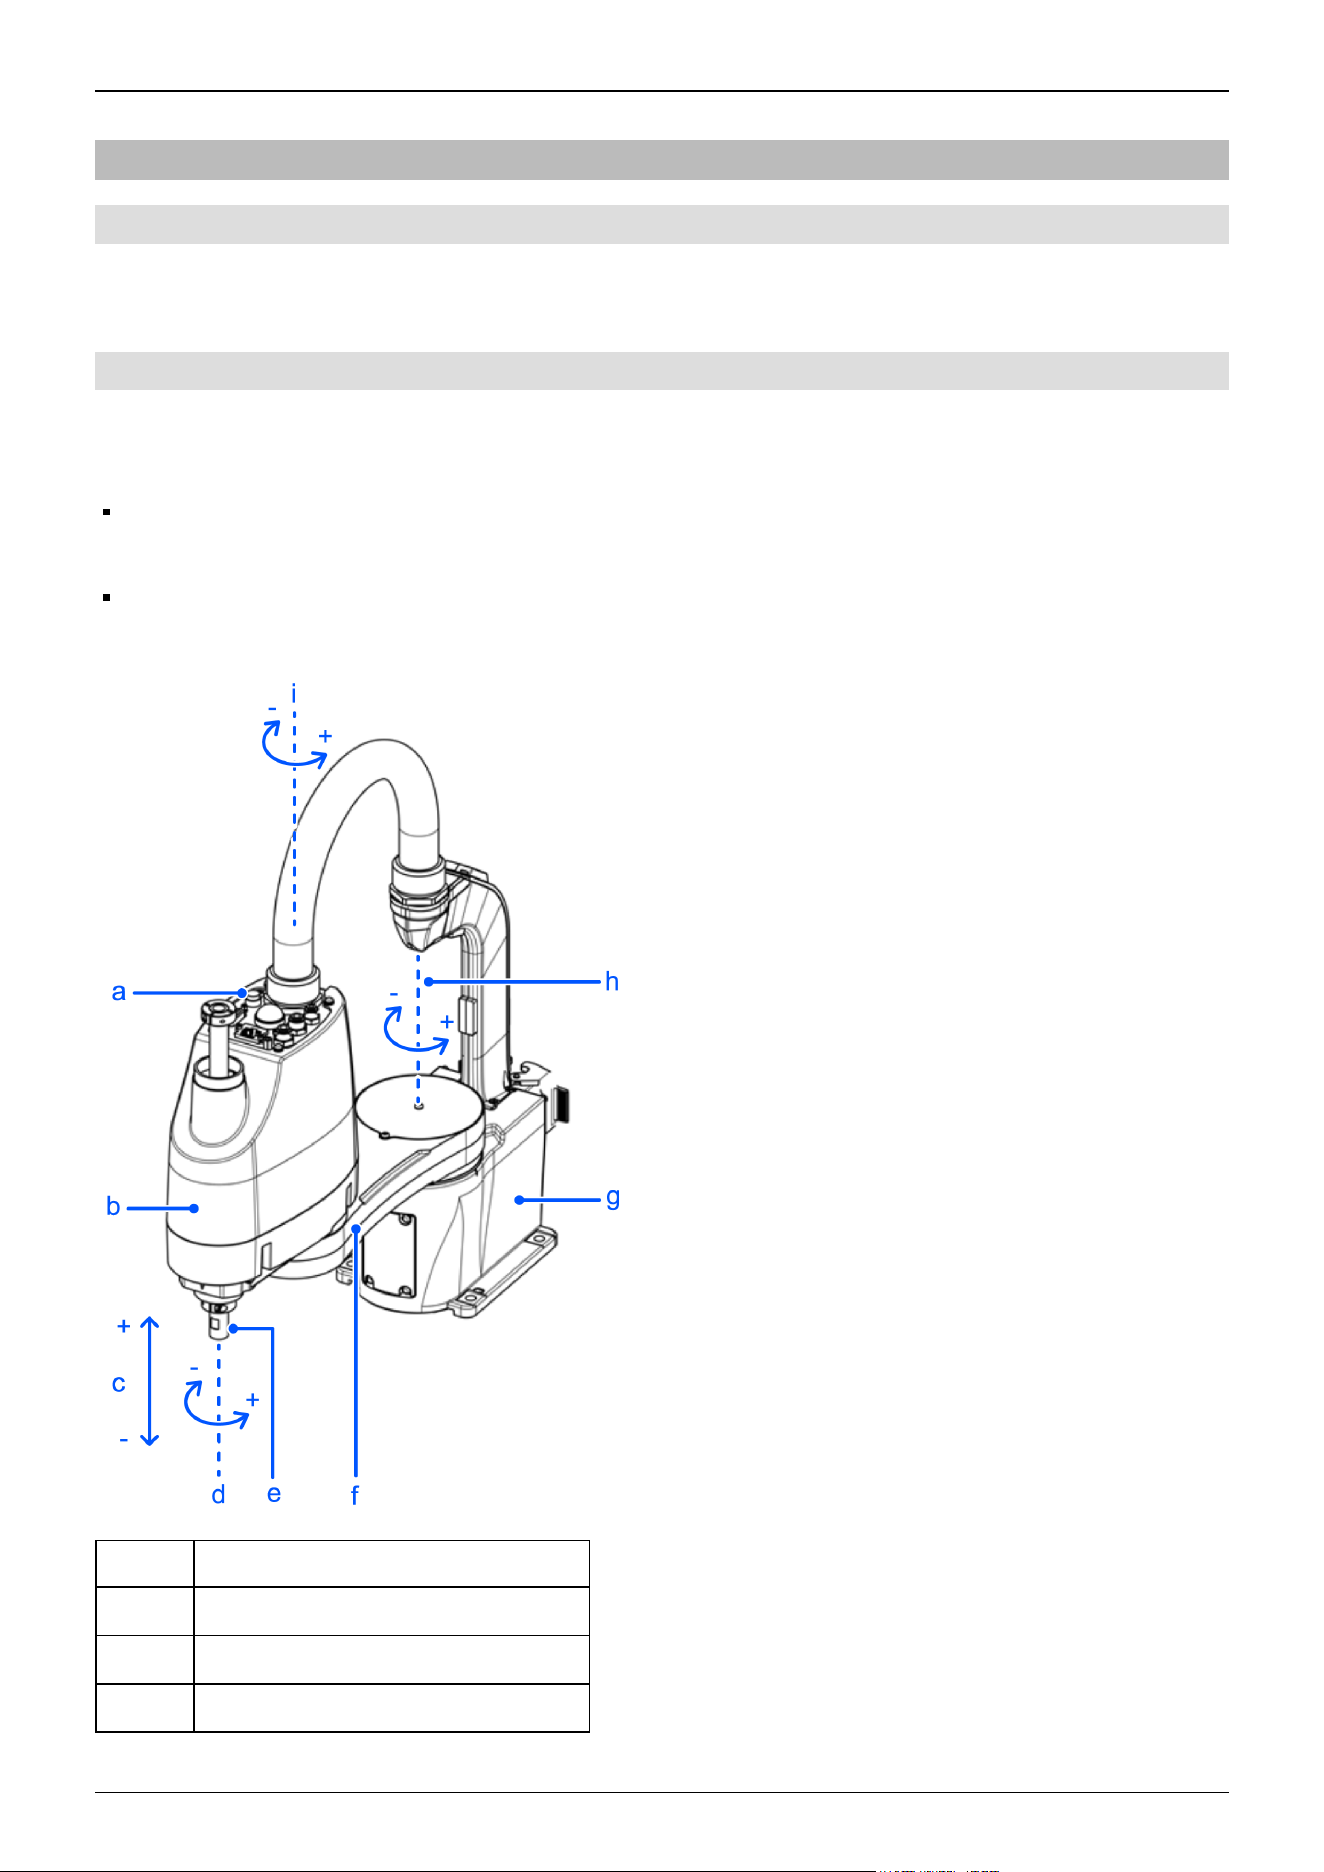
3.1.9 Responses for Emergencies or Malfunctions
3.1.9.1 When a Collision with the Manipulator Occurs
If the Manipulator has collided with a mechanical stop, peripheral device, or other object, discontinue use and contact the
supplier.
3.1.9.2 Entanglement with the Manipulator
If an operator gets caught between the Manipulator and a mechanical part such as a base table, press the emergency stop switch
to release the operator by using the following method.
Operator body is entangled with a robot arm
The brake is not functioning. Move the arm manually.
Operator body is entangled with the shaft
The brake is functioning. Press the brake release switch, and move the shaft.
Symbol Description
a Joint #3 and Joint #4 brake release switch
b Arm #2
c Joint #3 (up/down movement)
Industrial Robot: SCARA Robots GX series Manual Rev.11
84
Symbol Description
d Joint #4 (rotation)
e Shaft
f Arm #1
g Base
h Joint #1 (rotation)
i Joint #2 (rotation)
CAUTION
While the brake release switch is being pressed, in addition to Joint #3, Joint #4 may also move due to its
own weight. Be careful of the shaft descending and rotating.
Industrial Robot: SCARA Robots GX series Manual Rev.11
85
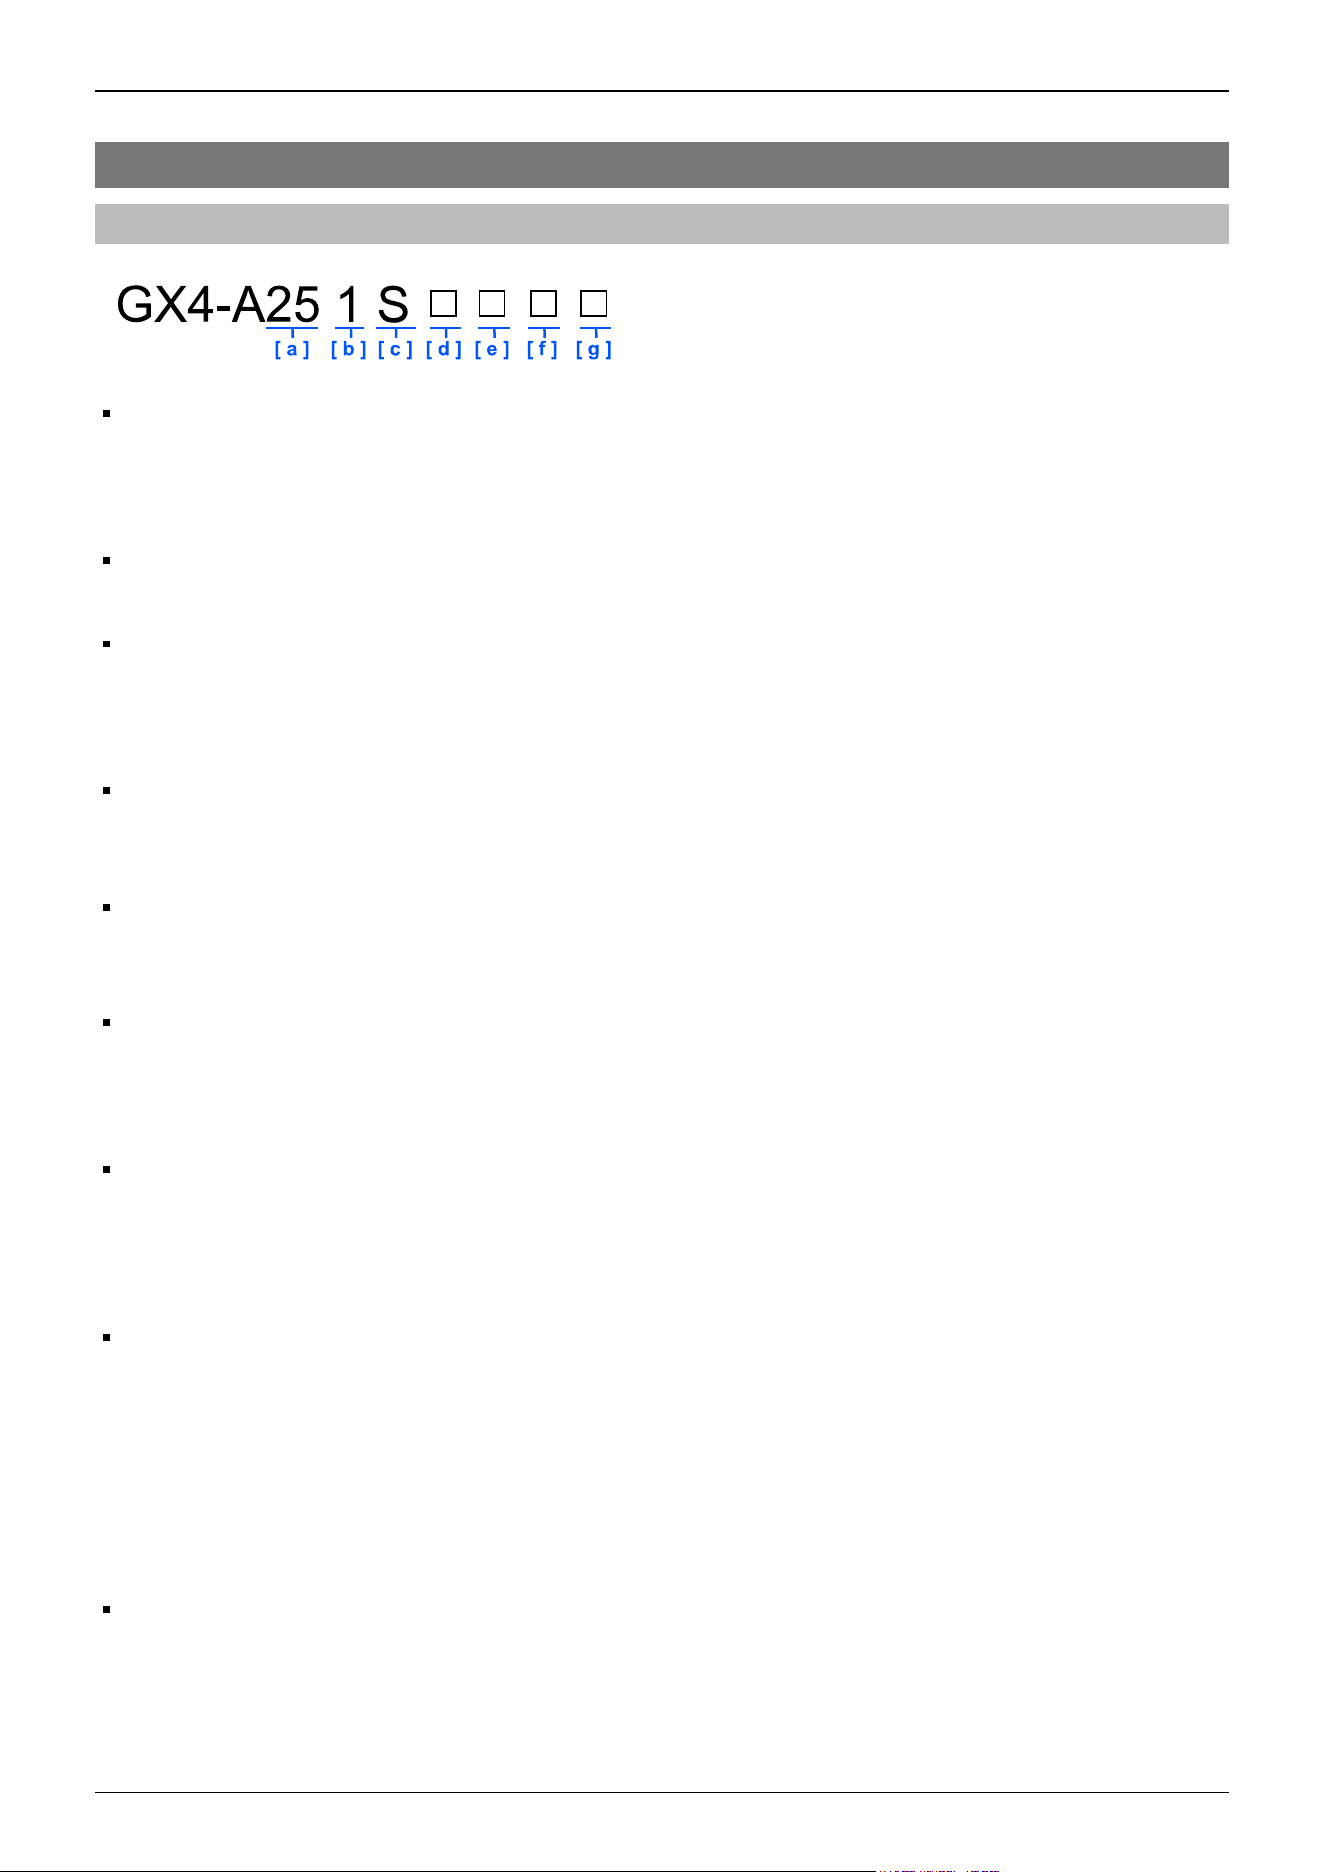
3.2 Specifications
3.2.1 Model Name GX4-A
a: Arm length
25: 250 mm
30: 300 mm
35: 350 mm
b: Joint #3 stroke
1: 150 mm (GX4-A**1S*, E*), 120 mm (GX4-A**1C*)
c: Environmental specifications
S: Standard (equivalent to IP20)
E: ESD (anti-static)
C: Cleanroom & ESD (anti-static)
d: Mounting specifications
□: Table top mounting
M: Multiple mounting
e: Cable mounting direction
□: Standard (table top mounting - cable routing from rear side, multiple mounting - cable routing from top side)
B: Cable routing from bottom side (table top mounting only)
f: Arm type
□: Straight
-L: Left-curved
-R: Right-curved
g: Standard
□: Standard
-UL: UL1740 certified
Environmental specifications
ESD (anti-static) specifications: GX4-A**1E*
ESD specifications are specifications that use conductive materials for or apply plating to the major resin parts as anti-static
measures.
We have confirmed that the Manipulator tip (tool mounting section) is at ±5 V or less, even directly after the measuring
operation according to Seiko Epson standards.
If you need any other detailed information, please contact the supplier.
Also, please check the amount of charge on any hand, wiring, or the like that you will attach to the robot on your own
before use.
Cleanroom & ESD (anti-static) specifications: GX4-A**1C*
Manipulators with cleanroom & ESD (anti-static) specifications have a base design with the standard specifications, but as
an additional feature, have reduced dust emissions from the Manipulator to enable use in cleanroom environments.
Industrial Robot: SCARA Robots GX series Manual Rev.11
86

Model list
Arm
Length
Joint #3
Stroke
Environmental
Specifications
Mounting
Specifications
Cable Mounting
Direction
Arm
Type
Model
Number
250 150
Standard
Table top
Standard
Straight
GX4-
A251S
Cable routing from
bottom side
GX4-
A251SB
ESD
Standard
GX4-
A251E
Cable routing from
bottom side
GX4-
A251EB
Cleanroom & ESD
Standard
GX4-
A251C
Cable routing from
bottom side
GX4-
A251CB
300 150
Standard
Table top
Standard
Straight
GX4-
A301S
Cable routing from
bottom side
GX4-
A301SB
Multiple mounting Standard
GX4-
A301SM
ESD
Table top
Standard
GX4-
A301E
Cable routing from
bottom side
GX4-
A301EB
Multiple mounting Standard
GX4-
A301EM
300 120 Cleanroom & ESD
Table top
Standard
Straight
GX4-
A301C
Cable routing from
bottom side
GX4-
A301CB
Multiple mounting Standard
GX4-
A301CM
350
150
Standard
Table top
Standard
Straight
GX4-
A351S
Left-
curved
GX4-
A351S-L
Right-
curved
GX4-
A351S-R
Cable routing from
bottom side
Straight
GX4-
A351SB
Left-
curved
GX4-
A351SB-L
Industrial Robot: SCARA Robots GX series Manual Rev.11
88
Arm
Length
Joint #3
Stroke
Environmental
Specifications
Mounting
Specifications
Cable Mounting
Direction
Arm
Type
Model
Number
Right-
curved
GX4-
A351SB-R
Multiple mounting Standard Straight
GX4-
A351SM
350 150 ESD
Table top
Standard
Straight
GX4-
A351E
Left-
curved
GX4-
A351E-L
Right-
curved
GX4-
A351E-R
Cable routing from
bottom side
Straight
GX4-
A351EB
Left-
curved
GX4-
A351EB-L
Right-
curved
GX4-
A351EB-R
Multiple mounting Standard Straight
GX4-
A351EM
350 120 Cleanroom & ESD
Table top
Standard
Straight
GX4-
A351C
Left-
curved
GX4-
A351C-L
Right-
curved
GX4-
A351C-R
Cable routing from
bottom side
Straight
GX4-
A351CB
Left-
curved
GX4-
A351CB-L
Right-
curved
GX4-
A351CB-R
Multiple mounting Standard Straight
GX4-
A351CM
(Units: mm)
Industrial Robot: SCARA Robots GX series Manual Rev.11
89
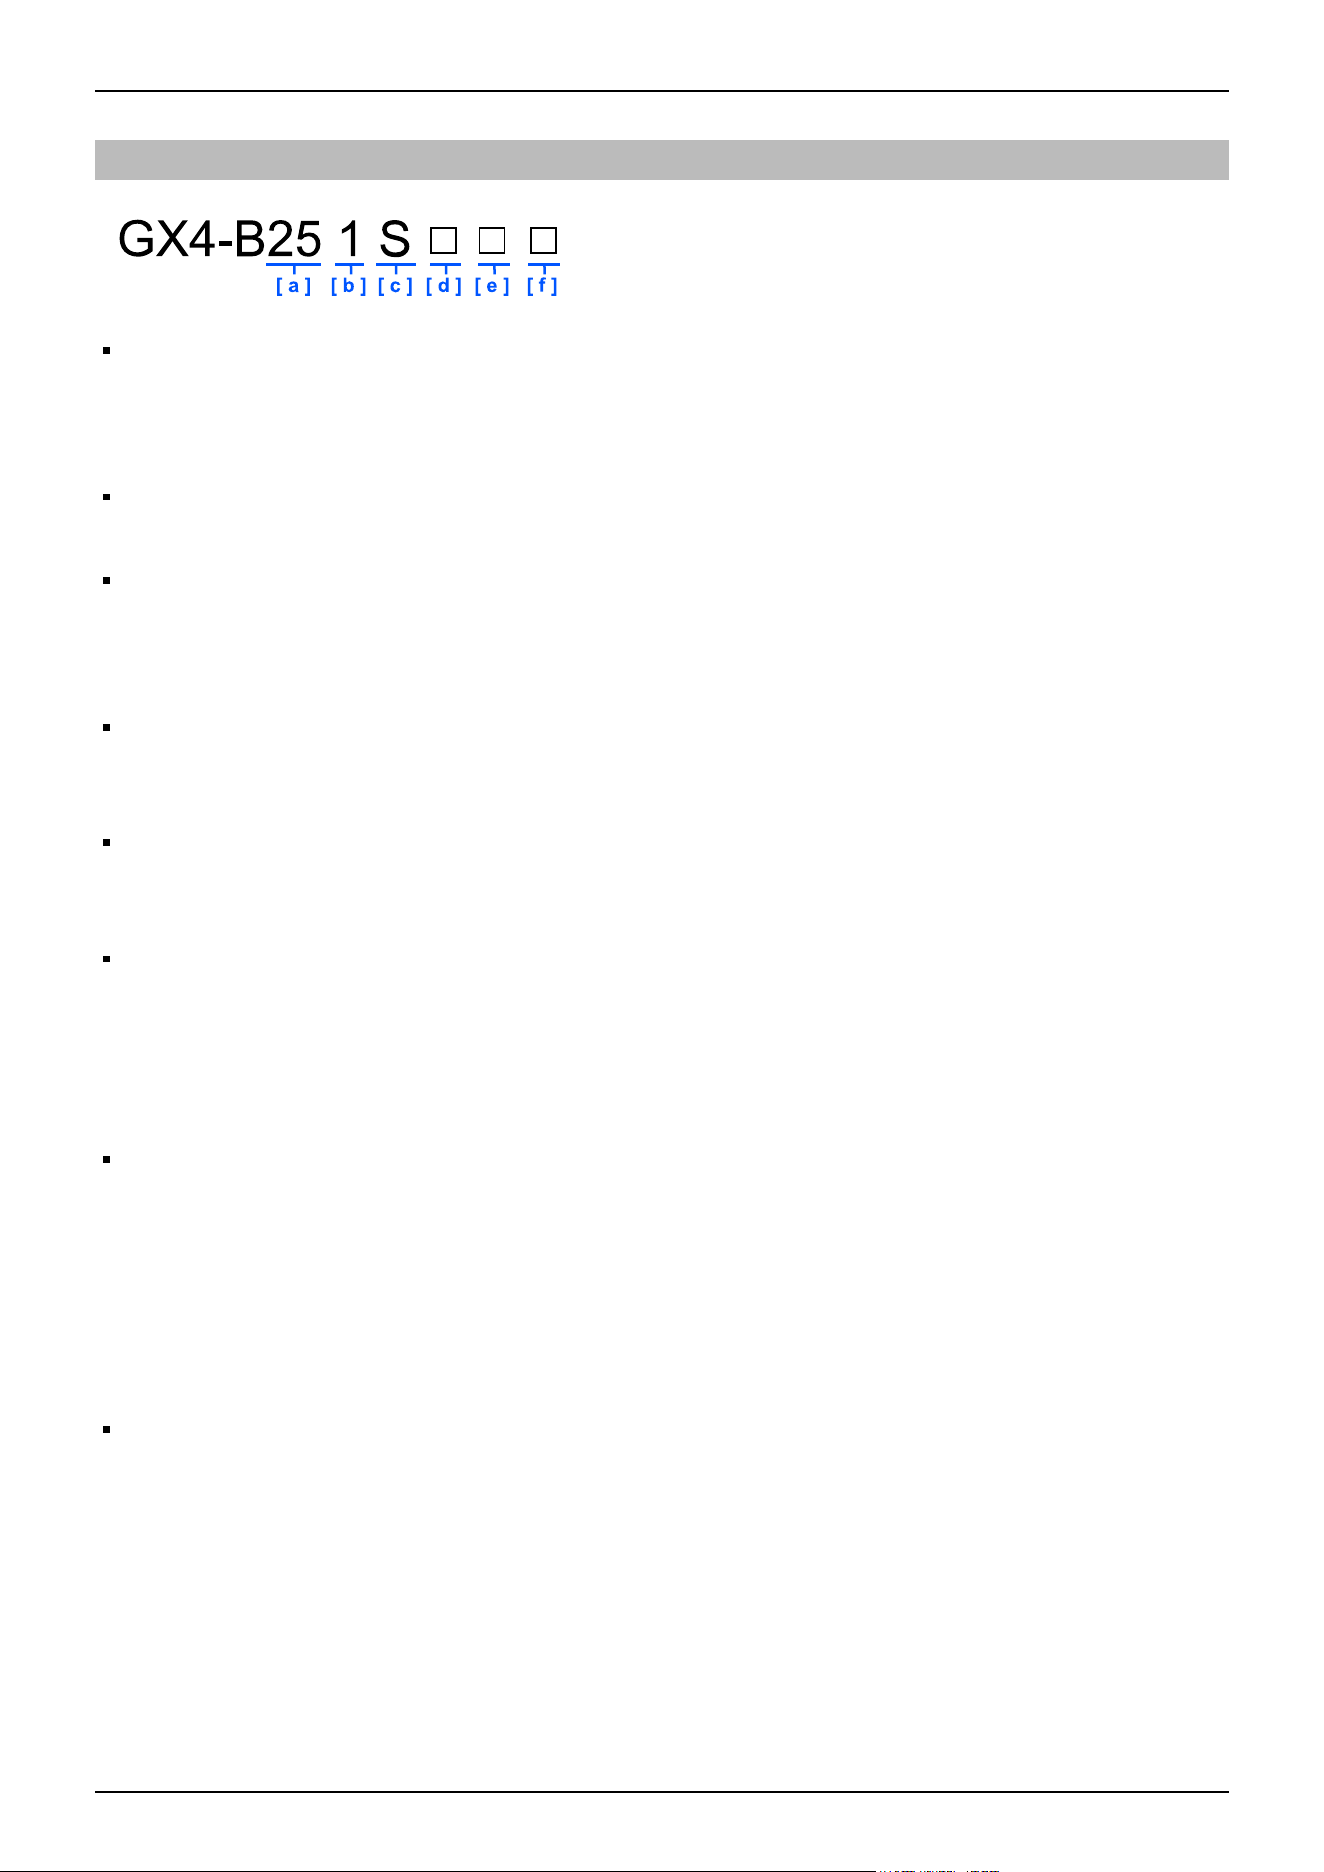
3.2.2 Model Name GX4-B
a: Arm length
25: 250 mm
30: 300 mm
35: 350 mm
b: Joint #3 stroke
1: 150 mm (GX4-B**1S*, E*), 120 mm (GX4-B**1C*)
c: Environmental specifications
S: Standard (equivalent to IP20)
E: ESD (anti-static)
C: Cleanroom & ESD (anti-static)
d: Mounting specifications
□: Table top mounting
M: Multiple mounting
e: Cable mounting direction
□: Standard (table top mounting - cable routing from rear side, multiple mounting - cable routing from top side)
B: Cable routing from bottom side (table top mounting only)
f: Arm type
□: Straight
-L: Left-curved
-R: Right-curved
Environmental specifications
ESD (anti-static) specifications: GX4-B**1E*
ESD specifications are specifications that use conductive materials for or apply plating to the major resin parts as anti-static
measures.
We have confirmed that the Manipulator tip (tool mounting section) is at ±5 V or less, even directly after the measuring
operation according to Seiko Epson standards.
If you need any other detailed information, please contact the supplier.
Also, please check the amount of charge on any hand, wiring, or the like that you will attach to the robot on your own
before use.
Cleanroom & ESD (anti-static) specifications: GX4-B**1C*
Manipulators with cleanroom & ESD (anti-static) specifications have a base design with the standard specifications, but as
an additional feature, have reduced dust emissions from the Manipulator to enable use in cleanroom environments.
For details on the specifications, refer to the following section.
Appendix A: Specifications Table
Industrial Robot: SCARA Robots GX series Manual Rev.11
90
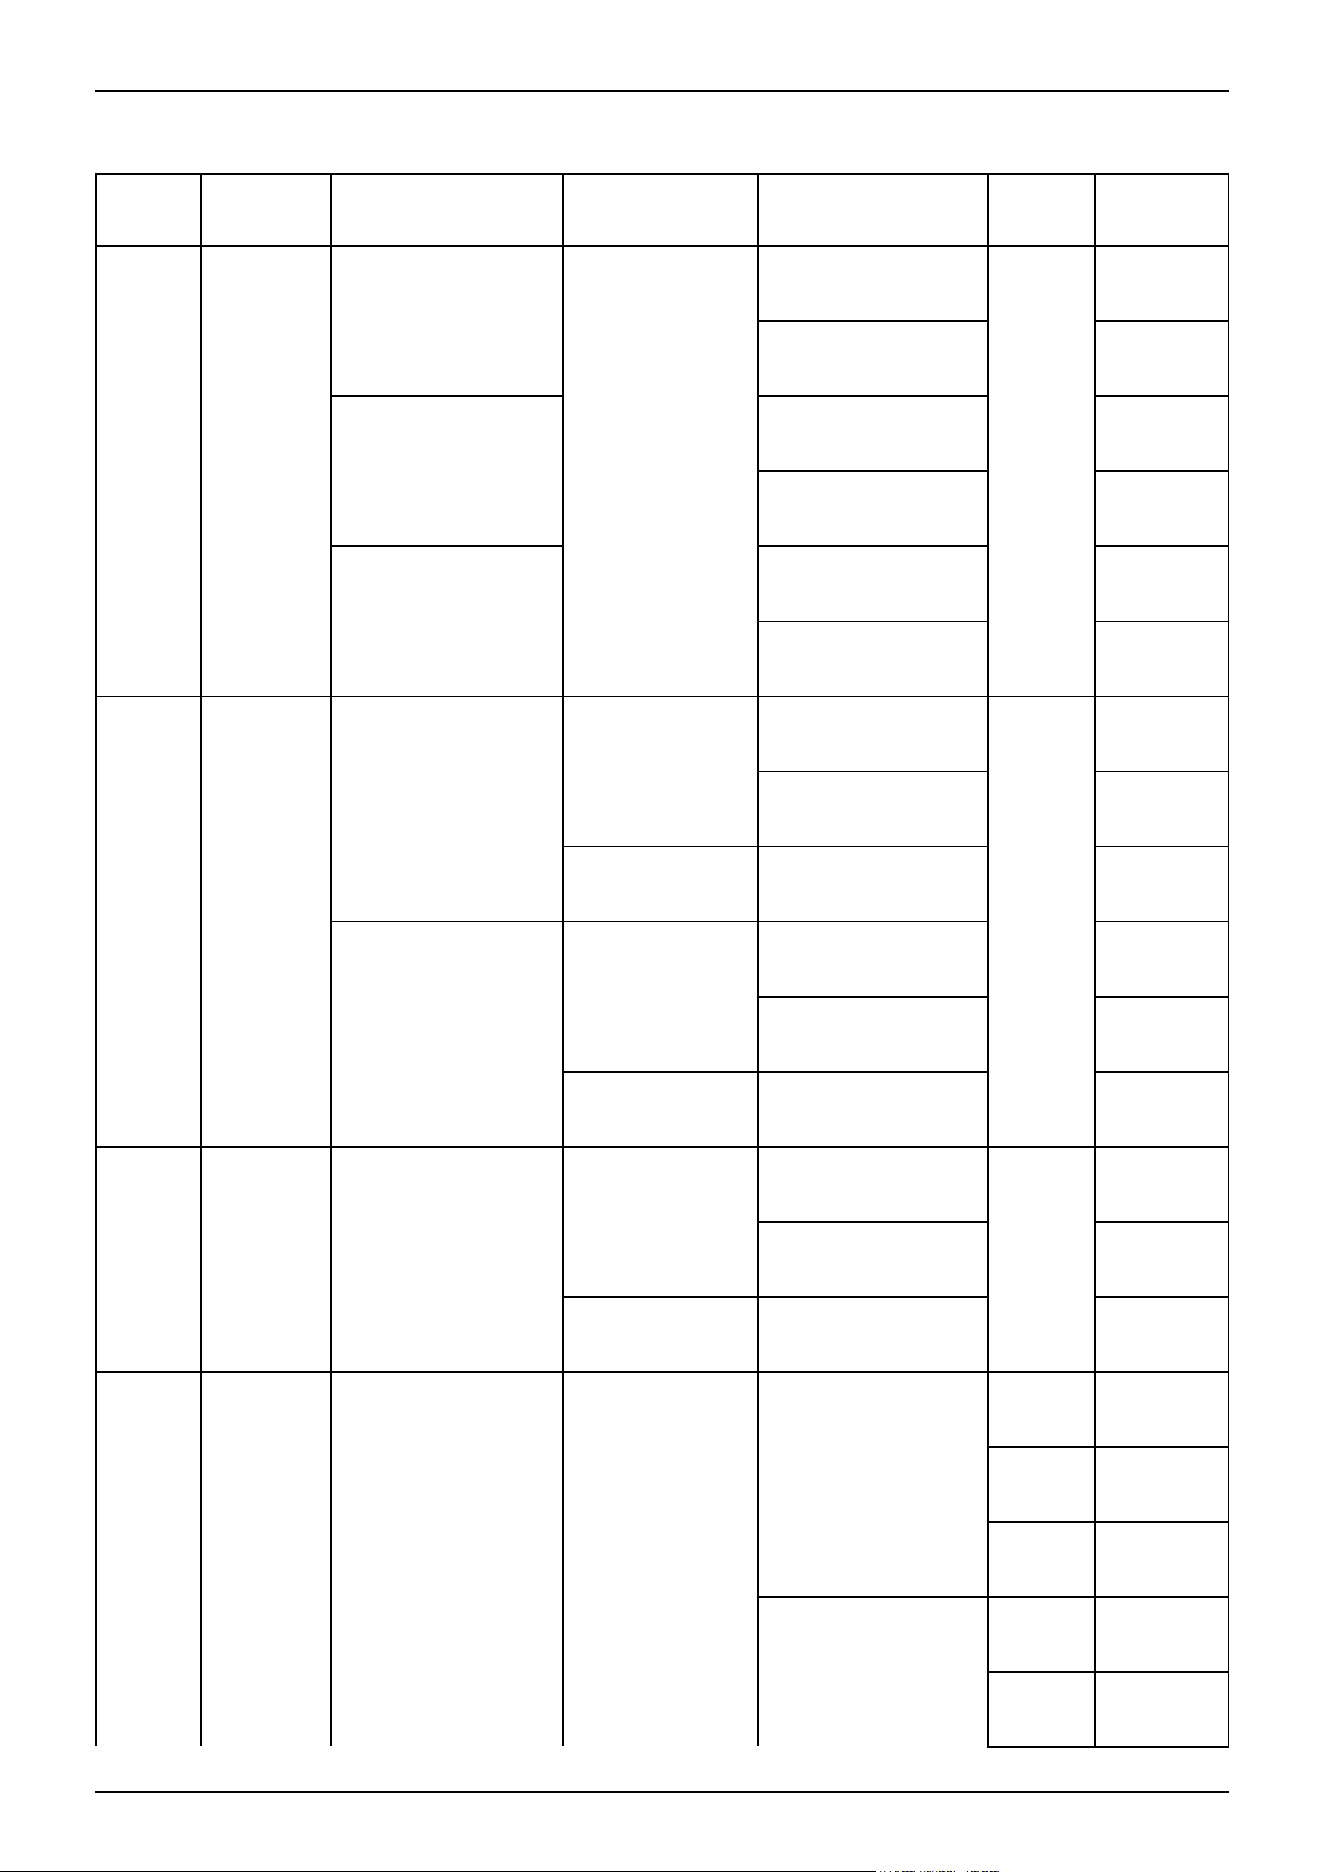
Model list
Arm
Length
Joint #3
Stroke
Environmental
Specifications
Mounting
Specifications
Cable Mounting
Direction
Arm
Type
Model
Number
250 150
Standard
Table top
Standard
Straight
GX4-
B251S
Cable routing from
bottom side
GX4-
B251SB
ESD
Standard
GX4-
B251E
Cable routing from
bottom side
GX4-
B251EB
Cleanroom & ESD-
Standard
GX4-
B251C
Cable routing from
bottom side
GX4-
B251CB
300 150
Standard
Table top
Standard
Straight
GX4-
B301S
Cable routing from
bottom side
GX4-
B301SB
Multiple mounting Standard
GX4-
B301SM
ESD
Table top
Standard
GX4-
B301E
Cable routing from
bottom side
GX4-
B301EB
Multiple mounting Standard
GX4-
B301EM
300 120 Cleanroom & ESD
Table top
Standard
Straight
GX4-
B301C
Cable routing from
bottom side
GX4-
B301CB
Multiple mounting Standard
GX4-
B301CM
350
150
Standard
Table top
Standard
Straight
GX4-
B351S
Left-
curved
GX4-
B351S-L
Right-
curved
GX4-
B351S-R
Cable routing from
bottom side
Straight
GX4-
B351SB
Left-
curved
GX4-
B351SB-L
Industrial Robot: SCARA Robots GX series Manual Rev.11
91
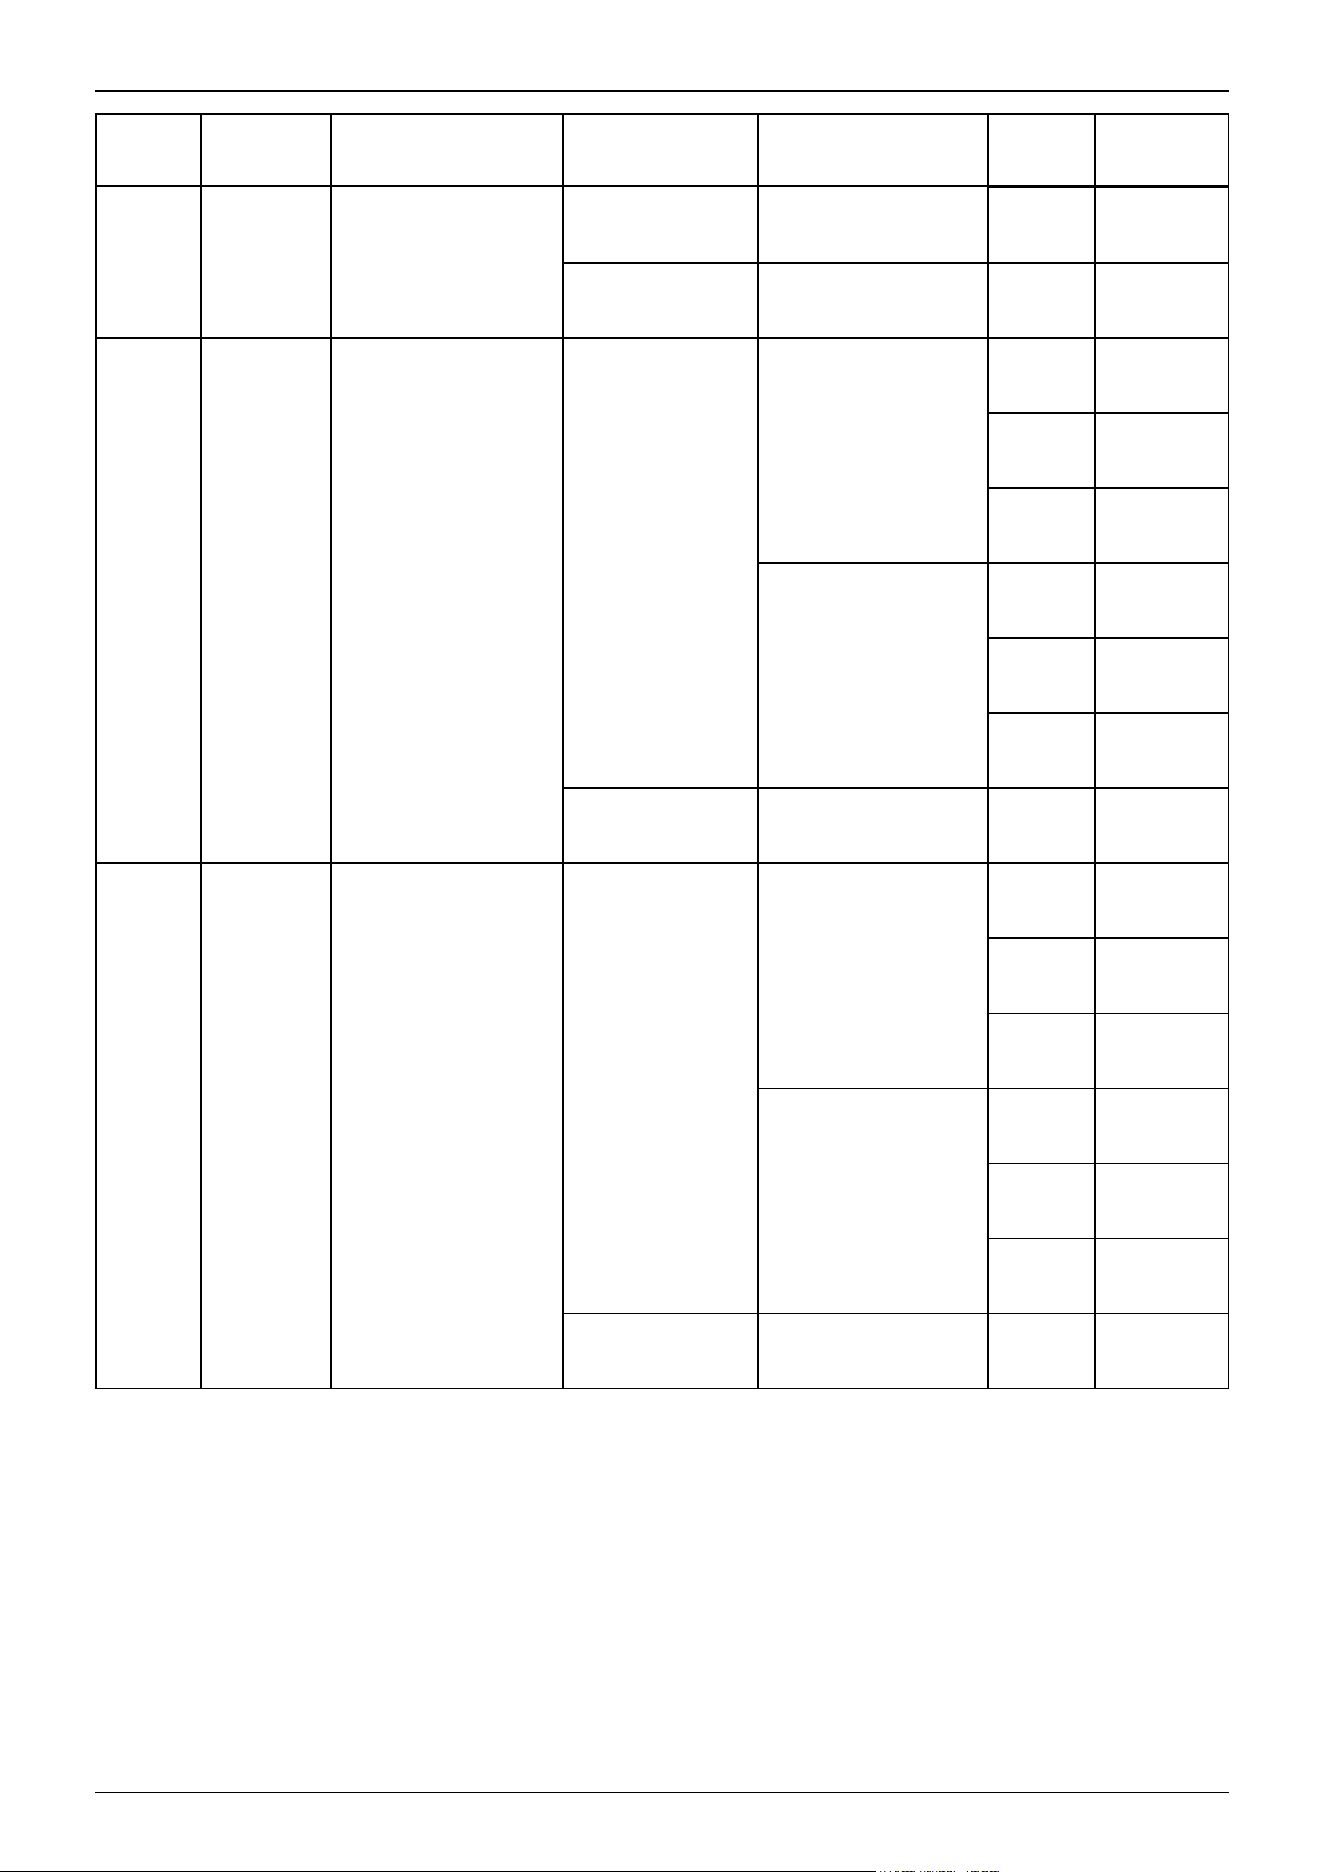
Arm
Length
Joint #3
Stroke
Environmental
Specifications
Mounting
Specifications
Cable Mounting
Direction
Arm
Type
Model
Number
Right-
curved
GX4-
B351SB-R
Multiple mounting Standard Straight
GX4-
B351SM
350 150 ESD
Table top
Standard
Straight
GX4-
B351E
Left-
curved
GX4-
B351E-L
Right-
curved
GX4-
B351E-R
Cable routing from
bottom side
Straight
GX4-
B351EB
Left-
curved
GX4-
B351EB-L
Right-
curved
GX4-
B351EB-R
Multiple mounting Standard Straight
GX4-
B351EM
350 120 Cleanroom & ESD
Table top
Standard
Straight
GX4-
B351C
Left-
curved
GX4-
B351C-L
Right-
curved
GX4-
B351C-R
Cable routing from
bottom side
Straight
GX4-
B351CB
Left-
curved
GX4-
B351CB-L
Right-
curved
GX4-
B351CB-R
Multiple mounting Standard Straight
GX4-
B351CM
(Units: mm)
Industrial Robot: SCARA Robots GX series Manual Rev.11
92
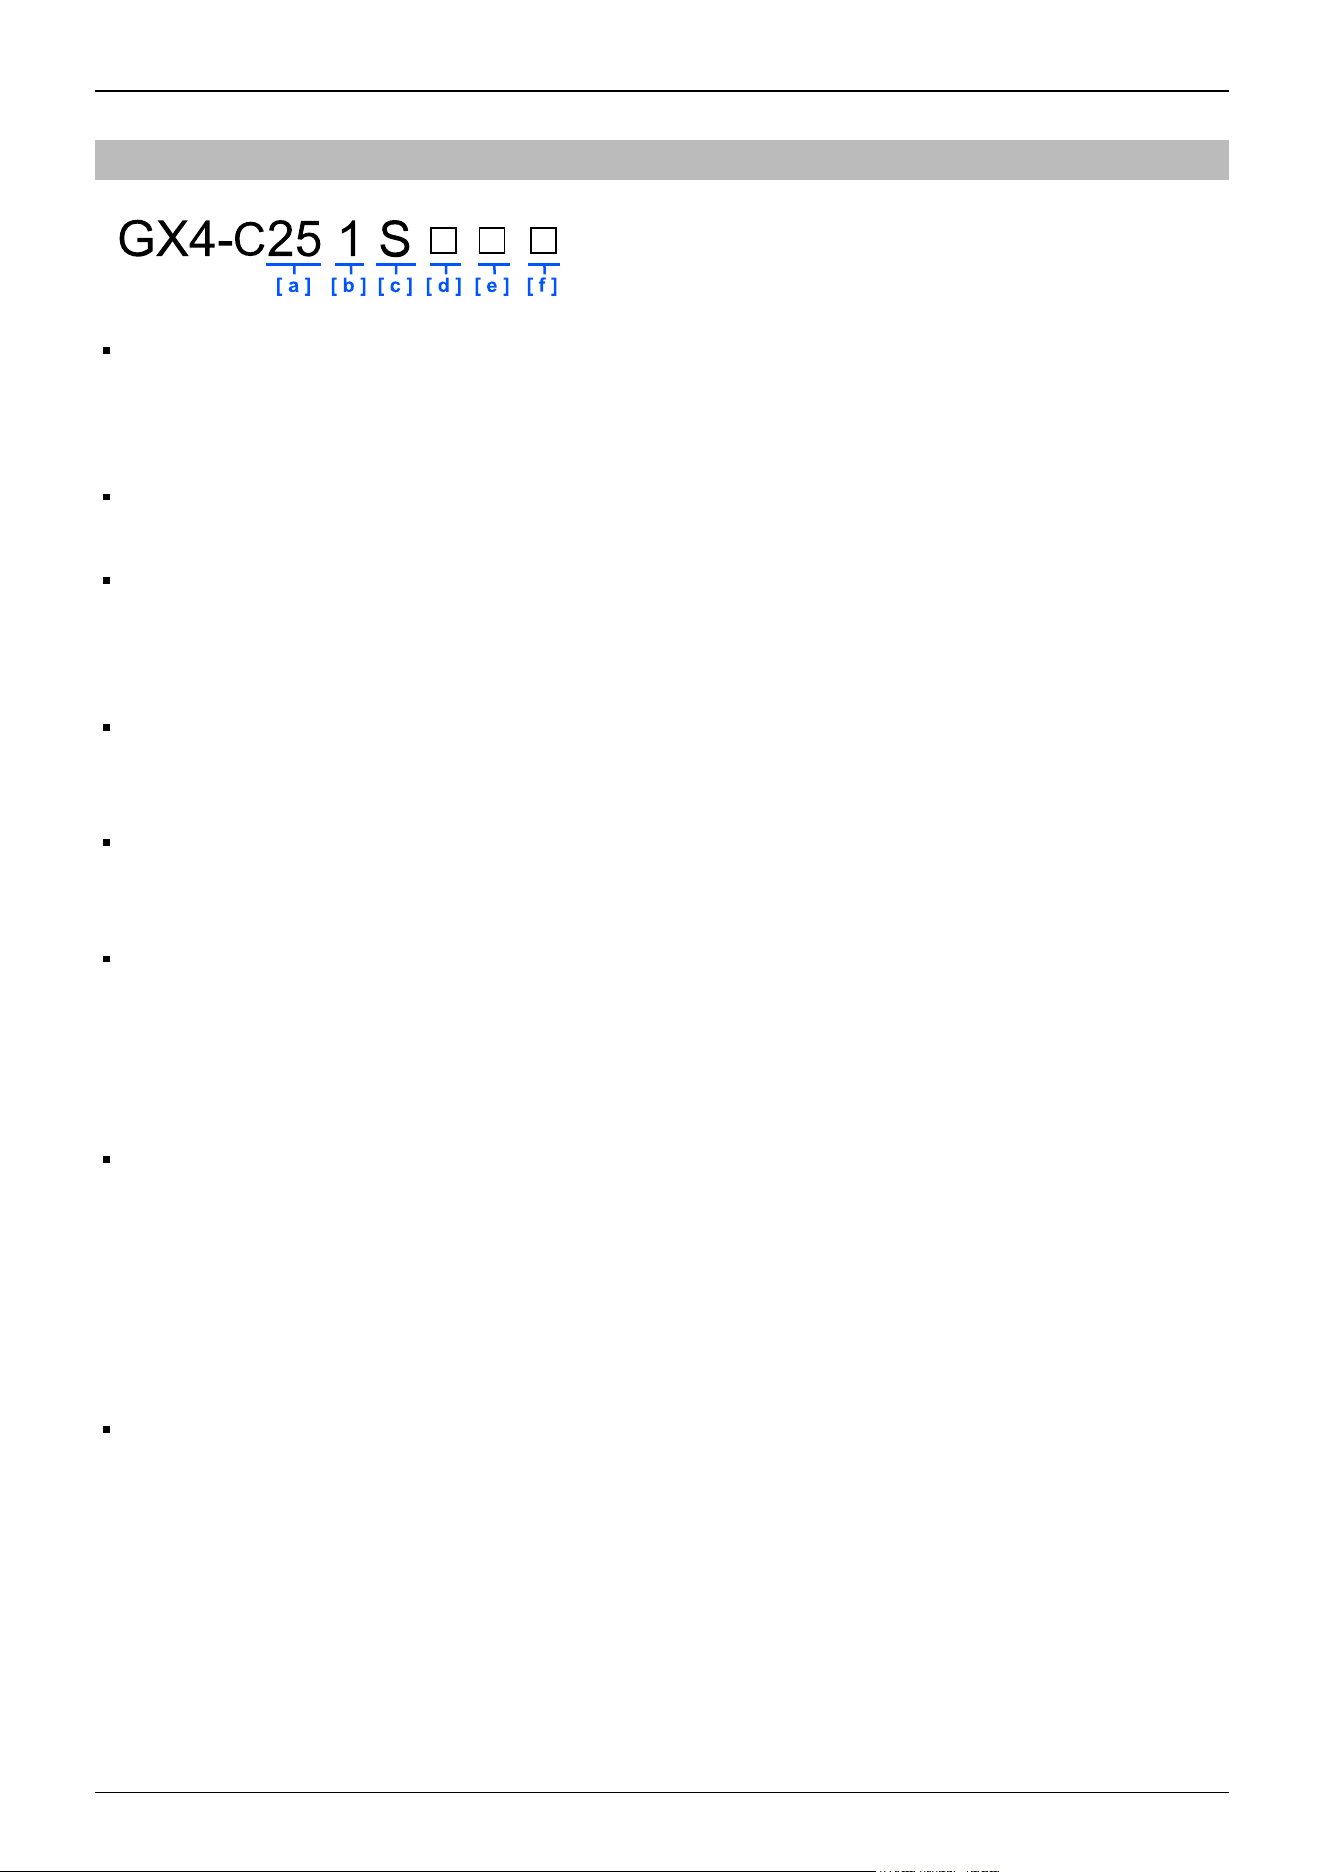
3.2.3 Model Name GX4-C
a: Arm length
25: 250 mm
30: 300 mm
35: 350 mm
b: Joint #3 stroke
1: 150 mm (GX4-C**1S*, E*), 120 mm (GX4-C**1C*)
c: Environmental specifications
S: Standard (equivalent to IP20)
E: ESD (anti-static)
C: Cleanroom & ESD (anti-static)
d: Mounting specifications
□: Table top mounting
M: Multiple mounting
e: Cable mounting direction
□: Standard (table top mounting - cable routing from rear side, multiple mounting - cable routing from top side)
B: Cable routing from bottom side (table top mounting only)
f: Arm type
□: Straight
-L: Left-curved
-R: Right-curved
Environmental specifications
ESD (anti-static) specifications: GX4-C**1E*
ESD specifications are specifications that use conductive materials for or apply plating to the major resin parts as anti-static
measures.
We have confirmed that the Manipulator tip (tool mounting section) is at ±5 V or less, even directly after the measuring
operation according to Seiko Epson standards.
If you need any other detailed information, please contact the supplier.
Also, please check the amount of charge on any hand, wiring, or the like that you will attach to the robot on your own
before use.
Cleanroom & ESD (anti-static) specifications: GX4-C**1C*
Manipulators with cleanroom & ESD (anti-static) specifications have a base design with the standard specifications, but as
an additional feature, have reduced dust emissions from the Manipulator to enable use in cleanroom environments.
For details on the specifications, refer to the following section.
Appendix A: Specifications Table
Industrial Robot: SCARA Robots GX series Manual Rev.11
93
Model list
Arm
Length
Joint #3
Stroke
Environmental
Specifications
Mounting
Specifications
Cable Mounting
Direction
Arm
Type
Model
Number
250 150
Standard
Table top
Standard
Straight
GX4-
C251S
Cable routing from
bottom side
GX4-
C251SB
ESD
Standard
GX4-
C251E
Cable routing from
bottom side
GX4-
C251EB
Cleanroom & ESD-
Standard
GX4-
C251C
Cable routing from
bottom side
GX4-
C251CB
300 150
Standard
Table top
Standard
Straight
GX4-
C301S
Cable routing from
bottom side
GX4-
C301SB
Multiple mounting Standard
GX4-
C301SM
ESD
Table top
Standard
GX4-
C301E
Cable routing from
bottom side
GX4-
C301EB
Multiple mounting Standard
GX4-
C301EM
300 120 Cleanroom & ESD
Table top
Standard
Straight
GX4-
C301C
Cable routing from
bottom side
GX4-
C301CB
Multiple mounting Standard
GX4-
C301CM
350
150
Standard
Table top
Standard
Straight
GX4-
C351S
Left-
curved
GX4-
C351S-L
Right-
curved
GX4-
C351S-R
Cable routing from
bottom side
Straight
GX4-
C351SB
Left-
curved
GX4-
C351SB-L
Industrial Robot: SCARA Robots GX series Manual Rev.11
94
Arm
Length
Joint #3
Stroke
Environmental
Specifications
Mounting
Specifications
Cable Mounting
Direction
Arm
Type
Model
Number
Right-
curved
GX4-
C351SB-R
Multiple mounting Standard Straight
GX4-
C351SM
350 150 ESD
Table top
Standard
Straight
GX4-
C351E
Left-
curved
GX4-
C351E-L
Right-
curved
GX4-
C351E-R
Cable routing from
bottom side
Straight
GX4-
C351EB
Left-
curved
GX4-
C351EB-L
Right-
curved
GX4-
C351EB-R
Multiple mounting Standard Straight
GX4-
C351EM
350 120 Cleanroom & ESD
Table top
Standard
Straight
GX4-
C351C
Left-
curved
GX4-
C351C-L
Right-
curved
GX4-
C351C-R
Cable routing from
bottom side
Straight
GX4-
C351CB
Left-
curved
GX4-
C351CB-L
Right-
curved
GX4-
C351CB-R
Multiple mounting Standard Straight
GX4-
C351CM
(Units: mm)
Industrial Robot: SCARA Robots GX series Manual Rev.11
95
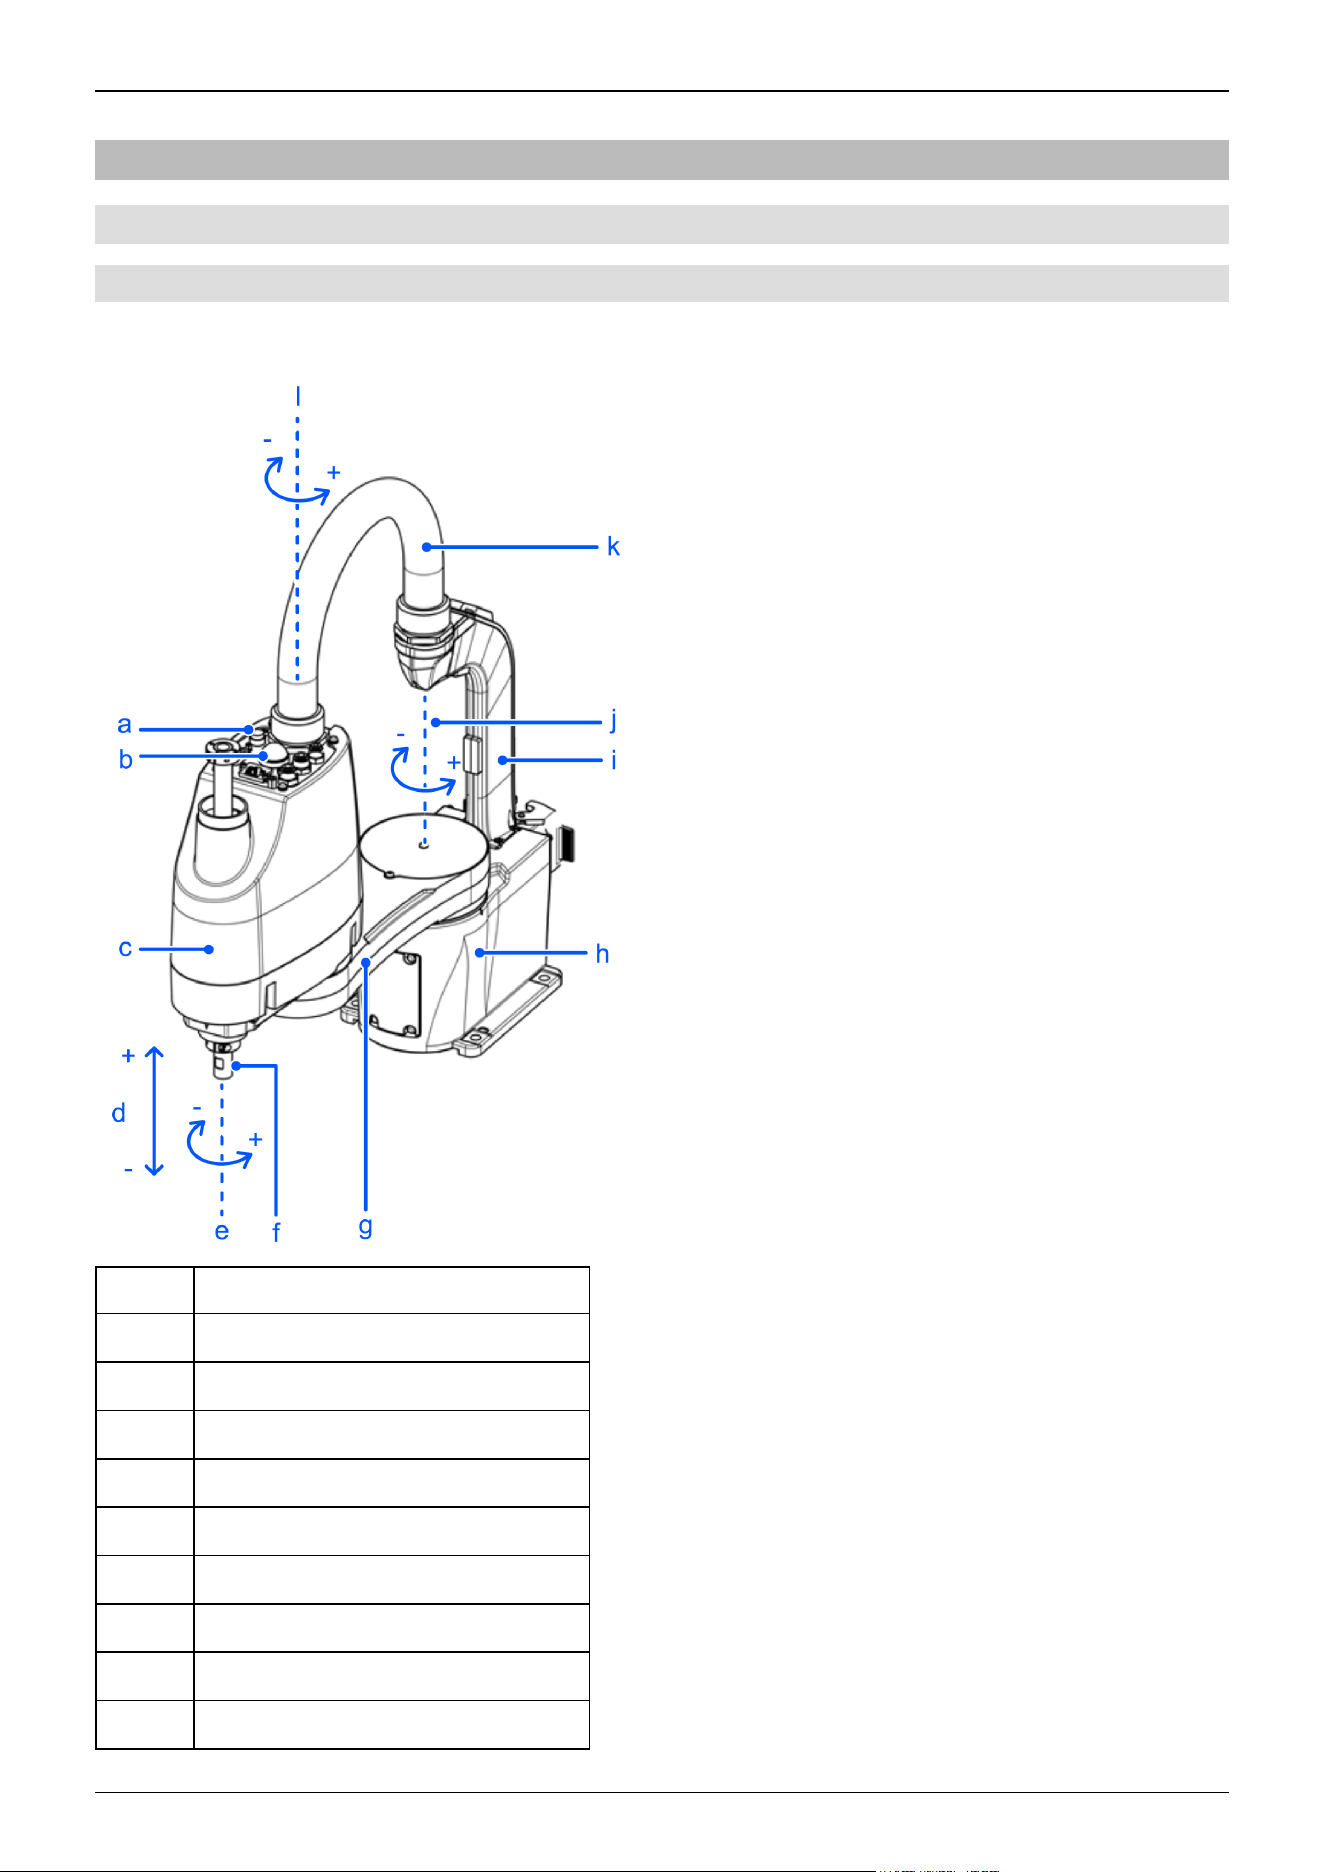
3.2.4 Names of Parts and Their Dimensions
3.2.4.1 Table Top Mounting Specifications
3.2.4.1.1 Cable Mounting Direction: Standard
Standard specifications GX4-A/GX4-B/GX4-C**1S
Symbol Description
a Joint #3 and Joint #4 brake release switch
b Indicating lamp
c Arm #2
d Joint #3 (up/down movement)
e Joint #4 (rotation)
f Shaft
g Arm #1
h Base
i Cable duct
Industrial Robot: SCARA Robots GX series Manual Rev.11
96
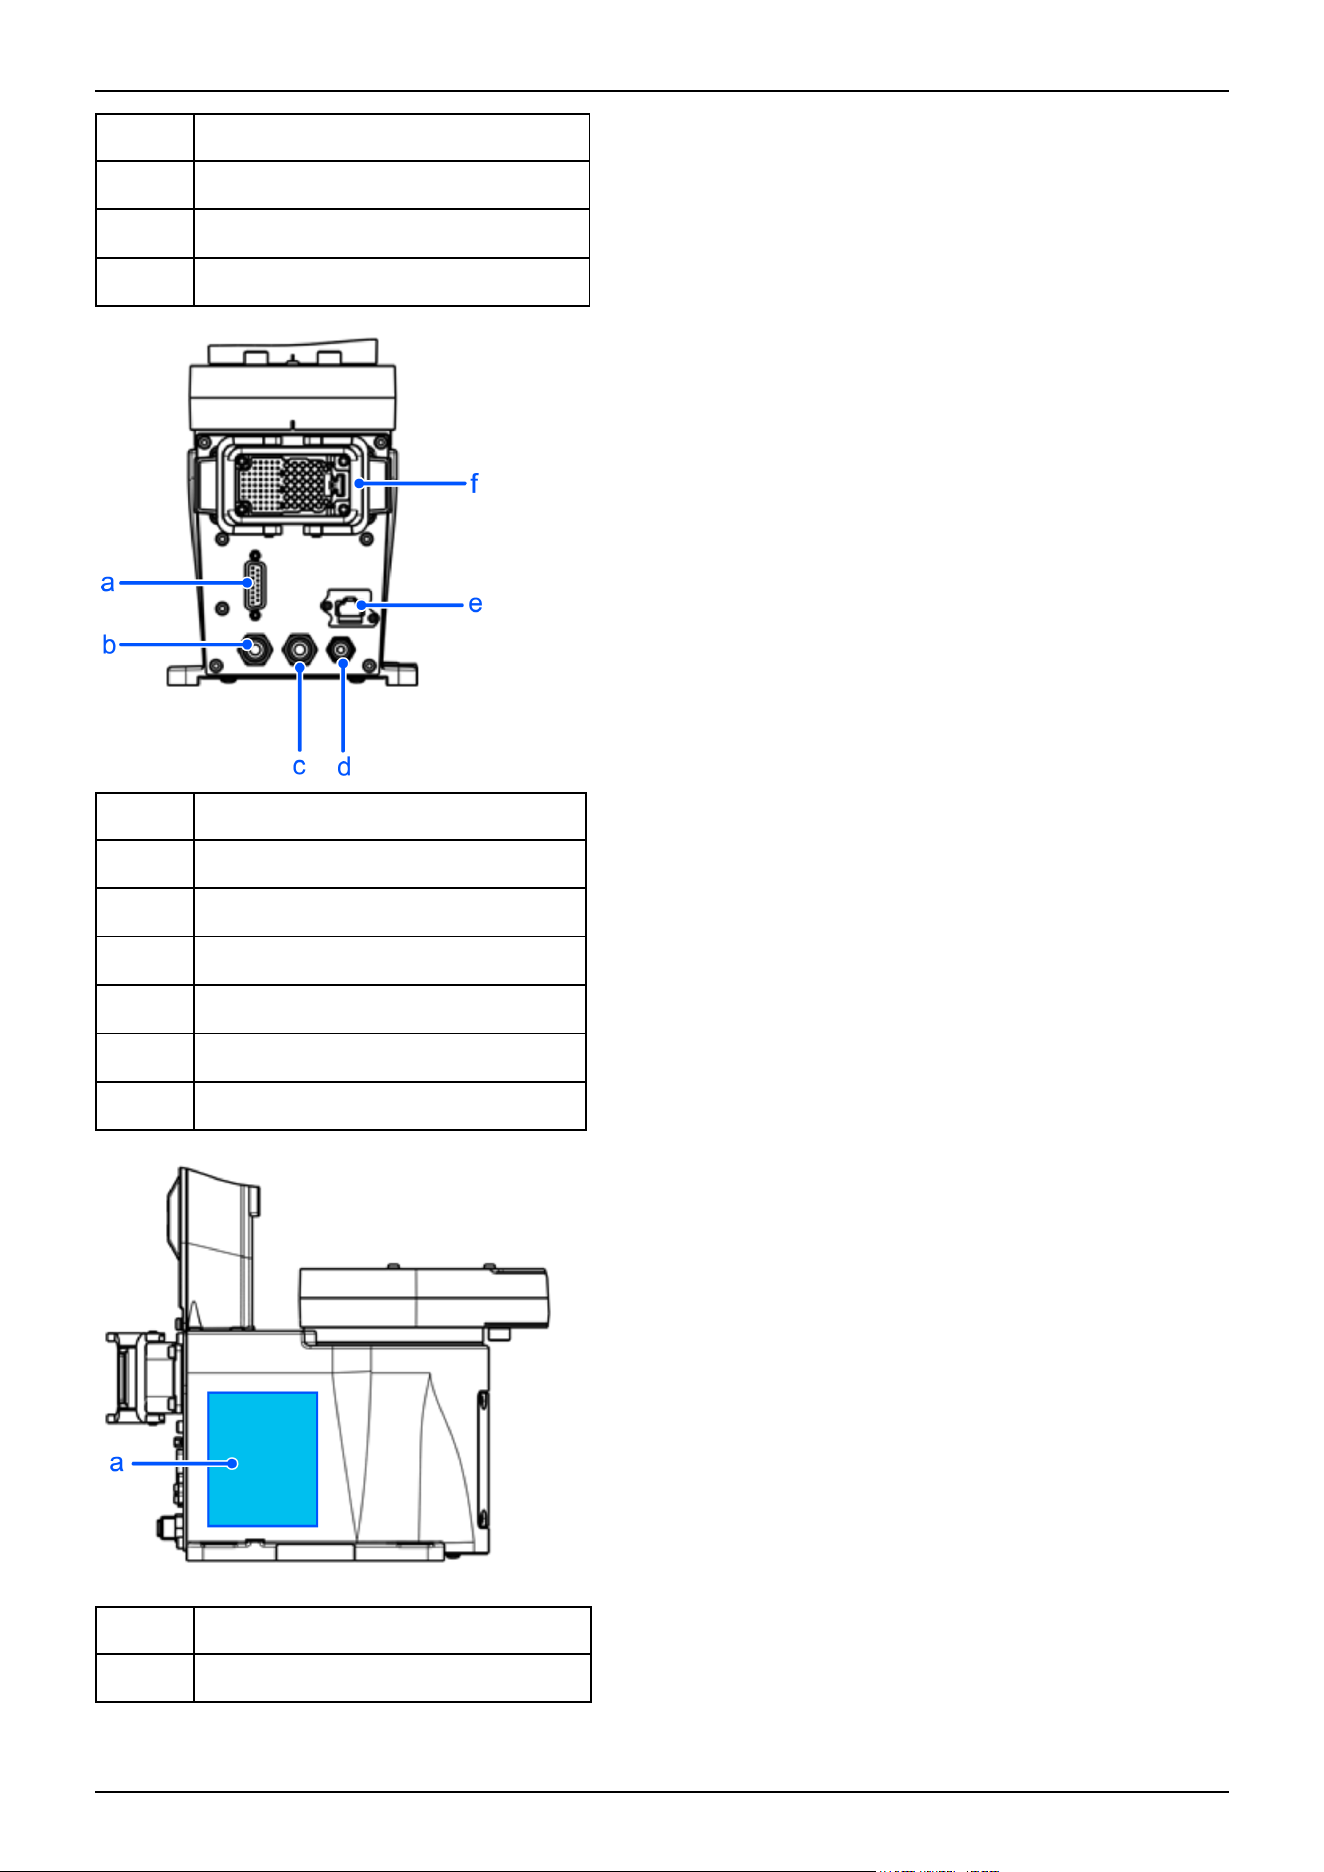
Symbol Description
j Joint #1 (rotation)
k Conduit tube
l Joint #2 (rotation)
Symbol Description
a User connector (15-pin D-sub connector)
b Fitting for ø6 mm tube (white)
c Fitting for ø6 mm tube (blue)
d Fitting for ø4 mm tube (blue)
e Ethernet connector
f M/C cable connector
Symbol Description
a Face plate (serial number of Manipulator)
Industrial Robot: SCARA Robots GX series Manual Rev.11
97

KEY POINTS
The brake release switch is used with both Joint #3 and Joint #4. Press the brake release switch while in the
emergency stop state to simultaneously release the brakes on Joint #3 and Joint #4.
Before starting any maintenance work, be sure to turn off the Controller and inform others in the surrounding
area that work is in progress. Performing any work procedure with the power turned on is extremely
dangerous and may result in electric shock and/or malfunction of the robot system.
✏
Industrial Robot: SCARA Robots GX series Manual Rev.11
98
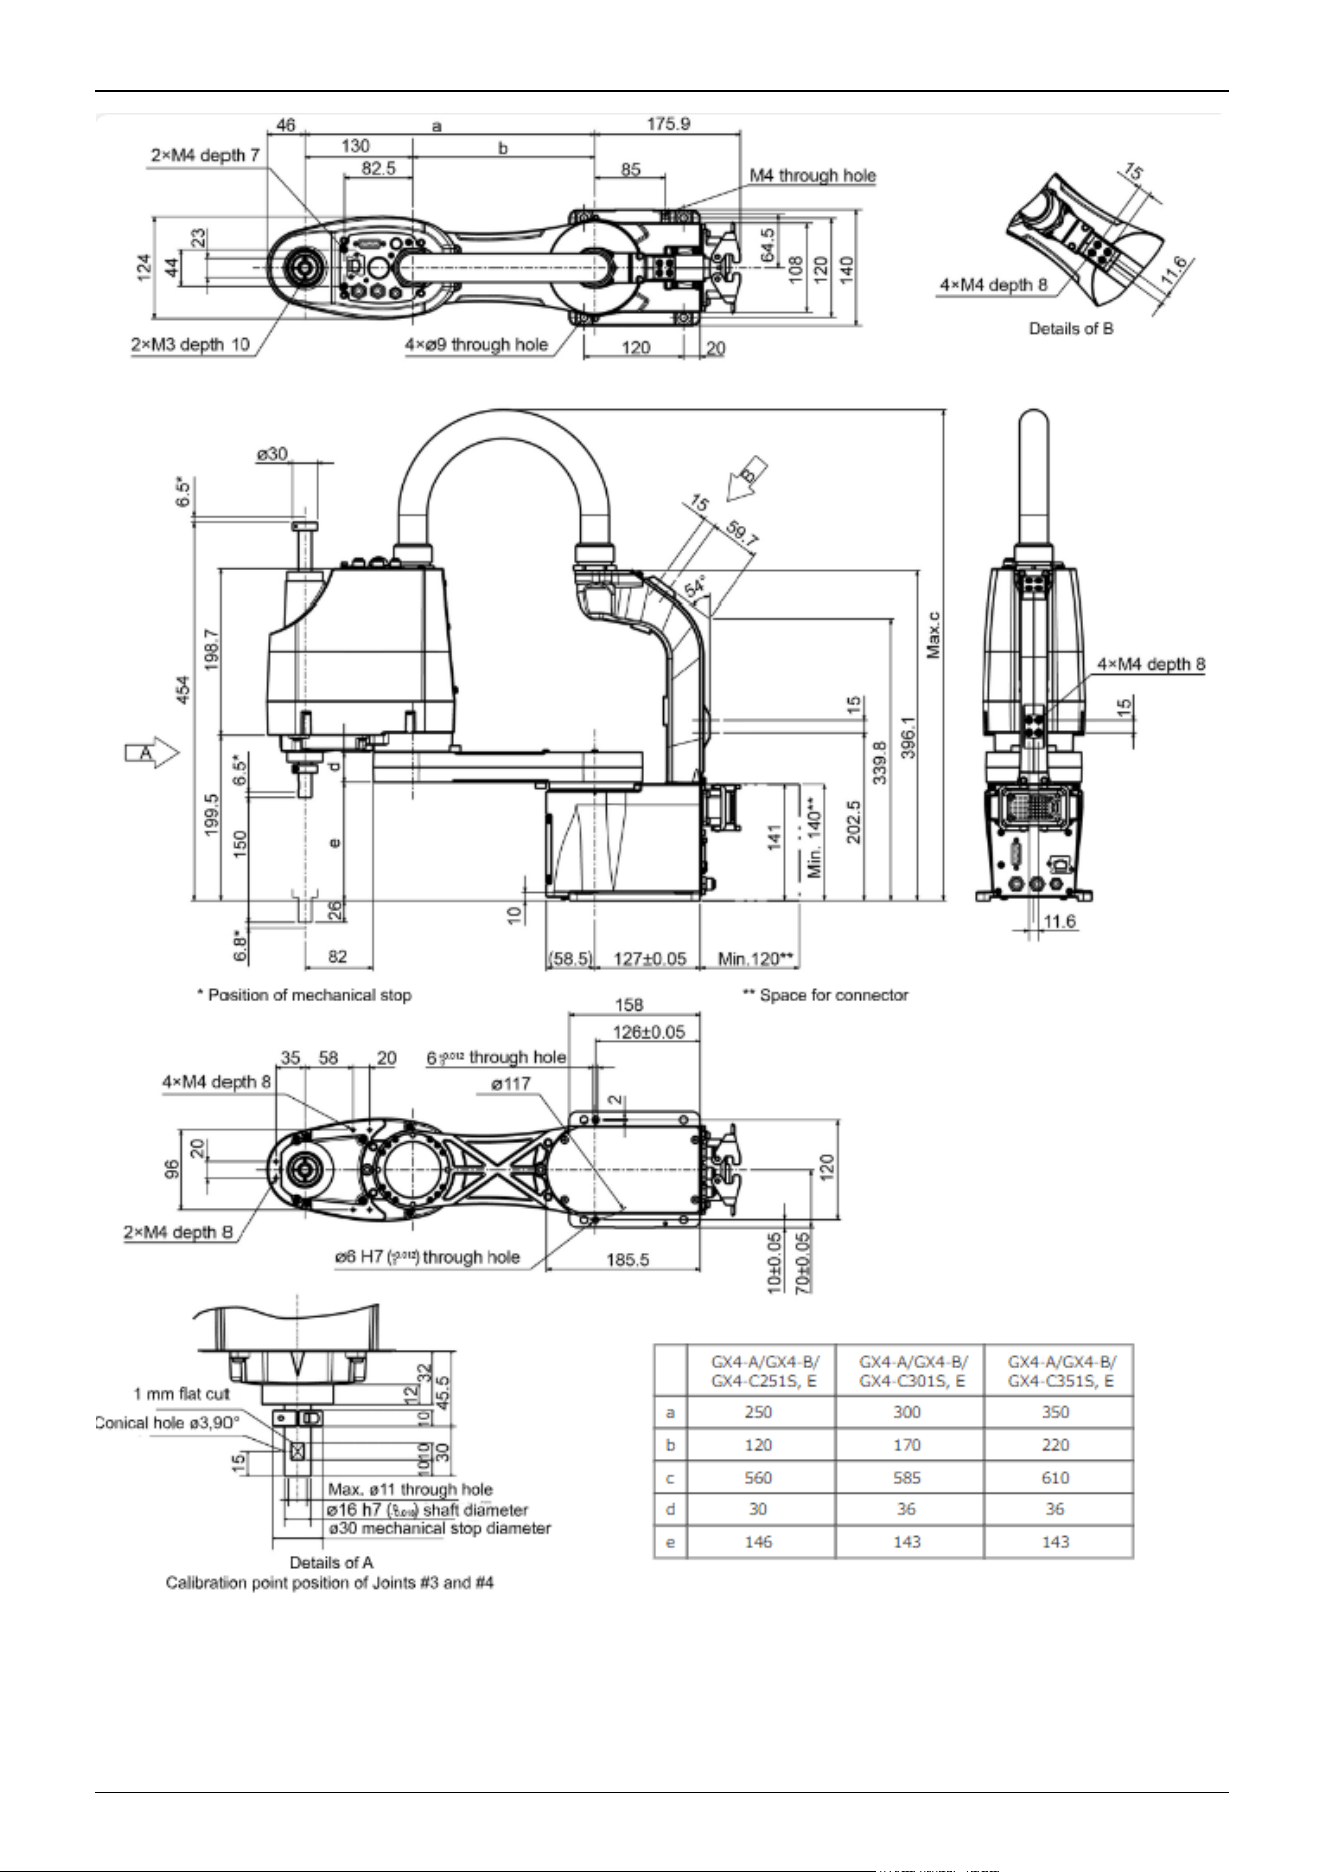
Industrial Robot: SCARA Robots GX series Manual Rev.11
99
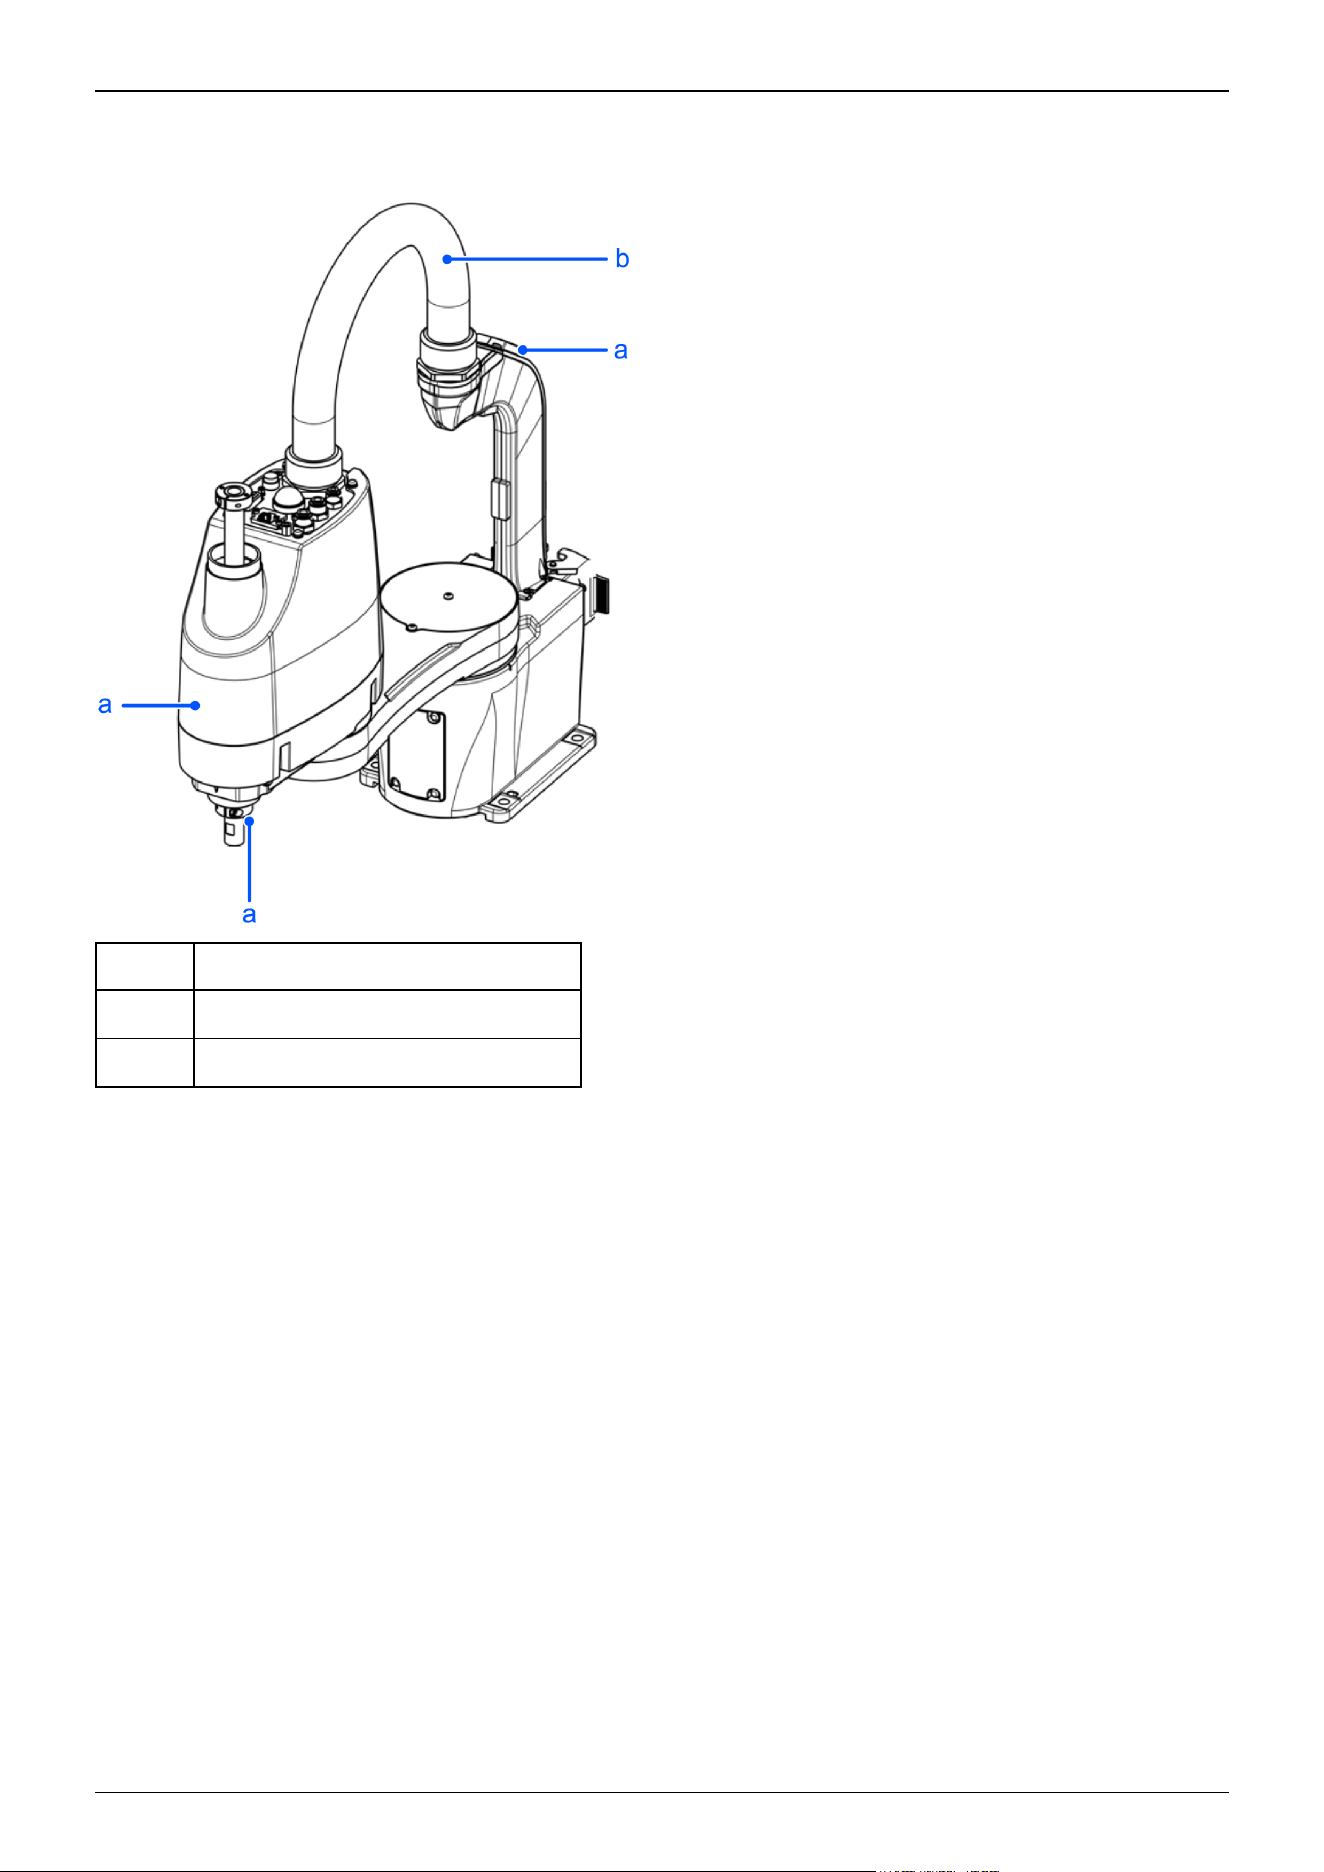
ESD specifications GX4-A/GX4-B/GX4-C**1E
The part shown below is different from the standard specifications. The external dimensions are identical.
Symbol Description
a Plating covers (anti-static specifications)
b Conduit tube (anti-static specifications)
Industrial Robot: SCARA Robots GX series Manual Rev.11
100
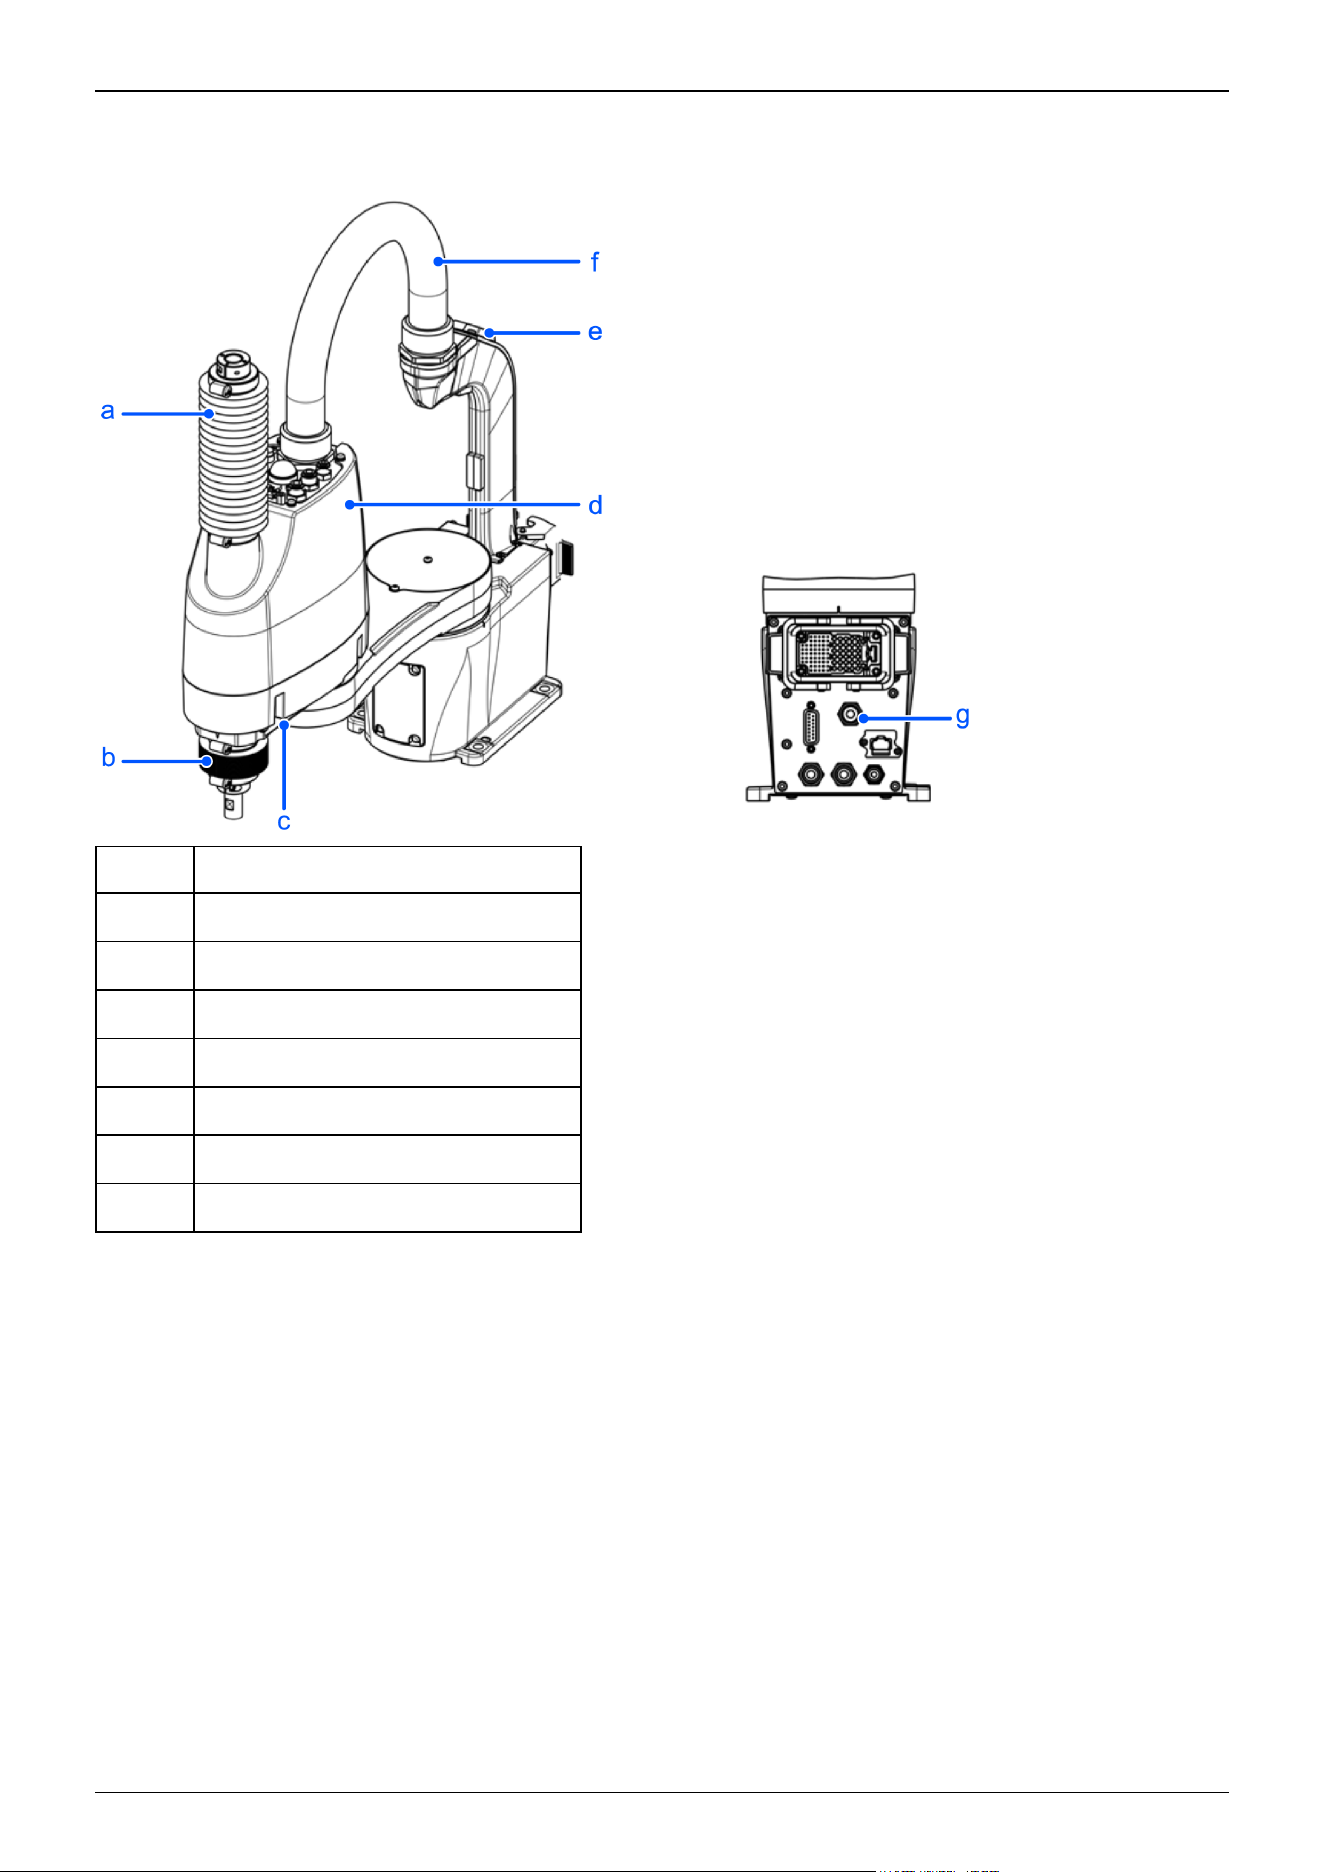
Cleanroom & ESD specifications GX4-A/GX4-B/GX4-C**1C
The parts shown below differ from the standard specifications.
Symbol Description
a Upper bellows
b Lower bellows
c Plating covers (anti-static specifications)
d Plating covers (anti-static specifications)
e Plating covers (anti-static specifications)
f Conduit tube (anti-static specifications)
g Exhaust port
Industrial Robot: SCARA Robots GX series Manual Rev.11
101
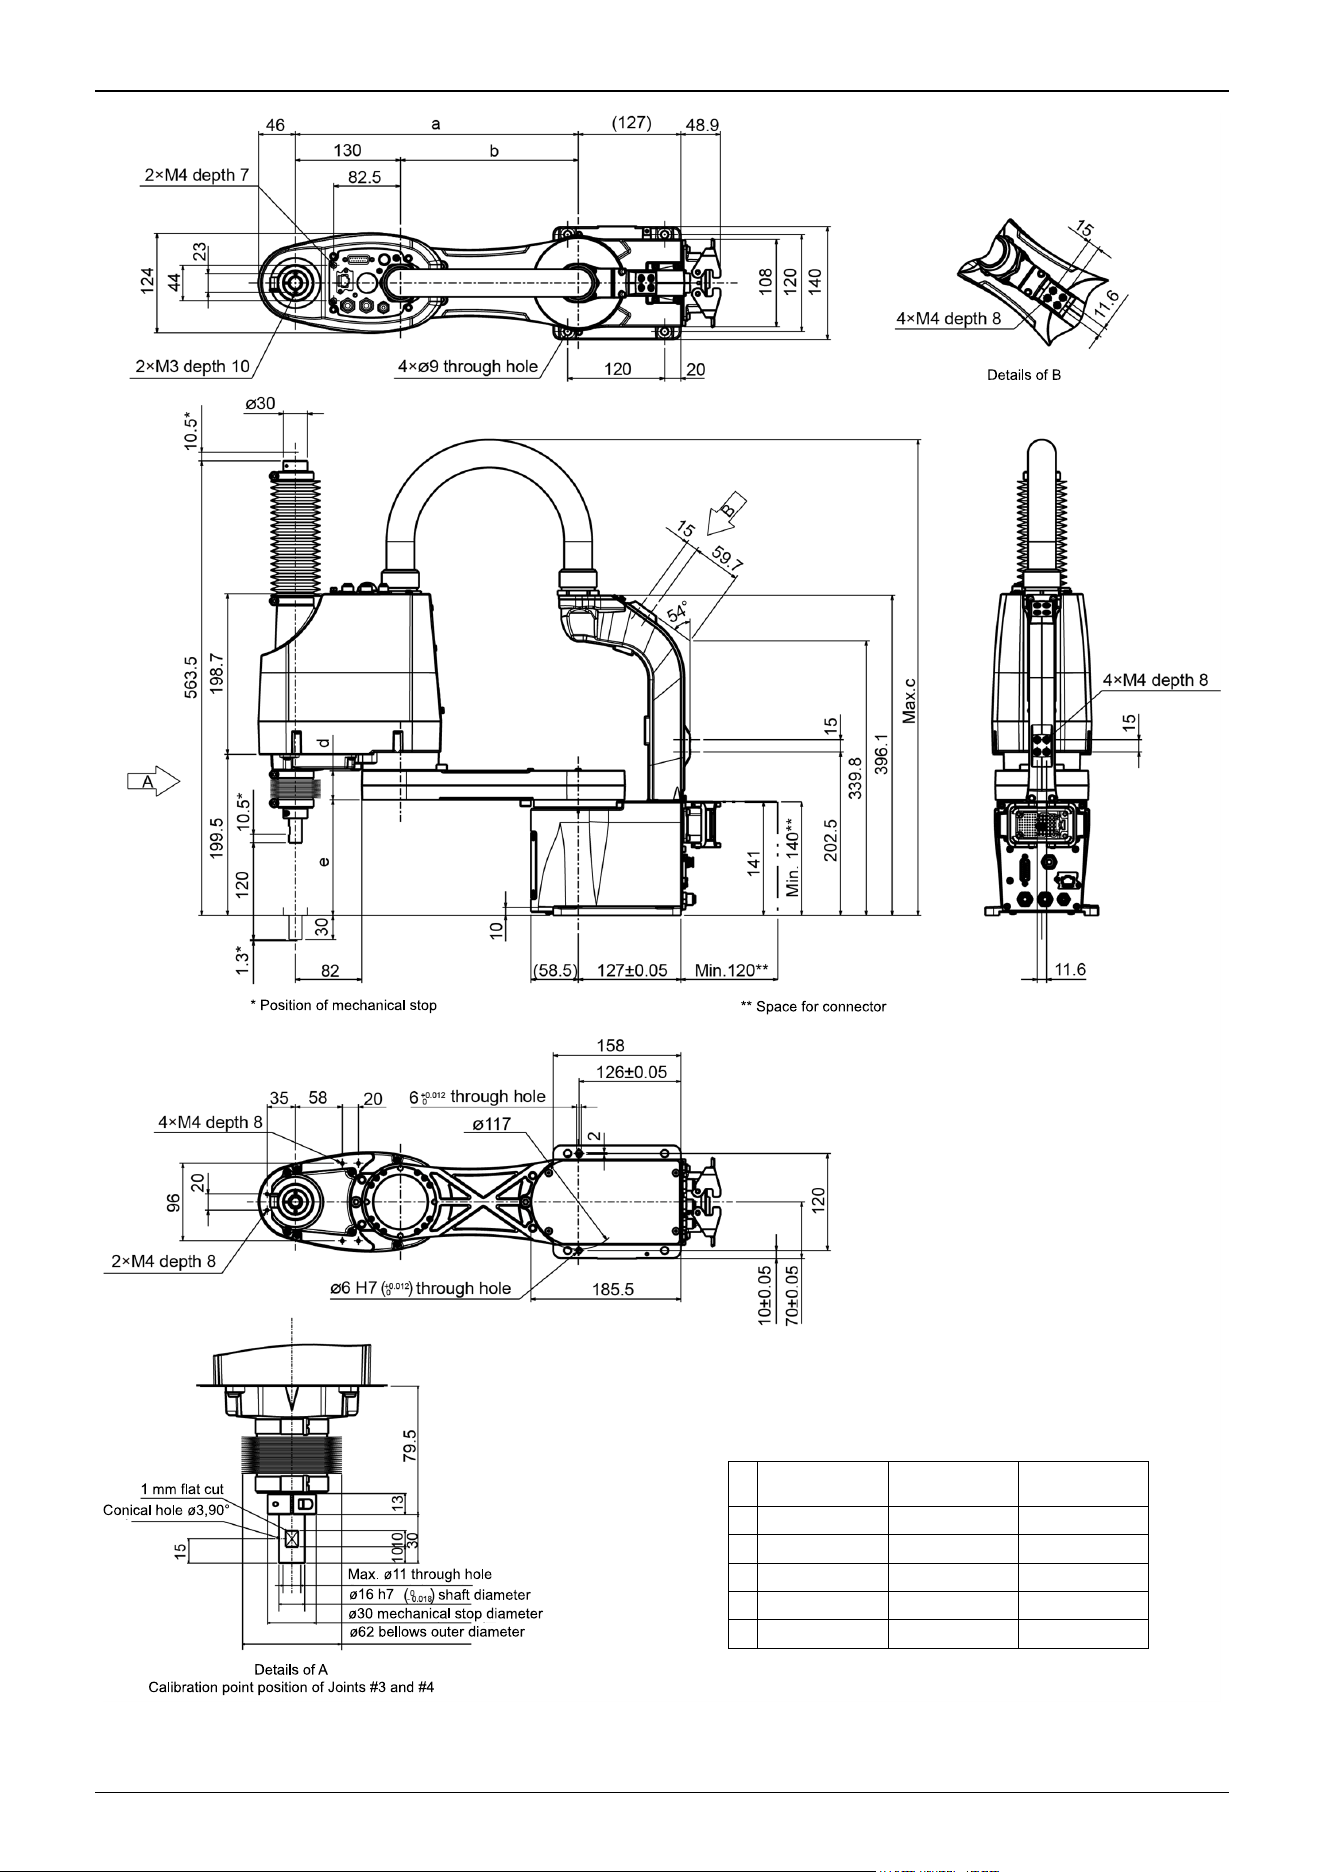
GX4-A/GX4-B/
GX4-C251C
GX4-A/GX4-B/
GX4-C301C
GX4-A/GX4-B/
GX4-C351C
a 250 300 350
b 120 170 220
c 560 585 610
d 30 36 36
e 146 143 143
Industrial Robot: SCARA Robots GX series Manual Rev.11
102
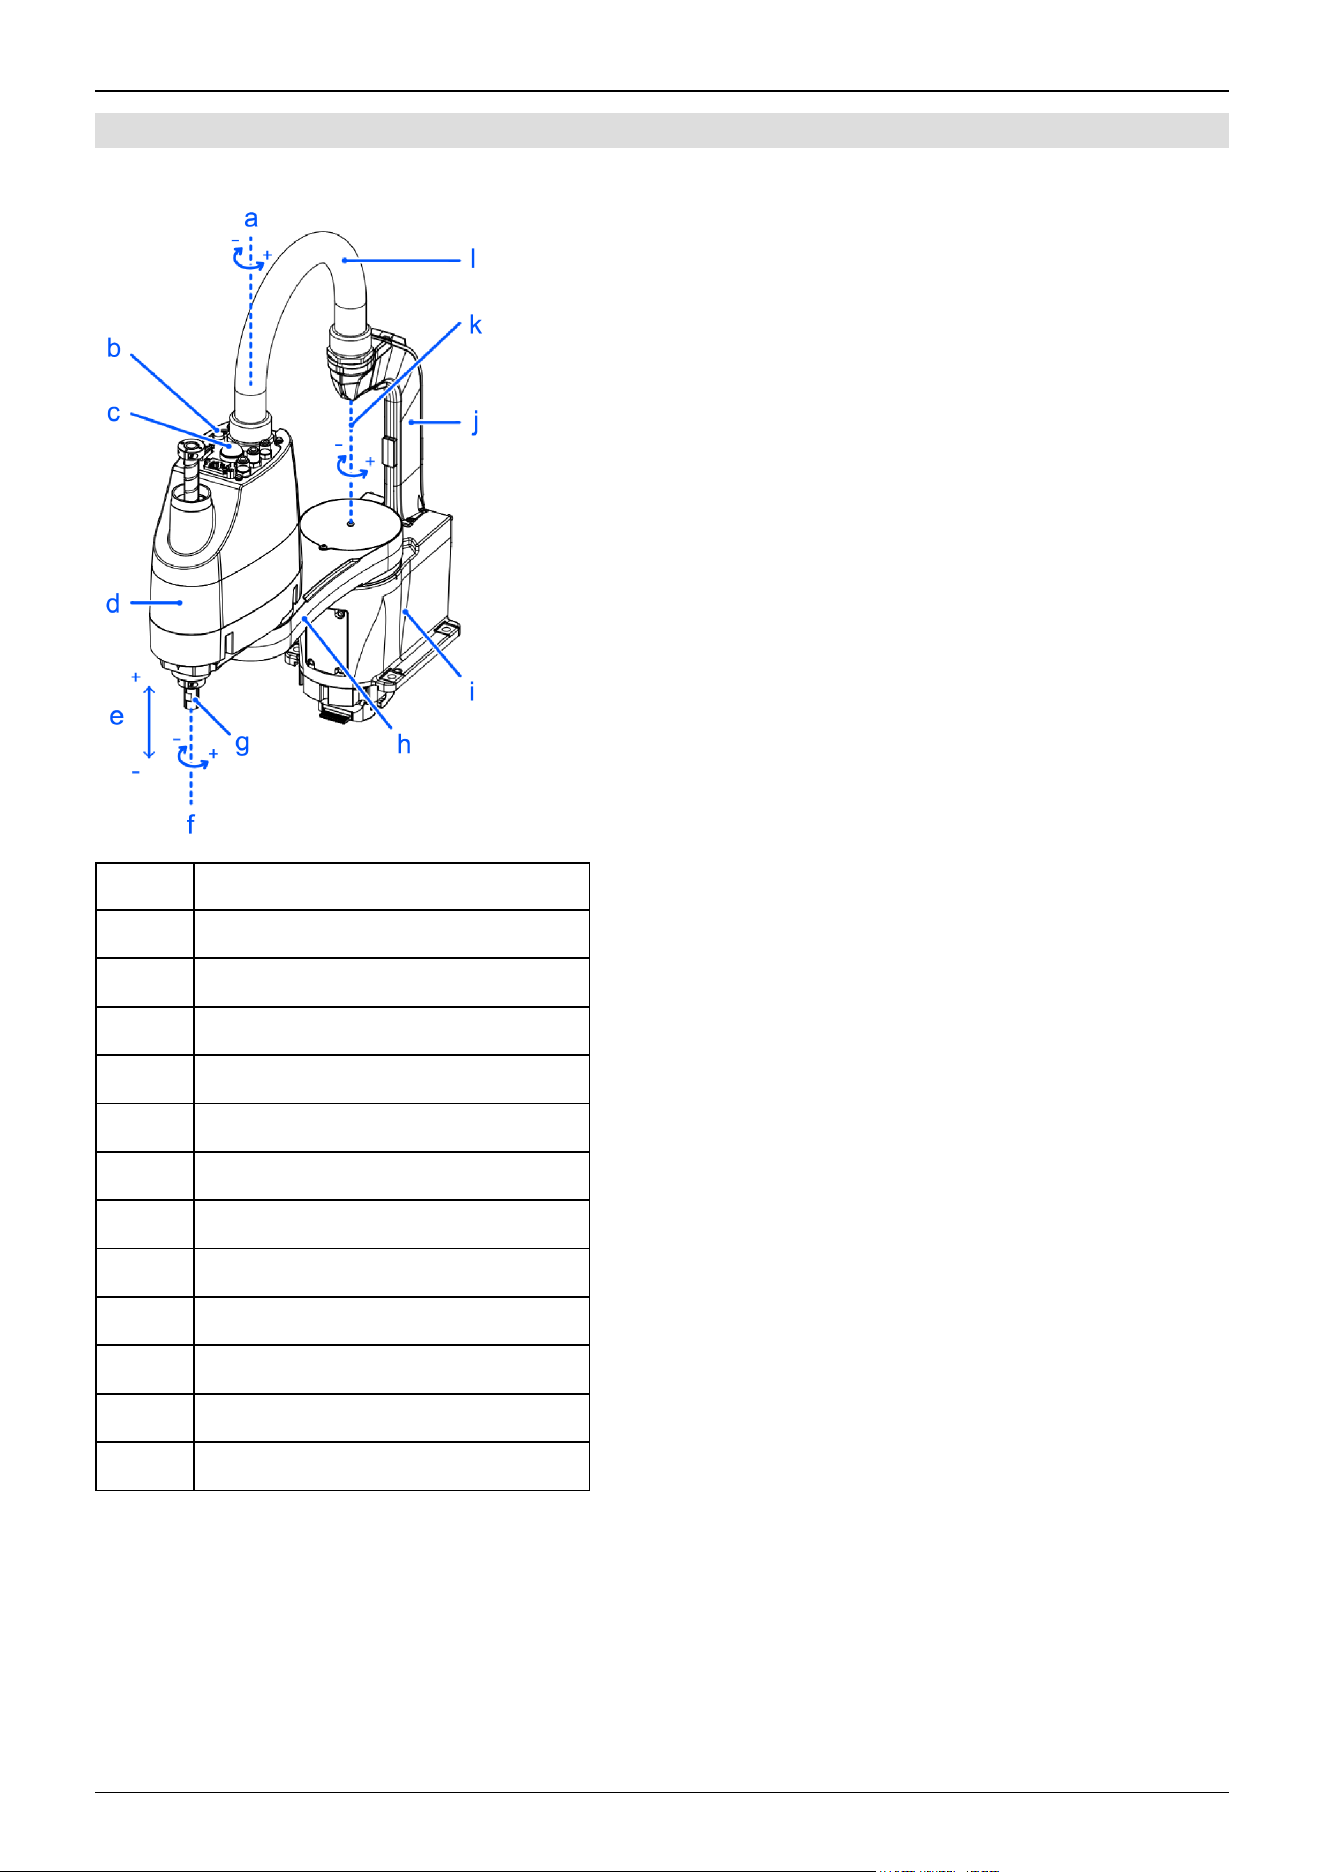
3.2.4.1.2 Cable Mounting Direction: Cable Routing from Bottom Side
Standard specifications GX4-A/GX4-B/GX4-C**1SB
Symbol Description
a Joint #2 (rotation)
b Joint #3 and Joint #4 brake release switch
c Indicating lamp
d Arm #2
e Joint #3 (up/down movement)
f Joint #4 (rotation)
g Shaft
h Arm1
i Base
j Cable duct
k Joint #1 (rotation)
l Conduit tube
Industrial Robot: SCARA Robots GX series Manual Rev.11
103
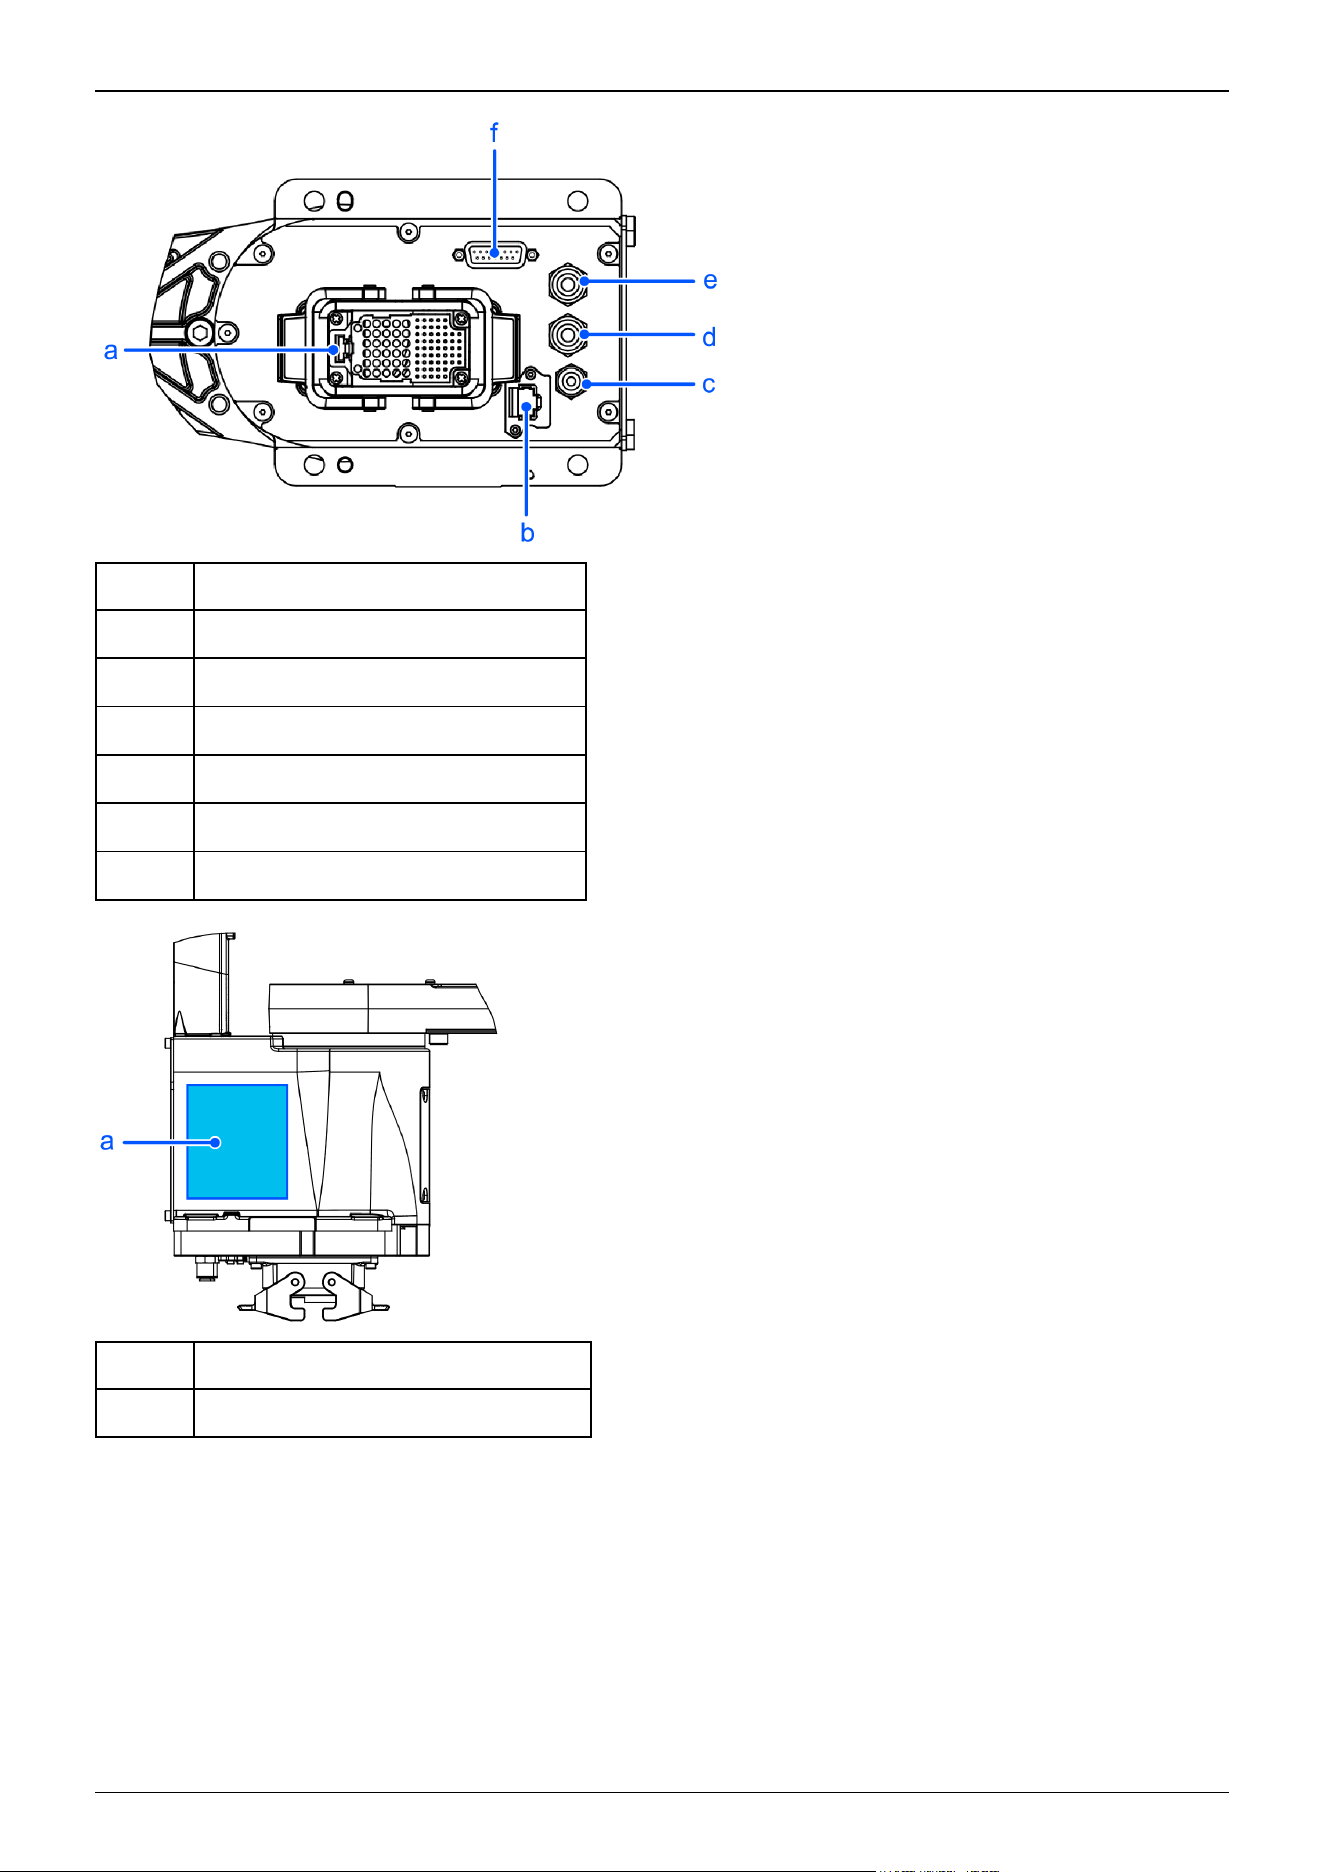
Symbol Description
a M/C cable connector
b Ethernet connector
c Fitting for ø4 mm tube (blue)
d Fitting for ø6 mm tube (blue)
e Fitting for ø6 mm tube (white)
f User connector (15-pin D-sub connector)
Symbol Description
a Face plate (serial number of Manipulator)
Industrial Robot: SCARA Robots GX series Manual Rev.11
104
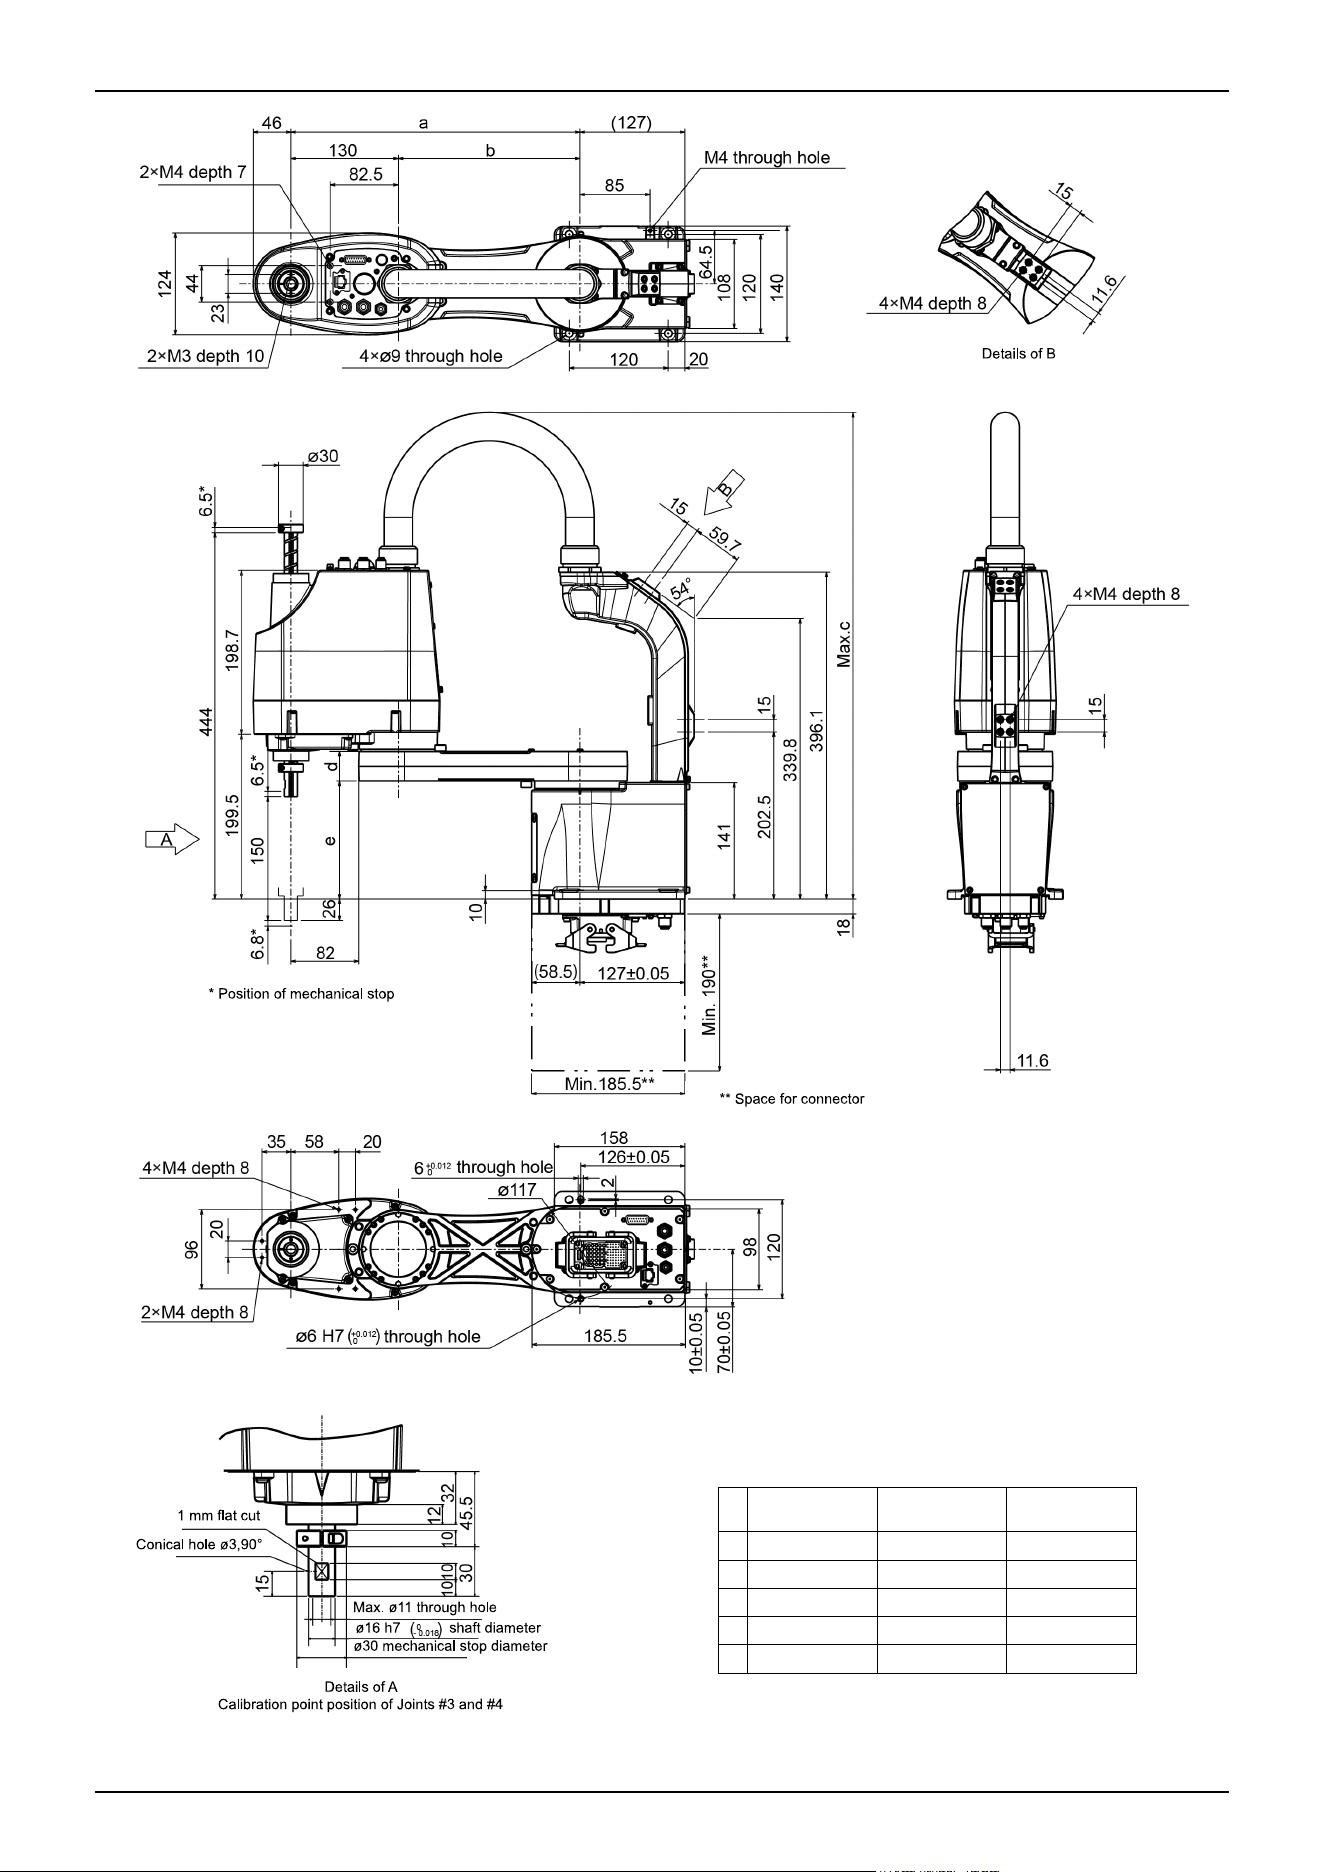
GX4-A/GX4-B/
GX4-C251SB, EB
GX4-A/GX4-B/
GX4-C301SB, EB
GX4-A/GX4-B/
GX4-C351SB, EB
a 250 300 350
b 120 170 220
c 560 585 610
d 30 36 36
e 146 143 143
Industrial Robot: SCARA Robots GX series Manual Rev.11
105
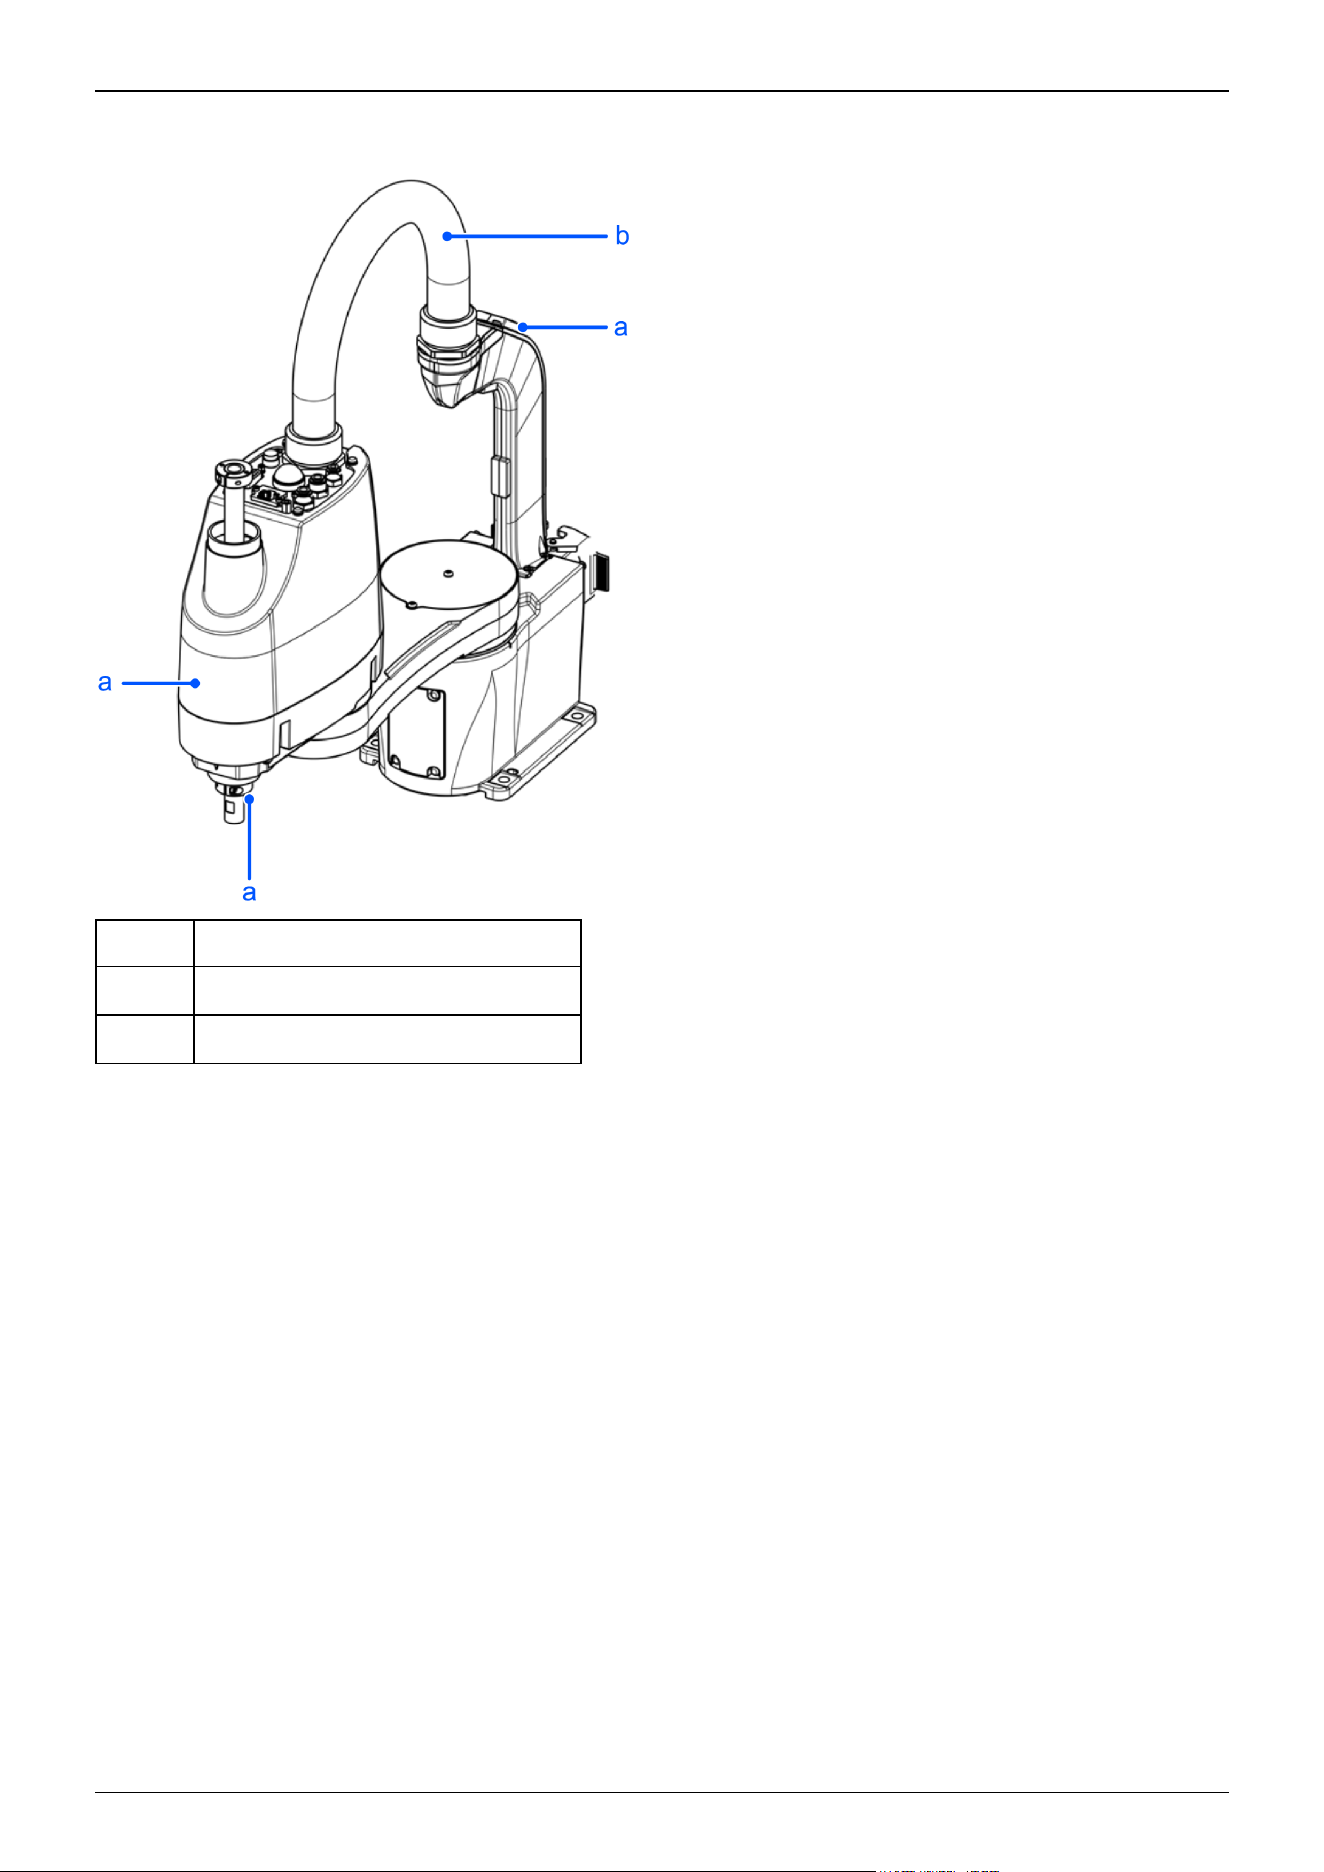
ESD specifications GX4-A/GX4-B/GX4-C**1EB
The parts shown below differ from the standard specifications. The external dimensions are identical.
Symbol Description
a Plating covers (anti-static specifications)
b Conduit tube (anti-static specifications)
Industrial Robot: SCARA Robots GX series Manual Rev.11
106
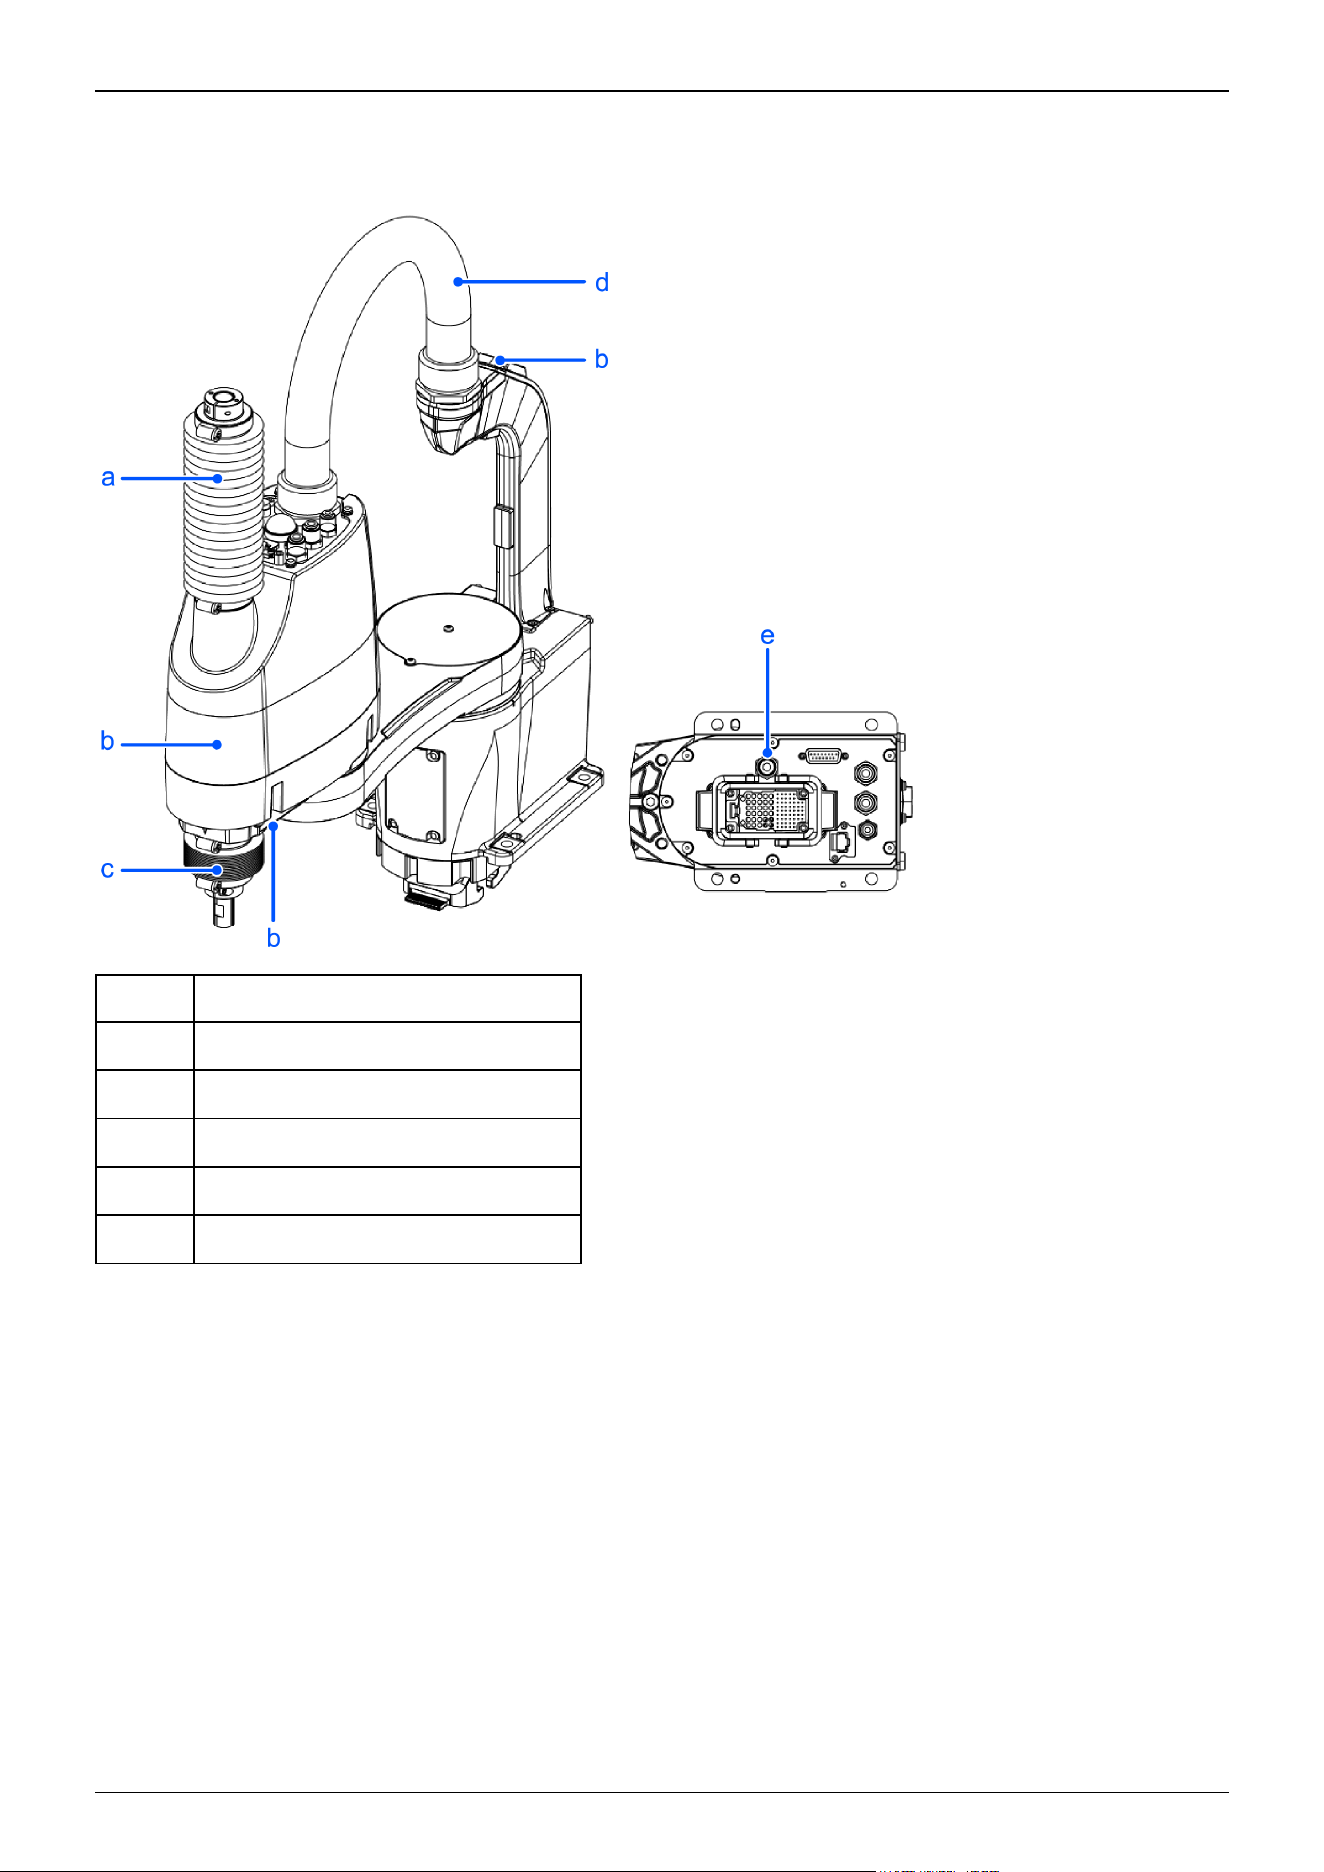
Cleanroom & ESD specifications GX4-A/GX4-B/GX4-C**1CB
The parts shown below differ from the standard specifications.
Symbol Description
a Upper bellows
b Plating covers (anti-static specifications)
c Lower bellows
d Conduit tube (anti-static specifications)
e Exhaust port
Industrial Robot: SCARA Robots GX series Manual Rev.11
107
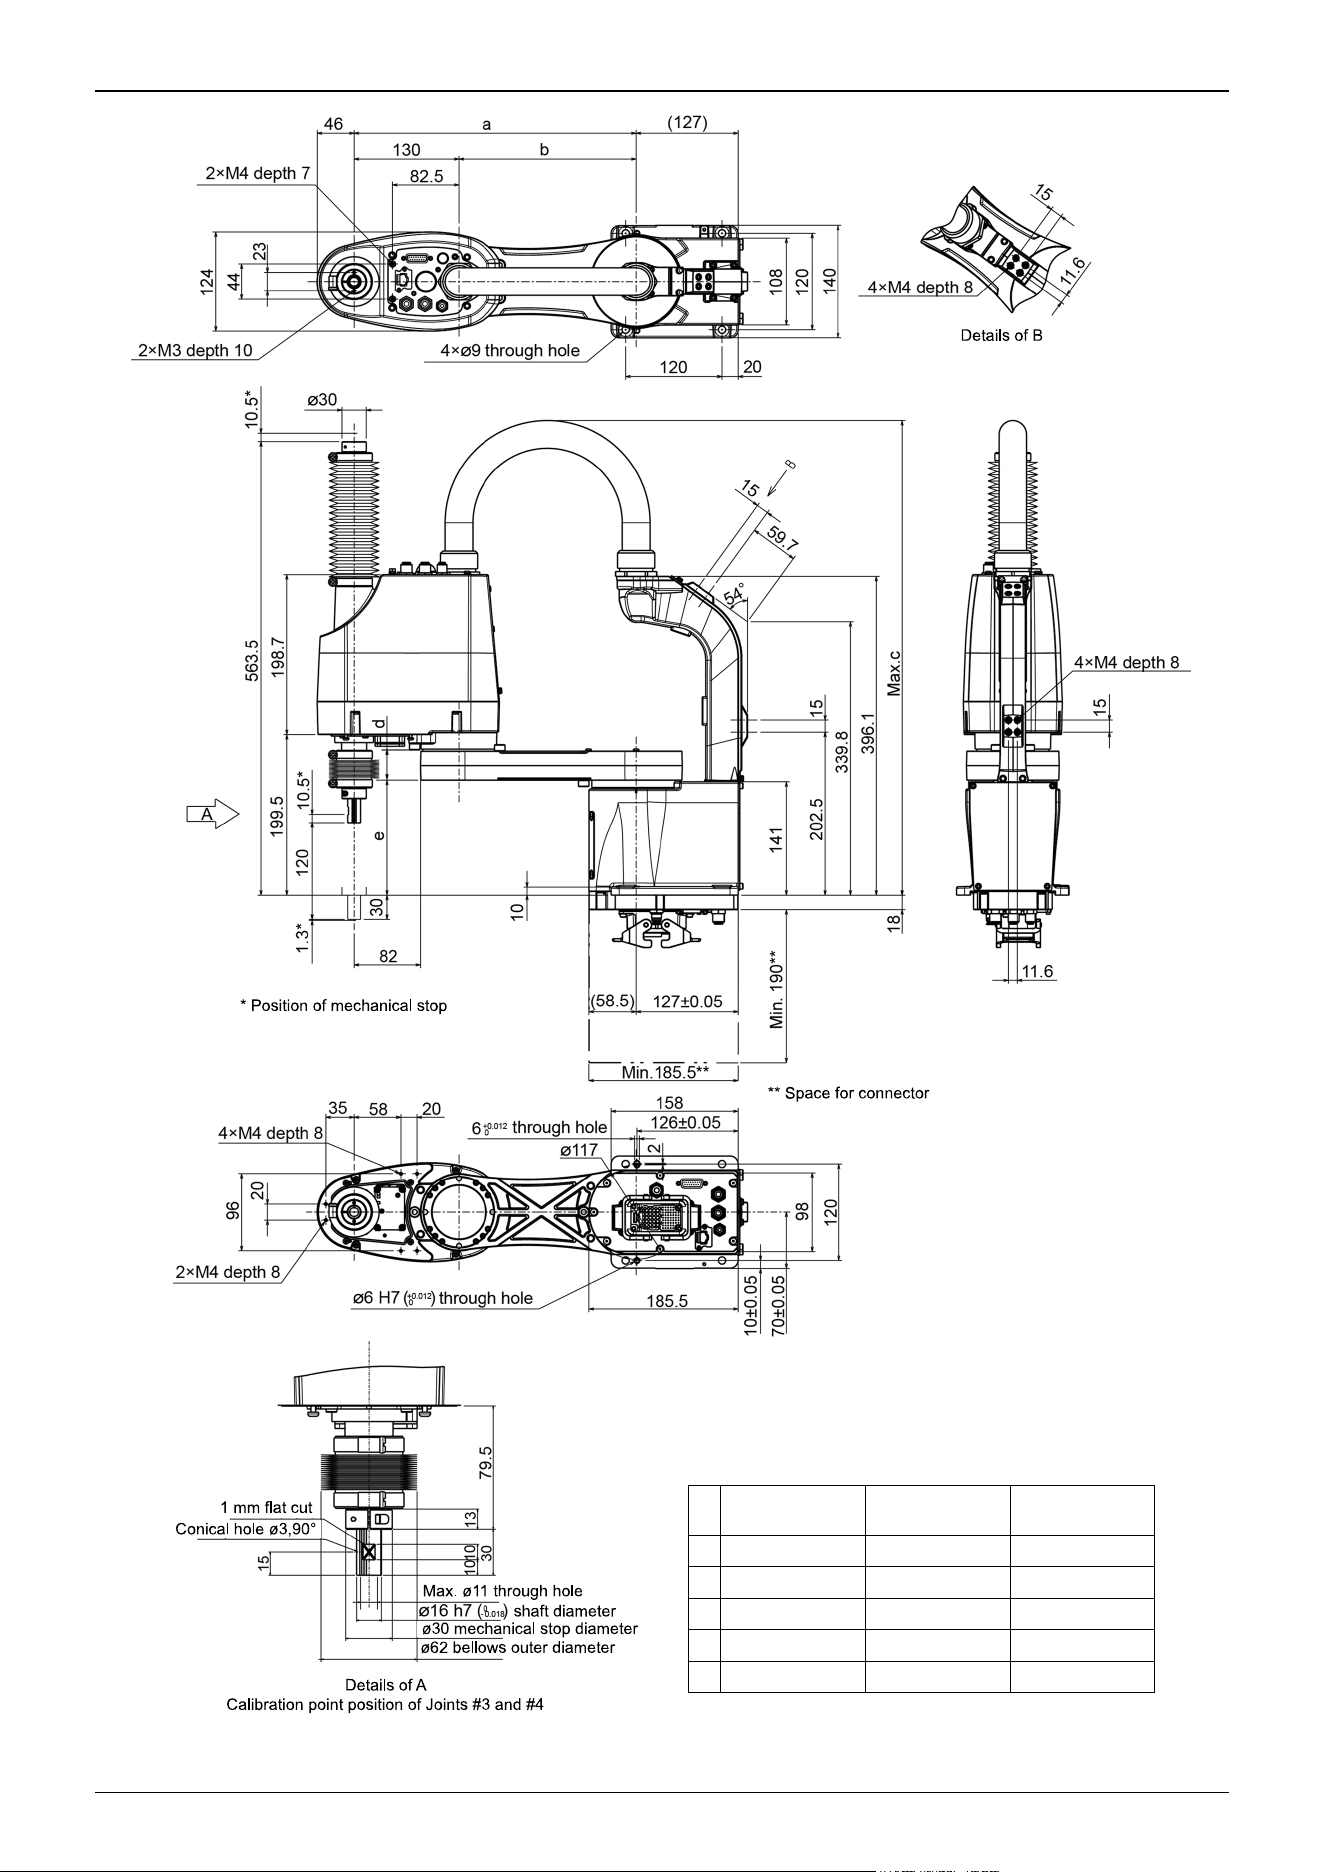
GX4-A/GX4-B/
GX4-C251CB
GX4-A/GX4-B/
GX4-C301CB
GX4-A/GX4-B/
GX4-C351CB
a 250 300 350
b 120 170 220
c 560 585 610
d 30 36 36
e 146 143 143
Industrial Robot: SCARA Robots GX series Manual Rev.11
108
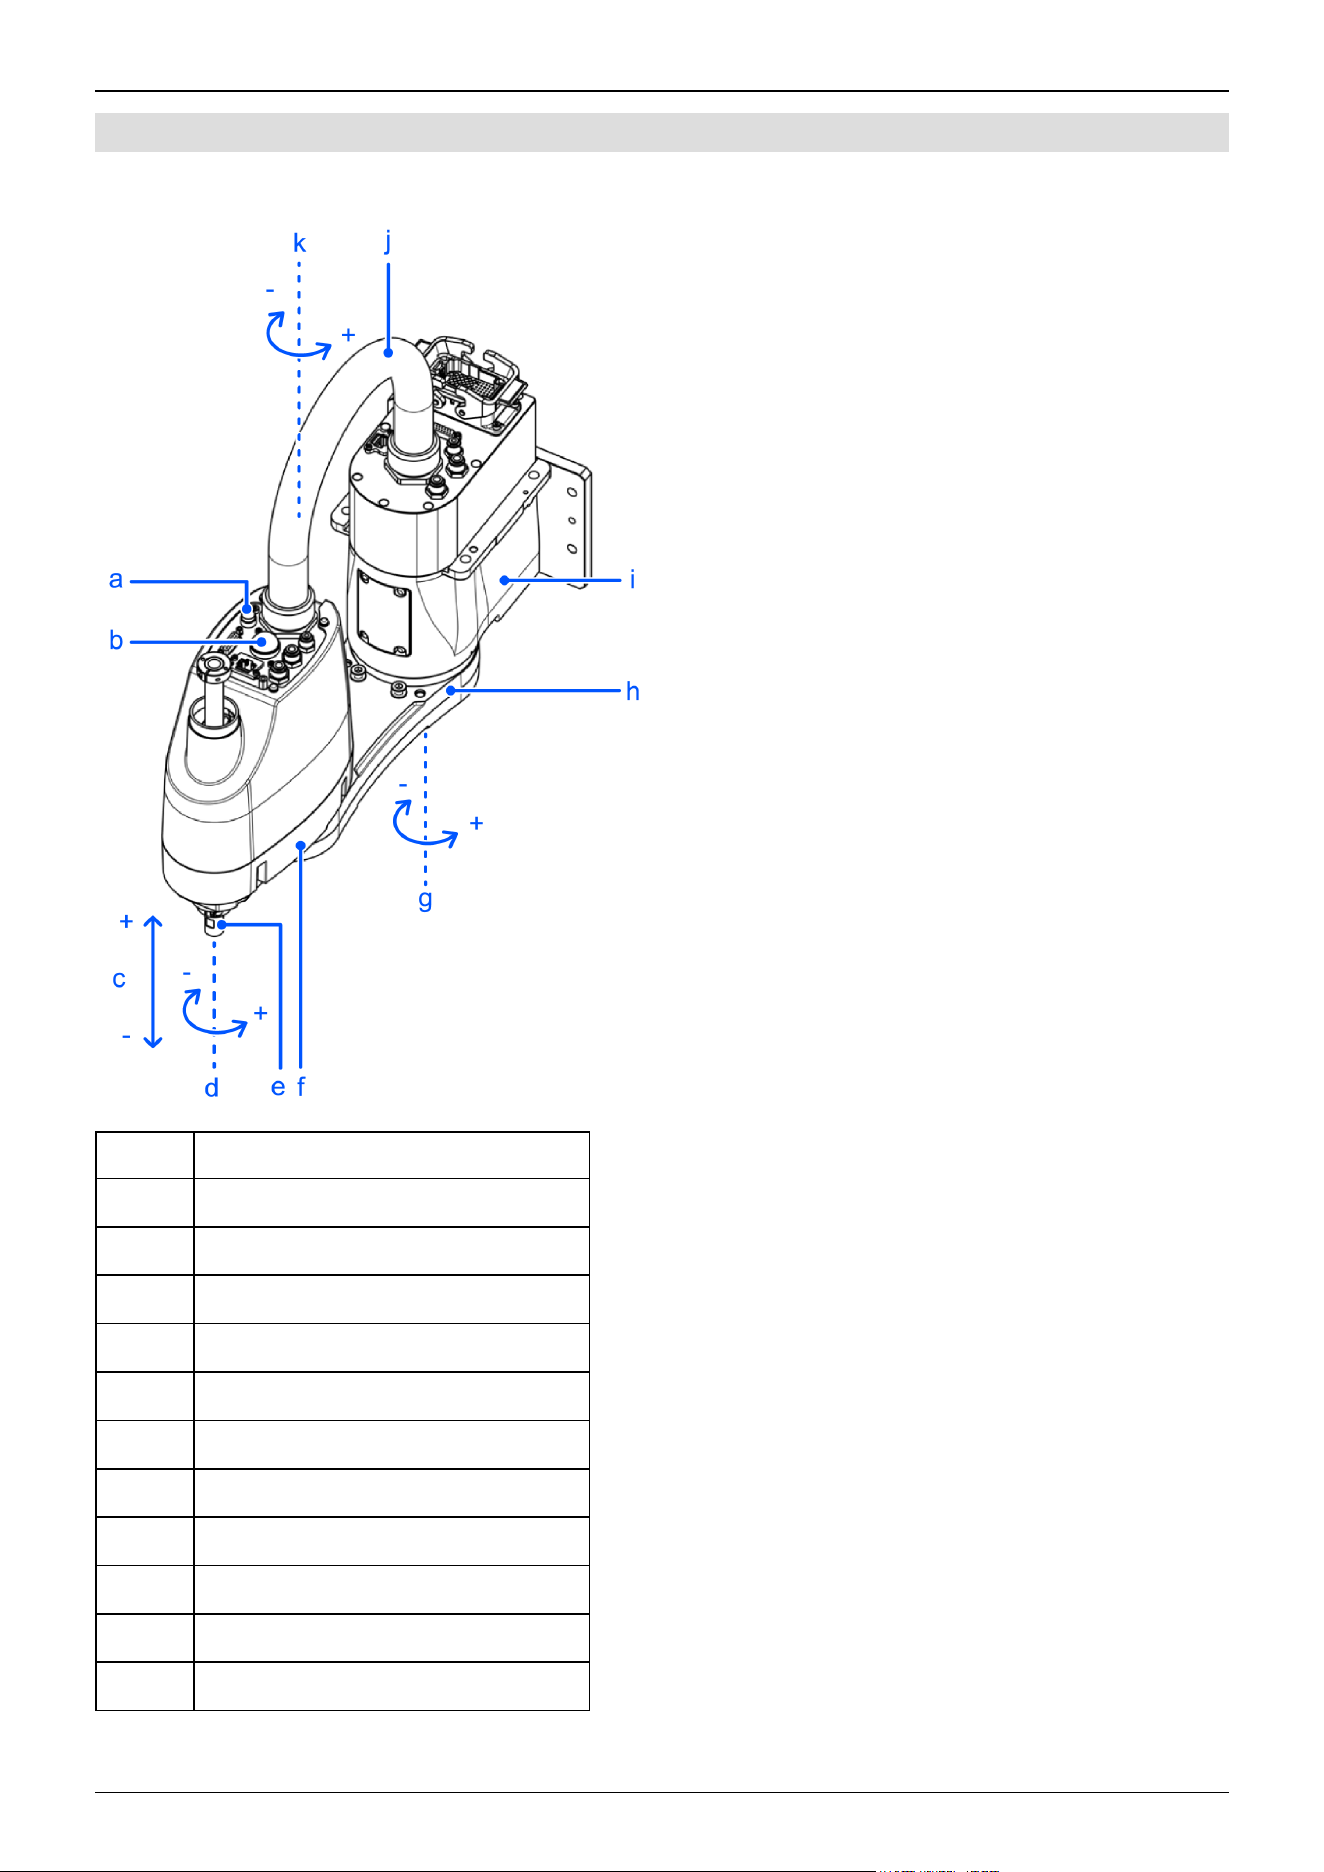
3.2.4.2 Multiple Mounting Specifications
Standard specifications GX4-A/GX4-B/GX4-C**1SM
Symbol Description
a Joint #3 and Joint #4 brake release switch
b Indicating lamp
c Joint #3 (up/down movement)
d Joint #4 (rotation)
e Shaft
f Arm #2
g Joint #1 (rotation)
h Arm #1
i Base
j Conduit tube
k Joint #2 (rotation)
Industrial Robot: SCARA Robots GX series Manual Rev.11
109
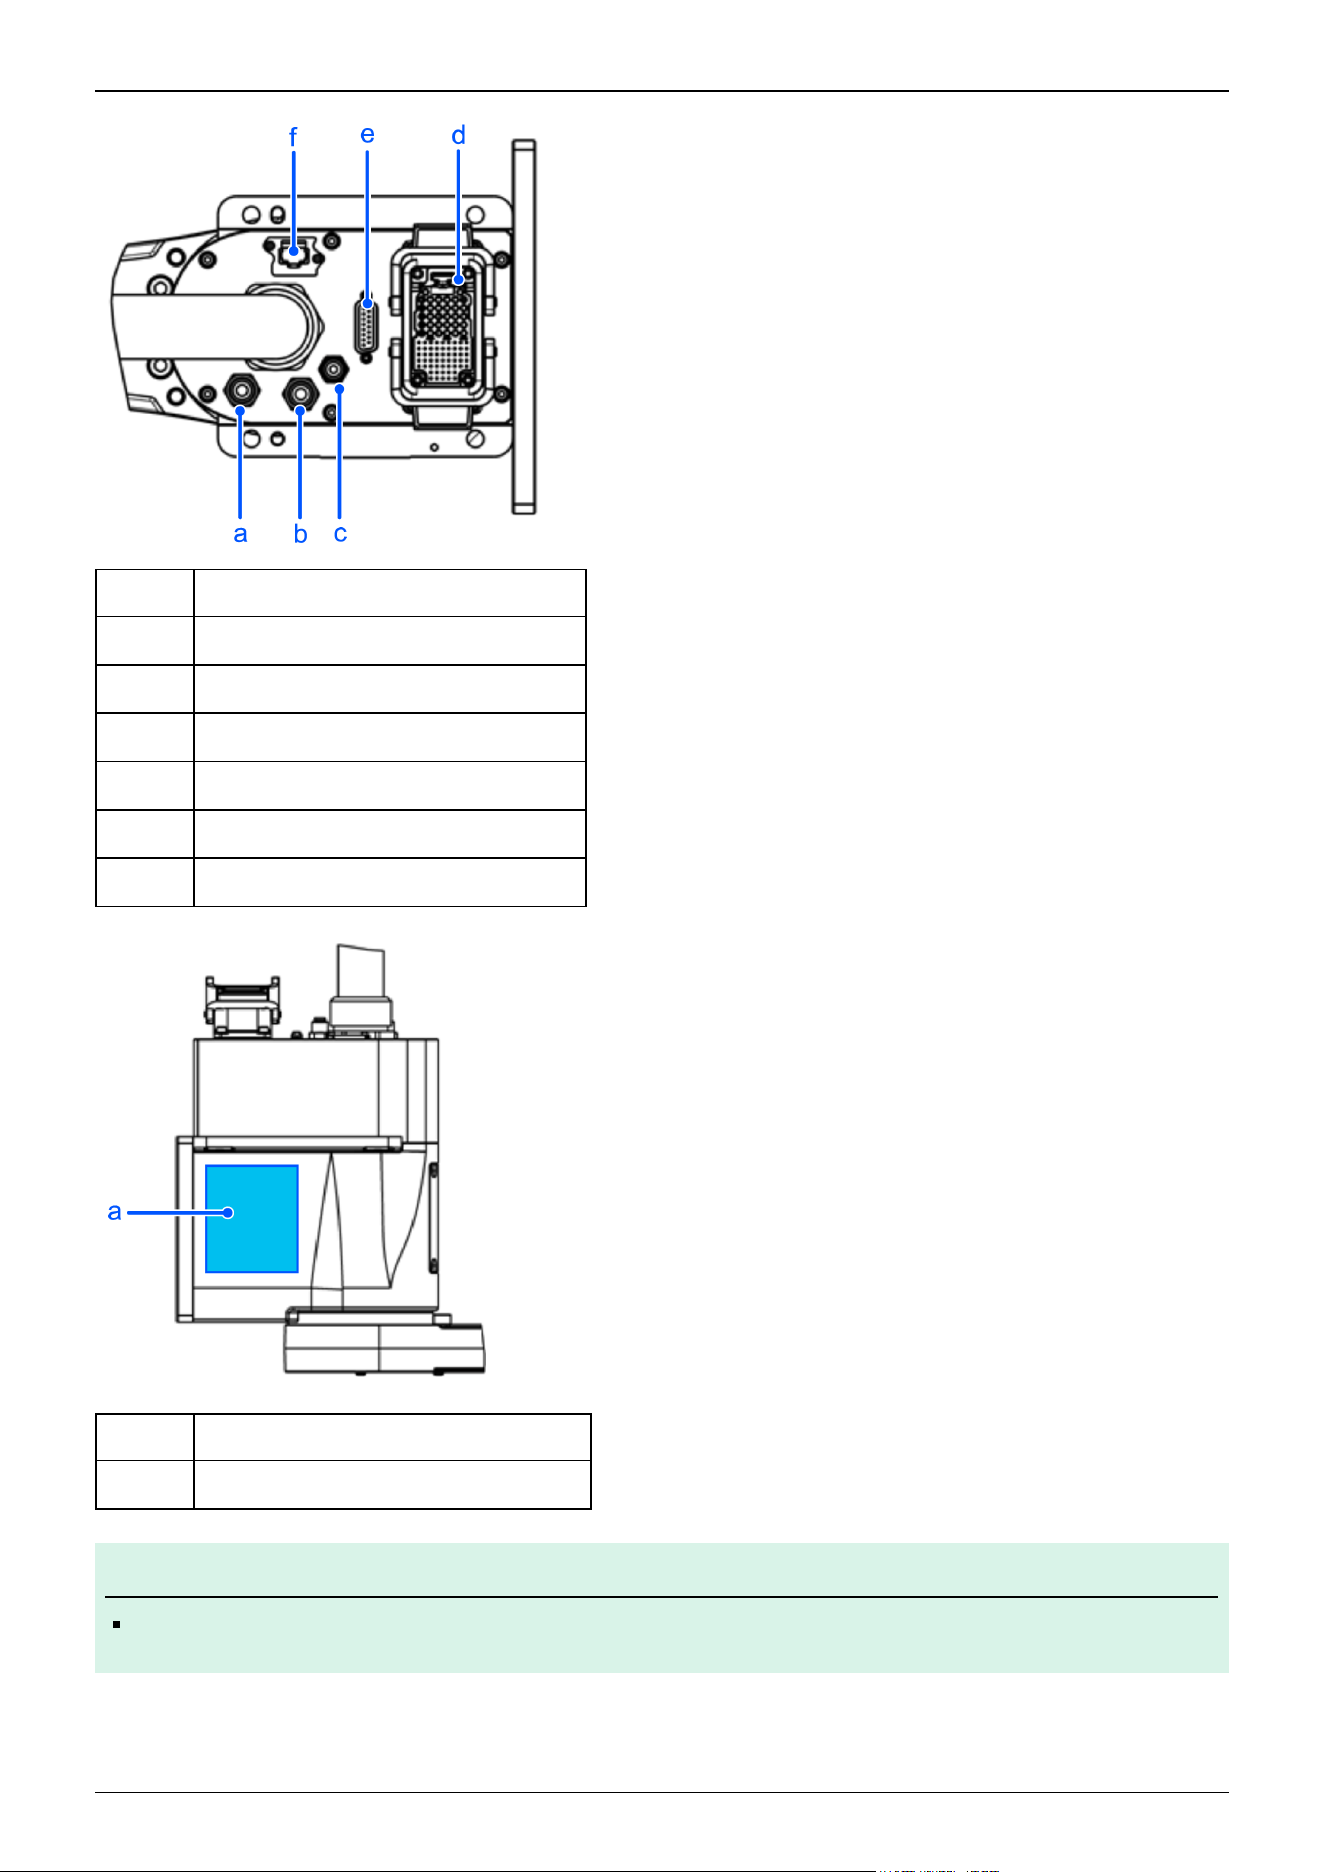
Symbol Description
a Fitting for ø6 mm tube (white)
b Fitting for ø6 mm tube (blue)
c Fitting for ø4 mm tube (blue)
d M/C cable connector
e User connector (15-pin D-sub connector)
f Ethernet connector
Symbol Description
a Face plate (serial number of Manipulator)
Note
The brake release switch is used with both Joint #3 and Joint #4. Press the brake release switch while in the
emergency stop state to simultaneously release the brakes on Joint #3 and Joint #4.
✏
Industrial Robot: SCARA Robots GX series Manual Rev.11
110
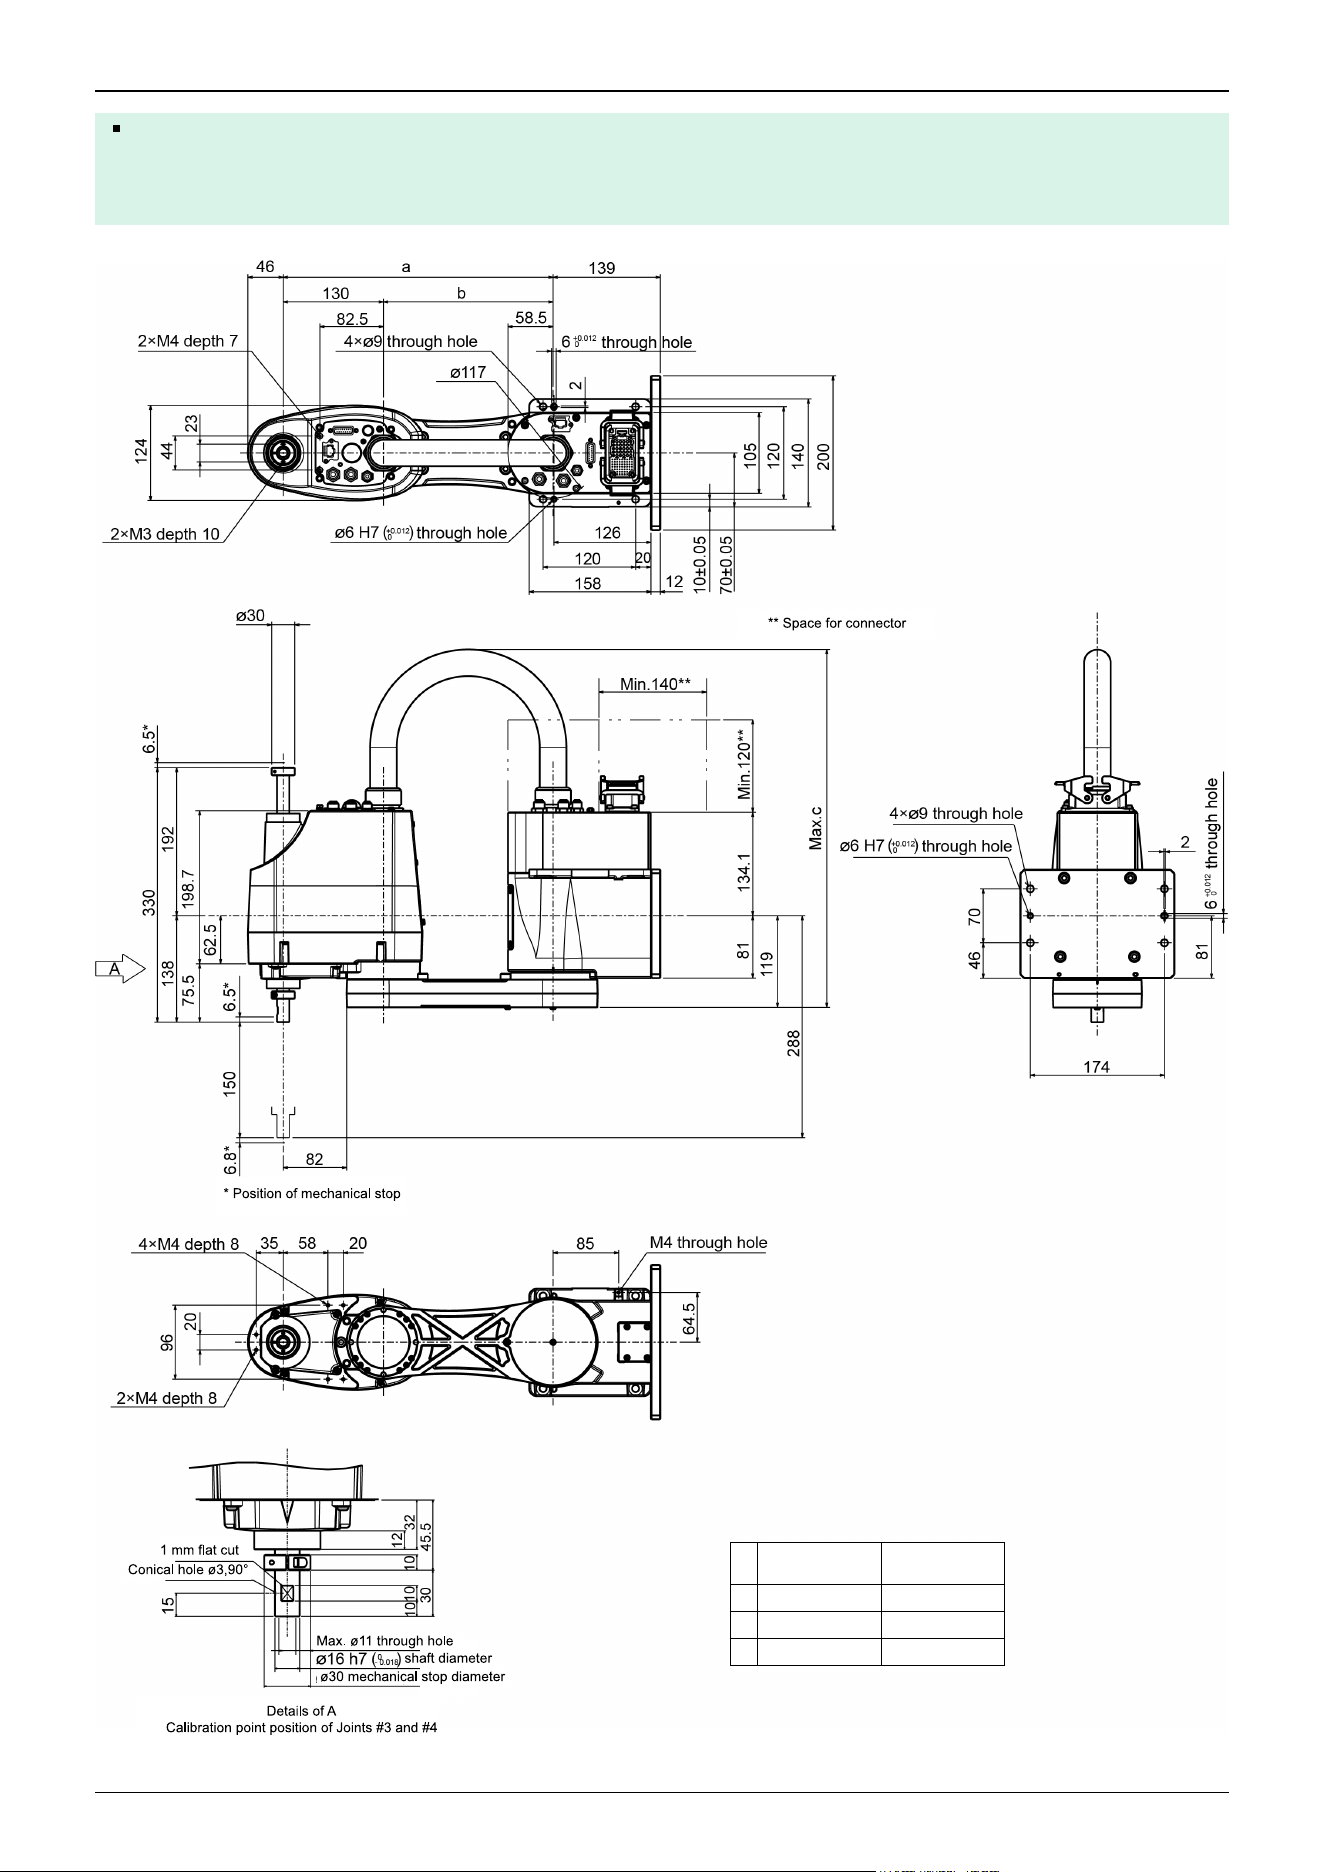
Before starting any maintenance work, be sure to turn off the Controller and inform others in the surrounding
area that work is in progress. Performing any work procedure with the power turned on is extremely
dangerous and may result in electric shock and/or malfunction of the robot system.
GX4-A/GX4-B/
GX4-C301SM, EM
GX4-A/GX4-B/
GX4-C351SM, EM
a 300 350
b 170 220
c 475 500
Industrial Robot: SCARA Robots GX series Manual Rev.11
111
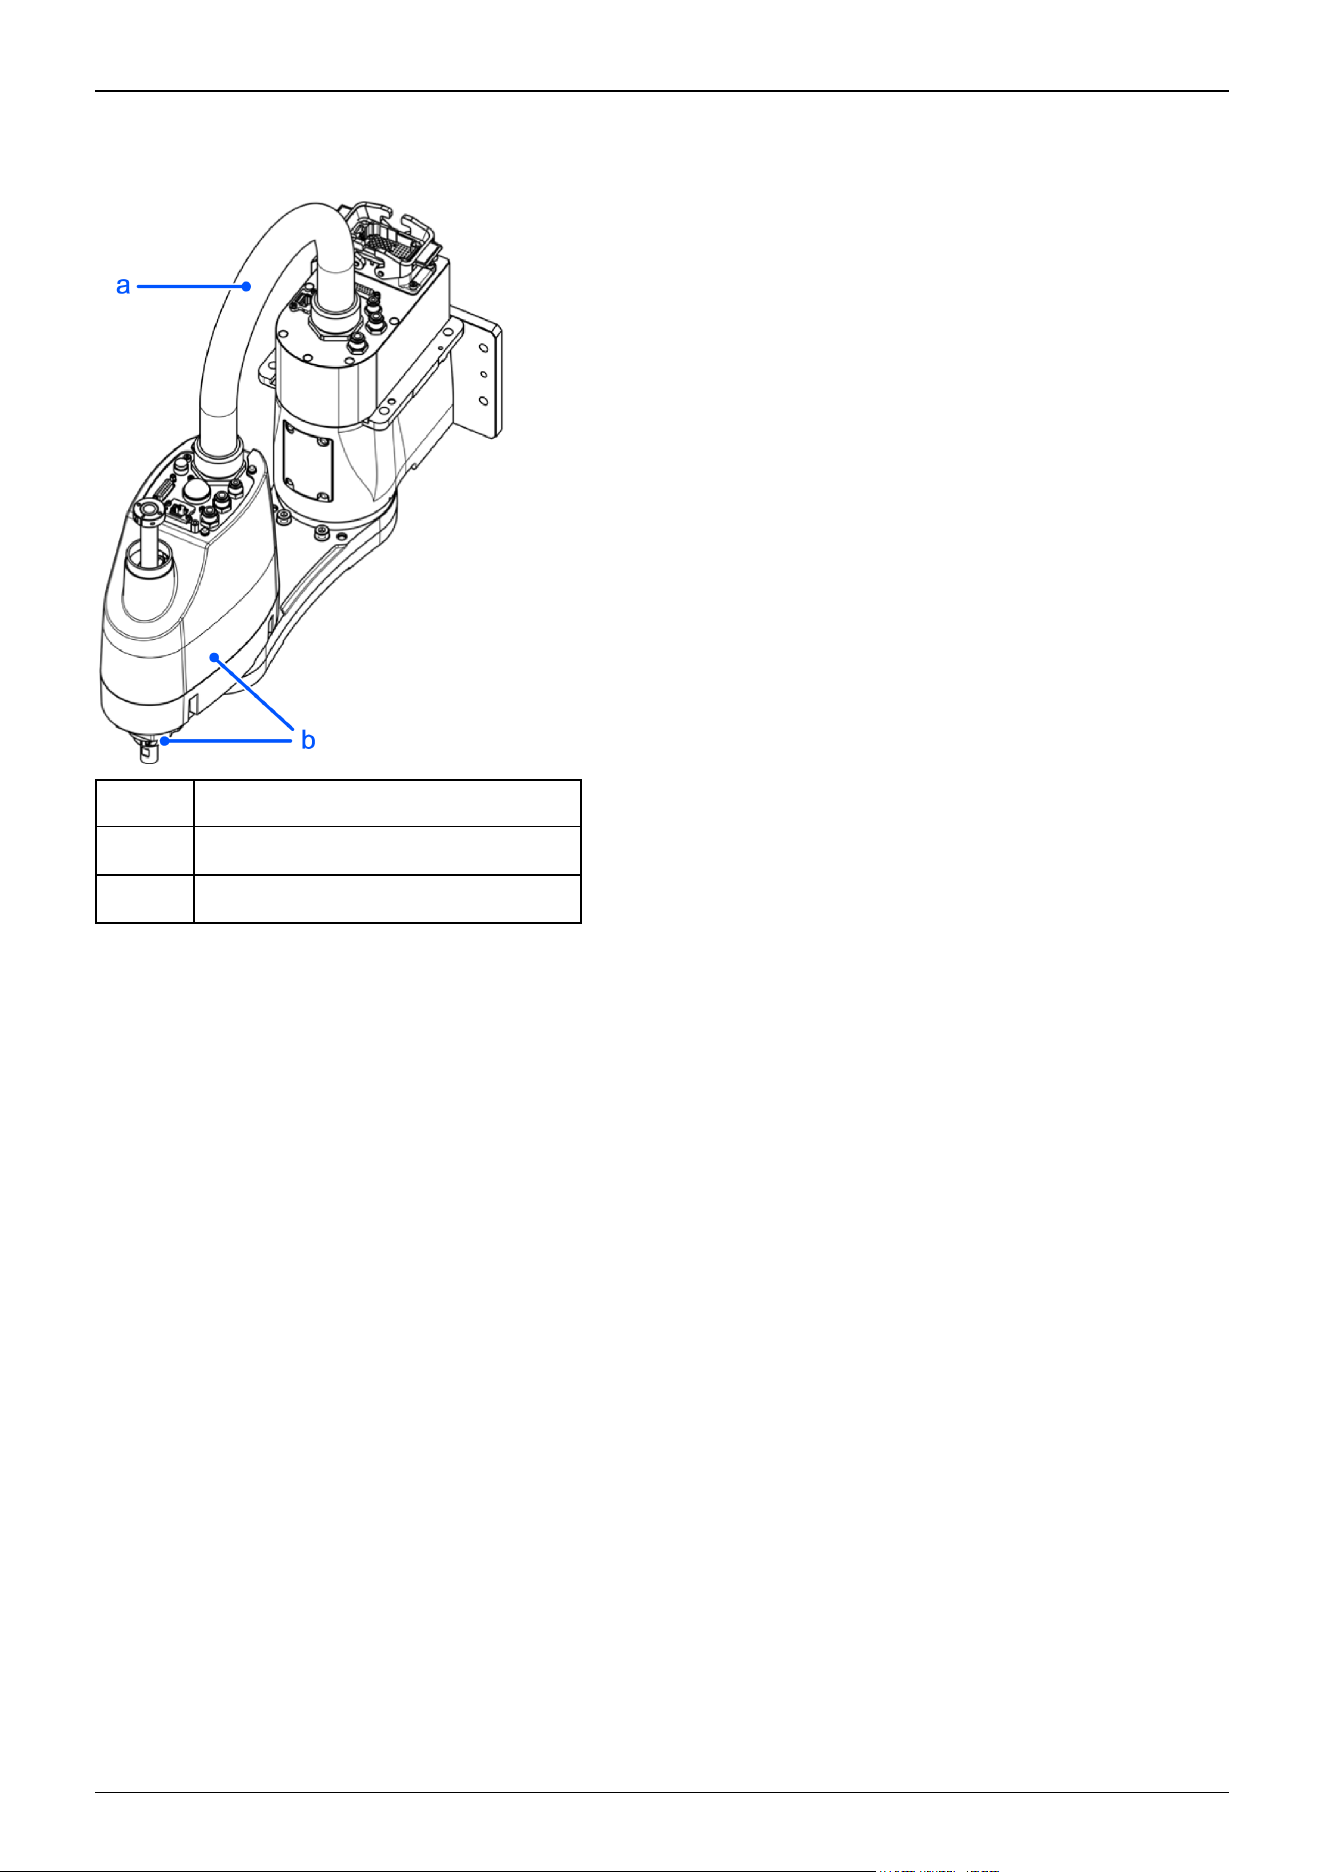
ESD specifications GX4-A/GX4-B/GX4-C**1EM
The part shown below is different from the standard specifications. The external dimensions are identical.
Symbol Description
a Conduit tube (anti-static specifications)
b Plating covers (anti-static specifications)
Industrial Robot: SCARA Robots GX series Manual Rev.11
112
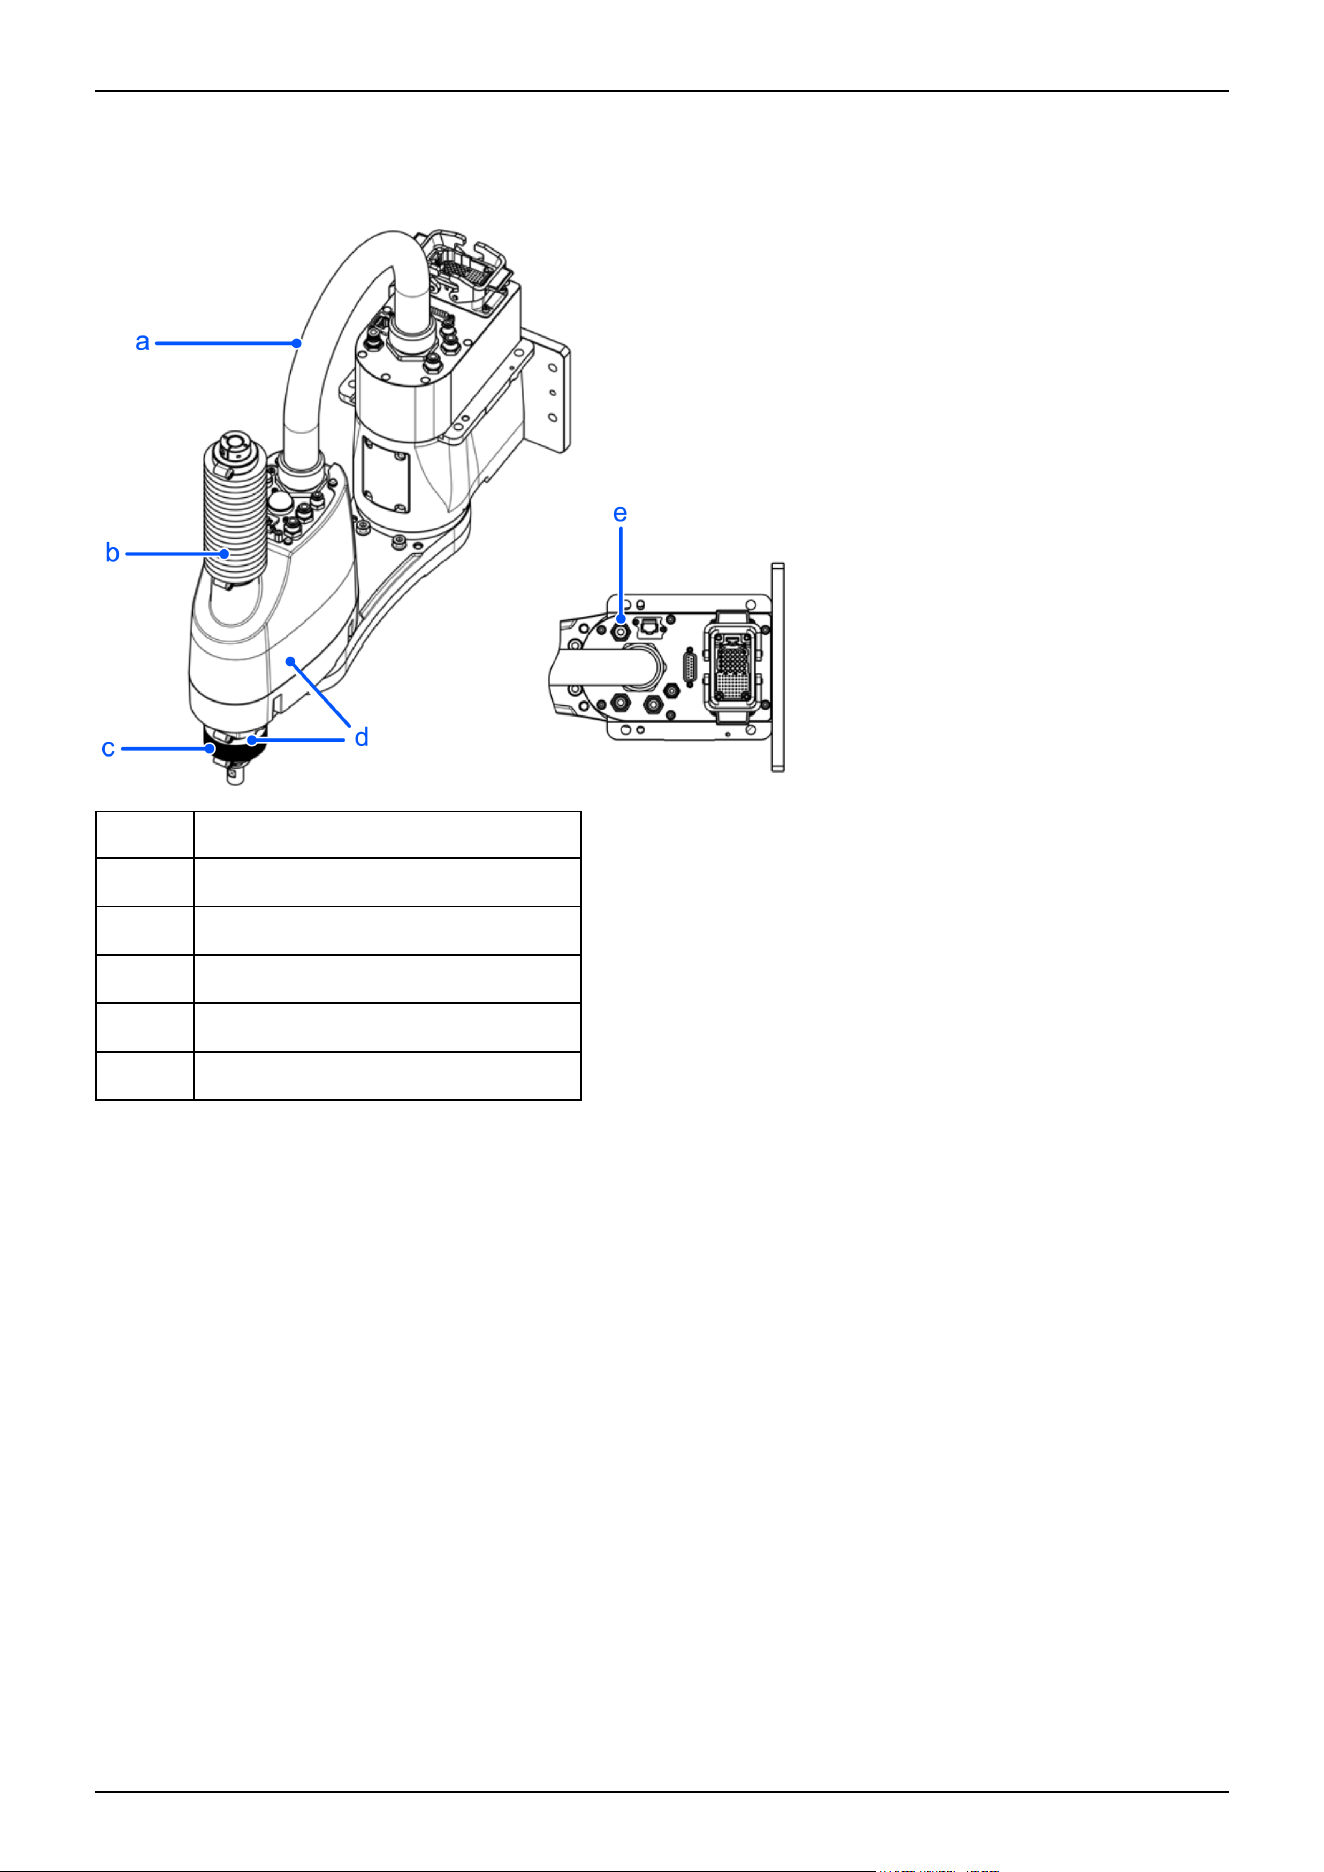
Cleanroom & ESD specifications GX4-A/GX4-B/GX4-C**1CM
The parts shown below differ from the standard specifications.
Symbol Description
a Conduit tube (anti-static specifications)
b Upper bellows
c Lower bellows
d Plating covers (anti-static specifications)
e Exhaust port
Industrial Robot: SCARA Robots GX series Manual Rev.11
113
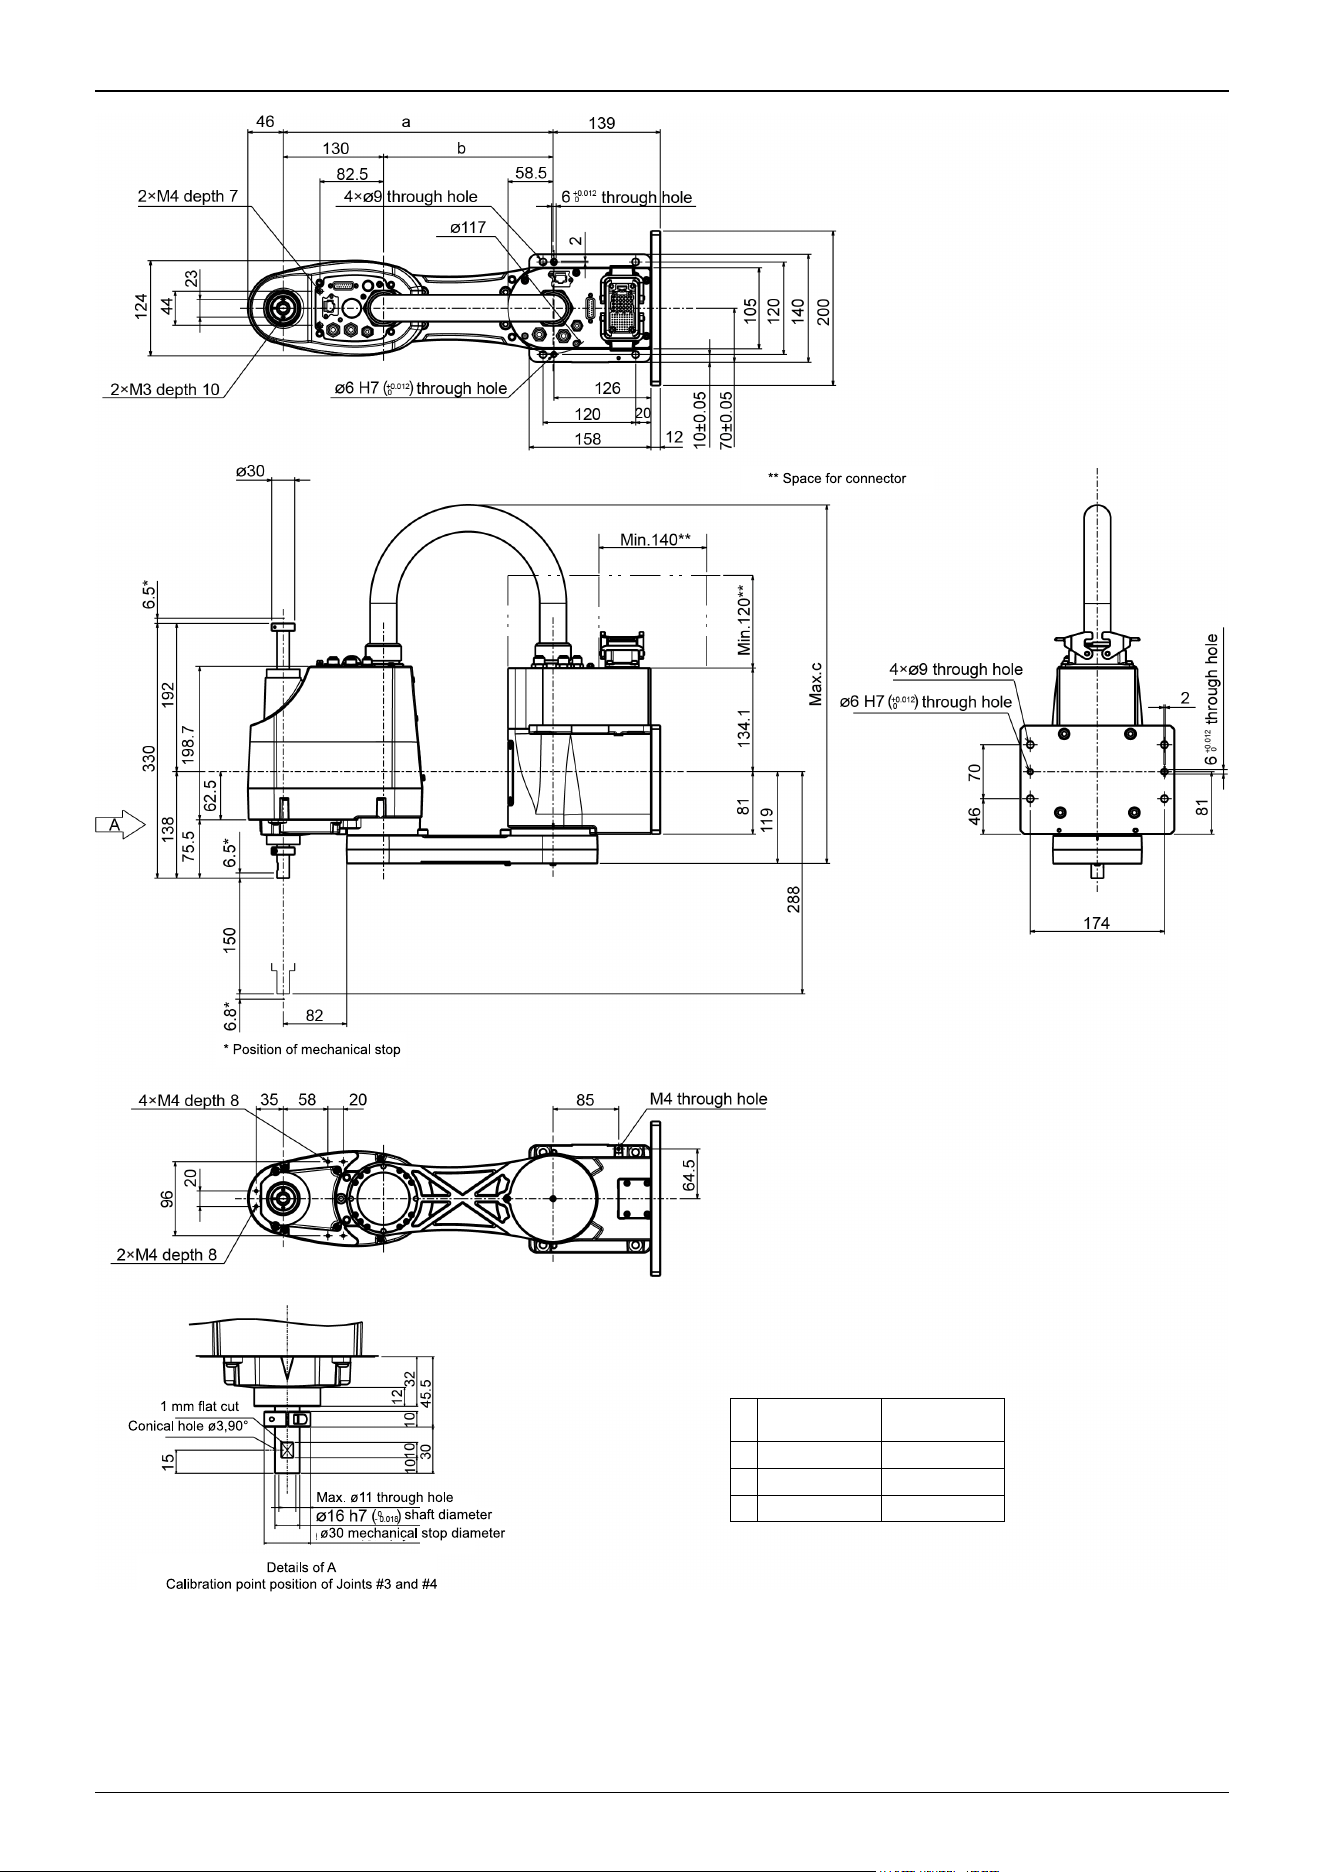
GX4-A/GX4-B/
GX4-C301SM, EM
GX4-A/GX4-B/
GX4-C351SM, EM
a 300 350
b 170 220
c 475 500
Industrial Robot: SCARA Robots GX series Manual Rev.11
114
3.2.5 Specifications Table
For the specifications tables of each model, refer to the following section.
Appendix A: Specifications Table
3.2.6 How to Set the Model
The Manipulator model for your system has been set before shipment from the factory.
Normally, the model does not need to be changed when you receive your system.
CAUTION
If changing the setting of the Manipulator model, be responsible and absolutely certain that the wrong
Manipulator model is not set. Incorrect setting of the Manipulator model may result in abnormal or no
operation by the Manipulator and could even cause safety problems.
KEY POINTS
If a custom specifications number (MT***) or (X***) is written on the face plate (serial number label), the
Manipulator has custom specifications.
Models with custom specifications may require a different setting procedure. Check the custom specifications number and
contact the supplier for more information.
The Manipulator model is set from software. For details, refer to the following manual.
"Epson RC+ User's Guide - Robot Settings"
✏
Industrial Robot: SCARA Robots GX series Manual Rev.11
115
3.3 Environment and Installation
The robot system should be designed and installed by people who have received installation training provided by Epson and
the suppliers. Also, the laws and regulations of the installation country must be followed.
3.3.1 Environment
To ensure that the robot system operates and maintains maximum performance and to ensure its safe use, the robot system
should be installed in an environment that meets the following requirements.
Item Requirement
Ambient temperature
*
1
Installation: 5 to 40°C
Transportation and storage temperature:– 20 to 60°C
Ambient relative humidity
Installation: 10 to 80% (no condensation)
Transport, storage: 10 to 90% (no condensation)
Fast transient burst noise 1 kV or less (signal line)
Electrostatic noise 4 kV or less
Altitude 2,000 m or less
Environment
Install indoors.
Keep away from direct sunlight.
Keep away from dust, oily smoke, salinity, metal powder, and other contaminants.
Keep away from flammable or corrosive liquids and gases.
Keep away from water.
Keep away from shocks or vibrations.
Keep away from sources of electric noise.
Keep away from explosive materials.
Keep away from high amounts of radiation.
KEY POINTS
Manipulators are not designed for use in adverse environments. If the Manipulator will be used in a location that
does not meet the above requirements, please contact the supplier.
*1 The ambient temperature requirement is for the Manipulator only. For details on the environment requirements
for the connected Controller, refer to the following manual.
"Controller Manual"
KEY POINTS
When used in a low-temperature environment near the minimum temperature specified in the product
specifications, or when the unit is idle for a long period of time during holidays or at night, a collision detection
error or similar error may occur immediately after the start of operation due to high resistance in the drive unit. In
such cases, warm-up operation for about 10 minutes is recommended.
✏
✏
Industrial Robot: SCARA Robots GX series Manual Rev.11
116
KEY POINTS
If there are conductive objects such as fences or ladders within 2.5 m of the Manipulator, these objects must be
grounded.
Special environmental requirements
Manipulator surfaces are generally oil-resistant, but if special oils are to be used, oil resistance should be checked before use.
For more information, please contact the supplier.
In environments with rapid changes in temperature and humidity, condensation may form inside the Manipulator.
When handling food directly, it is necessary to make sure that the Manipulator is not likely to contaminate the food. For more
information, please contact the supplier.
The Manipulator cannot be used in corrosive environments where acids or alkalis are present. In environments where rust can
easily form, such as those exposed to salt, rust may also form on the Manipulator.
WARNING
Always use a circuit breaker for the Controller's power supply. Failure to use a circuit breaker may result in an
electrical shock hazard or malfunction due to an electrical leakage.
Select the correct circuit breaker based on the Controller that you are using. For more information, refer to the
following manual.
"Controller Manual"
CAUTION
When cleaning the Manipulator, do not rub it strongly with alcohol or benzene. Coated surfaces may lose their
luster.
3.3.2 Base Table
A base table for anchoring the Manipulator is not supplied. The base table must be fabricated or obtained by the customer.
The shape and size of the base table vary depending on the application of the robot system. As a reference when designing the
base table, the requirements from the Manipulator side are shown here.
The base table must not only be able to bear the weight of the Manipulator but also be able to withstand the dynamic
movement of the Manipulator when it operates at maximum acceleration/deceleration. Ensure that the base table has enough
strength by using reinforcing materials such as crossbeams.
The torque and reaction force produced by the movement of the Manipulator are as follows:
Maximum torque on horizontal surface: 500 N·m
Maximum reaction force in horizontal direction: 2,000 N
Maximum reaction force in vertical direction: 1,000 N
M8 threaded holes are used for mounting the Manipulator on the base table.
Use bolts for mounting the Manipulator that have a strength compliant with ISO 898-1 property class 10.9 or 12.9. For details
✏
Industrial Robot: SCARA Robots GX series Manual Rev.11
117
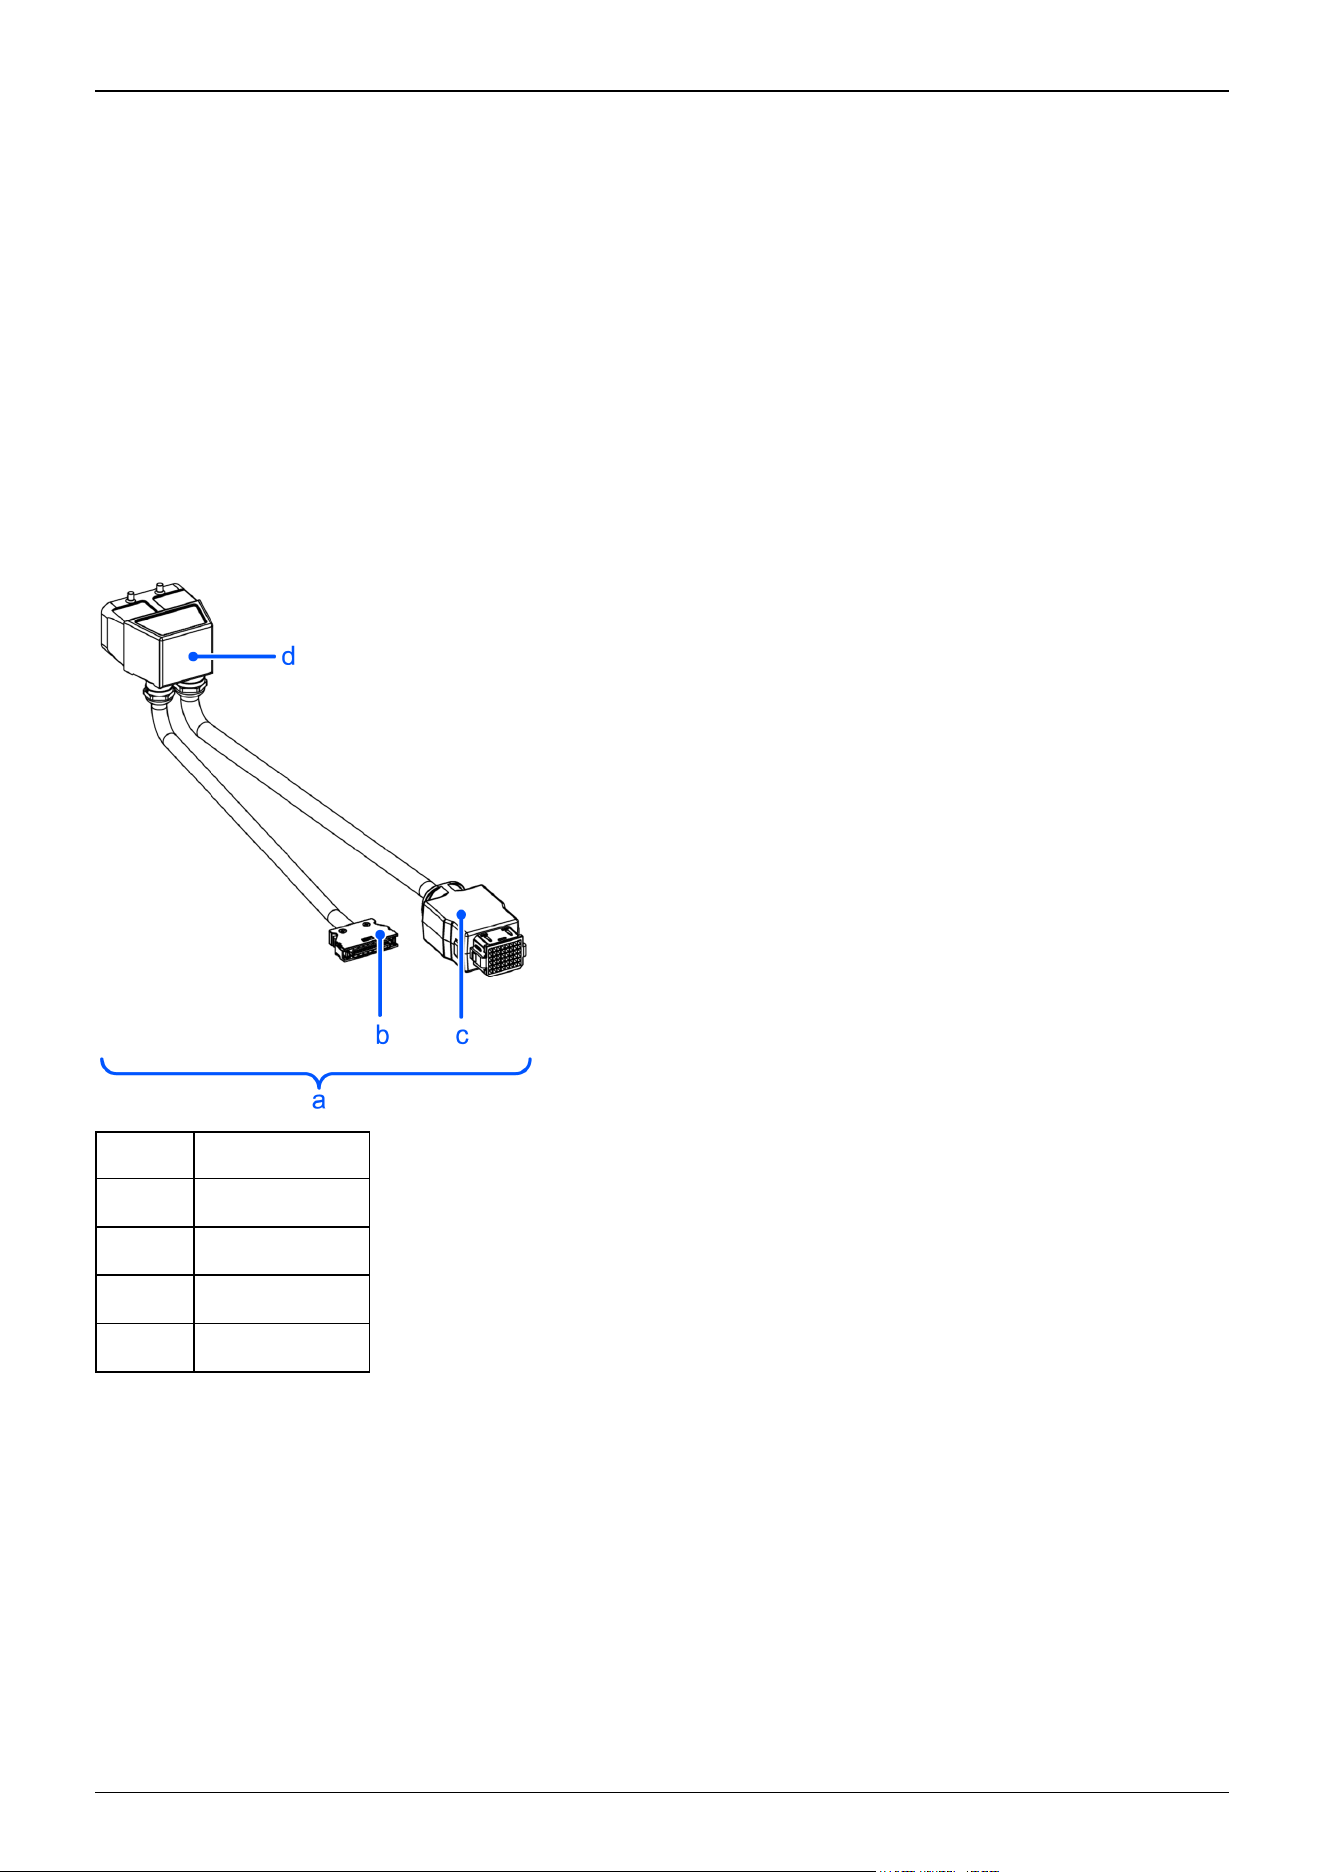
on the dimensions, refer to the following sections.
Names of Parts and Their Dimensions
Manipulator Mounting Dimensions
The plate for the Manipulator mounting face should be at least 20 mm thick and made of steel for reducing vibrations. A
surface roughness of 25 μm or less at the maximum height is appropriate.
The base table must be secured to the floor or wall to prevent it from moving.
The Manipulator mounting surface should have a flatness of 0.5 mm or less and an inclination of 0.5° or less to a horizontal or
vertical surface. If the installation surface does not have the proper flatness, the base of the Manipulator may be damaged or
the robot may be unable to operate at maximum performance.
When using a leveler to adjust the height of the base table, use a screw with M16 diameter or more.
If passing cables through the holes in the base table, refer to the connector dimensions in the figures below.
(Units: mm)
Symbol Description
a M/C cable
b Signal connector
c Power connector
d M/C cable hood
Industrial Robot: SCARA Robots GX series Manual Rev.11
118
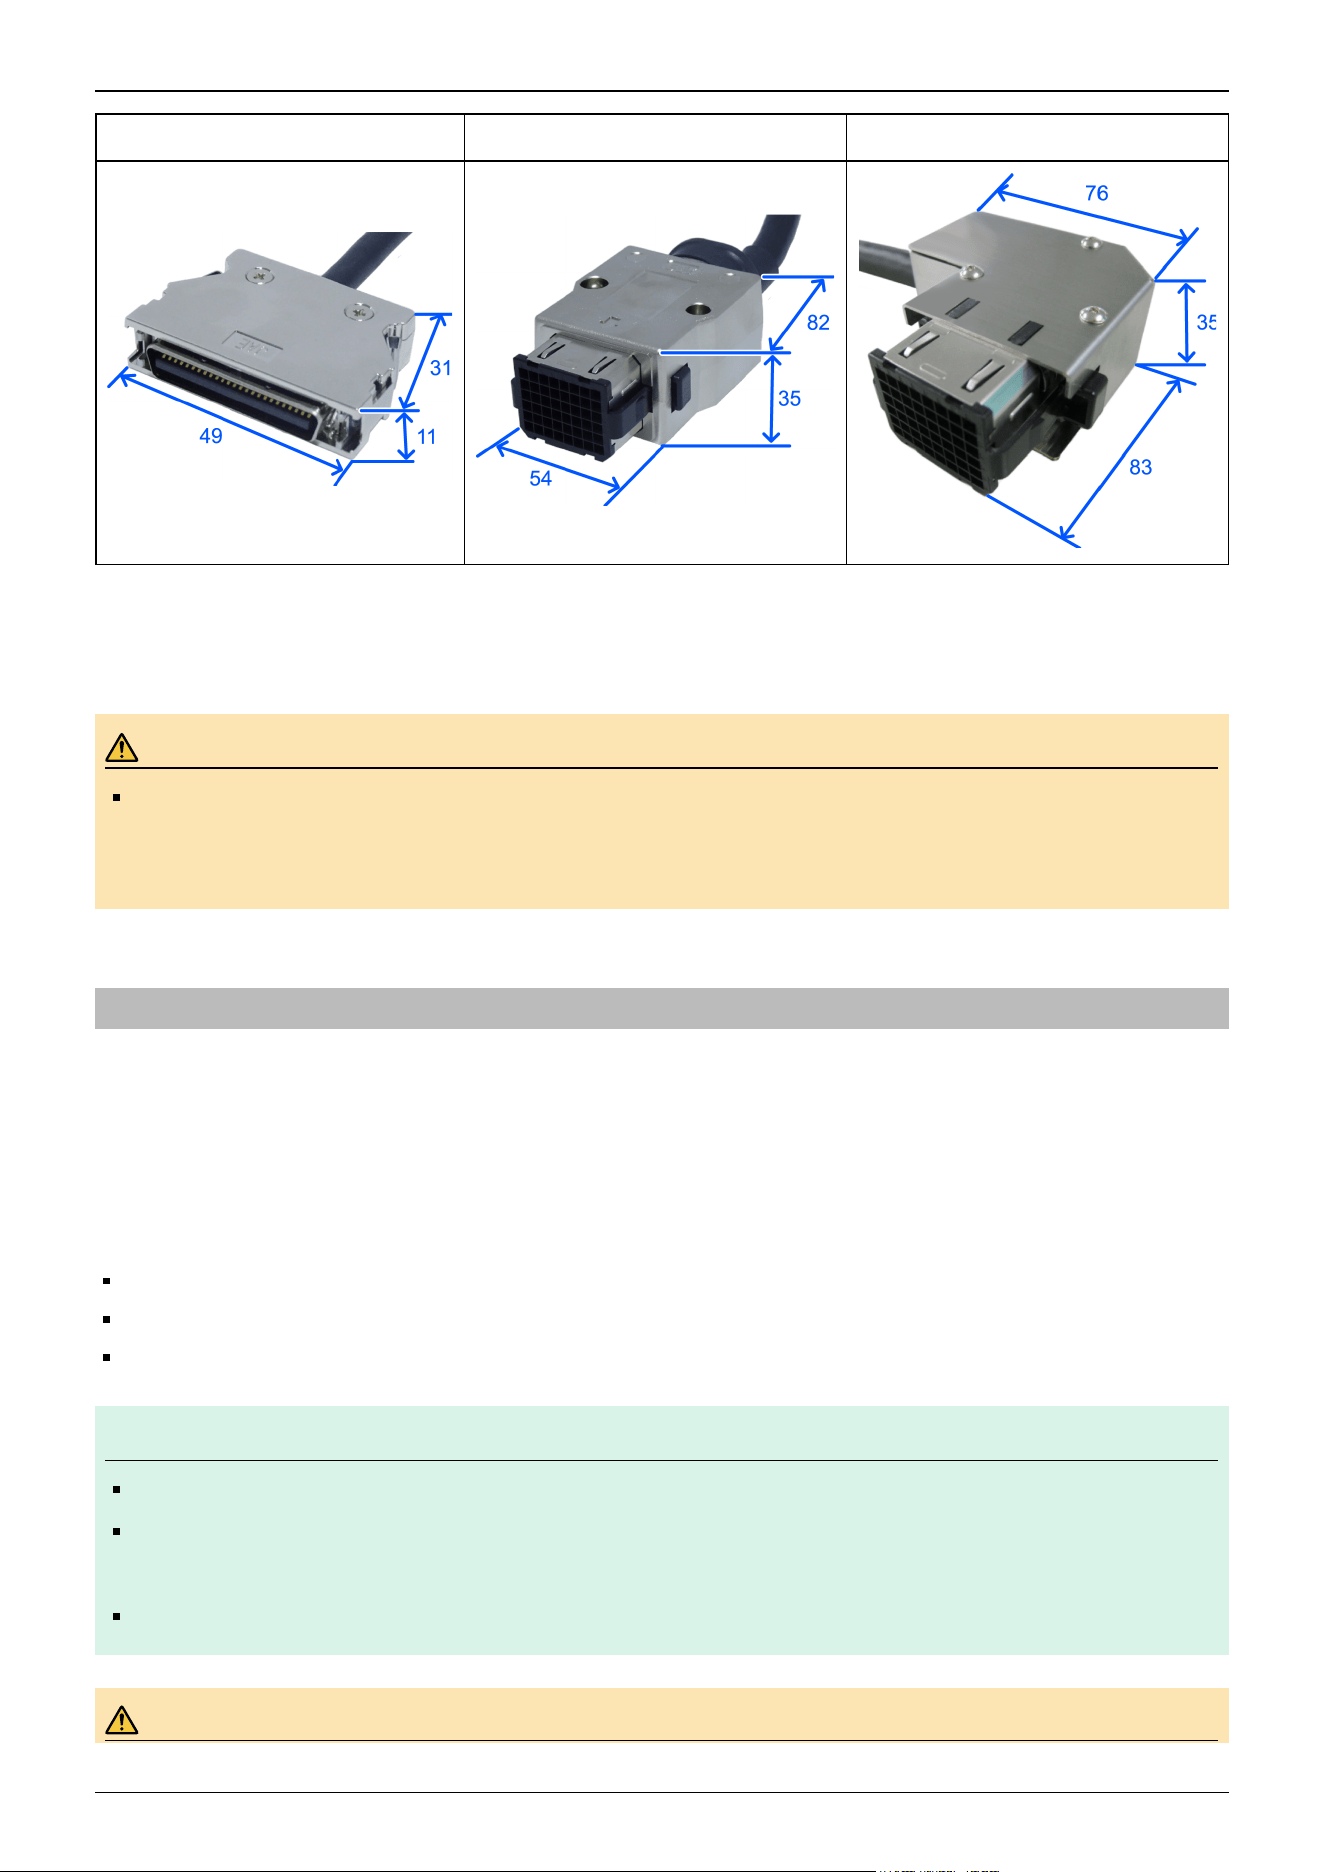
Signal Connector Power Connector (Straight) Power Connector (L-shaped)
For details on the environmental requirements for the space when housing the Controller in the base table, refer to the
following manual.
"Controller Manual"
WARNING
To ensure safety, be sure to install safety barriers for the robot system. For details, refer to the following
section.
Safeguard (SG)
3.3.3 Manipulator Mounting Dimensions
The maximum envelope of the Manipulator is shown in the figures below. The maximum envelope shown in each figure
includes the 60 mm radius of the hand. If the radius of the hand exceeds 60 mm, define the radius as the distance to the outer
edge of the maximum envelope. In addition to the hand, if a camera, solenoid valve, or other component attached to the arm is
large, set the maximum envelope to include the range that the component may reach.
Also, besides the area required for installation of the Manipulator, Controller, peripheral equipment, and other devices, the
following space should be provided at a minimum.
Space for teaching
Space for maintenance and inspection (Space for working safely in the safety barriers)
Space for cables
KEY POINTS
When installing the cables, be sure to maintain sufficient distance from obstacles.
For the minimum bend radius of the M/C cable, refer to the following section.
GX4
Also, leave enough space for other cables so that they are not forced to bend at extreme angles.
WARNING
✏
Industrial Robot: SCARA Robots GX series Manual Rev.11
119
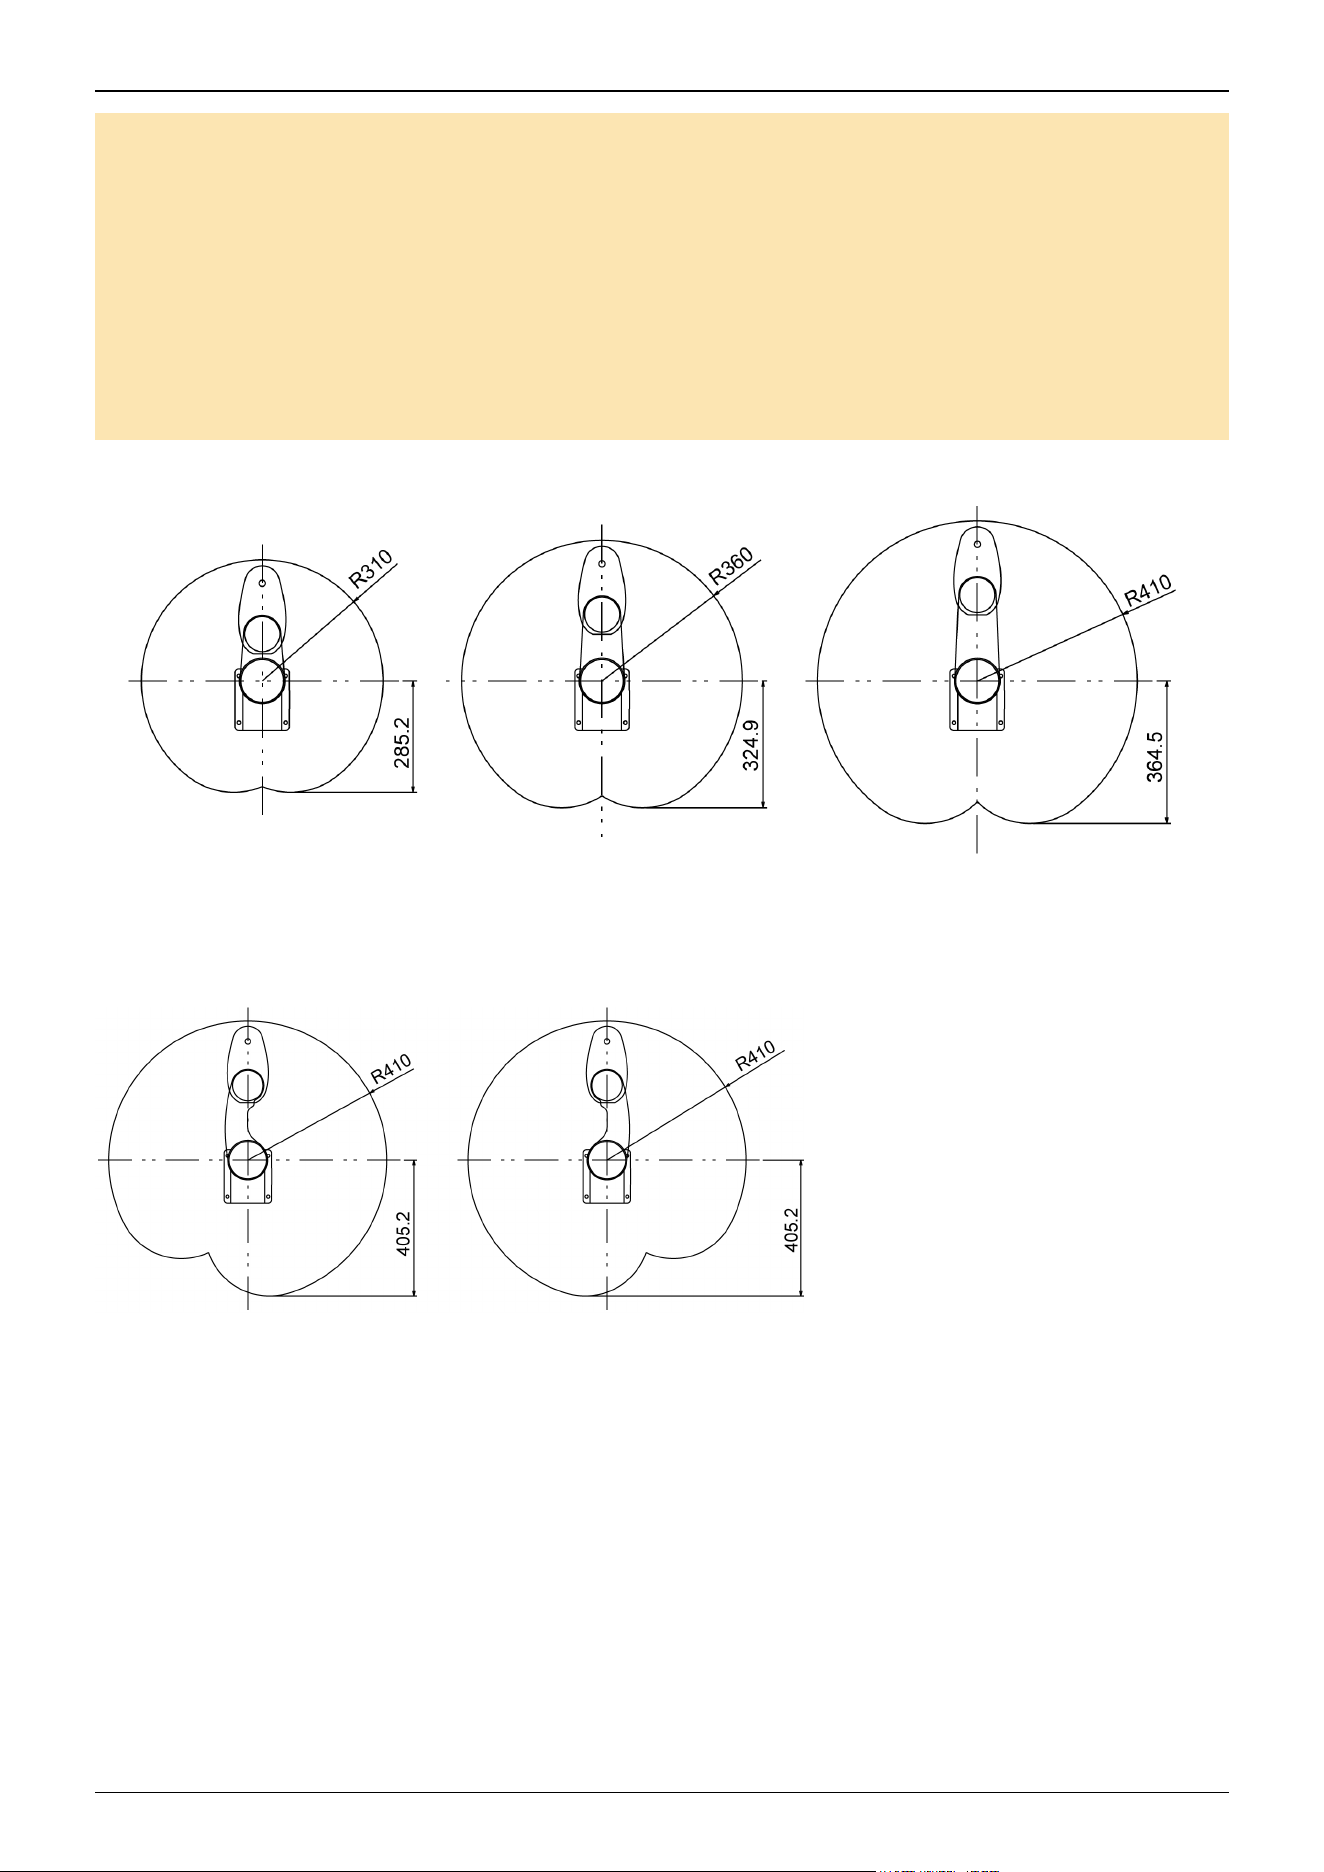
Install the Manipulator in a location with enough space so that a tool or a workpiece tip does not reach a wall or
safety barriers when the Manipulator extends its arm while holding a workpiece.
If the tool or the workpiece tip reaches a wall or safety barriers, it is extremely hazardous and may result in
serious bodily injury to operators and/or severe equipment damage.
The distance between the safety barriers and the tool or workpiece should be set according to ISO 10218-2.
For the stopping time and stopping distance, refer to the following sections.
Appendix B: Stopping Time and Stopping Distance at Emergency Stop
Appendix C: Stopping Time and Stopping Distance When Safeguard is Open
Table top mounting specifications - Straight arm
Table top mounting specifications - Curved arm
GX4-A/GX4-B/
GX4-C251**
GX4-A/GX4-B/
GX4-C301**
GX4-A/GX4-B/
GX4-C351**
GX4-A/GX4-B/
GX4 -C351**-R
GX4-A/GX4-B/
GX4-C351**-L
Industrial Robot: SCARA Robots GX series Manual Rev.11
120
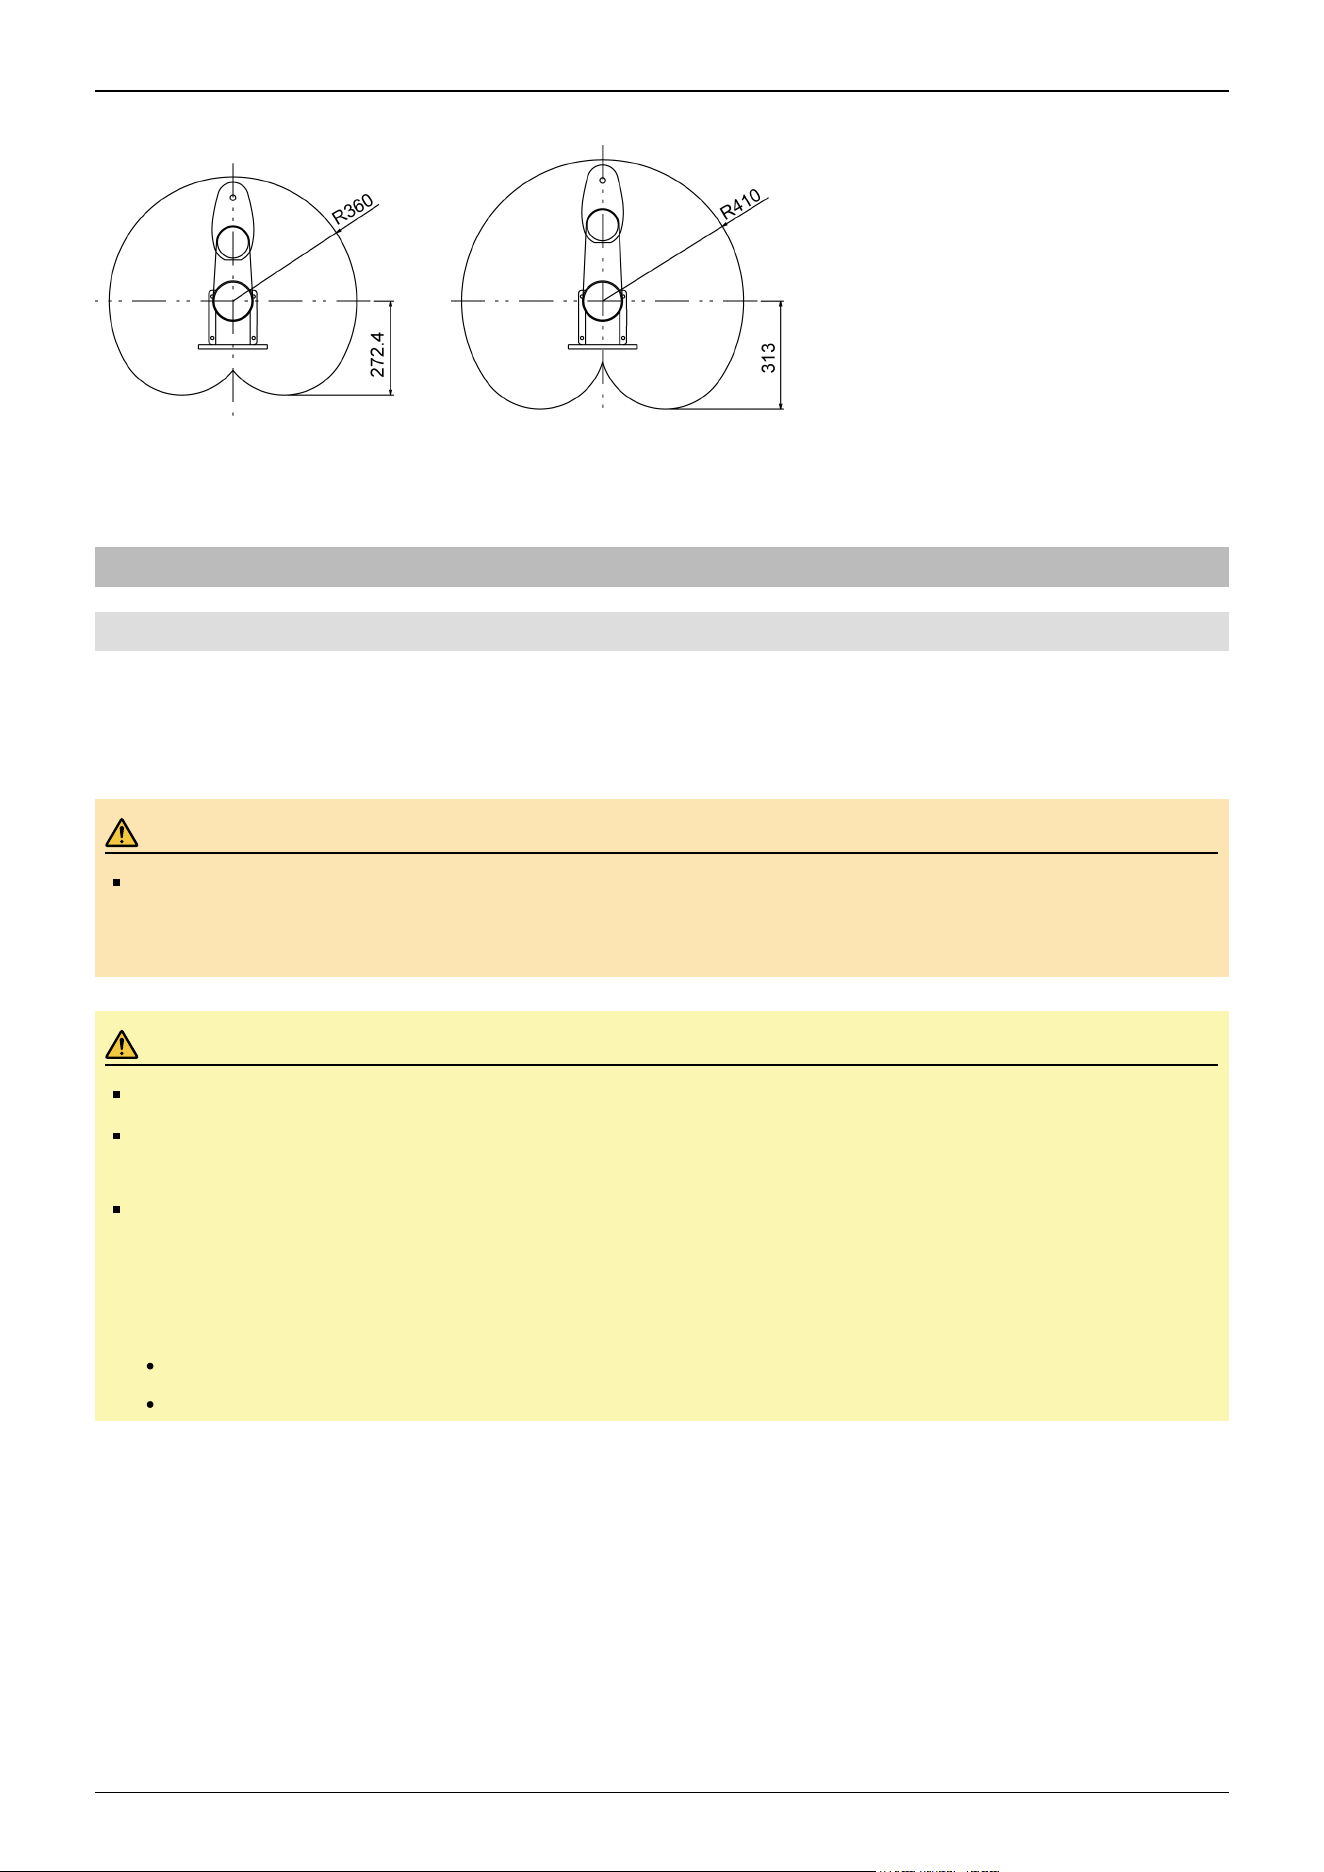
Multiple mounting specifications - Straight
3.3.4 From Unpacking to Installation
3.3.4.1 Safety Information for the Flow from Unpacking to Installation
Transportation and installation of the Manipulator and related equipment should be performed by people who have received
installation training provided by Epson and the suppliers. Also, the laws and regulations of the installation country must be
followed.
WARNING
Only qualified personnel should perform sling work and operate a crane or a forklift. When these operations
are performed by unqualified personnel, it is extremely hazardous and may result in serious bodily injury to
operators and/or severe equipment damage.
CAUTION
Use a cart or the like to transport the Manipulator in the same status as it was delivered.
After removing the fixing bolts securing the Manipulator to the transportation pallet, the Manipulator can fall.
Be careful not to get your hands or feet caught in between the Manipulator.
The Manipulator should be transported by two or more people, either secured to transporting equipment or
carried by placing their hands under Arm #1 or the bottom of the base.
When holding the bottom of the base by hand, be extremely careful not to get your hands or fingers caught.
Table top mounting
GX4-A/GX4-B/GX4-C251**: Approx.15 kg (33 lb)
GX4-A/GX4-B/GX4-C301**: Approx.15 kg (33 lb)
GX4-A/GX4-B/
GX4-C351*M
GX4-A/GX4-B/
GX4-C301*M
Industrial Robot: SCARA Robots GX series Manual Rev.11
121
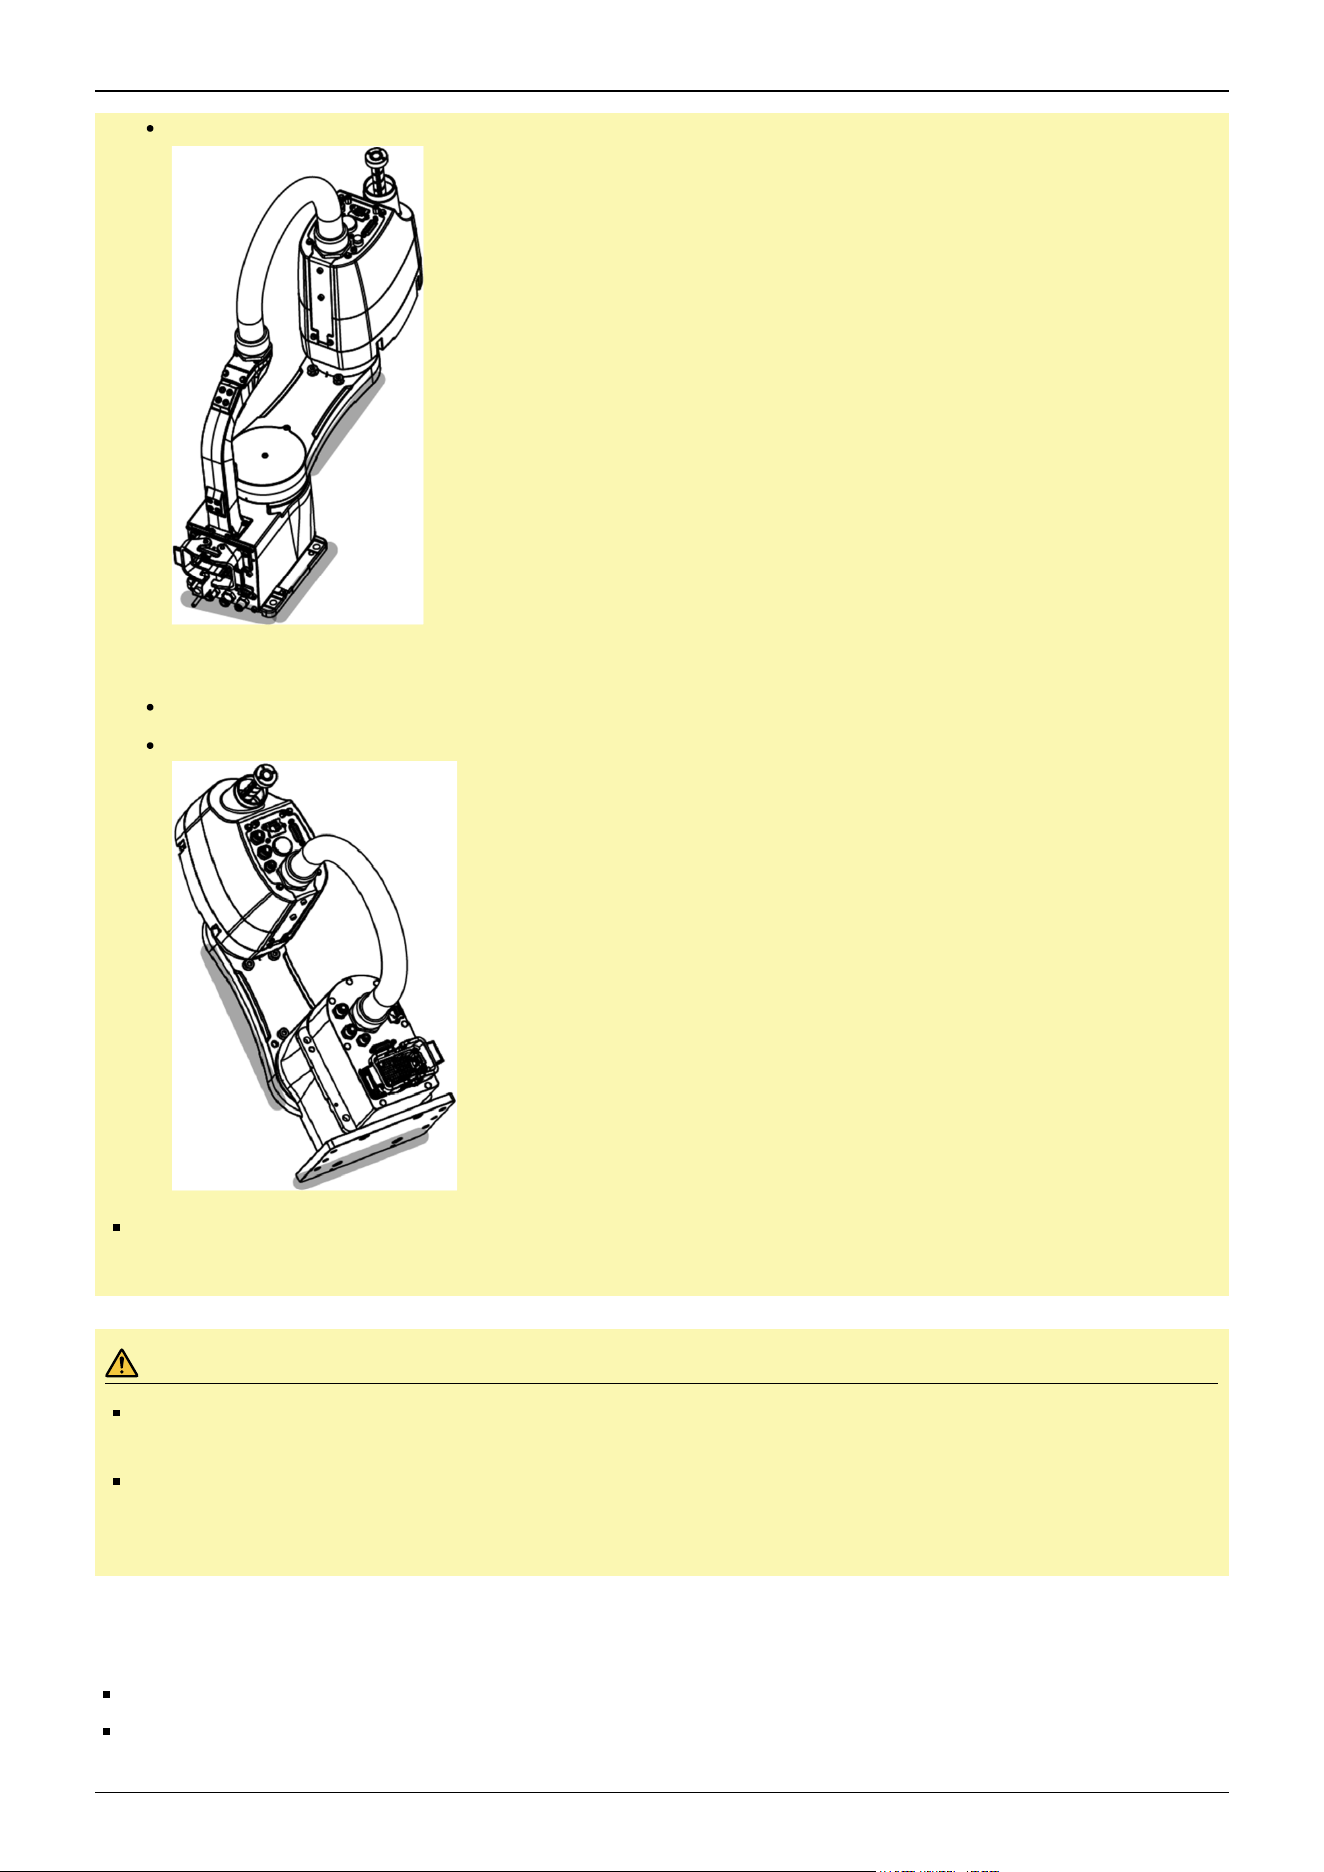
GX4-A/GX4-B/GX4-C351**: Approx.16 kg (35 lb)
Multiple mounting
GX4-A/GX4-B/GX4-C301*M: Approx.17 kg (38 lb)
GX4-A/GX4-B/GX4-C351*M: Approx.17 kg (38 lb)
When transporting the Manipulator over long distances, secure it directly to transporting equipment so that it
will not fall. If necessary, pack the Manipulator using the same packaging as delivery.
CAUTION
The Manipulator must be installed to avoid interference with surrounding buildings, structures, and other
machines and equipment that may create a trapping hazard or pinch points.
Resonance (resonating sound or minute vibrations) may occur during Manipulator operation depending on
the rigidity of the base table. If the resonance occurs, improve the rigidity of the base table or change the
speed or acceleration and deceleration settings of the Manipulator.
For details on the Manipulator installation procedure for models with standard specifications and ESD specifications, refer to
the following sections.
Table Top Mounting Specifications
Multiple Mounting Specifications
Industrial Robot: SCARA Robots GX series Manual Rev.11
122
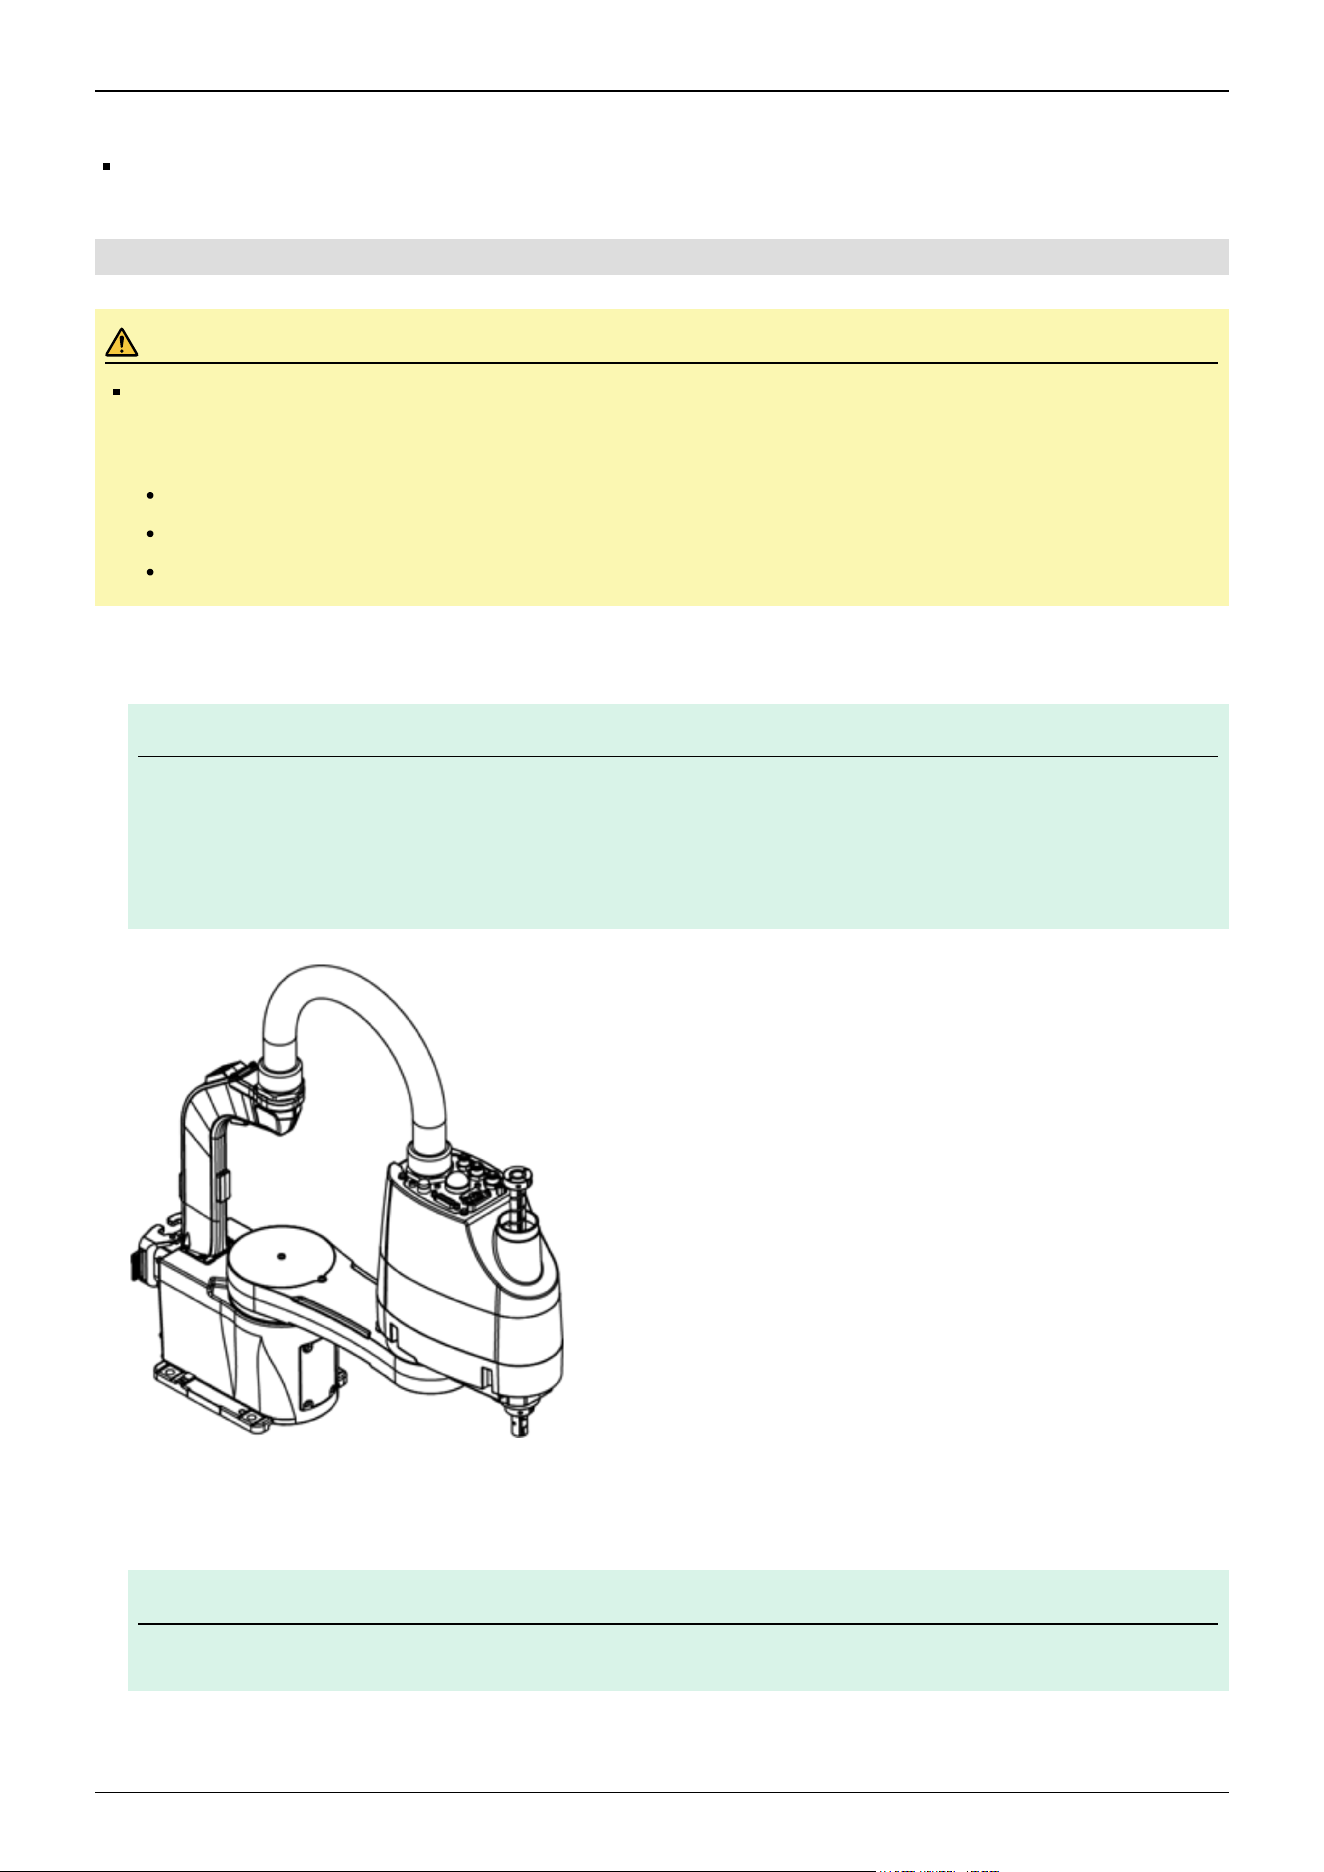
For Manipulator models with cleanroom & ESD specifications, refer to the following section.
Cleanroom & ESD Specifications
3.3.4.2 Table Top Mounting Specifications
CAUTION
Be sure to always use two or more people when installing or relocating the model with table top mounting
specifications. The Manipulator weights are as follows. Be careful not to get hands or feet caught or have
equipment damaged due to dropping of the Manipulator.
GX4-A/GX4-B/GX4-C251**: Approx. 15 kg (33 lb)
GX4-A/GX4-B/GX4-C301**: Approx. 15 kg (33 lb)
GX4-A/GX4-B/GX4-C351**: Approx. 16 kg (35 lb)
1. With the arm extended, take out the Manipulator from the packing box.
KEY POINTS
When taking out the Manipulator from the packing box, be sure that the Manipulator does not drop or fall
because it is not secured in place.
The joints of the Manipulator may rotate due to their own weight. Be careful not to get your hands or fingers
caught.
2. Secure the base to the base table using four bolts. Be sure to always use washers.
Tightening torque: 32.0 N·m (326 kgf·cm)
KEY POINTS
Use bolts with strength specifications compliant with ISO 898-1 property class: 10.9 or 12.9.
✏
✏
Industrial Robot: SCARA Robots GX series Manual Rev.11
123
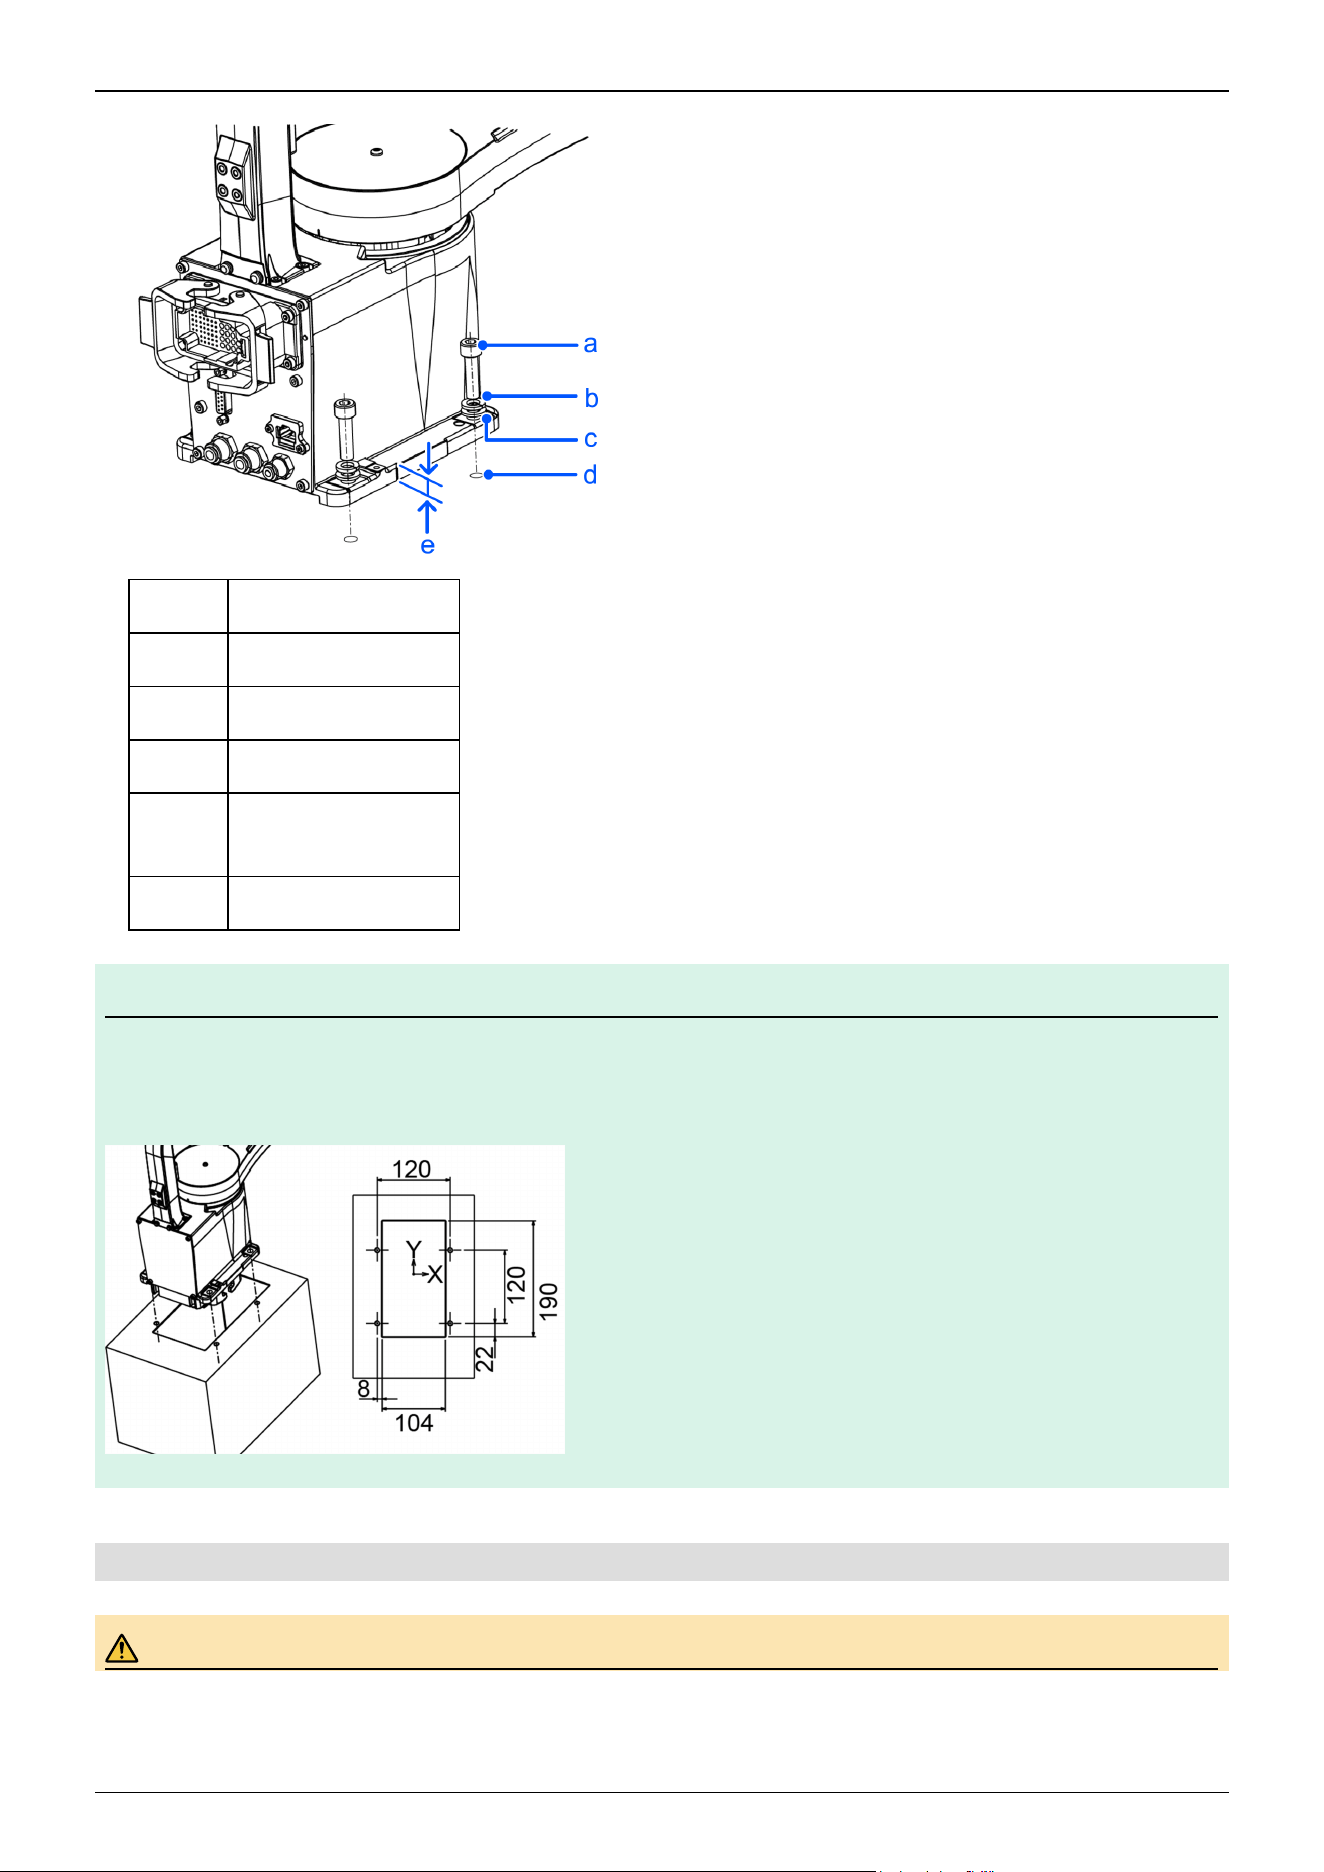
Symbol Description
a 4 × M8 × 30
b Spring washer
c Plain washer
d
4 × M8 threaded hole
(20 mm or more depth)
e 10 mm
KEY POINTS
If the cable is routed by exiting from the bottom side, make sure there is enough space in the center of the base
table where the base will be secured in place.
Height: 190 mm min. Width: 104 mm Depth: 190 mm or more
3.3.4.3 Multiple Mounting Specifications
WARNING
✏
以上
Industrial Robot: SCARA Robots GX series Manual Rev.11
124
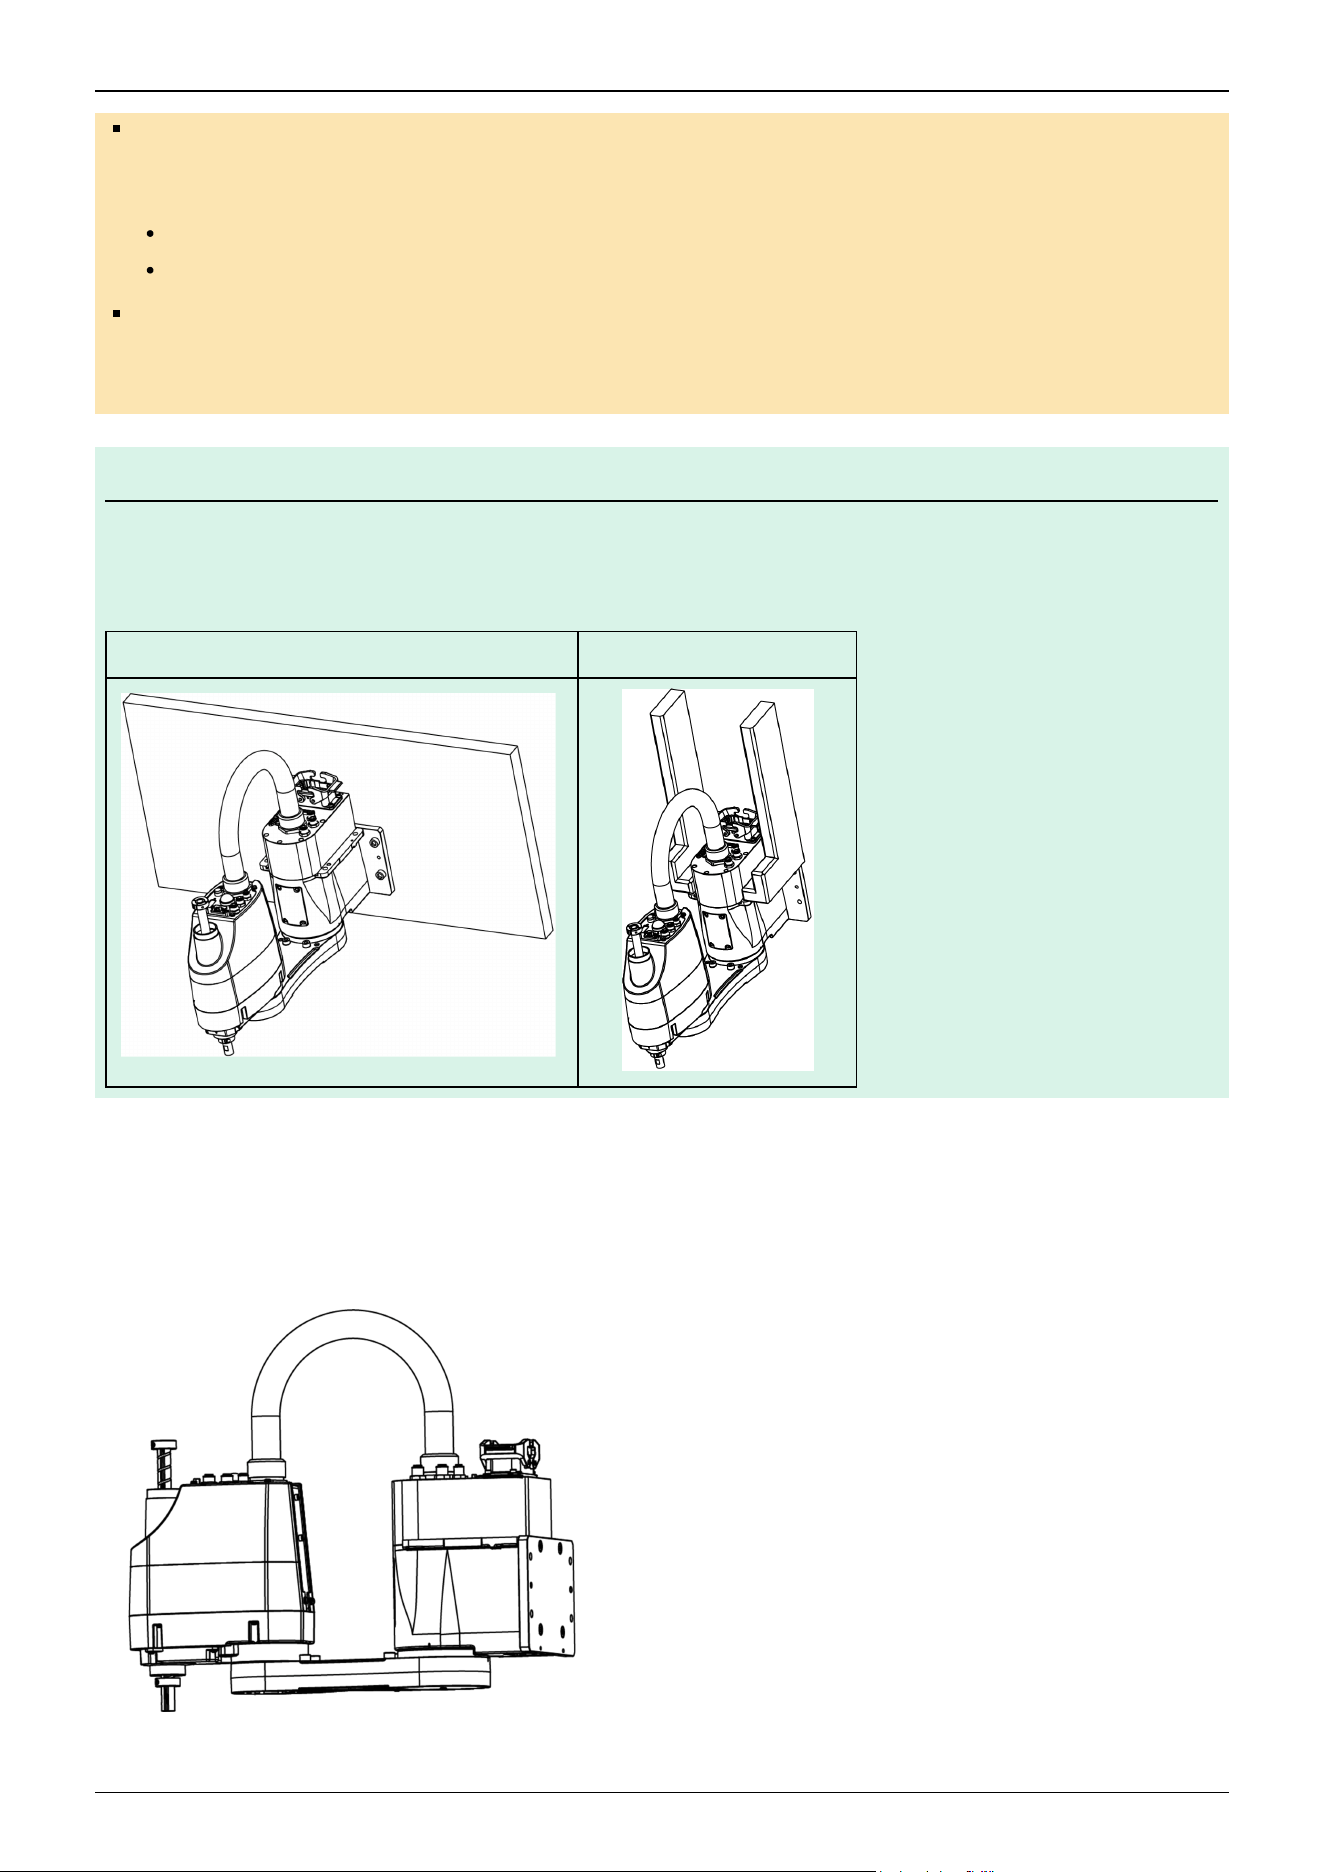
Be sure to always use two or more people when installing or relocating the model with multiple mounting
specifications. The Manipulator weights are as follows. Be careful not to get hands or feet caught or have
equipment damaged due to dropping of the Manipulator.
GX4-A/GX4-B/GX4-C301*M: Approx. 17 kg (38 lb)
GX4-A/GX4-B/GX4-C351*M: Approx. 17 kg (38 lb)
When installing the Manipulator on a wall or similar structure, support the Manipulator until all of the anchor
bolts are secured in place. Removing the support before the anchor bolts are fully secured is extremely
hazardous and may cause the Manipulator to fall.
KEY POINTS
Fabricate the base table for installing the Manipulator with multiple mounting specifications so that it does not
touch any cable and conduit tube connected to the Manipulator.
The recommended installation methods are as follows:
Side (Wall Mounting) Ceiling (Ceiling Mounting)
The recommended wall mounting method is described below.
1. With the arm extended, take out the Manipulator from the packing box.
When taking out the Manipulator from the packing box, be sure that the Manipulator does not drop or fall because it is not
secured in place.
The joints of the Manipulator may rotate due to their own weight. Be careful not to get your hands or fingers caught.
✏
Industrial Robot: SCARA Robots GX series Manual Rev.11
125
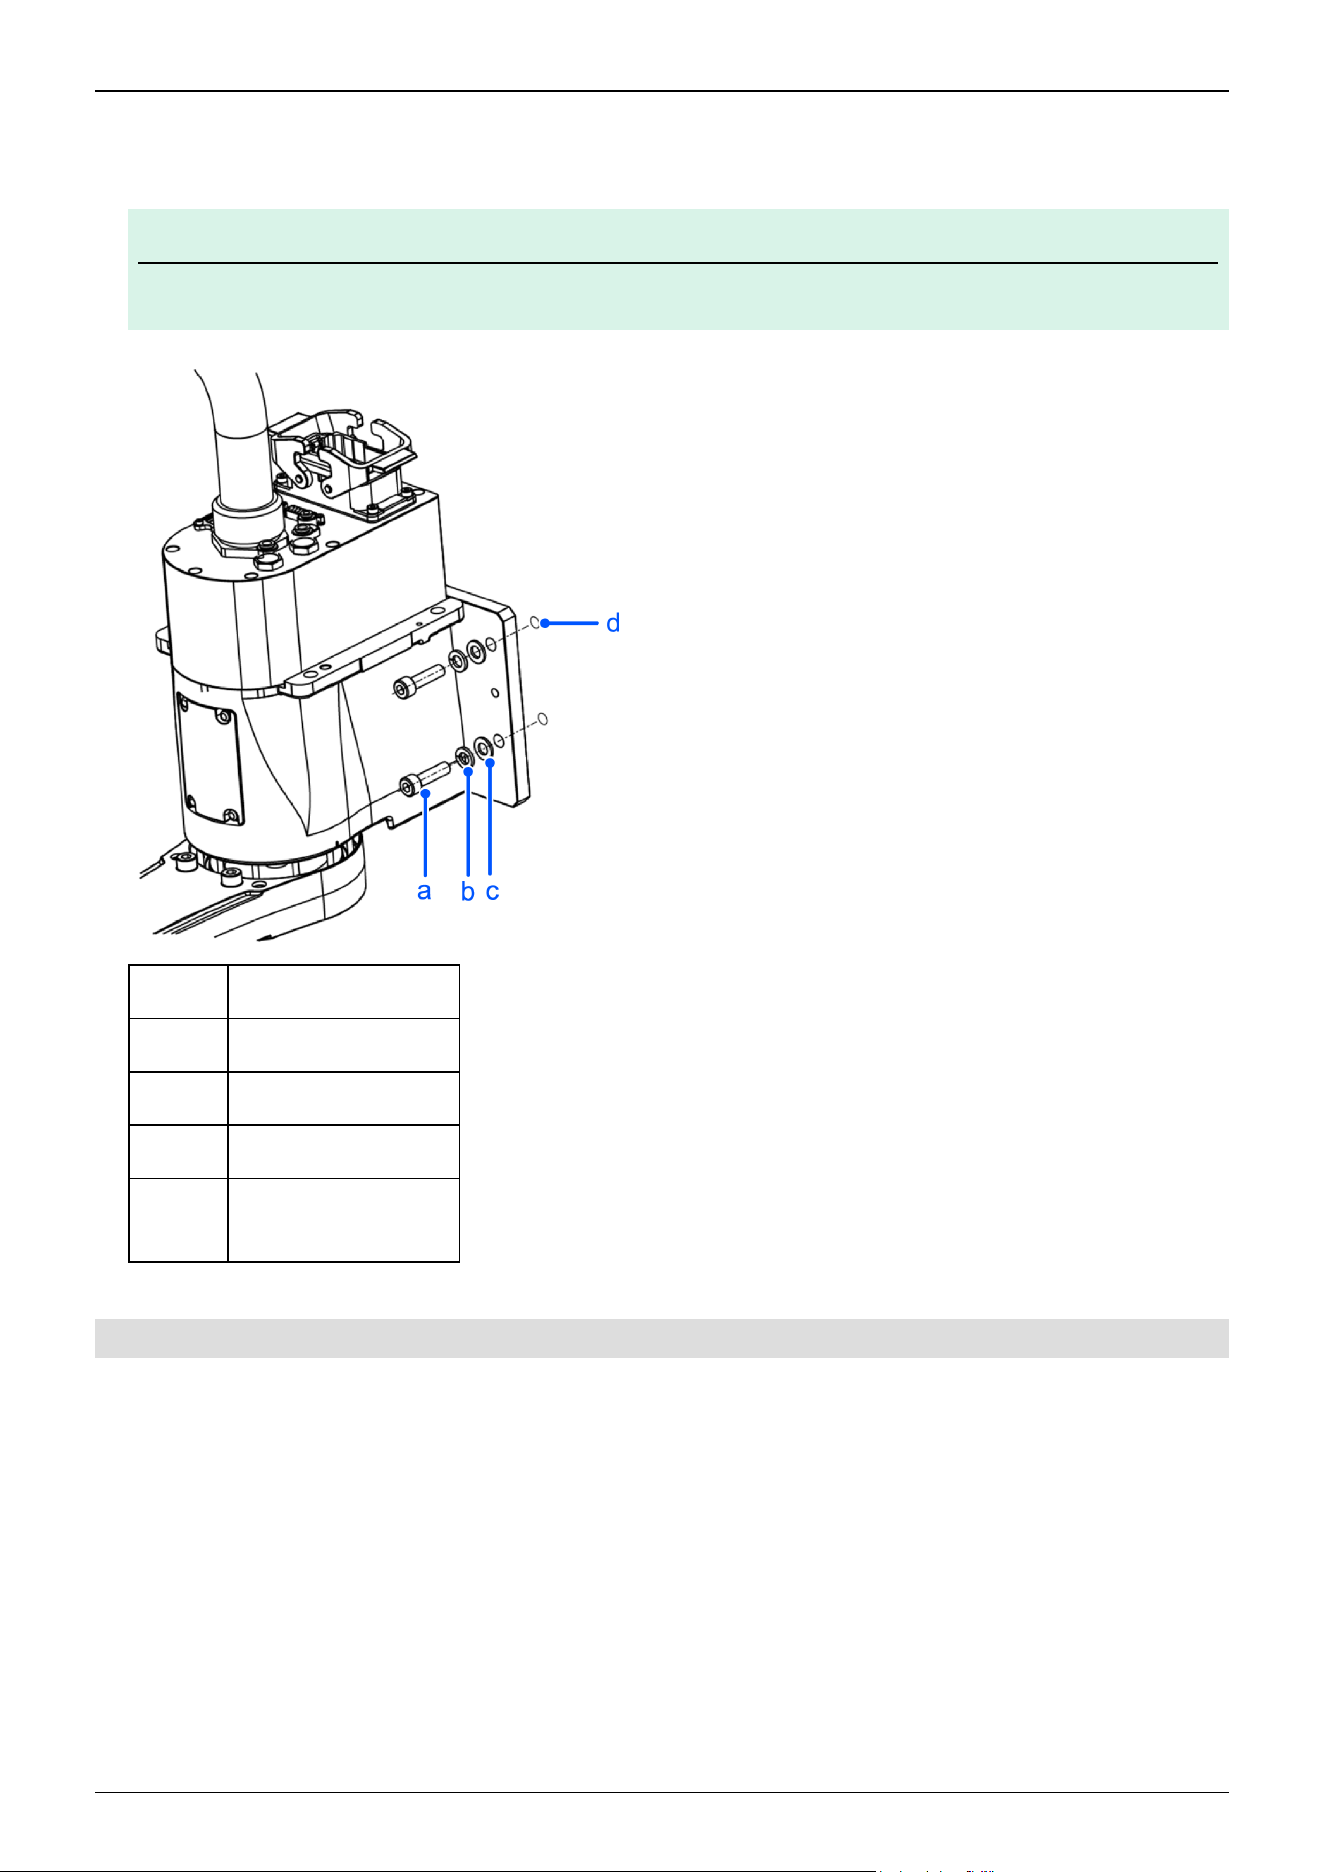
2. Secure the base to the wall using four bolts. Be sure to always use washers.
Tightening torque: 32.0 N·m (326 kgf·cm)
KEY POINTS
Use bolts with strength specifications compliant with ISO 898-1 property class: 10.9 or 12.9.
Symbol Description
a 4 × M8 × 30
b Spring washer
c Plain washer
d
4 × M8 threaded hole
(20 mm or more depth)
3.3.4.4 Cleanroom & ESD Specifications
1. Unpack the Manipulator outside of the cleanroom.
2. Secure the Manipulator to transporting equipment (or a pallet) with bolts so that the Manipulator does not fall down.
3. Wipe off any dust on the Manipulator using a lint-free cloth that was dipped in ethyl alcohol or distilled water.
4. Carry the Manipulator into the cleanroom.
5. Refer to the installation procedure for the respective Manipulator model, and install the Manipulator.
"Table Top Mounting Specifications"
"Multiple Mounting Specifications"
6. Connect an exhaust tube to the exhaust port.
✏
Industrial Robot: SCARA Robots GX series Manual Rev.11
126
When the Manipulator is a model with cleanroom & ESD specifications, an exhaust system must be connected. The
exhaust system is described in the following section.
Appendix A: Specifications Table
3.3.5 Connecting the Cables
WARNING
To perform the power supply lockout, remove the power plug. Be sure to connect the AC power cable to a
power outlet. Do not connect it directly to a factory power source.
Before performing any replacement work, inform others in the area that you are working, and then turn off the
Controller and related equipment, and unplug the power cable from the power source. Performing any work
procedure with the power turned on is extremely dangerous and may result in electric shock and/or
malfunction of the robot system.
Be sure to connect the cables properly. Do not put heavy objects on the cables, bend or pull on the cables
forcibly, or allow the cables to be pinched. Damaged cables, broken wires, or contact failure is extremely
hazardous and may result in electric shock and/or malfunction of the robot system.
The Manipulator is grounded by connecting it to the Controller. Ensure that the Controller is grounded and the
cables are correctly connected. If the ground wire is improperly connected to ground, it may result in the fire
or electric shock.
Be sure to turn off the power and tag out (e.g., with a "DO NOT TURN ON" sign) before performing wiring.
Performing any work procedure with the power turned on is extremely dangerous and may result in electric
shock and/or malfunction of the robot system.
CAUTION
When connecting the Manipulator and the Controller, check that the serial numbers match for each device.
Improper connection between the Manipulator and the Controller may not only lead to malfunction of the robot
system but also serious safety problems. The connection method between the Manipulator and the Controller
varies depending on the Controller. For details on the connections, refer to the following manual.
"Controller Manual"
When the Manipulator is a model with cleanroom & ESD specifications, please note the following points.
When the Manipulator is a model with cleanroom & ESD specifications, an exhaust system must be connected. The exhaust
system is described in the following section.
Appendix A: Specifications Table
Industrial Robot: SCARA Robots GX series Manual Rev.11
127
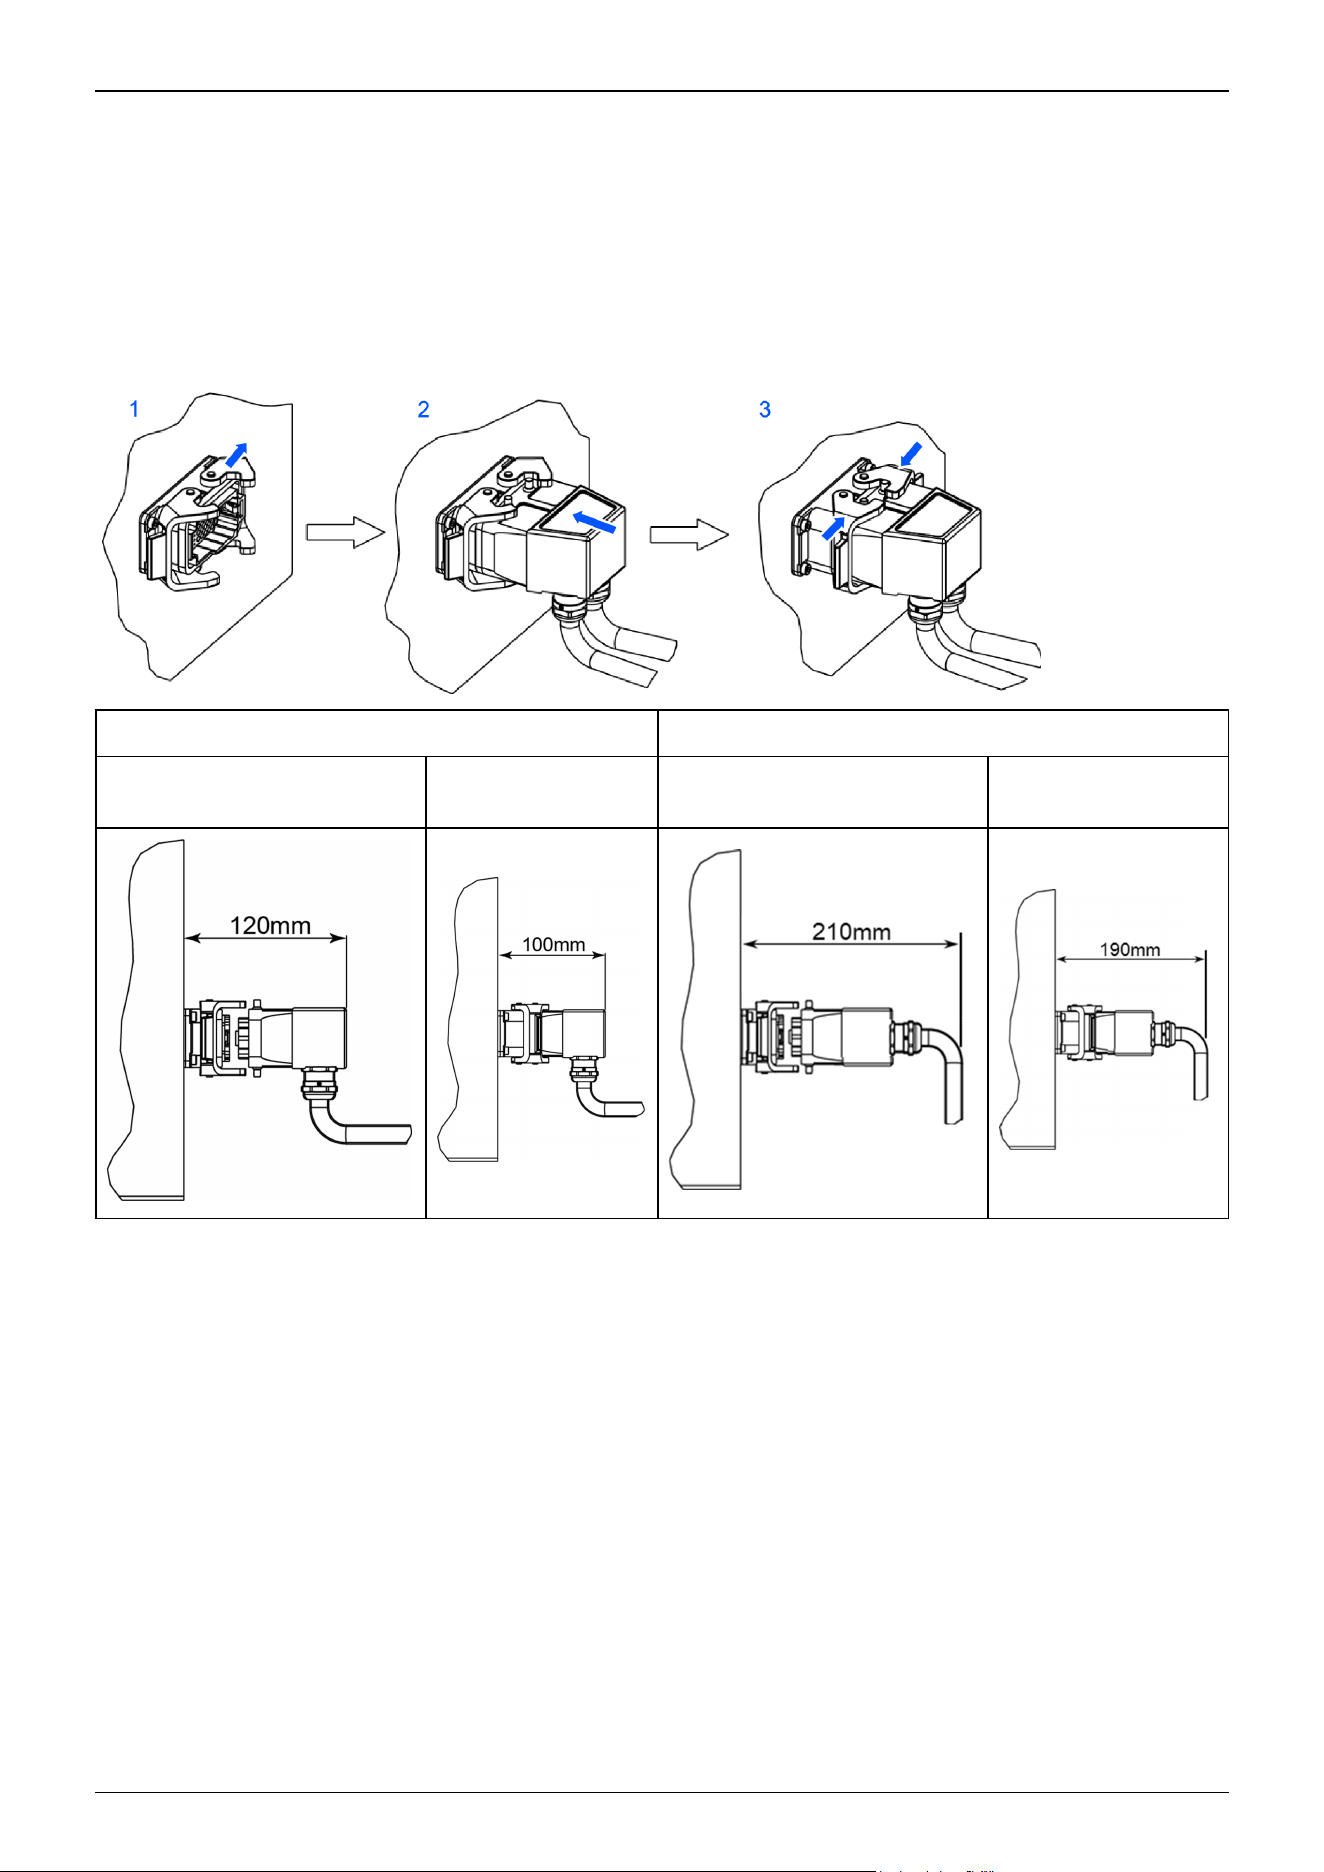
Connection procedure for Manipulator and M/C cable
Insert the M/C cable hood into the M/C cable housing on the back and bottom of the Manipulator, and secure it with the lock
attached to the housing.
1. Open the lock plates on both sides of the M/C cable housing.
2. Insert the M/C cable hood all the way to the back.
3. Close the lock plates on both sides of the M/C cable housing.
L-shape (Standard) Straight
Minimum Distance Required
for Insertion and Removal
Distance When
Mounted
Minimum Distance Required
for Insertion and Removal
Distance When
Mounted
Industrial Robot: SCARA Robots GX series Manual Rev.11
128
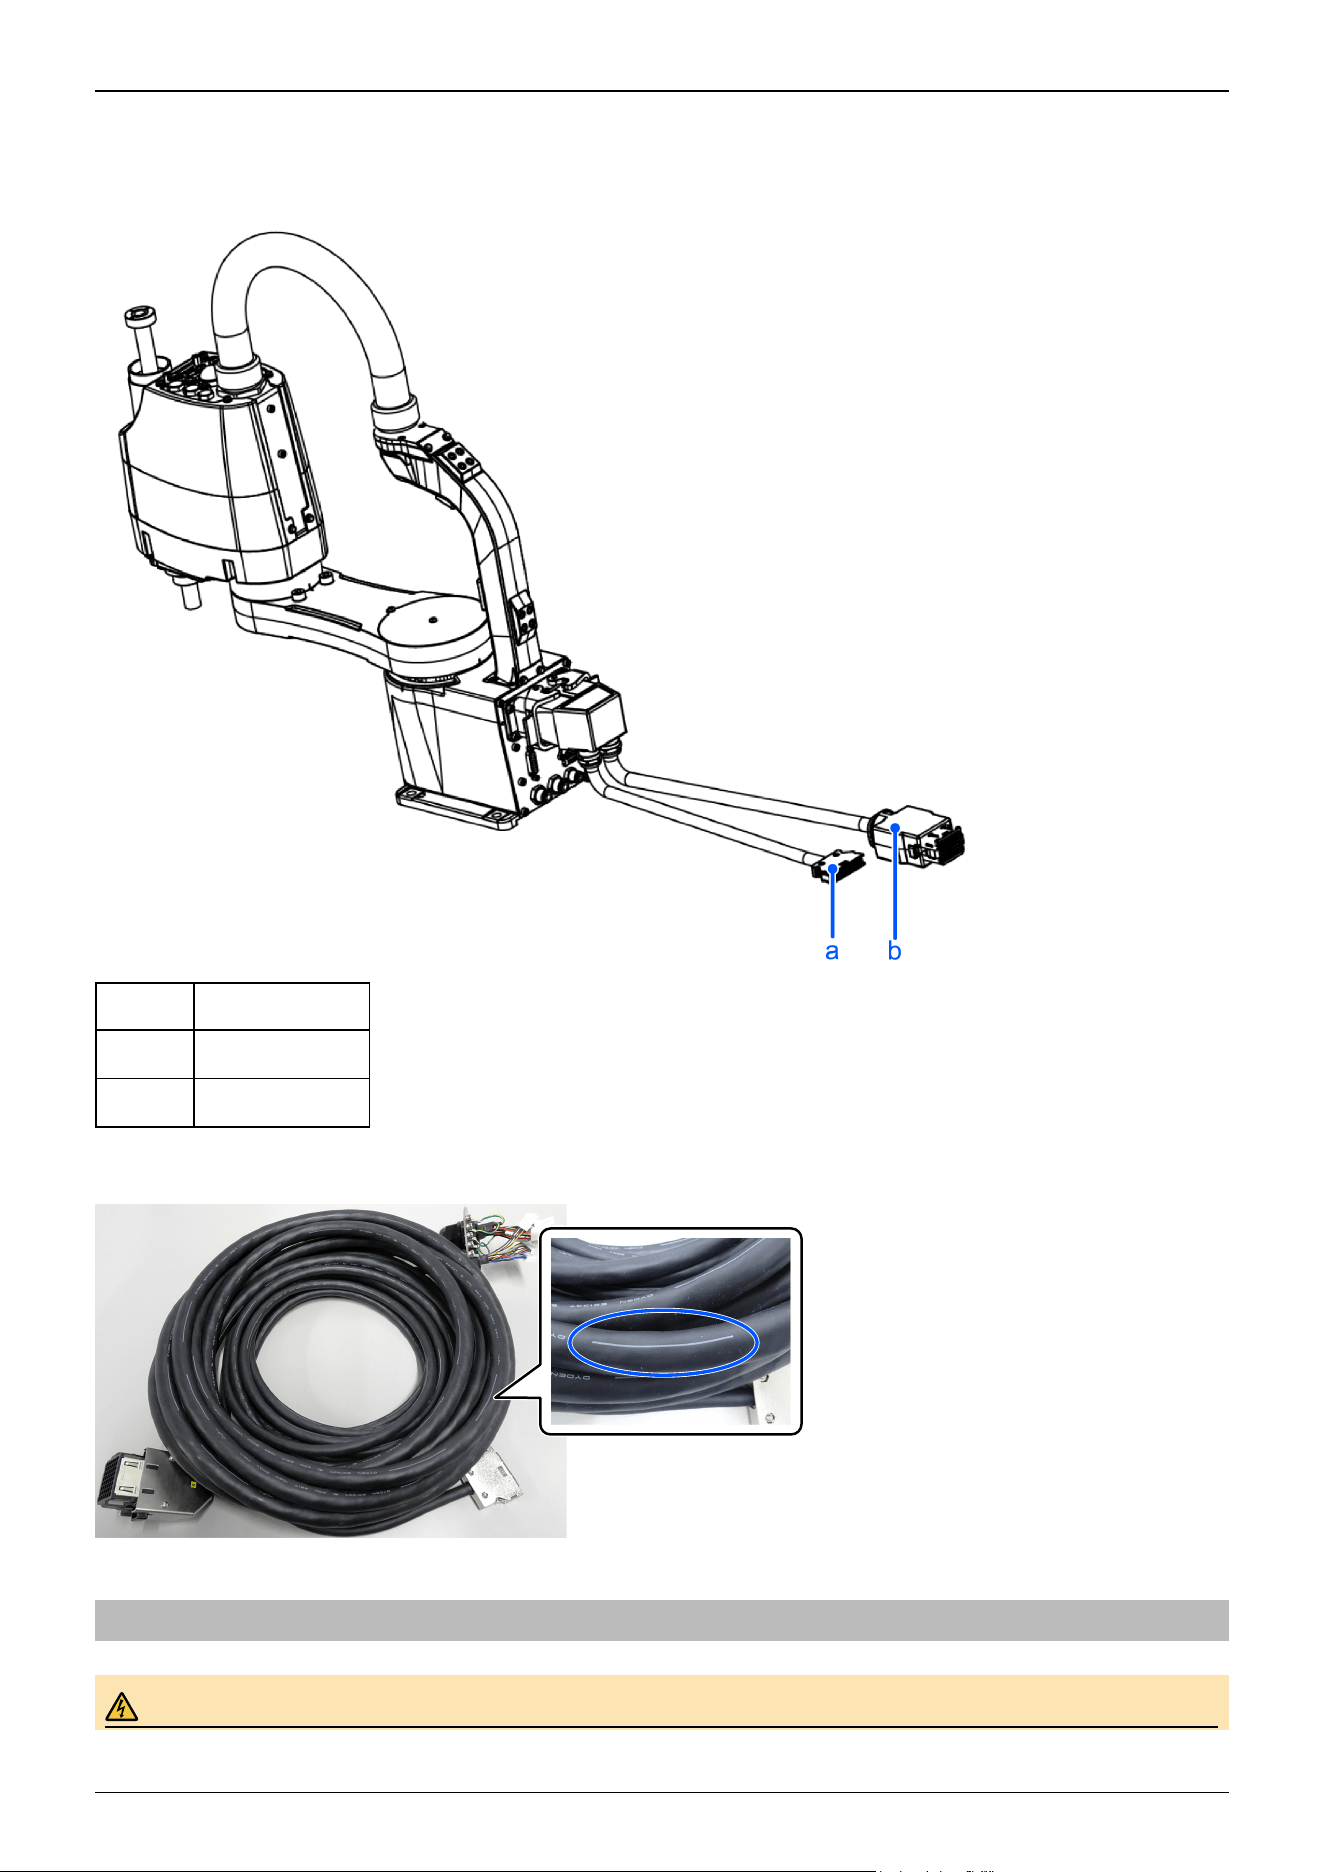
Connecting the M/C cable and the Controller
Connect the power connector and signal connector of the M/C cable to the Controller.
Symbol Description
a Signal connector
b Power connector
There are two types of M/C cables: fixed and movable. Movable cables have wires as shown in the figure below.
3.3.6 User Wires and Pneumatic Tubes
WARNING
Industrial Robot: SCARA Robots GX series Manual Rev.11
129
Be sure to turn off the power and tag out (e.g., with a "DO NOT TURN ON" sign) before performing wiring.
Performing any work procedure with the power turned on is extremely dangerous and may result in electric
shock and/or malfunction of the robot system.
CAUTION
Only authorized or certified staff should be allowed to perform wiring. Wiring by unauthorized or uncertified
staff may result in bodily injury and/or malfunction of the robot system.
3.3.6.1 Electrical Wires
Connect the following connectors and cables to the user connector of the Manipulator.
Manipulator cable specifications
Rated
Voltage
Allowable
Current
Nominal Cross-sectional Area of
Conductor
Remarks
D-sub 15
pin
30V AC/DC 1.0 A
0.08 mm
2
Shielded
RJ45 - - -
Equivalent to
CAT5e
For each connector, pins with the same number are wired between the connector on the base side and the connector on the Arm
#2 side in the Manipulator.
Attached connector for user wires
Manufacturer Model Number Type Remarks
D-sub 15 pin
Connector Würth Elektronik 61801524823 Solder type 2 included
Clamp hood Würth Elektronik 61801525311 Connector setscrew: #4-40 UNC 2 included
8-pin (RJ45) equivalent to Cat.5e
An Ethernet cable (commercially available) can be connected to Manipulator models with standard and cleanroom & ESD
specifications.
3.3.6.2 Pneumatic Tubes
Manipulator pneumatic tube specifications
Maximum Working Pressure Number of Tubes O.D. × I.D.
0.59 Mpa (6 kgf/cm
2
: 86 psi)
2 ø6 mm × ø4 mm
1 ø4 mm × ø2.5 mm
Inside the Manipulator, fittings of the same size and tip color (blue/white) are connected between the air fitting on the base side
and the air fitting on the Arm #2 side.
Industrial Robot: SCARA Robots GX series Manual Rev.11
130
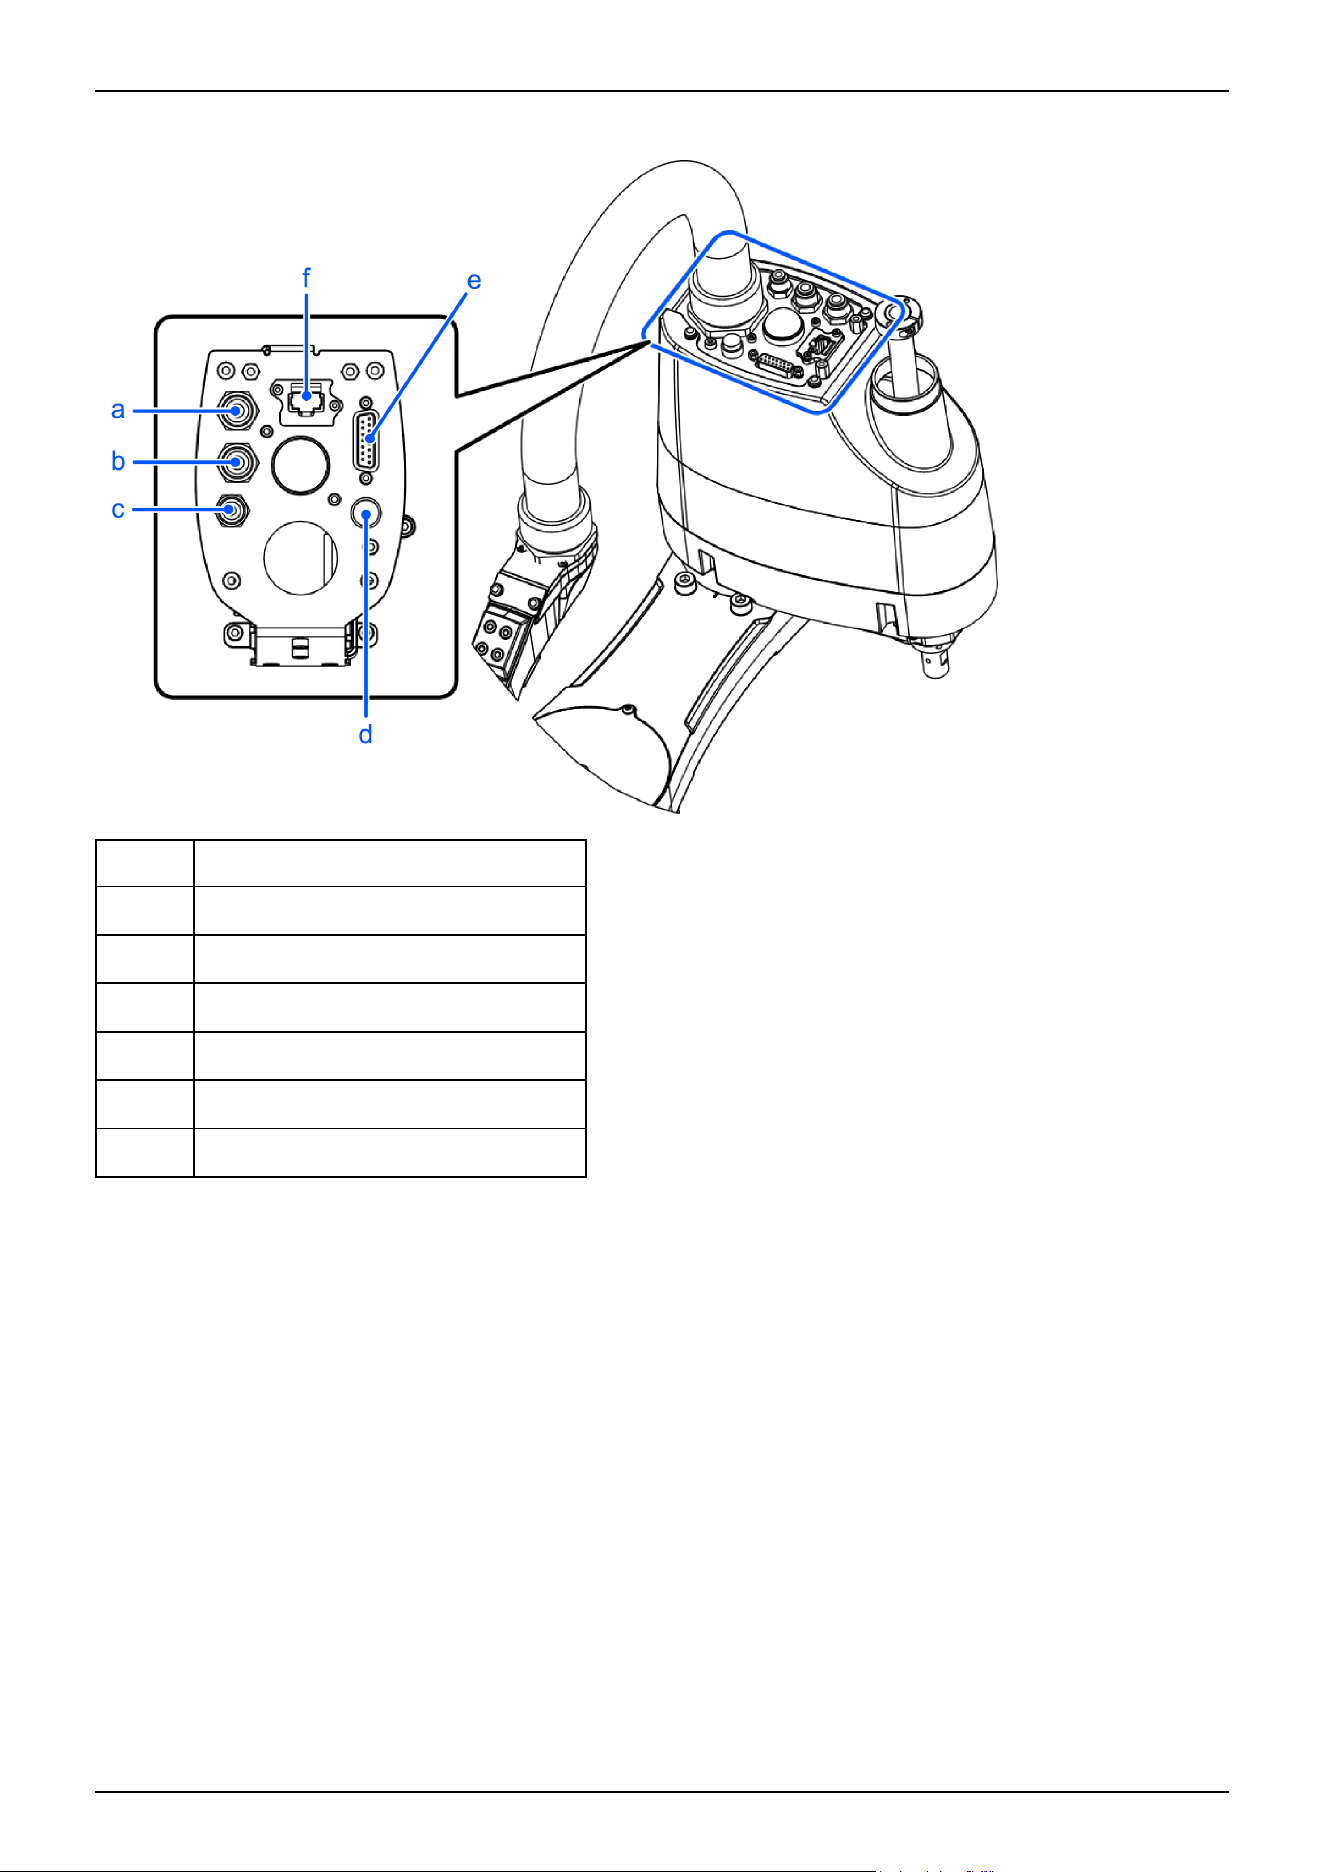
Arm #2 side (common to GX4 series)
Symbol Description
a Fitting for ø6 mm tube (white)
b Fitting for ø6 mm tube (blue)
c Fitting for ø4 mm tube (blue)
d Brake release switch
e User connector (15-pin D-sub connector)
f Ethernet connector
Industrial Robot: SCARA Robots GX series Manual Rev.11
131
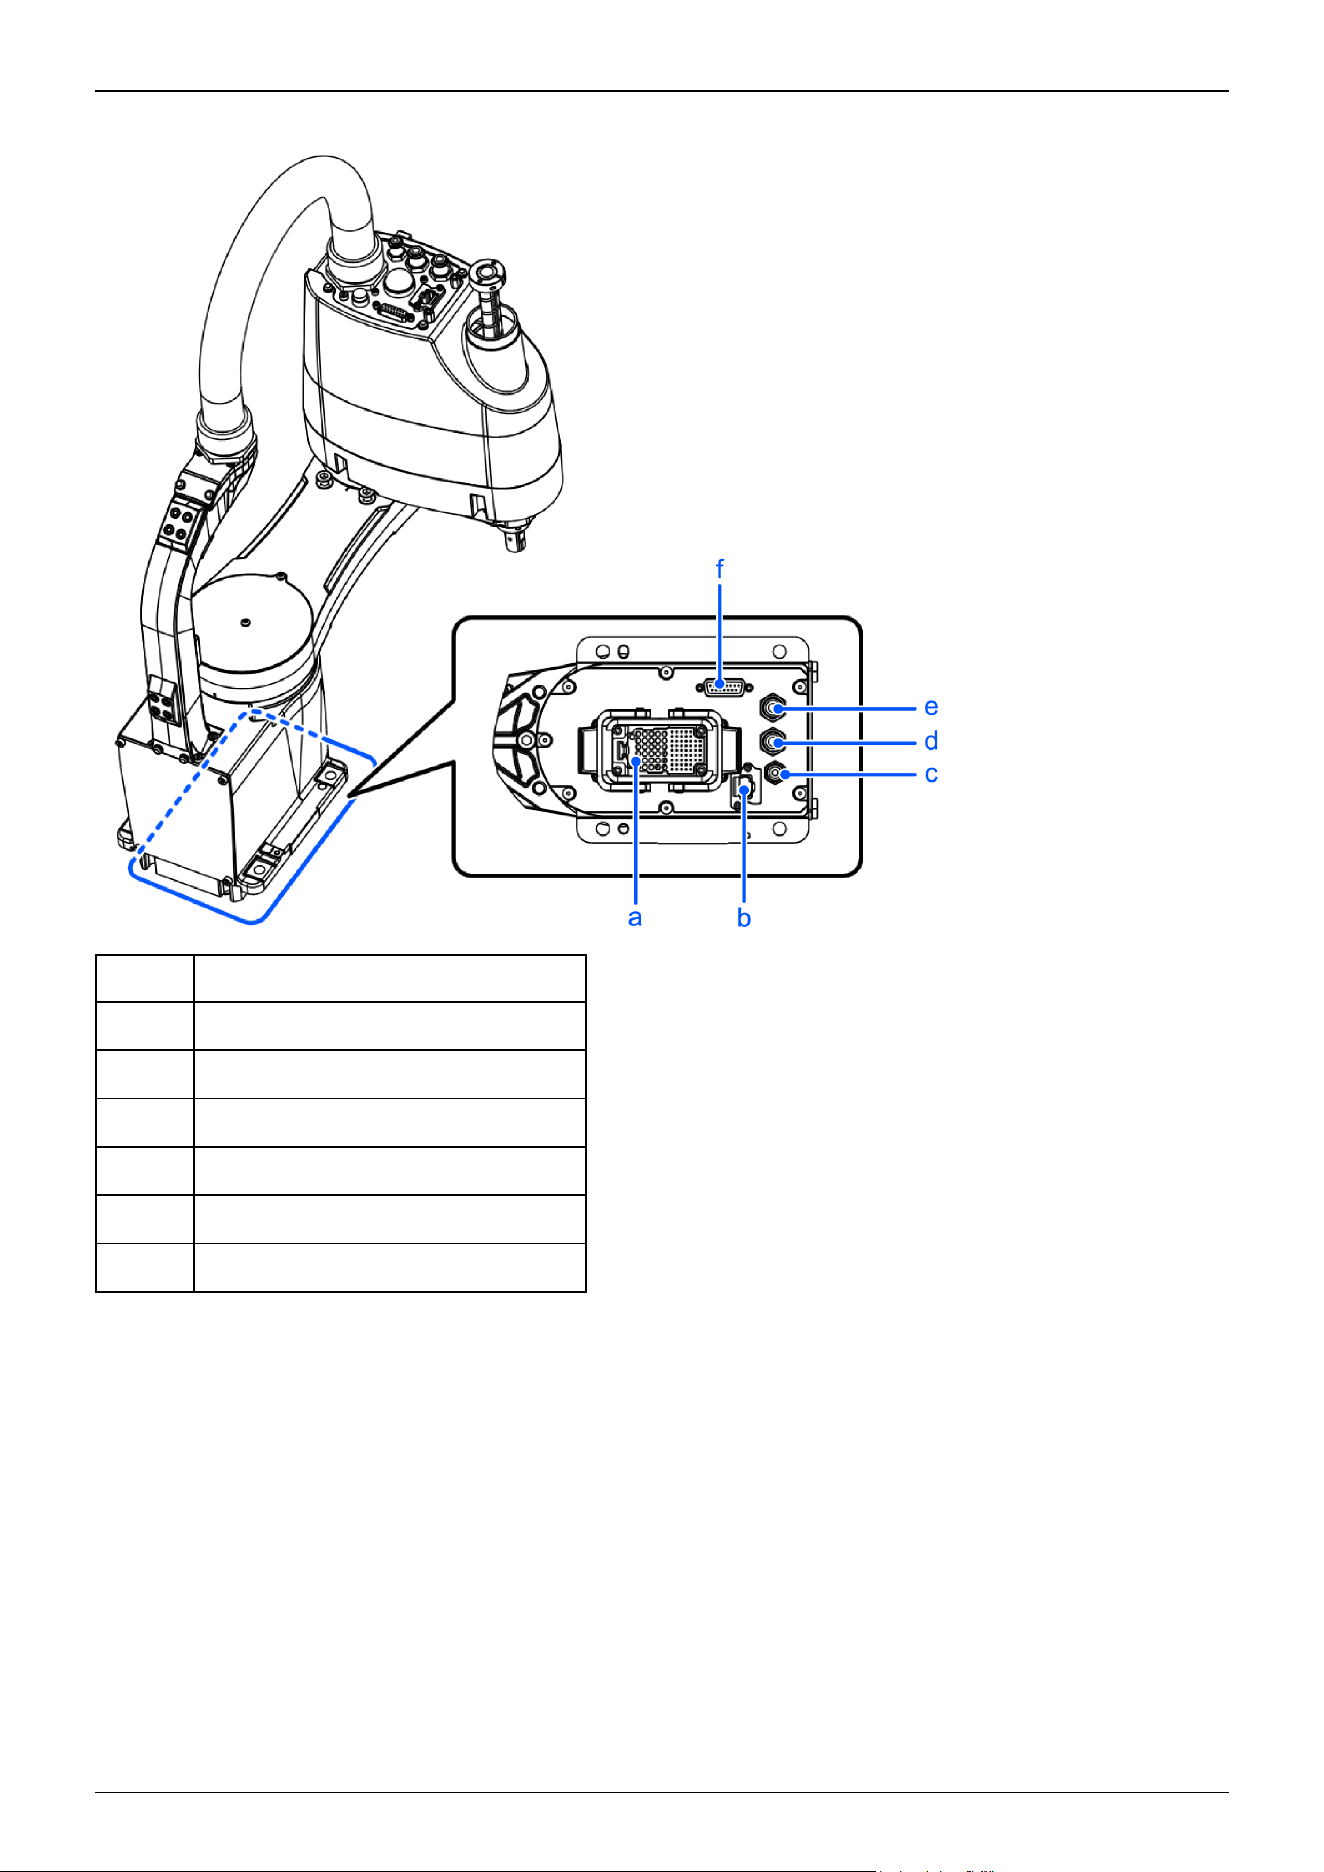
Base side (table top mounting specifications: cable routing from bottom side)
Symbol Description
a M/C cable housing
b Ethernet connector
c Fitting for ø4 mm tube (blue)
d Fitting for ø6 mm tube (blue)
e Fitting for ø6 mm tube (white)
f User connector (15-pin D-sub connector)
Industrial Robot: SCARA Robots GX series Manual Rev.11
132
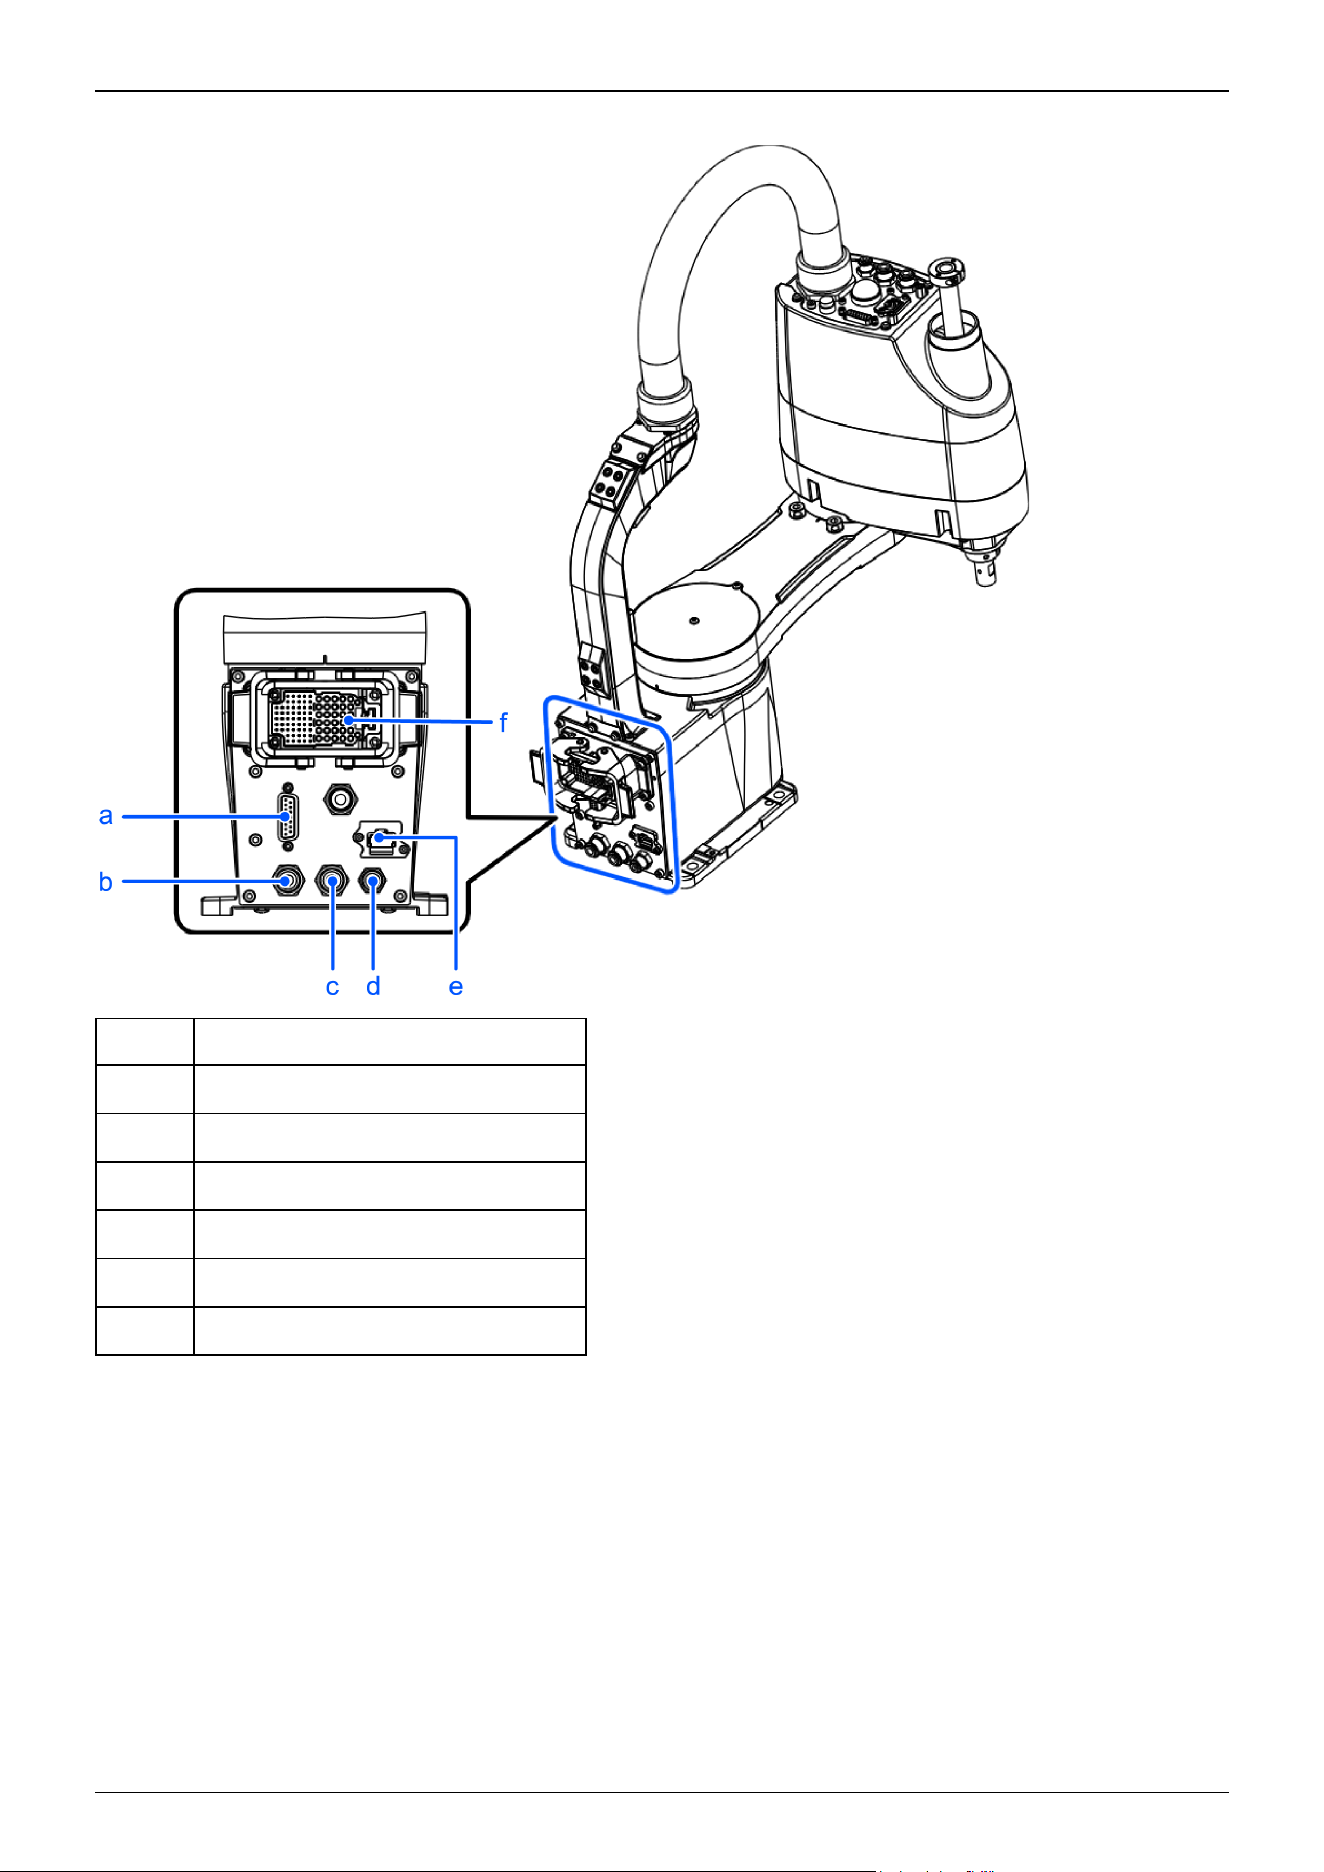
Base side (table top mounting specifications)
Symbol Description
a User connector (15-pin D-sub connector)
b Fitting for ø6 mm tube (white)
c Fitting for ø6 mm tube (blue)
d Fitting for ø4 mm tube (blue)
e Ethernet connector
f M/C cable housing
Industrial Robot: SCARA Robots GX series Manual Rev.11
133
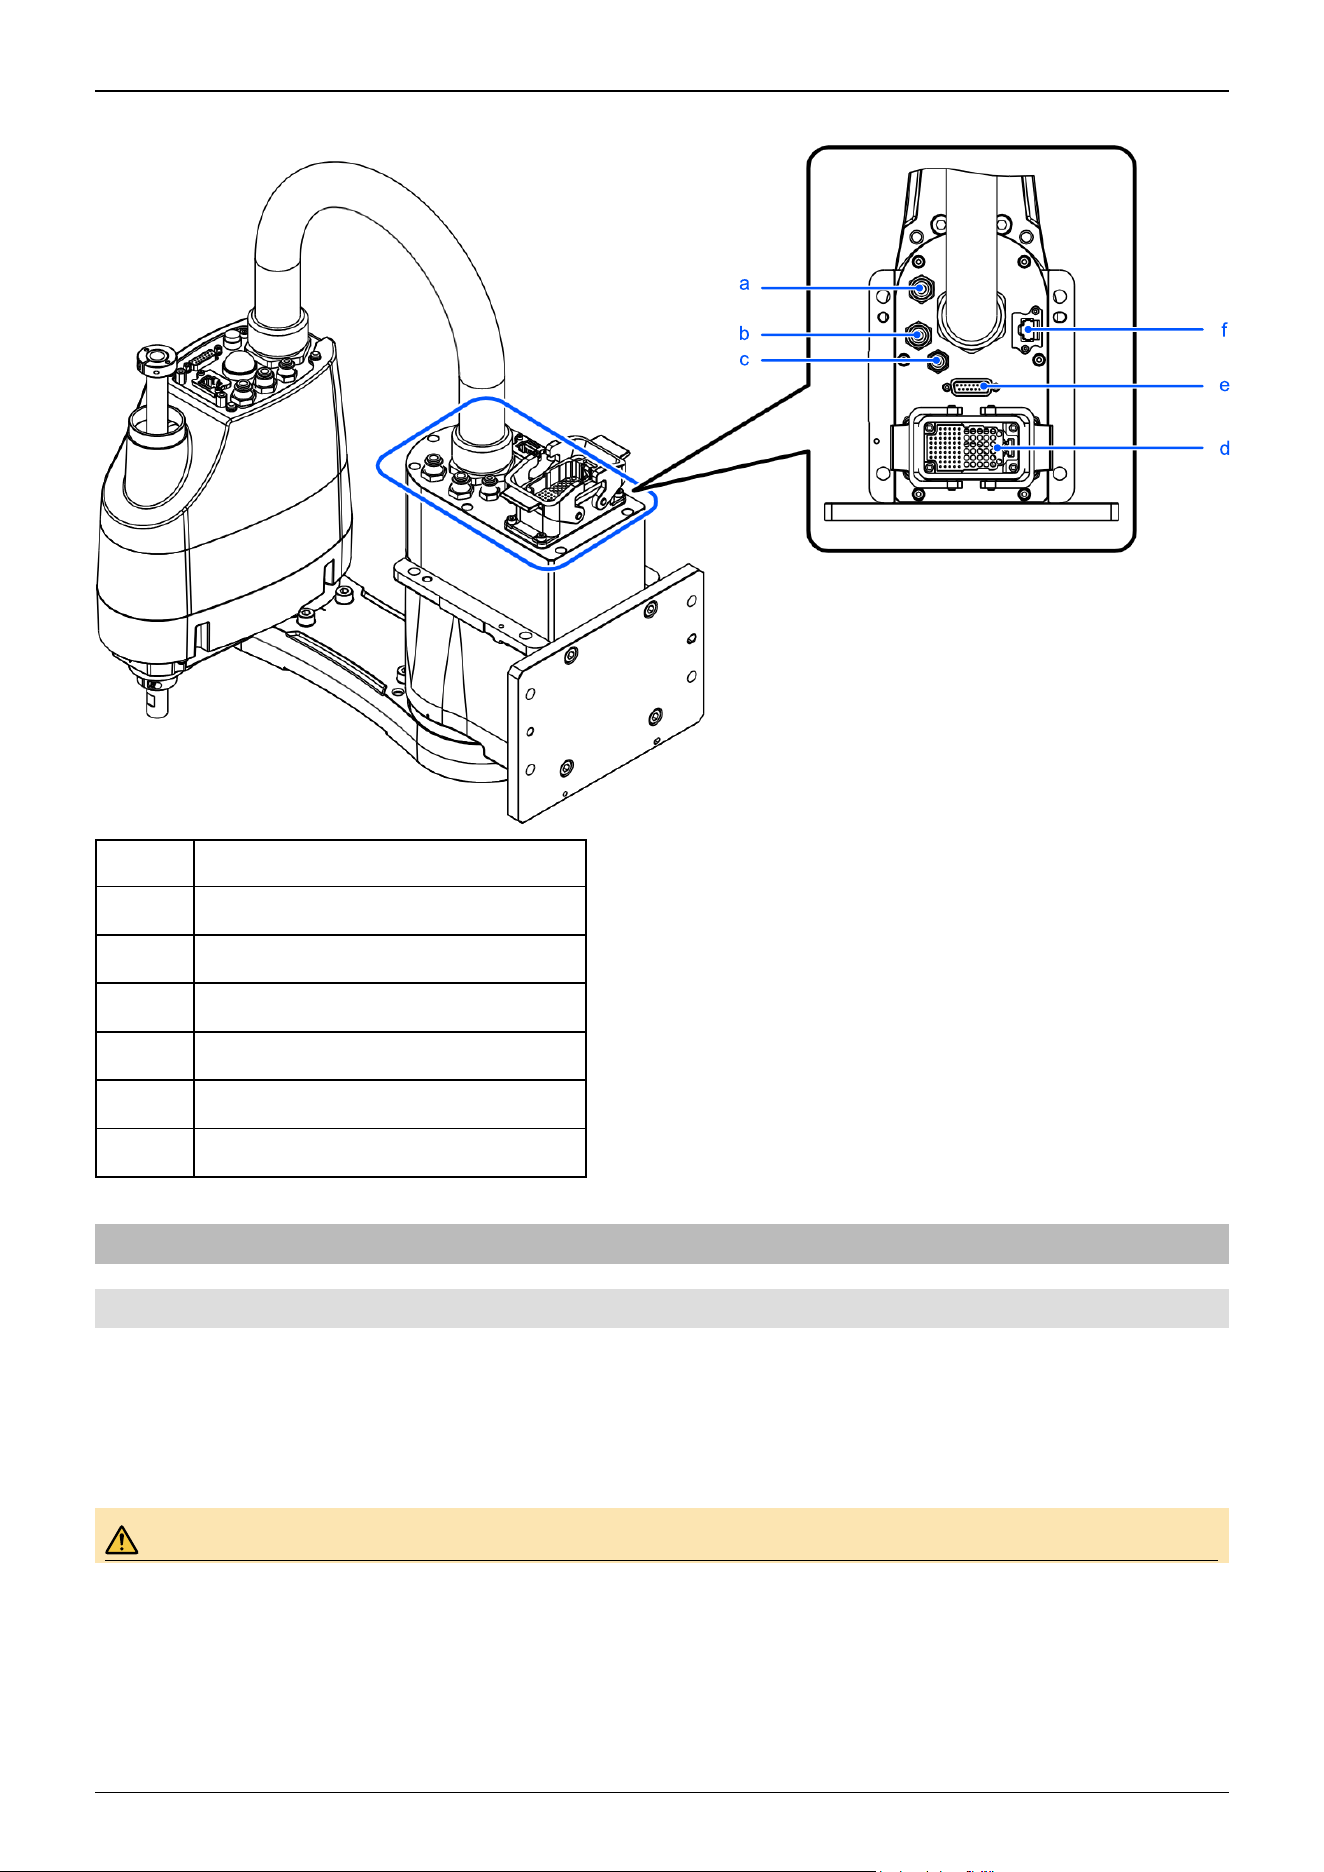
Base side (multiple mounting specifications)
Symbol Description
a Fitting for ø6 mm tube (white)
b Fitting for ø6 mm tube (blue)
c Fitting for ø4 mm tube (blue)
d M/C cable housing
e User connector (15-pin D-sub connector)
f Ethernet connector
3.3.7 Relocation and Storage
3.3.7.1 Safety Information for Relocation and Storage
Pay attention to the following requirements when relocating, storing, and transporting the Manipulators.
Transportation and installation of the Manipulator and related equipment should be performed by people who have received
installation training provided by Epson and the suppliers. Also, the laws and regulations of the installation country must be
followed.
WARNING
Industrial Robot: SCARA Robots GX series Manual Rev.11
134
Only qualified personnel should perform sling work and operate a crane or a forklift. When these operations
are performed by unqualified personnel, it is extremely hazardous and may result in serious bodily injury to
operators and/or severe equipment damage.
CAUTION
Before relocating, fold the arm and secure it tightly with a cable tie to prevent hands or fingers from getting
caught in the Manipulator.
When removing the anchor bolts, support the Manipulator so that it does not fall. Removing the anchor bolts
without supporting the Manipulator can cause it to fall, causing hands or feet to get caught.
The Manipulator should be transported by two or more people, either secured to transporting equipment or
carried by placing their hands under Arm #1 or the bottom of the base. When holding the bottom of the base
by hand, be extremely careful not to get your hands or fingers caught.
When transporting the Manipulator over long distances, secure it directly to transporting equipment so that it will not fall. If
necessary, pack the Manipulator using the same packaging as delivery.
When the Manipulator is reassembled and used for a robot system again after an extended period of storage, perform a test run
to verify that it works properly before starting the main operation.
Manipulators should be transported and stored under the following conditions: Temperature: -20 to +60°C, Humidity: 10 to
90% (no condensation).
If condensation has formed on the Manipulator during transportation or storage, do not turn on the power until the
condensation is removed.
Do not subject the Manipulator to excessive impacts or vibrations during the transportation process.
3.3.7.2 Table Top Mounting Specifications
CAUTION
Be sure to always use two or more people when installing or relocating the model with table top mounting
specifications. The Manipulator weights are as follows. Be careful not to get hands or feet caught or have
equipment damaged due to dropping of the Manipulator.
GX4-A/GX4-B/GX4-C251**: Approx.15 kg (33 lb)
GX4-A/GX4-B/GX4-C301**: Approx.15 kg (33 lb)
GX4-A/GX4-B/GX4-C351**: Approx.16 kg (35 lb)
1. Turn off all power, and remove the wiring and tubes connected to the Manipulator.
KEY POINTS
If using variable mechanical stops for Joints #1 and #2 and the operating angle is limited, change to the
mechanical stop positions at factory shipping.
Setting the Work Envelope by Mechanical Stops
2. Wrap a sheet around the arm so that it will not get damaged. Refer to the figure below, and use a cable tie or similar object
to bind the lower end of the shaft and the arm, and the base and the arm so that the shaft does not sag down.
✏
Industrial Robot: SCARA Robots GX series Manual Rev.11
135
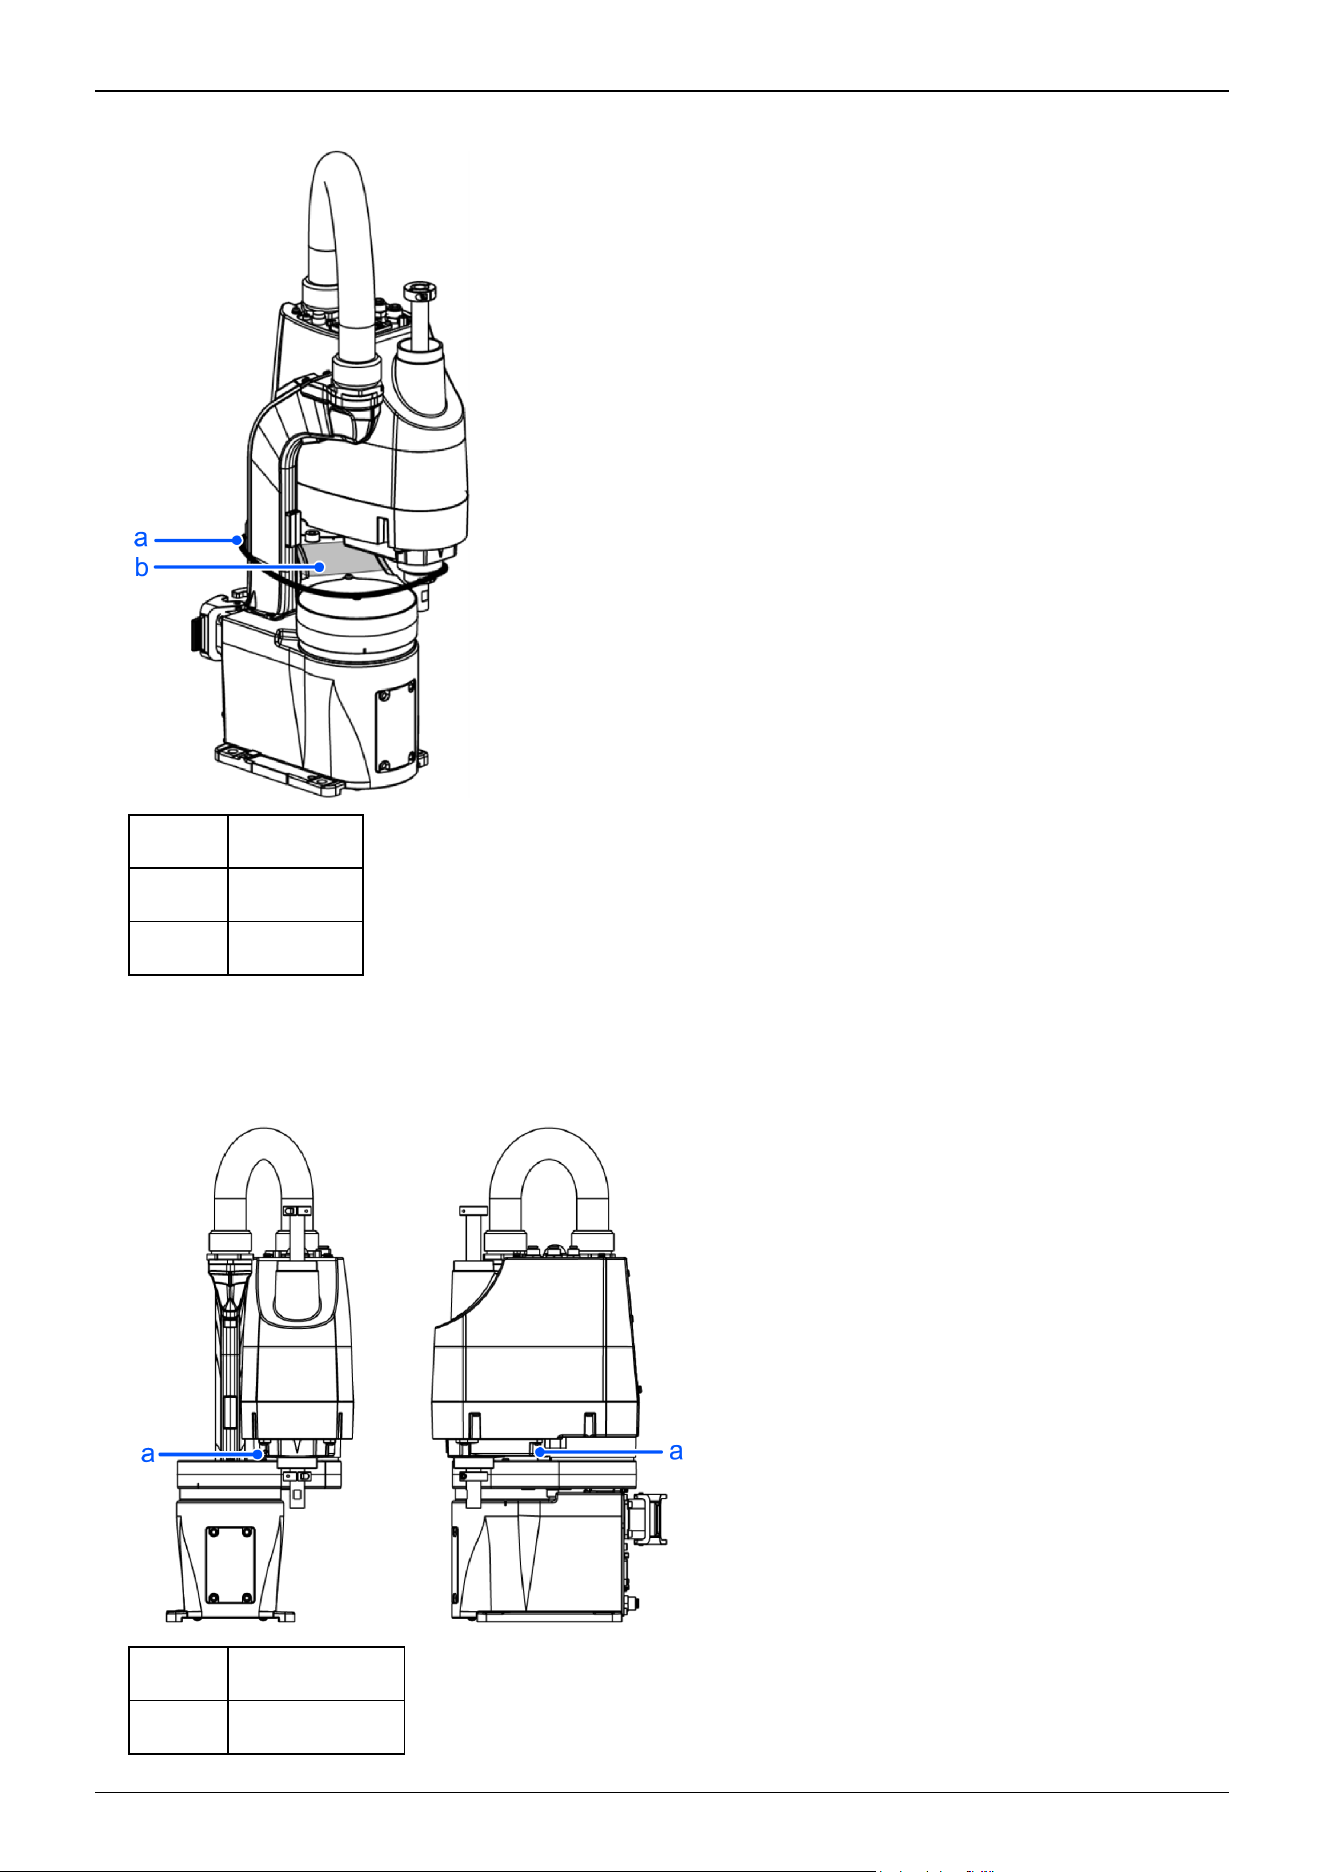
Example of securing arm in place
Symbol Description
a Cable tie
b Sheet
3. While supporting the bottom of Arm #1 by hand so that the Manipulator does not fall over, remove the anchor bolts. Then,
remove the Manipulator from the base table.
GX4-A/GX4-B/GX4-C251**
Symbol Description
a Center of gravity
Industrial Robot: SCARA Robots GX series Manual Rev.11
136
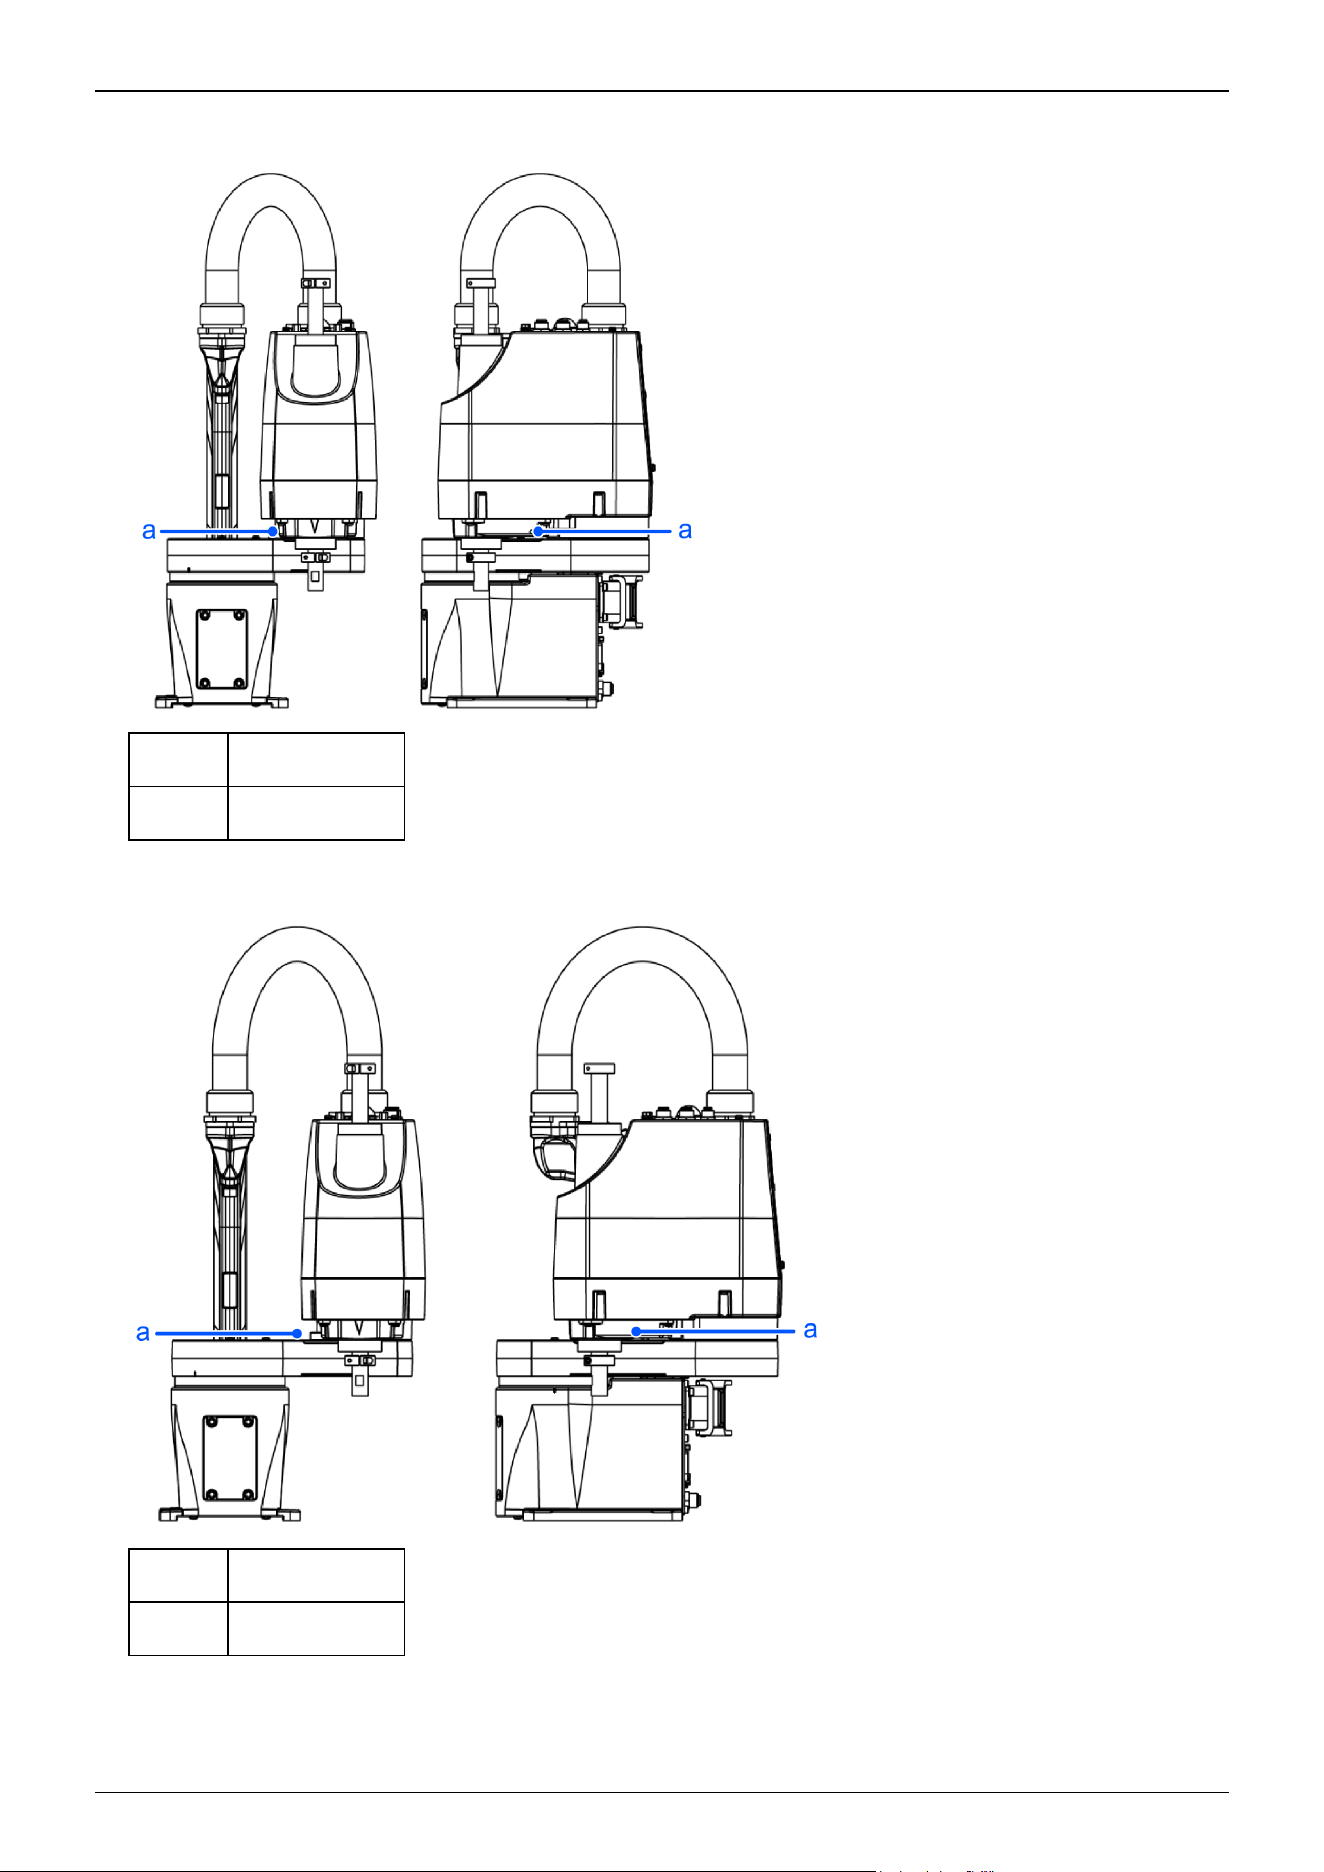
GX4-A/GX4-B/GX4-C301**
Symbol Description
a Center of gravity
GX4-A/GX4-B/GX4-C351**
Symbol Description
a Center of gravity
Industrial Robot: SCARA Robots GX series Manual Rev.11
137
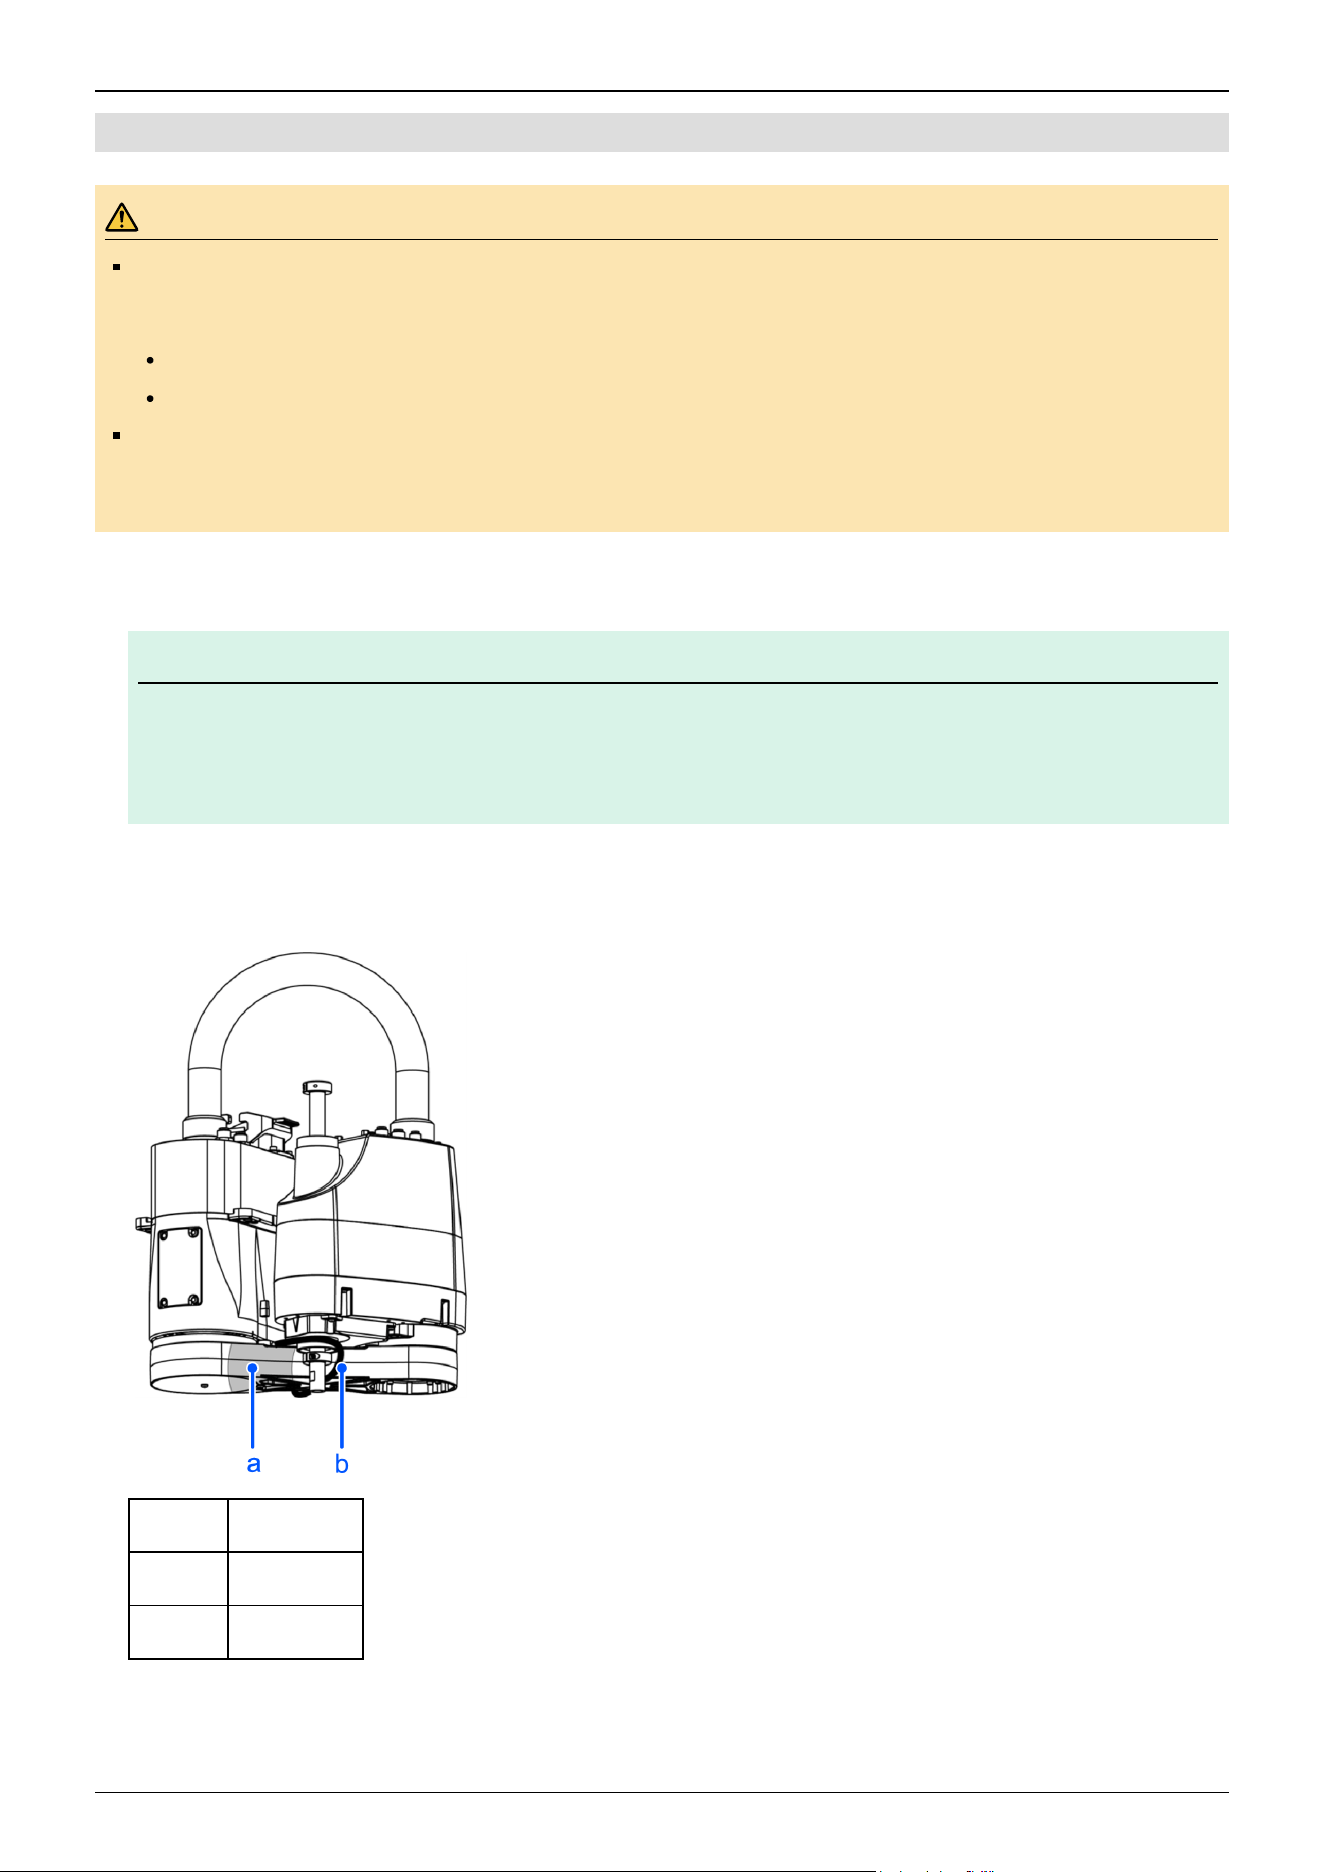
3.3.7.3 Multiple Mounting Specifications
WARNING
Be sure to always use two or more people when installing or relocating the model with multiple mounting
specifications. The Manipulator weights are as follows. Be careful not to get hands or feet caught or have
equipment damaged due to dropping of the Manipulator.
GX4-A/GX4-B/GX4-C301*M: Approx. 17 kg (38 lb)
GX4-A/GX4-B/GX4-C351*M: Approx. 17 kg (38 lb)
When removing the Manipulator from a wall or other location, be sure to support the Manipulator before
removing the anchor bolts. Removing the anchor bolts without supporting the Manipulator is extremely
hazardous and may cause the Manipulator to fall.
1. Turn off all power, and remove the wiring and tubes connected to the Manipulator.
KEY POINTS
If using variable mechanical stops for Joints #1 and #2 and the operating angle is limited, change to the
mechanical stop positions at factory shipping.
Setting the Work Envelope by Mechanical Stops
2. Wrap a sheet around the arm so that it will not get damaged. Secure the arm while referring to the figure.
Example of securing arm in place
Symbol Description
a Sheet
b Cable tie
3. While supporting the bottom of Arm #1 by hand so that the Manipulator does not fall over, remove the anchor bolts. Then,
remove the Manipulator from the wall.
✏
Industrial Robot: SCARA Robots GX series Manual Rev.11
138
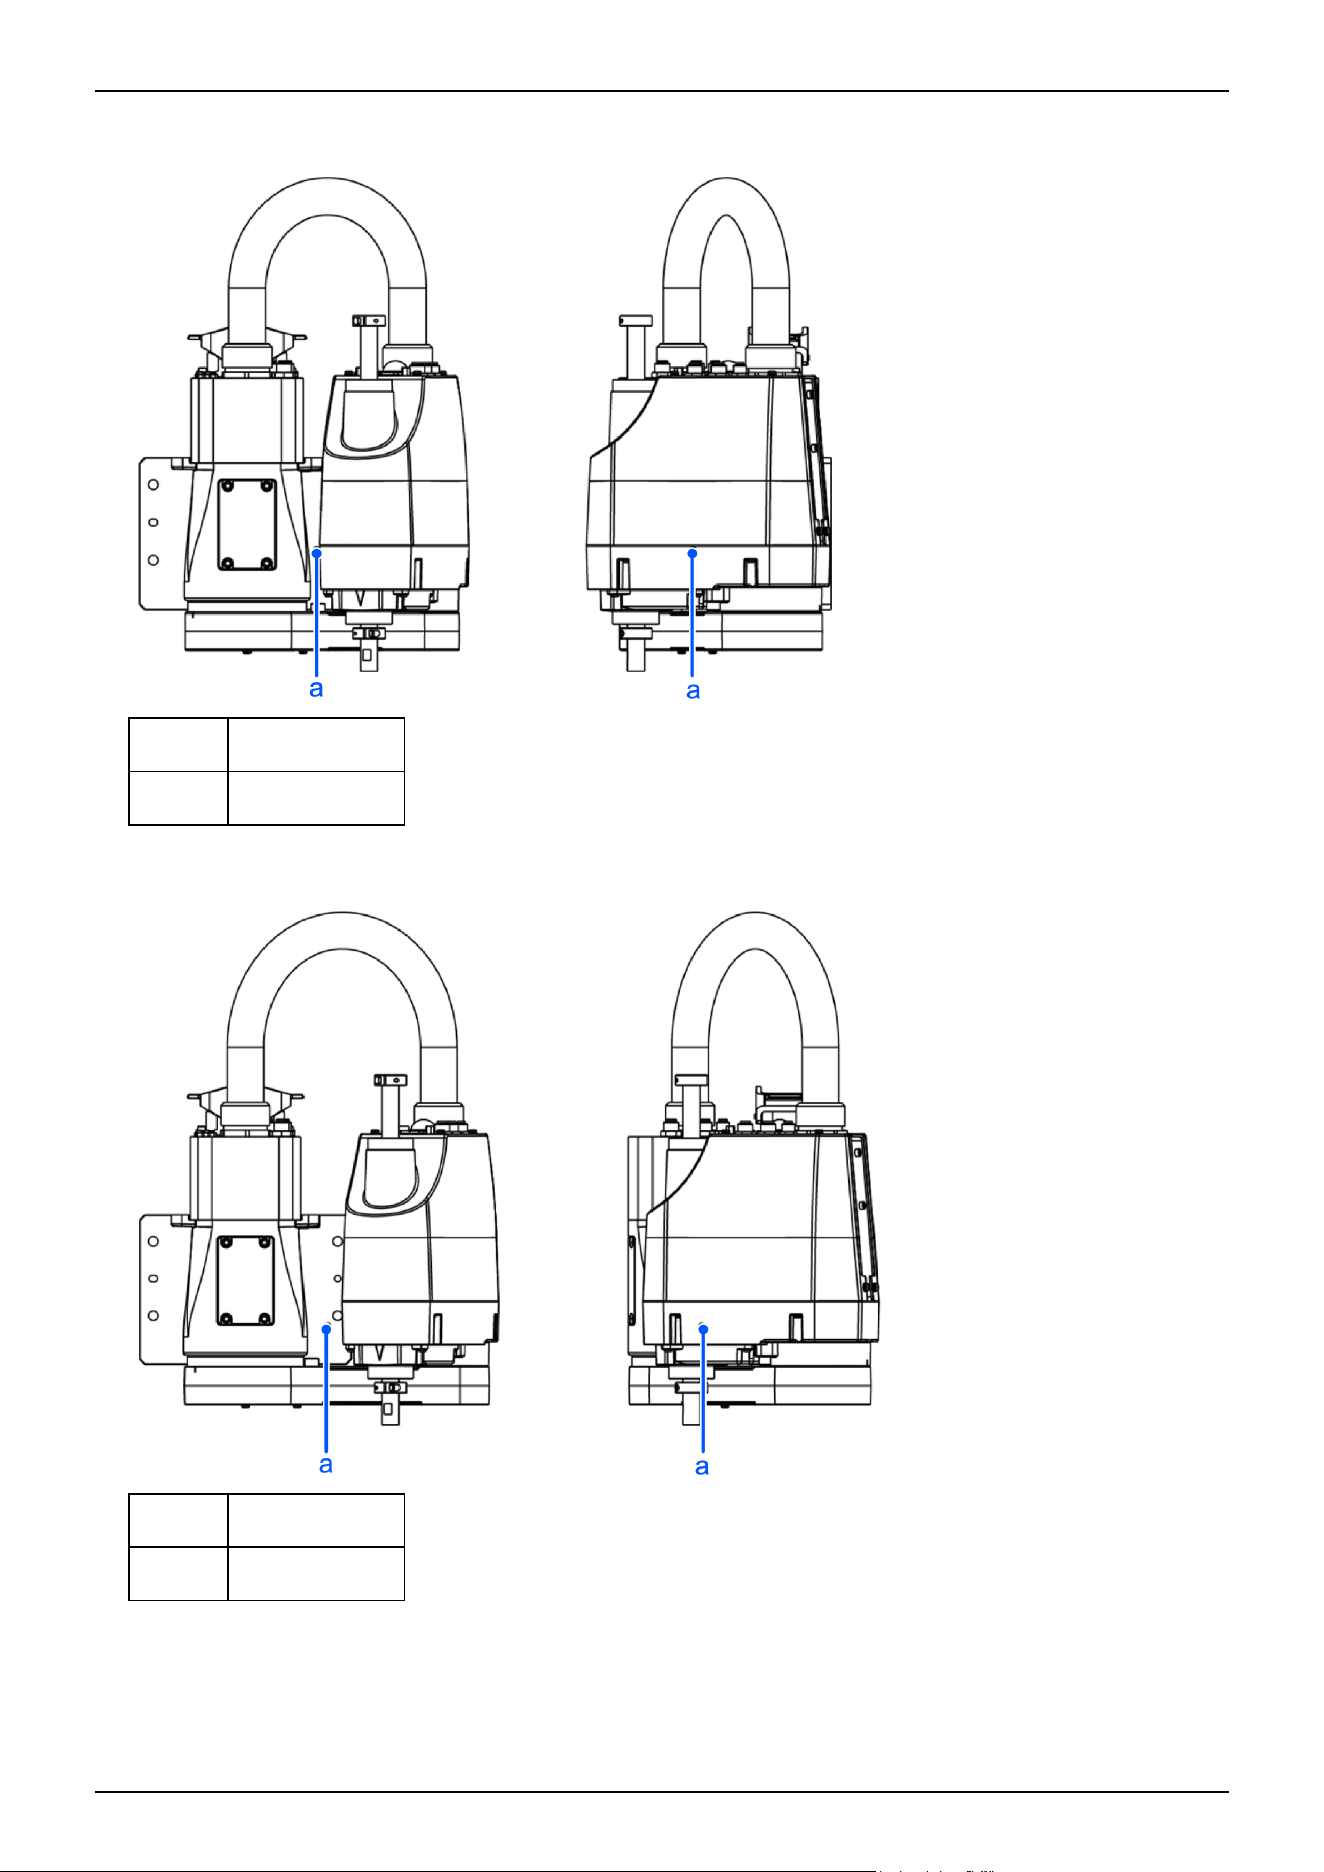
GX4-A/GX4-B/GX4-C301*M
Symbol Description
a Center of gravity
GX4-A/GX4-B/GX4-C351*M
Symbol Description
a Center of gravity
Industrial Robot: SCARA Robots GX series Manual Rev.11
139
3.4 Setting the Hand
3.4.1 Installing the Hand
The hand (end effector) must be prepared by the customer. When installing the hand, take note of the following. For details on
attaching the hand, refer to the following manual.
"Hand Function Manual"
WARNING
Before attaching a hand or peripheral equipment, be sure to always turn off the Controller and related
equipment and unplug the power cables. Performing any work procedure with the power turned on is
extremely dangerous and may result in electric shock and/or malfunction of the robot system.
CAUTION
When the hand is equipped with a workpiece gripping mechanism, ensure that the wiring and pneumatic tubes
do not cause the hand to release the workpiece when the power is turned off. When the wiring and pneumatic
tubes are not designed for the hand to maintain its grip on the workpiece when the power is turned off, pressing
the emergency stop switch releases the workpiece, which may damage the robot system and the workpiece.
By default, all I/Os are designed to automatically turn off (0) when the power is shut off, when an emergency stop
is triggered, or by the robot system's safety function.
However, I/Os set with the Hand function does not turn off (0) when executing the Reset statement, or when
performing an emergency stop.
For the risk of the residual air pressure, conduct a risk assessment on the equipment and take the necessary
protective measures.
Shaft
Attach the hand to the lower end of the shaft.
For the layout dimensions in the area around the shaft and the overall dimensions of the Manipulator, refer to the following
section.
Names of Parts and Their Dimensions
Do not move the upper limit mechanical stop on the lower side of the shaft. When performing a Jump operation, the upper
limit mechanical stop may come into contact with the Manipulator body, which may cause the Manipulator to stop
functioning properly.
When attaching the hand to the shaft, have the hand hold the shaft using M4 or larger screws.
Brake release switch
Joint #3 and Joint #4 have an electromagnetic brake that is triggered when the power is off, preventing them from being
moved up and down or rotated by hand.
To move Joint #3 up or down or rotate Joint #4 when attaching a hand, turn on the Controller, and then press the brake
release switch.
This button switch is a momentary brake release type where the brake is released only while the button switch is being
pressed. The switch releases the brake of Joints #3 and #4 simultaneously.
Industrial Robot: SCARA Robots GX series Manual Rev.11
140
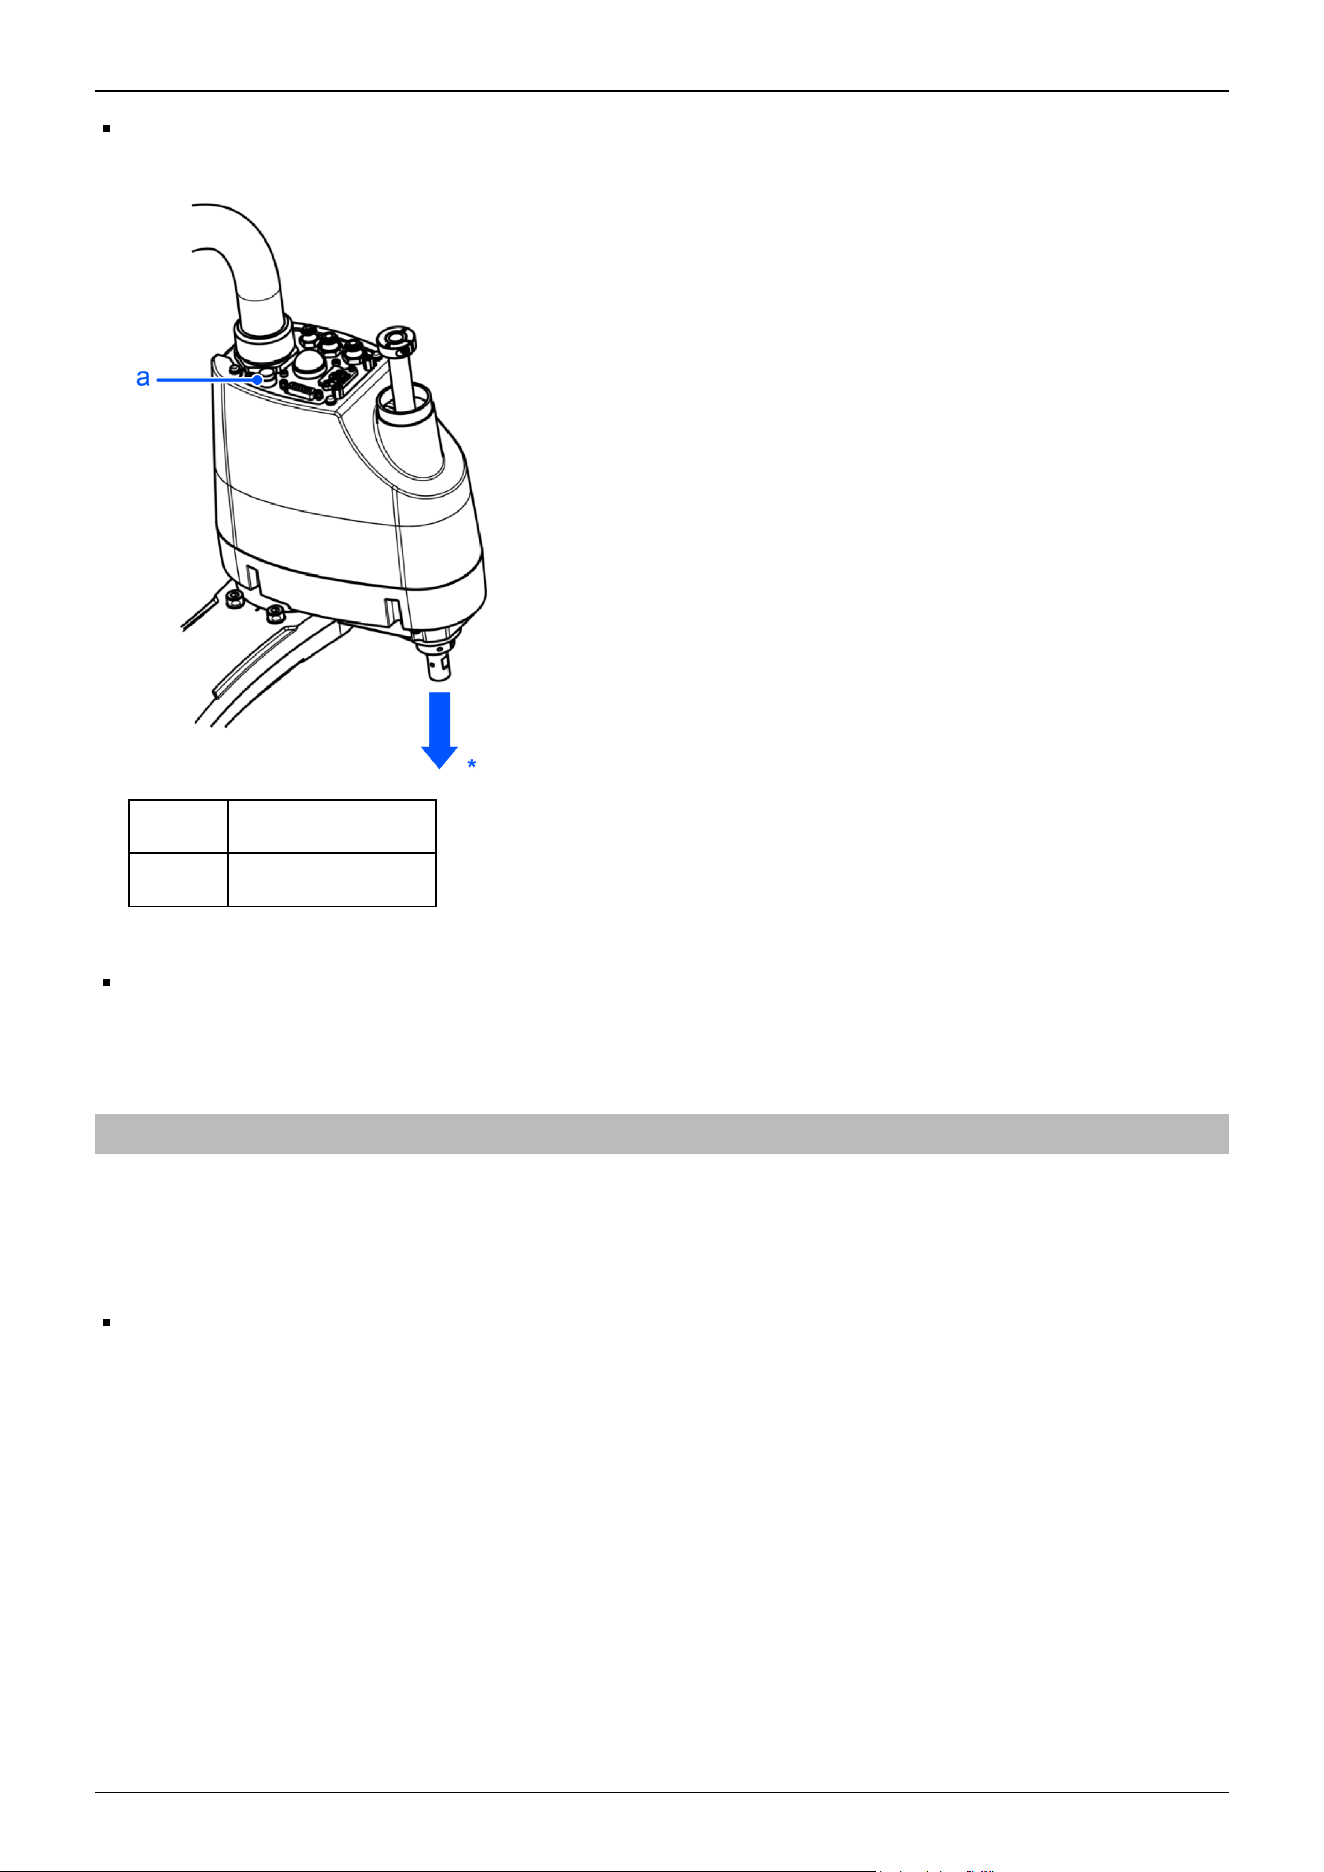
When pressing the brake release switch, watch for the shaft descending or rotating under the weight of the hand.
*: The shaft may drop due to the weight of the hand or other object.
Symbol Description
a Brake release switch
Layout
When attaching and operating a hand, the hand may come into contact with the Manipulator body due to the outer diameter
of the hand, the size of the workpiece, or the position of the arm. Carefully consider the interference area of the hand when
designing the system layout.
3.4.2 Attaching Cameras and Valves
Arm #2 (top surface and bottom surface) and the cable duct (cover) have threaded holes as shown in the figure below. Use the
threaded holes in Arm #2 (bottom surface) for attaching cameras, valves, and other heavy objects to the Manipulator. When
attaching pneumatic tubes, Ethernet cables, and other objects to the threaded holes in Arm #2 (top surface) and the cable duct
(cover), do not exceed the allowable load.
Allowable load: 200 g (Assuming a distance of 100 mm from the mounting surface to the center of gravity)
Arm #2 side (GX4 series models)
Industrial Robot: SCARA Robots GX series Manual Rev.11
141
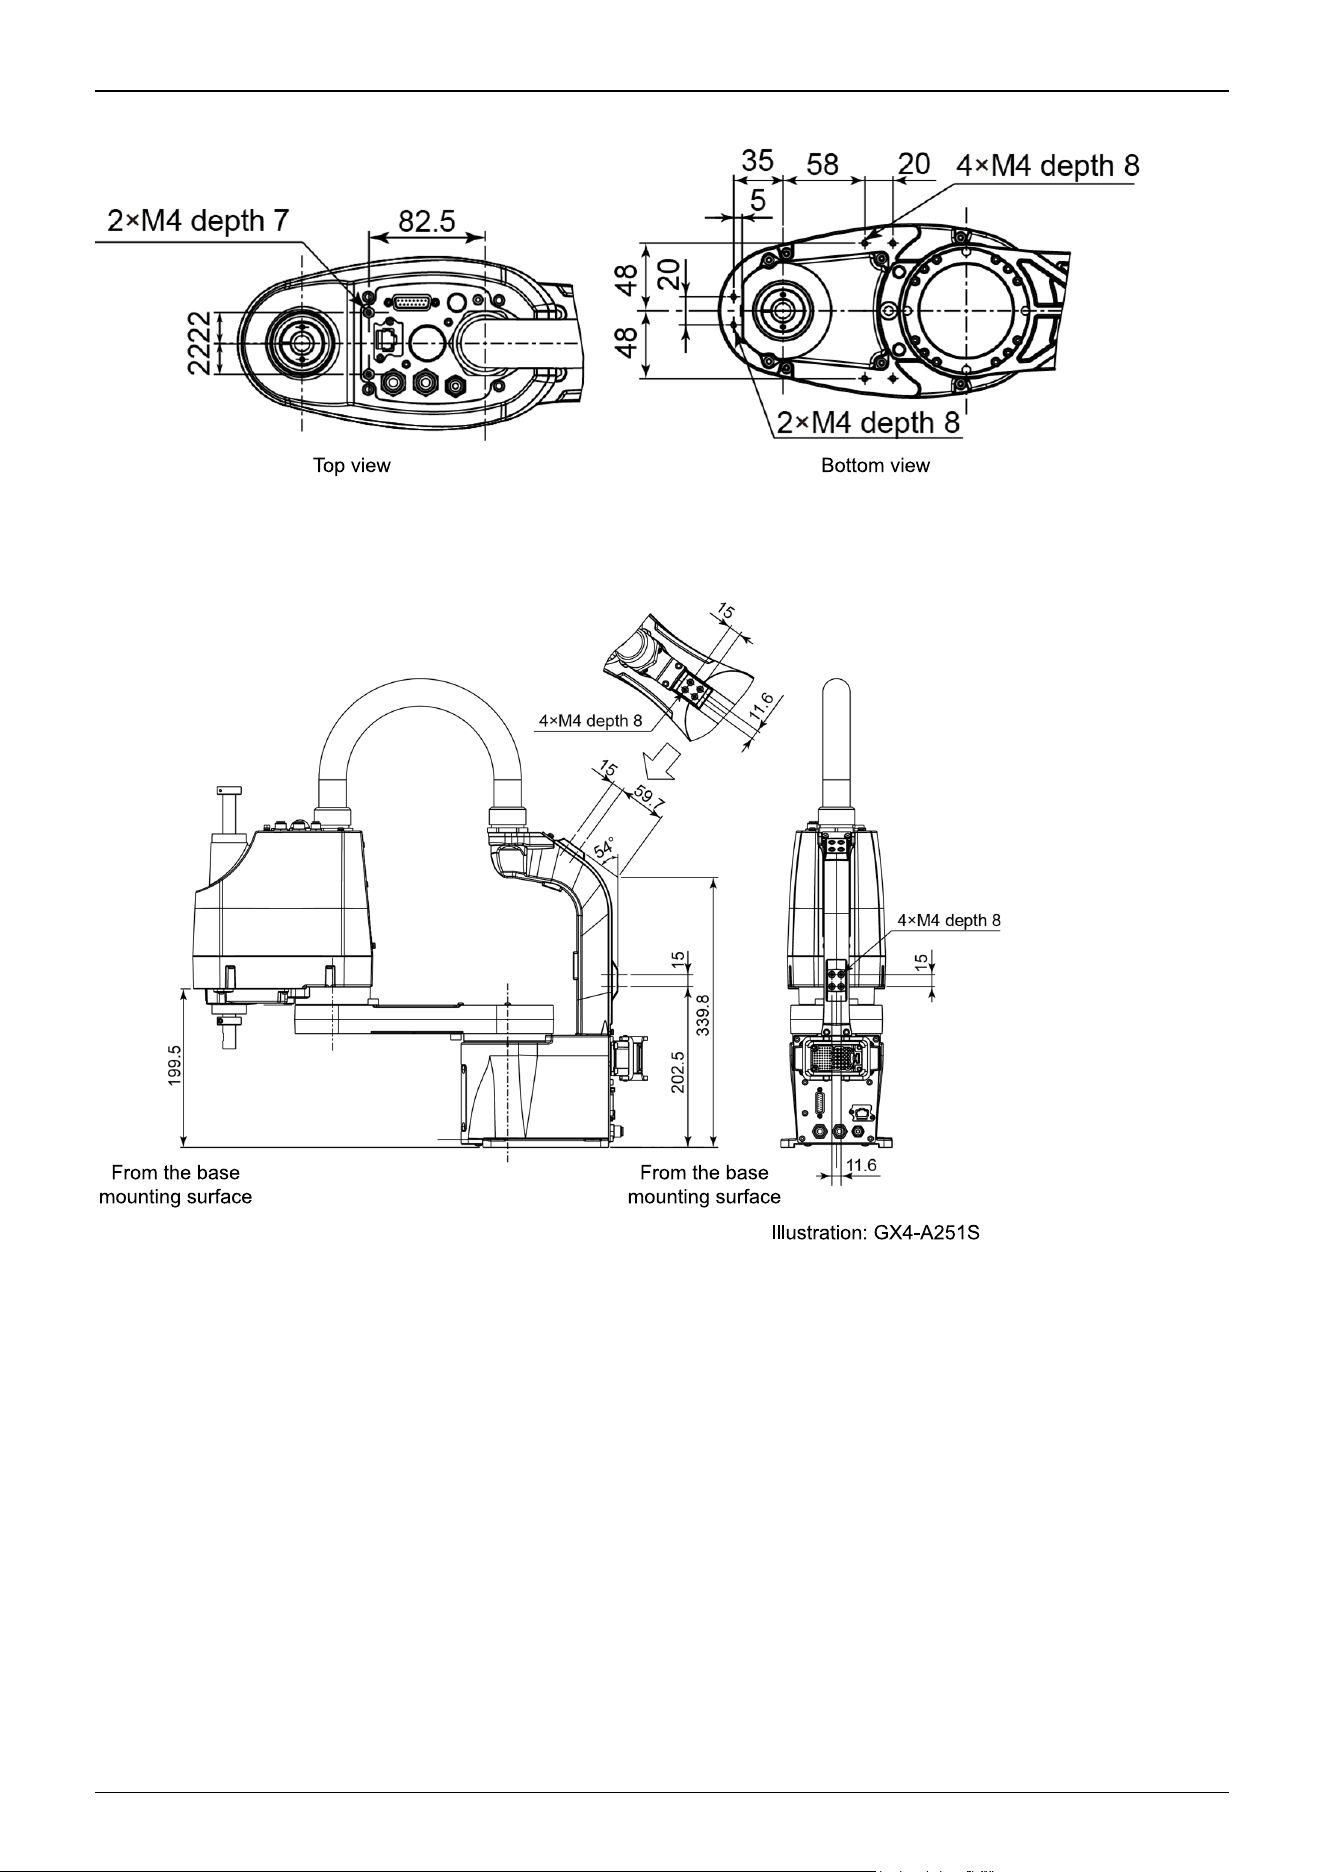
(Units: mm)
Table top mounting specifications
(Units: mm)
Industrial Robot: SCARA Robots GX series Manual Rev.11
142
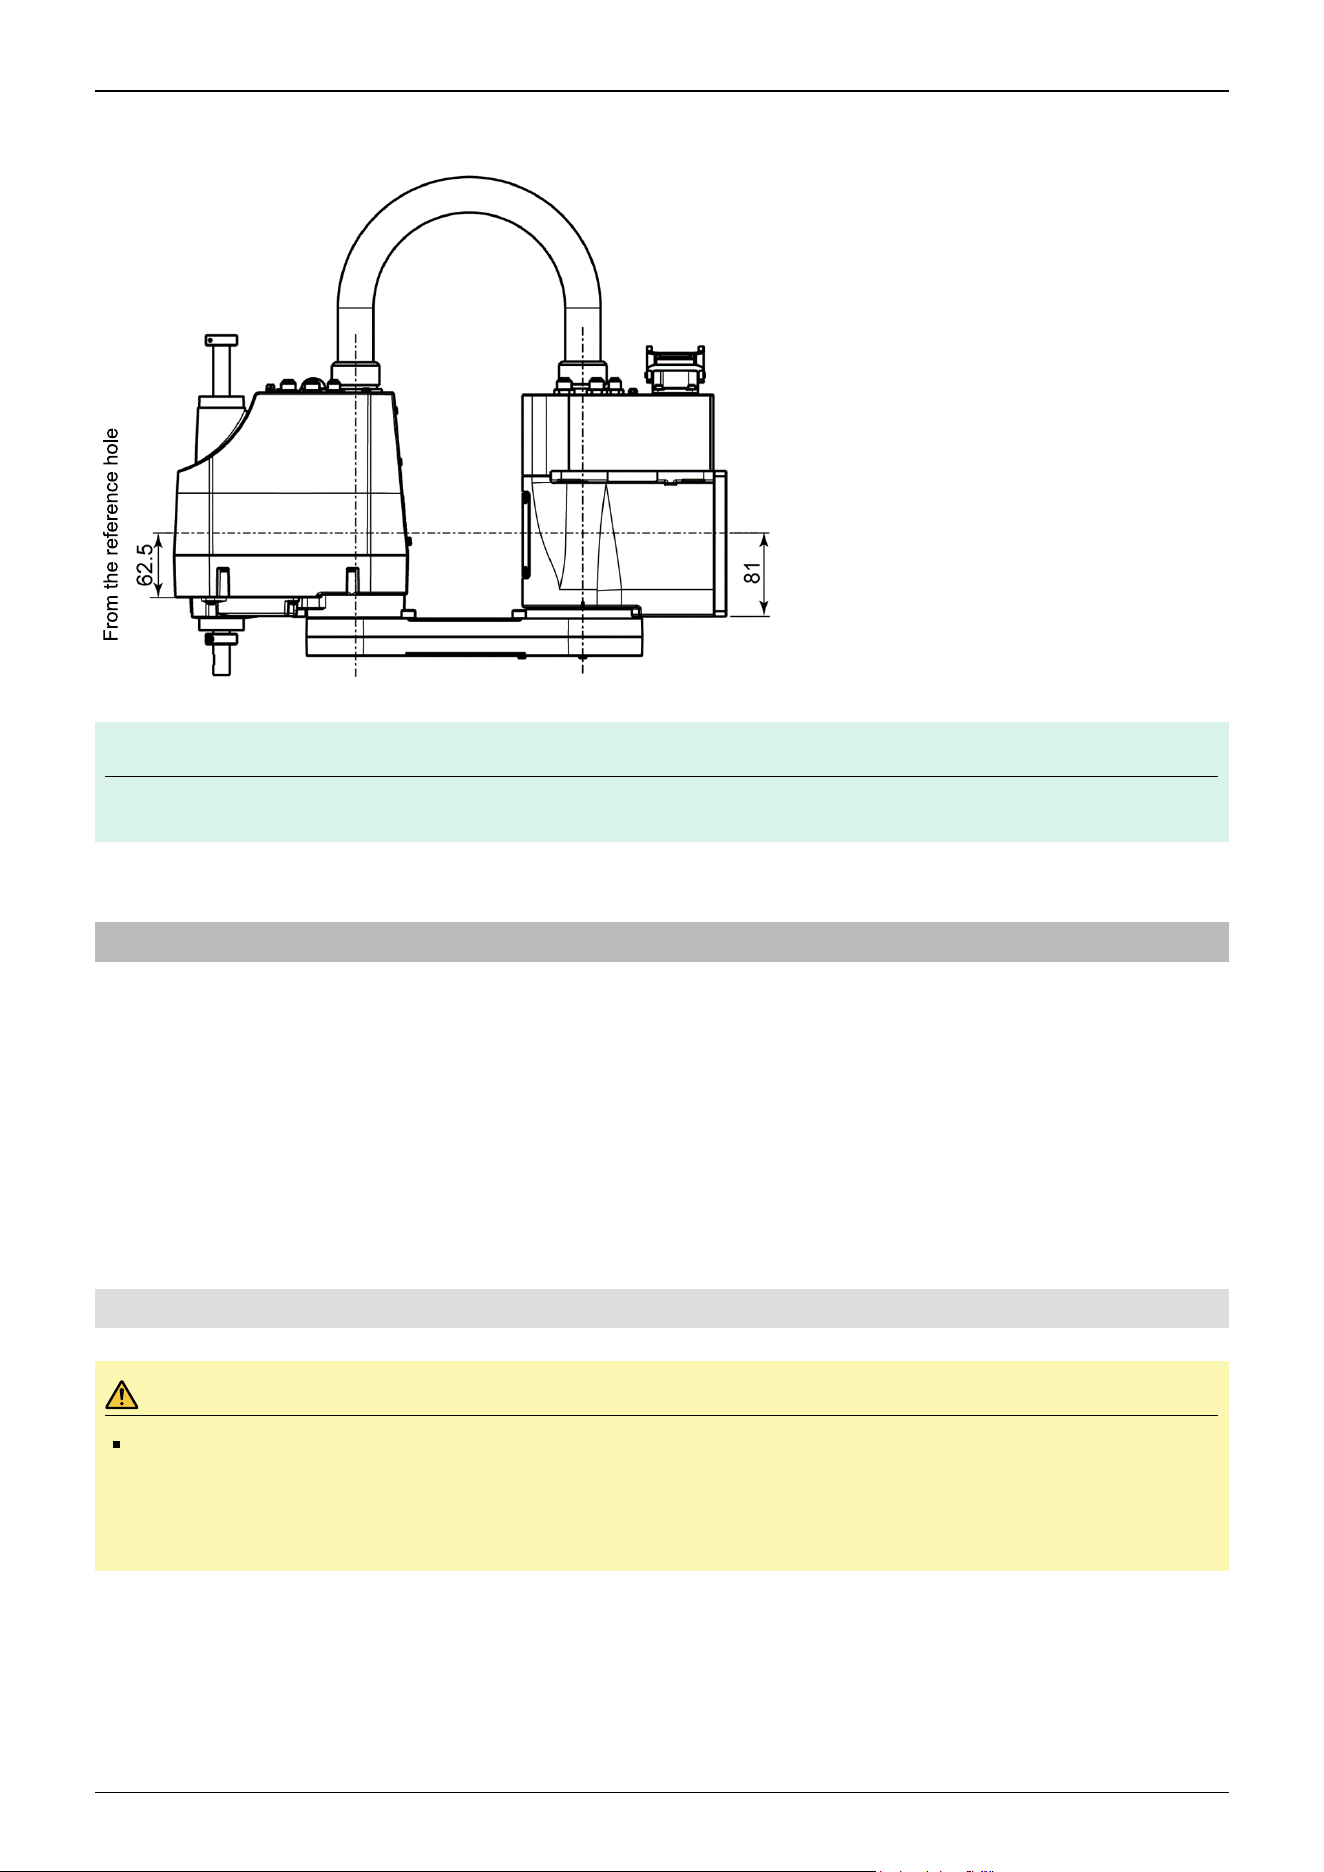
Multiple mounting specifications
(Units: mm)
KEY POINTS
The maximum tightening torque for the screws mounted to the cable duct cover should be 1.5 N·m.
3.4.3 Weight and Inertia Settings
To ensure that the Manipulator is functioning properly, keep the load (the sum of the weights of the hand and workpiece) and
the moment of inertia of the load within the rated values, and do not allow for eccentricity from the center of the Joint #4. If,
for some unavoidable reason, the load or moment of inertia exceeds the rated value, or if eccentricity occurs, configure
parameters as described in the "Weight setting" and "Inertia setting."
These settings optimize the Manipulator's PTP motion, reduce vibration, and shorten operation times. This also works to curb
any persistent vibration that may occur when the hand and workpiece have a large moment of inertia.
You can also perform settings using the "Weight, Inertia, and Eccentricity/offset Measurement Utility".
For details, refer to the following manual:
"Epson RC+ User's Guide - Weight, Inertia, and Eccentricity/Offset Measurement Utility"
3.4.3.1 Weight Setting
CAUTION
The total weight of the hand and the workpiece must not exceed 4 kg. The GX4 series Manipulators are not
designed to work with loads exceeding 4 kg. Always set the value according to the load. Setting the hand
weight parameter to a value smaller than the actual weight may cause errors or impact that not only impair full
functionality but also shorten the life of the mechanical components.
The allowable load weight (hand and workpiece) in the GX4 series is 2 kg at the default rating and 4 kg at the maximum.
Depending on the load weight, change the setting for the hand weight parameter in the Weight statement. After the setting is
changed, the maximum speed and acceleration/deceleration of the Manipulator during PTP motion that correspond to the
"Hand Weight" are corrected automatically.
✏
Industrial Robot: SCARA Robots GX series Manual Rev.11
143

3.4.3.1.1 Weight of Load Attached to Shaft
The weight of the load (hand + workpiece) attached to the shaft can be set by the "Hand Weight" parameter in the Weight
statement.
Go to [Tools] - [Robot Manager] - [Weight] panel, and enter the value in the [Weight] text box. (This can also be set using the
Weight statement in [Command Window].)
3.4.3.1.2 Weight of Load Attached to Arm
When a camera, valve, or other object is attached to the arm, its weight is converted to the equivalent weight of the shaft and
added to the weight of the load attached to shaft to set the "Hand Weight" parameter.
Equivalent weight formula
W
M
=M×(L
M
+L
1
)
2
/(L
1
+L
2
)
2
W
M
: Equivalent weight
M: Weight of load attached to the arm
L
1
: Length of Arm #1
L
2
: Length of Arm #2
L
M
: Distance from rotation center of Joint #2 to center of gravity of load attached to the arm
Example:
Calculates [Weight] parameter when a 1 kg camera is attached to the end of GX4 Arm #2 (180 mm from the center of rotation
of Joint #2) with a load weight of W = 1 kg.
W=1
M = 1
L
1
= 220
L
2
= 130
L
M
= 180
W
M
=1×(180+220)
2
/(130+220)
2
=1.31 (Round up to two decimal places)
W + W
M
= 1+1.31=2.31
Enter "2.31" for the [Hand Weight] parameter.
Industrial Robot: SCARA Robots GX series Manual Rev.11
144
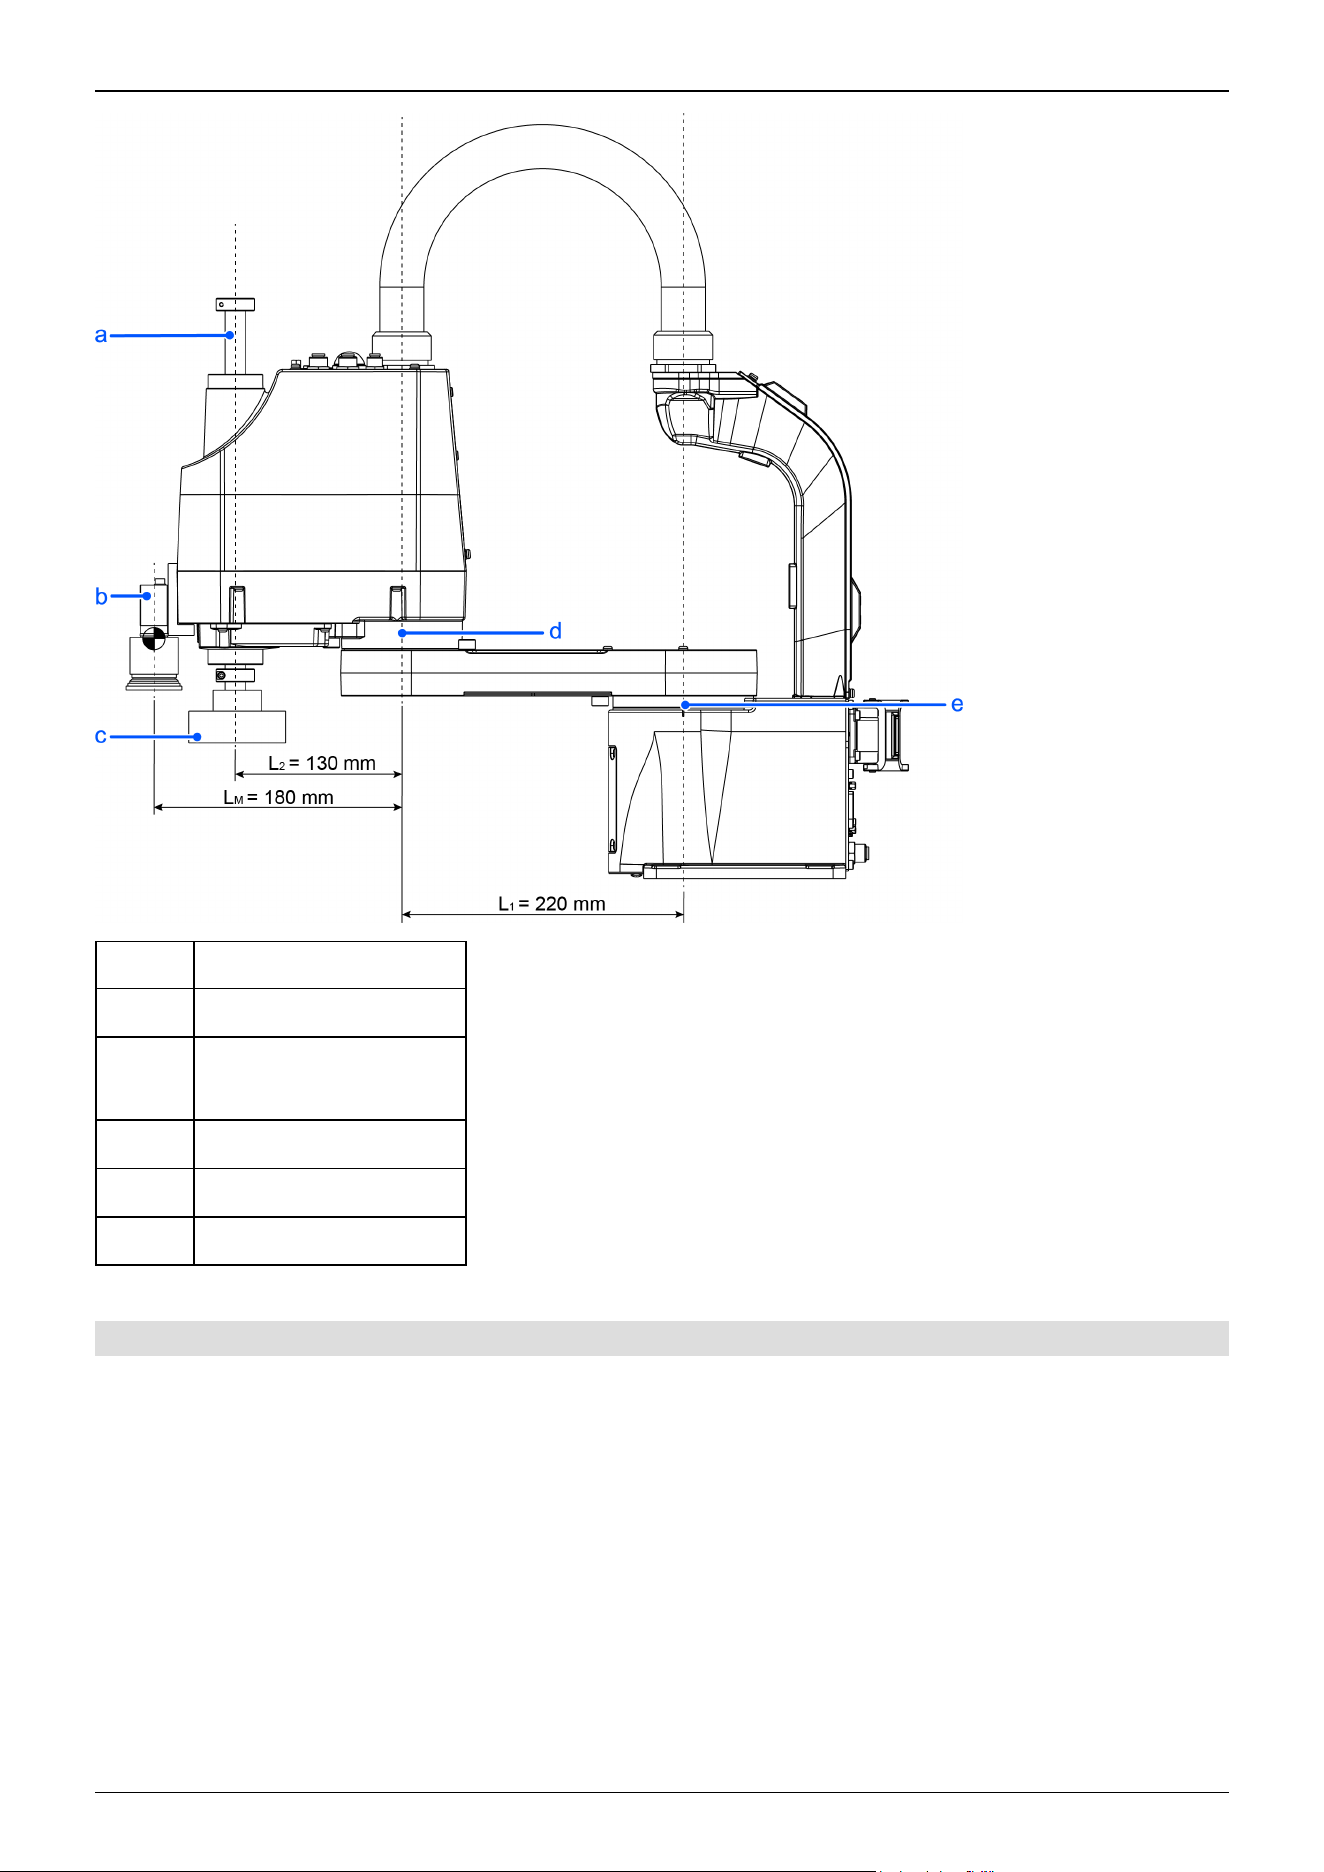
Symbol Description
a Shaft
b
Weight of the entire camera
M = 1 kg
c W = 1 kg
d Joint #2
e Joint #1
3.4.3.1.3 Automatic Speed Correction at Weight Setting
Standard mode
GX4-A/GX4-B/GX4-C25**, GX4-A/GX4-B/GX4-C30**, GX4-A/GX4-B/GX4-C35**
Industrial Robot: SCARA Robots GX series Manual Rev.11
145
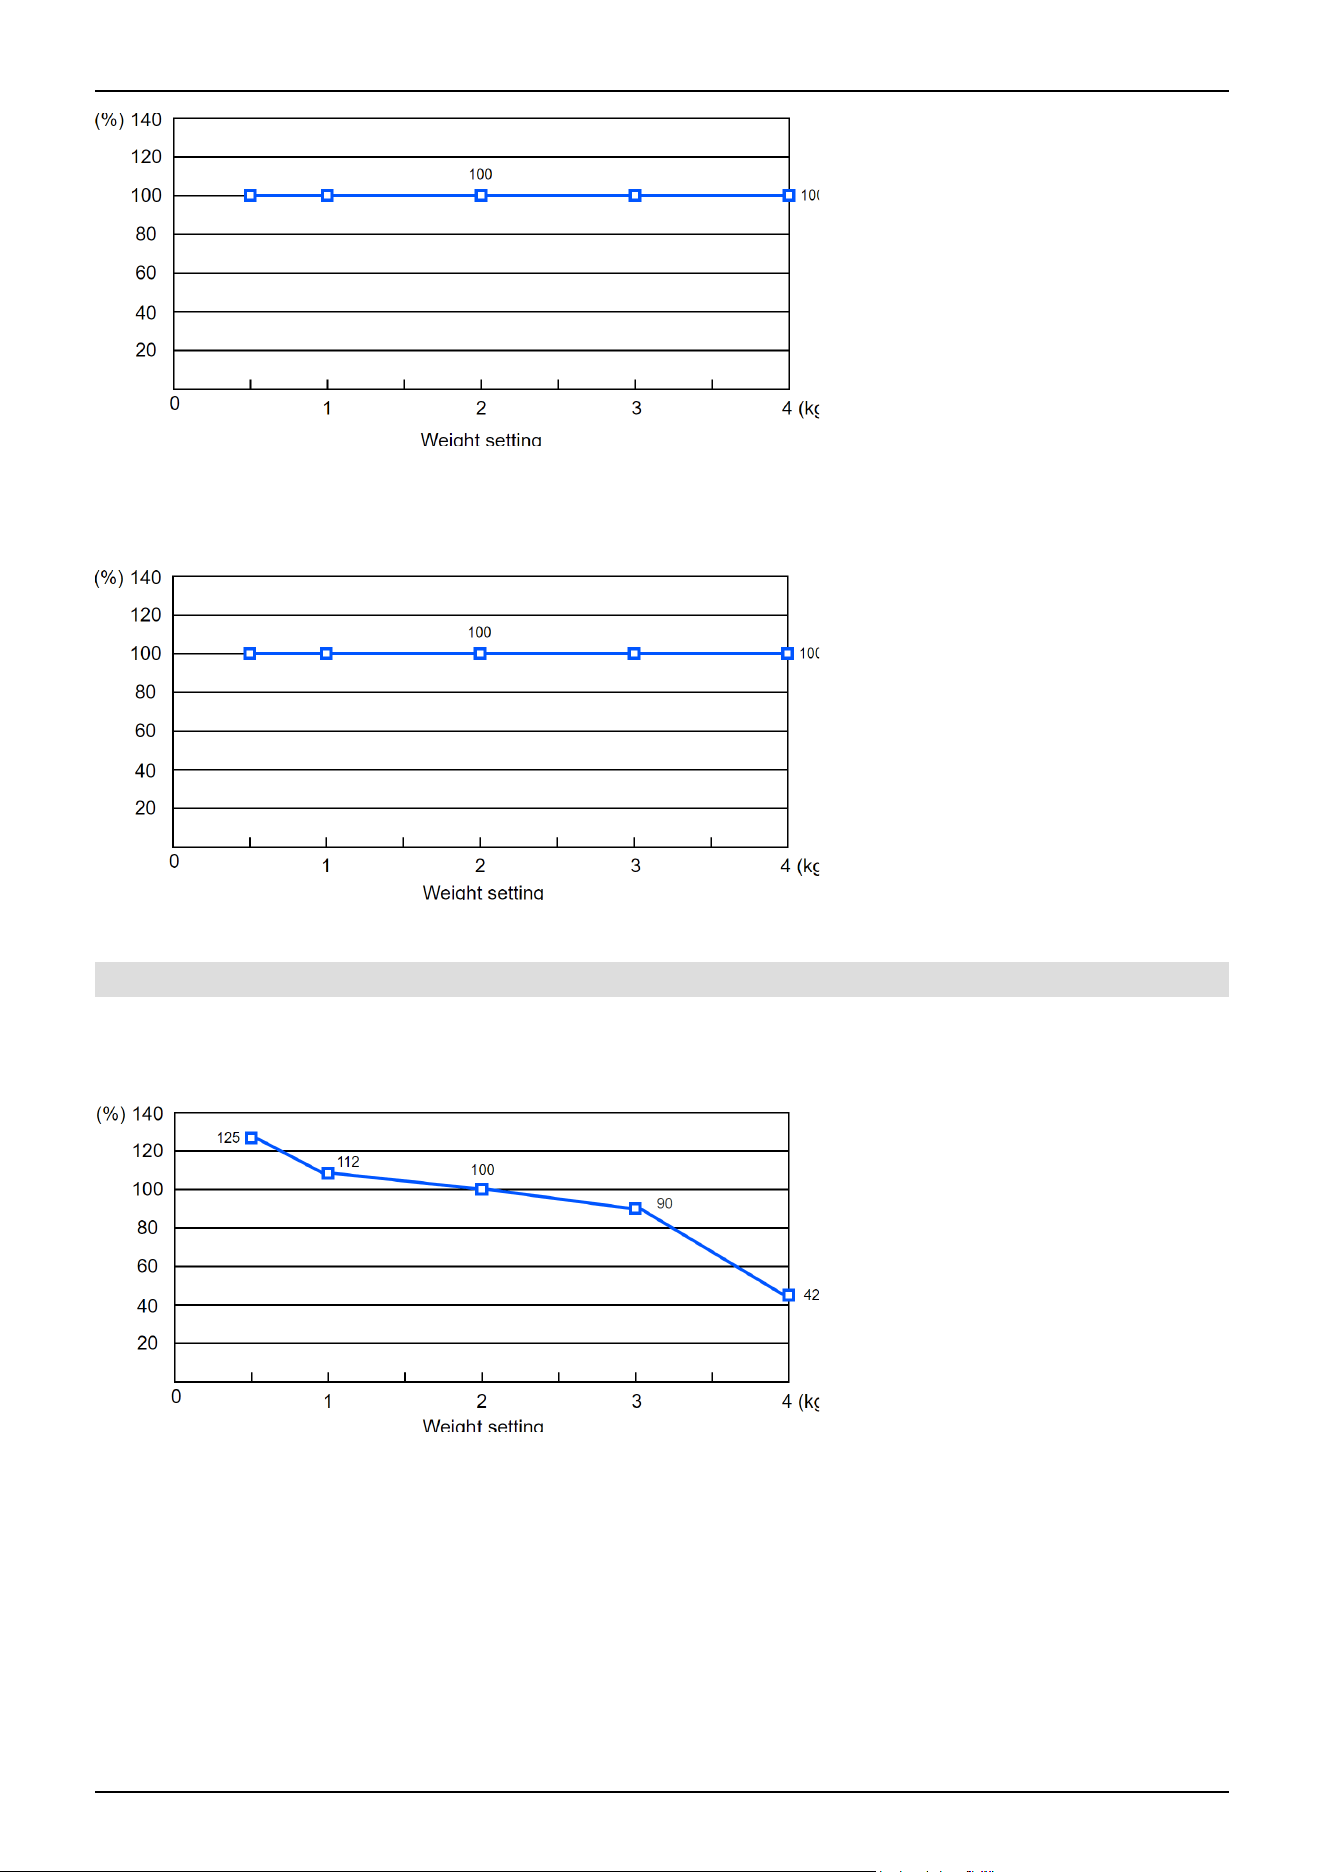
The percentages on the graph are ratios based on 100% as the speed at the rated (2 kg) setting.
Boost mode
GX4-A/GX4-B/GX4-C25**, GX4-A/GX4-B/GX4-C30**, GX4-A/GX4-B/GX4-C35**
The percentages on the graph are ratios based on 100% as the speed at the rated (2 kg) setting.
3.4.3.1.4 Automatic Acceleration/Deceleration Correction at Weight Setting
Standard mode
GX4-A/GX4-B/GX4-C25**
The percentages on the graph are ratios based on 100% as the acceleration/deceleration at the rated (2 kg) setting.
Industrial Robot: SCARA Robots GX series Manual Rev.11
146
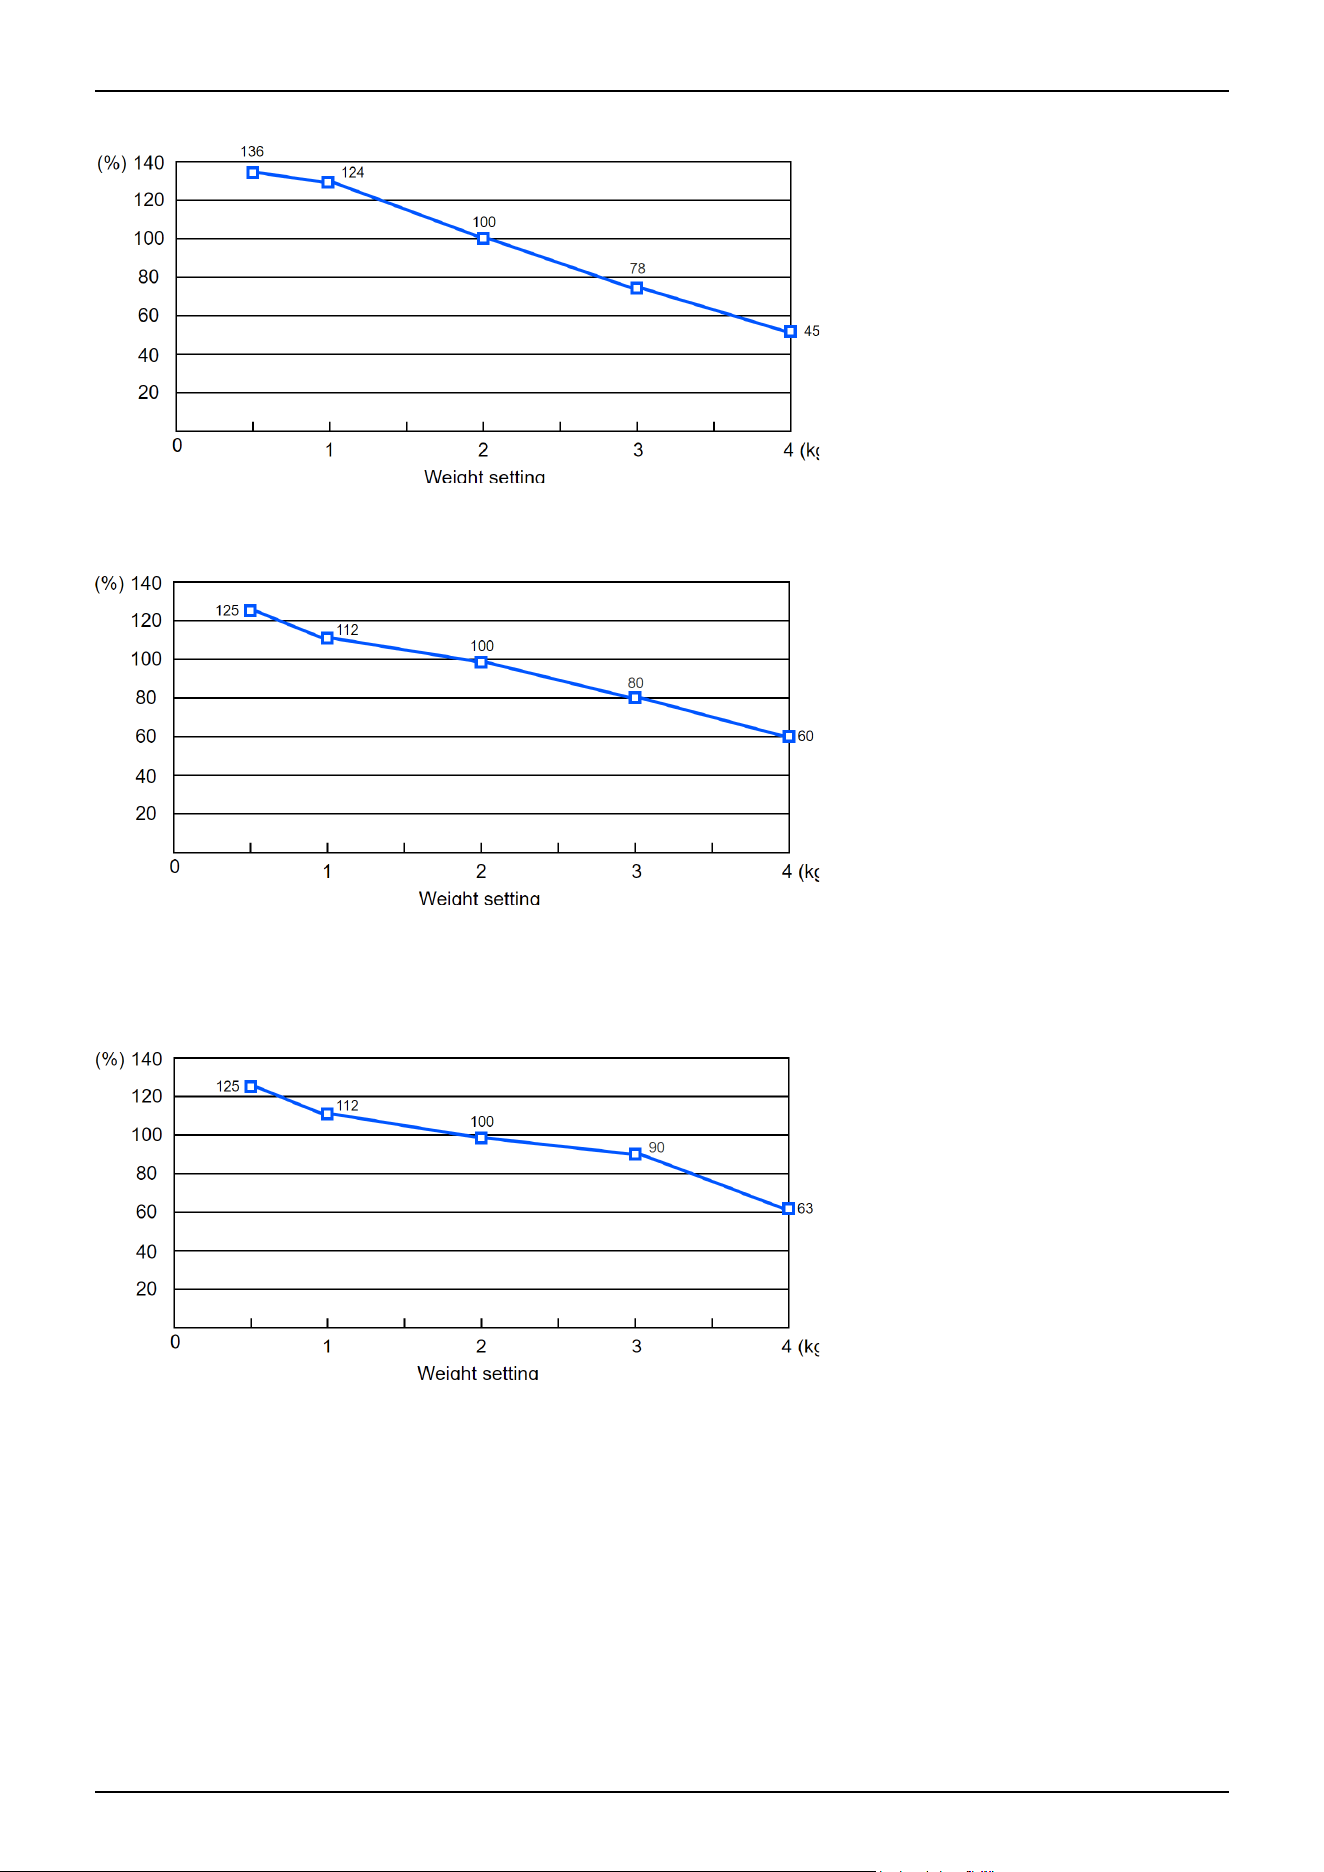
GX4-A/GX4-B/GX4-C30**
The percentages on the graph are ratios based on 100% as the acceleration/deceleration at the rated (2 kg) setting.
GX4-A/GX4-B/GX4-C35**
The percentages on the graph are ratios based on 100% as the acceleration/deceleration at the rated (2 kg) setting.
Boost mode
GX4-A/GX4-B/GX4-C25**
The percentages on the graph are ratios based on 100% as the acceleration/deceleration at the rated (2 kg) setting.
GX4-A/GX4-B/GX4-C30**
Industrial Robot: SCARA Robots GX series Manual Rev.11
147
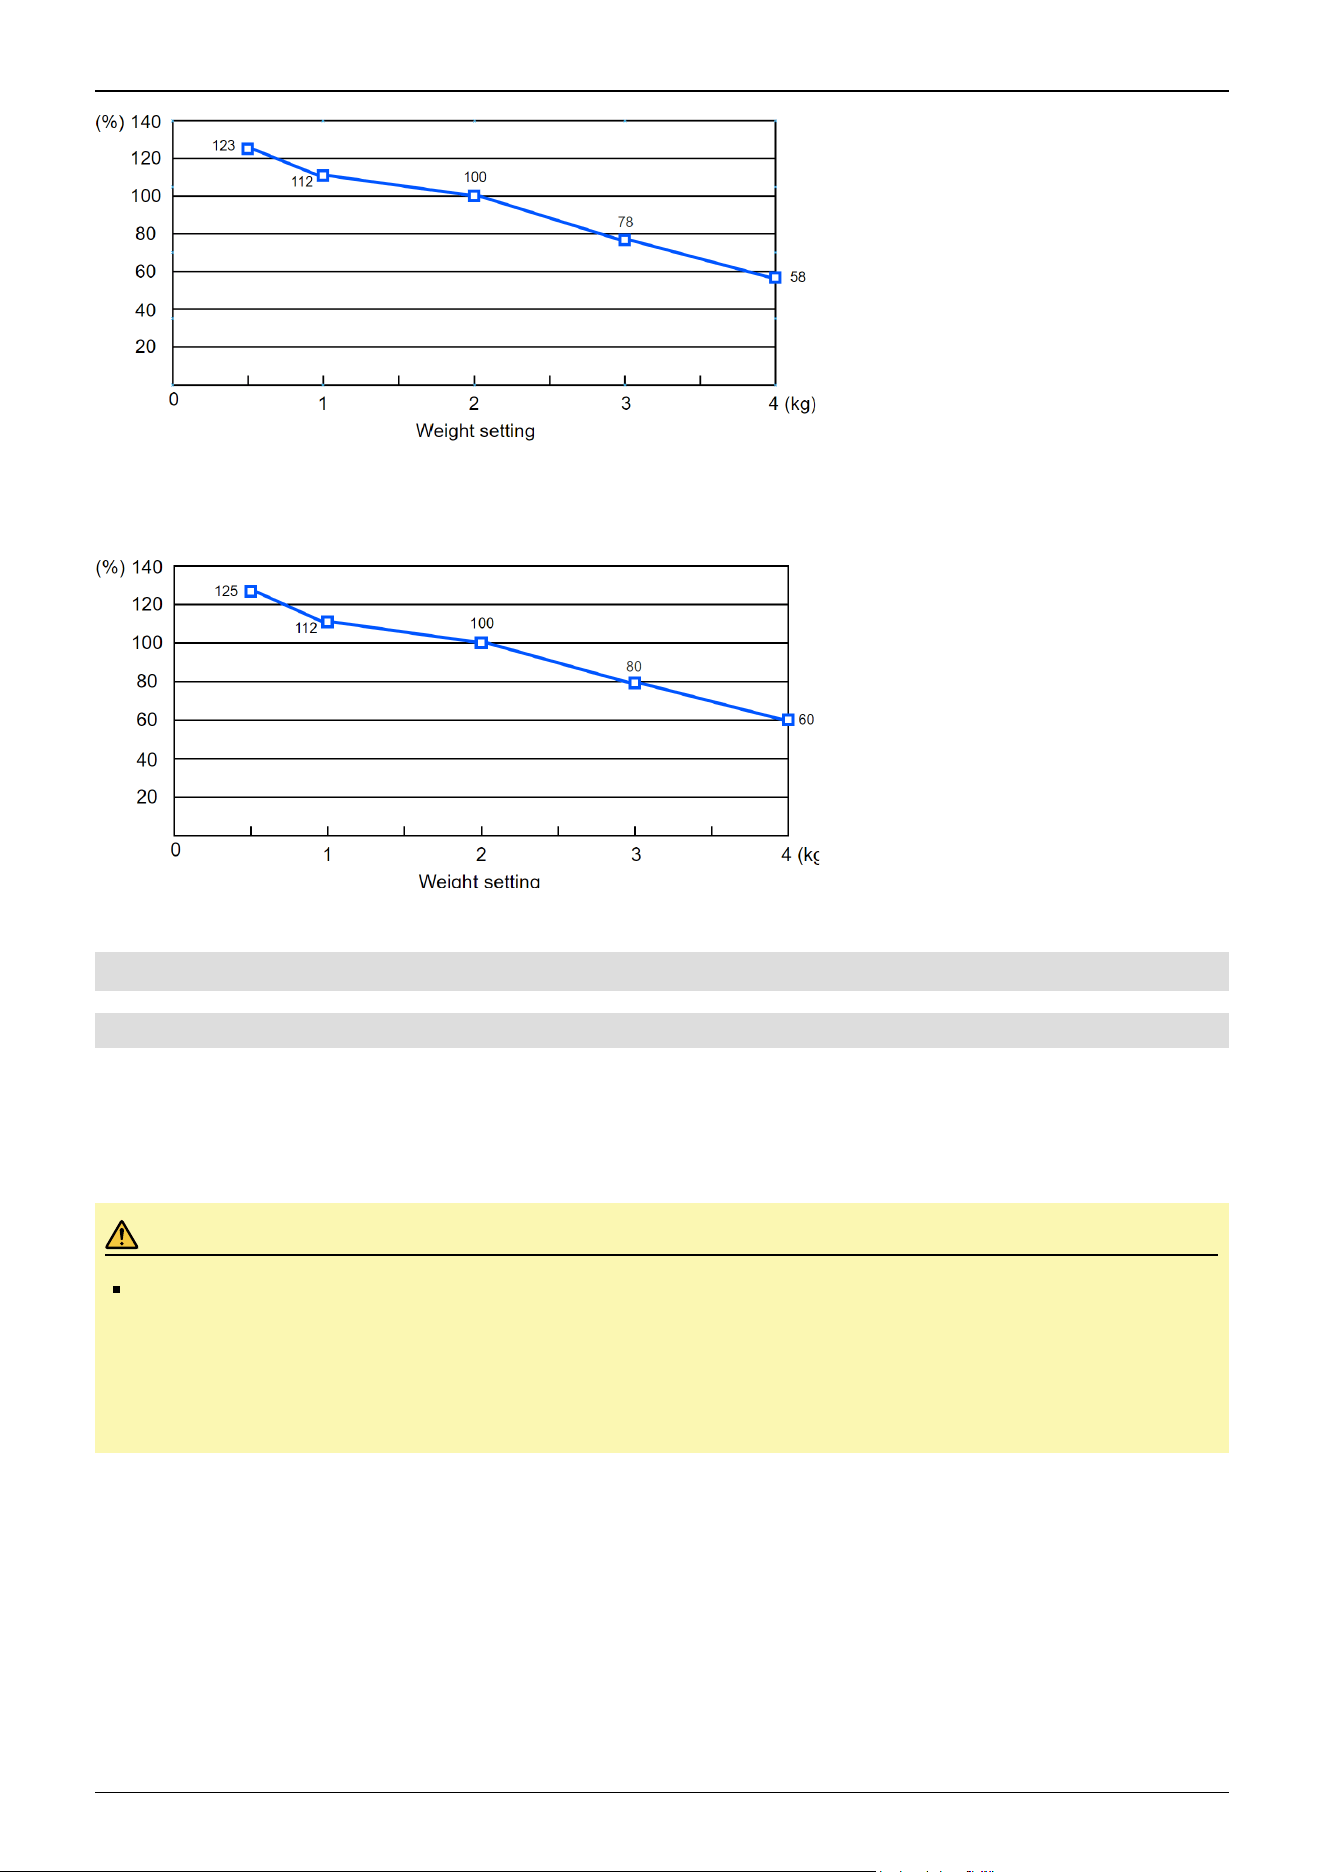
The percentages on the graph are ratios based on 100% as the acceleration/deceleration at the rated (2 kg) setting.
GX4-A/GX4-B/GX4-C35**
The percentages on the graph are ratios based on 100% as the acceleration/deceleration at the rated (2 kg) setting.
3.4.3.2 Inertia Setting
3.4.3.2.1 Moment of Inertia and Inertia Setting
The moment of inertia is a quantity that expresses how hard it is for an object to turn, and it is expressed in terms of values for
the moment of inertia, inertia, or GD
2
. When a hand or other object is attached to a shaft for operation, the moment of inertia
of the load must be taken into consideration.
CAUTION
The moment of inertia of the load (weight of the hand and workpiece) must be 0.05 kg·m
2
or less. The GX4
series Manipulators are not designed to work with a moment of inertia exceeding 0.05 kg·m
2
. Always set the
value corresponding to the moment of inertia. Setting a parameter value that is smaller than the actual
moment of inertia may cause errors or impact, may prevent the Manipulator from working at full functionality,
and may shorten the lifespan of mechanical parts.
The allowable moment of inertia of a load for GX4 series Manipulators is 0.005 kg·m
2
at the default rating and 0.05 kg·m
2
at
the maximum. Depending on the moment of inertia, change the setting of the moment of inertia parameter for the load in the
Inertia statement. After the setting is changed, the maximum acceleration/deceleration of Joint #4 during PTP motion that
corresponds to the "Inertia" value is corrected automatically.
Industrial Robot: SCARA Robots GX series Manual Rev.11
148

3.4.3.2.2 Moment of Inertia of Load Attached to Shaft
The moment of inertia of the load (hand + workpiece) attached to the shaft can be set by the "Inertia" parameter in the Inertia
statement.
Go to [Tools] - [Robot Manager] - [Inertia] panel, and enter the value in [Inertia]. (This can also be set using the Inertia
statement in [Command Window].)
Industrial Robot: SCARA Robots GX series Manual Rev.11
149
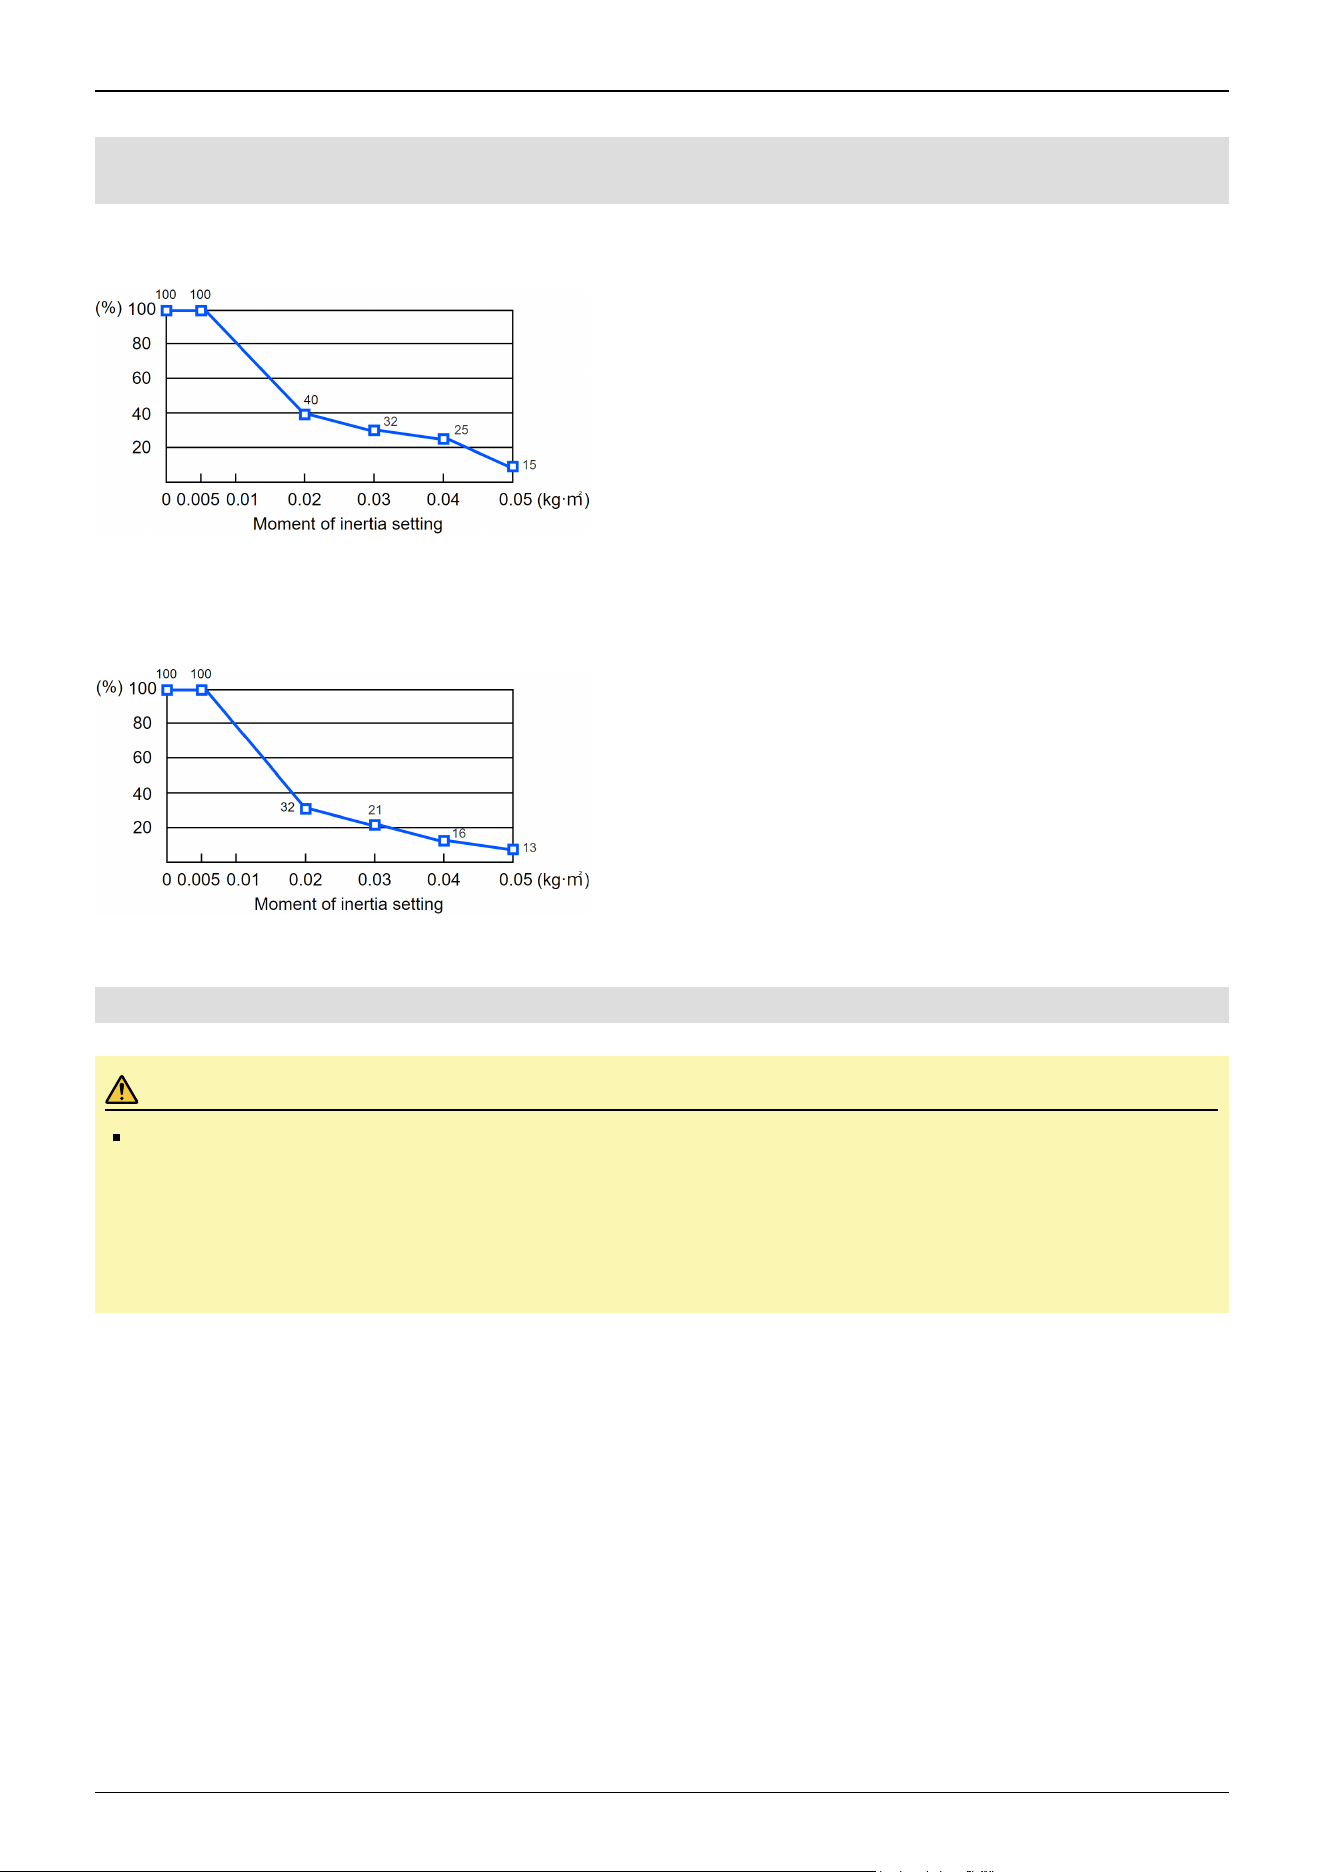
3.4.3.2.3 Automatic Acceleration/Deceleration Correction of Joint #4 at Inertia (Moment
of Inertia) Setting
Standard mode
GX4-A/GX4-B/GX4-C25**, GX4-A/GX4-B/GX4-C30**, GX4-A/GX4-B/GX4-C35**
The percentages on the graph are ratios based on 100% as the acceleration/deceleration at the rated (0.005 kg·m
2
) setting.
Boost mode
GX4-A/GX4-B/GX4-C25**, GX4-A/GX4-B/GX4-C30**, GX4-A/GX4-B/GX4-C35**
The percentages on the graph are ratios based on 100% as the acceleration/deceleration at the rated (0.005 kg·m
2
) setting.
3.4.3.2.4 Eccentricity and Inertia Setting
CAUTION
The eccentricity of the load (hand and workpiece) must be 150 mm or less.
The GX4 series Manipulators are not designed to work with eccentricities exceeding 150 mm. Always set the
value based on the eccentricity. Setting the eccentricity parameter to a value smaller than the actual
eccentricity may cause errors or impact that not only impair full functionality but also shorten the life of the
mechanical components.
The allowable eccentricity of load for GX4 series Manipulators is 0 mm at the default rating and 150 mm at the maximum.
Depending on the load eccentricity, change the setting for the eccentricity parameter in Inertia statement. After the setting is
changed, the maximum acceleration/deceleration of the Manipulator during PTP motion that corresponds to the "Eccentricity"
is corrected automatically.
Industrial Robot: SCARA Robots GX series Manual Rev.11
150
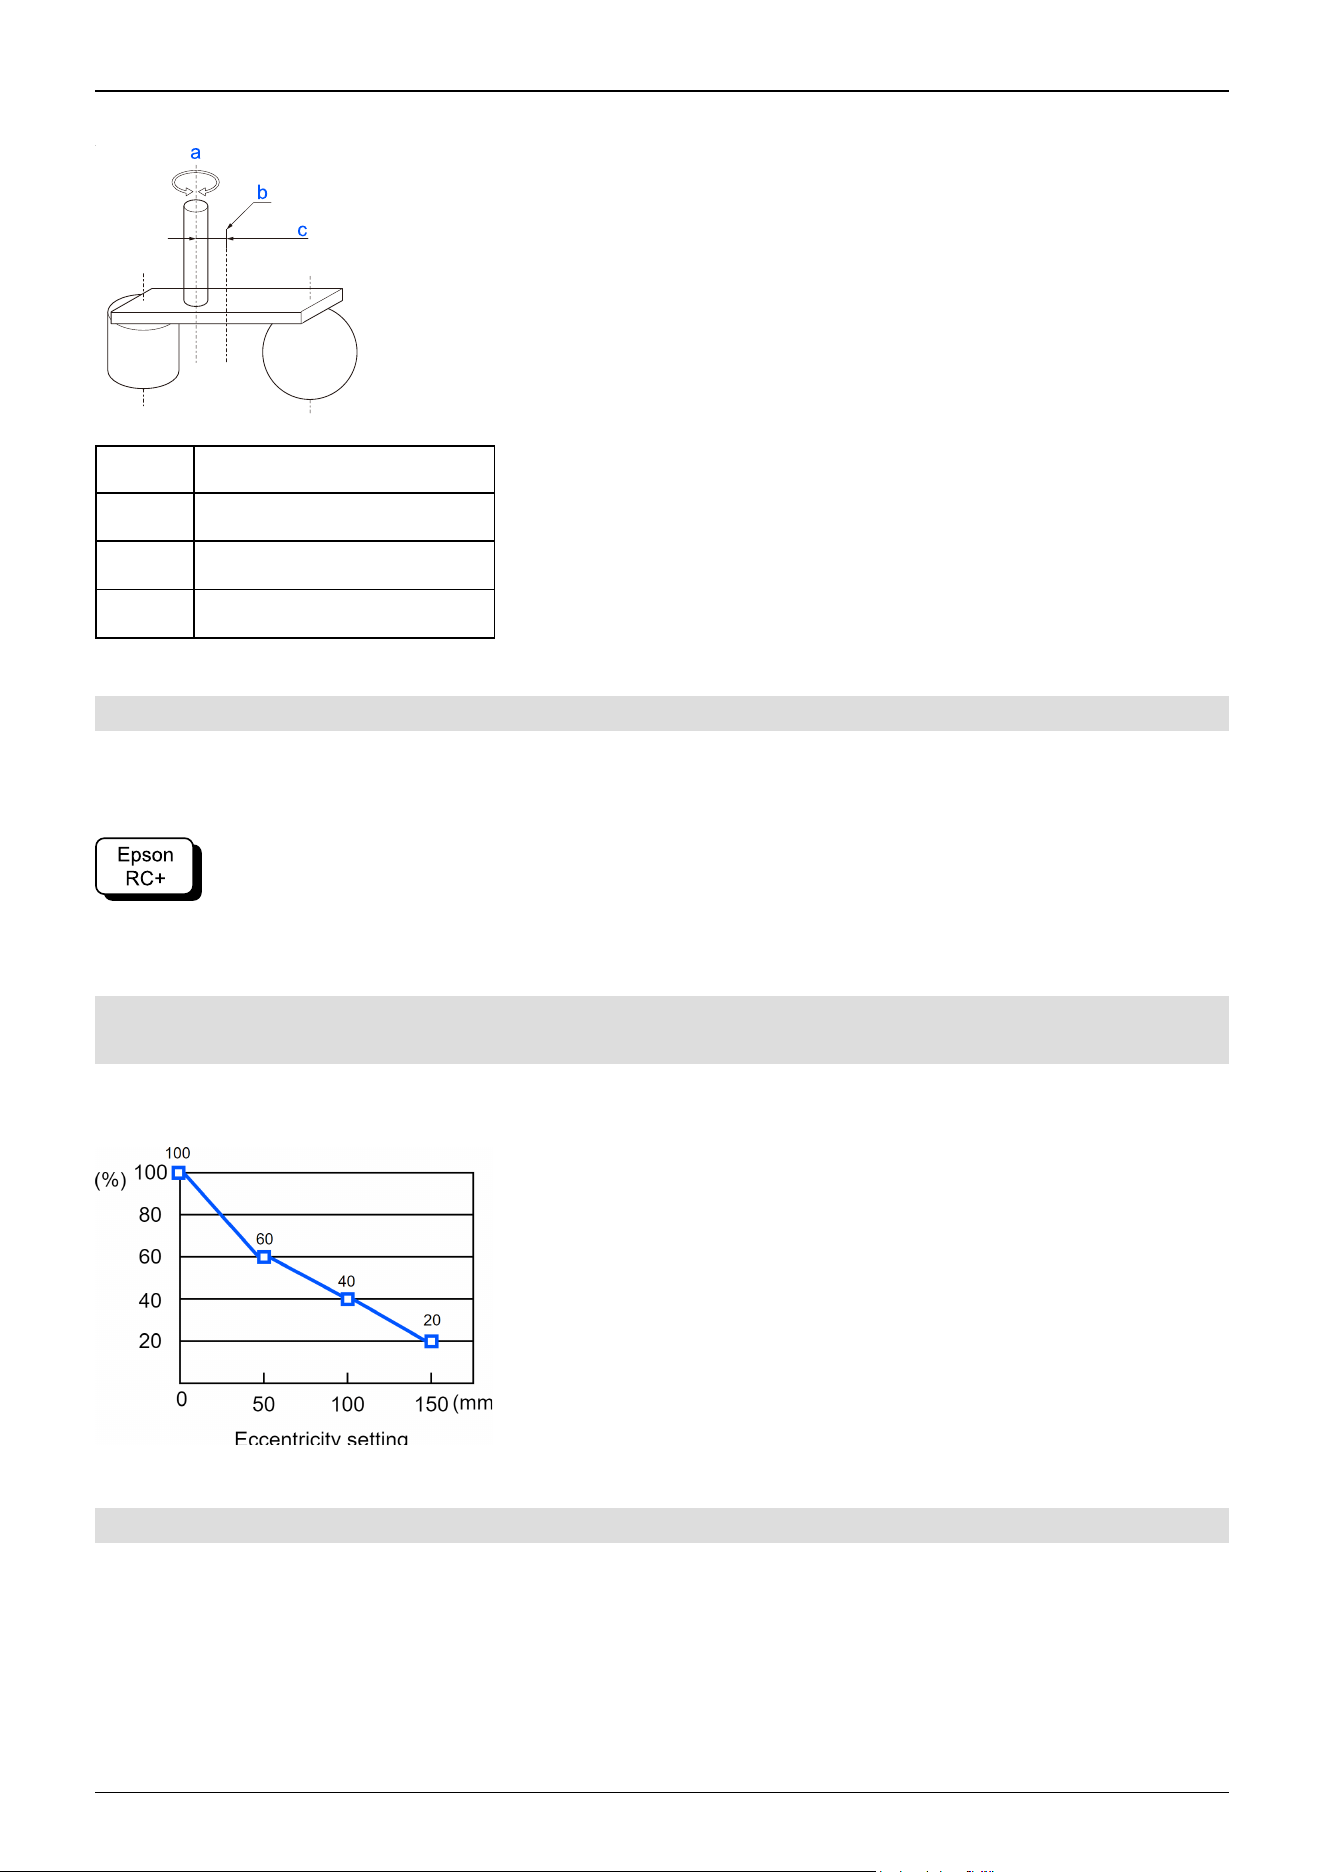
Eccentricity
Symbol Description
a Rotation axis
b Load center of gravity position
c Eccentricity (150 mm or less)
3.4.3.2.5 Eccentricity of Load Attached to Shaft
The eccentricity of the load (hand + workpiece) attached to the shaft can be set by the "Eccentricity" parameter in the Inertia
statement.
Go to [Tools] - [Robot Manager] - [Inertia] panel, and enter the value in [Eccentricity]. (This can also be set using the Inertia
statement in [Command Window].)
3.4.3.2.6 Automatic Acceleration/Deceleration Correction at Inertia (Eccentricity)
Setting
Standard mode, boost mode
GX4-A/GX4-B/GX4-C25**, GX4-A/GX4-B/GX4-C30**, GX4-A/GX4-B/GX4-C35**
The percentages on the graph are ratios based on 100% as the acceleration/deceleration at the 0 mm setting.
3.4.3.2.7 Calculating the Moment of Inertia
An example of calculating the moment of inertia of a load (hand holding a workpiece) is shown below.
Industrial Robot: SCARA Robots GX series Manual Rev.11
151
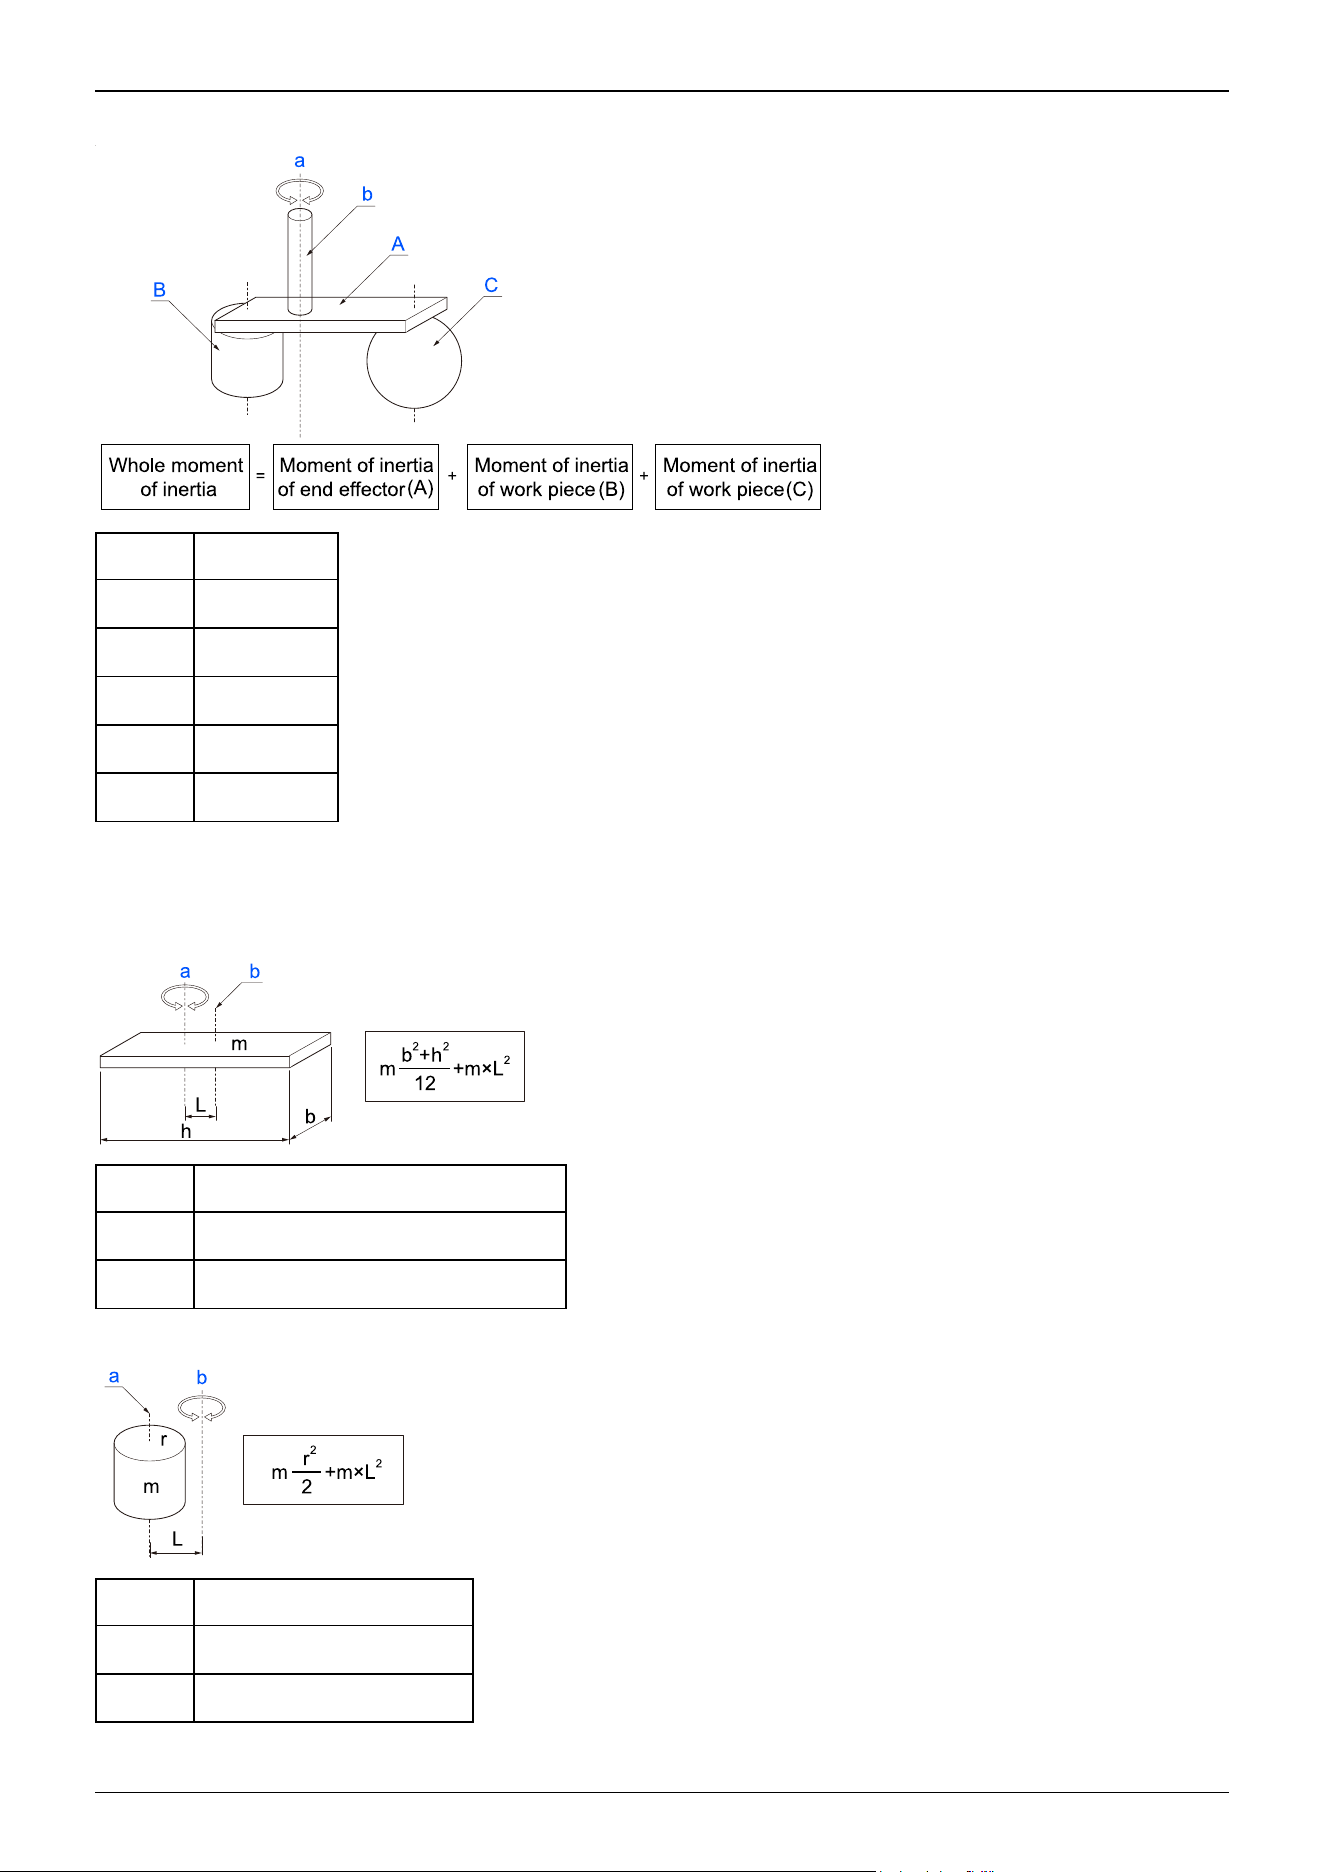
The moment of inertia of the entire load is calculated by the sum of individual parts (A), (B), and (C).
Symbol Description
a Rotation axis
b Shaft
A Hand
B Workpiece
C Workpiece
The methods for calculating the moment of inertia for (A), (B), and (C) are shown below. Use the moment of inertia of these
basic shapes as a reference to find the moment of inertia of the entire load.
(A) Moment of inertia of a rectangular parallelepiped
Symbol Description
a Rotation axis
b Center of gravity of rectangular cuboid
(B) Moment of inertia of a cylinder
Symbol Description
a Center of gravity of cylinder
b Rotation axis
Industrial Robot: SCARA Robots GX series Manual Rev.11
152
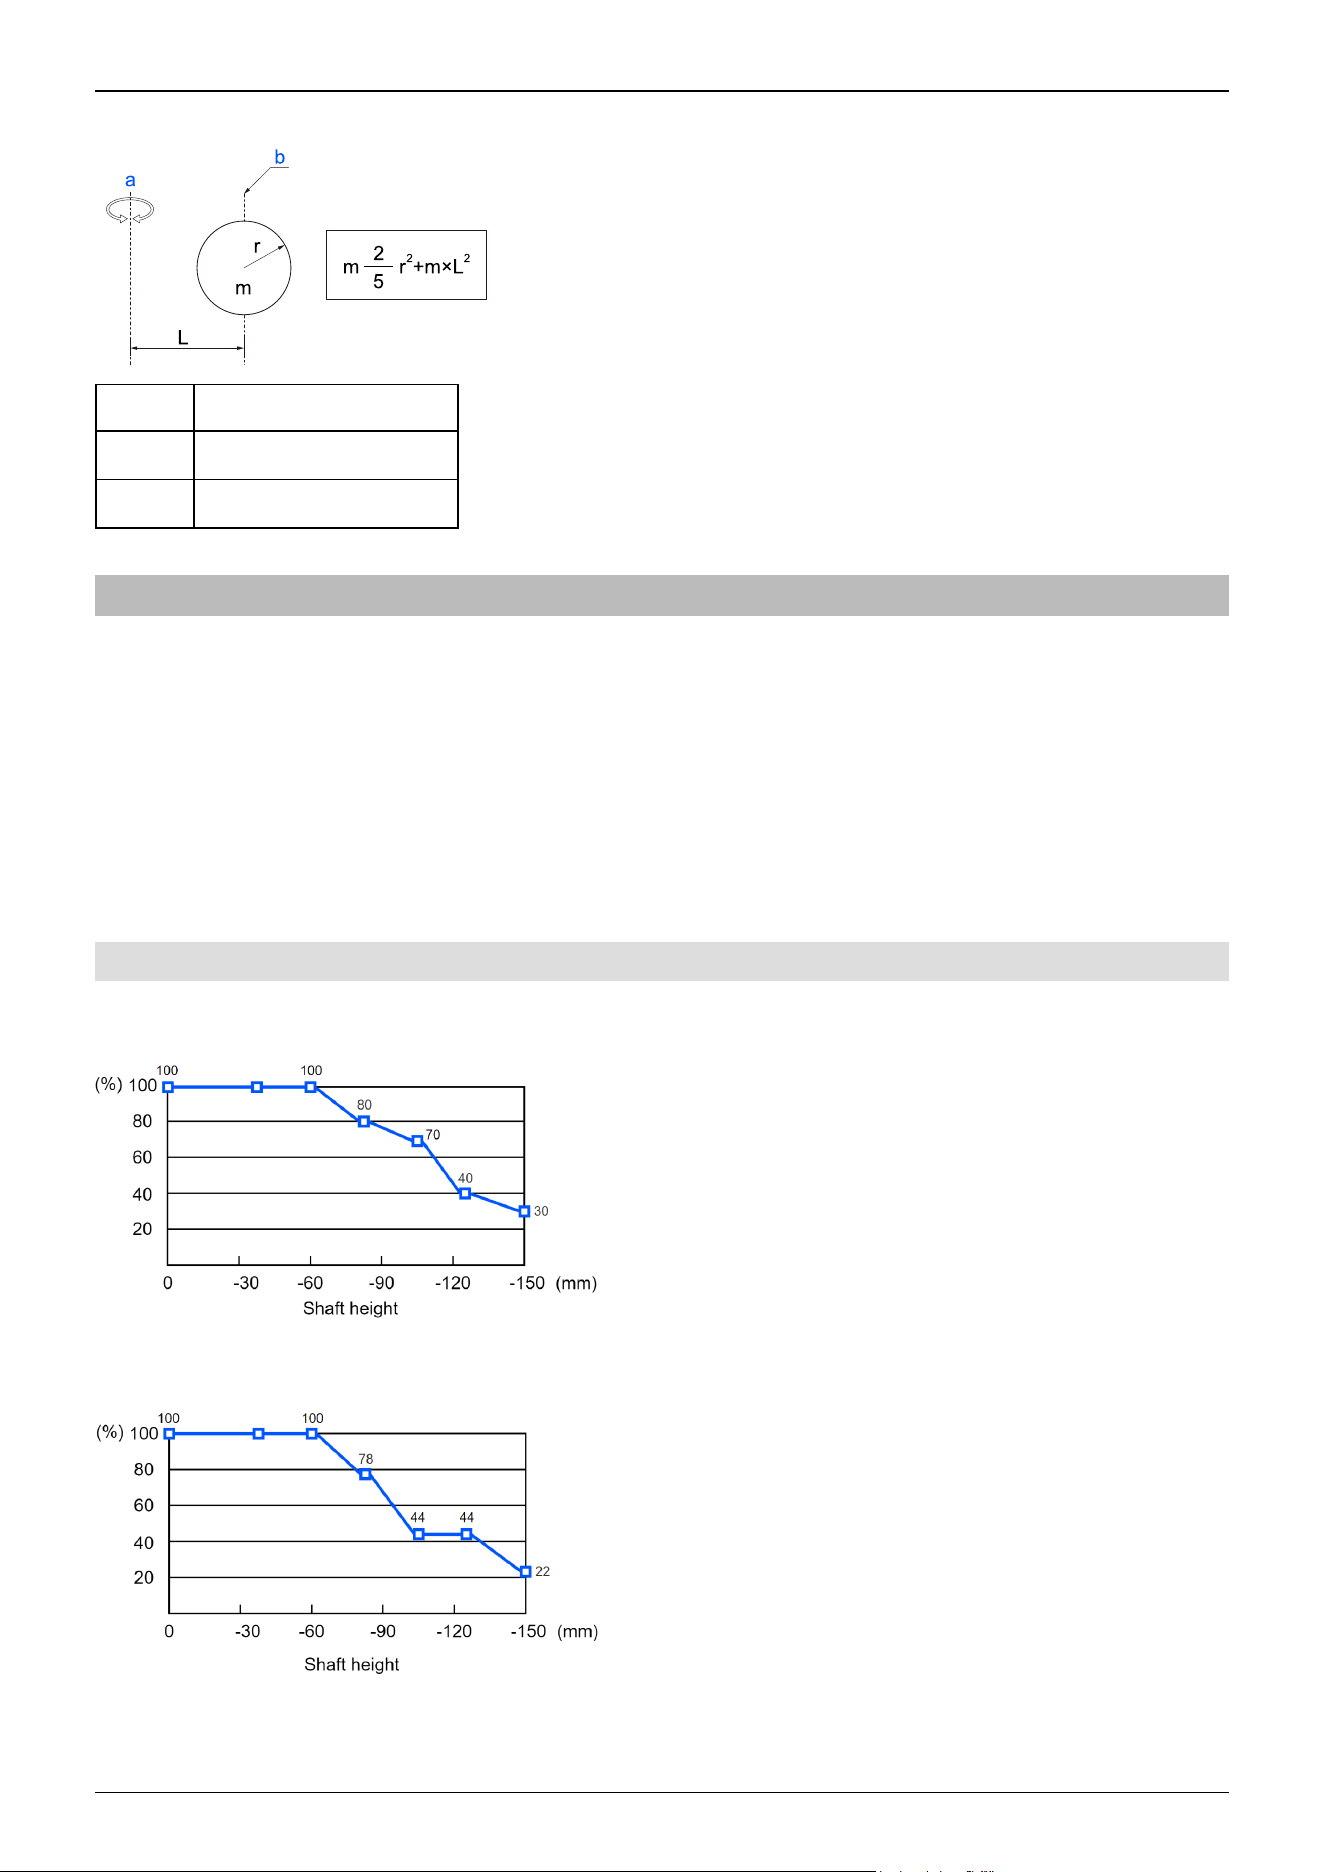
(C) Moment of inertia of a sphere
Symbol Description
a Rotation axis
b Center of gravity of sphere
3.4.4 Safety Information for Auto Acceleration of Joint #3
When performing horizontal movement in PTP motion, the operation time can be shorted by setting the shaft to a high
position.
When performing horizontal movement in PTP motion, if the shaft height is less than a certain value, the auto acceleration
function is activated, and the acceleration/deceleration of the movement is set slower for lower shaft heights. A higher shaft
position results in a faster acceleration/deceleration for the movement, but the up movement time and down movement time of
the shaft are also required.
Adjust the shaft height by taking into consideration the positional relationship between the current position and the target
position.
The shaft height at the time of horizontal movement for the Jump statement can be set by the LimZ statement.
3.4.4.1 Automatic Acceleration/Deceleration Correction by Shaft Position
Standard mode
GX4-A/GX4-B/GX4-C25**
The percentages on the graph are ratios based on 100% as the acceleration/deceleration at the shaft upper limit position.
GX4-A/GX4-B/GX4-C30**
The percentages on the graph are ratios based on 100% as the acceleration/deceleration at the shaft upper limit position.
Industrial Robot: SCARA Robots GX series Manual Rev.11
153
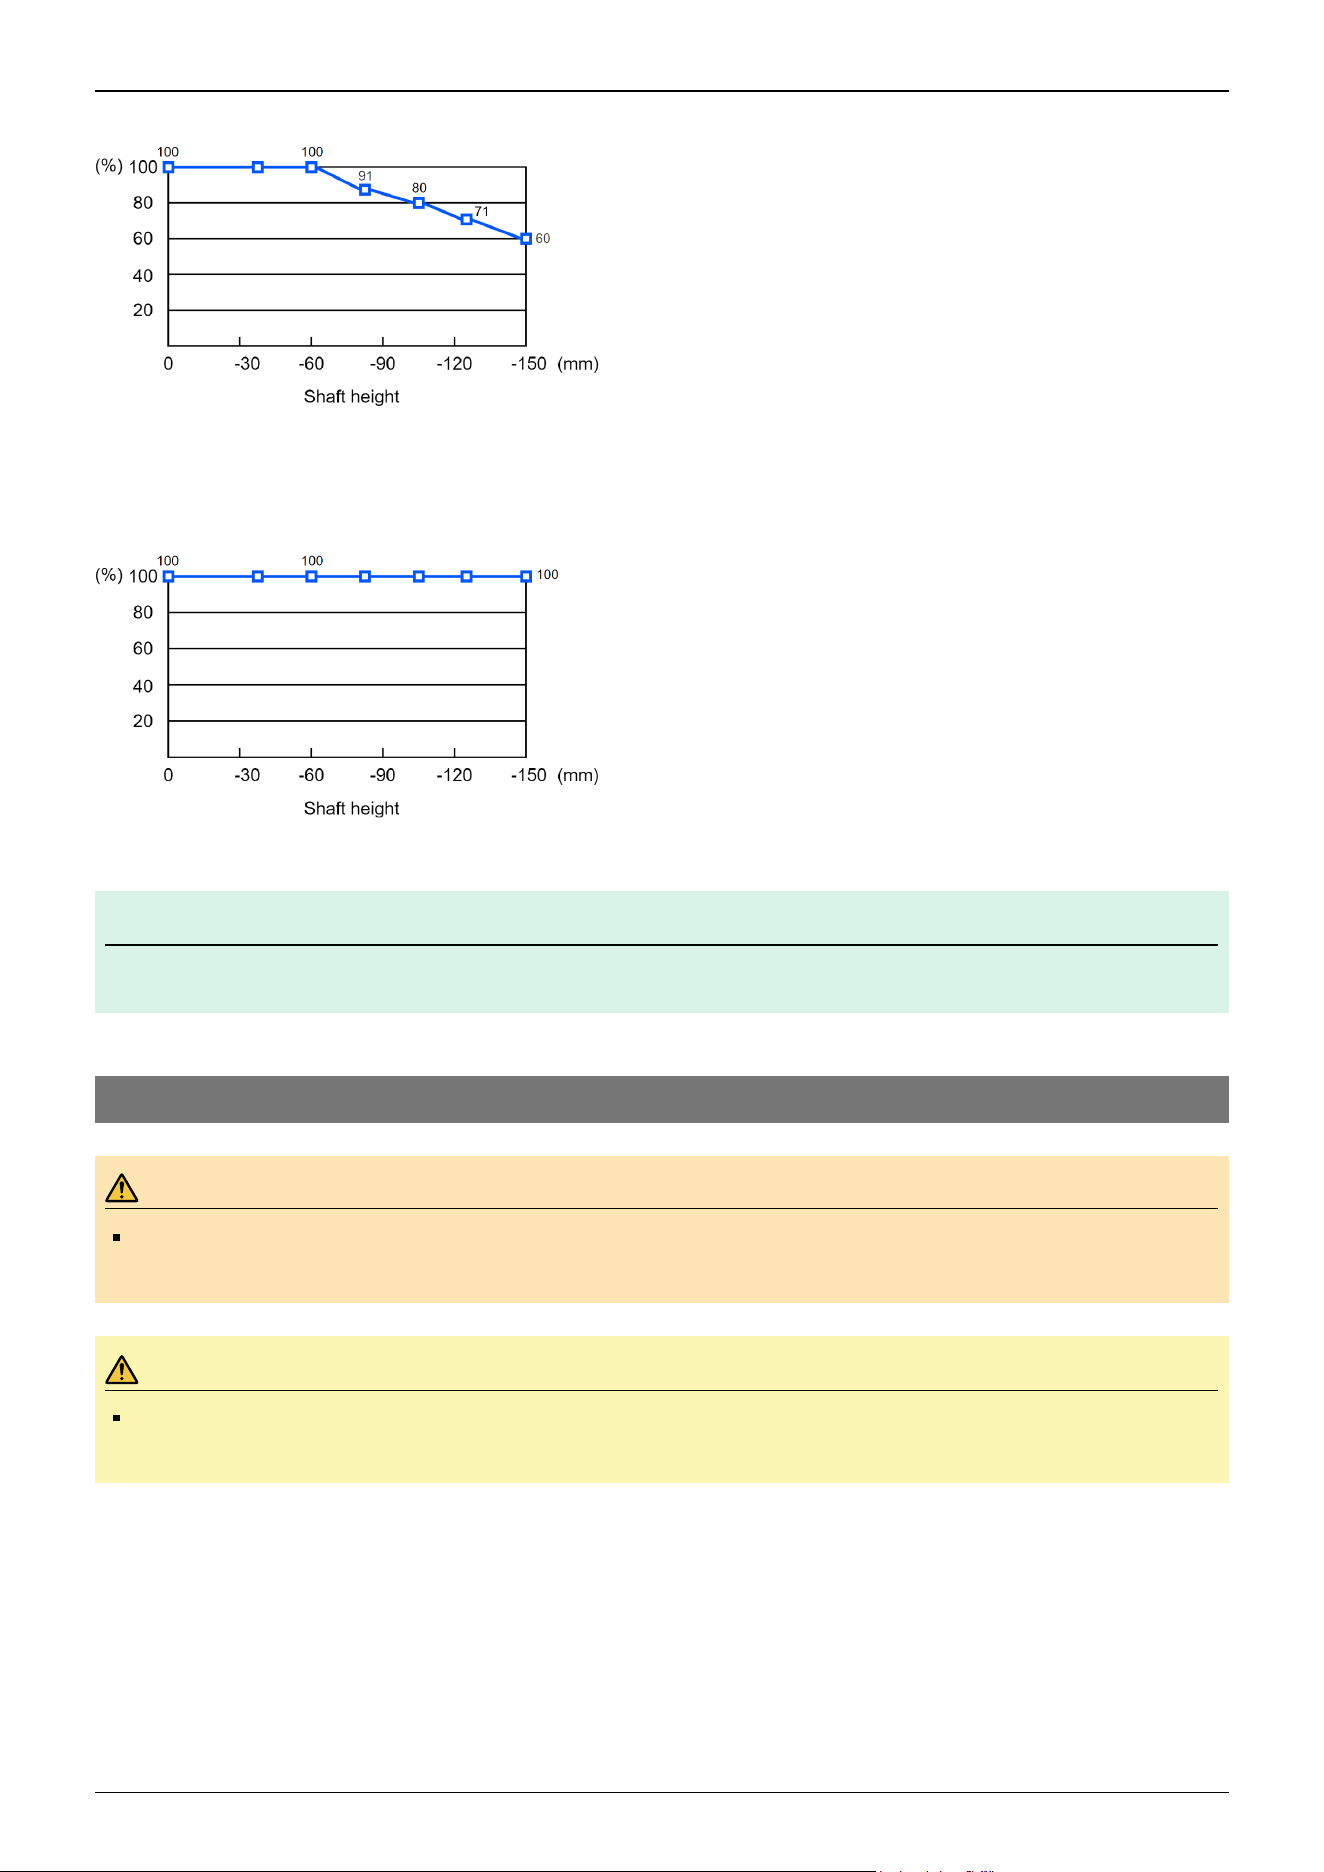
GX4-A/GX4-B/GX4-C35**
The percentages on the graph are ratios based on 100% as the acceleration/deceleration at the shaft upper limit position.
Boost mode
GX4-A/GX4-B/GX4-C25**, GX4-A/GX4-B/GX4-C30**, GX4-A/GX4-B/GX4-C35**
The percentages on the graph are ratios based on 100% as the acceleration/deceleration at the shaft upper limit position.
KEY POINTS
Horizontal movement with the shaft lowered may cause overshooting during positioning.
3.5 Work Envelope
WARNING
Do not operate the Manipulator with the mechanical stop removed. Removing the mechanical stop is
extremely dangerous because the Manipulator may move to a position outside its normal work envelope.
CAUTION
When restricting the work envelope for safety reasons, be sure to make settings using both the pulse range
and mechanical stop.
The work envelope is preset at the factory as explained in the following section.
Standard Work Envelope
The work envelope can be set by one of the following three methods.
1. Setting by pulse range (for all joints)
2. Setting by mechanical stops (for Joints #1 to #3)
✏
Industrial Robot: SCARA Robots GX series Manual Rev.11
154
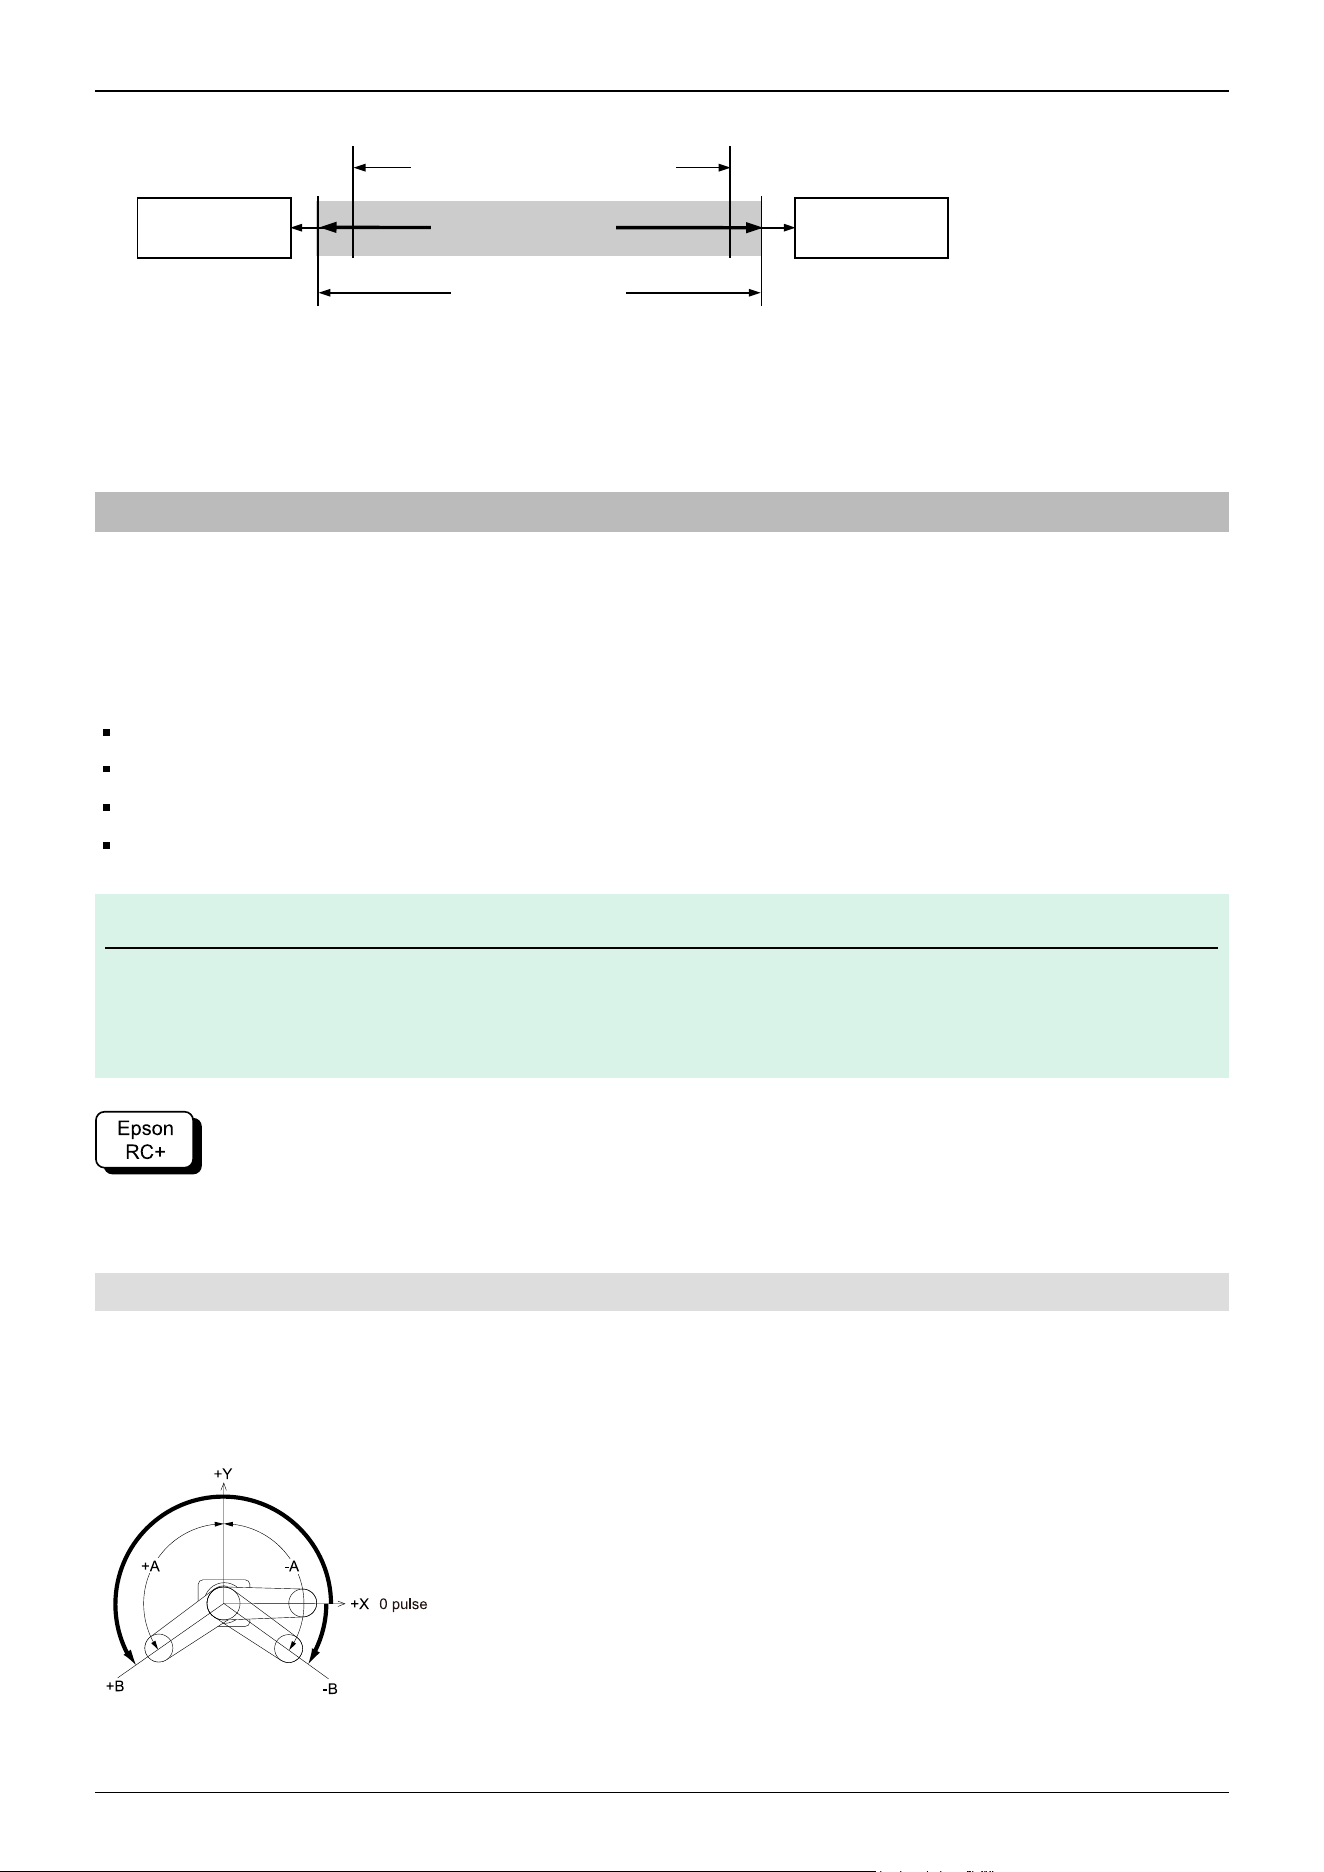
3. Setting the rectangular range in the XY coordinate system of the Manipulator (for Joints #1 and #2)
To limit the work envelope for layout efficiency or safety reasons, make the settings as explained in the following sections.
Work Envelope Setting by Pulse Range
Setting the Work Envelope by Mechanical Stops
Setting the Rectangular Range in the XY Coordinate System of the Manipulator
3.5.1 Work Envelope Setting by Pulse Range
Pulses are the basic unit of Manipulator motion. The motion range (work envelope) of the Manipulator is set by the pulse
lower limit value and pulse upper limit value (pulse range) for each joint.
Pulse values are read from the encoder output of the servomotor.
For the maximum pulse range, refer to the following sections.
The pulse range must be set inside the mechanical stop settings.
Joint #1 Maximum Pulse Range
Joint #2 Maximum Pulse Range
Joint #3 Maximum Pulse Range
Joint #4 Maximum Pulse Range
KEY POINTS
Once the Manipulator receives a motion command, it checks whether the target position specified by the
command is within the pulse range before operating. If the target position is outside of the pulse range that was
set, an error occurs and the Manipulator does not move.
Go to [Tools] - [Robot Manager] - [Range] panel, and make the setting.
This can also be set using the Range statement in [Command Window].
3.5.1.1 Joint #1 Maximum Pulse Range
The 0 (zero) pulse position of Joint #1 is the position where Arm #1 is facing the positive (+) direction on the X-coordinate
axis.
With the 0 pulse as a starting point, the counterclockwise pulse value is defined as positive (+), and the clockwise pulse value
is defined as negative (-).
Pulse range
Work Envelope
Mechanical
Stop
Mechanical
Stop
Rectangular range setting
✏
Industrial Robot: SCARA Robots GX series Manual Rev.11
155
Table top mounting specifications
Arm Length (mm)
Arm Shape
Straight Left-curved Right-curved
A: Max. motion range (deg.)
250
±140
- -
300
350 -165/110 -110/165
B: Max. pulse range (pulse)
250
-1456356 to 6699236
- -
300
350 2184534 to 5825423 582543 to 7427414
Multiple mounting specifications
Arm Length (mm)
Arm Shape
Straight
A: Max. motion range (deg.)
300 ±115
350 ±115
B: Max. pulse range (pulse)
300 -728178 to 5971058
350 -873814 to 6116694
Industrial Robot: SCARA Robots GX series Manual Rev.11
156
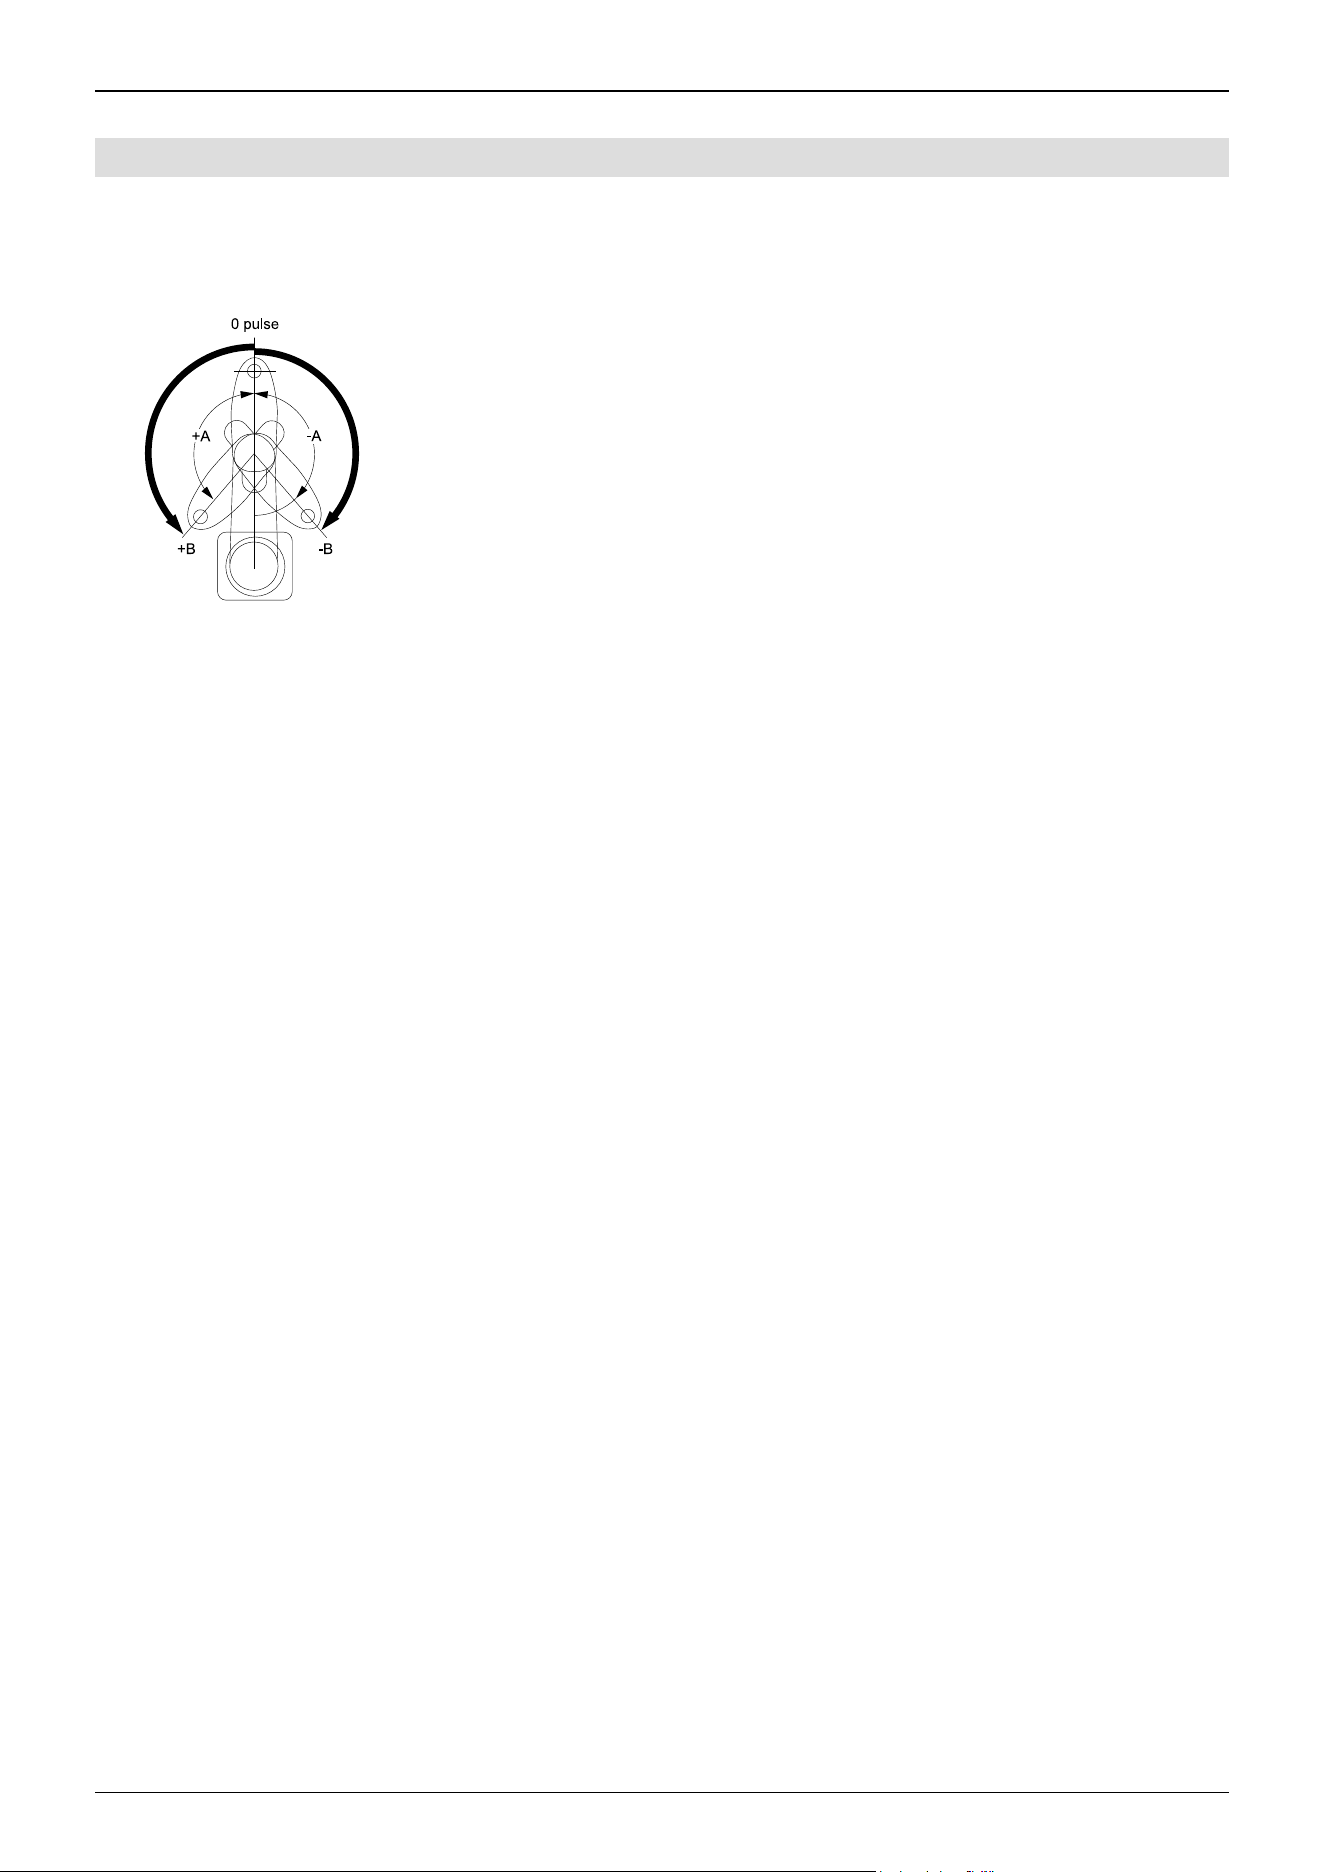
3.5.1.2 Joint #2 Maximum Pulse Range
The 0 (zero) pulse position of Joint #2 is the position where Arm #2 is aligned with Arm #1. (The orientation of Arm #1 does
not matter.) With the 0 pulse as a starting point, the counterclockwise pulse value is defined as positive (+), and the clockwise
pulse value is defined as negative (-).
Industrial Robot: SCARA Robots GX series Manual Rev.11
157
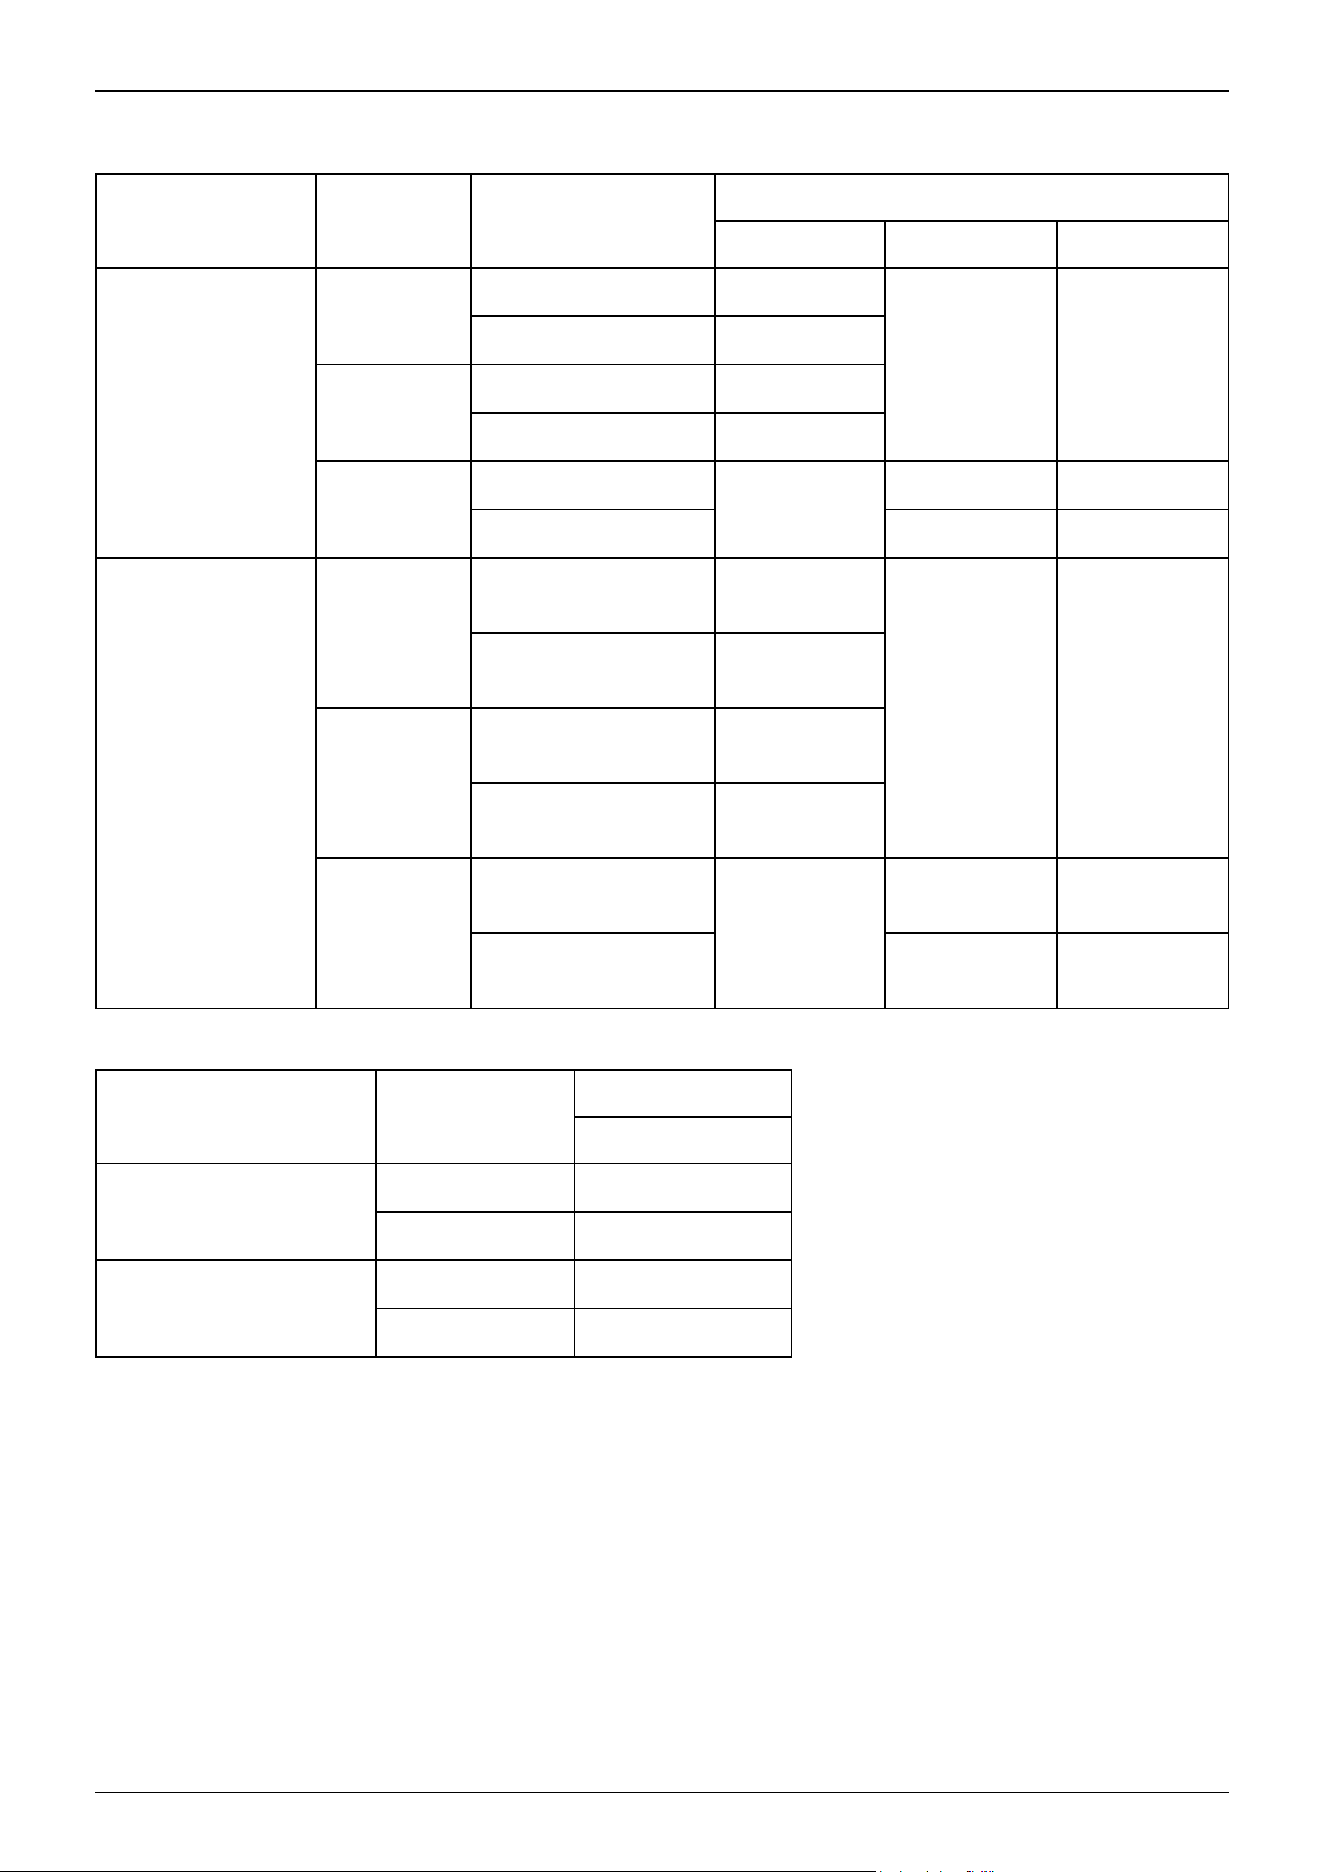
Table top mounting specifications
Arm Length
(mm)
Environmental
Specifications
Arm Shape
Straight Left-curved Right-curved
A: Max. motion
range (deg.)
250
S, E ±141
- -
C ±137
300
S, E ±142
C ±141
350
S, E
±142
-165 to 120 -120 to 165
C -160 to 120 -120 to 160
B: Max. pulse range
(pulse)
250
S, E
-2566827 to
2566827
- -
C
-2494009 to
2494009
300
S, E
-2585032 to
2585032
C
-2566827 to
2566827
350
S, E
-2585032 to
2585032
-3003734 to
2184534
-2184534 to
3003734
C
-2912712 to
2184534
-2184534 to
2912712
Multiple mounting specifications
Arm Length (mm)
Arm Shape
Straight
A: Max. motion range (deg.)
300 ±135
350 ±142
B: Max. pulse range (pulse)
300 -2457600 to 2457600
350 -2585032 to 2585032
Industrial Robot: SCARA Robots GX series Manual Rev.11
158
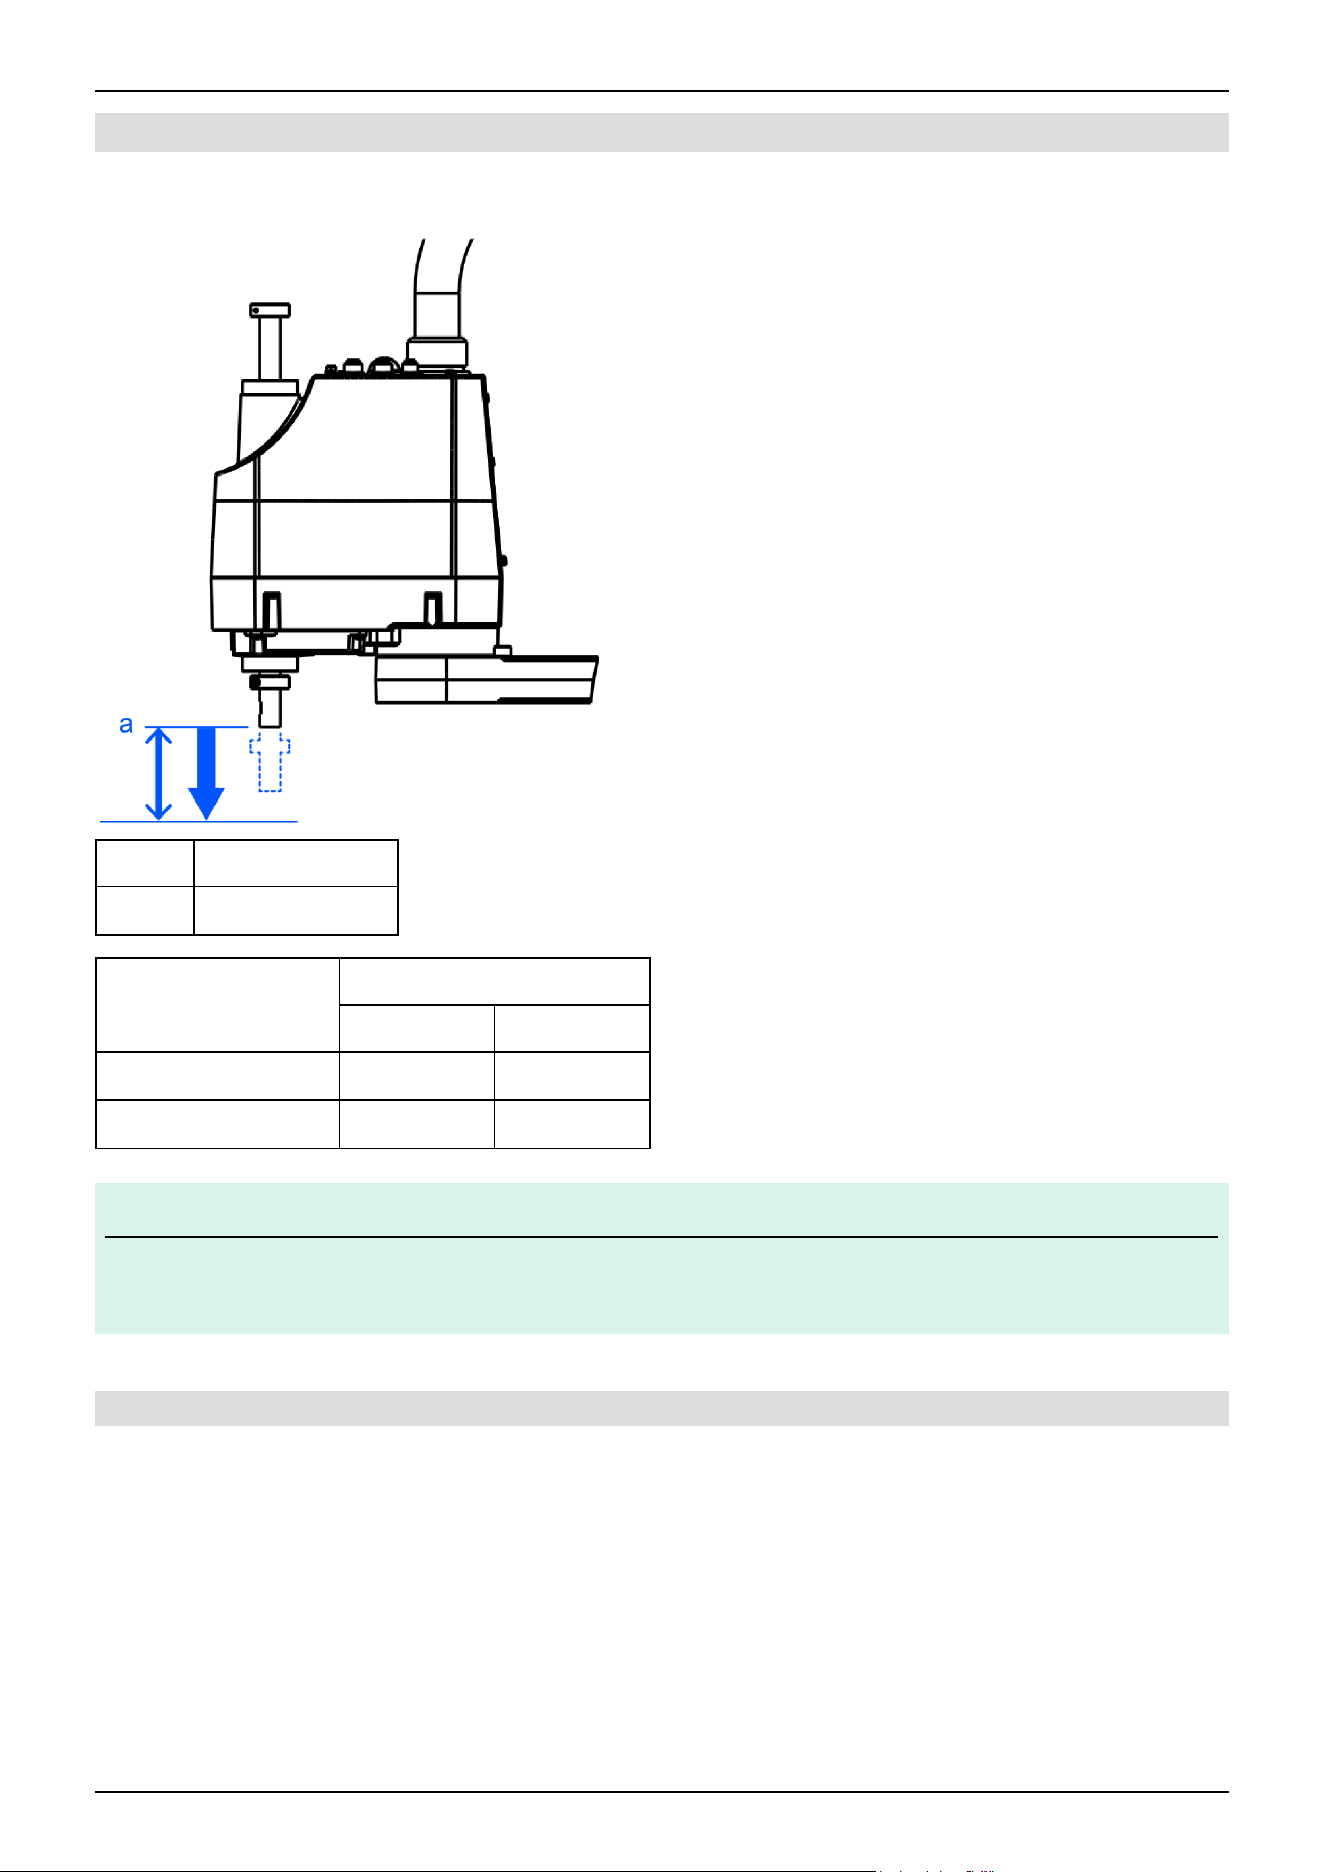
3.5.1.3 Joint #3 Maximum Pulse Range
The 0 (zero) pulse position of Joint #3 is the position where the shaft is at its upper limit. The pulse value is always negative
because Joint #3 moves down from the 0 pulse position.
Symbol Description
a Upper limit: 0 pulse
Environmental Specifications
S, E C
Max. motion range(mm) -150 to 0 -120 to 0
Max. pulse range(pulse) -1706667 to 0 -1365334 to 0
KEY POINTS
For Manipulators with cleanroom & ESD specifications (GX4-A/GX4-B/GX4-C**1C*), the work envelope set using
the Joint #3 mechanical stop cannot be changed.
3.5.1.3.1 Joint #4 Maximum Pulse Range
The 0 (zero) pulse position of Joint #4 is the position where the flat surface near the end of the shaft faces toward the end of
Arm #2. (The orientation of Arm #2 does not matter.)
With the 0 pulse as a starting point, the counterclockwise pulse value is defined as positive (+), and the clockwise pulse value
is defined as negative (-).
✏
Industrial Robot: SCARA Robots GX series Manual Rev.11
159
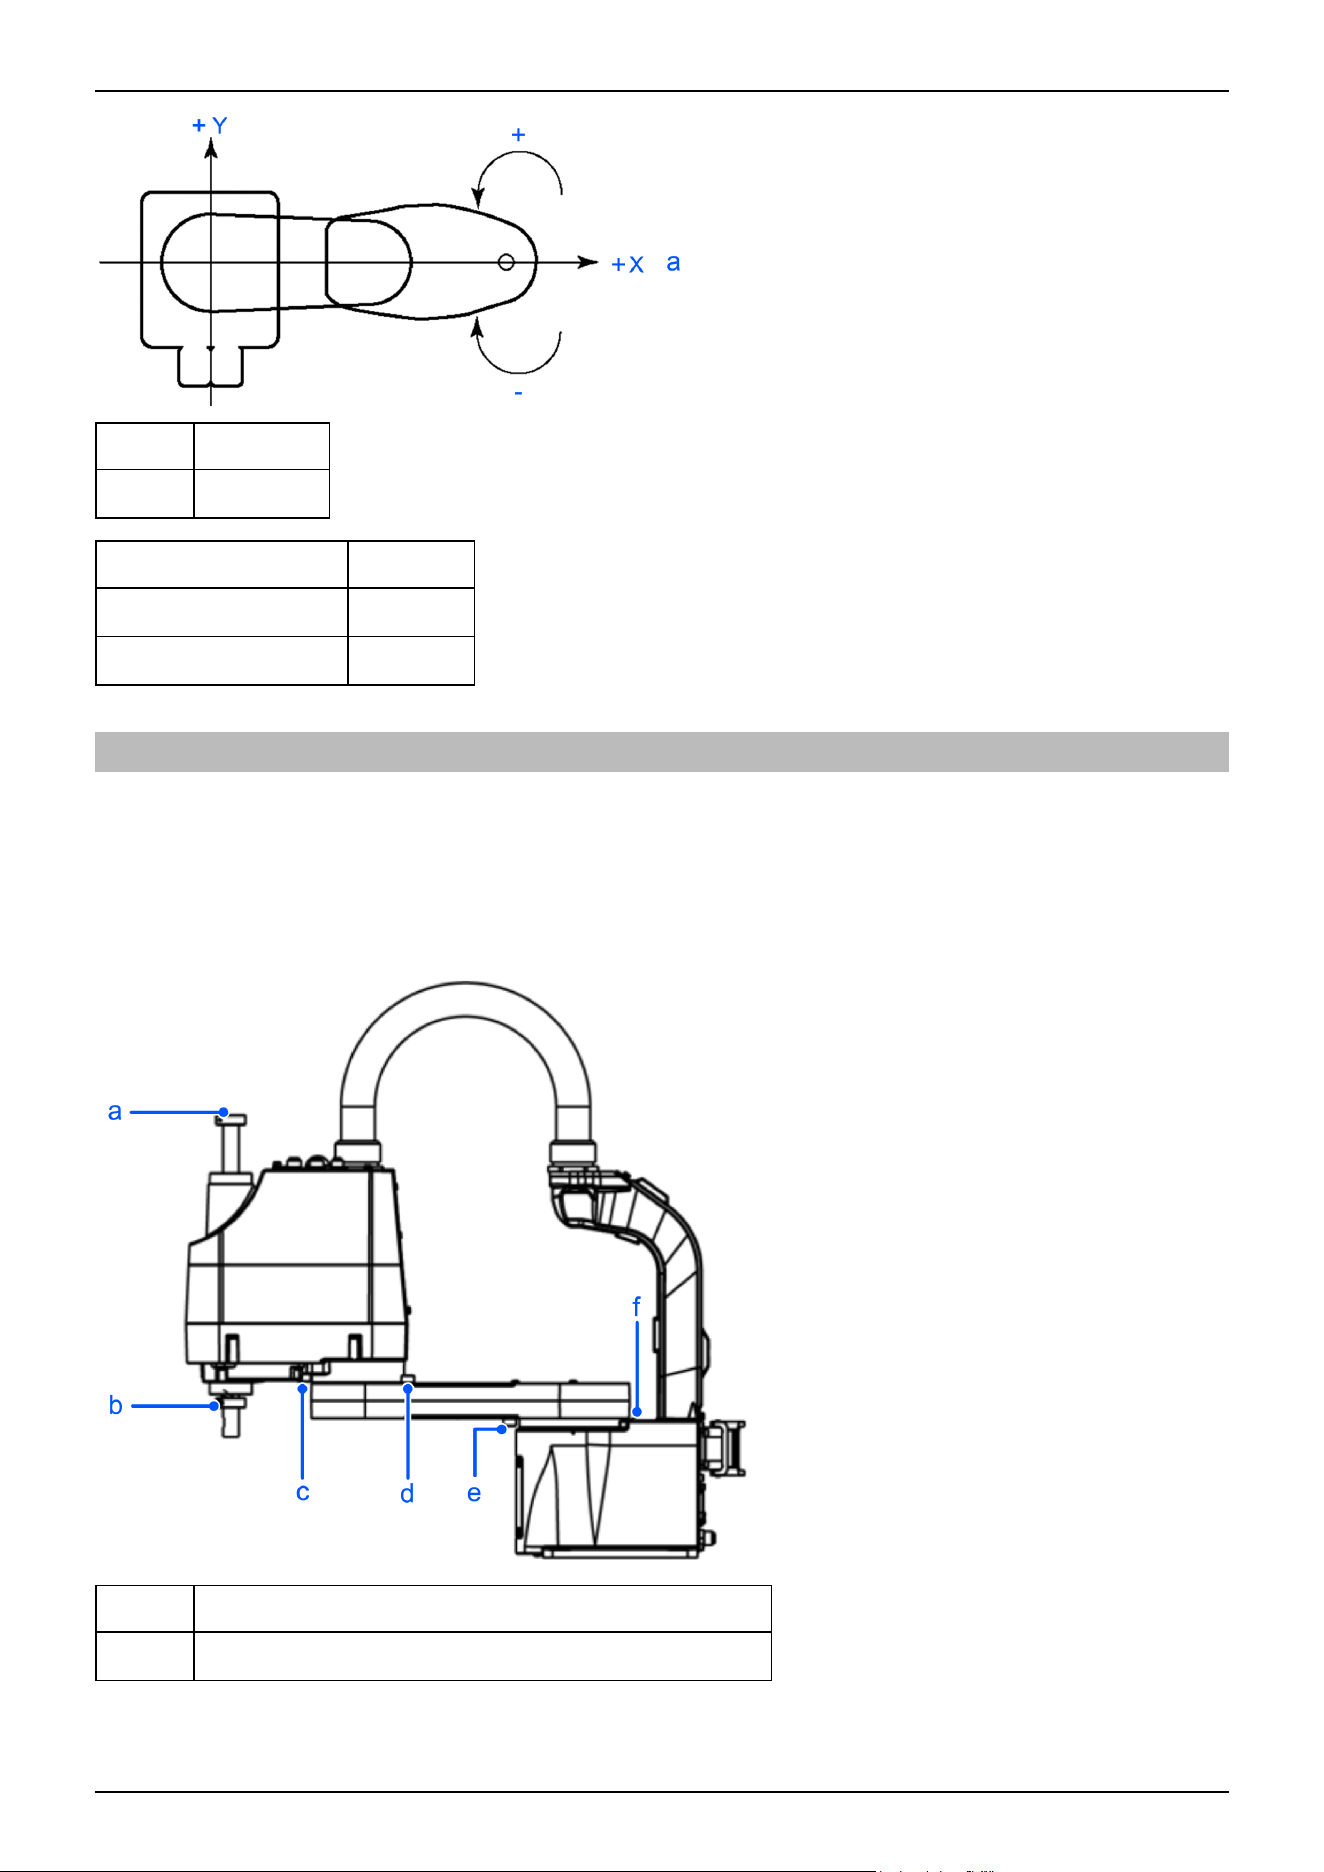
Symbol Description
a 0 pulse
All Models
Max. motion range (deg.) ±360
Max. pulse range (pulse) ±1310720
3.5.2 Setting the Work Envelope by Mechanical Stops
Mechanical stops set the absolute work envelope that physically limits where the Manipulator can move.
Both Joints #1 and #2 have threaded holes in positions corresponding to angles for the setting area. The positions of the
mechanical stops (variable) set the work envelope. Install the bolts in the threaded holes corresponding to the angles to be set.
Joint #3 can be set to any length less than the maximum stroke.
Table top mounting specifications
Symbol Description
a Joint #3 mechanical stop (lower limit mechanical stop)
Industrial Robot: SCARA Robots GX series Manual Rev.11
160
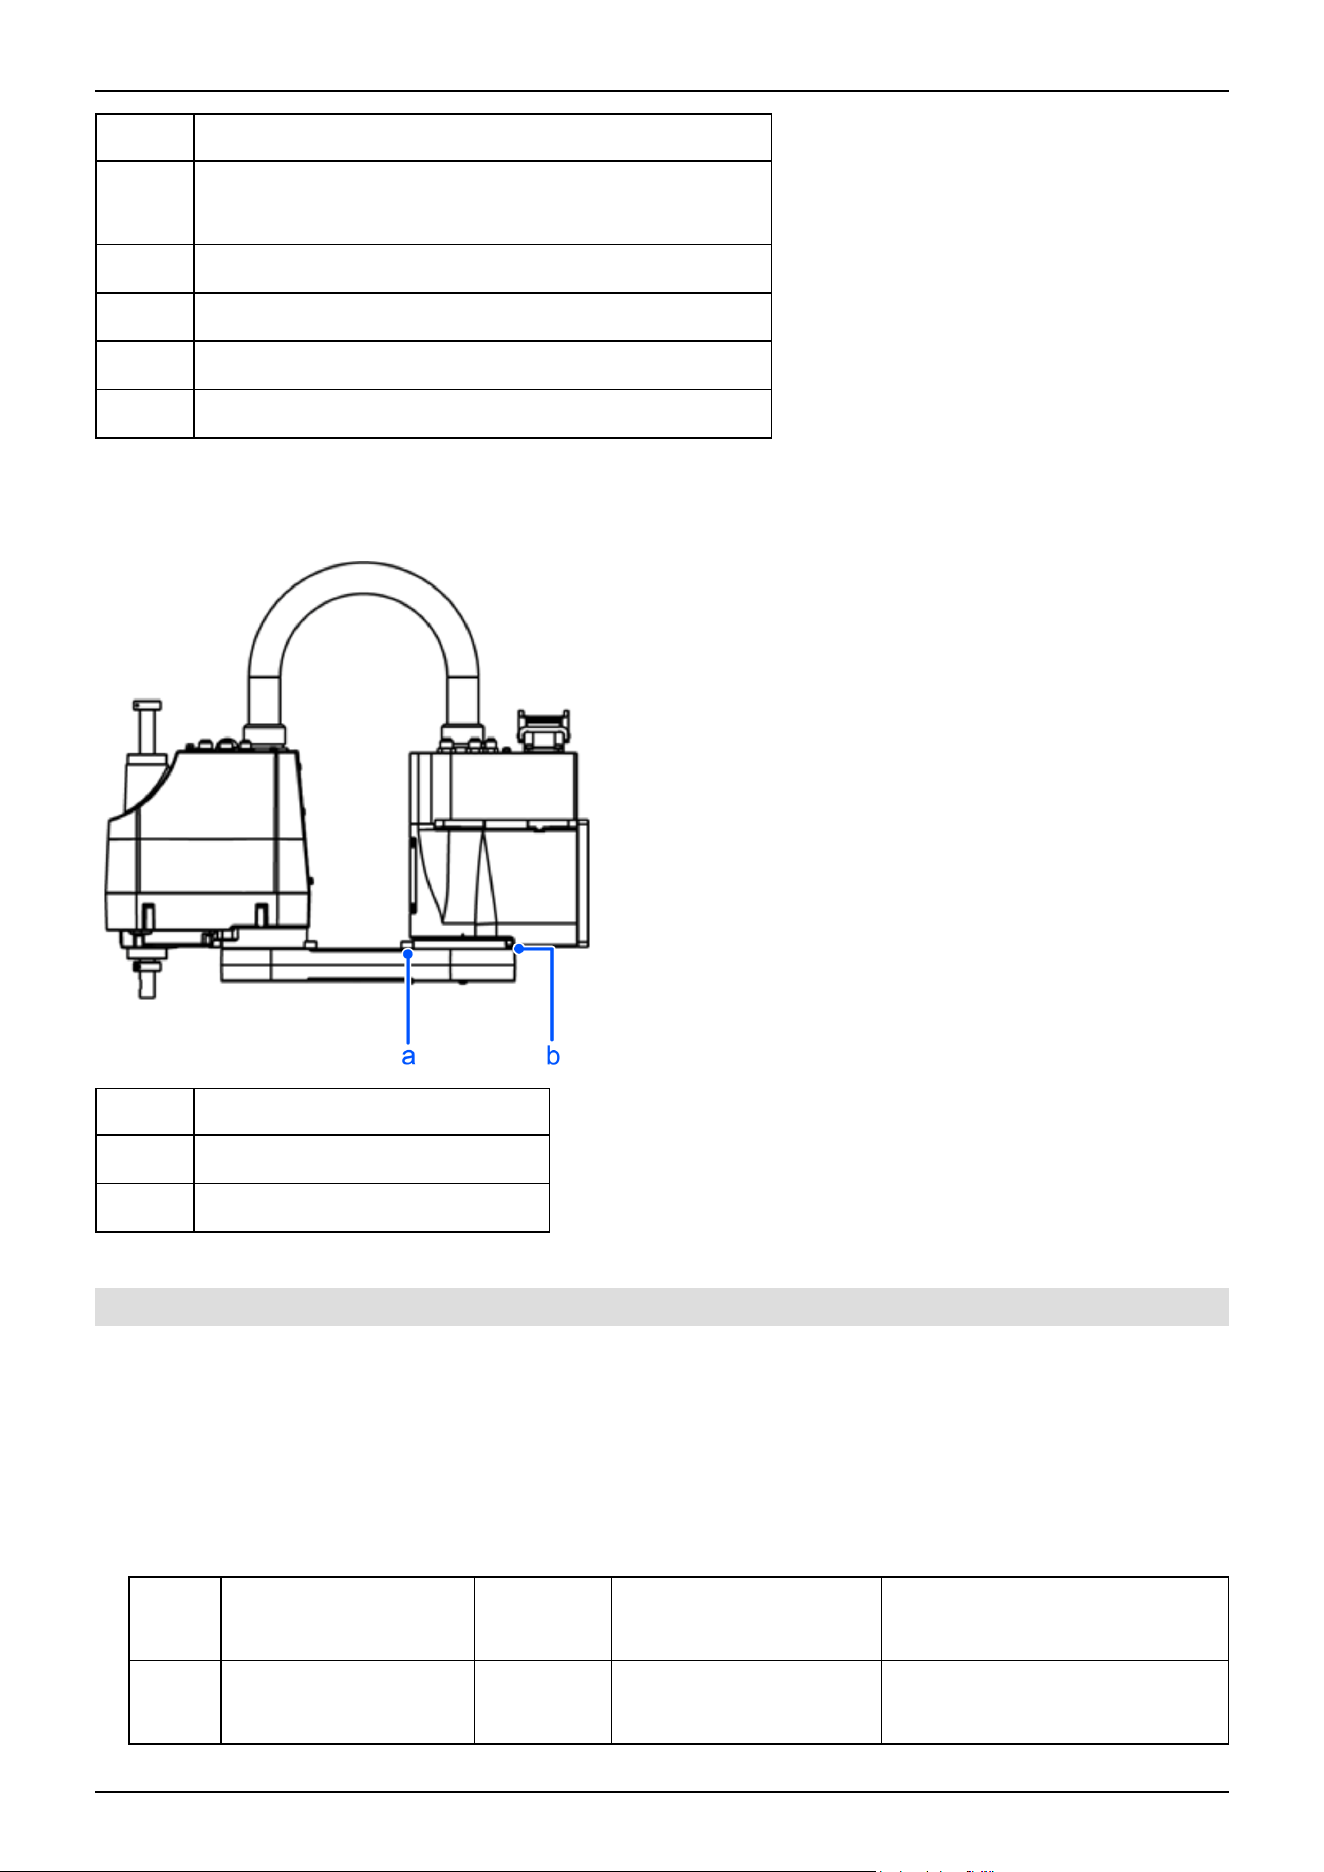
Symbol Description
b
Joint #3 mechanical stop (upper limit mechanical stop)
*Do not move the position of the upper limit mechanical stop.
c Joint #2 mechanical stop (adjustable)
d Joint #2 mechanical stop (fixed)
e Joint #1 mechanical stop (adjustable)
f Joint #1 mechanical stop (fixed)
Multiple mounting specifications
For the model with multiple mounting specifications, only the stop positions that are different from the model with table top
mounting specifications are explained here.
Symbol Description
a Joint #1 mechanical stop (adjustable)
b Joint #1 mechanical stop (fixed)
3.5.2.1 Setting the Mechanical Stops of Joints #1 and #2
Both Joints #1 and #2 have threaded holes in positions corresponding to angles for the setting area. The positions of the
mechanical stops (variable) set the work envelope.
Use the following procedure to install the bolts in the threaded holes corresponding to the angles to be set.
1. Turn off the Controller.
2. Install a hexagon socket head cap bolt into the threaded hole corresponding to the setting angle, and tighten it.
Joint #
Hexagon Socket Head
Cap Bolt
Number of
Bolts
Recommended
Tightening Torque
Strength
1, 2 M8 × 10 Total thread
1 for each
side
18.0 N∙m (194 kgf∙cm)
ISO 898-1 property class 10.9 or
12.9 equivalent
Industrial Robot: SCARA Robots GX series Manual Rev.11
161
3. Turn on the Controller.
4. Set the pulse range corresponding to the new positions of the mechanical stops.
KEY POINTS
Be sure to set the pulse range inside the positions of the mechanical stop range.
Example: Setting Joint #1 to -110° to +110° and Joint #2 to -120° to +120° for the GX4-A**1S*
Execute the following command in [Command Window].
>JRANGE 1,-582542,5825423 'Sets the pulse range of Joint #1
>JRANGE 2,-2184533,2184533 'Sets the pulse range of Joint #2
>RANGE 'Confirms the setting value using the Range
statement
-582542, 5825423,-2184533,2184533,-1706667
,0, -1310720, 1310720
5. Move the arm by hand until it touches the mechanical stops to check that nothing will hinder the arm motion during
operation, such as by hitting peripheral equipment.
6. Operate the joint with the new settings at low speeds until it reaches the positions of the minimum and maximum values of
the pulse range. Check that the arm does not hit any mechanical stops.
(Check the position of the mechanical stops and the motion range that were set.)
Example: Setting Joint #1 to -110° to +110° and Joint #2 to -120° to +120° for the GX4-A**1S*
Execute the following command in [Command Window].
>MOTOR ON 'Turns on the motor
>POWER LOW 'Sets to low power mode
>SPEED 5 'Sets to low speed
>PULSE -582542,0,0,0 'Moves to the minimum pulse position of Joint #1
>PULSE 5825423,0,0,0 'Moves to the maximum pulse position of Joint #1
>PULSE 2621440,-2184533,0,0 'Moves to the minimum pulse position of Joint #2
>PULSE 2621440,2184533,0,0 'Moves to the maximum pulse position of Joint #2
The Pulse statement (Go Pulse statement) moves all joints to the specified positions at the same time. Set safe positions
after taking into consideration the motion of the joints whose pulse range have been changed and also the other joints.
In this example, when checking Joint #2, Joint #1 is moved to the 0° position (pulse value: 2621440) near the center of its
work envelope.
If the arm hits a mechanical stop or if an error occurs after the arm hits a mechanical stop, either reset the pulse range to a
narrower pulse range so that nothing blocks the arm motion, or extend the positions of the mechanical stops within the
limit.
✏
Industrial Robot: SCARA Robots GX series Manual Rev.11
162
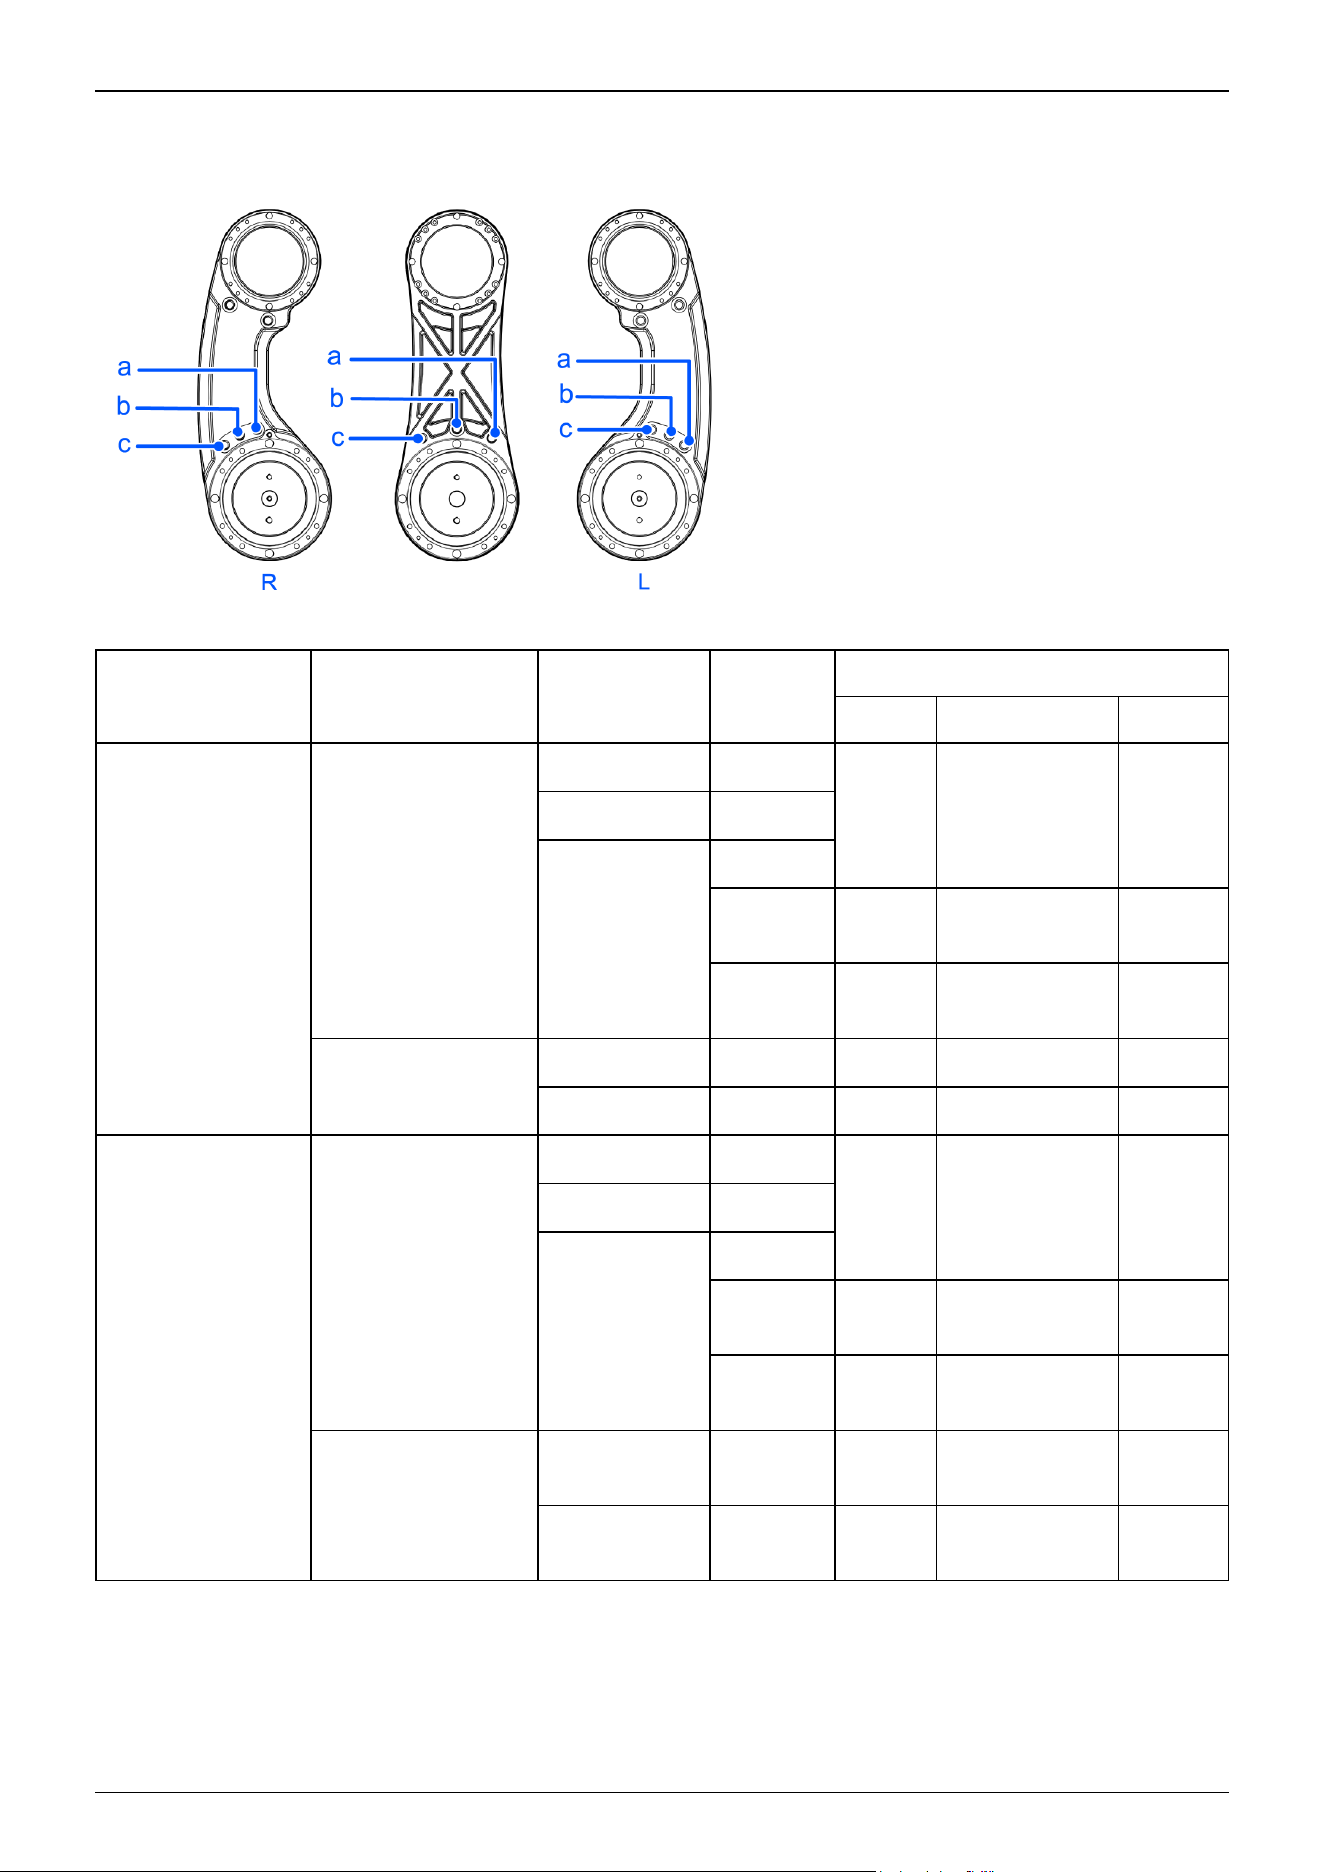
Joint #1 mechanical stop
Views from the bottom of Arm #1
Mounting
Specifications
Arm Length
(mm)
Arm
Shape
Mechanical Stop Position
a b c
Max. motion range
(deg.)
Table top
250 Straight
+110 ±140 -110300 Straight
350
Straight
Left-
curved
+95 -165 to 110 -150
Right-
curved
+150 -110 to 165 -95
Multiple mounting
300 Straight +102.6 ±115 -102.6
350 Straight +103.5 ±120 -103.5
Max. pulse range
(pulse)
Table top
250 Straight
5825423
-1456356 to
6699236
-582542300 Straight
350
Straight
Left-
curved
5388516
-2184534 to
5825423
-1747627
Right-
curved
6990507
-582543 to
7427414
-145636
Multiple mounting
300 Straight 5609882
-728178 to
5971058
-367002
350 Straight 5636096
-873814 to
6116694
-393216
Industrial Robot: SCARA Robots GX series Manual Rev.11
163
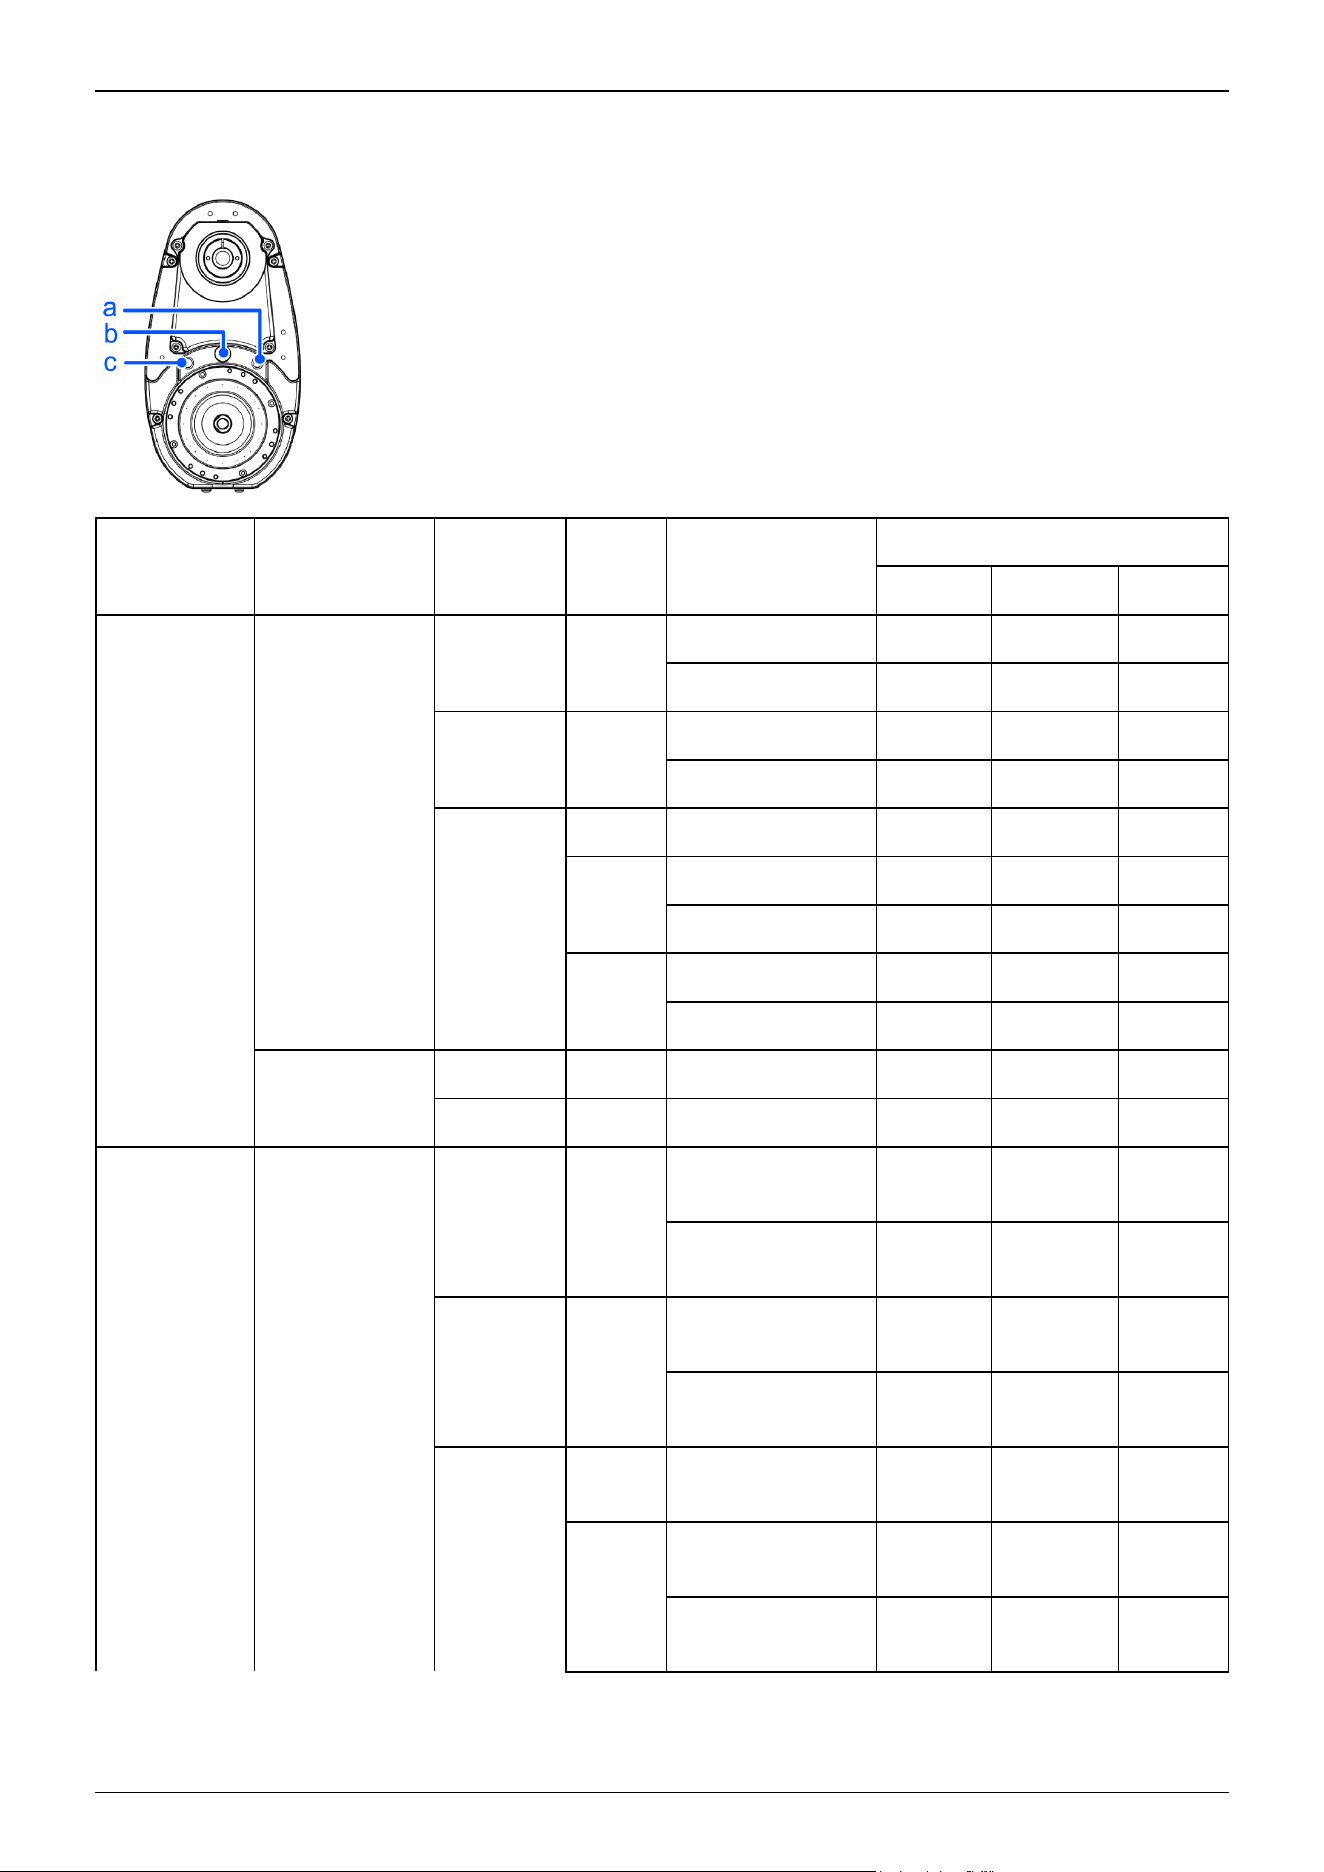
Joint #2 mechanical stop
Mounting
Specifications
Arm
Length
(mm)
Arm
Shape
Environmental
Specifications
Mechanical Stop Position
a b c
Max. motion
range (deg.)
Table top
250 Straight
S, E +111 ±141 -111
C +107 ±137 -107
300 Straight
S, E +112 ±142 -112
C +111 ±141 -111
350
Straight S, E, C +112 ±142 -112
Left-
curved
S, E +90 -165 to 120 -135
C +90 -160 to 120 -130
Right-
curved
S, E +135 -120 to 165 -90
C +130 -120 to 160 -90
Multiple
mounting
300 Straight S, E, C +105 ±135 -105
350 Straight S, C +112 ±142 -112
Max. pulse
range (pulse)
Table top
250 Straight
S, E +2020693
-2566827
to 2566827
-2020693
C +1947876
-2494009
to 2494009
-1947876
300 Straight
S, E +2038898
-2585032
to 2585032
-2038898
C +2020693
-2566827
to 2566827
-2020693
350
Straight S, E, C +2038898
-2585032
to 2585032
-2038898
Left-
curved
S, E +1638400
-3003734
to 2184534
-2457600
C +1638400
-2912712
to 2184534
-2366578
Industrial Robot: SCARA Robots GX series Manual Rev.11
164
Mounting
Specifications
Arm
Length
(mm)
Arm
Shape
Environmental
Specifications
Mechanical Stop Position
a b c
Right-
curved
S, E +2457600
-2184534
to 3003734
-1638400
C +2366578
-2184534
to 2912712
-1638400
Multiple
mounting
300 Straight S, E, C +1911467
-2457600
to 2457600
-1911467
350 Straight S, E, C +2038898
-2585032
to 2585032
-2038898
KEY POINTS
For models with multiple mounting specifications, the work envelope cannot be completely limited because the
Manipulator could hit a wall within the setting range of the mechanical stops.
3.5.2.2 Setting the Mechanical Stop of Joint #3
KEY POINTS
This method can be used only for the Manipulator models with standard specifications (GX4-***1S*) and ESD
specifications (GX4-***1E*).
For Manipulators with cleanroom & ESD specifications (GX4-***1C*), the work envelope set by the Joint #3
mechanical stop cannot be changed.
1. Turn on the Controller, and turn off the motors using the Motor OFF statement.
✏
✏
Industrial Robot: SCARA Robots GX series Manual Rev.11
165
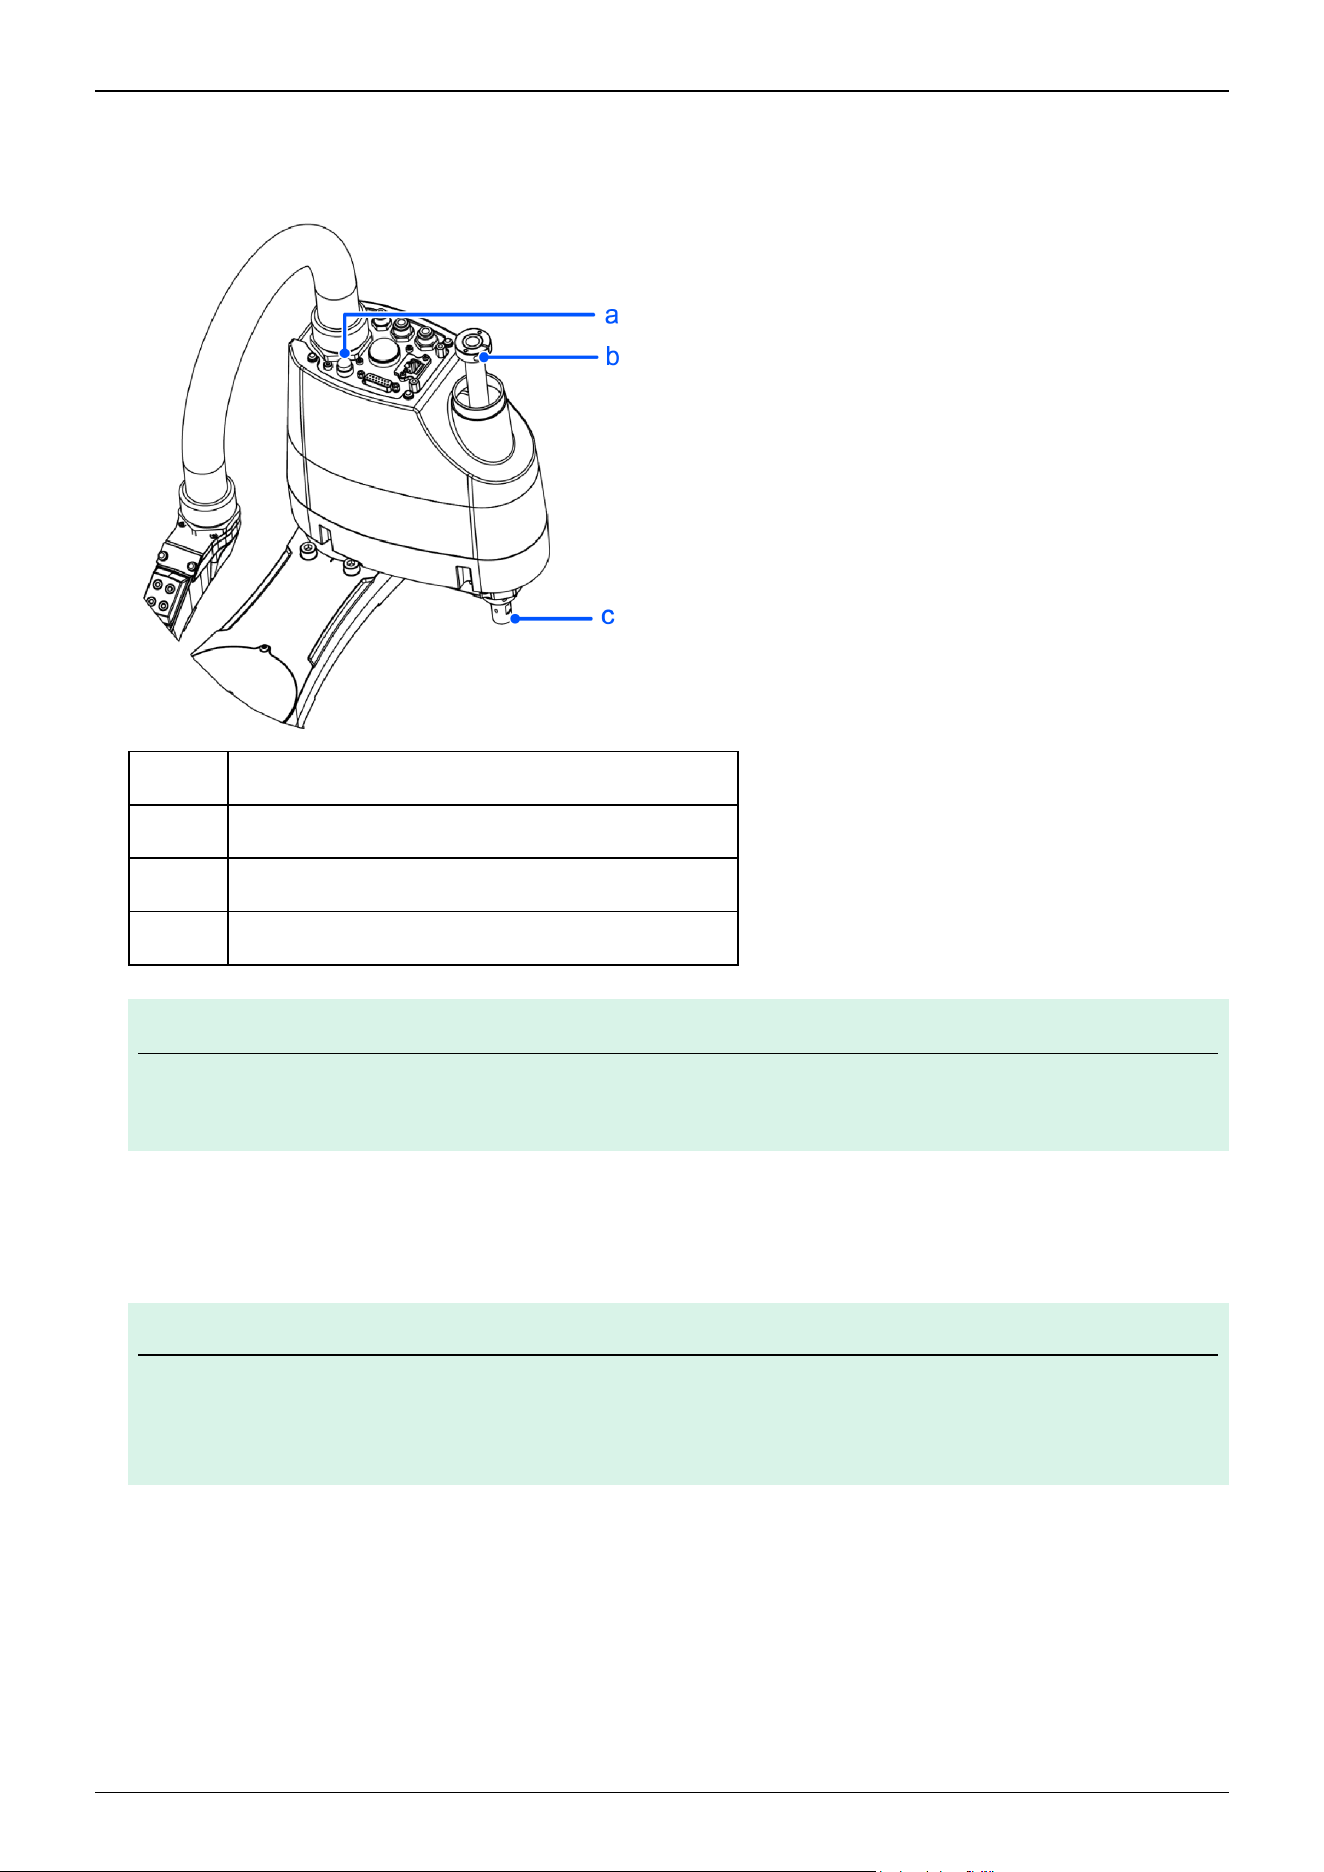
2. Push up the shaft while pressing the brake release switch.
Do not push the shaft up to its upper limit or it will be difficult for the arm top cover to be removed. Push the shaft up to a
position where the Joint #3 mechanical stop can be changed.
Symbol Description
a Brake release switch
b Lower limit mechanical stop mounting screw M3 × 10
c Shaft
KEY POINTS
When you press the brake release switch, the shaft may lower due to the weight of the hand. Be sure to hold
the shaft by hand while pressing the switch.
3. Turn off the Controller.
4. Loosen the lower limit mechanical stop screw (M3 × 10).
KEY POINTS
A mechanical stop is mounted on both the top and bottom of Joint #3. However, only the position of the lower
limit mechanical stop on the top can be changed. Do not remove the upper limit mechanical stop on the
bottom because the origin position of Joint #3 is determined by this stop.
5. The upper end of the shaft defines the maximum stroke position. Move the lower limit mechanical stop down by the length
that you want to limit the stroke.
For example, when the lower limit mechanical stop is set at the "150 mm" stroke, the lower limit Z coordinate value is
✏
✏
Industrial Robot: SCARA Robots GX series Manual Rev.11
166
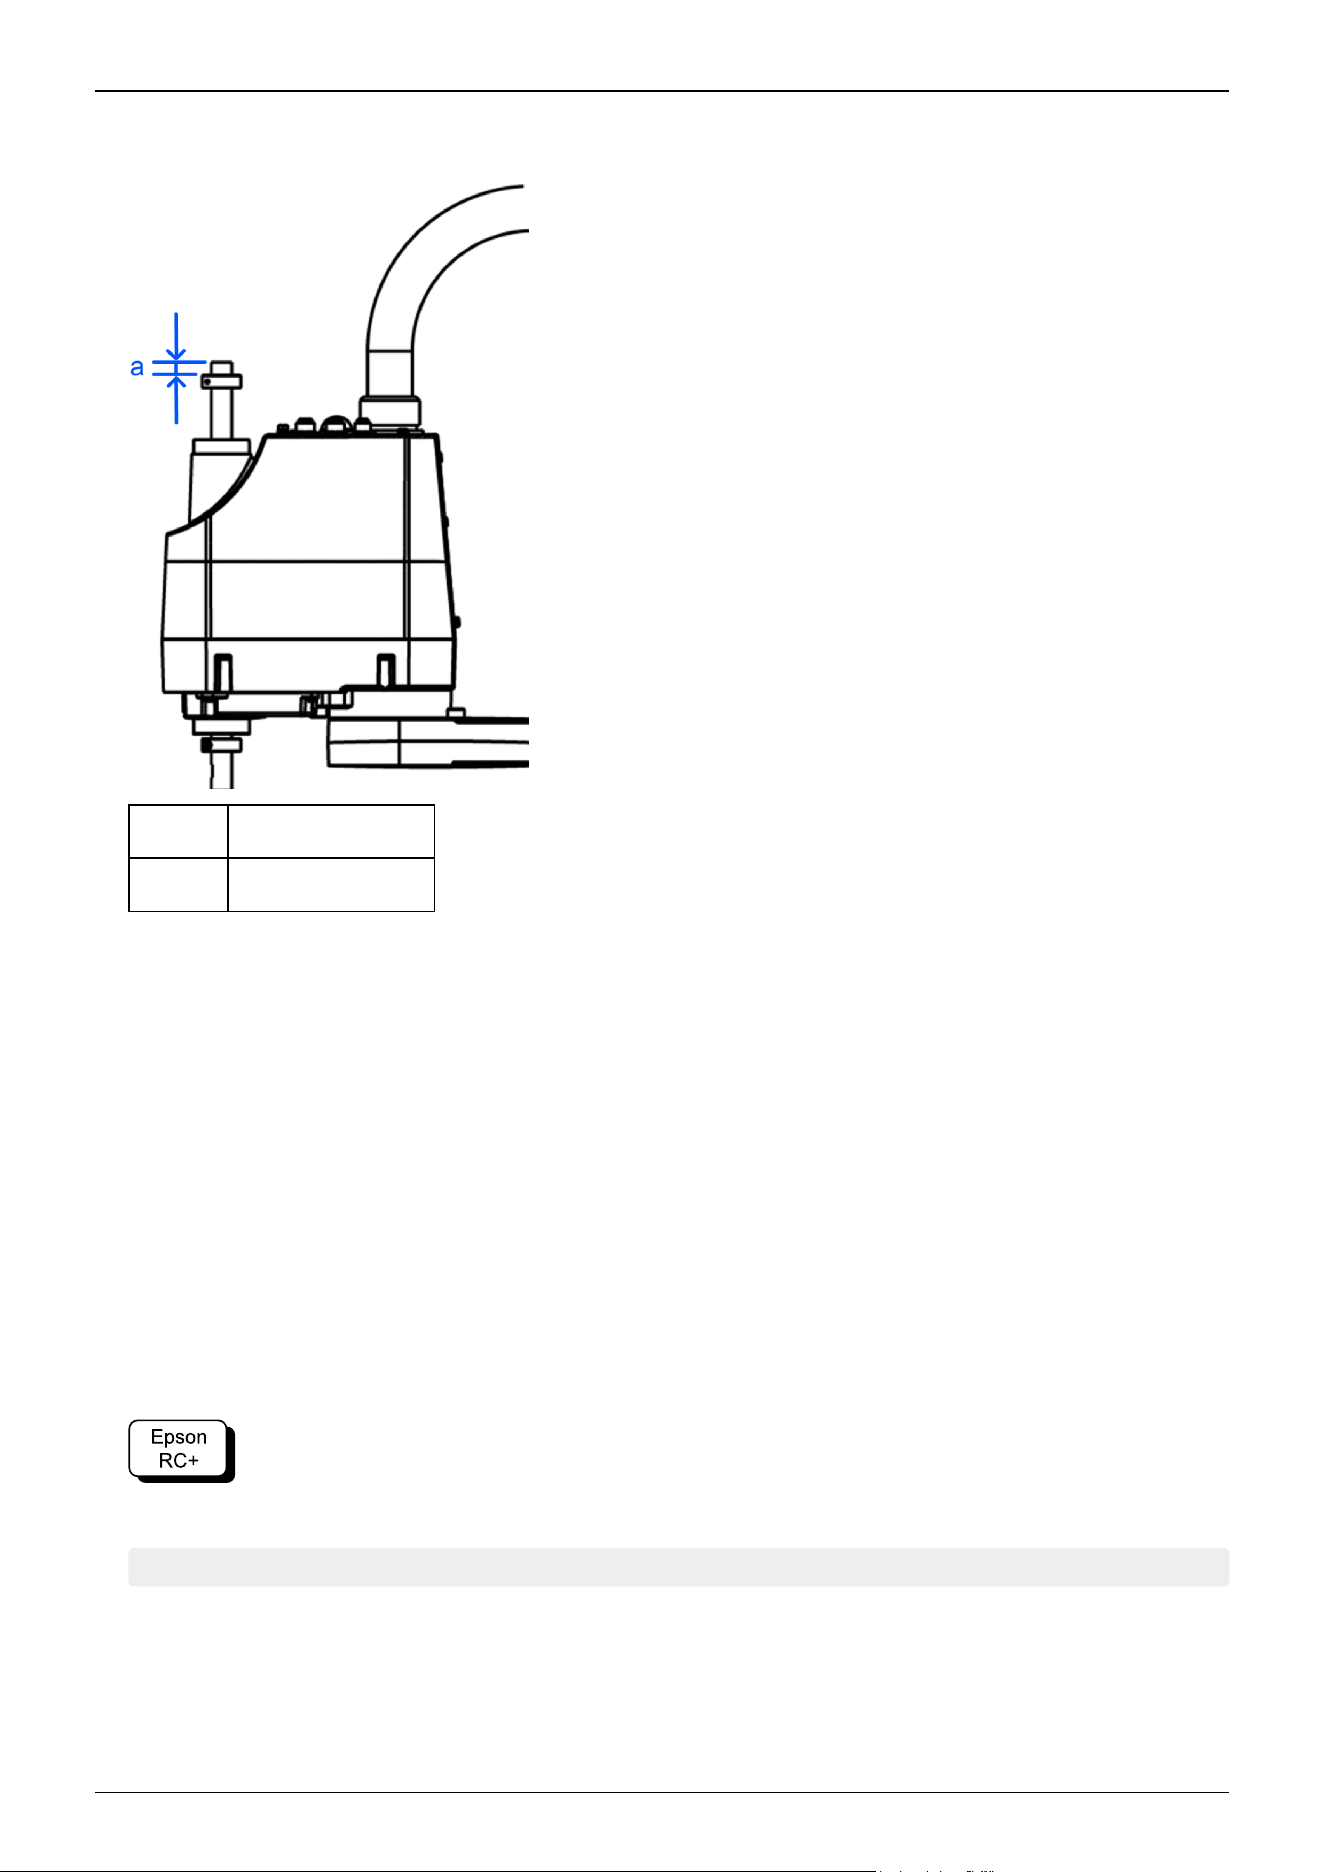
"-150". To change this value to "-130", move the lower limit mechanical stop down by 20 mm. Use calipers or similar tool
to measure the distance when adjusting the mechanical stop.
Symbol Description
a Measurement length
6. Firmly tighten the lower limit mechanical stop screw (M3 × 10) while being careful that it does not enter the shaft groove.
Recommended tightening torque: 2.4 N·m (25 kgf·cm)
7. Turn on the Controller.
8. Press down Joint #3 while pressing the brake release switch, and then check the lower limit position. Do not lower the
mechanical stop too far. Otherwise, the joint may not reach a target position.
9. Calculate the lower limit pulse value of the pulse range using the formula shown below, and set the value.
The result of the calculation is always negative because the lower limit Z coordinate value is negative.
GX4-A/GX4-B/GX4-C**1S*(Z:-150 mm): Lower limit of pulse = (lower limit Z coordinate value)/16 × 131072
× (50/36)
Example: To lower the mechanical stop by 50 mm and change the lower limit Z coordinate value to
"-100" with a 150 mm stroke
(-100)/16131072 × (50/36) = -1137778
Execute the following command in [Command Window].
>JRANGE 3,-1137778 ,0 ' Sets the pulse range of Joint #3
10. Using the Pulse statement (Go Pulse statement), move Joint #3 to the lower limit position of the pulse range that was set at
low speed.
If the mechanical stop range is less than the pulse range, Joint #3 will hit the mechanical stop and an error will occur. When
Industrial Robot: SCARA Robots GX series Manual Rev.11
167
an error occurs, either change the pulse range to a narrower setting or extend the position of the mechanical stop within the
limit.
Example: To lower the mechanical stop by 50 mm and change the lower limit Z coordinate value to
"-100" with a 150 mm stroke
Execute the following command in [Command Window]. Enter the value calculated in Step (9) for -1137778.
>MOTOR ON 'Turns on the motor
>SPEED 5 'Sets to low speed
>PULSE 0,0,-1137778,0 ' Moves to the lower limit pulse position of Joint
#3
(In this example, all pulses except those for Joint #3 are "0". Substitute these "0" values with the other pulse values to
specify a position where interference will not occur even when lowering Joint #3.)
3.5.3 Setting the Rectangular Range in the XY Coordinate System of the
Manipulator
(For Joints #1 and #2)
Use this procedure to set the upper and lower limits of the X and Y coordinates.
This setting is a software-based limit only, and so it does not change the maximum physical range. The maximum physical
range is based on the position of the mechanical stops.
Go to [Tools] - [Robot Manager] - [XYZ Limits] panel, and make the setting. This can also be set using the XYLim statement
in [Command Window].
3.5.4 Standard Work Envelope
The following "work envelope" diagrams show the model with standard (maximum) specifications. When each joint motor is
under servo control, the center of the Manipulator shaft’s lowest point moves in the ranges shown in the figure.
Range to mechanical stop
This is the range where the center of shaft’s lowest point can be moved when each joint motor is not under servo control.
Mechanical stop
This is the stop that sets the absolute work envelope where the Manipulator cannot move beyond mechanically.
Maximum zone
This is the range that contains the farthest reach of the arms where interference can occur. If the maximum radius of the
hand exceeds 60 mm, add the "Range to mechanical stop" and the "Radius of the hand." The total value is specified as the
maximum zone.
Industrial Robot: SCARA Robots GX series Manual Rev.11
168
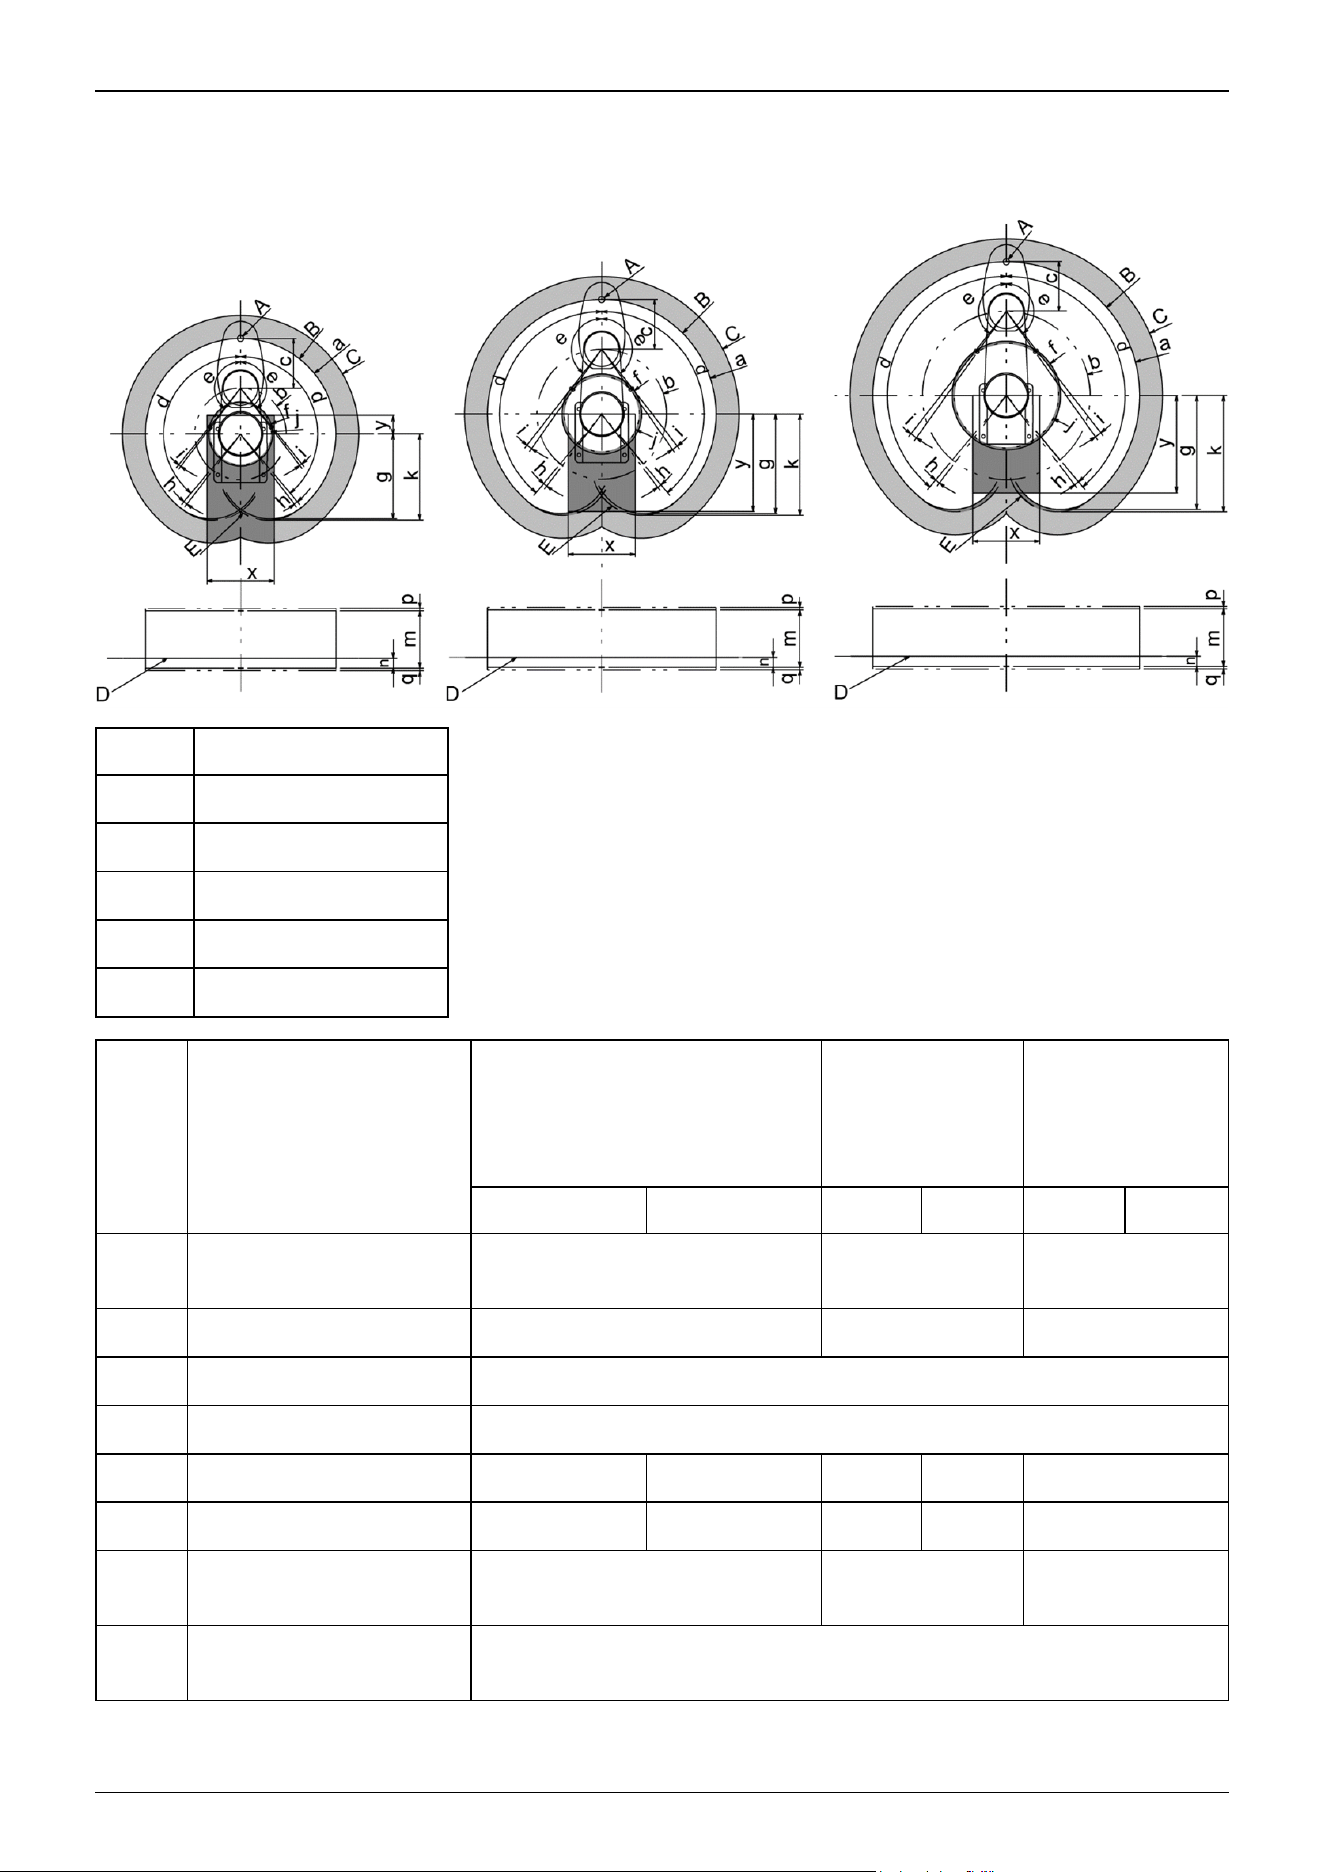
Table top mounting specifications: Straight arm
Symbol Description
A Center of Joint #3
B Work envelope
C Maximum zone
D Base mounting surface
E Range to mechanical stop
GX4-A/GX4-B/GX4-C251 *
GX4-A/GX4-B/GX4-C251*B
GX4-A/GX4-
B/GX4-C301 *
GX4-A/GX4-
B/GX4-C301*B
GX4-A/GX4-
B/GX4-C351 *
GX4-A/GX4-
B/GX4-C351*B
S, E C S, E C S, E C
a
Length of Arm #1 + Arm #2
(mm)
250 300 350
b Length of Arm #1 (mm) 120 170 220
c Length of Arm #2 (mm) 130
d Joint #1 motion (°) 140
e Joint #2 motion (°) 141 137 142 141 142
f (Work envelope) 87 95 105 107 142
g
(Work envelope of the back
side)
221.9 260.2 298.5
h
Angle to the Joint #1
mechanical stop (°)
2.5
GX4-A/GX4-B/
GX4-C351**
GX4-A/GX4-B/
GX4-C301**
GX4-A/GX4-B/
GX4-C251**
Industrial Robot: SCARA Robots GX series Manual Rev.11
169
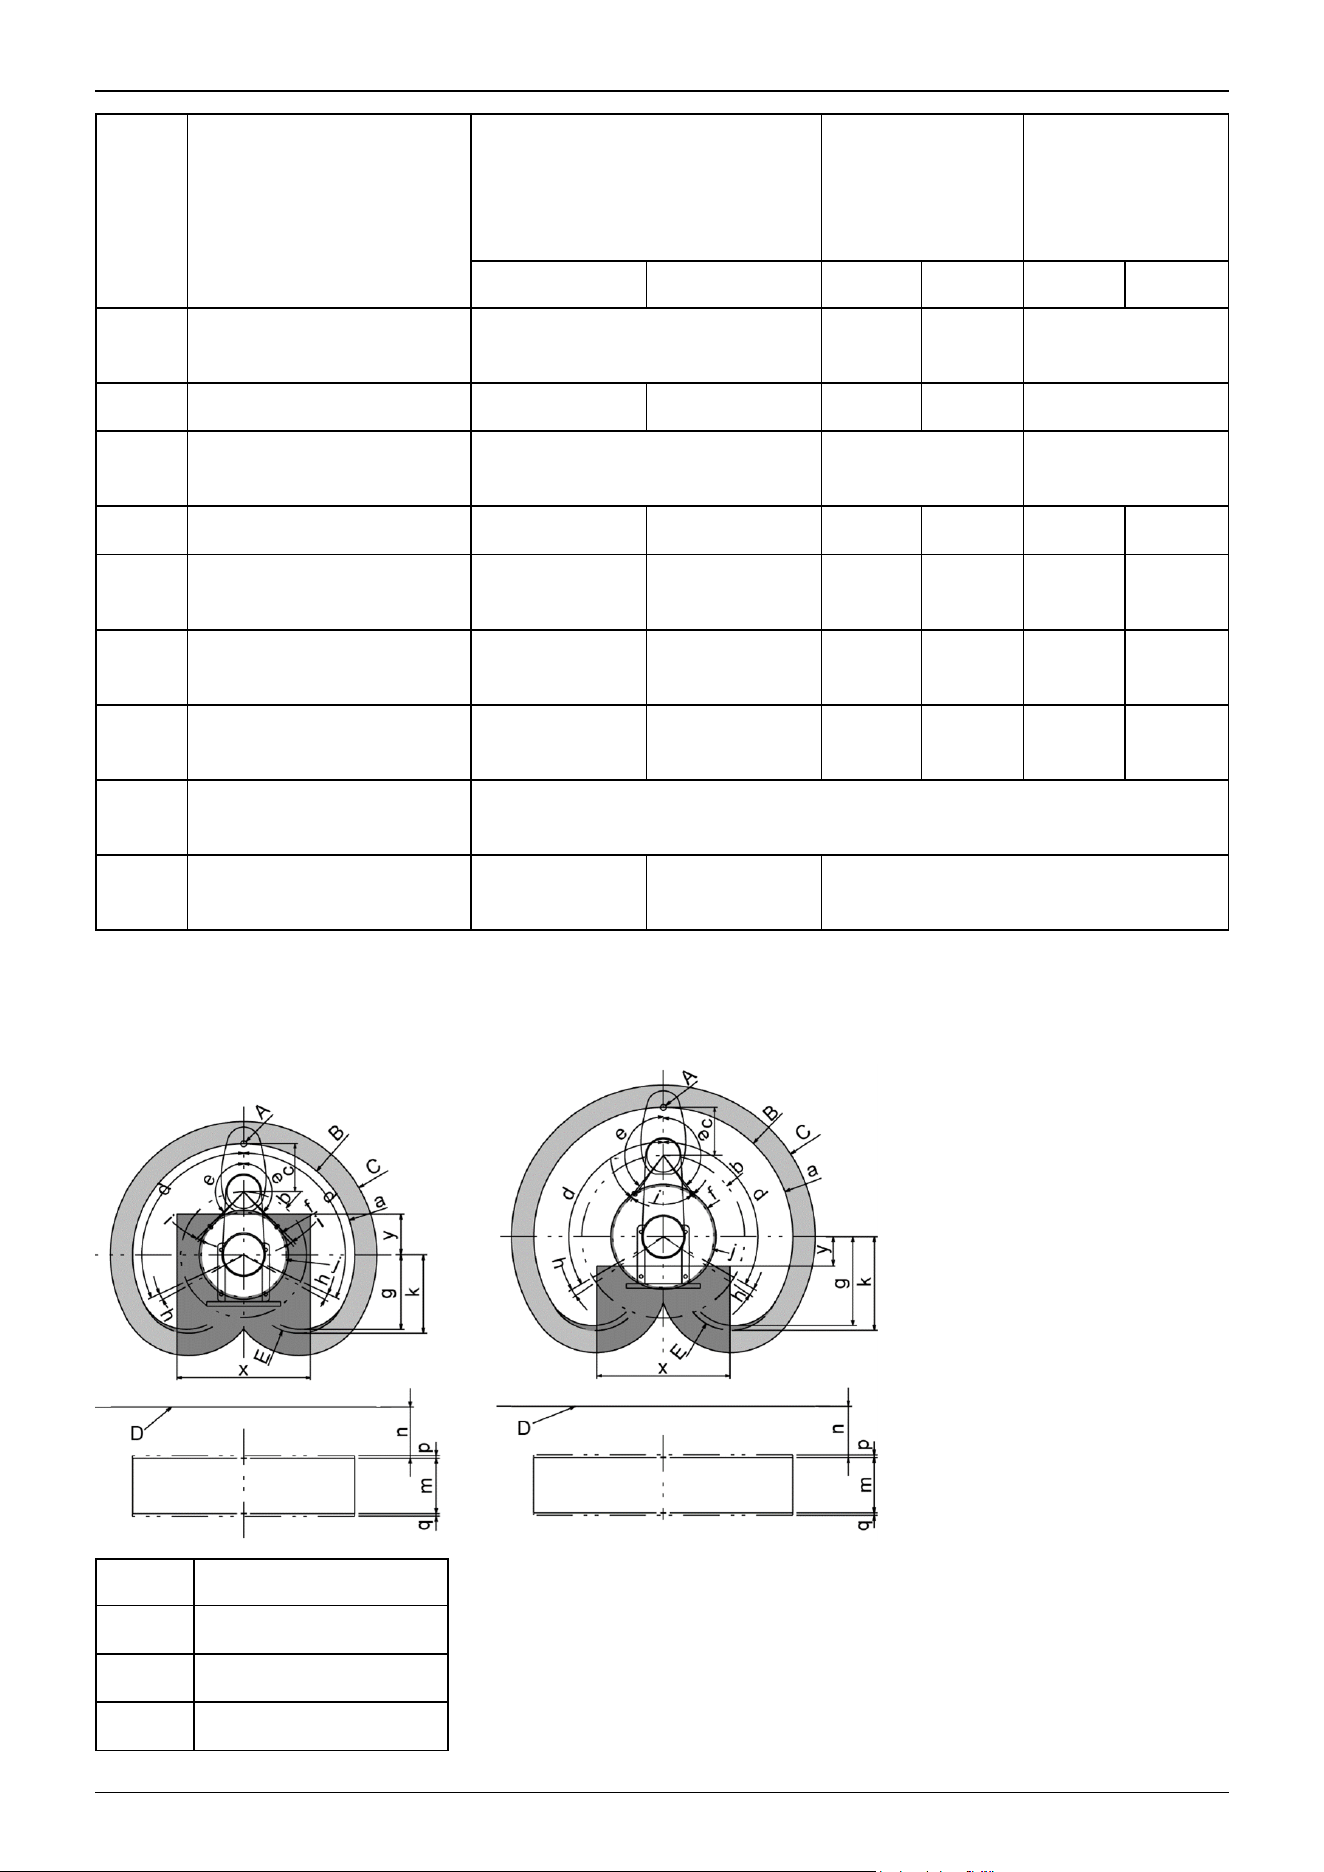
GX4-A/GX4-B/GX4-C251 *
GX4-A/GX4-B/GX4-C251*B
GX4-A/GX4-
B/GX4-C301 *
GX4-A/GX4-
B/GX4-C301*B
GX4-A/GX4-
B/GX4-C351 *
GX4-A/GX4-
B/GX4-C351*B
S, E C S, E C S, E C
i
Angle to the Joint #2
mechanical stop (°)
1.5 2.4 1.6 2.5
j (Mechanical stop area) 84 92 99 103 137
k
(Mechanical stop area of the
back side)
225.2 264.9 304.5
m Joint #3 motion stroke 150 120 150 120 150 120
n
Distance from base
mounting surface
26 30 26 30 26 30
p
Joint #3 mechanical stop
area top end
6.5 10.5 6.5 10.5 6.5 10.5
q
Joint #3 mechanical stop
area bottom end
6.8 1.3 6.8 1.3 6.8 1.3
x
Dimensions of motion
prohibited area (mm)
176
y
Dimensions of motion
prohibited area (mm)
+49 (infinite on
back side)
+66 (infinite on
back side)
-255
Multiple mounting specifications: Straight arm
Symbol Description
A Center of Joint #3
B Work envelope
C Maximum zone
GX4-A/GX4-B/
GX4-C301*M
GX4-A/GX4-B/
GX4-C351*M
Industrial Robot: SCARA Robots GX series Manual Rev.11
170
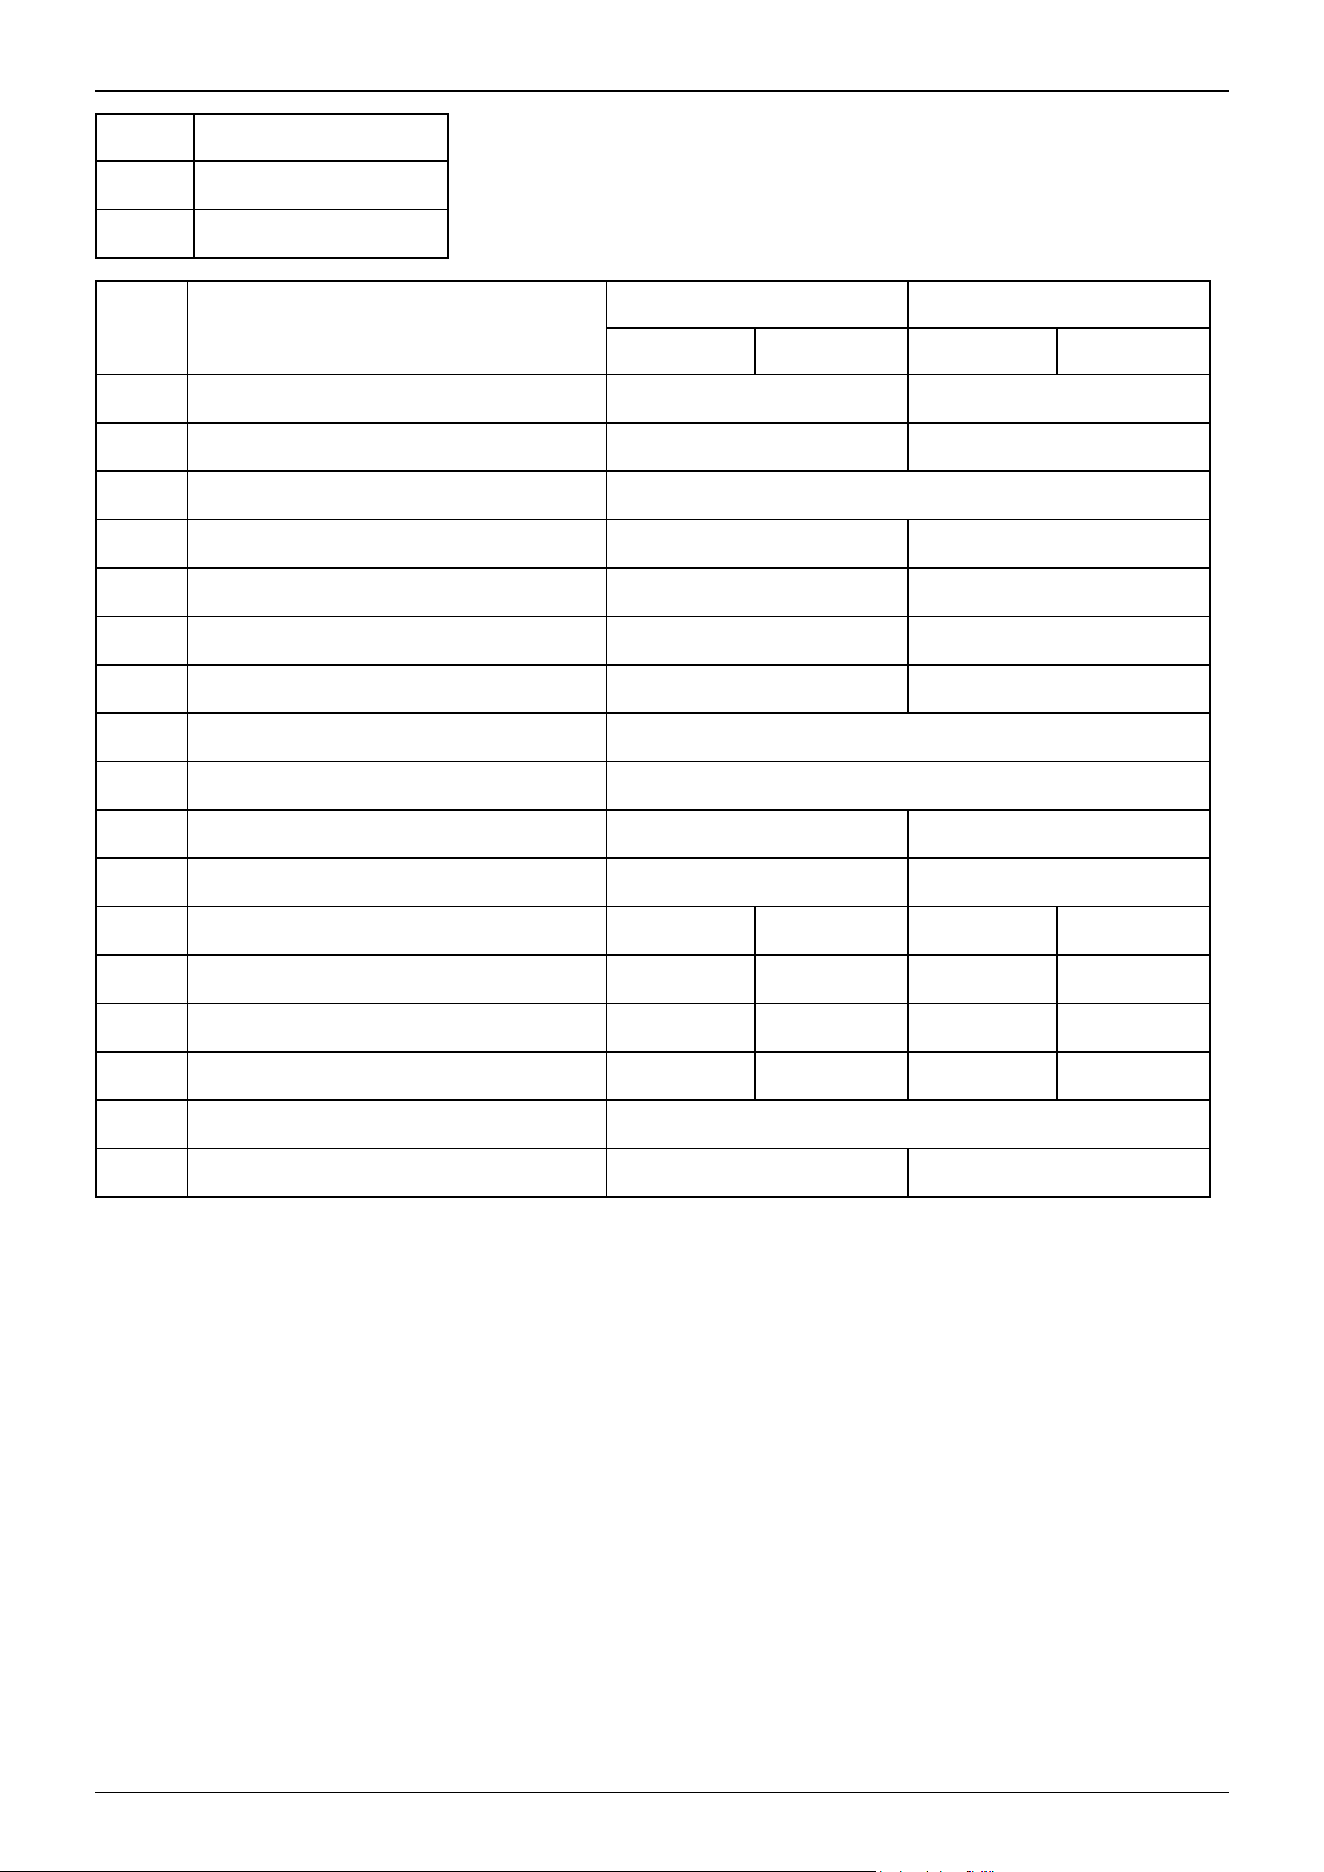
Symbol Description
D Base mounting surface
E Range to mechanical stop
GX4-A/GX4-B/GX4-C301*M GX4-A/GX4-B/GX4-C351*M
S, E C S, E C
a Length of Arm #1 + Arm #2 (mm) 300 350
b Length of Arm #1 (mm) 170 220
c Length of Arm #2 (mm) 130
d Joint #1 motion (°) 115 120
e Joint #2 motion (°) 135 142
f (Work envelope) 121 142
g (Work envelope on the back side) 210.8 240
h Angle to the Joint #1 mechanical stop (°) 4.0
i Angle to the Joint #2 mechanical stop (°) 2.5
j (Mechanical stop area) 115 137
k (Mechanical stop area of the back side) 212.4 253
m Joint #3 motion stroke 150 120 150 120
n Distance from base mounting surface 138 172 138 172
p Joint #3 mechanical stop area top end 6.5 10.5 6.5 10.5
p Joint #3 mechanical stop area bottom end 6.8 1.3 6.8 1.3
x Dimensions of motion prohibited area (mm) 360
y Dimensions of motion prohibited area (mm) +110 (infinite on back side) -79.5 (infinite on back side)
Industrial Robot: SCARA Robots GX series Manual Rev.11
171
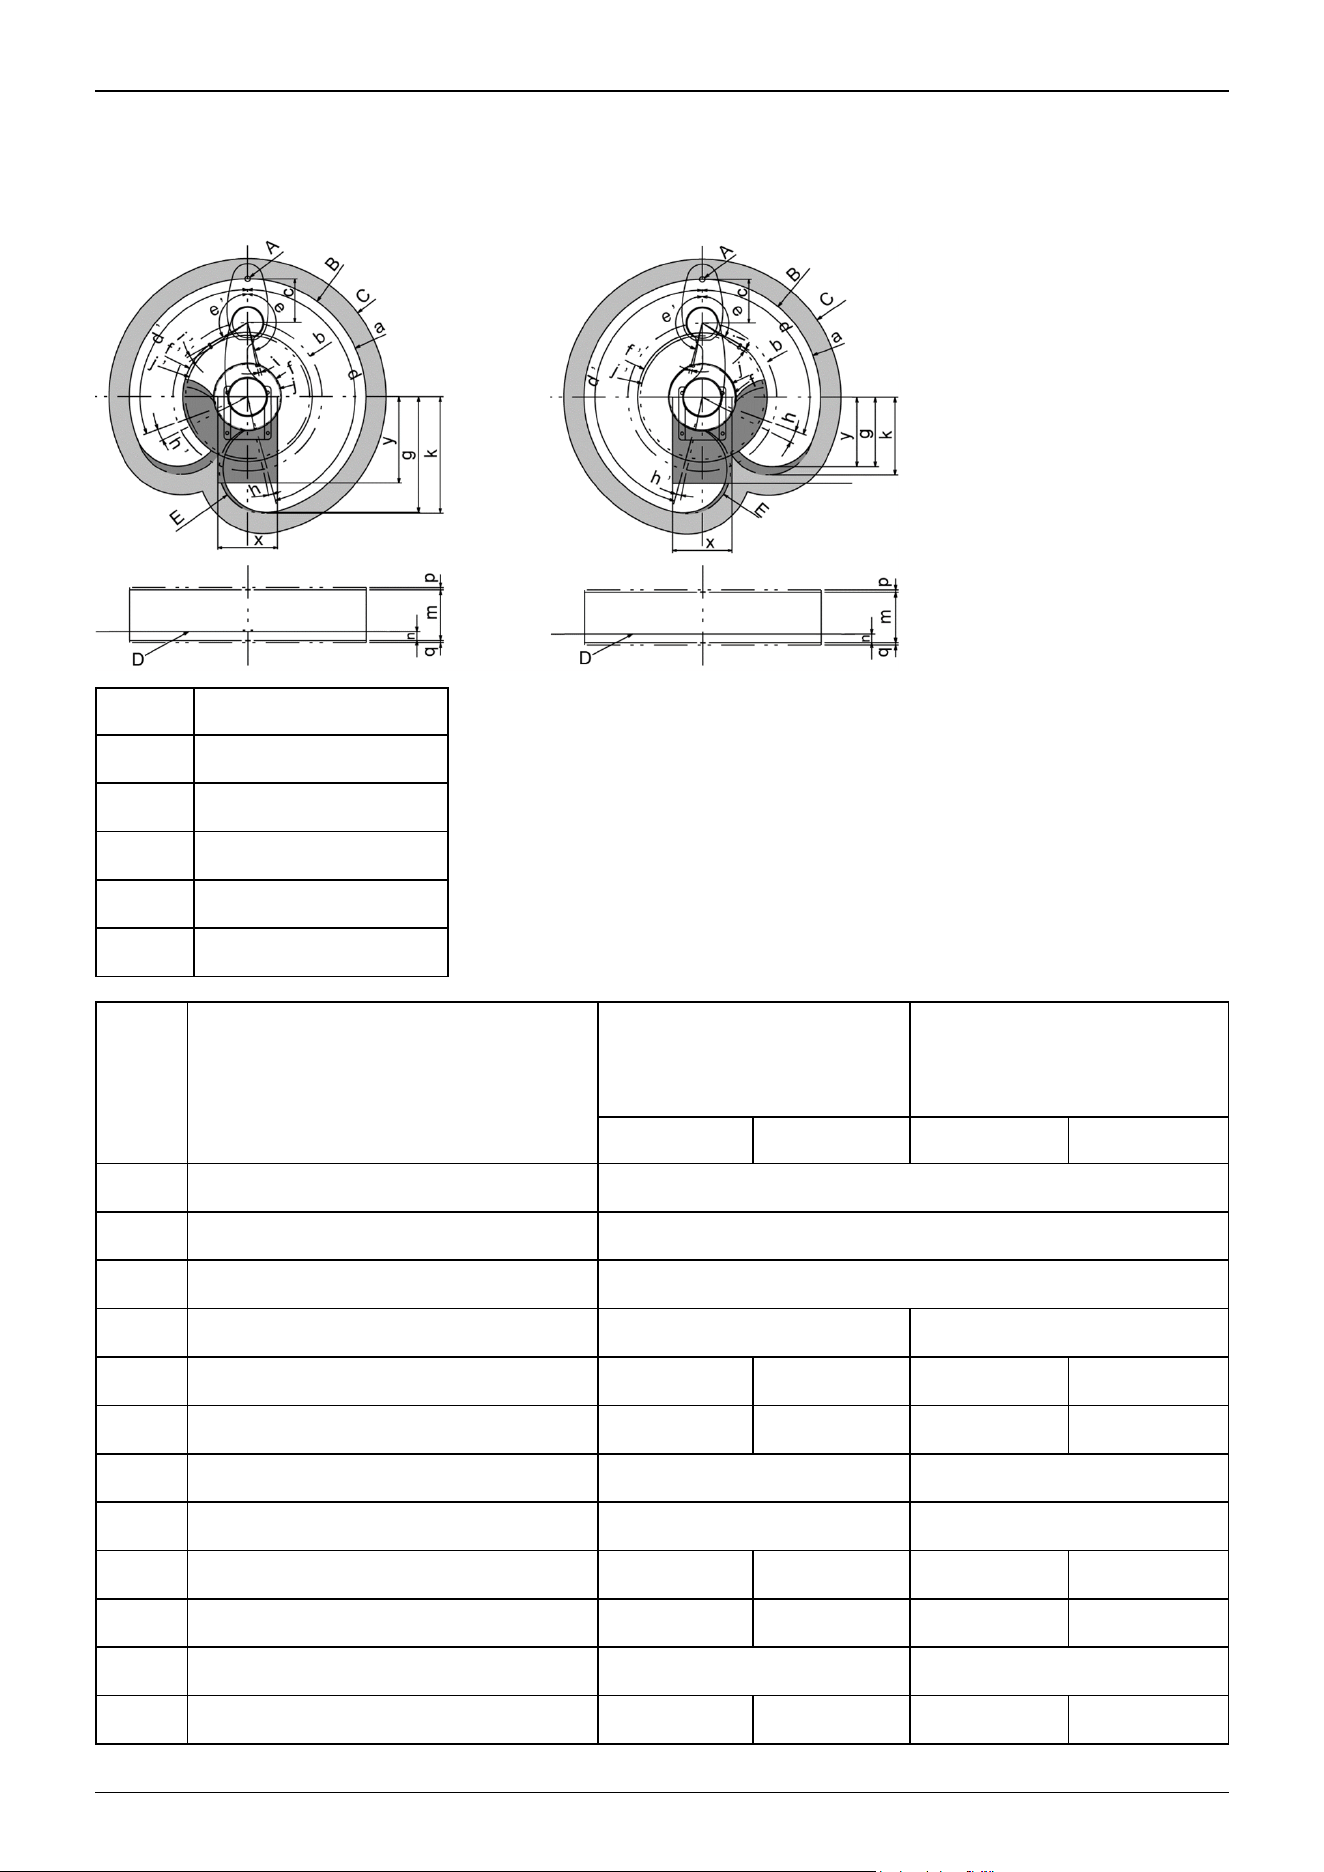
Table top mounting specifications: Curved arm
Symbol Description
A Center of Joint #3
B Work envelope
C Maximum zone
D Base mounting surface
E Range to mechanical stop
GX4-A/GX4-B/GX4-C351*-L
GX4-A/GX4-B/GX4-C351*B-
L
GX4-A/GX4-B/GX4-C351*-R
GX4-A/GX4-B/GX4-C351*B-
R
S, E C S, E C
a Length of Arm #1 + Arm #2 (mm) 350
b Length of Arm #1 (mm) 220
c Length of Arm #2 (mm) 130
d / d’ Joint #1 motion (°) 165 / 110 110 / 165
e / e’ Joint #2 motion (°) 165 / 120 160 / 120 120 / 165 120 / 160
f / f’ (Work envelope) 100 / 192 107 / 192 192 / 100 192 / 107
g (Work envelope on the back side) 342.5 342.5
h / h’ Angle of Joint #1 mechanical stop (°) 3.0 / 7.0 7.0 / 3.0
i / i’ Angle to Joint #2 mechanical stop (°) 2.8 / 3.8 3.5 / 3.8 3.8 / 2.8 3.8 / 3.5
j / j’ (Mechanical stop area) 97 / 183 102 / 183 183 / 97 183 / 102
k (Mechanical stop area of the back side) 345.2 345.2
m Joint #3 motion stroke 150 120 150 120
GX4-A/GX4-B/
GX4-C351**-L
GX4-A/GX4-B/
GX4-C351**-R
Industrial Robot: SCARA Robots GX series Manual Rev.11
172
GX4-A/GX4-B/GX4-C351*-L
GX4-A/GX4-B/GX4-C351*B-
L
GX4-A/GX4-B/GX4-C351*-R
GX4-A/GX4-B/GX4-C351*B-
R
S, E C S, E C
n Distance from base mounting surface 26 30 26 30
p Joint #3 mechanical stop area top end 6.5 10.5 6.5 10.5
p Joint #3 mechanical stop area bottom end 6.8 1.3 6.8 1.3
x
Dimensions of motion prohibited area
(mm)
176
y
Dimensions of motion prohibited area
(mm)
-255
Industrial Robot: SCARA Robots GX series Manual Rev.11
173

4. GX8 Manipulator
This chapter contains information on the setup and operation of the Manipulators.
Please read this chapter thoroughly before setting up and operating the Manipulators.
Industrial Robot: SCARA Robots GX series Manual Rev.11
174
4.1 Safety
The Manipulator and its related equipment should be unpacked and transported by people who have received installation
training provided by Epson and the suppliers. Also, the laws and regulations of the installation country must be followed.
Before use, please read this manual and other related manuals to ensure correct use.
After reading this manual, store it in an easily accessible location for future reference.
This product is intended for transporting and assembling parts in a safely isolated area.
4.1.1 Conventions Used in This Manual
The following symbols are used in this manual to indicate important safety information. Be sure to read the descriptions shown
with each symbol.
WARNING
This symbol indicates an imminently hazardous situation which, if operation is not performed properly, will result
in death or serious injury.
WARNING
This symbol indicates a potentially hazardous situation which, if operation is not performed properly, could result
in an injury due to electric shock.
CAUTION
This symbol indicates a potentially hazardous situation which, if operation is not performed properly, may result in
a minor or moderate injury or in property damage only.
Industrial Robot: SCARA Robots GX series Manual Rev.11
175
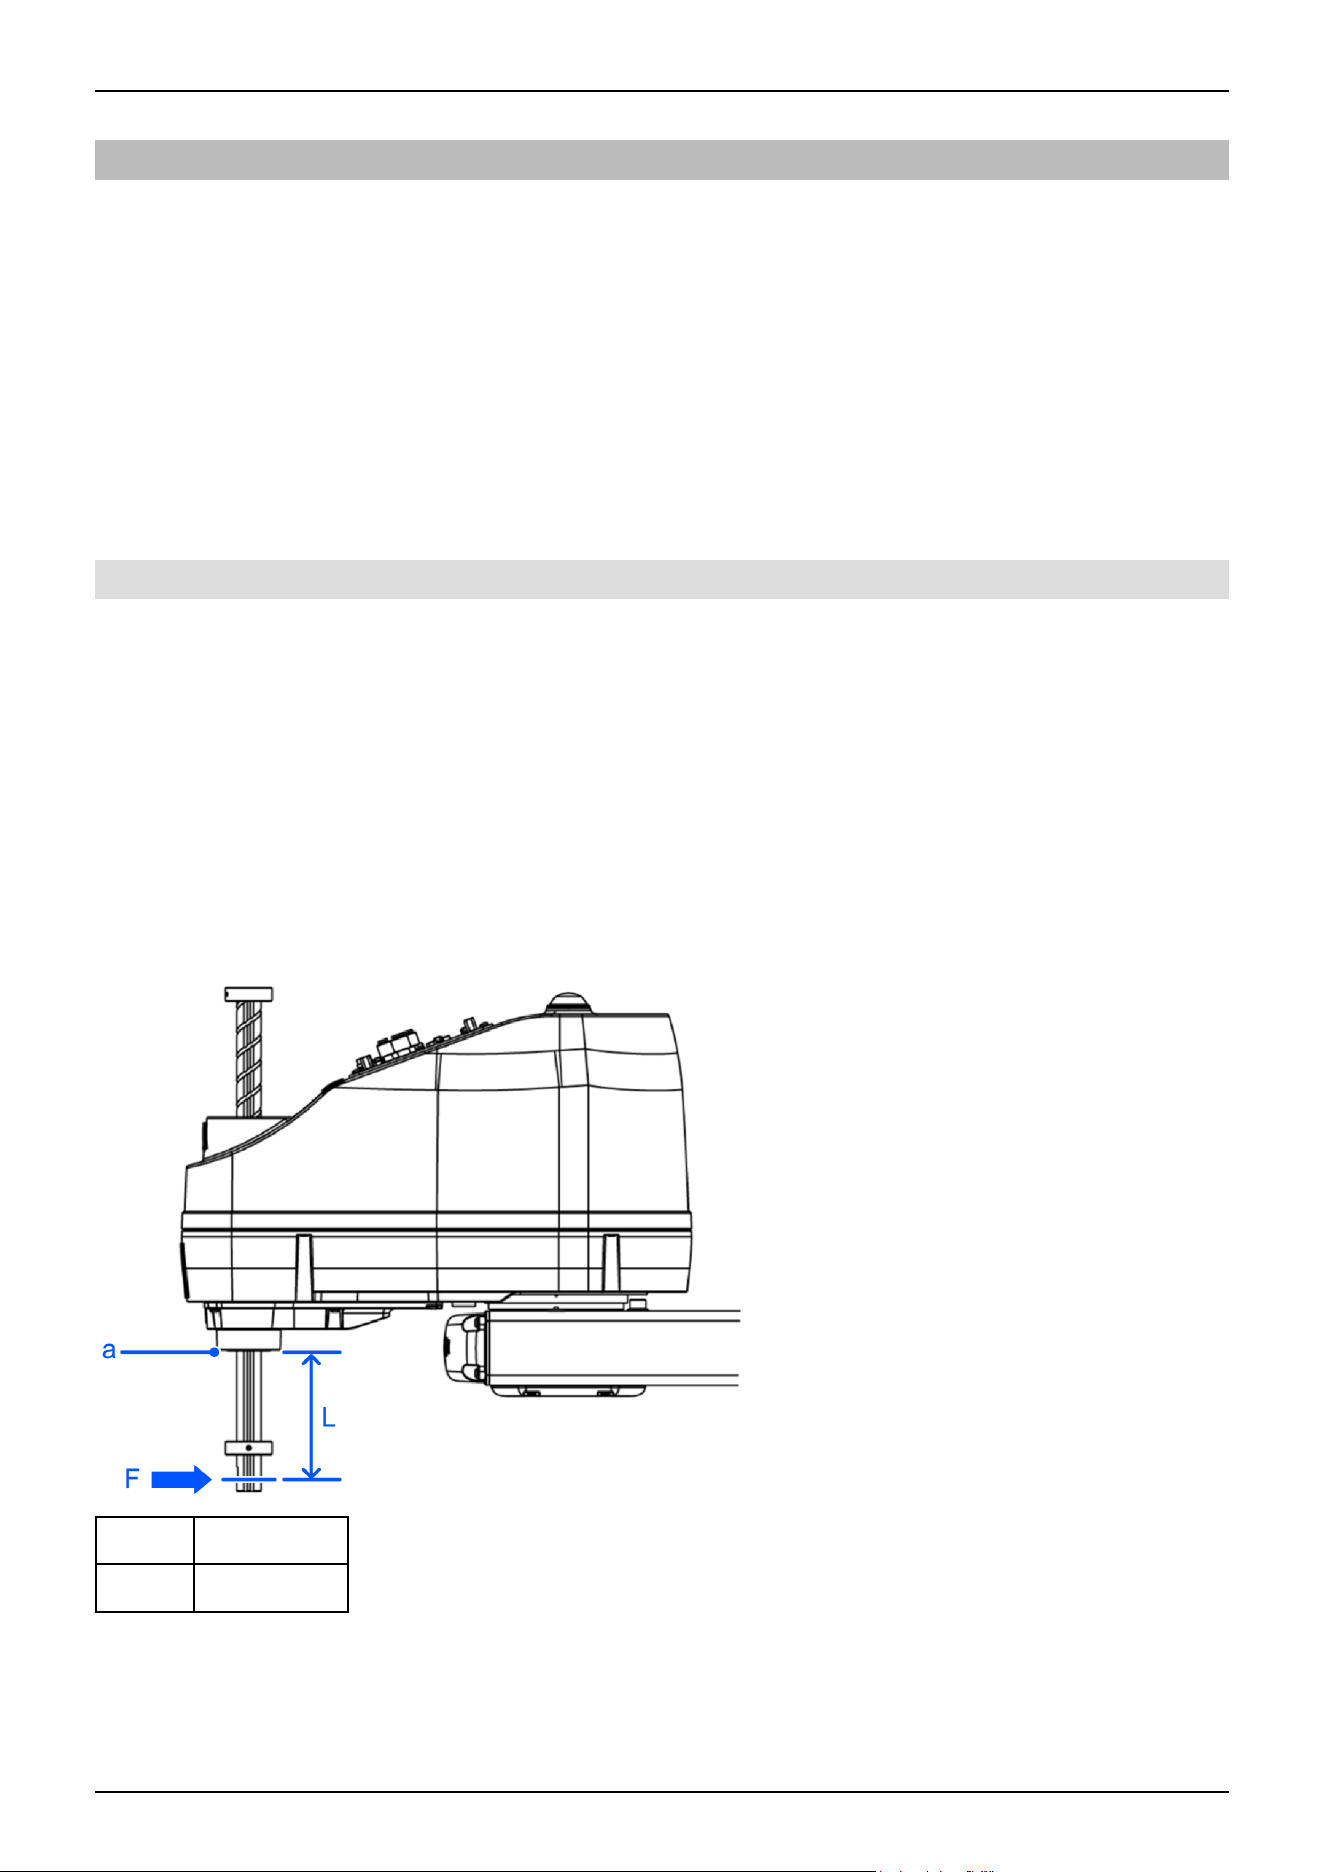
4.1.2 Design and Installation Safety
The robot system should be designed and installed by people who have received installation training provided by Epson and
the suppliers.
Design personnel should refer to the following manuals:
"Safety Manual"
"Controller Manual"
"Manipulator Manual"
Refer to the following section for the installation safety information.
Environment and Installation
Be sure to read this section and follow the safety information before installation to ensure that the installation work is
performed safely.
4.1.2.1 Strength of the Ball Screw Spline
If a load exceeding the allowable bending load is applied to the ball screw spline, it may not work properly due to deformation
or breakage of the shaft.
If a load exceeding the allowable value is applied to the ball screw spline, the ball screw spline unit must be replaced.
The allowable load varies depending on the distance over which the load is applied. To calculate the allowable load, refer to
the formula below.
Allowable bending moment
GX8: M=27,000 N∙mm
Calculation example: 270 N load applied at 100 mm from the end of the spline nut
Moment
M=F∙L=100∙270=27,000 N∙mm
Symbol Description
a Spline nut end
Industrial Robot: SCARA Robots GX series Manual Rev.11
176
4.1.3 Operation Safety
The following items are safety precautions for operating personnel:
WARNING
Be sure to read the Safety Manual before use. Operating the robot system without understanding the safety
information can be extremely dangerous and may result in serious injury or severe equipment damage.
Before operating the robot system, make sure that no one is inside the safety barriers. The robot system can
be operated in the teaching operation mode even when someone is inside the safety barriers. Even though
the motion of the Manipulator is always restricted (low speed and low power) to ensure operator safety, an
unexpected movement by the Manipulator can be extremely dangerous and may cause serious safety
problems.
If the Manipulator makes any abnormal movements during operation of the robot system, do not hesitate to
immediately press the emergency stop switch.
WARNING
To perform the power supply lockout, remove the power plug. Be sure to connect the AC power cable to a
power outlet. Do not connect it directly to a factory power source.
Before performing any replacement work, inform others in the area that you are working, and then turn off the
Controller and related equipment, and unplug the power cable from the power source. Performing any work
procedure with the power turned on is extremely dangerous and may result in electric shock and/or
malfunction of the robot system.
Do not connect or disconnect the connector of the M/C cable while the Controller is turned on. There is a risk
the Manipulator may malfunction, which is extremely hazardous. Also, performing any work procedure with
the power turned on may result in electric shock and/or malfunction of the robot system.
CAUTION
Whenever possible, only one person should operate the robot system. If it is necessary to operate with more
than one person, ensure that all personnel communicate with each other and take all necessary safety
precautions.
Joints #1, #2, and #4:
If the Manipulator is operated repeatedly with an operating angle of 5° or less, the bearings used in the joints
are likely to cause oil film shortage. Repeated operation may cause premature damage. To prevent premature
damage, operate the Manipulator to move each joint to an angle of 50° or more about once per hour.
Joint #3:
If the up-and-down motion of the hand is 10 mm or less, move the hand about half or more of its maximum
stroke about once per hour.
When the robot is operating at low speed (Speed: 5 to 20%), vibration (resonance) may occur continuously
during operation depending on the combination of the arm orientation and hand load. Vibration occurs due to
the natural vibration frequency of the arm and can be reduced by taking the following measures:
Changing the robot speed
Changing the teach points
Changing the hand load
Industrial Robot: SCARA Robots GX series Manual Rev.11
177
4.1.4 Emergency Stop
Each robot system needs equipment that will allow the operator to immediately stop the system's operation. Install an
emergency stop device by using emergency stop input from the Controller or other equipment.
Before using the emergency stop switch, be aware of the following points.
The emergency stop switch should be used to stop the Manipulator only in case of emergencies.
Besides pressing the emergency stop switch when an emergency occurs, to stop the Manipulator during program operation,
use the Pause or STOP (program stop) statements assigned to a standard I/O.
The Pause and STOP statements do not turn off motor energization, and so the brake is not locked.
To place the robot system in emergency stop mode in a non-emergency (normal) situation, press the emergency stop switch
while the Manipulator is not operating.
Do not press the emergency stop switch unnecessarily while the Manipulator is operating normally.
It could shorten the lifespan of the following components.
Brakes
The brakes will be locked, which will shorten the lifespan of the brakes due to worn brake friction plates.
Normal brake lifespan:
About 2 years (when the brakes are used 100 times/day)
or about 20,000 times
Reduction gears
An emergency stop applies an impact to the reduction gear, which can shorten its life.
If the Manipulator is stopped by turning off the Controller while it is operating, the following problems may occur.
Reduced life and damage to reduction gear
Position shift at the joints
If a power outage or other unavoidable Controller power-off occurs during Manipulator operation, check the following points
after power is restored.
Damage in reduction gear
Shifting of the joints from their proper positions
If there was any shifting, maintenance is required. For more information, please contact the supplier.
Stopping distance of emergency stop
The Manipulator during operation cannot stop immediately after the emergency stop switch is pressed. Also, the stopping time
and movement distance vary depending on the following factors.
Hand weight, WEIGHT setting, ACCEL setting, workpiece weight, SPEED setting, movement posture, etc.
For the stopping time and movement distance of the Manipulator, refer to the following section.
Appendix B: Stopping Time and Stopping Distance at Emergency Stop
4.1.5 Safeguard (SG)
To maintain a safe working zone, safety barriers must be set up around the Manipulator, and safeguards must be installed at the
entrance and exit of the safety barriers.
The term "safeguard" as used in this manual refers to a safety device with an interlock that allows entry into the safety barriers.
Specifically, this includes safety door switches, safety barriers, light curtains, safety gates, safety floor mats, and so on. The
safeguard is an input that informs the Robot Controller that an operator may be inside the safeguard area. You must assign at
least one Safeguard (SG) in Safety Function Manager.
Industrial Robot: SCARA Robots GX series Manual Rev.11
178
When the safeguard is opened, Protective Stop operates to change to the safeguard open state (display: SO).
Safeguard open
Operations are prohibited. Further robot operation is not possible until either the safeguard is closed, the latched state is
released, and a command is executed, or the TEACH or TEST operation mode is turned on and the enable circuit is
activated.
Safeguard closed
The robot can operate automatically in an unrestricted (high power) state.
WARNING
If a third party accidentally releases the safeguard while an operator is working inside the safety barriers, this
may result in a hazardous situation. To protect the operator working inside the safety barriers, implement
measures to lock out or tag out the latch release switch.
To protect operators working near the robot, be sure to connect a safeguard switch and make sure that it
works properly.
Installing safety barriers
When installing safety barriers within the maximum range of the Manipulator, combine safety functions such as SLP. Carefully
take into account the size of the hand and the workpieces to be held so that no interference occurs between the operating parts
and the safety barriers.
Installing safeguards
Design the safeguards so that they satisfy the following requirements:
When using a key switch type safety device, use a switch that forcibly opens the interlock contacts. Do not use switches
that open their contacts using the spring force of the interlock.
When using an interlock mechanism, do not disable the interlock mechanism.
Considering the stopping distance
During operation, the Manipulator cannot stop immediately even if the safeguard is opened. Also, the stopping time and
movement distance vary depending on the following factors.
Hand weight, WEIGHT setting, ACCEL setting, workpiece weight, SPEED setting, movement posture, etc.
For the stopping time and movement distance of the Manipulator, refer to the following section.
Appendix C: Stopping Time and Stopping Distance When Safeguard is Open
Precautions for safeguard operation
Do not open the safeguard unnecessarily while the motor is energized. Frequent safeguard inputs will reduce the life of the
relay.
Normal relay lifespan: About 20,000 times
4.1.6 Arm Movement Method in the Emergency Stop State
In the emergency stop state, move the Manipulator joints directly by hand as shown below.
Joint #1:
Push Arm #1 by hand.
Joint #2:
Push Arm #2 by hand.
Joint #3:
The joint cannot be moved up or down by hand because the electromagnetic brake is activated.
Move the joint while pressing down the brake release switch.
Industrial Robot: SCARA Robots GX series Manual Rev.11
179
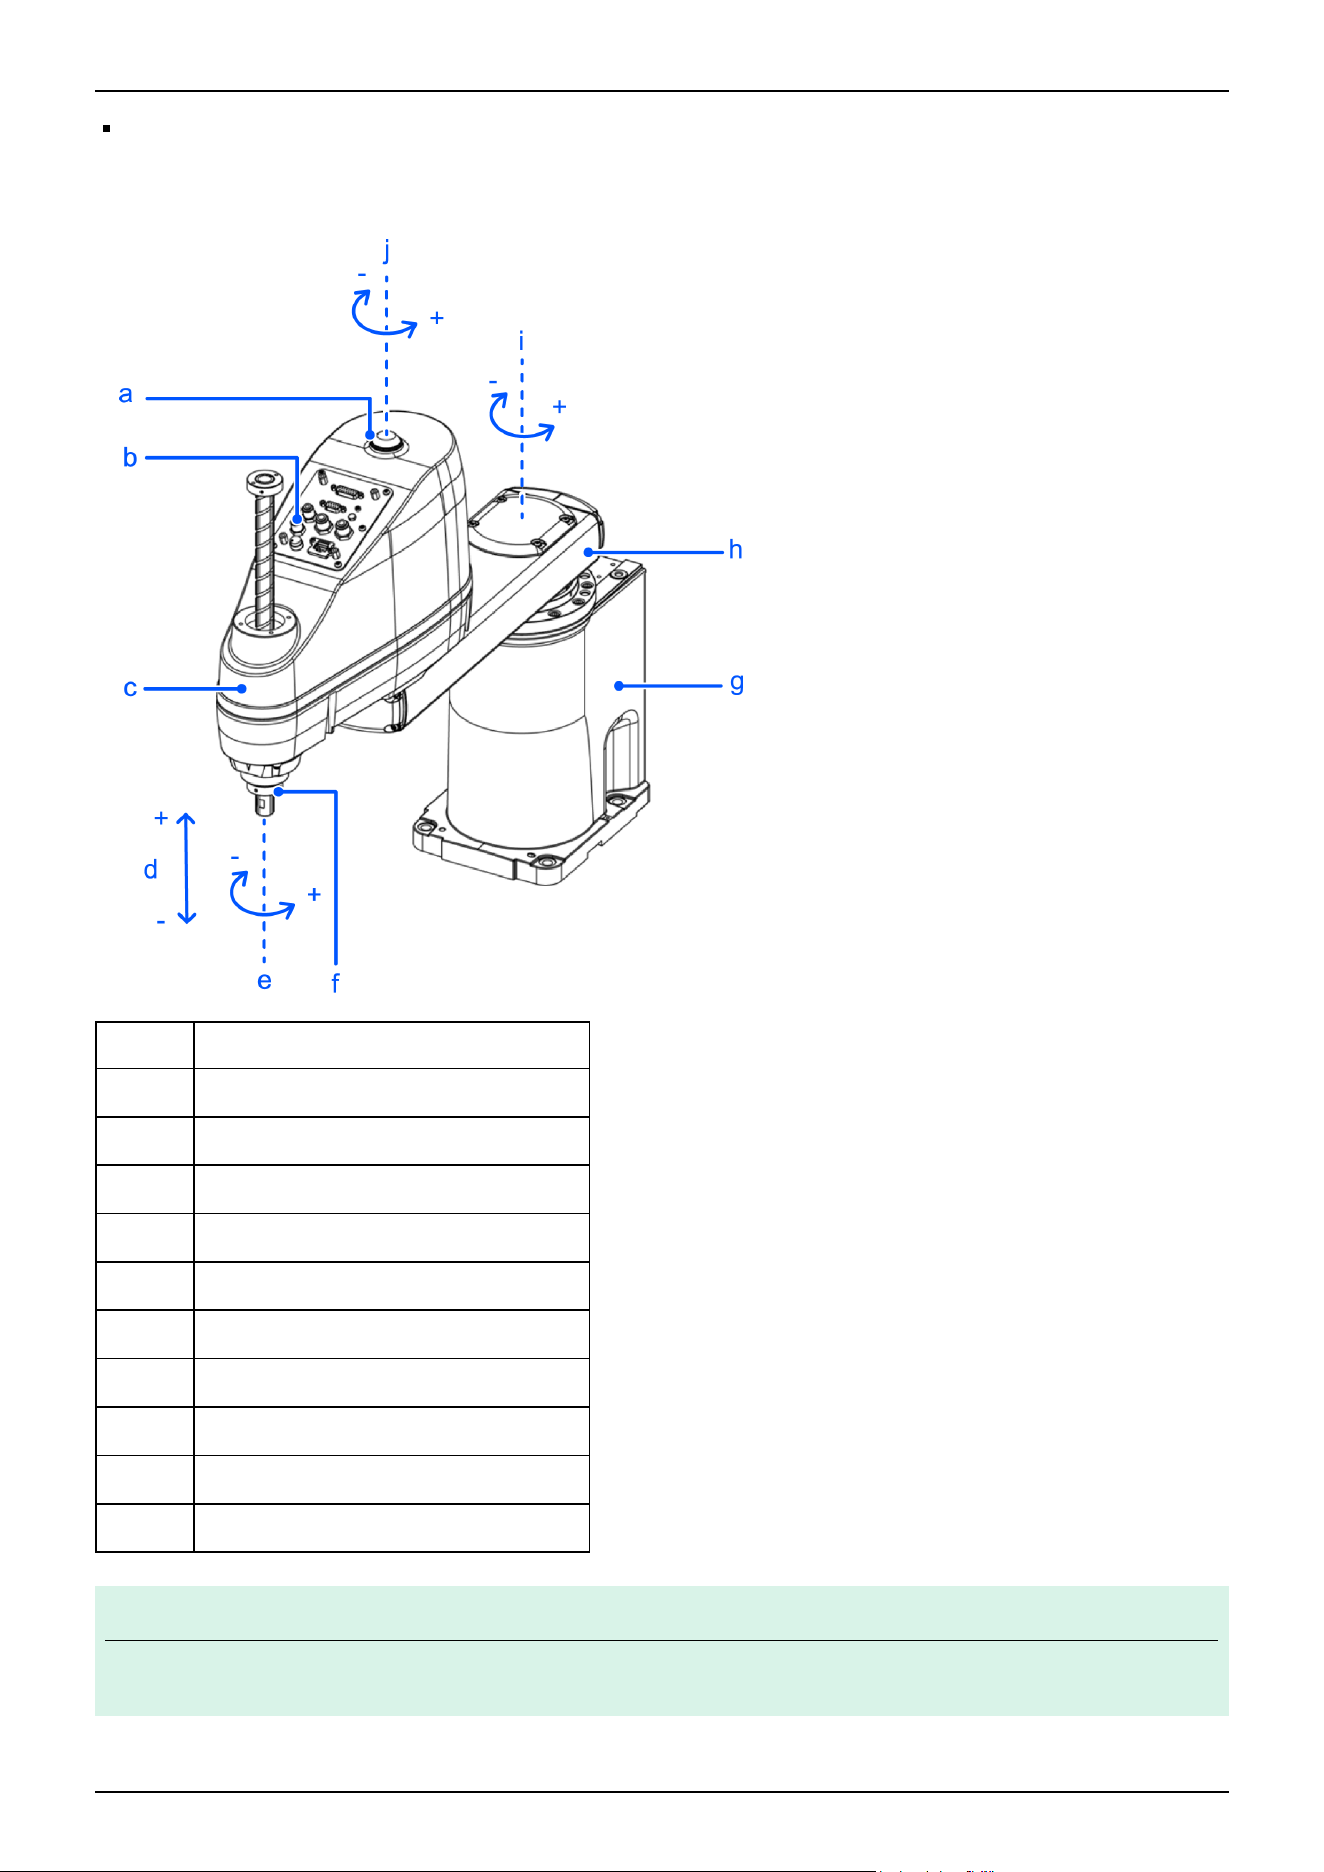
Joint #4:
The joint cannot be rotated by hand because the electromagnetic brake is activated.
Move the joint while pressing down the brake release switch.
Symbol Description
a Indicating lamp
b Joint #3 and Joint #4 brake release switch
c Arm #2
d Joint #3 (up/down movement)
e Joint #4 (rotation)
f Shaft
g Base
h Arm #1
i Joint #1 (rotation)
j Joint #2 (rotation)
KEY POINTS
The brake release switch is used with both Joint #3 and Joint #4. Press the brake release switch while in the
emergency stop state to simultaneously release the brakes on Joint #3 and Joint #4.
✏
Industrial Robot: SCARA Robots GX series Manual Rev.11
180
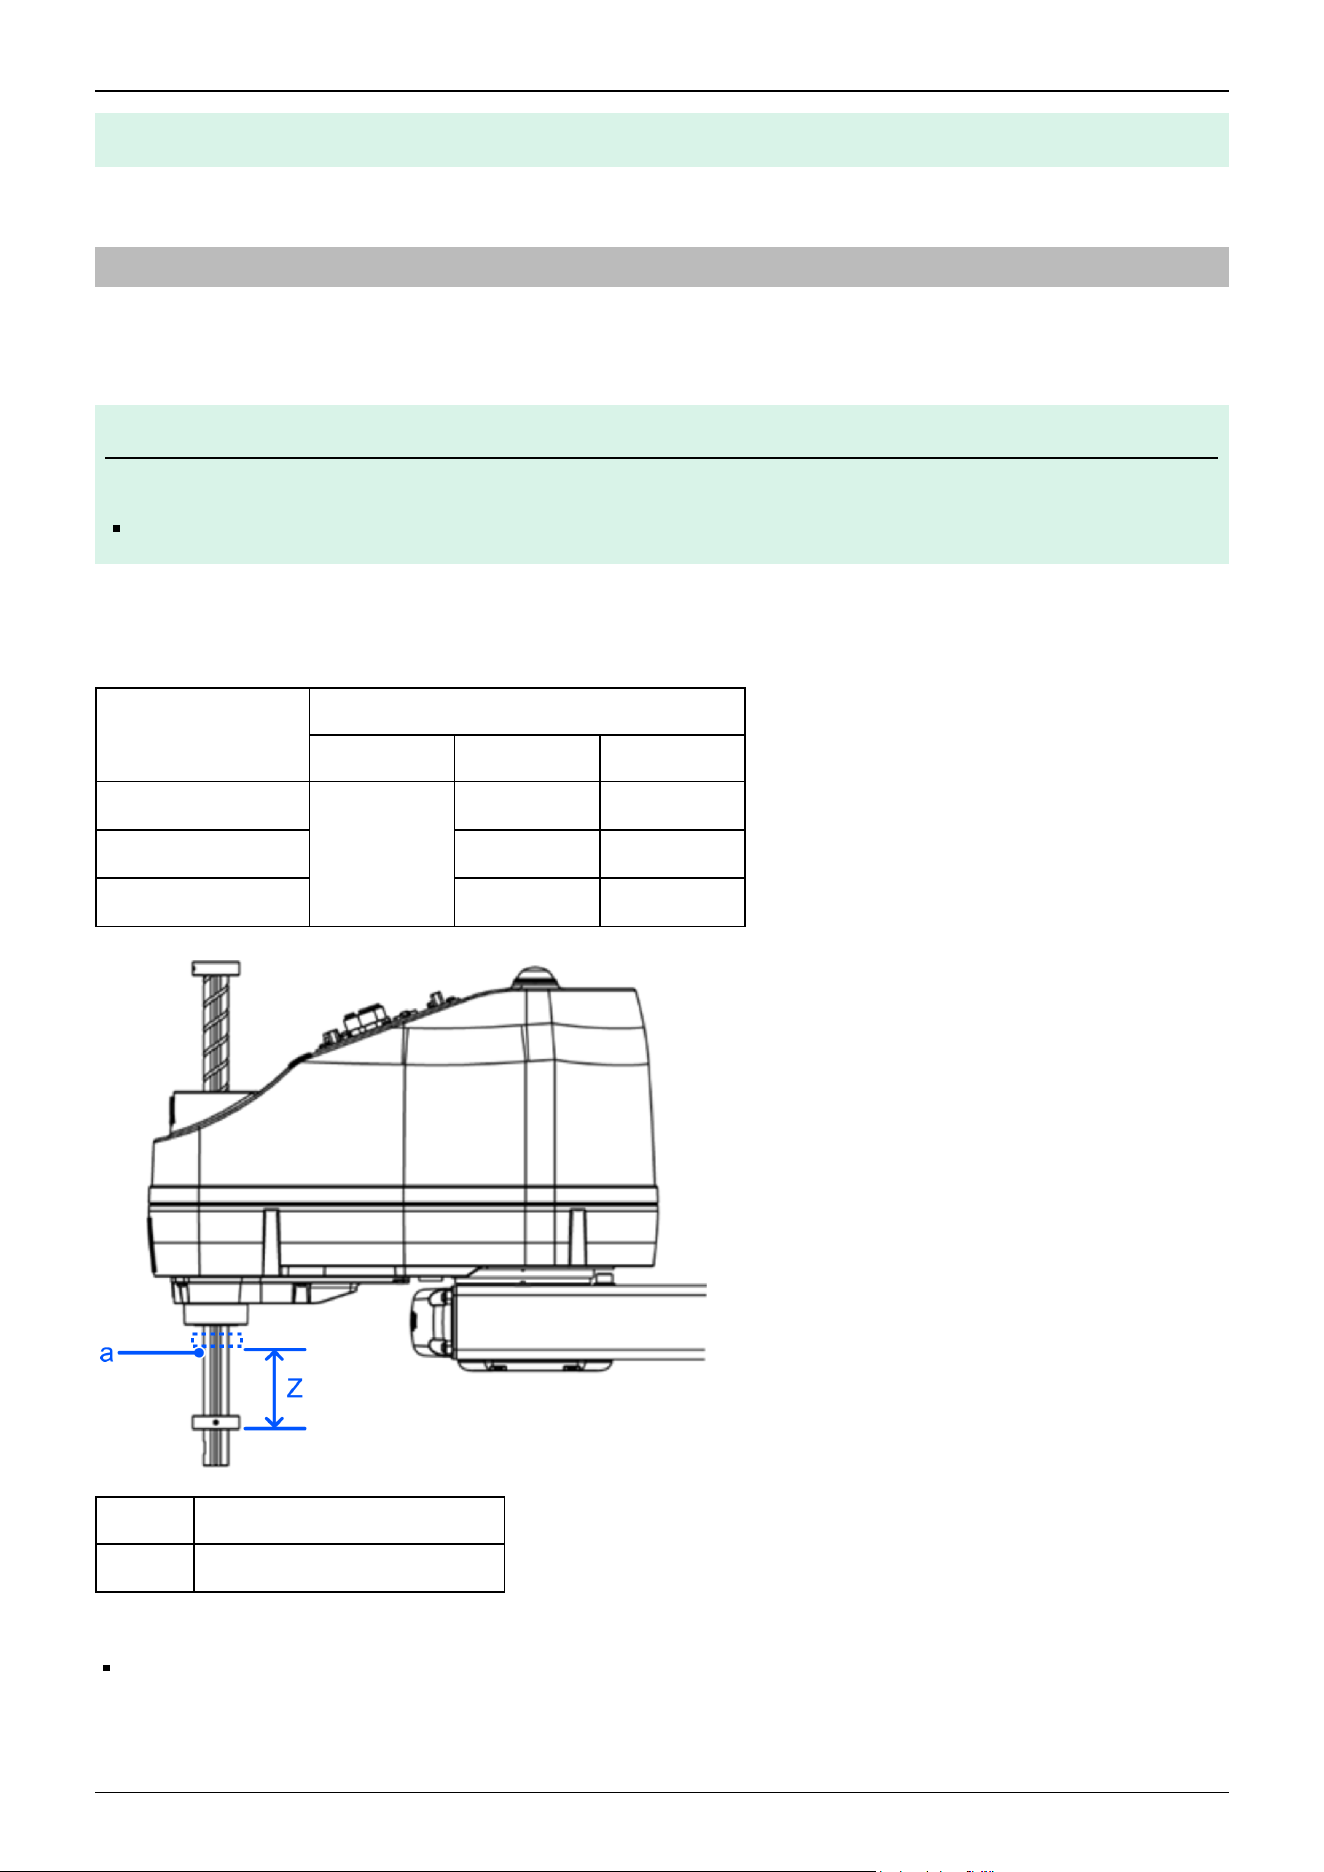
When pressing the brake release switch, watch for the shaft descending or rotating under the weight of the hand.
4.1.7 ACCELS Setting for CP Motion
To make the Manipulator move in CP motion, set ACCELS properly in the SPEL program according to the tip load and the Z-
axis height.
KEY POINTS
If the ACCELS settings are not properly configured, the following problem may occur.
Shortened lifespan and damage to the ball screw spline
Set ACCELS as shown below based on the Z-axis height.
ACCELS setting values by the Z-axis height and tip load
Z-axis Height (mm)
Tip Load
4 kg or Less 6 kg or Less 8 kg or Less
0 > Z ≥ -100
25000 or less
25000 or less 23500 or less
- 100 > Z ≥ -200 23000 or less 16000 or less
- 200 > Z ≥ -330 16000 or less 11500 or less
Symbol Description
a Z-axis height 0 (origin position)
Also, if a CP motion was performed with incorrect values set, check the following point.
No deformation or bending of the shaft of the ball screw spline
✏
Industrial Robot: SCARA Robots GX series Manual Rev.11
181
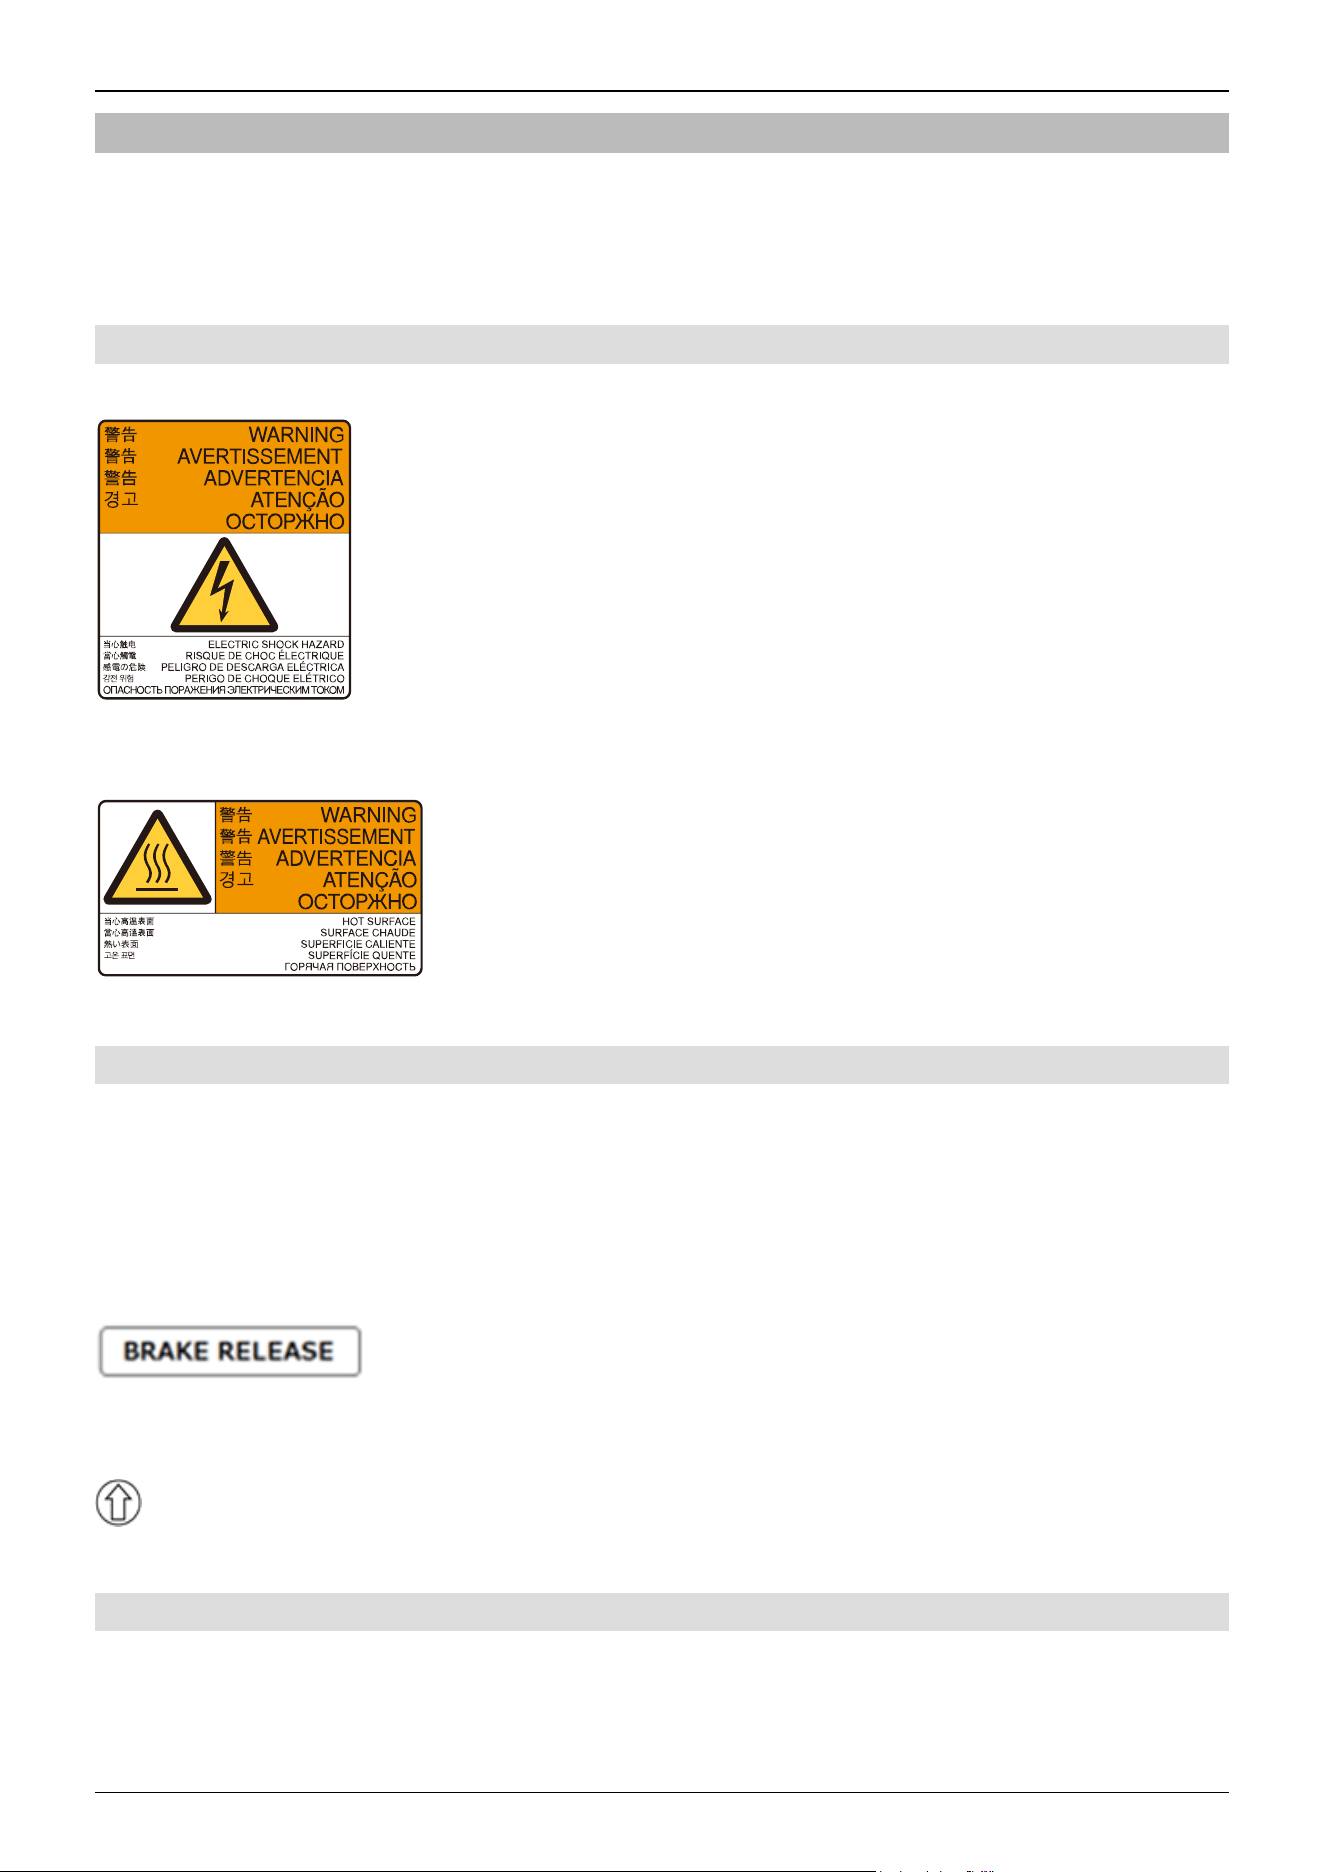
4.1.8 Warning Labels
The Manipulator has the following warning labels.
Specific hazards exist in the vicinity of areas with the warning labels. Be thoroughly careful in handling.
To ensure that the Manipulator is operated and maintained safely, be sure to follow the safety information and warnings
indicated on the warning labels. Also, do not tear, damage, or remove these warning labels.
4.1.8.1 Warning Labels
A
Touching any internal electrified parts while the power is turned on may cause electric shock.
B
The surface of the Manipulator is hot during and after operation, and there is a risk of burns.
4.1.8.2 Information Labels
1
This indicates the product name, model name, serial number, information of supported laws and regulations, product
specifications (Weight, MAX.REACH, MAX.PAYLOAD, AIR PRESSURE, Motor Power), Main document No.,
manufacturer, importer, date of manufacture, country of manufacture, and the like.
For details, see the label affixed to the product.
2
Indicates the position of a brake release button.
3
Indicates the position of a threaded hole for an eyebolt mounting screw.
4.1.8.3 Labelled Locations
Common (Arm #2)
Industrial Robot: SCARA Robots GX series Manual Rev.11
182
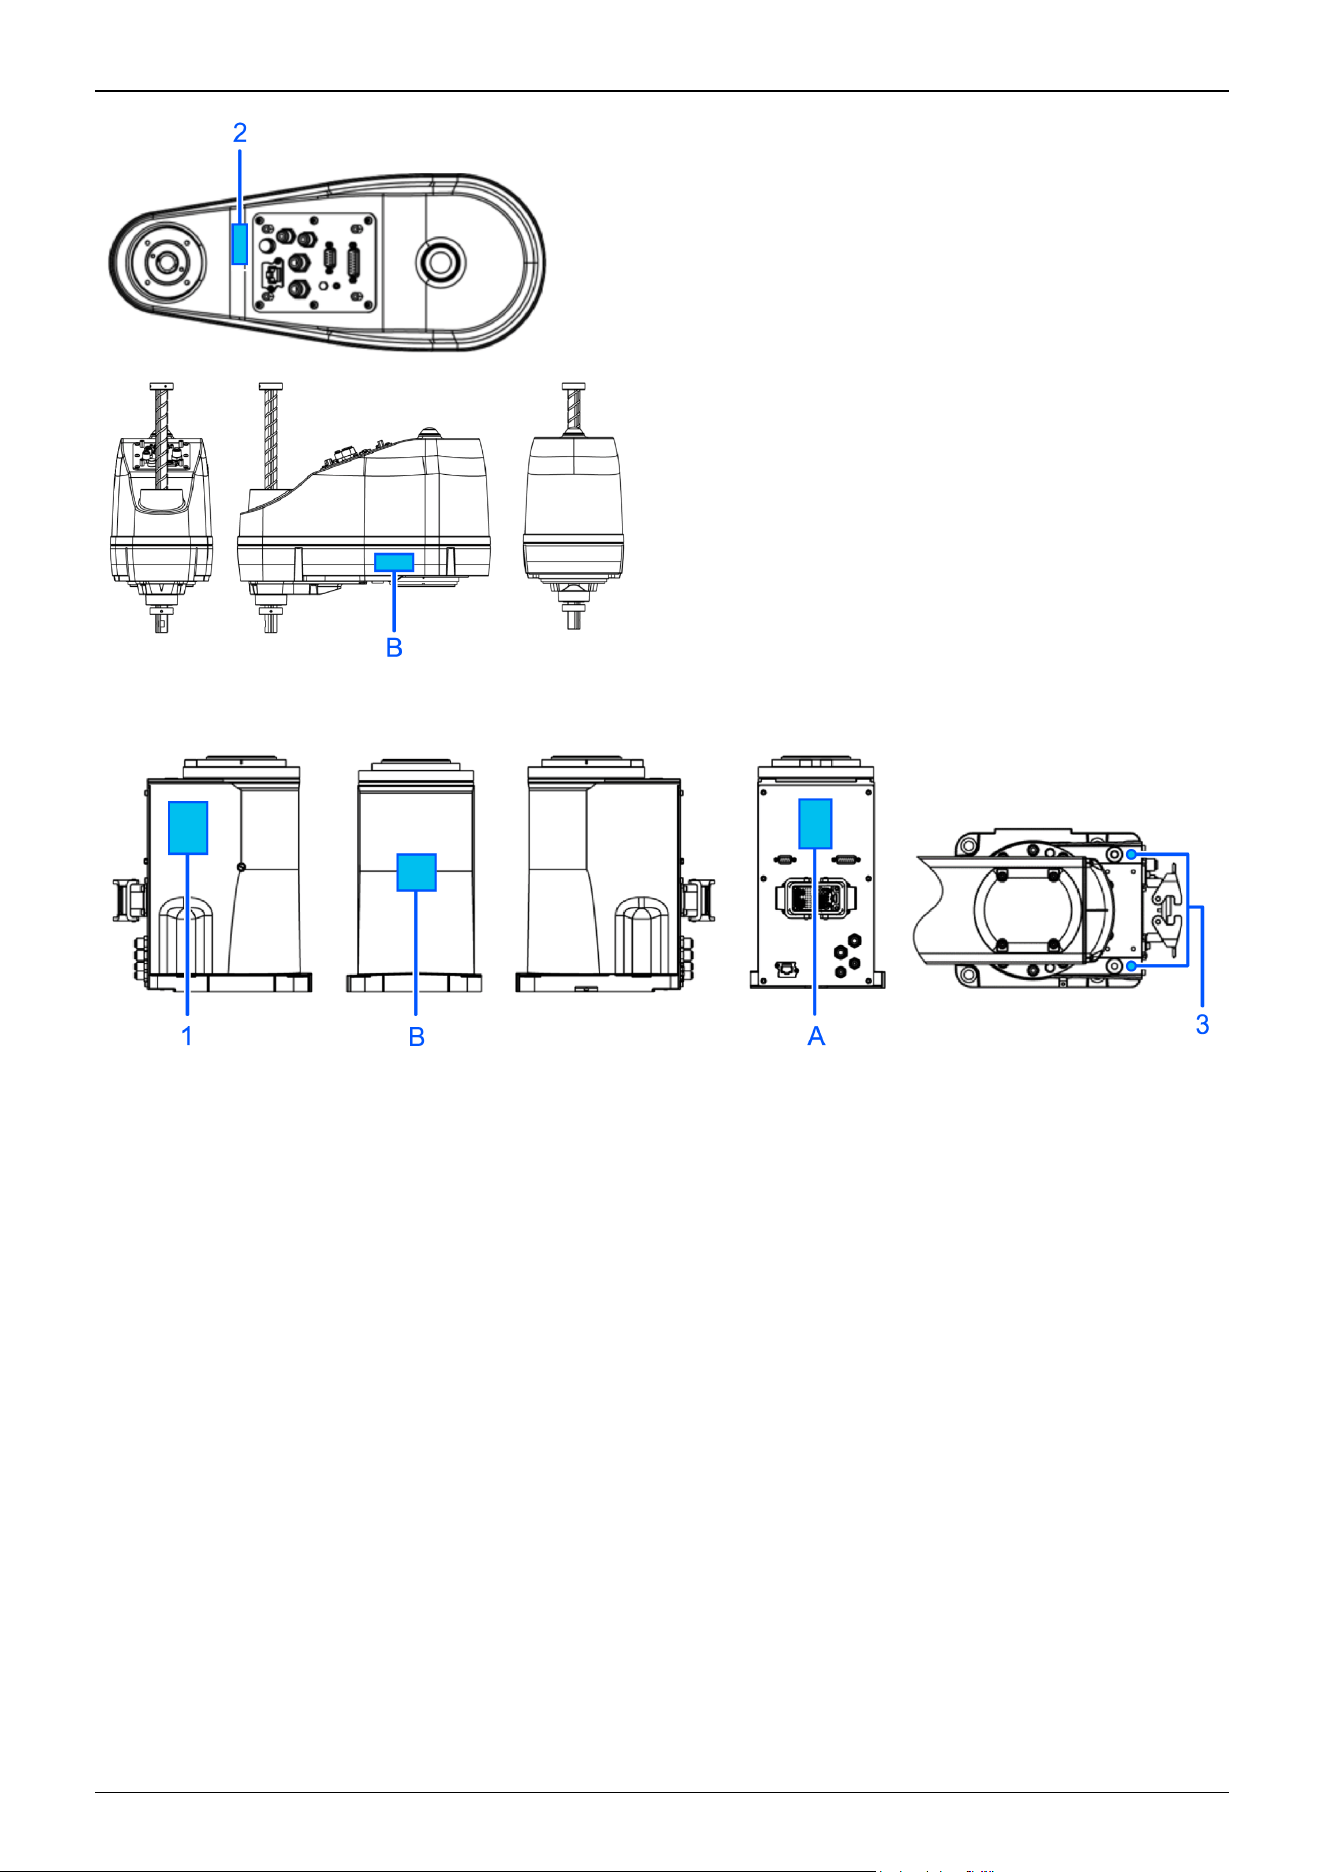
Table top mounting specifications (GX8-A/GX8-B/GX8-C****)
Industrial Robot: SCARA Robots GX series Manual Rev.11
183
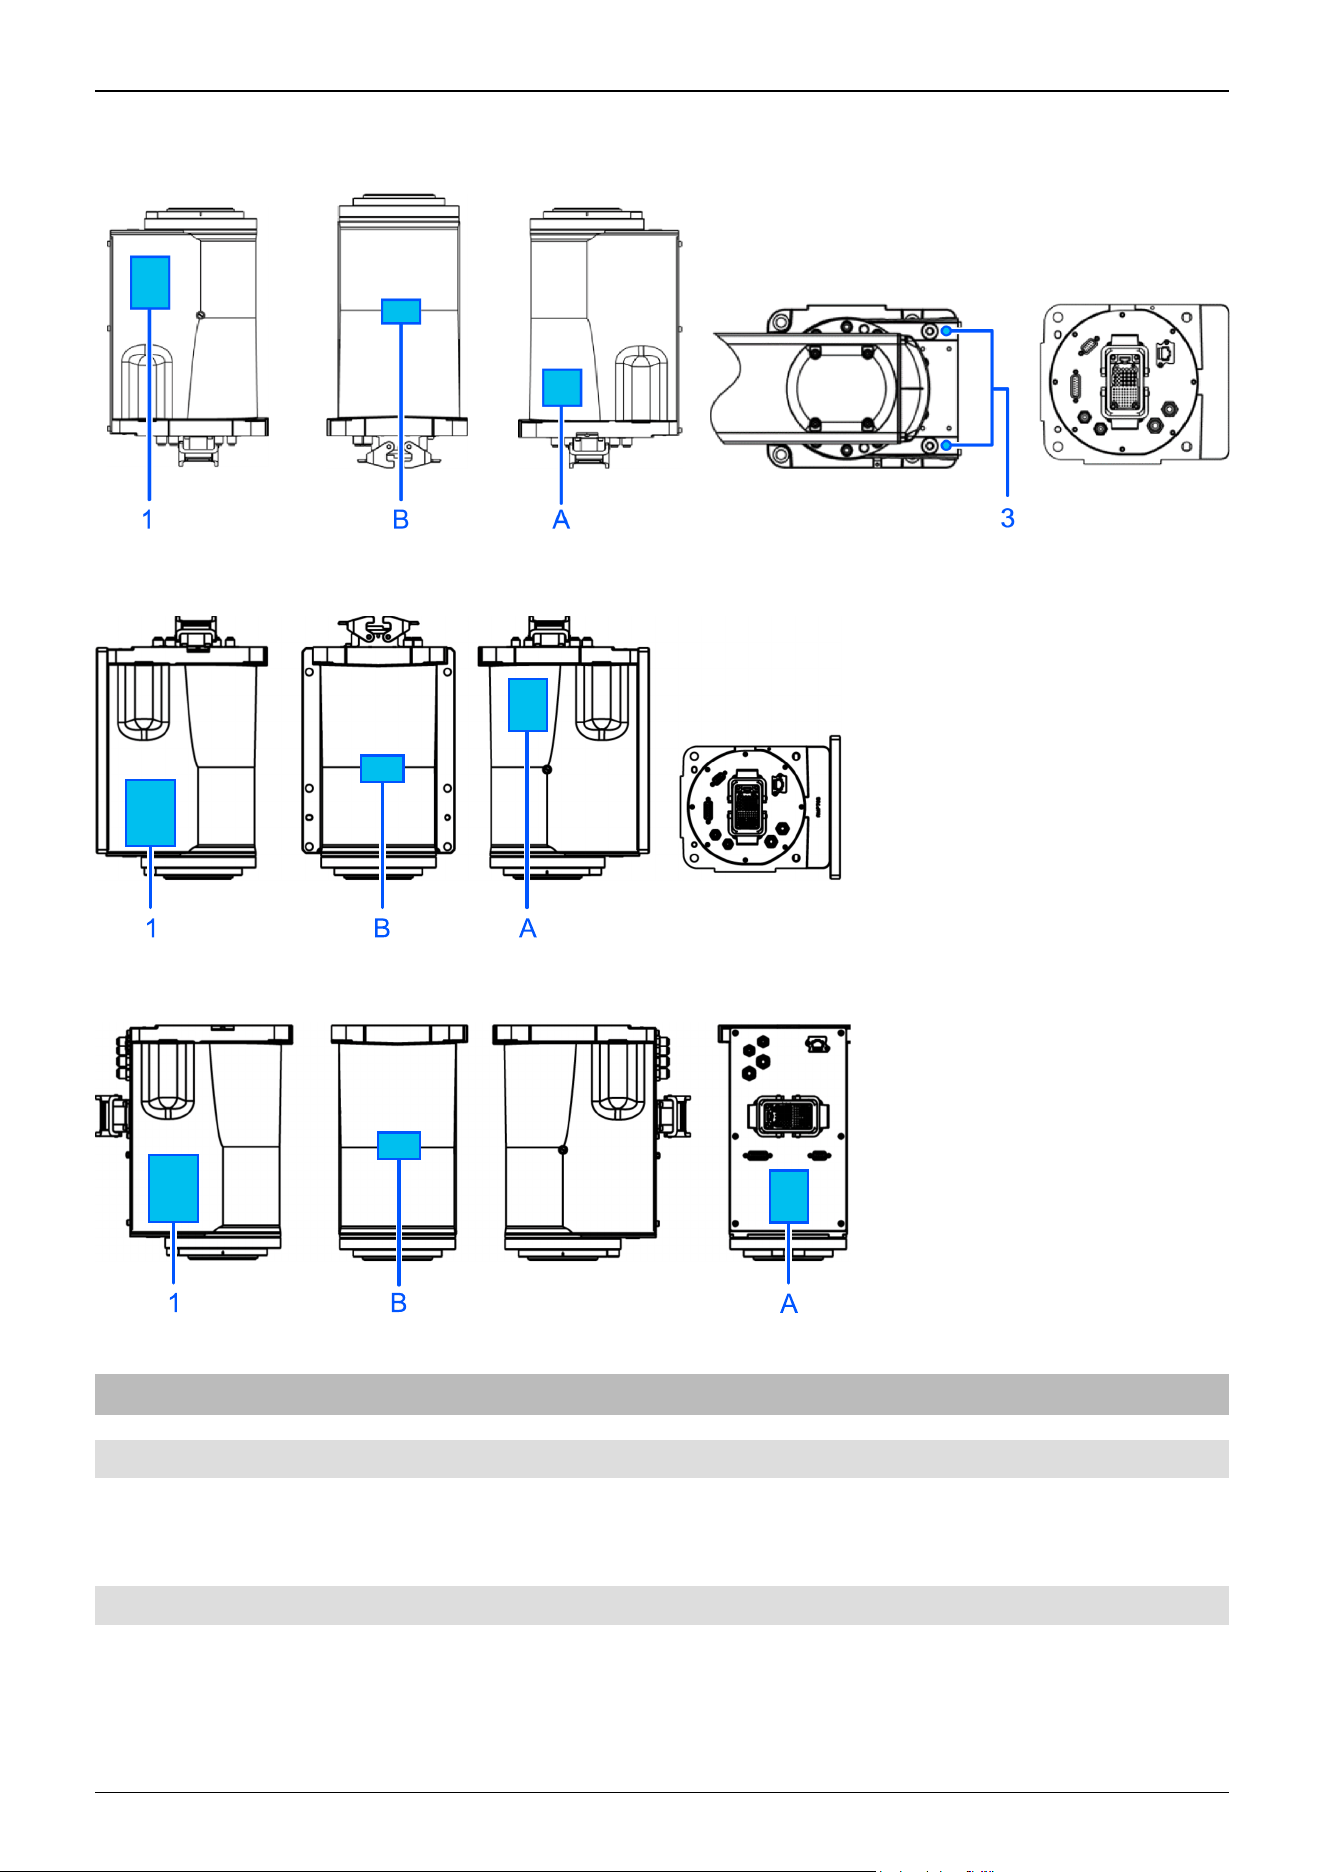
Table top mounting specifications (cable routing from bottom side)
Wall mounting specifications (GX8-A/GX8-B/GX8-C****W)
Ceiling mounting specifications (GX8-A/GX8-B/GX8-C****R)
4.1.9 Responses for Emergencies or Malfunctions
4.1.9.1 When a Collision with the Manipulator Occurs
If the Manipulator has collided with a mechanical stop, peripheral device, or other object, discontinue use and contact the
supplier.
4.1.9.2 Entanglement with the Manipulator
If an operator gets caught between the Manipulator and a mechanical part such as a base table, press the emergency stop switch
to release the operator by using the following method.
Industrial Robot: SCARA Robots GX series Manual Rev.11
184
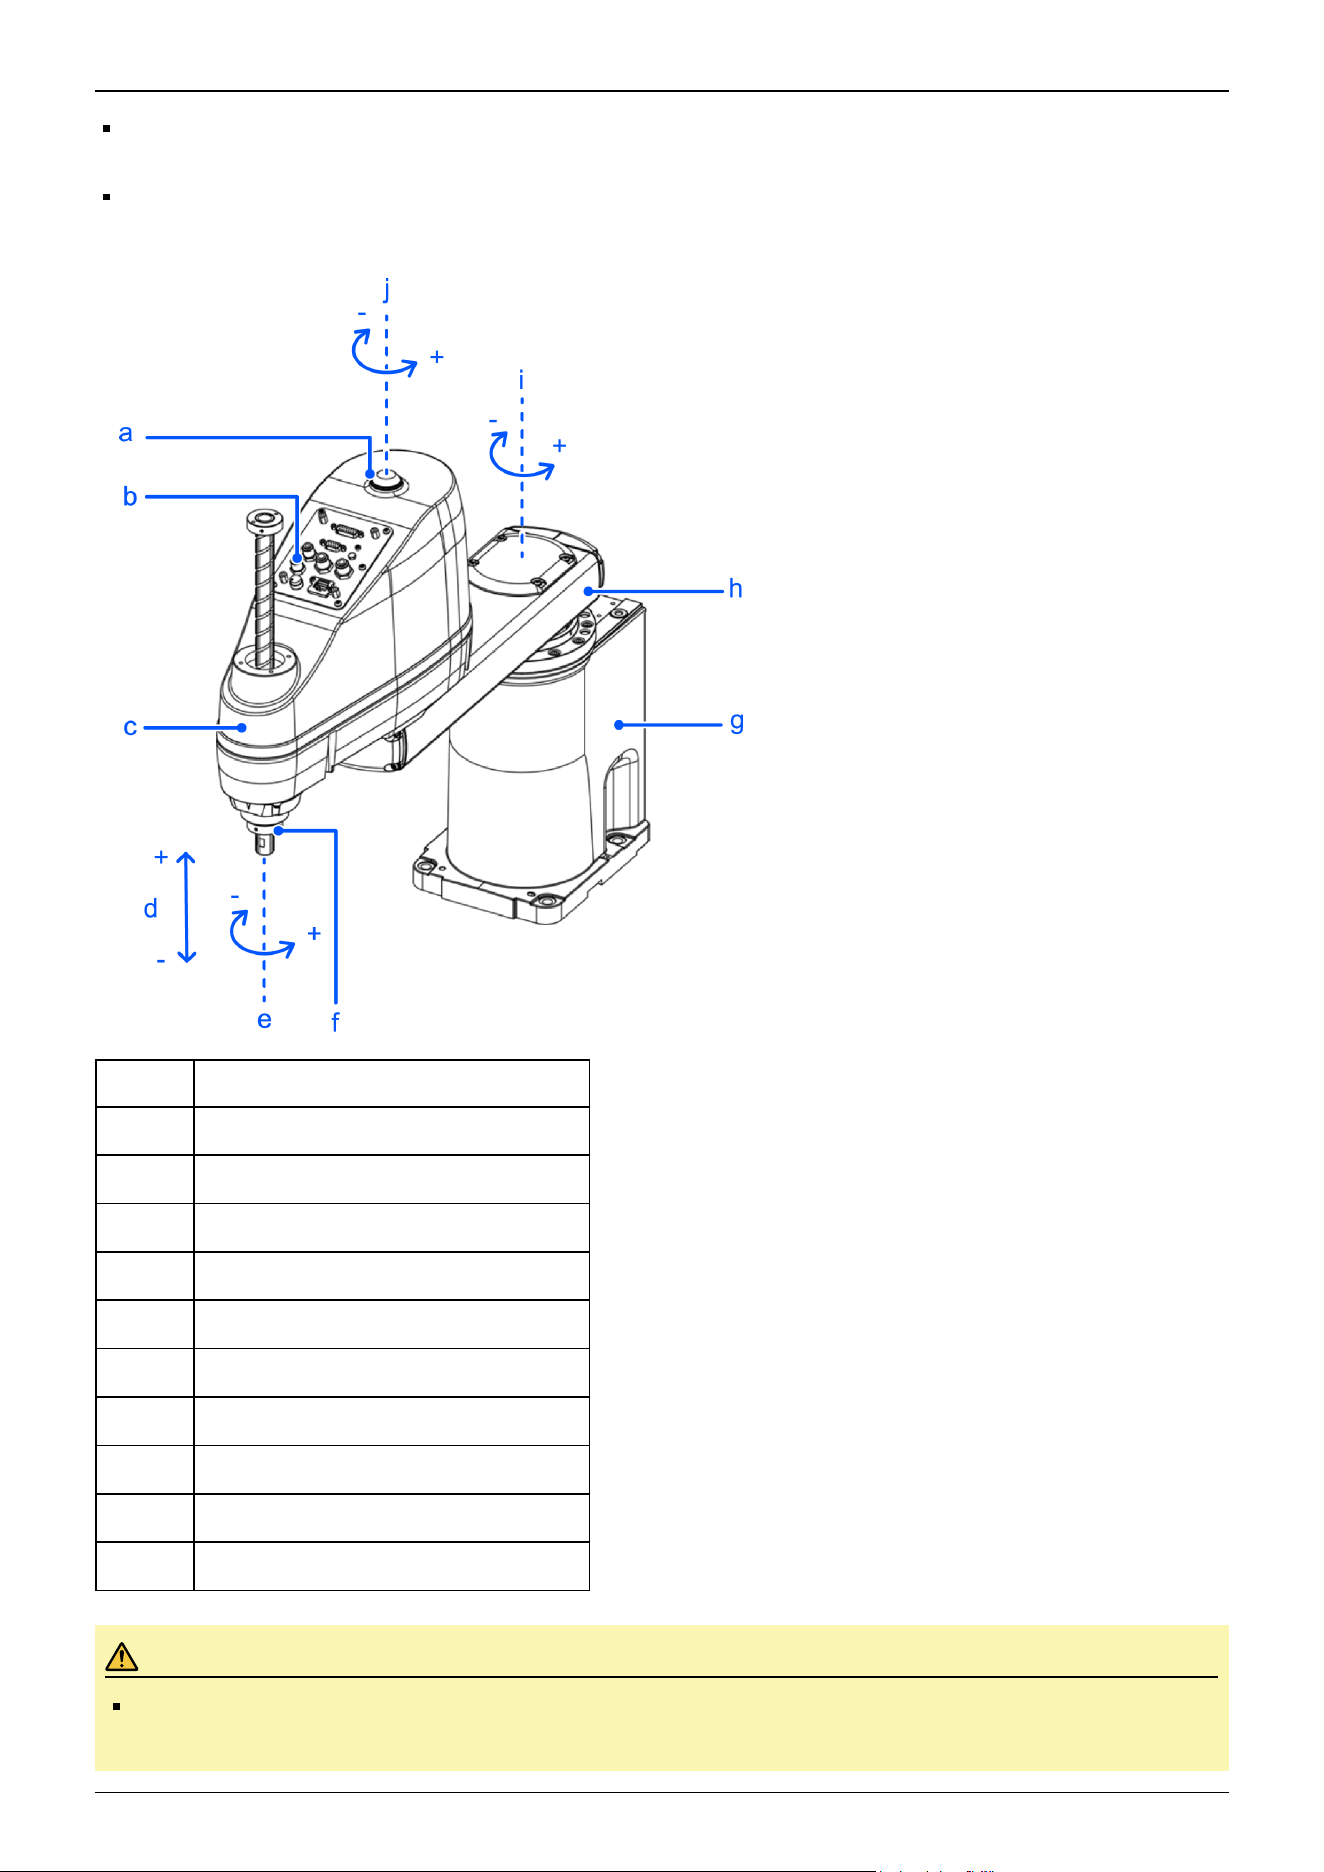
Operator body is entangled with a robot arm
The brake is not functioning. Move the arm manually.
Operator body is entangled with the shaft
The brake is functioning. Press the brake release switch, and move the shaft.
Symbol Description
a Indicating lamp
b Joint #3 and Joint #4 brake release switch
c Arm #2
d Joint #3 (up/down movement)
e Joint #4 (rotation)
f Shaft
g Base
h Arm #1
i Joint #1 (rotation)
j Joint #2 (rotation)
CAUTION
While the brake release switch is being pressed, in addition to Joint #3, Joint #4 may also move due to its
own weight. Be careful of the shaft descending and rotating.
Industrial Robot: SCARA Robots GX series Manual Rev.11
185
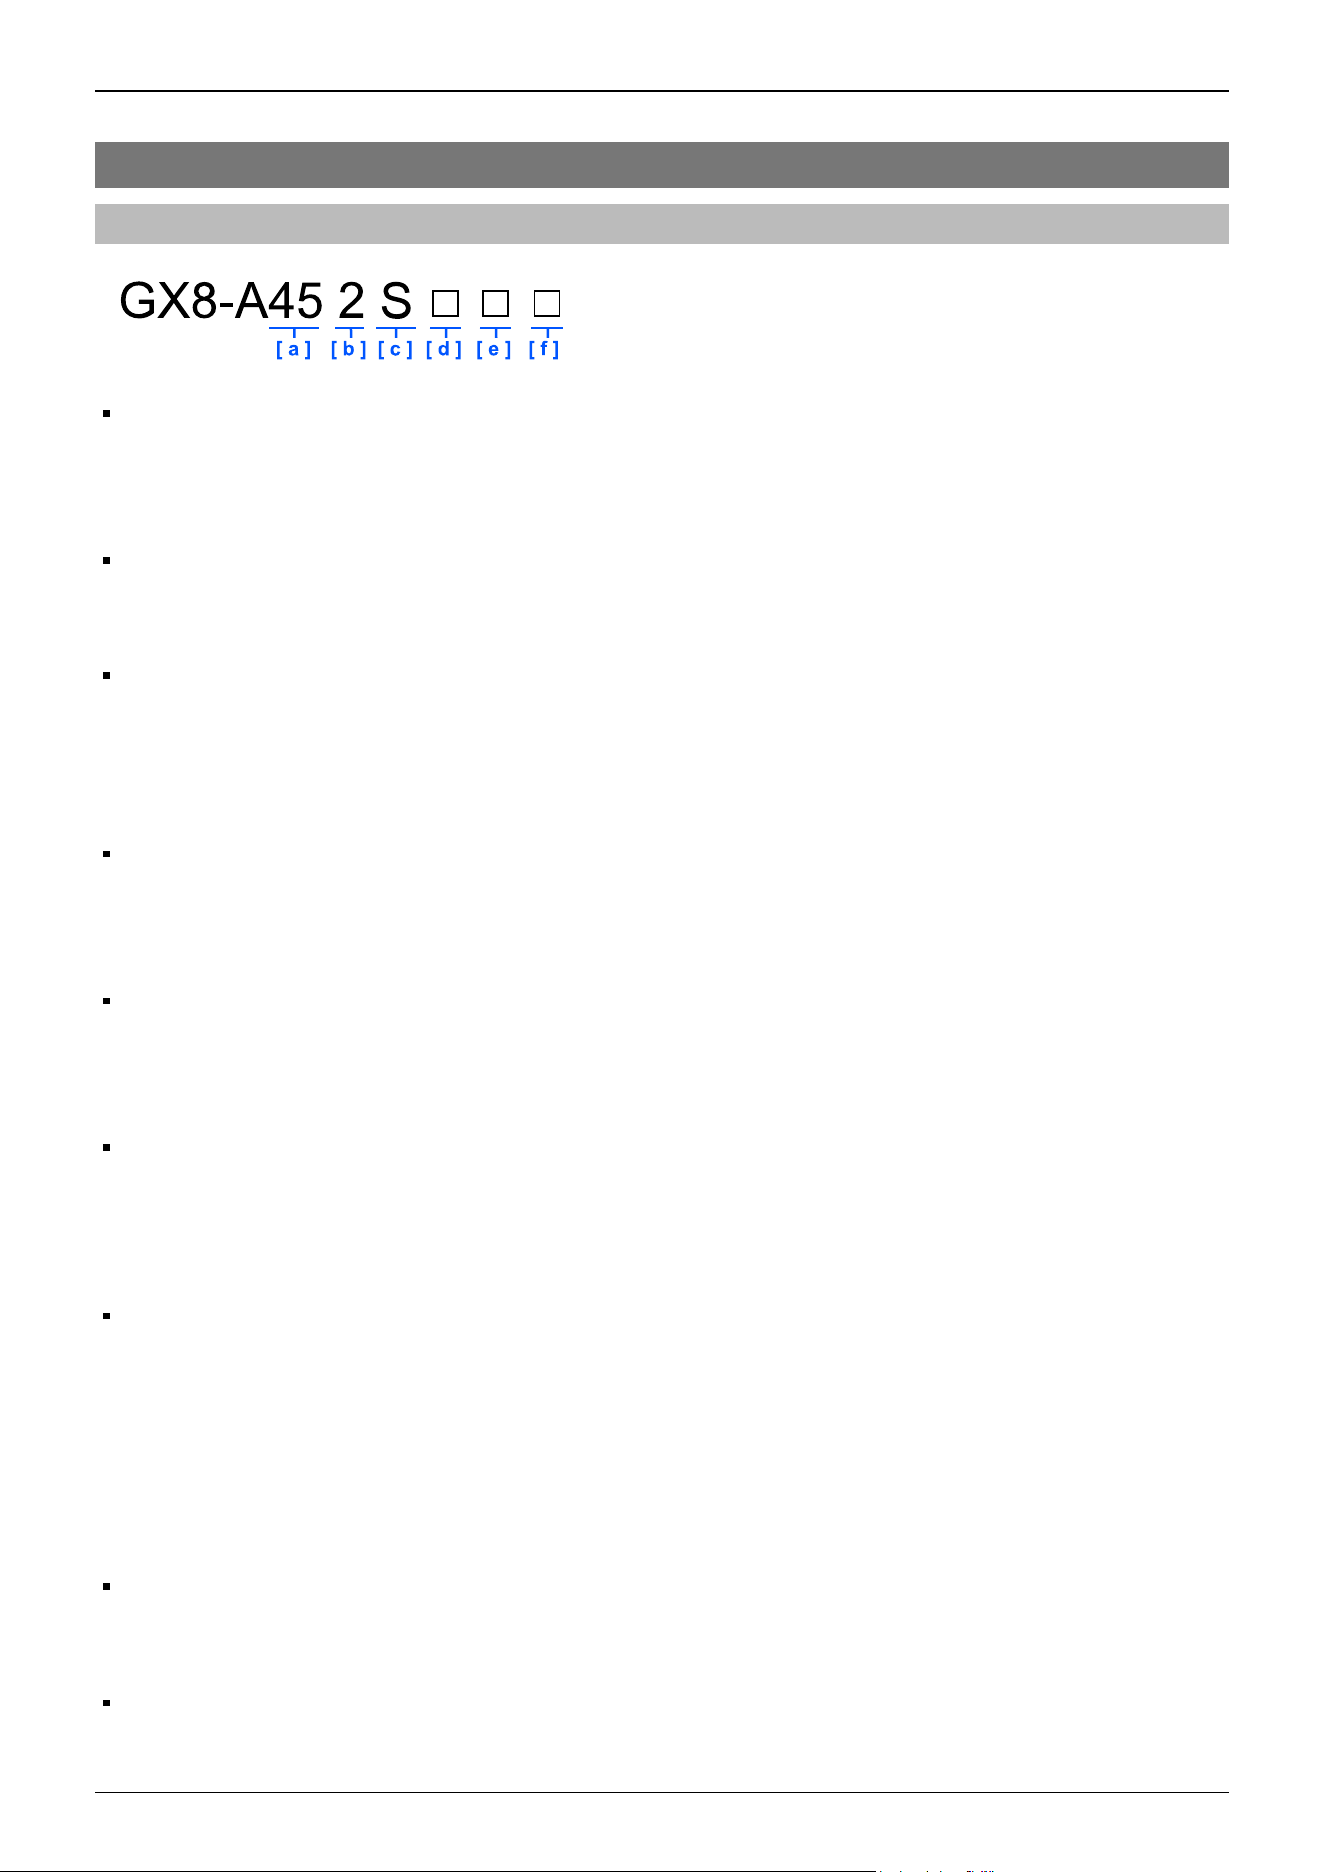
4.2 Specifications
4.2.1 Model Name GX8-A
a: Arm length
45: 450 mm
55: 550 mm
65: 650 mm
b: Joint #3 stroke
2: 200 mm (GX8-A**2S*, E*), 170 mm (GX8-A**2C*, P*)
3: 330 mm (GX8-A**3S*, E*), 300 mm (GX8-A**3C*, P*)
c: Environmental specifications
S: Standard (equivalent to IP20)
E: ESD (anti-static)
C: Cleanroom & ESD (anti-static)
P: Protection class: IP 65
d: Mounting specifications
□: Table top mounting
W: Wall mounting
R: Ceiling mounting
e: Cable mounting direction
□: Standard (table top mounting - cable routing from rear side, wall mounting - cable routing from top side, ceiling
mounting- cable routing from rear side)
B: Cable routing from bottom side (table top mounting only)
f: Standard
□: Standard
-UL: UL1740 certified
Environmental specifications
ESD (anti-static) specifications: GX8-A***E*
ESD specifications are specifications that use conductive materials for or apply plating to the major resin parts as anti-static
measures.
We have confirmed that the Manipulator tip (tool mounting section) is at ±5 V or less, even directly after the measuring
operation according to Seiko Epson standards.
If you need any other detailed information, please contact the supplier.
Also, please check the amount of charge on any hand, wiring, or the like that you will attach to the robot on your own
before use.
Cleanroom & ESD (anti-static) specifications: GX8-A***C*
Manipulators with cleanroom & ESD (anti-static) specifications have a base design with the standard specifications, but as
an additional feature, have reduced dust emissions from the Manipulator to enable use in cleanroom environments.
Protected-model (IP65): GX8-A***P*
Manipulators with protected-models have a base design with the standard specifications, but as an additional feature, can
Industrial Robot: SCARA Robots GX series Manual Rev.11
186

be used in adverse environments such as those exposed to oil smoke and dust.
These are compliant with the IP65 protection class (IEC 60529, JIS C0920).
For details on the specifications, refer to the following section.
Appendix A: Specifications Table
Industrial Robot: SCARA Robots GX series Manual Rev.11
187
Model list
Arm
Length
Joint #3
Stroke
Environmental
Specifications
Mounting
Specifications
Cable Mounting
Direction
Model
Number
450 200 Standard
Table top
Standard GX8-A452S
Cable routing from
bottom side
GX8-
A452SB
Wall Standard
GX8-
A452SW
Ceiling Standard
GX8-
A452SR
450 200 ESD
Table top
Standard GX8-A452E
Cable routing from
bottom side
GX8-
A452EB
Wall Standard
GX8-
A452EW
Ceiling Standard
GX8-
A452ER
450 170 Cleanroom & ESD
Table top
Standard GX8-A452C
Cable routing from
bottom side
GX8-
A452CB
Wall Standard
GX8-
A452CW
Ceiling Standard
GX8-
A452CR
450 170 Protection
Table top
Standard GX8-A452P
Cable routing from
bottom side
GX8-
A452PB
Wall Standard
GX8-
A452PW
Ceiling Standard
GX8-
A452PR
450 330 Standard
Table top
Standard GX8-A453S
Cable routing from
bottom side
GX8-
A453SB
Wall Standard
GX8-
A453SW
Ceiling Standard
GX8-
A453SR
Industrial Robot: SCARA Robots GX series Manual Rev.11
188
Arm
Length
Joint #3
Stroke
Environmental
Specifications
Mounting
Specifications
Cable Mounting
Direction
Model
Number
450 330 ESD
Table top
Standard GX8-A453E
Cable routing from
bottom side
GX8-
A453EB
Wall Standard
GX8-
A453EW
Ceiling Standard
GX8-
A453ER
450 300 Cleanroom & ESD
Table top
Standard GX8-A453C
Cable routing from
bottom side
GX8-
A453CB
Wall Standard
GX8-
A453CW
Ceiling Standard
GX8-
A453CR
450 300 Protection
Table top
Standard GX8-A453P
Cable routing from
bottom side
GX8-
A453PB
Wall Standard
GX8-
A453PW
Ceiling Standard
GX8-
A453PR
550 200 Standard
Table top
Standard GX8-A552S
Cable routing from
bottom side
GX8-
A552SB
Wall Standard
GX8-
A552SW
Ceiling Standard
GX8-
A552SR
550 200 ESD
Table top
Standard GX8-A552E
Cable routing from
bottom side
GX8-
A552EB
Wall Standard
GX8-
A552EW
Ceiling Standard
GX8-
A552ER
550
170
Cleanroom & ESD
Table top
Standard GX8-A552C
Cable routing from
bottom side
GX8-
A552CB
Wall Standard
GX8-
A552CW
Industrial Robot: SCARA Robots GX series Manual Rev.11
189
Arm
Length
Joint #3
Stroke
Environmental
Specifications
Mounting
Specifications
Cable Mounting
Direction
Model
Number
Ceiling Standard
GX8-
A552CR
550 170 Protection
Table top
Standard GX8-A552P
Cable routing from
bottom side
GX8-
A552PB
Wall Standard
GX8-
A552PW
Ceiling Standard
GX8-
A552PR
550 330 Standard
Table top
Standard GX8-A553S
Cable routing from
bottom side
GX8-
A553SB
Wall Standard
GX8-
A553SW
Ceiling Standard
GX8-
A553SR
550 330 ESD
Table top
Standard GX8-A553E
Cable routing from
bottom side
GX8-
A553EB
Wall Standard
GX8-
A553EW
Ceiling Standard
GX8-
A553ER
550 300 Cleanroom & ESD
Table top
Standard GX8-A553C
Cable routing from
bottom side
GX8-
A553CB
Wall Standard
GX8-
A553CW
Ceiling Standard
GX8-
A553CR
550 300 Protection
Table top
Standard GX8-A553P
Cable routing from
bottom side
GX8-
A553PB
Wall Standard
GX8-
A553PW
Ceiling Standard
GX8-
A553PR
Industrial Robot: SCARA Robots GX series Manual Rev.11
190
Arm
Length
Joint #3
Stroke
Environmental
Specifications
Mounting
Specifications
Cable Mounting
Direction
Model
Number
650 200 Standard
Table top
Standard GX8-A652S
Cable routing from
bottom side
GX8-
A652SB
Wall Standard
GX8-
A652SW
Ceiling Standard
GX8-
A652SR
650 200 ESD
Table top
Standard GX8-A652E
Cable routing from
bottom side
GX8-
A652EB
Wall Standard
GX8-
A652EW
Ceiling Standard
GX8-
A652ER
650 170 Cleanroom & ESD
Table top
Standard GX8-A652C
Cable routing from
bottom side
GX8-
A652CB
Wall Standard
GX8-
A652CW
Ceiling Standard
GX8-
A652CR
650 170 Protection
Table top
Standard GX8-A652P
Cable routing from
bottom side
GX8-
A652PB
Wall Standard
GX8-
A652PW
Ceiling Standard
GX8-
A652PR
650 330 Standard
Table top
Standard GX8-A653S
Cable routing from
bottom side
GX8-
A653SB
Wall Standard
GX8-
A653SW
Ceiling Standard
GX8-
A653SR
650
330
ESD
Table top
Standard GX8-A653E
Cable routing from
bottom side
GX8-
A653EB
Wall Standard
GX8-
A653EW
Industrial Robot: SCARA Robots GX series Manual Rev.11
191
Arm
Length
Joint #3
Stroke
Environmental
Specifications
Mounting
Specifications
Cable Mounting
Direction
Model
Number
Ceiling Standard
GX8-
A653ER
650 300 Cleanroom & ESD
Table top
Standard GX8-A653C
Cable routing from
bottom side
GX8-
A653CB
Wall Standard
GX8-
A653CW
Ceiling Standard
GX8-
A653CR
650 300 Protection
Table top
Standard GX8-A653P
Cable routing from
bottom side
GX8-
A653PB
Wall Standard
GX8-
A653PW
Ceiling Standard
GX8-
A653PR
(Units: mm)
Industrial Robot: SCARA Robots GX series Manual Rev.11
192
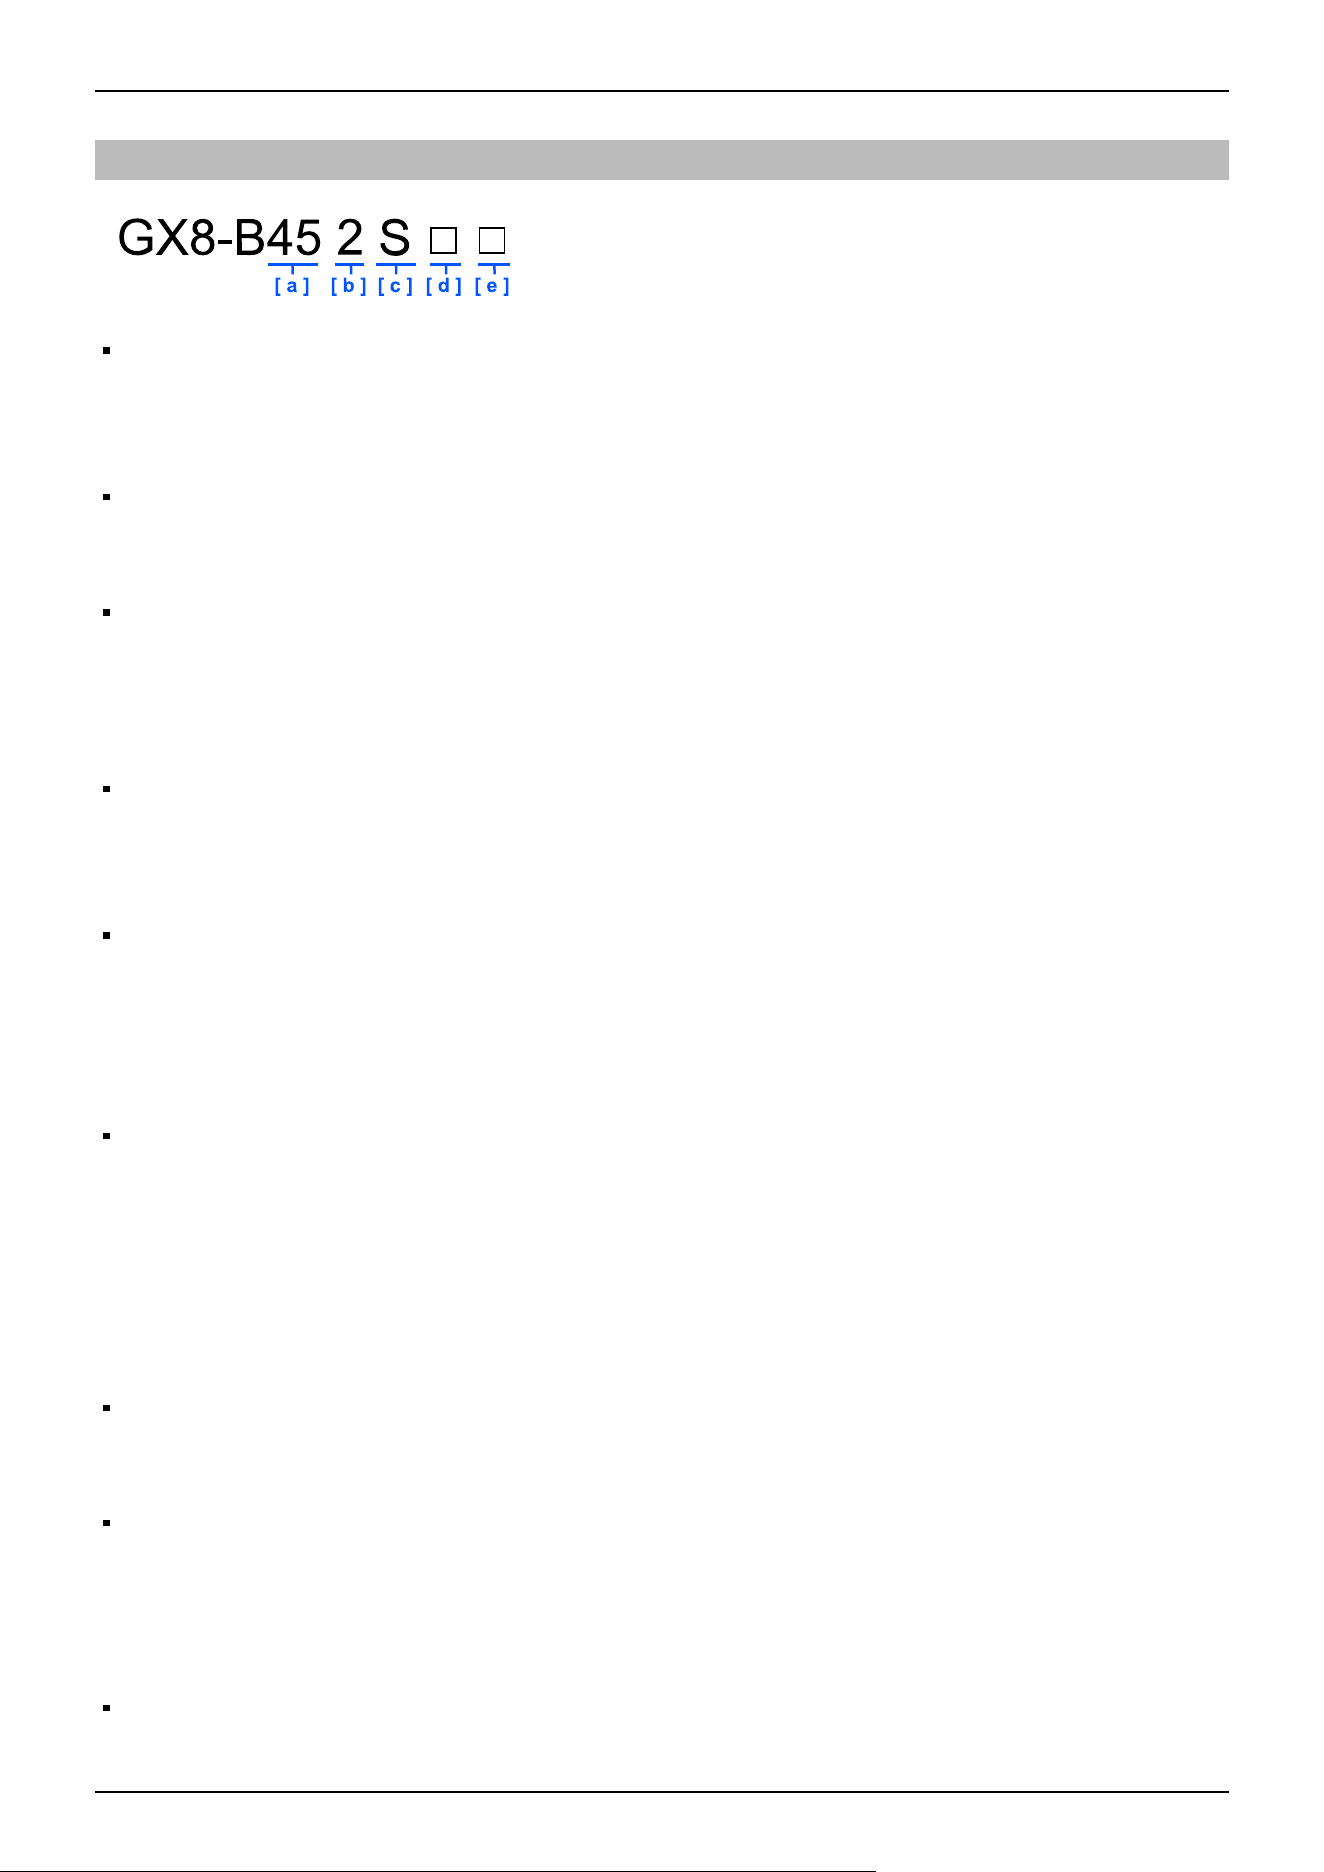
4.2.2 Model Name GX8-B
a: Arm length
45: 450 mm
55: 550 mm
65: 650 mm
b: Joint #3 stroke
2: 200 mm (GX8-B**2S*, E*), 170 mm (GX8-B**2C*, P*)
3: 330 mm (GX8-B**3S*, E*), 300 mm (GX8-B**3C*, P*)
c: Environmental specifications
S: Standard (equivalent to IP20)
E: ESD (anti-static)
C: Cleanroom & ESD (anti-static)
P: Protection class: IP 65
d: Mounting specifications
□: Table top mounting
W: Wall mounting
R: Ceiling mounting
e: Cable mounting direction
□: Standard (table top mounting - cable routing from rear side, wall mounting - cable routing from top side, ceiling
mounting- cable routing from rear side)
B: Cable routing from bottom side (table top mounting only)
Environmental specifications
ESD (anti-static) specifications: GX8-B***E*
ESD specifications are specifications that use conductive materials for or apply plating to the major resin parts as anti-static
measures.
We have confirmed that the Manipulator tip (tool mounting section) is at ±5 V or less, even directly after the measuring
operation according to Seiko Epson standards.
If you need any other detailed information, please contact the supplier.
Also, please check the amount of charge on any hand, wiring, or the like that you will attach to the robot on your own
before use.
Cleanroom & ESD (anti-static) specifications: GX8-B***C*
Manipulators with cleanroom & ESD (anti-static) specifications have a base design with the standard specifications, but as
an additional feature, have reduced dust emissions from the Manipulator to enable use in cleanroom environments.
Protected-model (IP65): GX8-B***P*
Manipulators with protected-models have a base design with the standard specifications, but as an additional feature, can
be used in adverse environments such as those exposed to oil smoke and dust.
These are compliant with the IP65 protection class (IEC 60529, JIS C0920).
Food grade grease model (GX8-B**3P-FZ)
Food grade grease model have the grease for Z-axis ball screw splines which is usable for foods. Customer is responsible
for integrating into food processing machinery and complying with related laws, regulations, and standards.
Industrial Robot: SCARA Robots GX series Manual Rev.11
193
Food grade grease models are made up of a combination of the following Controller and software.
Manipulator Controller Software
GX8-B**3P-FZ RC700-E EPSON RC+ 7.0 Ver.7.5.4
Be sure to use the specified grease for food specification machine. For details, refer to the following section.
Applying Grease
For details on the specifications, refer to the following section.
Appendix A: Specifications Table
Industrial Robot: SCARA Robots GX series Manual Rev.11
194
Model list
Arm
Length
Joint #3
Stroke
Environmental
Specifications
Mounting
Specifications
Cable Mounting
Direction
Model
Number
450 200 Standard
Table top
Standard GX8-B452S
Cable routing from
bottom side
GX8-
B452SB
Wall Standard
GX8-
B452SW
Ceiling Standard
GX8-
B452SR
450 200 ESD
Table top
Standard GX8-B452E
Cable routing from
bottom side
GX8-
B452EB
Wall Standard
GX8-
B452EW
Ceiling Standard
GX8-
B452ER
450 170 Cleanroom & ESD
Table top
Standard GX8-B452C
Cable routing from
bottom side
GX8-
B452CB
Wall Standard
GX8-
B452CW
Ceiling Standard
GX8-
B452CR
450 170 Protection
Table top
Standard GX8-B452P
Cable routing from
bottom side
GX8-
B452PB
Wall Standard
GX8-
B452PW
Ceiling Standard
GX8-
B452PR
450 330 Standard
Table top
Standard GX8-B453S
Cable routing from
bottom side
GX8-
B453SB
Wall Standard
GX8-
B453SW
Ceiling Standard
GX8-
B453SR
Industrial Robot: SCARA Robots GX series Manual Rev.11
195
Arm
Length
Joint #3
Stroke
Environmental
Specifications
Mounting
Specifications
Cable Mounting
Direction
Model
Number
450 330 ESD
Table top
Standard GX8-B453E
Cable routing from
bottom side
GX8-
B453EB
Wall Standard
GX8-
B453EW
Ceiling Standard
GX8-
B453ER
450 300 Cleanroom & ESD
Table top
Standard GX8-B453C
Cable routing from
bottom side
GX8-
B453CB
Wall Standard
GX8-
B453CW
Ceiling Standard
GX8-
B453CR
450 300 Protection
Table top
Standard GX8-B453P
Cable routing from
bottom side
GX8-
B453PB
Wall Standard
GX8-
B453PW
Ceiling Standard
GX8-
B453PR
550 200 Standard
Table top
Standard GX8-B552S
Cable routing from
bottom side
GX8-
B552SB
Wall Standard
GX8-
B552SW
Ceiling Standard
GX8-
B552SR
550 200 ESD
Table top
Standard GX8-B552E
Cable routing from
bottom side
GX8-
B552EB
Wall Standard
GX8-
B552EW
Ceiling Standard
GX8-
B552ER
550
170
Cleanroom & ESD
Table top
Standard GX8-B552C
Cable routing from
bottom side
GX8-
B552CB
Wall Standard
GX8-
B552CW
Industrial Robot: SCARA Robots GX series Manual Rev.11
196
Arm
Length
Joint #3
Stroke
Environmental
Specifications
Mounting
Specifications
Cable Mounting
Direction
Model
Number
Ceiling Standard
GX8-
B552CR
550 170 Protection
Table top
Standard GX8-B552P
Cable routing from
bottom side
GX8-
B552PB
Wall Standard
GX8-
B552PW
Ceiling Standard
GX8-
B552PR
550 330 Standard
Table top
Standard GX8-B553S
Cable routing from
bottom side
GX8-
B553SB
Wall Standard
GX8-
B553SW
Ceiling Standard
GX8-
B553SR
550 330 ESD
Table top
Standard GX8-B553E
Cable routing from
bottom side
GX8-
B553EB
Wall Standard
GX8-
B553EW
Ceiling Standard
GX8-
B553ER
550 300 Cleanroom & ESD
Table top
Standard GX8-B553C
Cable routing from
bottom side
GX8-
B553CB
Wall Standard
GX8-
B553CW
Ceiling Standard
GX8-
B553CR
550 300 Protection
Table top
Standard GX8-B553P
Cable routing from
bottom side
GX8-
B553PB
Wall Standard
GX8-
B553PW
Ceiling Standard
GX8-
B553PR
Industrial Robot: SCARA Robots GX series Manual Rev.11
197
Arm
Length
Joint #3
Stroke
Environmental
Specifications
Mounting
Specifications
Cable Mounting
Direction
Model
Number
650 200 Standard
Table top
Standard GX8-B652S
Cable routing from
bottom side
GX8-
B652SB
Wall Standard
GX8-
B652SW
Ceiling Standard
GX8-
B652SR
650 200 ESD
Table top
Standard GX8-B652E
Cable routing from
bottom side
GX8-
B652EB
Wall Standard
GX8-
B652EW
Ceiling Standard
GX8-
B652ER
650 170 Cleanroom & ESD
Table top
Standard GX8-B652C
Cable routing from
bottom side
GX8-
B652CB
Wall Standard
GX8-
B652CW
Ceiling Standard
GX8-
B652CR
650 170 Protection
Table top
Standard GX8-B652P
Cable routing from
bottom side
GX8-
B652PB
Wall Standard
GX8-
B652PW
Ceiling Standard
GX8-
B652PR
650 330 Standard
Table top
Standard GX8-B653S
Cable routing from
bottom side
GX8-
B653SB
Wall Standard
GX8-
B653SW
Ceiling Standard
GX8-
B653SR
650
330
ESD
Table top
Standard GX8-B653E
Cable routing from
bottom side
GX8-
B653EB
Wall Standard
GX8-
B653EW
Industrial Robot: SCARA Robots GX series Manual Rev.11
198
Arm
Length
Joint #3
Stroke
Environmental
Specifications
Mounting
Specifications
Cable Mounting
Direction
Model
Number
Ceiling Standard
GX8-
B653ER
650 300 Cleanroom & ESD
Table top
Standard GX8-B653C
Cable routing from
bottom side
GX8-
B653CB
Wall Standard
GX8-
B653CW
Ceiling Standard
GX8-
B653CR
650 300 Protection
Table top
Standard GX8-B653P
Cable routing from
bottom side
GX8-
B653PB
Wall Standard
GX8-
B653PW
Ceiling Standard
GX8-
B653PR
(Units: mm)
Industrial Robot: SCARA Robots GX series Manual Rev.11
199
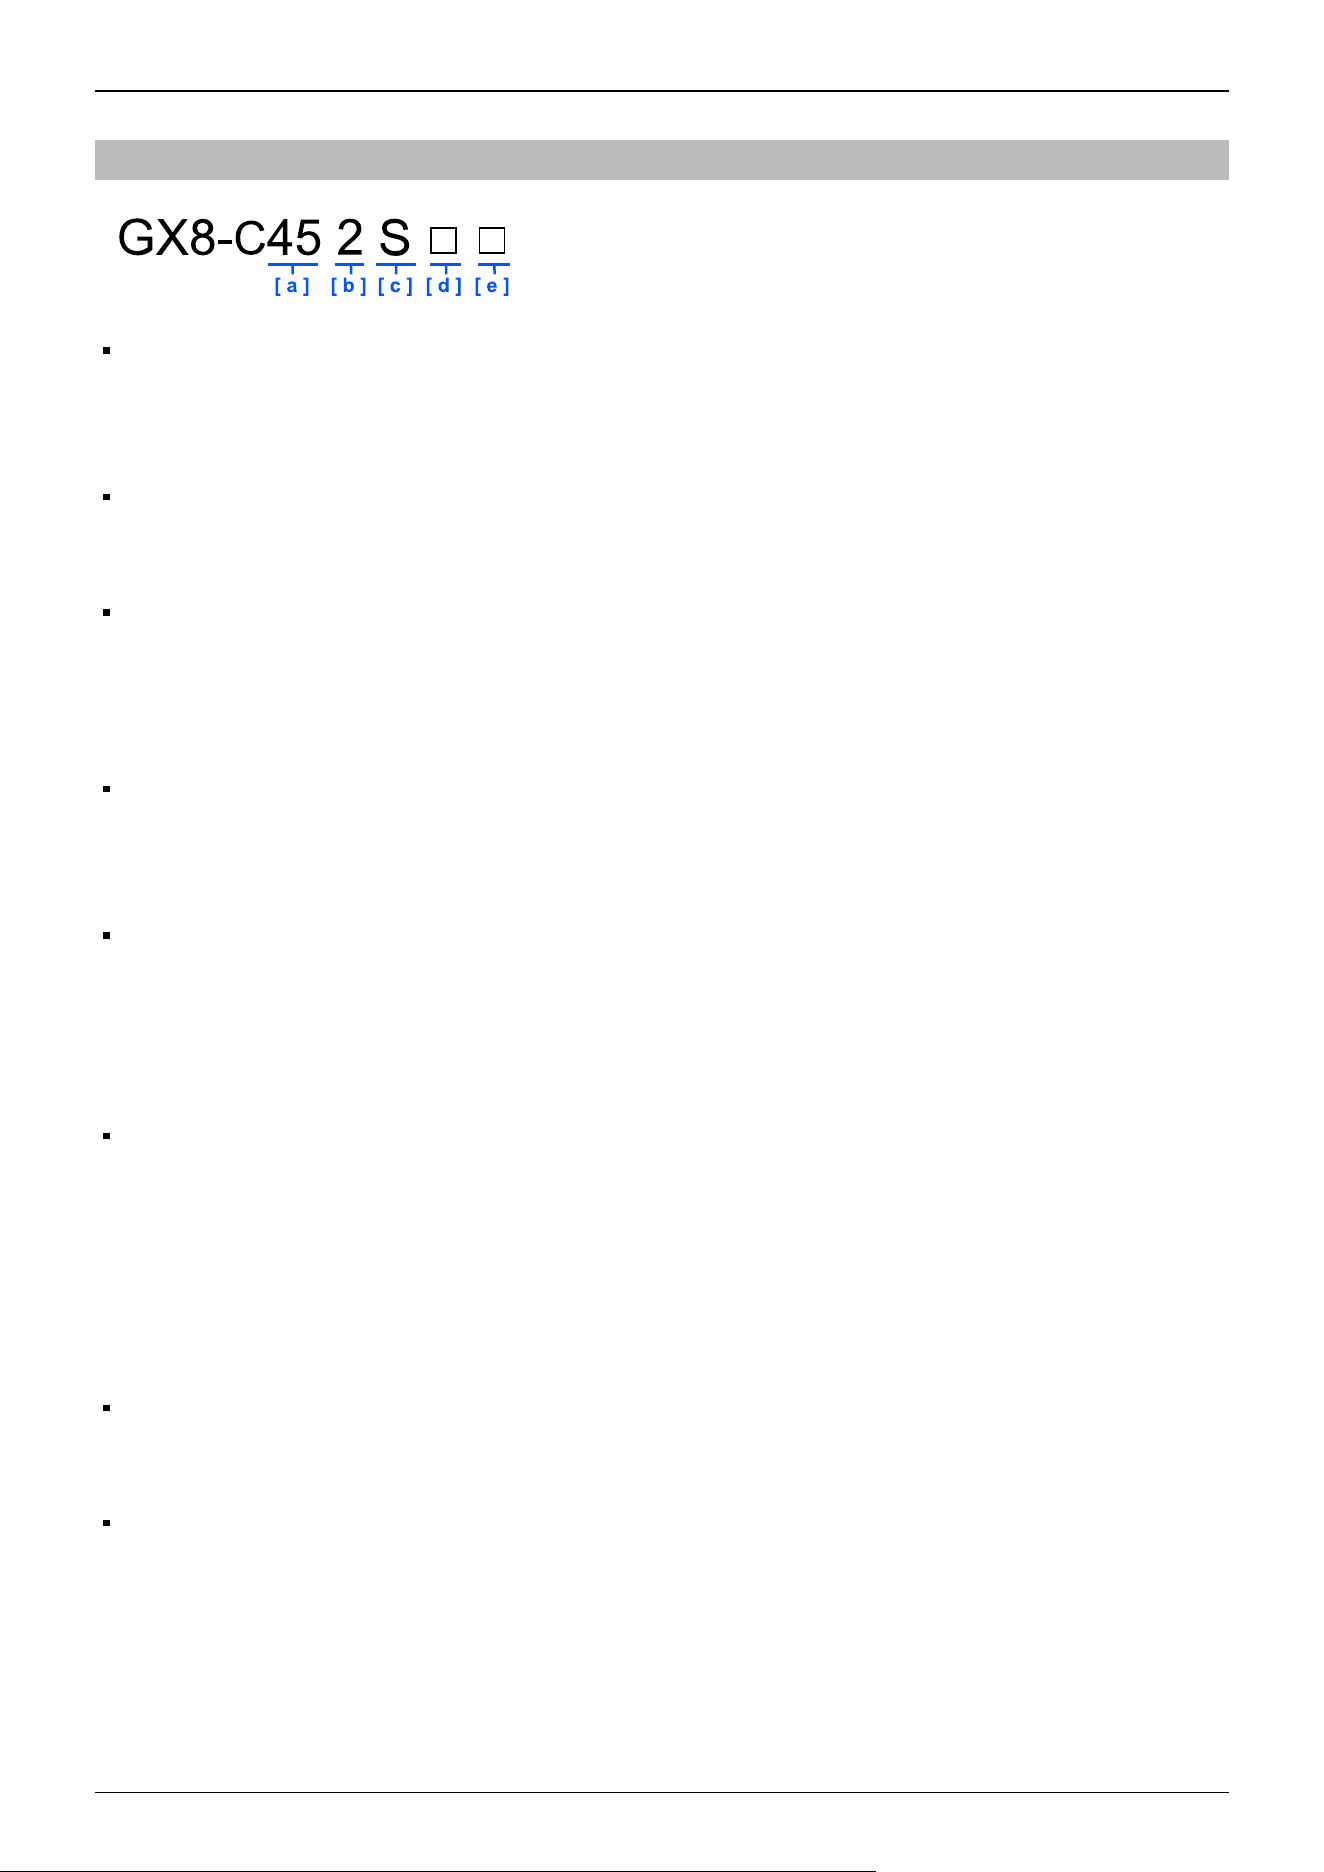
4.2.3 Model Name GX8-C
a: Arm length
45: 450 mm
55: 550 mm
65: 650 mm
b: Joint #3 stroke
2: 200 mm (GX8-C**2S*, E*), 170 mm (GX8-C**2C*, P*)
3: 330 mm (GX8-C**3S*, E*), 300 mm (GX8-C**3C*, P*)
c: Environmental specifications
S: Standard (equivalent to IP20)
E: ESD (anti-static)
C: Cleanroom & ESD (anti-static)
P: Protection class: IP 65
d: Mounting specifications
□: Table top mounting
W: Wall mounting
R: Ceiling mounting
e: Cable mounting direction
□: Standard (table top mounting - cable routing from rear side, wall mounting - cable routing from top side, ceiling
mounting- cable routing from rear side)
B: Cable routing from bottom side (table top mounting only)
Environmental specifications
ESD (anti-static) specifications: GX8-C***E*
ESD specifications are specifications that use conductive materials for or apply plating to the major resin parts as anti-static
measures.
We have confirmed that the Manipulator tip (tool mounting section) is at ±5 V or less, even directly after the measuring
operation according to Seiko Epson standards.
If you need any other detailed information, please contact the supplier.
Also, please check the amount of charge on any hand, wiring, or the like that you will attach to the robot on your own
before use.
Cleanroom & ESD (anti-static) specifications: GX8-C***C*
Manipulators with cleanroom & ESD (anti-static) specifications have a base design with the standard specifications, but as
an additional feature, have reduced dust emissions from the Manipulator to enable use in cleanroom environments.
Protected-model (IP65): GX8-C***P*
Manipulators with protected-models have a base design with the standard specifications, but as an additional feature, can
be used in adverse environments such as those exposed to oil smoke and dust.
These are compliant with the IP65 protection class (IEC 60529, JIS C0920).
Industrial Robot: SCARA Robots GX series Manual Rev.11
200
Model list
Arm
Length
Joint #3
Stroke
Environmental
Specifications
Mounting
Specifications
Cable Mounting
Direction
Model
Number
450 200 Standard
Table top
Standard GX8-C452S
Cable routing from
bottom side
GX8-
C452SB
Wall Standard
GX8-
C452SW
Ceiling Standard
GX8-
C452SR
450 200 ESD
Table top
Standard GX8-C452E
Cable routing from
bottom side
GX8-
C452EB
Wall Standard
GX8-
C452EW
Ceiling Standard
GX8-
C452ER
450 170 Cleanroom & ESD
Table top
Standard GX8-C452C
Cable routing from
bottom side
GX8-
C452CB
Wall Standard
GX8-
C452CW
Ceiling Standard
GX8-
C452CR
450 170 Protection
Table top
Standard GX8-C452P
Cable routing from
bottom side
GX8-
C452PB
Wall Standard
GX8-
C452PW
Ceiling Standard
GX8-
C452PR
450 330 Standard
Table top
Standard GX8-C453S
Cable routing from
bottom side
GX8-
C453SB
Wall Standard
GX8-
C453SW
Ceiling Standard
GX8-
C453SR
Industrial Robot: SCARA Robots GX series Manual Rev.11
201
Arm
Length
Joint #3
Stroke
Environmental
Specifications
Mounting
Specifications
Cable Mounting
Direction
Model
Number
450 330 ESD
Table top
Standard GX8-C453E
Cable routing from
bottom side
GX8-
C453EB
Wall Standard
GX8-
C453EW
Ceiling Standard
GX8-
C453ER
450 300 Cleanroom & ESD
Table top
Standard GX8-C453C
Cable routing from
bottom side
GX8-
C453CB
Wall Standard
GX8-
C453CW
Ceiling Standard
GX8-
C453CR
450 300 Protection
Table top
Standard GX8-C453P
Cable routing from
bottom side
GX8-
C453PB
Wall Standard
GX8-
C453PW
Ceiling Standard
GX8-
C453PR
550 200 Standard
Table top
Standard GX8-C552S
Cable routing from
bottom side
GX8-
C552SB
Wall Standard
GX8-
C552SW
Ceiling Standard
GX8-
C552SR
550 200 ESD
Table top
Standard GX8-C552E
Cable routing from
bottom side
GX8-
C552EB
Wall Standard
GX8-
C552EW
Ceiling Standard
GX8-
C552ER
550
170
Cleanroom & ESD
Table top
Standard GX8-C552C
Cable routing from
bottom side
GX8-
C552CB
Wall Standard
GX8-
C552CW
Industrial Robot: SCARA Robots GX series Manual Rev.11
202
Arm
Length
Joint #3
Stroke
Environmental
Specifications
Mounting
Specifications
Cable Mounting
Direction
Model
Number
Ceiling Standard
GX8-
C552CR
550 170 Protection
Table top
Standard GX8-C552P
Cable routing from
bottom side
GX8-
C552PB
Wall Standard
GX8-
C552PW
Ceiling Standard
GX8-
C552PR
550 330 Standard
Table top
Standard GX8-C553S
Cable routing from
bottom side
GX8-
C553SB
Wall Standard
GX8-
C553SW
Ceiling Standard
GX8-
C553SR
550 330 ESD
Table top
Standard GX8-C553E
Cable routing from
bottom side
GX8-
C553EB
Wall Standard
GX8-
C553EW
Ceiling Standard
GX8-
C553ER
550 300 Cleanroom & ESD
Table top
Standard GX8-C553C
Cable routing from
bottom side
GX8-
C553CB
Wall Standard
GX8-
C553CW
Ceiling Standard
GX8-
C553CR
550 300 Protection
Table top
Standard GX8-C553P
Cable routing from
bottom side
GX8-
C553PB
Wall Standard
GX8-
C553PW
Ceiling Standard
GX8-
C553PR
Industrial Robot: SCARA Robots GX series Manual Rev.11
203
Arm
Length
Joint #3
Stroke
Environmental
Specifications
Mounting
Specifications
Cable Mounting
Direction
Model
Number
650 200 Standard
Table top
Standard GX8-C652S
Cable routing from
bottom side
GX8-
C652SB
Wall Standard
GX8-
C652SW
Ceiling Standard
GX8-
C652SR
650 200 ESD
Table top
Standard GX8-C652E
Cable routing from
bottom side
GX8-
C652EB
Wall Standard
GX8-
C652EW
Ceiling Standard
GX8-
C652ER
650 170 Cleanroom & ESD
Table top
Standard GX8-C652C
Cable routing from
bottom side
GX8-
C652CB
Wall Standard
GX8-
C652CW
Ceiling Standard
GX8-
C652CR
650 170 Protection
Table top
Standard GX8-C652P
Cable routing from
bottom side
GX8-
C652PB
Wall Standard
GX8-
C652PW
Ceiling Standard
GX8-
C652PR
650 330 Standard
Table top
Standard GX8-C653S
Cable routing from
bottom side
GX8-
C653SB
Wall Standard
GX8-
C653SW
Ceiling Standard
GX8-
C653SR
650
330
ESD
Table top
Standard GX8-C653E
Cable routing from
bottom side
GX8-
C653EB
Wall Standard
GX8-
C653EW
Industrial Robot: SCARA Robots GX series Manual Rev.11
204
Arm
Length
Joint #3
Stroke
Environmental
Specifications
Mounting
Specifications
Cable Mounting
Direction
Model
Number
Ceiling Standard
GX8-
C653ER
650 300 Cleanroom & ESD
Table top
Standard GX8-C653C
Cable routing from
bottom side
GX8-
C653CB
Wall Standard
GX8-
C653CW
Ceiling Standard
GX8-
C653CR
650 300 Protection
Table top
Standard GX8-C653P
Cable routing from
bottom side
GX8-
C653PB
Wall Standard
GX8-
C653PW
Ceiling Standard
GX8-
C653PR
(Units: mm)
Industrial Robot: SCARA Robots GX series Manual Rev.11
205
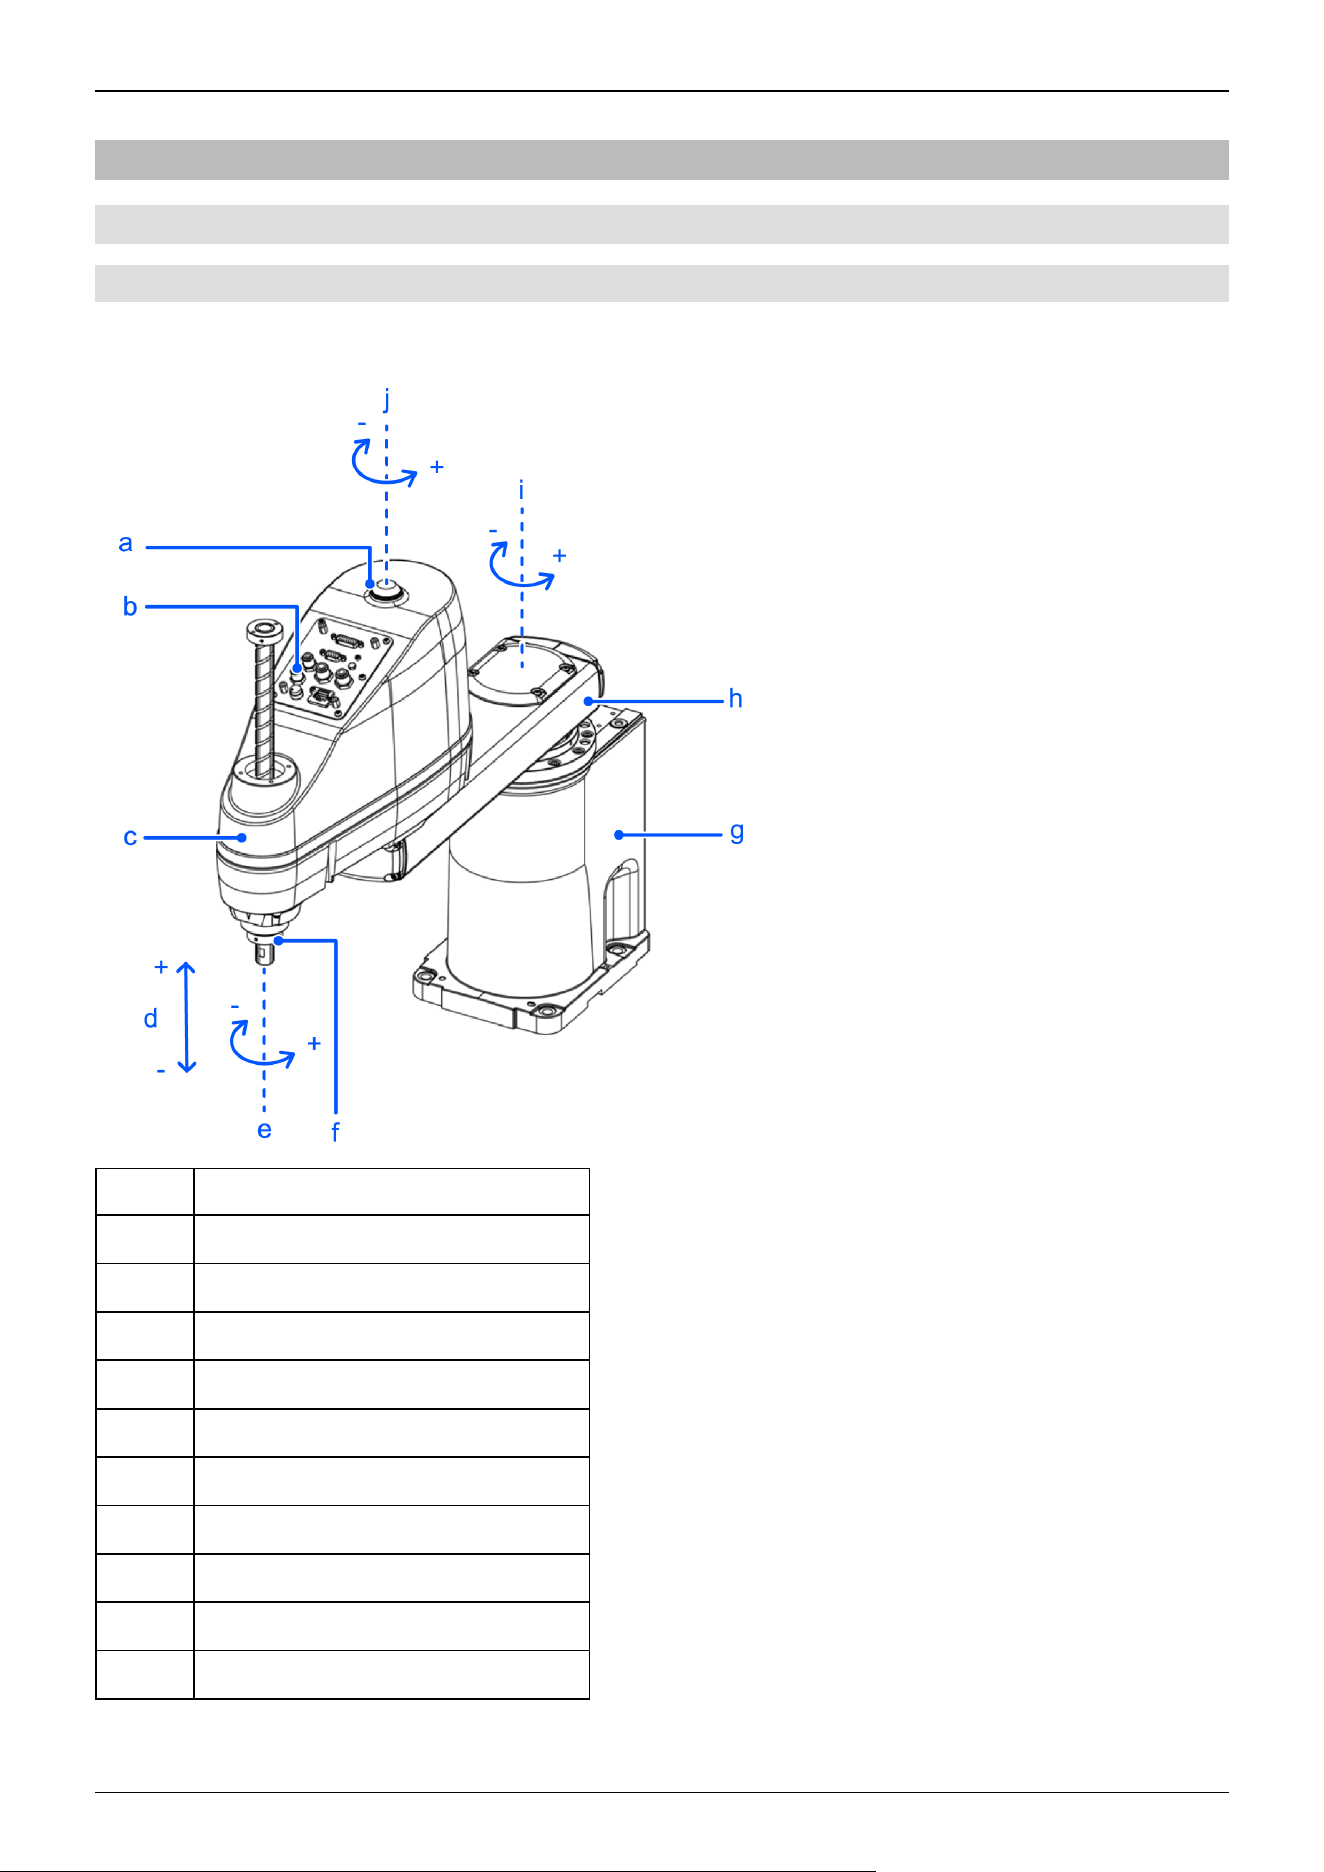
4.2.4 Names of Parts and Their Dimensions
4.2.4.1 Table Top Mounting Specifications
4.2.4.1.1 Cable Mounting Direction: Standard
Standard specifications GX8-A/GX8-B/GX8-C***S
Symbol Description
a Indicating lamp
b Joint #3 and Joint #4 brake release switch
c Arm #2
d Joint #3 (up/down movement)
e Joint #4 (rotation)
f Shaft
g Base
h Arm #1
i Joint #1 (rotation)
j Joint #2 (rotation)
Industrial Robot: SCARA Robots GX series Manual Rev.11
206
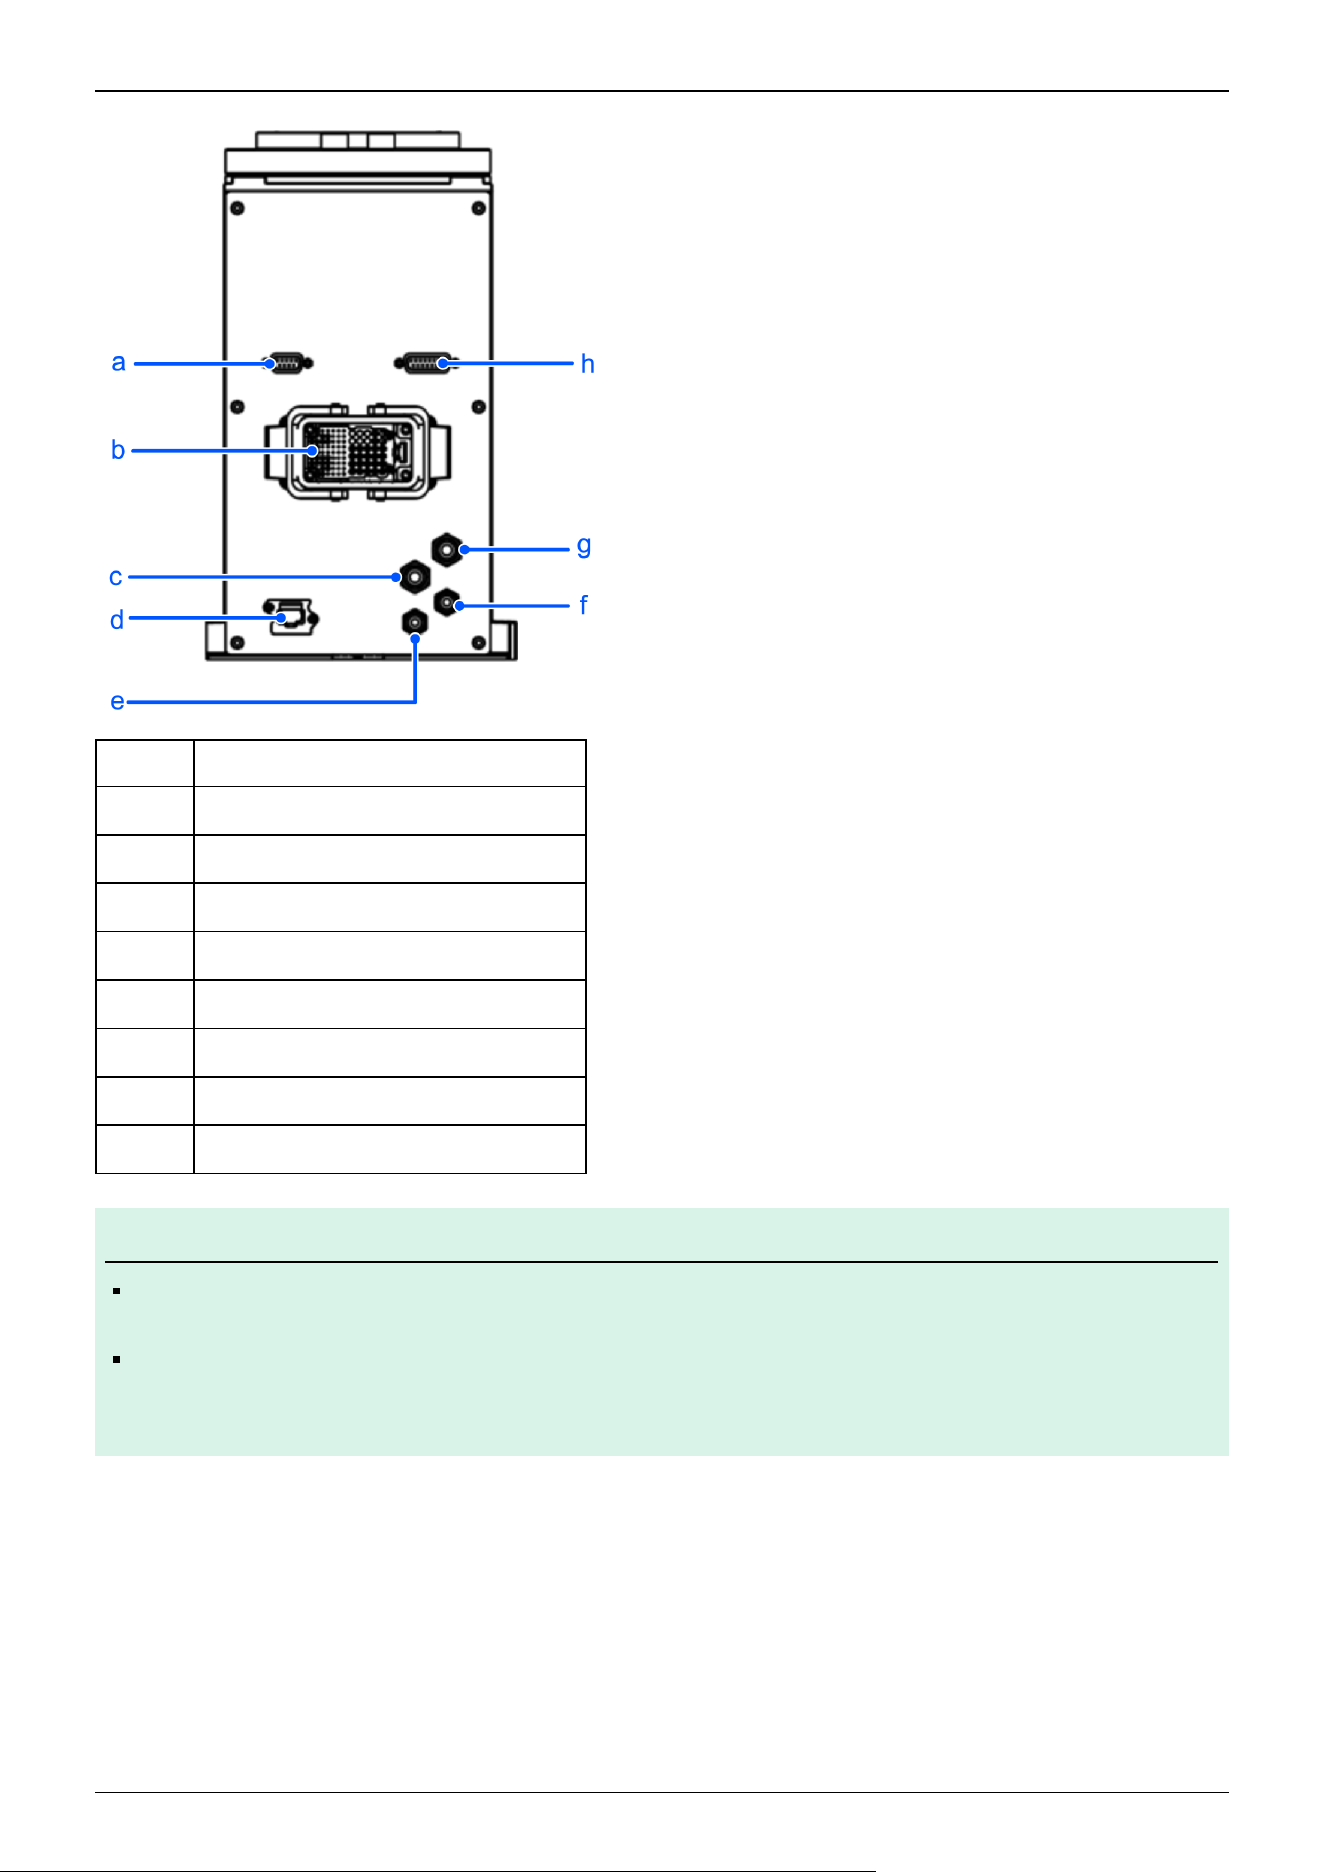
Symbol Description
a User connector (9-pin D-sub connector)
b M/C cable housing
c Fitting for ø6 mm tube (blue)
d User connector (Ethernet connector)
e Fitting for ø4 mm tube (blue)
f Fitting for ø4 mm tube (white)
g Fitting for ø6 mm tube (white)
h User connector (15-pin D-sub connector)
KEY POINTS
The brake release switch is used with both Joint #3 and Joint #4. Press the brake release switch while in the
emergency stop state to simultaneously release the brakes on Joint #3 and Joint #4.
Before starting any maintenance work, be sure to turn off the Controller and inform others in the surrounding
area that work is in progress. Performing any work procedure with the power turned on is extremely
dangerous and may result in electric shock and/or malfunction of the robot system.
✏
Industrial Robot: SCARA Robots GX series Manual Rev.11
207
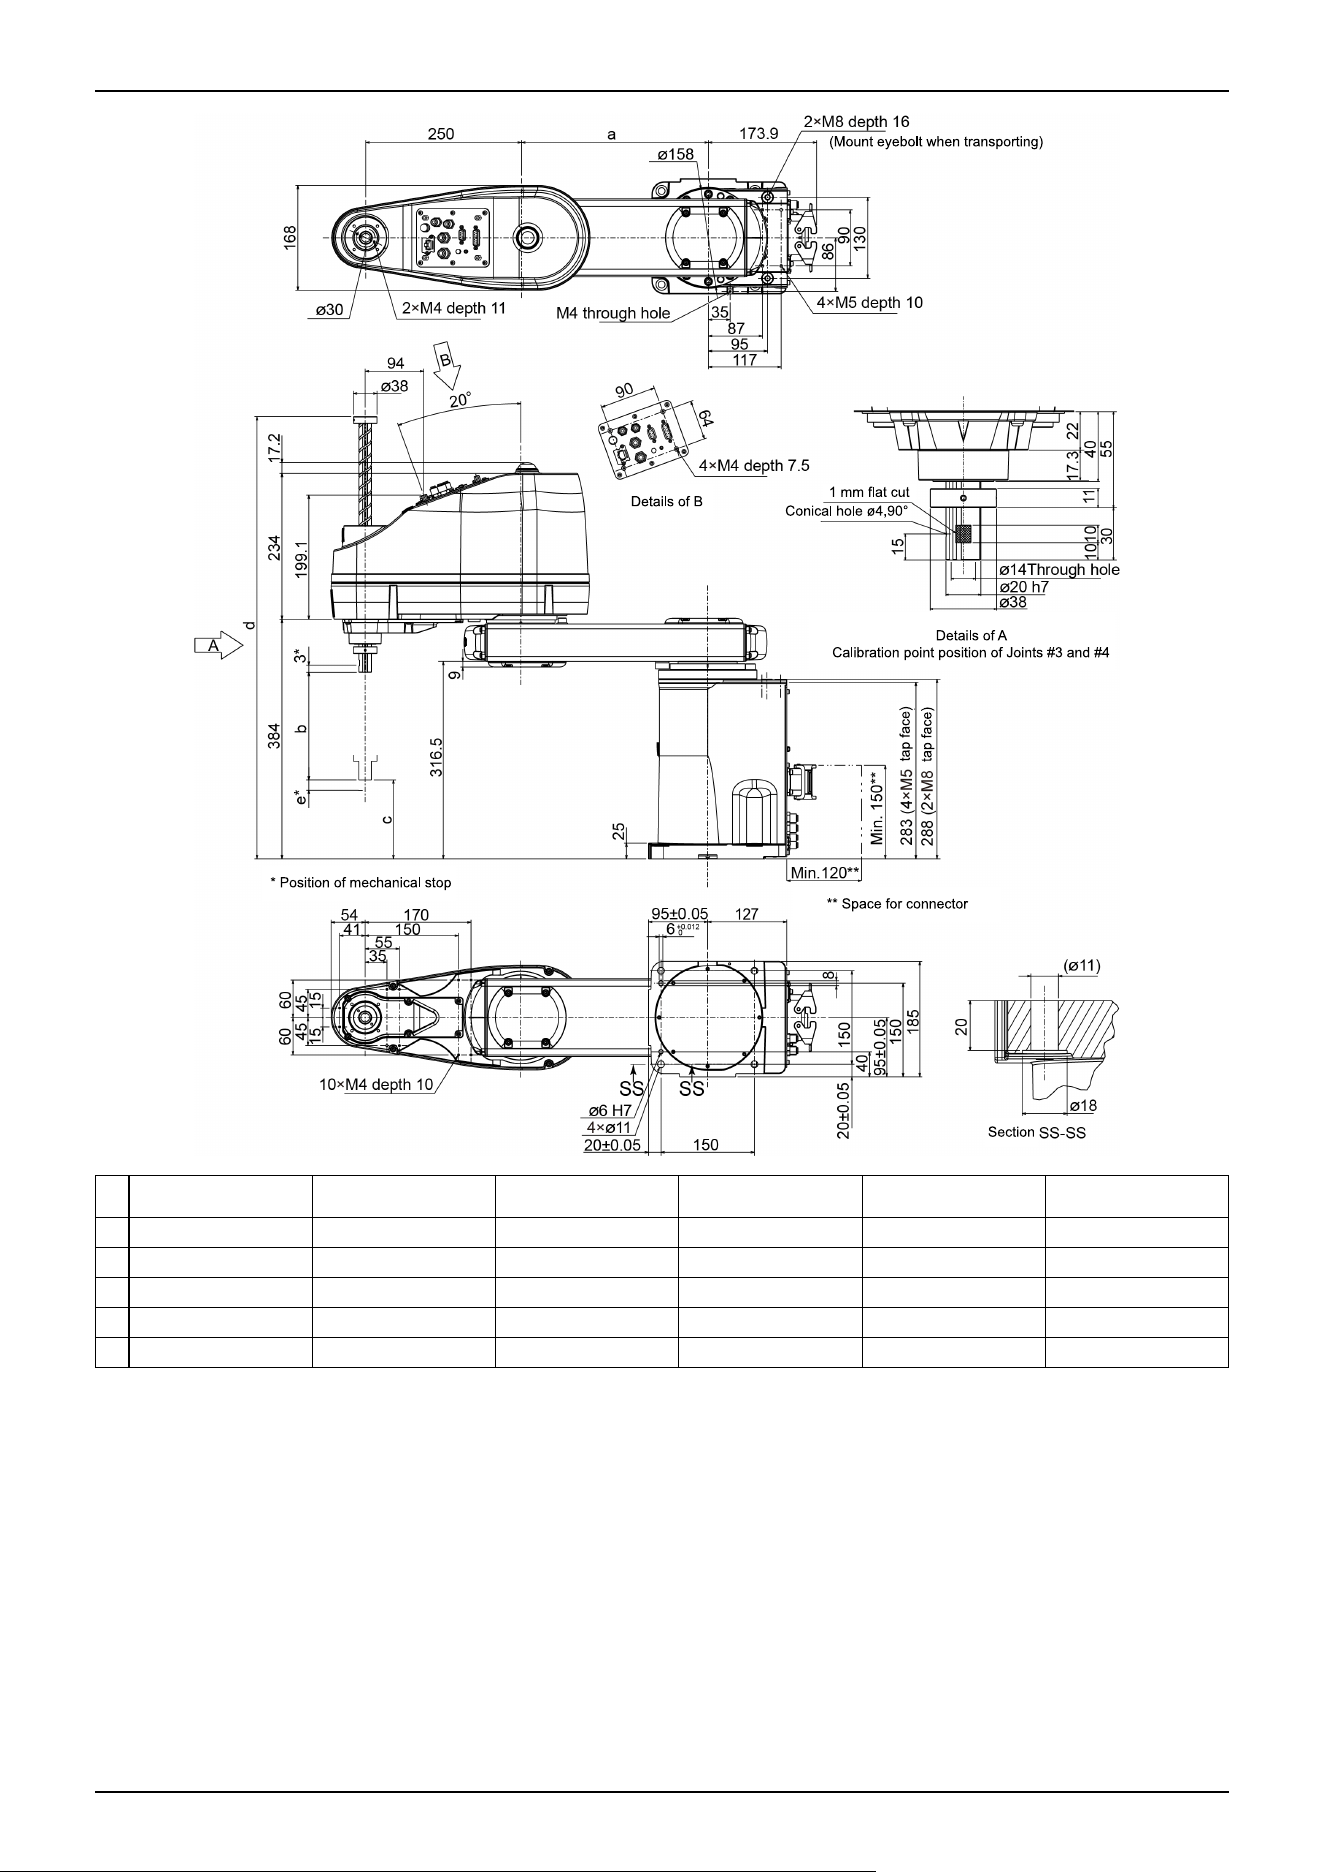
GX8-A/GX8-B/
GX8-C452S, E
GX8-A/GX8-B/
GX8-C453S, E
GX8-A/GX8-B/
GX8-C552S, E
GX8-A/GX8-B/
GX8-C553S, E
GX8-A/GX8-B/
GX8-C652S, E
GX8-A/GX8-B/
GX8-C653S, E
a 200 200 300 300 400 400
b 200 330 200 330 200 330
c 99 -31 99 -31 99 -31
d 709 834 709 834 709 834
e 15.6 10.6 15.6 10.6 15.6 10.6
Industrial Robot: SCARA Robots GX series Manual Rev.11
208
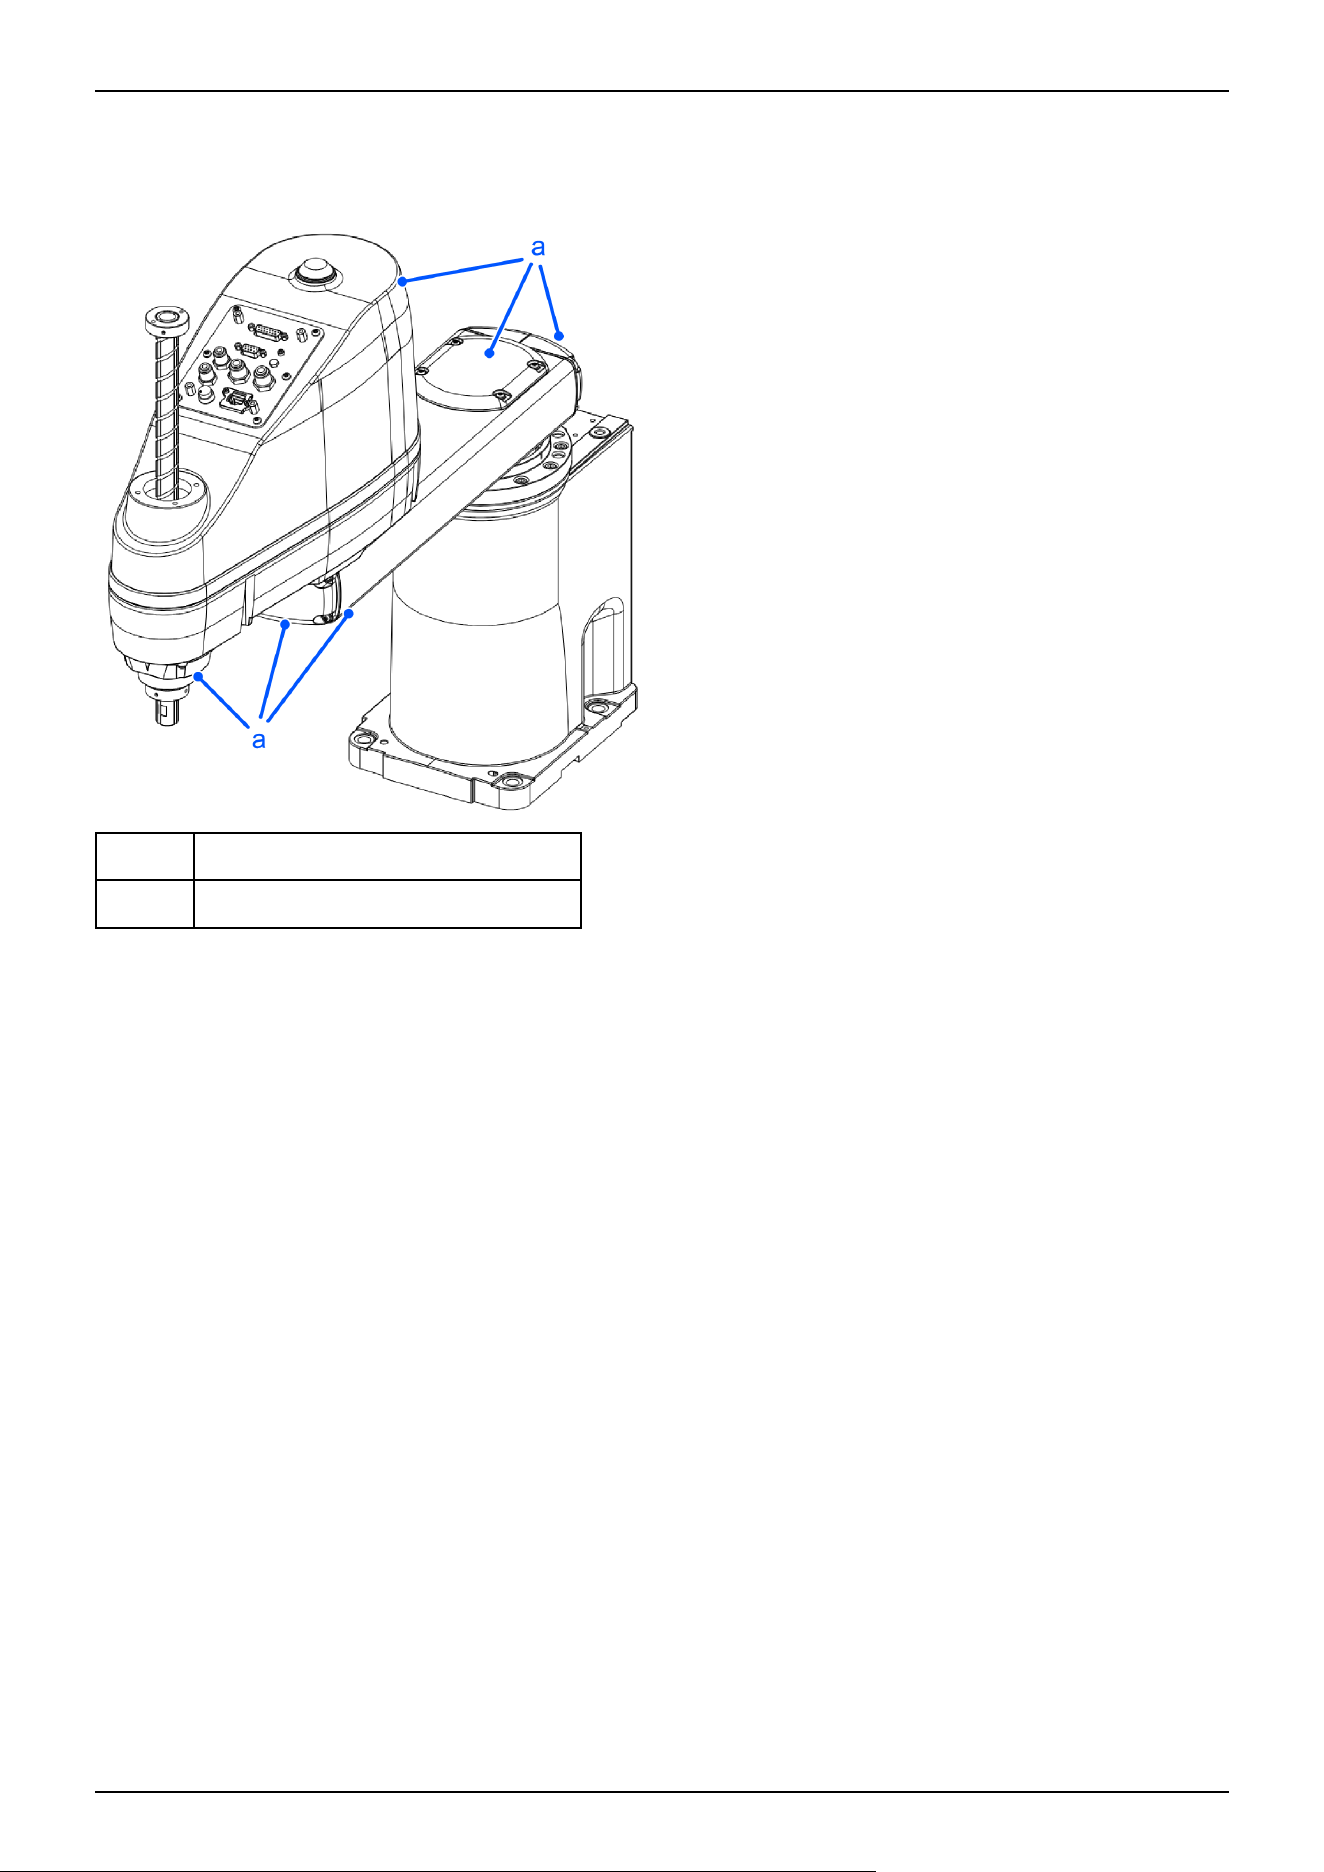
ESD specifications GX8-A/GX8-B/GX8-C***E
The parts shown below differ from the standard specifications. The external dimensions are identical.
Symbol Description
a Plating covers (anti-static specifications)
Industrial Robot: SCARA Robots GX series Manual Rev.11
209
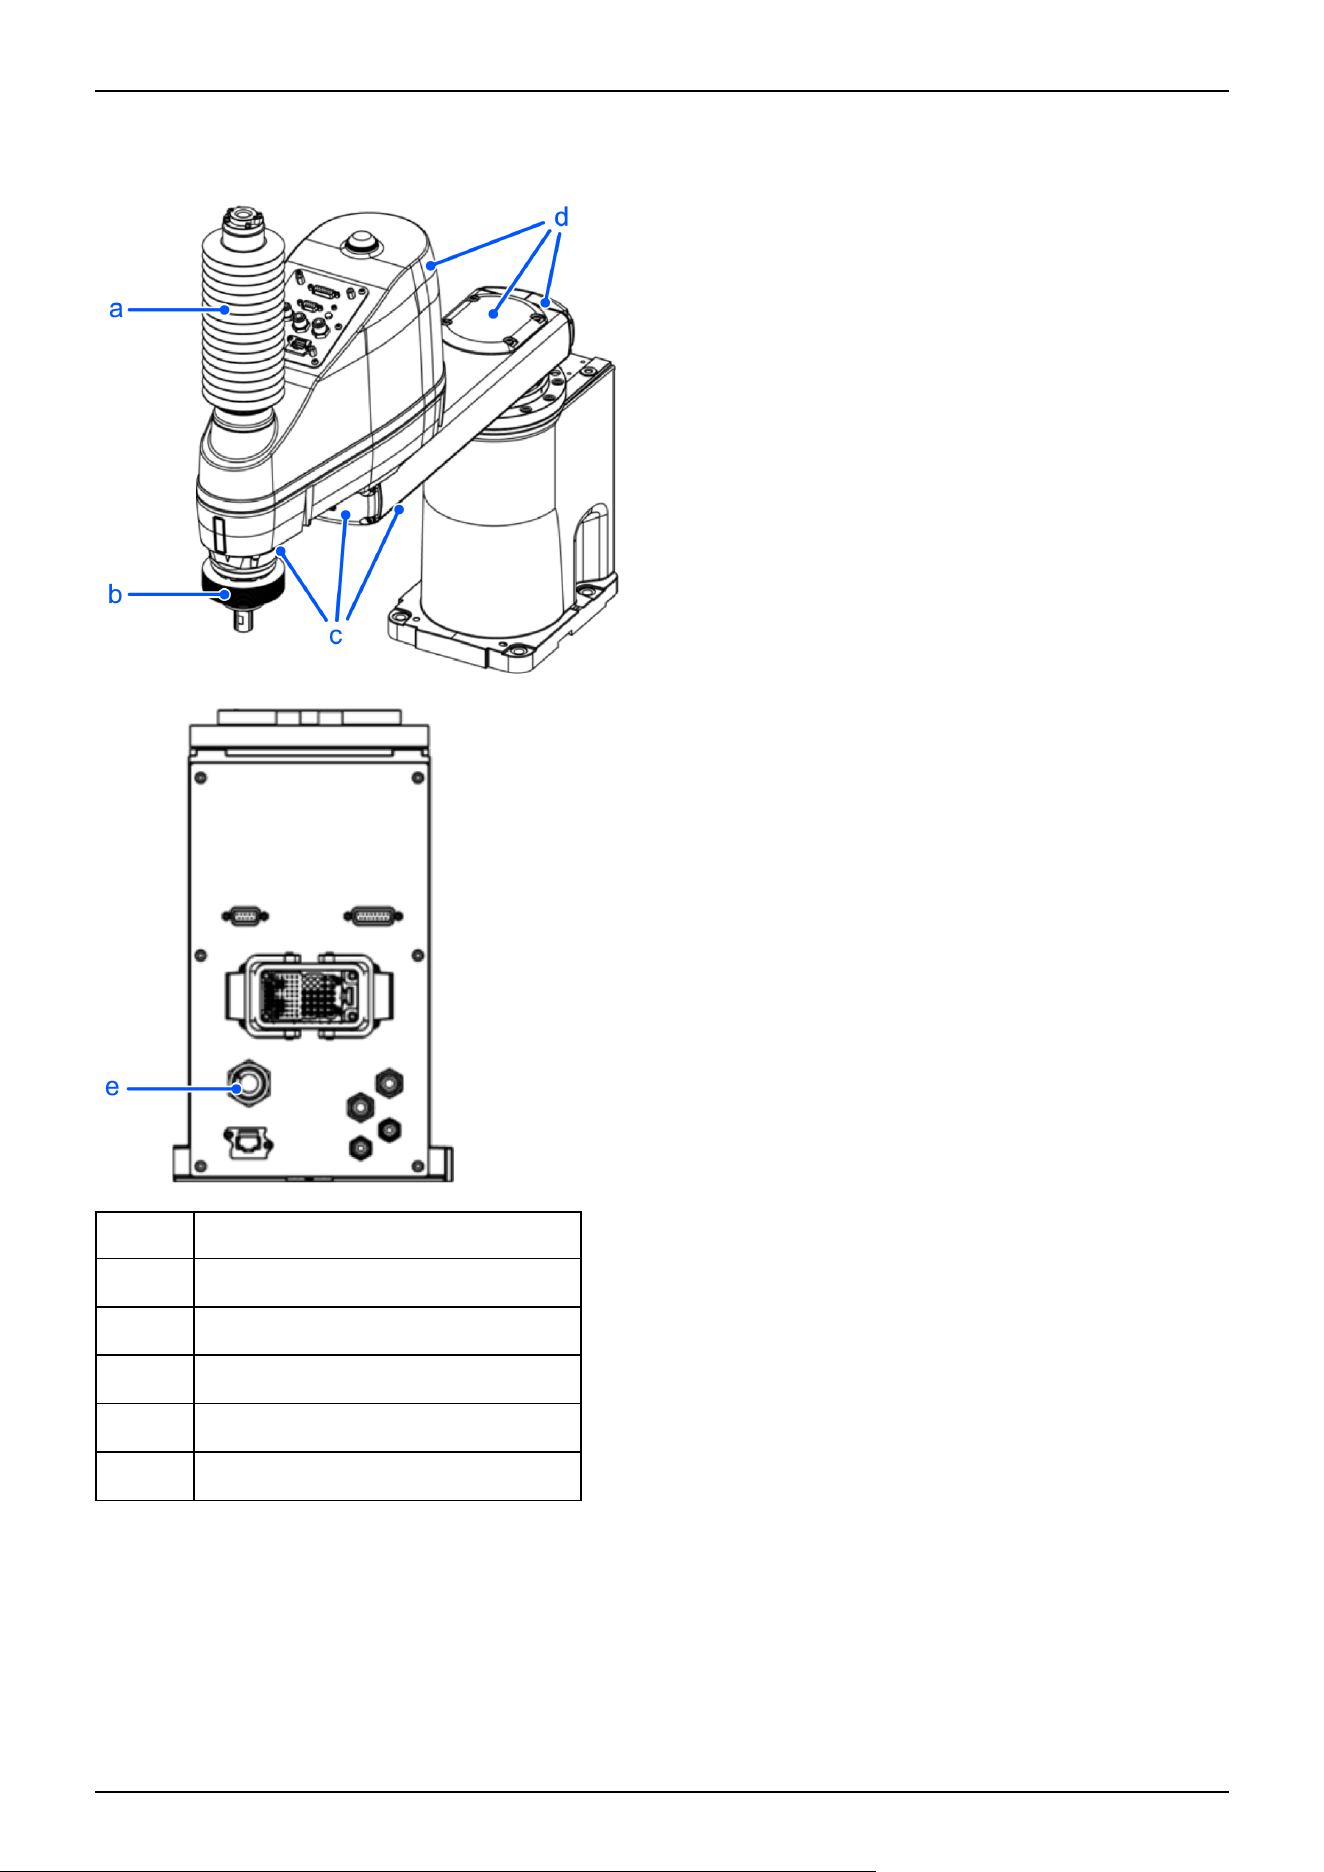
Cleanroom & ESD specifications GX8-A/GX8-B/GX8-C***C
The parts shown below differ from the standard specifications.
Symbol Description
a Upper bellows
b Lower bellows
c Plating covers (anti-static specifications)
d Plating cover (anti-static specifications)
e Exhaust port
Industrial Robot: SCARA Robots GX series Manual Rev.11
210
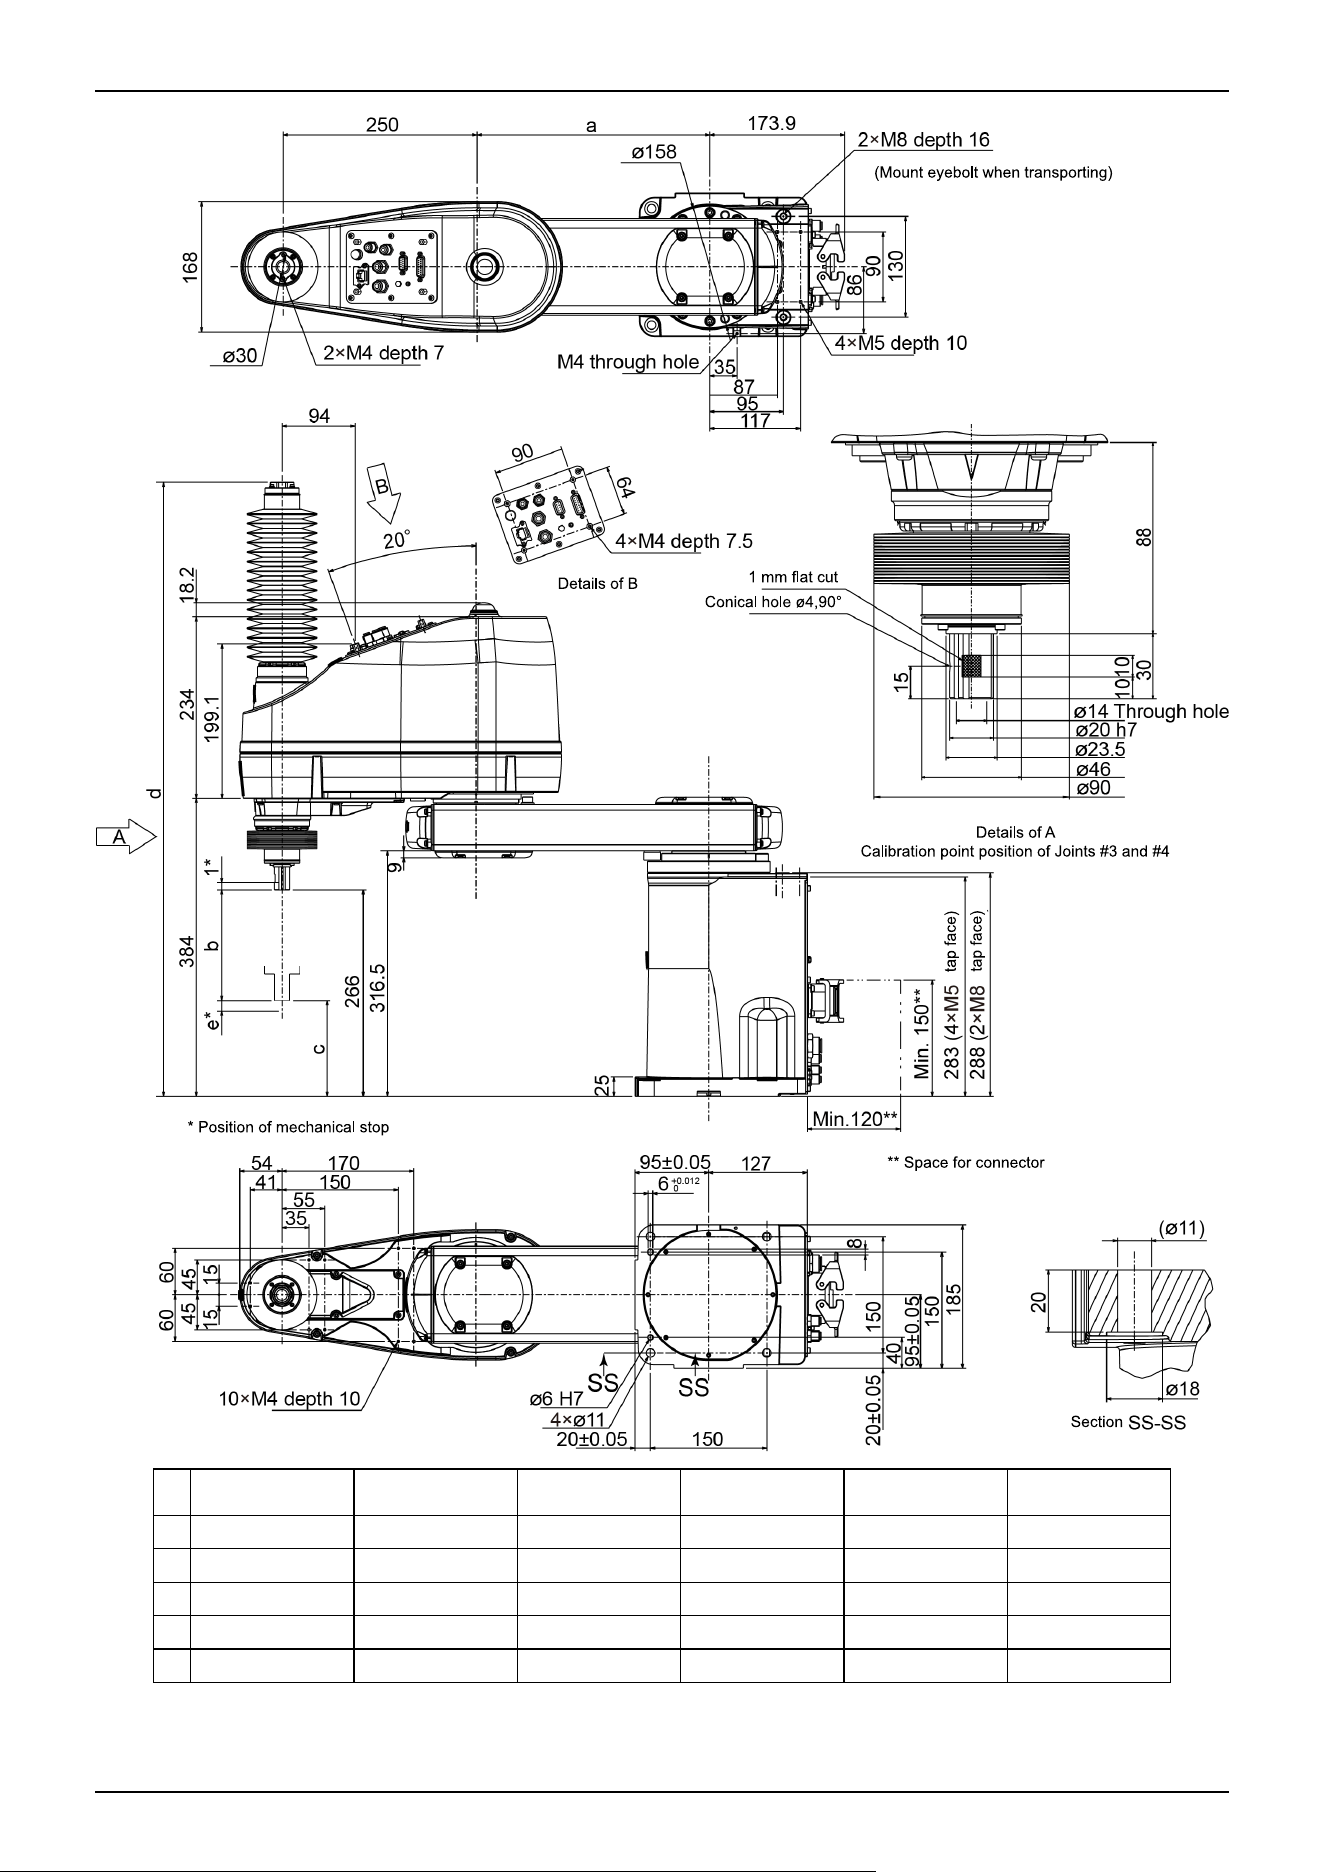
GX8-A/GX8-B/
GX8-C452C
GX8-A/GX8-B/
GX8-C453C
GX8-A/GX8-B/
GX8-C552C
GX8-A/GX8-B/
GX8-C553C
GX8-A/GX8-B/
GX8-C652C
GX8-A/GX8-B/
GX8-C653C
a 200 200 300 300 400 400
b 170 300 170 300 170 300
c 96 -34 96 -34 96 -34
d 791.5 910.5 791.5 910.5 791.5 910.5
e 12.6 7.6 12.6 7.6 12.6 7.6
Industrial Robot: SCARA Robots GX series Manual Rev.11
211
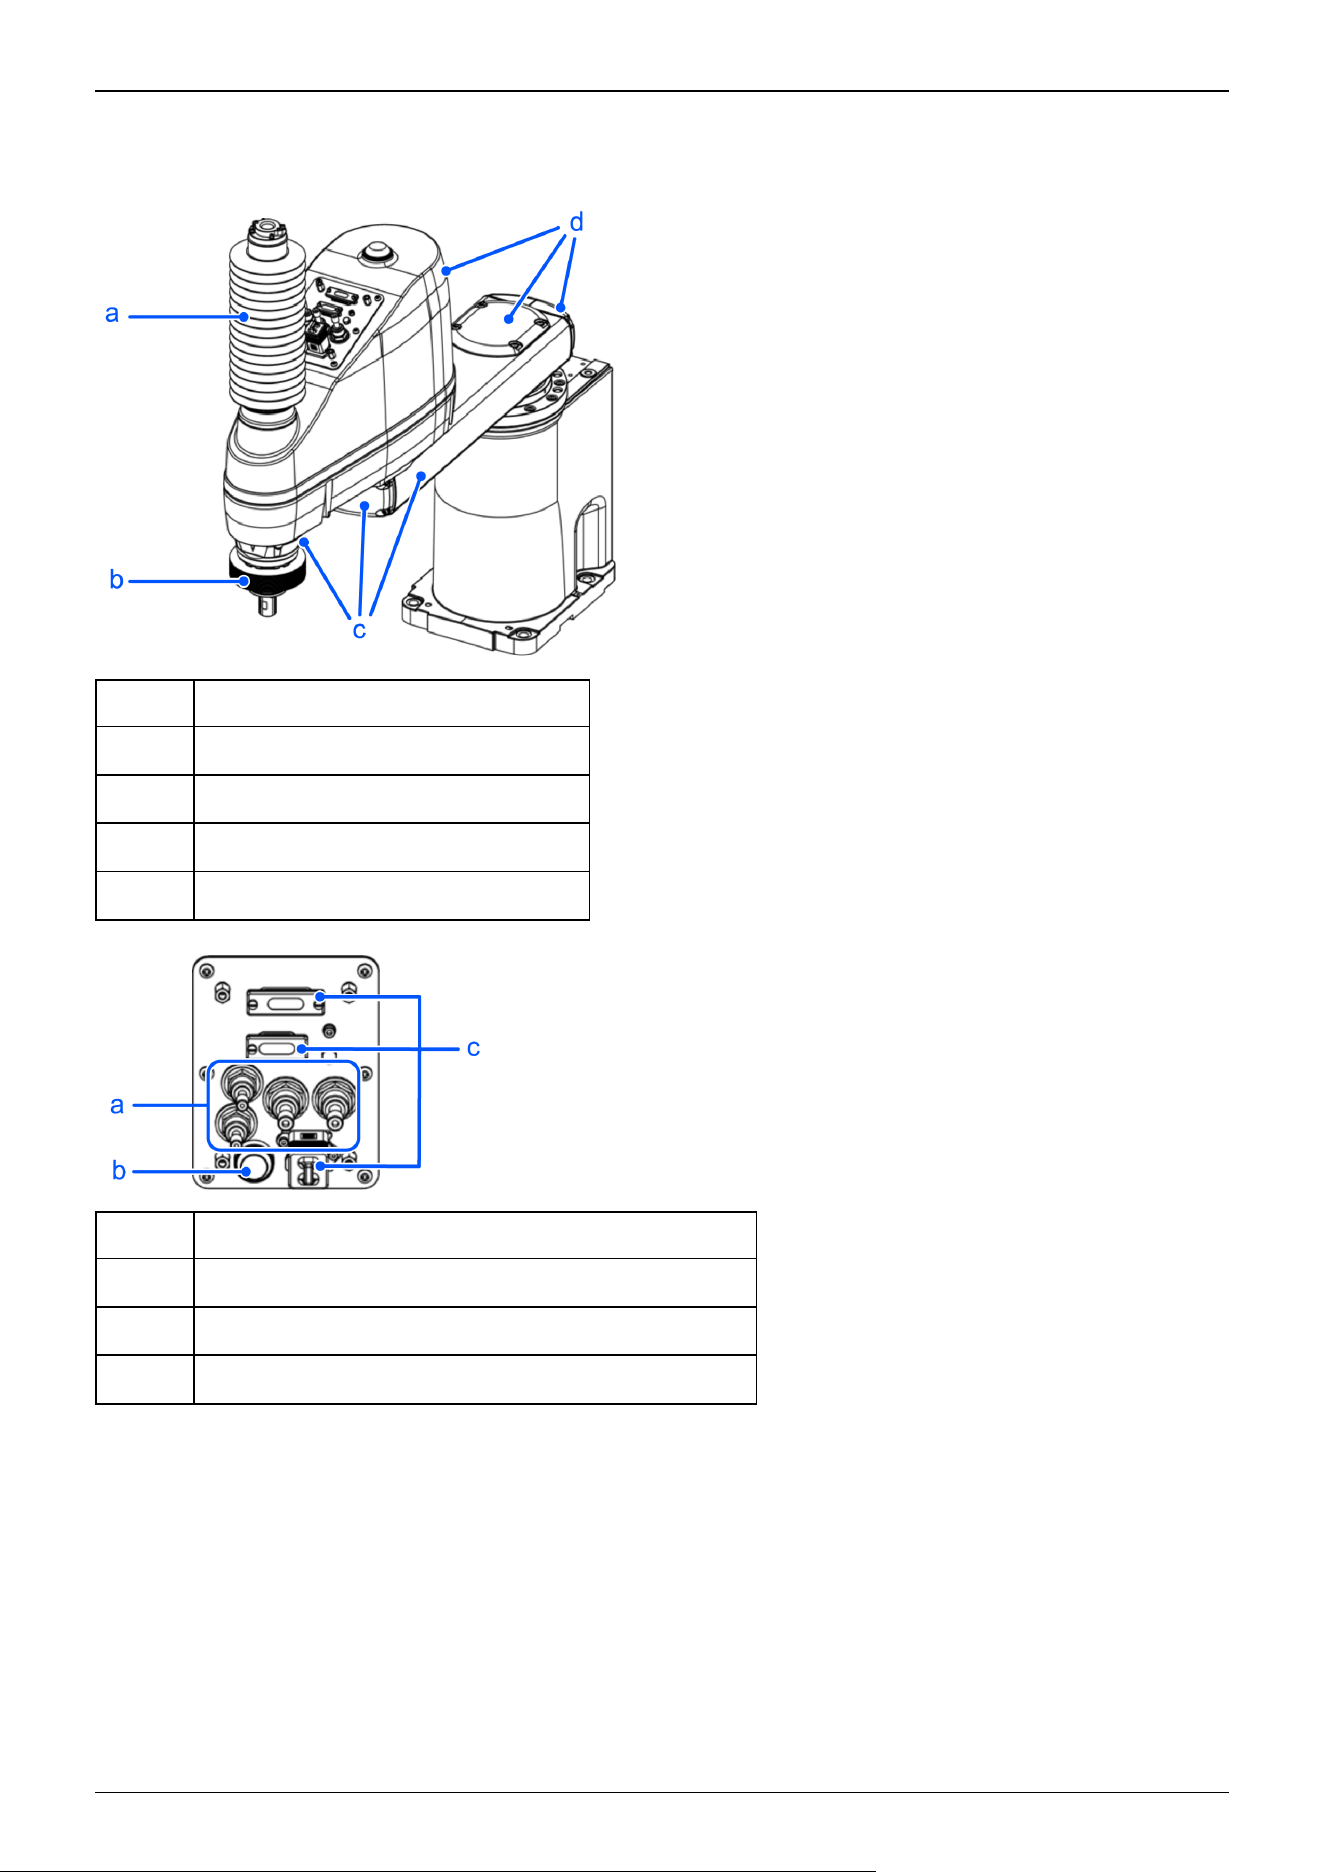
Protected-models GX8-A/GX8-B/GX8-C***P
The parts shown below differ from the standard specifications.
Symbol Description
a Upper bellows
b Lower bellows
c Plating cover (oil-resistant specifications)
d Plating cover (oil-resistant specifications)
Symbol Description
a Fittings with cover (protected-model)
b Joint #3 and Joint #4 brake release switch (protected-model)
c User connectors with cover (protected-model)
Industrial Robot: SCARA Robots GX series Manual Rev.11
212
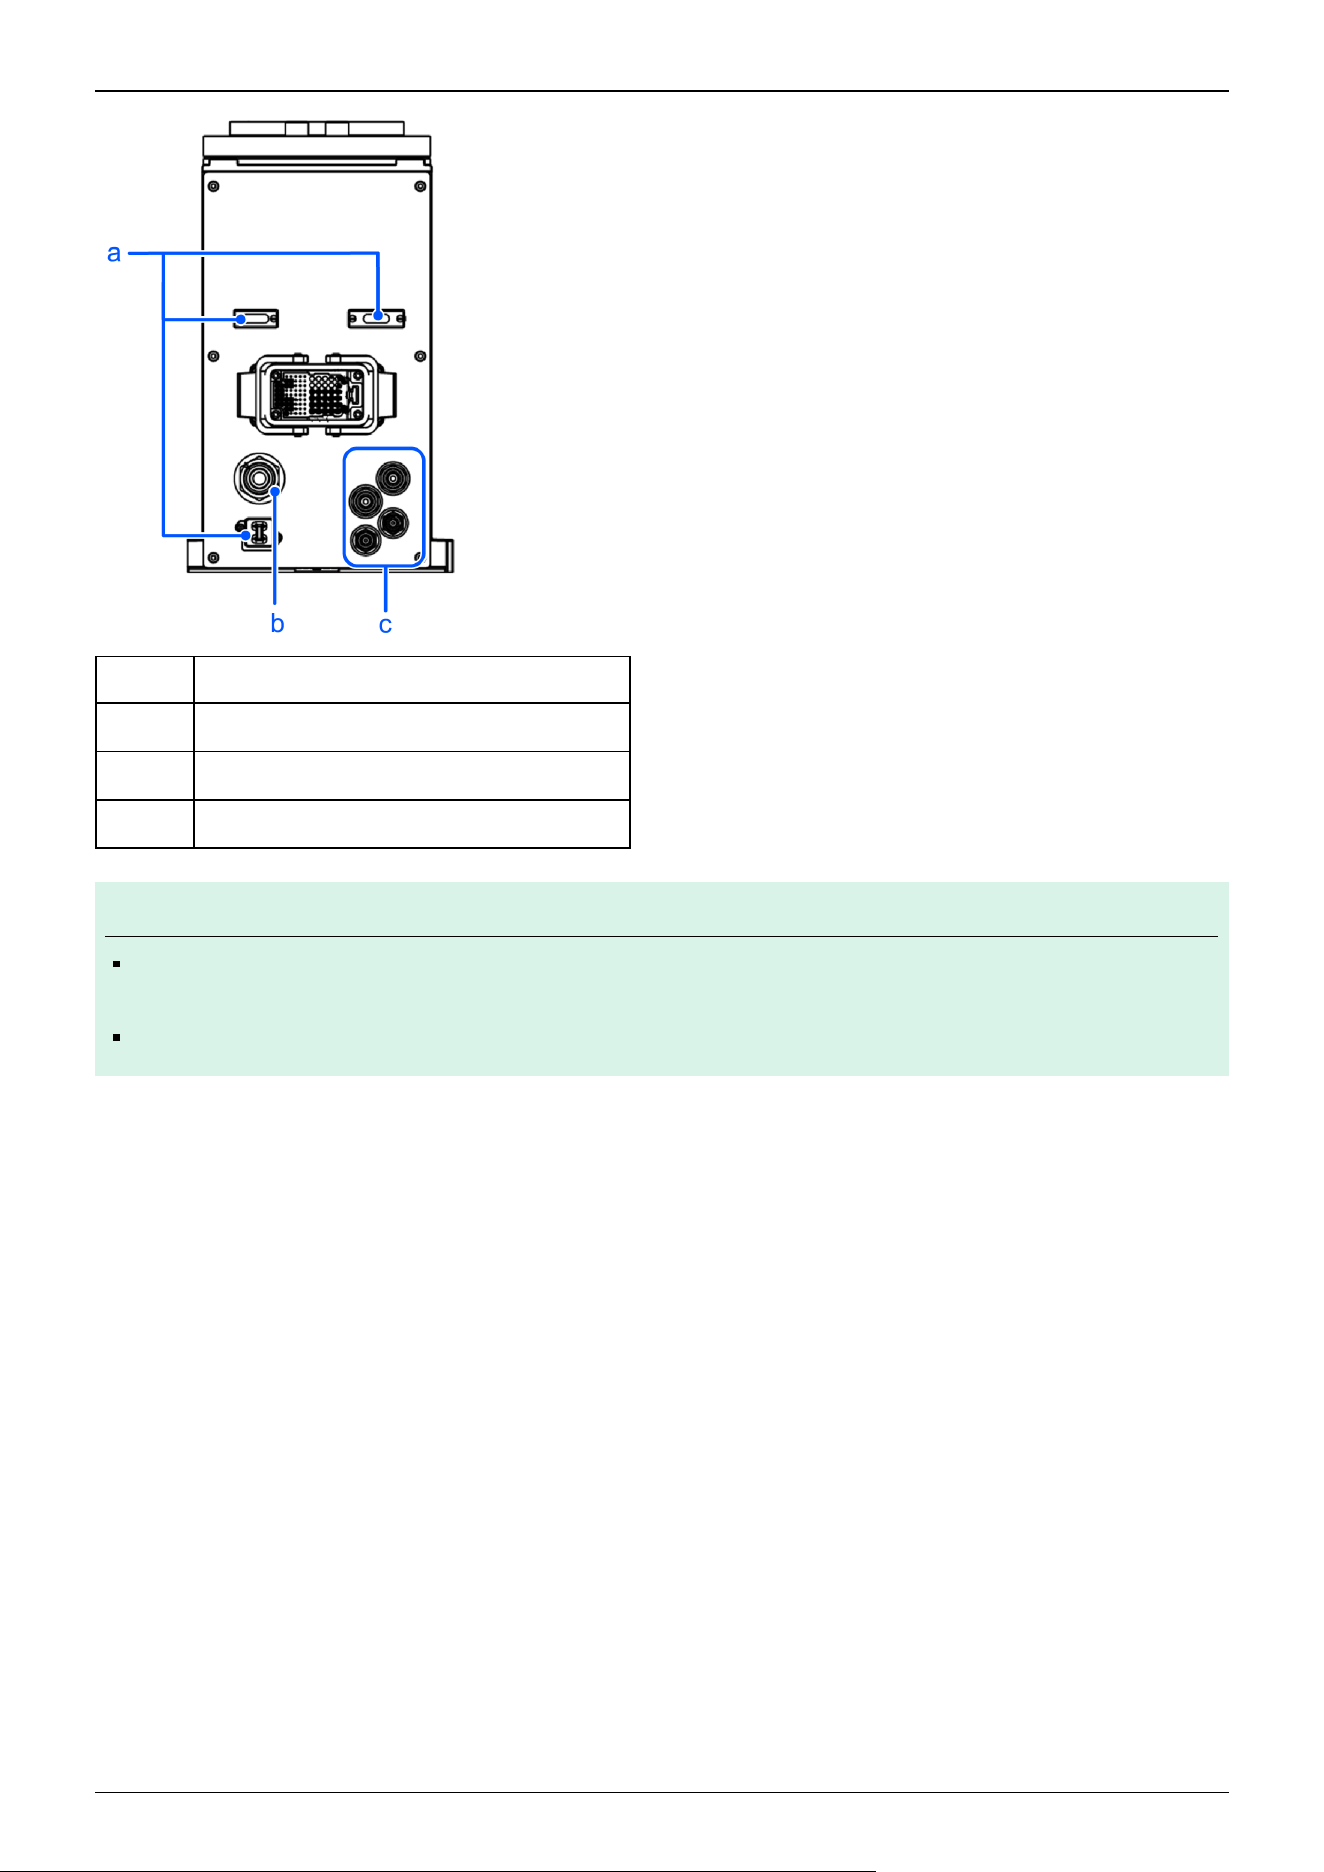
Symbol Description
a User connectors with cover (protected-model)
b Exhaust port with cover
c Fittings with cover (protected-model)
KEY POINTS
For protected-models, all screws used for the exterior are stainless steel screws. (except for screws used for
stops).
The part of the M/C cable housing is not IP65 compliant when the M/C cable hood is not connected.
✏
Industrial Robot: SCARA Robots GX series Manual Rev.11
213
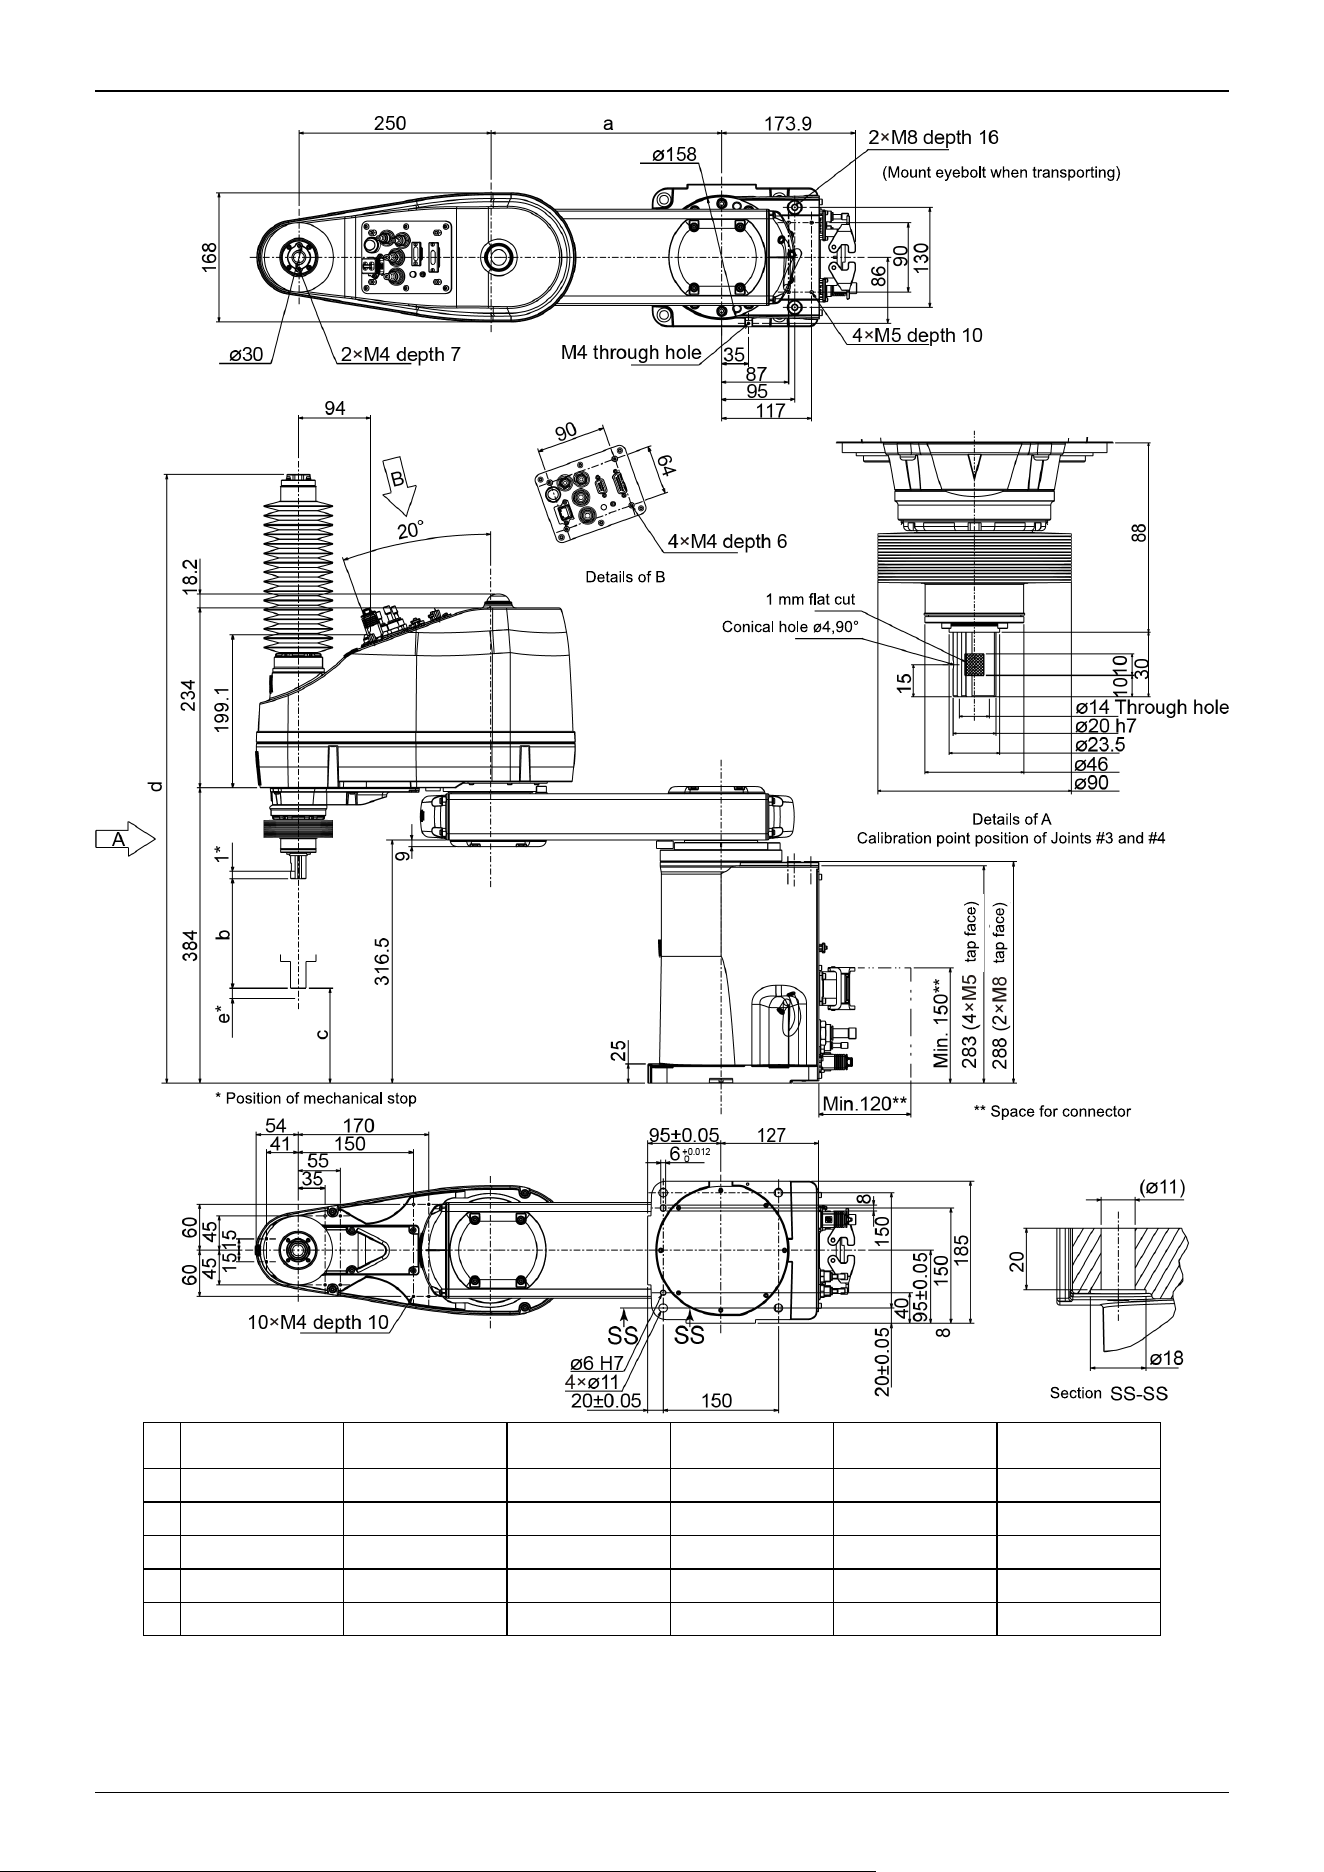
GX8-A/GX8-B/
GX8-C452P
GX8-A/GX8-B/
GX8-C453P
GX8-A/GX8-B/
GX8-C552P
GX8-A/GX8-B/
GX8-C553P
GX8-A/GX8-B/
GX8-C652P
GX8-A/GX8-B/
GX8-C653P
a 200 200 300 300 400 400
b 170 300 170 300 170 300
c 96 -34 96 -34 96 -34
d 791.5 910.5 791.5 910.5 791.5 910.5
e 12.6 7.6 12.6 7.6 12.6 7.6
Industrial Robot: SCARA Robots GX series Manual Rev.11
214
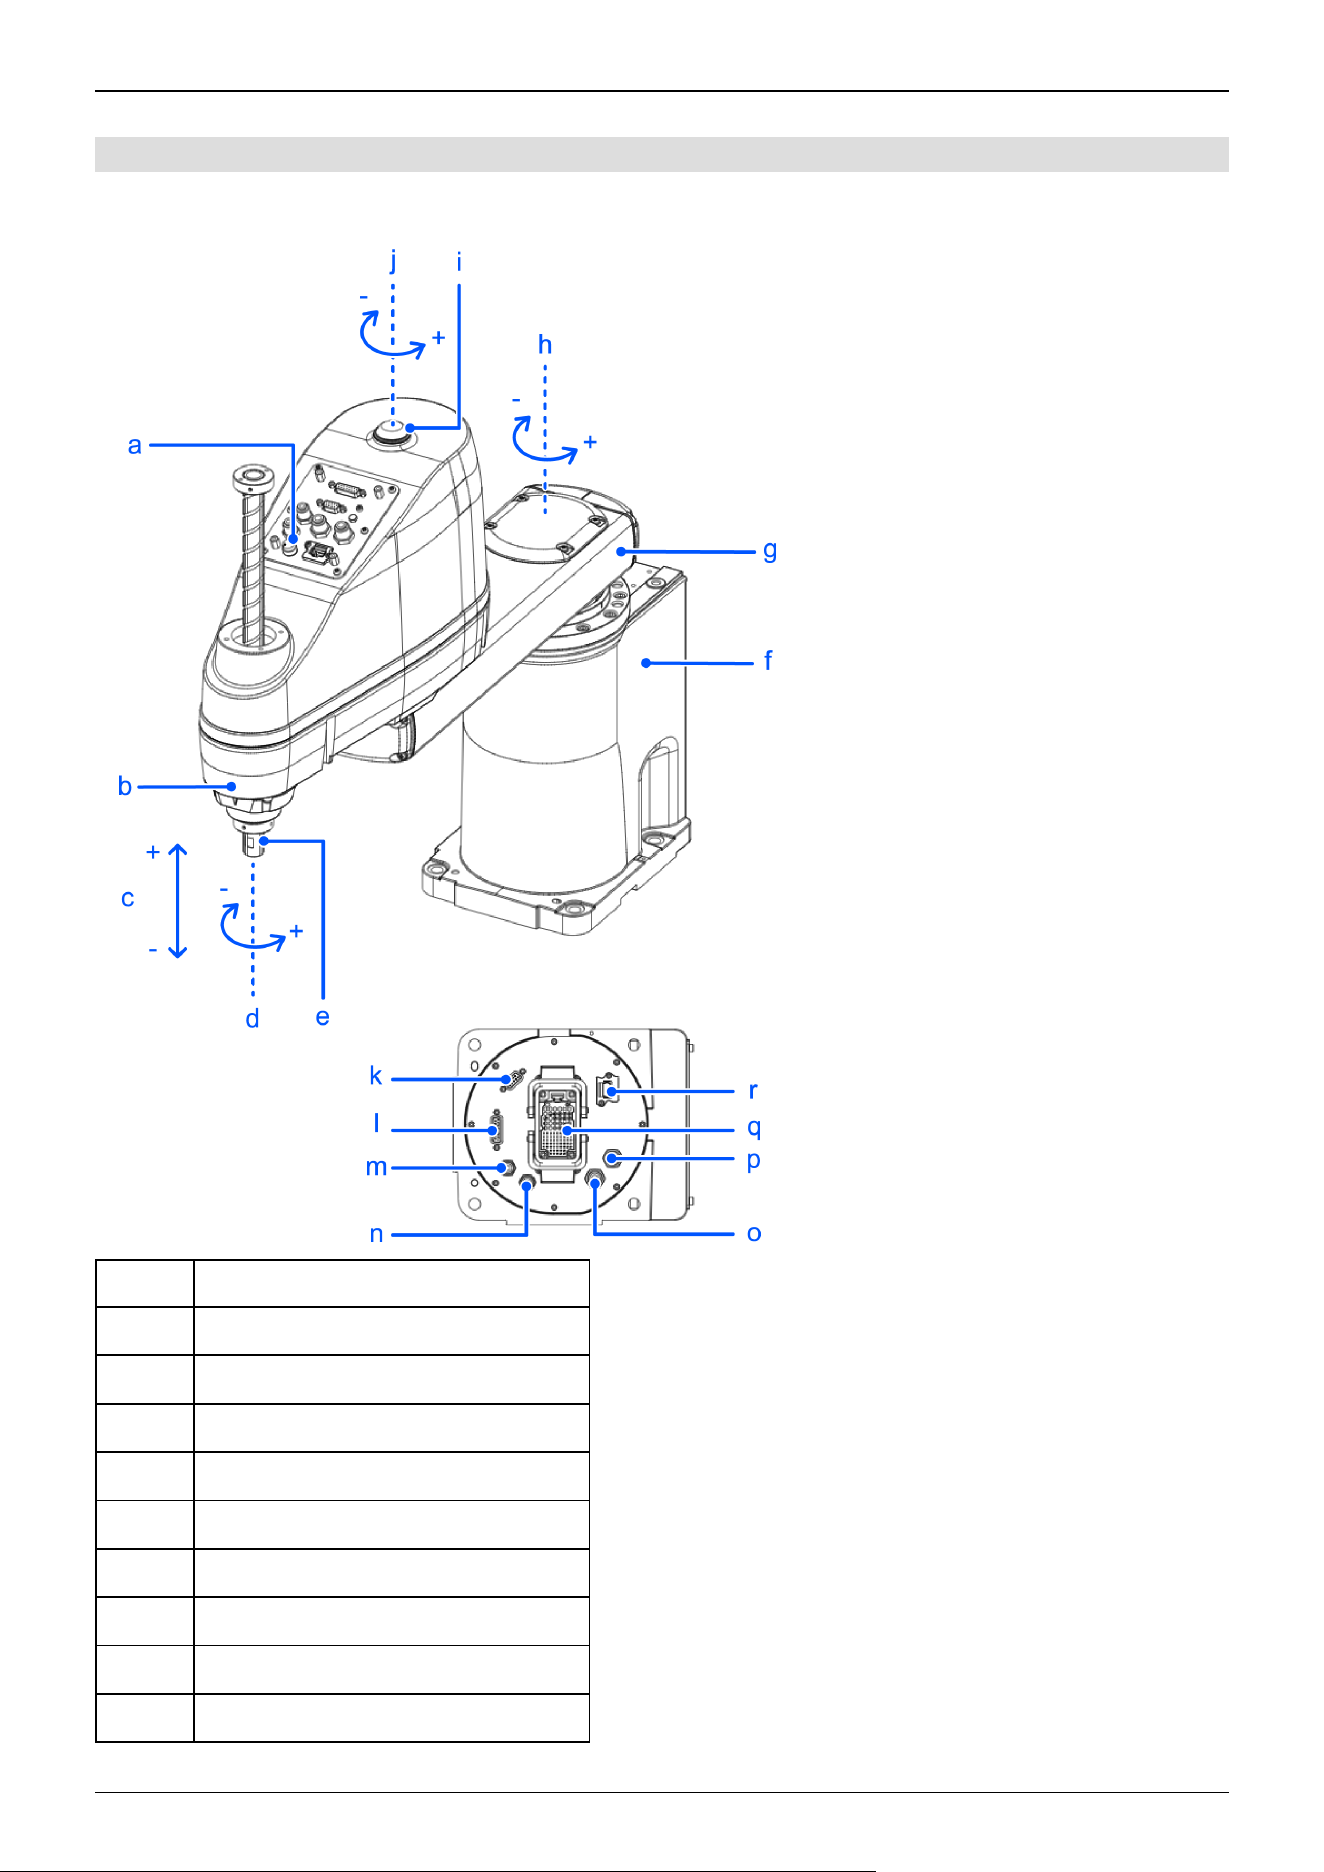
4.2.4.1.2 Cable Mounting Direction: Cable Routing from Bottom Side
Standard specifications GX8-A/GX8-B/GX8-C***SB
Symbol Description
a Joint #3 and Joint #4 brake release switch
b Arm #2
c Joint #3 (up/down movement)
d Joint #4 (rotation)
e Shaft
f Base
g Arm #1
h Joint #1 (rotation)
i Indicating lamp
Industrial Robot: SCARA Robots GX series Manual Rev.11
215
Symbol Description
j Joint #2 (rotation)
k User connector (9-pin D-sub connector)
l User connector (15-pin D-sub connector)
m Fitting for ø4 mm tube (blue)
n Fitting for ø4 mm tube (white)
o Fitting for ø6 mm tube (blue)
p Fitting for ø6 mm tube (white)
p M/C cable housing
r User connector (Ethernet connector)
KEY POINTS
The brake release switch is used with both Joint #3 and Joint #4. Press the brake release switch while in the
emergency stop state to simultaneously release the brakes on Joint #3 and Joint #4.
Before starting any maintenance work, be sure to turn off the Controller and inform others in the surrounding
area that work is in progress. Performing any work procedure with the power turned on is extremely
dangerous and may result in electric shock and/or malfunction of the robot system.
✏
Industrial Robot: SCARA Robots GX series Manual Rev.11
216
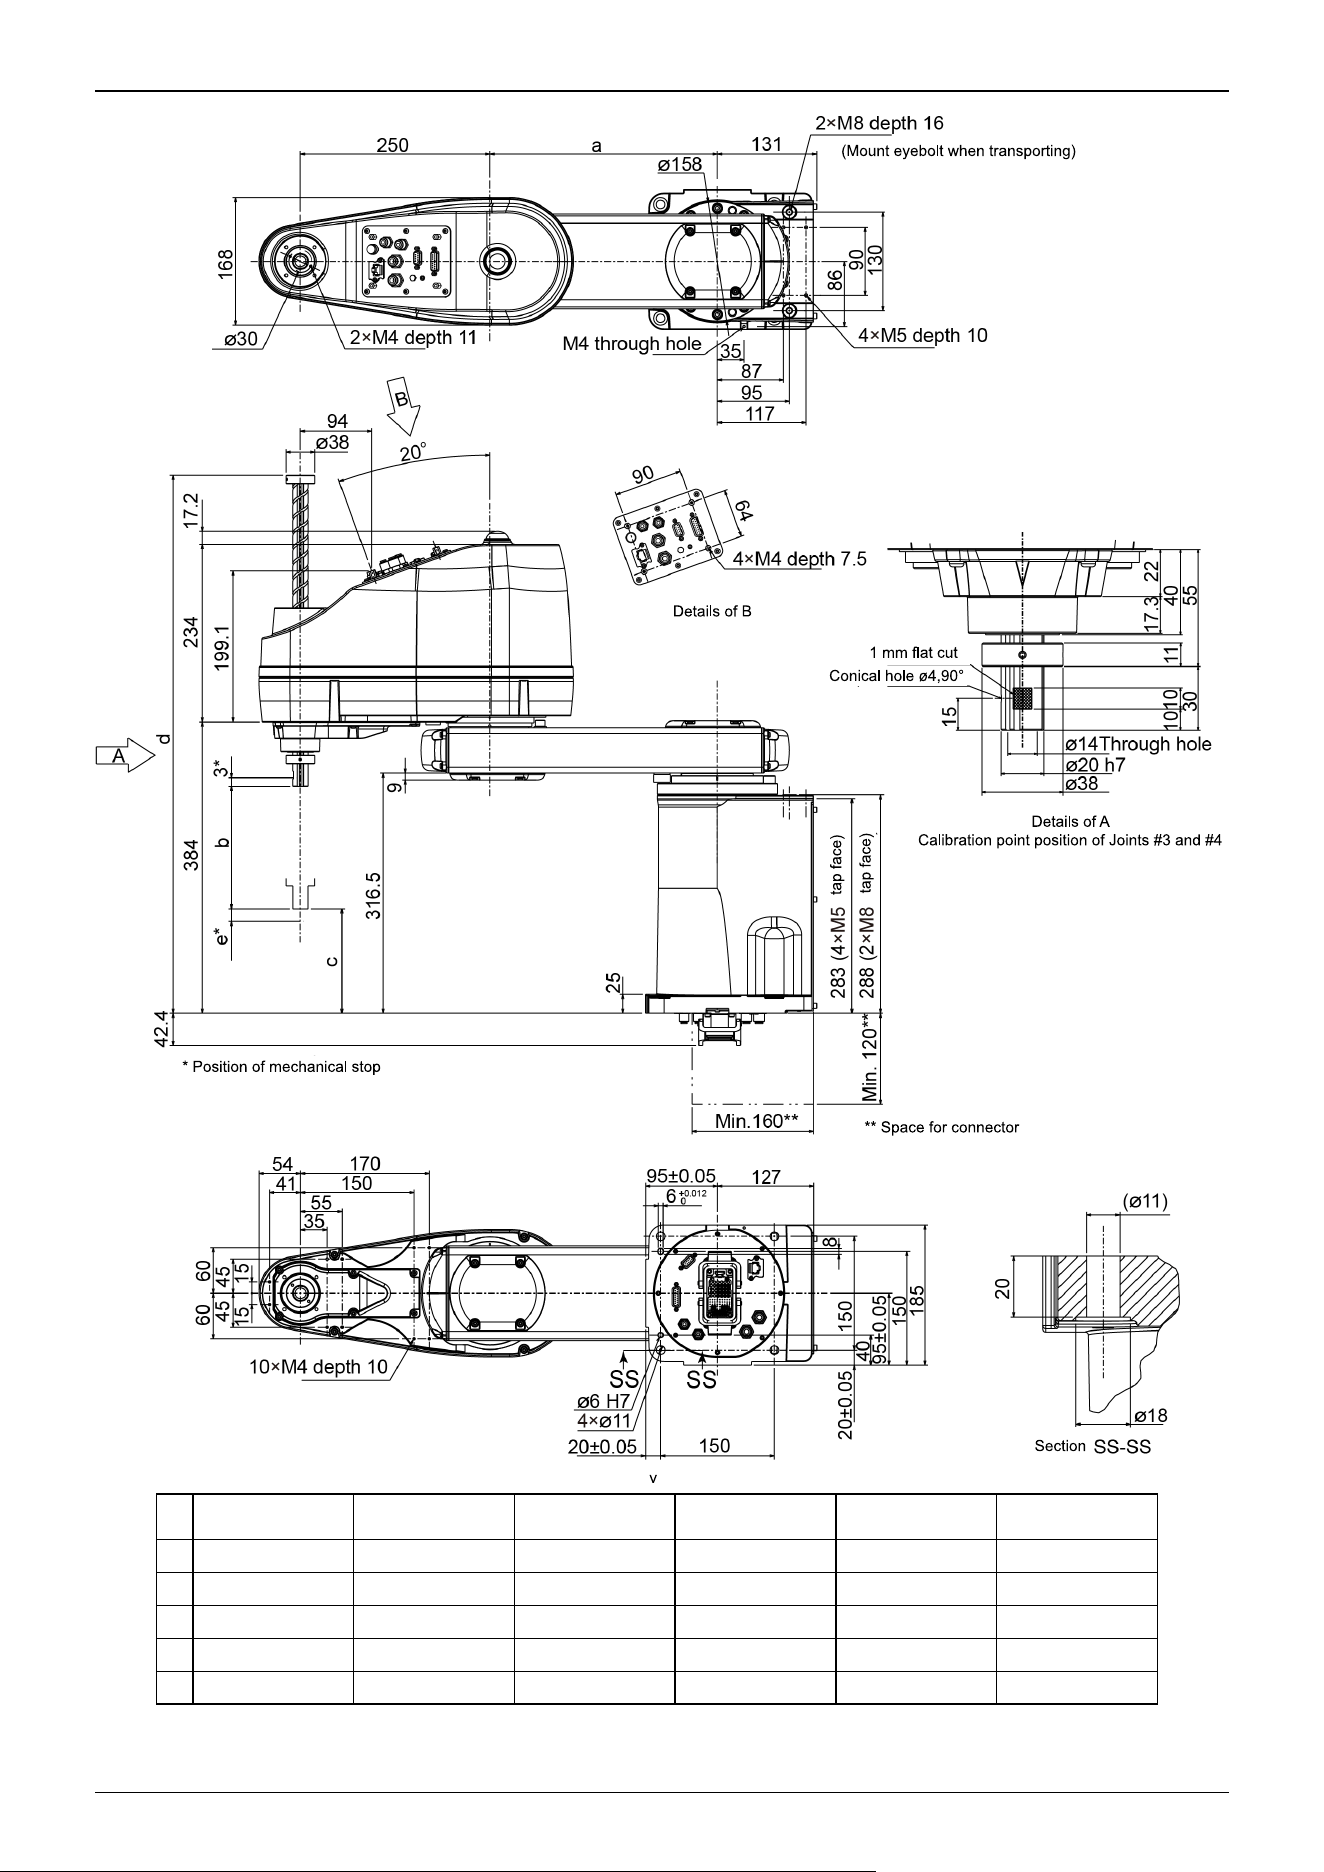
GX8-A/GX8-B/
GX8-C452SB, EB
GX8-A/GX8-B/
GX8-C453SB, EB
GX8-A/GX8-B/
GX8-C552SB, EB
GX8-A/GX8-B/
GX8-C553SB, EB
GX8-A/GX8-B/
GX8-C652SB, EB
GX8-A/GX8-B/
GX8-C653SB, EB
a 200 200 300 300 400 400
b 200 330 200 330 200 330
c 99 -31 99 -31 99 -31
d 709 834 709 834 709 834
e 15.6 10.6 15.6 10.6 15.6 10.6
Industrial Robot: SCARA Robots GX series Manual Rev.11
217
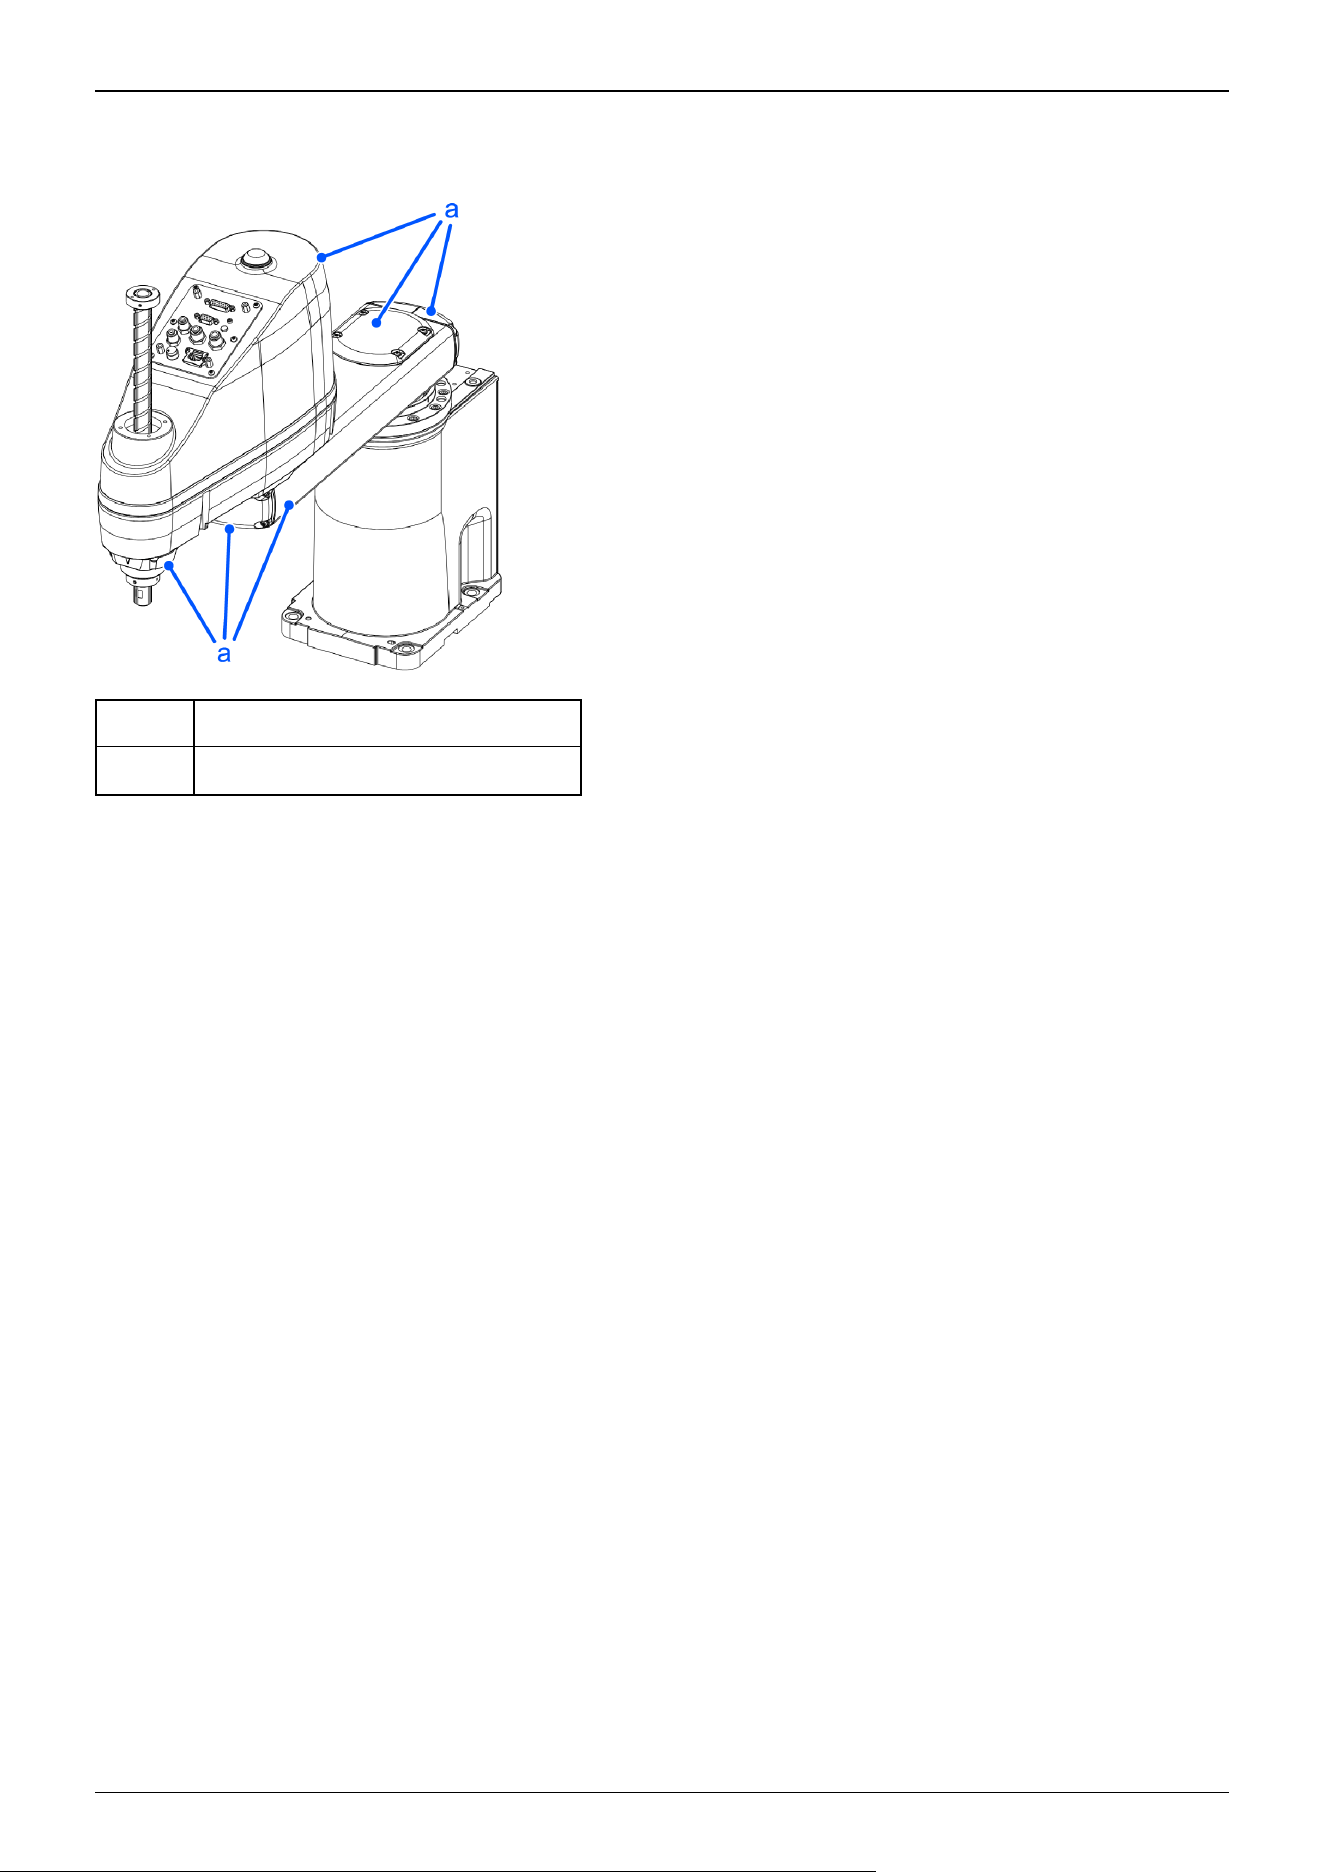
ESD specifications GX8-A/GX8-B/GX8-C***EB
The parts shown below differ from the standard specifications. The external dimensions are identical.
Symbol Description
a Plating covers (anti-static specifications)
Industrial Robot: SCARA Robots GX series Manual Rev.11
218
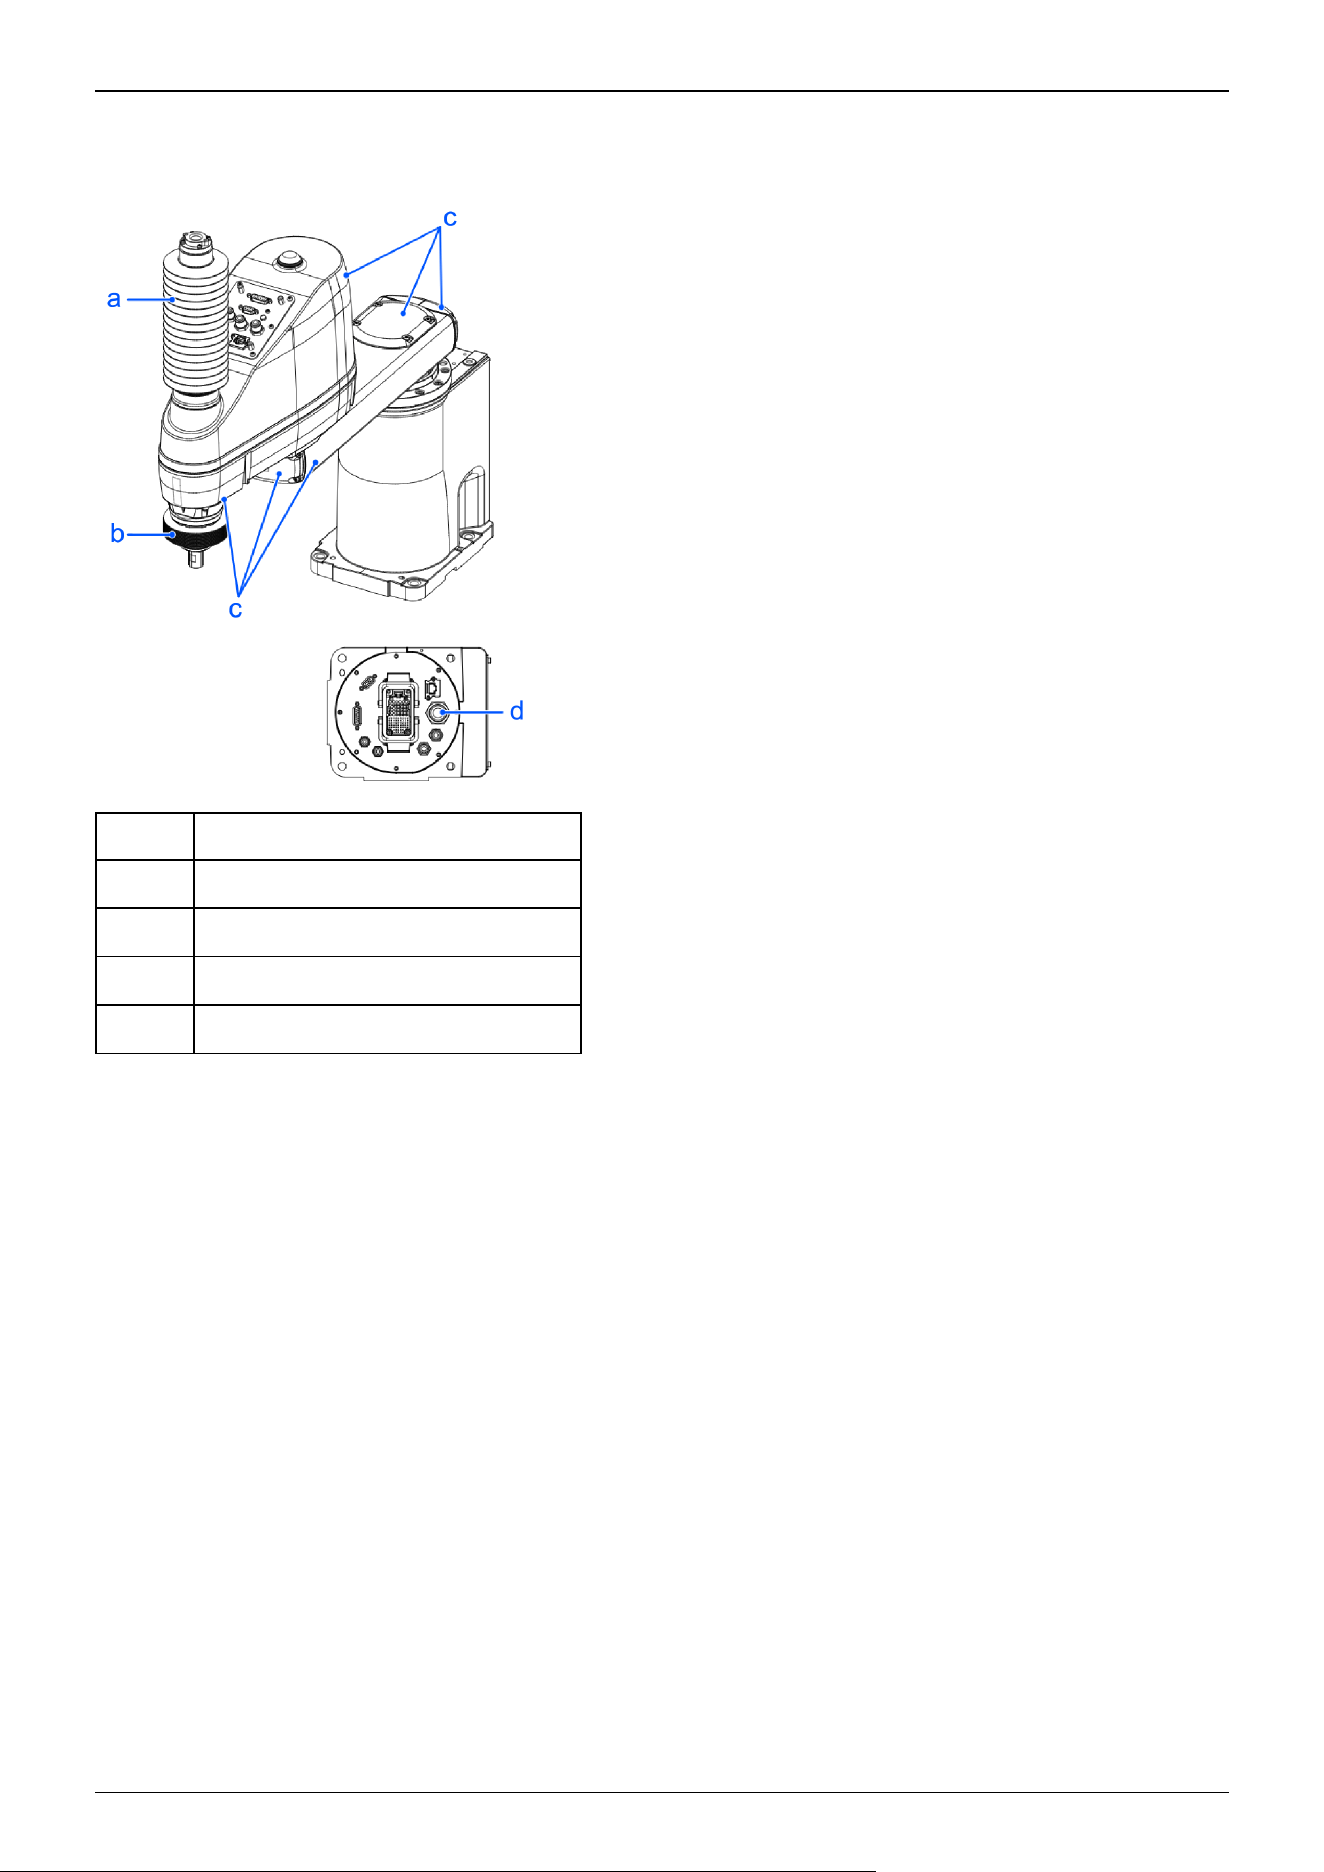
Cleanroom & ESD specifications GX8-A/GX8-B/GX8-C***CB
The parts shown below differ from the standard specifications.
Symbol Description
a Upper bellows
b Lower bellows
c Plating covers (anti-static specifications)
d Exhaust port
Industrial Robot: SCARA Robots GX series Manual Rev.11
219
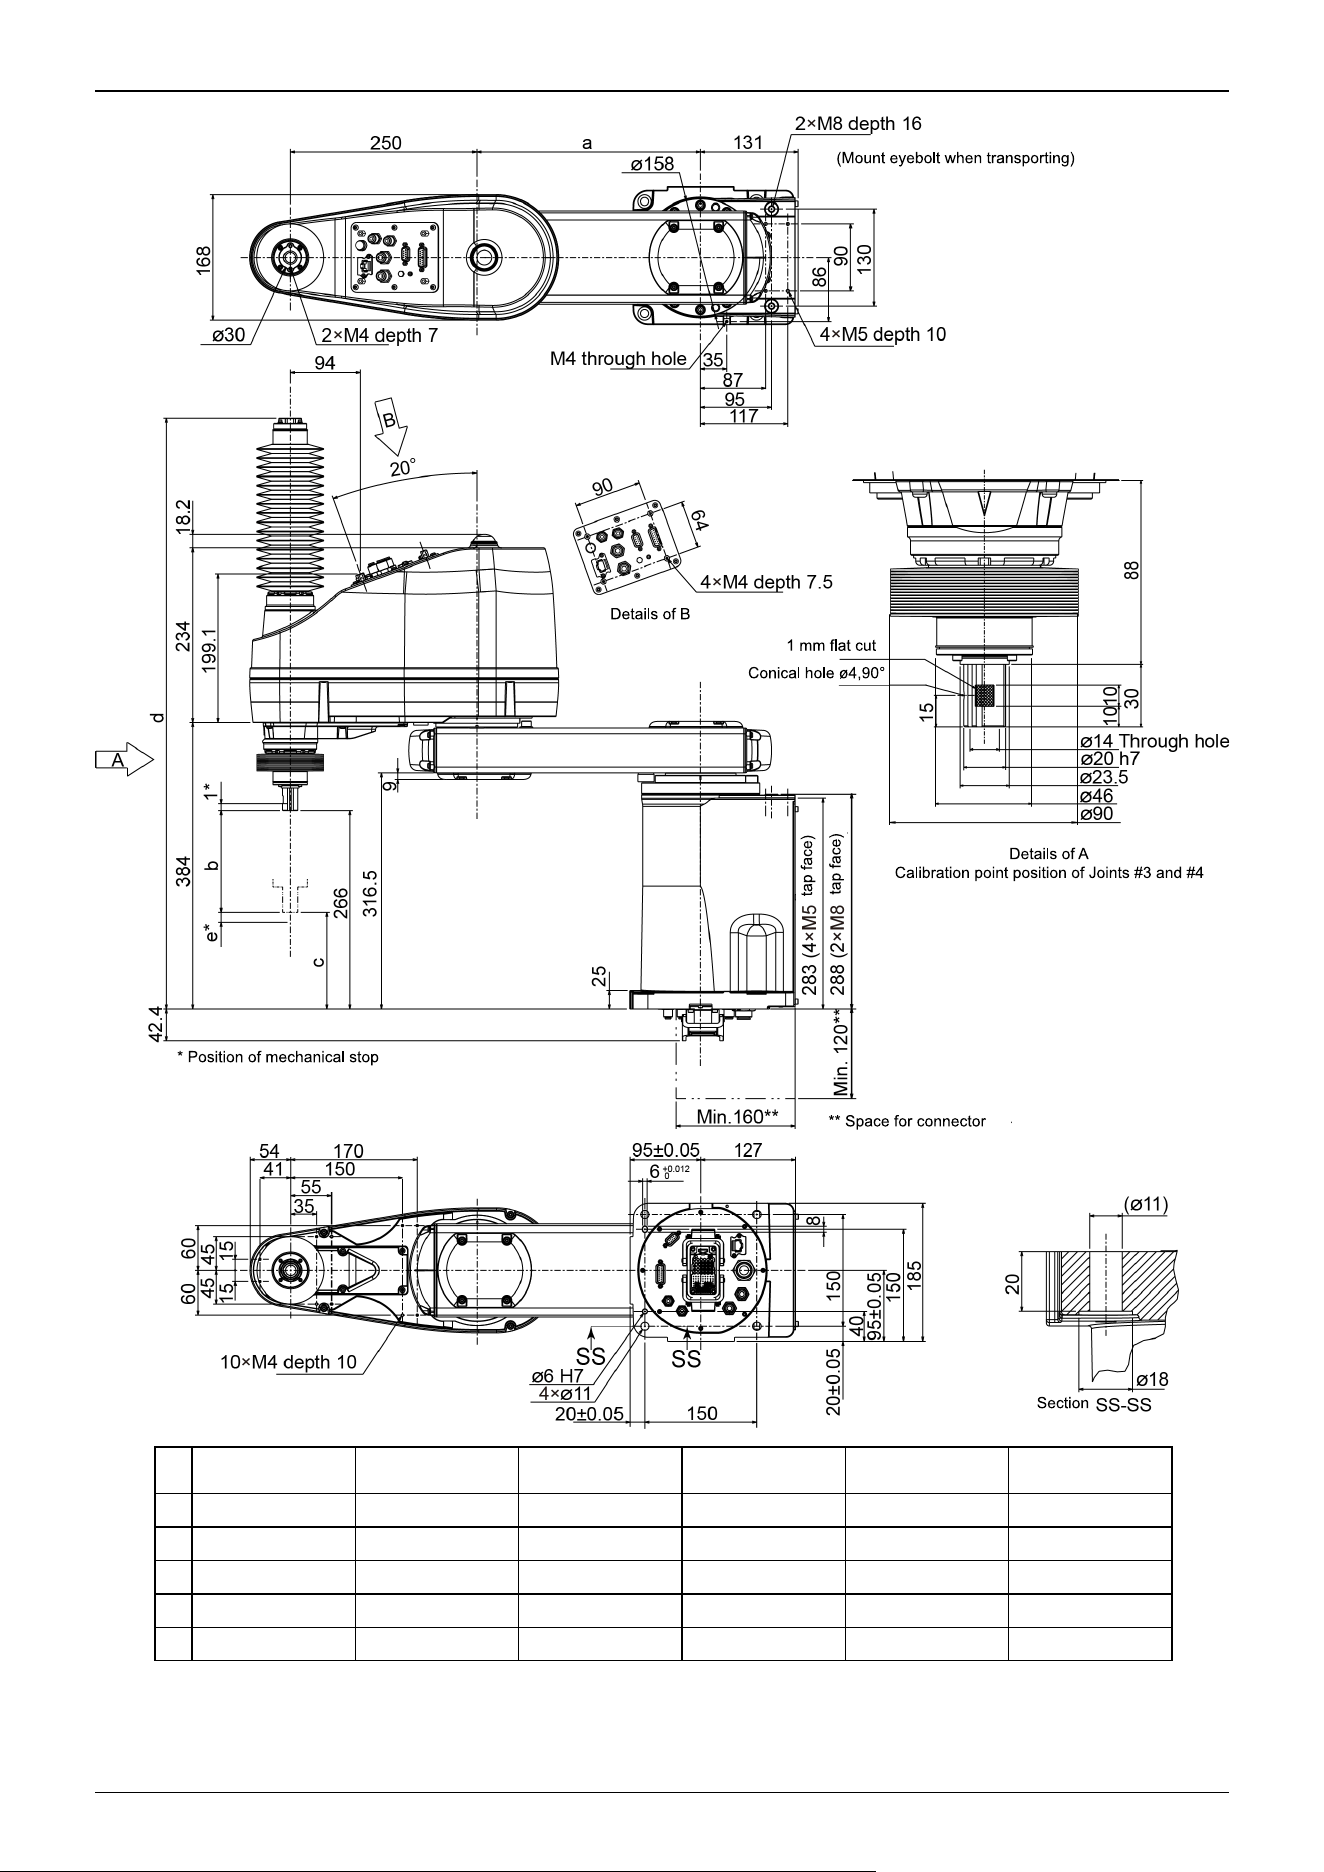
GX8-A/GX8-B/
GX8-C452CB
GX8-A/GX8-B/
GX8-C453CB
GX8-A/GX8-B/
GX8-C552CB
GX8-A/GX8-B/
GX8-C553CB
GX8-A/GX8-B/
GX8-C652CB
GX8-A/GX8-B/
GX8-C653CB
a 200 200 300 300 400 400
b 170 300 170 300 170 300
c 96 -34 96 -34 96 -34
d 791.5 910.5 791.5 910.5 791.5 910.5
e 12.6 7.6 12.6 7.6 12.6 7.6
Industrial Robot: SCARA Robots GX series Manual Rev.11
220
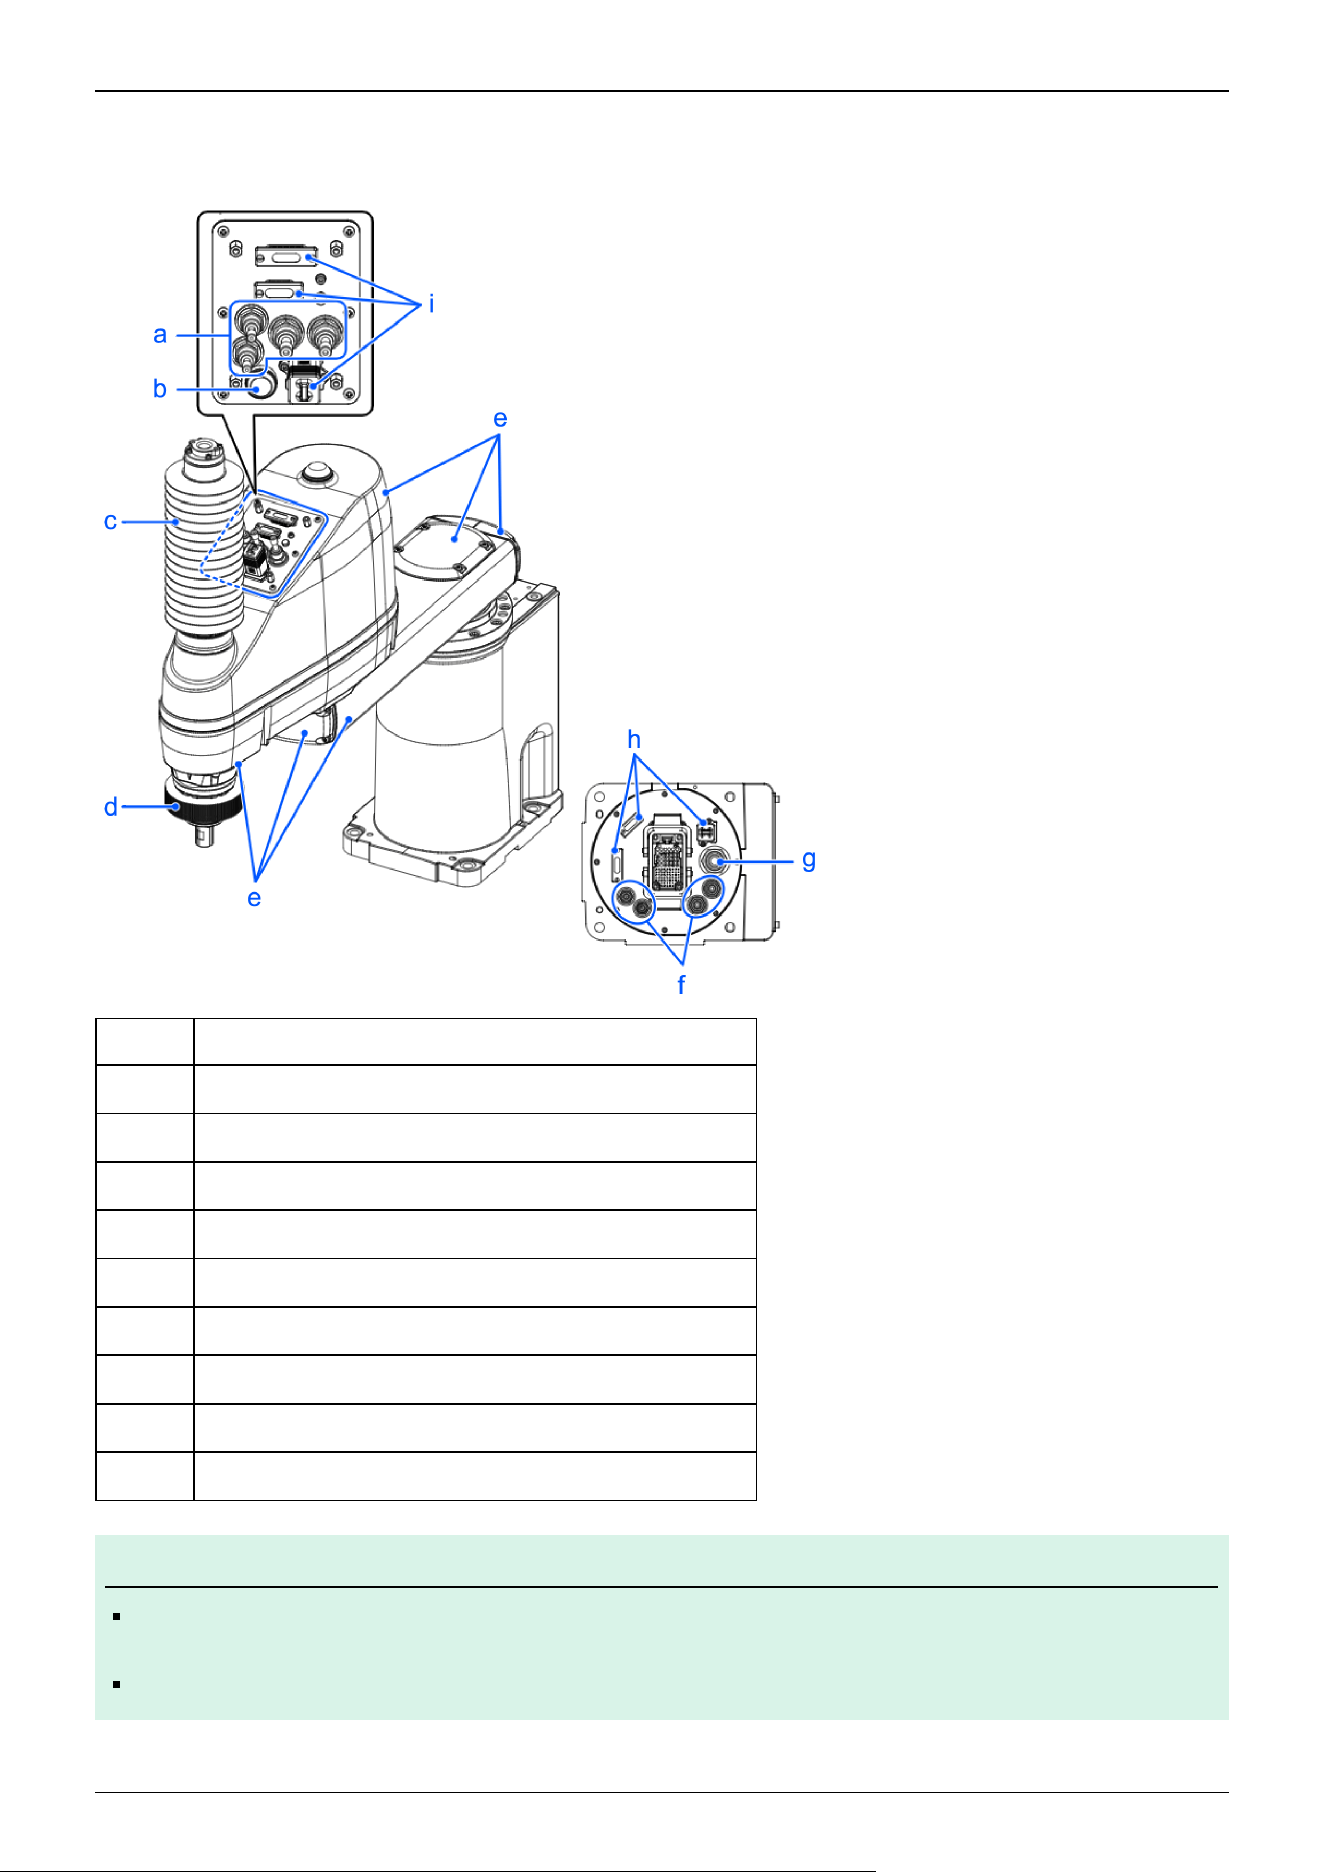
Protected-model GX8-A/GX8-B/GX8-C***PB
The parts shown below differ from the standard specifications.
Symbol Description
a Fittings with cover (protected-model)
b Joint #3 and Joint #4 brake release switch (protected-model)
c Upper bellows
d Lower bellows
e Plating cover (oil-resistant specifications)
f Fittings with cover (protected-model)
g Exhaust port with cover (protected-model)
h User connectors with cover (protected-model)
i User connectors with cover (protected-model)
KEY POINTS
For protected-models, all screws used for the exterior are stainless steel screws. (except for screws used for
stops).
The part of the M/C cable housing is not IP65 compliant when the M/C cable hood is not connected.
✏
Industrial Robot: SCARA Robots GX series Manual Rev.11
221
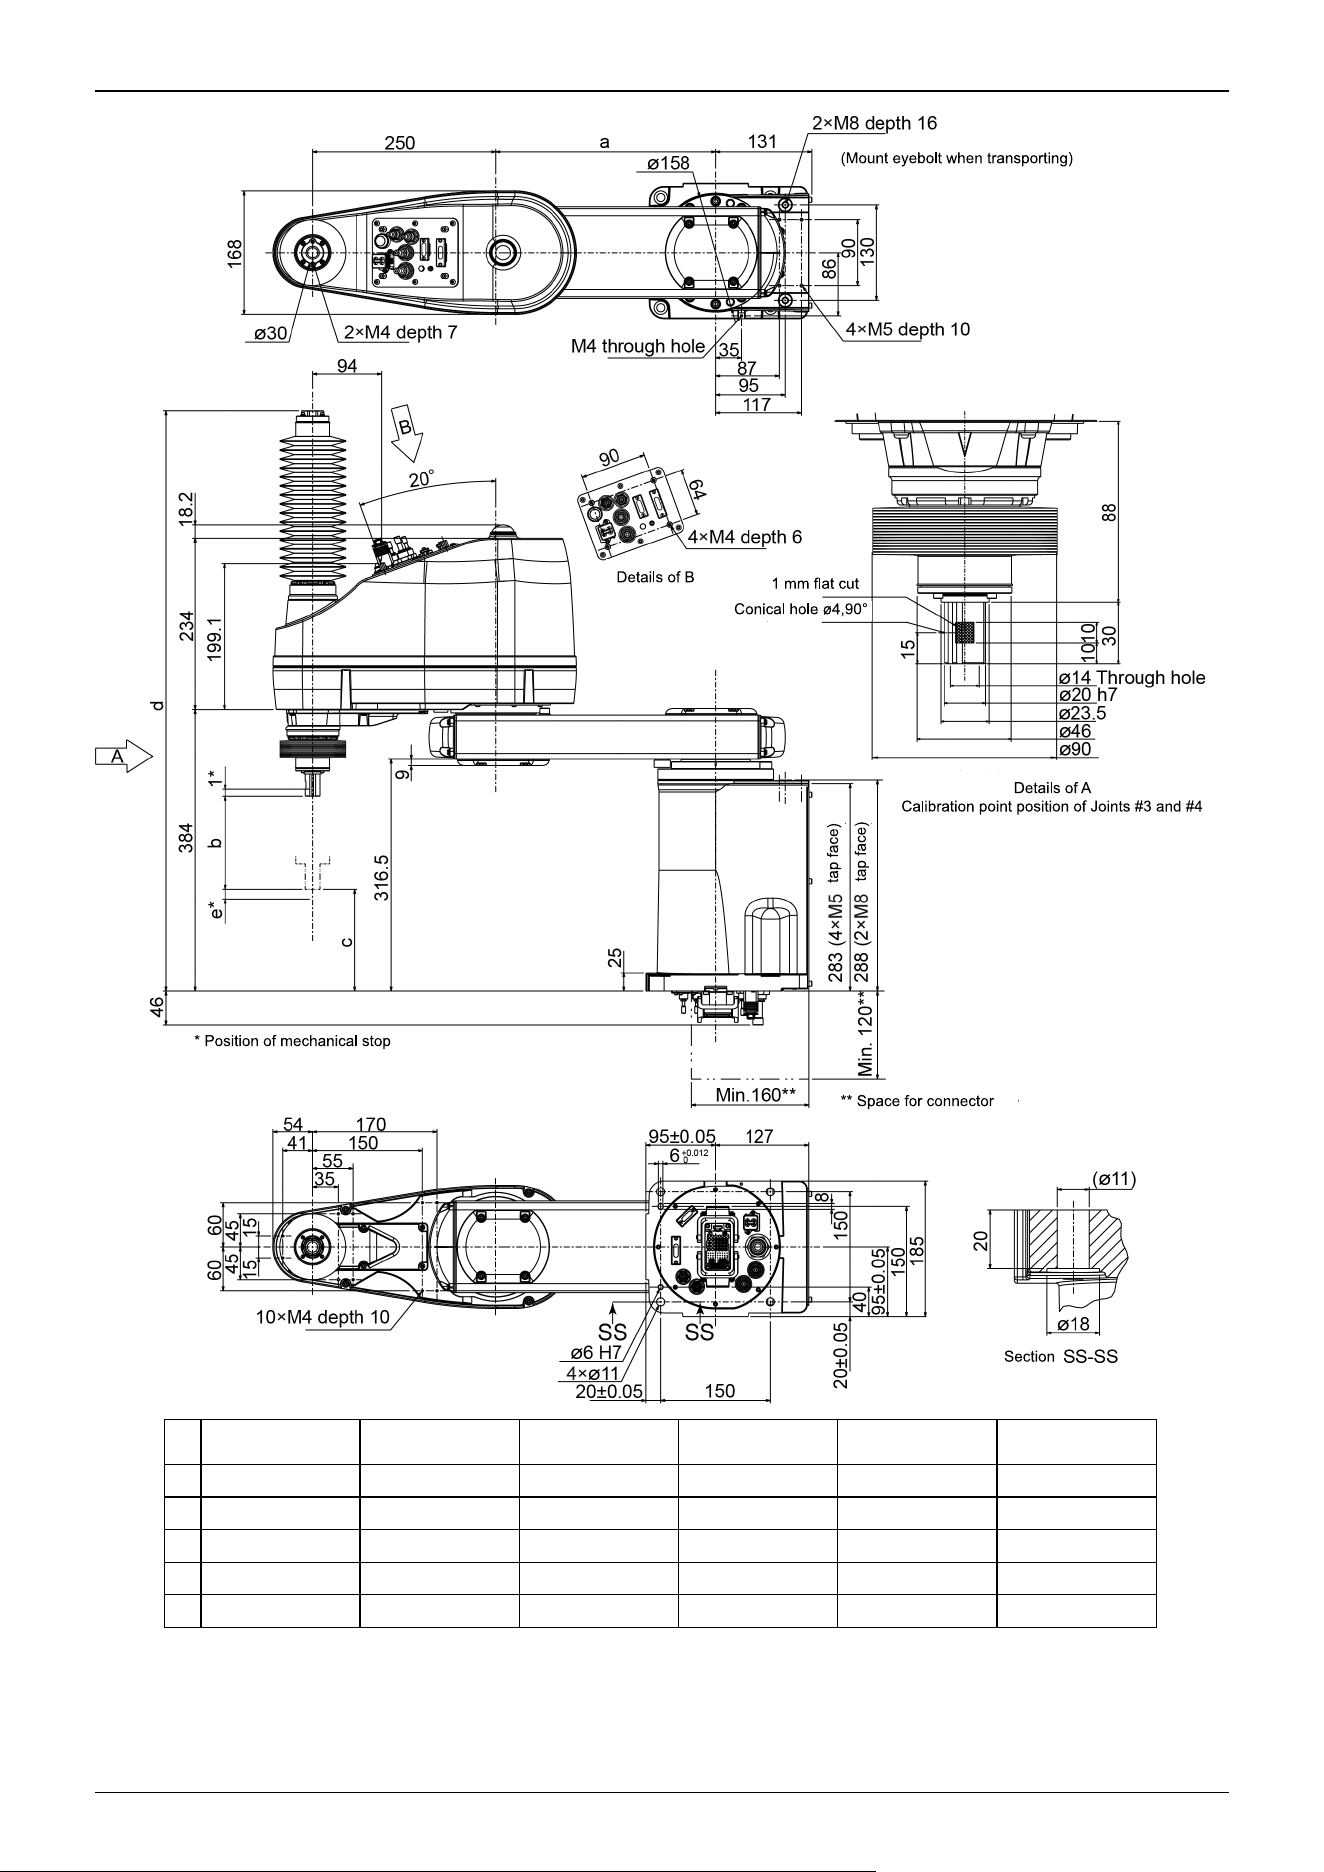
GX8-A/GX8-B/
GX8-C452PB
GX8-A/GX8-B/
GX8-C453PB
GX8-A/GX8-B/
GX8-C552PB
GX8-A/GX8-B/
GX8-C553PB
GX8-A/GX8-B/
GX8-C652PB
GX8-A/GX8-B/
GX8-C653PB
a 200 200 300 300 400 400
b 170 300 170 300 170 300
c 96 -34 96 -34 96 -34
d 791.5 910.5 791.5 910.5 791.5 910.5
e 12.6 7.6 12.6 7.6 12.6 7.6
Industrial Robot: SCARA Robots GX series Manual Rev.11
222
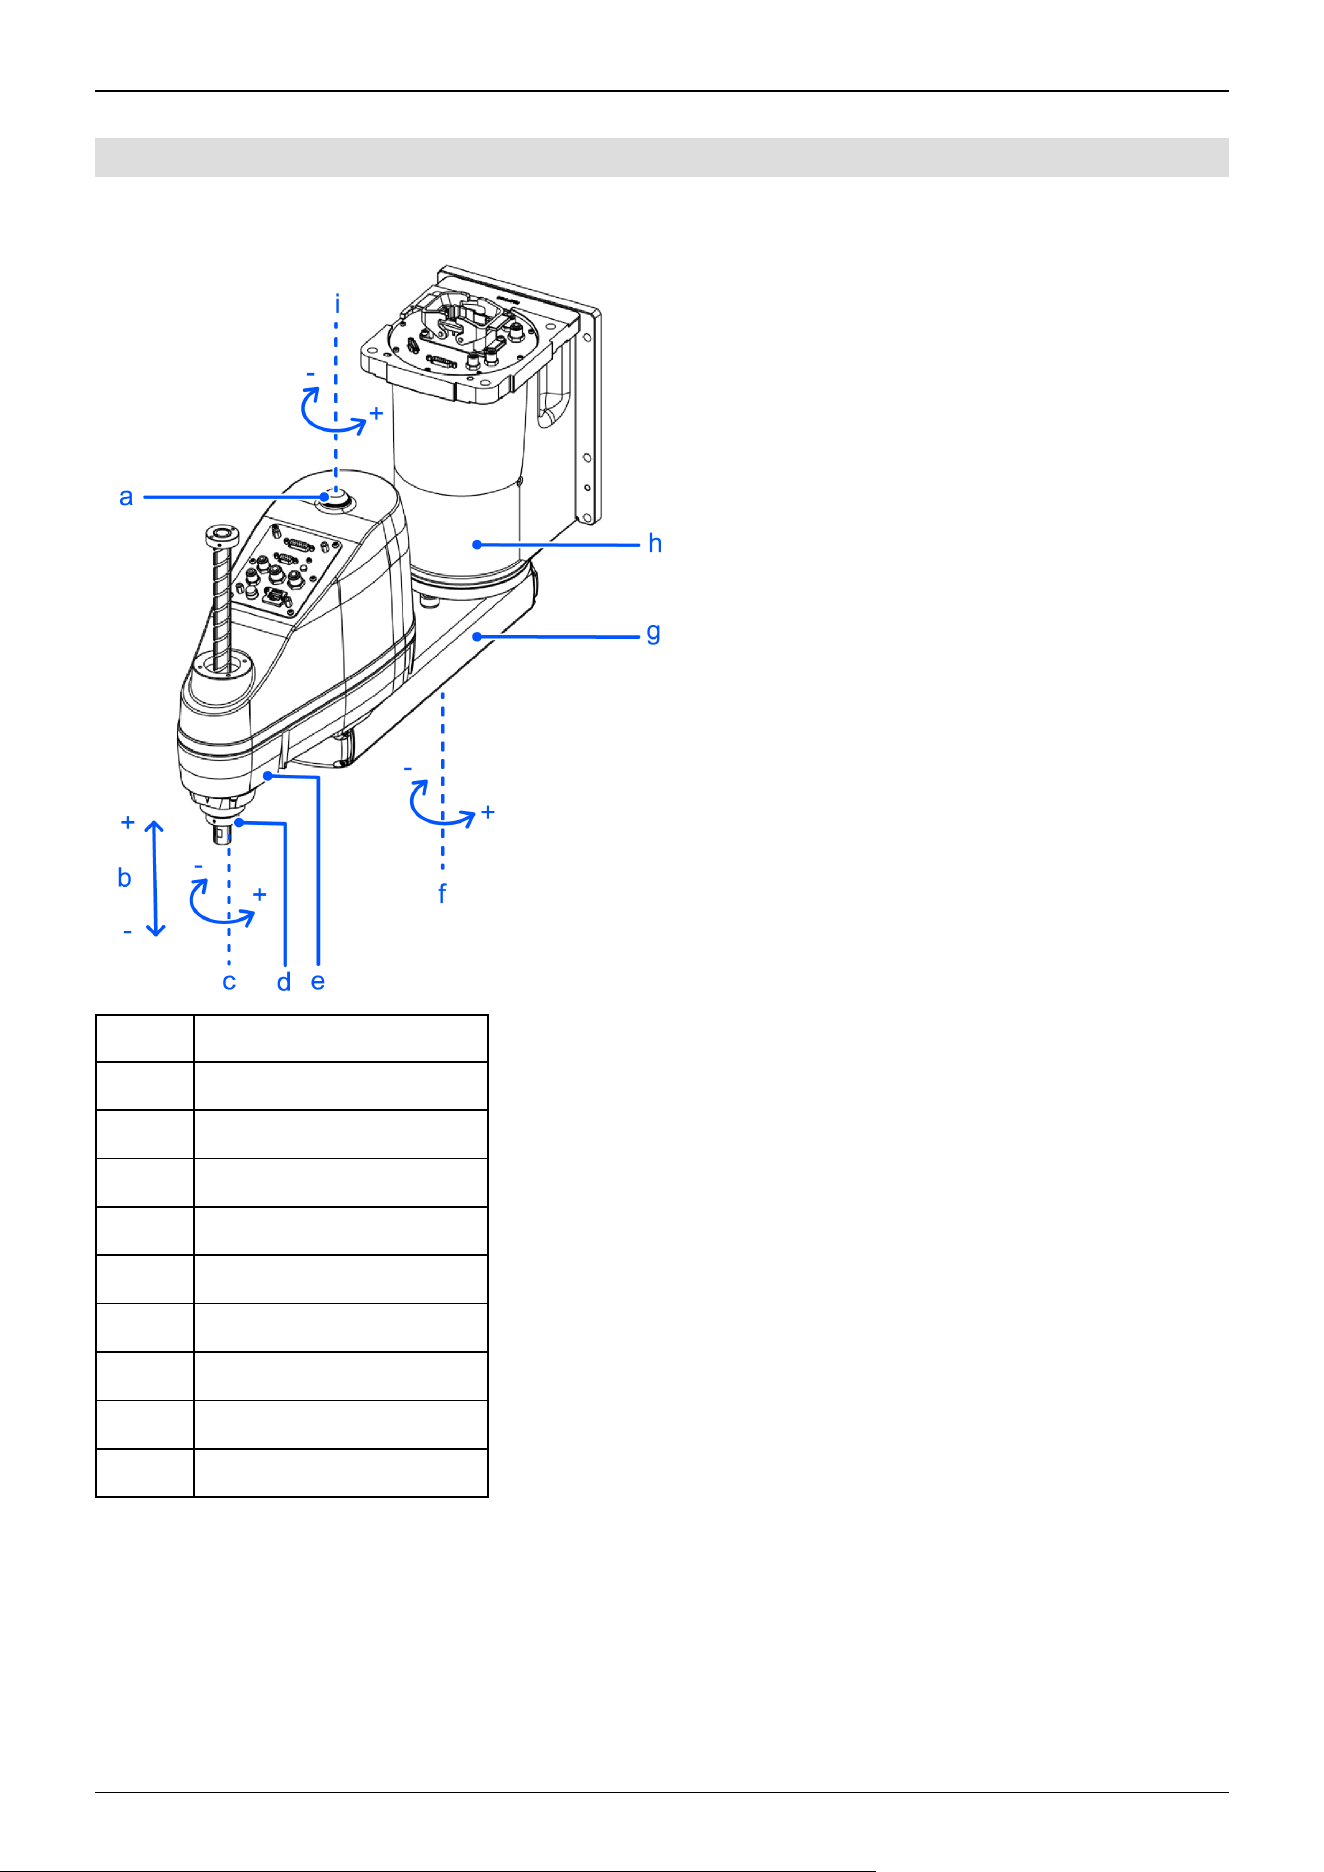
4.2.4.2 Wall Mounting Specifications
Standard specifications GX8-A/GX8-B/GX8-C***SW
Symbol Description
a Indicating lamp
b Joint #3 (up/down movement)
c Joint #4 (rotation)
d Shaft
e Arm #2
f Joint #1 (rotation)
g Arm #1
h Base
i Joint #2 (rotation)
Industrial Robot: SCARA Robots GX series Manual Rev.11
223
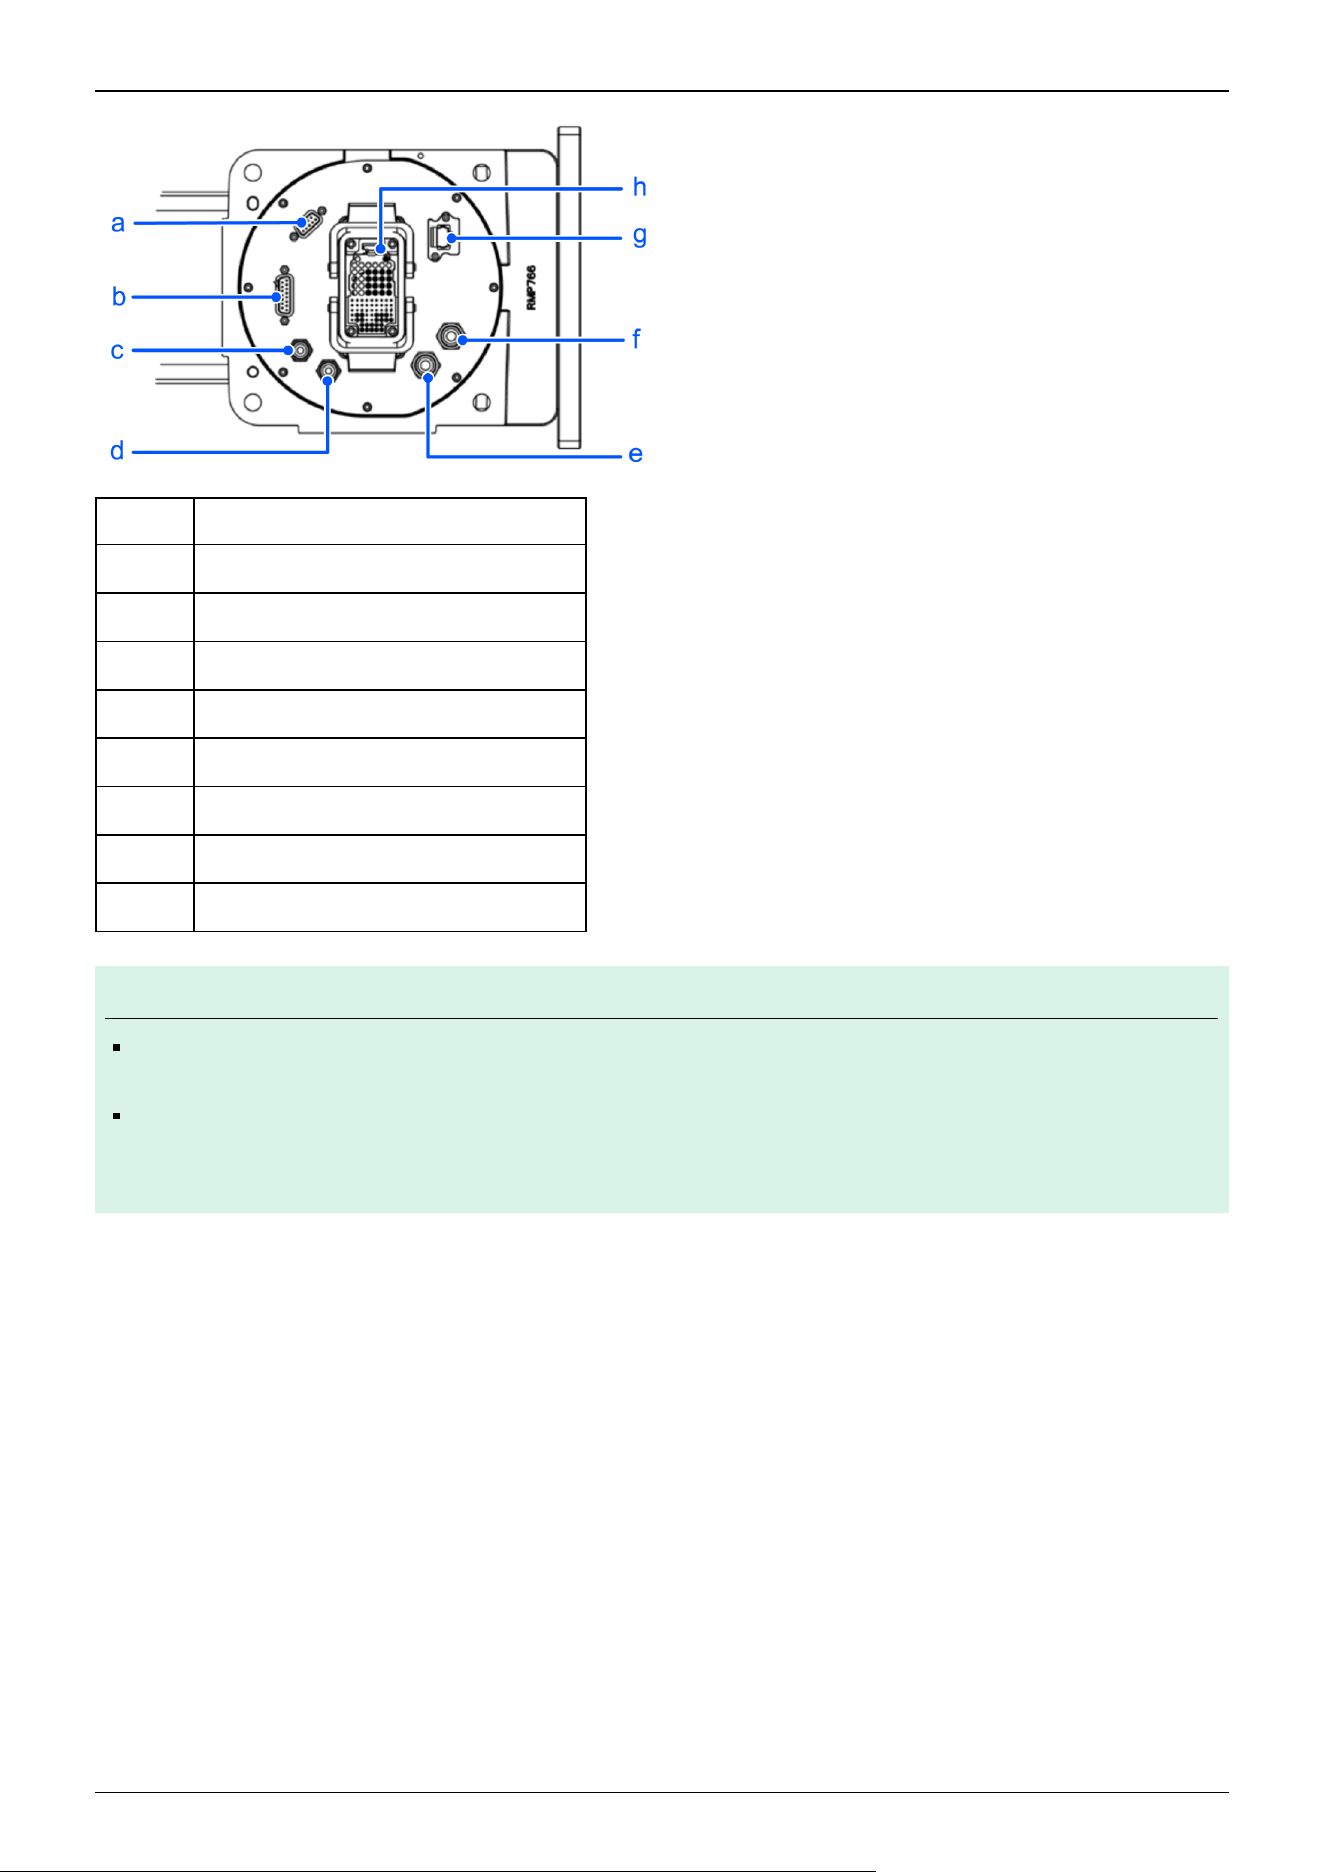
Symbol Description
a User connector (9-pin D-sub connector)
b User connector (15-pin D-sub connector)
c Fitting for ø4 mm tube (blue)
d Fitting for ø4 mm tube (white)
e Fitting for ø6 mm tube (blue)
f Fitting for ø6 mm tube (white)
g User connector (Ethernet connector)
h M/C cable housing
KEY POINTS
The brake release switch is used with both Joint #3 and Joint #4. Press the brake release switch while in the
emergency stop state to simultaneously release the brakes on Joint #3 and Joint #4.
Before starting any maintenance work, be sure to turn off the Controller and inform others in the surrounding
area that work is in progress. Performing any work procedure with the power turned on is extremely
dangerous and may result in electric shock and/or malfunction of the robot system.
✏
Industrial Robot: SCARA Robots GX series Manual Rev.11
224
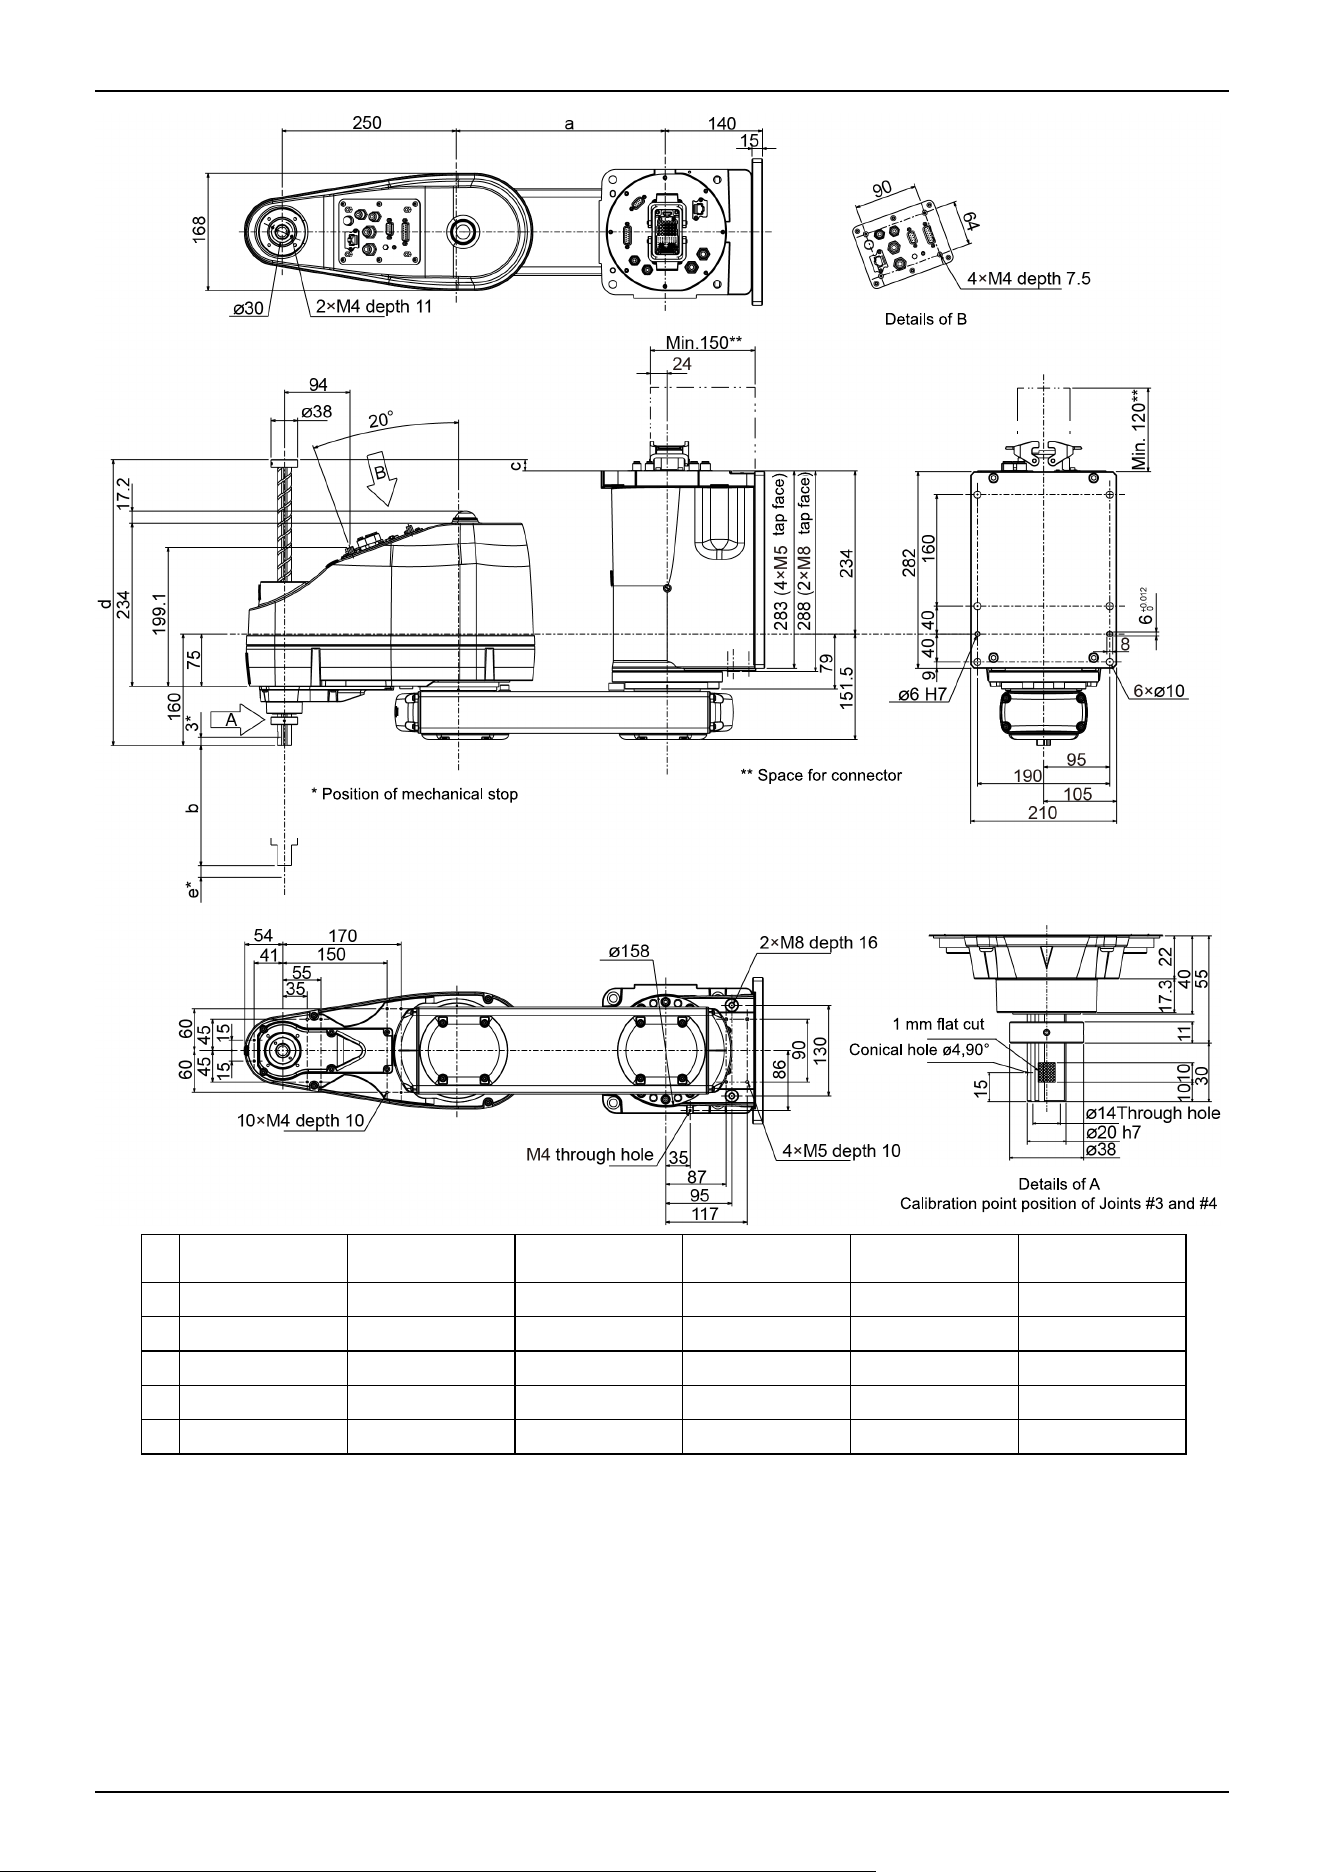
GX8-A/GX8-B/
GX8-C452SW, EW
GX8-A/GX8-B/
GX8-C453SW, EW
GX8-A/GX8-B/
GX8-C552SW, EW
GX8-A/GX8-B/
GX8-C553SW, EW
GX8-A/GX8-B/
GX8-C652SW, EW
GX8-A/GX8-B/
GX8-C653SW, EW
a 200 200 300 300 400 400
b 200 330 200 330 200 330
c 16 141 16 141 16 141
d 410 535 410 535 410 535
e 15.6 10.6 15.6 10.6 15.6 10.6
Industrial Robot: SCARA Robots GX series Manual Rev.11
225
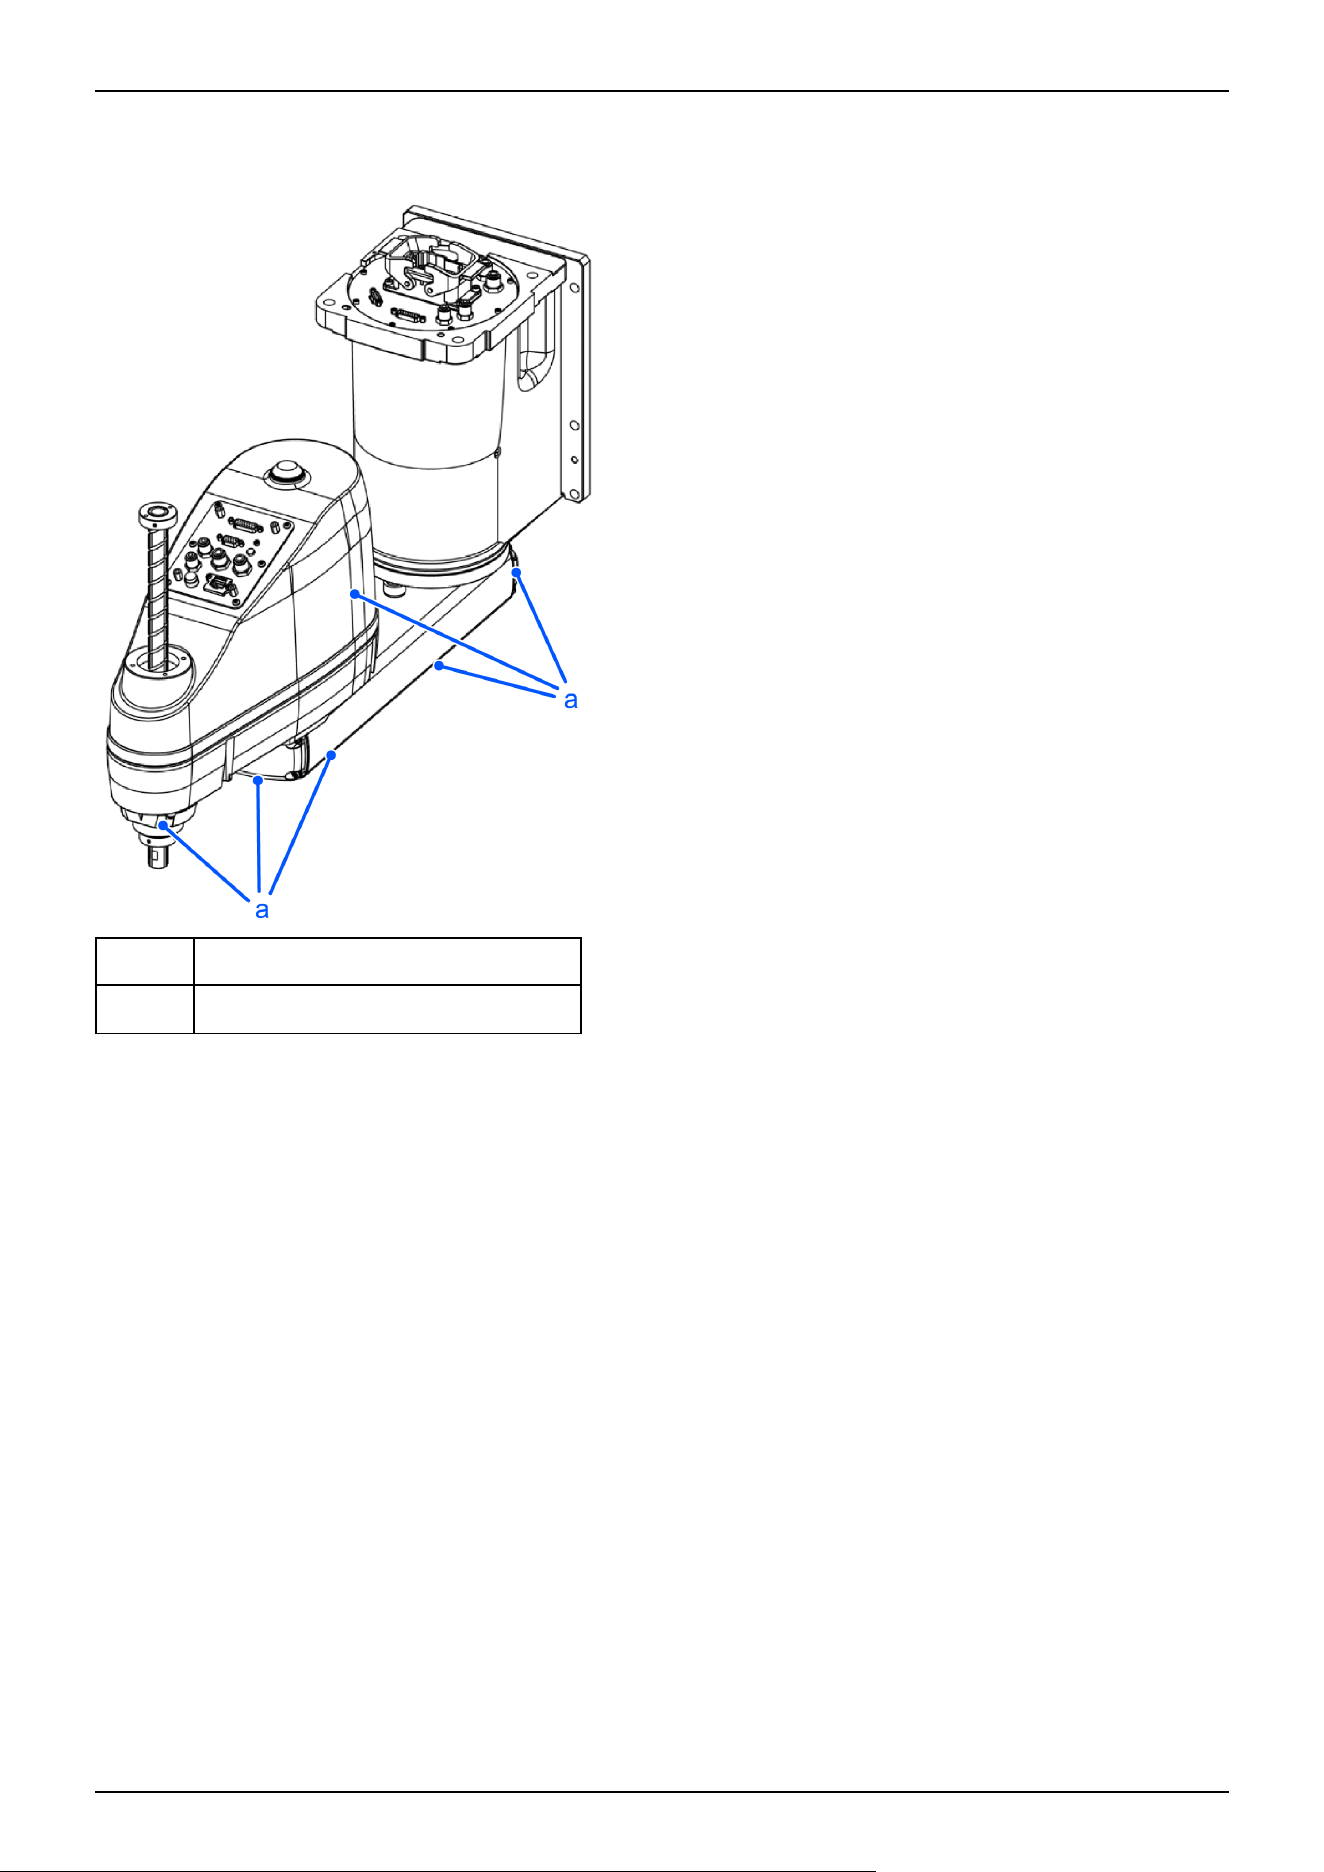
ESD specifications GX8-A/GX8-B/GX8-C***EW
The parts shown below differ from the standard specifications. The external dimensions are identical.
Symbol Description
a Plating covers (anti-static specifications)
Industrial Robot: SCARA Robots GX series Manual Rev.11
226
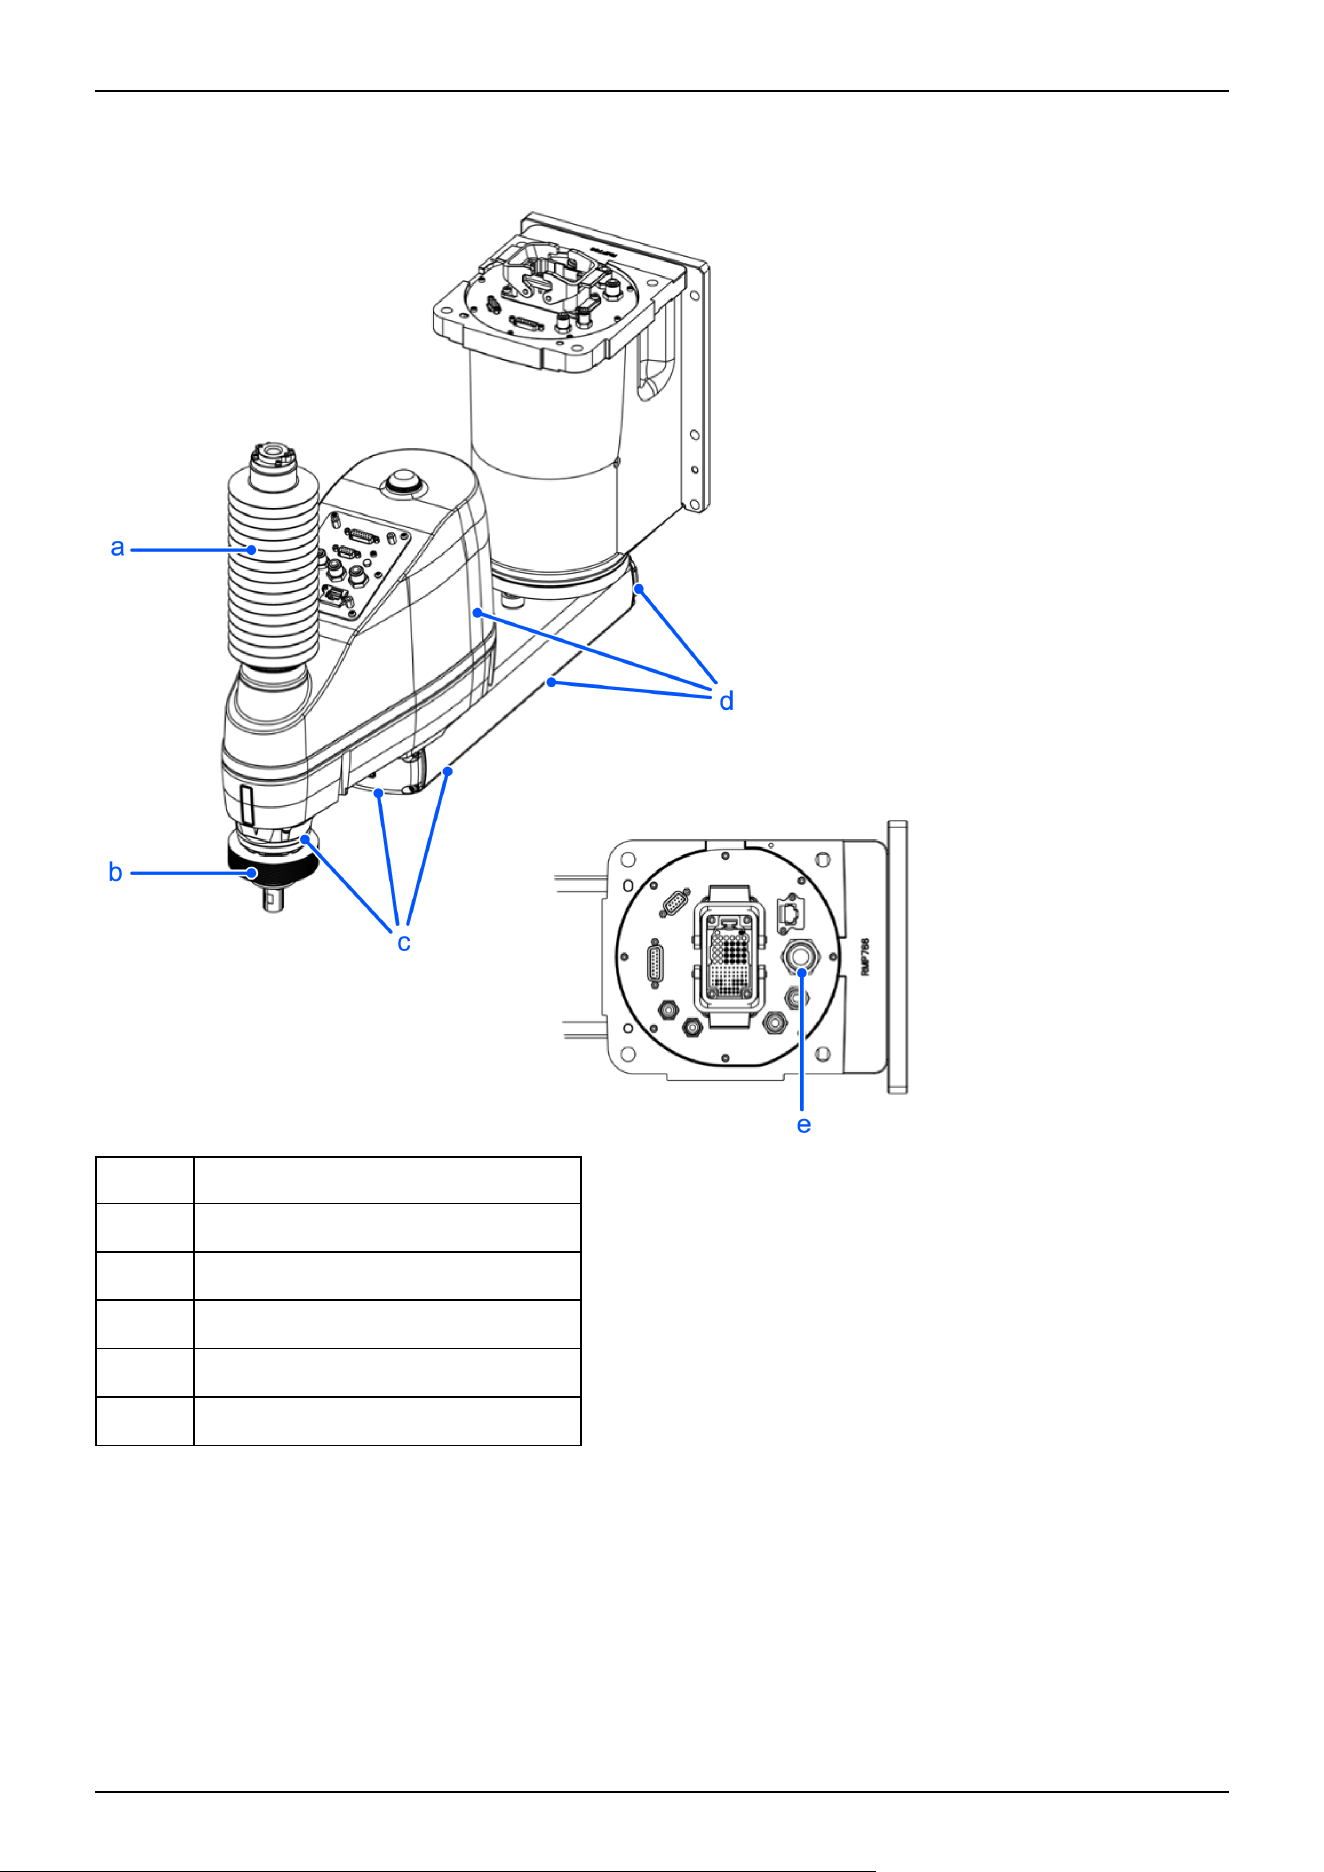
Cleanroom & ESD specifications GX8-A/GX8-B/GX8-C***CW
The parts shown below differ from the standard specifications.
Symbol Description
a Upper bellows
b Lower bellows
c Plating covers (anti-static specifications)
d Plating cover (anti-static specifications)
e Exhaust port
Industrial Robot: SCARA Robots GX series Manual Rev.11
227
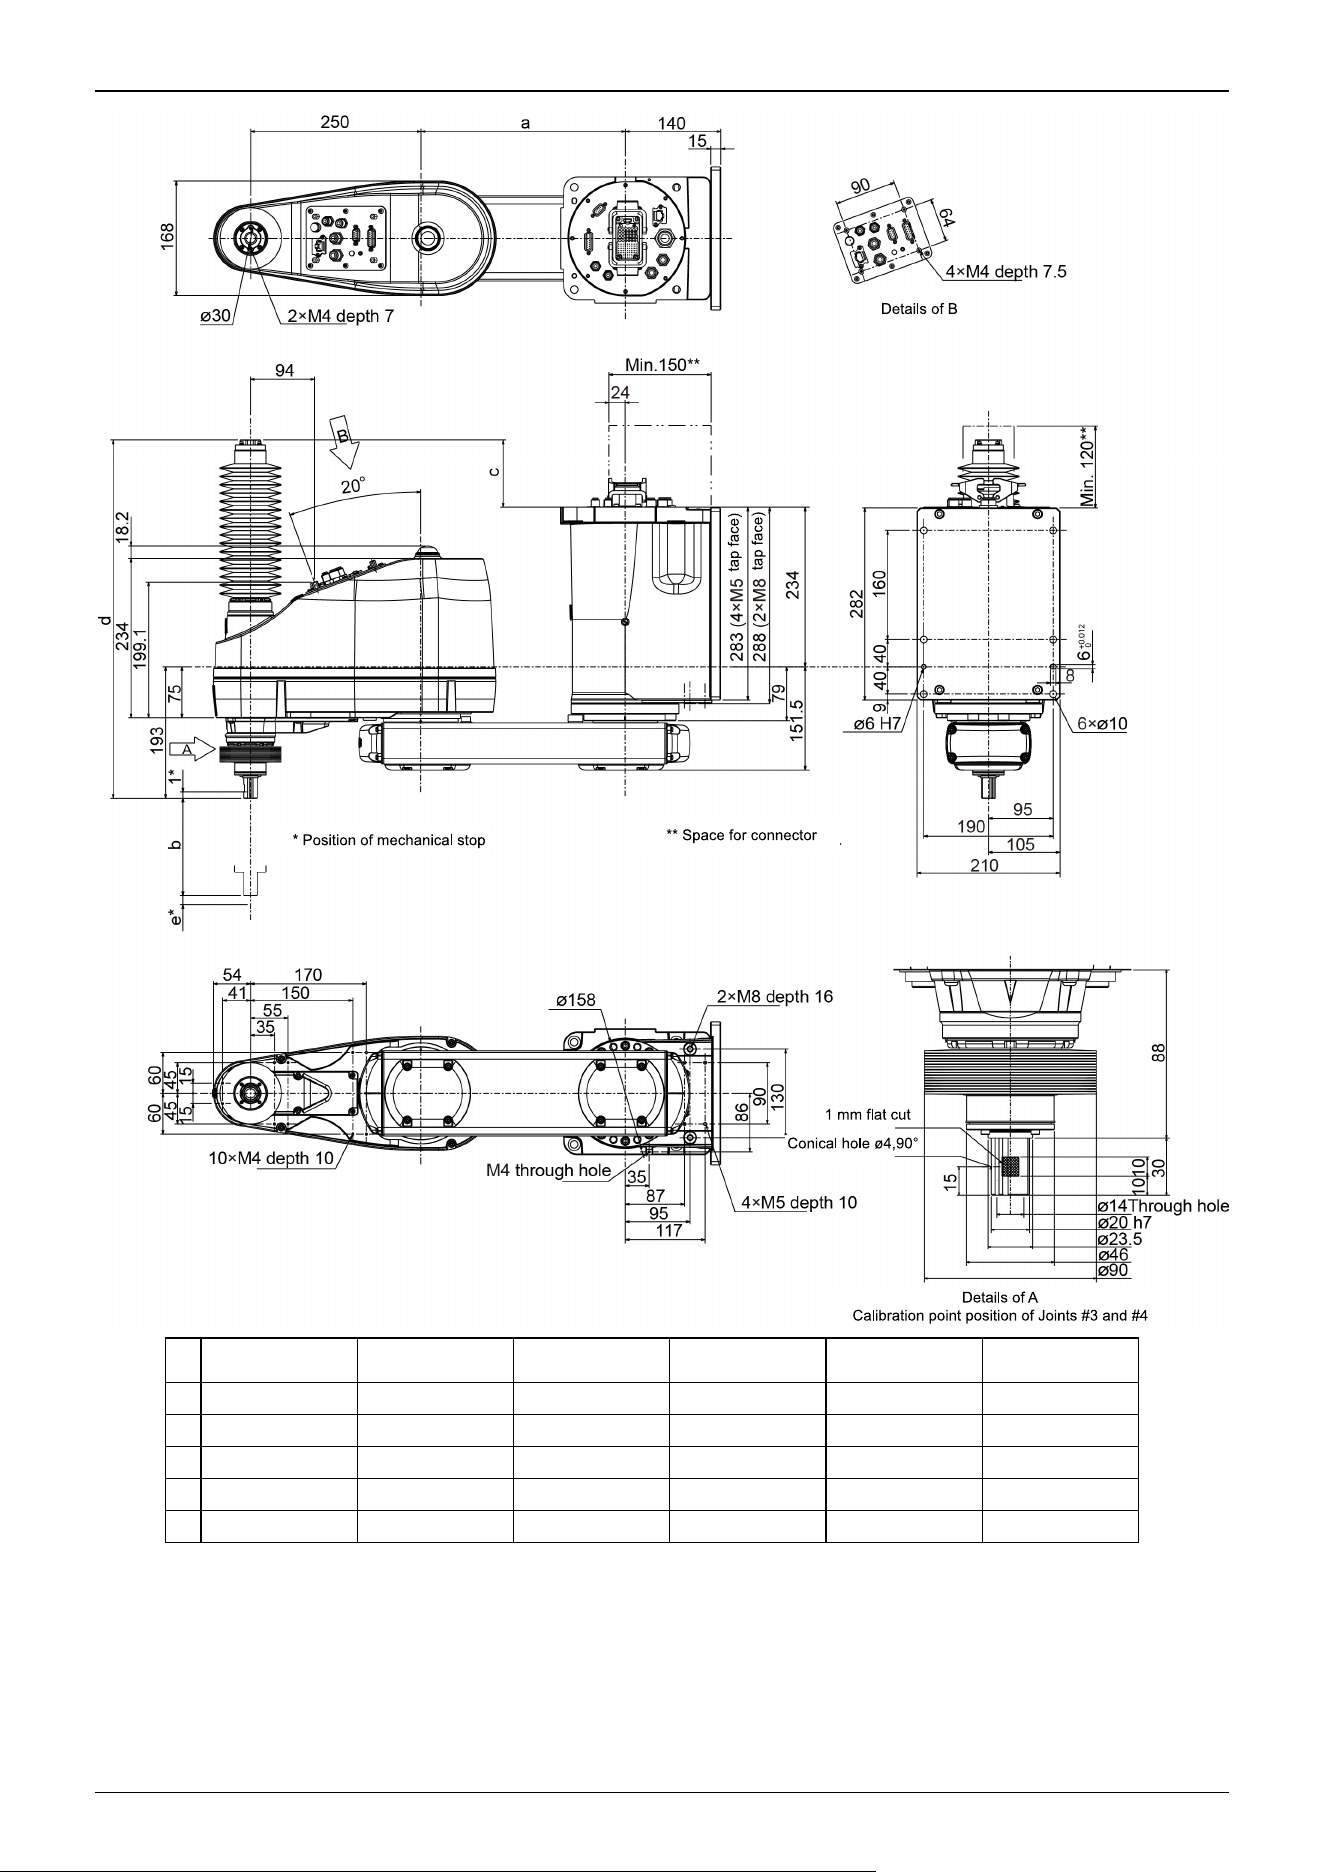
GX8-A/GX8-B/
GX8-C452CW
GX8-A/GX8-B/
GX8-C453CW
GX8-A/GX8-B/
GX8-C552CW
GX8-A/GX8-B/
GX8-C553CW
GX8-A/GX8-B/
GX8-C652CW
GX8-A/GX8-B/
GX8-C653CW
a 200 200 300 300 400 400
b 170 300 170 300 170 300
c 98.5 223.5 98.5 223.5 98.5 223.5
d 525.5 650.5 525.5 650.5 525.5 650.5
e 12.6 7.6 12.6 7.6 12.6 7.6
Industrial Robot: SCARA Robots GX series Manual Rev.11
228
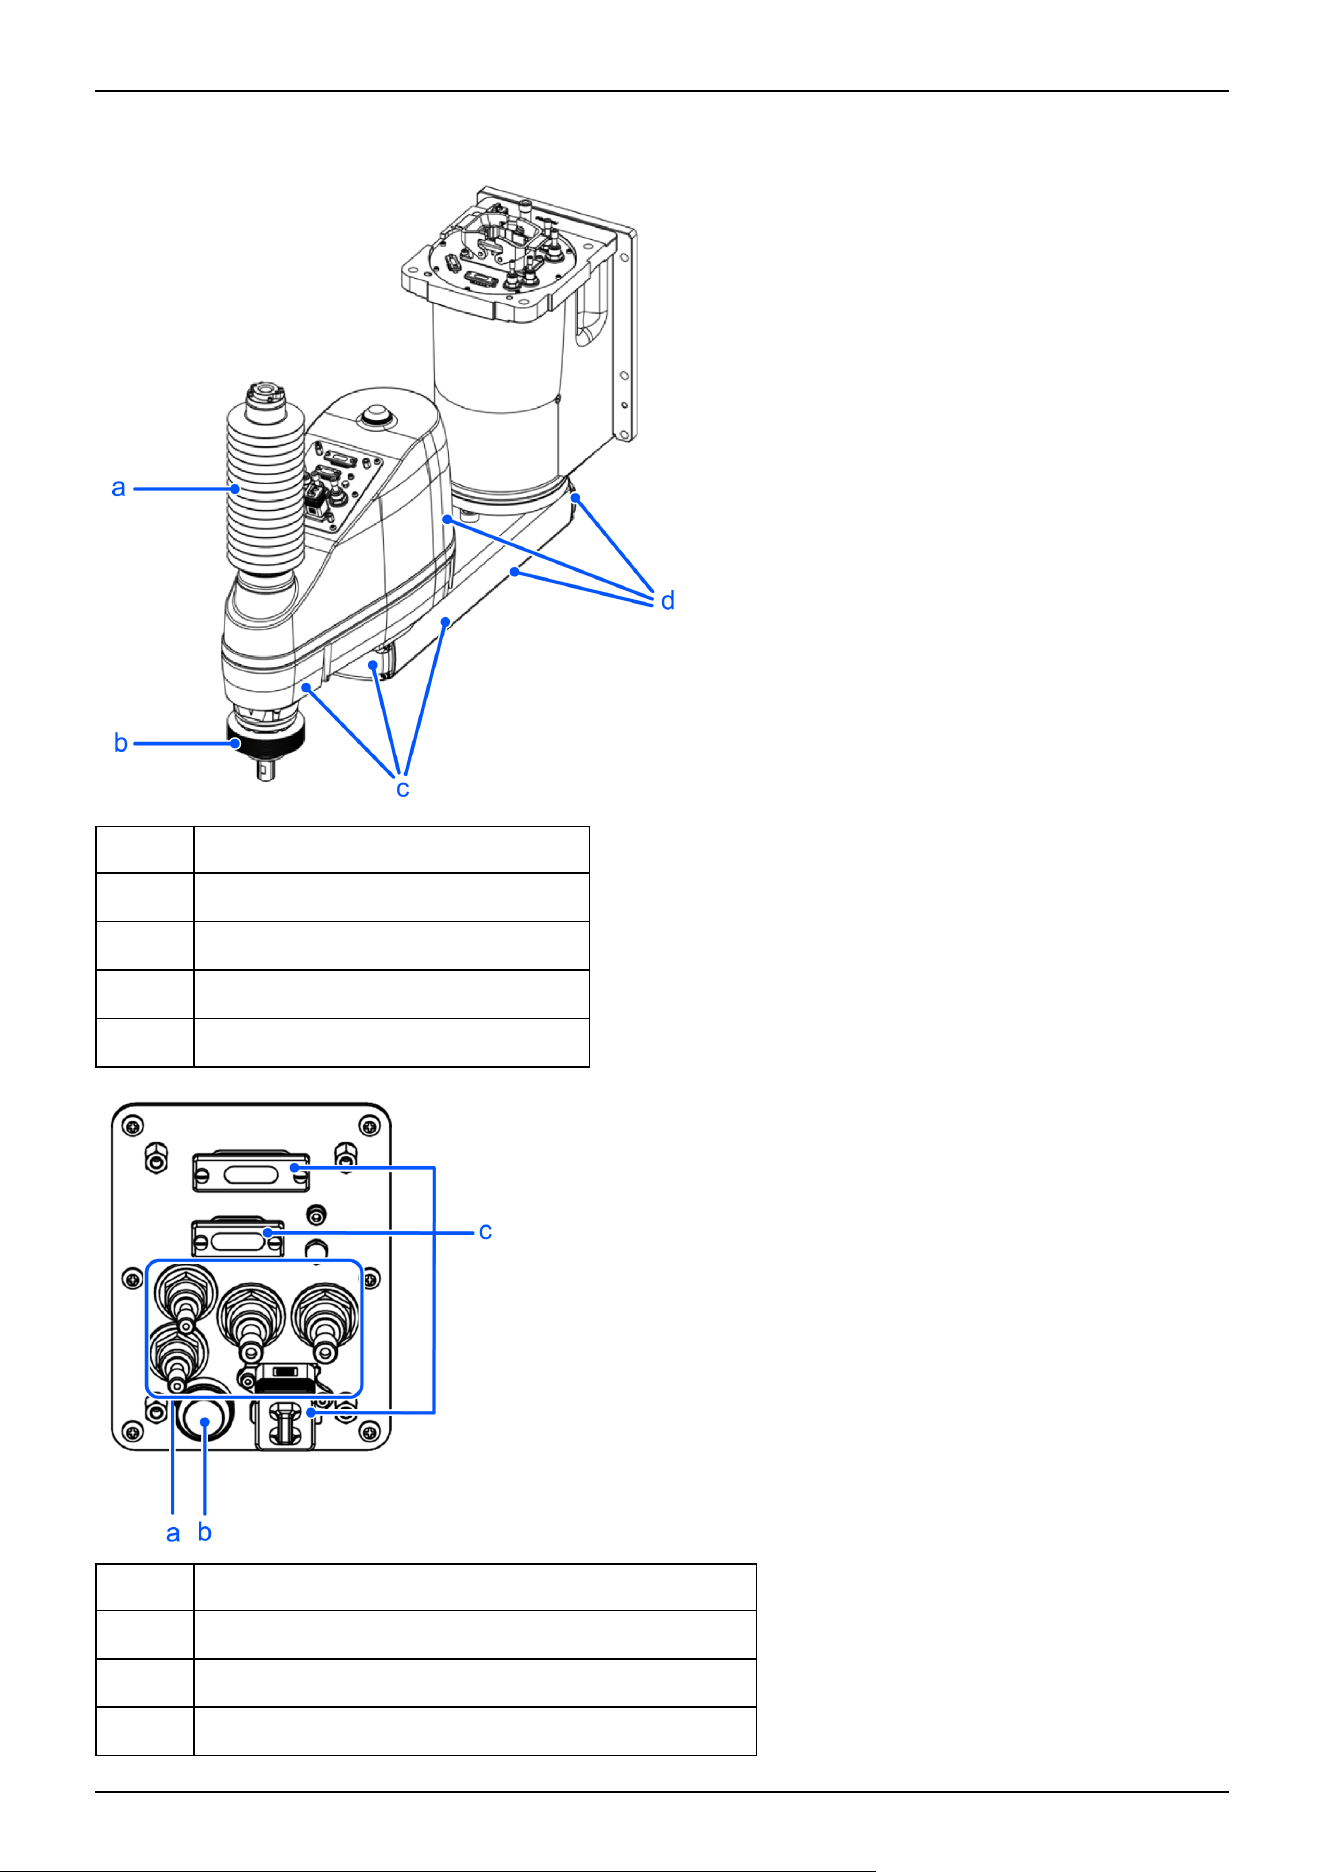
Protected-model GX8-A/GX8-B/GX8-C***PW
The parts shown below differ from the standard specifications.
Symbol Description
a Upper bellows
b Lower bellows
c Plating cover (oil-resistant specifications)
d Plating cover (oil-resistant specifications)
Symbol Description
a Fittings with cover (protected-model)
b Joint #3 and Joint #4 brake release switch (protected-model)
c User connectors with cover (protected-model)
Industrial Robot: SCARA Robots GX series Manual Rev.11
229
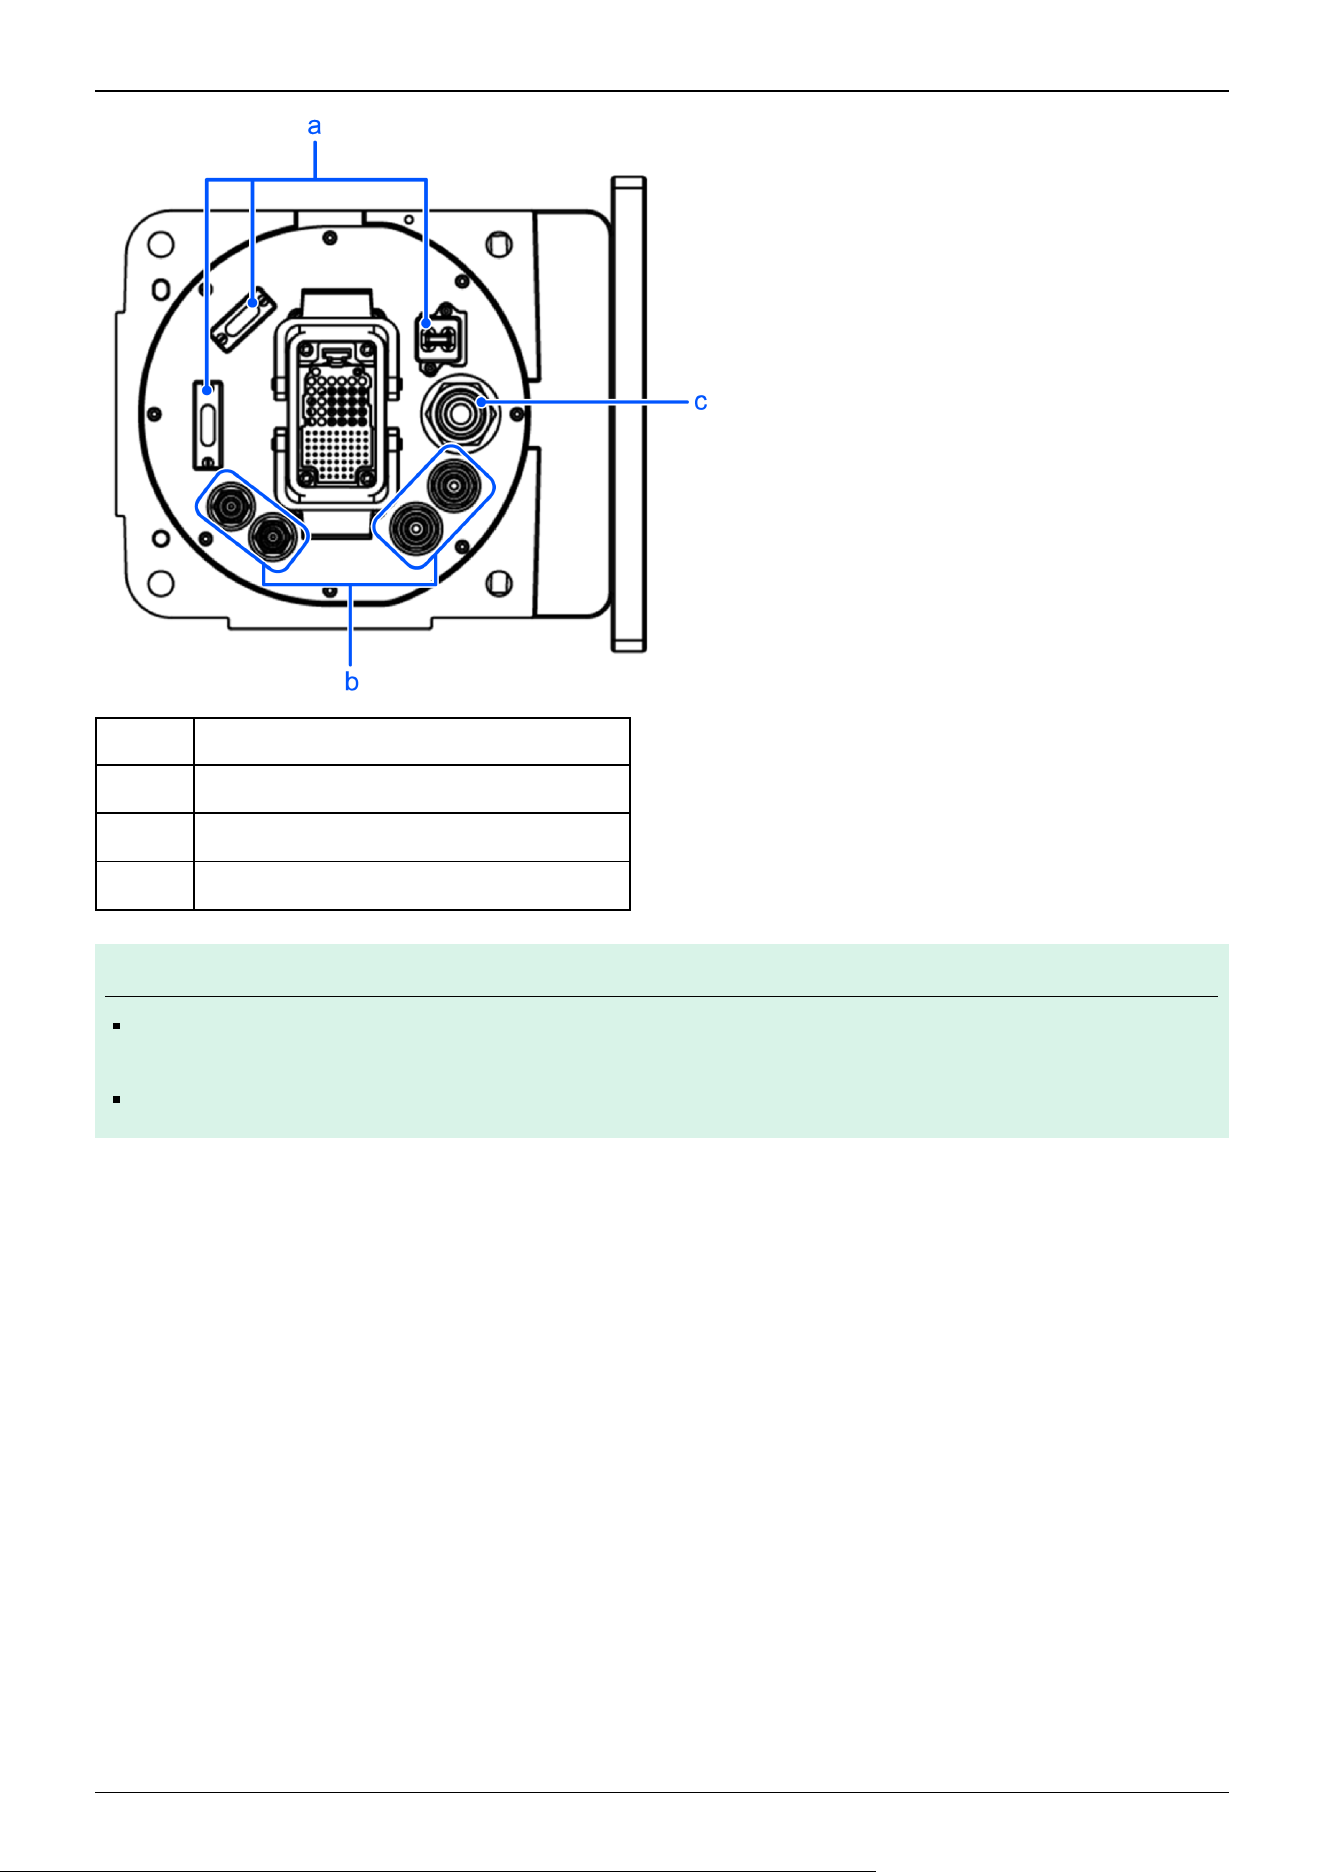
Symbol Description
a User connectors with cover (protected-model)
b Fittings with cover (protected-model)
c Exhaust port with cover
KEY POINTS
For protected-models, all screws used for the exterior are stainless steel screws. (except for screws used for
stops).
The part of the M/C cable housing is not IP65 compliant when the M/C cable hood is not connected.
✏
Industrial Robot: SCARA Robots GX series Manual Rev.11
230
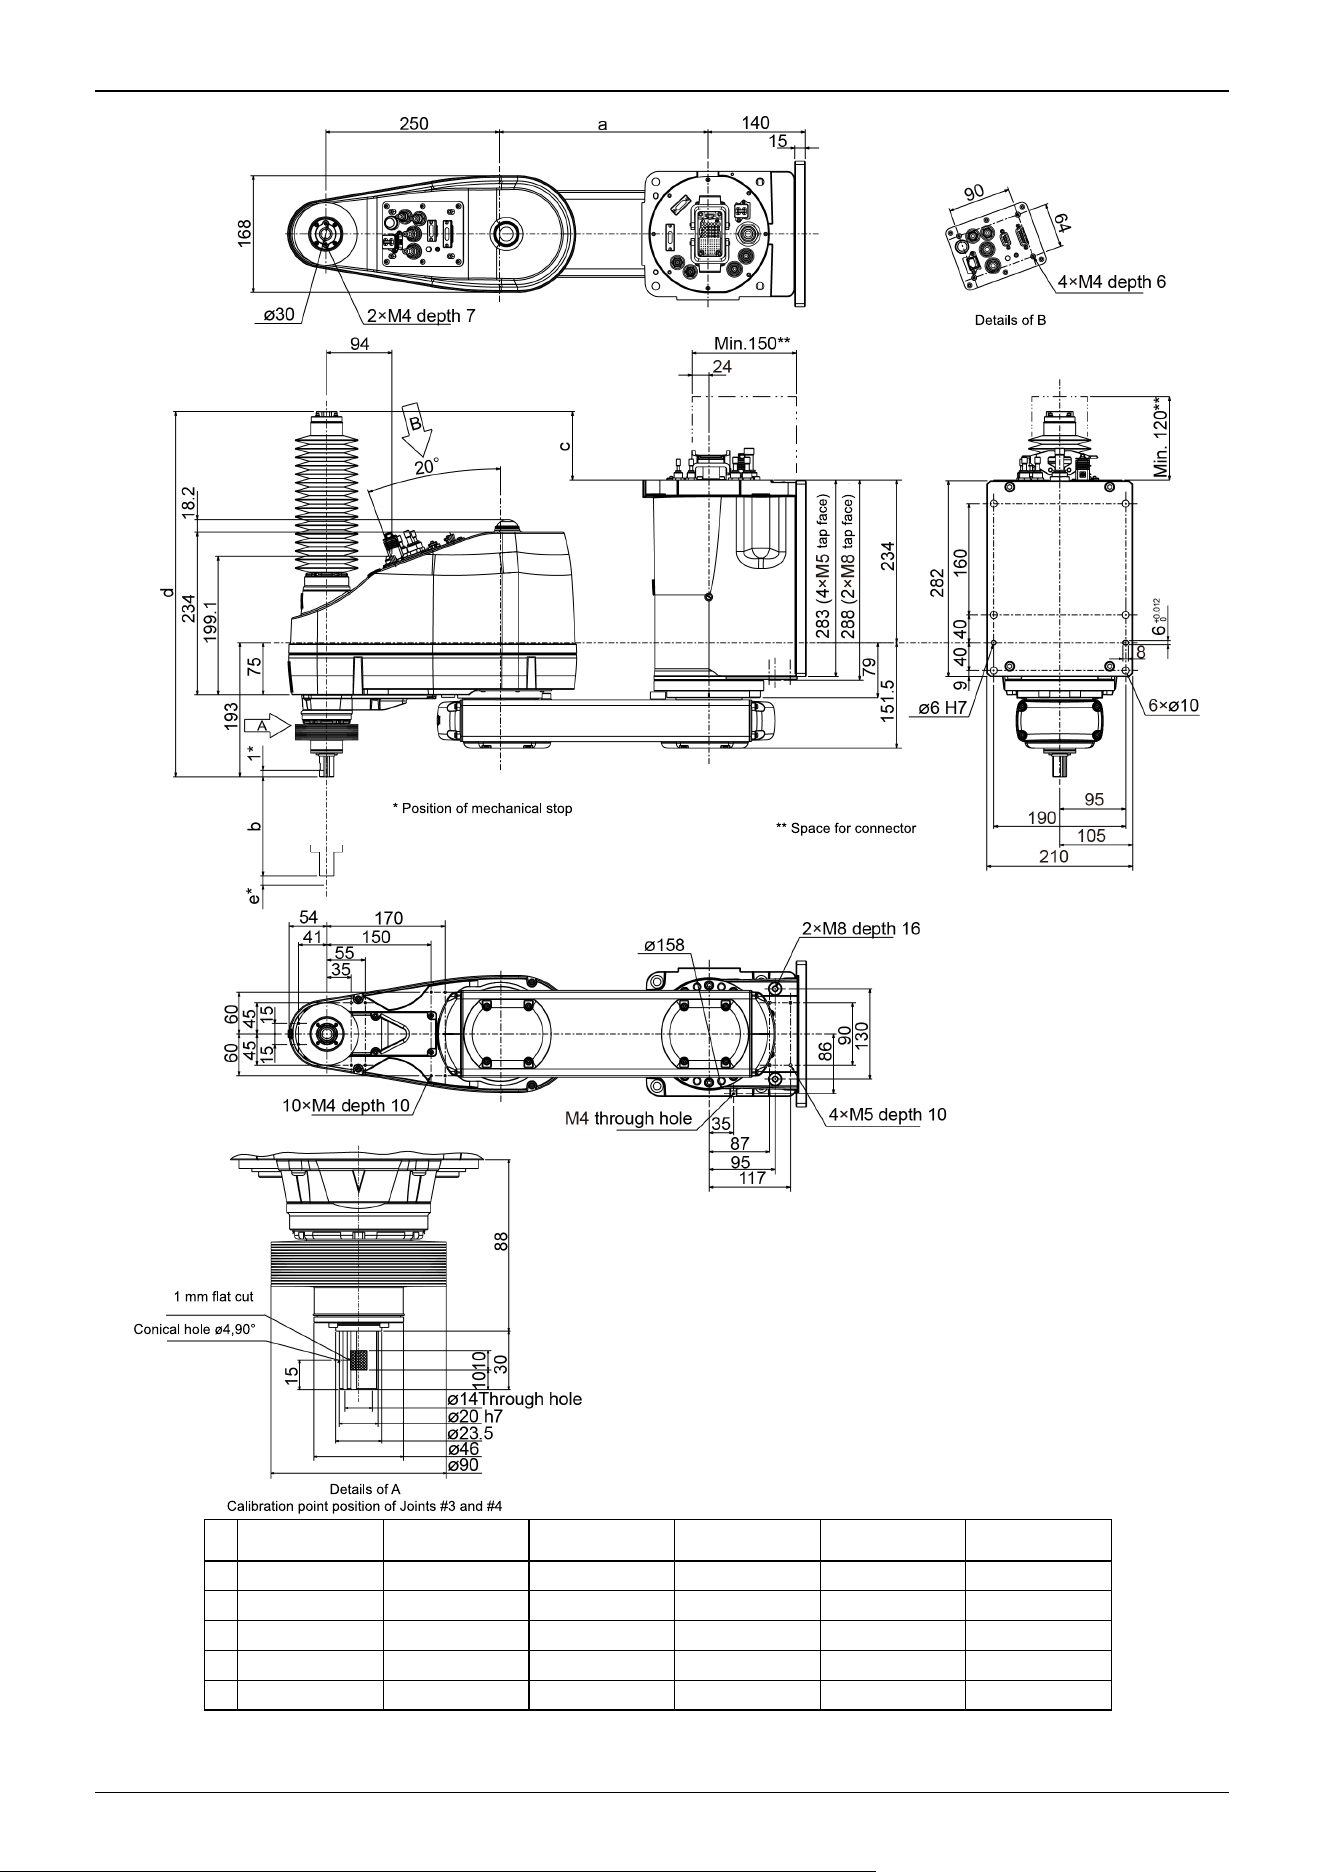
GX8-A/GX8-B/
GX8-C452PW
GX8-A/GX8-B/
GX8-C453PW
GX8-A/GX8-B/
GX8-C552PW
GX8-A/GX8-B/
GX8-C553PW
GX8-A/GX8-B/
GX8-C652PW
GX8-A/GX8-B/
GX8-C653PW
a 200 200 300 300 400 400
b 170 300 170 300 170 300
c 98.5 223.5 98.5 223.5 98.5 223.5
d 525.5 650.5 525.5 650.5 525.5 650.5
e 12.6 7.6 12.6 7.6 12.6 7.6
Industrial Robot: SCARA Robots GX series Manual Rev.11
231
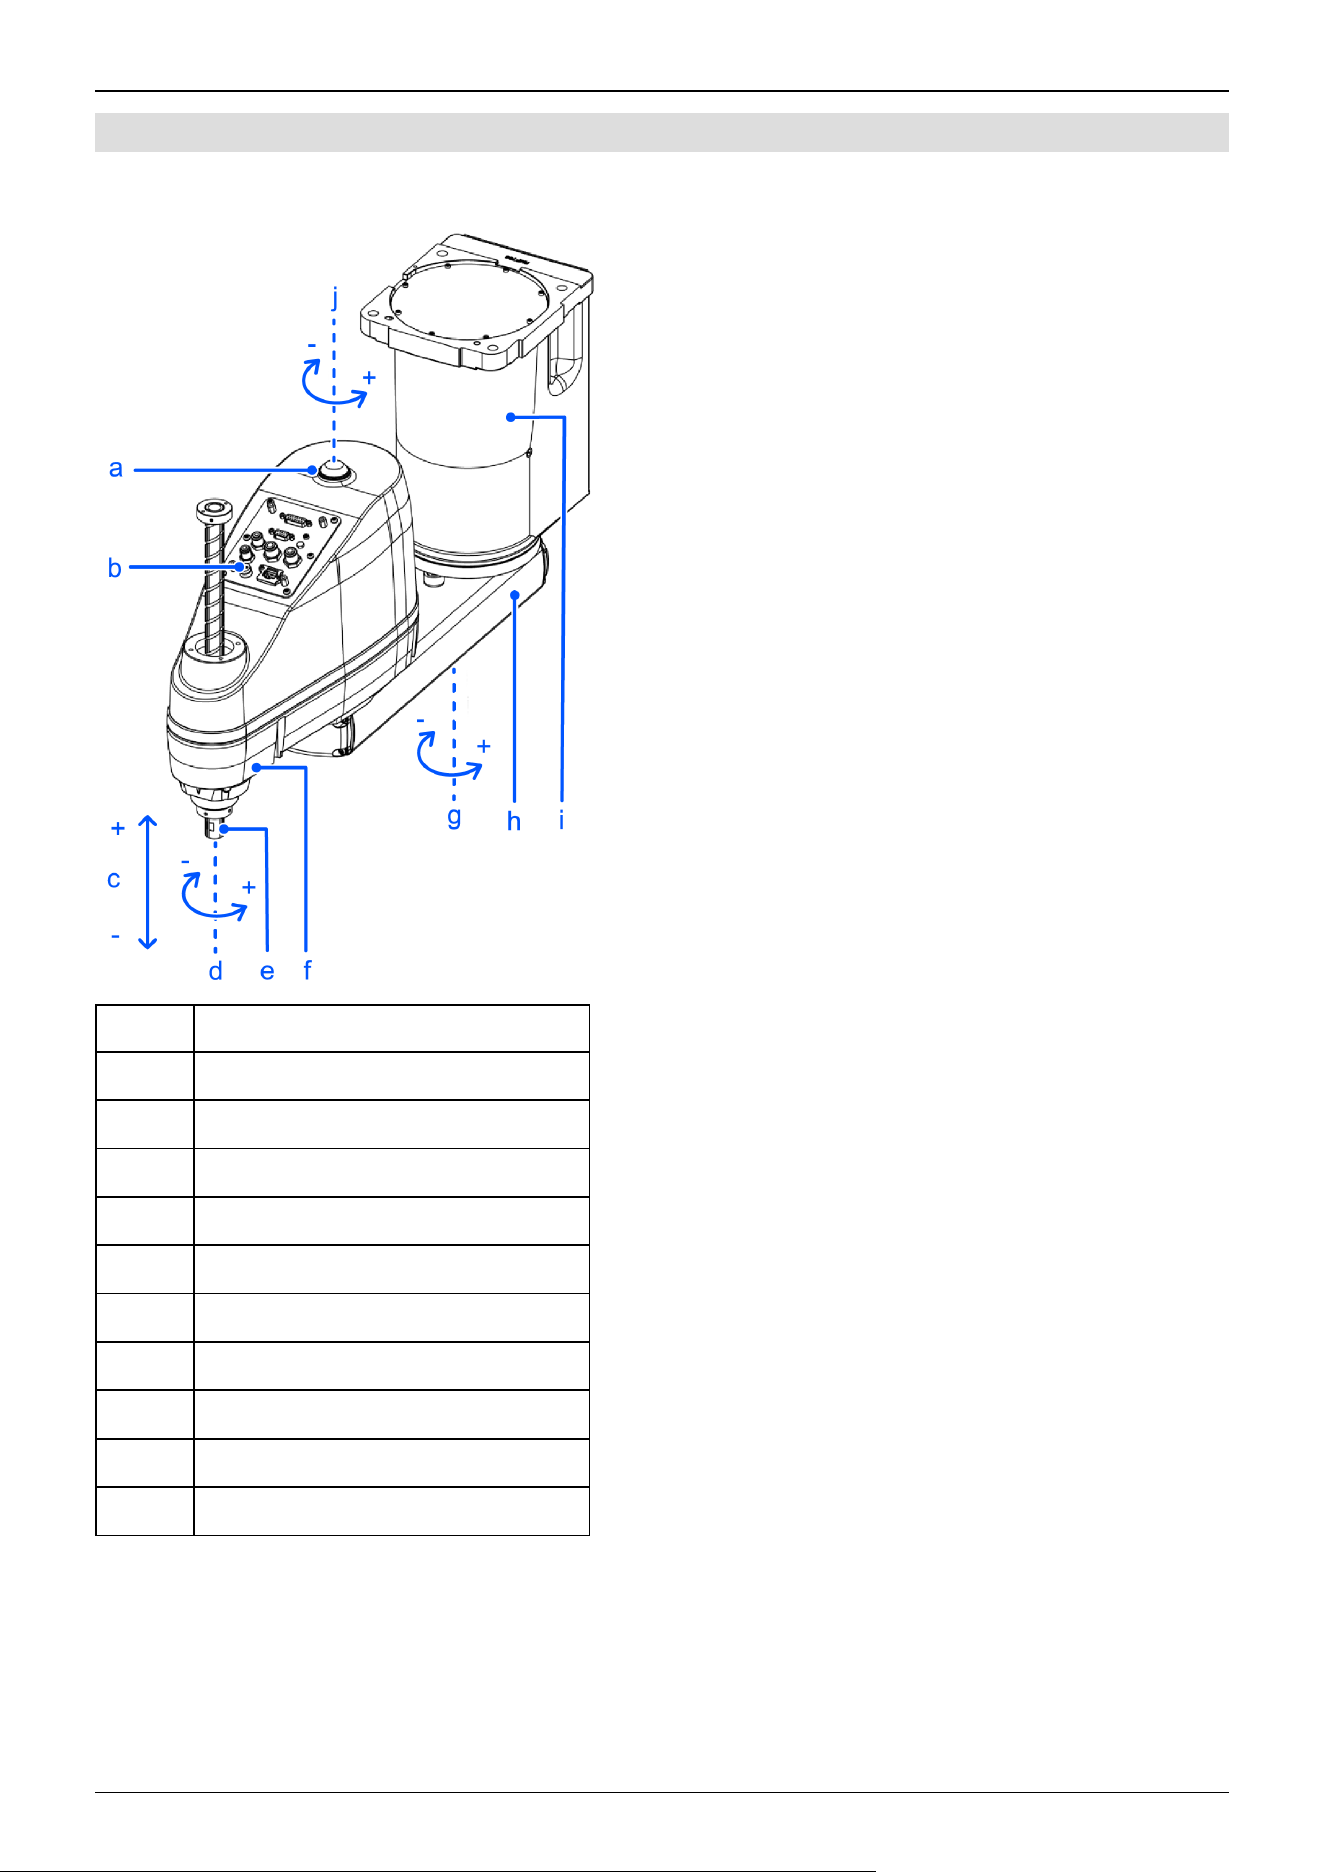
4.2.4.3 Ceiling Mounting Specifications
Standard specifications GX8-A/GX8-B/GX8-C***SR
Symbol Description
a Indicating lamp
b Joint #3 and Joint #4 brake release switch
c Joint #3 (up/down movement)
d Joint #4 (rotation)
e Shaft
f Arm #2
g Joint #1 (rotation)
h Arm #1
i Base
j Joint #2 (rotation)
Industrial Robot: SCARA Robots GX series Manual Rev.11
232
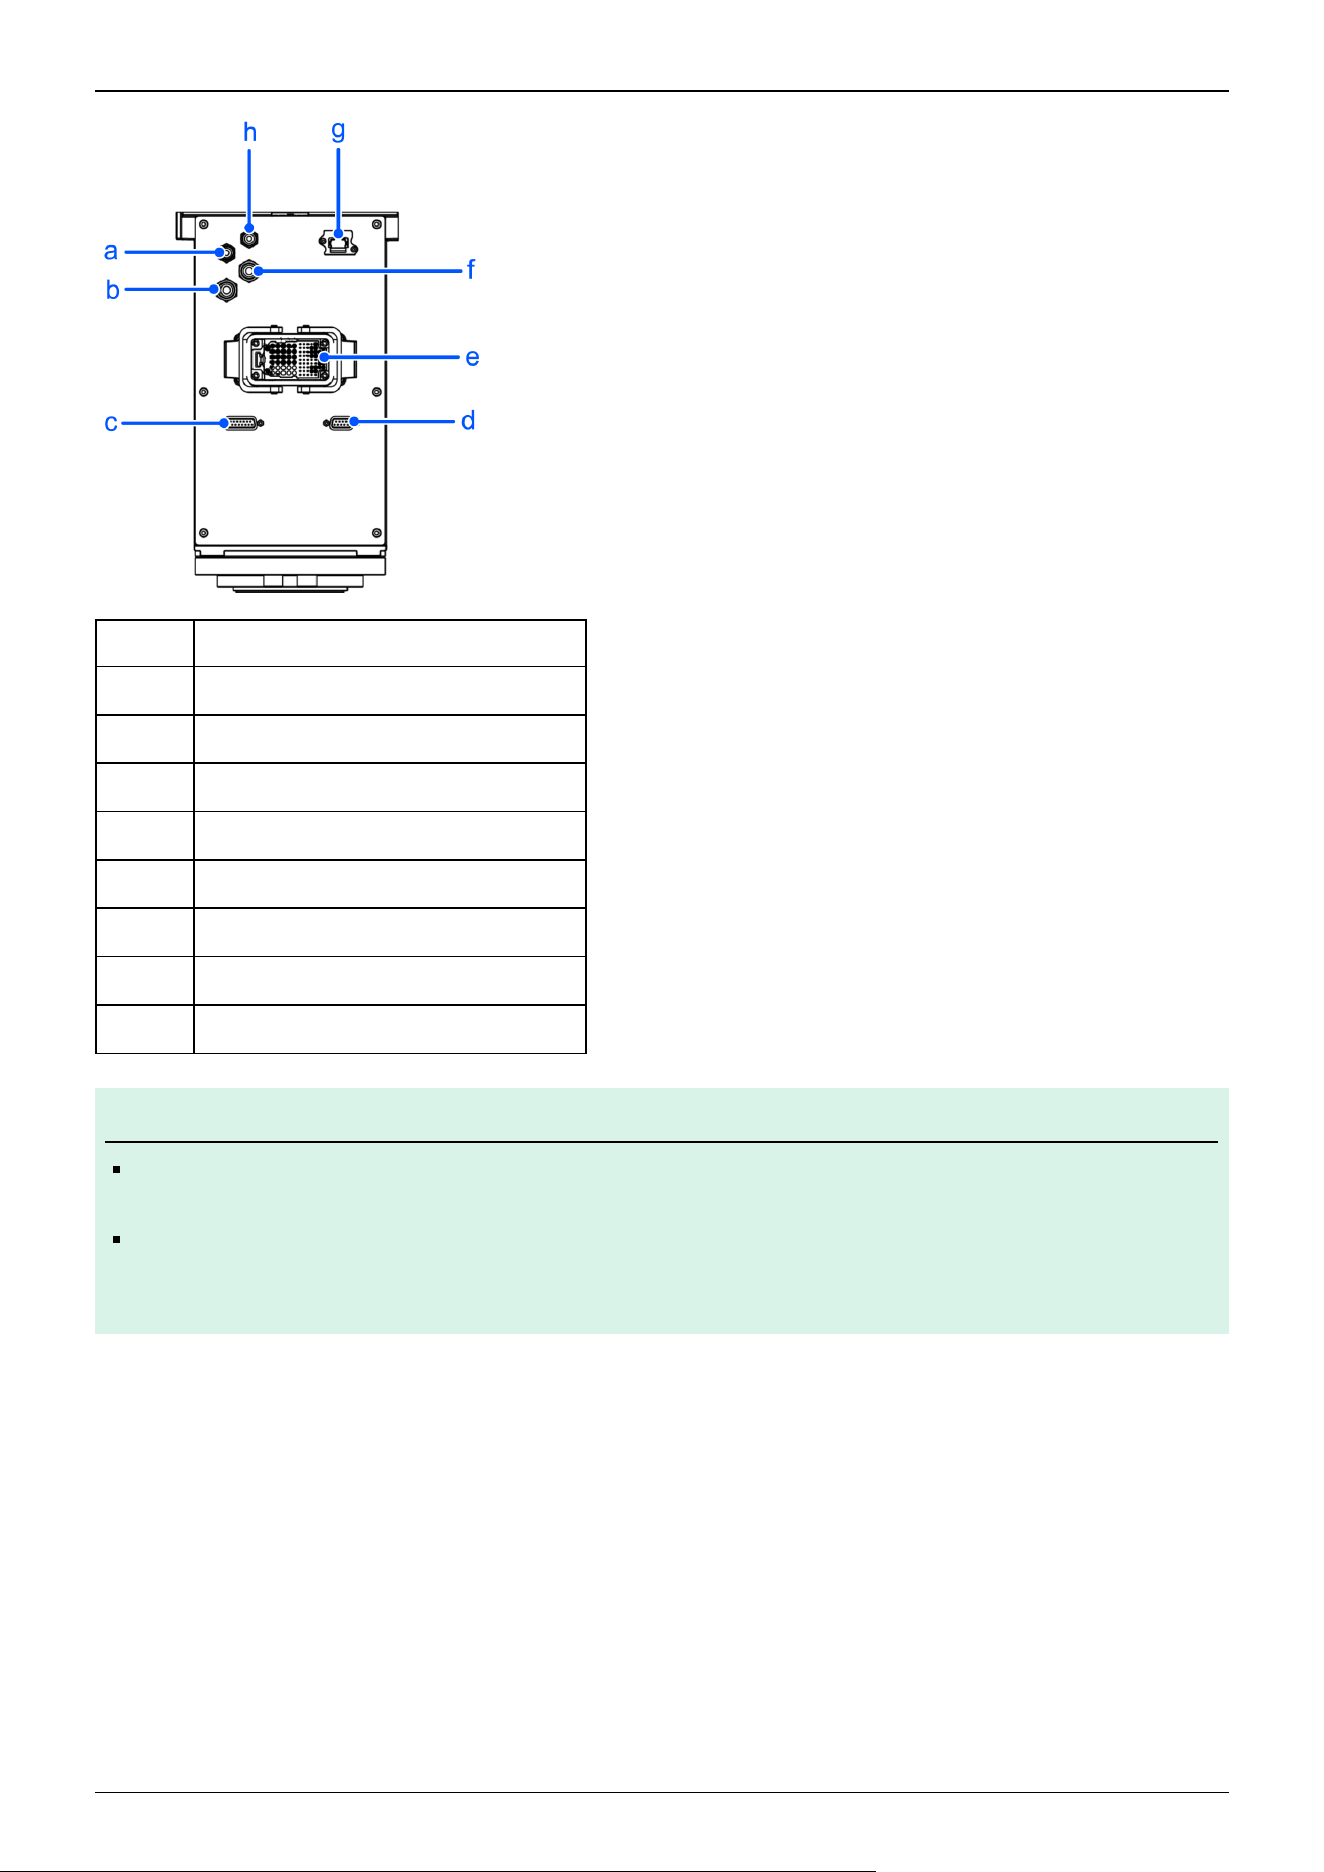
Symbol Description
a Fitting for ø4 mm tube (white)
b Fitting for ø6 mm tube (white)
c User connector (15-pin D-sub connector)
d User connector (9-pin D-sub connector)
e M/C cable housing
f User connector (Ethernet connector)
g Fitting for ø6 mm tube (blue)
h Fitting for ø4 mm tube (blue)
KEY POINTS
The brake release switch is used with both Joint #3 and Joint #4. Press the brake release switch while in the
emergency stop state to simultaneously release the brakes on Joint #3 and Joint #4.
Before starting any maintenance work, be sure to turn off the Controller and inform others in the surrounding
area that work is in progress. Performing any work procedure with the power turned on is extremely
dangerous and may result in electric shock and/or malfunction of the robot system.
✏
Industrial Robot: SCARA Robots GX series Manual Rev.11
233
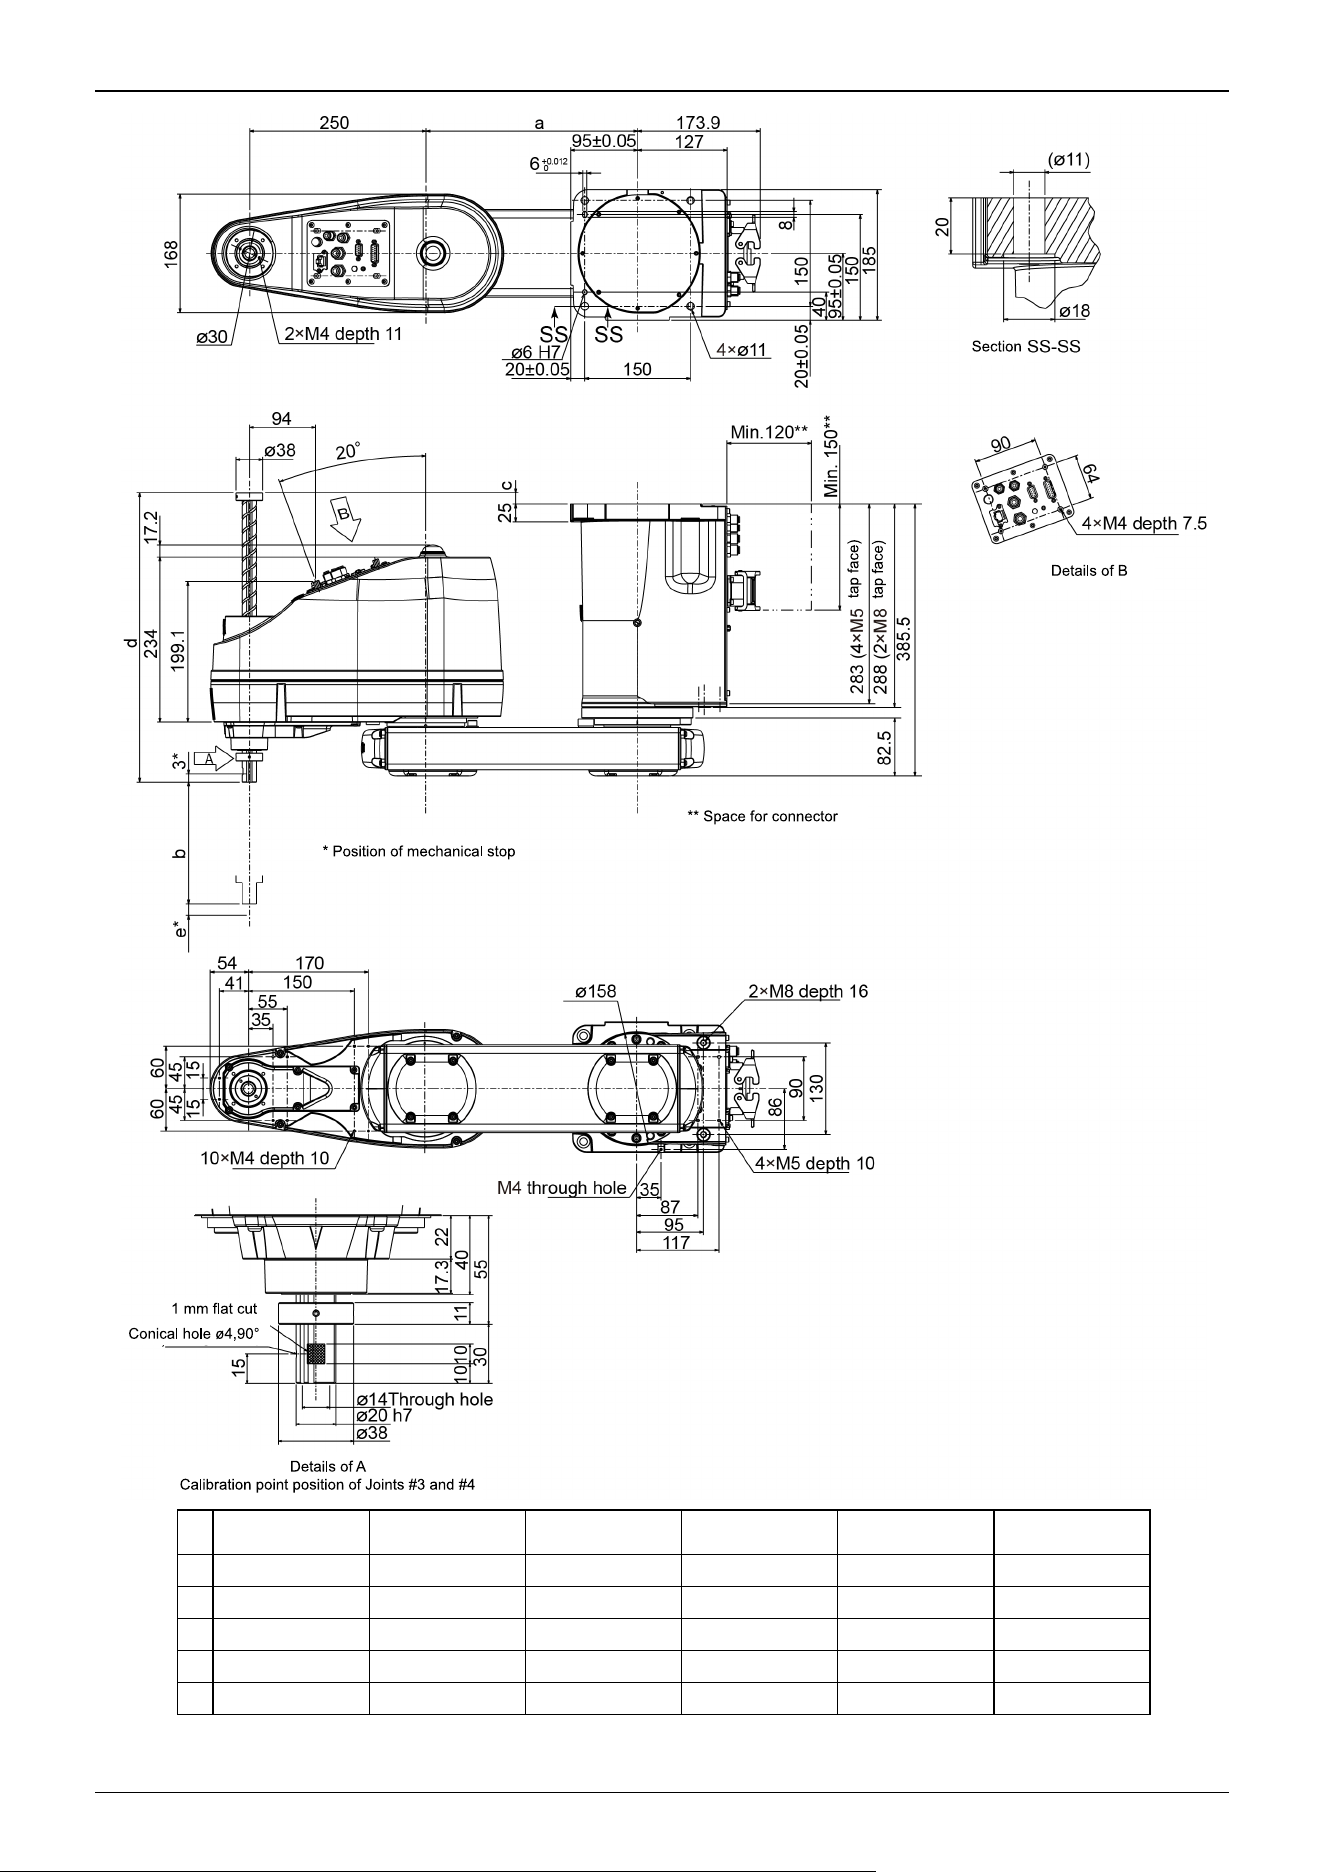
GX8-A/GX8-B/
GX8-C452SR, ER
GX8-A/GX8-B/
GX8-C453SR, ER
GX8-A/GX8-B/
GX8-C552SR, ER
GX8-A/GX8-B/
GX8-C553SR, ER
GX8-A/GX8-B/
GX8-C652SR, ER
GX8-A/GX8-B/
GX8-C653SR, ER
a 200 200 300 300 400 400
b 200 330 200 330 200 330
c 16 141 16 141 16 141
d 410 535 410 535 410 535
e 15.6 10.6 15.6 10.6 15.6 10.6
Industrial Robot: SCARA Robots GX series Manual Rev.11
234
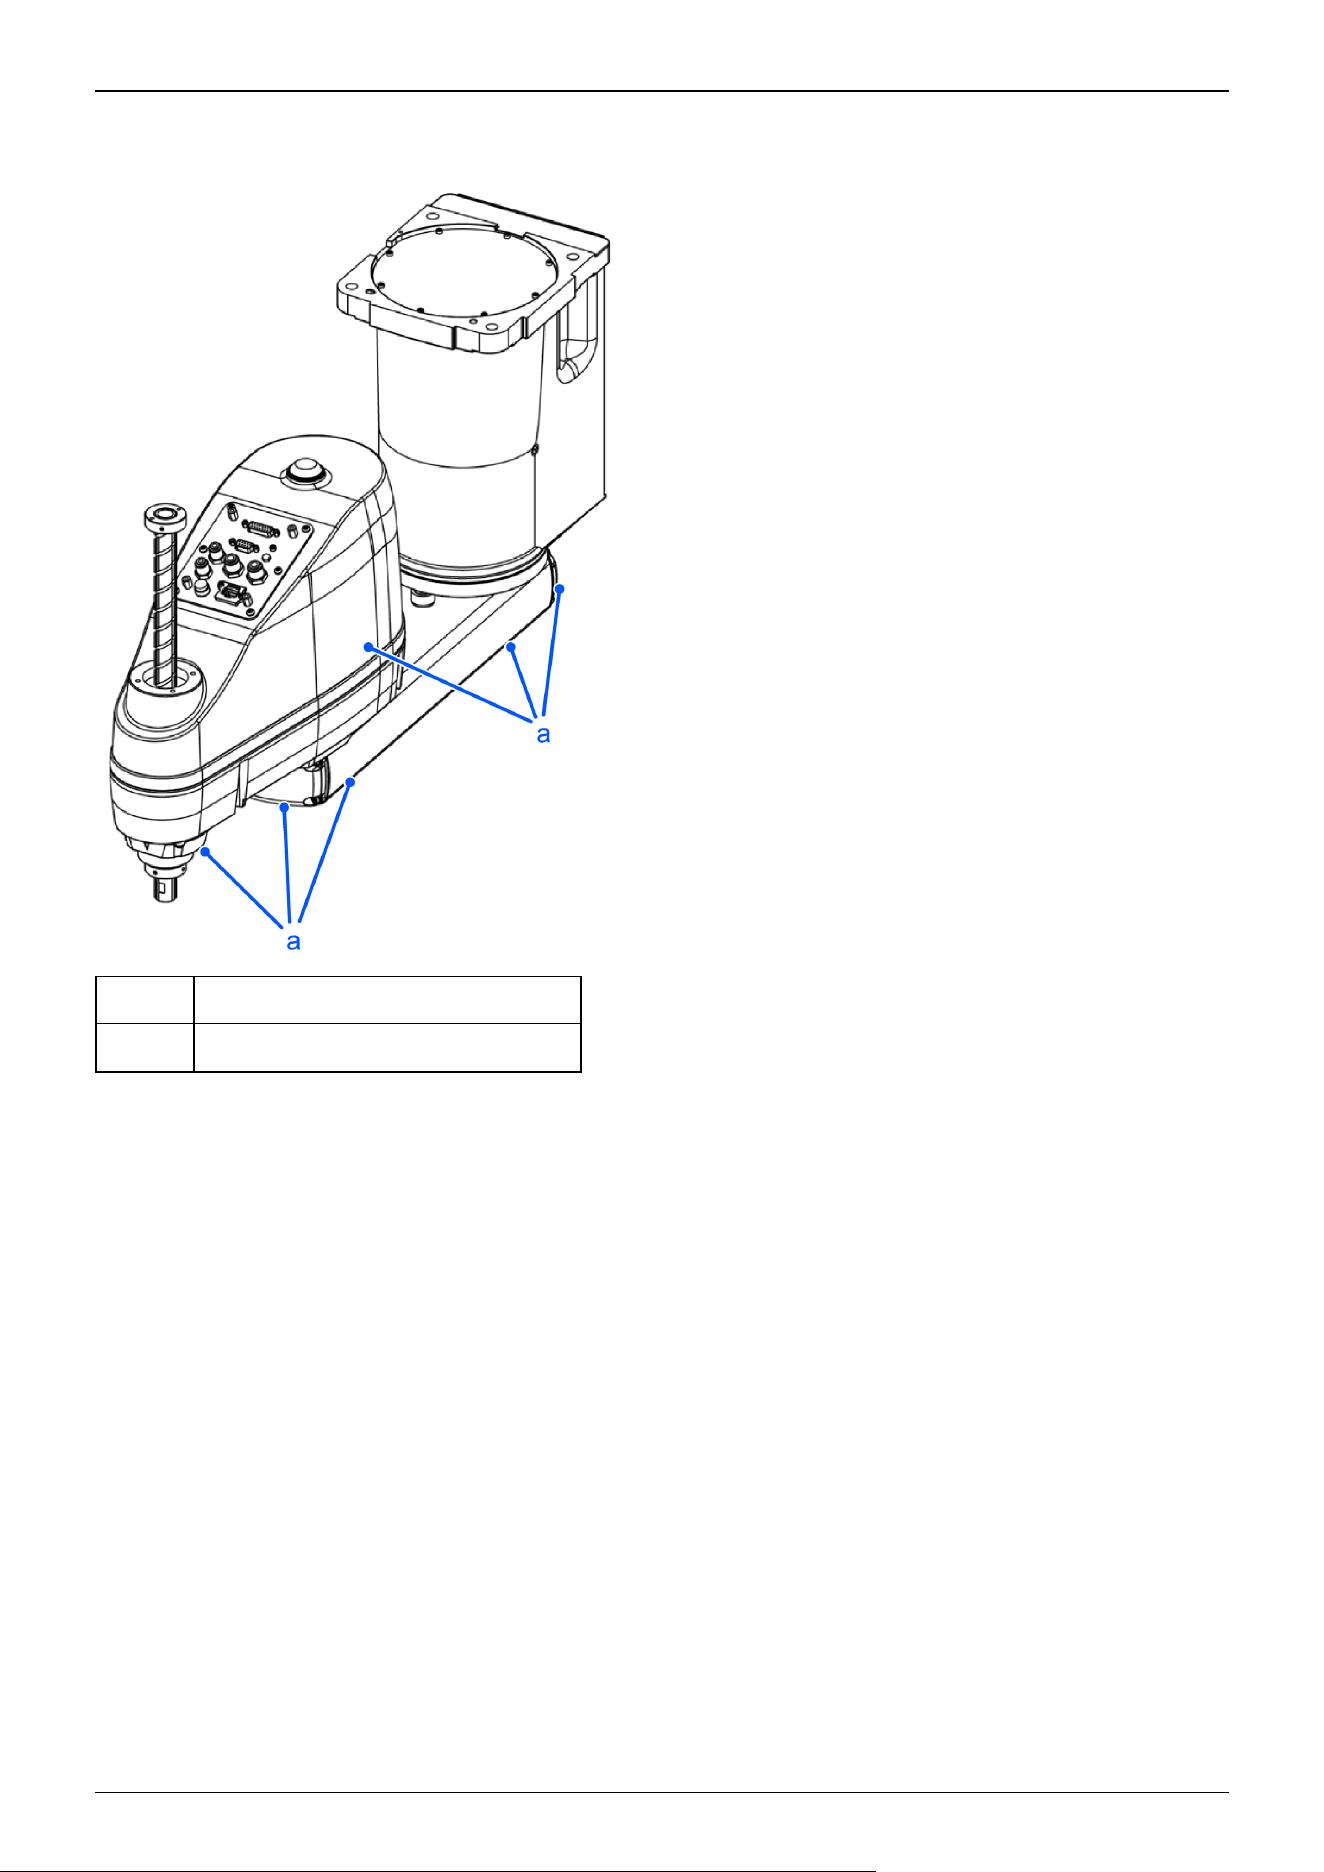
ESD specifications GX8-A/GX8-B/GX8-C***ER
The parts shown below differ from the standard specifications. The external dimensions are identical.
Symbol Description
a Plating covers (anti-static specifications)
Industrial Robot: SCARA Robots GX series Manual Rev.11
235
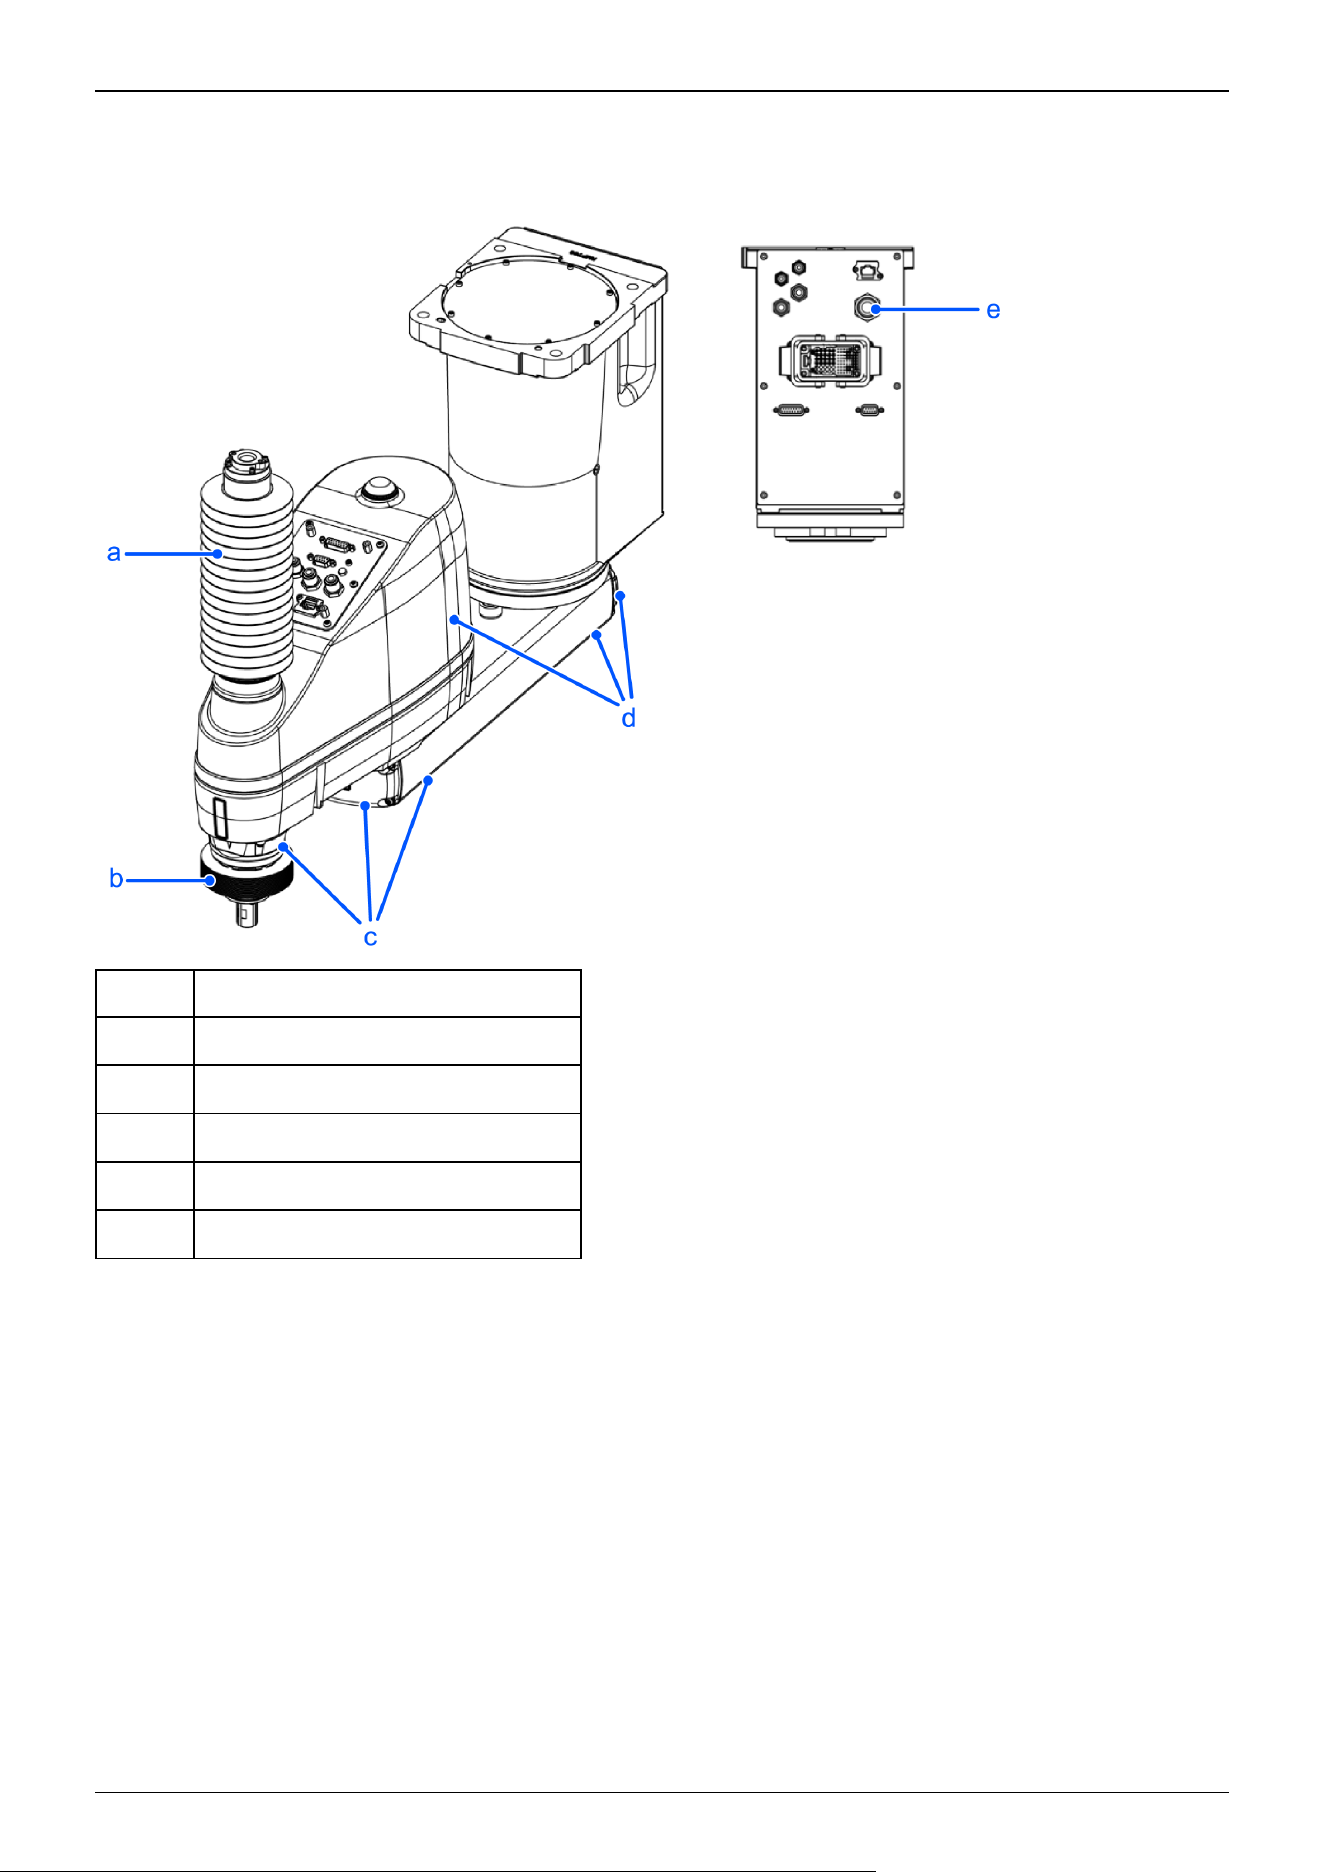
Cleanroom & ESD specifications GX8-A/GX8-B/GX8-C***CR
The parts shown below differ from the standard specifications.
Symbol Description
a Upper bellows
b Lower bellows
c Plating covers (anti-static specifications)
d Plating cover (anti-static specifications)
e Exhaust port
Industrial Robot: SCARA Robots GX series Manual Rev.11
236
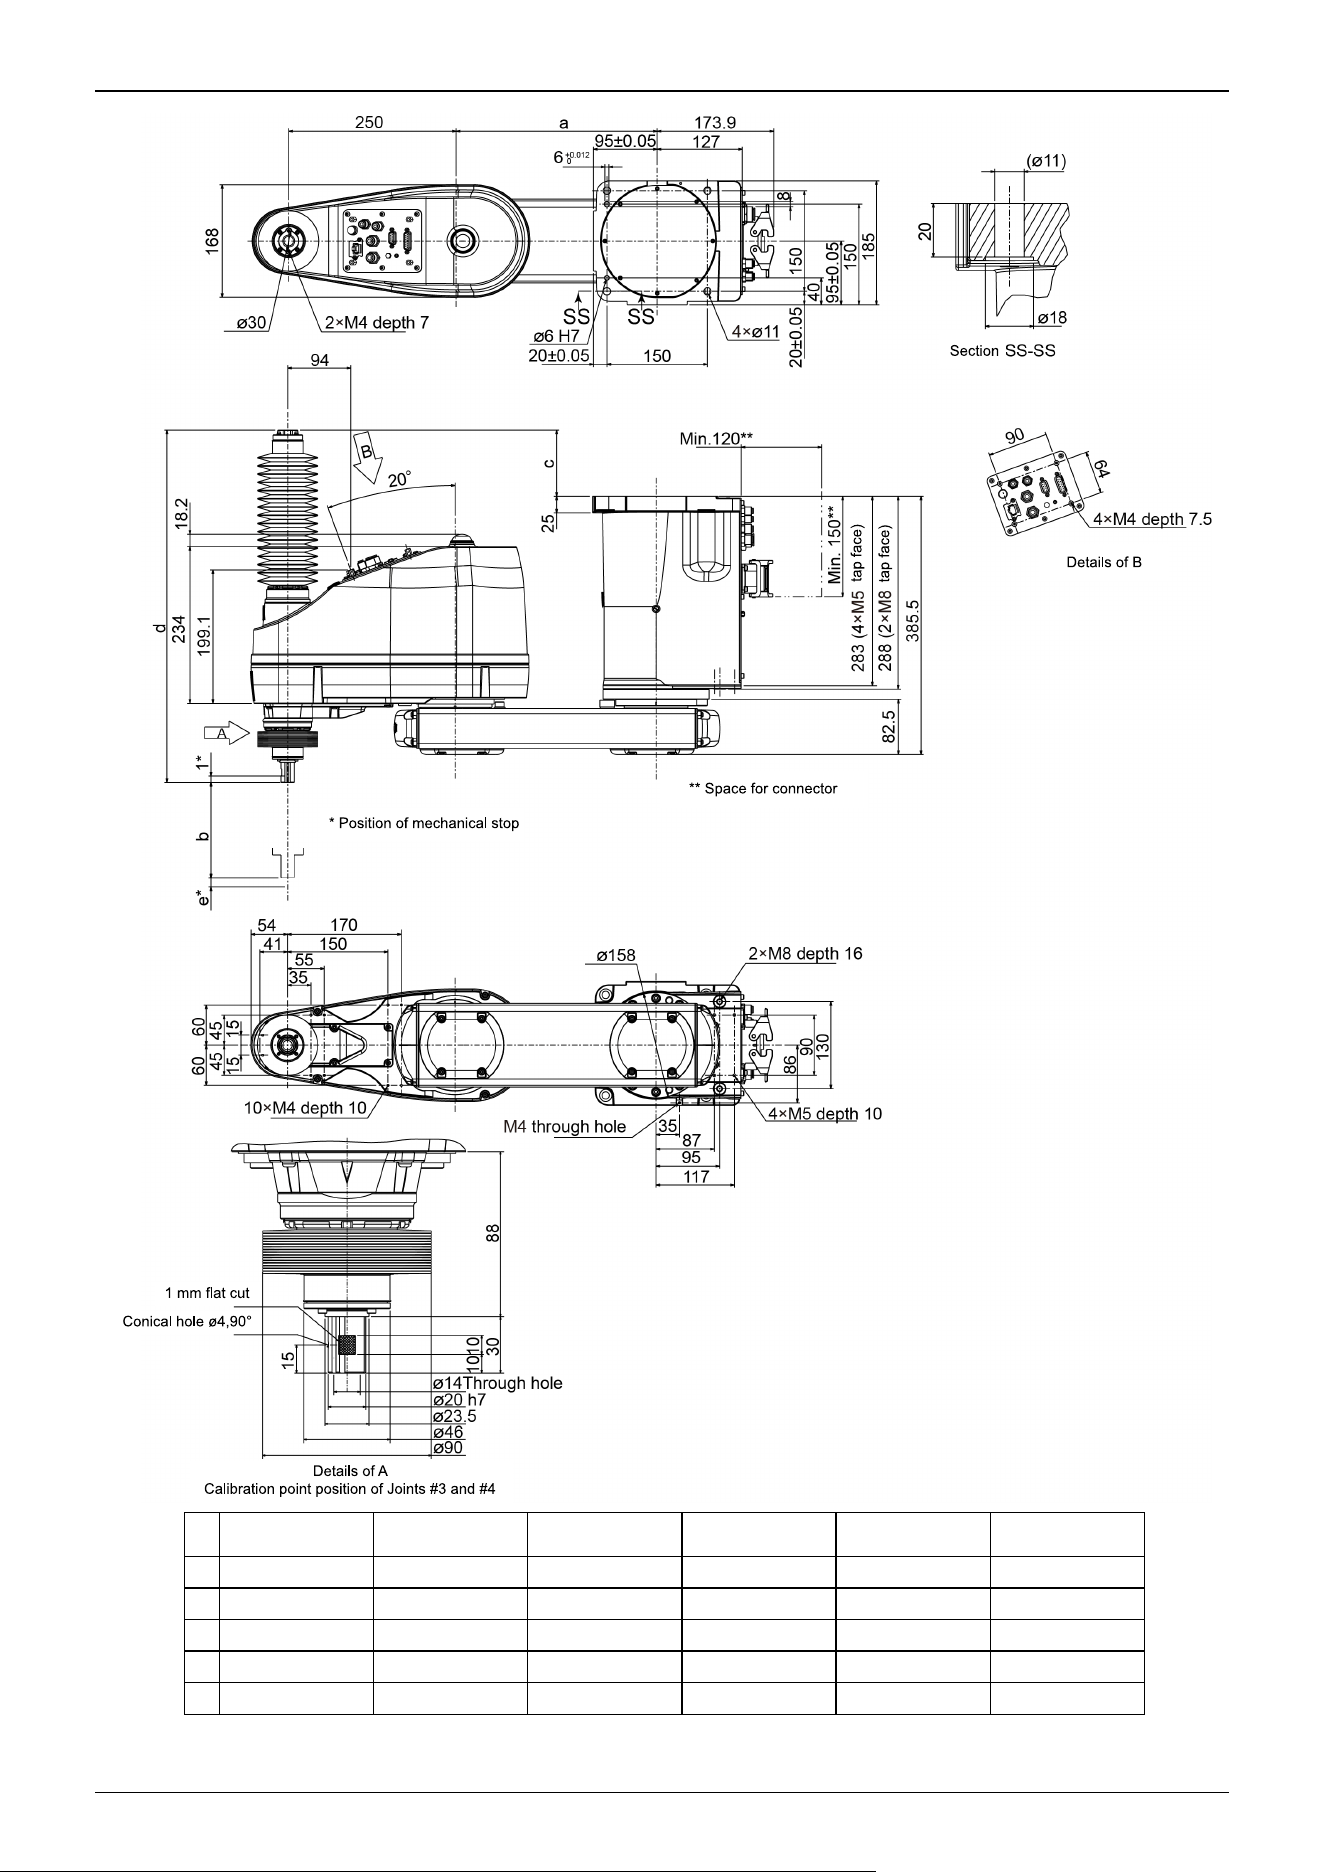
GX8-A/GX8-B/
GX8-C452CR
GX8-A/GX8-B/
GX8-C453CR
GX8-A/GX8-B/
GX8-C552CR
GX8-A/GX8-B/
GX8-C553CR
GX8-A/GX8-B/
GX8-C652CR
GX8-A/GX8-B/
GX8-C653CR
a 200 200 300 300 400 400
b 170 300 170 300 170 300
c 98.5 223.5 98.5 223.5 98.5 223.5
d 525.5 650.5 525.5 650.5 525.5 650.5
e 12.6 7.6 12.6 7.6 12.6 7.6
Industrial Robot: SCARA Robots GX series Manual Rev.11
237
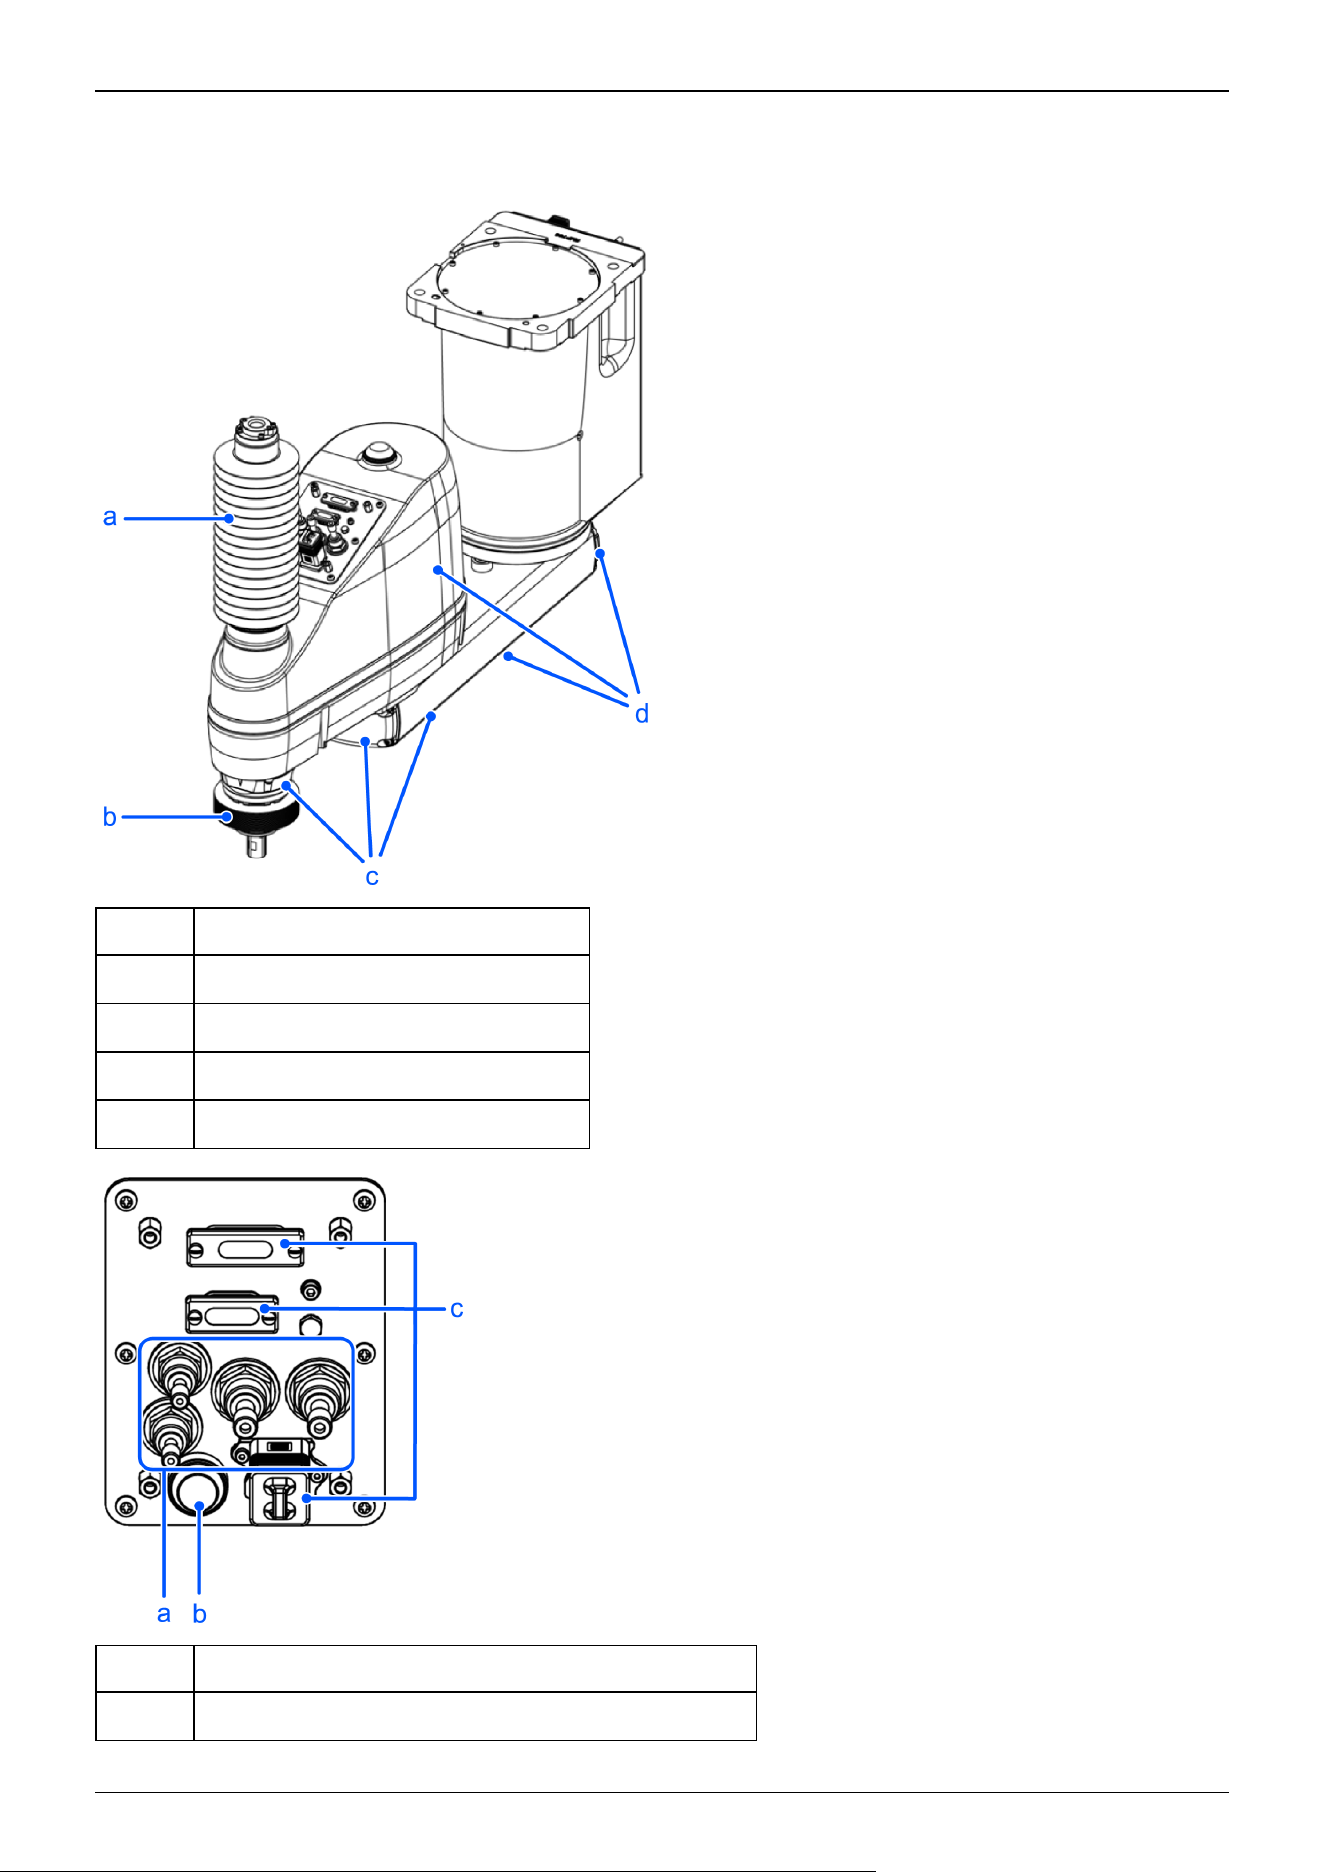
Protected-model GX8-A/GX8-B/GX8-C***PR
The parts shown below differ from the standard specifications.
Symbol Description
a Upper bellows
b Lower bellows
c Plating cover (oil-resistant specifications)
d Plating cover (oil-resistant specifications)
Symbol Description
a Fittings with cover (protected-model)
Industrial Robot: SCARA Robots GX series Manual Rev.11
238
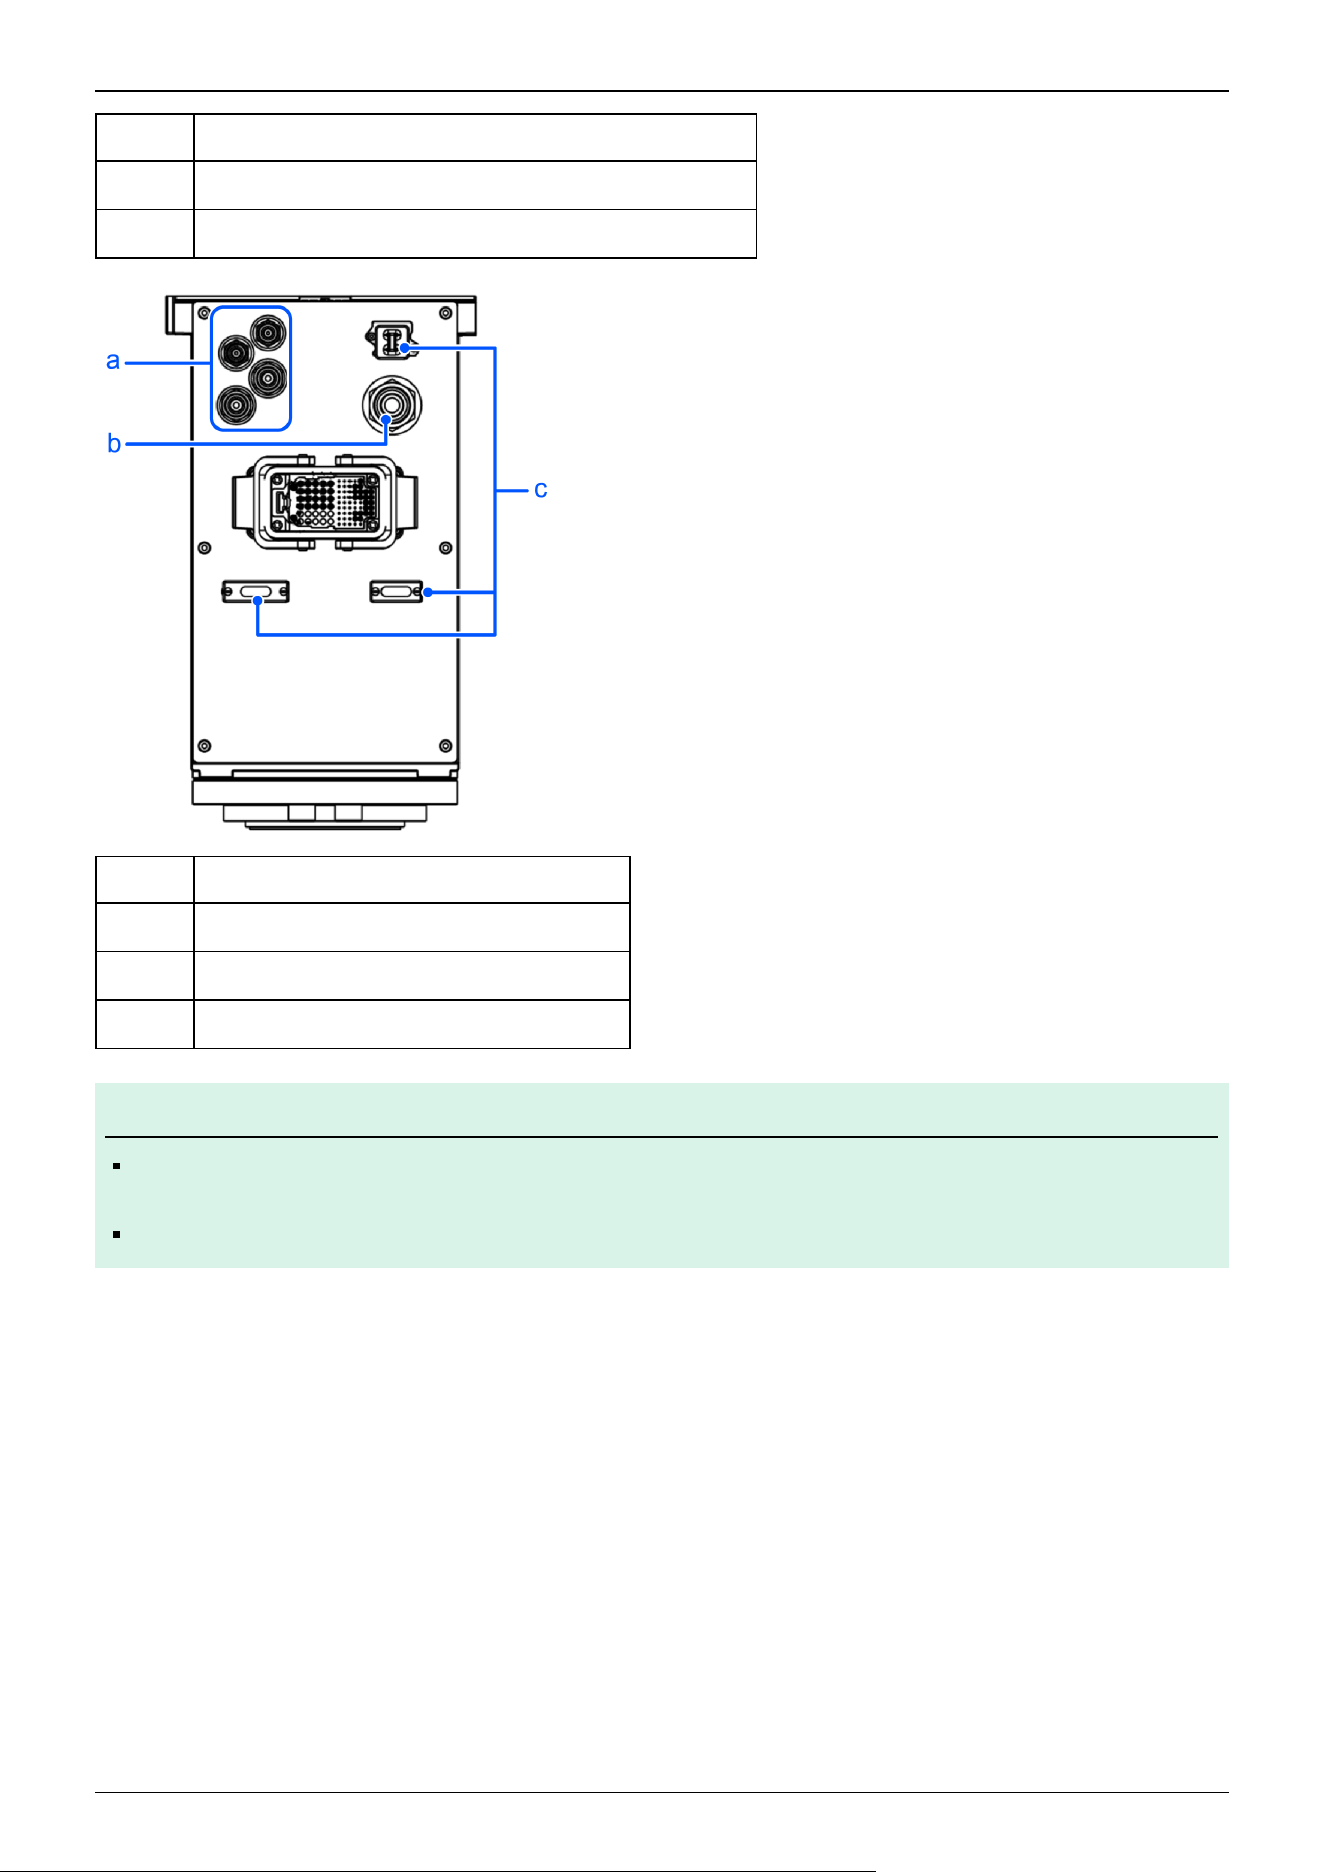
Symbol Description
b Joint #3 and Joint #4 brake release switch (protected-model)
c User connectors with cover (protected-model)
Symbol Description
a Fittings with cover (protected-model)
b Exhaust port with cover
c User connectors with cover (protected-model)
KEY POINTS
For protected-models, all screws used for the exterior are stainless steel screws. (except for screws used for
stops).
The part of the M/C cable housing is not IP65 compliant when the M/C cable hood is not connected.
✏
Industrial Robot: SCARA Robots GX series Manual Rev.11
239
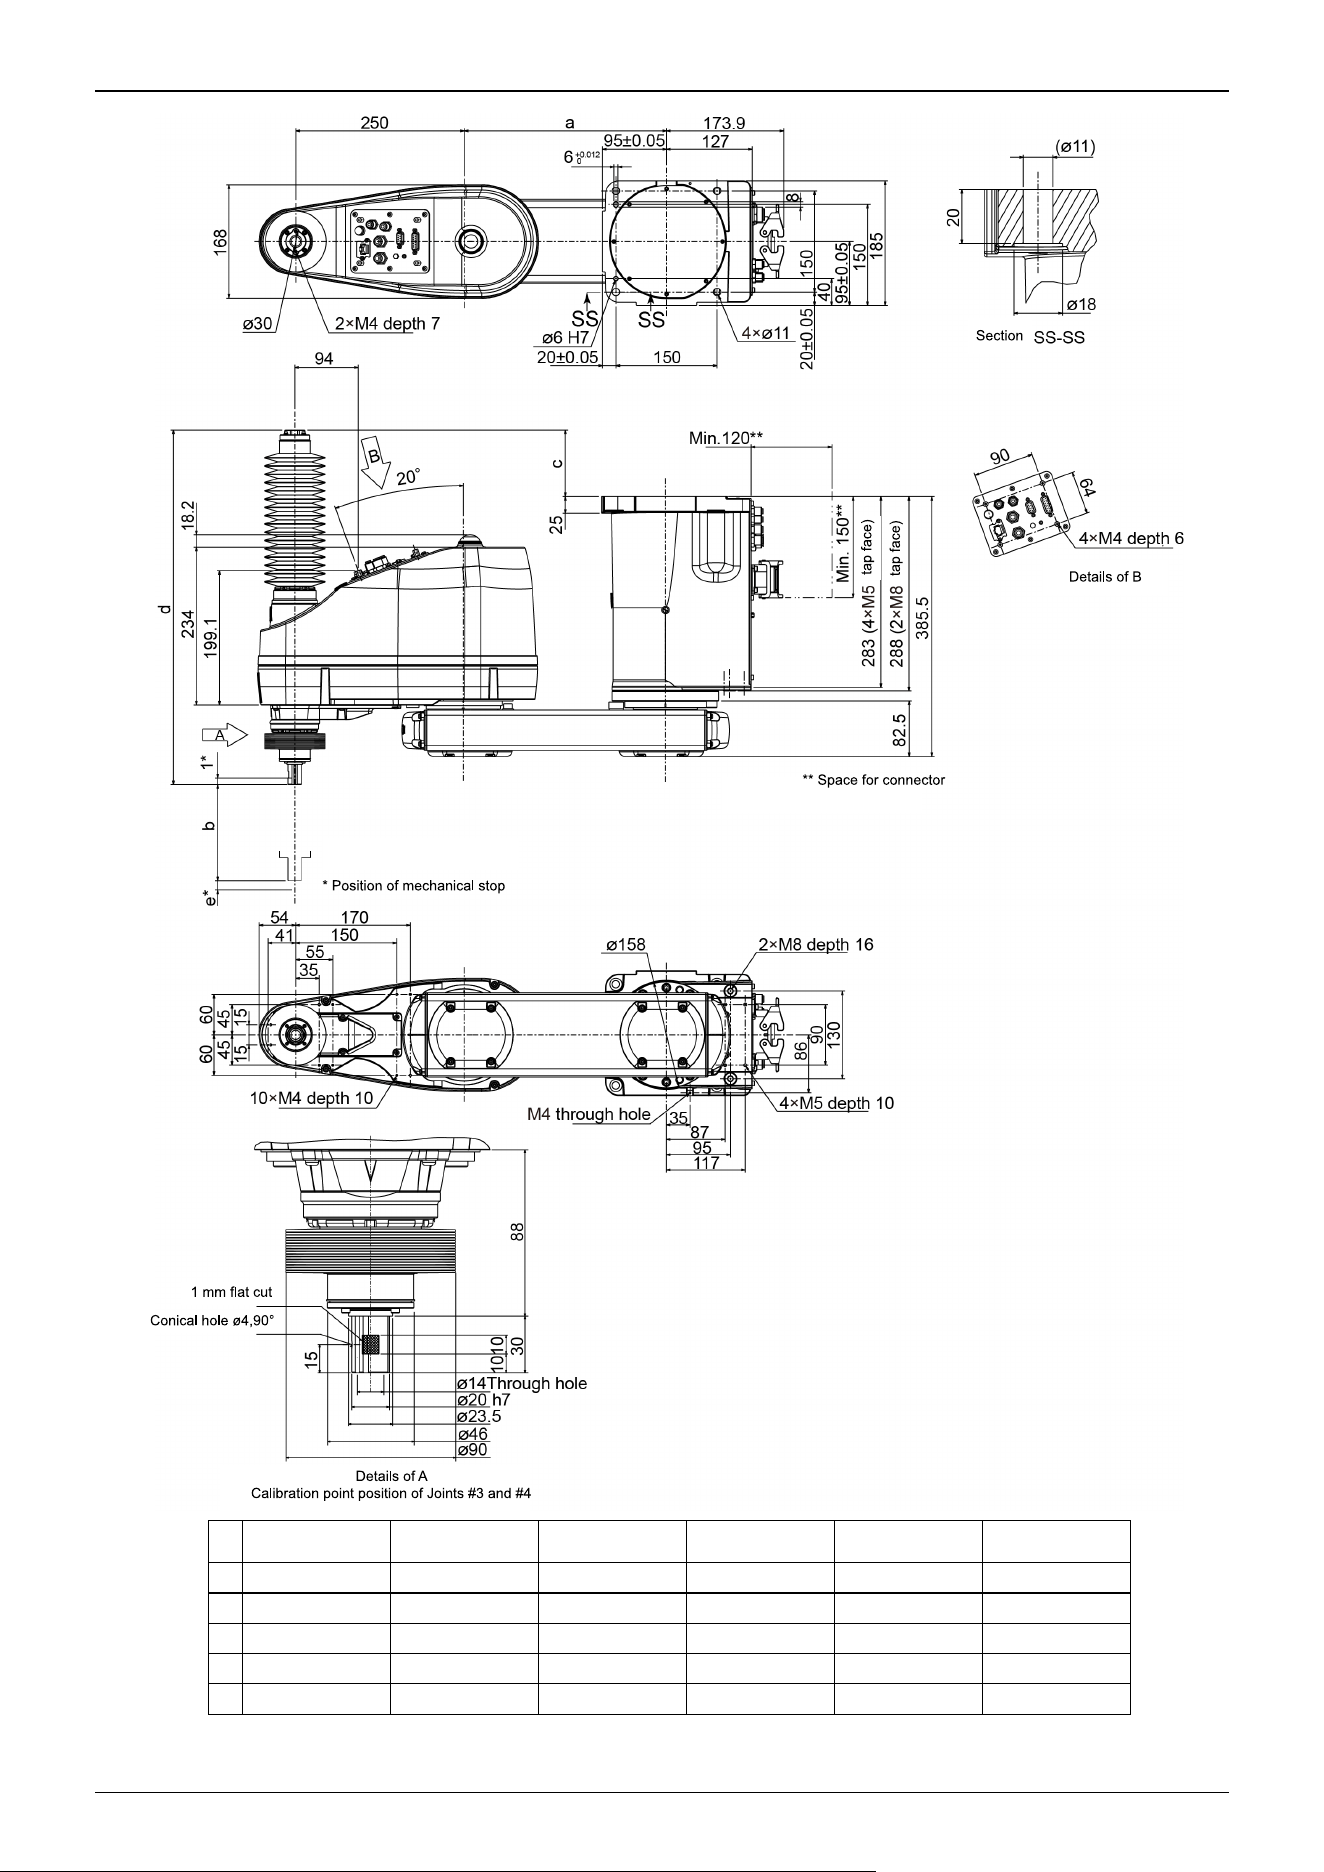
GX8-A/GX8-B/
GX8-C452PR
GX8-A/GX8-B/
GX8-C453PR
GX8-A/GX8-B/
GX8-C552PR
GX8-A/GX8-B/
GX8-C553PR
GX8-A/GX8-B/
GX8-C652PR
GX8-A/GX8-B/
GX8-C653PR
a 200 200 300 300 400 400
b 170 300 170 300 170 300
c 98.5 223.5 98.5 223.5 98.5 223.5
d 525.5 650.5 525.5 650.5 525.5 650.5
e 12.6 7.6 12.6 7.6 12.6 7.6
Industrial Robot: SCARA Robots GX series Manual Rev.11
240
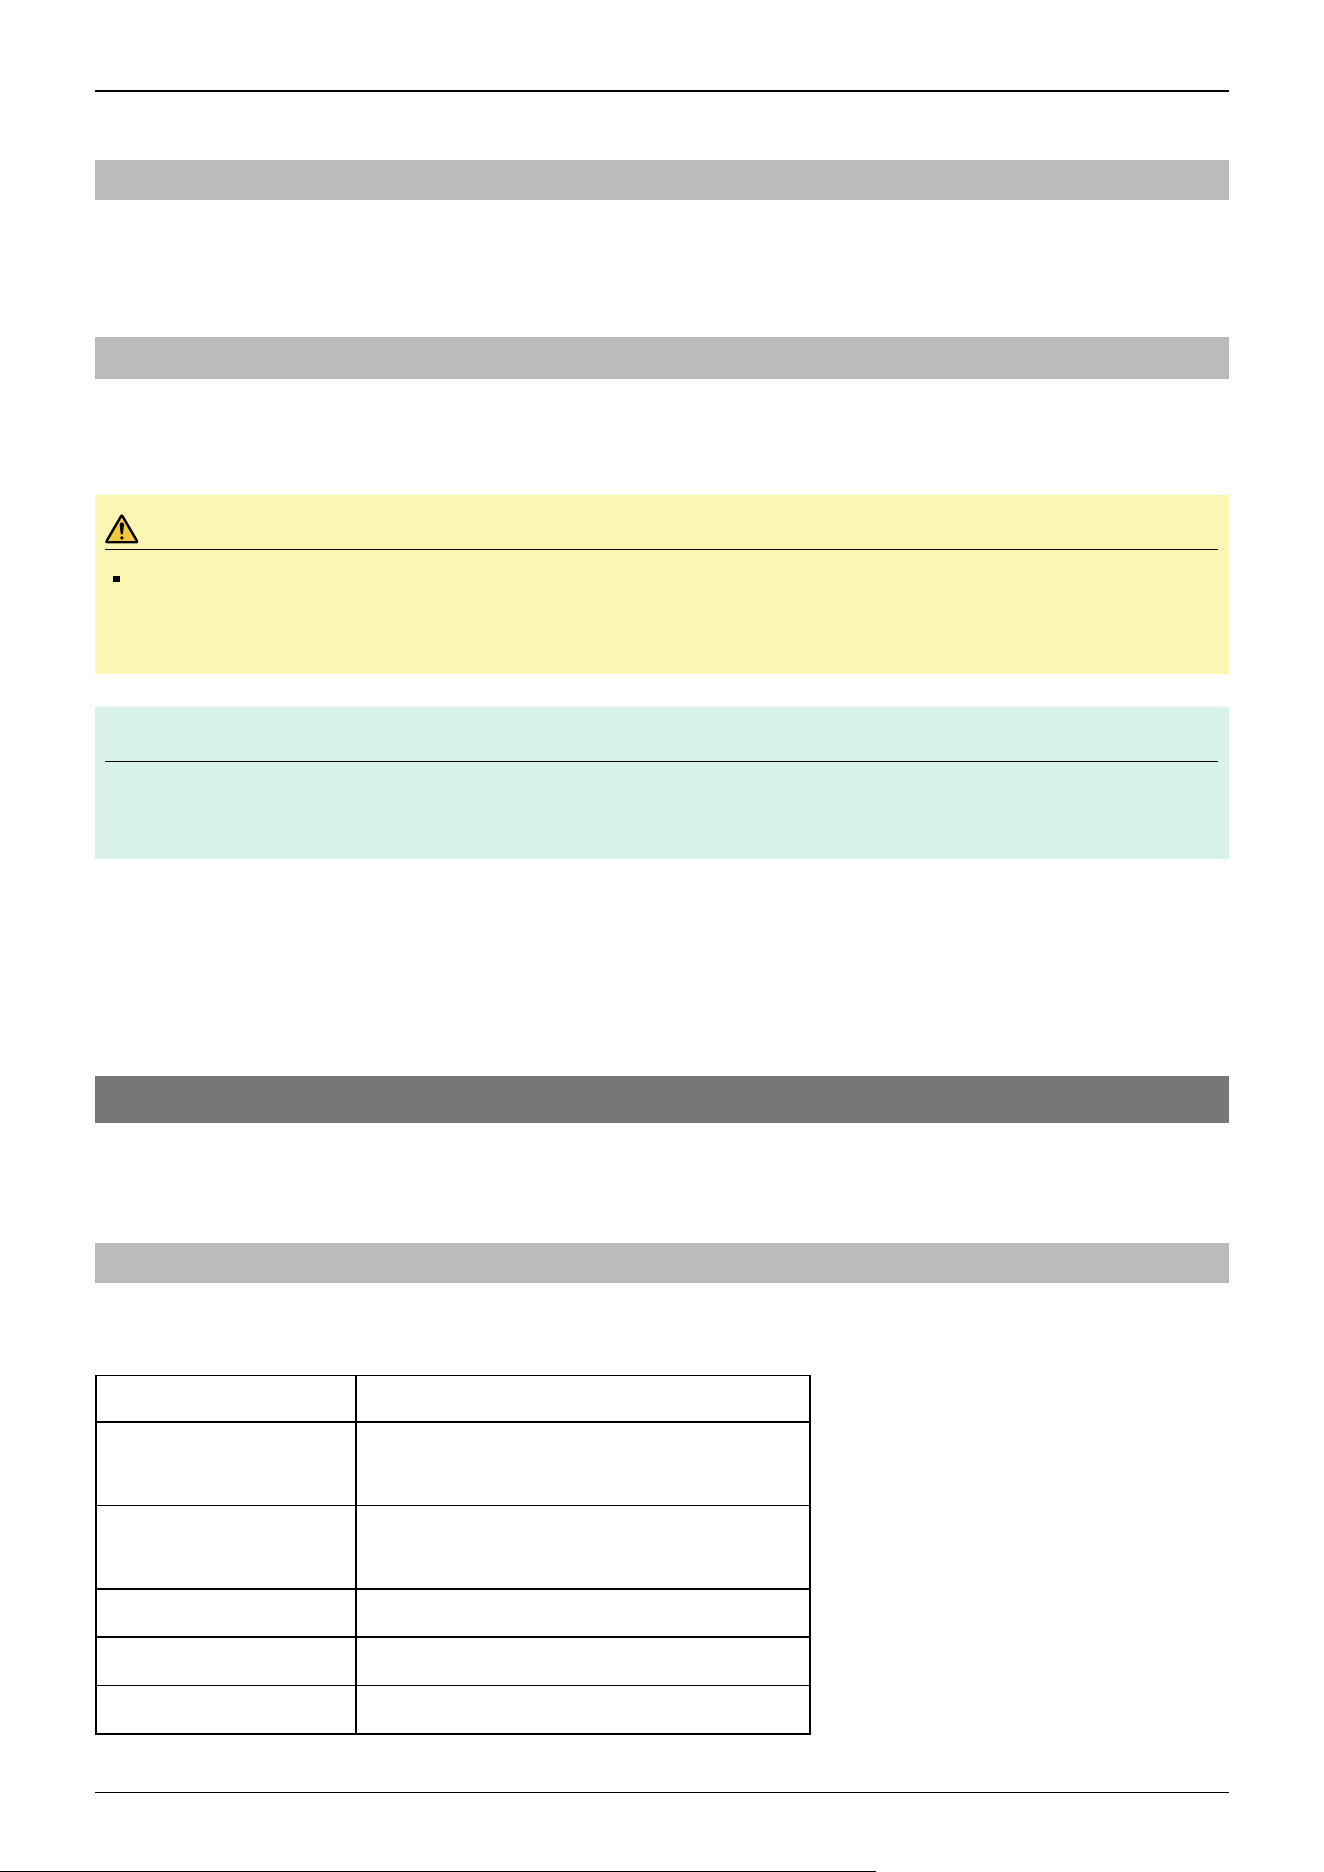
4.2.5 Specifications Table
For the specifications tables of each model, refer to the following section.
Appendix A: Specifications Table
4.2.6 How to Set the Model
The Manipulator model for your system has been set before shipment from the factory.
Normally, the model does not need to be changed when you receive your system.
CAUTION
If changing the setting of the Manipulator model, be responsible and absolutely certain that the wrong
Manipulator model is not set. Incorrect setting of the Manipulator model may result in abnormal or no
operation by the Manipulator and could even cause safety problems.
KEY POINTS
If a custom specifications number (MT***) or (X***) is written on the face plate (serial number label), the
Manipulator has custom specifications.
Models with custom specifications may require a different setting procedure. Check the custom specifications number and
contact the supplier for more information.
The Manipulator model is set from software. For details, refer to the following manual.
"Epson RC+ User's Guide - Robot Settings"
4.3 Environment and Installation
The robot system should be designed and installed by people who have received installation training provided by Epson and
the suppliers. Also, the laws and regulations of the installation country must be followed.
4.3.1 Environment
To ensure that the robot system operates and maintains maximum performance and to ensure its safe use, the Manipulator
should be installed in an environment that meets the following requirements.
Item Requirement
Ambient temperature
*1
Installation: 5 to 40°C
Transport, storage: -20 to 60°C
Ambient relative humidity
Installation: 10 to 80% (no condensation)
Transport, storage: 10 to 90% (no condensation)
Fast transient burst noise 1 kV or less (signal line)
Electrostatic noise 4 kV or less
Altitude 2,000 m or less
✏
Industrial Robot: SCARA Robots GX series Manual Rev.11
241
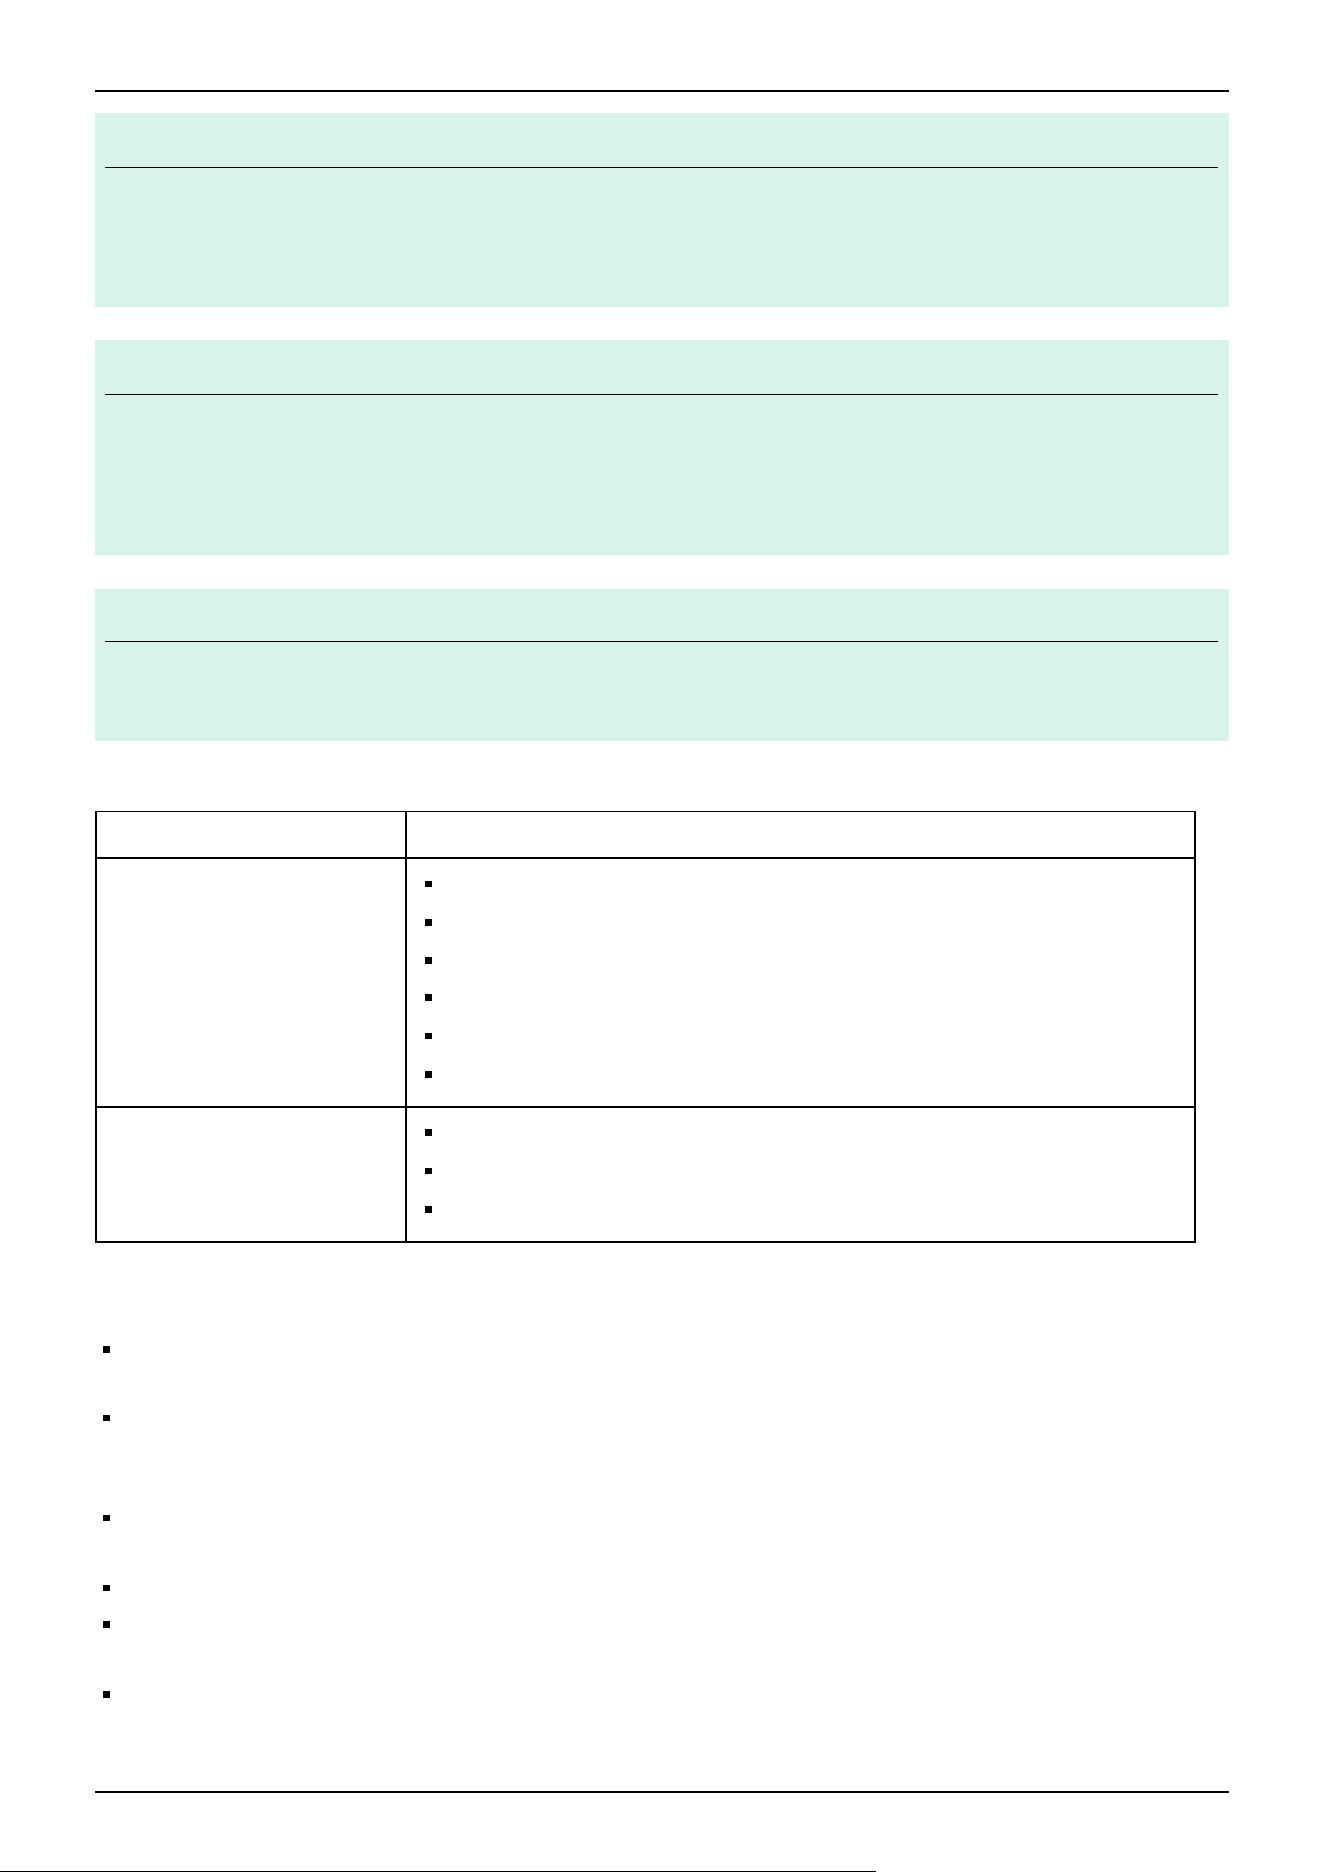
KEY POINTS
*1 The ambient temperature requirement is for the Manipulator only. For details on the environment requirements
for the connected Controller, refer to the following manual.
"Controller Manual"
KEY POINTS
When used in a low-temperature environment near the minimum temperature specified in the product
specifications, or when the unit is idle for a long period of time during holidays or at night, a collision detection
error or similar error may occur immediately after the start of operation due to high resistance in the drive unit. In
such cases, warm-up operation for about 10 minutes is recommended.
KEY POINTS
If there are conductive objects such as fences or ladders within 2.5 m of the Manipulator, these objects must be
grounded.
Also, depending on the environmental specifications of the Manipulator, the following requirements must be met.
Environmental Specifications Manipulator Installation Environment Requirements
S, E, C, P
Install indoors.
Keep away from direct sunlight.
Keep away from shocks or vibrations.
Keep away from sources of electric noise.
Keep away from explosive areas.
Keep away from large quantities of radiation.
S, E, C
Keep away from dust, oily smoke, salinity, metal powder, and other contaminants.
Keep away from flammable or corrosive liquids and gases.
Keep away from water.
The following items should also be taken into consideration for the installation environment of Manipulators with protected-
models.
These are compliant with the IP65 protection class (IEC 60529, JIS C0920). They can be installed in environments exposed
to dust or splashing of water.
They can be installed in environments where dust, oil smoke, metal powder, and similar substances are airborne, but they
are not suitable for use with nitrile rubber oil seals, O-rings, packings, liquid gaskets, or other substances that impair
sealing performance.
The Manipulator cannot be used in environments exposed to liquids or airborne droplets that are corrosive such as acids or
alkalis.
In environments that are exposed to airborne droplets containing salt, rust may also form on the Manipulator.
Manipulator surfaces are generally oil-resistant, but if special oils are to be used, oil resistance should be checked before
use. For more information, please contact the supplier.
In environments with rapid changes in temperature and humidity, condensation may form inside the Manipulator.
✏
✏
✏
Industrial Robot: SCARA Robots GX series Manual Rev.11
242
When handling food directly, it is necessary to make sure that the Manipulator is not likely to contaminate the food. For
more information, please contact the supplier.
The Controllers used with Manipulators with protected-models do not have protection against harsh environments. The
Controller should be installed in a location that meets its operating environment requirements.
WARNING
Always use a circuit breaker for the Controller's power supply. Failure to use a circuit breaker may result in an
electrical shock hazard or malfunction due to an electrical leakage.
Select the correct circuit breaker based on the Controller that you are using. For details, refer to the following
manual.
"Controller Manual"
CAUTION
When cleaning the Manipulator, do not rub it strongly with alcohol or benzene. Coated surfaces may lose their
luster.
4.3.2 Base Table
A base table for anchoring the Manipulator is not supplied. The base table must be fabricated or obtained by the customer. The
shape and size of the base table vary depending on the application of the robot system. As a reference when designing the base
table, the requirements from the Manipulator side are shown here.
The base table must not only be able to bear the weight of the Manipulator but also be able to withstand the dynamic
movement of the Manipulator when it operates at maximum acceleration/deceleration. Ensure that the base table has enough
strength by using reinforcing materials such as crossbeams.
The torque and reaction force produced by the movement of the Manipulator are as follows:
Maximum torque on horizontal surface: 700 N·m
Maximum reaction force in horizontal direction: 4,000 N
Maximum reaction force in vertical direction: 1,500 N
For models with table top mounting specifications and models with ceiling mounting specifications, the threaded holes
required for mounting the Manipulator base are M8 or M10.
For models with wall mounting specifications, the threaded holes required for mounting the Manipulator base are M8.
Use bolts for mounting the Manipulator that have a strength compliant with ISO 898-1 property class 10.9 or 12.9. The
dimensions are provided in the following sections.
Names of Parts and Their Dimensions
Manipulator Mounting Dimensions
The plate for the Manipulator mounting face should be at least 20 mm thick and made of steel for reducing vibrations. A
surface roughness of 25 μm or less at the maximum height is appropriate.
The base table must be secured to the floor or wall to prevent it from moving.
The Manipulator mounting surface should have a flatness of 0.5 mm or less and an inclination of 0.5° or less to a horizontal or
vertical surface. If the installation surface does not have the proper flatness, the base of the Manipulator may be damaged or
the robot may be unable to operate at maximum performance.
Industrial Robot: SCARA Robots GX series Manual Rev.11
243
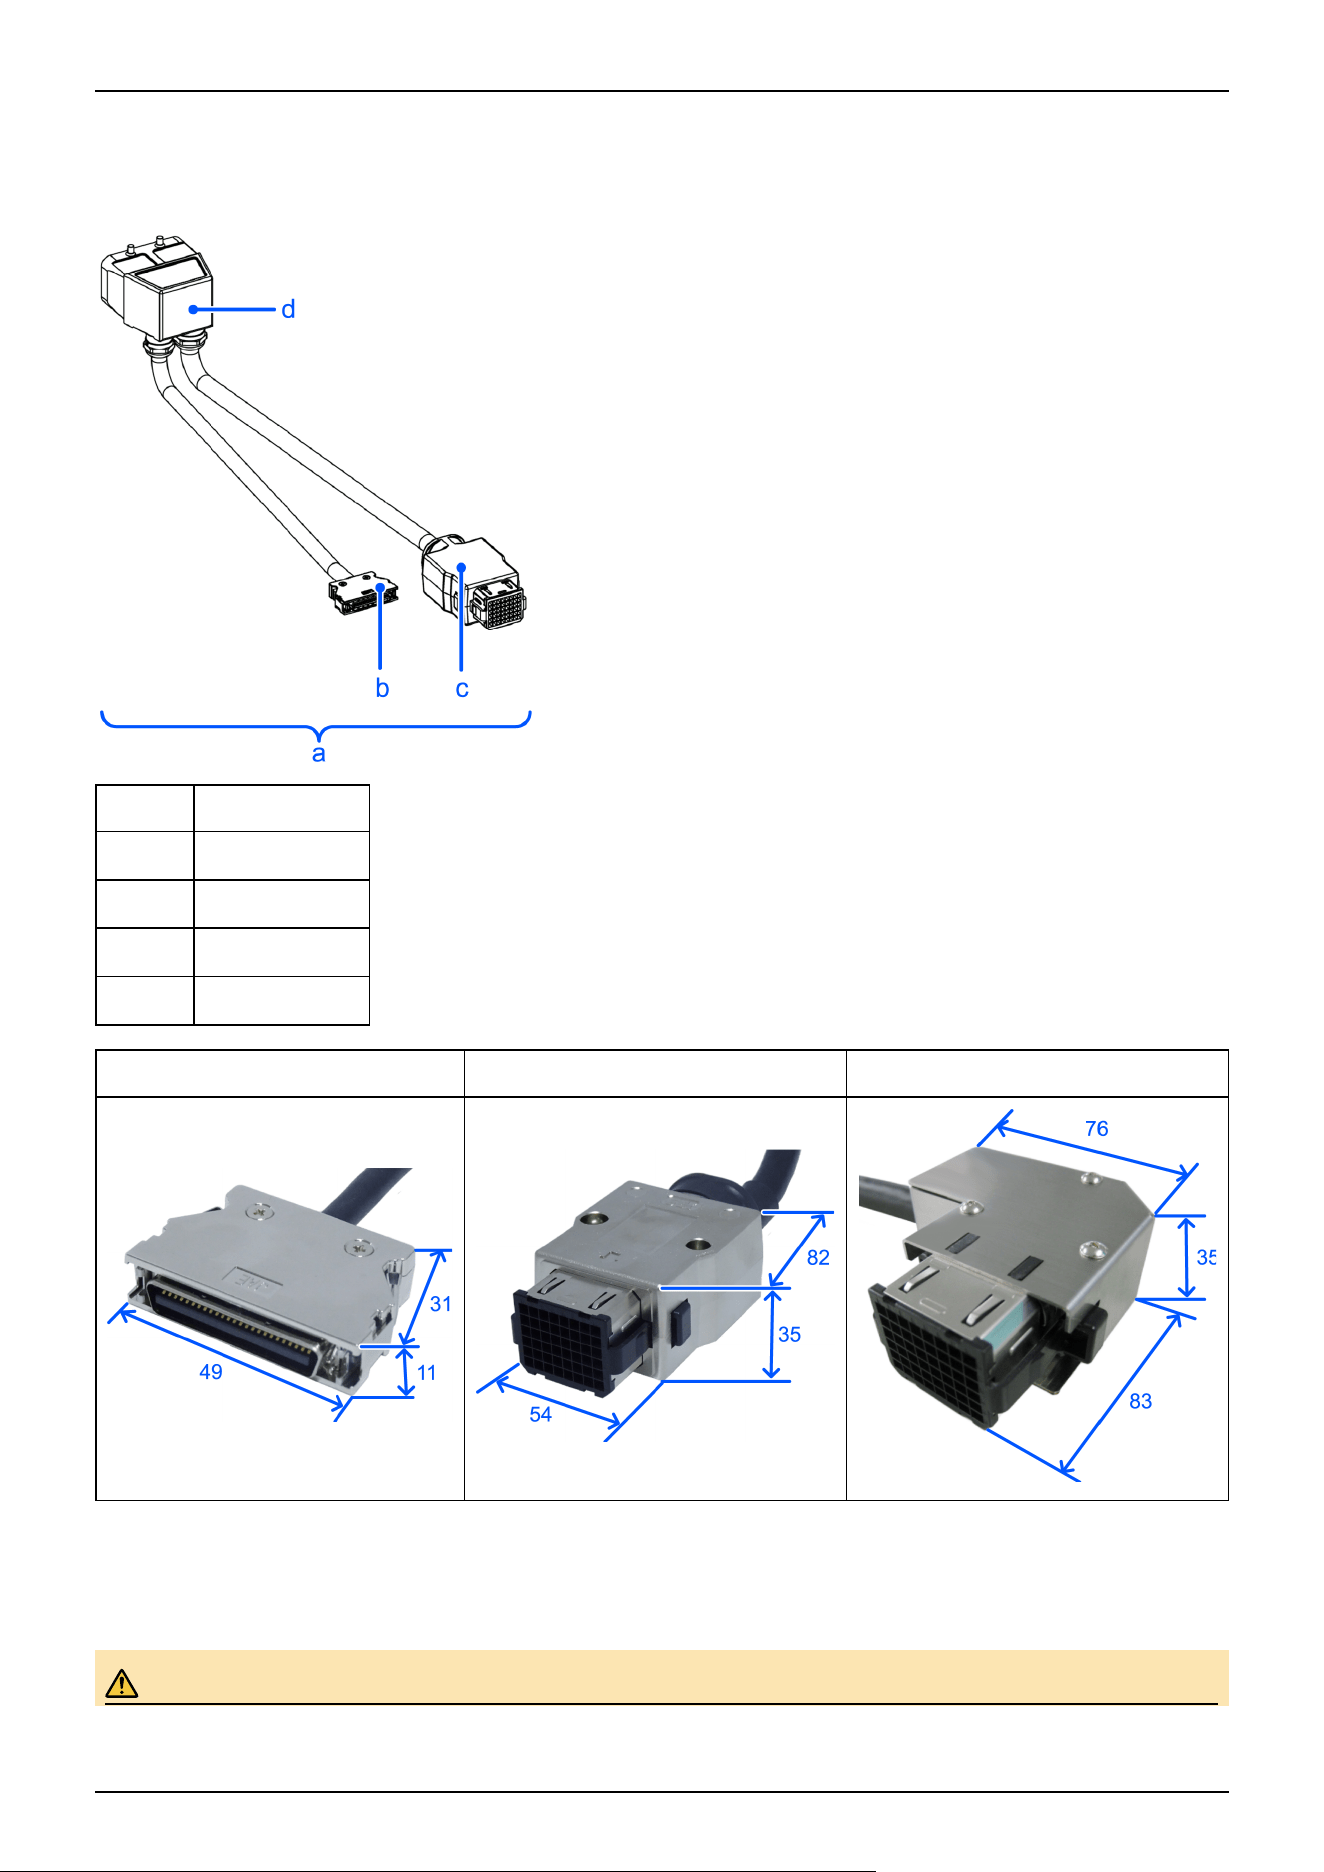
When using a leveler to adjust the height of the base table, use a screw with M16 diameter or more.
If passing cables through the holes in the base table, refer to the connector dimensions in the figures below.
(Units: mm)
Symbol Description
a M/C cable
b Signal connector
c Power connector
d M/C cable hood
Signal Connector Power Connector (Straight) Power Connector (L-shaped)
For details on the environmental requirements for the space when housing the Controller in the base table, refer to the
following manual.
"Controller Manual"
WARNING
Industrial Robot: SCARA Robots GX series Manual Rev.11
244
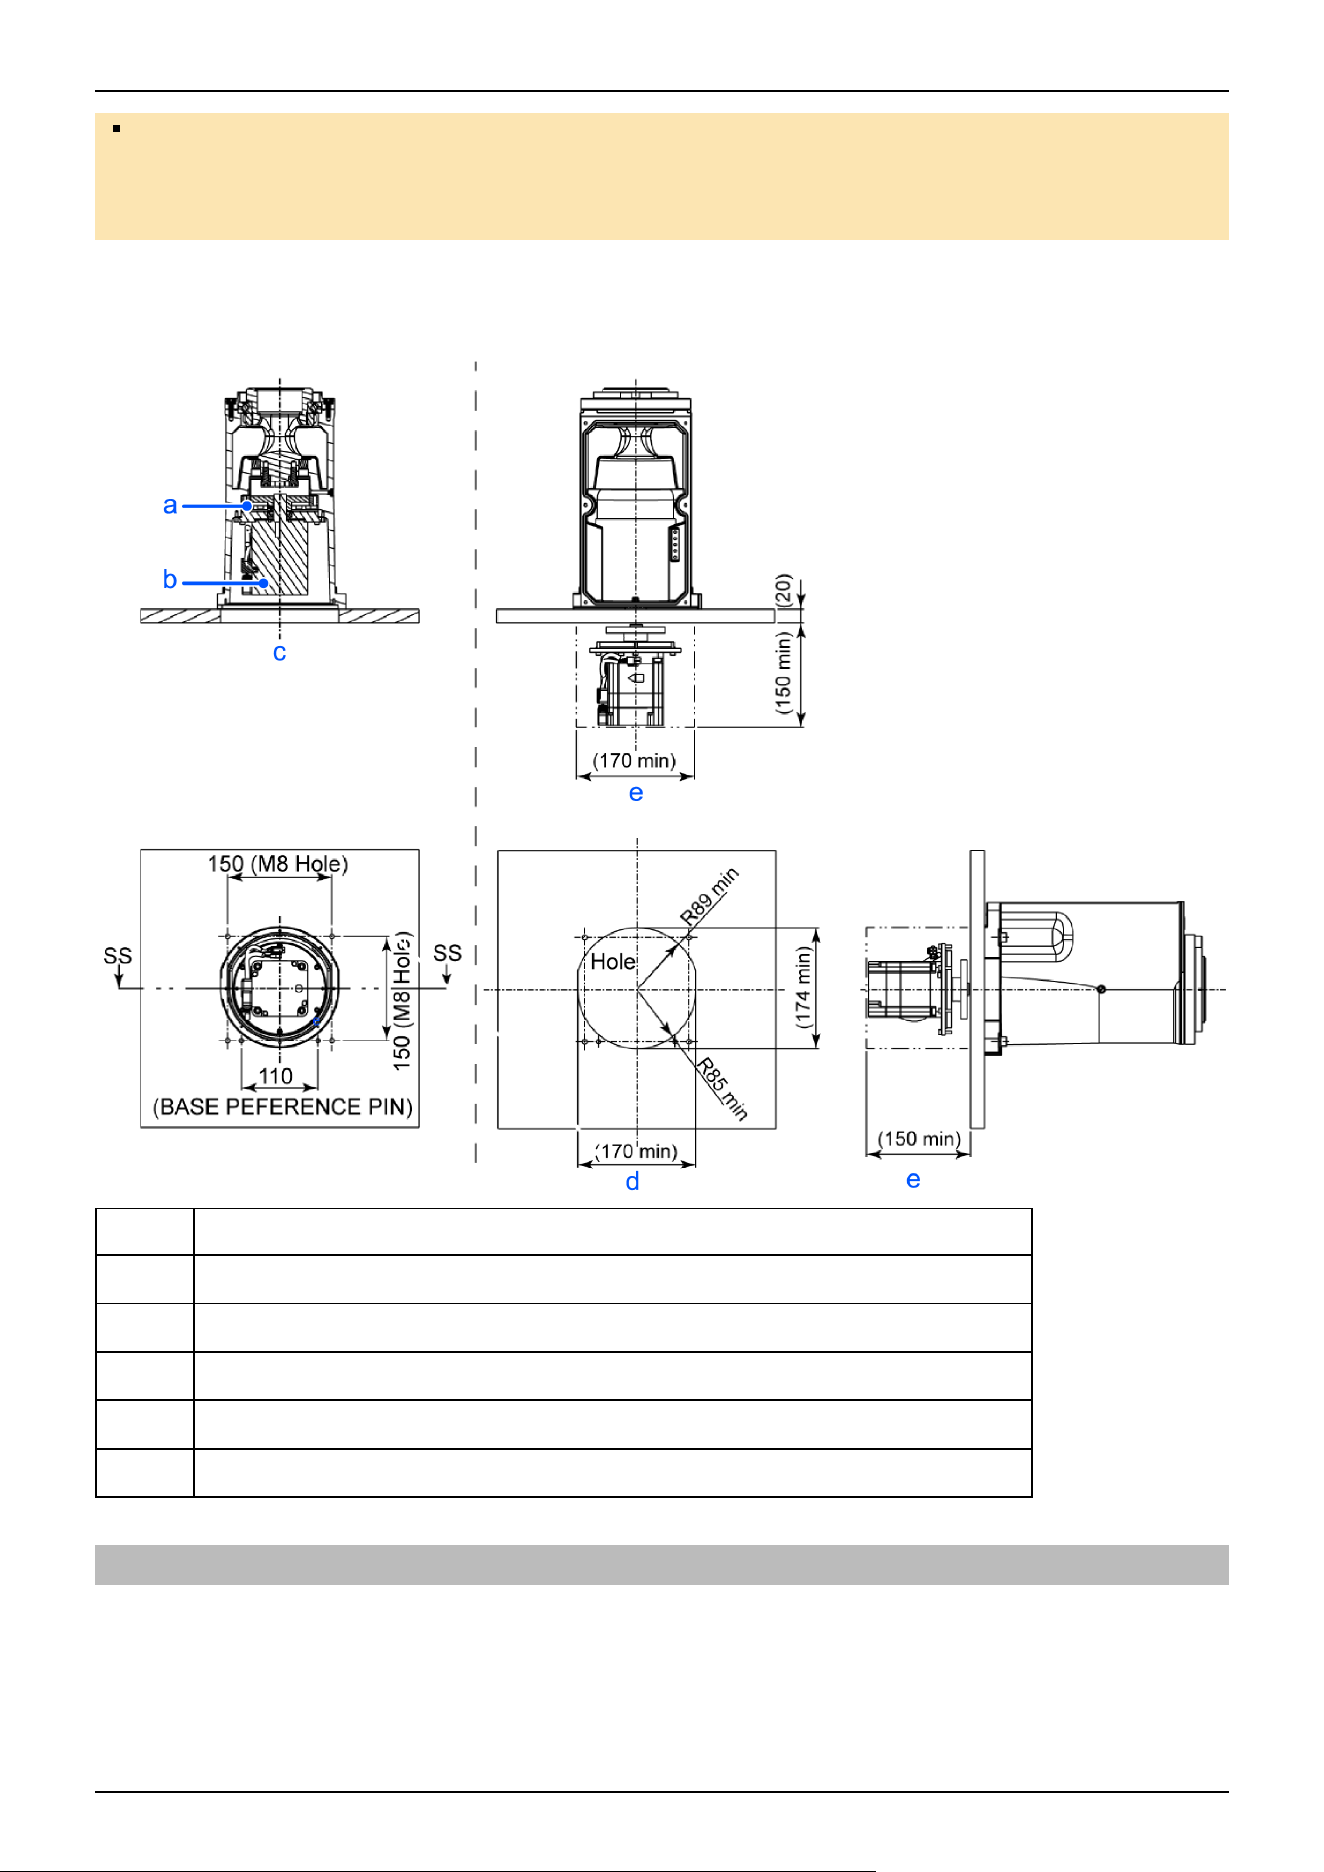
To ensure safety, be sure to install safety barriers for the robot system. For more information on safeguards,
refer to the following section.
Safeguard (SG)
By drilling holes in the base table in advance, the Joint #1 motor can be replaced while the Manipulator is fixed to the base
table for improved ease of maintenance.
Symbol Description
a Joint #1 reduction gear
b Joint #1 motor
c Cross-sectional view along SS-SS
d Minimum hole on the base table required to remove the Joint #1 motor and reduction gear
e Minimum space on the base table required to remove the Joint #1 motor and reduction gear
4.3.3 Manipulator Mounting Dimensions
The maximum envelope of the Manipulator is shown in the figures below. The maximum envelope shown in each figure shows
the case when the radius of the hand is 60 mm or less. If the radius of the hand exceeds 60 mm, define the radius as the
distance to the outer edge of the maximum envelope. In addition to the hand, if a camera, solenoid valve, or other component
attached to the arm is large, set the maximum envelope to include the range that the component may reach.
Industrial Robot: SCARA Robots GX series Manual Rev.11
245
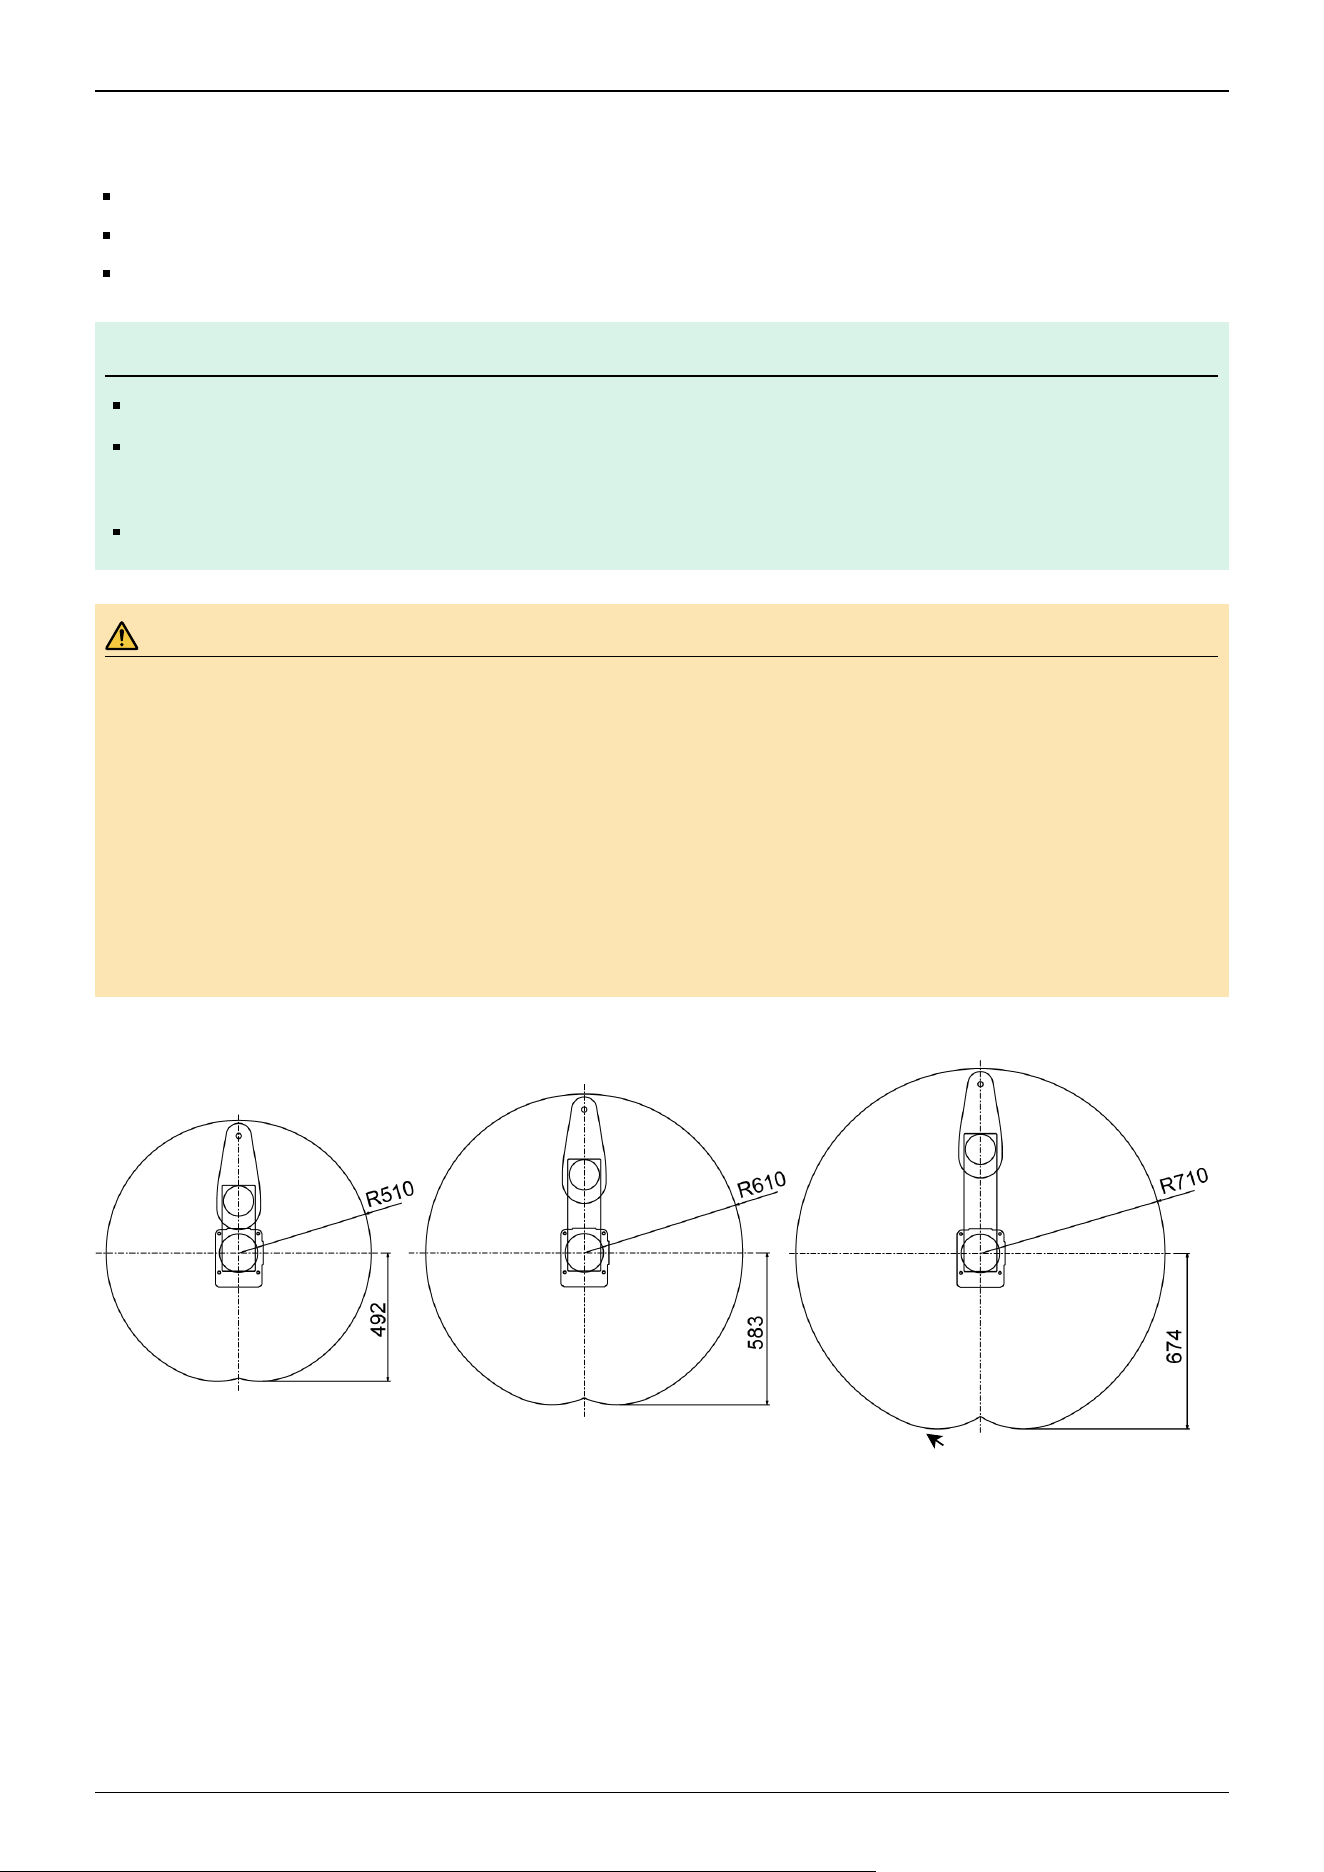
Also, besides the area required for installation of the Manipulator, Controller, peripheral equipment, and other devices, the
following space should be provided at a minimum.
Space for teaching
Space for maintenance and inspection (Space for working safely in the safety barriers)
Space for cables
KEY POINTS
When installing the cables, be sure to maintain sufficient distance from obstacles.
For the minimum bend radius of the M/C cable, refer to the following section.
GX8
Also, leave enough space for other cables so that they are not forced to bend at extreme angles.
WARNING
Install the Manipulator in a location with enough space so that a tool or a workpiece tip does not reach a wall or
safety barriers when the Manipulator extends its arm while holding a workpiece.
If the tool or the workpiece tip reaches a wall or safety barriers, it is extremely hazardous and may result in
serious bodily injury to operators and/or severe equipment damage.
The distance between the safety barriers and the tool or workpiece should be set according to ISO 10218-2.
For the stopping time and stopping distance, refer to the following sections.
Appendix B: Stopping Time and Stopping Distance at Emergency Stop
Appendix C: Stopping Time and Stopping Distance When Safeguard is Open
Table top mounting specifications
✏
GX8-A/GX8-B/
GX8-C45***
GX8-A/GX8-B/
GX8-C55***
GX8-A/GX8-B/
GX8-C65***
Industrial Robot: SCARA Robots GX series Manual Rev.11
246
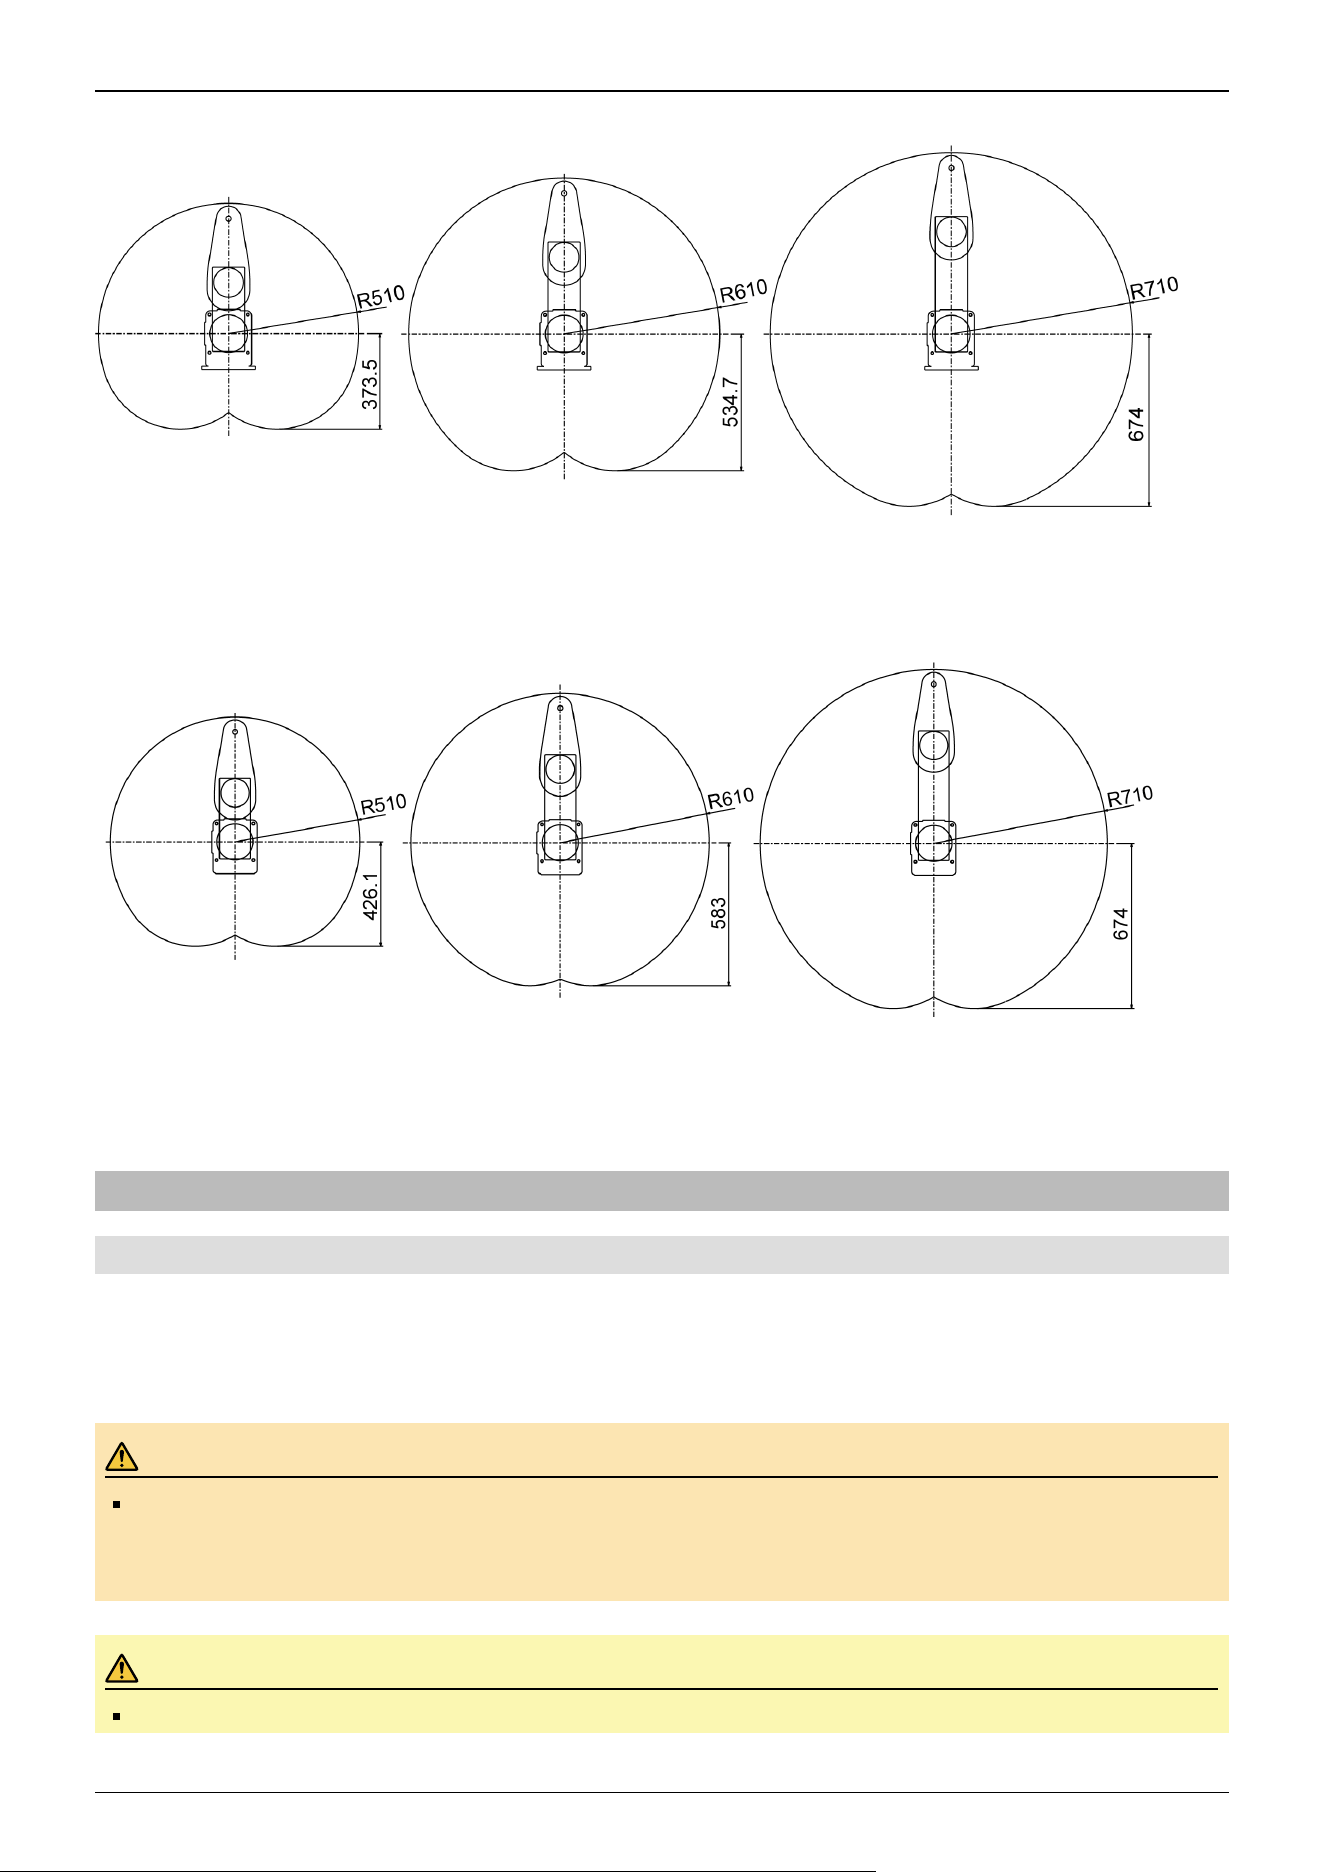
Wall mounting specifications
Ceiling mounting specifications
4.3.4 From Unpacking to Installation
4.3.4.1 Safety Information for the Flow from Unpacking to Installation
Transportation and installation of the Manipulator and related equipment should be performed by people who have received
installation training provided by Epson and the suppliers. Also, the laws and regulations of the installation country must be
followed.
WARNING
Only qualified personnel should perform sling work and operate a crane or a forklift. When these operations
are performed by unqualified personnel, it is extremely hazardous and may result in serious bodily injury to
operators and/or severe equipment damage.
CAUTION
Use a cart or the like to transport the Manipulator in the same status as it was delivered.
GX8-A/GX8-B/
GX8-C55**W
GX8-A/GX8-B/
GX8-C65**W
GX8-A/GX8-B/
GX8-C45**W
GX8-A/GX8-B/
GX8-C55**R
GX8-A/GX8-B/
GX8-C65**R
GX8-A/GX8-B/
GX8-C45**R
Industrial Robot: SCARA Robots GX series Manual Rev.11
247
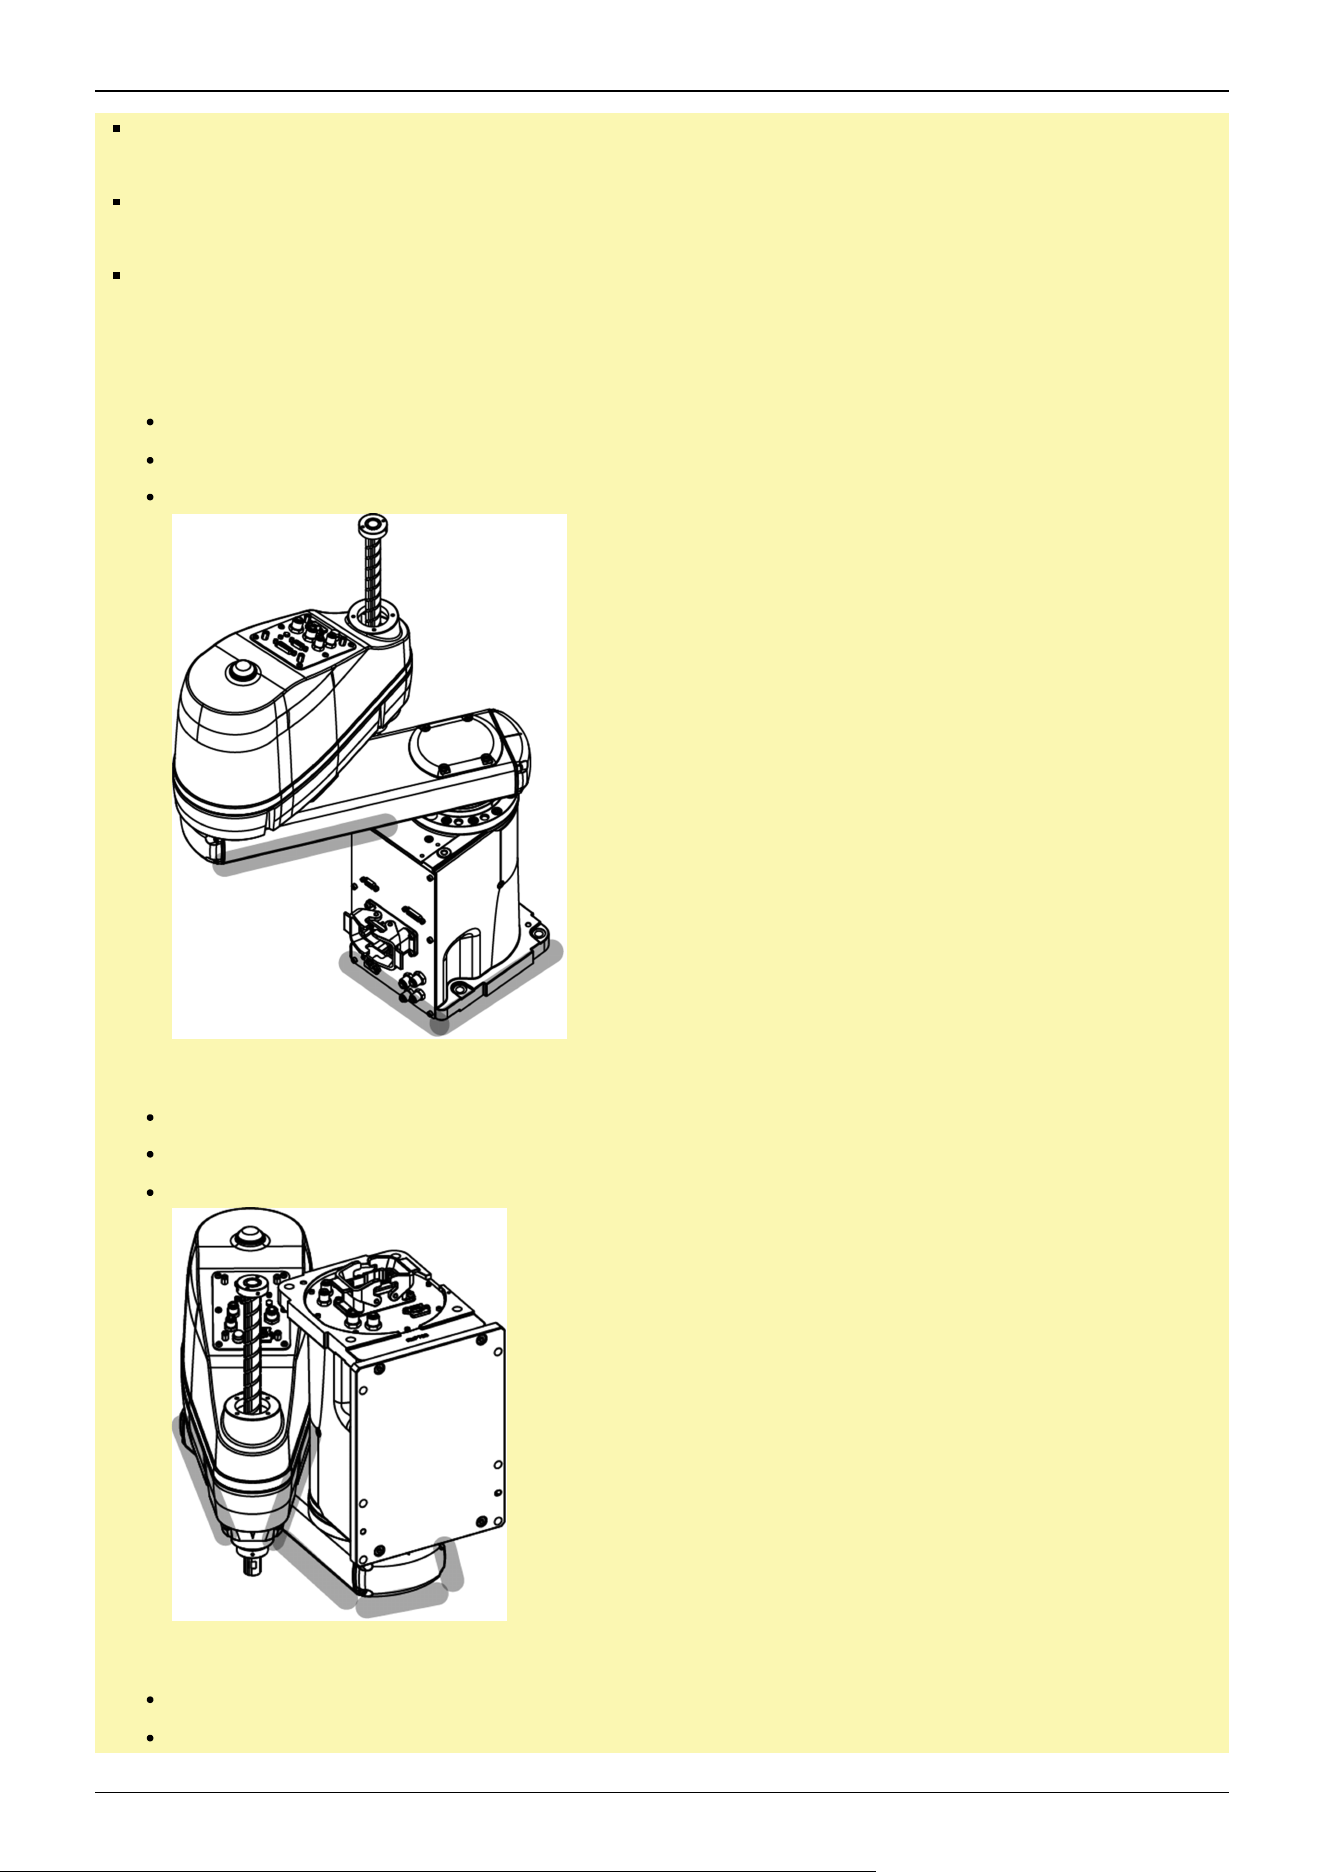
After removing the fixing bolts securing the Manipulator to the transportation pallet, the Manipulator can fall.
Be careful not to get your hands or feet caught in between the Manipulator.
The arm is secured in place with cable ties or similar restraints. To prevent hands or other body parts from
getting pinched in the robot arm, do not remove the cable ties until installation is complete.
The Manipulator should be transported by two or more people, either secured to transporting equipment or
carried by placing their hands under the shaded sections (the bottom of Arm #1 and bottom of the base).
When holding the bottom of the base by hand, be extremely careful not to get your hands or fingers caught.
Table top mounting specifications
GX8-A/GX8-B/GX8-C45***: Approx.33 kg (73 lb)
GX8-A/GX8-B/GX8-C55***: Approx.34 kg (75 lb)
GX8-A/GX8-B/GX8-C65***: Approx.35 kg (77 lb)
Wall mounting specifications
GX8-A/GX8-B/GX8-C45**W: Approx.35 kg (77 lb)
GX8-A/GX8-B/GX8-C55**W: Approx.36 kg (79 lb)
GX8-A/GX8-B/GX8-C65**W: Approx.37 kg (82 lb)
Ceiling mounting specifications
GX8-A/GX8-B/GX8-C**R: Approx.33 kg (73 lb)
GX8-A/GX8-B/GX8-C55**R: Approx.34 kg (75 lb)
Industrial Robot: SCARA Robots GX series Manual Rev.11
248
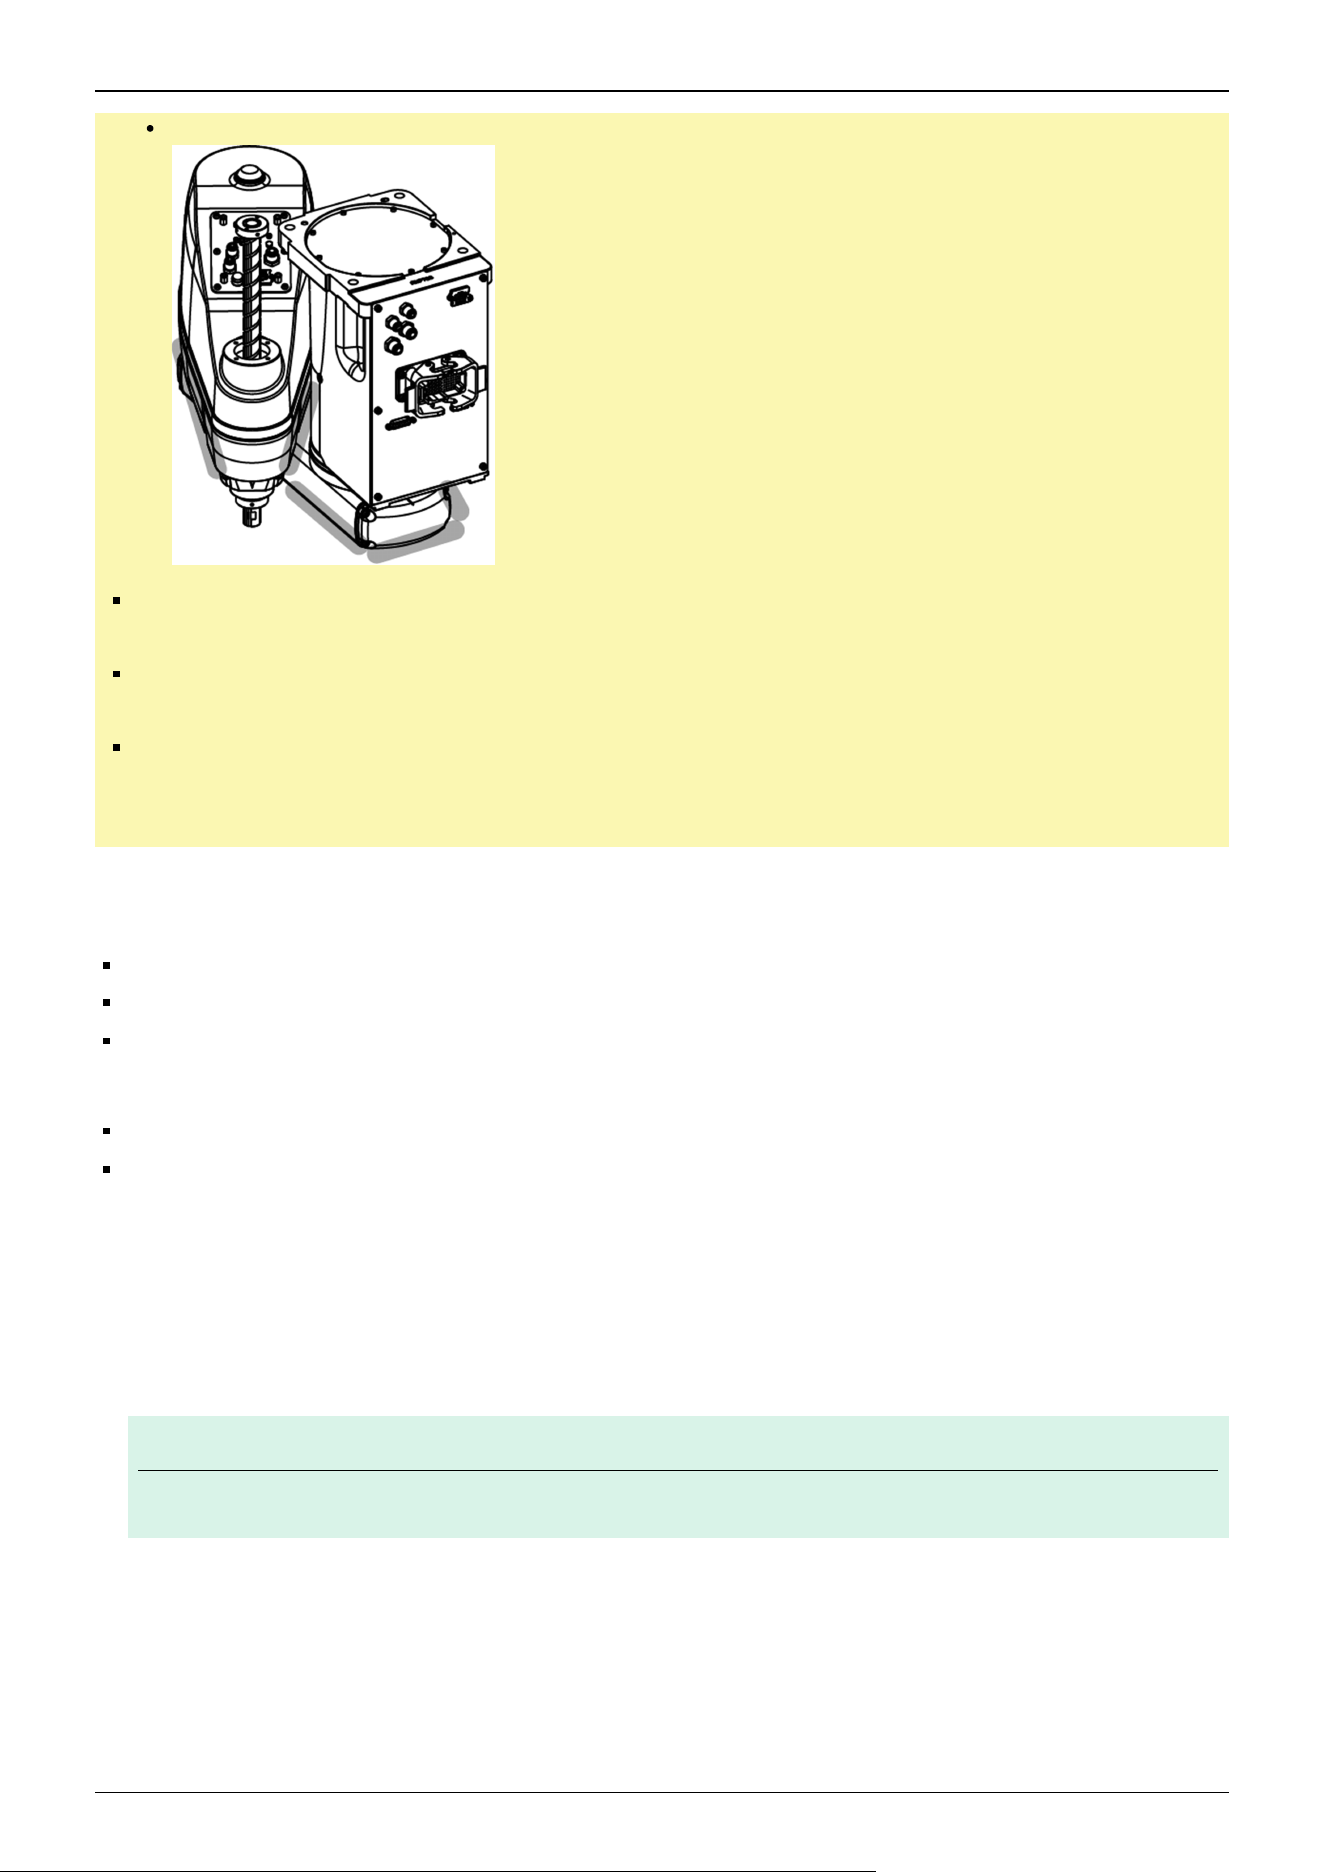
GX8-A/GX8-B/GX8-C65**R: Approx.35 kg (77 lb)
When transporting the Manipulator over long distances, secure it directly to transporting equipment so that it
will not fall. If necessary, pack the Manipulator using the same packaging as delivery.
The Manipulator must be installed to avoid interference with surrounding buildings, structures, and other
machines and equipment that may create a trapping hazard or pinch points.
Resonance (resonating sound or minute vibrations) may occur during Manipulator operation depending on
the rigidity of the base table. If the resonance occurs, improve the rigidity of the base table or change the
speed or acceleration and deceleration settings of the Manipulator.
For details on the Manipulator installation procedure for models with standard specifications and ESD specifications, refer to
the following sections.
"Table Top Mounting Specifications"
"Wall Mounting Specifications"
"Ceiling Mounting Specifications"
For Manipulator models with cleanroom & ESD specifications and with protected-model, refer to the following sections.
"Cleanroom & ESD Specifications"
"Protected-Model"
The following procedure should be followed when transporting the Manipulator by hoisting.
1. Attach the eyebolts to the top of the Manipulator base.
2. Place the Manipulator arm in the extended position.
3. Ensure that the hoisting belt can be secured to Arm #2. Using the metal part of the shaded area as a guide, apply the band
so that it does not shift.
KEY POINTS
Please note that the plastic cover section may be damaged if a load is applied to it.
4. To prevent the Manipulator from falling over, lift while providing support at the position indicated by the arrow, and move
it to the base table where it will installed.
✏
Industrial Robot: SCARA Robots GX series Manual Rev.11
249
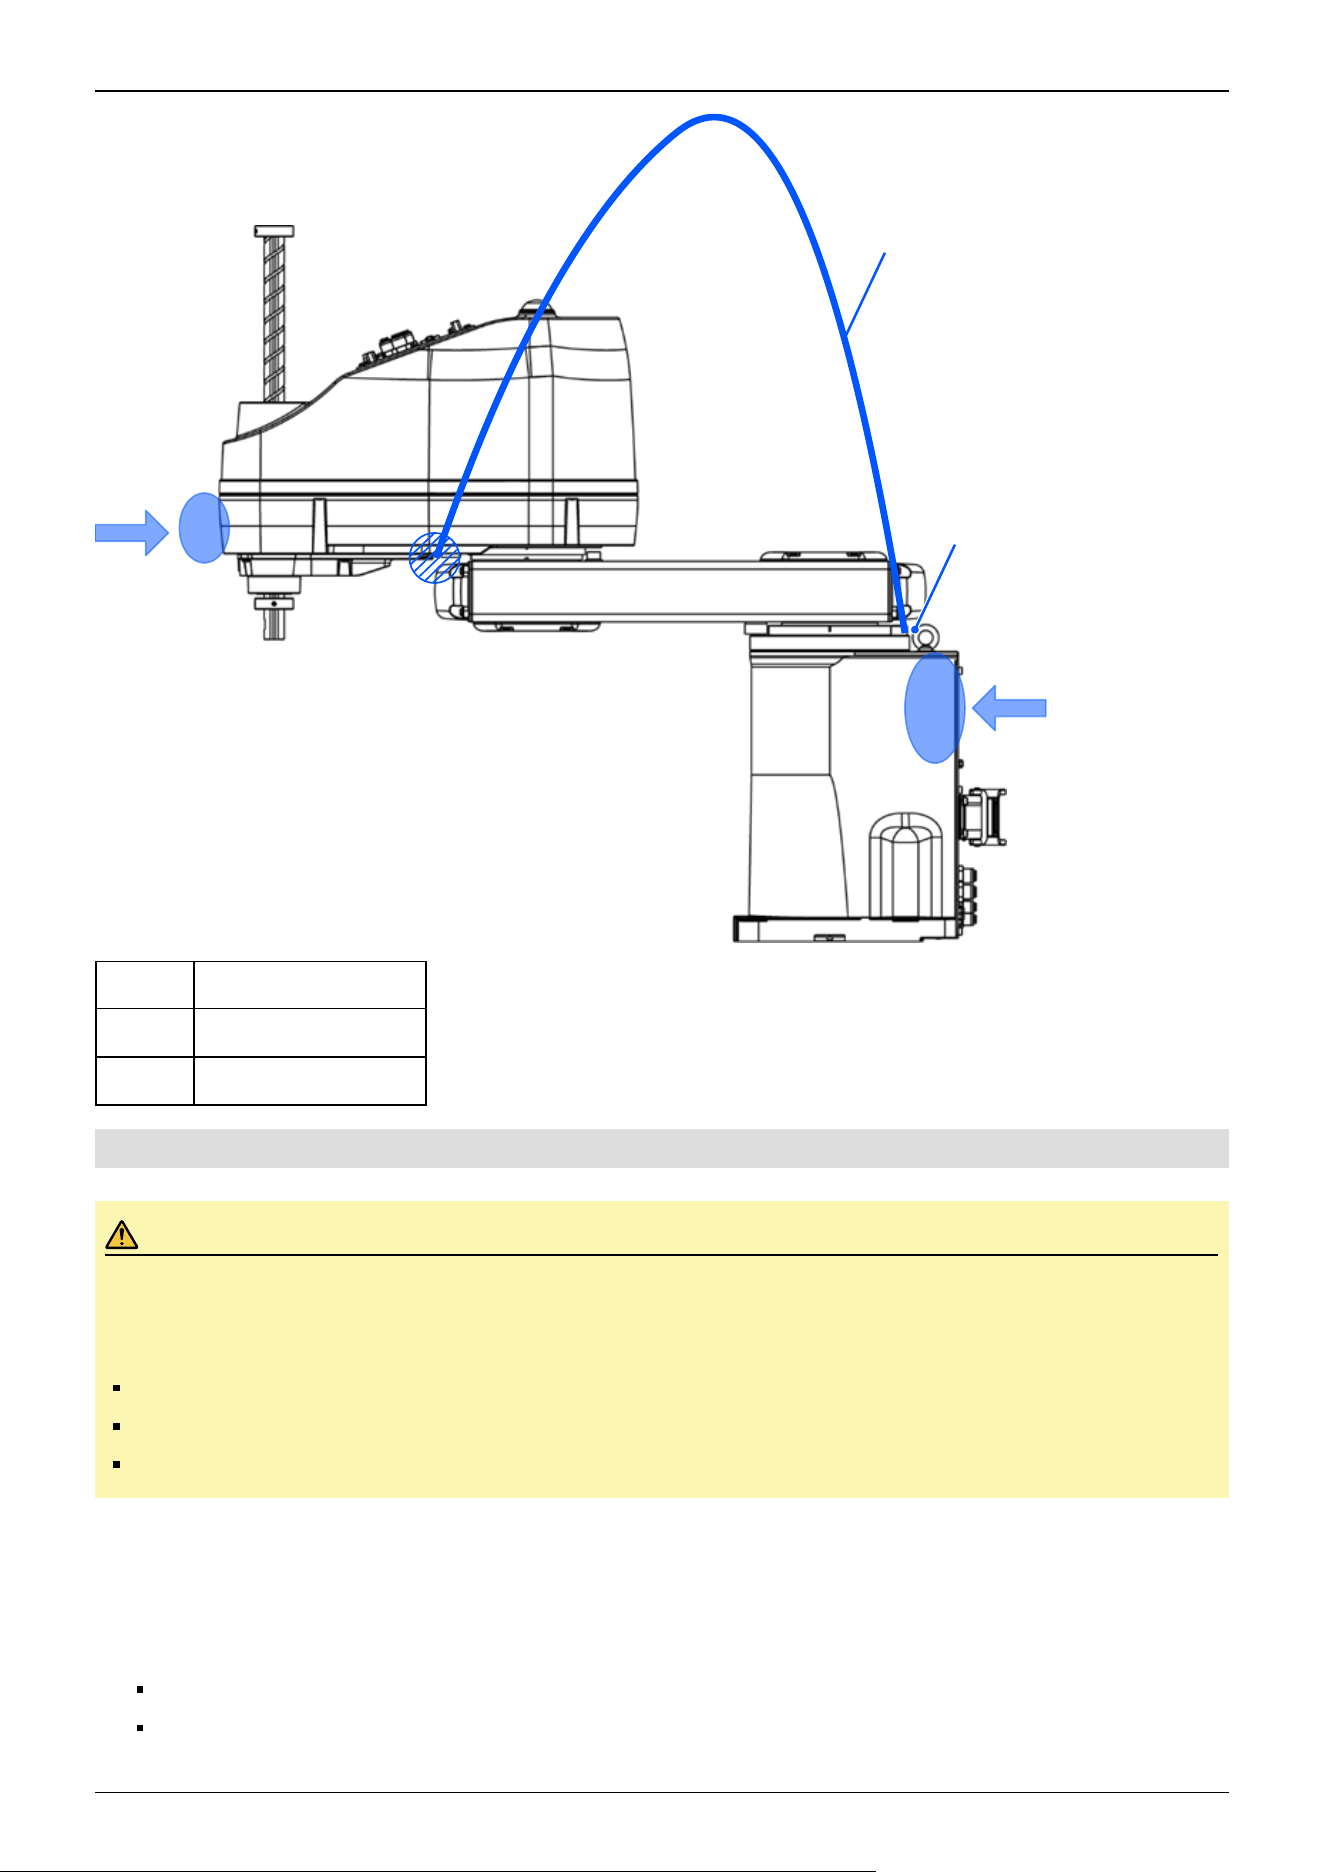
Symbol Description
a Hoisting belt
b M8 eyebolts (included)
4.3.4.2 Table Top Mounting Specifications
CAUTION
Be sure to always use two or more people when installing or relocating the model with table top mounting
specifications. The Manipulator weights are as follows. Be careful not to get hands or feet caught or have
equipment damaged due to dropping of the Manipulator.
GX8-A/GX8-B/GX8-C45***: Approx.33 kg (73 lb)
GX8-A/GX8-B/GX8-C55***: Approx.34 kg (75 lb)
GX8-A/GX8-B/GX8-C65***: Approx.35 kg (77 lb)
Standard-model
1. Secure the base to the base table using four bolts. Be sure to always use washers.
Tightening torque:
M8: 32.0 N·m (326 kgf·cm)
M10: 58.0 N·m (626 kgf·cm)
a
b
Industrial Robot: SCARA Robots GX series Manual Rev.11
250
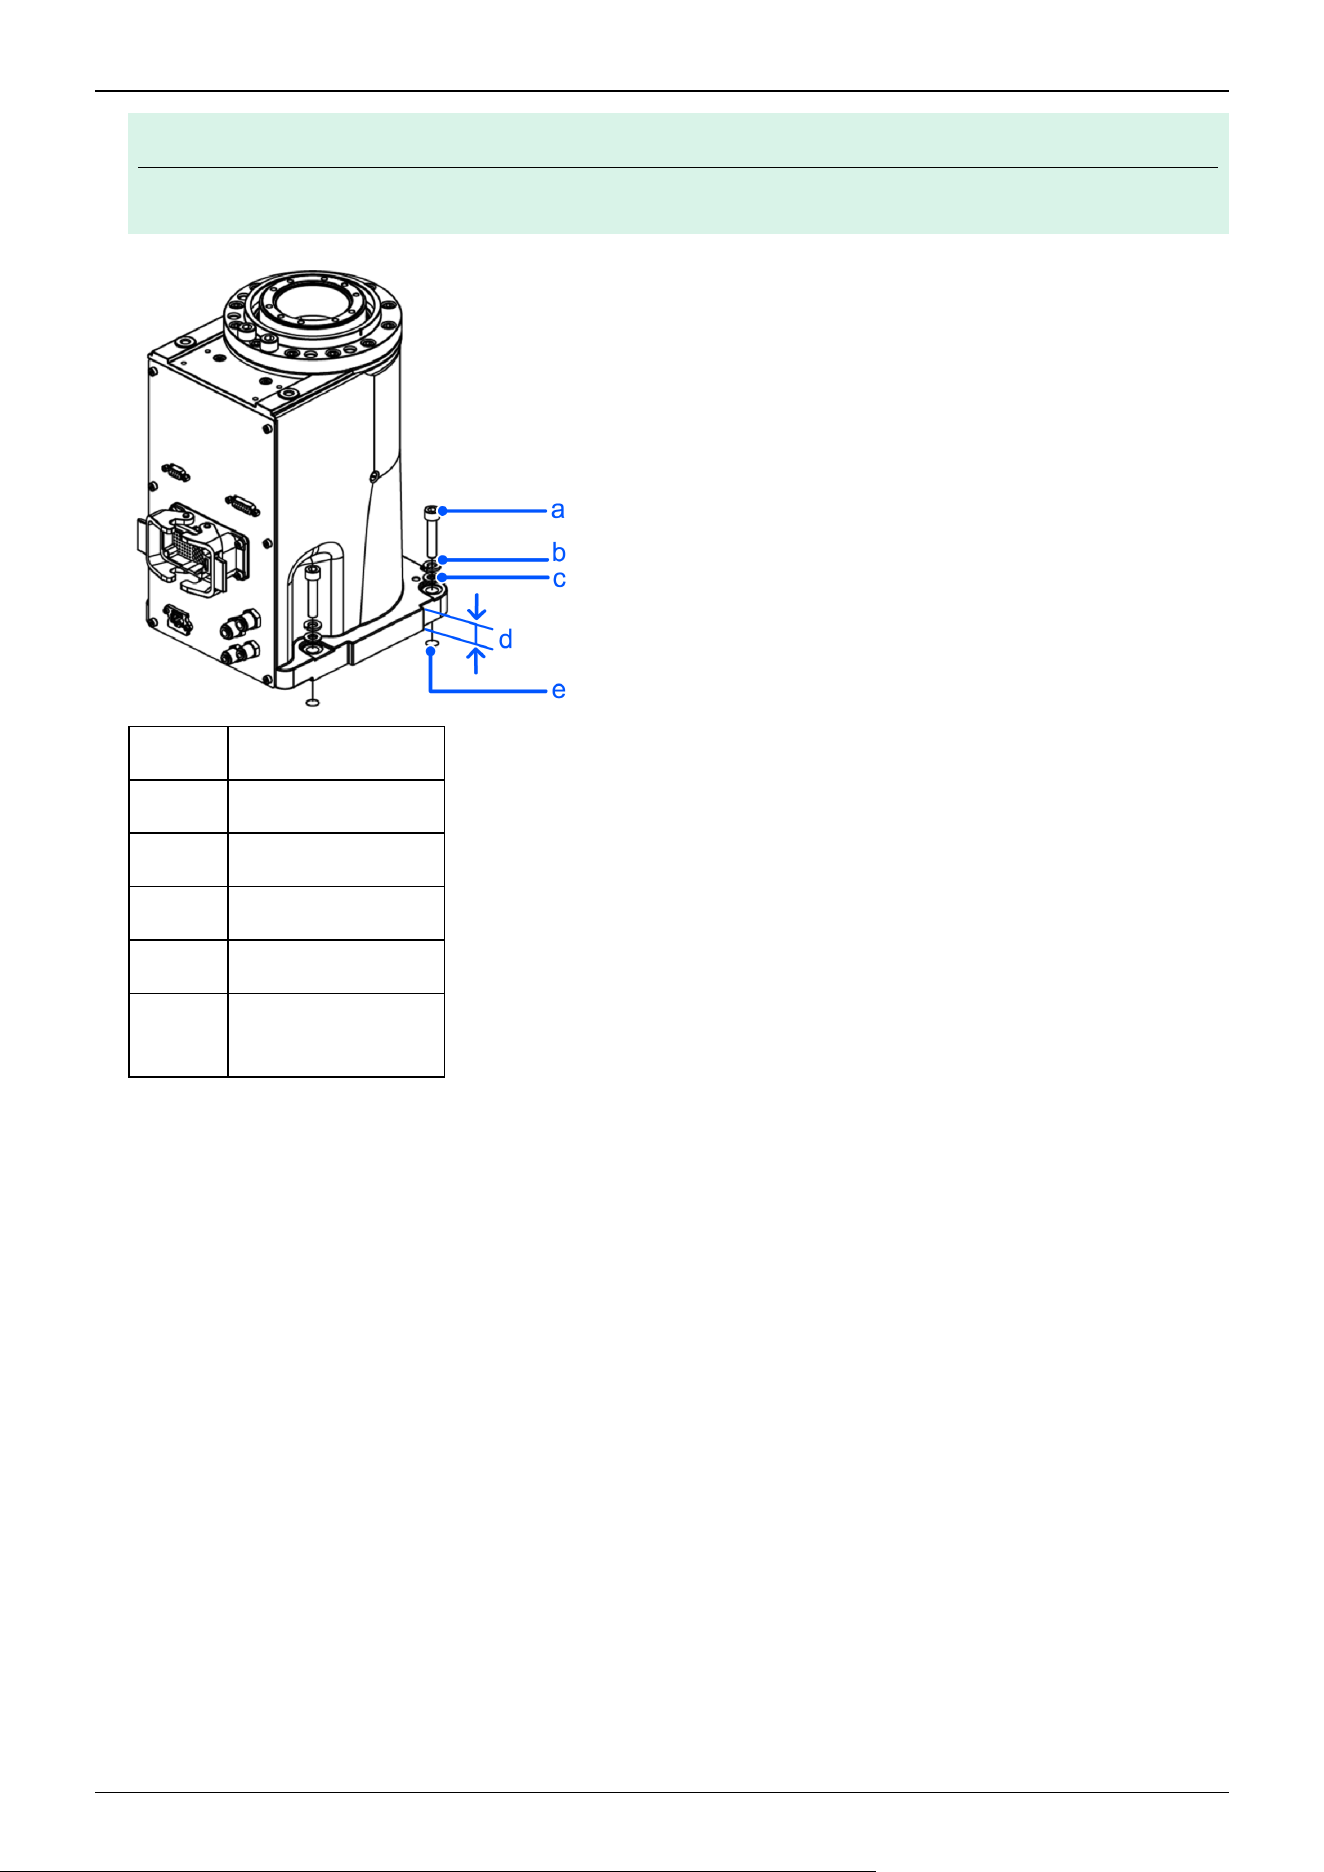
KEY POINTS
Use bolts with strength specifications compliant with ISO 898-1 property class: 10.9 or 12.9.
Symbol Description
a 4 × M8 × 40
b Spring washer
c Plain washer
d 20 mm
e
Threaded hole
20 mm or more depth
✏
Industrial Robot: SCARA Robots GX series Manual Rev.11
251
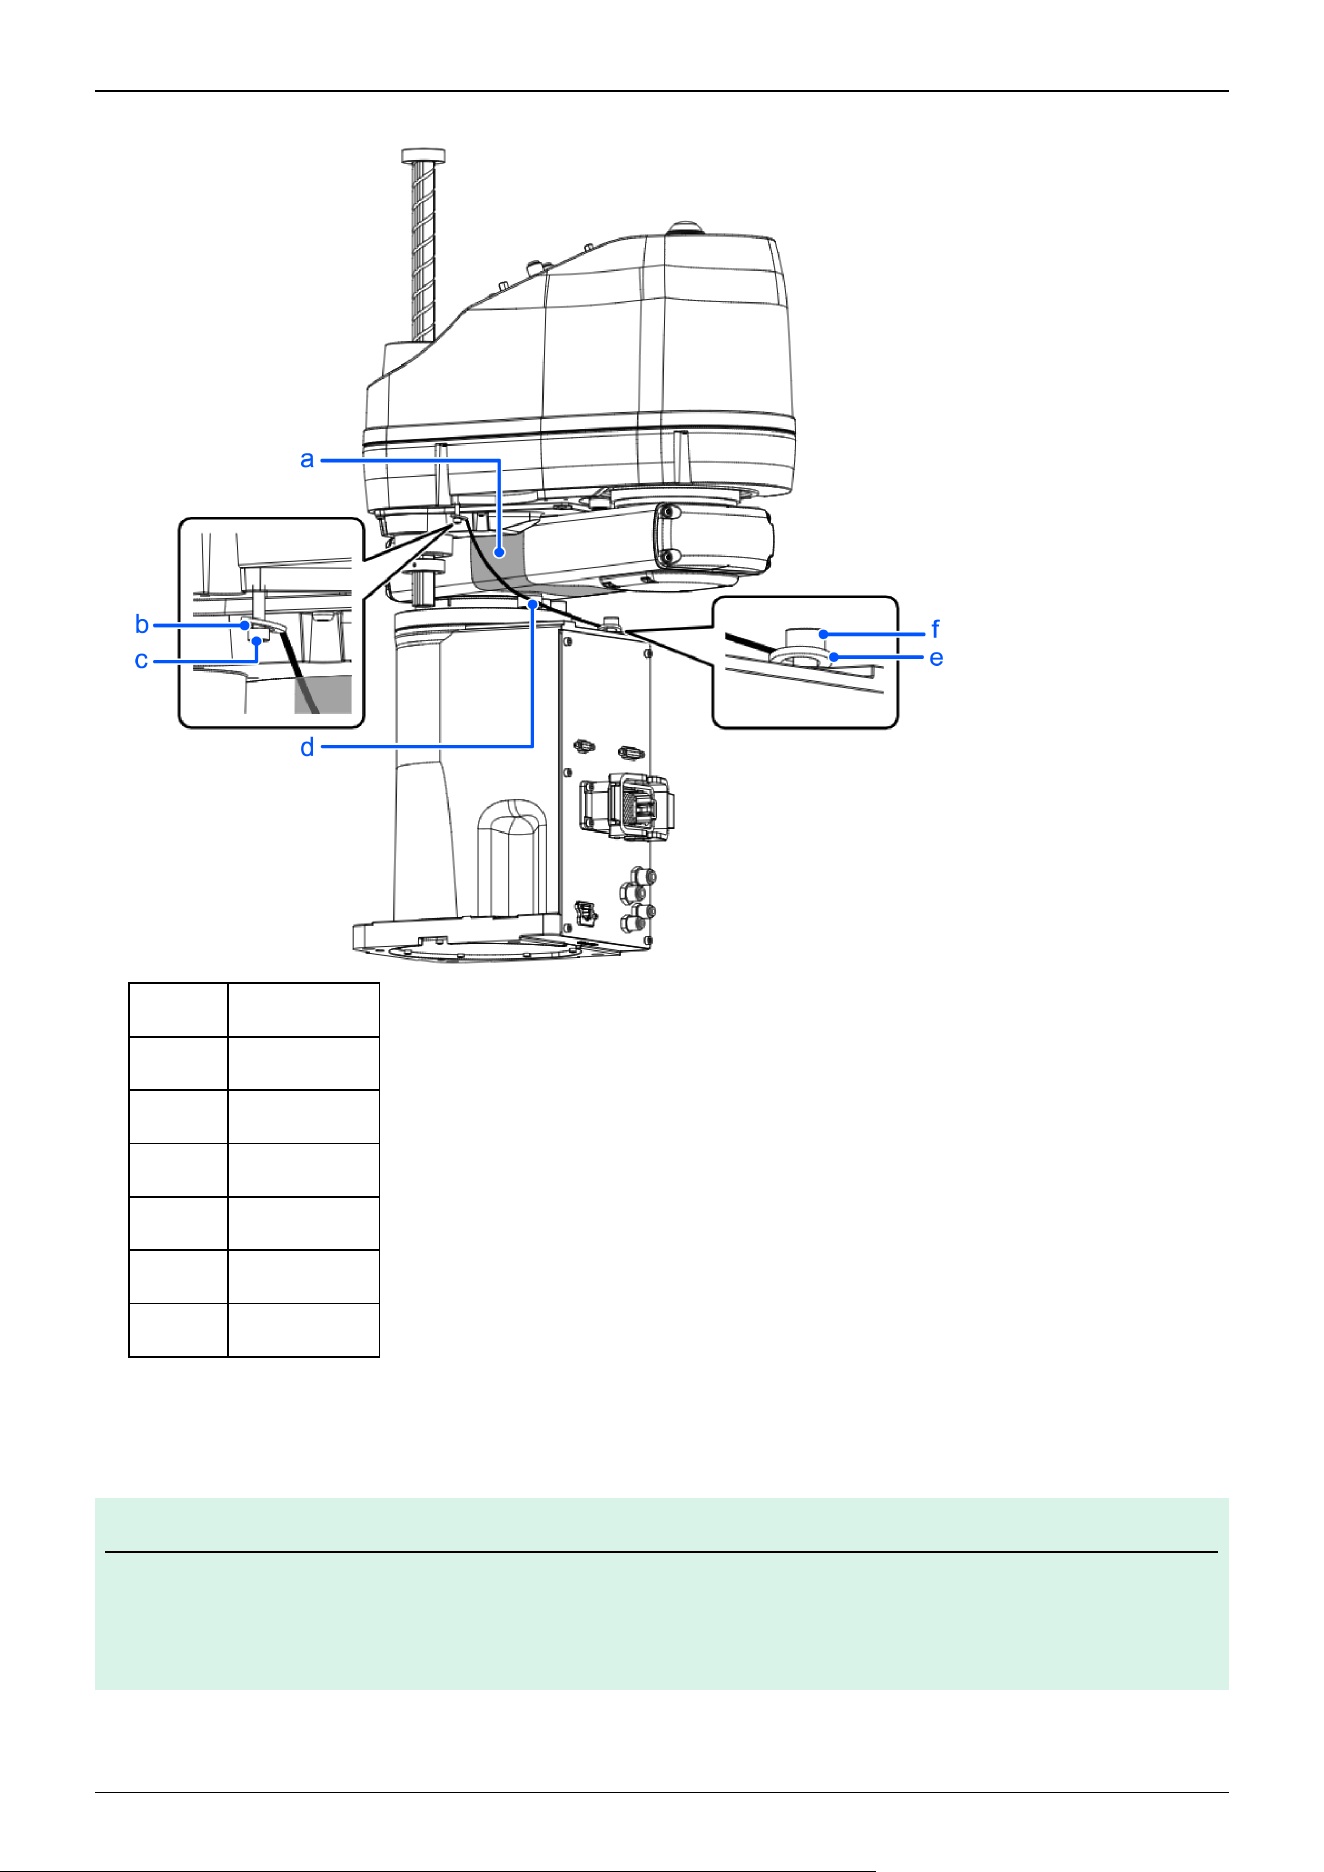
2. Use a nippers or similar tool to cut the cable ties holding the arm in place.
Symbol Description
a Sheet
b Washer
c Bolt: M4 × 35
d Cable tie
e Washer
f Bolt: M8 × 20
3. Remove the bolts that secured the cable ties in step 2.
4. Remove the transportation fixtures.
KEY POINTS
If the cable is routed by exiting from the bottom side:
Make sure there is enough space in the center of the base table where the base will be secured in place.
Diameter: ø150 mm or more
Depth: M/C cable L-angle type 120 mm or more, M/C cable straight type 190 mm or more
✏
Industrial Robot: SCARA Robots GX series Manual Rev.11
252
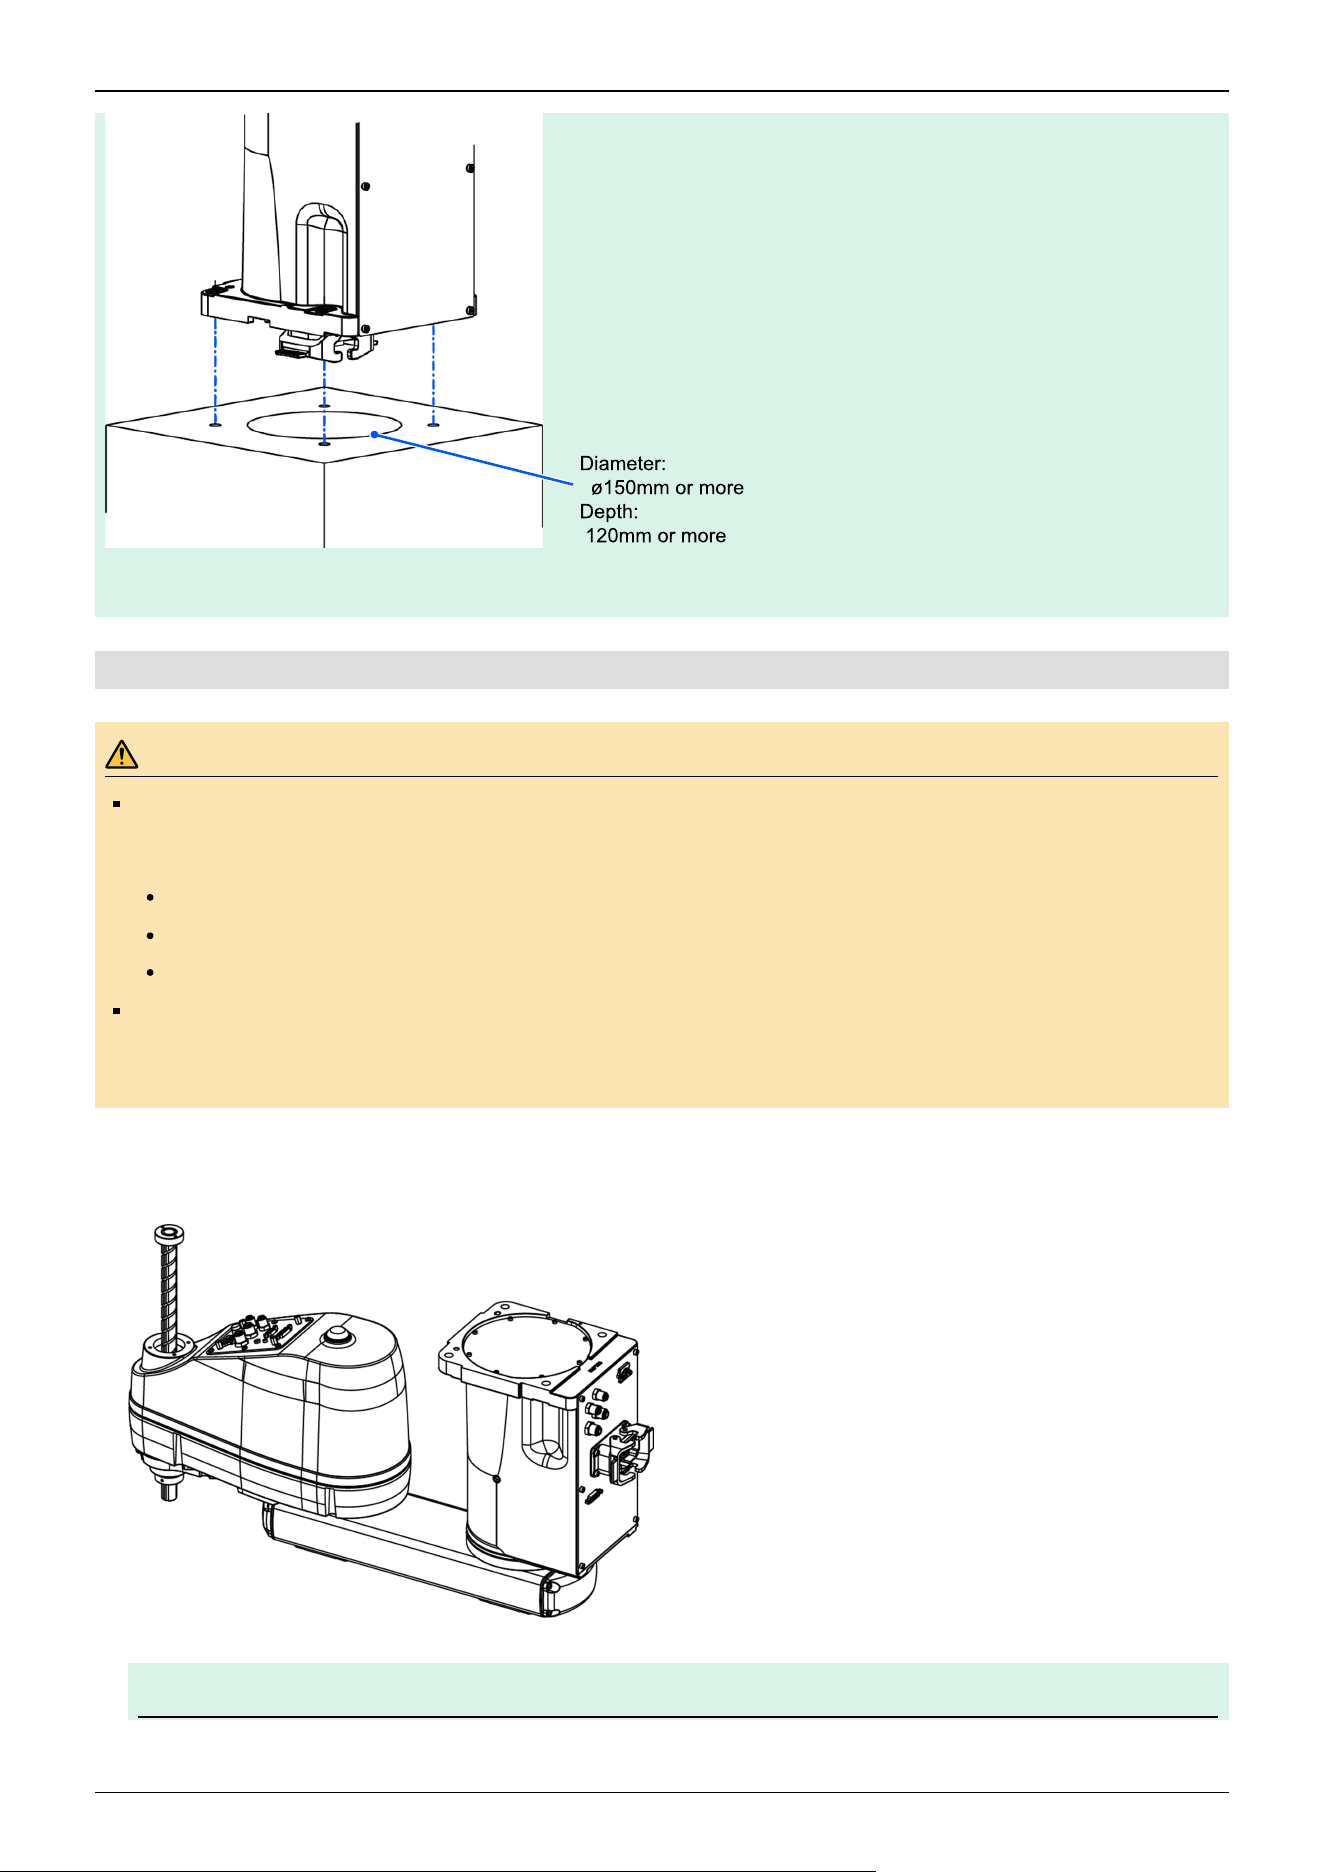
4.3.4.3 Wall Mounting Specifications
WARNING
Be sure to always use two or more people when installing or relocating the model with wall mounting
specifications. The Manipulator weights are as follows. Be careful not to get hands or feet caught or have
equipment damaged due to dropping of the Manipulator.
GX8-A/GX8-B/GX8-C45**W: Approx.35 kg (77 lb)
GX8-A/GX8-B/GX8-C55**W: Approx.36 kg (79 lb)
GX8-A/GX8-B/GX8-C65**W: Approx.37 kg (82 lb)
When installing the Manipulator on a wall or similar structure, support the Manipulator until all of the anchor
bolts are secured in place. Removing the support before the anchor bolts are fully secured is extremely
hazardous and may cause the Manipulator to fall.
Standard specifications
1. With the arm extended, take out the Manipulator from the packing box.
KEY POINTS
✏
Industrial Robot: SCARA Robots GX series Manual Rev.11
253
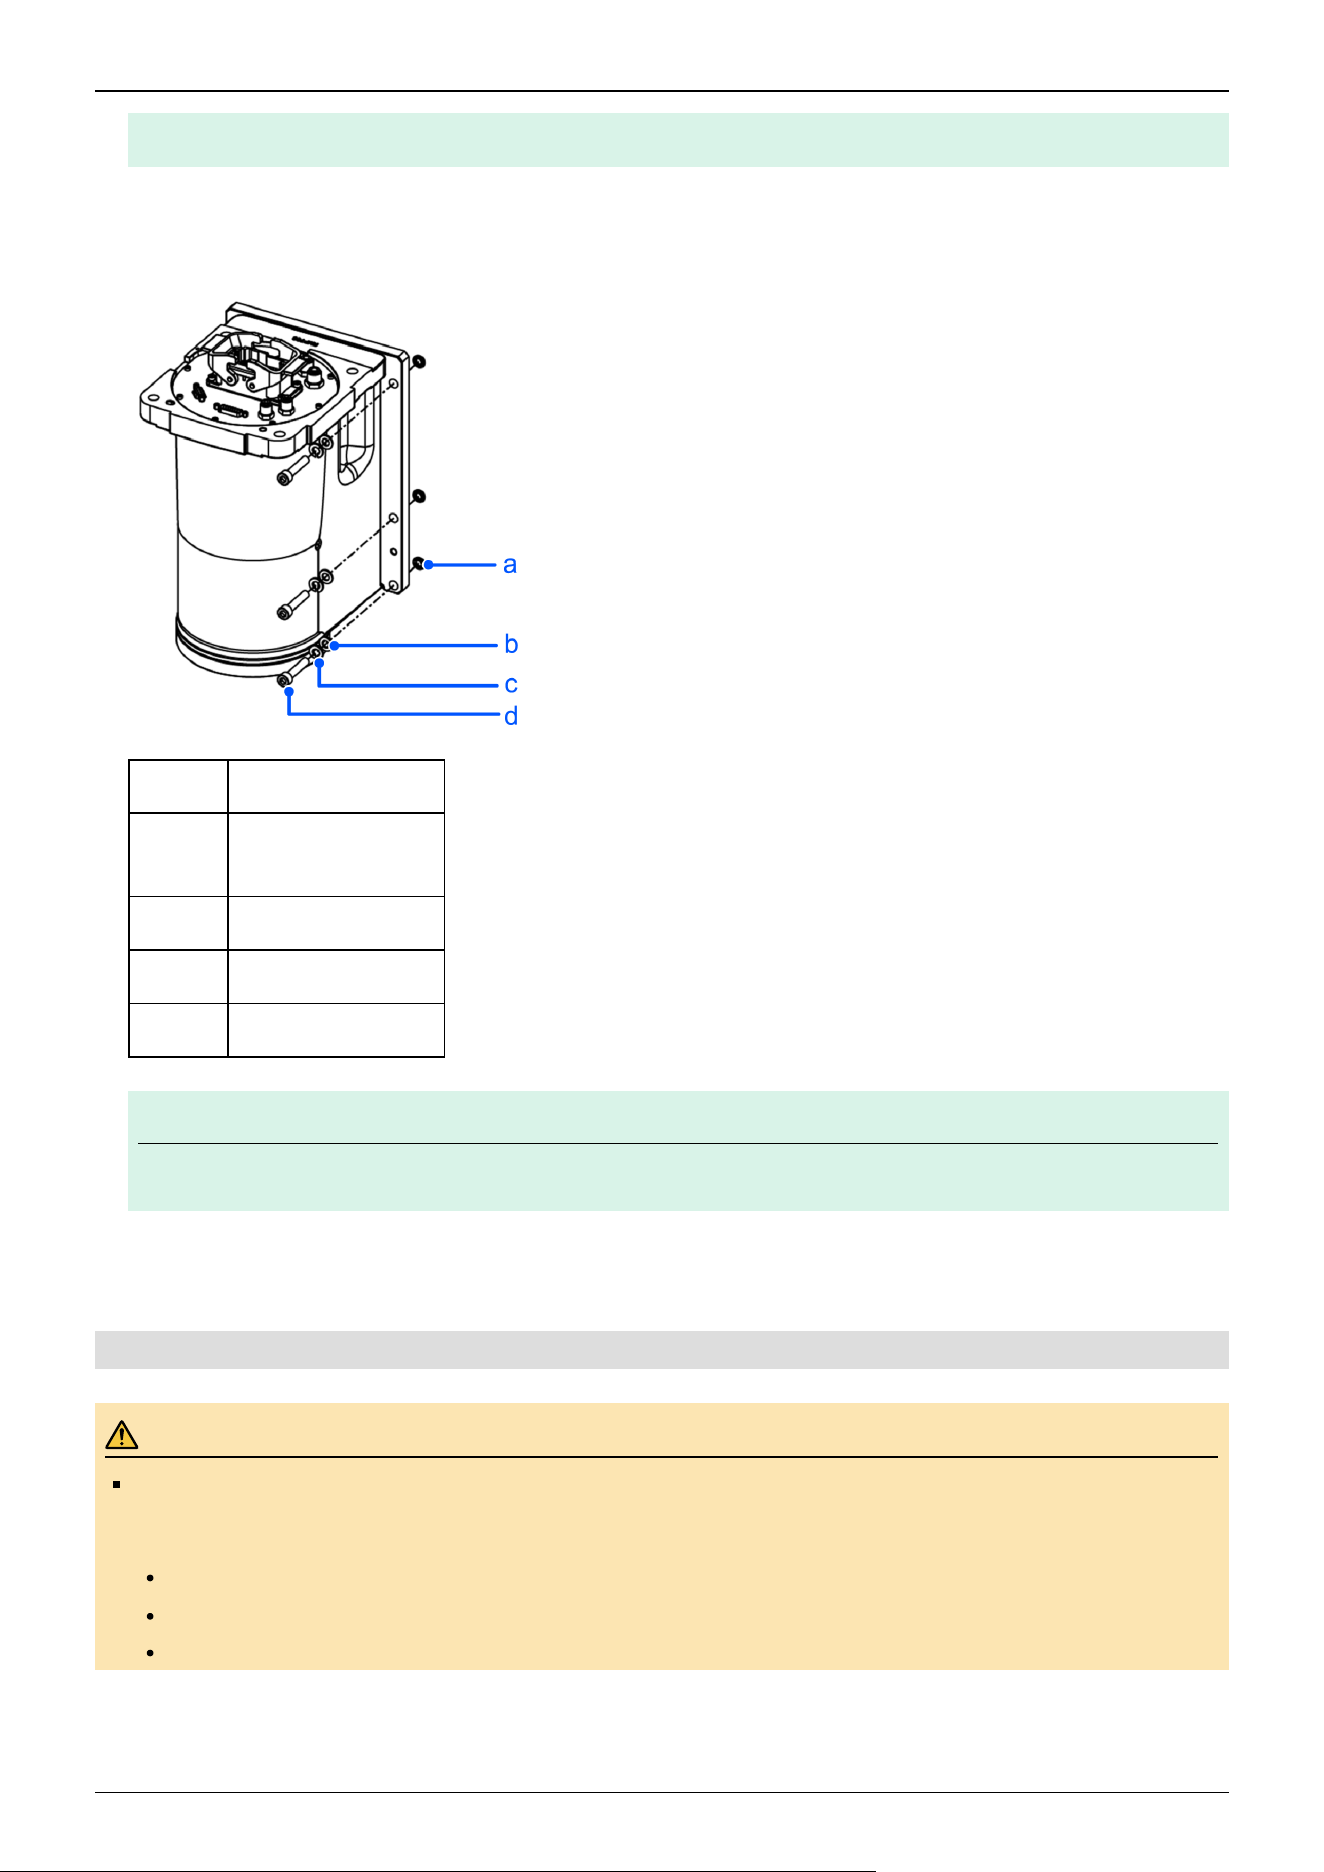
The joints may rotate due to the Manipulator's own weight. Be careful not to get your hands or fingers caught.
2. Secure the base to the wall using the six bolts.
Be sure to always use washers.
Tightening torque: 32.0 N·m (326 kgf·cm)
Symbol Description
a
6 × M8 threaded hole
20 mm or more depth
b 6 × plain washer
c 6 × spring washer
d 6 × M8×40
KEY POINTS
Use bolts with strength specifications compliant with ISO 898-1 property class: 10.9 or 12.9.
3. Remove the transportation fixtures.
4.3.4.4 Ceiling Mounting Specifications
WARNING
Be sure to always use two or more people when installing or relocating the model with ceiling mounting
specifications. The Manipulator weights are as follows. Be careful not to get hands or feet caught or have
equipment damaged due to dropping of the Manipulator.
GX8-A/GX8-B/GX8-C45**R: Approx.33 kg (73 lb)
GX8-A/GX8-B/GX8-C55**R: Approx.34 kg (75 lb)
GX8-A/GX8-B/GX8-C65**R: Approx.35 kg (77 lb)
✏
Industrial Robot: SCARA Robots GX series Manual Rev.11
254

When installing the Manipulator on a ceiling or similar structure, support the Manipulator until all of the anchor
bolts are secured in place. Removing the support before the anchor bolts are fully secured is extremely
hazardous and may cause the Manipulator to fall.
Industrial Robot: SCARA Robots GX series Manual Rev.11
255
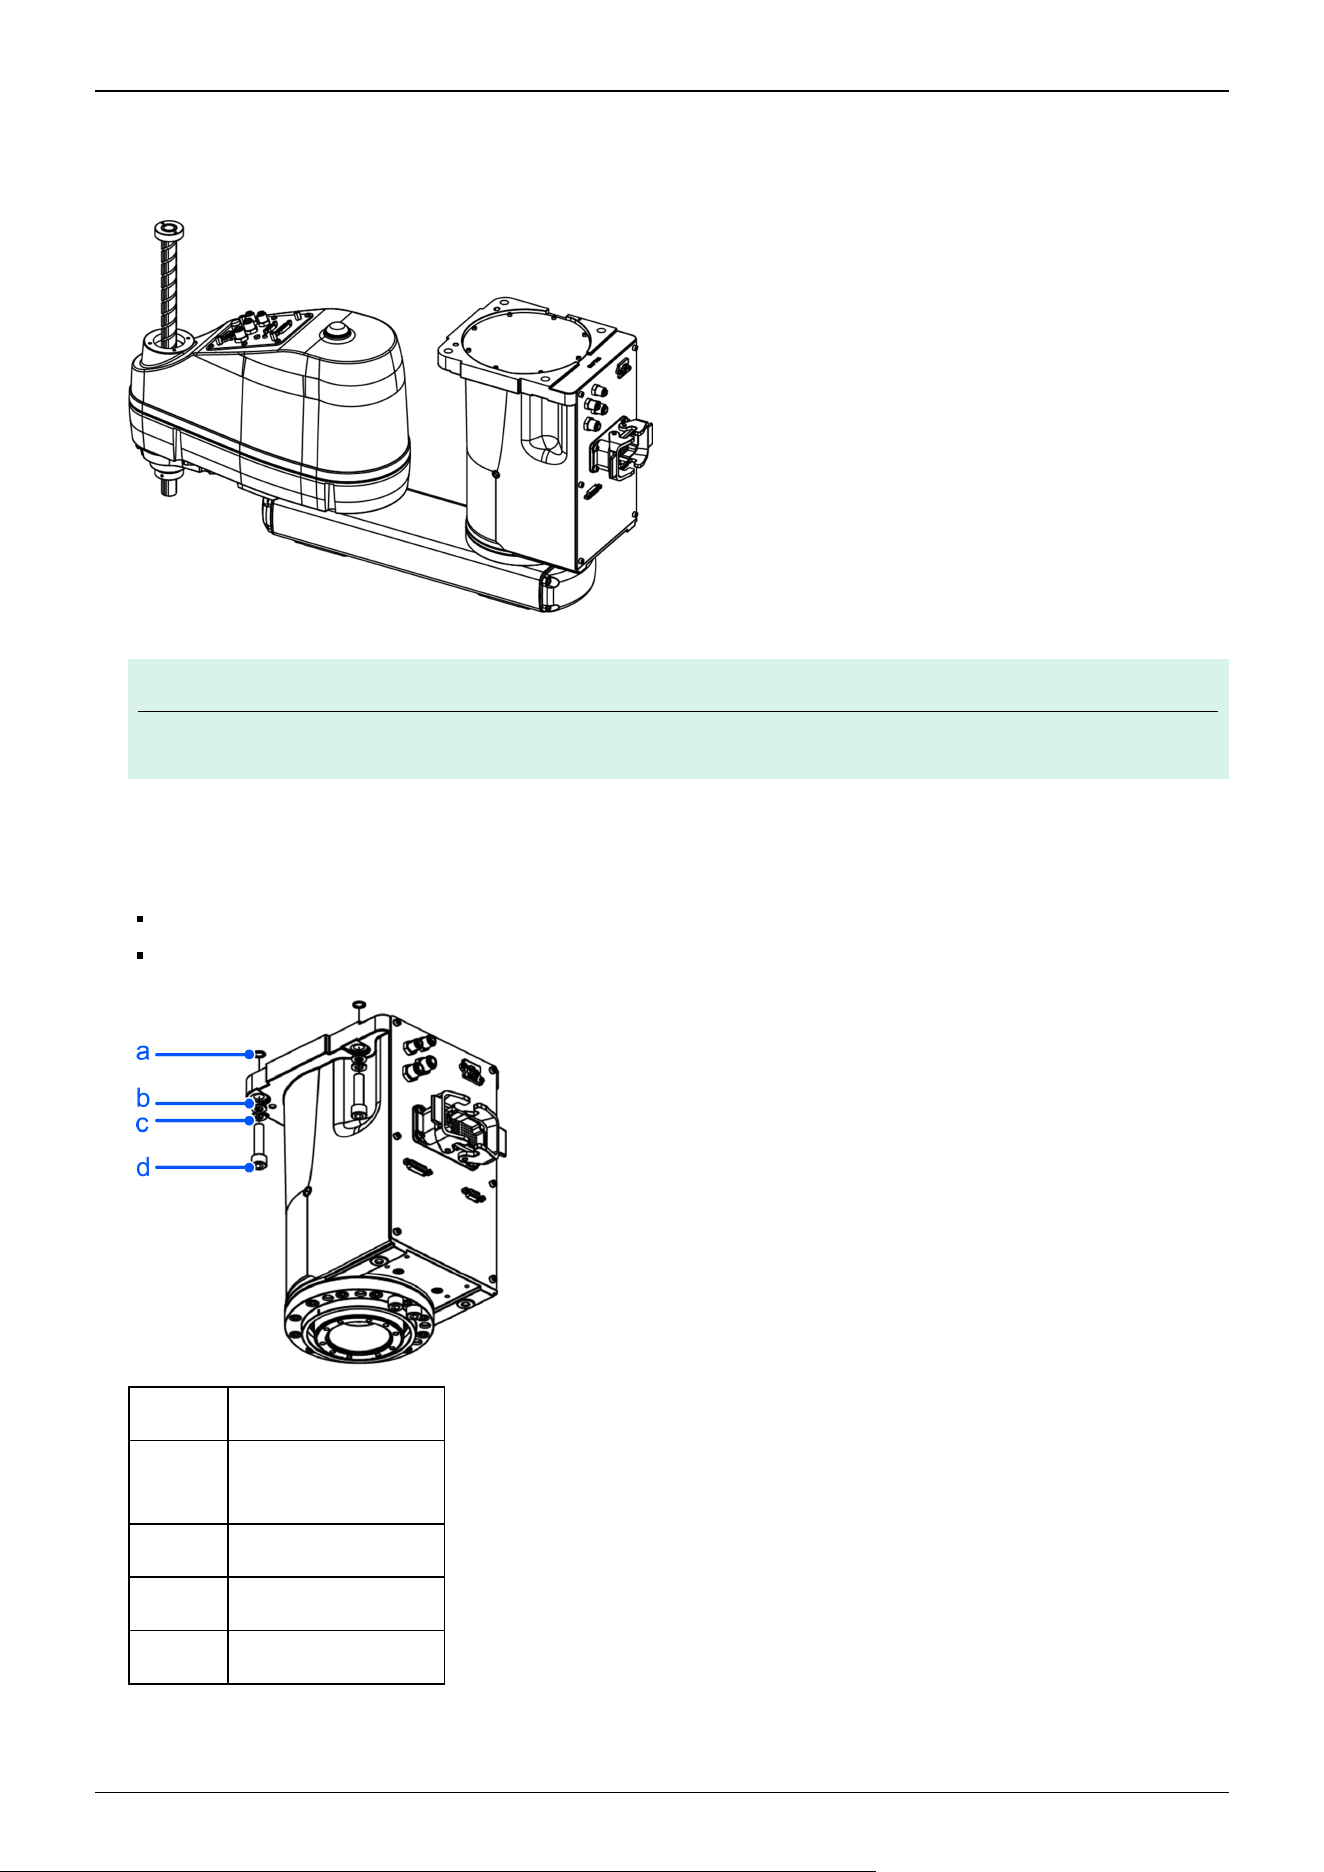
Standard specifications
1. With the arm extended, take out the Manipulator from the packing box.
KEY POINTS
The joints may rotate due to the Manipulator's own weight. Be careful not to get your hands or fingers caught.
2. Secure the base to the ceiling using the four bolts. Be sure to always use washers.
Tightening torque:
M8: 32.0 N·m (326 kgf·cm)
M10: 58.0 N·m (592 kgf·cm)
Symbol Description
a
Threaded hole
20 mm or more depth
b Plain washer
c Spring washer
d 4 × M8 × 40
✏
Industrial Robot: SCARA Robots GX series Manual Rev.11
256
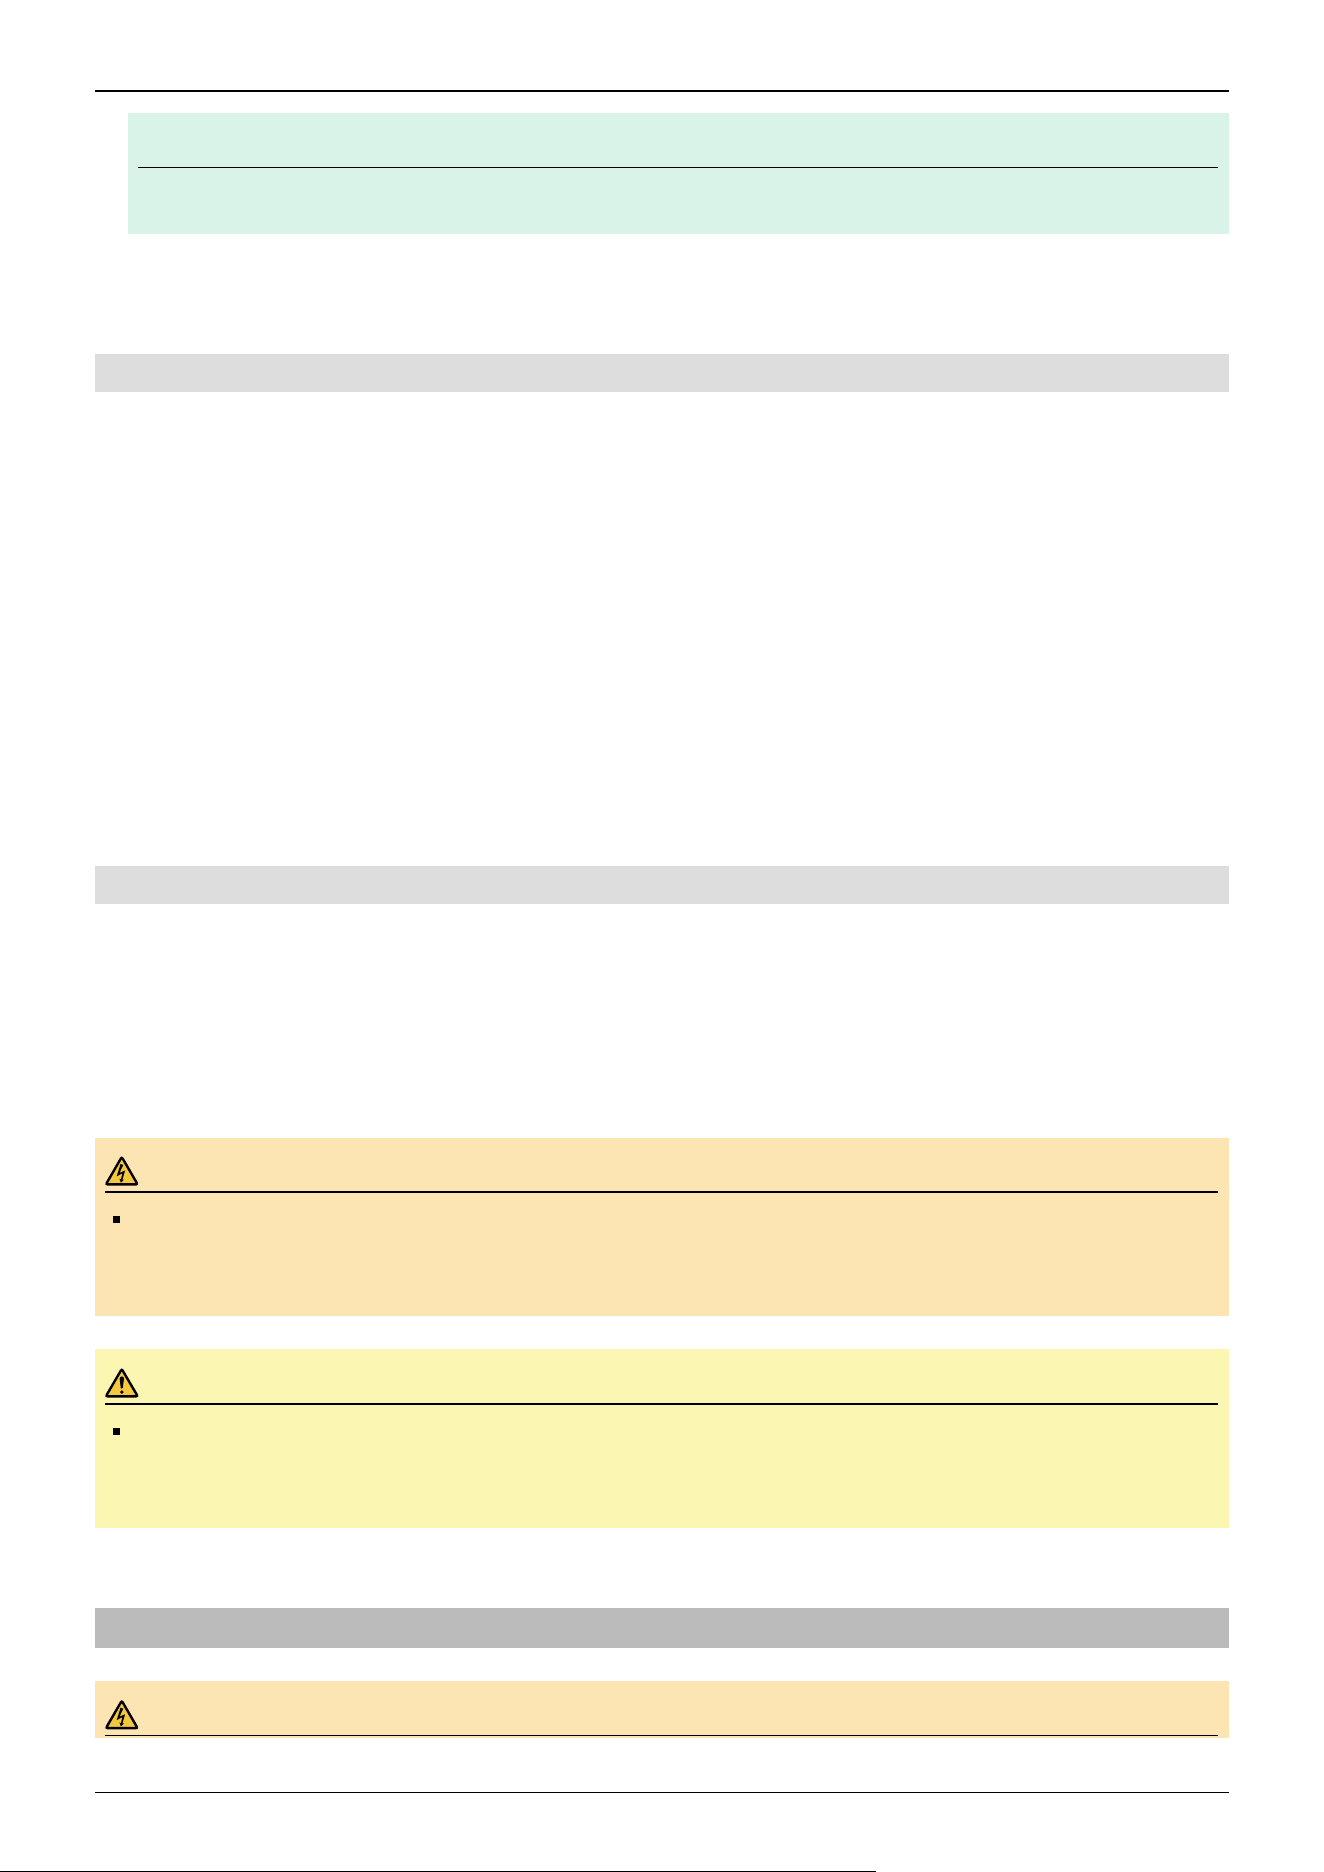
KEY POINTS
Use bolts with strength specifications compliant with ISO 898-1 property class: 10.9 or 12.9.
3. Remove the transportation fixtures.
4.3.4.5 Cleanroom & ESD-Model
1. Unpack the Manipulator outside of the cleanroom.
2. Secure the Manipulator to transporting equipment (or a pallet) with bolts so that the Manipulator does not fall down.
3. Wipe off any dust on the Manipulator using a lint-free cloth that was dipped in ethyl alcohol or distilled water.
4. Carry the Manipulator into the cleanroom.
5. Refer to the installation procedure for the respective Manipulator model, and install the Manipulator.
Table Top Mounting Specifications
Wall Mounting Specifications
Ceiling Mounting Specifications
6. Connect an exhaust tube to the exhaust port.
When the Manipulator is a model with cleanroom & ESD specifications, an exhaust system must be connected. For details,
refer to the following section.
Appendix A: Specifications Table
4.3.4.6 Protected-Model
Refer to the installation procedure for the respective Manipulator model, and install the Manipulator.
Table Top Mounting Specifications
Wall Mounting Specifications
Ceiling Mounting Specifications
When the Manipulator is a protected-model, take note of the following safety information.
WARNING
After the Manipulator is installed, immediately connect the M/C cable connector to the Manipulator. Leaving
the Manipulator unconnected may result in electric shock and/or malfunction of the robot system because
protection at IP65 cannot be ensured.
CAUTION
When operating Manipulators in special environments (oil smoke, dust, etc.), do not install the Controller in
the same environment. The Controller does not satisfy the protection class (IP65). Using the Controller in
these special environments may damage or lead to a breakdown of the Controller.
4.3.5 Connecting the Cables
WARNING
✏
Industrial Robot: SCARA Robots GX series Manual Rev.11
257
To perform the power supply lockout, remove the power plug. Be sure to connect the AC power cable to a
power outlet. Do not connect it directly to a factory power source.
Before performing any replacement work, inform others in the area that you are working, and then turn off the
Controller and related equipment, and unplug the power cable from the power source. Performing any work
procedure with the power turned on is extremely dangerous and may result in electric shock and/or
malfunction of the robot system.
Be sure to connect the cables properly. Do not place heavy objects on the cables, bend them at extreme
angles, pull them forcibly, or allow them to get pinched between objects. Damaged cables, broken wires, or
contact failure is extremely hazardous and may result in electric shock and/or malfunction of the robot
system.
The Manipulator is grounded by connecting it to the Controller. Ensure that the Controller is grounded and the
cables are correctly connected. If the ground wire is improperly connected to ground, it may result in the fire
or electric shock.
CAUTION
When connecting the Manipulator and the Controller, check that the serial numbers match for each device.
Improper connection between the Manipulator and the Controller may not only lead to malfunction of the robot
system but also serious safety problems. The connection method between the Manipulator and the Controller
varies depending on the Controller. For details on the connections, refer to the following manual.
"Controller Manual"
When the Manipulator is a model with cleanroom & ESD specifications, please note the following points.
When the Manipulator is a model with cleanroom & ESD specifications, an exhaust system must be connected. For details,
refer to the following section.
Appendix A: Specifications Table
When the Manipulator is a protected-model, please note the following points.
WARNING
After the Manipulator is installed, immediately connect the M/C cable connector to the connector plate.
Leaving the Manipulator unconnected may result in electric shock and/or malfunction of the robot system
because protection at IP65 cannot be ensured.
CAUTION
When operating Manipulators in special environments (oil smoke, dust, etc.), do not install the Controller in
the same environment. The Controller does not satisfy the protection class (IP65). Using the Controller in
these special environments may damage or lead to a breakdown of the Controller.
Industrial Robot: SCARA Robots GX series Manual Rev.11
258
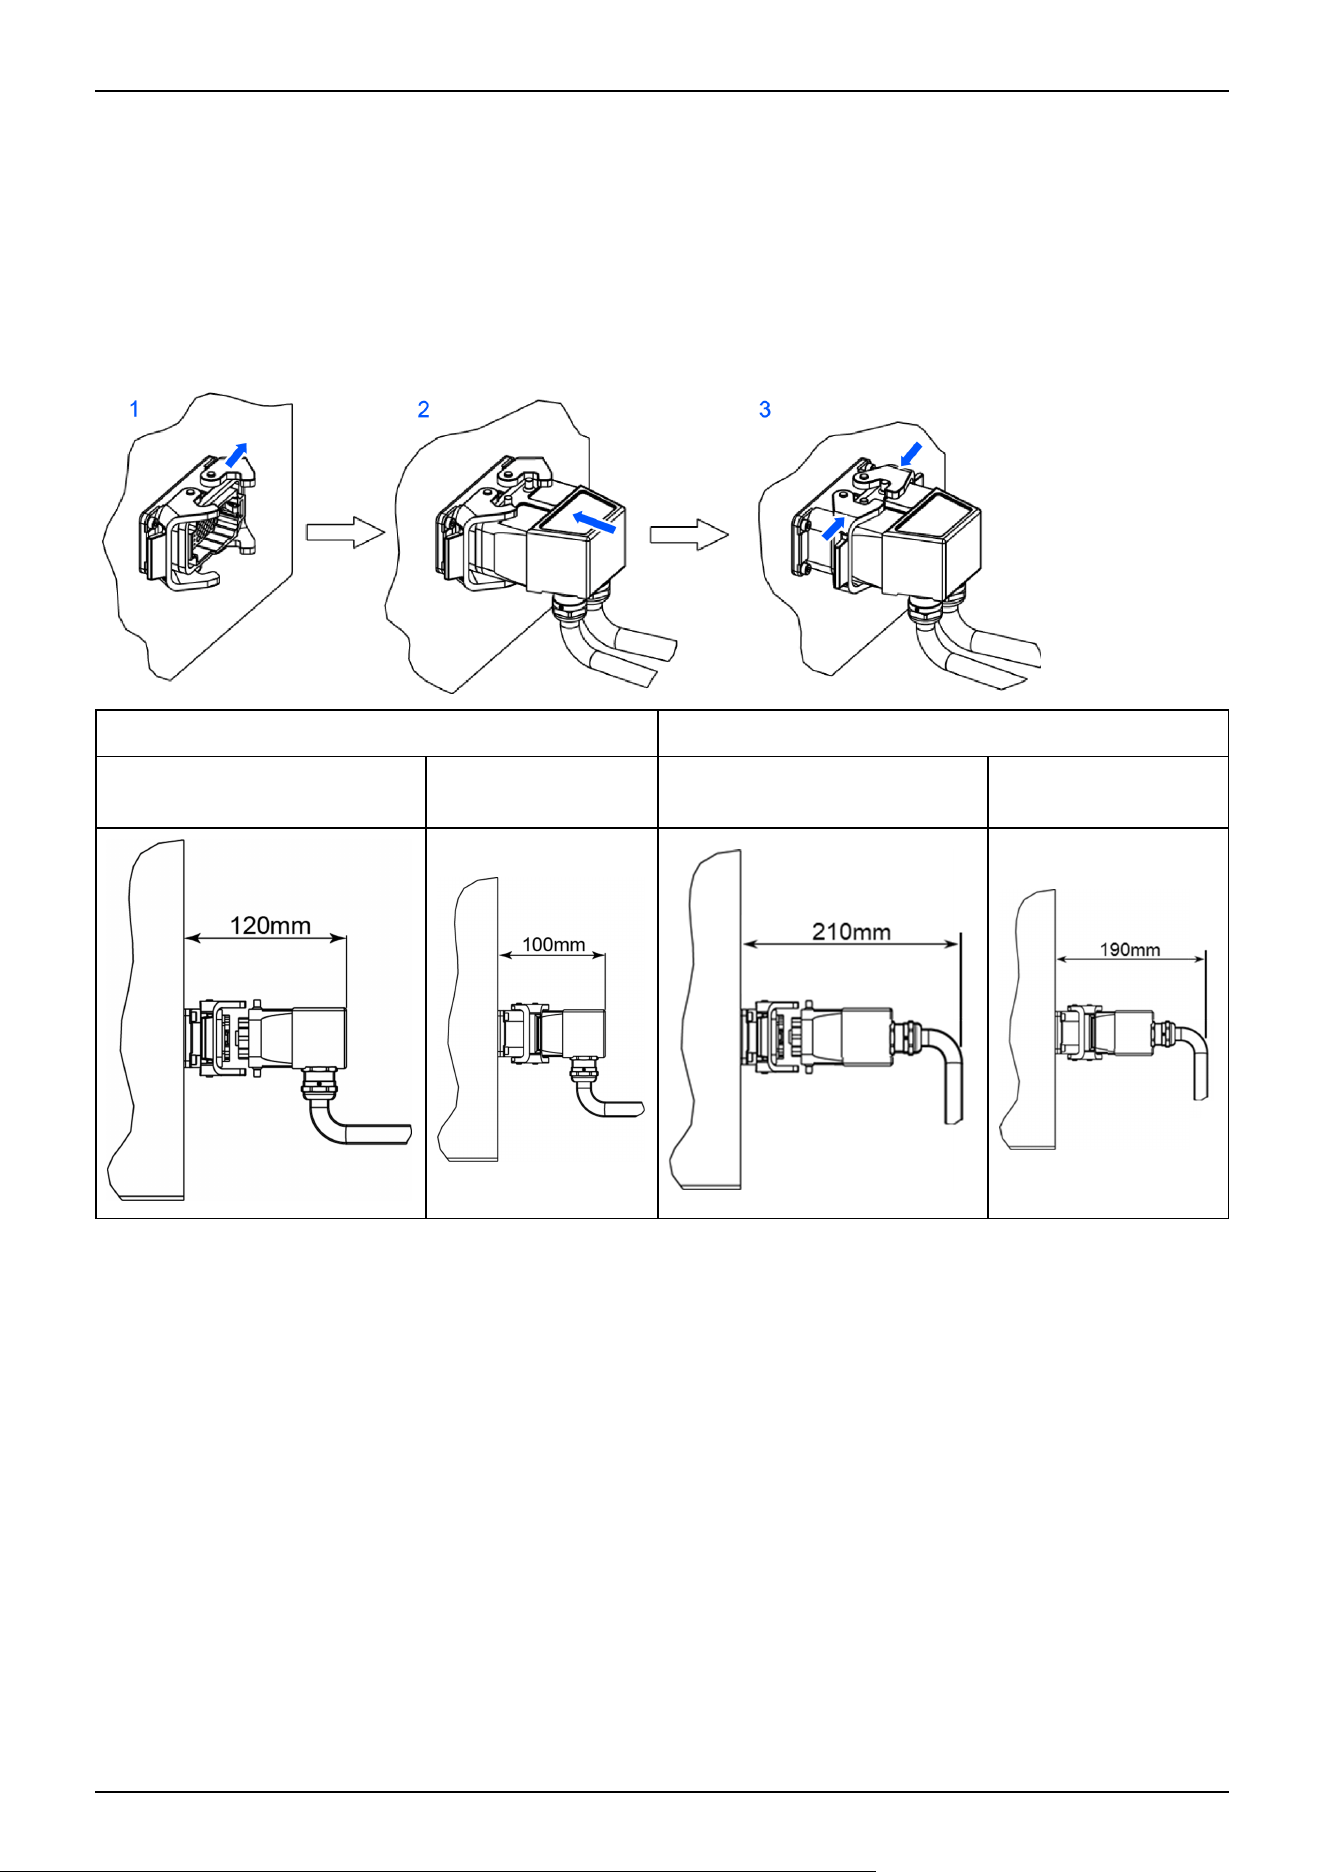
Connection procedure for Manipulator and M/C cable
Insert the M/C cable hood into the M/C cable housing on the back and bottom of the Manipulator, and secure it with the lock
attached to the housing.
1. Open the lock plates on both sides of the M/C cable housing.
2. Insert the M/C cable hood all the way to the back.
3. Close the lock plates on both sides of the M/C cable housing.
L-shape (Standard) Straight
Minimum Distance Required
for Insertion and Removal
Distance When
Mounted
Minimum Distance Required
for Insertion and Removal
Distance When
Mounted
Industrial Robot: SCARA Robots GX series Manual Rev.11
259
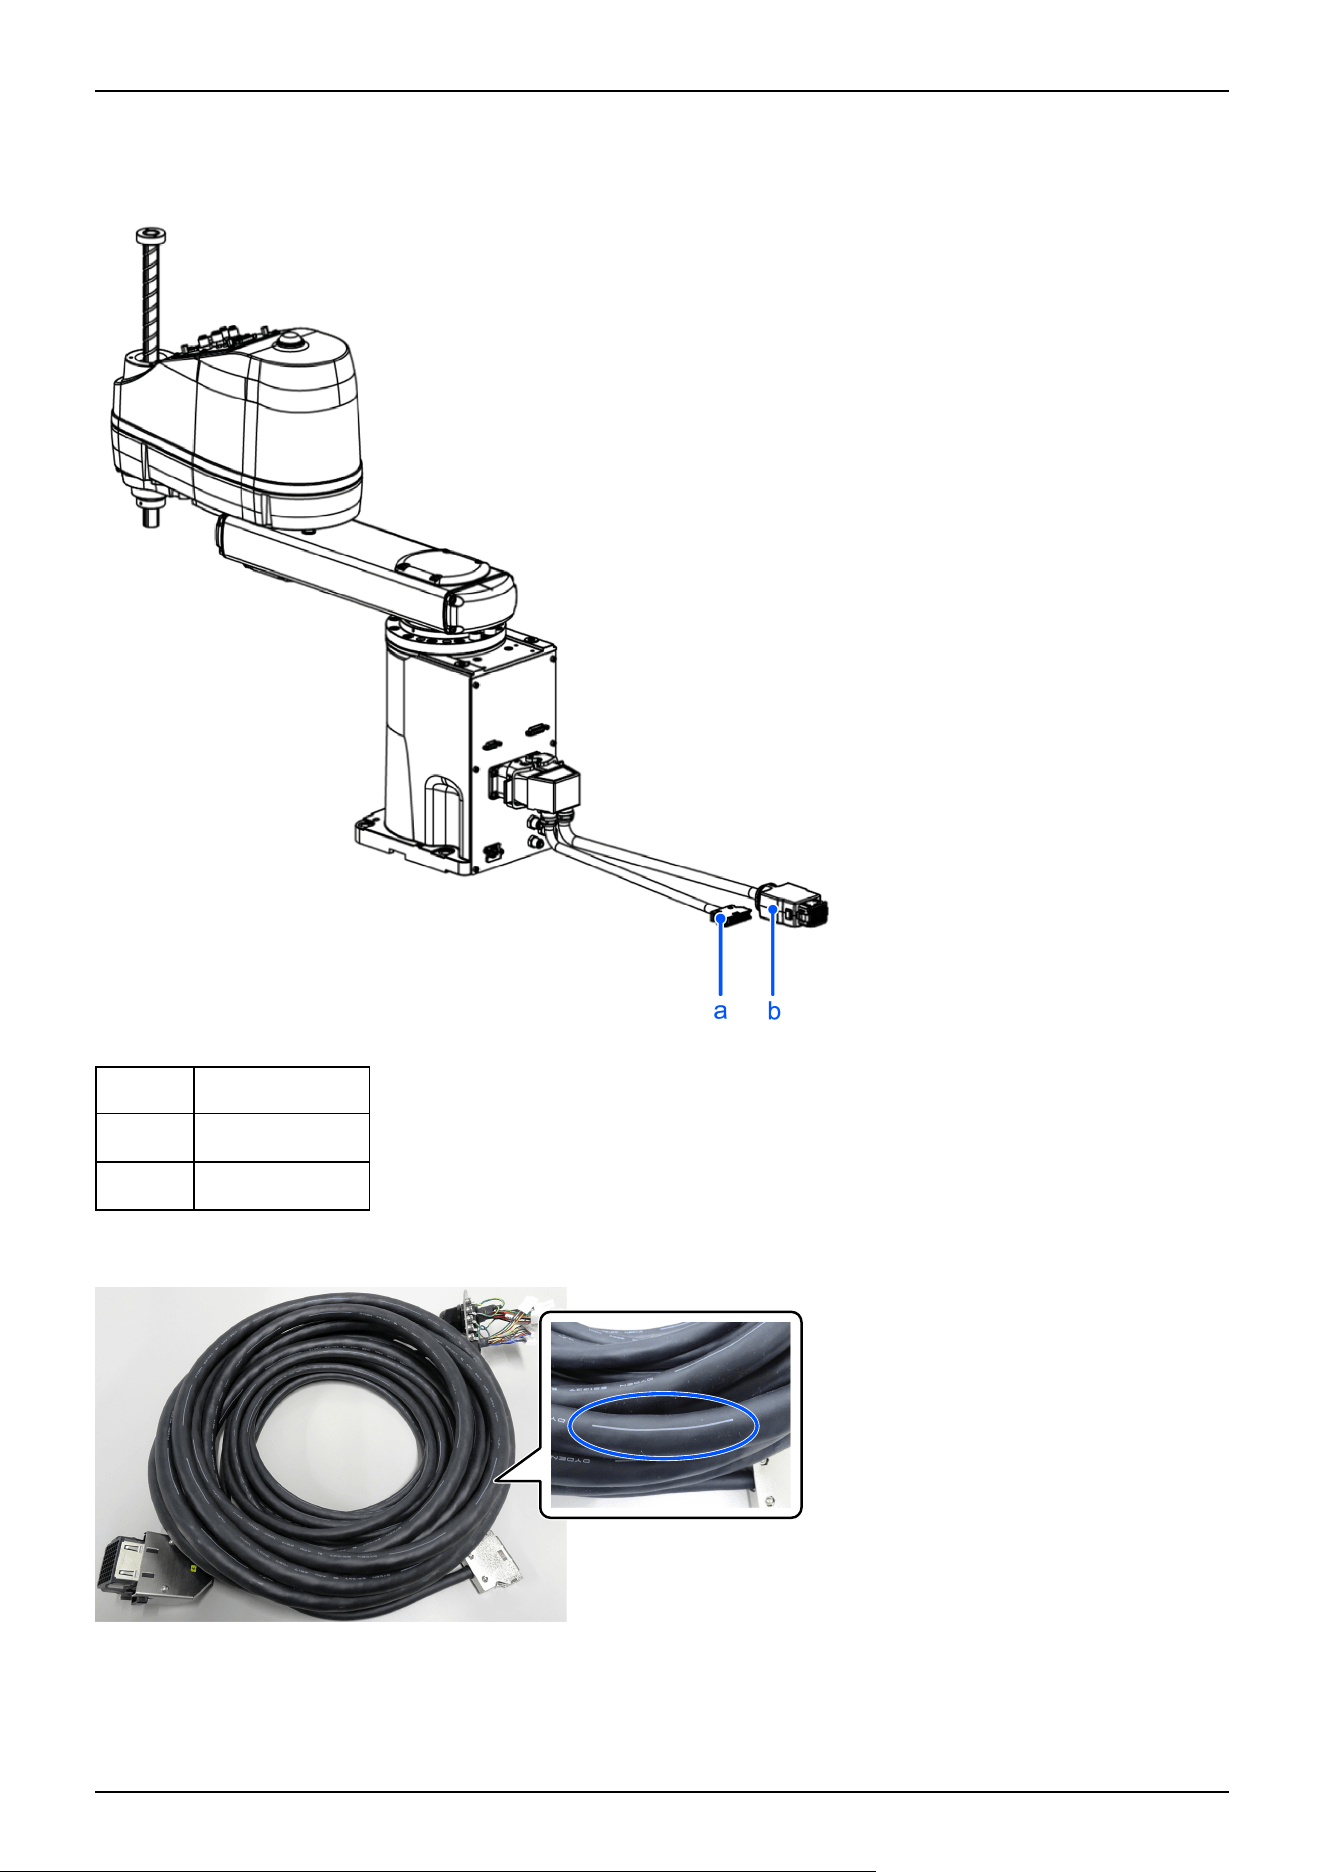
Connecting the M/C cable and the Controller
Connect the power connector and signal connector of the M/C cable to the Controller.
Symbol Description
a Signal connector
b Power connector
There are two types of M/C cables: fixed and movable. Movable cables have wires as shown in the figure below.
Industrial Robot: SCARA Robots GX series Manual Rev.11
260
4.3.6 User Wires and Pneumatic Tubes
CAUTION
Only authorized or certified personnel should perform wiring. Wiring by unauthorized or uncertified staff may
result in bodily injury and/or malfunction of the robot system.
4.3.6.1 Electrical Wires
Connect the following connectors and cables to the user connector of the Manipulator.
Manipulator cable specifications
Rated
Voltage
Allowable
Current
Nominal Cross-sectional Area of
Conductor
Remarks
D-sub
15pin
D- 9pin
30V AC/DC 1.0A
0.08 mm
2
Shielded
RJ45 - - -
Equivalent to
CAT5e
For each connector, pins with the same number are wired between the connector on the base side and the connector on the Arm
#2 side in the Manipulator.
Connectors to the Manipulator (recommended)
Standard, ESD, cleanroom & ESD specifications
Manufacturer Model Number Type Remarks
D-sub 15 pin
Connector Würth Elektronik 61801524823 Solder type 2 included
Clamp hood Würth Elektronik 61801525311 Connector setscrew: #4-40 UNC 2 included
D-sub 9 pin
Connector Würth Elektronik 61800924823 Solder type 2 included
Clamp hood Würth Elektronik 61800925311 Connector setscrew: #4-40 UNC 2 included
RJ45 Connector CommScope 6-569550-3- - -
Protected-model
Manufacturer Model Number Type Remarks
D-sub 15-pin
Connector HARTING 09670155615 Solder type 2 included
Clamp hood HARTING 09670150538 Connector setscrew: #4-40 UNC 2 included
D-sub 9-pin
Connector HARTING 09670095615 Solder type 2 included
Clamp hood HARTING 09670090538 Connector setscrew: #4-40 UNC 2 included
RJ45 Plug HARTING 09451951560 - -
Industrial Robot: SCARA Robots GX series Manual Rev.11
261
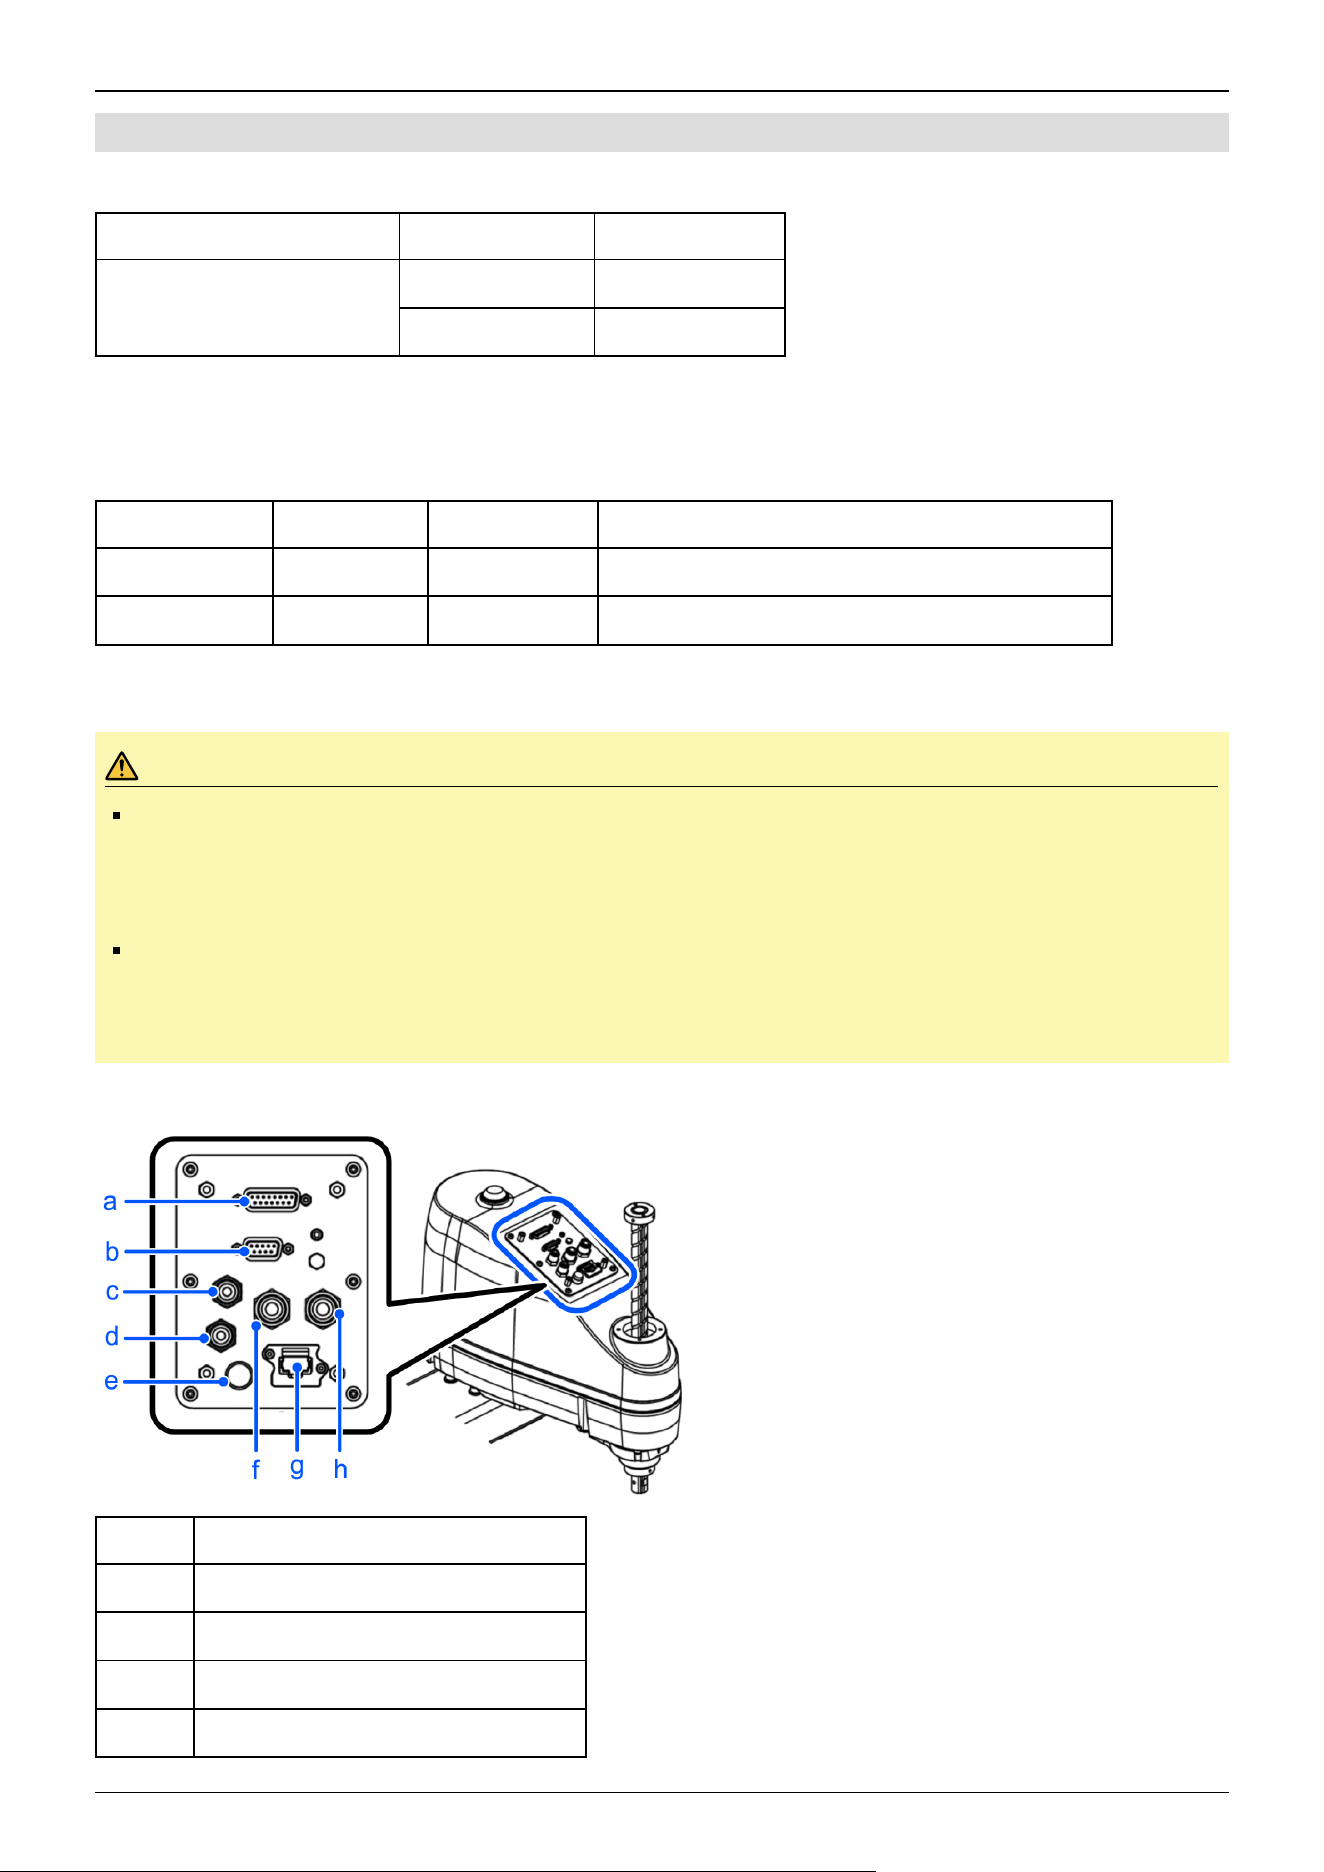
4.3.6.2 Pneumatic Tubes
Manipulator pneumatic tube specifications
Maximum Working Pressure Number of Tubes O.D. × I.D.
0.59 Mpa (6 kgf/cm
2
: 86 psi)
2 ø6 mm × ø4 mm
2 ø4 mm × ø2.5 mm
For each connector inside the Manipulator, fittings of the same size and tip color (blue/white) are connected between the air
fitting on the base side and the air fitting on the Arm #2 side.
Pneumatic tubes connected to the Manipulator (recommended)
Outer Diameter Manufacturer Model Number Remarks
ø6 mm SMC TU0604 * Equivalent products from other companies can be used
ø4 mm SMC TU0425 * Equivalent products from other companies can be used
When the Manipulator is a protected-model, please note the following points.
CAUTION
In special environments (e.g., oil smoke, dust, etc.), the user wires and pneumatic tubes should have
protected-model (compliant with protection class IP65). If the user wires and pneumatic tubes without
protected-model are connected, the protection class (IP65) cannot be guaranteed, and the Manipulator may
be damaged or break down.
Be sure to always connect the cap when the user cable connector is not being used.
If the cap is not attached, foreign matter such as oil smoke or dust may enter the connector, causing the
Manipulator to be damaged or break down.
Arm #2 side (common to GX8 series)
Symbol Description
a User connector (15-pin D-sub connector)
b User connector (9-pin D-sub connector)
c Fitting for ø4 mm tube (blue)
d Fitting for ø4 mm tube (white)
Industrial Robot: SCARA Robots GX series Manual Rev.11
262
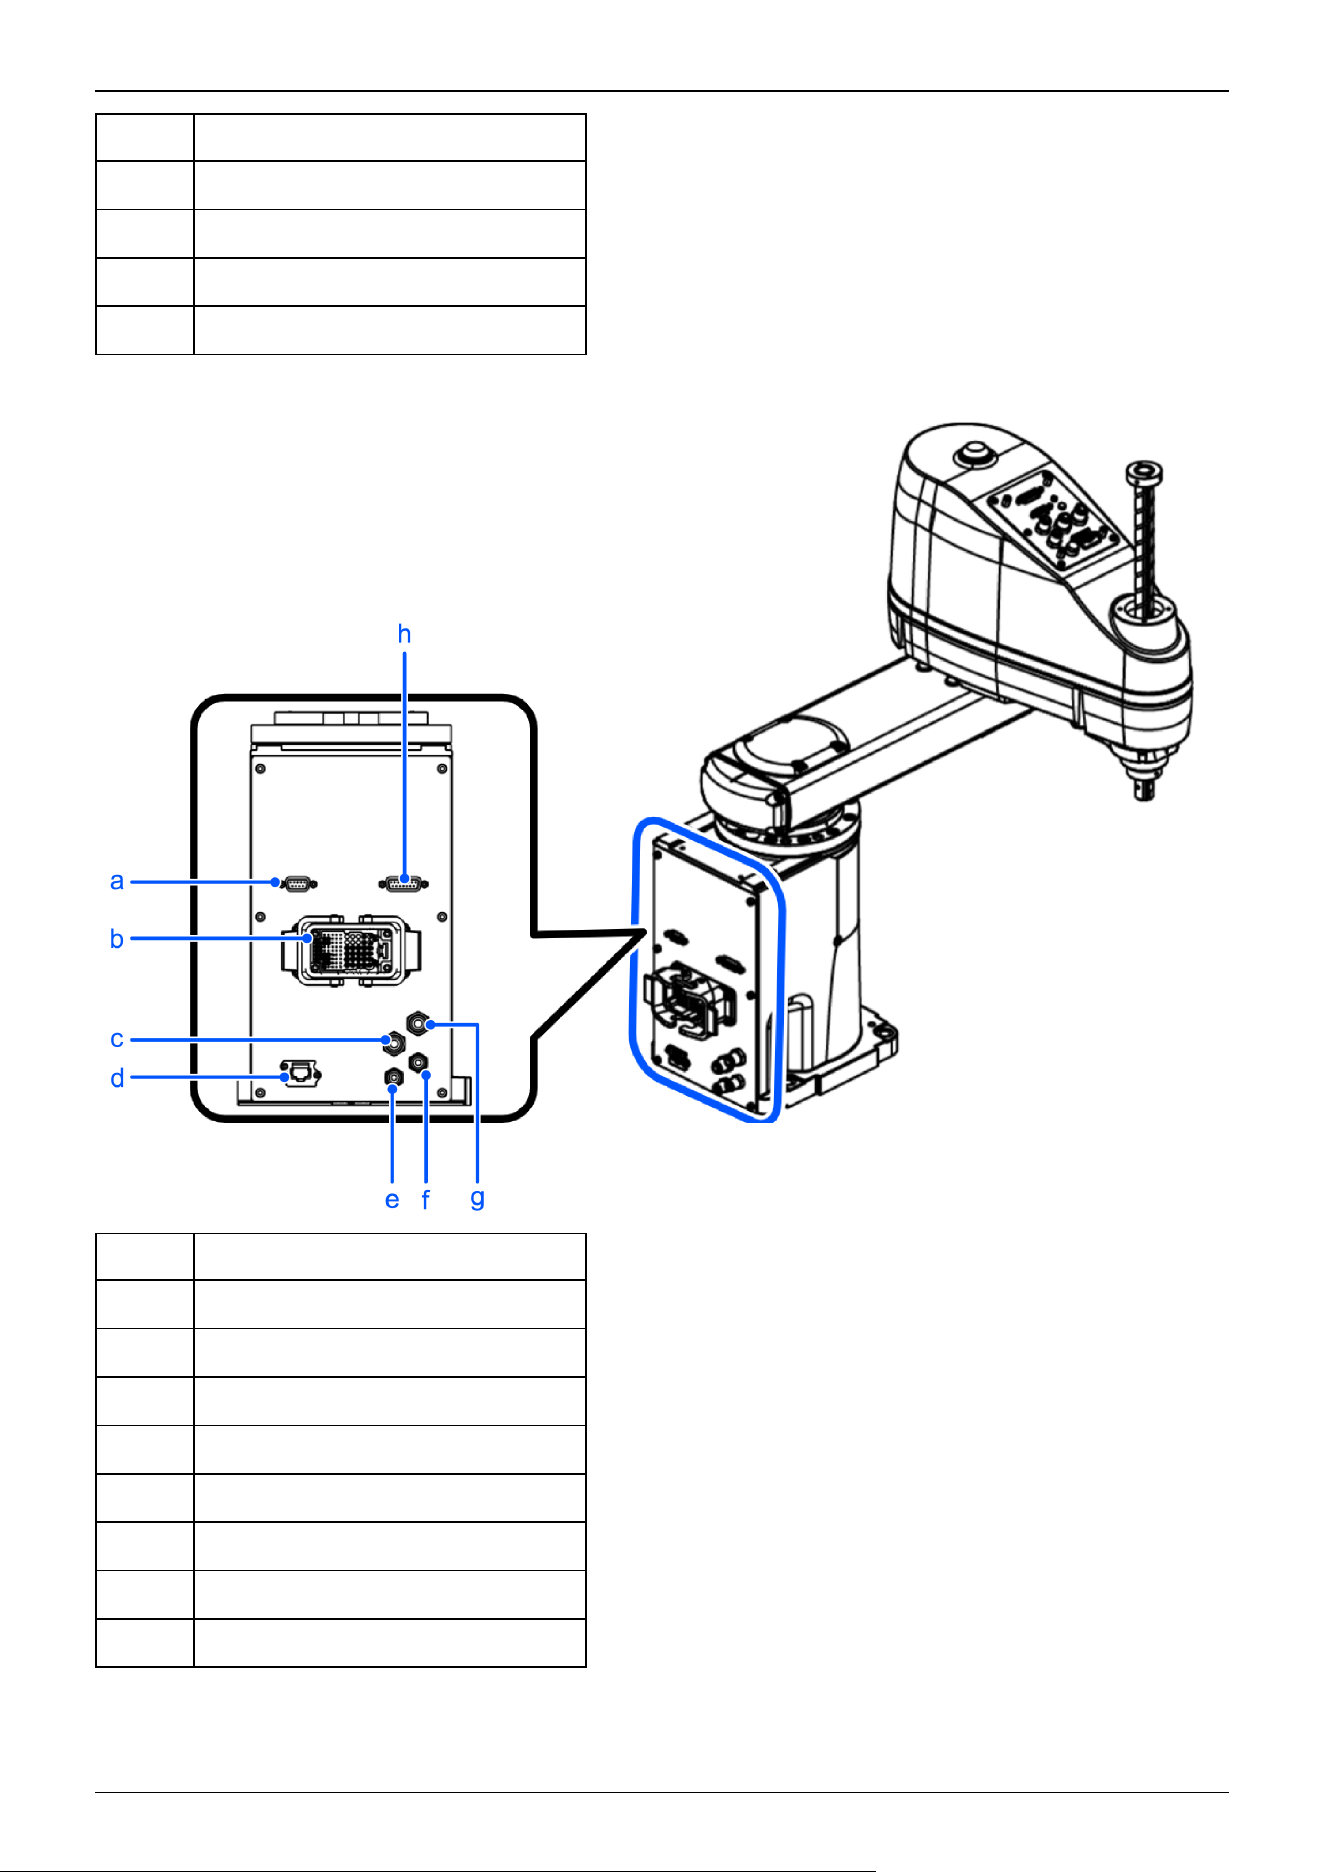
Symbol Description
e Brake release switch
f Fitting for ø6 mm tube (white)
g Ethernet connector
h Fitting for ø6 mm tube (blue)
Base side (table top mounting specifications)
Symbol Description
a User connector (9-pin D-sub connector)
b M/C cable housing
c Fitting for ø6 mm tube (blue)
d Ethernet connector
e Fitting for ø4 mm tube (blue)
f Fitting for ø4 mm tube (white)
g Fitting for ø6 mm tube (white)
h User connector (15-pin D-sub connector)
Industrial Robot: SCARA Robots GX series Manual Rev.11
263
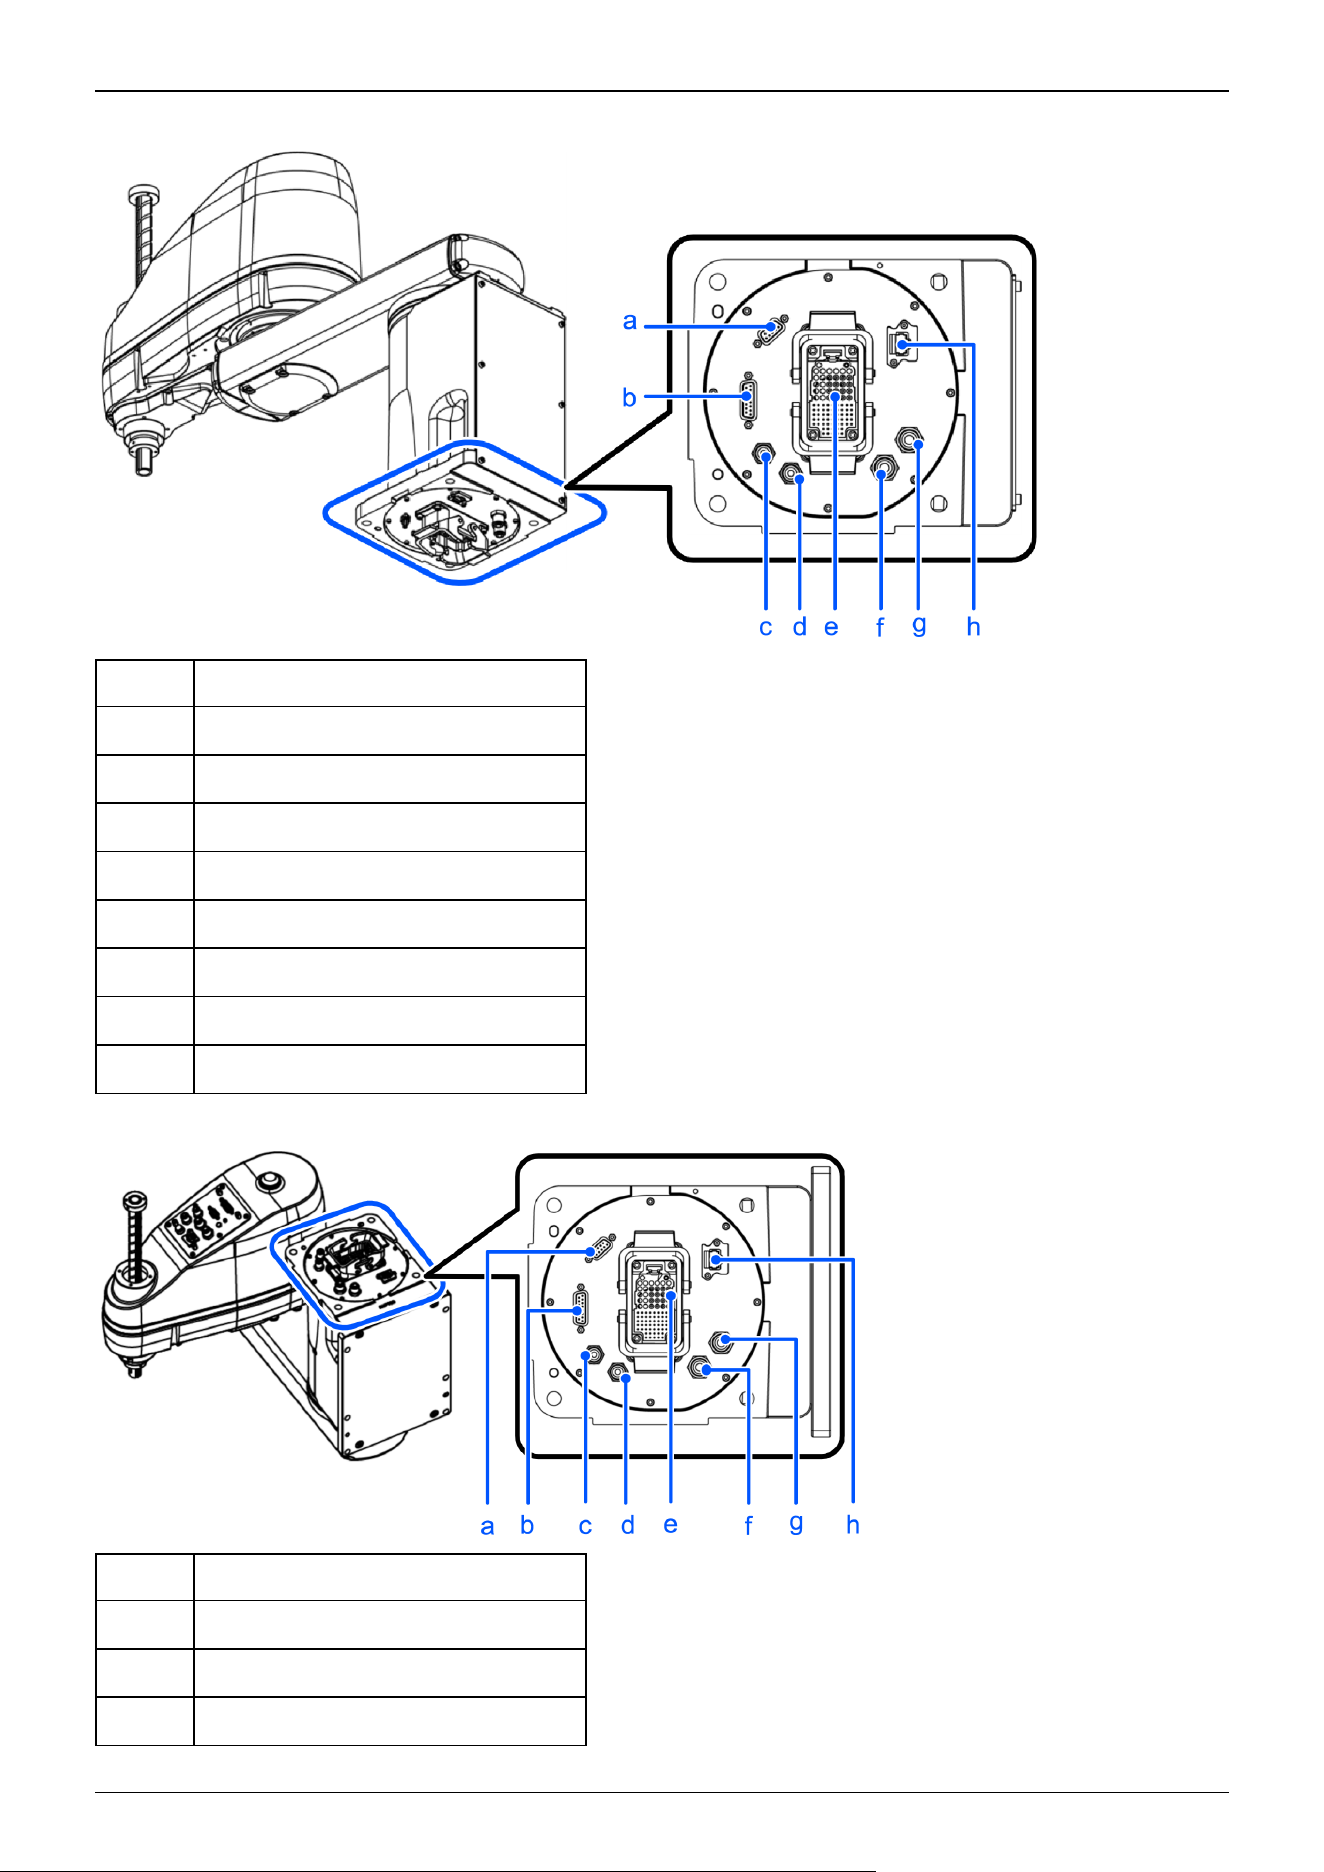
Base side (table top mounting specifications: cable routing from bottom side)
Symbol Description
a User connector (9-pin D-sub connector)
b User connector (15-pin D-sub connector)
c Fitting for ø4 mm tube (blue)
d Fitting for ø4 mm tube (white)
e M/C cable housing
f Fitting for ø6 mm tube (blue)
g Fitting for ø6 mm tube (white)
h Ethernet connector
Base side (wall mounting specifications)
Symbol Description
a User connector (9-pin D-sub connector)
b User connector (15-pin D-sub connector)
c Fitting for ø4 mm tube (blue)
Industrial Robot: SCARA Robots GX series Manual Rev.11
264
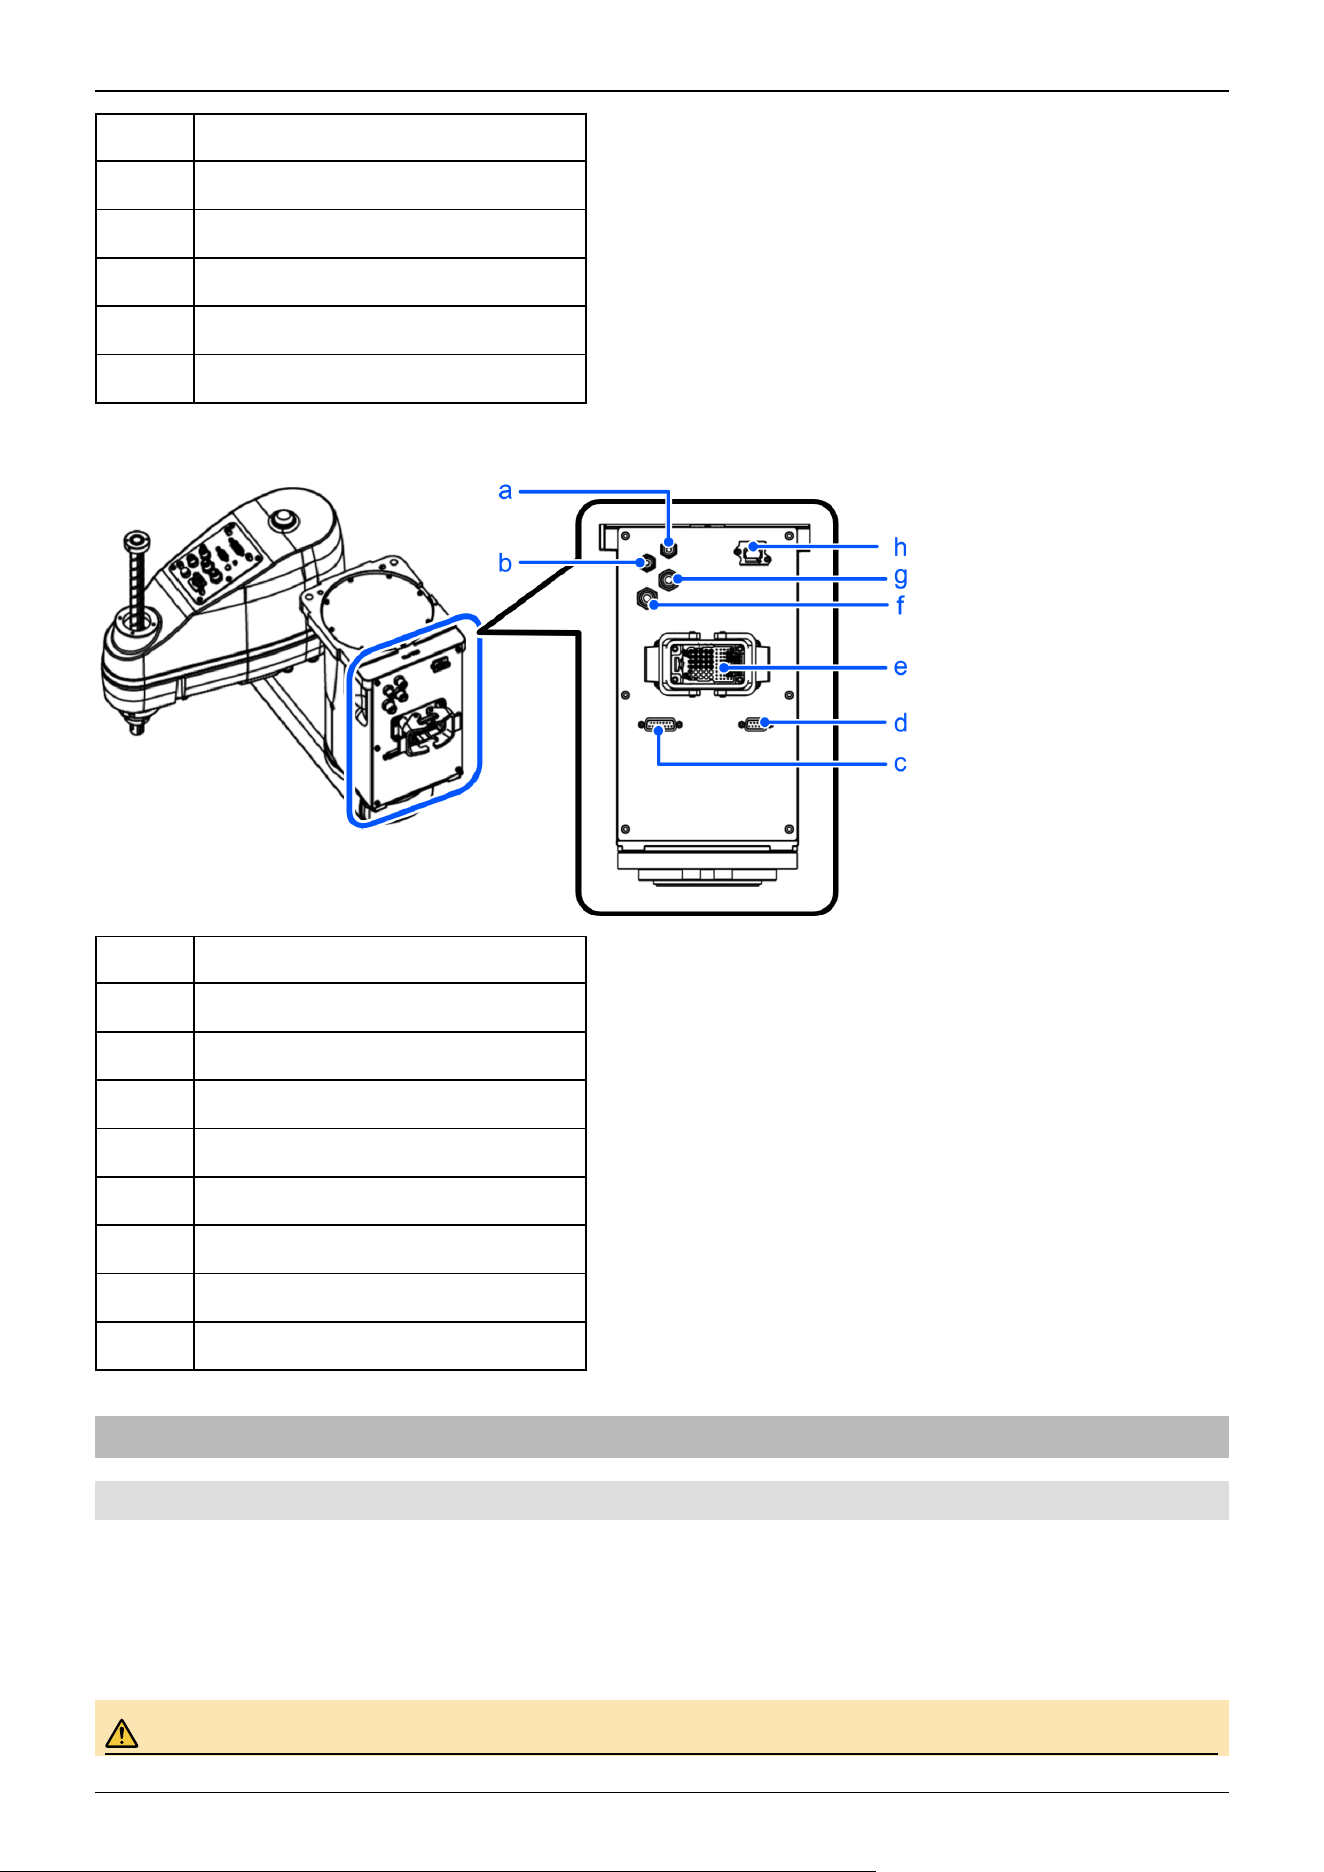
Symbol Description
d Fitting for ø4 mm tube (white)
e M/C cable housing
f Fitting for ø6 mm tube (blue)
g Fitting for ø6 mm tube (white)
h Ethernet connector
Base side (ceiling mounting specifications)
Symbol Description
a Fitting for ø4 mm tube (blue)
b Fitting for ø4 mm tube (white)
c User connector (15-pin D-sub connector)
d User connector (9-pin D-sub connector)
e M/C cable housing
f Fitting for ø6 mm tube (white)
g Fitting for ø6 mm tube (blue)
h Ethernet connector
4.3.7 Relocation and Storage
4.3.7.1 Safety Information for Relocation and Storage
Pay attention to the following requirements when relocating, storing, and transporting the Manipulators.
Transportation and installation of the Manipulator and related equipment should be performed by people who have received
installation training provided by Epson and the suppliers. Also, the laws and regulations of the installation country must be
followed.
WARNING
Industrial Robot: SCARA Robots GX series Manual Rev.11
265
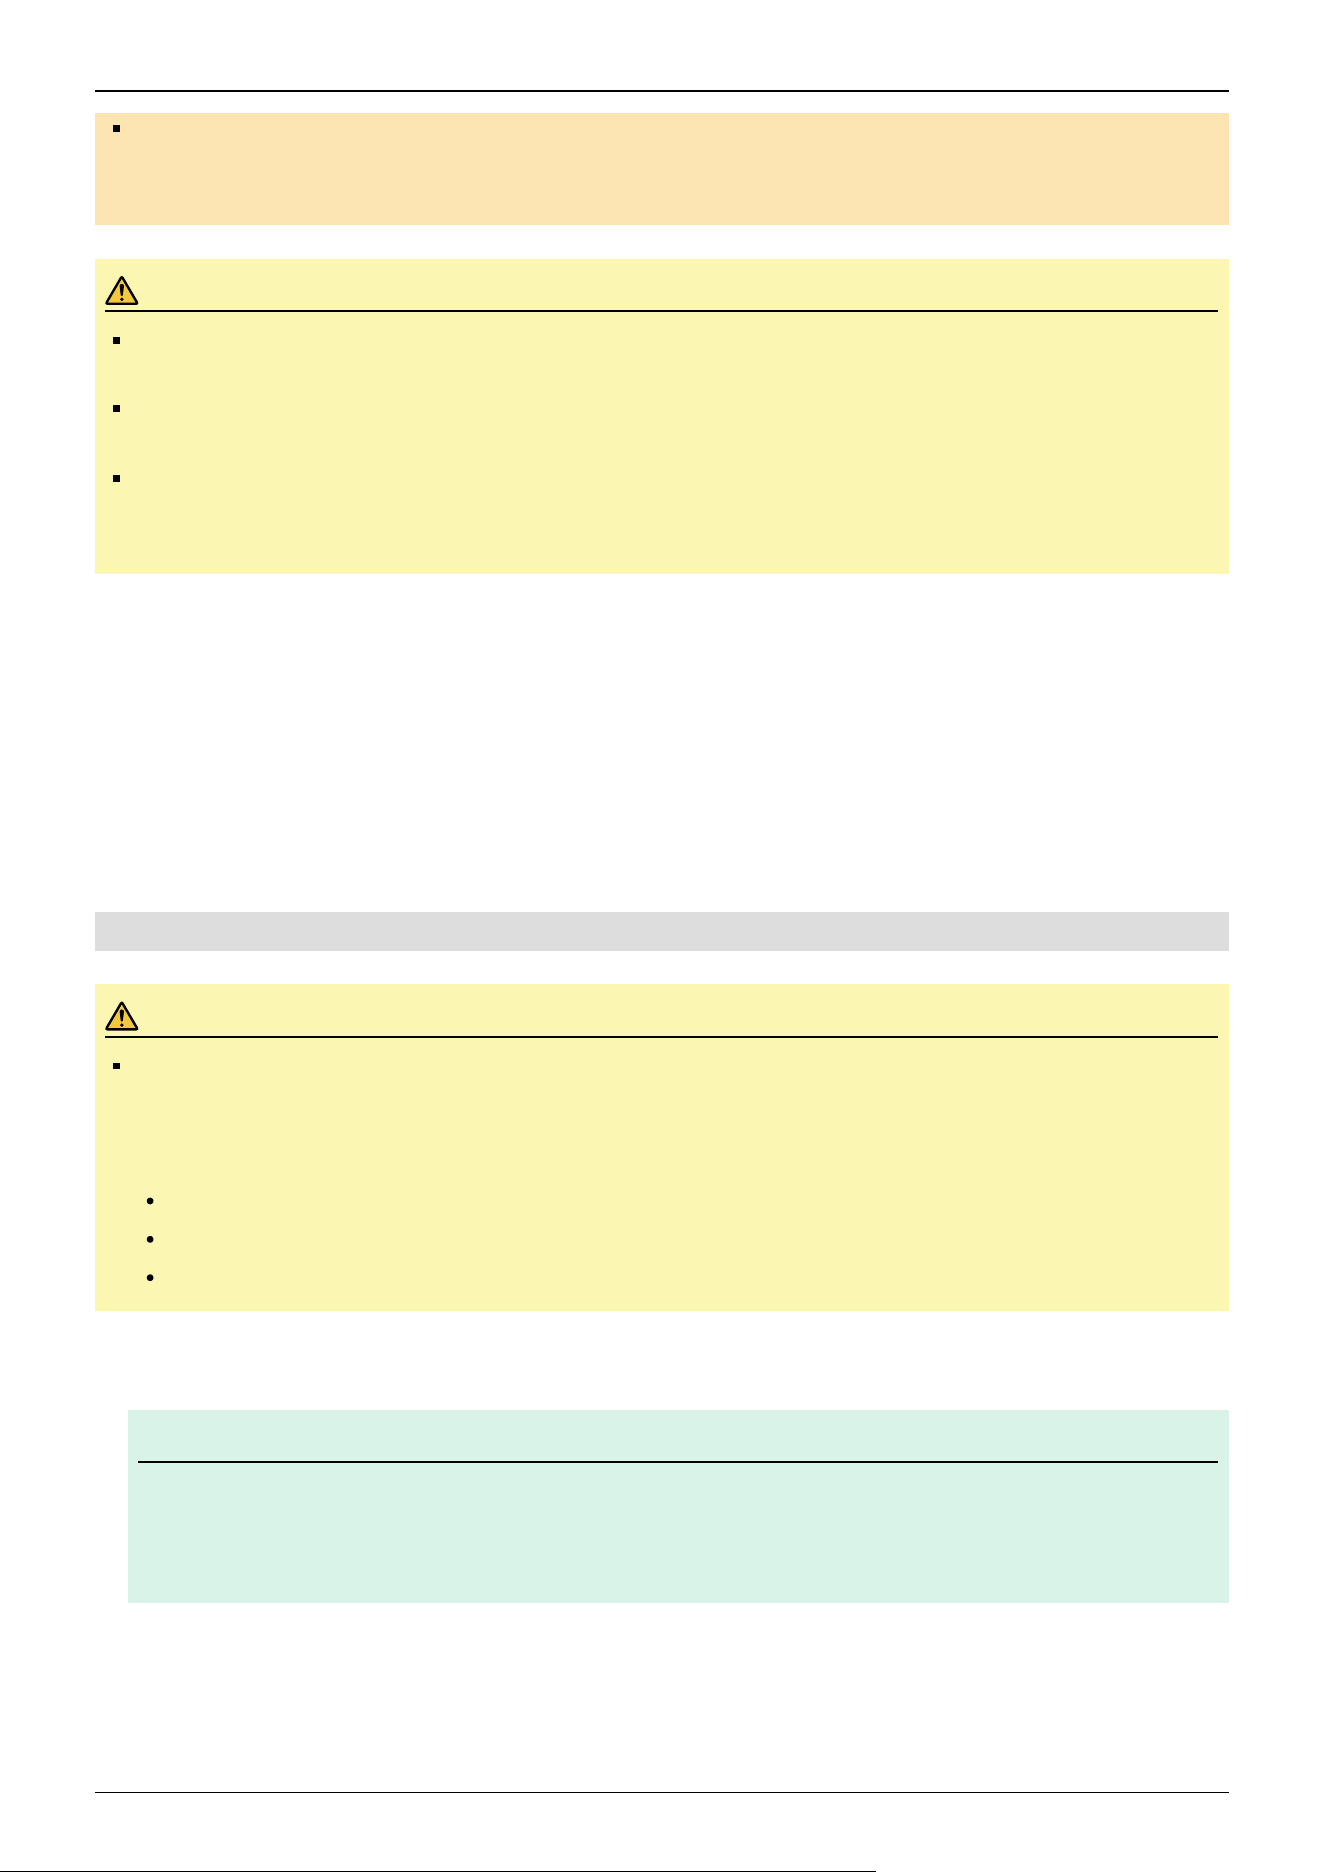
Only qualified personnel should perform sling work and operate a crane or a forklift. When these operations
are performed by unqualified personnel, it is extremely hazardous and may result in serious bodily injury to
operators and/or severe equipment damage.
CAUTION
Before relocating, fold the arm and secure it tightly with a cable tie to prevent hands or fingers from getting
caught in the Manipulator.
When removing the anchor bolts, support the Manipulator so that it does not fall. Removing the anchor bolts
without supporting the Manipulator can cause it to fall, causing hands or feet to get caught.
The Manipulator should be transported by three or more people, either secured to transporting equipment or
carried by placing their hands under Arm #1 or the bottom of the base. When holding the bottom of the base
by hand, be extremely careful not to get your hands or fingers caught.
When transporting the Manipulator over long distances, secure it directly to transporting equipment so that it will not fall. If
necessary, pack the Manipulator using the same packaging as delivery.
When the Manipulator is reassembled and used for a robot system again after an extended period of storage, perform a test run
to verify that it works properly before starting the main operation.
Manipulators should be transported and stored under the following conditions: Temperature: -20 to +60°C, Humidity: 10 to
90% (no condensation)
If condensation has formed on the Manipulator during transportation or storage, do not turn on the power until the
condensation is removed.
Do not subject the Manipulator to excessive impacts or vibrations during the transportation process.
4.3.7.2 Table Top Mounting Specifications
CAUTION
Be sure to use four or more people when installing or relocating a model with table top mounting
specifications, and use three or more people when lifting a Manipulator. The Manipulator weights are as
follows. Be careful not to get hands or feet caught or have equipment damaged due to dropping of the
Manipulator.
GX8-A/GX8-B/GX8-C45***: Approx.33 kg (73 lb)
GX8-A/GX8-B/GX8-C55***: Approx.34 kg (75 lb)
GX8-A/GX8-B/GX8-C65***: Approx.35 kg (77 lb)
1. Turn off all power, and remove the wiring and tubes connected to the Manipulator.
KEY POINTS
If using variable mechanical stops for Joints #1 and #2 and the operating angle is limited, change to the
mechanical stop positions at factory shipping.
Setting the Work Envelope by Mechanical Stops
2. Wrap a sheet around the arm so that it will not get damaged.
Bind the lower end of the shaft to the arm and the base to the arm. Secure the arm while referring to the figure below.
✏
Industrial Robot: SCARA Robots GX series Manual Rev.11
266
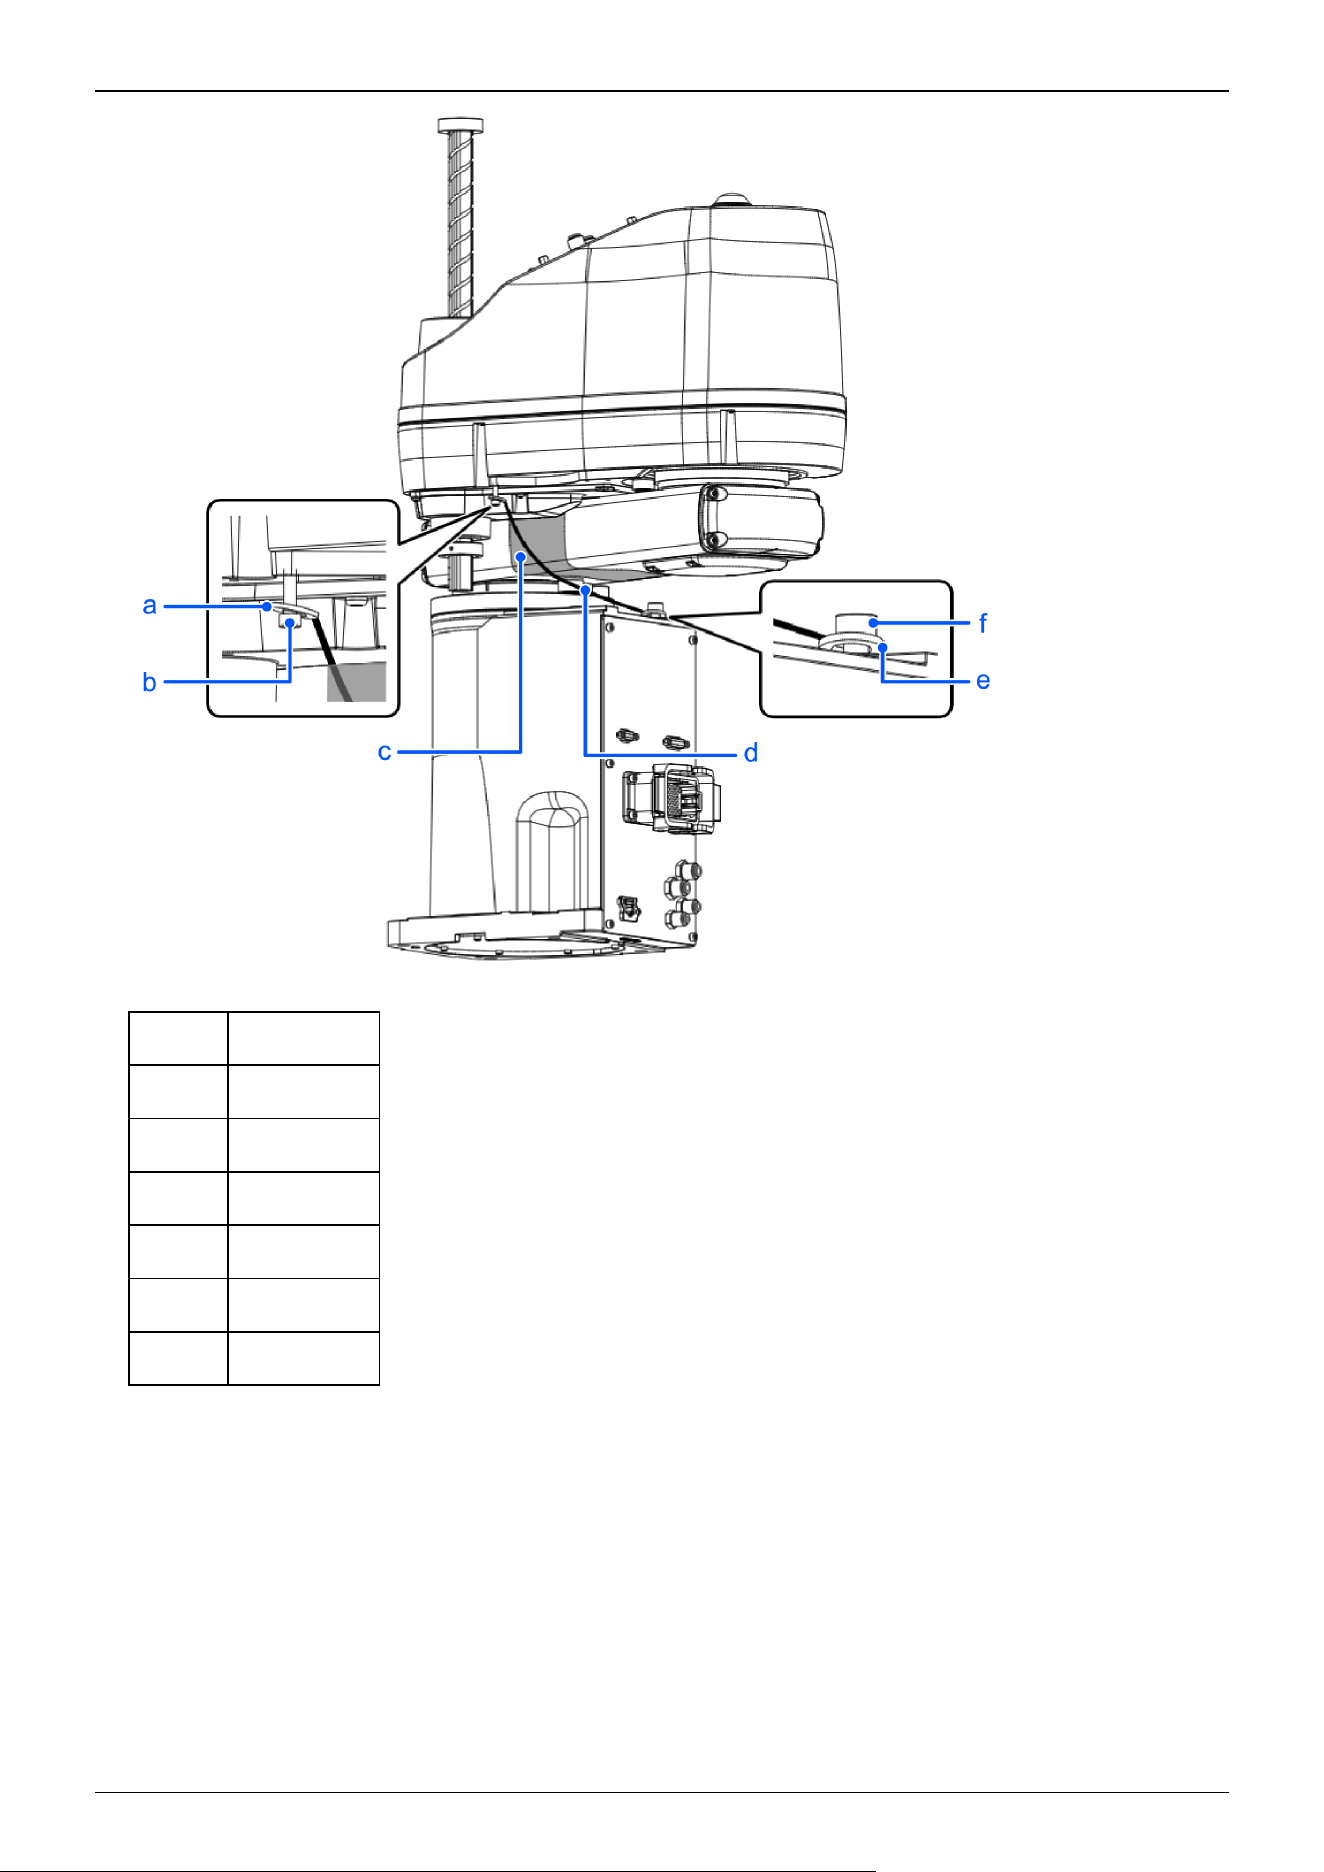
Illustration: GX8-A552S
Symbol Description
a Washer
b Bolt: M4 × 35
c Sheet
d Cable tie
e Washer
f Bolt: M8 × 20
3. While supporting the bottom of Arm #1 by hand so that the Manipulator does not fall over, remove the anchor bolts. Then,
remove the Manipulator from the base table.
GX8-A/GX8-B/GX8-C45***
Industrial Robot: SCARA Robots GX series Manual Rev.11
267
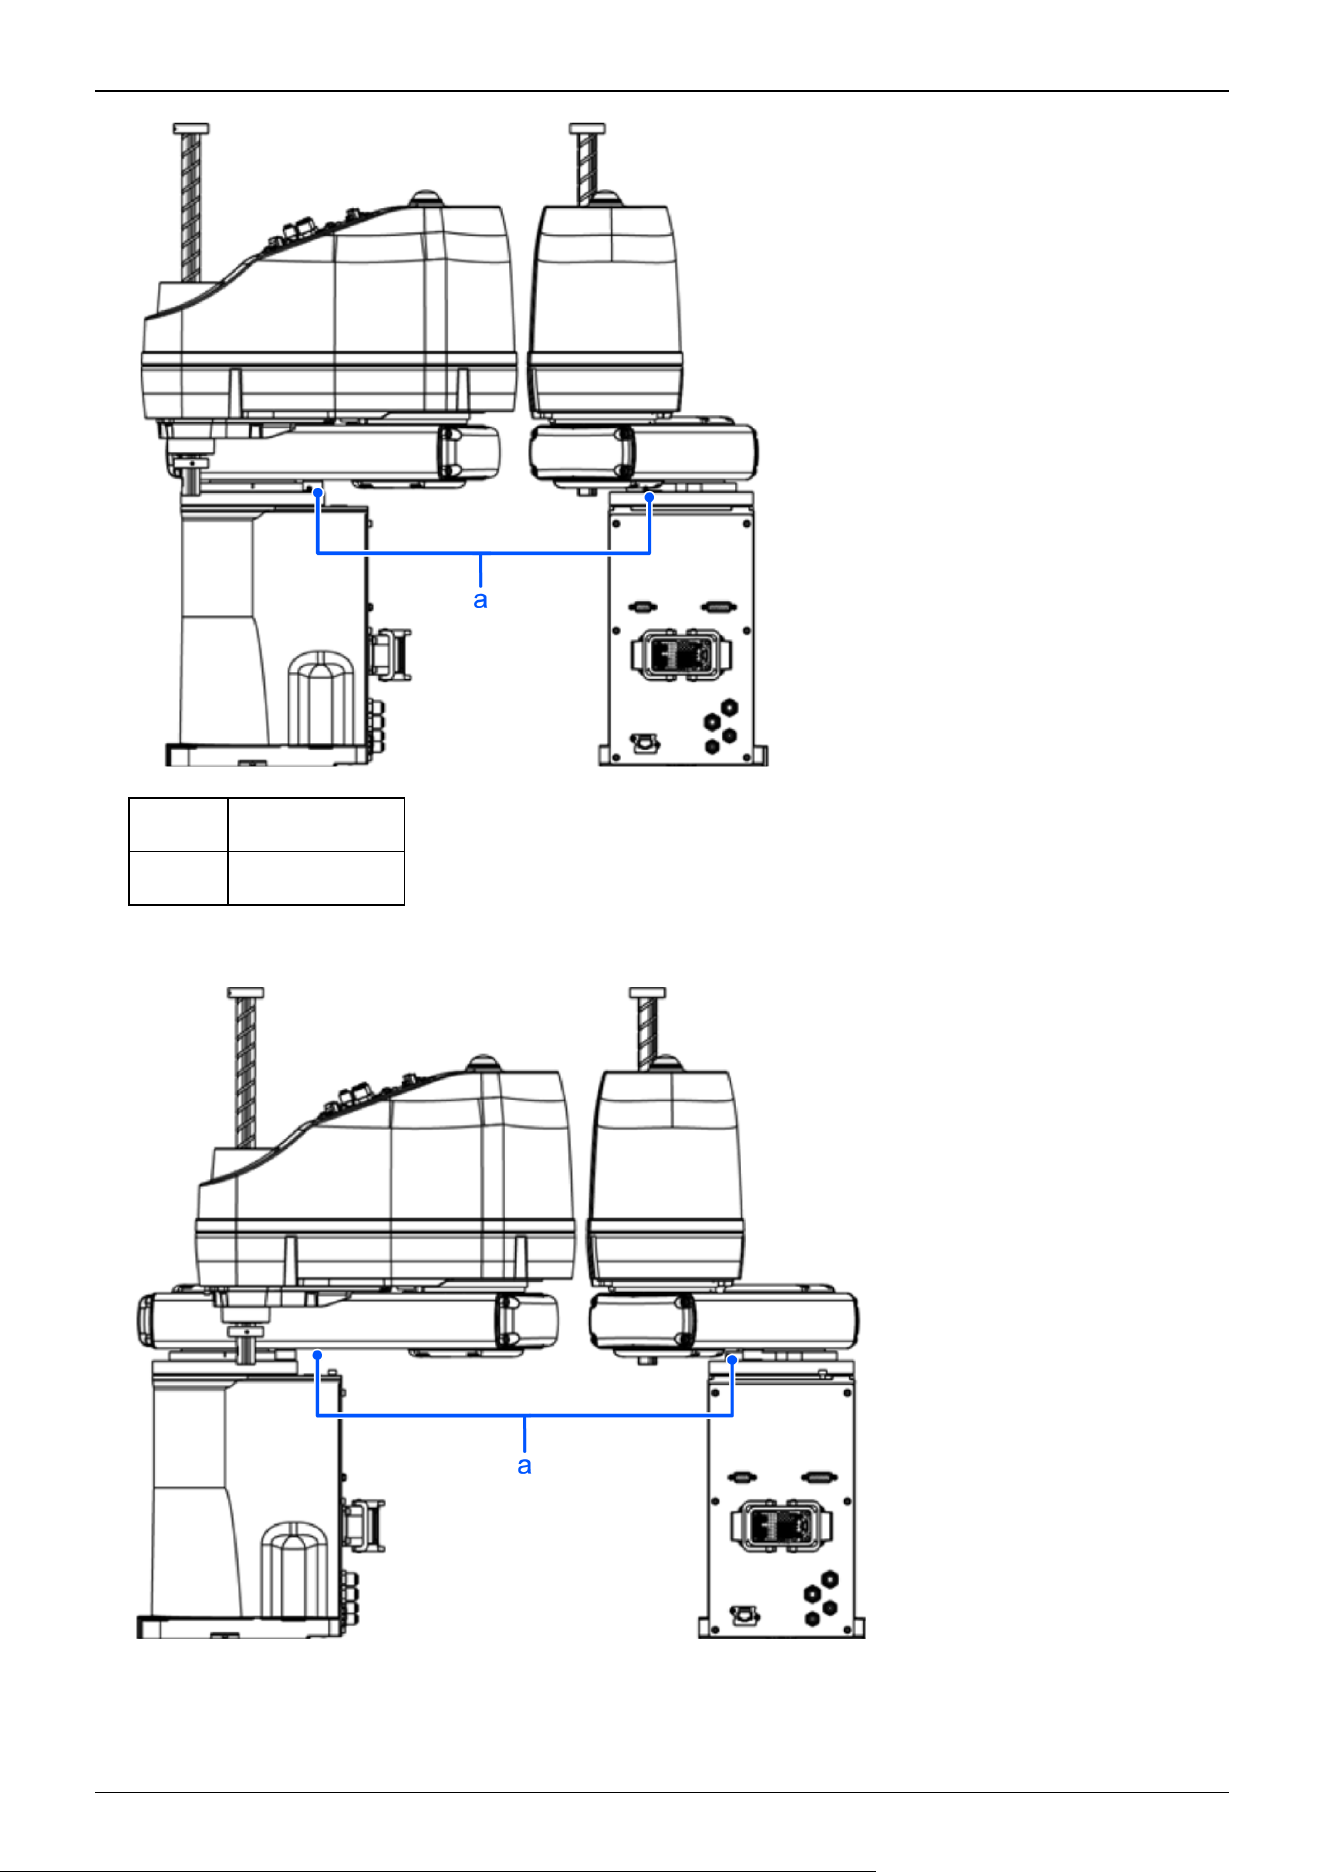
Symbol Description
a Center of gravity
GX8-A/GX8-B/GX8-C55***
Industrial Robot: SCARA Robots GX series Manual Rev.11
268
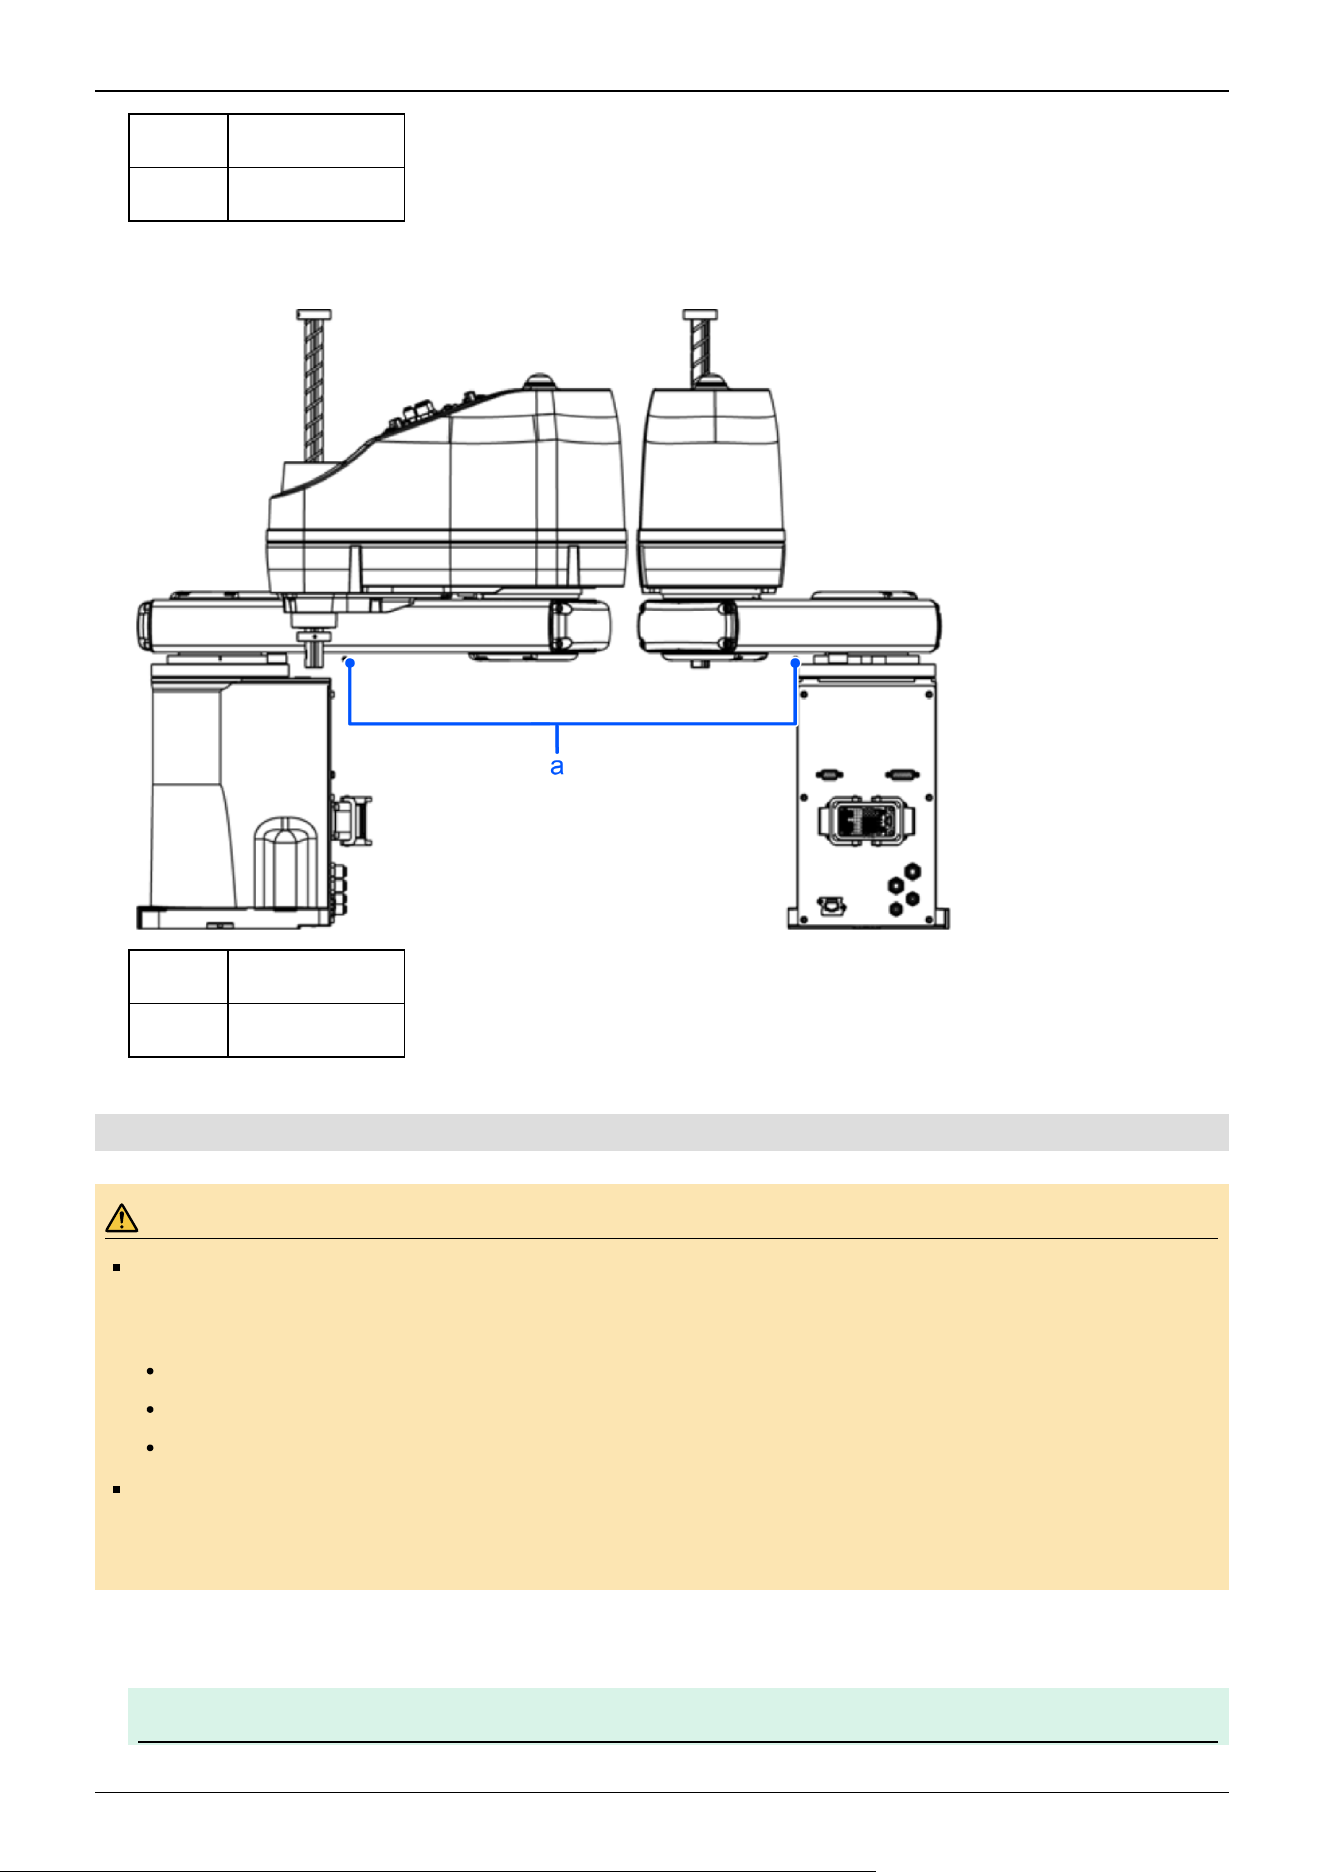
Symbol Description
a Center of gravity
GX8-A/GX8-B/GX8-C65***
Symbol Description
a Center of gravity
4.3.7.3 Wall Mounting Specifications
WARNING
Be sure to always use two or more people when installing or relocating the model with wall mounting
specifications. The Manipulator weights are as follows. Be careful not to get hands or feet caught or have
equipment damaged due to dropping of the Manipulator.
GX8-A/GX8-B/GX8-C45**W: Approx.35 kg (77 lb)
GX8-A/GX8-B/GX8-C55**W: Approx.36 kg (79 lb)
GX8-A/GX8-B/GX8-C65**W: Approx.37 kg (82 lb)
When removing the Manipulator from a wall or other location, be sure to support the Manipulator before
removing the anchor bolts. Removing the anchor bolts without supporting the Manipulator is extremely
hazardous and may cause the Manipulator to fall.
1. Turn off all power, and remove the wiring and tubes connected to the Manipulator.
KEY POINTS
✏
Industrial Robot: SCARA Robots GX series Manual Rev.11
269
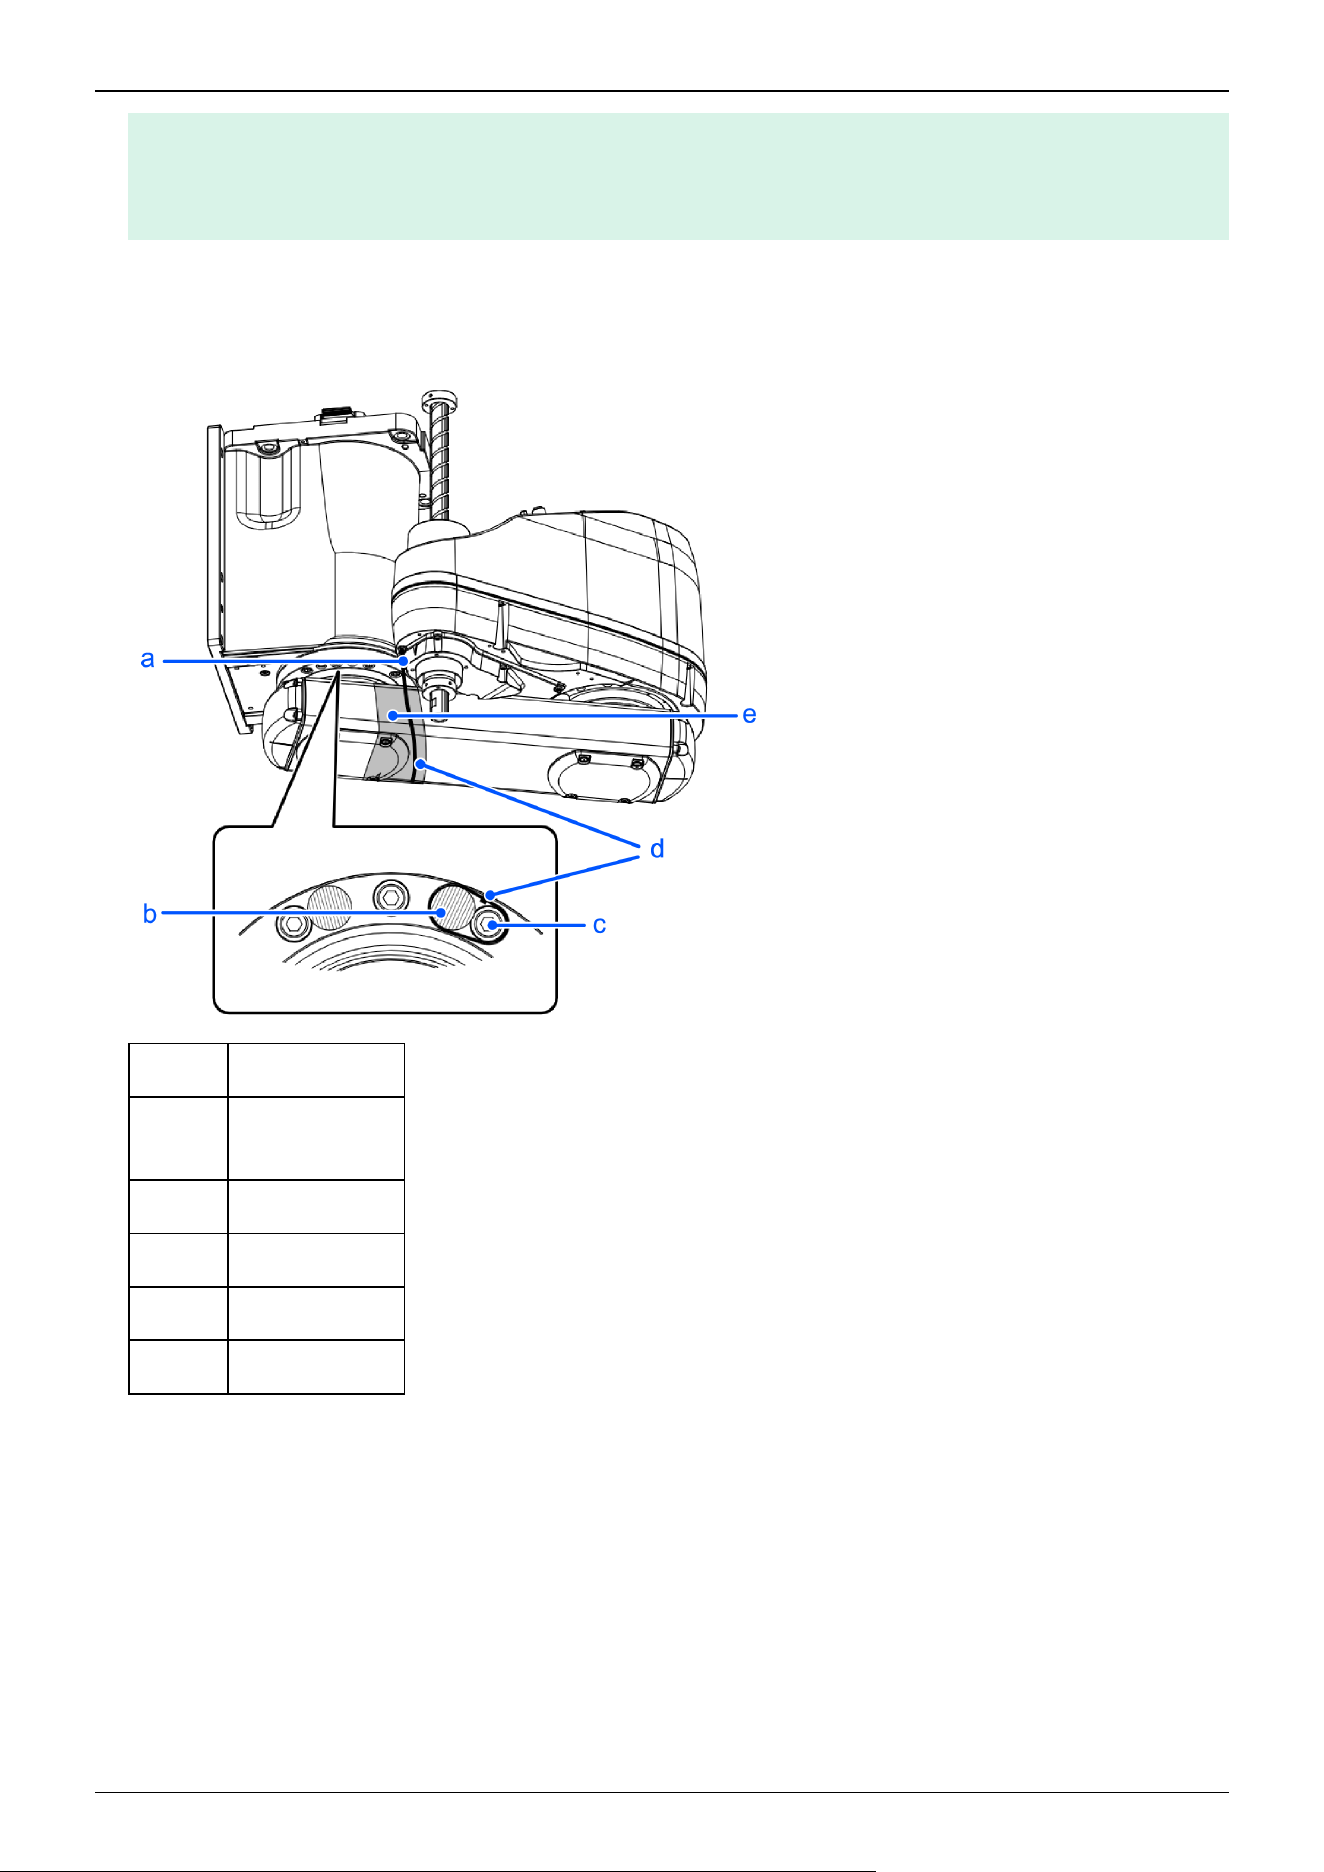
If using variable mechanical stops for Joints #1 and #2 and the operating angle is limited, change to the
mechanical stop positions at factory shipping.
Setting the Work Envelope by Mechanical Stops
2. Wrap a sheet around the arm so that it will not get damaged. Secure the arm while referring to the figure.
Example of securing arm in place
Symbol Description
a
Bolt: M4 × 15
Washer
b Arm #1 stop bolt
c Arm fixing bolt
d Cable tie
e Sheet
3. While supporting the bottom of Arm #1 by hand so that the Manipulator does not fall over, remove the anchor bolts. Then,
remove the Manipulator from the wall.
GX8-A/GX8-B/GX8-C45**W
Industrial Robot: SCARA Robots GX series Manual Rev.11
270
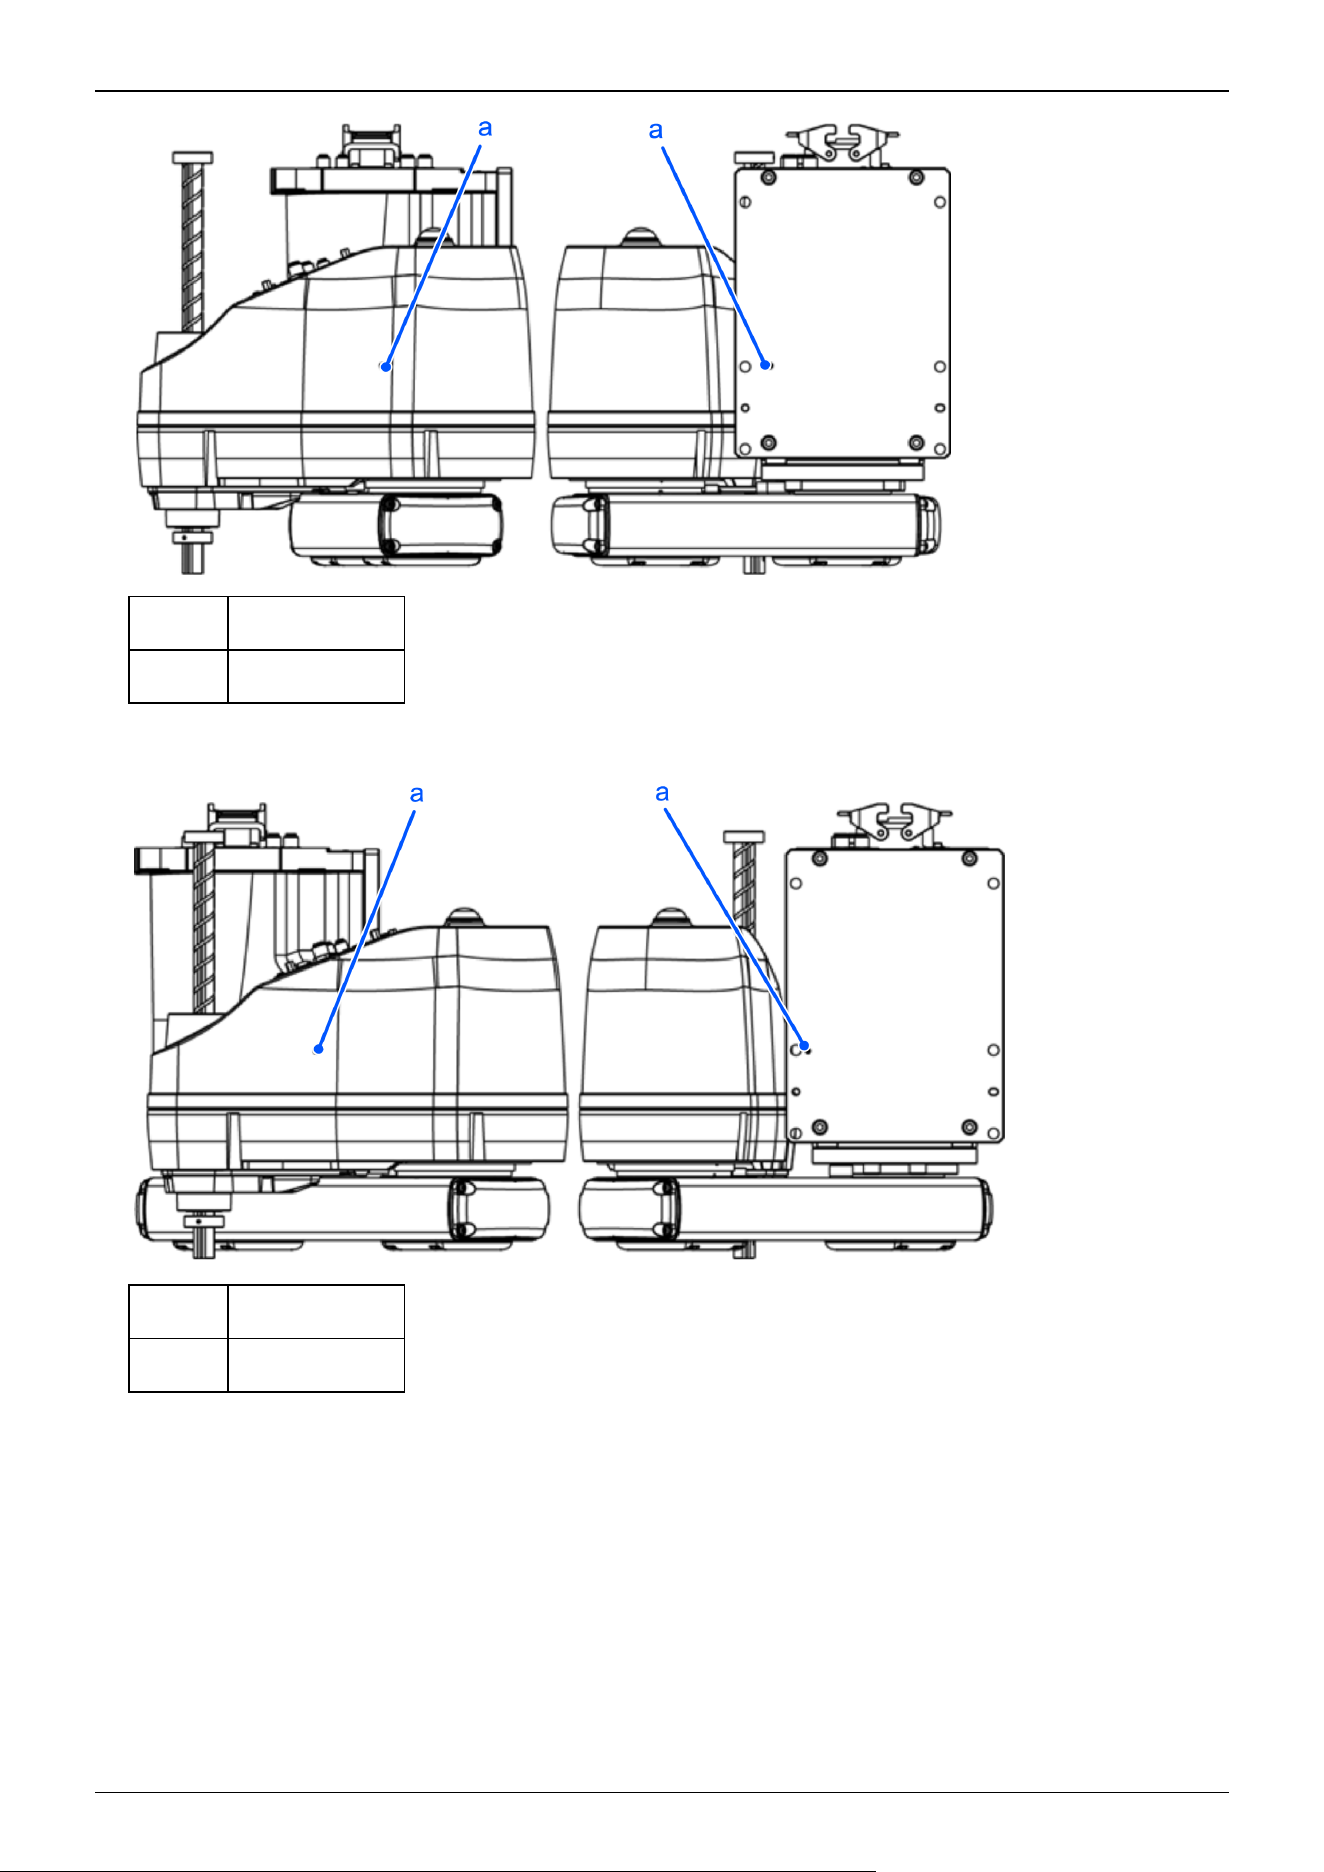
Symbol Description
a Center of gravity
GX8-A/GX8-B/GX8-C55**W
Symbol Description
a Center of gravity
GX8-A/GX8-B/GX8-C65**W
Industrial Robot: SCARA Robots GX series Manual Rev.11
271
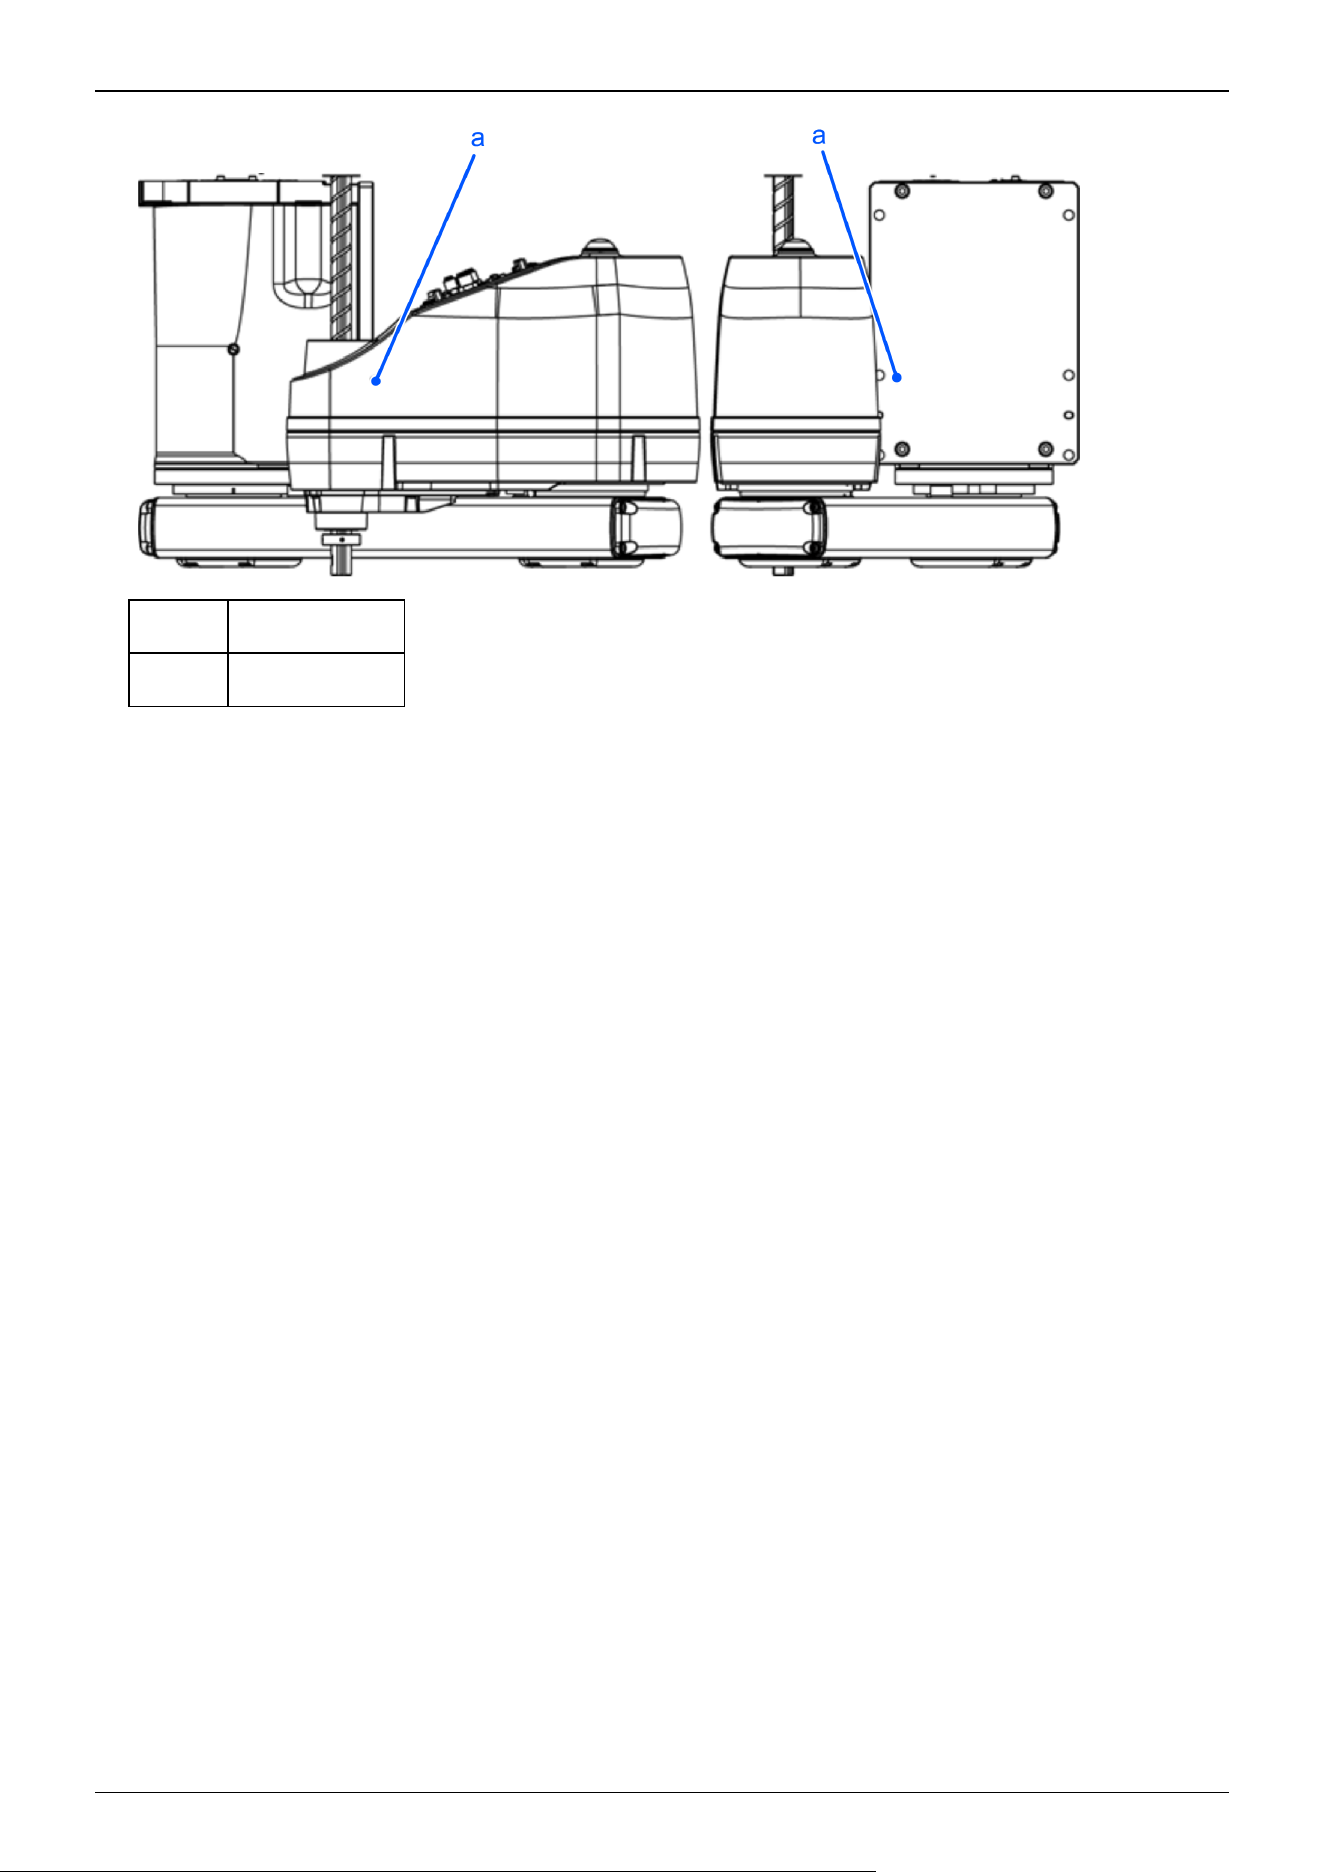
Symbol Description
a Center of gravity
Industrial Robot: SCARA Robots GX series Manual Rev.11
272
4.3.7.4 Ceiling Mounting Specifications
WARNING
Be sure to always use two or more people when installing or relocating the model with ceiling mounting
specifications. The Manipulator weights are as follows. Be careful not to get hands or feet caught or have
equipment damaged due to dropping of the Manipulator.
GX8-A/GX8-B/GX8-C45**R: Approx.33 kg (73 lb)
GX8-A/GX8-B/GX8-C55**R: Approx.34 kg (75 lb)
GX8-A/GX8-B/GX8-C65**R: Approx.35 kg (77 lb)
When removing the Manipulator from a ceiling surface or other location, be sure to support the Manipulator
before removing the anchor bolts. Removing the anchor bolts without supporting the Manipulator is extremely
hazardous and may cause the Manipulator to fall.
1. Turn off all power, and remove the wiring and tubes connected to the Manipulator.
KEY POINTS
If using variable mechanical stops for Joints #1 and #2 and the operating angle is limited, change to the
mechanical stop positions at factory shipping.
Setting the Work Envelope by Mechanical Stops
2. Wrap a sheet around the arm so that it will not get damaged. Secure the arm while referring to the figure.
Example of securing arm in place
✏
Industrial Robot: SCARA Robots GX series Manual Rev.11
273
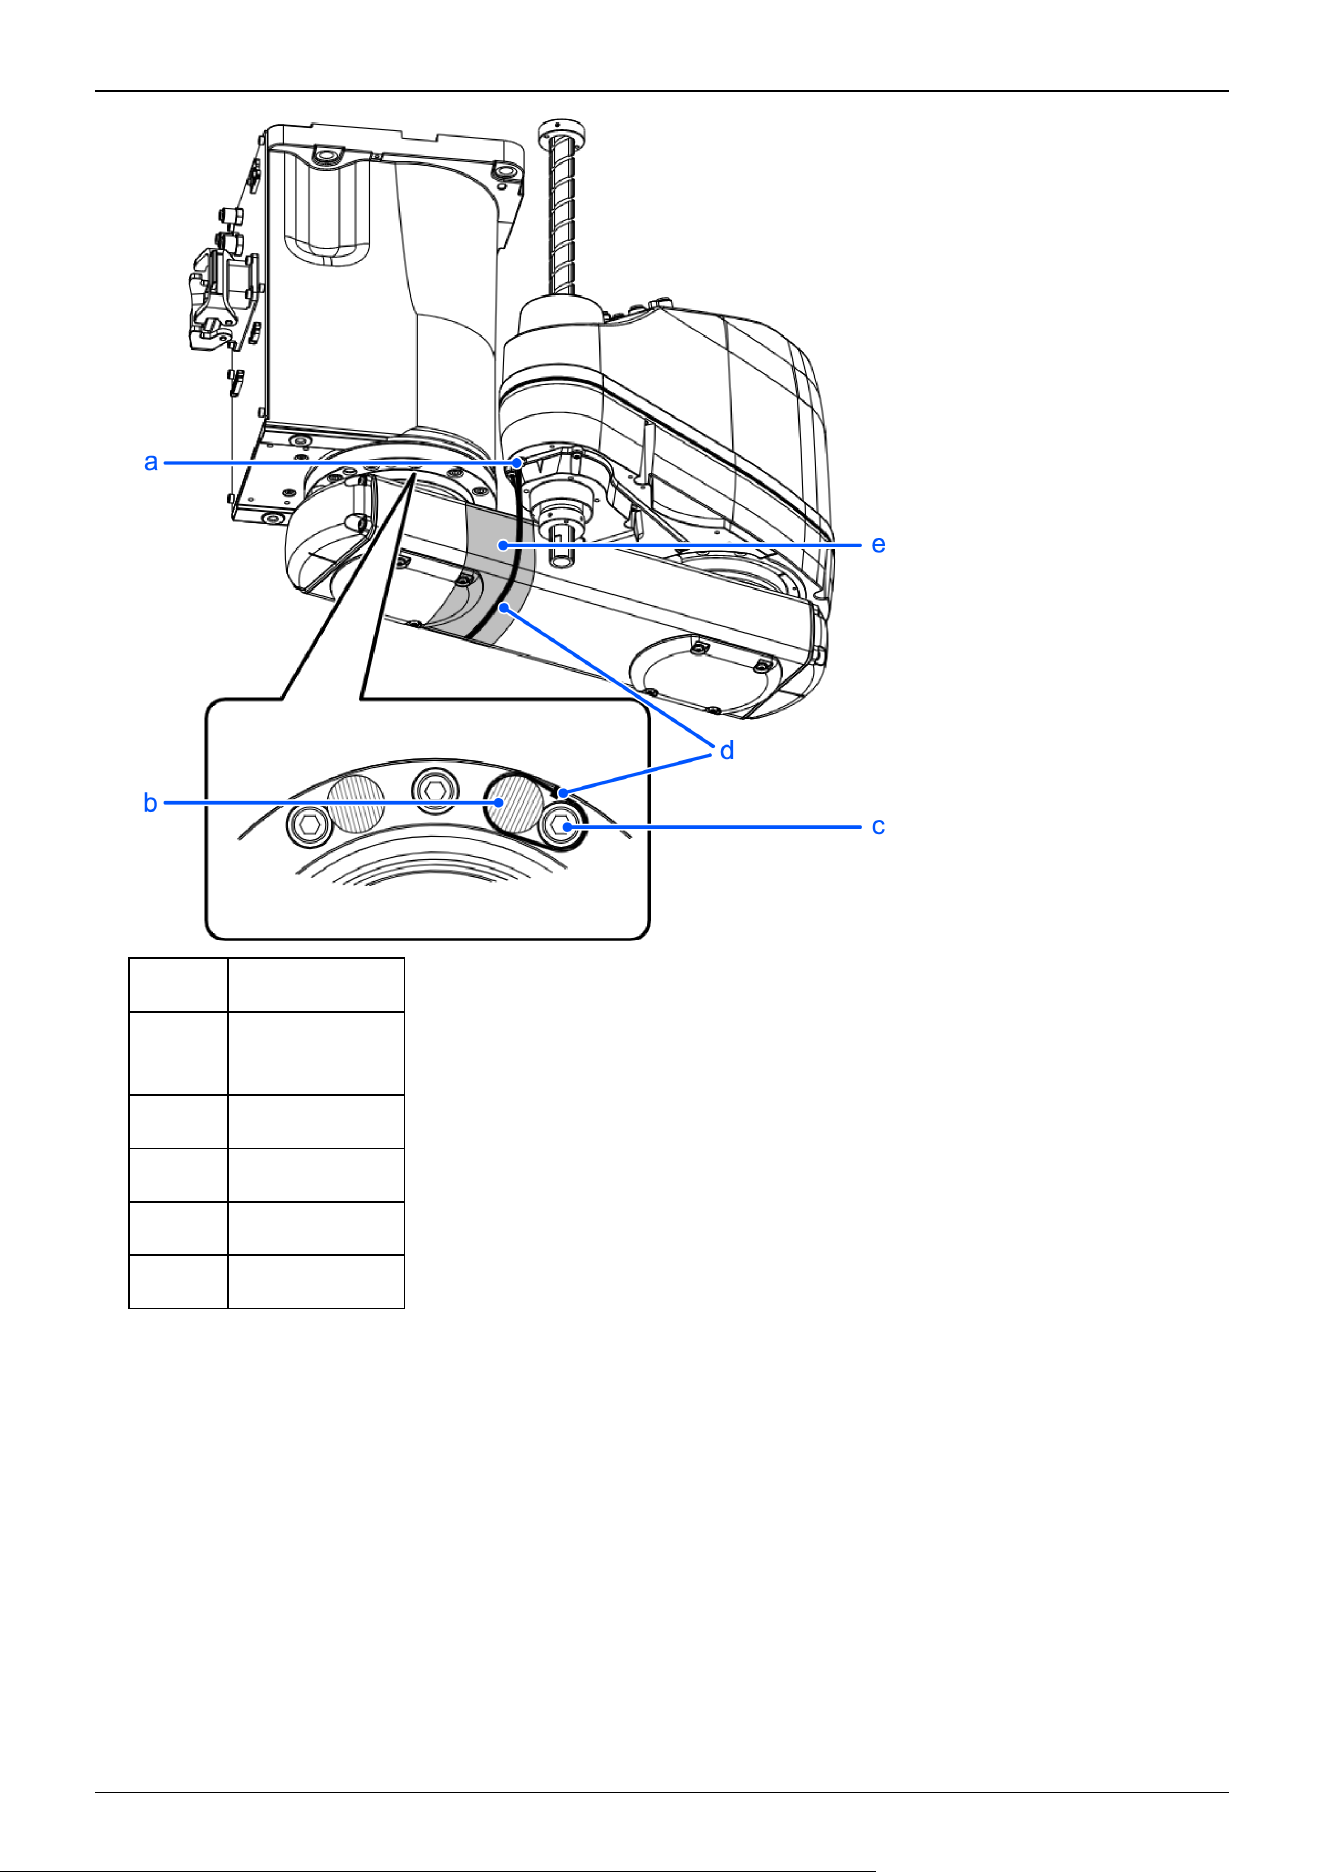
Symbol Description
a
Bolt: M4 × 15
Washer
b Arm #1 stop bolt
c Arm fixing bolt
d Cable tie
e Sheet
3. While supporting the bottom of Arm #1 by hand so that the Manipulator does not fall over, remove the anchor bolts. Then,
remove the Manipulator from the ceiling.
GX8-A/GX8-B/GX8-C45**R
Industrial Robot: SCARA Robots GX series Manual Rev.11
274
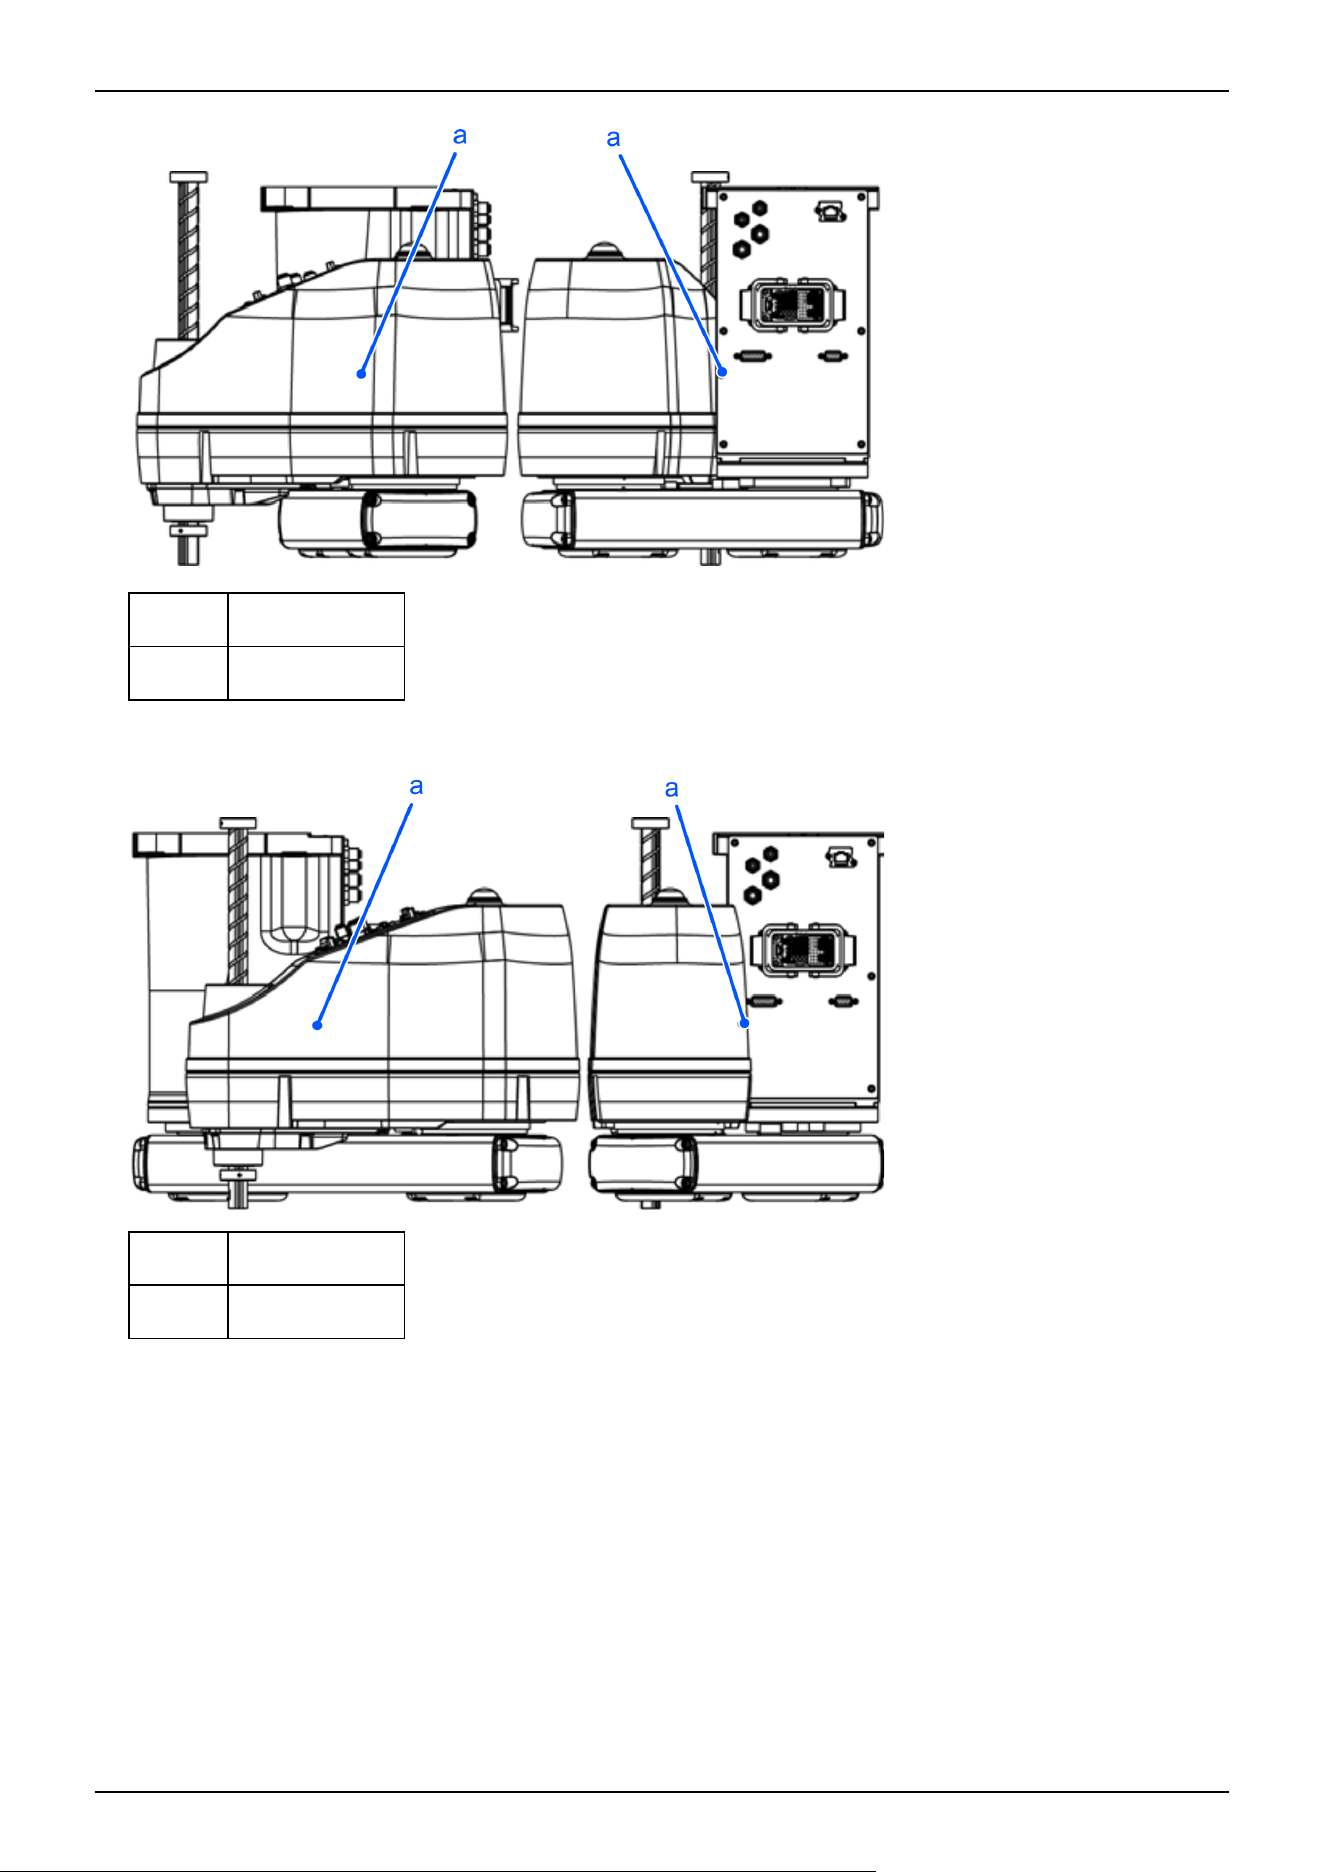
Symbol Description
a Center of gravity
GX8-A/GX8-B/GX8-C55**R
Symbol Description
a Center of gravity
GX8-A/GX8-B/GX8-C65**R
Industrial Robot: SCARA Robots GX series Manual Rev.11
275
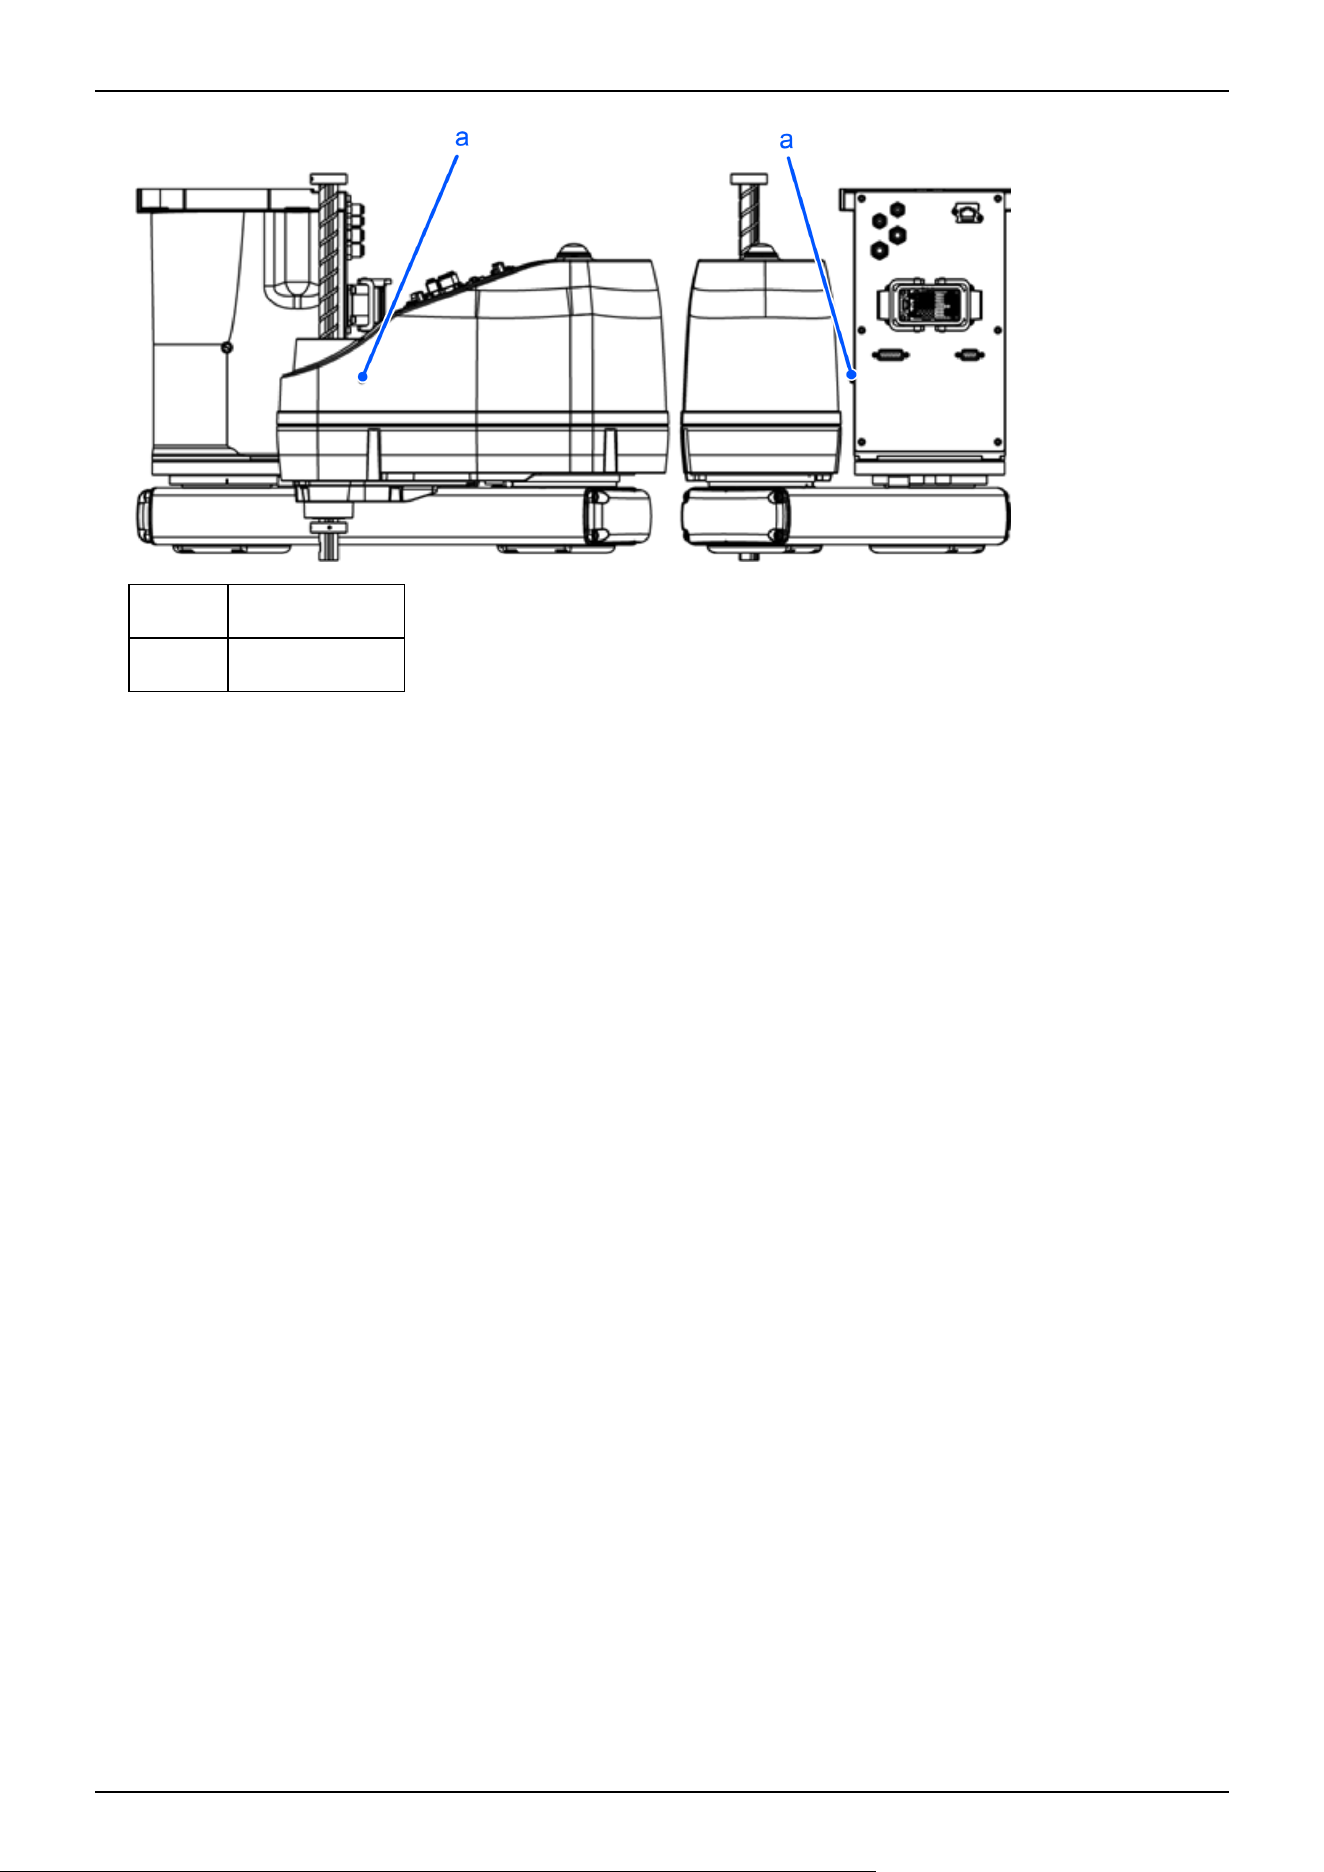
Symbol Description
a Center of gravity
Industrial Robot: SCARA Robots GX series Manual Rev.11
276
4.4 Setting the Hand
4.4.1 Installing the Hand
The hand (end effector) must be prepared by the customer. When installing the hand, take note of the following. For details on
attaching the hand, refer to the following manual.
"Hand Function Manual"
WARNING
Before attaching a hand or peripheral equipment, be sure to always turn off the Controller and related
equipment and unplug the power cables. Performing any work procedure with the power turned on is
extremely dangerous and may result in electric shock and/or malfunction of the robot system.
CAUTION
When the hand is equipped with a workpiece gripping mechanism, ensure that the wiring and pneumatic tubes
do not cause the hand to release the workpiece when the power is turned off. When the wiring and pneumatic
tubes are not designed for the hand to maintain its grip on the workpiece when the power is turned off, pressing
the emergency stop switch releases the workpiece, which may damage the robot system and the workpiece.
By default, all I/Os are designed to automatically turn off (0) when the power is shut off, when an emergency stop
is triggered, or by the robot system's safety function.
However, I/Os set with the Hand function does not turn off (0) when executing the Reset statement, or when
performing an emergency stop.
For the risk of the residual air pressure, conduct a risk assessment on the equipment and take the necessary
protective measures.
Shaft
Attach the hand to the lower end of the shaft.
For the layout dimensions in the area around the shaft and the overall dimensions of the Manipulator, refer to the following
section.
Names of Parts and Their Dimensions
Do not move the upper limit mechanical stop on the lower side of the shaft. When performing a Jump operation, the upper
limit mechanical stop may come into contact with the Manipulator body, which may cause the Manipulator to stop
functioning properly.
When attaching the hand to the shaft, have the hand hold the shaft using M4 or larger screws.
Brake release switch
Joint #3 and Joint #4 have an electromagnetic brake that is triggered when the power is off, preventing them from being
moved up and down or rotated by hand.
To move Joint #3 up or down or rotate Joint #4 when attaching a hand, turn on the Controller, and then press the brake
release switch.
This button switch is a momentary brake release type where the brake is released only while the button switch is being
pressed. The switch releases the brake of Joints #3 and #4 simultaneously.
Industrial Robot: SCARA Robots GX series Manual Rev.11
277
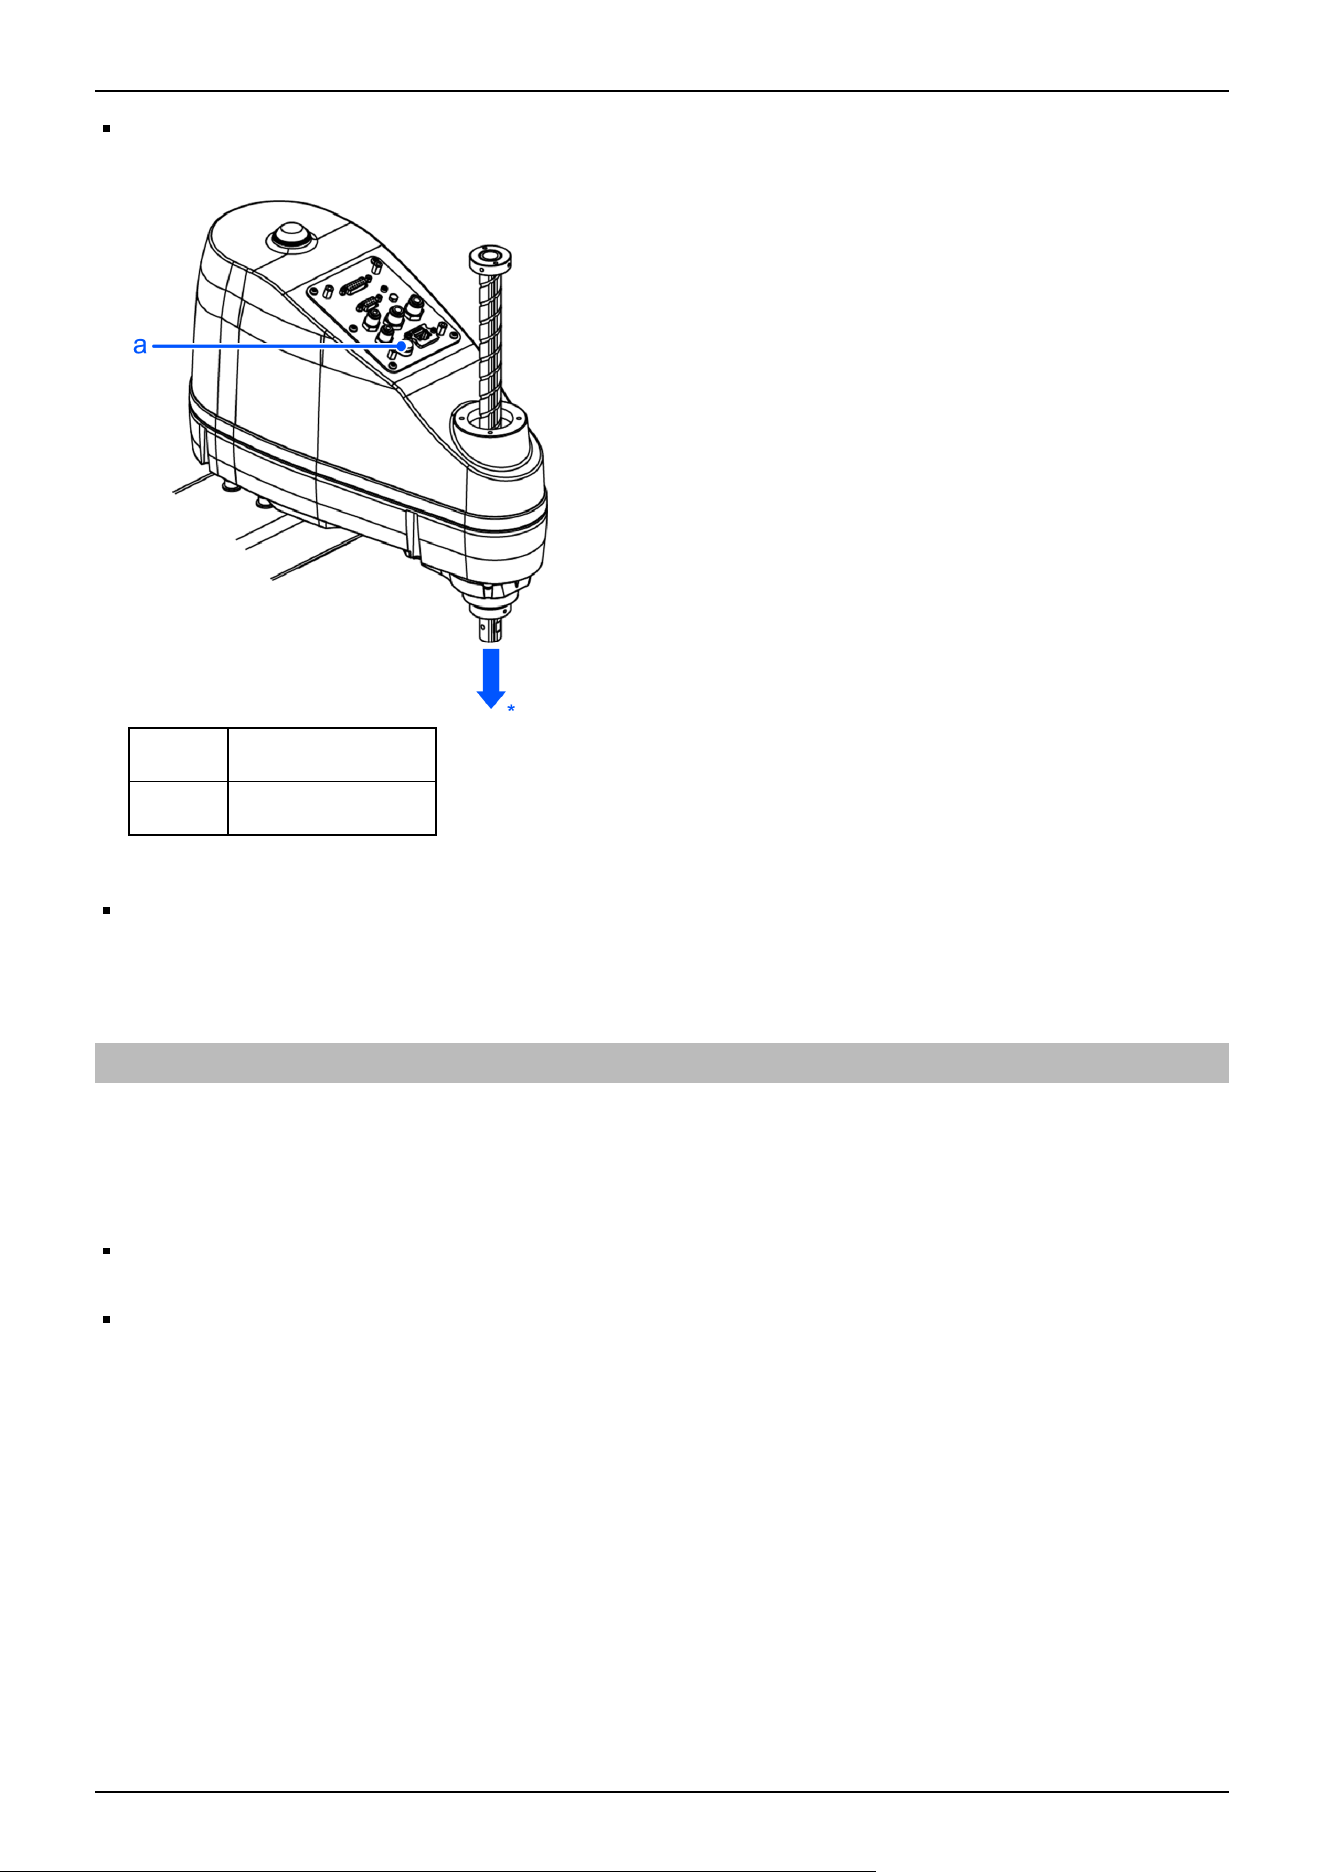
When pressing the brake release switch, watch for the shaft descending or rotating under the weight of the hand.
*: The shaft may drop due to the weight of the hand or other object.
Symbol Description
a Brake release switch
Layout
When attaching and operating a hand, the hand may come into contact with the Manipulator body due to the outer diameter
of the hand, the size of the workpiece, or the position of the arm. Carefully consider the interference area of the hand when
designing the system layout.
4.4.2 Attaching Cameras and Valves
The base and Arm #2 (top and bottom surfaces) have threaded holes as shown in the figure below. Use the threaded holes in
Arm #2 (bottom surface) for attaching cameras, valves, and other heavy objects to the Manipulator.
When attaching pneumatic tubes, Ethernet cables, and other objects to the threaded holes in Arm #2 (top surface), do not
exceed the following allowable loads.
With an external wiring unit installed: 250 g (assuming a distance of 100 mm from the mounting surface to center of
gravity)
Without an external wiring unit installed: 750 g (assuming a distance of 100 mm from the mounting surface to center of
gravity)
Industrial Robot: SCARA Robots GX series Manual Rev.11
278
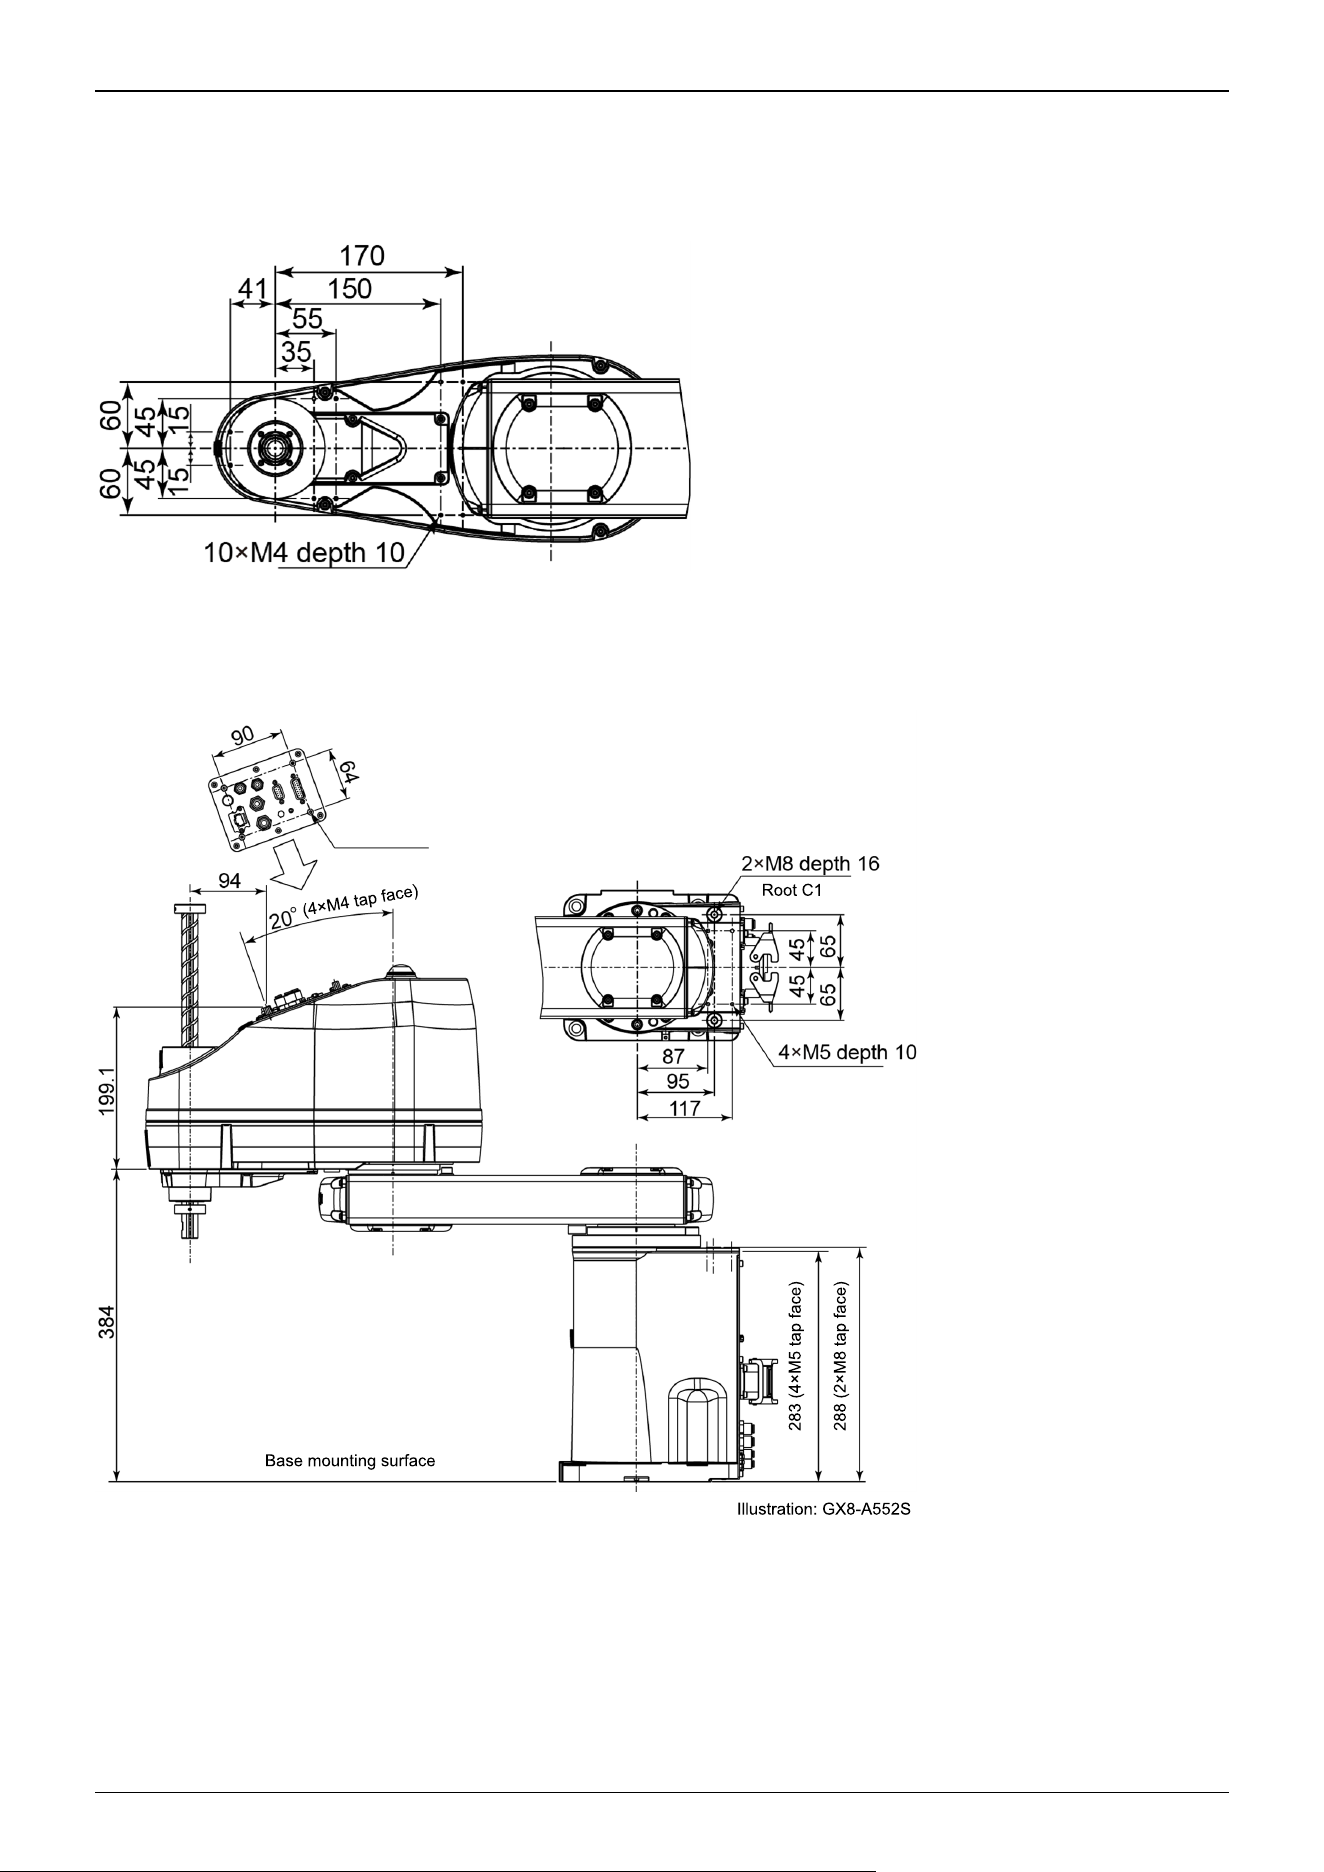
Common for all models
(Units: mm)
Table top mounting specifications
(Units: mm)
GX8-A/GX8-B/GX8-C***P* : 4×M4 depth6
Other than GX8-A/GX8-B/GX8-C***P* : 4×M4 depth7.5
Industrial Robot: SCARA Robots GX series Manual Rev.11
279
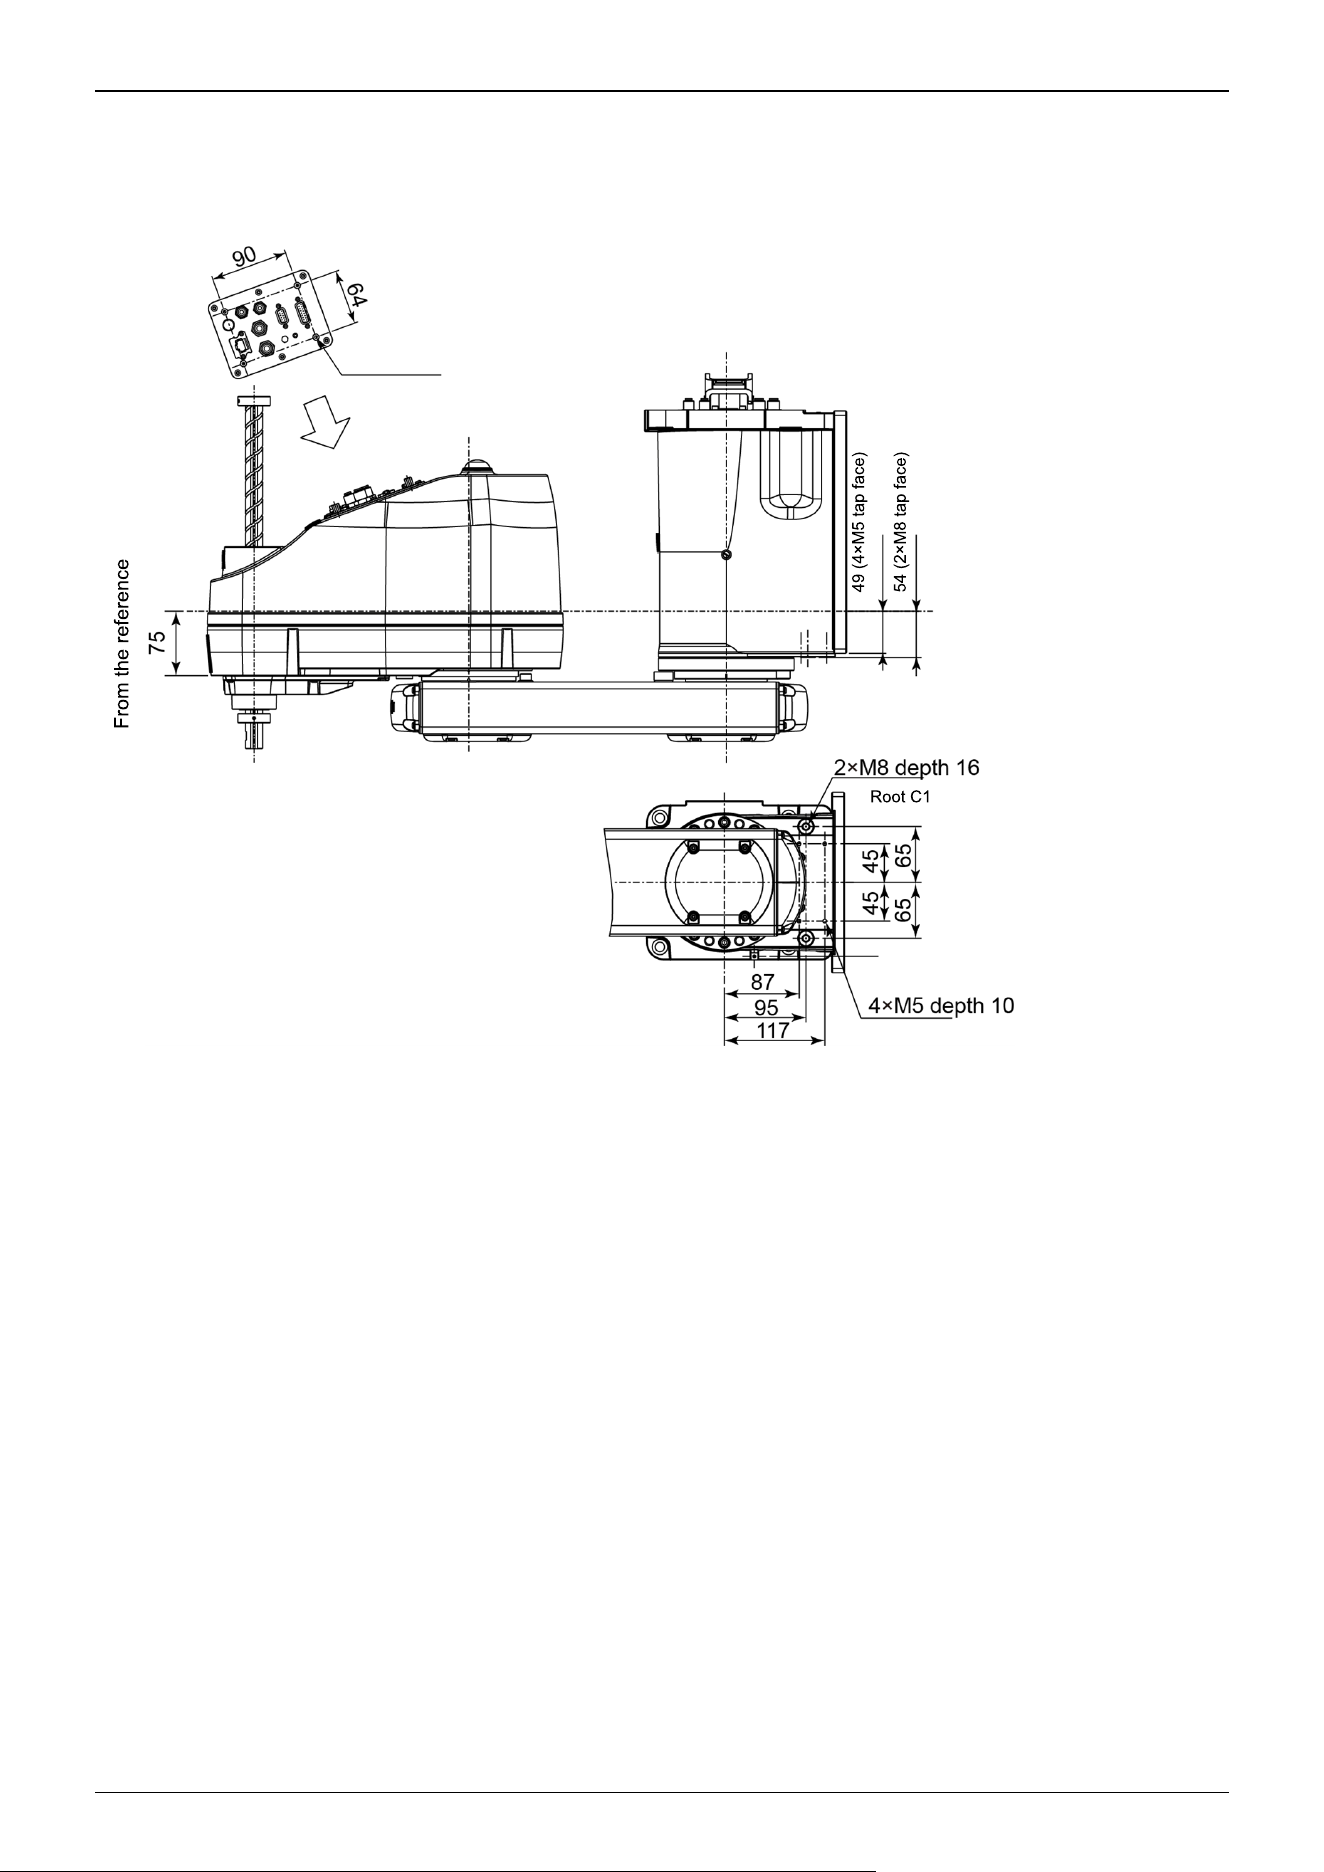
Wall mounting specifications
(Units: mm)
GX8-A/GX8-B/GX8-C***PW : 4×M4 depth6
Other than GX8-A/GX8-B/GX8-C***PW : 4×M4 depth7.5
Industrial Robot: SCARA Robots GX series Manual Rev.11
280
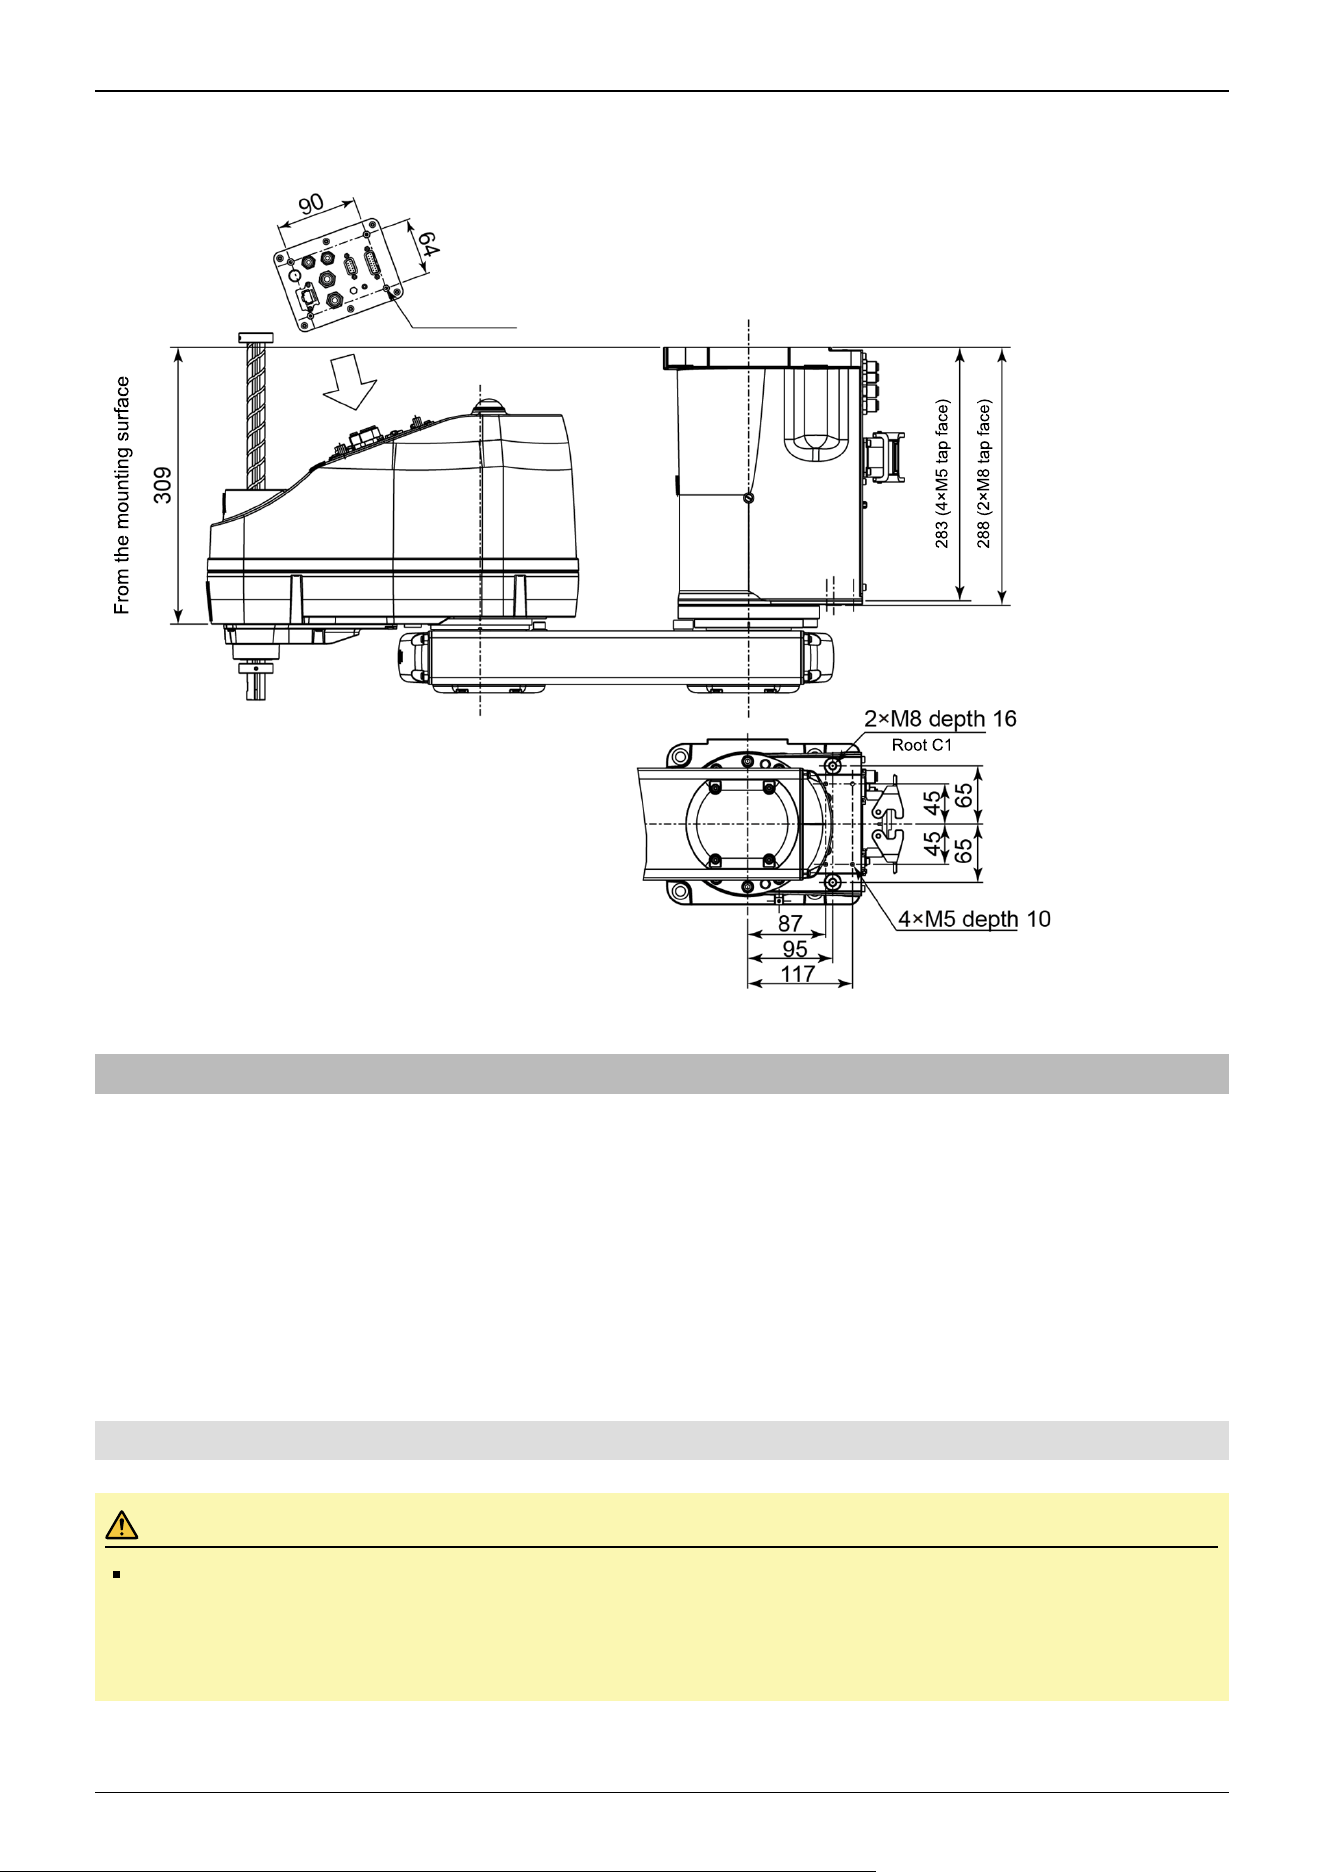
Ceiling mounting specifications (Units: mm)
4.4.3 Weight and Inertia Settings
To ensure that the Manipulator is functioning properly, keep the load (the sum of the weights of the hand and workpiece) and
the moment of inertia of the load within the rated values, and do not allow for eccentricity from the center of the Joint #4. If,
for some unavoidable reason, the load or moment of inertia exceeds the rated value, or if eccentricity occurs, configure
parameters as described in the "Weight setting" and "Inertia setting."
These settings optimize the Manipulator's PTP motion, reduce vibration, and shorten operation times. This also works to curb
any persistent vibration that may occur when the hand and workpiece have a large moment of inertia.
You can also perform settings using the "Weight, Inertia, and Eccentricity/Offset Measurement Utility".
For details, refer to the following manual:
"Epson RC+ User's Guide - Weight, Inertia, and Eccentricity/Offset Measurement Utility"
4.4.3.1 Weight Setting
CAUTION
The total weight of the hand and the workpiece must not exceed 8 kg. The GX8 series Manipulators are not
designed to work with loads exceeding 8 kg. Always set the value according to the load. Setting the hand
weight parameter to a value smaller than the actual weight may cause errors or impact that not only impair full
functionality but also shorten the life of the mechanical components.
GX8-A/GX8-B/GX8-C***PR : 4×M4 depth6
Other than GX8-A/GX8-B/GX8-C***PR : 4×M4 depth7.5
Industrial Robot: SCARA Robots GX series Manual Rev.11
281
The allowable load weight (hand and workpiece) in the GX8 series is 4 kg at the default rating and 8 kg at the maximum.
Depending on the load weight, change the setting for the hand weight parameter in the Weight statement. After the setting is
changed, the maximum speed and acceleration/deceleration of the Manipulator during PTP motion that correspond to the
"Hand Weight" are corrected automatically.
4.4.3.1.1 Weight of Load Attached to Shaft
The weight of the load (hand + workpiece) attached to the shaft can be set by the "Hand Weight" parameter in the Weight
statement.
Go to [Tools] - [Robot Manager] - [Weight] panel, and enter the value in the [Weight] text box. (This can also be set using the
Weight statement in [Command Window].)
4.4.3.1.2 Weight of Load Attached to Arm
When a camera, valve, or other object is attached to the arm, its weight is converted to the equivalent weight of the shaft and
added to the weight of the load attached to shaft to set the "Hand Weight" parameter.
If an external wiring unit (excluding cables) is installed near the user connector on the Arm #2 side, add 0.16 kg to the
equivalent weight conversion value of the shaft.
Equivalent weight formula
W
M
=M×(L
M
+L
1
)
2
/(L
1
+L
2
)
2
W
M
: Equivalent weight
M: Weight of load attached to the arm
L
1
: Length of Arm #1
L
2
: Length of Arm #2
L
M
: Distance from rotation center of Joint #2 to center of gravity of load attached to the arm
Example:
Calculates [Weight] parameter when a 1 kg camera is attached to the end of GX8 Arm #2 (350 mm from the center of rotation
of Joint #2) with a load weight of W = 2 kg
W=2
M = 1
L
1
= 300
L
2
= 250
L
M
= 350
W
M
=1×(350+300)
2
/(250+300)
2
=1.40 (Round up to two decimal places)
W + W
M
= 2 + 1.4 = 3.4
Enter "3.4" for the [Hand Weight] parameter.
Industrial Robot: SCARA Robots GX series Manual Rev.11
282
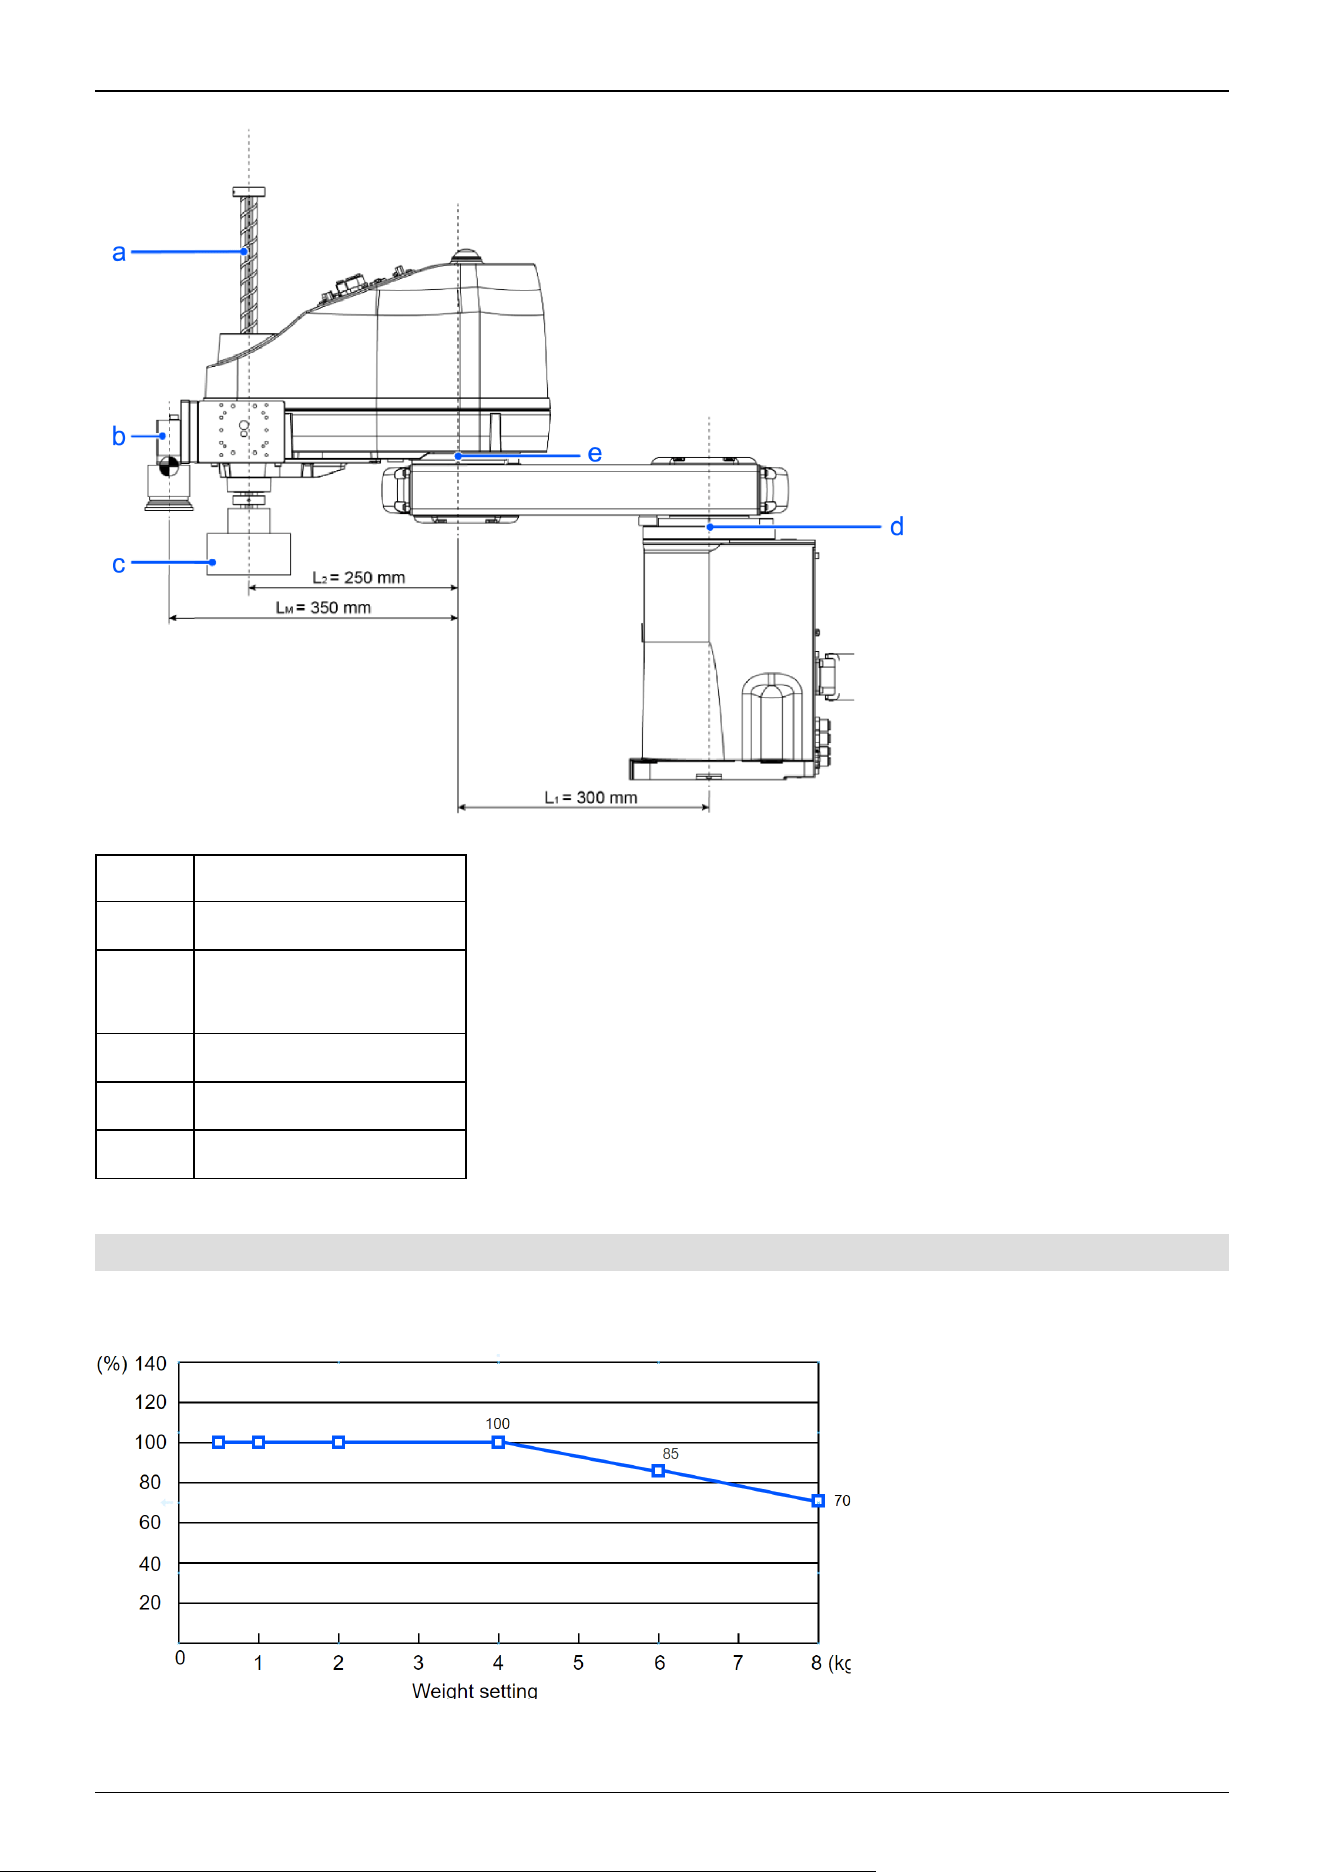
Symbol Description
a Shaft
b
Weight of the entire camera
M = 1 kg
c W = 2 kg
d Joint #1
e Joint #2
4.4.3.1.3 Automatic Speed Correction at Weight Setting
Standard mode
GX8-A/GX8-B/GX8-C45***
The percentages on the graph are ratios based on 100% as the speed at the rated (4 kg) setting.
Industrial Robot: SCARA Robots GX series Manual Rev.11
283
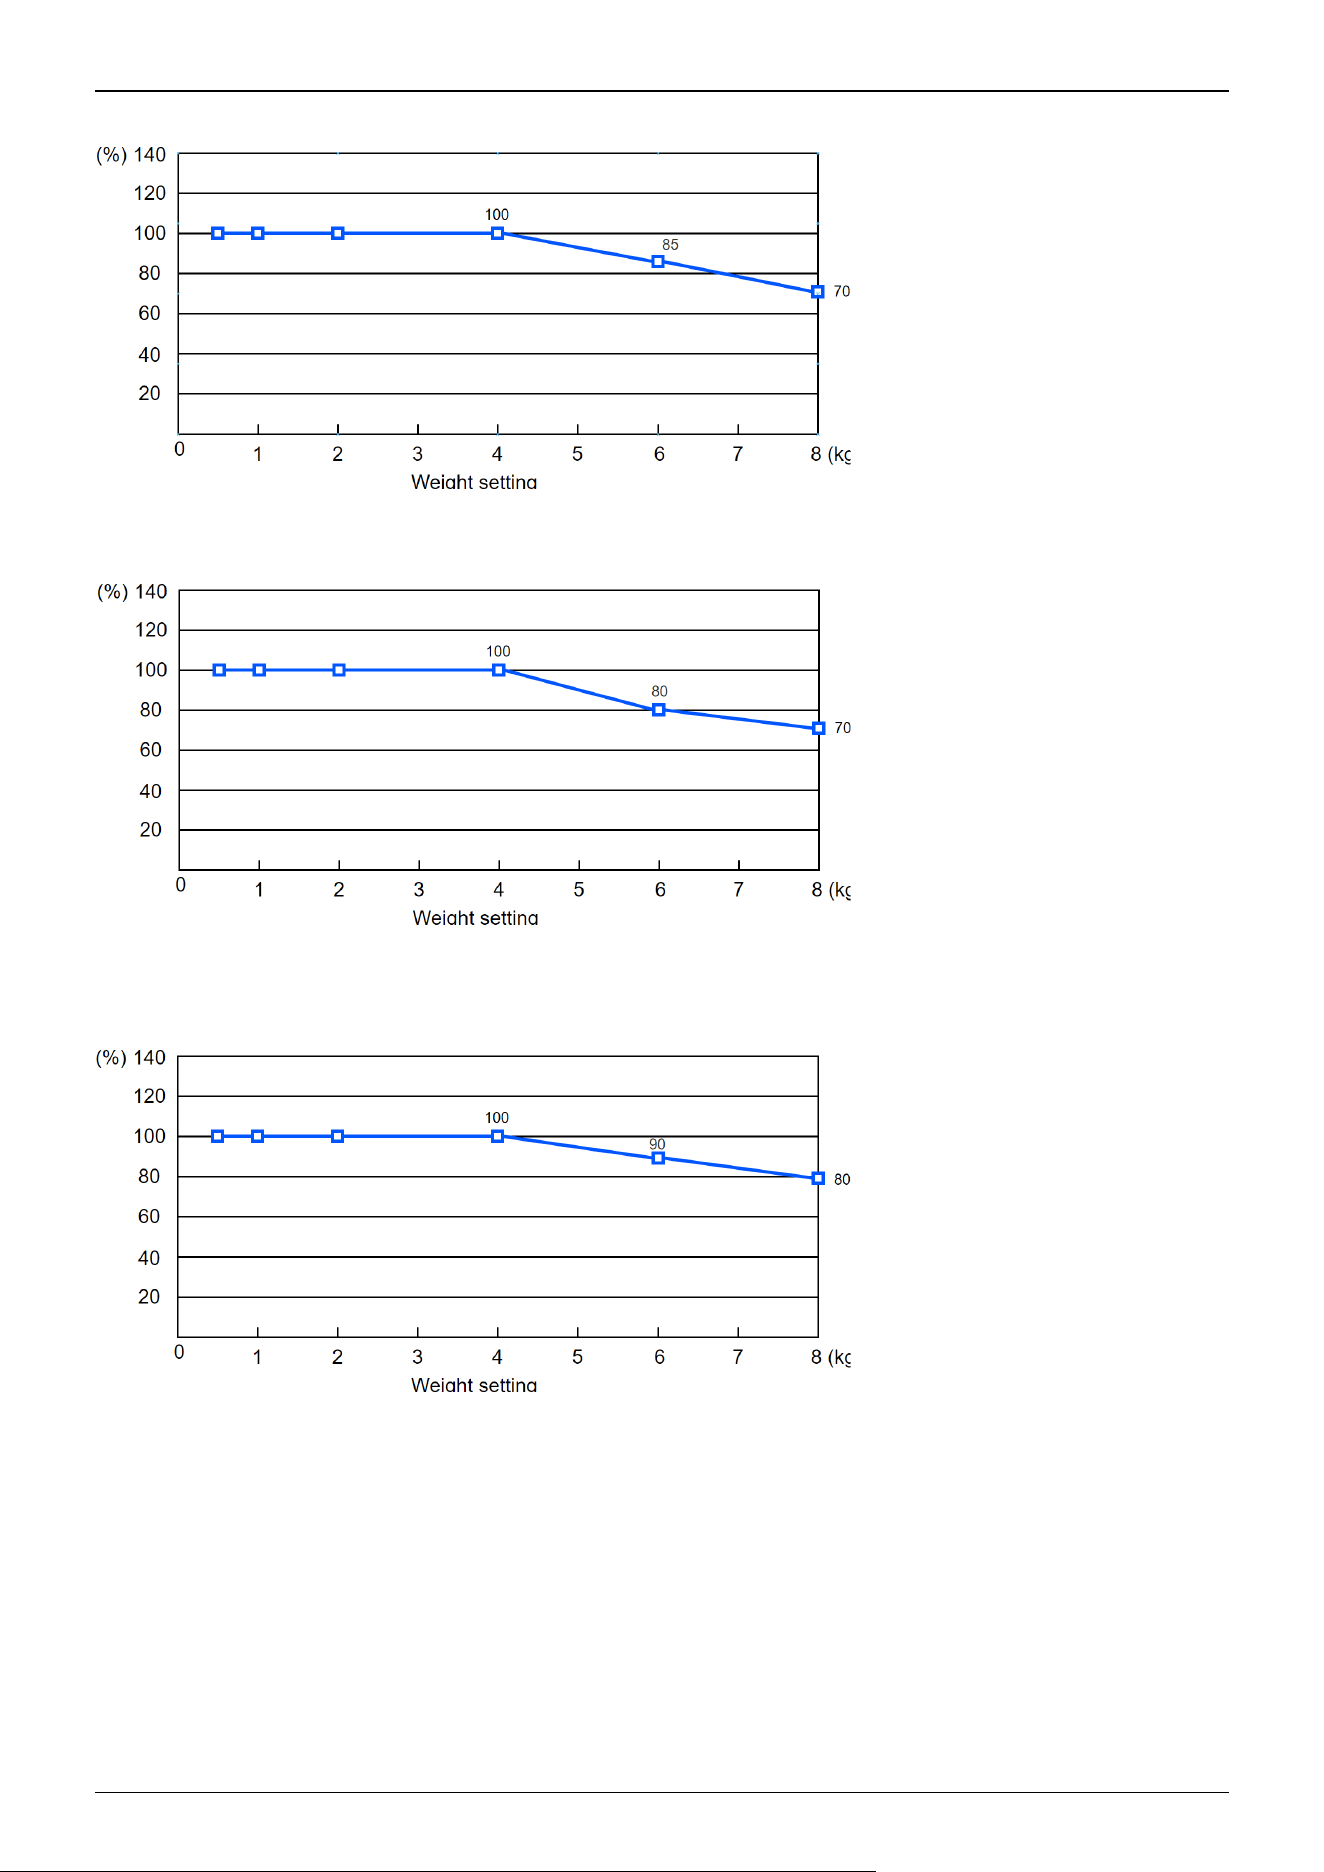
GX8-A/GX8-B/GX8-C55***
The percentages on the graph are ratios based on 100% as the speed at the rated (4 kg) setting.
GX8-A/GX8-B/GX8-C65***
The percentages on the graph are ratios based on 100% as the speed at the rated (4 kg) setting.
Boost mode
GX8-A/GX8-B/GX8-C45***
The percentages on the graph are ratios based on 100% as the speed at the rated (4 kg) setting.
Industrial Robot: SCARA Robots GX series Manual Rev.11
284
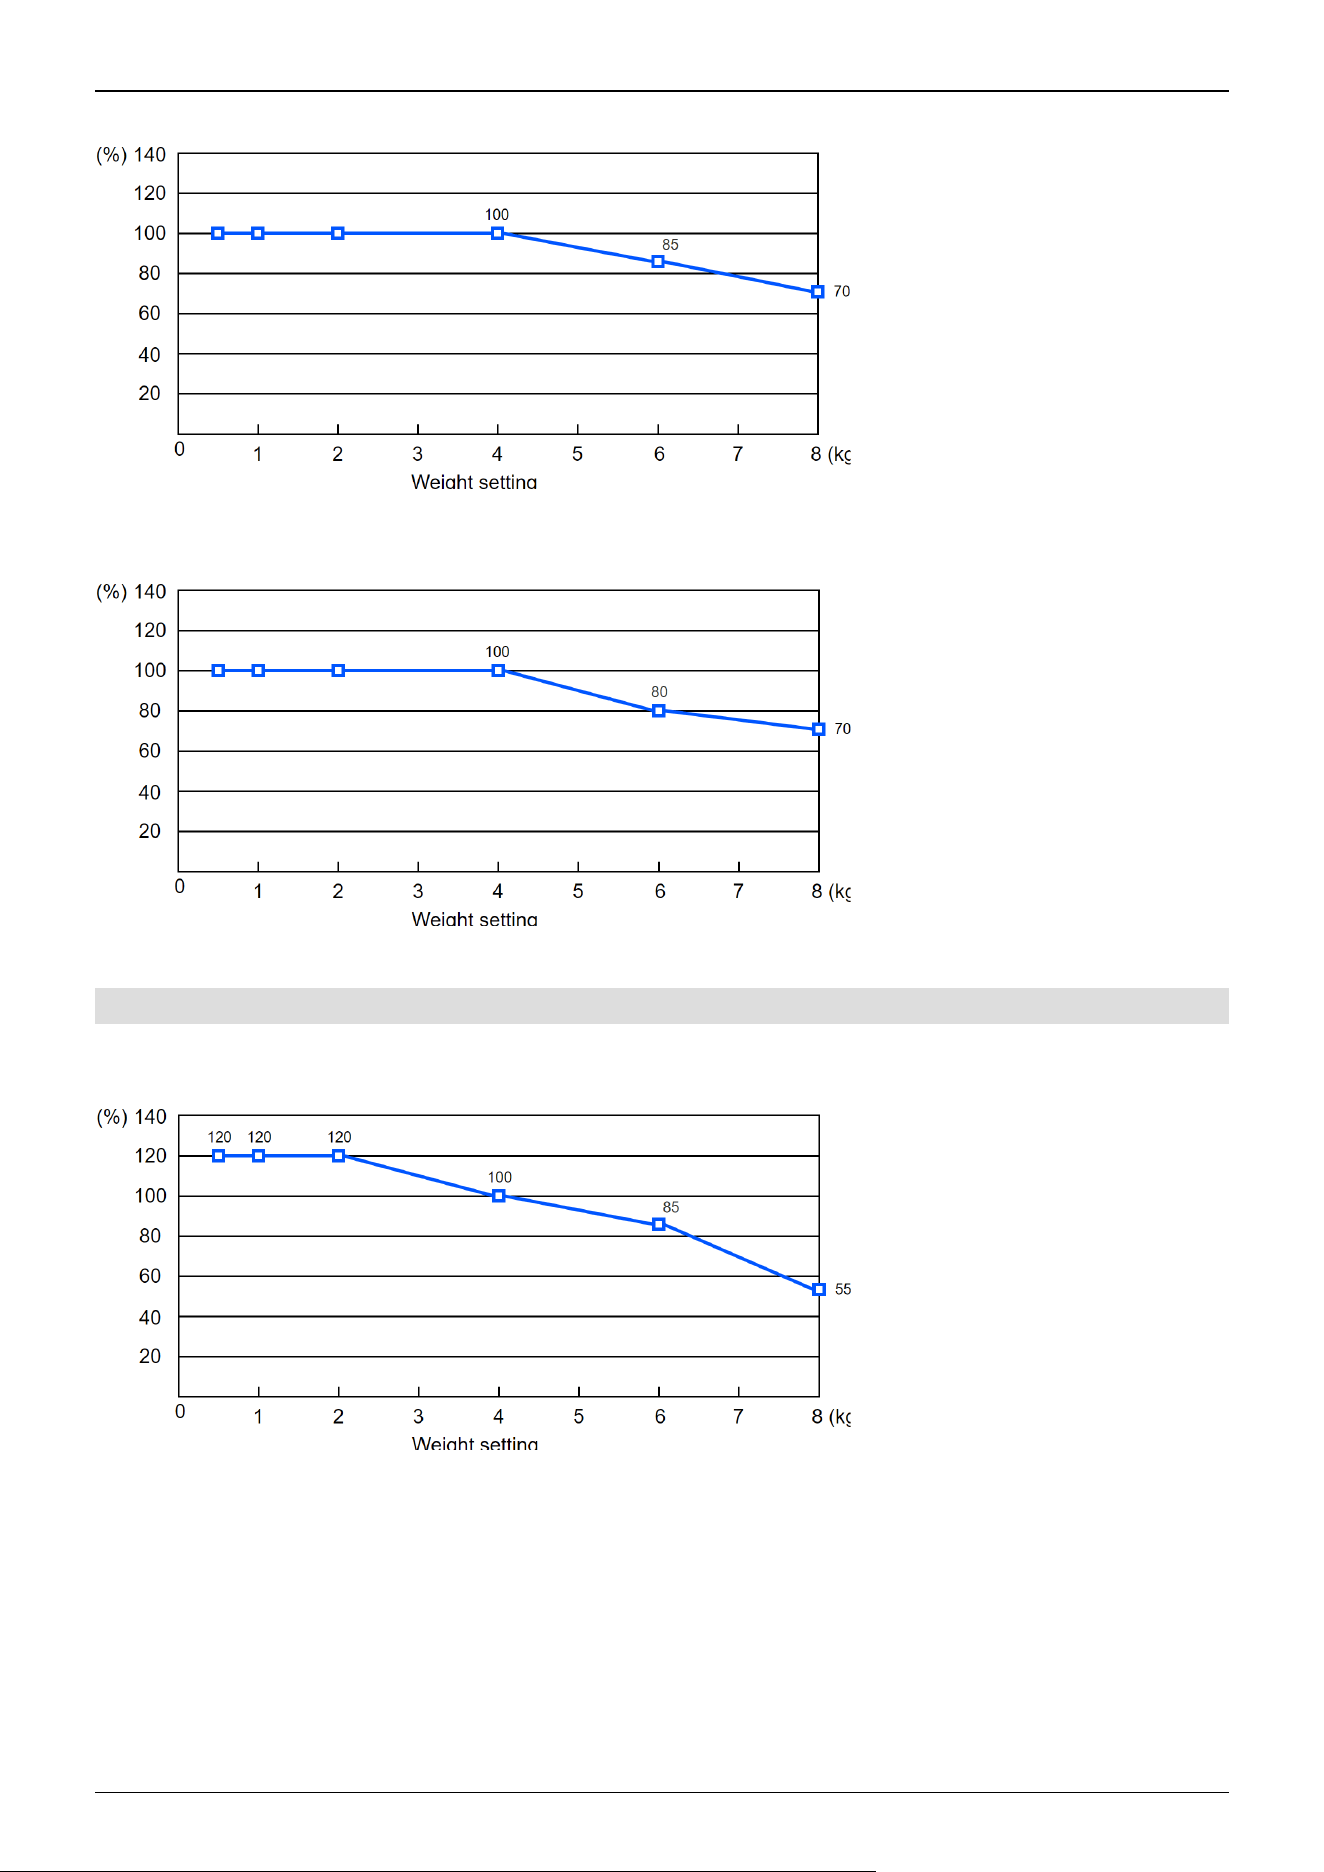
GX8-A/GX8-B/GX8-C55***
The percentages on the graph are ratios based on 100% as the speed at the rated (4 kg) setting.
GX8-A/GX8-B/GX8-C65***
The percentages on the graph are ratios based on 100% as the speed at the rated (4 kg) setting.
4.4.3.1.4 Automatic Acceleration/Deceleration Correction at Weight Setting
Standard mode
GX8-A/GX8-B/GX8-C45***
The percentages on the graph are ratios based on 100% as the acceleration/deceleration at the rated (4 kg) setting.
Industrial Robot: SCARA Robots GX series Manual Rev.11
285
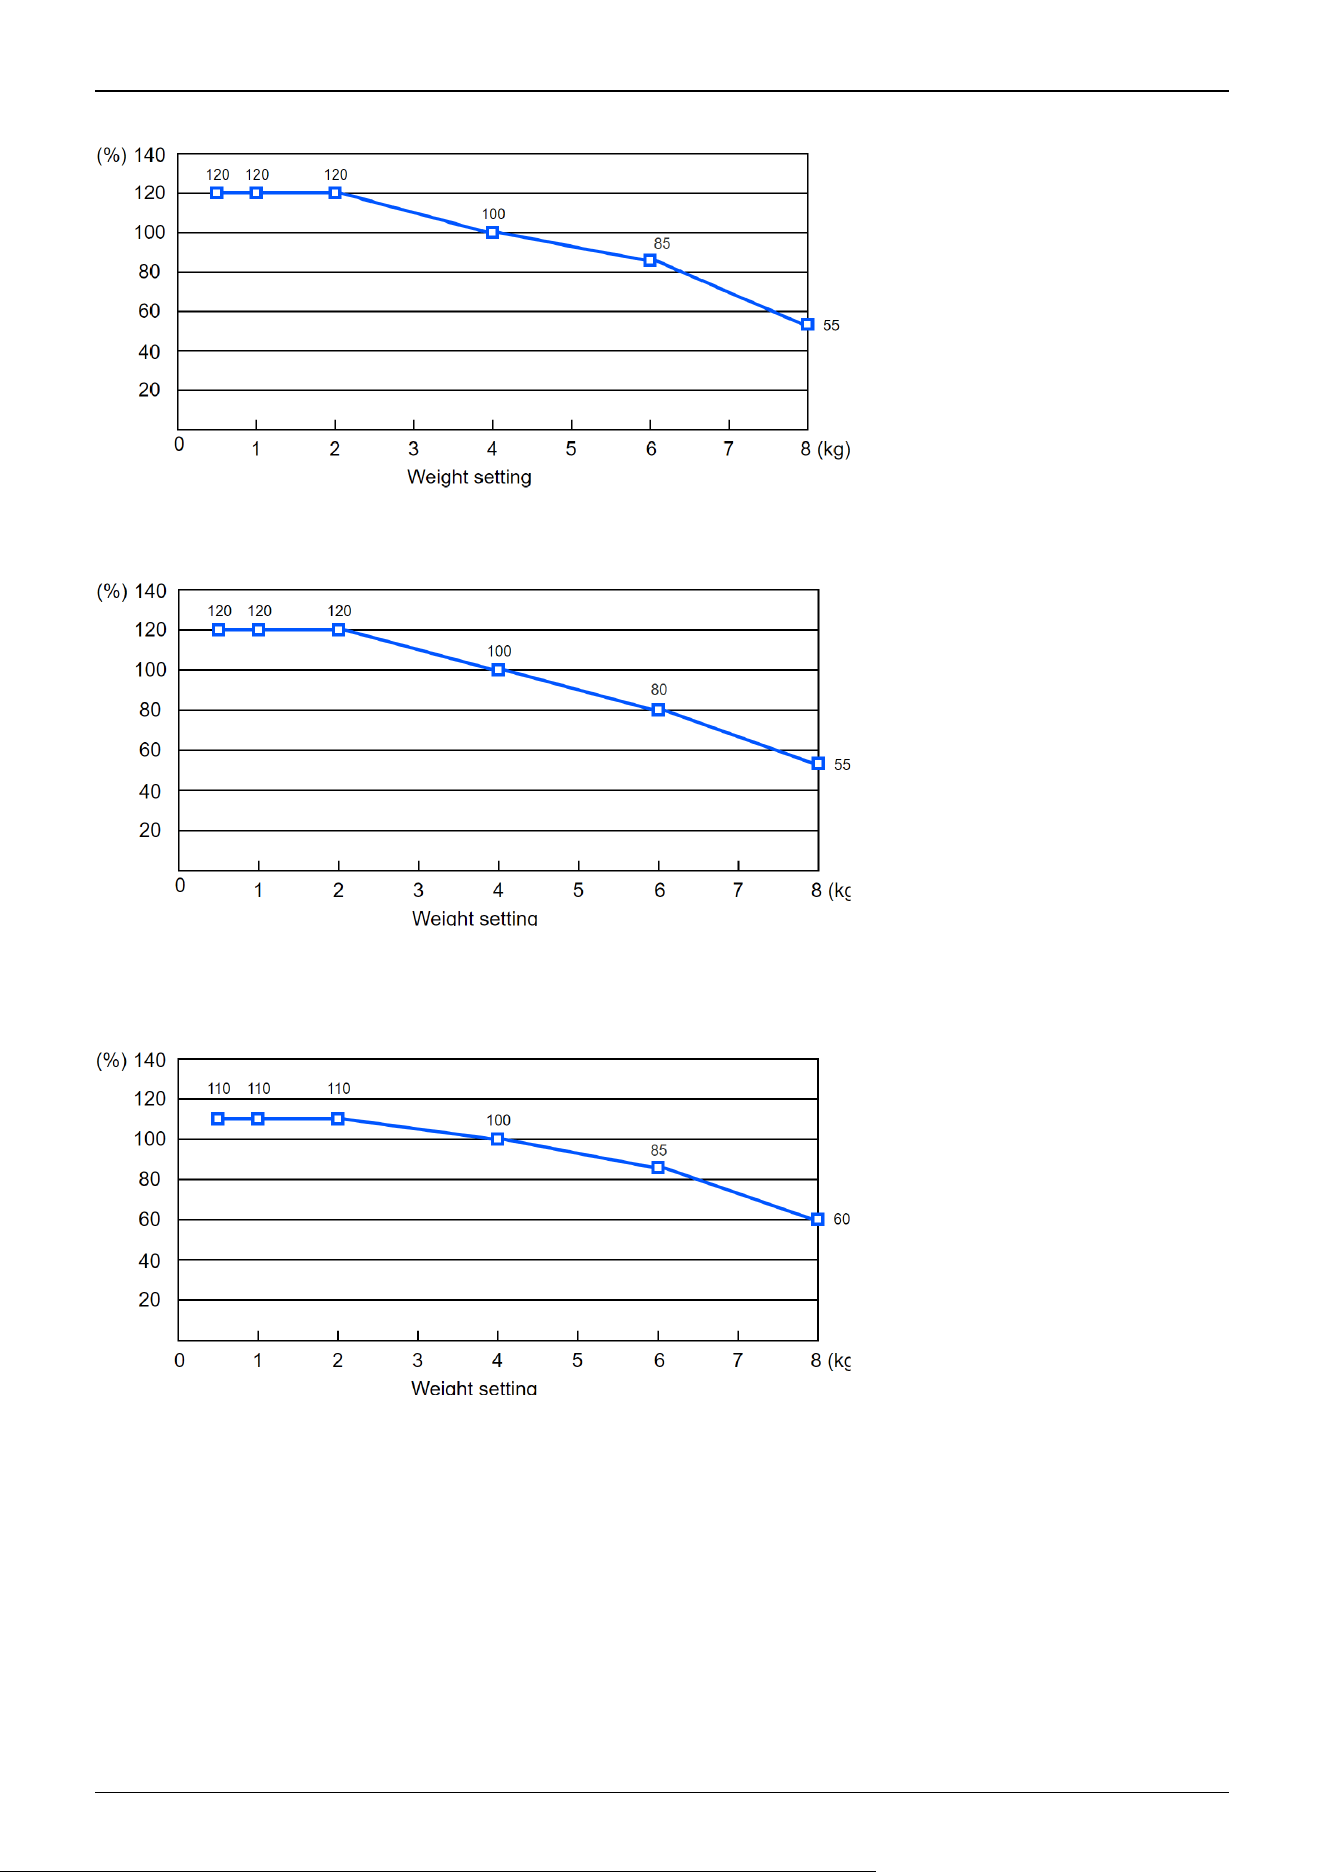
GX8-A/GX8-B/GX8-C55***
The percentages on the graph are ratios based on 100% as the acceleration/deceleration at the rated (4 kg) setting.
GX8-A/GX8-B/GX8-C65***
The percentages on the graph are ratios based on 100% as the acceleration/deceleration at the rated (4 kg) setting.
Boost mode
GX8-A/GX8-B/GX8-C45***
The percentages on the graph are ratios based on 100% as the acceleration/deceleration at the rated (4 kg) setting.
Industrial Robot: SCARA Robots GX series Manual Rev.11
286
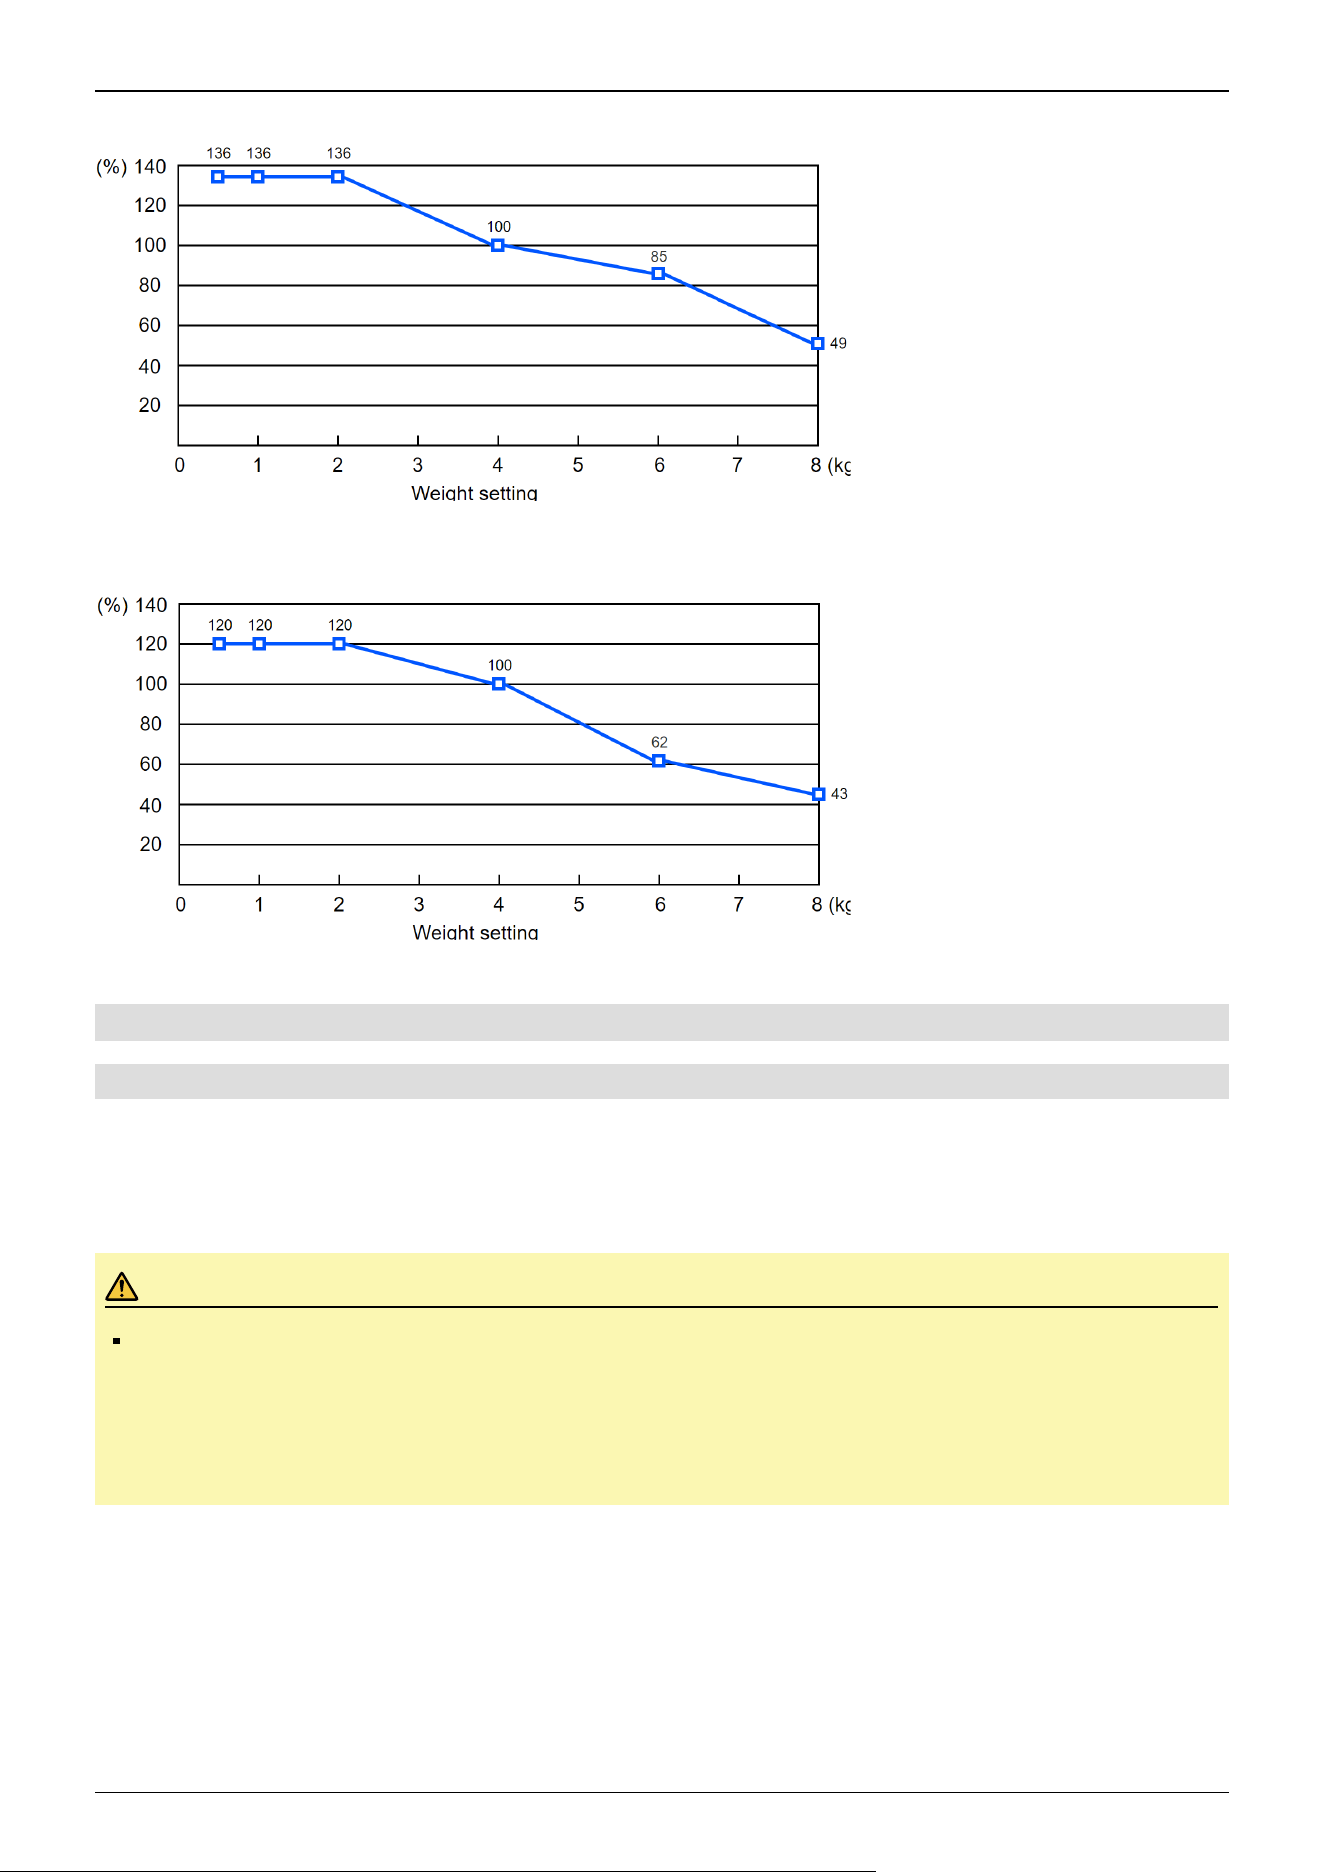
GX8-A/GX8-B/GX8-C55***
The percentages on the graph are ratios based on 100% as the acceleration/deceleration at the rated (4 kg) setting.
GX8-A/GX8-B/GX8-C65***
The percentages on the graph are ratios based on 100% as the acceleration/deceleration at the rated (4 kg) setting.
4.4.3.2 Inertia Setting
4.4.3.2.1 Moment of Inertia and Inertia Setting
The moment of inertia is a quantity that expresses how hard it is for an object to turn, and it is expressed in terms of values for
the moment of inertia, inertia, or GD
2
. When a hand or other object is attached to a shaft for operation, the moment of inertia
of the load must be taken into consideration.
CAUTION
The moment of inertia of the load (weight of the hand and workpiece) must be 0.16 kg·m
2
or less. The GX8
series Manipulators are not designed to work with a moment of inertia exceeding 0.16 kg·m
2
. Always set the
value corresponding to the moment of inertia. Setting a parameter value that is smaller than the actual
moment of inertia may cause errors or impact, may prevent the Manipulator from working at full functionality,
and may shorten the lifespan of mechanical parts.
The allowable moment of inertia of a load for GX8 series Manipulators is 0.01 kg·m
2
at the default rating and 0.16 kg·m
2
at
the maximum. Depending on the moment of inertia, change the setting of the moment of inertia parameter for the load in the
Inertia statement. After the setting is changed, the maximum acceleration/deceleration of Joint #4 during PTP motion that
corresponds to the "Inertia" value is corrected automatically.
Industrial Robot: SCARA Robots GX series Manual Rev.11
287
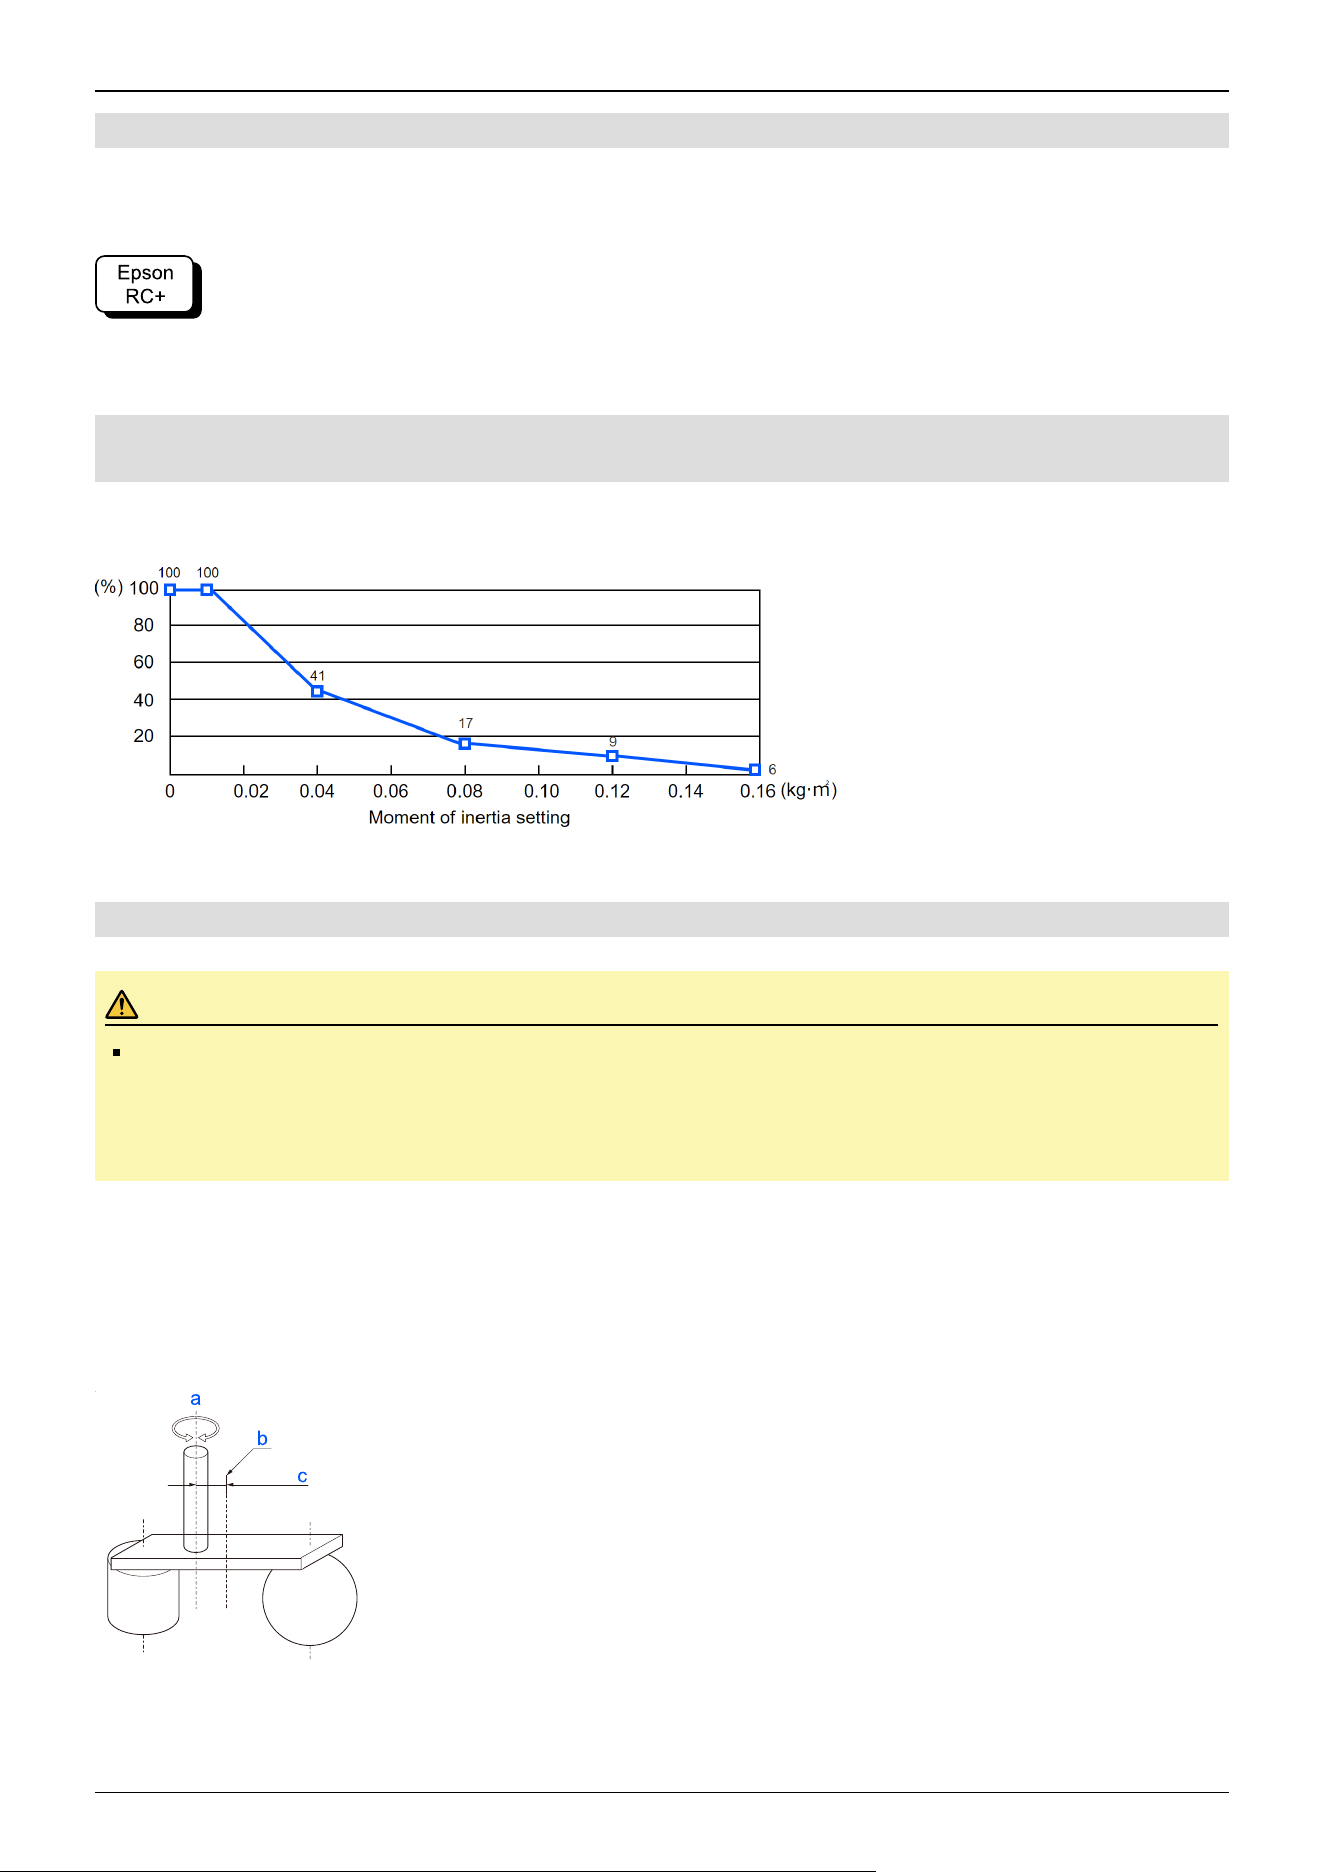
4.4.3.2.2 Moment of Inertia of Load Attached to Shaft
The moment of inertia of the load (hand + workpiece) attached to the shaft can be set by the "Inertia" parameter in the Inertia
statement.
Go to [Tools] - [Robot Manager] - [Inertia] panel, and enter the value in [Inertia].
This can also be set using the Inertia statement in [Command Window].
4.4.3.2.3 Automatic Acceleration/Deceleration Correction of Joint #4 at Inertia (Moment
of Inertia) Setting
Standard mode, boost mode
GX8-A/GX8-B/GX8-C45***, GX8-A/GX8-B/GX8-C55***, GX8-A/GX8-B/GX8-C65***
The percentages on the graph are ratios based on 100% as the acceleration/deceleration at the rated (0.01 kg·m
2
) setting.
4.4.3.2.4 Eccentricity and Inertia Setting
CAUTION
The eccentricity of the load (hand and workpiece) must be 150 mm or less. The GX8 series Manipulators are
not designed to work with eccentricities exceeding 150 mm. Always set the value based on the eccentricity.
Setting the eccentricity parameter to a value smaller than the actual eccentricity may cause errors or impact
that not only impair full functionality but also shorten the life of the mechanical components.
The allowable eccentricity of load for GX8 series Manipulators is 0 mm at the default rating and 150 mm at the maximum.
Depending on the load eccentricity, change the setting for the eccentricity parameter in Inertia statement. After the setting is
changed, the maximum acceleration/deceleration of the Manipulator during PTP motion that corresponds to the "Eccentricity"
is corrected automatically.
Eccentricity
Industrial Robot: SCARA Robots GX series Manual Rev.11
288
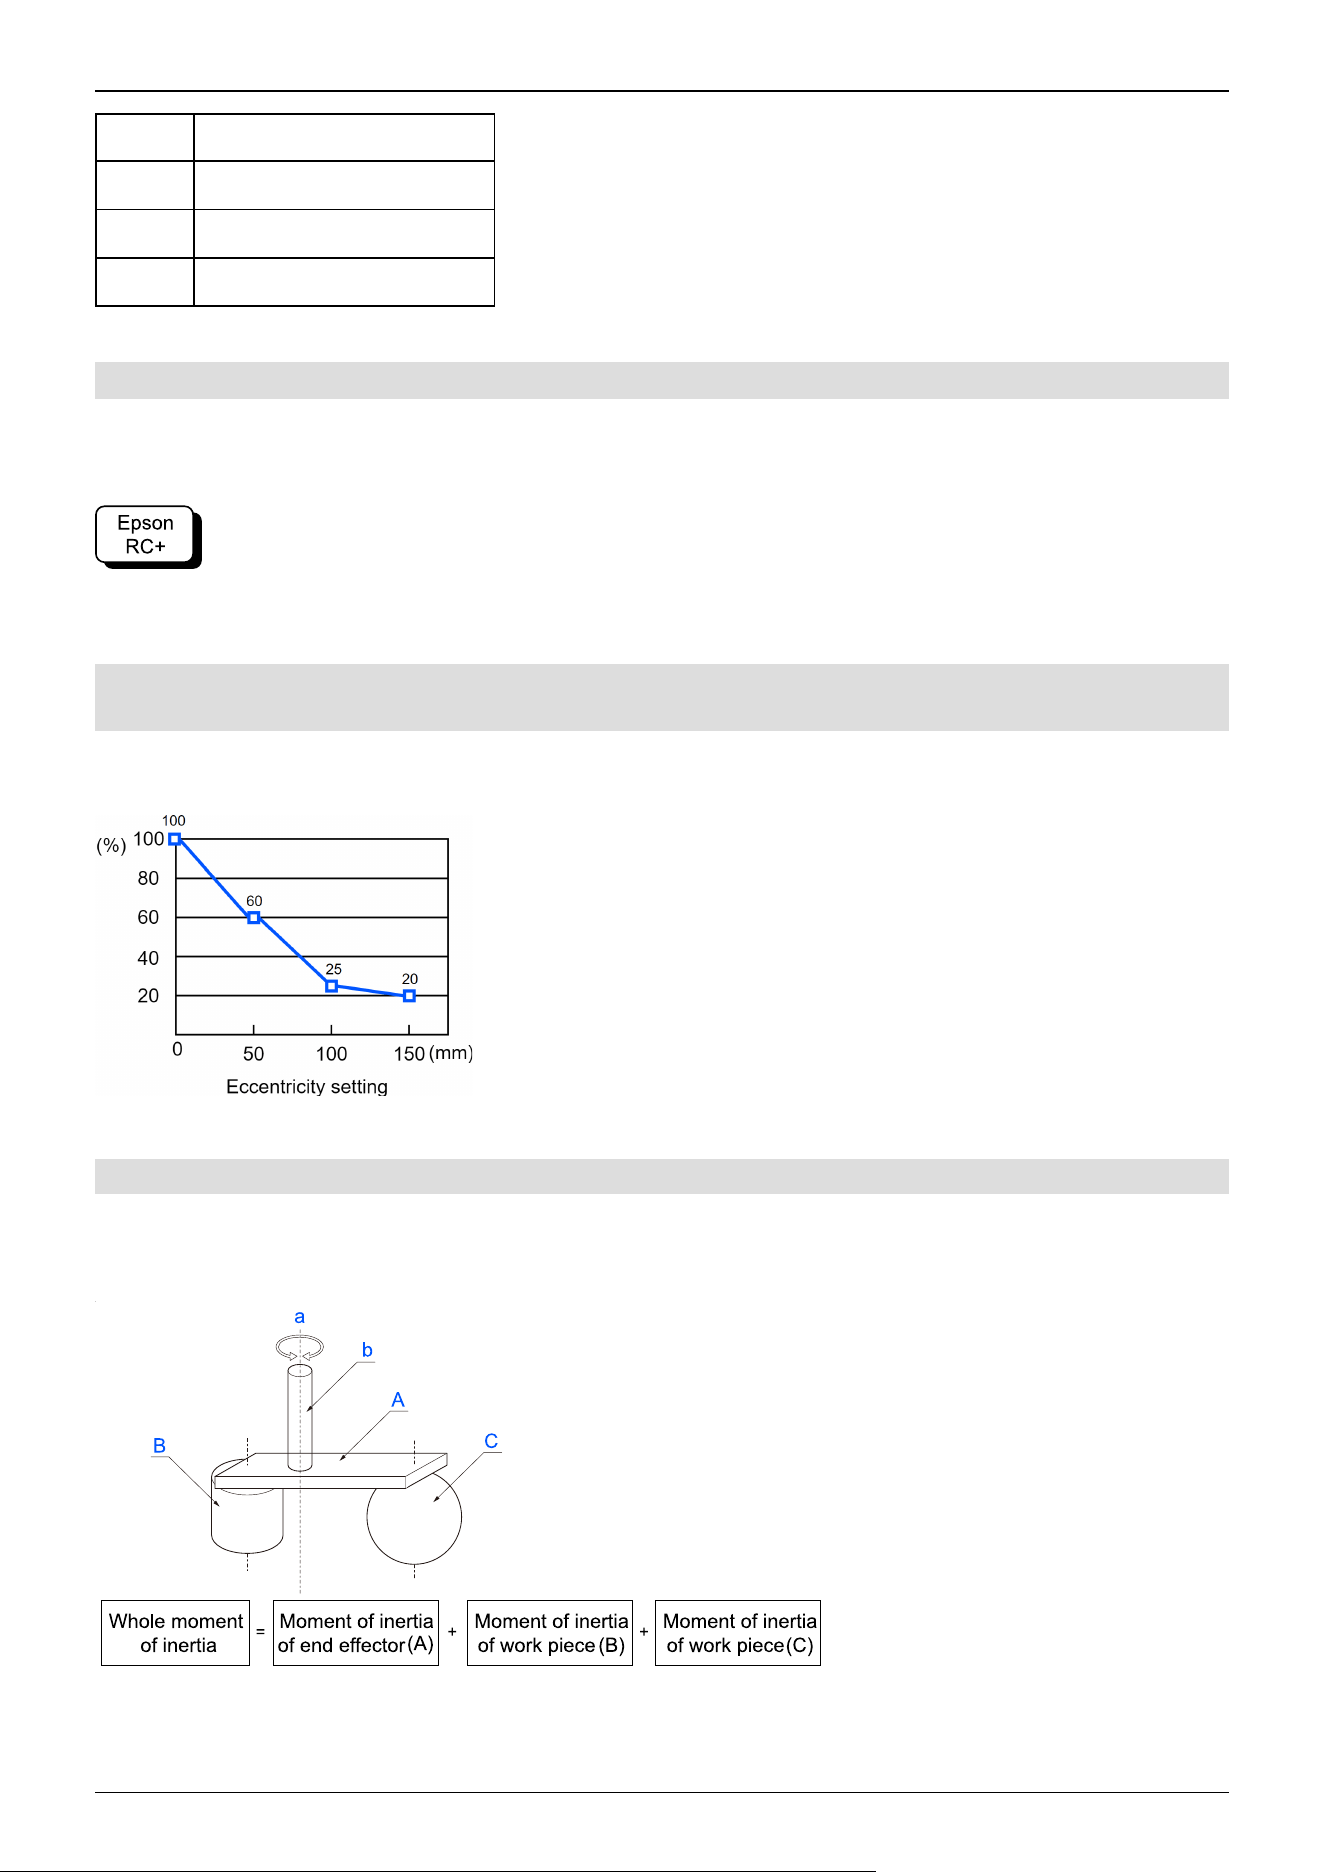
Symbol Description
a Rotation axis
b Load center of gravity position
c Eccentricity (150 mm or less)
4.4.3.2.5 Eccentricity of Load Attached to Shaft
The eccentricity of the load (hand + workpiece) attached to the shaft can be set by the "Eccentricity" parameter in the Inertia
statement.
Go to [Tools] - [Robot Manager] - [Inertia] panel, and enter the value in [Eccentricity].
This can also be set using the Inertia statement in [Command Window].
4.4.3.2.6 Automatic Acceleration/Deceleration Correction at Inertia (Eccentricity)
Setting
Standard mode, boost mode
GX8-A/GX8-B/GX8-C45***, GX8-A/GX8-B/GX8-C55***, GX8-A/GX8-B/GX8-C65***
The percentages on the graph are ratios based on 100% as the acceleration/deceleration at the 0 mm setting.
4.4.3.2.7 Calculating the Moment of Inertia
An example of calculating the moment of inertia of a load (hand holding a workpiece) is shown below.
The moment of inertia of the entire load is calculated by the sum of (A), (B), and (C).
Industrial Robot: SCARA Robots GX series Manual Rev.11
289
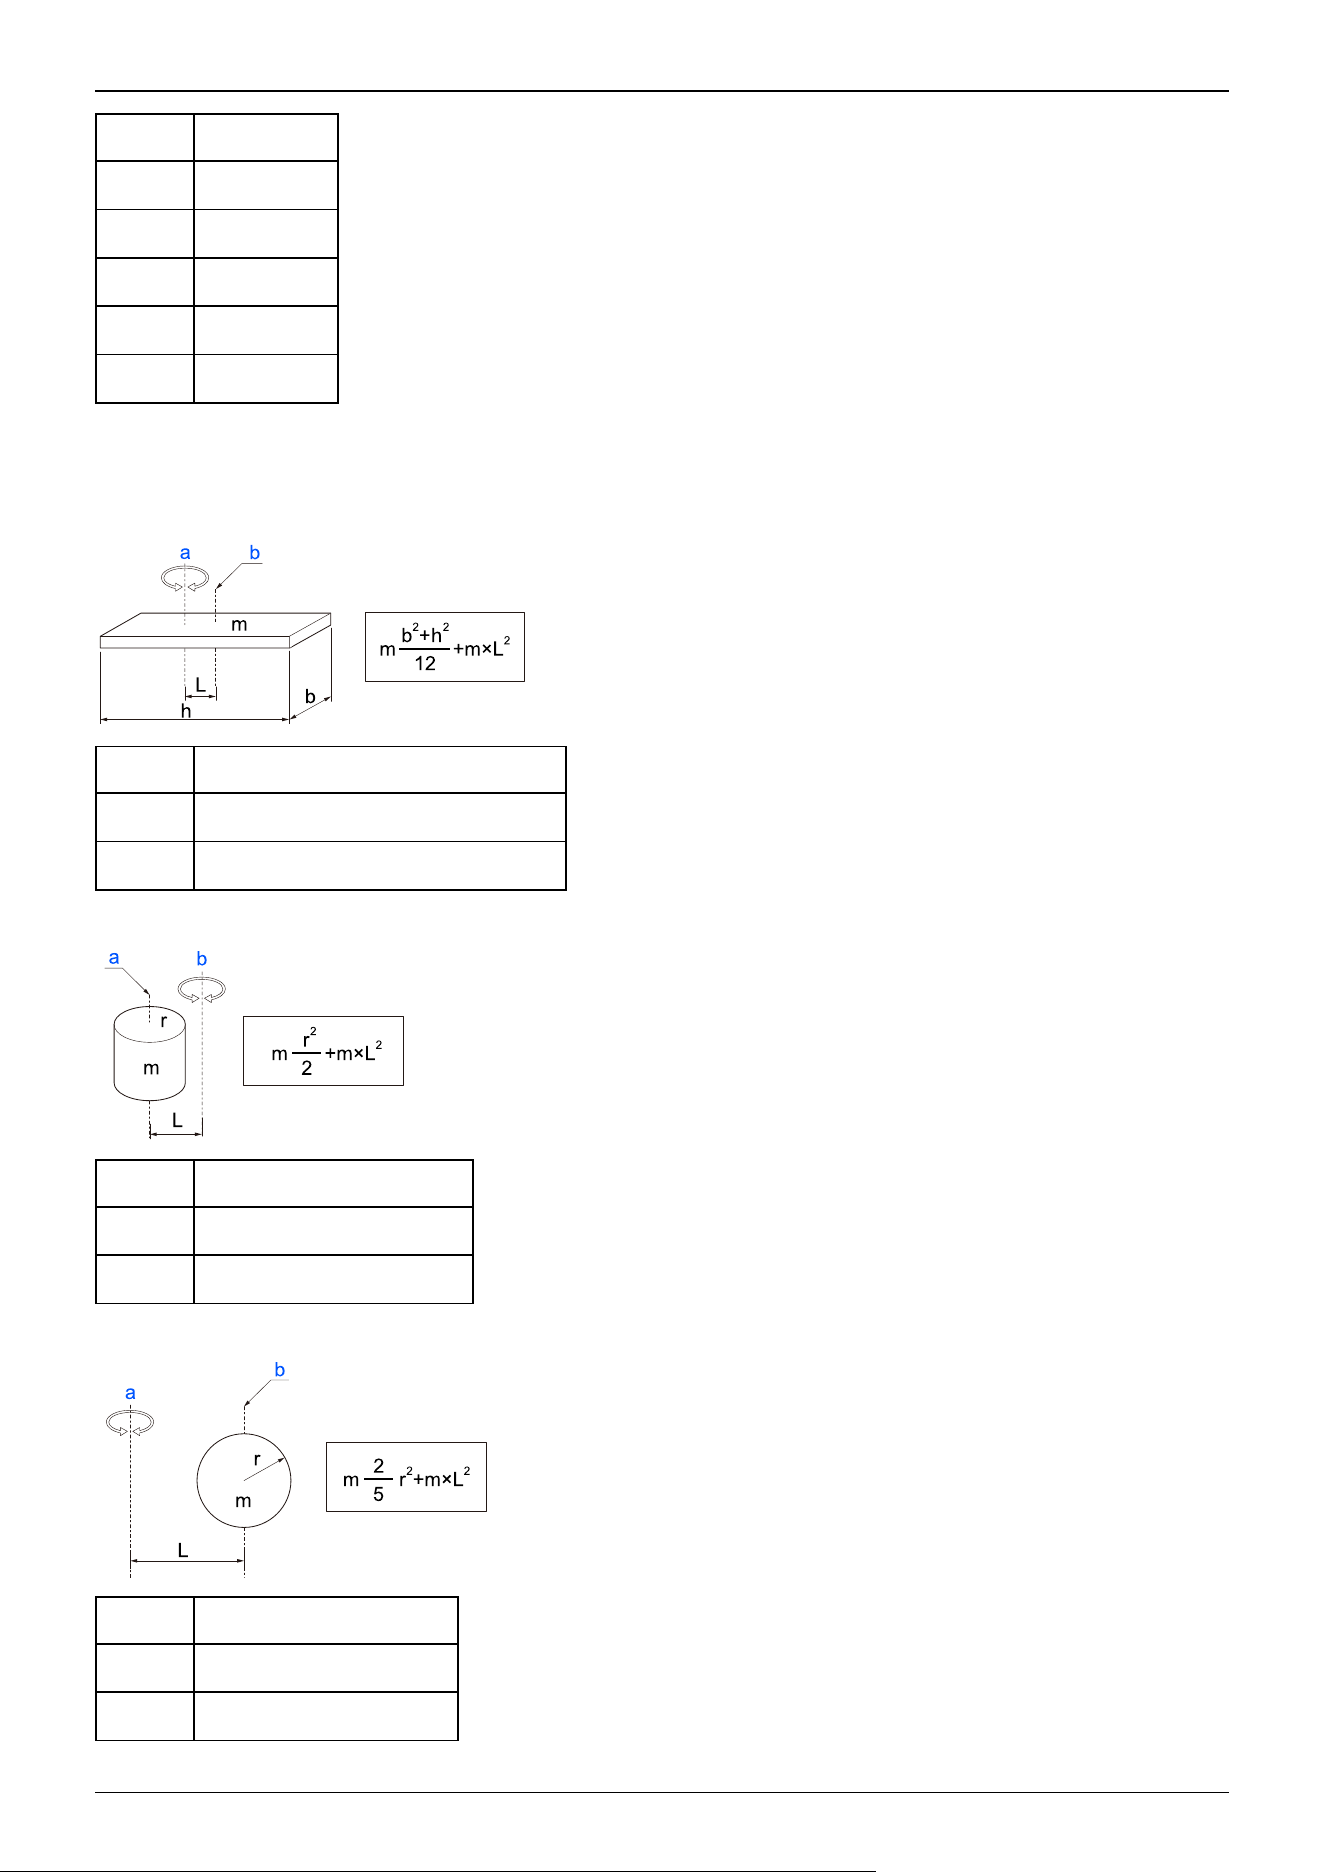
Symbol Description
a Rotation axis
b Shaft
A Hand
B Workpiece
C Workpiece
The methods for calculating the moment of inertia for (A), (B), and (C) are shown below. Use the moment of inertia of these
basic shapes as a reference to find the moment of inertia of the entire load.
(A) Moment of inertia of a rectangular parallelepiped
Symbol Description
a Rotation axis
b Center of gravity of rectangular cuboid
(B) Moment of inertia of a cylinder
Symbol Description
a Center of gravity of cylinder
b Rotation axis
(B) Moment of inertia of a sphere
Symbol Description
a Rotation axis
b Center of gravity of sphere
Industrial Robot: SCARA Robots GX series Manual Rev.11
290
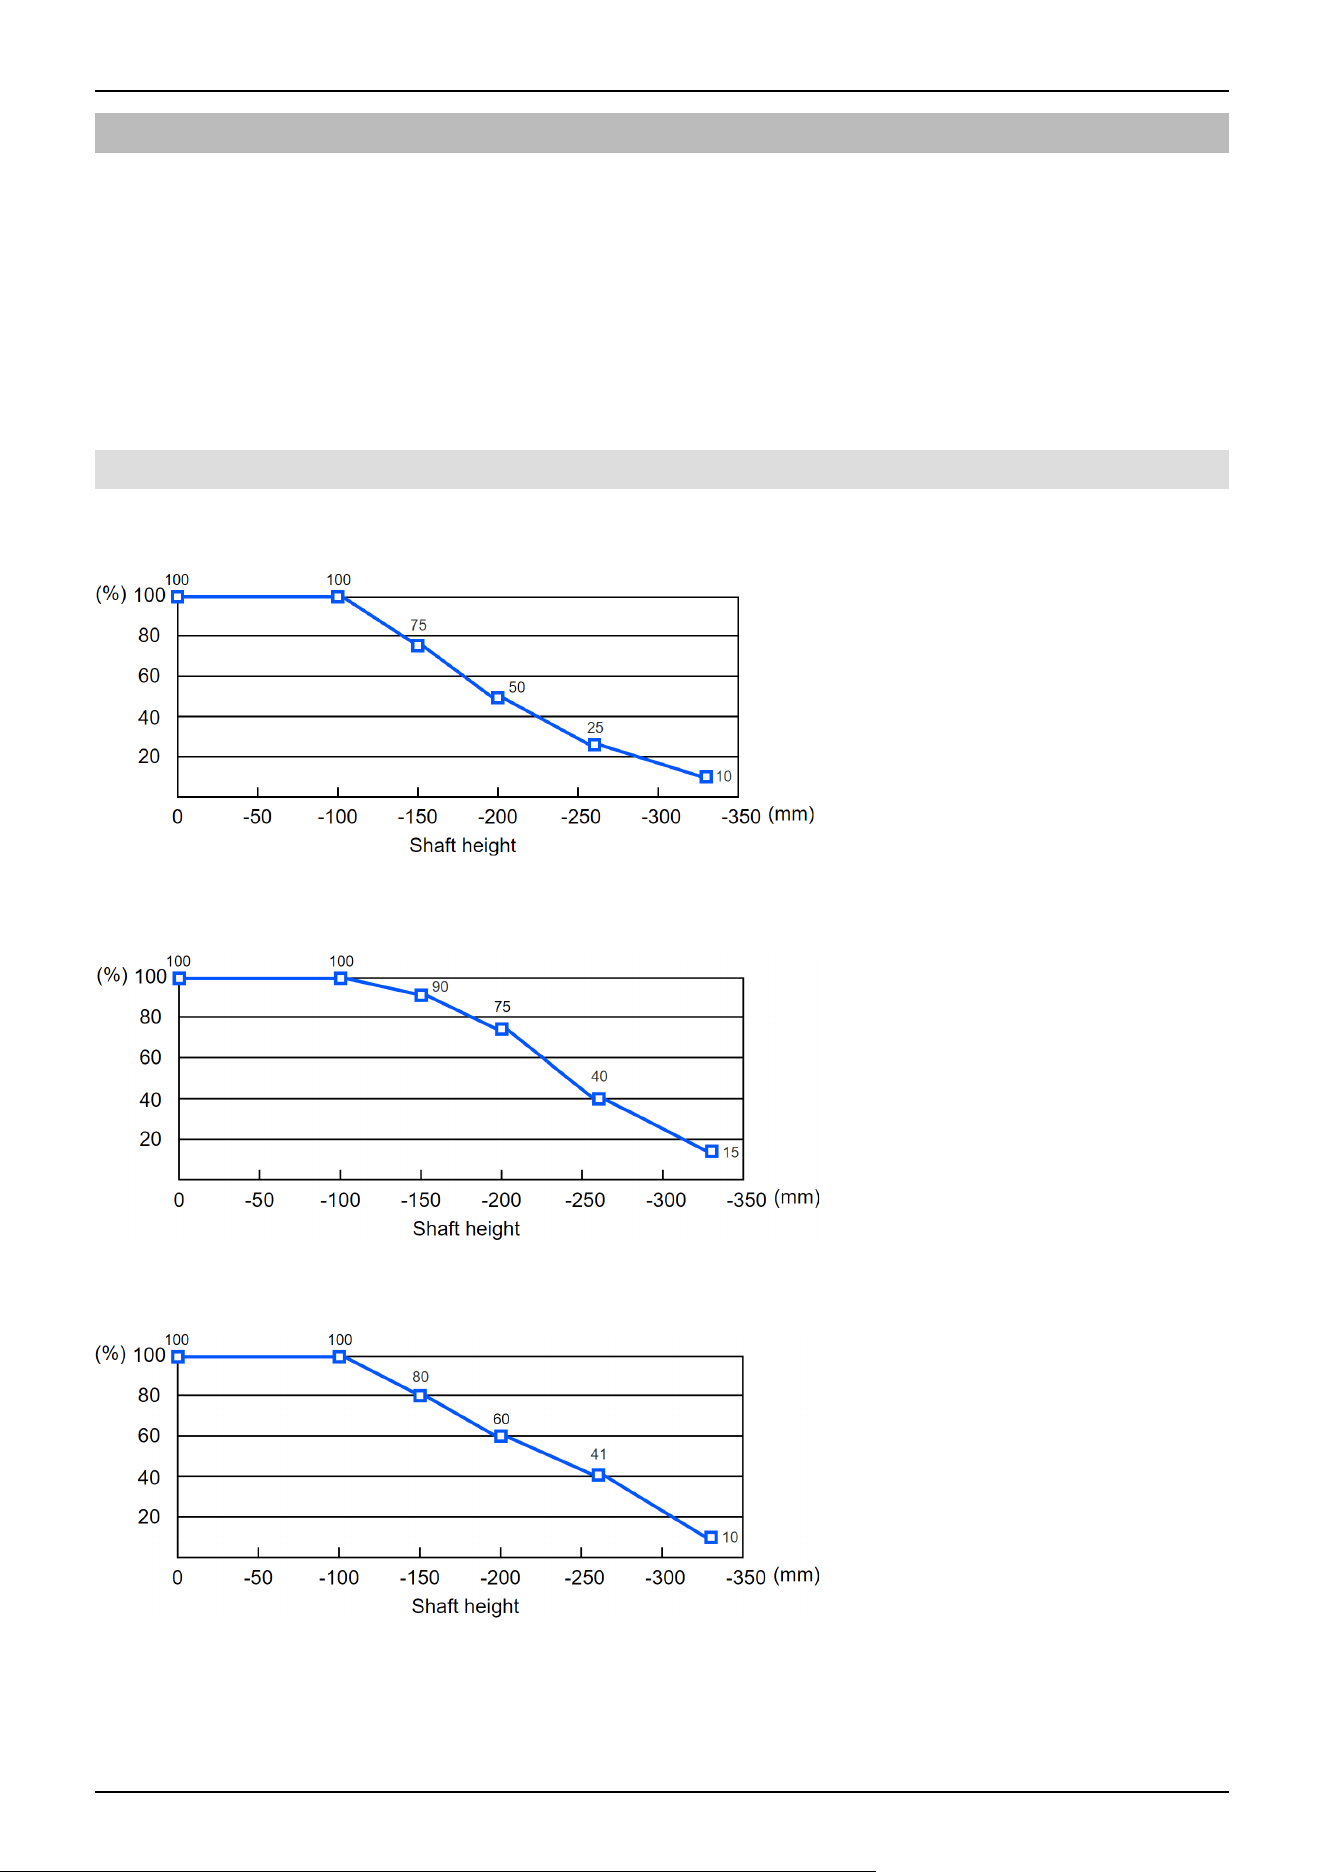
4.4.4 Safety Information for Auto Acceleration of Joint #3
When performing horizontal movement in PTP motion, the operation time can be shorted by setting the shaft to a high
position.
When performing horizontal movement in PTP motion, if the shaft height is less than a certain value, the auto acceleration
function is activated, and the acceleration/deceleration of the movement is set slower for lower shaft heights. A higher shaft
position results in a faster acceleration/deceleration for the movement, but the up movement time and down movement time of
the shaft are also required. Adjust the shaft height by taking into consideration the positional relationship between the current
position and the target position.
The shaft height at the time of horizontal movement for the Jump statement can be set by the LimZ statement.
4.4.4.1 Automatic Acceleration/Deceleration Correction by Shaft Position
Standard mode
GX8-A/GX8-B/GX8-C45***
The percentages on the graph are ratios based on 100% as the acceleration/deceleration at the shaft upper limit position.
GX8-A/GX8-B/GX8-C55***
The percentages on the graph are ratios based on 100% as the acceleration/deceleration at the shaft upper limit position.
GX8-A/GX8-B/GX8-C65***
The percentages on the graph are ratios based on 100% as the acceleration/deceleration at the shaft upper limit position.
Boost mode
GX8-A/GX8-B/GX8-C45***
Industrial Robot: SCARA Robots GX series Manual Rev.11
291
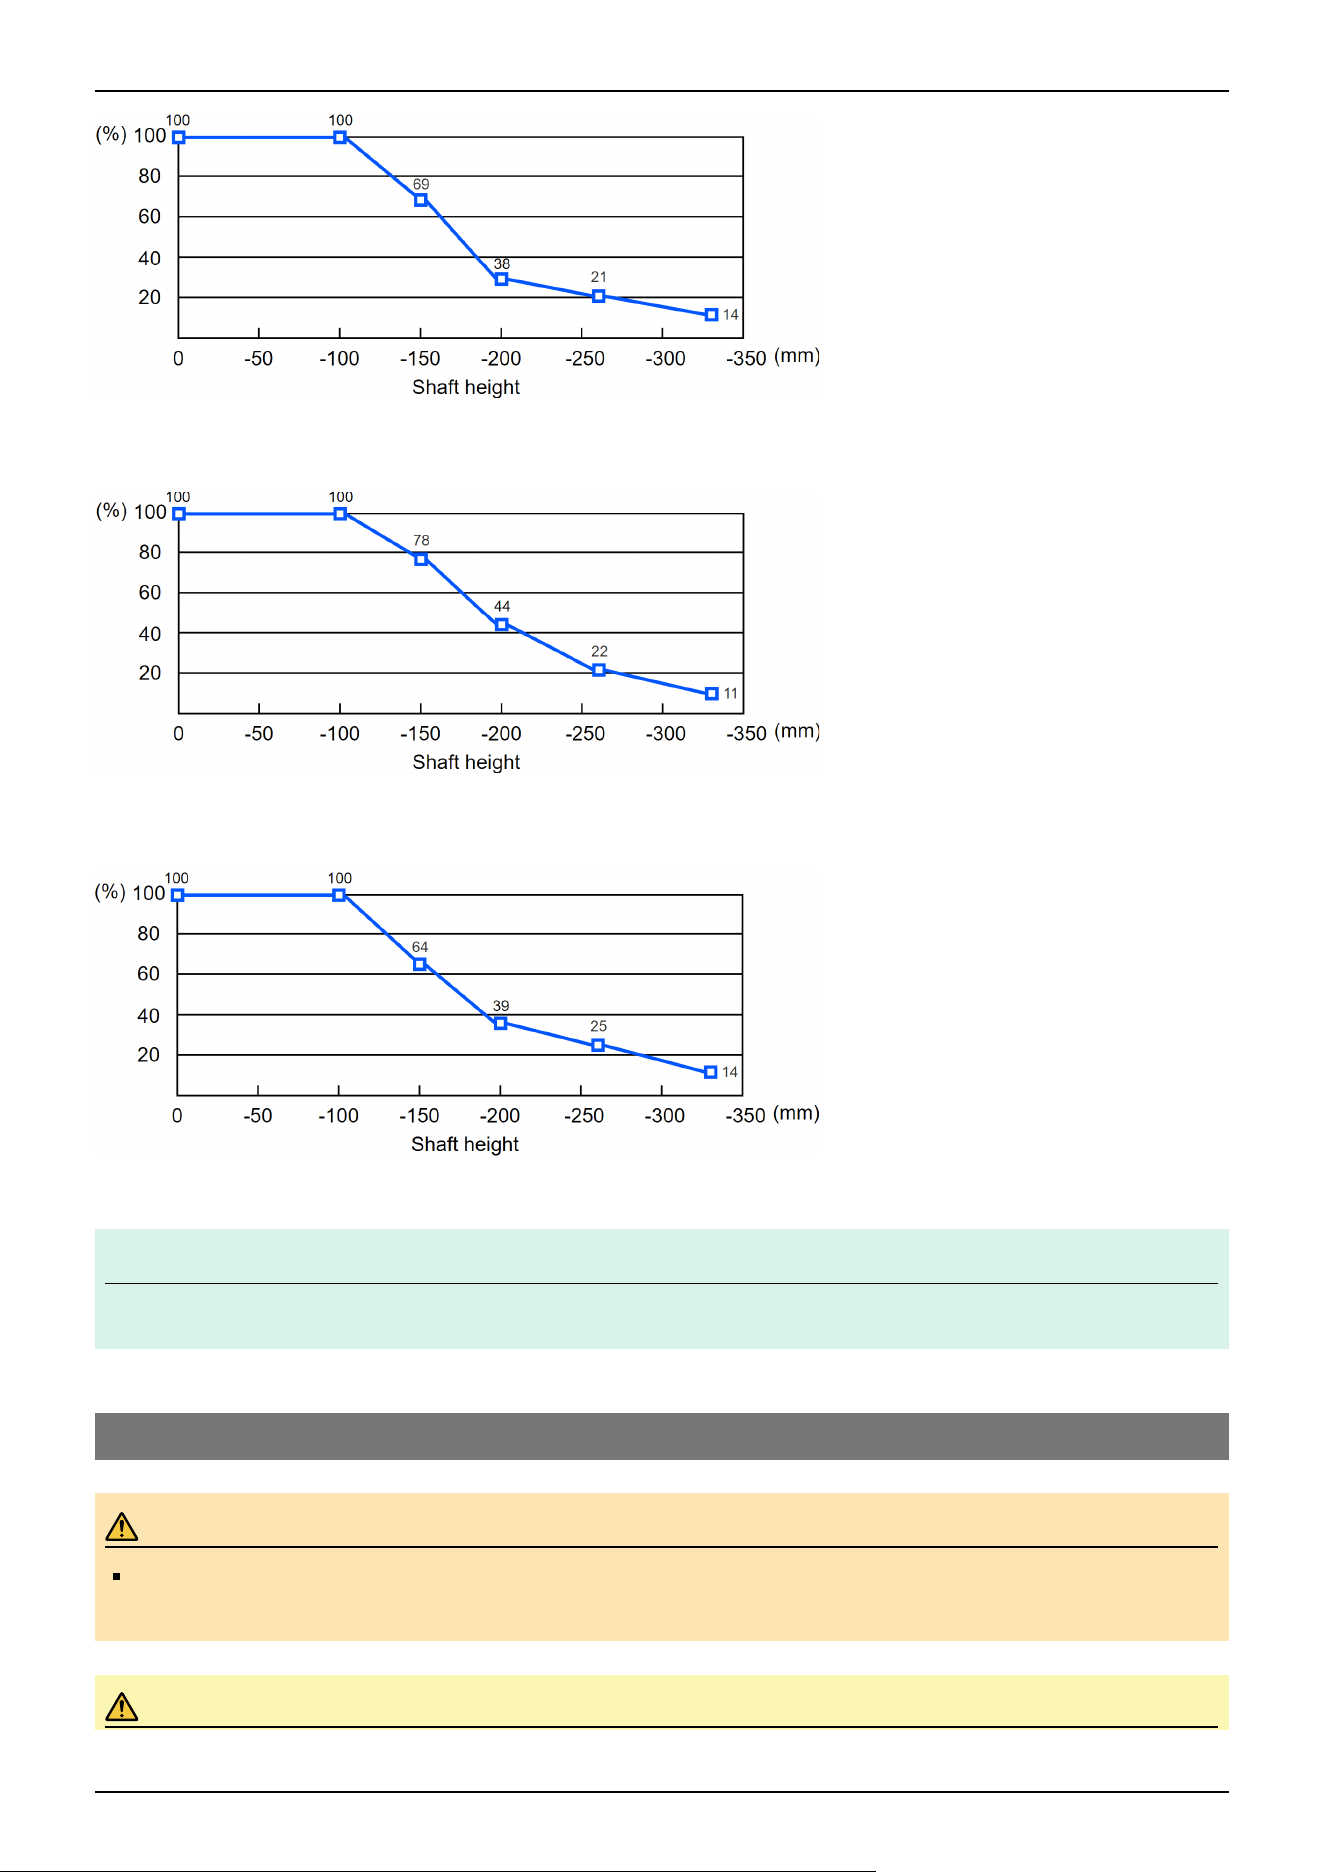
The percentages on the graph are ratios based on 100% as the acceleration/deceleration at the shaft upper limit position.
GX8-A/GX8-B/GX8-C55***
The percentages on the graph are ratios based on 100% as the acceleration/deceleration at the shaft upper limit position.
GX8-A/GX8-B/GX8-C65***
The percentages on the graph are ratios based on 100% as the acceleration/deceleration at the shaft upper limit position.
KEY POINTS
Horizontal movement with the shaft lowered may cause overshooting during positioning.
4.5 Work Envelope
WARNING
Do not operate the Manipulator with the mechanical stop removed. Removing the mechanical stop is
extremely dangerous because the Manipulator may move to a position outside its normal work envelope.
CAUTION
✏
Industrial Robot: SCARA Robots GX series Manual Rev.11
292
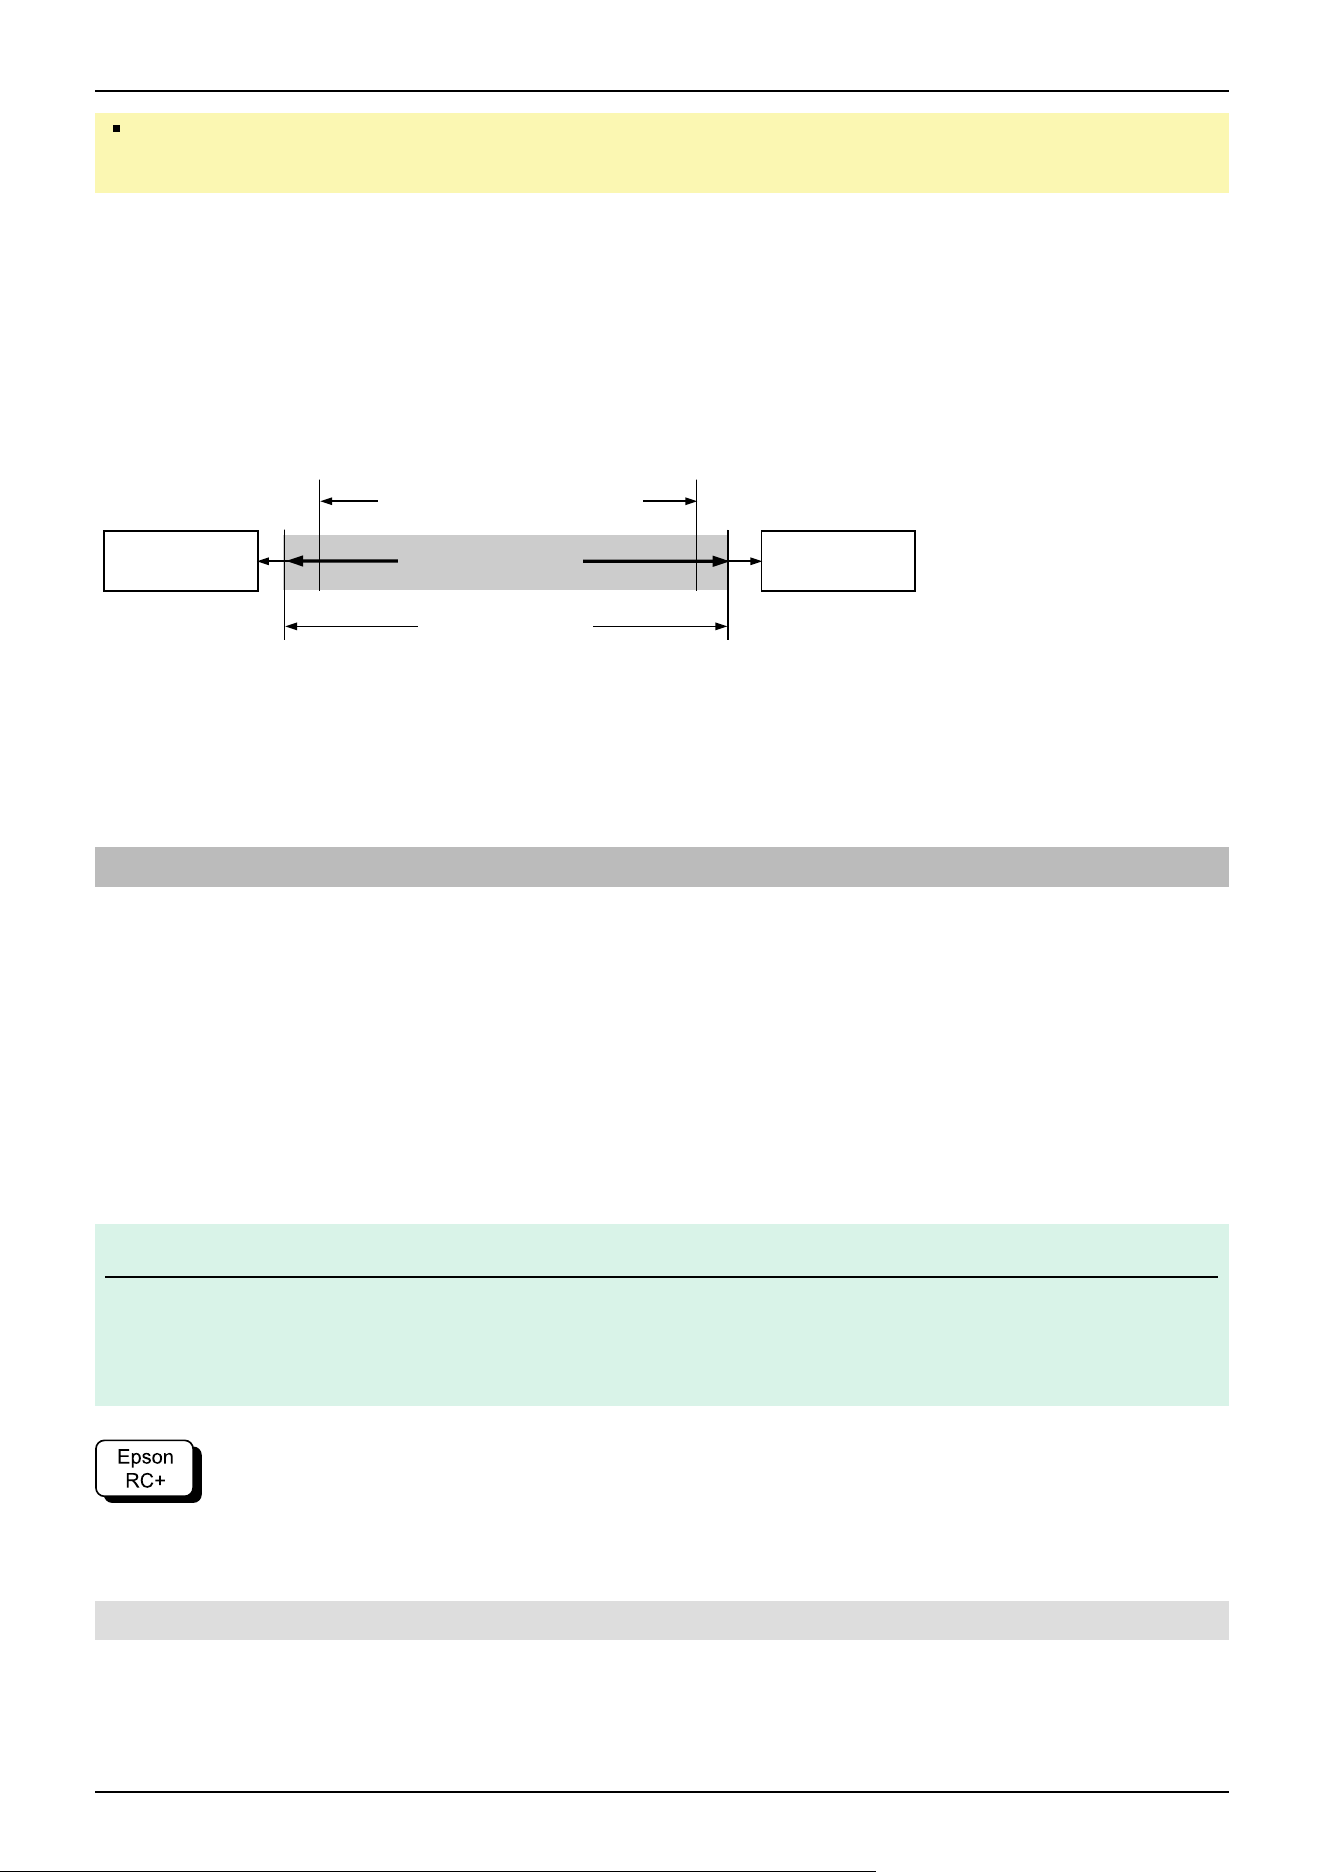
When restricting the work envelope for safety reasons, be sure to make settings using both the pulse range
and mechanical stop.
The work envelope is preset at the factory as explained in the following section.
Standard Work Envelope
The work envelope can be set by one of the following three methods.
1. Setting by pulse range (for all joints)
2. Setting by mechanical stops (for Joints #1 to #3)
3. Setting the rectangular range in the XY coordinate system of the Manipulator (for Joints #1 and #2)
To limit the work envelope for layout efficiency or safety reasons, make the settings as explained in the following sections.
Work Envelope Setting by Pulse Range
Setting the Work Envelope by Mechanical Stops
Setting the Rectangular Range in the XY Coordinate System of the Manipulator
4.5.1 Work Envelope Setting by Pulse Range
Pulses are the basic unit of Manipulator motion. The motion range (work envelope) of the Manipulator is set by the pulse
lower limit value and pulse upper limit value (pulse range) for each joint.
Pulse values are read from the encoder output of the servomotor.
For the maximum pulse range, refer to the following sections.
The pulse range must be set within the mechanical stop range.
Joint #1 Maximum Pulse Range
Joint #2 Maximum Pulse Range
Joint #3 Maximum Pulse Range
Joint #4 Maximum Pulse Range
KEY POINTS
Once the Manipulator receives an operation command, it checks whether the target position specified by the
command is within the pulse range before operating. If the target position is outside of the pulse range that was
set, an error occurs and the Manipulator does not move.
Go to [Tools] - [Robot Manager] - [Range] panel, and make the setting.
This can also be set using the Range statement in [Command Window].
4.5.1.1 Joint #1 Maximum Pulse Range
The 0 (zero) pulse position of Joint #1 is the position where Arm #1 is facing the positive (+) direction on the X-coordinate
axis.
Pulse range
Work Envelope
Mechanical
Stop
Mechanical
Stop
Rectangular range setting
✏
Industrial Robot: SCARA Robots GX series Manual Rev.11
293
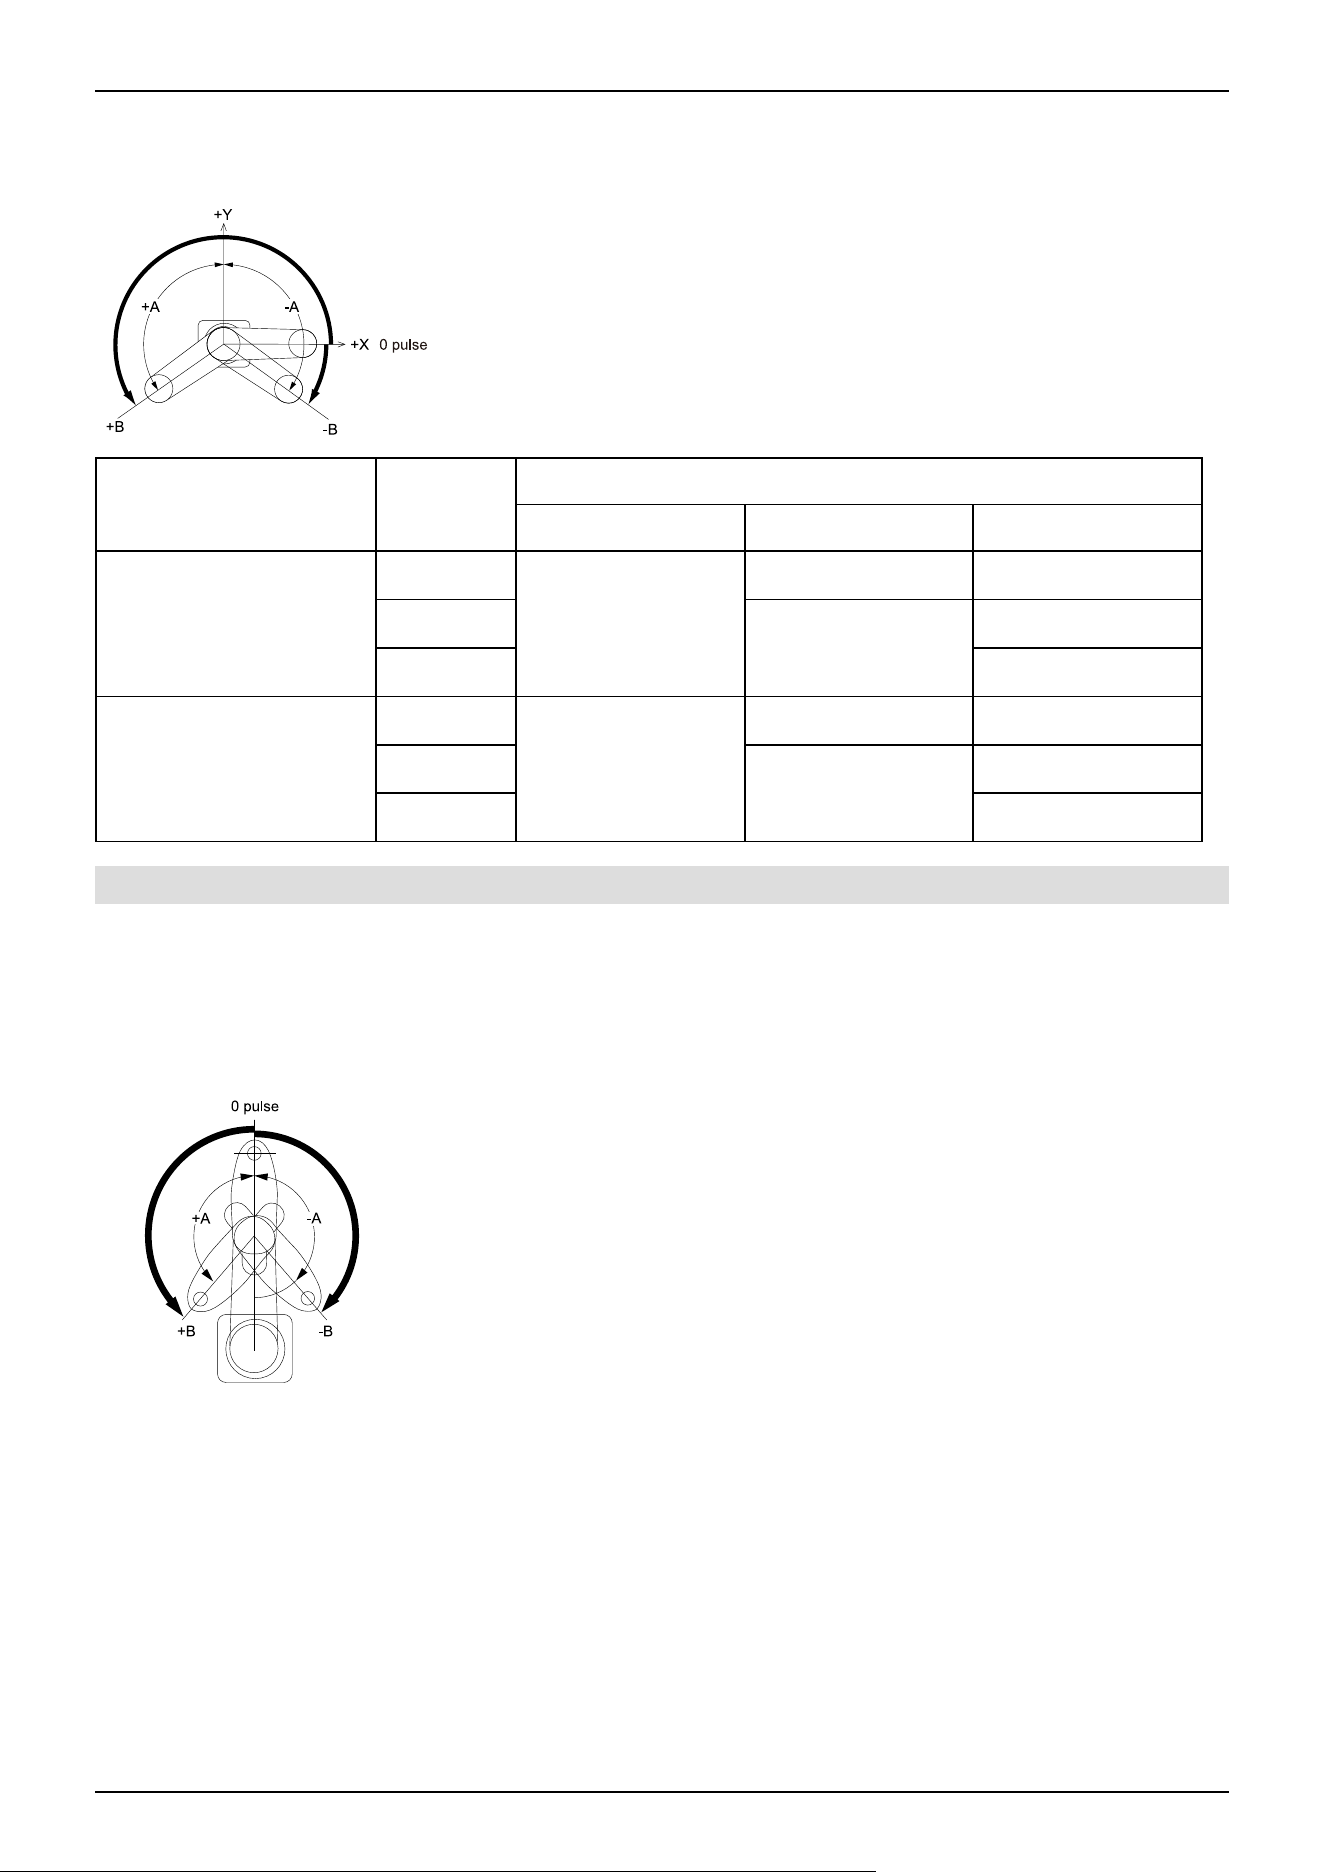
With the 0 pulse as a starting point, the counterclockwise pulse value is defined as positive (+), and the clockwise pulse value
is defined as negative (-).
Arm Length
(mm)
Mounting Specifications
Table Top Ceiling Wall
A: Max. motion range (deg.)
450
±152
±105 ±105
550
±152
±135
650 ±148
B: Max. pulse range (pulse)
450
-1128676 to +4405476
273067 to +3549867 -273067 to +3549867
550
-1128676 to +4405476
-819200 to +4096000
650 -1055858 to +4332658
4.5.1.2 Joint #2 Maximum Pulse Range
The 0 (zero) pulse position of Joint #2 is the position where Arm #2 is aligned with Arm #1. (The orientation of Arm #1 does
not matter.)
With the 0 pulse as a starting point, the counterclockwise pulse value is defined as positive (+), and the clockwise pulse value
is defined as negative (-).
Industrial Robot: SCARA Robots GX series Manual Rev.11
294
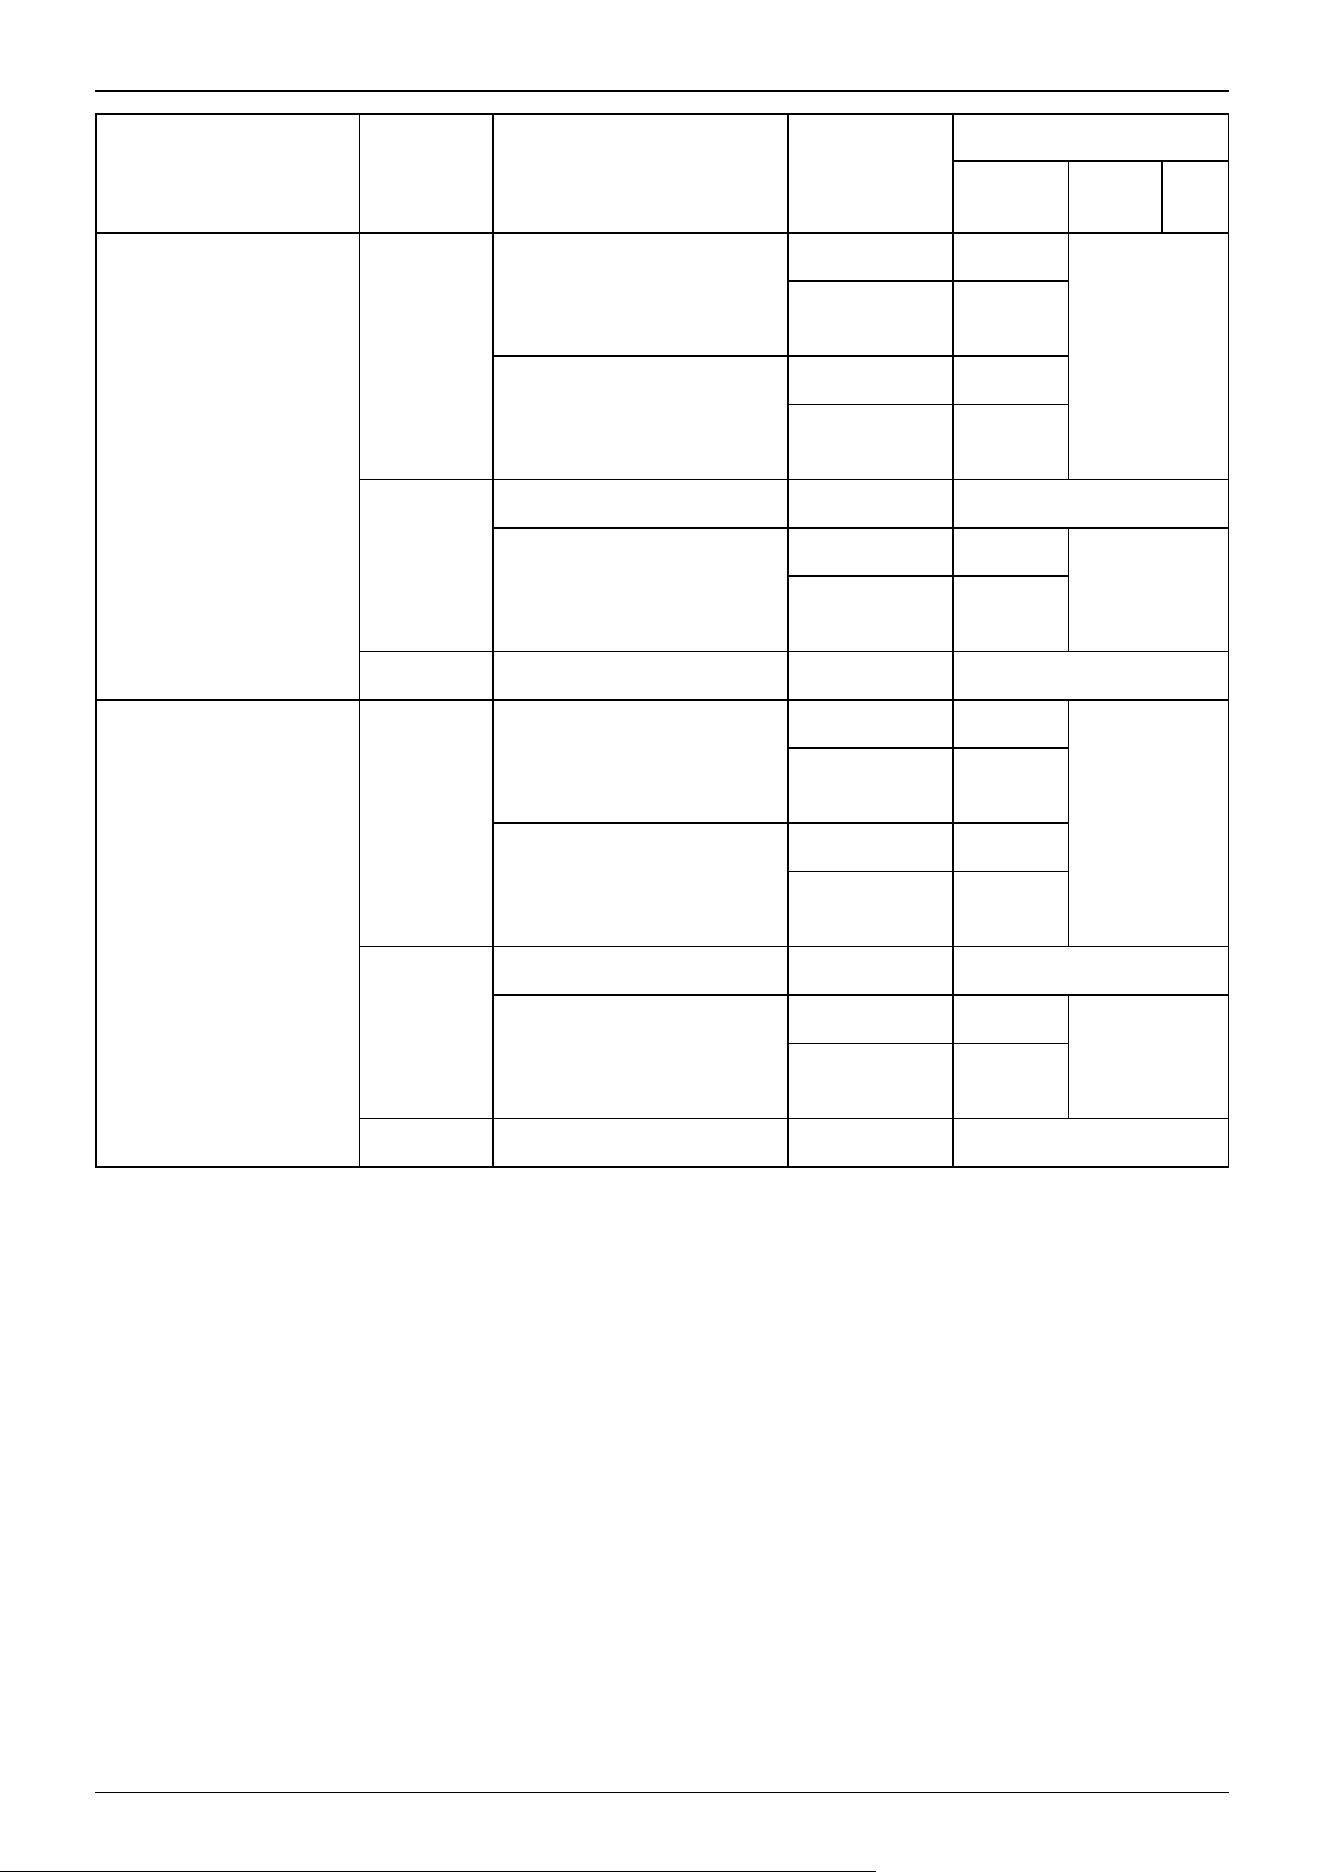
Arm
Length
(mm)
Environmental
Specifications
Z-value
Range
(mm)
Mounting Specifications
Table
Top
Ceiling Wall
A: Max. motion range
(deg.)
450
S, E
0 ≥ Z ≥ –270 ±147.5
±125
–270 > Z ≥ –
330
±145
C, P
0 ≥ Z ≥ –240 ±147.5
–240 > Z ≥ –
300
±137.5
550
S, E - ±147.5
C, P
0 ≥ Z ≥ –240 ±147.5
±145
–240 > Z ≥ –
300
±145
650 S, E, C, P - ±147.5
B: Max. pulse range
(pulse)
450
S, E
0 ≥ Z ≥ –270 ±2685156
±2275556
–270 > Z ≥ –
330
±2639644
C, P
0 ≥ Z ≥ –240 ±2685156
–240 > Z ≥ –
330
±2503111
550
S, E - ±2685156
C, P
0 ≥ Z ≥ –240 ±2685156
±2639644
–240 > Z ≥ –
300
±2639644
650 S, E, C, P - ±2685156
Industrial Robot: SCARA Robots GX series Manual Rev.11
295
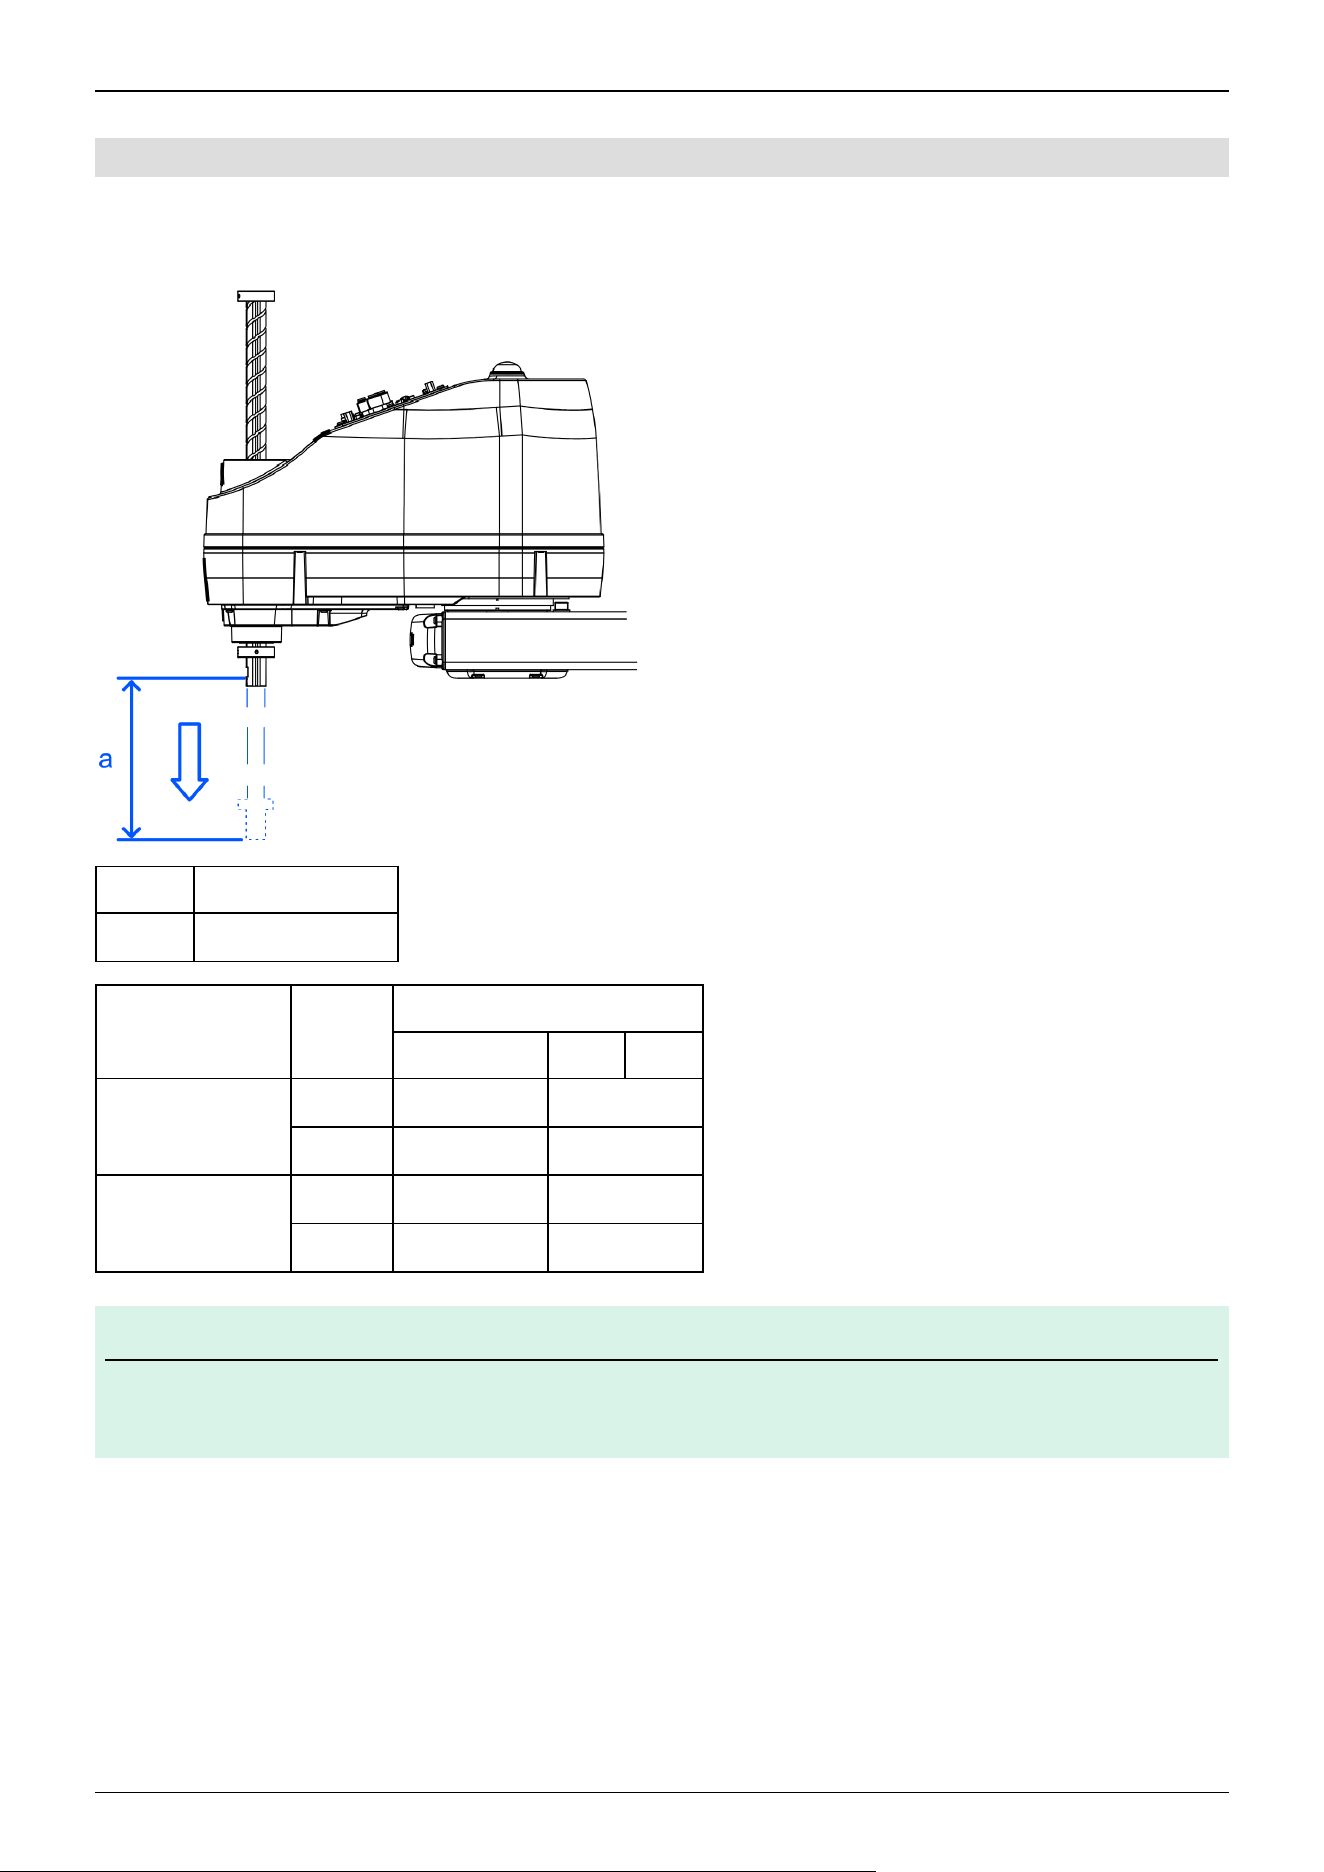
4.5.1.3 Joint #3 Maximum Pulse Range
The 0 (zero) pulse position of Joint #3 is the position where the shaft is at its upper limit. The pulse value is always negative
because Joint #3 moves down from the 0 pulse position.
Symbol Description
a Upper limit: 0 pulse
Joint #3
Stroke
Environmental Specifications
S, E C P
Max. motion range
(mm)
200 mm -200 to 0 -170 to 0
300 mm -330 to 0 -300 to 0
Max. pulse range
(pulse)
2 -1092267 to 0 -928427 to 0
3 -1802240 to 0 -1638400 to 0
KEY POINTS
For Manipulator models with cleanroom & ESD specifications and with protected-model, the work envelope set
by the Joint #3 mechanical stop cannot be changed.
✏
Industrial Robot: SCARA Robots GX series Manual Rev.11
296
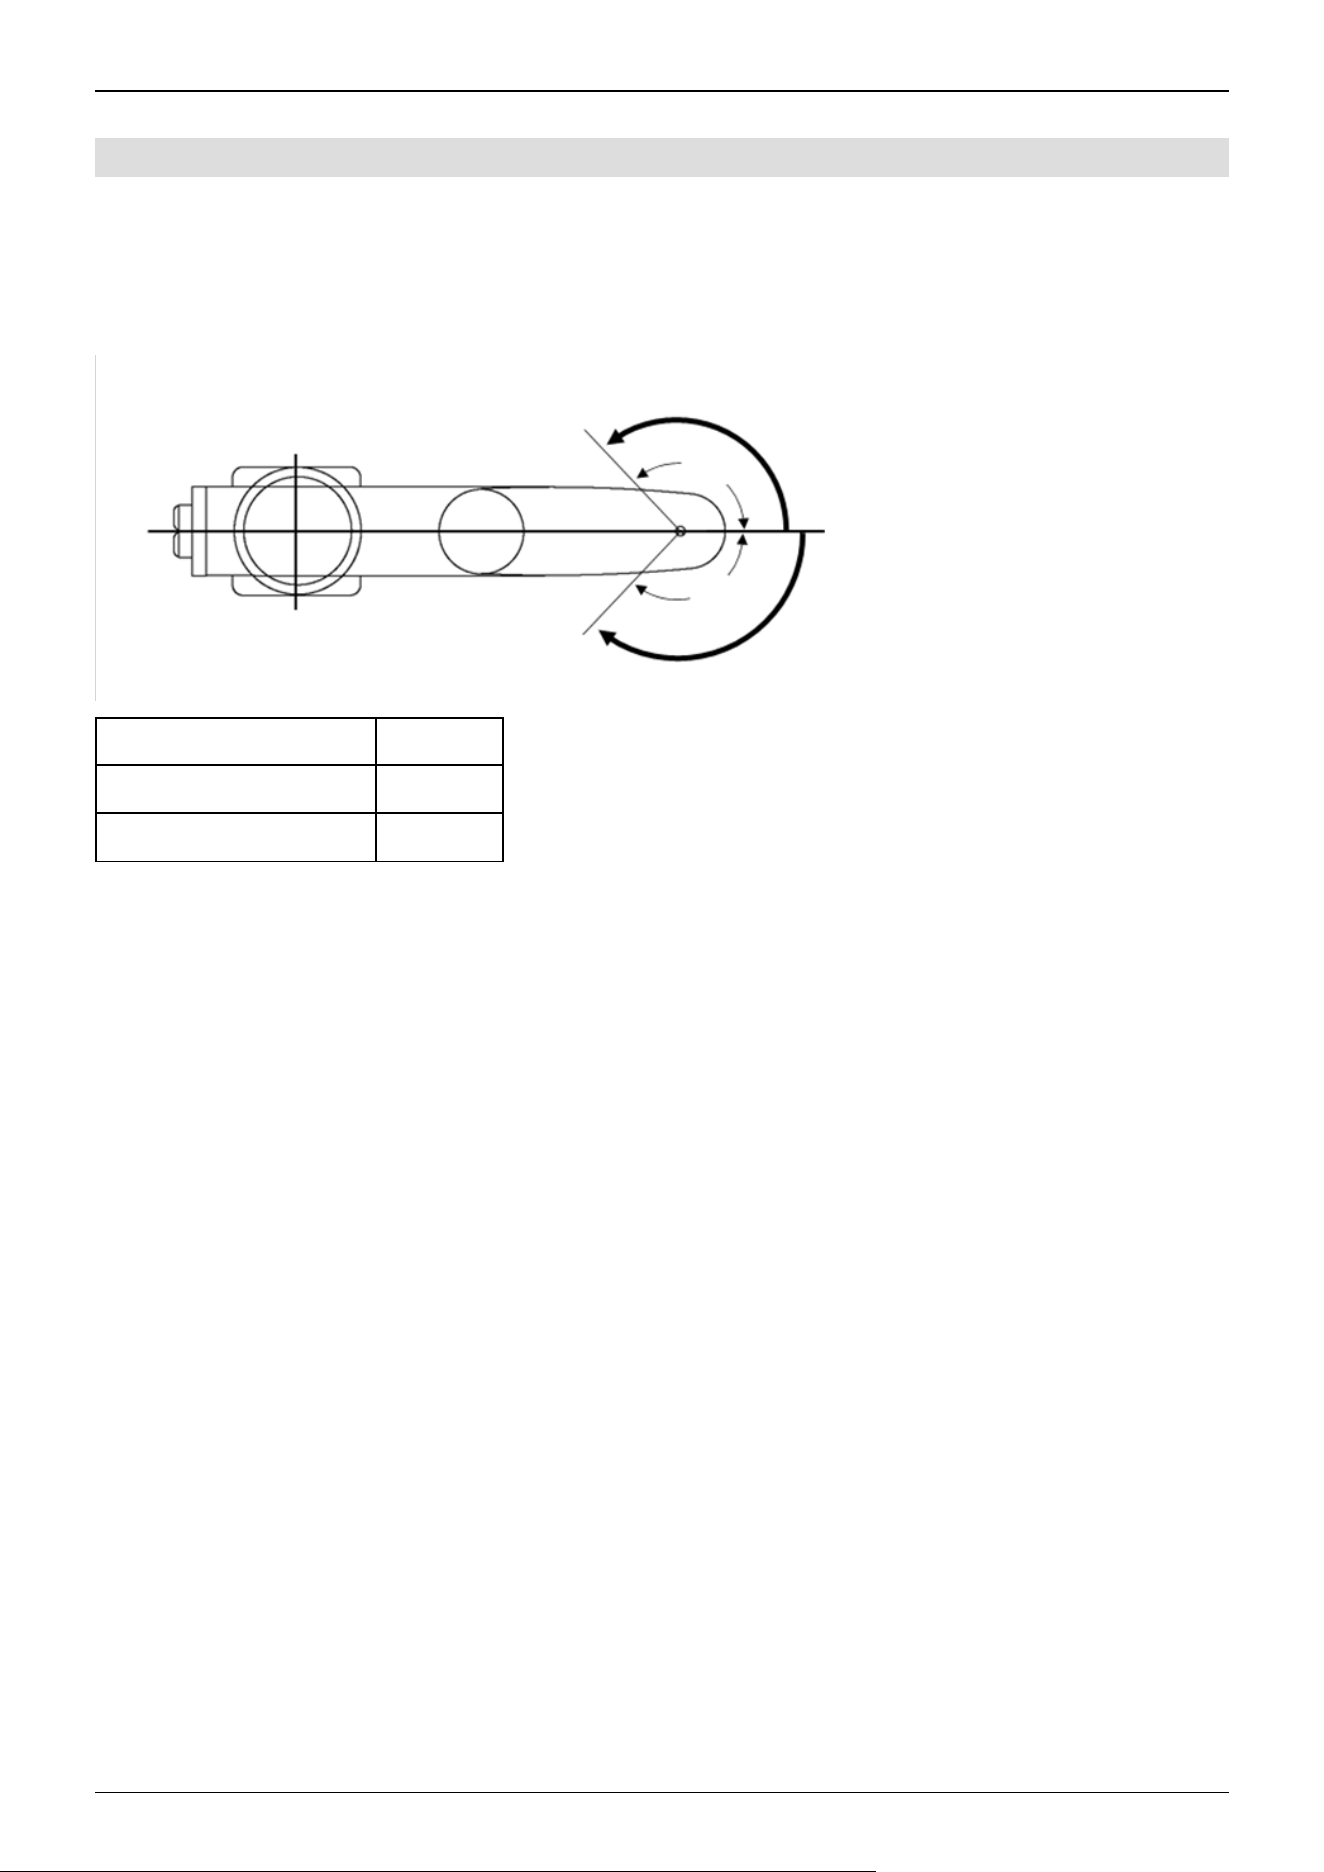
4.5.1.4 Joint #4 Maximum Pulse Range
The 0 (zero) pulse position of Joint #4 is the position where the flat surface near the end of the shaft faces toward the end of
Arm #2. (The orientation of Arm #2 does not matter.)
With the 0 pulse as a starting point, the counterclockwise pulse value is defined as positive (+), and the clockwise pulse value
is defined as negative (-).
All Models
A: Max. motion range (deg.) ±360
B: Max. pulse range (pulse) ±1668189
+A
-A
+B
-B
0 pulse
+B
-B
-A
+A
Industrial Robot: SCARA Robots GX series Manual Rev.11
297
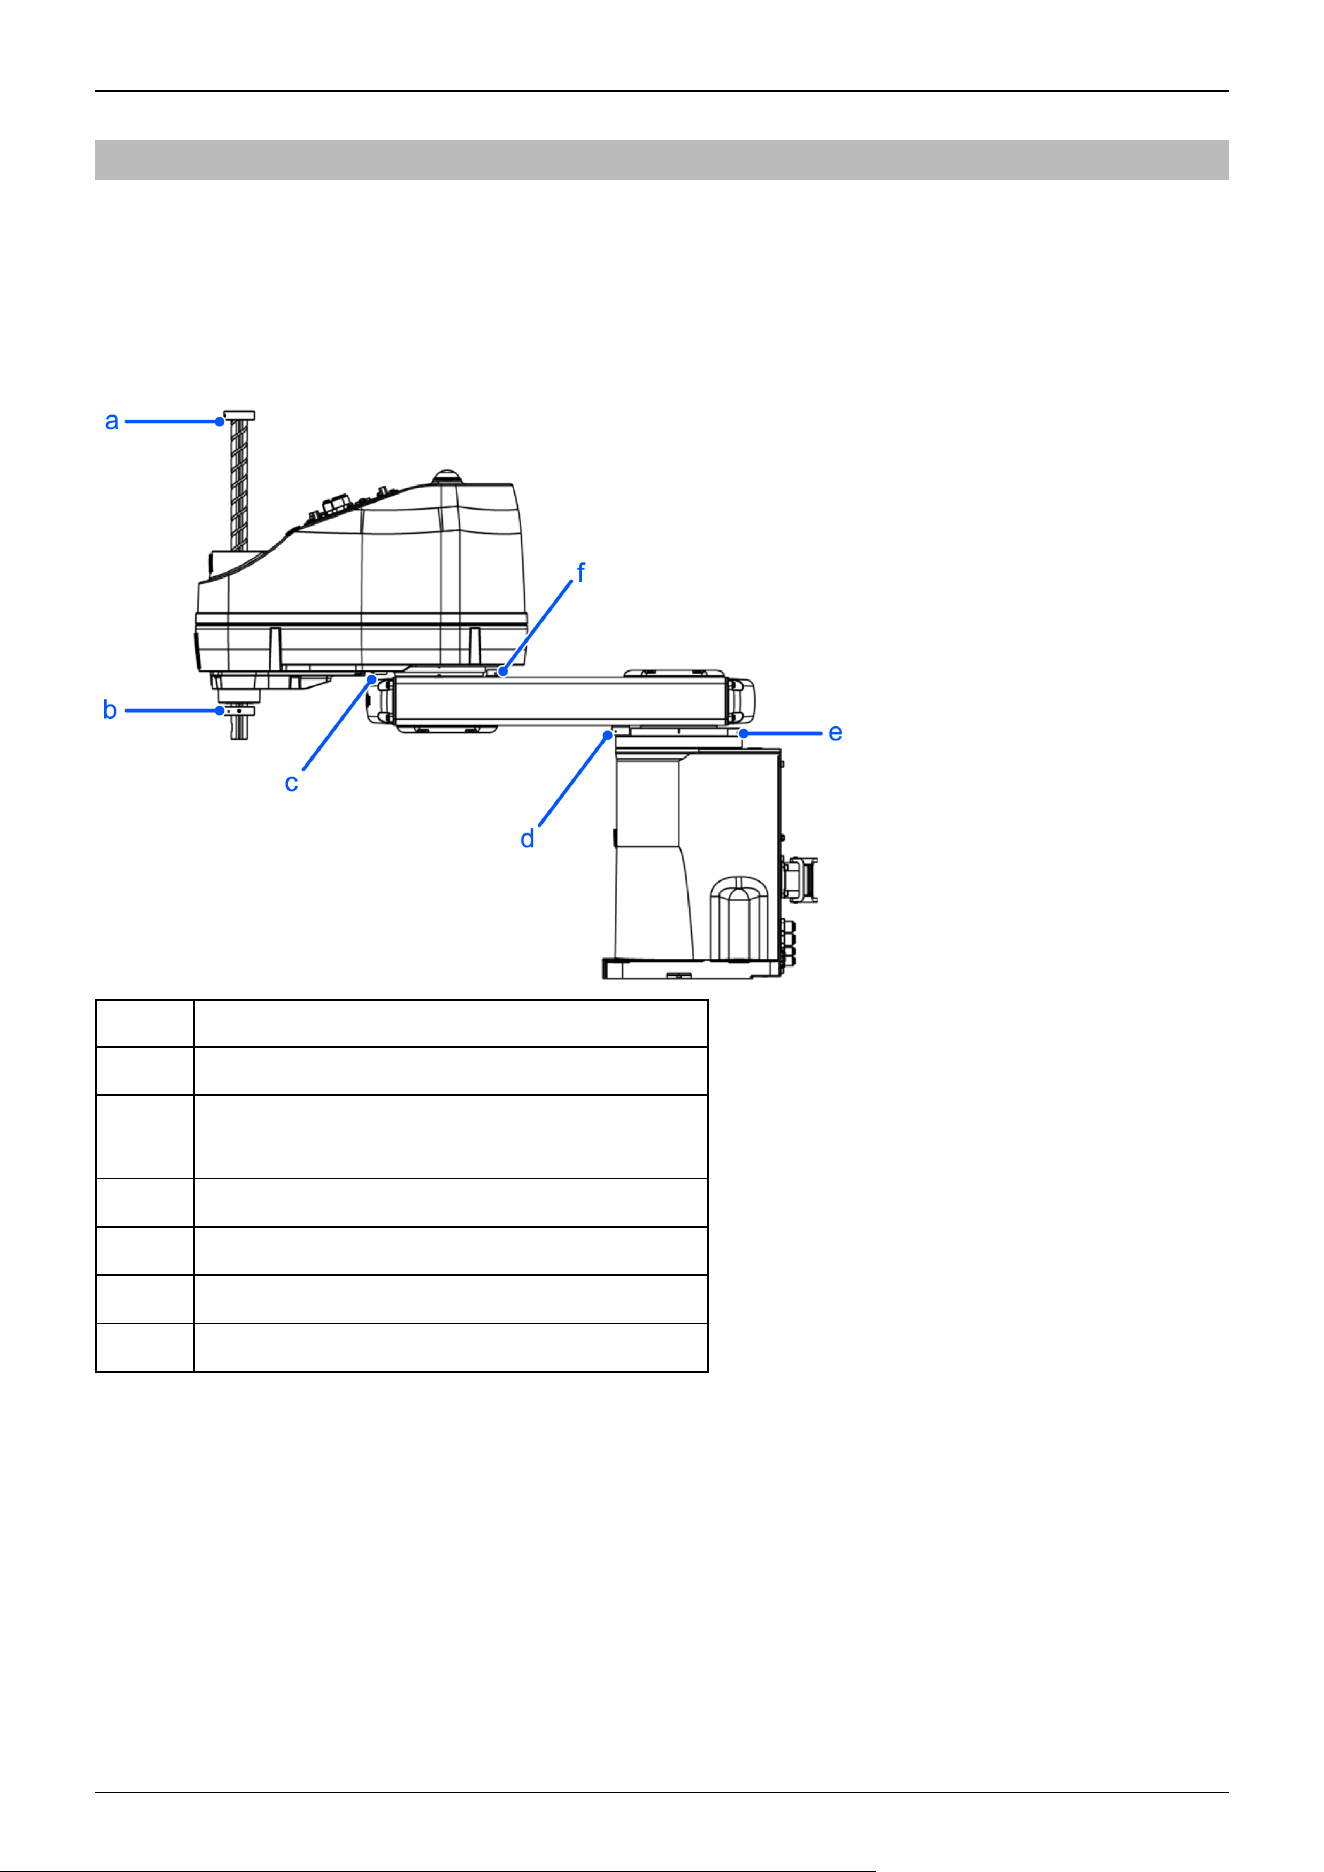
4.5.2 Setting the Work Envelope by Mechanical Stops
Mechanical stops set the absolute work envelope that physically limits where the Manipulator can move.
Both Joints #1 and #2 have threaded holes in positions corresponding to angles for the setting area. The positions of the
mechanical stops (variable) set the work envelope. Install the bolts in the threaded holes corresponding to the angles to be set.
Joint #3 can be set to any length less than the maximum stroke.
Table top mounting specifications
Symbol Description
a Joint #3 mechanical stop (lower limit mechanical stop)
b
Joint #3 mechanical stop (upper limit mechanical stop)
*Do not move the position.
c Joint #2 mechanical stop (variable)
d Joint #1 mechanical stop (fixed)
e Joint #1 mechanical stop (variable)
f Joint #2 mechanical stop (fixed)
Industrial Robot: SCARA Robots GX series Manual Rev.11
298
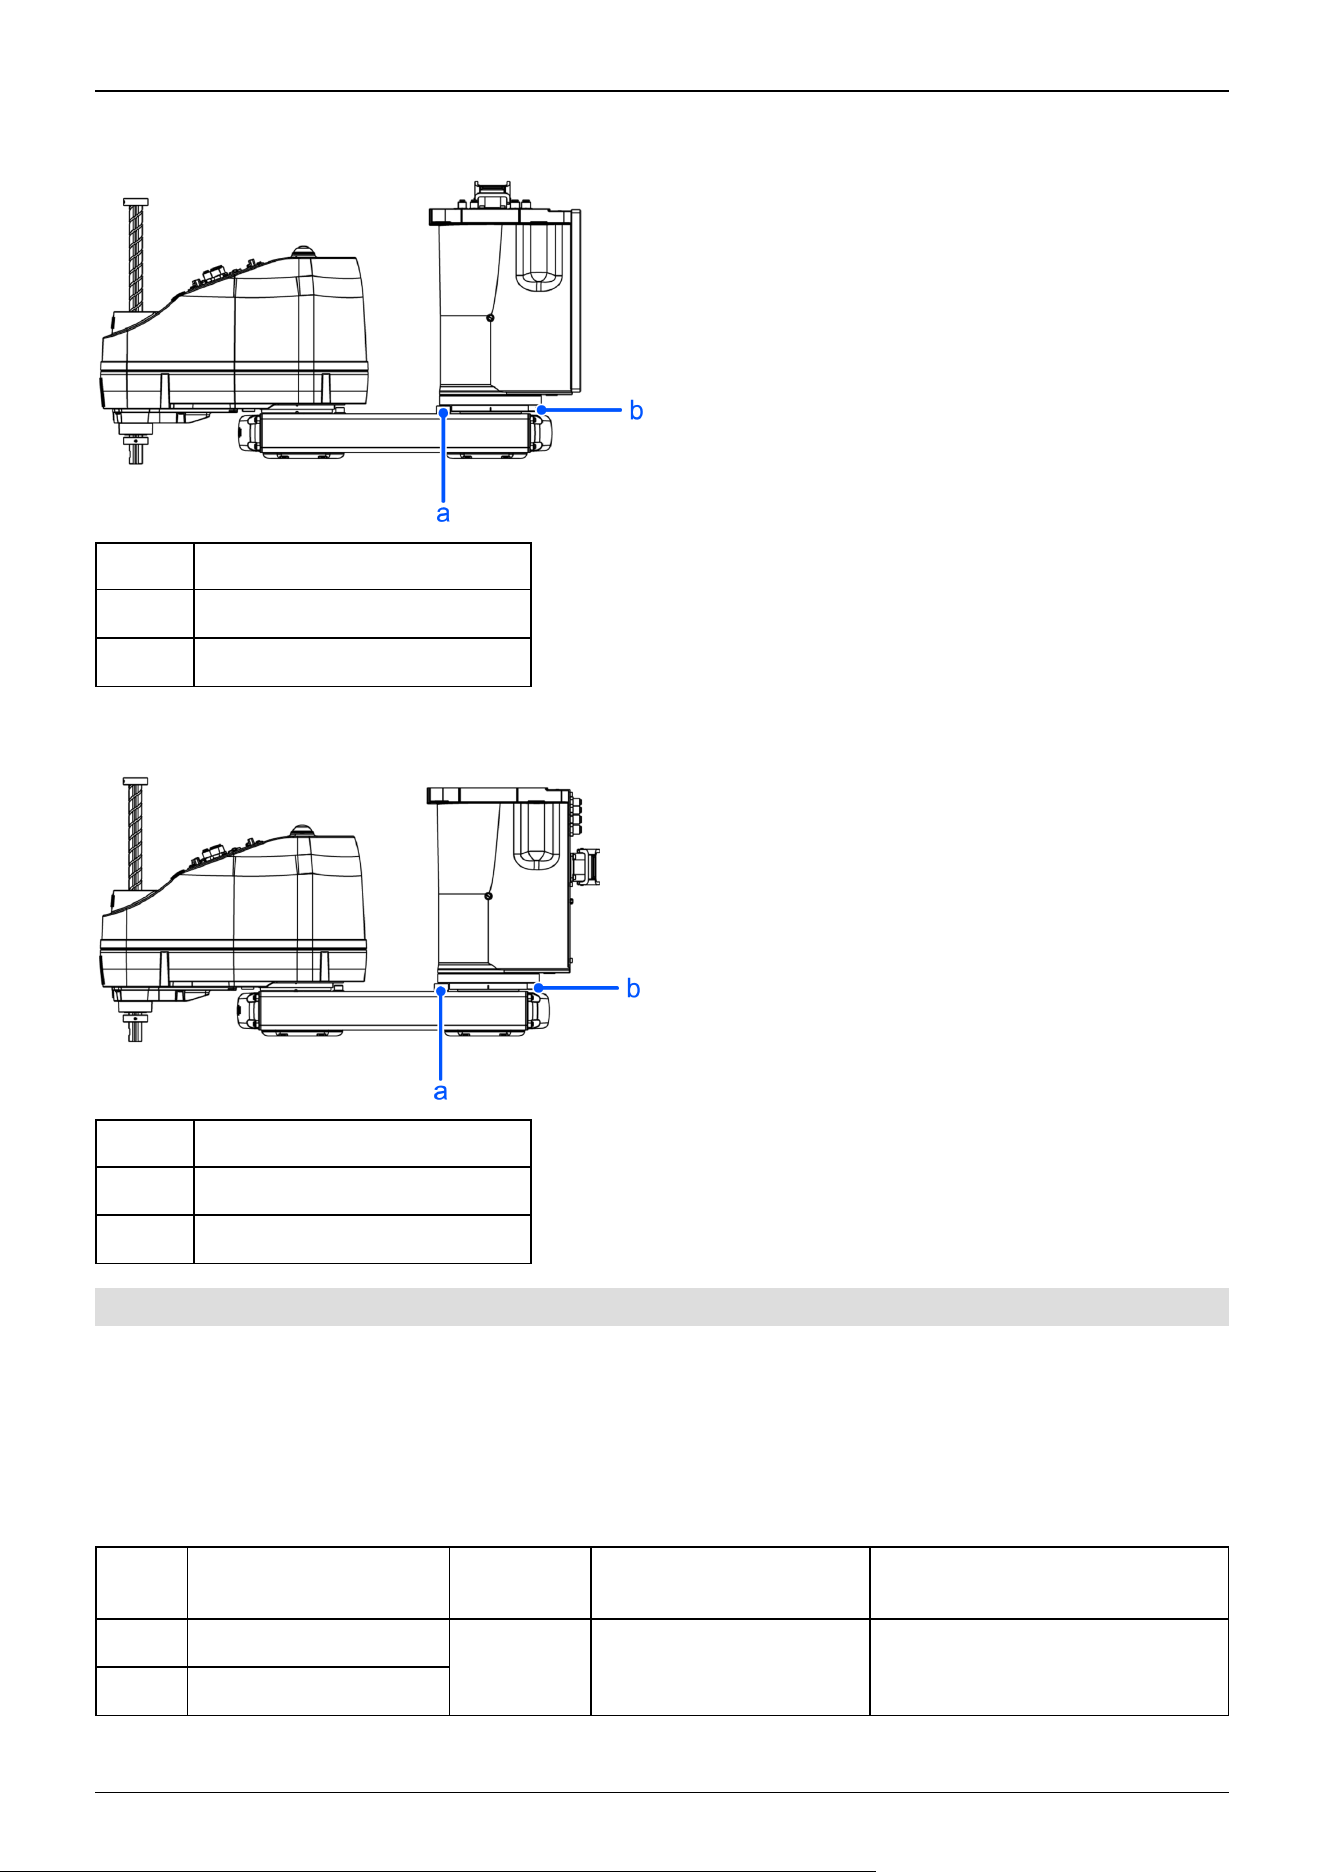
Wall mounting specifications
Only the stop positions that are different from the model with table top mounting specifications are explained here.
Symbol Description
a Joint #1 mechanical stop (fixed)
b Joint #1 mechanical stop (variable)
Ceiling mounting specifications
Only the stop positions that are different from the model with table top mounting specifications are explained here.
Symbol Description
a Joint #1 mechanical stop (fixed)
b Joint #1 mechanical stop (variable)
4.5.2.1 Setting the Mechanical Stops of Joints #1 and #2
Both Joints #1 and #2 have threaded holes in positions corresponding to angles for the setting area. The positions of the
mechanical stops (variable) set the work envelope.
Use the following procedure to install the bolts in the holes corresponding to the angle that you want to set.
1. Turn off the Controller.
2. Install a hexagon socket head cap bolt into the threaded hole corresponding to the setting angle, and tighten it.
Joint #
Hexagon Socket Head
Cap Bolt
Number of
Bolts
Recommended
Tightening Torque
Strength
1 M10 × 20 full thread
1 for each
side
18.0 N·m (194 kgf·cm)
ISO 898-1 property class 10.9 or
12.9 equivalent
2 M8 × 10 full thread
Industrial Robot: SCARA Robots GX series Manual Rev.11
299
3. Turn on the Controller.
4. Set the pulse range corresponding to the new positions of the mechanical stops.
KEY POINTS
Be sure to set the pulse range inside the positions of the mechanical stop range.
Example: Setting Joint #1 to -135° to +135° and Joint #2 to -125° to +125° for the GX8-A**2S*
Execute the following command in [Command Window].
>JRANGE 1,-819200,4096000 'Sets the pulse range of Joint #1
>JRANGE 2,-2275556,+2275556 'Sets the pulse range of Joint #2
>RANGE 'Confirms the setting value using the Range
statement
-819200,4096000,-2275556,2275556,-1092267,0,-1668189, 1668189
5. Move the arm by hand until it touches the mechanical stops to check that nothing will hinder the arm motion during
operation, such as by hitting peripheral equipment.
6. Operate the joint with the new settings at low speeds until it reaches the positions of the minimum and maximum values of
the pulse range. Check that the arm does not hit any mechanical stops.
(Check the position of the mechanical stops and the motion range that were set.)
Example: Setting Joint #1 to -85° to +115° and Joint #2 to -100° to +100° for the GX8-A**2S*
Execute the following command in [Command Window].
>MOTOR ON 'Turns on the motor
>POWER LOW 'Sets to low power mode
>SPEED 5 'Sets to low speed
>PULSE 91022,0,0,0 'Moves to the minimum pulse position of
Joint #1
>PULSE 3731912,0,0,0 'Moves to the maximum pulse position of
Joint #1
>PULSE 1638400,-1820444,0,0 'Moves to the minimum pulse
position of Joint #2
>PULSE 1638400,1820444,0,0 'Moves to the maximum pulse
position of Joint #2
The Pulse statement (Go Pulse statement) moves all joints to the specified positions at the same time. Set safe positions after
taking into consideration the motion of the joints whose pulse range have been changed and also the other joints.
In this example, when checking Joint #2, Joint #1 is moved to the 0° position (pulse value: 1638400) near the center of its work
envelope.
If the arm hits a mechanical stop or if an error occurs after the arm hits a mechanical stop, either reset the pulse range to a
narrower pulse range so that nothing blocks the arm motion, or extend the positions of the mechanical stops within the limit.
✏
Industrial Robot: SCARA Robots GX series Manual Rev.11
300
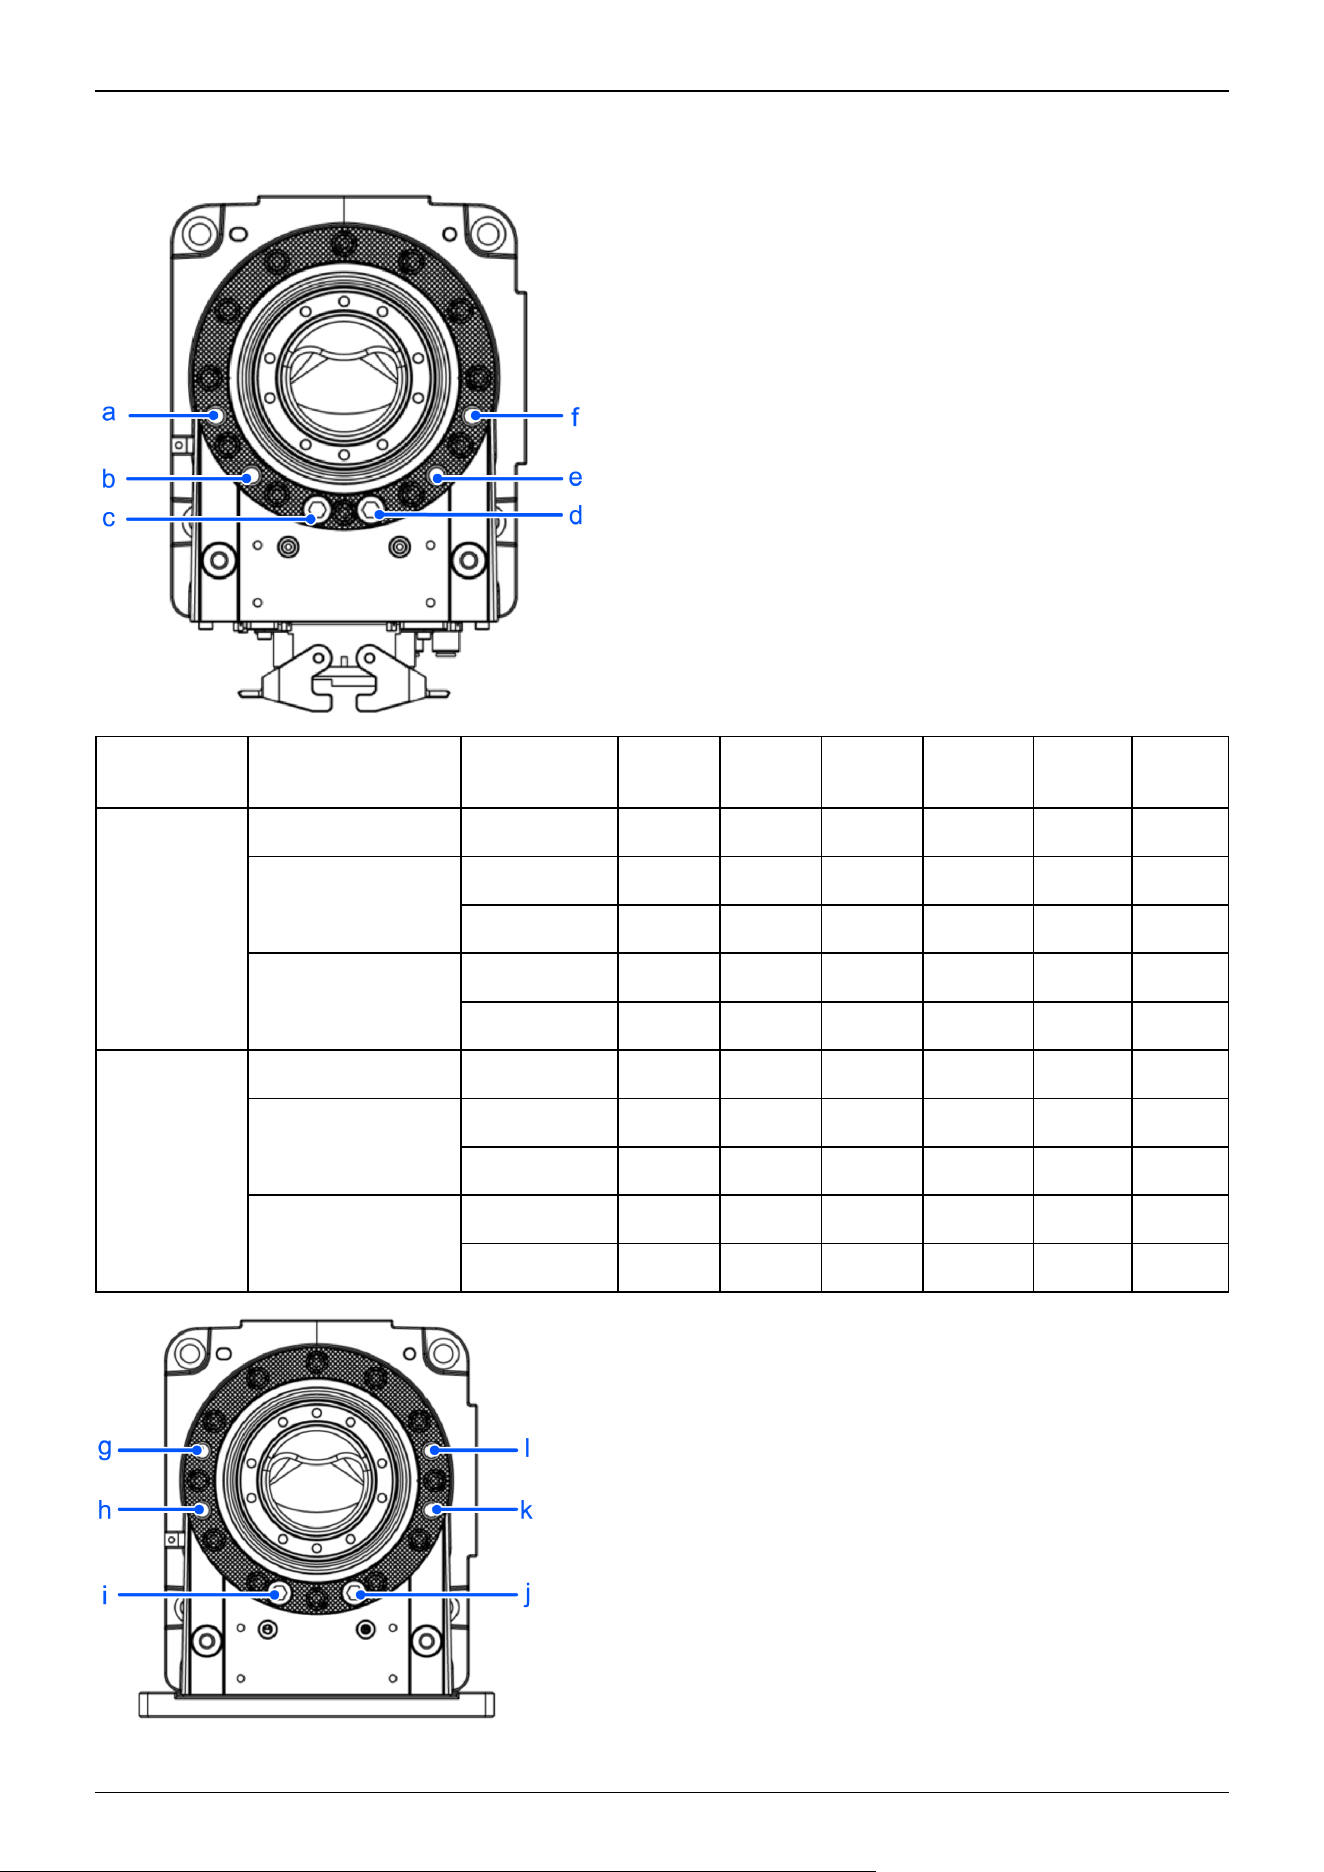
Joint #1 mechanical stop
Mounting
Specifications
Arm Length
(mm)
a b c d e f
Max. motion
range
(deg.)
Table top 450, 550, 650 115° 135° 152° -152° -135° -115°
Ceiling
450 85° 105° - - -105° -85°
550, 650 115° 135° 152° -152° -135° -115°
Wall
450 85° 105° - - -105° -85°
650 115° 135° 148° -148° -135° -115°
Max. pulse
range
(pulse)
Table top 450, 550, 650 3731912 4096000 4405476 -1128676 -819200 -455111
Ceiling
450 3185778 3549867 - - -273067 91022
550, 650 3731912 4096000 4405476 -1128676 -819200 -455111
Wall
450 3185778 3549867 - - -273067 91022
650 3731912 4096000 4332658 -1055858 -819200 -455111
Industrial Robot: SCARA Robots GX series Manual Rev.11
301
Mounting
Specifications
Arm Length
(mm)
g h i j k l
Max. motion
range
(deg.)
Wall 550
55 85 135 -135 -85 -55
Max. pulse
range
(pulse)
2639645 3185778 4096000 -819200 91022 637156
Industrial Robot: SCARA Robots GX series Manual Rev.11
302
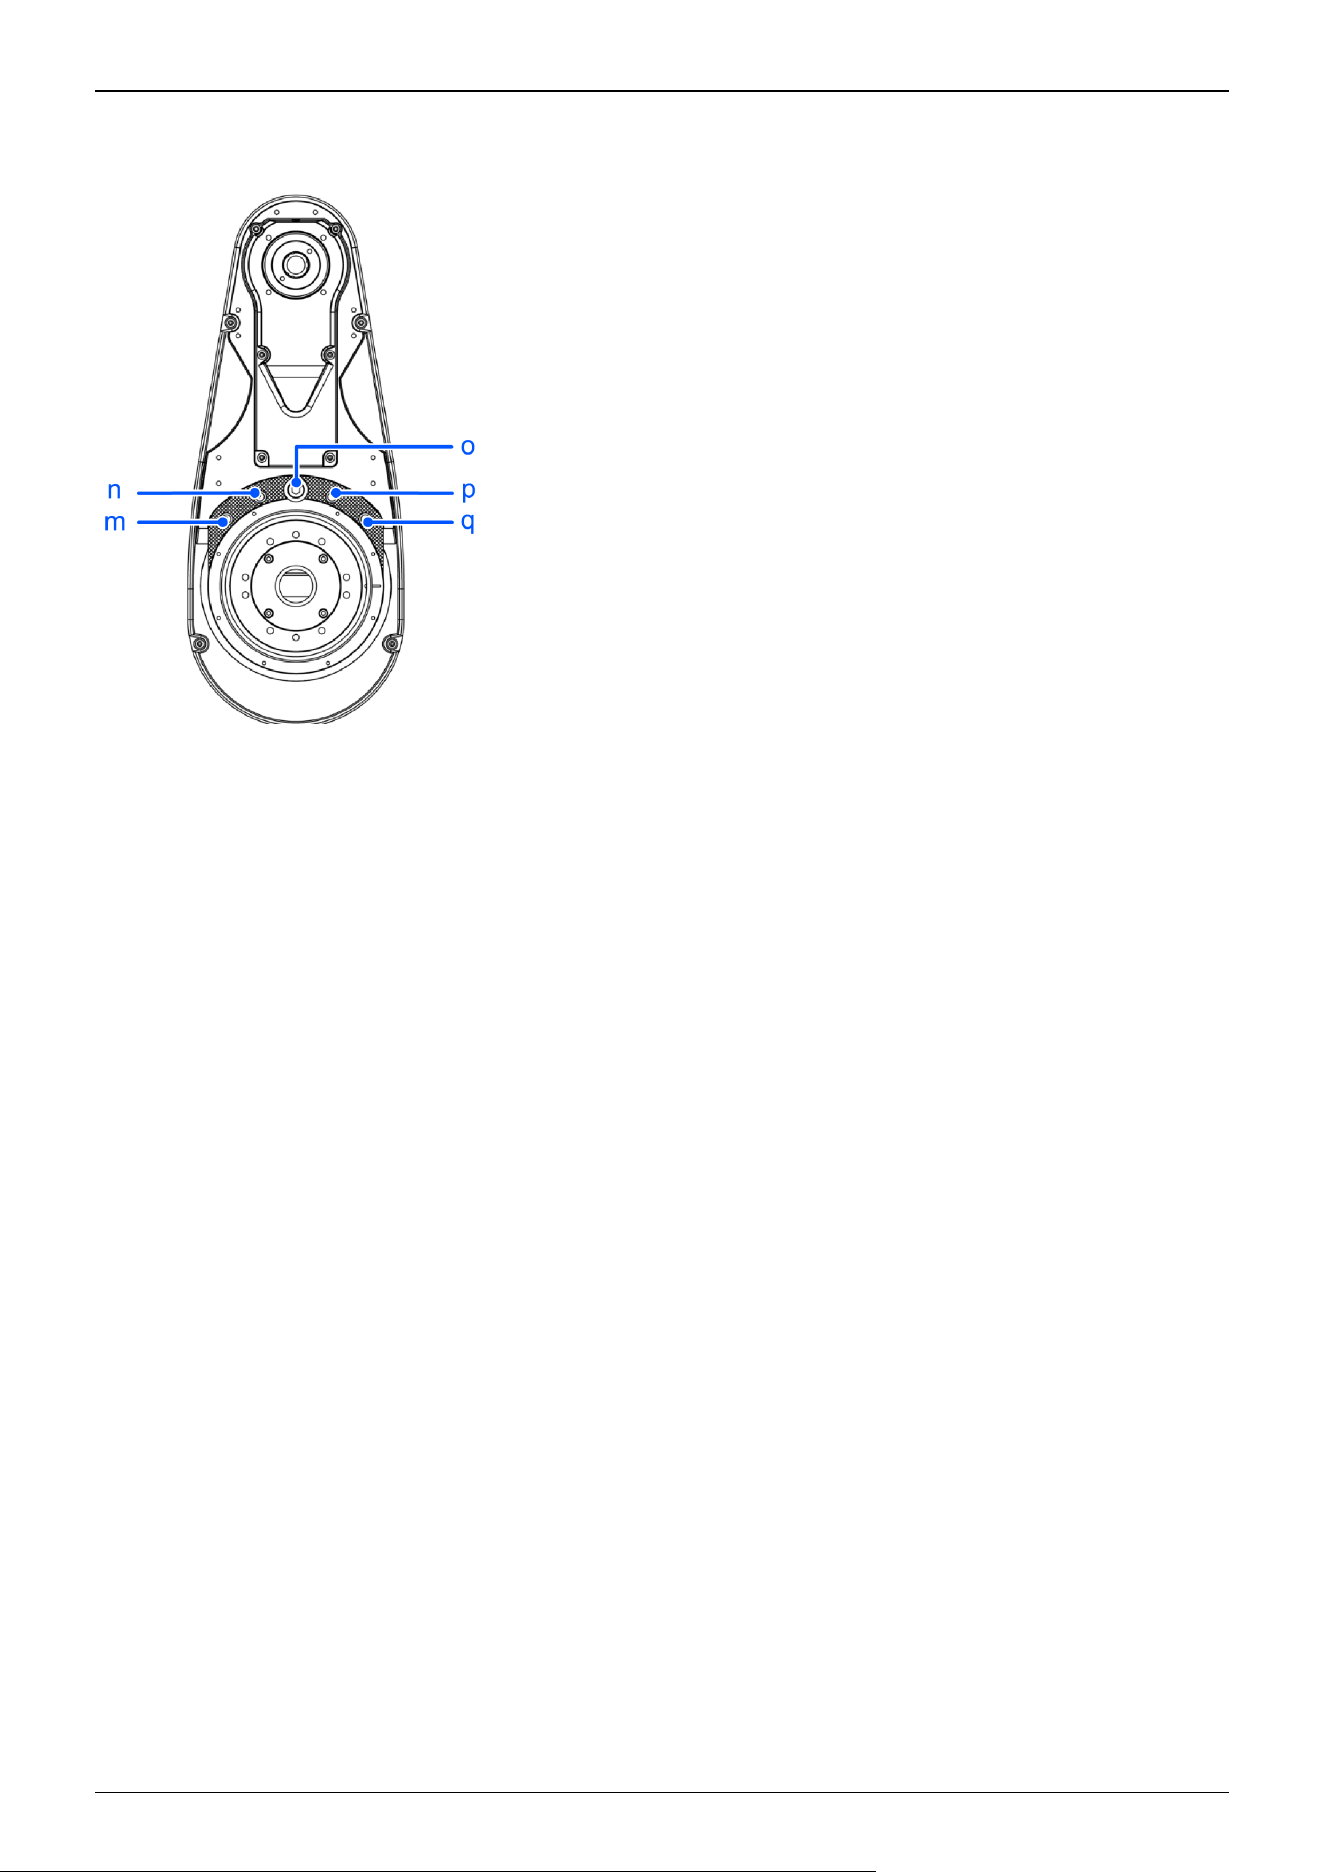
Joint #2 mechanical stop
Industrial Robot: SCARA Robots GX series Manual Rev.11
303
Max. motion range (deg.):
Arm
Length
(mm)
Mounting
Specifications
Environmental
Specifications
Z-value
Range
(mm)
m n o p q
450
Table top
S, E
0 ≥ Z ≥ –270
+100 +125
±147.5
-125 -100
–270 > Z ≥ –
330
±145
C, P
0 ≥ Z ≥ –240 ±147.5
–240 > Z ≥ –
300
±137.5
Ceiling
S, E, C, P - +79 +103 ±125 -103 -79
Wall
550
Table top
S, E -
+100 +125
±147.5
-125 -100
C, P
0 ≥ Z ≥ –240 ±147.5
–240 > Z ≥ –
300
±145
Ceiling
S, E - ±147.5
C, P - ±145
Wall
S, E - ±147.5
C, P - ±145
650
Table top
S, E, C, P - ±147.5Ceiling
Wall
Industrial Robot: SCARA Robots GX series Manual Rev.11
304
Max. pulse range (pulse):
Arm
Length
(mm)
Mounting
Specifications
Environmental
Specifications
Z-value
Range
(mm)
m n o p q
450
Table top
S, E
0 ≥ Z ≥ –
270
+1820444 +2275556
±2685156
-2275556 -1820444
–270 > Z
≥ –330
±2639644
C, P
0 ≥ Z ≥ –
240
±2685156
–240 > Z
≥ –300
±2503111
Ceiling
S, E, C, P - +1438151 +1875058 ±2275556 -1875058 -1438151
Wall
550
Table top
S, E -
+1820444 +2275556
±2685156
-2275556 -1820444
C, P
0 ≥ Z ≥ –
240
±2685156
–240 > Z
≥ –300
±2639644
Ceiling
S, E - ±2685156
C, P - ±2639644
Wall
S, E - ±2685156
C, P - ±2639644
650
Table top
S, E, C, P - ±2685156Ceiling
Wall
4.5.2.2 Setting the Mechanical Stop of Joint #3
KEY POINTS
This method can be used only for the Manipulator models with standard specifications (GX8-****S*) and ESD
specifications (GX8-****E*).
For Manipulator models with cleanroom & ESD specifications (GX8-****C*) and protected-model (GX8-****P*),
the work envelope set by the Joint #3 mechanical stop cannot be changed.
1. Turn on the Controller, and turn off the motors using the Motor OFF statement.
✏
Industrial Robot: SCARA Robots GX series Manual Rev.11
305
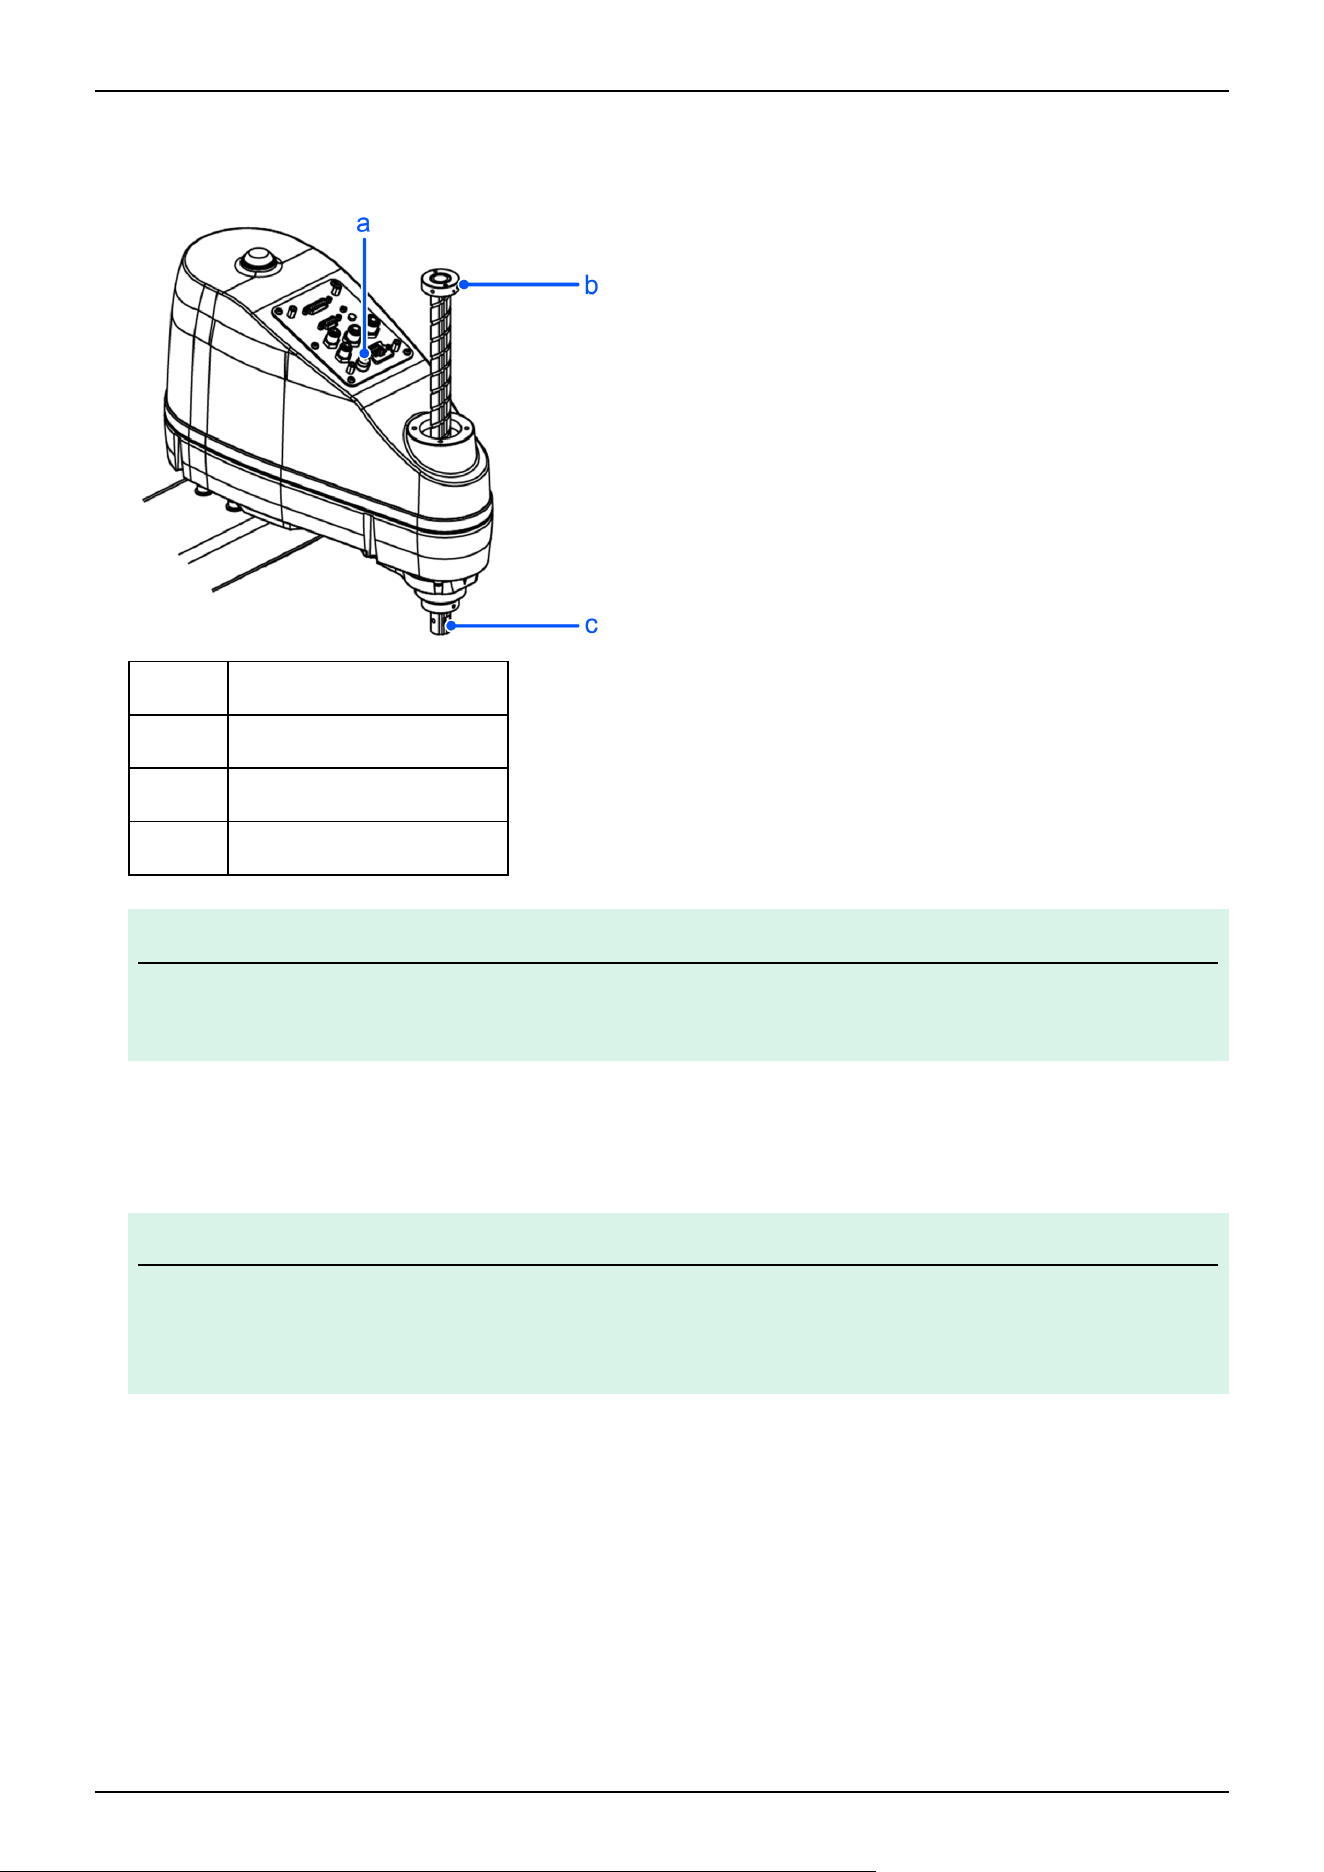
2. Push up the shaft while pressing the brake release switch.
Do not push the shaft up to its upper limit or it will be difficult for the arm top cover to be removed. Push the shaft up to a
position where the Joint #3 mechanical stop can be changed.
Symbol Description
a Brake release switch
b Lower limit mechanical stop
c Shaft
KEY POINTS
When you press the brake release switch, the shaft may lower or rotate due to the weight of the hand. Be
sure to hold the shaft by hand while pressing the switch.
3. Turn off the Controller.
4. Loosen the low-profile hexagon socket head cap bolts (2 × M5) on the lower limit mechanical stop.
KEY POINTS
A mechanical stop is mounted on both the top and bottom of Joint #3. However, only the position of the lower
limit mechanical stop on the top can be changed. Do not remove the upper limit mechanical stop on the
bottom because the origin position of Joint #3 is determined by this stop.
5. The upper end of the shaft defines the maximum stroke position. Move the lower limit mechanical stop down by the length
that you want to limit the stroke.
For example, when the lower limit mechanical stop is set at the "200 mm" stroke, the lower limit Z coordinate value is
"-200". To change this value to "-150", move the lower limit mechanical stop down by "50 mm". Use calipers or similar
tool to measure the distance when adjusting the mechanical stop.
✏
✏
Industrial Robot: SCARA Robots GX series Manual Rev.11
306
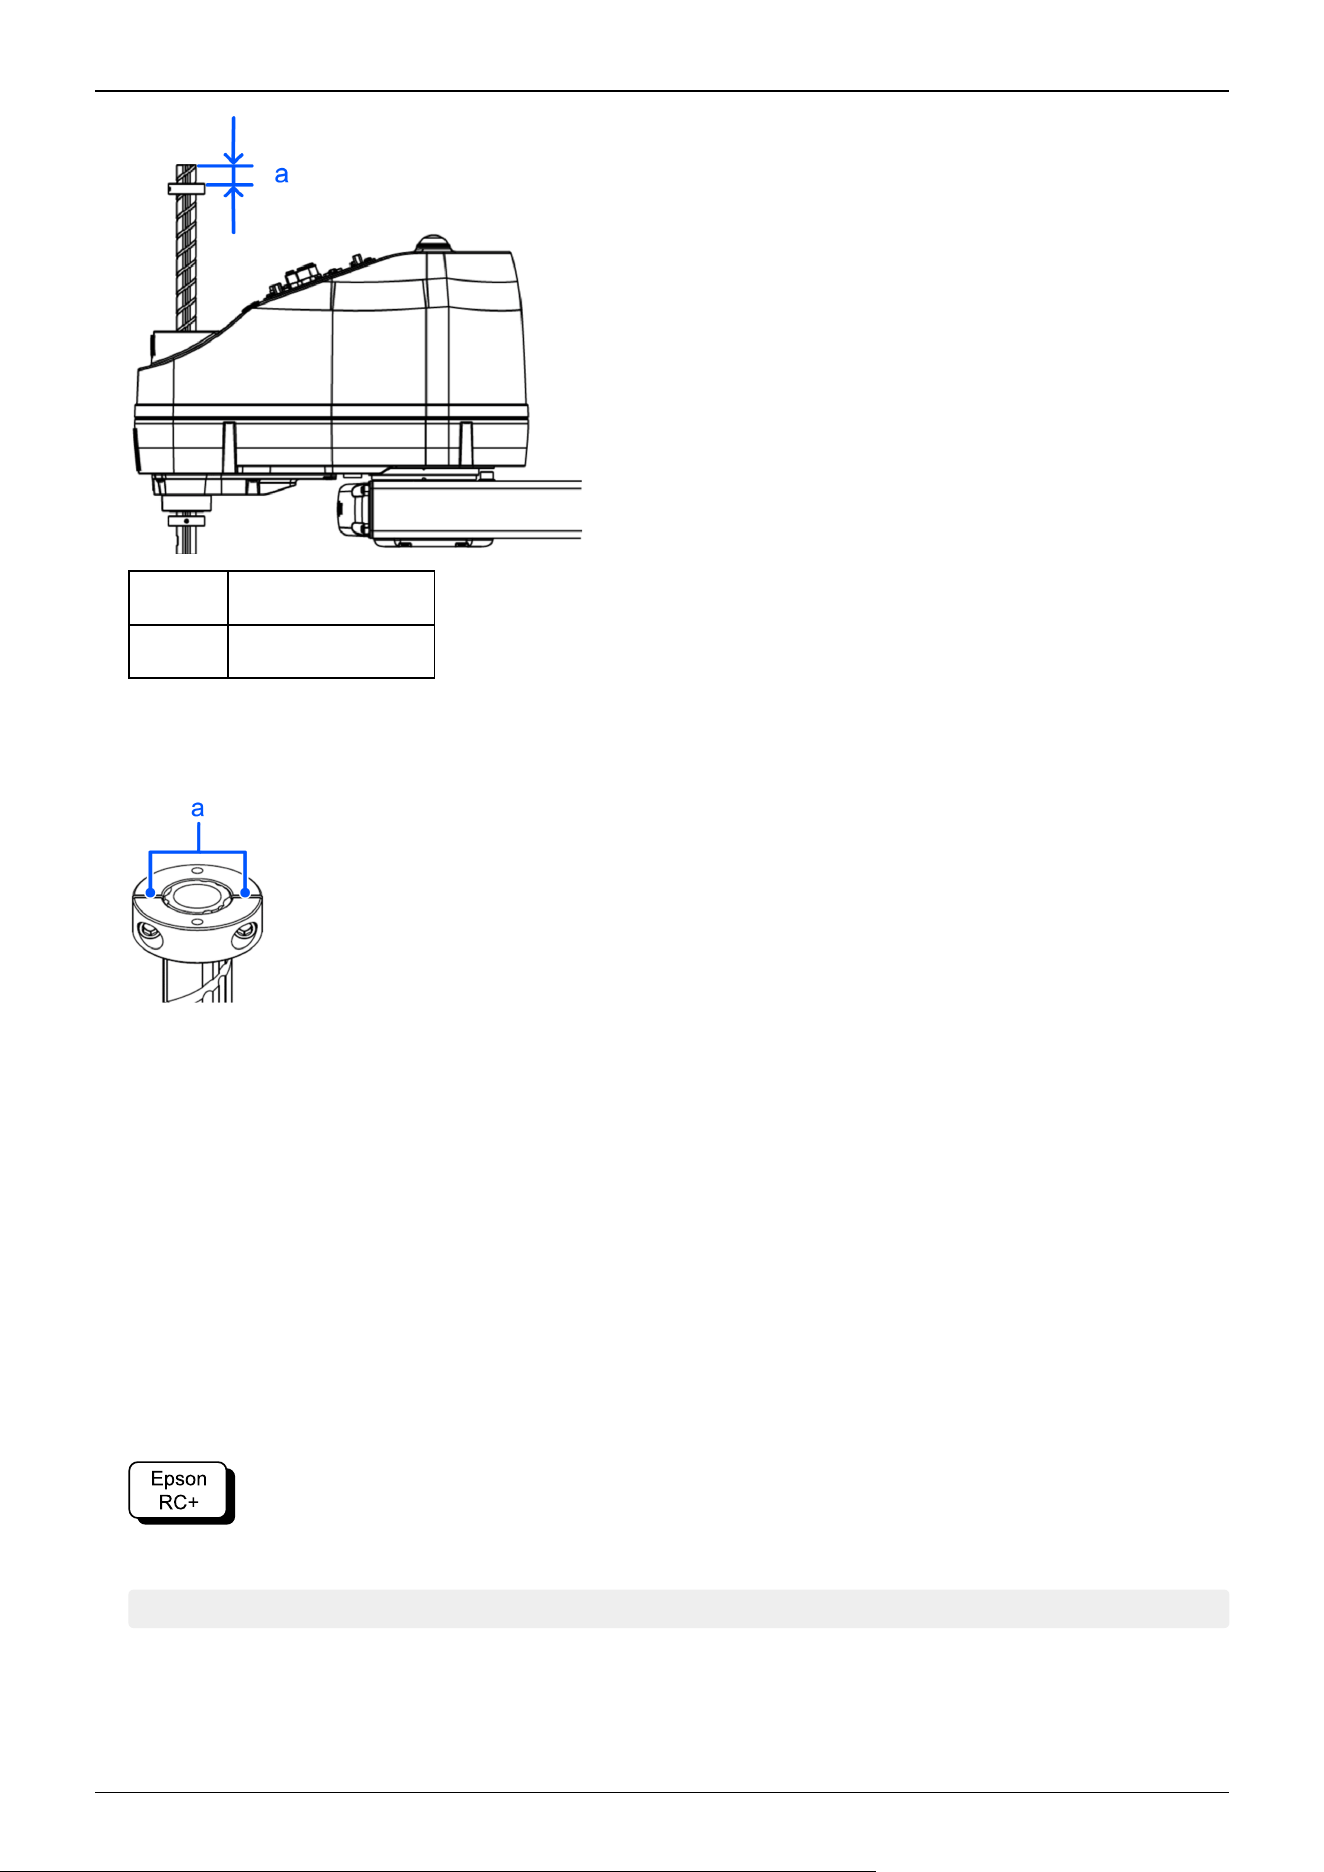
Symbol Description
a Measurement length
6. Adjust the low-profile hexagon socket head cap bolts (2 × M5) of the lower limit mechanical stop so that the size of the gap
(a) between the two is about the same, and secure in place at the following torque.
Recommended tightening torque: 8.0 ± 0.4 N⋅m (82 ± 4 kgf⋅cm)
7. Turn on the Controller.
8. Press down Joint #3 while pressing the brake release switch, and then check the lower limit position. Do not lower the
mechanical stop too far. Otherwise, the joint may not reach a target position.
9. Calculate the lower limit pulse value of the pulse range using the formula shown below, and set the value.
The result of the calculation is always negative because the lower limit Z coordinate value is negative.
GX8-***2S (Z: -200 mm): Lower limit of pulse = (lower limit Z coordinate value)/40 × 131072 × (60/36)
GX8-***3S (Z: -330 mm): Lower limit of pulse = (lower limit Z coordinate value)/40 × 131072 × (60/36)
Example: To lower the mechanical stop by 50 mm and change the lower limit Z coordinate value to
"-150" with a 200 mm stroke
(-150)/40 × 131072 × (60/36) = -819200
Execute the following command in [Command Window].
>JRANGE 3,-819200,0 'Sets the pulse range of Joint #3
10. Using the Pulse statement (Go Pulse statement), move Joint #3 to the lower limit position of the pulse range that was set at
low speed.
Industrial Robot: SCARA Robots GX series Manual Rev.11
307
If the mechanical stop range is less than the pulse range, Joint #3 will hit the mechanical stop and an error will occur. When
an error occurs, either change the pulse range to a narrower setting or extend the position of the mechanical stop within the
limit.
Example: To lower the mechanical stop by 50 mm and change the lower limit Z coordinate value to
"-150" with a 200 mm stroke
Execute the following command in [Command Window].
>MOTOR ON 'Turns on the motor
>SPEED 5 'Sets to low speed
>PULSE 0,0,-819200,0 'Moves to the lower limit pulse position of Joint #3
(In this example, all pulses except those for Joint #3 are "0". Substitute these "0" values with the other pulse values to
specify a position where interference will not occur even when lowering Joint #3.)
4.5.3 Setting the Rectangular Range in the XY Coordinate System of the
Manipulator
(For Joints #1 and #2)
Use this procedure to set the upper and lower limits of the X and Y coordinates.
This setting is a software-based limit only, and so it does not change the maximum physical range. The maximum physical
range is based on the position of the mechanical stops.
Go to [Tools] - [Robot Manager] - [XYZ Limits] panel, and make the setting.
This can also be set using the XYLim statement in [Command Window].
4.5.4 Standard Work Envelope
The following "work envelope" diagrams show the model with standard (maximum) specifications. When each joint motor is
under servo control, the center of the Manipulator shaft's lowest point moves in the ranges shown in the figure.
Range to mechanical stop
This is the range where the center of shaft’s lowest point can be moved when each joint motor is not under servo control.
Mechanical stop
This is the stop that sets the absolute work envelope where the Manipulator cannot move beyond mechanically.
Maximum zone
This is the range that contains the farthest reach of the arms where interference can occur. If the maximum radius of the
hand exceeds 60 mm, add the "Range to mechanical stop" and the "Radius of the hand." The total value is specified as the
maximum zone.
Industrial Robot: SCARA Robots GX series Manual Rev.11
308
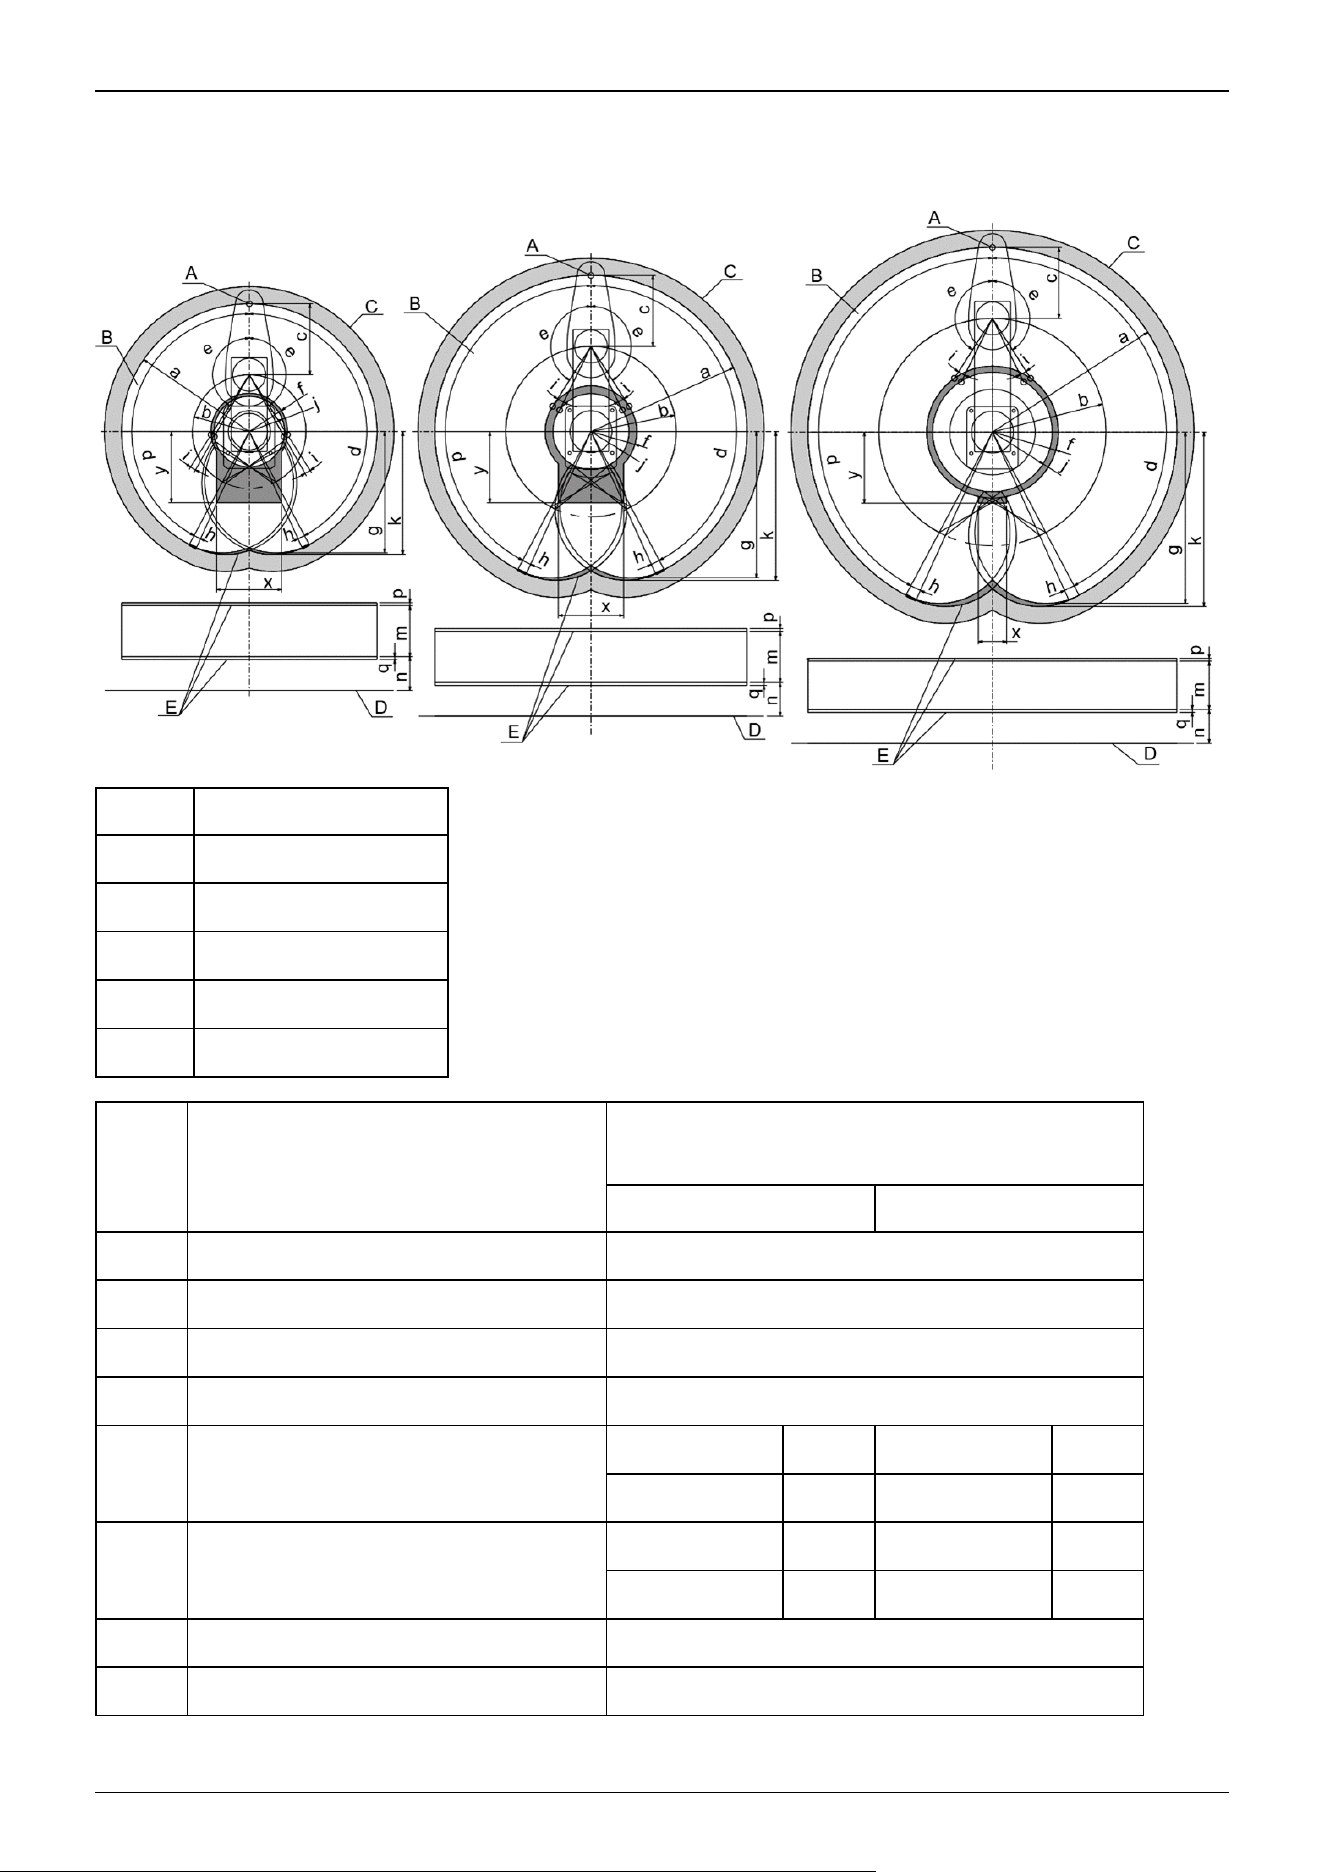
Table top mounting specifications
Symbol Description
A Center of Joint #3
B Work envelope
C Maximum zone
D Base mounting surface
E Range to mechanical stop
GX8-A/GX8-B/GX8-C45 **
GX8-A/GX8-B/GX8-C45**B
S, E C, P
a Length of Arm #1 + Arm #2 (mm) 450
b Length of Arm #1 (mm) 200
c Length of Arm #2 (mm) 250
d Joint #1 motion (°) 152
e Joint #2 motion (°)
0 ≥ Z ≥ −270 147.5 0 ≥ Z ≥ −240 147.5
−270 > Z ≥ −330 145 −240 > Z ≥ −300 137.5
f (Work envelope)
0 ≥ Z ≥ −270 134.8 0 ≥ Z ≥ −240 134.8
−270 > Z ≥ −330 145 −240 > Z ≥ −300 137.5
g (Work envelope on the back side) 426.6
h Angle to the Joint #1 mechanical stop (°) 1.4
GX8-A/GX8-B/
GX8-C45***
GX8-A/GX8-B/
GX8-C55***
GX8-A/GX8-B/
GX8-C65***
Industrial Robot: SCARA Robots GX series Manual Rev.11
309
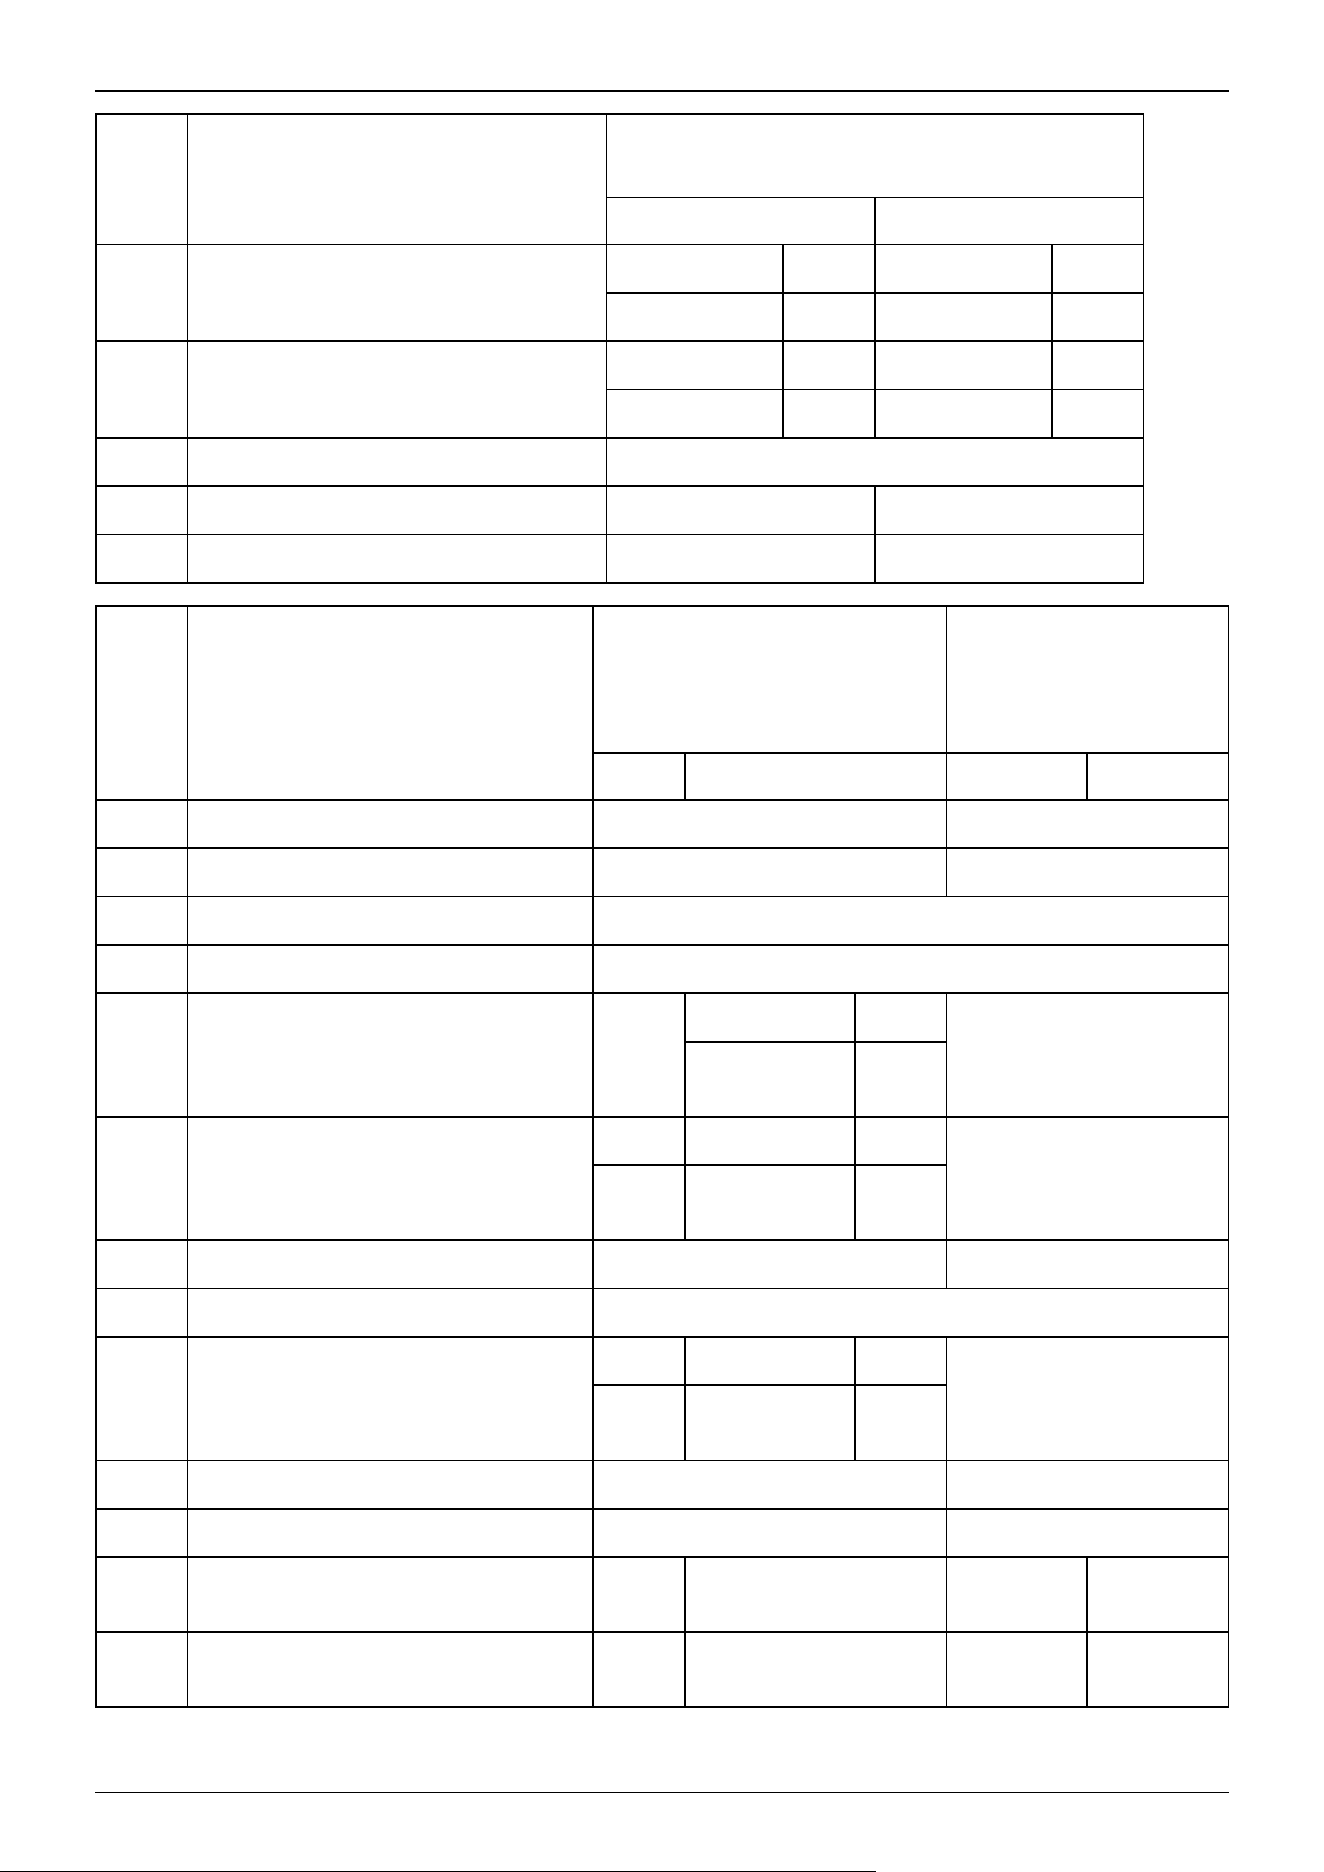
GX8-A/GX8-B/GX8-C45 **
GX8-A/GX8-B/GX8-C45**B
S, E C, P
i Angle to the Joint #2 mechanical stop (°)
0 ≥ Z ≥ −270 3.1 0 ≥ Z ≥ −240 3.1
−270 > Z ≥ −330 5.6 −240 > Z ≥ −300 13.1
j (Mechanical stop area)
0 ≥ Z ≥ −270 124 0 ≥ Z ≥ −240 124
−270 > Z ≥ −330 124 −240 > Z ≥ −300 121.6
k (Mechanical stop area of the back side) 428.8
x Dimensions of motion prohibited area (mm) 230 260
y Dimensions of motion prohibited area (mm) -250 -280
GX8-A/GX8-B/GX8-C55 **
GX8-A/GX8-B/GX8-C55**B
GX8-A/GX8-B/GX8-C65
**
GX8-A/GX8-B/GX8-
C65**B
S, E C, P S, E C, P
a Length of Arm #1 + Arm #2 (mm) 550 650
b Length of Arm #1 (mm) 300 400
c Length of Arm #2 (mm) 250
d Joint #1 motion (°) 152
e Joint #2 motion (°) 147.5
0 ≥ Z ≥ −240 147.5
147.5
−240 > Z ≥
−300
145
f (Work envelope)
161.2 0 ≥ Z ≥ −240 161.2
232
161.2
−240 > Z ≥
−300
172.1
g (Work envelope on the back side) 514.9 603.2
h Angle to the Joint #1 mechanical stop (°) 1.4
i Angle to the Joint #2 mechanical stop (°)
3.1 0 ≥ Z ≥ −240 3.1
3.1
3.1
−240 > Z
≥−300
5.6
j (Mechanical stop area) 147.7 219.7
k (Mechanical stop area of the back side) 518.2 607.7
x
Dimensions of motion prohibited area
(mm)
230 260 100 160
y
Dimensions of motion prohibited area
(mm)
-250 -280 -250 -280
Industrial Robot: SCARA Robots GX series Manual Rev.11
310
GX8-A/GX8-B/GX8-C*52 **
GX8-A/GX8-B/GX8-C*52**B
GX8-A/GX8-B/GX8-C*53 **
GX8-A/GX8-B/GX8-C*53**B
S, E C, P S, E C, P
m Joint #3 work envelope 200 170 330 300
n Distance from base mounting surface 99 96 -31 -34
p Joint #3 mechanical stop area (upper limit) 3 1 3 1
q Joint #3 mechanical stop area (lower limit) 15.6 12.6 10.6 7.6
Industrial Robot: SCARA Robots GX series Manual Rev.11
311
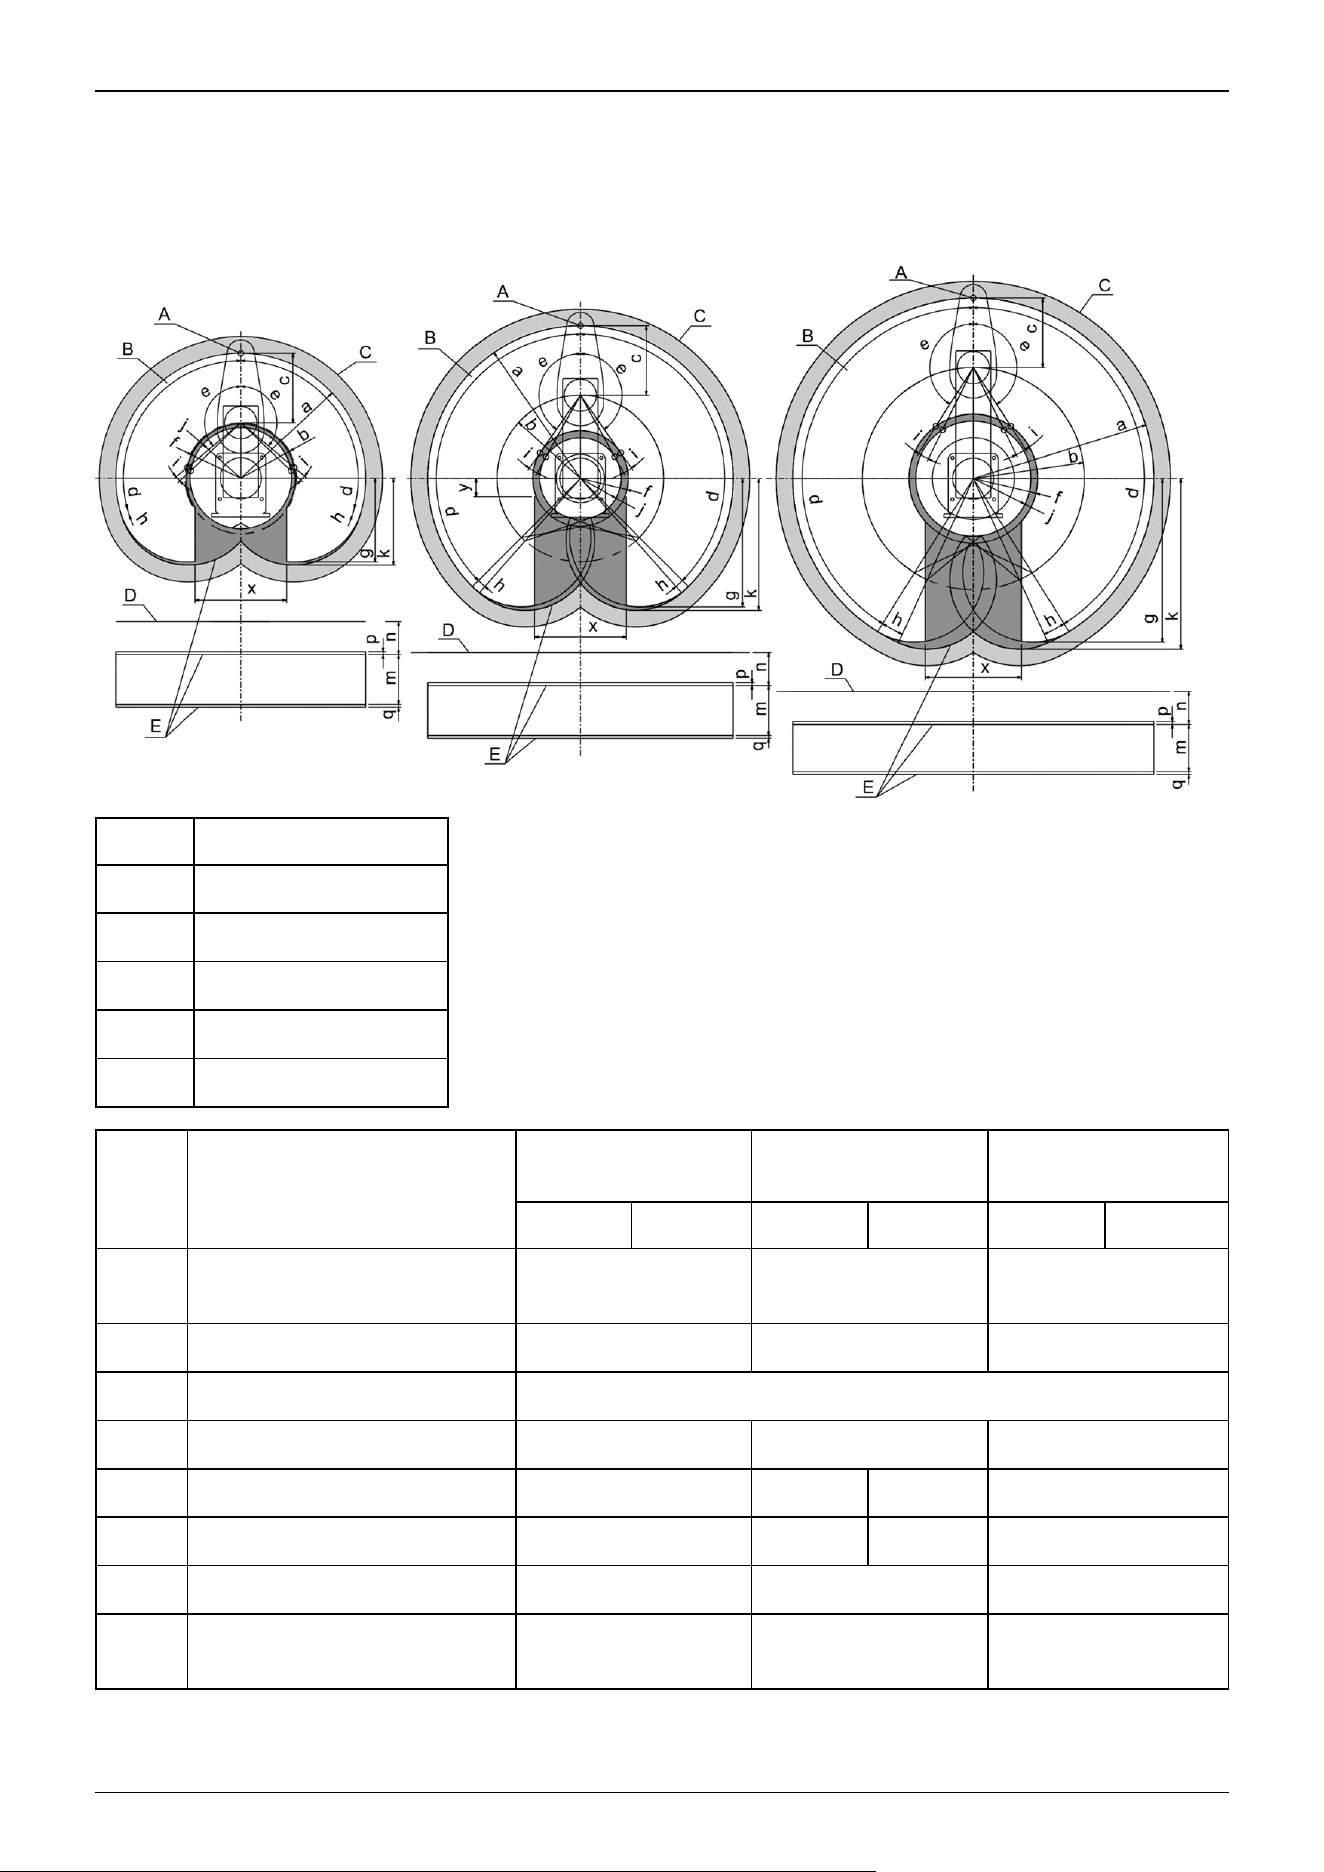
Wall mounting specifications
Symbol Description
A Center of Joint #3
B Work envelope
C Maximum zone
D Base mounting surface
E Range to mechanical stop
GX8-A/GX8-B/GX8-
C45**W
GX8-A/GX8-B/GX8-
C55**W
GX8-A/GX8-B/GX8-
C65**W
S, E C, P S, E C, P S, E C, P
a
Length of Arm #1 + Arm #2
(mm)
450 550 650
b Length of Arm #1 (mm) 200 300 400
c Length of Arm #2 (mm) 250
d Joint #1 motion (°) 105 135 147.5
e Joint #2 motion (°) 125 147.5 145 147.5
f (Work envelope) 212.5 161.2 172.1 232
g (Work envelope on the back side) 292.5 462.1 589.2
h
Angle to the Joint #1 mechanical
stop (°)
0.9 11.2 5.4
GX8-A/GX8-B/
GX8-C45**W
GX8-A/GX8-B/
GX8-C55**W
GX8-A/GX8-B/
GX8-C65**W
Industrial Robot: SCARA Robots GX series Manual Rev.11
312
GX8-A/GX8-B/GX8-
C45**W
GX8-A/GX8-B/GX8-
C55**W
GX8-A/GX8-B/GX8-
C65**W
S, E C, P S, E C, P S, E C, P
i
Angle to the Joint #2 mechanical
stop (°)
6.1 3.1 5.6 3.1
j (Mechanical stop area) 191.7 147.7 219.7
k
(Mechanical stop area of the back
side)
295.7 499.3 607.7
x
Dimensions of motion prohibited
area (mm)
380 330
y
Dimensions of motion prohibited
area (mm)
0 (infinite on back
side)
-65 (infinite on back
side)
0 (infinite on back side)
GX8-A/GX8-B/GX8-C**2*W GX8-A/GX8-B/GX8-C**3*W
S, E C, P S, E C, P
m Joint #3 work envelope 200 170 330 300
n Distance from base mounting surface 160 193 160 193
p Joint #3 mechanical stop area (upper limit) 3 1 3 1
q Joint #3 mechanical stop area (lower limit) 15.6 12.6 10.6 7.6
Industrial Robot: SCARA Robots GX series Manual Rev.11
313
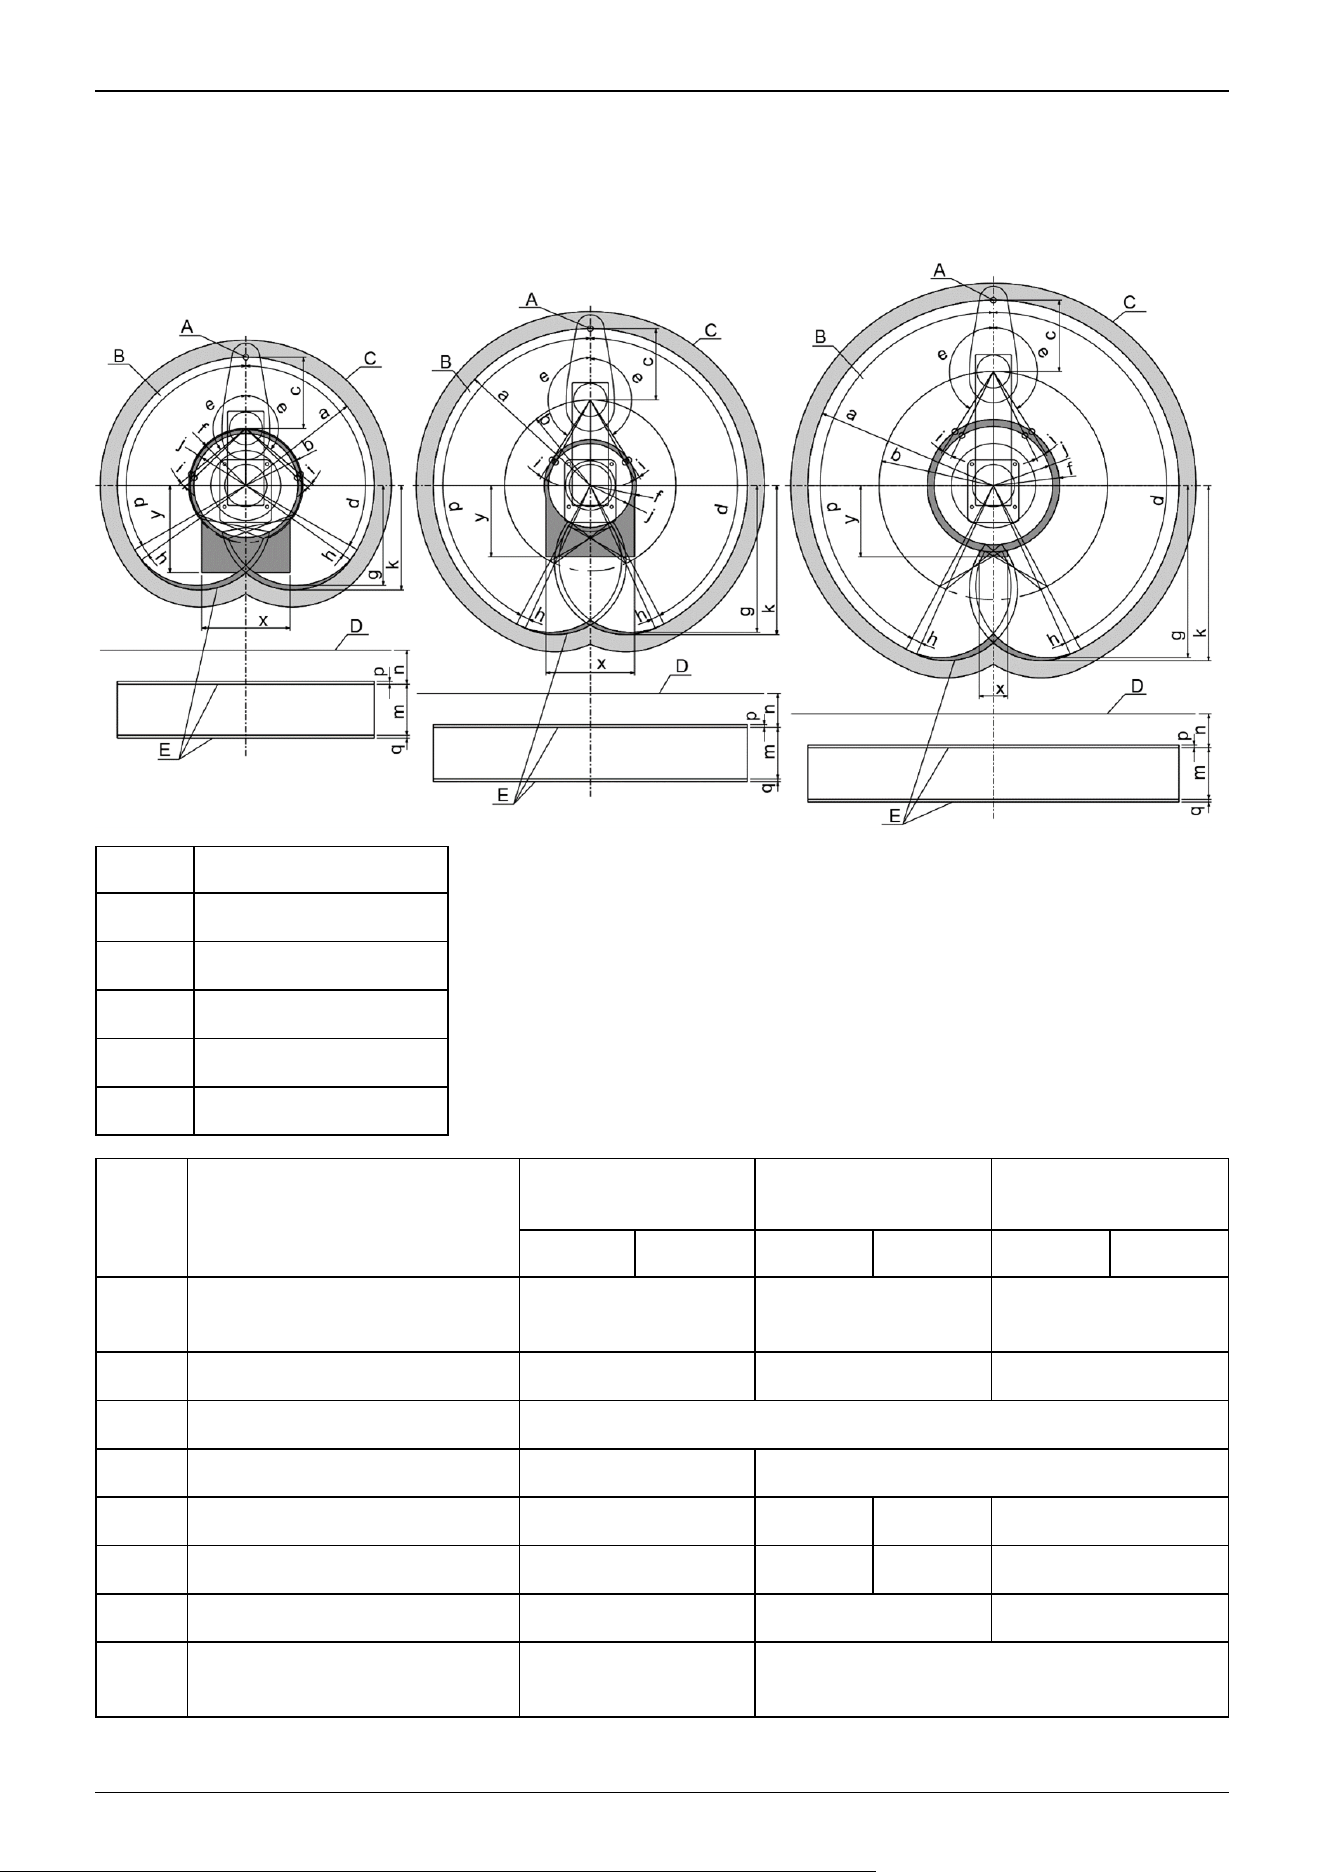
Ceiling mounting specifications
Symbol Description
A Center of Joint #3
B Work envelope
C Maximum zone
D Base mounting surface
E Range to mechanical stop
GX8-A/GX8-B/GX8-
C45**R
GX8-A/GX8-B/GX8-
C55**R
GX8-A/GX8-B/GX8-
C65**R
S, E C, P S, E C, P S, E C, P
a
Length of Arm #1 + Arm #2
(mm)
450 550 650
b Length of Arm #1 (mm) 200 300 400
c Length of Arm #2 (mm) 250
d Joint #1 motion (°) 105 152
e Joint #2 motion (°) 125 147.5 145 147.5
f (Work envelope) 212.5 161.2 172.1 232
g (Work envelope on the back side) 292.5 515.4 603.2
h
Angle to the Joint #1 mechanical
stop (°)
0.9 1.4
GX8-A/GX8-B/
GX8-C45**R
GX8-A/GX8-B/
GX8-C55**R
GX8-A/GX8-B/
GX8-C65**R
Industrial Robot: SCARA Robots GX series Manual Rev.11
314
GX8-A/GX8-B/GX8-
C45**R
GX8-A/GX8-B/GX8-
C55**R
GX8-A/GX8-B/GX8-
C65**R
S, E C, P S, E C, P S, E C, P
i
Angle to the Joint #2 mechanical
stop (°)
6.1 3.1 5.6 3.1
j (Mechanical stop area) 191.7 147.7 219.7
k
(Mechanical stop area of the back
side)
295.7 518.2 607.7
x
Dimensions of motion prohibited
area (mm)
310 100 160
y
Dimensions of motion prohibited
area (mm)
-305 -250 -280 -250 280
GX8-A/GX8-B/GX8-C**2*R GX8-A/GX8-B/GX8-C**3*R
S, E C, P S, E C, P
m Joint #3 work envelope 200 170 330 300
n Distance from base mounting surface 394 427 394 427
p Joint #3 mechanical stop area (upper limit) 3 1 3 1
q Joint #3 mechanical stop area (lower limit) 15.6 12.6 10.6 7.6
Industrial Robot: SCARA Robots GX series Manual Rev.11
315

5. GX10 GX20 Manipulators
This chapter contains information on the setup and operation of the Manipulators.
Please read this chapter thoroughly before setting up and operating the Manipulators.
Industrial Robot: SCARA Robots GX series Manual Rev.11
316
5.1 Safety
The Manipulator and its related equipment should be unpacked and transported by people who have received installation
training provided by Epson and the suppliers. Also, the laws and regulations of the installation country must be followed.
Before use, please read this manual and other related manuals to ensure correct use.
After reading this manual, store it in an easily accessible location for future reference.
This product is intended for transporting and assembling parts in a safely isolated area.
5.1.1 Conventions Used in This Manual
The following symbols are used in this manual to indicate important safety information. Be sure to read the descriptions shown
with each symbol.
WARNING
This symbol indicates an imminently hazardous situation which, if operation is not performed properly, will result
in death or serious injury.
WARNING
This symbol indicates a potentially hazardous situation which, if operation is not performed properly, could result
in an injury due to electric shock.
CAUTION
This symbol indicates a potentially hazardous situation which, if operation is not performed properly, may result in
a minor or moderate injury or in property damage only.
Industrial Robot: SCARA Robots GX series Manual Rev.11
317
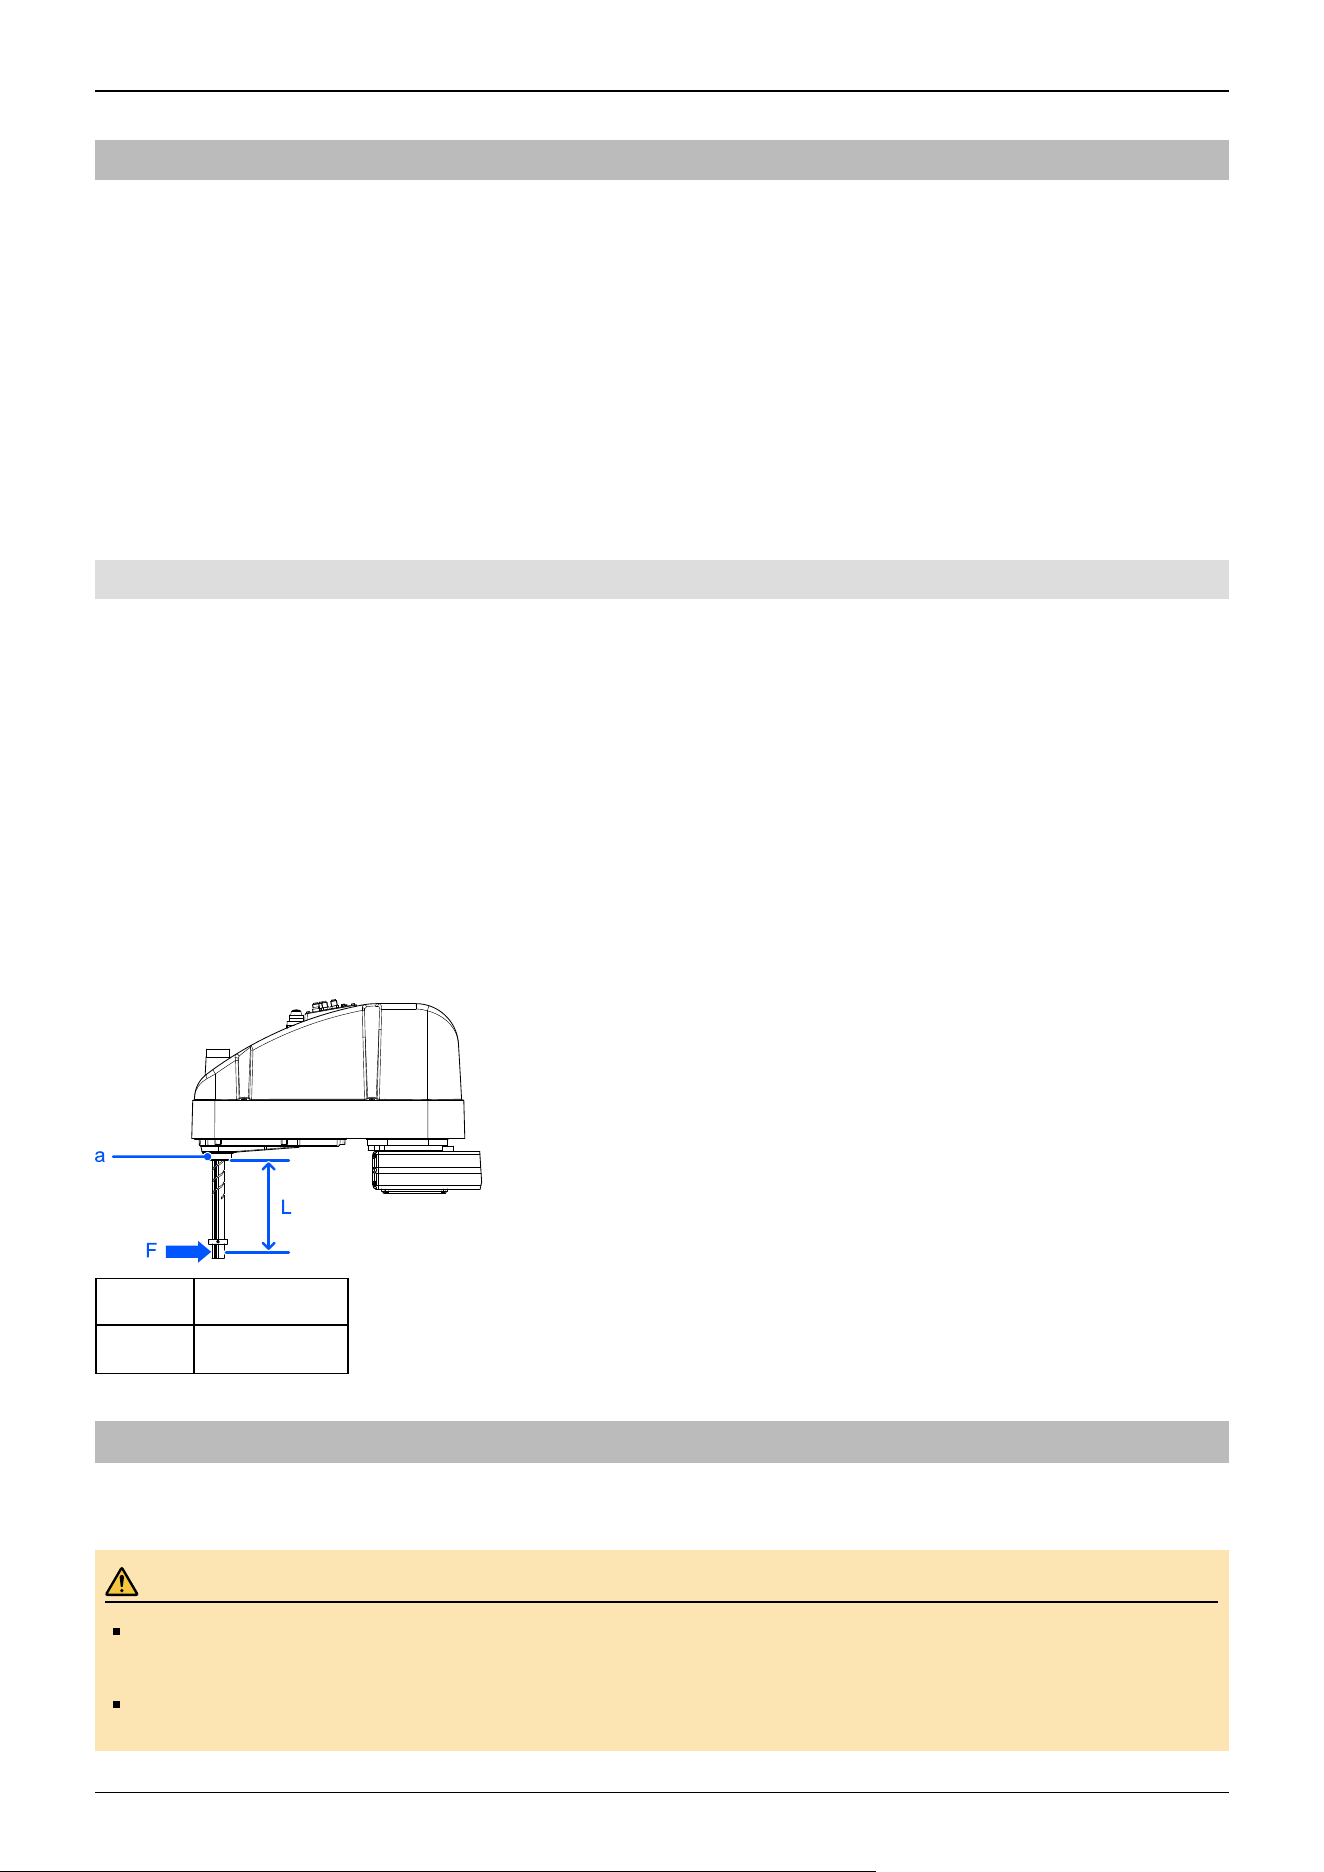
5.1.2 Design and Installation Safety
The robot system should be designed and installed by people who have received installation training provided by Epson and
the suppliers.
Design personnel should refer to the following manuals:
"Safety Manual"
"Controller Manual"
"Manipulator Manual"
Refer to the following section for the installation safety information.
Environment and Installation
Be sure to read this section and follow the safety information before installation to ensure that the installation work is
performed safely.
5.1.2.1 Strength of the Ball Screw Spline
If a load exceeding the allowable bending load is applied to the ball screw spline, it may not work properly due to deformation
or breakage of the shaft.
If a load exceeding the allowable value is applied to the ball screw spline, the ball screw spline unit must be replaced.
The allowable load varies depending on the distance over which the load is applied. To calculate the allowable load, refer to
the formula below.
Allowable bending moment
GX10-B/GX10-C/GX20-B/GX20-C: M=50,000 N·mm
Calculation example: 500 N load applied at 100 mm from the end of the spline nut
Moment
M = F·L = 100·500 = 50,000 N·mm
Symbol Description
a Spline nut end
5.1.3 Operation Safety
The following items are safety precautions for operating personnel:
WARNING
Be sure to read the Safety Manual before use. Operating the robot system without understanding the safety
information can be extremely dangerous and may result in serious injury or severe equipment damage.
Before operating the robot system, make sure that no one is inside the safety barriers. The robot system can
be operated in the teaching operation mode even when someone is inside the safety barriers. Even though
Industrial Robot: SCARA Robots GX series Manual Rev.11
318
the motion of the Manipulator is always restricted (low speed and low power) to ensure operator safety, an
unexpected movement by the Manipulator can be extremely dangerous and may cause serious safety
problems.
If the Manipulator makes any abnormal movements during operation of the robot system, do not hesitate to
immediately press the emergency stop switch.
WARNING
To perform the power supply lockout, remove the power plug. Be sure to connect the AC power cable to a
power outlet. Do not connect it directly to a factory power source.
Before performing any replacement work, inform others in the area that you are working, and then turn off the
Controller and related equipment, and unplug the power cable from the power source. Performing any work
procedure with the power turned on is extremely dangerous and may result in electric shock and/or
malfunction of the robot system.
Do not connect or disconnect the connector of the M/C cable while the Controller is turned on. There is a risk
the Manipulator may malfunction, which is extremely hazardous. Also, performing any work procedure with
the power turned on may result in electric shock and/or malfunction of the robot system.
CAUTION
Whenever possible, only one person should operate the robot system. If it is necessary to operate with more
than one person, ensure that all personnel communicate with each other and take all necessary safety
precautions.
Joints #1, #2, and #4:
If the Manipulator is operated repeatedly with an operating angle of 5° or less, the bearings used in the joints
are likely to cause oil film shortage. Repeated operation may cause premature damage. To prevent premature
damage, operate the Manipulator to move each joint to an angle of 50° or more about once per hour.
Joint #3:
If the up-and-down motion of the hand is 10 mm or less, move the hand about half or more of its maximum
stroke about once per hour.
When the robot is operating at low speed (Speed: 5 to 20%), vibration (resonance) may occur continuously
during operation depending on the combination of the arm orientation and hand load. Vibration occurs due to
the natural vibration frequency of the arm and can be reduced by taking the following measures:
Changing the robot speed
Changing the teach points
Changing the hand load
5.1.4 Emergency Stop
Each robot system needs equipment that will allow the operator to immediately stop the system's operation. Install an
emergency stop device by using emergency stop input from the Controller or other equipment.
Before using the emergency stop switch, be aware of the following points.
The emergency stop switch should be used to stop the Manipulator only in case of emergencies.
Besides pressing the emergency stop switch when an emergency occurs, to stop the Manipulator during program operation,
use the Pause or STOP (program stop) statements assigned to a standard I/O.
The Pause and STOP statements do not turn off motor energization, and so the brake is not locked.
Industrial Robot: SCARA Robots GX series Manual Rev.11
319
To place the robot system in emergency stop mode in a non-emergency (normal) situation, press the emergency stop switch
while the Manipulator is not operating.
Do not press the emergency stop switch unnecessarily while the Manipulator is operating normally.
It could shorten the lifespan of the following components.
Brakes
The brakes will be locked, which will shorten the lifespan of the brakes due to worn brake friction plates.
Normal brake lifespan:
About 2 years (when the brakes are used 100 times/day)
or about 20,000 times
Reduction gears
An emergency stop applies an impact to the reduction gear, which can shorten its life.
If the Manipulator is stopped by turning off the Controller while it is operating, the following problems may occur.
Reduced life and damage to reduction gear
Position shift at the joints
If a power outage or other unavoidable Controller power-off occurs during Manipulator operation, check the following points
after power is restored.
Damage in reduction gear
Shifting of the joints from their proper positions
If there was any shifting, maintenance is required. For more information, please contact the supplier.
Stopping distance of emergency stop
The Manipulator during operation cannot stop immediately after the emergency stop switch is pressed. Also, the stopping time
and movement distance vary depending on the following factors.
Hand weight, WEIGHT setting, ACCEL setting, workpiece weight, SPEED setting, movement posture, etc.
For the stopping time and movement distance of the Manipulator, refer to the following section.
Appendix B: Stopping Time and Stopping Distance at Emergency Stop
5.1.5 Safeguard (SG)
To maintain a safe working zone, safety barriers must be set up around the Manipulator, and safeguards must be installed at the
entrance and exit of the safety barriers.
The term "safeguard" as used in this manual refers to a safety device with an interlock that allows entry into the safety barriers.
Specifically, this includes safety door switches, safety barriers, light curtains, safety gates, safety floor mats, and so on. The
safeguard is an input that informs the Robot Controller that an operator may be inside the safeguard area. You must assign at
least one Safeguard (SG) in Safety Function Manager.
When the safeguard is opened, Protective Stop operates to change to the safeguard open state (display: SO).
Safeguard open
Operations are prohibited. Further robot operation is not possible until either the safeguard is closed, the latched state is
released, and a command is executed, or the TEACH or TEST operation mode is turned on and the enable circuit is
activated.
Safeguard closed
The robot can operate automatically in an unrestricted (high power) state.
WARNING
Industrial Robot: SCARA Robots GX series Manual Rev.11
320
If a third party accidentally releases the safeguard while an operator is working inside the safety barriers, this
may result in a hazardous situation. To protect the operator working inside the safety barriers, implement
measures to lock out or tag out the latch release switch.
To protect operators working near the robot, be sure to connect a safeguard switch and make sure that it
works properly.
Installing safety barriers
When installing safety barriers within the maximum range of the Manipulator, combine safety functions such as SLP. Carefully
take into account the size of the hand and the workpieces to be held so that no interference occurs between the operating parts
and the safety barriers.
Installing safeguards
Design the safeguards so that they satisfy the following requirements:
When using a key switch type safety device, use a switch that forcibly opens the interlock contacts. Do not use switches
that open their contacts using the spring force of the interlock.
When using an interlock mechanism, do not disable the interlock mechanism.
Considering the stopping distance
During operation, the Manipulator cannot stop immediately even if the safeguard is opened. Also, the stopping time and
movement distance vary depending on the following factors.
Hand weight, WEIGHT setting, ACCEL setting, workpiece weight, SPEED setting, movement posture, etc.
For the stopping time and movement distance of the Manipulator, refer to the following section.
Appendix C: Stopping Time and Stopping Distance When Safeguard is Open
Precautions for safeguard operation
Do not open the safeguard unnecessarily while the motor is energized. Frequent safeguard inputs will reduce the life of the
relay.
Normal relay lifespan: About 20,000 times
5.1.6 Arm Movement Method in the Emergency Stop State
In the emergency stop state, move the Manipulator joints directly by hand as shown below.
Joint #1:
Push Arm #1 by hand.
Joint #2:
Push Arm #2 by hand.
Joint #3:
The joint cannot be moved up or down by hand because the electromagnetic brake is activated.
Move the joint while pressing down the brake release switch.
Joint #4:
The joint cannot be rotated by hand because the electromagnetic brake is activated.
Move the joint while pressing down the brake release switch.
Industrial Robot: SCARA Robots GX series Manual Rev.11
321
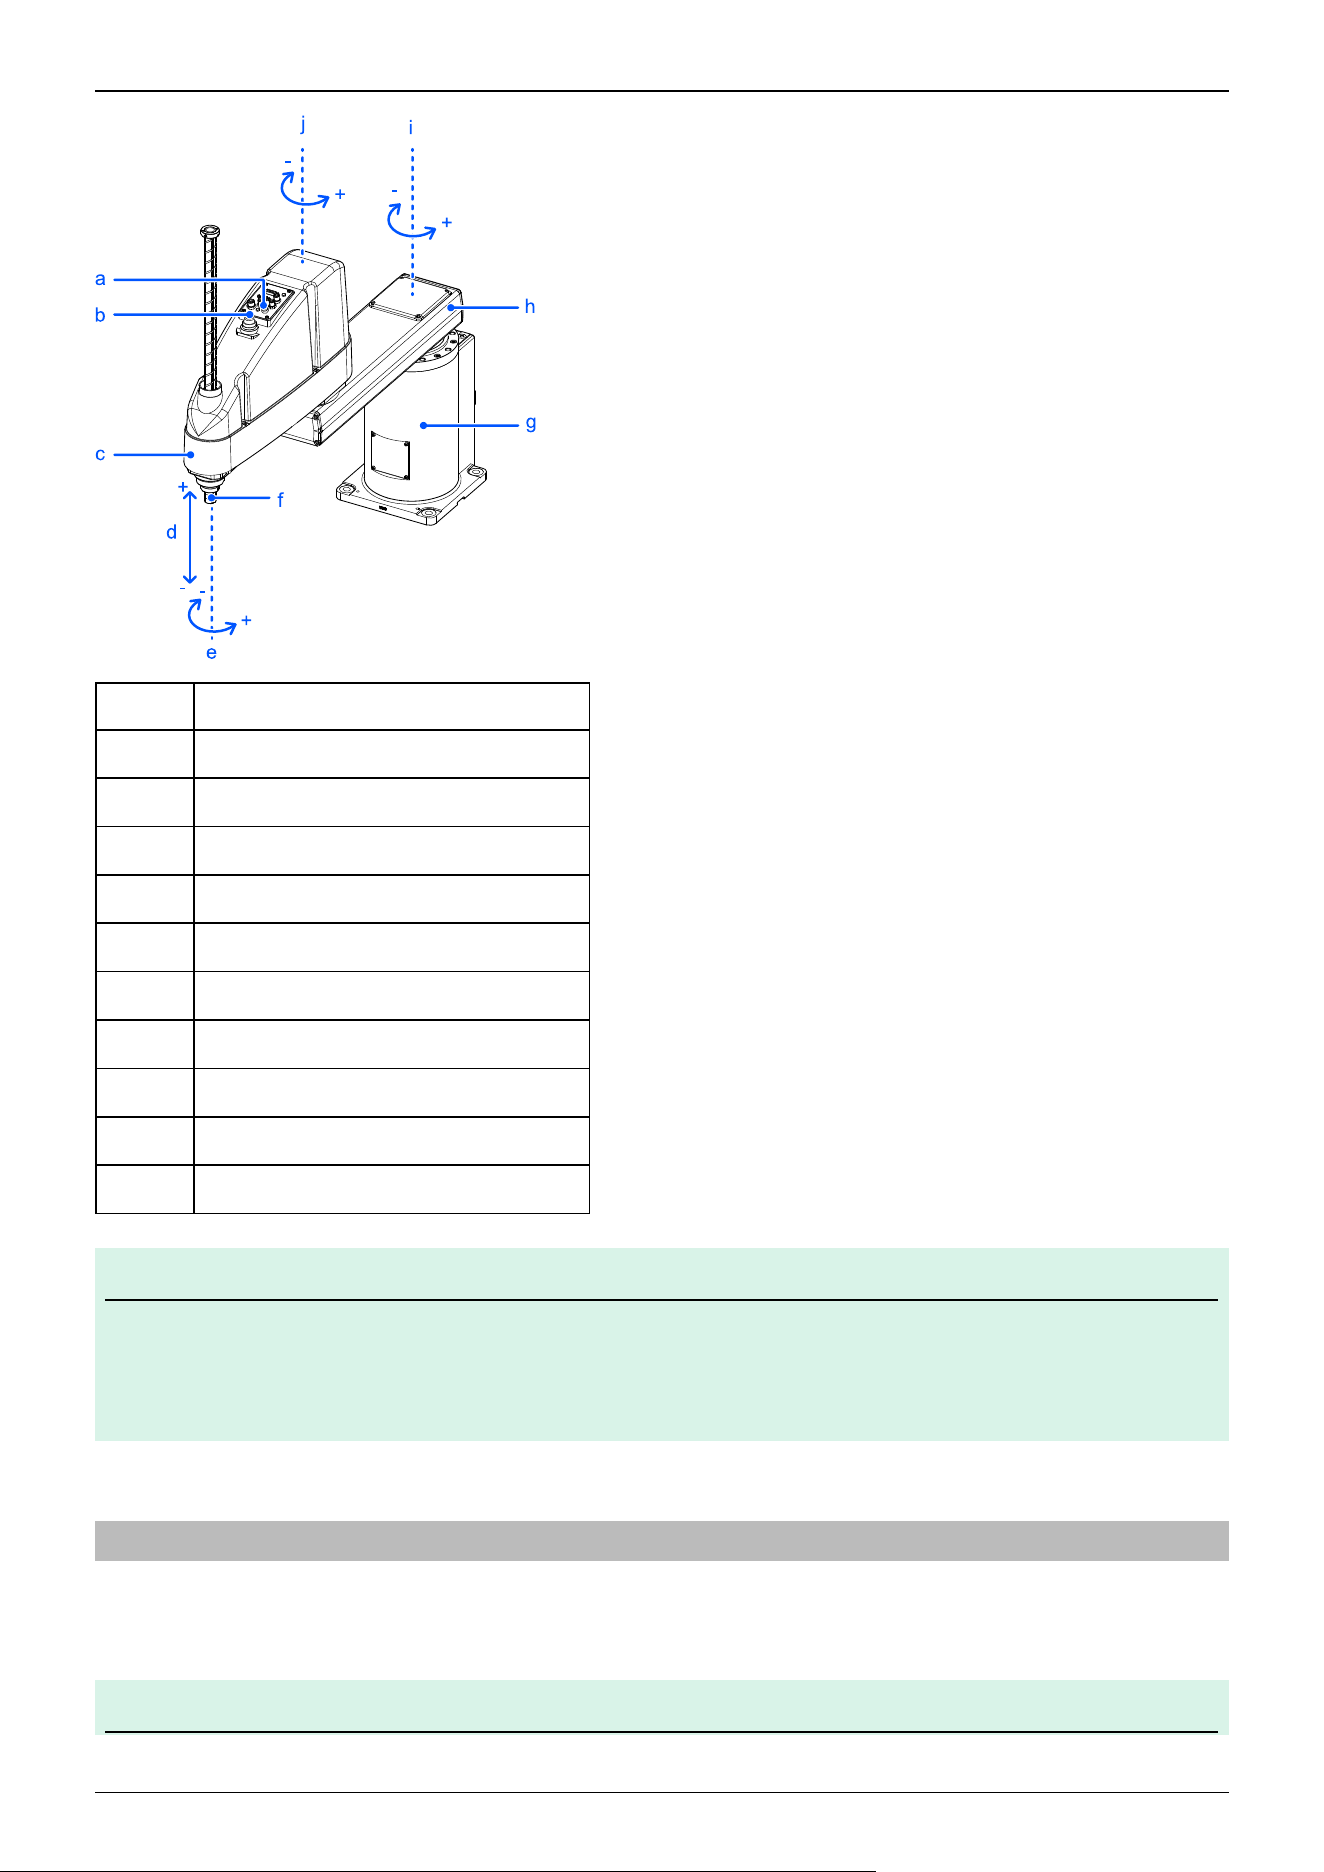
Symbol Description
a Joint #3 and Joint #4 brake release switch
b Indicating lamp
c Arm #2
d Joint #3 (up/down movement)
e Joint #4 (rotation)
f Shaft
g Base
h Arm #1
i Joint #1 (rotation)
j Joint #2 (rotation)
KEY POINTS
The brake release switch is used with both Joint #3 and Joint #4. Press the brake release switch while in the
emergency stop state to simultaneously release the brakes on Joint #3 and Joint #4.
When pressing the brake release switch, watch for the shaft descending or rotating under the weight of the hand.
5.1.7 ACCELS Setting for CP Motion
To make the Manipulator move in CP motion, set ACCELS properly in the SPEL program according to the tip load and the Z-
axis height.
KEY POINTS
✏
✏
Industrial Robot: SCARA Robots GX series Manual Rev.11
322
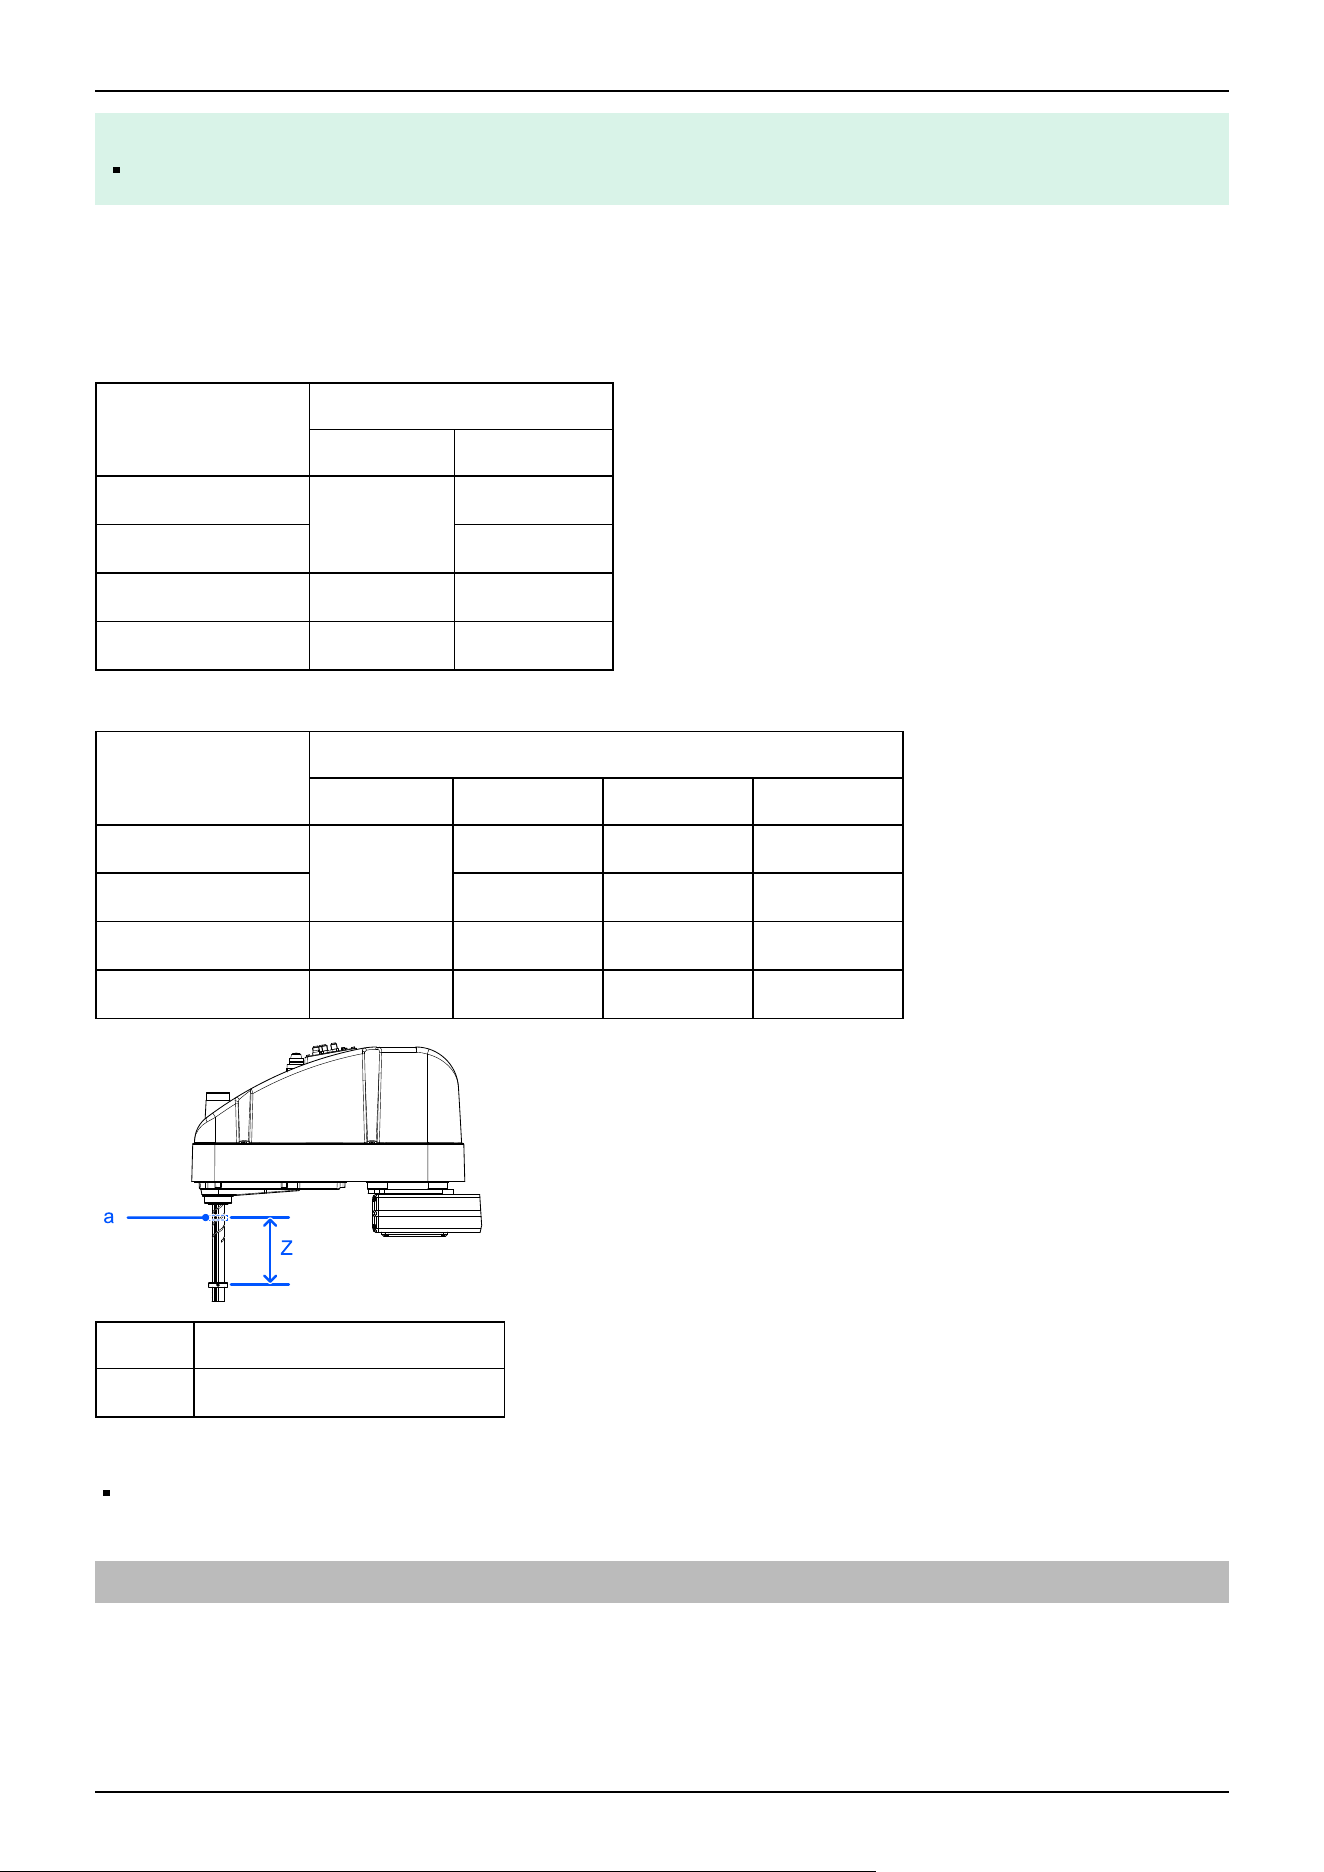
If the ACCELS settings are not properly configured, the following problem may occur.
Shortened lifespan and damage to the ball screw spline
Set ACCELS as shown below based on the Z-axis height.
ACCELS setting values by the Z-axis height and tip load
GX10-B/GX10-C
Z-axis Height (mm)
Tip Load
5 kg or Less 10 kg or Less
0 > Z ≥ -100
25000 or less
18000 or less
-100 > Z ≥ -200 11000 or less
- 200 > Z ≥ -300 15000 or less 7500 or less
- 300 > Z ≥ -420 11000 or less 5500 or less
GX20-B/GX20-C
Z-axis Height (mm)
Tip Load
5 kg or less 10 kg or less 15 kg or less 20 kg or less
0 > Z ≥ -100
25000 or less
18000 or less 12000 or less 9000 or less
- 100 > Z ≥ -200 11000 or less 7000 or less 5500 or less
- 200 > Z ≥ -300 15000 or less 7500 or less 5000 or less 3500 or less
- 300 > Z ≥ -420 11000 or less 5500 or less 3500 or less 2500 or less
Symbol Description
a Z-axis height 0 (origin position)
Also, if a CP motion was performed with incorrect values set, check the following point.
No deformation or bending of the shaft of the ball screw spline
5.1.8 Warning Labels
The Manipulator has the following warning labels.
Specific hazards exist in the vicinity of areas with the warning labels. Be thoroughly careful in handling.
To ensure that the Manipulator is operated and maintained safely, be sure to follow the safety information and warnings
indicated on the warning labels. Also, do not tear, damage, or remove these warning labels.
Industrial Robot: SCARA Robots GX series Manual Rev.11
323
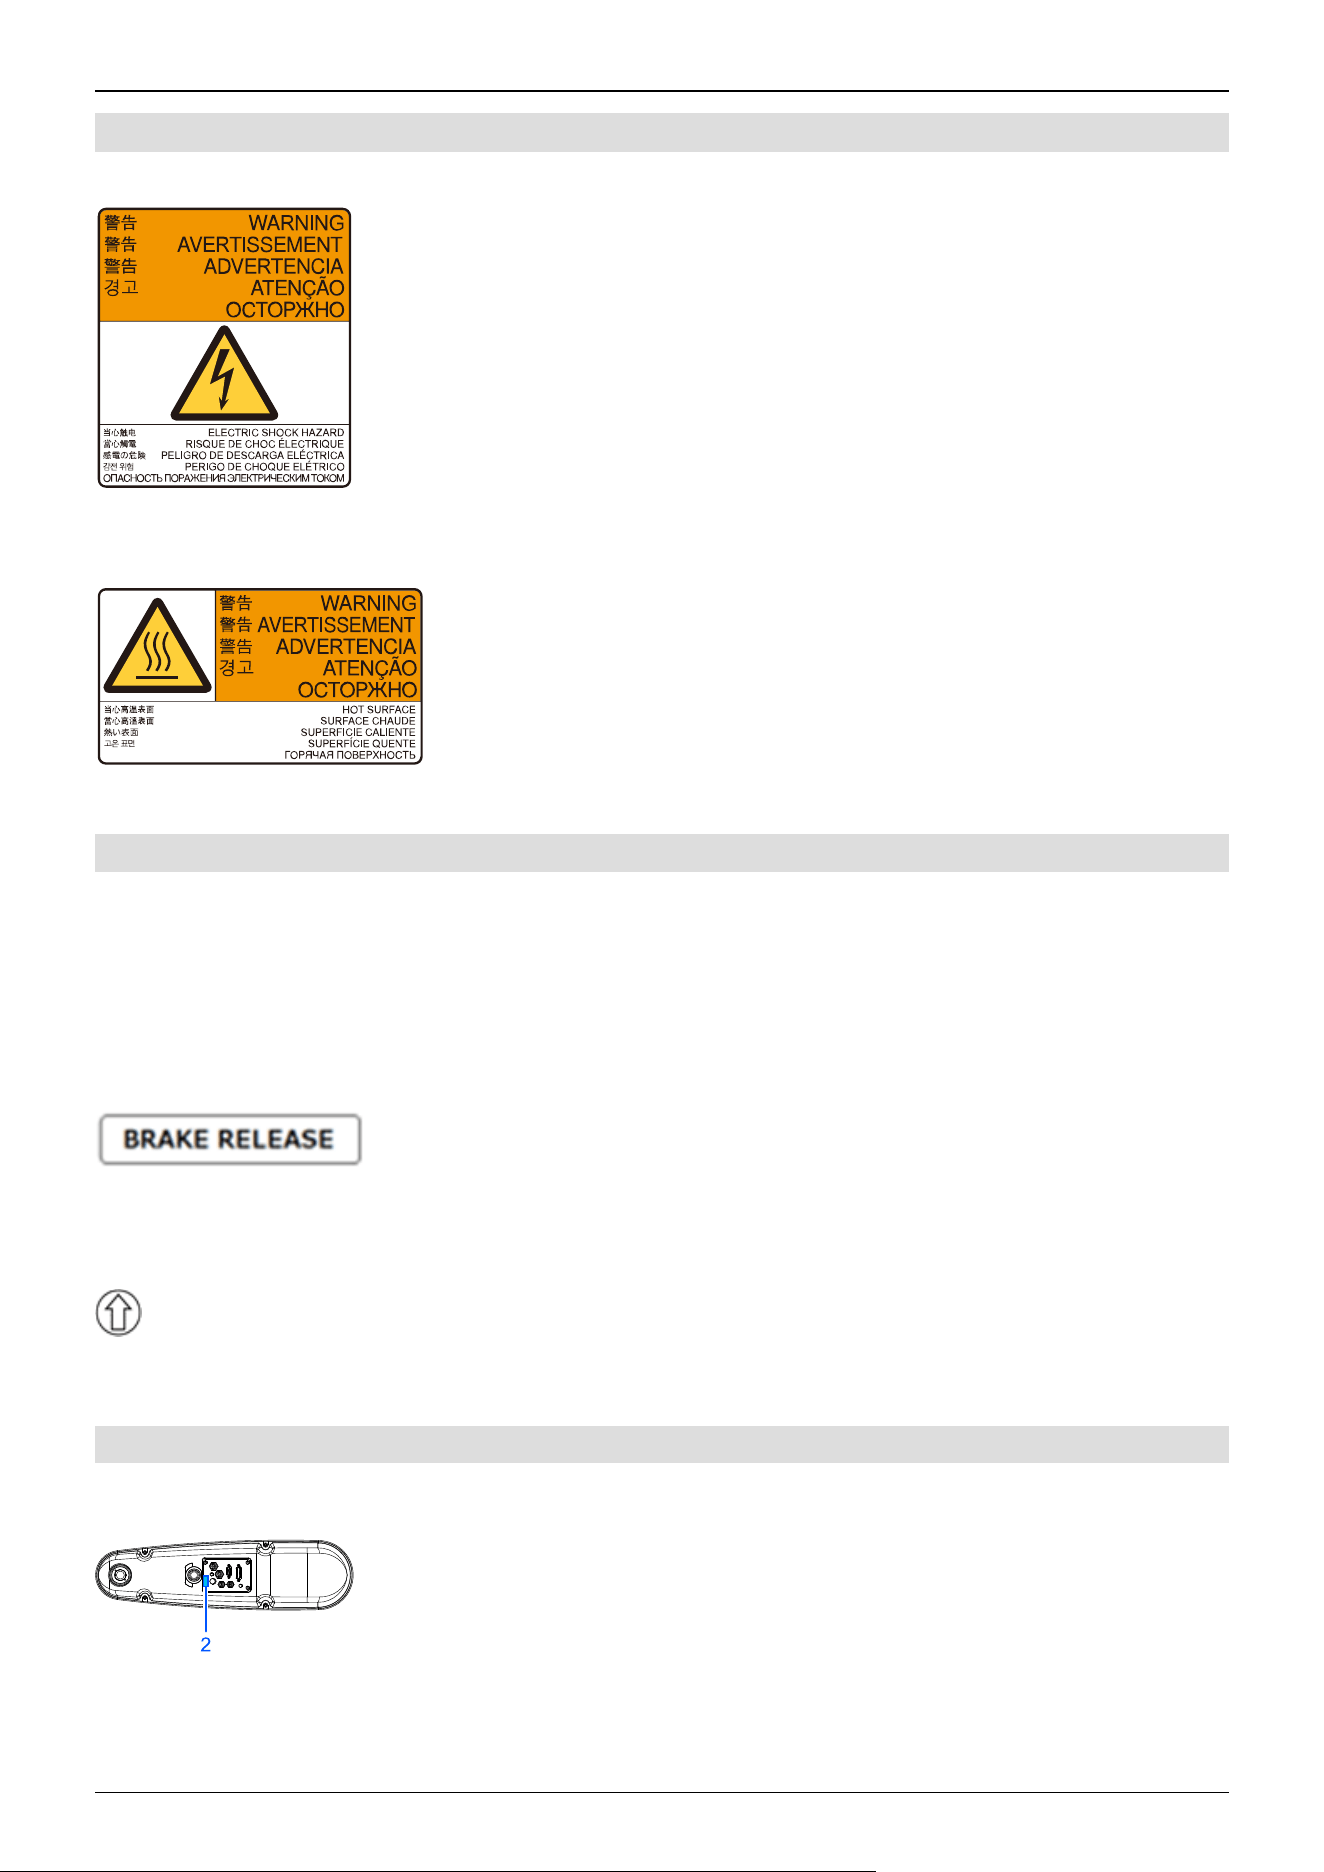
5.1.8.1 Warning Labels
A
Touching any internal electrified parts while the power is turned on may cause electric shock.
B
The surface of the Manipulator is hot during and after operation, and there is a risk of burns.
5.1.8.2 Information Labels
1
This indicates the product name, model name, serial number, information of supported laws and regulations, product
specifications (Weight, MAX.REACH, MAX.PAYLOAD, AIR PRESSURE, Motor Power), Main document No.,
manufacturer, importer, date of manufacture, country of manufacture, and the like.
For details, see the label affixed to the product.
2
Indicates the position of a brake release button.
3
Indicates the position of a threaded hole for an eyebolt mounting screw.
5.1.8.3 Labelled Locations
Common (Arm #2)
Table top mounting specifications (GX10-B/GX10-C/GX20-B/GX20-C****)
Industrial Robot: SCARA Robots GX series Manual Rev.11
324
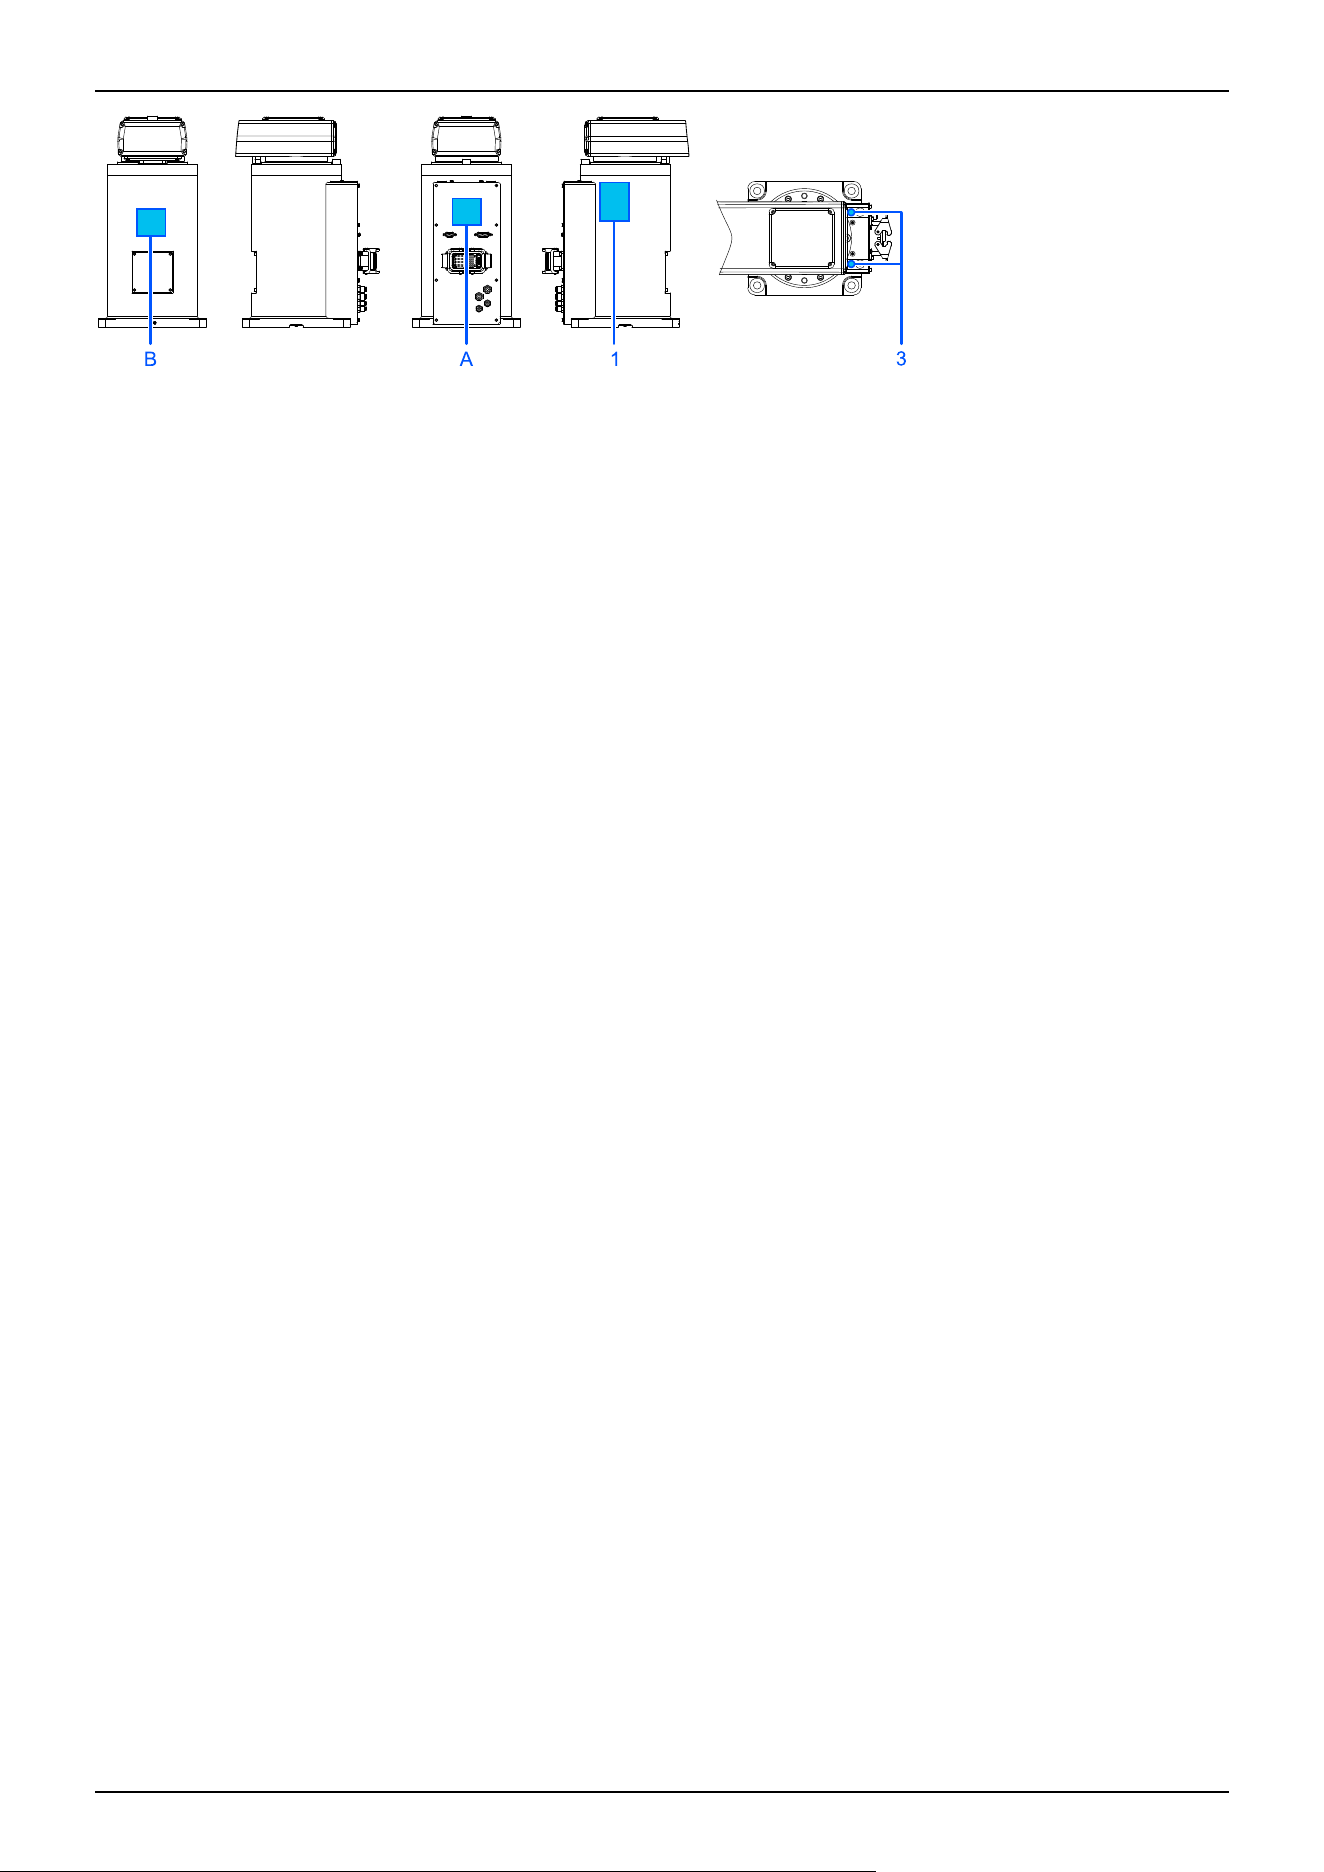
Industrial Robot: SCARA Robots GX series Manual Rev.11
325
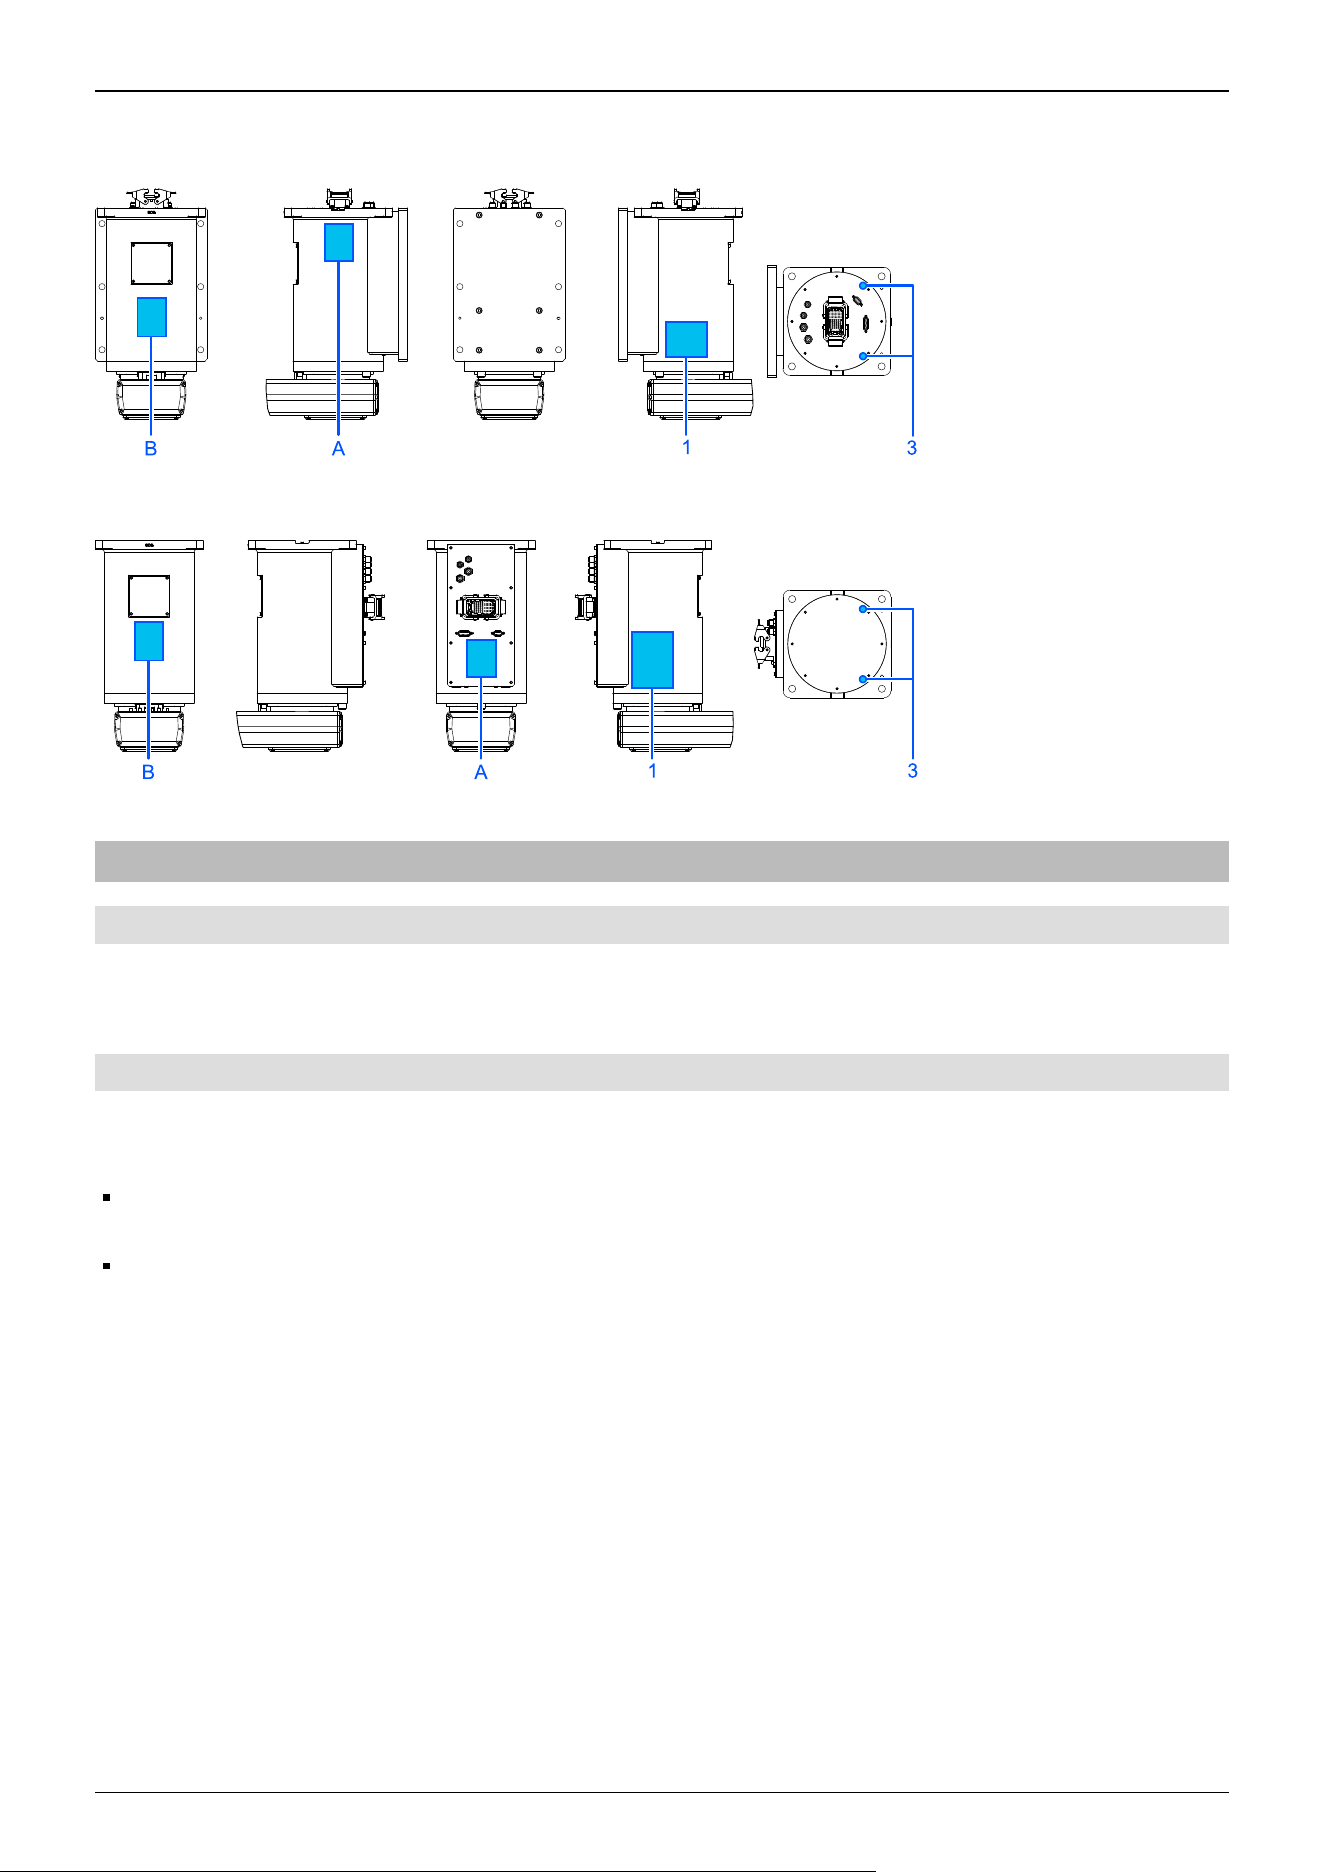
Wall mounting specifications (GX10-B/GX10-C/GX20-B/GX20-C****W)
Ceiling mounting specifications (GX10-B/GX10-C/GX20-B/GX20-C****R)
5.1.9 Responses for Emergencies or Malfunctions
5.1.9.1 When a Collision with the Manipulator Occurs
If the Manipulator has collided with a mechanical stop, peripheral device, or other object, discontinue use and contact the
supplier.
5.1.9.2 Entanglement with the Manipulator
If an operator gets caught between the Manipulator and a mechanical part such as a base table, press the emergency stop switch
to release the operator by using the following method.
Operator body is entangled with a robot arm
The brake is not functioning. Move the arm manually.
Operator body is entangled with the shaft
The brake is functioning. Press the brake release switch, and move the shaft.
Industrial Robot: SCARA Robots GX series Manual Rev.11
326
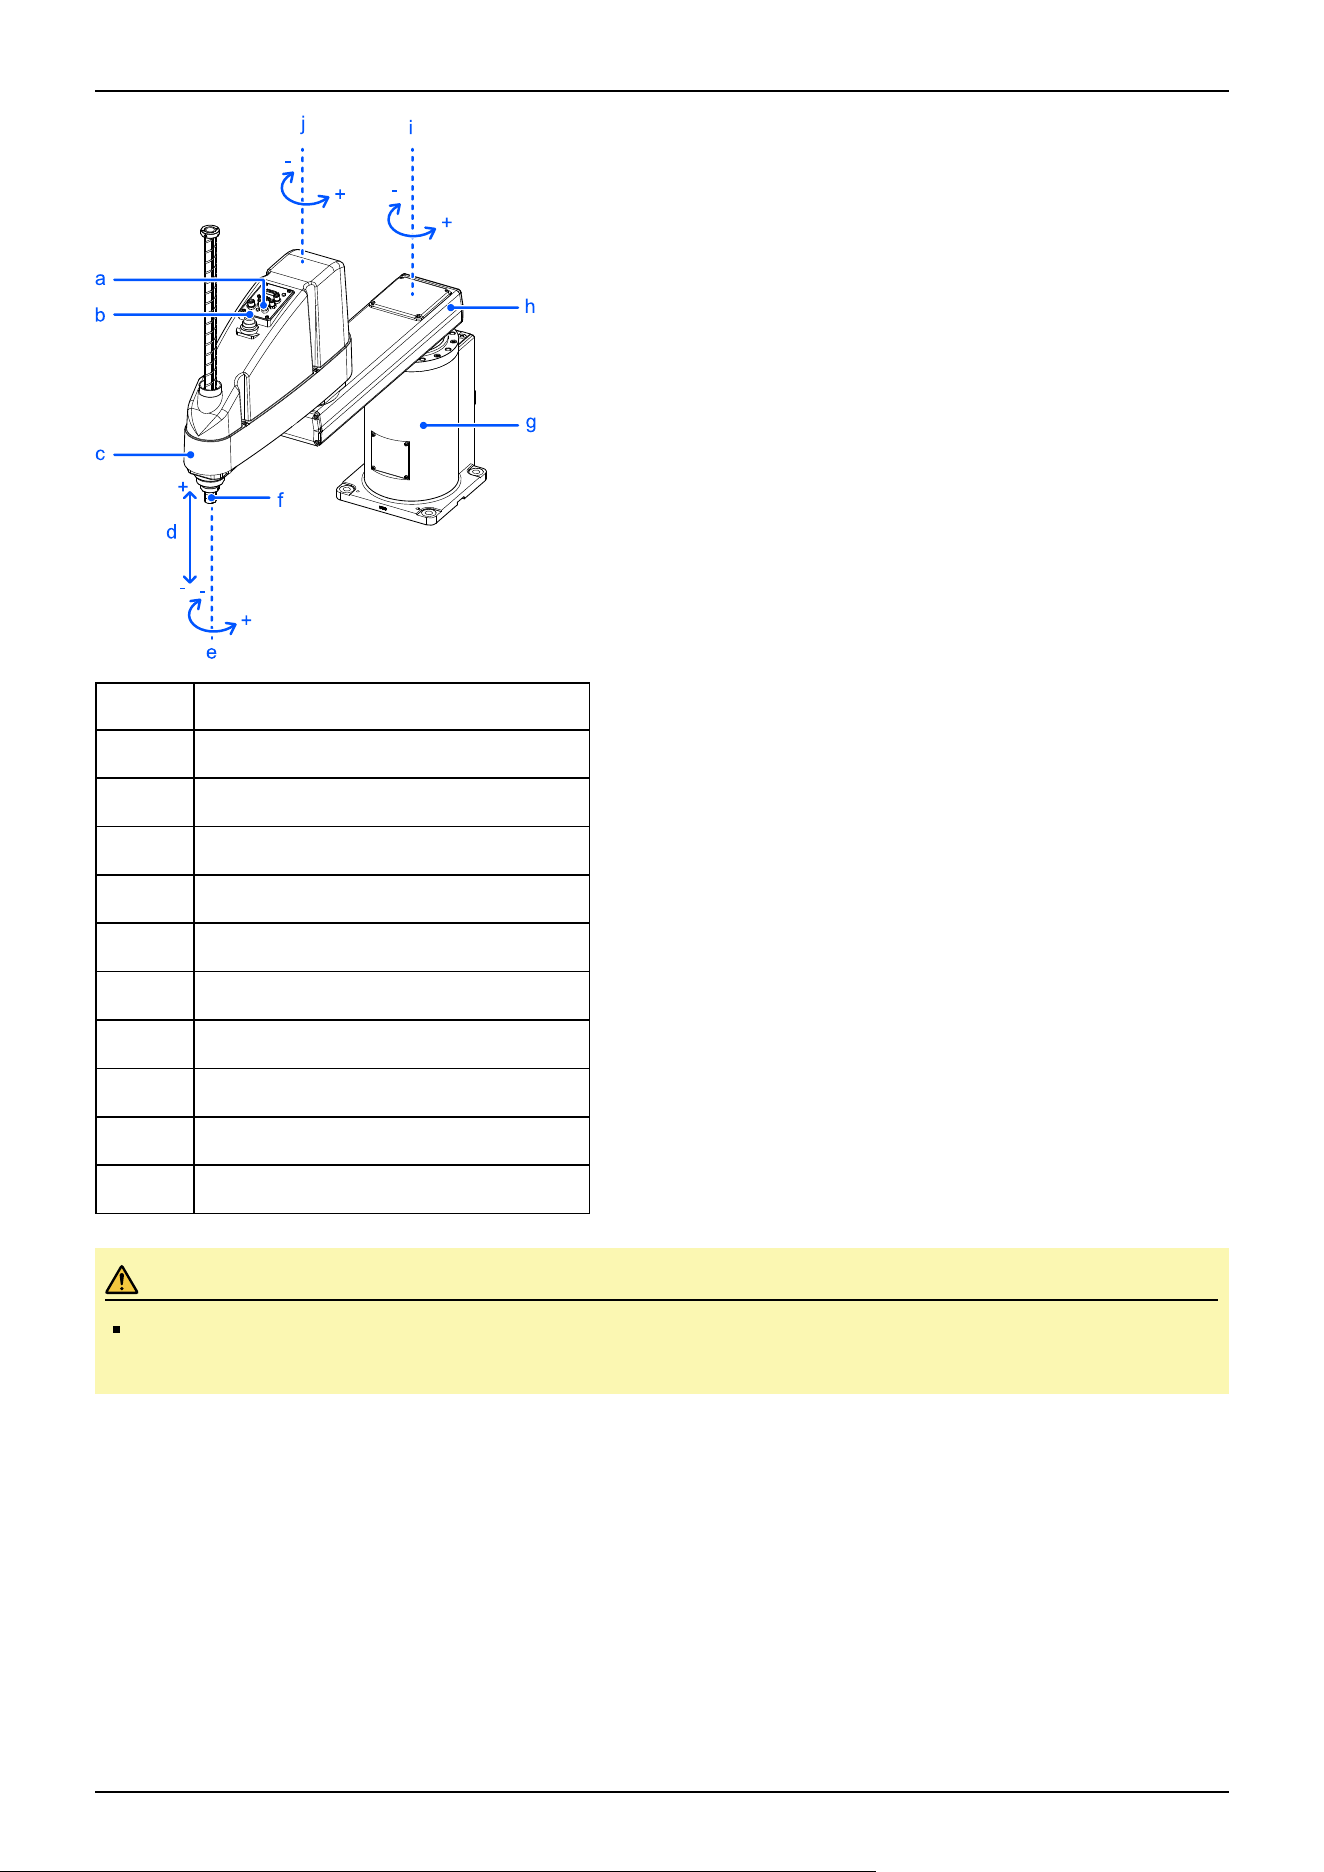
Symbol Description
a Joint #3 and Joint #4 brake release switch
b Indicating lamp
c Arm #2
d Joint #3 (up/down movement)
e Joint #4 (rotation)
f Shaft
g Base
h Arm #1
i Joint #1 (rotation)
j Joint #2 (rotation)
CAUTION
While the brake release switch is being pressed, in addition to Joint #3, Joint #4 may also move due to its
own weight. Be careful of the shaft descending and rotating.
Industrial Robot: SCARA Robots GX series Manual Rev.11
327
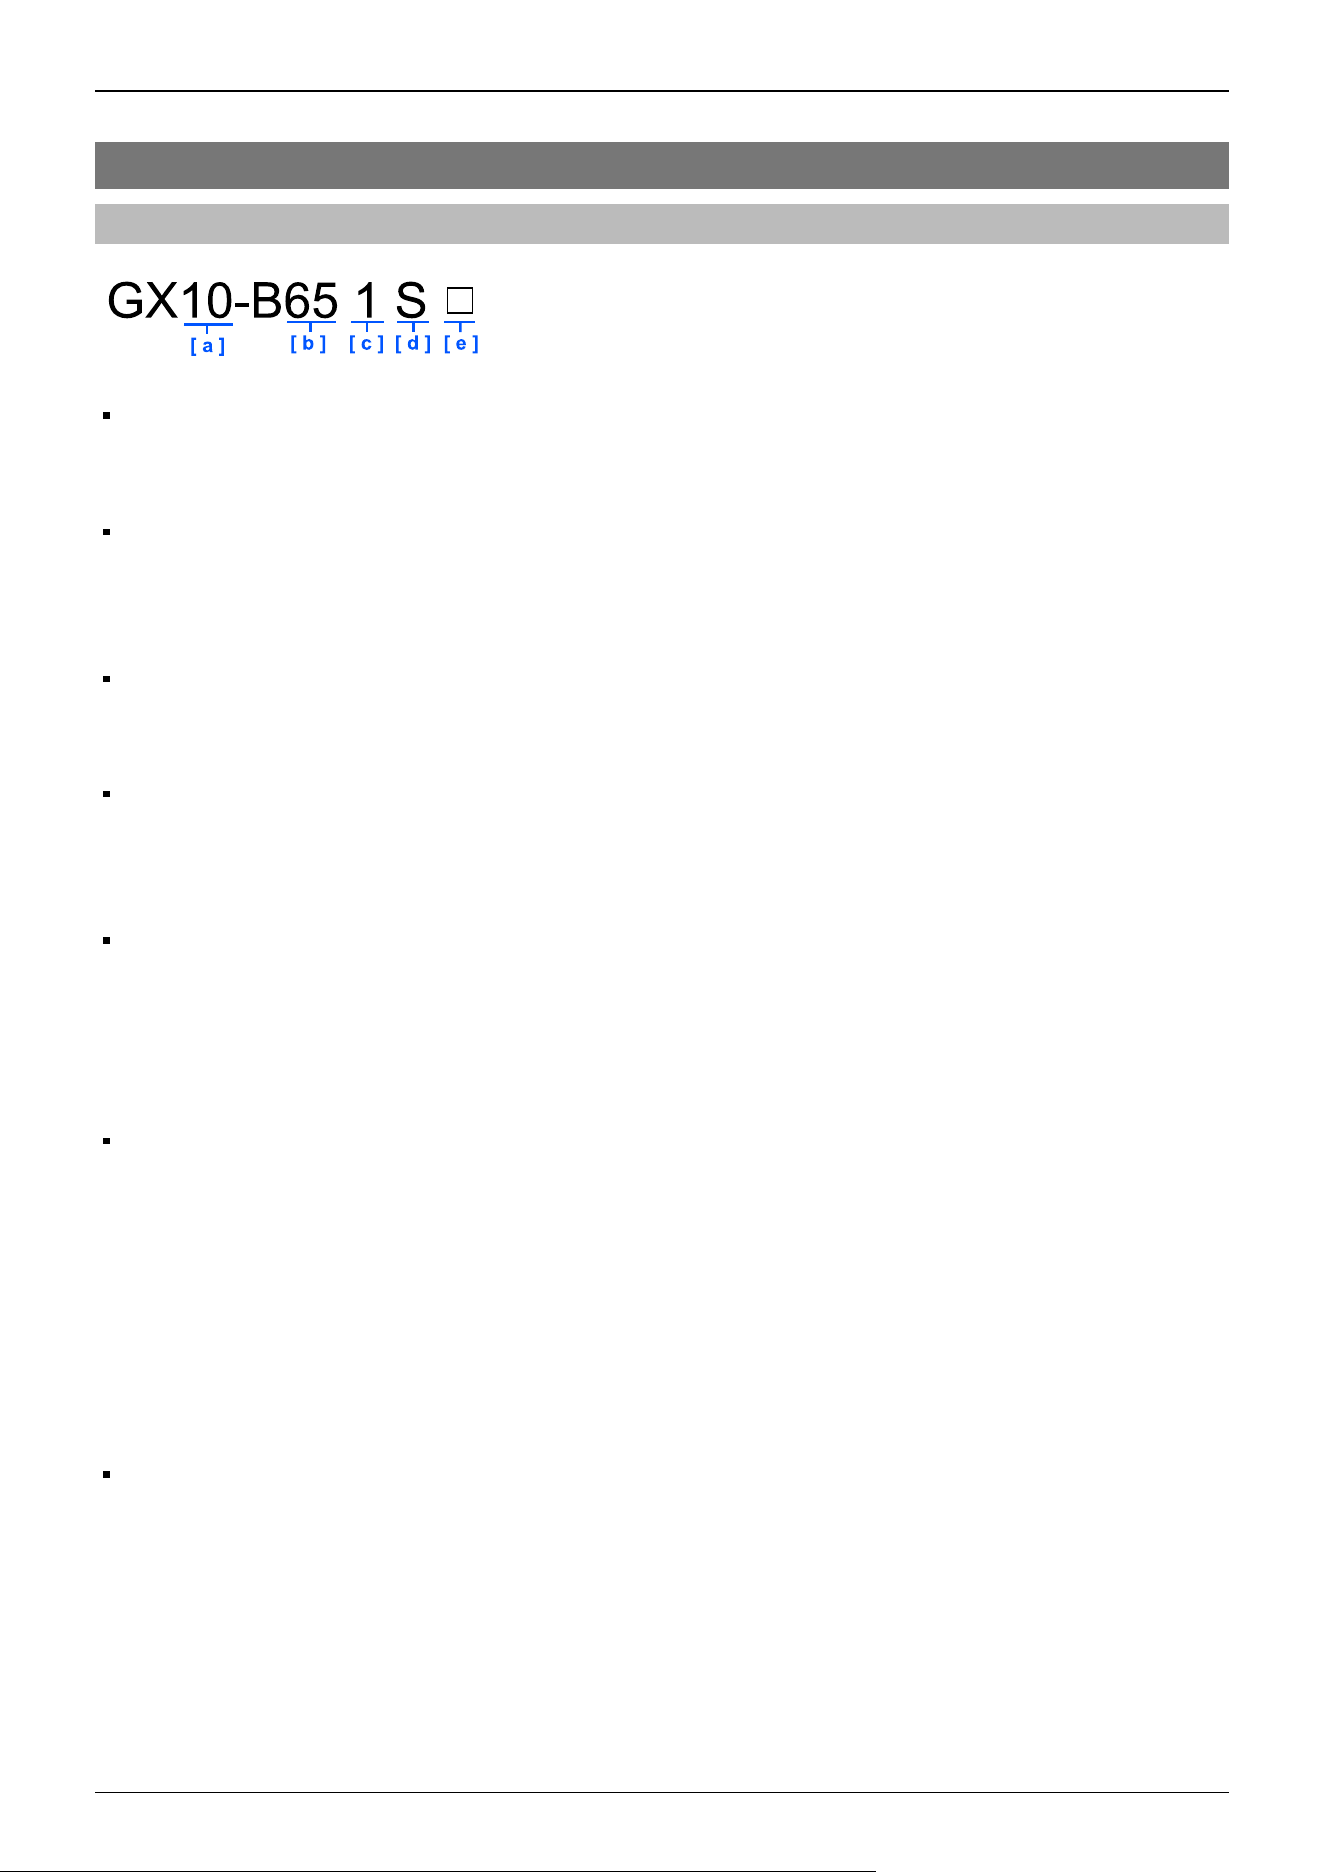
5.2 Specifications
5.2.1 Model Name GX10-B/GX20-B
a: Model name
GX10-B: GX10-B series
GX20-B: GX20-B series
b: Arm length
65: 650 mm (GX10-B series only)
85: 850 mm
A0: 1000 mm (GX20-B series only)
c: Joint #3 stroke
1: 180 mm (GX10-B/GX20-B**1S*), 150 mm (GX10-B/GX20-B**1C*, P*)
4: 420 mm (GX10-B/GX20-B**4S*), 390 mm (GX10-B/GX20-B**4C*, P*)
d: Environmental specifications
S: Standard (equivalent to IP20)
C: Cleanroom & ESD (anti-static)
P: Protection class: IP 65
e: Mounting specifications
□: Table top mounting
W: Wall mounting
R: Ceiling mounting
Environmental specifications
Cleanroom & ESD (anti-static) specifications: GX10-B/GX20-B***C*
Manipulators with cleanroom & ESD (anti-static) specifications have a base design with the standard specifications, but as
an additional feature, have reduced dust emissions from the Manipulator to enable use in cleanroom environments.
ESD specifications are specifications that use conductive materials for or apply plating to the major resin parts as anti-static
measures.
We have confirmed that the Manipulator tip (tool mounting section) is at ±5 V or less, even directly after the measuring
operation according to Seiko Epson standards.
If you need any other detailed information, please contact the supplier.
Also, please check the amount of charge on any hand, wiring, or the like that you will attach to the robot on your own
before use.
Protected-model (IP65): GX10-B/GX20-B***P*
Manipulators with protected-models have a base design with the standard specifications, but as an additional feature, can
be used in adverse environments such as those exposed to oil smoke and dust.
These are compliant with the IP65 protection class (IEC 60529, JIS C0920).
For details on the specifications, refer to the following section.
Appendix A: Specifications Table
Industrial Robot: SCARA Robots GX series Manual Rev.11
328
Model list
GX10-B series
Arm Length Joint #3 Stroke Environmental Specifications Mounting Specifications Model Number
650
180 Standard
Table top GX10-B651S
Wall GX10-B651SW
Ceiling GX10-B651SR
150
Cleanroom & ESD-
Table top GX10-B651C
Wall GX10-B651CW
Ceiling GX10-B651CR
Protection
Table top GX10-B651P
Wall GX10-B651PW
Ceiling GX10-B651PR
420 Standard
Table top GX10-B654S
Wall GX10-B654SW
Ceiling GX10-B654SR
390
Cleanroom & ESD
Table top GX10-B654C
Wall GX10-B654CW
Ceiling GX10-B654CR
Protection
Table top GX10-B654P
Wall GX10-B654PW
Ceiling GX10-B654PR
850
180 Standard
Table top GX10-B851S
Wall GX10-B851SW
Ceiling GX10-B851SR
150
Cleanroom & ESD
Table top GX10-B851C
Wall GX10-B851CW
Ceiling GX10-B851CR
Protection
Table top GX10-B851P
Wall GX10-B851PW
Ceiling GX10-B851PR
420 Standard
Table top GX10-B854S
Wall GX10-B854SW
Ceiling GX10-B854SR
Industrial Robot: SCARA Robots GX series Manual Rev.11
329
Arm Length Joint #3 Stroke Environmental Specifications Mounting Specifications Model Number
390
Cleanroom & ESD
Table top GX10-B854C
Wall GX10-B854CW
Ceiling GX10-B854CR
Protection
Table top GX10-B854P
Wall GX10-B854PW
Ceiling GX10-B854PR
(Units: mm)
Industrial Robot: SCARA Robots GX series Manual Rev.11
330
GX20-B series
Arm Length Joint #3 Stroke Environmental Specifications Mounting Specifications Model Number
850
180 Standard
Table top GX20-B851S
Wall GX20-B851SW
Ceiling GX20-B851SR
150
Cleanroom & ESD
Table top GX20-B851C
Wall GX20-B851CW
Ceiling GX20-B851CR
Protection
Table top GX20-B851P
Wall GX20-B851PW
Ceiling GX20-B851PR
420 Standard
Table top GX20-B854S
Wall GX20-B854SW
Ceiling GX20-B854SR
390
Cleanroom & ESD
Table top GX20-B854C
Wall GX20-B854CW
Ceiling GX20-B854CR
Protection
Table top GX20-B854P
Wall GX20-B854PW
Ceiling GX20-B854PR
1000
180 Standard
Table top GX20-BA01S
Wall GX20-BA01SW
Ceiling GX20-BA01SR
150
Cleanroom & ESD
Table top GX20-BA01C
Wall GX20-BA01CW
Ceiling GX20-BA01CR
Protection
Table top GX20-BA01P
Wall GX20-BA01PW
Ceiling GX20-BA01PR
420 Standard
Table top GX20-BA04S
Wall GX20-BA04SW
Ceiling GX20-BA04SR
Industrial Robot: SCARA Robots GX series Manual Rev.11
331
Arm Length Joint #3 Stroke Environmental Specifications Mounting Specifications Model Number
390
Cleanroom & ESD
Table top GX20-BA04C
Wall GX20-BA04CW
Ceiling GX20-BA04CR
Protection
Table top GX20-BA04P
Wall GX20-BA04PW
Ceiling GX20-BA04PR
(Units: mm)
Industrial Robot: SCARA Robots GX series Manual Rev.11
332
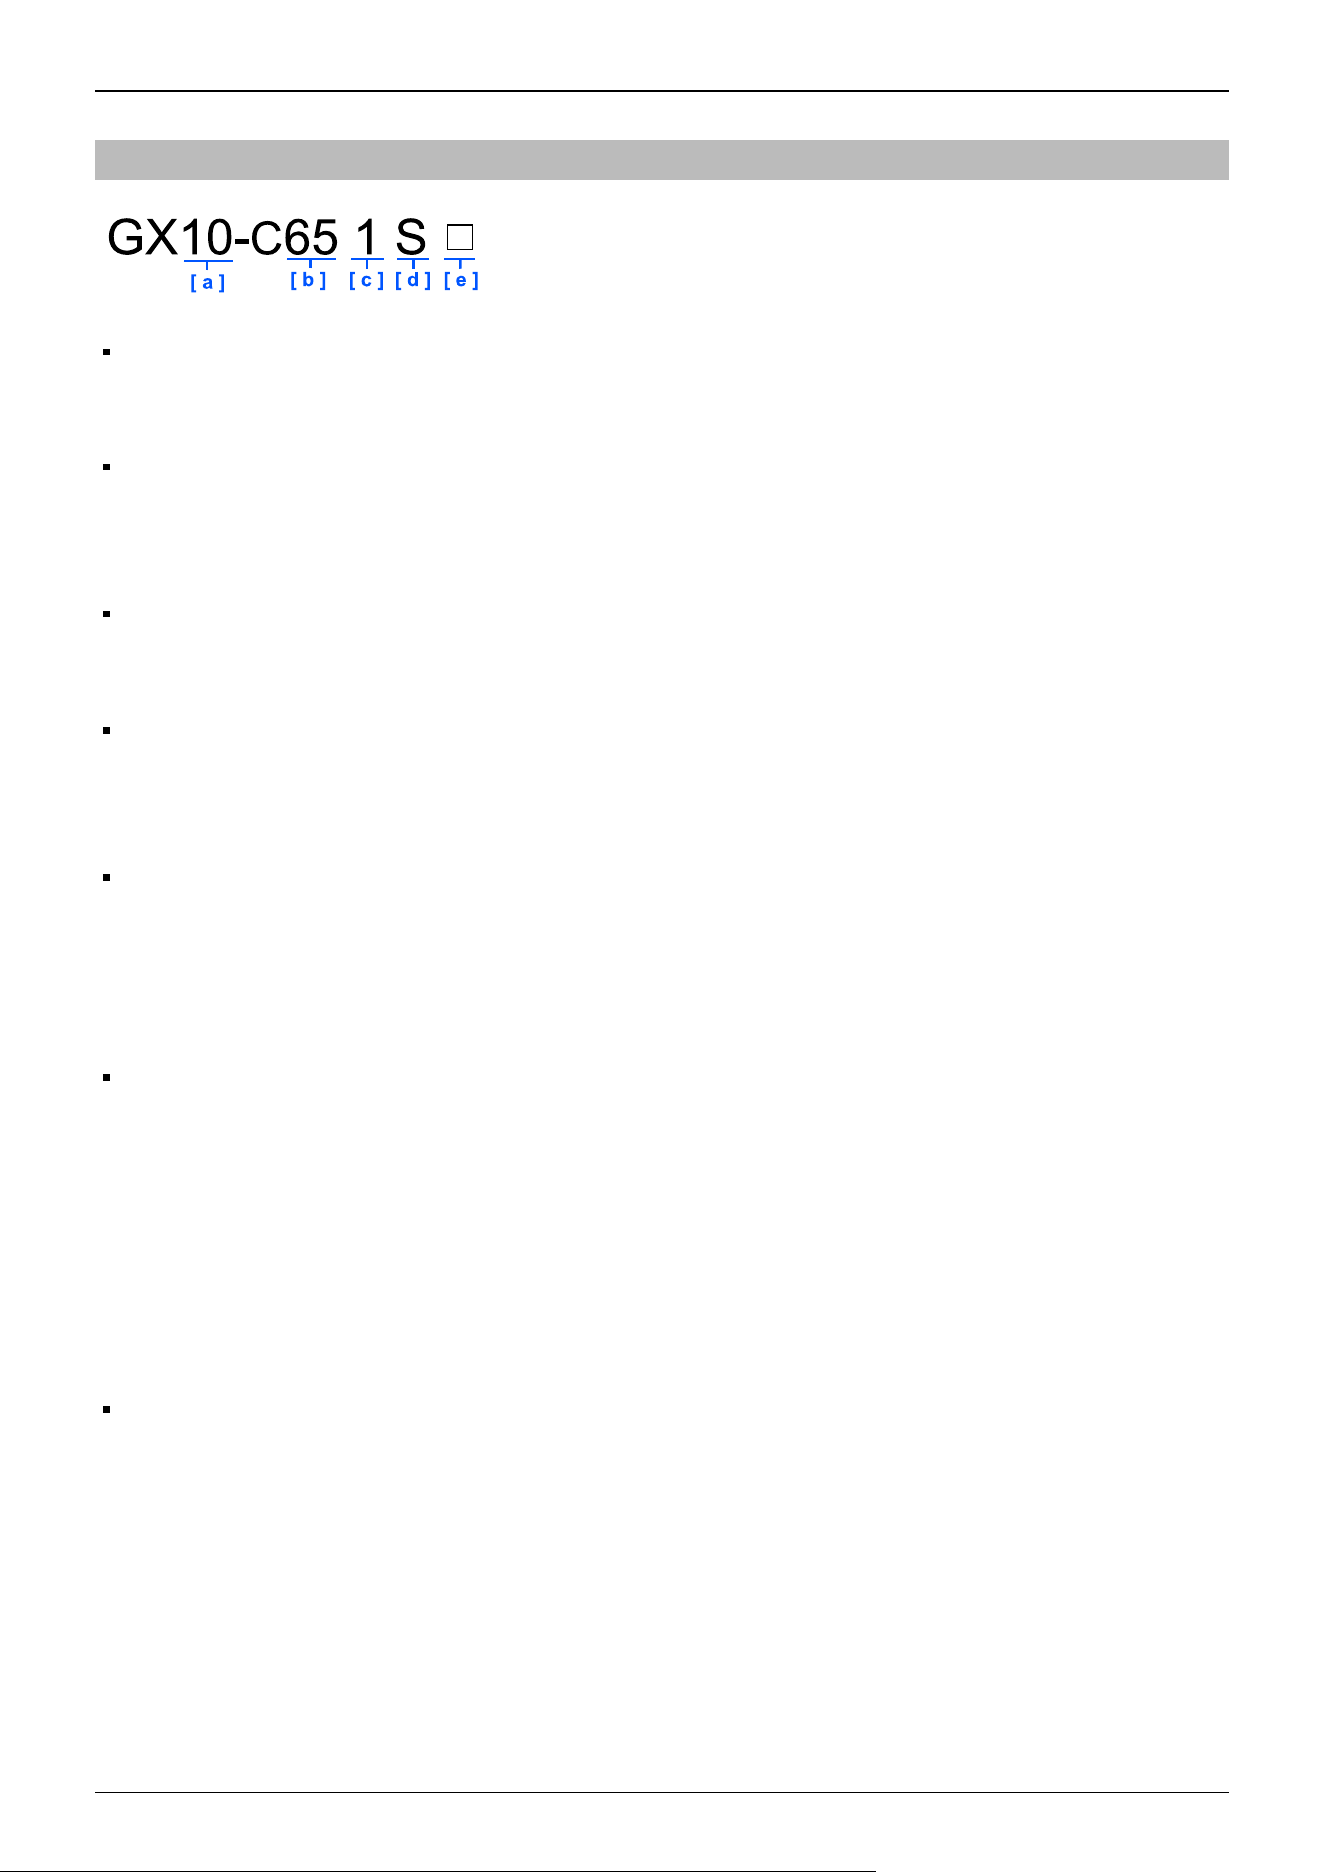
5.2.2 Model Name GX10-C/GX20-C
a: Model name
GX10-C: GX10-C series
GX20-C: GX20-C series
b: Arm length
65: 650 mm (GX10-C series only)
85: 850 mm
A0: 1000 mm (GX20-C series only)
c: Joint #3 stroke
1: 180 mm (GX10-C/GX20-C**1S*), 150 mm (GX10-C/GX20-C**1C*, P*)
4: 420 mm (GX10-C/GX20-C**4S*), 390 mm (GX10-C/GX20-C**4C*, P*)
d: Environmental specifications
S: Standard (equivalent to IP20)
C: Cleanroom & ESD (anti-static)
P: Protection class: IP 65
e: Mounting specifications
□: Table top mounting
W: Wall mounting
R: Ceiling mounting
Environmental specifications
Cleanroom & ESD (anti-static) specifications: GX10-C/GX20-C***C*
Manipulators with cleanroom & ESD (anti-static) specifications have a base design with the standard specifications, but as
an additional feature, have reduced dust emissions from the Manipulator to enable use in cleanroom environments.
ESD specifications are specifications that use conductive materials for or apply plating to the major resin parts as anti-static
measures.
We have confirmed that the Manipulator tip (tool mounting section) is at ±5 V or less, even directly after the measuring
operation according to Seiko Epson standards.
If you need any other detailed information, please contact the supplier.
Also, please check the amount of charge on any hand, wiring, or the like that you will attach to the robot on your own
before use.
Protected-model (IP65): GX10-C/GX20-C***P*
Manipulators with protected-models have a base design with the standard specifications, but as an additional feature, can
be used in adverse environments such as those exposed to oil smoke and dust.
These are compliant with the IP65 protection class (IEC 60529, JIS C0920).
For details on the specifications, refer to the following section.
Appendix A: Specifications Table
Industrial Robot: SCARA Robots GX series Manual Rev.11
333
Model list
GX10-C series
Arm Length Joint #3 Stroke Environmental Specifications Mounting Specifications Model Number
650
180 Standard
Table top GX10-C651S
Wall GX10-C651SW
Ceiling GX10-C651SR
150
Cleanroom & ESD
Table top GX10-C651C
Wall GX10-C651CW
Ceiling GX10-C651CR
Protection
Table top GX10-C651P
Wall GX10-C651PW
Ceiling GX10-C651PR
420 Standard
Table top GX10-C654S
Wall GX10-C654SW
Ceiling GX10-C654SR
390
Cleanroom & ESD
Table top GX10-C654C
Wall GX10-C654CW
Ceiling GX10-C654CR
Protection
Table top GX10-C654P
Wall GX10-C654PW
Ceiling GX10-C654PR
850
180 Standard
Table top GX10-C851S
Wall GX10-C851SW
Ceiling GX10-C851SR
150
Cleanroom & ESD
Table top GX10-C851C
Wall GX10-C851CW
Ceiling GX10-C851CR
Protection
Table top GX10-C851P
Wall GX10-C851PW
Ceiling GX10-C851PR
420 Standard
Table top GX10-C854S
Wall GX10-C854SW
Ceiling GX10-C854SR
Industrial Robot: SCARA Robots GX series Manual Rev.11
334
Arm Length Joint #3 Stroke Environmental Specifications Mounting Specifications Model Number
390
Cleanroom & ESD
Table top GX10-C854C
Wall GX10-C854CW
Ceiling GX10-C854CR
Protection
Table top GX10-C854P
Wall GX10-C854PW
Ceiling GX10-C854PR
(Units: mm)
Industrial Robot: SCARA Robots GX series Manual Rev.11
335
GX20-C series
Arm Length Joint #3 Stroke Environmental Specifications Mounting Specifications Model Number
850
180 Standard
Table top GX20-C851S
Wall GX20-C851SW
Ceiling GX20-C851SR
150
Cleanroom & ESD
Table top GX20-C851C
Wall GX20-C851CW
Ceiling GX20-C851CR
Protection
Table top GX20-C851P
Wall GX20-C851PW
Ceiling GX20-C851PR
420 Standard
Table top GX20-C854S
Wall GX20-C854SW
Ceiling GX20-C854SR
390
Cleanroom & ESD
Table top GX20-C854C
Wall GX20-C854CW
Ceiling GX20-C854CR
Protection
Table top GX20-C854P
Wall GX20-C854PW
Ceiling GX20-C854PR
1000
180 Standard
Table top GX20-CA01S
Wall GX20-CA01SW
Ceiling GX20-CA01SR
150
Cleanroom & ESD
Table top GX20-CA01C
Wall GX20-CA01CW
Ceiling GX20-CA01CR
Protection
Table top GX20-CA01P
Wall GX20-CA01PW
Ceiling GX20-CA01PR
420 Standard
Table top GX20-CA04S
Wall GX20-CA04SW
Ceiling GX20-CA04SR
Industrial Robot: SCARA Robots GX series Manual Rev.11
336
Arm Length Joint #3 Stroke Environmental Specifications Mounting Specifications Model Number
390
Cleanroom & ESD
Table top GX20-CA04C
Wall GX20-CA04CW
Ceiling GX20-CA04CR
Protection
Table top GX20-CA04P
Wall GX20-CA04PW
Ceiling GX20-CA04PR
(Units: mm)
Industrial Robot: SCARA Robots GX series Manual Rev.11
337
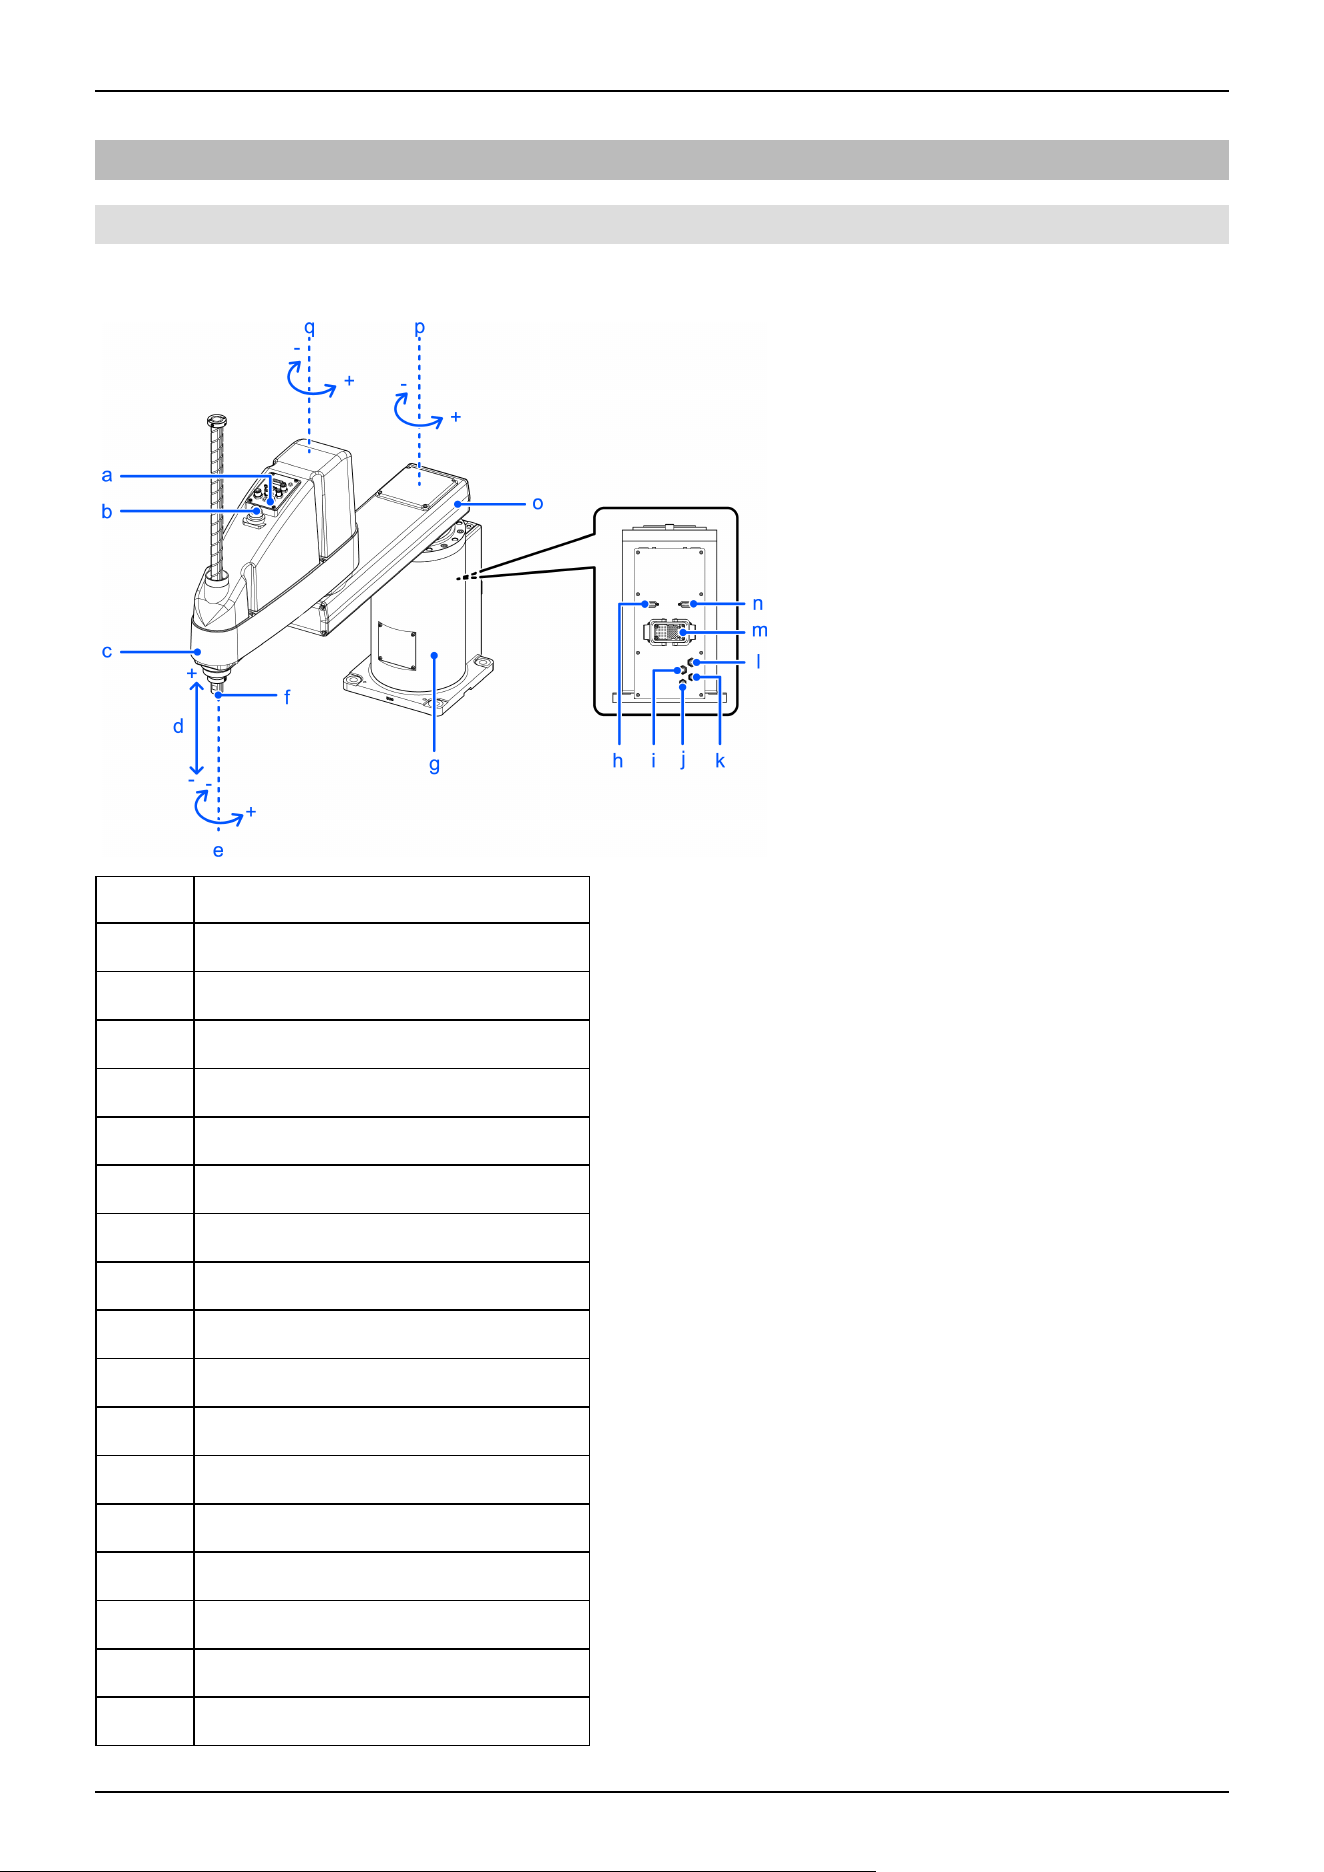
5.2.3 Names of Parts and Their Dimensions
5.2.3.1 Table Top Mounting Specifications
Standard specifications GX10-B/GX10-C/GX20-B/GX20-C***S
Symbol Description
a Joint #3 and Joint #4 brake release switch
b Indicating lamp
c Arm #2
d Joint #3 (up/down movement)
e Joint #4 (rotation)
f Shaft
g Base
h User connector (9-pin D-sub connector)
i Fitting for ø6 mm tube (blue)
j Fitting for ø4 mm tube (blue)
k Fitting for ø4 mm tube (white)
l Fitting for ø6 mm tube (white)
m M/C cable housing
n User connector (15-pin D-sub connector)
o Arm #1
p Joint #1 (rotation)
q Joint #2 (rotation)
Industrial Robot: SCARA Robots GX series Manual Rev.11
338
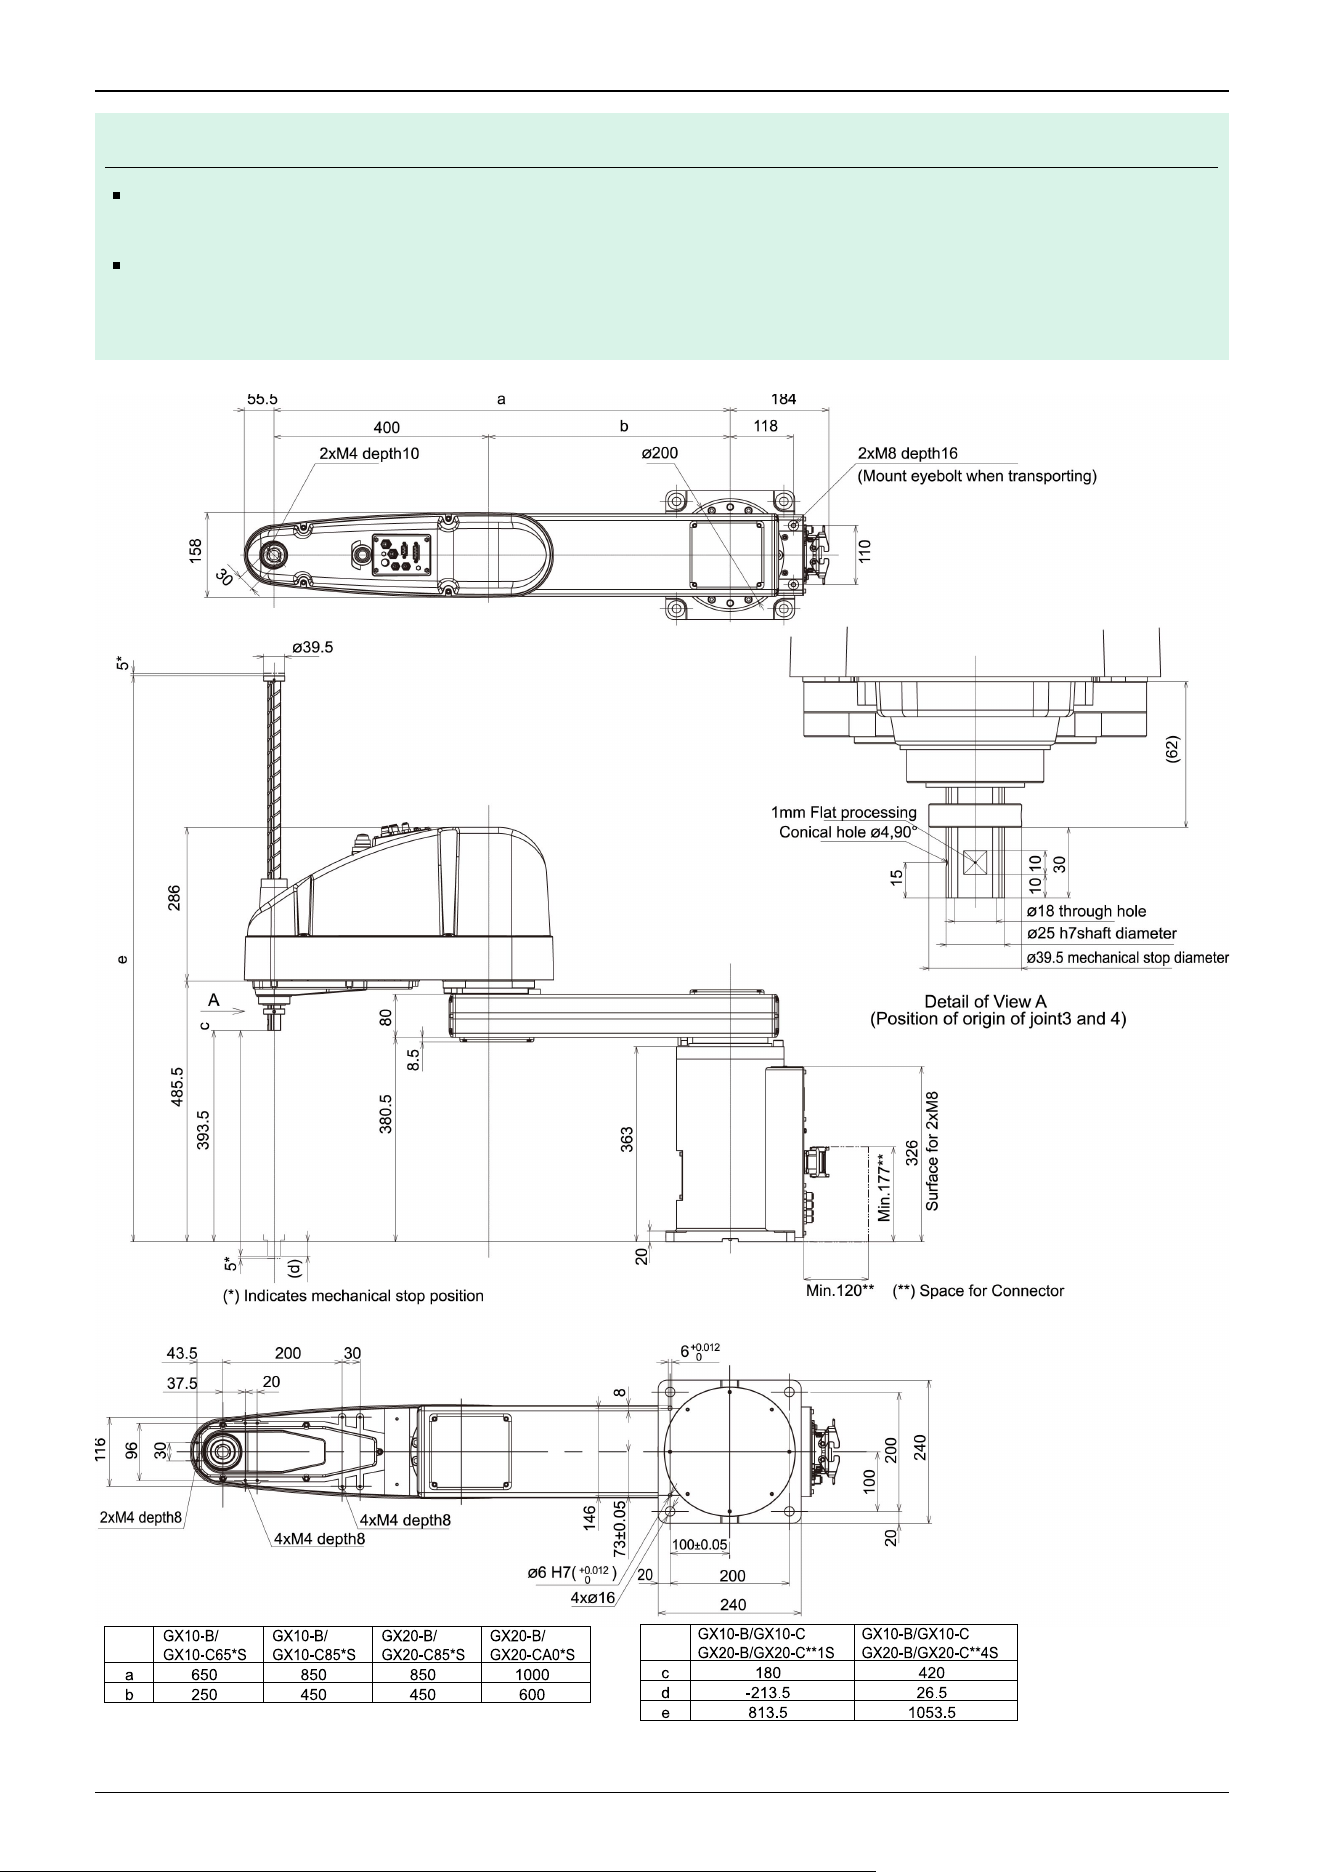
KEY POINTS
The brake release switch is used with both Joint #3 and Joint #4. Press the brake release switch while in the
emergency stop state to simultaneously release the brakes on Joint #3 and Joint #4.
Before starting any maintenance work, be sure to turn off the Controller and inform others in the surrounding
area that work is in progress. Performing any work procedure with the power turned on is extremely
dangerous and may result in electric shock and/or malfunction of the robot system.
✏
Industrial Robot: SCARA Robots GX series Manual Rev.11
339
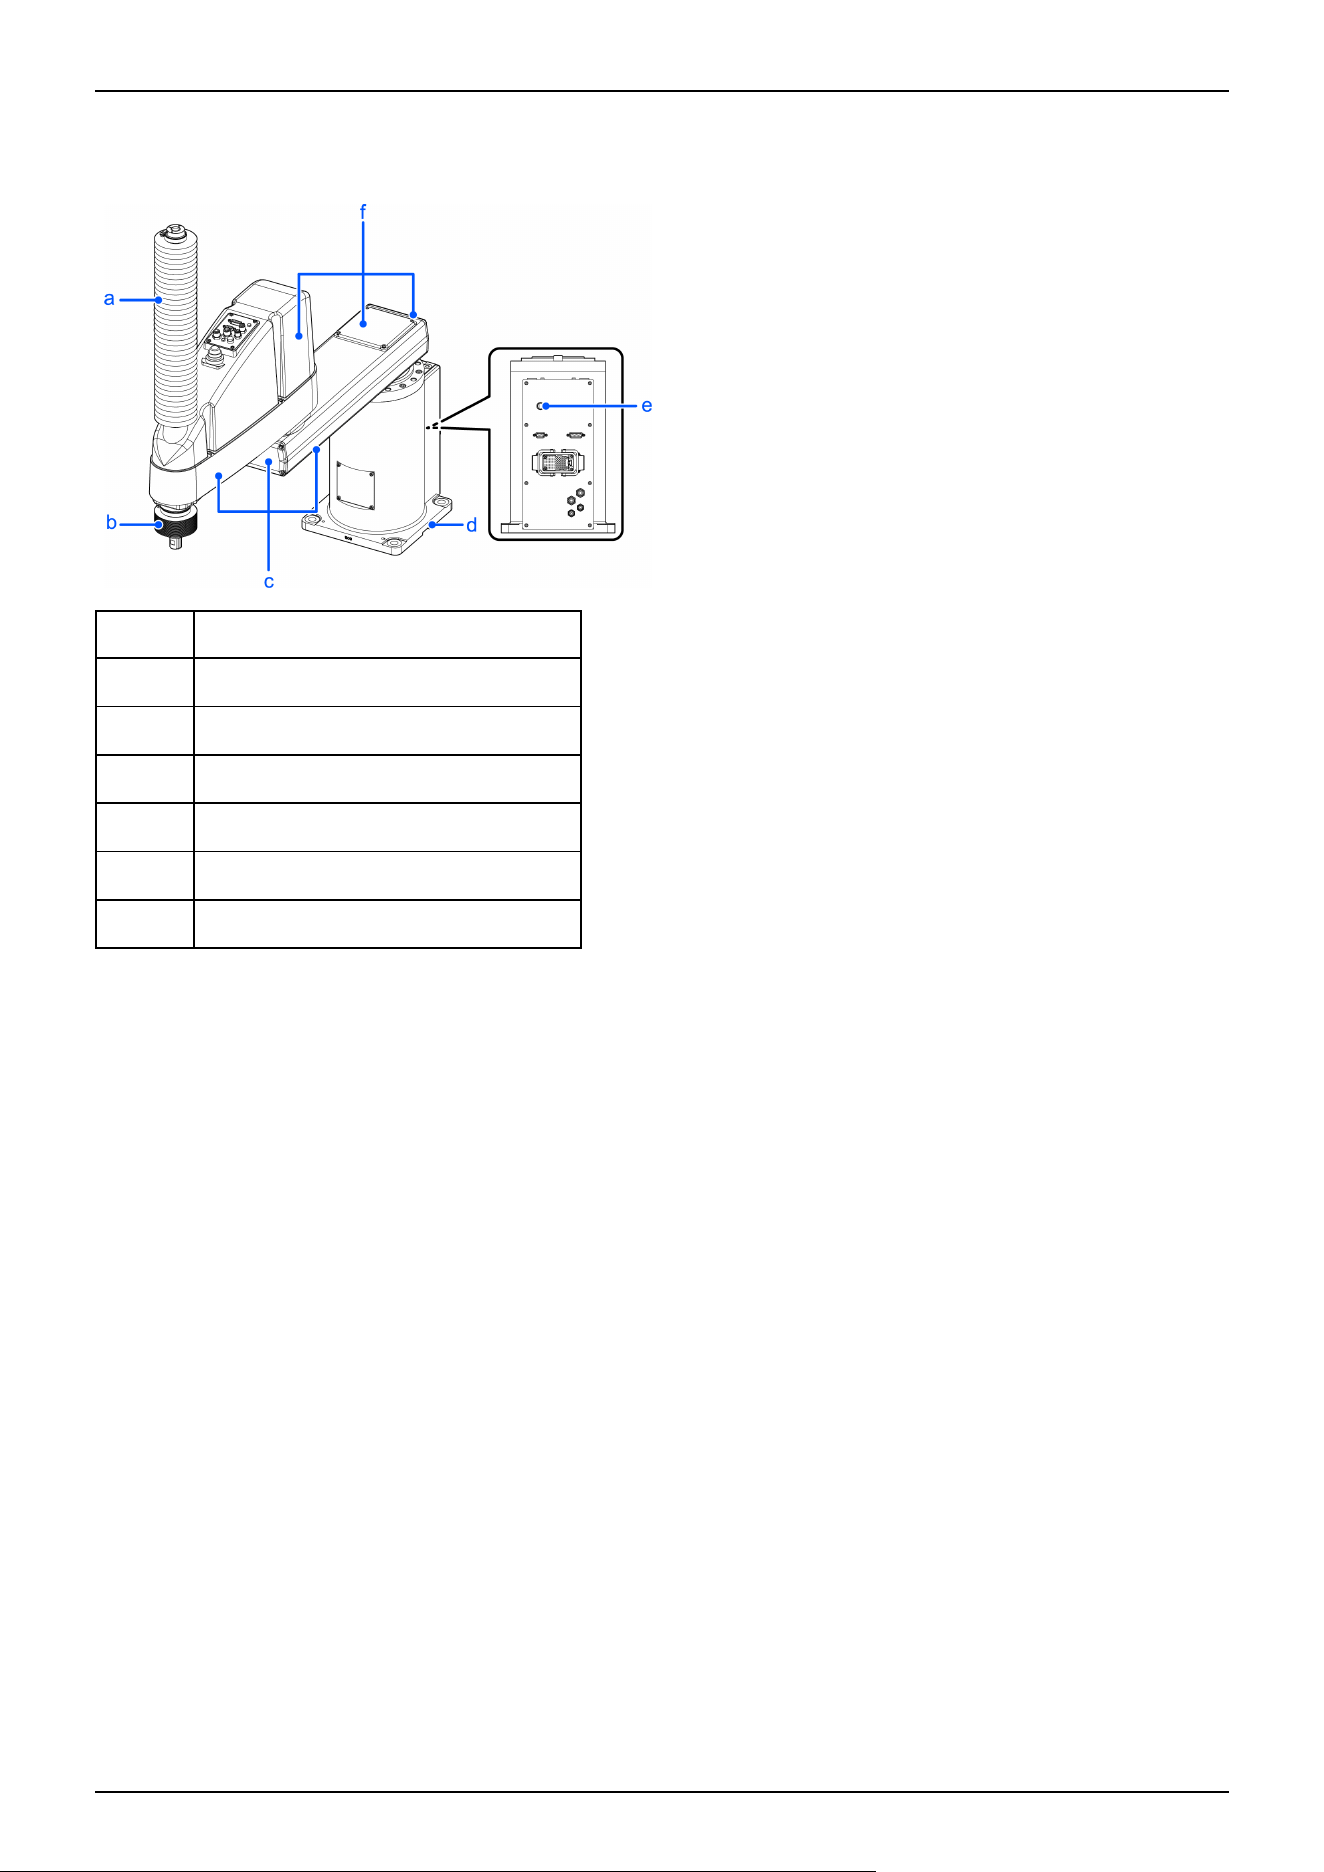
Cleanroom & ESD specifications GX10-B/GX10-C/GX20-B/GX20-C***C
The parts shown below differ from the standard specifications.
Symbol Description
a Upper bellows
b Lower bellows
c Plating covers (anti-static specifications)
d Table top mounting surface cover
e Exhaust port
f Plating covers (anti-static specifications)
Industrial Robot: SCARA Robots GX series Manual Rev.11
340
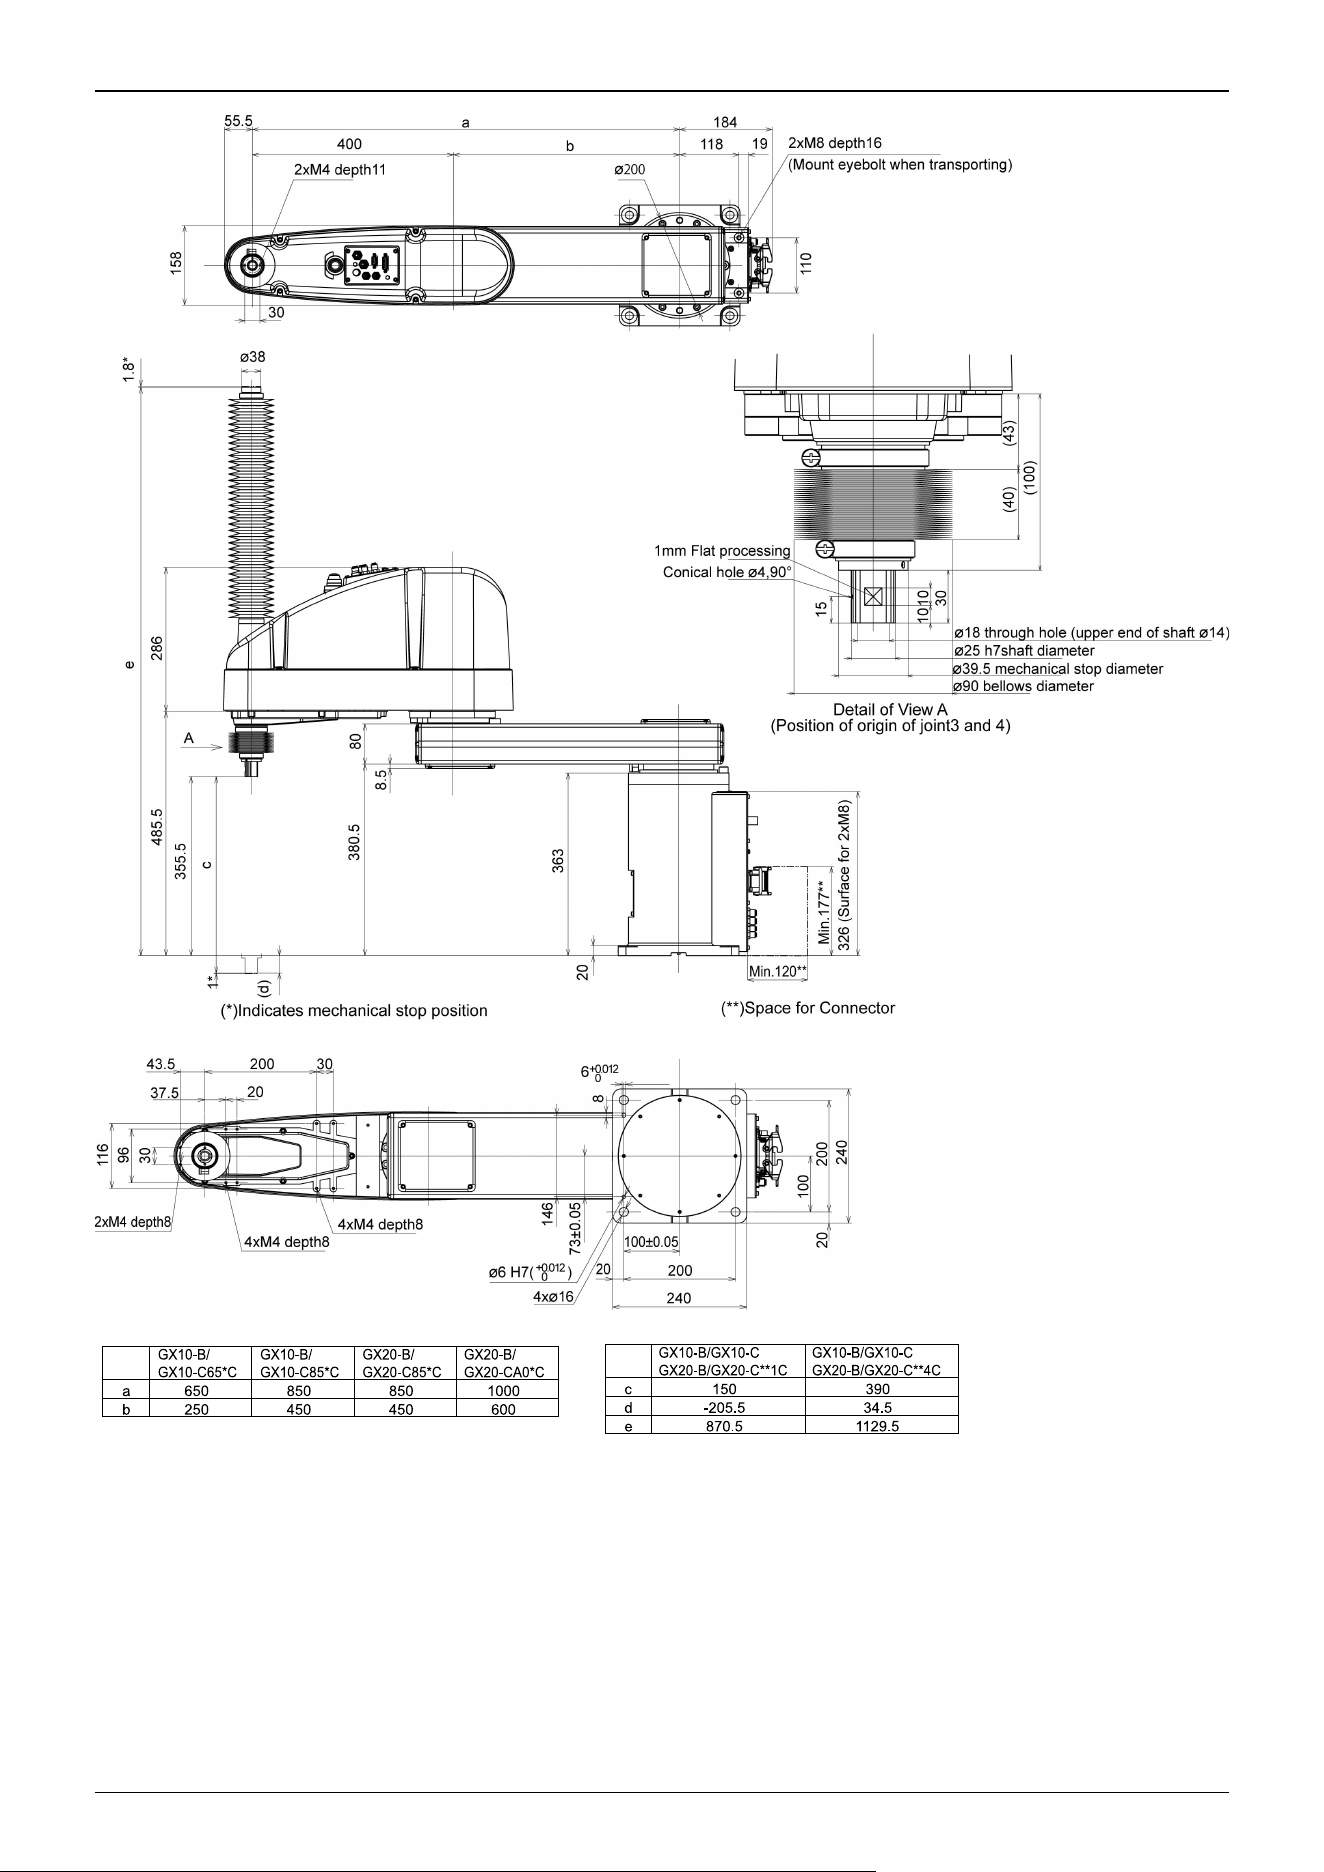
Industrial Robot: SCARA Robots GX series Manual Rev.11
341
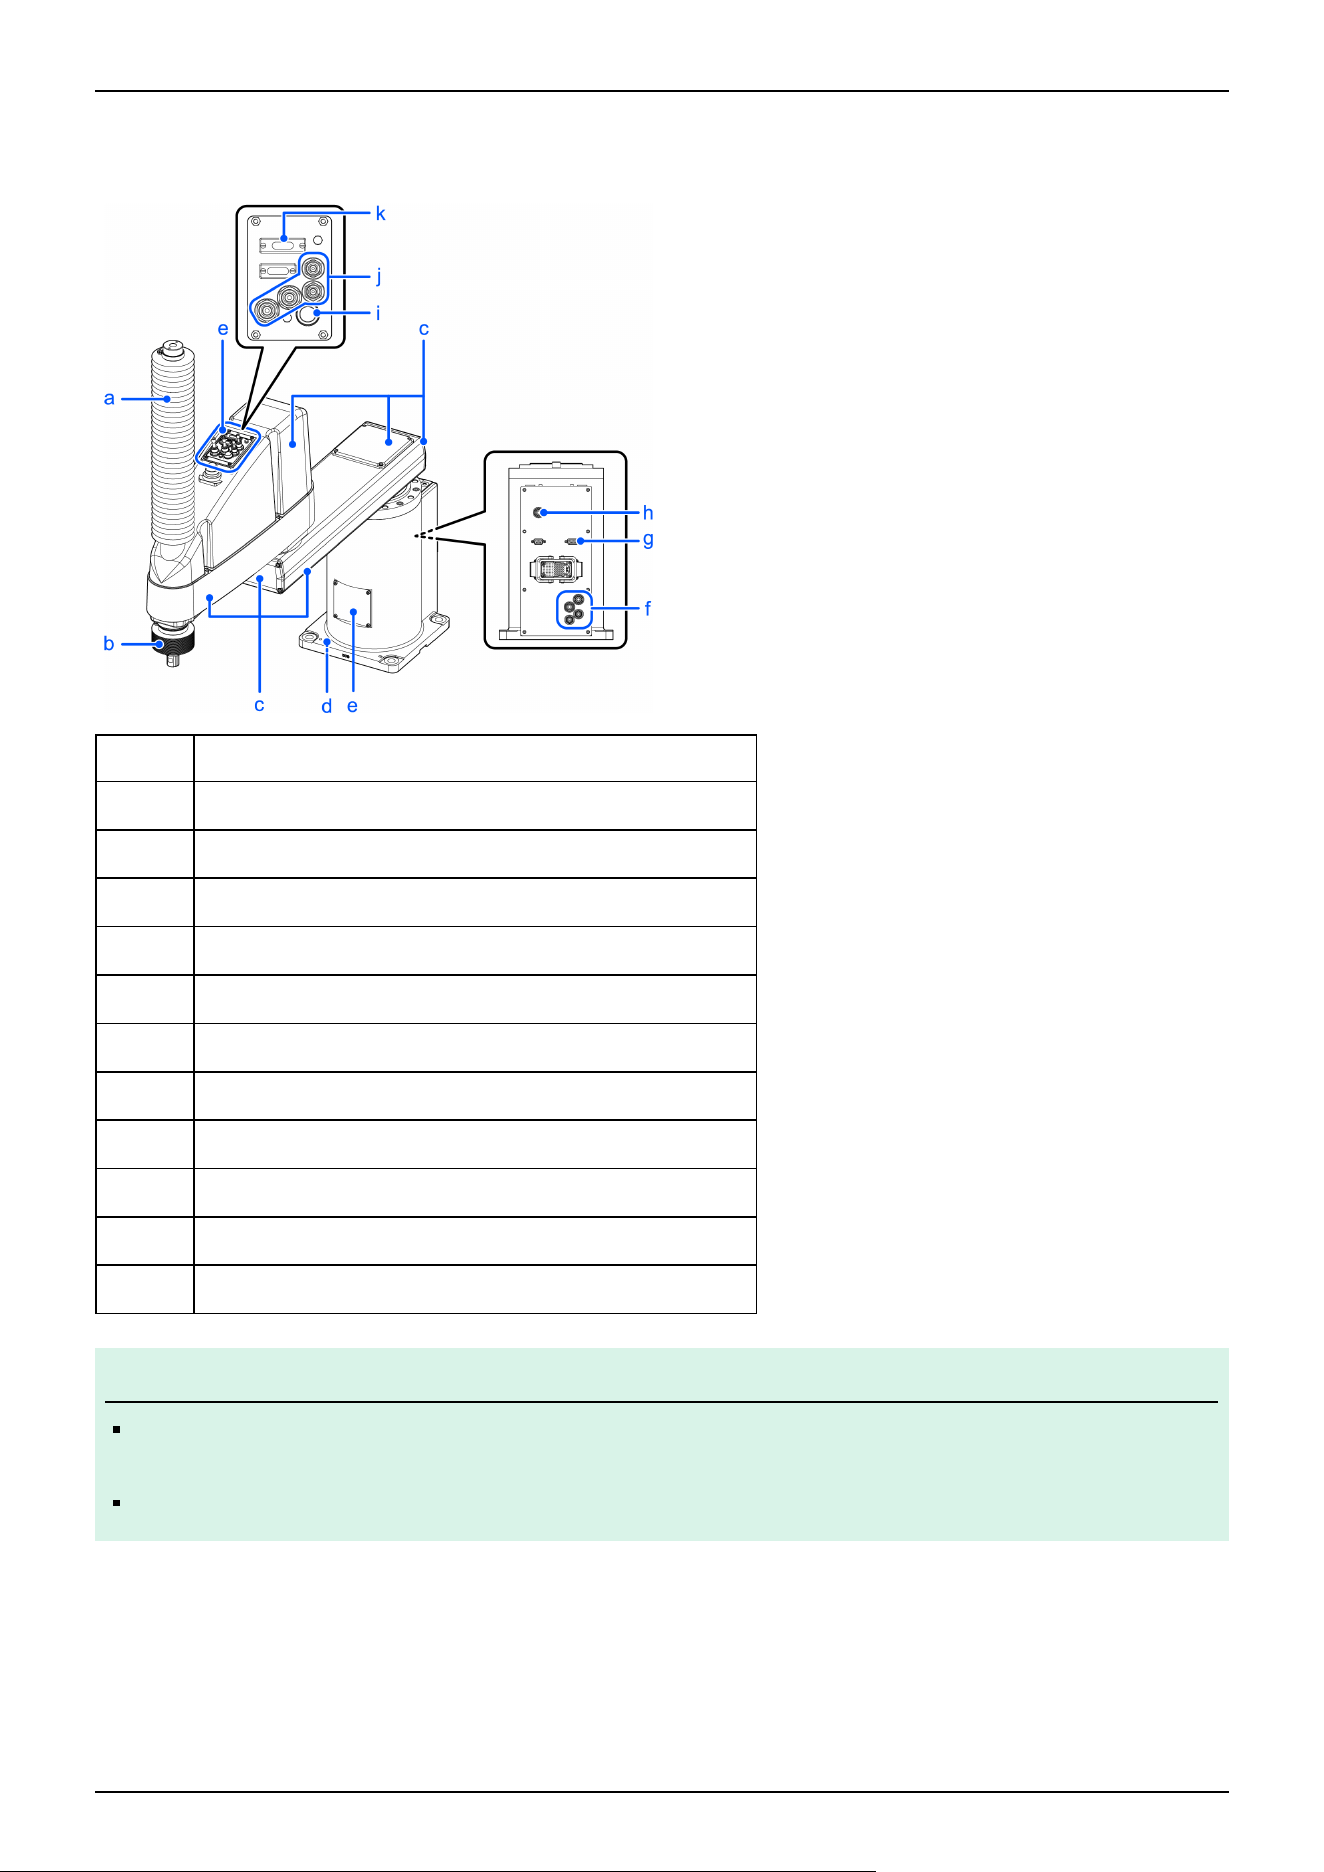
Protected-models GX10-B/GX10-C/GX20-B/GX20-C***P
The parts shown below differ from the standard specifications.
Symbol Description
a Upper bellows
b Lower bellows
c Plating cover (oil-resistant specifications)
d Stainless steel plate for table top mounting surface
e Stainless steel plate
f Fittings with cover (protected-model)
g User connector (protected-model)
h Exhaust port
i Joint #3 and Joint #4 brake release switch (protected-model)
j Fittings with cover (protected-model)
k User connector (protected-model)
KEY POINTS
For protected-models, all screws used for the exterior are stainless steel screws. (except for screws used for
stops).
The part of the M/C cable housing is not IP65 compliant when the M/C cable hood is not connected.
✏
Industrial Robot: SCARA Robots GX series Manual Rev.11
342
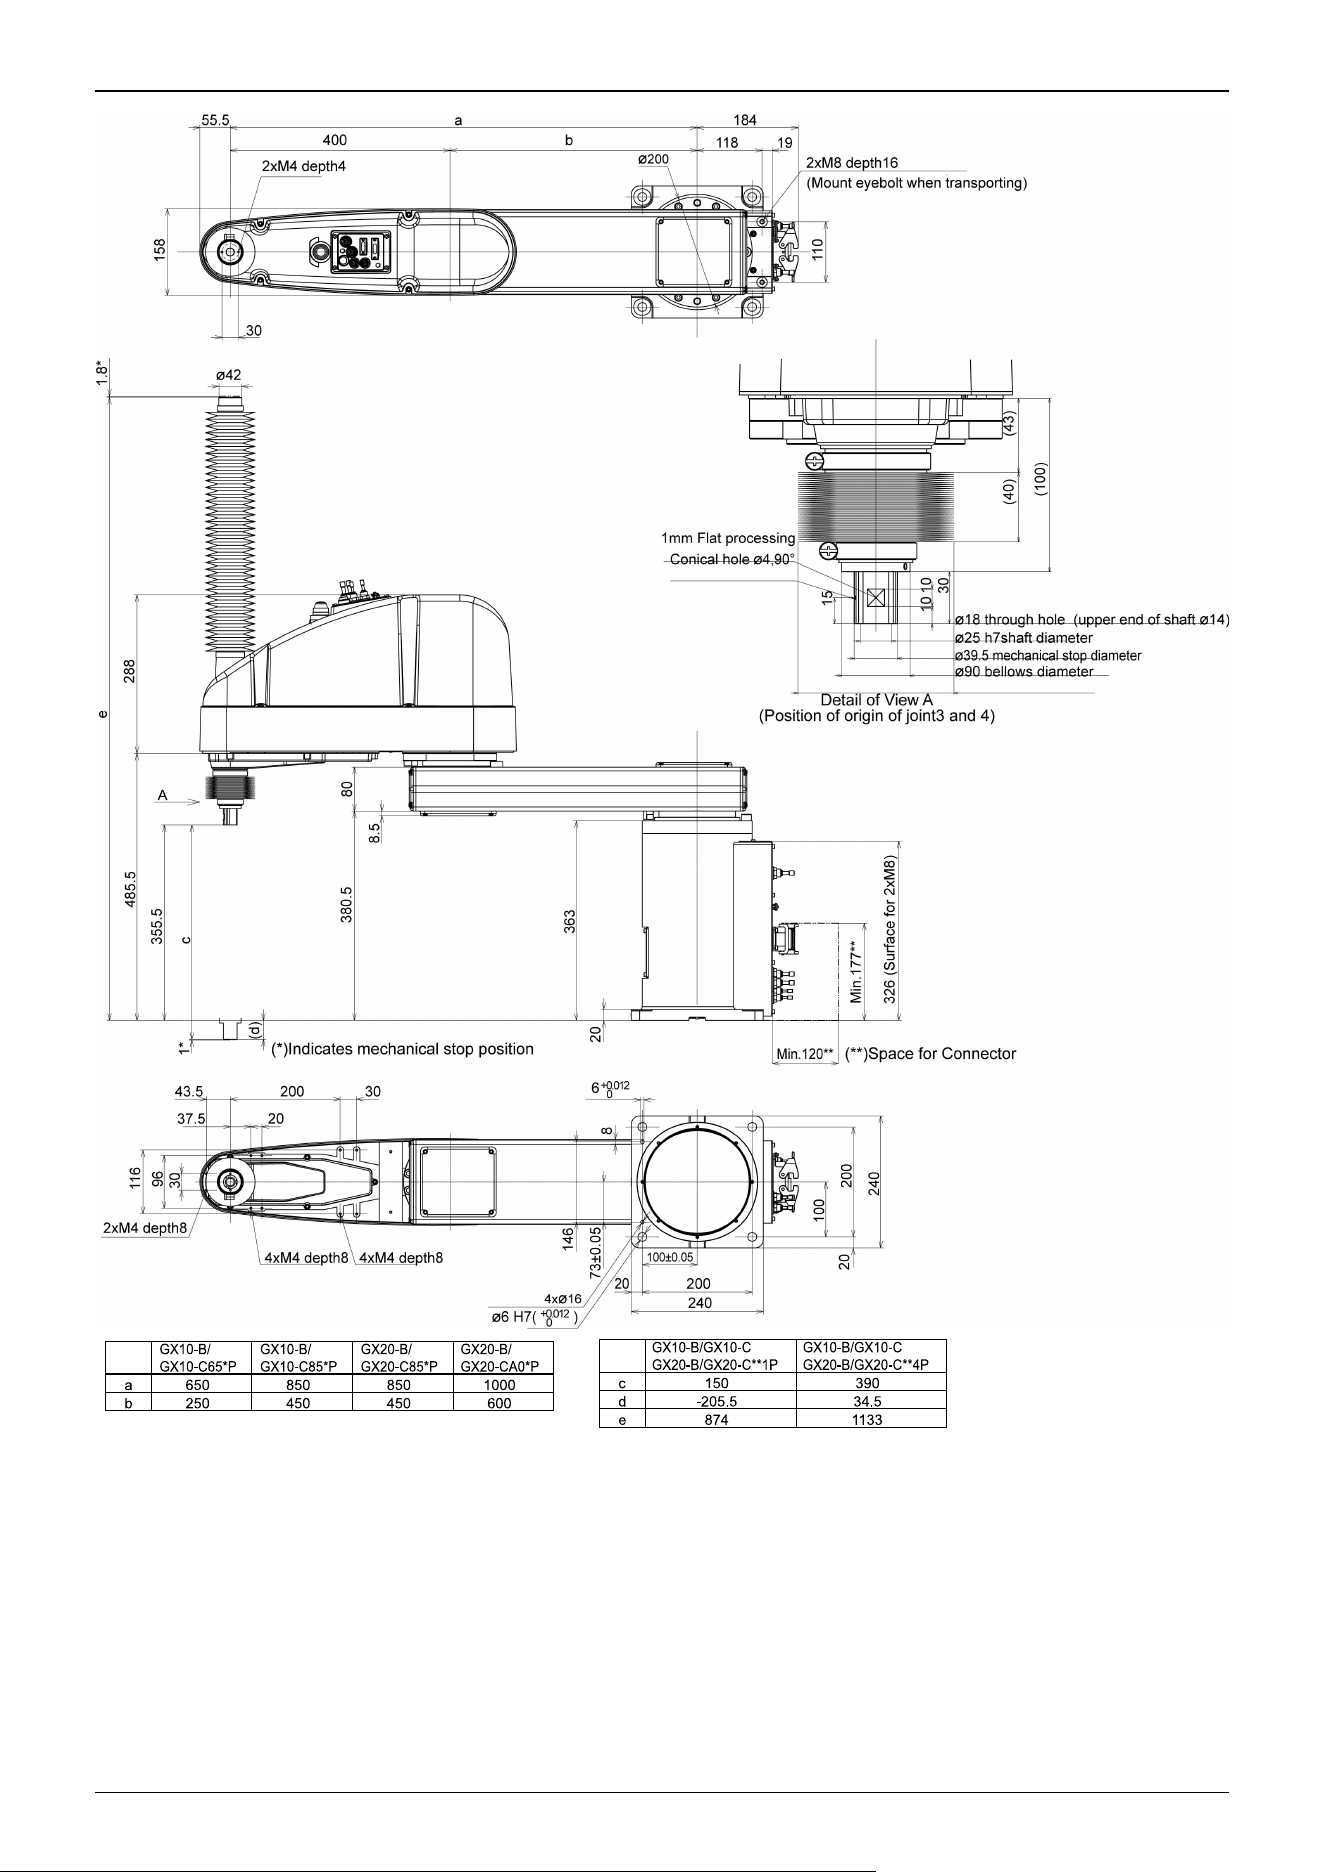
Industrial Robot: SCARA Robots GX series Manual Rev.11
343
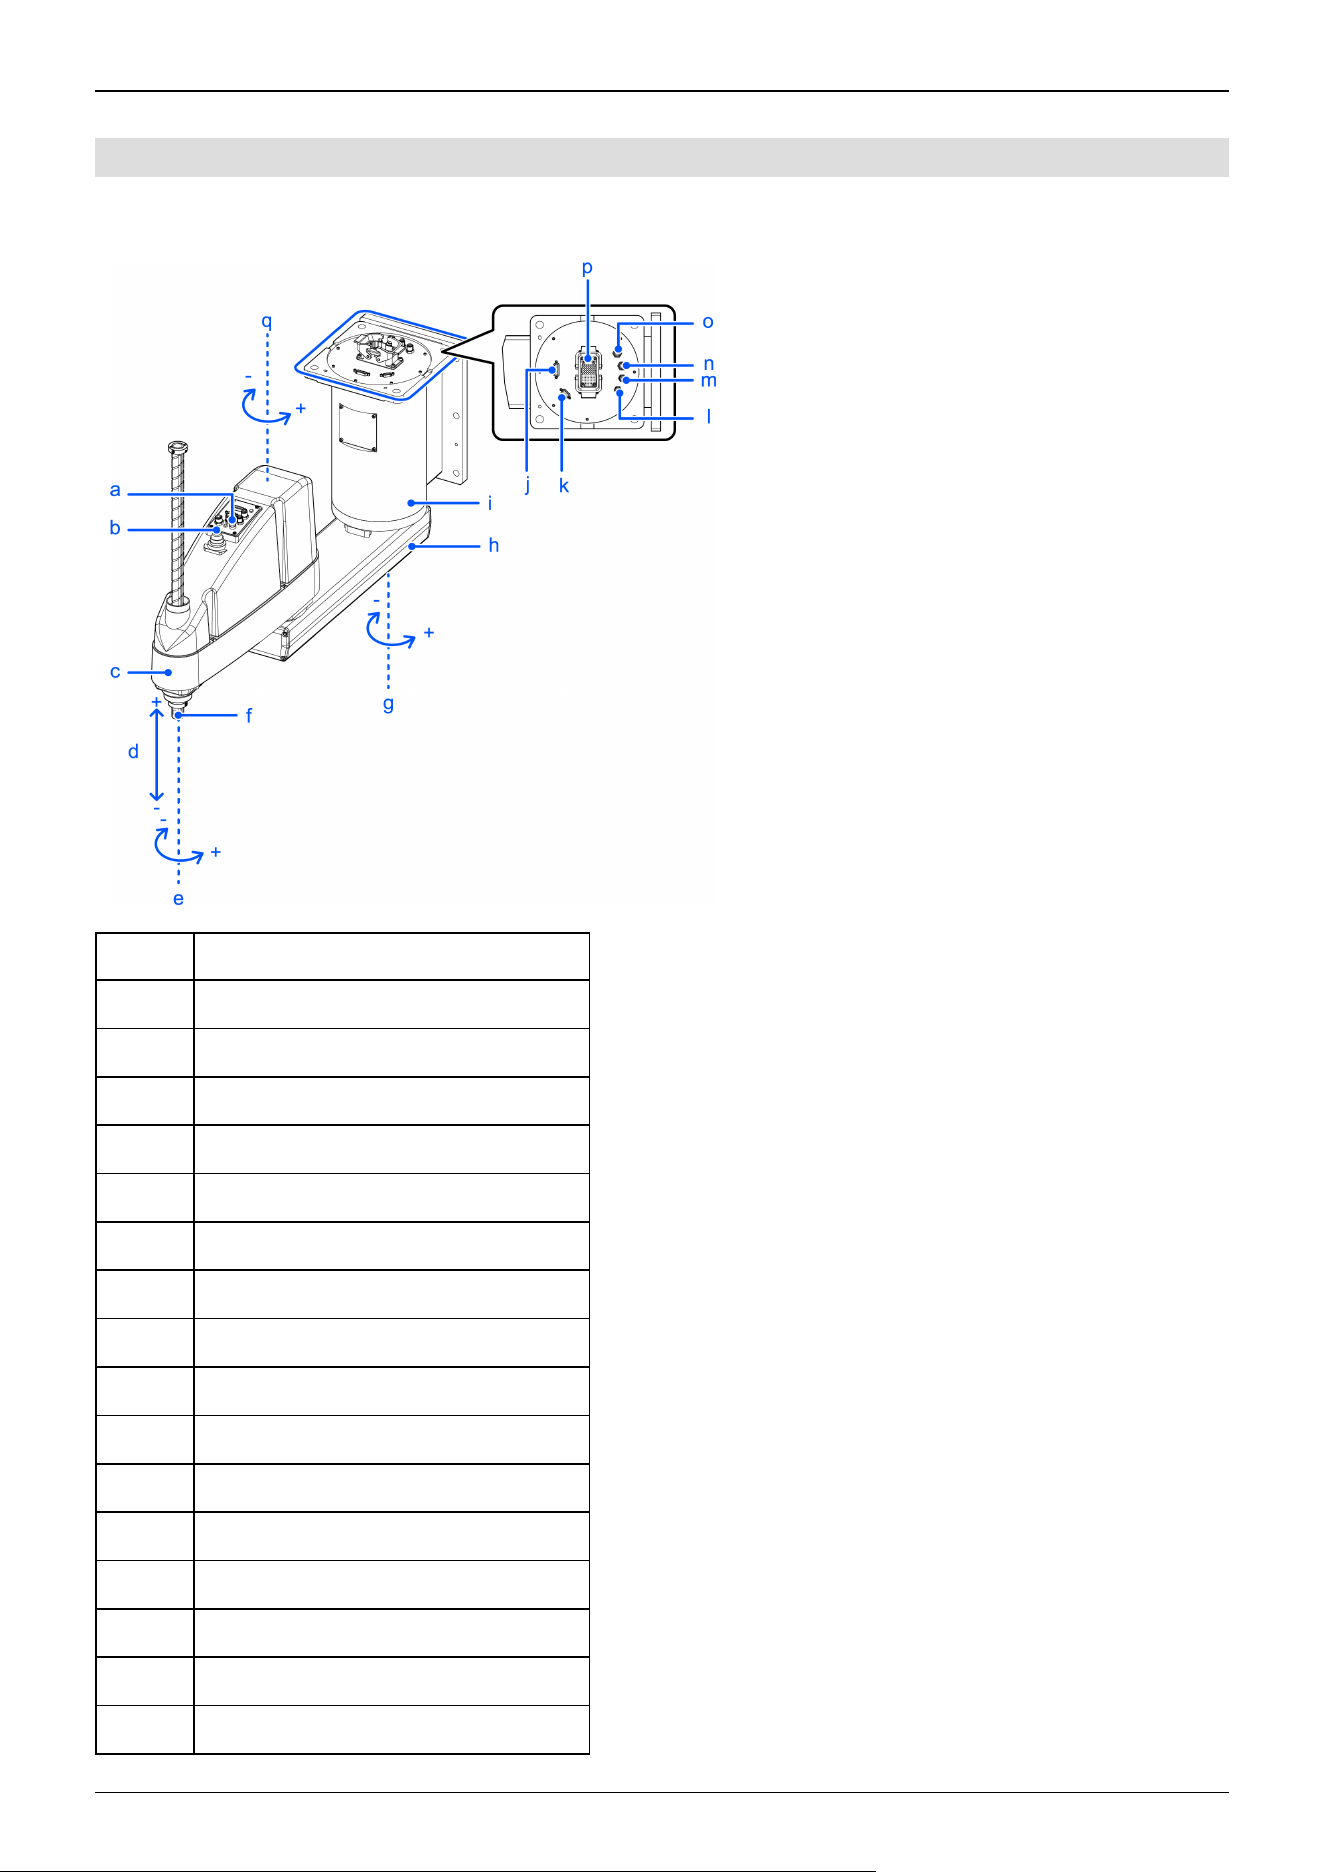
5.2.3.2 Wall Mounting Specifications
Standard specifications GX10-B/GX10-C/GX20-B/GX20-C***SW
Symbol Description
a Joint #3 and Joint #4 brake release switch
b Indicating lamp
c Arm #2
d Joint #3 (up/down movement)
e Joint #4 (rotation)
f Shaft
g Joint #1 (rotation)
h Arm #1
i Base
j User connector (15-pin D-sub connector)
k User connector (9-pin D-sub connector)
l Fitting for ø4 mm tube (blue)
m Fitting for ø4 mm tube (white)
n Fitting for ø6 mm tube (blue)
o Fitting for ø6 mm tube (white)
p M/C cable housing
Industrial Robot: SCARA Robots GX series Manual Rev.11
344
Symbol Description
q Joint #2 (rotation)
KEY POINTS
The brake release switch is used with both Joint #3 and Joint #4. Press the brake release switch while in the
emergency stop state to simultaneously release the brakes on Joint #3 and Joint #4.
Before starting any maintenance work, be sure to turn off the Controller and inform others in the surrounding
area that work is in progress. Performing any work procedure with the power turned on is extremely
dangerous and may result in electric shock and/or malfunction of the robot system.
✏
Industrial Robot: SCARA Robots GX series Manual Rev.11
345
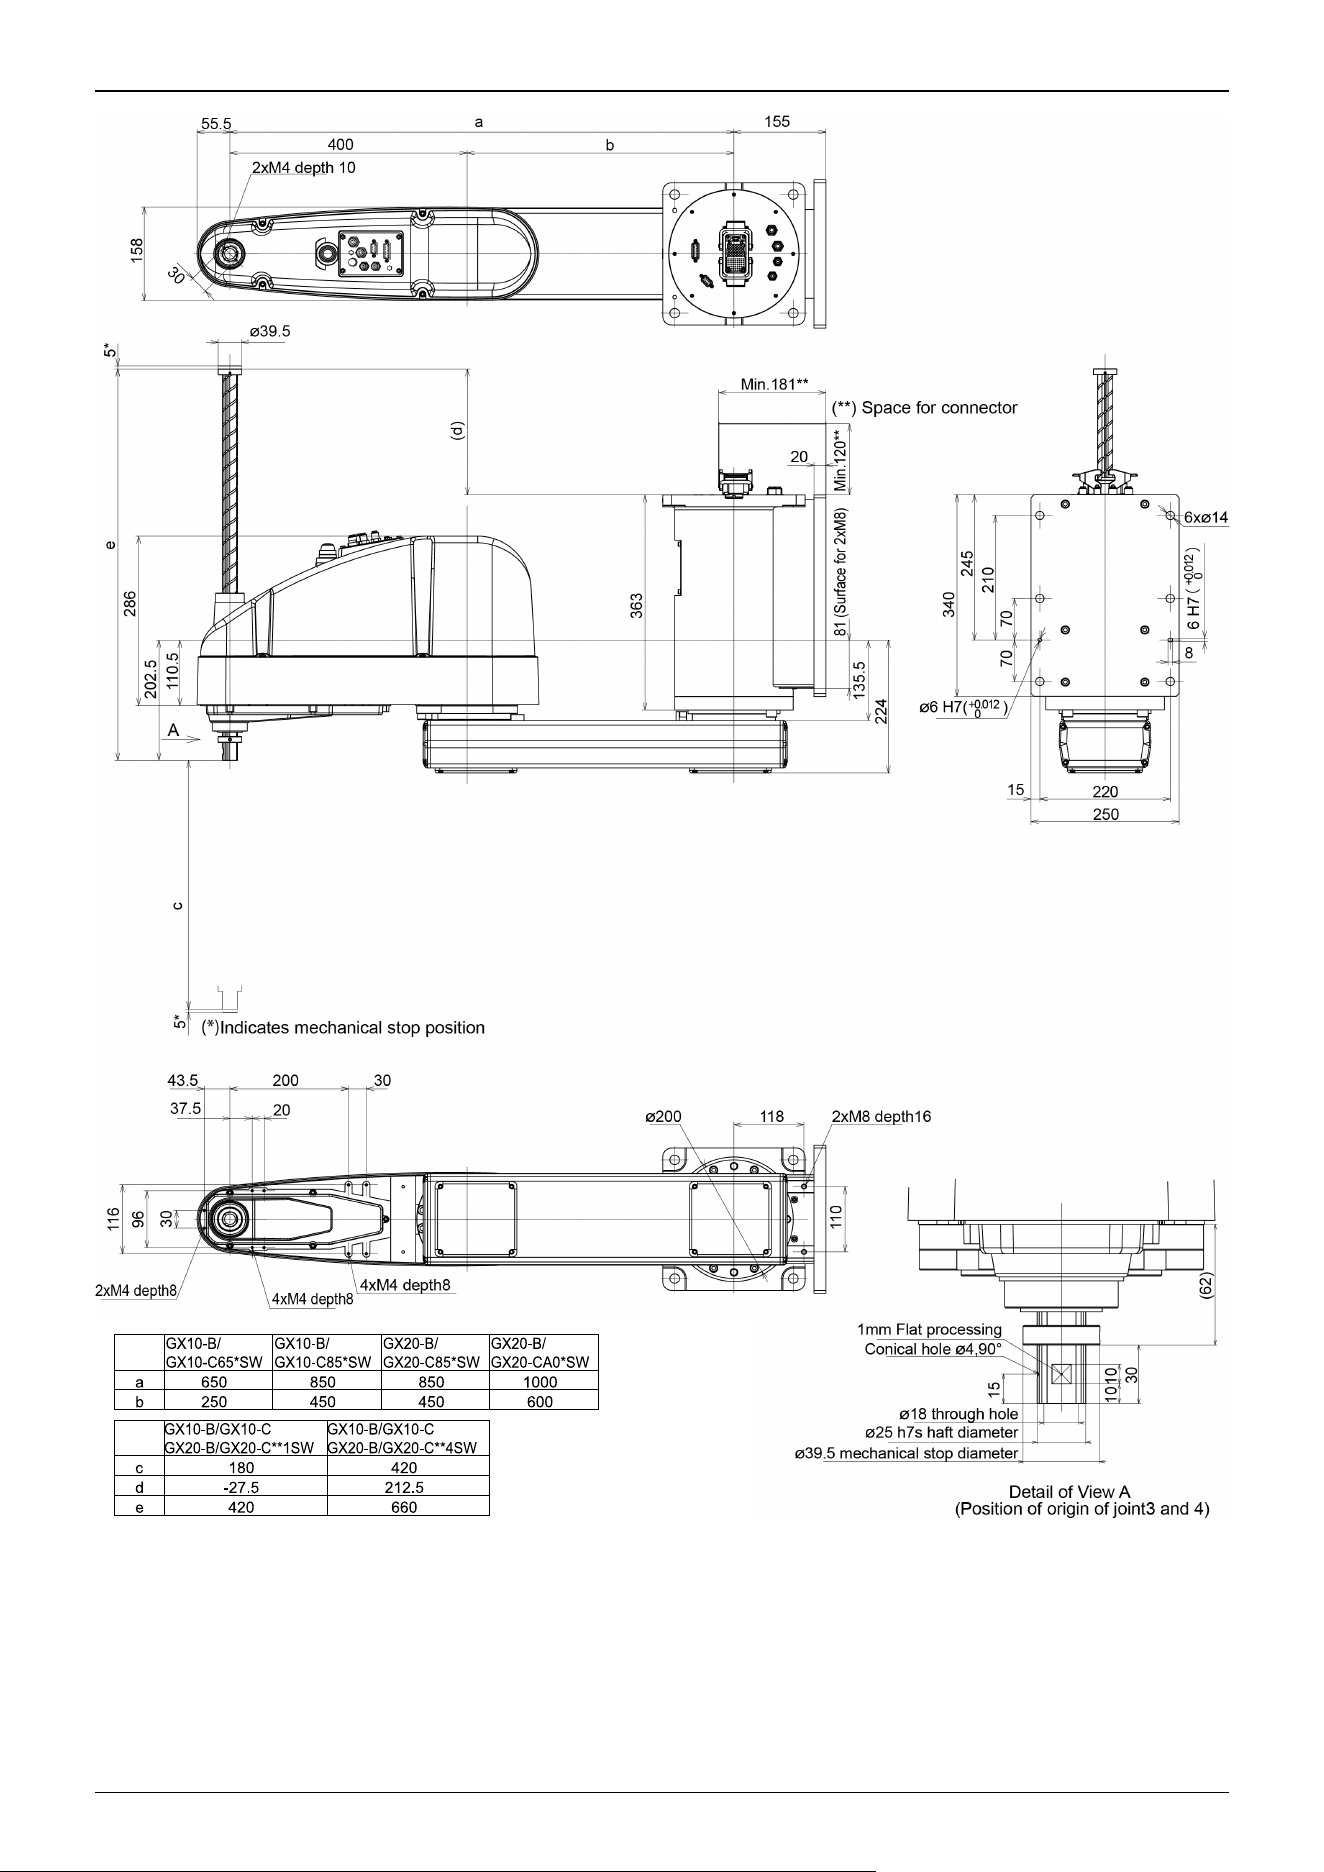
Industrial Robot: SCARA Robots GX series Manual Rev.11
346
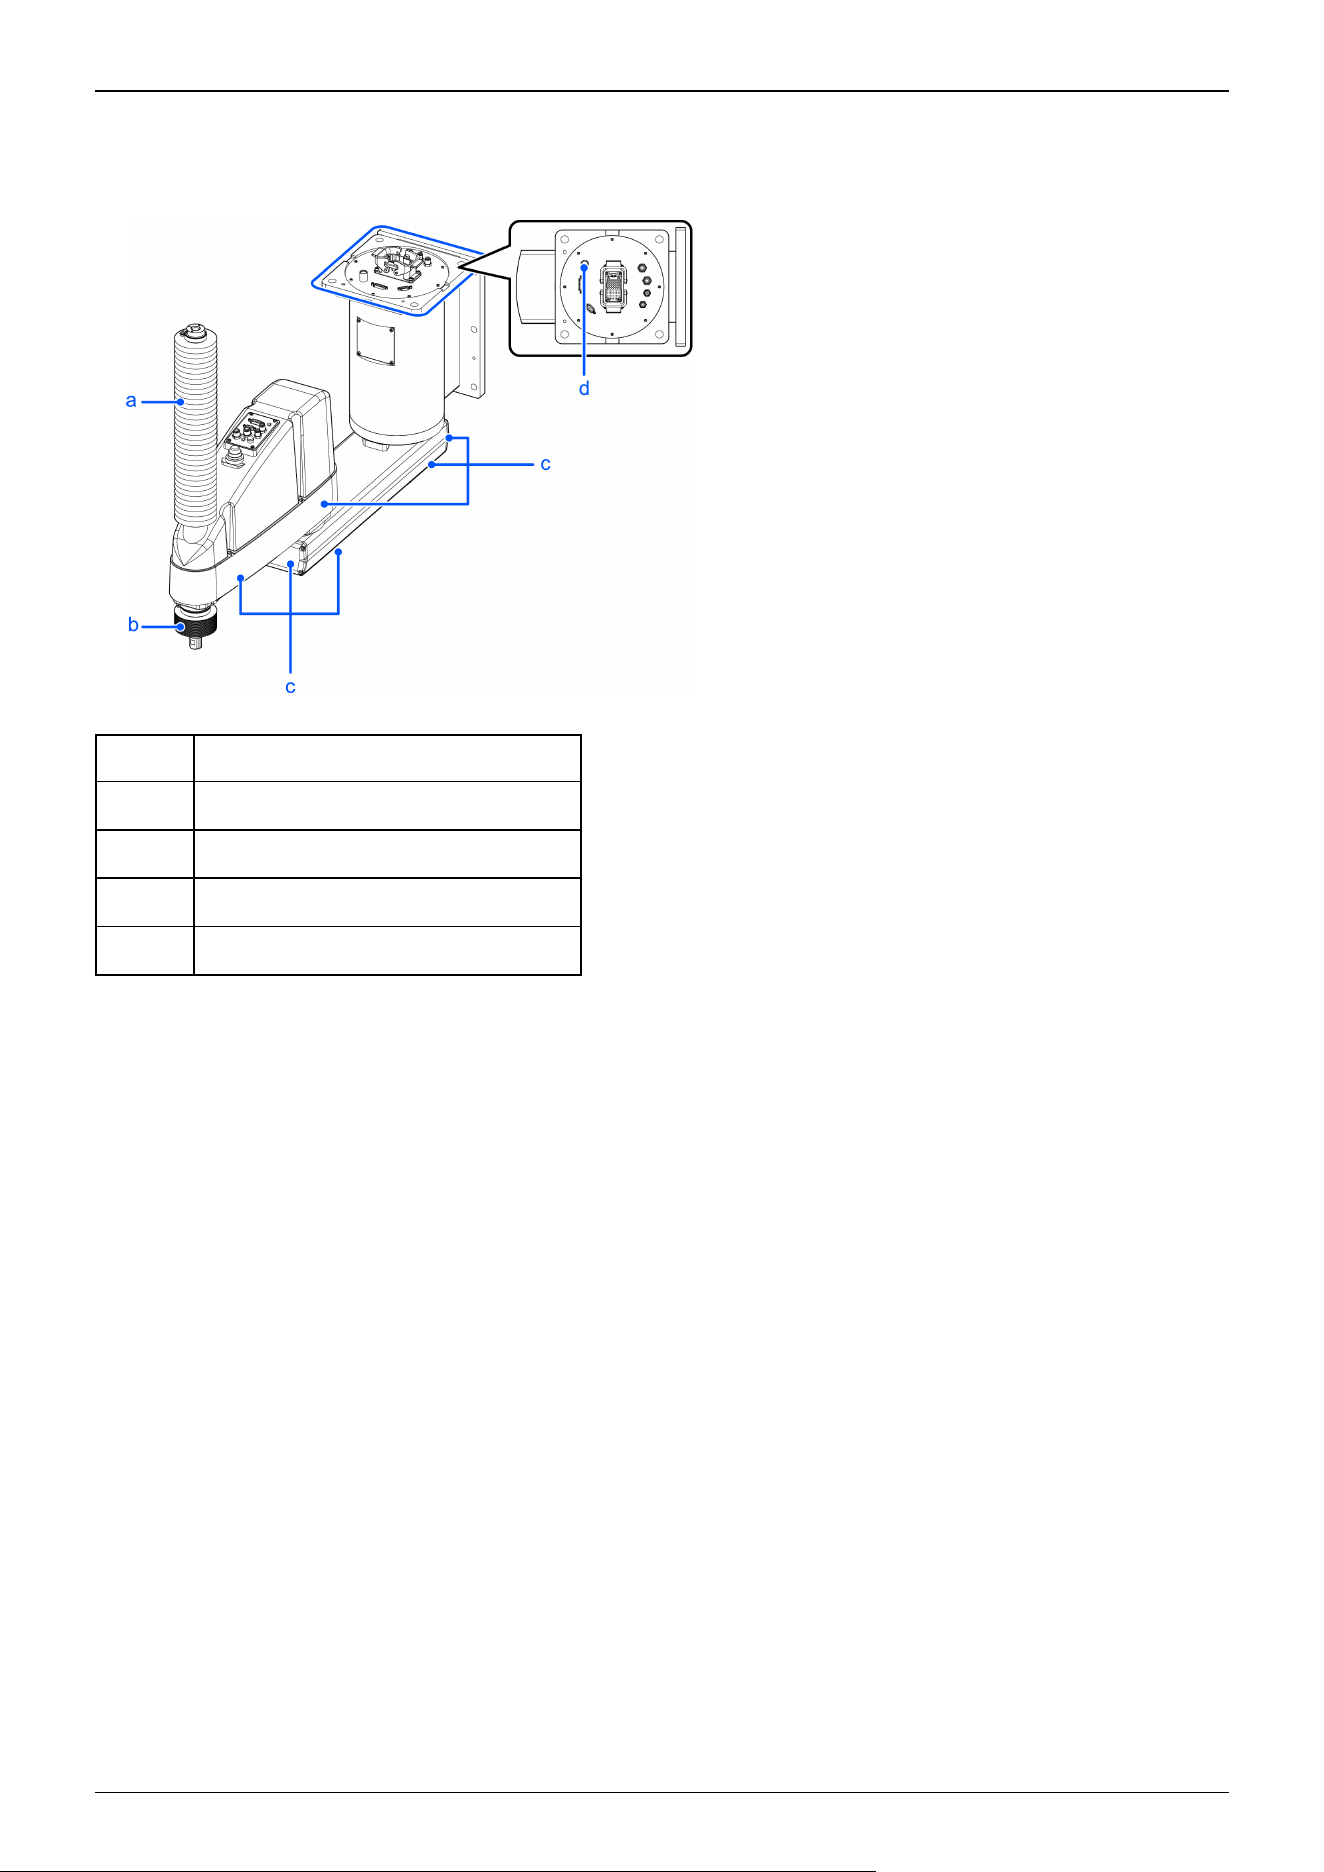
Cleanroom & ESD specifications GX10-B/GX10-C/GX20-B/GX20-C***CW
The parts shown below differ from the standard specifications.
Symbol Description
a Upper bellows
b Lower bellows
c Plating covers (anti-static specifications)
d Exhaust port
Industrial Robot: SCARA Robots GX series Manual Rev.11
347
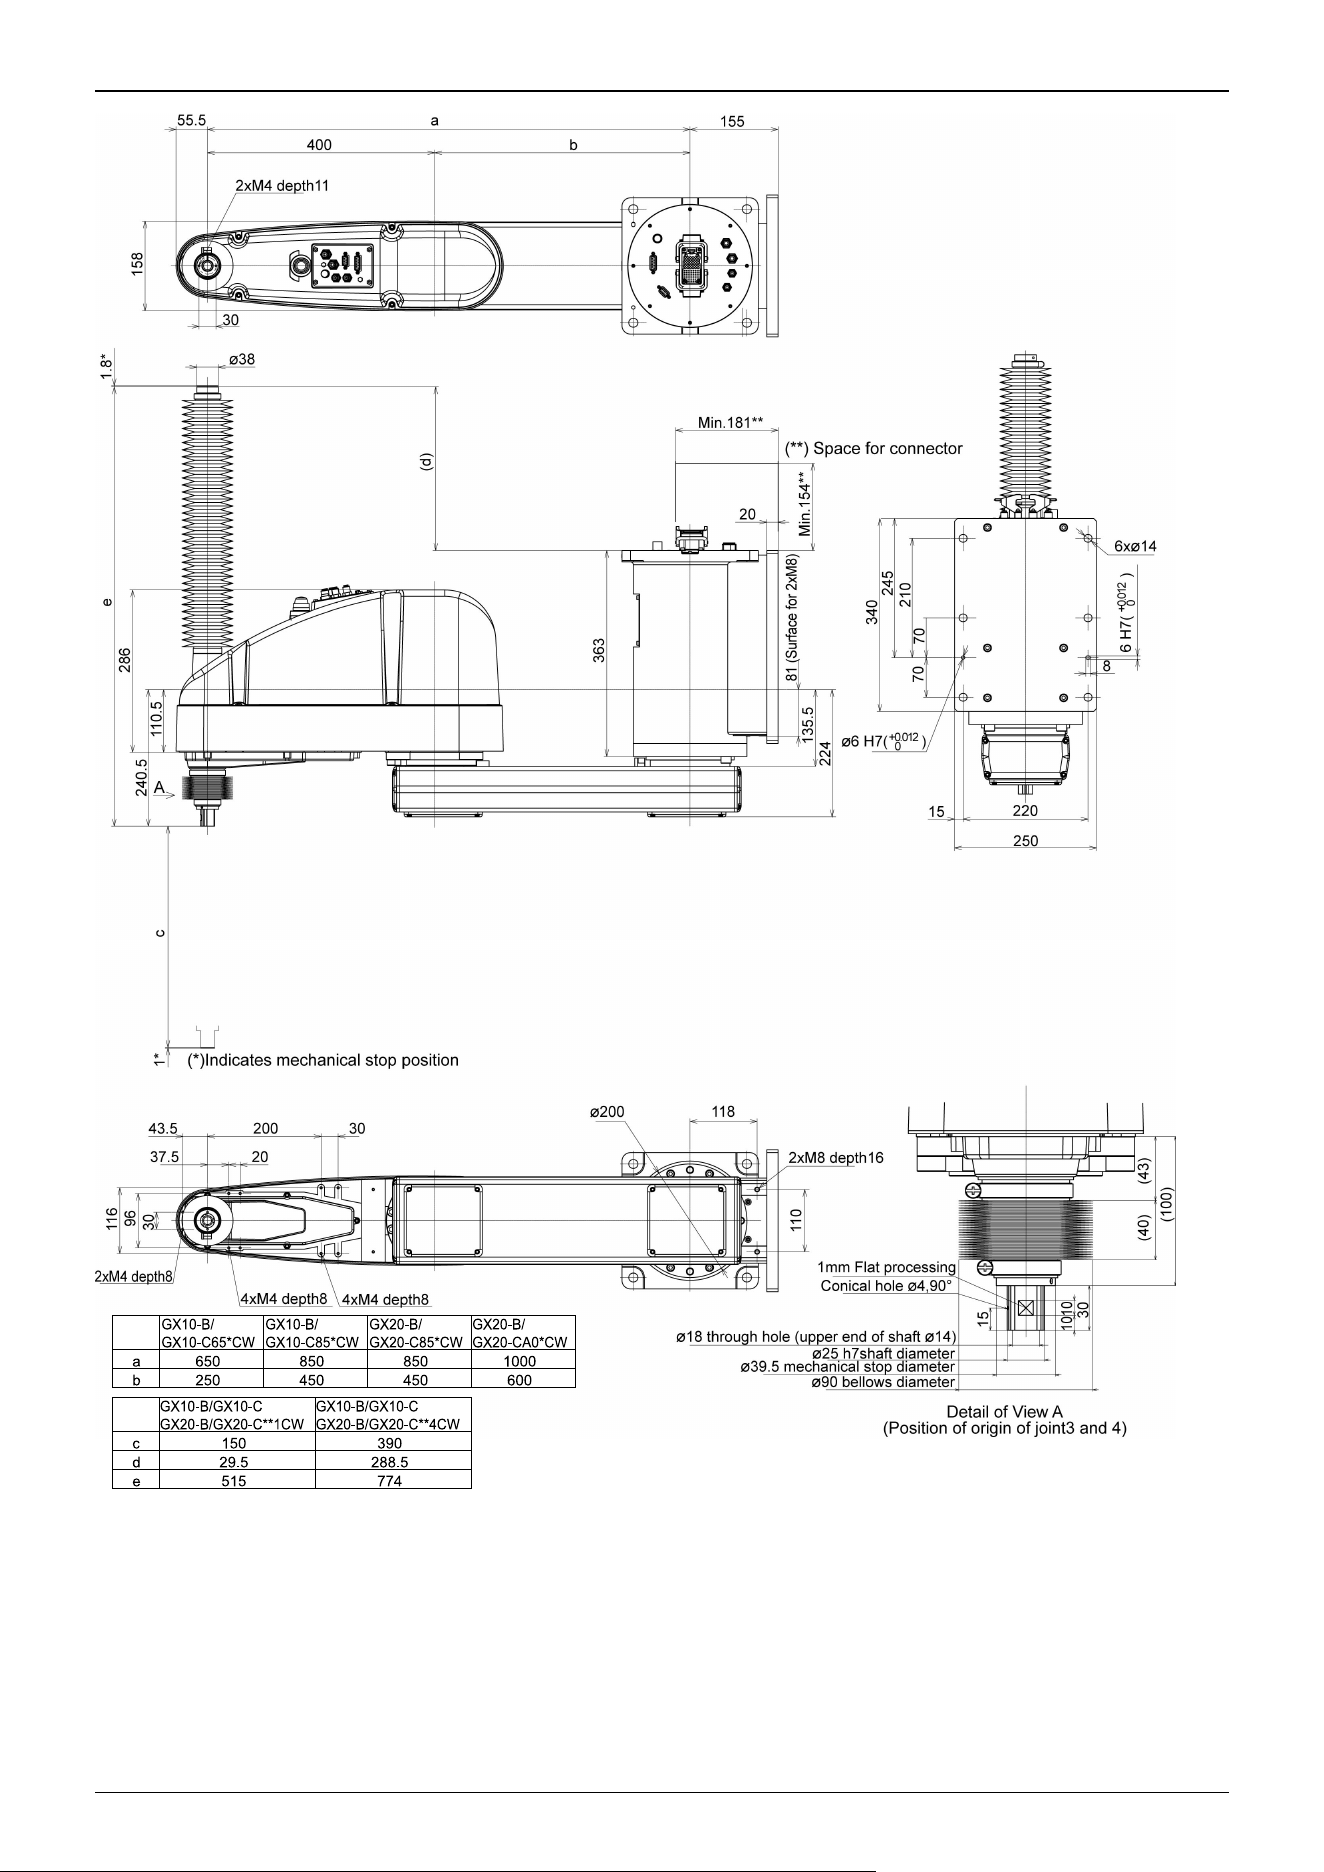
Industrial Robot: SCARA Robots GX series Manual Rev.11
348
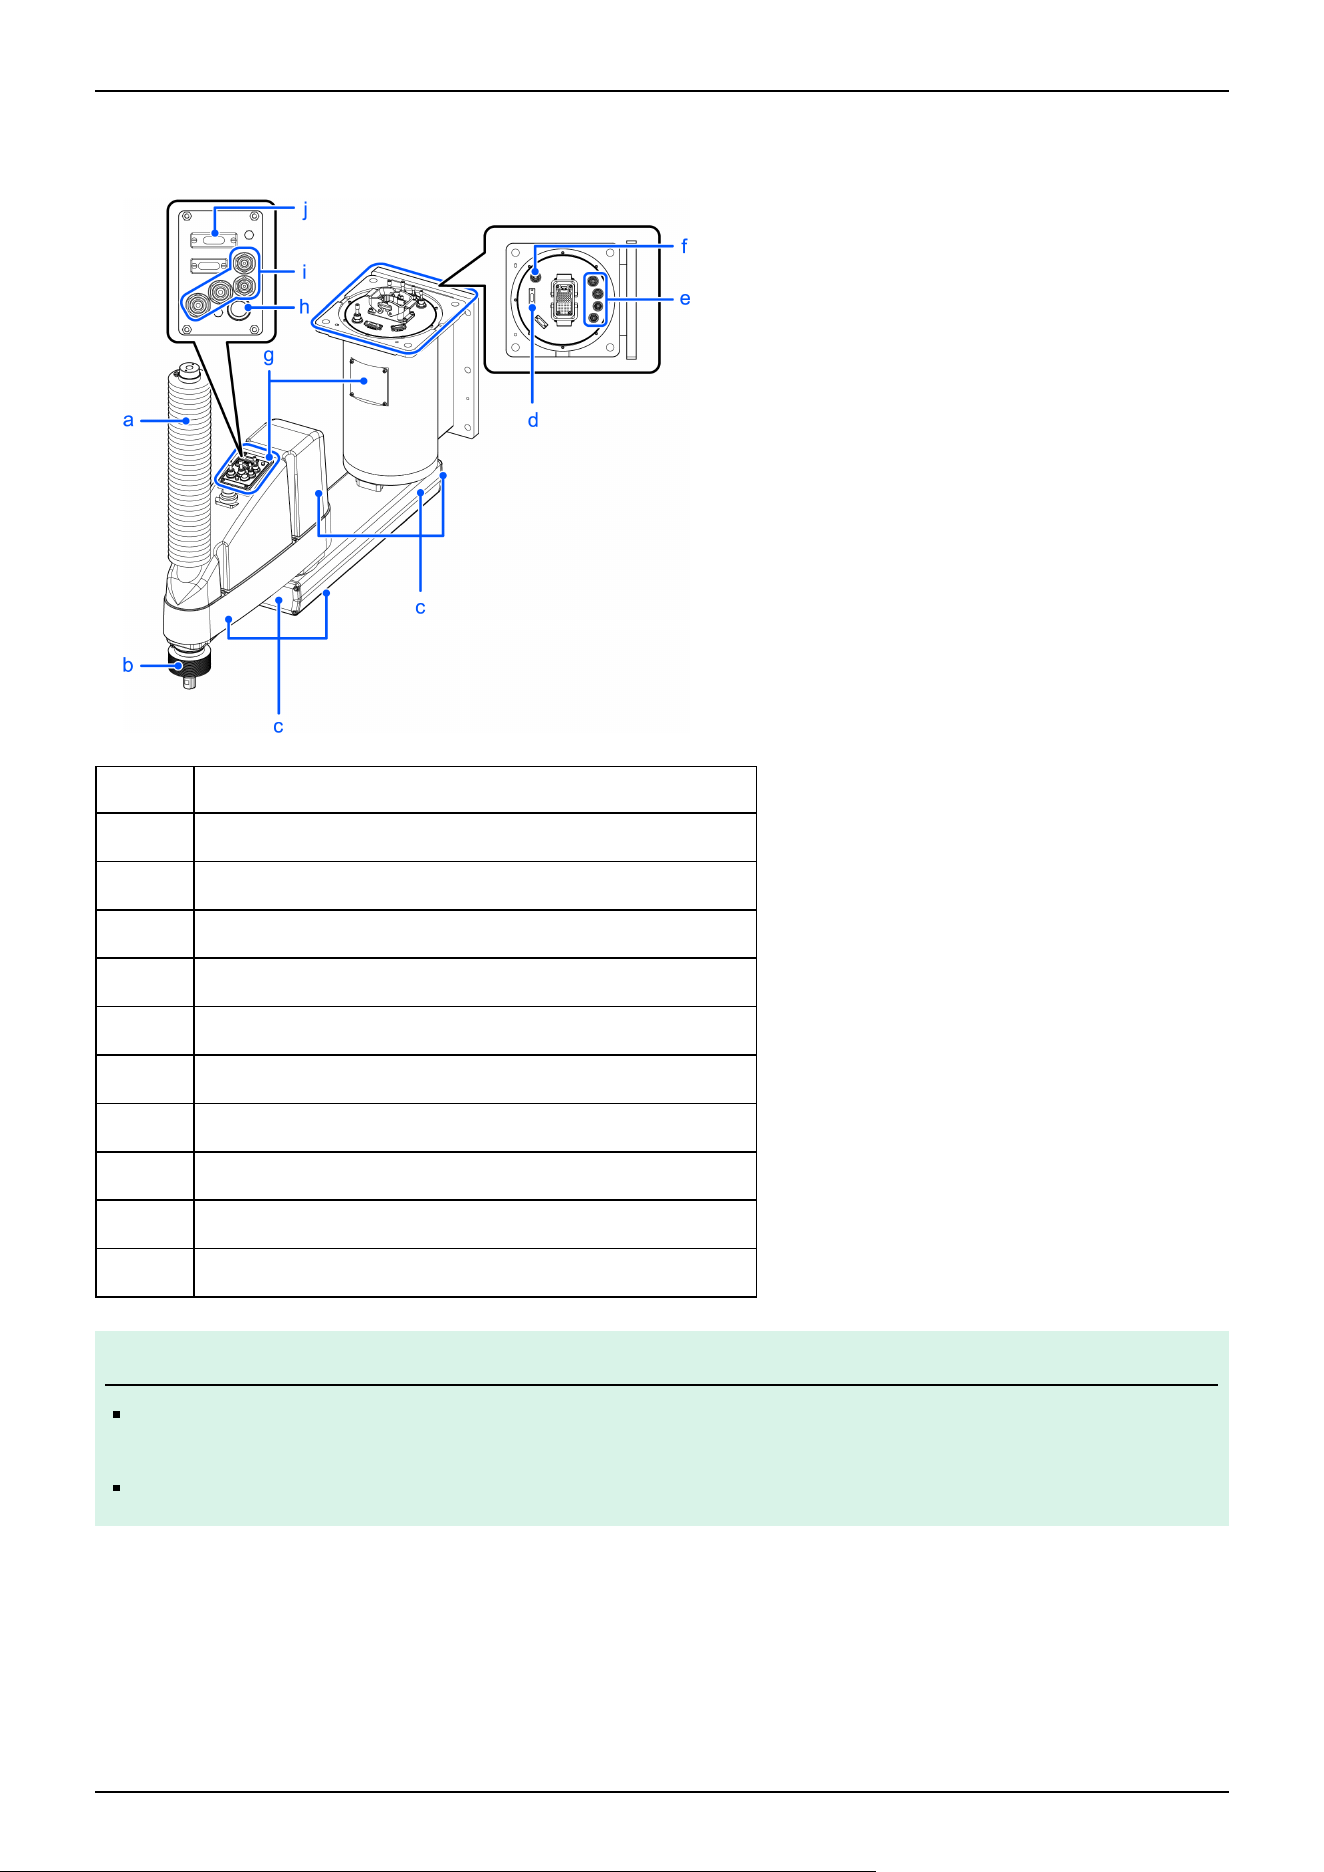
Protected-models GX10-B/GX10-C/GX20-B/GX20-C***PW
The parts shown below differ from the standard specifications.
Symbol Description
a Upper bellows
b Lower bellows
c Plating cover (oil-resistant specifications)
d User connector (protected-model)
e Fittings with cover (protected-model)
f Exhaust port
g Stainless steel plate
h Joint #3 and Joint #4 brake release switch (protected-model)
i Fittings with cover (protected-model)
j User connector (protected-model)
KEY POINTS
For protected-models, all screws used for the exterior are stainless steel screws. (except for screws used for
stops).
The part of the M/C cable housing is not IP65 compliant when the M/C cable hood is not connected.
✏
Industrial Robot: SCARA Robots GX series Manual Rev.11
349
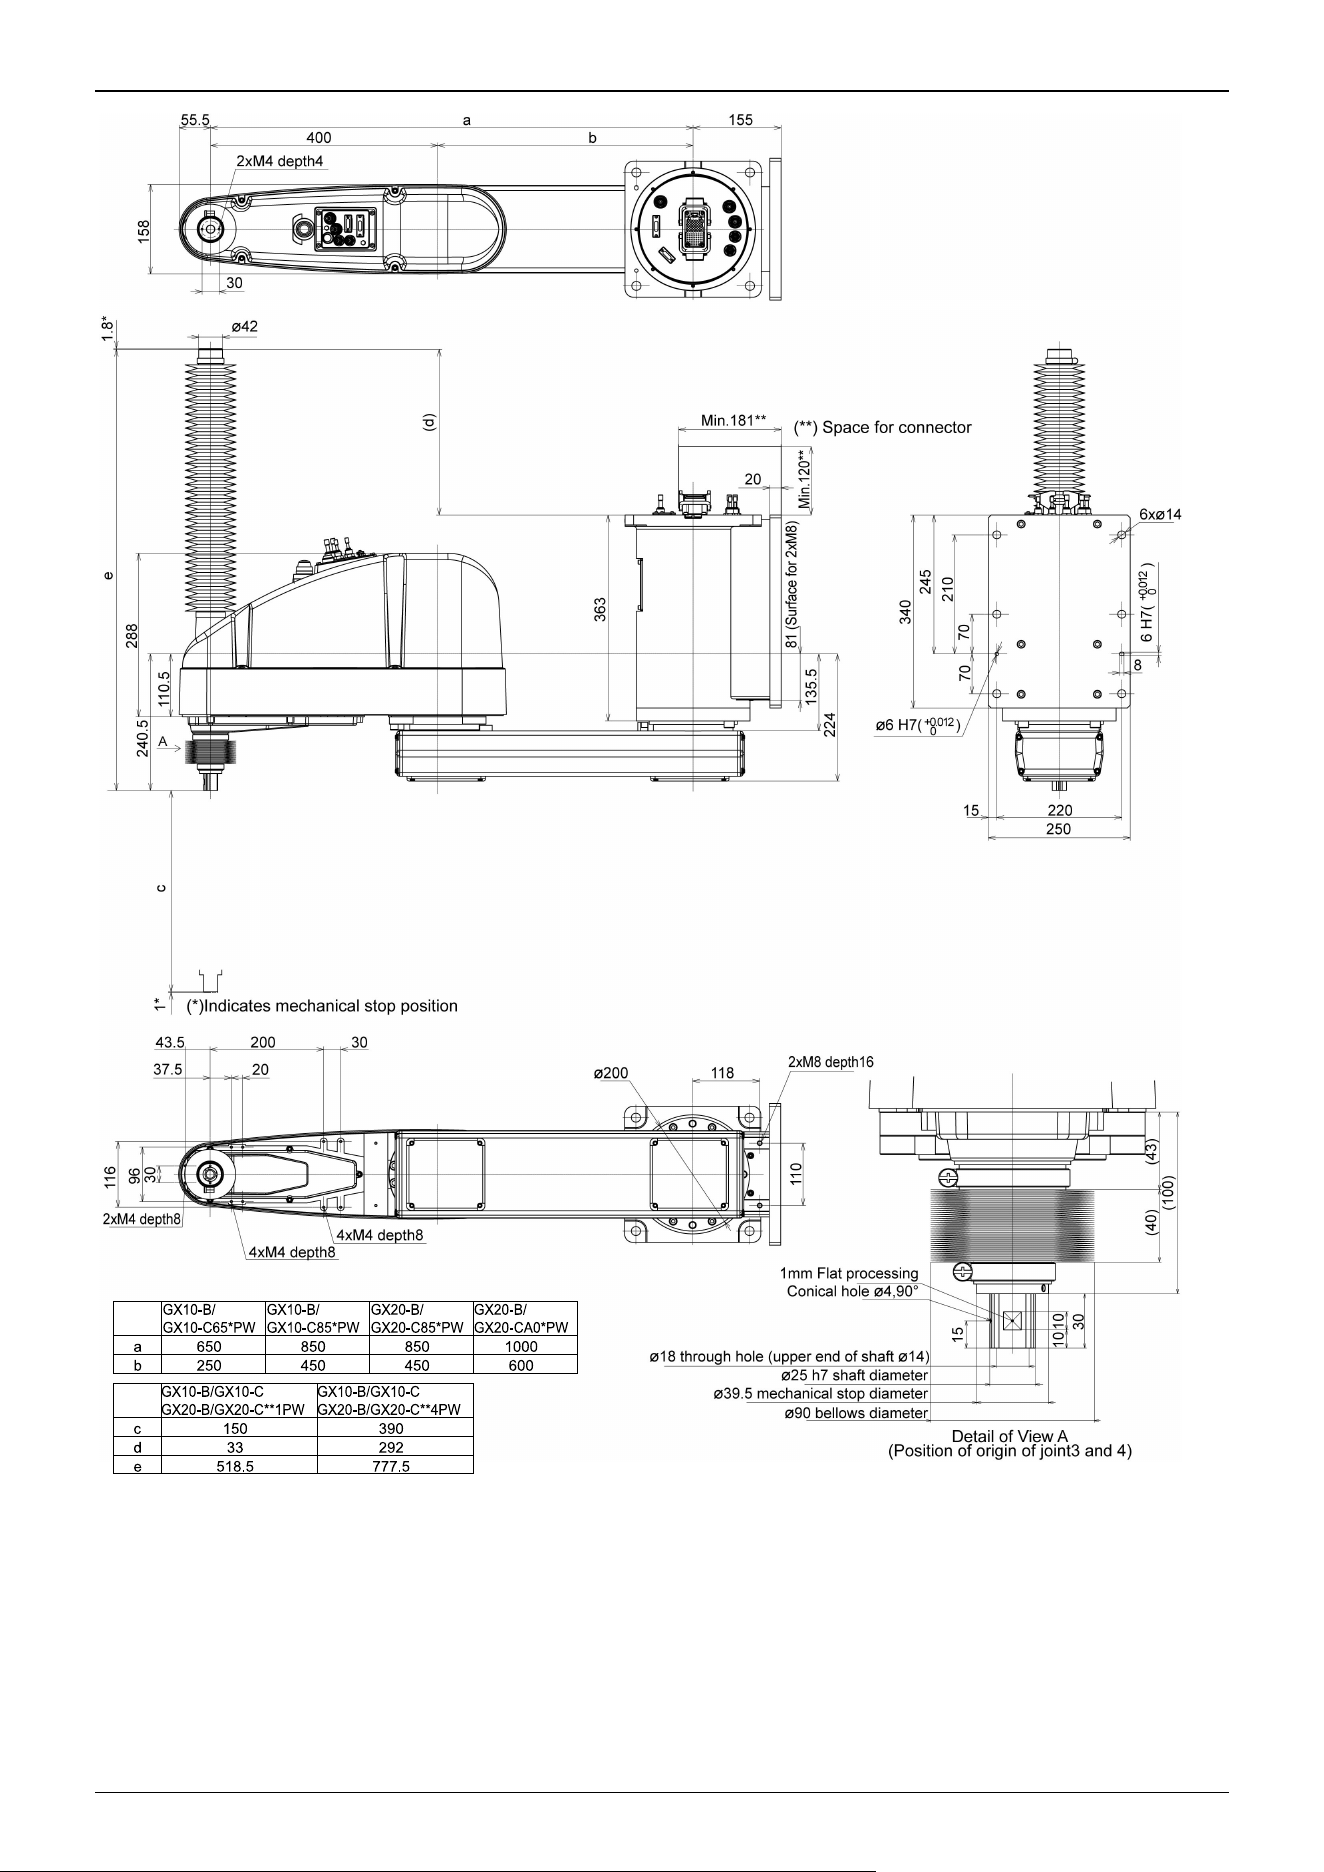
Industrial Robot: SCARA Robots GX series Manual Rev.11
350
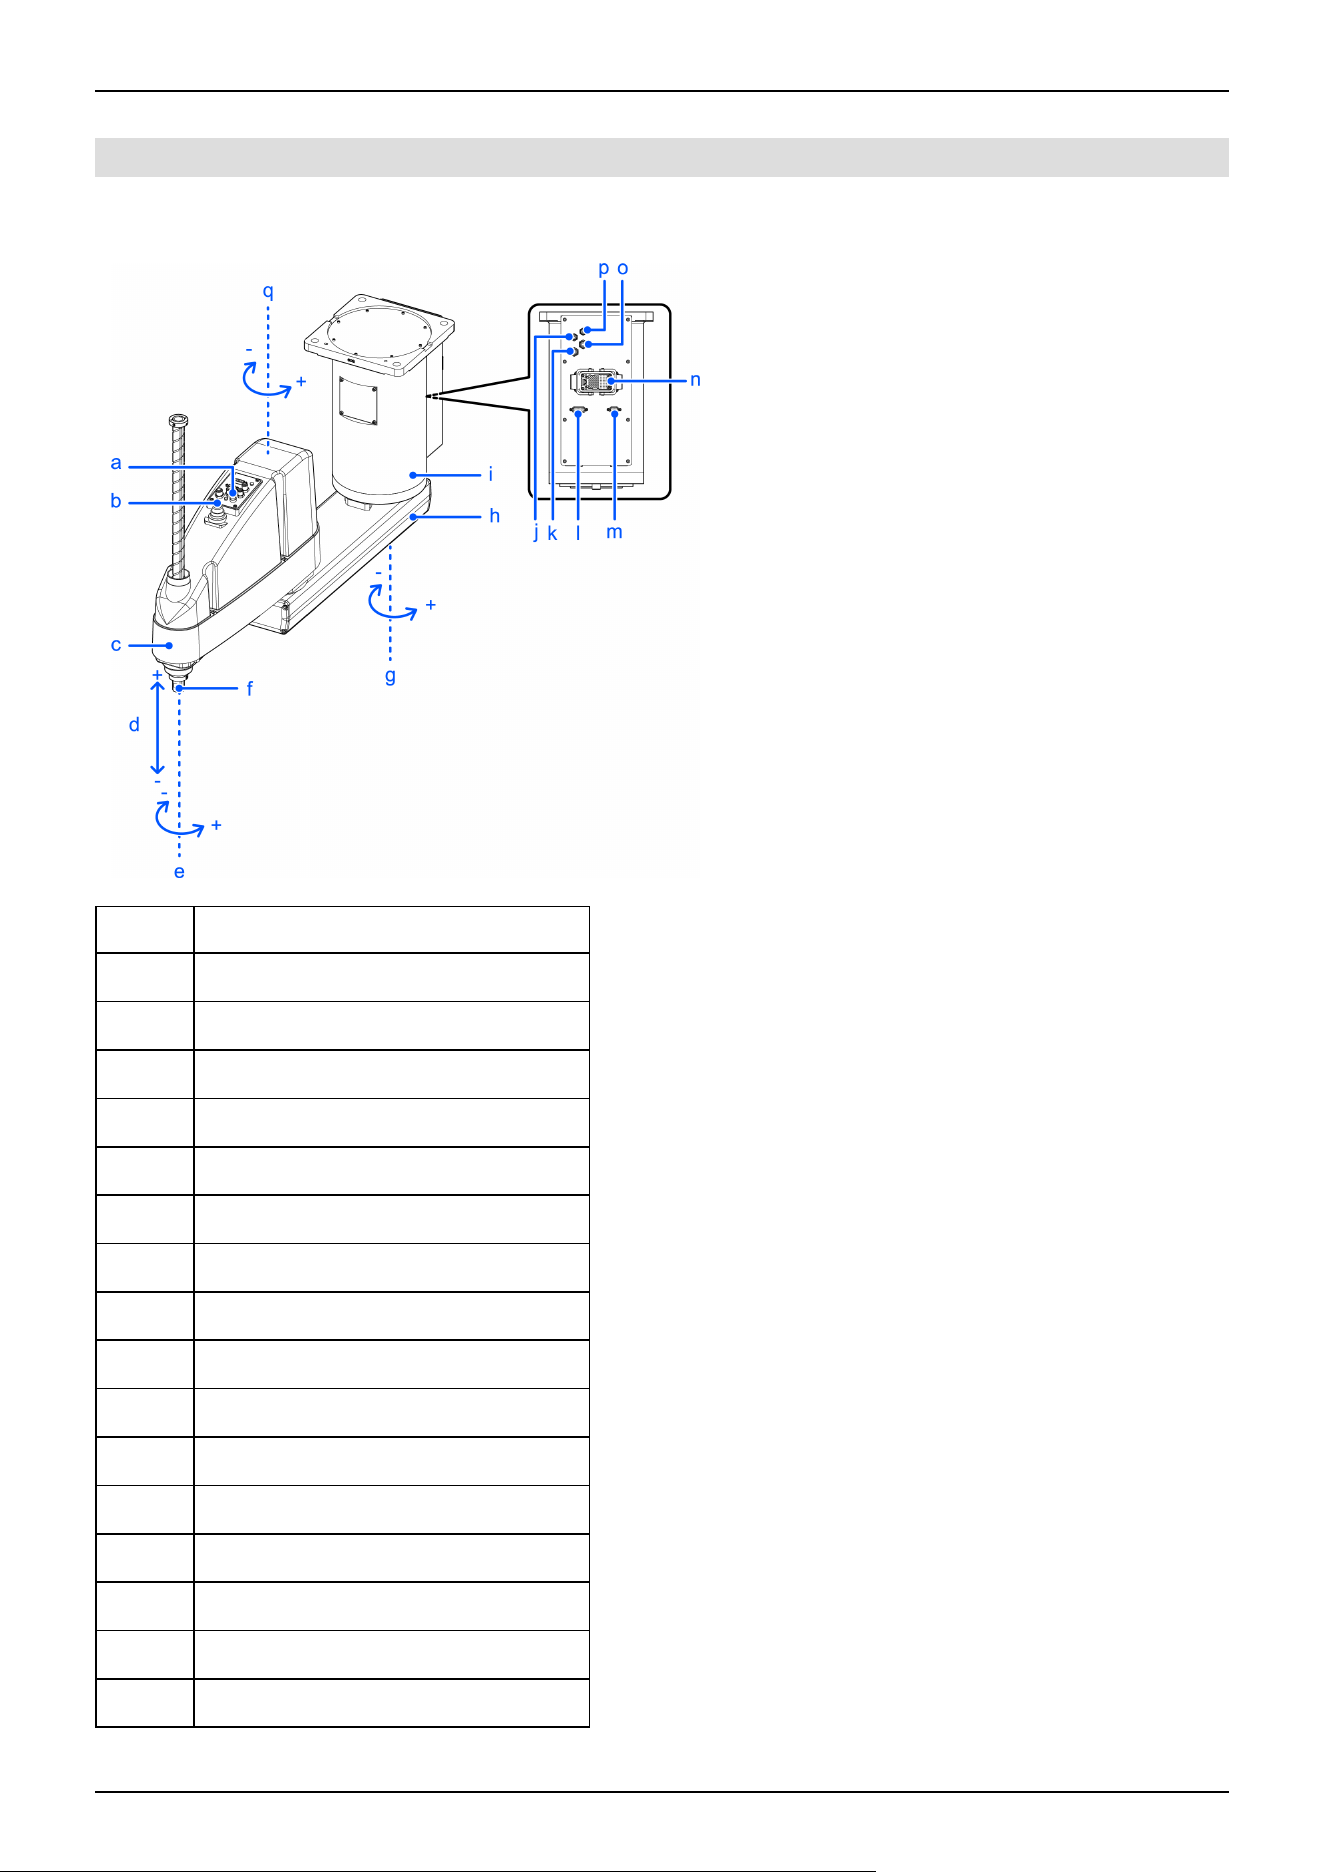
5.2.3.3 Ceiling Mounting Specifications
Standard specifications GX10-B/GX10-C/GX20-B/GX20-C***SR
Symbol Description
a Joint #3 and Joint #4 brake release switch
b Indicating lamp
c Arm #2
d Joint #3 (up/down movement)
e Joint #4 (rotation)
f Shaft
g Joint #1 (rotation)
h Arm #1
i Base
j Fitting for ø4 mm tube (white)
k Fitting for ø6 mm tube (white)
l User connector (15-pin D-sub connector)
m User connector (9-pin D-sub connector)
n M/C cable housing
o Fitting for ø6 mm tube (blue)
p Fitting for ø4 mm tube (blue)
Industrial Robot: SCARA Robots GX series Manual Rev.11
351
Symbol Description
q Joint #2 (rotation)
KEY POINTS
The brake release switch is used with both Joint #3 and Joint #4. Press the brake release switch while in the
emergency stop state to simultaneously release the brakes on Joint #3 and Joint #4.
Before starting any maintenance work, be sure to turn off the Controller and inform others in the surrounding
area that work is in progress. Performing any work procedure with the power turned on is extremely
dangerous and may result in electric shock and/or malfunction of the robot system.
✏
Industrial Robot: SCARA Robots GX series Manual Rev.11
352
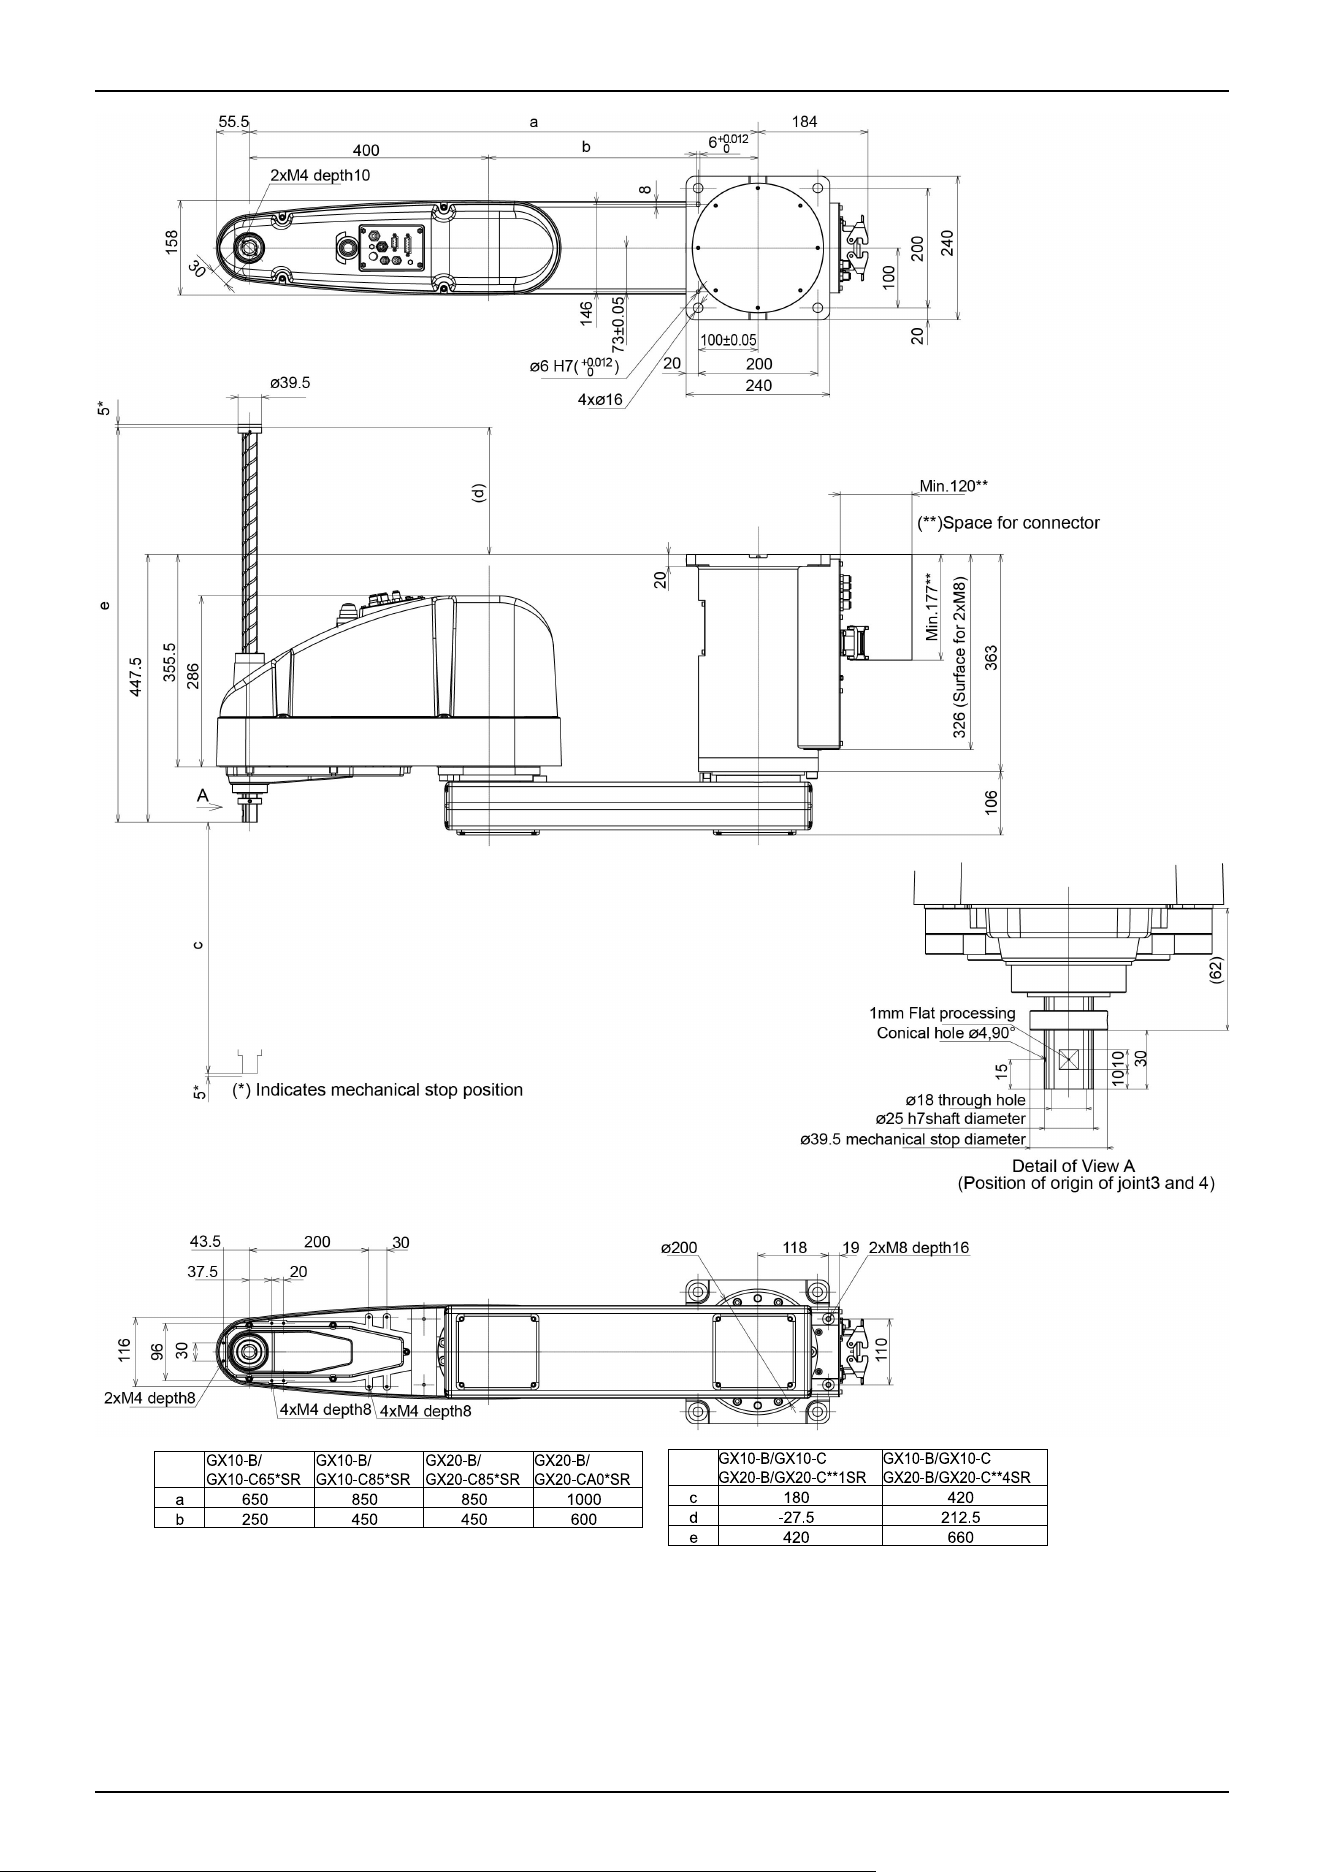
Industrial Robot: SCARA Robots GX series Manual Rev.11
353
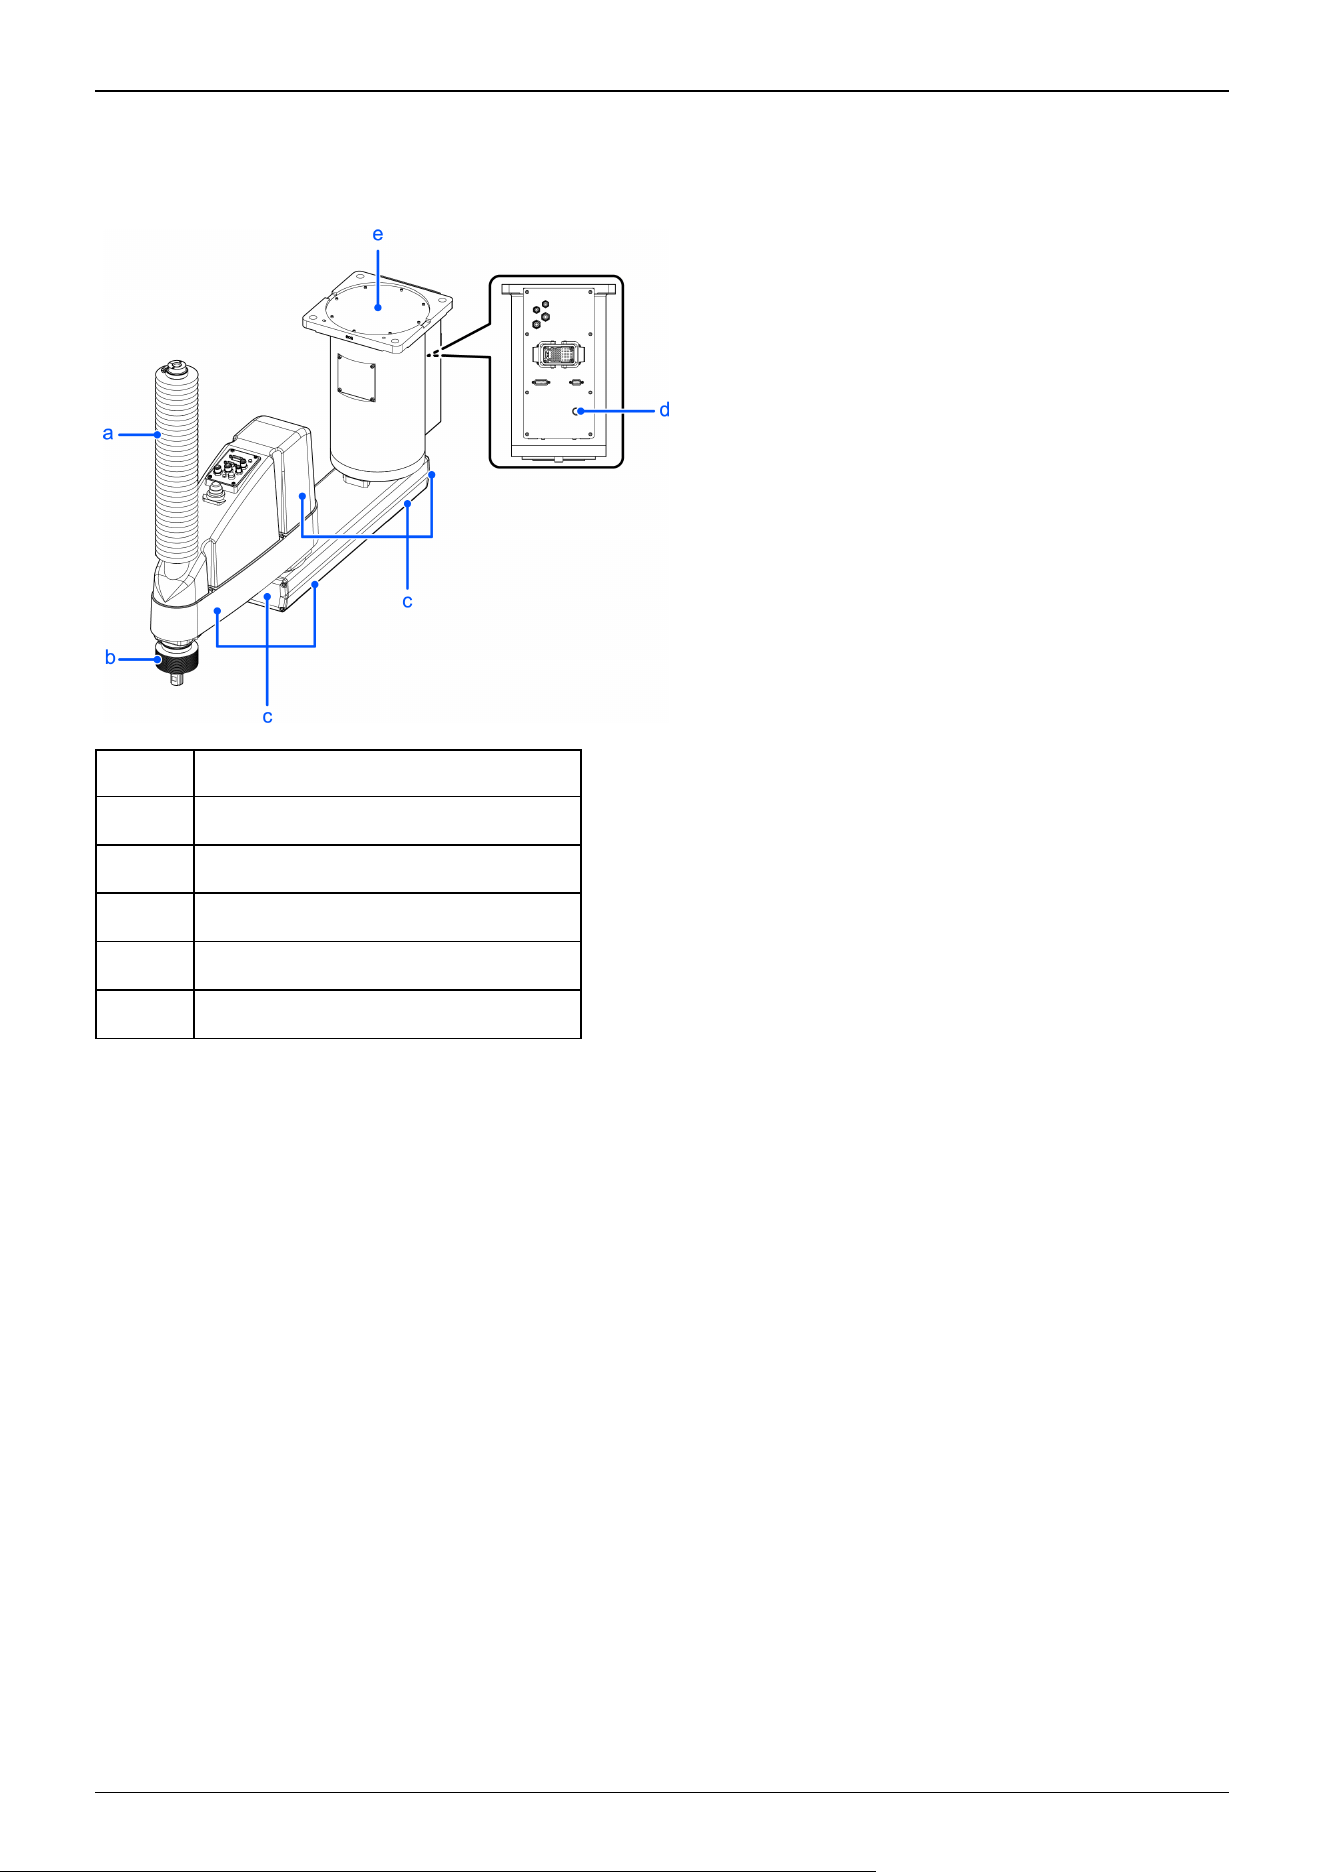
Cleanroom & ESD specifications GX10-B/GX10-C/GX20-B/GX20-C***CR
The parts shown below differ from the standard specifications.
Symbol Description
a Upper bellows
b Lower bellows
c Plating covers (anti-static specifications)
d Exhaust port
e Ceiling mounting surface cover
Industrial Robot: SCARA Robots GX series Manual Rev.11
354
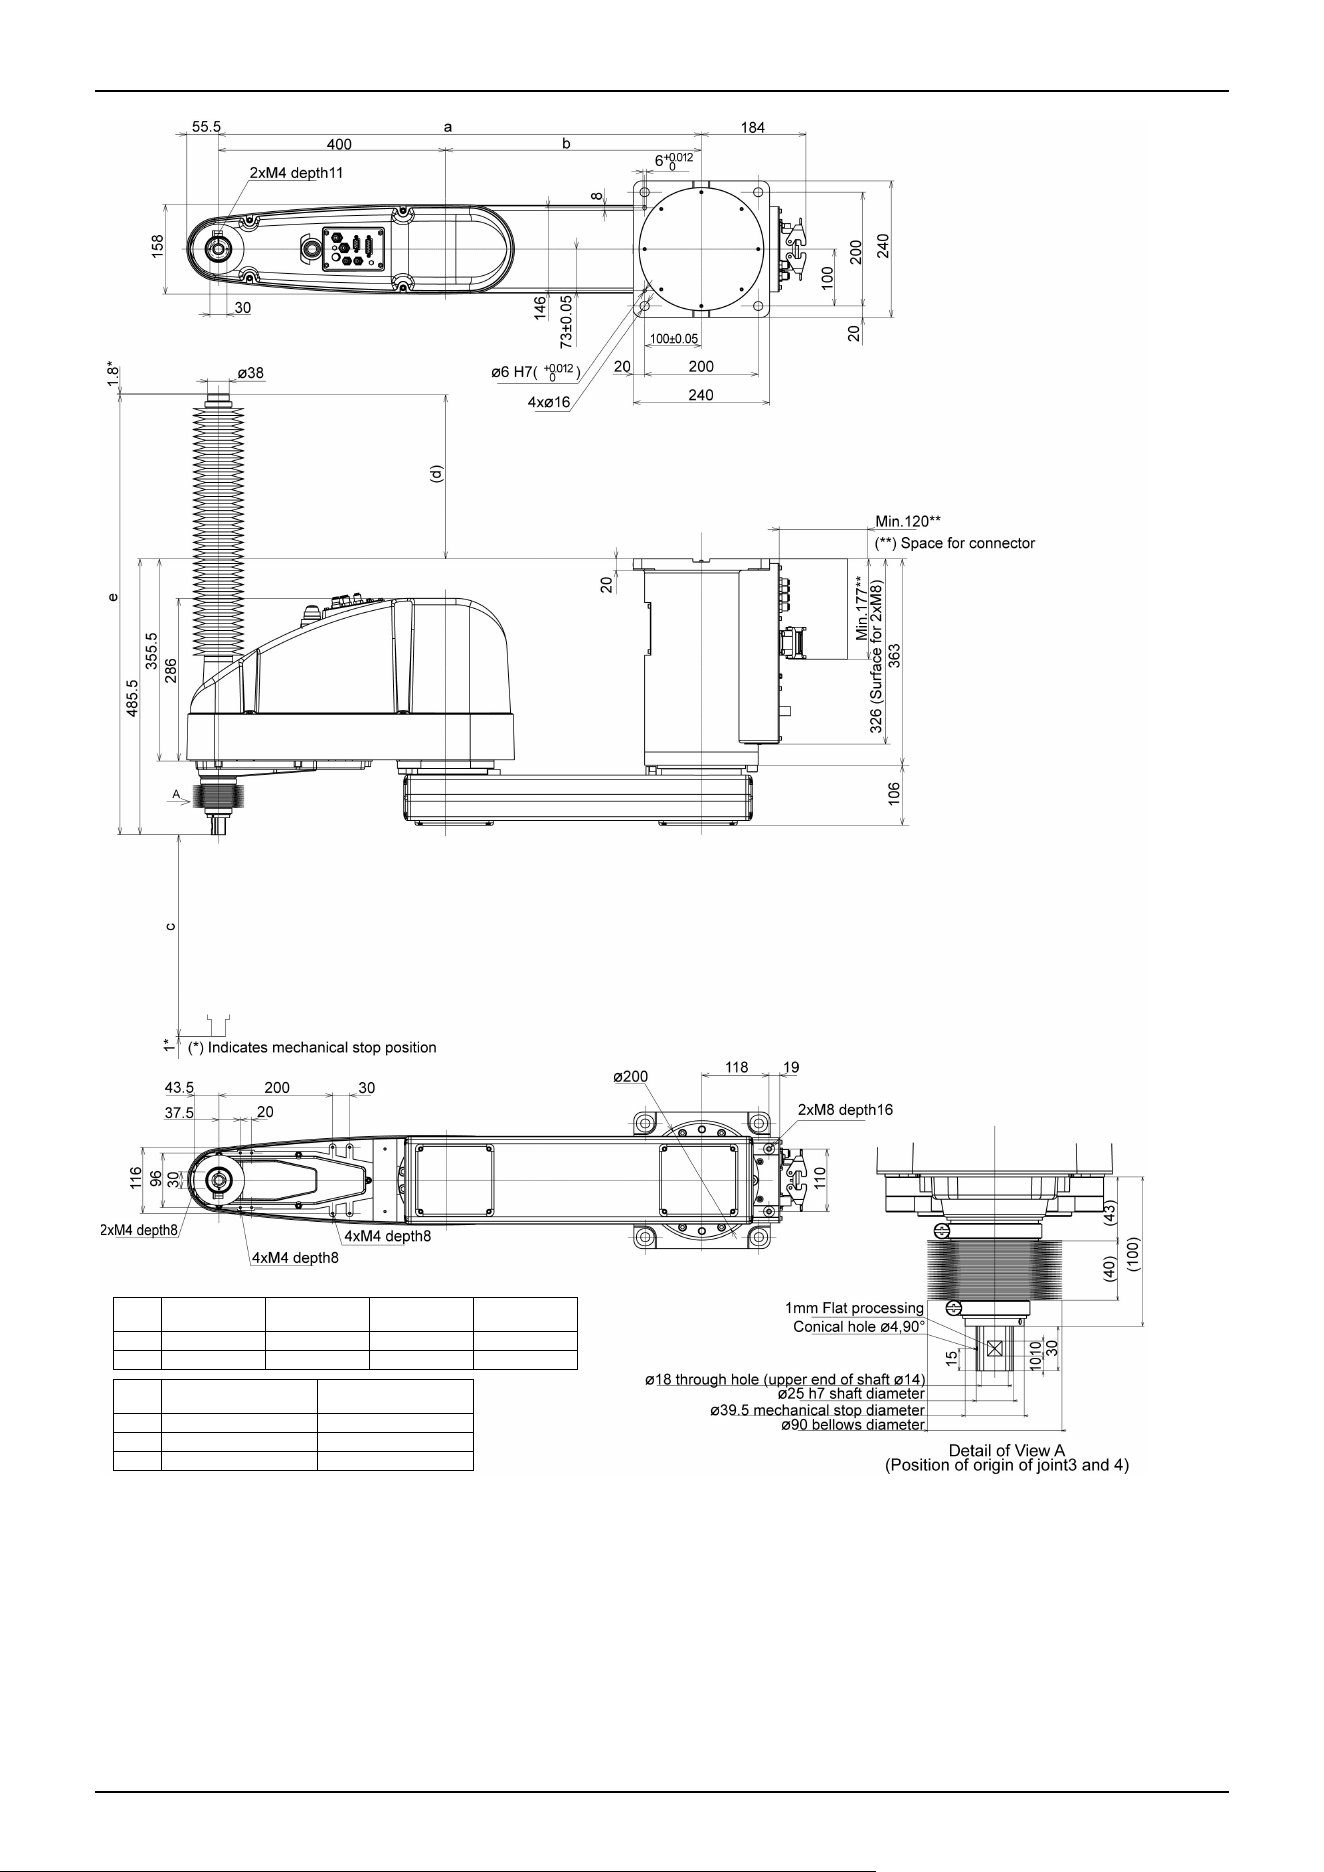
GX10-B/
GX10-C65*CR
GX10-B/
GX10-C85*CR
GX20-B/
GX20-C85*CR
GX20-B/
GX20-CA0*CR
a 650 850 850 1000
b 250 450 450 600
GX10-B/GX10-C
GX20-B/GX20-C**1CR
GX10-B/GX10-C
GX20-B/GX20-C**4CR
c 150 390
d 29.5 288.5
e 515 774
Industrial Robot: SCARA Robots GX series Manual Rev.11
355
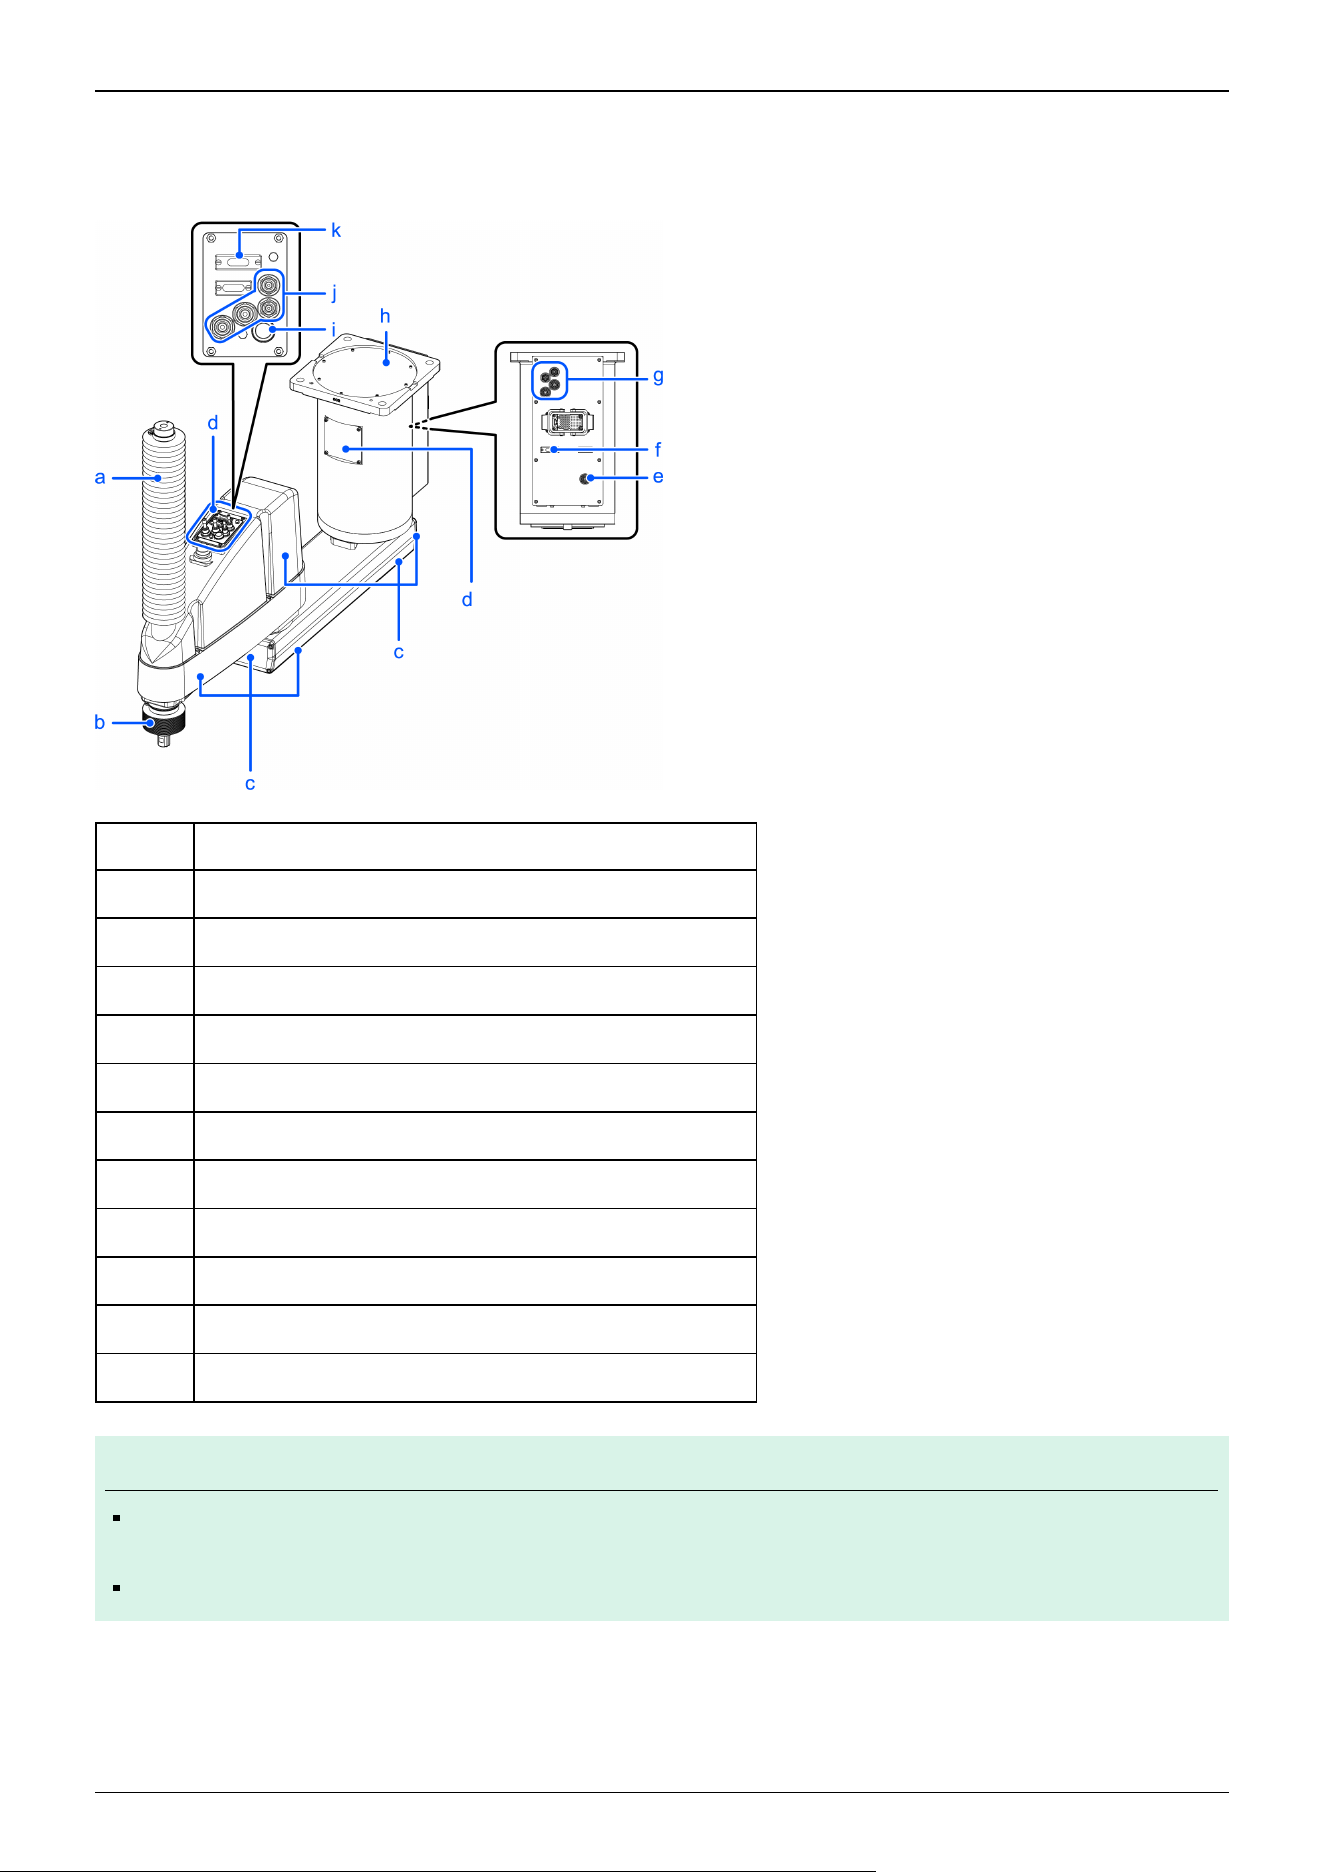
Protected-models GX10-B/GX10-C/GX20-B/GX20-C***PR
The parts shown below differ from the standard specifications.
Symbol Description
a Upper bellows
b Lower bellows
c Plating cover (oil-resistant specifications)
d Stainless steel plate
e Exhaust port
f User connector (protected-model)
g Fittings with cover (protected-model)
h Stainless steel plate for ceiling mounting surface
i Joint #3 and Joint #4 brake release switch (protected-model)
j Fittings with cover (protected-model)
k User connector (protected-model)
KEY POINTS
For protected-models, all screws used for the exterior are stainless steel screws. (except for screws used for
stops).
The part of the M/C cable housing is not IP65 compliant when the M/C cable hood is not connected.
✏
Industrial Robot: SCARA Robots GX series Manual Rev.11
356
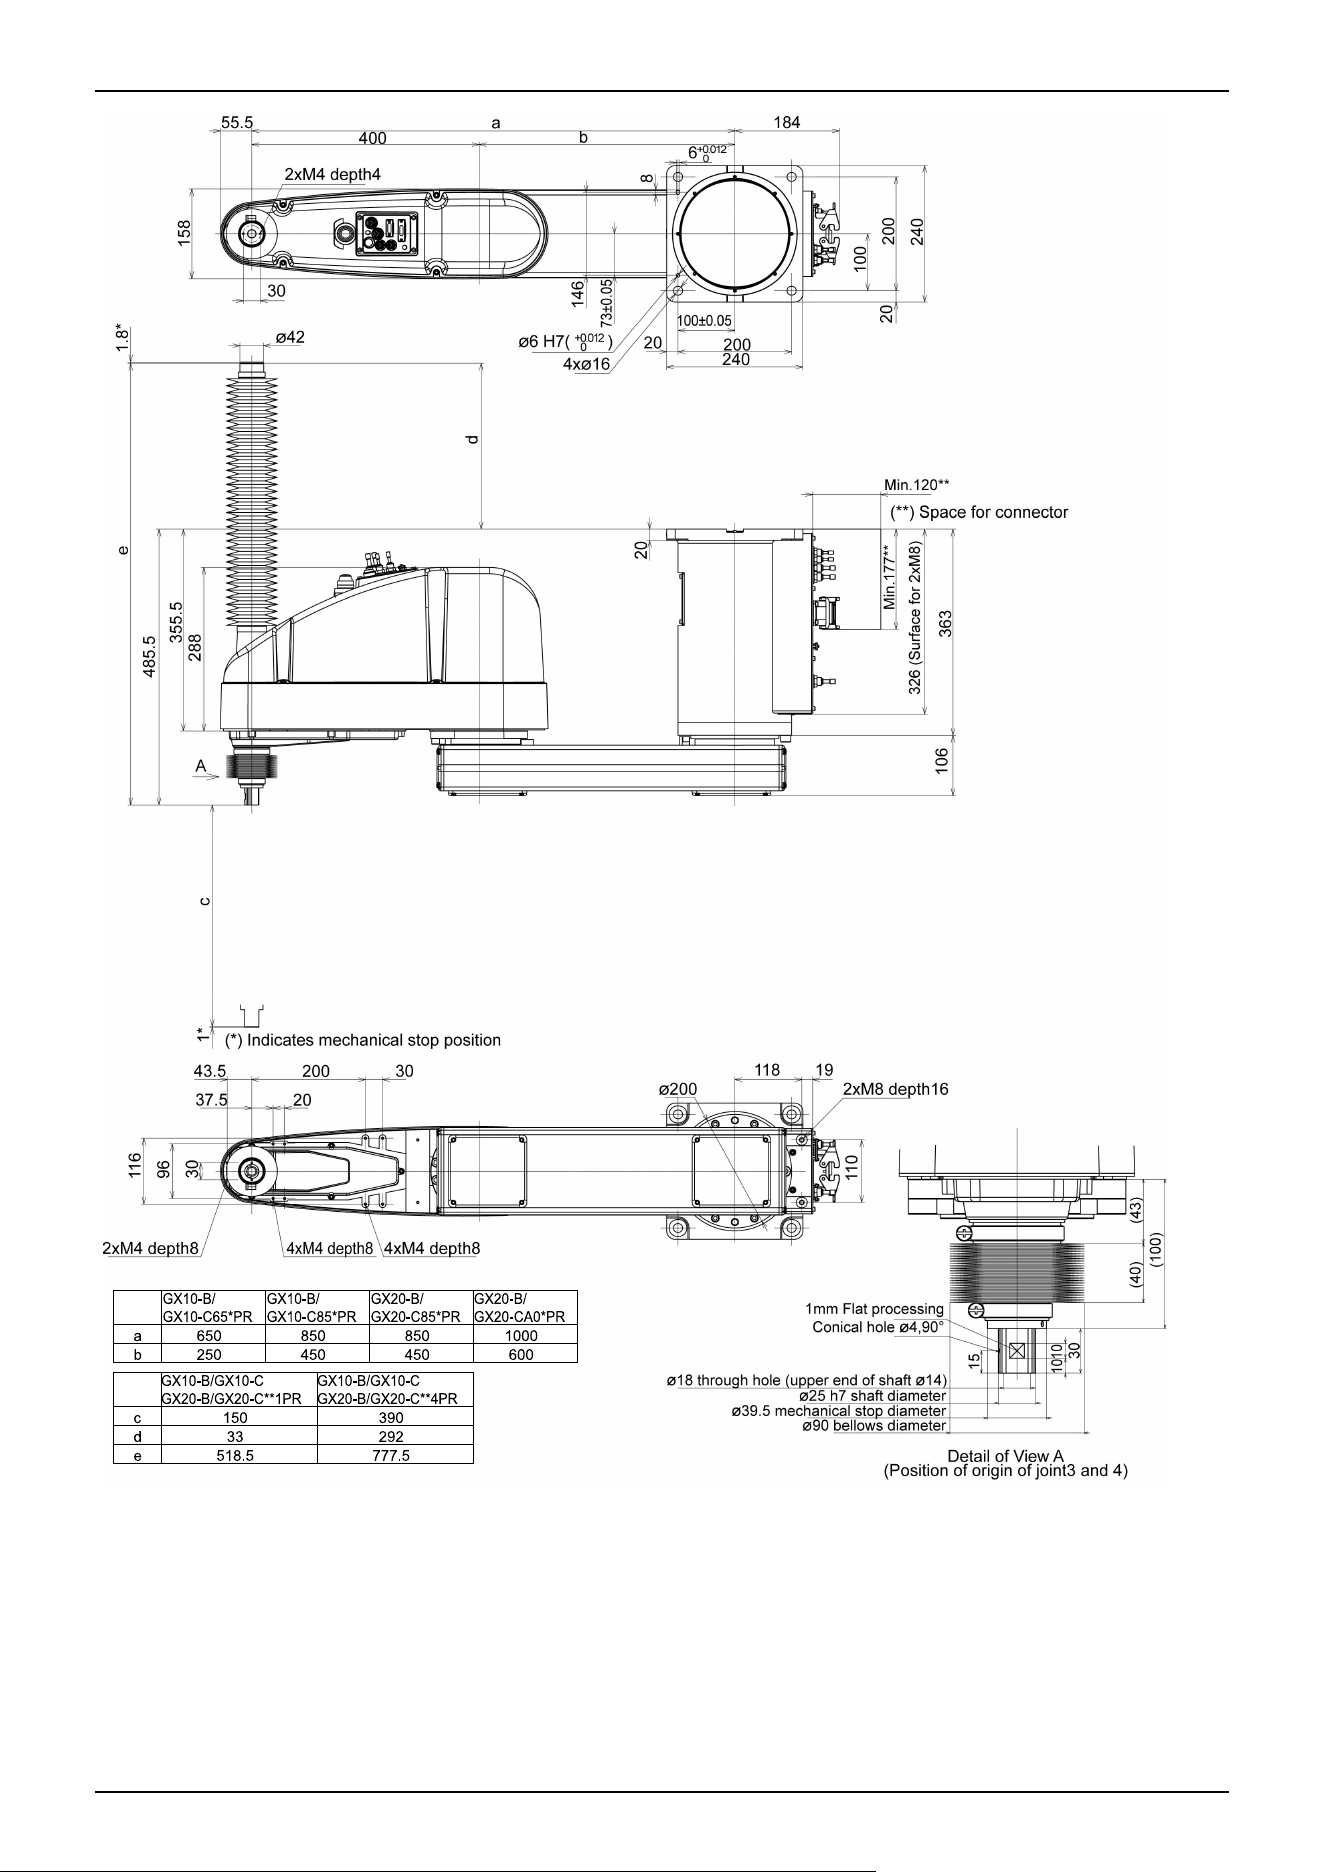
Industrial Robot: SCARA Robots GX series Manual Rev.11
357
5.2.4 Specifications Table
For the specifications tables of each model, refer to the following section.
Appendix A: Specifications Table
5.2.5 How to Set the Model
The Manipulator model for your system has been set before shipment from the factory.
Normally, the model does not need to be changed when you receive your system.
CAUTION
If changing the setting of the Manipulator model, be responsible and absolutely certain that the wrong
Manipulator model is not set. Incorrect setting of the Manipulator model may result in abnormal or no
operation by the Manipulator and could even cause safety problems.
KEY POINTS
If a custom specifications number (MT***) or (X***) is written on the face plate (serial number label), the
Manipulator has custom specifications.
Models with custom specifications may require a different setting procedure. Check the custom specifications number and
contact the supplier for more information.
The Manipulator model is set from software. For details, refer to the following manual.
"Epson RC+ User's Guide - Robot Settings"
5.3 Environment and Installation
The robot system should be designed and installed by people who have received installation training provided by Epson and
the suppliers. Also, the laws and regulations of the installation country must be followed.
5.3.1 Environment
To ensure that the robot system operates and maintains maximum performance and to ensure its safe use, the Manipulator
should be installed in an environment that meets the following requirements.
Item Requirement
Ambient temperature
*1
Installation: 5 to 40°C
Transport, storage: - 20 to 60°C
Ambient relative humidity
Installation: 10 to 80% (no condensation)
Transport, storage: 10 to 90% (no condensation)
Fast transient burst noise 1 kV or less (signal line)
Electrostatic noise 4 kV or less
Altitude 1000 m or less
✏
Industrial Robot: SCARA Robots GX series Manual Rev.11
358
KEY POINTS
*1 The ambient temperature requirement is for the Manipulator only. For details on the environment requirements
for the connected Controller, refer to the following manual.
"Controller Manual"
KEY POINTS
When used in a low-temperature environment near the minimum temperature specified in the product
specifications, or when the unit is idle for a long period of time during holidays or at night, a collision detection
error or similar error may occur immediately after the start of operation due to high resistance in the drive unit. In
such cases, warm-up operation for about 10 minutes is recommended.
KEY POINTS
If there are conductive objects such as fences or ladders within 2.5 m of the Manipulator, these objects must be
grounded.
Also, depending on the environmental specifications of the Manipulator, the following requirements must be met.
Environmental Specifications Manipulator Installation Environment Requirements
S, C, P
Install indoors.
Keep away from direct sunlight.
Keep away from shocks or vibrations.
Keep away from sources of electric noise.
Keep away from explosive areas.
Keep away from large quantities of radiation.
S, C
Keep away from dust, oily smoke, salinity, metal powder, and other contaminants.
Keep away from flammable or corrosive liquids and gases.
Keep away from water.
The following items should also be taken into consideration for the installation environment of Manipulators with protected-
models.
These are compliant with the IP65 protection class (IEC 60529, JIS C0920). They can be installed in environments exposed
to dust or splashing of water.
They can be installed in environments where dust, oil smoke, metal powder, and similar substances are airborne, but they
are not suitable for use with nitrile rubber oil seals, O-rings, packings, liquid gaskets, or other substances that impair
sealing performance.
The Manipulator cannot be used in environments exposed to liquids or airborne droplets that are corrosive such as acids or
alkalis.
In environments that are exposed to airborne droplets containing salt, rust may also form on the Manipulator.
Manipulator surfaces are generally oil-resistant, but if special oils are to be used, oil resistance should be checked before
use. For more information, please contact the supplier.
In environments with rapid changes in temperature and humidity, condensation may form inside the Manipulator.
✏
✏
✏
Industrial Robot: SCARA Robots GX series Manual Rev.11
359
When handling food directly, it is necessary to make sure that the Manipulator is not likely to contaminate the food. For
more information, please contact the supplier.
The Controllers used with Manipulators with protected-models do not have protection against harsh environments. The
Controller should be installed in a location that meets its operating environment requirements.
WARNING
Always use a circuit breaker for the Controller's power supply. Failure to use a circuit breaker may result in an
electrical shock hazard or malfunction due to an electrical leakage.
Select the correct circuit breaker based on the Controller that you are using. For details, refer to the following
manual.
"Controller Manual"
CAUTION
When cleaning the Manipulator, do not rub it strongly with alcohol or benzene. Coated surfaces may lose their
luster.
5.3.2 Base Table
A base table for anchoring the Manipulator is not supplied. The base table must be fabricated or obtained by the customer. The
shape and size of the base table vary depending on the application of the robot system. As a reference when designing the base
table, the requirements from the Manipulator side are shown here.
The base table must not only be able to bear the weight of the Manipulator but also be able to withstand the dynamic
movement of the Manipulator when it operates at maximum acceleration/deceleration. Ensure that the base table has enough
strength by using reinforcing materials such as crossbeams.
The torque and reaction force produced by the movement of the Manipulator are as follows:
GX10-B/GX10-C GX20-B/GX20-C
Maximum torque on horizontal surface 1000 N·m 1000 N·m
Maximum reaction force in horizontal direction 4500 N 7500 N
Maximum reaction force in vertical direction 2000 N 2000 N
M12 threaded holes are used for mounting the Manipulator on the base table.
Use bolts for mounting the Manipulator that have a strength compliant with ISO 898-1 property class 10.9 or 12.9. The
dimensions are provided in the following sections.
Names of Parts and Their Dimensions
Manipulator Mounting Dimensions
The plate for the Manipulator mounting face should be at least 20 mm thick and made of steel for reducing vibrations. A
surface roughness of 25 μm or less at the maximum height is appropriate.
The base table must be secured to the floor or wall to prevent it from moving.
Industrial Robot: SCARA Robots GX series Manual Rev.11
360
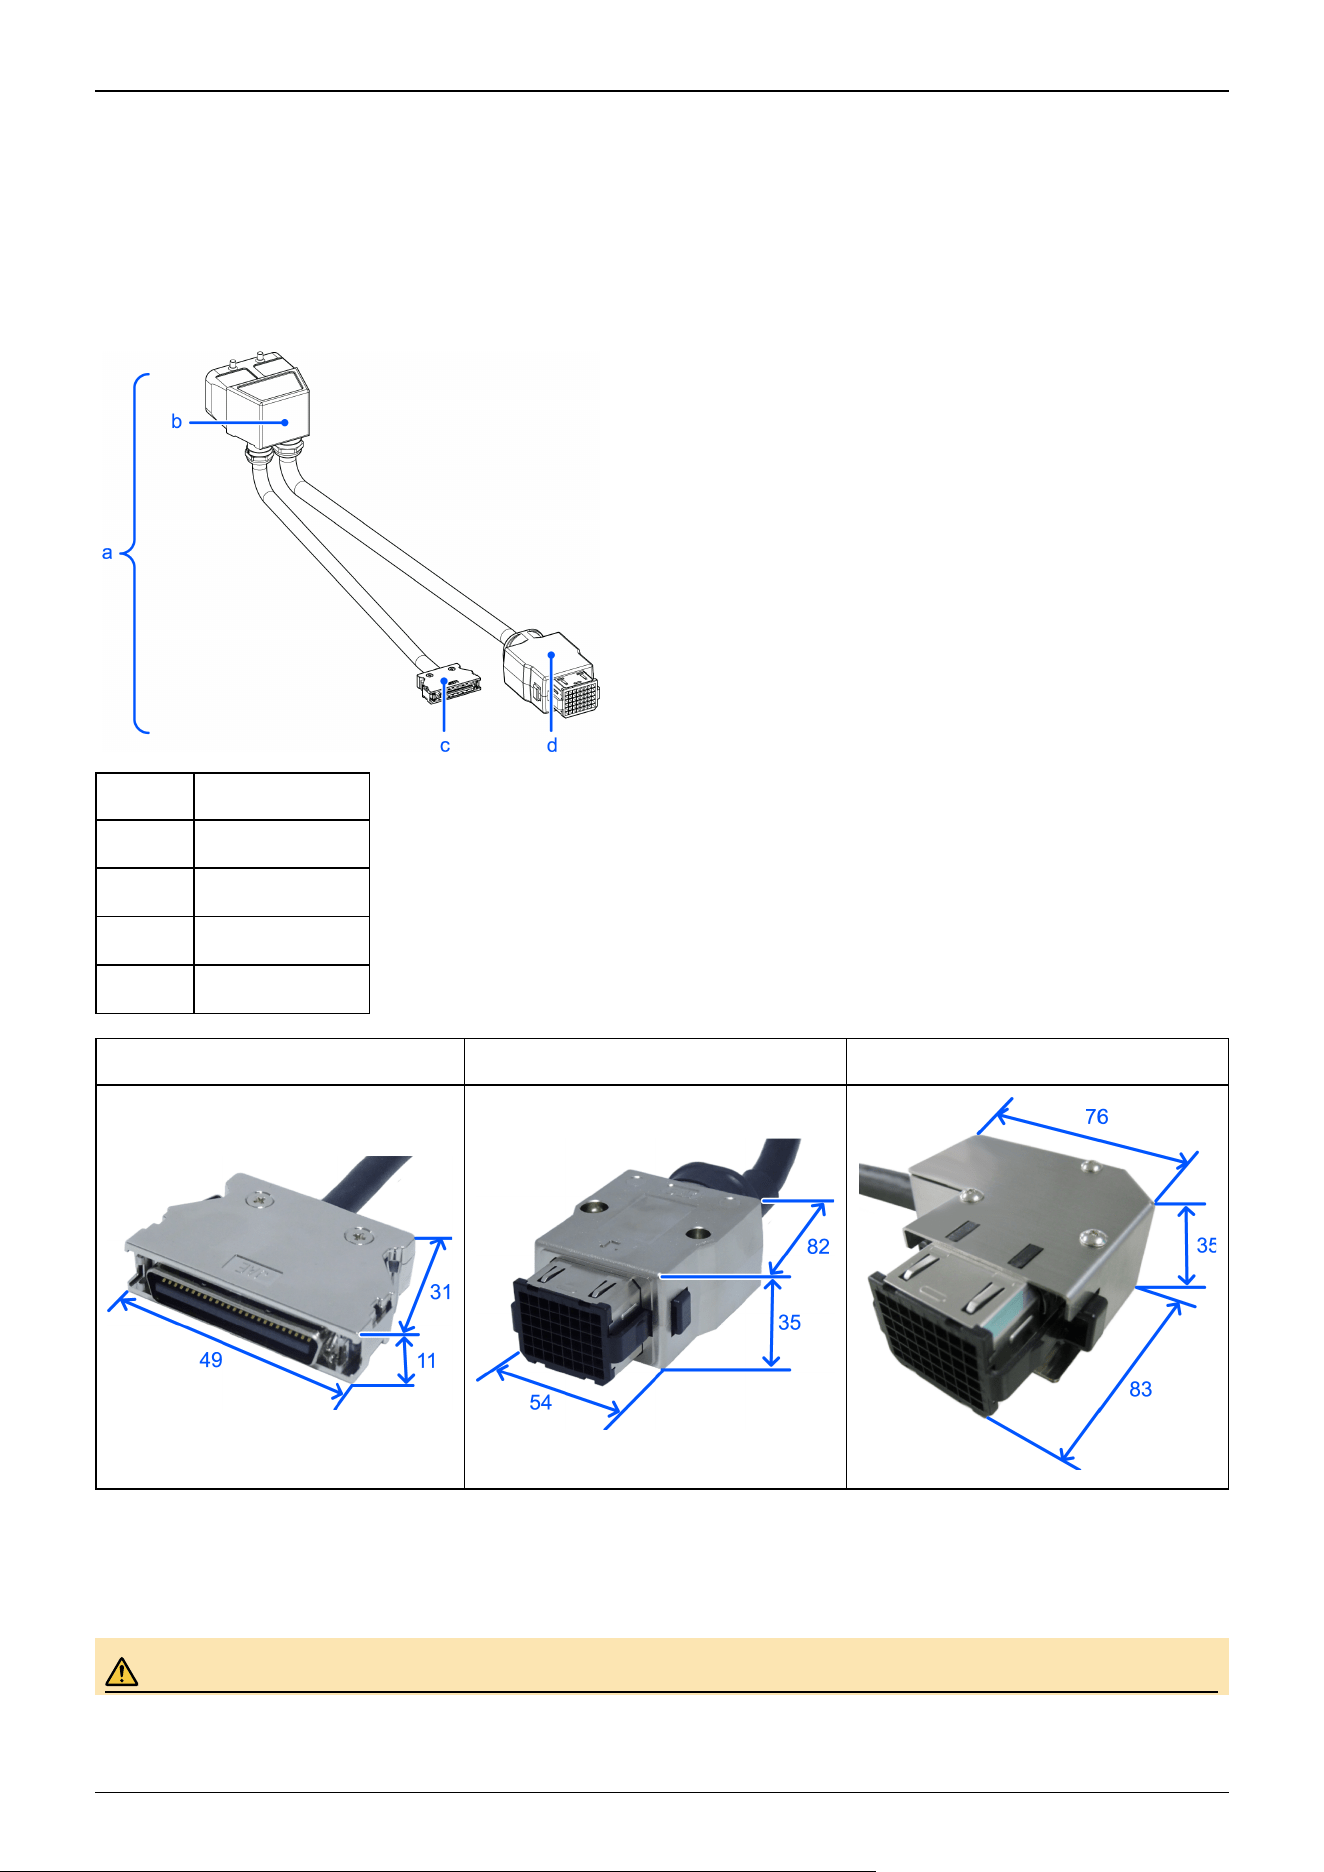
The Manipulator mounting surface should have a flatness of 0.5 mm or less and an inclination of 0.5° or less to a horizontal or
vertical surface. If the installation surface does not have the proper flatness, the base of the Manipulator may be damaged or
the robot may be unable to operate at maximum performance.
When using a leveler to adjust the height of the base table, use a screw with M16 diameter or more.
If passing cables through the holes in the base table, refer to the connector dimensions in the figures below.
(Units: mm)
Symbol Description
a M/C cable
b M/C cable hood
c Signal connector
d Power connector
Signal Connector Power Connector (Straight) Power Connector (L-shaped)
For details on the environmental requirements for the space when housing the Controller in the base table, refer to the
following manual.
"Controller Manual"
WARNING
Industrial Robot: SCARA Robots GX series Manual Rev.11
361
To ensure safety, be sure to install safety barriers for the robot system. For more information on safeguards,
refer to the following section.
Safeguard (SG)
5.3.3 Manipulator Mounting Dimensions
The maximum envelope of the Manipulator is shown in the figures below. The maximum envelope shown in each figure shows
the case when the radius of the hand is 60 mm or less. If the radius of the hand exceeds 60 mm, define the radius as the
distance to the outer edge of the maximum envelope. In addition to the hand, if a camera, solenoid valve, or other component
attached to the arm is large, set the maximum envelope to include the range that the component may reach.
Also, besides the area required for installation of the Manipulator, Controller, peripheral equipment, and other devices, the
following space should be provided at a minimum.
Space for teaching
Space for maintenance and inspection (Space for working safely in the safety barriers)
Space for cables
KEY POINTS
When installing the cables, be sure to maintain sufficient distance from obstacles.
For the minimum bend radius of the M/C cable, refer to the following section.
GX10/20
Also, leave enough space for other cables so that they are not forced to bend at extreme angles.
WARNING
Install the Manipulator in a location with enough space so that a tool or a workpiece tip does not reach a wall or
safety barriers when the Manipulator extends its arm while holding a workpiece.
If the tool or the workpiece tip reaches a wall or safety barriers, it is extremely hazardous and may result in
serious bodily injury to operators and/or severe equipment damage.
The distance between the safety barriers and the tool or workpiece should be set according to ISO 10218-2.
For the stopping time and stopping distance, refer to the following sections.
Appendix B: Stopping Time and Stopping Distance at Emergency Stop
Appendix C: Stopping Time and Stopping Distance When Safeguard is Open
✏
Industrial Robot: SCARA Robots GX series Manual Rev.11
362
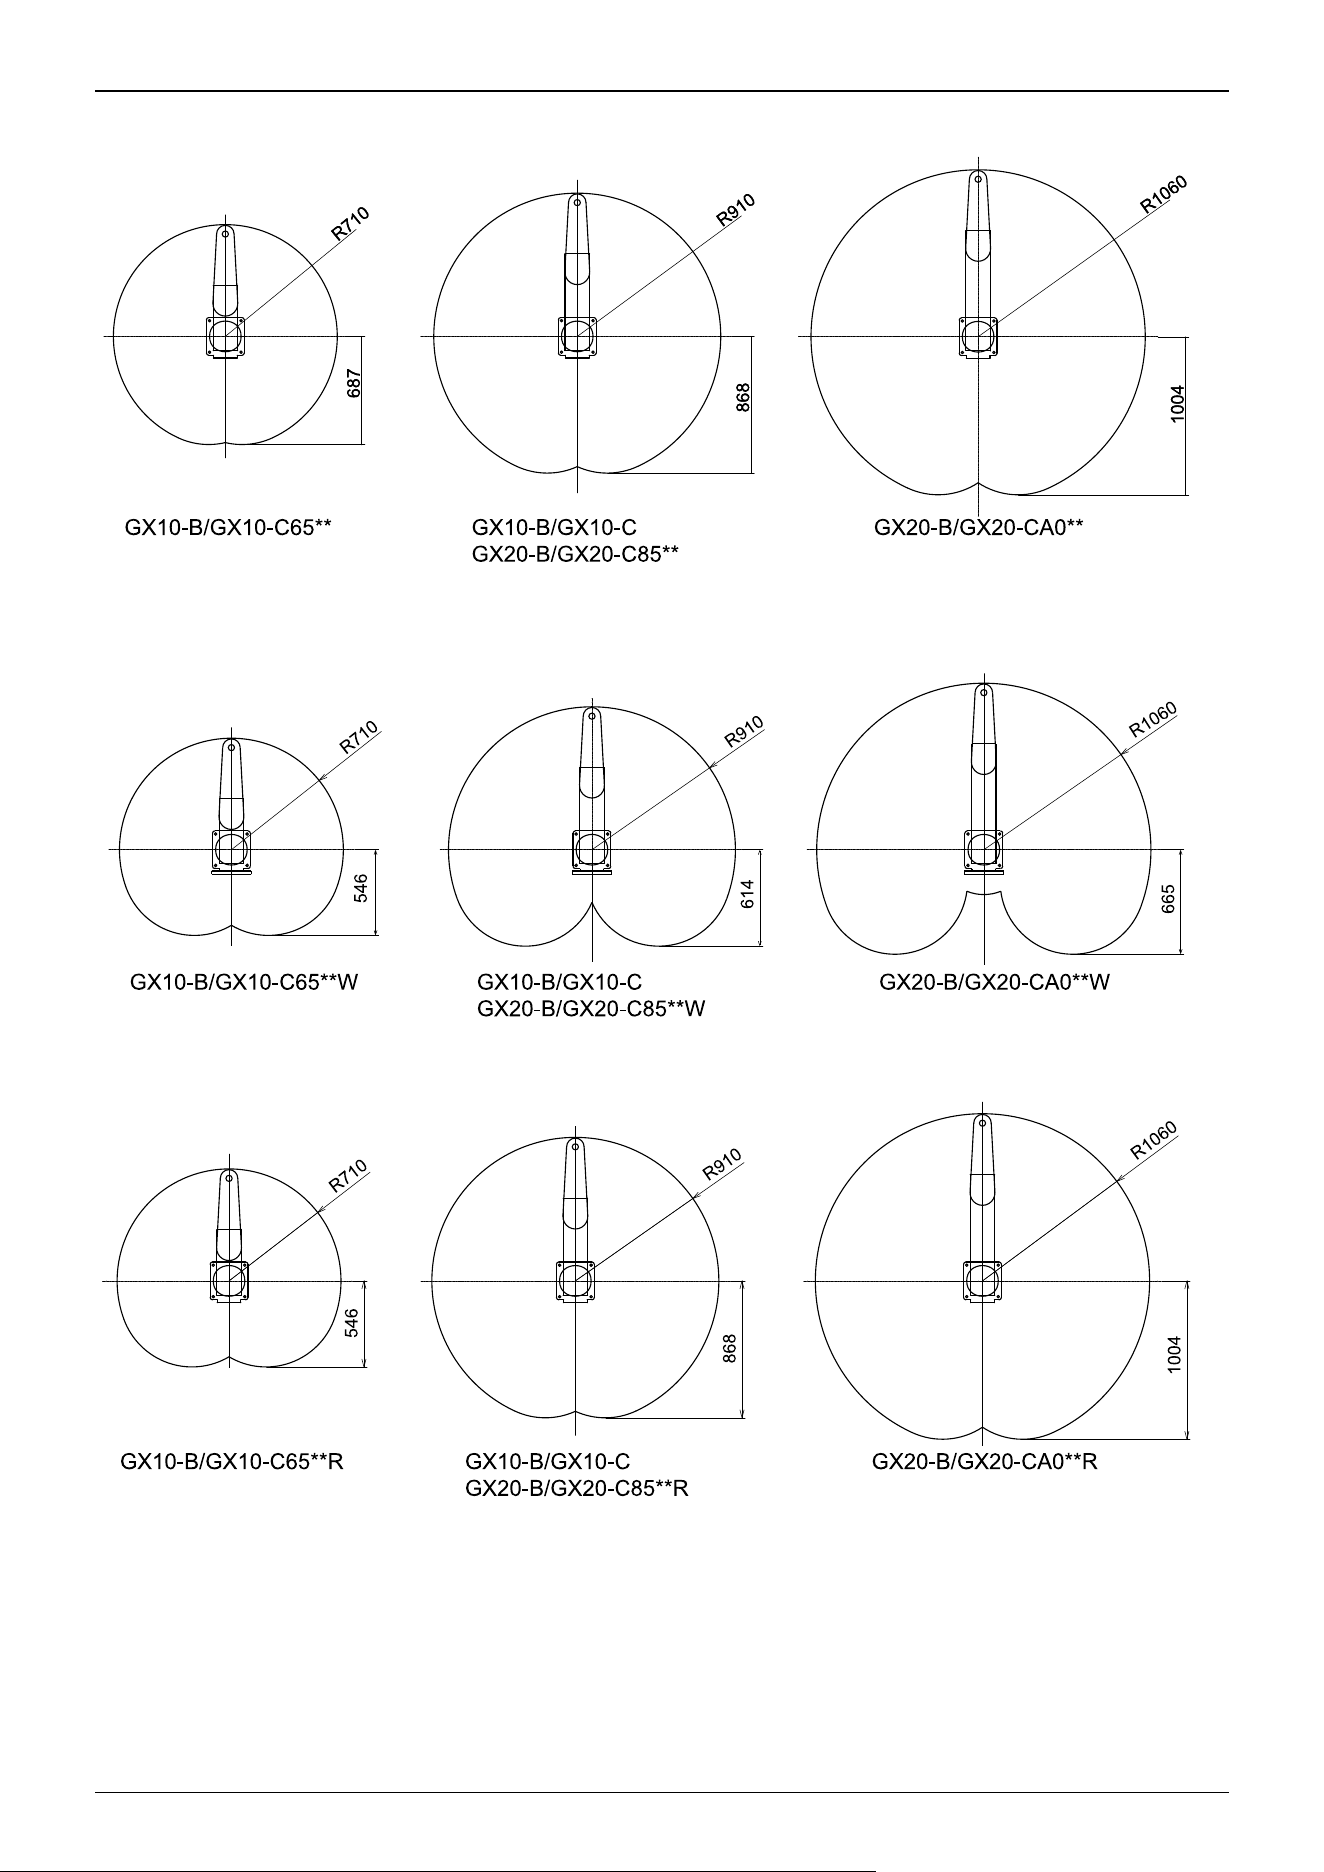
Table top mounting specifications
Wall mounting specifications
Ceiling mounting specifications
Industrial Robot: SCARA Robots GX series Manual Rev.11
363
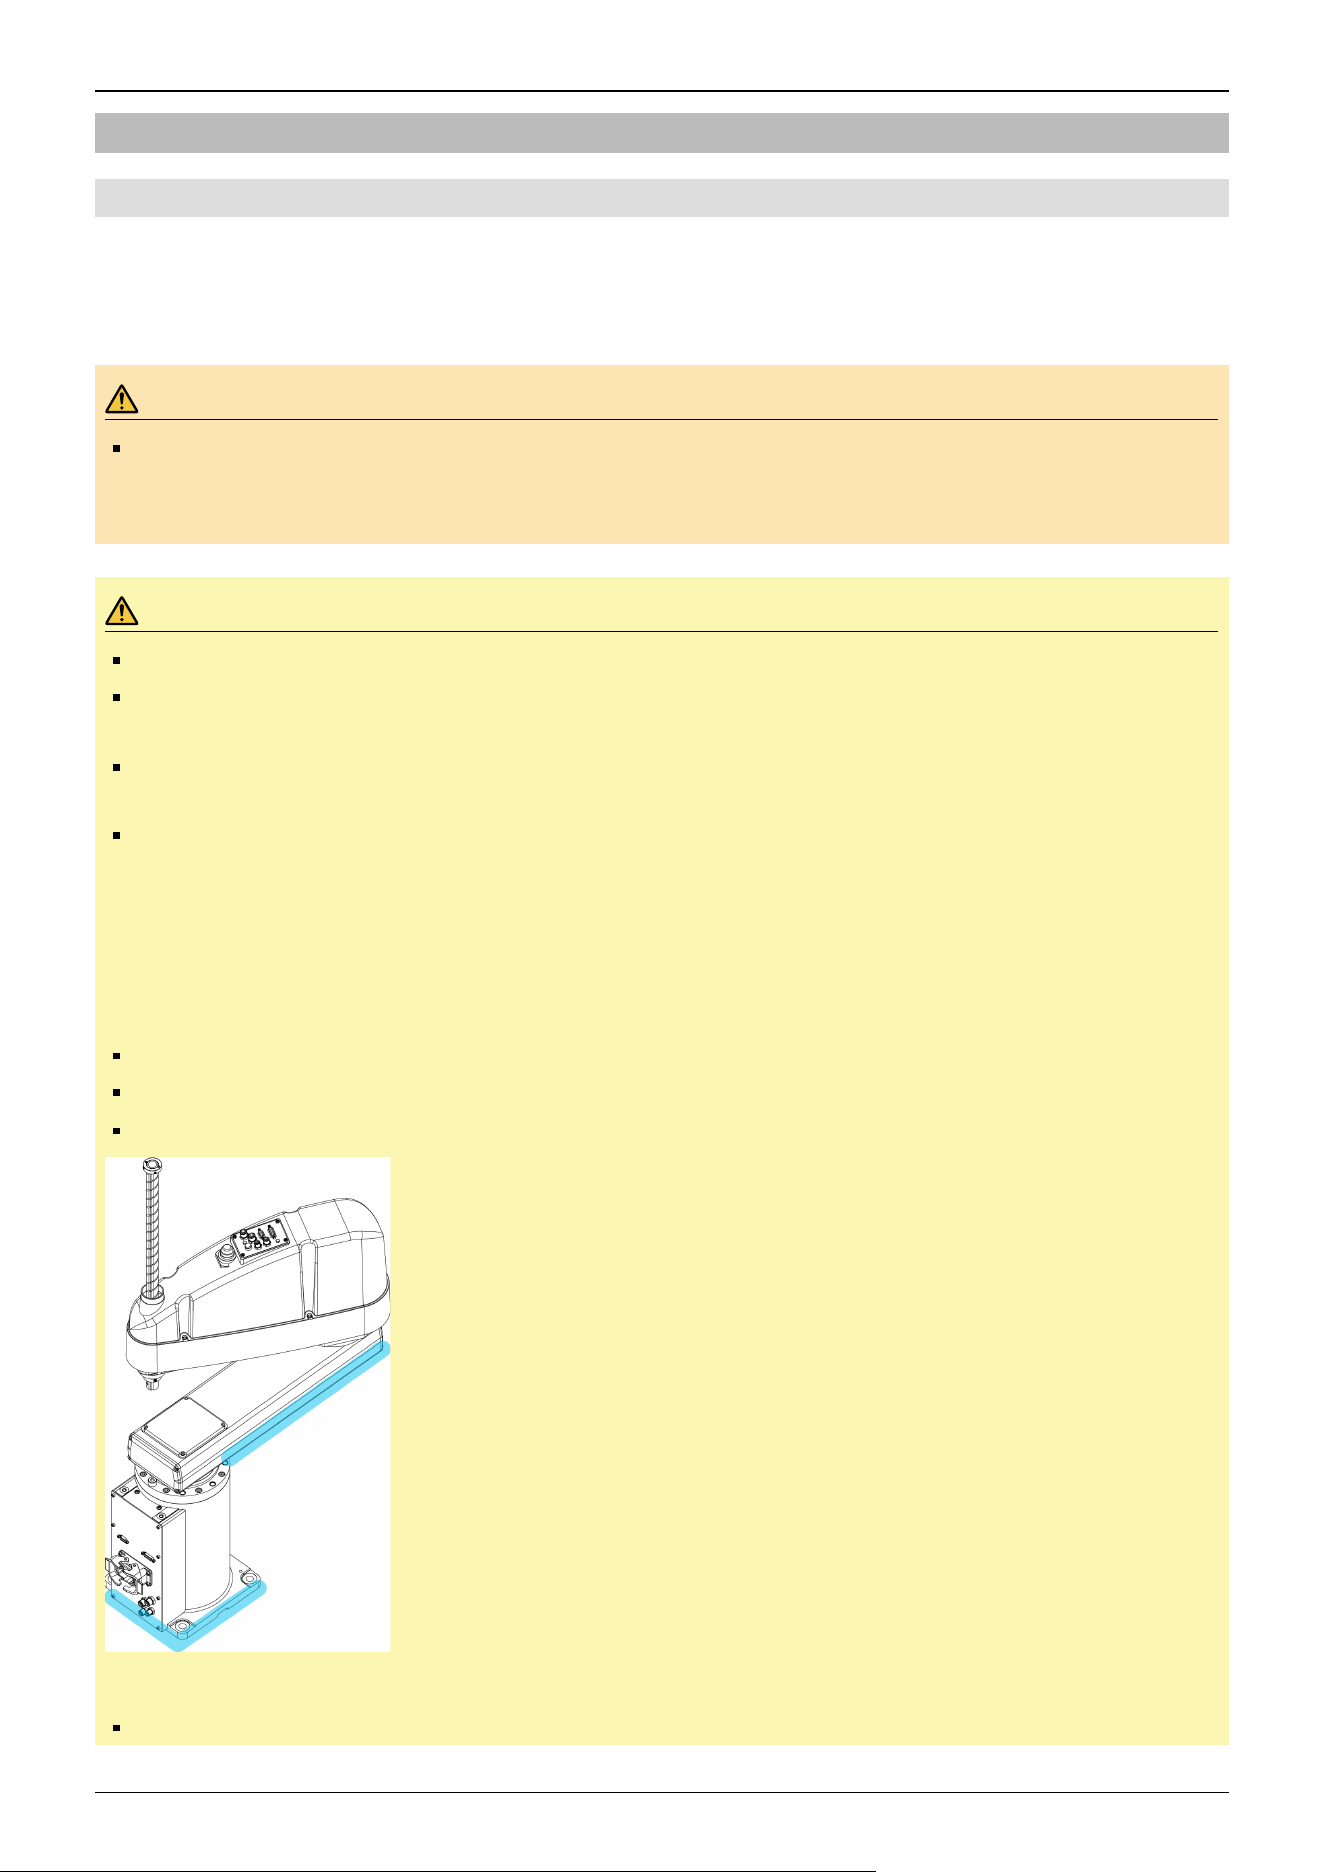
5.3.4 From Unpacking to Installation
5.3.4.1 Safety Information for the Flow from Unpacking to Installation
Transportation and installation of the Manipulator and related equipment should be performed by people who have received
installation training provided by Epson and the suppliers. Also, the laws and regulations of the installation country must be
followed.
WARNING
Only qualified personnel should perform sling work and operate a crane or a forklift. When these operations
are performed by unqualified personnel, it is extremely hazardous and may result in serious bodily injury to
operators and/or severe equipment damage.
CAUTION
Use a cart or the like to transport the Manipulator in the same status as it was delivered.
After removing the fixing bolts securing the Manipulator to the transportation pallet, the Manipulator can fall.
Be careful not to get your hands or feet caught in between the Manipulator.
The arm is secured in place with cable ties or similar restraints. To prevent hands or other body parts from
getting pinched in the robot arm, do not remove the cable ties until installation is complete.
When transported, the Manipulator should either be secured to transporting equipment or carried by three or
more people with hands placed under the shaded sections (under Arm #1 and bottom of base). When holding
the bottom of the base by hand, be extremely careful not to get your hands or fingers caught.
When transporting the Manipulator by hoisting, refer to the following:
"Transporting the Manipulator by Hoisting"
Table Top Mounting Specifications
GX10-B/GX10-C65**: Approx.46 kg (102 lb)
GX10-B/GX10-C/GX20-B/GX20-C85**: Approx.49 kg (108 lb)
GX20-B/GX20-CA0**: Approx.50 kg (111 lb)
Wall Mounting Specifications
GX10-B/GX10-C65**W: Approx.51 kg (113 lb)
Industrial Robot: SCARA Robots GX series Manual Rev.11
364
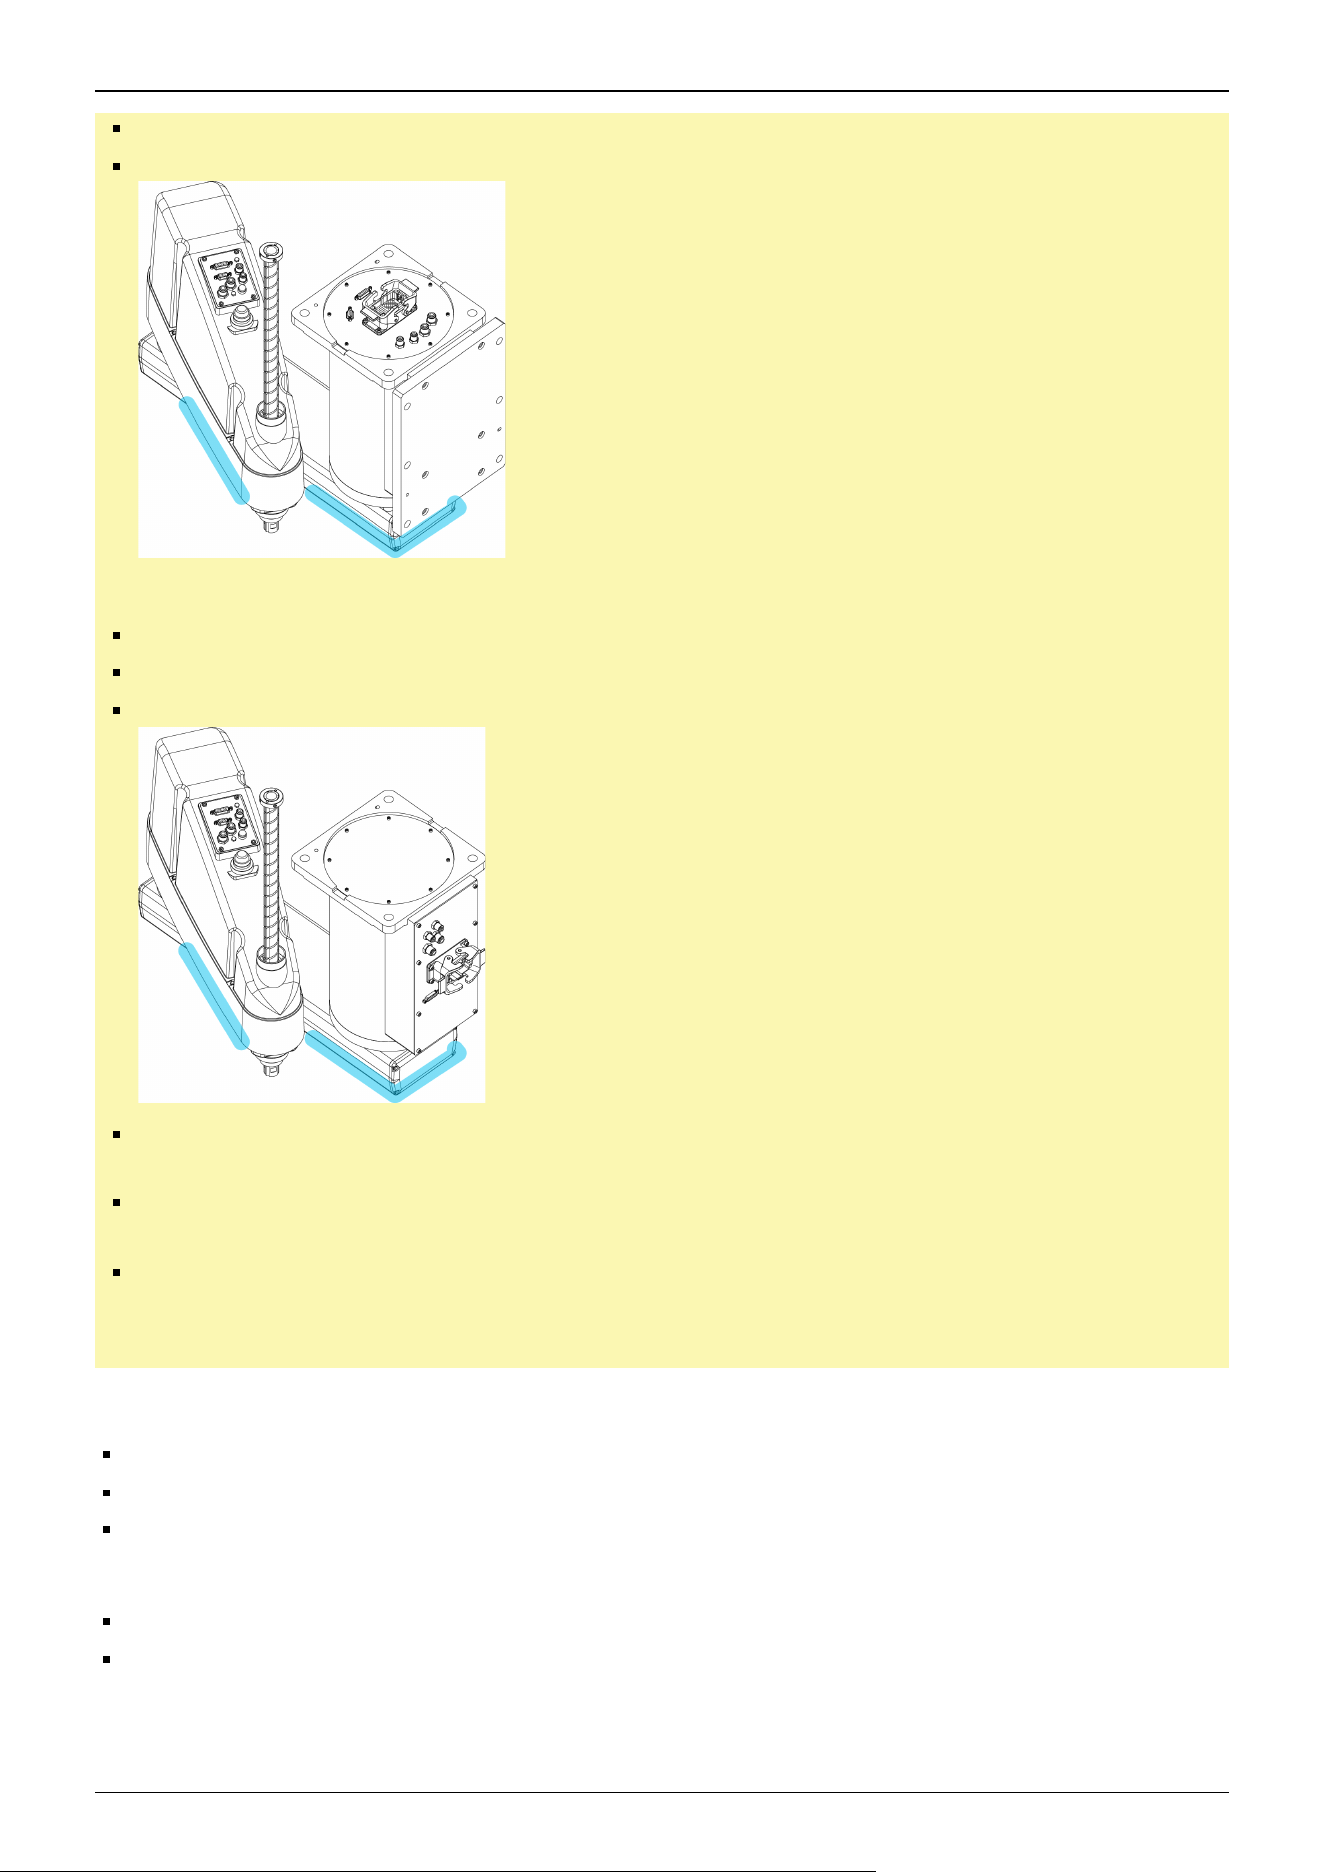
GX10-B/GX10-C/GX20-B/GX20-C85**W: Approx.53 kg (117 lb)
GX20-B/GX20-CA0**W: Approx.55 kg (122 lb)
Ceiling Mounting Specifications
GX10-B/GX10-C65**R: Approx.46 kg (102 lb)
GX10-B/GX10-C/GX20-B/GX20-C85**R: Approx.49 kg (108 lb)
GX20-B/GX20-CA0**R: Approx.50 kg (111 lb)
When transporting the Manipulator over long distances, secure it directly to transporting equipment so that it
will not fall. If necessary, pack the Manipulator using the same packaging as delivery.
The Manipulator must be installed to avoid interference with surrounding buildings, structures, and other
machines and equipment that may create a trapping hazard or pinch points.
Resonance (resonating sound or minute vibrations) may occur during Manipulator operation depending on
the rigidity of the base table. If the resonance occurs, improve the rigidity of the base table or change the
speed or acceleration and deceleration settings of the Manipulator.
For details on the Manipulator installation procedure for models with standard specifications, refer to the following sections.
"Table Top Mounting Specifications"
"Wall Mounting Specifications"
"Ceiling Mounting Specifications"
For Manipulator models with cleanroom & ESD specifications and with protected-model, refer to the following sections.
"Cleanroom & ESD Specifications"
"Protected-Model"
Industrial Robot: SCARA Robots GX series Manual Rev.11
365
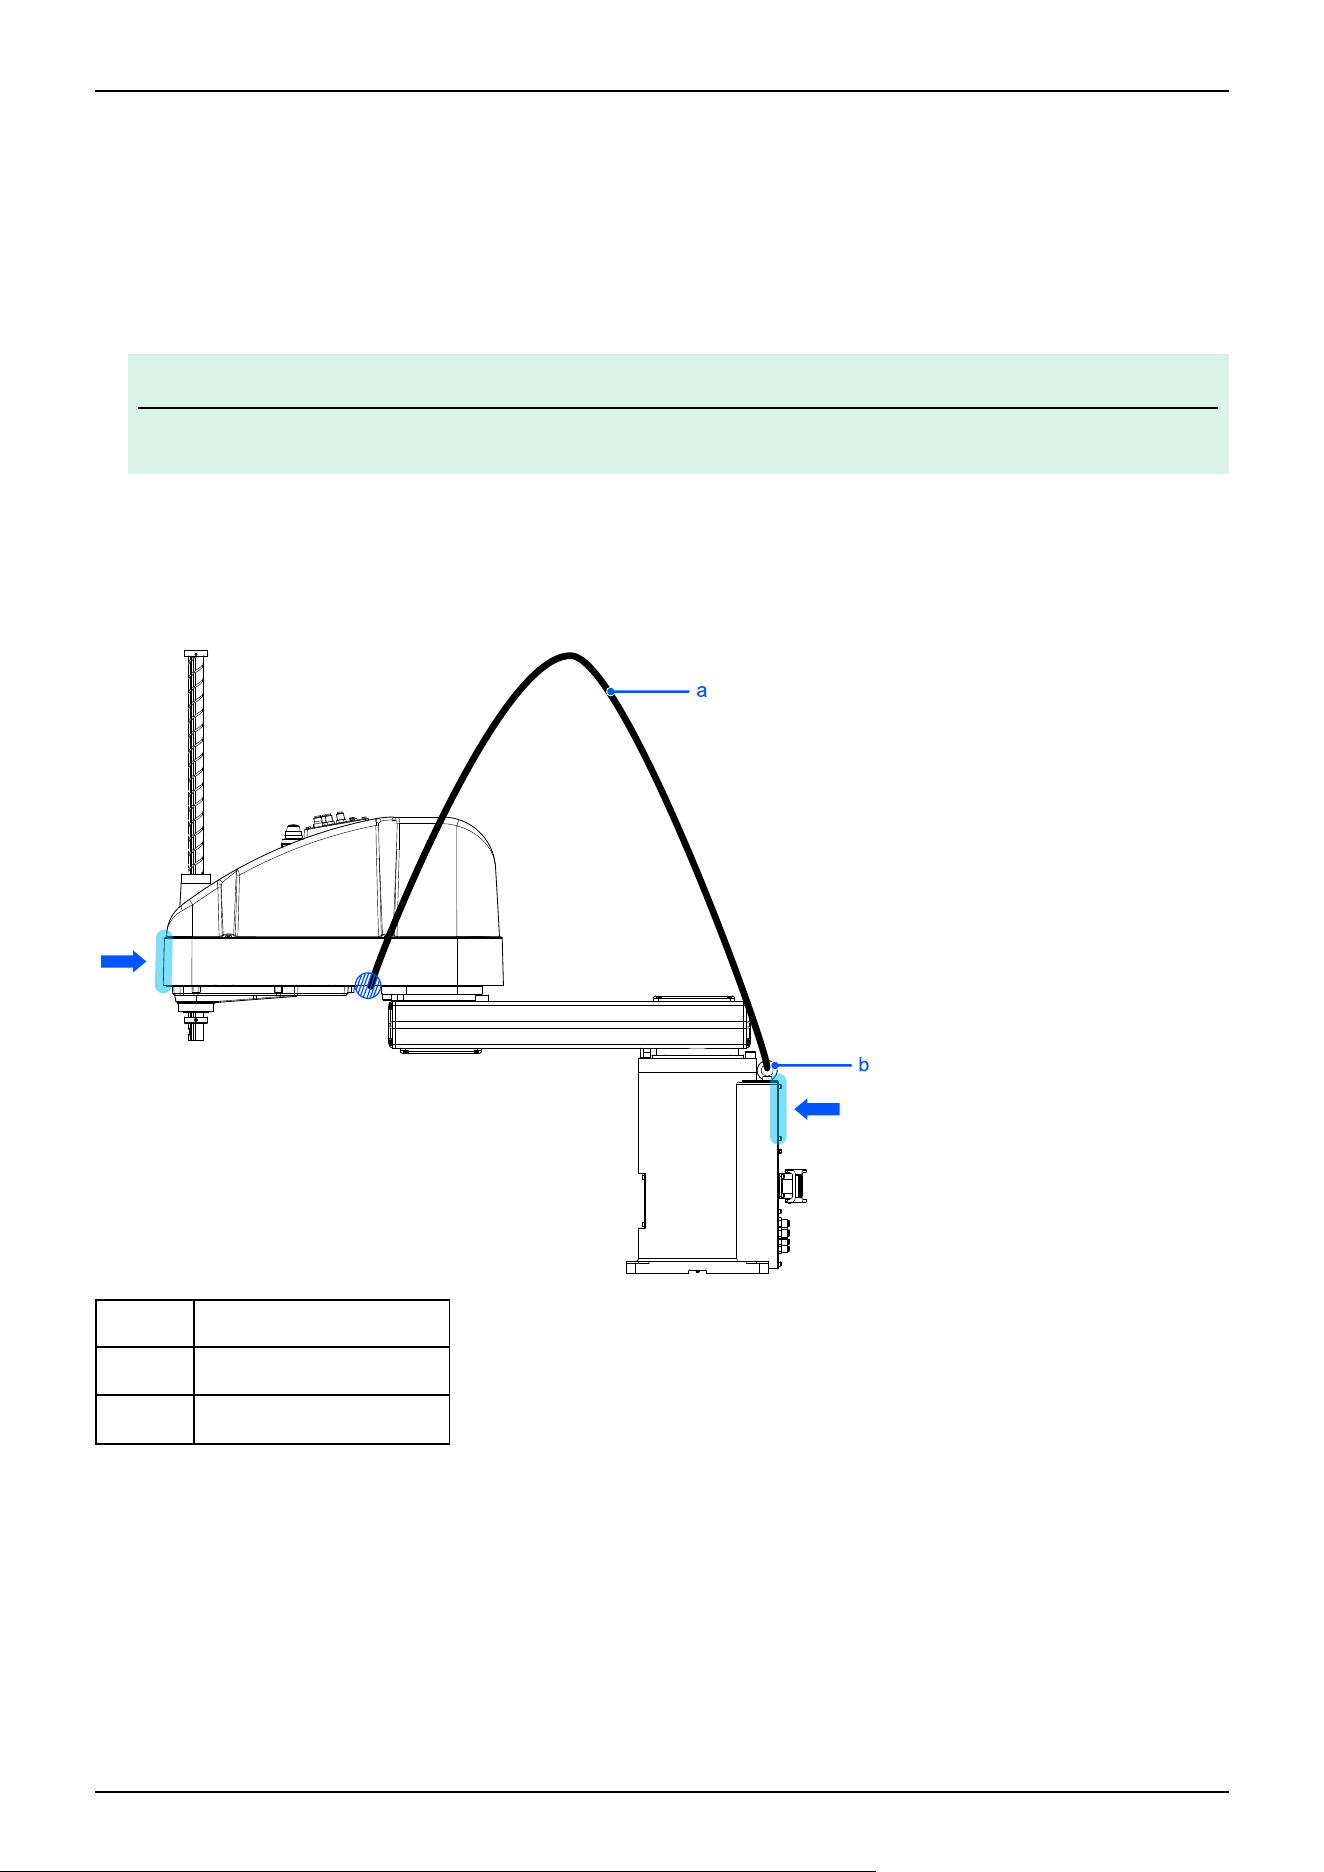
Transporting the Manipulator by Hoisting
Follow the procedure below.
1. Attach the eyebolts to the top of the Manipulator base as shown in the figure below.
2. Place the Manipulator arm in the extended position.
3. Ensure that the hoisting belt can be secured to Arm #2. Using the metal part of the shaded area as a guide, apply the band
so that it does not shift.
KEY POINTS
Please note that the plastic cover section may be damaged if a load is applied to it.
4. To prevent the Manipulator from falling over, lift while providing support at the position indicated by the arrow, and move
it to the base table where it will installed.
Table Top Mounting Specifications
Symbol Description
a Hoisting belt
b M8 eyebolts: 2 (included)
Wall mounting specifications, ceiling mounting specifications
✏
Industrial Robot: SCARA Robots GX series Manual Rev.11
366
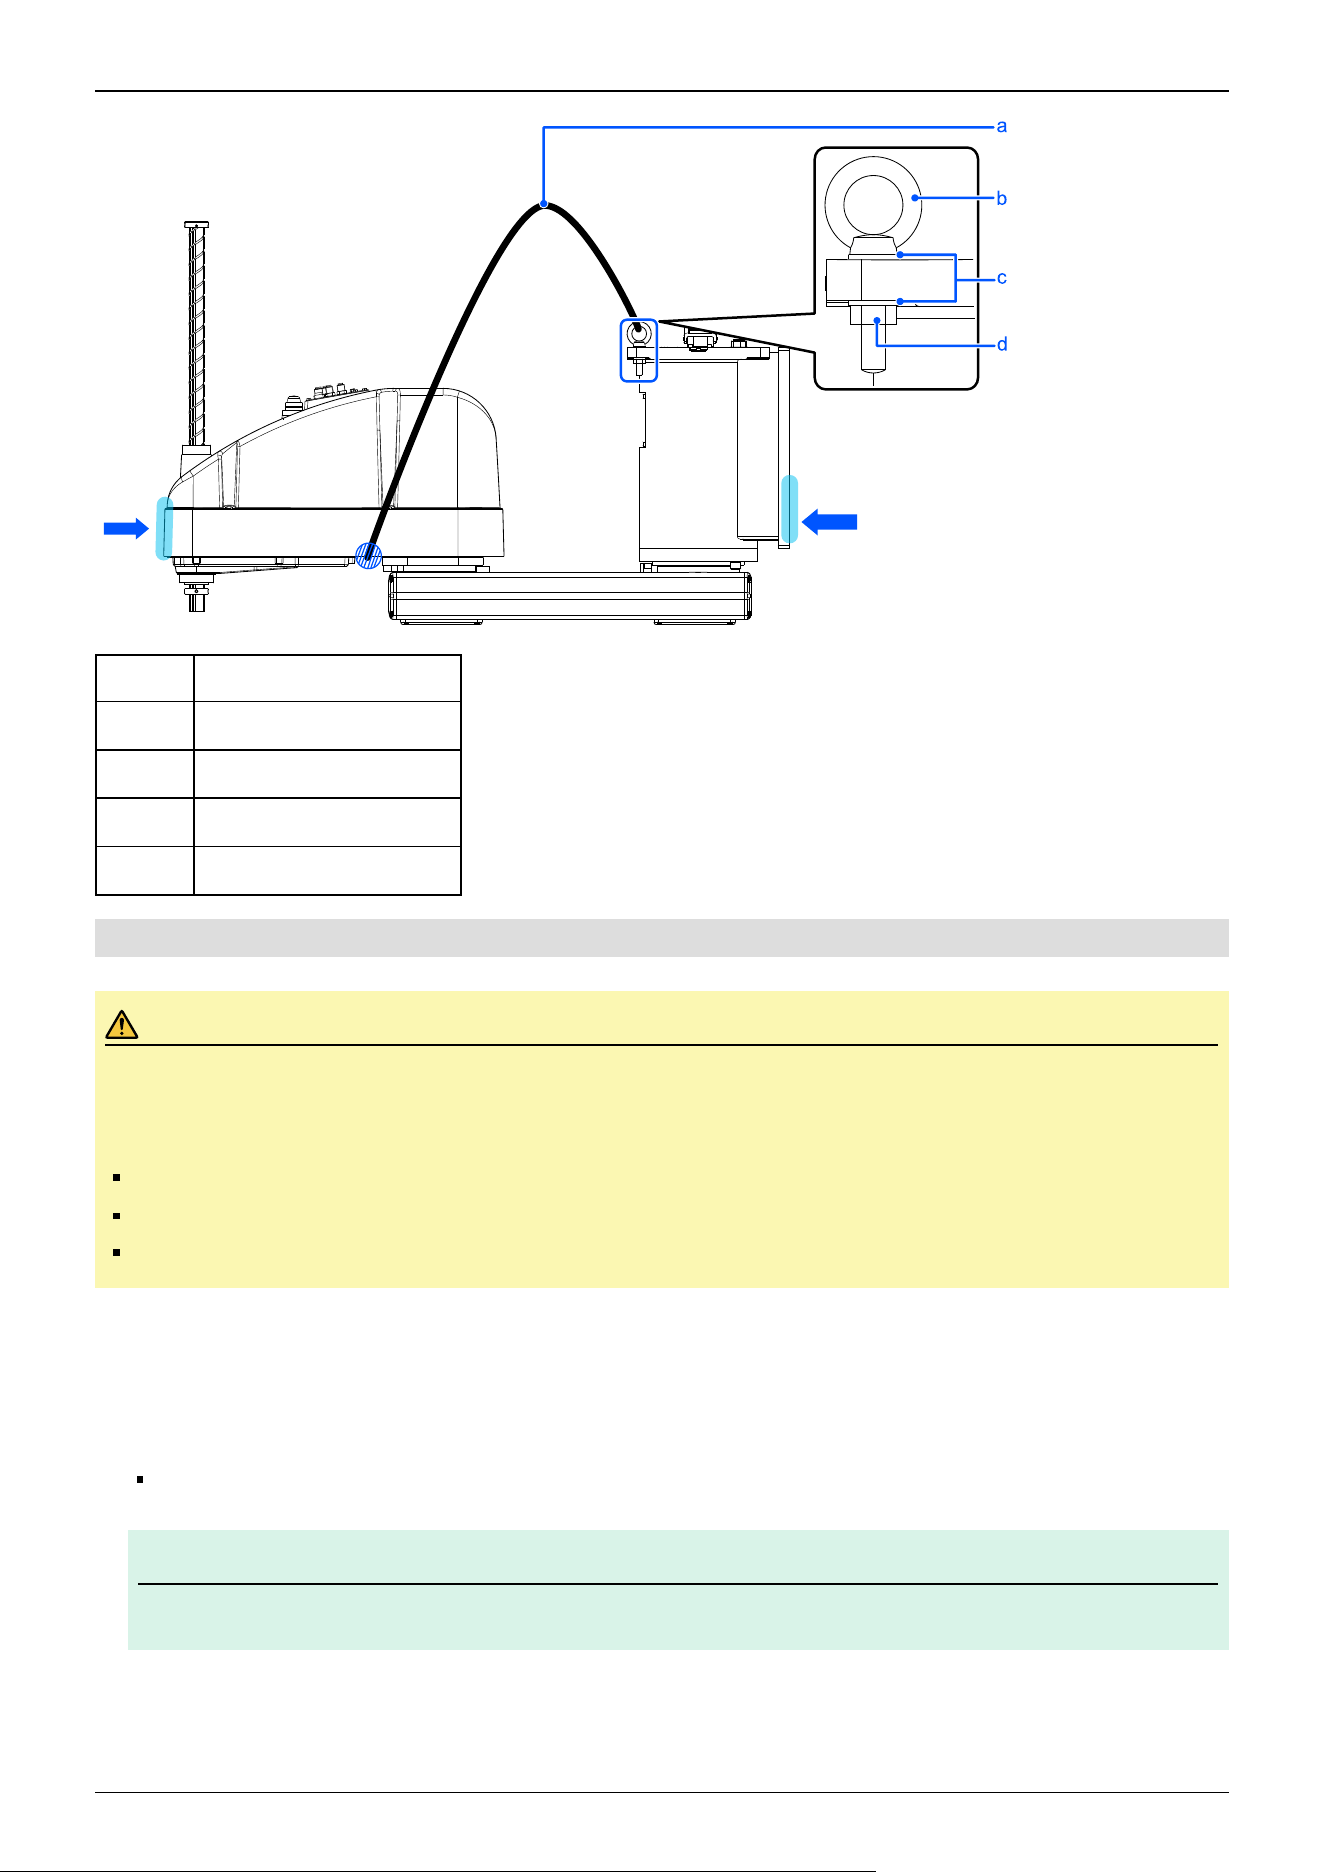
Symbol Description
a Hoisting belt
b M10 eyebolts: 2 (included)
c Plain washers: 2 (included)
d Nuts: 2 (included)
5.3.4.2 Table Top Mounting Specifications
CAUTION
Be sure to use four or more people when installing or relocating a model with table top mounting specifications,
and use three or more people when lifting a Manipulator. The Manipulator weights are as follows. Be careful not
to get hands or feet caught or have equipment damaged due to dropping of the Manipulator.
GX10-B/GX10-C65**: Approx.46 kg (102 lb)
GX10-B/GX10-C/GX20-B/GX20-C85**: Approx.49 kg (108 lb)
GX20-B/GX20-CA0**: Approx.50 kg (111 lb)
Standard-model
1. Secure the base to the base table using four bolts. Be sure to always use washers.
Tightening torque:
100.0 N·m (1,020 kgf·cm)
KEY POINTS
Use bolts with strength specifications compliant with ISO 898-1 property class: 10.9 or 12.9.
✏
Industrial Robot: SCARA Robots GX series Manual Rev.11
367
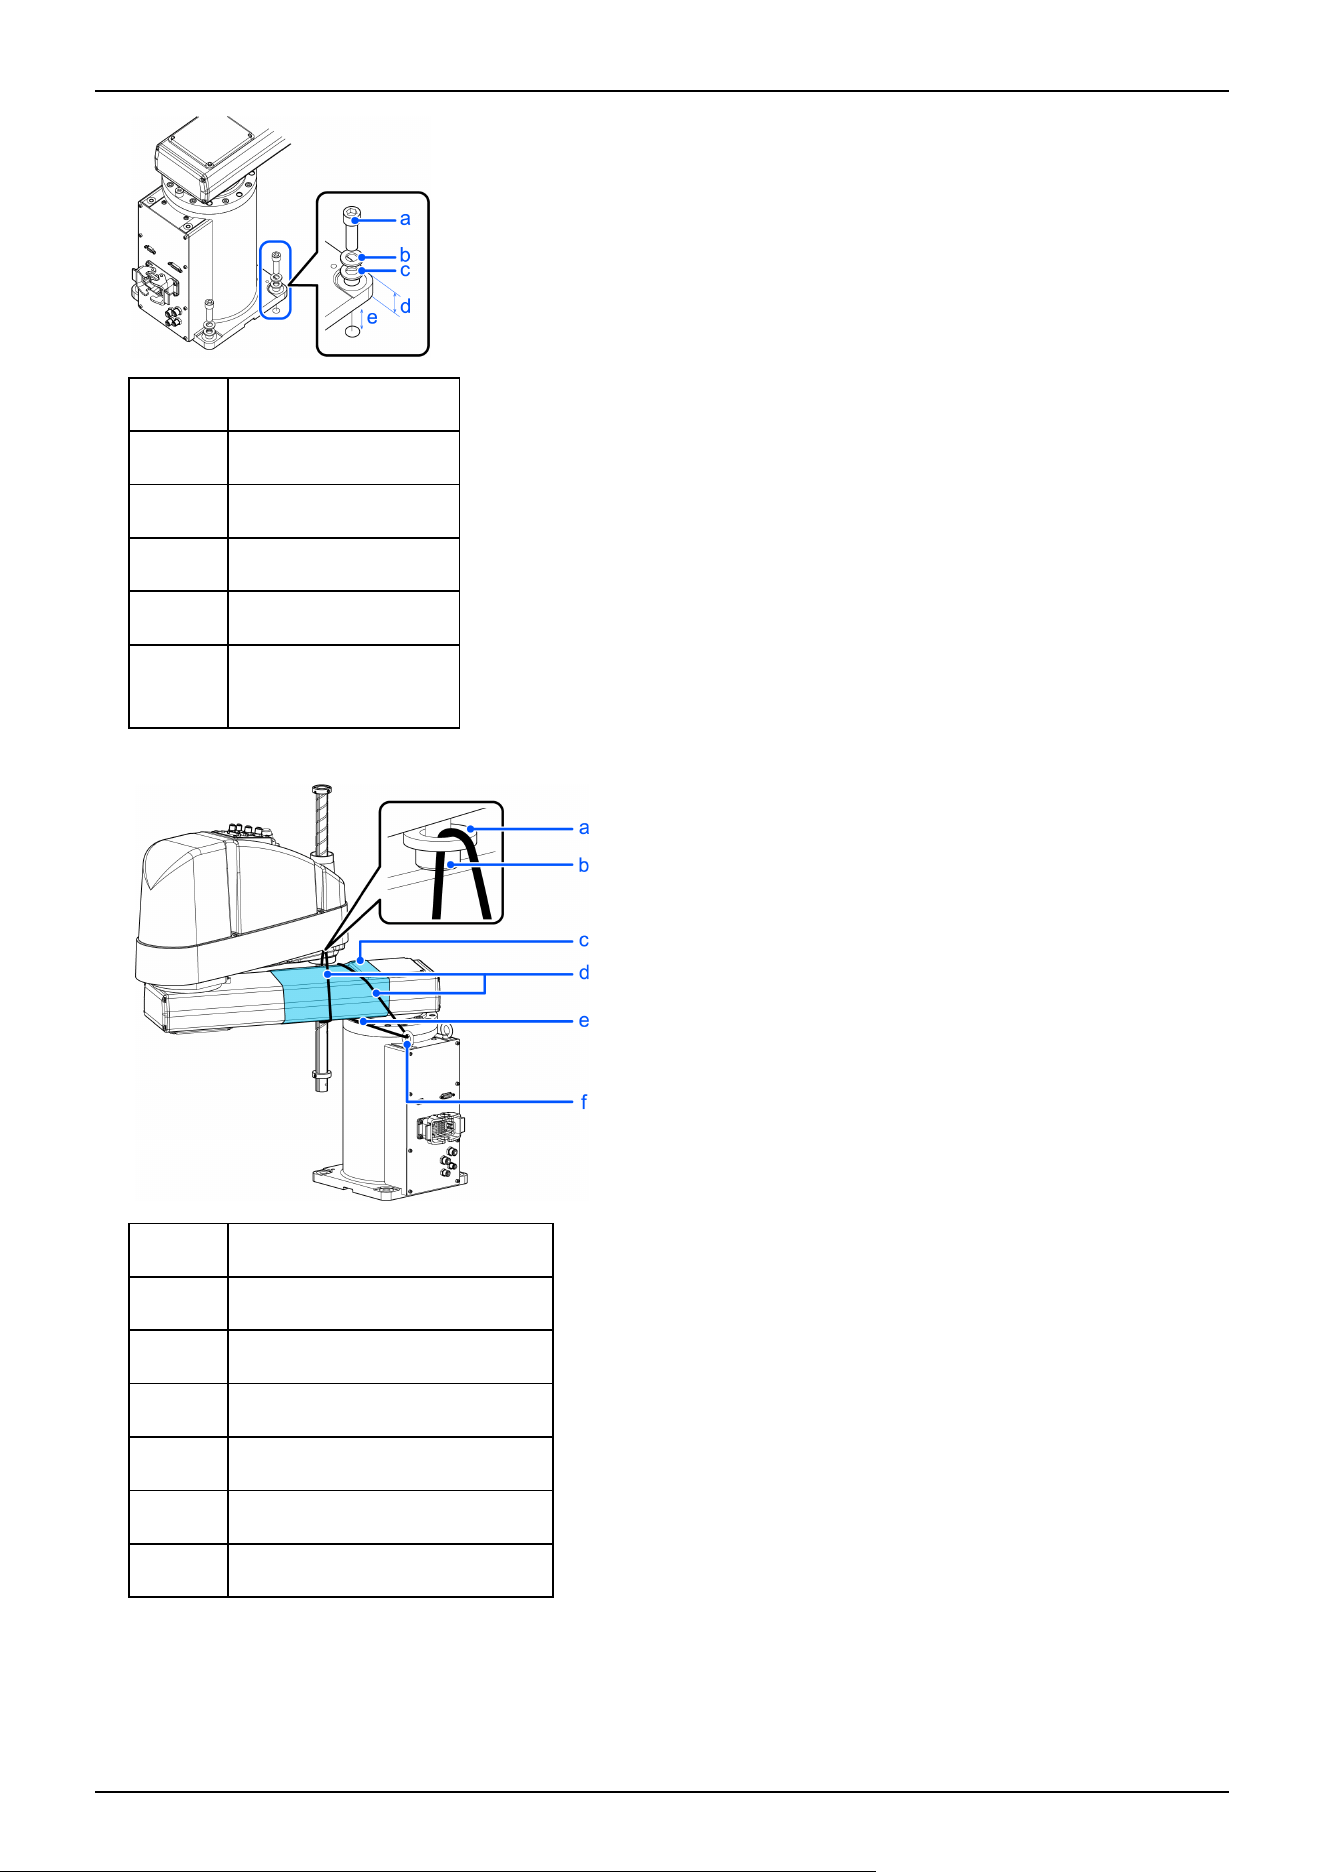
Symbol Description
a 4 × M12 × 40
b Spring washer
c Plain washer
d 20 mm
e
Threaded hole
(20 mm or more depth)
2. Use a nippers or similar tool to cut the cable ties holding the arm in place.
Symbol Description
a Washer
b Bolt: M4 × 15
c Sheet
d Cable tie
e Bolt: M12 (transportation fixture)
f Eyebolts (included)
3. Remove the bolts that secured the cable ties in step 2.
4. Remove the transportation fixtures.
Industrial Robot: SCARA Robots GX series Manual Rev.11
368
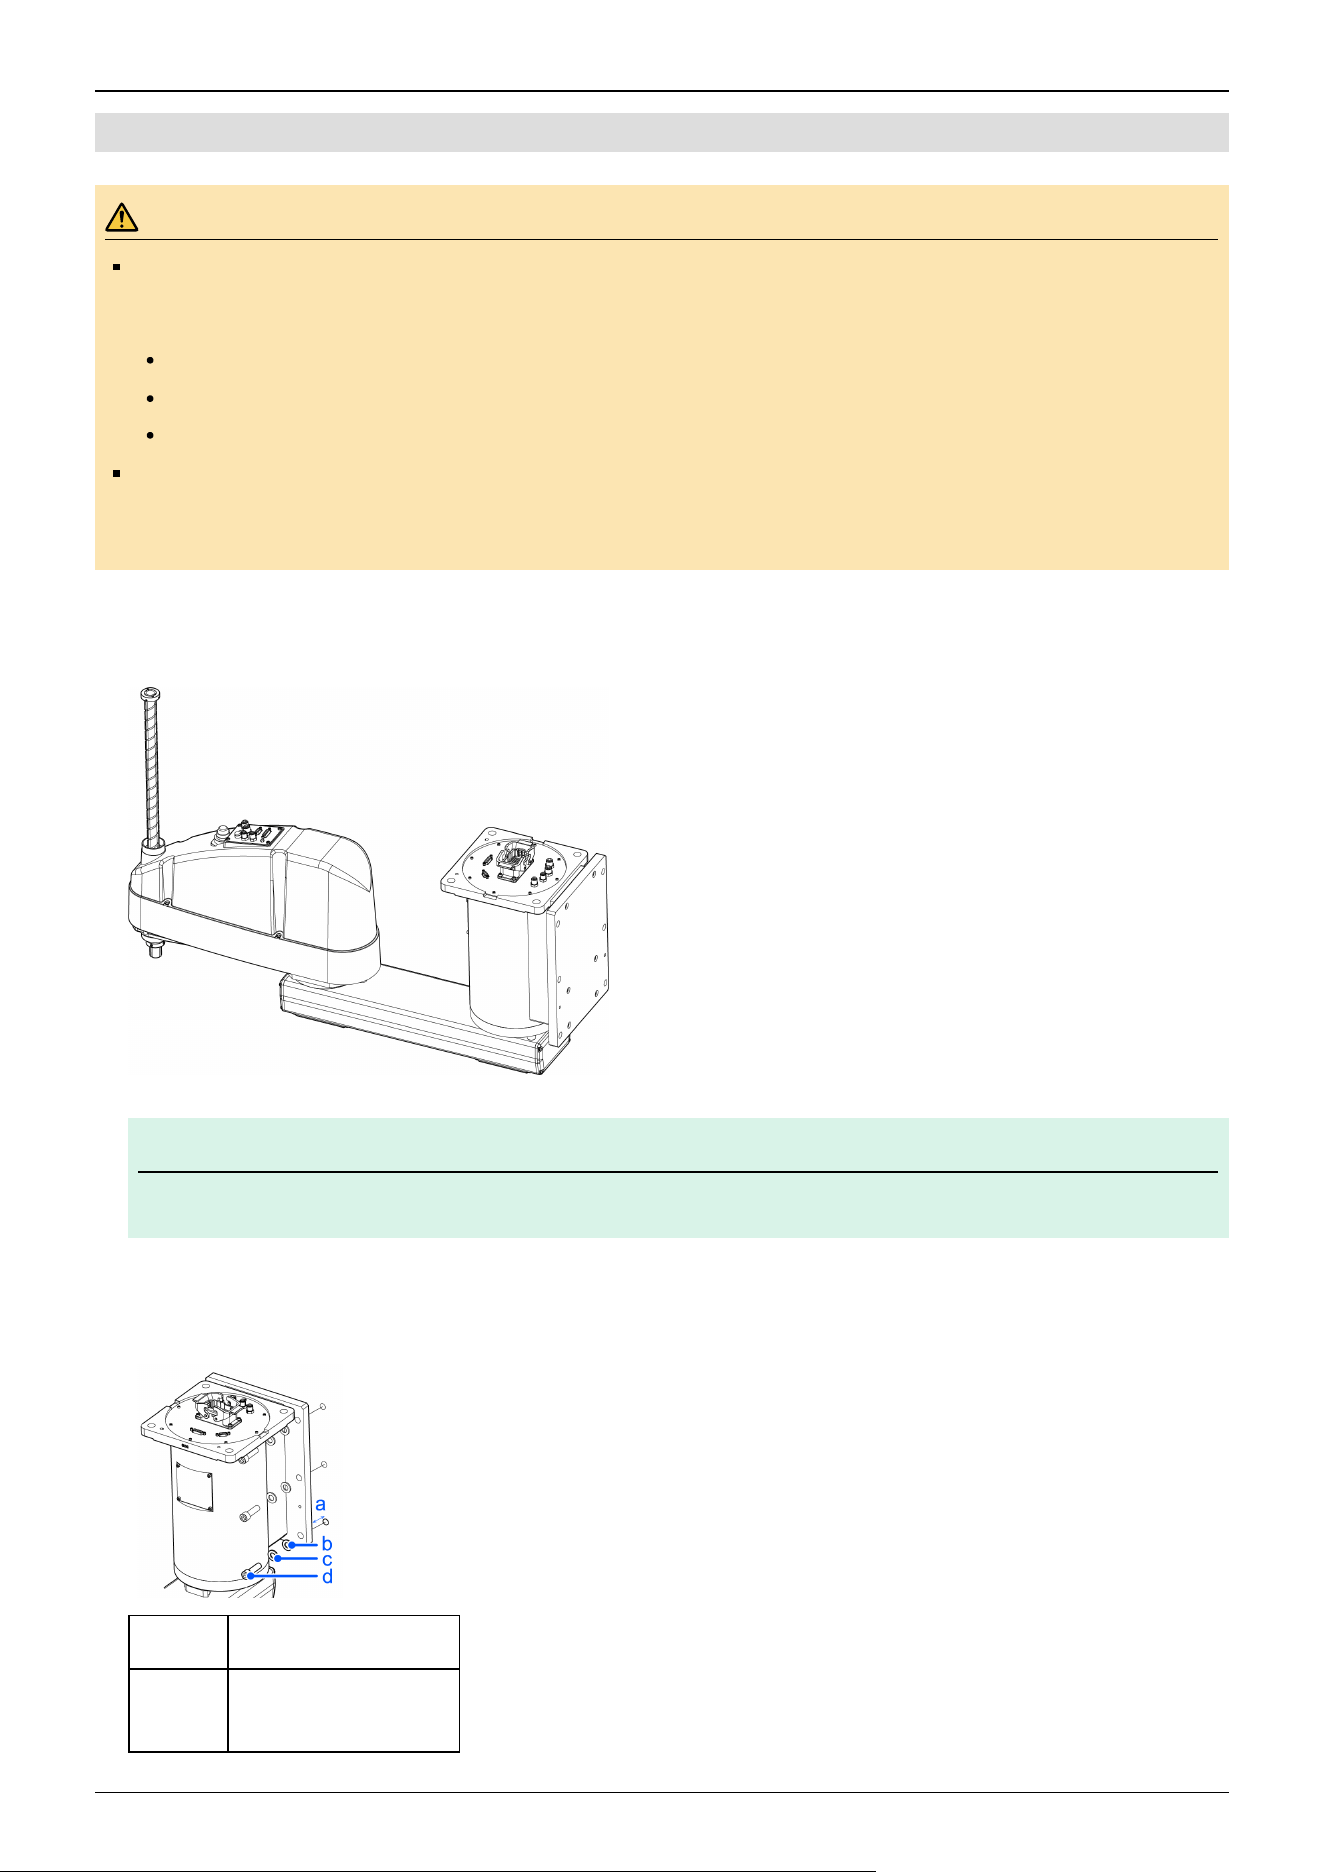
5.3.4.3 Wall Mounting Specifications
WARNING
Be sure to use four or more people when installing or relocating a model with wall mounting specifications,
and use three or more people when lifting a Manipulator. The Manipulator weights are as follows. Be careful
not to get hands or feet caught or have equipment damaged due to dropping of the Manipulator.
GX10-B/GX10-C65**W: Approx.51 kg (113 lb)
GX10-B/GX10-C/GX20-B/GX20-C85**W: Approx.53 kg (117 lb)
GX20-B/GX20-CA0**W: Approx.55 kg (122 lb)
When installing the Manipulator on a wall or similar structure, support the Manipulator until all of the anchor
bolts are secured in place. Removing the support before the anchor bolts are fully secured is extremely
hazardous and may cause the Manipulator to fall.
Standard specifications
1. With the arm extended, take out the Manipulator from the packing box.
KEY POINTS
The joints may rotate due to the Manipulator's own weight. Be careful not to get your hands or fingers caught.
2. Secure the base to the wall using the six bolts.
Be sure to always use washers.
Tightening torque: 100.0 N·m (1,020 kgf·cm)
Symbol Description
a
Threaded hole
(20 mm or more depth)
✏
Industrial Robot: SCARA Robots GX series Manual Rev.11
369
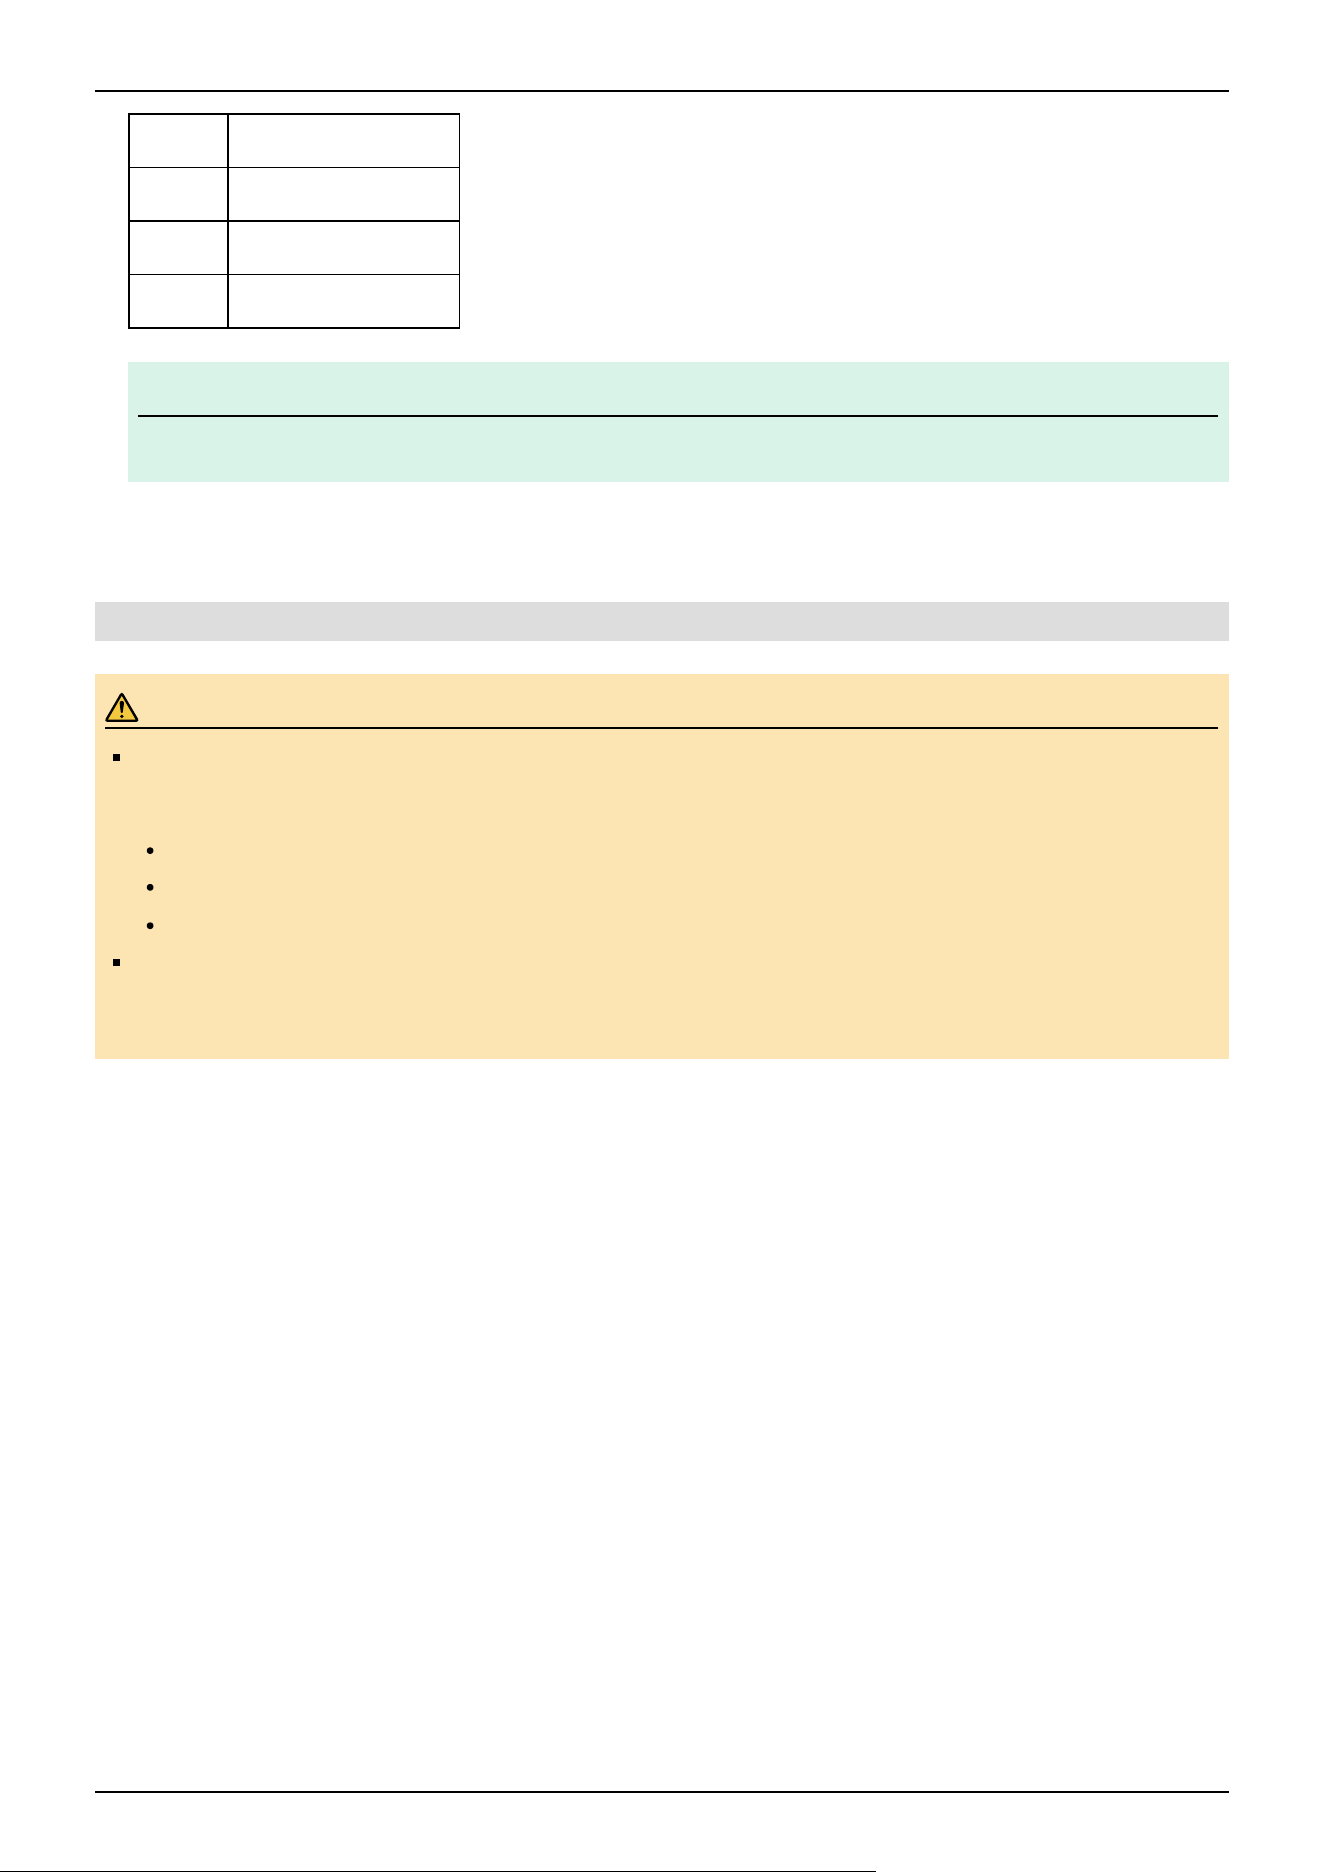
Symbol Description
b Plain washer
c Spring washer
d 6 × M12 × 40
KEY POINTS
Use bolts with strength specifications compliant with ISO 898-1 property class: 10.9 or 12.9.
3. Remove the transportation fixtures.
5.3.4.4 Ceiling Mounting Specifications
WARNING
Be sure to use four or more people when installing or relocating a model with ceiling mounting specifications,
and use three or more people when lifting a Manipulator. The Manipulator weights are as follows. Be careful
not to get hands or feet caught or have equipment damaged due to dropping of the Manipulator.
GX10-B/GX10-C65**R: Approx.46 kg (102 lb)
GX10-B/GX10-C/GX20-B/GX20-C85**R: Approx.49 kg (108 lb)
GX20-B/GX20-CA0**R: Approx.50 kg (111 lb)
When installing the Manipulator on a ceiling or similar structure, support the Manipulator until all of the anchor
bolts are secured in place. Removing the support before the anchor bolts are fully secured is extremely
hazardous and may cause the Manipulator to fall.
✏
Industrial Robot: SCARA Robots GX series Manual Rev.11
370
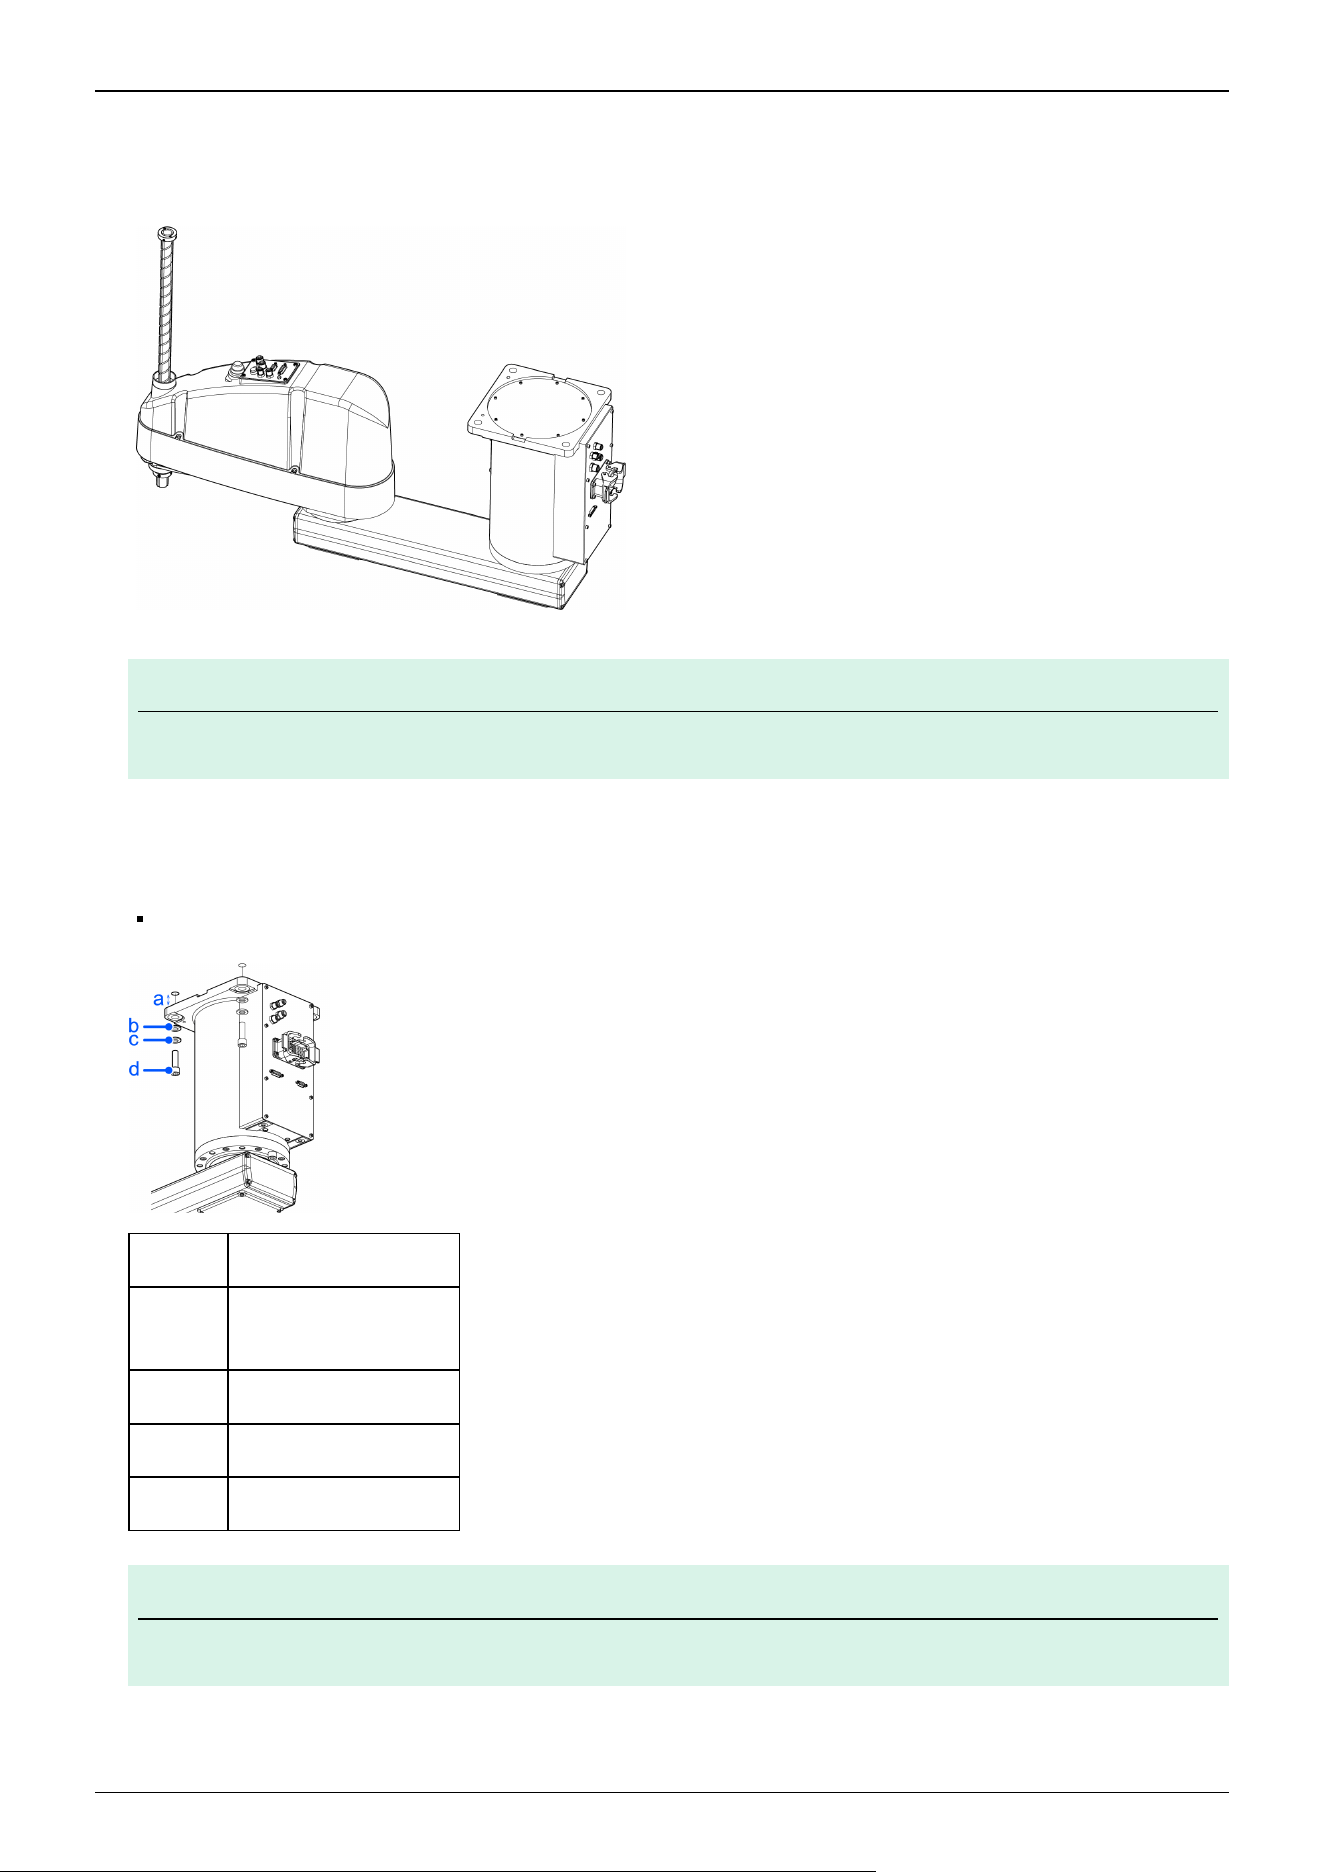
Standard specifications
1. With the arm extended, take out the Manipulator from the packing box.
KEY POINTS
The joints may rotate due to the Manipulator's own weight. Be careful not to get your hands or fingers caught.
2. Secure the base to the ceiling using the four bolts. Be sure to always use washers.
Tightening torque:
100.0 N·m (1,020 kgf·cm)
Symbol Description
a
Threaded hole
(20 mm or more depth)
b Plain washer
c Spring washer
d 6 × M12 × 40
KEY POINTS
Use bolts with strength specifications compliant with ISO 898-1 property class: 10.9 or 12.9.
3. Remove the transportation fixtures.
✏
✏
Industrial Robot: SCARA Robots GX series Manual Rev.11
371
5.3.4.5 Cleanroom & ESD-Model
1. Unpack the Manipulator outside of the cleanroom.
2. Secure the Manipulator to transporting equipment (or a pallet) with bolts so that the Manipulator does not fall down.
3. Wipe off any dust on the Manipulator using a lint-free cloth that was dipped in ethyl alcohol or distilled water.
4. Carry the Manipulator into the cleanroom.
5. Refer to the installation procedure for the respective Manipulator model, and install the Manipulator.
Table Top Mounting Specifications
Wall Mounting Specifications
Ceiling Mounting Specifications
6. Connect an exhaust tube to the exhaust port.
When the Manipulator is a model with cleanroom & ESD specifications, an exhaust system must be connected. For details,
refer to the following section.
Appendix A: Specifications Table
5.3.4.6 Protected-Model
Refer to the installation procedure for the respective Manipulator model, and install the Manipulator.
Table Top Mounting Specifications
Wall Mounting Specifications
Ceiling Mounting Specifications
When the Manipulator is a protected-model, take note of the following safety information.
WARNING
After the Manipulator is installed, immediately connect the M/C cable connector to the Manipulator. Leaving
the Manipulator unconnected may result in electric shock and/or malfunction of the robot system because
protection at IP65 cannot be ensured.
CAUTION
When operating Manipulators in special environments (oil smoke, dust, etc.), do not install the Controller in
the same environment. The Controller does not satisfy the protection class (IP65). Using the Controller in
these special environments may damage or lead to a breakdown of the Controller.
5.3.5 Connecting the Cables
WARNING
To perform the power supply lockout, remove the power plug. Be sure to connect the AC power cable to a
power outlet. Do not connect it directly to a factory power source.
Before performing any replacement work, inform others in the area that you are working, and then turn off the
Controller and related equipment, and unplug the power cable from the power source. Performing any work
procedure with the power turned on is extremely dangerous and may result in electric shock and/or
malfunction of the robot system.
Industrial Robot: SCARA Robots GX series Manual Rev.11
372
Be sure to connect the cables properly. Do not place heavy objects on the cables, bend them at extreme
angles, pull them forcibly, or allow them to get pinched between objects. Damaged cables, broken wires, or
contact failure is extremely hazardous and may result in electric shock and/or malfunction of the robot
system.
The Manipulator is grounded by connecting it to the Controller. Ensure that the Controller is grounded and the
cables are correctly connected. If the ground wire is improperly connected to ground, it may result in the fire
or electric shock.
CAUTION
When connecting the Manipulator and the Controller, check that the serial numbers match for each device.
Improper connection between the Manipulator and the Controller may not only lead to malfunction of the robot
system but also serious safety problems. The connection method between the Manipulator and the Controller
varies depending on the Controller. For details on the connections, refer to the following manual.
"Controller Manual"
When the Manipulator is a model with cleanroom & ESD specifications, please note the following points.
When the Manipulator is a model with cleanroom & ESD specifications, an exhaust system must be connected. For details,
refer to the following section.
Appendix A: Specifications Table
When the Manipulator is a protected-model, please note the following points.
WARNING
After the Manipulator is installed, immediately connect the M/C cable connector to the connector plate.
Leaving the Manipulator unconnected may result in electric shock and/or malfunction of the robot system
because protection at IP65 cannot be ensured.
CAUTION
When operating Manipulators in special environments (oil smoke, dust, etc.), do not install the Controller in
the same environment. The Controller does not satisfy the protection class (IP65). Using the Controller in
these special environments may damage or lead to a breakdown of the Controller.
Industrial Robot: SCARA Robots GX series Manual Rev.11
373
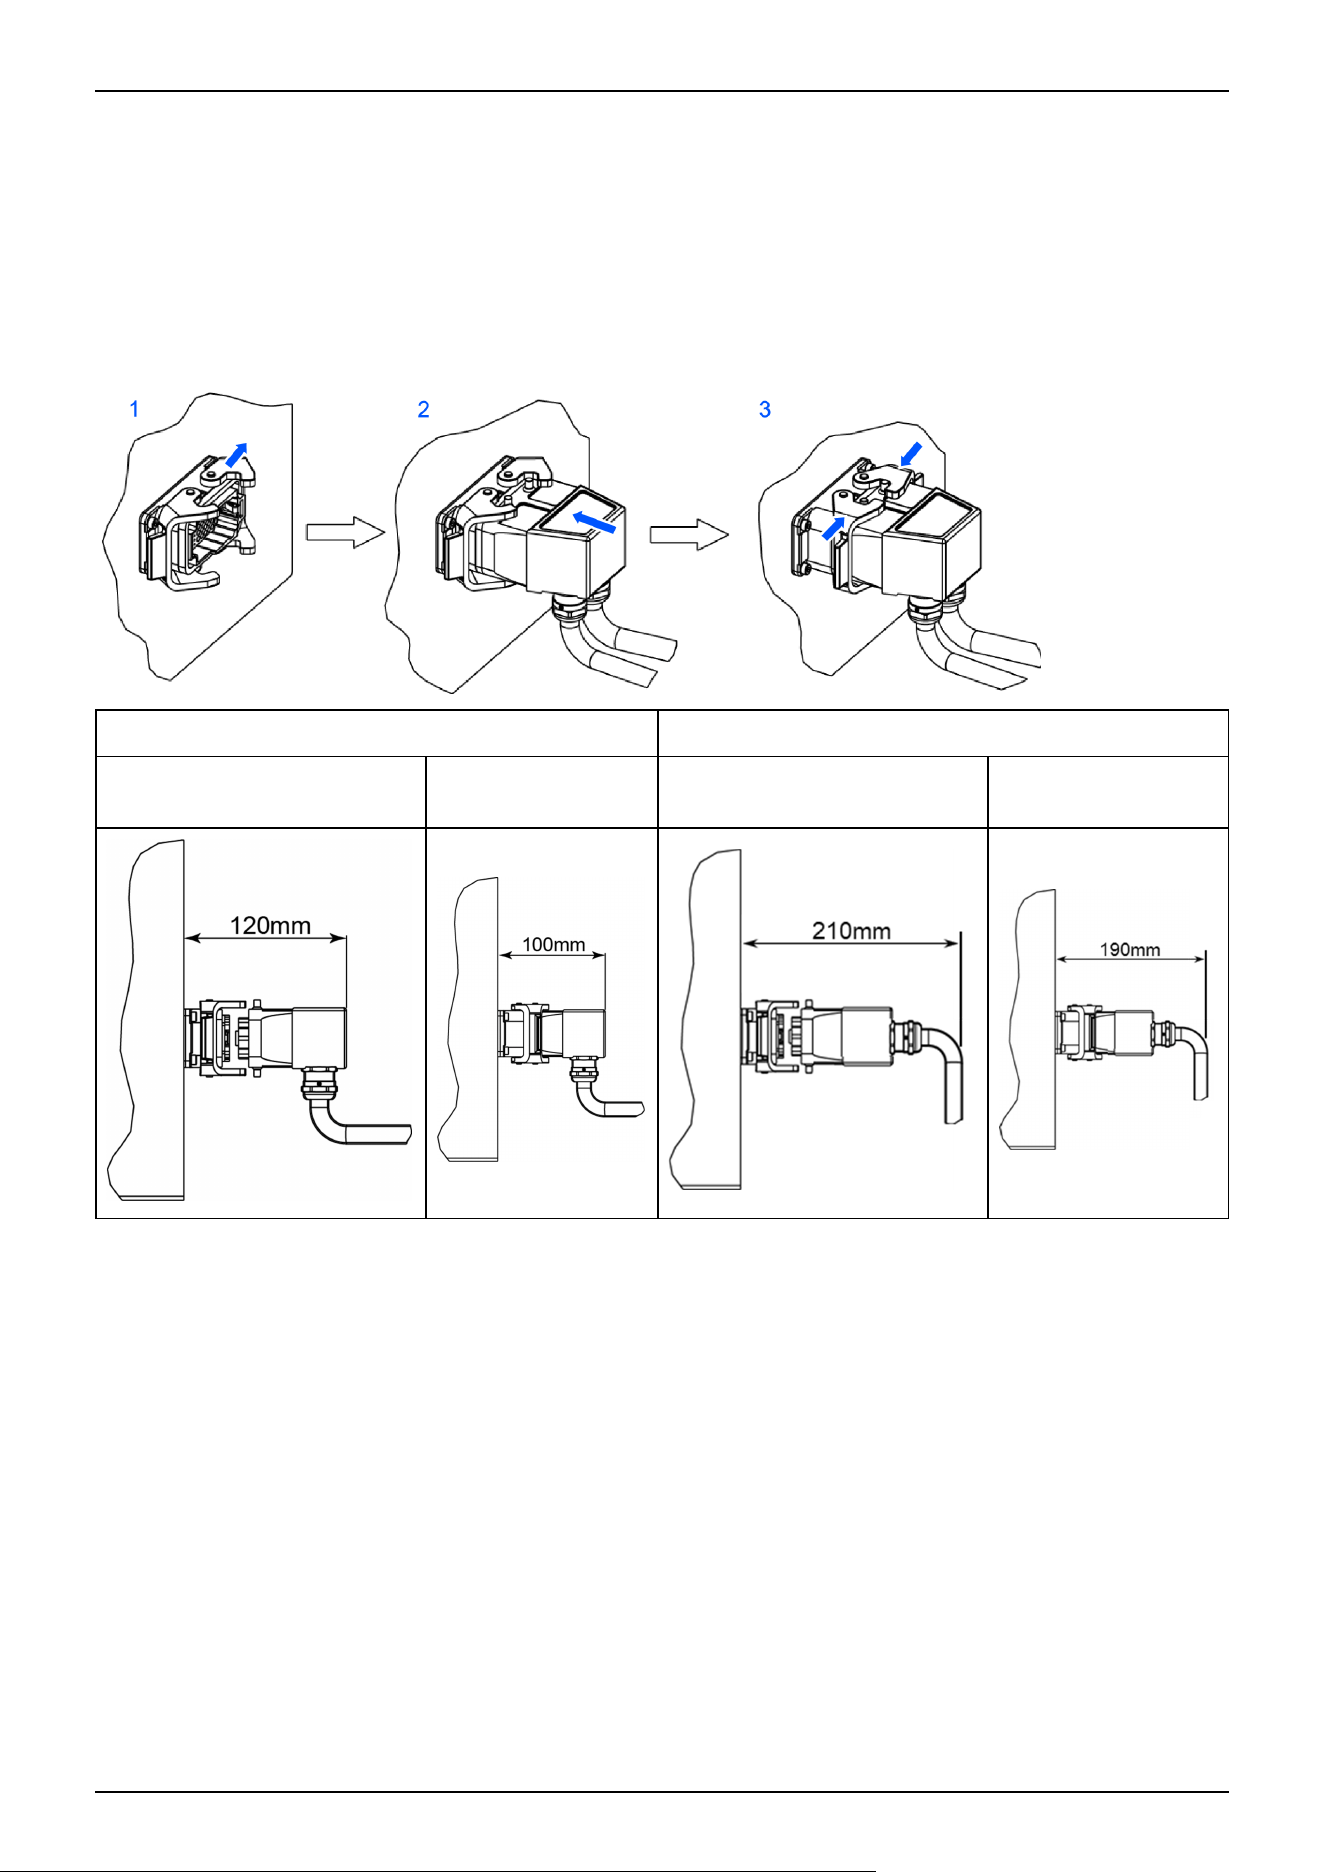
Connection procedure for Manipulator and M/C cable
Insert the M/C cable hood into the M/C cable housing on the back and bottom of the Manipulator, and secure it with the lock
attached to the housing.
1. Open the lock plates on both sides of the M/C cable housing.
2. Insert the M/C cable hood all the way to the back.
3. Close the lock plates on both sides of the M/C cable housing.
L-shape (Standard) Straight
Minimum Distance Required
for Insertion and Removal
Distance When
Mounted
Minimum Distance Required
for Insertion and Removal
Distance When
Mounted
Industrial Robot: SCARA Robots GX series Manual Rev.11
374
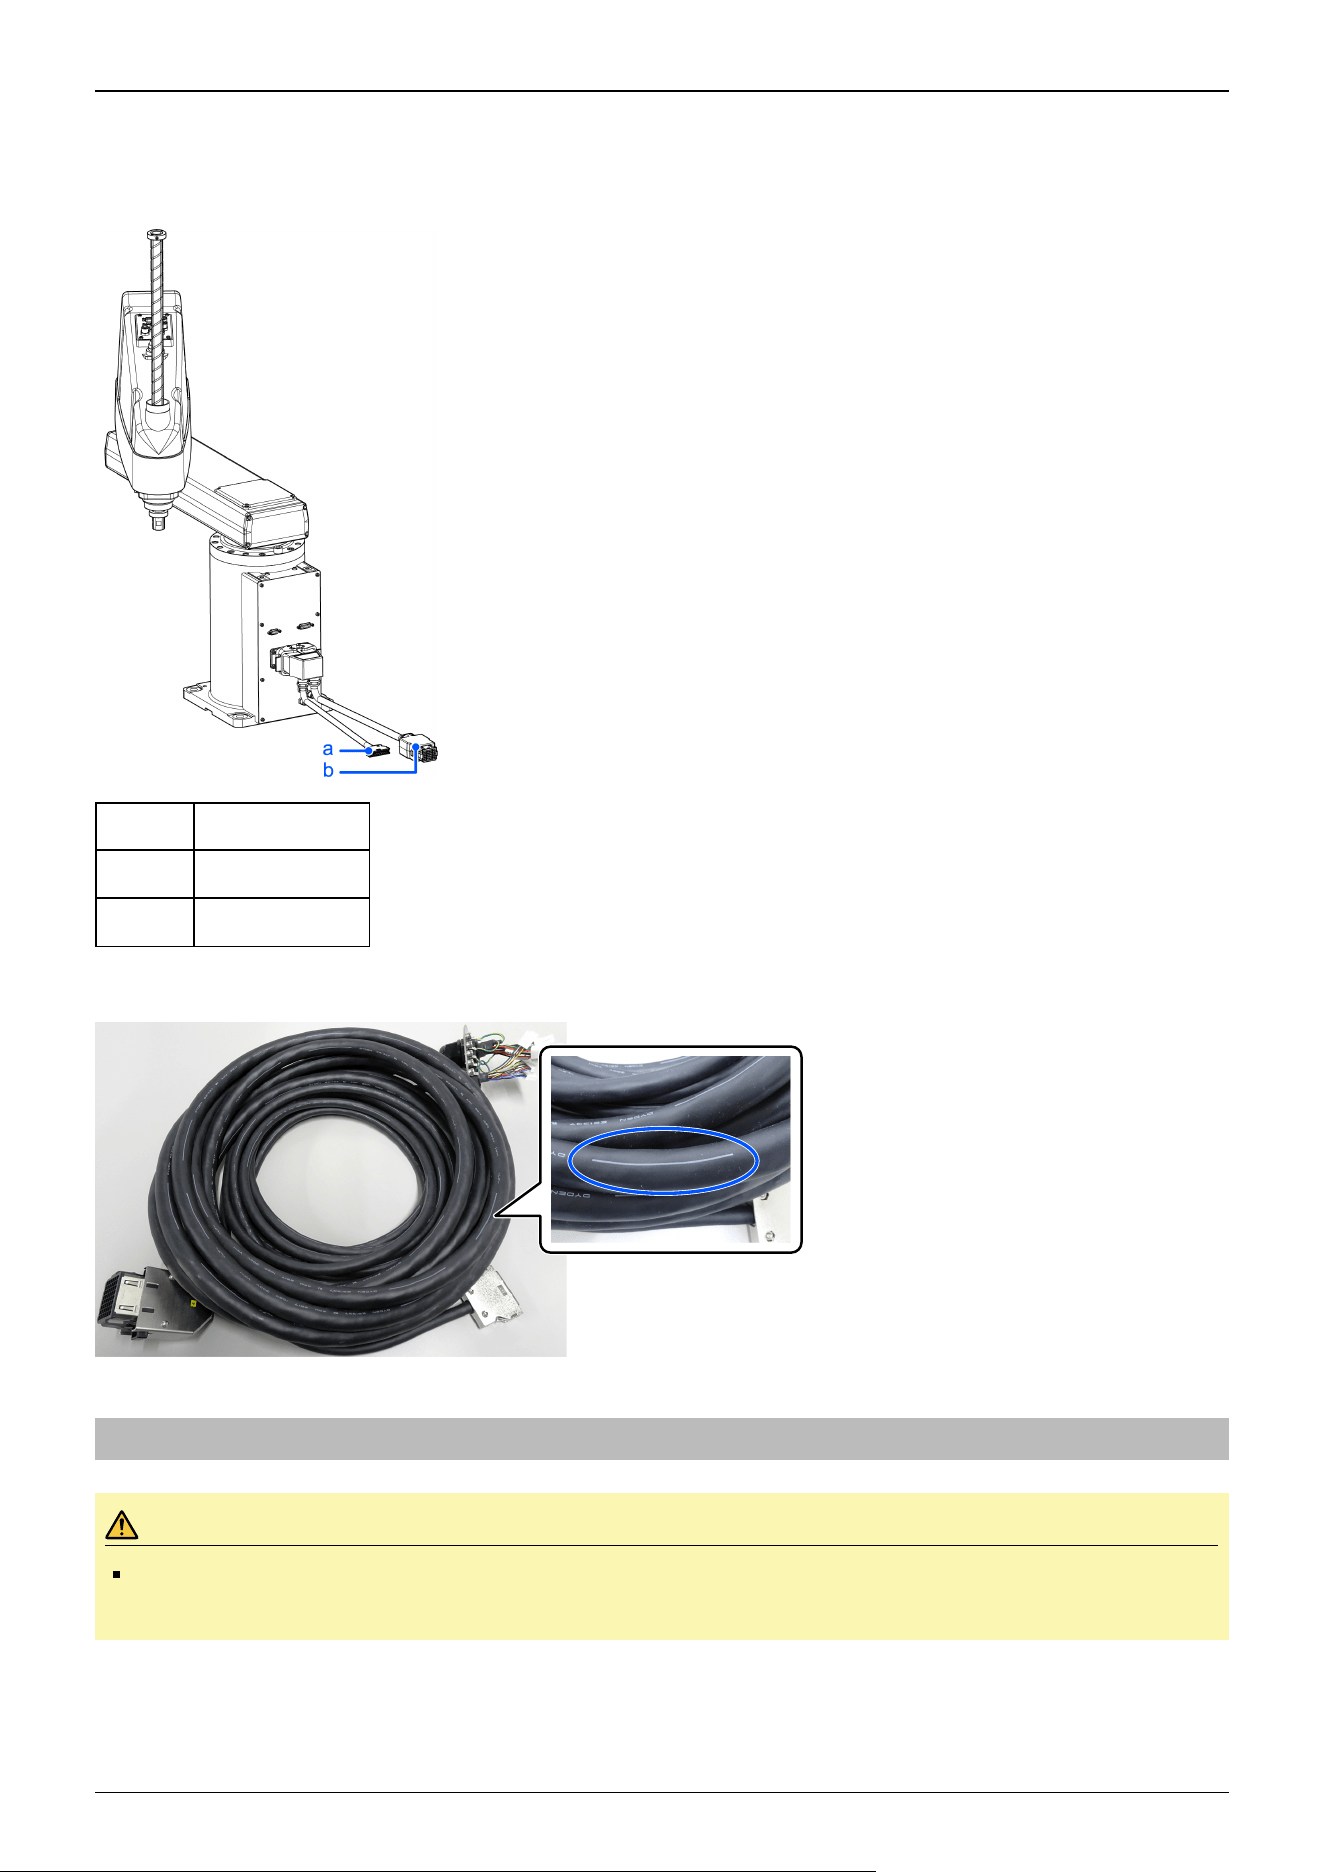
Connecting the M/C cable and the Controller
Connect the power connector and signal connector of the M/C cable to the Controller.
Symbol Description
a Signal connector
b Power connector
There are two types of M/C cables: fixed and movable. Movable cables have wires as shown in the figure below.
5.3.6 User Wires and Pneumatic Tubes
CAUTION
Only authorized or certified personnel should perform wiring. Wiring by unauthorized or uncertified staff may
result in bodily injury and/or malfunction of the robot system.
Industrial Robot: SCARA Robots GX series Manual Rev.11
375
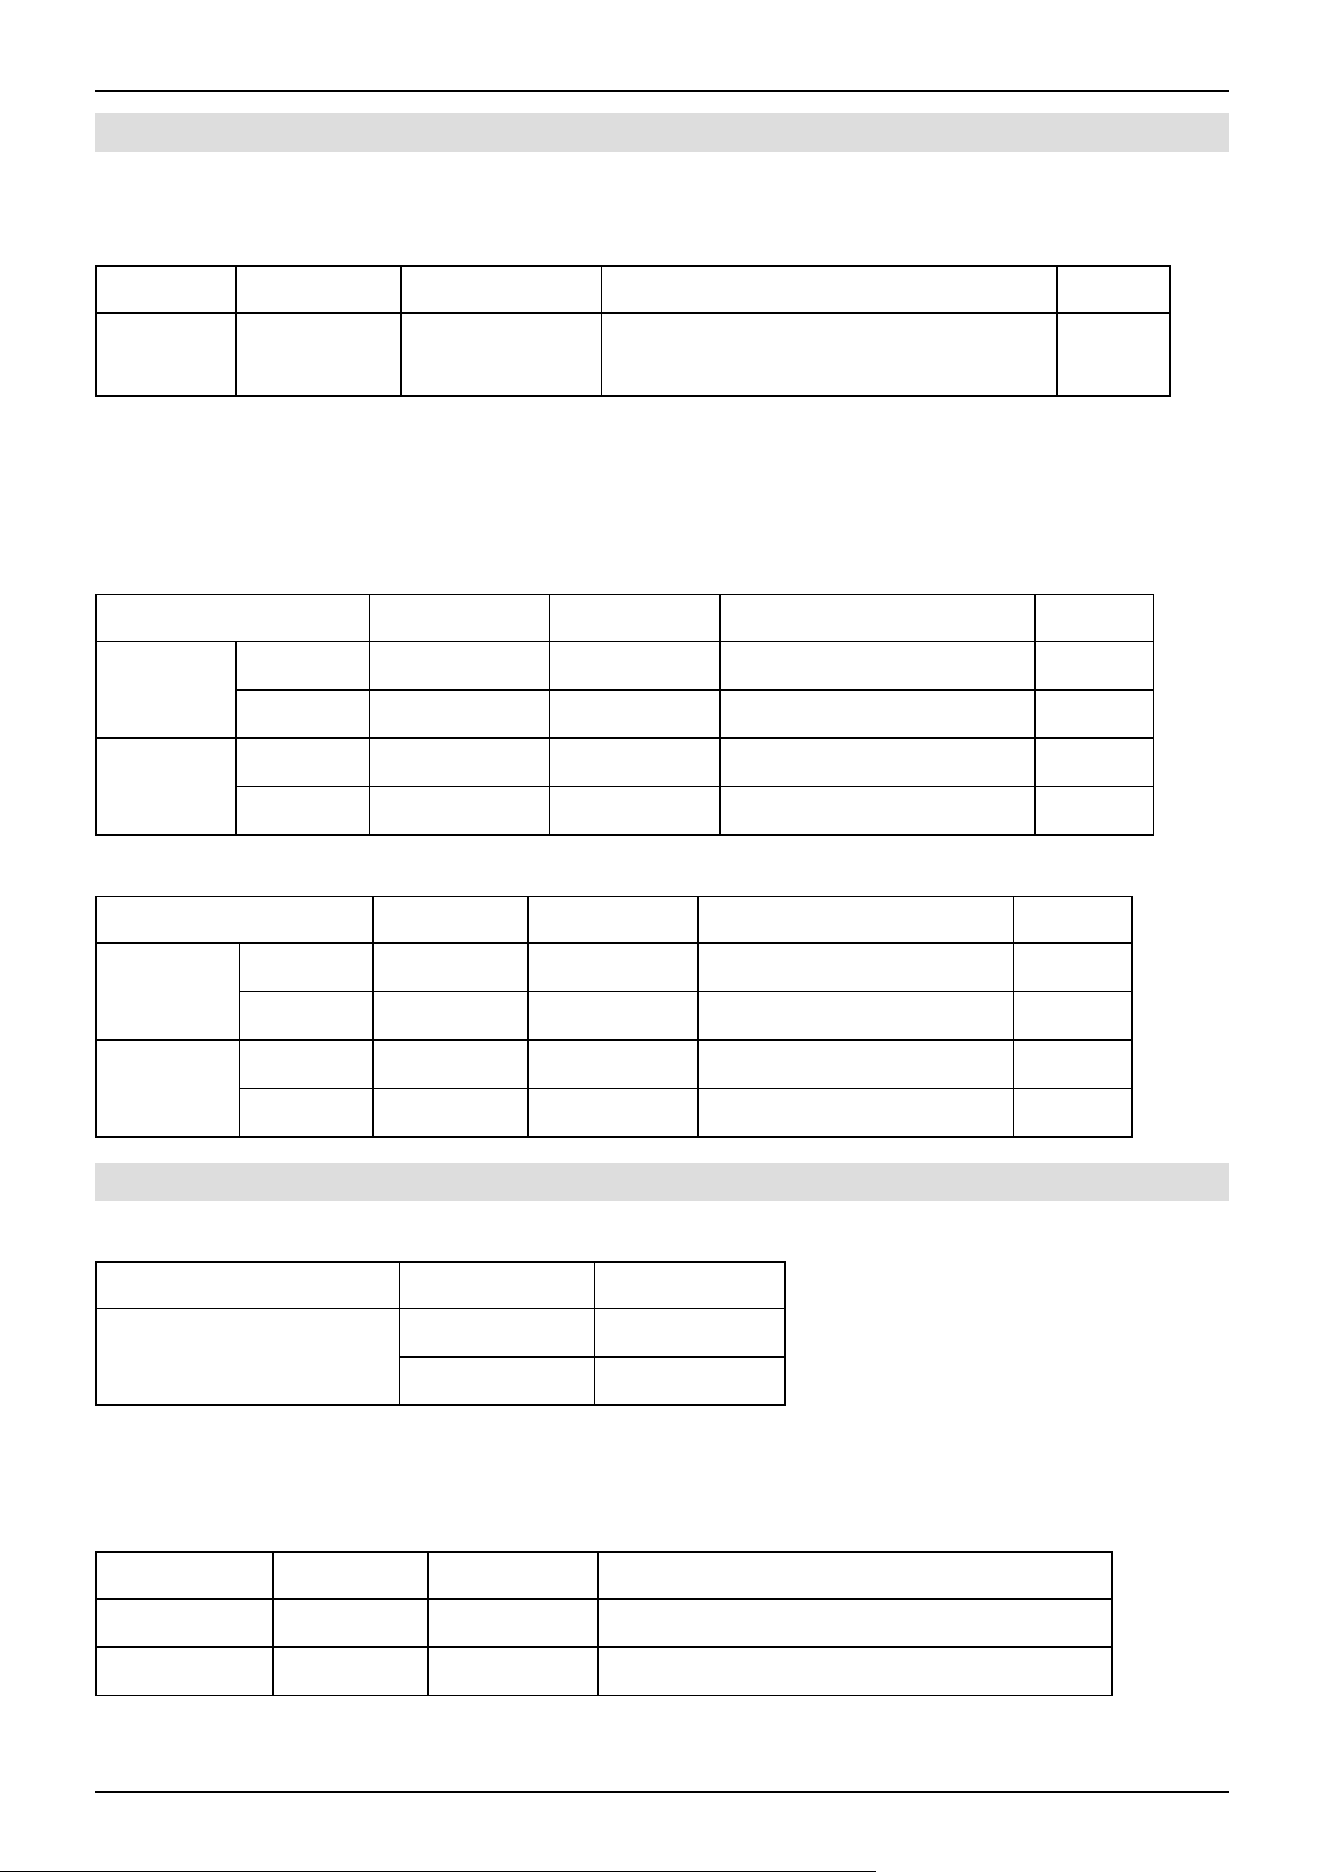
5.3.6.1 Electrical Wires
Connect the following connectors and cables to the user connector of the Manipulator.
Manipulator cable specifications
Rated Voltage Allowable Current Nominal Cross-Sectional Area of Conductor Remarks
D-sub 15 pin
D-sub 9 pin
AC/DC 30 V 1.0 A
0.08 mm
2
Shielded
For each connector, pins with the same number are wired between the connector on the base side and the connector on the Arm
#2 side in the Manipulator.
Connectors to the Manipulator (recommended)
Standard, cleanroom & ESD specifications
Manufacturer Model Number Type Remarks
D-sub 15 pin
Connector Würth Elektronik 61801524823 Solder type 2 included
Clamp hood Würth Elektronik 61801525311 Connector setscrew: #4-40 UNC 2 included
D-sub 9 pin
Connector Würth Elektronik 61800924823 Solder type 2 included
Clamp hood Würth Elektronik 61800925311 Connector setscrew: #4-40 UNC 2 included
Protected-Model
Manufacturer Model Number Type Remarks
D-sub 15-pin
Connector HARTING 09670155615 Solder type 2 included
Clamp hood HARTING 09670150538 Connector setscrew: #4-40 UNC 2 included
D-sub 9-pin
Connector HARTING 09670095615 Solder type 2 included
Clamp hood HARTING 09670090538 Connector setscrew: #4-40 UNC 2 included
5.3.6.2 Pneumatic Tubes
Manipulator pneumatic tube specifications
Maximum Working Pressure Number of Tubes O.D. × I.D.
0.59 MPa (6 kgf/cm
2
: 86 psi)
2 ø6 mm × ø4 mm
302 ø4 mm × ø2.5 mm
For each connector inside the Manipulator, fittings of the same size and tip color (blue/white) are connected between the air
fitting on the base side and the air fitting on the Arm #2 side.
Pneumatic tubes connected to the Manipulator (recommended)
Outer Diameter Manufacturer Model Number Remarks
ø6 mm SMC TU0604 * Equivalent products from other companies can be used
ø4 mm SMC TU0425 * Equivalent products from other companies can be used
Industrial Robot: SCARA Robots GX series Manual Rev.11
376
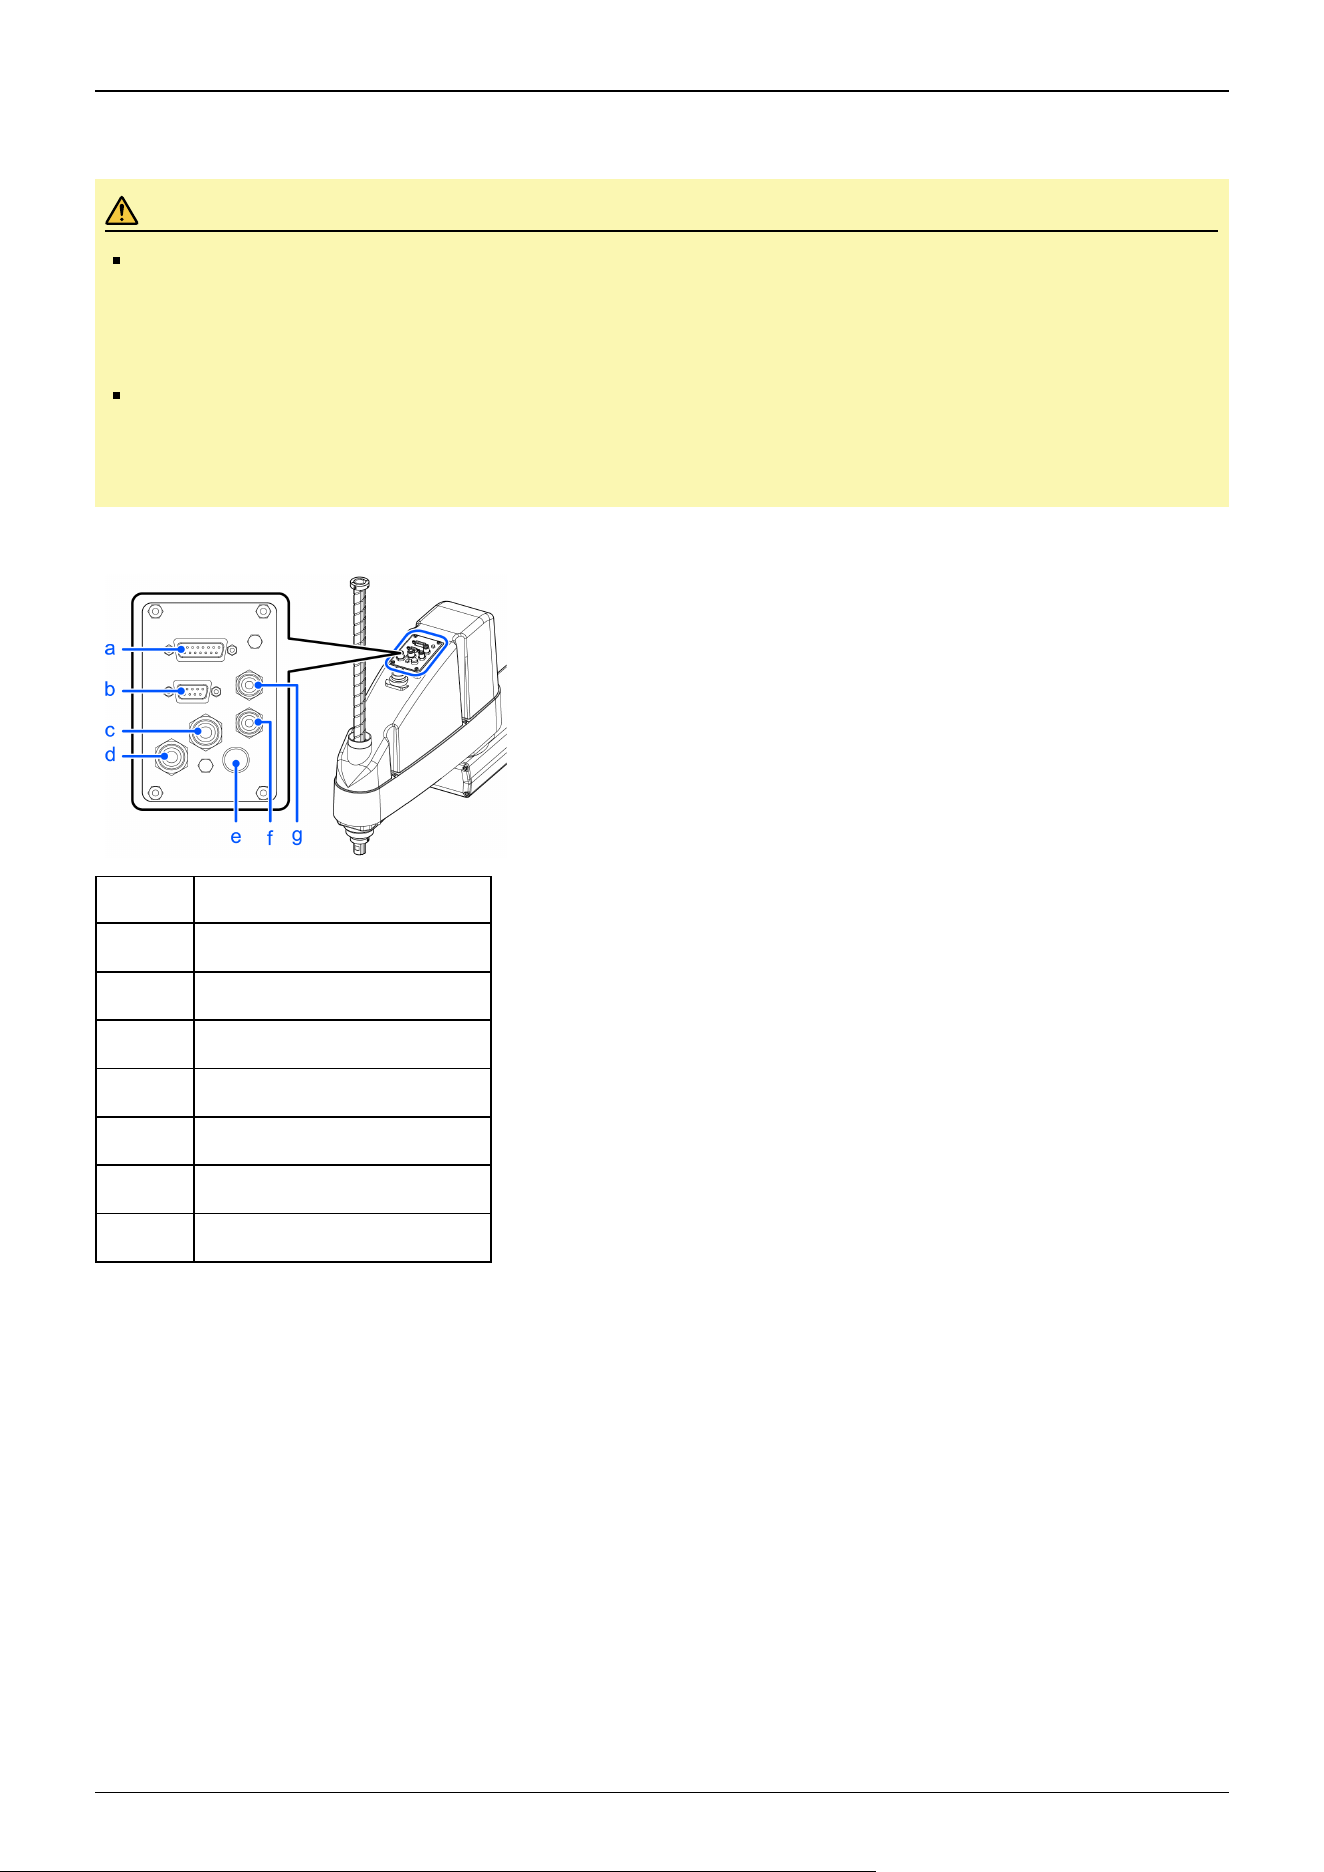
When the Manipulator is a protected-model, please note the following points.
CAUTION
In special environments (e.g., oil smoke, dust, etc.), the user wires and pneumatic tubes should have
protected-model (compliant with protection class IP65). If the user wires and pneumatic tubes without
protected-model are connected, the protection class (IP65) cannot be guaranteed, and the Manipulator may
be damaged or break down.
Be sure to always connect the cap when the user cable connector is not being used.
If the cap is not attached, foreign matter such as oil smoke or dust may enter the connector, causing the
Manipulator to be damaged or break down.
Arm #2 side (common)
Symbol Description
a 15-pin D-sub connector
b 9-pin D-sub connector
c Fitting for ø6 mm tube (blue)
d Fitting for ø6 mm tube (white)
e Brake release switch
f Fitting for ø4 mm tube (white)
g Fitting for ø4 mm tube (blue)
Industrial Robot: SCARA Robots GX series Manual Rev.11
377
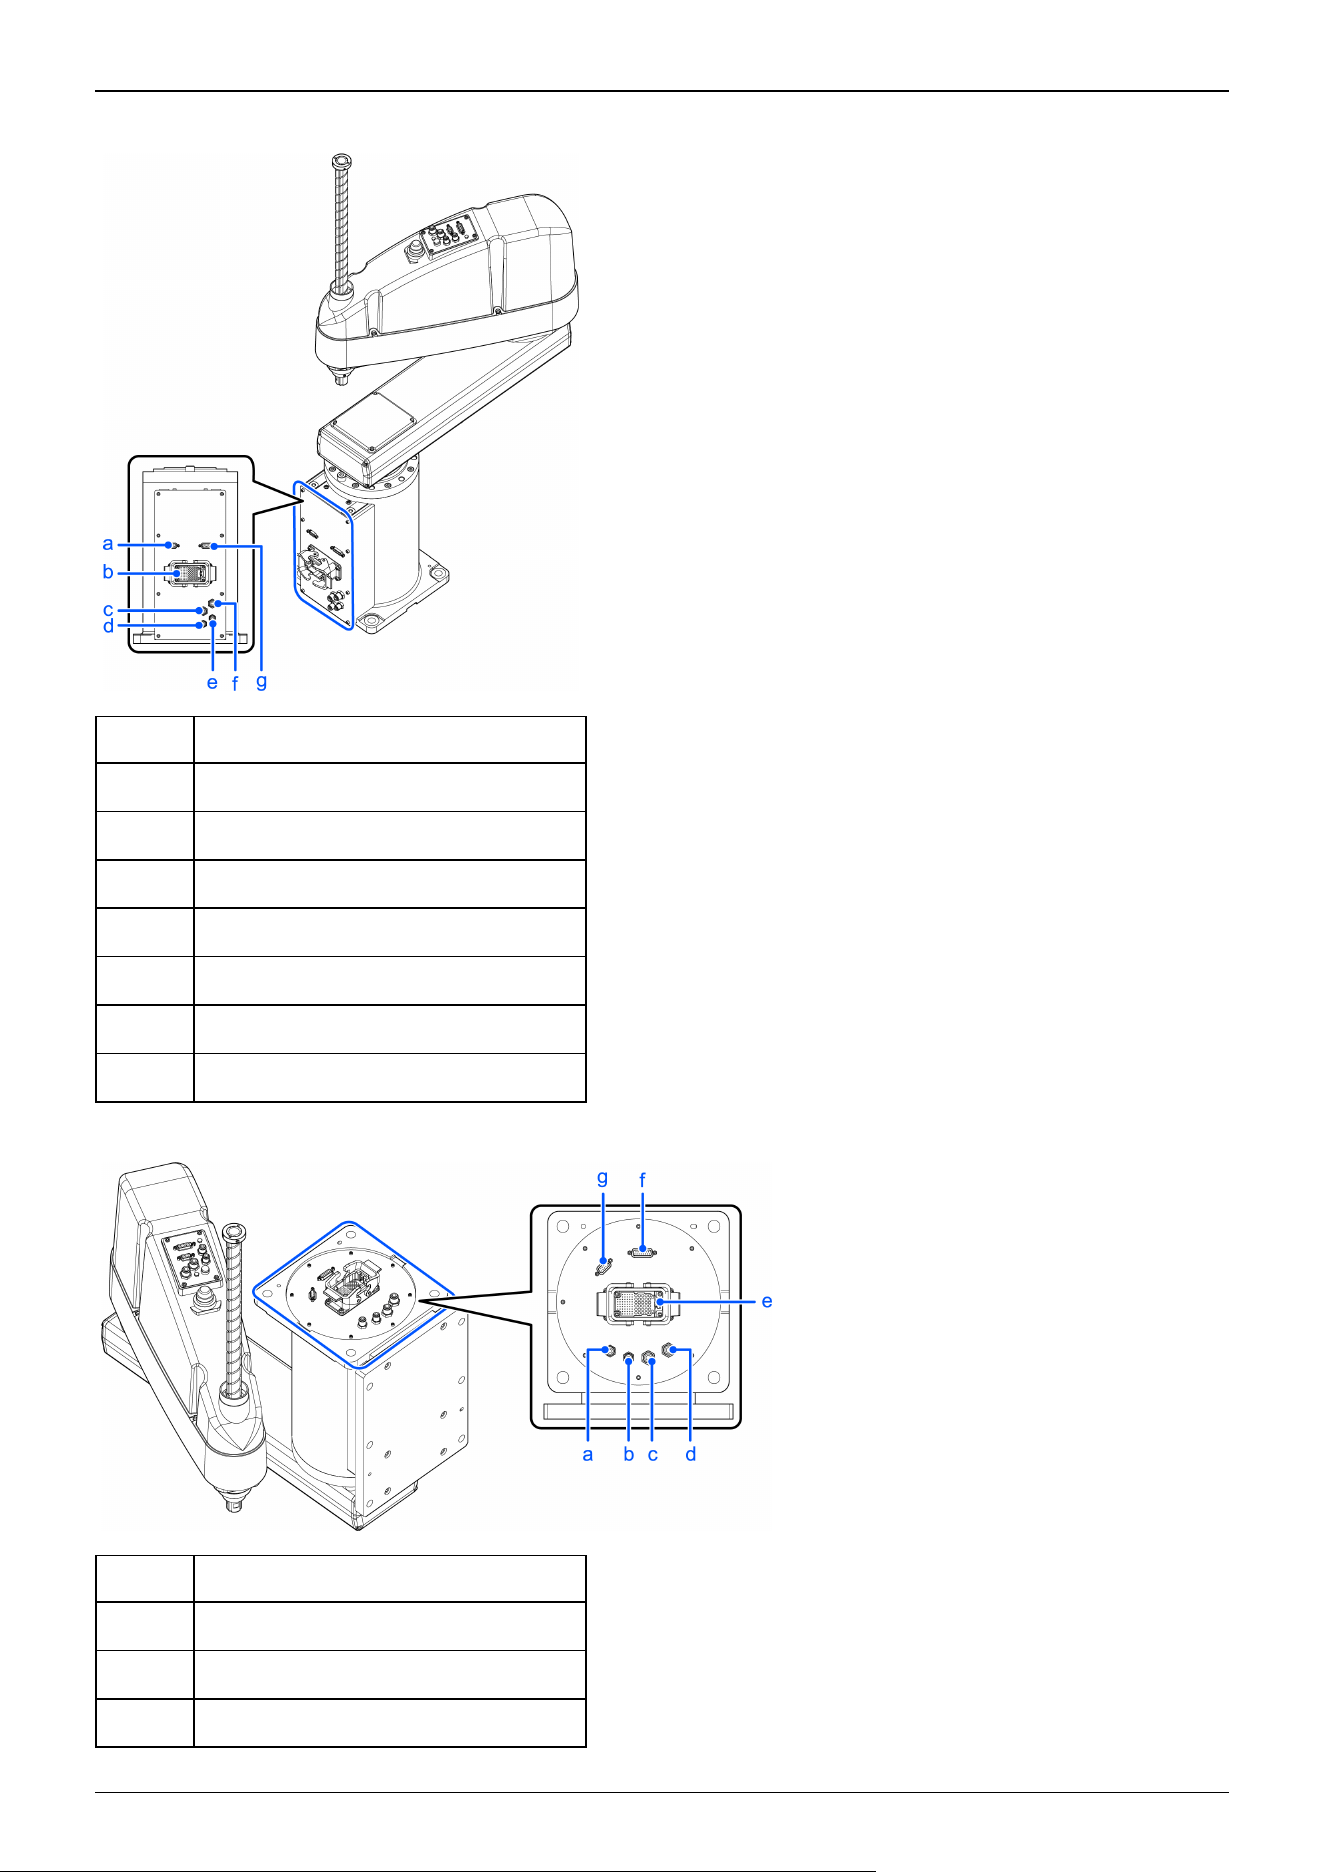
Base side (table top mounting specifications)
Symbol Description
a User connector (9-pin D-sub connector)
b M/C cable housing
c Fitting for ø6 mm tube (blue)
d Fitting for ø4 mm tube (blue)
e Fitting for ø4 mm tube (white)
f Fitting for ø6 mm tube (white)
g User connector (15-pin D-sub connector)
Base side (wall mounting specifications)
Symbol Description
a Fitting for ø4 mm tube (blue)
b Fitting for ø4 mm tube (white)
c Fitting for ø6 mm tube (blue)
Industrial Robot: SCARA Robots GX series Manual Rev.11
378
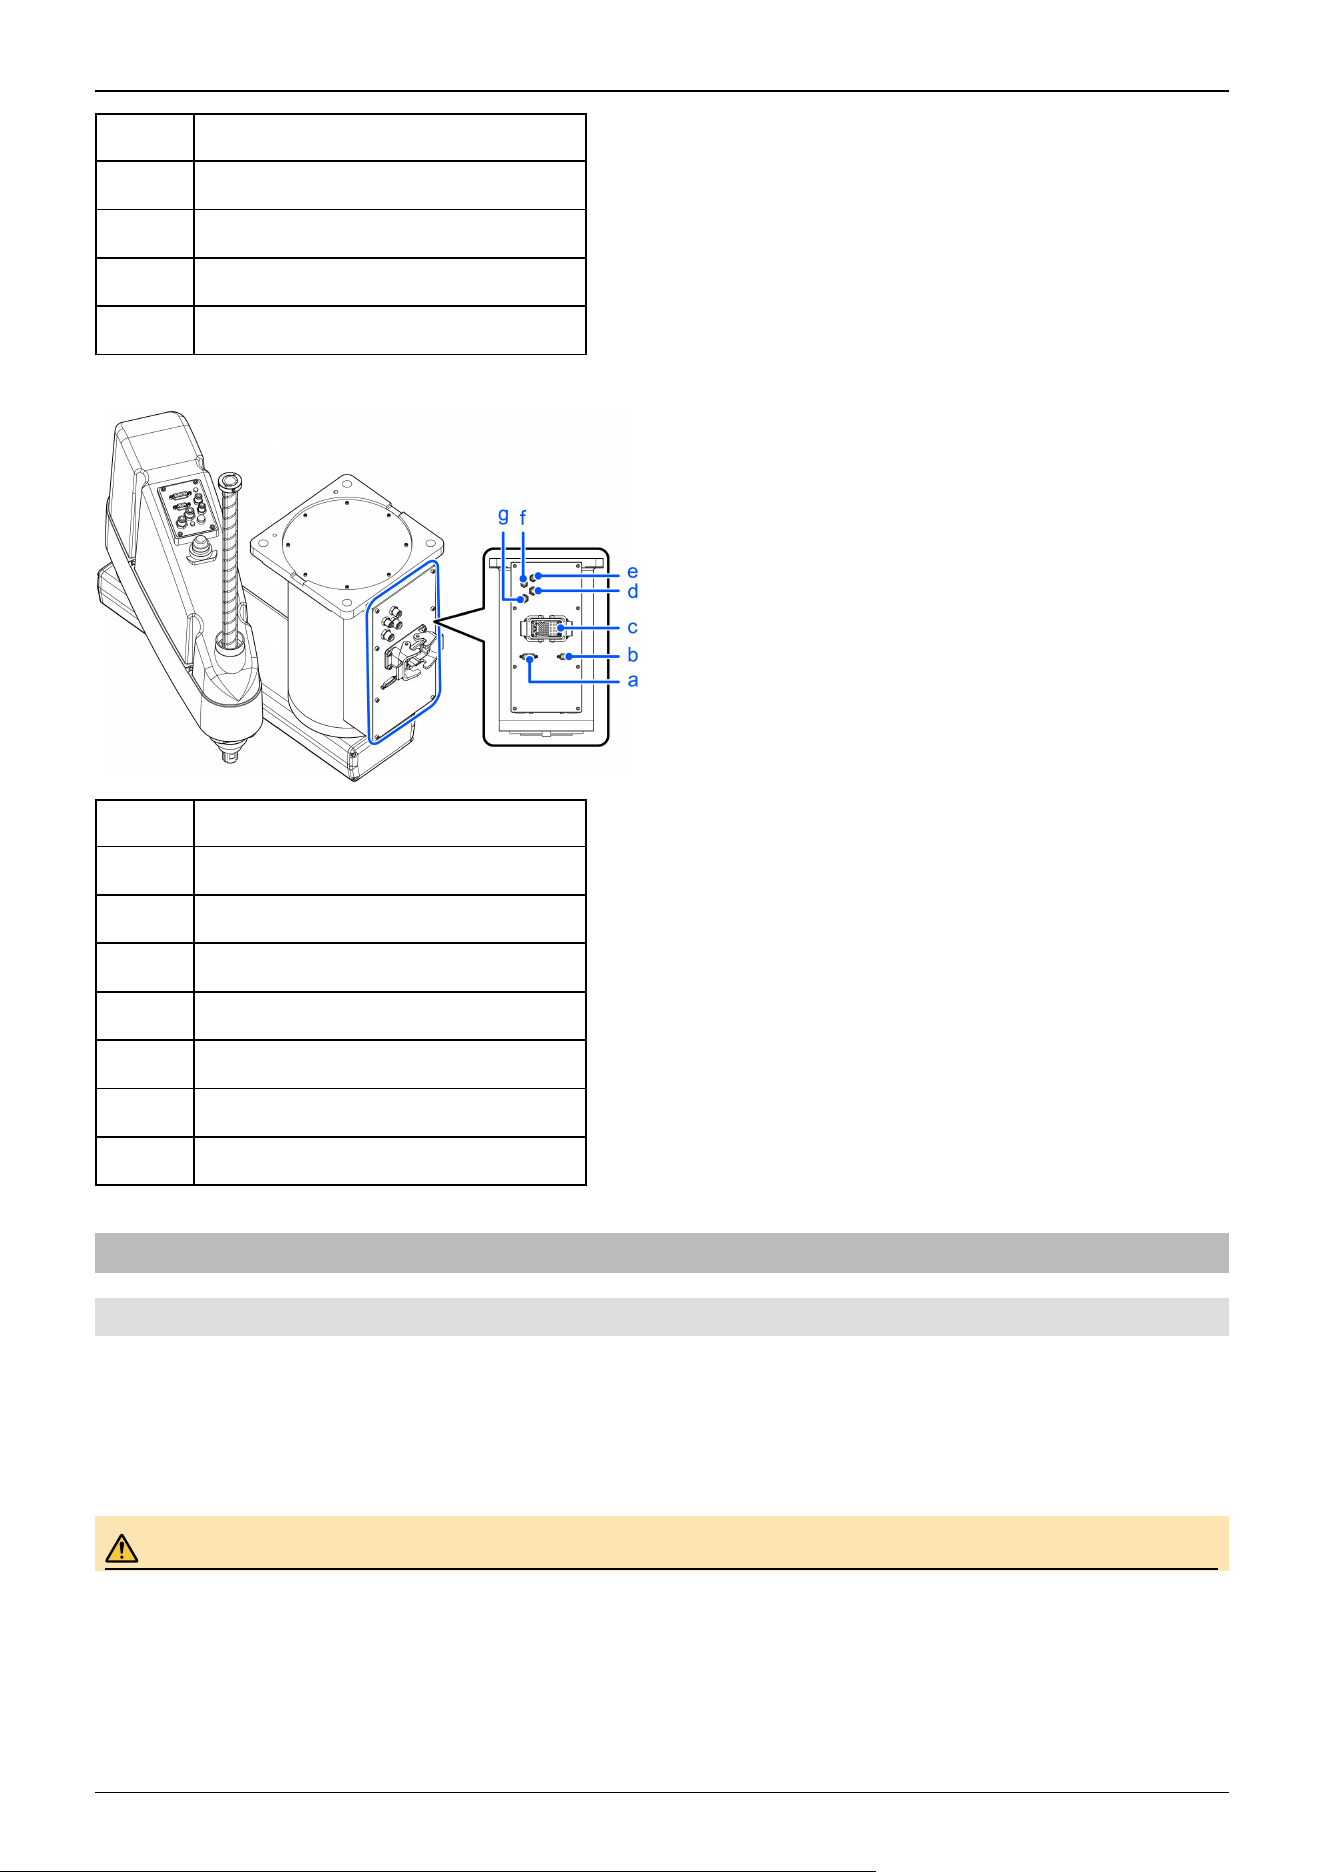
Symbol Description
d Fitting for ø6 mm tube (white)
e M/C cable housing
f User connector (15-pin D-sub connector)
g User connector (9-pin D-sub connector)
Base side (ceiling mounting specifications)
Symbol Description
a User connector (15-pin D-sub connector)
b User connector (9-pin D-sub connector)
c M/C cable housing
d Fitting for ø6 mm tube (blue)
e Fitting for ø4 mm tube (blue)
f Fitting for ø4 mm tube (white)
g Fitting for ø6 mm tube (white)
5.3.7 Relocation and Storage
5.3.7.1 Safety Information for Relocation and Storage
Pay attention to the following requirements when relocating, storing, and transporting the Manipulators.
Transportation and installation of the Manipulator and related equipment should be performed by people who have received
installation training provided by Epson and the suppliers. Also, the laws and regulations of the installation country must be
followed.
WARNING
Industrial Robot: SCARA Robots GX series Manual Rev.11
379
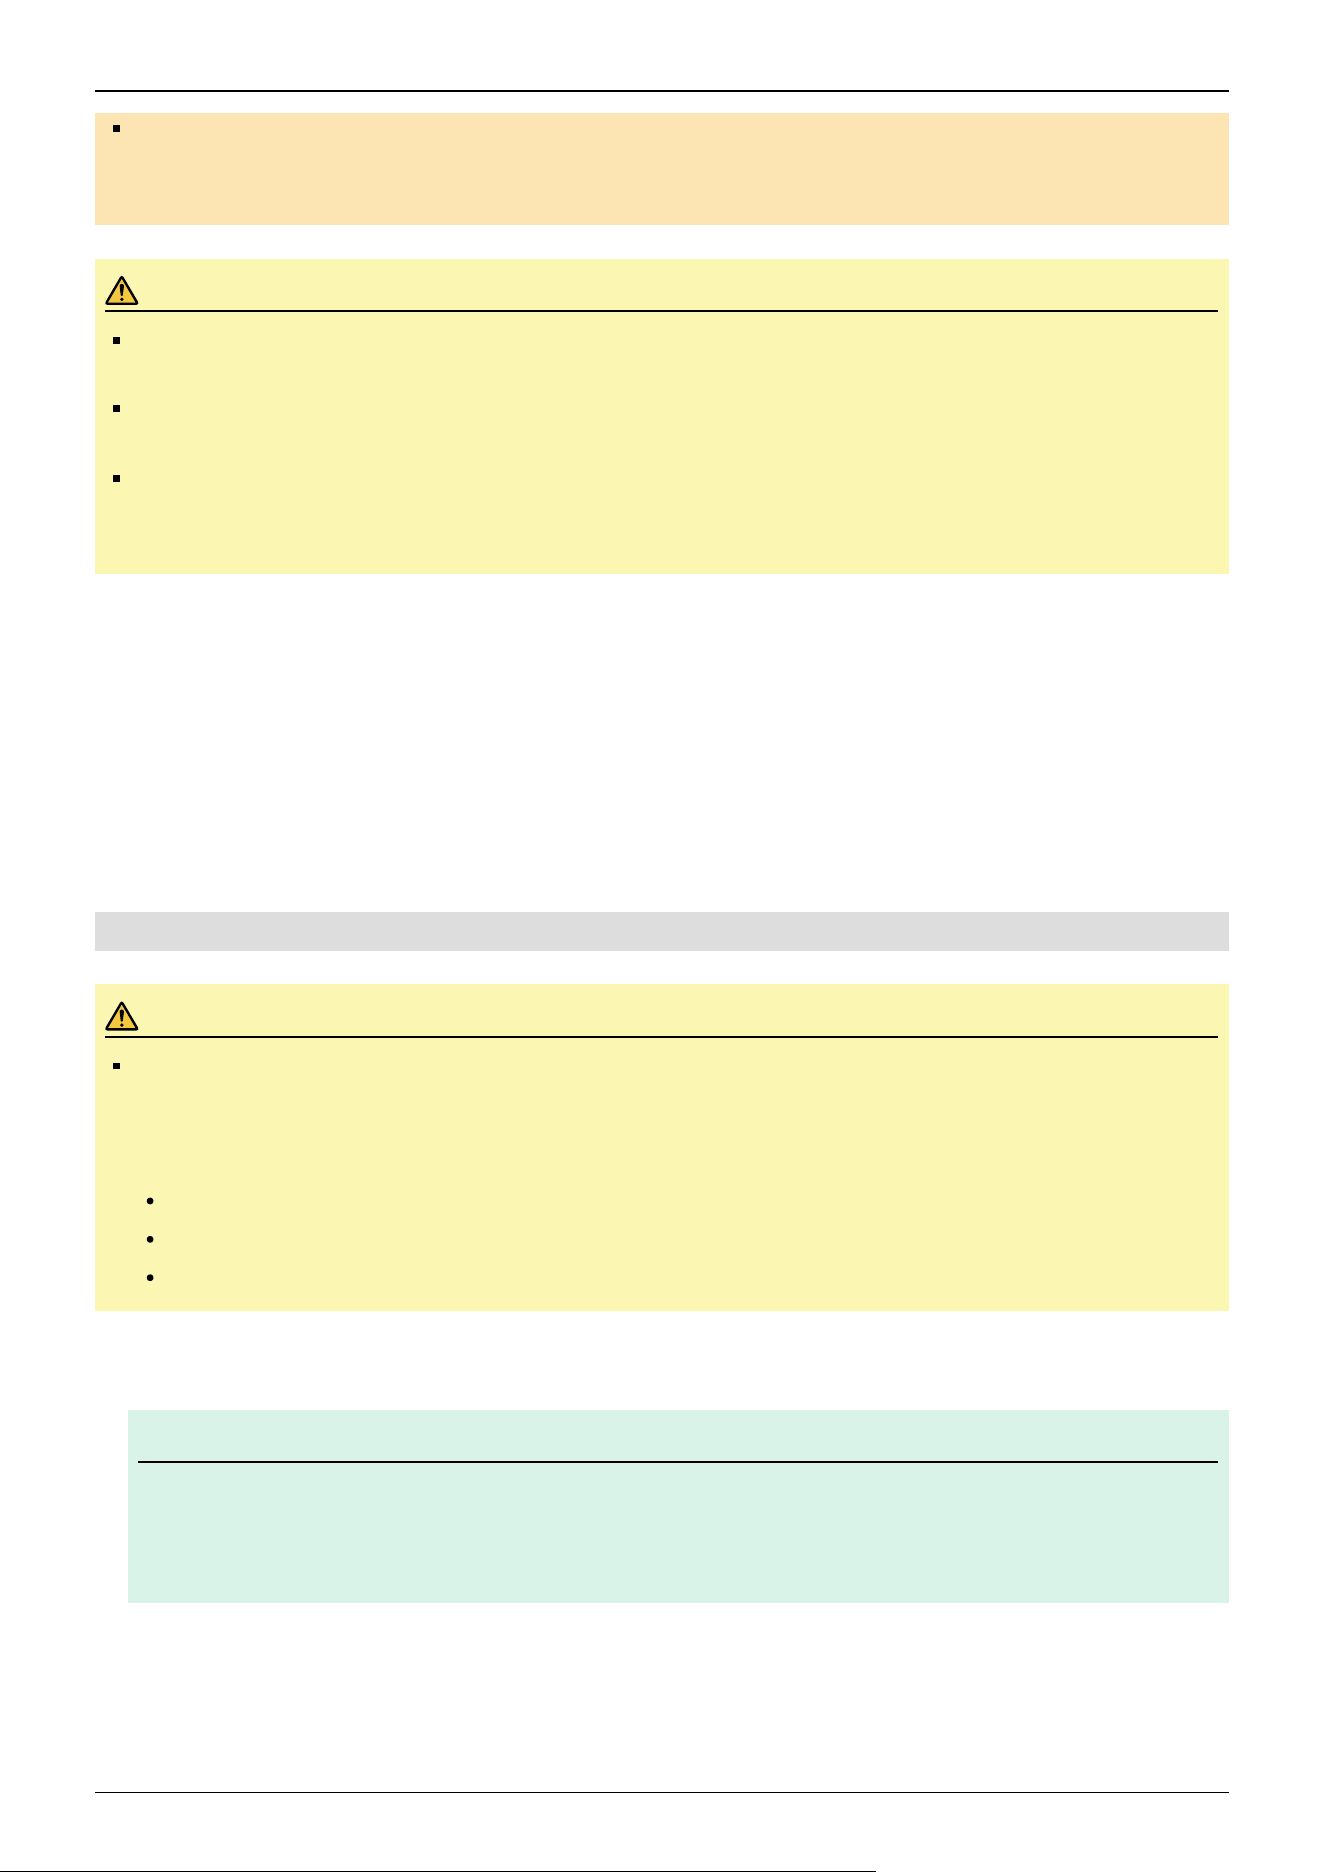
Only qualified personnel should perform sling work and operate a crane or a forklift. When these operations
are performed by unqualified personnel, it is extremely hazardous and may result in serious bodily injury to
operators and/or severe equipment damage.
CAUTION
Before relocating, fold the arm and secure it tightly with a cable tie to prevent hands or fingers from getting
caught in the Manipulator.
When removing the anchor bolts, support the Manipulator so that it does not fall. Removing the anchor bolts
without supporting the Manipulator can cause it to fall, causing hands or feet to get caught.
The Manipulator should be transported by three or more people, either secured to transporting equipment or
carried by placing their hands under Arm #1 or the bottom of the base. When holding the bottom of the base
by hand, be extremely careful not to get your hands or fingers caught.
When transporting the Manipulator over long distances, secure it directly to transporting equipment so that it will not fall. If
necessary, pack the Manipulator using the same packaging as delivery.
When the Manipulator is reassembled and used for a robot system again after an extended period of storage, perform a test run
to verify that it works properly before starting the main operation.
Manipulators should be transported and stored under the following conditions: Temperature: -20 to +60°C, Humidity: 10 to
90% (no condensation)
If condensation has formed on the Manipulator during transportation or storage, do not turn on the power until the
condensation is removed.
Do not subject the Manipulator to excessive impacts or vibrations during the transportation process.
5.3.7.2 Table Top Mounting Specifications
CAUTION
Be sure to use four or more people when installing or relocating a model with table top mounting
specifications, and use three or more people when lifting a Manipulator. The Manipulator weights are as
follows. Be careful not to get hands or feet caught or have equipment damaged due to dropping of the
Manipulator.
GX10-B/GX10-C65**: Approx.46 kg (102 lb)
GX10-B/GX10-C/GX20-B/GX20-C85**: Approx.49 kg (108 lb)
GX20-B/GX20-CA0**: Approx.50 kg (111 lb)
1. Turn off all power, and remove the wiring and tubes connected to the Manipulator.
KEY POINTS
If using variable mechanical stops for Joints #1 and #2 and the operating angle is limited, change to the
mechanical stop positions at factory shipping.
Setting the Work Envelope by Mechanical Stops
2. Attach the eyebolts to the top back of the Manipulator.
3. Bind the lower end of the shaft to the arm and the base to the arm.
Using a cable tie or similar material, bind tightly enough that the shaft does not sag down.
✏
Industrial Robot: SCARA Robots GX series Manual Rev.11
380
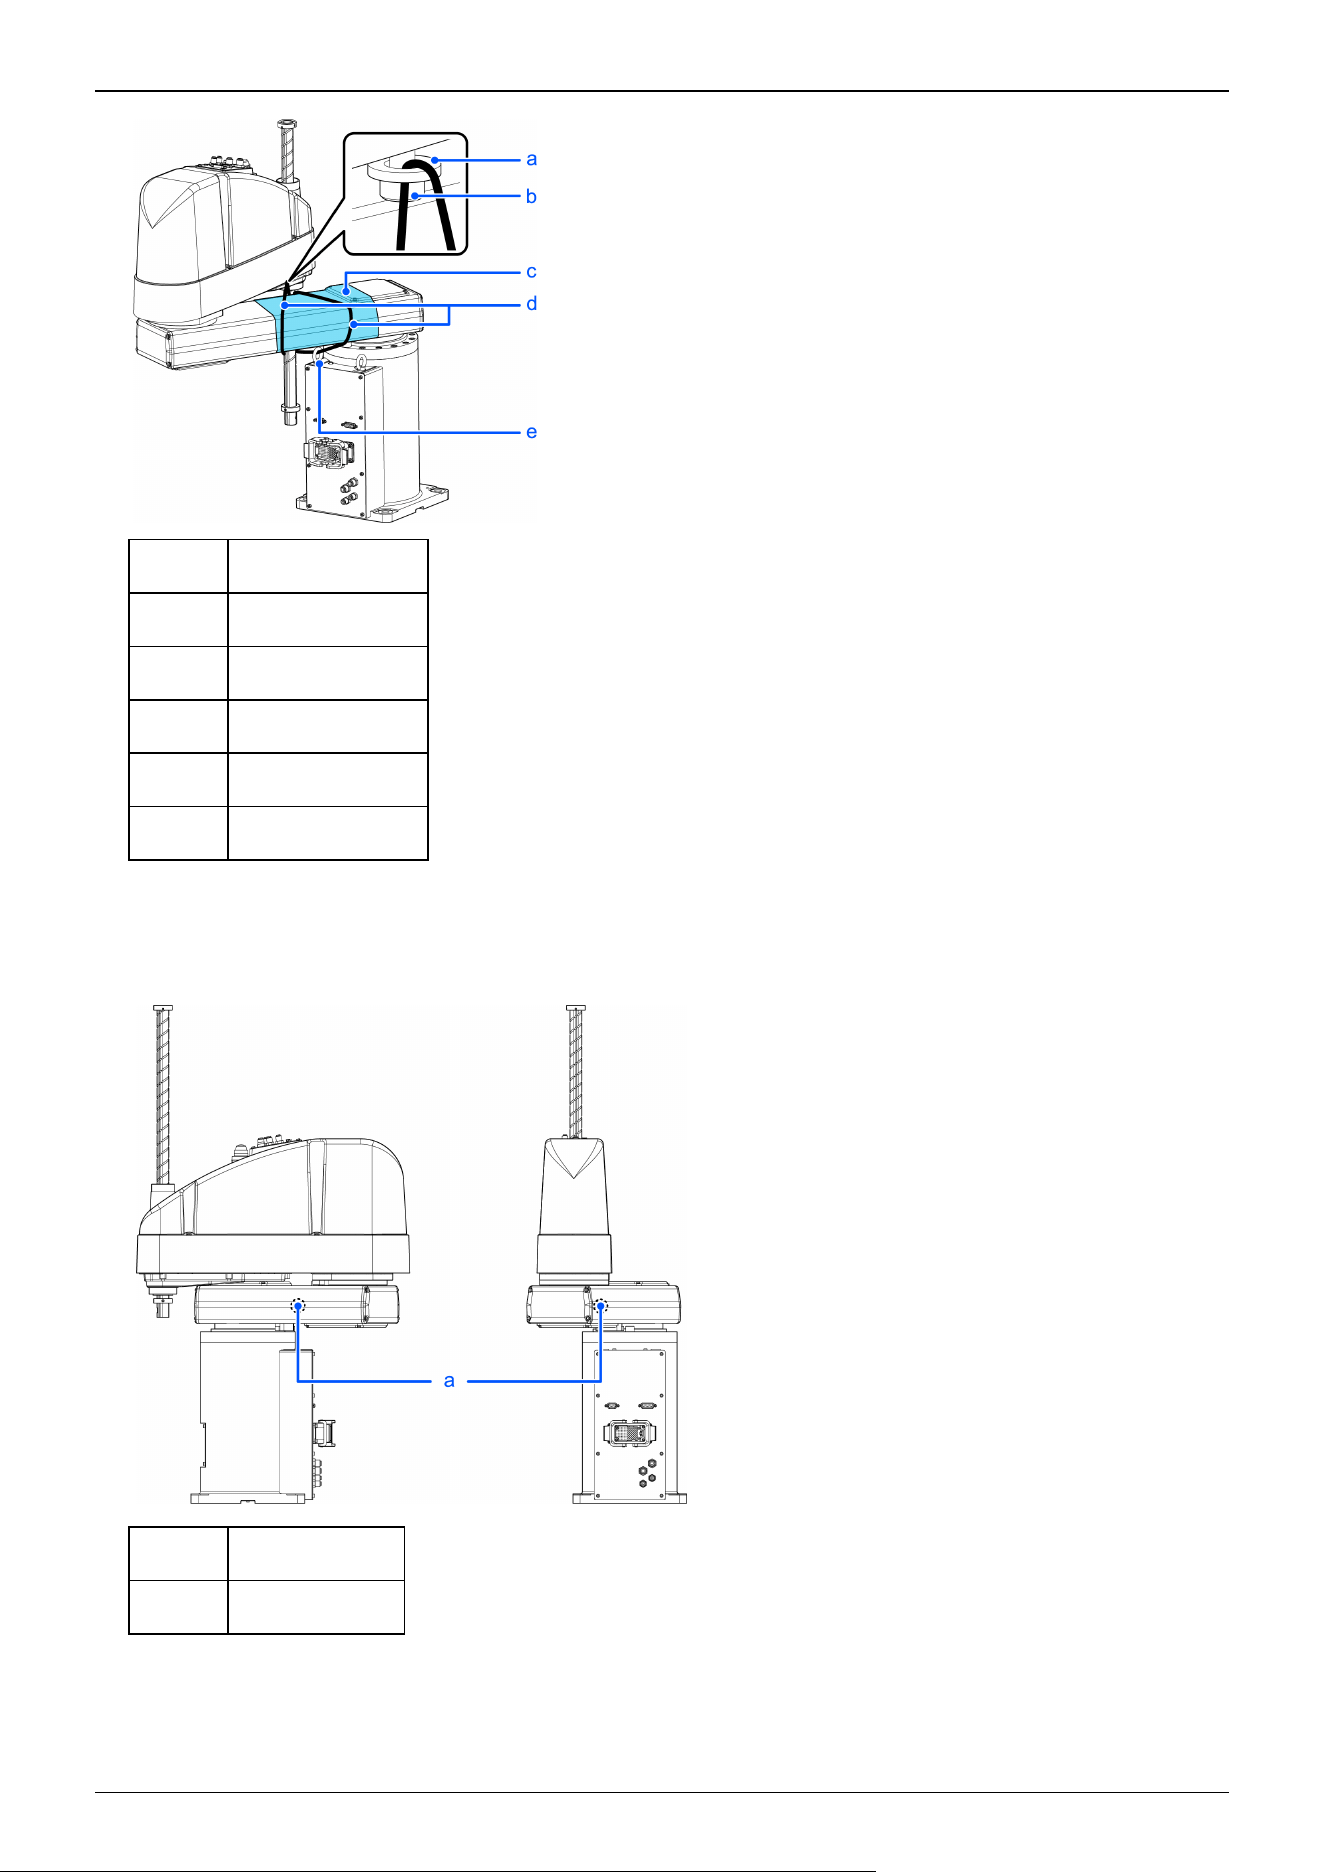
Symbol Description
a Washer:
b Bolt: M4 × 15
c Sheet
d Cable tie
f Eyebolts (included)
4. While supporting the bottom of Arm #1 by hand so that the Manipulator does not fall over, remove the anchor bolts. Then,
remove the Manipulator from the base table.
GX10-B/GX10-C65**
Symbol Description
a Center of gravity
GX10-B/GX10-C/GX20-B/GX20-C85**
Industrial Robot: SCARA Robots GX series Manual Rev.11
381
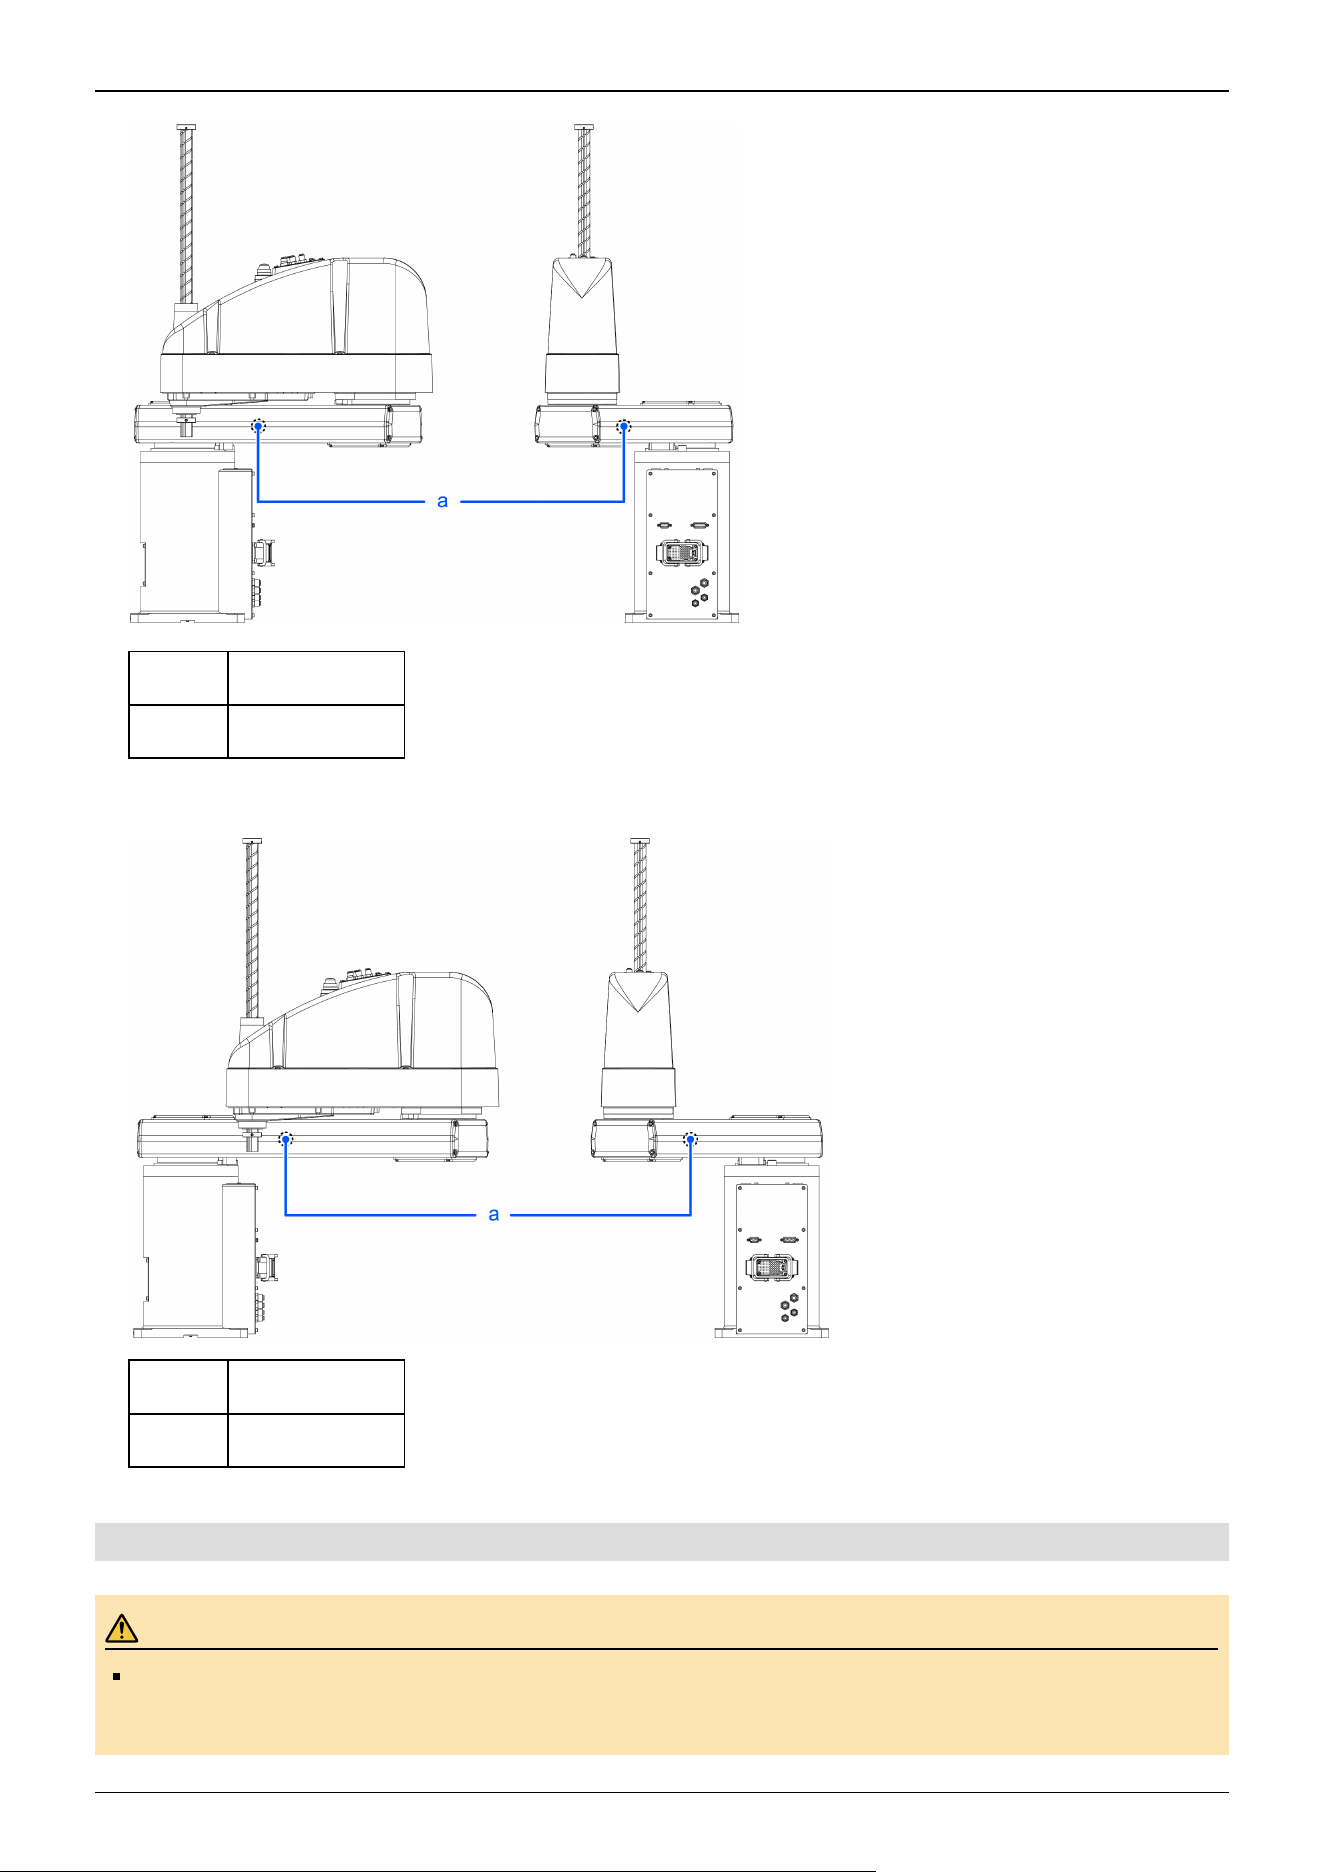
Symbol Description
a Center of gravity
GX20-B/GX20-CA0**
Symbol Description
a Center of gravity
5.3.7.3 Wall Mounting Specifications
WARNING
Be sure to use four or more people when installing or relocating a model with wall mounting specifications,
and use three or more people when lifting a Manipulator. The Manipulator weights are as follows. Be careful
not to get hands or feet caught or have equipment damaged due to dropping of the Manipulator.
Industrial Robot: SCARA Robots GX series Manual Rev.11
382
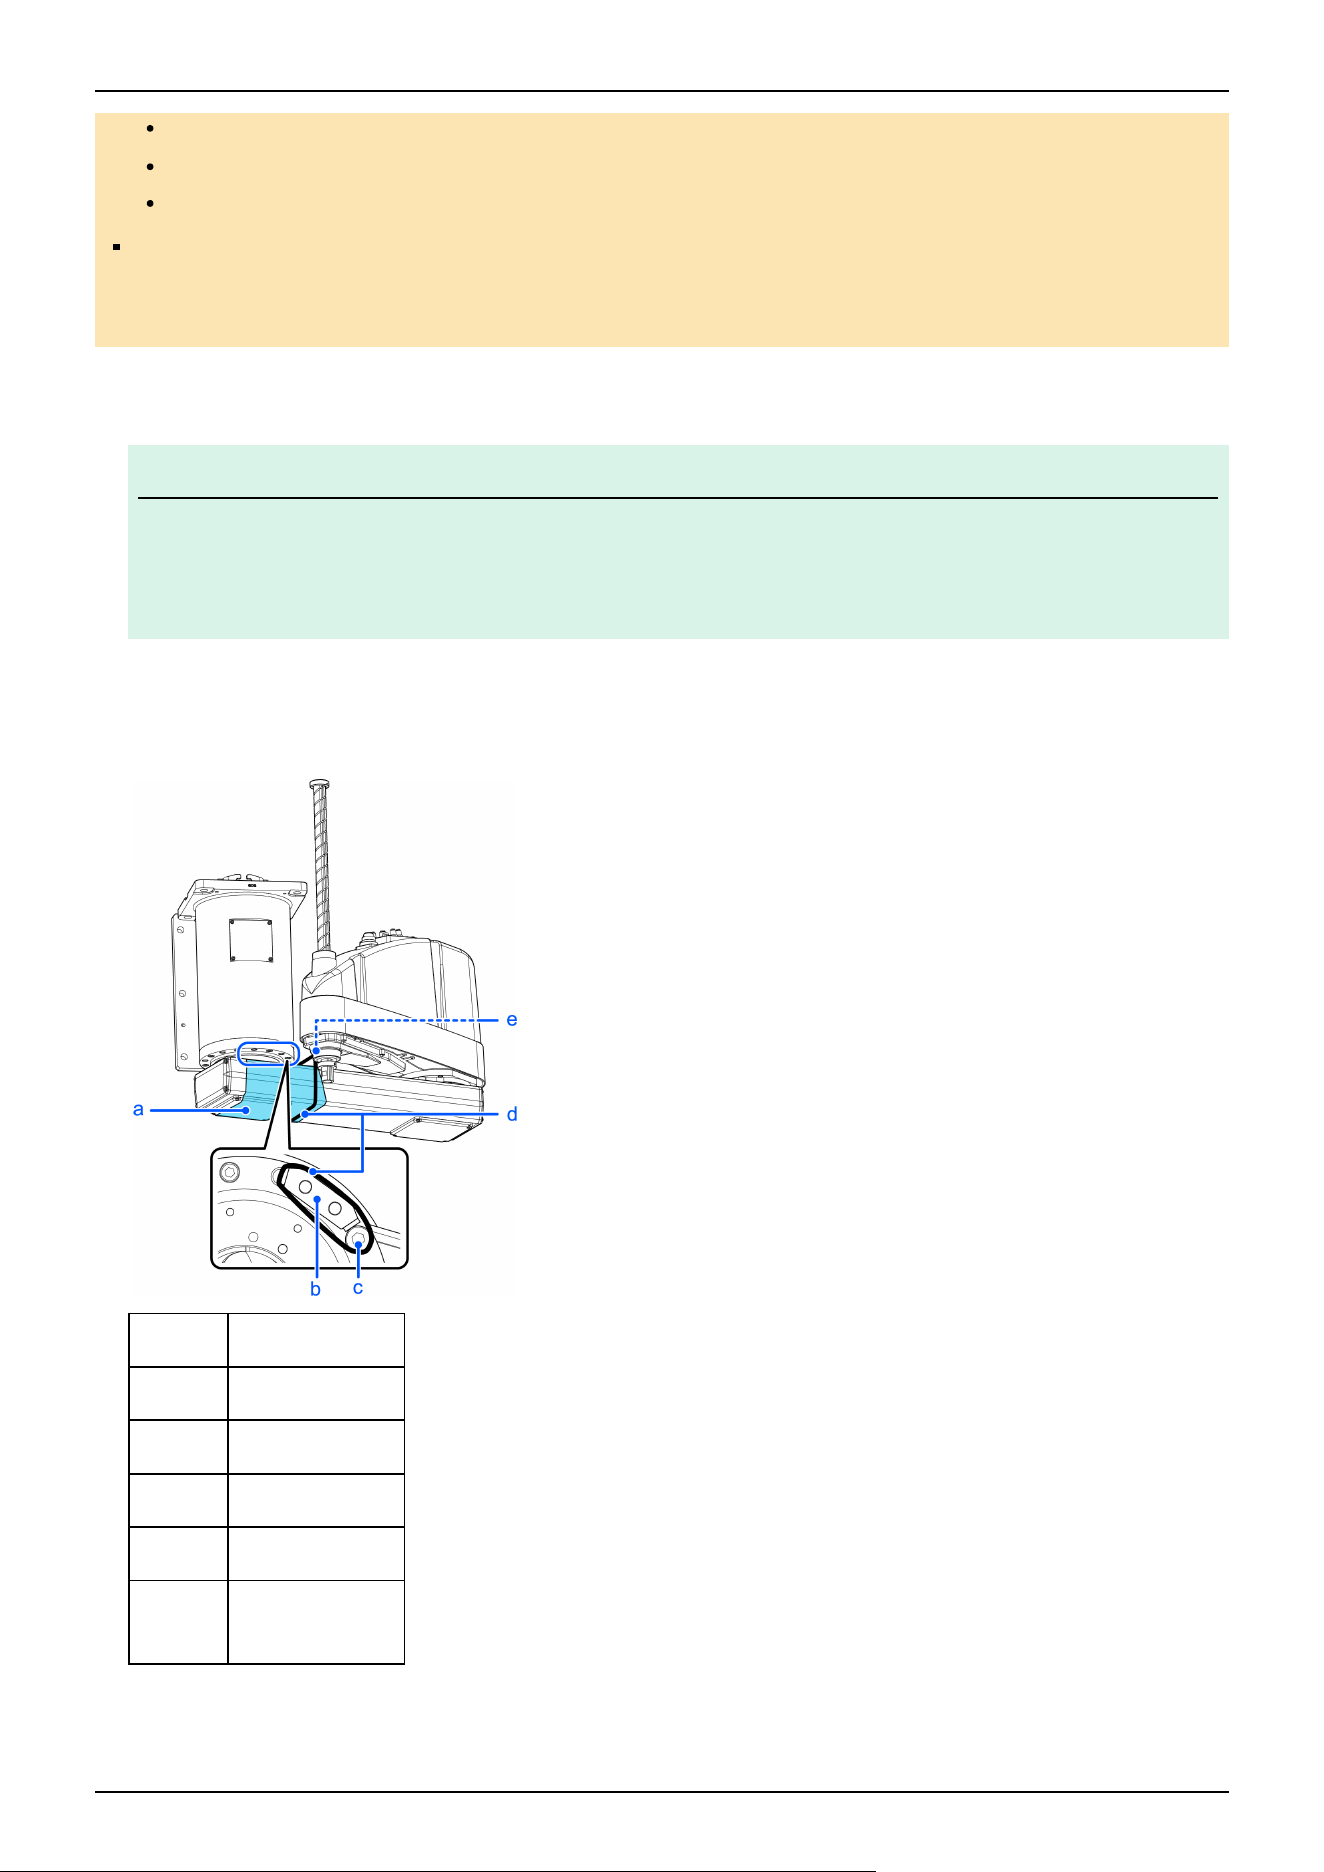
GX10-B/GX10-C65**W: Approx.51 kg (113 lb)
GX10-B/GX10-C/GX20-B/GX20-C85**W: Approx.53 kg (117 lb)
GX20-B/GX20-CA0**W: Approx.55 kg (122 lb)
When removing the Manipulator from a wall or other location, be sure to support the Manipulator before
removing the anchor bolts. Removing the anchor bolts without supporting the Manipulator is extremely
hazardous and may cause the Manipulator to fall.
1. Turn off all power, and remove the wiring and tubes connected to the Manipulator.
KEY POINTS
If using variable mechanical stops for Joints #1 and #2 and the operating angle is limited, change to the
mechanical stop positions at factory shipping.
Setting the Work Envelope by Mechanical Stops
2. Wrap a sheet around the arm so that it will not get damaged. Secure the arm while referring to the figure.
Example of securing arm in place
Symbol Description
a Sheet
b Arm #1 stop bolt
c Arm fixing bolt
d Cable tie
e
Bolt: M4 × 15
Washer
3. While supporting the bottom of Arm #1 by hand so that the Manipulator does not fall over, remove the anchor bolts. Then,
remove the Manipulator from the wall.
✏
Industrial Robot: SCARA Robots GX series Manual Rev.11
383
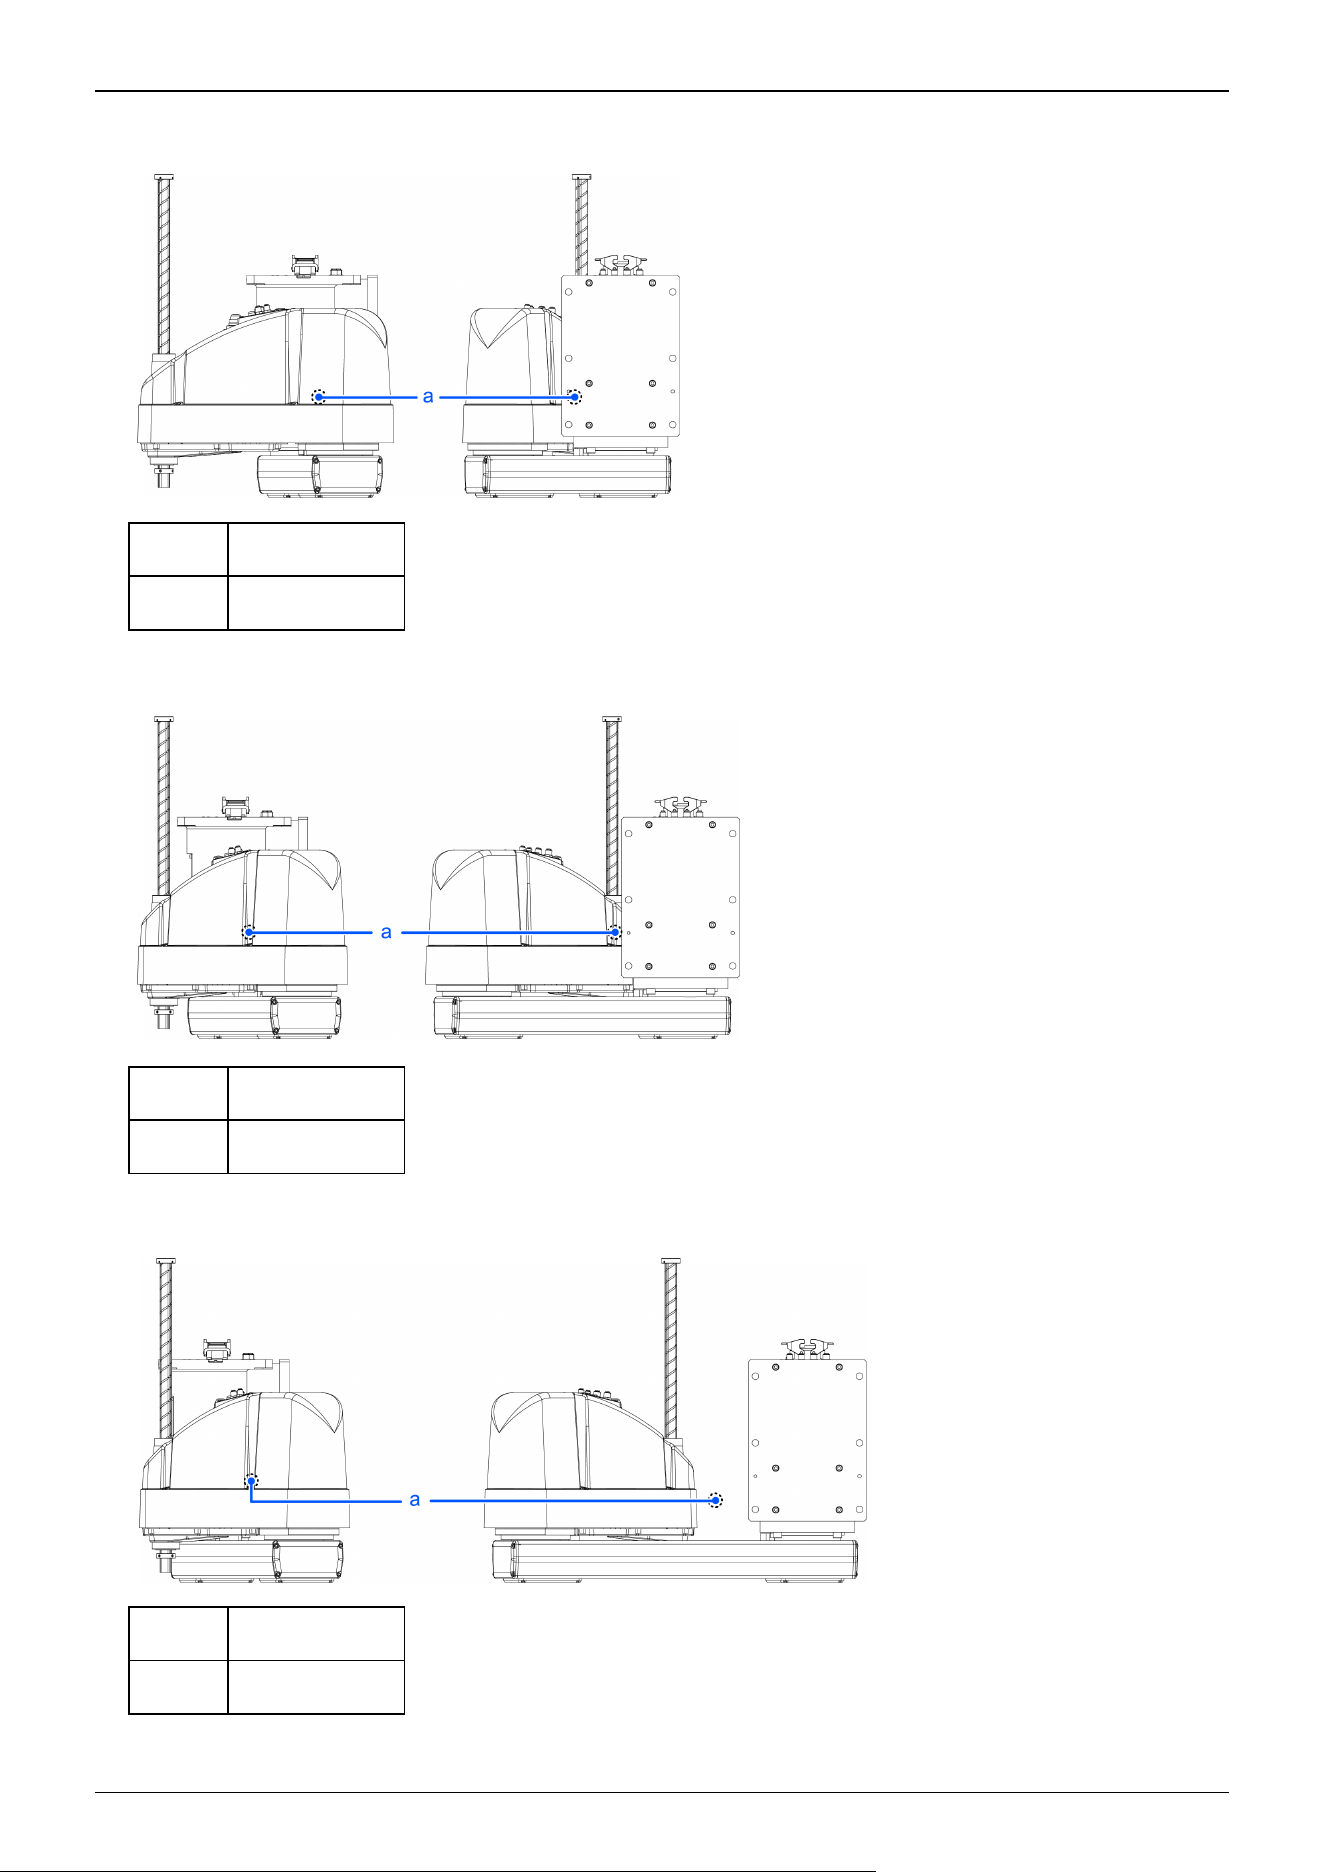
GX10-B/GX10-C65**W
Symbol Description
a Center of gravity
GX10-B/GX10-C/GX20-B/GX20-C85**W
Symbol Description
a Center of gravity
GX20-B/GX20-CA0**W
Symbol Description
a Center of gravity
Industrial Robot: SCARA Robots GX series Manual Rev.11
384
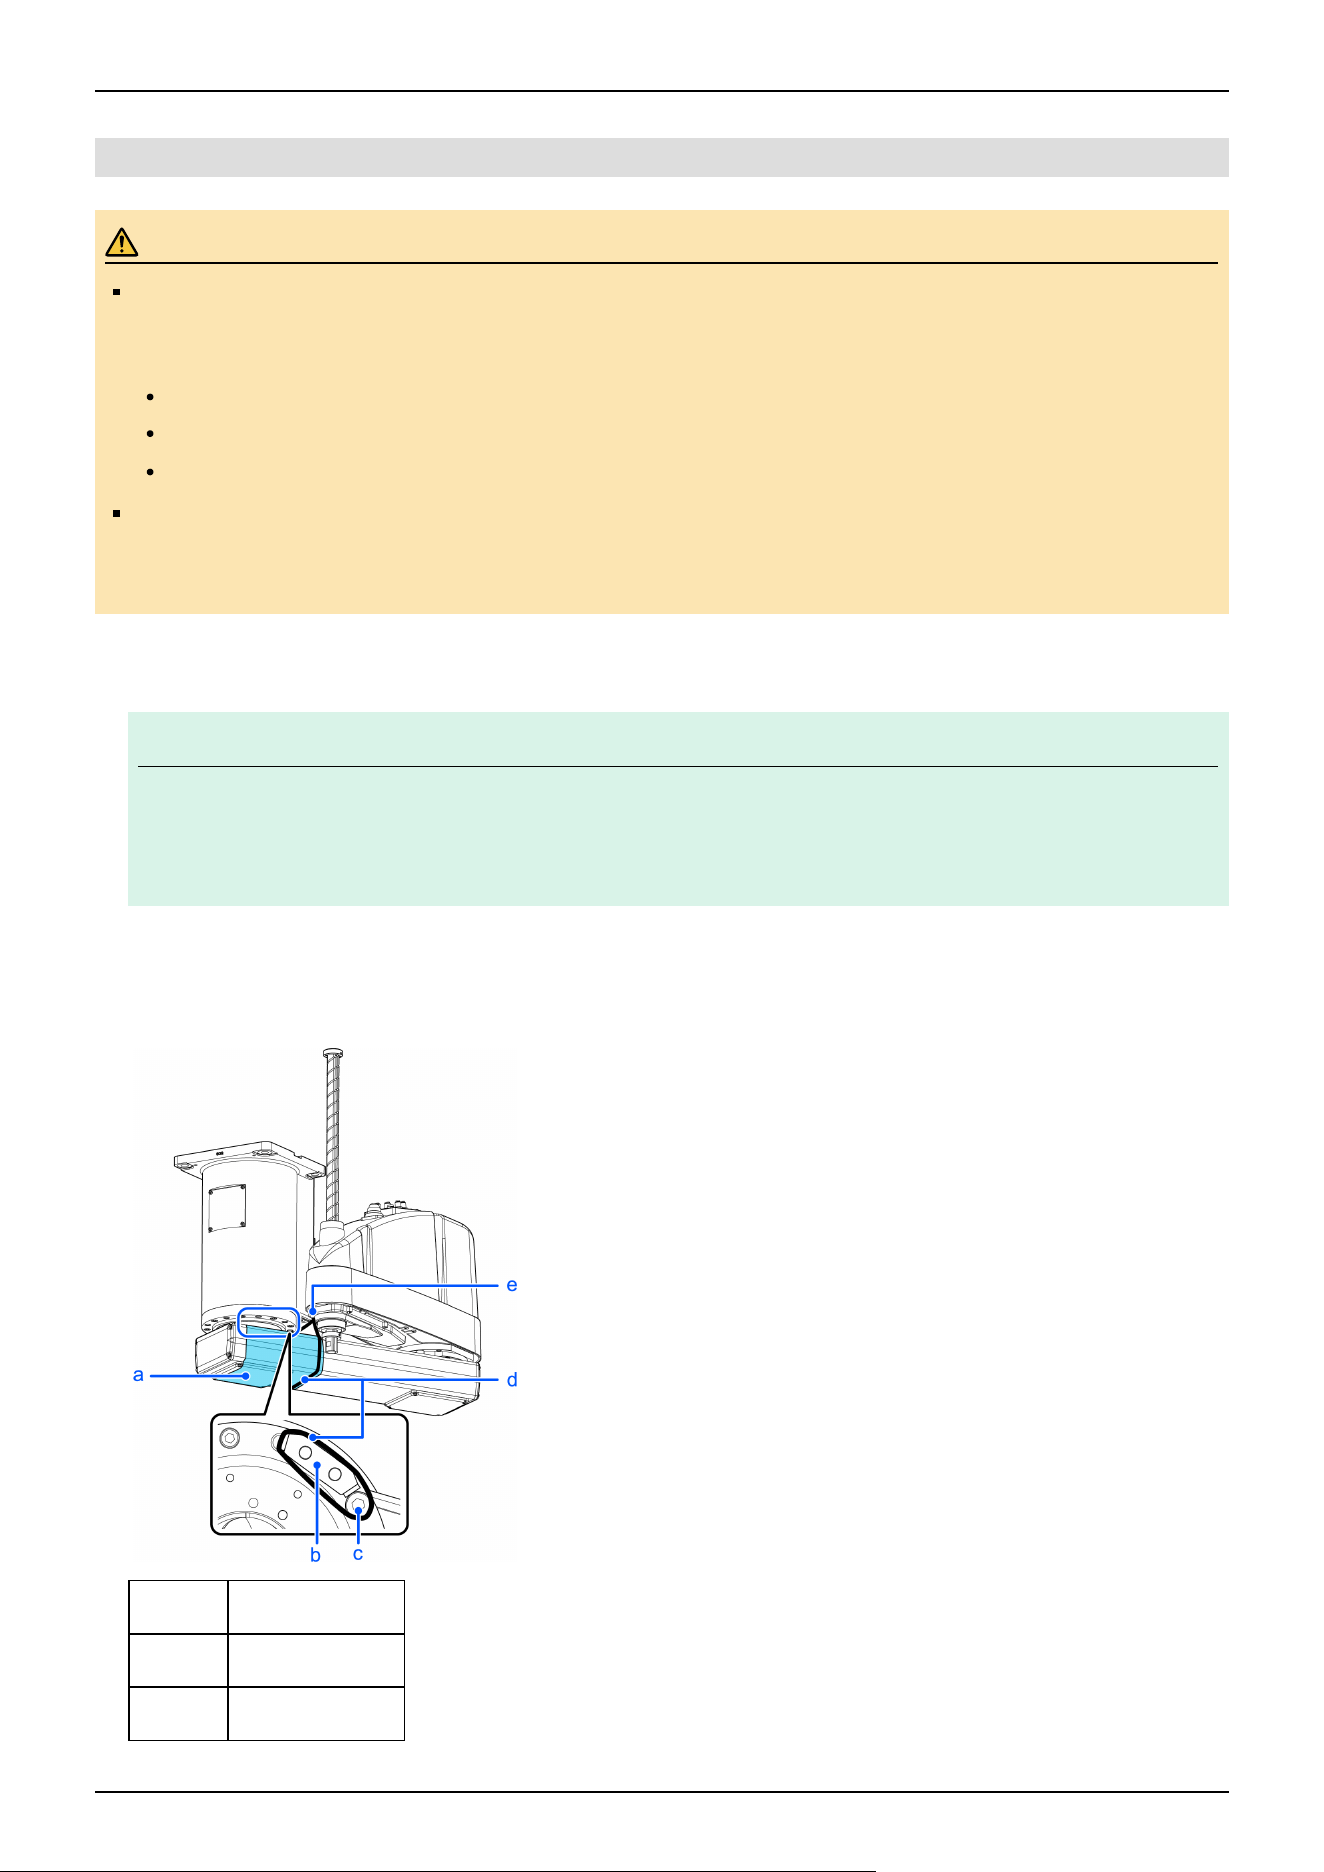
5.3.7.4 Ceiling Mounting Specifications
WARNING
Be sure to use four or more people when installing or relocating a model with ceiling mounting specifications,
and use three or more people when lifting a Manipulator. The Manipulator weights are as follows. Be careful
not to get hands or feet caught or have equipment damaged due to dropping of the Manipulator.
GX10-B/GX10-C65**R: Approx.46 kg (102 lb)
GX10-B/GX10-C/GX20-B/GX20-C85**R: Approx.49 kg (108 lb)
GX20-B/GX20-CA0**R: Approx.50 kg (111 lb)
When removing the Manipulator from a ceiling surface or other location, be sure to support the Manipulator
before removing the anchor bolts. Removing the anchor bolts without supporting the Manipulator is extremely
hazardous and may cause the Manipulator to fall.
1. Turn off all power, and remove the wiring and tubes connected to the Manipulator.
KEY POINTS
If using variable mechanical stops for Joints #1 and #2 and the operating angle is limited, change to the
mechanical stop positions at factory shipping.
Setting the Work Envelope by Mechanical Stops
2. Wrap a sheet around the arm so that it will not get damaged. Secure the arm while referring to the figure.
Example of securing arm in place
Symbol Description
a Sheet
b Arm #1 stop bolt
✏
Industrial Robot: SCARA Robots GX series Manual Rev.11
385
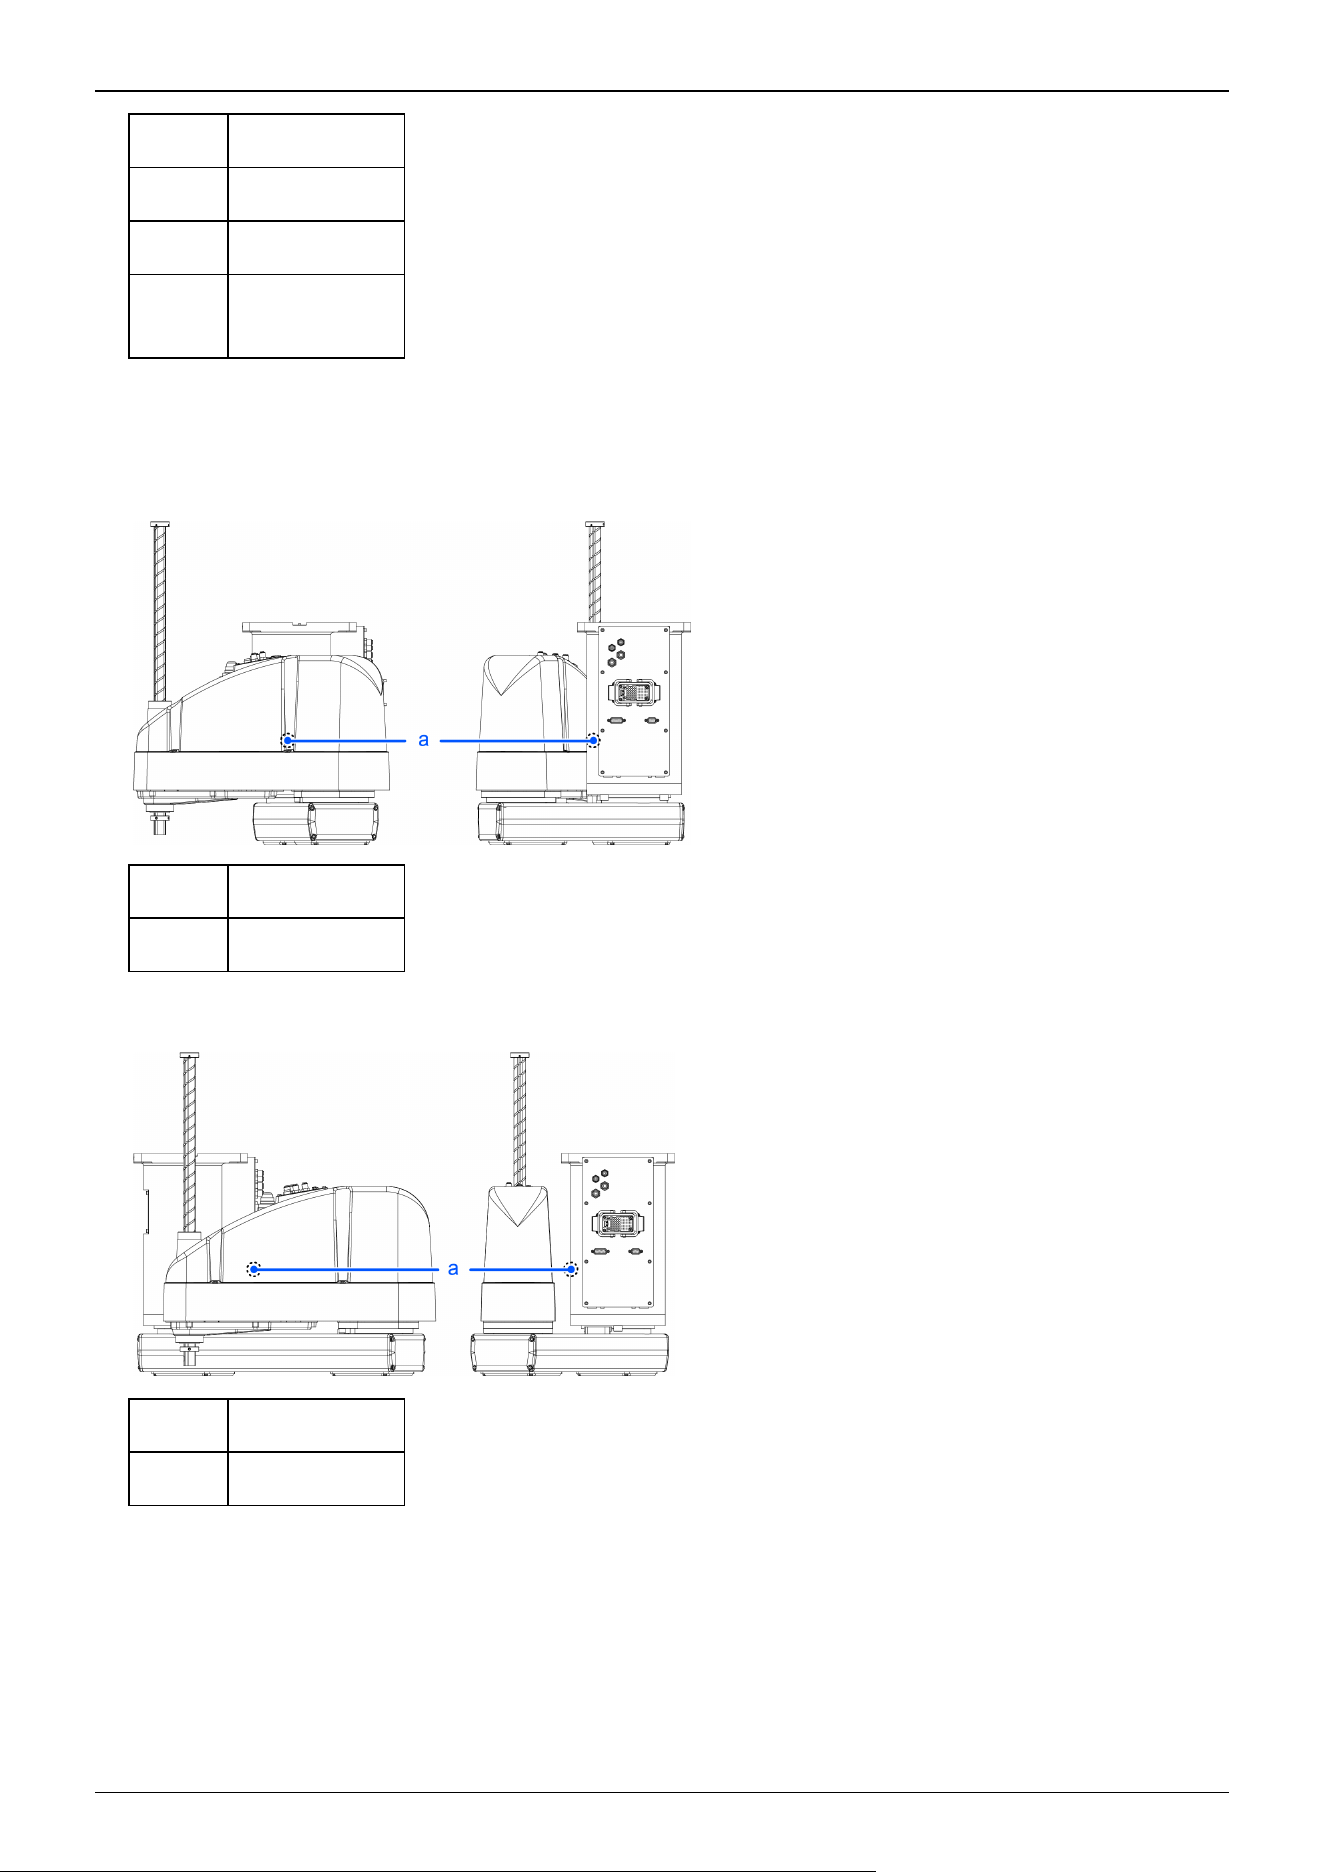
Symbol Description
c Arm fixing bolt
d Cable tie
e
Bolt: M4 × 15
Washer
3. While supporting the bottom of Arm #1 by hand so that the Manipulator does not fall over, remove the anchor bolts. Then,
remove the Manipulator from the ceiling.
GX10-B/GX10-C65**R
Symbol Description
a Center of gravity
GX10-B/GX10-C/GX20-B/GX20-C85**R
Symbol Description
a Center of gravity
GX20-B/GX20-CA0**R
Industrial Robot: SCARA Robots GX series Manual Rev.11
386
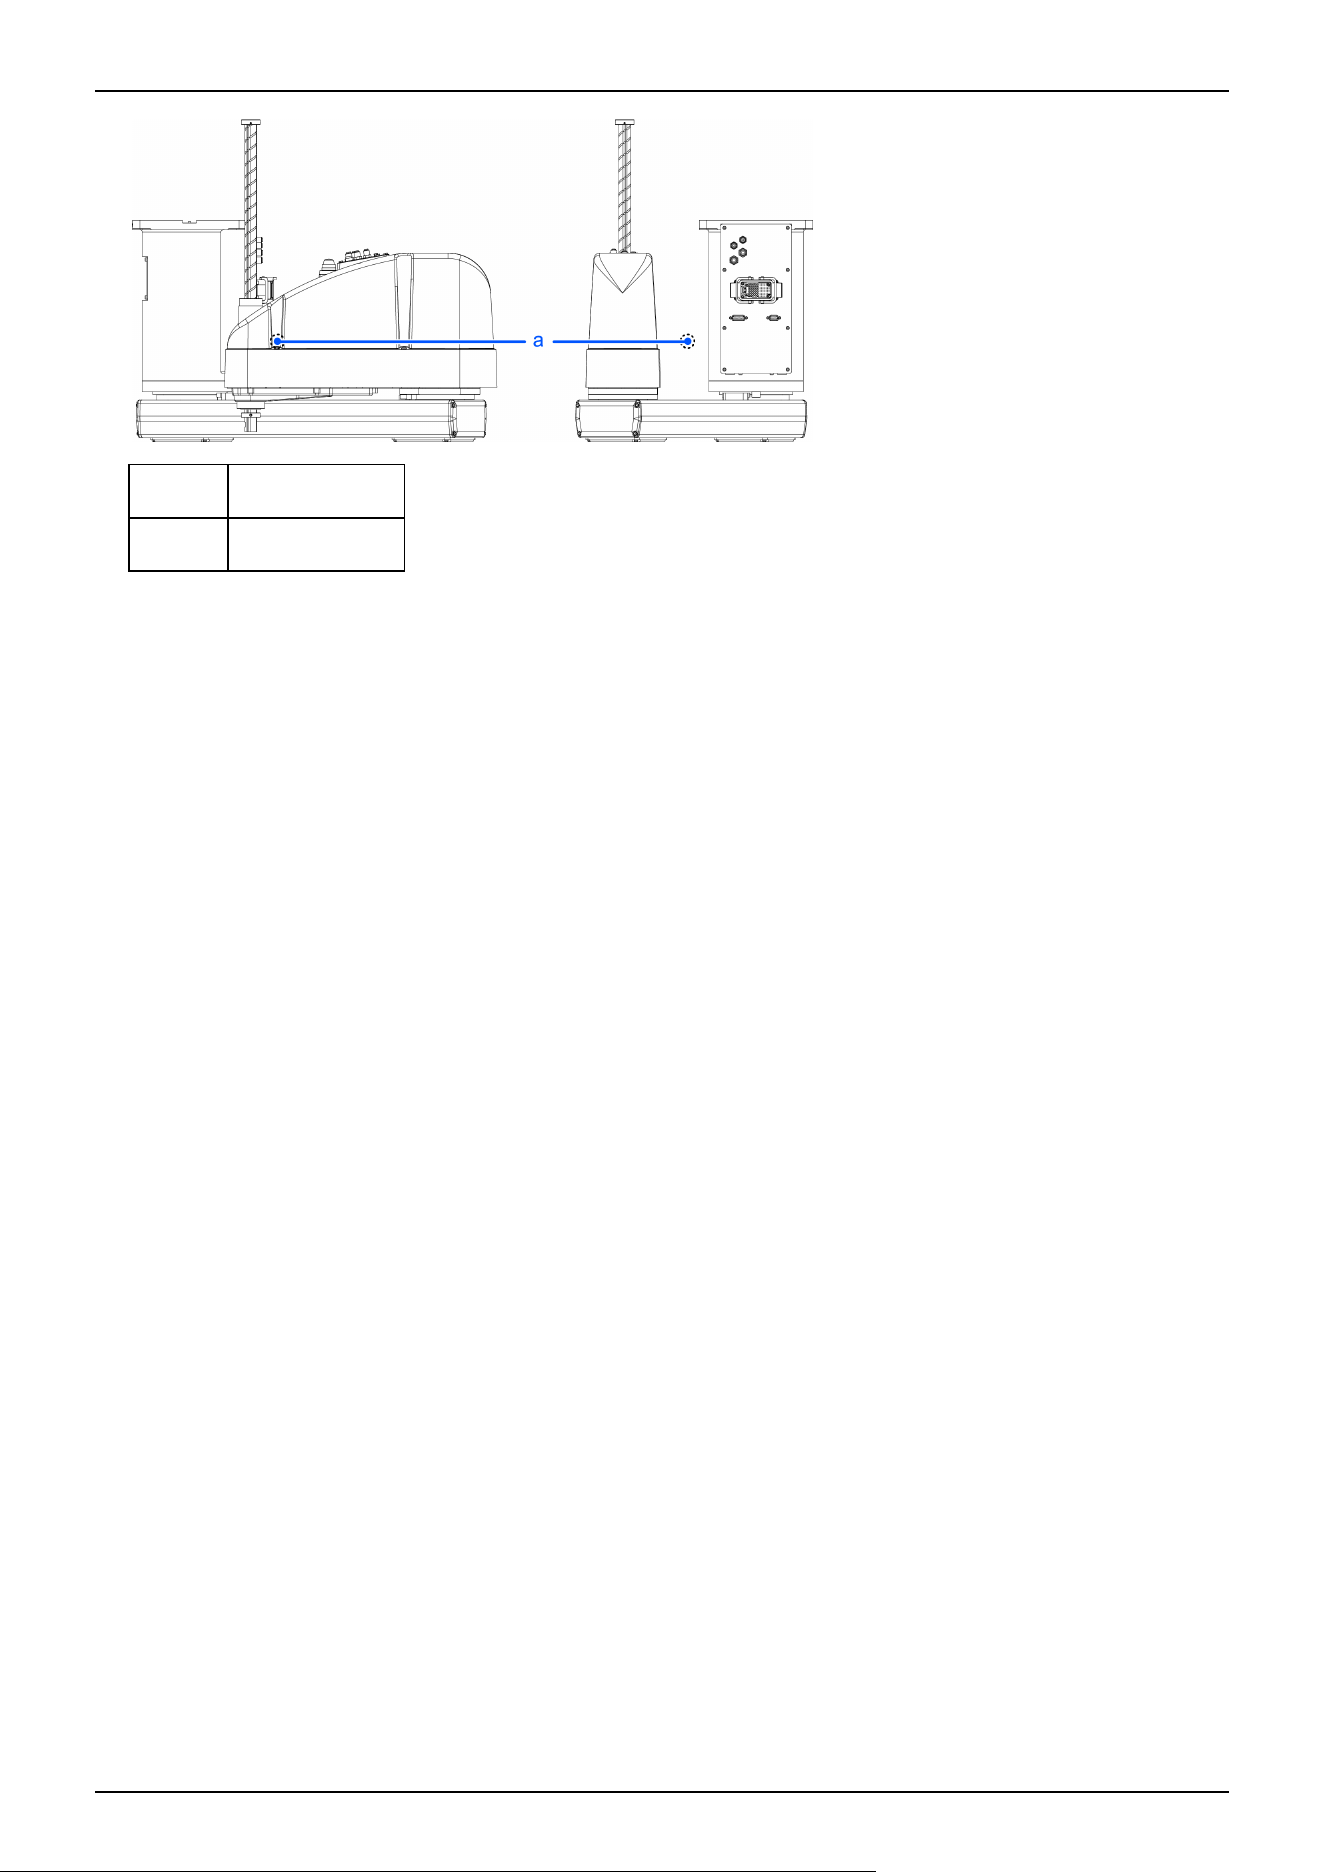
Symbol Description
a Center of gravity
Industrial Robot: SCARA Robots GX series Manual Rev.11
387
5.4 Setting the Hand
5.4.1 Installing the Hand
The hand (end effector) must be prepared by the customer. When installing the hand, take note of the following. For details on
attaching the hand, refer to the following manual.
"Hand Function Manual"
WARNING
Before attaching a hand or peripheral equipment, be sure to always turn off the Controller and related
equipment and unplug the power cables. Performing any work procedure with the power turned on is
extremely dangerous and may result in electric shock and/or malfunction of the robot system.
CAUTION
When the hand is equipped with a workpiece gripping mechanism, ensure that the wiring and pneumatic tubes
do not cause the hand to release the workpiece when the power is turned off. When the wiring and pneumatic
tubes are not designed for the hand to maintain its grip on the workpiece when the power is turned off, pressing
the emergency stop switch releases the workpiece, which may damage the robot system and the workpiece.
By default, all I/Os are designed to automatically turn off (0) when the power is shut off, when an emergency stop
is triggered, or by the robot system's safety function.
However, I/Os set with the Hand function does not turn off (0) when executing the Reset statement, or when
performing an emergency stop.
For the risk of the residual air pressure, conduct a risk assessment on the equipment and take the necessary
protective measures.
Shaft
Attach the hand to the lower end of the shaft.
For the layout dimensions in the area around the shaft and the overall dimensions of the Manipulator, refer to the following
section.
Names of Parts and Their Dimensions
Do not move the upper limit mechanical stop on the lower side of the shaft. When performing a Jump operation, the upper
limit mechanical stop may come into contact with the Manipulator body, which may cause the Manipulator to stop
functioning properly.
When attaching the hand to the shaft, have the hand hold the shaft using M4 or larger screws.
Brake release switch
Joint #3 and Joint #4 have an electromagnetic brake that is triggered when the power is off, preventing them from being
moved up and down or rotated by hand.
To move Joint #3 up or down or rotate Joint #4 when attaching a hand, turn on the Controller, and then press the brake
release switch.
This button switch is a momentary brake release type where the brake is released only while the button switch is being
pressed. The switch releases the brake of Joints #3 and #4 simultaneously.
Industrial Robot: SCARA Robots GX series Manual Rev.11
388
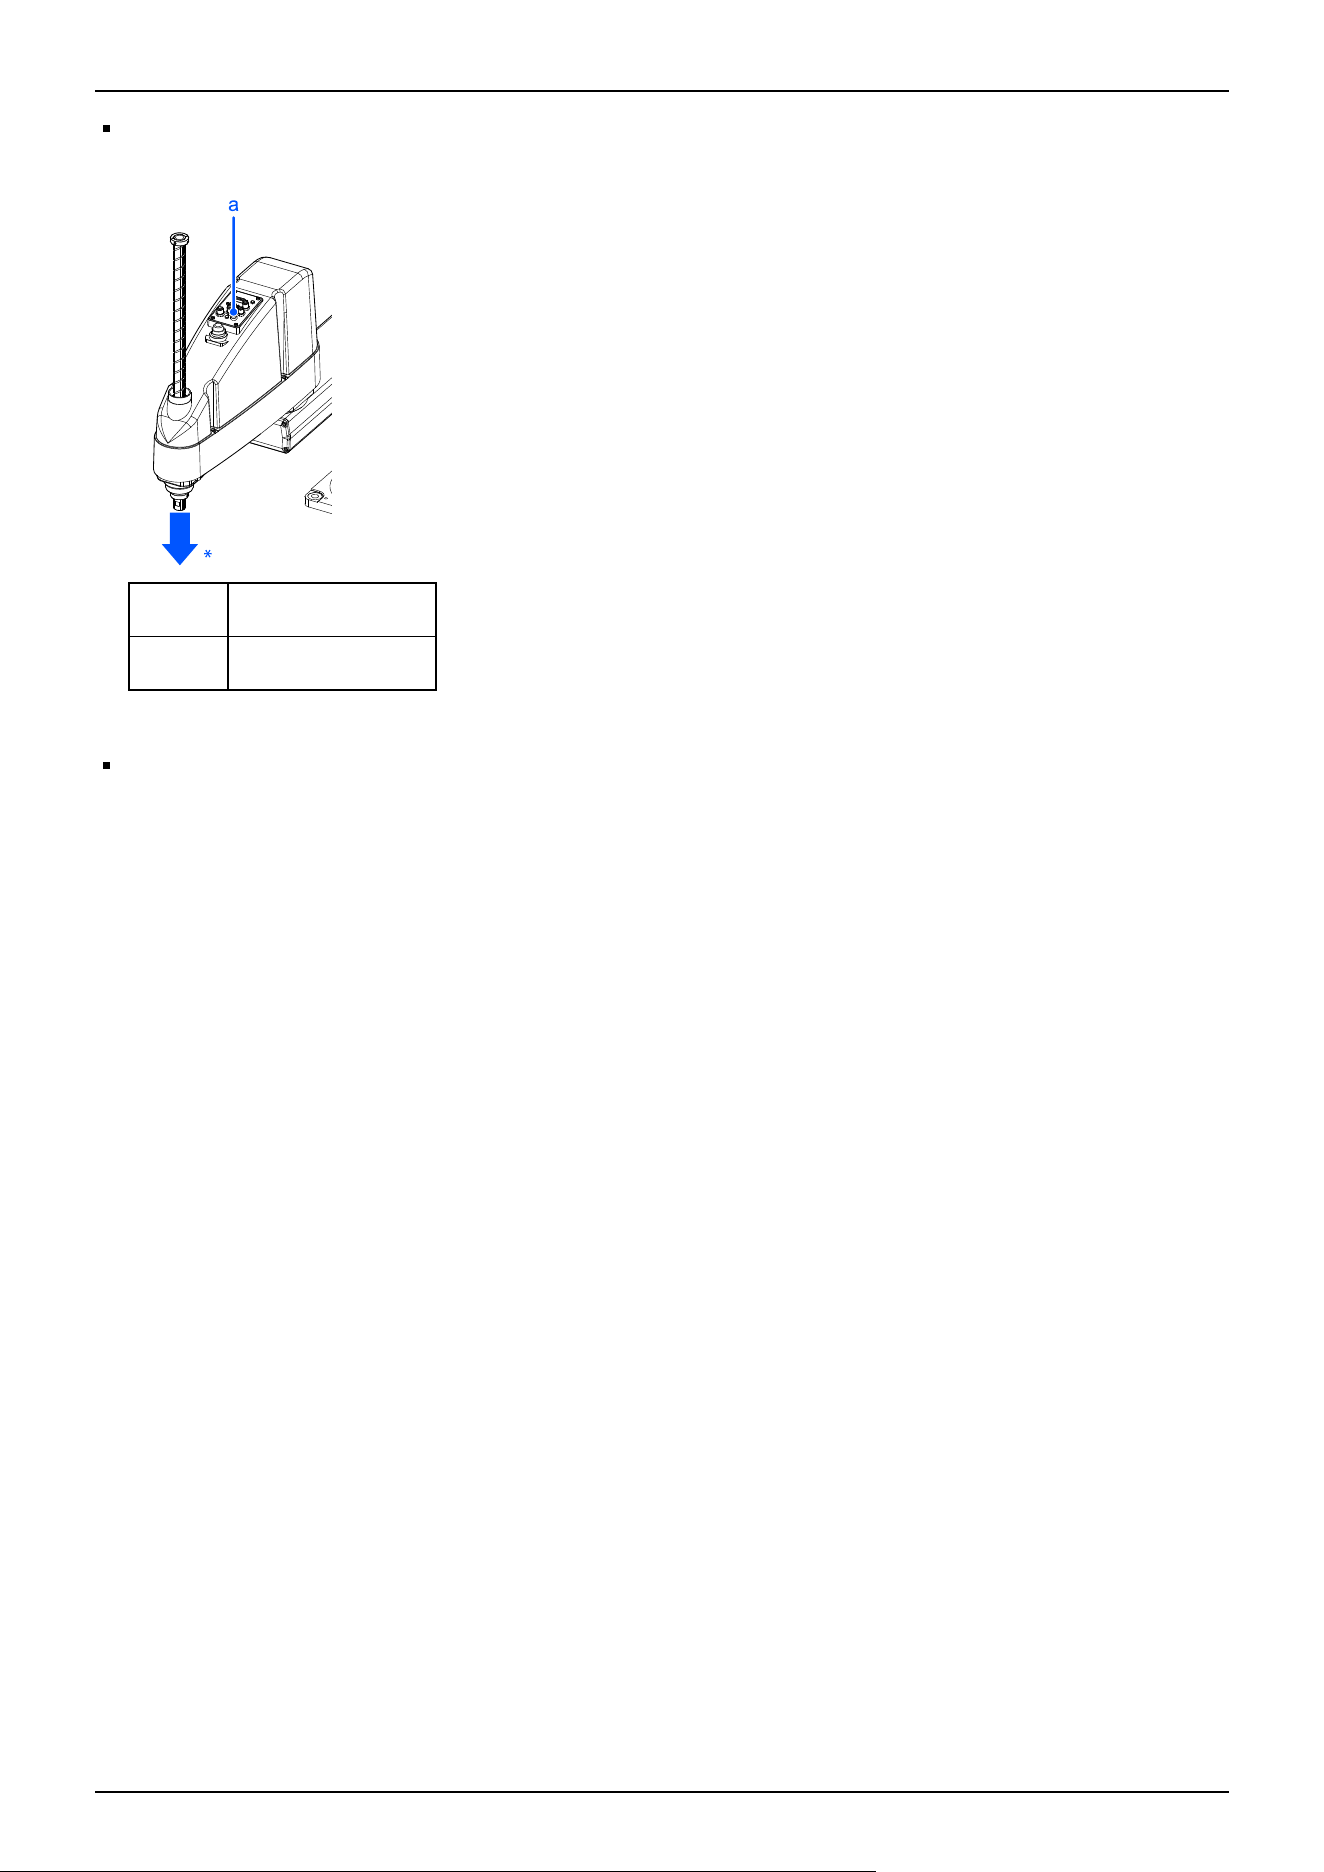
When pressing the brake release switch, watch for the shaft descending or rotating under the weight of the hand.
*: The shaft may drop due to the weight of the hand or other object.
Symbol Description
a Brake release switch
Layout
When attaching and operating a hand, the hand may come into contact with the Manipulator body due to the outer diameter
of the hand, the size of the workpiece, or the position of the arm. Carefully consider the interference area of the hand when
designing the system layout.
Industrial Robot: SCARA Robots GX series Manual Rev.11
389
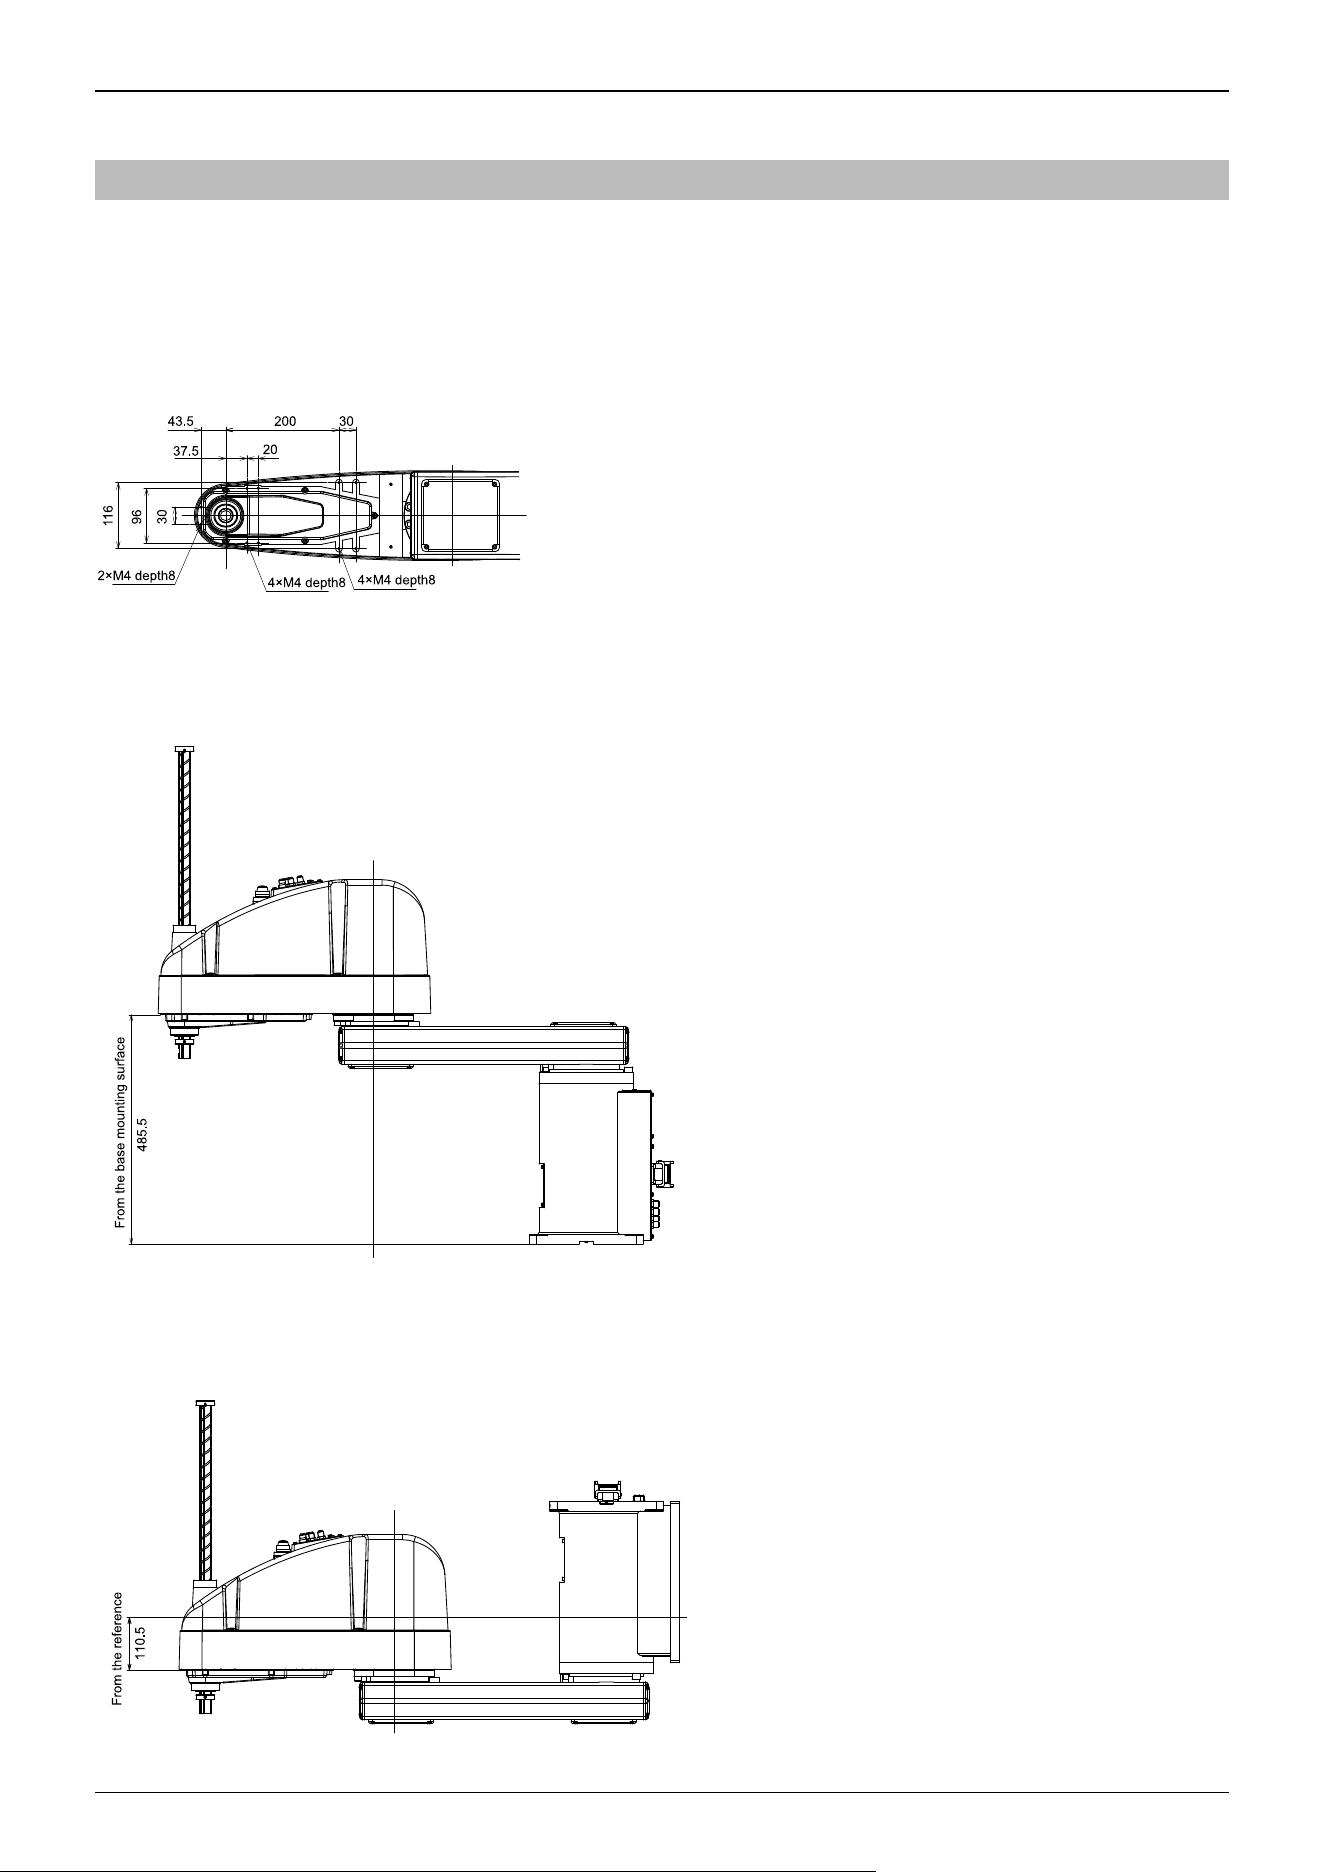
5.4.2 Attaching Cameras and Valves
The base and Arm #2 (bottom surfaces) have threaded holes as shown in the figure below. Use the threaded holes in Arm #2
(bottom surface) for attaching cameras, valves, and other heavy objects to the Manipulator.
Common for all models
(Units: mm)
Table top mounting specifications
(Units: mm)
Wall mounting specifications
(Units: mm)
Industrial Robot: SCARA Robots GX series Manual Rev.11
390
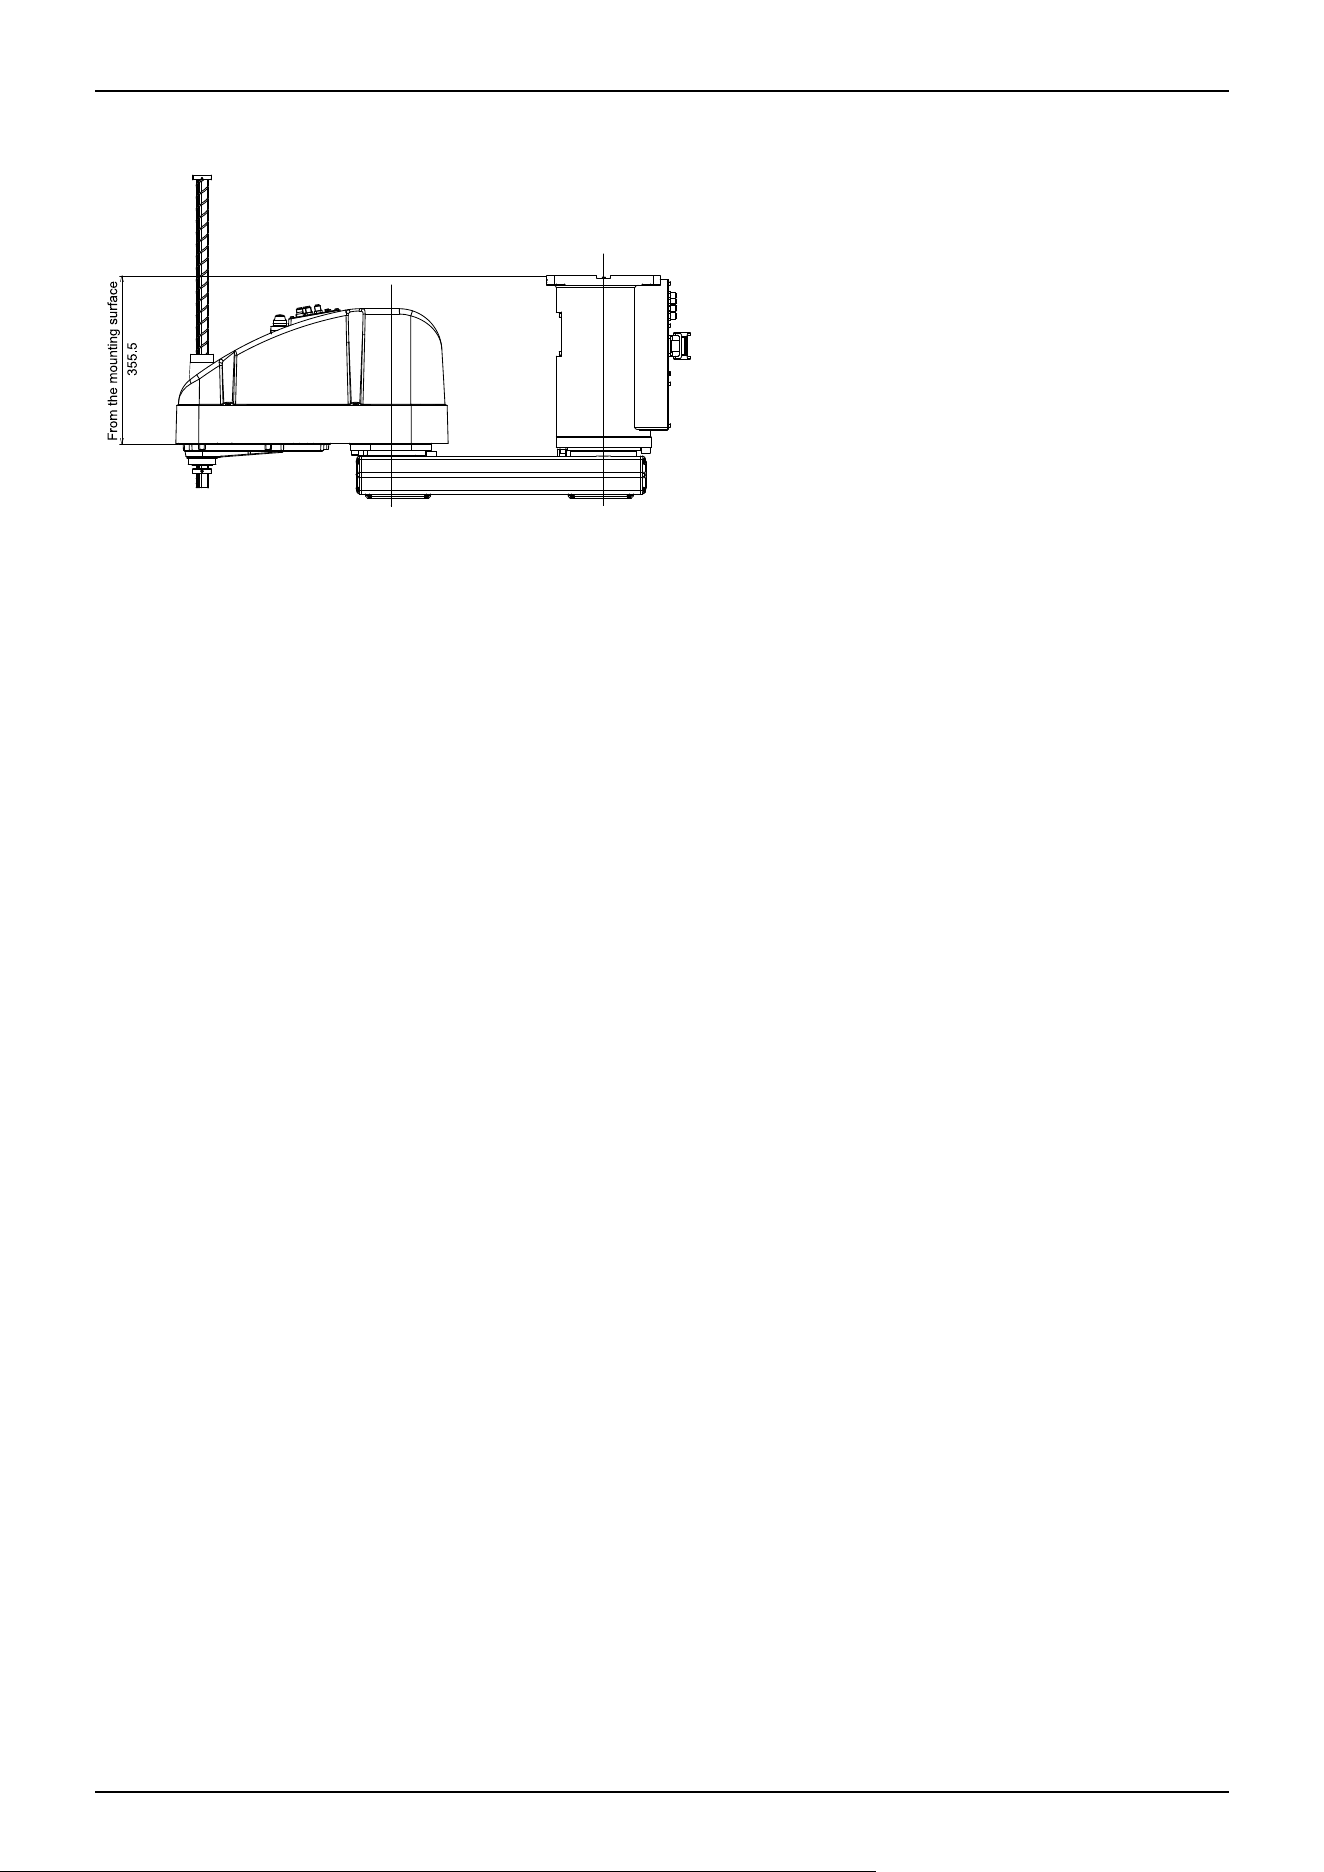
Ceiling mounting specifications (Units: mm)
Industrial Robot: SCARA Robots GX series Manual Rev.11
391
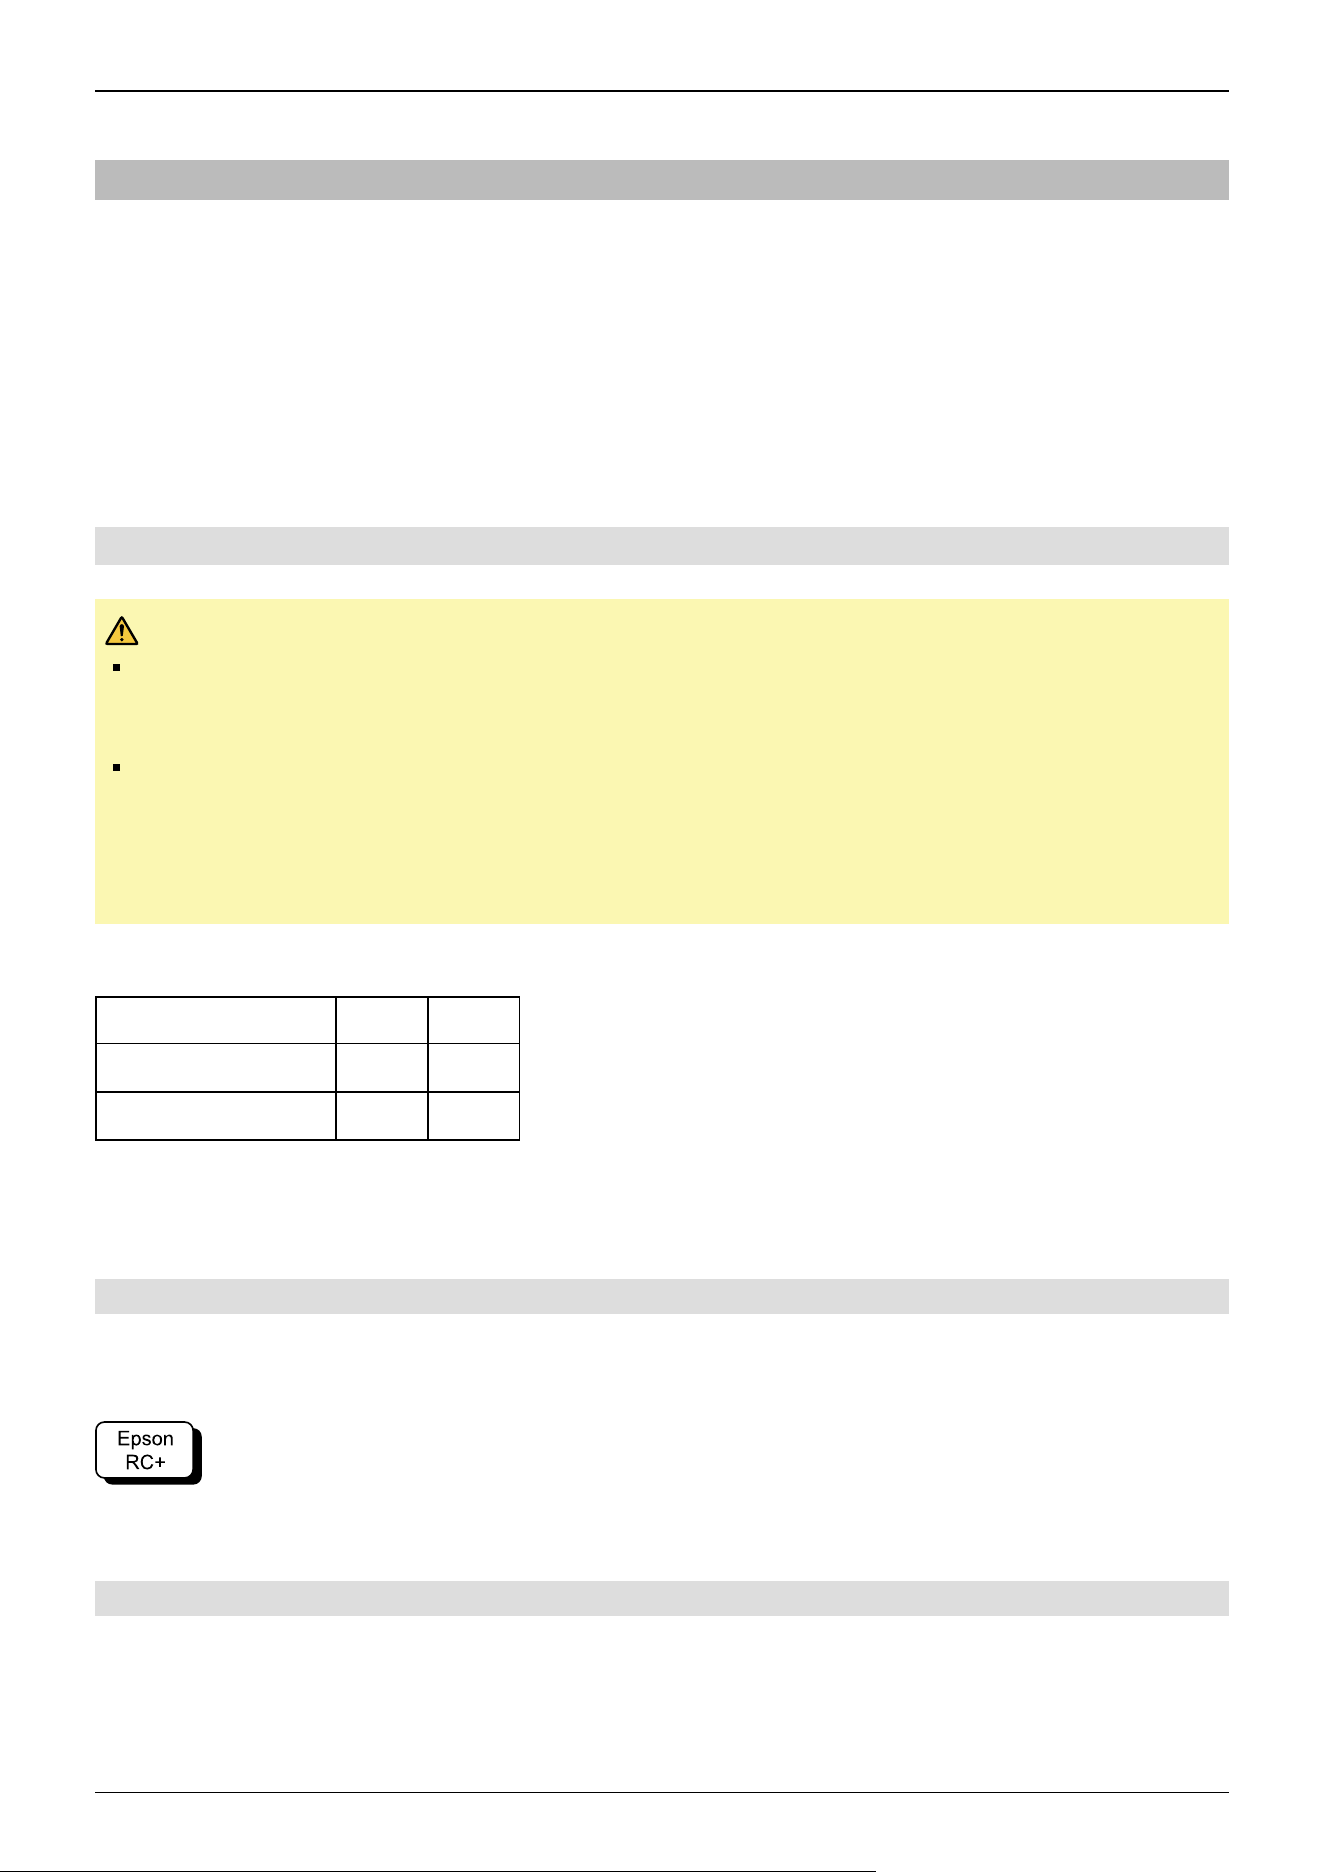
5.4.3 Weight and Inertia Settings
To ensure that the Manipulator is functioning properly, keep the load (the sum of the weights of the hand and workpiece) and
the moment of inertia of the load within the rated values, and do not allow for eccentricity from the center of the Joint #4. If,
for some unavoidable reason, the load or moment of inertia exceeds the rated value, or if eccentricity occurs, configure
parameters as described in the "Weight setting" and "Inertia setting."
These settings optimize the Manipulator's PTP motion, reduce vibration, and shorten operation times. This also works to curb
any persistent vibration that may occur when the hand and workpiece have a large moment of inertia.
You can also perform settings using the "Weight, Inertia, and Eccentricity/Offset Measurement Utility".
For details, refer to the following manual:
"Epson RC+ User's Guide - Weight, Inertia, and Eccentricity/Offset Measurement Utility"
5.4.3.1 Weight Setting
CAUTION
GX10-B/GX10-C Series
The total weight of the hand and the workpiece must not exceed 10 kg. The GX10-B/GX10-C Manipulators
are not designed to work with loads exceeding 10 kg.
GX20-B/GX20-C Series
The total weight of the hand and the workpiece must not exceed 20 kg. The GX20-B/GX20-C Manipulators
are not designed to work with loads exceeding 20 kg. Always set the value according to the load. Setting the
hand weight parameter to a value smaller than the actual weight may cause errors or impact that not only
impair full functionality but also shorten the life of the mechanical components.
For the GX10-B/GX10-C/GX20-B/GX20-C series, the allowable load (hand weight and workpiece weight) is as shown below.
Rated Max.
GX10-B/GX10-C series 5 kg 10 kg
GX20-B/GX20-C series 10 kg 20 kg
Depending on the load weight, change the setting for the hand weight parameter in the Weight statement. After the setting is
changed, the maximum speed and acceleration/deceleration of the Manipulator during PTP motion that correspond to the
"Hand Weight" are corrected automatically.
5.4.3.1.1 Weight of Load Attached to Shaft
The weight of the load (hand + workpiece) attached to the shaft can be set by the "Hand Weight" parameter in the Weight
statement.
Go to [Tools] - [Robot Manager] - [Weight] panel, and enter the value in the [Weight] text box. (This can also be set using the
Weight statement in [Command Window].)
5.4.3.1.2 Weight of Load Attached to Arm
When a camera, valve, or other object is attached to the arm, its weight is converted to the equivalent weight of the shaft and
added to the weight of the load attached to shaft to set the "Hand Weight" parameter.
Industrial Robot: SCARA Robots GX series Manual Rev.11
392
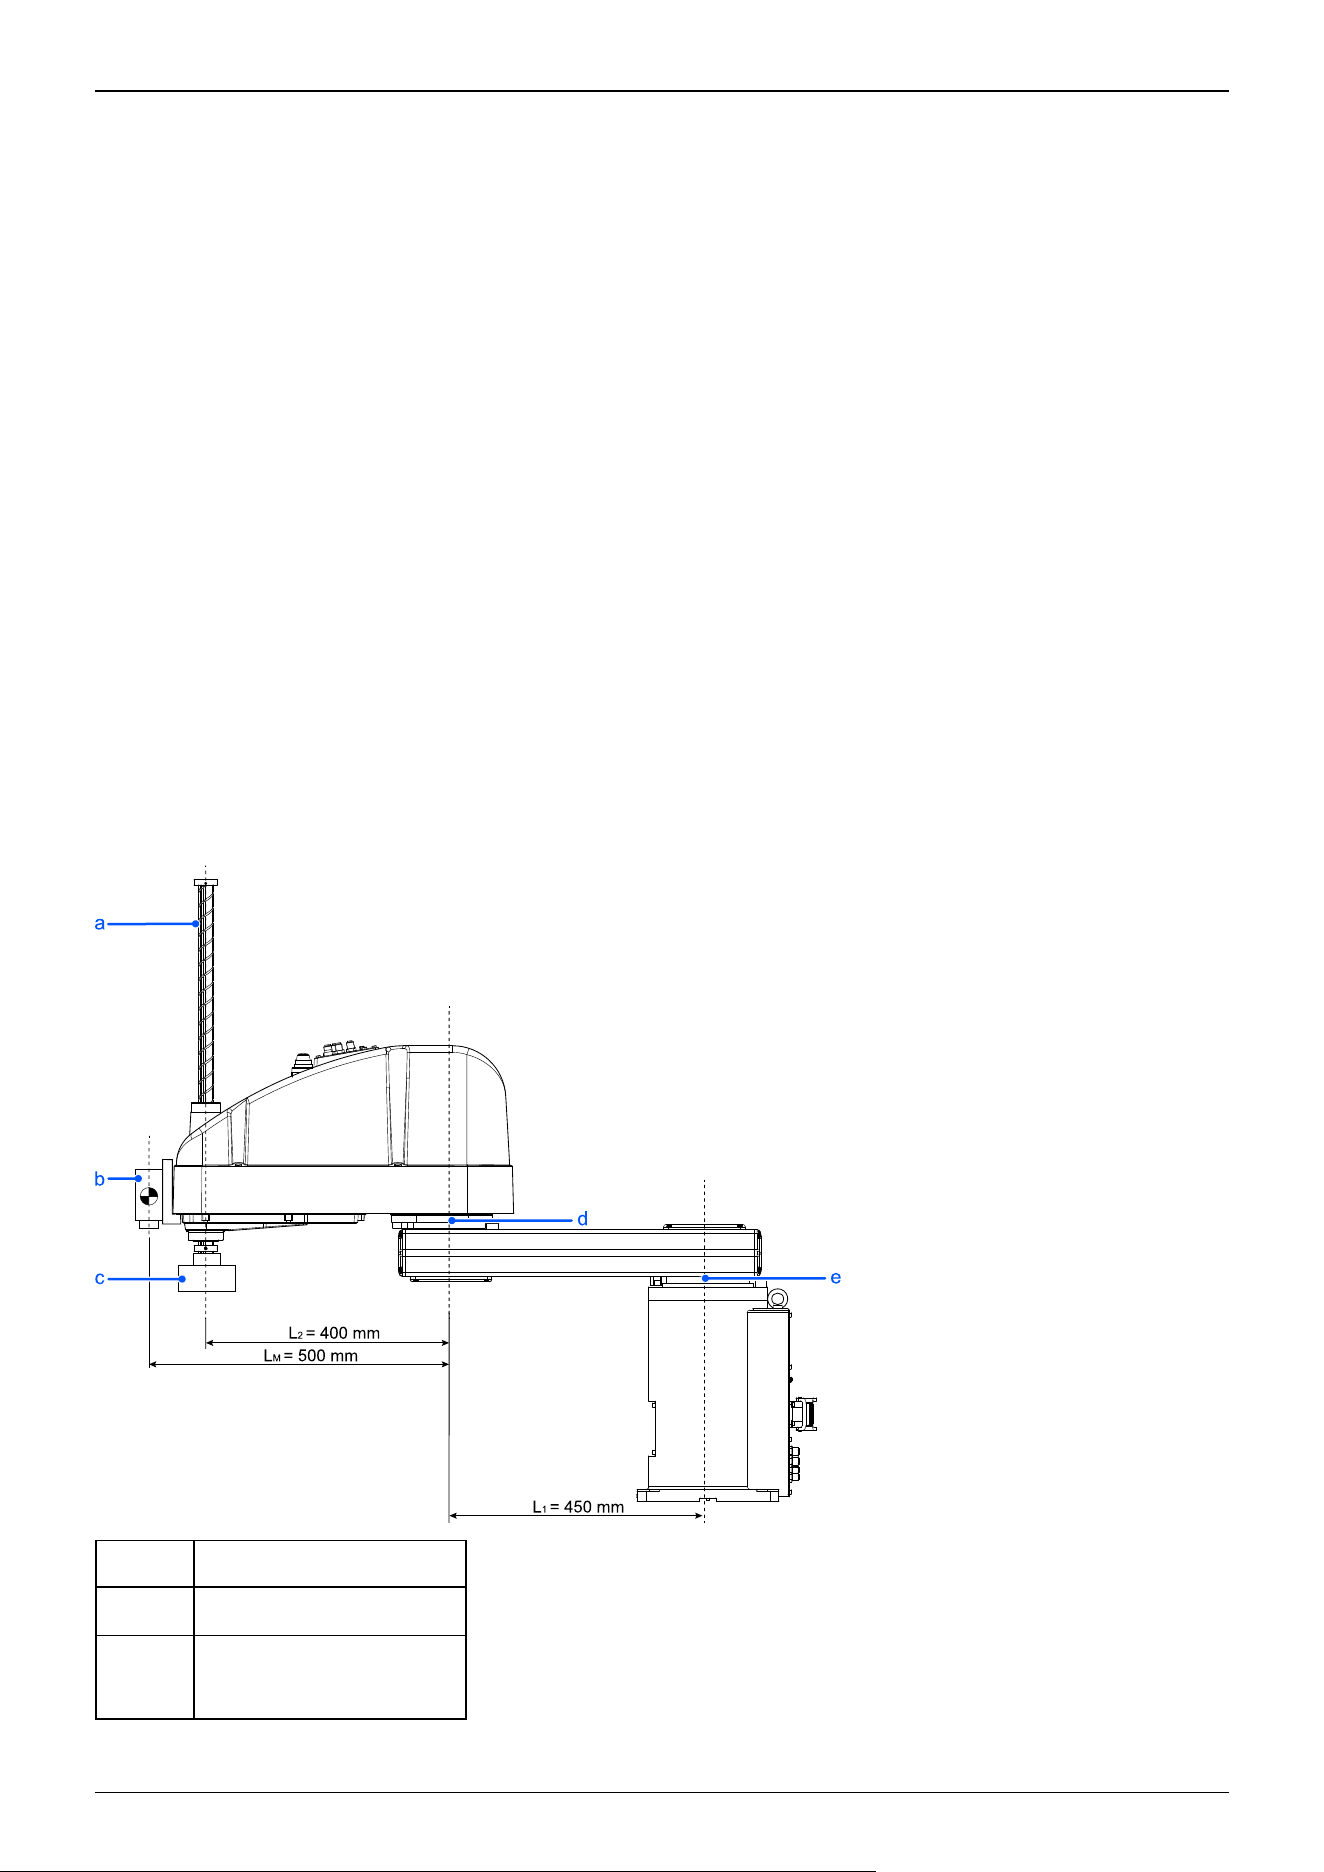
If an external wiring unit (excluding cables) is installed near the user connector on the Arm #2 side, add 0.16 kg to the
equivalent weight conversion value of the shaft.
Equivalent weight formula
W
M
=M×(L
M
+L
1
)
2
/(L
1
+L
2
)
2
W
M
: Equivalent weight
M: Weight of load attached to the arm
L
1
: Length of Arm #1
L
2
: Length of Arm #2
L
M
: Distance from rotation center of Joint #2 to center of gravity of load attached to the arm
Example:
Calculates [Weight] parameter when a 1 kg camera is attached to the end of GX10-B Arm #2 (500 mm from the center of
rotation of Joint #2) with a load weight of W = 2 kg
W=2
M = 1
L
1
= 450
L
2
= 400
L
M
= 500
W
M
=1×(500+450)
2
/(400+450)
2
=1.25 (Round up to two decimal places)
W + W
M
= 2 + 1.25 = 3.25
Enter "3.25" for the [Hand Weight] parameter.
Symbol Description
a Shaft
b
Weight of the entire camera
M = 1 kg
Industrial Robot: SCARA Robots GX series Manual Rev.11
393
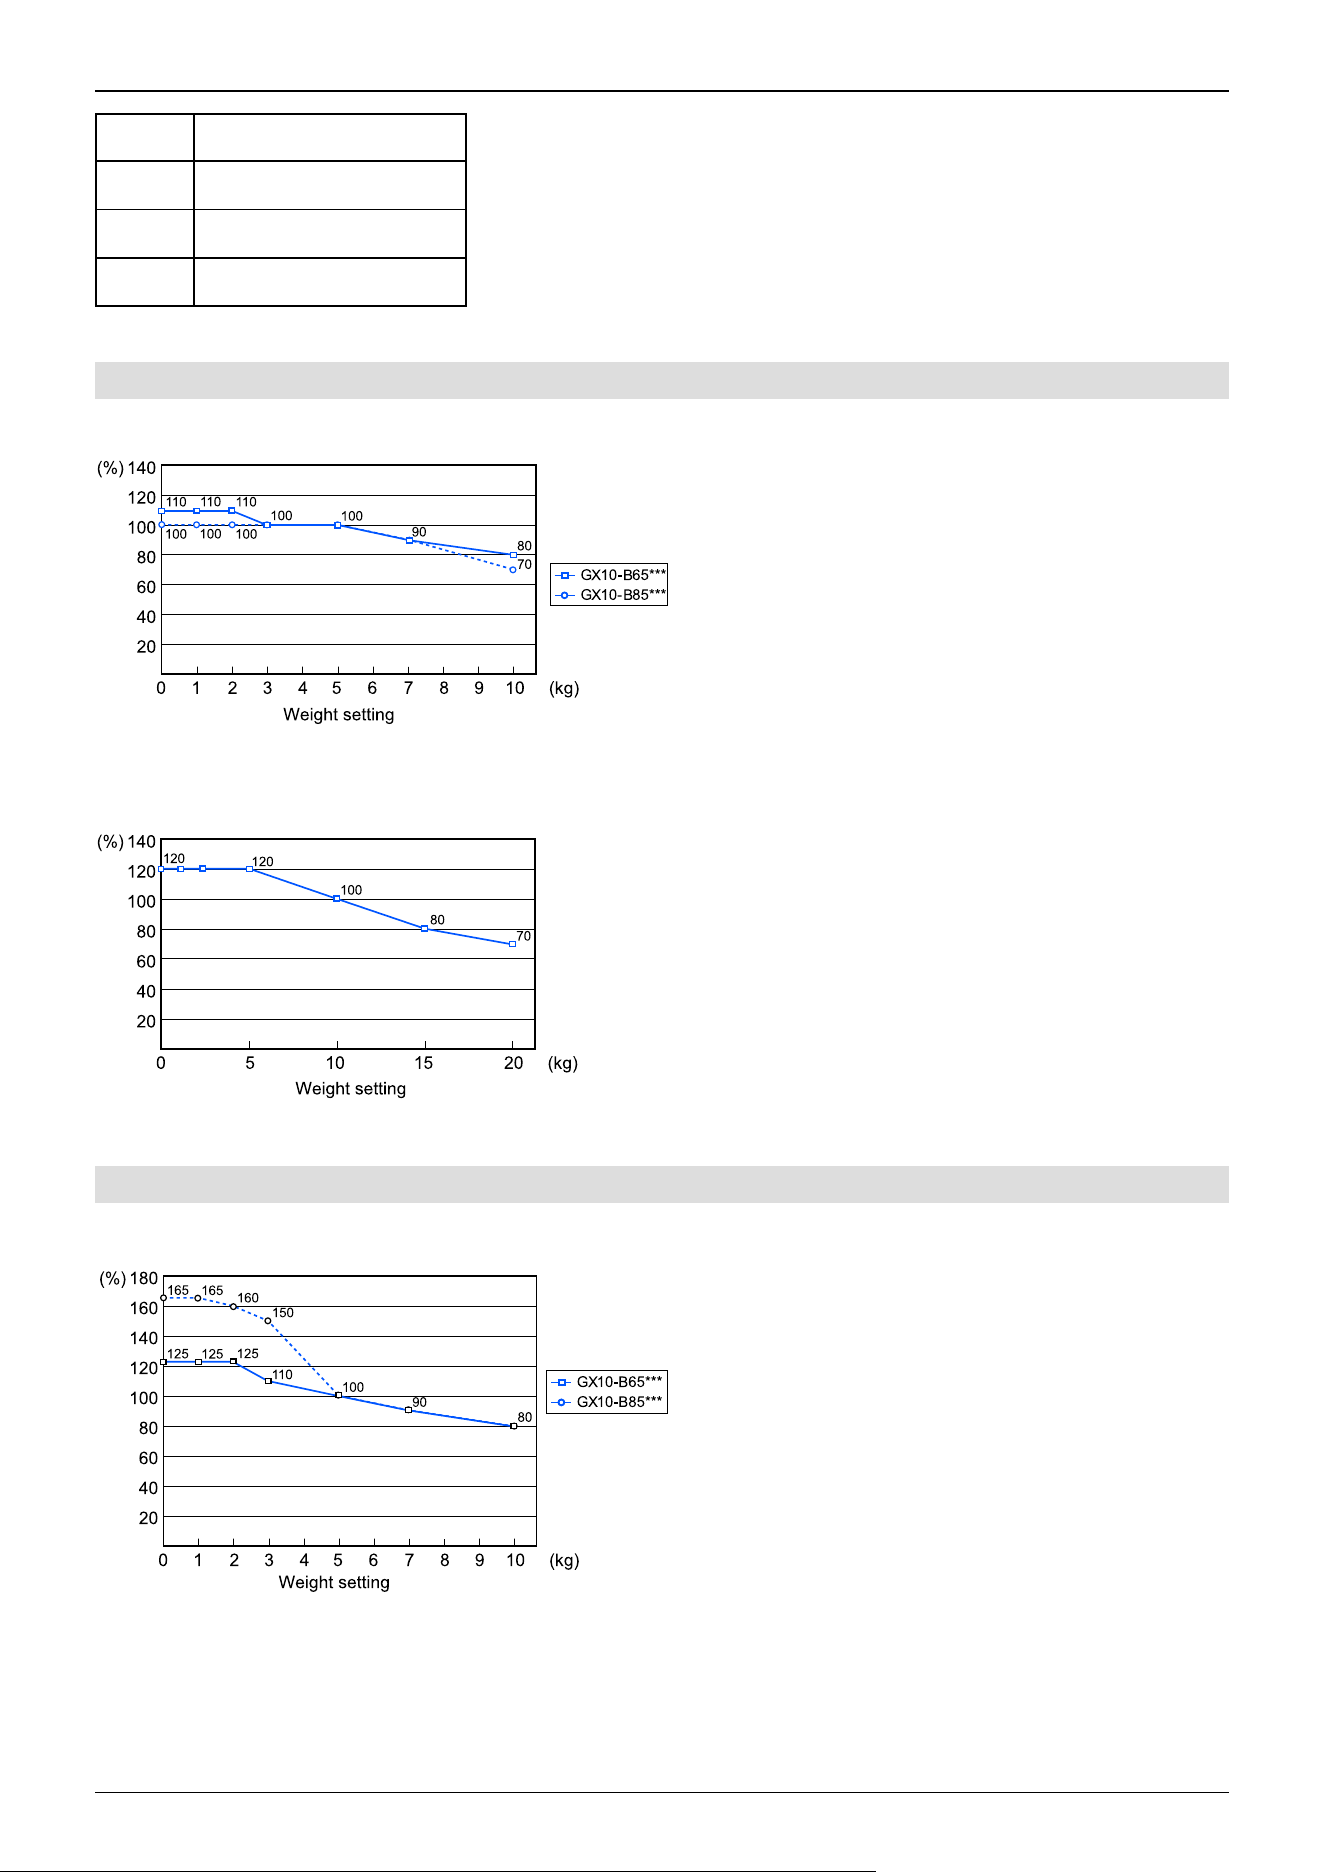
Symbol Description
c W = 2 kg
d Joint #2
e Joint #1
5.4.3.1.3 Automatic Speed Correction at Weight Setting
GX10-B/GX10-C Series
The percentages on the graph are ratios based on 100% as the speed at the rated (5 kg) setting.
GX20-B/GX20-C Series
The percentages on the graph are ratios based on 100% as the speed at the rated (10 kg) setting.
5.4.3.1.4 Automatic Acceleration/Deceleration Correction at Weight Setting
GX10-B/GX10-C Series
The percentages on the graph are ratios based on 100% as the acceleration/deceleration at the rated (5 kg) setting.
Industrial Robot: SCARA Robots GX series Manual Rev.11
394
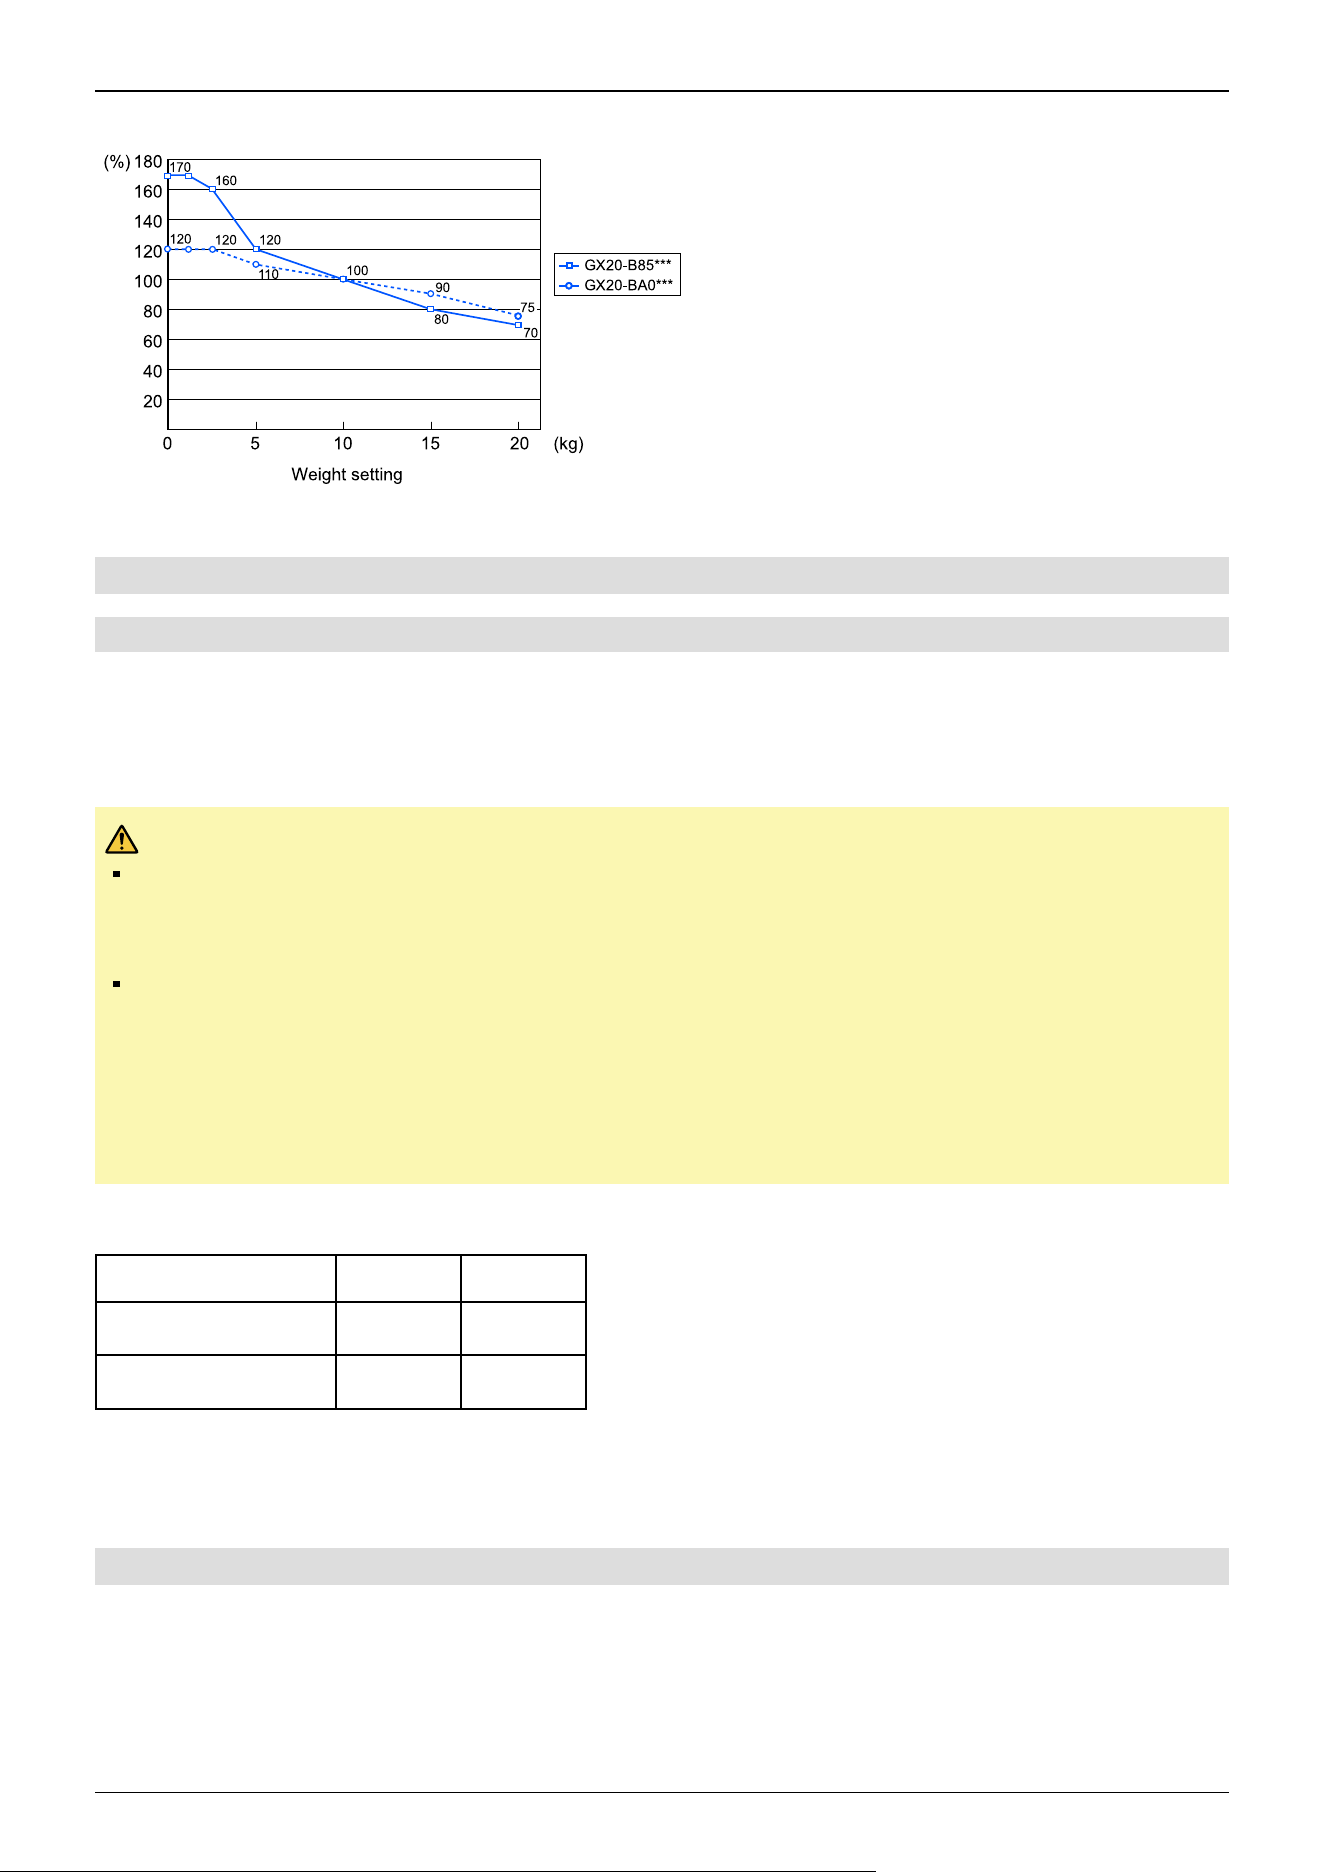
GX20-B/GX20-C Series
The percentages on the graph are ratios based on 100% as the acceleration/deceleration at the rated (10 kg) setting.
5.4.3.2 Inertia Setting
5.4.3.2.1 Moment of Inertia and Inertia Setting
The moment of inertia is a quantity that expresses how hard it is for an object to turn, and it is expressed in terms of values for
the moment of inertia, inertia, or GD
2
. When a hand or other object is attached to a shaft for operation, the moment of inertia
of the load must be taken into consideration.
CAUTION
GX10-B/GX10-C Series
The moment of inertia of the load (weight of the hand and workpiece) must be 0.25 kg·m
2
or less. The GX10-
B/GX10-C series Manipulators are not designed to work with a moment of inertia exceeding 0.25 kg·m
2
.
GX20-B/GX20-C Series
The moment of inertia of the load (weight of the hand and workpiece) must be 0.45 kg·m
2
or less. The GX20-
B/GX20-C series Manipulators are not designed to work with a moment of inertia exceeding 0.45 kg·m
2
.
Always set the value corresponding to the moment of inertia. Setting a parameter value that is smaller than
the actual moment of inertia may cause errors or impact, may prevent the Manipulator from working at full
functionality, and may shorten the lifespan of mechanical parts.
The allowable moment of inertia of a load for a GX10-B/GX10-C/GX20-B/GX20-C series Manipulator is as follows.
Rated Max.
GX10-B/GX10-C series
0.02 kg·m
2
0.25 kg·m
2
GX20-B/GX20-C series
0.05 kg·m
2
0.45 kg·m
2
Depending on the moment of inertia, change the setting of the moment of inertia parameter for the load in the Inertia statement.
After the setting is changed, the maximum acceleration/deceleration of Joint #4 during PTP motion that corresponds to the
"Inertia" value is corrected automatically.
5.4.3.2.2 Moment of Inertia of Load Attached to Shaft
The moment of inertia of the load (hand + workpiece) attached to the shaft can be set by the "Inertia" parameter in the Inertia
statement.
Industrial Robot: SCARA Robots GX series Manual Rev.11
395
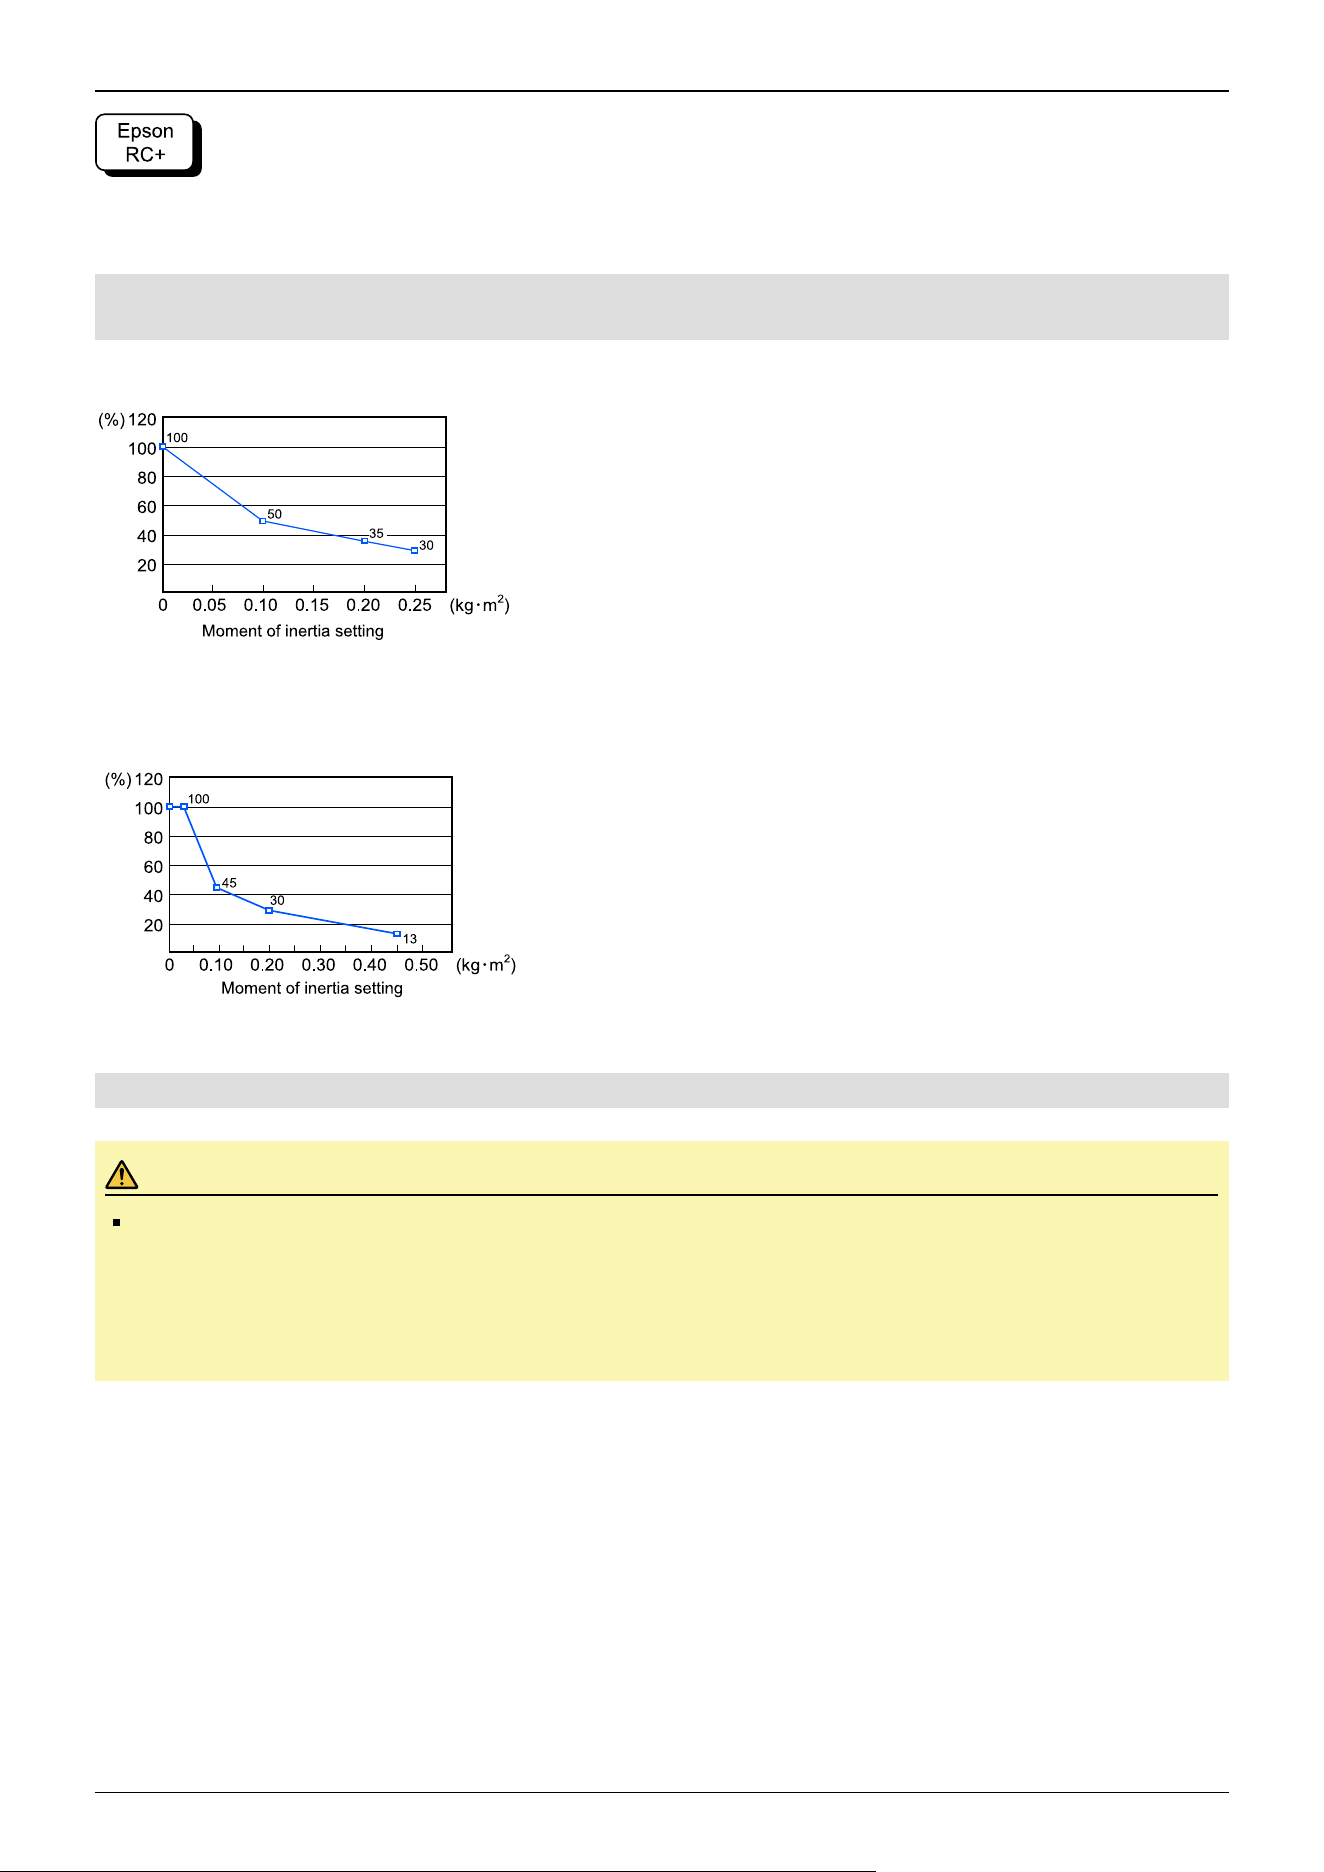
Go to [Tools] - [Robot Manager] - [Inertia] panel, and enter the value in [Inertia].
This can also be set using the Inertia statement in [Command Window].
5.4.3.2.3 Automatic Acceleration/Deceleration Correction of Joint #4 at Inertia (Moment
of Inertia) Setting
GX10-B/GX10-C Series
The percentages on the graph are ratios based on 100% as the acceleration/deceleration at the rated (0 kg·m
2
) setting.
GX20-B/GX20-C Series
The percentages on the graph are ratios based on 100% as the acceleration/deceleration at the rated (0.05 kg·m
2
) setting.
5.4.3.2.4 Eccentricity and Inertia Setting
CAUTION
The eccentricity of the load (hand and workpiece) must be 200 mm or less. GX10-B/GX10-C series and
GX20-B/GX20-C series Manipulators are not designed to work with eccentricities exceeding 200 mm. Always
set the value based on the eccentricity. Setting the eccentricity parameter to a value smaller than the actual
eccentricity may cause errors or impact that not only impair full functionality but also shorten the life of the
mechanical components.
The allowable load eccentricity for GX10-B/GX10-C series and GX20-B/GX20-C series Manipulators is 0 mm at the default
rating and 200 mm at the maximum. Depending on the load eccentricity, change the setting for the eccentricity parameter in
Inertia statement. After the setting is changed, the maximum acceleration/deceleration of the Manipulator during PTP motion
that corresponds to the "Eccentricity" is corrected automatically.
Industrial Robot: SCARA Robots GX series Manual Rev.11
396
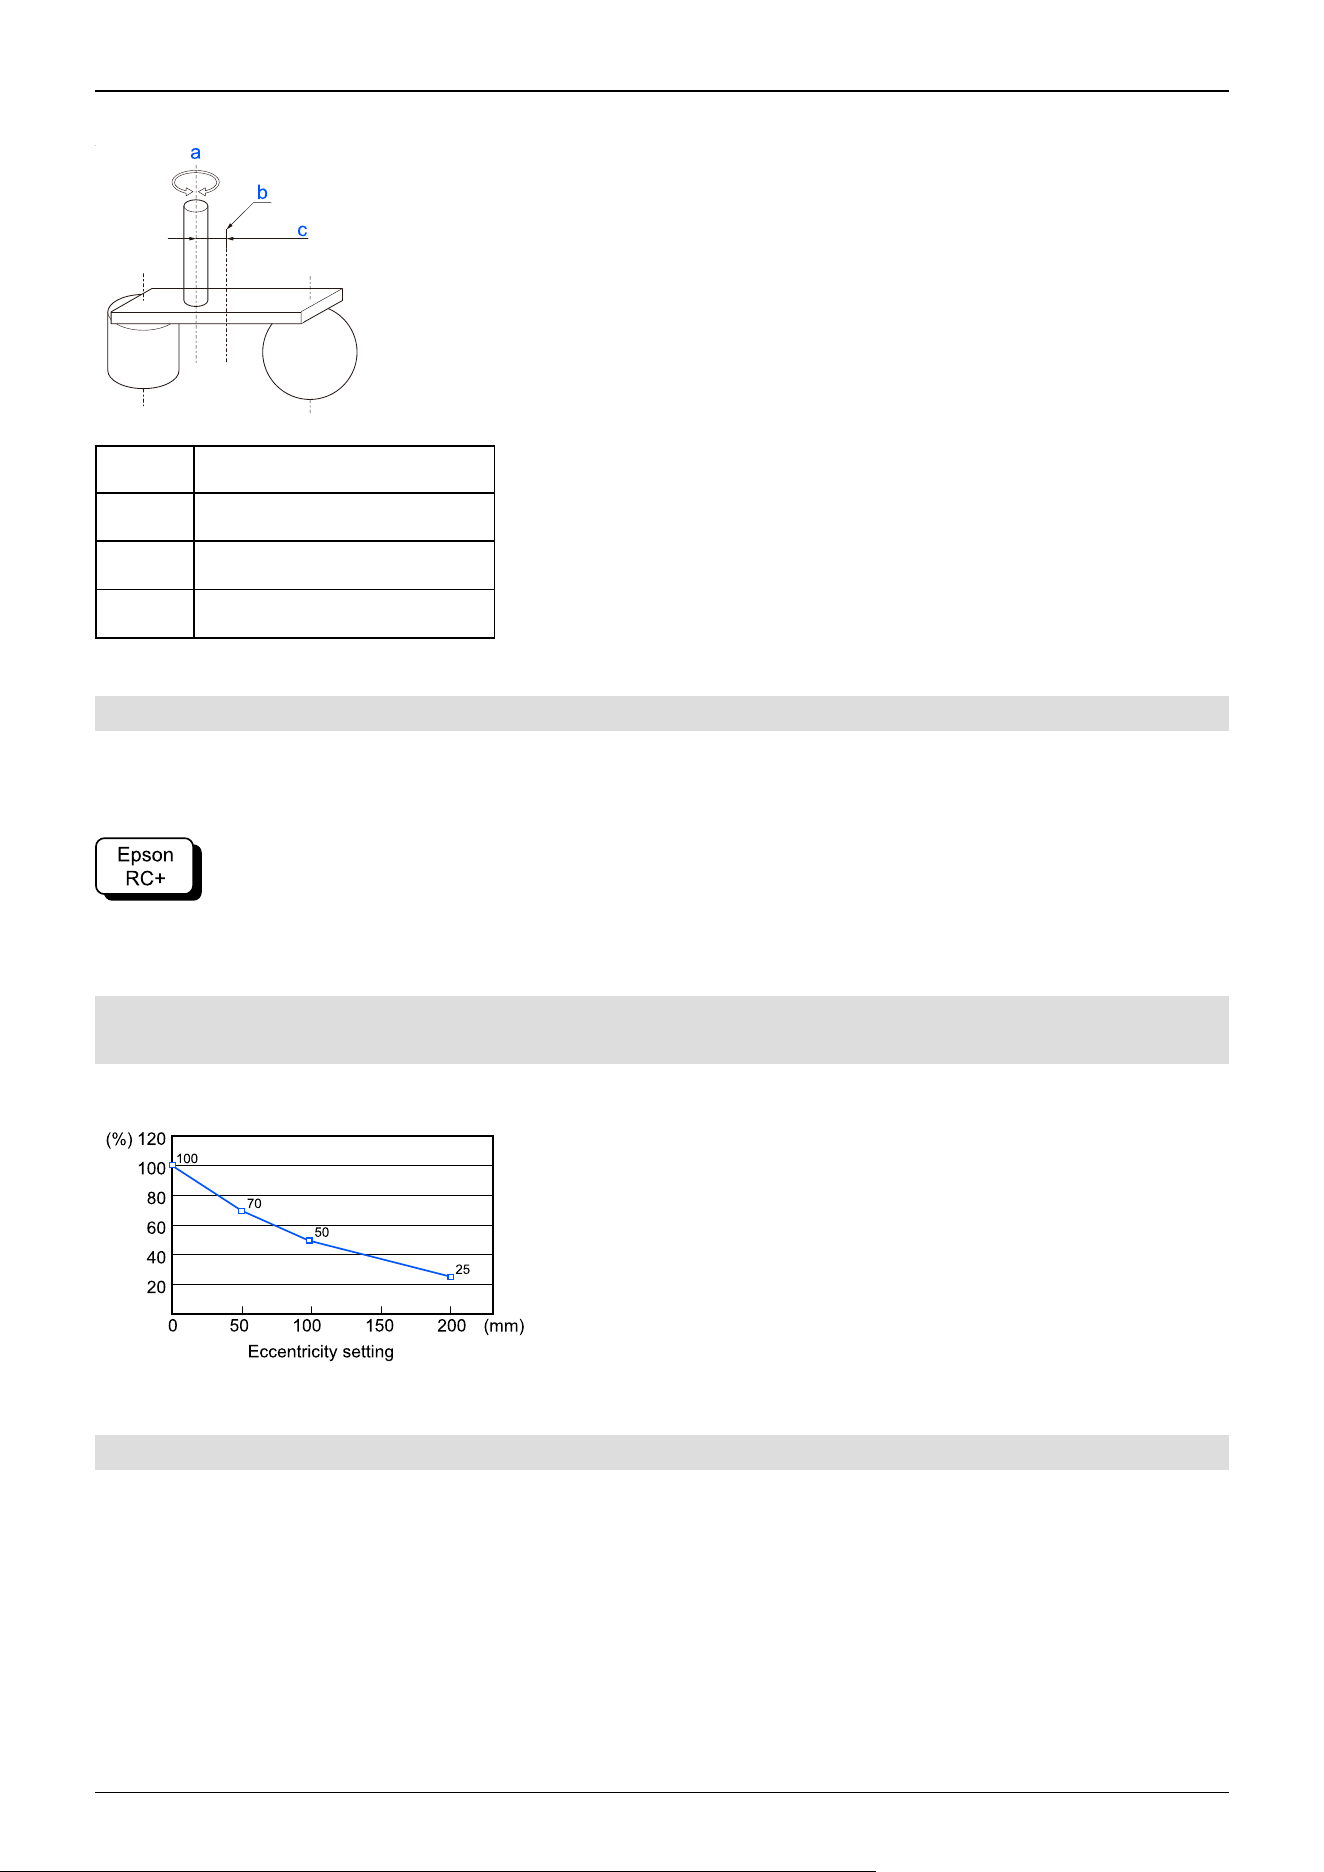
Eccentricity
Symbol Description
a Rotation axis
b Load center of gravity position
c Eccentricity (200 mm or less)
5.4.3.2.5 Eccentricity of Load Attached to Shaft
The eccentricity of the load (hand + workpiece) attached to the shaft can be set by the "Eccentricity" parameter in the Inertia
statement.
Go to [Tools] - [Robot Manager] - [Inertia] panel, and enter the value in [Eccentricity].
This can also be set using the Inertia statement in [Command Window].
5.4.3.2.6 Automatic Acceleration/Deceleration Correction at Inertia (Eccentricity)
Setting
GX10-B/GX20-B series
The percentages on the graph are ratios based on 100% as the acceleration/deceleration at the 0 mm setting.
5.4.3.2.7 Calculating the Moment of Inertia
An example of calculating the moment of inertia of a load (hand holding a workpiece) is shown below.
Industrial Robot: SCARA Robots GX series Manual Rev.11
397
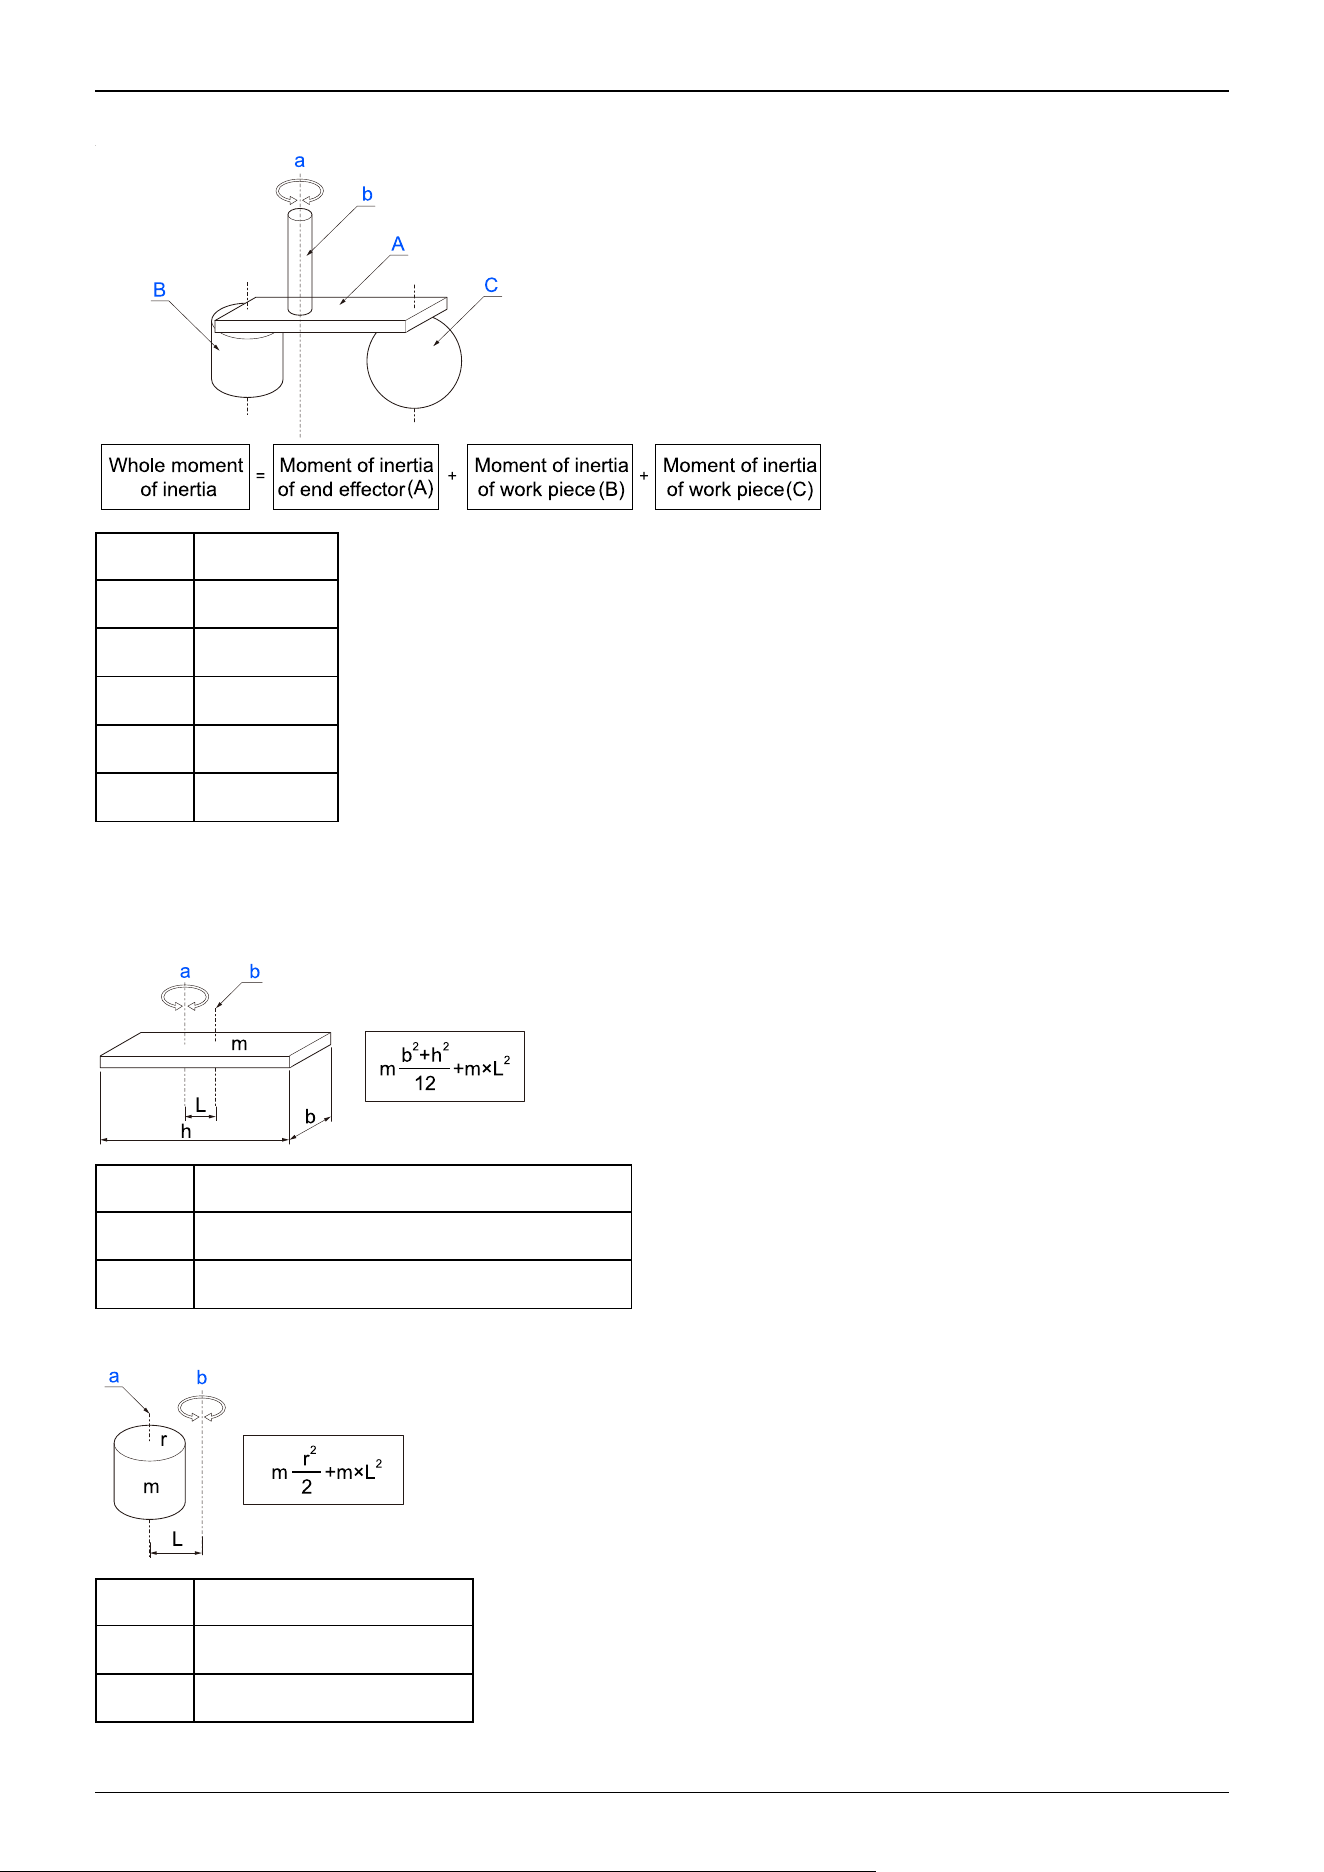
The moment of inertia of the entire load is calculated by the sum of (A), (B), and (C).
Symbol Description
a Rotation axis
b Shaft
A Hand
B Workpiece
C Workpiece
The methods for calculating the moment of inertia for (A), (B), and (C) are shown below. Use the moment of inertia of these
basic shapes as a reference to find the moment of inertia of the entire load.
(A) Moment of inertia of a rectangular parallelepiped
Symbol Description
a Rotation axis
b Center of gravity of rectangular parallelepiped
(B) Moment of inertia of a cylinder
Symbol Description
a Center of gravity of cylinder
b Rotation axis
Industrial Robot: SCARA Robots GX series Manual Rev.11
398
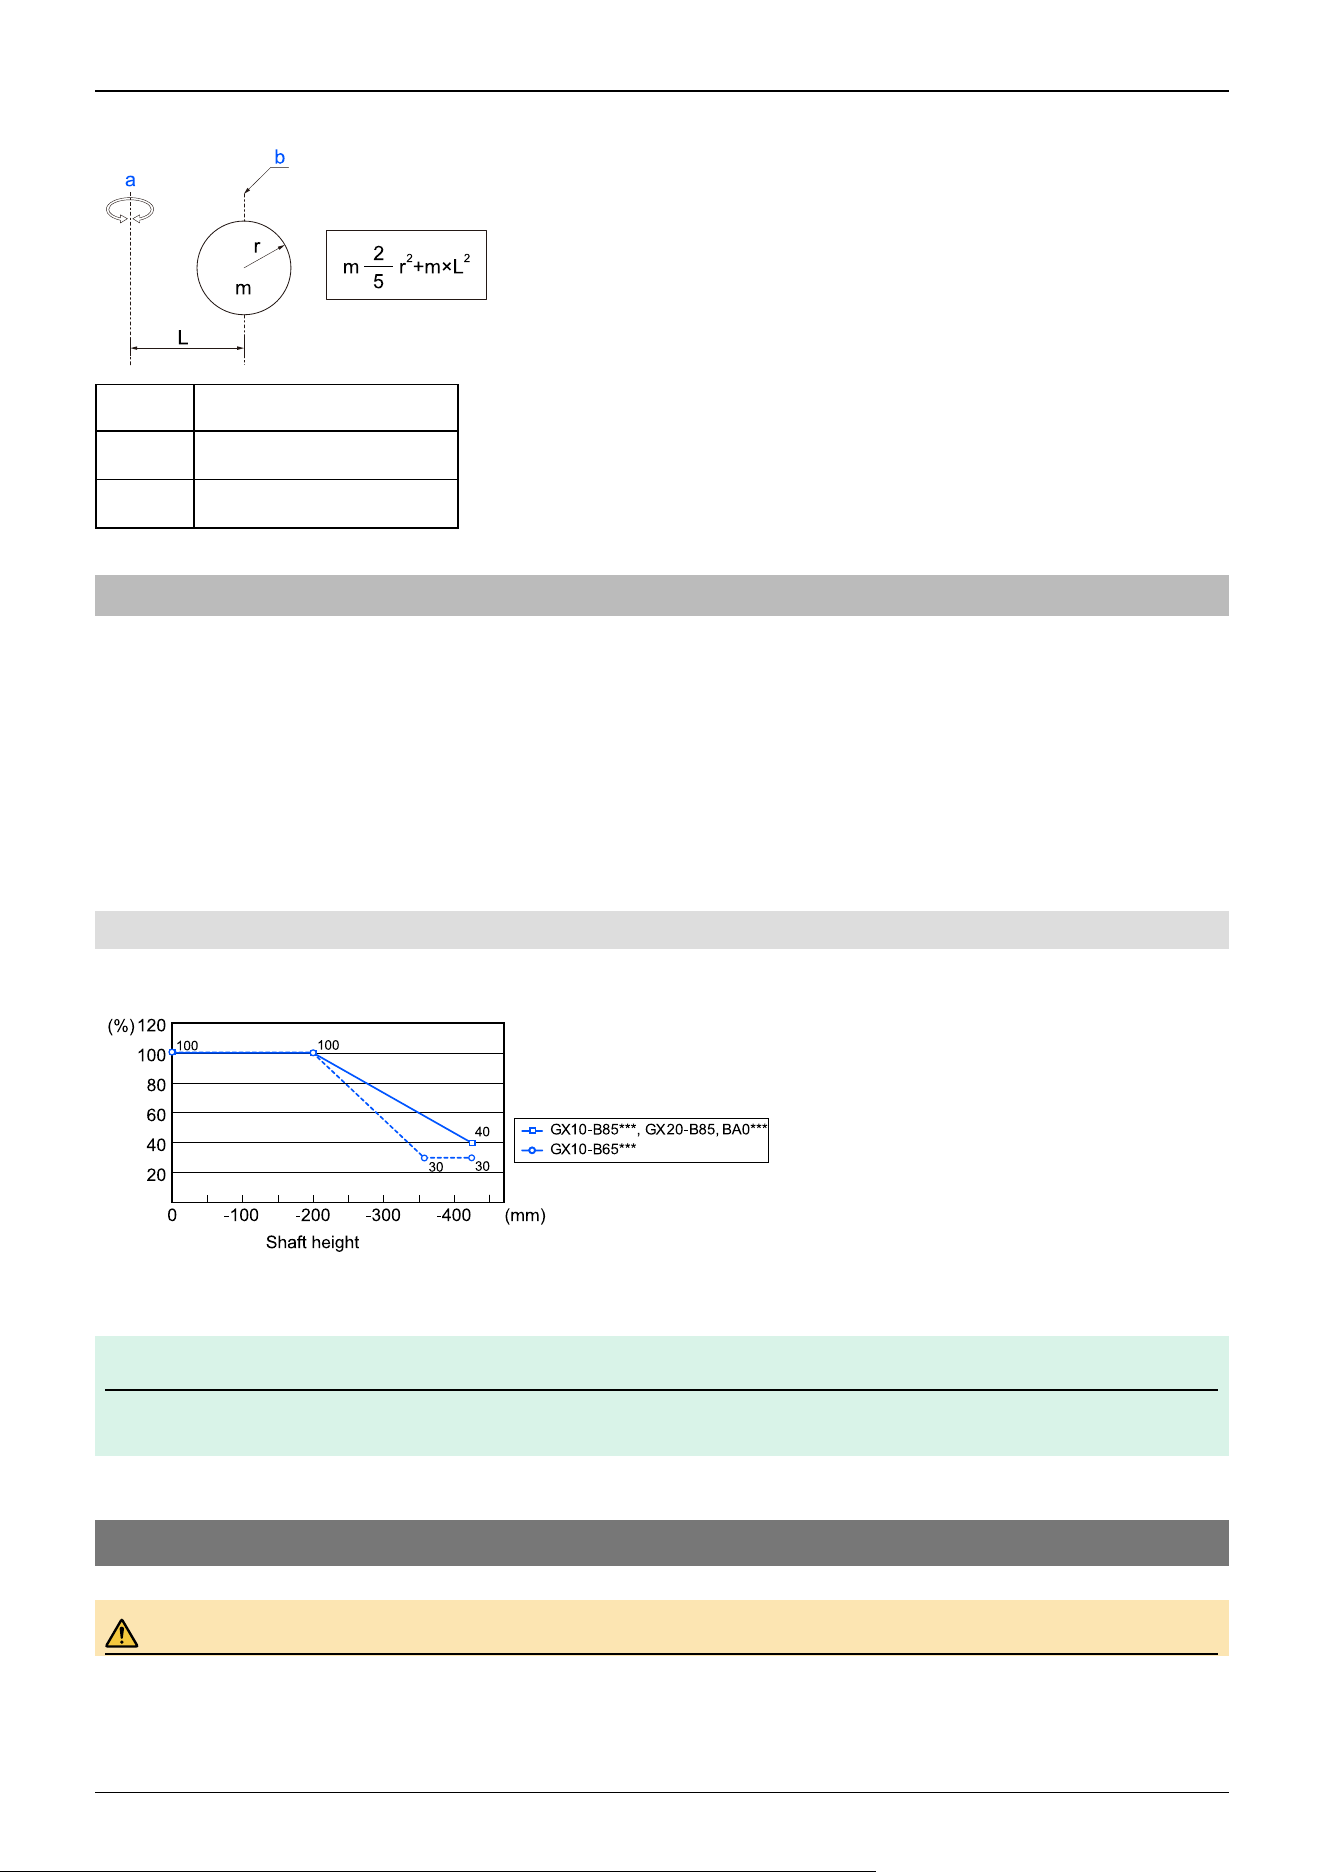
(C) Moment of inertia of a sphere
Symbol Description
a Rotation axis
b Center of gravity of sphere
5.4.4 Safety Information for Auto Acceleration of Joint #3
When performing horizontal movement in PTP motion, the operation time can be shorted by setting the shaft to a high
position.
When performing horizontal movement in PTP motion, if the shaft height is less than a certain value, the auto acceleration
function is activated, and the acceleration/deceleration of the movement is set slower for lower shaft heights. A higher shaft
position results in a faster acceleration/deceleration for the movement, but the up movement time and down movement time of
the shaft are also required. Adjust the shaft height by taking into consideration the positional relationship between the current
position and the target position.
The shaft height at the time of horizontal movement for the Jump statement can be set by the LimZ statement.
5.4.4.1 Automatic Acceleration/Deceleration Correction by Shaft Position
GX10-B/GX10-C/GX20-B/GX20-C Series
The percentages on the graph are ratios based on 100% as the acceleration/deceleration at the shaft upper limit position.
KEY POINTS
Horizontal movement with the shaft lowered may cause overshooting during positioning.
5.5 Work Envelope
WARNING
✏
Industrial Robot: SCARA Robots GX series Manual Rev.11
399
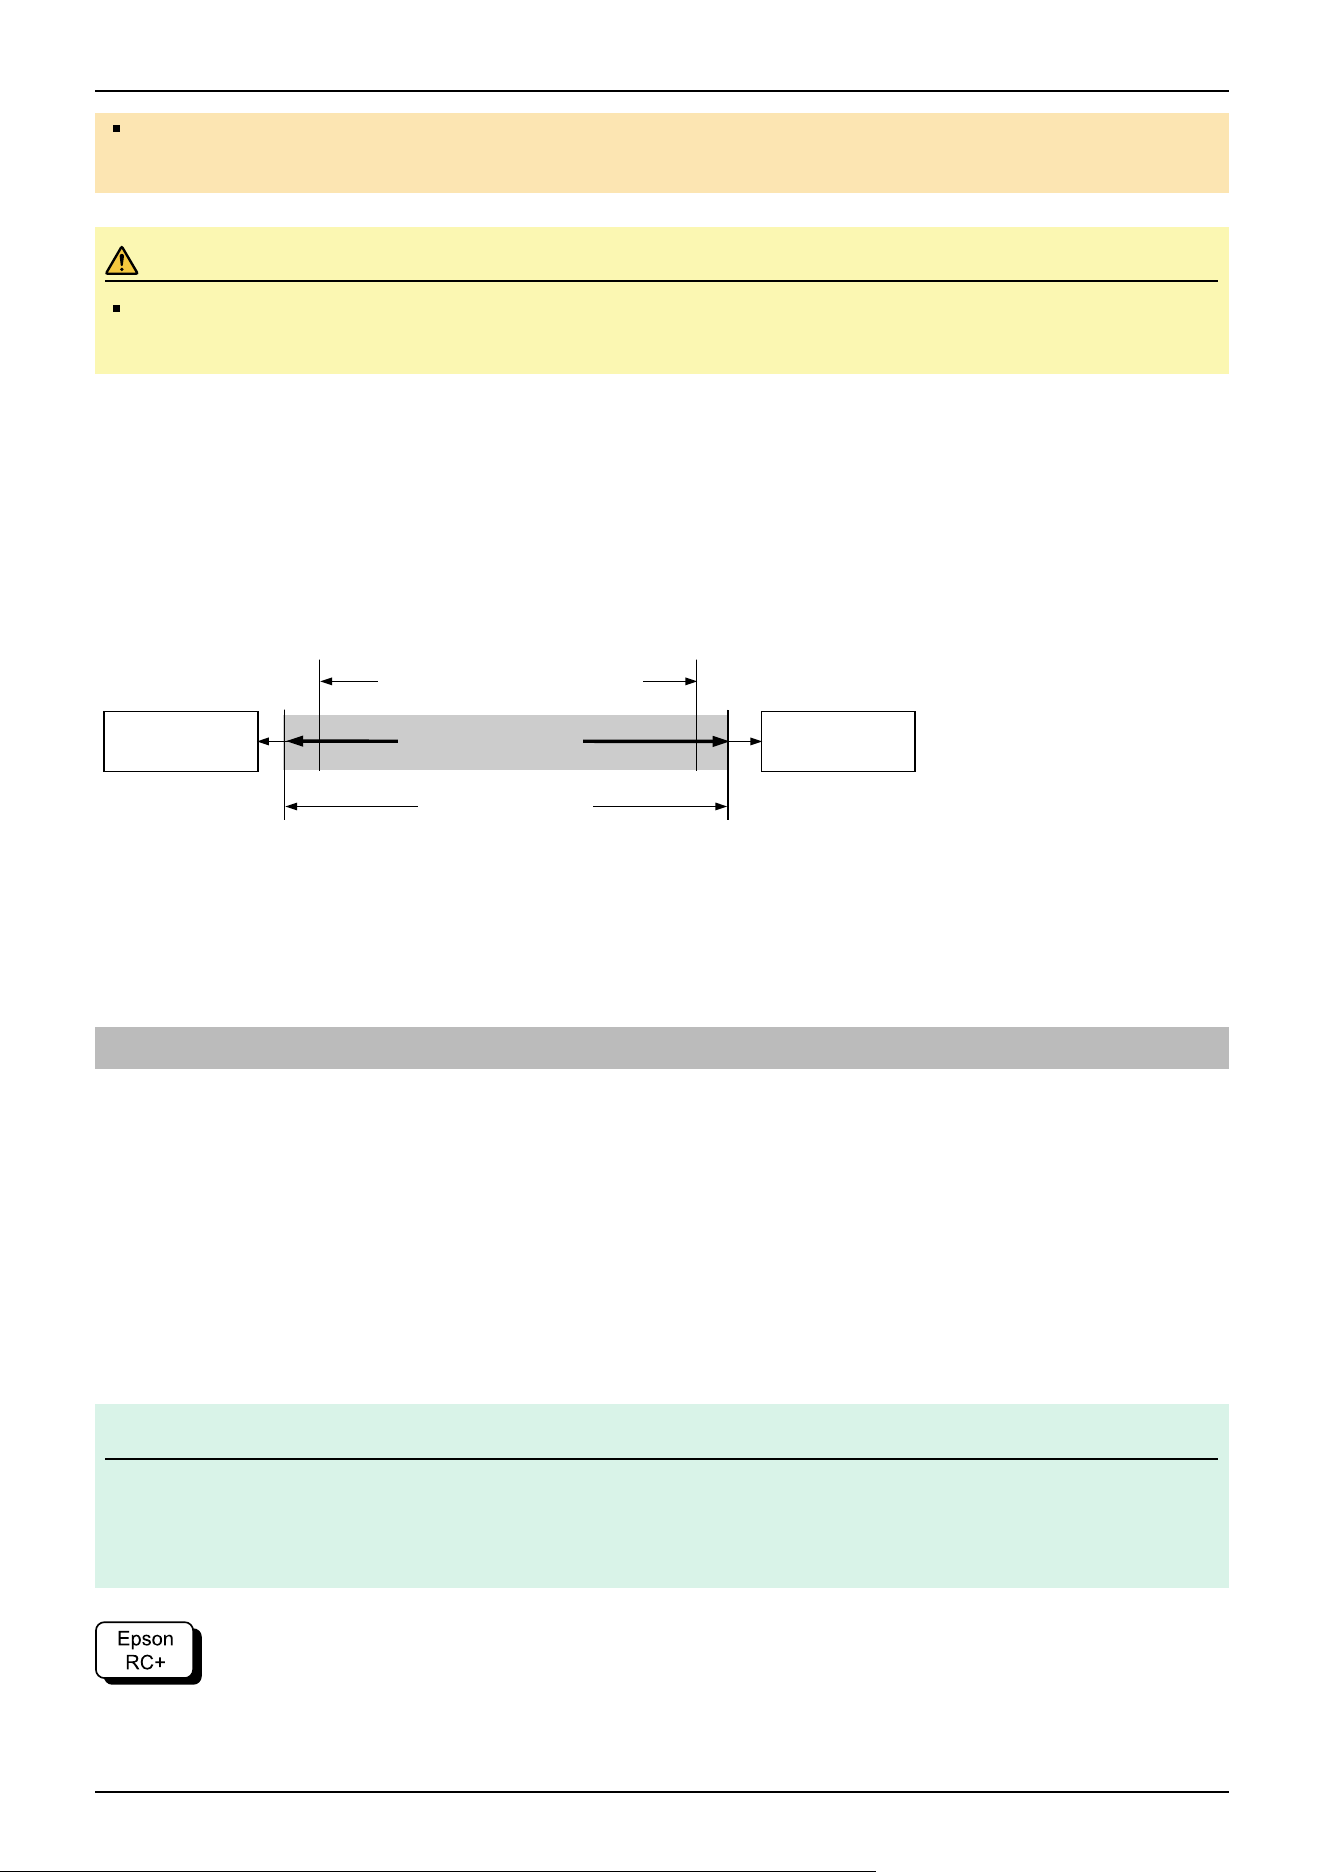
Do not operate the Manipulator with the mechanical stop removed. Removing the mechanical stop is
extremely dangerous because the Manipulator may move to a position outside its normal work envelope.
CAUTION
When restricting the work envelope for safety reasons, be sure to make settings using both the pulse range
and mechanical stop.
The work envelope is preset at the factory as explained in the following section.
Standard Work Envelope
The work envelope can be set by one of the following three methods.
1. Setting by pulse range (for all joints)
2. Setting by mechanical stops (for Joints #1 to #3)
3. Setting the rectangular range in the XY coordinate system of the Manipulator (for Joints #1 and #2)
To limit the work envelope for layout efficiency or safety reasons, make the settings as explained in the following sections.
Work Envelope Setting by Pulse Range
Setting the Work Envelope by Mechanical Stops
Setting the Rectangular Range in the XY Coordinate System of the Manipulator
5.5.1 Work Envelope Setting by Pulse Range
Pulses are the basic unit of Manipulator motion. The motion range (work envelope) of the Manipulator is set by the pulse
lower limit value and pulse upper limit value (pulse range) for each joint.
Pulse values are read from the encoder output of the servomotor.
For the maximum pulse range, refer to the following sections.
The pulse range must be set within the mechanical stop range.
Joint #1 Maximum Pulse Range
Joint #2 Maximum Pulse Range
Joint #3 Maximum Pulse Range
Joint #4 Maximum Pulse Range
KEY POINTS
Once the Manipulator receives an operation command, it checks whether the target position specified by the
command is within the pulse range before operating. If the target position is outside of the pulse range that was
set, an error occurs and the Manipulator does not move.
Go to [Tools] - [Robot Manager] - [Range] panel, and make the setting.
This can also be set using the Range statement in [Command Window].
Pulse range
Work Envelope
Mechanical
Stop
Mechanical
Stop
Rectangular range setting
✏
Industrial Robot: SCARA Robots GX series Manual Rev.11
400
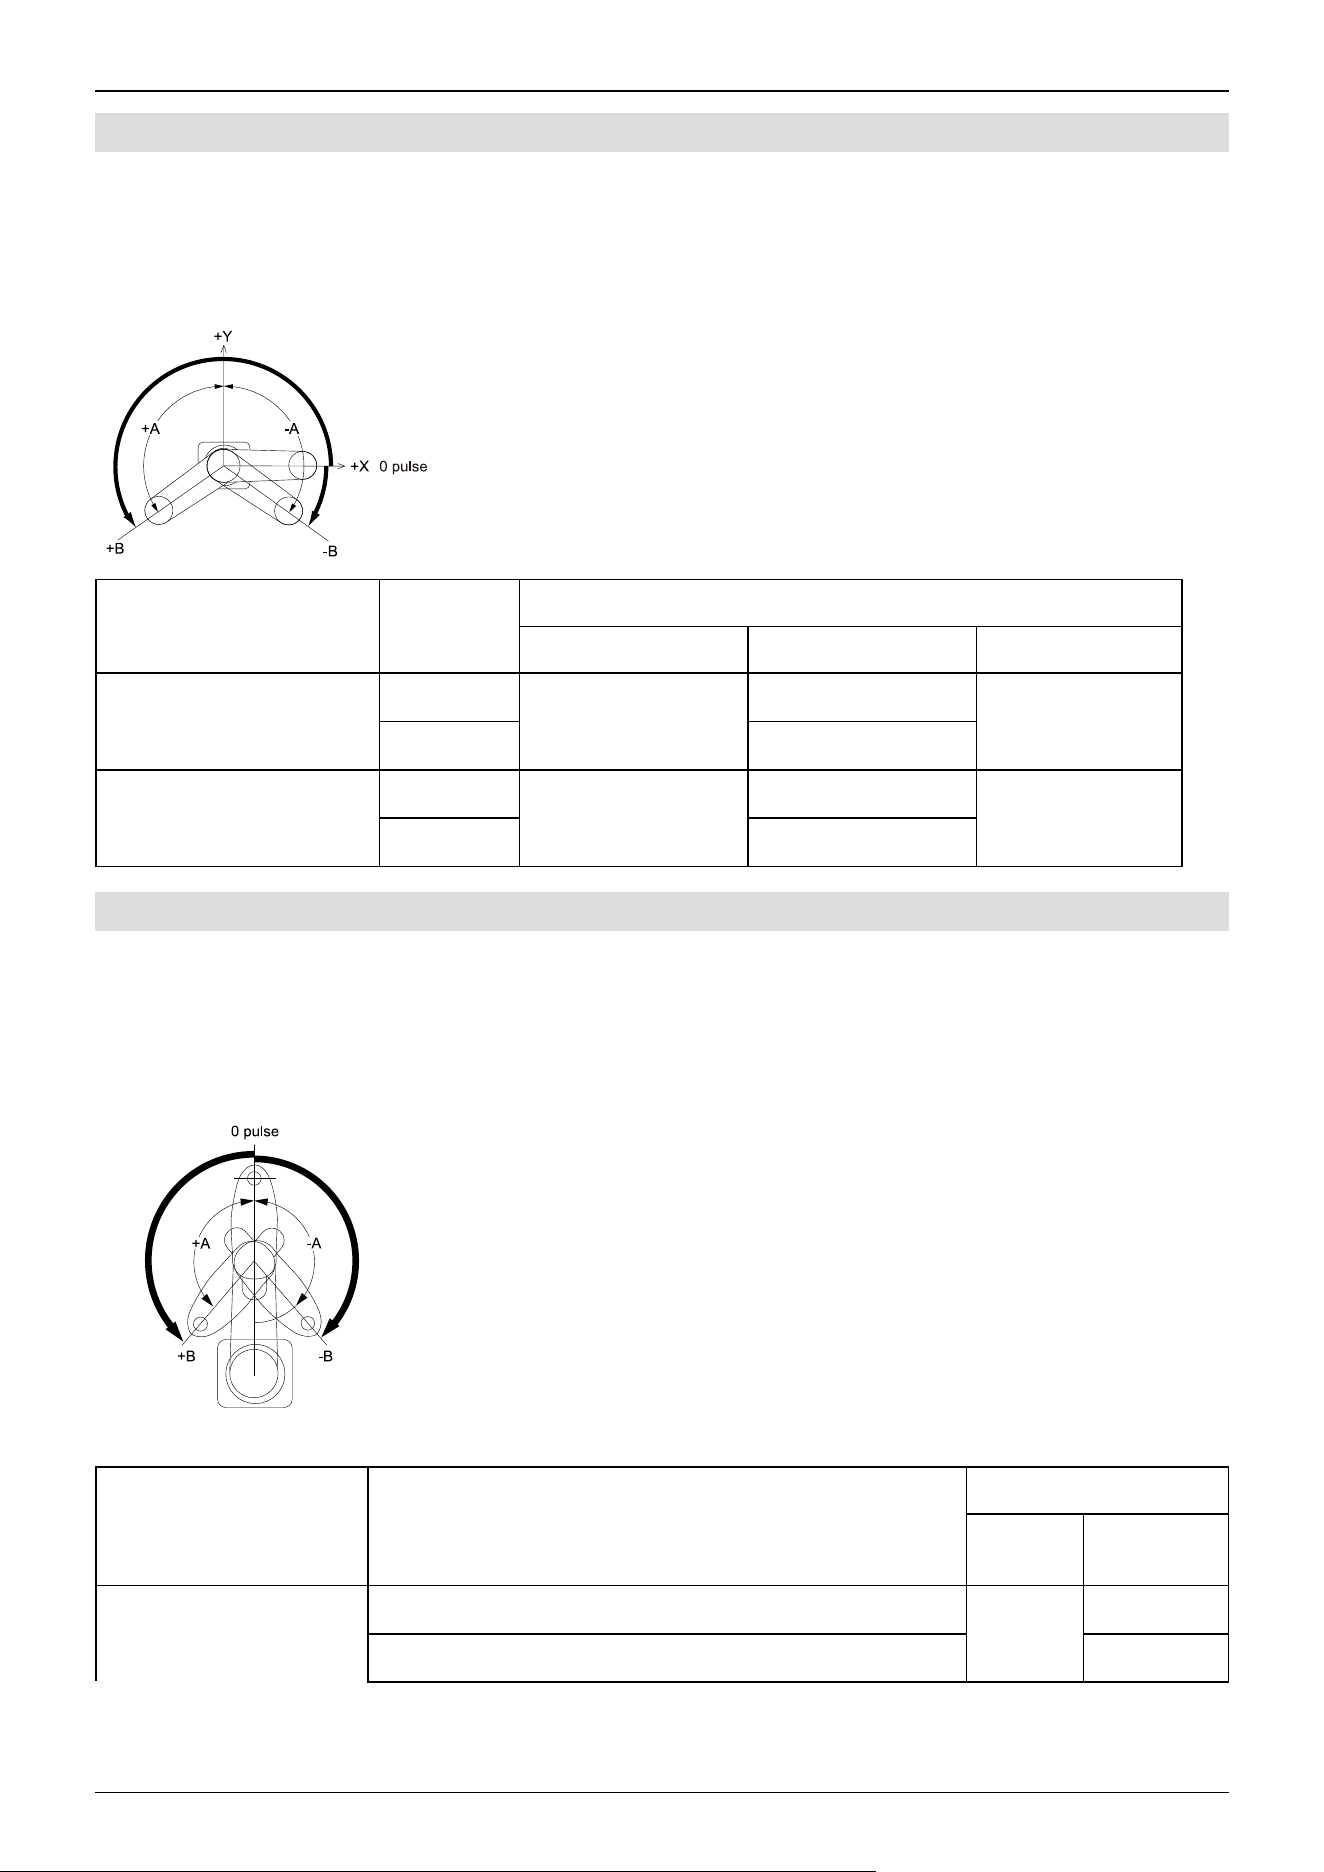
5.5.1.1 Joint #1 Maximum Pulse Range
The 0 (zero) pulse position of Joint #1 is the position where Arm #1 is facing the positive (+) direction on the X-coordinate
axis.
With the 0 pulse as a starting point, the counterclockwise pulse value is defined as positive (+), and the clockwise pulse value
is defined as negative (-).
Arm Length
(mm)
Mounting Specifications
Table top Ceiling Wall
A: Max. Motion range (deg.)
650
±152
±107
±107
850, 1000 ±152
B: Max. pulse range (pulse)
650
-1805881 to +7048761
-495161 to 5738041
-495161 to 5738041
850, 1000 -1805881 to +7048761
5.5.1.2 Joint #2 Maximum Pulse Range
The 0 (zero) pulse position of Joint #2 is the position where Arm #2 is aligned with Arm #1. (The orientation of Arm #1 does
not matter.)
With the 0 pulse as a starting point, the counterclockwise pulse value is defined as positive (+), and the clockwise pulse value
is defined as negative (-).
Type
Mounting Specifications
Table
Top
Ceiling,
Wall
A: Max. motion range
(deg.)
GX10-B/GX10-C65 ***
±152.5
±130
GX10-B/GX10-C/GX20-B/GX20-C85*S * ±152.5
Industrial Robot: SCARA Robots GX series Manual Rev.11
401
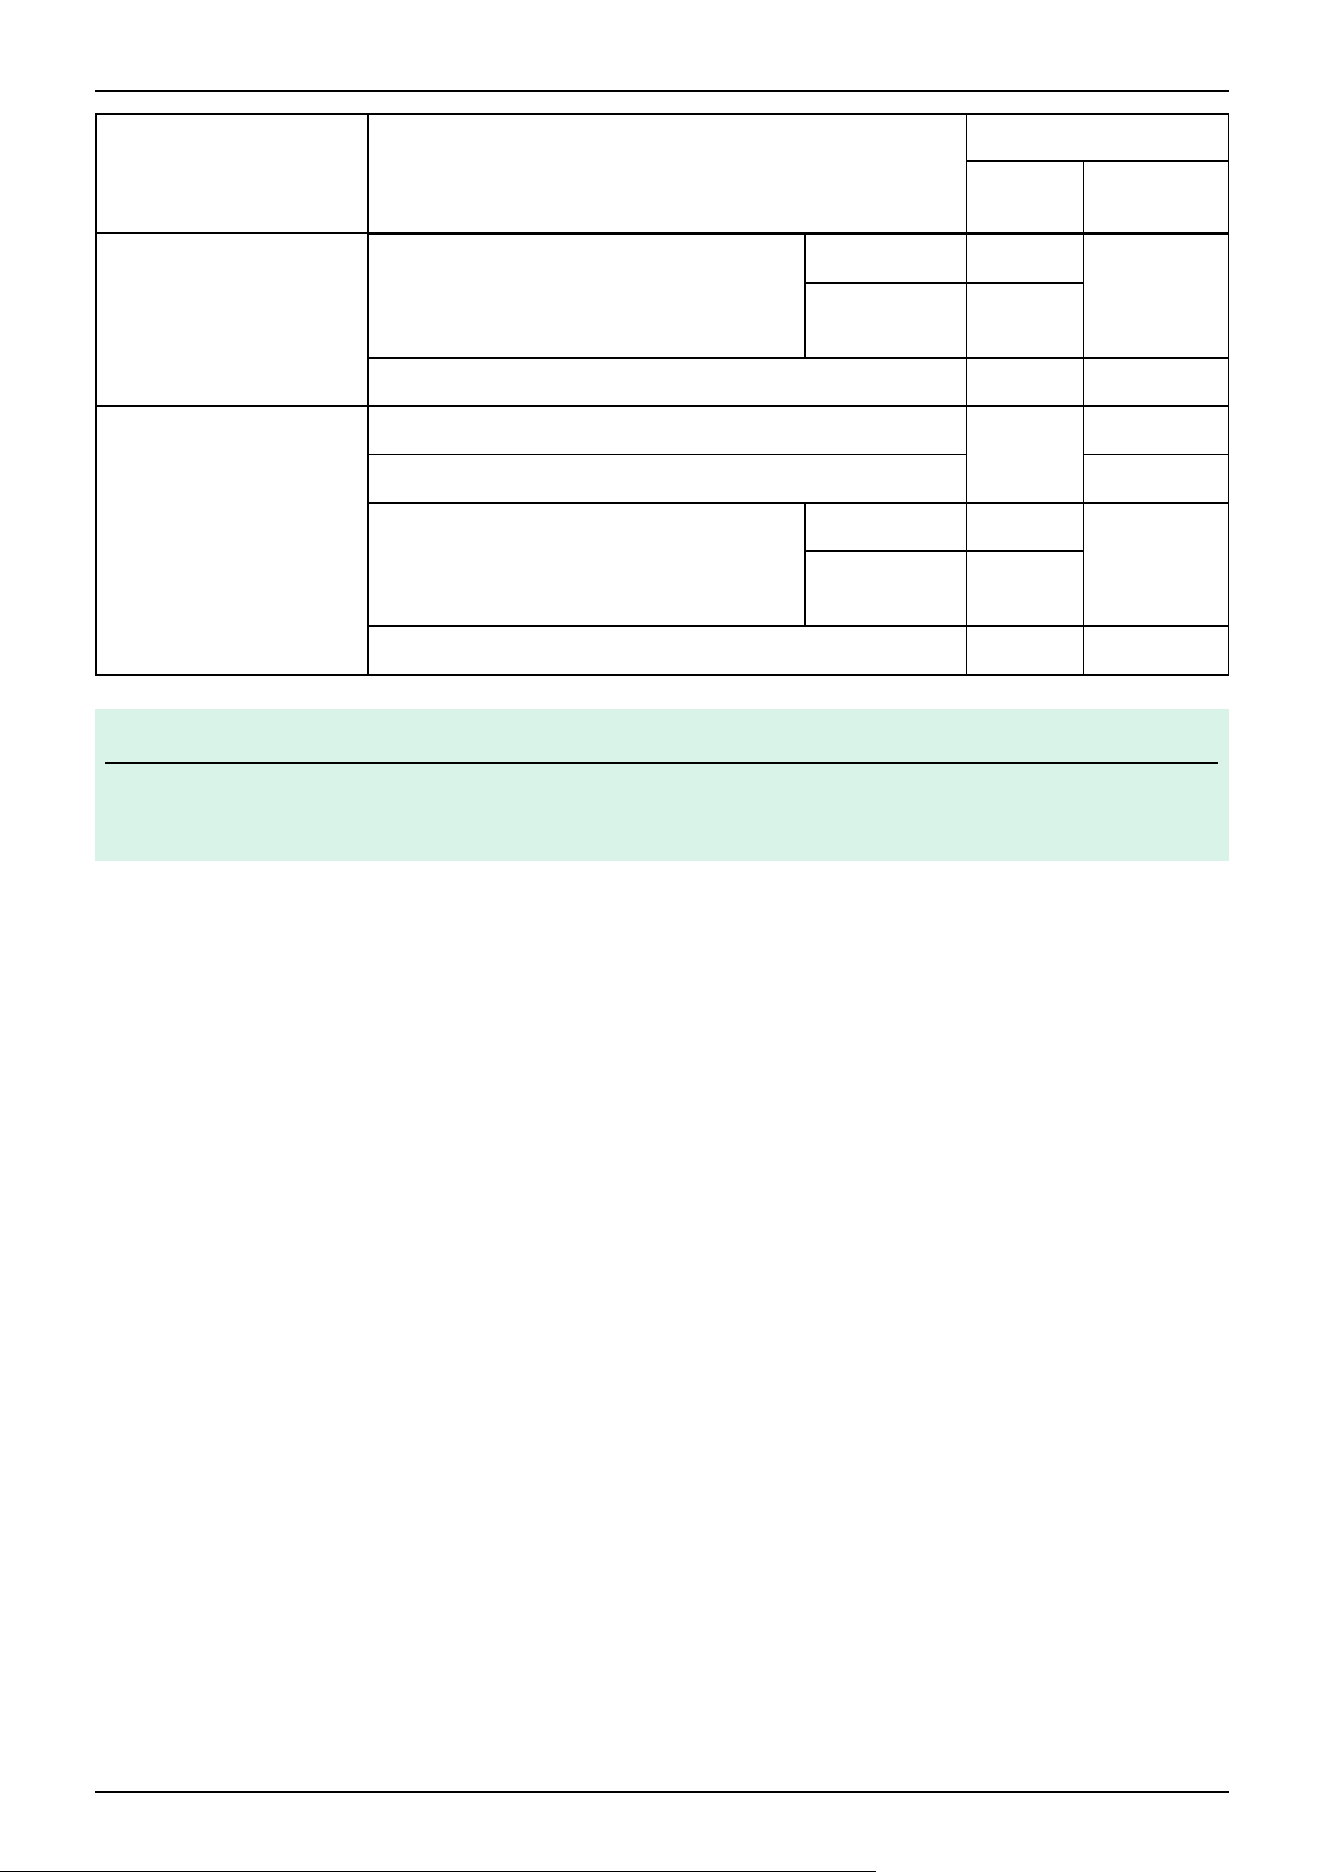
Type
Mounting Specifications
Table
Top
Ceiling,
Wall
GX10-B/GX10-C/GX20-B/GX20-C85*C*, P
*
Z: 0 to ‒360 ±152.5
±151
Z: ‒360 to ‒
390
±151
GX20-B/GX20-CA0 *** ±152.5 ±152.5
B: Max. pulse range (pulse)
GX10-B/GX10-C65 ***
±2776178
±2366578
GX10-B/GX10-C/GX20-B/GX20-C85*S * ±2776178
GX10-B/GX10-C/GX20-B/GX20-C85*C*, P
*
Z: 0 to ‒360 ±2776178
±2748872
Z: ‒360 to ‒
390
±2748872
GX20-B/GX20-CA0 *** ±2776178 ±2776178
KEY POINTS
Z: In the -360 to -390 mm range, the area is limited due to interference between the Manipulator body and the
arm.
✏
Industrial Robot: SCARA Robots GX series Manual Rev.11
402
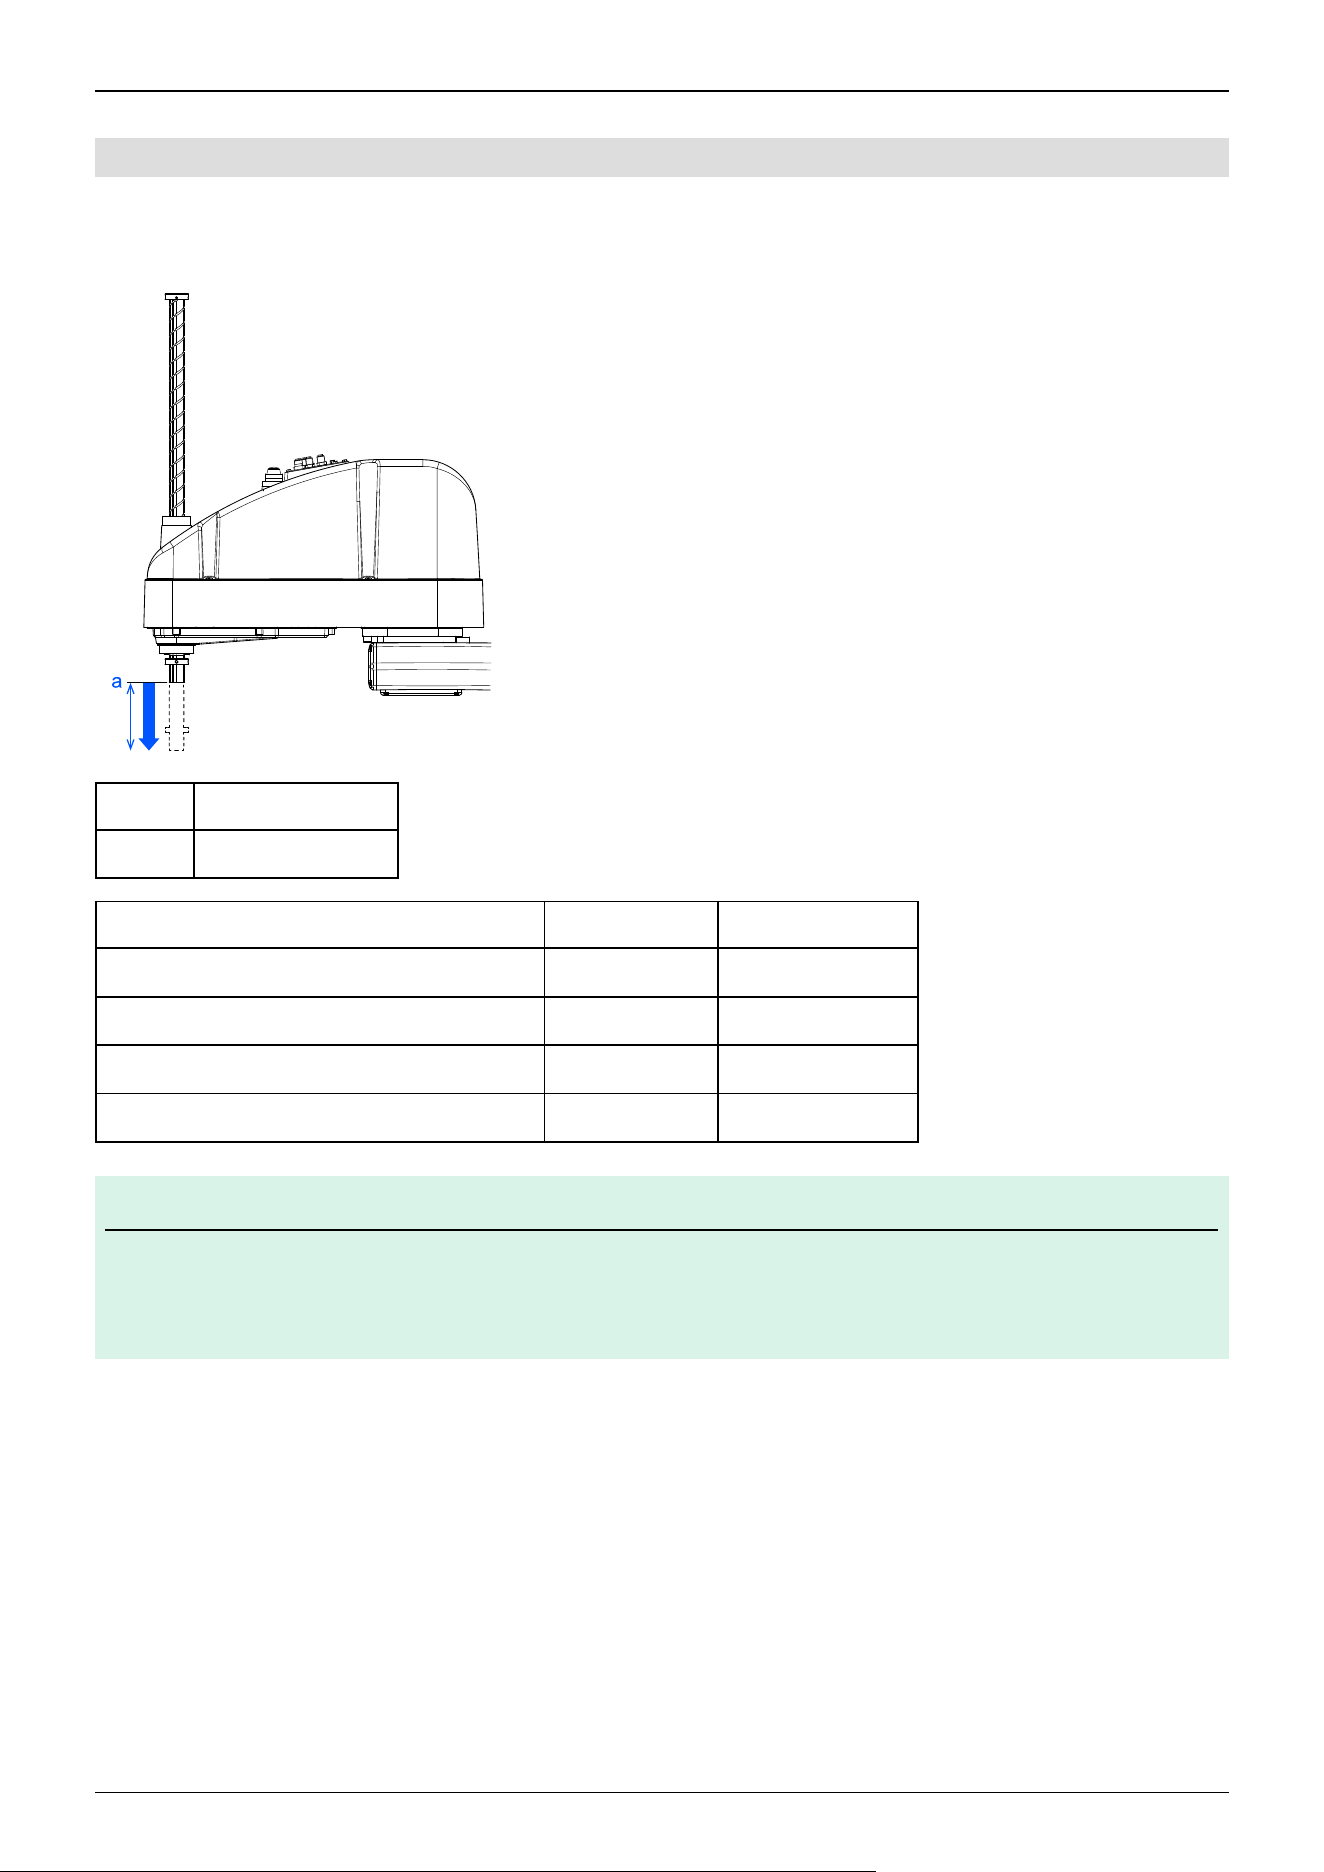
5.5.1.3 Joint #3 Maximum Pulse Range
The 0 (zero) pulse position of Joint #3 is the position where the shaft is at its upper limit. The pulse value is always negative
because Joint #3 moves down from the 0 pulse position.
Symbol Description
a Upper limit: 0 pulse
Type Joint #3 Stroke Lower Limit Pulse
GX10-B/GX10-C/GX20-B/GX20-C**1S * 180 mm -973210
GX10-B/GX10-C/GX20-B/GX20-C**4S * 420 mm -2270823
GX10-B/GX10-C/GX20-B/GX20-C**1C*, P * 150 mm -811008
GX10-B/GX10-C/GX20-B/GX20-C**4C*, P * 390 mm -2108621
KEY POINTS
For Manipulator models with standard specifications (GX20-B/GX20-C***S*), cleanroom & ESD specifications
(GX10-B/GX10-C/GX20-B/GX20-C***C*) and protected-models (GX10-B/GX10-C/GX20-B/GX20-C***P*), the
work envelope set by the Joint #3 mechanical stop cannot be changed.
✏
Industrial Robot: SCARA Robots GX series Manual Rev.11
403
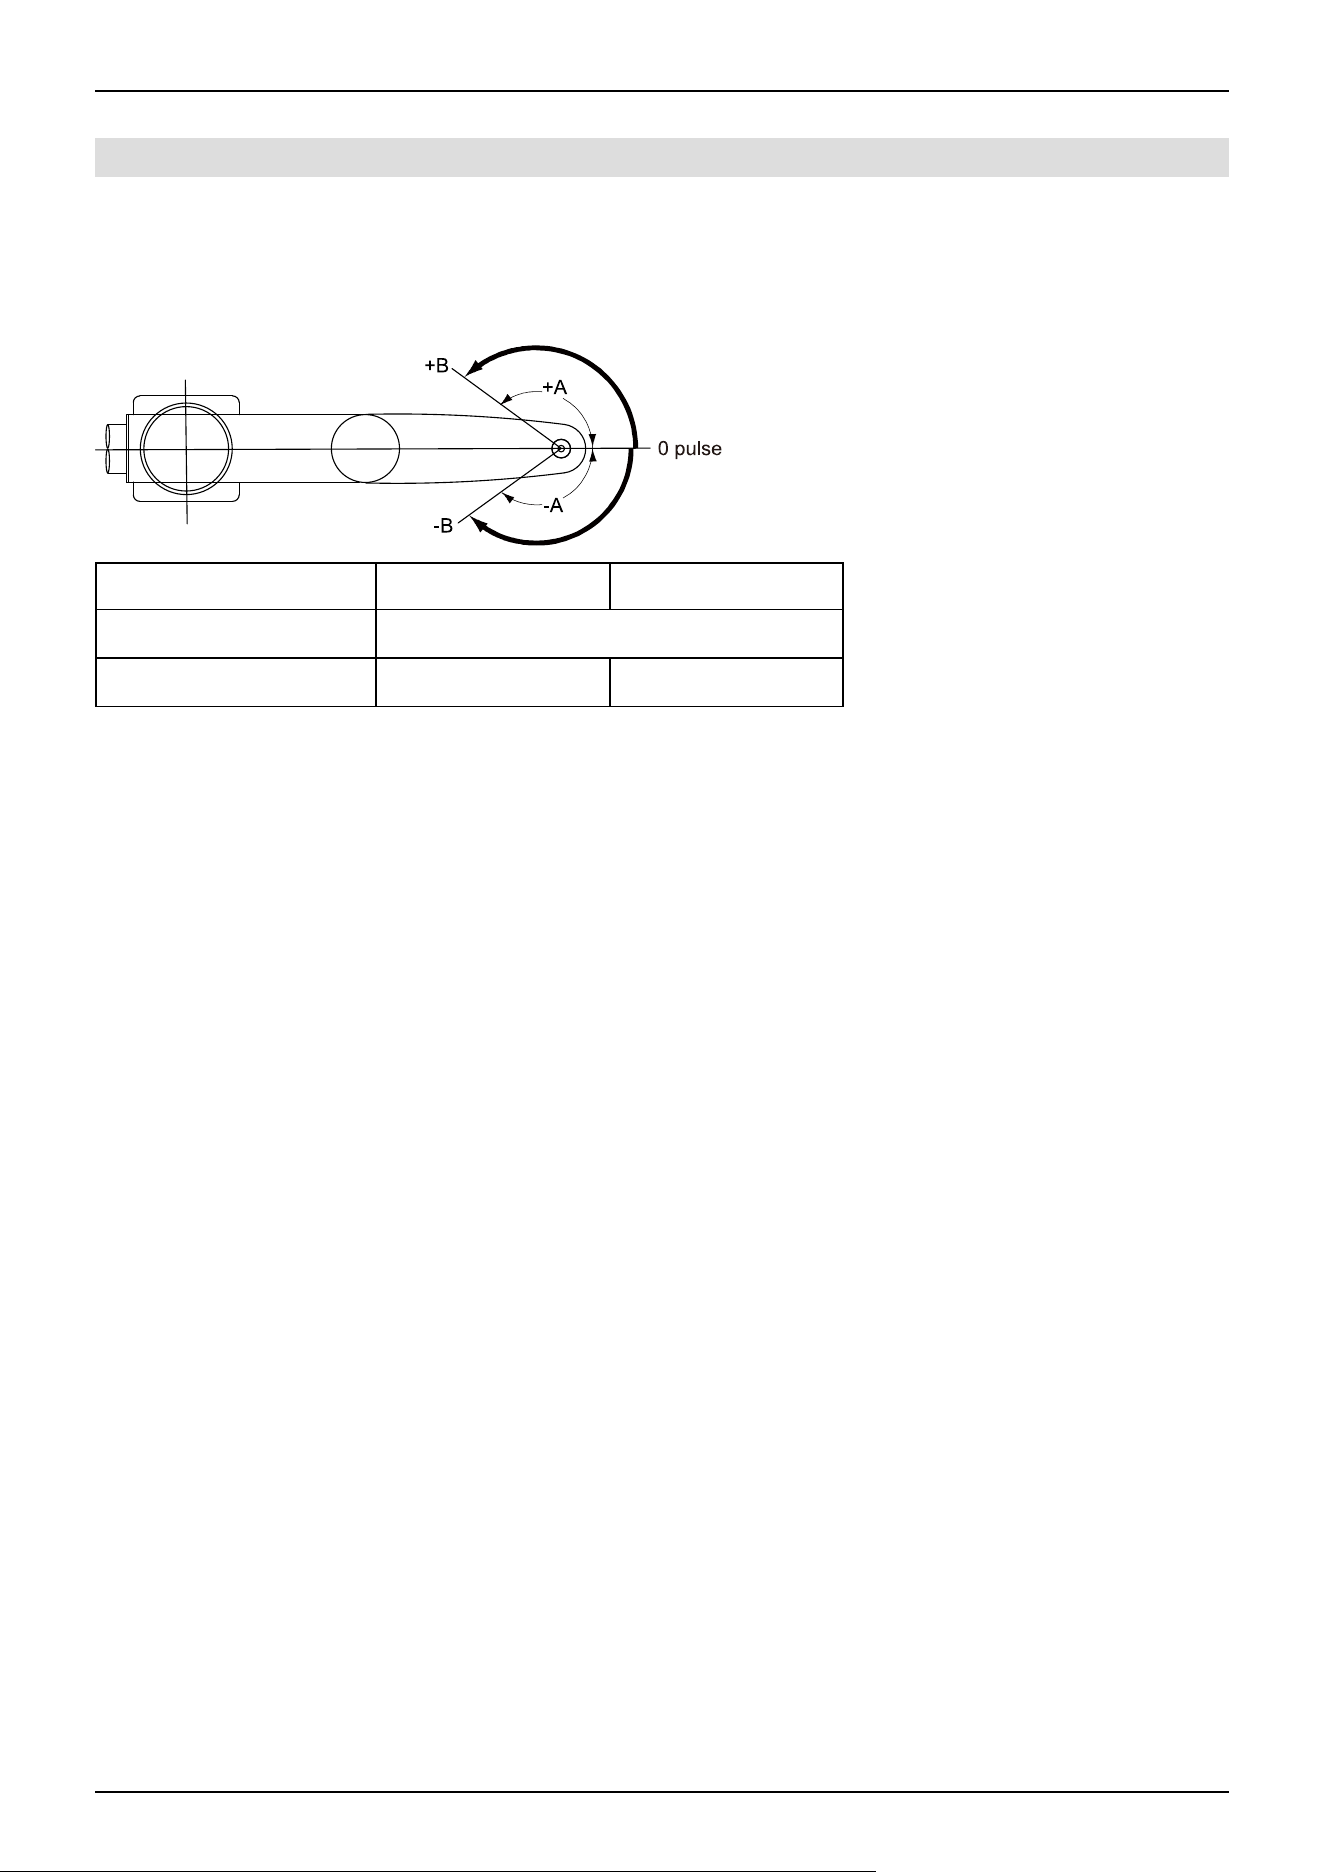
5.5.1.4 Joint #4 Maximum Pulse Range
The 0 (zero) pulse position of Joint #4 is the position where the flat surface near the end of the shaft faces toward the end of
Arm #2. (The orientation of Arm #2 does not matter.)
With the 0 pulse as a starting point, the counterclockwise pulse value is defined as positive (+), and the clockwise pulse value
is defined as negative (-).
GX10-B/GX10-C***** GX20-B/GX20-C*****
A: Max. motion range (deg.) ±360
B: Max. pulse range (pulse) ±1951517 ±2752512
Industrial Robot: SCARA Robots GX series Manual Rev.11
404
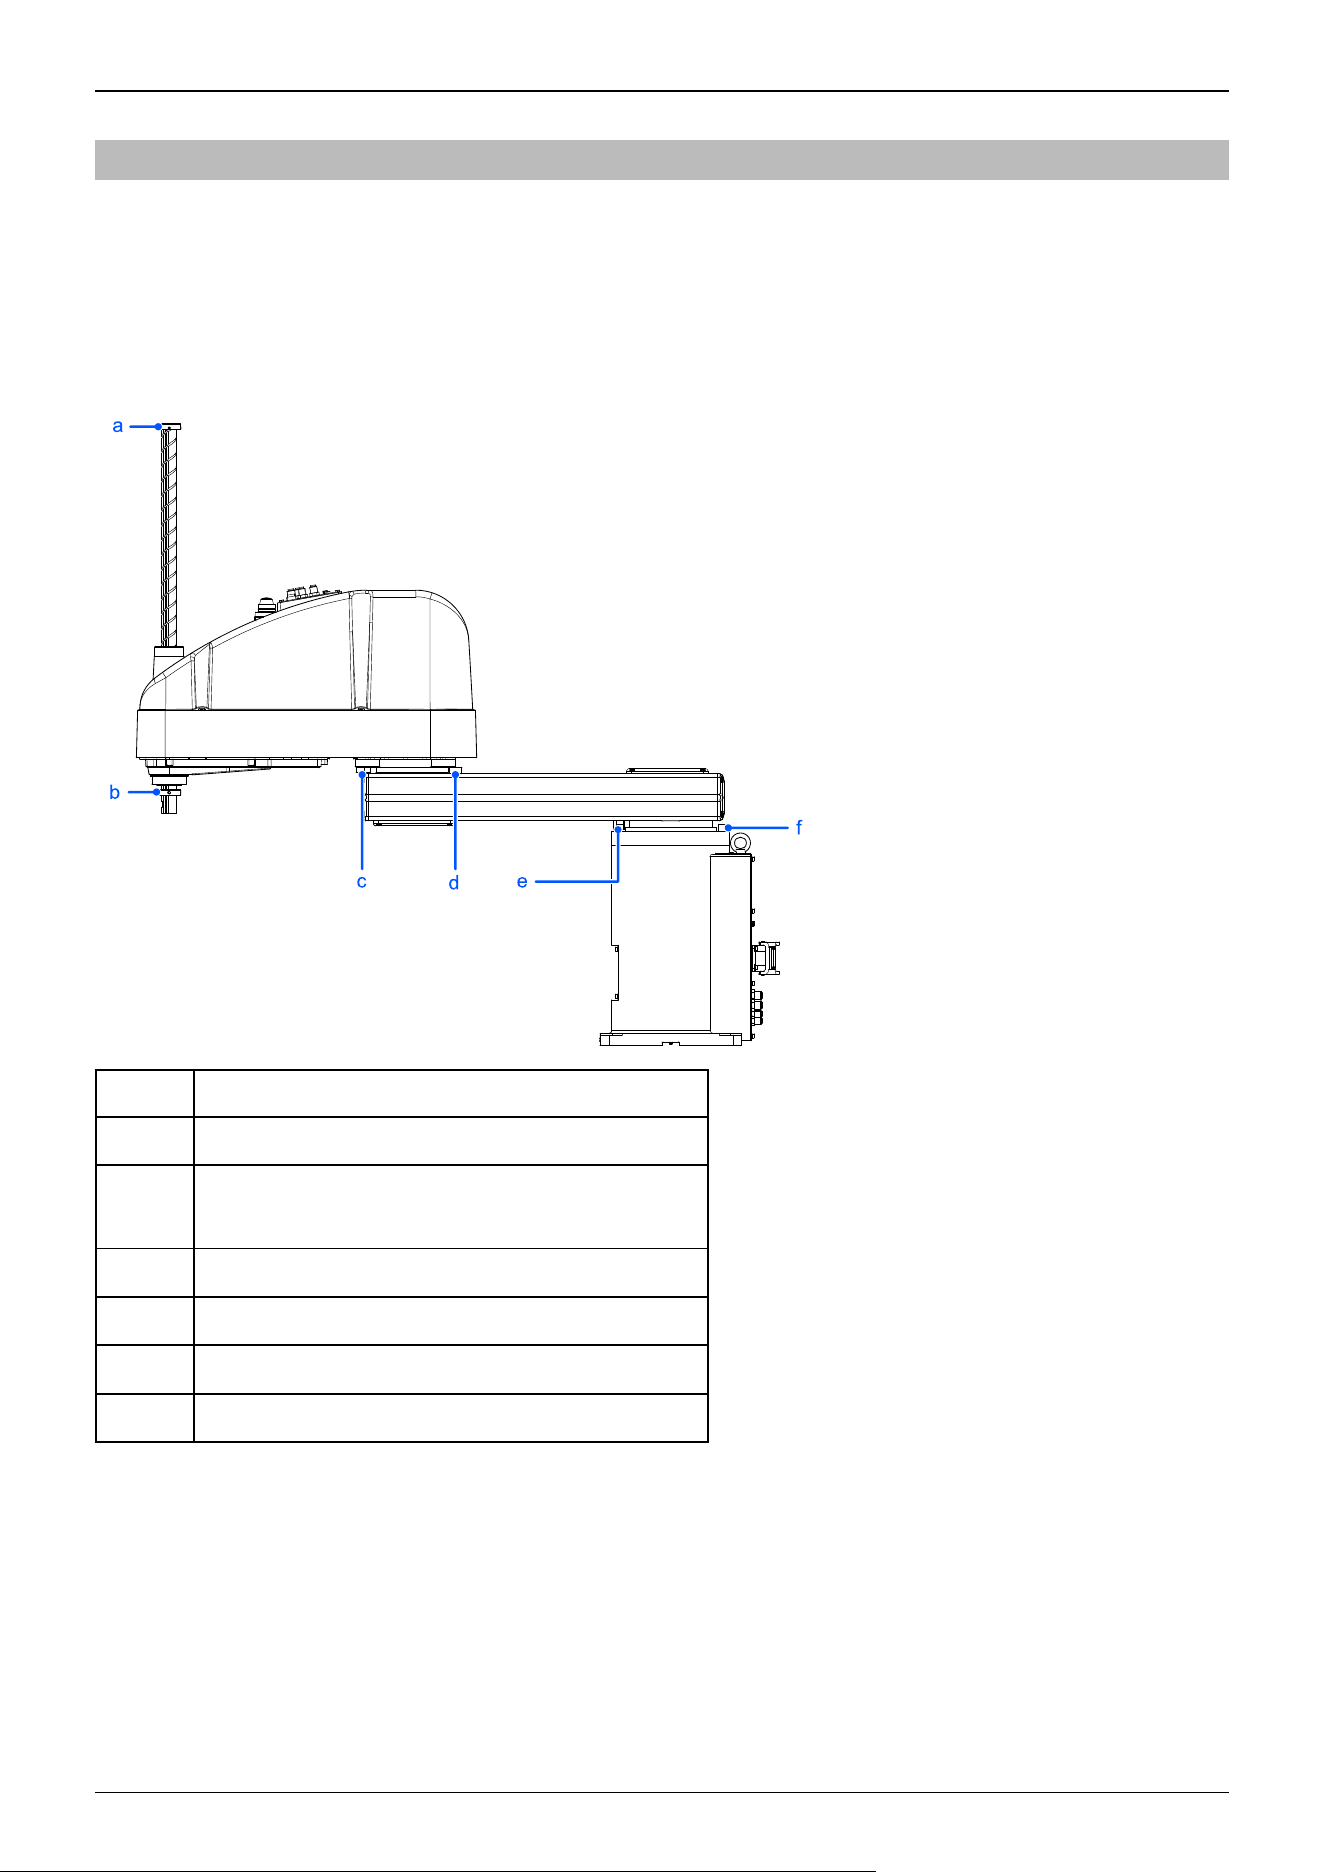
5.5.2 Setting the Work Envelope by Mechanical Stops
Mechanical stops set the absolute work envelope that physically limits where the Manipulator can move.
Both Joints #1 and #2 have threaded holes in positions corresponding to angles for the setting area. The positions of the
mechanical stops (variable) set the work envelope. Install the bolts in the threaded holes corresponding to the angles to be set.
Joint #3 can be set to any length less than the maximum stroke.
Table top mounting specifications
Symbol Description
a Joint #3 mechanical stop (lower limit mechanical stop)
b
Joint #3 mechanical stop (upper limit mechanical stop)
*Do not move the position.
c Joint #2 mechanical stop (variable)
d Joint #2 mechanical stop (fixed)
e Joint #1 mechanical stop (fixed)
f Joint #1 mechanical stop (variable)
Industrial Robot: SCARA Robots GX series Manual Rev.11
405
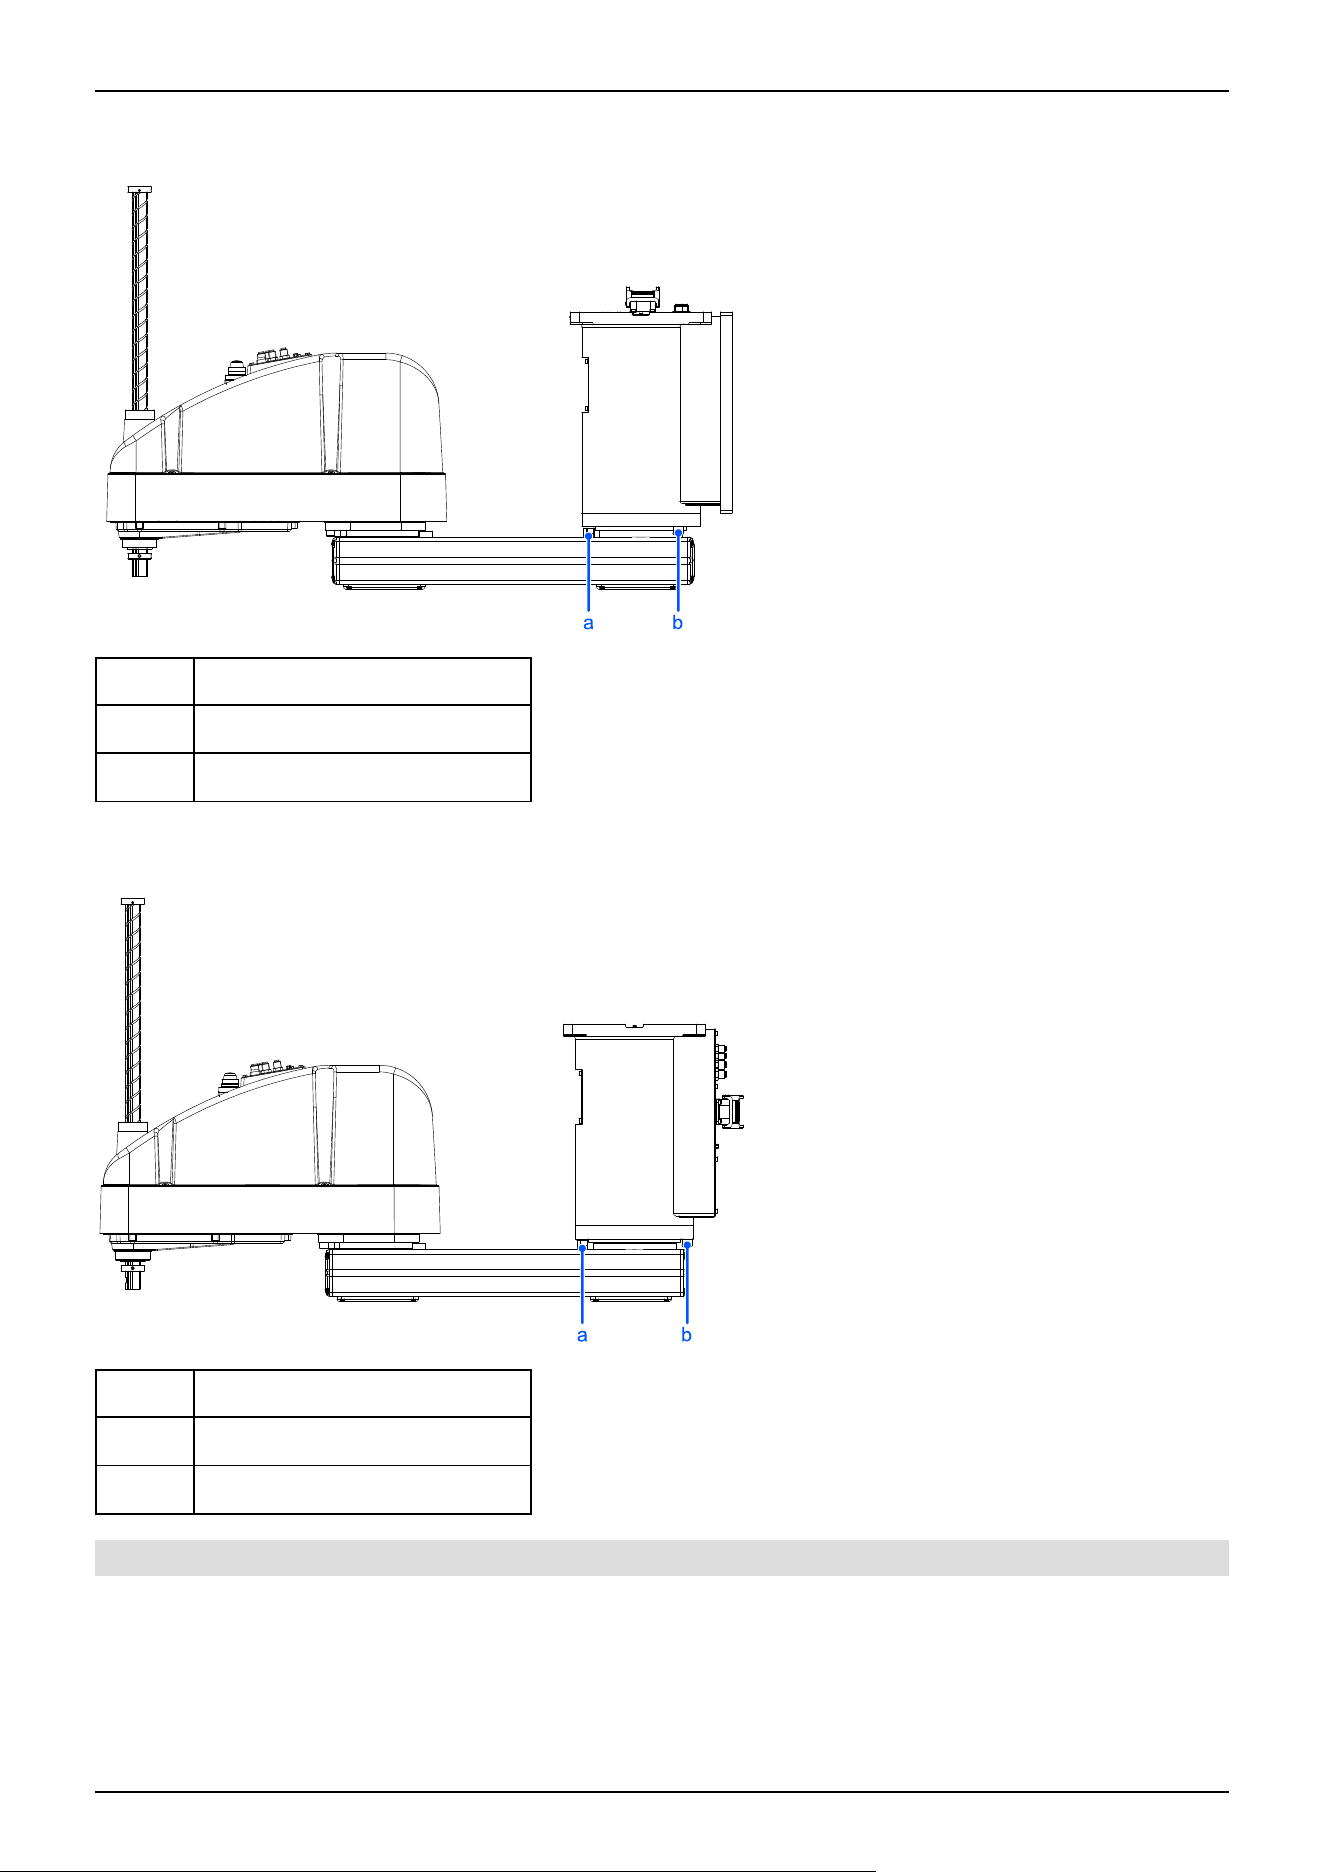
Wall Mounting Specifications
Only the stop positions that are different from the model with table top mounting specifications are explained here.
Symbol Description
a Joint #1 mechanical stop (fixed)
b Joint #1 mechanical stop (variable)
Ceiling mounting specifications
Only the stop positions that are different from the model with table top mounting specifications are explained here.
Symbol Description
a Joint #1 mechanical stop (fixed)
b Joint #1 mechanical stop (variable)
5.5.2.1 Setting the Mechanical Stops of Joints #1 and #2
Both Joints #1 and #2 have threaded holes in positions corresponding to angles for the setting area. The positions of the
mechanical stops (variable) set the work envelope.
Use the following procedure to install the bolts in the holes corresponding to the angle that you want to set.
1. Turn off the Controller.
Industrial Robot: SCARA Robots GX series Manual Rev.11
406
2. Install a hexagon socket head cap bolt into the threaded hole corresponding to the setting angle, and tighten it.
Joint #
Hexagon Socket Head
Cap Bolt
Number of
Bolts
Recommended
Tightening Torque
Strength
1 M12 × 20 full thread 1 127.4 N·m (1300 kgf·cm)
ISO898-1 property class 10.9 or 12.9
equivalent
2 M10 × 10 full thread 2 73.5 N⋅m (750 kgf⋅cm)
3. Turn on the Controller.
4. Set the pulse range corresponding to the new positions of the mechanical stops.
KEY POINTS
Be sure to set the pulse range inside the positions of the mechanical stop range.
Example: Setting Joint #1 to -105° to +105° and Joint #2 to -122.5° to +122.5° for the GX10-B854S
Execute the following command in [Command Window].
>JRANGE 1,-436907,5679787 'Sets the pulse range of Joint #1
>JRANGE 2,-2230045,2230045 'Sets the pulse range of Joint #2
>RANGE 'Confirms the setting value using the Range statement
-436907,5679787,-2230045,2230045,-2270823,0,-1951517,1951517
5. Move the arm by hand until it touches the mechanical stops to check that nothing will hinder the arm motion during
operation, such as by hitting peripheral equipment.
6. Operate the joint with the new settings at low speeds until it reaches the positions of the minimum and maximum values of
the pulse range. Check that the arm does not hit any mechanical stops.
(Check the position of the mechanical stops and the motion range that were set.)
Example: Setting Joint #1 to -105° to +105° and Joint #2 to -122.5° to +122.5° for the GX10-B854S
Execute the following command in [Command Window].
>MOTOR ON 'Turns on the motor
>POWER LOW 'Sets to low power mode
>SPEED 5 'Sets to low speed
>PULSE -436907,0,0,0 'Moves to the minimum pulse position of Joint #1
>PULSE 5679787,0,0,0 'Moves to the maximum pulse position of Joint #1
>PULSE 2621440,-2230045,0,0 'Moves to the minimum pulse position of Joint #2
>PULSE 2621440,2230045,0,0 'Moves to the maximum pulse position of Joint #2
The Pulse statement (Go Pulse statement) moves all joints to the specified positions at the same time. Set safe positions after
taking into consideration the motion of the joints whose pulse range have been changed and also the other joints.
In this example, when checking Joint #2, Joint #1 is moved to the 0° position (pulse value: 2621440) near the center of its work
envelope.
✏
Industrial Robot: SCARA Robots GX series Manual Rev.11
407
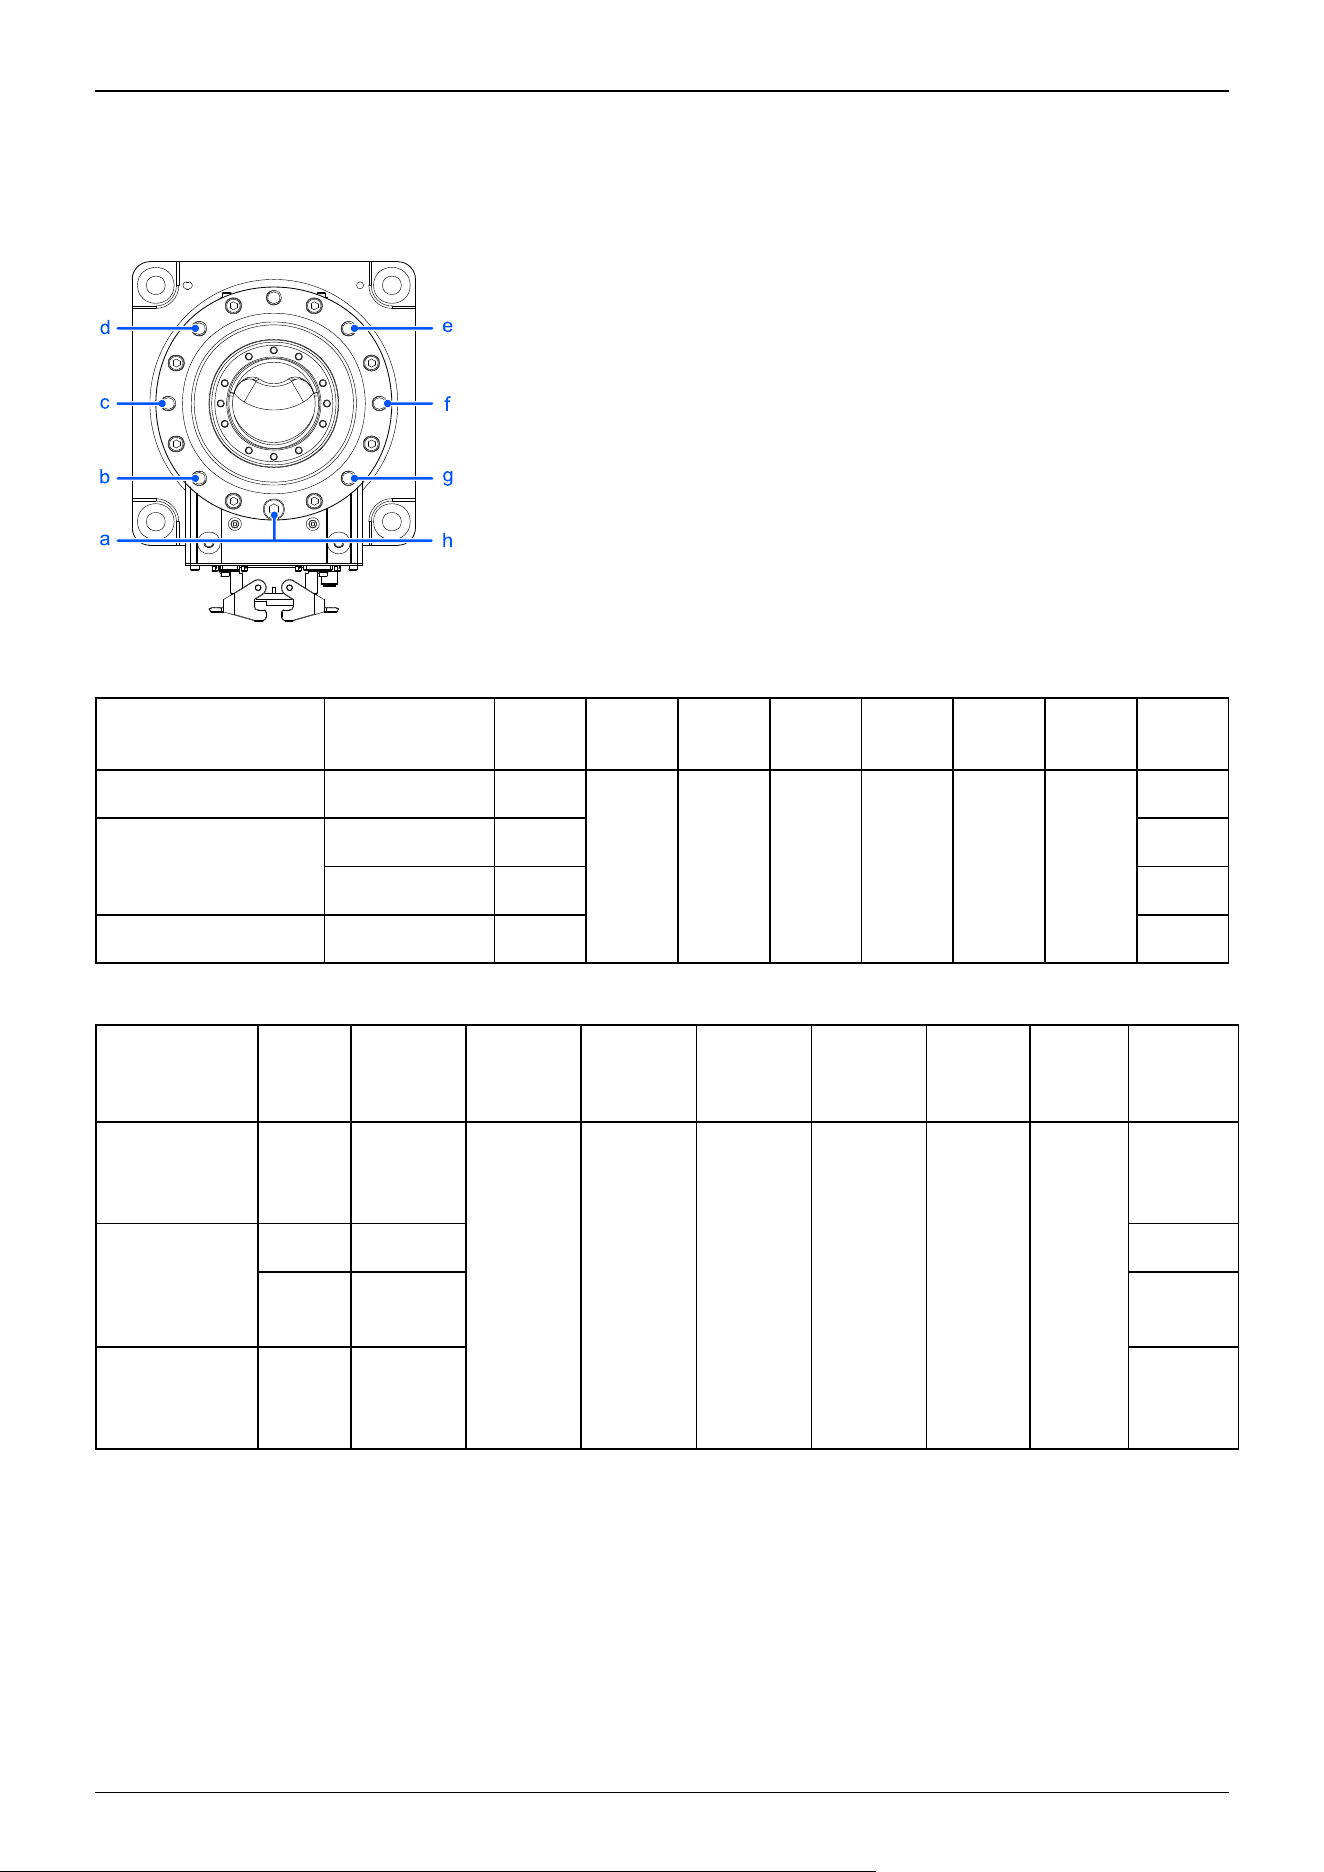
If the arm hits a mechanical stop or if an error occurs after the arm hits a mechanical stop, either reset the pulse range to a
narrower pulse range so that nothing blocks the arm motion, or extend the positions of the mechanical stops within the limit.
Joint #1 mechanical stop
Max. motion range (deg.):
Mounting
Specifications
Arm Length
(mm)
a b c d e f g h
Table top 650, 850, 1000 +152
+107 +60 +15 -15 -60 -107
-152
Ceiling
650 - -
850, 1000 +152 -152
Wall 650, 850, 1000 - -
Max. pulse range (pulse):
Mounting
Specifications
Arm
Length
(mm)
a b c d e f g h
Table top
650,
850,
1000
+7048761
+5738041 +4369067 +3058347 +2184534 +873814 -495161
-1805881
Ceiling
650 - -
850,
1000
+7048761 -1805881
Wall
650,
850,
1000
- -
Joint #2 mechanical stop
Industrial Robot: SCARA Robots GX series Manual Rev.11
408
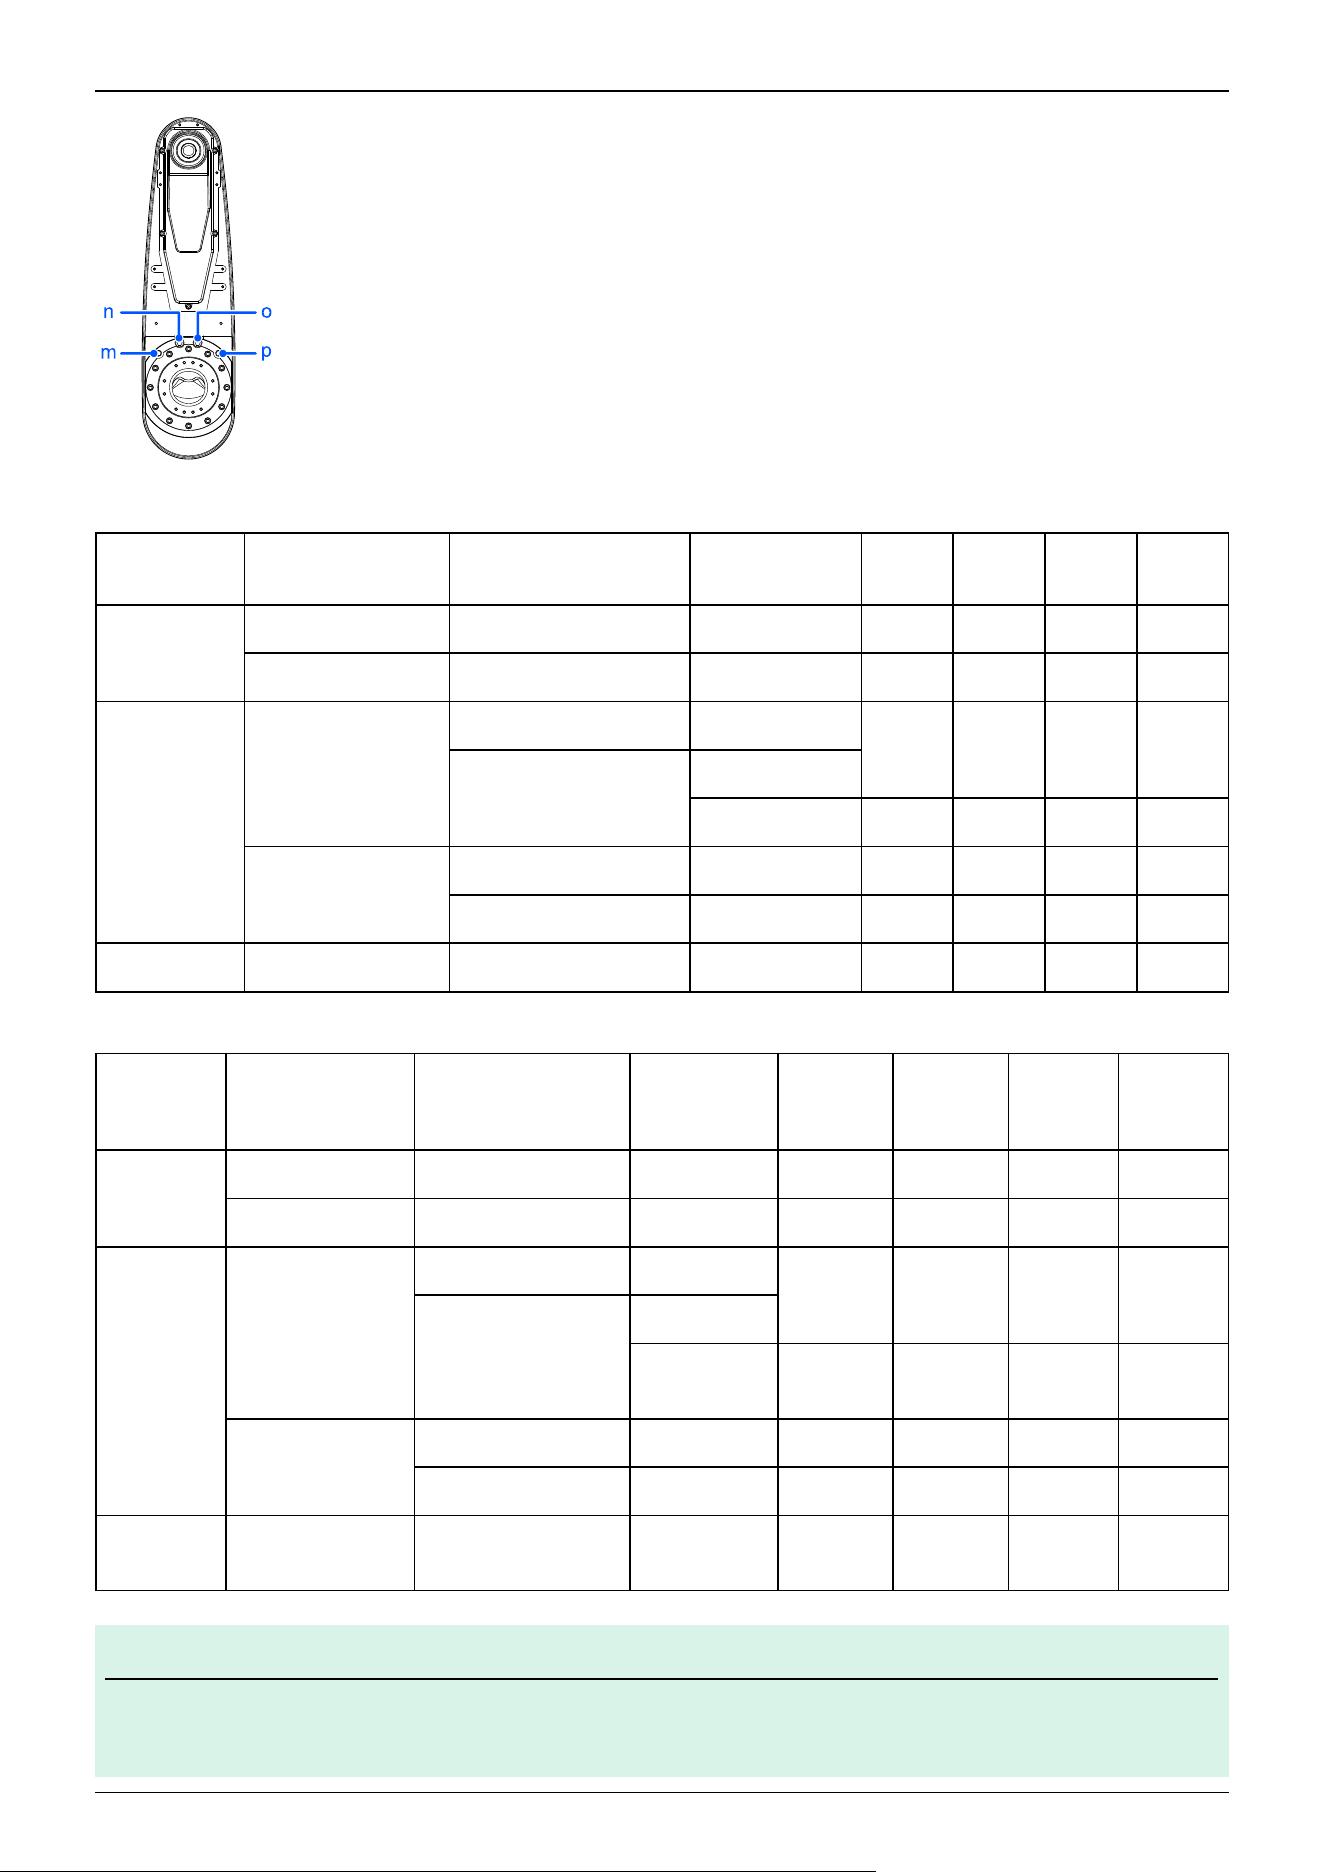
Max. motion range (deg.):
Arm Length
(mm)
Mounting
Specifications
Environmental
Specifications
Z-value Range
(mm)
m n o q
650
Table top S, C, P - +122.5 +152.5 -152.5 -122.5
Ceiling, Wall S, C, P - +100 +130 -130 -100
850
Table top
S -
+122.5 +152.5 -152.5 -122.5
C,P
Z: 0 to –360
Z: –360 to –390 +121 +151 -151 -121
Ceiling, Wall
S - +122.5 +152.5 -152.5 -122.5
C, P - +100 +130 -130 -100
1000 Table, Ceiling, Wall S, C, P - +122.5 +152.5 -152.5 -122.5
Max. pulse range (pulse):
Arm
Length
(mm)
Mounting
Specifications
Environmental
Specifications
Z-value
Range (mm)
m n o q
650
Table top S,C,P - +2230045 +2776178 -2776178 -2230045
Ceiling, Wall S,C,P - +1820445 +2366578 -2366578 -1820445
850
Table top
S -
+2230045 +2776178 -2776178 -2230045
C,P
Z: 0 to –360
Z: –360 to –
390
+2202738 +2748872 -2748872 -2202738
Ceiling, Wall
S - +2230045 +2776178 -2776178 -2230045
C,P - +1820445 +2366578 -2366578 -1820445
1000
Table, Ceiling,
Wall
S,C,P - +2230045 +2776178 -2776178 -2230045
KEY POINTS
Z: In the -360 to -390 mm range, the area is limited due to interference between the Manipulator body and the
arm.
✏
Industrial Robot: SCARA Robots GX series Manual Rev.11
409
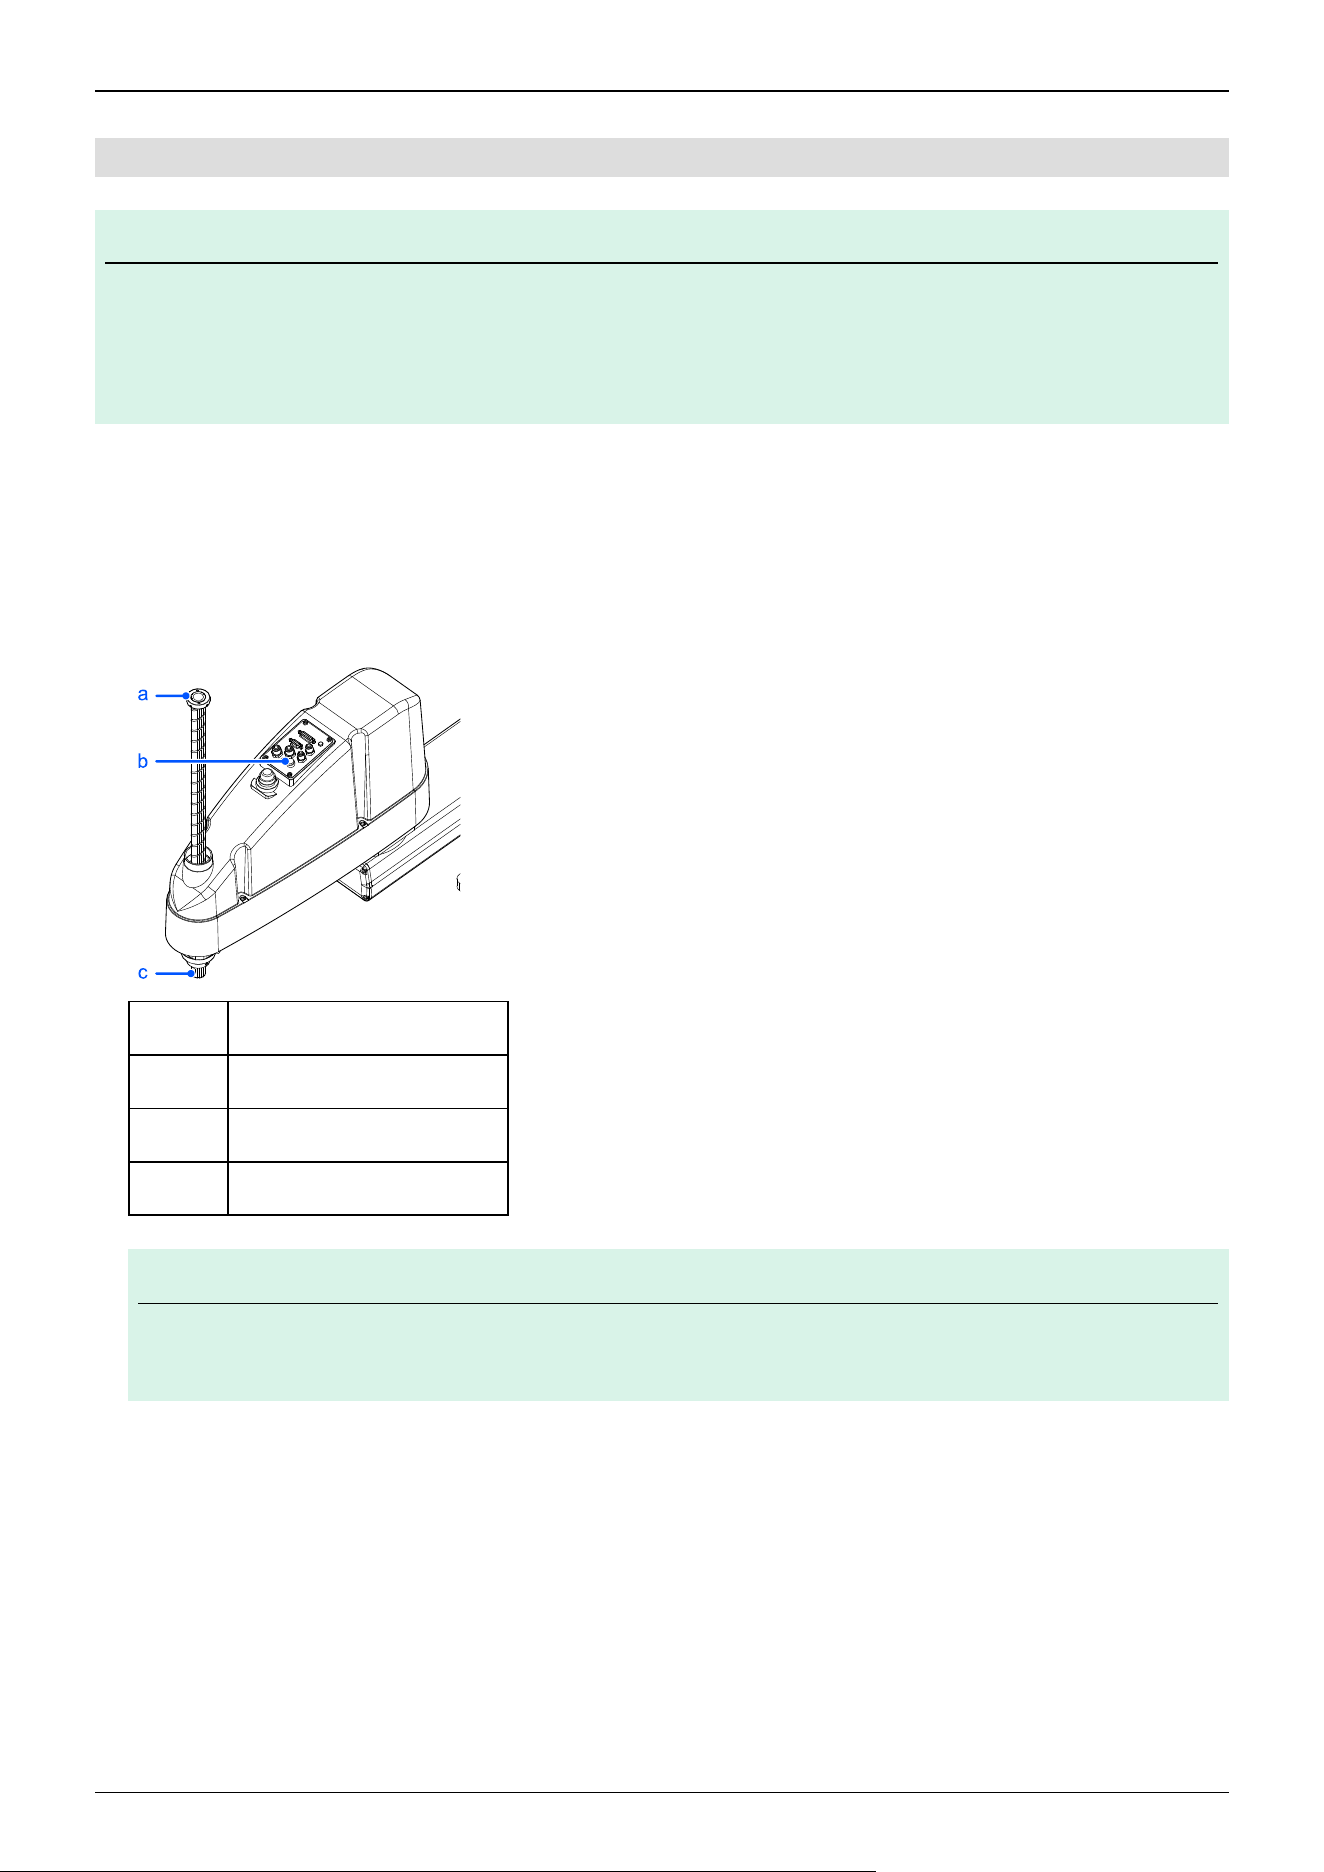
5.5.2.2 Setting the Mechanical Stop of Joint #3
KEY POINTS
This method can be used only for the Manipulator models with standard specifications (GX10-B/GX10-C***S*).
For Manipulator models with standard specifications (GX20-B/GX20-C***S*), cleanroom specifications (GX10-
B/GX10-C/GX20-B/GX20-C***C*), and protected-models (GX10-B/GX10-C/GX20-B/GX20-C***P*), the work
envelope set by the Joint #3 mechanical stop cannot be changed.
To change from the factory default position
1. Turn on the Controller, and turn off the motors using the Motor OFF statement.
2. Push up the shaft while pressing the brake release switch.
Do not push the shaft up to its upper limit or it will be difficult for the arm top cover to be removed. Push the shaft up to a
position where the Joint #3 mechanical stop can be changed.
Symbol Description
a Lower limit mechanical stop
b Brake release switch
c Shaft
KEY POINTS
When you press the brake release switch, the shaft may lower or rotate due to the weight of the hand. Be
sure to hold the shaft by hand while pressing the switch.
3. Turn off the Controller.
4. Loosen the lower limit mechanical stop screws (2 × M4 × 8, 2 × M6 × 6).
When changing the lower limit mechanical stop from the factory default position, use only the M6 set screws.
Remove the M4 set screws from the lower limit mechanical stop and do not lose them. They are used again when returning
✏
✏
Industrial Robot: SCARA Robots GX series Manual Rev.11
410
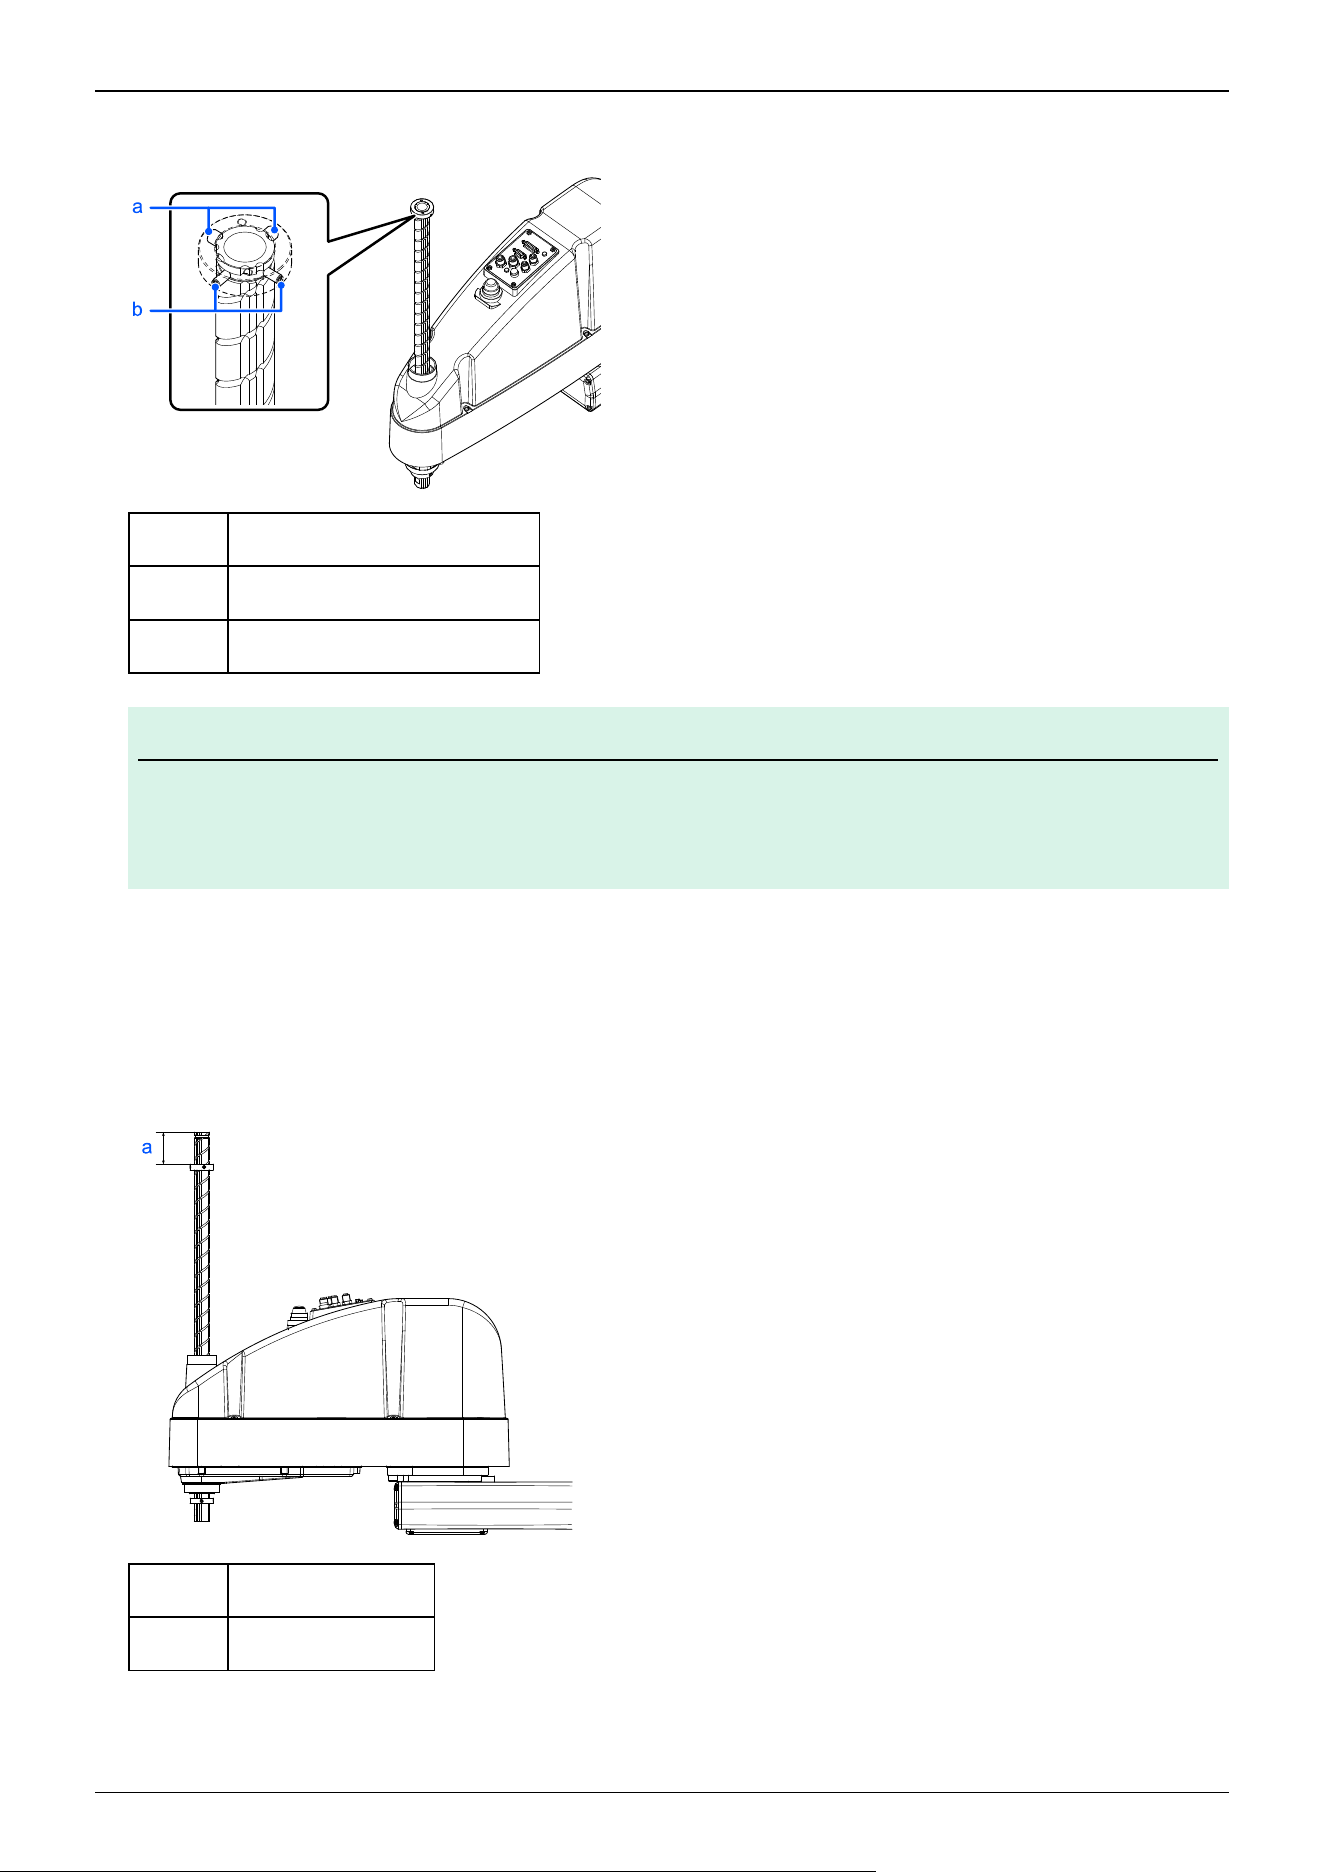
to the factory default position.
Symbol Description
a M6 × 6 set screw (recessed end)
b M4 × 8 set screw (flat tip)
KEY POINTS
A mechanical stop is mounted on both the top and bottom of Joint #3. However, only the position of the lower
limit mechanical stop on the top can be changed. Do not remove the upper limit mechanical stop on the
bottom because the origin position of Joint #3 is determined by this stop.
5. The upper end of the shaft defines the maximum stroke position. Move the lower limit mechanical stop down by the length
that you want to limit the stroke.
For example, when the lower limit mechanical stop is set at the "420 mm" stroke, the lower limit Z coordinate value is
"-420". To change this value to "-320", move the lower limit mechanical stop down by "100 mm". Use calipers or similar
tool to measure the distance when adjusting the mechanical stop.
Symbol Description
a Measurement length
6. Tighten the set screws (2 × M6 × 6) of the lower limit mechanical stop firmly at the positions shown in the figure below
(one in the helical groove and one on the cylindrical surface).
✏
Industrial Robot: SCARA Robots GX series Manual Rev.11
411
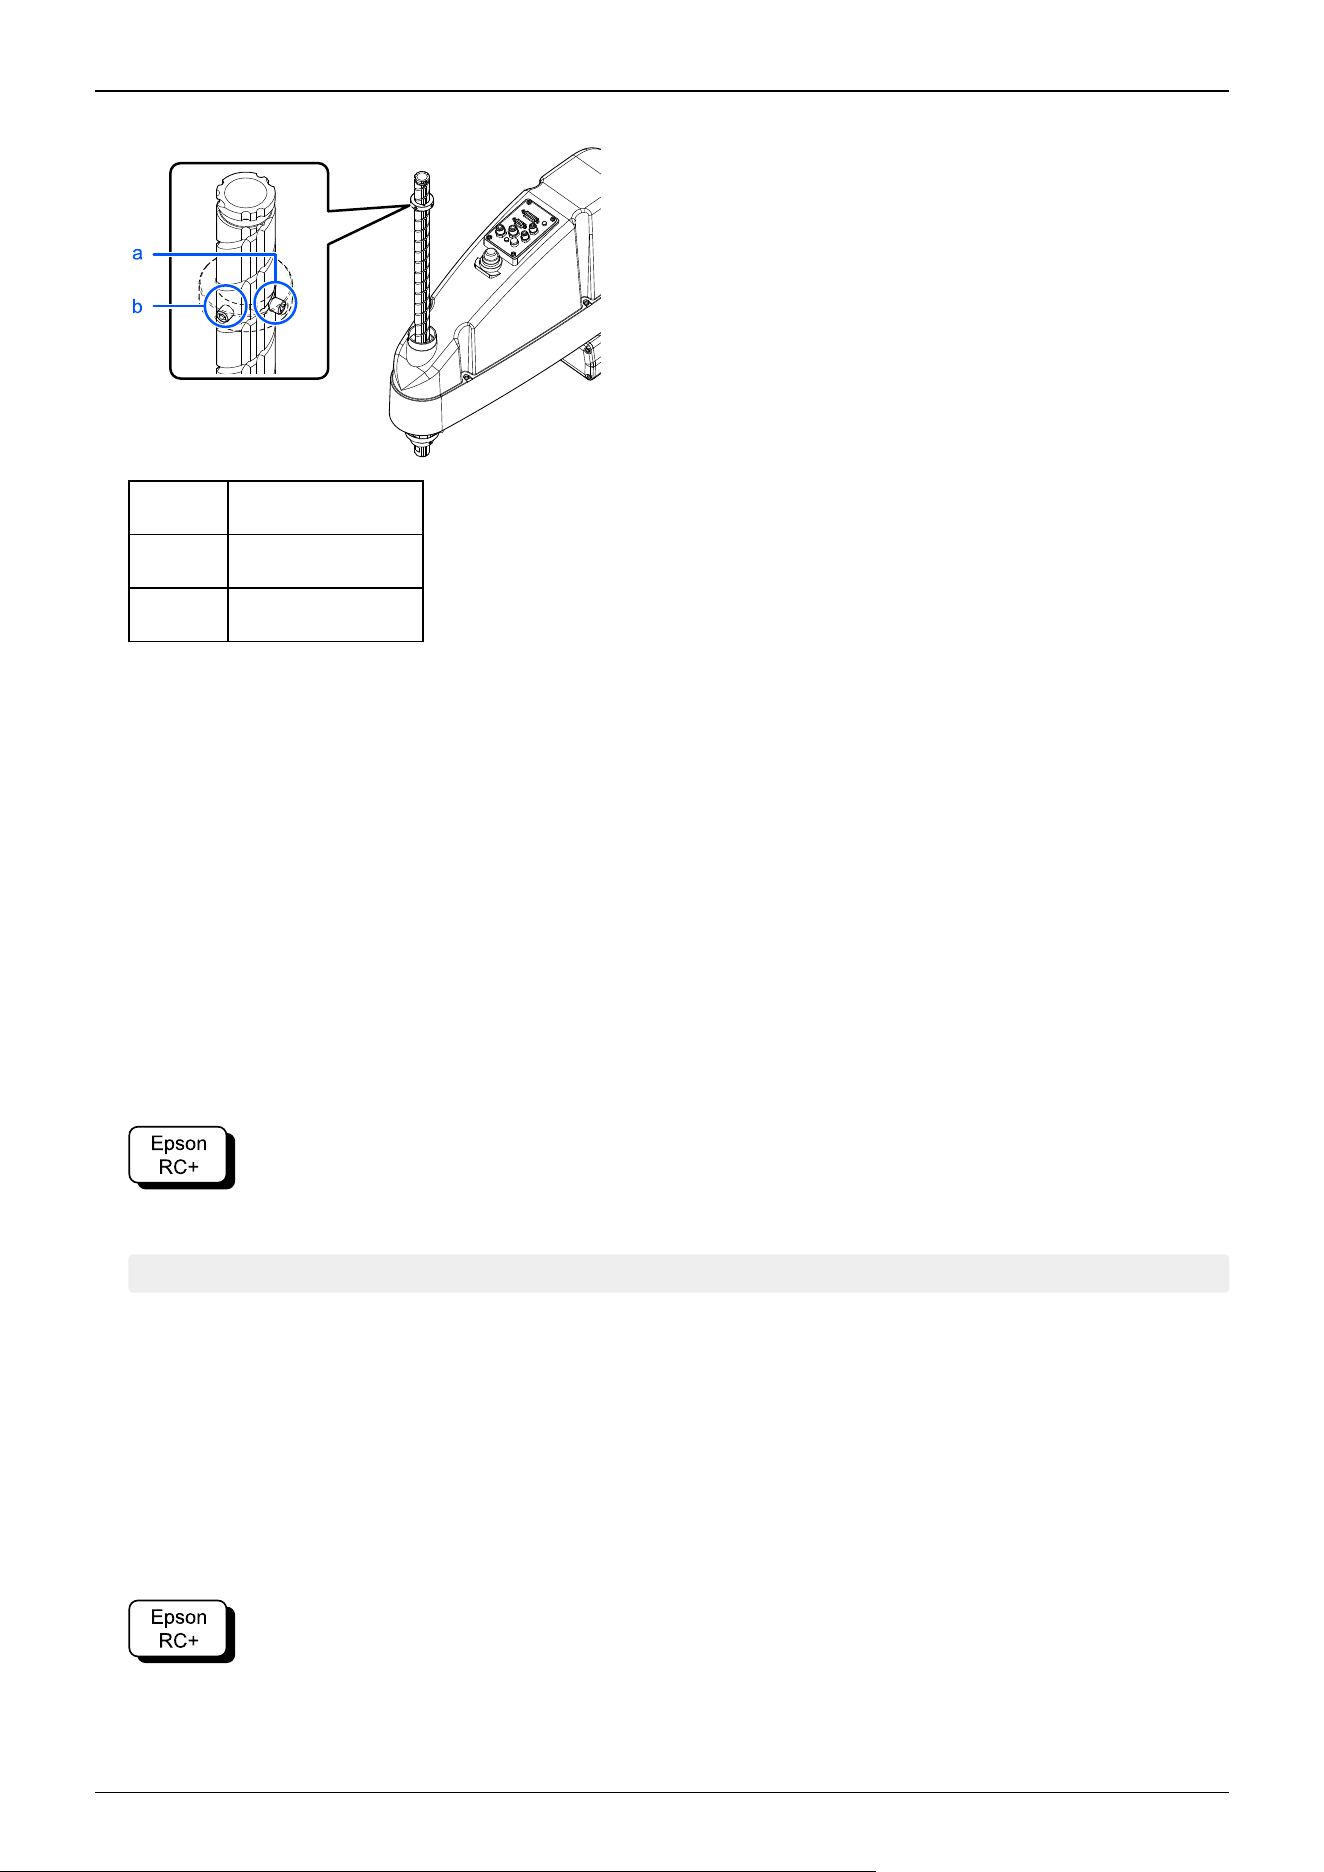
Recommended tightening torque: 8.0 ± 0.4 N⋅m(82 ± 4 kgf⋅cm)
Symbol Description
a Helical groove
b Cylindrical surface
7. Turn on the Controller.
8. Press down Joint #3 while pressing the brake release switch, and then check the lower limit position. Do not lower the
mechanical stop too far. Otherwise, the joint may not reach a target position.
9. Calculate the lower limit pulse value of the pulse range using the formula shown below, and set the value.
The result of the calculation is always negative because the lower limit Z coordinate value is negative.
GX10-B/GX10-C**1S (Z: -180 mm): Lower limit of pulse = (Lower limit Z coordinate value)/50 × 131072 ×
(66/32)
GX10-B/GX10-C**4S (Z: -420 mm): Lower limit of pulse = (Lower limit Z coordinate value)/50 × 131072 ×
(66/32)
Example: To lower the mechanical stop by 80 mm and change the lower limit Z coordinate value
to"-100" with a 180 mm stroke
(-100)/50 × 131072 × (66/32) = -540672
Execute the following command in [Command Window].
>JRANGE 3,-540672,0 'Sets the pulse range of Joint #3
10. Using the Pulse statement (Go Pulse statement), move Joint #3 to the lower limit position of the pulse range that was set at
low speed.
If the mechanical stop range is less than the pulse range, Joint #3 will hit the mechanical stop and an error will occur. When
an error occurs, either change the pulse range to a narrower setting or extend the position of the mechanical stop within the
limit.
Example: To lower the mechanical stop by 80 mm and change the lower limit Z coordinate value to
"-100" with a 180 mm stroke
Execute the following command in [Command Window].
Industrial Robot: SCARA Robots GX series Manual Rev.11
412

>MOTOR ON ' Turns on the motor
>SPEED 5 ' Sets to low speed
>PULSE 0,0,- 540672,0 ' Moves to the lower limit pulse position of
Joint #3
(In this example, all pulses except those for Joint #3 are "0". Substitute these "0" values with the other pulse values to
specify a position where interference will not occur even when lowering Joint #3.)
Industrial Robot: SCARA Robots GX series Manual Rev.11
413
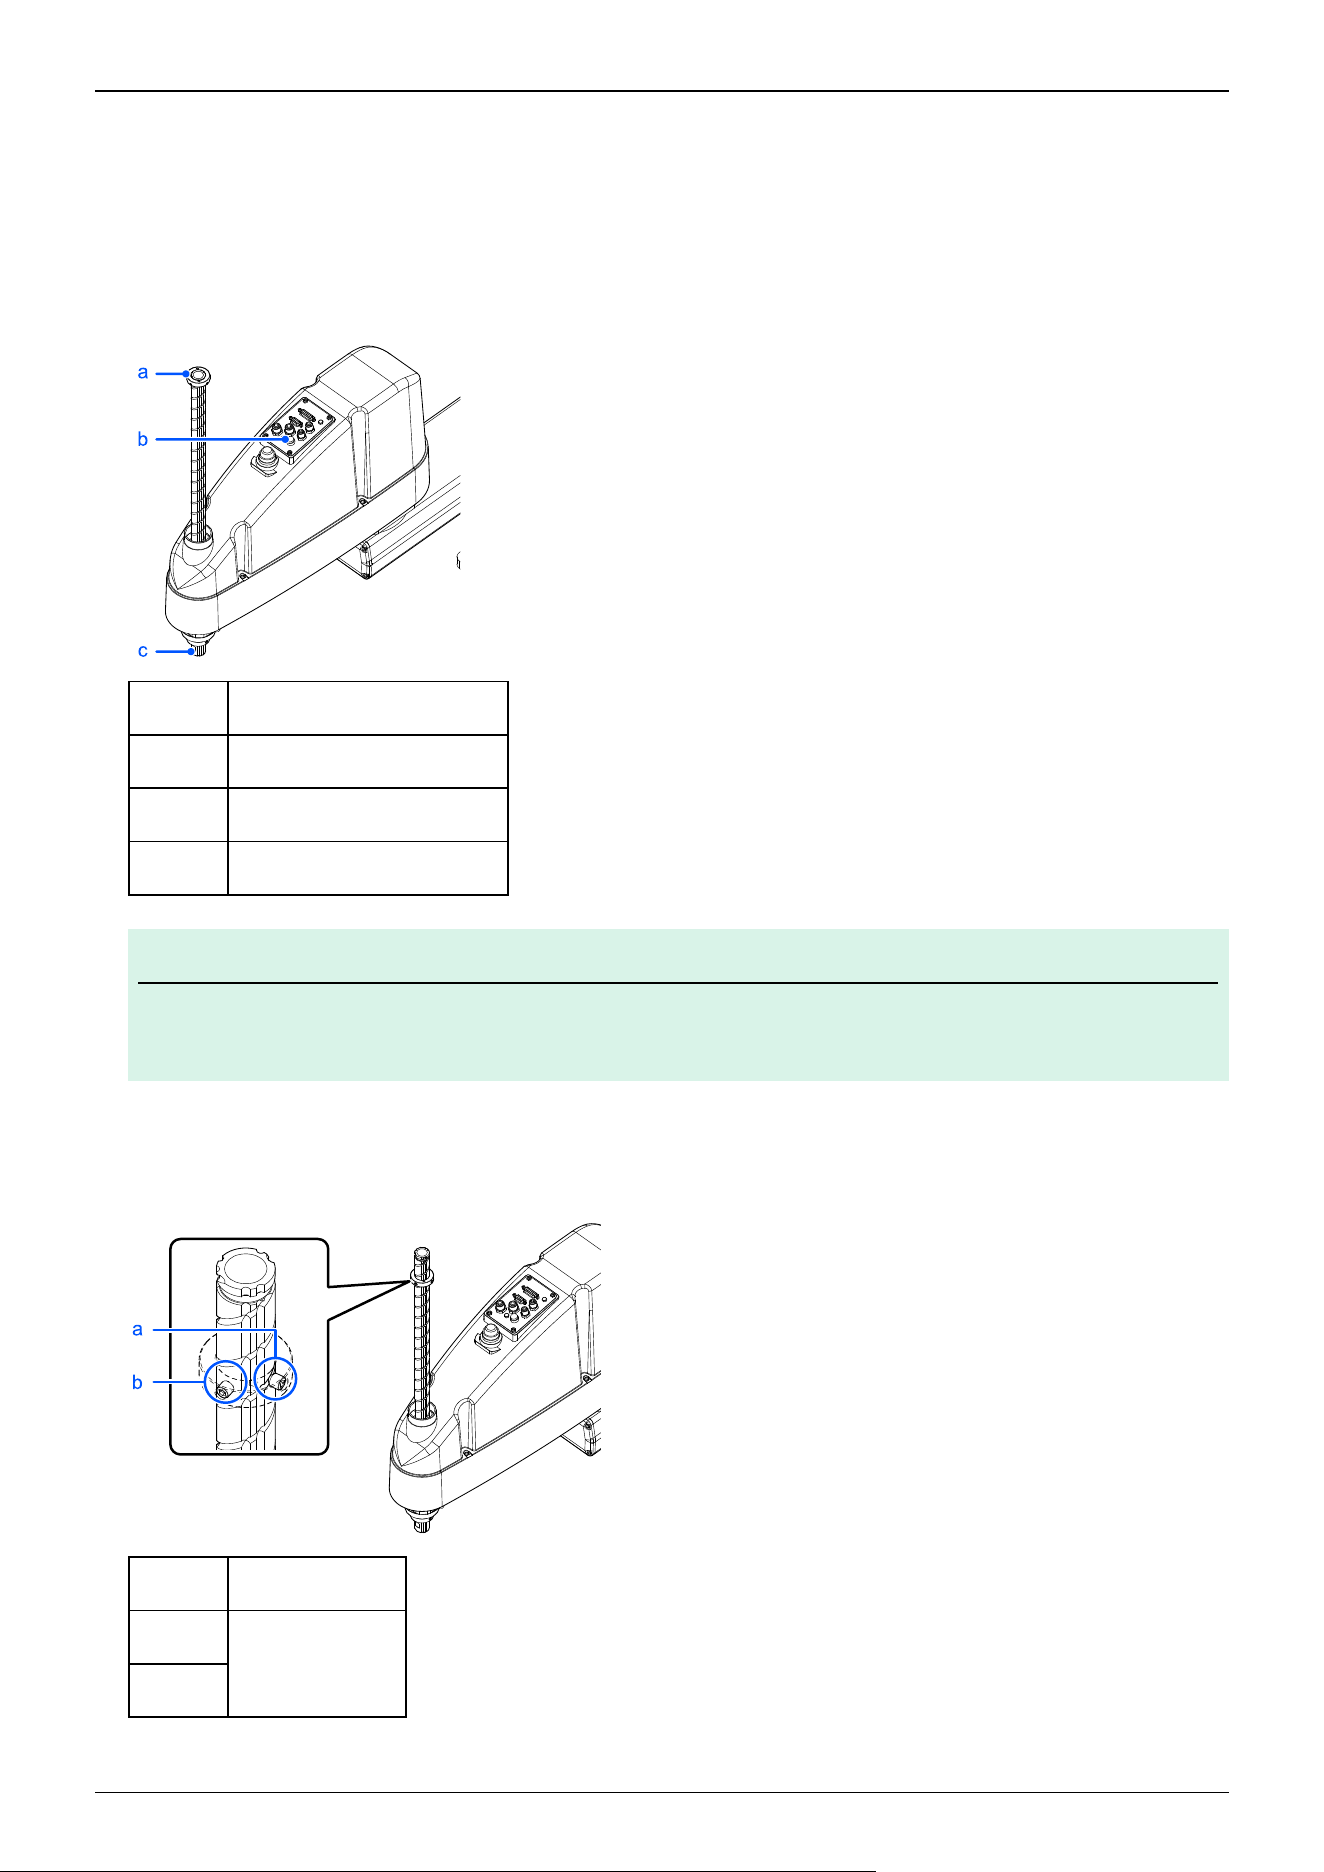
To return to the factory default position
1. Turn on the Controller, and turn off the motors using the Motor OFF statement.
2. Push up the shaft while pressing the brake release switch.
Do not push the shaft up to its upper limit or it will be difficult for the arm top cover to be removed. Push the shaft up to a
position where the Joint #3 mechanical stop can be changed.
Symbol Description
a Lower limit mechanical stop
b Brake release switch
c Shaft
KEY POINTS
When you press the brake release switch, the shaft may lower or rotate due to the weight of the hand. Be
sure to hold the shaft by hand while pressing the switch.
3. Turn off the Controller.
4. Loosen the lower limit mechanical stop screws (2 × M6 × 6).
Symbol Description
a
M6 × 6 set screw
b
✏
Industrial Robot: SCARA Robots GX series Manual Rev.11
414
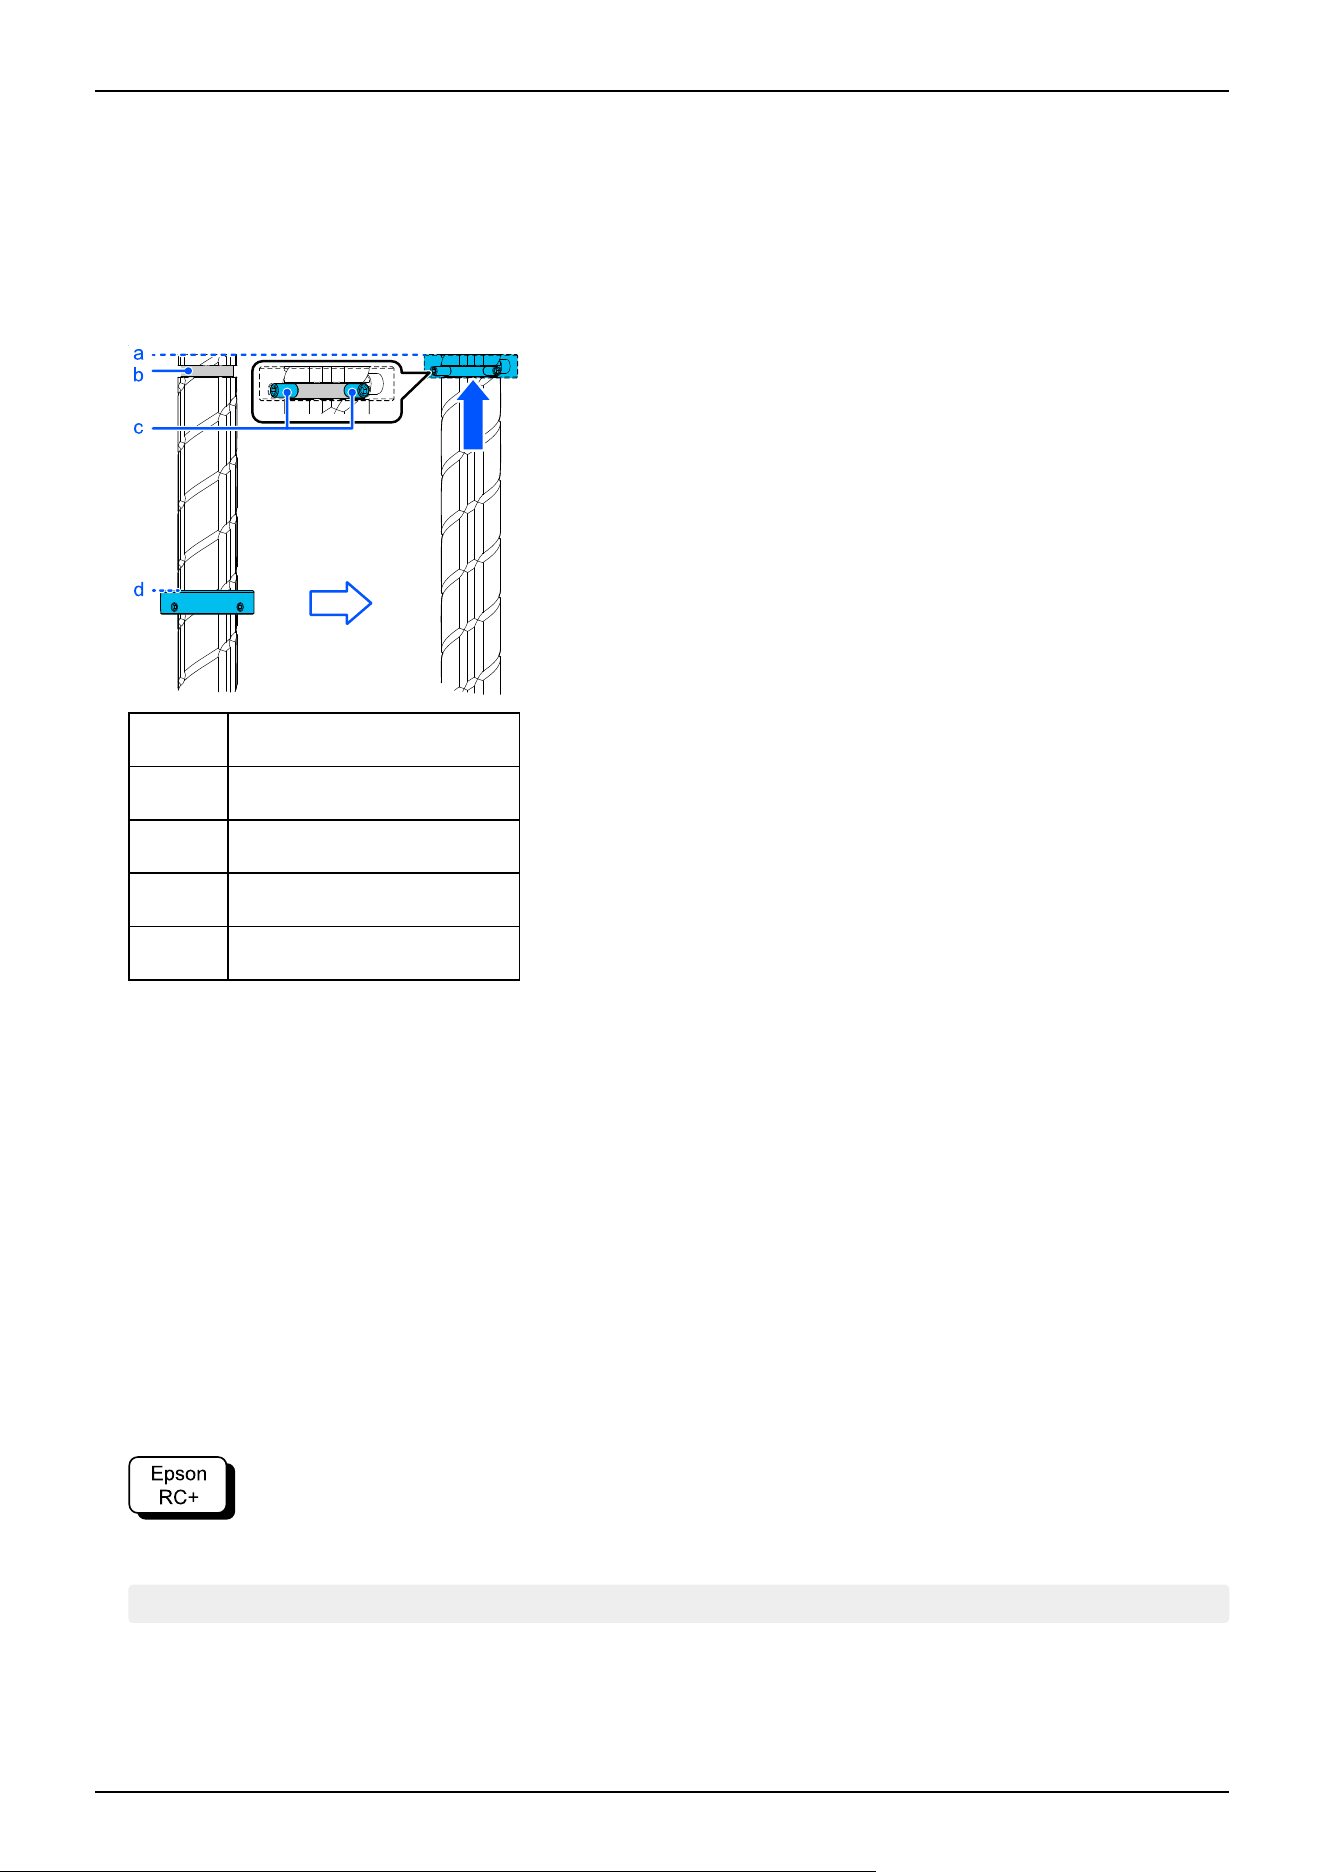
5. Prepare the 2 × M4 × 8 set screws removed in step 4 of "To change from the factory default position."
Adjust so that the shaft groove and set screws (2 × M4 × 8) are in the positions shown below, and insert the set screws (2 ×
M4 × 8).
Adjust so that the upper end face of the shaft is aligned with the upper end face of the mechanical stop. Securely tighten the
set screws (2 × M4 × 8).
Recommended tightening torque: 2.4 ± 0.1 N⋅m(24 ± 1 kgf⋅cm)
Symbol Description
a Upper end of shaft
b Groove on shaft
c Set screw
d Upper end of mechanical stop
6. Insert the set screws (2 × M6 × 6) of the lower limit mechanical stop from the outer surface of the lower limit mechanical
stop.
7. Turn on the Controller.
8. Press down Joint #3 while pressing the brake release switch, and then check the lower limit position. Do not lower the
mechanical stop too far. Otherwise, the joint may not reach a target position.
9. Calculate the lower limit pulse value of the pulse range using the formula shown below, and set the value.
The result of the calculation is always negative because the lower limit Z coordinate value is negative.
GX10-B/GX10-C**1S (Z: -180 mm): Lower limit of pulse = (-180)/50 × 131072 × (66/32) = -973210
GX10-B/GX10-C**4S (Z: -420 mm): Lower limit of pulse = (-420)/50 × 131072 × (66/32) = -2270823
Example: To return the mechanical stop to its factory default position after being lowered by 80 mm
with a stroke of 180 mm
Execute the following command in [Command Window].
>JRANGE 3,-973210,0 'Sets the pulse range of Joint #3
10. Using the Pulse statement (Go Pulse statement), move Joint #3 to the lower limit position of the pulse range that was set at
low speed.
If the mechanical stop range is less than the pulse range, Joint #3 will hit the mechanical stop and an error will occur. When
Industrial Robot: SCARA Robots GX series Manual Rev.11
415
an error occurs, either change the pulse range to a narrower setting or extend the position of the mechanical stop within the
limit.
Example: To return the mechanical stop to its factory default position after being lowered by 80 mm
with a stroke of 180 mm
Execute the following command in [Command Window].
>MOTOR ON 'Turns on the motor
>SPEED 5 'Sets to low speed
>PULSE 0,0,- 973210,0 ' Moves to the lower limit pulse position of Joint #3
(In this example, all pulses except those for Joint #3 are "0". Substitute these "0" values with the other pulse values to
specify a position where interference will not occur even when lowering Joint #3.)
5.5.3 Setting the Rectangular Range in the XY Coordinate System of the
Manipulator
(For Joints #1 and #2)
Use this procedure to set the upper and lower limits of the X and Y coordinates.
This setting is a software-based limit only, and so it does not change the maximum physical range. The maximum physical
range is based on the position of the mechanical stops.
Go to [Tools] - [Robot Manager] - [XYZ Limits] panel, and make the setting.
This can also be set using the XYLim statement in [Command Window].
5.5.4 Standard Work Envelope
The following "work envelope" diagrams show the model with standard (maximum) specifications. When each joint motor is
under servo control, the center of the Manipulator shaft's lowest point moves in the ranges shown in the figure.
Range to mechanical stop
This is the range where the center of shaft’s lowest point can be moved when each joint motor is not under servo control.
Mechanical stop
This is the stop that sets the absolute work envelope where the Manipulator cannot move beyond mechanically.
Maximum zone
This is the range that contains the farthest reach of the arms where interference can occur. If the maximum radius of the
hand exceeds 60 mm, add the "Range to mechanical stop" and the "Radius of the hand." The total value is specified as the
maximum zone.
Industrial Robot: SCARA Robots GX series Manual Rev.11
416
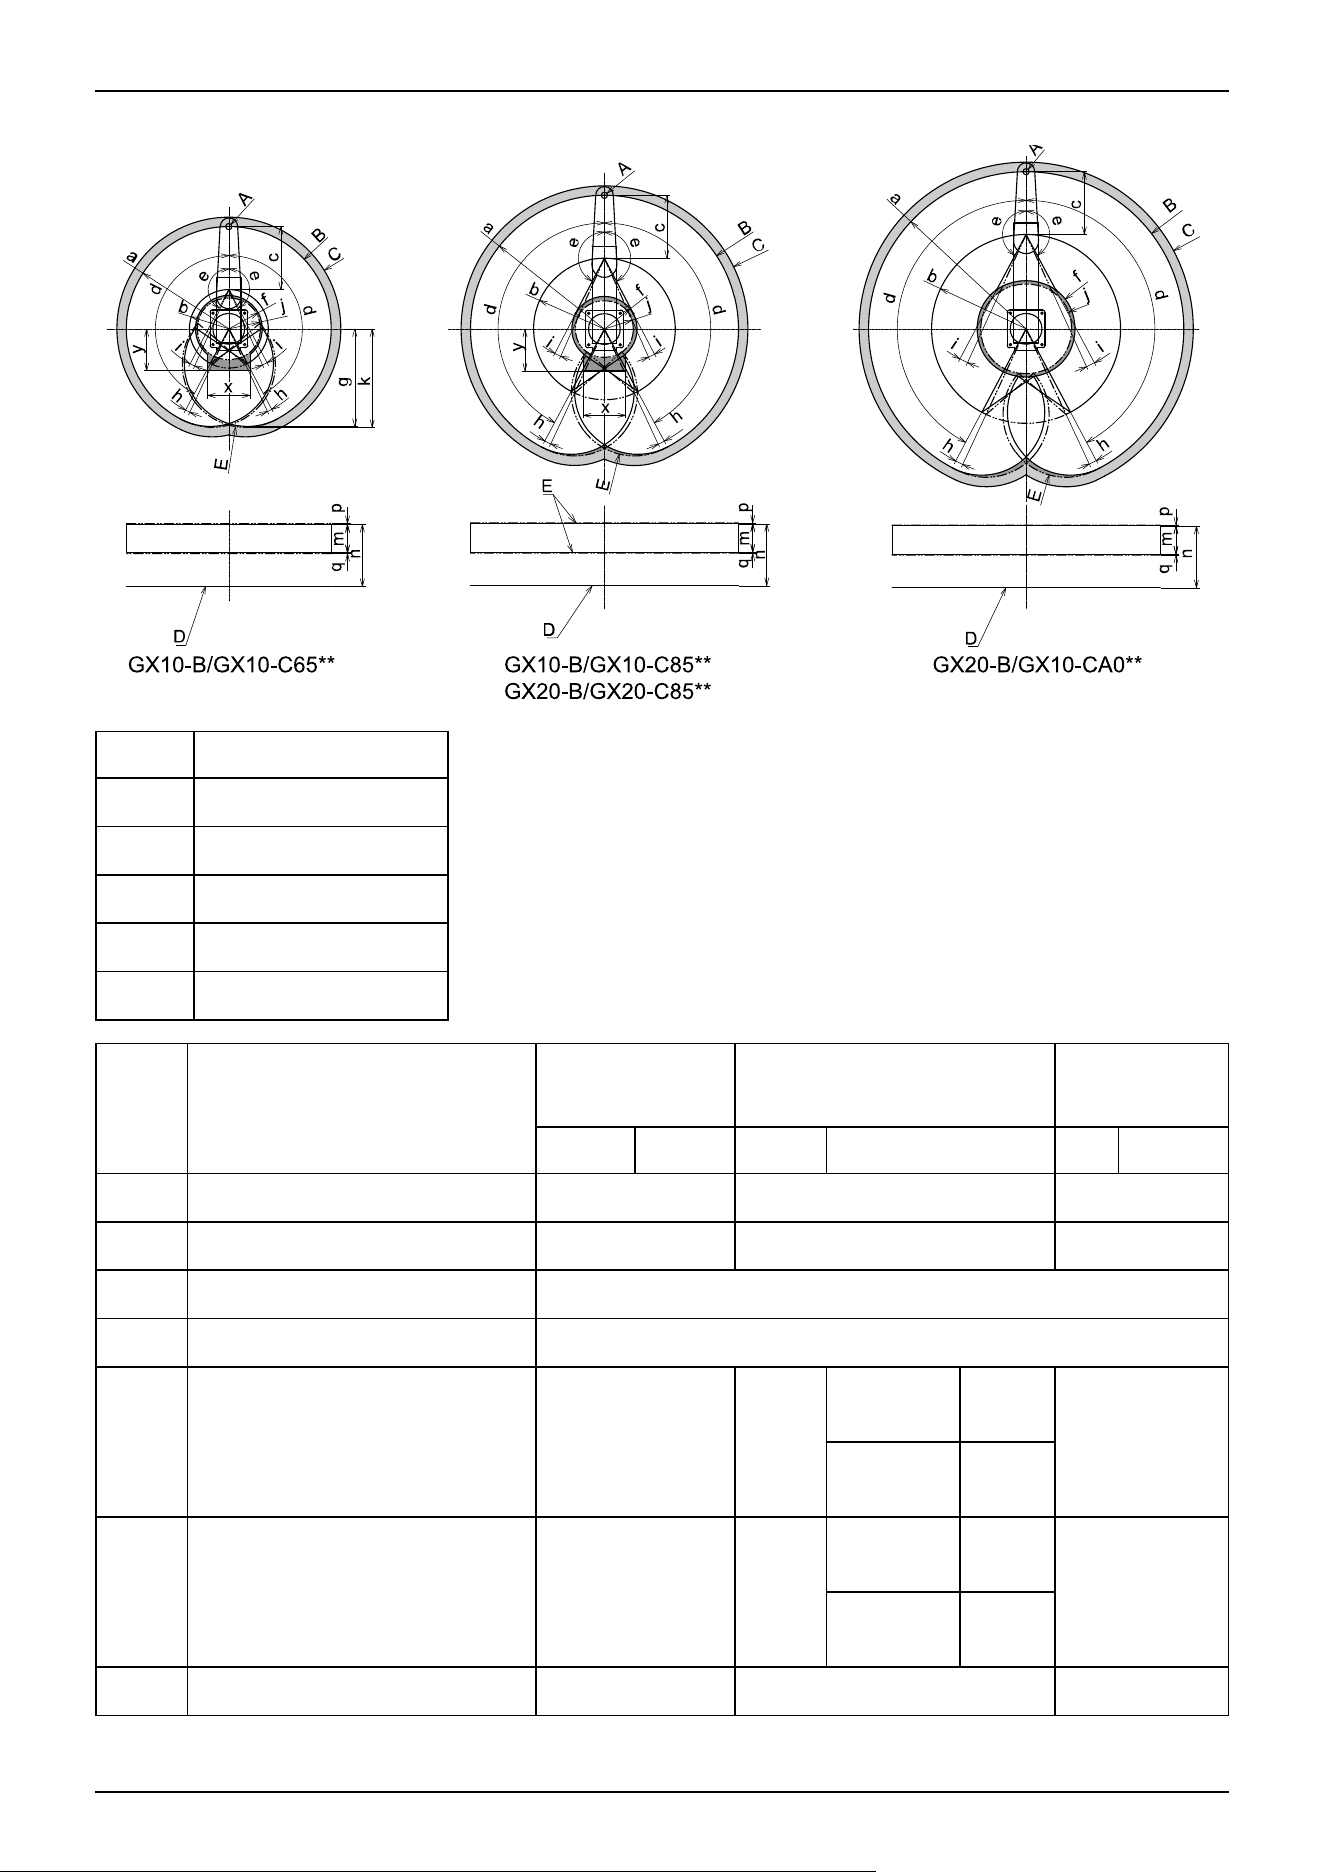
Table top mounting specifications
Symbol Description
A Center of Joint #3
B Work envelope
C Maximum zone
D Base mounting surface
E Range to mechanical stop
GX10-B/GX10-
C65 **
GX10-B/GX10-C85 **
GX20-B/GX20-C85 **
GX20-B/GX20-
CA0**
S C, P S C, P S C, P
a Length of Arm #1 + Arm #2 (mm) 650 850 1000
b Length of Arm #1 (mm) 250 450 600
c Length of Arm #2 (mm) 400
d Joint #1 motion (°) 152
e Joint #2 motion (°) 152.5 152.5
0 ≥ Z ≥
-360
152.5
152.5
-360 > Z
≥-390
151
f (Work envelope) 212.4 207.8
0 ≥ Z ≥
-360
207.8
307
-360 > Z ≥
-390
218.3
g (Work envelope of the back side) 620.7 797.3 929.8
Industrial Robot: SCARA Robots GX series Manual Rev.11
417
GX10-B/GX10-
C65 **
GX10-B/GX10-C85 **
GX20-B/GX20-C85 **
GX20-B/GX20-
CA0**
S C, P S C, P S C, P
h
Angle to the Joint #1 mechanical
stop (°)
3
i
Angle to the Joint #2 mechanical
stop (°)
3.5 3.5
0 ≥ Z ≥ -360 3.5
3.5
-360 > Z ≥
-390
5
j (Mechanical stop area) 199.4 183.3 285.4
k
(Mechanical stop area of the back
side)
626.6 807.8 943.8
x
Dimensions of motion prohibited
area (mm)
270 -
y
Dimensions of motion prohibited
area (mm)
267 292 267 292 -
GX10-B/GX10-C**4
GX20-B/GX20-C**4
Industrial Robot: SCARA Robots GX series Manual Rev.11
418
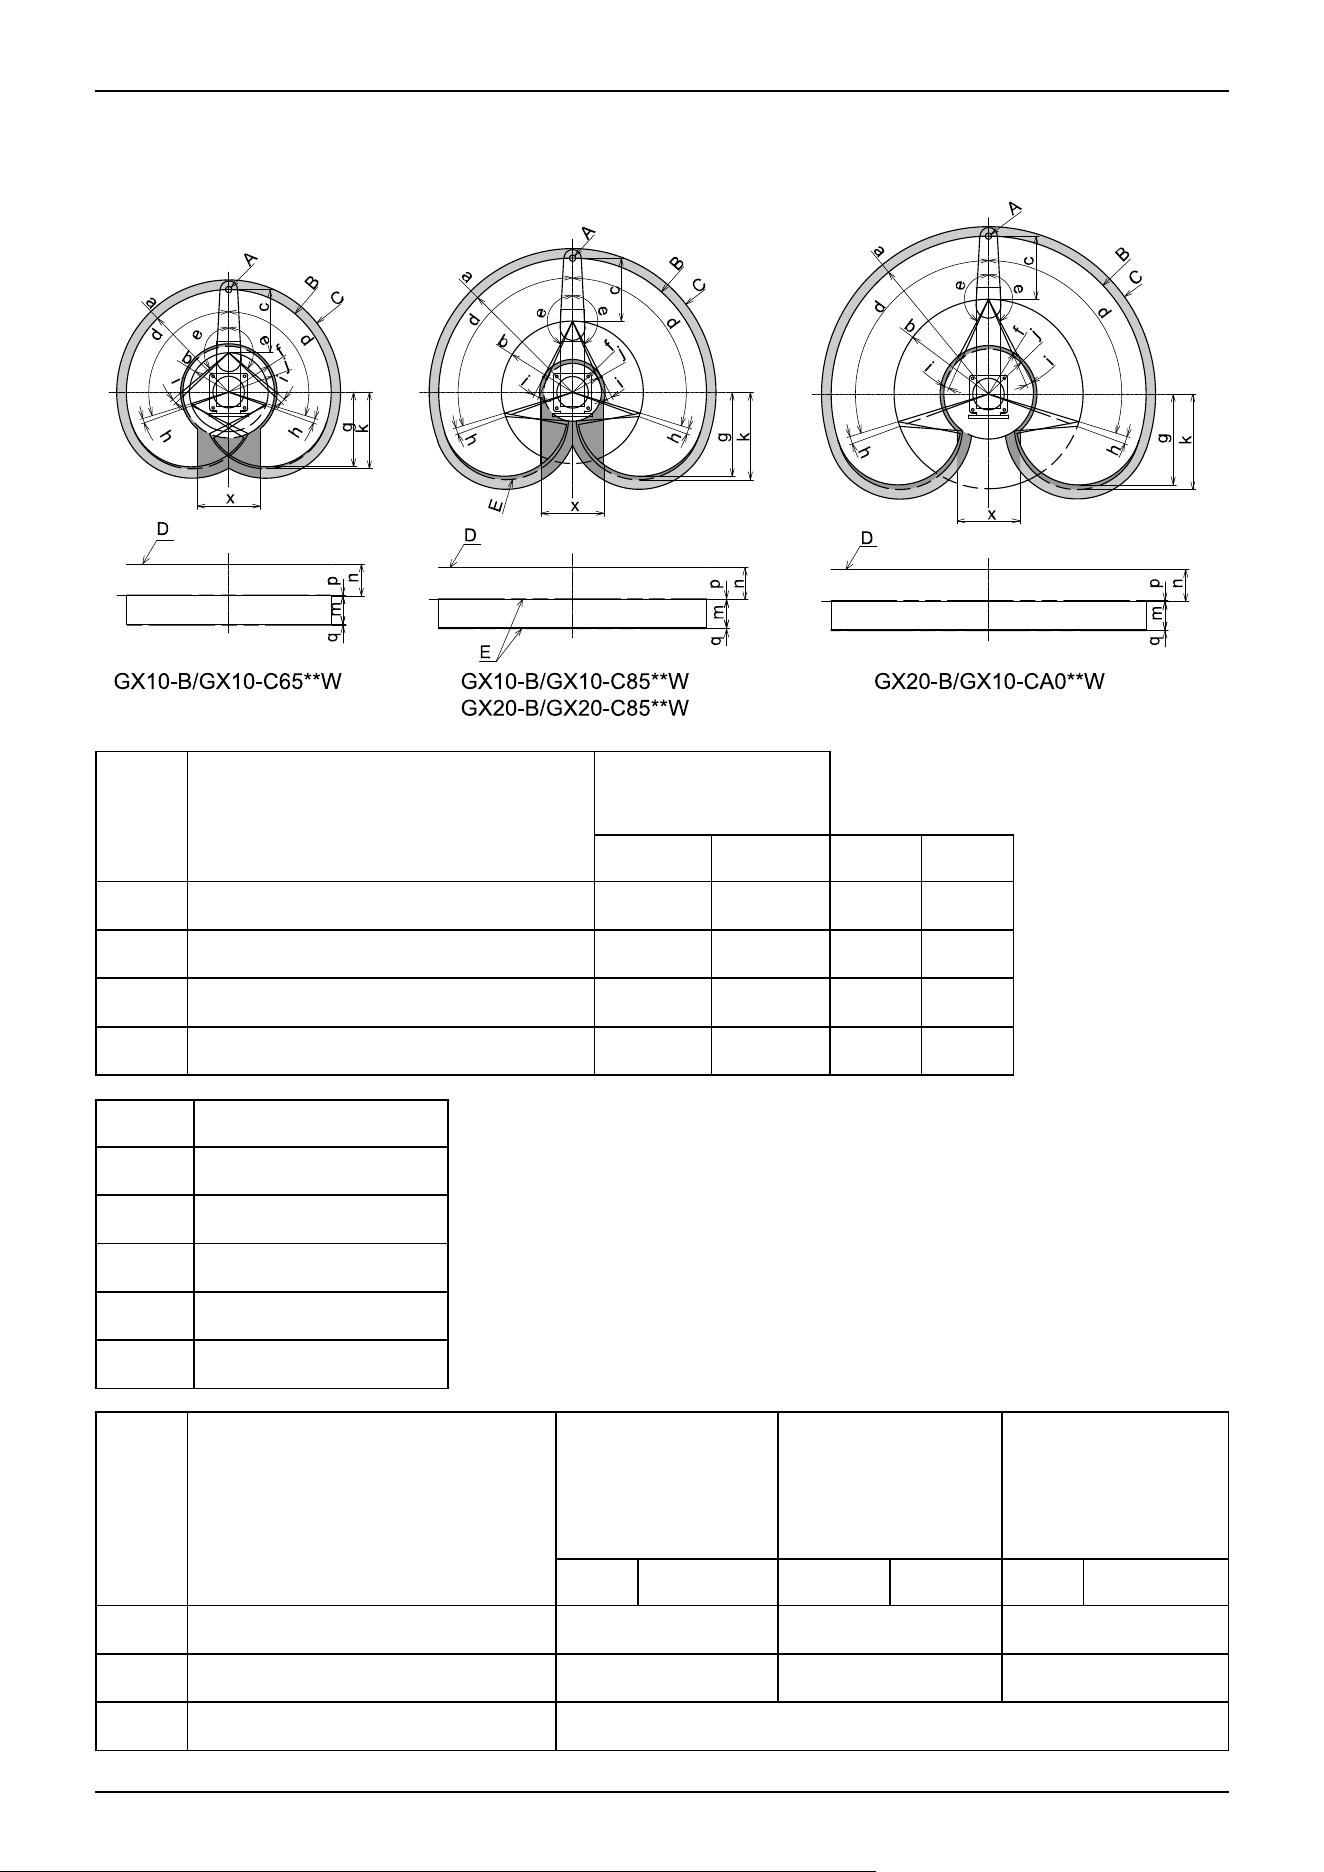
Wall mounting specifications
GX10-B/GX10-C**1*
GX20-B/GX20-C**1 *
S C, P S C, P
m Joint #3 work envelope 180 150 420 390
n Distance from base mounting surface 393.5 355.5 393.5 355.5
p Joint #3 mechanical stop area (upper limit) 5 1.8 5 1.8
q Joint #3 mechanical stop area (lower limit) 5 1 5 1
Symbol Description
A Center of Joint #3
B Work envelope
C Maximum zone
D Base mounting surface
E Range to mechanical stop
GX10-B/GX10-
C65**W
GX10-B/GX10-
C85**W
GX20-B/GX20-
C85**W
GX20-B/GX20-
CA0**W
S C, P S C, P S C, P
a Length of Arm #1 + Arm #2 (mm) 650 850 1000
b Length of Arm #1 (mm) 250 450 600
c Length of Arm #2 (mm) 400
Industrial Robot: SCARA Robots GX series Manual Rev.11
419
GX10-B/GX10-
C65**W
GX10-B/GX10-
C85**W
GX20-B/GX20-
C85**W
GX20-B/GX20-
CA0**W
S C, P S C, P S C, P
d Joint #1 motion (°) 107
e Joint #2 motion (°) 130 152.5 151 152.5
f (Work envelope) 306.5 207.8 218.3 307
g (Work envelope of the back side) 473.1 531.6 575.4
h
Angle to the Joint #1 mechanical stop
(°)
3
i
Angle to the Joint #2 mechanical stop
(°)
3.5 3.5 5 3.5
j (Mechanical stop area) 291.2 183.3 285.4
k
(Mechanical stop area of the back
side)
485.5 553.9 605.2
x
Dimensions of motion prohibited area
(mm)
400
y
Dimensions of motion prohibited area
(mm)
0 (infinite on back side)
GX10-B/GX10-C**1*W
GX20-B/GX20-C**1*W
GX10-B/GX10-C**4*W
GX20-B/GX20-C**4*W
S C, P S C, P
m Joint #3 work envelope 180 150 420 390
n Distance from base mounting surface 202.5 240.5 202.5 240.5
p Joint #3 mechanical stop area (upper limit) 5 1.8 5 1.8
q Joint #3 mechanical stop area (lower limit) 5 1 5 1
Industrial Robot: SCARA Robots GX series Manual Rev.11
420
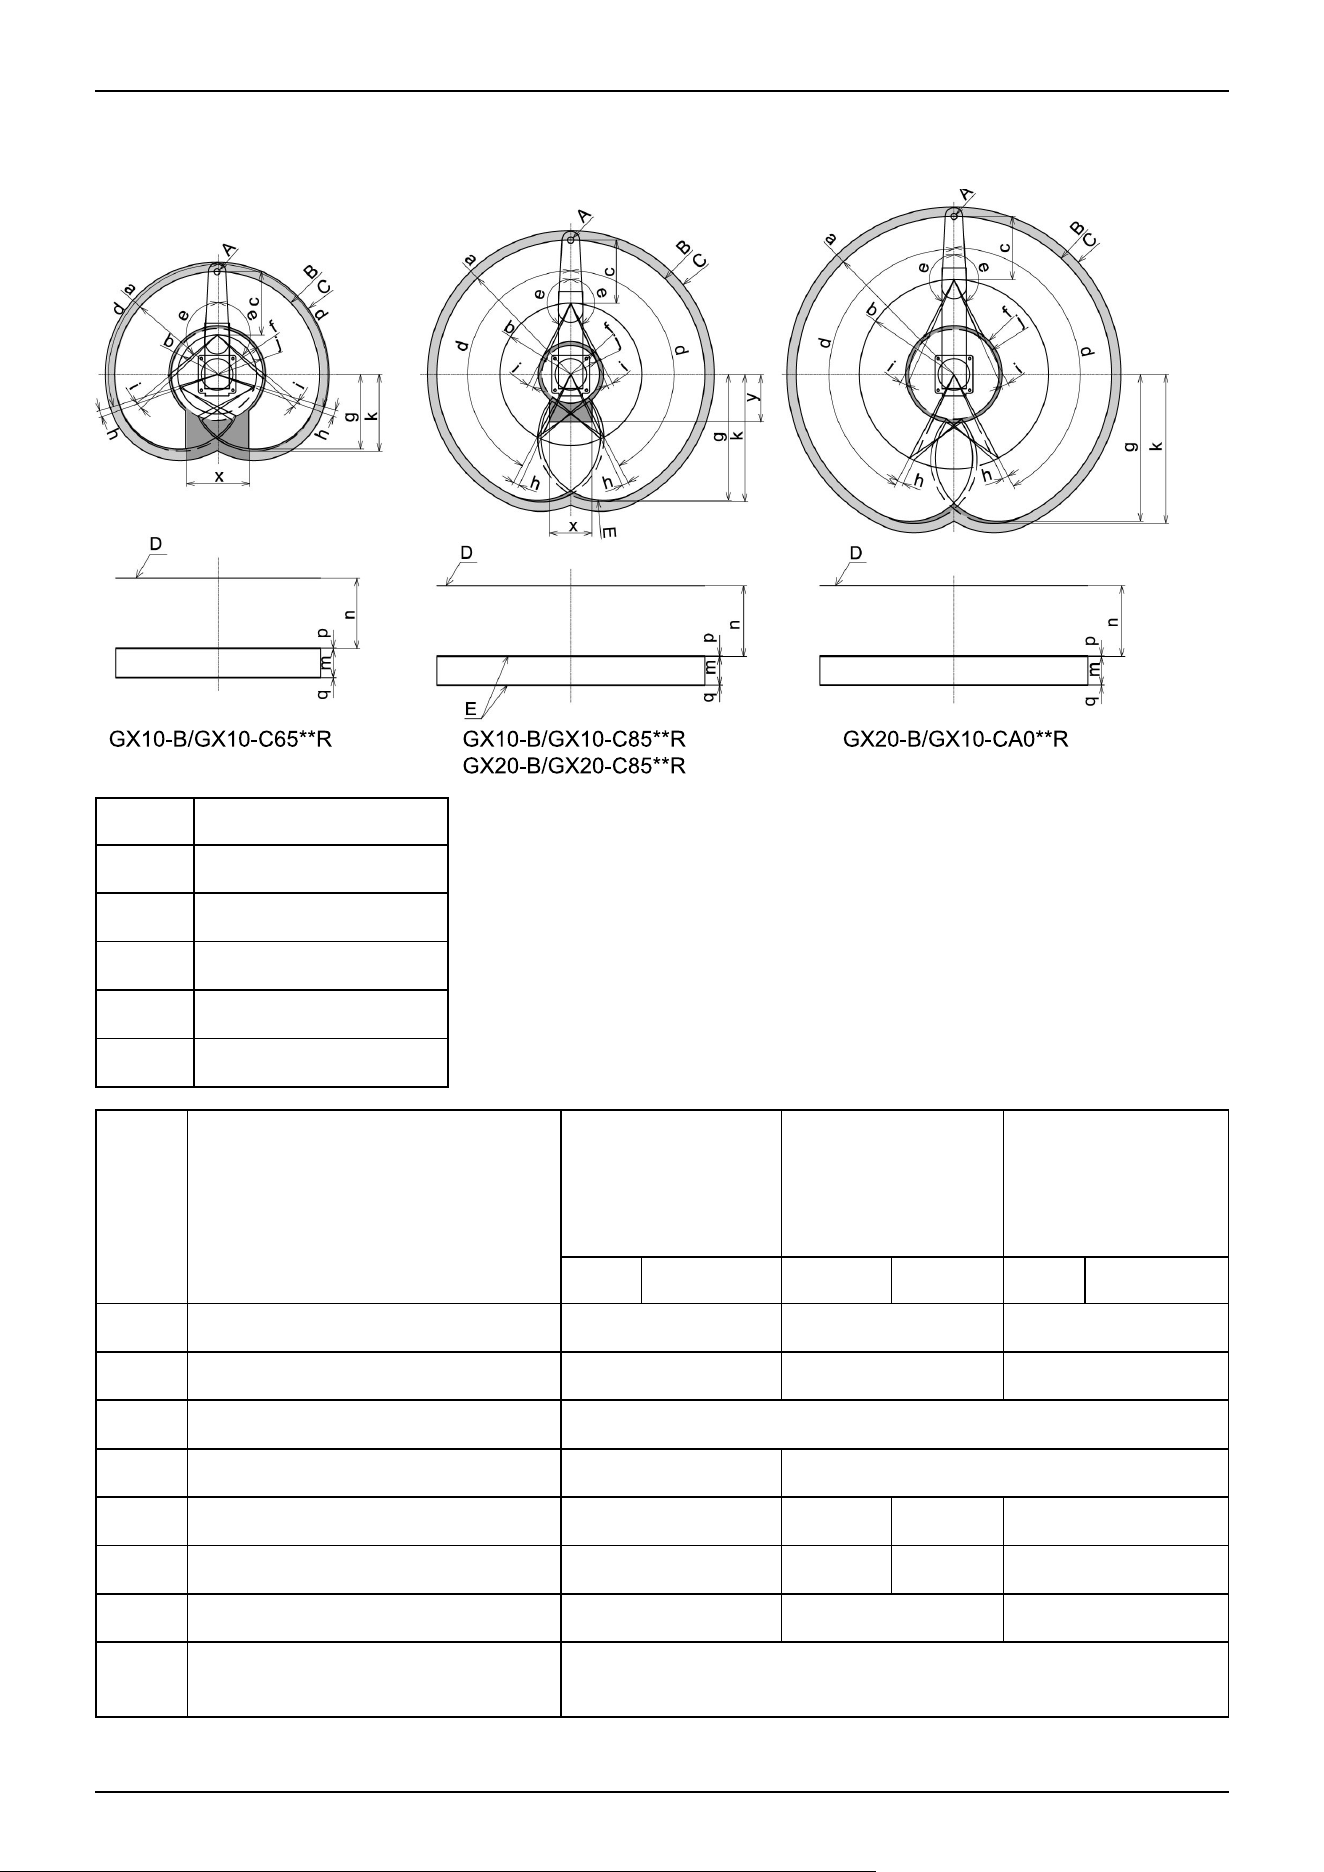
Ceiling mounting specifications
Symbol Description
A Center of Joint #3
B Work envelope
C Maximum zone
D Base mounting surface
E Range to mechanical stop
GX10-B/GX10-
C65**R
GX10-B/GX10-
C85**R
GX20-B/GX20-
C85**R
GX20-B/GX20-
CA0**R
S C, P S C, P S C, P
a Length of Arm #1 + Arm #2 (mm) 650 850 1000
b Length of Arm #1 (mm) 250 450 600
c Length of Arm #2 (mm) 400
d Joint #1 motion (°) 107 152
e Joint #2 motion (°) 130 152.5 151 152.5
f (Work envelope) 306.5 207.8 218.3 307
g (Work envelope of the back side) 473.1 797.3 929.8
h
Angle to the Joint #1 mechanical stop
(°)
3
Industrial Robot: SCARA Robots GX series Manual Rev.11
421
GX10-B/GX10-
C65**R
GX10-B/GX10-
C85**R
GX20-B/GX20-
C85**R
GX20-B/GX20-
CA0**R
S C, P S C, P S C, P
i
Angle to the Joint #2 mechanical stop
(°)
3.5 3.5 5 3.5
j (Mechanical stop area) 291.2 183.3 285.4
k (Mechanical stop area of the back side) 485.5 807.8 943.8
x
Dimensions of motion prohibited area
(mm)
400 270 -
y
Dimensions of motion prohibited area
(mm)
0 (infinite on back
side)
300 -
GX10-B/GX10-C**1*R
GX20-B/GX20-C**1*R
GX10-B/GX10-C**4*R
GX20-B/GX20-C**4*R
S C, P S C, P
m Joint #3 work envelope 180 150 420 390
n Distance from base mounting surface 447.5 485.5 447.5 485.5
p Joint #3 mechanical stop area (upper limit) 5 1.8 5 1.8
q Joint #3 mechanical stop area (lower limit) 5 1 5 1
Industrial Robot: SCARA Robots GX series Manual Rev.11
422

6. Periodic Inspection
Accurate inspection work is necessary to prevent breakdowns and ensure safety.
This section explains the inspection schedule and what should be inspected.
Perform inspections according to the predetermined schedule.
Industrial Robot: SCARA Robots GX series Manual Rev.11
423
6.1 GX1 Manipulator Periodic Inspection
6.1.1 Inspection
6.1.1.1 Inspection Schedule
Inspection items are divided into five stages (daily, 1-month, 3-month, 6-month, and 12-month), with additional items added at
each stage. However, if the Manipulator is powered and operated for more than 250 hours in a month, add inspection items
every 250, 750, 1,500, and 3,000 hours.
Inspection Item
Daily
inspection
Monthly
inspection
Quarterly
inspection
Biannual
inspection
Annual
inspection
Overhaul
(replacement)*
1-Month
inspection(250
hours)
Perform
daily
✓
2 months (500
hours)
✓
3 months (750
hours)
✓ ✓
4 months (1,000
hours)
✓
5 months (1,250
hours)
✓
6 months (1,500
hours)
✓ ✓ ✓
7 months (1,750
hours)
✓
8 months (2,000
hours)
✓
9 months (2,250
hours)
✓ ✓
10 months (2,500
hours)
✓
11 months (2,750
hours)
✓
12 months (3,000
hours)
✓ ✓ ✓ ✓
13 months (3,250
hours)
✓
: : : : : : :
20,000 hours
✓
* Overhaul (Parts Replacement)
Industrial Robot: SCARA Robots GX series Manual Rev.11
424

Note
An overhaul (parts replacement) should be performed after every 20,000 hours of Manipulator operation.
(Assuming an operation time of 8 hours per day and 250 hours per month, an overhaul should be performed
every 80 months.)
✏
Industrial Robot: SCARA Robots GX series Manual Rev.11
425
6.1.1.2 Inspection Details
Inspection items
Inspection Item Inspection Place
Daily
inspection
Monthly
inspection
Quarterly
inspection
Biannual
inspection
Annual
inspection
Loose bolts: Check for
rattling
Hand mounting
bolts
✓ ✓ ✓ ✓ ✓
Manipulator
installation bolts
✓ ✓ ✓ ✓ ✓
Check looseness of
connectors.
External connectors
on Manipulator
(On the connector
plates, etc.)
✓ ✓ ✓ ✓ ✓
Visually check for external
defects.
Clean if necessary.
The entire
Manipulator.
✓ ✓ ✓ ✓ ✓
External cables
✓ ✓ ✓ ✓
Correct deformations and
misalignments.
Safety barriers, etc. ✓ ✓ ✓ ✓ ✓
Check the brake operation. Joint #3:
✓ ✓ ✓ ✓ ✓
Check for abnormal operation
noises and vibrations
Whole ✓ ✓ ✓ ✓ ✓
Industrial Robot: SCARA Robots GX series Manual Rev.11
426
Inspection Method
Inspection Item Inspection Method
Check for loose or
rattling bolts.
Using an Allen wrench or similar tool, check that the hand mounting bolts and Manipulator
installation bolts are not loose.
If the bolts are loose, refer to the following section, and retighten to the proper torque.
Tightening the Hexagon Socket Head Cap Bolts
Check looseness of
connectors.
Check that no connectors are loose.
If a connector is loose, reattach it so that it will not come off.
Visually check for
external defects.
Clean if necessary.
Check the appearance of the Manipulator, and clean off any dust or other foreign substances
adhering to it.
Check the appearance of the cables for any flaws, and make sure it is not disconnected.
Correct deformations and
misalignments.
Check for misalignment of safety barriers and other components.
If it is misaligned, correct it to the original position.
Check the brake
operation.
Check that the shaft does not drop in the MOTOR OFF state.
If the shaft drops while the motor is turned off and the brake is not released, contact the
supplier. Also, contact the supplier if the brakes do not release despite the brake release
operation.
Check for abnormal
operation noises and
vibrations
Check for any abnormal noises or vibrations during operation.
If you notice anything unusual, contact the supplier.
6.1.2 Overhaul (Parts Replacement)
Overhauls (replacements) can only be performed by properly trained service engineers.
For details, refer to the following section.
"Safety Manual - Training"
WARNING
To continue using the Manipulator safely and in accordance with the cleanroom and specifications and the ESD
specifications, be sure to perform periodic overhauls of the cable unit, replacing damaged or worn-out parts. In
accordance with ESD specifications, the conduit tube is made of conductive materials to prevent static electricity.
If the cables wear down over a long period of operation and cause an internal short circuit, the conduit tube may
be electrified. Touching the conduit tube while the power is turned on could result in serious bodily injury due to
electric shock.
6.1.3 Applying Grease
Ball screw splines and reduction gears require periodic greasing. Be sure to use the specified grease.
CAUTION
Be careful that the grease does not run out. When grease runs out, scratches and other defects can occur on
the slide, not only hindering maximum performance, but also requiring significant time and money to repair.
Industrial Robot: SCARA Robots GX series Manual Rev.11
427
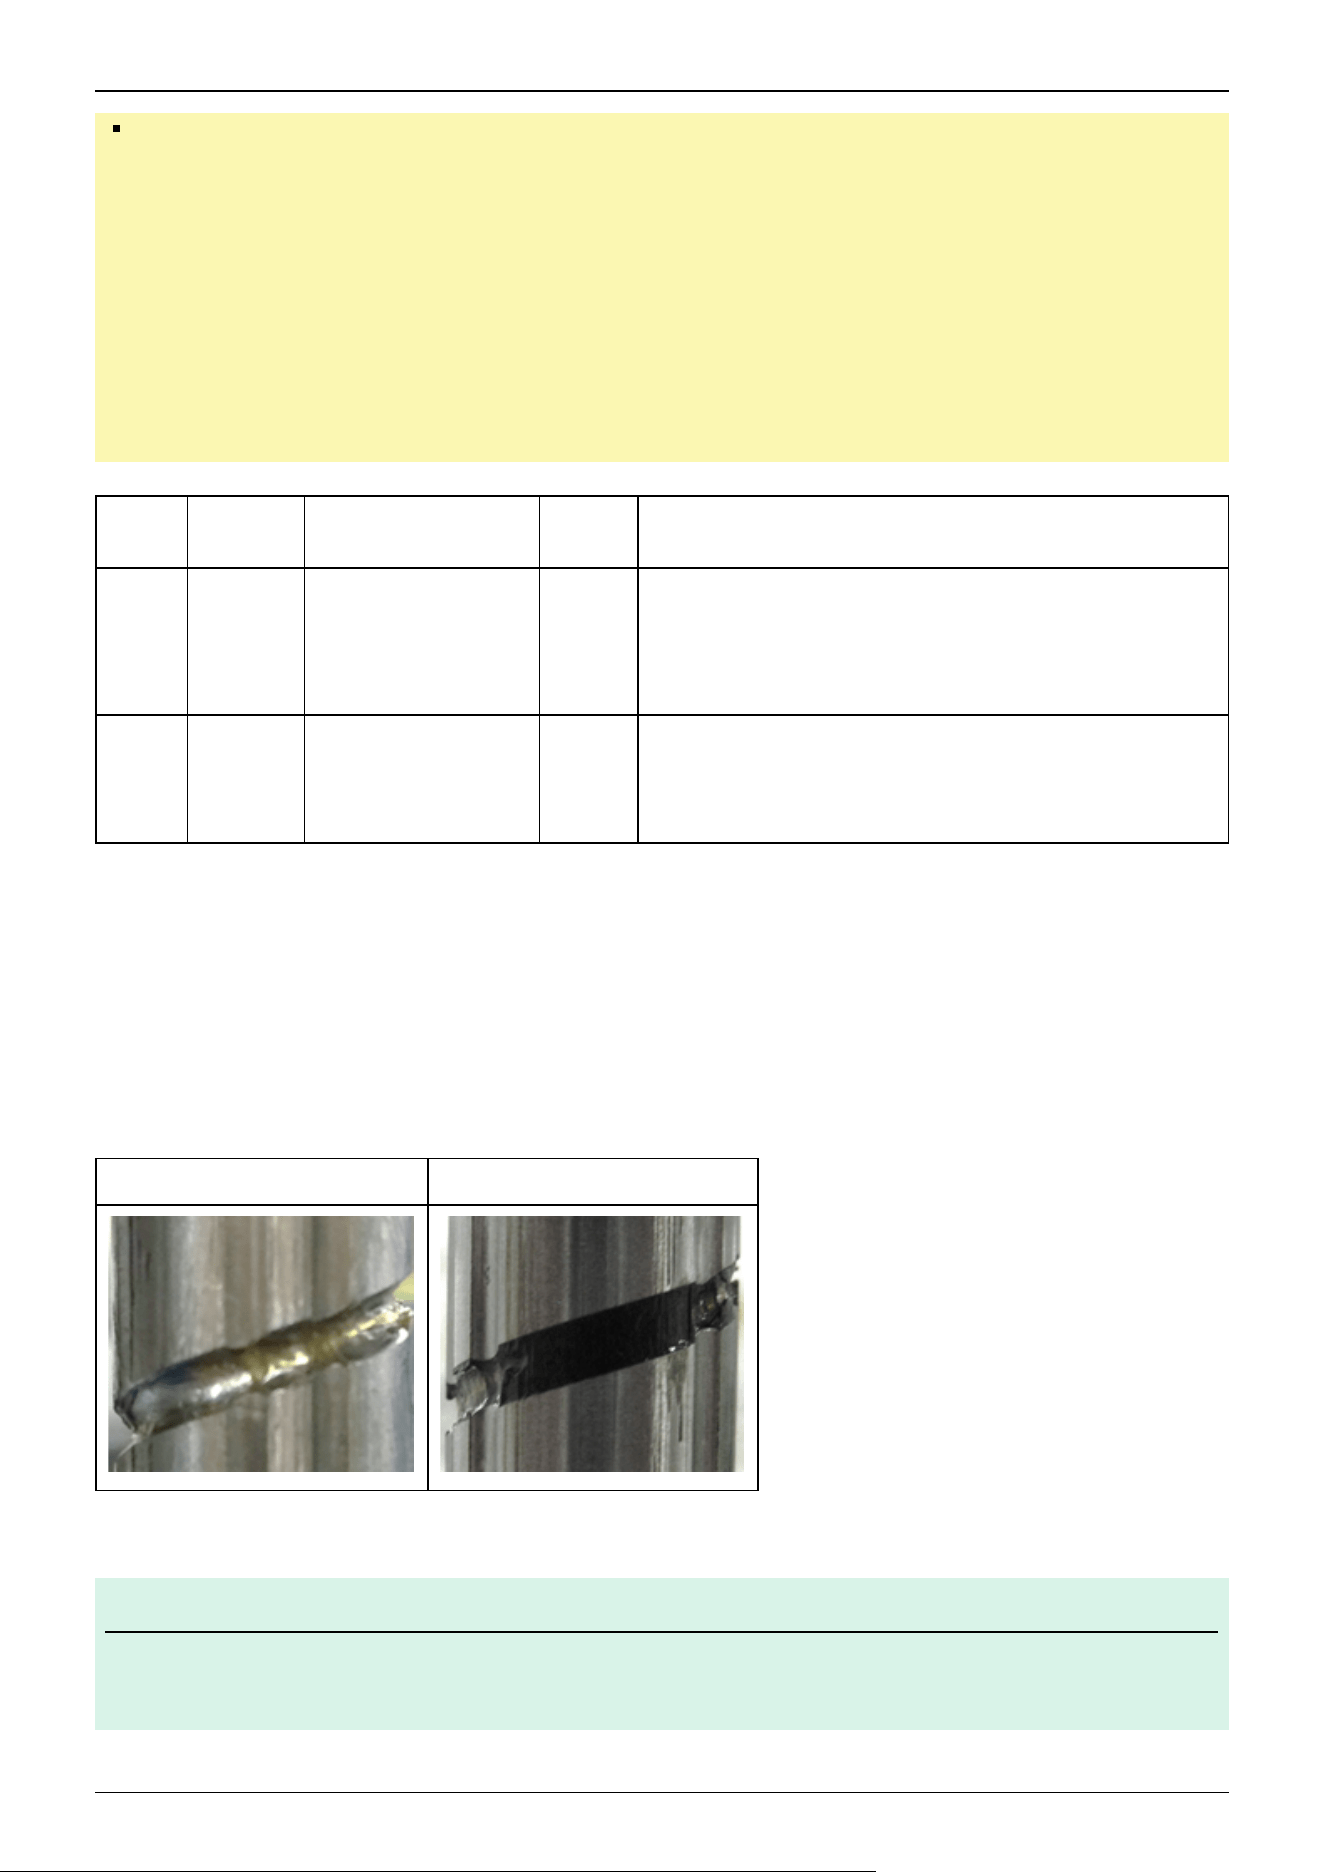
If grease enters the eyes or mouth or adheres to the skin, take the following measures:
If it enters the eyes
After rinsing the eyes thoroughly with clean water, seek medical attention.
If it enters the mouth
If swallowed, do not force vomiting, and seek medical attention.
If the mouth is contaminated, rinse thoroughly with water.
If adhered to skin
Rinse with water and soap.
Greasing
part
Greasing interval Grease Applying Grease
Joint
#1:
Joint
#2:
Reduction
gear units
Overhaul timing -
Overhauls (replacements) can only be performed by properly
trained service engineers. For more information, please contact
the supplier.
Joint
#3:
Ball
screw
spline
unit
At 100 km of operation
(50 km for first
greasing)
AFB *
"Applying grease to the ball screw spline unit"
(See below)
* Use the grease below.
Product name: THK AFB-LF Grease
Manufacturer: THK Co., LTD.
URL: https://www.thk.com/
Ball screw spline unit of Joint #3
The recommended interval to perform greasing is when the unit has run 100 km. However, the interval can also be confirmed
from the grease state. As shown in the figure, apply grease when the grease turns black or has dried up.
Normal grease Blackened grease
For the first time only, apply grease after running for 50 km.
Note
When using EPSON RC+, the recommended interval for applying grease to the ball screw spline unit can be
viewed in the [Maintenance] dialog box in EPSON RC+.
✏
Industrial Robot: SCARA Robots GX series Manual Rev.11
428
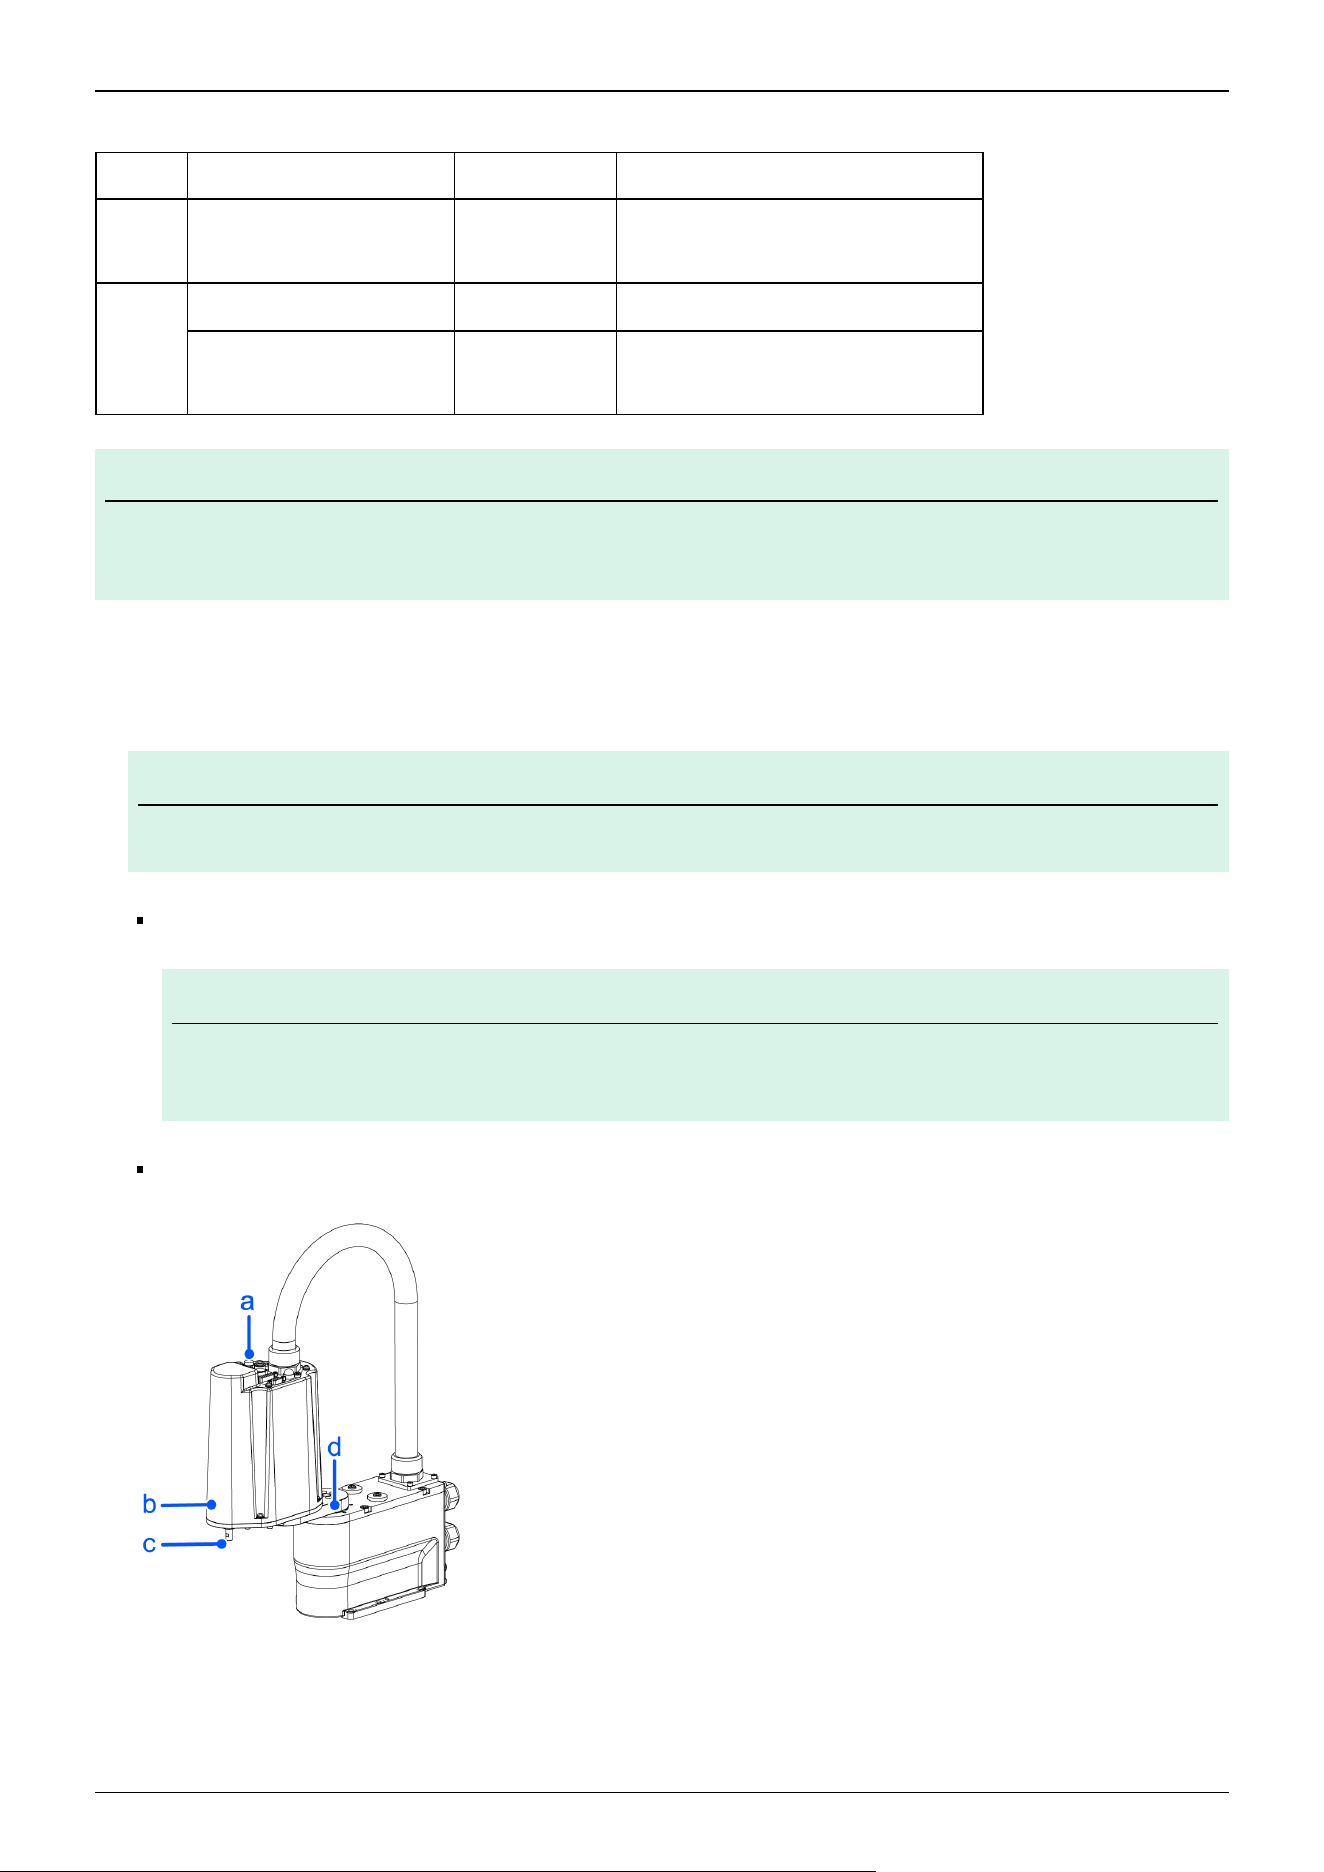
Applying grease to the ball screw spline unit
Name Quantity Note
Grease
For Ball Screw Spline Unit
(AFB grease)
Proper quantity -
Tools
Wiping cloth 1 For wiping grease (Spline shaft)
Phillips 1
For removing the clamp band
Cleanroom & ESD specifications only
Note
When applying grease, be careful to cover the hand and peripheral equipment so that, if any grease falls on
them, it will not affect their performance.
1. Turn on the Controller.
2. Lower the shaft to the lower limit in one of the following ways.
Note
Make sure that the hand does not interfere with peripheral equipment or other objects.
While pressing down the brake release switch, manually lower the shaft to the lower limit.
Note
When pressing the brake release switch, watch for the shaft descending or rotating under the weight of
the hand.
Using the EPSON RC+ [Tools]-[Robot Manager]-[Jog & Teach] panel, lower the shaft to the lower limit.
✏
✏
✏
Industrial Robot: SCARA Robots GX series Manual Rev.11
429
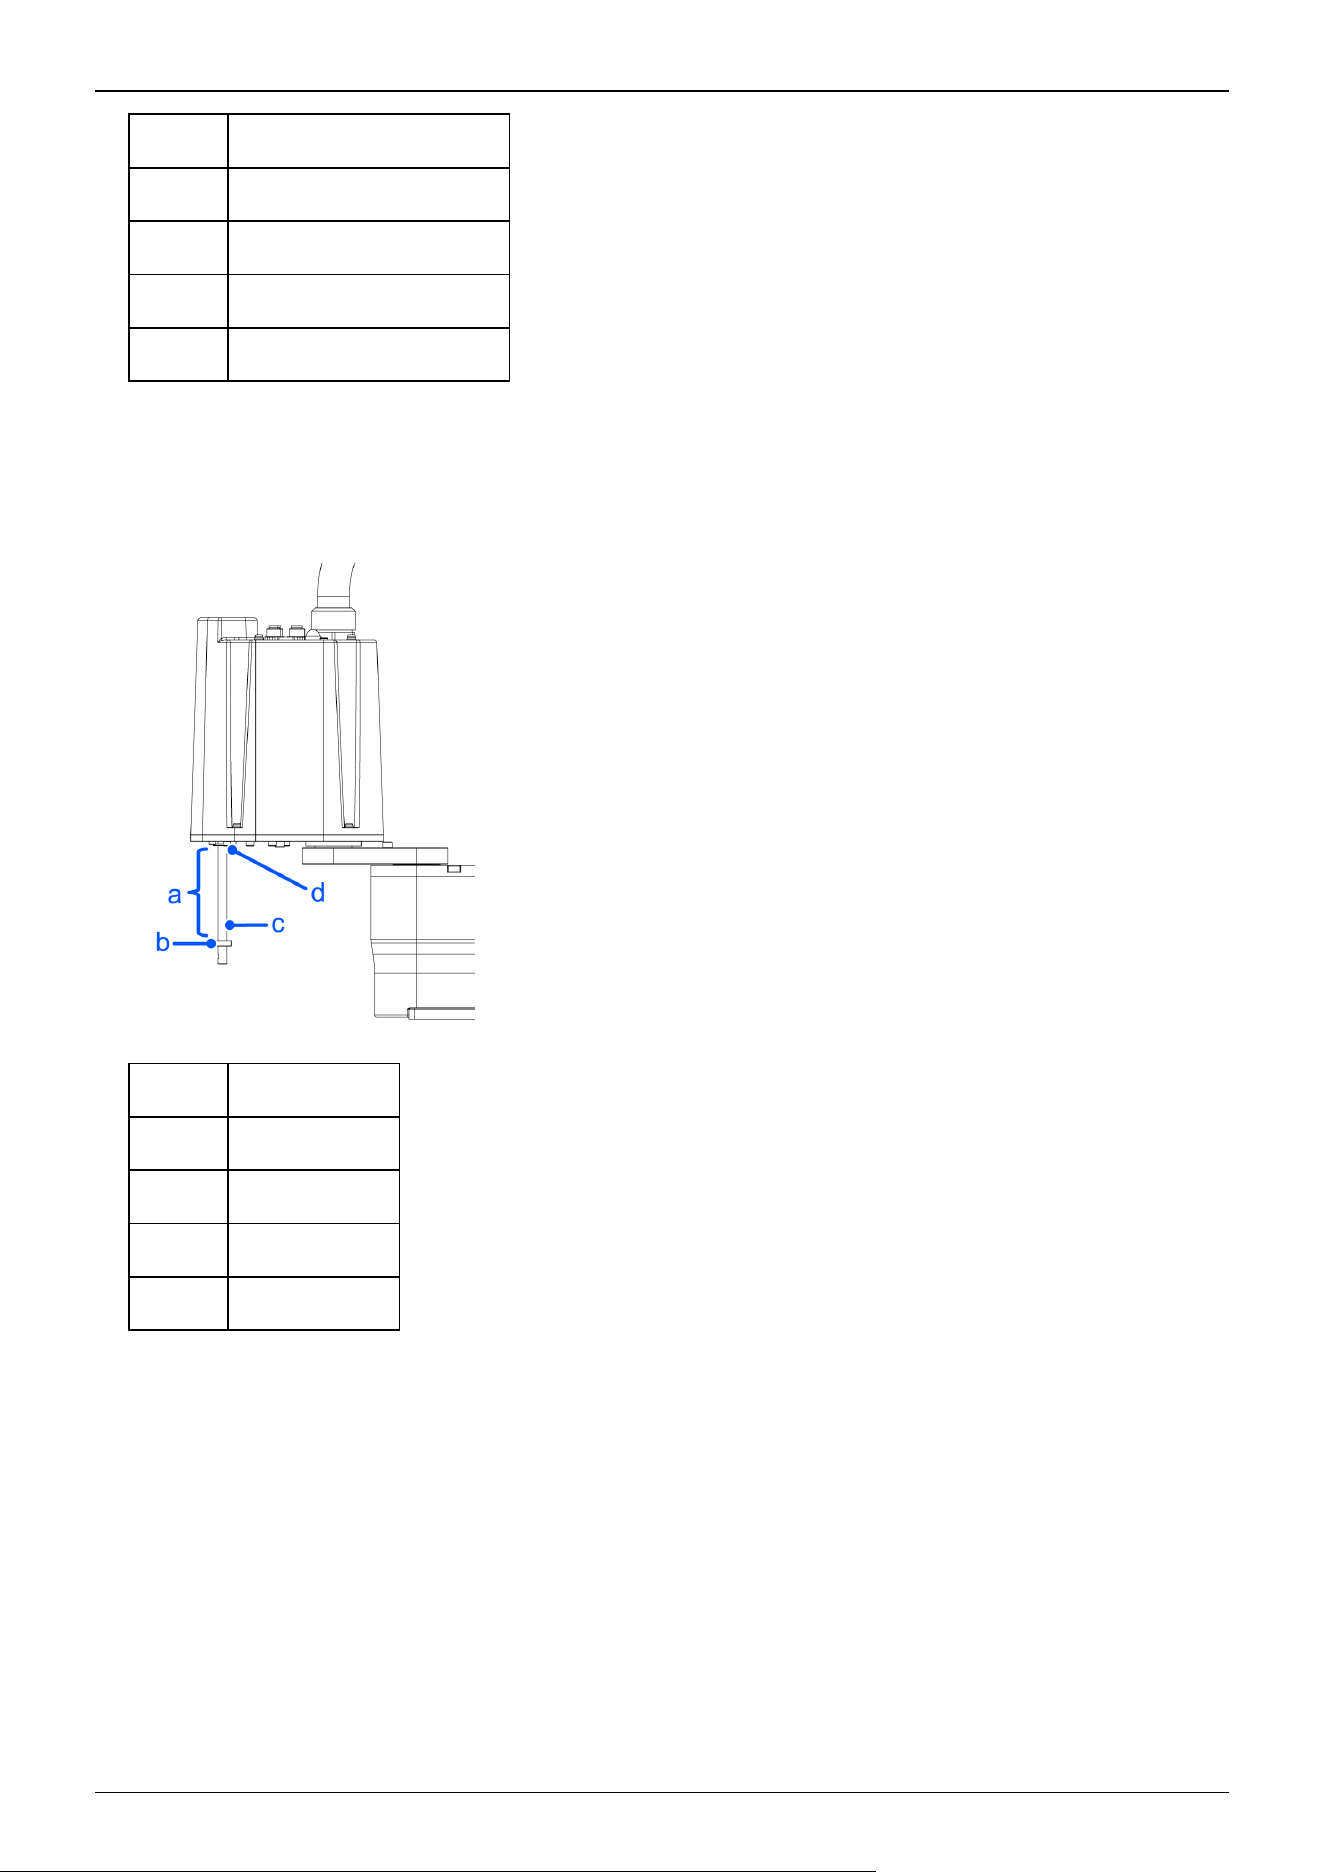
Symbol Description
a Joint #3 brake release switch
b Arm2
c Shaft
d Arm1
3. Turn off the Controller.
4. Wipe off the old grease on the shaft, and apply new grease.
The grease application area is from the end of the spline nut to the mechanical stop.
Symbol Description
a Application area
b Mechanical stop
c Shaft
d Spline nut
Industrial Robot: SCARA Robots GX series Manual Rev.11
430
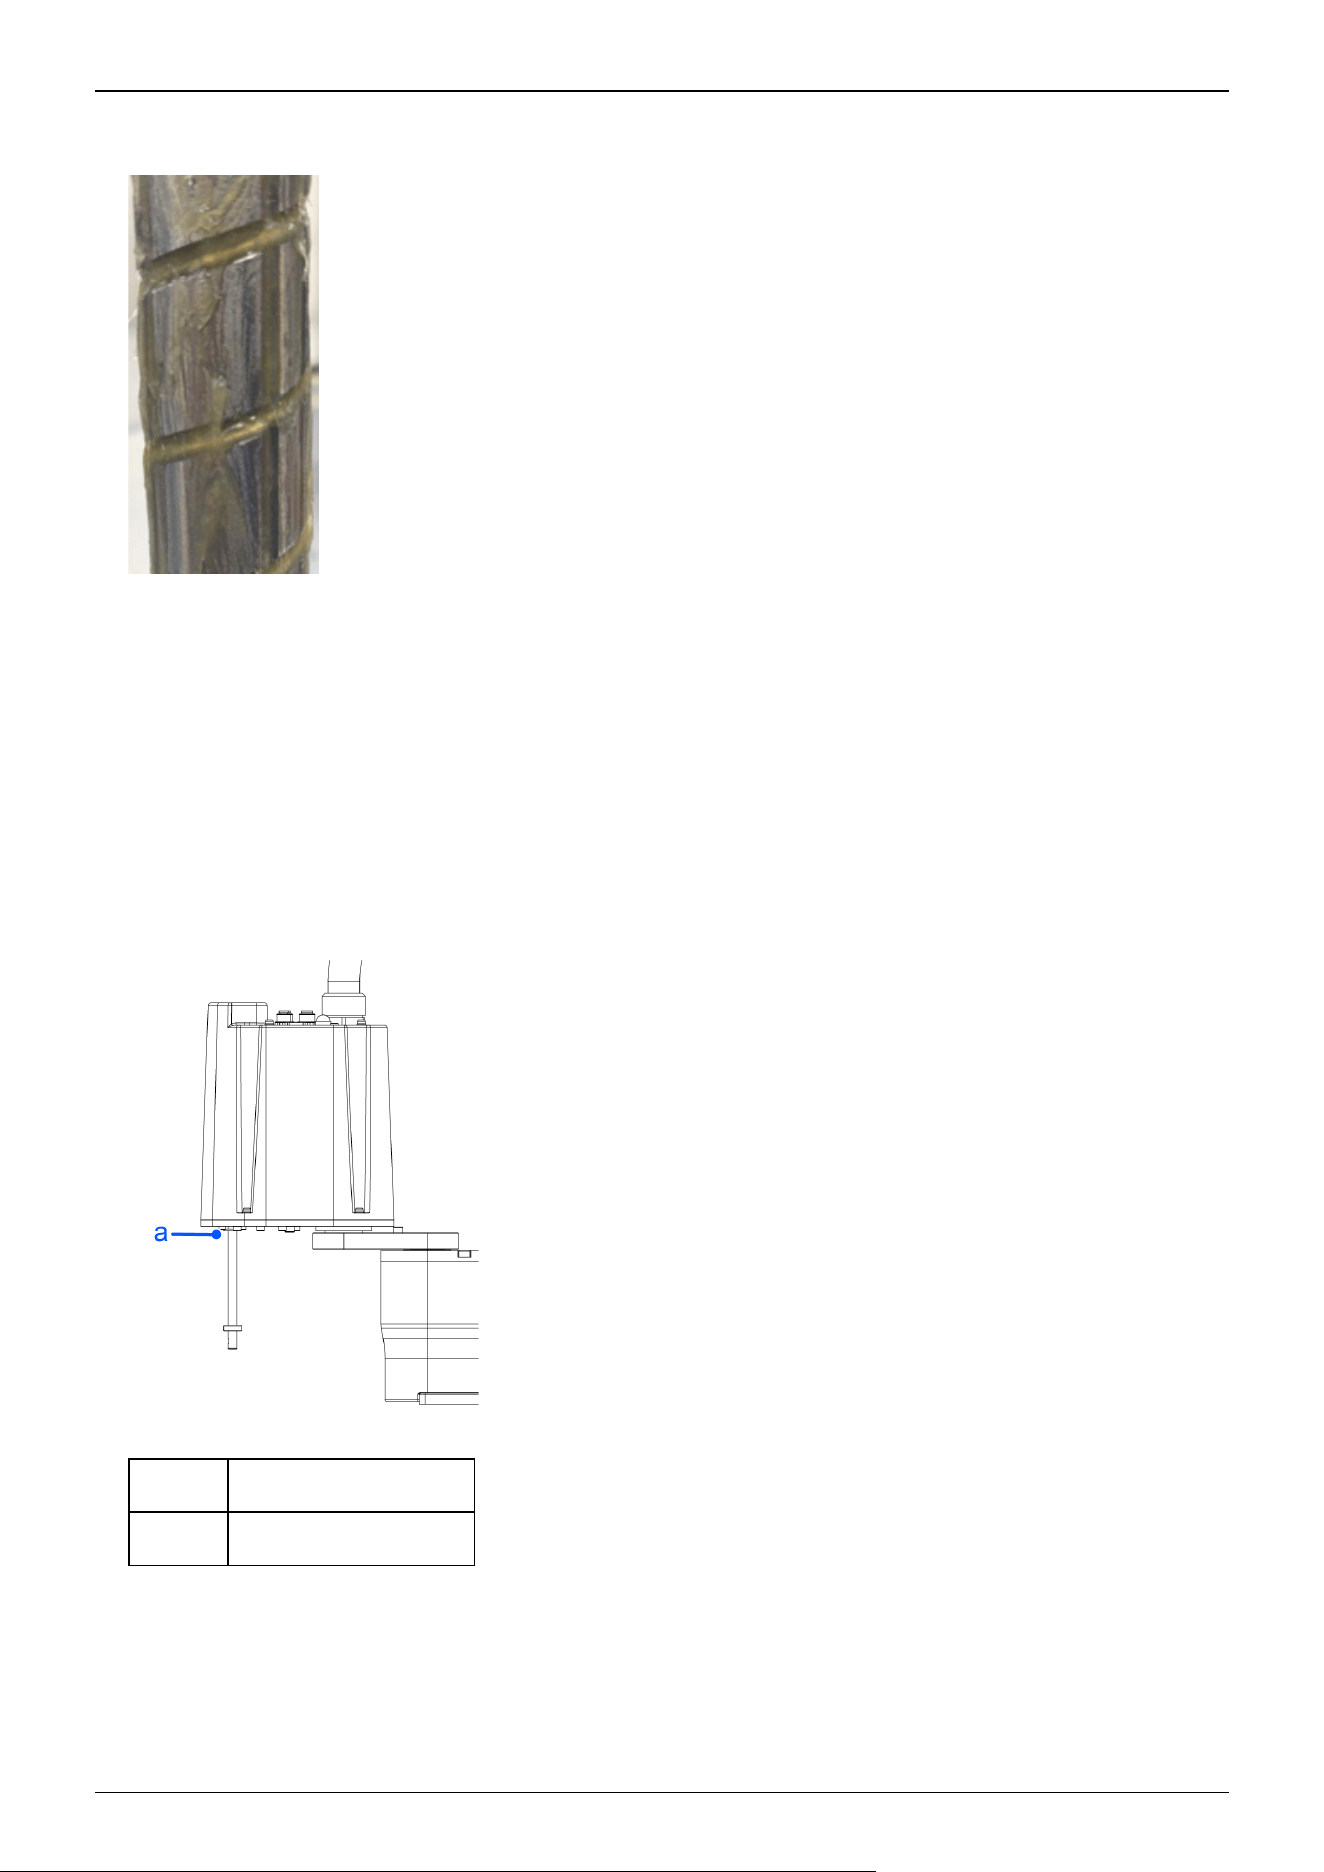
5. Grease should be applied to the helical and vertical grooves of the ball screw spline so that the grooves are filled evenly.
Example of grease application
6. Turn on the Controller.
7. Start the Robot Manager, and move the shaft to the origin position. Be careful not to hit any peripheral equipment.
8. After moving to the origin position, perform a reciprocating motion with the shaft. The reciprocating motion is performed
from the upper limit to the lower limit using the low-power mode operation program. Perform the motion for about 5
minutes to allow the grease to spread.
9. Turn on the Controller.
10. Wipe off any excess grease at the spline nut end and mechanical stop section.
Symbol Description
a The end of the spline nut
Industrial Robot: SCARA Robots GX series Manual Rev.11
431
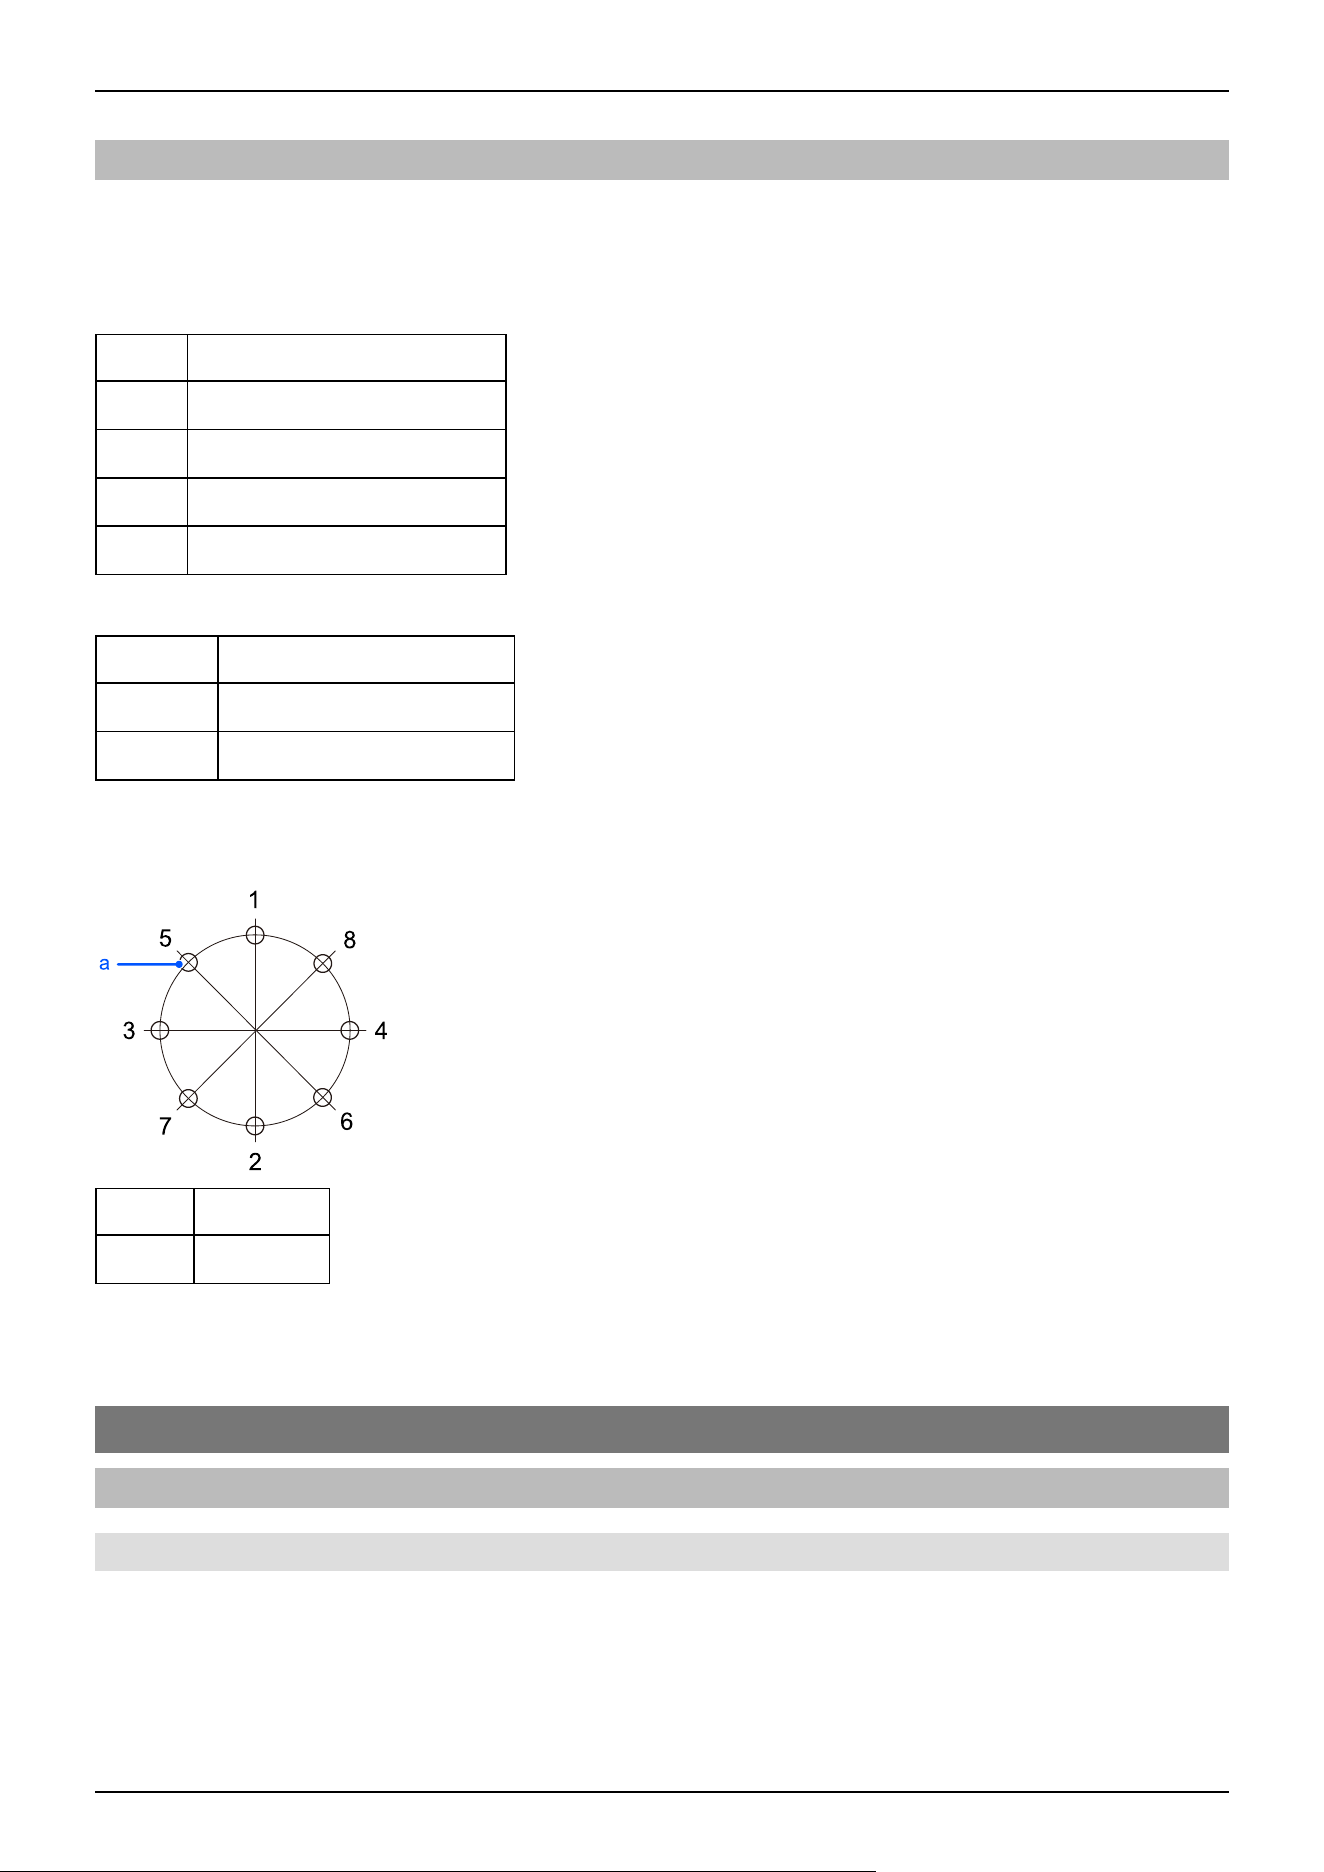
6.1.4 Tightening the Hexagon Socket Head Cap Bolts
Hexagon socket head cap bolts (referred to as "bolts" below) are used in locations where mechanical strength is required. Are
used. During assembly, these bolts are tightened at the tightening torques shown in the following table.
Unless otherwise specified, when retightening these bolts in the work procedures described in this manual, use a torque wrench
or similar tool to obtain the tightening torques in the following table.
Bolt Tightening torque
M3 2.0 ± 0.1 N·m (21 ± 1 kgf·cm)
M4 4.0 ± 0.2 N·m (41 ± 2 kgf·cm)
M5 8.0 ± 0.4 N·m (82 ± 4 kgf·cm)
M6 13.0 ± 0.6 N·m (133 ± 6 kgf·cm)
For set screws, refer to the following table.
Set screw Tightening torque
M3 1.5 ± 0.1 N·m (16 ± 1 kgf·cm)
M4 2.4 ± 0.1 N·m (26 ± 1 kgf·cm)
It is recommended that bolts arranged in a circular pattern be secured in place by tightening in criss-cross order as shown in the
figure.
Symbol Description
a Bolt hole
When securing the bolts, do not tighten the bolts all at once, but tighten them in two or three separate rounds with an Allen
wrench, and then use a torque wrench or similar tool to secure them at the tightening torques shown in the table above.
6.2 GX4 Manipulator Periodic Inspection
6.2.1 Inspection
6.2.1.1 Inspection Schedule
Inspection items are divided into five stages (daily, 1-month, 3-month, 6-month, and 12-month), with additional items added at
each stage. However, if the Manipulator is powered and operated for more than 250 hours in a month, add inspection items
every 250, 750, 1,500, and 3,000 hours.
Industrial Robot: SCARA Robots GX series Manual Rev.11
432
Inspection Item
Daily
Inspection
1-month
Inspection
3-month
Inspection
6-month
Inspection
12-month
Inspection
Overhaul*
1-month inspection
(250 hours)
Perform
daily
✓
2 months (500 hours)
✓
3 months (750 hours)
✓ ✓
4 months (1,000
hours)
✓
5 months (1,250
hours)
✓
6 months (1,500
hours)
✓ ✓ ✓
7 months (1,750
hours)
✓
8 months (2,000
hours)
✓
9 months (2,250
hours)
✓ ✓
10 months (2,500
hours)
✓
11 months (2,750
hours)
✓
12 months (3,000
hours)
✓ ✓ ✓ ✓
13 months (3,250
hours)
✓
: : : : : : :
20,000 hours
✓
* Overhaul (parts replacement)
KEY POINTS
An overhaul (parts replacement) should be performed after every 20,000 hours of Manipulator operation.
(Assuming an operation time of 8 hours per day and 250 hours per month, an overhaul should be performed
every 80 months.)
✏
Industrial Robot: SCARA Robots GX series Manual Rev.11
433
6.2.1.2 Inspection Details
Inspection items
Inspection Item
Inspection
Location
Daily
inspection
1-month
Inspection
3-month
Inspection
6-month
Inspection
12-month
Inspection
Loose bolts: Check for
rattling
Hand mounting
bolts
✓ ✓ ✓ ✓ ✓
Manipulator
installation bolts
✓ ✓ ✓ ✓ ✓
Check for loose connectors.
Manipulator side
external
(Connector plate,
etc.)
✓ ✓ ✓ ✓ ✓
Inspect for flaws:
Clean off adhering debris, etc.
Entire
Manipulator
✓ ✓ ✓ ✓ ✓
External cables
✓ ✓ ✓ ✓
Correct deformations and
misalignments
Safety barriers,
etc.
✓ ✓ ✓ ✓ ✓
Check brake operation Joints #3 and #4
✓ ✓ ✓ ✓ ✓
Check for abnormal operation
noise and vibration
Entire
Manipulator
✓ ✓ ✓ ✓ ✓
Industrial Robot: SCARA Robots GX series Manual Rev.11
434
Inspection methods
Inspection Item Inspection Method
Check for loose or
rattling bolts
Using an Allen wrench or similar tool, check that the hand mounting bolts and Manipulator
installation bolts are not loose.
If the bolts are loose, refer to the following section, and retighten to the proper torque.
Tightening the Hexagon Socket Head Cap Bolts
Check for loose
connectors
Check that no connectors are loose.
If a connector is loose, reattach it so that it will not come off.
Inspect for flaws
Clean off adhering
debris, etc.
Check the appearance of the Manipulator, and clean off any dust or other foreign substances
adhering to it.
Check the appearance of the cables for any flaws, and make sure it is not disconnected.
Correct deformation and
misalignment
Check for misalignment of safety barriers and other components.
If it is misaligned, correct it to the original position.
Check brake operation
With the motor turned off, check that the shaft does not drop.
If the shaft drops while the motor is turned off and the brake is not released, contact the supplier.
Also, contact the supplier if the brakes do not release despite the brake release operation.
Check for abnormal
operation noise and
vibration
Check for any abnormal noises and vibrations during operation.
If you notice anything unusual, contact the supplier.
6.2.2 Overhaul (Parts Replacement)
Overhauls (replacements) can only be performed by properly trained service engineers.
For details, refer to the following section.
"Safety Manual - Training"
WARNING
To continue using the Manipulator safely and in accordance with the cleanroom and the ESD specifications and
the ESD specifications, be sure to perform periodic overhauls of the cable unit, replacing damaged or worn-out
parts. In accordance with the cleanroom and ESD specifications and the ESD specifications, the conduit tube is
made of conductive materials to prevent static electricity. If the cables wear down over a long period of operation
and cause an internal short circuit, the conduit tube may be electrified. Touching the conduit tube while the power
is turned on could result in serious bodily injury due to electric shock.
6.2.3 Applying Grease
Ball screw splines and reduction gears require periodic greasing. Be sure to use the specified grease.
CAUTION
Be careful that the grease does not run out. When grease runs out, scratches and other defects can occur on
the slide, not only hindering maximum performance, but also requiring significant time and money to repair.
If grease enters the eyes or mouth or adheres to the skin, take the following measures:
Industrial Robot: SCARA Robots GX series Manual Rev.11
435
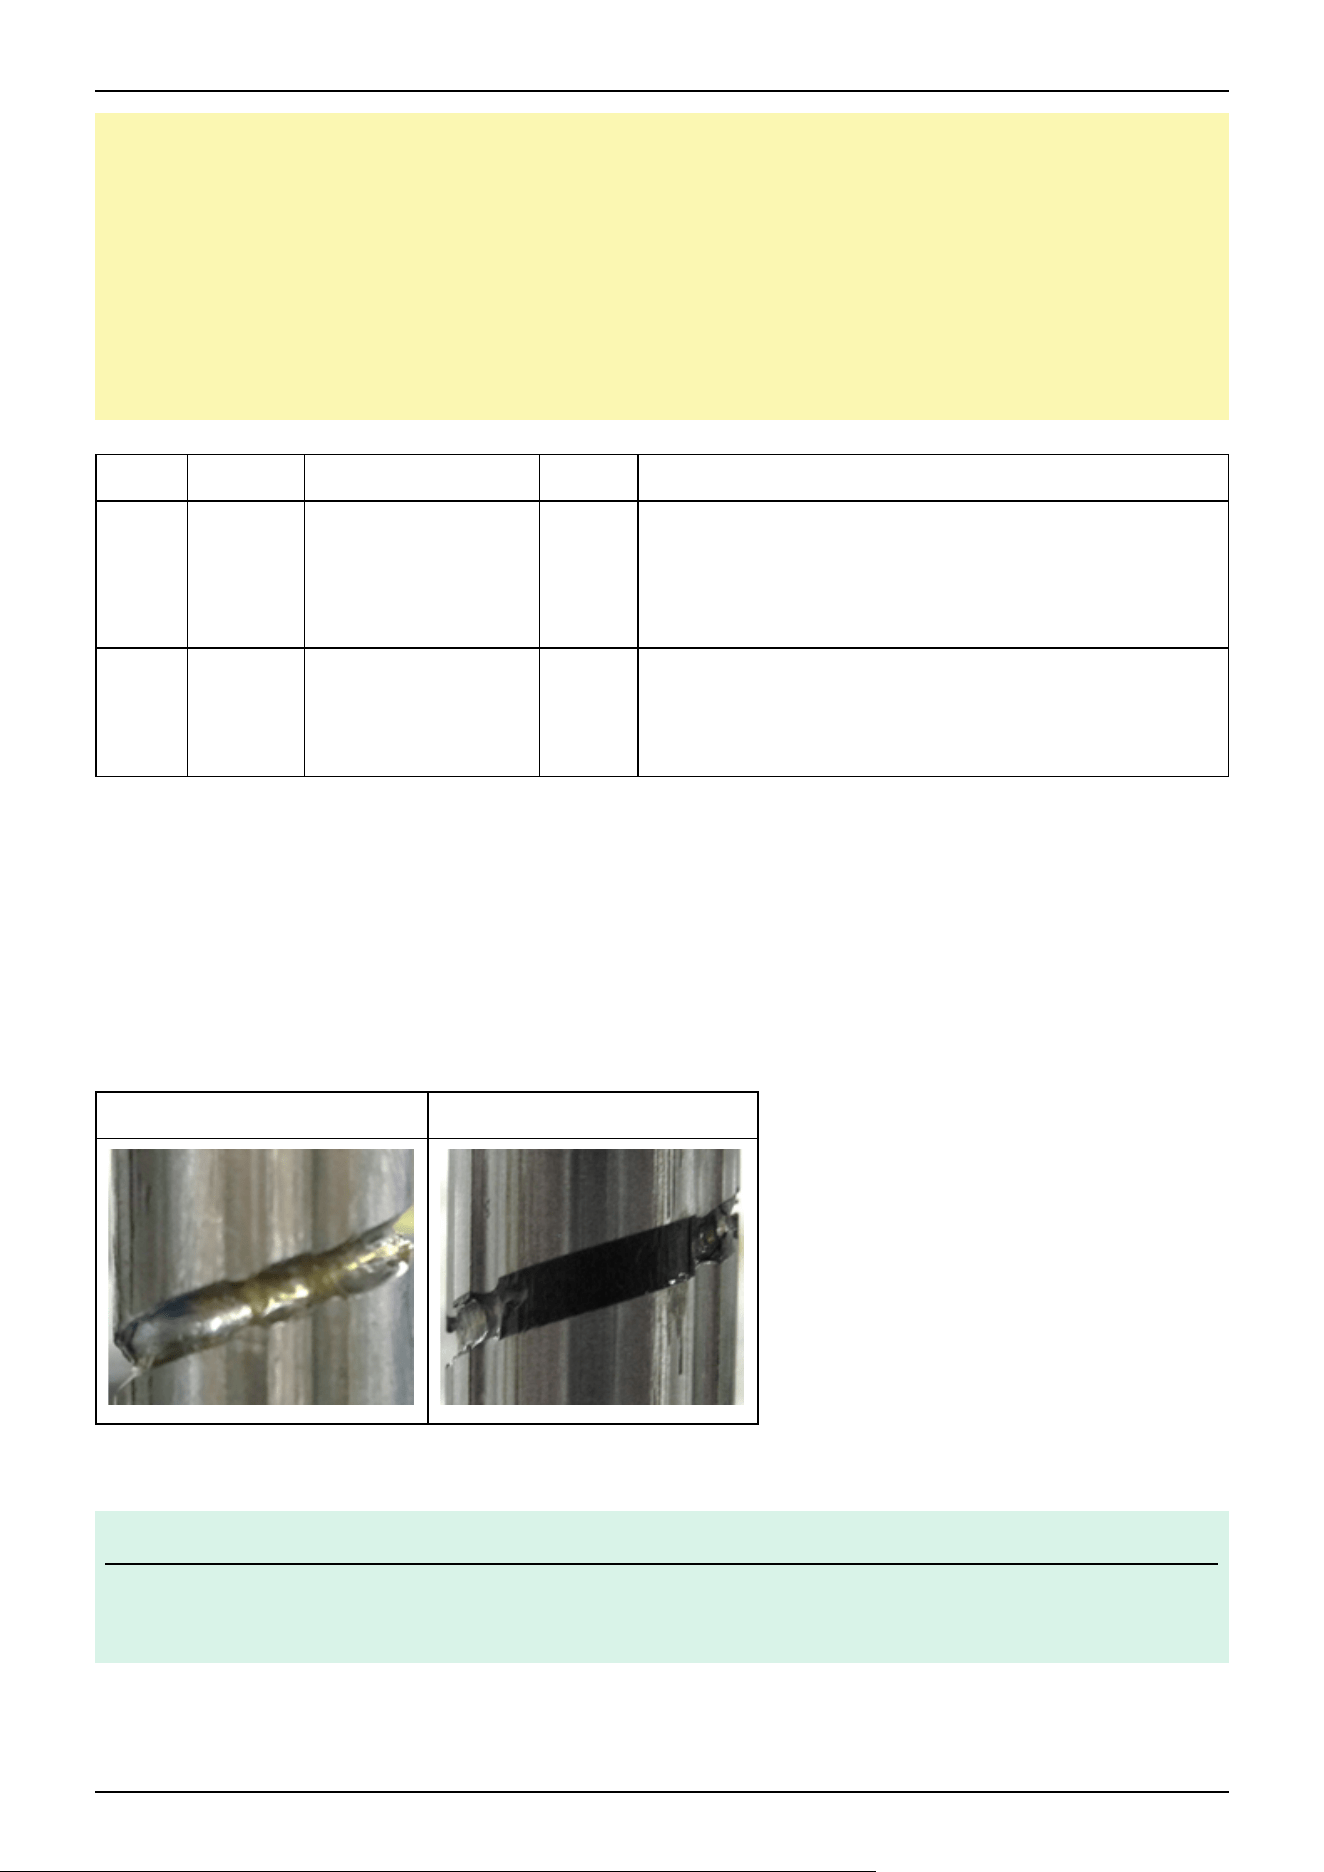
If it enters the eyes
After rinsing the eyes thoroughly with clean water, seek medical attention.
If it enters the mouth
If swallowed, do not force vomiting, and seek medical attention.
If the mouth is contaminated, rinse thoroughly with water.
If adhered to skin
Rinse with water and soap.
Part Interval Grease Grease Application Procedure
Joint
#1
Joint
#2
Reduction
gear
When overhaul is
performed
-
Overhauls (replacements) can only be performed by properly
trained service engineers. For more information, please contact
the supplier.
Joint
#3:
Ball
screw
spline
unit
At 100 km of operation
(50 km for first
greasing)
AFB *
"Applying grease to the ball screw spline unit"
(See below)
* Use the grease below.
Product name: THK AFB-LF Grease
Manufacturer: THK Co., LTD.
URL: https://www.thk.com/
Ball screw spline unit of Joint #3
The recommended interval to perform greasing is when the unit has run 100 km. However, the interval can also be confirmed
from the grease state. As shown in the figure, apply grease when the grease turns black or has dried up.
Normal Grease Blackened Grease
For the first time only, apply grease after running for 50 km.
KEY POINTS
When using Epson RC+, the recommended interval for applying grease to the ball screw spline unit can be
viewed from the [Maintenance] dialog box in Epson RC+.
Applying grease to the ball screw spline unit
✏
Industrial Robot: SCARA Robots GX series Manual Rev.11
436
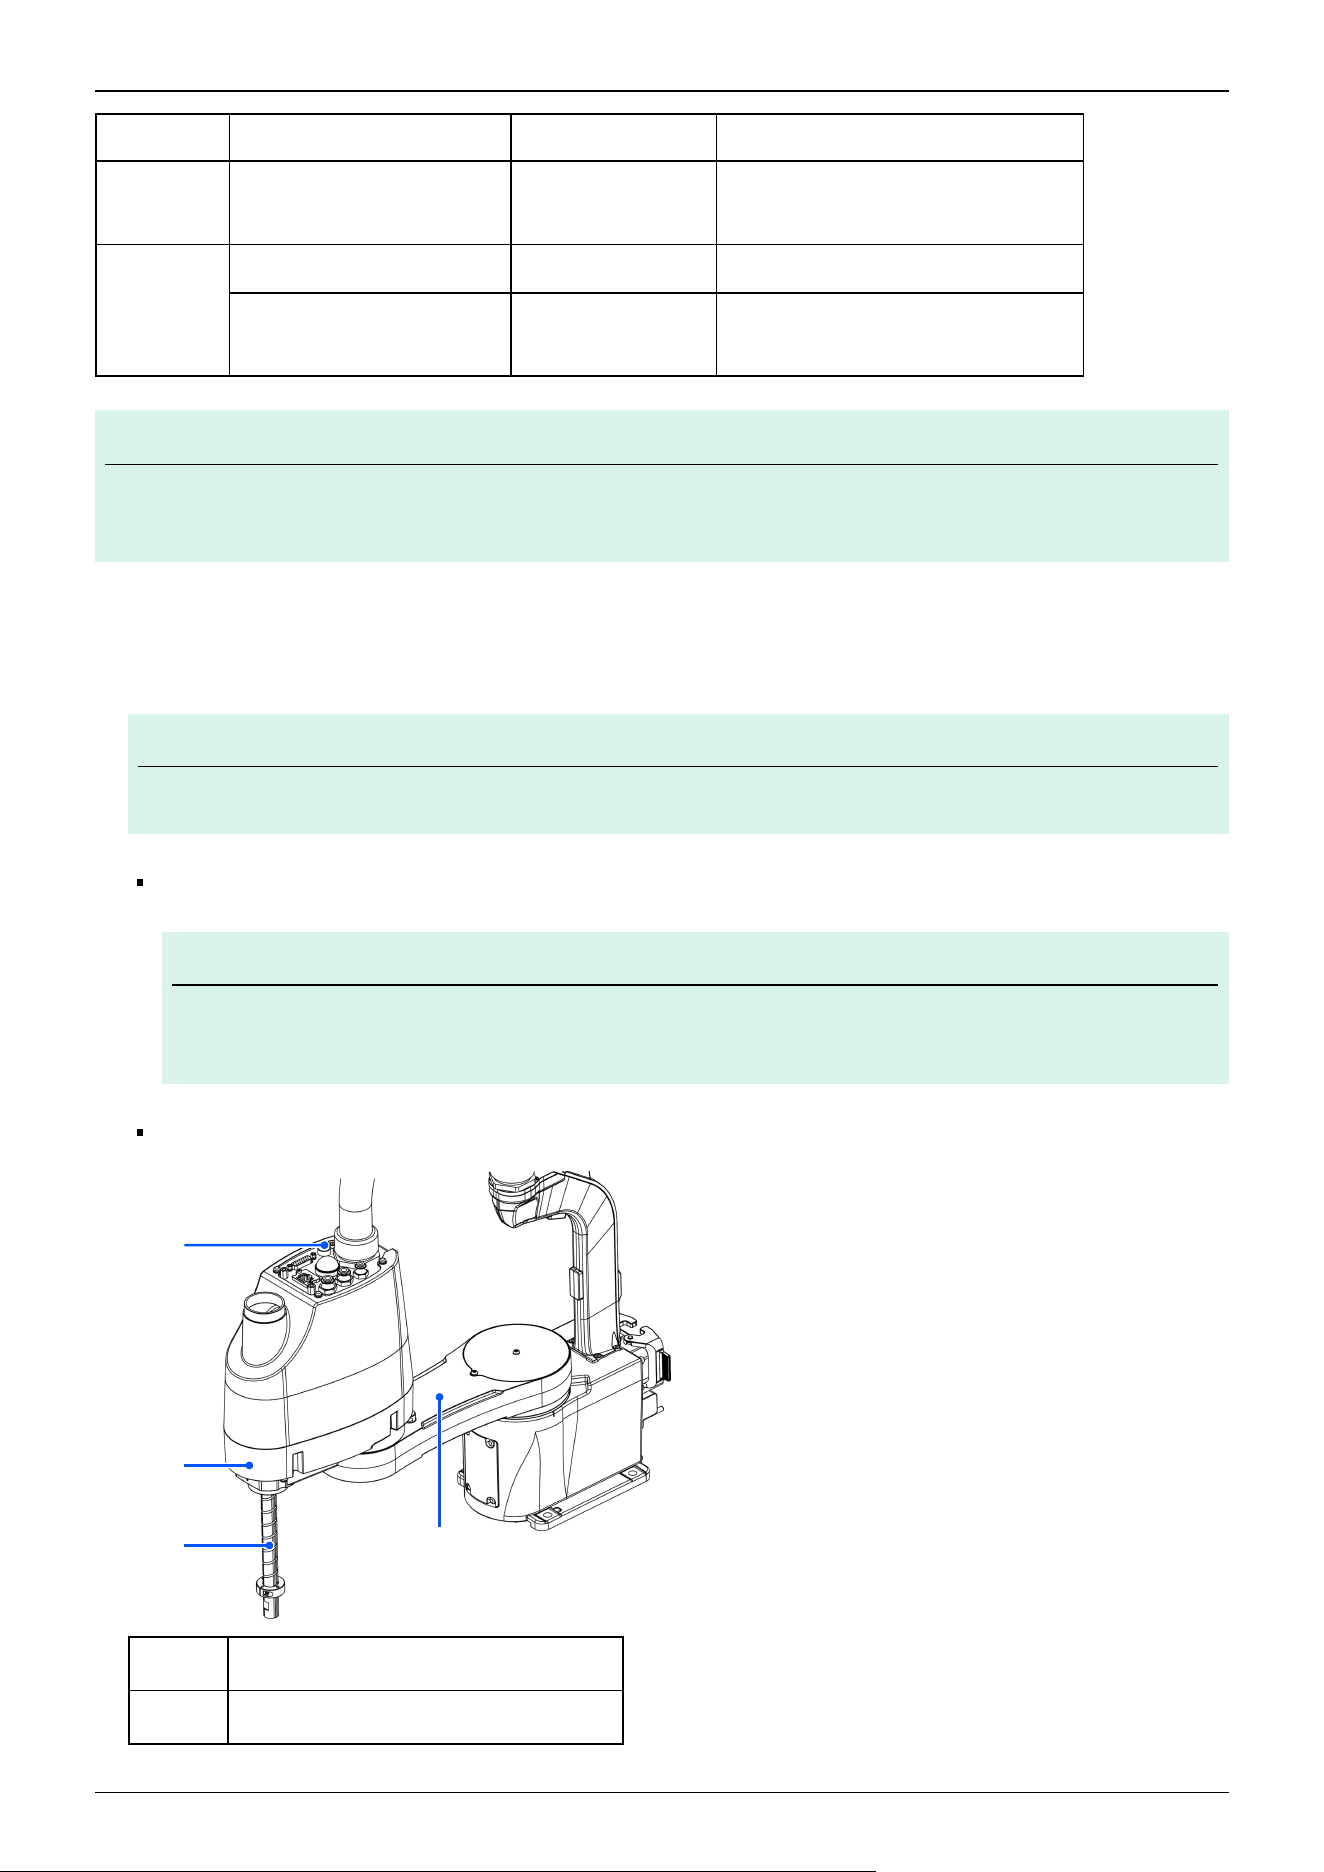
Name Quantity Remarks
Grease used
Grease for ball screw splines
(AFB grease)
Appropriate amount -
Tools used
Wiping cloth 1 For wiping off grease (Spline shaft)
Phillips screwdriver 1
For removing the clamp band
Cleanroom & ESD specifications only
KEY POINTS
When applying grease, be careful to cover the hand and peripheral equipment so that, if any grease falls on
them, it will not affect their performance.
1. Turn on the Controller.
2. Lower the shaft to the lower limit in one of the following ways.
KEY POINTS
Make sure that the hand does not interfere with peripheral equipment or other objects.
While pressing down the brake release switch, manually lower the shaft to the lower limit.
KEY POINTS
When pressing the brake release switch, watch for the shaft descending or rotating under the weight of
the hand.
Using the Epson RC+ [Tools] - [Robot Manager] - [Jog & Teach] panel, lower the shaft to the lower limit.
Symbol Description
a Joint #3 and Joint #4 brake release switch
✏
✏
✏
a
b
c d
Industrial Robot: SCARA Robots GX series Manual Rev.11
437
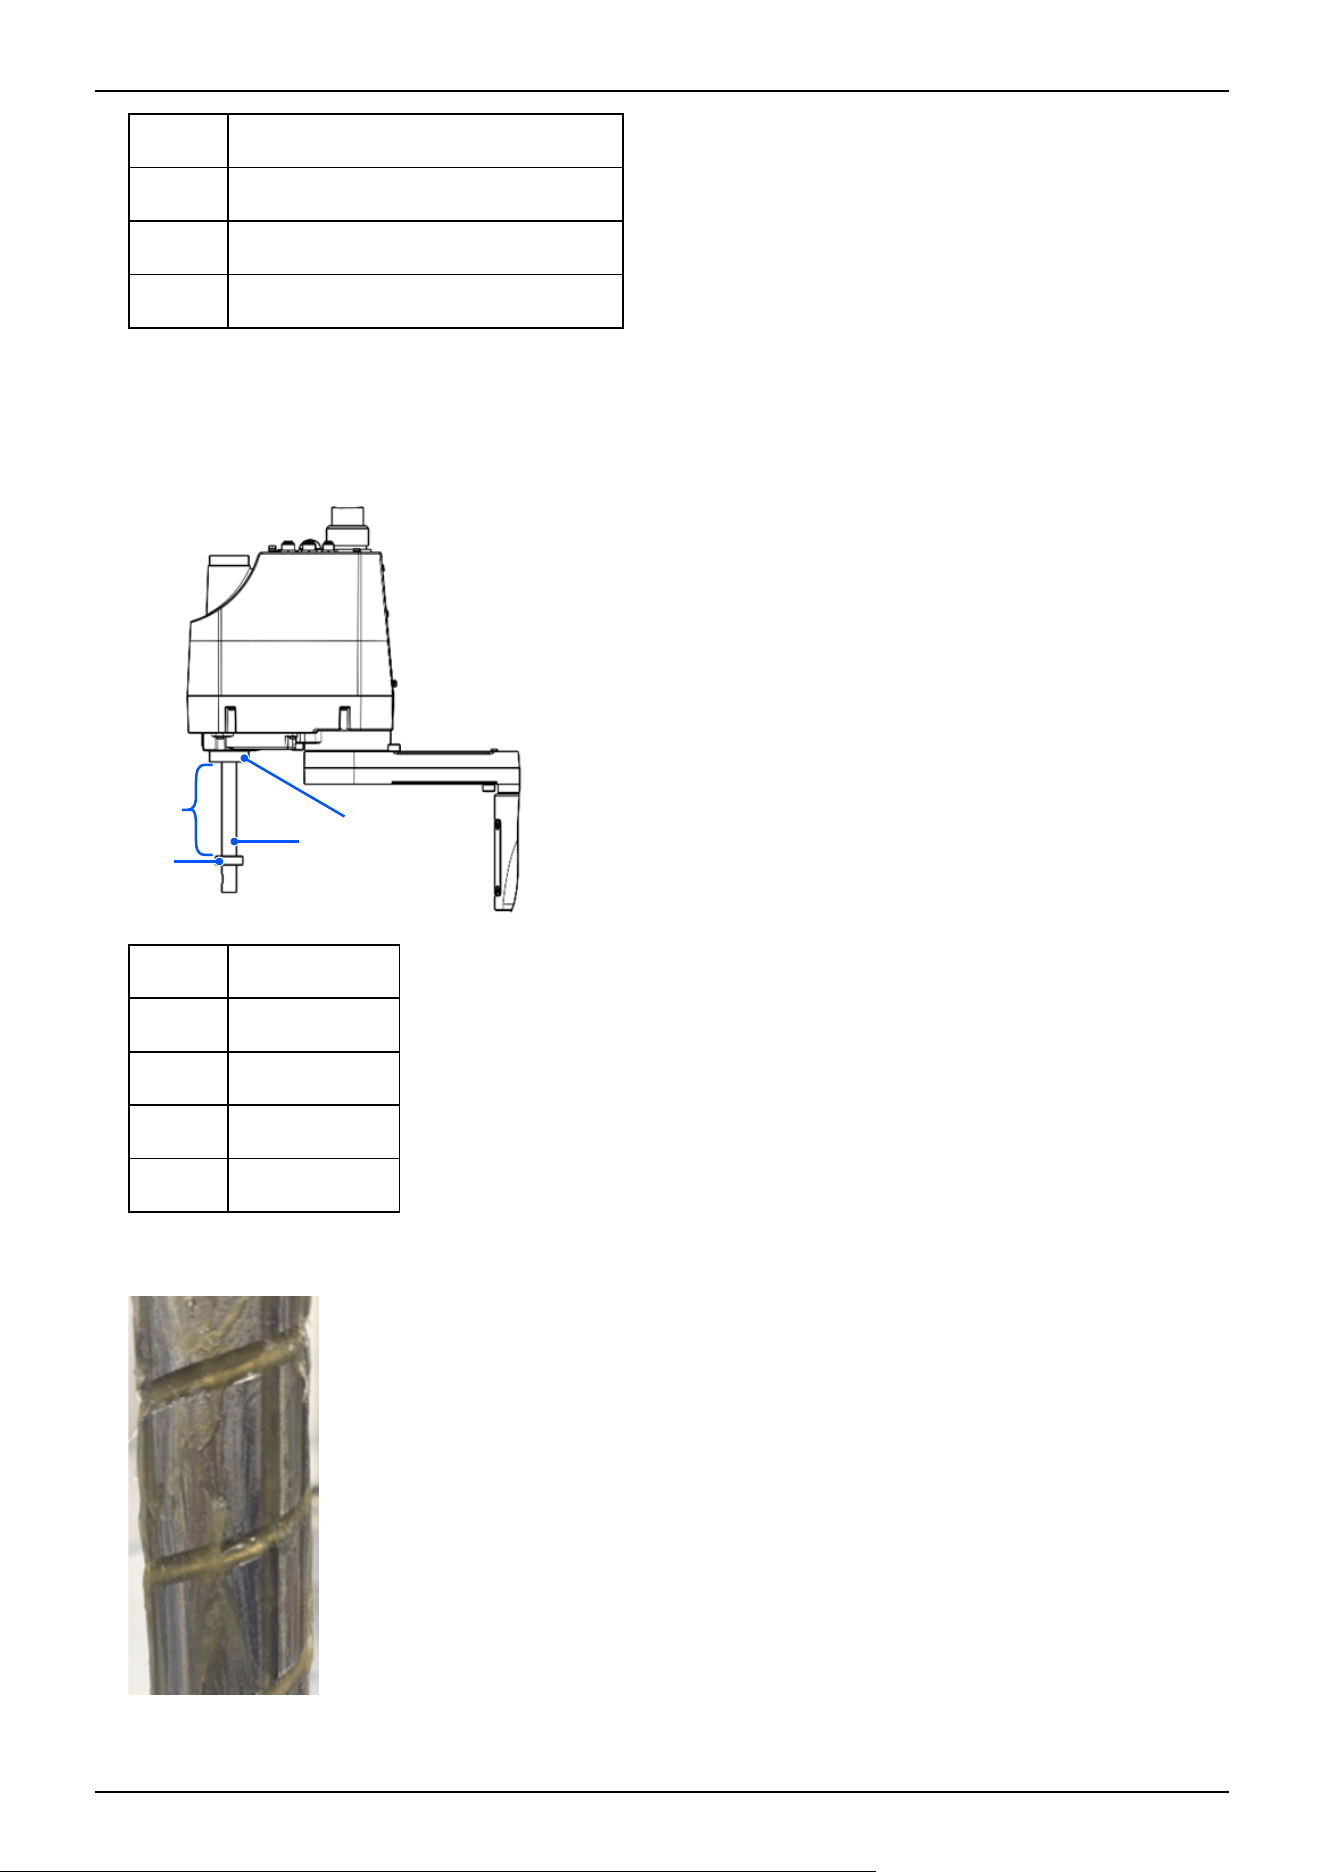
Symbol Description
b Arm #2
c Shaft
d Arm #1
3. Turn off the Controller.
4. Wipe off the old grease on the shaft, and apply new grease.
The grease application area is from the end of the spline nut to the mechanical stop.
Symbol Description
a Application area
b Mechanical stop
c Shaft
d Spline nut
5. Grease should be applied to the helical and vertical grooves of the ball screw spline so that the grooves are filled evenly.
Example of grease application
b
c
d
a
Industrial Robot: SCARA Robots GX series Manual Rev.11
438
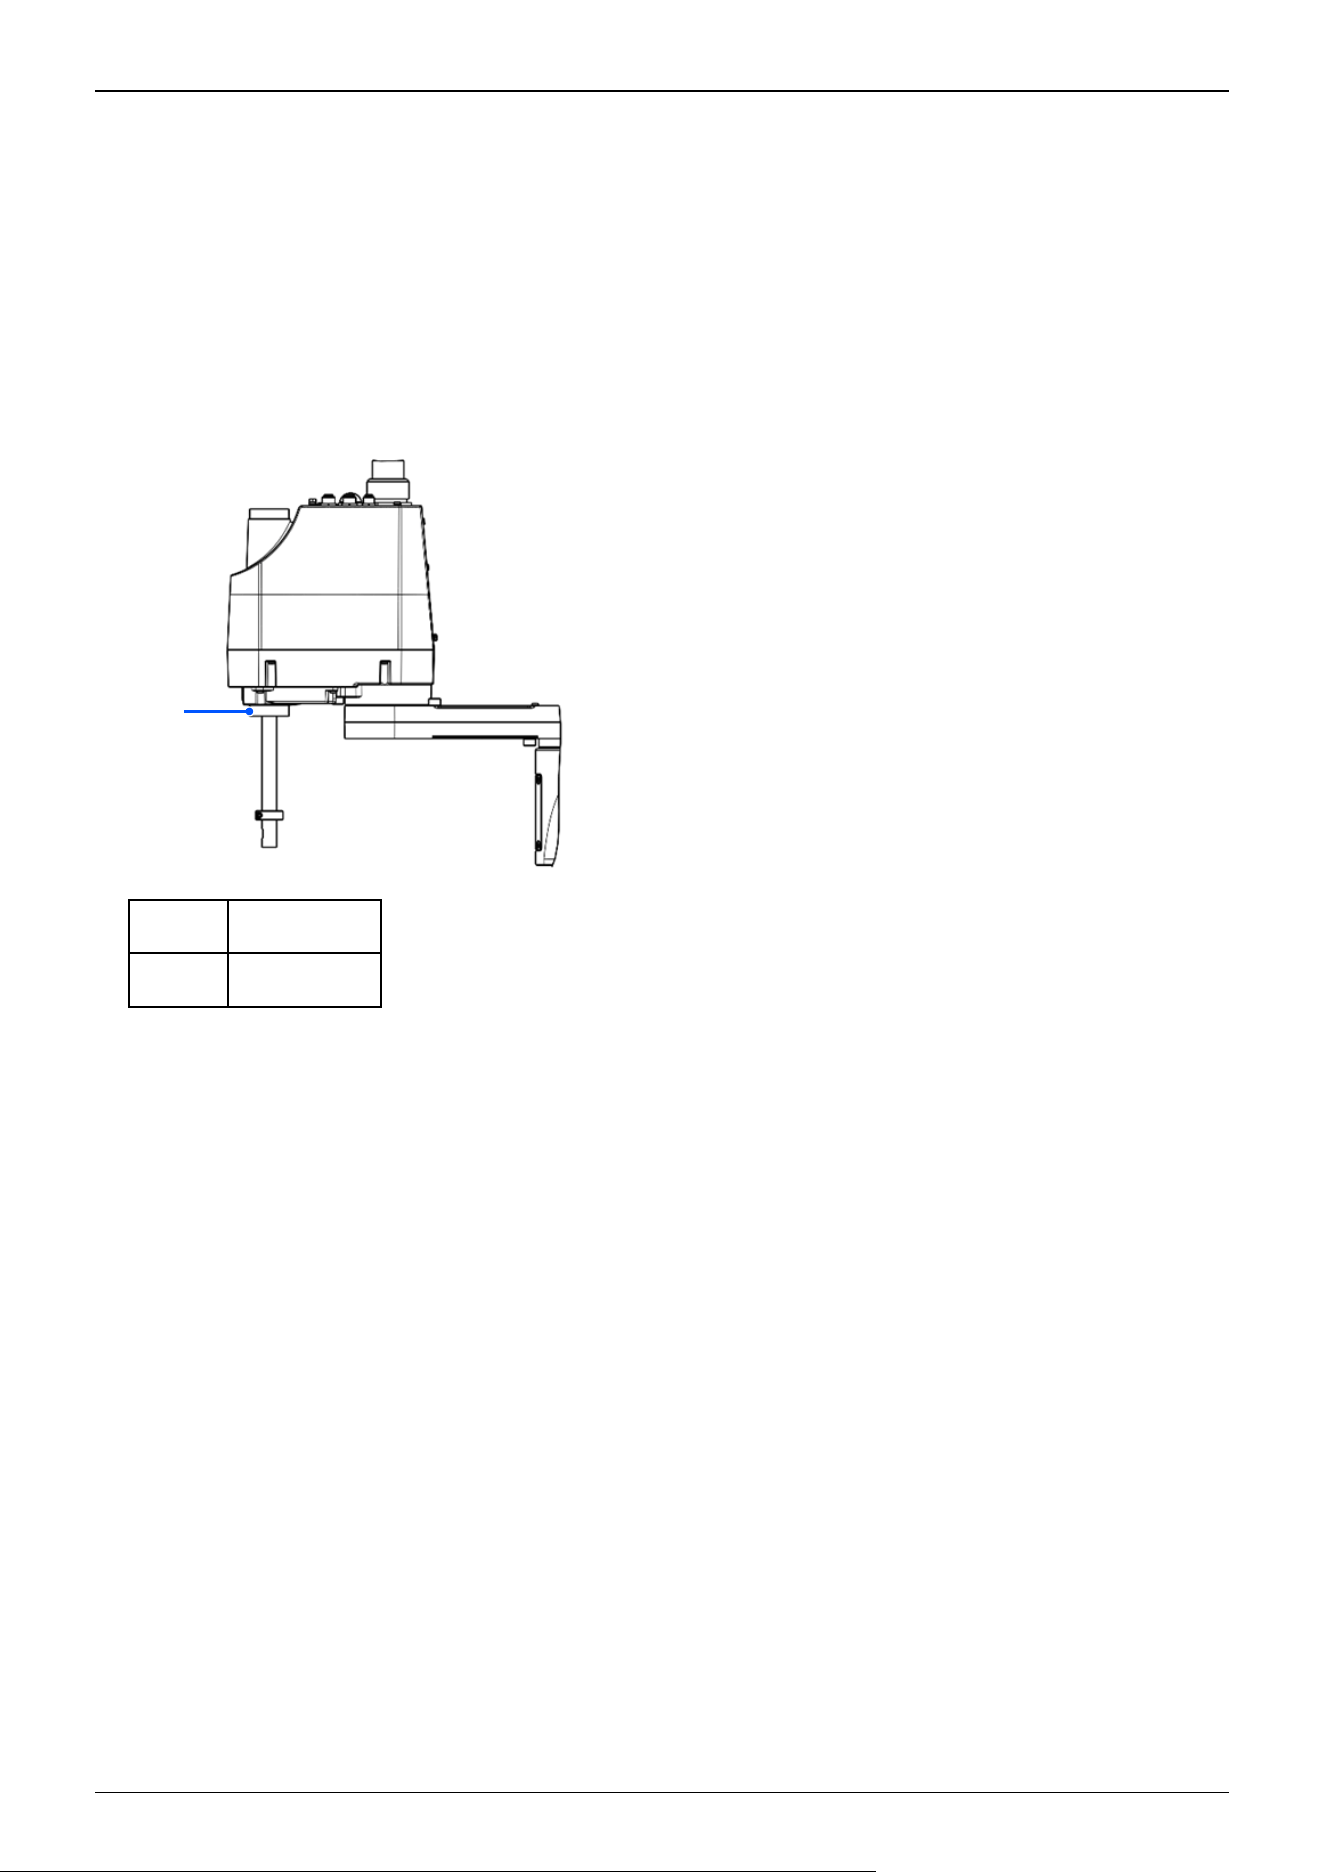
6. Turn on the Controller.
7. Start the Robot Manager, and move the shaft to the origin position. Be careful not to hit any peripheral equipment.
8. After moving to the origin position, perform a reciprocating motion with the shaft. The reciprocating motion is performed
from the upper limit to the lower limit using the low-power mode operation program. Perform the motion for about 5
minutes to allow the grease to spread.
9. Turn on the Controller.
10. Wipe off any excess grease at the spline nut end and mechanical stop section.
Symbol Description
a Spline nut end
a
Industrial Robot: SCARA Robots GX series Manual Rev.11
439
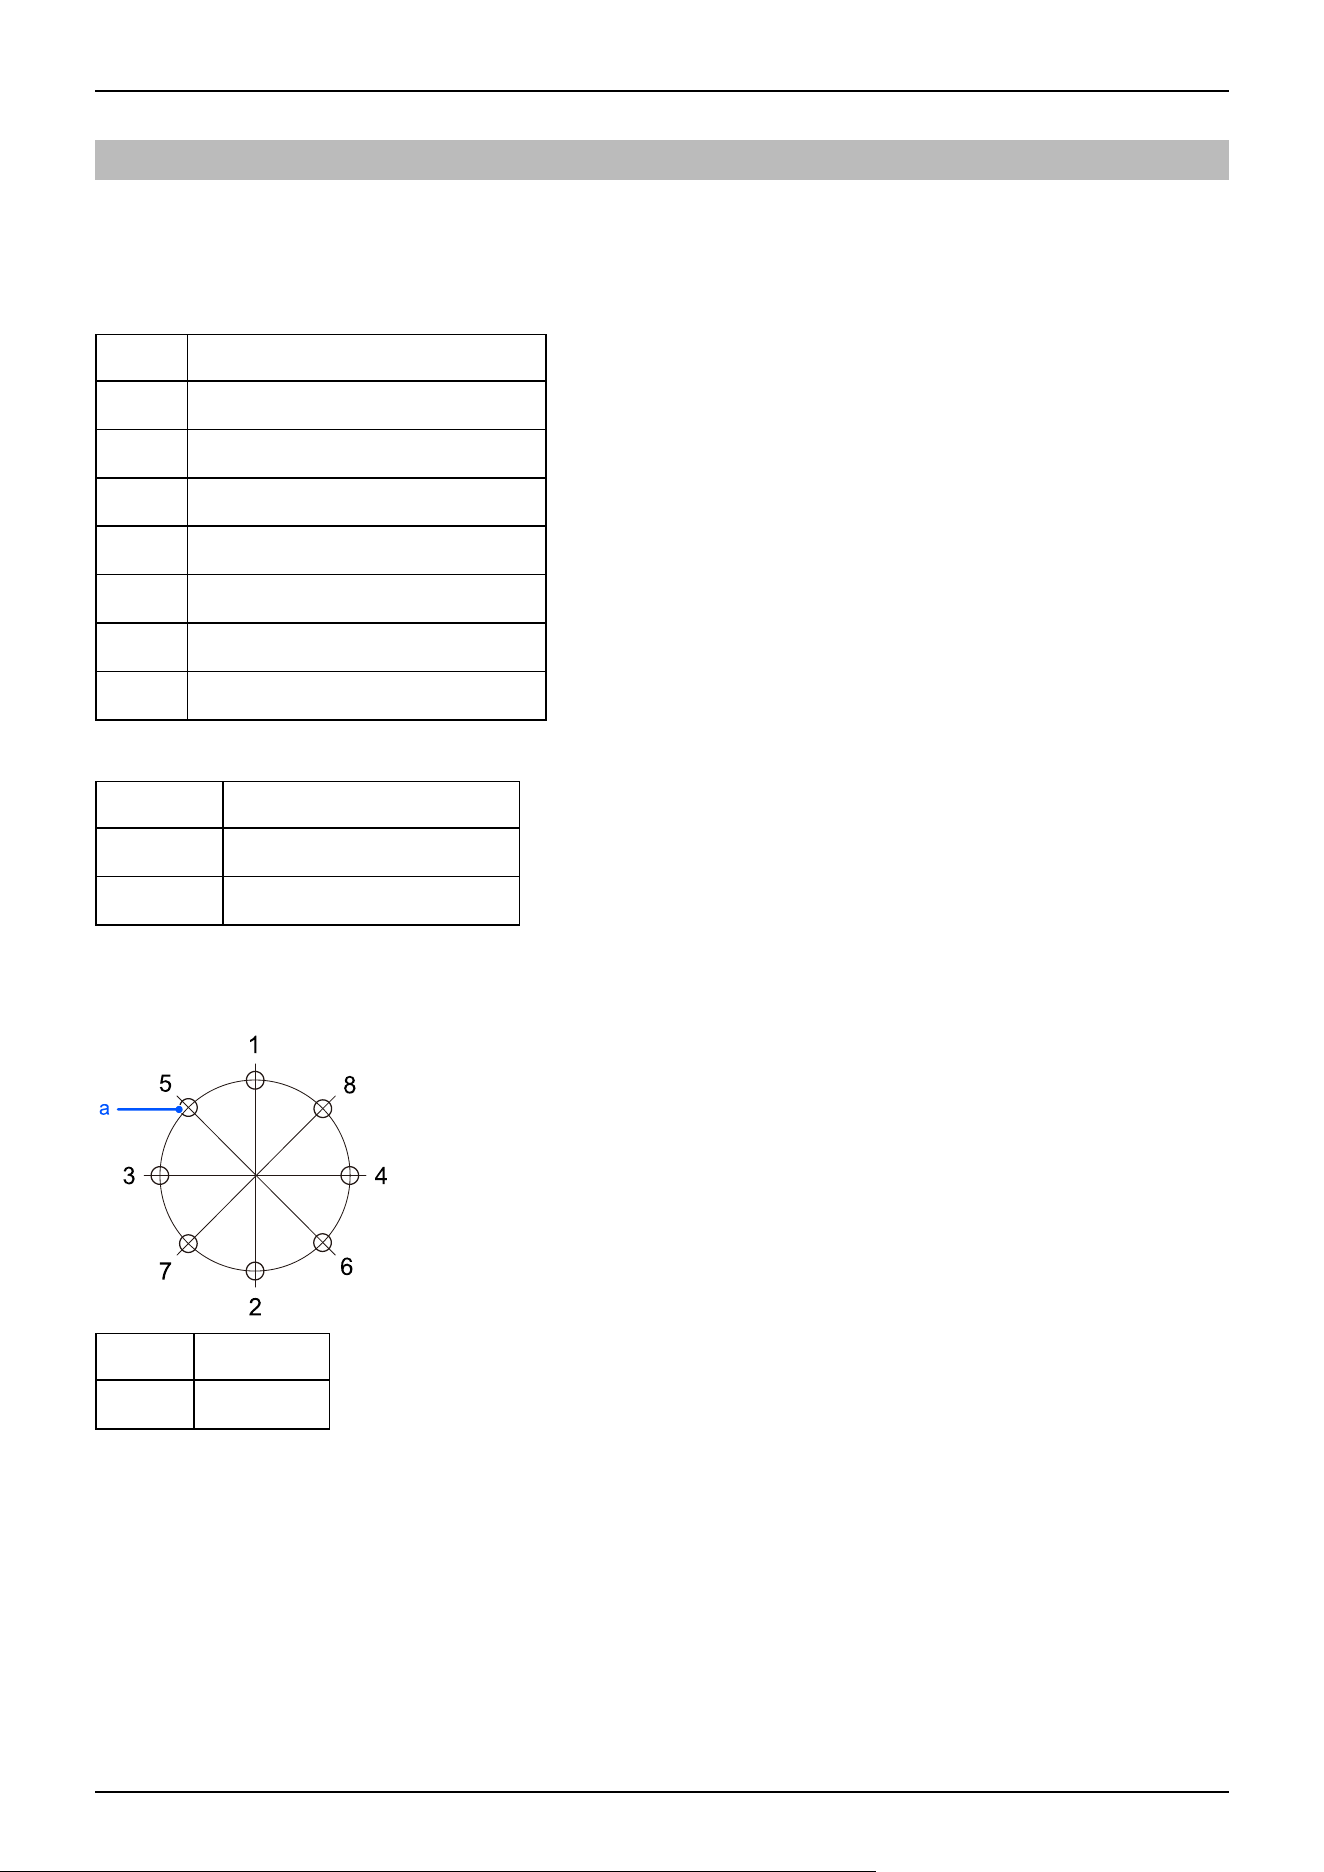
6.2.4 Tightening the Hexagon Socket Head Cap Bolts
Hexagon socket head cap bolts (referred to as "bolts" below) are used in locations where mechanical strength is required.
During assembly, these bolts are tightened at the tightening torques shown in the following table.
Unless otherwise specified, when retightening these bolts in the work procedures described in this manual, use a torque wrench
or similar tool to obtain the tightening torques in the following table.
Bolt Tightening Torque
M3 2.0 ± 0.1 N·m (21 ± 1 kgf·cm)
M4 4.0 ± 0.2 N·m (41 ± 2 kgf·cm)
M5 8.0 ± 0.4 N·m (82 ± 4 kgf·cm)
M6 13.0 ± 0.6 N·m (133 ± 6 kgf·cm)
M8 32.0 ± 1.6 N·m (326 ± 16 kgf·cm)
M10 58.0 ± 2.9 N·m (590 ± 30 kgf·cm)
M12 100.0 ± 5.0 N·m (1,020 ± 51 kgf·cm)
For set screws, refer to the following table.
Set Screw Tightening Torque
M4 2.4 ± 0.1 N·m (26 ± 1 kgf·cm)
M5 3.9 ± 0.2 N·m (40 ± 2 kgf·cm)
It is recommended that bolts arranged in a circular pattern be secured in place by tightening in criss-cross order as shown in the
figure.
Symbol Description
a Bolt hole
When securing the bolts, do not tighten the bolts all at once, but tighten them in two or three separate rounds with an Allen
wrench, and then use a torque wrench or similar tool to secure them at the tightening torques shown in the table above.
Industrial Robot: SCARA Robots GX series Manual Rev.11
440
6.3 GX8 Manipulator Periodic Inspection
6.3.1 Inspection
6.3.1.1 Inspection Schedule
Inspection items are divided into five stages (daily, 1-month, 3-month, 6-month, and 12-month), with additional items added at
each stage. However, if the Manipulator is powered and operated for more than 250 hours in a month, add inspection items
every 250, 750, 1,500, and 3,000 hours.
Inspection Item
Daily
Inspection
1-month
Inspection
3-month
Inspection
6-month
Inspection
12-month
Inspection
Overhaul*
1-month inspection
(250 hours)
Perform
daily
✓
2 months (500 hours)
✓
3 months (750 hours)
✓ ✓
4 months (1,000
hours)
✓
5 months (1,250
hours)
✓
6 months (1,500
hours)
✓ ✓ ✓
7 months (1,750
hours)
✓
8 months (2,000
hours)
✓
9 months (2,250
hours)
✓ ✓
10 months (2,500
hours)
✓
11 months (2,750
hours)
✓
12 months (3,000
hours)
✓ ✓ ✓ ✓
13 months (3,250
hours)
✓
: : : : : : :
20,000 hours
✓
* Overhaul (parts replacement)
KEY POINTS
✏
Industrial Robot: SCARA Robots GX series Manual Rev.11
441

An overhaul (parts replacement) should be performed after every 20,000 hours of Manipulator operation.
(Assuming an operation time of 8 hours per day and 250 hours per month, an overhaul should be performed
every 80 months.)
Industrial Robot: SCARA Robots GX series Manual Rev.11
442
6.3.1.2 Inspection Details
Inspection items
Inspection Item
Inspection
Location
Daily
Inspection
1-month
Inspection
3-month
Inspection
6-month
Inspection
12-month
Inspection
Loose bolts: Check for
rattling
Hand mounting
bolts
✓ ✓ ✓ ✓ ✓
Manipulator
installation bolts
✓ ✓ ✓ ✓ ✓
Check for loose connectors
Manipulator side
external
(Connector plate,
etc.)
✓ ✓ ✓ ✓ ✓
Inspect for flaws:
Clean off adhering debris, etc.
Entire
Manipulator
✓ ✓ ✓ ✓ ✓
External cables
✓ ✓ ✓ ✓
Correct deformations and
misalignments
Safety barriers,
etc.
✓ ✓ ✓ ✓ ✓
Check brake operation Joints #3 and #4
✓ ✓ ✓ ✓ ✓
Check for abnormal operation
noise and vibration
Entire
Manipulator
✓ ✓ ✓ ✓ ✓
Industrial Robot: SCARA Robots GX series Manual Rev.11
443
Inspection methods
Inspection Item Inspection Method
Check for loose or
rattling bolts
Using an Allen wrench or similar tool, check that the hand mounting bolts and Manipulator
installation bolts are not loose. Refer to the following section, and retighten to the proper torque.
Tightening the Hexagon Socket Head Cap Bolts
Check for loose
connectors
Check that no connectors are loose.
If a connector is loose, reattach it so that it will not come off.
Inspect for flaws
Clean off adhering
debris, etc.
Check the appearance of the Manipulator, and clean off any dust or other foreign substances
adhering to it.
Check the appearance of the cables for any flaws, and make sure it is not disconnected.
Correct deformation and
misalignment
Check for misalignment of safety barriers and other components.
If it is misaligned, correct it to the original position.
Check brake operation
With the motor turned off, check that the shaft does not drop.
If the shaft drops while the motor is turned off and the brake is not released, contact the supplier.
Also, contact the supplier if the brakes do not release despite the brake release operation.
Check for abnormal
operation noise and
vibration
Check for any abnormal noises and vibrations during operation.
If you notice anything unusual, contact the supplier.
6.3.2 Overhaul (Parts Replacement)
Overhauls (replacements) can only be performed by properly trained service engineers.
For details, refer to the following section.
"Safety Manual - Training"
6.3.3 Applying Grease
Ball screw splines and reduction gears require periodic greasing. Be sure to use the specified grease.
CAUTION
Be careful that the grease does not run out. When grease runs out, scratches and other defects can occur on
the slide, not only hindering maximum performance, but also requiring significant time and money to repair.
If grease enters the eyes or mouth or adheres to the skin, take the following measures:
If it enters the eyes
After rinsing the eyes thoroughly with clean water, seek medical attention.
If it enters the mouth
If swallowed, do not force vomiting, and seek medical attention.
If the mouth is contaminated, rinse thoroughly with water.
If adhered to skin
Rinse with water and soap.
Industrial Robot: SCARA Robots GX series Manual Rev.11
444
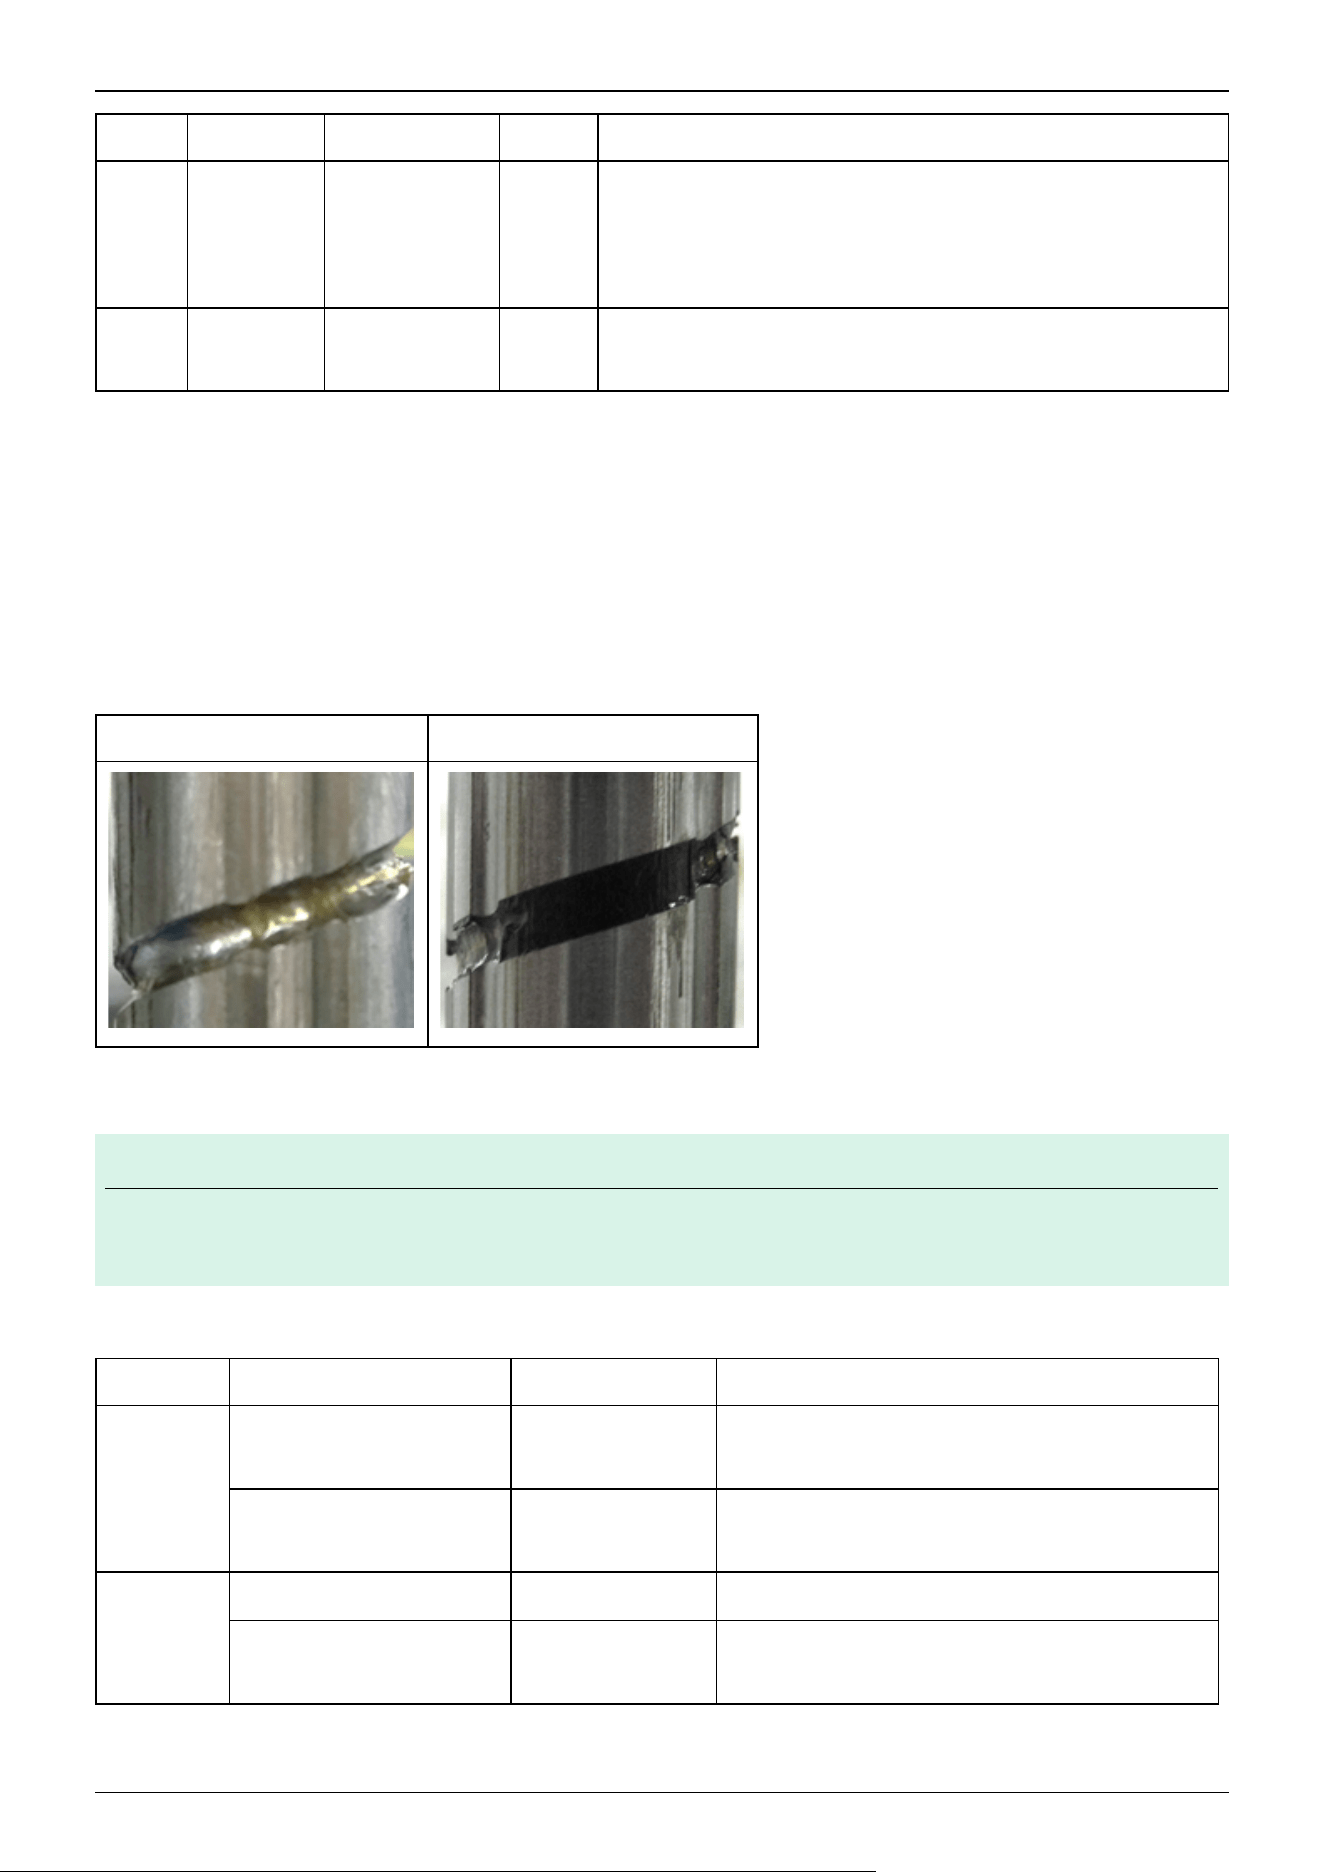
Part Interval Grease Grease Application Procedure
Joint
#1
Joint
#2
Reduction
gear
When overhaul
is performed
-
This can be performed by properly trained service engineers only.
For more information, please contact the supplier.
Joint
#3
Ball screw
spline unit
100 km (first 50
km) run
AFB *
"Applying grease to the ball screw spline unit"
(See below.)
* Use the grease below.
Product name: THK AFB-LF Grease Manufacturer: THK Co., LTD.
URL: https://www.thk.com/
For food-grade grease model (GX8-B**3P-FZ), use the following grease.
Product name: THK L700 Grease
Ball screw spline unit of Joint #3
The recommended interval to perform greasing is when the unit has run 100 km. However, the interval can also be confirmed
from the grease state. As shown in the figure, apply grease when the grease turns black or has dried up.
Normal Grease Blackened Grease
For the first time only, apply grease after running for 50 km.
KEY POINTS
When using Epson RC+, the recommended interval for applying grease to the ball screw spline unit can be
viewed from the [Maintenance] dialog box in Epson RC+.
Applying grease to the ball screw spline unit
Name Quantity Remarks
Grease used
Grease for ball screw splines
(AFB grease)
Appropriate amount -
Grease for ball screw splines
(L700 grease)
Appropriate amount L700 grease is specified for food grade grease model.
Tools
Wiping cloth 1 For wiping grease (Spline shaft)
Hook wrench 1
For removing the clamp band
Cleanroom specifications and protected-model only
✏
Industrial Robot: SCARA Robots GX series Manual Rev.11
445
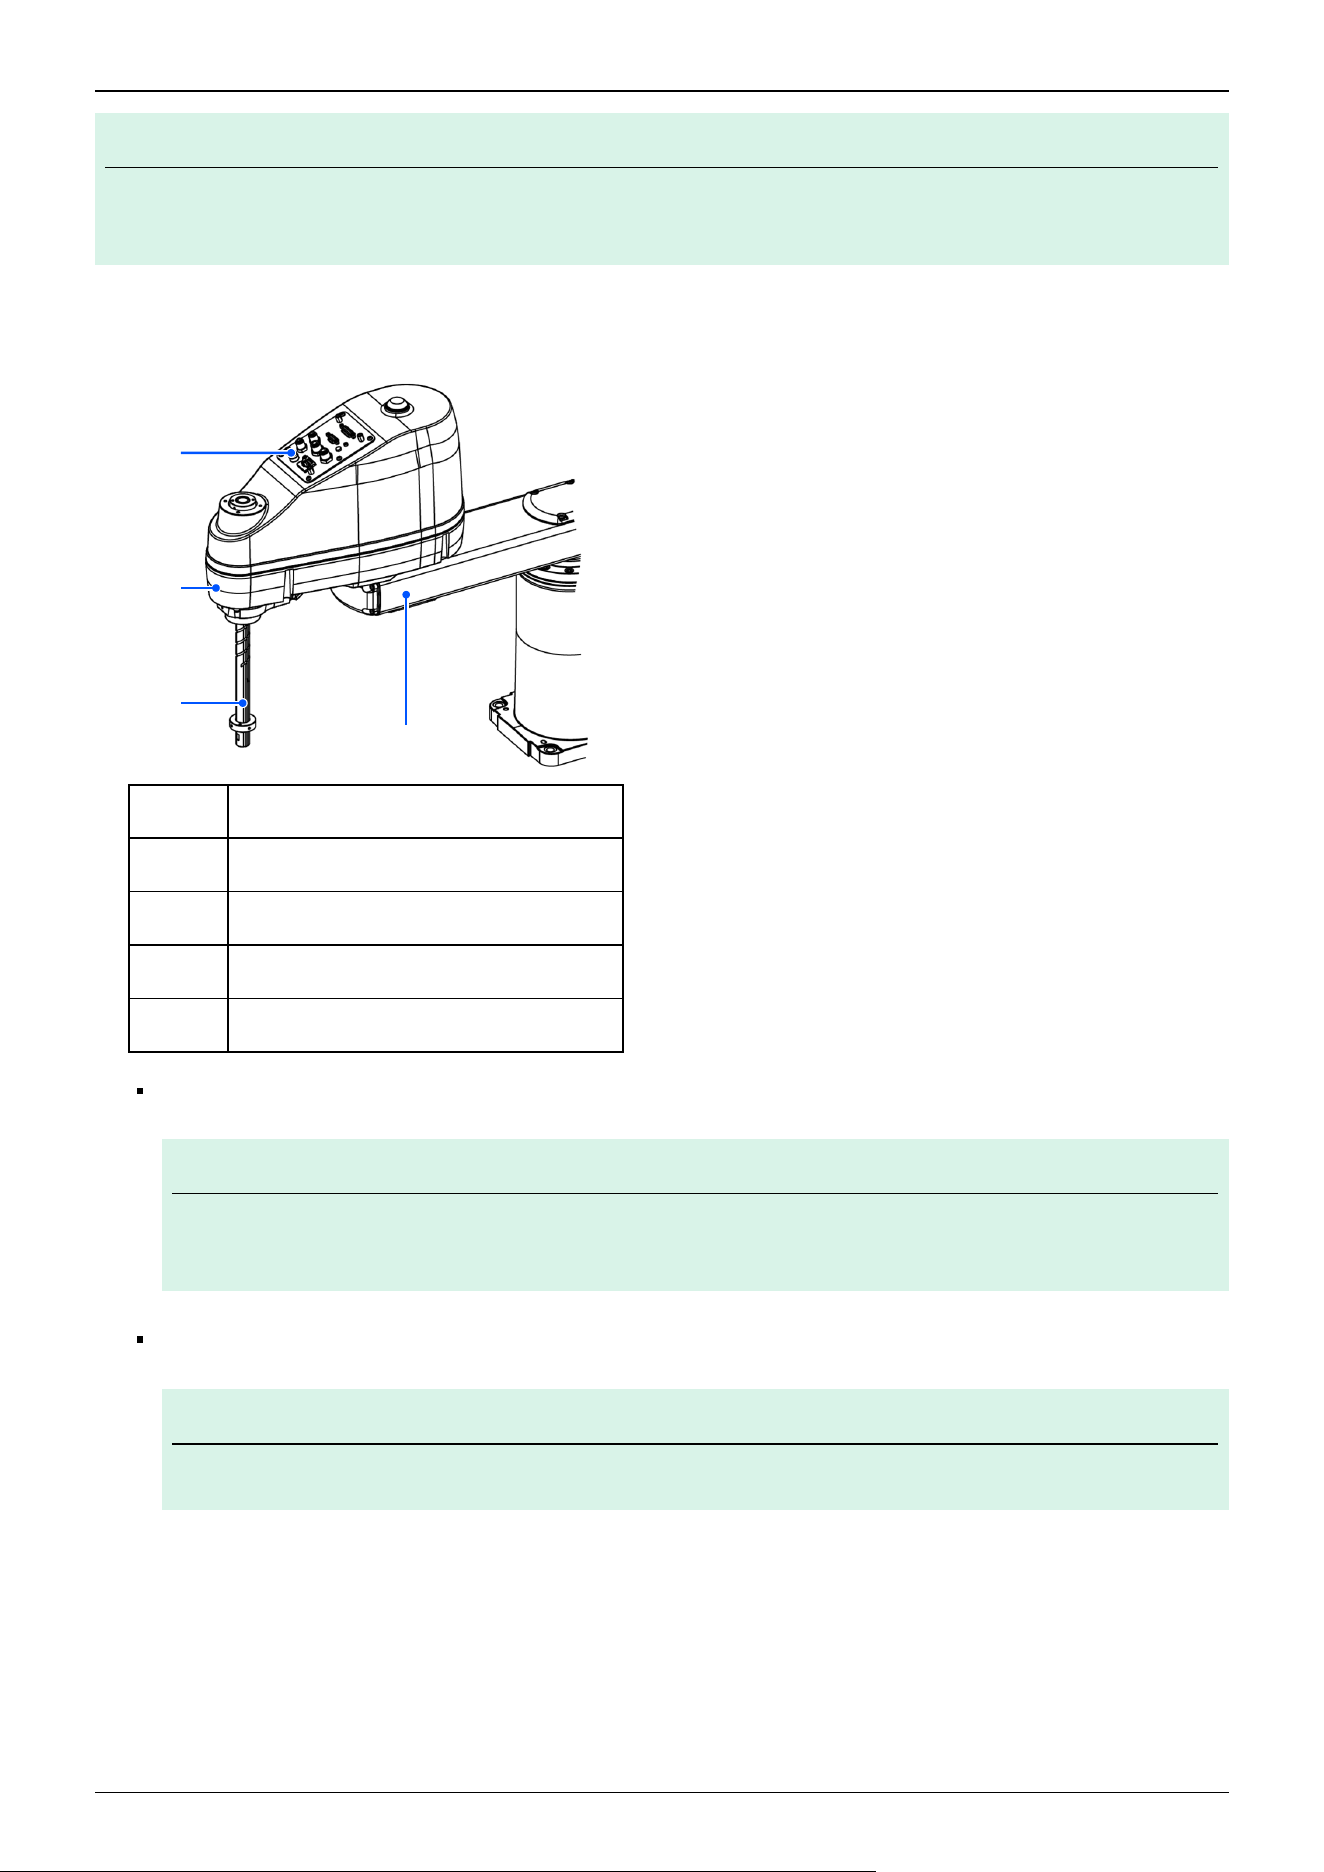
KEY POINTS
When applying grease, be careful to cover the hand and peripheral equipment so that, if any grease falls on
them, it will not affect their performance.
1. Turn on the Controller.
2. Lower the shaft to the lower limit in one of the following ways.
Symbol Description
a Joint #3 and Joint #4 brake release switch
b Arm #2
c Shaft
d Arm #1
While pressing down the brake release switch, manually lower the shaft to the lower limit.
KEY POINTS
When pressing the brake release switch, watch for the shaft descending or rotating under the weight of
the hand.
Using the Epson RC+ [Tools] - [Robot Manager] - [Jog & Teach] panel, lower the shaft to the lower limit.
KEY POINTS
Make sure that the hand does not interfere with peripheral equipment or other objects.
3. Turn off the Controller.
4. Wipe off the old grease on the shaft, and apply new grease.
The grease application area is from the end of the spline nut to the mechanical stop.
✏
a
b
c
d
✏
✏
Industrial Robot: SCARA Robots GX series Manual Rev.11
446
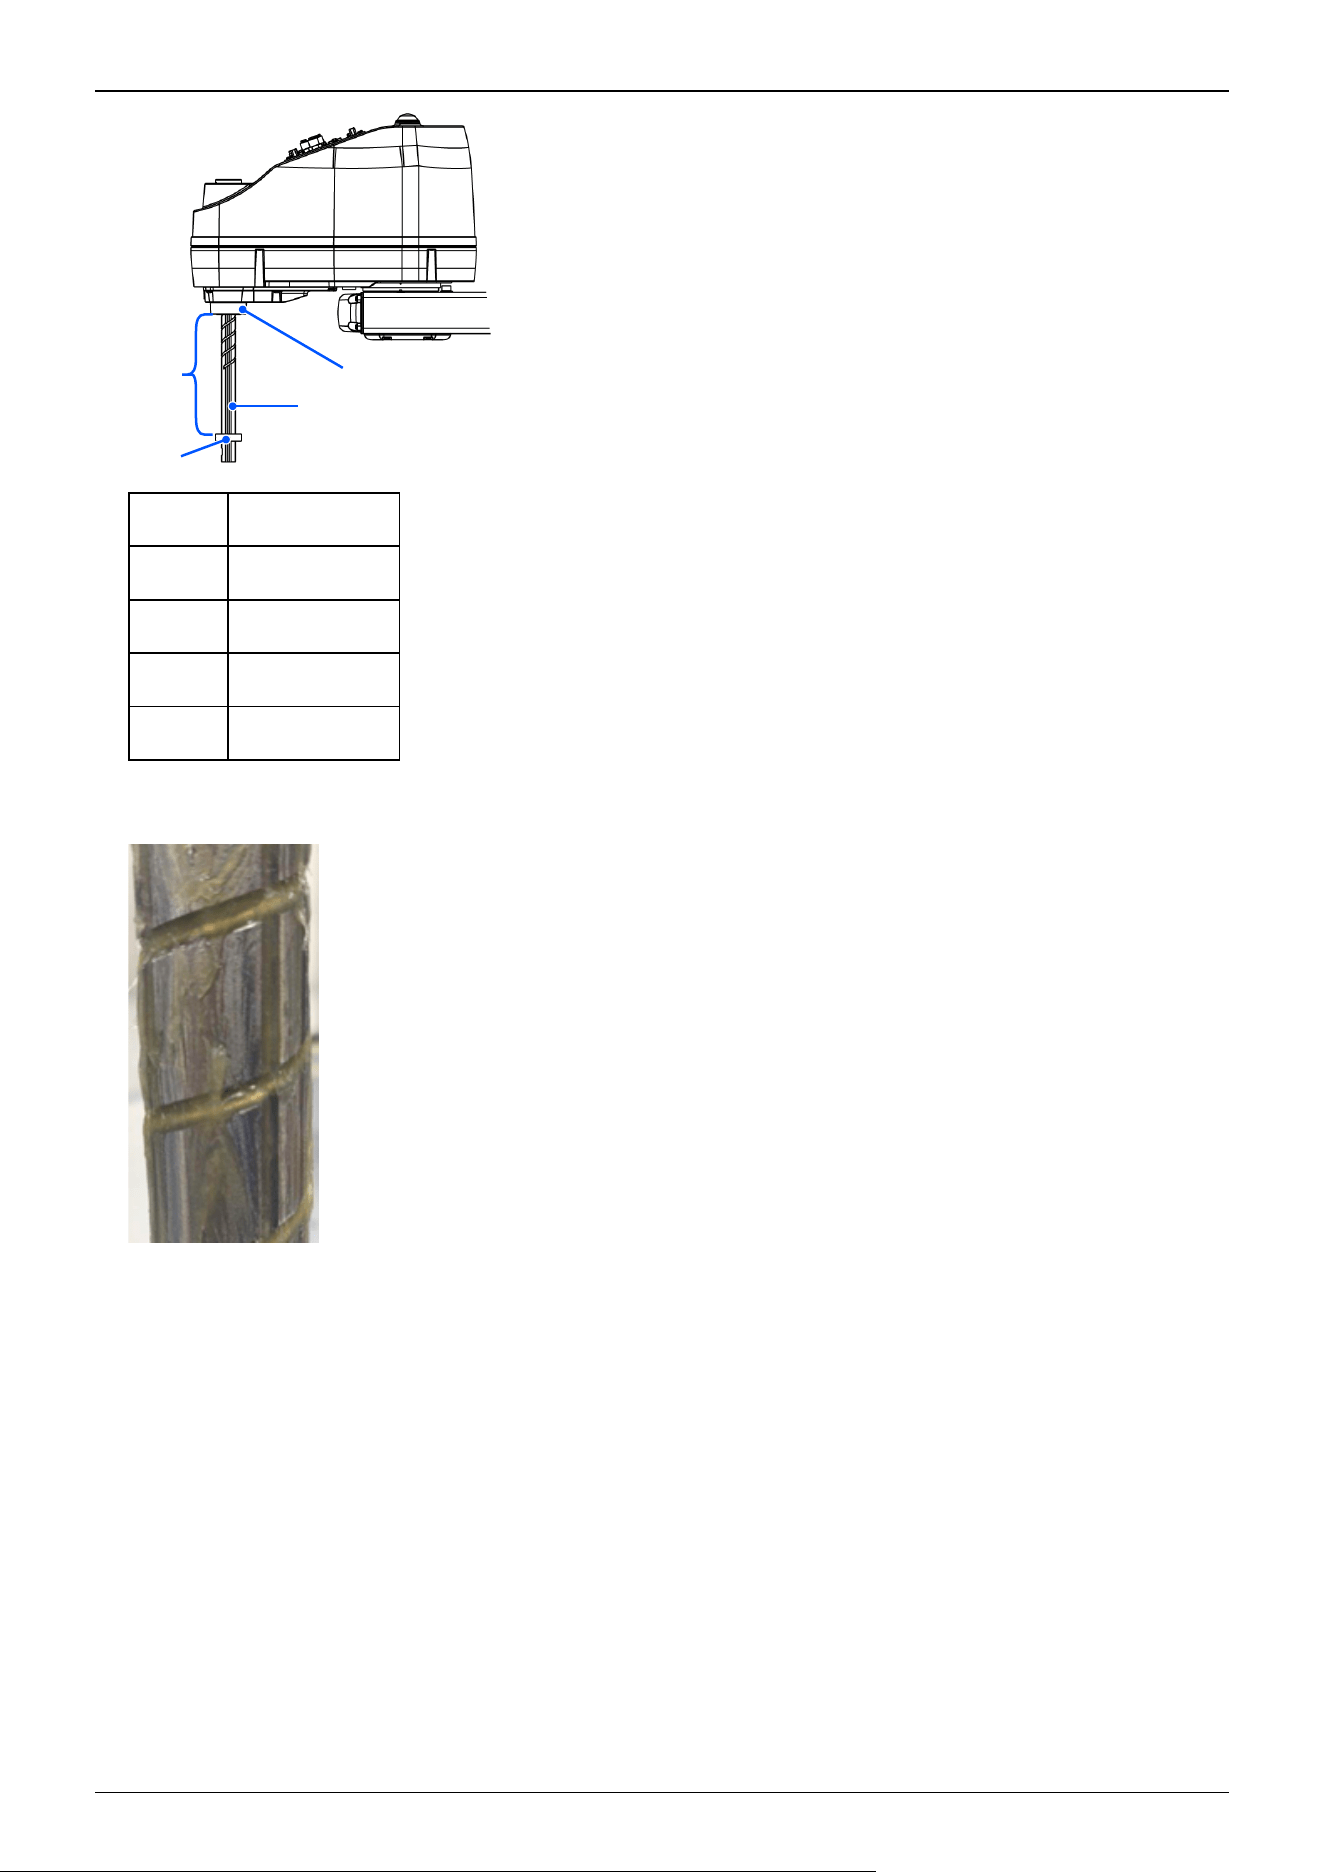
Symbol Description
a Application area
b Mechanical stop
c Shaft
d Spline nut
5. Grease should be applied to the helical and vertical grooves of the ball screw spline so that the grooves are filled evenly.
Example of grease application
6. Turn on the Controller.
7. Start the Robot Manager, and move the shaft to the origin position. Be careful not to hit any peripheral equipment.
8. After moving to the origin position, perform a reciprocating motion with the shaft. The reciprocating motion is performed
from the upper limit to the lower limit using the low-power mode operation program. Perform the motion for about 5
minutes to allow the grease to spread.
9. Turn on the Controller.
10. Wipe off any excess grease at the spline nut end and mechanical stop section.
b
c
d
a
Industrial Robot: SCARA Robots GX series Manual Rev.11
447
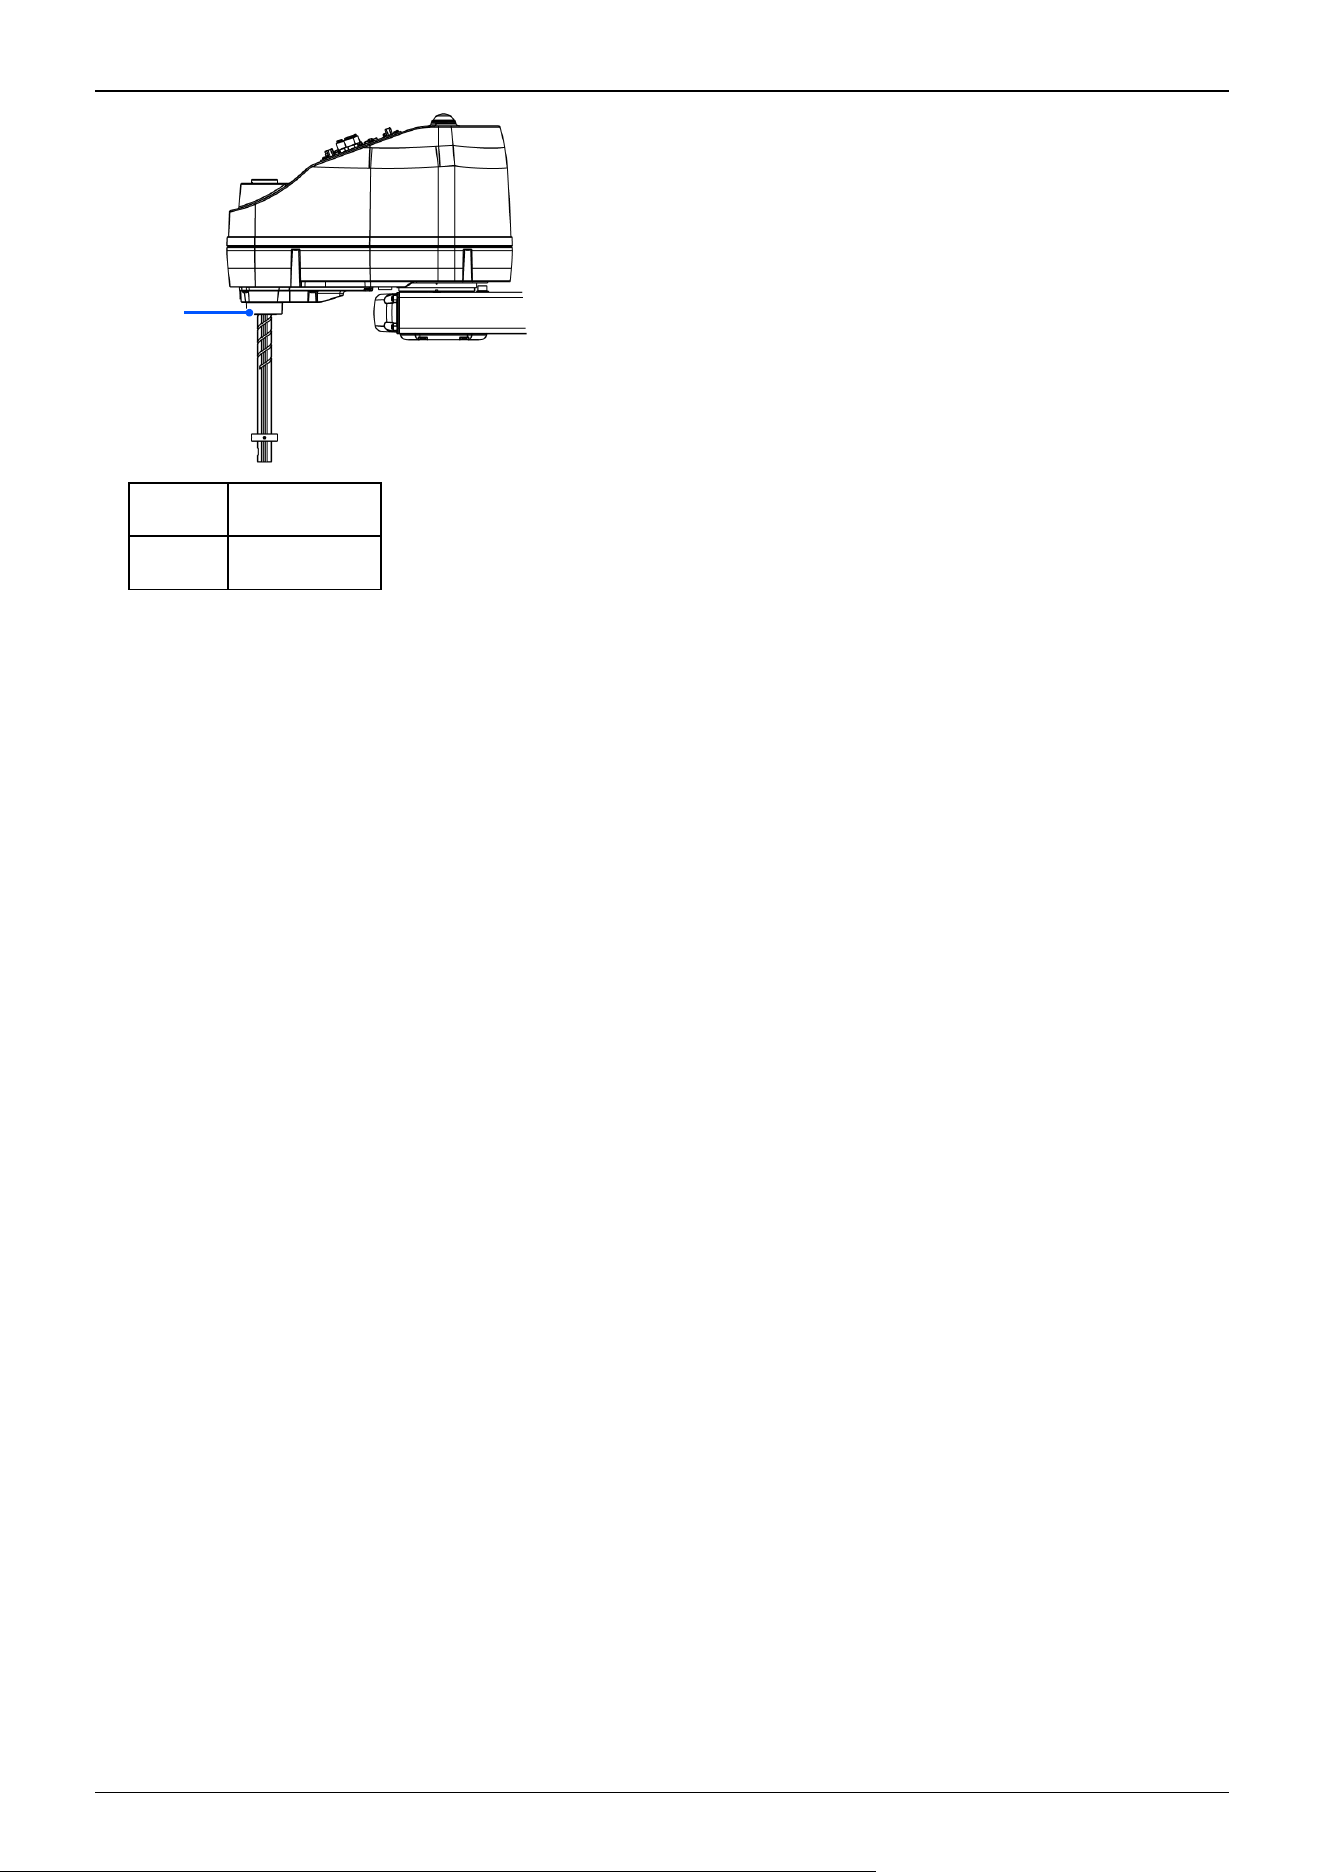
Symbol Description
a Spline nut end
a
Industrial Robot: SCARA Robots GX series Manual Rev.11
448
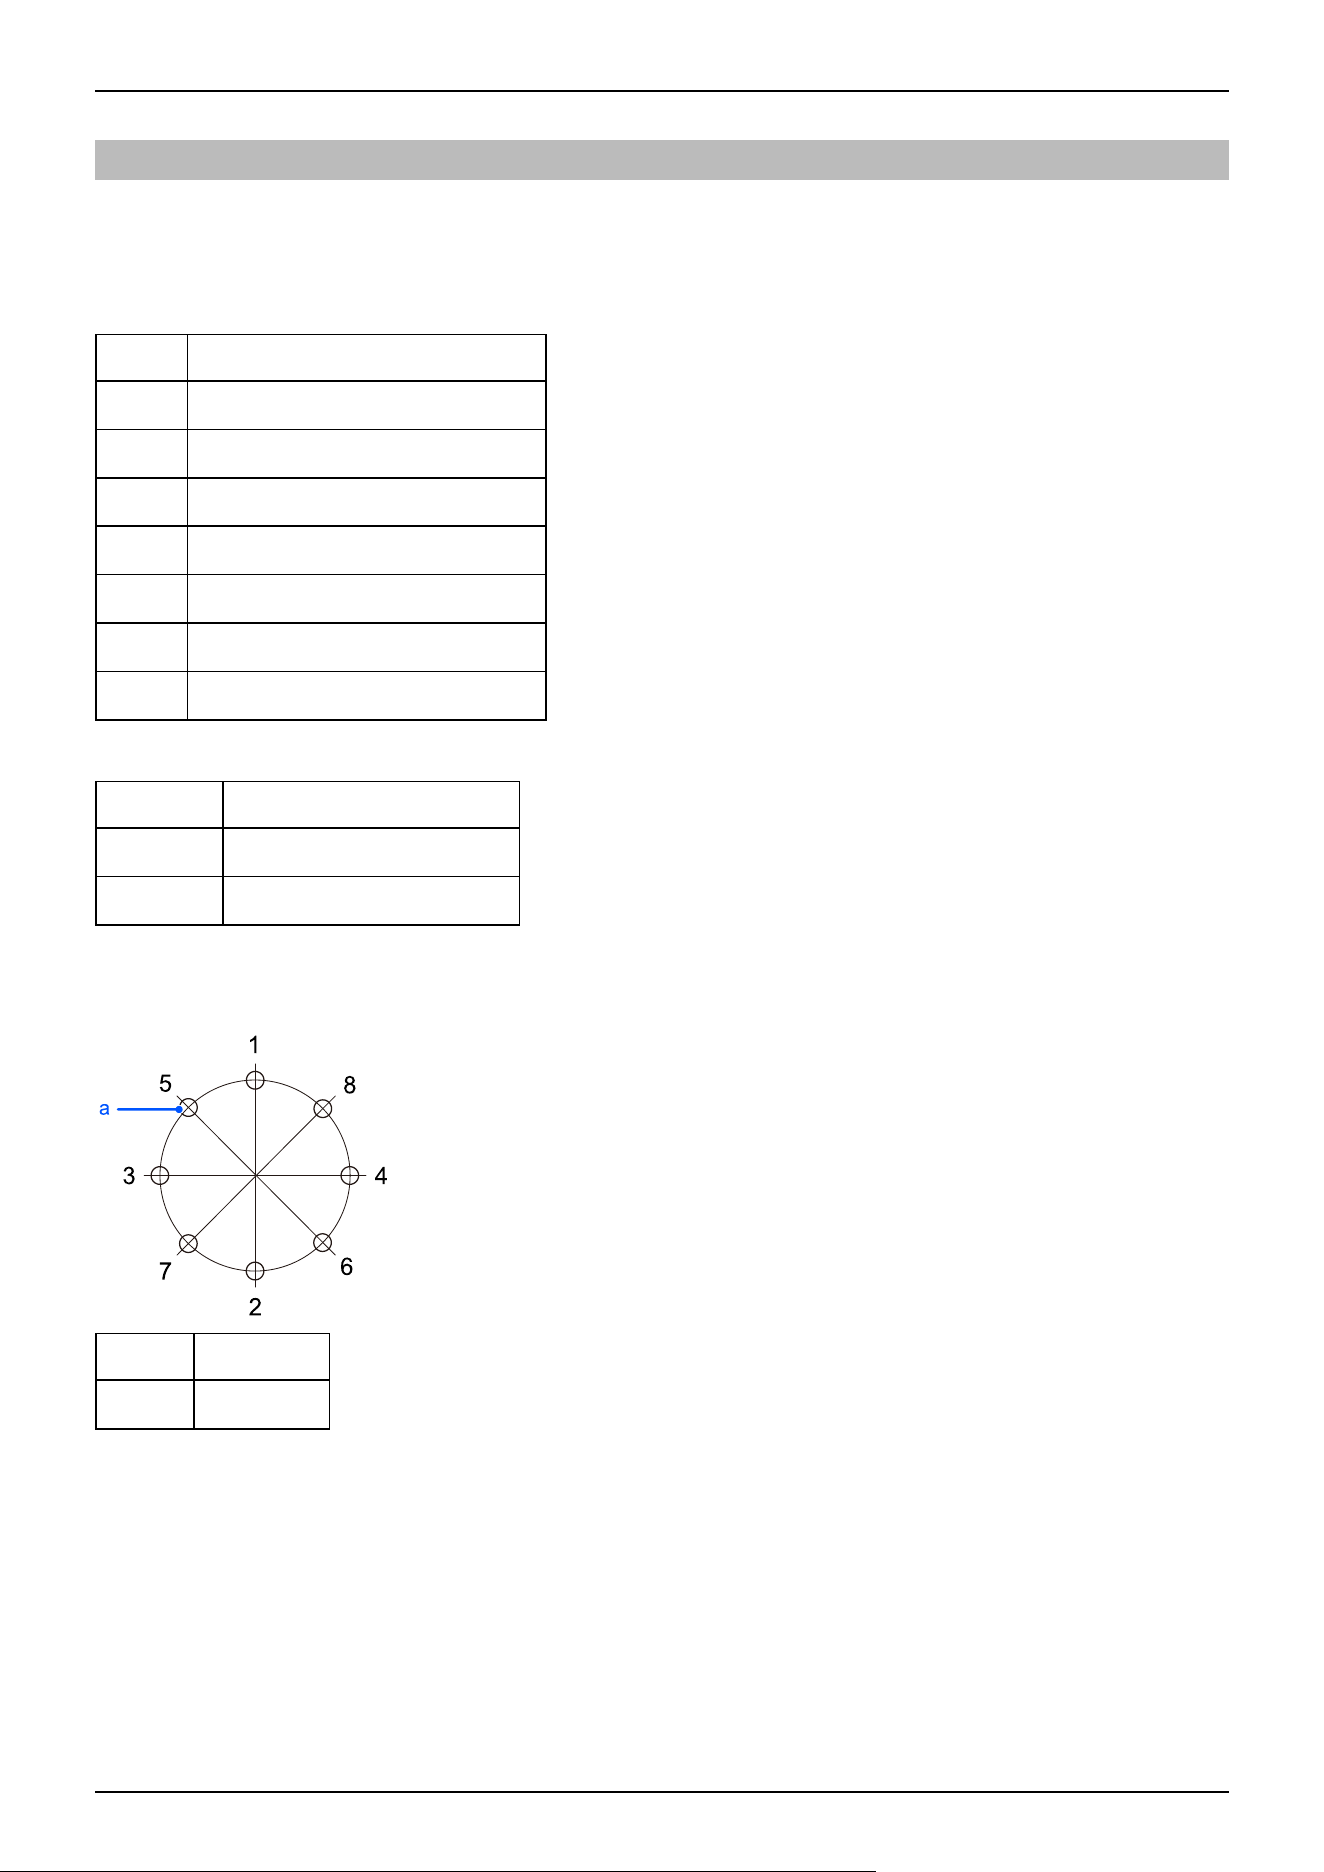
6.3.4 Tightening the Hexagon Socket Head Cap Bolts
Hexagon socket head cap bolts (referred to as "bolts" below) are used in locations where mechanical strength is required.
During assembly, these bolts are tightened at the tightening torques shown in the following table.
Unless otherwise specified, when retightening these bolts in the work procedures described in this manual, use a torque wrench
or similar tool to obtain the tightening torques in the following table.
Bolt Tightening Torque
M3 2.0 ± 0.1 N·m (21 ± 1 kgf·cm)
M4 4.0 ± 0.2 N·m (41 ± 2 kgf·cm)
M5 8.0 ± 0.4 N·m (82 ± 4 kgf·cm)
M6 13.0 ± 0.6 N·m (133 ± 6 kgf·cm)
M8 32.0 ± 1.6 N·m (326 ± 16 kgf·cm)
M10 58.0 ± 2.9 N·m (590 ± 30 kgf·cm)
M12 100.0 ± 5.0 N·m (1,020 ± 51 kgf·cm)
For set screws, refer to the following table.
Set Screw Tightening Torque
M4 2.4 ± 0.1 N·m (26 ± 1 kgf·cm)
M5 3.9 ± 0.2 N·m (40 ± 2 kgf·cm)
It is recommended that bolts arranged in a circular pattern be secured in place by tightening in criss-cross order as shown in the
figure.
Symbol Description
a Bolt hole
When securing the bolts, do not tighten the bolts all at once, but tighten them in two or three separate rounds with an Allen
wrench, and then use a torque wrench or similar tool to secure them at the tightening torques shown in the table above.
Industrial Robot: SCARA Robots GX series Manual Rev.11
449
6.4 GX10/GX20 Manipulator Periodic Inspection
6.4.1 Inspection
6.4.1.1 Inspection Schedule
Inspection items are divided into five stages (daily, 1-month, 3-month, 6-month, and 12-month), with additional items added at
each stage. However, if the Manipulator is powered and operated for more than 250 hours in a month, add inspection items
every 250, 750, 1,500, and 3,000 hours.
Inspection Item
Daily
inspection
1-month
Inspection
3-month
Inspection
6-month
Inspection
12-month
Inspection
Overhaul*
1-month inspection
(250 hours)
Perform
daily
✓
2 months (500 hours)
✓
3 months (750 hours)
✓ ✓
4 months (1,000
hours)
✓
5 months (1,250
hours)
✓
6 months (1,500
hours)
✓ ✓ ✓
7 months (1,750
hours)
✓
8 months (2,000
hours)
✓
9 months (2,250
hours)
✓ ✓
10 months (2,500
hours)
✓
11 months (2,750
hours)
✓
12 months (3,000
hours)
✓ ✓ ✓ ✓
13 months (3,250
hours)
✓
: : : : : : :
20,000 hours
✓
* Overhaul (parts replacement)
KEY POINTS
✏
Industrial Robot: SCARA Robots GX series Manual Rev.11
450

An overhaul (parts replacement) should be performed after every 20,000 hours of Manipulator operation.
(Assuming an operation time of 8 hours per day and 250 hours per month, an overhaul should be performed
every 80 months.)
Industrial Robot: SCARA Robots GX series Manual Rev.11
451
6.4.1.2 Inspection Details
Inspection items
Inspection Item
Inspection
Location
Daily
inspection
1-month
Inspection
3-month
Inspection
6-month
Inspection
12-month
Inspection
Loose bolts: Check for
rattling
Hand mounting
bolts
✓ ✓ ✓ ✓ ✓
Manipulator
installation bolts
✓ ✓ ✓ ✓ ✓
Check for loose connectors
Manipulator side
external
(Connector plate,
etc.)
✓ ✓ ✓ ✓ ✓
Inspect for flaws:
Clean off adhering debris, etc.
Entire
Manipulator
✓ ✓ ✓ ✓ ✓
External cables
✓ ✓ ✓ ✓
Correct deformations and
misalignments
Safety barriers,
etc.
✓ ✓ ✓ ✓ ✓
Check brake operation Joints #3 and #4
✓ ✓ ✓ ✓ ✓
Check for abnormal operation
noise and vibration
Entire
Manipulator
✓ ✓ ✓ ✓ ✓
Industrial Robot: SCARA Robots GX series Manual Rev.11
452
Inspection methods
Inspection Item Inspection Method
Check for loose or
rattling bolts
Using an Allen wrench or similar tool, check that the hand mounting bolts and Manipulator
installation bolts are not loose. Refer to the following section, and retighten to the proper torque.
Tightening the Hexagon Socket Head Cap Bolts
Check for loose
connectors
Check that no connectors are loose.
If a connector is loose, reattach it so that it will not come off.
Inspect for flaws
Clean off adhering
debris, etc.
Check the appearance of the Manipulator, and clean off any dust or other foreign substances
adhering to it.
Check the appearance of the cables for any flaws, and make sure it is not disconnected.
Correct deformation and
misalignment
Check for misalignment of safety barriers and other components.
If it is misaligned, correct it to the original position.
Check brake operation
With the motor turned off, check that the shaft does not drop.
If the shaft drops while the motor is turned off and the brake is not released, contact the supplier.
Also, contact the supplier if the brakes do not release despite the brake release operation.
Check for abnormal
operation noise and
vibration
Check for any abnormal noises and vibrations during operation.
If you notice anything unusual, contact the supplier.
6.4.2 Overhaul (Parts Replacement)
Overhauls (replacements) can only be performed by properly trained service engineers.
For details, refer to the following section.
"Safety Manual - Training"
6.4.3 Applying Grease
Ball screw splines and reduction gears require periodic greasing. Be sure to use the specified grease.
CAUTION
Be careful that the grease does not run out. When grease runs out, scratches and other defects can occur on
the slide, not only hindering maximum performance, but also requiring significant time and money to repair.
If grease enters the eyes or mouth or adheres to the skin, take the following measures:
If it enters the eyes
After rinsing the eyes thoroughly with clean water, seek medical attention.
If it enters the mouth
If swallowed, do not force vomiting, and seek medical attention.
If the mouth is contaminated, rinse thoroughly with water.
If adhered to skin
Rinse with water and soap.
Industrial Robot: SCARA Robots GX series Manual Rev.11
453
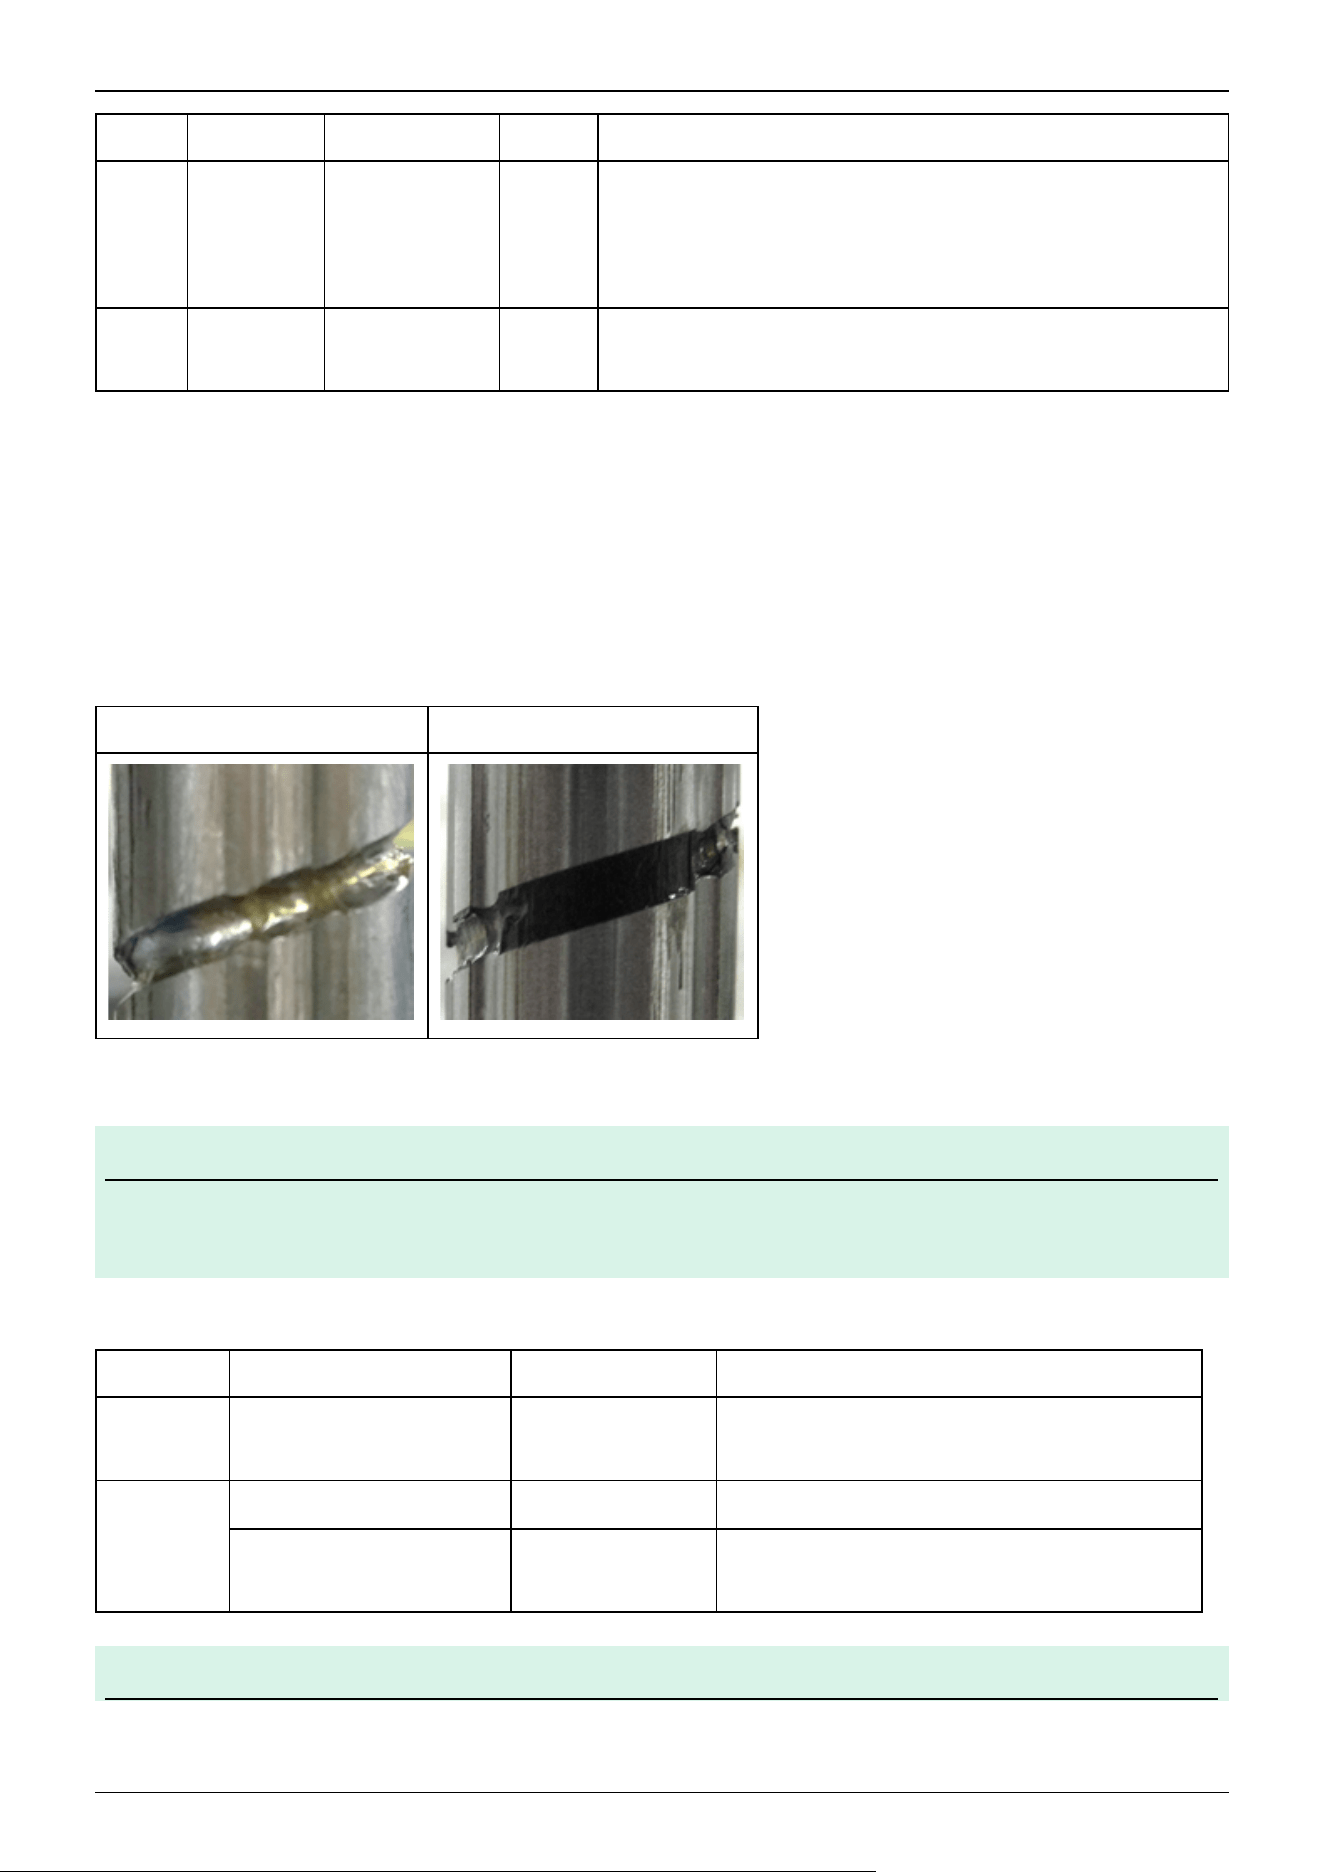
Part Interval Grease Grease Application Procedure
Joint
#1
Joint
#2
Reduction
gear
When overhaul
is performed
-
This can be performed by properly trained service engineers only.
For more information, please contact the supplier.
Joint
#3
Ball screw
spline unit
100 km (first 50
km) run
AFB *
"Applying grease to the ball screw spline unit"
(See below.)
* Use the grease below.
Product name: THK AFB-LF Grease
Manufacturer: THK Co., LTD.
URL: https://www.thk.com/
Ball screw spline unit of Joint #3
The recommended interval to perform greasing is when the unit has run 100 km. However, the interval can also be confirmed
from the grease state. As shown in the figure, apply grease when the grease turns black or has dried up.
Normal Grease Blackened Grease
For the first time only, apply grease after running for 50 km.
KEY POINTS
When using Epson RC+, the recommended interval for applying grease to the ball screw spline unit can be
viewed from the [Maintenance] dialog box in Epson RC+.
Applying grease to the ball screw spline unit
Name Quantity Remarks
Grease used
Grease for ball screw splines
(AFB grease)
Appropriate amount -
Tools used
Wiping cloth 1 For wiping off grease (Spline shaft)
Hook wrench 1
For removing the clamp band
Cleanroom specifications and protected-model only
KEY POINTS
✏
✏
Industrial Robot: SCARA Robots GX series Manual Rev.11
454
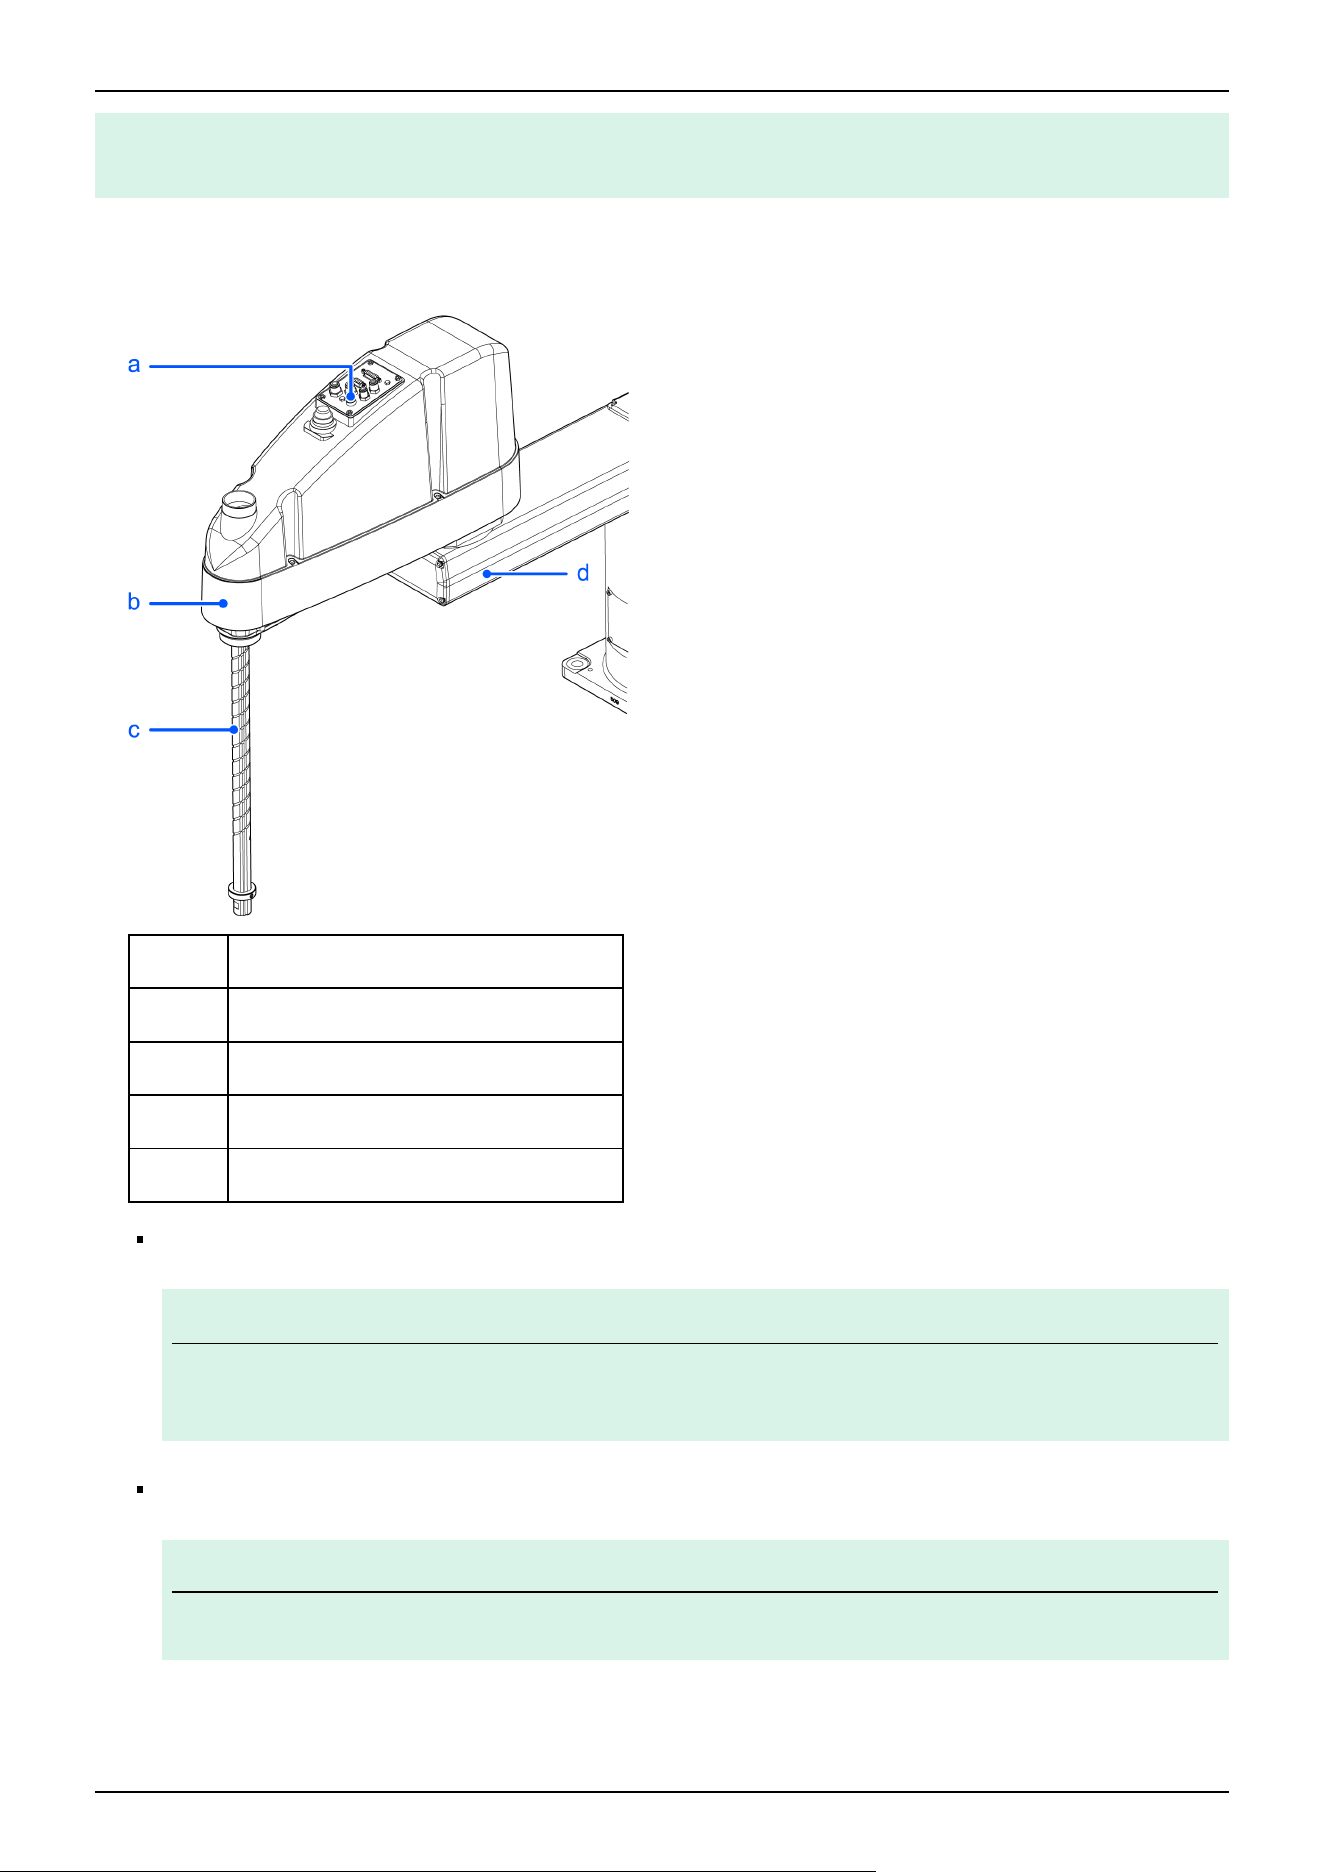
When applying grease, be careful to cover the hand and peripheral equipment so that, if any grease falls on
them, it will not affect their performance.
1. Turn on the Controller.
2. Lower the shaft to the lower limit in one of the following ways.
Symbol Description
a Joint #3 and Joint #4 brake release switch
b Arm #2
c Shaft
d Arm #1
While pressing down the brake release switch, manually lower the shaft to the lower limit.
KEY POINTS
When pressing the brake release switch, watch for the shaft descending or rotating under the weight of
the hand.
Using the Epson RC+ [Tools] - [Robot Manager] - [Jog & Teach] panel, lower the shaft to the lower limit.
KEY POINTS
Make sure that the hand does not interfere with peripheral equipment or other objects.
3. Turn off the Controller.
✏
✏
Industrial Robot: SCARA Robots GX series Manual Rev.11
455
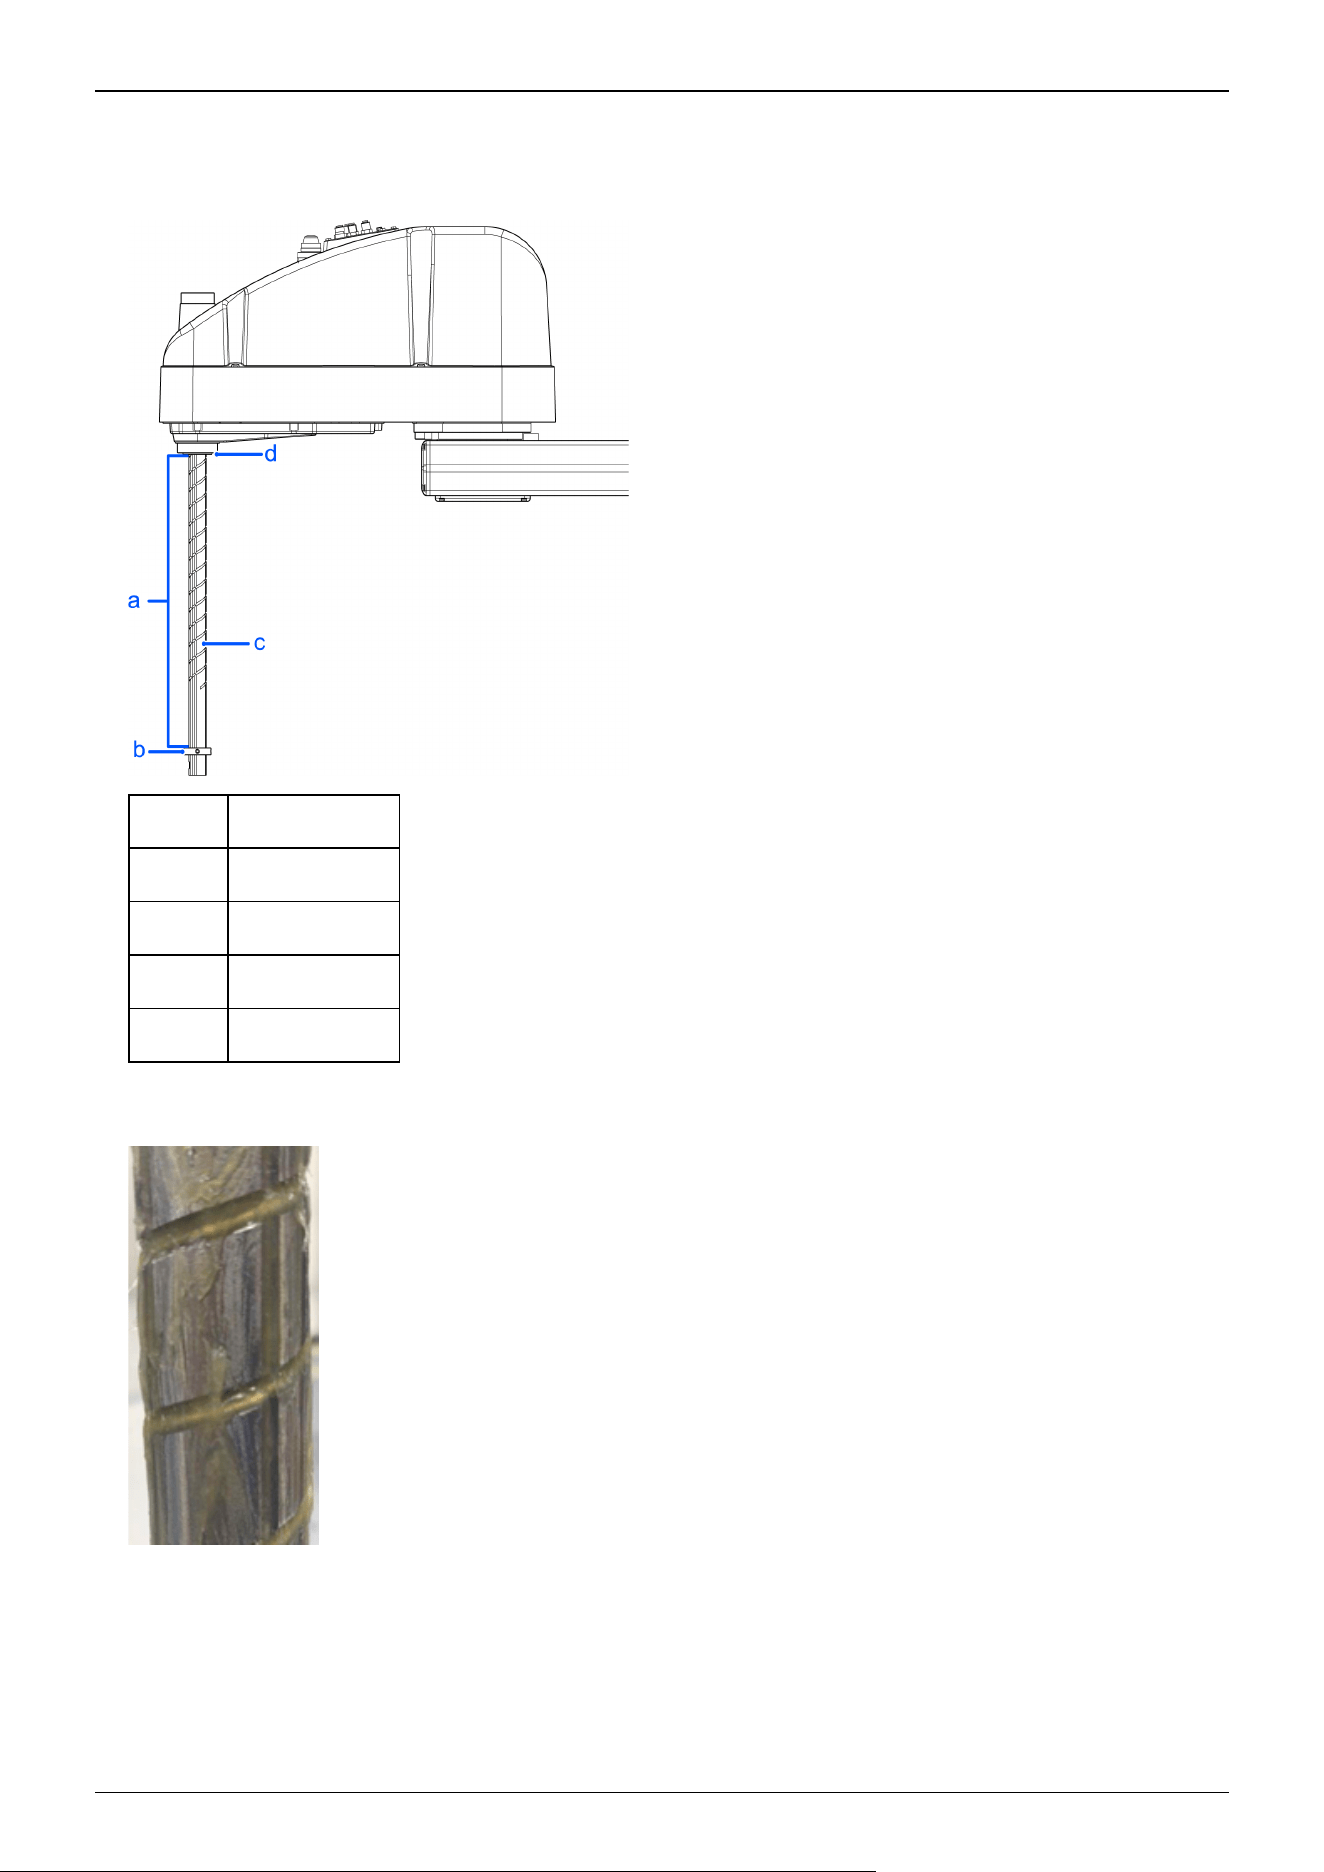
4. Wipe off the old grease on the shaft, and apply new grease.
The grease application area is from the end of the spline nut to the mechanical stop.
Symbol Description
a Application area
b Mechanical stop
c Shaft
d Spline nut
5. Grease should be applied to the helical and vertical grooves of the ball screw spline so that the grooves are filled evenly.
Example of grease application
6. Turn on the Controller.
7. Start the Robot Manager, and move the shaft to the origin position. Be careful not to hit any peripheral equipment.
Industrial Robot: SCARA Robots GX series Manual Rev.11
456
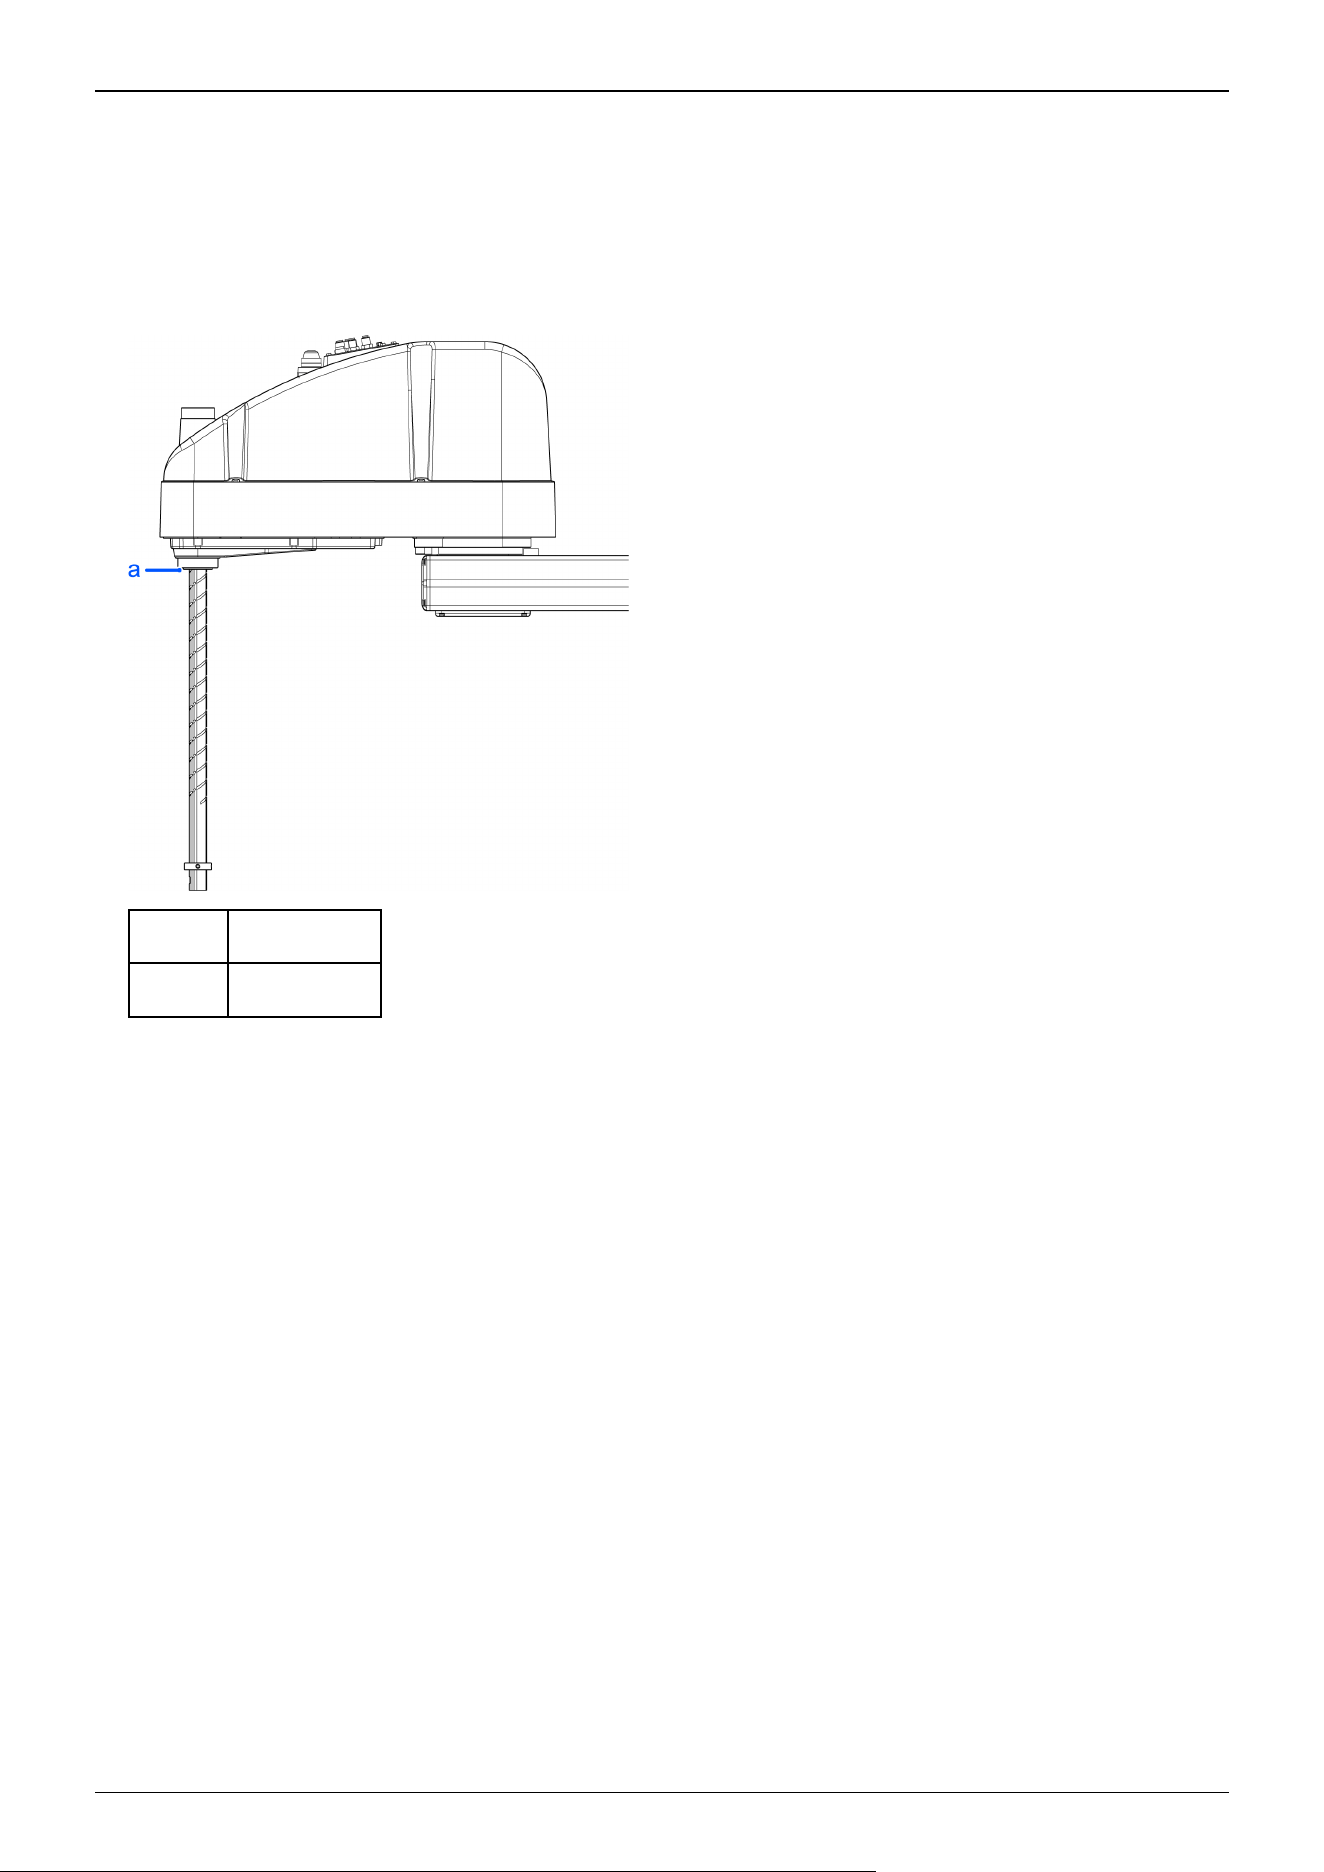
8. After moving to the origin position, perform a reciprocating motion with the shaft. The reciprocating motion is performed
from the upper limit to the lower limit using the low-power mode operation program. Perform the motion for about 5
minutes to allow the grease to spread.
9. Turn on the Controller.
10. Wipe off any excess grease at the spline nut end and mechanical stop section.
Symbol Description
a Spline nut end
Industrial Robot: SCARA Robots GX series Manual Rev.11
457
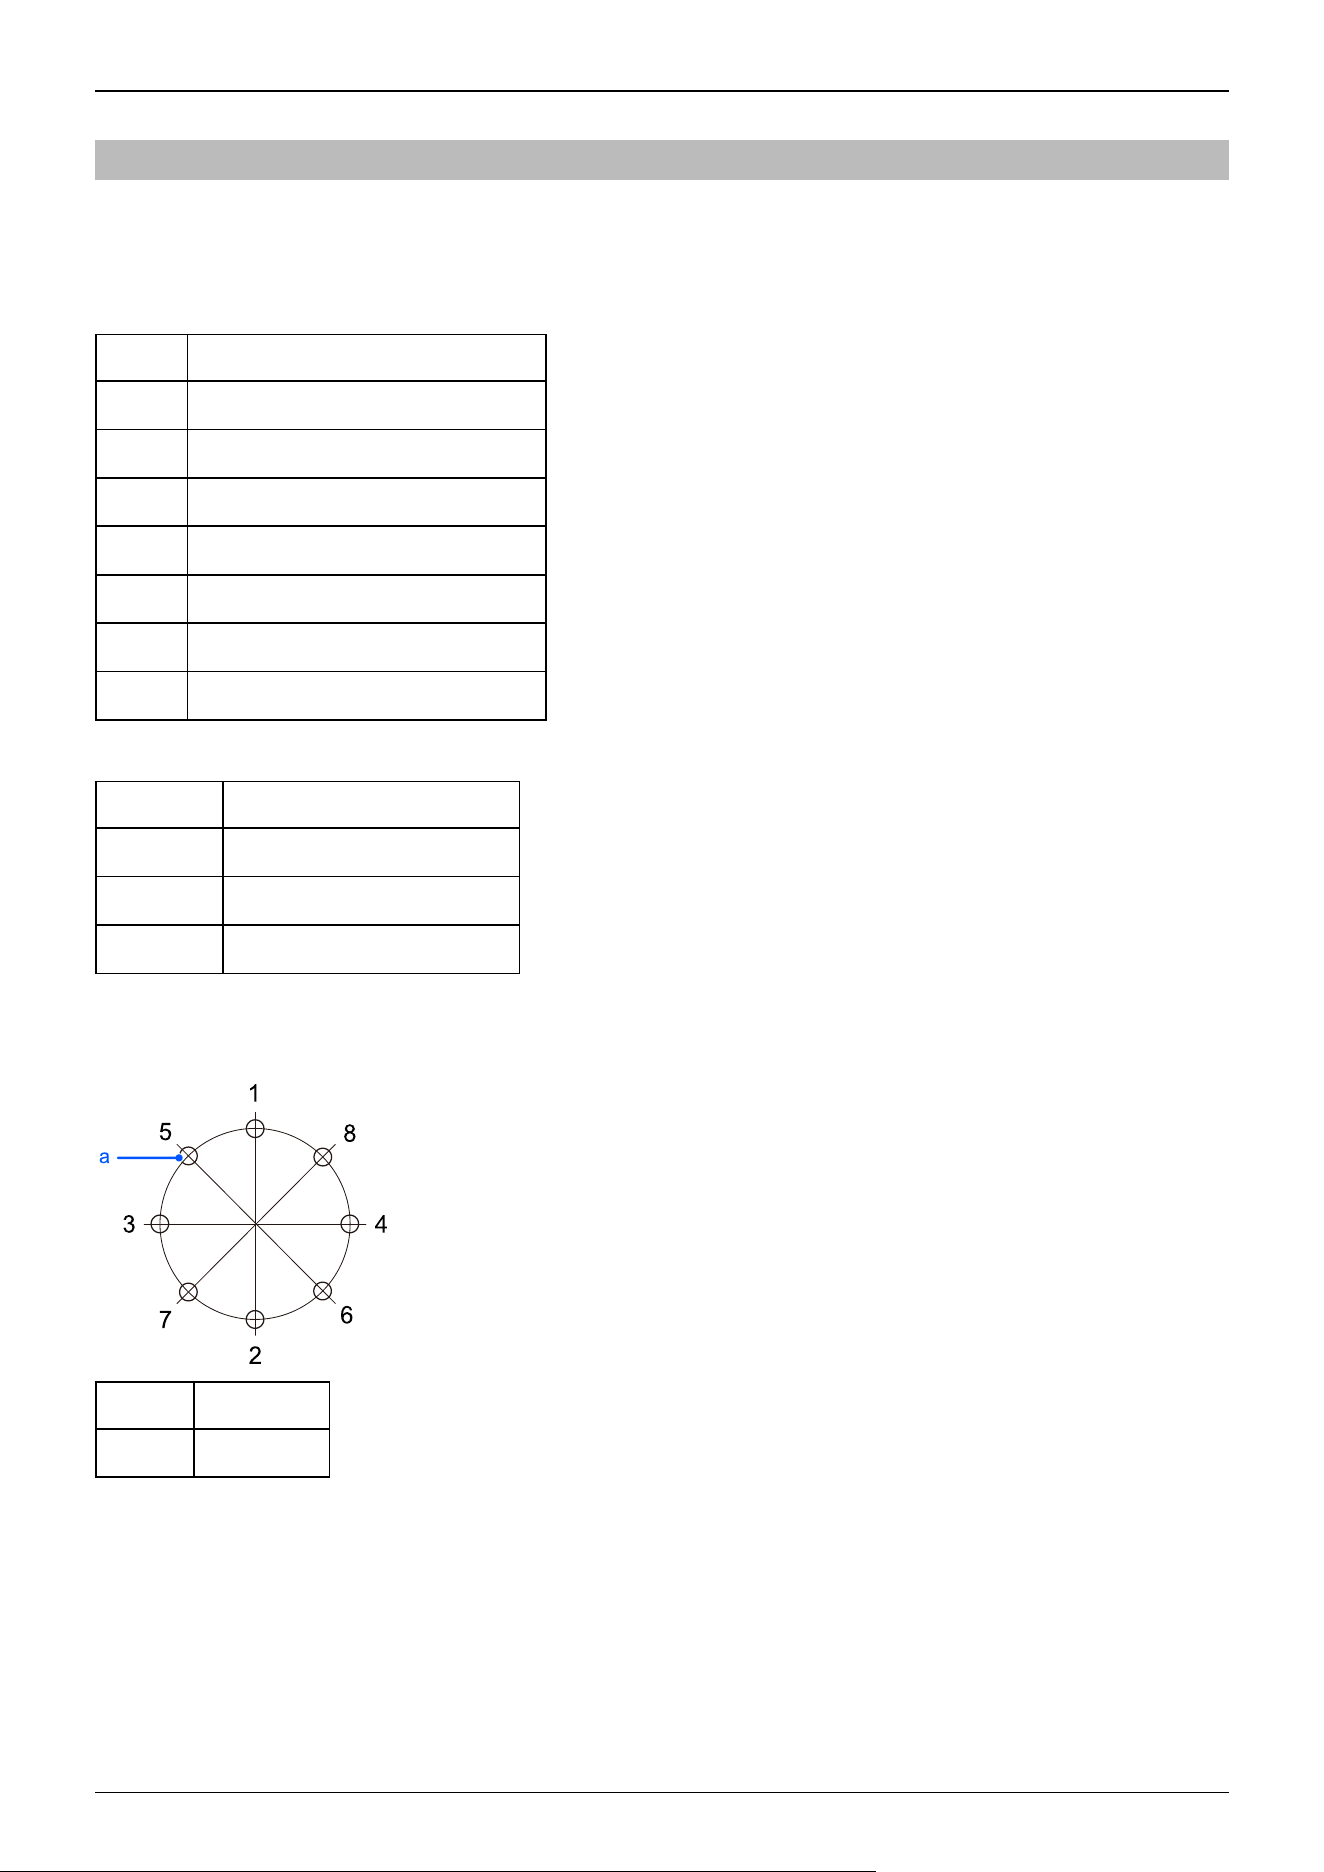
6.4.4 Tightening the Hexagon Socket Head Cap Bolts
Hexagon socket head cap bolts (referred to as "bolts" below) are used in locations where mechanical strength is required.
During assembly, these bolts are tightened at the tightening torques shown in the following table.
Unless otherwise specified, when retightening these bolts in the work procedures described in this manual, use a torque wrench
or similar tool to obtain the tightening torques in the following table.
Bolt Tightening Torque
M3 2.0 ± 0.1 N·m (21 ± 1 kgf·cm)
M4 4.0 ± 0.2 N·m (41 ± 2 kgf·cm)
M5 8.0 ± 0.4 N·m (82 ± 4 kgf·cm)
M6 13.0 ± 0.6 N·m (133 ± 6 kgf·cm)
M8 32.0 ± 1.6 N·m (326 ± 16 kgf·cm)
M10 58.0 ± 2.9 N·m (590 ± 30 kgf·cm)
M12 100.0 ± 5.0 N·m (1,020 ± 51 kgf·cm)
For set screws, refer to the following table.
Set Screw Tightening Torque
M4 2.4 ± 0.1 N·m (26 ± 1 kgf·cm)
M5 3.9 ± 0.2 N·m (40 ± 2 kgf·cm)
M6 8.9 ± 0.4 N·m (82 ± 4 kgf·cm)
It is recommended that bolts arranged in a circular pattern be secured in place by tightening in criss-cross order as shown in the
figure.
Symbol Description
a Bolt hole
When securing the bolts, do not tighten the bolts all at once, but tighten them in two or three separate rounds with an Allen
wrench, and then use a torque wrench or similar tool to secure them at the tightening torques shown in the table above.
Industrial Robot: SCARA Robots GX series Manual Rev.11
458

7. Appendix
This section provides detailed technical data such as the specifications, stopping time, and stopping distance for each model.
Industrial Robot: SCARA Robots GX series Manual Rev.11
459
7.1 Appendix A: Specifications Table
7.1.1 GX1
Item
4-Axis specifications 3-Axis specifications
GX1-
C171*
GX1-
C221*
GX1-
C171*Z
GX1-
C221*Z
Machinery name Industrial robot
Product series GX
Model
GX1-C*****
Model Name GX1-C
Installation method Table top mounting type
Arm length
Arm #1+Arm #2 175 mm 225 mm 175 mm 225 mm
Arm1 75 mm 125 mm 75 mm 125 mm
Arm2 100 mm 100 mm
Weight (not including weight of cables) 8 kg 8 kg
Drive system All joints AC servo motor
Maximum speed *1
Joint #1+Joint #2
2630
mm/s
3000
mm/s
2630 mm/s 3000 mm/s
Joint #3 (Z-axis) 1200 mm/s 1200 mm/s
Joint #4 (U-axis) 3000 deg/s −
Repeat accuracy
Joint #1+Joint #2
± 0.005
mm
± 0.008
mm
± 0.005
mm
± 0.008 mm
Joint #3 (Z-axis) ± 0.01 mm ± 0.01 mm
Joint #4 (U-axis) ± 0.01 deg −
Max. motion range
Joint #1: ± 125 deg ± 125 deg
Joint #2: ± 140 deg ± 152 deg ± 135 deg ± 135 deg
(Cleanroom & ESD specifications)
(± 140
deg)
(± 149
deg)
(± 123 deg) (± 132 deg)
Z stroke
± 100 (80) mm ± 100 (80) mm
(Cleanroom & ESD specifications)
Joint #4: ± 360 deg *2 −
Maximum Pulse Range
Joint #1: − 1019449 ~ 6262329 pulse
Joint #2: ± 2548623 ± 2767076 ± 2457600 ± 2457600
(Cleanroom & ESD specifications)
(±
2548623)
(±
2712463)
(±
2239147)
(± 2402987)
Joint #3: − 1092267 to 0
Industrial Robot: SCARA Robots GX series Manual Rev.11
460
Item
4-Axis specifications 3-Axis specifications
GX1-
C171*
GX1-
C221*
GX1-
C171*Z
GX1-
C221*Z
(Cleanroom & ESD specifications) (- 873813 ~ 0)
Joint #4: − 393216 to 393216
Resolution
Joint #1: 3.43322E-05 deg/pulse
Joint #2: 5.49316E-05 deg/pulse
Joint #3: 9.15527E-05 mm/pulse
Joint #4: 9.15527E-04 deg/pulse
Motor rated capacity 50 W (all axes)
Payload (load)
Rated 0.5 kg 0.5 kg
Maximum 1 kg 1.5 kg
Joint #4 allowable
moment of inertia
Rated
0.0003 kg·m
2
-
Moment *3 Maximum
0.004 kg·m
2
-
Hand ø 8 mm
Hole for mounting 125 × 88 (4-M6)
Joint #3 press force 50 N
User Wires 24 pin (9+15)
User Tubes
1 × ø4 mm pneumatic tube, pressure resistance: 0.59
MPa (6 kgf/cm
2
: 86 psi)
2 × ø4 mm pneumatic tube, pressure resistance: 0.59
MPa (6 kgf/cm
2
: 86 psi)
Environmental requirements *4
Ambient
temperature
5 to 40°C
Ambient relative
humidity
10 to 80 % RH (no condensation)
Vibration level
Below 4.9 m/s
2
(0.5G)
Noise level *5 Below L
Aeq
= 70 dB
Installation Environment Cleanroom & ESD specifications (ISO class 3) *6
Compatible Controllers RC800-A
Setting value range
( )Default value
Speed 1 ~ (5) ~ 100
Accel *7 1 ~ (10) ~ 120
SpeedS 0.1 ~ (50) ~ 2000
AccelS 0.1 ~ (200) ~ 25000
Fine 0 ~ (10000) ~ 65535
Industrial Robot: SCARA Robots GX series Manual Rev.11
461
Item
4-Axis specifications 3-Axis specifications
GX1-
C171*
GX1-
C221*
GX1-
C171*Z
GX1-
C221*Z
Weight 0 ~ (0.5) ~ 1 1 ~ (0.5) ~ 1.5
M/C Cable
Specifications
Cable weight
(cable only)
For fixing and
signal
0.06 kg/m
For fixing and
power
0.30 kg/m
Cable outer
diameter
For fixing and
signal
ø 6.2 mm (typ)
For fixing and
power
ø 13.7 mm (typ)
Minimum bending
radius *8
For fixing and
signal
39 mm
For fixing and
power
83 mm
*1: During PTP command: The maximum operating speed in CP motion is 2,000 mm/s in the horizontal plane.
*2: The rotational motion of J4 can be set from ±360 to ±3600°. Rotation limits differ depending on the model. Be sure to
contact the supplier if you would like to set it to a range higher than the above.
*3: When the center of gravity of the load matches the Joint #4 center position
When the center of gravity position is separated from the Joint #4 center position, set the parameter using the Inertia statement.
*4: When used in a low-temperature environment near the minimum temperature specified in the product specifications, or
when the unit is idle for a long period of time during holidays or at night, a collision detection error or similar error may occur
immediately after the start of operation due to high resistance in the drive unit. In such cases, warm-up operation for about 10
minutes is recommended.
*5: The conditions at measurement are as follows.
Manipulator operating conditions
Rated load, four-joint simultaneous operation, maximum speed, maximum acceleration/deceleration
Measurement locations
Manipulator rear side, 1,000 mm away from work envelope, and 50 mm above base mounting surface
*6: Manipulators with Cleanroom specifications discharge the exhaust inside of the base and inside of the arm cover section
together.
Consequently, if there is a gap in the base section, the arm tip section will not be sufficiently negatively pressurized, which
may result in dust generation. Fasten the exhaust port and exhaust tube firmly with vinyl tape to prevent gaps. If the exhaust
discharge rate is not sufficient, dust generation will exceed the specifications.
Cleanliness : Class ISO 3 (ISO14644-1)
Exhaust:
Exhaust port dimensions: Inner diameter ø8 mm
Compatible exhaust tubes:
- Polyurethane tubes
- Outer diameter ø8 mm
- Recommended exhaust discharge rate: About 1,000 cm
3
/s (standard state)
Industrial Robot: SCARA Robots GX series Manual Rev.11
462
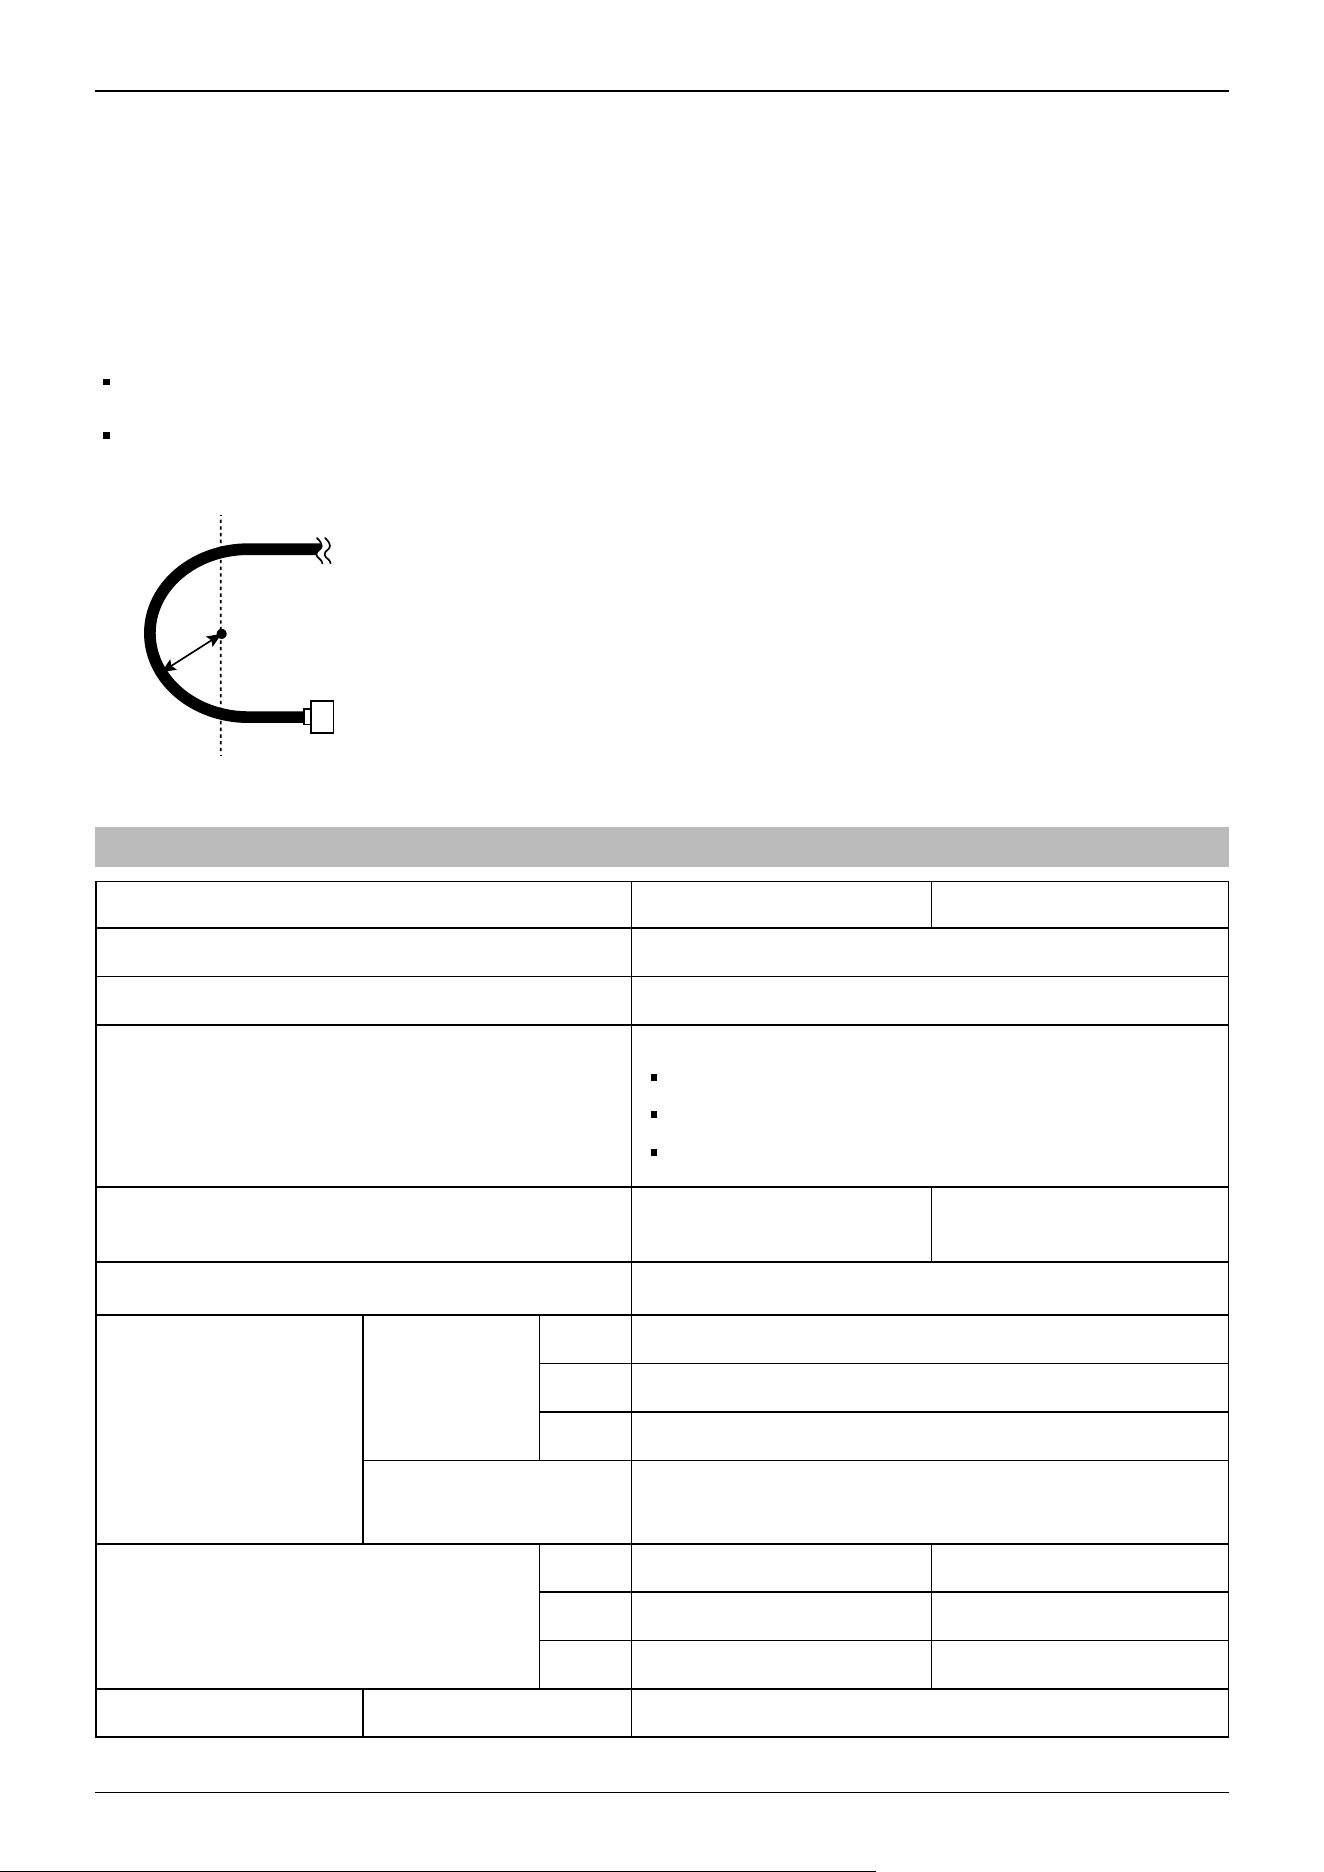
In ESD specifications Manipulators, anti-static measures have been applied to the resin material. This specification suppresses
the adhesion of dirt, dust, and other contaminants caused by static electrification.
*7: The Accel setting of "100" is the optimum setting that balances acceleration/deceleration and vibration during positioning.
The ACCEL setting can be set to values above 100, but if you continue using the Manipulator at a high value, you may
seriously shorten its lifespan, so we recommend limiting the use of such values to operations for which they are essential.
*8: Note the following points when wiring the M/C cable.
Install the cable so as not to apply a load to the connector.
Bend the cable at the minimum bending radius or more. The bending radius (a) and dimensions are shown in the figure
below.
7.1.2 GX4
Item GX4-A/GX4-B/GX4-C ***** GX4-A/GX4-B/GX4-C****M
Machinery name Industrial robot
Product series GX
Model
GX4-A*****, GX4-B*****, GX4-C *****
Model Name GX4-A
Model Name GX4-B
Model Name GX4-C
Installation method
Table top mounting
specifications
Multiple mounting
specifications
Environmental specifications
ESD specifications, Cleanroom & ESD specifications
*1
Arm length
Arm #1 +
Arm #2
25 250 mm
30 300 mm
35 350 mm
Arm #3
150 mm: GX4-***1S*, E*
120 mm: GX4-***1C*
Weight
(not including weight of cables)
25 15 kg (33 lb) -
30 15 kg (33 lb) 17 kg (38 lb)
35 16 kg (35 lb) 17 kg (38 lb)
Drive system All joints AC servo motor
M/C cable
Connector
a
Industrial Robot: SCARA Robots GX series Manual Rev.11
463
Item GX4-A/GX4-B/GX4-C ***** GX4-A/GX4-B/GX4-C****M
Maximum operating speed
*2
Joint #1 + Joint
#2
25 3,550 mm/s
30 3,950 mm/s
35 4,350 mm/s
Joint #3 1,100 mm/s
Joint #4 3,100 deg/s
Industrial Robot: SCARA Robots GX series Manual Rev.11
464
Item
GX4-A/GX4-B/GX4-
C *****
GX4-A/GX4-B/GX4-
C****M
Repeatability
Joint #1 +
Joint #2
25 ±0.008 mm
30 ±0.01 mm
35 ±0.01 mm
Joint #3 ±0.01 mm
Joint #4 ±0.005 deg
Max. motion range
Joint #1
25 ±140 deg -
30 ±140 deg ±115 deg
35
Straight ±140 deg ±120 deg
Left-curved -165 to +110 deg -
Right-curved -110 to +165 deg -
Joint #2
25
S, E ±141 deg
-
C ±137 deg
30
S, E ±142 deg
±135 deg
C ±137 deg
35
Straight ±142 deg ±142 deg
Left-
curved
S, E -165 to +120 deg -
C -160 to +120 deg -
Right-
curved
S, E -120 to +165 deg -
C -120 to +160 deg -
Joint #3
S, E 150 mm
C 120 mm
Joint #4 ±360 deg
Max. pulse range
(pulse)
Joint #1
25
-1456356 to 6699236
-
30 -728178 to 5971058
35
Straight -873814 to 6116694
Left-curved -2184534 to 5825423 -
Right-curved -582543 to 7427414 -
Joint #2
25
S, E -2566827 to 2566827
-
C -2494009 to 2494009
30
S, E -2585032 to 2585032
-2457600 to 2457600
C -2566827 to 2566827
Industrial Robot: SCARA Robots GX series Manual Rev.11
465
Item
GX4-A/GX4-B/GX4-
C *****
GX4-A/GX4-B/GX4-
C****M
35
Straight -2585032 to 2585032 -2585032 to 2585032
Left-
curved
S, E -3003734 to 2184534 -
C -2912712 to 2184534 -
Right-
curved
S, E -2184534 to 3003734 -
C -2184534 to 2912712 -
Joint #3
S, E 0 to -1706667
C 0 to 1365334
Joint #4 ±1310720
Industrial Robot: SCARA Robots GX series Manual Rev.11
466
Item GX4-A/GX4-B/GX4-C*****
Resolution
Joint #1 0.0000343323 deg/pulse
Joint #2 0.0000549316 deg/pulse
Joint #3 0.0000878906 mm/pulse
Joint #4 0.000274658 deg/pulse
Motor rated capacity
Joint #1 400 W
Joint #2 150 W
Joint #3 150 W
Joint #4 150 W
Payload (load)
Rated 2 kg
Max. 4 kg
Joint #4 allowable moment of
inertia
*3
Rating
0.005 kg·m
2
Max.
0.05 kg·m
2
Shaft diameter
Outer ø16 mm
Inner ø11 mm
Joint #3 press force 150 N
User wiring
15 (15-pin: D-sub)
Ethernet CAT5e or equivalent
User piping
2 × ø6 mm pneumatic tube, Pressure resistance: 0.59 MPa (6
kgf/cm
2
: 86 psi)
1 × ø4 mm pneumatic tube, Pressure resistance: 0.59 MPa (6
kgf/cm
2
: 86 psi)
Environmental requirements
Ambient temperature
*4
5 to 40°C
Ambient relative
humidity
10 to 80% (no condensation)
Transportation and storage
Temperature −20 to +60°C
Humidity 10 to 90% (no condensation)
Noise level
*5
LAeq = 71 dB(A)
Compatible Controllers
GX4-A: RC700-D
GX4-B: RC700-E
GX4-C: RC800-A
Operation mode
*6
Standard mode (default), Boost mode
Industrial Robot: SCARA Robots GX series Manual Rev.11
467
Item GX4-A/GX4-B/GX4-C*****
Setting value range
( )Default value
Speed 1 to (5) to 100
Accel
*7
1 to (10) to 100
SpeedS 0.1 to (50) to 2000
AccelS 0.1 to (200) to 25000
Fine 0 to (10000) to 65535
Weight 0 to (2) to 4
M/C
cable
Cable weight (cable
only)
For fixing and signal 0.06 kg/m
For fixing and power 0.30 kg/m
For movable and
signal
0.07 kg/m
For movable and
power
0.36 kg/m
Cable outer diameter
For fixing and signal ⌀6.5 mm (typ)
For fixing and power ⌀13.7 mm (typ)
For movable and
signal
⌀6.4 mm (typ)
For movable and
power
⌀13.7 mm (typ)
Minimum bending
radius
*8
For fixing and signal 40 mm
For fixing and power 83 mm
For movable and
signal
100 mm
For movable and
power
100 mm
*1: Manipulators with cleanroom & ESD specifications discharge the exhaust inside of the base and inside of the arm cover
section together.
Consequently, if there is a gap in the base section, the arm tip section will not be fully negative pressurized, which may result
in dust generation. Do not remove the maintenance cover on the front of the base. Connect the exhaust tube to the exhaust port
on the back (or bottom) of the base.
If the exhaust discharge rate is not sufficient, dust generation will exceed the specifications.
Cleanliness:
Class ISO 3 (ISO 14644-1)
Exhaust
Exhaust port dimensions: Inner diameter ø6 mm
Compatible exhaust tubes
- Polyurethane tubes
- Outer diameter ø6 mm (Inner diameter ø4 mm)
- Recommended exhaust discharge rate: About 1,000 cm
3
/s (standard state)
Industrial Robot: SCARA Robots GX series Manual Rev.11
468
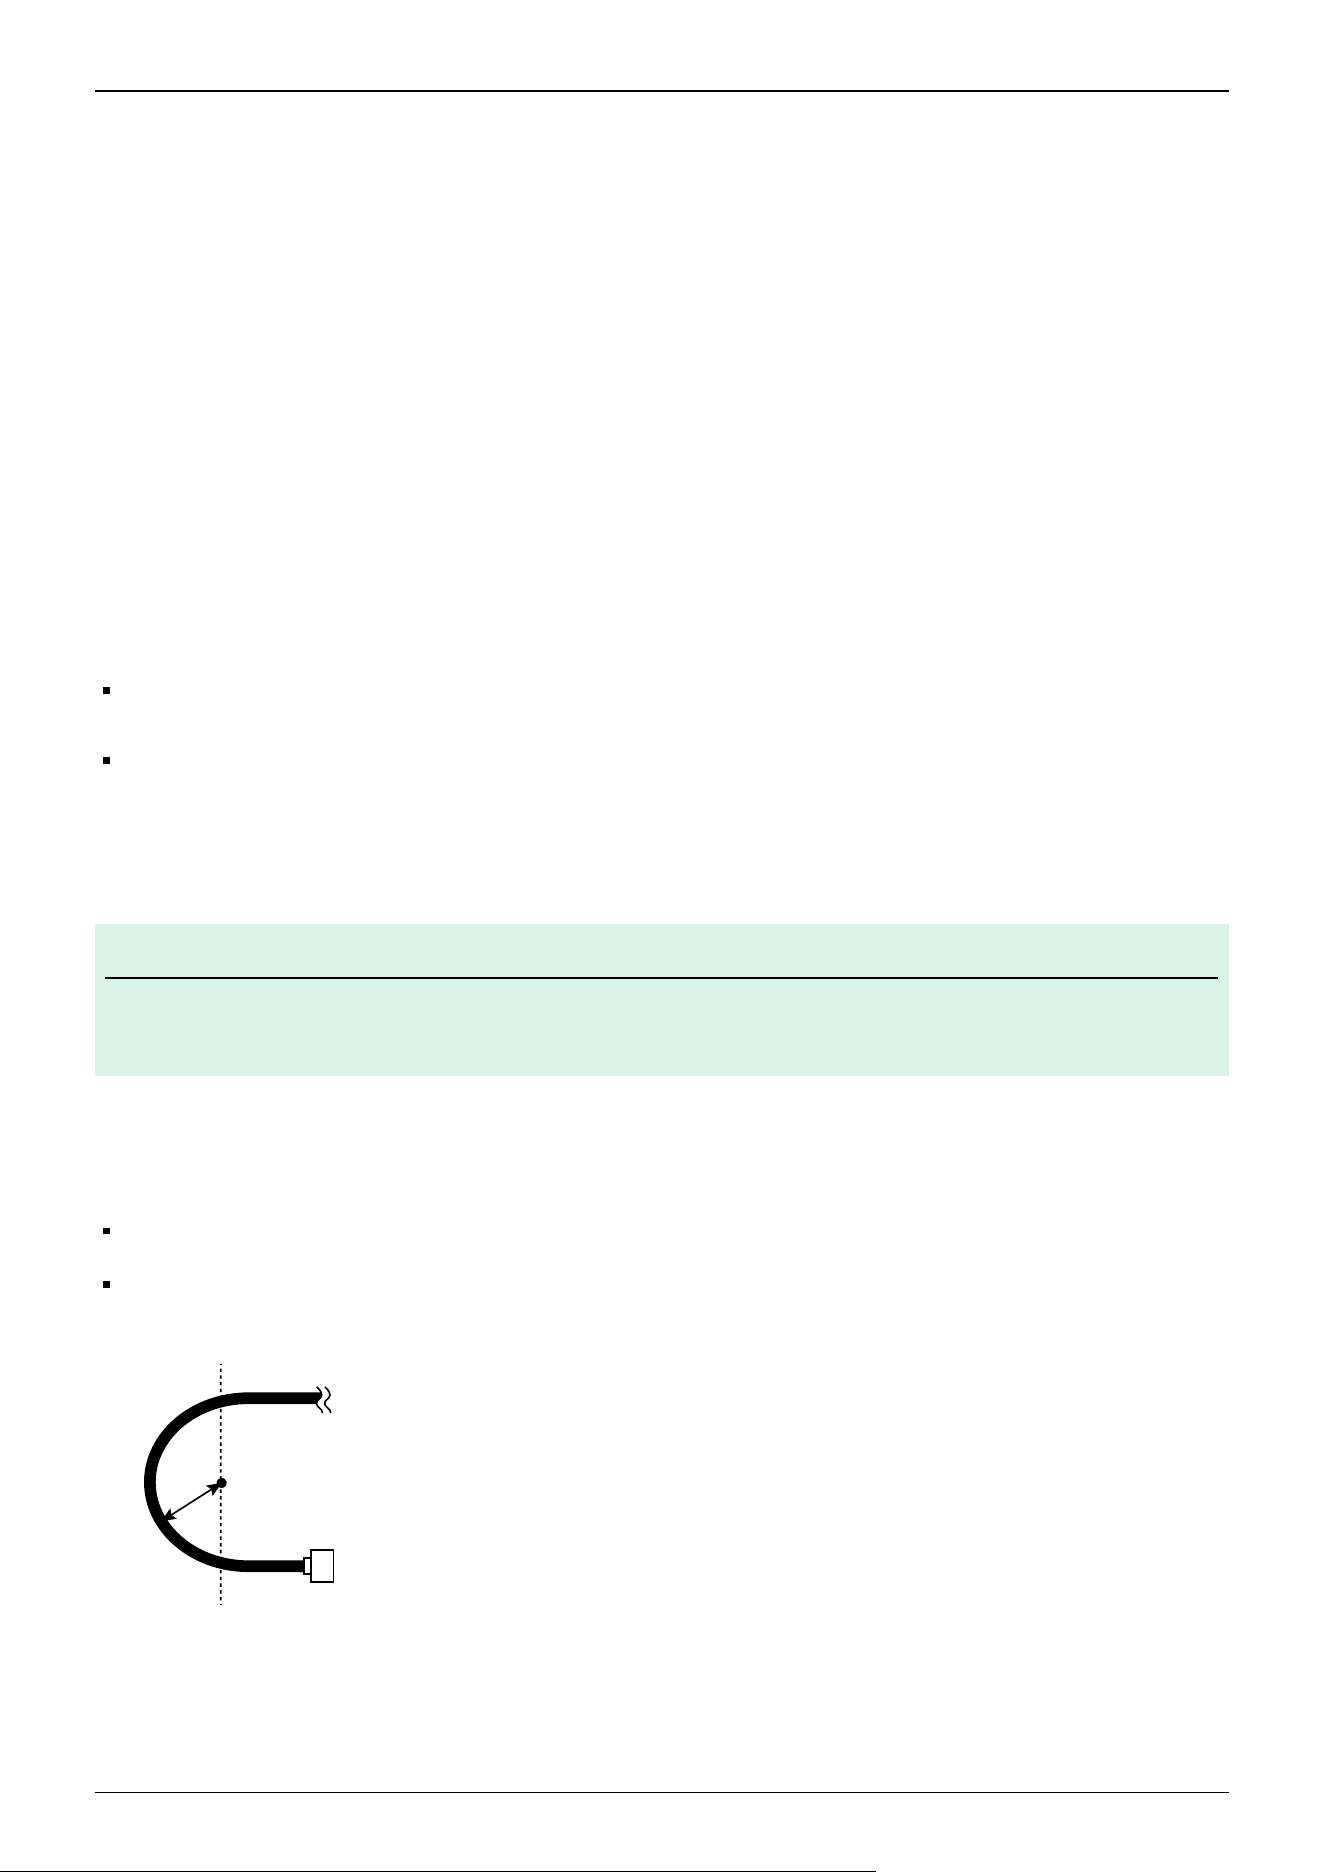
ESD specifications are specifications that use conductive materials for or apply plating to the major resin parts as anti-static
measures.
We have confirmed that the Manipulator tip (tool mounting section) is at ±5 V or less, even directly after the measuring
operation according to Seiko Epson standards.
If you need any other detailed information, please contact the supplier.
Also, please check the amount of charge on any hand, wiring, or the like that you will attach to the robot on your own before
use.
*2: When PTP statements are used. The maximum operating speed in CP motion is 2,000 mm/s in the horizontal plane.
*3: When the center of gravity of the load matches the Joint #4 center position
When the center of gravity position is separated from the Joint #4 center position, set the parameter using the Inertia statement.
*4: When used in a low-temperature environment near the minimum temperature specified in the product specifications, or
when the unit is idle for a long period of time during holidays or at night, a collision detection error or similar error may occur
immediately after the start of operation due to high resistance in the drive unit.
In such cases, warm-up operation for about 10 minutes is recommended.
*5: The conditions at measurement are as follows.
Manipulator operating conditions
Rated load, four-joint simultaneous operation, maximum speed, maximum acceleration/deceleration
Measurement locations
Manipulator rear side, 1,000 mm away from work envelope, and 50 mm above base mounting surface
*6: The PerformMode command can be used to switch operation modes. For details, refer to the following manual.
"Epson RC+ SPEL+ Language Reference"
KEY POINTS
Boost mode reduces the amount of time for a single operation compared to Standard mode; however, it worsens
the operation duty and the vibration when stopping operation. Use it with caution.
*7: The Accel setting of "100" is the optimum setting that balances acceleration/deceleration and vibration during positioning.
*8: Note the following points when wiring the movable M/C cable.
Install the cable so as not to apply a load to the connector.
Bend the cable at the minimum bending radius of the movable part or more. The bending radius (a) and dimensions are
shown in the figure below.
✏
M/C cable
Connector
a
Industrial Robot: SCARA Robots GX series Manual Rev.11
469
7.1.3 GX8
Item
GX8-A/GX8-B/GX8-C
*****
GX8-A/GX8-B/GX8-
C****R
GX8-A/GX8-
B/GX8-C****W
Machinery name Industrial robot
Product series GX
Model
GX8-A*****, GX8-B*****, GX8-C *****
Model Name GX8-A
Model Name GX8-B
Model Name GX8-C
Installation method
Table top mounting
specifications
Ceiling mounting
specifications
Wall mounting
specifications
Environmental specifications
ESD specifications, Cleanroom & ESD specifications
*1
, Protected-
model
*2
Arm length
Arm #1 +
Arm #2
45 450 mm
55 550 mm
65 650 mm
Arm #3
2
200 mm: GX8-***2S*, E*
170 mm: GX8-***2C*, P*
3
330 mm: GX8-***3S*, E*
300 mm: GX8-***3C*, P*
Weight (not including weight of
cables)
45 33 kg (73 lb) 35 kg (77 lb)
55 34 kg (75 lb) 36 kg (79 lb)
65 35 kg:(77 lb) 37 kg:(82 lb)
Drive system All joints AC servo motor
Maximum operating
speed
*3
Joint #1 +
Joint #2
45 7,450 mm/s
55 8,450 mm/s
65 9,460 mm/s
Joint #3
2 2,350 mm/s
3 2,350 mm/s
Joint #4 2,800 deg/s
Repeatability
Joint #1 + Joint #2 ±0.015 mm
Joint #3 ±0.01 mm
Joint #4 ±0.005 deg
Industrial Robot: SCARA Robots GX series Manual Rev.11
470
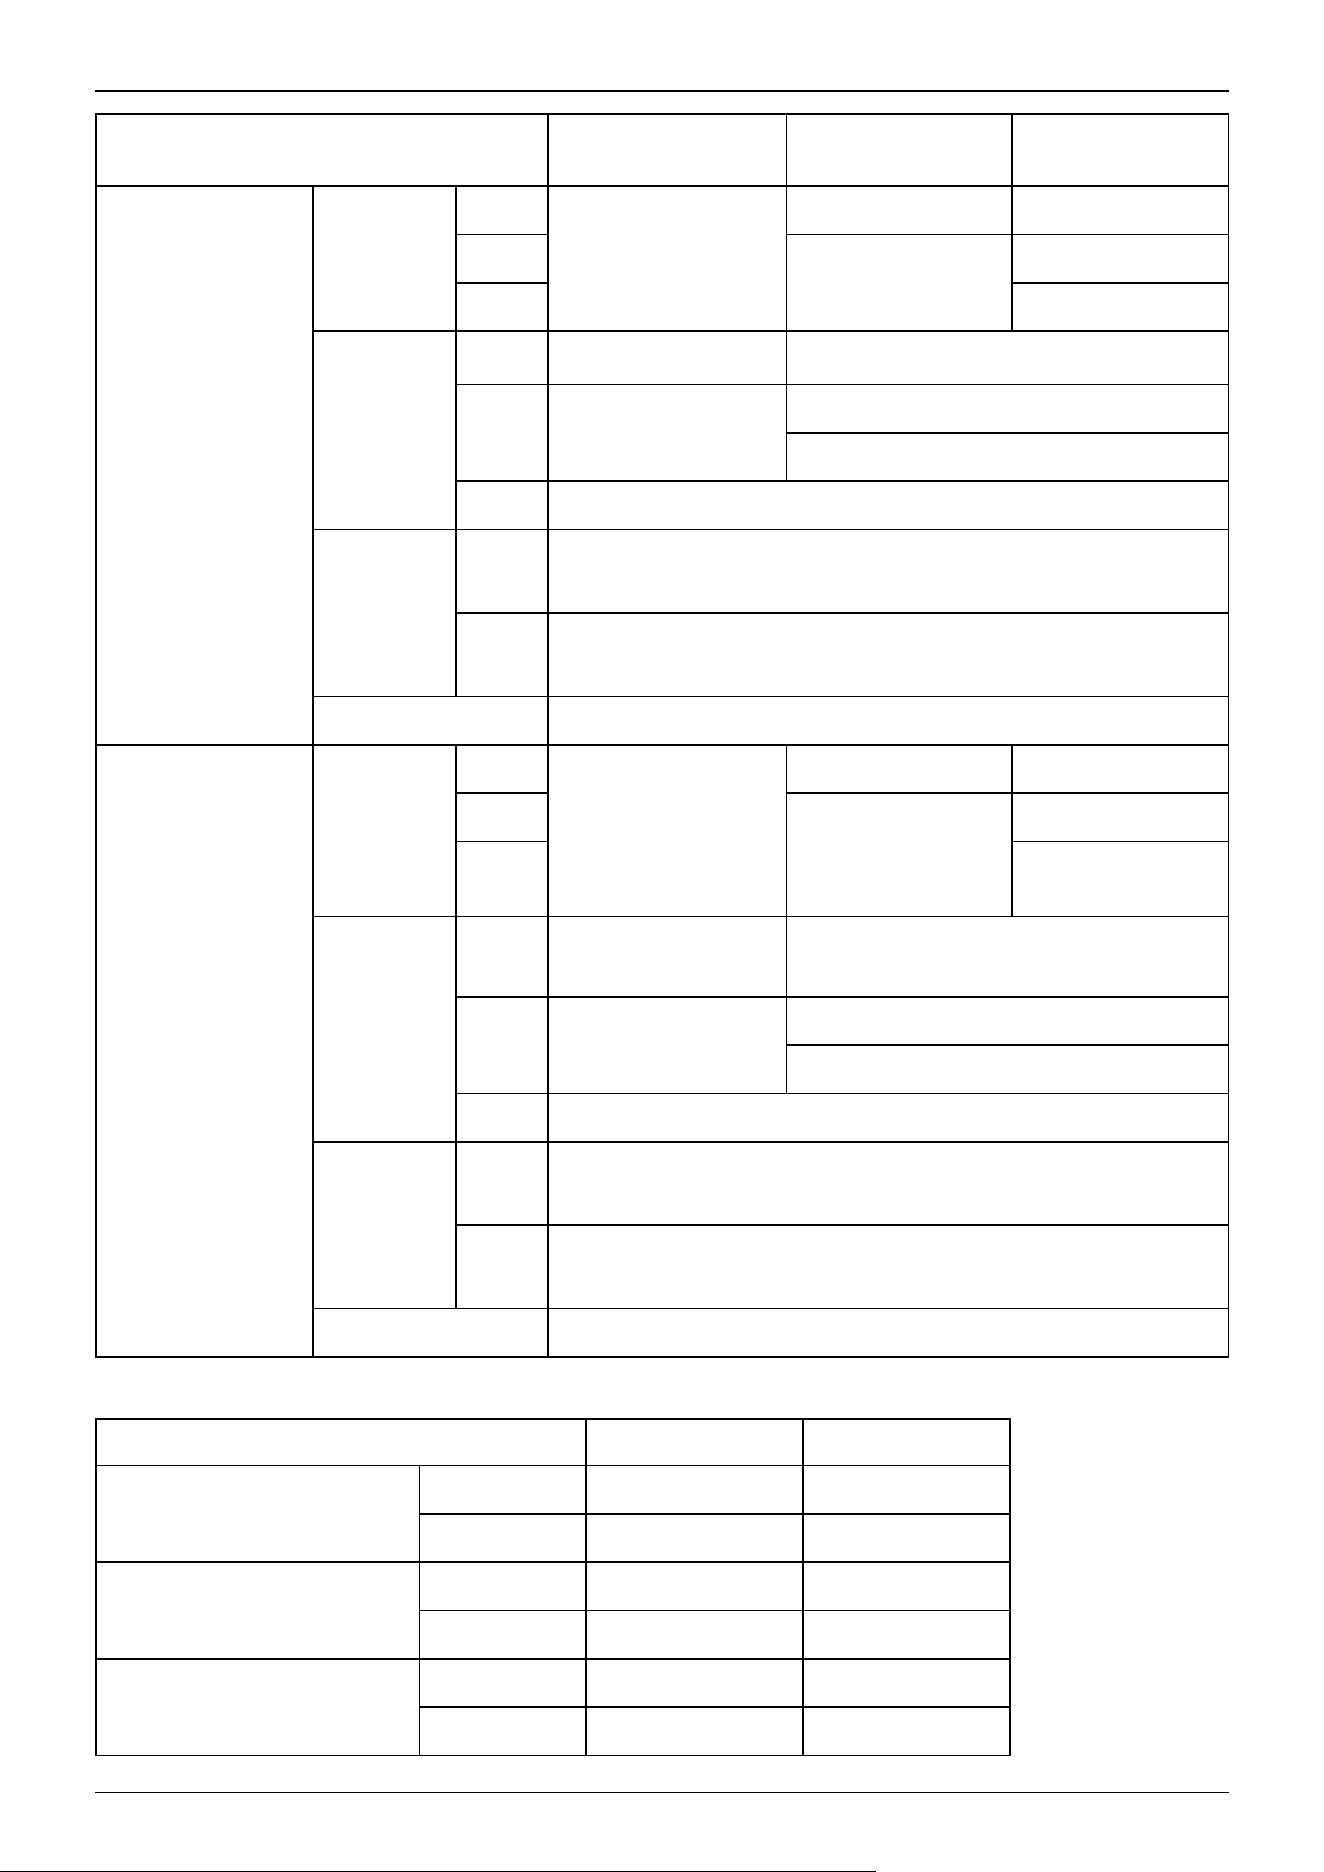
Item
GX8-A/GX8-B/GX8-C
*****
GX8-A/GX8-B/GX8-
C****R
GX8-A/GX8-
B/GX8-C****W
Max. motion range
Joint #1
45
±152 deg
±105 deg ±105 deg
55
±152 deg
±135 deg
65 ±148 deg
Joint #2
45
±142 to 147.5 deg
*a
±125 deg
55
±145 to 147.5 deg
*\a
±147.5 deg: S*, E*
±145 deg: C*, P*
65 ±147.5 deg
Joint #3
2
200 mm: GX8-***2S*, E*
170 mm: GX8-***2C*, P*
3
330 mm: GX8-***3S*, E*
300 mm: GX8-***3C*, P*
Joint #4 ±360 deg
Max. pulse range
(pulse)
Joint #1
45
-1128676 to +4405476
-273067 to +3549867 -273067 to +3549867
55
-1128676 to
+4405476
-819200 to +4096000
65
-1055858 to
+4332658
Joint #2
45
±2503111 to ±2685156
*a
±2275556
55
±2639644 to ±2685156
*a
±2685156: S*, E*
±2639645: C*, P*
65 ±2685156
Joint #3
2
-1092267: GX8-***2S*, E*
-928427: GX8-***2C*, P*
3
-1802240: GX8-***3S*, E*
-1638400: GX8-***3C*, P*
Joint #4 ±1668189
*a: GX8-*45***、GX8-*55*** Joint #2
Max. Motion Range Max. Pulse Range
GX8-A/GX8-B/GX8-C45*S*,E*
0 ≥ Z ≥ -270 ±147.5 deg ±2685156 pulse
-270 > Z ≥ -330 ±145 deg ±2639644 pulse
GX8-A/GX8-B/GX8-C45*C*,P*
0 ≥ Z ≥ -240 ±147.5 deg ±2685156 pulse
-240 > Z ≥ -300 ±137.5 deg ±2503111 pulse
GX8-A/GX8-B/GX8-C55*C*,P*
0 ≥ Z ≥ -240 ±147.5 deg ±2685156 pulse
-240 > Z ≥ -300 ±145 deg ±2639644 pulse
Industrial Robot: SCARA Robots GX series Manual Rev.11
471
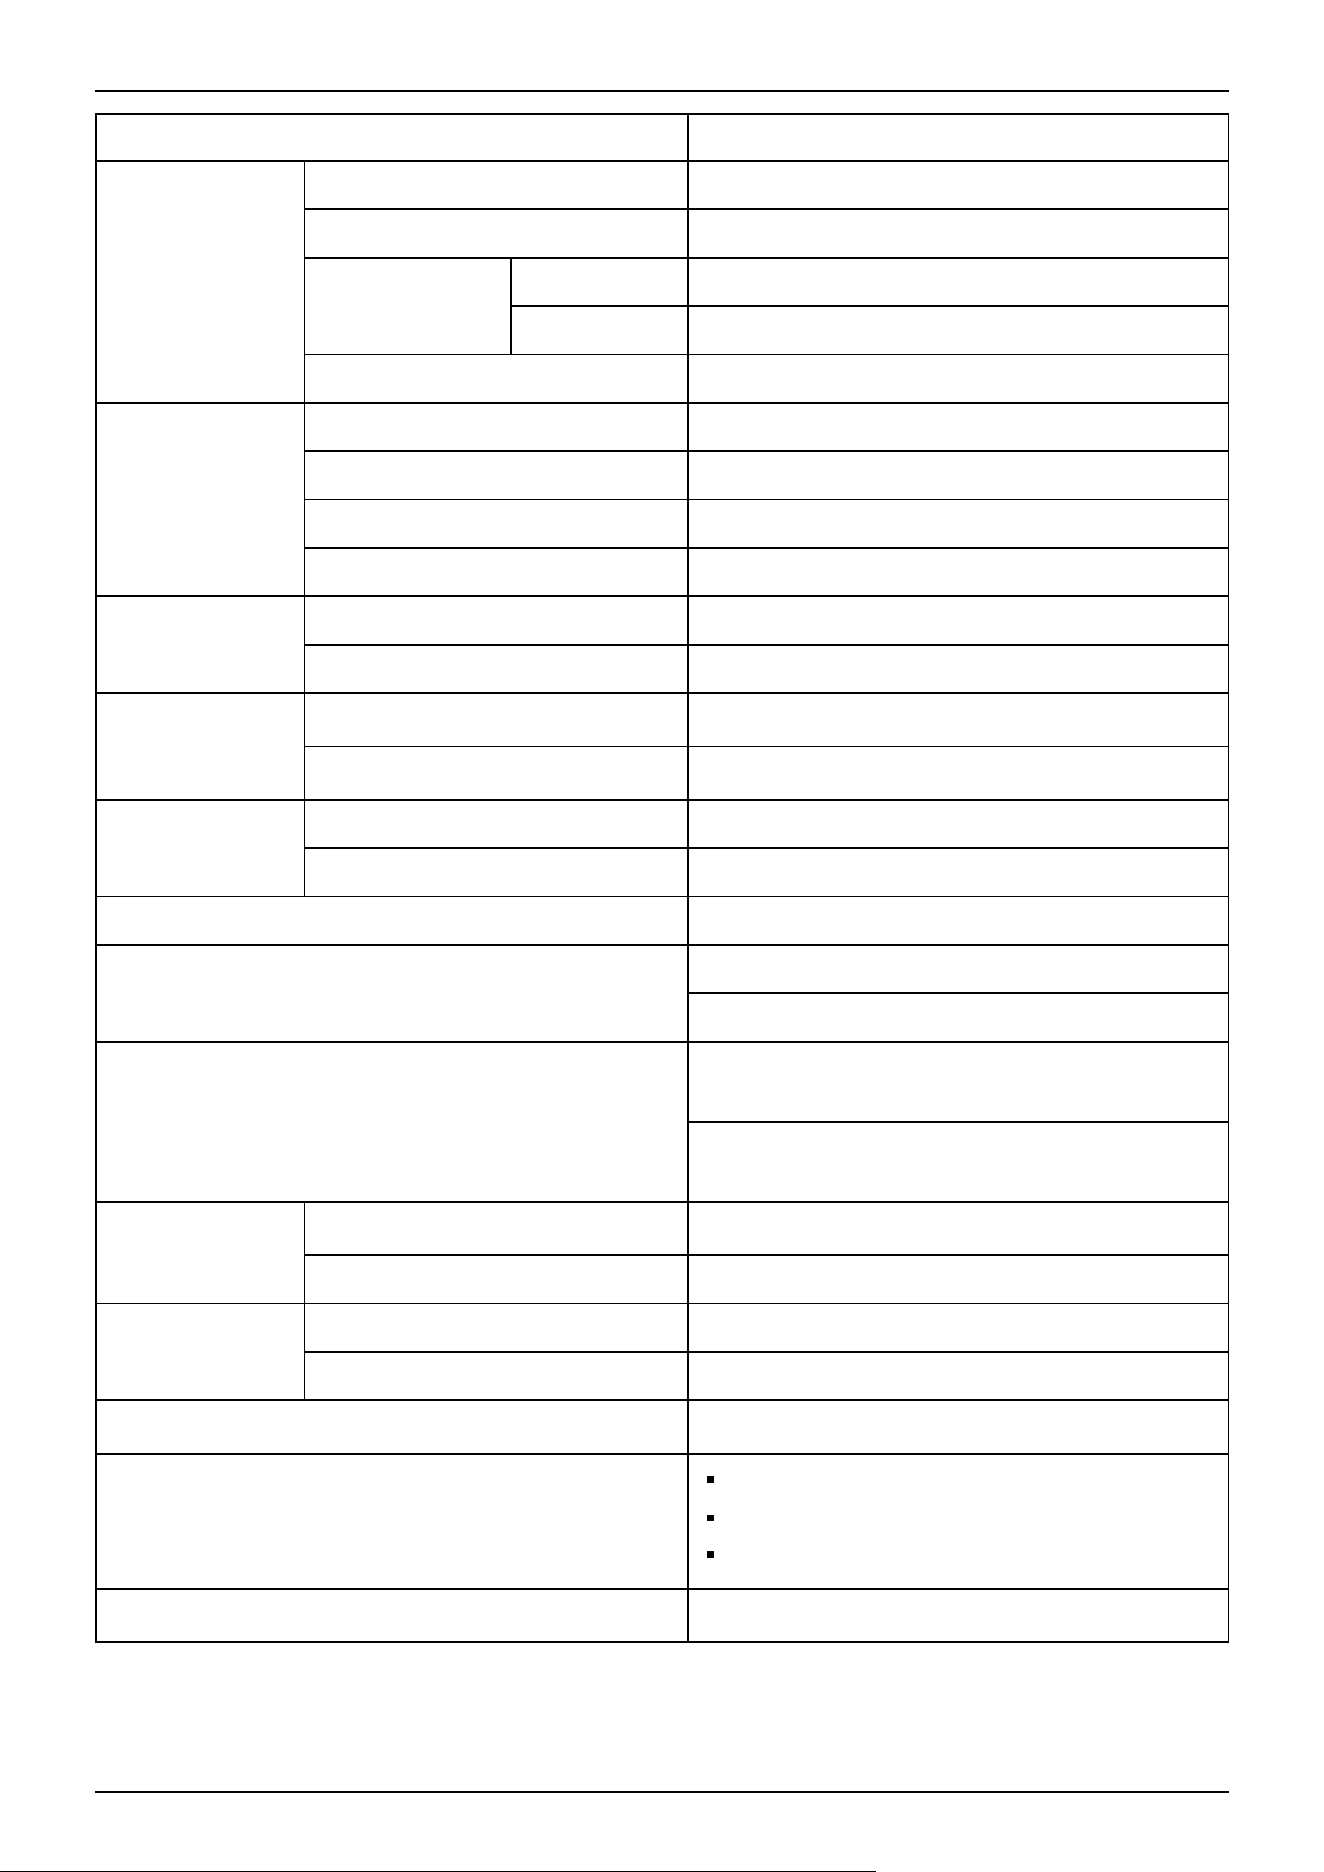
Item GX8-A/GX8-B/GX8-C*****
Resolution
Joint #1 0.0000549 deg/pulse
Joint #2 0.0000549 deg/pulse
Joint #3
2 0.0001831 mm/pulse
3 0.0001831 mm/pulse
Joint #4 0.0002140 deg/pulse
Motor rated
capacity
Joint #1 750 W
Joint #2 600 W
Joint #3 200 W
Joint #4 200 W
Payload (load)
Rated 4 kg
Max. 8 kg
Joint #4 allowable
moment of inertia
*4
Rating
0.01 kg·m
2
Max.
0.16 kg·m
2
Shaft diameter
Outer ø20 mm
Inner ø14 mm
Joint #3 press force 150 N
User wiring
24 (15 pin + 9 pin: D-sub)
Ethernet CAT5e or equivalent
User piping
2 × ø6 mm pneumatic tube, Pressure resistance: 0.59
MPa (6 kgf/cm
2
: 86 psi)
2 × ø4 mm pneumatic tube, Pressure resistance: 0.59
MPa (6 kgf/cm
2
: 86 psi)
Environmental
requirements
Ambient temperature
*5
5 to 40°C
Ambient relative humidity 10 to 80% (no condensation)
Transportation and
storage
Temperature −20 to +60°C
Humidity 10 to 90% (no condensation)
Noise level
*6
LAeq = 74 dB(A)
Compatible Controllers
GX8-A: RC700-D
GX8-B: RC700-E
GX8-C: RC800-A
Operation mode
*7
Standard mode (default), Boost mode
Industrial Robot: SCARA Robots GX series Manual Rev.11
472
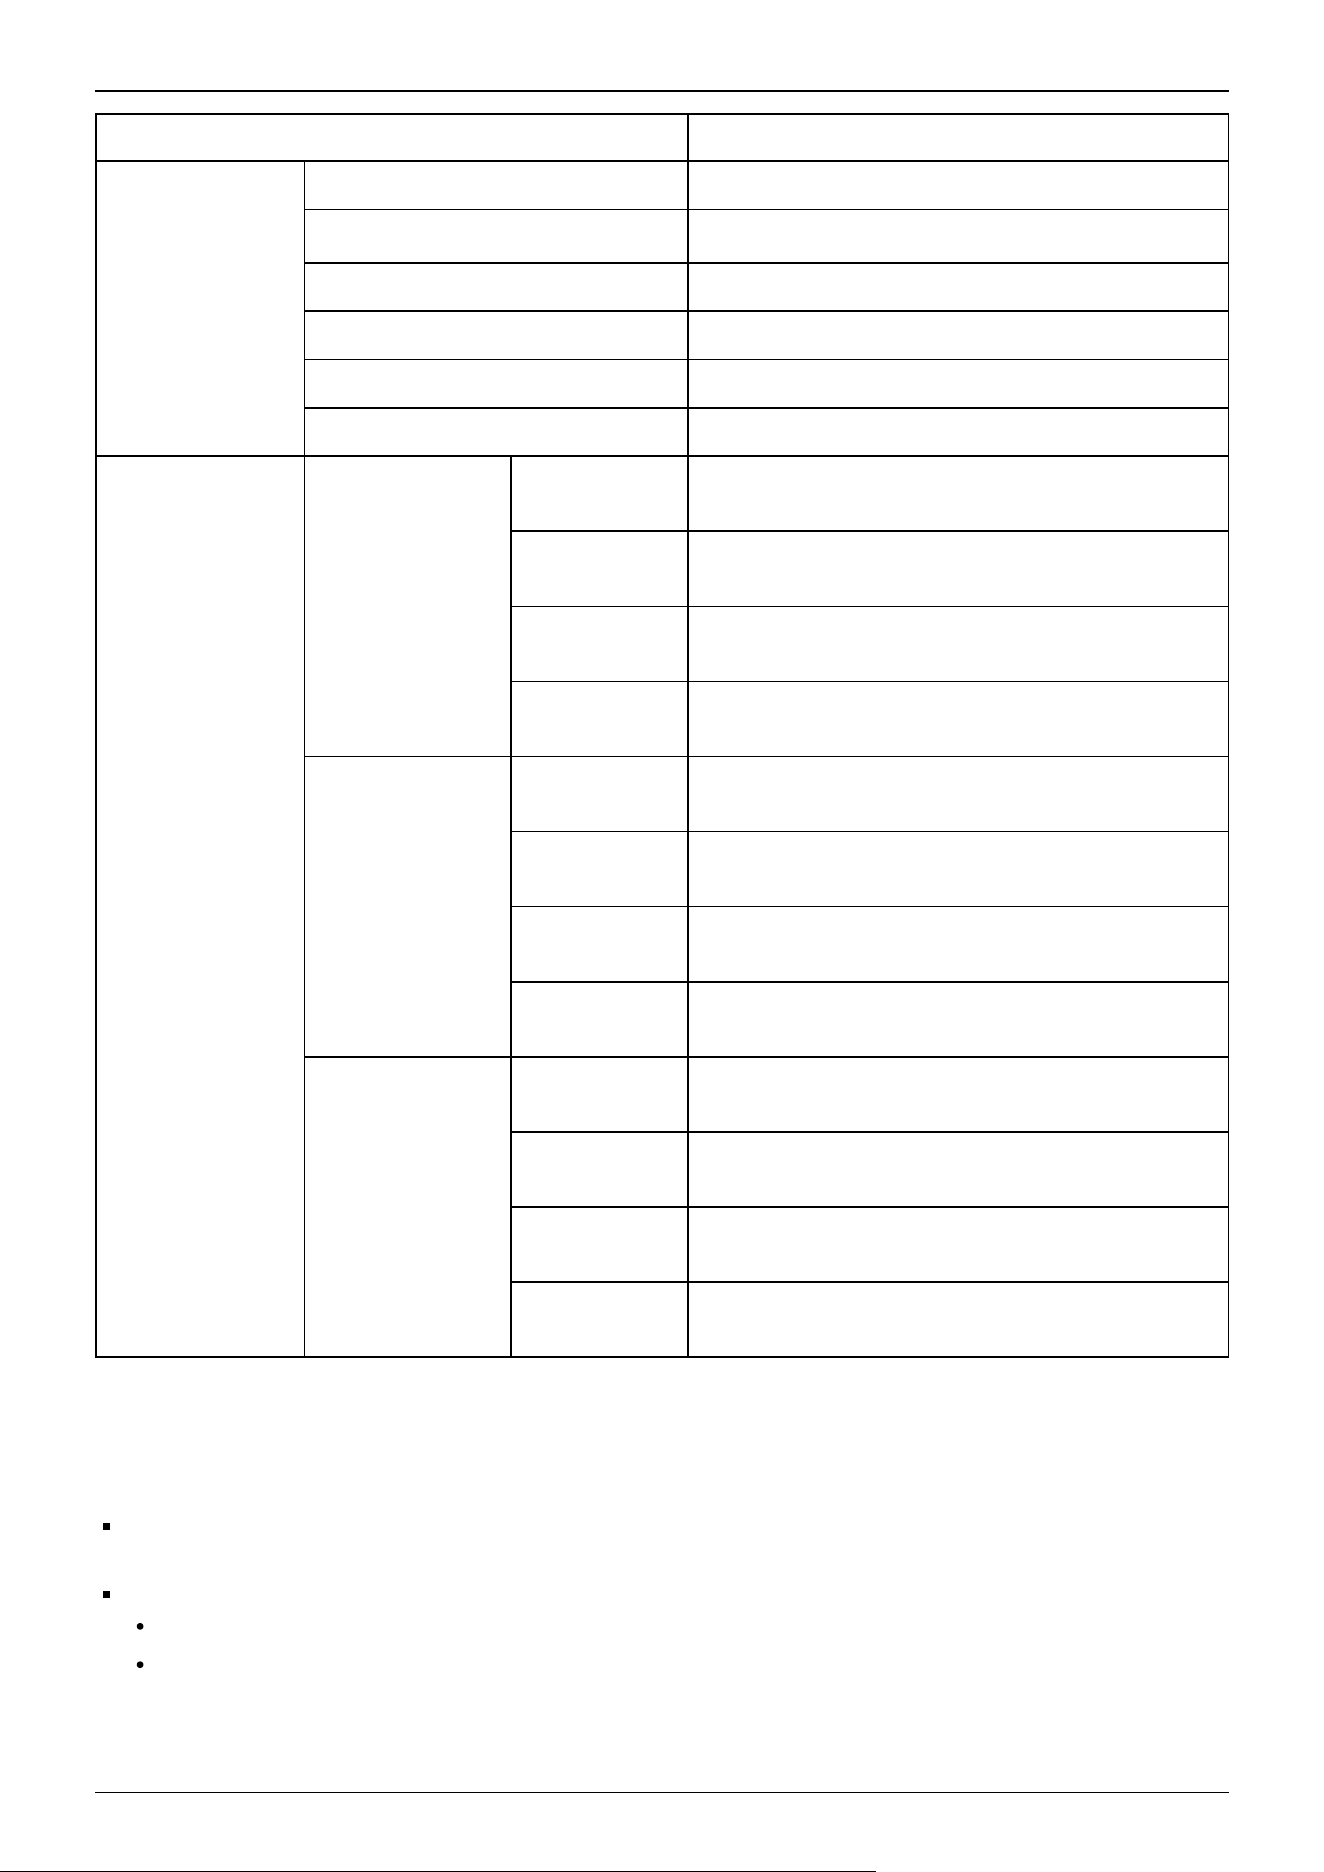
Item GX8-A/GX8-B/GX8-C*****
Setting value range
( )Default value
Speed 1 to (3) to 100
Accel
*8
1 to (10) to 100
SpeedS 0.1 to (50) to 2000
AccelS 0.1 to (200) to 25000
Fine 0 to (10000) to 65535
Weight 0 to (4) to 8
M/C cable
Cable weight (cable
only)
For fixing and
signal
0.06 kg/m
For fixing and
power
0.30 kg/m
For movable and
signal
0.07 kg/m
For movable and
power
0.36 kg/m
Cable outer
diameter
For fixing and
signal
⌀6.5 mm (typ)
For fixing and
power
⌀13.7 mm (typ)
For movable and
signal
⌀6.4 mm (typ)
For movable and
power
⌀13.7 mm (typ)
Minimum bending
radius
*9
For fixing and
signal
40 mm
For fixing and
power
83 mm
For movable and
signal
100 mm
For movable and
power
100 mm
*1: Manipulators with cleanroom & ESD specifications (GX8-A/GX8-B/GX8-C***C*) discharge the exhaust inside of the
base and inside of the arm cover together.
Connect the exhaust tube to the exhaust port on the back (or bottom) of the base.
If the exhaust discharge rate is not sufficient, dust generation will exceed the specifications.
Cleanliness:
Class ISO 3 (ISO 14644-1)
Exhaust
Exhaust port dimensions: Inner diameter ø 12 mm
Compatible exhaust tubes
- Polyurethane tubes
- Outer diameter ø12 mm (Inner diameter ø8 mm)
Industrial Robot: SCARA Robots GX series Manual Rev.11
473
- Recommended exhaust discharge rate: About 1,000 cm
3
/s (standard state)
ESD specifications (GX8-A/GX8-B/GX8-C***E*) are specifications that use conductive materials for or apply plating to the
major resin parts as anti-static measures.
We have confirmed that the Manipulator tip (tool mounting section) is at ±5 V or less, even directly after the measuring
operation according to Seiko Epson standards.
If you need any other detailed information, please contact the supplier.
Also, please check the amount of charge on any hand, wiring, or the like that you will attach to the robot on your own before
use.
*2: The IP (International Protection) rating for Manipulators with protected-models is an international standard indicating the
degree of protection against dust and water.
Model Protection Class
GX8-A/GX8-
B/GX8-C***P *
IP65
Dust
protection
level: 6
No ingress of dust
Water
protection
level: 5
Water which is directed against the enclosure from any direction as a jet
shall not have any harmful effects or impair performance.
*3: When PTP statements are used
The maximum operating speed in CP motion is 2,000 mm/s in the horizontal plane.
*4: When the center of gravity of the load matches the Joint #4 center position
When the center of gravity position is separated from the Joint #4 center position, set the parameter using the Inertia statement.
*5: When used in a low-temperature environment near the minimum temperature specified in the product specifications, or
when the unit is idle for a long period of time during holidays or at night, a collision detection error or similar error may occur
immediately after the start of operation due to high resistance in the drive unit.
In such cases, warm-up operation for about 10 minutes is recommended.
*6: The conditions at measurement are as follows.
Manipulator operating conditions:
Rated load, four-joint simultaneous operation, maximum speed, maximum acceleration/deceleration
Measurement locations
Manipulator rear side, 1,000 mm away from work envelope, and 50 mm above base mounting surface
*7: The PerformMode command can be used to switch operation modes. For details, refer to the following manual.
"Epson RC+ SPEL+ Language Reference"
KEY POINTS
Boost mode reduces the amount of time for a single operation compared to Standard mode; however, it worsens
the operation duty and the vibration when stopping operation. Use it with caution.
*8: The Accel setting of "100" is the optimum setting that balances acceleration/deceleration and vibration during positioning.
*9: Note the following points when wiring the movable M/C cable.
Install the cable so as not to apply a load to the connector.
✏
Industrial Robot: SCARA Robots GX series Manual Rev.11
474
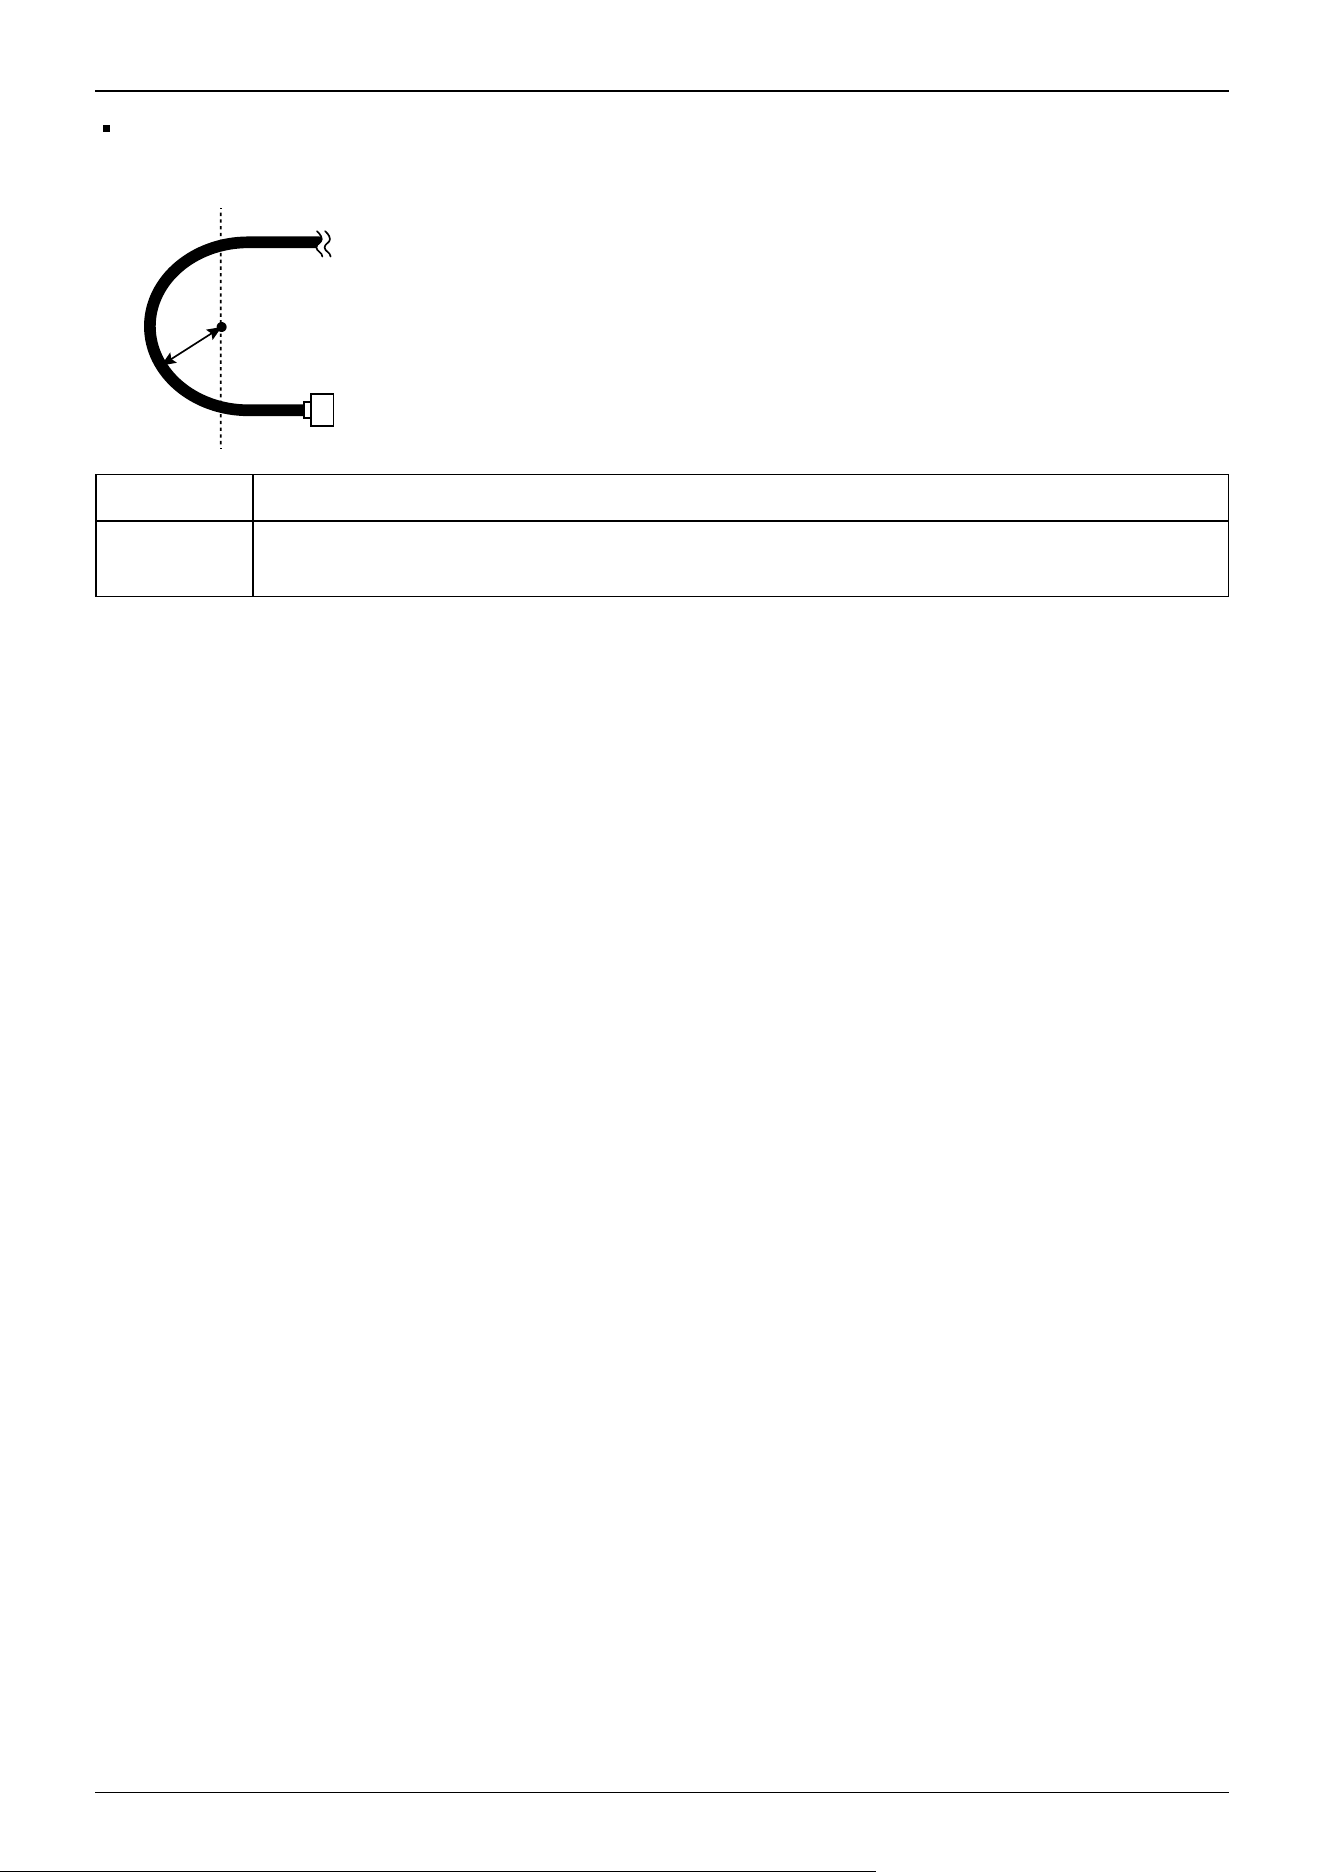
Bend the cable at the minimum bending radius of the movable part or more. The bending radius (a) and dimensions are
shown in the figure below.
Item GX8-B**3P-FZ
Food grade
grease model
Food grade grease model have the grease for Z-axis ball screw splines which is usable for foods. Be sure
to use the specified grease(L700) for food specification machine.
M/C cable
Connector
a
Industrial Robot: SCARA Robots GX series Manual Rev.11
475
7.1.4 GX10/20
Item
GX10-B/GX10-C ****
GX20-B/GX20-C ****
GX10-B/GX10-
C****R
GX20-B/GX20-
C****R
GX10-B/GX10-
C****W
GX20-B/GX20-
C****W
Machinery name Industrial robot
Product series GX
Model
GX10-B*****, GX10-C***** , GX20-B*****, GX20-C *****
Model Name GX10-B/GX20-B
Model Name GX10-C/GX20-C
Installation method
Table top mounting
specifications
Ceiling mounting
specifications
Wall mounting
specifications
Environmental specifications
Cleanroom specifications & ESD
*1
, Protected-model
*2
Arm length
Arm #1 +
Arm #2
65 650 mm (GX10-B/GX10-C only)
85 850 mm (GX10-B/GX10-C/GX20-B/GX20-C)
A0 1000 mm (GX20-B/GX20-C only)
Arm #3
1
180 mm: GX10-B/GX10-C/GX20-B/GX20-C**1S*
150 mm: GX10-B/GX10-C/GX20-B/GX20-C**1C*, P*
4
420 mm: GX10-B/GX10-C/GX20-B/GX20-C**4S*
390 mm: GX10-B/GX10-C/GX20-B/GX20-C**4C*, P*
Weight (not including weight of
cables)
65 46 kg (102 lb) 51 kg (113 lb)
85 49 kg (108 lb) 53 kg (117 lb)
A0 50 kg (111 lb) 55 kg (122 lb)
Drive system All joints AC servo motor
Maximum operating
speed
*3
Joint #1 +
Joint #2
65 8800 mm/s
85 11000 mm/s
A0 11500 mm/s
Joint #3 2350 mm/s
Joint #4
2400 deg/s (GX10-B/GX10-C only)
1700 deg/s (GX20-B/GX20-C only)
Repeatability
Joint #1 + Joint #2 ±0.025 mm
Joint #3 ±0.01 mm
Joint #4 ±0.005 deg
Industrial Robot: SCARA Robots GX series Manual Rev.11
476
Item
GX10-B/GX10-C ****
GX20-B/GX20-C ****
GX10-B/GX10-
C****R
GX20-B/GX20-
C****R
GX10-B/GX10-
C****W
GX20-B/GX20-
C****W
Max. motion range
(deg.)
Joint #1
65
±152 deg
±107 deg
±107deg85
±152 deg
A0
Joint #2
65
±152.5 deg
*a
±130 deg
85
±152.5 deg
*a
A0
Joint #3
1
180 mm: GX10-B/GX10-C/GX20-B/GX20-C**1S*
150 mm: GX10-B/GX10-C/GX20-B/GX20-C**1C*, P*
4
420 mm: GX10-B/GX10-C/GX20-B/GX20-C**4S*
390 mm: GX10-B/GX10-C/GX20-B/GX20-C**4C*, P*
Joint #4 ±360 deg
Max. pulse range
(pulse)
Joint #1
65
-1805881 to +7048761
-495161 to +5738041
-495161 to
+5738041
85
-1805881 to 7048761
A0
Joint #2
65
±2776178
*a
±2366578
85
±2776178
*a
A0
Joint #3
1
-973210: GX10-B/GX10-C/GX20-B/GX20-C**1S*
-811008: GX10-B/GX10-C/GX20-B/GX20-C**1C*, P*
4
-2270823: GX10-B/GX10-C/GX20-B/GX20-C**4S*
-2108621: GX10-B/GX10-C/GX20-B/GX20-C**4C*, P*
Joint #4:
±1951517 (GX10-B/GX10-C only)
±2752512 (GX20-B/GX20-C only)
KEY POINTS
The length of Arm #1 + Arm #2 varies depending on the model.
65: 650 mm GX10-B/GX10-C only
85: 850 mm GX10-B/GX10-C/GX20-B/GX20-C
A0: 1000 mm GX20-B/GX20-C only
*a: For Manipulators in table below (Joint #2)
✏
Industrial Robot: SCARA Robots GX series Manual Rev.11
477
Max. Motion Range Max. Pulse Range
GX10-B/GX10-C/GX20-B/GX20-C85*C, P (Z: -360 to -390 only)
GX10-B/GX10-C/GX20-B/GX20-C85*CW, PW
GX10-B/GX10-C/GX20-B/GX20-C85*CR, PR
±151 deg ±2748872
Industrial Robot: SCARA Robots GX series Manual Rev.11
478
Item GX10-B/GX10-C ***** GX20-B/GX20-C*****
Resolution
Joint #1 0.0000343 deg/pulse
Joint #2 0.0000549 deg/pulse
Joint #3 0.000185 mm/pulse
Joint #4 0.0001845 deg/pulse 0.0001308 deg/pulse
Motor rated capacity
Joint #1 750 W
Joint #2 600 W
Joint #3 400 W
Joint #4 150 W
Payload (load)
Rated 5 kg 10 kg
Max. 10 kg 20 kg
Joint #4 allowable moment
of inertia
*4
Rating
0.02 kg·m
2
0.05 kg·m
2
Max.
0.25 kg·m
2
0.45 kg·m
2
Shaft diameter
Outer ø25 mm
Inner
ø18 mm
* Manipulators with cleanroom & ESD specifications or protected-
model: upper end of shaft ø14 mm
Joint #3 press force 250 N
User wiring 24 pin (15 pin + 9 pin: D-sub)
User piping
2 × ø6 mm pneumatic tube, Pressure resistance: 0.59 MPa (6 kgf/cm
2
:
86 psi)
2 × ø4 mm pneumatic tube, Pressure resistance: 0.59 MPa (6 kgf/cm
2
:
86 psi)
Environmental requirements
*5
Ambient
temperature
5 to 40 °C
Ambient relative
humidity
10 to 80% (no condensation)
Transportation and storage
Temperature -20 to +60°C
Humidity 10 to 90% (no condensation)
Noise level
*6
LAeq = 73 dB (A)
Compatible Controllers
GX10-B, GX20-B: RC700-E
GX10-C, GX20-C: RC800-A
Setting value range( )Default
value
Speed 1 to (3) to 100
Accel
*7
1 to (10) to 120
SpeedS 0.1 to (50) to 2000
AccelS 0.1 to (200) to 25000
Industrial Robot: SCARA Robots GX series Manual Rev.11
479
Item GX10-B/GX10-C ***** GX20-B/GX20-C*****
Fine 0 to (10000) to 65535
Weight 0 ~ (5) ~ 10 0 ~ (10) ~ 20
M/C
cable
Cable weight
(cable only)
For fixing and
signal
0.06 kg/m
For fixing and
power
0.30 kg/m
For movable and
signal
0.07 kg/m
For movable and
power
0.36 kg/m
Cable outer
diameter
For fixing and
signal
⌀6.5 mm (typ)
For fixing and
power
⌀13.7 mm (typ)
For movable and
signal
⌀6.4 mm (typ)
For movable and
power
⌀13.7 mm (typ)
Minimum bending
radius
*8
For fixing and
signal
40 mm
For fixing and
power
83 mm
For movable and
signal
100 mm
For movable and
power
100 mm
*1: Manipulators with cleanroom & ESD specifications (GX10-B/GX10-C/GX20-B/GX20-C***C*) discharge exhaust inside
the base and inside the arm cover together.
Consequently, if there is a gap in the base section, the arm tip section will not be sufficiently negatively pressurized, which
may result in dust generation.
Do not remove the maintenance cover on the front of the base.
Connect the exhaust tube to the exhaust port on the back (or bottom) of the base.
If the exhaust discharge rate is not sufficient, dust generation will exceed the specifications.
Fasten the exhaust port and exhaust tube firmly with vinyl tape to prevent gaps.
Cleanliness:
Class ISO 3 (ISO 14644-1)
Exhaust
Exhaust port dimensions: Inner diameter ø12 mm, outer diameter ø16 mm
Compatible exhaust tubes
- Polyurethane tubes
- Outer diameter ø12 mm (inner diameter ø8 mm) or inner diameter ø16 mm or more
- Recommended exhaust discharge rate: About 1000 cm
3
/s (standard state)
Industrial Robot: SCARA Robots GX series Manual Rev.11
480
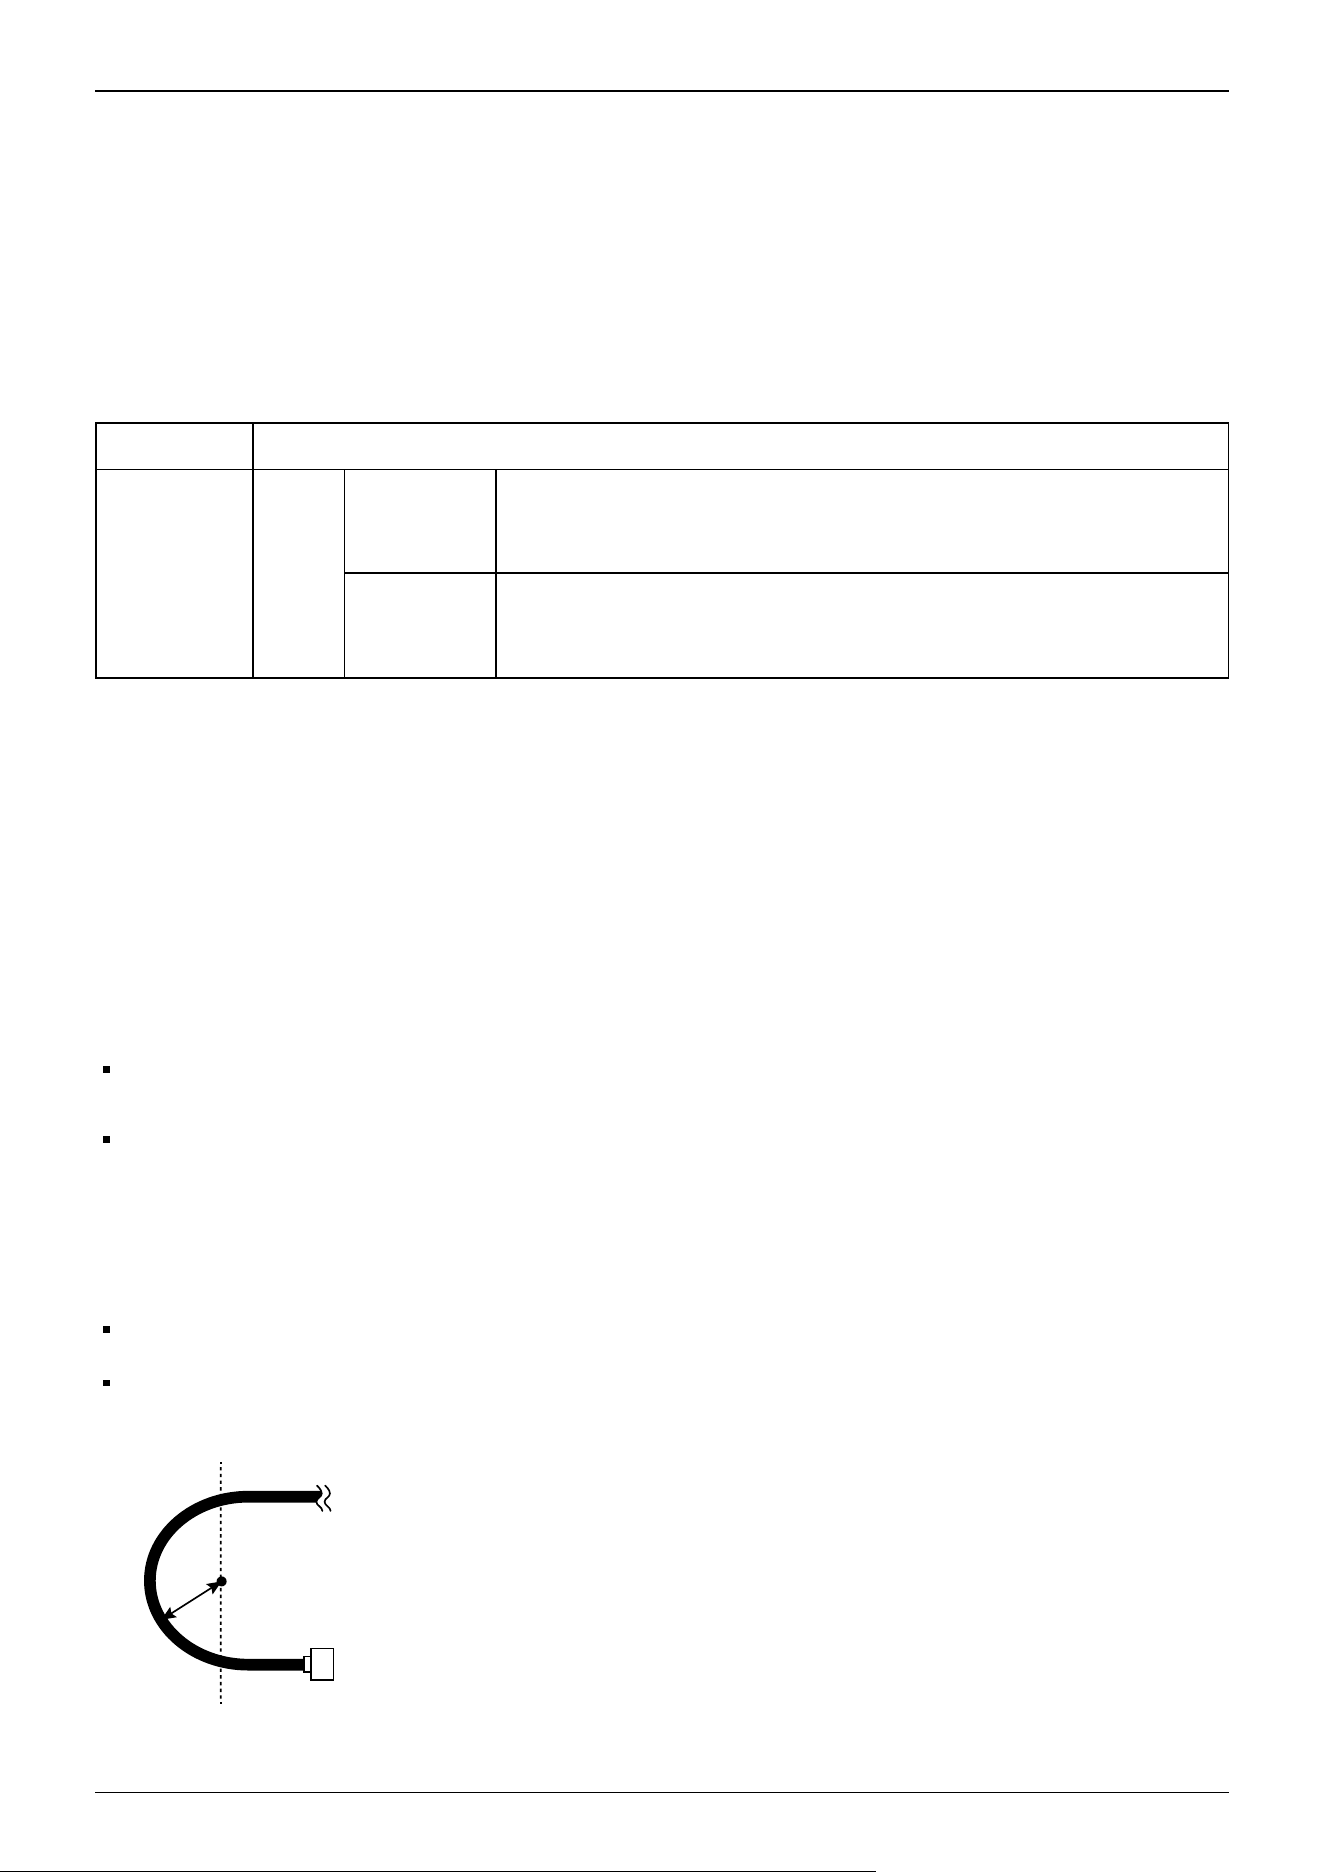
ESD specifications are specifications that use conductive materials for or apply plating to the major resin parts as anti-static
measures.
We have confirmed that the Manipulator tip (tool mounting section) is at ±5 V or less, even directly after the measuring
operation according to Seiko Epson standards.
If you need any other detailed information, please contact the supplier.
Also, please check the amount of charge on any hand, wiring, or the like that you will attach to the robot on your own before
use.
*2: The IP (International Protection) rating for Manipulators with protected-models is an international standard indicating the
degree of protection against dust and water.
Model Protection Class
GX10-
B/GX10-
C***P *
GX20-
B/GX20-
C***P *
IP65
Dust
protection
level: 6
No ingress of dust
Water
protection
level: 5
Water which is directed against the enclosure from any direction as a jet shall
not have any harmful effects or impair performance.
*3: When PTP statements are used
The maximum operating speed in CP motion is 2,000 mm/s in the horizontal plane.
*4: When the center of gravity of the load matches the Joint #4 center position
When the center of gravity position is separated from the Joint #4 center position, set the parameter using the Inertia statement.
*5: When used in a low-temperature environment near the minimum temperature specified in the product specifications, or
when the unit is idle for a long period of time during holidays or at night, a collision detection error or similar error may occur
immediately after the start of operation due to high resistance in the drive unit.
In such cases, warm-up operation for about 10 minutes is recommended.
*6: The conditions at measurement are as follows.
Manipulator operating conditions:
Rated load, four-joint simultaneous operation, maximum speed, maximum acceleration/deceleration
Measurement locations
Manipulator rear side, 1,000 mm away from work envelope, and 50 mm above base mounting surface
*7: The Accel setting of "100" is the optimum setting that balances acceleration/deceleration and vibration during positioning.
*8: Note the following points when wiring the movable M/C cable.
Install the cable so as not to apply a load to the connector.
Bend the cable at the minimum bending radius of the movable part or more. The bending radius (a) and dimensions are
shown in the figure below.
M/C cable
Connector
a
Industrial Robot: SCARA Robots GX series Manual Rev.11
481
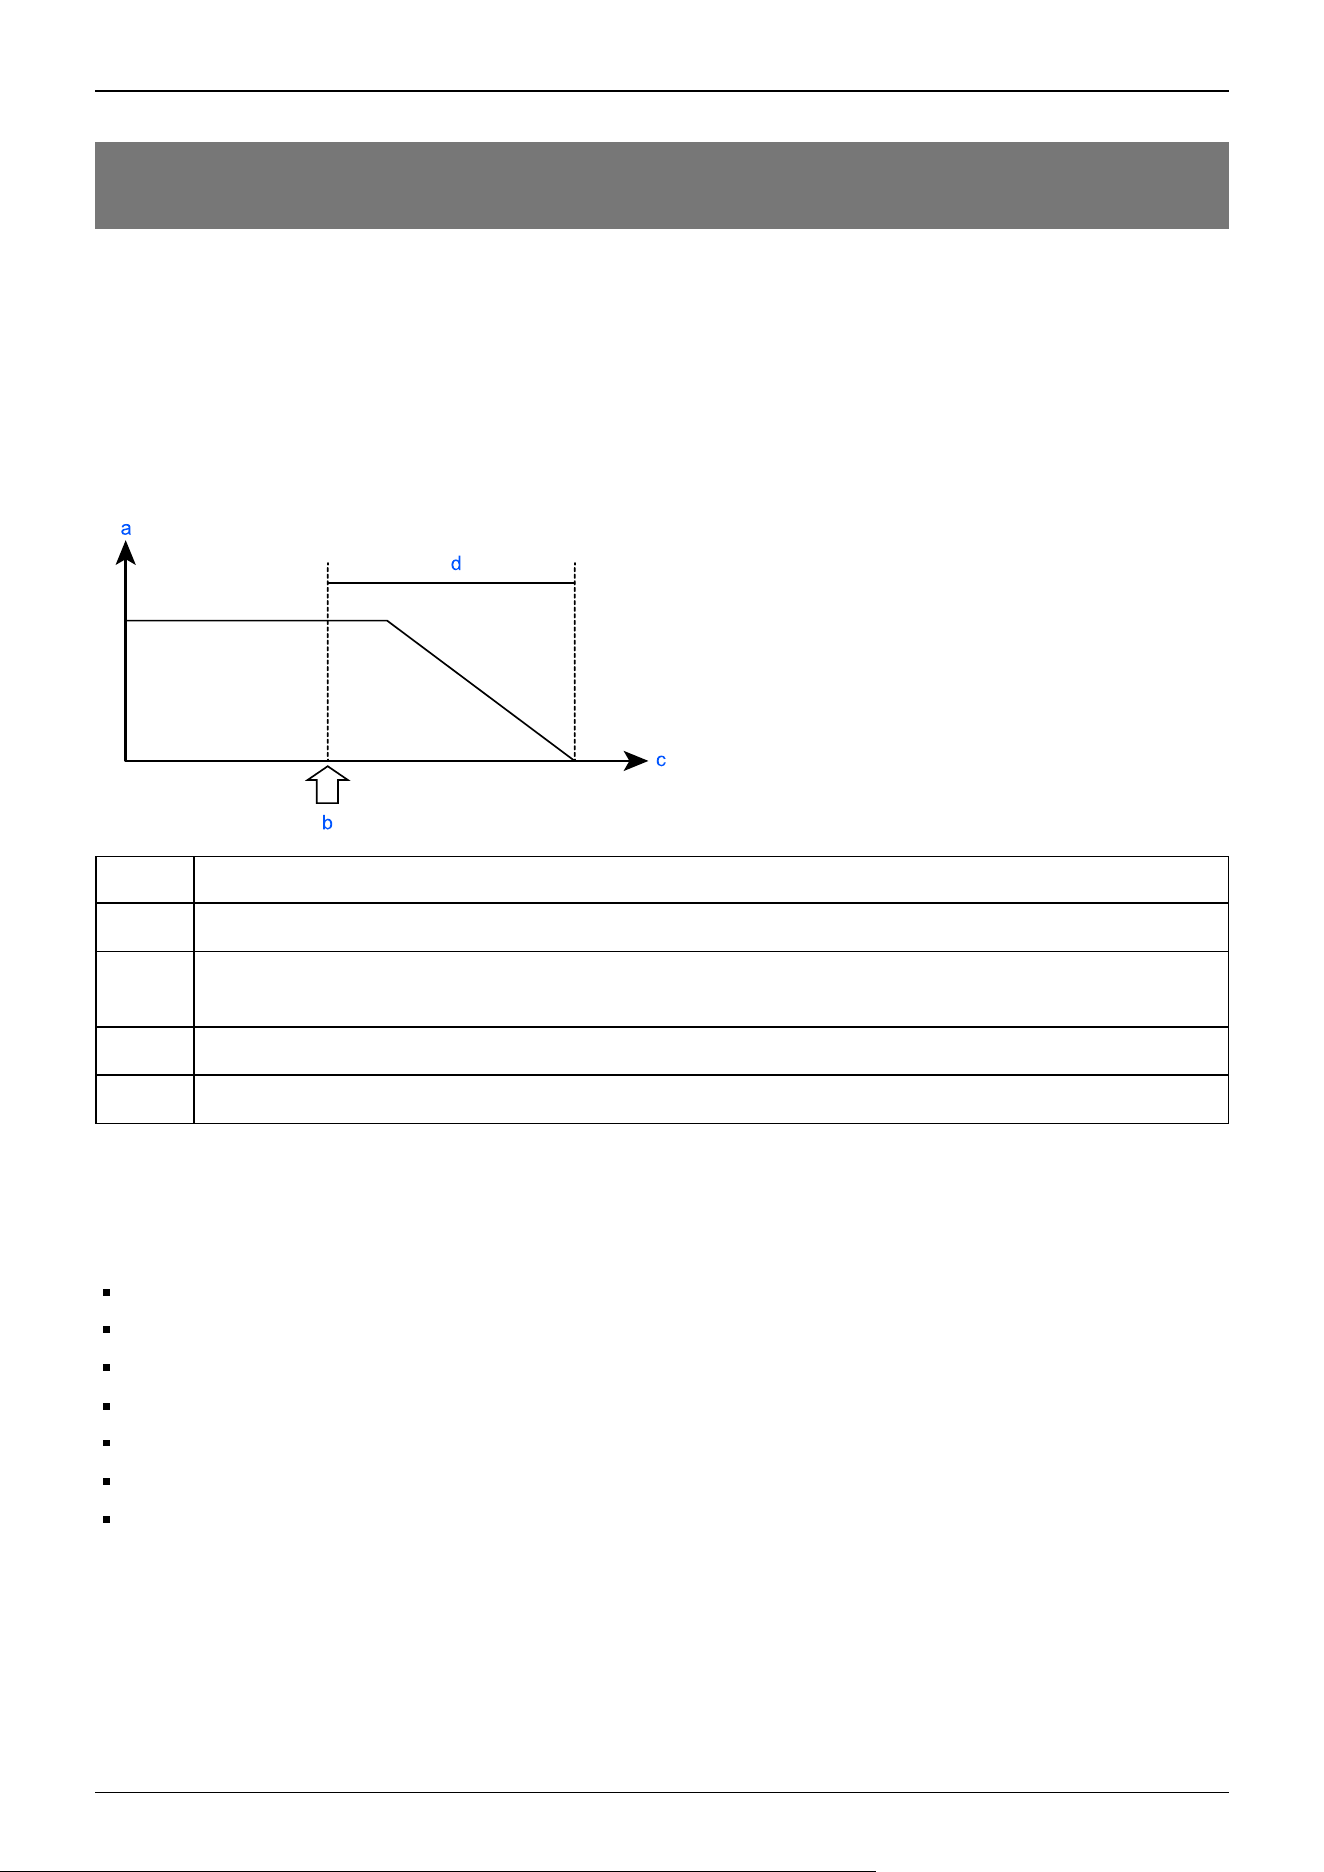
7.2 Appendix B: Stopping Time and Stopping Distance at Emergency
Stop
The stopping time and stopping distance at an emergency stop are shown in the graphs for each model.
The stopping time is the length of time corresponding to the "Stopping time" in the figure below. Be sure to confirm that a safe
environment is provided where the robot will be installed and operated.
For models equipped with a safety board such as RC700-E, RC800-A, the stopping time and stopping distance when using the
Safety Limited Speed (SLS), Safety Limited Position (SLP), and Soft Axis Limiting are equivalent to those of the emergency
stop.
Symbol Description
a Motor speed
b
Emergency stop, Maximum Speed of SLS exceeded, monitoring areas and Joint Angle Limit of SLP exceeded,
restricted range of Soft Axis Limiting exceeded
c Time
d Stopping time
Conditions
The stopping time and stopping distance depend on the parameters (setting values) that were set for the robot. These graphs
show the times and distances for the following parameters.
These conditions are based on the ISO 10218-1:2011 Annex B.
Accel: 100, 100
Speed: 100 %, 66 %, 33 %Settings
Weight: 100 %, 66 %, 33 % of the maximum payload, rated payload
Arm elongation rate: 100 %, 66 %, 33 % *1
Other settings: Default
Motion: Singular axis motion of a Go command
Input timing of the Stop signal: input with maximum speed. In this motion, it is the center of the motion range.
*1 Arm elongation rate
When J1 is operating, the arm elongation rate θ is as shown in the figure below.
Among the following arm elongation rate, the graph shows the results with the longest stopping time and stopping distance.
When J2 is operating, J3 is 0 mm.
Industrial Robot: SCARA Robots GX series Manual Rev.11
482
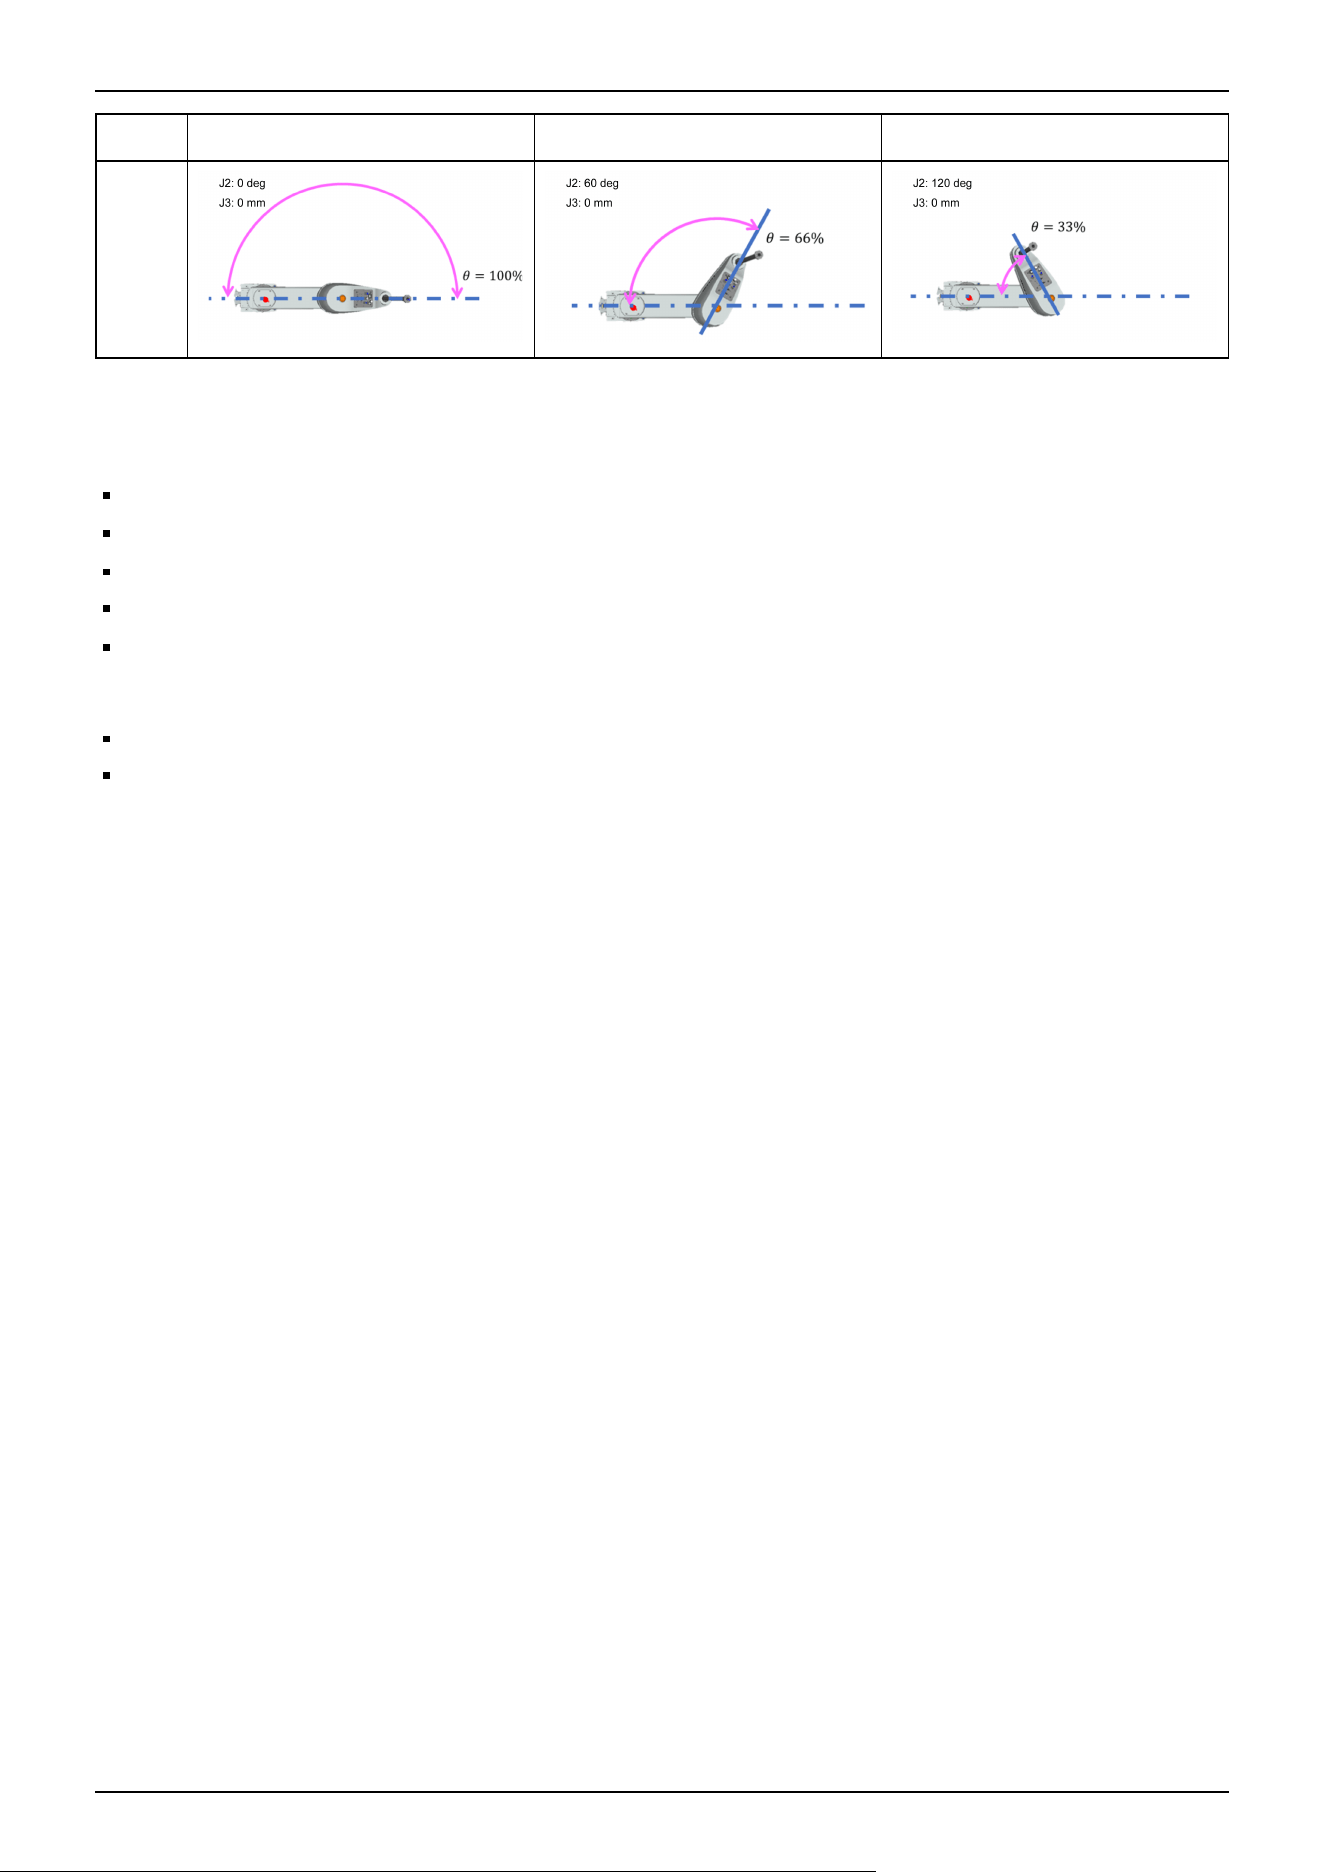
Axis θ = 100% θ = 66% θ = 33%
J1
Explanation of legend
The graphs are displayed for each Weight setting value (at 100%, approx. 66%, and approx. 33% of the maximum payload, and
at the rated payload).
Horizontal axis: Arm speed (Speed setting)
Vertical axis: Stopping time and stopping distance at each arm speed
Time (sec): Stopping time (sec)
Distance (deg): J1 and J2 stopping distance (degree)
Distance (mm): J3 stopping distance
When single failures are taken into account, the following adjustments are used.
Stopping distance and angle: Each axis reaches the mechanical stop
Stopping time: Add 500 ms
Industrial Robot: SCARA Robots GX series Manual Rev.11
483
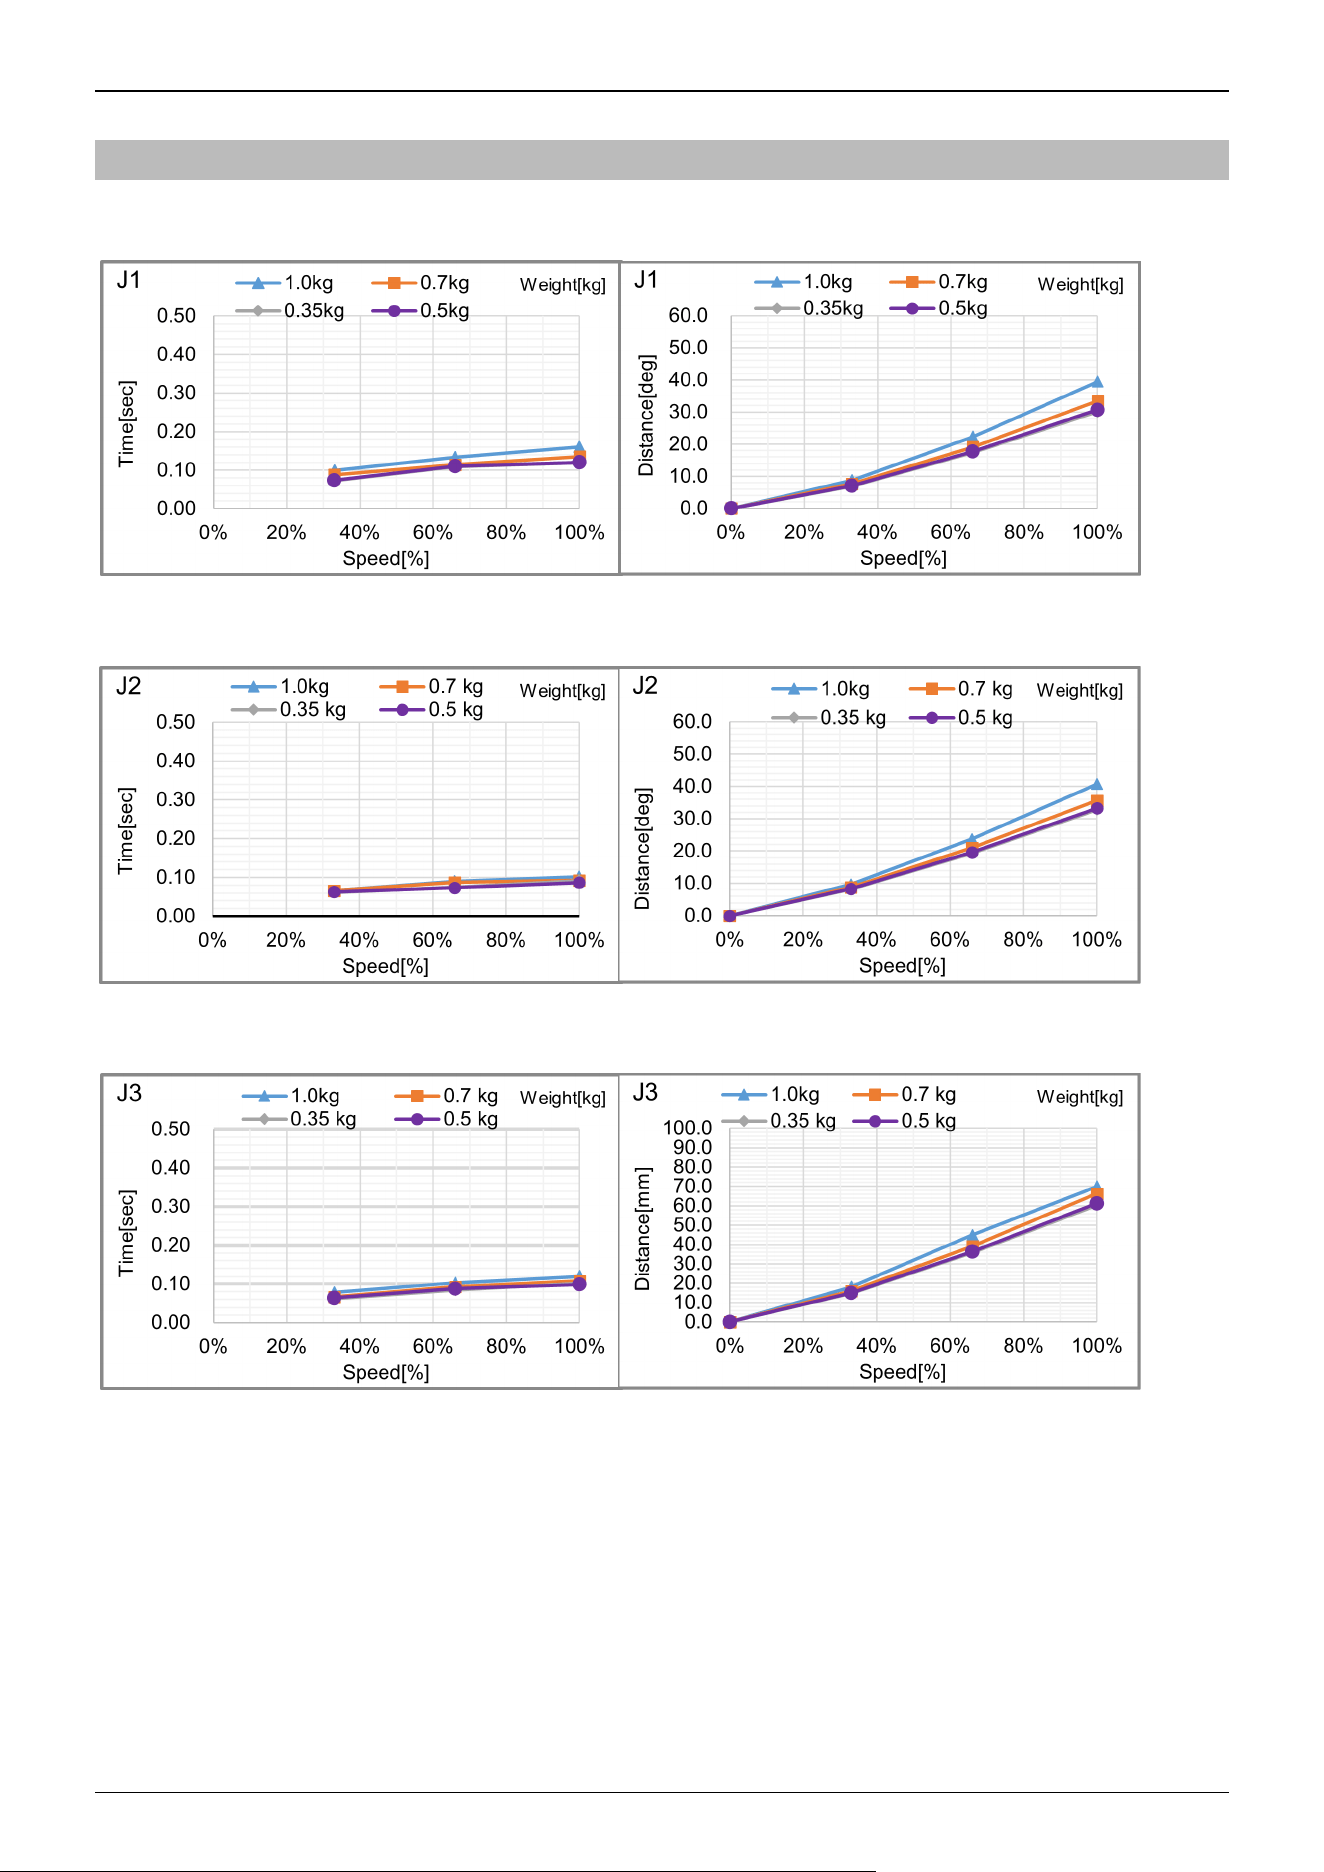
7.2.1 GX1 Stopping Time and Stopping Distance at Emergency Stop
GX1-C171*: J1
GX1-C171*: J2
GX1-C171*: J3
Industrial Robot: SCARA Robots GX series Manual Rev.11
484
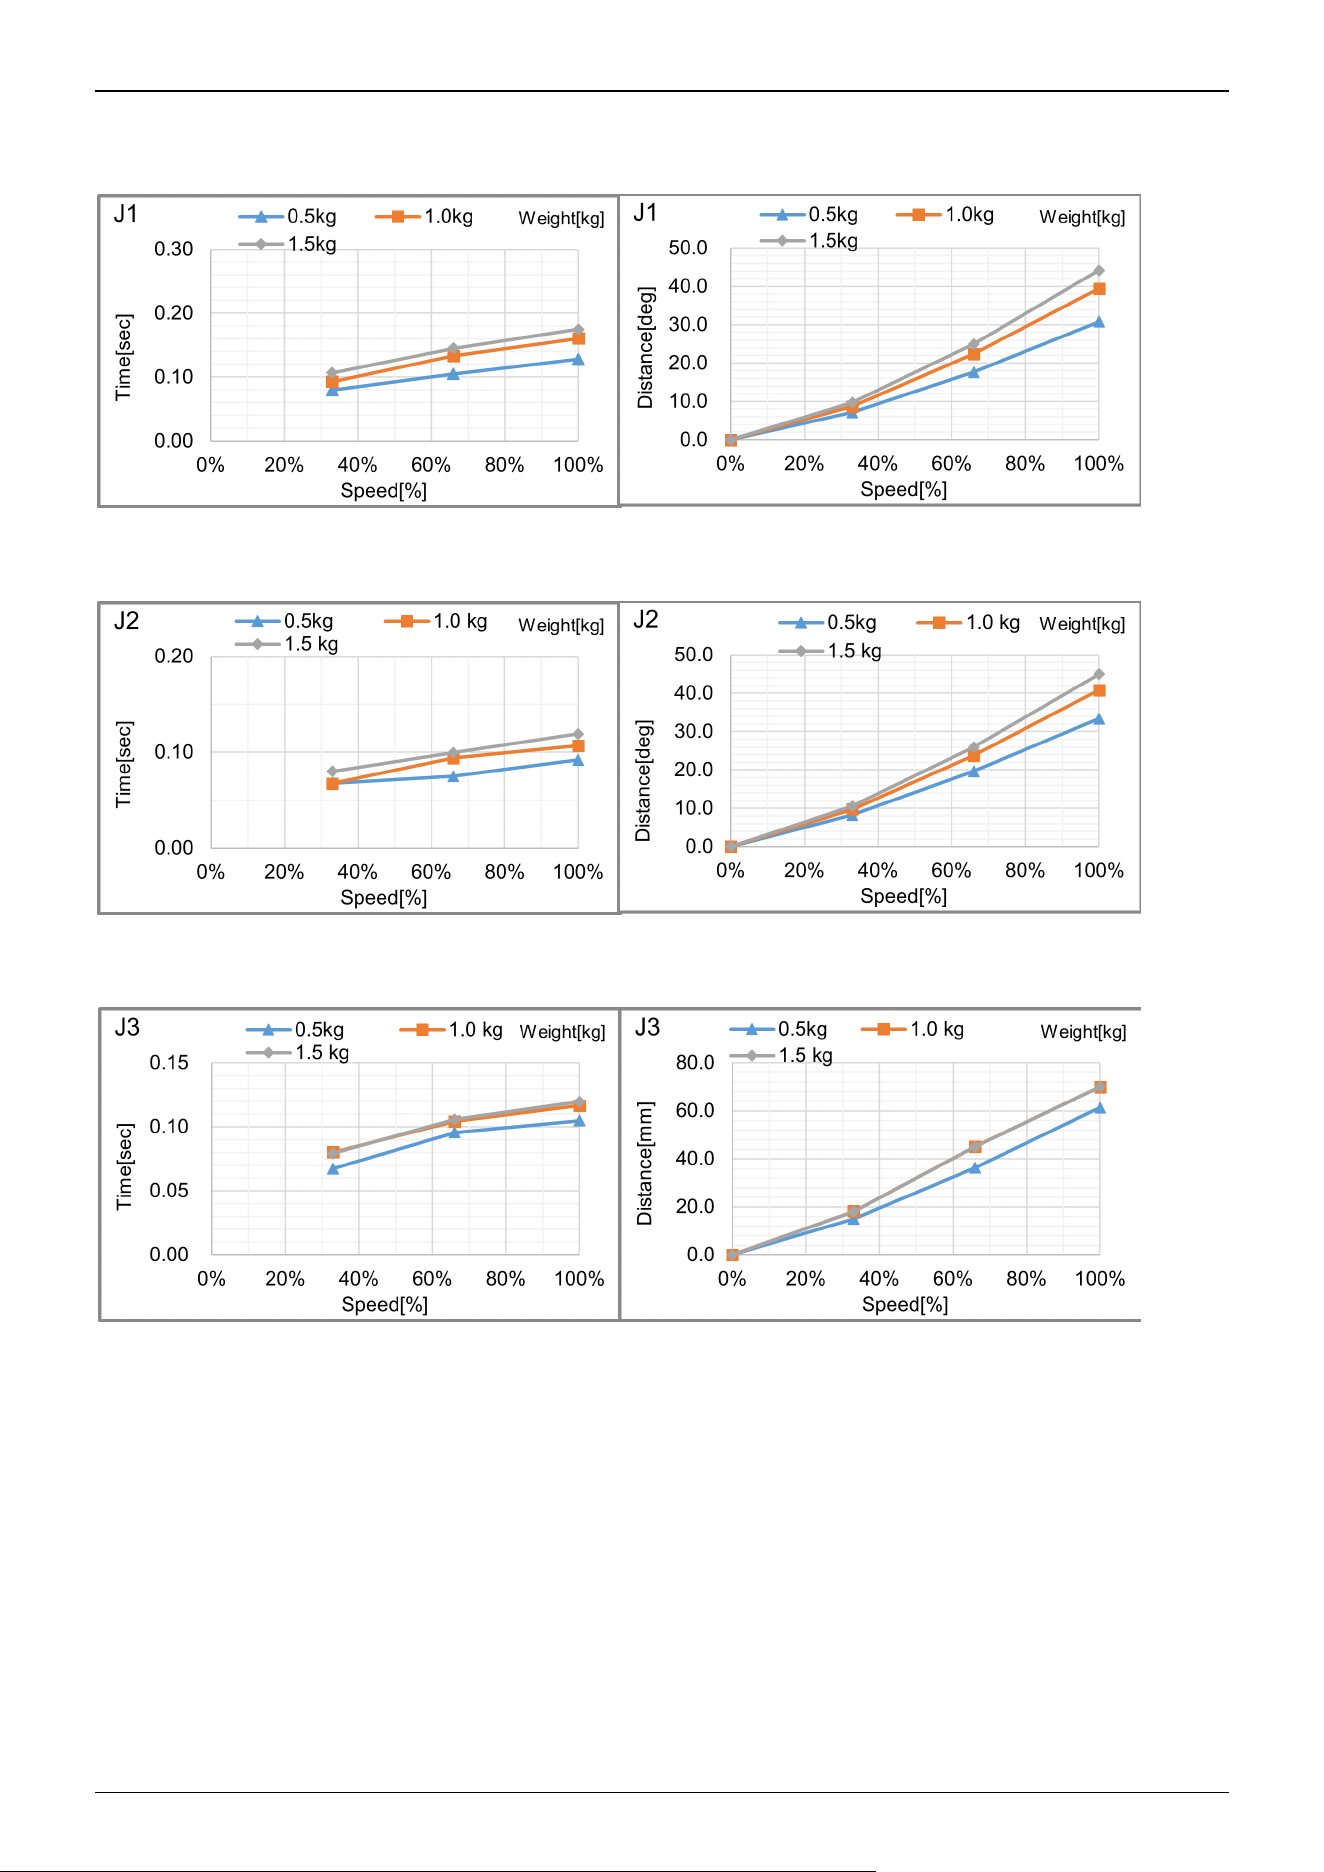
GX1-C171SZ: J1
GX1-C171SZ: J2
GX1-C171SZ: J3
Industrial Robot: SCARA Robots GX series Manual Rev.11
485
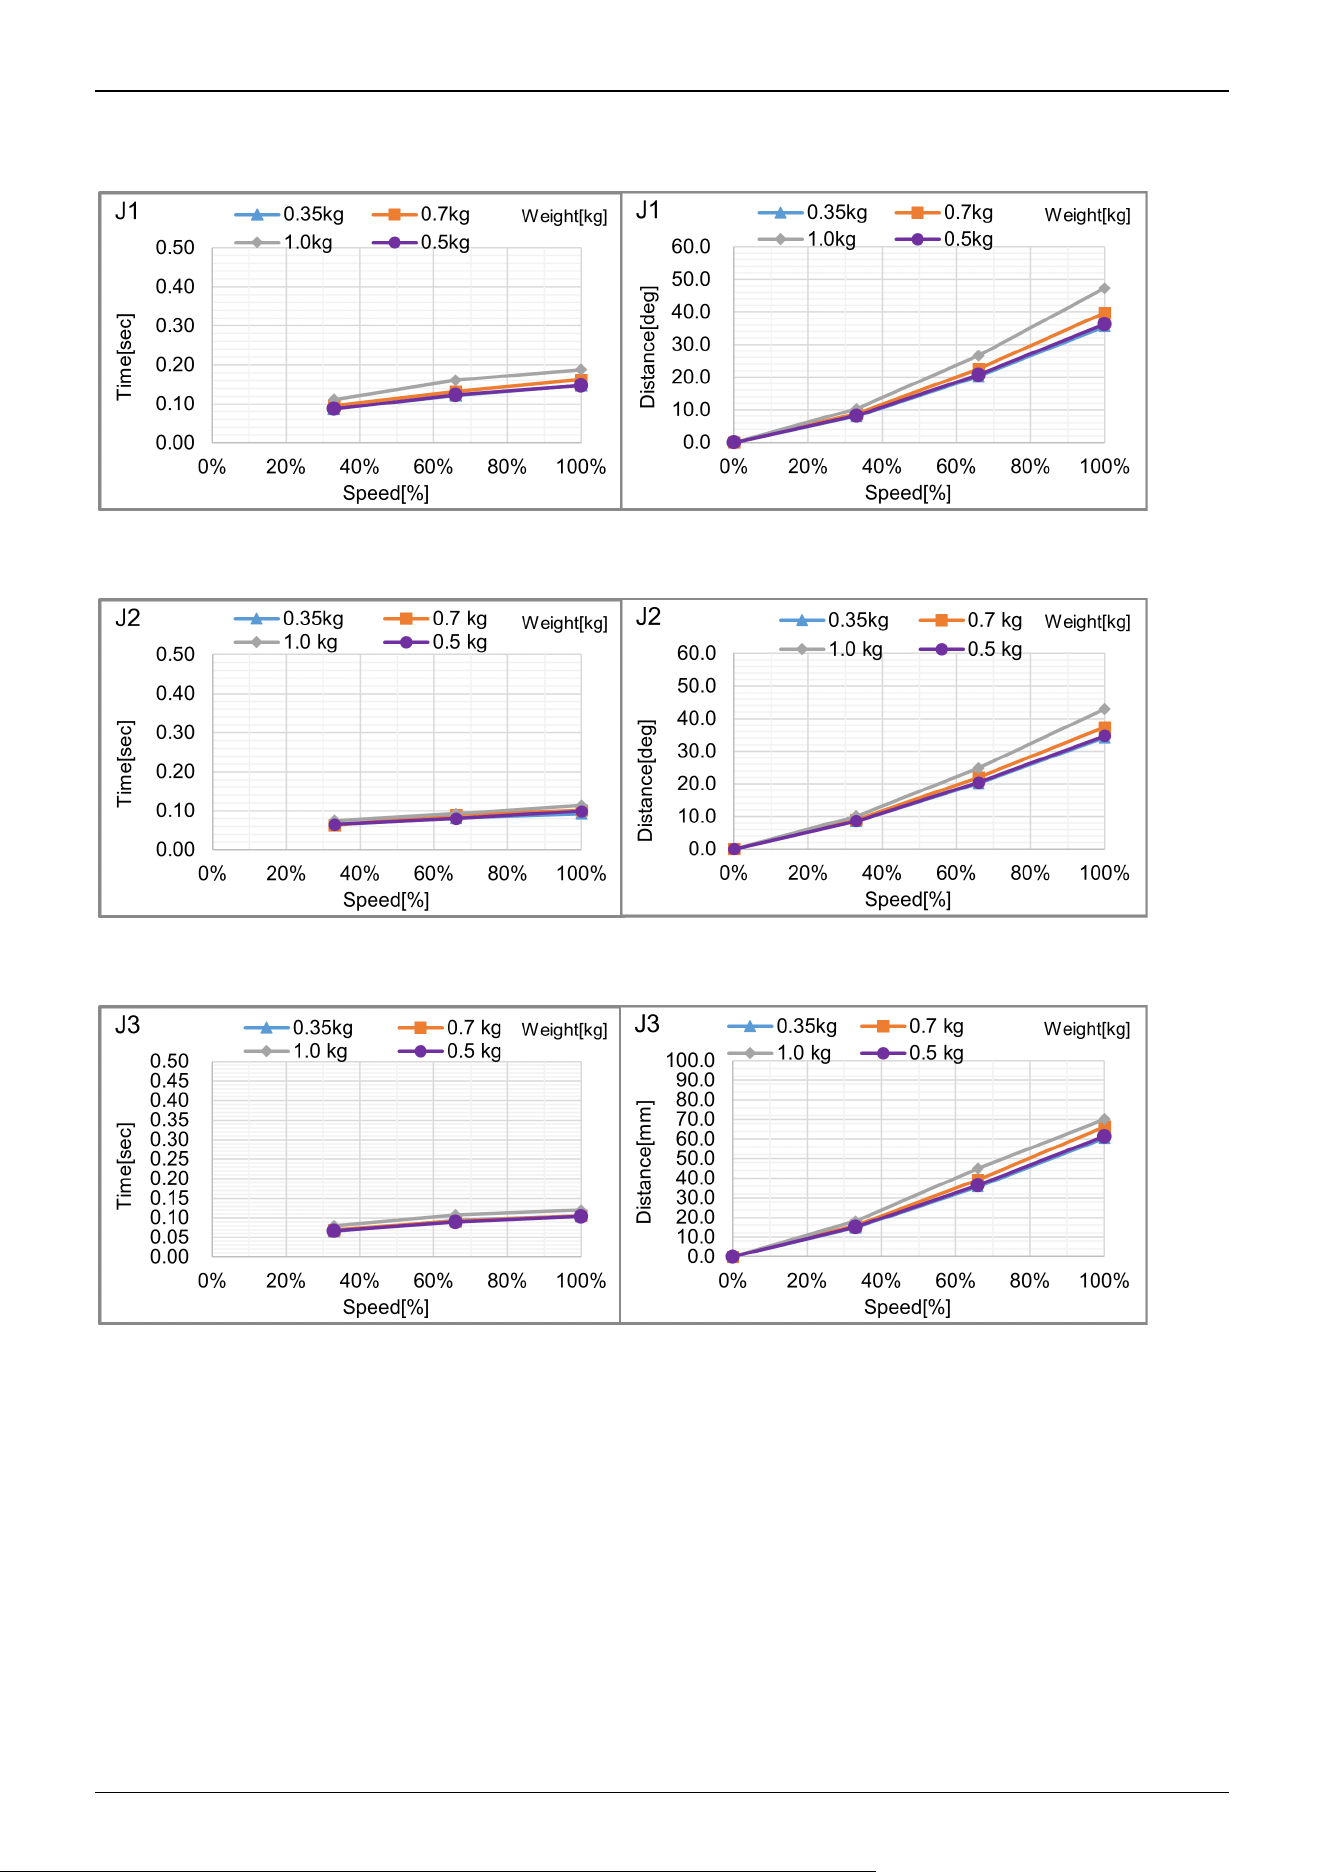
GX1-C221*: J1
GX1-C221*: J2
GX1-C221*: J3
Industrial Robot: SCARA Robots GX series Manual Rev.11
486
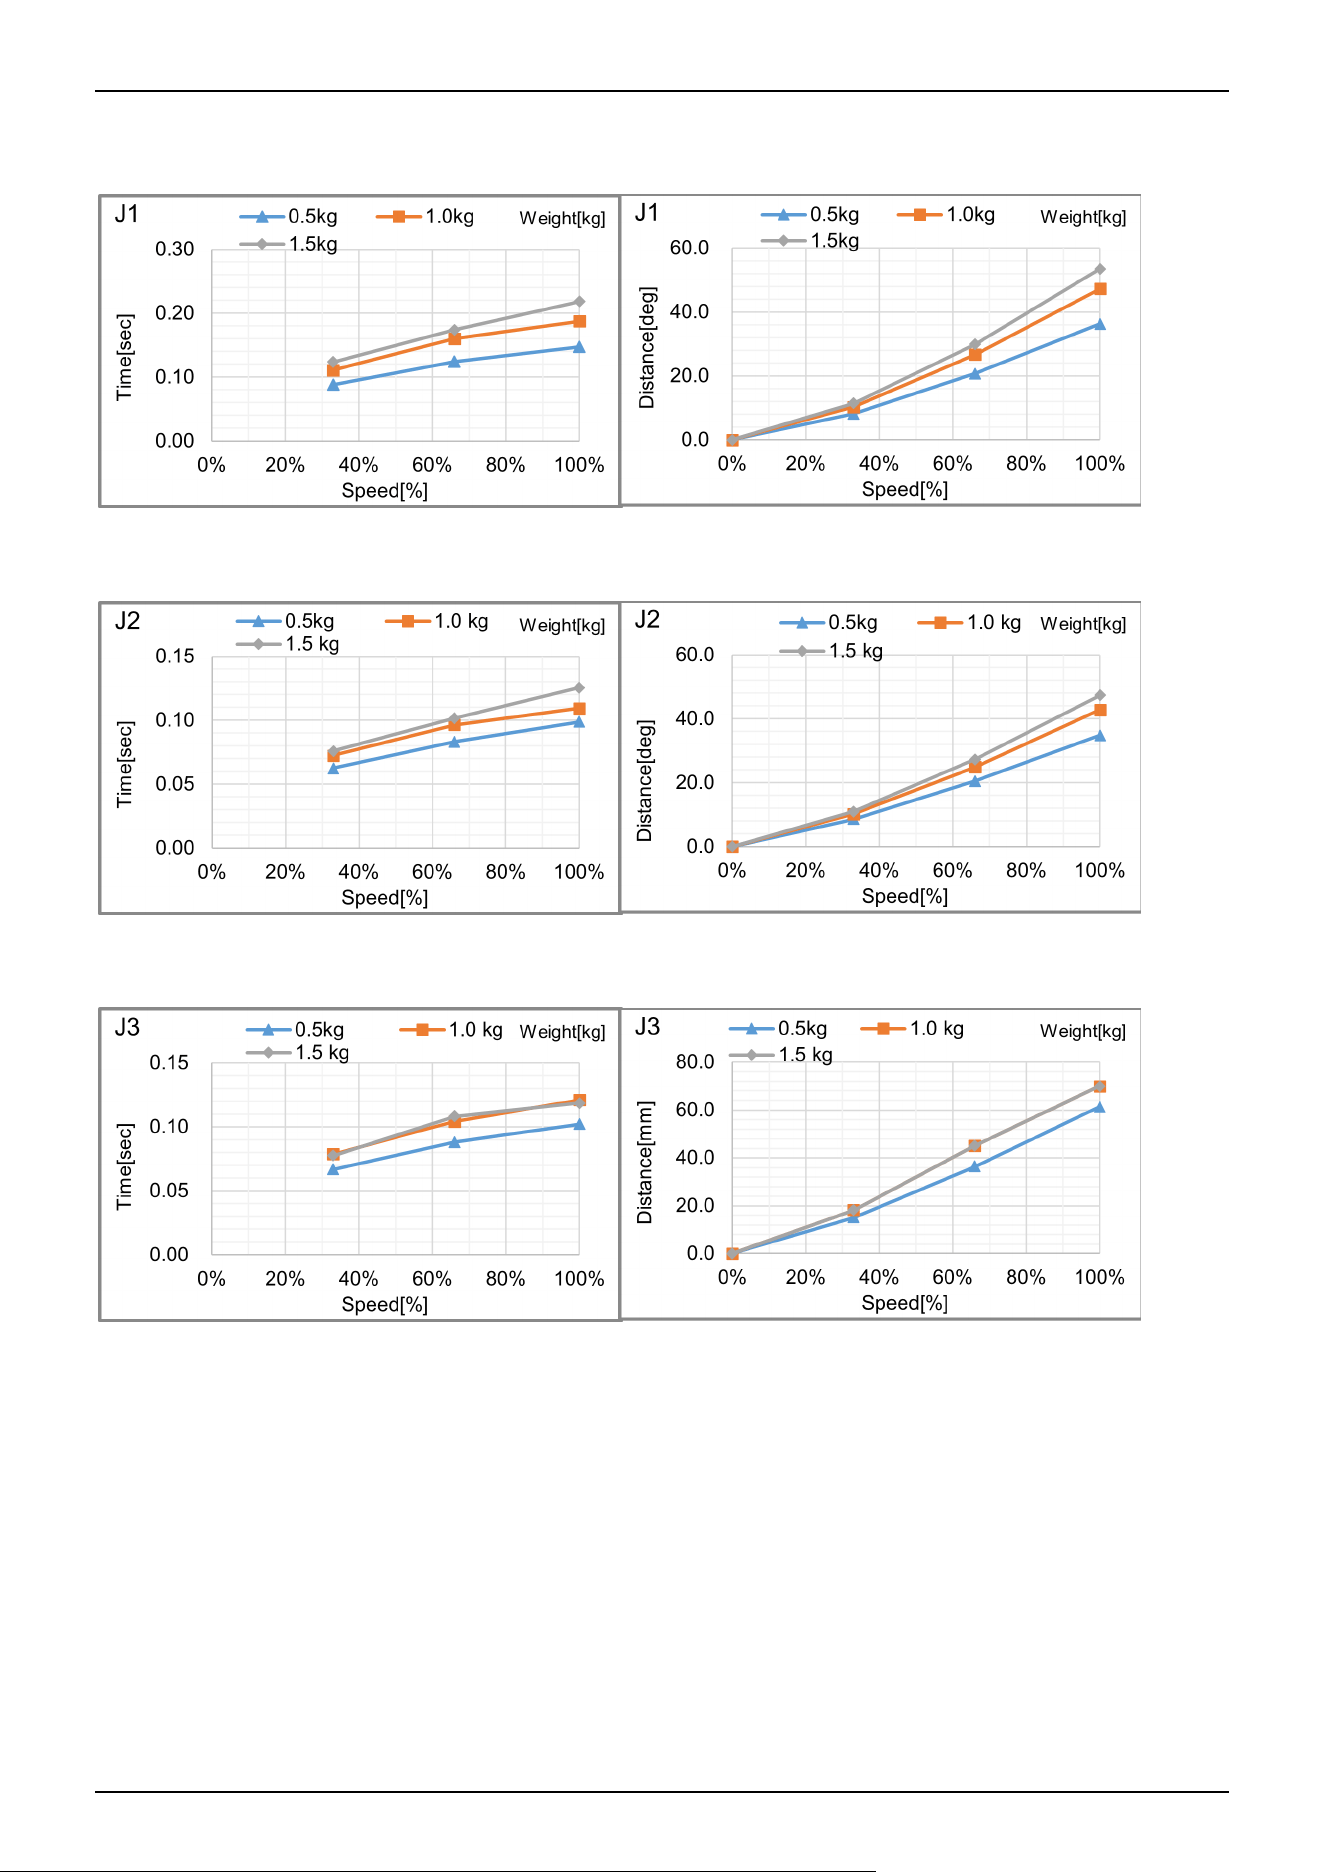
GX1-C221SZ: J1
GX1-C221SZ: J2
GX1-C221SZ: J3
Industrial Robot: SCARA Robots GX series Manual Rev.11
487
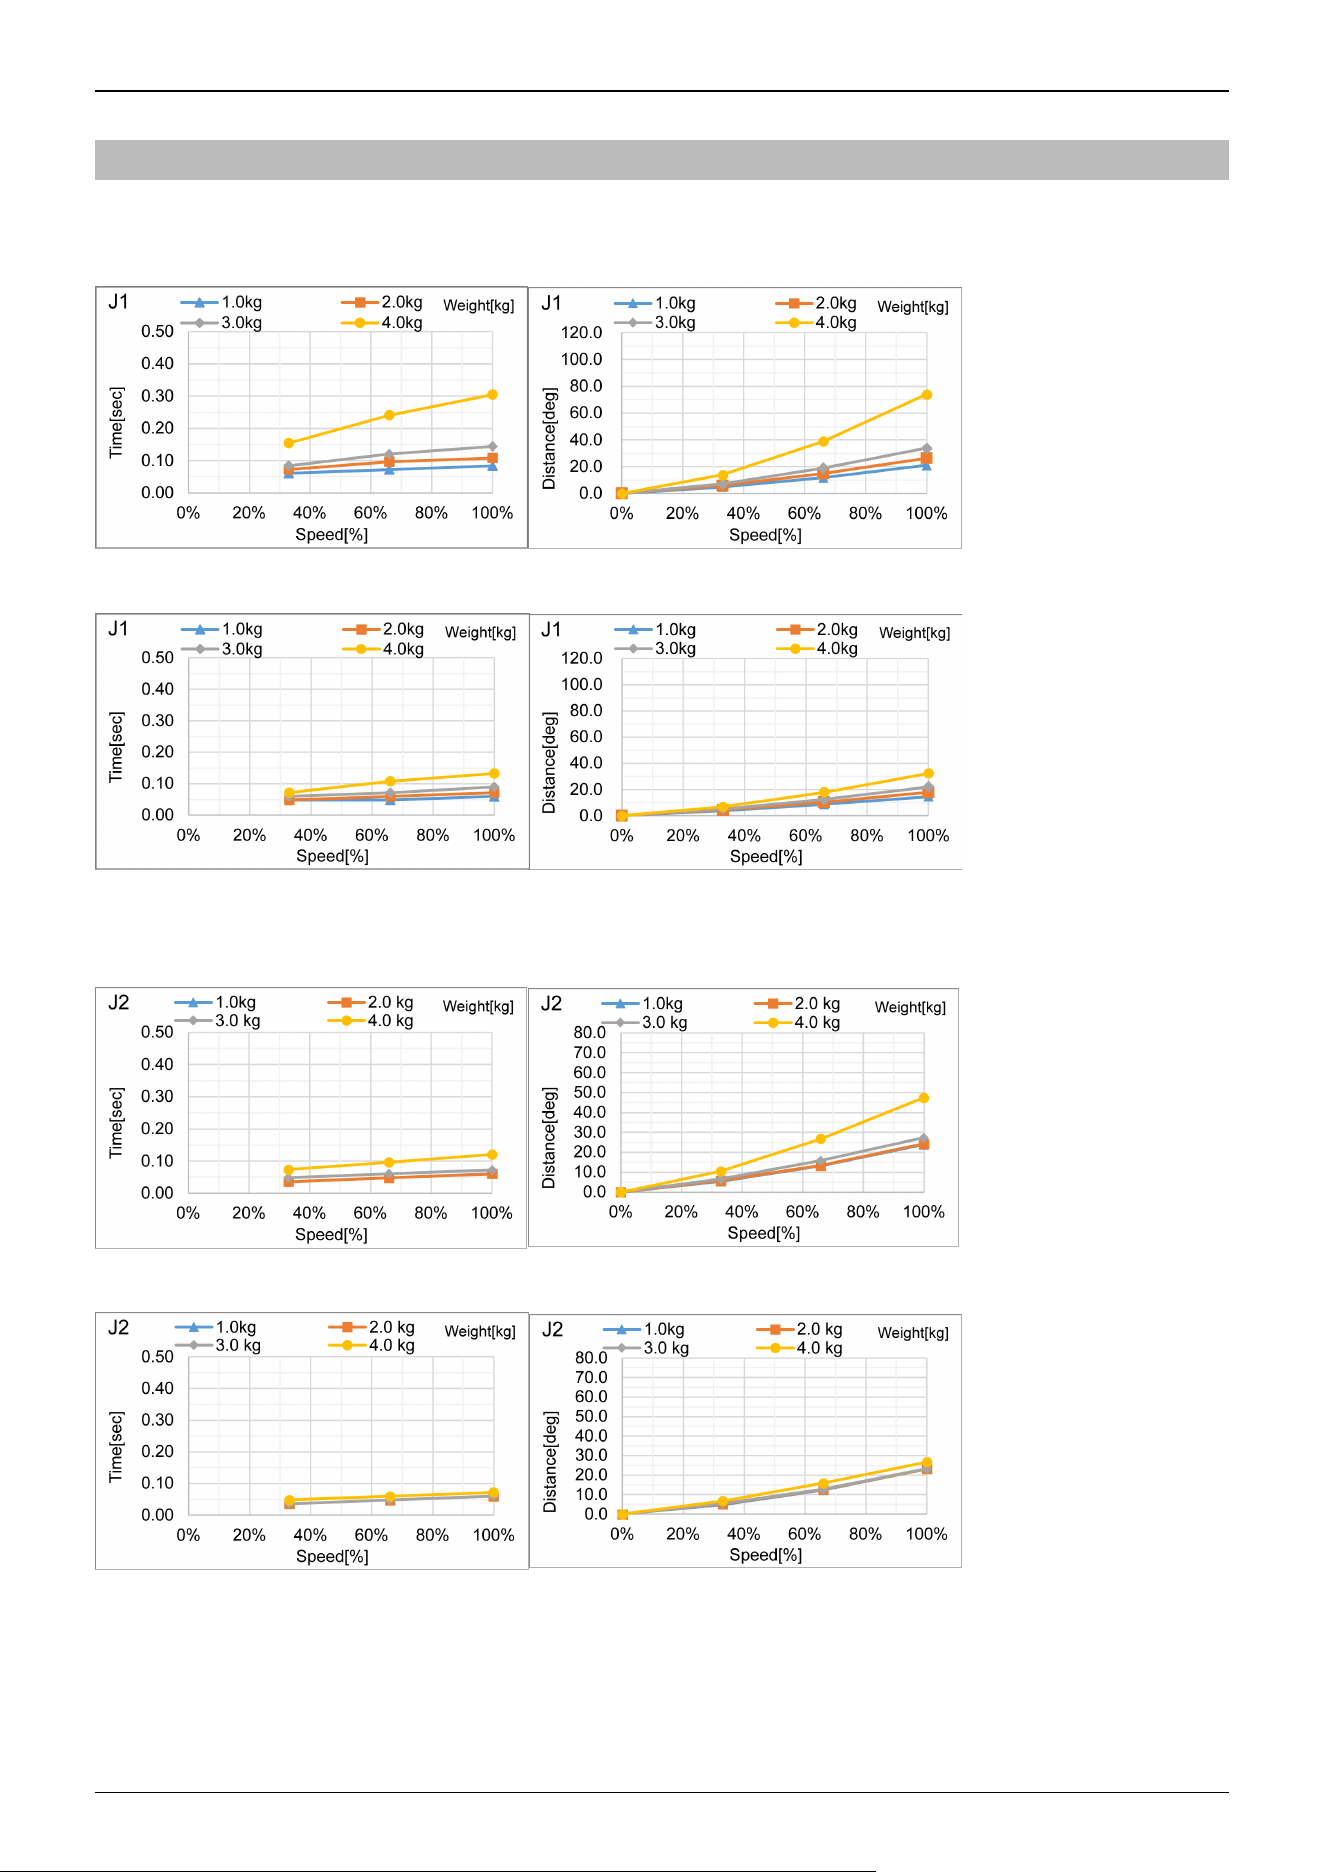
7.2.2 GX4 Stopping Time and Stopping Distance at Emergency Stop
GX4-A/GX4-B/GX4-C25***: J1
Standard mode
Boost mode
GX4-A/GX4-B/GX4-C25***: J2
Standard mode
Boost mode
Industrial Robot: SCARA Robots GX series Manual Rev.11
488
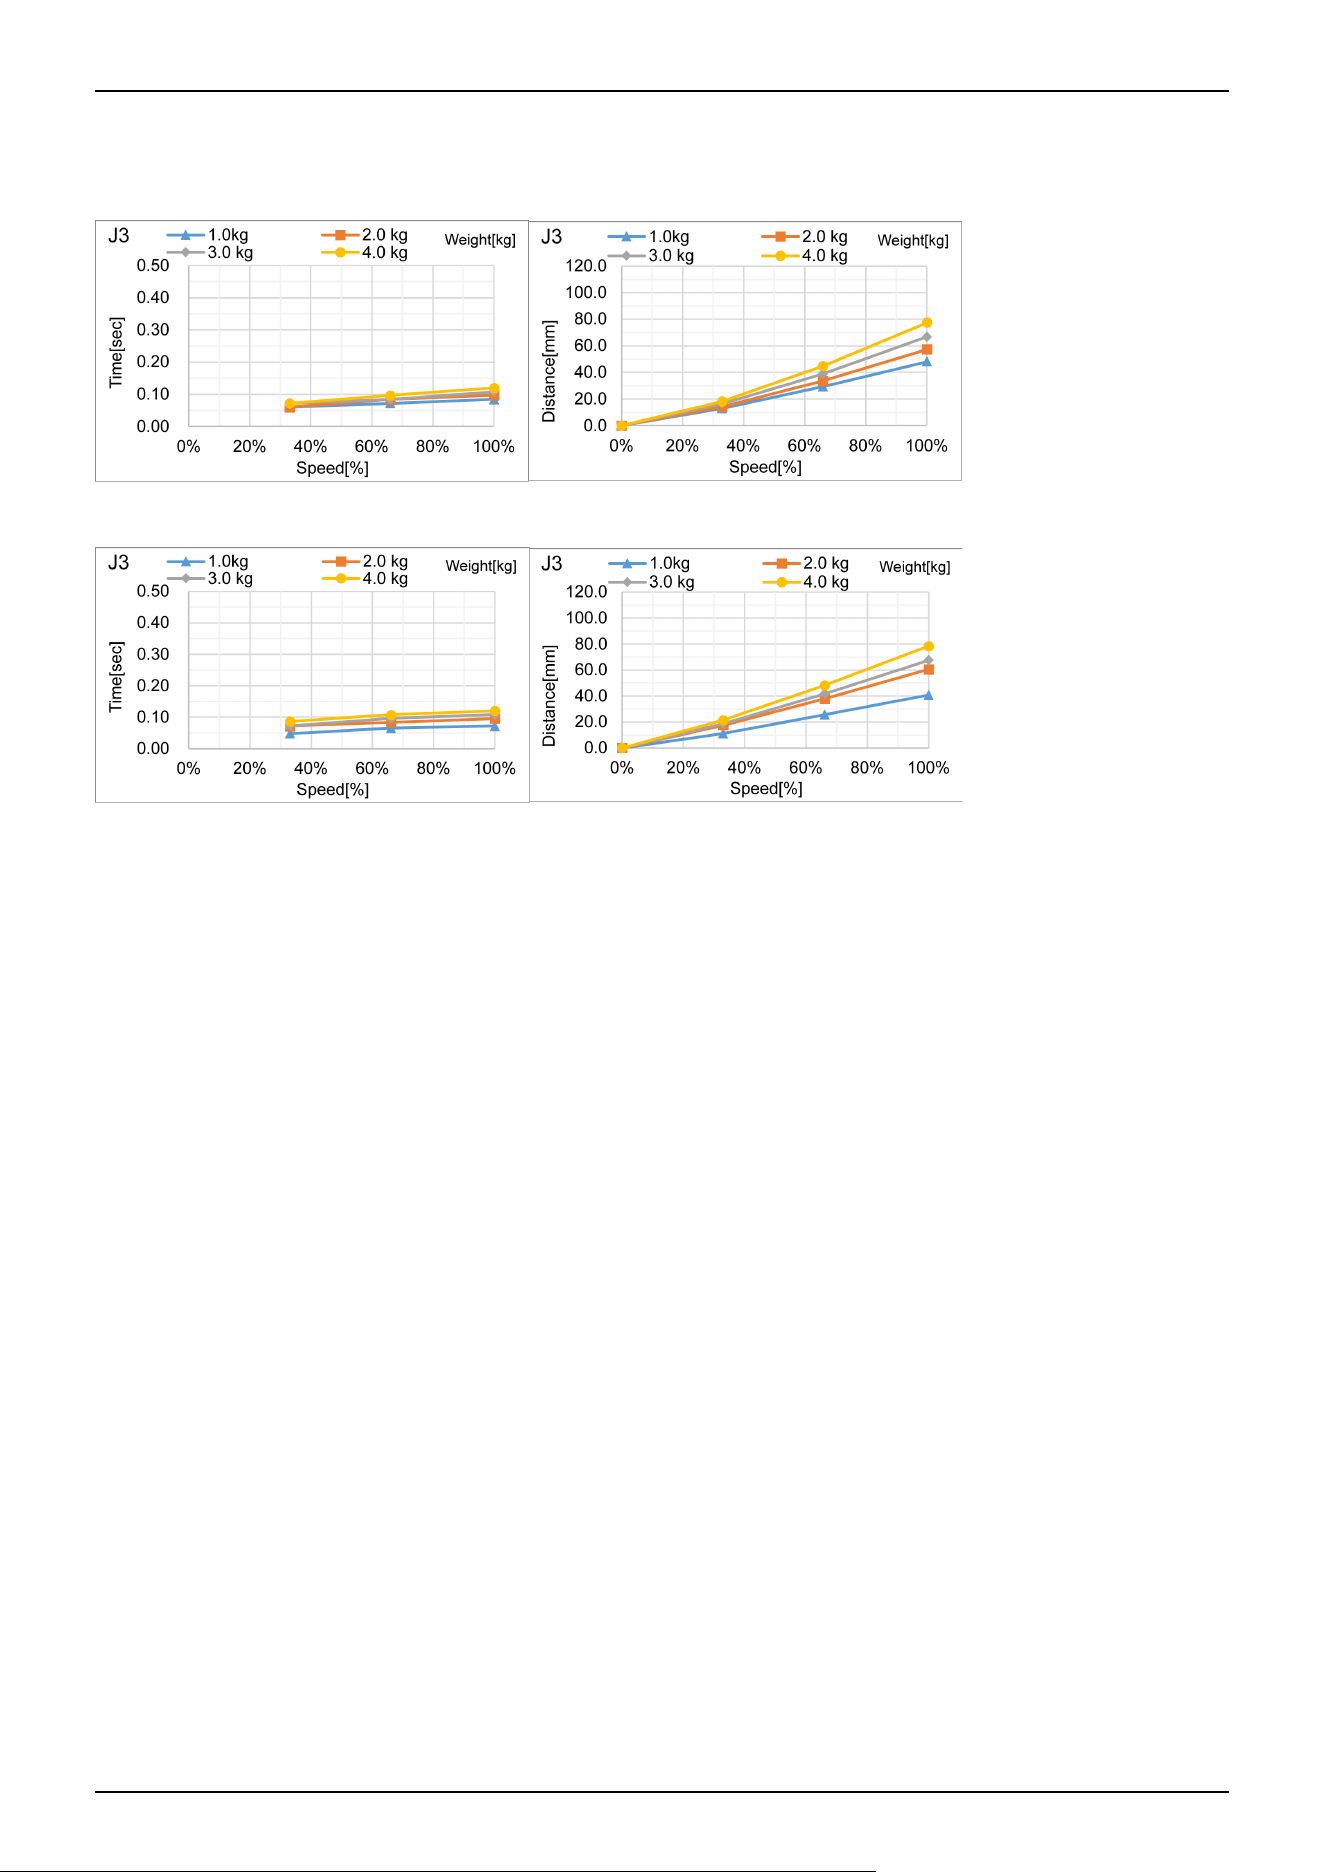
GX4-A/GX4-B/GX4-C25***: J3
Standard mode
Boost mode
Industrial Robot: SCARA Robots GX series Manual Rev.11
489
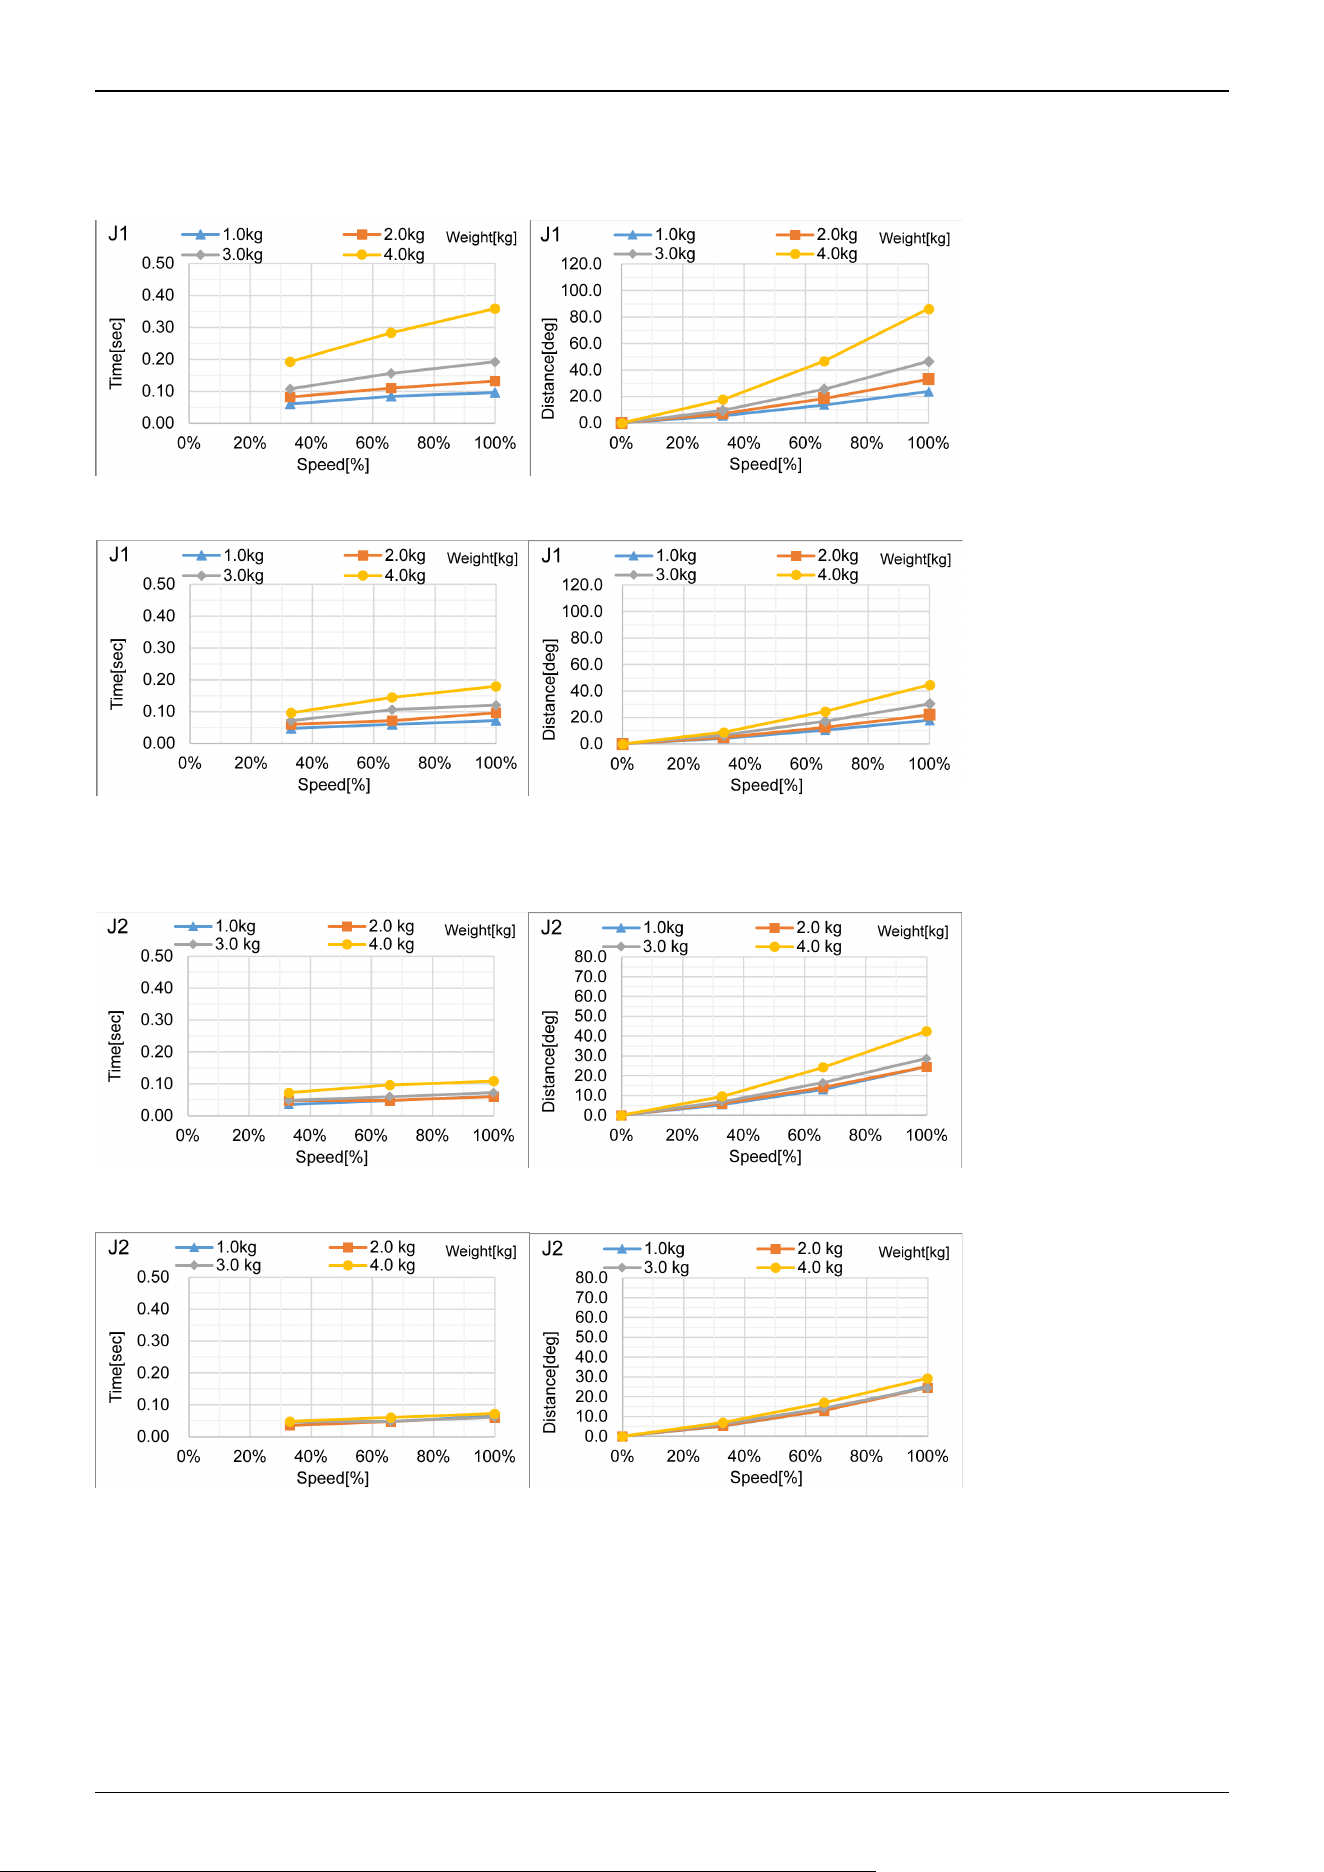
GX4-A/GX4-B/GX4-C30***: J1
Standard mode
Boost mode
GX4-A/GX4-B/GX4-C30***: J2
Standard mode
Boost mode
Industrial Robot: SCARA Robots GX series Manual Rev.11
490
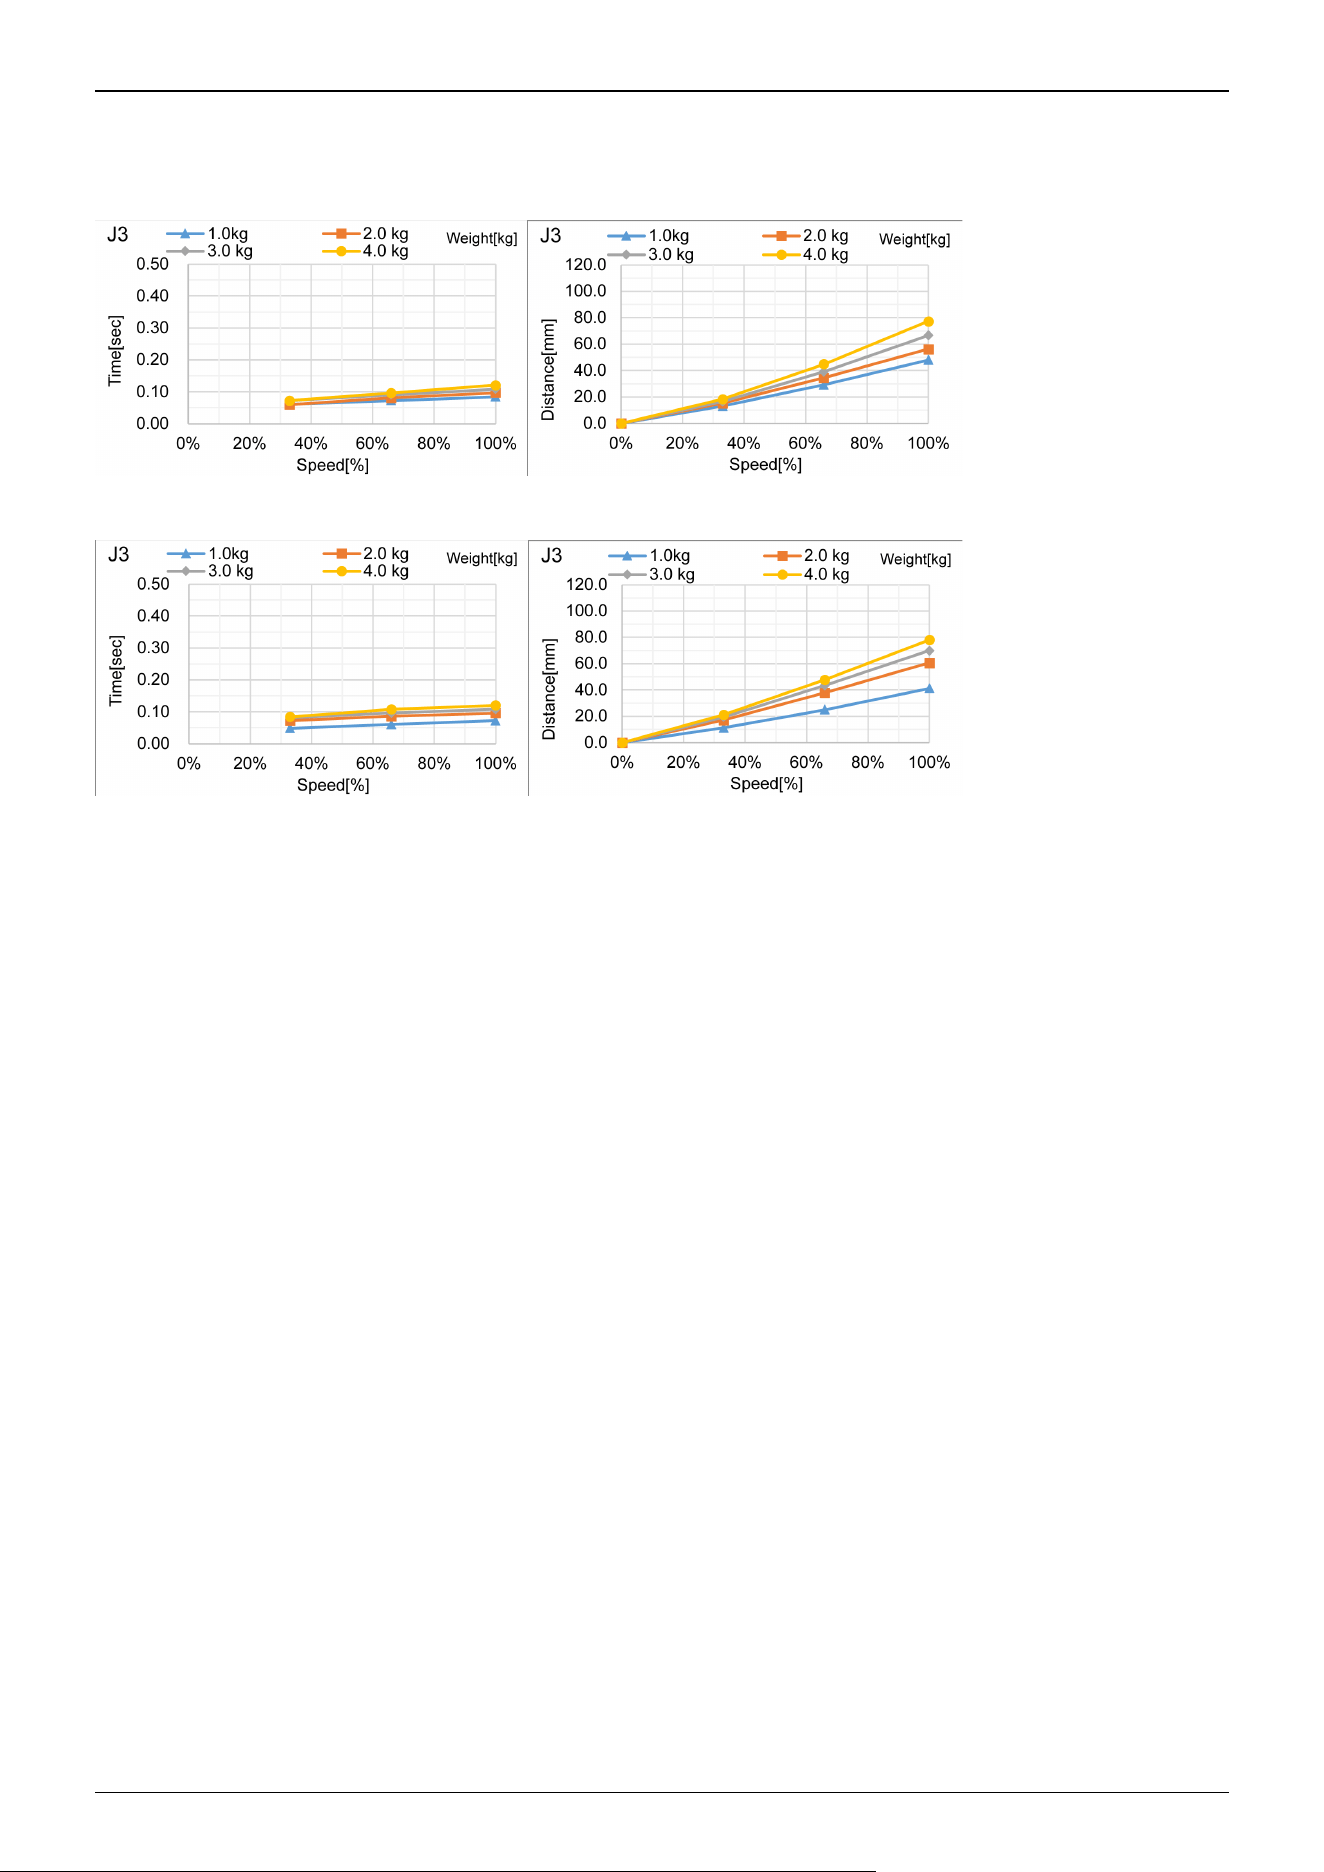
GX4-A/GX4-B/GX4-C30***: J3
Standard mode
Boost mode
Industrial Robot: SCARA Robots GX series Manual Rev.11
491
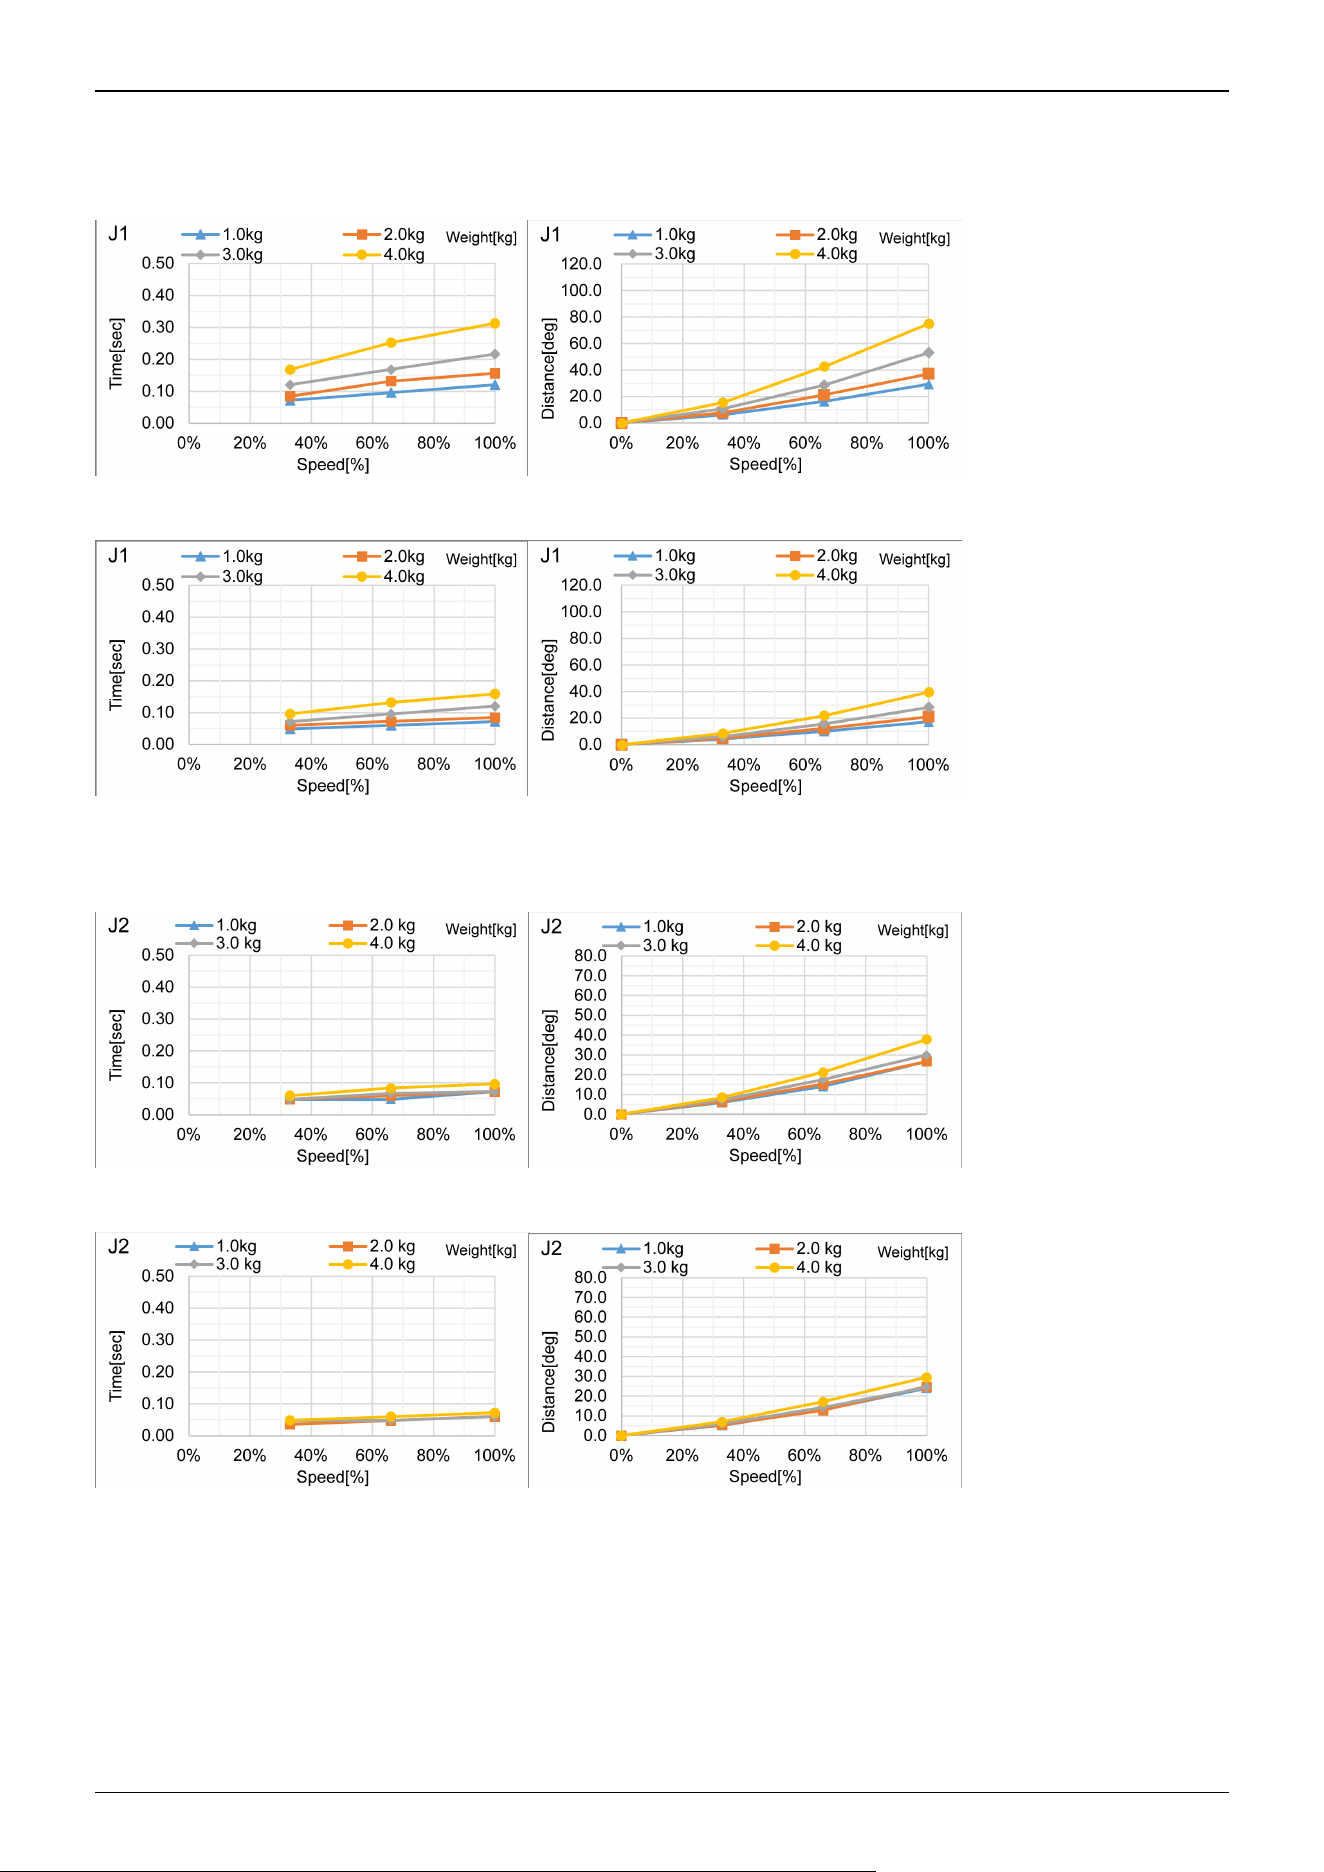
GX4-A/GX4-B/GX4-C35***: J1
Standard mode
Boost mode
GX4-A/GX4-B/GX4-C35***: J2
Standard mode
Boost mode
Industrial Robot: SCARA Robots GX series Manual Rev.11
492
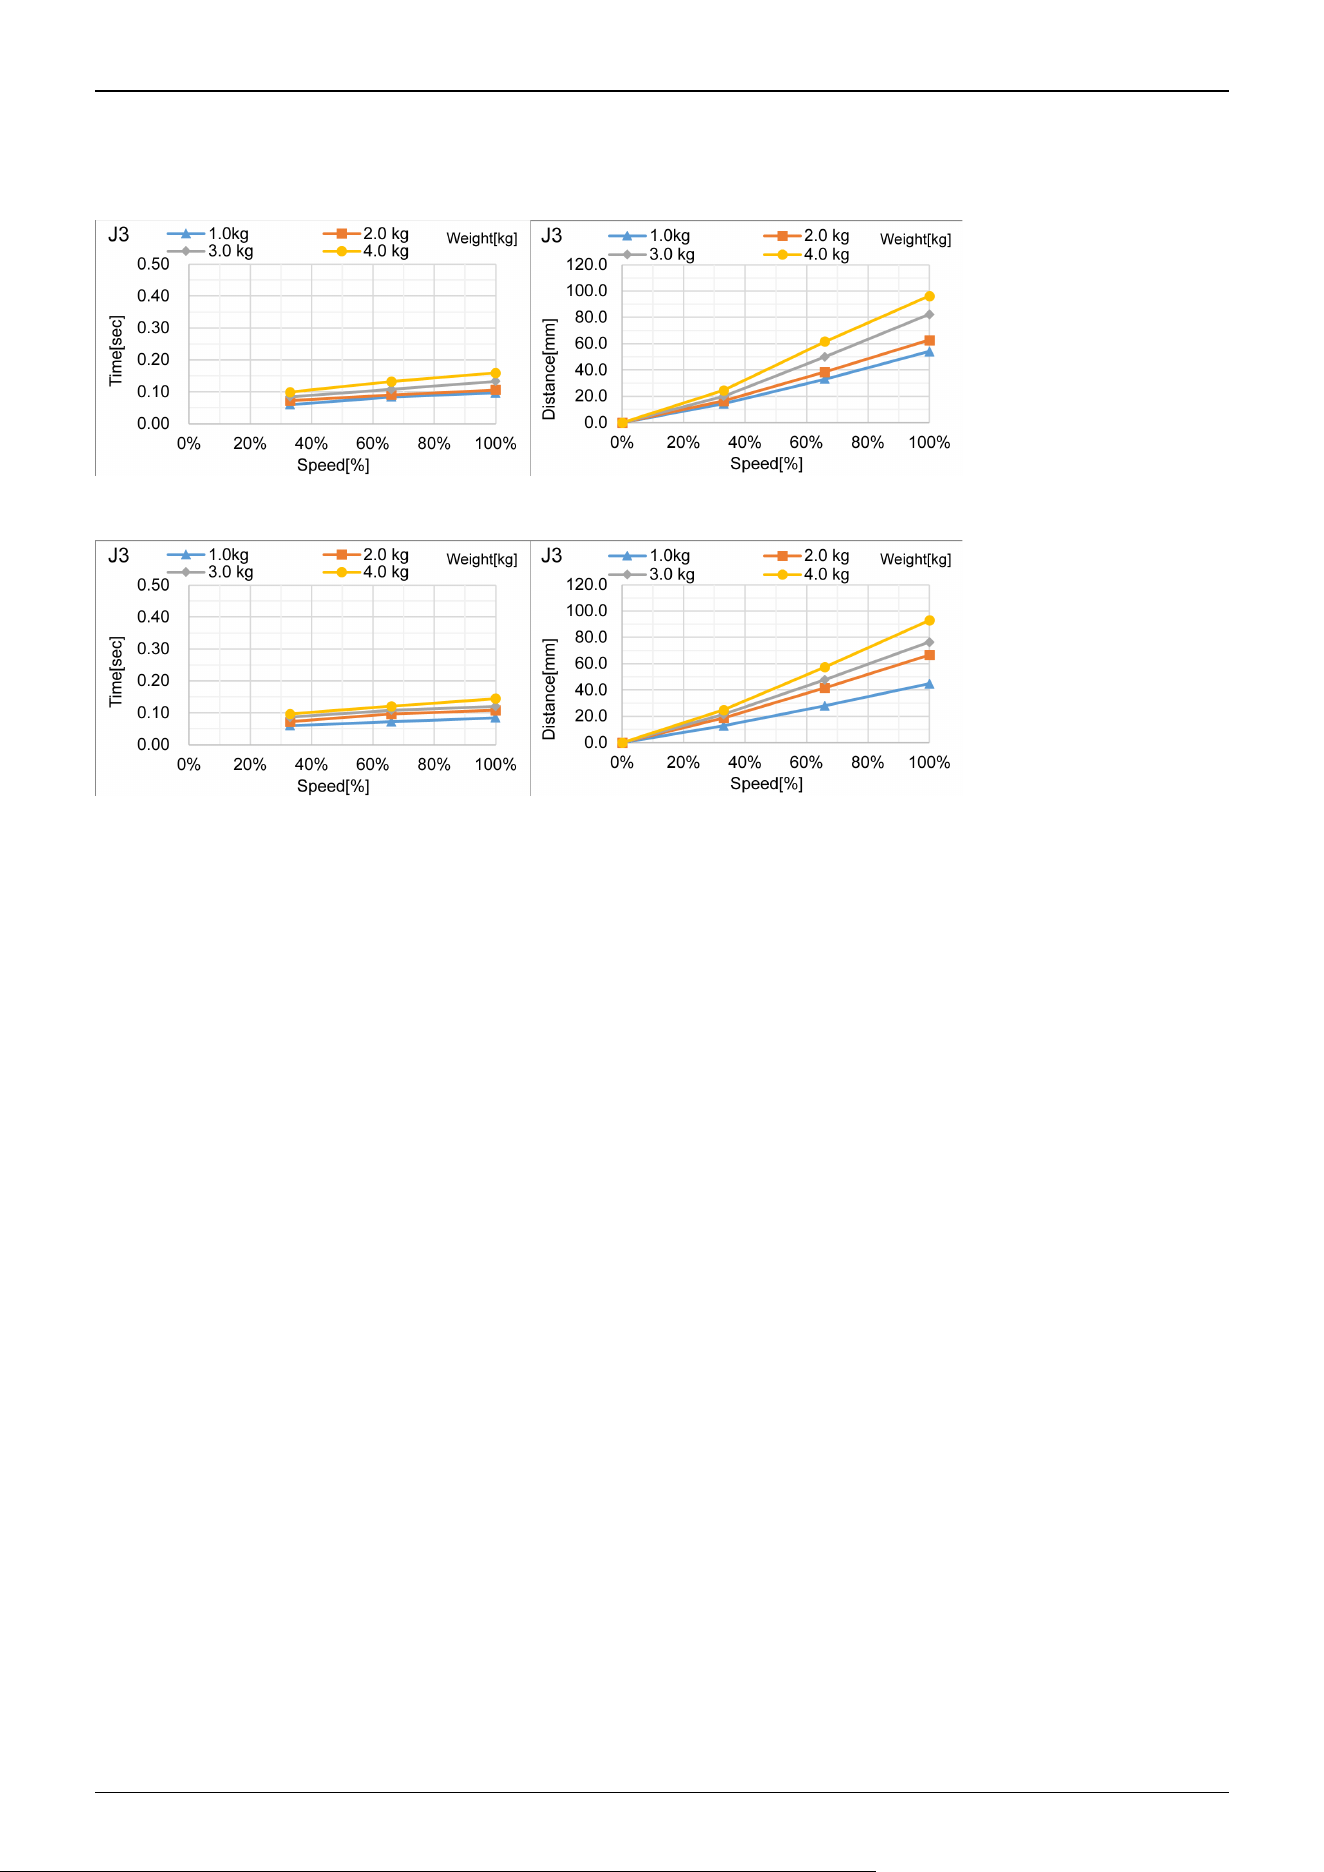
GX4-A/GX4-B/GX4-C35***: J3
Standard mode
Boost mode
Industrial Robot: SCARA Robots GX series Manual Rev.11
493
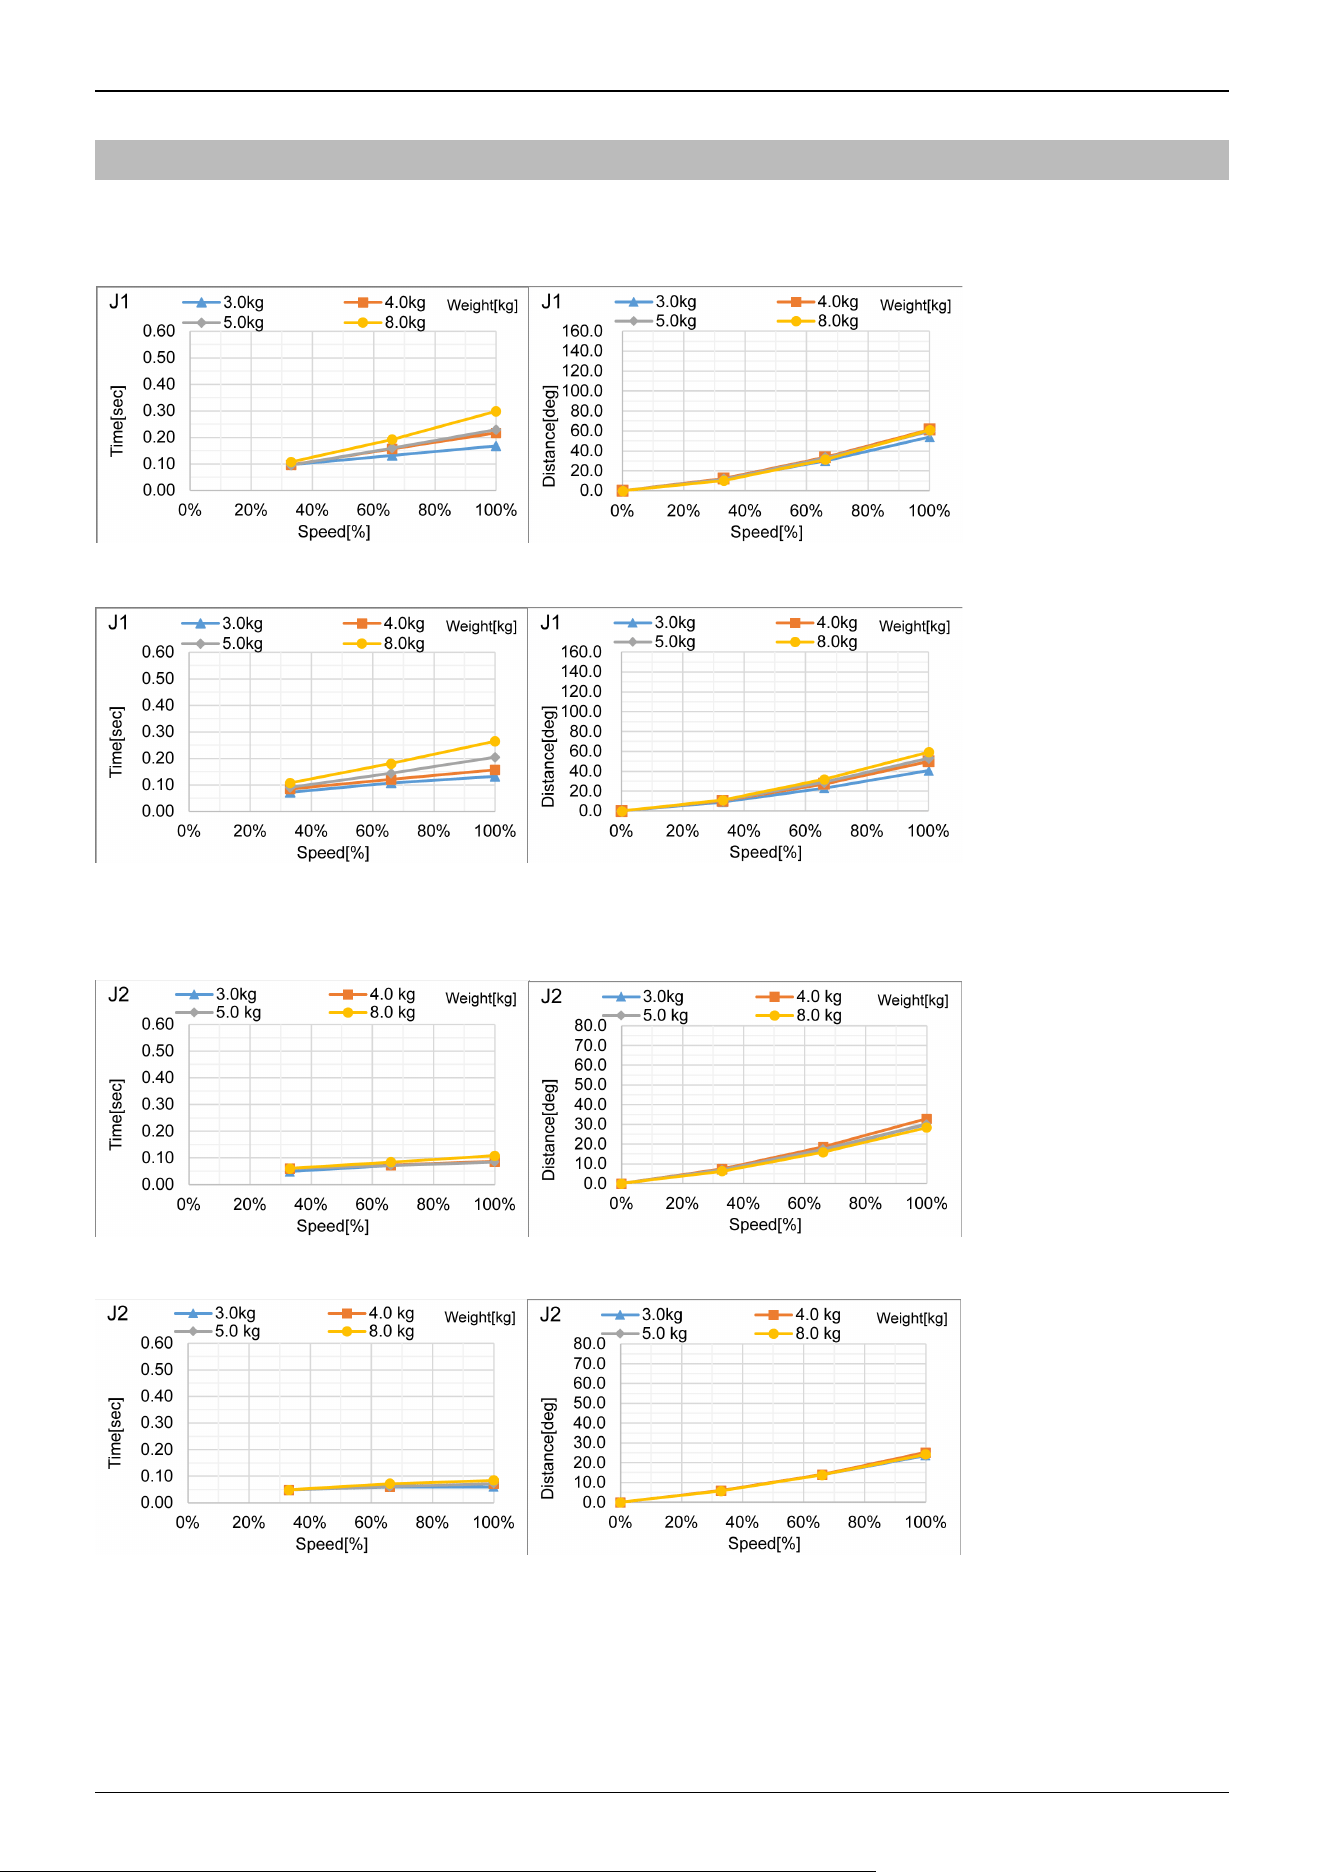
7.2.3 GX8 Stopping Time and Stopping Distance at Emergency Stop
GX8-A/GX8-B/GX8-C45***: J1
Standard mode
Boost mode
GX8-A/GX8-B/GX8-C45***: J2
Standard mode
Boost mode
Industrial Robot: SCARA Robots GX series Manual Rev.11
494
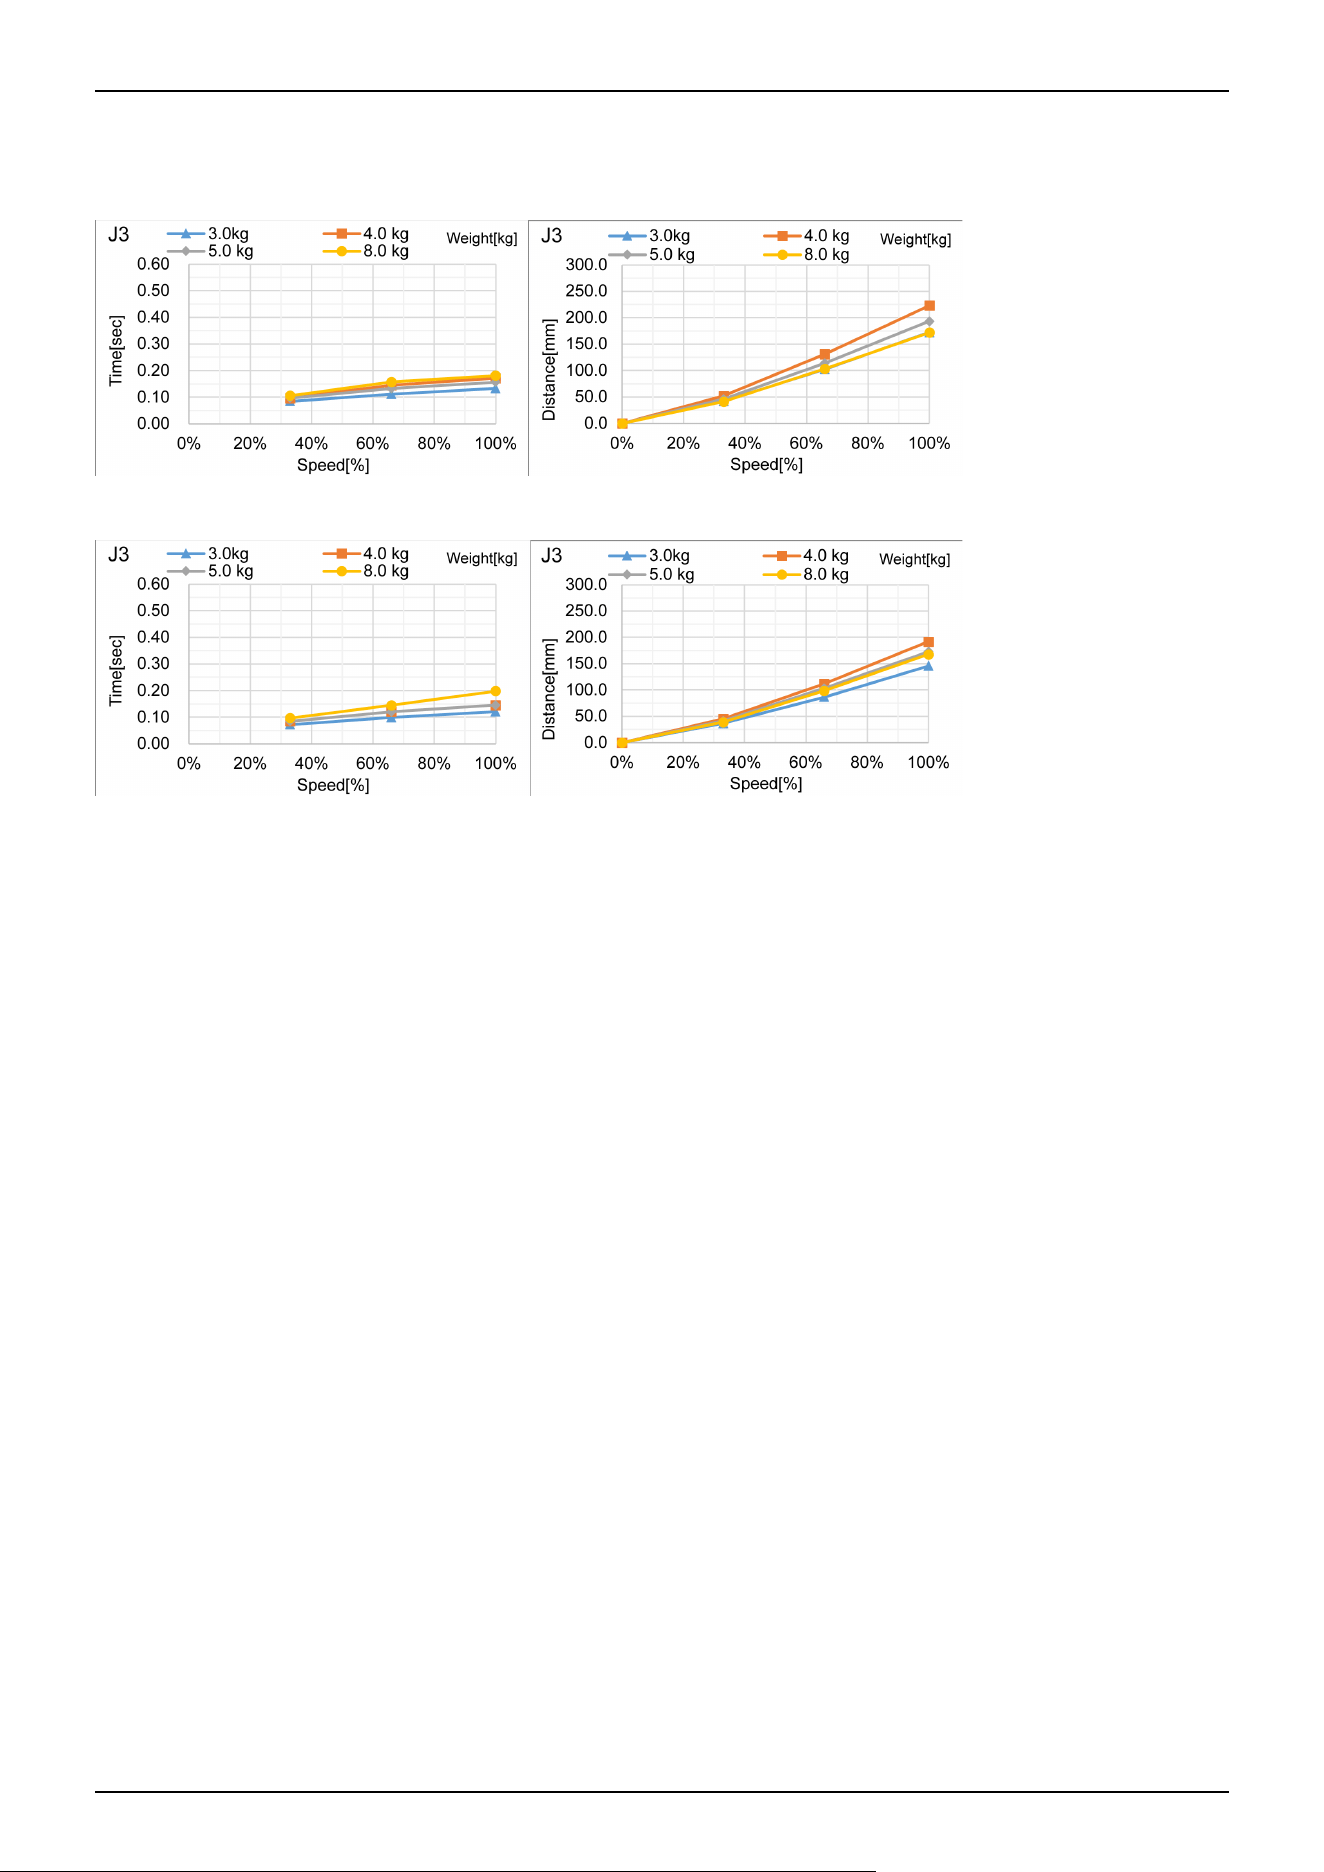
GX8-A/GX8-B/GX8-C45***: J3
Standard mode
Boost mode
Industrial Robot: SCARA Robots GX series Manual Rev.11
495
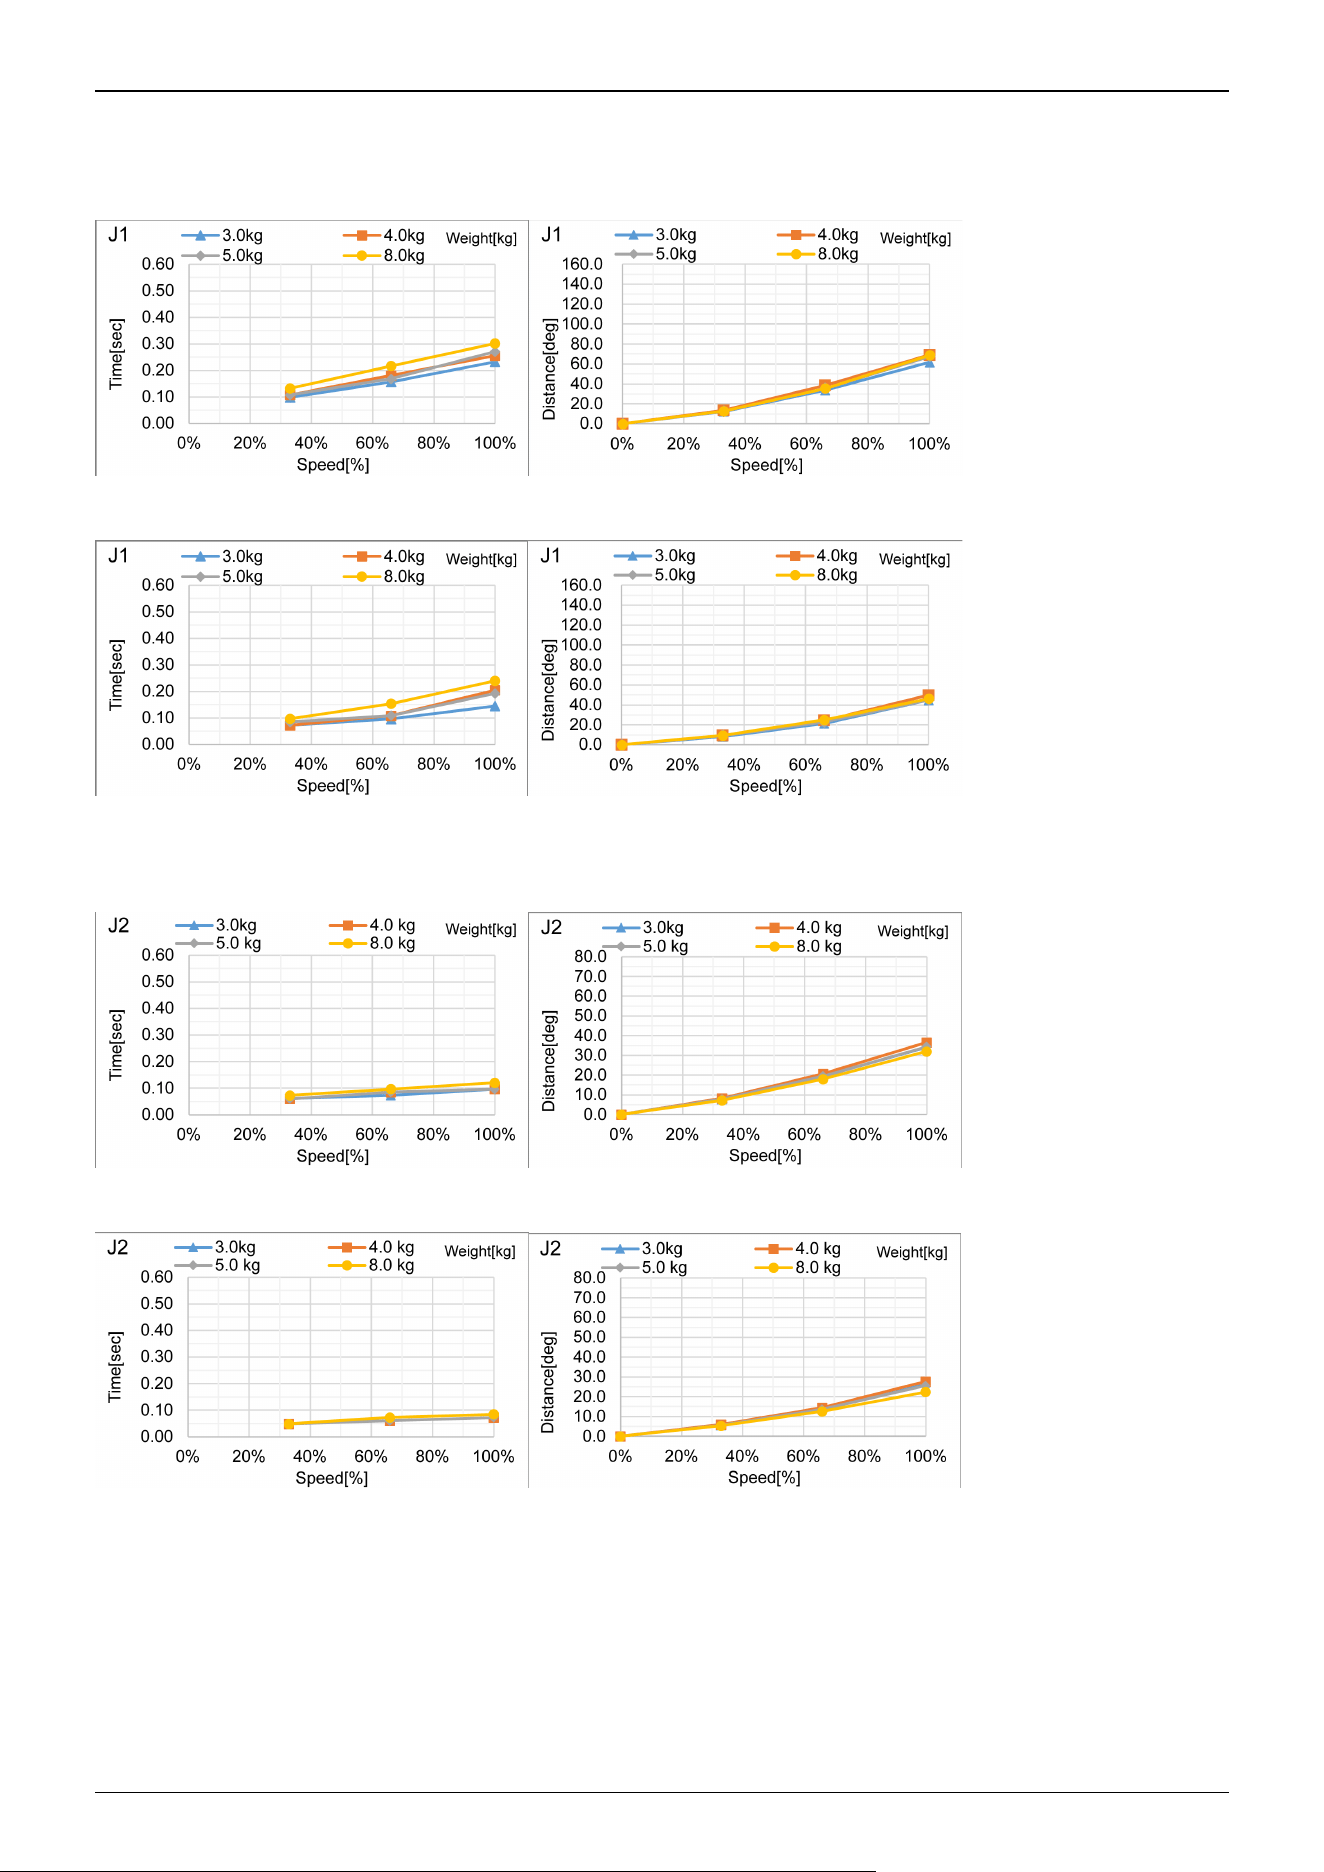
GX8-A/GX8-B/GX8-C55***: J1
Standard mode
Boost mode
GX8-A/GX8-B/GX8-C55***: J2
Standard mode
Boost mode
Industrial Robot: SCARA Robots GX series Manual Rev.11
496
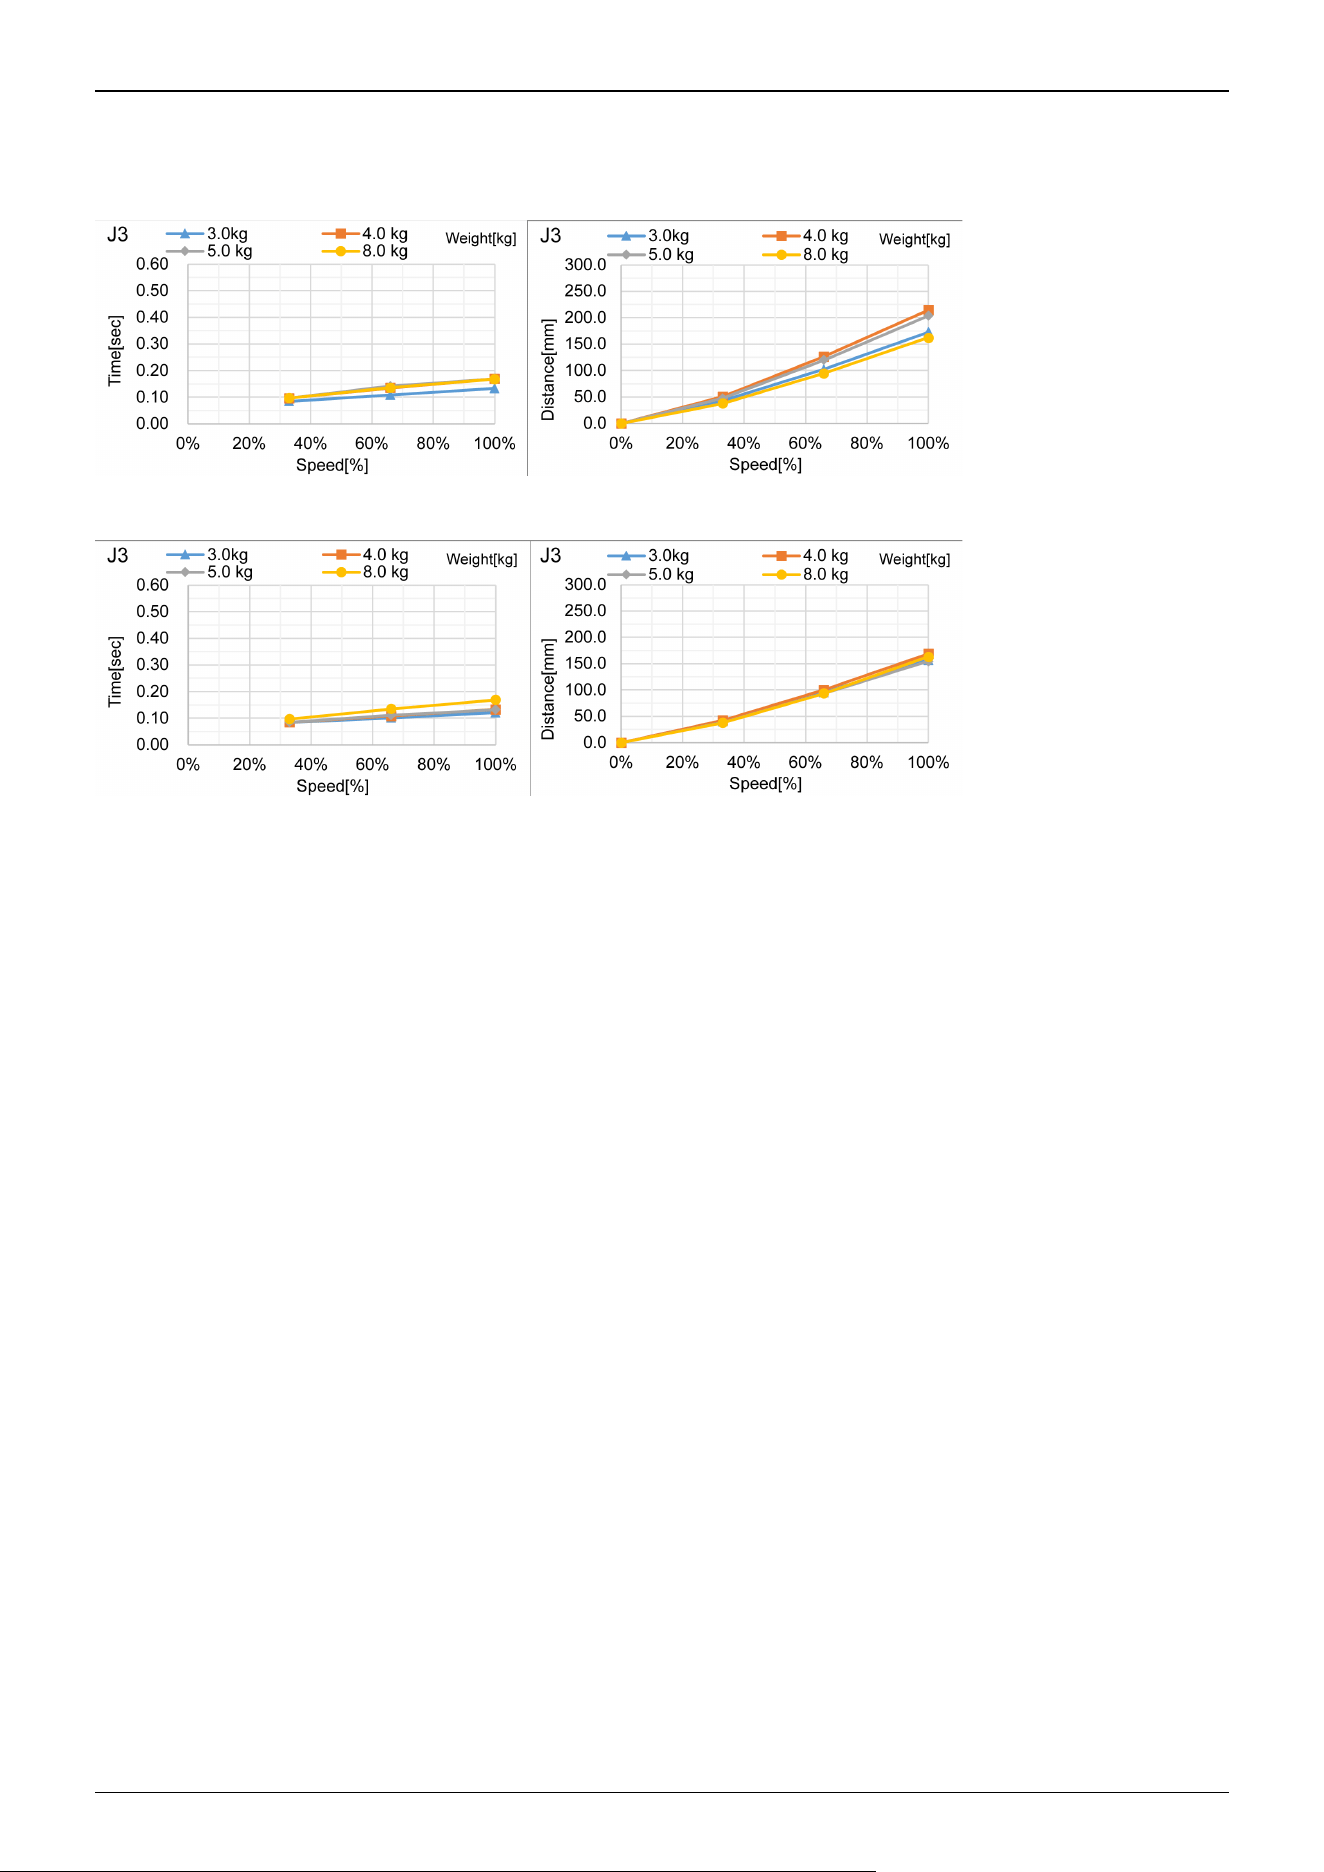
GX8-A/GX8-B/GX8-C55***: J3
Standard mode
Boost mode
Industrial Robot: SCARA Robots GX series Manual Rev.11
497
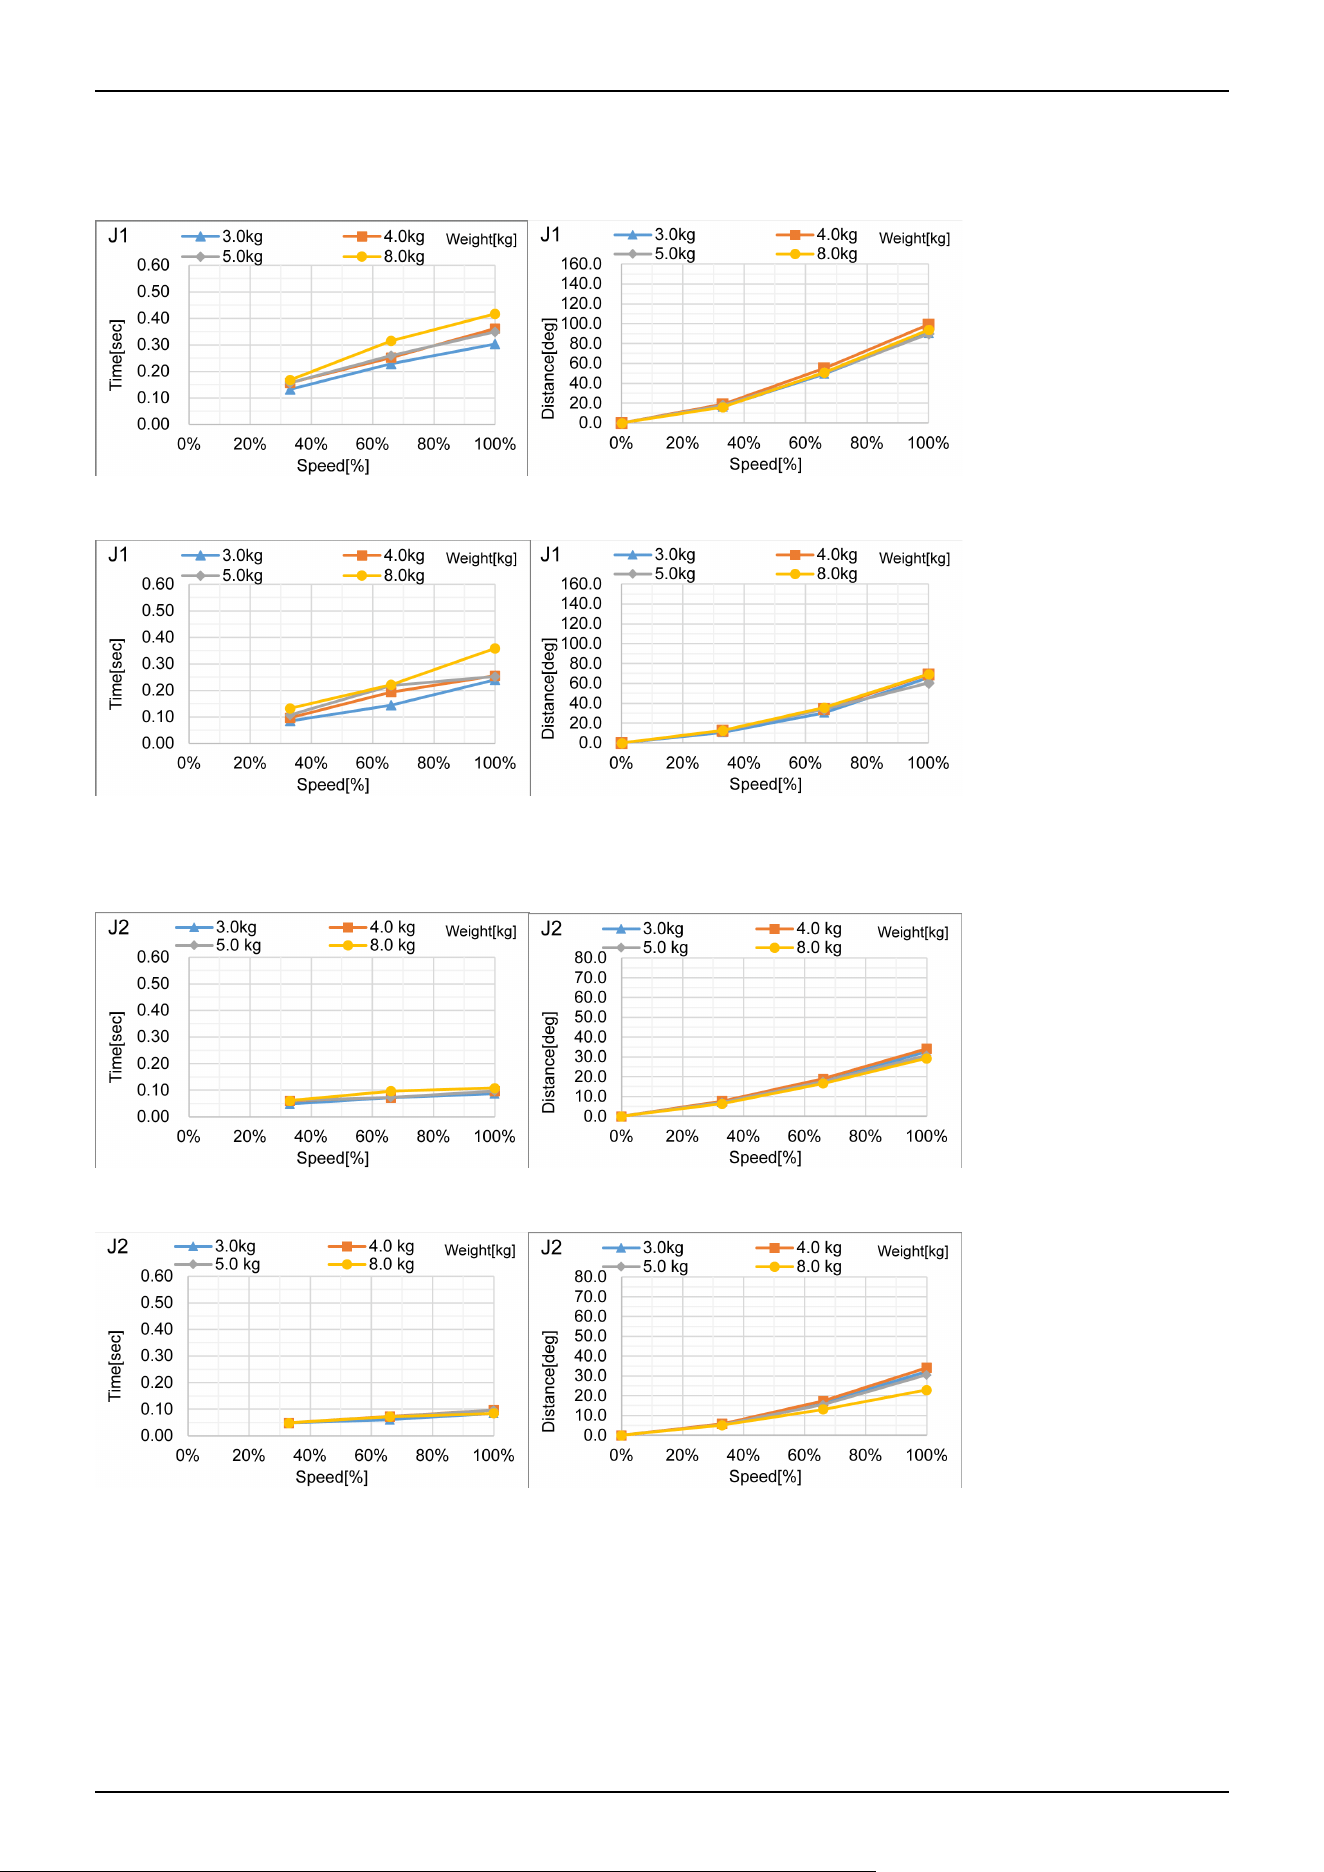
GX8-A/GX8-B/GX8-C65***: J1
Standard mode
Boost mode
GX8-A/GX8-B/GX8-C65***: J2
Standard mode
Boost mode
Industrial Robot: SCARA Robots GX series Manual Rev.11
498
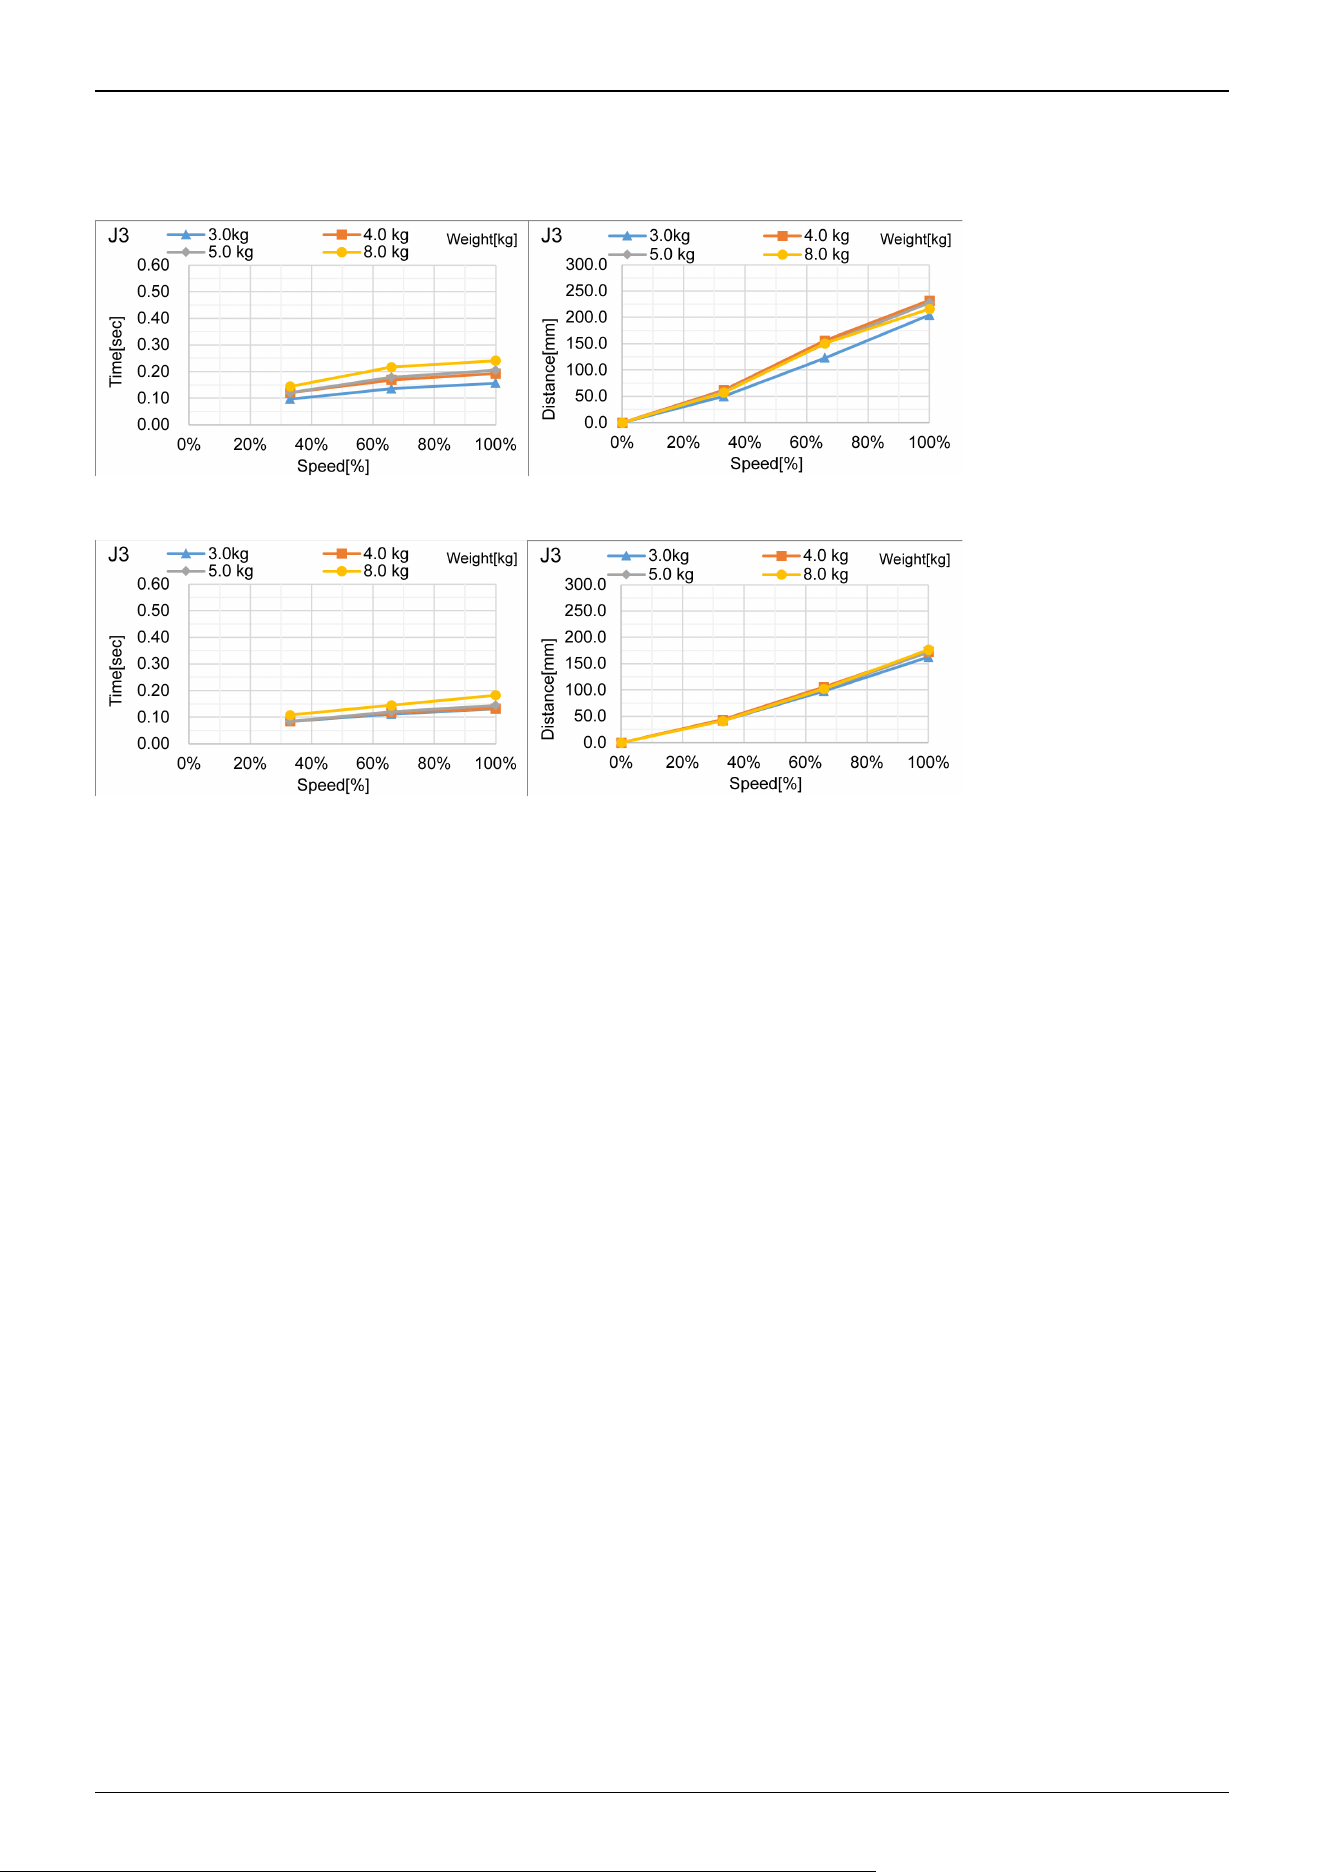
GX8-A/GX8-B/GX8-C65***: J3
Standard mode
Boost mode
Industrial Robot: SCARA Robots GX series Manual Rev.11
499
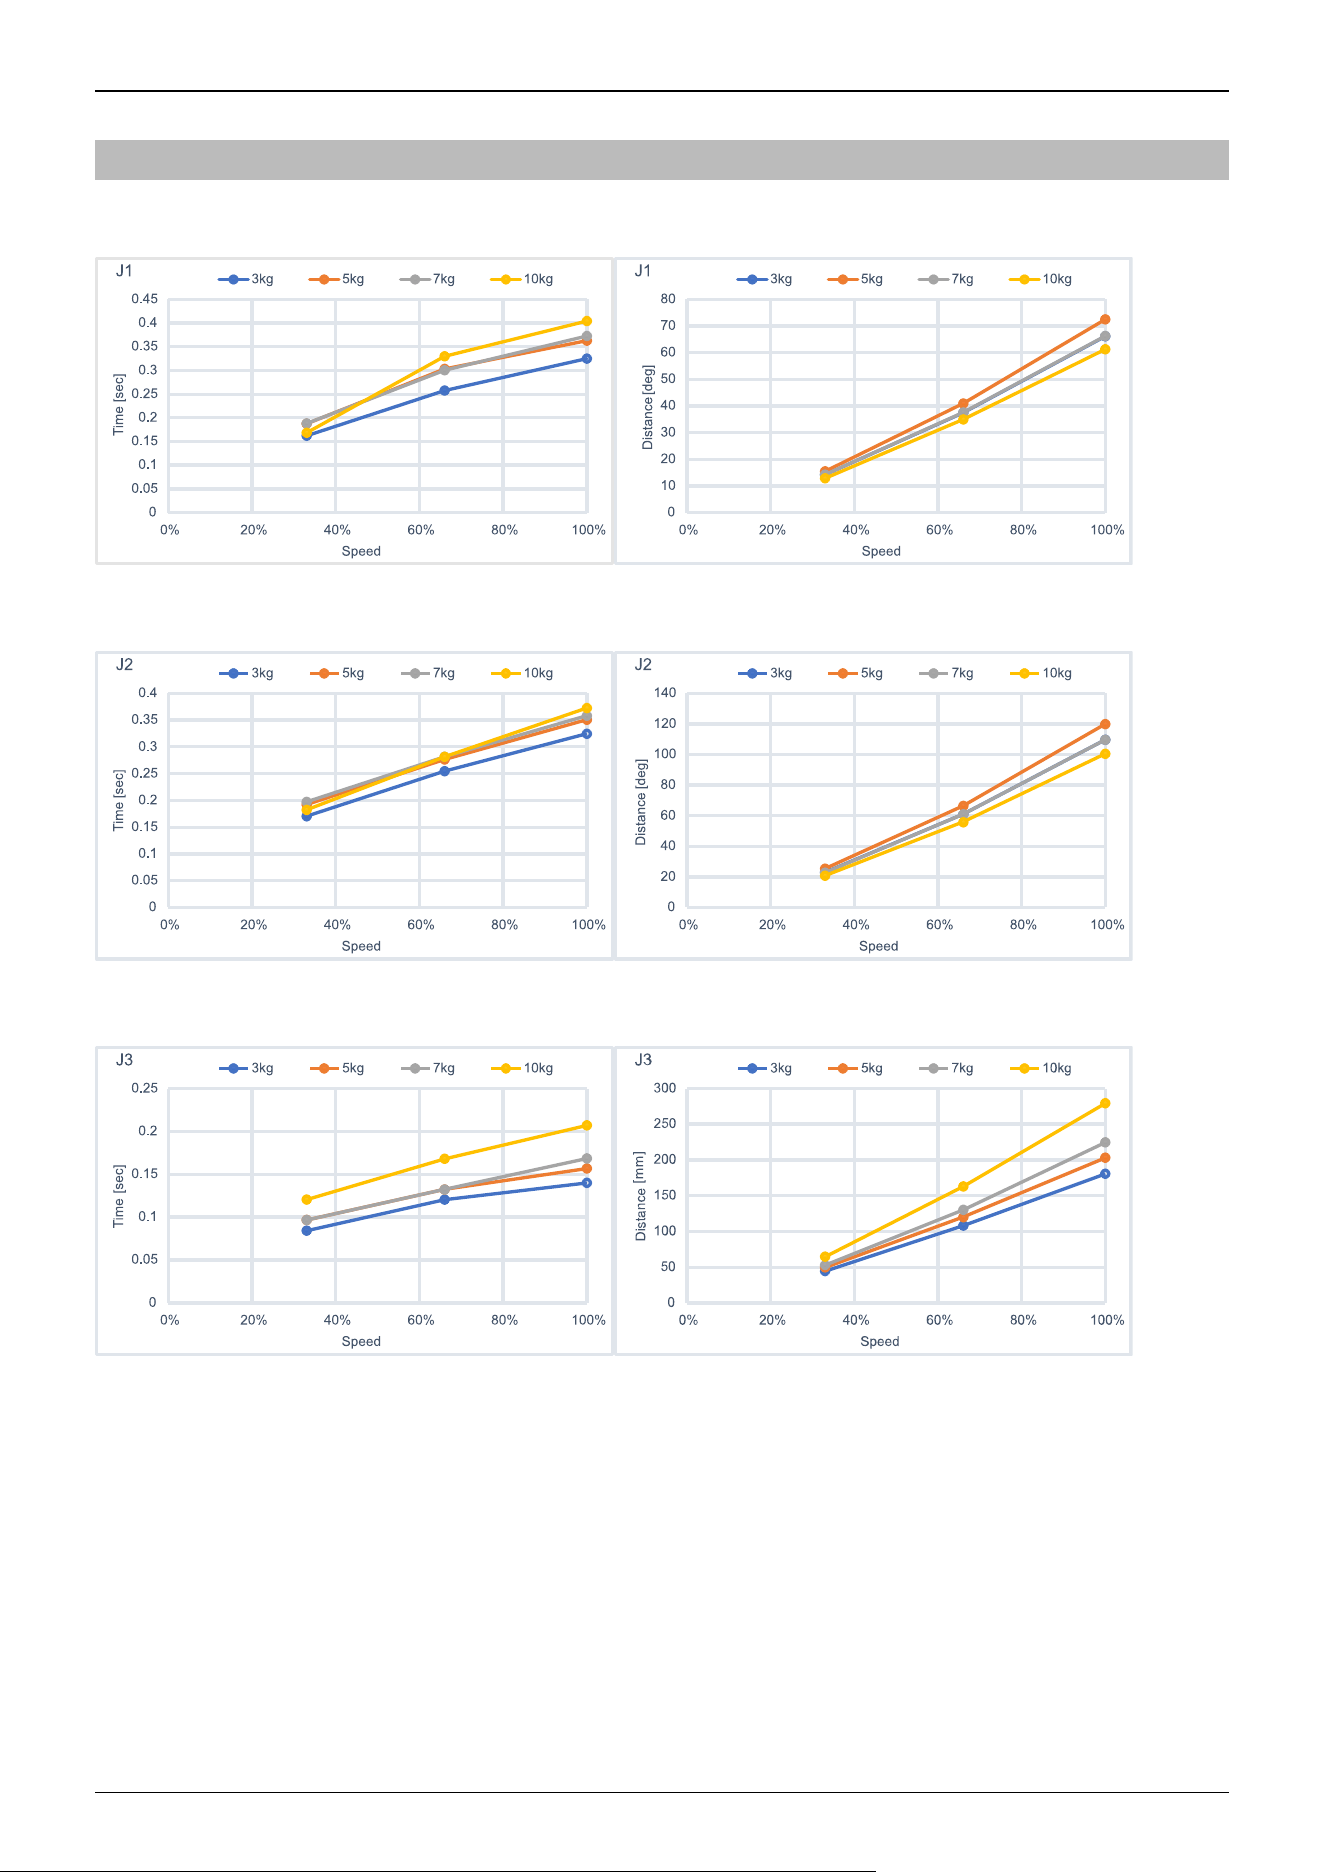
7.2.4 GX10 Stopping Time and Stopping Distance at Emergency Stop
GX10-B/GX10-C65***: J1
GX10-B/GX10-C65***: J2
GX10-B/GX10-C65***: J3
Industrial Robot: SCARA Robots GX series Manual Rev.11
500
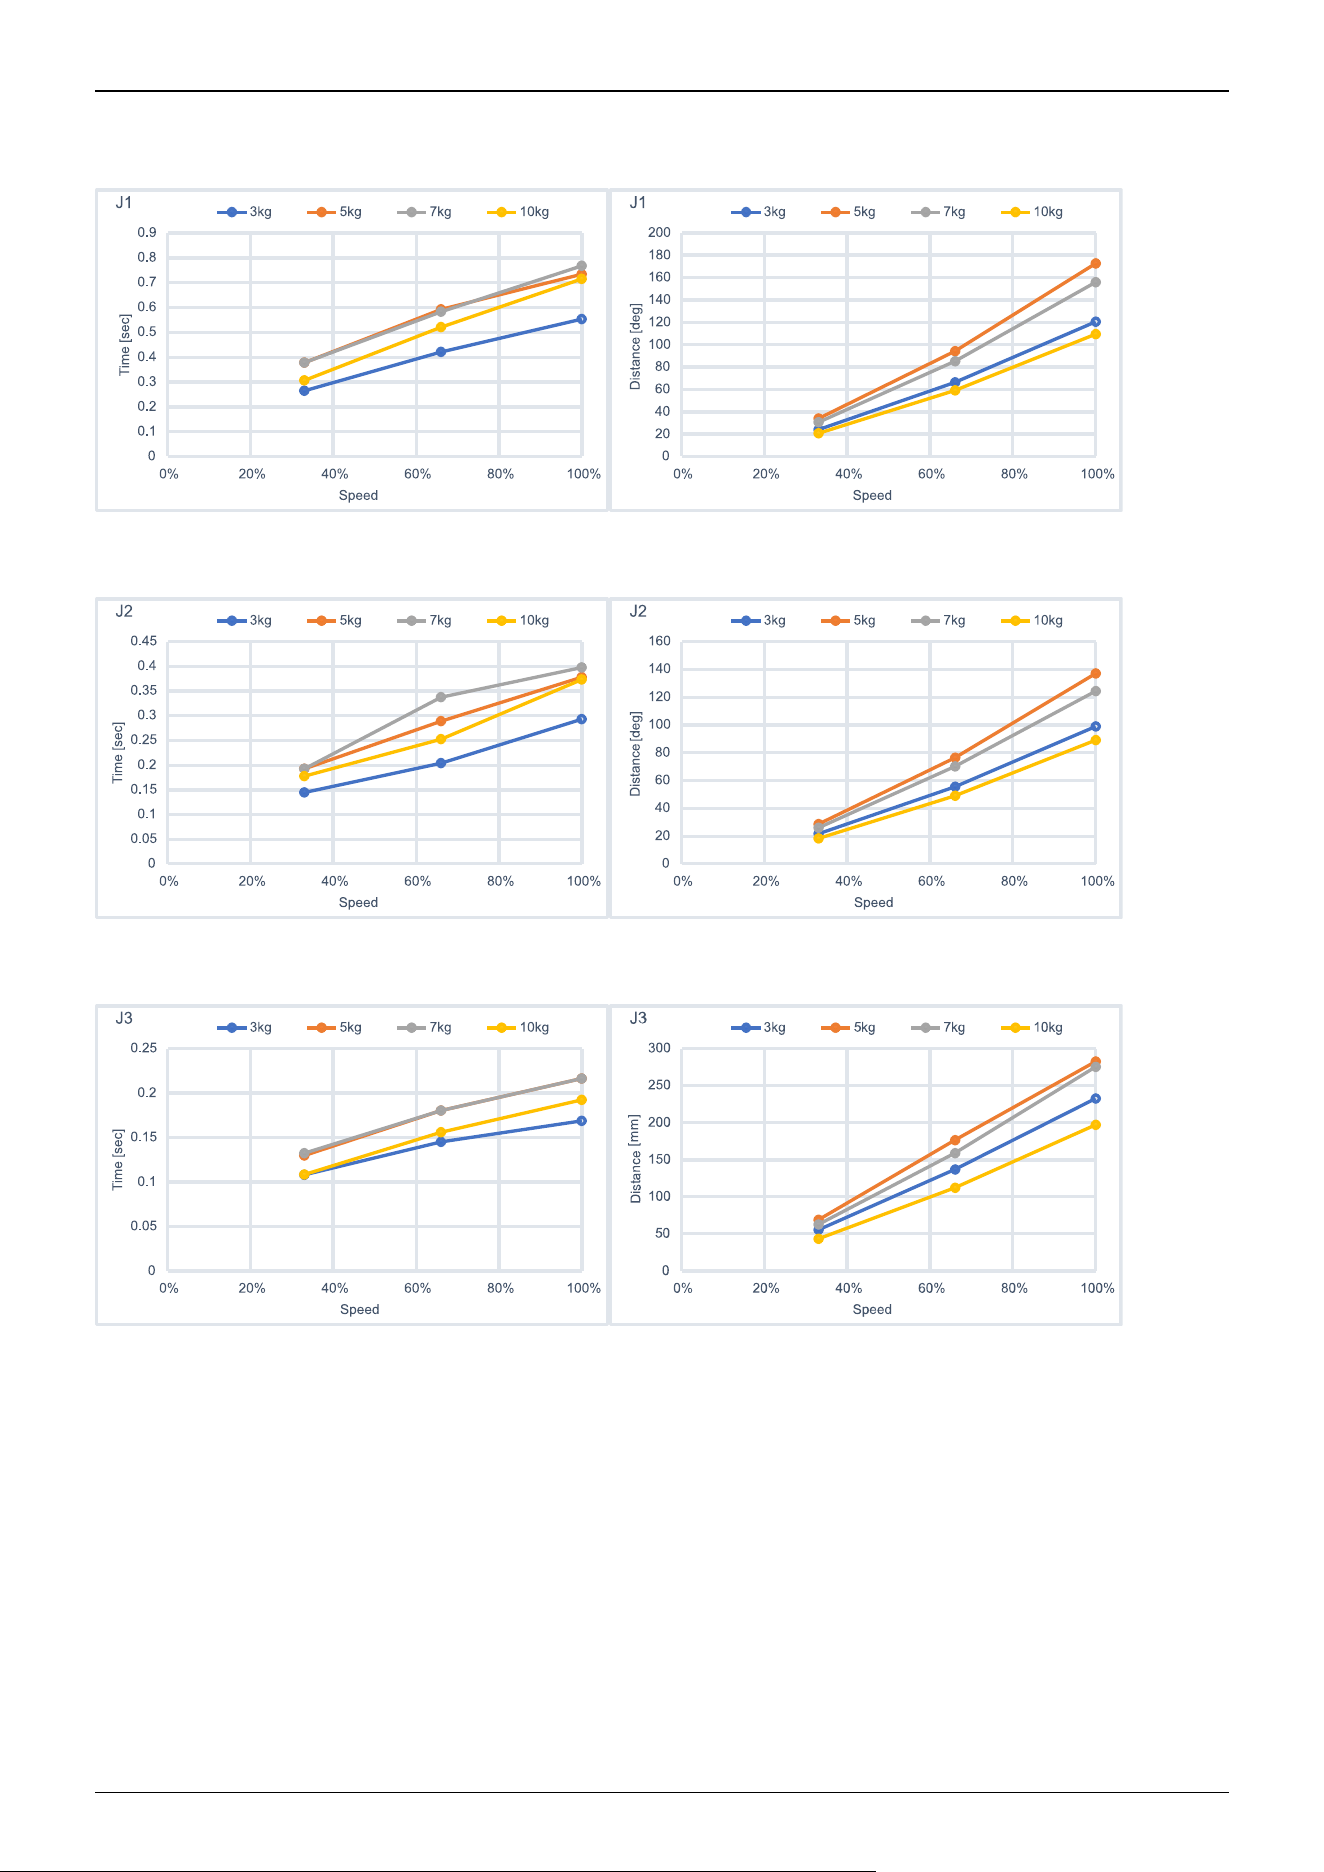
GX10-B/GX10-C85***: J1
GX10-B/GX10-C85***: J2
GX10-B/GX10-C85***: J3
Industrial Robot: SCARA Robots GX series Manual Rev.11
501
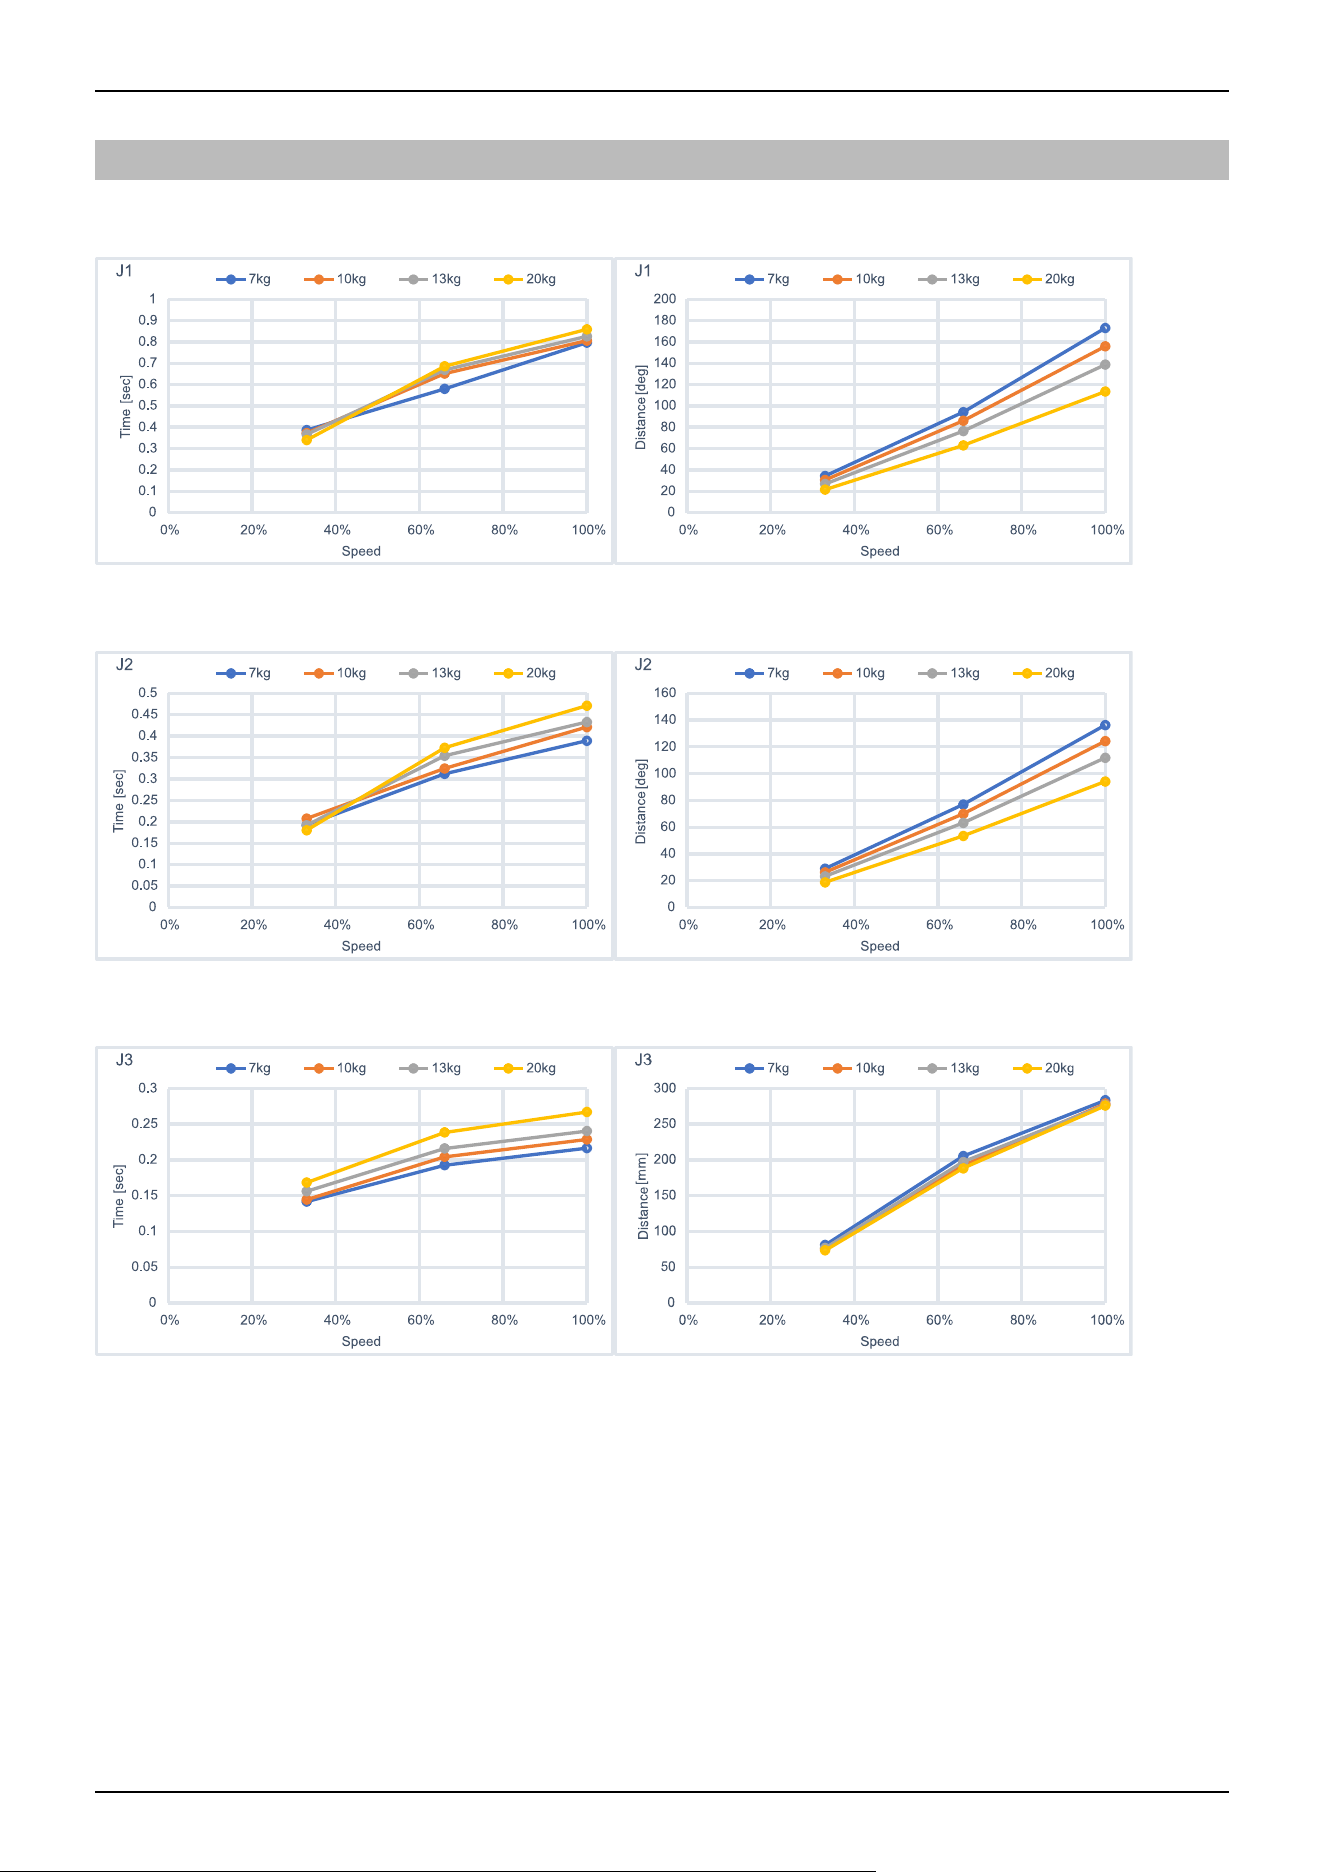
7.2.5 GX20 Stopping Time and Stopping Distance at Emergency Stop
GX20-B/GX20-C85***: J1
GX20-B/GX20-C85***: J2
GX20-B/GX20-C85***: J3
Industrial Robot: SCARA Robots GX series Manual Rev.11
502
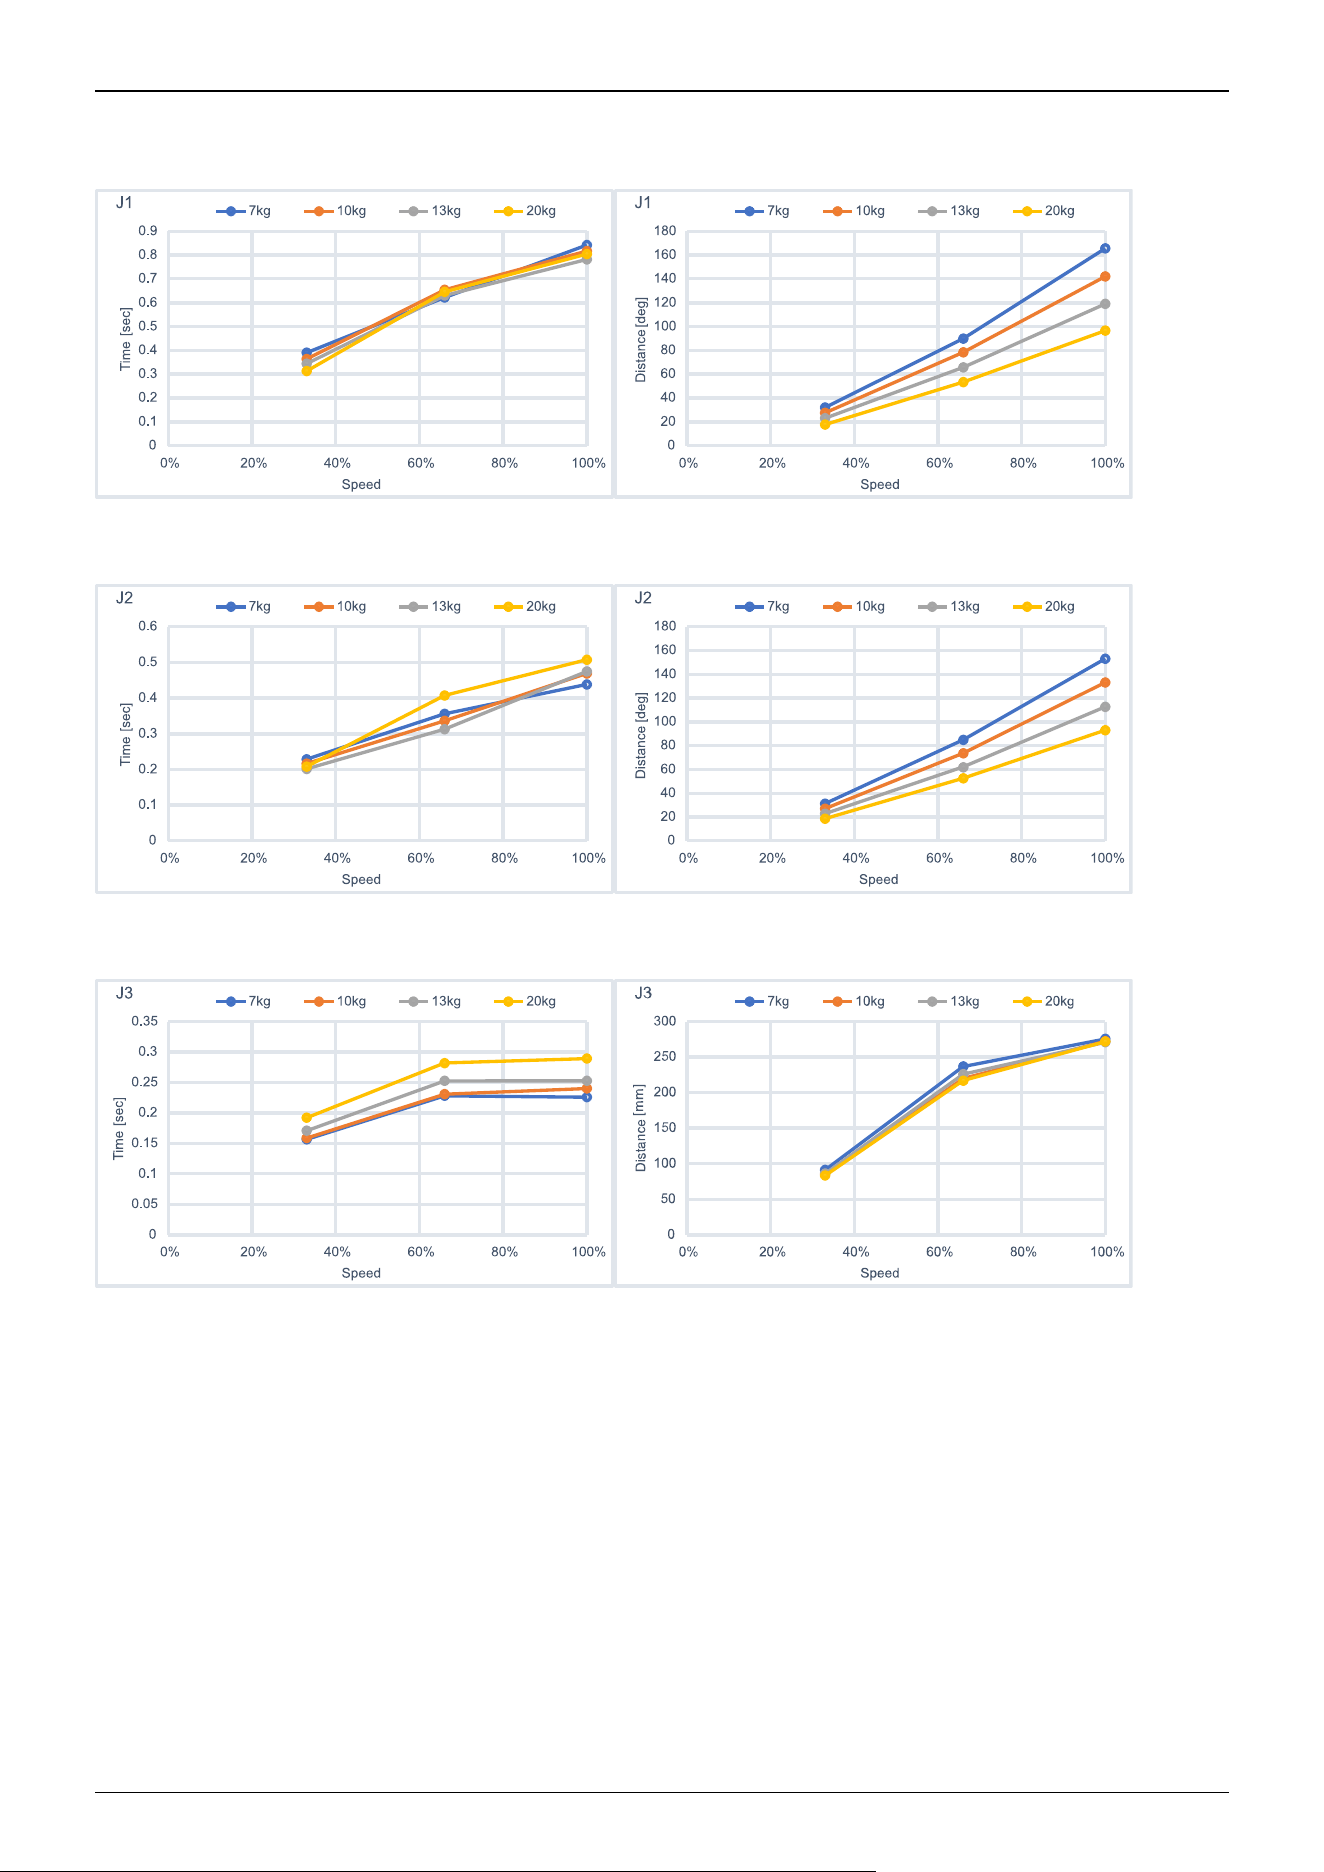
GX20-B/GX20-CA0***: J1
GX20-B/GX20-CA0***: J2
GX20-B/GX20-CA0***: J3
Industrial Robot: SCARA Robots GX series Manual Rev.11
503
7.2.6 Supplementary Information regarding the Stopping Time and
Stopping Distance at Emergency Stop
The stopping time and stopping distance described in Appendix B was measured by the motion determined by us based on the
ISO 10218-1.
Therefore, it does not guarantee the maximum value of the stopping time and stopping distance in the customer’s environment.
The stopping time and stopping distance differs depending on the robot’s model, motion, and input timing of the stop signal.
Make sure to always measure the stopping time and stopping distance that matches the customer’s environment.
KEY POINTS
The following are included in the robot’s motion and parameter.
The motion’s starting point, target point, and relay point
Motion commands (Go, Move, Jump commands etc.)
Weight and Inertia Settings
Motion speed, acceleration, deceleration, and one where the motion timing changes
Also, refer to the following description.
GX1:
Weight and Inertia Settings
Safety Information for Auto Acceleration of Joint #3
GX4:
Weight and Inertia Settings
Safety Information for Auto Acceleration of Joint #3
GX8:
Weight and Inertia Settings
Safety Information for Auto Acceleration of Joint #3
GX10/GX20:
Weight and Inertia Settings
Safety Information for Auto Acceleration of Joint #3
7.2.6.1 How to check the stopping time and stopping distance in the customer’s
environment
Measure the stopping time and stopping distance of the actual motion with the following method.
1. Create a motion program in the customer’s environment.
2. After the motion to check the stopping time and stopping distance starts, input the stop signal at your own timing.
3. Record the time and distance from when the stop signal was input until the robot stopped.
4. Check the maximum stopping time and stopping distance by repeating 1 through 3 mentioned above.
How to input the stop signal: Operate the stop switch manually or input the stop signal with the safety PLC.
How to measure the stopping position: Measure with a tape measure. The angle could also be measured with the Where or
RealPos command.
How to measure the stopping time: Measure with a stop watch. The Tmr function can also be used to measure the stopping
time.
CAUTION
✏
Industrial Robot: SCARA Robots GX series Manual Rev.11
504
The stopping time and stopping distance changes depending on the timing the stop signal is input.
In order to prevent collision with people or objects, perform a risk assessment based on the maximum stopping
time and stopping distance and perform an equipment design.
Therefore, make sure to measure the maximum value by changing the timing of the stop signal input during the
actual motion and measure repeatedly.
To shorten the stopping time and stopping distance, use the Safety Limited Speed (SLS) and limit the maximum speed.
For details on the safety limited speed, refer to the following manual.
“Safety Function Manual“
7.2.6.2 Commands that can be useful when measuring stopping time and
stopping distance
Commands Functions
Where Returns the data of the robot’s current position
RealPos
Returns the current position of the specified robot
Unlike the motion target position of the CurPos, this obtains the position of the actual robot from the
encoder in real time.
PAgl
Returns by calculating the Joint position from the specified coordinate value.
P1 = RealPos 'Obtain the current position
Joint1 = PAgl (P1, 1) ‘ Request the J1 angle from the current position
SF_RealSpeedS Display the current speed from the limited speed position in mm/s.
Tmr The Tmr function returns the elapsed time from when the timer starts in seconds.
Xqt
Runs the program specified with the function name and complete the task.
The function used to measure the stopping time and stopping distance should be used to run tasks that
were launched by attaching the NoEmgAbort options. You can run a task that does not stop with the
emergency stop and safeguard open.
For more information, refer to the following manual.
"Epson RC+ SPEL+ Language Reference"
Industrial Robot: SCARA Robots GX series Manual Rev.11
505
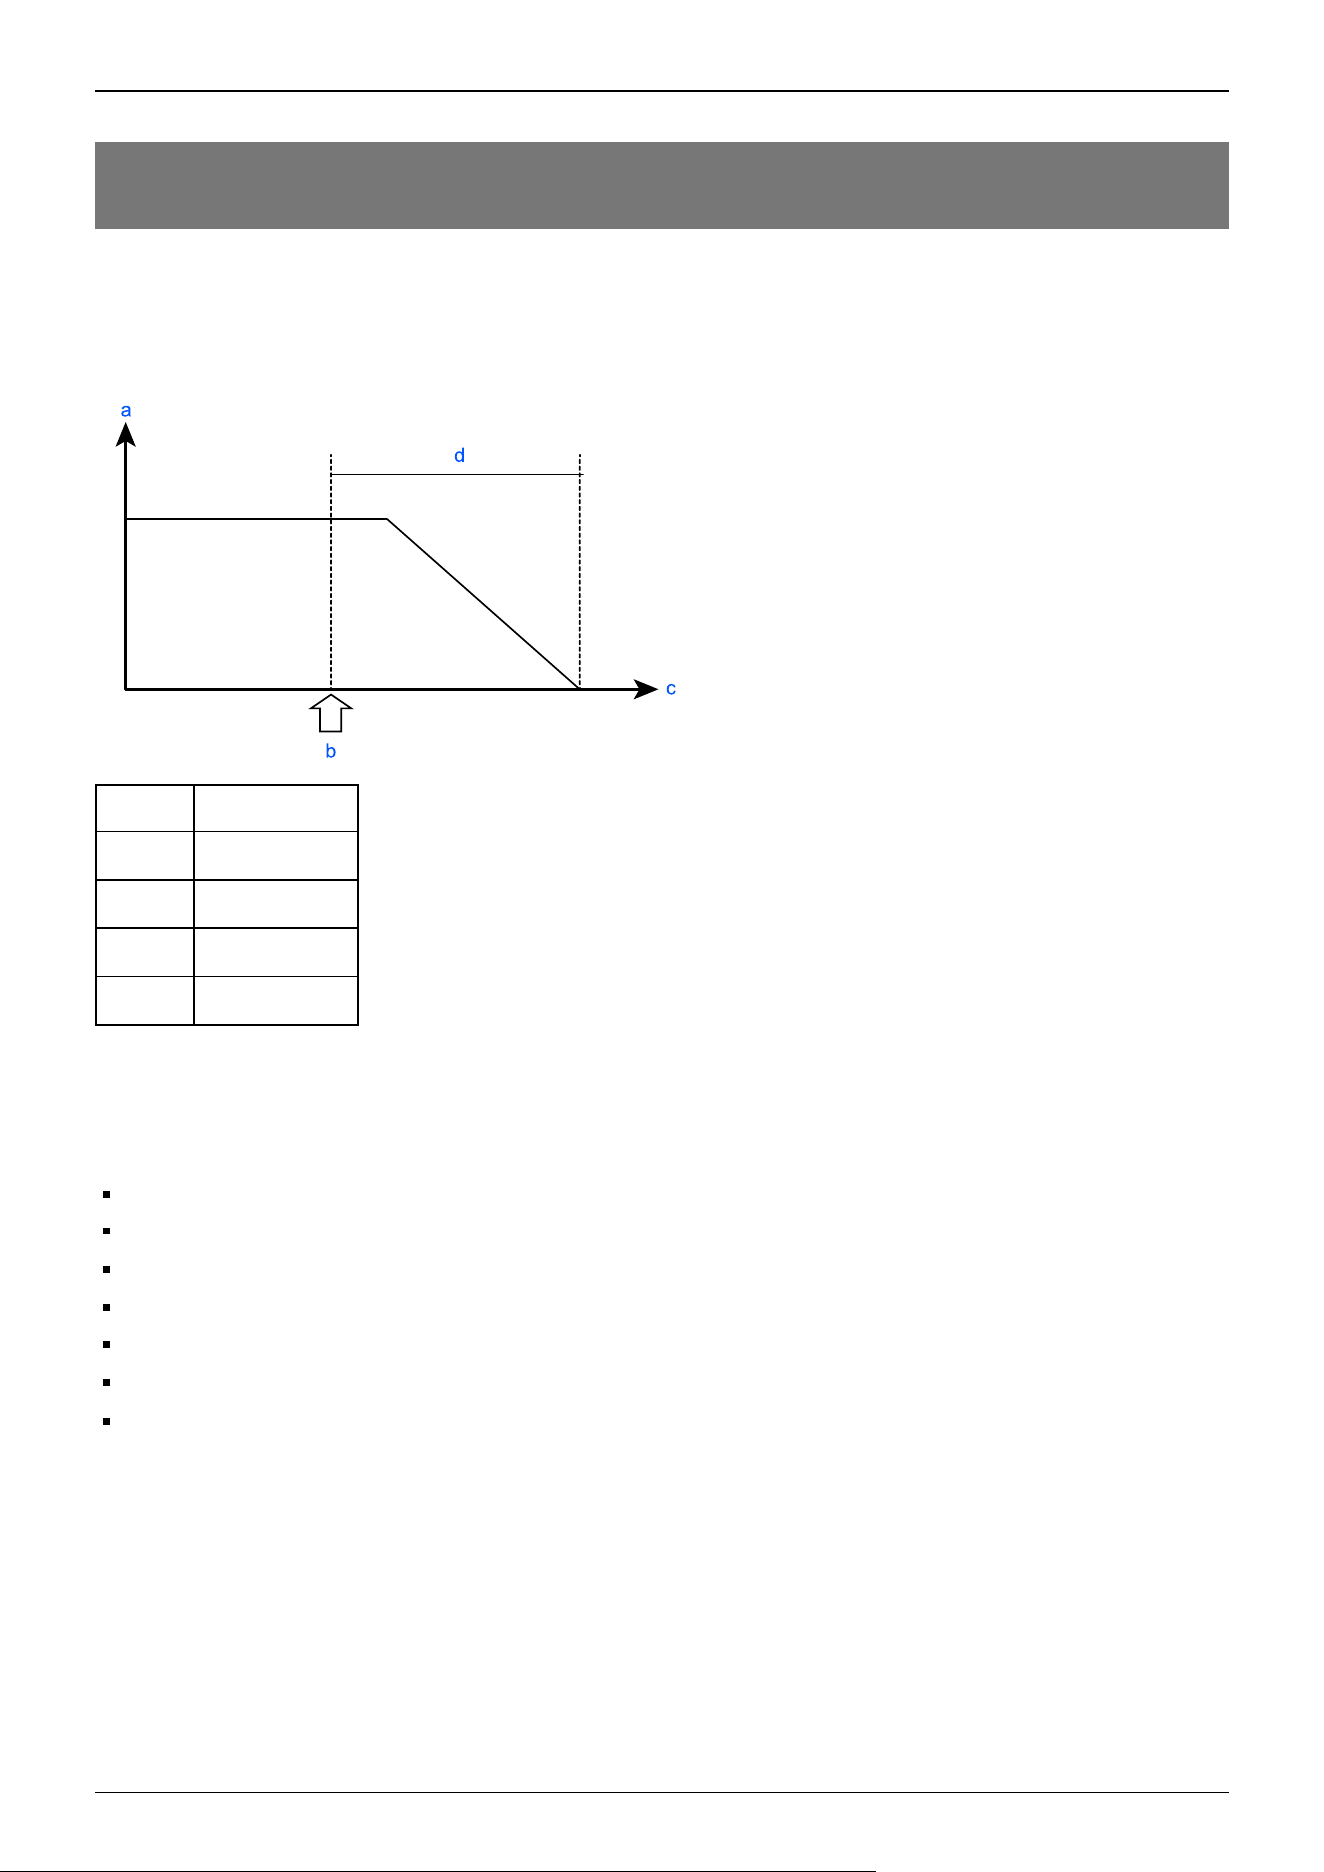
7.3 Appendix C: Stopping Time and Stopping Distance When
Safeguard is Open
The stopping time and stopping distance when the safeguard is opened are shown in the graphs for each model.
The stopping time is the length of time corresponding to the "Stopping time" in the figure below. Be sure to confirm that a safe
environment is provided where the robot will be installed and operated.
Symbol Description
a Motor speed
b Safeguard open
c Time
d Stopping time
Conditions
The stopping time and stopping distance depend on the parameters (setting values) that were set for the robot. These graphs
show the times and distances for the following parameters.
These conditions are based on the ISO 10218-1:2011 Annex B.
Accel: 100, 100
Speed: 100 %, 66 %, 33 %Settings
Weight: 100 %, 66 %, 33 % of the maximum payload, rated payload
Arm elongation rate: 100 %, 66 %, 33 % *1
Other settings: Default
Motion: Singular axis motion of a Go command
Input timing of the Stop signal: input with maximum speed. In this motion, it is the center of the motion range.
*1 Arm elongation rate
When J1 is operating, the arm elongation rate θ is as shown in the figure below.
Among the following arm elongation rate, the graph shows the results with the longest stopping time and stopping distance.
When J2 is operating, J3 is 0 mm.
Industrial Robot: SCARA Robots GX series Manual Rev.11
506
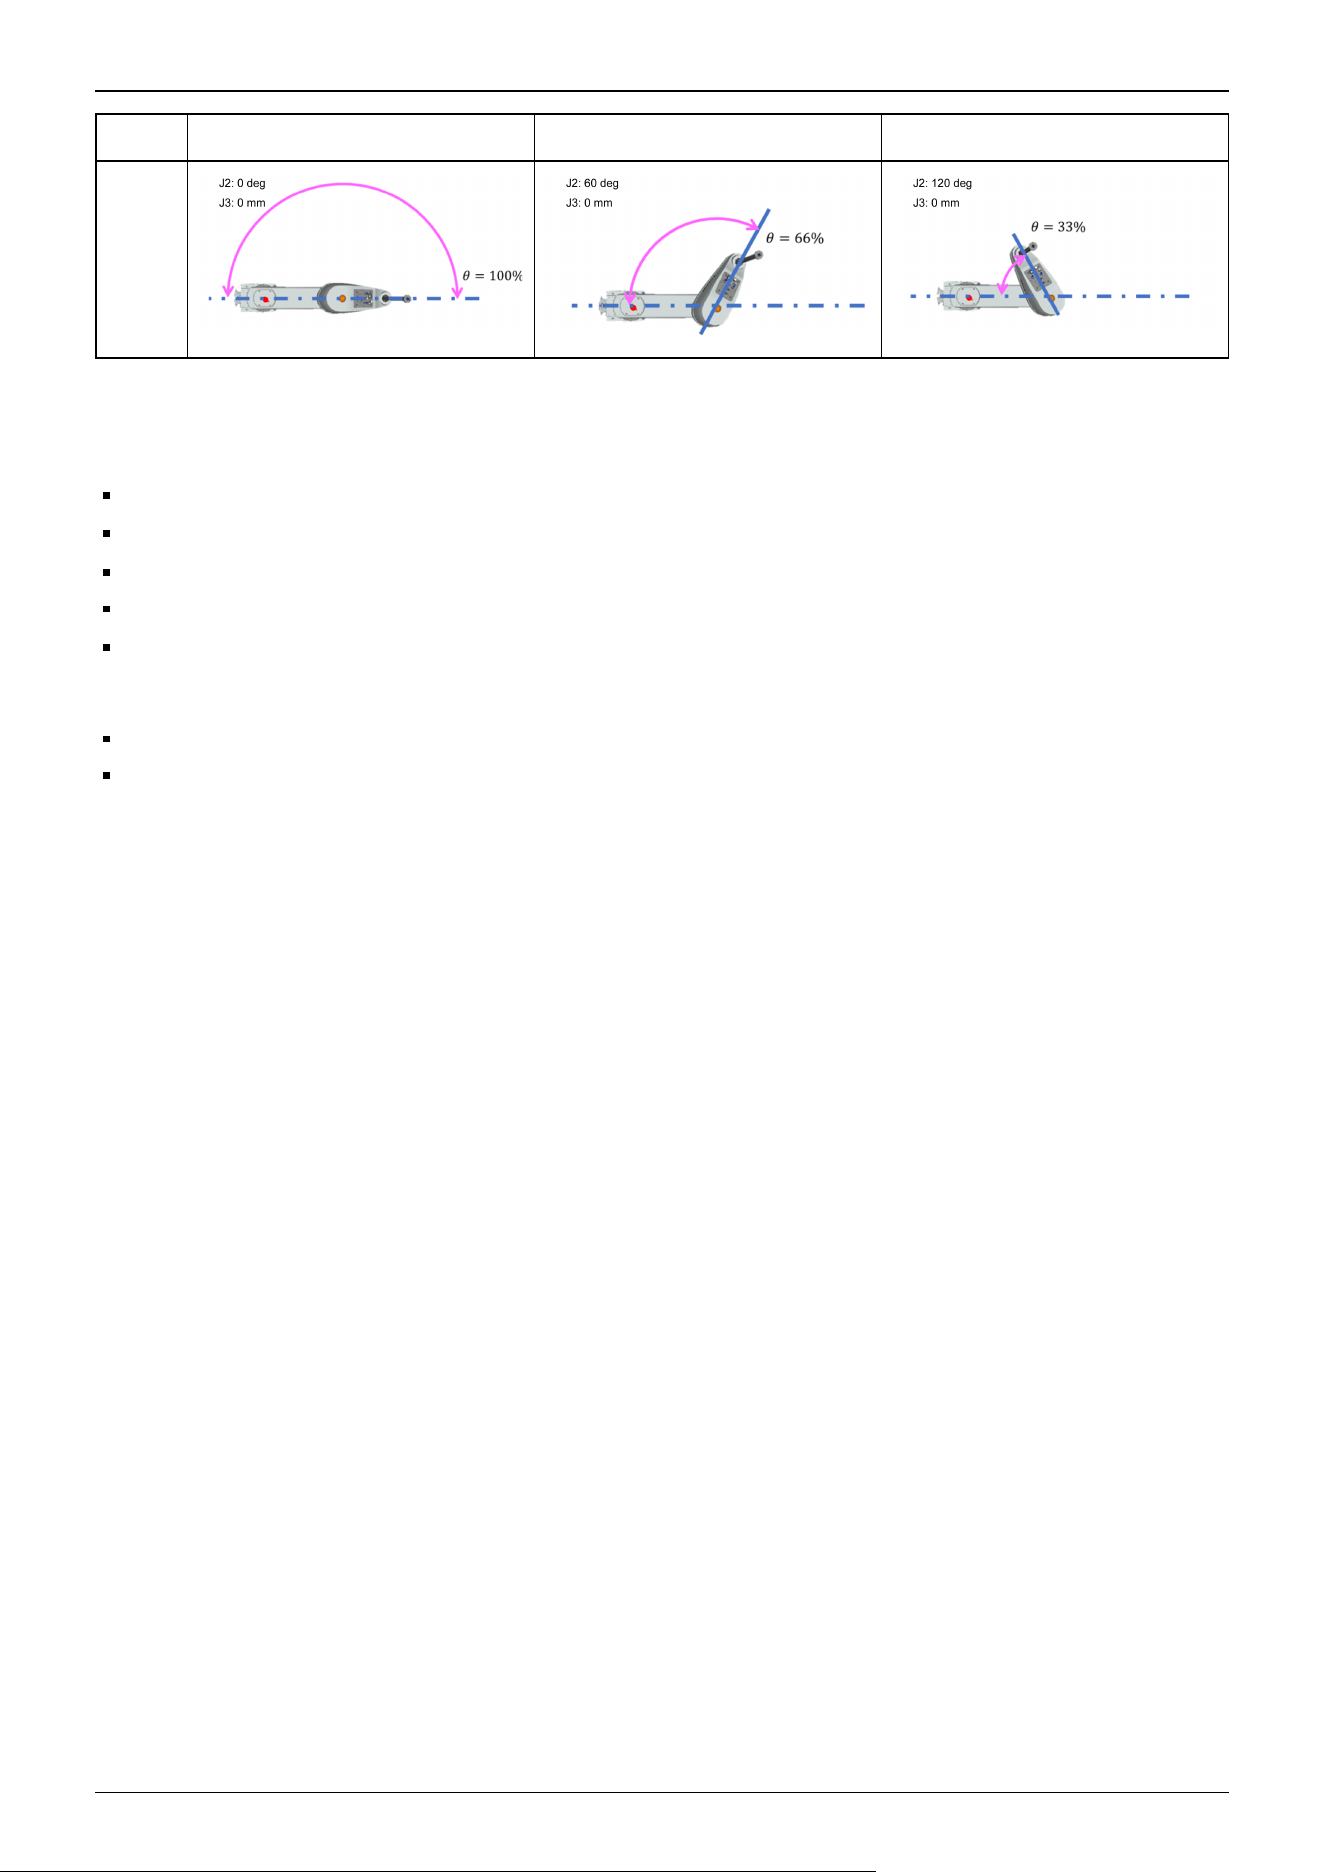
Axis θ = 100% θ = 66% θ = 33%
J1
Explanation of legend
The graphs are displayed for each Weight setting value (at 100%, approx. 66%, and approx. 33% of the maximum payload, and
at the rated payload).
Horizontal axis: Arm speed (Speed setting)
Vertical axis: Stopping time and stopping distance at each arm speed
Time (sec): Stopping time (sec)
Distance (deg): J1 and J2 stopping distance (degree)
Distance (mm): J3 stopping distance
When single failures are taken into account, the following adjustments are used.
Stopping distance and angle: Each axis reaches the mechanical stop
Stopping time: Add 500 ms
Industrial Robot: SCARA Robots GX series Manual Rev.11
507
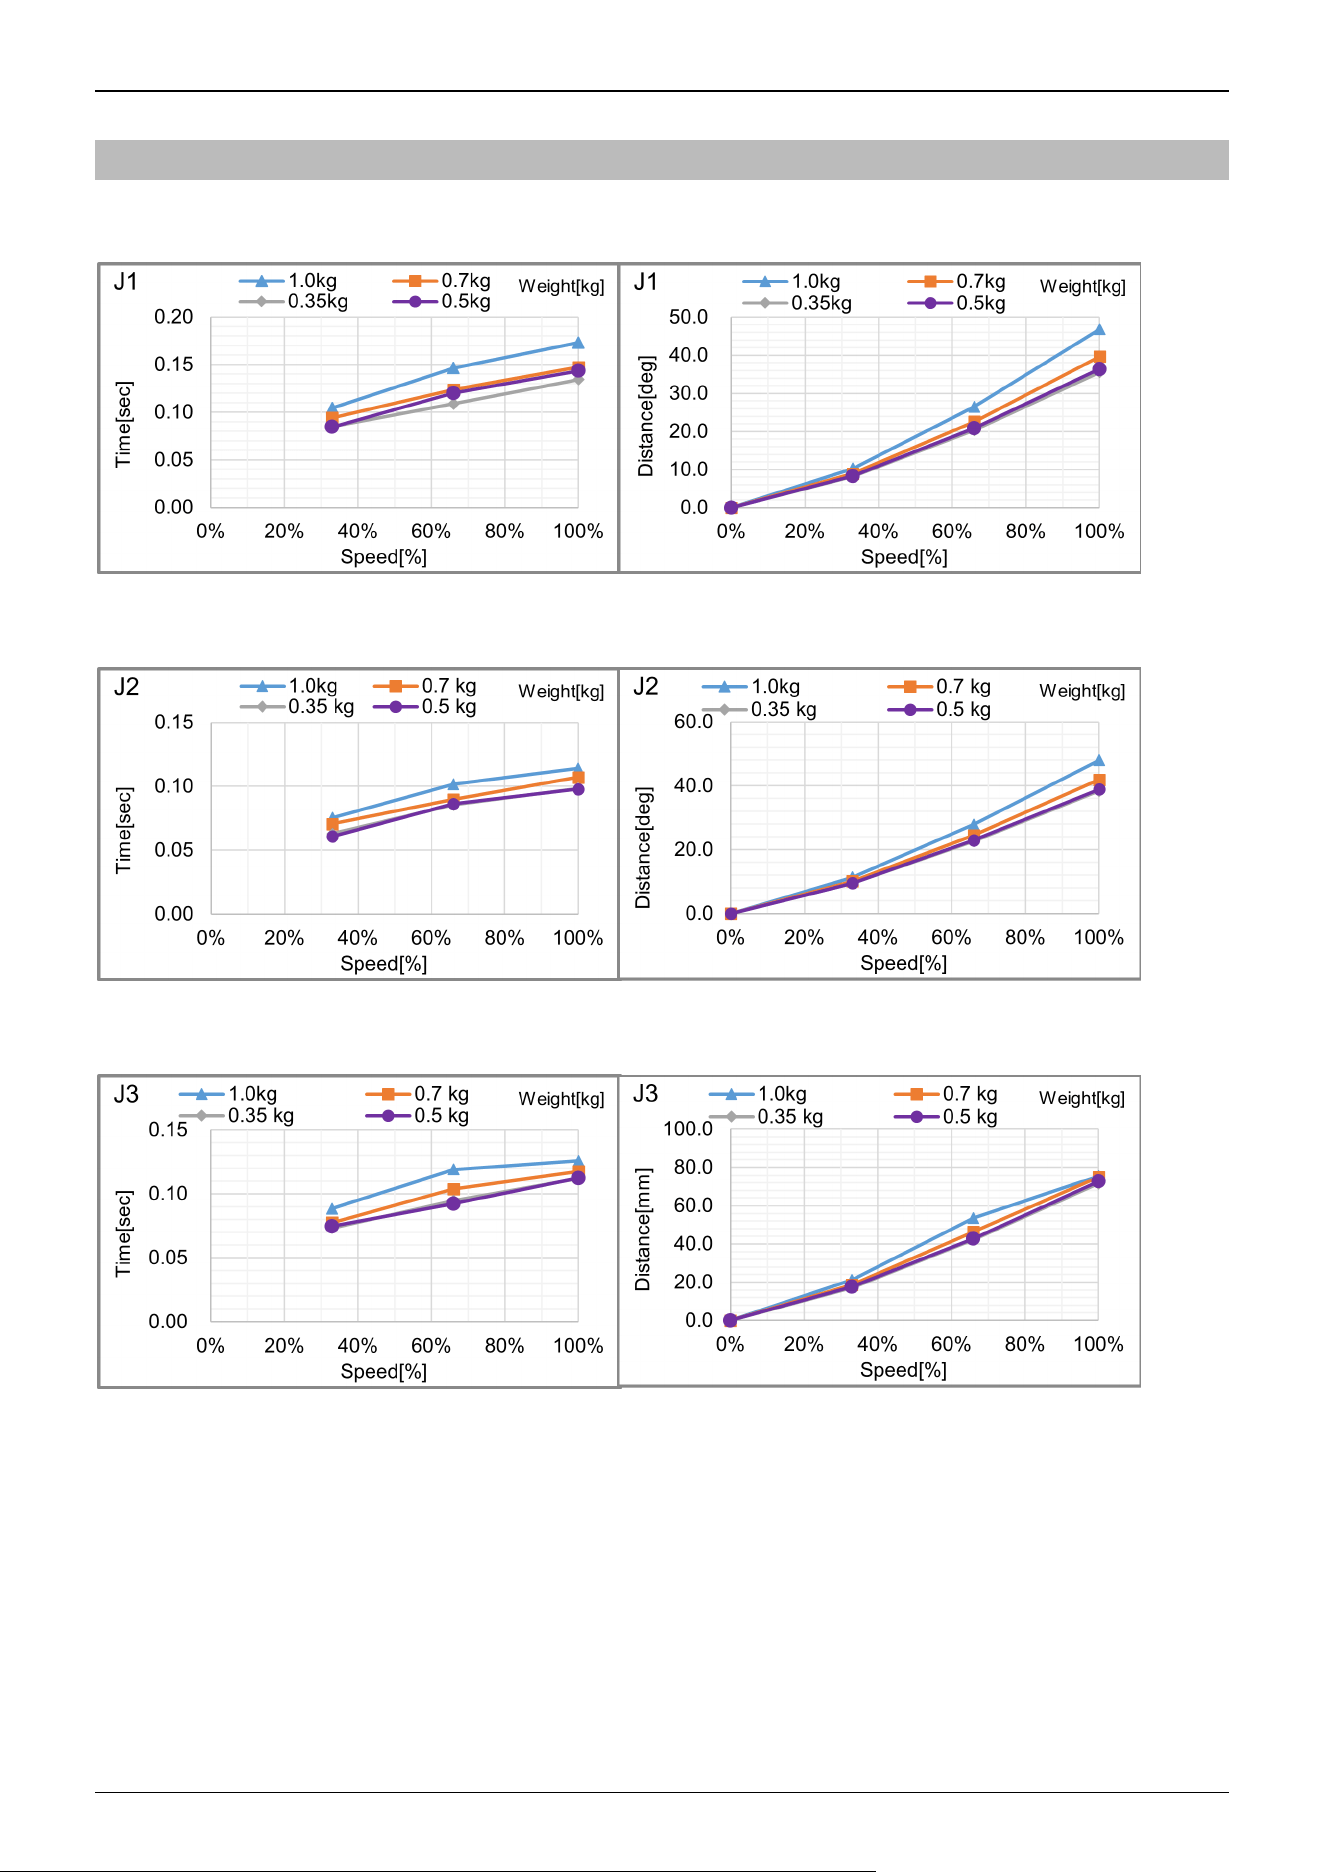
7.3.1 GX1 Stopping Time and Stopping Distance When Safeguard is Open
GX1-C171*: J1
GX1-C171*: J2
GX1-C171*: J3
Industrial Robot: SCARA Robots GX series Manual Rev.11
508
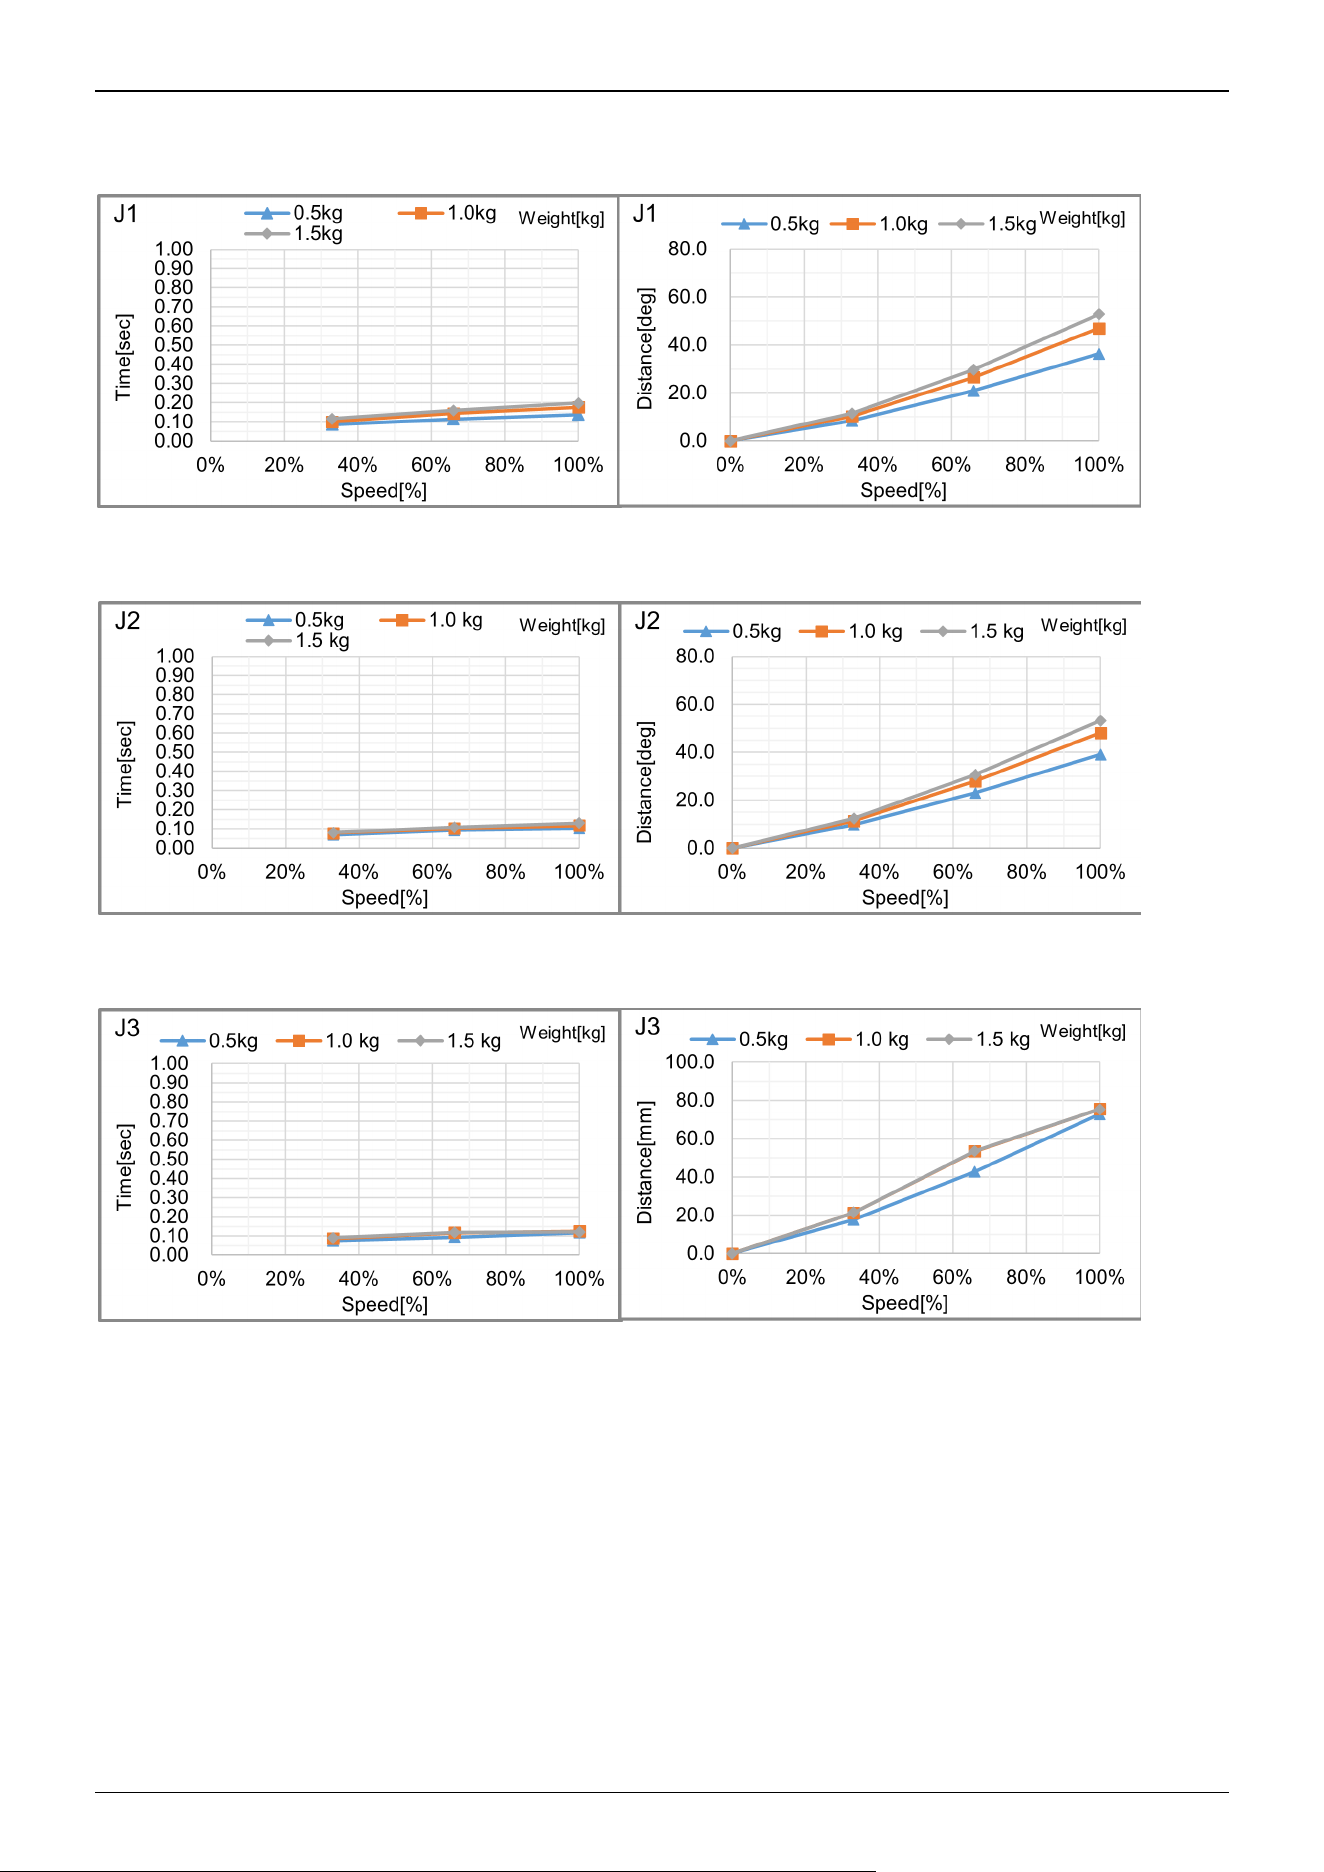
GX1-C171SZ: J1
GX1-C171SZ: J2
GX1-C171SZ: J3
Industrial Robot: SCARA Robots GX series Manual Rev.11
509
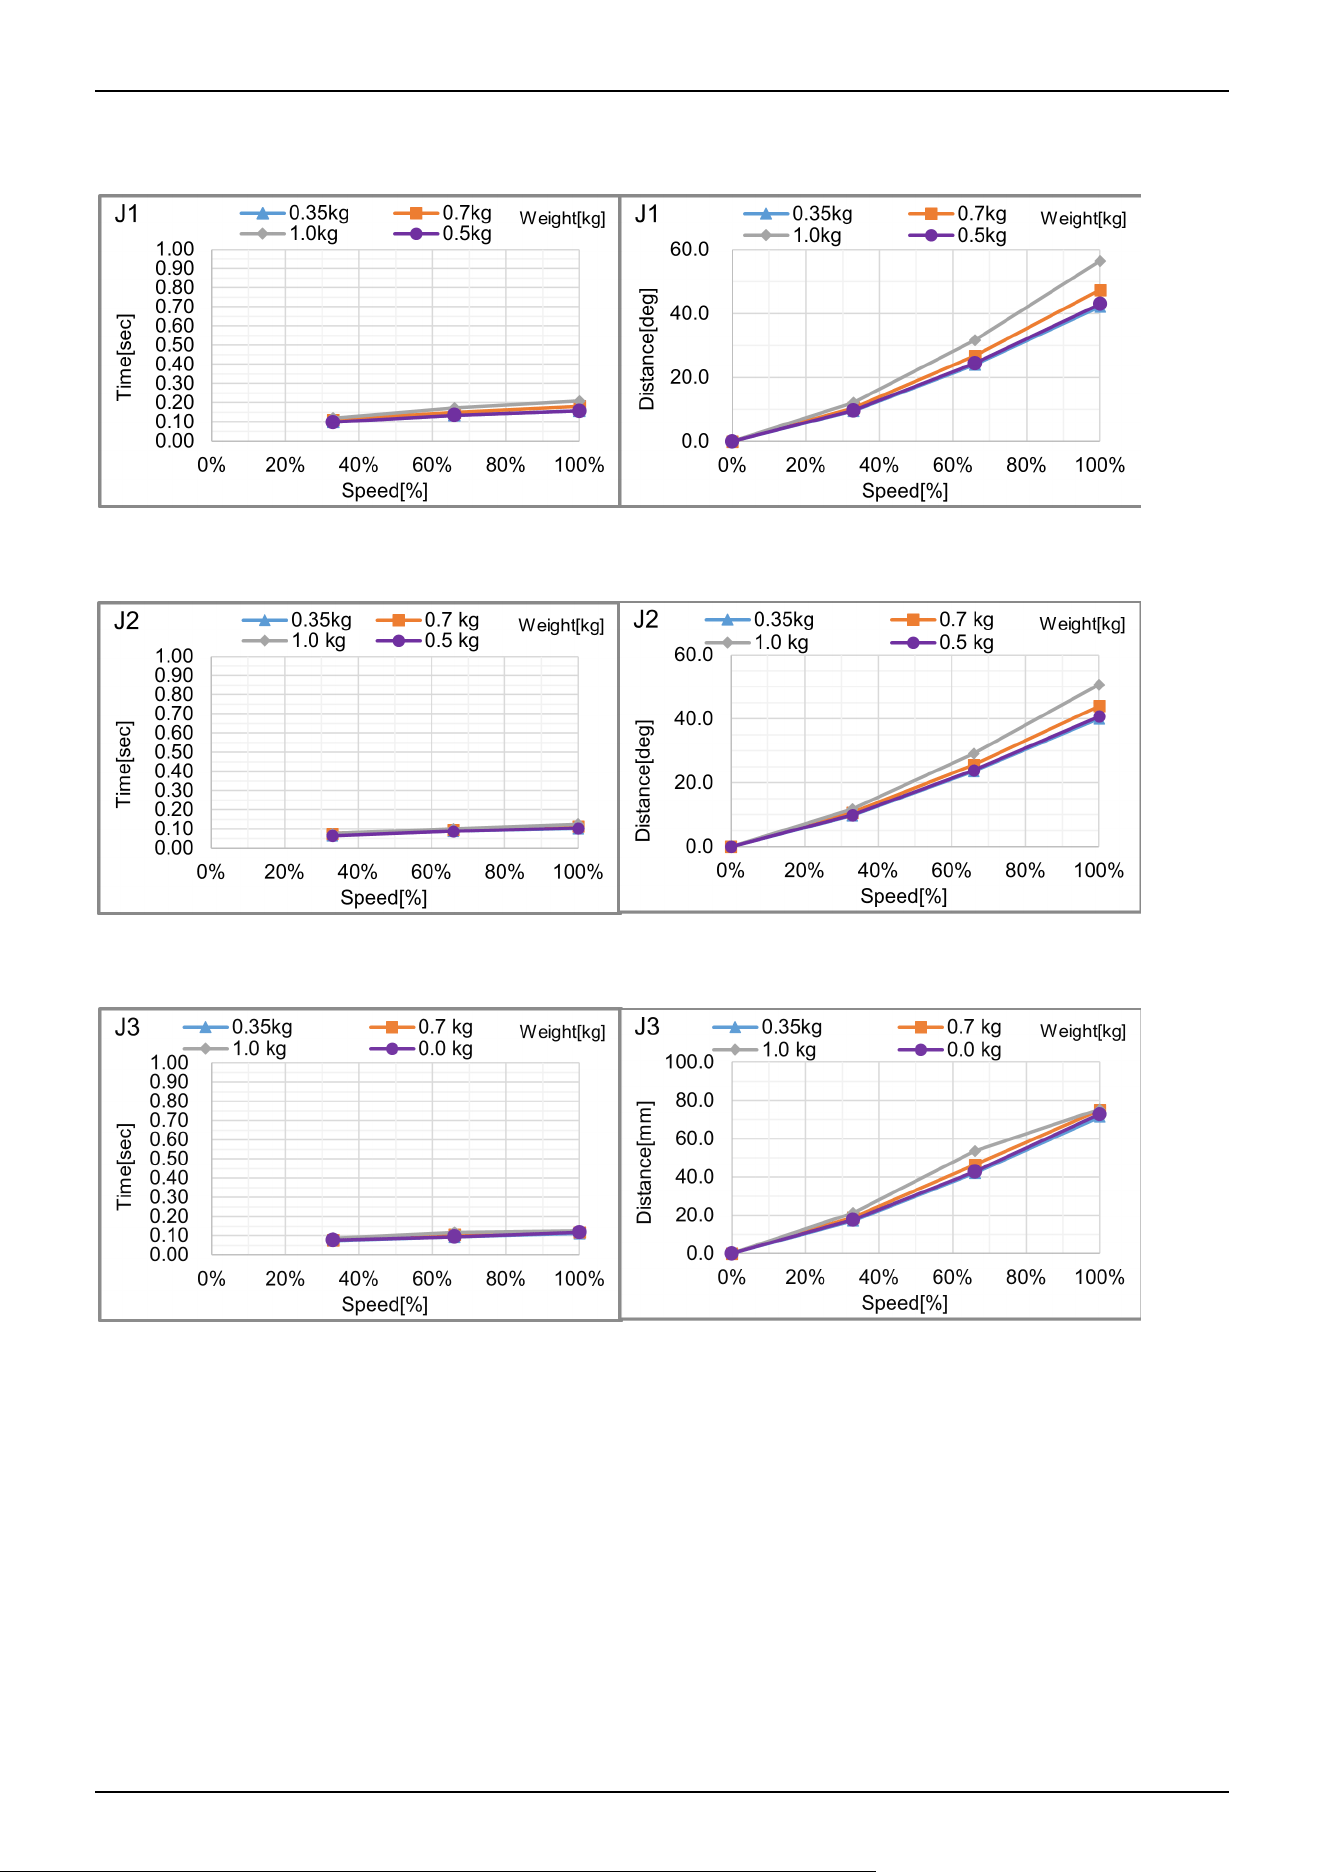
GX1-C221*: J1
GX1-C221*: J2
GX1-C221*: J3
Industrial Robot: SCARA Robots GX series Manual Rev.11
510
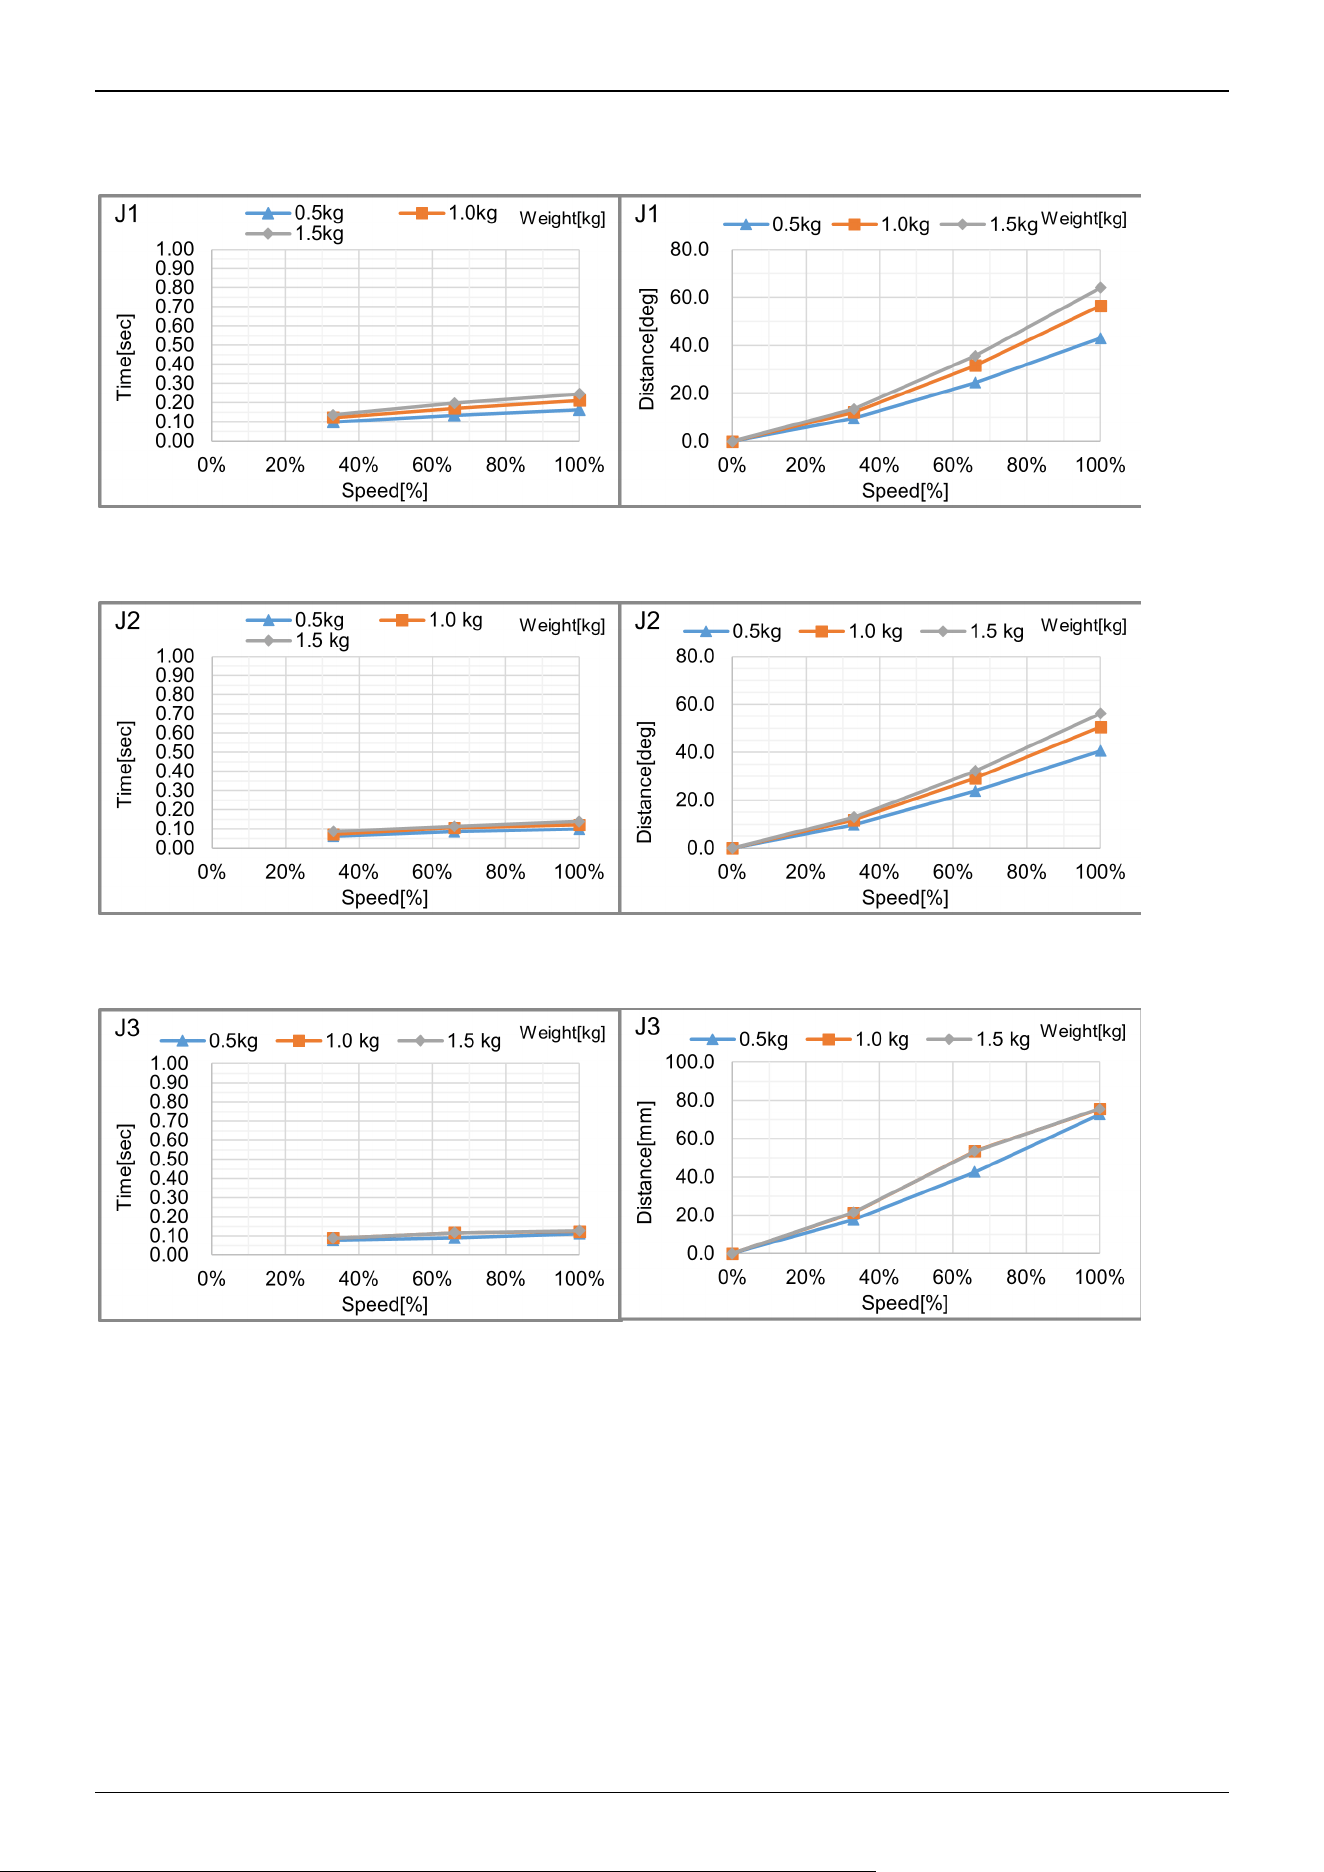
GX1-C221SZ: J1
GX1-C221SZ: J2
GX1-C221SZ: J3
Industrial Robot: SCARA Robots GX series Manual Rev.11
511
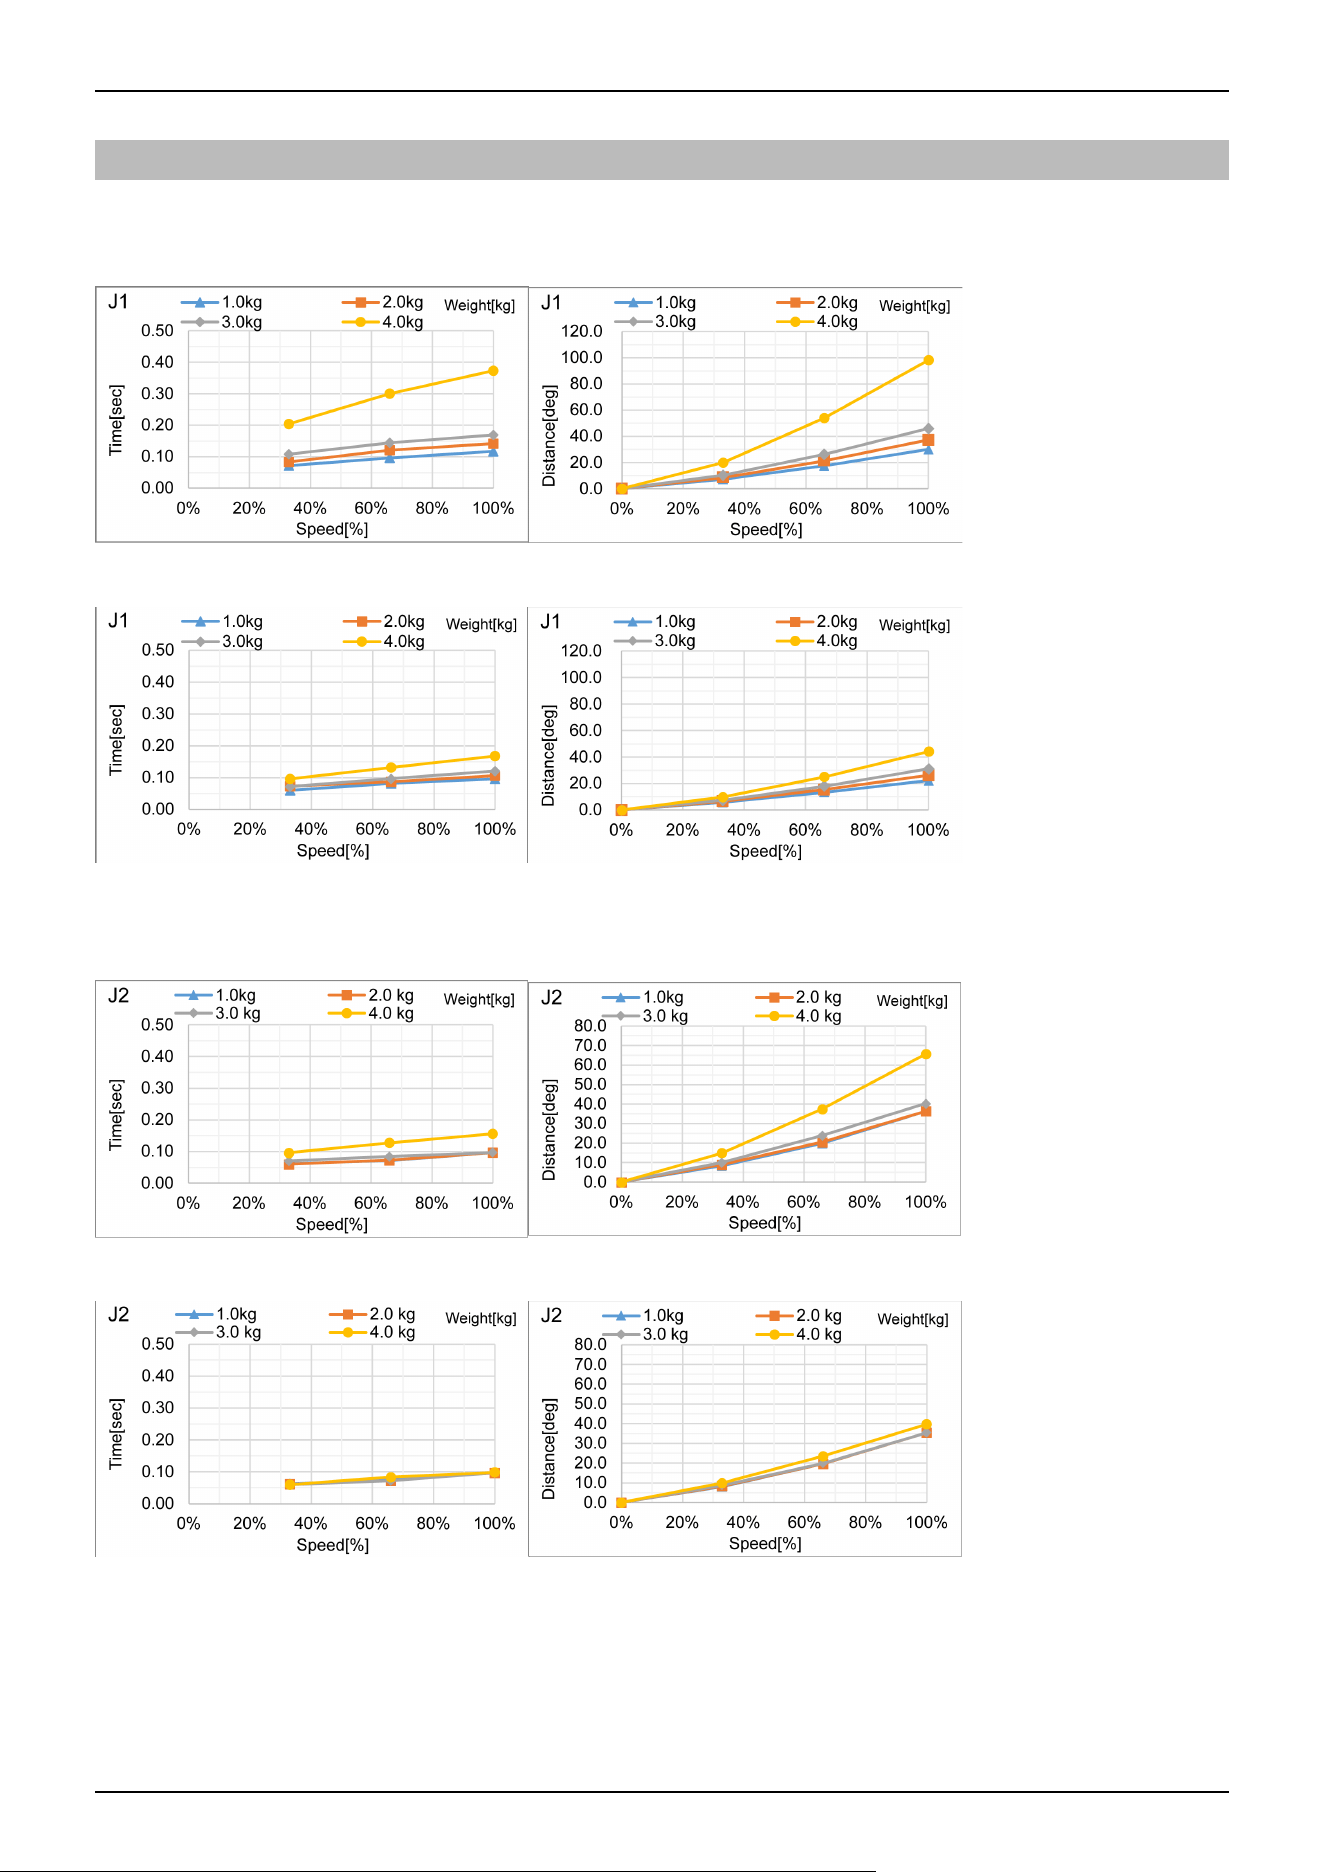
7.3.2 GX4 Stopping Time and Stopping Distance When Safeguard is Open
GX4-A/GX4-B/GX4-C25***: J1
Standard mode
Boost mode
GX4-A/GX4-B/GX4-C25***: J2
Standard mode
Boost mode
Industrial Robot: SCARA Robots GX series Manual Rev.11
512
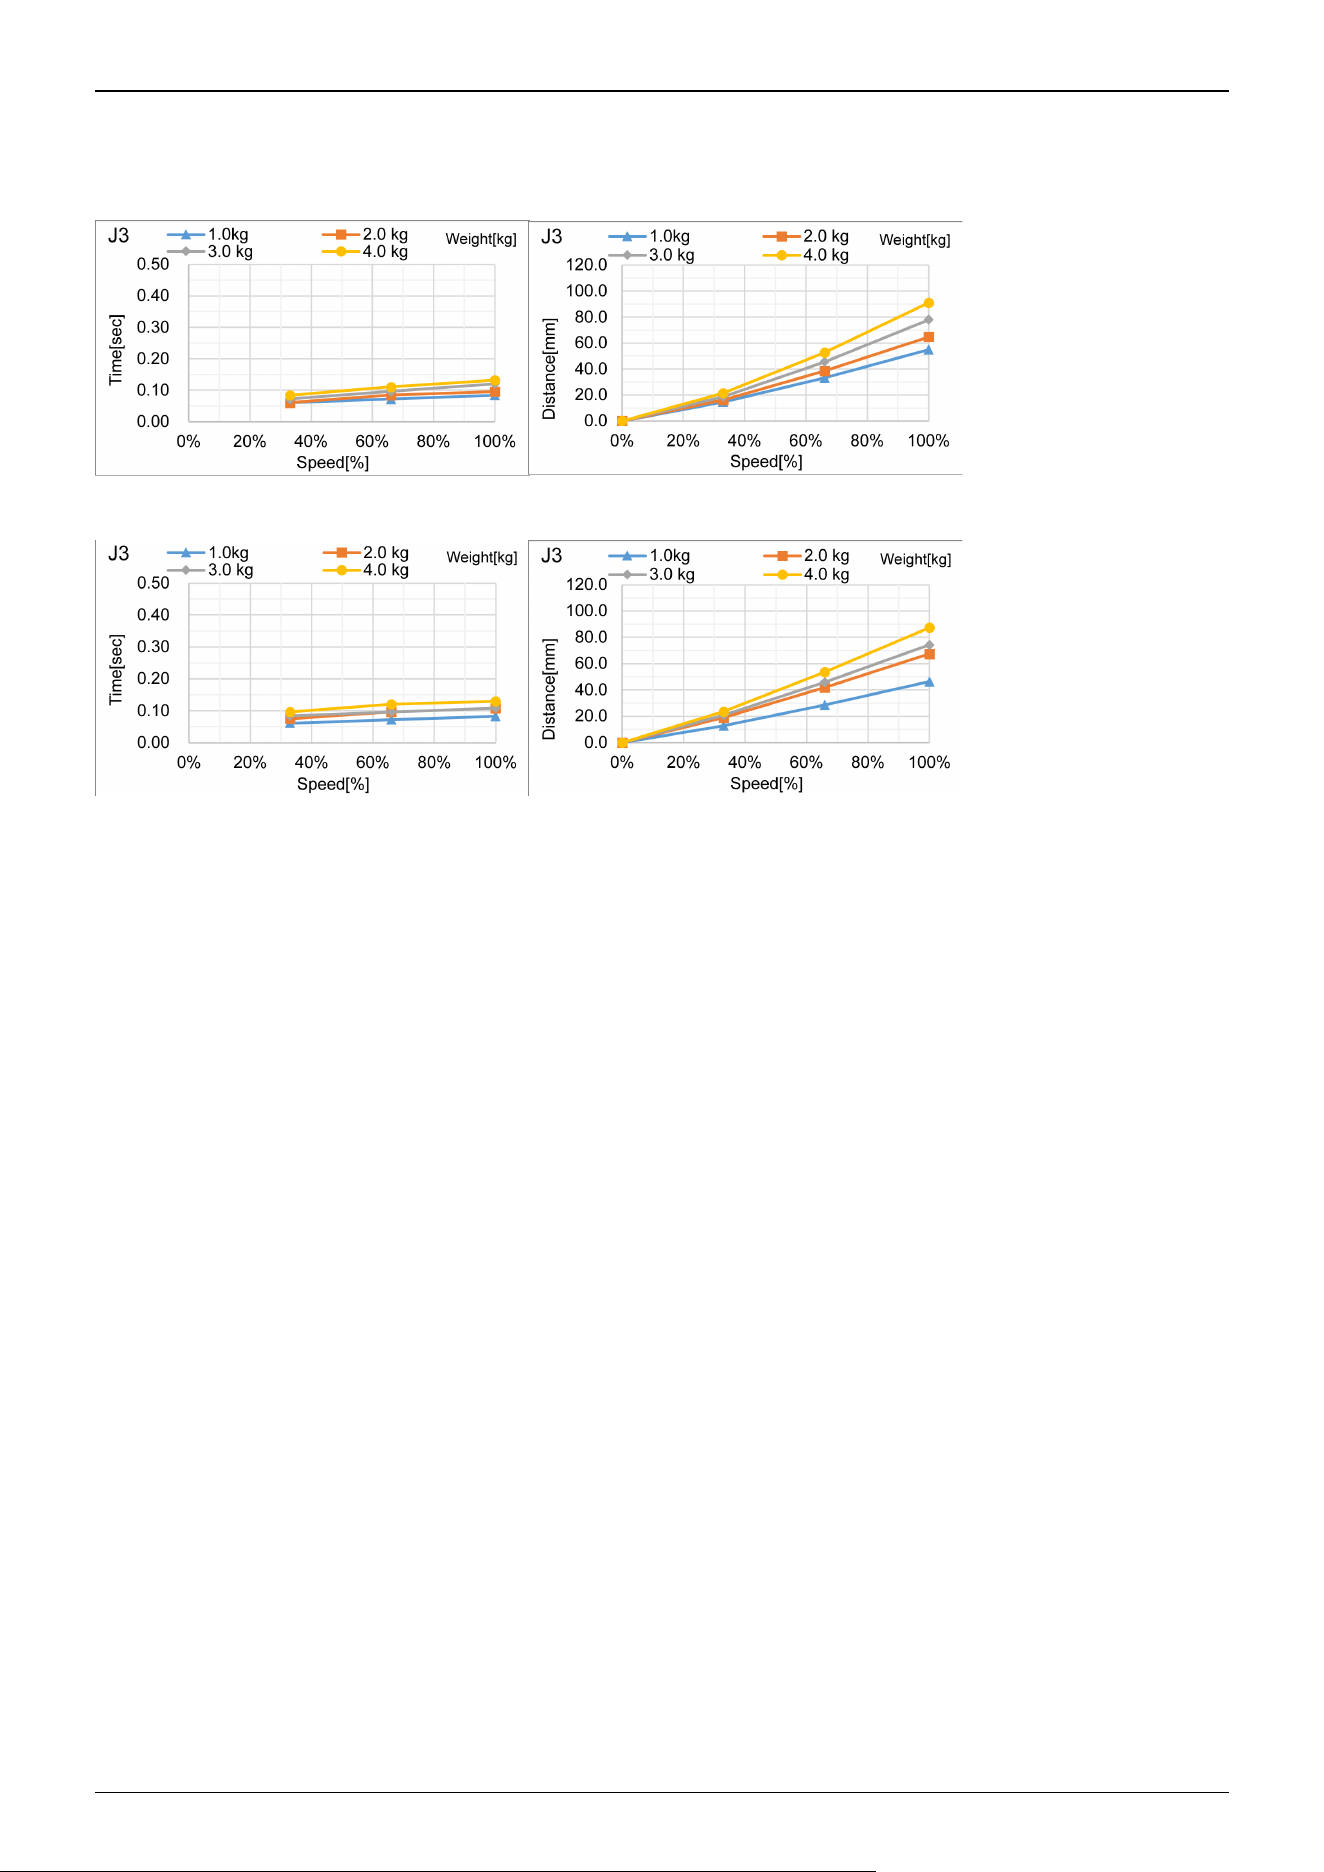
GX4-A/GX4-B/GX4-C25***: J3
Standard mode
Boost mode
Industrial Robot: SCARA Robots GX series Manual Rev.11
513
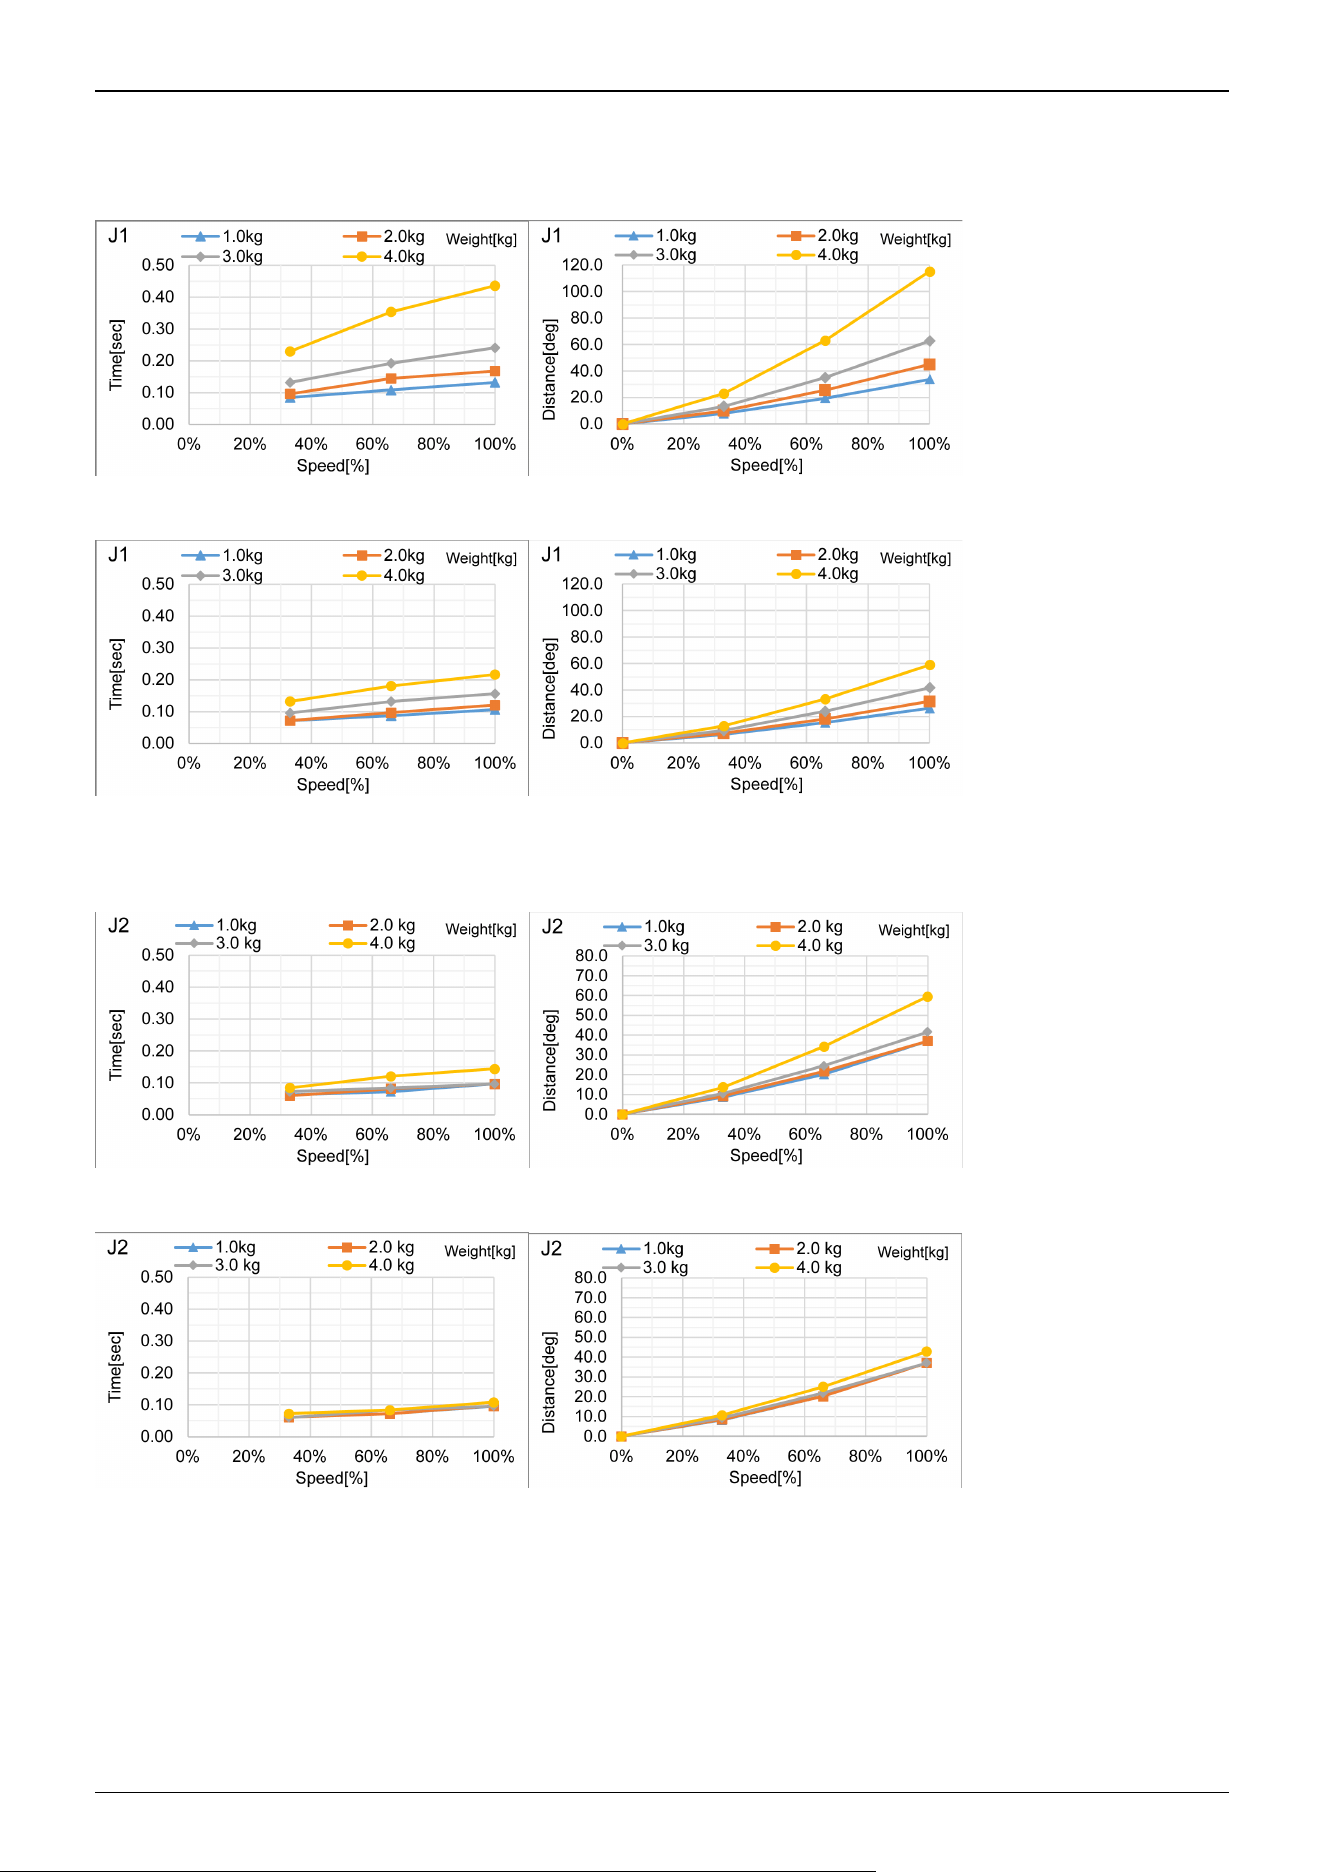
GX4-A/GX4-B/GX4-C30***: J1
Standard mode
Boost mode
GX4-A/GX4-B/GX4-C30***: J2
Standard mode
Boost mode
Industrial Robot: SCARA Robots GX series Manual Rev.11
514
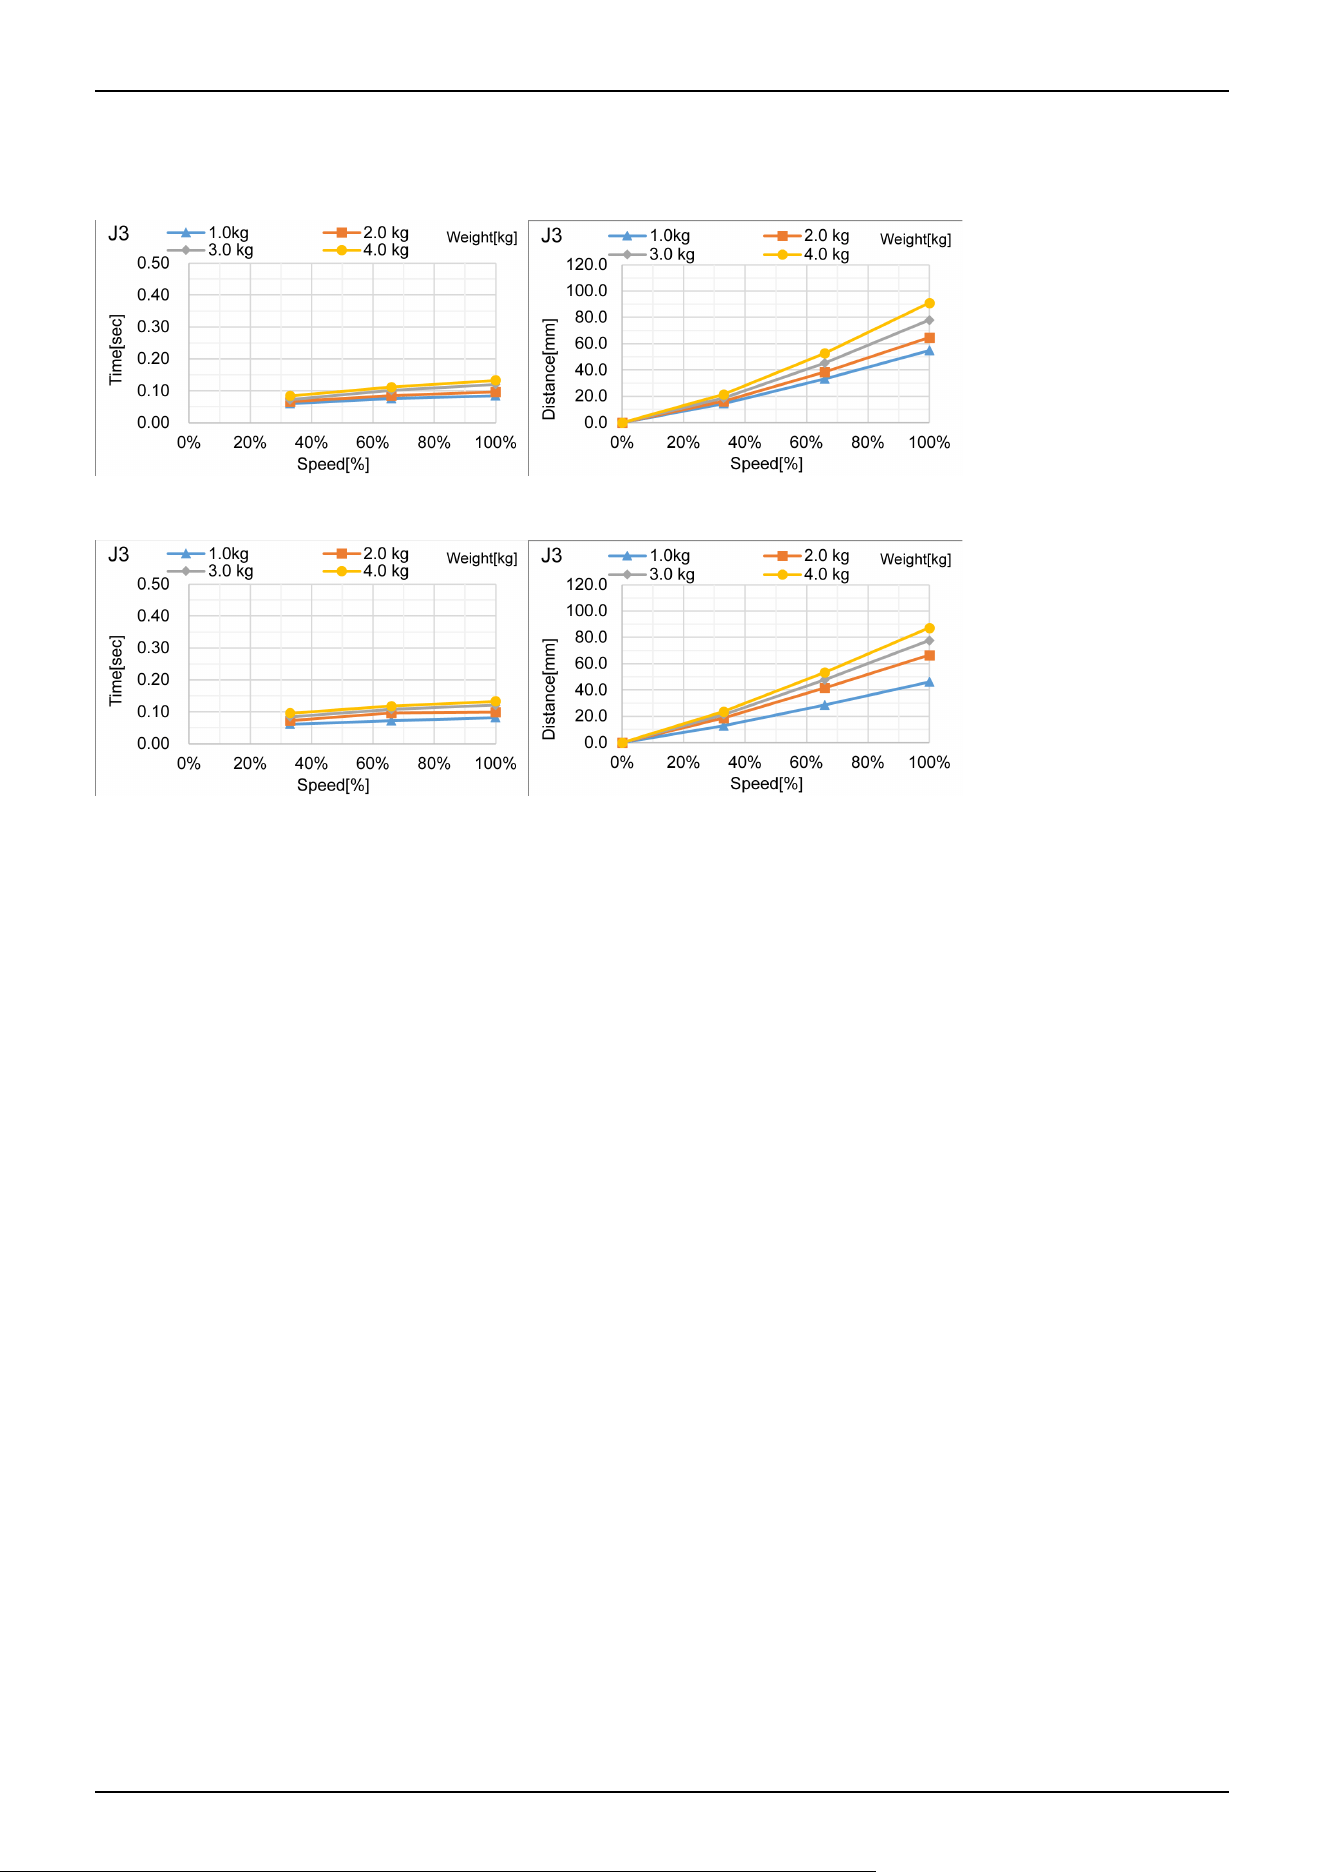
GX4-A/GX4-B/GX4-C30***: J3
Standard mode
Boost mode
Industrial Robot: SCARA Robots GX series Manual Rev.11
515
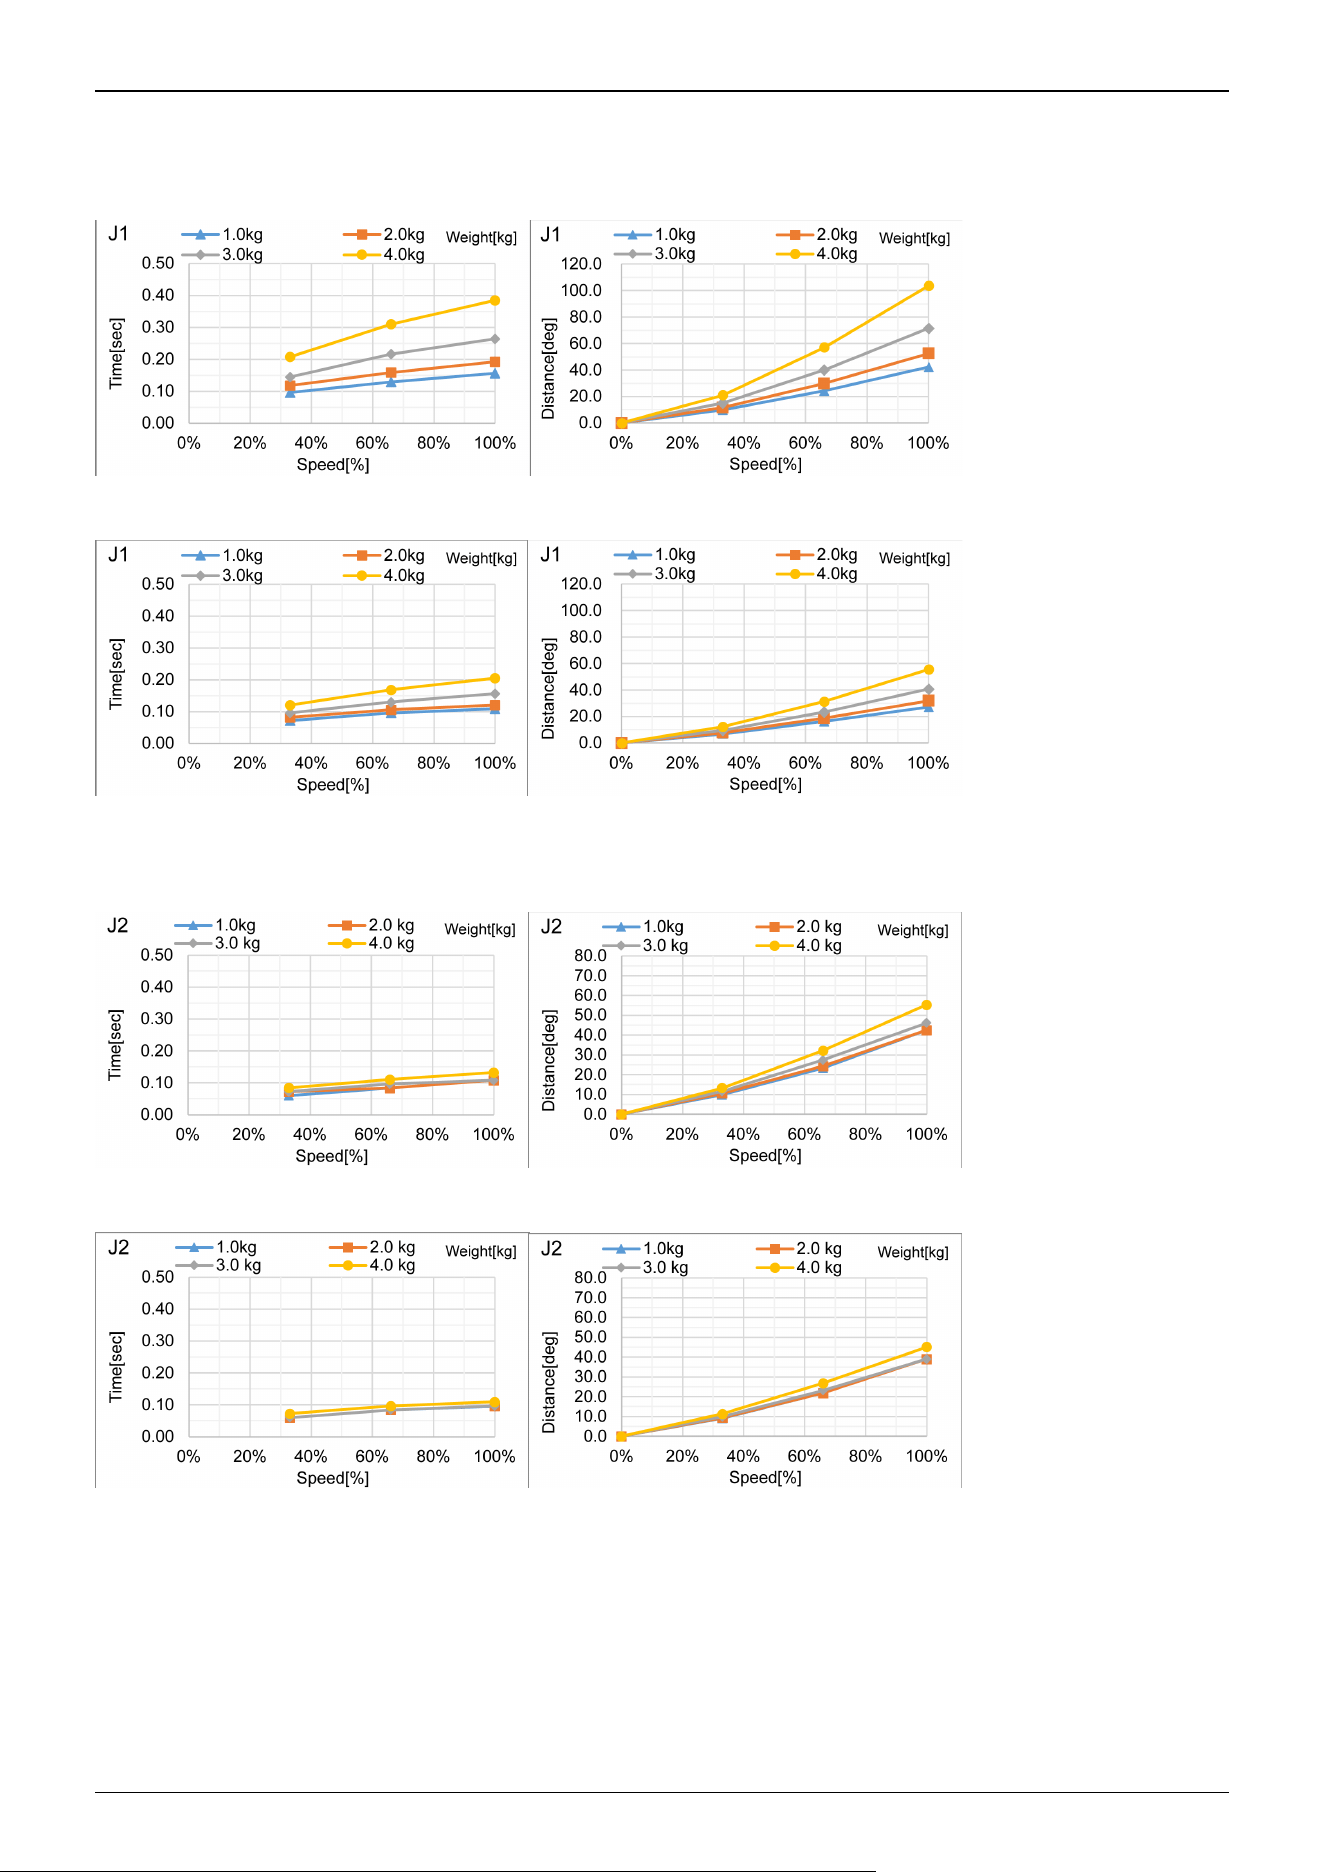
GX4-A/GX4-B/GX4-C35***: J1
Standard mode
Boost mode
GX4-A/GX4-B/GX4-C35***: J2
Standard mode
Boost mode
Industrial Robot: SCARA Robots GX series Manual Rev.11
516
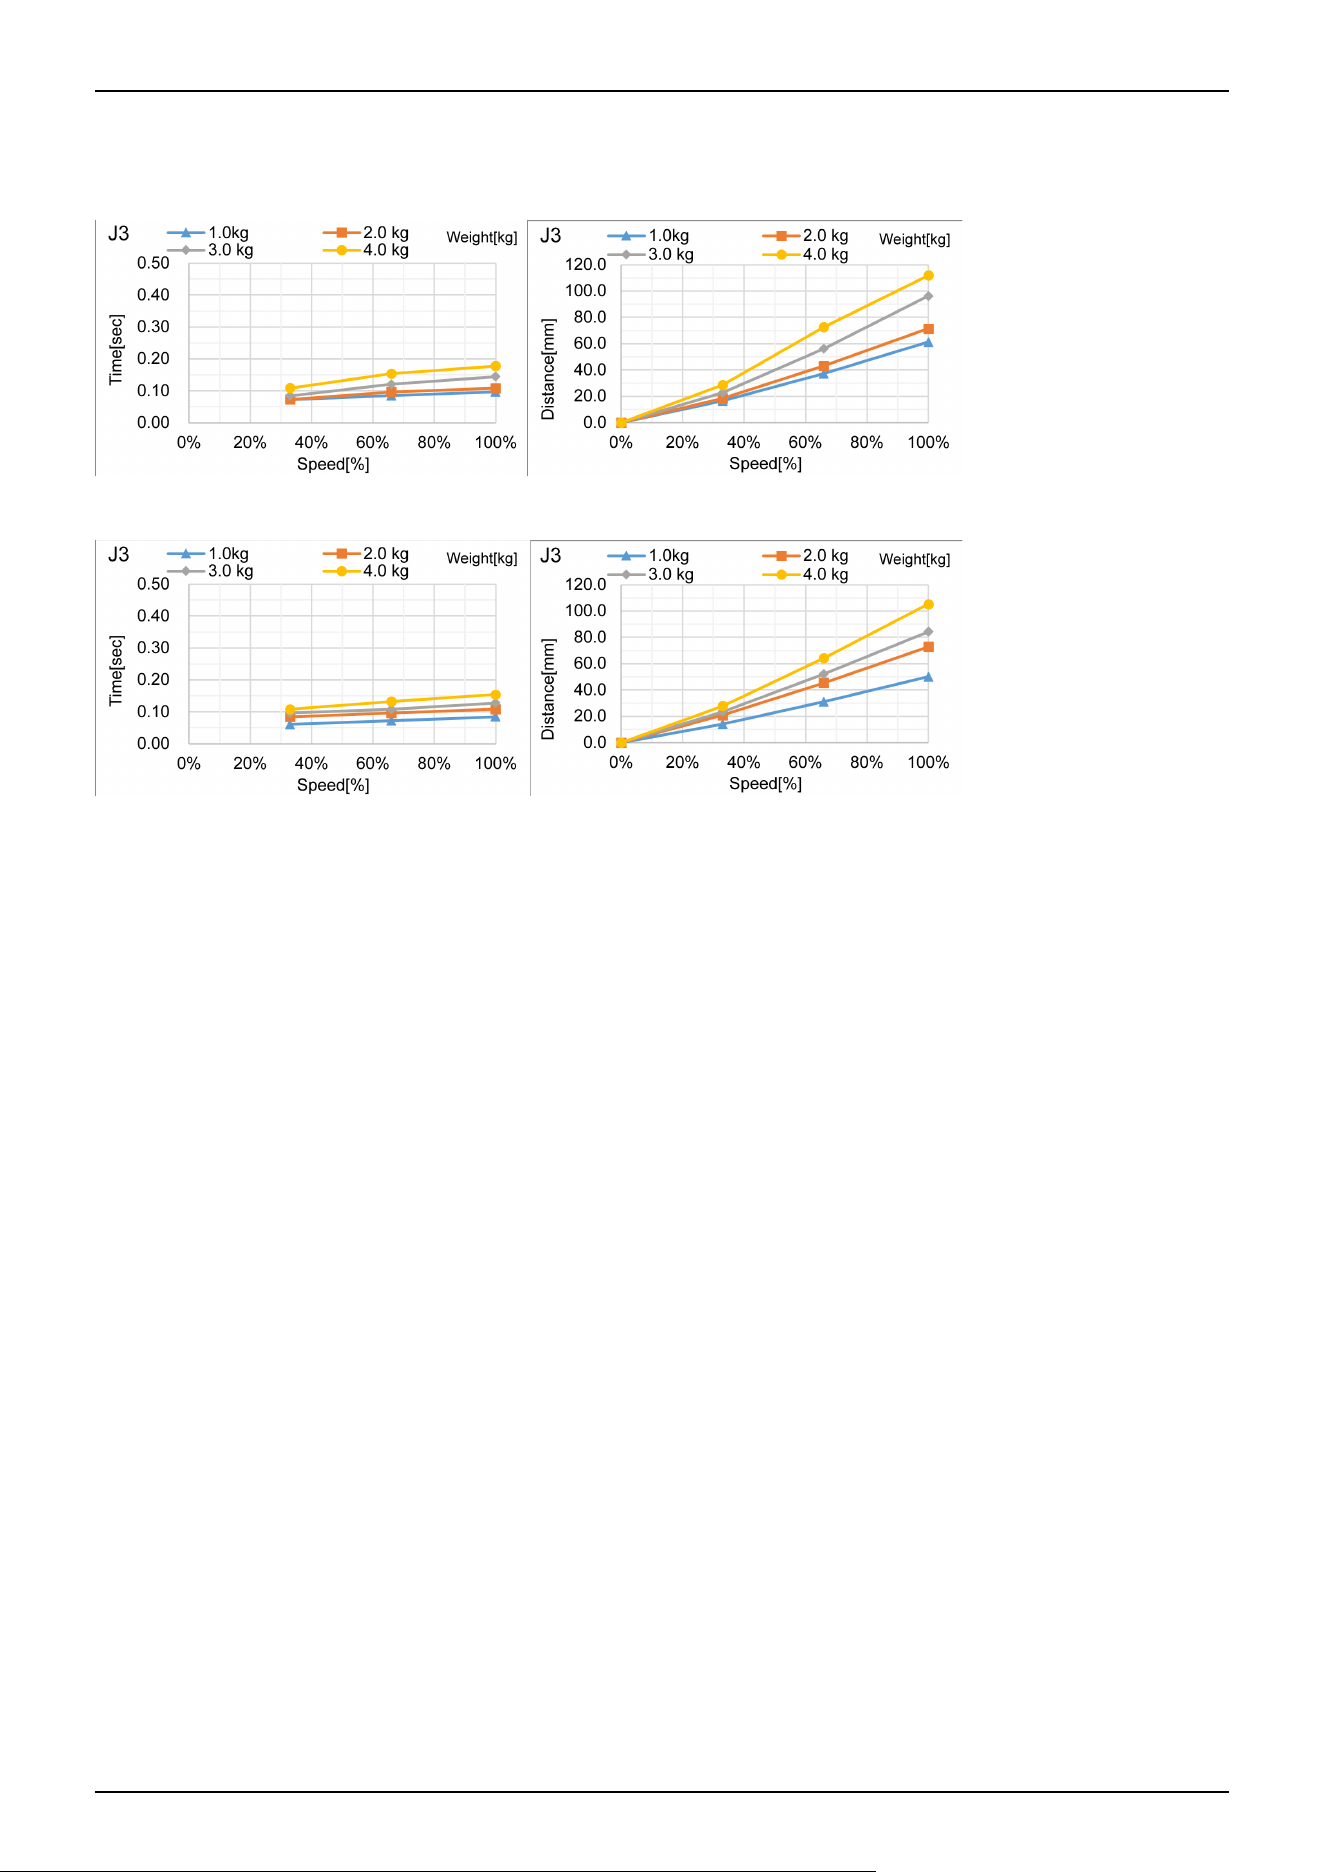
GX4-A/GX4-B/GX4-C35***: J3
Standard mode
Boost mode
Industrial Robot: SCARA Robots GX series Manual Rev.11
517
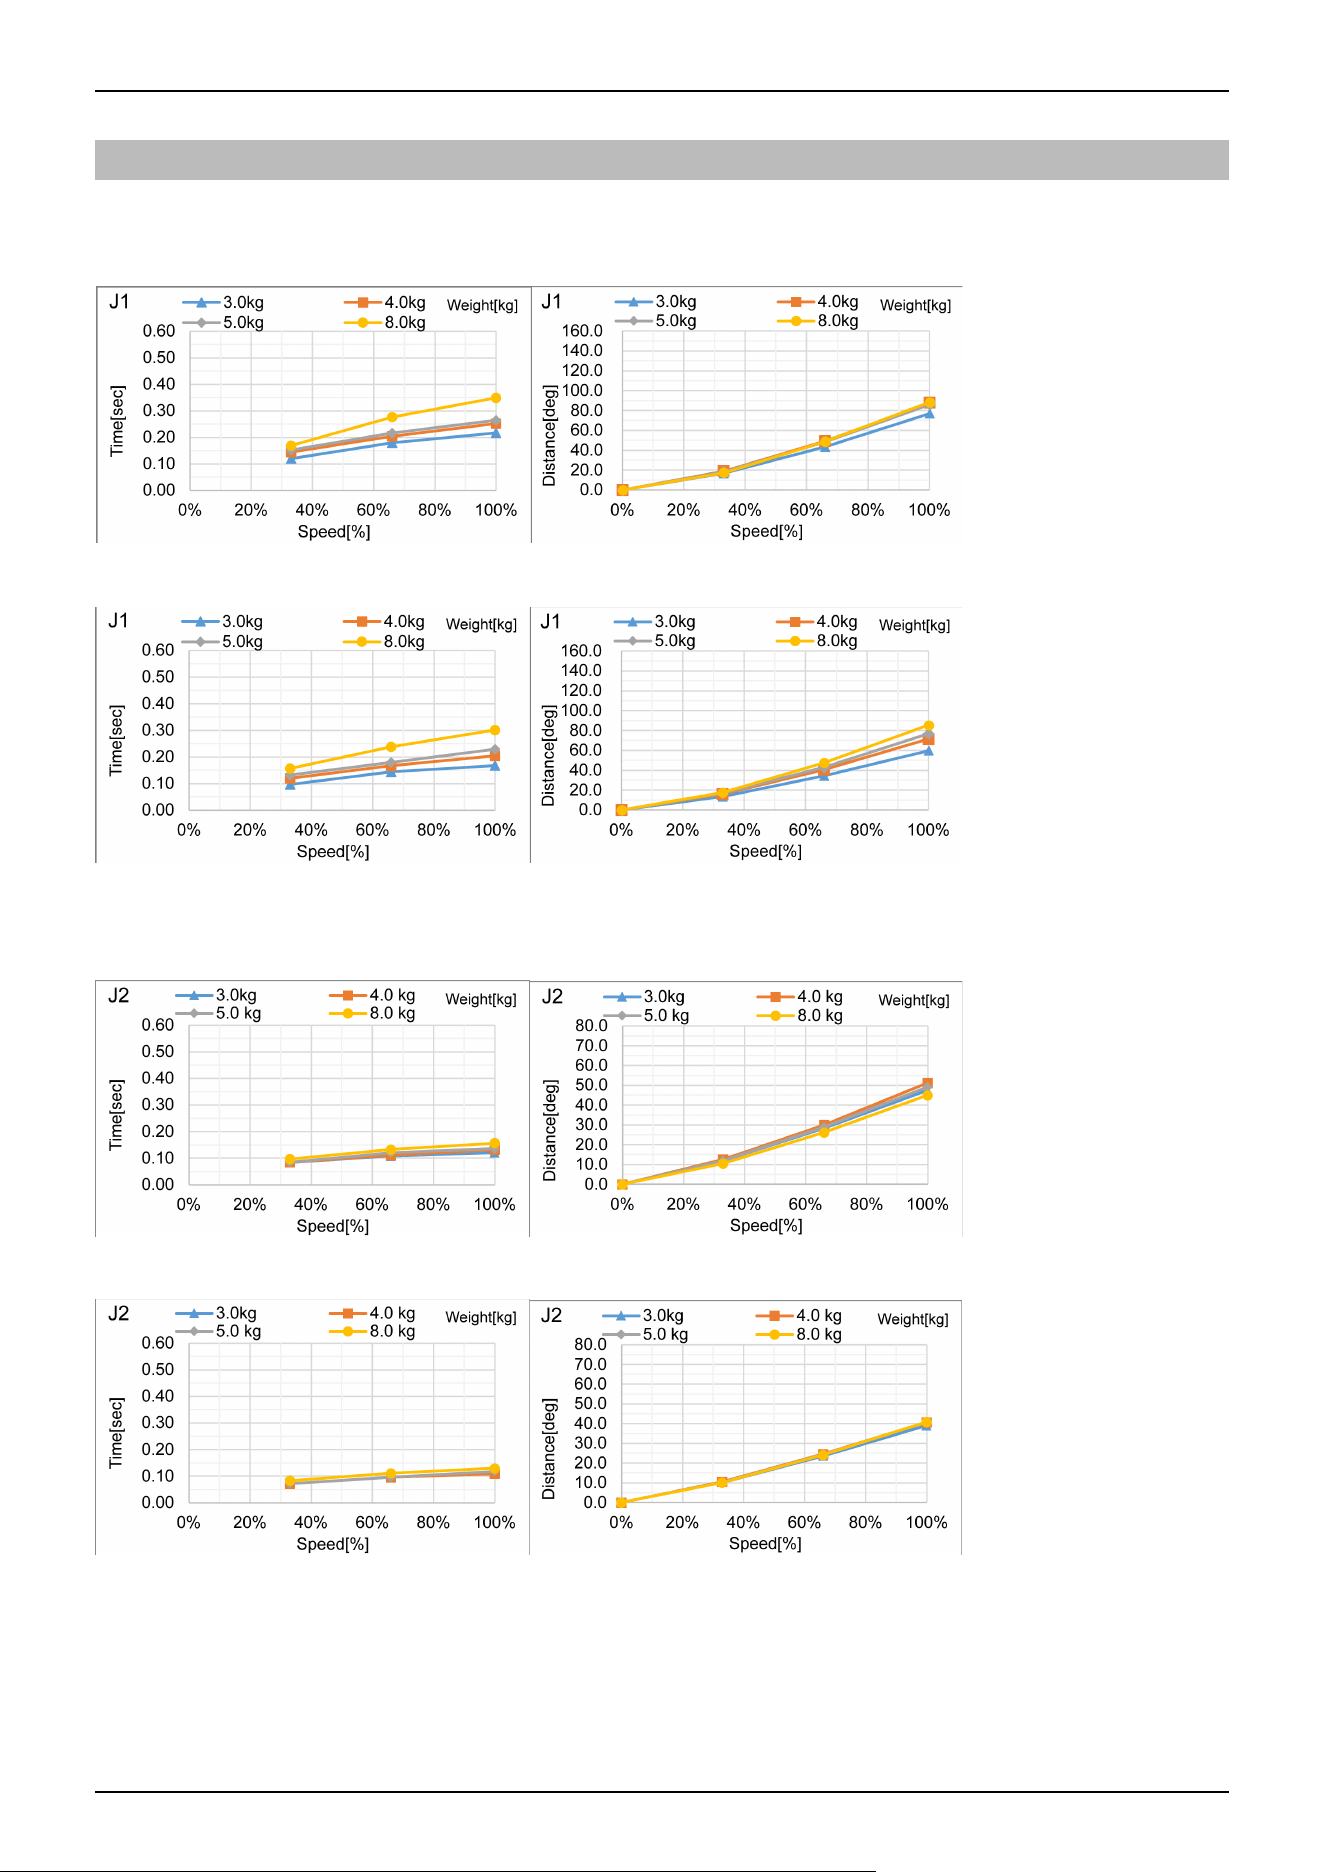
7.3.3 GX8 Stopping Time and Stopping Distance When Safeguard is Open
GX8-A/GX8-B/GX8-C45***: J1
Standard mode
Boost mode
GX8-A/GX8-B/GX8-C45***: J2
Standard mode
Boost mode
Industrial Robot: SCARA Robots GX series Manual Rev.11
518
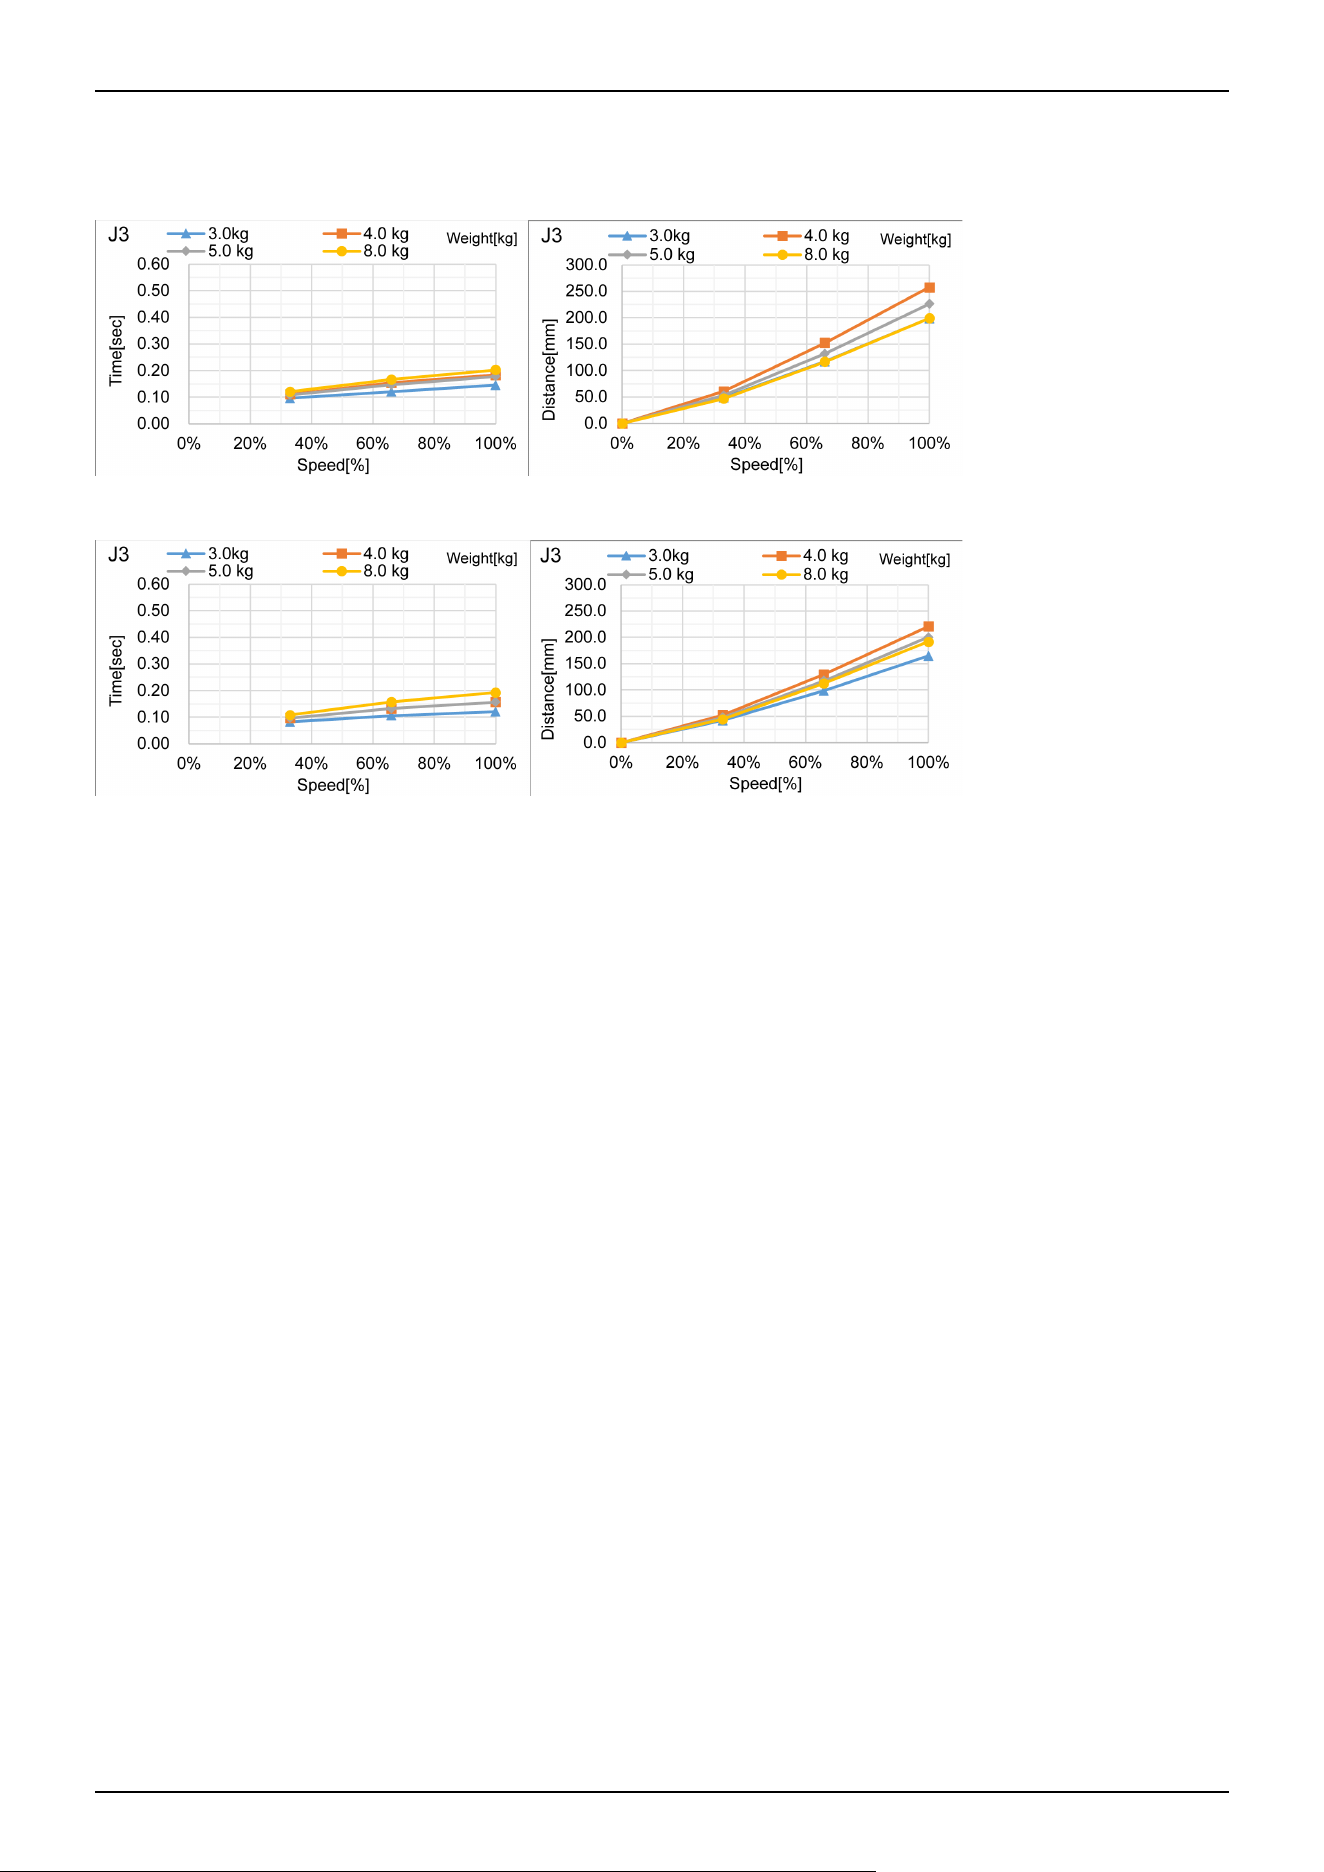
GX8-A/GX8-B/GX8-C45***: J3
Standard mode
Boost mode
Industrial Robot: SCARA Robots GX series Manual Rev.11
519
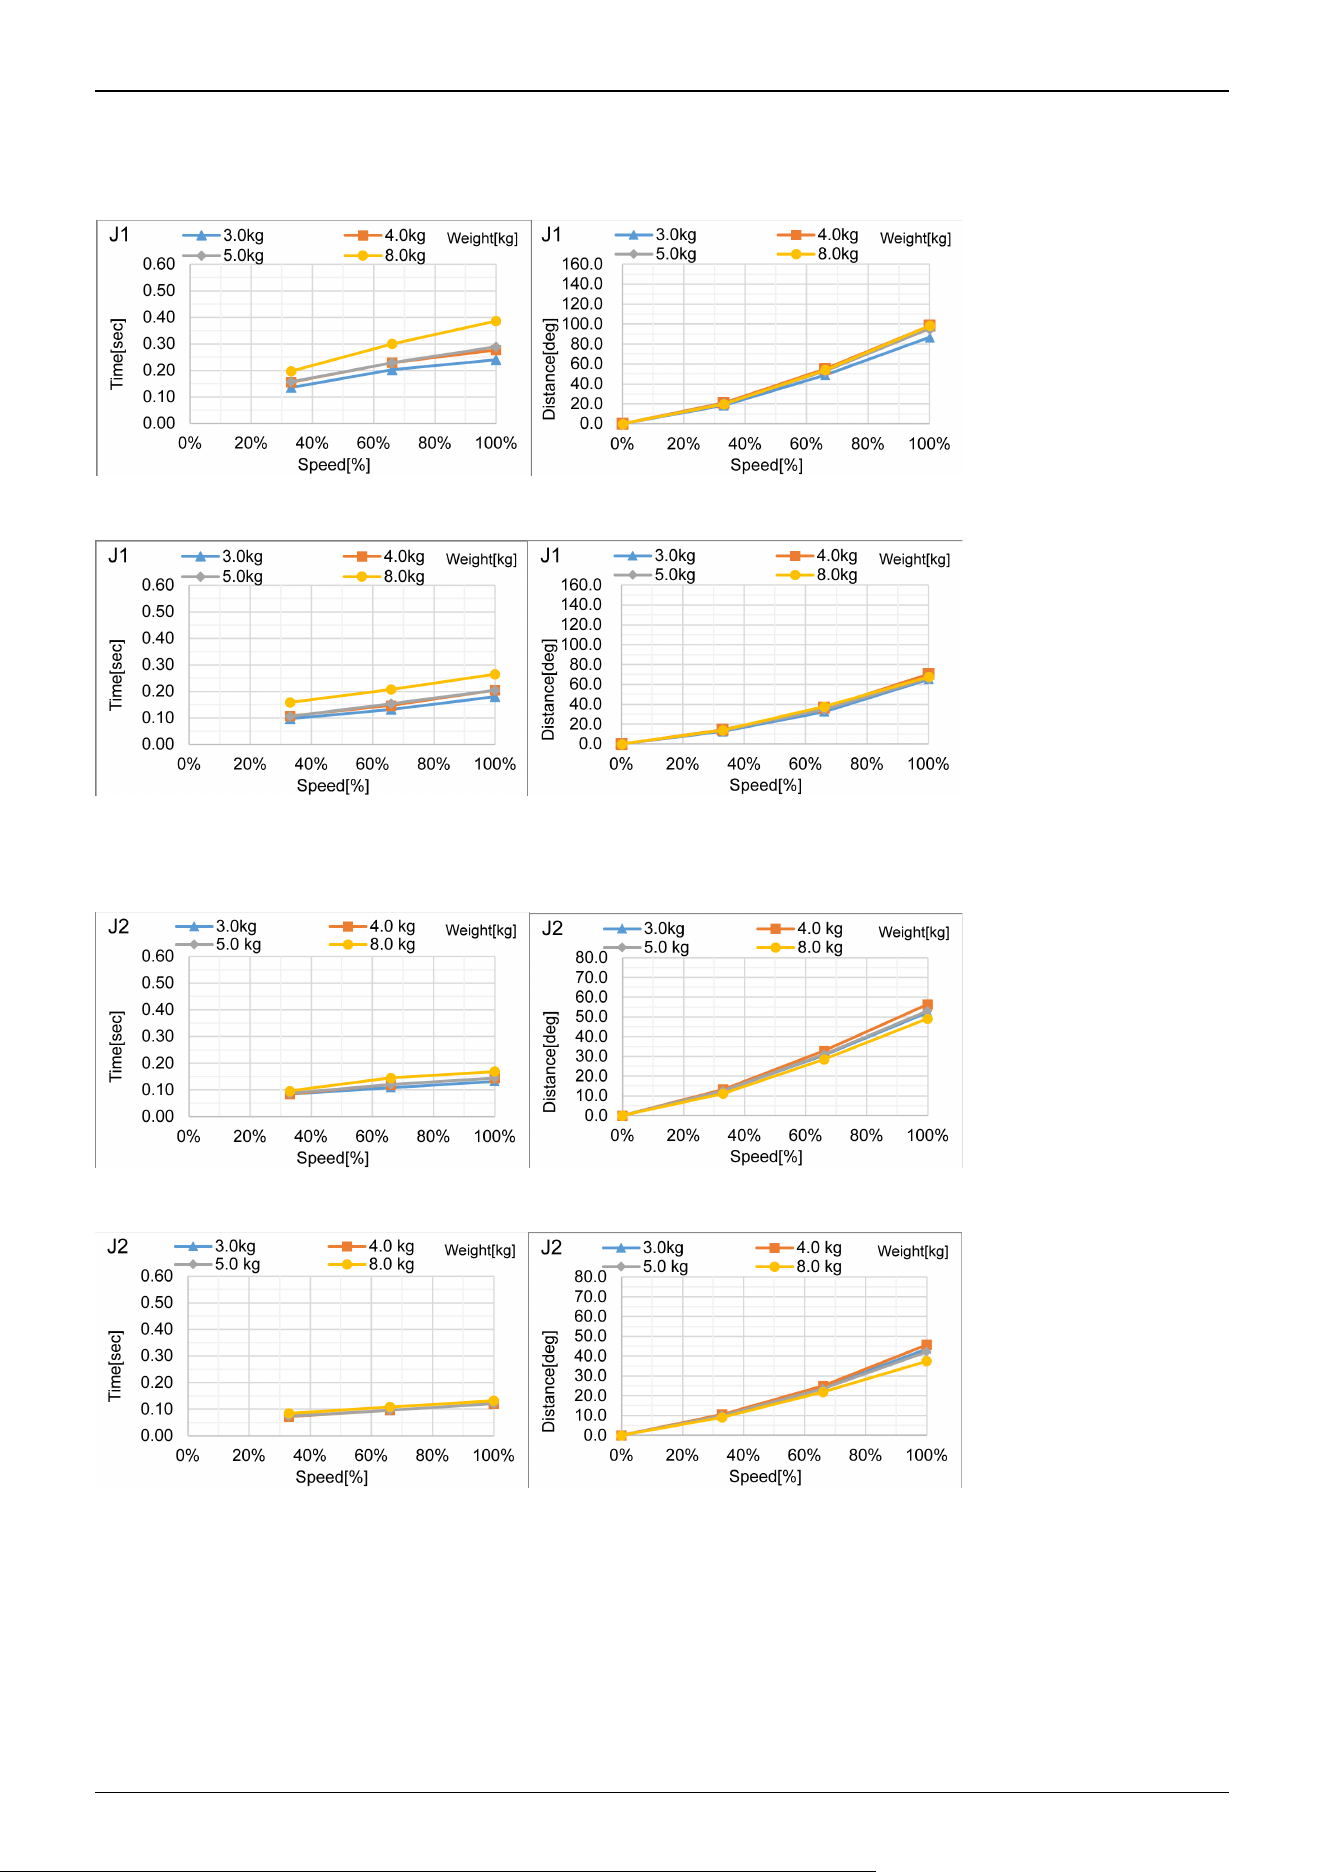
GX8-A/GX8-B/GX8-C55***: J1
Standard mode
Boost mode
GX8-A/GX8-B/GX8-C55***: J2
Standard mode
Boost mode
Industrial Robot: SCARA Robots GX series Manual Rev.11
520
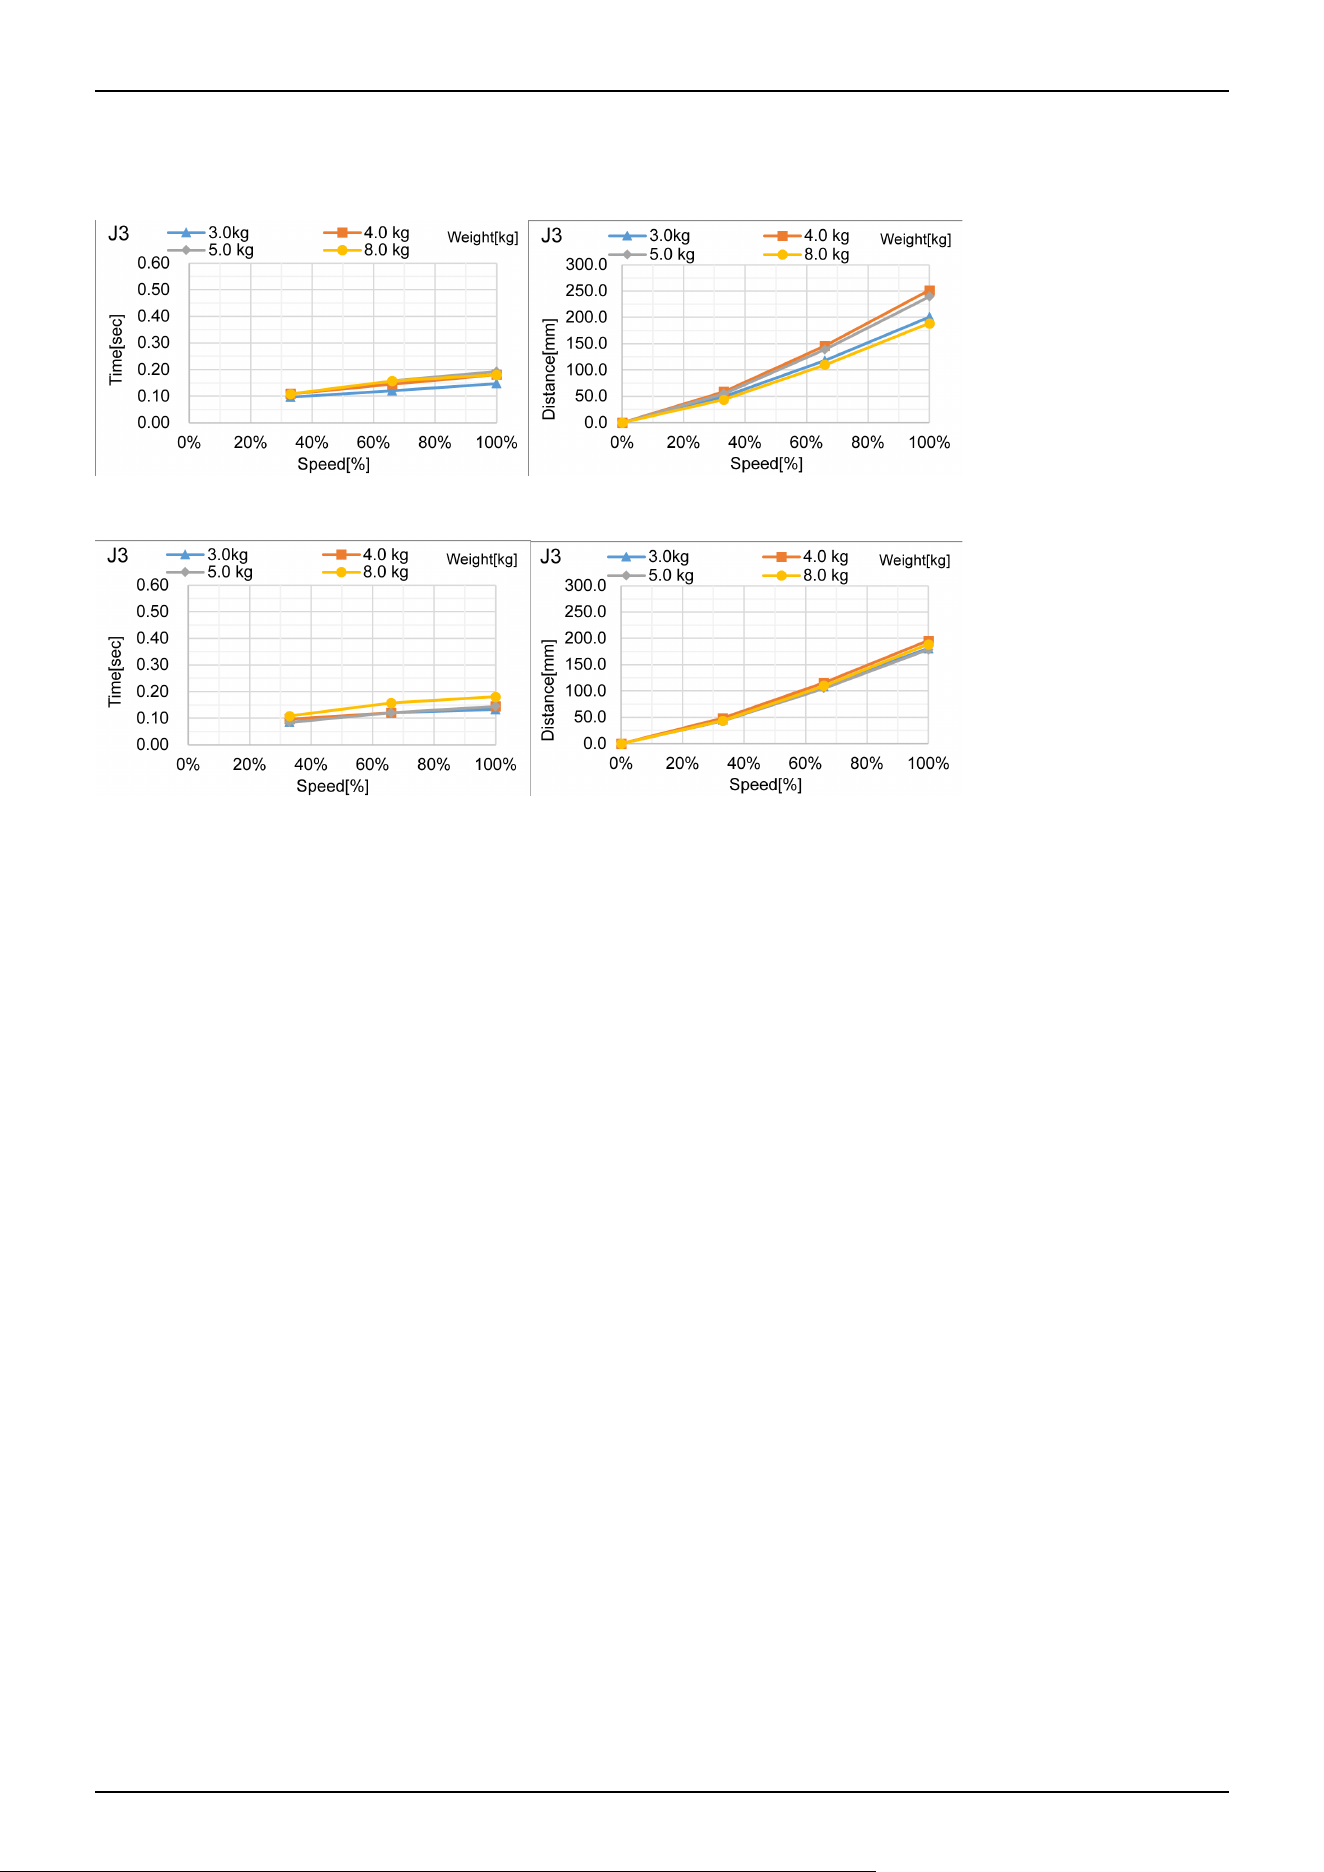
GX8-A/GX8-B/GX8-C55***: J3
Standard mode
Boost mode
Industrial Robot: SCARA Robots GX series Manual Rev.11
521
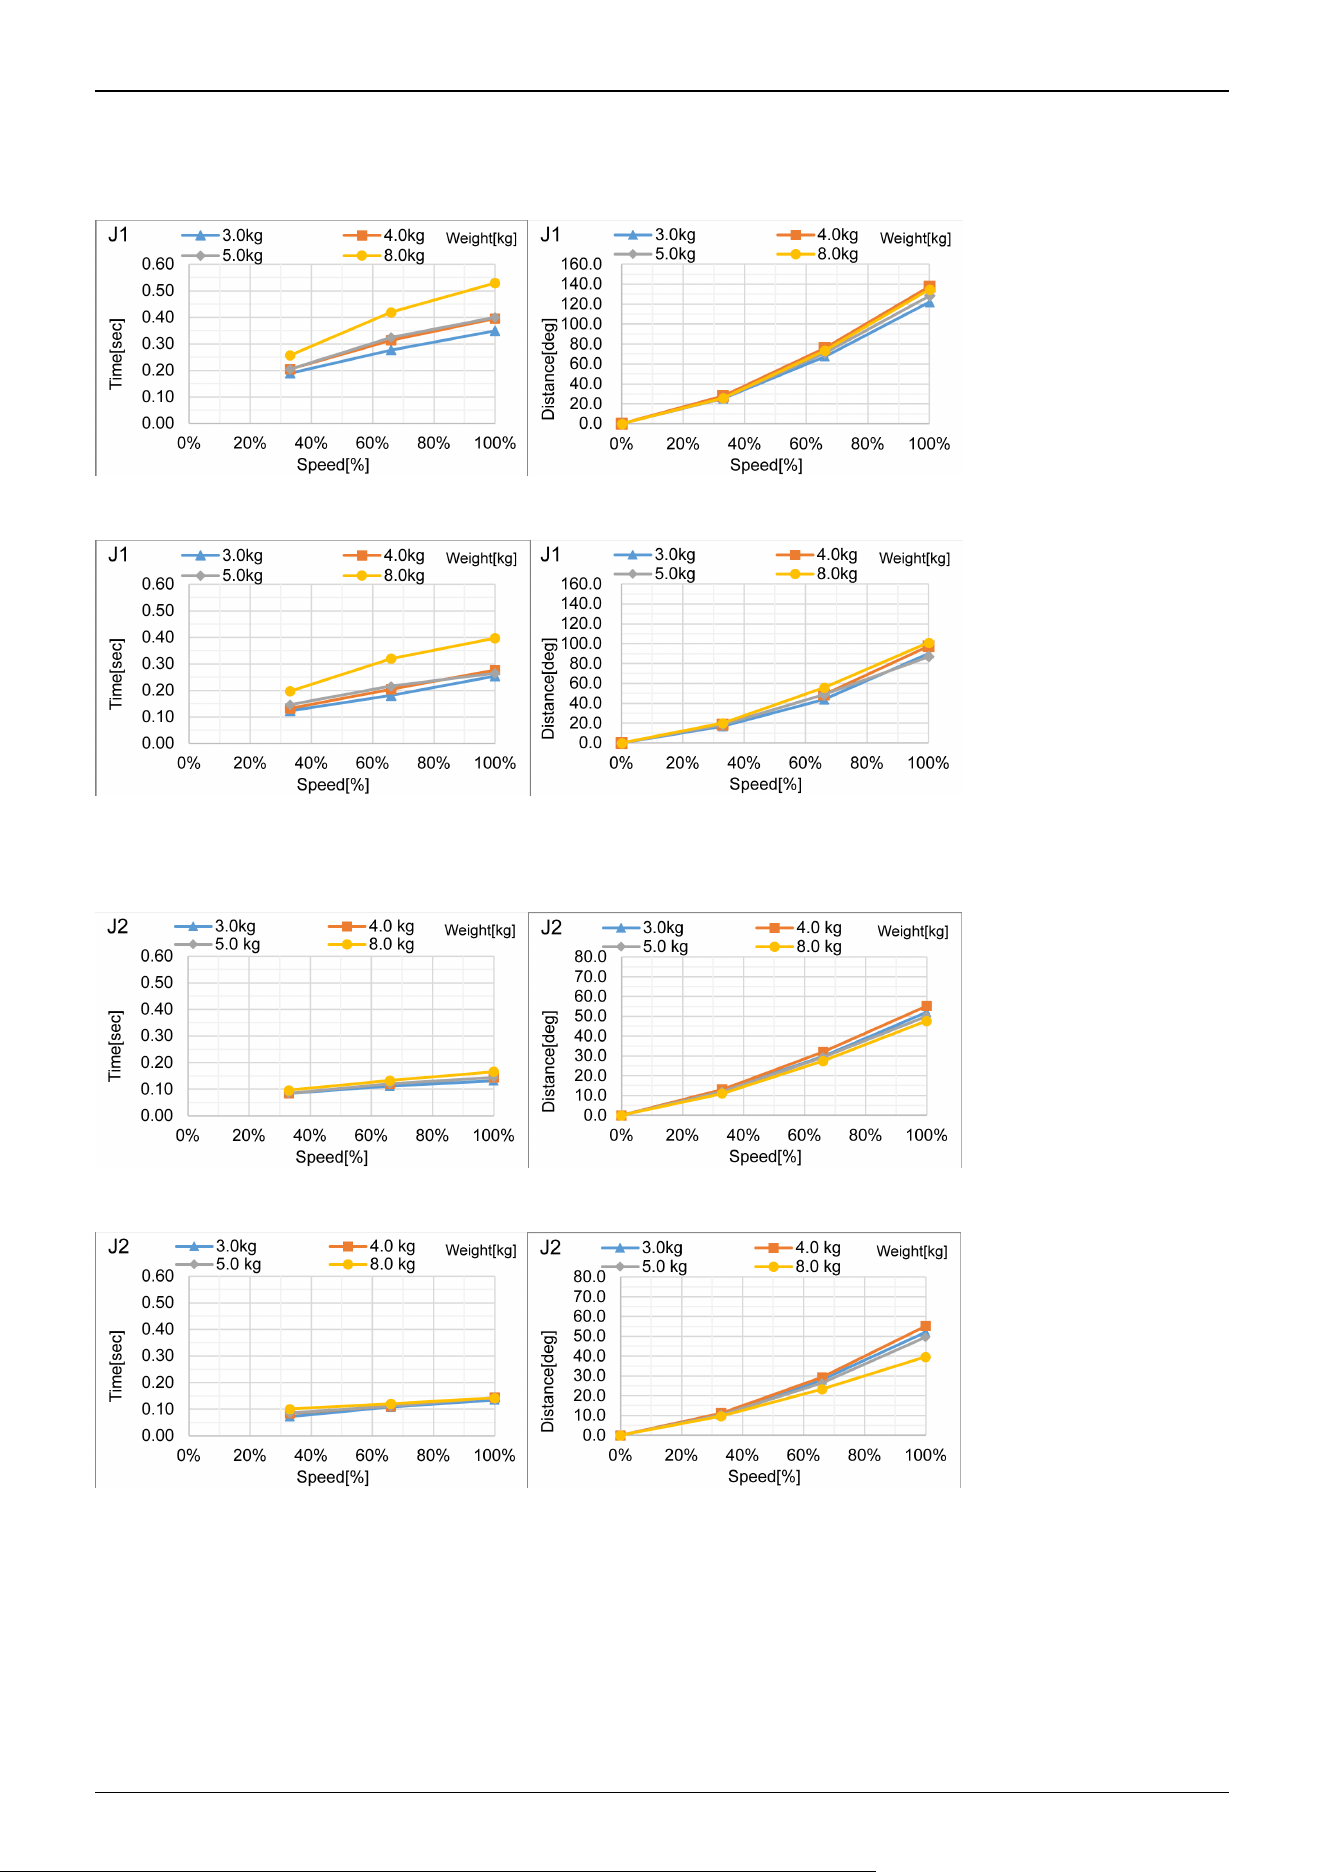
GX8-A/GX8-B/GX8-C65***: J1
Standard mode
Boost mode
GX8-A/GX8-B/GX8-C65***: J2
Standard mode
Boost mode
Industrial Robot: SCARA Robots GX series Manual Rev.11
522
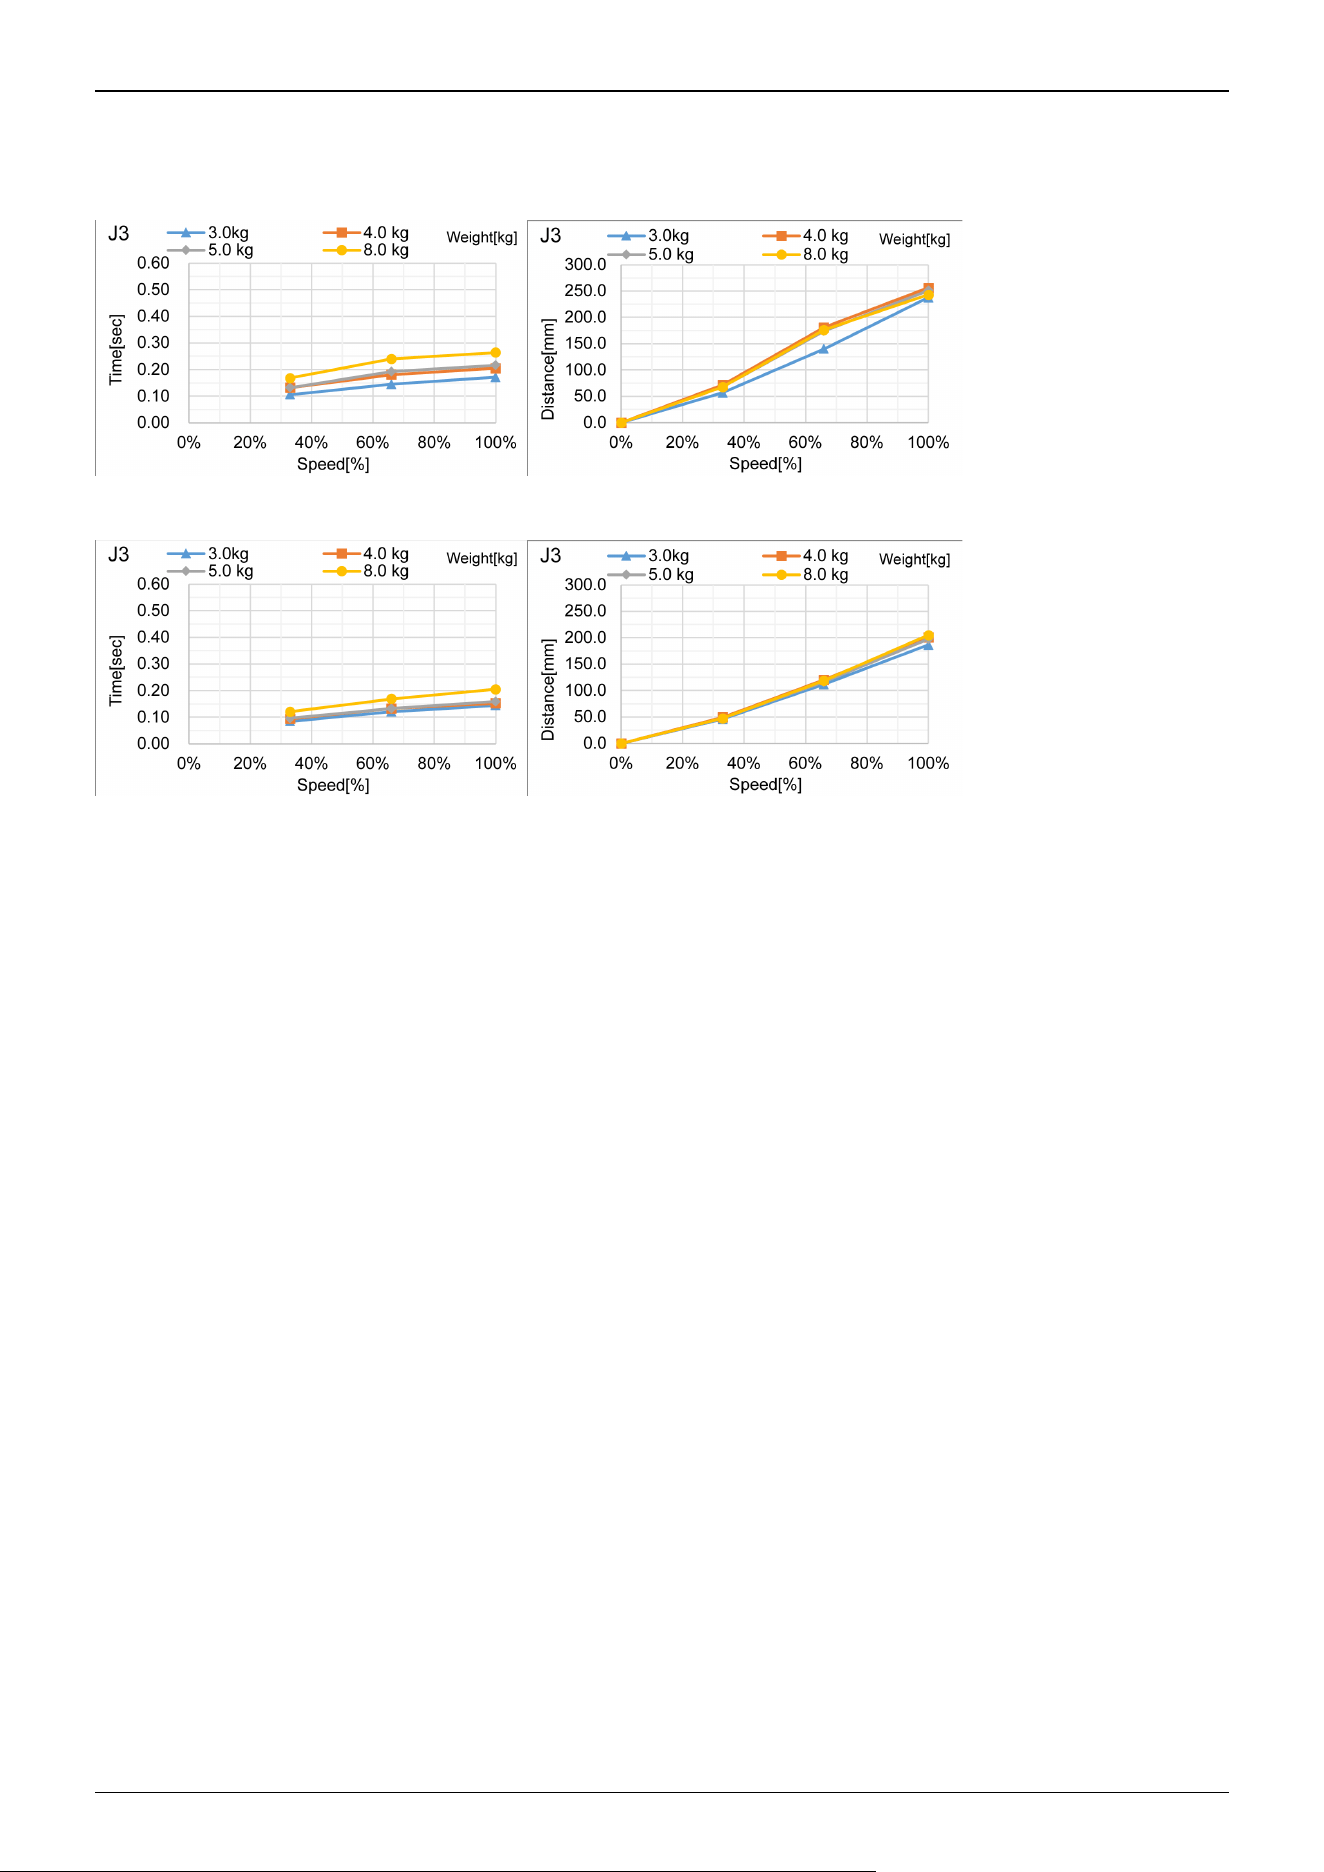
GX8-A/GX8-B/GX8-C65***: J3
Standard mode
Boost mode
Industrial Robot: SCARA Robots GX series Manual Rev.11
523
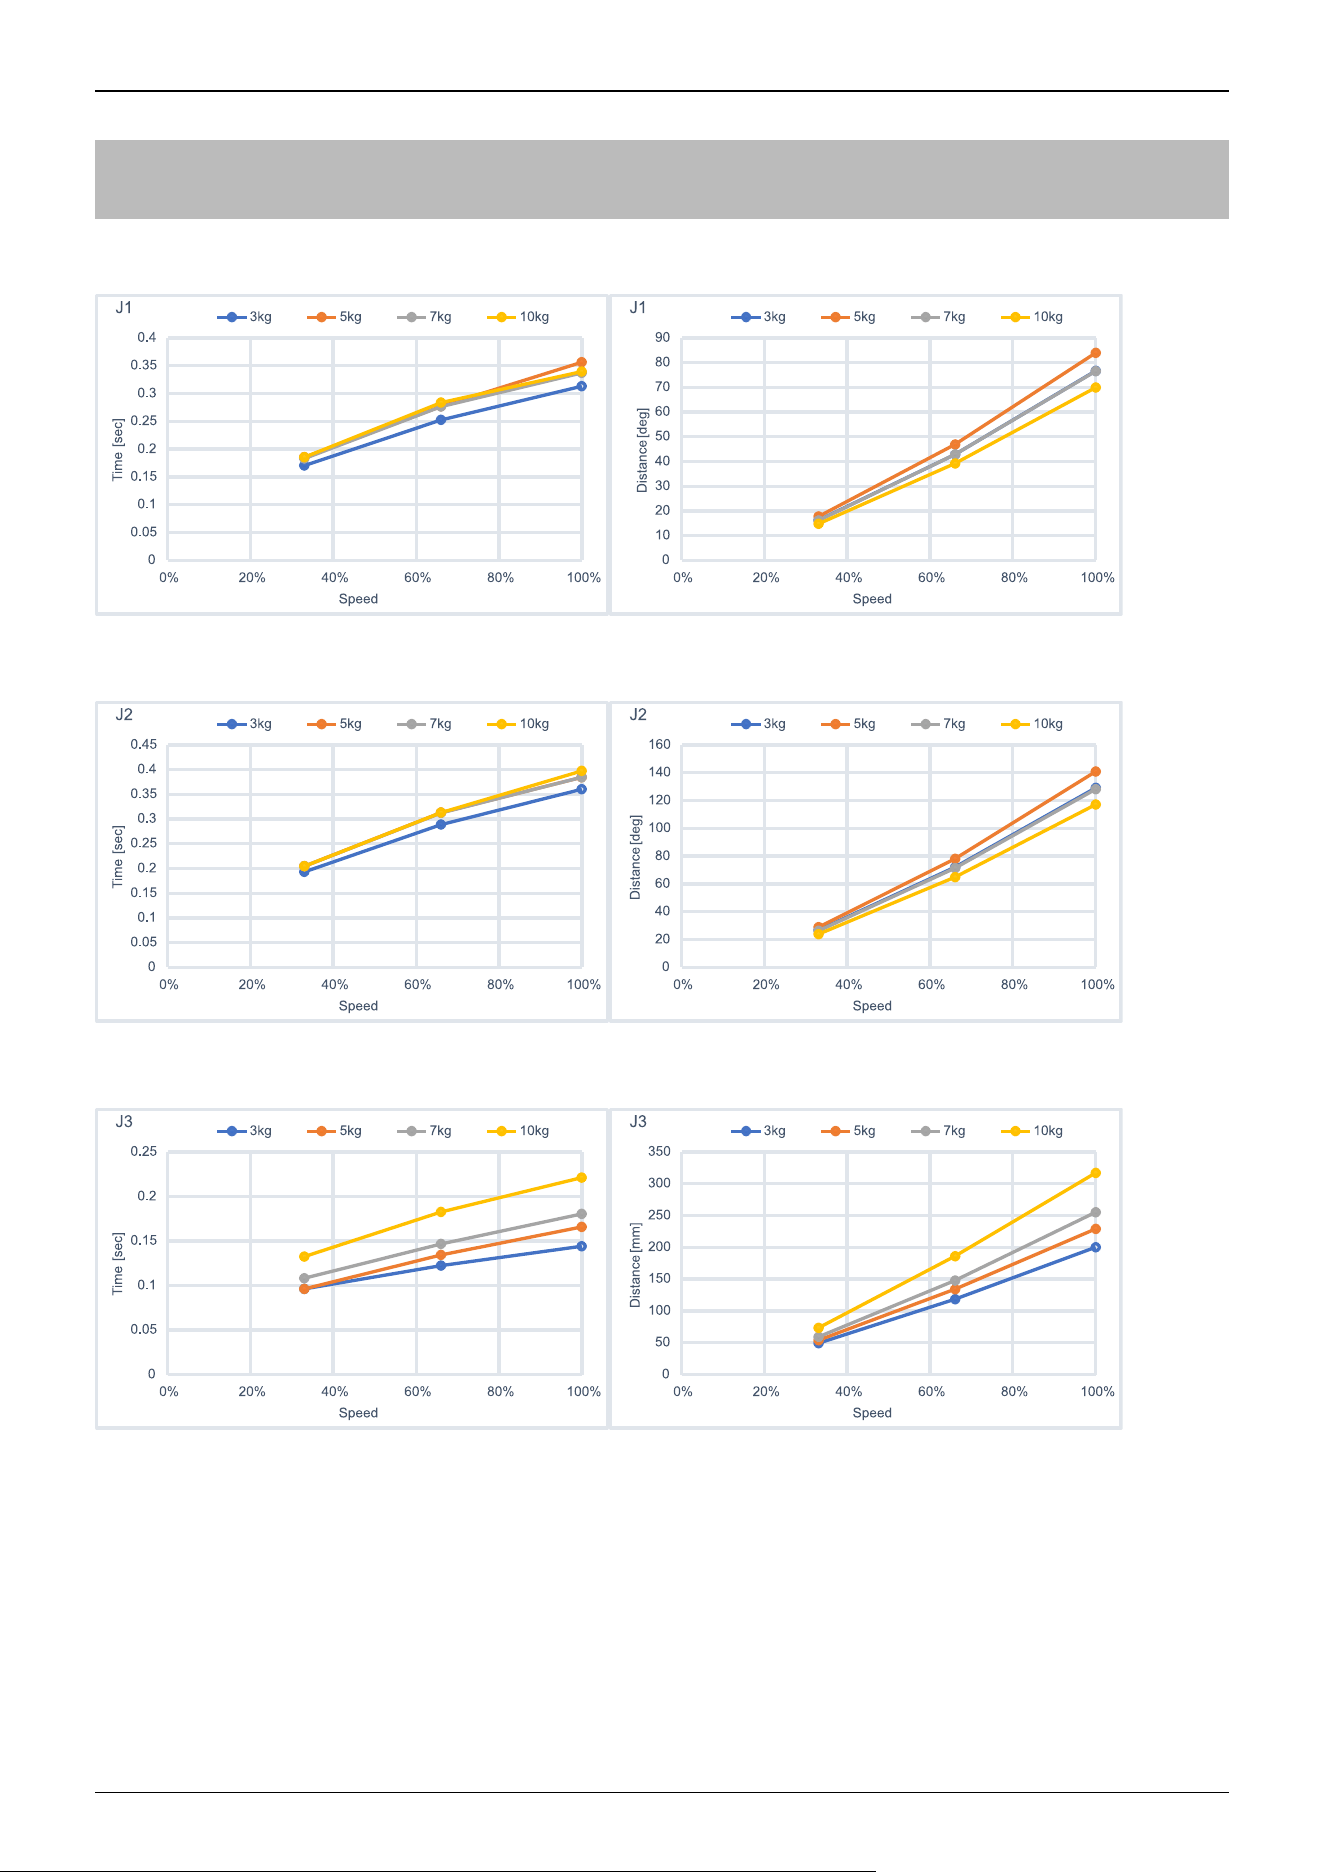
7.3.4 GX10 Stopping Time and Stopping Distance When Safeguard is
Open
GX10-B/GX10-C65***: J1
GX10-B/GX10-C65***: J2
GX10-B/GX10-C65***: J3
Industrial Robot: SCARA Robots GX series Manual Rev.11
524
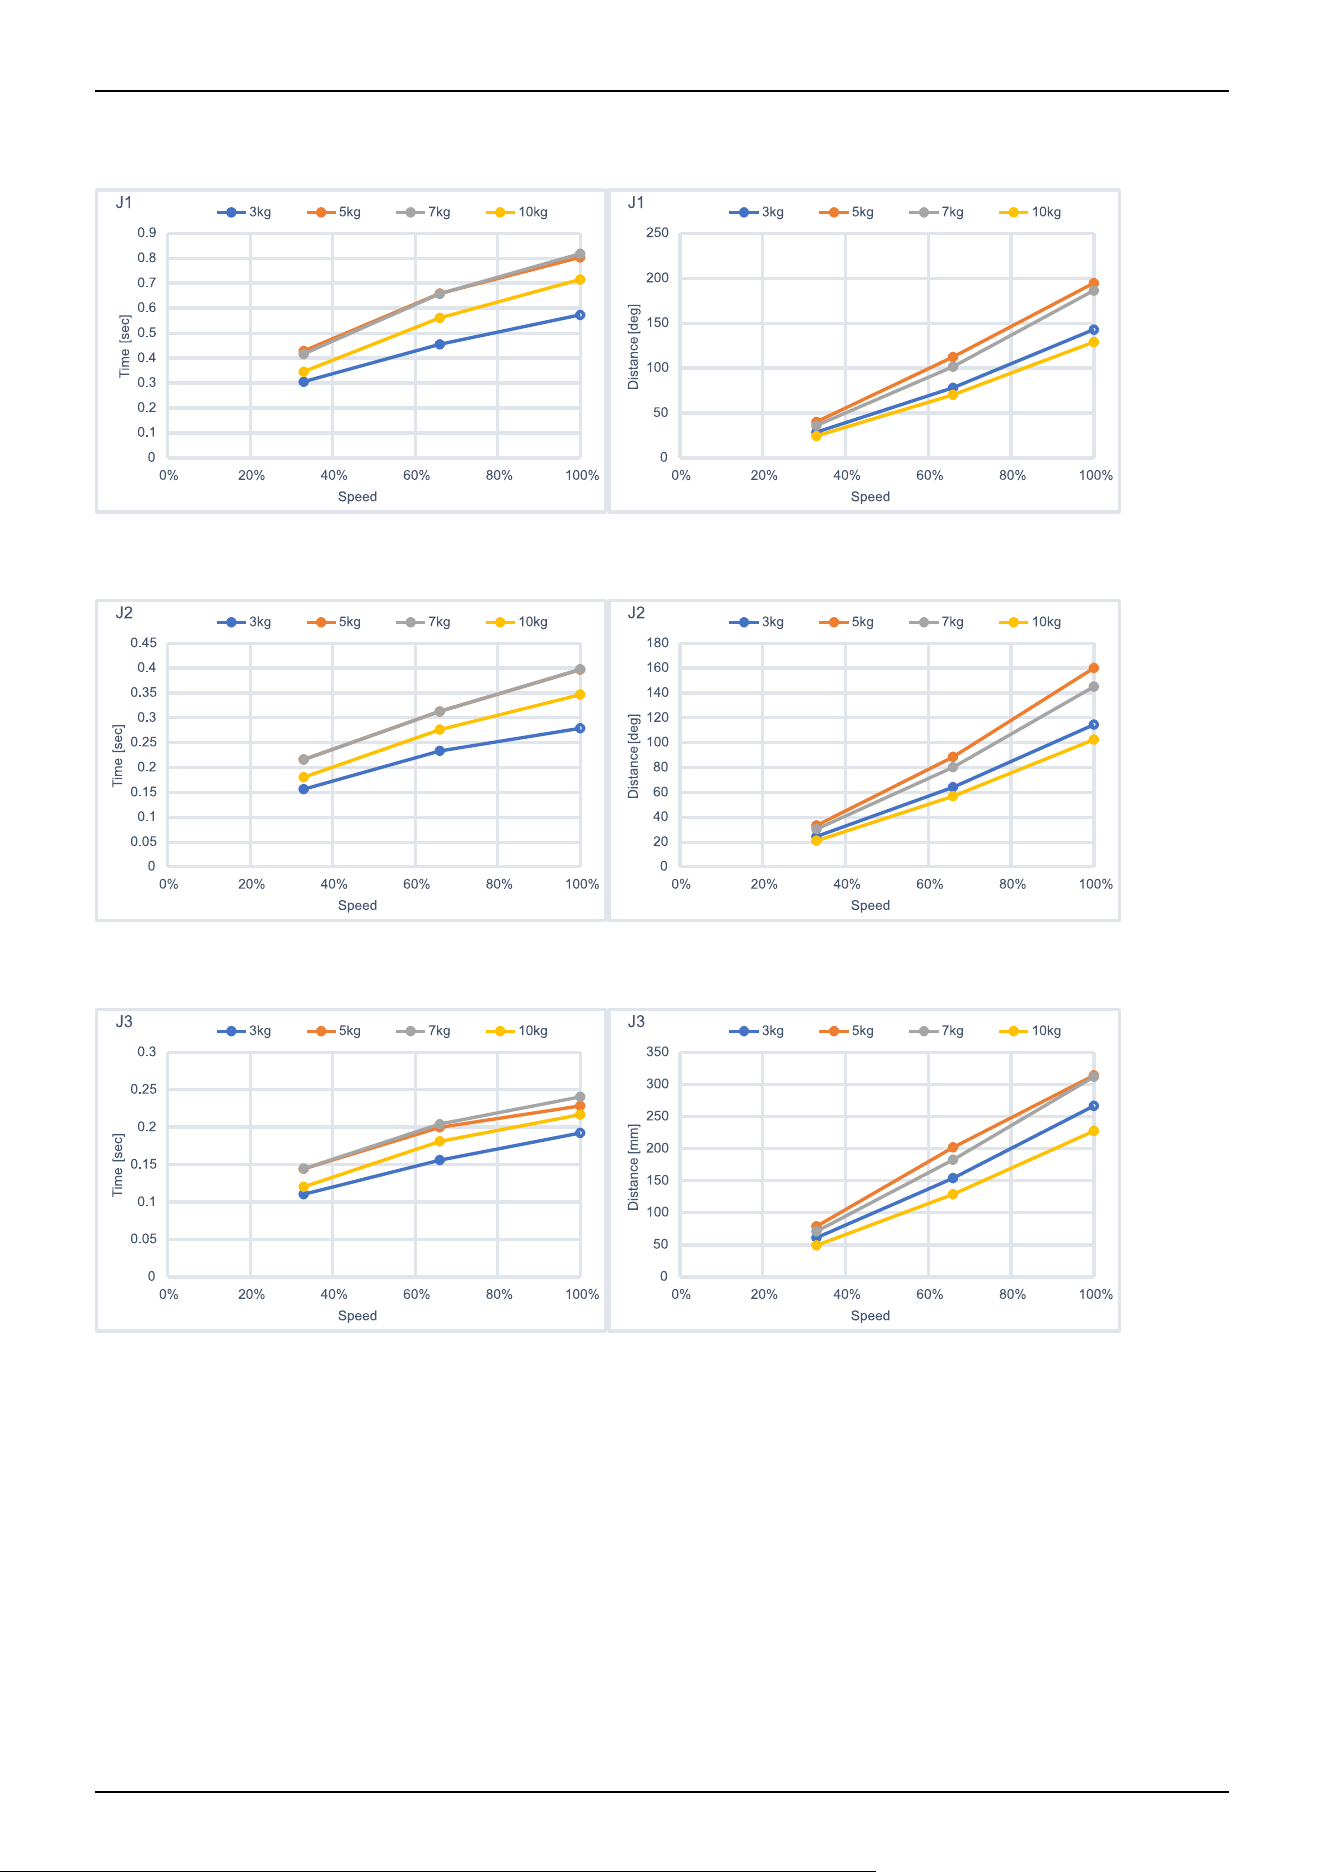
GX10-B/GX10-C85***: J1
GX10-B/GX10-C85***: J2
GX10-B/GX10-C85***: J3
Industrial Robot: SCARA Robots GX series Manual Rev.11
525
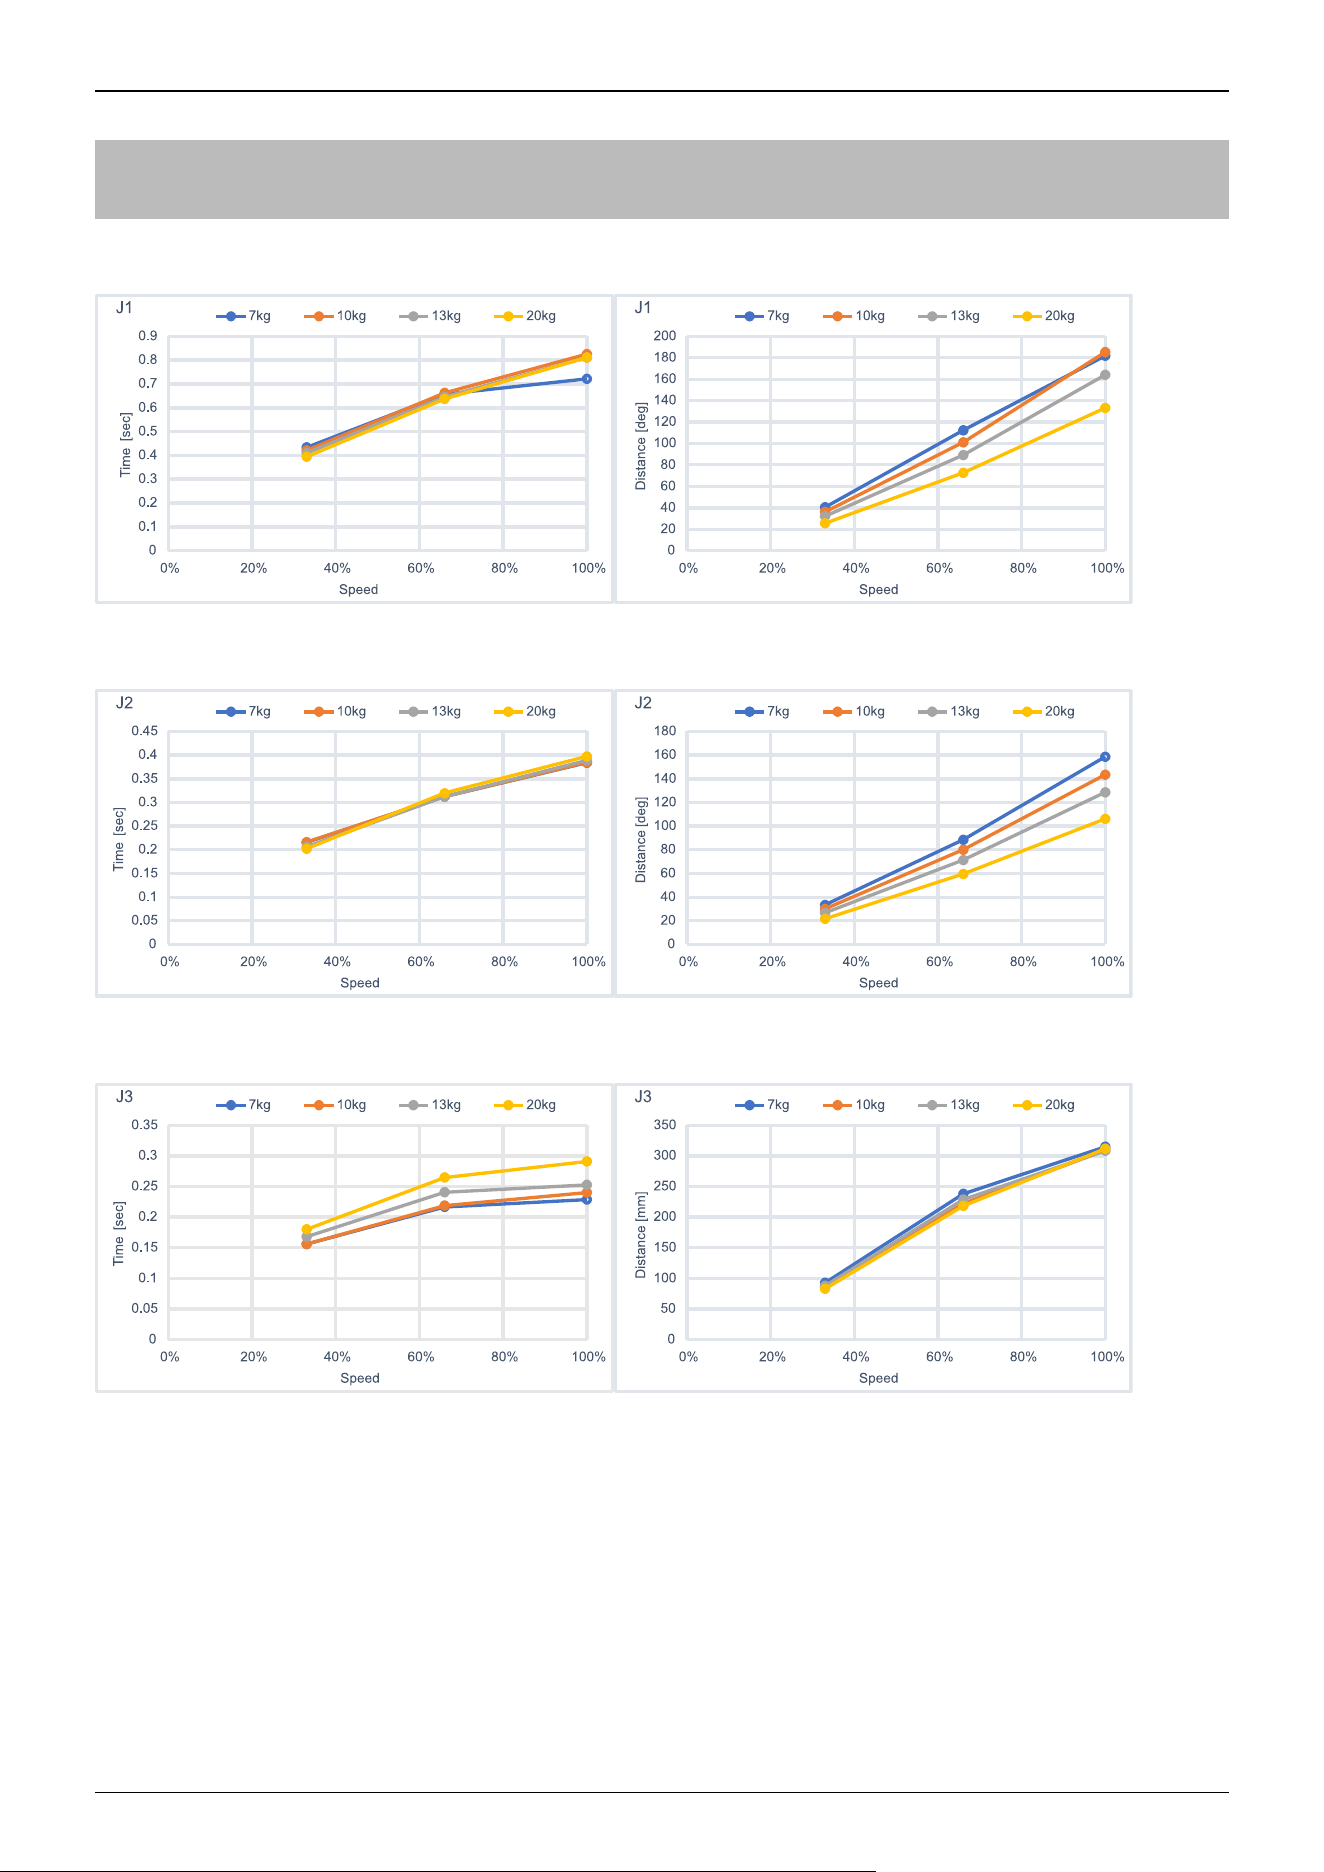
7.3.5 GX20 Stopping Time and Stopping Distance When Safeguard is
Open
GX20-B/GX20-C85***: J1
GX20-B/GX20-C85***: J2
GX20-B/GX20-C85***: J3
Industrial Robot: SCARA Robots GX series Manual Rev.11
526
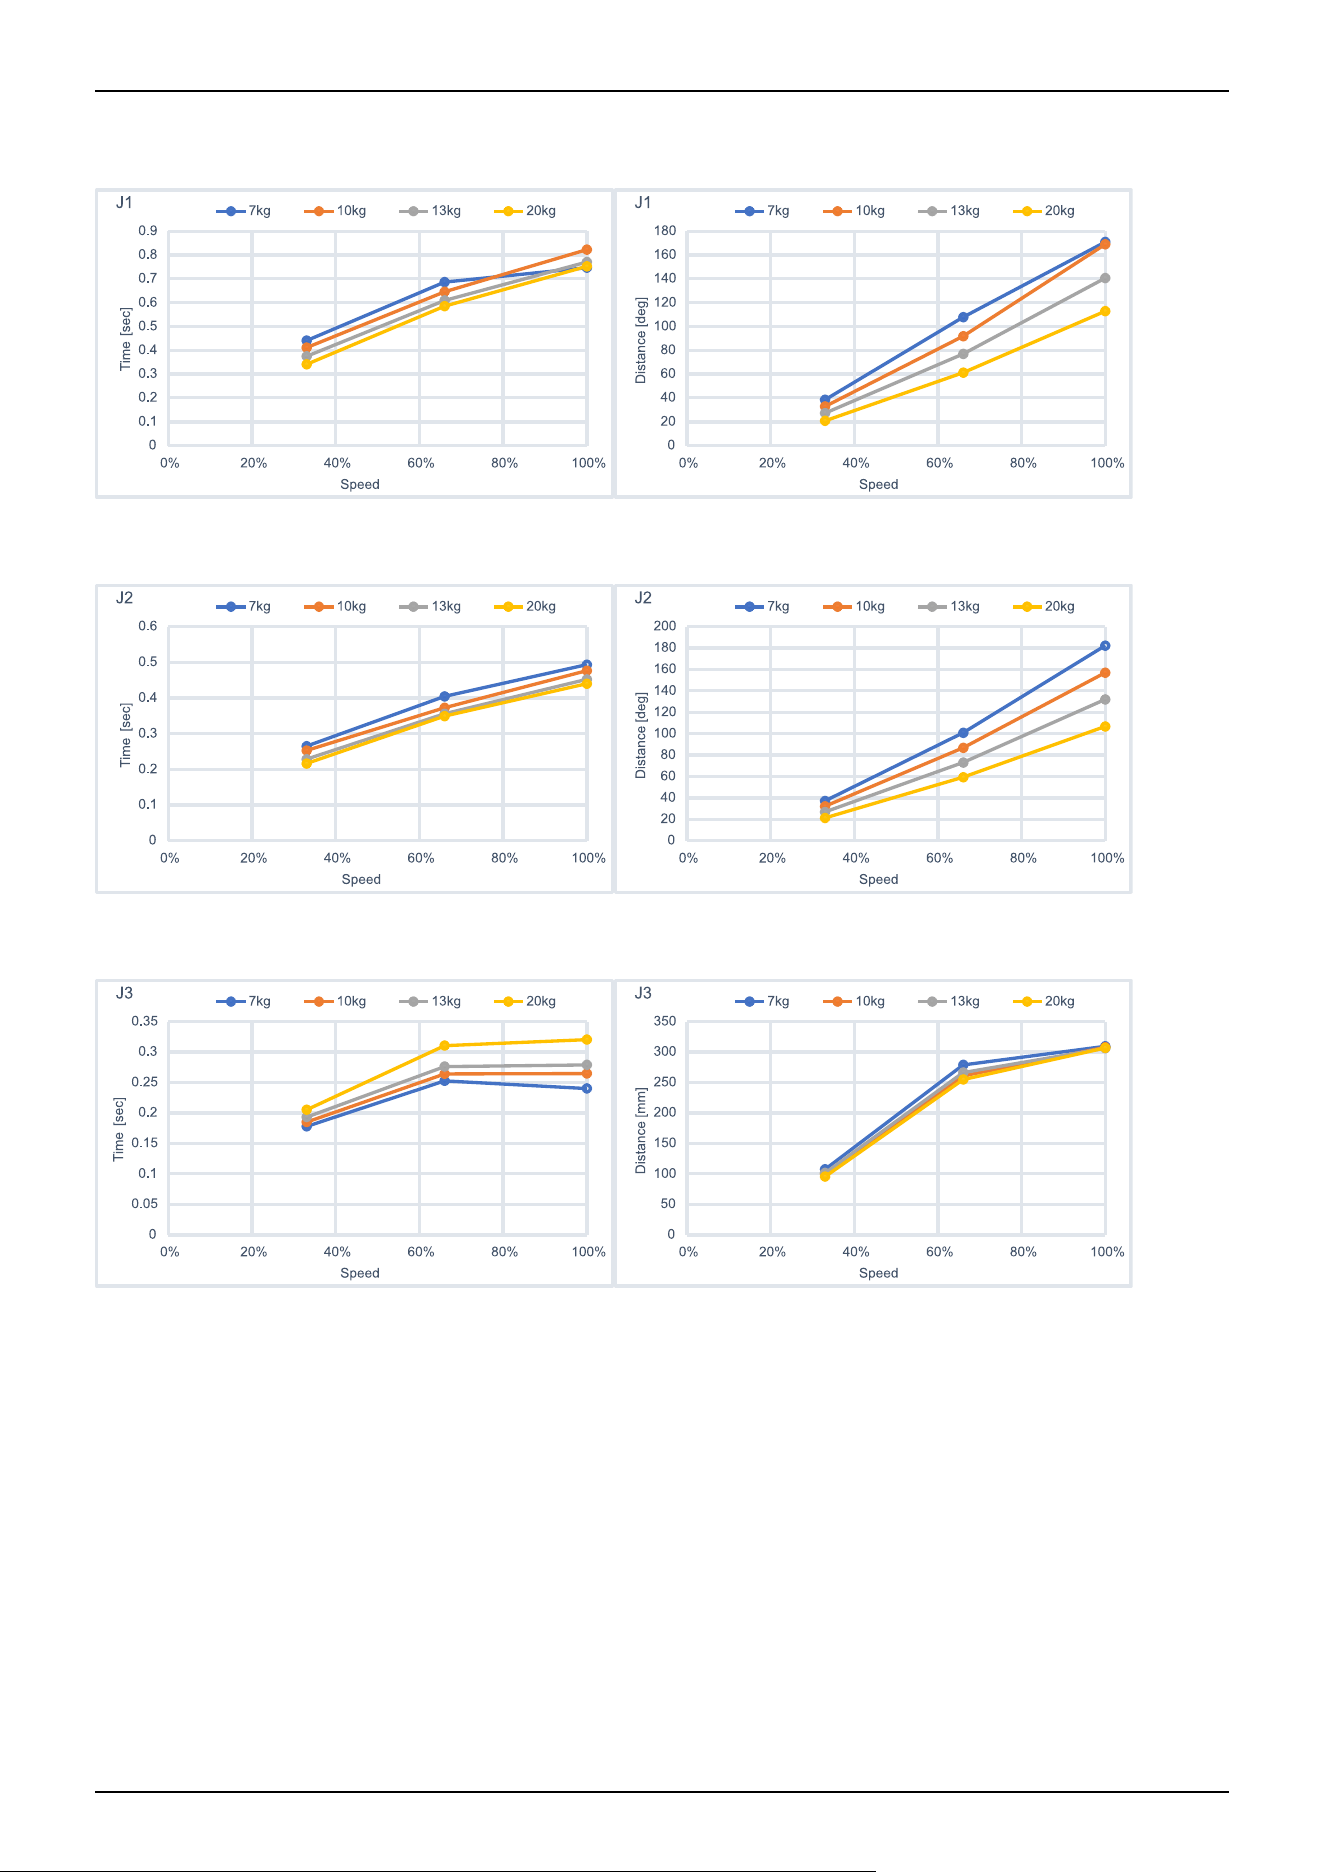
GX20-B/GX20-CA0***: J1
GX20-B/GX20-CA0***: J2
GX20-B/GX20-CA0***: J3
Industrial Robot: SCARA Robots GX series Manual Rev.11
527
7.3.6 Supplementary Information regarding the Stopping Time and
Stopping Distance when the Safeguard is Open
The stopping time and stopping distance described in Appendix C was measured by the motion determined by us based on the
ISO 10218-1.
Therefore, it does not guarantee the maximum value of the stopping time and stopping distance in the customer’s environment.
The stopping time and stopping distance differs depending on the robot’s model, motion, and input timing of the stop signal.
Make sure to always measure the stopping time and stopping distance that matches the customer’s environment.
KEY POINTS
The following are included in the robot’s motion and parameter.
The motion’s starting point, target point, and relay point
Motion commands (Go, Move, Jump commands etc.)
Weight and Inertia Settings
Motion speed, acceleration, deceleration, and one where the motion timing changes
Also, refer to the following description.
GX1:
Weight and Inertia Settings
Safety Information for Auto Acceleration of Joint #3
GX4:
Weight and Inertia Settings
Safety Information for Auto Acceleration of Joint #3
GX8:
Weight and Inertia Settings
Safety Information for Auto Acceleration of Joint #3
GX10/GX20:
Weight and Inertia Settings
Safety Information for Auto Acceleration of Joint #3
7.3.6.1 How to check the stopping time and stopping distance in the customer’s
environment
Measure the stopping time and stopping distance of the actual motion with the following method.
1. Create a motion program in the customer’s environment.
2. After the motion to check the stopping time and stopping distance starts, input the stop signal at your own timing.
3. Record the time and distance from when the stop signal was input until the robot stopped.
4. Check the maximum stopping time and stopping distance by repeating 1 through 3 mentioned above.
How to input the stop signal: Operate the stop switch/safeguard manually or input the stop signal with the safety PLC.
How to measure the stopping position: Measure with a tape measure. The angle could also be measured with the Where or
RealPos command.
How to measure the stopping time: Measure with a stop watch. The Tmr function can also be used to measure the stopping
time.
CAUTION
✏
Industrial Robot: SCARA Robots GX series Manual Rev.11
528
The stopping time and stopping distance changes depending on the timing the stop signal is input.
In order to prevent collision with people or objects, perform a risk assessment based on the maximum stopping
time and stopping distance and perform an equipment design.
Therefore, make sure to measure the maximum value by changing the timing of the stop signal input during the
actual motion and measure repeatedly.
To shorten the stopping time and stopping distance, use the Safety Limited Speed (SLS) and limit the maximum speed.
For details on the safety limited speed, refer to the following manual.
“Safety Function Manual“
7.3.6.2 Commands that can be useful when measuring stopping time and
stopping distance
Commands Functions
Where Returns the data of the robot’s current position
RealPos
Returns the current position of the specified robot
Unlike the motion target position of the CurPos, this obtains the position of the actual robot from the
encoder in real time.
PAgl
Returns by calculating the Joint position from the specified coordinate value.
P1 = RealPos 'Obtain the current position
Joint1 = PAgl (P1, 1) ‘ Request the J1 angle from the current position
SF_RealSpeedS Display the current speed from the limited speed position in mm/s.
Tmr The Tmr function returns the elapsed time from when the timer starts in seconds.
Xqt
Runs the program specified with the function name and complete the task.
The function used to measure the stopping time and stopping distance should be used to run tasks that
were launched by attaching the NoEmgAbort options. You can run a task that does not stop with the
emergency stop and safeguard open.
For more information, refer to the following manual.
"Epson RC+ SPEL+ Language Reference"
Industrial Robot: SCARA Robots GX series Manual Rev.11
529
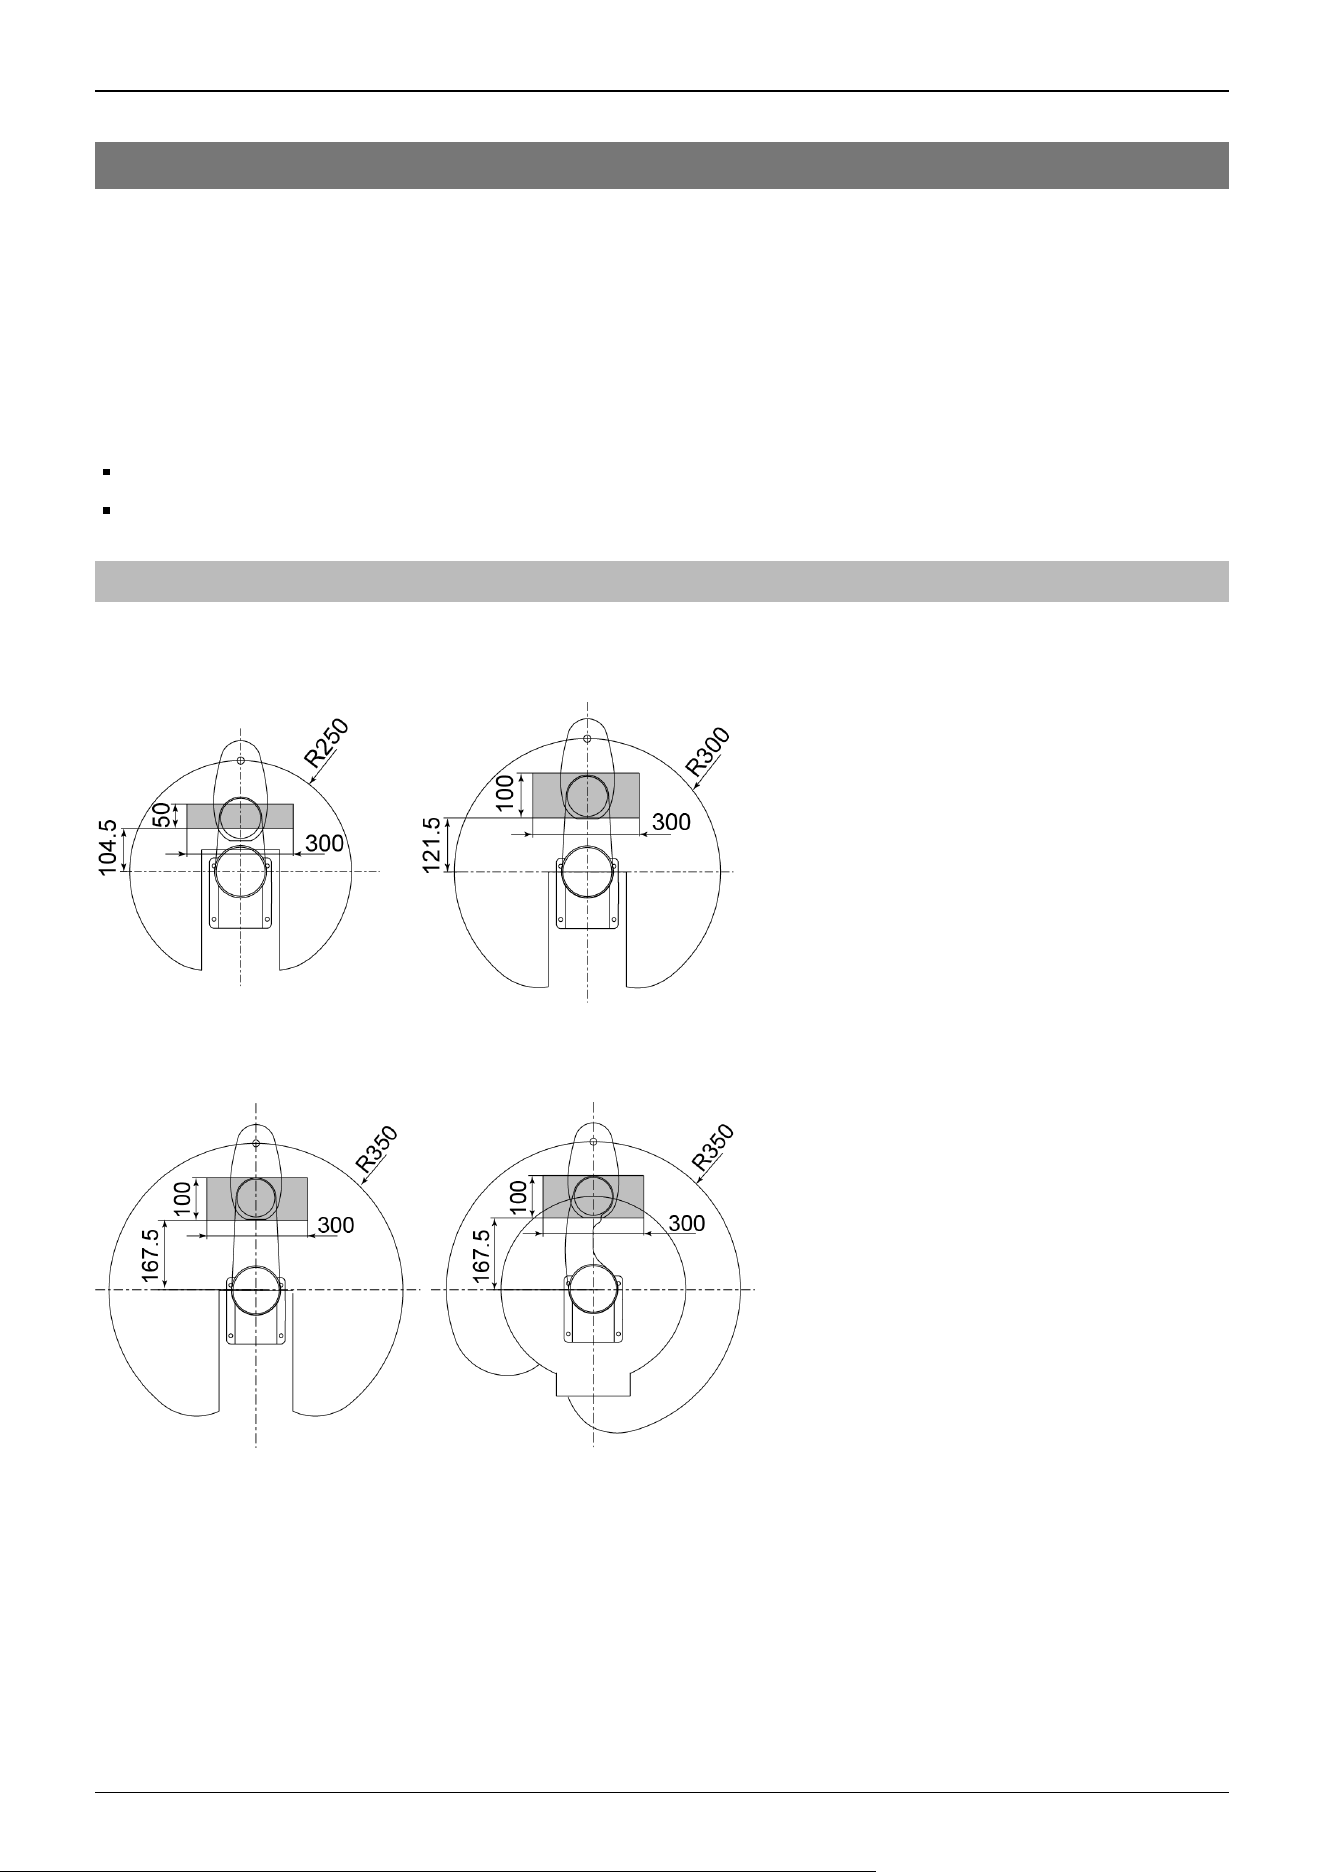
7.4 Appendix D: Correction Area for Arm Length Correction
This product is available with an option that enables correction of the arm length. (Model with table top mounting
specifications only)
For details on available options, please contact the supplier.
For details on arm length calibration, refer to the following manual.
"Epson RC+ User's Guide - Arm Length Calibration"
This section shows the measured correction area as shipped. (Shaded area: Correction area, Units: mm)
The measured Z-axis position is shown below.
GX4 series: Z = -130 mm
GX8 series: Z = -180 mm
7.4.1 GX4 Series
(The figure shows L.)
GX4-A/GX4-B/
GX4-C251**
GX4-A/GX4-B/
GX4-C301**
GX4-A/GX4-B/
GX4-C351**
GX4-A/GX4-B/
GX4-C351**-L,R
Industrial Robot: SCARA Robots GX series Manual Rev.11
530
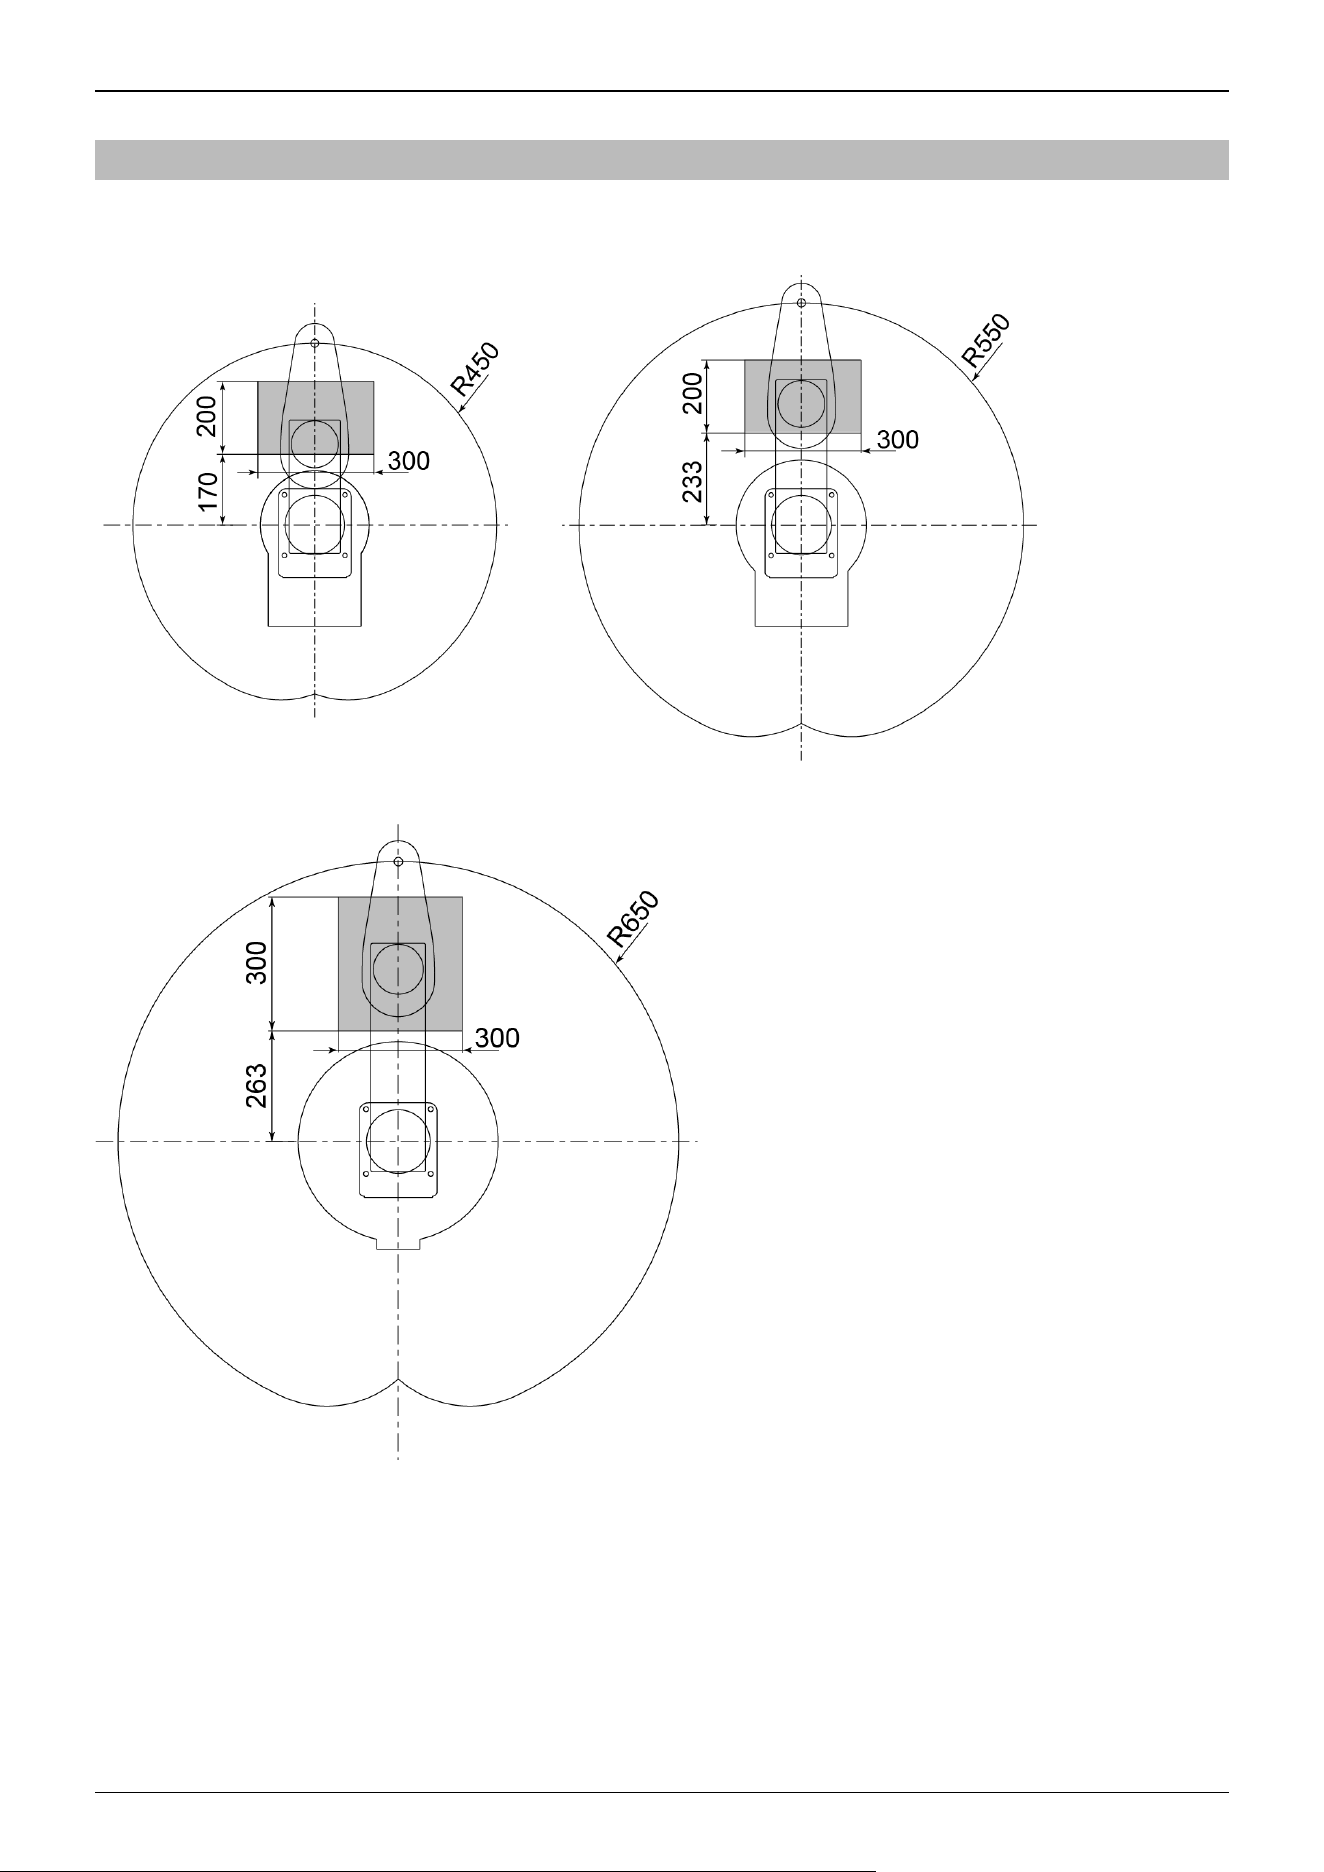
7.4.2 GX8 Series
GX8-A/GX8-B/
GX8-C45***
GX8-A/GX8-B/
GX8-C55***
GX8-A/GX8-B/
GX8-C65***
Industrial Robot: SCARA Robots GX series Manual Rev.11
531
7.5 Appendix E: Included Items
The Manipulators are shipped with the following parts.
7.5.1 GX1 series
Name Model number Quantity
DSUB9_METALIZED_PLASTIC_HOOD 618 009 253 11 2
DSUB15_METALIZED_PLASTIC_HOOD 618 015 253 11 2
DSUB9_MALE_SOLDER_BUCKET 618 009 248 23 2
DSUB15_MALE_SOLDER_BUCKET 618 015 248 23 2
7.5.2 GX4 series
Name Model number Quantity
DSUB15_METALIZED_PLASTIC_HOOD 618 015 253 11 2
DSUB15_MALE_SOLDER_BUCKET 618 015 248 23 2
GREASE NIPPLE A-M6F 1
7.5.3 GX8 series
Standard specifications
Name Model number Quantity
TENSIONER_A - 1
TENSIONER_B - 1
Hexagon head bolt M4X25 1
Washer M4 1
Hexagon socket head cap bolt (with washer) M4X10 4
Hexagon head bolt M6X20 2
DSUB9_METALIZED_PLASTIC_HOOD 618 009 253 11 2
DSUB15_METALIZED_PLASTIC_HOOD 618 015 253 11 2
DSUB9_MALE_SOLDER_BUCKET 618 009 248 23 2
DSUB15_MALE_SOLDER_BUCKET 618 015 248 23 2
EYE_BOLT B-130-8 2
GREASE NIPPLE A-M6F 1
Industrial Robot: SCARA Robots GX series Manual Rev.11
532
Protected-model
Name Model number Quantity
TENSIONER_A - 1
TENSIONER_B - 1
Hexagon head bolt M4X25 1
Washer M4 1
Hexagon socket head cap bolt (with washer) M4X10 4
Hexagon head bolt M6X20 2
CONNECTOR/09 67 009 5615 09 67 009 5615 2
CONNECTOR ACCESSORY/09 67 009 0538 09 67 009 0538 2
CONNECTOR/09 67 015 5615 09 67 015 5615 2
CONNECTOR ACCESSORY/09 67 015 0538 09 67 015 0538 2
EYE_BOLT B-130-8 2
GREASE NIPPLE A-M6F 1
7.5.4 GX10/20 series
For Standard or Cleanroom specification / Table top mounting
Name Model number Quantity
DSUB9_METALIZED_PLASTIC_HOOD 618 009 253 11 2
DSUB15_METALIZED_PLASTIC_HOOD 618 015 253 11 2
DSUB9_MALE_SOLDER_BUCKET 618 009 248 23 2
DSUB15_MALE_SOLDER_BUCKET 618 015 248 23 2
EYE_BOLT B-130-8 2
Industrial Robot: SCARA Robots GX series Manual Rev.11
533
For Protected-model / Table table top mounting
Name Model number Quantity
CONNECTOR/09 67 009 5615 09 67 009 5615 2
CONNECTOR ACCESSORY/09 67 009 0538 09 67 009 0538 2
CONNECTOR/09 67 015 5615 09 67 015 5615 2
CONNECTOR ACCESSORY/09 67 015 0538 09 67 015 0538 2
EYE_BOLT B-130-8 2
For Standard or Cleanroom specification / Ceiling mounting or Wall mounting
Name Model number Quantity
DSUB9_METALIZED_PLASTIC_HOOD 618 009 253 11 2
DSUB15_METALIZED_PLASTIC_HOOD 618 015 253 11 2
DSUB9_MALE_SOLDER_BUCKET 618 009 248 23 2
DSUB15_MALE_SOLDER_BUCKET 618 015 248 23 2
EYE_BOLT TIB-10ML 2
Washer M10 2
For Protected-model / Ceiling mounting or Wall mounting
Name Model number Quantity
CONNECTOR/09 67 009 5615 09 67 009 5615 2
CONNECTOR ACCESSORY/09 67 009 0538 09 67 009 0538 2
CONNECTOR/09 67 015 5615 09 67 015 5615 2
CONNECTOR ACCESSORY/09 67 015 0538 09 67 015 0538 2
EYE_BOLT TIB-10ML 2
Washer M10 2
Industrial Robot: SCARA Robots GX series Manual Rev.11
534