
Deco WM9000 (3-Pack)
Outdoor/Indoor Mesh Wi-Fi
User Guide
AX3000 Indoor/
Outdoor Whole Home
Mesh Wi-Fi 6 System
1910013751 REV1.6.0 © 2024 TP-Link

Contents
About This Guide ···················································· 1
Appearance(Deco WM9000-Outdoor) ······ 2
Appearance(Deco WM9000) ··························· 3
Set Up Your Indoor Deco ···································· 4
Set Up Your Outdoor Deco ································ 9
Troubleshooting ····················································12
Authentication ························································13
1
About This Guide
This guide provides a brief introduction to Deco Indoor/Outdoor Whole Home Mesh Wi-Fi 6 System and regulatory information.
Features available in Deco may vary by model and software version. Deco availability may also vary by region or ISP. All images, steps, and descriptions
in this guide are only examples and may not reect your actual Deco experience.
Conventions
In this guide, the following conventions are used:
Convention Description
Deco
Stands for Deco Whole Home Mesh Wi-Fi System/
Unit.
Underline
Hyperlinks are in teal and underlined. You can click to
redirect to a website or a specic section.
Teal
Key information appears in teal, including
management page text such as menus, items,
buttons and so on.
Note:
Ignoring this type of note might result in a malfunction
or damage to the device.
Tips:
Indicates important information that helps you make
better use of your device.
More Info
• Specic product information can be found on the product page at
https://www.tp-link.com.
• A Technical Community is provided for you to discuss our products
at https://community.tp-link.com.
• Our Technical Support contact information can be found at the
Help center of the Deco app and the Contact Technical Support
page at https://www.tp-link.com/support.
Speed/Coverage/Device Quantity Disclaimer
Maximum wireless signal rates are the physical rates derived from IEEE
Standard 802.11 specications. Actual wireless data throughput and
wireless coverage, and quantity of connected devices are not guaranteed
and will vary as a result of network conditions, client limitations, and
environmental factors, including building materials, obstacles, volume and
density of trac, and client location.
MU-MIMO Disclaimer
Use of MU-MIMO requires clients to also support MU-MIMO.
IoT Compatibility Disclaimer
IoT compatibility refers only to smart devices that can be controlled via the
Deco app. Other wireless devices can still connect to Deco for normal Wi-Fi
use.
Seamless Roaming Disclaimer
Clients need to support 802.11k/v/r and may require additional set up.
Performance may vary depending on the client device.

2
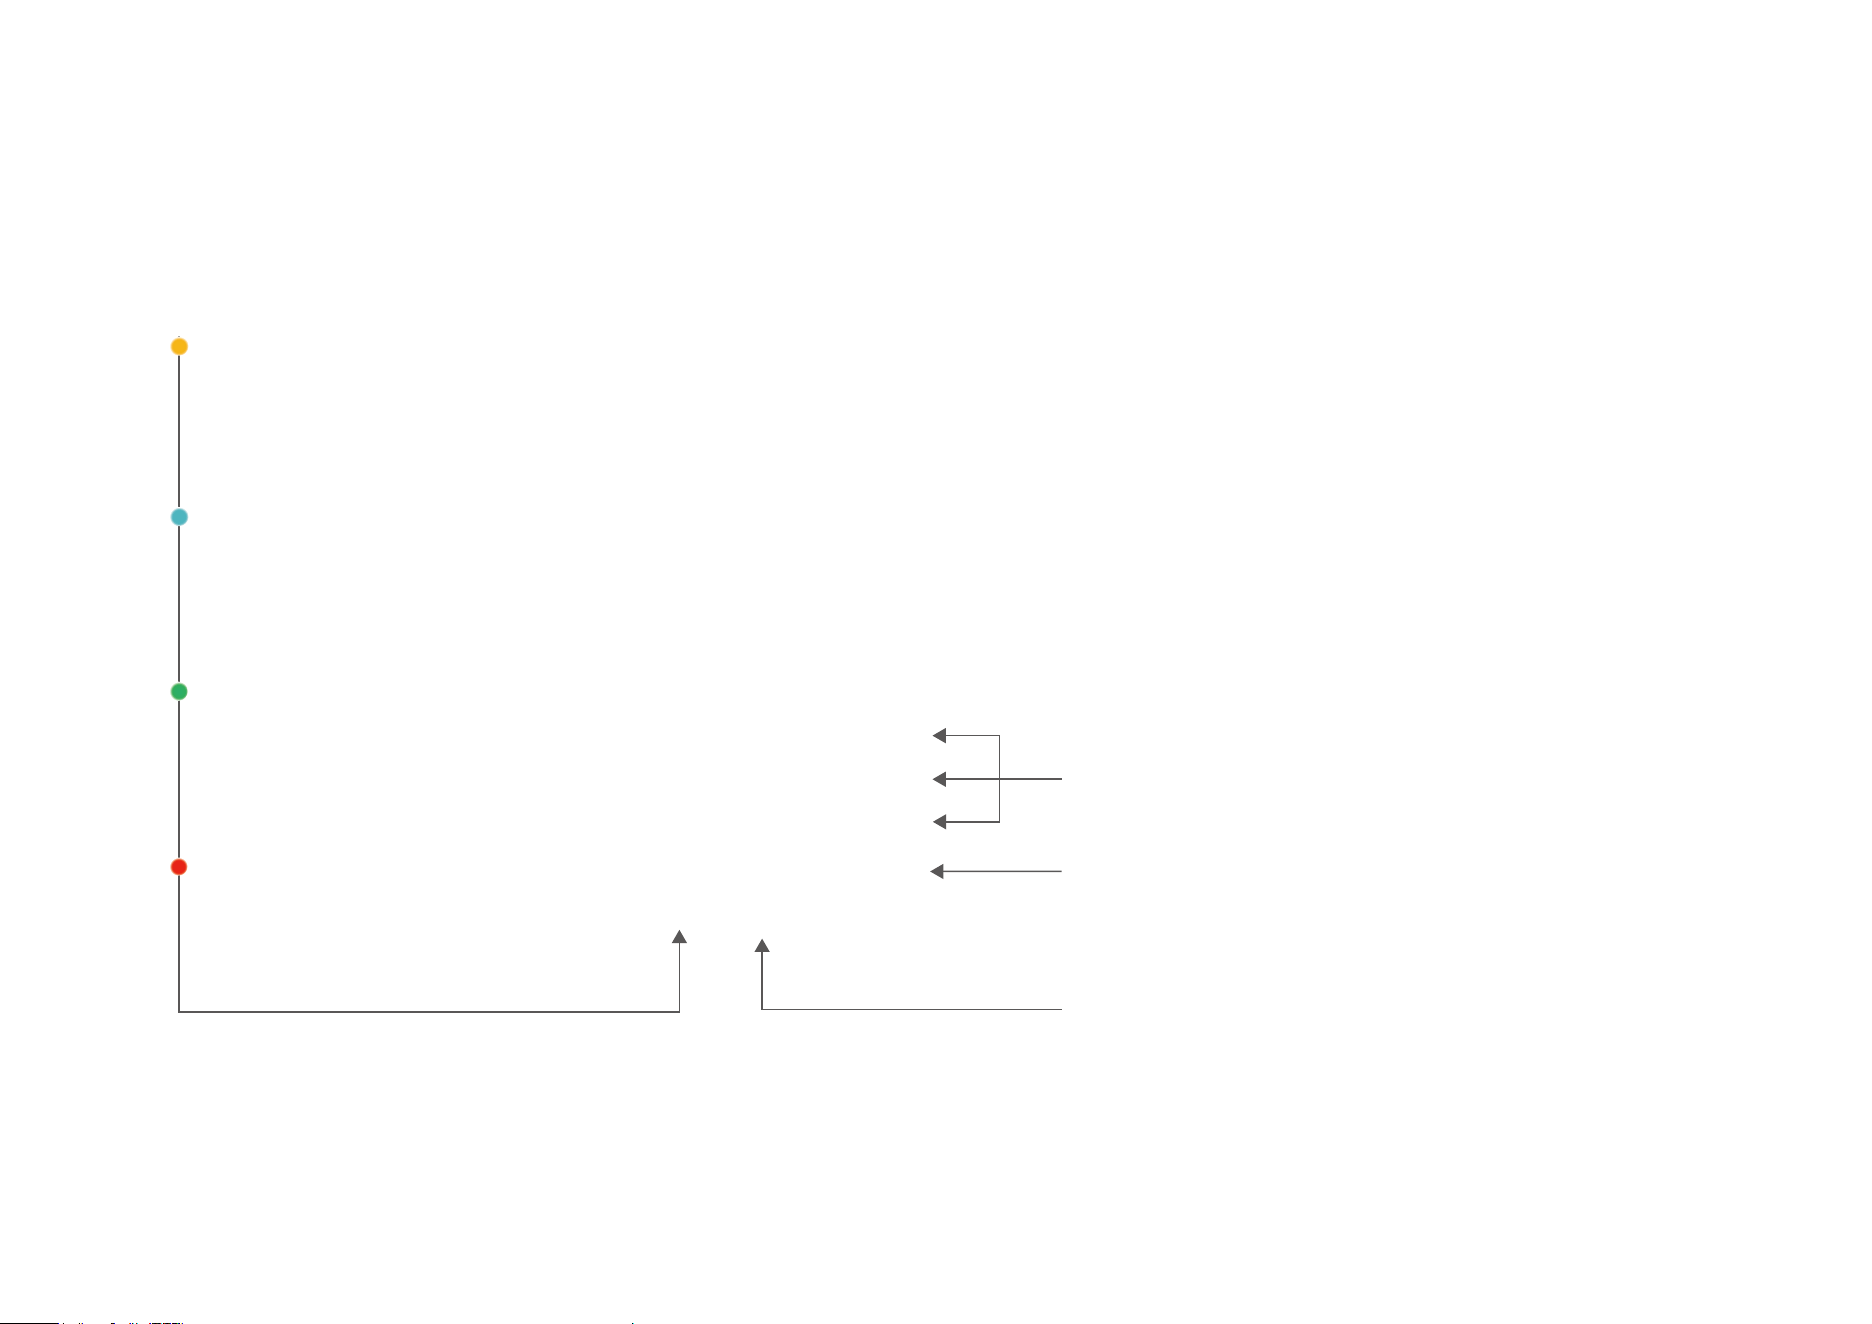
Appearance(Deco WM9000-Outdoor)
Each Deco WM9000-Outdoor has an LED that changes color according to its status, a mounting tab, two gigabit ports, a power slot, and a Reset
button.
See the explanation below:
Yellow pulse:
Deco is resetting.
Yellow solid:
Deco is starting up.
Blue pulse:
Deco is ready for setup
or WPS in progress.
Blue solid:
Deco is setting up.
Green pulse:
Deco is upgrading rmware.
Green solid:
Deco is registered and all is well.
Red pulse:
Deco is disconnected from main Deco.
Red solid:
Deco has an issue.
Wall/Pole Mounting Tab
For connecting Deco to a pole or wall with the
provided mounting kits.
Power Slot:
For powering up Deco via the provided power
cord.
Reset Button:
Press for 1 second and release to reset Deco to
factory default settings. The light changing from
pulsing yellow to solid yellow indicates a successful
reset.
2× Gigabit Ports with Power over Ethernet
support:
• As the PoE port: For powering Deco up via a PSE
device (such as a PoE switch).
• As the WAN/LAN port: For connecting Deco to
your modem, the Ethernet outlet or other
internet devices.
3
Appearance(Deco WM9000)
Each Deco WM9000 has an LED that changes color according to its status, three Ethernet ports, a power slot, and a Reset button.
See the explanation below:
Pulse Yellow:
Deco is resetting.
Solid Yellow:
Deco is starting up.
Pulse Blue:
Deco is ready for setup.
Solid Blue:
Deco is setting up.
Pulse Green:
Deco is upgrading rmware.
Solid Green:
Deco is all set up and connected.
Pulse Red:
The satellite Deco is disconnected
from the main Deco.
Solid Red:
Deco has an issue.
Ethernet Ports:
For connecting Deco to your modem, the Ethernet outlet,
or for other internet services in Wireless Router mode.
Reset Button:
Press for 1 second and release to reset Deco to factory
default settings. The light changing from pulsing yellow to
solid yellow indicates a successful reset.
Power Slot:
For connecting Deco to the power socket via the provided
power adapter.
4
Set Up Your Indoor Deco
First let's start by setting up the indoor Deco network. Get the TP-Link Deco app for iOS or Android, then follow the app to walk through the setup.
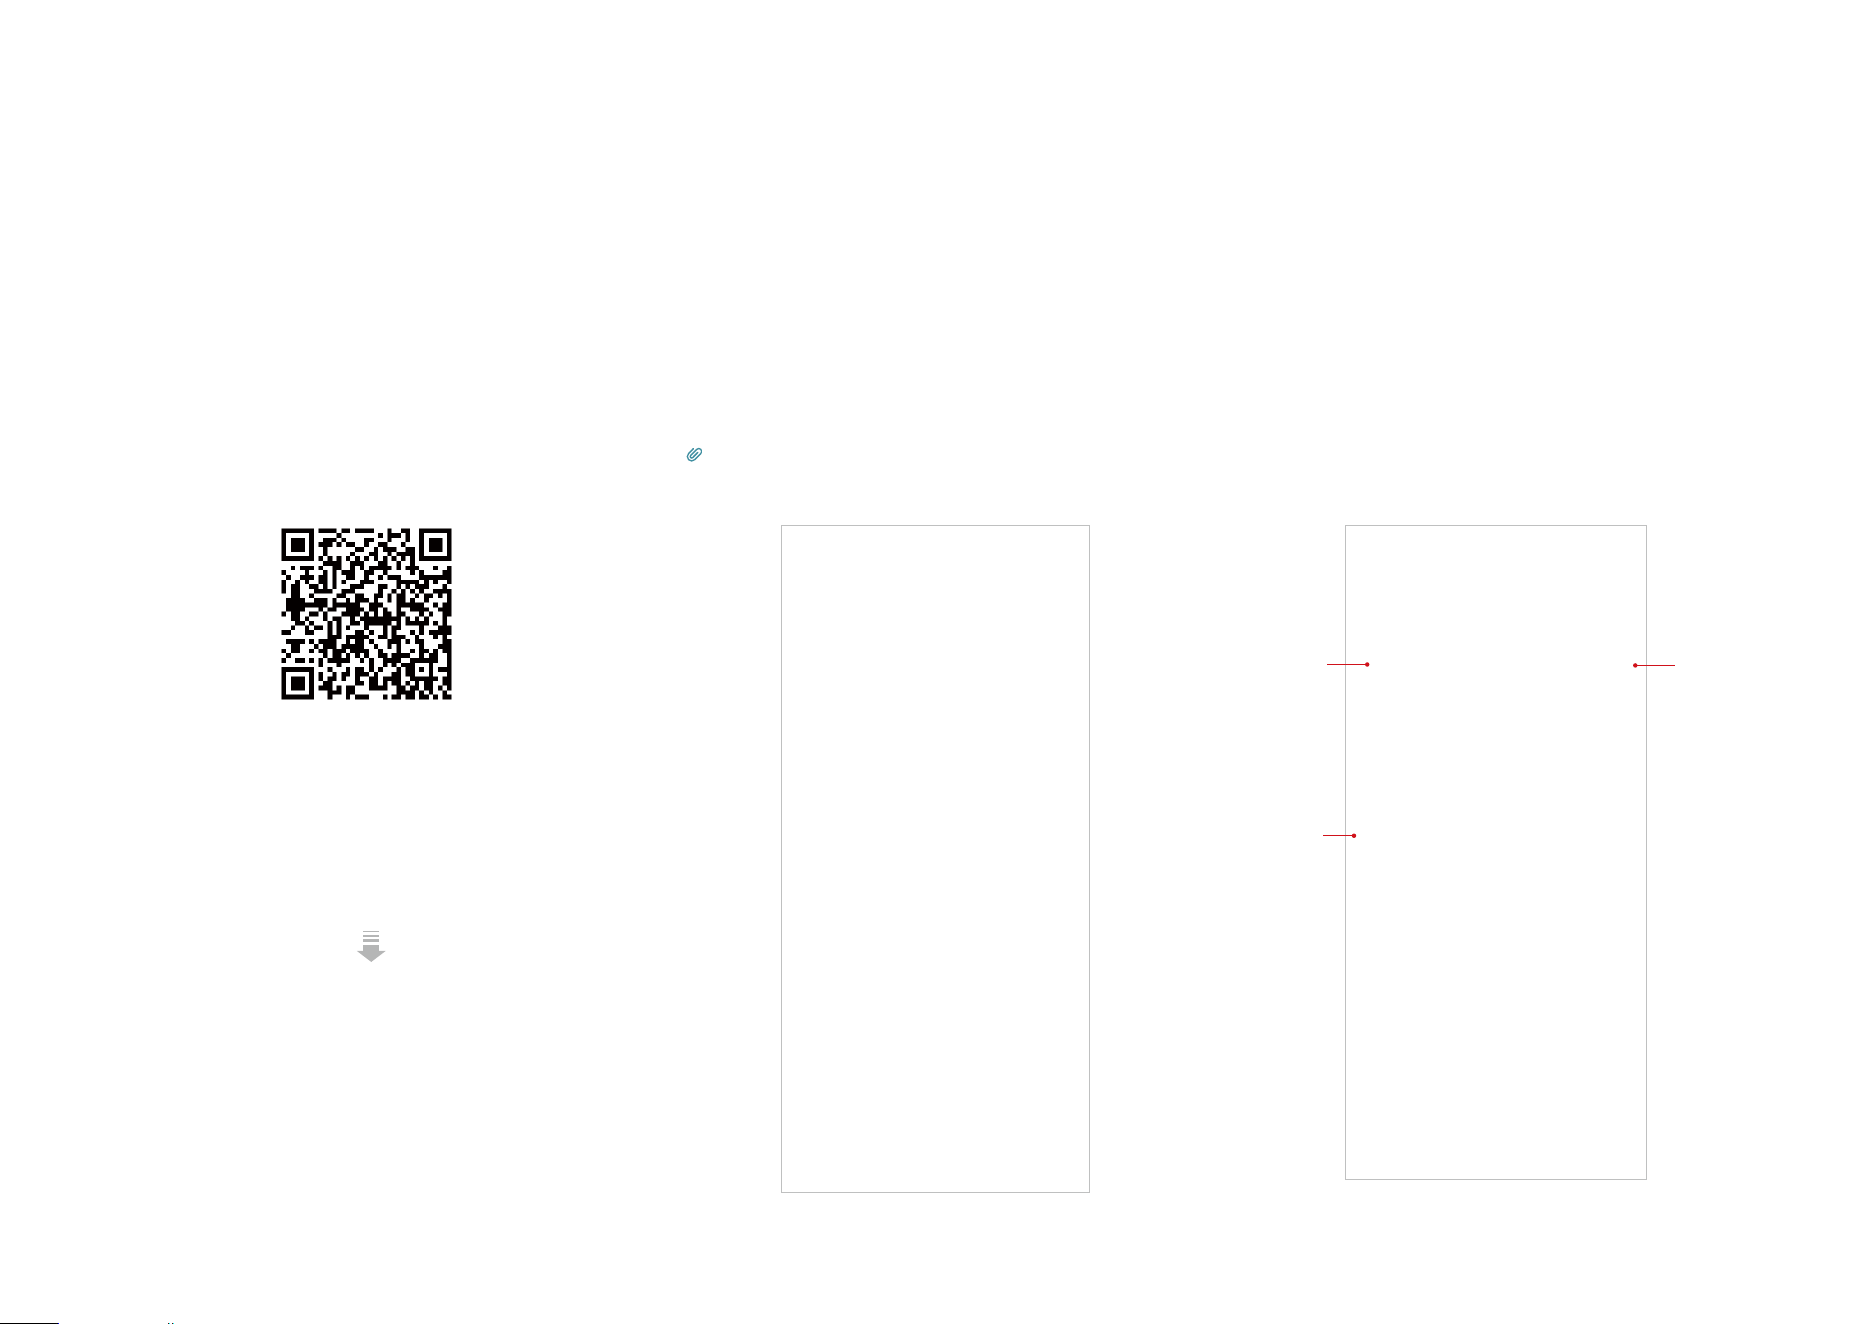
1. Get the Deco app
Download and install the Deco app from
Google Play or App Store, or by scanning the
QR code below.
2. Log in with TP-Link ID
Open the app and log in with your TP-Link ID. If
you don’t have a TP-Link ID, create one rst.
Tip: If you forgot your login password, tap Forgot Password.
The app will help you reset your password.
or
3. Select your Deco model
Select your Deco model in any of the following
ways. If you have more than one Deco model,
tap the question below the search box to
check how to maximize the overall network.
Search
Deco
model
Scan
Deco's
product
label
Select
Deco
model

5
5. Plug in your indoor Deco
Power o your modem. Connect your indoor
Deco to the modem and power them both on.
If you don't have a modem, connect your
indoor Deco directly to the Ethernet outlet.
6. Wait until indoor Deco's LED pulses blue
Wait until your indoor Deco's LED pulses blue,
then your phone/tablet will connect to the
indoor Deco's default Wi-Fi automatically.
4. Scan your Deco's product label
Scan the product label on your Deco for
a quicker setup. You'll then automatically
connect to the Deco's default Wi-Fi. You can
also set it up manually by following the steps.

6
9. Create your Wi-Fi network
Set a network name and a password. These
will be the name and password you use to
connect your devices to Wi-Fi.
8. Connect your indoor Deco to the internet
Select the internet connection type and enter
the information. If you are not sure, contact
your internet service provider.
7. Specify your indoor Deco's location
Select or custom a location for your indoor
Deco. The location will be used as the name of
your indoor Deco.

7
12. Add more indoor Decos
Plug in the other included indoor Decos, and
they will automatically join the network within
2 minutes, and the LED will turn solid green,
indicating a successful connection.
11. Setup complete
Your indoor Deco network is now up. You
can connect your devices to the network.
10. Connect to your Wi-Fi network
Save and connect your phone/tablet to
the Deco's Wi-Fi to continue the setup.

9
Set Up Your Outdoor Deco
Your outdoor Deco is equipped with a waterproof cover for better safety in the outdoors. Follow the steps below to power on your outdoor Deco and
waterproof it, then mount it in the preferred way.
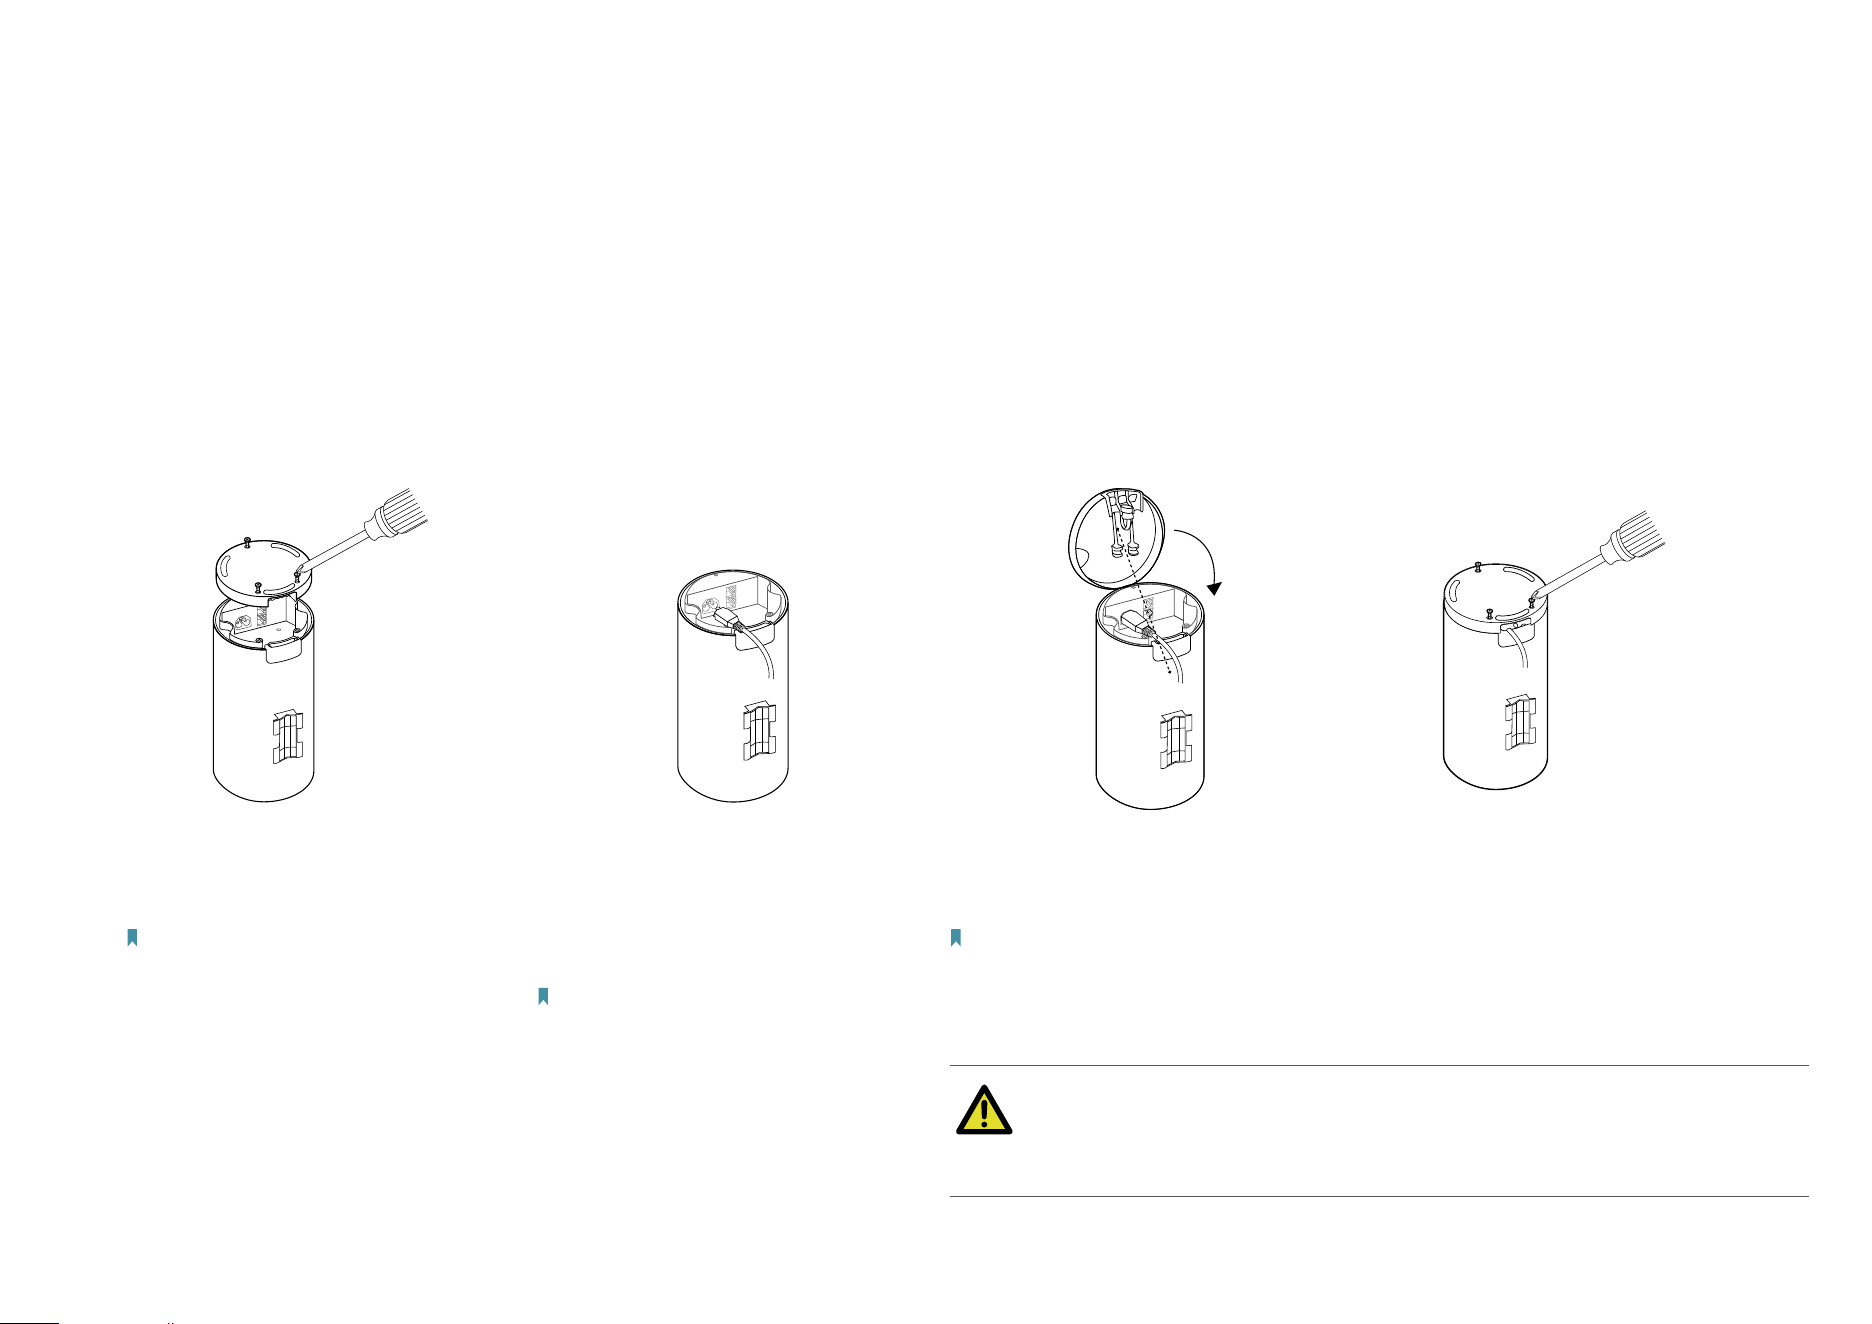
Step 1. Power on the outdoor Deco
1.
Loosen the screws to detach the
waterproof cover of the Deco with
a Phillips screwdriver.
Note: The screws cannot be detached from
the waterproof cover.
2.
Plug the outdoor Deco into a wall
outlet with earthing connection
through the provided power cord.
It will automatically join the network
and the LED will turn solid green.
Note:
1. To achieve better signal quality, place the
outdoor Deco closer to the indoor Deco. You
can also use an Ethernet cable to connect the
outdoor Deco to the indoor Deco.
2. The product can only be powered via the
normal building installation wiring.
3.
Open waterproof connector on
the base cover to expose the slot
aligning with your cable.
Note: Keep the other connector properly
closed for waterproong.
4.
Replace the waterproof cover,
leading the cable through the slot
of the waterproof rubber.
Re-secure the cover to your
outdoor Deco with the screws.
WARNING
The outdoor Deco can only be used in upright direction as shown in the image.
10
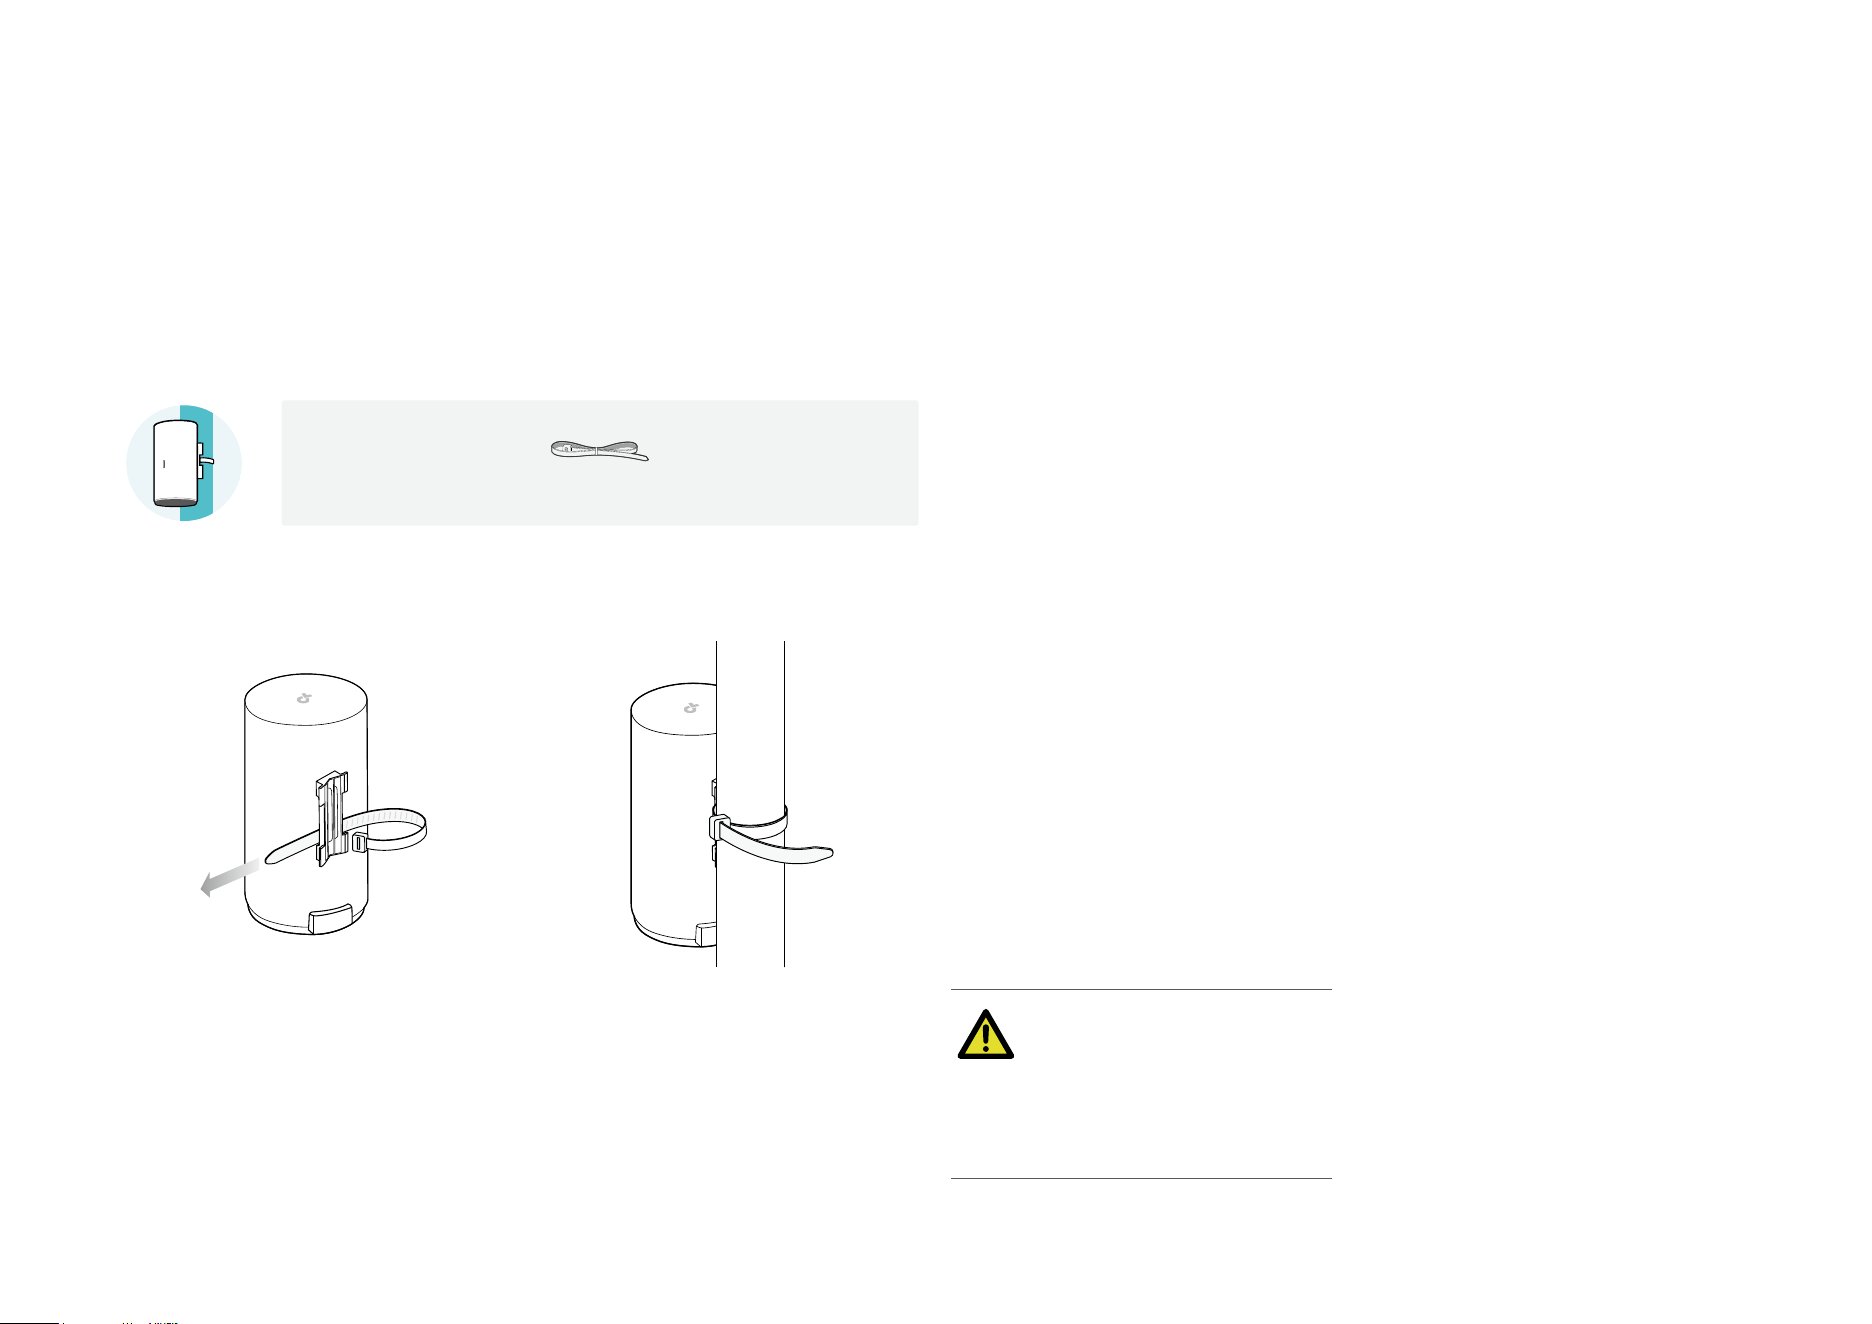
Step 2. Mount the outdoor Deco
Deco can be mounted to a pole or a wall. Choose the appropriate mounting methods.
Option 1: Pole Mounting
The outdoor Deco can be mounted to a pole with the strap in the package.
Pole Mounting Strap
1.
Lead the end of the pole mounting
strap through the back of the
outdoor Deco.
2.
Position the outdoor Deco and
wrap the pole mounting strap
around the pole.
Feed the end through the screw-
block and tighten the strap until the
outdoor Deco is secure.
WARNING
The outdoor Deco can only be
used in upright direction as shown
in the image.
11
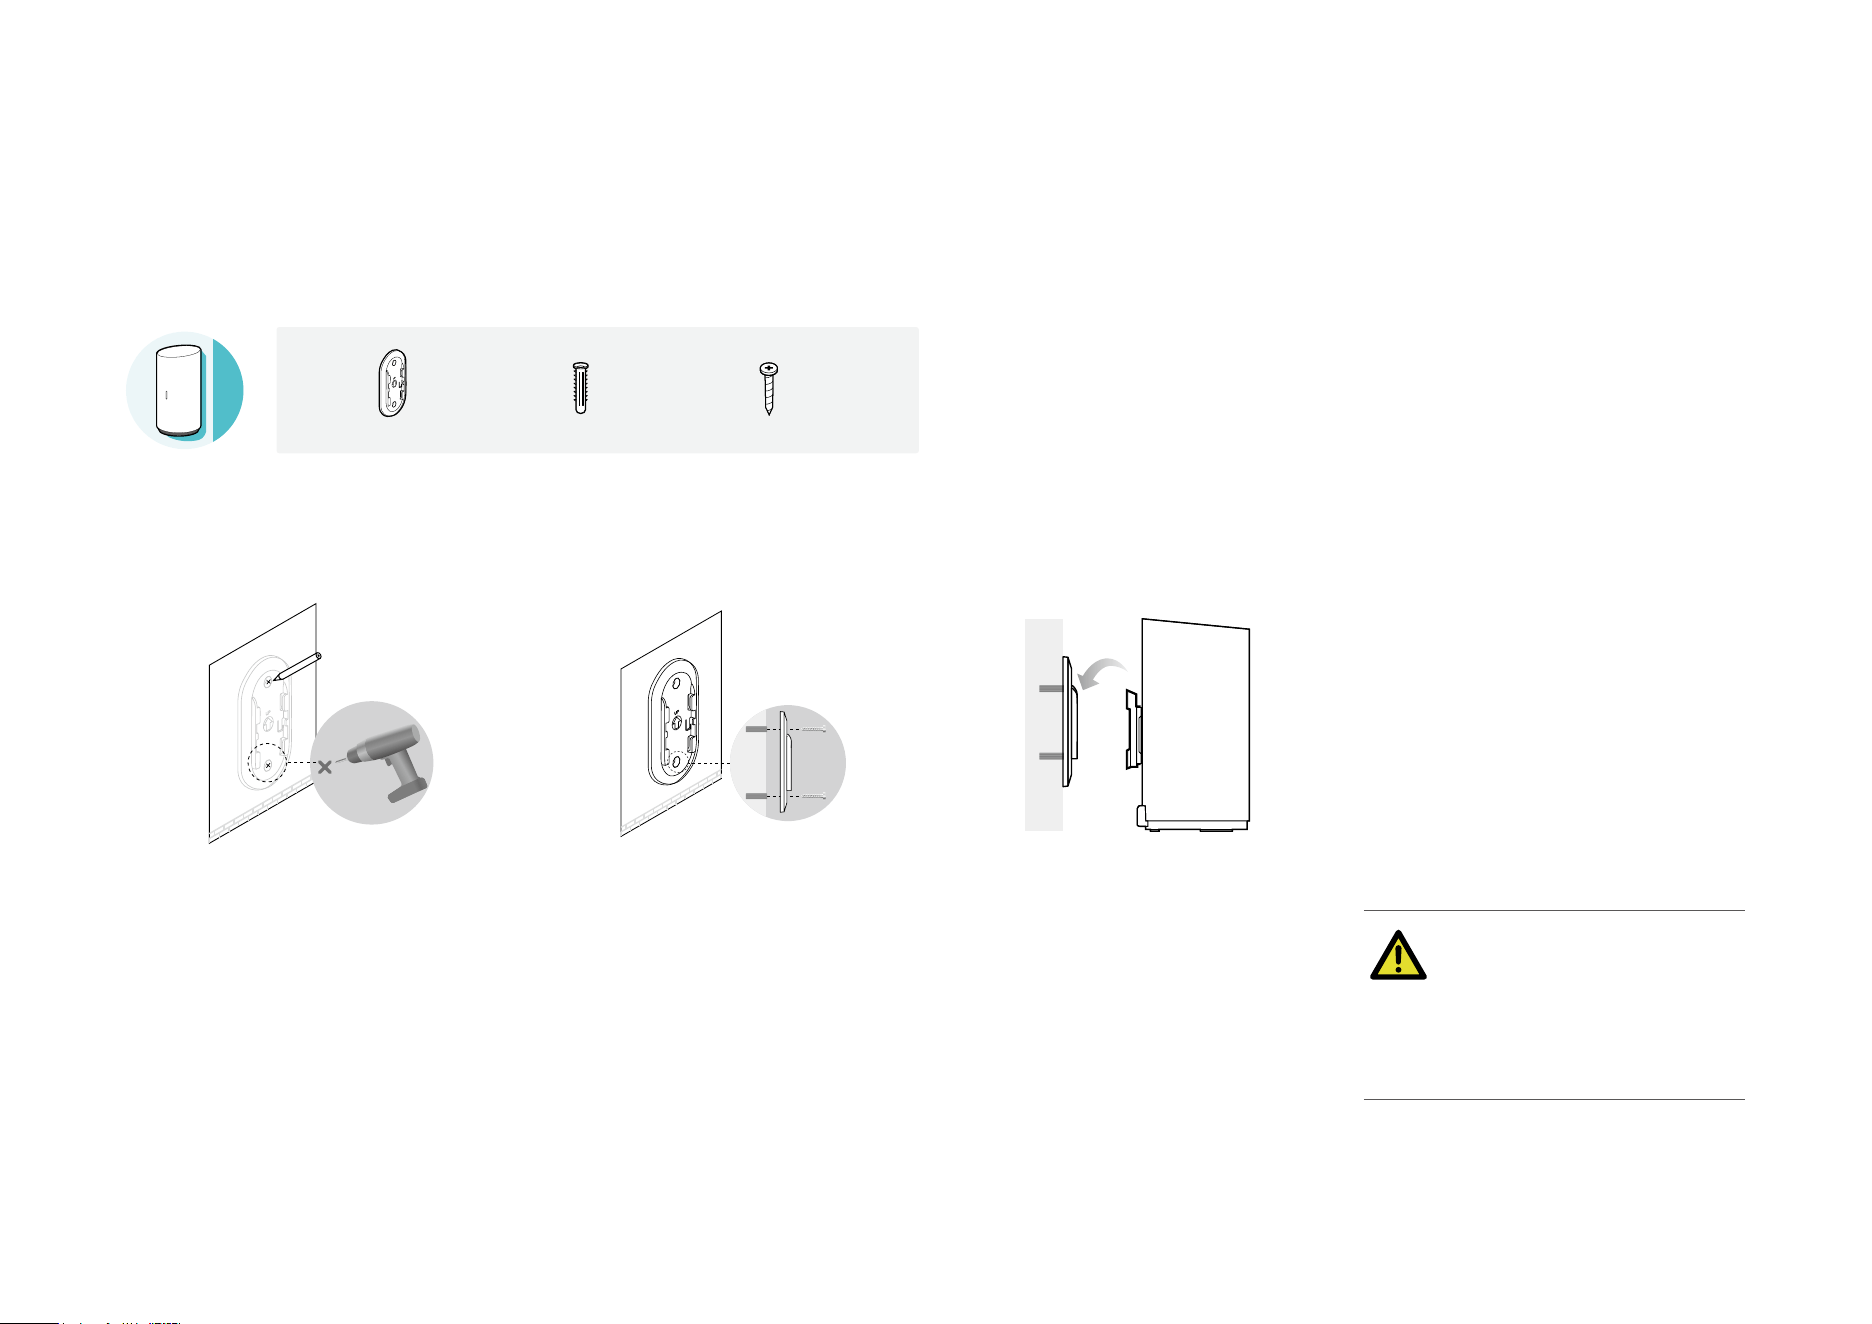
Option 2: Wall Mounting
The Deco can be mounted to a wall with the bracket, anchors, and screws in the package.
Self-tapping Screws
Plastic Wall Anchors
Mounting Bracket
1.
Place the mounting bracket in the
right position. Mark two positions
for the screw holes .
Drill two 6 mm diameter holes for
the screws at the marked positions.
2.
Insert the plastic wall anchors into
the 6 mmn diameter holes.
Align the mounting bracket to
the plastic wall anchors and drive
the self-tapping screws into the
anchors through the mounting
bracket.
3.
Align the mounting tabs on the
back of the outdoor Deco with the
slot of the mounting bracket.
Push and slide the outdoor Deco
downward until it locks into place.
WARNING
The outdoor Deco can only be
used in upright direction as shown
in the image.
You're all set! Now enjoy the internet!

12
Troubleshooting
Solutions to common problems during setup or use are provided here for reference. Follow the steps and the provided link below to diagnose and solve
problems you might experience with your Deco.
If problems still exist, contact us: https://www.tp-link.com/support
Q1. What should I do if I fail to congure the main Deco and get stuck on “We couldn't nd Deco”?
Refer to the guide https://www.tp-link.com/support/faq/2239/ or follow the video https://youtu.be/2HYuEYS9XJM
Q2. What should I do if I fail to congure the satellite Deco and get stuck on “We couldn't nd another Deco”?
Refer to the guide https://www.tp-link.com/support/faq/1447/ or follow the video https://youtu.be/iVgDzoo16T4
Q3. What should I do if I fail to congure the main Deco and get stuck on “Testing Internet Connection”?
Refer to the guide https://www.tp-link.com/support/faq/2239/
Refer to the video https://youtu.be/OSUrGdWH-i0
Q4. What should I do if my wireless devices cannot connect to Deco?
Refer to the guide https://www.tp-link.com/support/faq/2718/
Q5. What should I do if Deco suddenly lost internet access?
Refer to the guide https://www.tp-link.com/support/faq/2428/
Q6. How can I nd a suitable spot for my Deco?
Refer to the guide https://www.tp-link.com//support/faq/1446/
Q7. What can I do if the Deco app isn't working properly?
Refer to the guide https://www.tp-link.com/support/faq/1456/

13
Authentication
FCC Compliance Information Statement
Product Name: AX3000 Indoor/Outdoor Whole Home Mesh Wi-Fi 6 System
Model Number: Deco WM9000(3-pack)
Responsible party:
TP-Link Systems Inc.
Address: 10 Mauchly, Irvine, CA 92618
Website: http://www.tp-link.com/us/
Tel: +1 626 333 0234
Fax: +1 909 527 6804
E-mail: [email protected]om
This equipment has been tested and found to comply with the limits for a Class B digital device, pursuant to part 15 of the FCC Rules. These limits are
designed to provide reasonable protection against harmful interference in a residential installation. This equipment generates, uses and can radiate
radio frequency energy and, if not installed and used in accordance with the instructions, may cause harmful interference to radio communications.
However, there is no guarantee that interference will not occur in a particular installation. If this equipment does cause harmful interference to radio
or television reception, which can be determined by turning the equipment off and on, the user is encouraged to try to correct the interference by
one or more of the following measures:
• Reorient or relocate the receiving antenna.
• Increase the separation between the equipment and receiver.
• Connect the equipment into an outlet on a circuit different from that to which the receiver is connected.
• Consult the dealer or an experienced radio/ TV technician for help.
This device complies with part 15 of the FCC Rules. Operation is subject to the following two conditions:

14
1. This device may not cause harmful interference.
2. This device must accept any interference received, including interference that may cause undesired operation.
Any changes or modifications not expressly approved by the party responsible for compliance could void the user’s authority to operate the
equipment.
Note: The manufacturer is not responsible for any radio or TV interference caused by unauthorized modifications to this equipment. Such modifications
could void the user’s authority to operate the equipment.
FCC RF Radiation Exposure Statement
This equipment complies with FCC RF radiation exposure limits set forth for an uncontrolled environment. This device and its antenna must not be
co-located or operating in conjunction with any other antenna or transmitter.
“To comply with FCC RF exposure compliance requirements, this grant is applicable to only Mobile Configurations. The antennas used for this
transmitter must be installed to provide a separation distance of at least 20 cm from all persons and must not be co-located or operating in conjunction
with any other antenna or transmitter.”
We, TP-Link Systems Inc., has determined that the equipment shown as above has been shown to comply with the applicable technical standards,
FCC part 15. There is no unauthorized change is made in the equipment and the equipment is properly maintained and operated.
Issue Date: 2024-08-20

15
Safety Information (for indoor Decos)
• Keep the device away from fire or hot environments.
• Do not attempt to disassemble, repair, or modify the device. If you need service, please contact us.
• Do not use the device where wireless devices are not allowed.
• Do not use damaged charger or USB cable to charge the device.
• Do not use any other chargers than those recommended.
• Adapter shall be installed near the equipment and shall be easily accessible.
• Use only power supplies which are provided by manufacturer and in the original packing of this product. If you have any questions, please don’t
hesitate to contact us.
Please read and follow the above safety information when operating the device. We cannot guarantee that no accidents or damage will occur due to
improper use of the device. Please use this product with care and operate at your own risk.
Safety Information (for outdoor Decos)
• The socket-outlet shall be installed near the outdoor Deco and shall be easily accessible.
• Before mounting your Deco outdoors, waterproof it to ensure device safety and performance.
• The waterproof cover must be secured before use!
• The product can only be installed by instructed person or skilled person!
• Keep the device away from fire or hot environments. DO NOT immerse in water or any other liquid.
• Do not attempt to disassemble, repair, or modify the device. If you need service, please contact us.
• Do not use the device where wireless devices are not allowed.
• Use only power supplies which are provided by manufacturer and in the original packing of this product. If you have any questions, please don’t
hesitate to contact us.
• This equipment can be powered only by equipments that comply with Power Source Class 2 (PS2) or Limited Power Source (LPS) defined in the
standard of IEC 62368-1.
Please read and follow the above safety information when operating the device. We cannot guarantee that no accidents or damage will occur due to
improper use of the device. Please use this product with care and operate at your own risk.
16
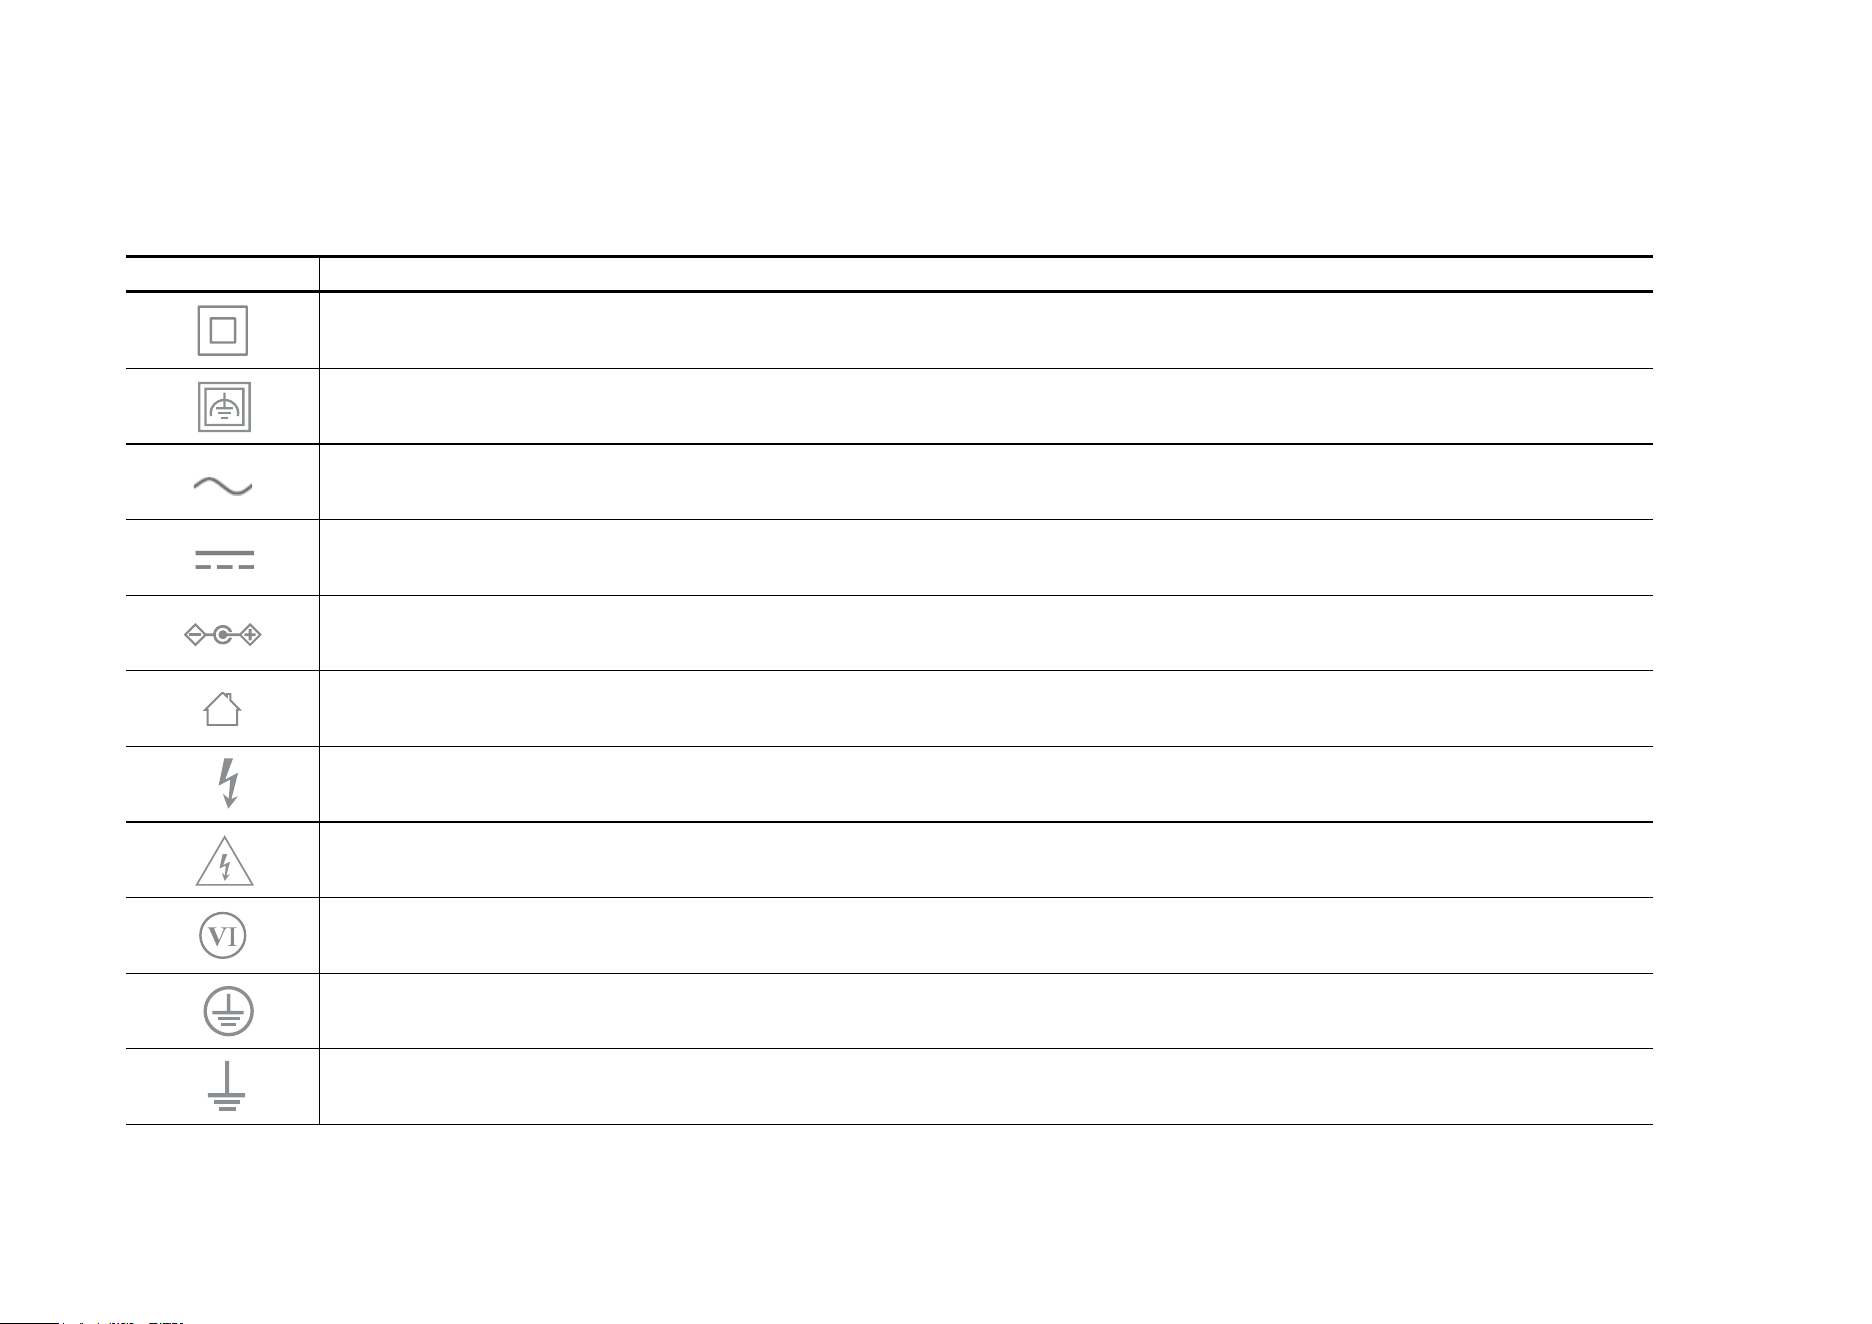
Explanation of the symbols on the product label
Symbols may vary from products.
Note: The product label can be found at the bottom of the product and its I.T.E. power supply.
Symbol Explanation
Class II equipment
Class II equipment with functional earthing
Alternating current
DC voltage
Polarity of output terminals
Indoor use only
Dangerous voltage
Caution, risk of electric shock
Energy efficiency Marking
Protective earth
Earth
17
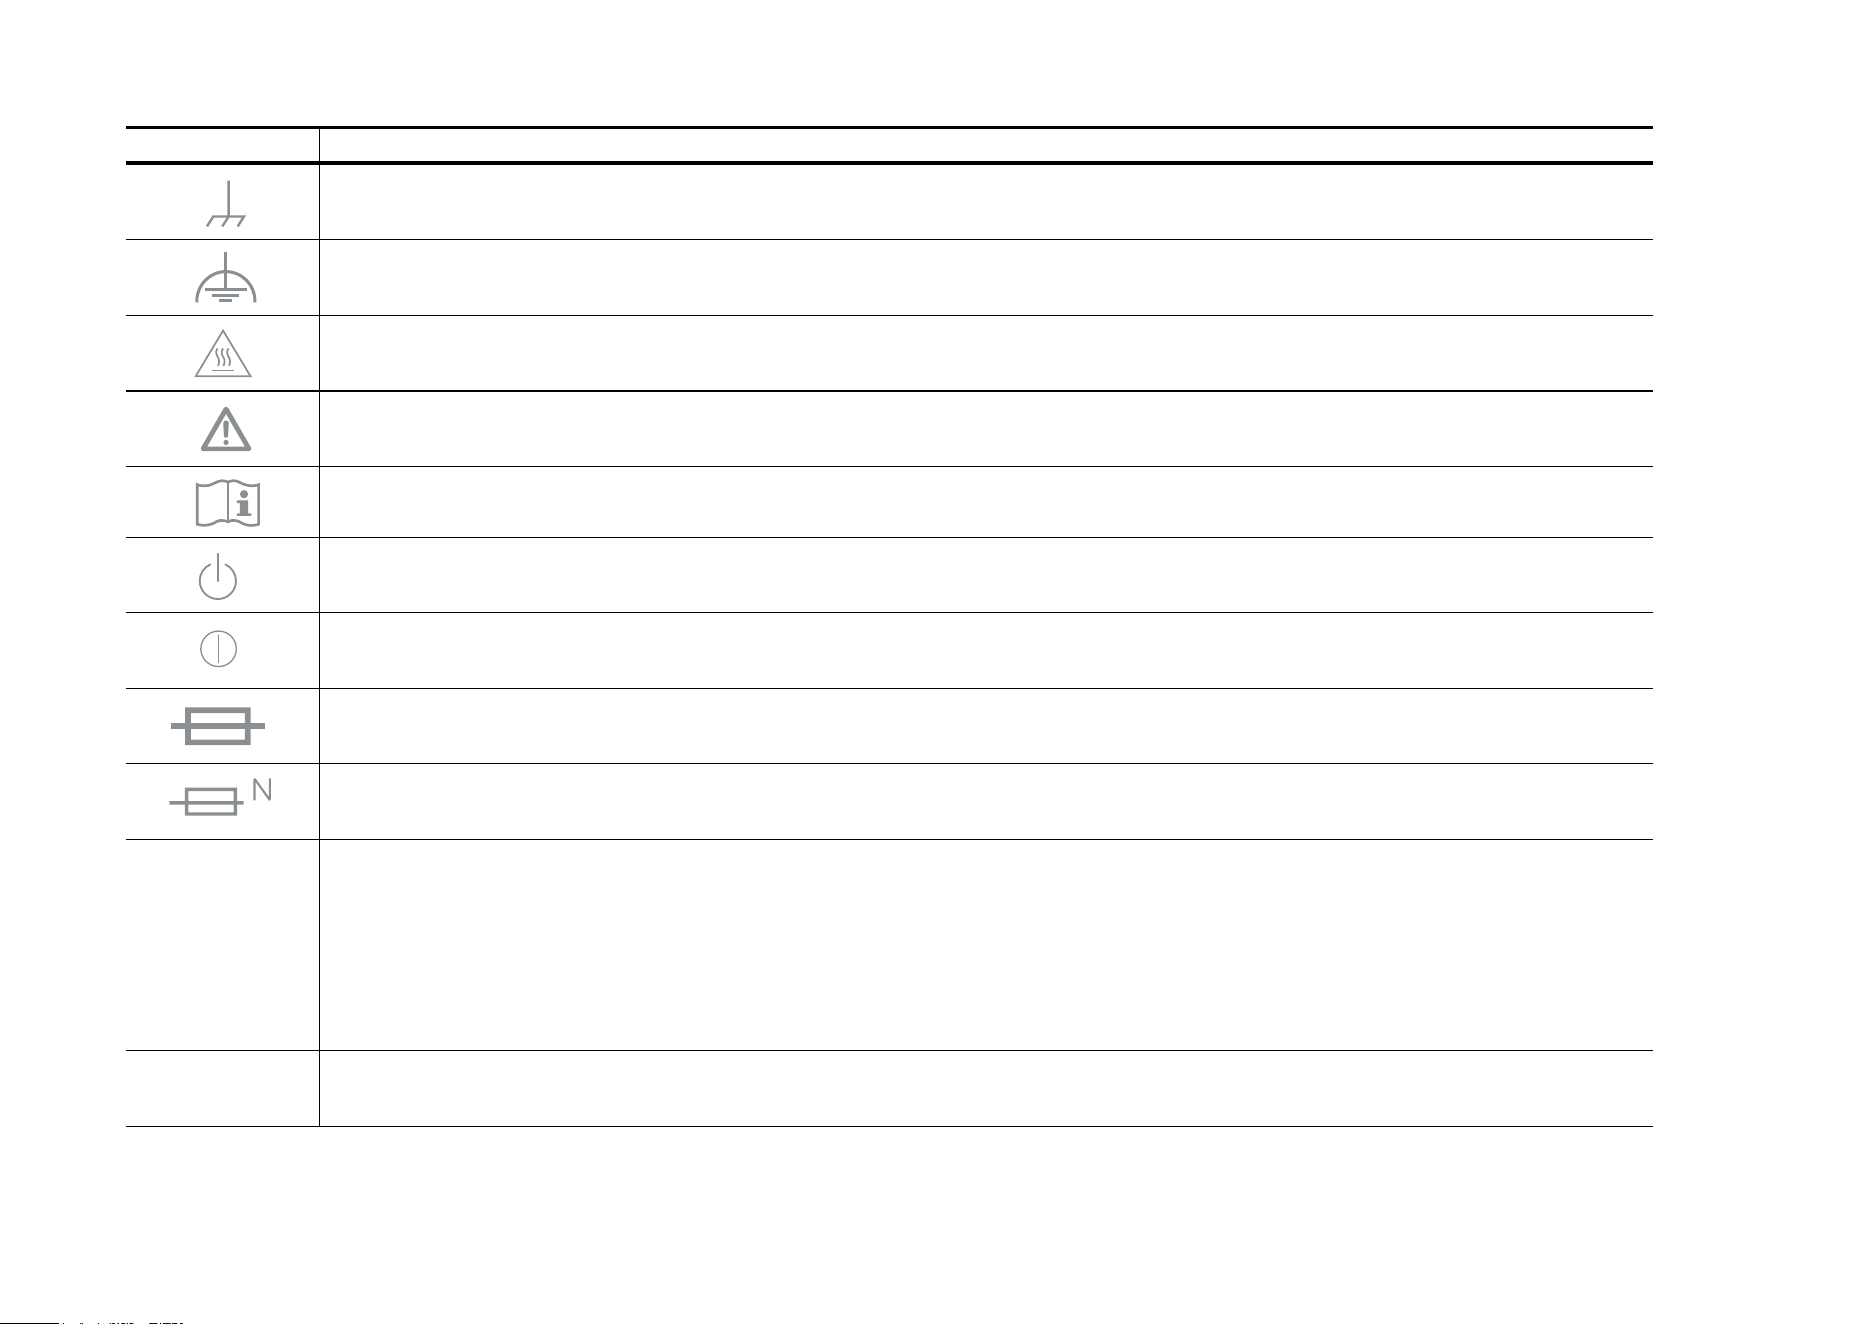
Symbol Explanation
Frame or chassis
Functional earthing
Caution, hot surface
Caution
Operator’s manual
Stand-by
“ON”/”OFF” (push-push)
Fuse
Fuse is used in neutral N
RECYCLING
This product bears the selective sorting symbol for Waste electrical and electronic equipment (WEEE). This means
that this product must be handled pursuant to European directive 2012/19/EU in order to be recycled or dismantled to
minimize its impact on the environment.
User has the choice to give his product to a competent recycling organization or to the retailer when he buys a new
electrical or electronic equipment.
Caution, avoid listening at high volume levels for long periods
18
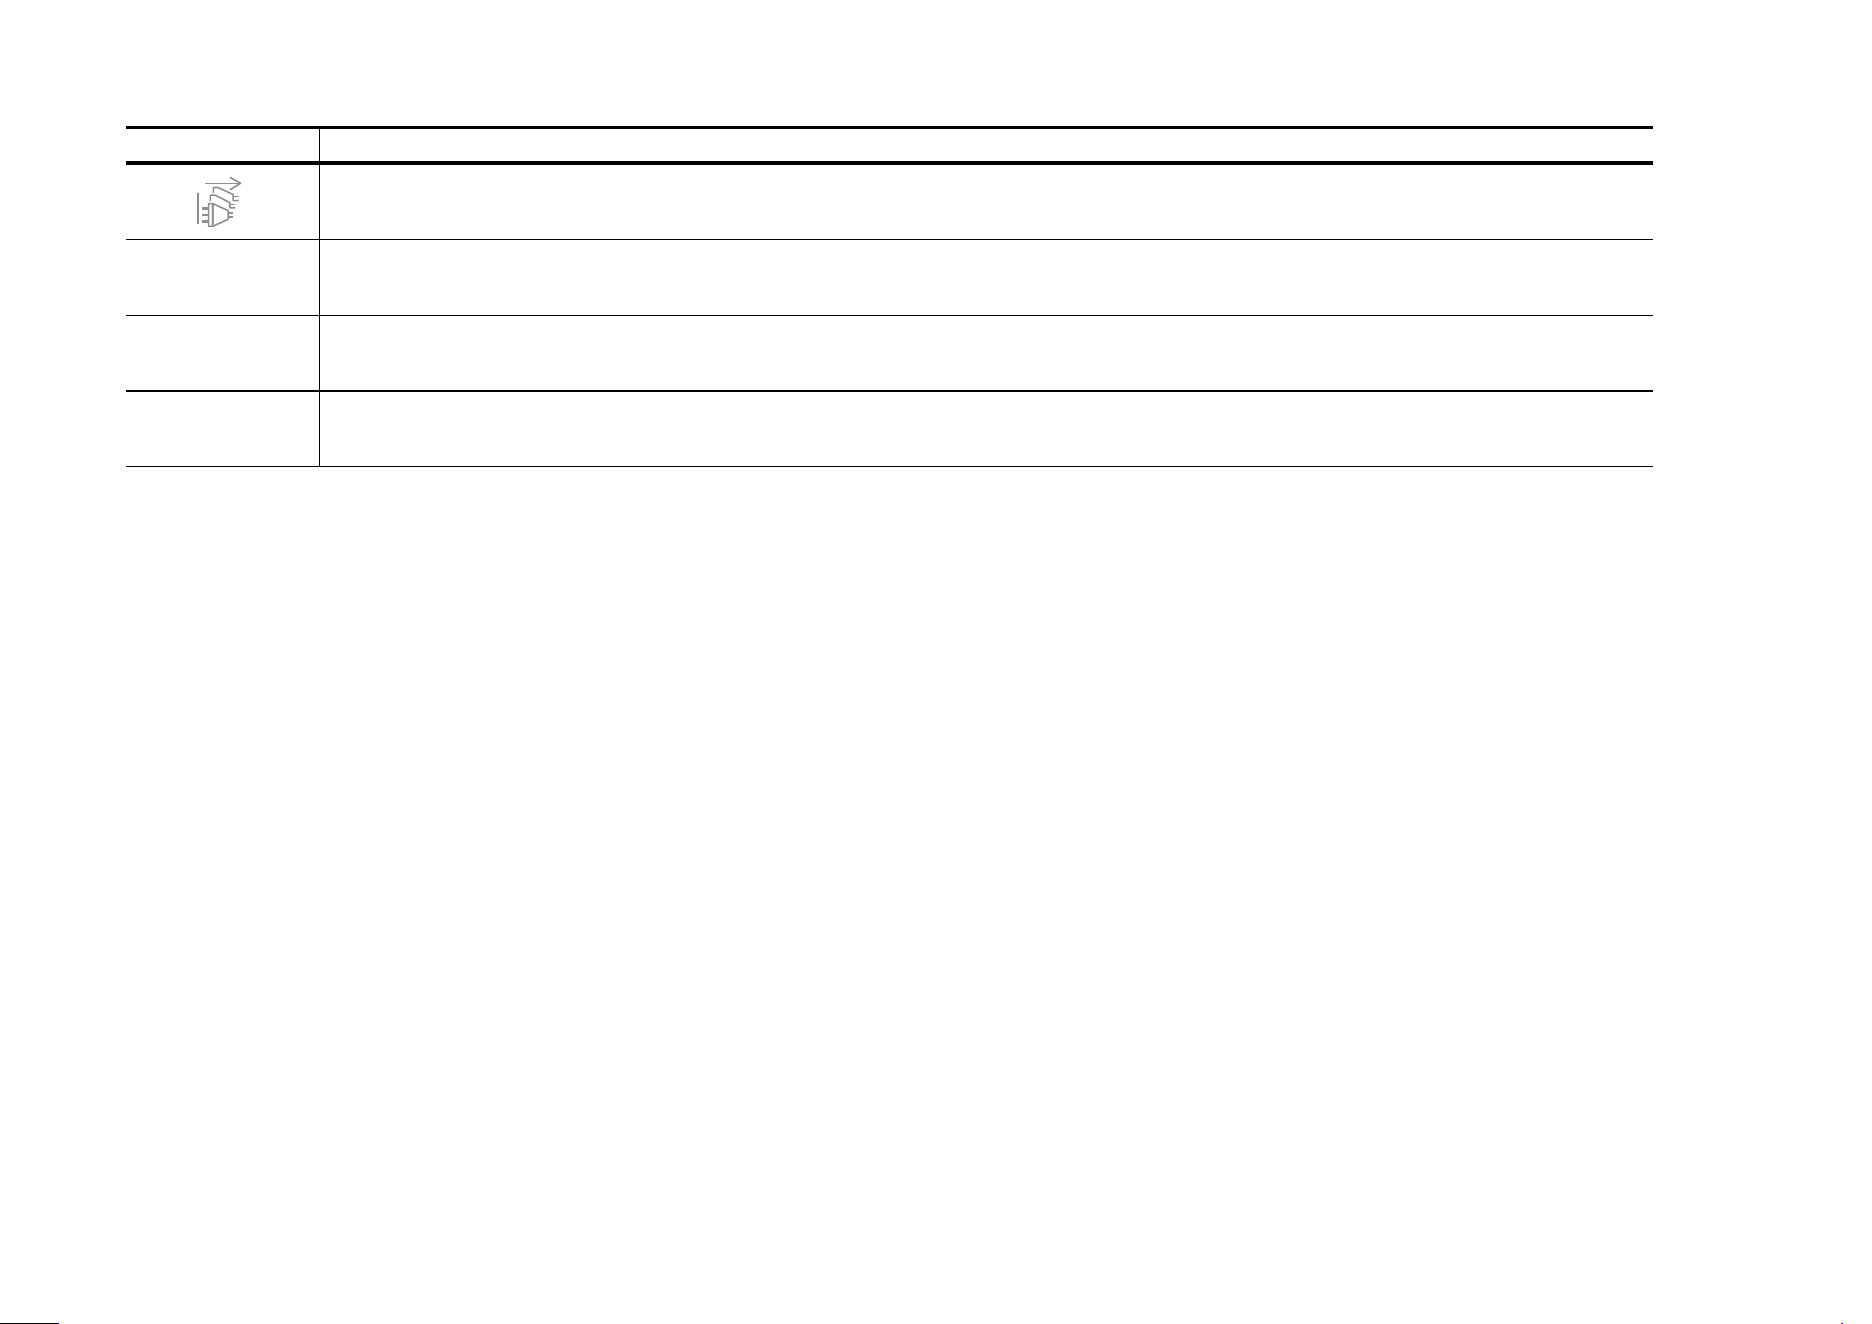
Symbol Explanation
Disconnection, all power plugs
m Switch of mini-gap construction
µ
Switch of micro-gap construction (for US version)
Switch of micro-gap / micro-disconnection construction (for other versions except US)
ε Switch without contact gap (Semiconductor switching device)