
1
Foreword
General
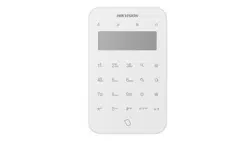
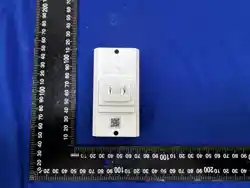
This manual introduces the functions and operations of the WIFI Doorbell(Model:LXDB4I-WIFI)
and WIFI Chime(Model: LXDBCM-WIFI).
Read carefully before using the device, and keep the manual safe for future reference.
About the Manual
● The manual is for reference only.
● The manual will be updated according to the latest laws and regulations of related
jurisdictions.
● There might be errors in the print or deviations in the description of the functions,
operations and technical data. If there is any doubt or dispute, we reserve the right of
final explanation.
● All trademarks, registered trademarks and company names in the manual are properties
of their respective owners.
FCC Warning
Federal Communication Commission Interference Statement
This equipment has been tested and found to comply with the limits for a Class B digital device,
pursuant to Part 15 of the FCC Rules. These limits are designed to provide reasonable protection against
harmful interference in a residential installation. This equipment generates, uses, and can radiate radio
frequency energy and, if not installed and used in accordance with the instructions, may cause harmful
interference to radio communications. However, there is no guarantee that interference will not occur in
a particular installation. If this equipment does cause harmful interference to radio or television
reception, which can be determined by turning the equipment off and on, the user is encouraged to try
to correct the interference by one or more of the following measures:
• Reorient or relocate the receiving antenna.
• Increase the separation between the equipment and receiver.
• Connect the equipment into an outlet on a circuit different from that to which the receiver is
connected.
• Consult the dealer or an experienced radio/TV technician for help.
FCC Caution:
This device complies with Part 15 of the FCC Rules. Operation is subject to the following two conditions:
(1) This device may not cause harmful interference, and (2) this device must accept any interference
received, including interference that may cause undesired operation.
Non-modification Statement:
Changes or modifications not expressly approved by the party responsible for compliance could void the user's authority to operate
the equipment.
FCC Radiation Exposure Statement:
This equipment complies with FCC radiation exposure limits set forth for an uncontrolled environment.
This equipment should be installed and operated with minimum distance 20cm between the radiator &
your body.

2
Important Safeguards and Warnings
This section introduces content covering the proper handling of the WIFI Doorbell(Model:
LXDB4I-WIFI), hazard prevention, and prevention of property damage. Read carefully before
using the WIFI Doorbell(Model:LXDB4I-WIFI), and comply with the guidelines when using it.
Installation Requirements
● Do not connect the power adapter to the WIFI Doorbell(Model:LXDB4I-WIFI) while the
adapter is powered on.
● Strictly comply with the local electric safety code and standards. Make sure the ambient
voltage is stable and meets the power supply requirements of the WIFI Doorbell(Model:
LXDB4I-WIFI).
● Personnel working at heights must take all necessary measures to ensure personal safety
including wearing a helmet and safety belts.
● Do not place the WIFI Doorbell(Model:LXDB4I-WIFI) in a place exposed to sunlight or near heat
sources.
● Keep the WIFI Doorbell(Model:LXDB4I-WIFI) away from dampness, dust, and soot.
● Install the WIFI Doorbell(Model:LXDB4I-WIFI) on a stable surface to prevent it from falling.
● Install the WIFI Doorbell(Model:LXDB4I-WIFI) in a well-ventilated place, and do not block its
ventilation.
● The power supply must conform to the requirements of ES1 in IEC 62368-1 standard and be no
higher than PS2. Please note that the power supply requirements are subject to the WIFI
Doorbell(Model:LXDB4I-WIFI) label.
Operation Requirements
● Check whether the power supply is correct before use.
● Do not unplug the power cord on the side of the WIFI Doorbell(Model:LXDB4I-WIFI) while
the adapter is powered
on.
● Operate the WIFI Doorbell(Model:LXDB4I-WIFI) within the rated range of power input and
output.
● Use the WIFI Doorbell(Model:LXDB4I-WIFI) under allowed humidity and temperature conditions.
● Do not drop or splash liquid onto the WIFI Doorbell(Model:LXDB4I-WIFI), and make sure that
there is no object
filled with liquid on the WIFI Doorbell(Model:LXDB4I-WIFI) to prevent liquid from flowing into
it.
● Do not disassemble the WIFI Doorbell(Model:LXDB4I-WIFI) without professional instruction.
● This product is professional equipment.
● This equipment is not suitable for use in locations where children are likely to be present.
3
1. Adding Devices
You can add a device by entering the device information manually (SN, IP), scanning the QR
code, or performing an online search.
1 Adding by SN/QR Code
You can add a device by scanning the QR code or by manually entering the SN.
1.1 Adding Wireless Devices
This section provides instructions for adding WIFI Doorbell(Model
:
LXDB4I-WIFI)s and WIFI
Chime(Model: LXDBCM-WIFI).
Procedure
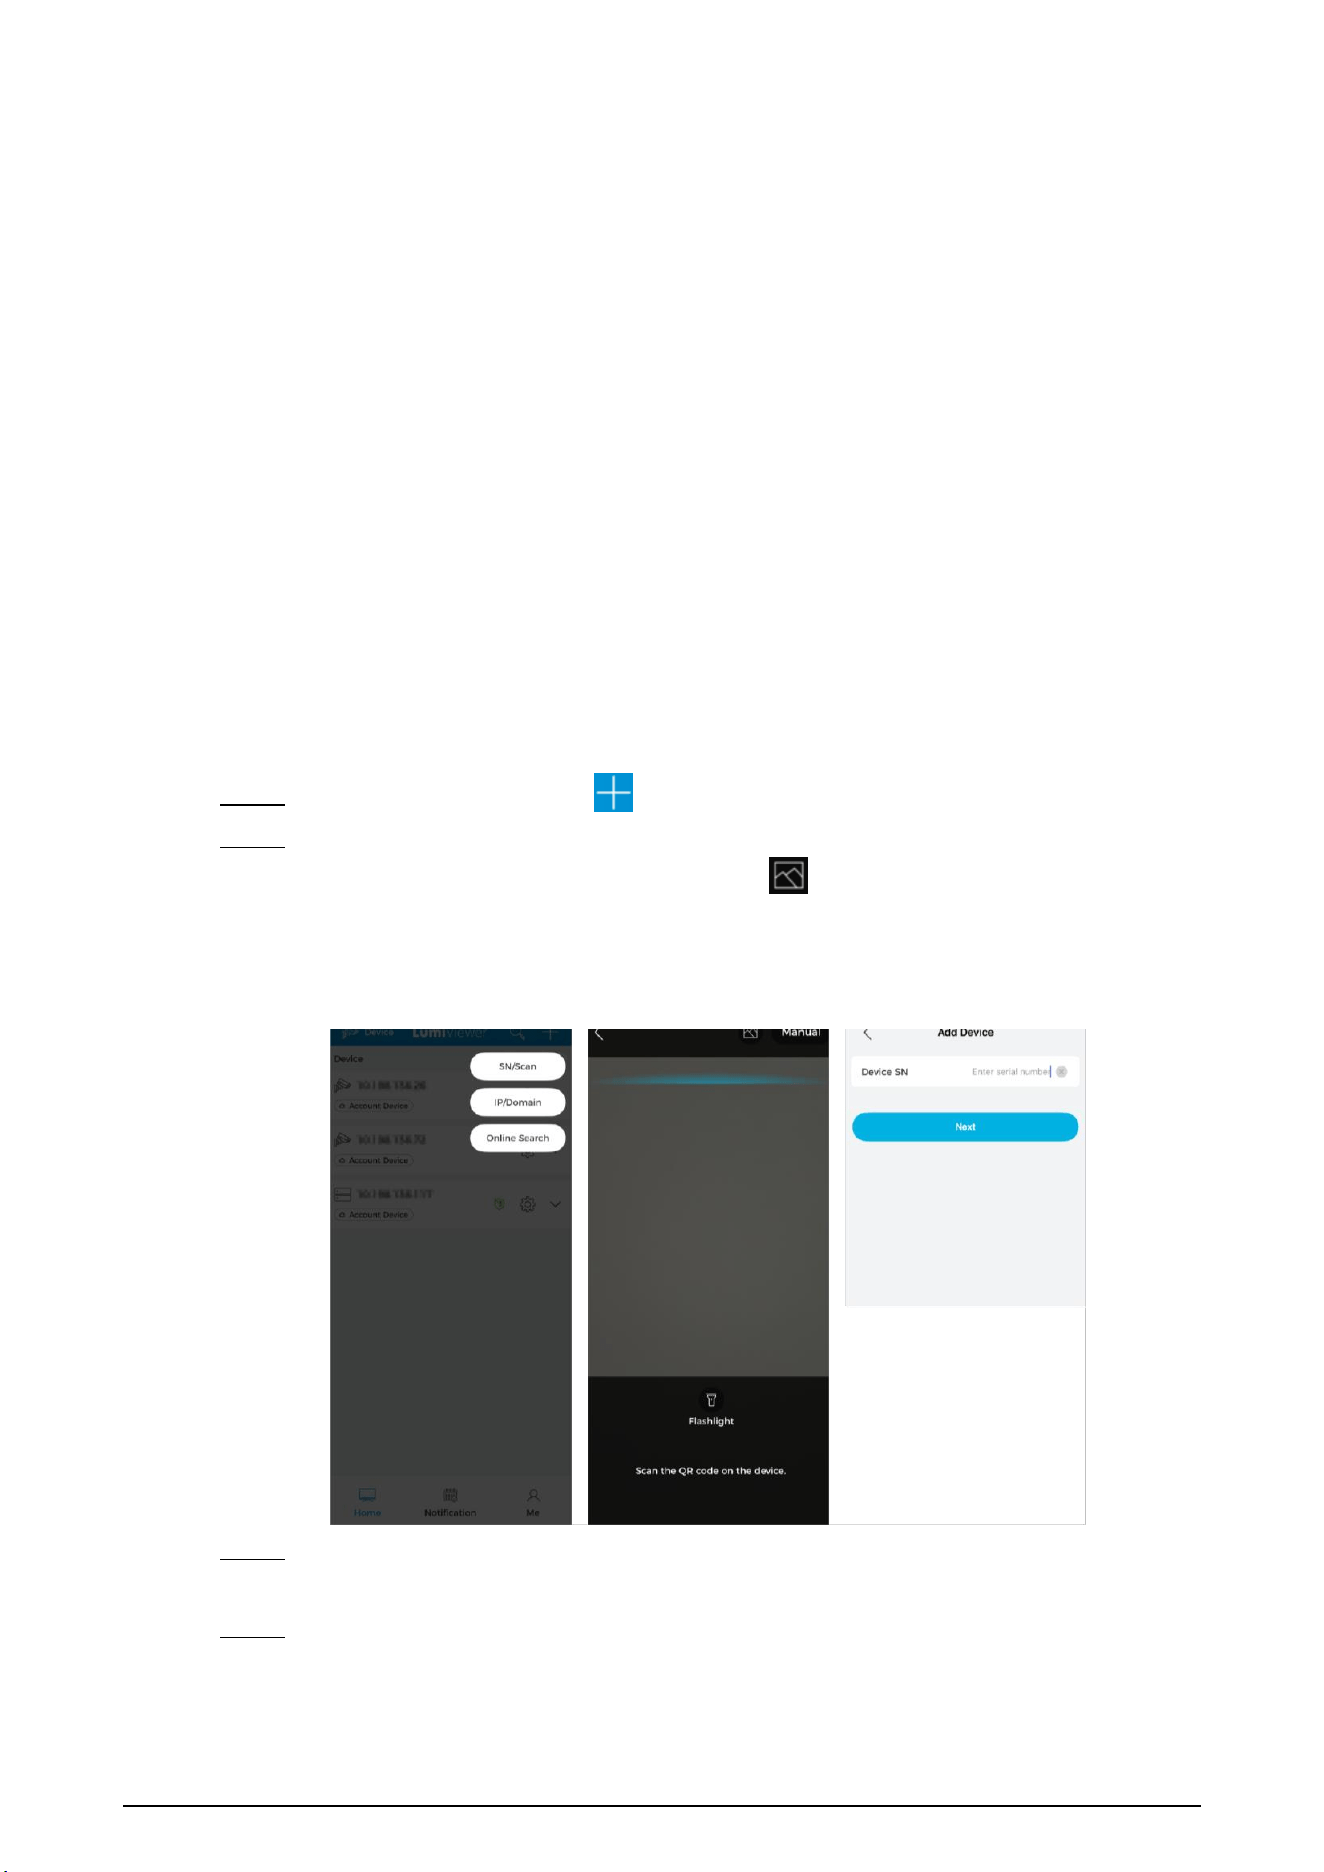
Step 1 On the Device screen, tap , then select SN/Scan.
Step 2 Add a device using one of the following methods:
●
Scan the device QR code directly, or tap to import a QR code picture, then
tap Next.
●
Tap Manual, enter the device SN, then tap Next.
Figure 1-1 Add a device
Step 3 Ensure the device is powered on and the indicator light is flashing blue or green, then
tap Next. If you are re-adding the device, skip steps 4–6 and start from step 7.
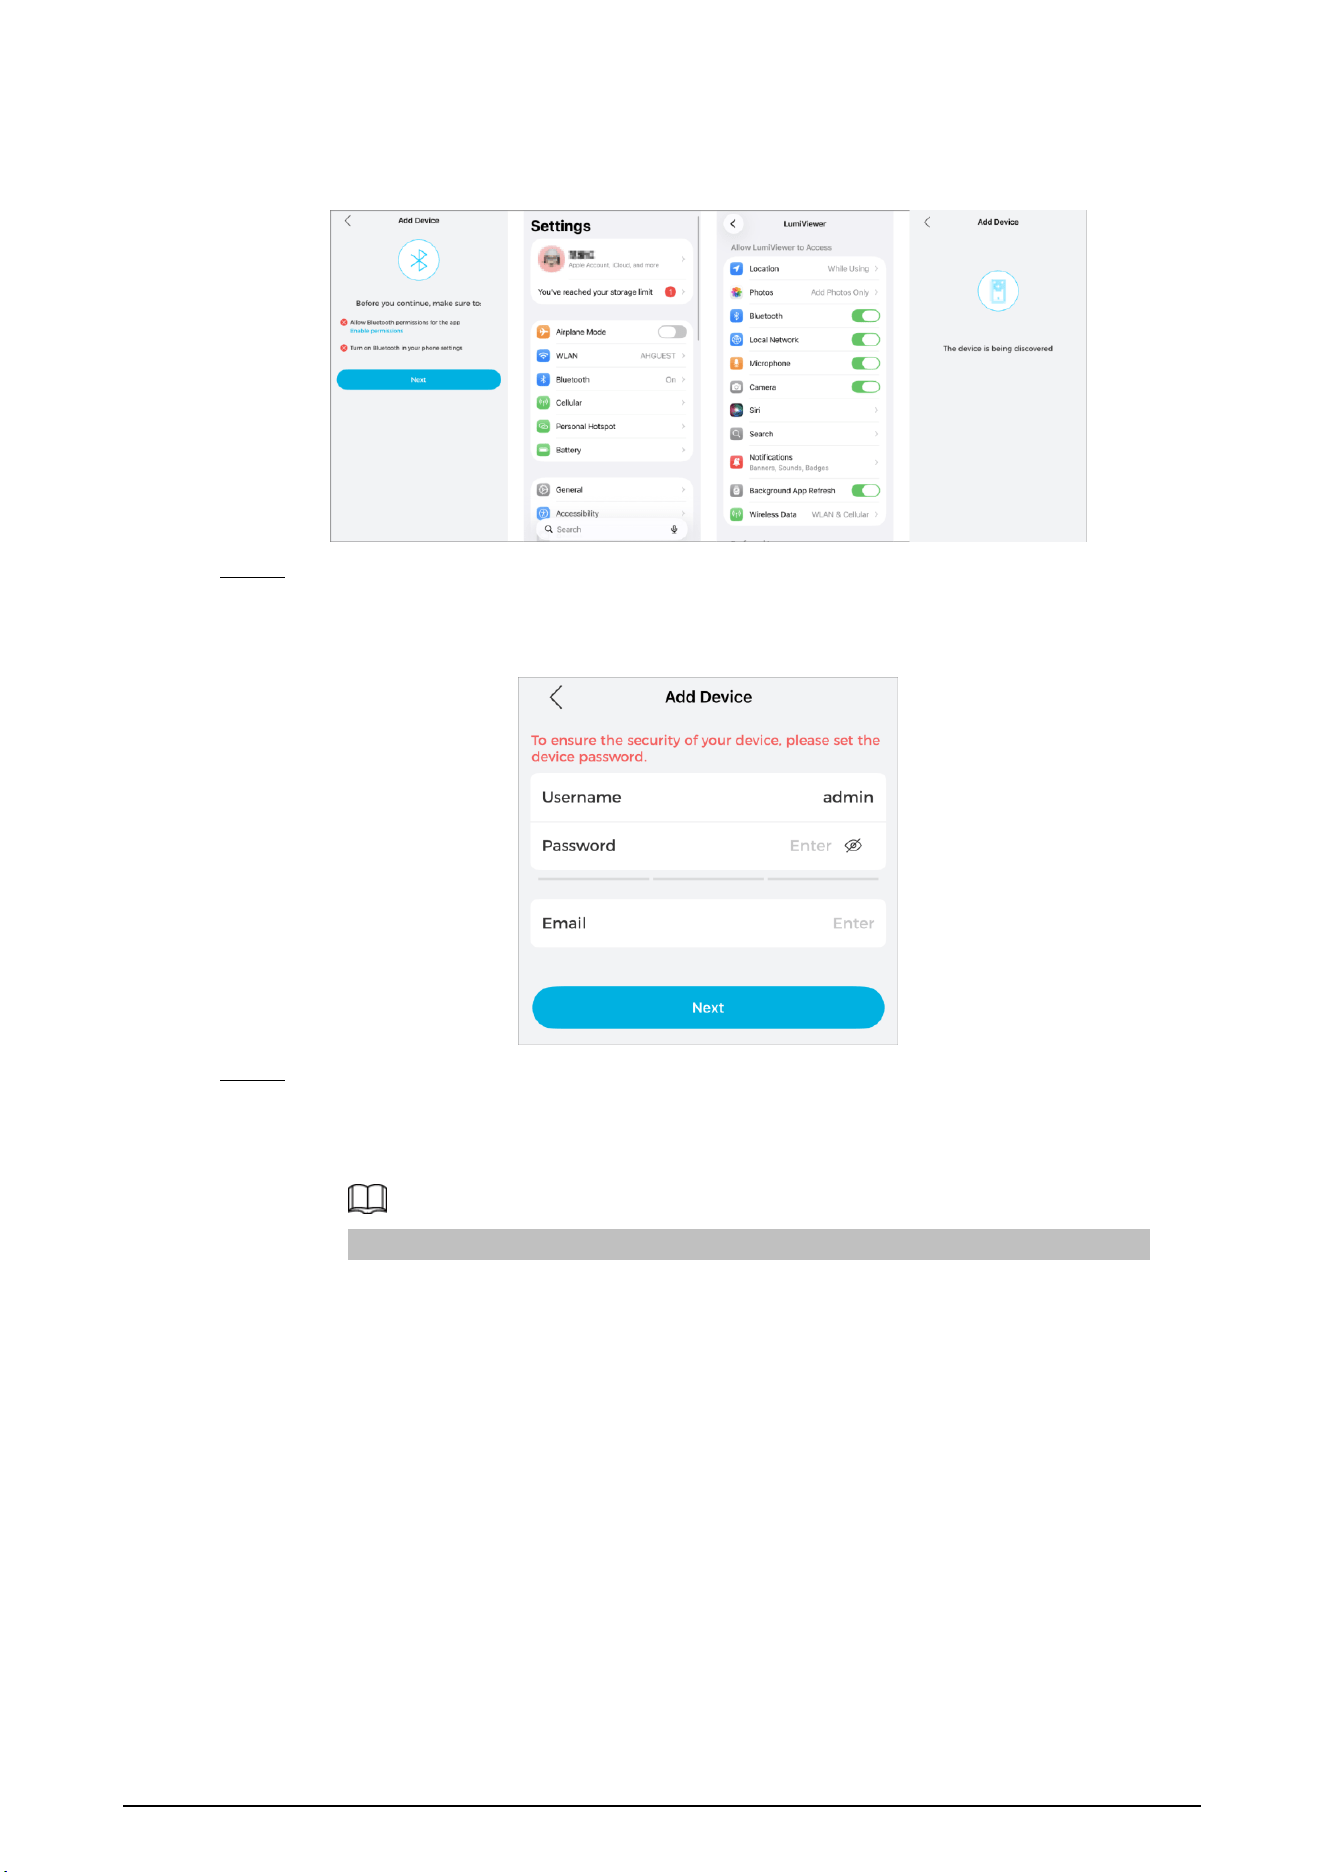
Step 4 (Optional) Find devices via Bluetooth.
1) Tap Settings to turn on your phone's Bluetooth.
2) Tap Enable permissions to allow Bluetooth permissions for the App.
4
3) Tap Next on the Add Device Screen. Pairing will begin automatically.
Figure 1-2 Find devices via Bluetooth
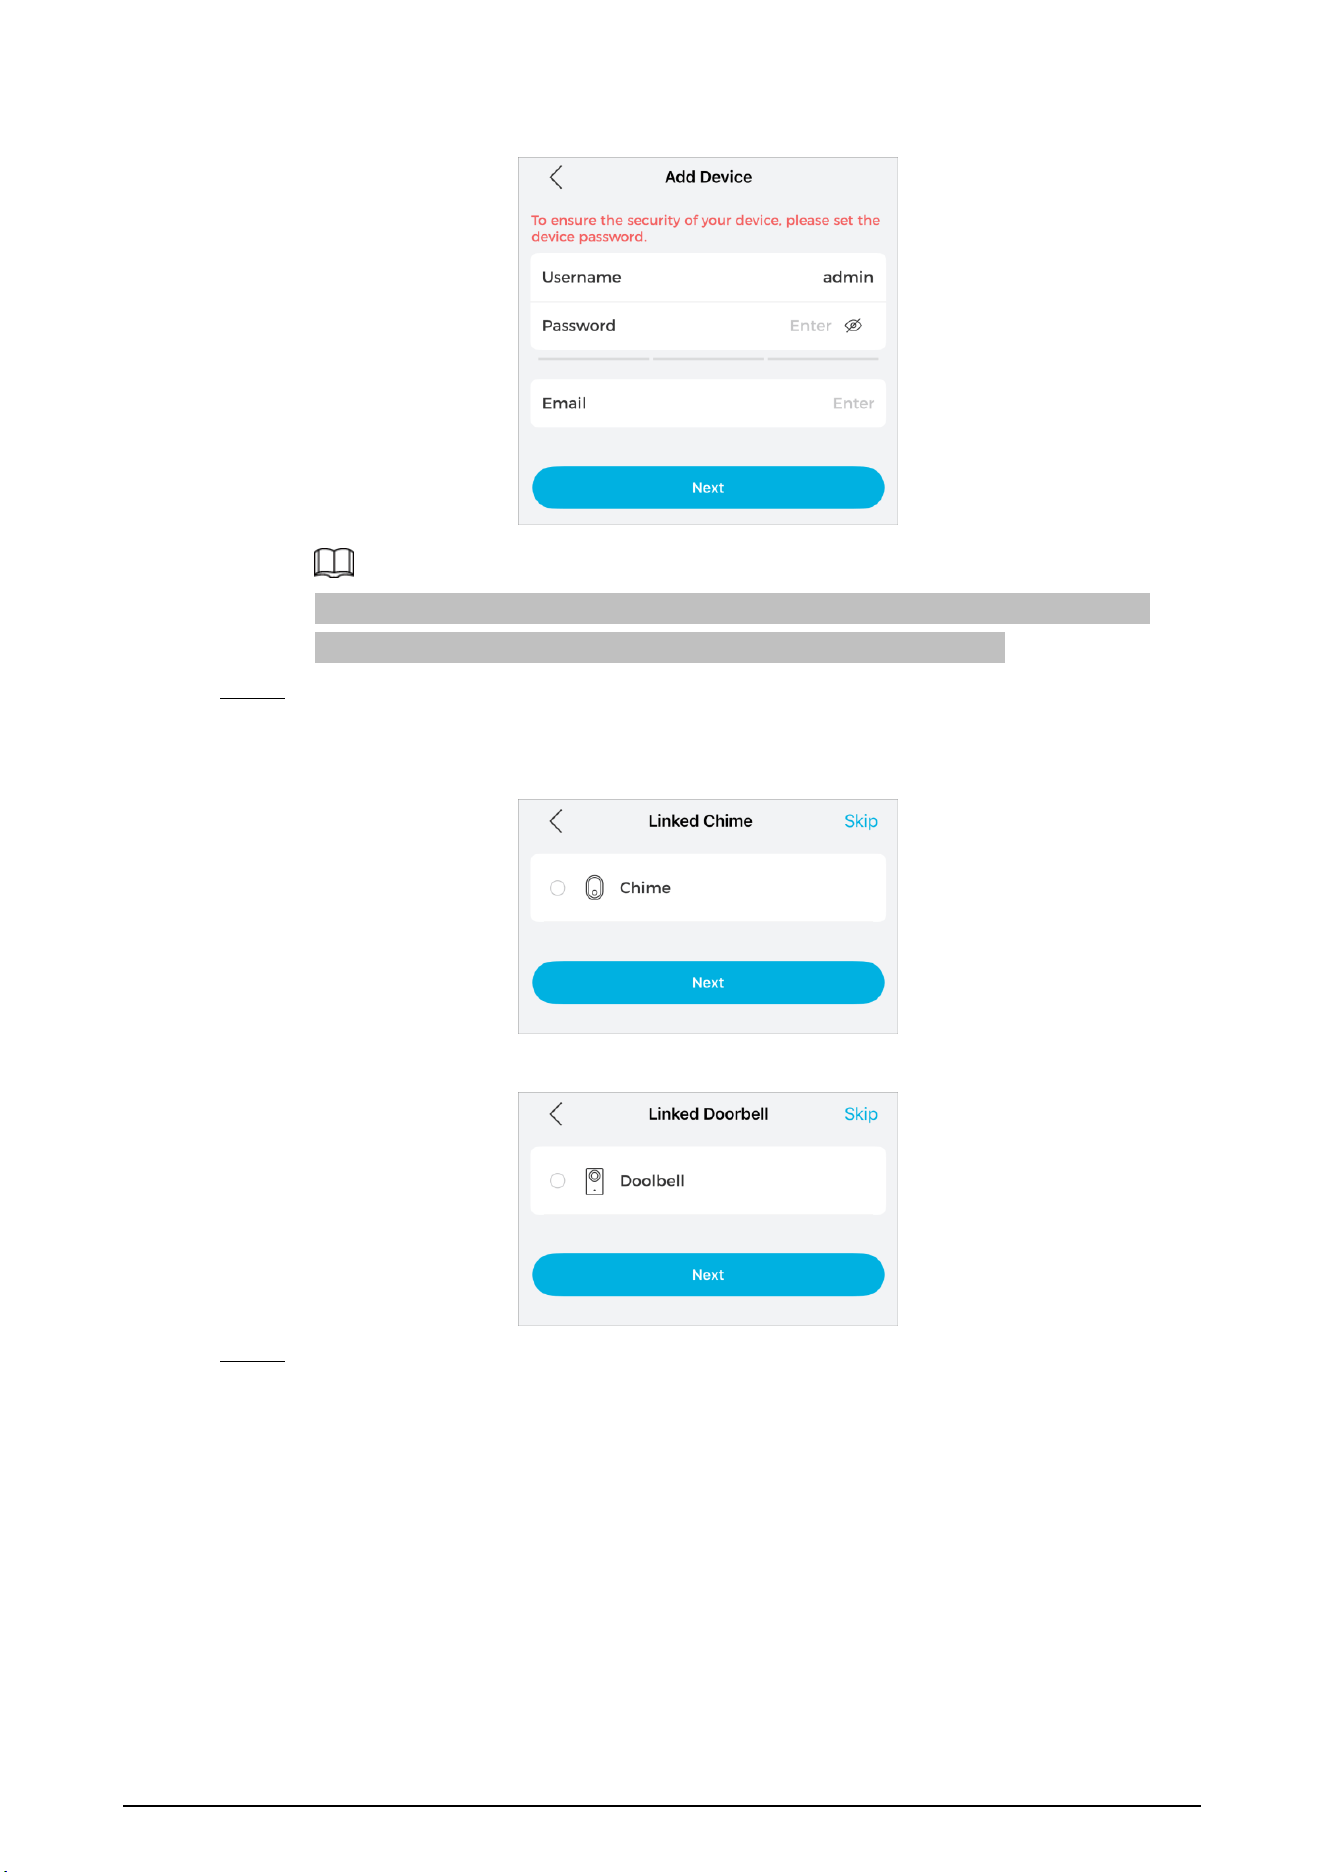
Step 5 On the Add Device screen, enter the device password and your email address, then
tap Next.
Figure 1-3 Set device password
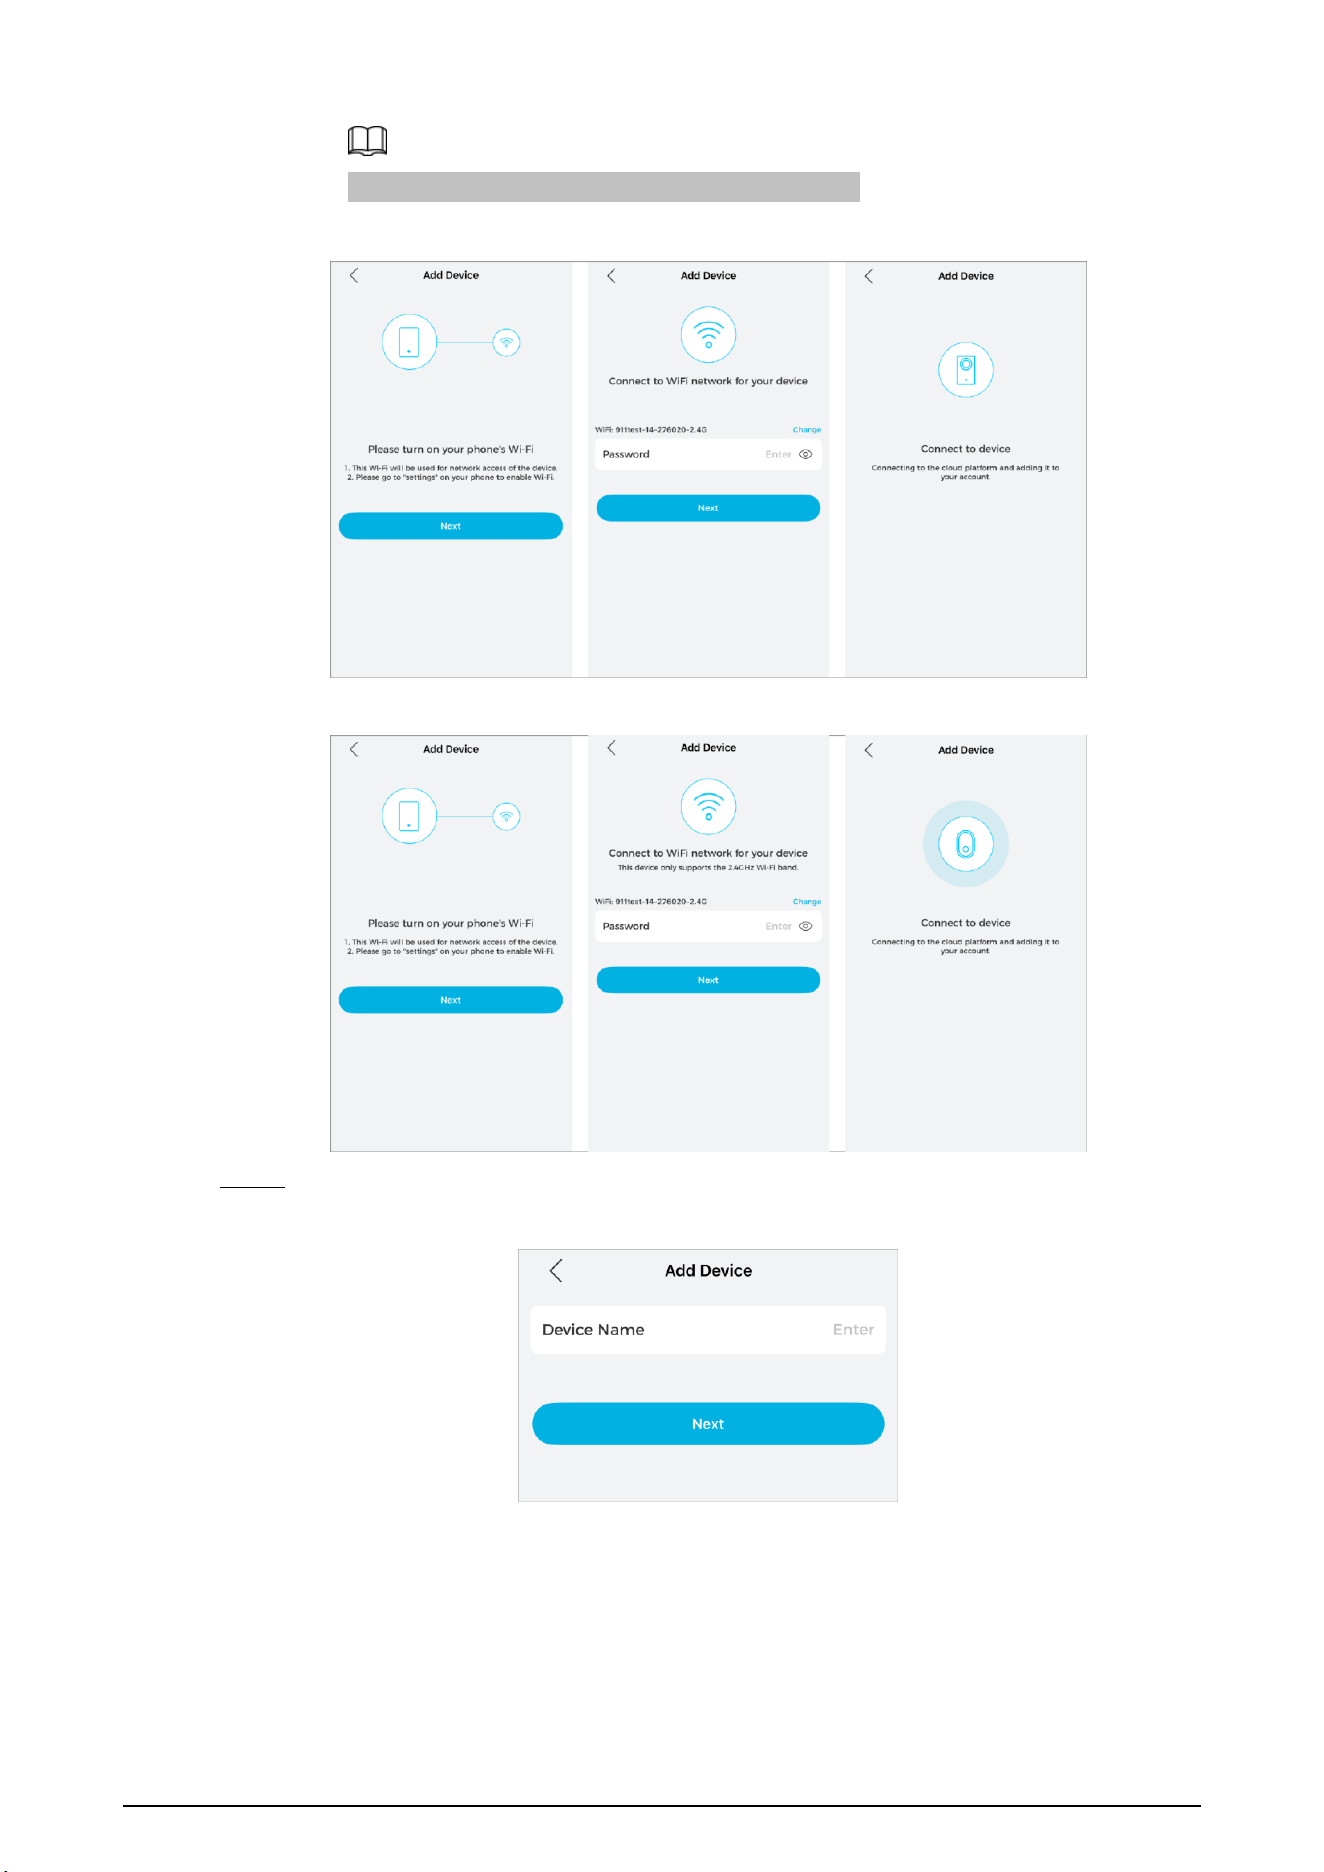
Step 6 Connect devices via Wi-Fi.
1)
(
Optional
)
Go to Settings > WLAN on your phone, then select the network to
connect your device.
The WIFI Chime (Model: LXDBCM-WIFI) only supports the 2.4 GHz Wi-Fi band.
2) Enter the Wi-Fi password on the Add Device Screen, then tap Next. The device
will begin connecting.
5
You can tap Change to change the Wi-Fi settings.
Figure 1-4 Connect devices via Wi‑Fi (WIFI Doorbell(Model:LXDB4I-WIFI))
Figure 1-5 Connect devices via Wi‑Fi (WIFI Chime (Model: LXDBCM-WIFI))
Step 7 On the Add Device screen, enter a name for the device, then tap Next.
Figure 1-6 Enter the device name -1
6
Figure 1-7 Enter the device name -2
When re-adding a device, you need to enter the device name and password. The
password must match the one previously configured on the device.
Step 8 (Optional) Select the existing WIFI Doorbell(Model
:
LXDB4I-WIFI) or WIFI
Chime(Model: LXDBCM-WIFI) to associate it, then tap Next.
Figure 4-8 Select the existing devices (WIFI Doorbell(Model:LXDB4I-WIFI))
Figure 1-9 Select the existing devices (WIFI Chime(Model: LXDBCM-WIFI))
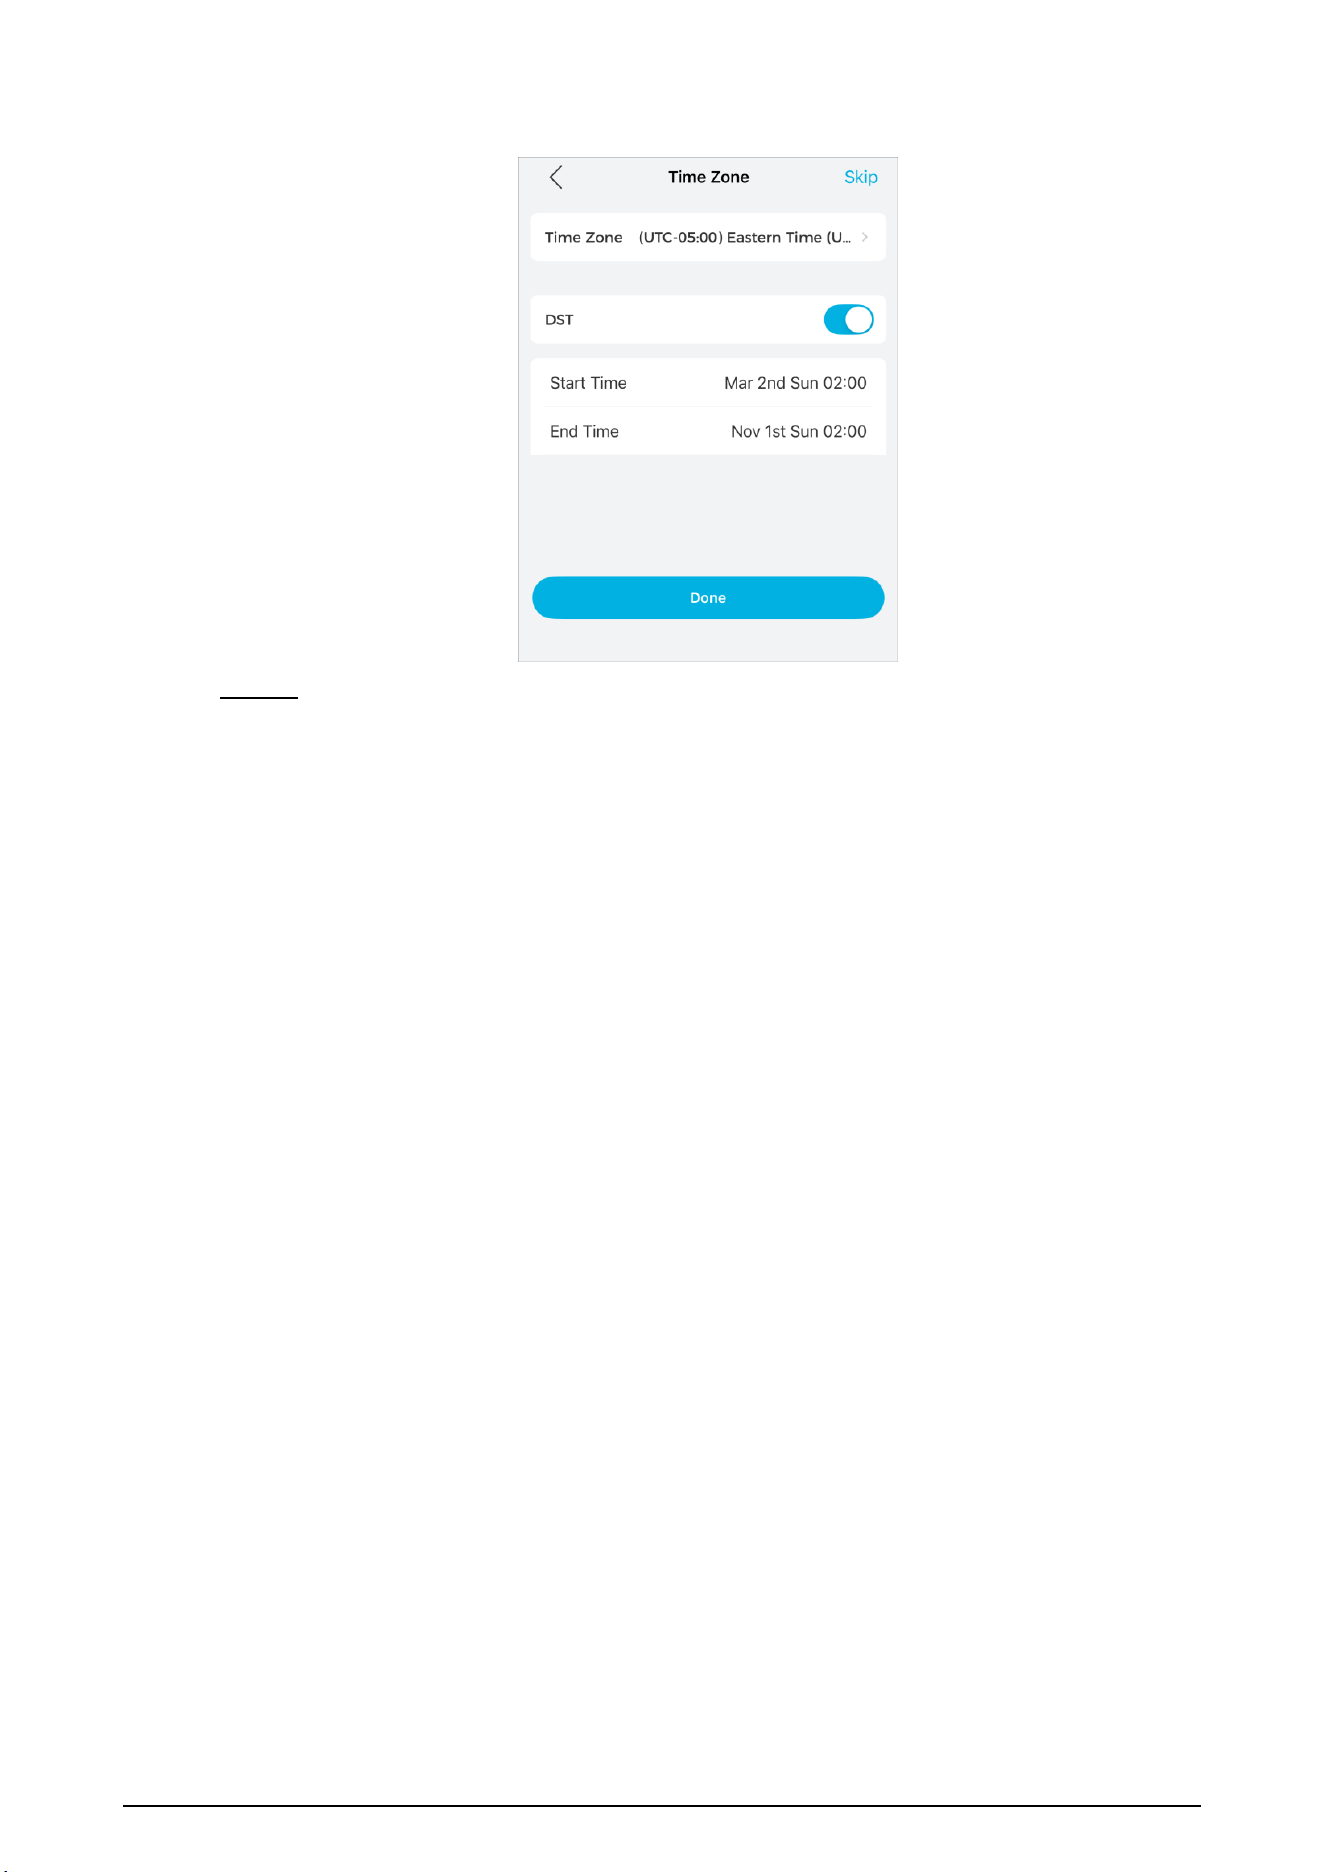
Step 9 (WIFI Doorbell(Model
:
LXDB4I-WIFI) devices only) On the Time Zone screen, select
time zone, set DST (Daylight Saving Time) settings, then tap Done.
7
Figure 1-10 Set DST time
Step 10 Tap OK to complete adding the device.
8
2. Basic Operations
After adding a device, you can perform basic operations, such as configuring device
parameters, restarting or deleting the device, and setting or changing the device password.
The interface may vary depending on the device model. Please refer to the actual situation.
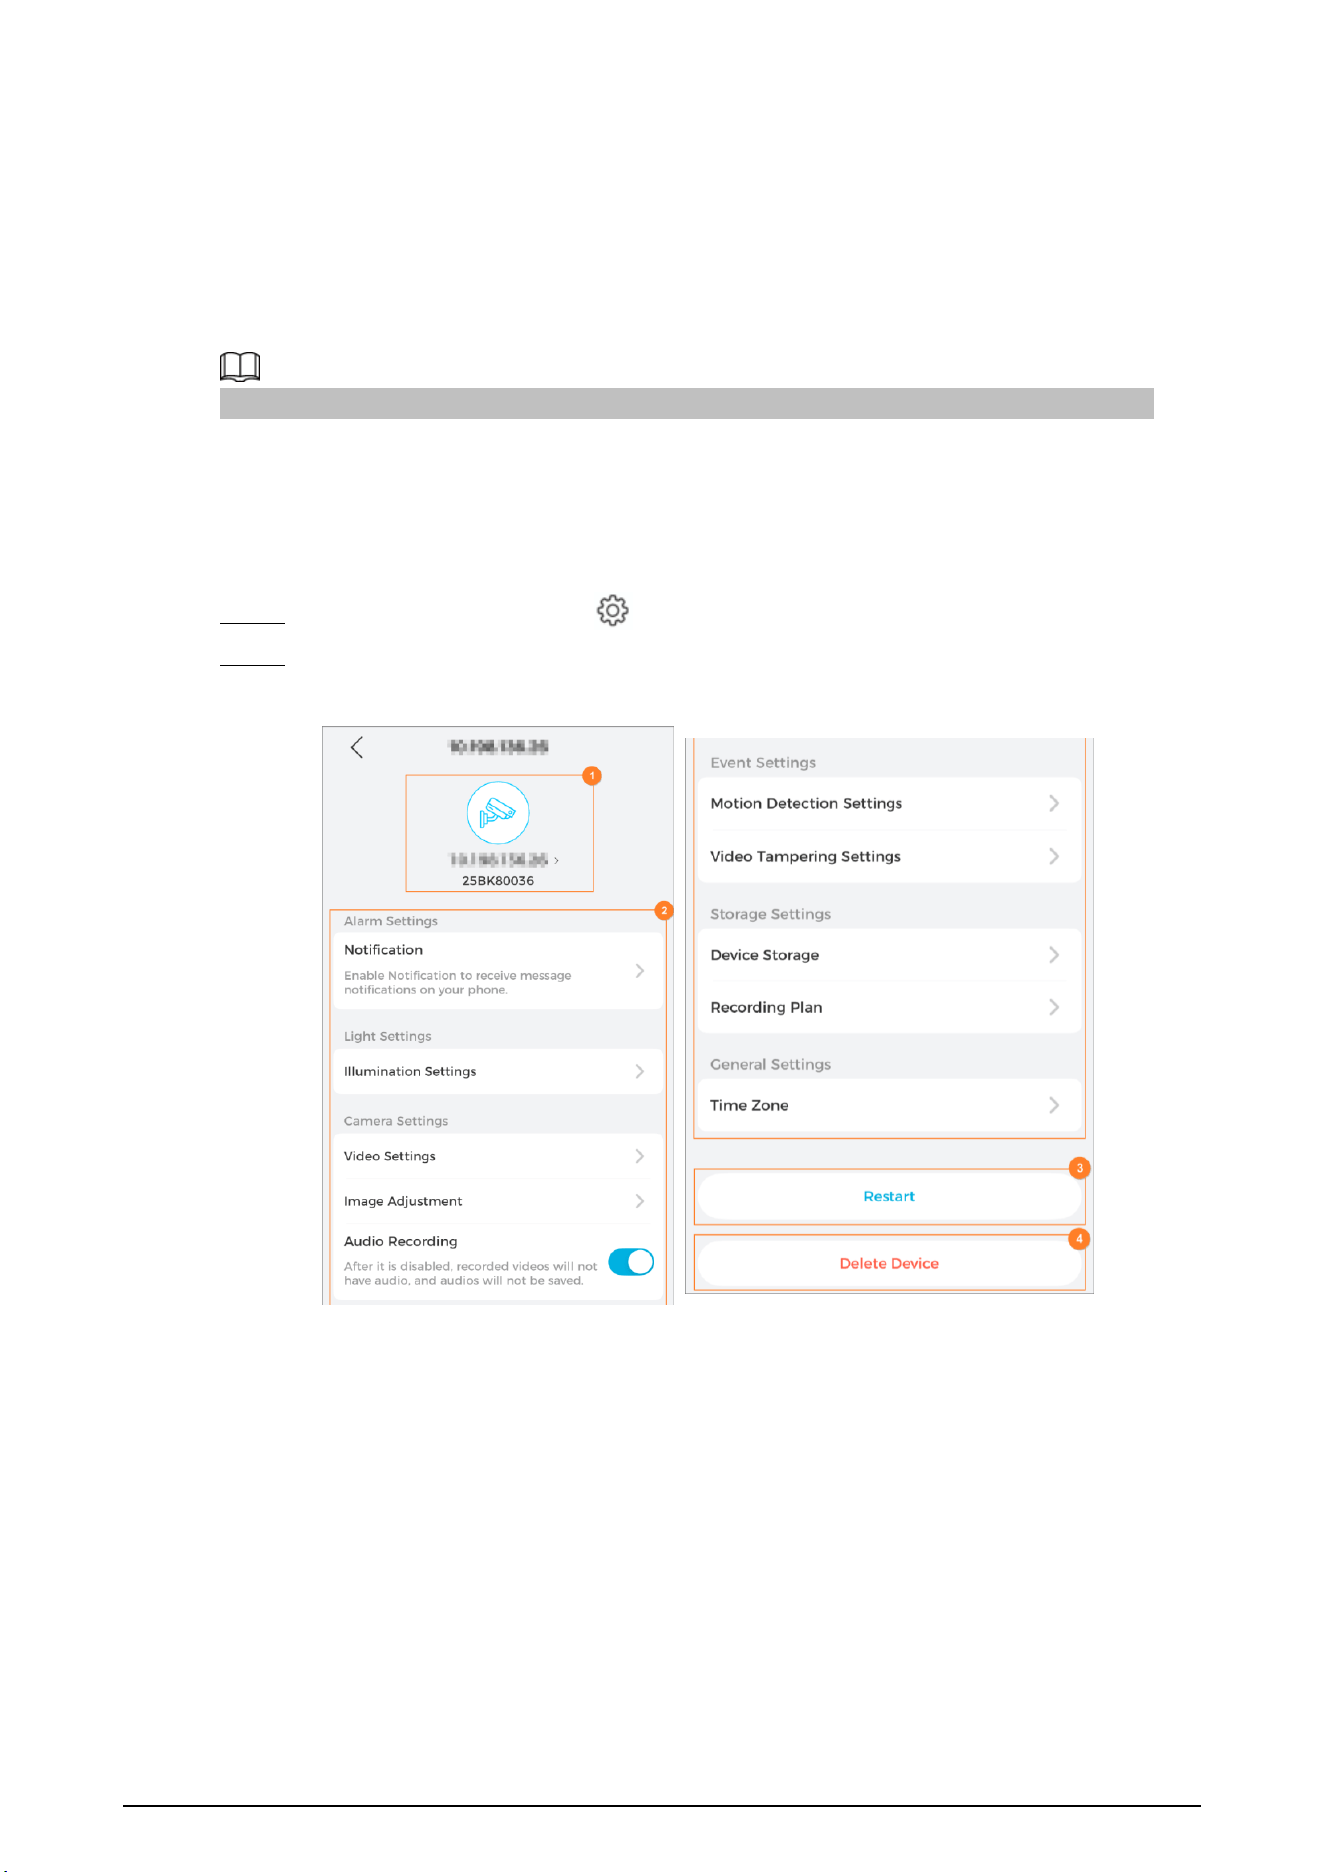
2.1 Device Settings
Procedure
Step 1 On the Device screen, tap next to the device.
Step 2 Configure the parameters on the device details screen.
Figure 2-1 Device details
2.2 Arm Settings
You can configure Human detection and vehicle detection features for WIFI Doorbell(Model
:
LXDB4I-WIFI)s.
Background Information
The device supports configuring motion detection and vehicle detection features either
simultaneously or individually. You can select the corresponding detection functions as
needed.
9
Procedure
Step 1 On the Device screen, tap next to a device.
Step 2 On the Alarm Settings section, tap Arm Settings.
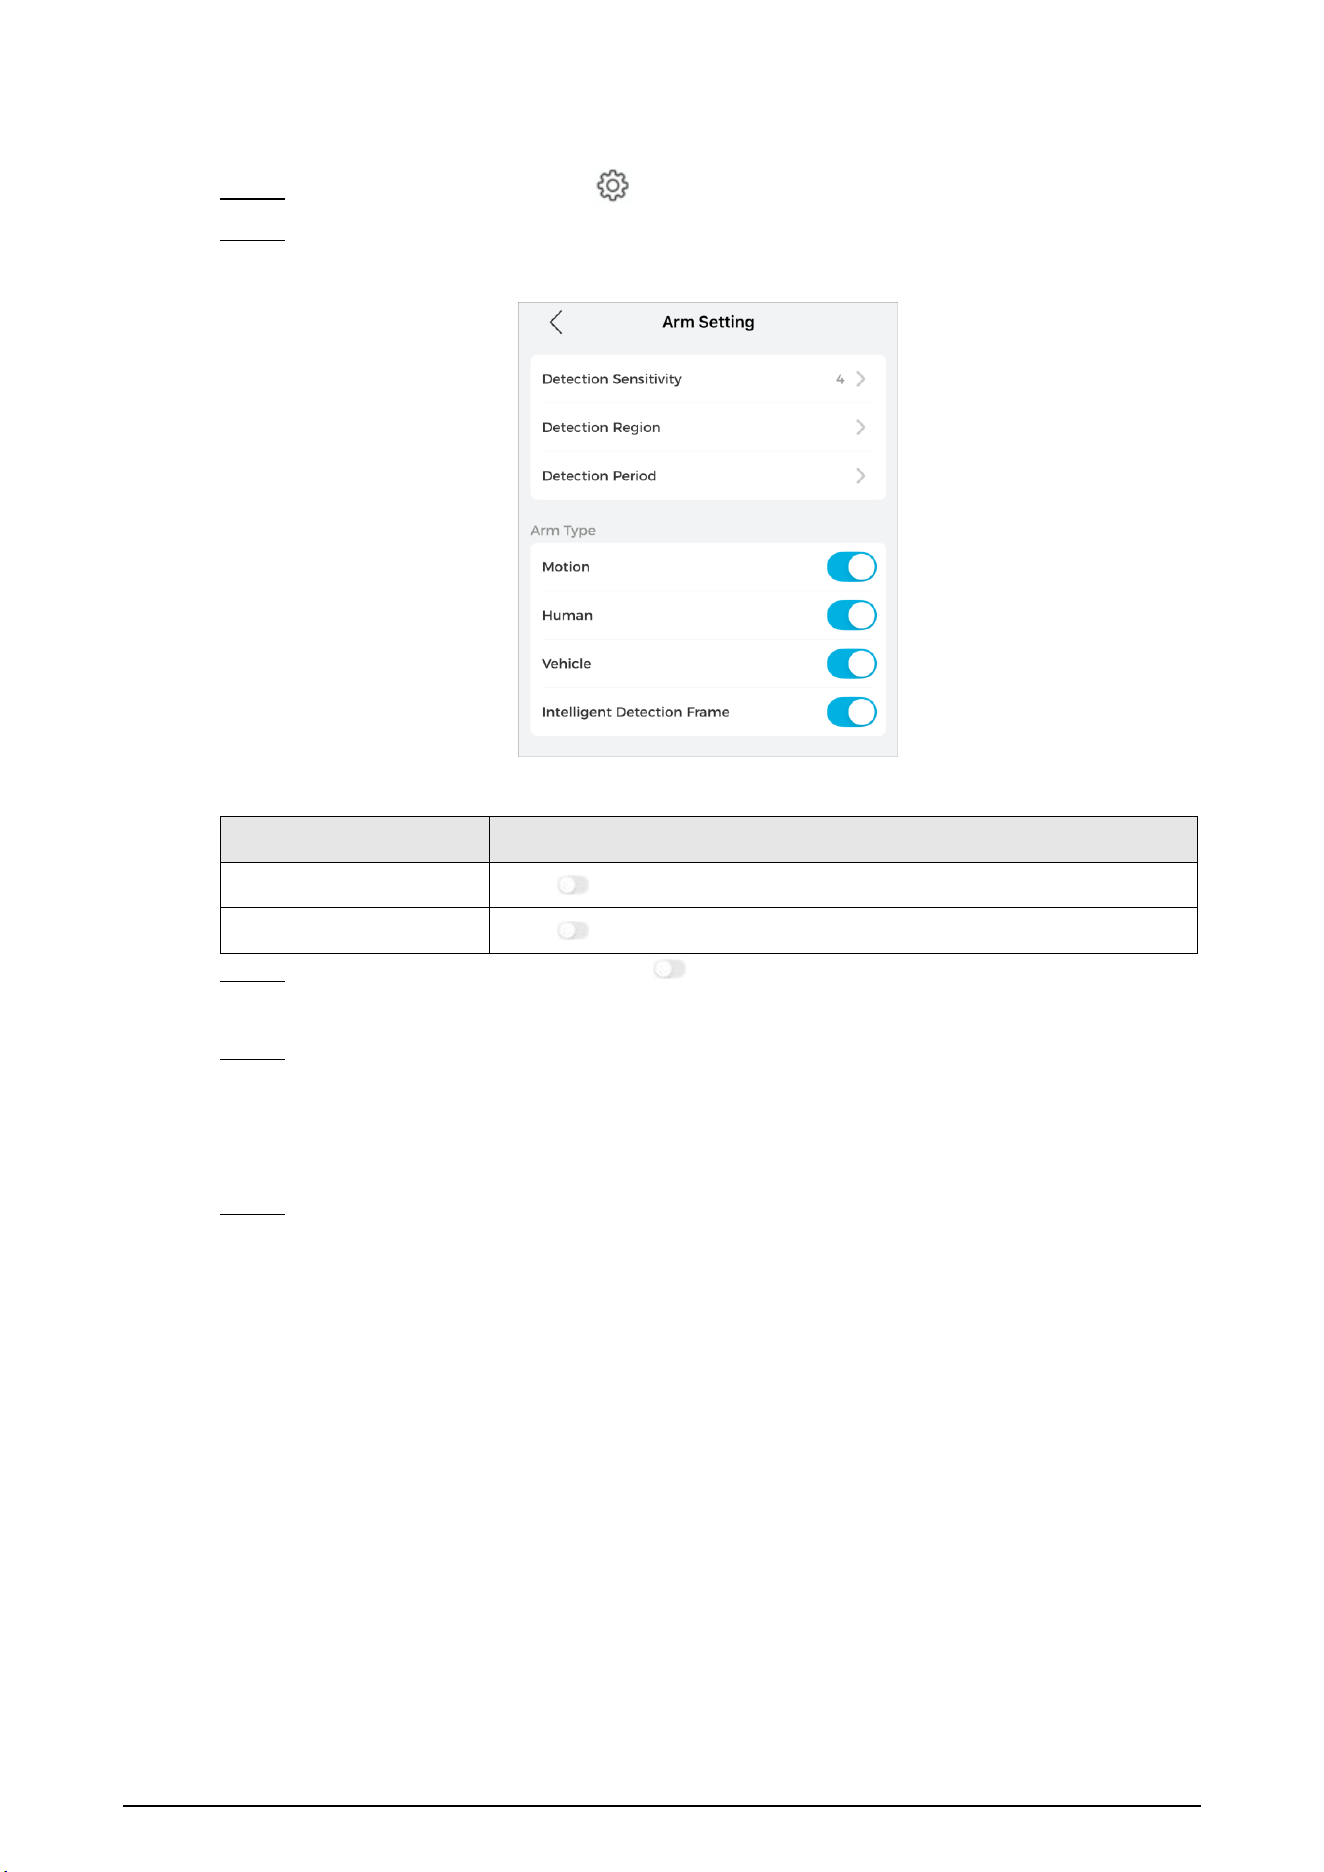
Figure 2-2 Arm Settings
Description of arm type
Arm Type/Function
Description
Human
Tap to enable the detection function.
Vehicle
Tap to enable the detection function.
Step 3 On the Arm Setting screen, tap next to Human/Vehicle to enable the detection
function.
Step 4 Configure the sensitivity.
On the Arm Setting screen, tap Detection Sensitivity to select an appropriate
sensitivity level. When the sensitivity is higher, detection becomes easier, but the
number of false positives will also increase.
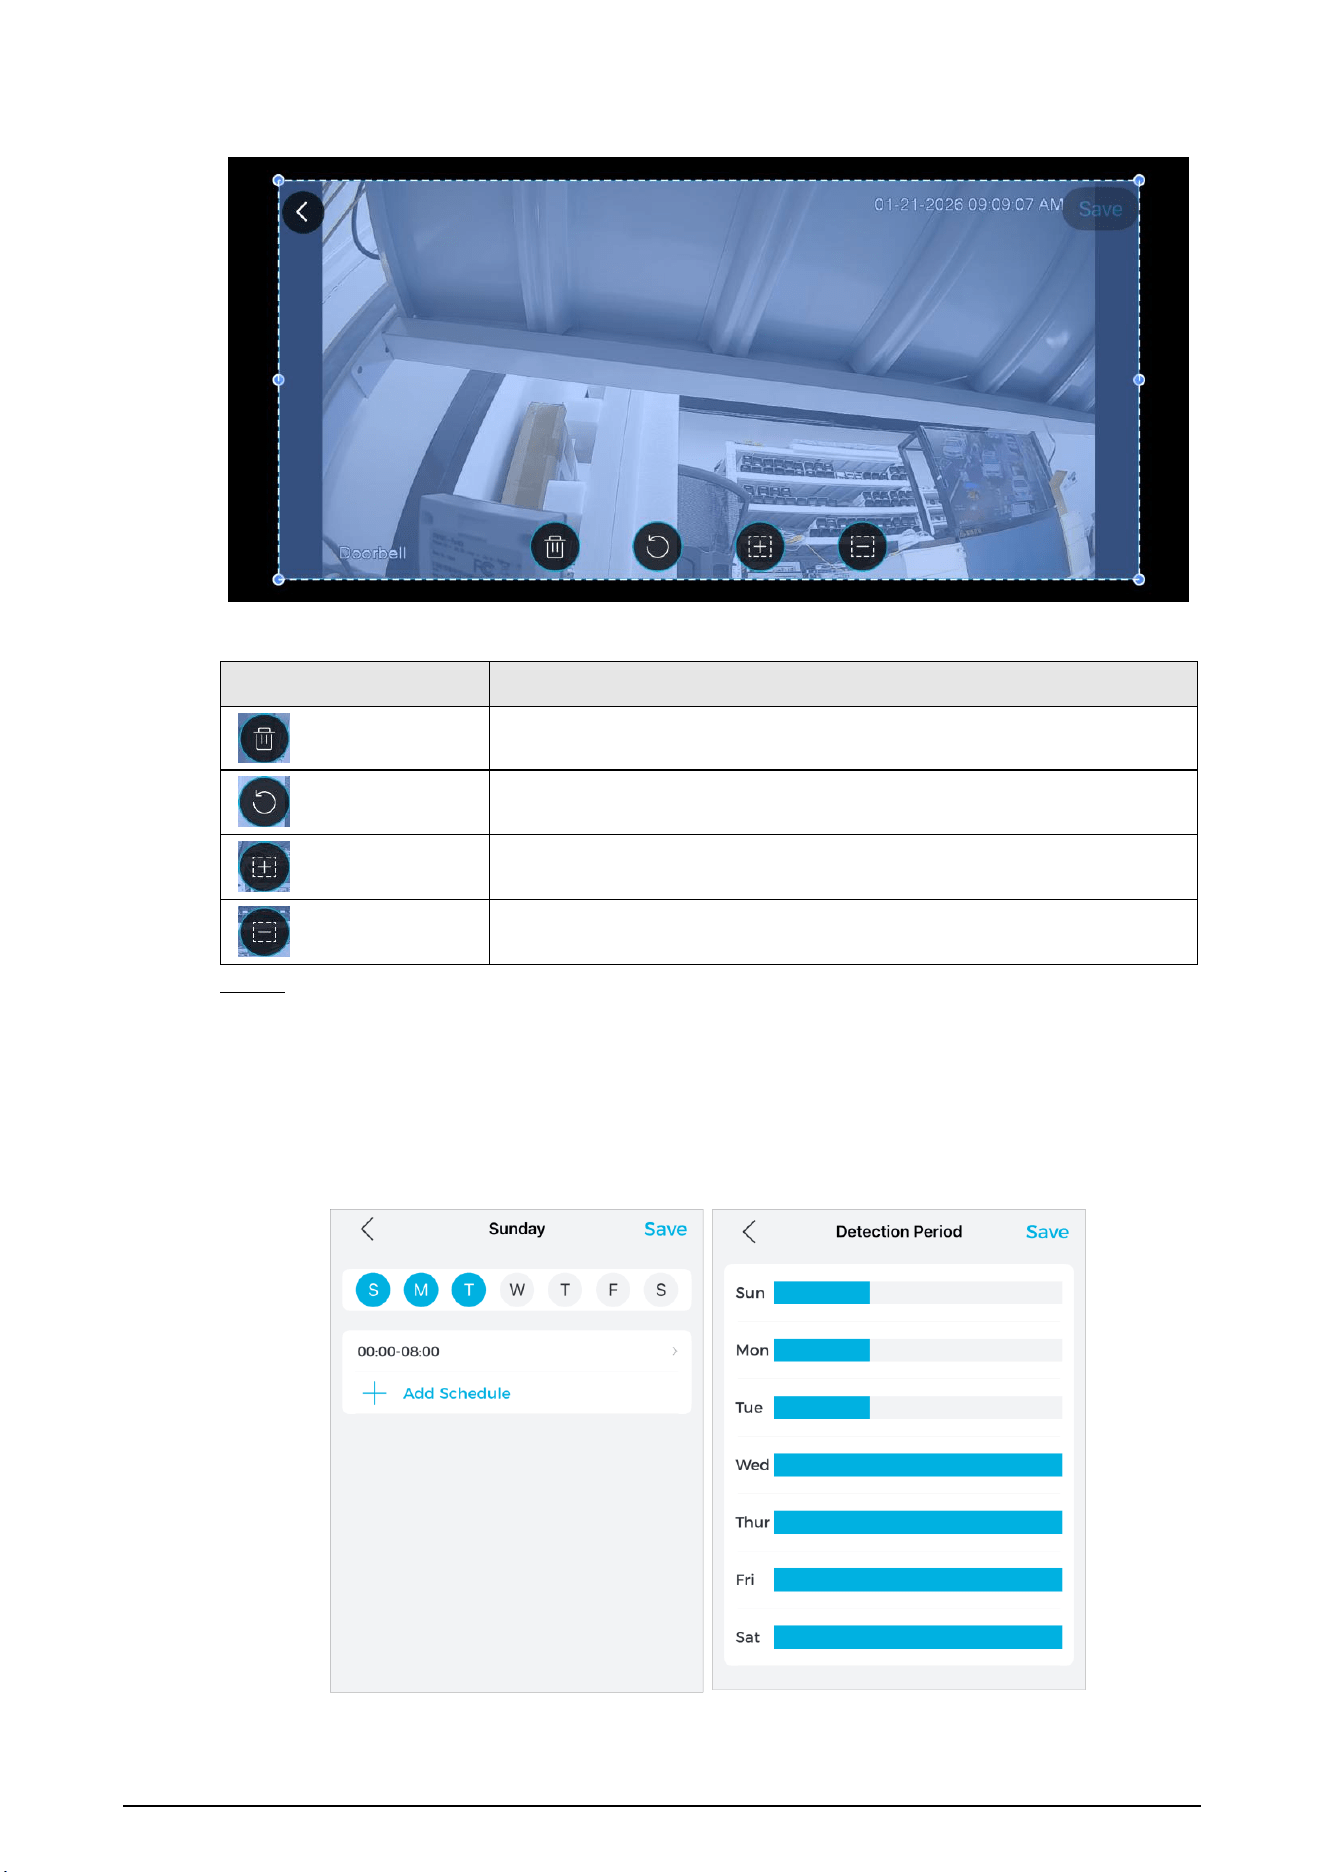
Step 5 Set the detection region.
On the Arm Setting screen, tap Detection Region, then drag the resize handles to
adjust the detection area and tap Save. The detection area can be irregular and
discontinuous.
10
Figure 2-3 Detection region
Screen icons
Icon
Description
Clear all detection areas.
Restore motion detection areas to default.
Add a detection area.
Delete the selected area.
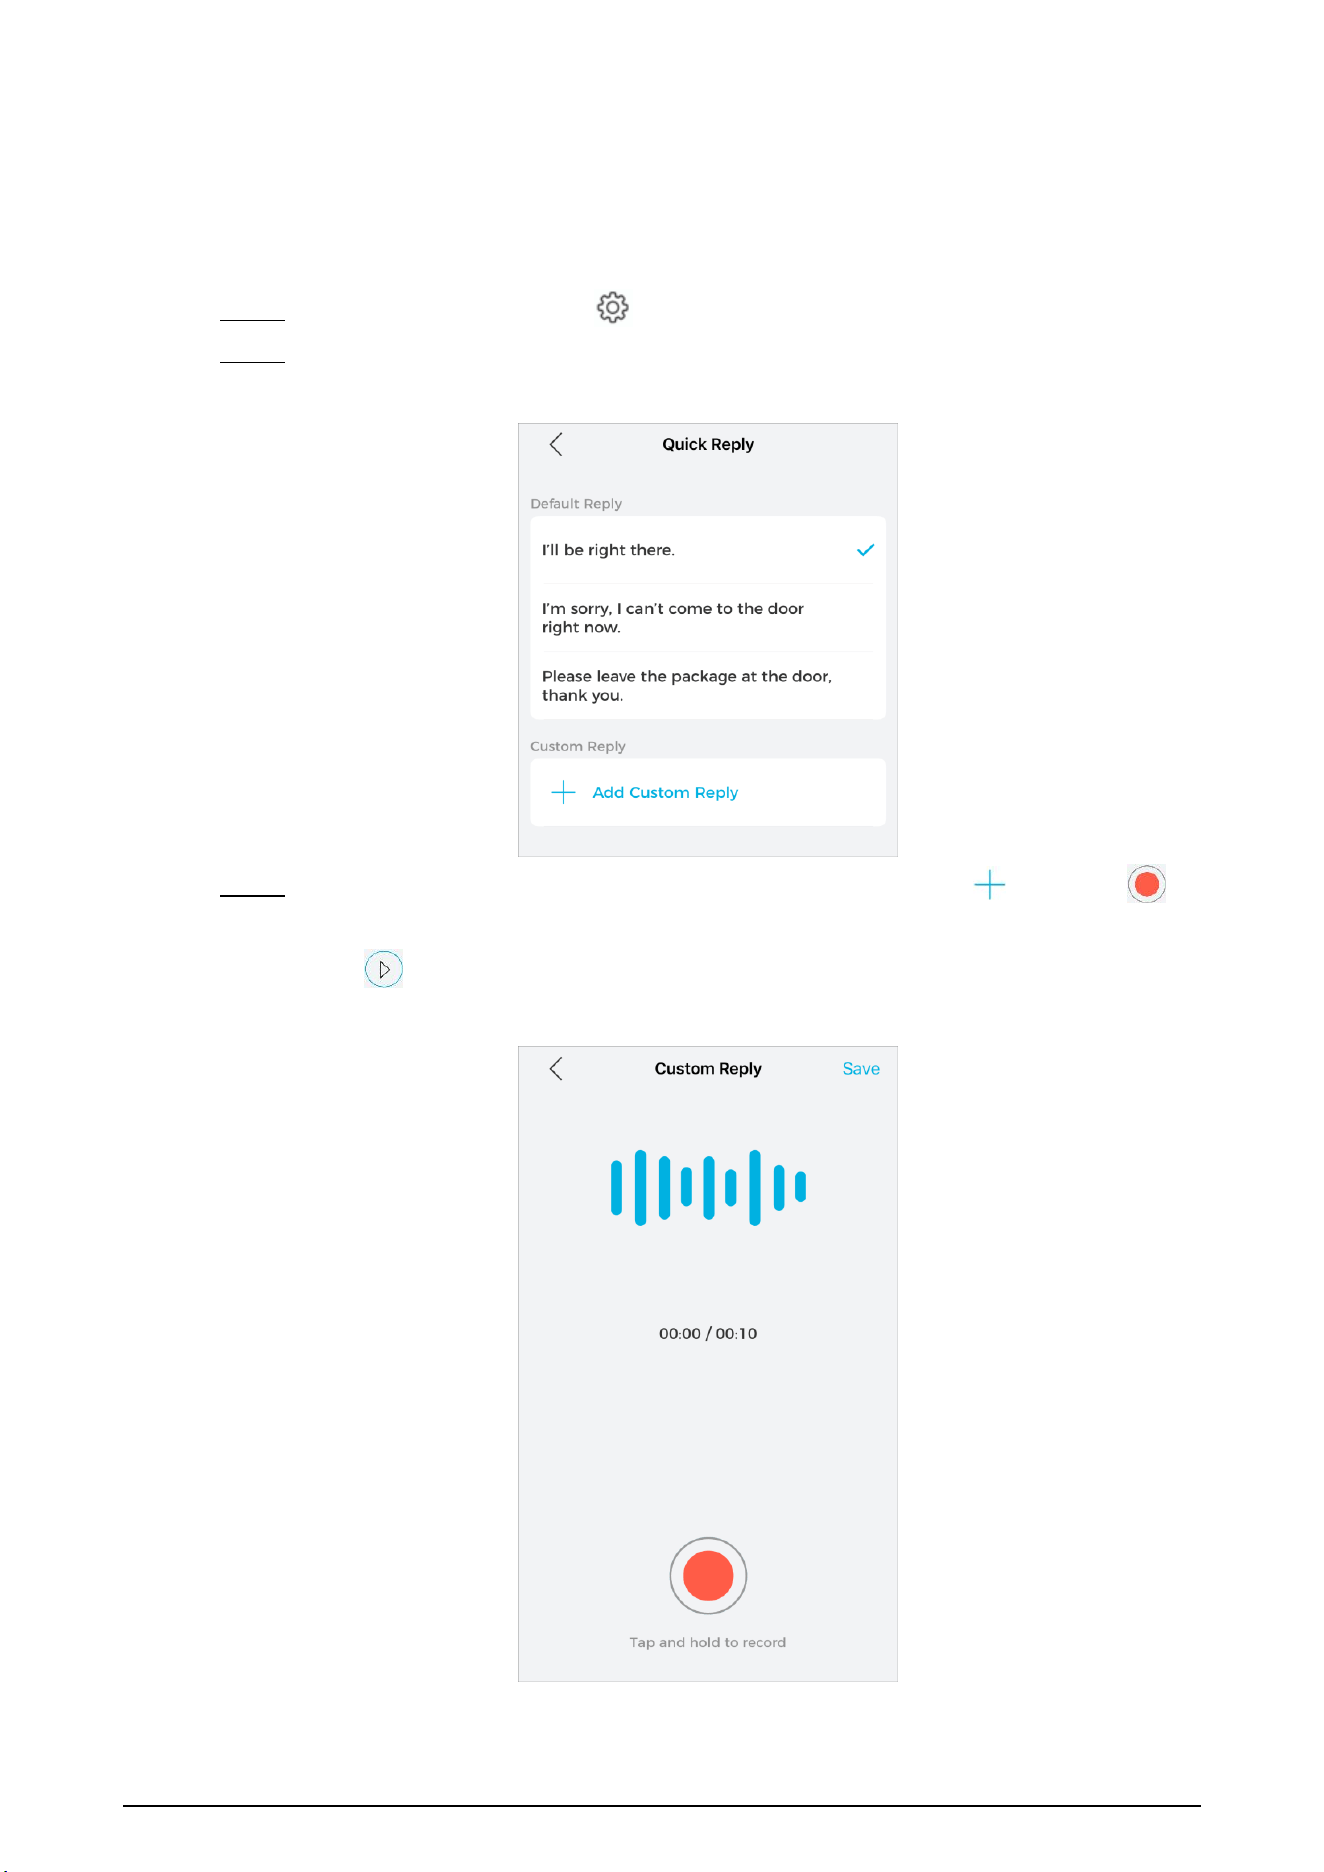
Step 6 Configure the arming schedule.
On the Arm Setting screen, tap Detection Period to customize your schedule, tap
the corresponding date to set the time range, then select additional dates to apply
the same settings, which allows you to maintain consistent configurations across
multiple days, then tap Save.
Figure 2-4 Configure the schedule
11
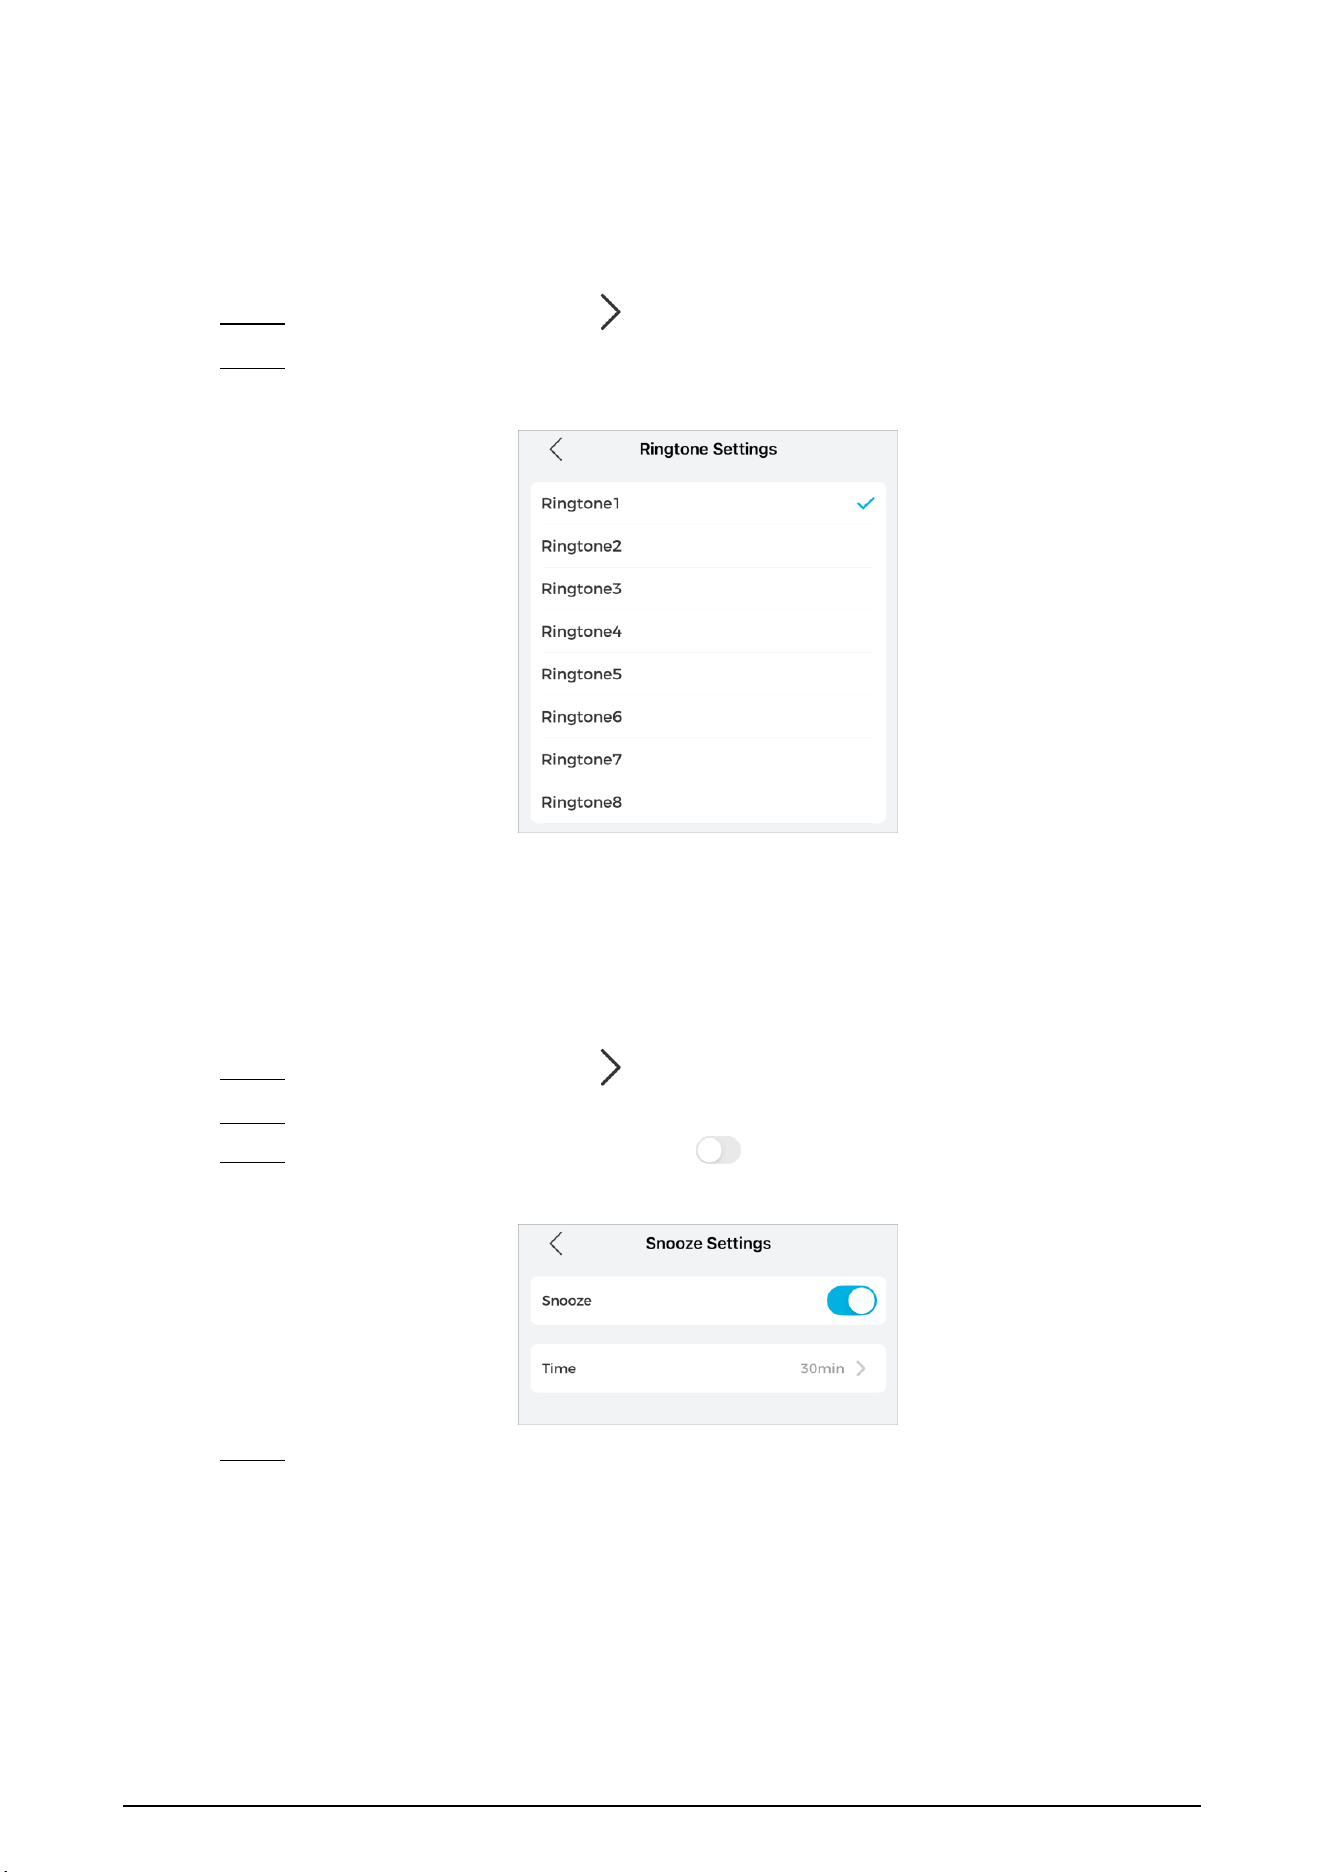
2.3 Quick Reply
You can specify a quick reply for Doolbells.
Procedure
Step 1 On the Device screen, tap next to a device.
Step 2 Tap Quick Reply in Alarm Settings section.
Figure 2-5 Quick Reply
Step 3 On the Quick Reply screen, you can select a quick reply, or tap , then hold
to create your own custom reply, then tap Save.
Tap if you want to play back the recording.
Figure 2-6 Custom Reply
12
2.4 Ringtone Settings
You can select WIFI Chime(Model: LXDBCM-WIFI)'s ringtone.
Procedure
Step 1 On the Device screen, tap next to a device.
Step 2 Tap Ringtone Settings in Alarm Settings section, then select the ringtone.
Figure 2-7 Ringtone Settings
2.5 Snooze Settings
You can specify a snooze period for WIFI Chime(Model: LXDBCM-WIFI).
Procedure
Step 1 On the Device screen, tap next to a device.
Step 2 Tap Snooze Settings in Alarm Settings section.
Step 3 On the Snooze Settings screen, tap next to Snooze to enable the function.
Figure 2-8 Snooze Settings
Step 4 Select a snooze period, then tap OK.
13
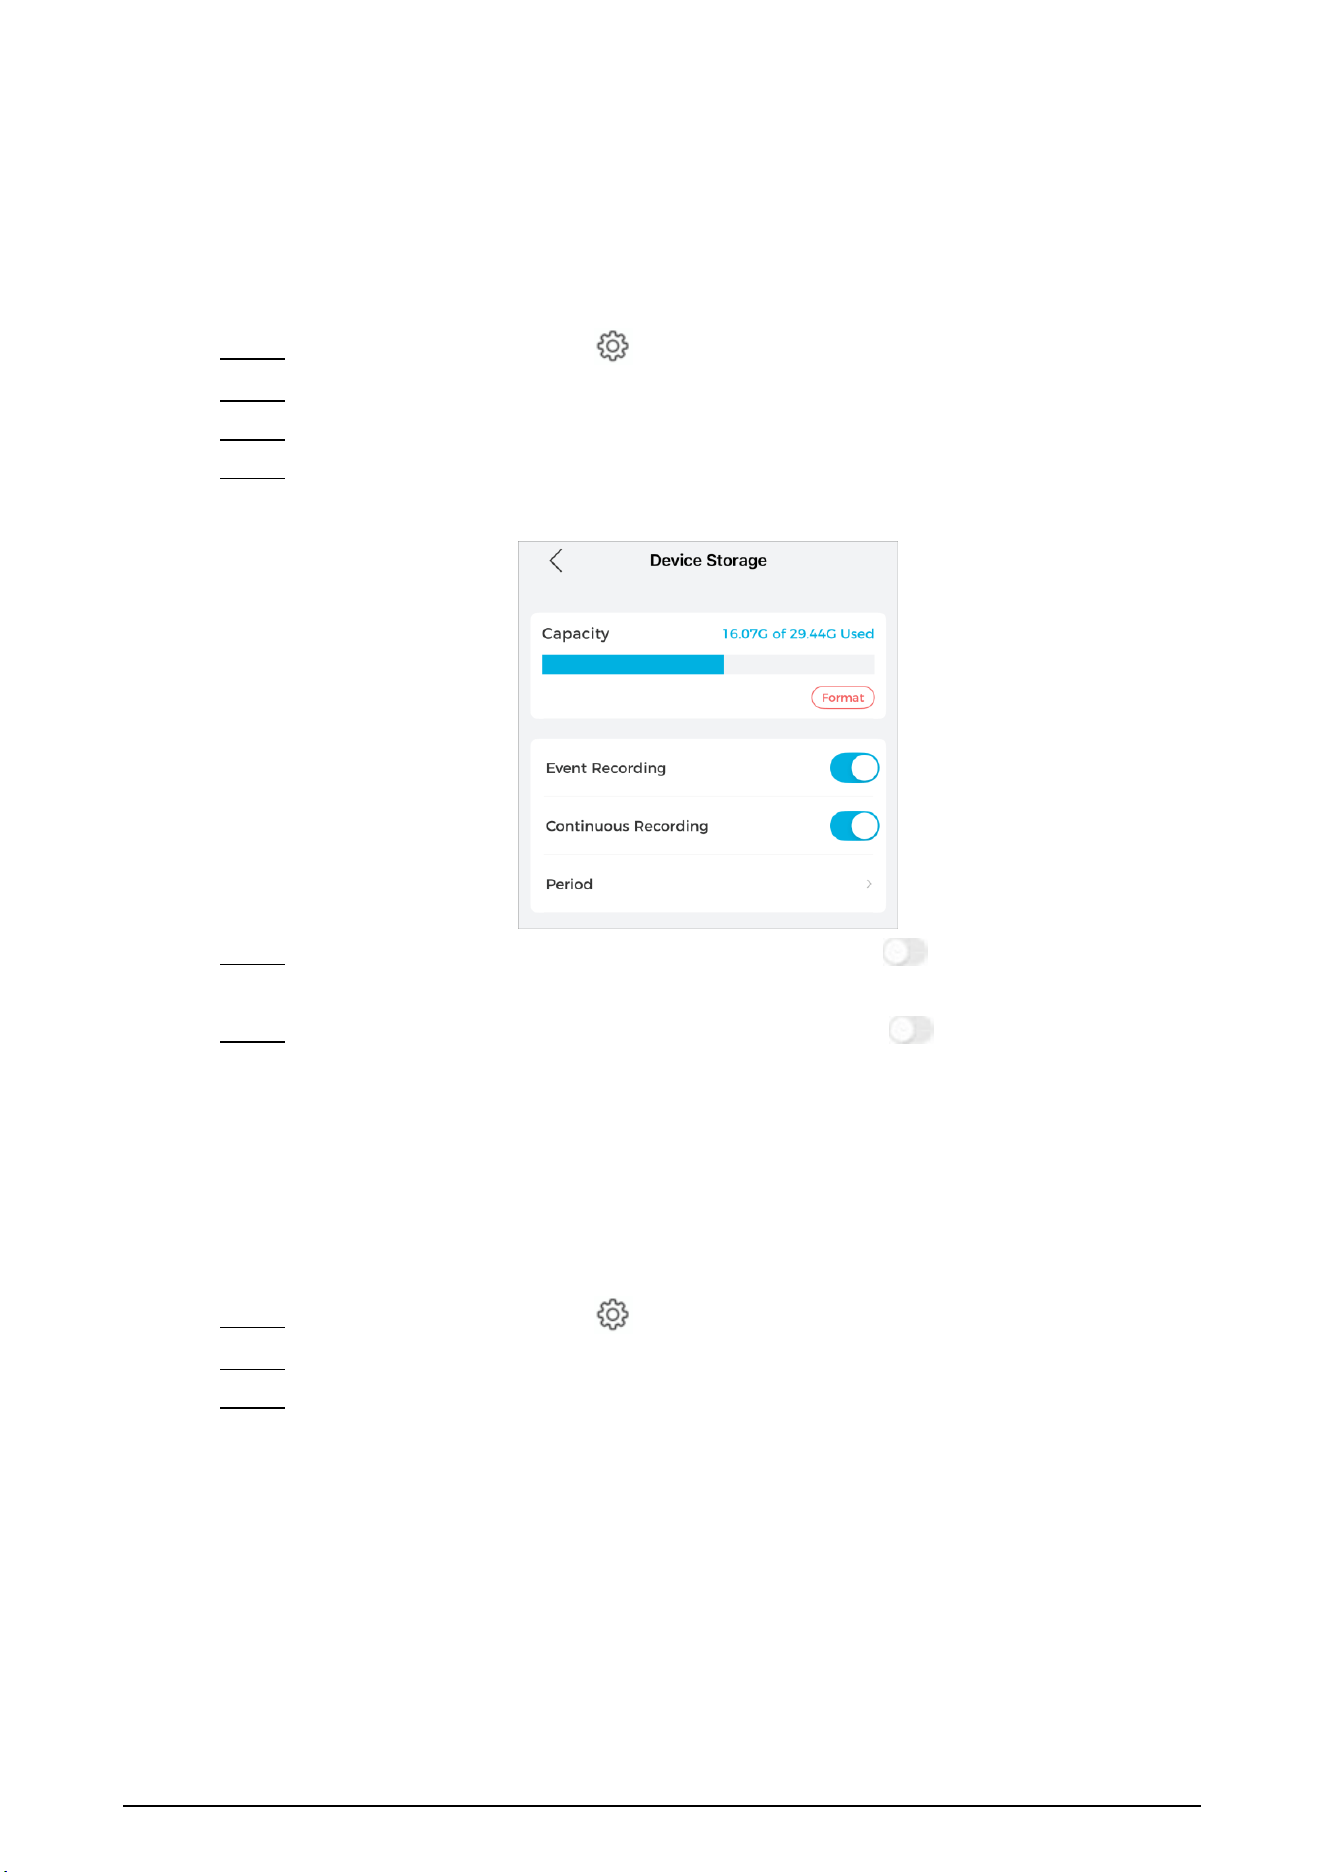
2.6 Storage setting
You can view device storage information and set recording plan. And also you can format for
the SD card.
Procedure
Step 1 On the Device screen, tap next to a device.
Step 2 (Optional) Select the device channel that you want to configure.
Step 3 Select Storage Settings > Device Storage.
Step 4 View the storage capacity of the SD card, also tap Format the Disk if you need to.
Figure 2-9 Storage (WIFI Doorbell(Model:LXDB4I-WIFI))
Step 5 (WIFI Doorbell(Model
:
LXDB4I-WIFI) devices only) Tap next to Event Recording
to enable the function.
Step 6 (WIFI Doorbell(Model
:
LXDB4I-WIFI) devices only) Tap next to Continuous
Recording to enable the function, then configure the recording schedule.
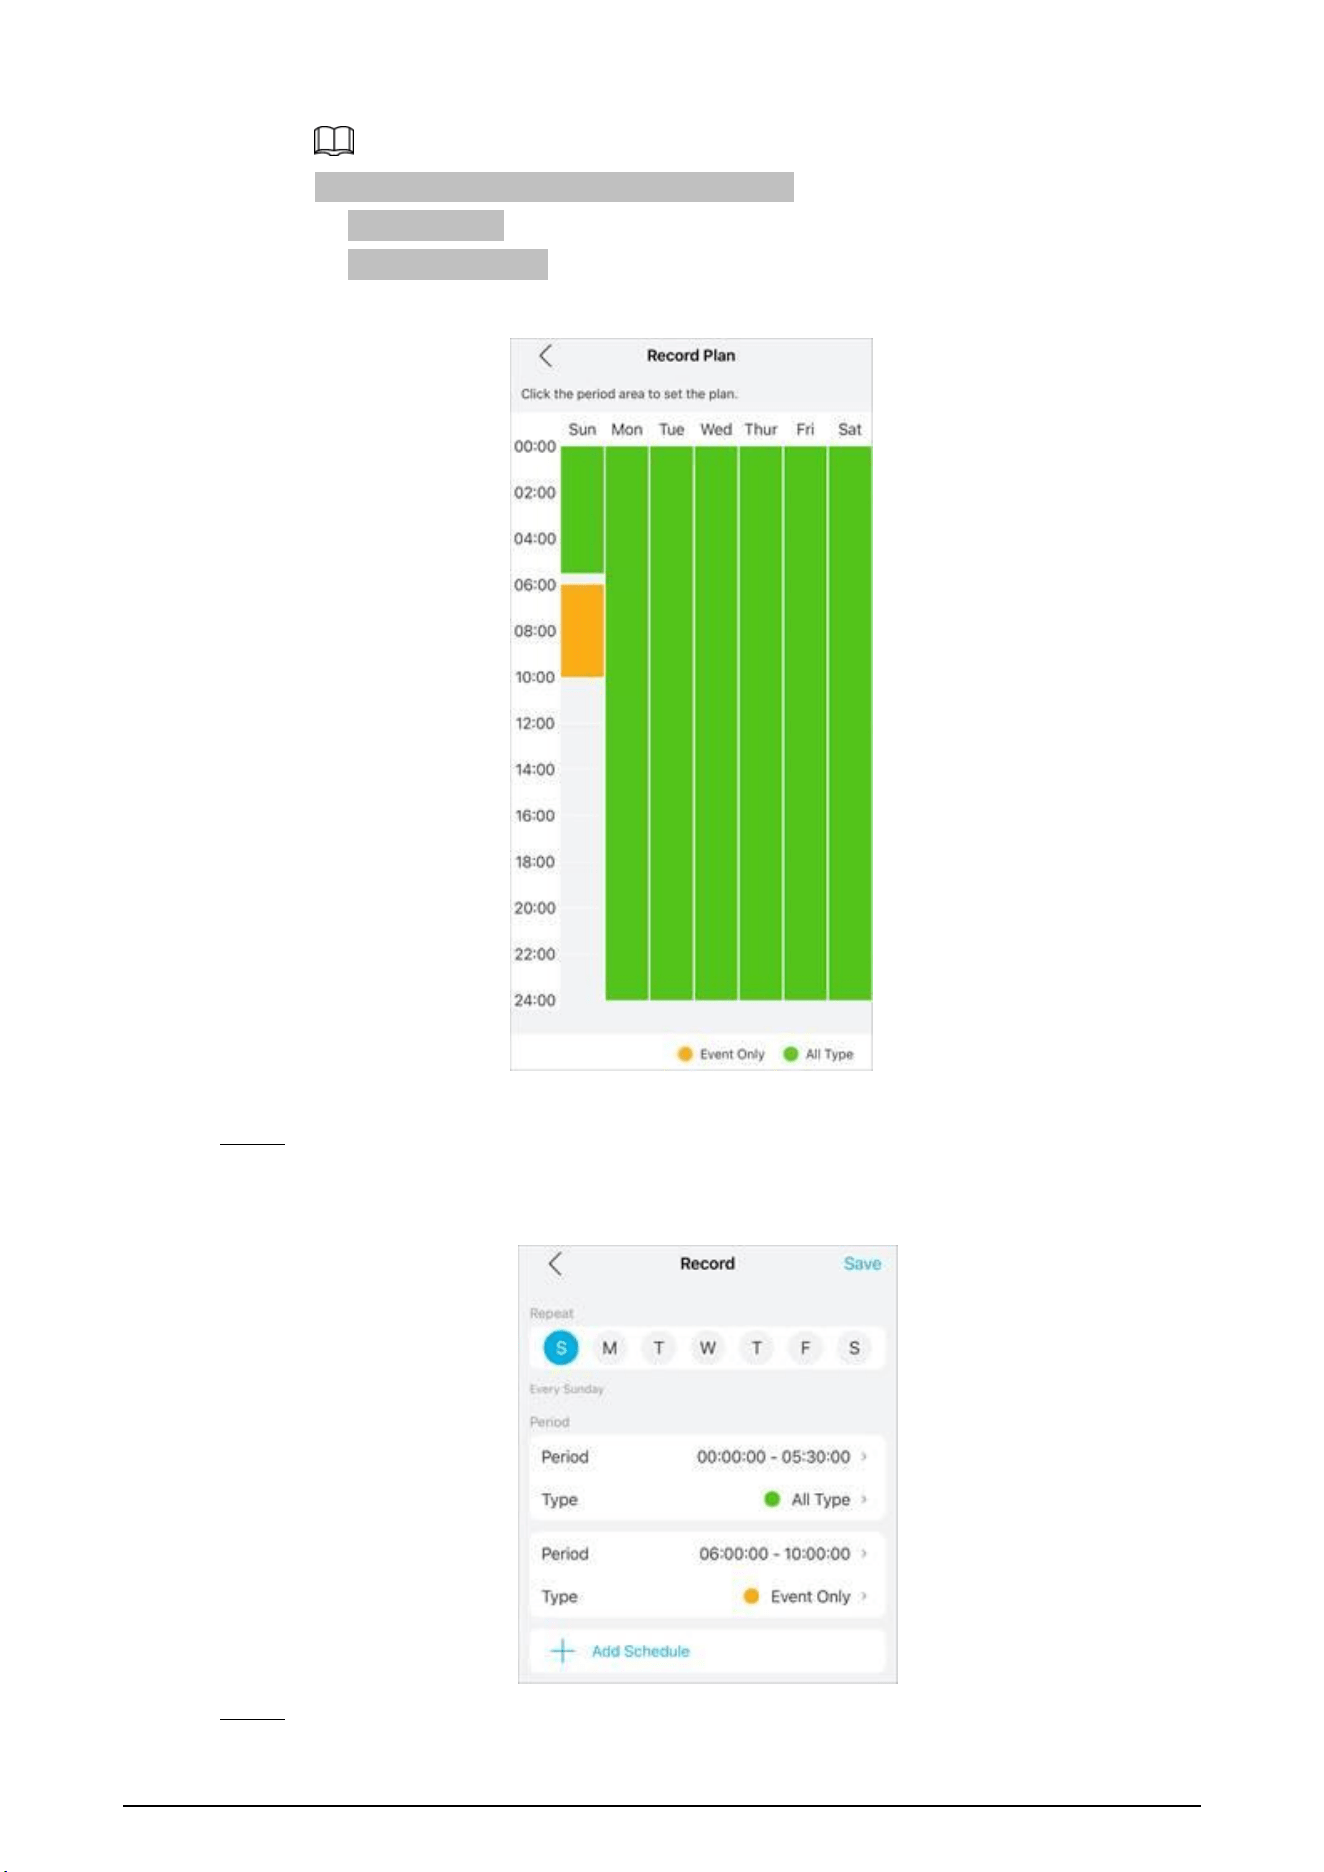
2.7 Recording Plan
You can configure the device recording period and recording type.
Procedure
Step 1 On the Device screen, tap next to a device.
Step 2 (Optional) Select the device channel that you want to configure.
Step 3 Select Storage Settings > Recording Plan.
14
Different recording types have different colors.
●
Green: All type.
●
Orange: Event only.
Figure 2-10 Schedule
Step 4 Tap the schedule area, select the repeat date, and then set the start time and end
time of the period (up to 6 periods can be set for each day).
Figure 2-11 Set recording
Step 5 Tap Save.
15
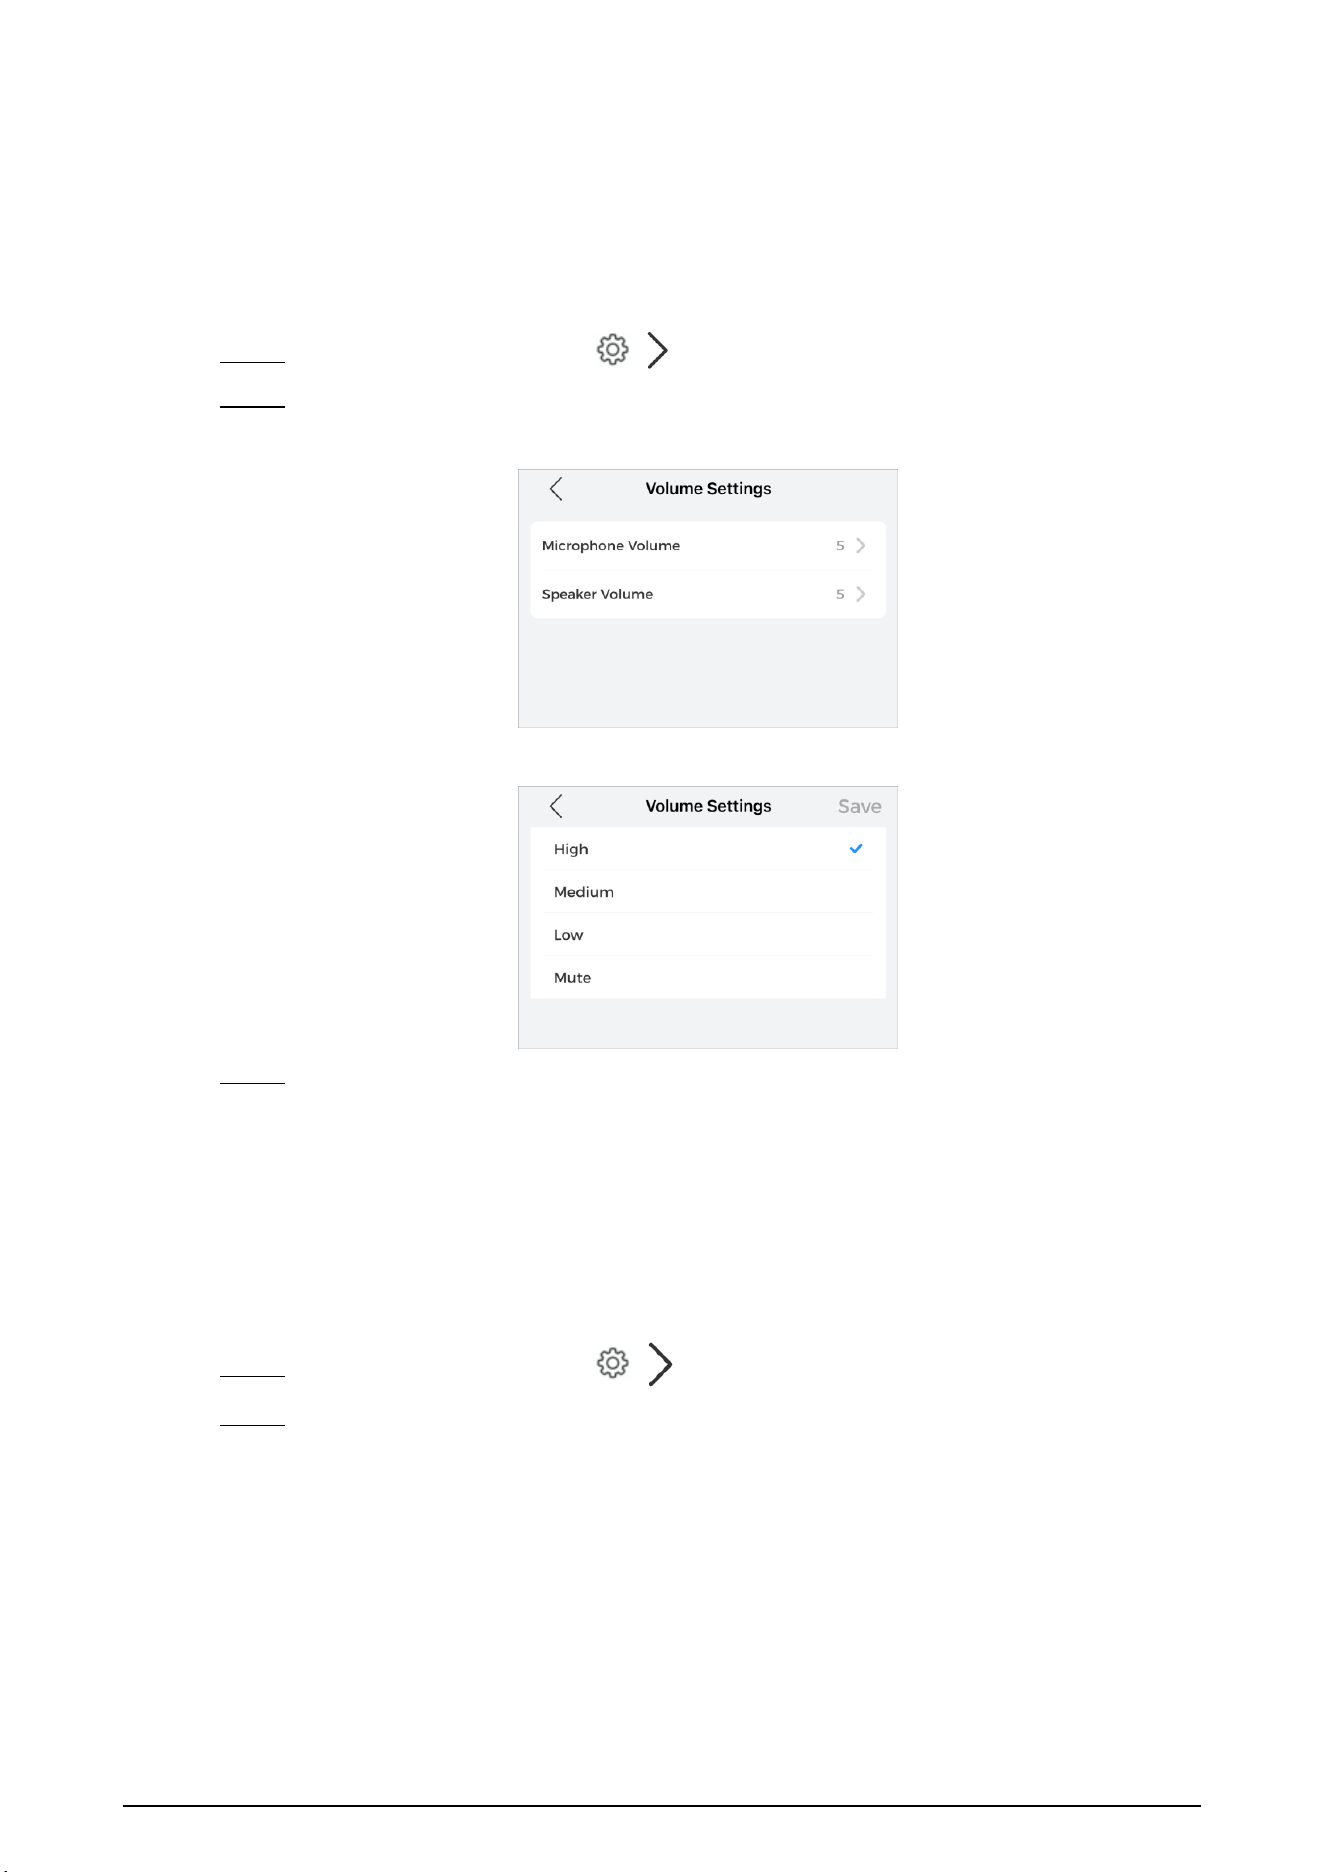
2.7 Volume Settings
You can adjust the microphone/speaker volume for WIFI Doorbell(Model
:
LXDB4I-WIFI)s and
WIFI Chimes(Model: LXDBCM-WIFI).
Procedure
Step 1 On the Device screen, tap / next to a device.
Step 2 Tap Volume Settings in General Settings section.
Figure 2-12 Volume Settings
Figure 2-13 Volume Settings
Step 3 Select the appropriate Volume, then tap Save/OK.
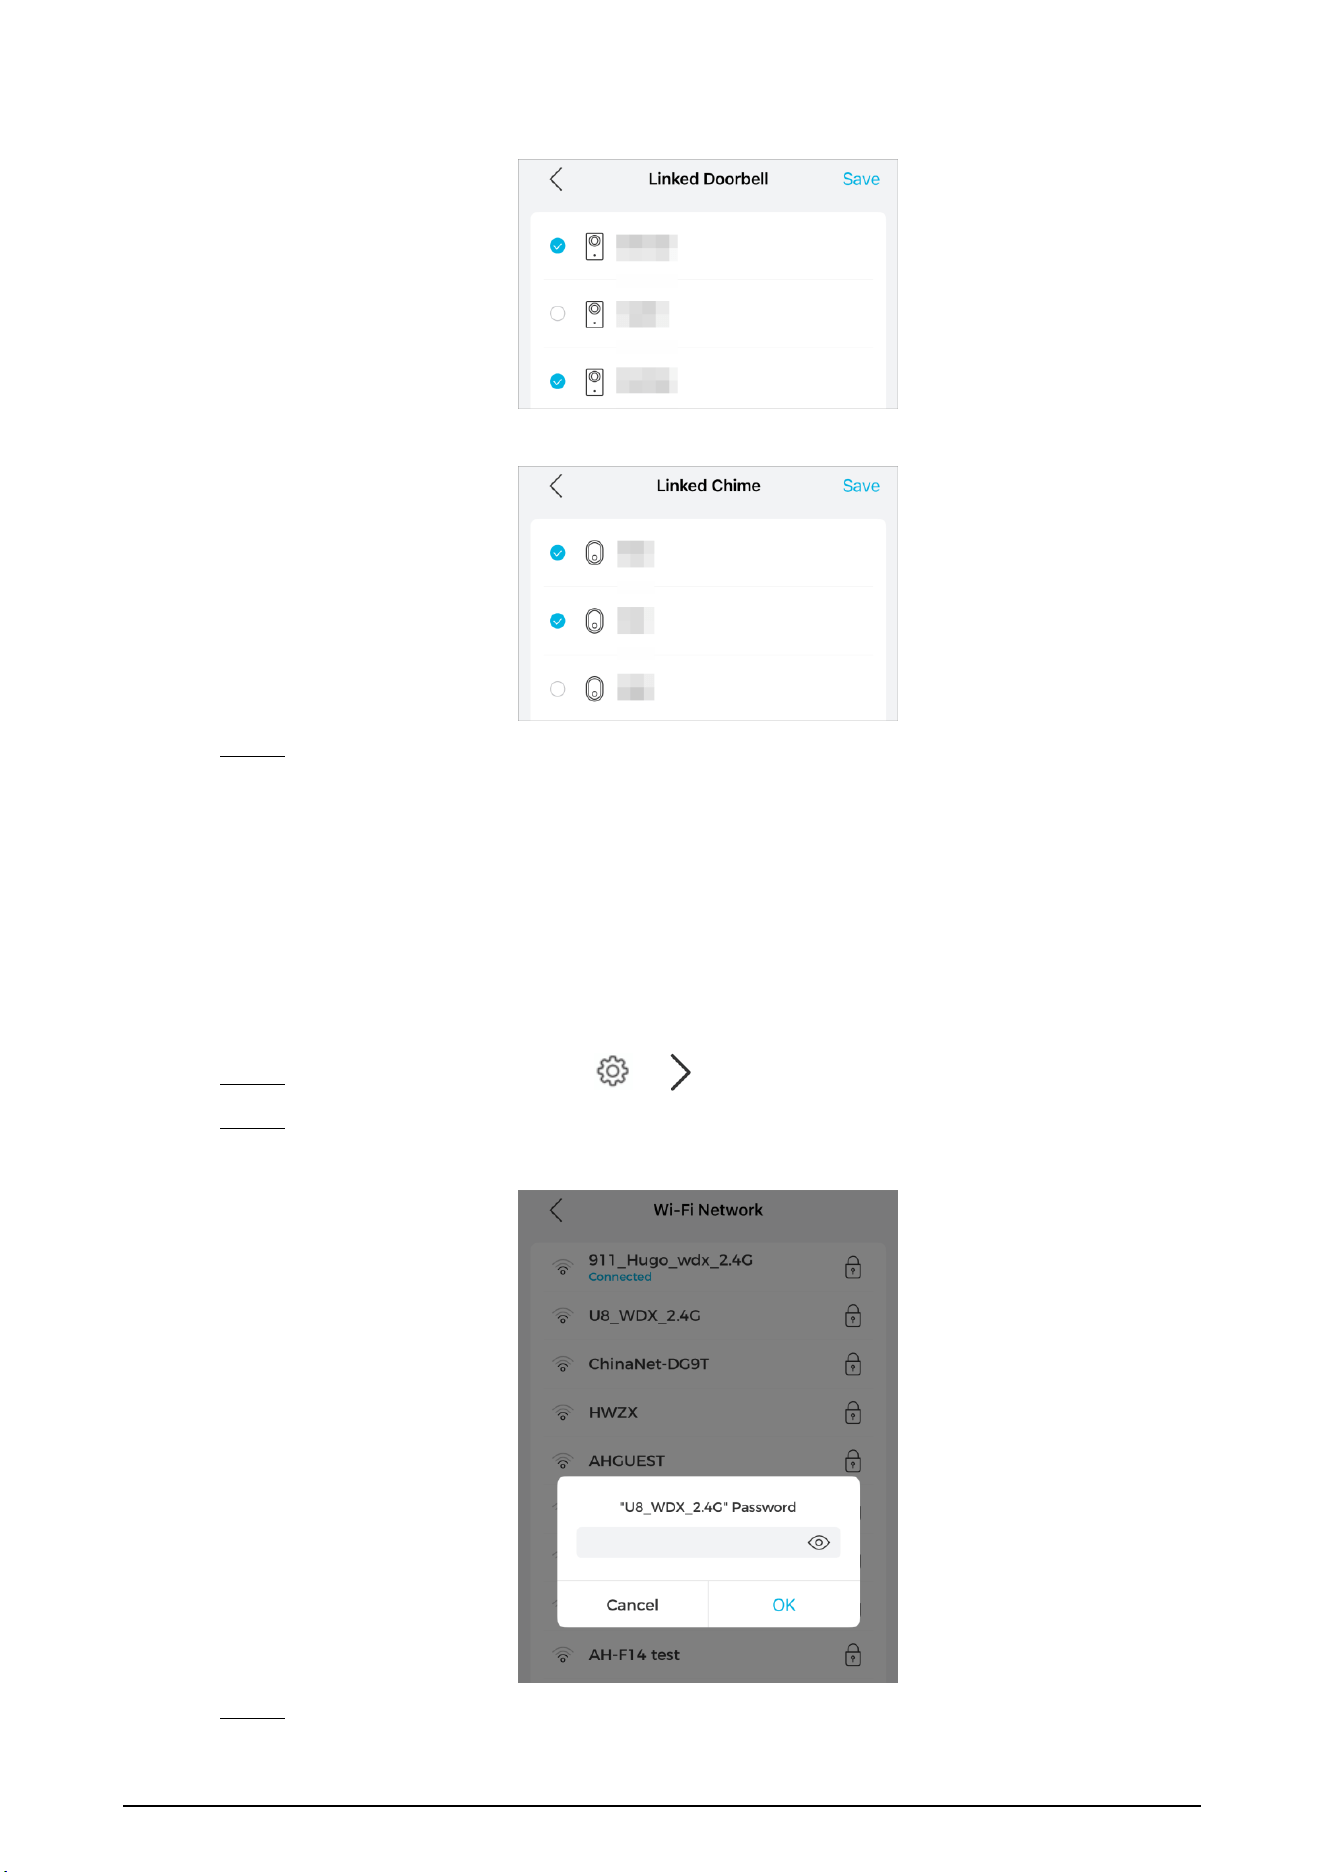
2.8 Linked Device
You can select the WIFI Doorbell(Model
:
LXDB4I-WIFI)s/WIFI Chimes(Model: LXDBCM-WIFI)
associated with the WIFI Doorbell(Model
:
LXDB4I-WIFI)/WIFI Chime(Model: LXDBCM-WIFI).
Procedure
Step 1 On the Device screen, tap / next to a device.
Step 2 Tap Linked WIFI Doorbell(Model
:
LXDB4I-WIFI)/Linked WIFI Chime(Model:
LXDBCM-WIFI) in General Settings section.
16
Figure 2-14 Linked WIFI Doorbell(Model:LXDB4I-WIFI)
Figure 2-15 Linked WIFI Chime(Model: LXDBCM-WIFI)
Step 3 Select one or more WIFI Doorbell(Model
:
LXDB4I-WIFI)s/WIFI Chime(Model:
LXDBCM-WIFI)s to associate, then click Save.
2.9 Wi-Fi Network
You can change the Wi-Fi settings for WIFI Doorbell(Model
:
LXDB4I-WIFI)s and WIFI
Chime(Model: LXDBCM-WIFI) that are online.
Procedure
Step 1 On the Device screen, tap / next to a device.
Step 2 Tap Wi-Fi Network in General Settings section.
Figure 2-16 Wi-Fi Network
Step 3 Select the target Wi-Fi from the displayed Wi-Fi list, enter the password, then click

17
OK.

18
Appendix 1 Cybersecurity Recommendations
Account Management
1. Use complex passwords
Please refer to the following suggestions for setting a password:
●
The length must not be less than 8 characters.
●
Include at least two types of characters: uppercase letters, lowercase letters, numbers,
and symbols.
●
Do not include the account name or the reverse order of the account name.
●
Do not use consecutive characters, such as "123" or "abc".
●
Do not use consecutively repeated characters, such as "111" or "aaa".
2. Change passwords regularly
It is recommended to regularly change device passwords to reduce the risk of being
guessed or cracked.
3. Allocate accounts and permissions appropriately
Add users appropriately according to service and management requirements, and assign
the minimum set of permissions to the users.
4. Enable account lockout function
The account lockout function is enabled by default. It is recommended that you keep this
feature enabled to protect account security. After multiple failed password attempts, the
corresponding account and source IP address will be locked.
5. Set and update password reset information timely
The platform supports a password reset function. To reduce the risk of this function being
exploited by malicious actors, please make timely modifications if there are any changes to
the information. When setting security questions, it is recommended not to use easily
guessable answers.
6. Enable account binding to IP/MAC
It is recommended to enable the account binding to IP/MAC mechanism to further enhance
access security.
Service Configuration
1. Enable HTTPS
We recommend that you enable HTTPS to access network services through a secure
channel.
2. Turn off non-essential services and use safe mode
If not needed, it is recommended to turn off non-essential services such as SNMP and
SMTP to reduce the attack surface.
If necessary, it is strongly recommended to select safe mode, including but not limited to
the following services:

19
Network Configuration
1. Enable firewall allow list
We recommend that you enable the allowlist feature, allowing only the IP addresses on the
allowlist to access the device. Therefore, be sure to add your computer's IP address and the
IP addresses of supported devices to the allowlist.
2. Network isolation
Network isolation should be achieved by segmenting the video surveillance network and
the office network into separate Virtual Local Area Networks (VLANs) on switches and
routers. This prevents attackers from leveraging the office network to launch lateral attacks
against the video surveillance network.
Security Auditing
1. Check online users
We recommend regularly checking online users to identify unauthorized users.
2. View platform logs
By reviewing the logs, you can obtain the IP information of attempts to log into the
Platform as well as key operational information of logged-in users.
Physical Protection
It is recommended to implement physical protection for the devices used in the Platform. For
example, place the devices in dedicated computer rooms and cabinets, and implement
comprehensive access control and key management to prevent unauthorized personnel
causing damage to the hardware through physical contact.
Perimeter Security
It is recommended to deploy perimeter security products and take necessary measures, such
as access control and intrusion prevention, to protect the security of the software platform.