NOTICE: For residential use only.
READ AND SAVE THESE INSTRUCTIONS
Installer: Leave this guide with the homeowner.
Homeowner: Keep this guide for future reference.
Rev.20241104
INSTALLATION GUIDE
AND USERS MANUAL
Model Name:
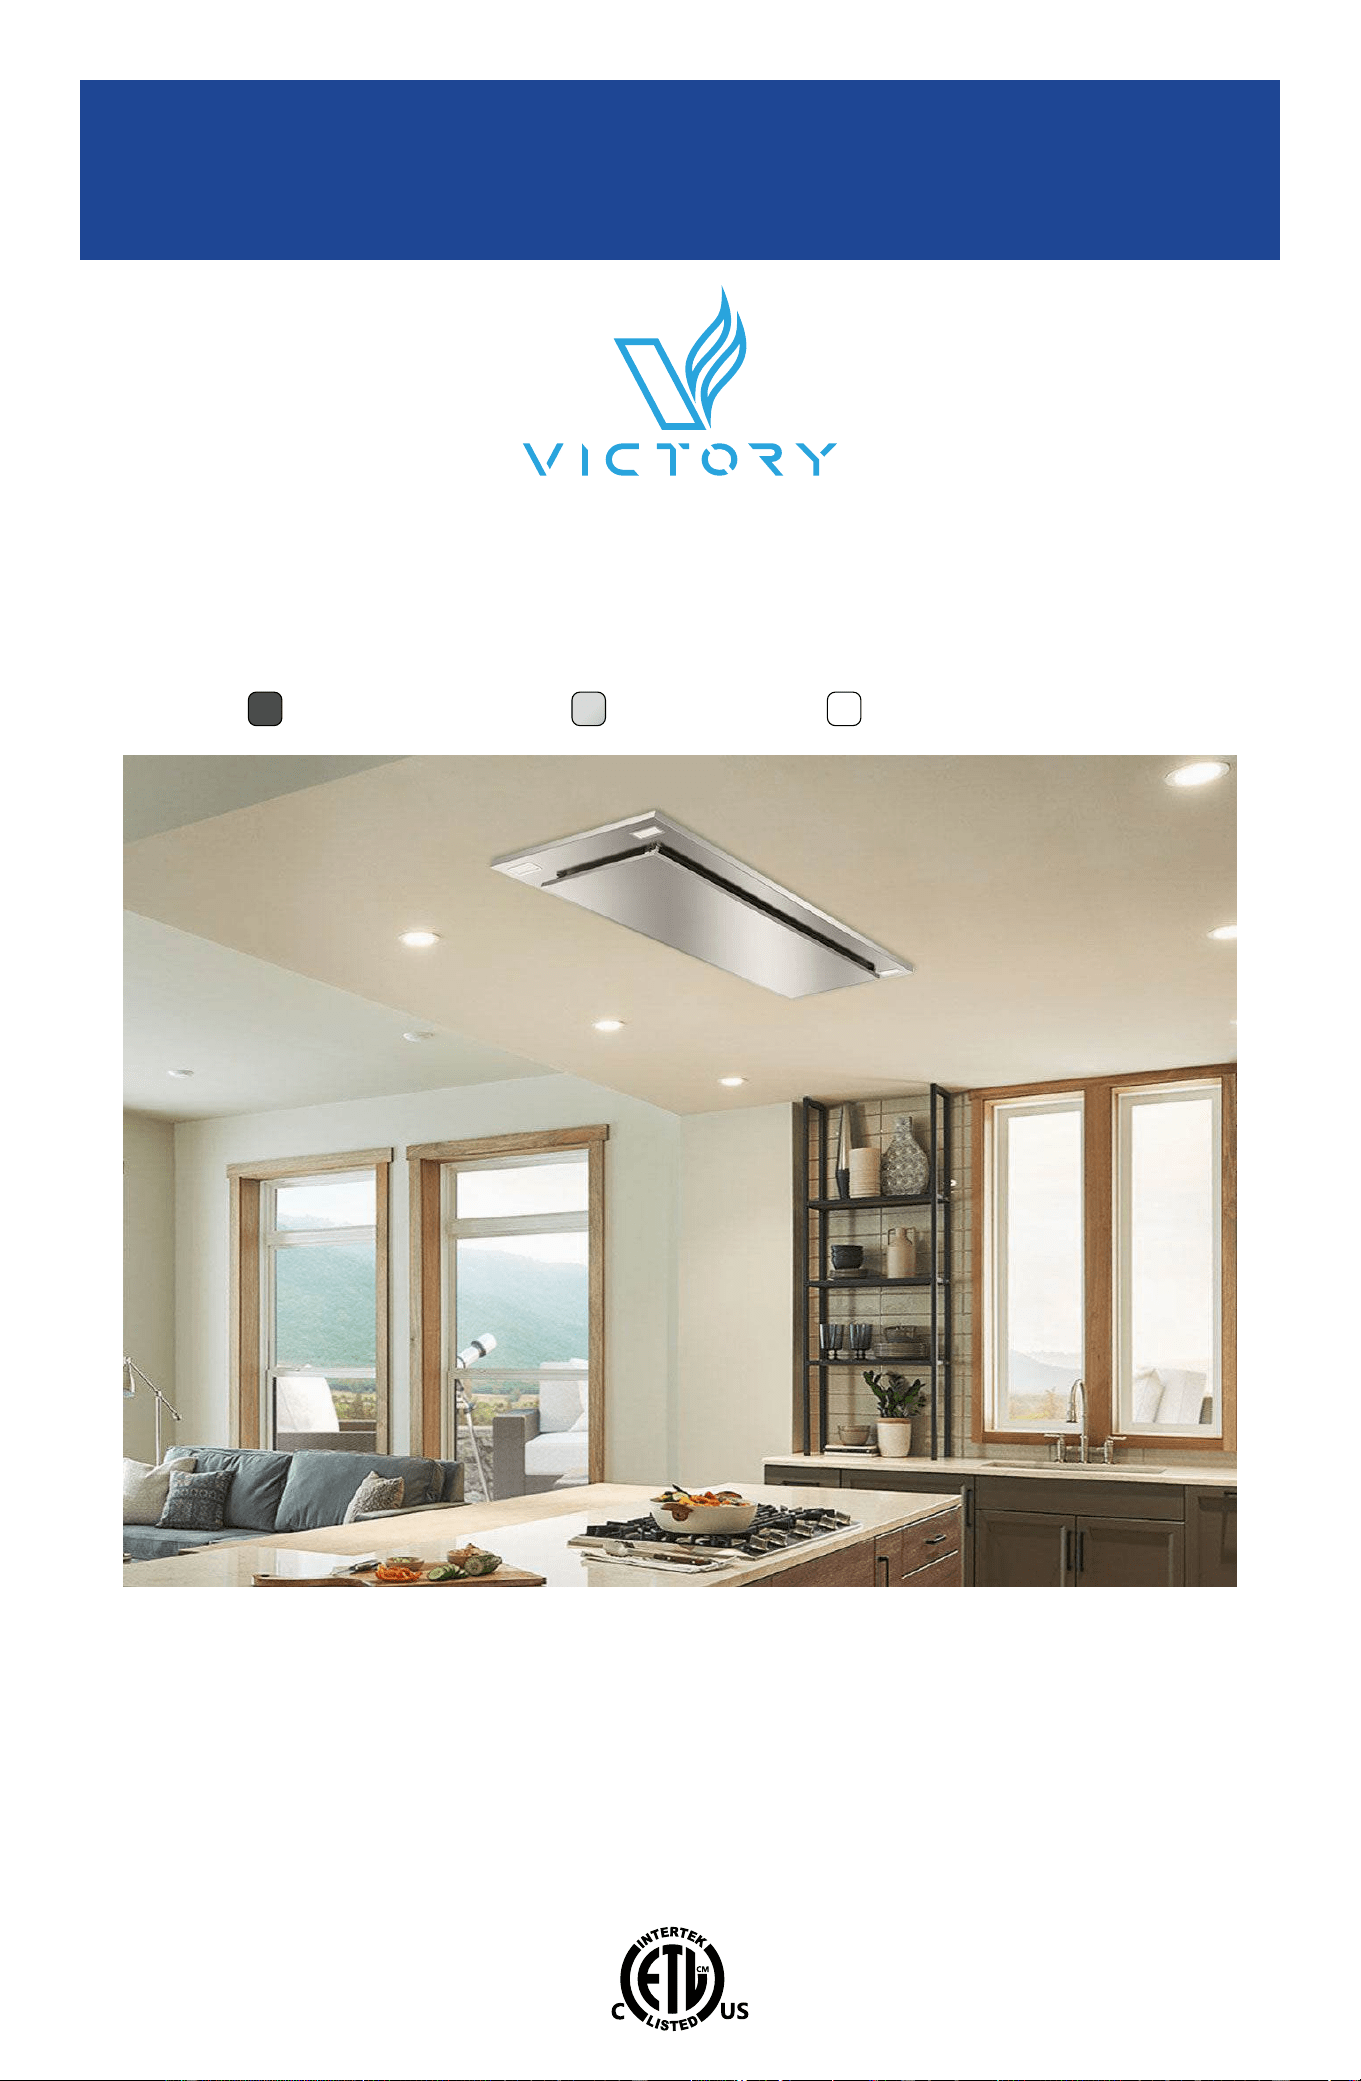
SUNSET
Stainless Steel WHITE Powder-coatBLACK Powder-coat
Ceiling Mount Range Hood
This appliance is not intended for use by persons (including children) with reduced physical, sensory or mental capabilities, or lack of experience and knowledge,
unless they have been given supervision or instruction concerning use of the appliance by a person responsible for their safety. Children should be supervised to
ensure that they do not play with the appliance.

Important Safety Notice............................................................................ 3
Electrical Requirements............................................................................ 5
Venting Requirements............................................................................... 6
Calculating Vent System Length.............................................................. 7
7
Parts Supplied............................................................................................ 8
Dimensions................................................................................................. 10
Preparation................................................................................................. 11
Rough-In..................................................................................................... 12
Installation.................................................................................................. 13
Venting Methods........................................................................................ 14
Remote Blower Option.............................................................................. 15
Filters.......................................................................................................... 17
Troubleshooting......................................................................................... 22
Required Tools........................................................................................... 8
Electrical Wiring Diagram......................................................................... 18
Maintenance............................................................................................... 23
Warranty...................................................................................................... 24
Disclaimer................................................................................................... 25
Contact Us................................................................................................. 25
Do’s and Don
s for Duct Venting............................................................. 16
| SUNSET2
TABLE OF CONTENTS
•
• DO NOT attempt to install this appliance yourself. Injury could result from installing the unit
due to lack of appropriate electrical and technical background.
• Range hood may have very sharp edges; please wear protective gloves if it is necessary to
remove any parts for installing, cleaning or servicing.
• Activating any switch ON before completing installation may cause ignition or an explosion.
• Due to the size and weight of this range hood, two-person installation is recommended.
• For general ventilating use only. DO NOT use to exhaust hazardous or explosive materials
and vapors.
•
by this unit’s operation. Follow the heating equipment manufacturer’s guideline and safety
standards such as those published by the National Fire Protection Association (NFPA), and
the American Society of Heating, Refrigeration and Air Conditioning Engineers (ASHRAE),
and the local code authorities.
• Before servicing or cleaning unit, switch power OFF at service panel and lock service panel
to prevent power from being switched ON accidentally.
•
make sure to vent air outside. DO NOT vent exhaust into spaces between walls, crawl
spaces, ceiling, attics and/or garages.
• Ducted fans MUST always be vented to the outdoors.
• Use only metal ductwork and this unit MUST be grounded.
•
prevent back drafting.
• When cutting or drilling into wall or ceiling, be careful not to damage electrical wiring or other
hidden utilities.
• All electrical wiring must be properly installed, insulated and grounded.
• Old duct work should be cleaned or replaced if necessary to avoid the possibility of a grease
• Check all joints on duct work to insure proper connection and all joints should be properly
taped.
• Use this unit only in the manner intended by the manufacturer. If you have questions, contact
the vendor.
•
tunnel and oil container.
• Always turn range hood ON when cooking at high heat or when cooking foods that produce
• Use high settings on cooking range only when necessary.
• Never leave surface units unattended at high settings. Boil overs cause smoking and greasy
spillovers that may ignite. Heat oils slowly on low or medium settings.
| TESNUS 3
IMPORTANT SAFETY NOTICE
Read all instructions before installing and operating this appliance
•
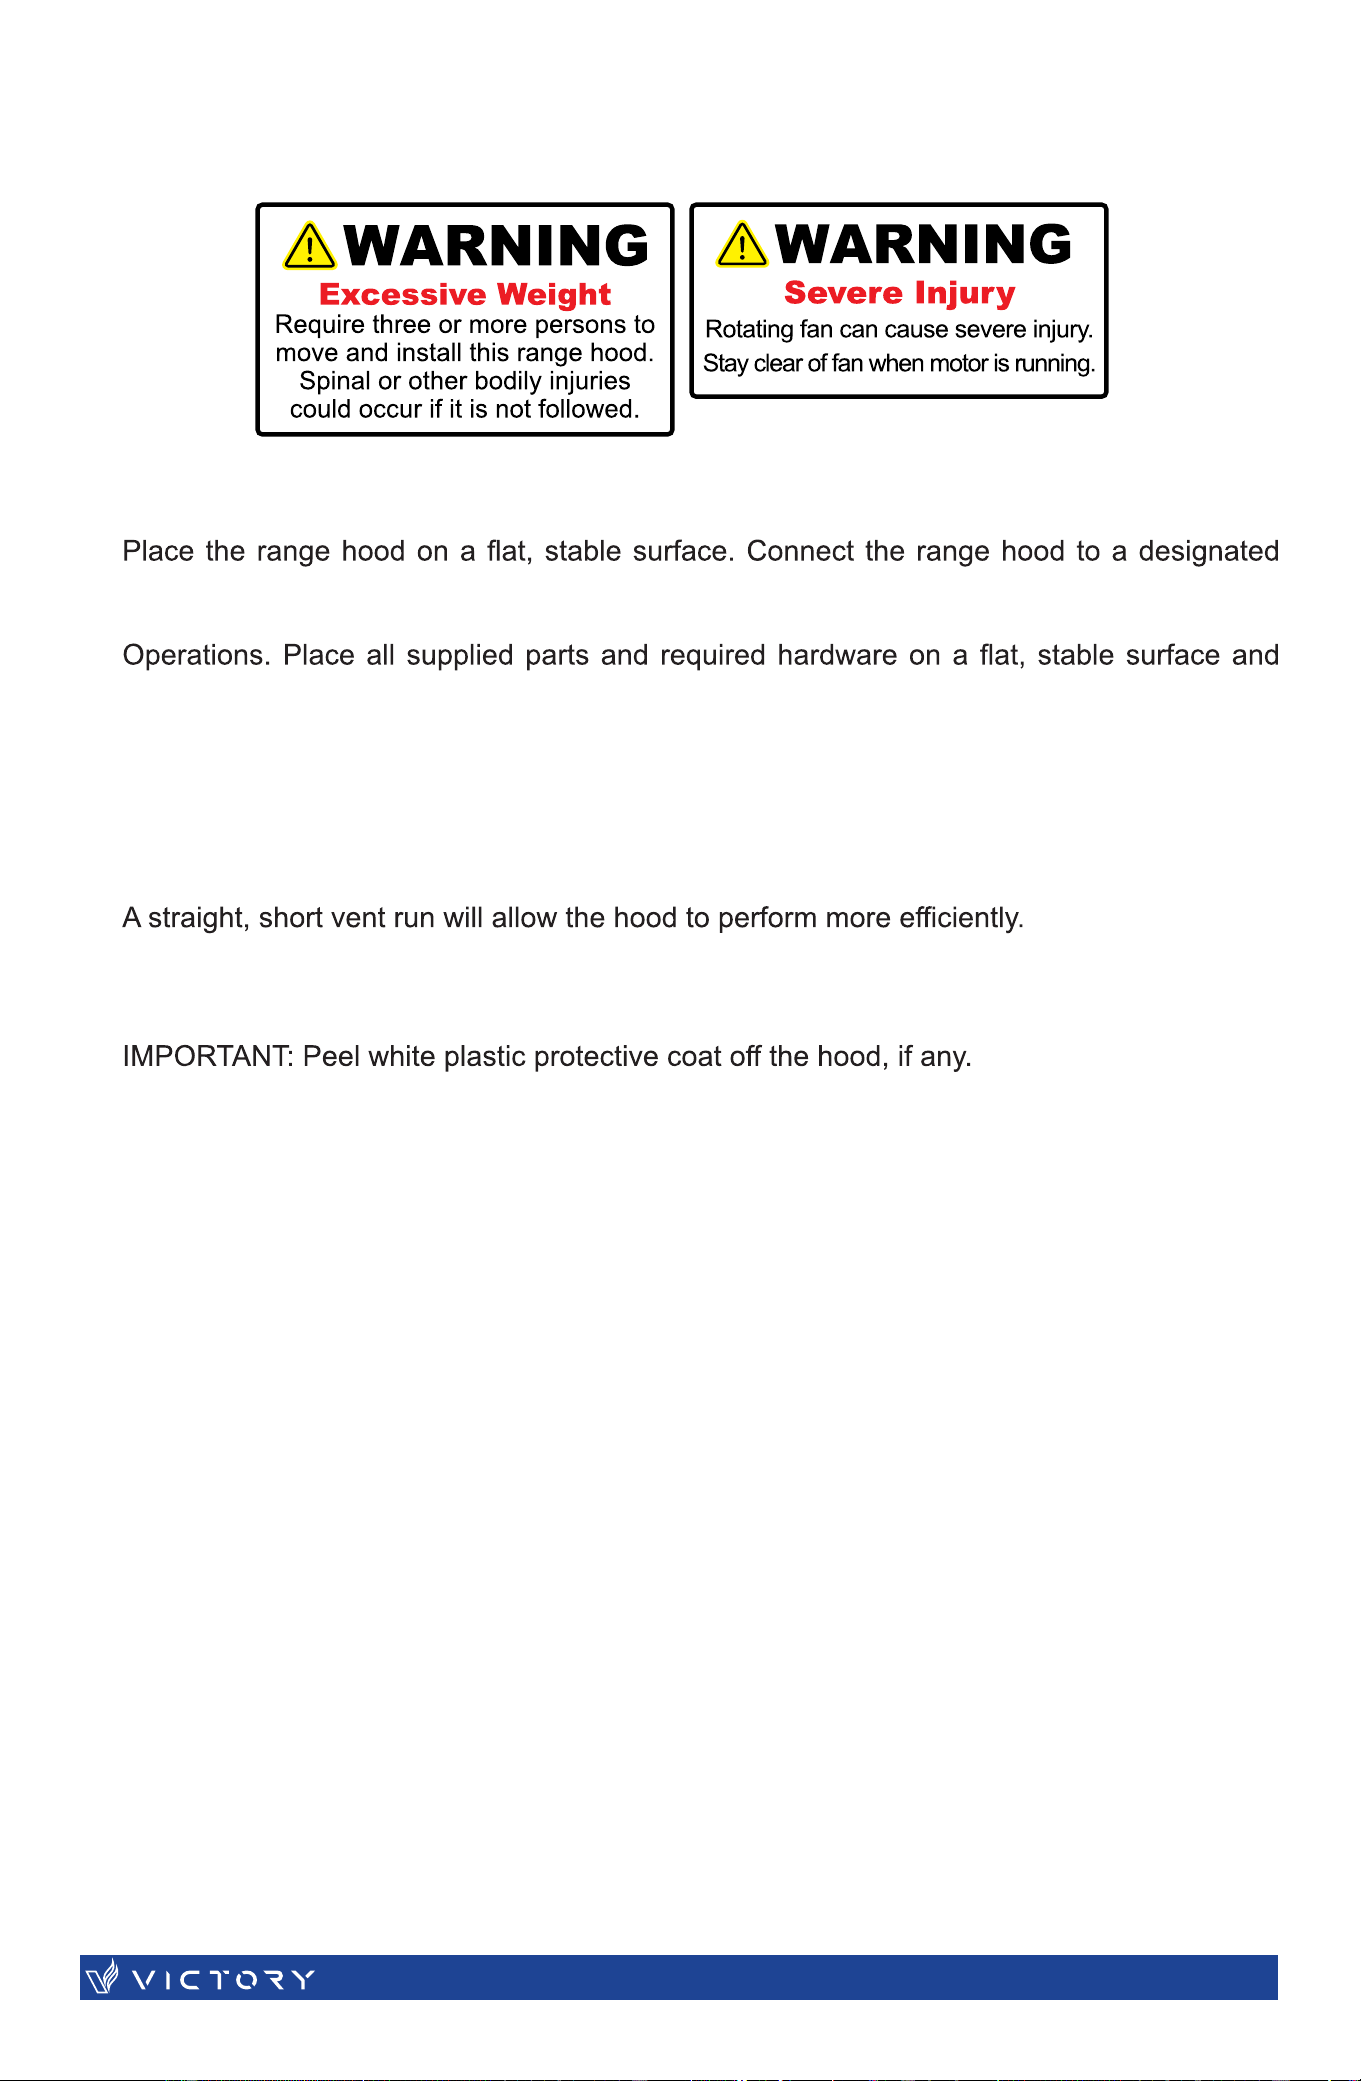
WARNING To Reduce The Risk Of Fire Or Electric Shock, Do Not Use This Fan With Any
Solid-State Speed Control Device.
• Clean ventilating fan frequently.
• Always use appropriate cookware and utensils size.
• Always use cookware appropriate for the size of the surface element.
•
immediately, EVACUATE and CALL the FIRE DEPARTMENT or dial your local emergency
service immediately.
• DO NOT use WATER, including wet dishcloths or towels — it will result in a violent steam
explosion
• Use an extinguisher ONLY if:
• You know you have a Class A, B, C extinguisher, and you already know how to operate it.
•
•
•
To reduce the risk of injury to persons in the event of a gas leaks:
•
• DO NOT turn on the range hood fan or any type of ventilator.
• DO NOT turn on the lights or any type of appliance.
• Open all doors and windows to disperse the gas. If you still smell gas, call the gas company
immediately.
Your safety and the safety of others is very important. We have provided many important
safety messages in this manual and on your appliance. Always read and obey all safety
messages. All safety messages will tell you what the potential hazard is, tell you how to
reduce the chance of injury
, and tell you what can happen if the instructions are not followed.
This is the safety alert symbol. This symbol alerts you to potential hazards that can hurt you
and others. All safety messages will follow the safety alert symbol and the word “WARNING”.
The manufacturer and/or distributor/reseller declines all responsibility in the event of failure
to observe the instructions given here for installation, maintenance and suitable use of the
product.
The manufacturer and/or distributor/reseller further declines all responsibility for injury due to
negligence and the warranty of the unit automatically expires due to improper maintenance.
The manufacturer and/or distributor/reseller will not be held responsible for any damages to
personal property or real estate or any bodily injuries whether caused directly or indirectly by
the range hood.
| SUNSET4
IMPORTANT SAFETY NOTICE
Read all instructions before installing and operating this appliance
WARNING – TO REDUCE THE RISK OF FIRE, ELECTRIC SHOCK, OR INJURY TO PERSONS, OBSERVE THE FOLLOWING:
a) Use this unit only in the manner intended by the manufacturer. If you have questions, contact the manufacturer.
b) Before servicing or cleaning unit, switch power off at service panel and lock the service
disconnecting means to prevent power from being switched on accidentally. When the service disconnecting means cannot be locked,
securely fasten a prominent warning device, such as a tag, to the service panel.
WARNING
To Reduce The Risk Of Fire, Electric Shock Or Injury To Persons, Do Not Use Replacement Parts That Have Not Been Recommended
By The Manufacturer (e.g. Parts Made At Home Using A 3D Printer).
WARNING
TO REDUCE THE RISK OF FIRE, USE ONLY METAL DUCTWORK.
WARNING – TO REDUCE THE RISK OF A RANGE TOP GREASE FIRE:
Use proper pan size. Always use cookware appropriate for the size of the surface element.
IMPORTANT: Observe all governing codes and ordinances.
It is the customer’s responsibility:
•
• To assure that the electrical installation is adequate and in conformance with National
Electrical Code, ANSI/NFPA 70 — latest edition*, or CSA Standards C22. 1-94, Canadian
Electrical Code, Part 1 and C22. 2 No. 0-M91 - latest edition** and all local codes and
ordinances.
determine that the ground path is adequate.
A 120-Volt, 60 Hz, AC-only, fused electrical supply is required on a separate 15-amp circuit.
DO NOT ground to a gas pipe.
DO NOT have a fuse in the neutral or ground circuit.
IMPORTANT: Save this Installation Guide for electrical inspector’s use.
The range hood must be connected with copper wire/plug only.
The range hood should be connected directly to the fused disconnect (or circuit breaker) box
relief must be provided at each end of the power supply cable.
Wire sizes (copper wire only) and connections must conform with the rating of the appliance
of the National Electrical Code ANSI/NFPA 70 — latest edition*, or CSA Standards C22.
1-94, Canadian Electrical Code Part 1 and C22. 2 No. 0-M91 - latest edition** and all
local codes and ordinances. A U.L. - or C.S.A. - listed conduit connector must be provided
at each end of the power supply cable (at the range hood and at the junction box).
Copies of the standards listed may be obtained from:
* National Fire Protection Association
Batterymarch Park
Quincy, Massachusetts 02269
** CSA International
8501 East Pleasant Valley Road
Cleveland, Ohio 44131-5575
| TESNUS 5
ELECTRICAL REQUIREMENTS
• Vent system must terminate to the outside (roof or side wall).
• DO NOT terminate the vent system in an attic or other enclosed area.
• DO NOT use 4" or 5" laundry-type wall caps. Use a 6" or larger Wall/Roof Cap.
• Use metal/aluminum vent only. We recommend using Rigid instead of Flex duct.
•
• It is recommended that the range hood be vented with a 6" or bigger round metal/aluminum
vent work.
• The size of the vent should be uniform.
• Use no more than two 90° elbows.
• Make sure there is a minimum of 24" (61 cm) of straight vent between the elbows if more
than one elbow is used.
• DO NOT install two elbows together.
• The length of vent system and number of elbows should be kept to a minimum to provide
• Use aluminum foil tape to seal all joints in the vent system.
• Use caulking to seal exterior wall or roof opening around the cap.
• Use 45° elbows instead of 90° elbows when possible.
IMPORTANT:
• A minimum of a 6" round duct (standard for this range hood) must be used to maintain
•
connecting to provided duct.
• Please use Duct Run Calculation below to compute total available duct run when using
elbows, transitions and caps.
• ALWAYS, when possible, reduce the number or transitions and turns in the duct run. If a
long duct run is required, increase the duct size from 6" to 8". If a reducer is used, install a
• If turns or transitions are required: Install as far away from opening and as far apart,
between 2, as possible.
Minimum Duct Size:
• Round - 6" minimum
| SUNSET6
VENTING REQUIREMENTS
Body Design
l
Ampere
Noise Level
Single Motor
Motor Type
Fan Type
Wall Switch
Filtration Type
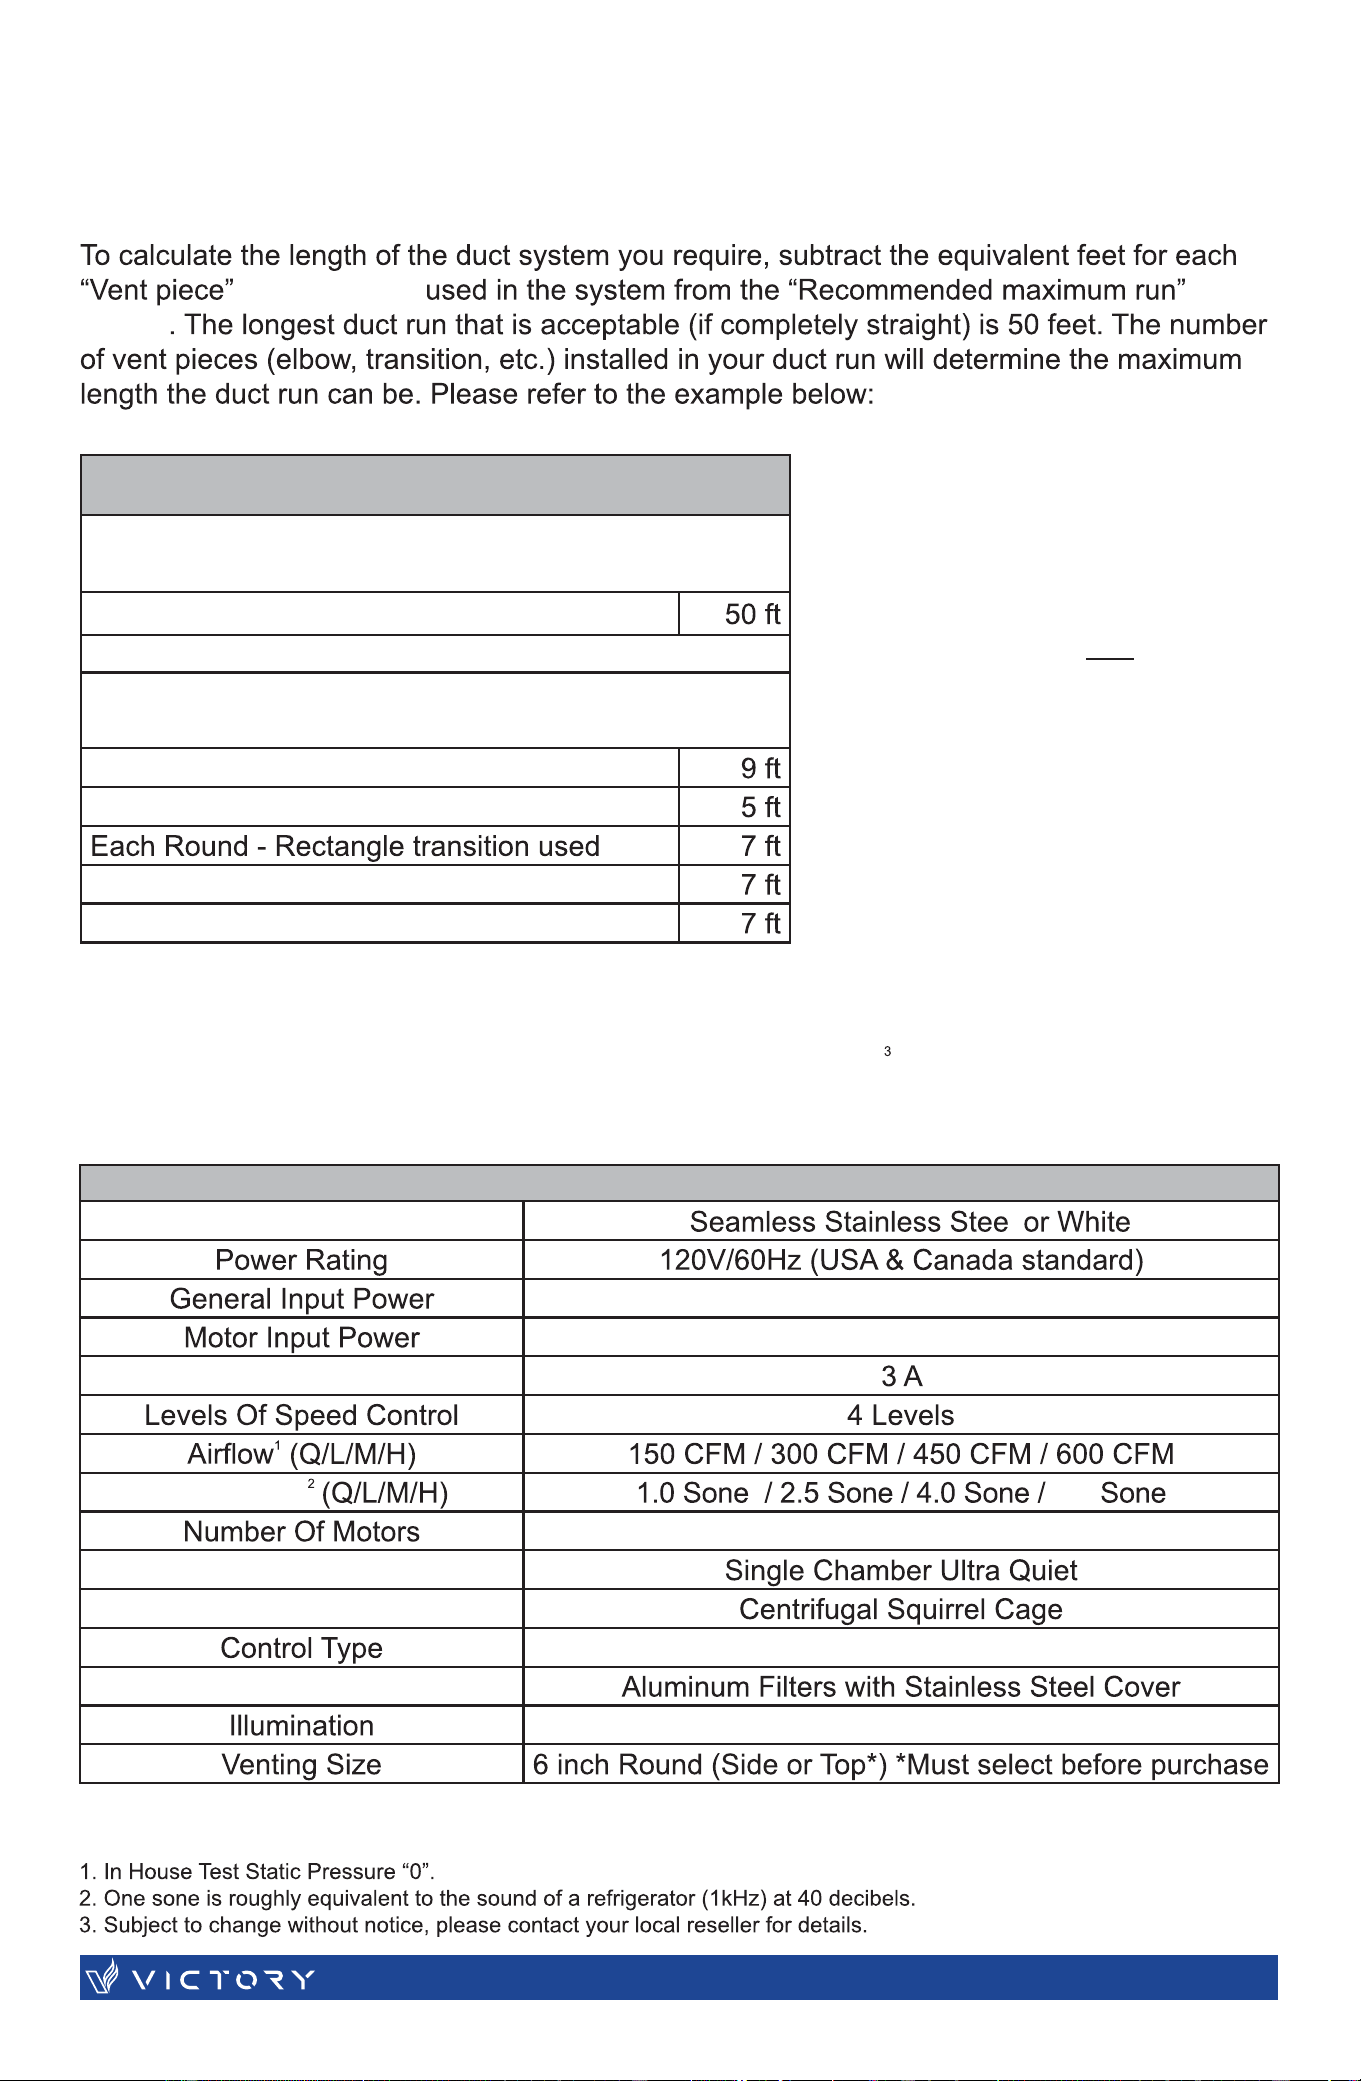
Duct Run Calculation:
6" Round Duck
Side Wall Cap with Damper
Roof Cap
Duct Run Calcuation example:
One roof cap, two 90º elbows, and
one 45º elbow used:
7ft + 9ft + 9ft + 5ft = 30ft used.
The above vent pieces used are
equivalent to 30ft of a straight
duct run. Subtract 30ft from the
allowable 50ft. The remaining
distance of 20ft is the longest that
the straight ducting (in addition to
the vent pieces) can be.
| TESNUS 7
CALCULATING VENT SYSTEM LENGTH
SPECIFICATIONS
Each 90° Elbow Used
Each 45° Elbow Used
(table below) (table
below)
Vent Piece Deduction
Recommended Maximum Run
6.0
12V LED Lights (3000K)
305 W
305 W + 16 W Light
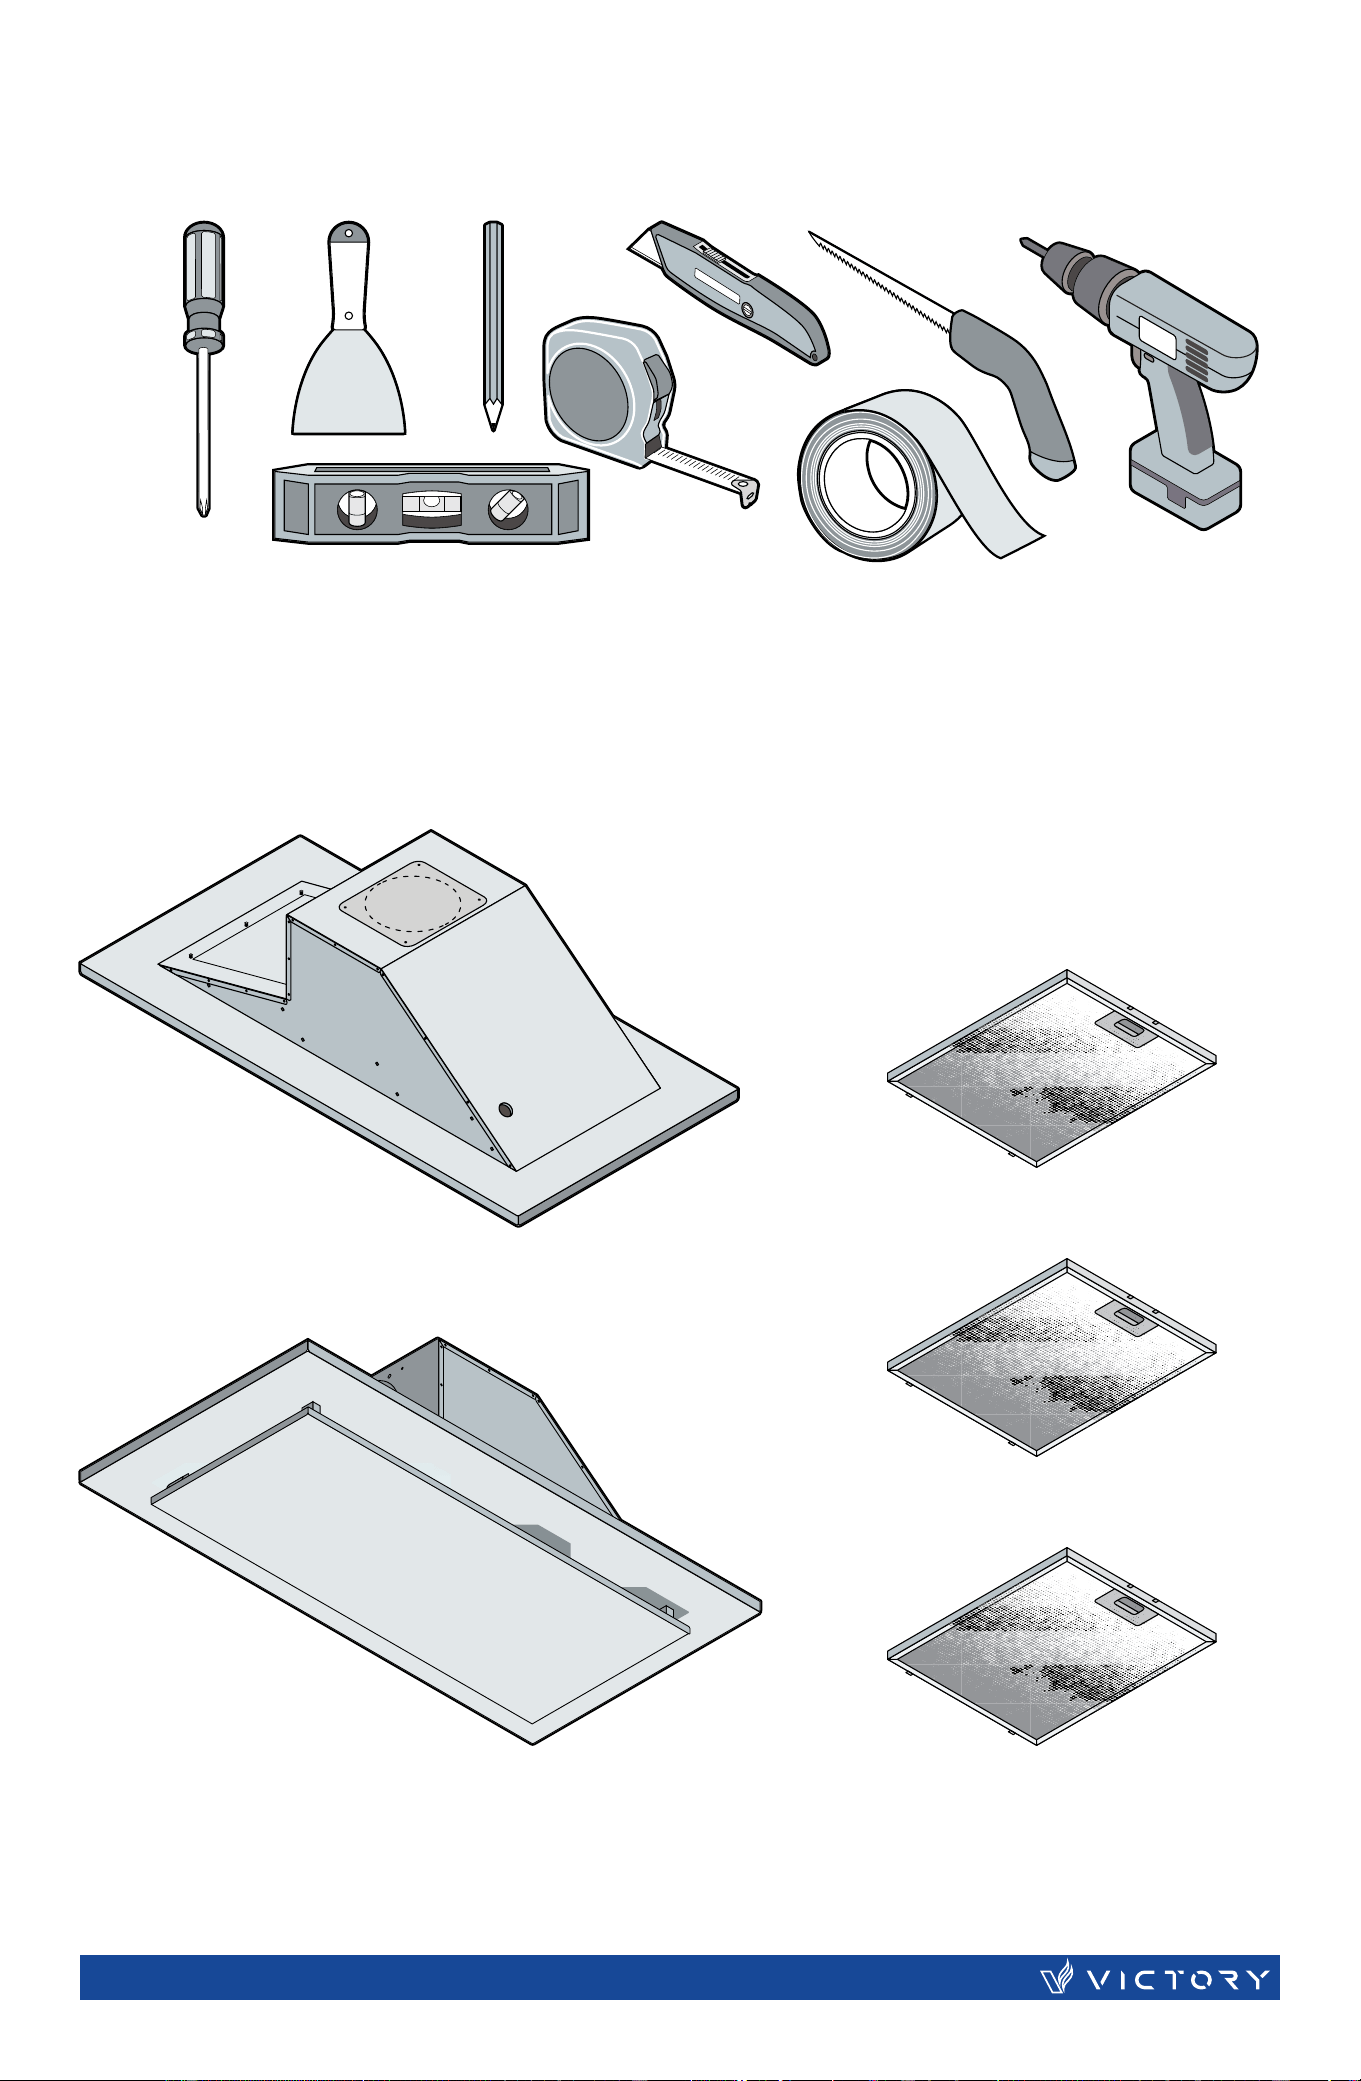
Putty
Knife
Pencil
Tape
Measure
Level
Phillips
Screwdriver
Aluminum Tape
Power
Drill
Utility
Knife
Drywall
Knife
NOTE:
Where necessary, additional screws will be needed for installation and added support, but is not
included. Please review contents before installation.
| SUNSET8
REQUIRED TOOLS
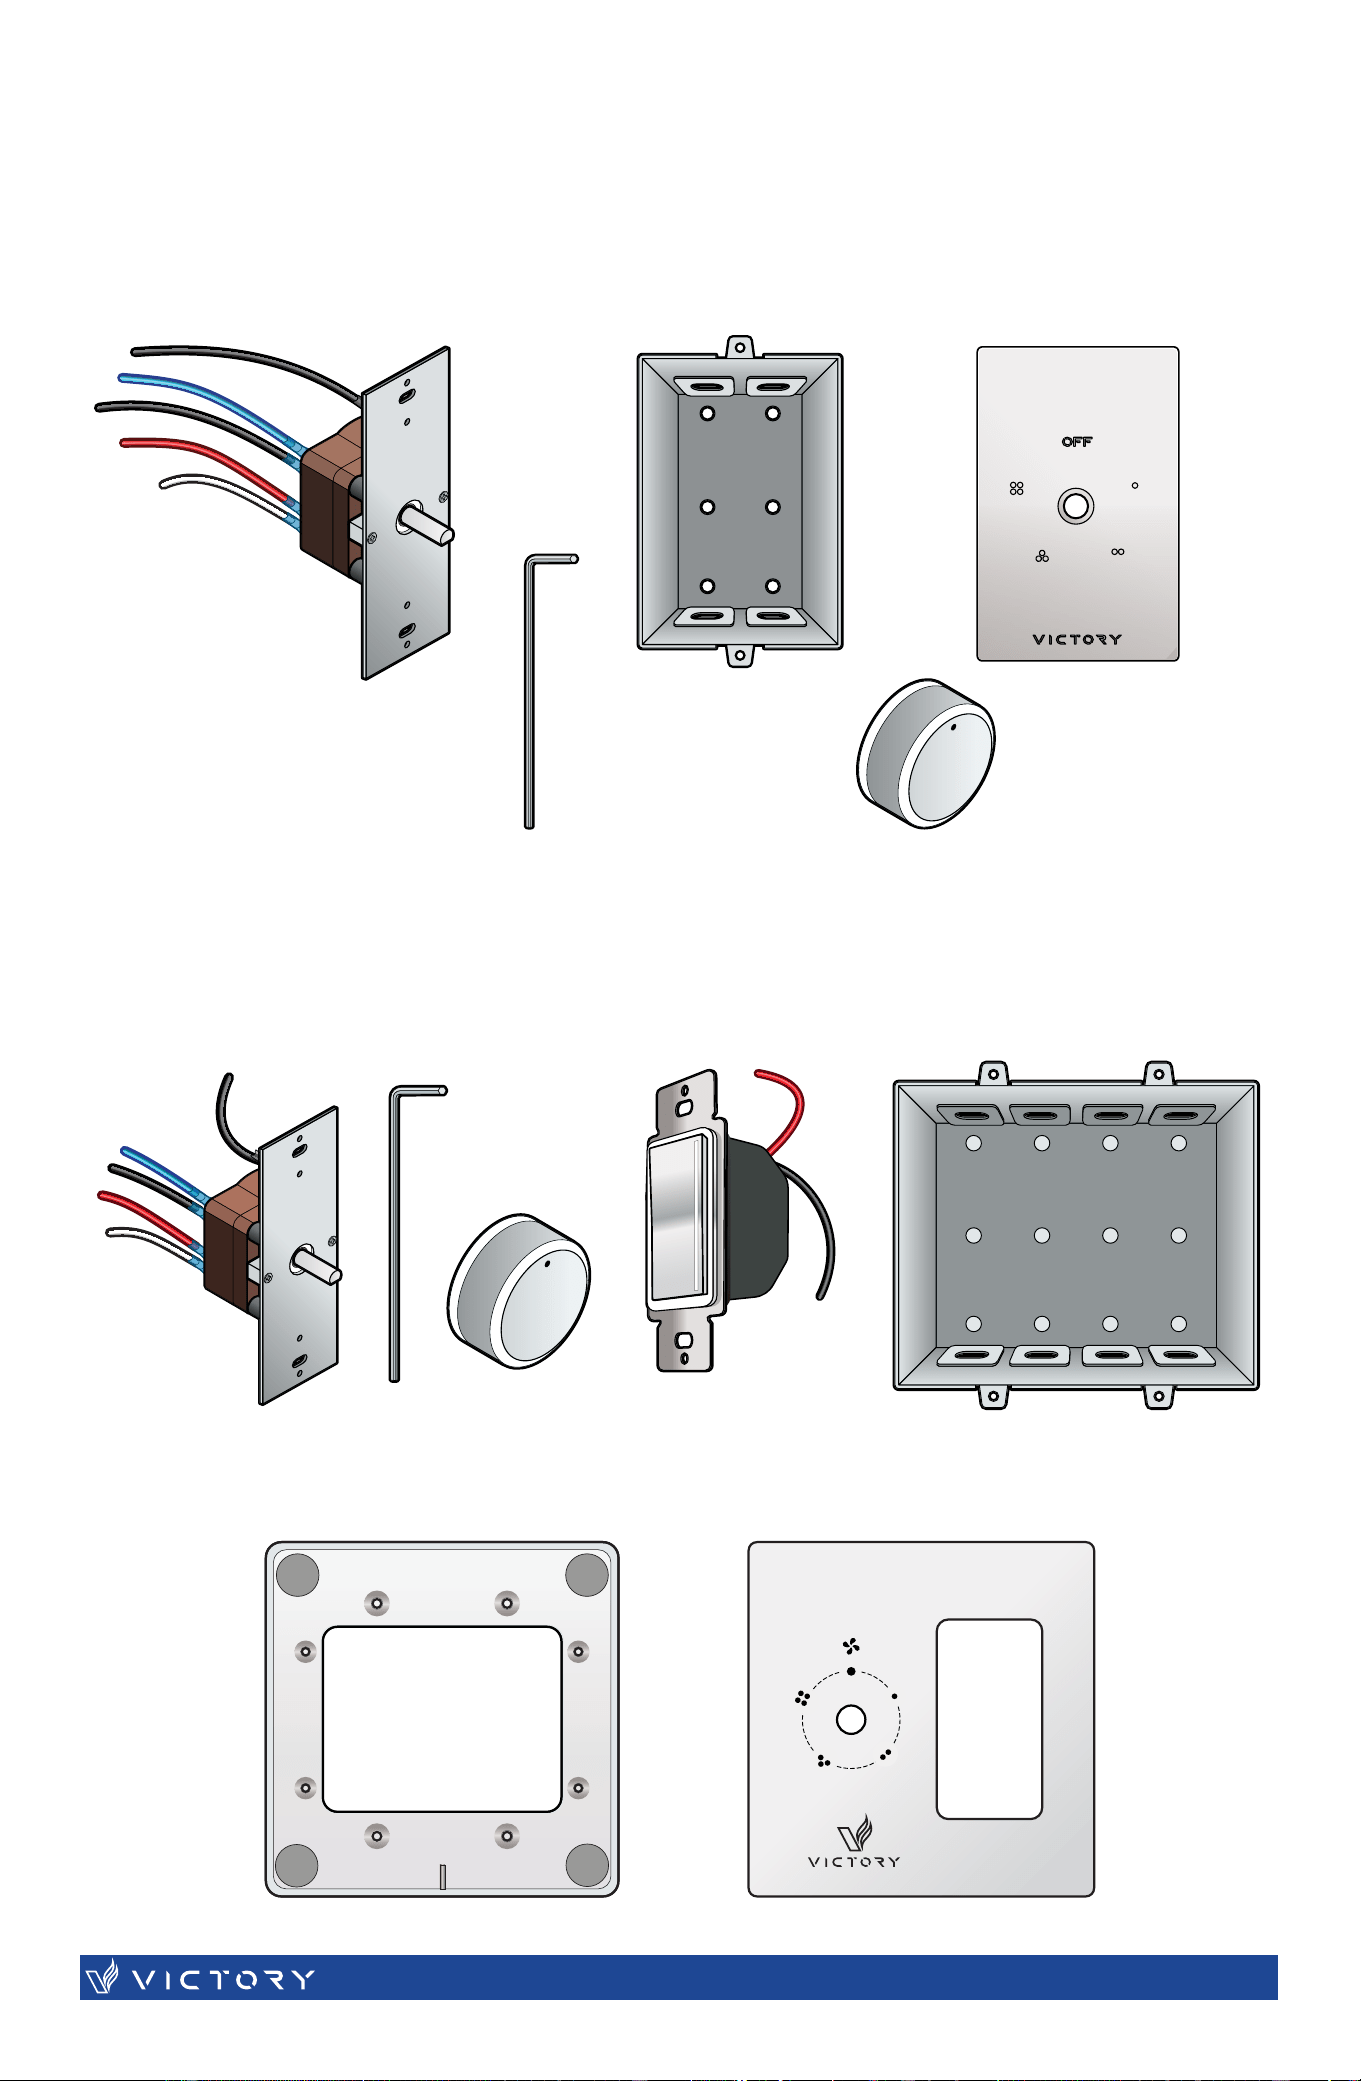
PARTS SUPPLIED
Top Down
Isometric View
Bottom Up
Isometric View
Mesh Filter (x3)
| TESNUS 9
PARTS SUPPLIED (Continued)
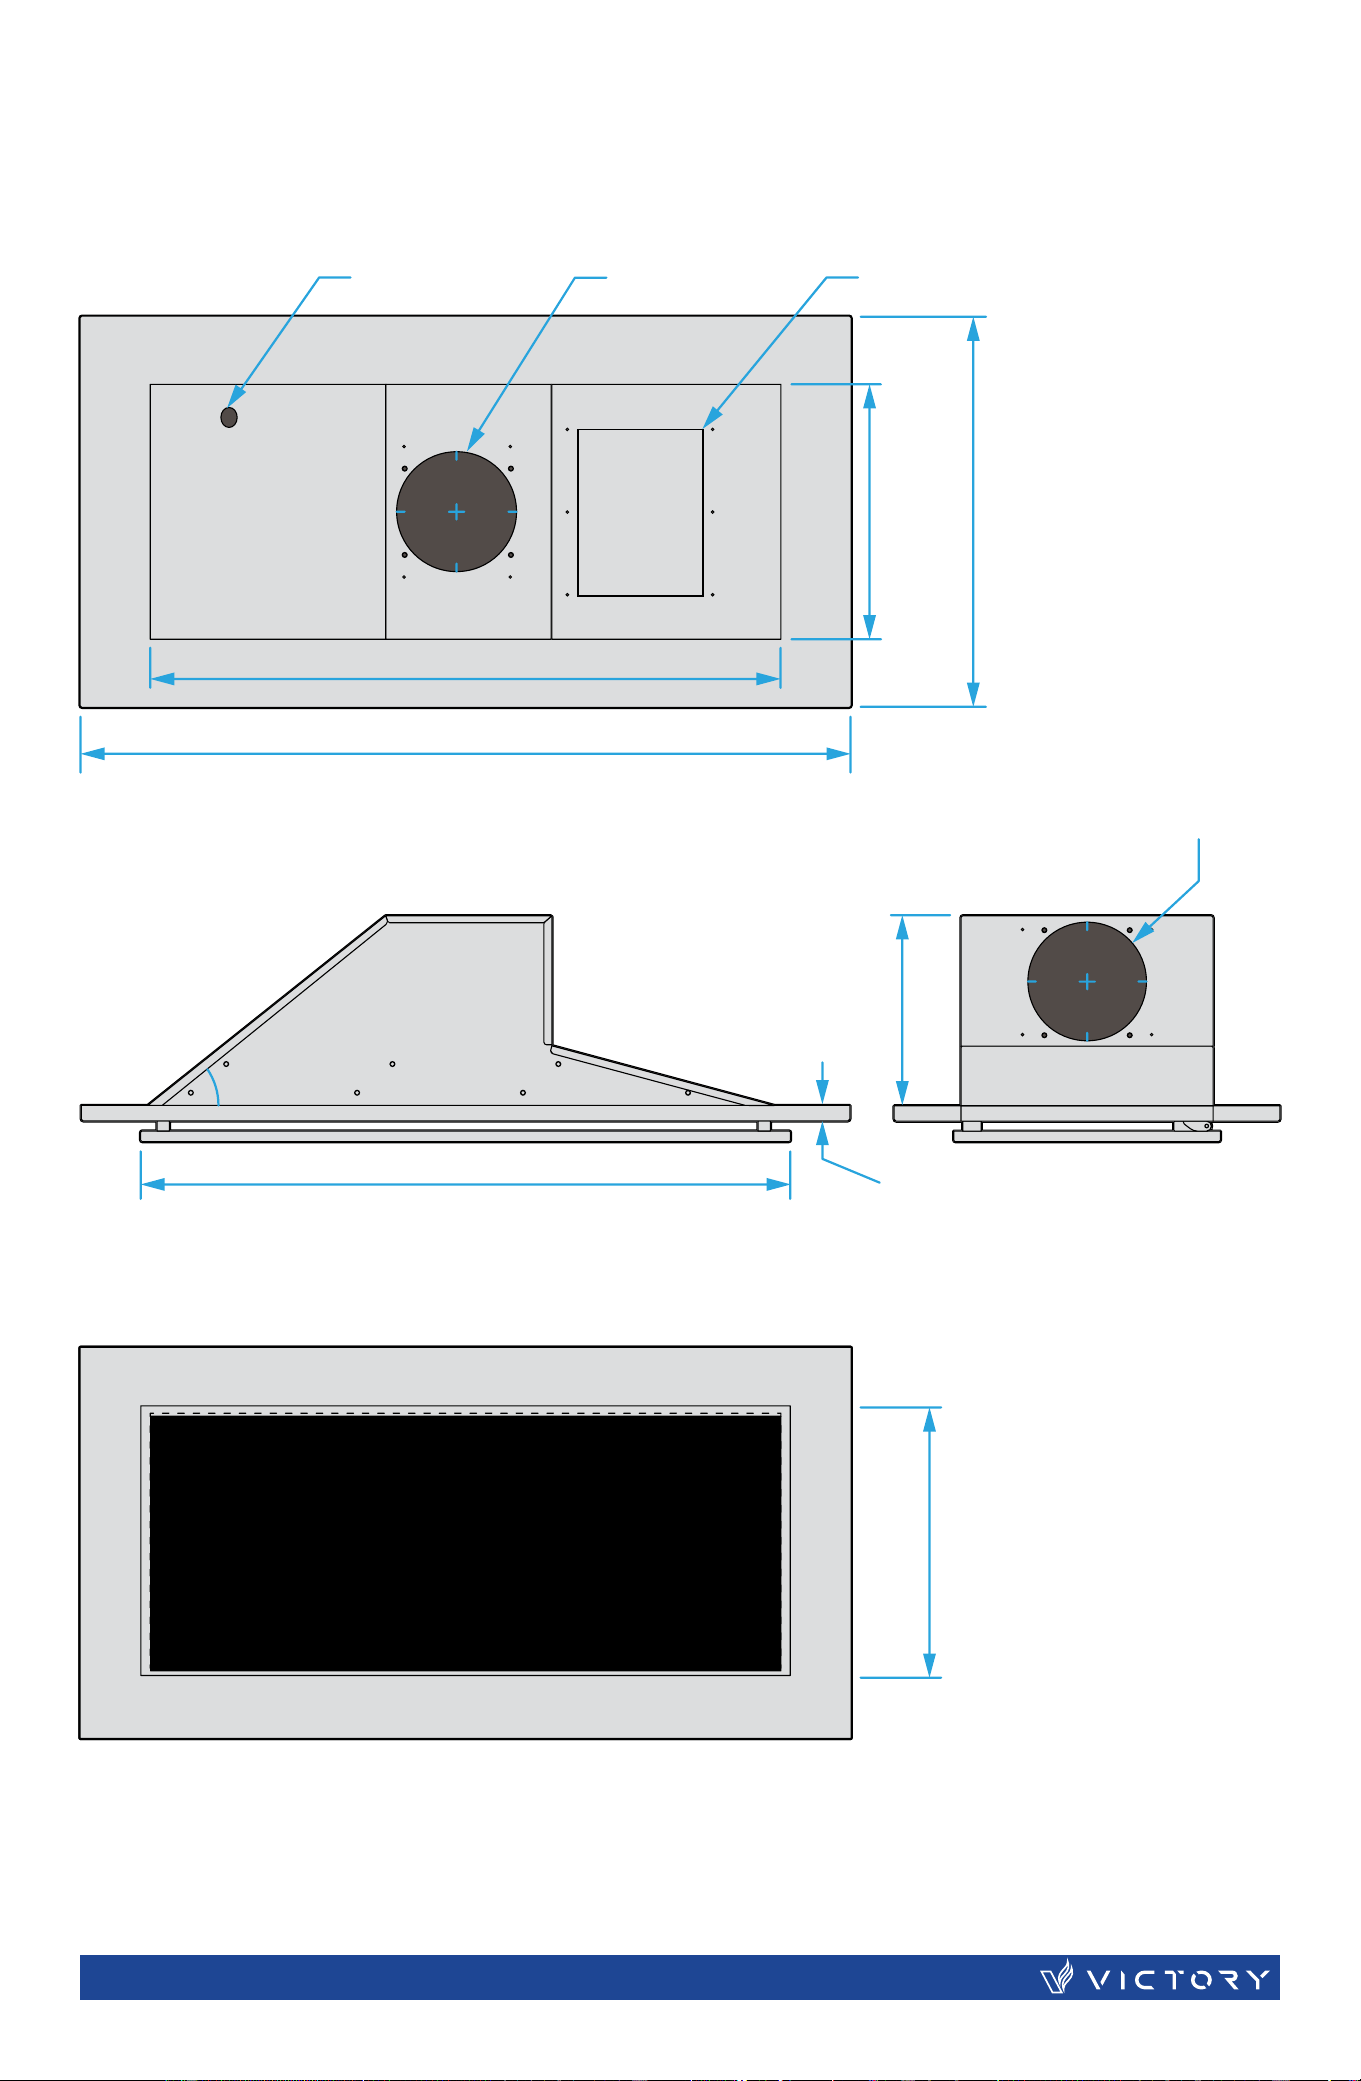
No Lights:
With Lights:
Rotary Switch
Rotary
Switch
Allen Key (M3)
Allen Key
(M3)
Light Dimmer
Magnetic Metal Plate
Magnetic Glass Cover Plate
Single Electrical Box
Dual Electrical Box
Panel Cover
Rotary Knob
Rotary Knob
BOTTOM VIEW
SIDE VIEW
TOP VIEW
38½"
31¾"
13½"
32½"
9½"
12¾" 19½"
¾" Trim
Port access for
Electrical Box
Duct access
Door
Exhaust Option
6"- Ø Top Vent
Exhaust Option
6"- Ø Side Vent
38°
| SUNSET10
DIMENSIONS
Advanced Preparations:
• Be familiar with the controls of the range hood by reading through Range Hood Operations.
•
standard outlet (please refer the product label for the suitable voltage of this unit) and turn
on the range hood. Verify all operations of the range hood by referring to Range Hood
verify the existence of all supplied parts.
• Carefully remove the white or blue plastic protective coat from the range hood.
Preparations:
NOTE: To avoid damage to your hood, prevent debris from entering the vent opening.
• Decide the location of the venting pipe from the hood to the outside. Refer to Venting Methods.
•
• Try to avoid as many transitions, elbows, and long run as possible. This may reduce the
performance of the hood.
• Using 45° elbows is better than using 90° elbows.
•
• Use aluminum tape to seal joints between pipe sections.
THE HOOD MUST BE TESTED BEFORE INSTALLATION.
PLEASE TEST THE RANGE HOOD FOR PROPER OPERATION BEFORE
BOXING IT, OR RECESSING IT INTO THE CEILING.
DO NOT CLOSE THE BOX AROUND THE HOOD UNTIL THE TEST HAS
BEEN PERFORMED.
Victory Range Hoods Inc. will not be responsible for additional labour costs related to
reinstallation of the hood due to transportation internal damage or wiring issues.
| TESNUS 11
PREPARATION
WARNING – TO REDUCE THE RISK OF FIRE, ELECTRIC SHOCK, OR INJURY TO PERSONS, OBSERVE THE FOLLOWING:
a) Installation work and electrical wiring must be done by qualified person(s) in accordance with all applicable codes and standards,
including fire-rated construction.
b) Sufficient air is needed for proper combustion and exhausting of gases through the flue (chimney) of fuel burning equipment to
prevent back drafting. Follow the heating equipment manufacturer's guideline and safety standards such as those published by the
National Fire Protection Association (NFPA), and the American Society for Heating, Refrigeration and Air Conditioning Engineers
(ASHRAE), and the local code authorities.
c) When cutting or drilling into wall or ceiling, do not damage electrical wiring and other hidden utilities.
d) Ducted fans used to exhaust contaminants must always be vented to the outdoors.
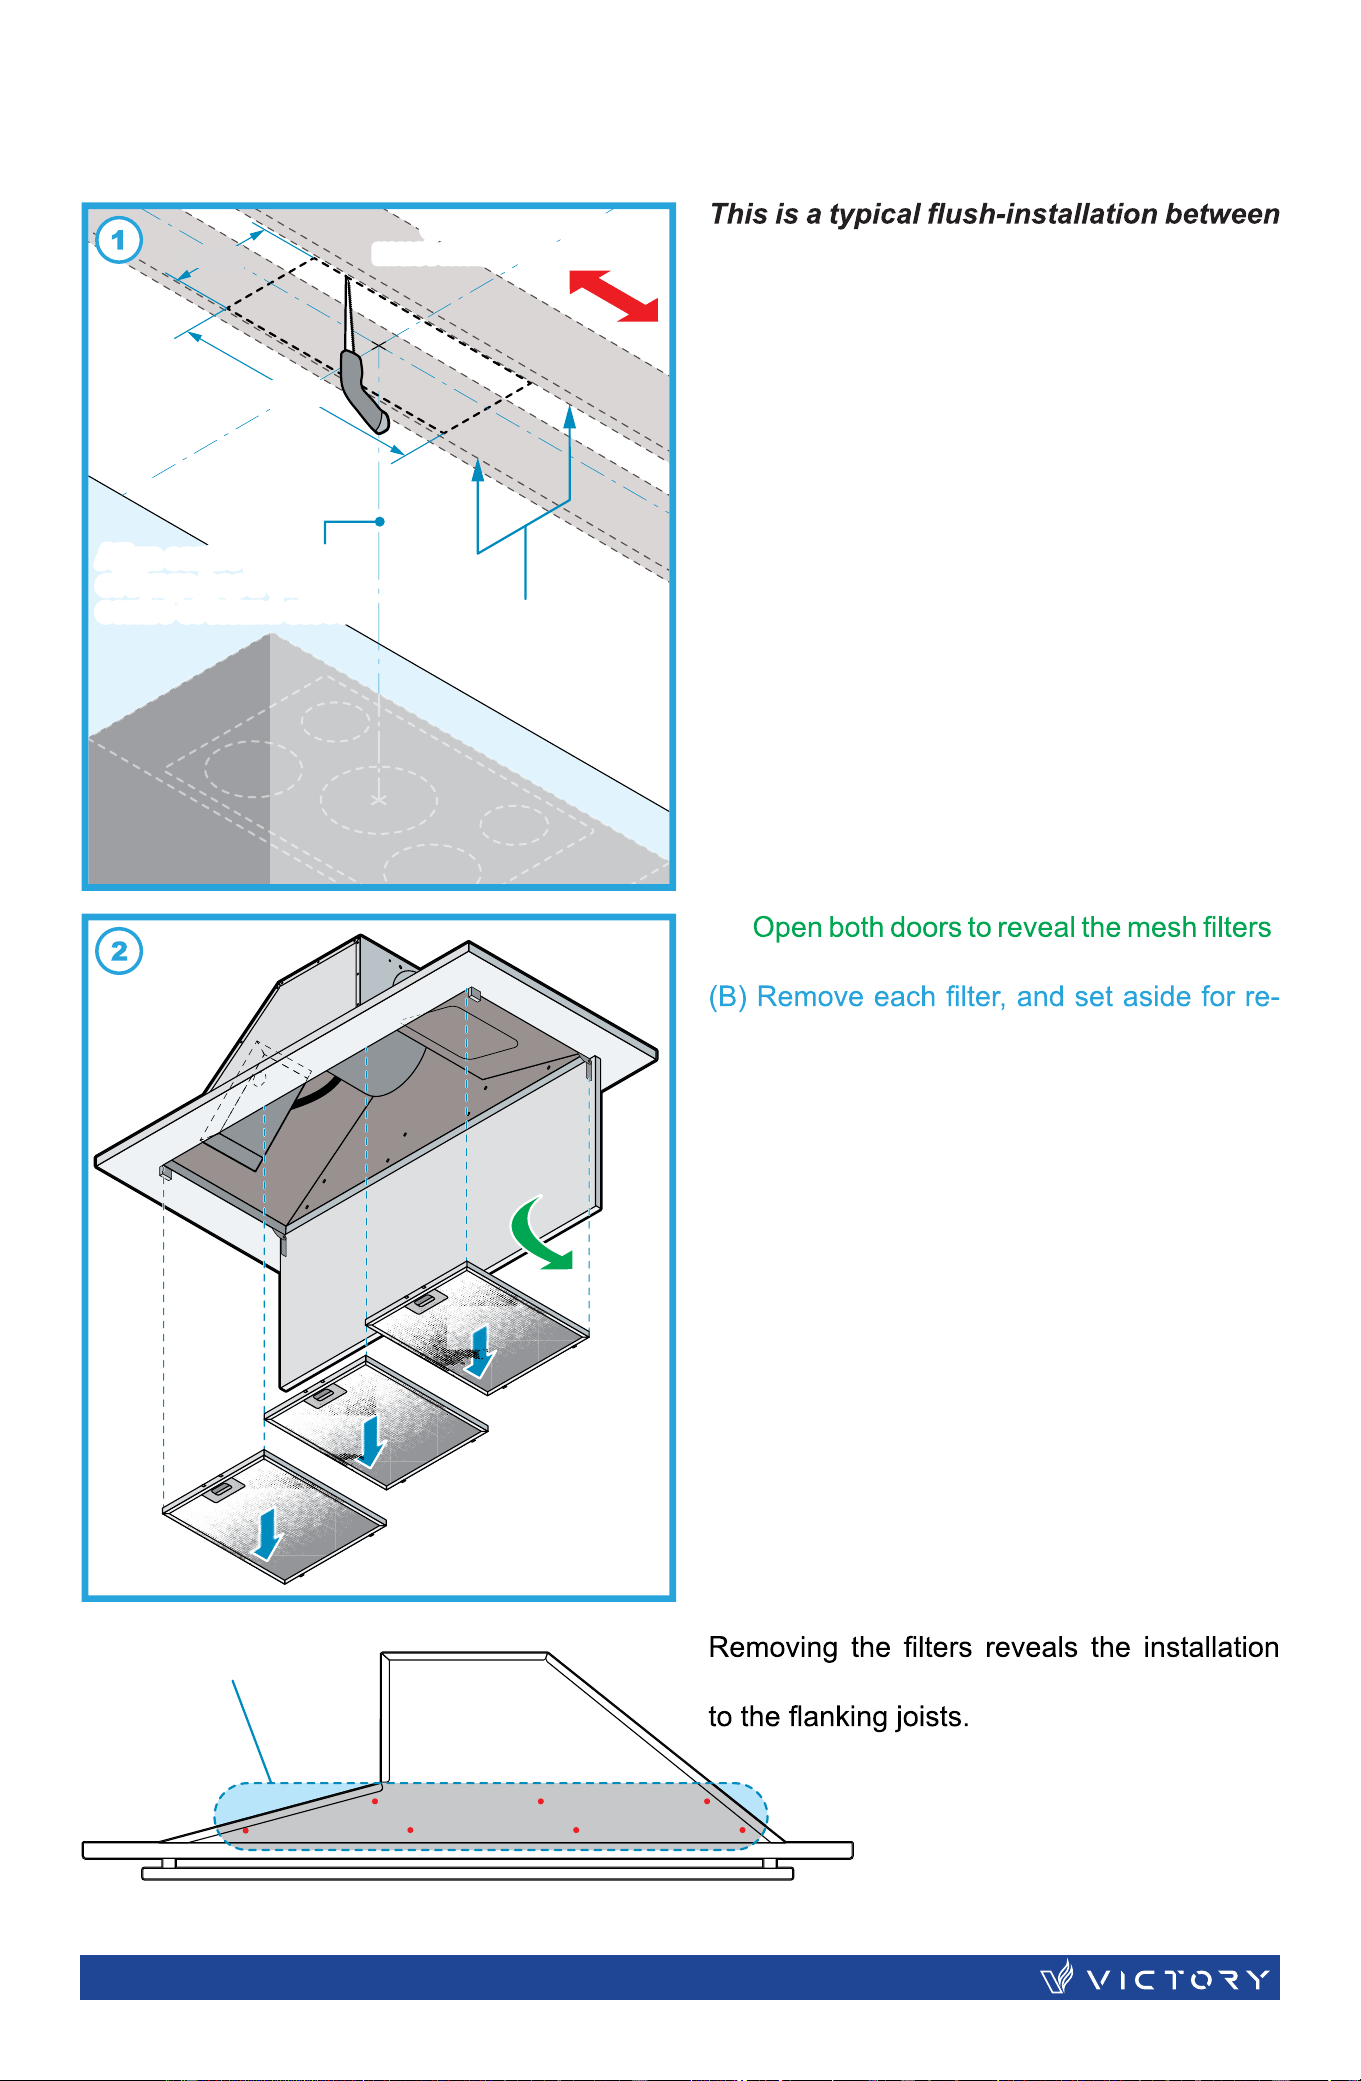
32"
13"
Cut-Out
Island St
ove
Counte
rtop
Ceiling
Wall
Joist
Orientation of Joists
must match island stove
Orientation of Joists
must match island stove
Cut-out ceiling board
must be installed
in between joists
Align centre placement
of range hood with
centre of island stove.
Align centre placement
of range hood with
centre of island stove
Installation Holes
the joists.
Please NOTE: The orientation of the joists
and the orientation of the stove must
match.
If the orientation does not match, the range
hood may need to be dropped down into a
box in order to rotate it.
(A) .
installment.
holes on both side walls to fasten screws on
| SUNSET12
ROUGH
-
IN
(A)
Swing
Open
Door
(B) Remove Filters
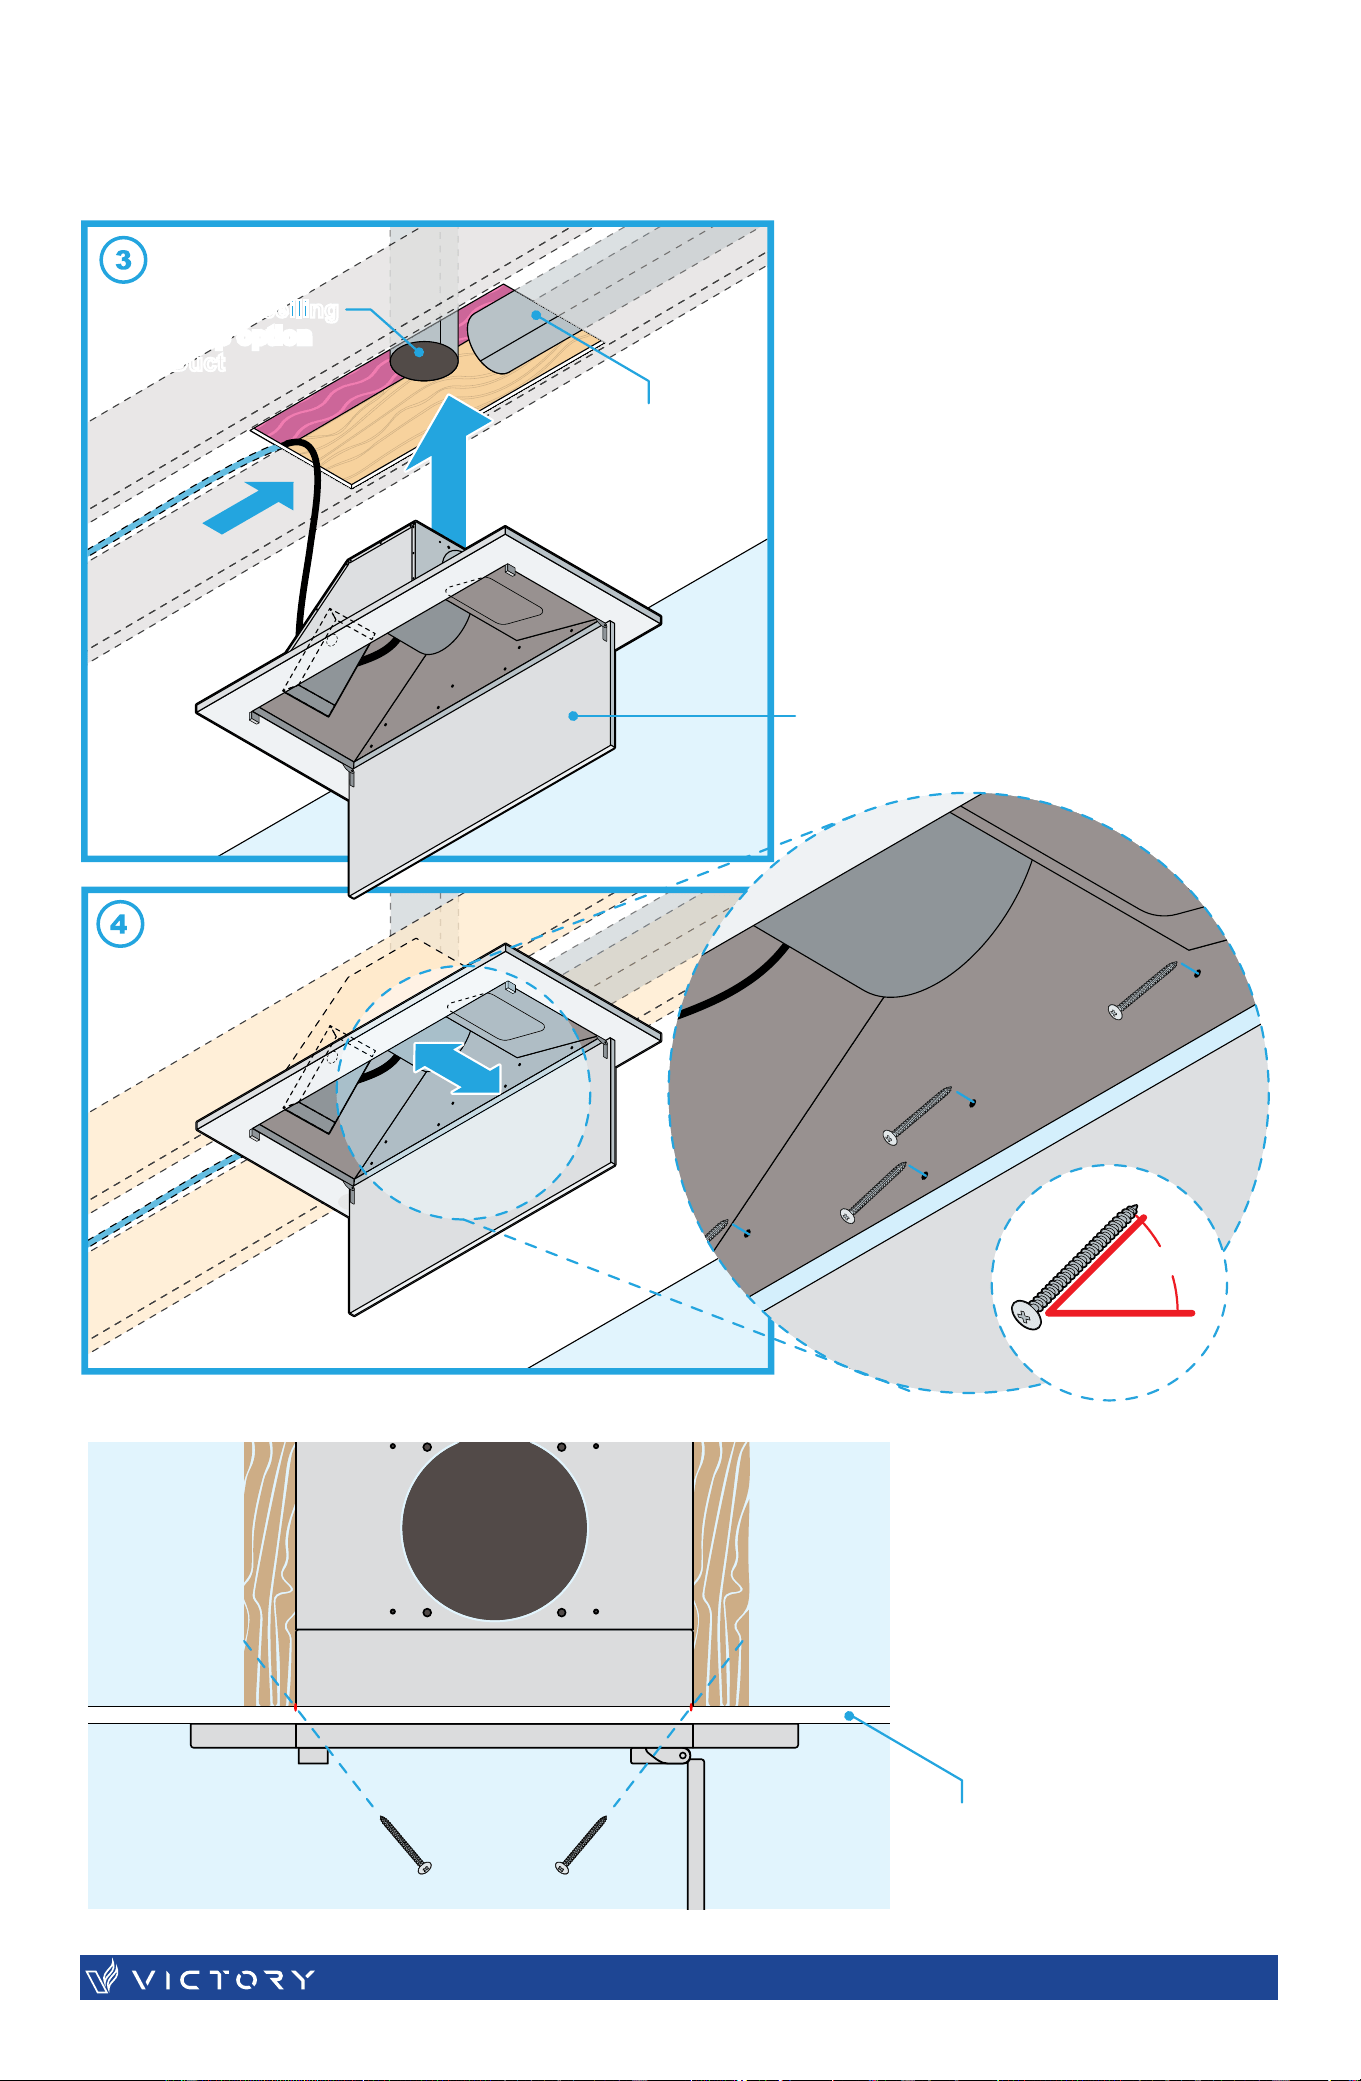
NOTE: Woodblocking may be needed if there is more space in between joists for installation.
SUNSET | 13
Ceiling
Wall
Joist
Vent through ceiling
to roof cap option
6”- Ø Duct
Vent through ceilingVent through ceiling
to roof cap optionto roof cap option
6”- Ø Duct
6"- Ø Duct
Option side vent
leading to wall
cap 6"- Ø Duct
(3) Lift up range hood to attach the
exhaust vent to the 6" duct tube of
your option (top or side vent).
Wiring coming from wall switch panel
and entering into the electrical box
2 x 14-3 Cables
(6 conductors + ground)
INSTALLATION
Panel door is non-reversible
(4) Anchor your range hood
by fastening woodscrews
through the side walls
where the installations
holes are located to the
joists flanking the range
hood. Use as many as
needed to have a secure fit.
45º
Drywall
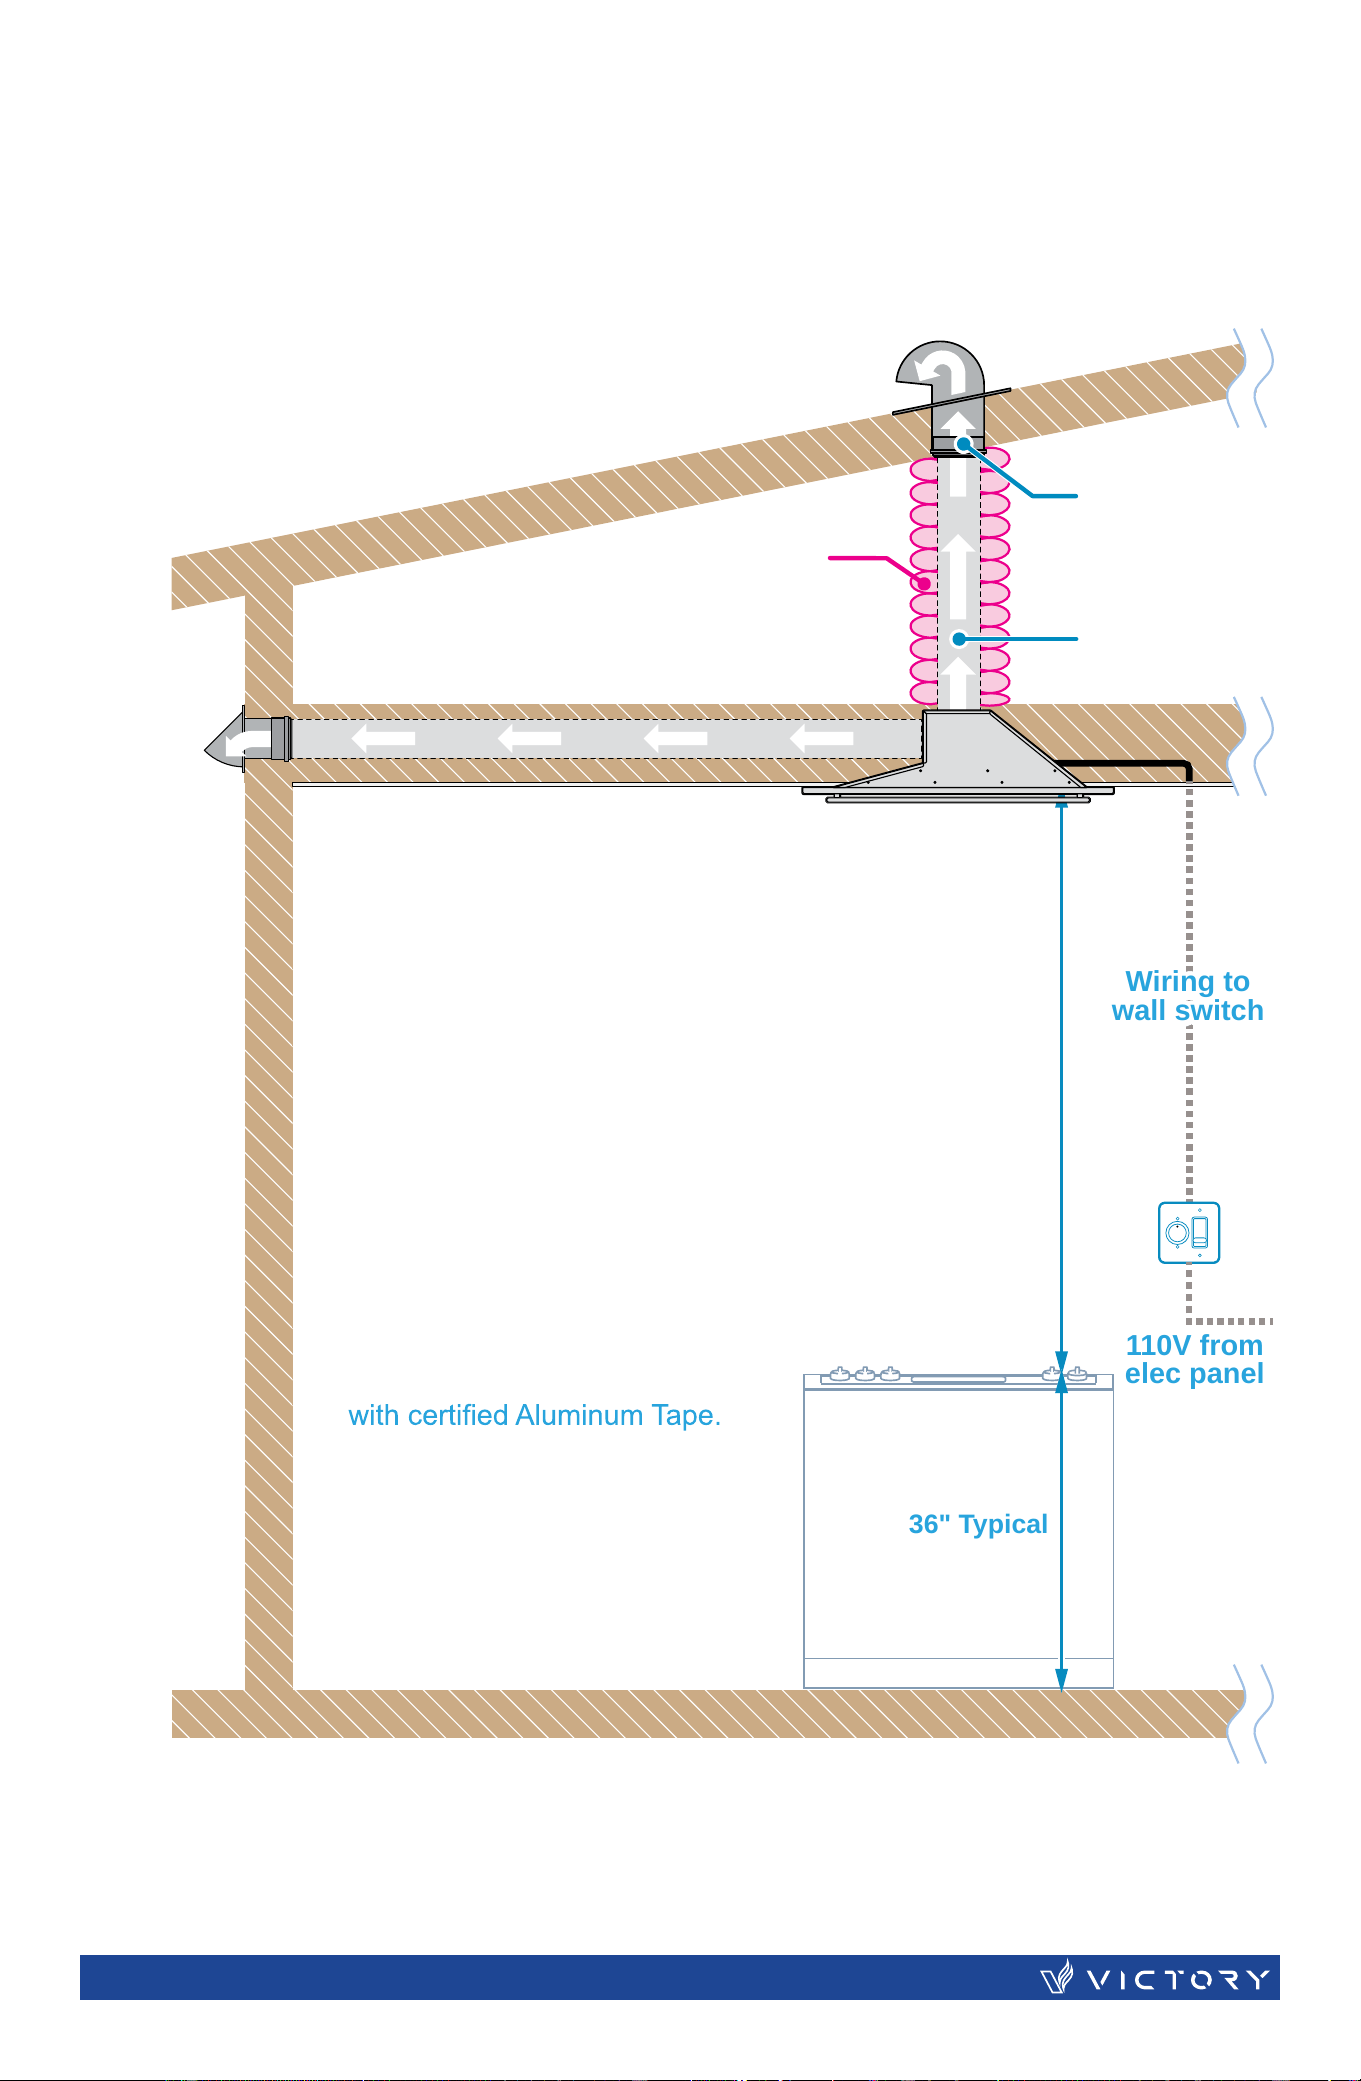
Standard
6" Wall
Vent Cap
6" Roof Vent Cap
Backdraft
Damper
Wrap insulation
required for
cold climates
6" Ø Duct
The hood will
become less
efficient if
installed at a
higher distance.
36" Typical
Wiring to
wall switch
Wiring to
wall switch
110V from
elec panel
IMPORTANT:
• NEVER exhaust air or terminate
duct work into spaces between
walls, crawl spaces, ceiling, attics
or garages. The range hood must
be ducted to the outside.
• Use metal/aluminum duct work
only.
• Fasten all connections with sheet
metal screws and tape all joints
• Use caulking to seal exterior wall
or roof opening around the cap.
• If the duct is running though a cold
section of the house (attic space),
insulation of the duct will be
required to prevent condensation
(refer to sketch).
The ceiling should be able to
bear 18 kg (40 lbs) in weight.
•
performance.
• This range hood is factory set for venting through the roof or wall.
• Vent work can terminate either through the roof or wall.
| SUNSET14
VENTING METHOD
The range hood should be placed at a maximum distance of about 8' from the floor for best
Recommended
Height: 48-60"
NOTE: there is no minimum distance
requirement between the the appliance
and the surrounding structure.
– there shall be adequate ventilation of the room when the range hood is used at the same time as appliances burning gas or other fuels (not applicable to
appliances that only discharge the air back into the room); the minimum clearance distance to be maintained between the cooking surface and the lowest edge of
the range hood;
– there is a fire risk if cleaning is not carried out in accordance with the instructions;
– do not flambé under the range hood;
– CAUTION: Accessible parts may become hot when used with cooking appliances.
NOTE:
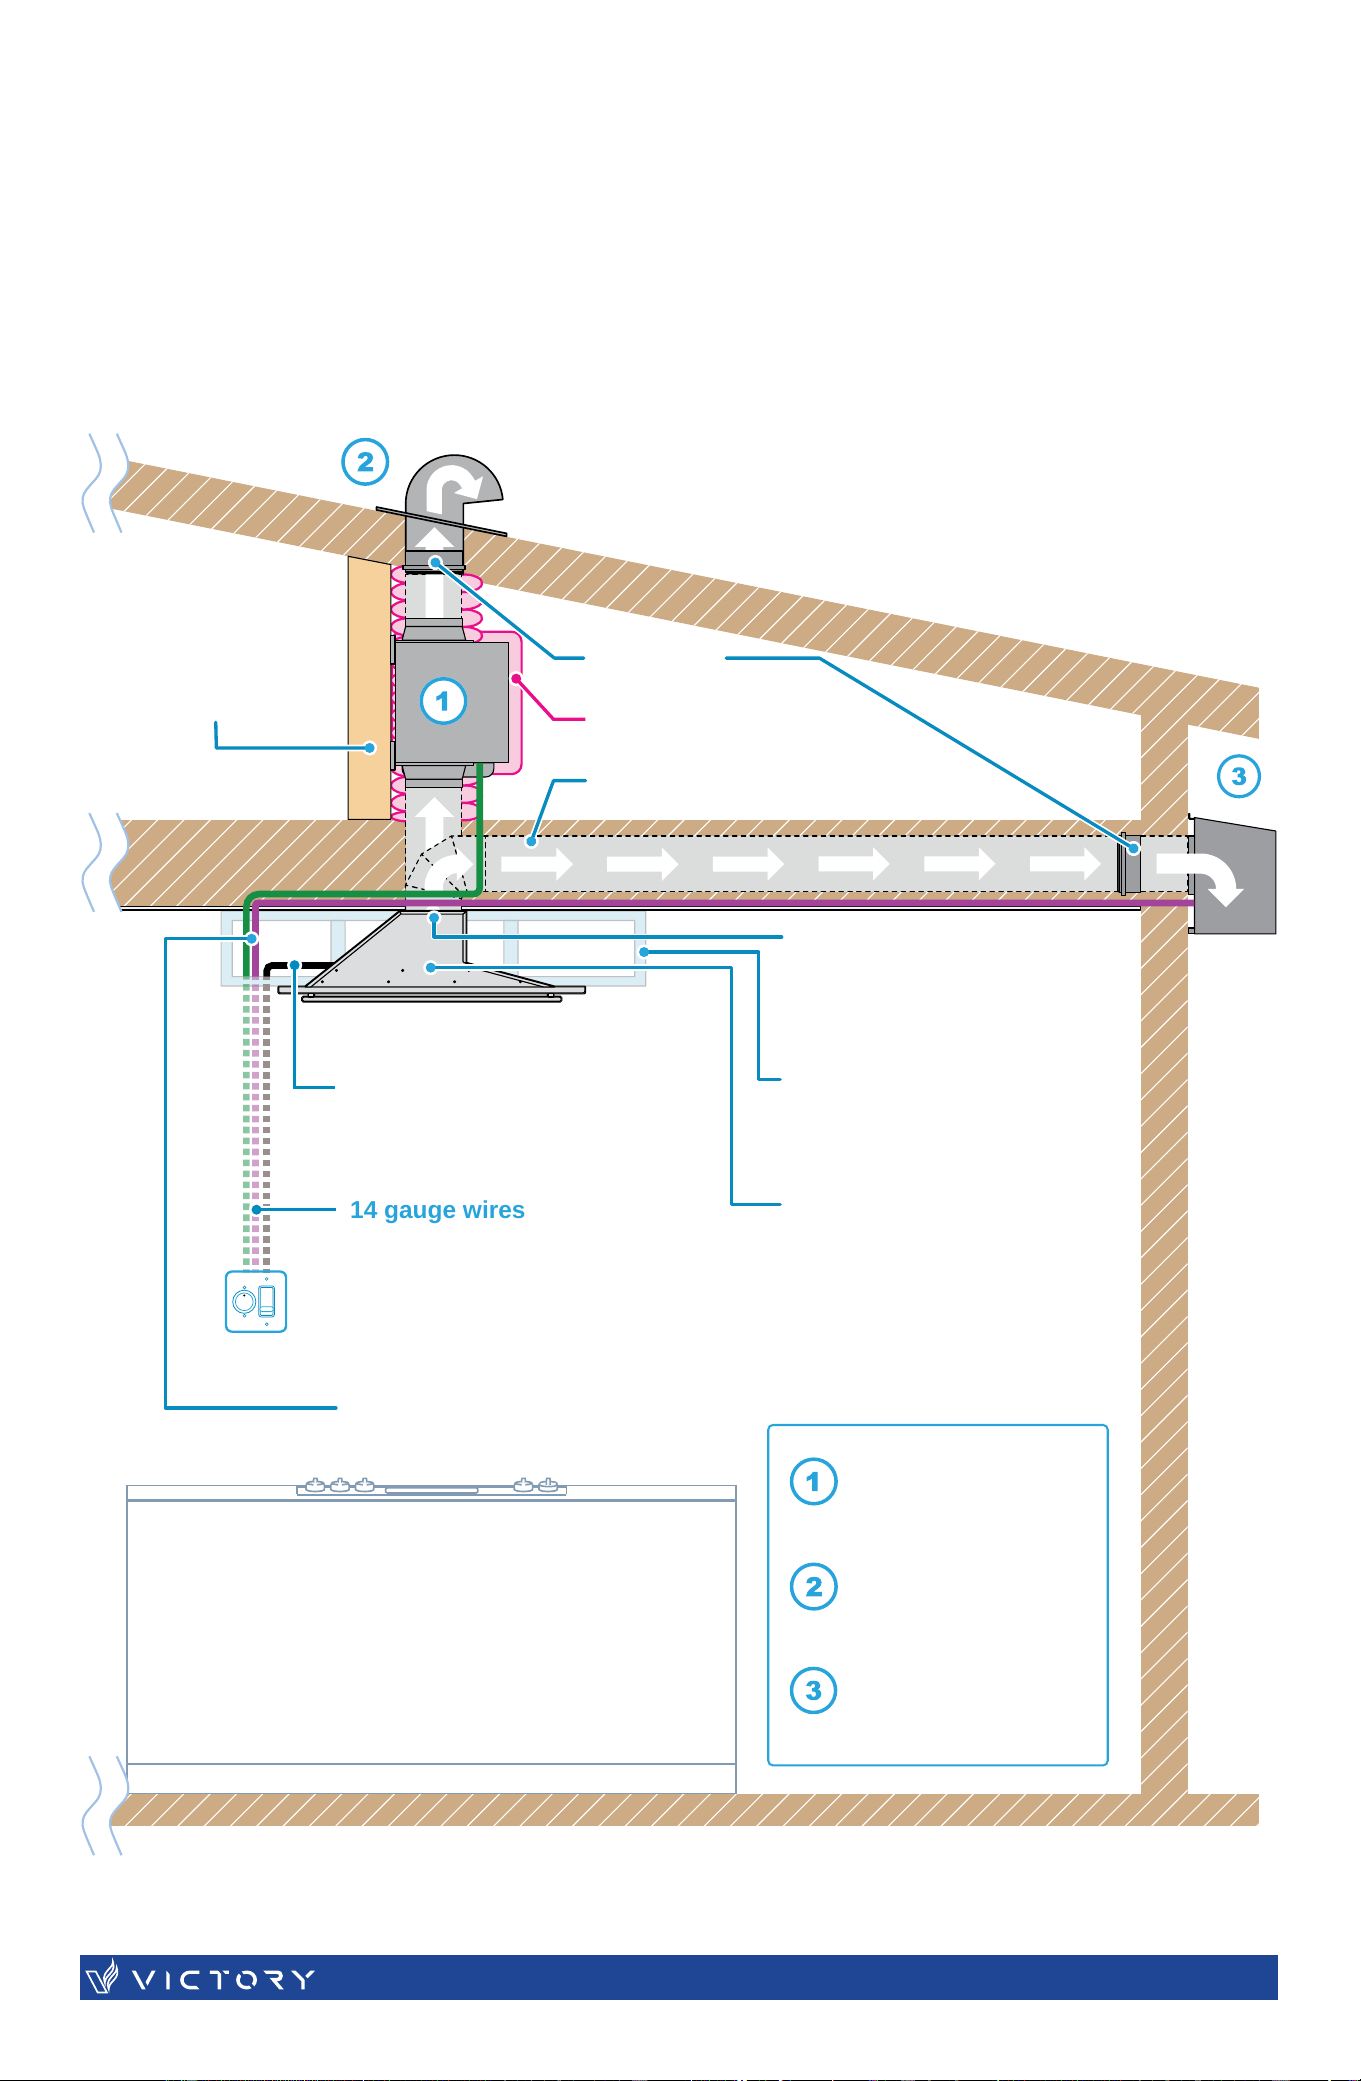
Required brace
to support the
optional remote
blower
Backdraft
Damper
Wrap insulation
required for cold climates
6"- Ø Duct recommended for
remote blower installations
6"- Ø top vent
Wood or metal stud framing
Internal blower removed
from range hood for the
remote blower setup
Wires controlling the blowers
Wires controlling the lights
14 gauge wires
Remote Blower
(Optional Setup)
6" Roof Vent Cap
Outdoor
Remote Blower
(Optional Setup)
| TESNUS 15
REMOTE BLOWER (Optional)
JOIST
JOIST
(a)
(b)
(c)
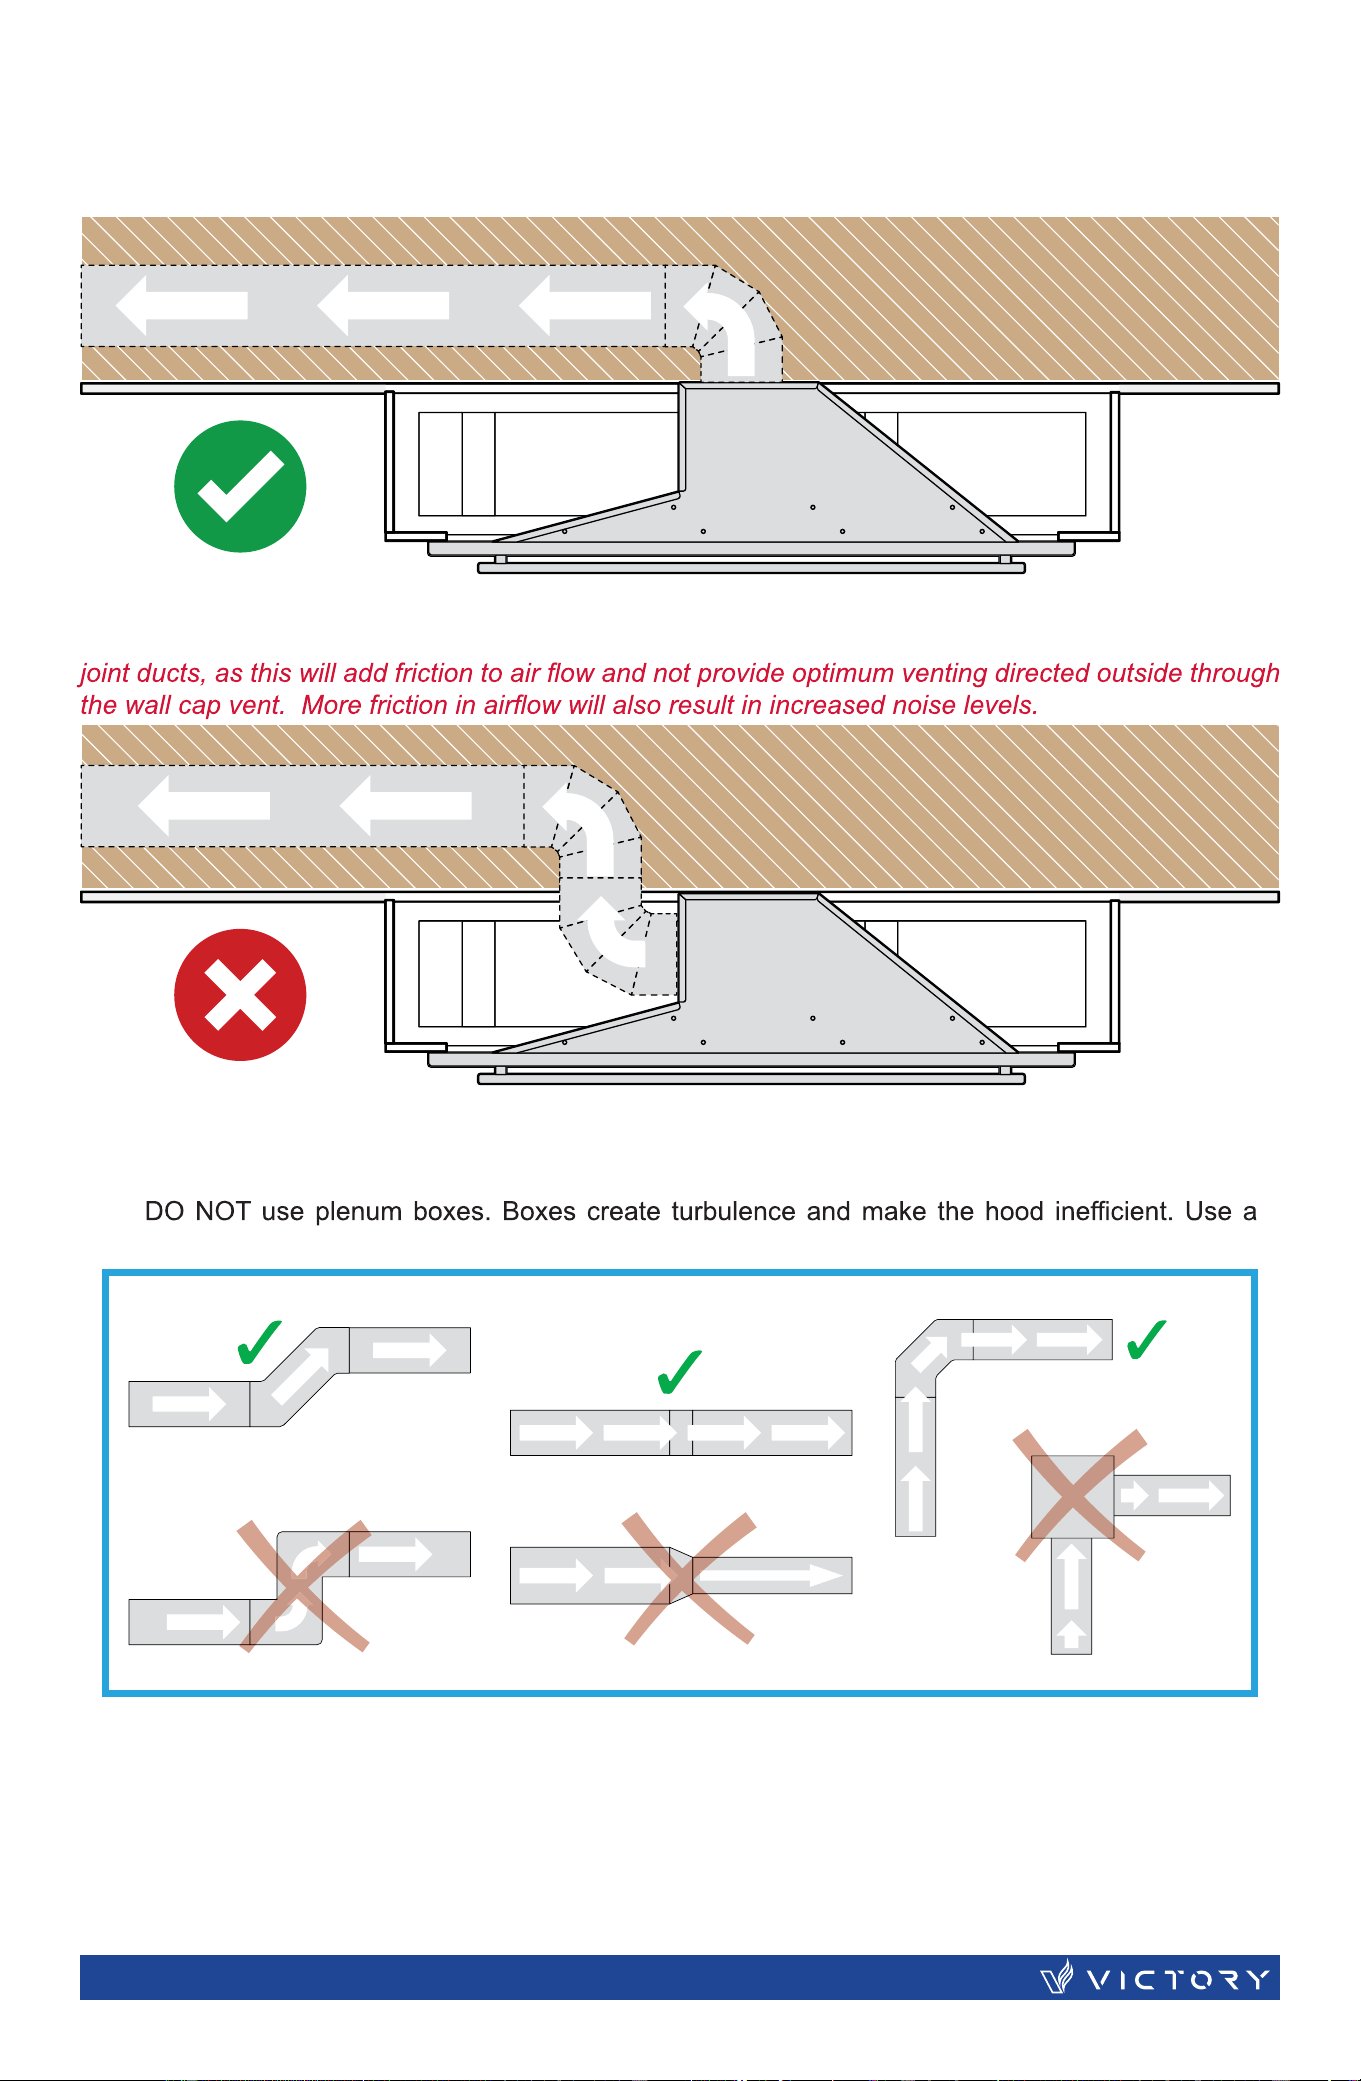
If you choose to use a drop box extension to vent out through your standard wall cap, ensure your
exhaust vent is attached from the top opening, and use an elbow joint duct.
Drop box
extension
NOTE: Do NOT exhaust through the side opening to vent in a drop box extension by using dual elbow
Drop box
extension
a. Avoid the use of sharp elbows. Use 45 degrees instead, if possible.
b. DO NOT use REDUCERS. Keep the size of the duct the same, as per the manual. A reducer
will reduce the CFM of the hood and increase the noise.
c.
smooth elbow to guide the air outdoors.
| SUNSET16
DO’S AND DON’TS FOR DUCT VENTING
• The air must not be discharged into a flue that is used for exhausting fumes from appliances burning gas or other fuels (not applicable
to appliances that only discharge the air back into the room);
• The minimum distance between the supporting surface for the cooking vessels on the hob and the lowest part of the range hood.
(When the range hood is located above a gas appliance, this distance shall be at least 65 cm. If the instructions for installation for the
gas hob specify a greater distance, this has to be taken into account. The distance of 65 cm can be reduced for:
• non-combustible parts of range hoods, or
• parts operating at safety extra low voltage, provided these parts do not give access to live parts if deformed);
• Regulations concerning the discharge of air have to be fulfilled.
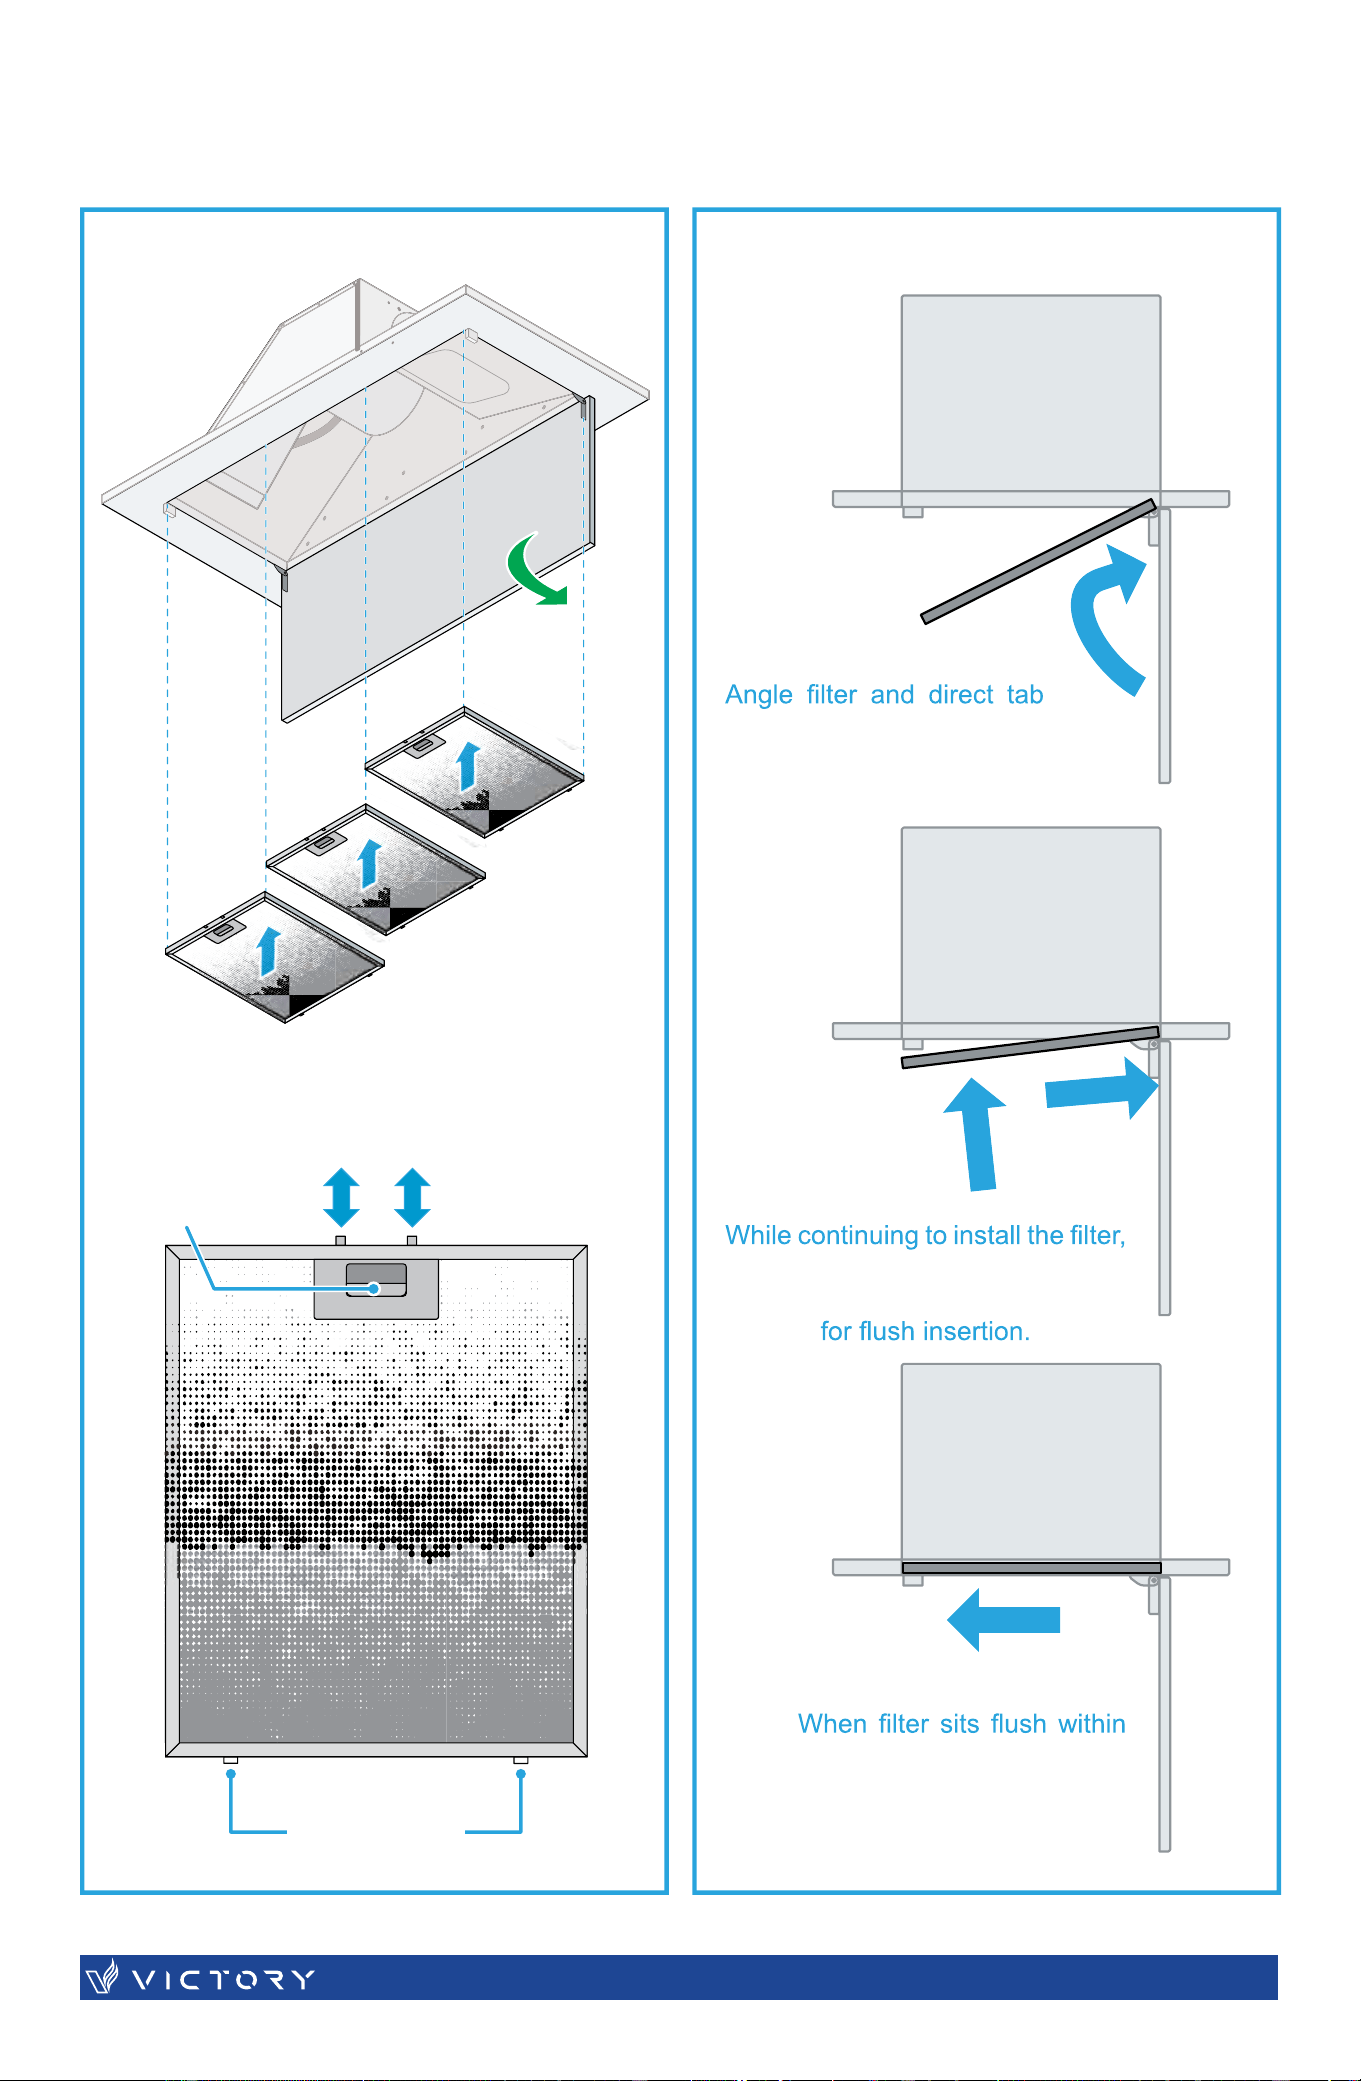
Retractable Tabs
Tab Inserts
Push Lever
Mesh Filters
ensure you depress the lever for
the retractable tabs to clear way
the opening, release the
push lever to lock in place.
SUNSET | 17
FILTERS
FRONT VIEW
inserts toward the aft slot
of the range hood opening.
BOTTOM VIEW
To Range Hood
Panel
Access to
Elec. Box
(Not included)
(Not included)
120 V
120 V
4 Speed
3 Speed
2 Speed
1 Speed
Load
Neutral
Ground
Ground
Rotary Switch
for Fan Speed
(Colour of wires may vary.
Follow the labels of corresponding wires.)
ALL SWITCH:
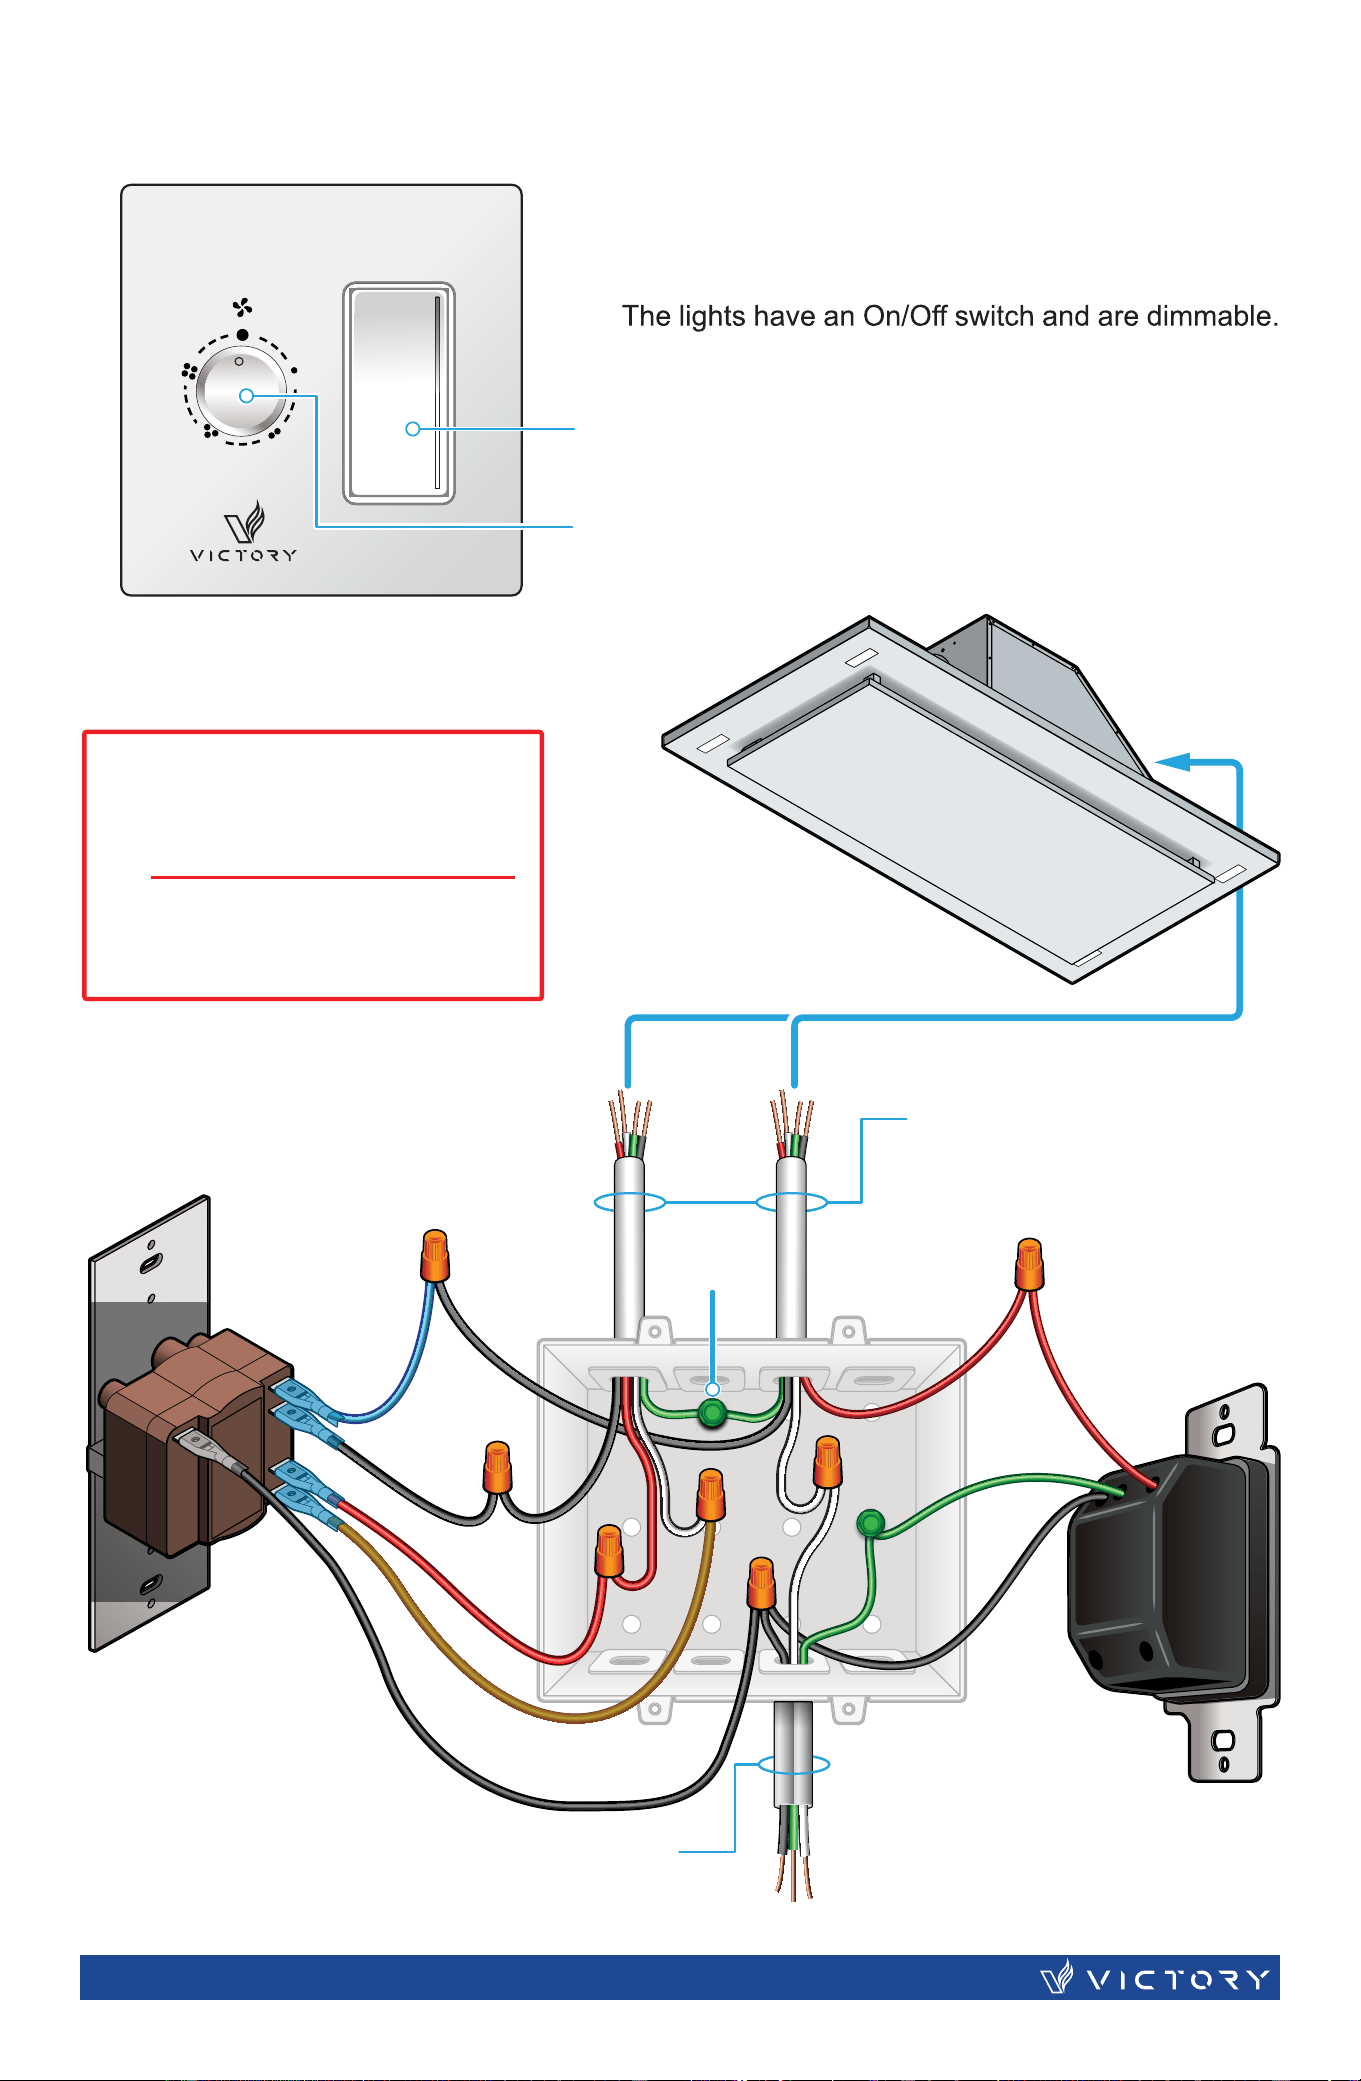
• This hood will come with a Wall Switch to operate
the lights and motor.
•
The motor has a 4-speed switch.
FRONT PANEL SWITCH*
*The wall switch may slightly vary
***IMPORTANT NOTICE***
The wiring of the range
hood must be performed by
a CERTIFIED ELECTRICIAN .
VICTORY Range Hoods is not
responsible for any damages
due to improper connection.
| SUNSET18
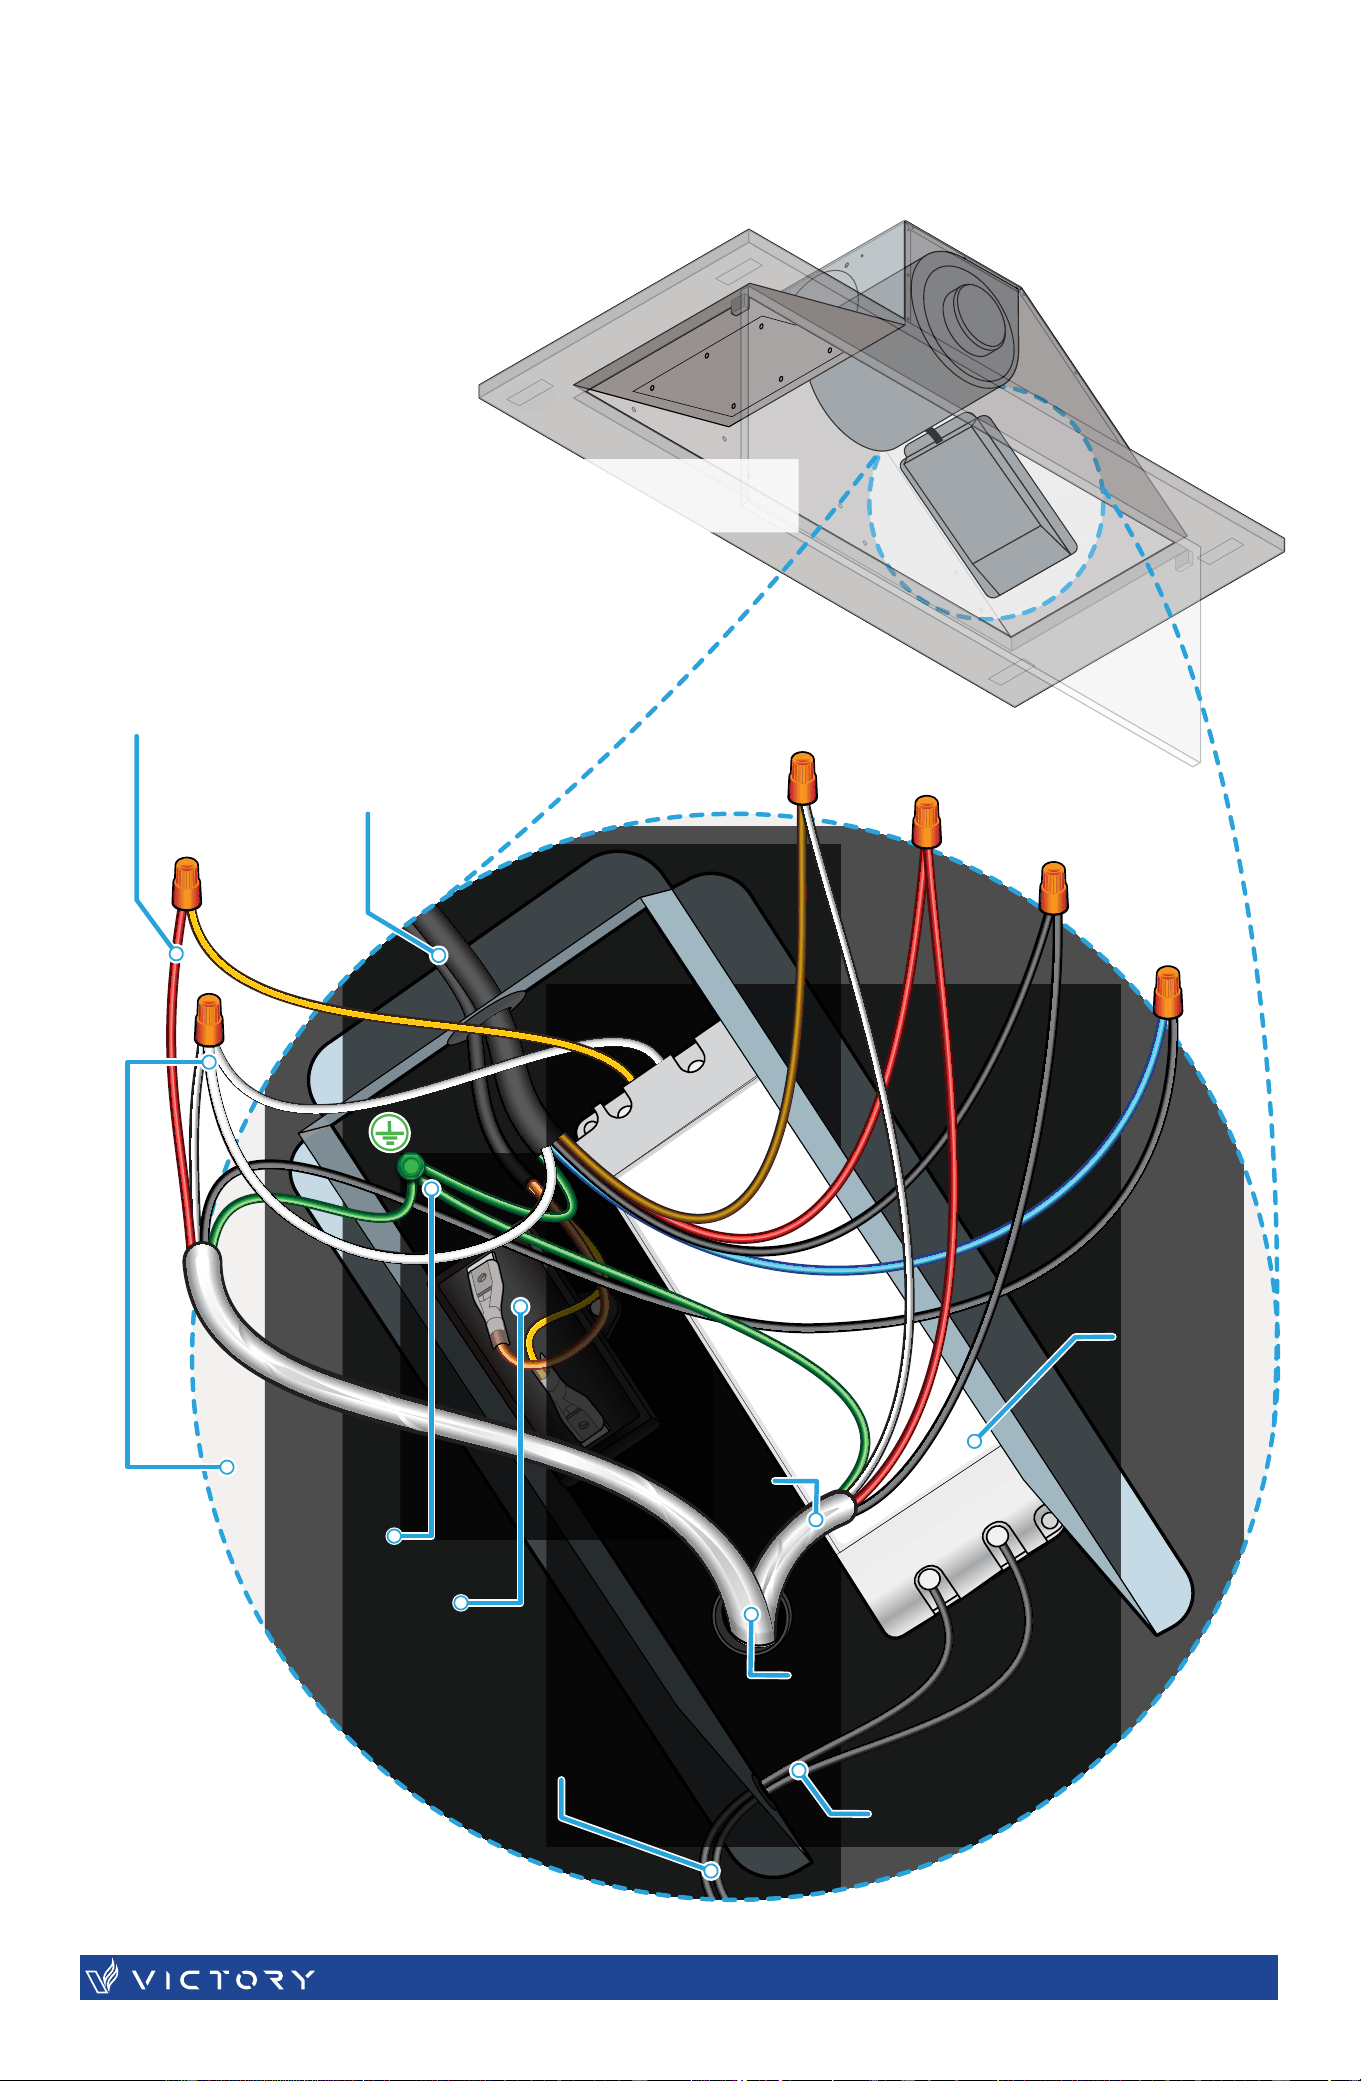
LED
Dimmer
14-3 Cables
14-2 Cable
Light Dimmer
W
Rotary Fan Switch
4 Speeds
From
ELECTRICAL WIRING DIAGRAM (With Lights)
(+)
(-)
(L)
(N)
From light switch
(120 V)
Cables from motor
LED
Driver
4 Speed
3 Speed
2 Speed
1 Speed
Neutral
Ground
Capacitor
14-3
14-3
12 V DC
To LED lights
(12 V)
Electrical Box Housing
(Colour of wires may vary. Follow the labels of corresponding wires.)
ELECTRICAL WIRING DIAGRAM (With Lights)
| 19SUNSET |
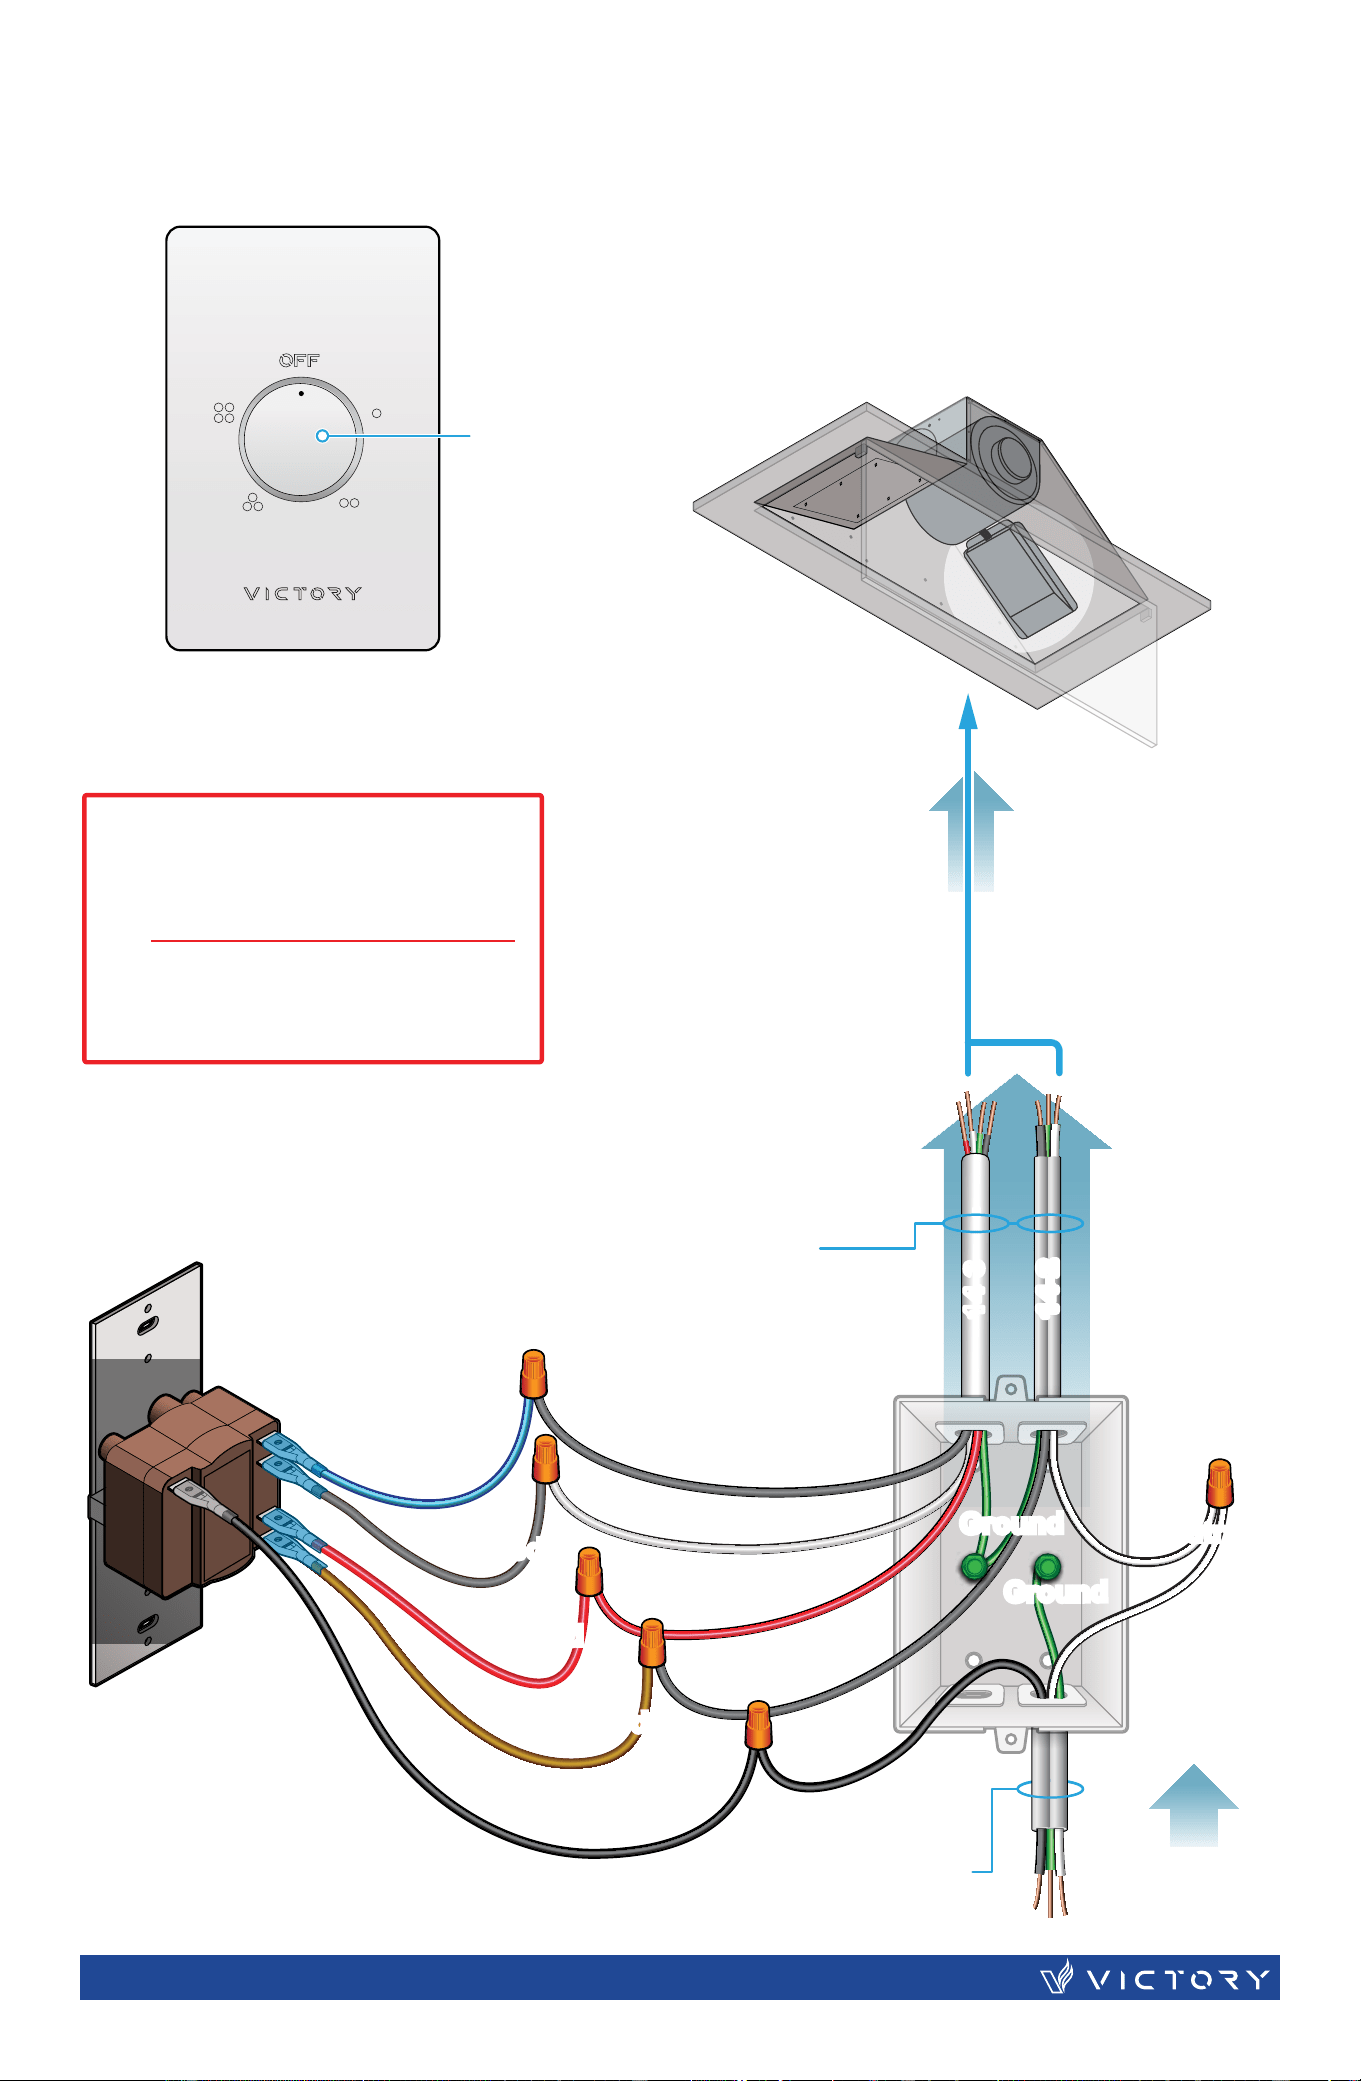
Access to
Elec. Box
Rotary Switch for Fan Speed
(Colour of wires may vary.
Follow the labels of corresponding wires.)
FRONT PANEL SWITCH*
*The wall switch may slightly vary
From
Panel
Not included
120 V Line
14-2 Cable
ELECTRICAL WIRING DIAGRAM (No Lights)
***IMPORTANT NOTICE***
The wiring of the range
hood must be performed by
a CERTIFIED ELECTRICIAN
VICTORY Range Hoods is not
responsible for any damages
due to improper connection.
14-2 Cable
& 14-3 Cable
Not included
14-2
14-314-3
14-2
To Electrical Box
of Range Hood
| SUNSET20
Rotary Fan Switch
4 Speeds
WALL SWITCH:
• This hood will come with a Wall Switch to operate motor.
2 Speed2 Speed
3 Speed
3 Speed
1 Speed
1 Speed
4 Speed
Ground
Ground
Neutral
Ground
Ground
Neutral
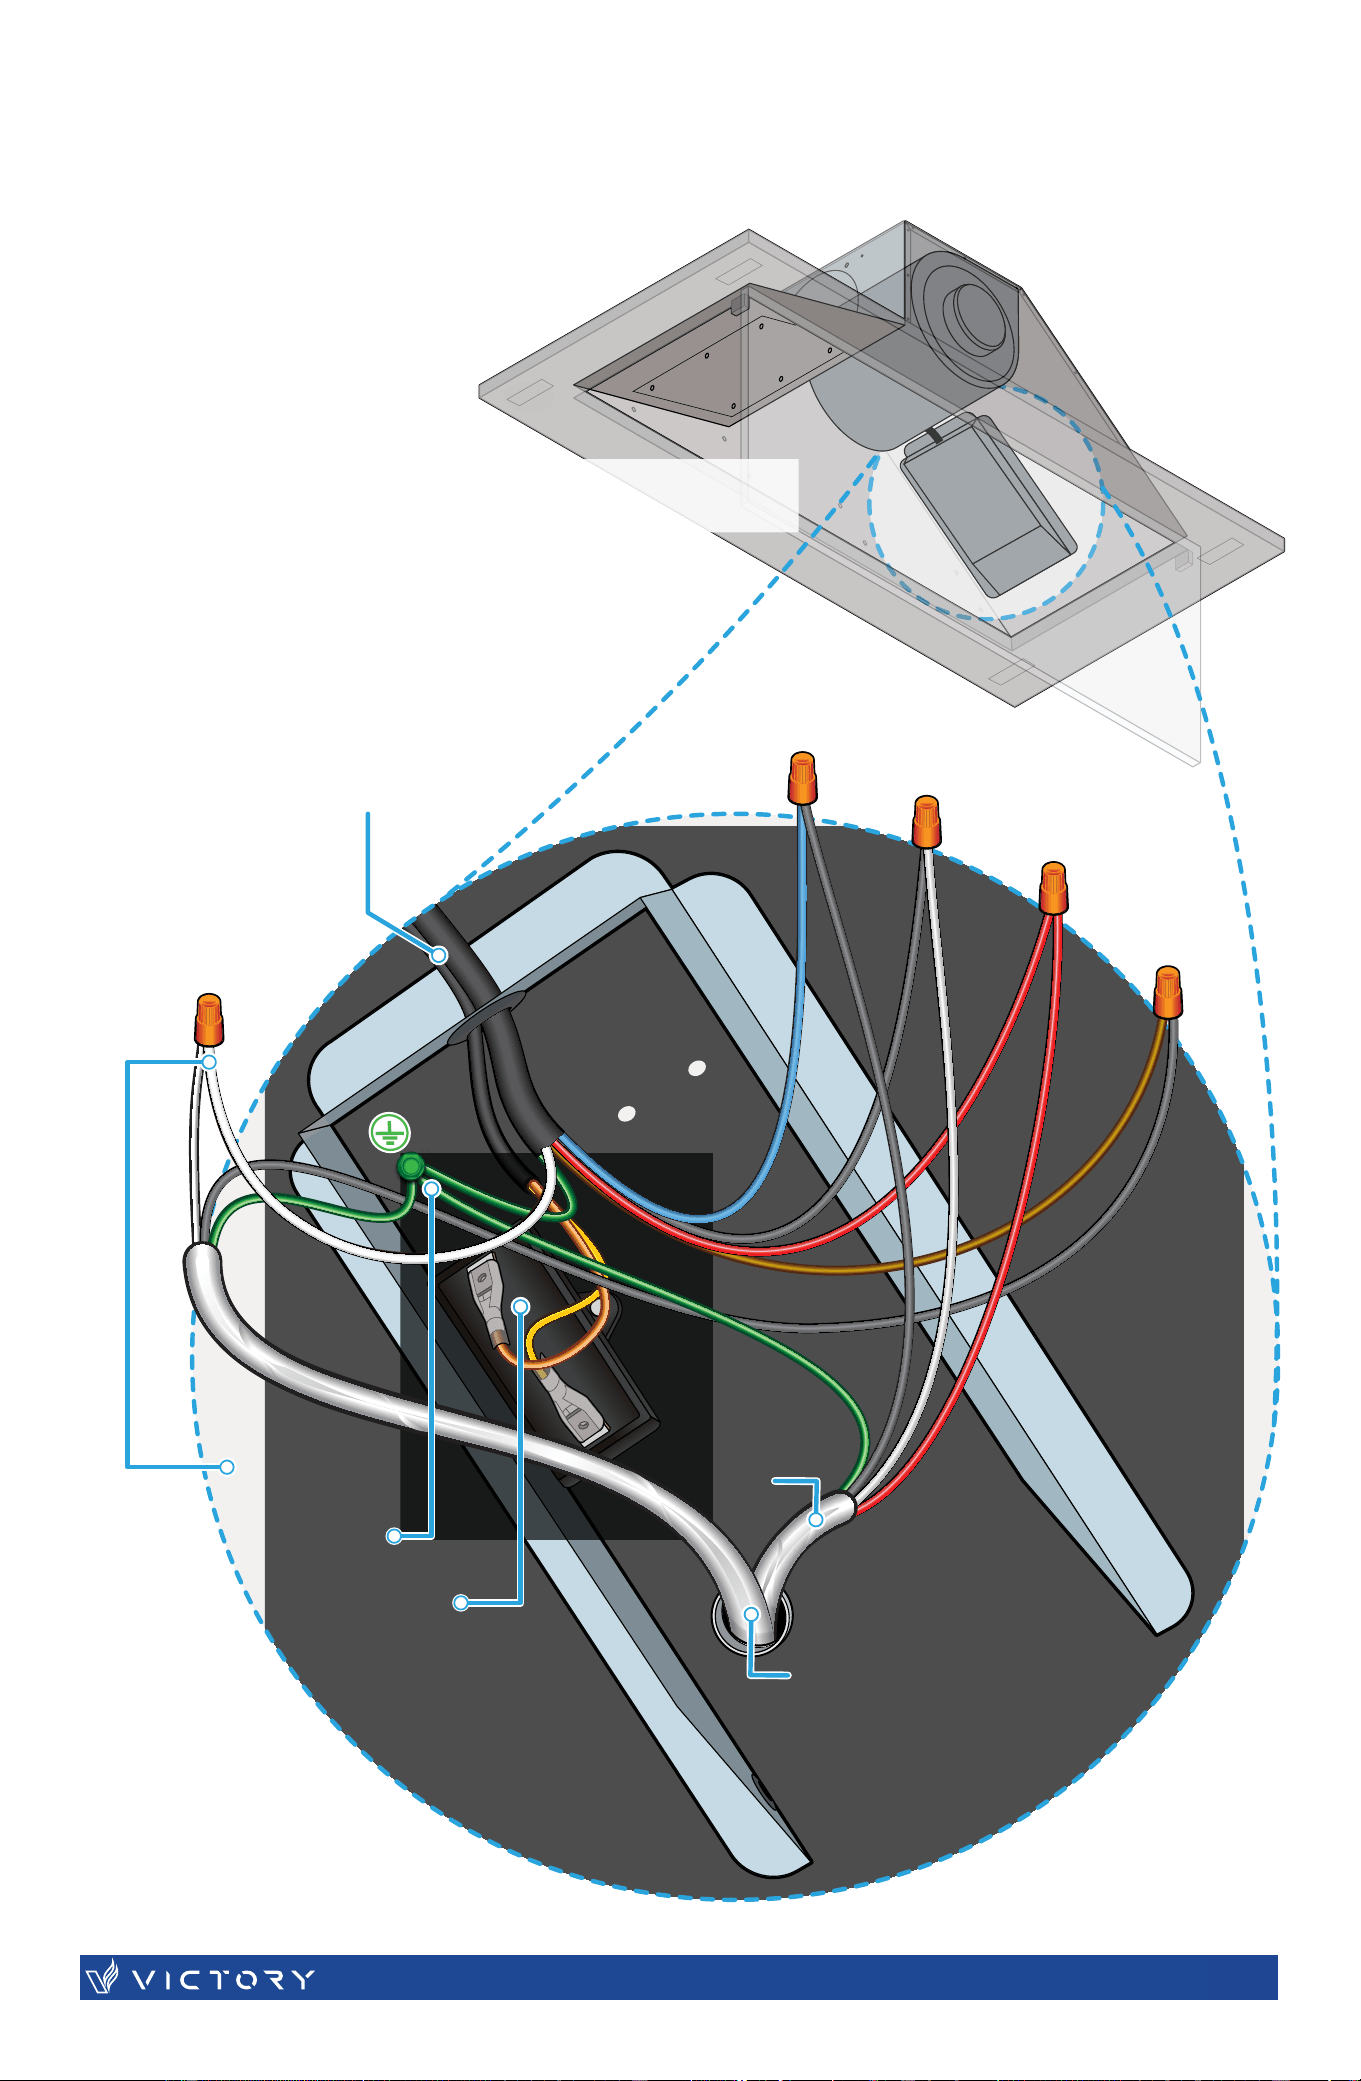
Cables from motor
1 Speed
2 Speed
3 Speed
4 Speed
Neutral
Ground
Capacitor
14-3
14-2
Electrical Box Housing
(Colour of wires may vary. Follow the labels of corresponding wires.)
ELECTRICAL WIRING DIAGRAM (No Lights)
| S21SUNSET |

1. If the range hood or lights do not operate
after installation:
2. One light is not working.
3. The range hood vibrates when the blower
is on:
4. The blower or fan seems weak:
5. The lights work but the blower is not
spinning at all, is stuck or is rattling.
6. The hood is not venting out properly:
• Check if the range hood has been plugged
in, make sure that all power has been
turned back ON, and all electrical wiring
are properly connected.
• Swap out light assembly to working ones to
determine whether it is caused by defective
bulbs. Contact Victory Range Hoods for
assistance to replace bulb.
• The range hood might not have been
secured properly on to the ceiling or wall.
• The impeller may be out of balance.
• Duct is too small. Range hood WILL NOT
function efficiently with insufficient duct size.
For example: Connecting this hood to 4" or
5" duct will reduce the suction and create
extra noise and vibrations. Check if duct
is clogged or if damper unit is not installed
correctly or opening properly. A tight mesh
on a side wall cap unit might also cause
restriction to the air flow.
• The blower might be jammed or scraping
the bottom due to shipping damage. Please
contact us immediately.
• Make sure the distance between the stove
top and the bottom of the hood is within
48" and 60" in distance. *Due to
ceiling height configurations, recommended
height may not be applicable.
• Reduce the number of elbows and length
of duct work. Check if all joints are properly
connected, sealed, and taped.
• Make sure the power is on high speed for
heavy cooking.
• The duct size must be 6", or larger. Please
make sure there are NO reducers or
plenums in the duct work.
• Refer to DO’S and DON’TS for DUCT
VENTING page for illustrative examples.
NOTE: For all other inquiries, please contact Victory Range Hoods.
| SUNSET22
TROUBLESHOO TING
Cleaning Exterior surfaces:
• Clean periodically with stainless steel cleaner and clean cotton cloth. Do not use corrosive or
abrasive detergent (e.g. Comet Power Scruv
® ®
oven cleaner), or steel wool/scoring pads,
which will scratch and damage the stainless steel surface. For heavier oil use liquid degrease
such as “Forumla 409
®
” or “Fantastic
®
” brand cleaner.
• If the hood looks splotchy (stainless steel hood), use a stainless steel cleaner to clean the surface
of the hood. Avoid getting cleaning solution onto or into the control panel. Follow directions of the
stainless steel cleaner. CAUTION: Do not leave on too long as this may cause damage to the
Use a dry soft towel to dry the hood.
• After cleaning, you may use non abrasive stainless steel polish such as 3M
®
or ZEP
®
, to polish
the grain.
• DO NOT allow deposits to accumulate or remain on the hood.
• DO NOT use ordinary steel wool or steel brushes. Small bits of steel may adhere to the surface
and cause rusting.
• DO NOT allow salt solutions, disinfectants, bleaches, or cleaning compounds to remain in contact
with stainless steel for extended periods. Many of these compounds contain chemicals, which
may be harmful. Rinse with water after exposure and wipe dry with a clean cloth.
Cleaning Aluminum Grease Filter:
• Filters should be cleaned after every 30 hours of use.
Spray “Formula 409
®
” or equivalent degreasing
ictory Range Hoods to
•
Replacing Filters:
•
Operations:
• Read and understand all instructions and warnings in this manual before operating the appliance.
Save these instructions for future reference.
•
• NEVER dispose cigarette ashes, ignitable substances, or any foreign objects into blowers.
•
The risk of self combustion is higher when the oil has been used several times.
•
•
• Filters must be cleaned periodically and free from accumulation of cooking residue. Old and worn
• DO NOT
Read and understand all instructions and warnings in this manual before proceeding.
• SAFETY WARNING: Never put your hand into area housing the fan while the fan is operating!
NOTE: For all other inquiries, please contact Victory Range Hoods.
| TESNUS 23
MAINTENANCE
Rectangular Lights, LED, are to be used in this range hood
Lights (for units with lights):
•
Rated Wattage 2.5W (max 5W for replacements)
•
Light fitting dimensions: 7cm x 2cm
•
TO OBTAIN SERVICE UNDER WARRANTY:
You must present proof of original purchase date.
Please provide an original dated proof of purchase (sales receipt / invoice)
in order to obtain service under warranty.
Parts Warranty (5 Years) & Motor Warranty (Lifetime*)
5
functionally equivalent to new.
*The Lifetime motor warranty is only applicable to the original purchaser and is non-transferable. Proof of
purchase and an order number are both required in order to create a warranty claim. The Lifetime motor
warranty is only valid for as long as the original purchaser owns the range hood. If the range hood is re-
sold or transfered in any way to another owner, the Lifetime motor warranty will no-longer apply.
Who is Covered:
This warranty is to the original purchaser for products purchased for ordinary home use.
This Warranty Will Be Voided When:
Product is damaged through negligence, improper installation, accident, abuse, misuse, natural
follow installation
instructions. When product is used commercially or other than its intended
correctly or has been sold as second-hand.
What is Not Covered:
to improper maintenance, use of corrosive and abrasive cleaning products, pads, and oven cleaner
reseller is not liable for, and does not cover under warranty, any loss of properties or any costs
associated with removing, servicing, installing, or determining the source of problems with this product.
implied, shall apply to this product thereafter.
T
Typically, you must include product identification information,
ou must
also include proof of the date of original purchase as evidence that the product is within the applicable warranty
| SUNSET24
WARRANTY
The information in this document is subject to change without notice, please contact Victory Range Hoods for updated details.
Carefully inspect all items for damages before accepting delivery. Note any damages on the
freight bill or express receipt. Request name and signature of the carrier’ s agent and keep a
copy to support your claim. Upon acceptance of items, owner assumes responsibility for its
. Failure to do so may
claim.
Damages on any returns or exchanges caused during transit are not covered under our war-
ranty (the customer must insure the return with the shipping company). If your range hood is
damaged in transit, please contact us within 14 days of receiving your new order to report the
-
gate the matter.
Please inspect contents of package(s) carefully upon receiving! W
damages and/or missing parts within fourteen (14) days upon your receipt of the package(s).
Claims will not be accepted after fourteen (14) days. NOTE: Items are thoroughly tested and
carefully packed in our facility before shipping.
Products must be returned in good working condition with ALL original parts and documenta-
A restocking fee of 10% will be
charged for all approved return(s). Exchanges or returns will not be accepted if the unit has
been installed, and may be rejected if parts are missing.
Make sure to inspect the hood for damages and defects before installation.
our warranty for returns or exchanges. Service visits are not covered under warranty and will
carry a service charge.
If you require assistance, please contact Victory Range Hoods. Please have your order number
and model of the range hood ready. You must have this information in order to receive a response
to your request.
583 Nicola Avenue, Port Coquitam, BC, V3B 0M3, Canada
Toll Free: 1-800-394-4020
| TESNUS 25
DISCLAIMER
CONTACT US
The information in this document is subject to change without notice, please contact Victory Range Hoods for updated details.
If you need replacement parts, we recommend using only genuine parts. Our accessories
and parts are engineered and designed specifitally for Victory Range Hoods. Each part is
rigorously tested assuring the utmost in durability and reliability, providing a factory match,
factory-installed appearance and functionality tailored to each individual range hood model.

| SUNSET26
NOTES

| TESNUS 27
NOTES

583 Nicola Avenue | Port Coquitlam | BC | V3B 0M3 | Canada
www.victoryrangehoods.com