
EN
EN User Manual VIDAA SMART TV
CZ
Uživatelská příručka VIDAA SMART TV
SK
Používateľská príručka VIDAA SMART TV
HU
Felhasználói kézikönyv VIDAA SMART TV
PL
Podręcznik użytkownika VIDAA SMART TV
SLE 65MUS700TCSB
SLE 55MUS700TCSB
SLE 43US700TCSB

EN
Disclaimer:
Images throughout this document are for illustrative purposes only and may dier from the actual
product. Parts of the software function change with the system upgrade.
Tip: Operating your TV is facilitated by the context help in the menu. The user’s manual can be found under Settings/
Support (this may not be available for all menu languages).

3
EN
Contents
Safety instructions ...............................................................................................................................................................4
Assembling the stand and connection ....................................................................................................................................................................4
Insert batteries ..................................................................................................................................................................................................................4
Remote Key Function ...........................................................................................................................................................5
Live TV ...................................................................................................................................................................................6
Channel Scan ..................................................................................................................................................................................................................... 6
Channel List ........................................................................................................................................................................................................................7
Channel Edit ....................................................................................................................................................................................................................... 7
Favourite ..............................................................................................................................................................................................................................8
Guide (EPG) .........................................................................................................................................................................................................................8
Multi-screen ..........................................................................................................................................................................9
Screen Sharing ..................................................................................................................................................................................................................9
Content Sharing ................................................................................................................................................................................................................9
Smart Functions ..................................................................................................................................................................10
Getting Familiar with the Home Screen .................................................................................................................................................................10
Using a VIDAA Account ................................................................................................................................................................................................11
Media ..................................................................................................................................................................................................................................11
App ......................................................................................................................................................................................................................................12
Installing Mobile App to Control your TV ..............................................................................................................................................................12
Picture and Sound ..............................................................................................................................................................13
Adjusting the Picture Quality .....................................................................................................................................................................................13
Game Mode Settings ....................................................................................................................................................................................................14
Adjusting the Sound Quality ......................................................................................................................................................................................14
Speakers Settings ...........................................................................................................................................................................................................15
Using Headphones ........................................................................................................................................................................................................15
Accessibility and System ....................................................................................................................................................16
Accessibility ......................................................................................................................................................................................................................16
Setting Time .....................................................................................................................................................................................................................16
Using Timer .......................................................................................................................................................................................................................16
Using Parental Controls ................................................................................................................................................................................................16
Setting Language and Location ................................................................................................................................................................................17
Setting Usage Mode ......................................................................................................................................................................................................17
Checking the Software Version .................................................................................................................................................................................17
Software Upgrade ..........................................................................................................................................................................................................17
HbbTV .................................................................................................................................................................................................................................18
Setting the TV Name .....................................................................................................................................................................................................18
Reset to Factory Default ...............................................................................................................................................................................................18
Technical Specications .....................................................................................................................................................19
4
EN
Safety instructions
To be able to use this product properly, read this user’s manual
carefully and keep it for future reference. If you plan to give (sell)
this device to a third person, include all documentation, including
this manual, with the transaction.
The lightning symbol inside a triangle indicates the device has
dangerous voltage that may cause electric shock.
The exclamation point symbol inside an isosceles triangle indicates
important operation and repair instructions in the included device
documentation.
ATTENTION
RISK OF ELECTRIC SHOCK – DO
NOT OPEN!
TO REDUCE THE RISK OF ELECTRIC SHOCK, DO NOT REMOVE
THE COVER (OR BACK SIDE). THERE ARE NO PARTS INSIDE
WHICH COULD BE REPAIRED BY THE USER. FOR REPAIRS AND
SERVICE, CONTACT AN AUTHORIZED SERVICE CENTRE.
WARNING:
To prevent risk of re or electric shock, do not expose the device to
rain or moisture. The batteries must not be exposed to excessive
heat, for example sunlight, re, etc.
This symbol indicates the device has double
insulation between dangerous voltage from the
network and useraccessible parts. Replace parts
with identical spare parts only
• Do not leave a static image on the LCD panel for more than
2hours. This may result in a damaged panel.
• LCD screens are made using precision technology to provide
even the nest image details. Several defective pixels can appear
on the screen from time to time, indicated as red, blue, green or
black dots (up to 0.001% of the total pixel count of the screen).
This does not aect the characteristics and the eectiveness of
your TV set.
Before using, read the detailed safety information in full user manu-
al available at websites www.sencor.com
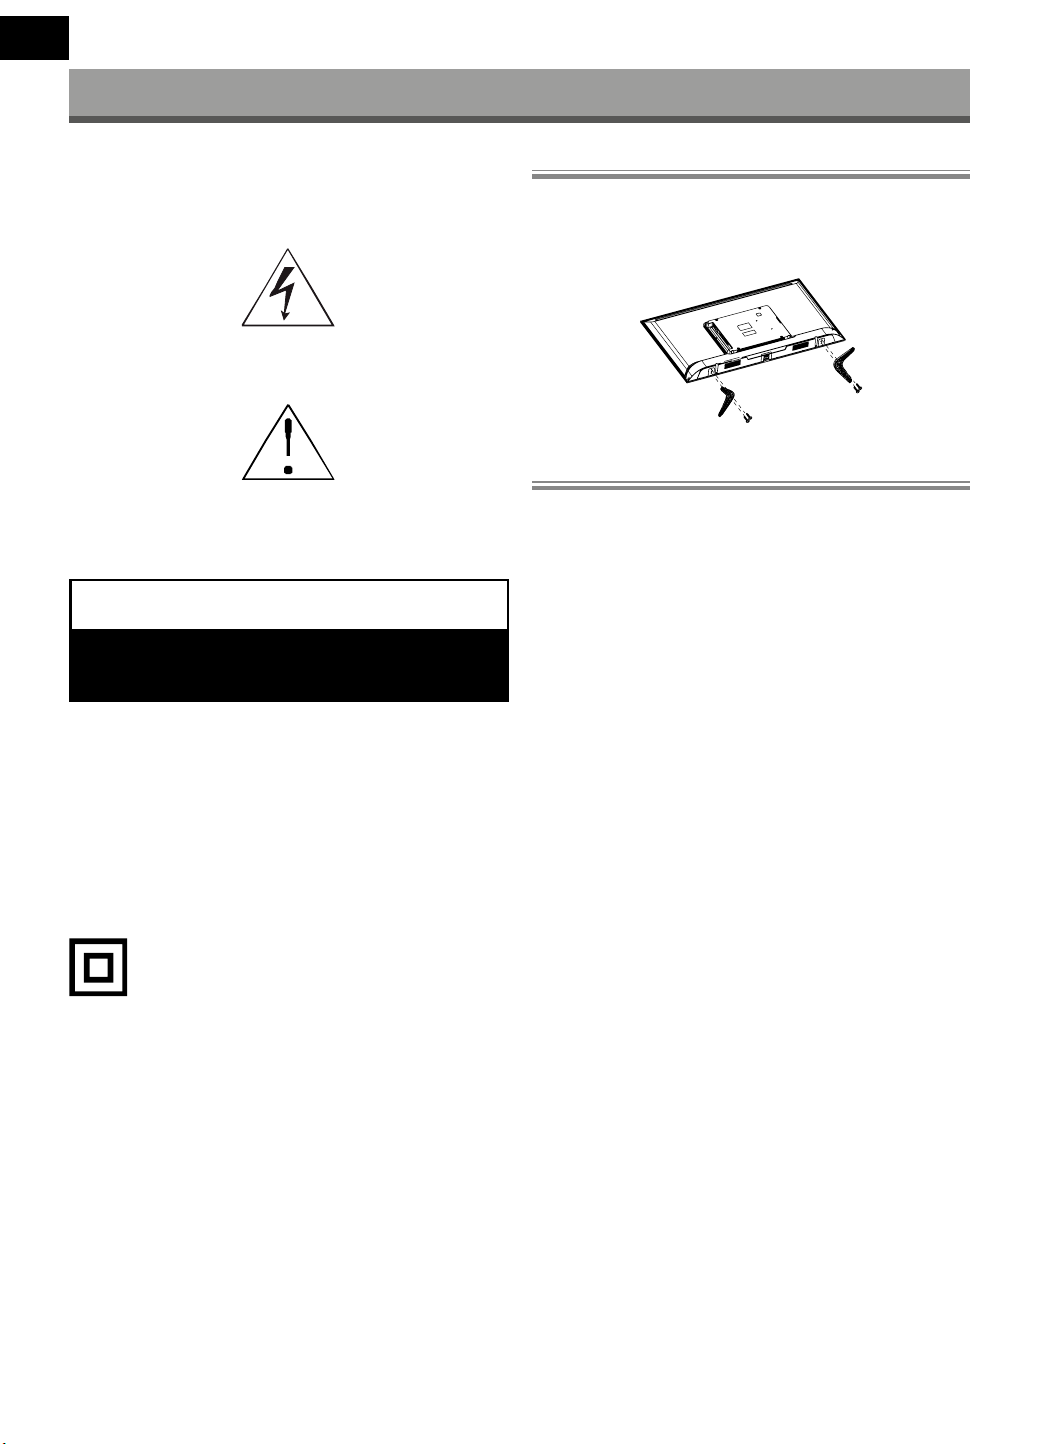
Assembling the stand and connection
For stand attach use the supplied or recommended screws. Make
sure that the supports are connected correctly so that the TV is
stable. You can then connect the TV to the power supply.
Insert batteries
To open the battery compartment, remove the back cover. Insert
two batteries size AAA. Replace the cover.
The incorrect use of batteries can result in leaks or bursting. Be sure
to follow these instructions:
• Place “AAA” batteries matching the (+) and (–) signs on each
battery to the (+) and (–) signs of the battery compartment.
• Do not mix battery types.
• Do not combine new batteries with used ones. It causes shorter
life or leakage of batteries. • Remove the dead batteries imme-
diately to prevent them from liquid leaking in the battery com-
partment. Don’t touch exposed battery acid, as it can damage
your skin.
• If you do not intend to use the remote control for a long period,
remove the batteries.
5
EN
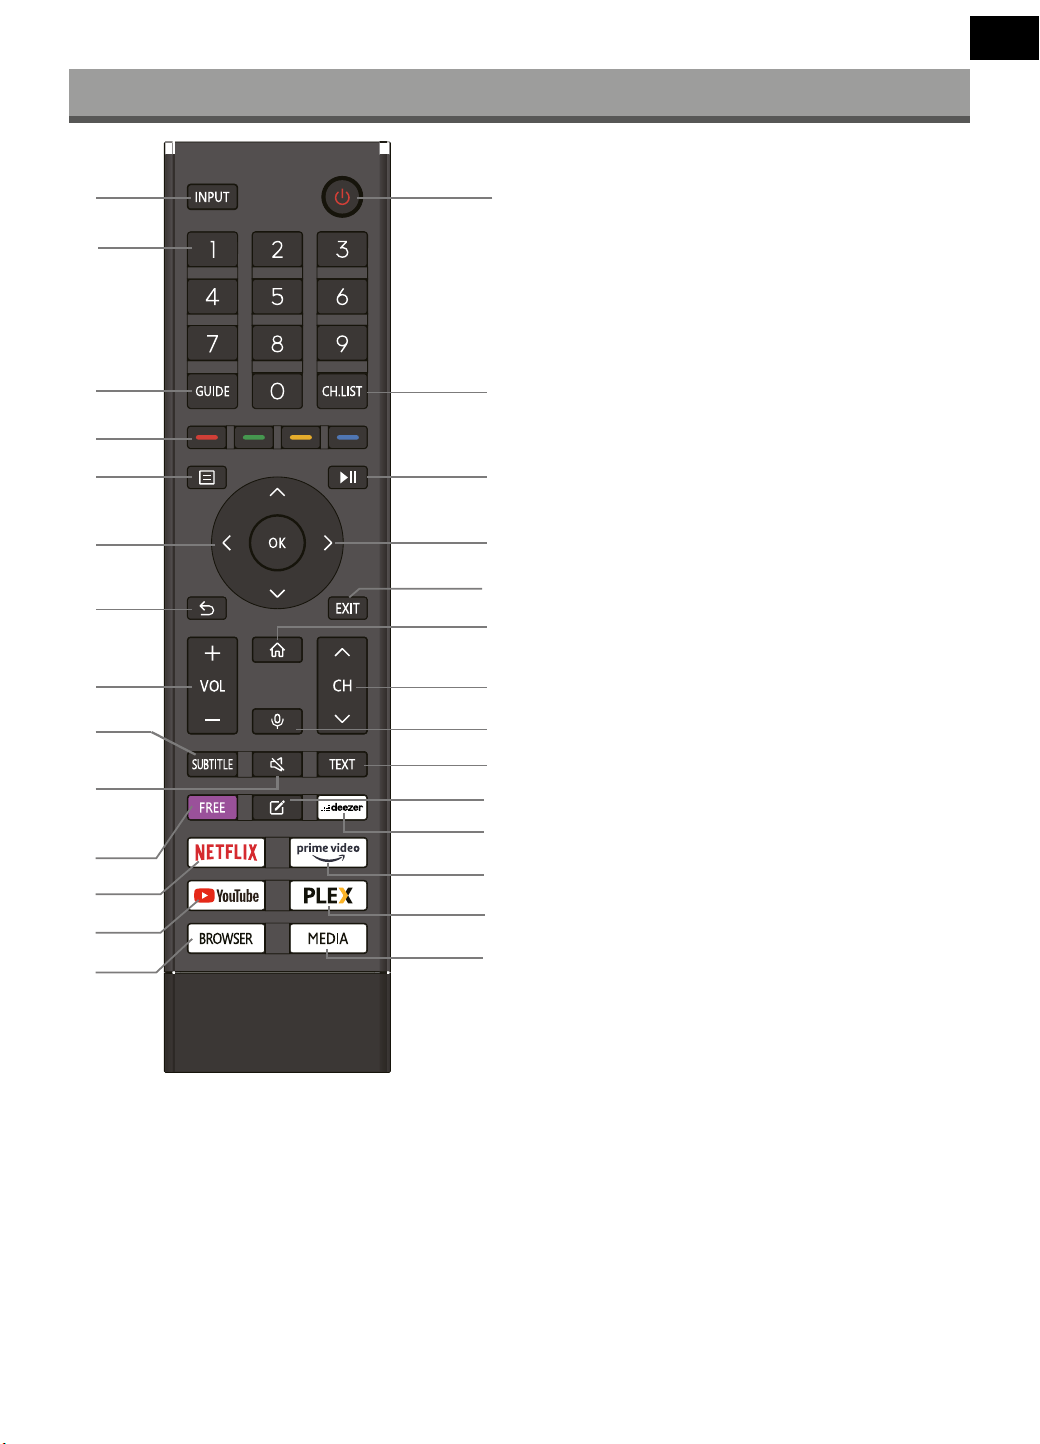
Functions of the remote control
1. INPUT: Select input source
2. POWER: Switch stand-by on/o
3. NUMBER KEYS: Direct station selection
4. GUIDE: Display programme information of the current pro-
gramme and subsequent programmes
5. CH.LIST: In TV mode: Open channel list
6. COLOUR BUTTONS:
In the menu: Menu functions as shown.
In TV Teletext mode: Teletext functions as displayed.
7. MENU: Open on-screen menu
8. : Playback control during media playback (without func-
tion in TV mode)
9. ARROW KEYS: Move in the menus
10. OK: Conrm selection
11. BACK: Back to the previous menu.
12. EXIT: To exit the menu or a SMART function Exit.
13. VOL+/-: To adjust the volume
14. HOME: Open Internet functions
15. CH
/
: To change the programmes
16. VOICE: Holding down the Voice button activates the
VIDAA-enabled microphone on the remote, and initiates
voice input. Releasing the Voice button ends voice input. With
VIDAA, you can use your voice to search for content, control
playback, and more. (VIDAA Voice Service requires Internet
connection)
17. SUBTITLE: To switch between dierent subtitles
18. MUTE: Mute Sound
19. TEXT: In TV mode: Open Teletext
20. FREE: Open VIDAA Free Portal
21. EDIT: Open editing menu
22. DEEZER: Open Deezer
23. NETFLIX: Open Netix
24. YouTube: Open YouTube
25. BROWSER: Open Internet Browser
26. Prime Video: Open Prime Video
27. PLEX: Open Plex
28. MEDIA: Open all units
1
2
3
4
6
5
8
0
7
9
qa
qd
w;
wd
wg
qs
qf
qg
qh
ql
wa
ws
wh
wj
wk
qj
qk
wf
6
EN
Live TV
Channel Scan
You can scan for channels automatically or manually.
NOTE
Satellite/antenna/cable function may not be applicable in some
models/countries/regions.
Auto Scan
Automatic channel scan.
>
TV
Alternatively, in Live TV,
/
> Settings > Channel > Auto
Scan.
If no TV channels were saved before, you will be prompted to do a
channel search.
Satellite
• Single satellite: You can use single satellite if you only have
one satellite equipped.
• DiSEqC: You can choose DiSEqC if you have DiSEqC equip-
ment.
Up to four satellites in DiSEqC 1.0 mode can be installed.
If you are using a motorised antenna, you can use DiSEqC 1.2
mode.
• Unicable: If your home is equipped with Unicable satellite
distribution, you should use this option.
Please make sure that you know the Unicable band and
frequency to be used. The information should be available on
the equipment or the landlord can provide it.
Antenna
• Channel: Select from All Channels or Free Channels. This
option may not be available depending on countries/regions/
operators.
• Scan Mode: Select from digital channels only (DTV), digital
and analogue channels (DTV+ATV) or analogue channels only
(ATV ).
If you receive DVB-T or DVB-T2 signal, you can use DTV.
• LCN: Switch on/o LCN (Logical Channel Number).
Please note that some operators are restricted to manually
change the channel order. If you switch o LCN, then the
channel list can be edited after channel scan.
This function may not be applicable in some models/count-
ries/regions.
Cable
• Channel: Select from All Channels or Free Channels. This
option may not be available depending on countries/regions/
operators.
• Scan Mode: Select from digital channels only (DTV), digital
and analogue channels (DTV+ATV) or analogue channels only
(ATV ).
• LCN: Switch on/o LCN (Logical Channel Number).
Please note that some operators are restricted to manually
change the channel order. If you switch o LCN, then the
channel list can be edited after channel scan.
This function may not be applicable in some models/count-
ries/regions.
Manual Scan
Manually scan for channels for DTV or ATV.
In Live TV,
/
> Settings > Channel > Advanced Settings
> Manual
Scan
DTV Manual Scan
Manually scan for DTV services.
When the DTV Manual Scan screen appears, press
/
button to select Antenna, Cable or Satellite, and select Start to
commence the search of that channel. When the signal has been
tuned, signal strength will be displayed on the screen.
ATV Manual Scan
Manually scan for ATV services.
• Frequency: Input the channel frequency you want.
• Picture System: Select the Colour System.
• Sound System: Select the Sound System.
Live TV tutorial
After channel scanning has completed for the rst time, the Live TV
operating tutorial will be displayed, this will include:
/
: Load the info bar
/
: Load the channel list
/
: Open the electronic programme guide (only available in
some models/countries/regions)
/
: Load on-screen menu
: Jump to the previous channel
NOTE
The remote control buttons may vary depending on models/
countries/regions.
7
EN
Live TV
Channel List
Displaying the channel list
In Live TV, press the
/
button to display the Channel List
menu.
Alternatively, in Live TV,
/
> Channel List.
Entering the sub-menu of channel list
In Live TV,
/
>
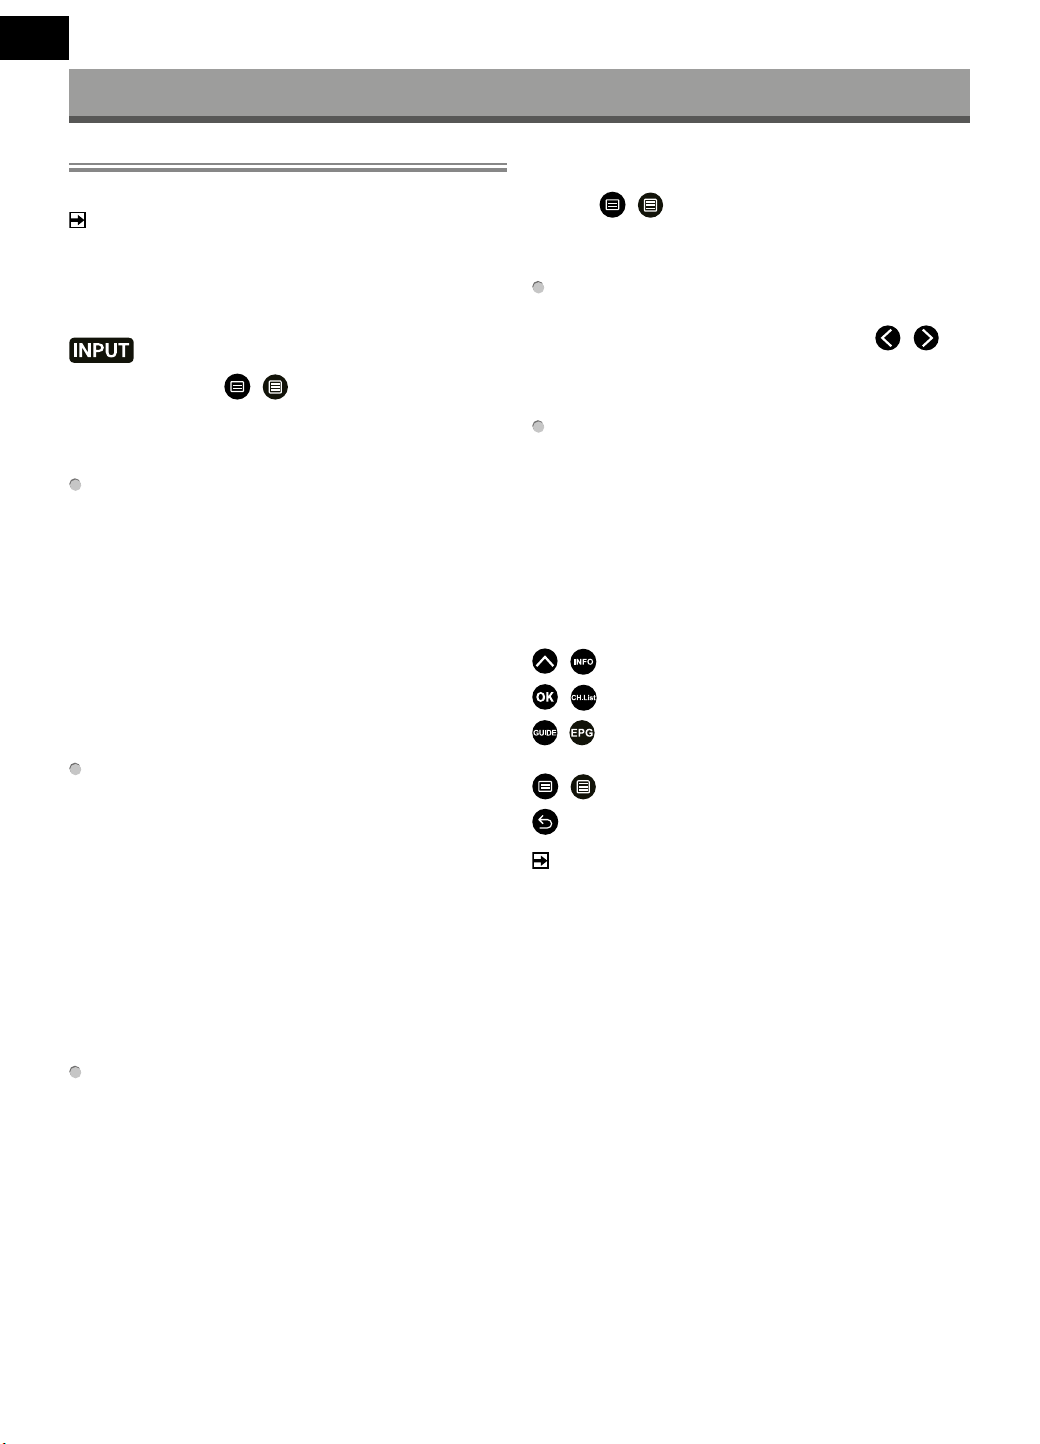
Introducing the sub-menu
In Live TV,
/
>
Channel
Channel
Channel
Channel
Channel
Channel
Channel
3D-HD
DX-HD
DX-HD1
3D-HD1
3D-HD2
DX-HD2
DX-HD3
Logo
Logo
Logo
Logo
Logo
Logo
Logo
Cable
Cable
FAV1
Filter
Edit
DTV
Search
Filter
TV List
Display Live TV channel categories, such as Cable and Antenna.
Fav
Display favourite lists 1 to 4.
Filter
Select channels by Content, HD, Child Lock, Scrambled and
Sort.
Some options in Filter may not be available in some models/
countries/regions.
Search
Call up search function.
Edit
Edit the channel list.
NOTE
The sub-menu options may vary depending on models/ count-
ries/regions.
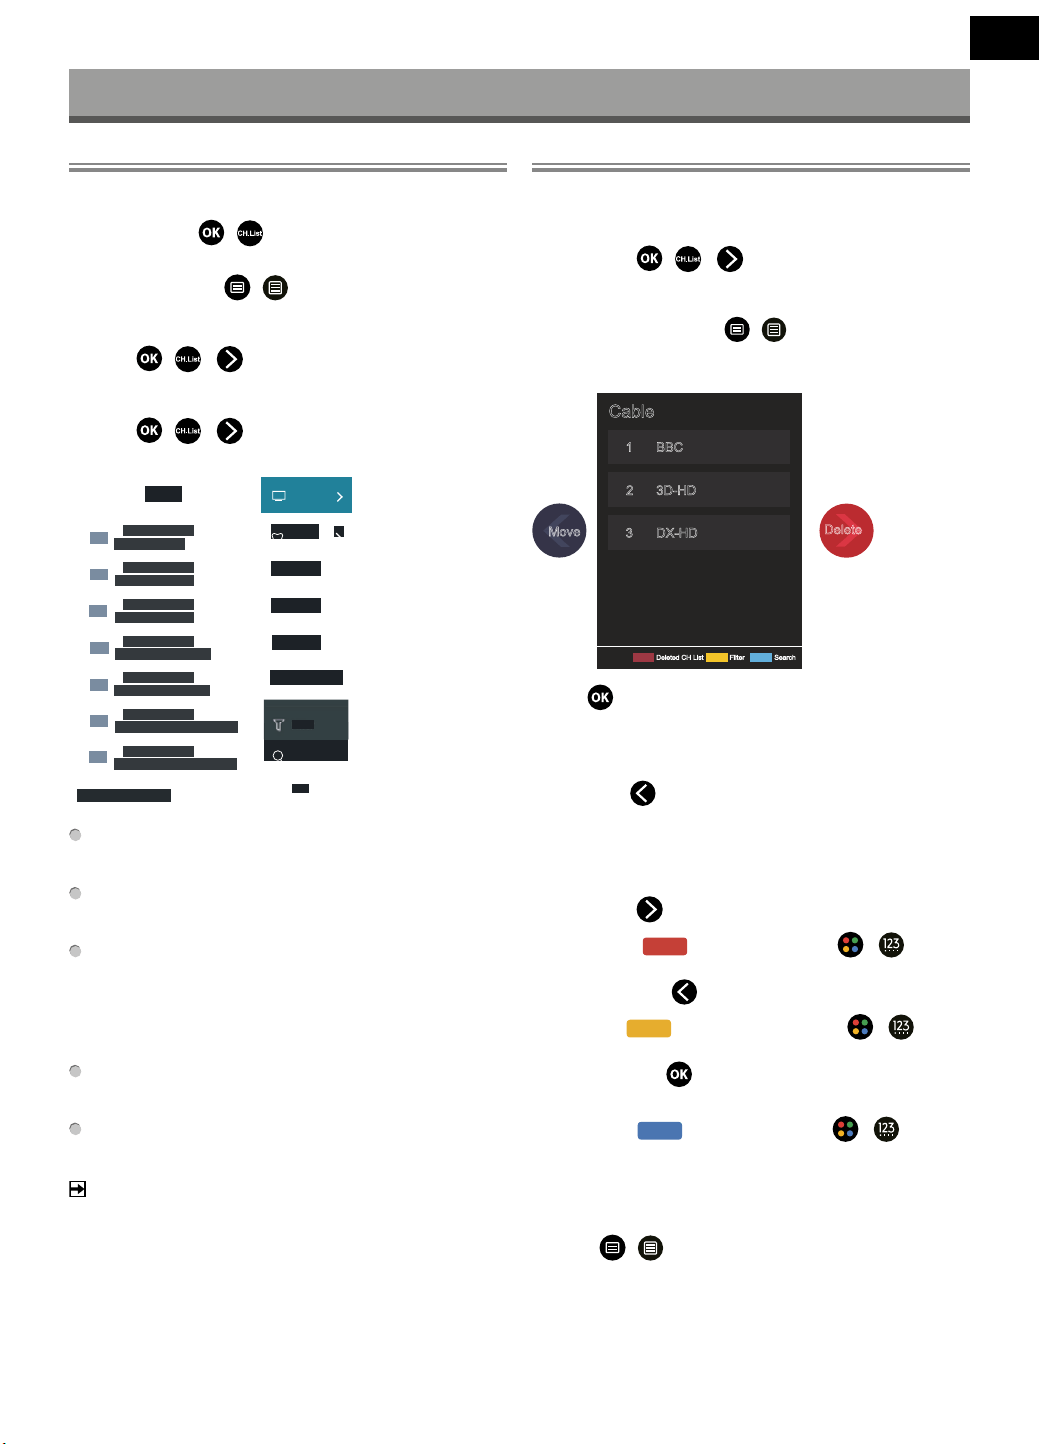
Channel Edit
Manually edit the channel list to your preference.
Editing Live TV channels
In Live TV, press
/
>
. to select a Live TV channel cate-
gory such as Antenna or Cable, then use D-pad to select Edit.
Alternatively, in Live TV, press
/
button, select Settings
> Channel > Channel Edit, and select a Live TV channel category
such as Antenna or Cable.
Cable
Filter Search
BBC
3D-HD
1
2
DX-HD3
Deleted CH List
Move
Delete
• Press
button on the selected channel, then a checkbox will
appear.
You can select multiple channels at the same time to move or
delete.
• Move: Press
button to move the selected channel.
Moving the channels could be restricted by the operator. If you
want to be able to move channels, it is not recommended to
choose an operator during channel scan, and LCN should be set
to O.
• Delete: Press
button to delete the selected channel.
• Restore: Press
[RED] button, or press
/
button to
display the colour menu and select RED to enter the list of delet-
ed channels. Press
button to restore the deleted channel.
• Filter: Press
[YELLOW] button or press
/
button
to display the colour menu and select YELLOW, the lter screen
will pop up. Press
button to select options, the channel list
can then be updated.
• Search: Press
[BLUE] button or press
/
button to
display the colour menu and select BLUE to search for a channel.
Exporting to USB
The current channel list can be exported to a USB storage device.
In Live TV,
/
> Settings > Channel > Channel Edit >
Export to USB
8
EN
Live TV
Importing from USB
Previously exported channel lists can be imported via a USB storage
device.
In Live TV,
/
> Settings > Channel > Channel Edit >
Import from USB
Favourite
Adding a channel to a favourite list
1 In Live TV, press
/
button to display the channel list.
2 Press
/
button and select the channel(s) you want to
add to the favourite list.
3 Select Add to Favourite, and choose from FAV1-FAV4.
4 Then, a heart-shape icon will appear next to the added channel.
Viewing your favourite list
In Live TV, press
/
>
> Fav to display the favourite list.
Editing the favourite list
In Live TV, press
/
>
> Fav >
to select FAV1-FAV4,
then use D-pad to select Edit.
Alternatively, go to
/
> Settings > Channel > Channel
Edit, and select FAV1 - FAV4.
You can add, move, or remove favourite channels.
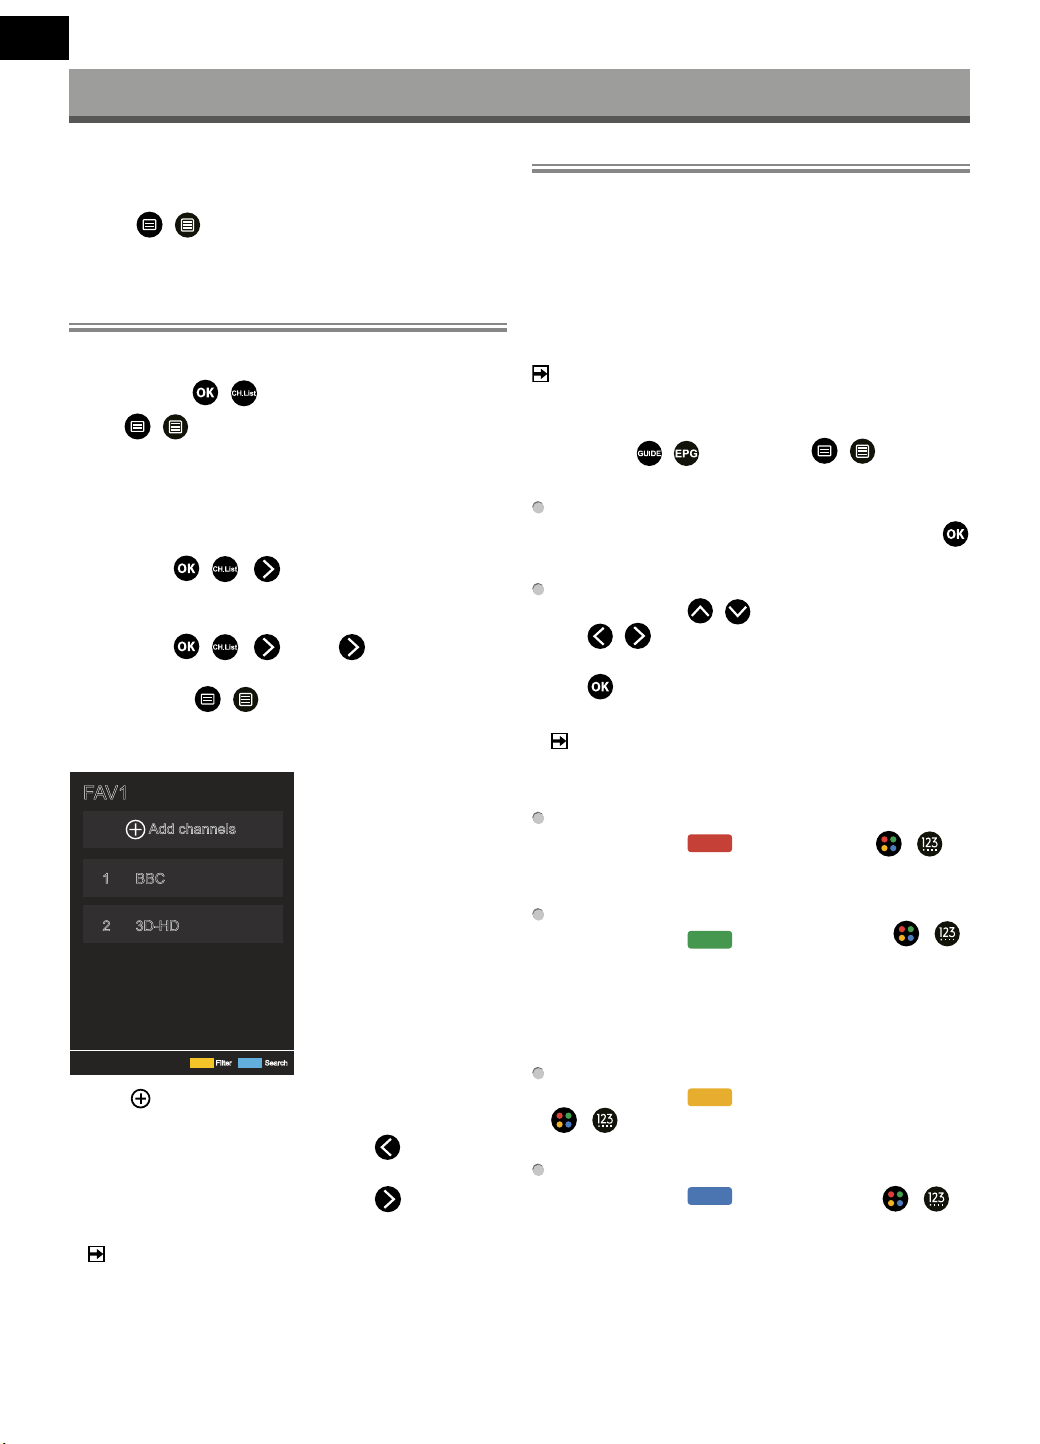
FAV1
Add channels
BBC
3D-HD
1
2
Filter Search
• Select
Add channels to add the selected channel to the
favourite list.
• Select a channel in a favourite list, and press
button to move
it.
• Select a channel in a favourite list, and press
button to
remove it.
NOTE
These steps should be operated under the TV input.
Before you edit the favourite lists, Channel Scan must be
completed rst.
You can add channels from various reception types to the
favourite list.
Guide (EPG)
The Guide (EPG) provides a convenient way to check TV pro-
grammes for the upcoming 7 days. The information displayed by
the Guide (EPG) is made available by the commercial television
networks for digital channels only. The Guide (EPG) also provides a
simple way to record your favourite programmes and a reminder
function, which can switch channels automatically at a scheduled
time, so that you will not miss programmes of interest. The availabi-
lity and amount of programme information will vary depending on
the broadcaster.
NOTE
The Guide (EPG) function is only available for digital channels.
Analogue channels are not supported.
In Live TV, press
/
button, or press
/
> Guide
(EPG) to display channel information Guide.
Watch
In Guide (EPG), when a current programme is selected, press
> Watch to switch to the channel you want to see.
Reminder
In Guide (EPG), press
/
button to select the channels.
Press
/
button to select programme based on the time
schedule.
Press
button to select Reminder.
NOTE
Reminder in the Guide (EPG) is only available for programmes
that have not been aired yet.
Schedule
In Guide (EPG), press
[RED] button or press
/
button to display the colour menu and select RED, to view a list
of scheduled reminders.
Programme Colour
In Guide (EPG), press
[GREEN] button or press
/
button to display the colour menu and select GREEN, to choose
colours to indicate dierent genres in the Guide (EPG) for quick
and easy viewing.
(This function may not be applicable in certain countries/regi-
ons.)
24h-
In Guide (EPG), press
[YELLOW] button or press
/
button to display the colour menu and select YELLOW
to select programmes of the previous day.
24h+
In Guide (EPG), press [BLUE] button or press
/
button to display the colour menu and select BLUE to select
programmes of the next day.
9
EN
Multi-screen
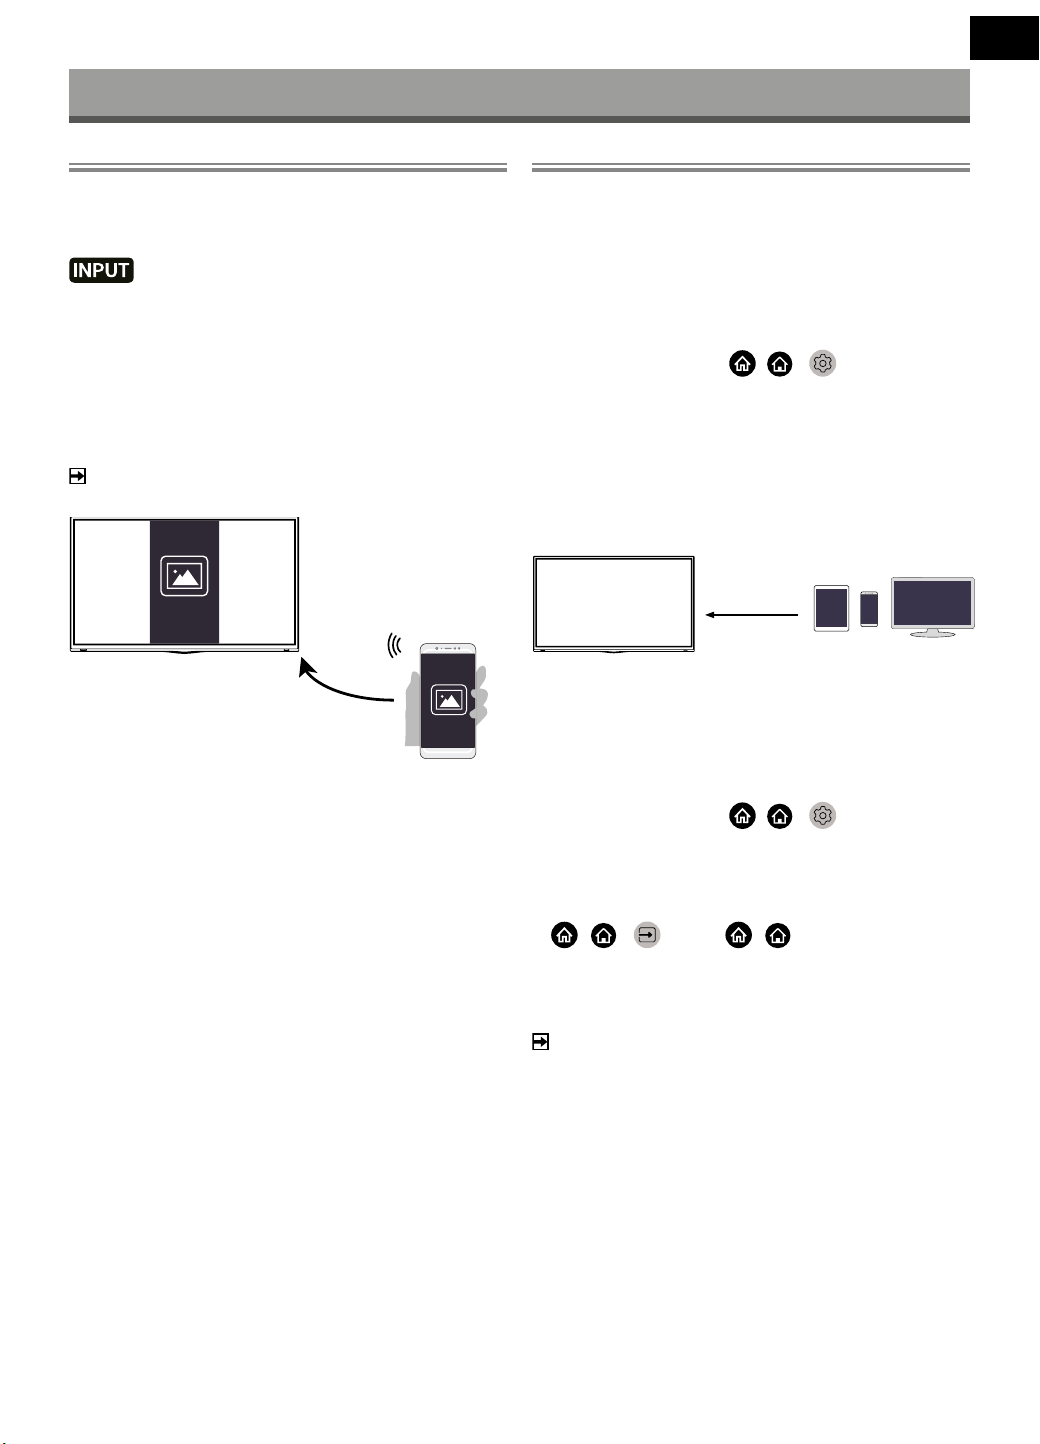
Screen Sharing
Mirror your mobile device screen to the TV.
Before using Screen Sharing, please set your TV to the wireless
network connection.
> TV
> Screen Share
1 Turn on the casting function of your Android/Windows10 device.
The setting icon may vary depending on the device. The feature
may be called “Wireless display”, “Smartview”, “Wireless projection”,
etc.
2 Find the TV name in the searching list of your device and select it.
Wait for the connection progress to complete and the content on
your device will be displayed on the TV.
NOTE
Some mobile devices may not support casting.
Mirror the screen of your
mobile device
Content Sharing
Content Sharing allows you to view media content, like videos,
music or photos saved in your Android/iOS/PC device on your TV
screen.
Sharing media content from your Android/iOS/PC
device
1 Connect your TV and Android/iOS/PC device to the same net-
work.
2 Turn on Content Sharing at
/ >
Settings > System
> Application Settings > Content Sharing.
3 Turn on the content sharing function in your Android/iOS/PC
device.
4 Find the TV name in the searching list of your device and select
it.
Wait for the connection progress to complete.
5 On your Android/iOS/PC device, choose the media content you
want to share on your TV.
Select a media content
to play on the TV
Playing media content from your Android/iOS/PC
device on the TV
You can connect media content saved in your Android/iOS/PC
device to your local network and play the content on your TV.
1 Connect your TV and Android/iOS/PC device to the same
network.
2 Turn on Content Sharing at
/ >
Settings > System
> Application Settings > Content Sharing.
3 Make sure your media content in your Android/iOS/PC device
are visible through local network.
4 On your TV, select a device with media content at
/ >
Input, or
/
>
> My Apps > Media.
The media content list in your Android/iOS/PC device appears.
5 Select a media content item from the list to play.
NOTE
Some Android/iOS/PC devices may not support content sharing
function. If your device does not support content sharing, you
can download an app that supports the function to connect to
your TV.
Content may not be played depending on the le format.
Content may not be played smoothly or the function may not
work properly due to the network condition.

10
EN
Smart Functions
Getting Familiar with the Home Screen
Press
/
>
button on your remote control to enter the Home
screen.
All TV functions can be accessed from the Home screen.
To exit the Home screen, press
> TV
button on your remote
or use the navigation buttons to move the cursor to the
/ >
Input
icon on the top of the screen, press
button to enter, and select
your desired input source.
Using the navigation bar
The navigation bar refers to indicators and icons on the top of the
Home screen.
NOTE
Indicators or icons may vary depending on models/countries/
regions.
Search
Search the content you want.
Input
Select the Input source depending on the device you have connect-
ed to your TV.
Settings
Manage TV conguration.
Notications
Allow pop-up notications to appear for useful information and
events that occur with your TV, including: Advertising, New Ar-
rivals, Warnings and Legal Statements, System Messages and
Alexa Notication. You can enable/disable each of these notica-
tions at Settings in the notication centre.
You can view the list of event messages generated by the TV.
To delete all notications, select Clear All.
NOTE
The Alexa Notication may not be applicable in some models/
countries/regions.
VIDAA Account
Sign in to your VIDAA account.
A VIDAA account provides all the best features of your smart TV and
ensures that all services are kept to date.
Time
You can always view the current time at the top of the Home
screen.
Network
Connect your TV to the Internet through a wireless connection
or an Ethernet cable
, and the corresponding icon will appear.
Using the Shortcuts
You can add inputs, channels and websites to the Home screen to
have quick access to them for your convenience.
Add inputs to the home screen
1 Press
> TV
button.
2 Move the focus to an input you want to add to the Home screen,
and press
/
> Add to home >
. The input icon will
appear in Shortcuts on the Home screen.
NOTE
Some options in inputs source page cannot be added to the
Home screen.
To remove inputs from Shortcuts, just move the focus to a short-
cut and press
/
button on your remote control.
Add channels to the home screen
1 In Live TV, press
/
button to access the channel list.
2 Press
/
button and press
button to tick channel(s)
that you would like to add on the Home screen.
3 Select Add to home. The channel icon will appear in Shortcuts
on the Home screen.
NOTE
To remove the channel from Shortcuts, just move the focus to
the shortcut and press
/
button on your remote control.
Add webpages to the home screen
1 In Browser, visit a website you would like to add on the Home
screen.
2 Use the D-pad to move the focus to
Add to home icon in
the top Browser navigation bar and select it.
3 Select Add, and this webpage will appear in Shortcuts on the
Home screen.
NOTE
To remove webpages from Shortcuts, just move the focus on
a shortcut page and press
/
button on your remote
control.
Managing apps
/
>
> My Apps
Select the item you want to move, press
/
button to
manage, then use the D-pad to select the desired position and
press
button to store the new position.
NOTE
Some Apps may not be moved.
11
EN
Smart Functions
Using a VIDAA Account
Signing into an account
Before signing into your VIDAA account, make sure your TV is
connected to the network.
1 After the network is connected, press
/
>
button on your
remote and select
VIDAA Account icon in the top naviga-
tion bar on the Home screen.
2 Register your device to your VIDAA Account. After entering your
E-mail and password, select Sign In.
Creating a new account
If you do not have a VIDAA account, create a new one to enjoy the
best features of your Smart TV.
Before creating a new account, make sure your TV is connected to
the network.
1 After the network is connected, press
/
>
button on your
remote and select
VIDAA Account icon in the top navigati-
on bar on the Home screen.
2 Select Create an Account on screen.
3 Enter your rst name, last name, E-mail address and password.
First Name and Last Name are optional.
4 Select Create an Account.
Media
/
>
> My Apps > Media
Media is a central location for you to view or listen to dierent types
of content, such as photos, music and movies. You can view media
content through the following methods:
A USB thumb drive or hard drive.
Compatible mobile phone, tablet or other personal devices: you
can stream movies, music and photos that are stored on compa-
tible personal device and play or view the content on your TV.
By default, there is Content Sharing displayed on the Media screen.
If your mobile device is connected to the TV, its name also appears
on the Media screen.
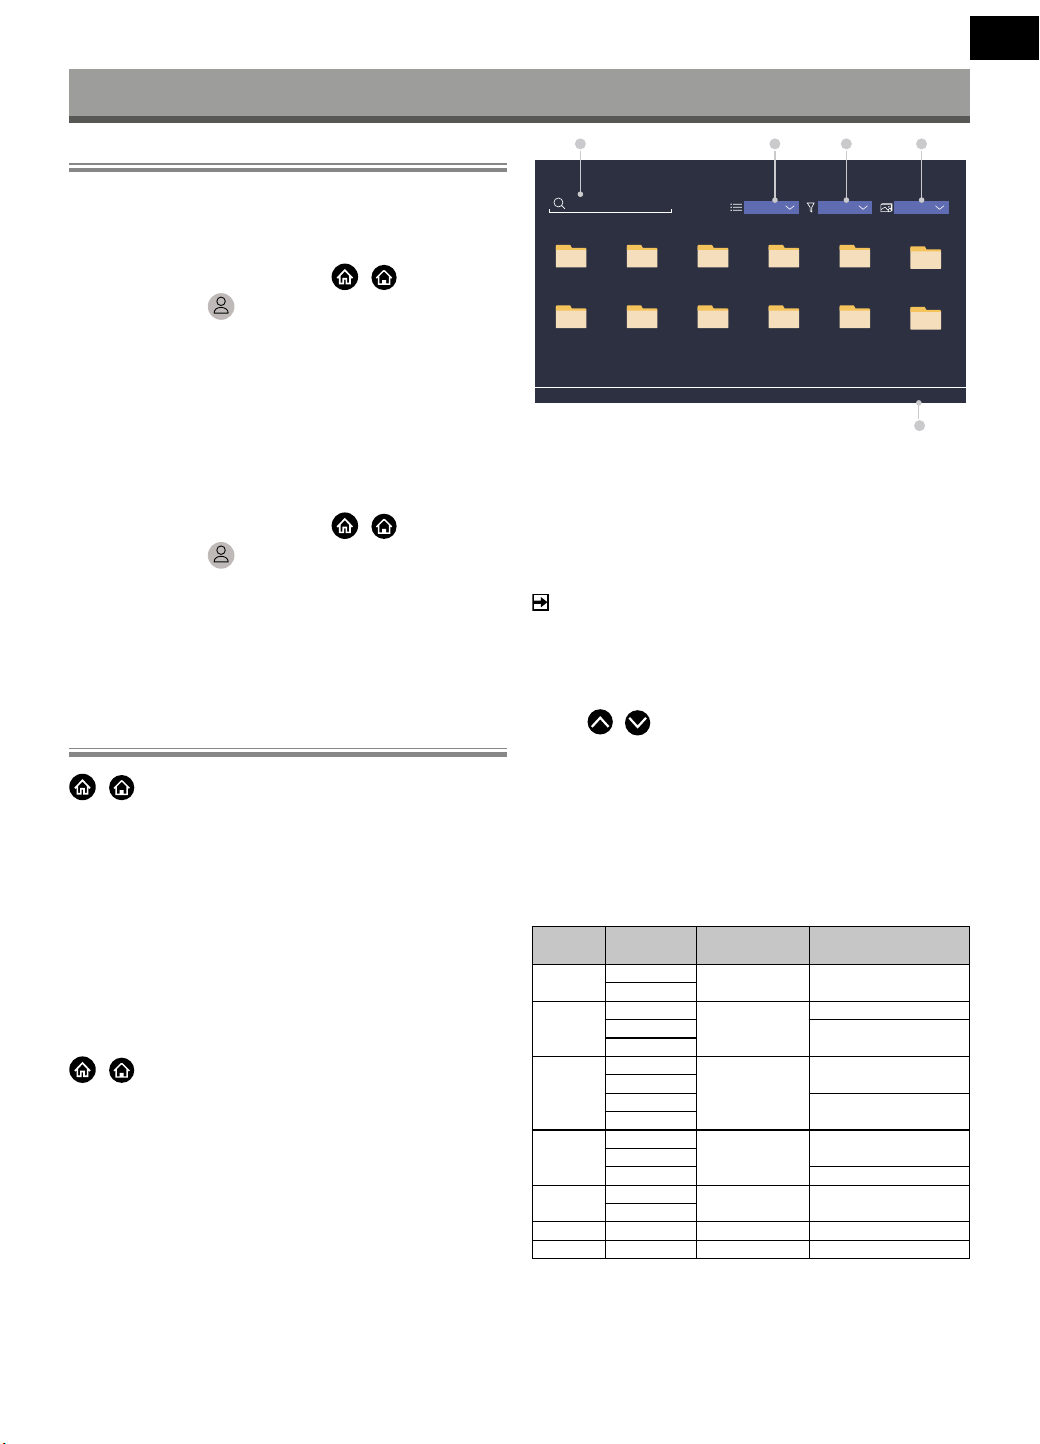
Playing media contents
/
>
> My Apps > Media > connected devices
Select the content you want to play on the screen, like pictures,
videos and music.
Search File
USB/
USB
Press MENU to create list
Name
Grid All Media
1 32 4
5
1 2 53 4
6
7 8 119 10
12
1 Search the content you want to play.
2 Arrange the content list by Grid, List.
3 Sort the content list by Name, Date modied, Size.
4 Filter the content list by All Media, Photo, Video, Music, Recor-
ded.
5 Create a photo, music, or video playlist.
NOTE
Some options in the above table may not be available in some
models/countries/regions.
Playing background music during viewing pictures
1 Choose a picture to display.
2 Press
/
button to call out playbar.
3 Select Background Music and choose your music to create a
Music Playlist.
Now you can play the background music during viewing pictures.
Media format list
Due to dierences in programming tools and other factors, some of
the le formats that are listed may not be supported.
Video Format
Container Video Codec
File Extension
Name
Resolution and Frame
Rate
MPEG Mpeg1/2 .mpg .mpeg .vob
1920 × 1080p @ 120fps
Mpeg4
MP4 Mpeg4 .mp4 .mov
1920 × 1080p @ 120fps
H.264 (AVC) 1920 × 1080p @ 60fps
H.265 (HEVC)
MKV Mpeg1/2 .mkv
1920 × 1080p @ 120fps
Mpeg4
H.264 (AVC) 1920 × 1080p @ 60fps
H.265 (HEVC)
AVI Mpeg1/2 .avi
1920 × 1080p @ 120fps
Mpeg4
H.264 (AVC) 1920 × 1080p @ 60fps
WMV WMV3 .asf .wmv 1920 × 1080p @ 60fps
H.264 (AVC)
FLV H.264 (AVC) .v 1920 × 1080p @ 60fps
TS H.265 (HEVC) .ts 1920 × 1080p @ 60fps
12
EN
Smart Functions
Audio Format
Container Audio Codec File Extension Name
WAV Mpeg1/2 Layer 1 .wav
MP3 Mpeg1/2 Layer 2 .mp3
Mpeg1/2 Layer 3
AAC AAC, HEAAC .m4a .aac
WMA WMA .wma
WMA Pro
PCM LPCM N/A
ADPCM
AC-3 AC-3 .ac3 .m4a
FLAC FLAC .ac
OPUS OPUS .opus
Photo Format
Container File Extension Name Mode of Operation Resolution
JPEG .jpg .jpeg base-line 15360 × 8640
progressive 1024 × 768
PNG .png no-interlace 3840 × 2160
interlace 1200 × 800
BMP .bmp - 3840 × 2160
GIF .gif - 6400 × 4800
App
/
>
> My Apps
Numerous factory-installed apps are available for you to choose for
your entertainment preferences.
Installing an app
Even though your TV has numerous factory-installed apps, there
may be others that you would like to download.
To install an app:
1
/
>
> My Apps > APP STORE.
2 Use the navigation buttons on your remote to select the app
that you want to install.
3 Select Install. The selected app is installed on the TV.
NOTE
To use this function, your TV must be connected to the Internet.
Adding apps is free, but it might cost you money when using
some apps.
Sorting apps in My Apps
1 In My Apps select the app you want to sort, and then press
/
button to select Sort.
2 Press
/
/
/
button to move it.
3 Press
button to store the new position.
NOTE
Some Apps may not be moved.
Removing an app in My Apps
You can only delete apps that you have installed to the TV. Factory-
-installed apps cannot be deleted.
1 In My Apps select the app you want to remove, and then press
/
button to select Remove.
2 Select
. The selected app is deleted.
Installing Mobile App to Control your TV
Press
/
>
button to select
Settings icon, and select
Support > Mobile App Download.
Scan the Mobile App download QR code on screen to install the
app on your mobile device. It is possible to control your TV, such
as turning the TV on or o, inputting characters with your mobile’s
keyboard and sharing pictures or videos from your mobile device to
the TV. This app is available on both Android and iOS.
To connect your TV after installing the mobile app:
1 Agree with end user license, and disclaimer and privacy policies
on TV. If you are not sure whether you have agreed, check at
/ >
Settings > Support > Disclaimer and Privacy.
2 Make sure your mobile phone and TV are connected to the same
network environment.
3 To use this function, switch on Content Sharing at
/ >
Settings > System > Application Settings >
Content Sharing.
4 Open the mobile app and select the TV device you want to
connect.

13
EN
Picture and Sound
Adjusting the Picture Quality
Adjust picture mode, picture size and other advanced picture
settings.
Choosing a picture mode
/ >
Settings > Picture > Picture Mode
Select a pre-set picture mode to best suit the content you are
viewing.
Options may dier depending on your model/country/region and
the content you are watching. Please refer to the specic product.
Standard
Use Standard mode for watching normal content, such as News,
Drama or Documentaries.
Cinema Day
Use Cinema Day for watching movies in a bright environment.
Cinema Night
Use Cinema Night for watching movies in a dark environment.
Dynamic
Use Dynamic mode for content that requires vivid picture
quality.
Sports
Optimised picture for watching sports.
Changing the aspect ratio
/ >
Settings > Picture > Aspect Ratio
Adjust the Aspect Ratio to stretch or zoom the picture.
Automatic
Automatically switch Aspect Ratio between 16:9 and 4:3 based
on the signal information.
16:9
Best suited for 16:9 Widescreen content. This will also stretch 4:3
content to Widescreen.
4:3
Best suited for 4:3 content.
Panoramic
Provides a full-screen image by stretching the edges of the
picture, the middle section of the picture will not be stretched.
Movie Zoom
Fill the entire screen by zooming in to remove horizontal black
bars from the top and bottom of the picture.
Direct
Point to point display also known as 1:1 Pixel Mapping.
Conguring advanced picture settings
/ >
Settings > Picture > Picture Mode
Settings
Adjust display settings for each Picture Mode. You can personalise
the picture quality by adjusting the following settings.
Apply Picture Settings
Adjust current picture mode to apply to all sources or just cur-
rent source.
Backlight
Set the overall brightness of the screen.
NOTE
The function name may vary depending on models.
The following option may dier depending on models. Please
refer to the actual product.
Dynamic Backlight Control
Enhance the contrast ratio between light and dark areas of the
picture.
This function may not be applicable in some models/countries/
regions.
Backlight
Adjust how bright you want images to appear, lower settings
create darker images (only when Dynamic Backlight Control is
o ).
This function may not be applicable in some models/countries/
regions.
Brightness
Adjust the Brightness level to generate lighter or darker images.
Contrast
Adjust the Contrast level to increase or decrease how bright
images appear.
Colour Saturation
Adjust the colour intensity of the picture for a more vibrant
image.
Sharpness
Adjust how sharp or soft edges of images appear.
Adaptive Contrast
Automatically adjust dark areas and light areas of the image to
see more detail.

14
EN
Picture and Sound
Noise Reduction
Improve the picture quality by reducing noise.
MPEG Noise Reduction
Reduce MPEG block noise to provide clearer edge transitions.
Colour Temperature
Adjust how warm (red) or cool (blue) the white areas of an image
appears.
Expert Settings
Adjust advanced picture settings based on your viewing prefer-
ence.
Overscan
Change the video size setting to crop the edges of the displayed
image.
This function may not be applicable in some models/countries/
regions.
Reset Current Mode
Restore all the picture settings in the current picture mode to
the factory default values.
Conguring expert settings
/ >
Settings > Picture > Picture Mode Set-
tings > Expert Settings
Advanced picture settings.
Colour Tuner
Adjust the Hue, Saturation and Brightness of colour settings.
White Balance
Adjust the intensity of red, green and blue lights to view the true
colours of all images in the picture.
Black Level
Adjust the HDMI Black Level to enhance current content.
Gamma Adjustment
Adjust the Gamma to alter how the TV will respond to grayscale
content. In low ambient light choose a higher number, in brigh-
ter ambient light select a lower number. The default setting of
2.2 is recommended for most ambient light conditions.
This function may not be applicable in some models/countries/
regions.
Gamma Calibration
Adjust selected Gamma curve.
This function may not be applicable in some models/countries/
regions.
RGB Only Mode
RGB lter for adjustment and control of colour space and colour
saturation.
Game Mode Settings
Enabling game mode
/ >
Settings > Picture > Game Mode
Enable Game Mode to optimise the TV’s settings to enjoy a better
gaming experience with a PC or a game console connected to the
TV.
Game Mode will allow:
Reducing input lag to make sure every press or click matches
what is happening on the screen;
Improving responsiveness to produce very little motion blur;
Processing YUV 4:4:4 format signals precisely to present accurate
image colours.
NOTE
This function may not be applicable in some input sources or
applications.
Adjusting the Sound Quality
Adjust sound mode and other advanced sound settings.
Choosing a sound mode
/ >
Settings > Sound > Sound Mode
Select a pre-set sound mode to suit the type of content you are
listening to.
Standard
In Standard mode, the TV delivers a at frequency response,
which preserves the natural characteristics of the original sound.
Theatre
Theatre mode increases the surround sound eect and provides
a more prominent bass response.
Music
In Music mode, low and high frequencies are emphasised to
enhance musical instrument reproduction.
Speech
In Speech mode, low and high frequencies are attenuated to
improve the reproduction and clarity of the human voice.
Late Night
In Late Night mode, the TV will improve the reproduction and
clarity of the human voice with a low volume level.
Sports
Optimised sound for watching Sports events.

15
EN
Picture and Sound
Conguring advanced sound settings
/ >
Settings > Sound > Sound Mode Settings
Adjust the audio settings of the TV. You can personalise the sound
quality by adjusting the following settings.
Apply Audio Settings
Adjust current sound mode to apply to all sources or just the
current source.
Equalizer
Boost the volume at dierent frequencies.
This function is only applicable when TV Speakers is selected at
/ >
Settings > Sound > Speakers > Audio Output.
Wall Mount Setup
Automatically optimise the sound based on the position of the
TV.
This function may not be applicable in certain models/countries/
regions.
Auto Volume Control
Activate to prevent the volume from changing when switching
TV channels.
This function may not be applicable in certain models/countries/
regions.
Reset Current Mode
Restore all of the audio settings in the current audio mode to the
factory default values.
NOTE
Some models may not support decoding of DTS CD bitstreams.
Playback of this format may produce undesirable noise.
Speakers Settings
/ >
Settings > Sound > Speakers
Adjust the settings of speakers.
Audio Output
Select the speakers which you want to use.
Digital Audio Output
Select the digital audio output format that best suits the audio
device type.
Auto: the audio device automatically outputs in a supported
format.
Pass Through: the audio device outputs without any processing.
PCM: the audio device outputs PCM (pulse code modulation)
format.
Dolby Digital: the audio device outputs Dolby Digital audio
when connected to the TV via optical port.
Dolby Digital Plus: the audio device outputs Dolby Digital Plus
audio when connected to the TV via HDMI (ARC/eARC) port.
NOTE
This function is only applicable when
/ >
Settings
> Sound > Speakers > Audio Output is set to ARC or SPDIF
Only.
When external audio devices are connected to the TV via optical,
PCM and Dolby Digital are suggested.
Digital Audio Delay
Adjust the digital audio output delay time to sync audio from an
external speaker with the images on the TV.
This function is only applicable when
/ >
Settings >
Sound > Speakers > Audio Output is set to ARC or SPDIF Only.
Lip Sync
Synchronise the video and audio.
This function may not be applicable in some Audio Output modes.
Balance
Adjust the left and right speaker level to optimise audio for a spe-
cic location.
This function may not be applicable in some Audio Output modes.
Using Headphones
/ >
Settings > Sound > Headphone
Set the sound output mode through headphones.
After connecting your headphone, or other external audio ampli-
ers, you can set up your TV to your preference.
This function may not be applicable in some models/countries/
regions.
Headphone Mode
Change Headphone audio settings.
Headphone Only, the TV speakers will be muted when the head-
phones are being used. Any other connected audio devices will also
be muted when headphones are in use.
Headphone with Speakers, the TV speakers, headphones and
other connected audio devices will have audio output.
Headphone Volume
Independently adjust the volume of the Headphones.
In Headphone Only mode, you can adjust the volume by the
remote or in Headphone Volume menu on screen.
In Headphone with Speakers mode, the TV speaker volume can
be adjusted by the remote. The volume of headphone can be
adjusted in Headphone Volume menu on screen.
16
EN
Accessibility and System
Accessibility
/ >
Settings > Accessibility
Accessibility function provides menu options and audio description
to aid the visually or hearing impaired.
Menu Scheme
Select menu scheme style from Dark, Light.
High Contrast Menu
Improve contrast for visually impaired.
Menu Transparency
Select menu transparency from O, Medium, High.
Closed captions
Specialised captions can be switched on or o if broadcast along
with your program.
Audio Type
Audio Type
Accessibility audio settings.
Voiceover Volume
Independently adjust voiceover level.
NOTE
The above functions may not be applicable in some models/
countries/regions.
Setting Time
/ >
System > Time
Set the current time based on your location.
Time Format
Set the time display to be 12 or 24-hour format.
Date/Time
Set the Date and Time. You can set the date and time to automa-
tically sync with Internet/broadcast or manually setup by your-
self.
This function may not be applicable in some models/countries/
regions.
Time Zone
Select your time zone.
This function may not be applicable in some models/countries/
regions.
Daylight Saving
Select whether to apply Daylight Saving Time to the TV.
This function may not be applicable in some models/countries/
regions.
Using Timer
/ >
Settings > System > Timer Settings
Adjust the timer settings to suit your preference.
Sleep Timer
Set the sleep timer to automatically turn the TV o at the speci-
ed time.
Power On Timer
Set the time you want the TV to turn on automatically. You can
set the same time each day or set a dierent time on dierent
days.
Power O Timer
Set the time you want the TV to turn o automatically. You can
set the same time each day or set a dierent time on dierent
days.
Menu Timeout
Set the amount of time you would like the menu to remain on
the screen.
Auto Sleep
Set the amount of time that you would like the TV to auto power
o after a period of no activity.
This function may not be applicable in some models/countries/
regions.
Auto Standby with No Signal
TV will go to standby if there is no signal after the set time.
Using Parental Controls
/ >
Settings > System > Parental Control
Turn on Parental Control to prevent children from being able to
view certain content.
If you have not set the PIN code before, create and conrm PIN win-
dow displays. Using the D-pad on your remote, create the PIN code.
If you have set the PIN code before, enter PIN window will be
displayed.
Set PIN code at
/ >
Settings > System > System PIN.
Locks
Turn on Locks to enable the Parental Control function.
You will see other Parental Control settings change from a
greyed out state to highlighted. When this occurs, Block Time,
Channel Block, Content Block, Input Block, App Block, or
Reset to Default features are available to set.
Block Time
Block the whole TV usage for a dened period of time, including
Live TV, HDMI and apps.
Channel Block
Block all or individual channels when you turn on the Parental
Control feature.
17
EN
Content Block
Certain programmes are blocked by age rating. This is controlled
by the broadcaster.
Input Block
Block content from devices that are connected to external
inputs.
App Block
Block access to certain apps.
Reset to Default
Restore Parental Control back to the factory default setting.
Setting Language and Location
/ >
Settings > System > Language and Location
Select the language used for this TV and your location.
Location
Choose the location from where you will watch your TV.
Menu Language
Set the default language for the TV menu.
Primary Audio
Set the default audio output language for the type of digital
broadcast content that you are viewing.
Secondary Audio
Set the secondary audio output language for digital broadcast
content.
Primary Subtitle
Set the default subtitle language for digital broadcast content.
Secondary Subtitle
Set the secondary subtitle language for digital broadcast con-
tent.
Digital Teletext
Adjust Teletext decoding.
Setting Usage Mode
/ >
Settings > System > Usage Mode
Set the TV to use in Home or Store mode.
Home Mode
Select Home Mode for normal TV usage.
If you want to switch to Store Mode when the TV is in Home
Mode, press
/
>
button to select
/ >
Settings, and
select System > Usage Mode, and choose Store Mode.
Store Mode
Select Store Mode to setup the TV in a retail setting. This mode
enables E-Pos and other demo functions and is only intended for
use in retail stores.
When Store Mode is selected, press
/
button on your
remote control to enter store mode settings.
If you want to switch to Home Mode when the TV is in Store
Mode, press
/
>
button to select
/ >
Settings, and
select System > Usage Mode, and choose Home Mode.
NOTE
Enabling Store Mode could increase energy consumption.
Checking the Software Version
To check the current software version of your TV:
Access
/ >
Settings > Support > System Info >
Version.
Software Upgrade
/ >
Settings > Support > System Upgrade
Set your TV to receive the latest rmware.
Auto Firmware Upgrade
Set your TV to automatically receive the latest rmware.
Check Firmware Upgrade
Check to ensure that your TV has received the latest rmware.
Please ensure your TV is connected to the Internet.
Check OAD Upgrade
Check to ensure that your TV has received the latest rmware via
the tuner.
NOTE
Please ensure your TV is connected to the Internet.
This function is only applicable when Thailand and Malaysia are
selected in Location.
System App Auto Upgrade
Set your system applications to automatically upgrade to the
latest version. App auto upgrade will be completed in the bac-
kground, conrmation on new Privacy Notices may be required
to complete any upgrades.
Upgrade from USB
Upgrade TV software from USB device.
NOTE
Please ensure the USB ash drive insert to USB 2.0 port of the TV.
The update les must be located in the root directory of the
update USB device.
The format of the USB must be FAT32 and the partition table
type must be MBR.
Accessibility and System

18
EN
Accessibility and System
HbbTV
Access service from providers through HbbTV.
/ >
Settings > System > Application Settings
> HbbTV
Enable or disable HbbTV functionality for all channels (only avail-
able for digital channels).
In Live TV, press
/
button to select HbbTV.
Enable or disable HbbTV functionality for the current channel (only
available for digital channels).
When HbbTV service is enabled and the programme supports
HbbTV, follow the instructions on the TV screen to select the corre-
sponding button on the remote control to access the service.
NOTE
This function may not be applicable in some models/countries/
regions.
Some channels may not support the HbbTV service.
Setting the TV Name
/ >
Settings > System > Advanced Settings >
TV Name
You can edit the name for your TV to be used on the network.
NOTE
Up to 18 characters can be entered.
Reset to Factory Default
/ >
Settings > Support > Reset to Factory
Default
Restore your TV to the factory default. Reset will clear your personal
settings, information and data.
19
EN
Technical Specications
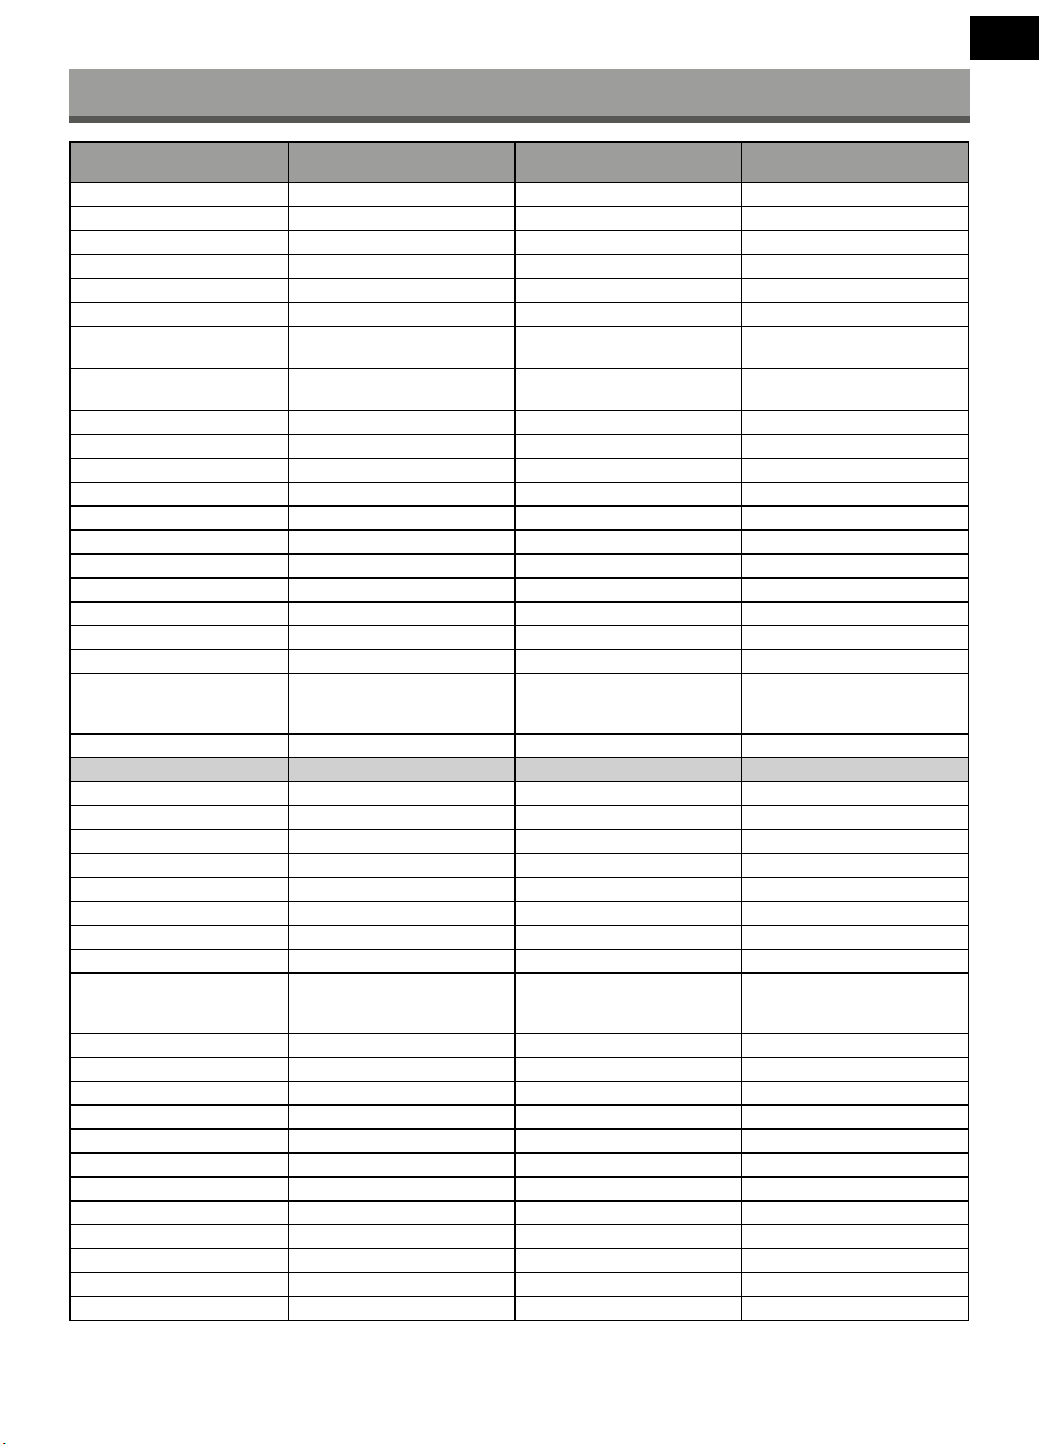
Model SLE 65MUS700TCSB SLE 55MUS700TCSB SLE 43US700TCSB
Panel size 65" (164 cm) 55" (139 cm) 43" (108 cm)
Power consumption 300 W 230 W 100 W
Standby consumption <0.5 W <0.5 W <0.5 W
Rated voltage AC 220–240 V ~ 50/60 Hz AC 220–240 V ~ 50/60 Hz AC 220–240 V ~ 50/60 Hz
Remote controller Yes Yes Yes
VESA wall mount 400 x 300 400 × 300 200 x 200
Dimensions with stand
(w × h × d)
1447*243*905 mm 1230*783*245 mm 955.5 x 606.5 x 207 mm
Dimensions without stand
(w × h × d)
1447*71*838 mm 1230*718*71 mm 955.5 x 559.5 x 97.5 mm
Net weight with stand 21.5 kg 15 kg 6.5 kg
Connection
RF IN 1 1 1
HDMI 3 (1xARC) 3 (1xARC) 3 (1xARC)
Optical 1 1 1
AV in 1 1 1
Composite in 1 1 1
Headphone out 1 1 1
USB 2 2 2
RJ45 1 1 1
Earphone Output 1 1 1
Supported USB formats
AVI, MP4, MPG, MKV, MOV, DAT,
VOB, MP3, M4A, AAC, WMA, JPEG,
JPG, PNG
AVI, MP4, MPG, MKV, MOV, DAT,
VOB, MP3, M4A, AAC, WMA, JPEG,
JPG, PNG
AVI, MP4, MPG, MKV, MOV, DAT,
VOB, MP3, M4A, AAC, WMA, JPEG,
JPG, PNG
CI slot 1 1 1
Other functions
Resolution 3840 x 2160 3840 x 2160 3840 x 2160
Viewing angle 178°/178° 178°/178° 178°/178°
Embedded tuner DVB-T/T2, DVB-C, DVB-S2 DVB-T/T2, DVB-C, DVB-S2 DVB-T/T2, DVB-C, DVB-S2
Video system PAL/SECAM BG/DK/I PAL/SECAM BG/DK/I PAL/SECAM BG/DK/I
Progressive scan Yes Yes Yes
Timeshift Yes Yes Yes
EPG Yes Yes Yes
Comb filter Digital Digital Digital
OSD menu
EN, CZE, POL, HUN, SVK, GER, FRE,
ITA, SPA, GRC, HRV, SRP, BUL, SLV,
LIT, RUS, ROM
EN, CZE, POL, HUN, SVK, GER, FRE,
ITA, SPA, GRC, HRV, SRP, BUL, SLV,
LIT, RUS, ROM
EN, CZE, POL, HUN, SVK, GER, FRE,
ITA, SPA, GRC, HRV, SRP, BUL, SLV,
LIT, RUS, ROM
Zoom Yes Yes Yes
Noise reduction Yes Yes Yes
Timer OFF / ON / SLEEP Yes Yes Yes
Subtitles Yes Yes Yes
Audio language Yes Yes Yes
Channel list Yes Yes Yes
Favourites list Yes Yes Yes
Image freeze Yes Yes Yes
Radio Yes Yes Yes
Lock Yes Yes Yes
Parent lock Yes Yes Yes
Hotel mode Yes Yes Yes
20
EN
INSTRUCTIONS AND INFORMATION ABOUT THE DISPOSAL OF DISCARDED PACKAGE
Return the packaging to acollection centre for disposal.
DISPOSAL OF DISCARDED ELECTRICAL AND ELECTRONIC EQUIPMENT
This symbol placed on the product, accessories or package noties that the product must not be treated as household waste.
Please dispose of this product in acollection centre designed for recycling electric and electronic equipment. In some EU or
European countries, you can return your products to your local dealer when buying anew equivalent product. Proper disposal
of this product helps save valuable natural resources and prevents possible adverse impacts on the environment and human
health that might be caused by improper waste disposal. For further information, please contact your local authorities or the
nearest waste disposal collection centre. Wrong disposal of this type of waste may be subject to alegal penalty.
EU Battery Regulation
This symbol on the battery(ies) or on the packaging indicates that the battery(ies) provided with this product shall not be
treated as household waste. Instead, please separate battery(ies) from other types of waste and recycle it(them) through your
local recycling system to protect environment and health. The chemical symbol for lead (Pb) is added under this symbol if the
battery(ies) contains more than 0.004 % lead. For more detailed information about recycling of this battery(ies), please contact
your local authority or the shop where you purchased the product or battery(ies).
For EU companies
If you need to dispose of an electric or electronic device, ask your dealer your supplier for necessary information.
Disposal in countries outside the European Union
To dispose of this product, please ask the ministry or your dealer for the necessary information on correct disposal.
The product meets the respective EU requirements.
FAST ČR, a.s. hereby declares that the radio device type SLE 65MUS700TCSB, SLE 55MUS700TCSB, SLE 43US700TCSB conforms to the
2014/53/EU directive.
For full version of the EU declaration of conformity, please refer to www.sencor.com website.
Changes in the text, design and technical specications may be made without prior notice and we reserve the right to make such changes.
Manufacturer’saddress: FAST ČR, a.s., USanitasu 1621, Říčany CZ-251 01
The terms HDMI, HDMI High-Denition Multimedia Interface, HDMI trade dress and the HDMI Logos are trademarks or registered trade-
marks of HDMI Licensing Administrator, Inc.
Dolby Audio
Manufactured under license from Dolby Laboratories. Dolby, Dolby Audio, and the double-D symbol are registered trademarks of Dolby
Laboratories Licensing Corporation.
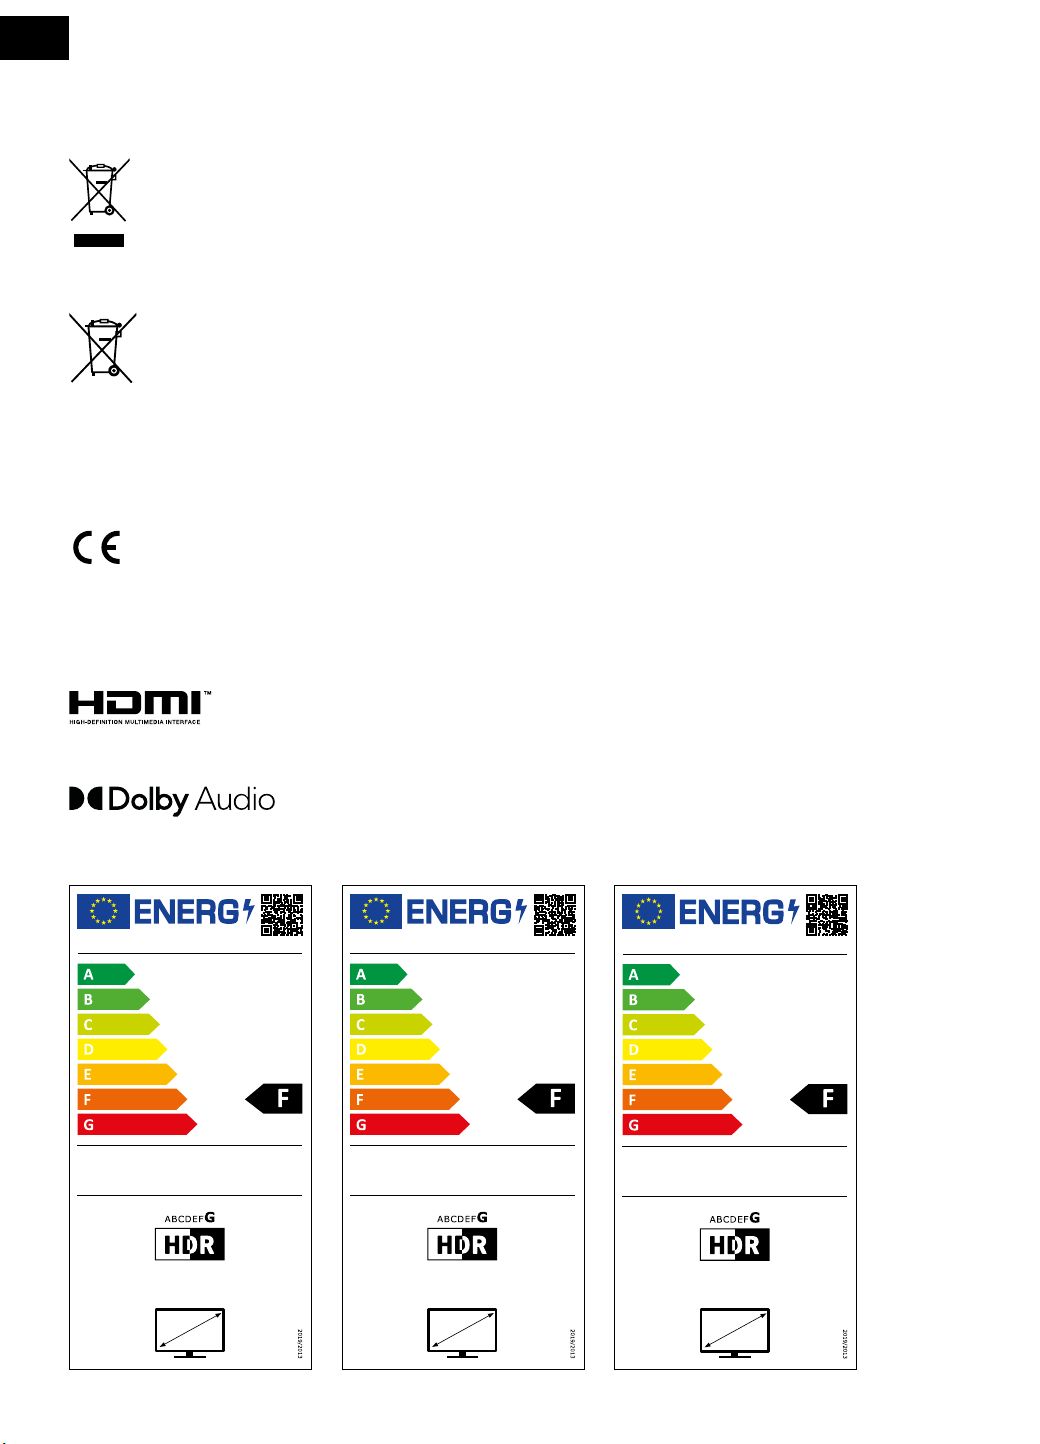
45 kWh/1000h
62 kWh/1000h
3840 px
2160 px
108 cm
43″
SENCOR
SLE 43US700TCS
77 kWh/1000h
127 kWh/1000h
3840 px
2160 px
139 cm
55″
SENCOR
SLE 55MUS700TCS
96 kWh/1000h
160 kWh/1000h
3840 px
2160 px
164 cm
65″
SENCOR
SLE 65MUS700TCS
Copyright © 2024, Fast ČR, a. s.
Revision 03/2024
21
EN
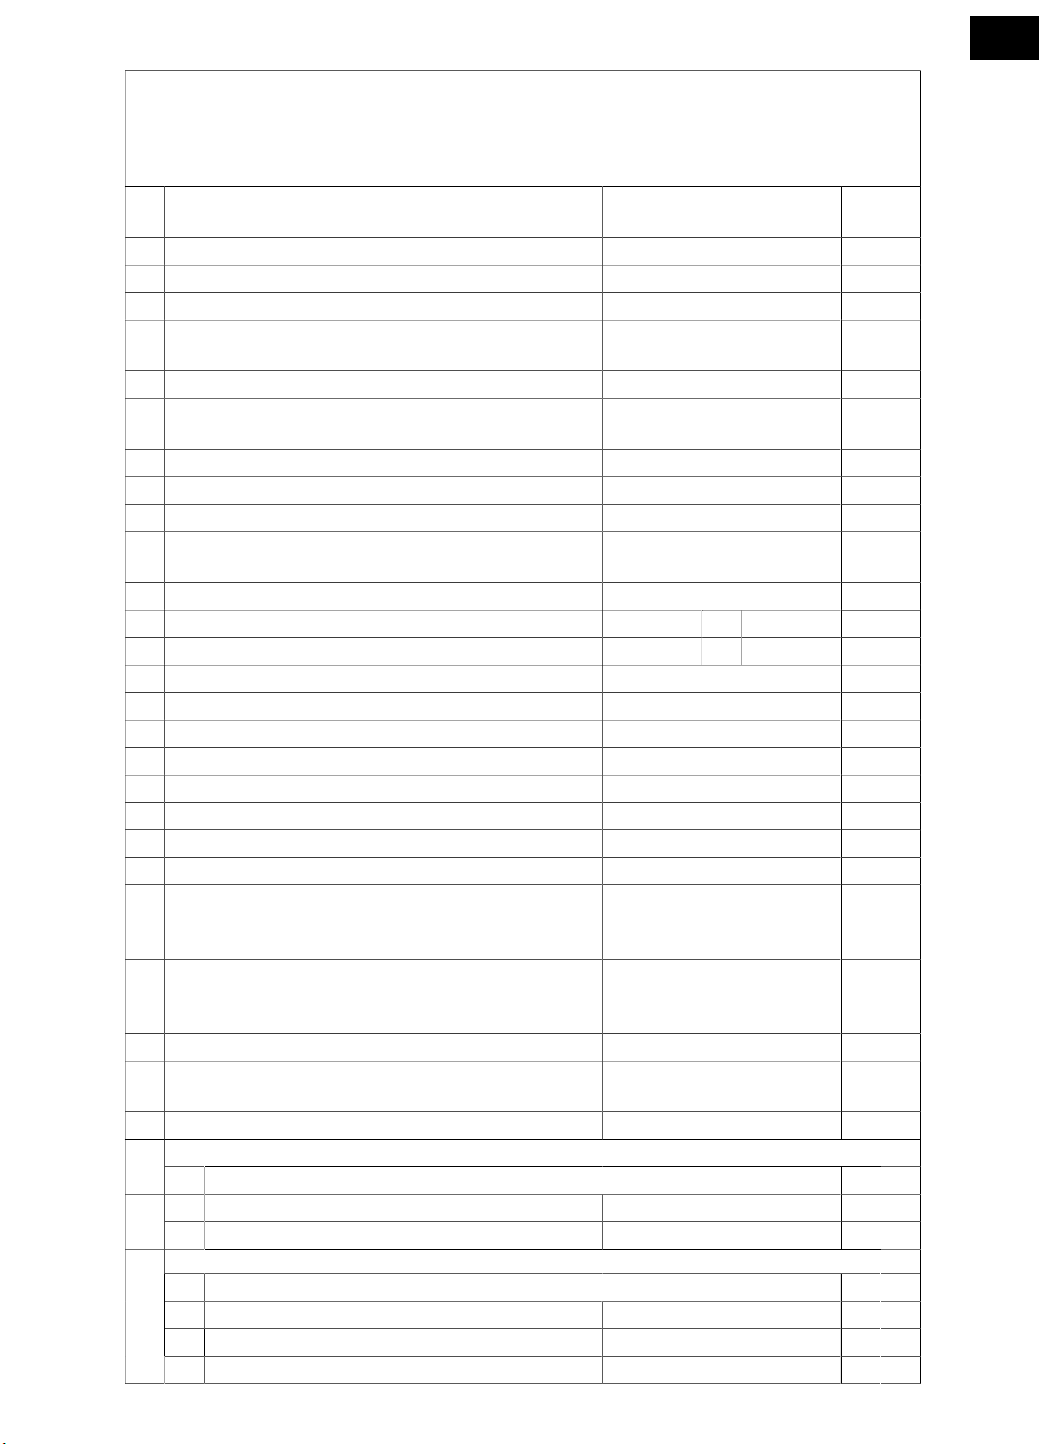
Product Information Sheet
COMMISSION DELEGATED REGULATION (EU) 2019/2013 with regard to energy labelling of
electronic displays
Parameter Parameter or value and
precision
Unit
1. Supplier's name or trademark. SENCOR
Supplier's address. -
2. Model identifier SLE 43US700TCS
3. Energy Efficiency Class for Standard Dynamic Range
(SDR)
F
4. On mode power demand in SDR 45,0 W
5. Energy Efficiency Class for High Dynamic Range
(HDR)
G
6. On mode power demand in HDR, if implemented 62,0 W
7. Off mode, power demand, if applicable 0,0 W
8. Standby mode power demand, if applicable 0,3 W
9. Networked standby mode power demand, if applic-
able
0,8 W
10. Electronic display category Television
11. Size ratio 16 : 9
12. Screen resolution 3 840 x 2 160 pixels
13. Screen diagonal 108,0 cm
14. Screen diagonal 43 inches
15. Visible screen area 49,8 dm²
16. Panel technology used LED LCD
17. Automatic Brightness Control (ABC) available No
18. Voice recognition sensor available No
19. Room presence sensor available No
20. Image refresh frequency rate (default) 60 Hz
21. Minimum guaranteed availability of software and
firmware updates (from the date of end of the
placement on the market)
8 Years
22. Minimum guaranteed availability of spare parts
(from the date of end of the placement on the mar-
ket)
7 Years
23. Minimum guaranteed product support 8 Years
Minimum duration of the general guarantee offered
by the supplier
2 Years
24. Power supply type Internal
External power supply (non standardized and included in the product box)25.
i -
ii Input voltage - V
iii Output voltage - V
26. External standardised power supply (or suitable one if not included in the product box)
Page 1 / 2
i -
ii Required output voltage -
V
iii Required delivered current (minimum) - A
iv Required current frequency - Hz
Page 2 / 2
22
EN
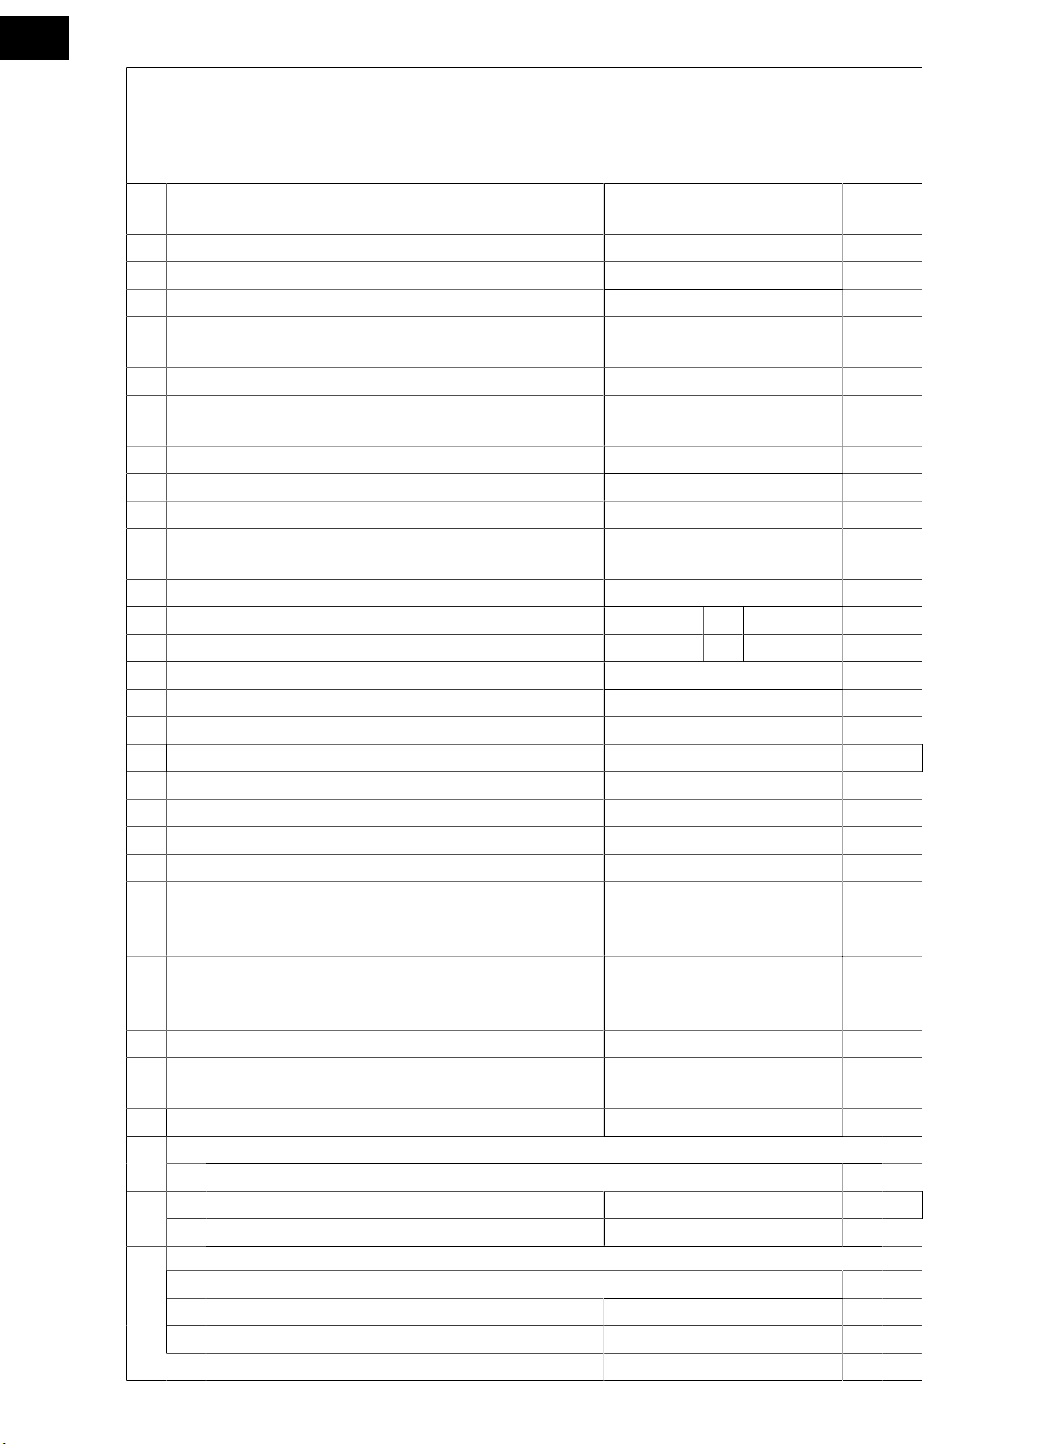
Product Information Sheet
COMMISSION DELEGATED REGULATION (EU) 2019/2013 with regard to energy labelling of
electronic displays
Parameter Parameter or value and
precision
Unit
1. Supplier's name or trademark. SENCOR
Supplier's address. -
2. Model identifier SLE 55MUS700TCS
3. Energy Efficiency Class for Standard Dynamic Range
(SDR)
F
4. On mode power demand in SDR 77,0 W
5. Energy Efficiency Class for High Dynamic Range
(HDR)
G
6. On mode power demand in HDR, if implemented 127 W
7. Off mode, power demand, if applicable n.a. W
8. Standby mode power demand, if applicable 0,4 W
9. Networked standby mode power demand, if applic-
able
0,9 W
10. Electronic display category Television
11. Size ratio 16 : 9
12. Screen resolution 3 840 x 2 160 pixels
13. Screen diagonal 139,0 cm
14. Screen diagonal 55 inches
15. Visible screen area 82,4 dm²
16. Panel technology used LED LCD
17. Automatic Brightness Control (ABC) available No
18. Voice recognition sensor available No
19. Room presence sensor available No
20. Image refresh frequency rate (default) 60 Hz
21. Minimum guaranteed availability of software and
firmware updates (from the date of end of the
placement on the market)
8 Years
22. Minimum guaranteed availability of spare parts
(from the date of end of the placement on the mar-
ket)
7 Years
23. Minimum guaranteed product support 8 Years
Minimum duration of the general guarantee offered
by the supplier
2 Years
24. Power supply type Internal
External power supply (non standardized and included in the product box)25.
i -
ii Input voltage - V
iii Output voltage - V
26. External standardised power supply (or suitable one if not included in the product box)
Page 1 / 2
i
-
ii Required output voltage -
V
iii Required delivered current (minimum) - A
iv Required current frequency - Hz
Page 2 / 2
23
EN
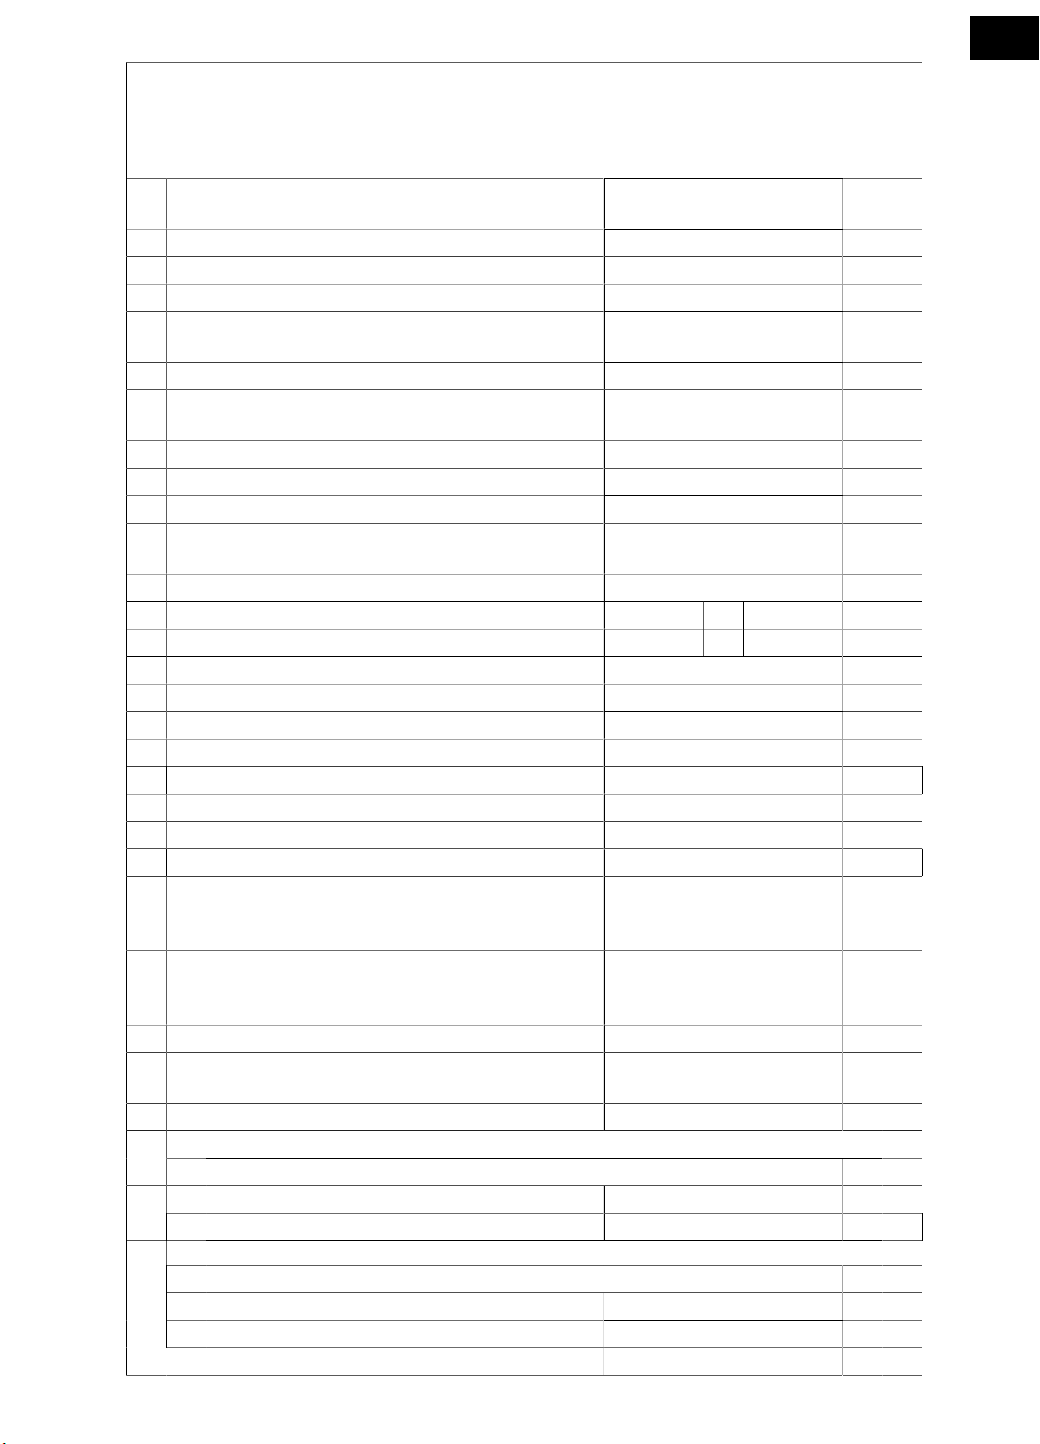
Product Information Sheet
COMMISSION DELEGATED REGULATION (EU) 2019/2013 with regard to energy labelling of
electronic displays
Parameter Parameter or value and
precision
Unit
1. Supplier's name or trademark. SENCOR
Supplier's address. -
2. Model identifier SLE 65MUS700TCS
3. Energy Efficiency Class for Standard Dynamic Range
(SDR)
F
4. On mode power demand in SDR 96,0 W
5. Energy Efficiency Class for High Dynamic Range
(HDR)
G
6. On mode power demand in HDR, if implemented 160 W
7. Off mode, power demand, if applicable 0,0 W
8. Standby mode power demand, if applicable 0,2 W
9. Networked standby mode power demand, if applic-
able
0,7 W
10. Electronic display category Television
11. Size ratio 16 : 9
12. Screen resolution 3 840 x 2 160 pixels
13. Screen diagonal 164,0 cm
14. Screen diagonal 65 inches
15. Visible screen area 114,8 dm²
16. Panel technology used LED LCD
17. Automatic Brightness Control (ABC) available No
18. Voice recognition sensor available No
19. Room presence sensor available No
20. Image refresh frequency rate (default) 60 Hz
21. Minimum guaranteed availability of software and
firmware updates (from the date of end of the
placement on the market)
8 Years
22. Minimum guaranteed availability of spare parts
(from the date of end of the placement on the mar-
ket)
7 Years
23. Minimum guaranteed product support 8 Years
Minimum duration of the general guarantee offered
by the supplier
2 Years
24. Power supply type Internal
External power supply (non standardized and included in the product box)25.
i
-
ii Input voltage - V
iii Output voltage - V
26. External standardised power supply (or suitable one if not included in the product box)
Page 1 / 2
i -
ii Required output voltage - V
iii Required delivered current (minimum) - A
iv Required current frequency - Hz
Page 2 / 2

24
EN
Warranty conditions
Warranty card is not apart of the device packaging.
This product is warranted for the period of 24 months from the date of purchase to the end-user. Warranty
is limited to the following conditions. Warranty is referred only to the customer goods using for common
domestic use. The claim for service can be applied either at dealer’sshop where the product was bought, or
at below mentioned authorized service shops. The end-user is obligated to set up aclaim immediately when
the defects appeared but only till the end of warranty period. The end user is obligated to cooperate to certify
the claiming defects. Only completed and clean (according to hygienic standards) product will be accepted.
In case of eligible warranty claim the warranty period will be prolonged by the period from the date of claim
application till the date of taking over the product by end-user, or the date the end-user is obligated to take it
over. To obtain the service under this warranty, end-user is obligated to certify his claim with duly completed
following documents: receipt, certificate of warranty, certificate of installation.
This warranty is void especially if apply as follows:
Defects which were put on sale.
Wear-out or damage caused by common use.
The product was damaged by unprofessional or wrong installation, used in contrary to the applicable
instruction manual, used in contrary to legal enactment and common process of use or used for another
purpose which has been designed for.
The product was damaged by uncared-for or insufficient maintenance.
The product was damaged by dirt, accident of force majeure (natural disaster, fire, and flood).
Defects on functionality caused by low duality of signal, electromagnetic field interference etc.
The product was mechanically damaged (e.g. broken button, fall).
Damage caused by use of unsuitable media, fillings, expendable supplies (batteries) or by unsuitable
working conditions (e.g. high temperatures, high humidity, quakes).
Repair, modification or other failure action to the product by unauthorized person.
End-user did not prove enough his right to claim (time and place of purchase).
Data on presented documents differs from data on products.
Cases when the claiming product cannot be indentified according to the presented documents (e.g. the
serial number or the warranty seal has been damaged).
Manufacturer:
FAST ČR, a.s., U Sanitasu 1621, Říčany 251 01, Czech Republic
Visit www.sencor.com for detailed information about authorized service centers.
The original version of the instructions is in the Czech language, other language versions are made by the
appropriate translation.