1
Miri V410 快速入
Miri V410 Quick Guide
门
V410 4K
双向编解码一体机快速使用指
V410 4K Bidirectional Codec All-in-One Machine Quick Guide
南
1
1.
. 设备清
Equipment List
单
为确保质量体系的完整与可追溯,请在开箱时严格核对以下物品
To ensure the integrity and traceability of the quality system, strictly verify the following items upon opening the box:
:
物品名
Item name
称
单
Unit
位
数
Quantity
量
miri v410
编解码一体
Miri v410 All-in-One codec Dev-
ice
机
Table
台
1
DC 12V/2A 电源适配
DC 12V/2A power adapter
器
Individual
个
1
快速使用指
Quick Usage Guide
南
Stem or root of plants
本
1
合格证与保修
Certificate of Conformity and Wa-
rranty Card
卡
Portion
份
1
2
2.
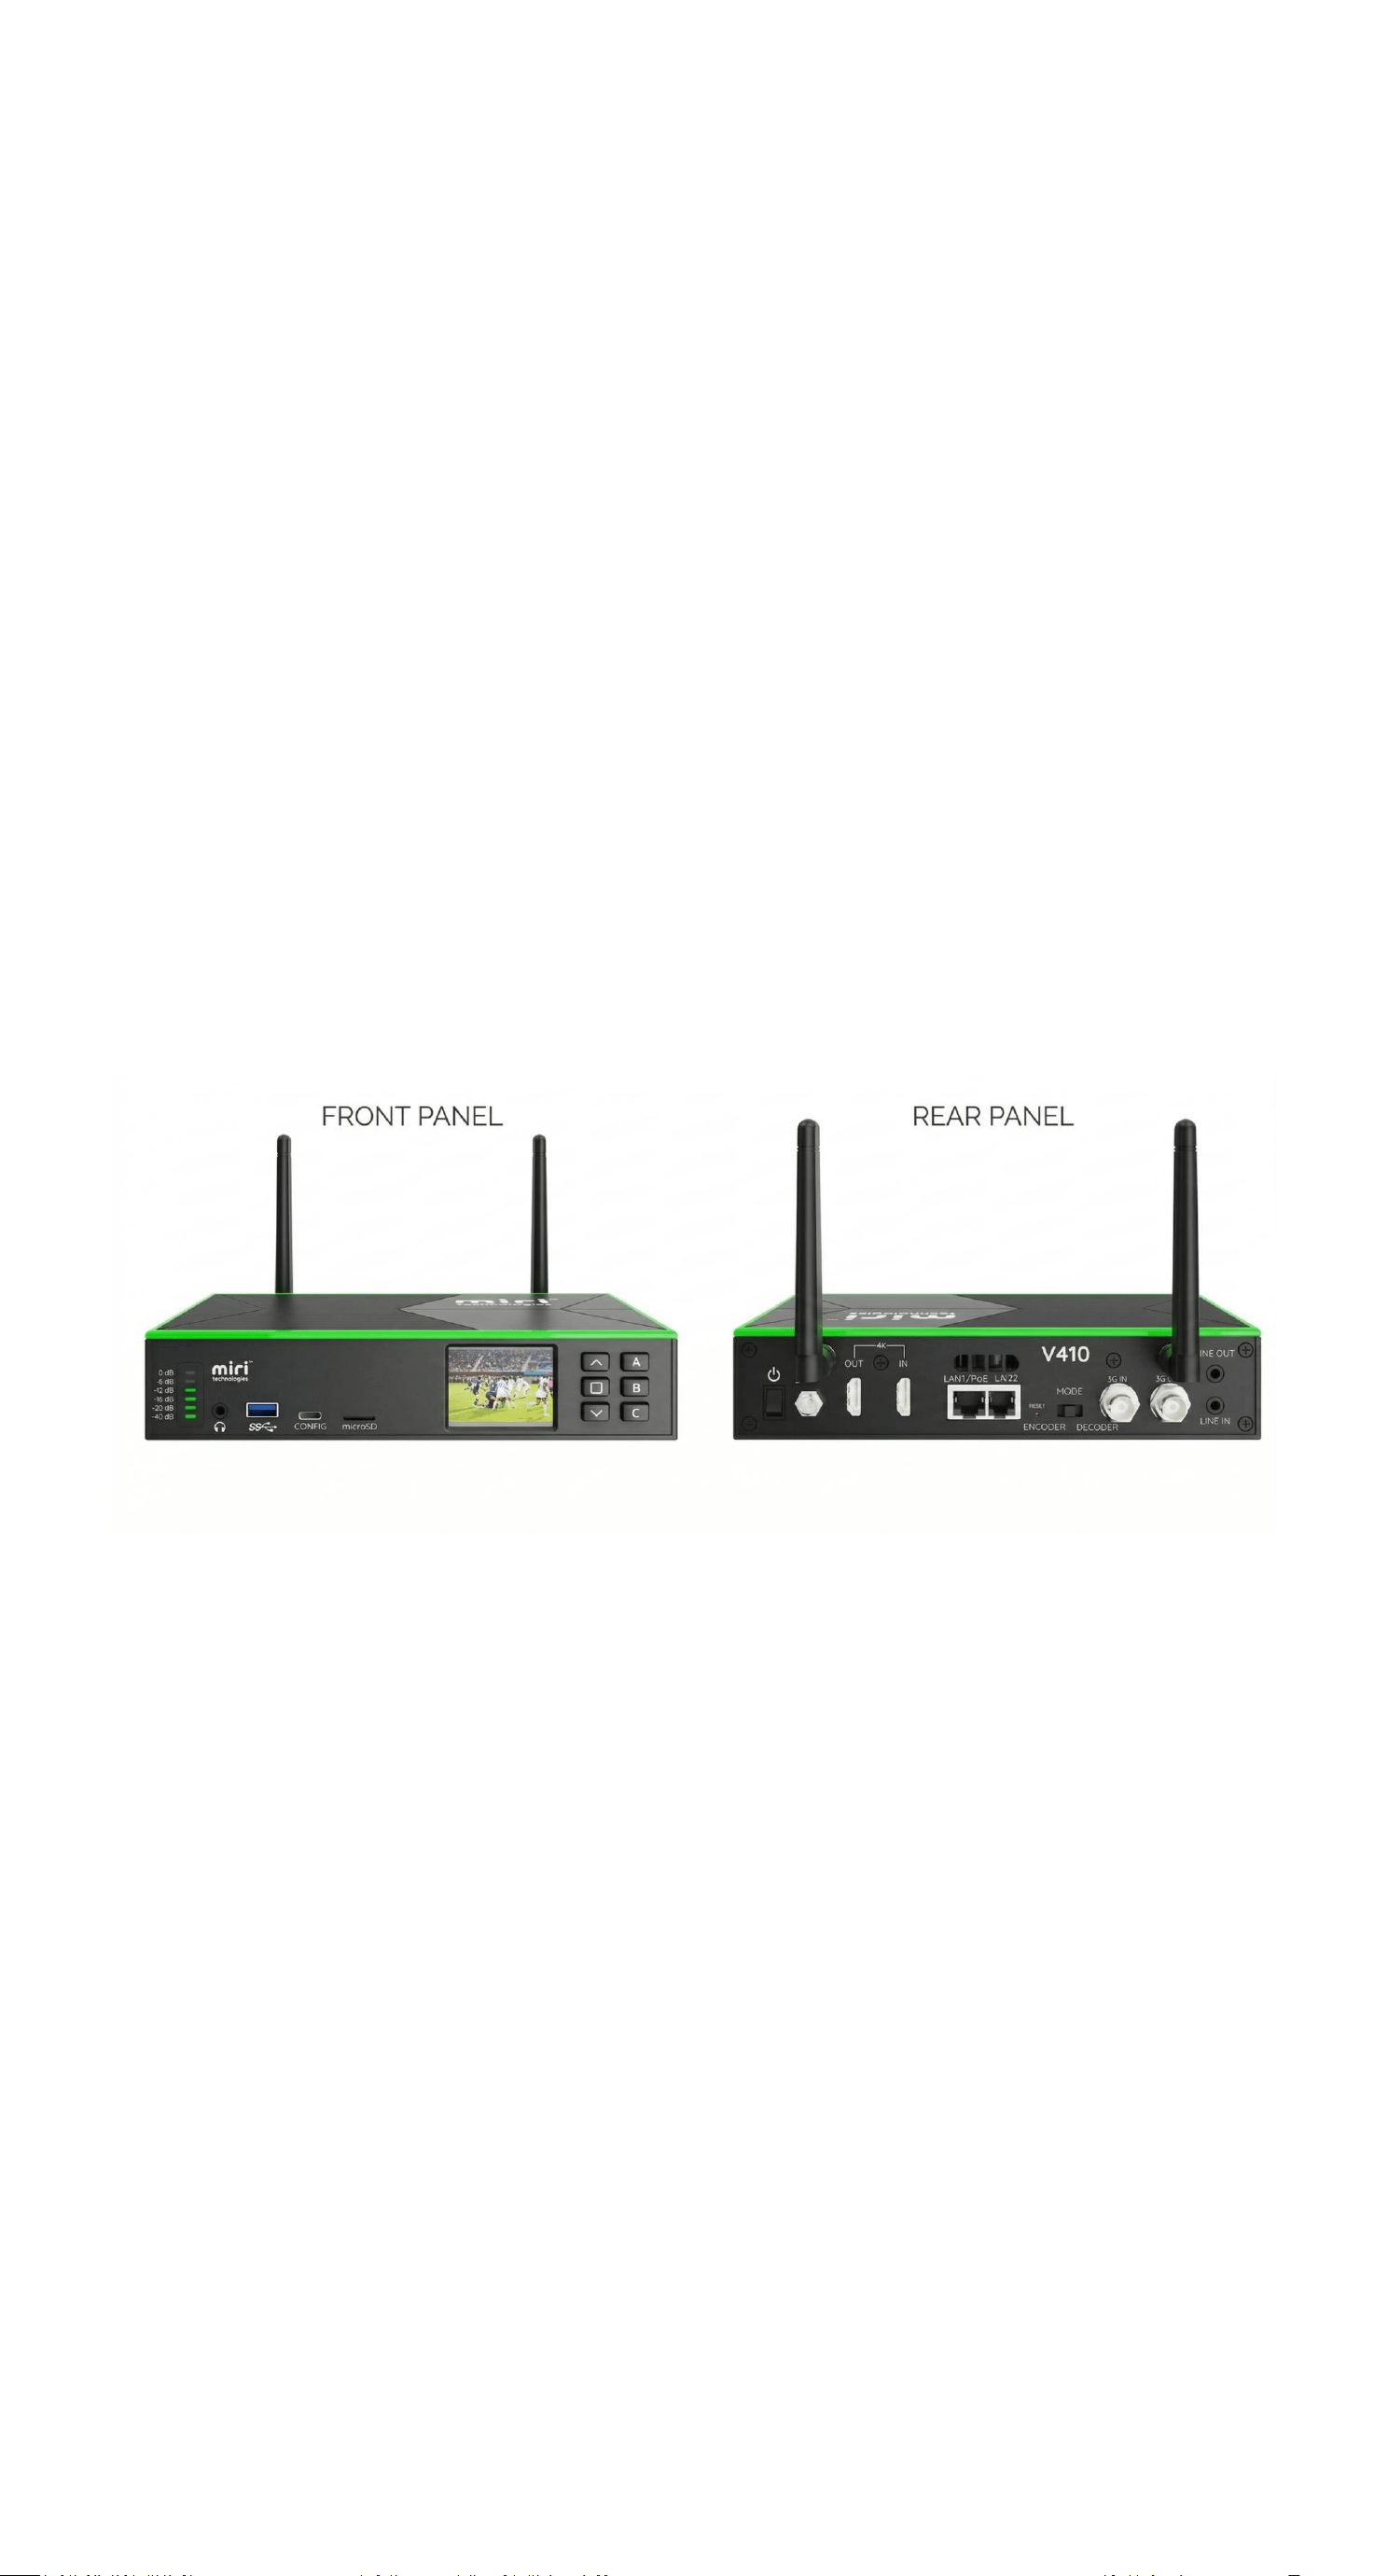
. 设备接口与交互单元概
Overview of Device Interfaces and Interaction Units
述
miri v410 提供了丰富的专业音视频与控制接口,请在接线前确认线缆规格匹配
The miri v410 offers a comprehensive set of professional audio, video, and control interfaces. Ensure the cable specifications match
before wiring:
:
●
●
视频接口:
1× 3G-SDI
输入,
1× 3G-SDI
输出;
1× HDMI 2.0
输入,
1× HDMI 2.0
输出
Video Interface:1× 3G-SDI input, 1× 3G-SDI output; 1× HDMI 2.0 input, 1× HDMI 2.0 output.
。
●
● 音频接口:1× 3.5mm LINE IN,1× 3.5mm LINE OUT,1× Headphone Out (监听)
Audio interfaces:1× 3.5mm LINE IN, 1× 3.5mm LINE OUT, 1× Headphone Out(monitor).
。
●
● 网络接口:2× 1000M RJ45 千兆以太网口(其中 LAN1 支持 PoE 供电,LAN2 可用于备用或独立配置)
Network Interface:2× 1000M RJ45 Gigabit Ethernet ports (LAN1 supports PoE power supply, while LAN2 can be configured
as a backup or standalone setup).
。
●
● USB 与存储:1× USB 2.0 Type-A(外接 U 盘等录制存储)、1 x Tpyec(在解码模式作为输出源);另配有 Micro SD/TF 卡
槽用于本地录像
USB and Storage:1× USB 2.0 Type-A (for external storage devices such as USB drives during recording), 1× Type-C (used as
the output source in decoding mode); includes a Micro SD/TF card slot for local recording.
。
●
●
快捷交互:前面板配备
2.0" LCD
屏幕 及
6
个实体按键(上下和确认键、
3
个快捷键),用于状态监看与基础配置
Quick interaction: The front panel features a 2.0-inch LCD screen and six physical buttons(up/down and confirm buttons,
and three shortcut keys) for status monitoring and basic configuration.
。
●
●
硬件控制:
Reset
复位孔,以及用于编解码模式物理切换拨码
Hardware control:Reset hole, and the physical switch dial for codec mode switching.
。
3
3.
. 切换编码和解码模
Switch Encoding and Decoding Modes
式
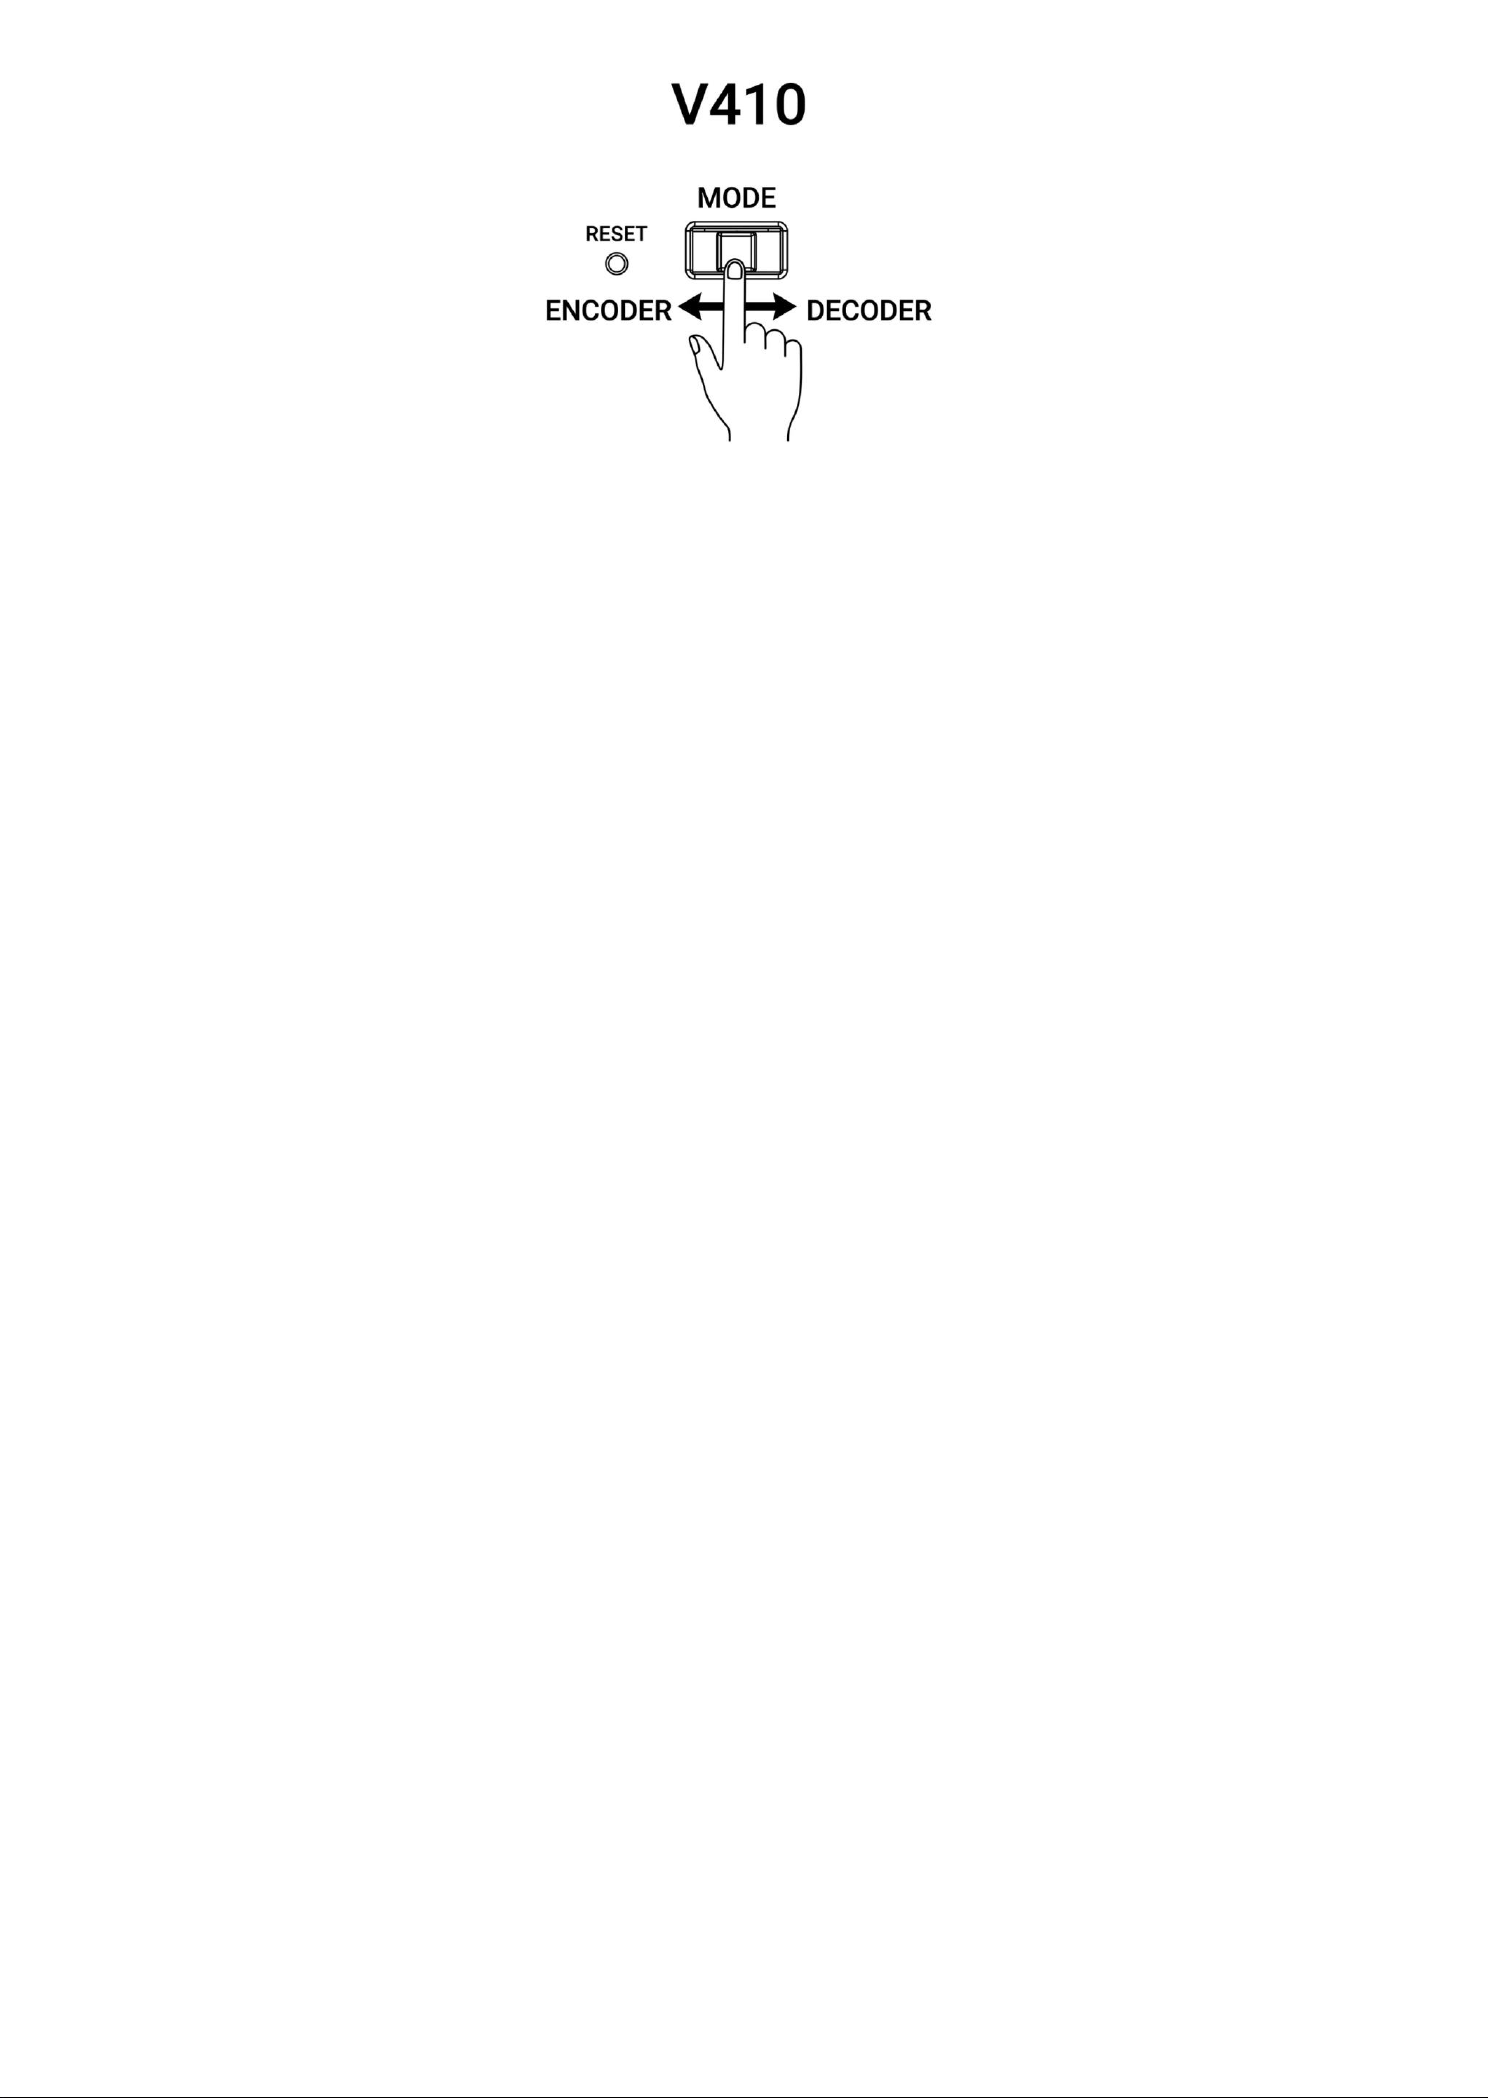
硬件切换:通过后面板的 MODE 标识的拨动按钮来切换设备的工作模式,选择“编码 (Encoder)”或“解码 (Decoder)”,滑动
后设备会重启以切换模式
Hardware Switch: Use the MODE button on the back panel to switch the device's operating mode—select "Encoder" or "Decoder."
Swiping will restart the device and change the mode.
。
2
4
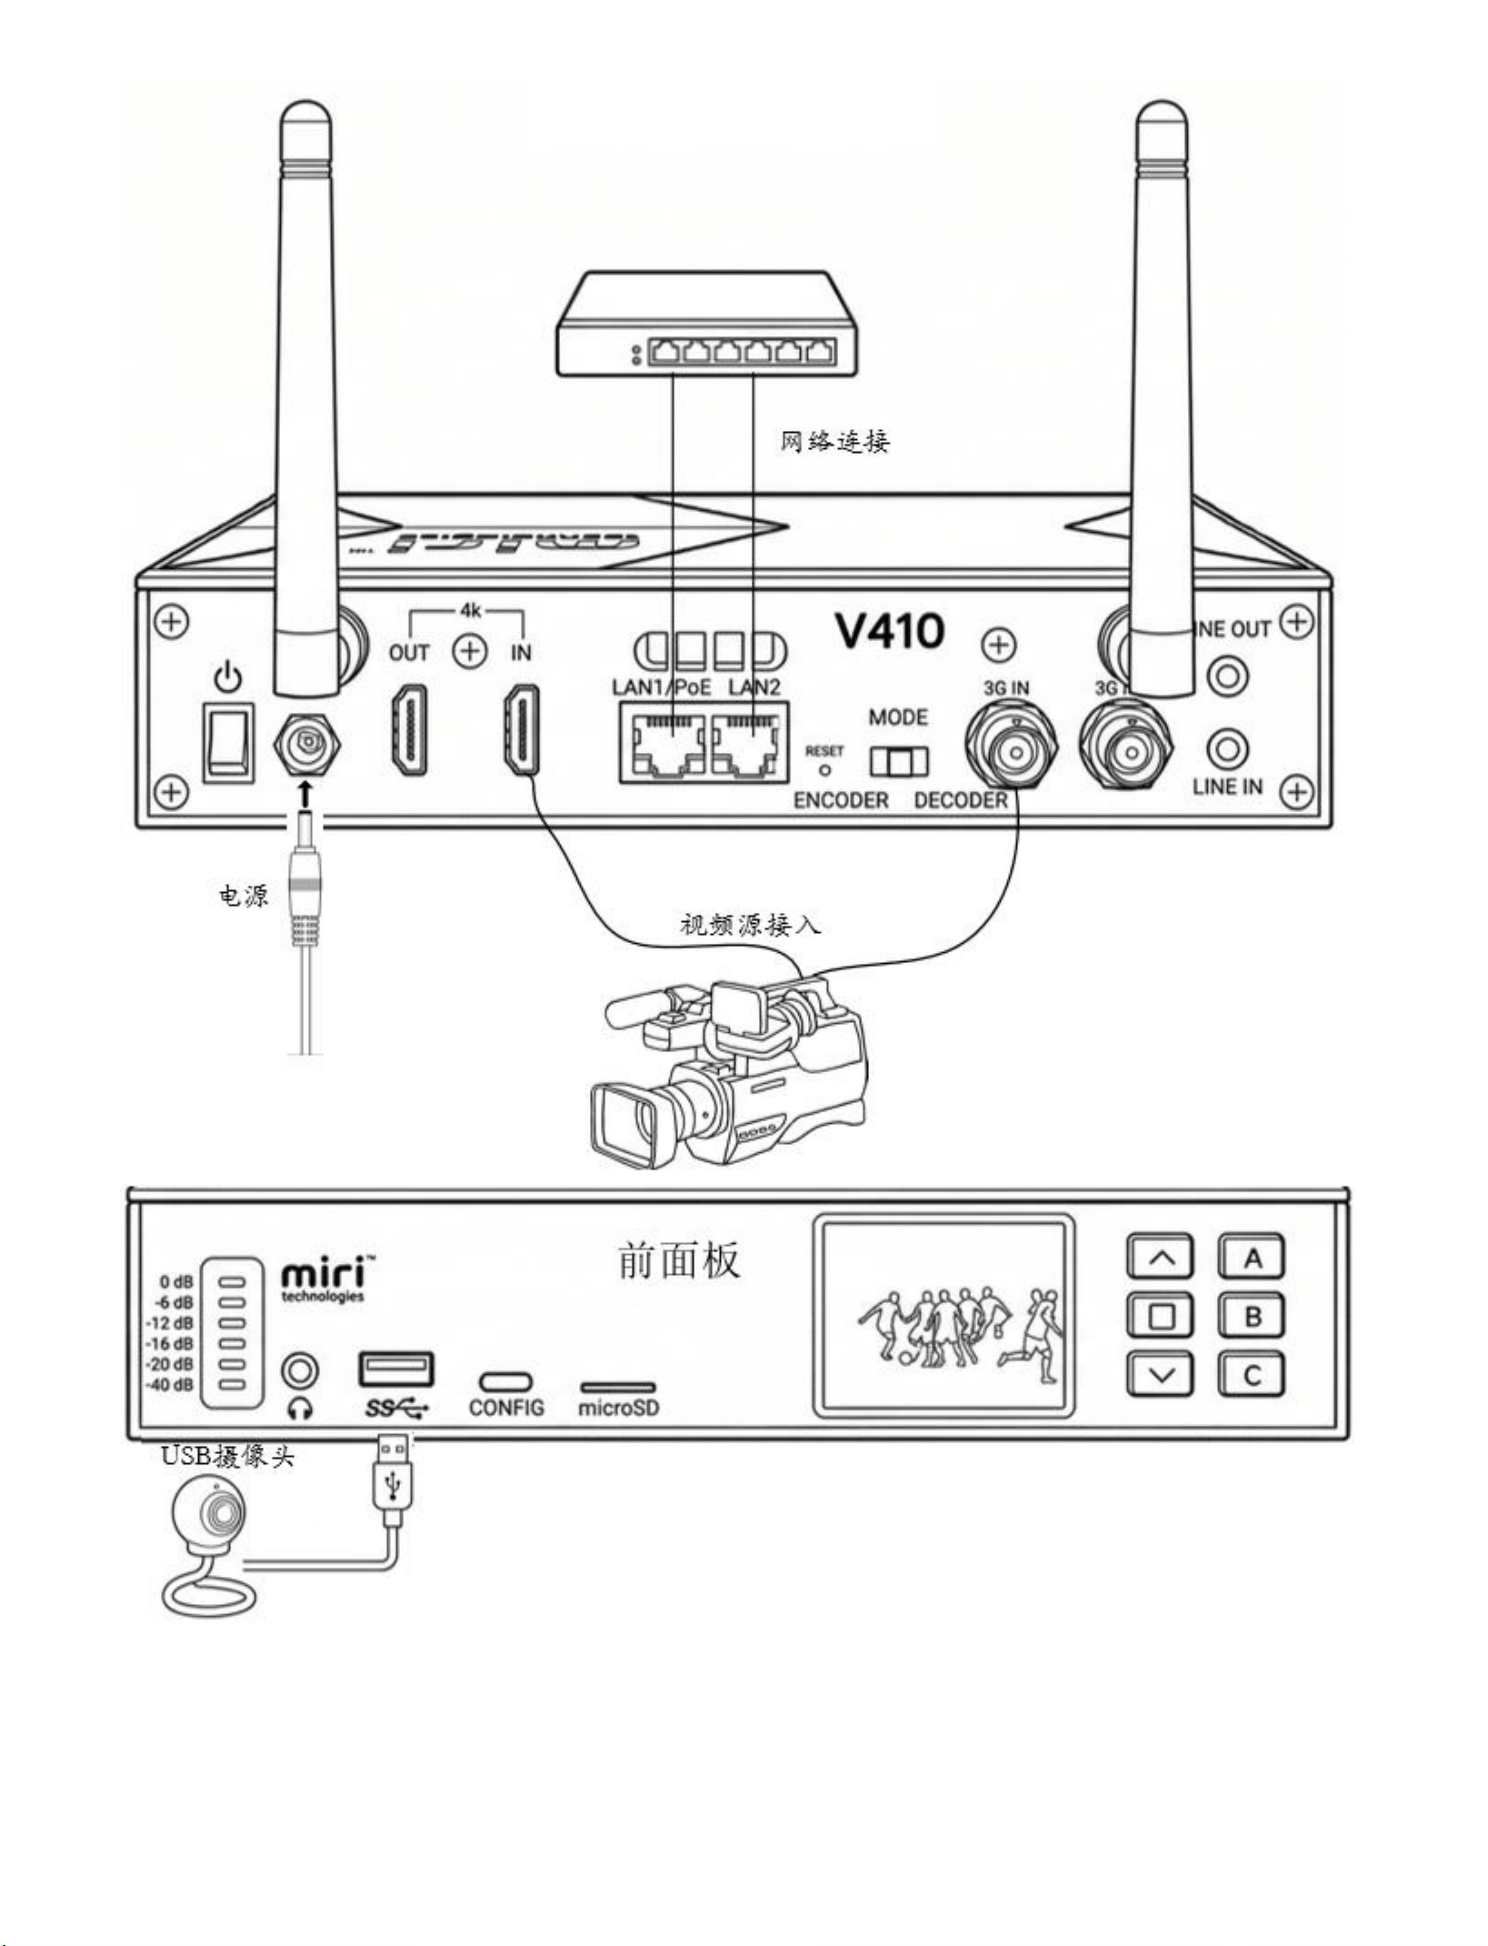
4 编码模式接线说
Code Pattern and Wiring Instructions
明
●
● 视频源输入:将摄像机、电脑或导播台的视频输出连接至 V410 的 HDMI IN、3G-SDI IN 或 USB 接口
Video source input: Connect the video output from the camera, computer, or studio console to the HDMI IN,3G-SDI IN, or
USB interface of the V410.
。
●
● 网络与供电:将网线接入带有 PoE 标识的千兆以太网口(支持一线解决供电和网络);若网络环境无 PoE,请连接附
带的
DC 12V
电源适配器。也可以通过内置
Wi-Fi 7
连接网络
Network and Power Supply: Connect the network cable to the Gigabit Ethernet port with a PoE indicator (which supports
simultaneous power and network connectivity); if the network environment lacks PoE, connect the included 12V DC power
adapter. Alternatively, connect to the network via the built-in Wi-Fi 7.
。
●
● 音频(可选):通过 3.5mm Line IN 接入外部调音台或麦克风音频;将耳机插入前面板的耳机孔进行实时监听
Audio (optional): Connect external mixing console or microphone audio via the 3.5 mm Line IN; Insert headphones into the
front panel's headphone jack for real-time monitoring.
。
3
如何快速 RTMP 推流(以斗鱼为例
How to Stream via RTMP Quickly (Using Douyu as an Example)
)
1
1.
. 获取推流码:登录斗鱼创作者中心,在直播设置中复制你的专属 RTMP 地址 和 直播码 (Stream Key)
Get the streaming code: Log in to the Douyu Creator Center, and copy your exclusive RTMP address and streaming code
(Stream Key)in the live broadcast settings.
。
4
2
2.
.
登录控制台:在电脑浏览器中输入
V410
的
IP
地址登录
Web UI
Log in to the Console: Enter the IP Address of V410 in Your Computer Browser to Log in to the Web UI.
。
默认登录用户名和密码都是 admin
The default login username and password are both admin.
。
3
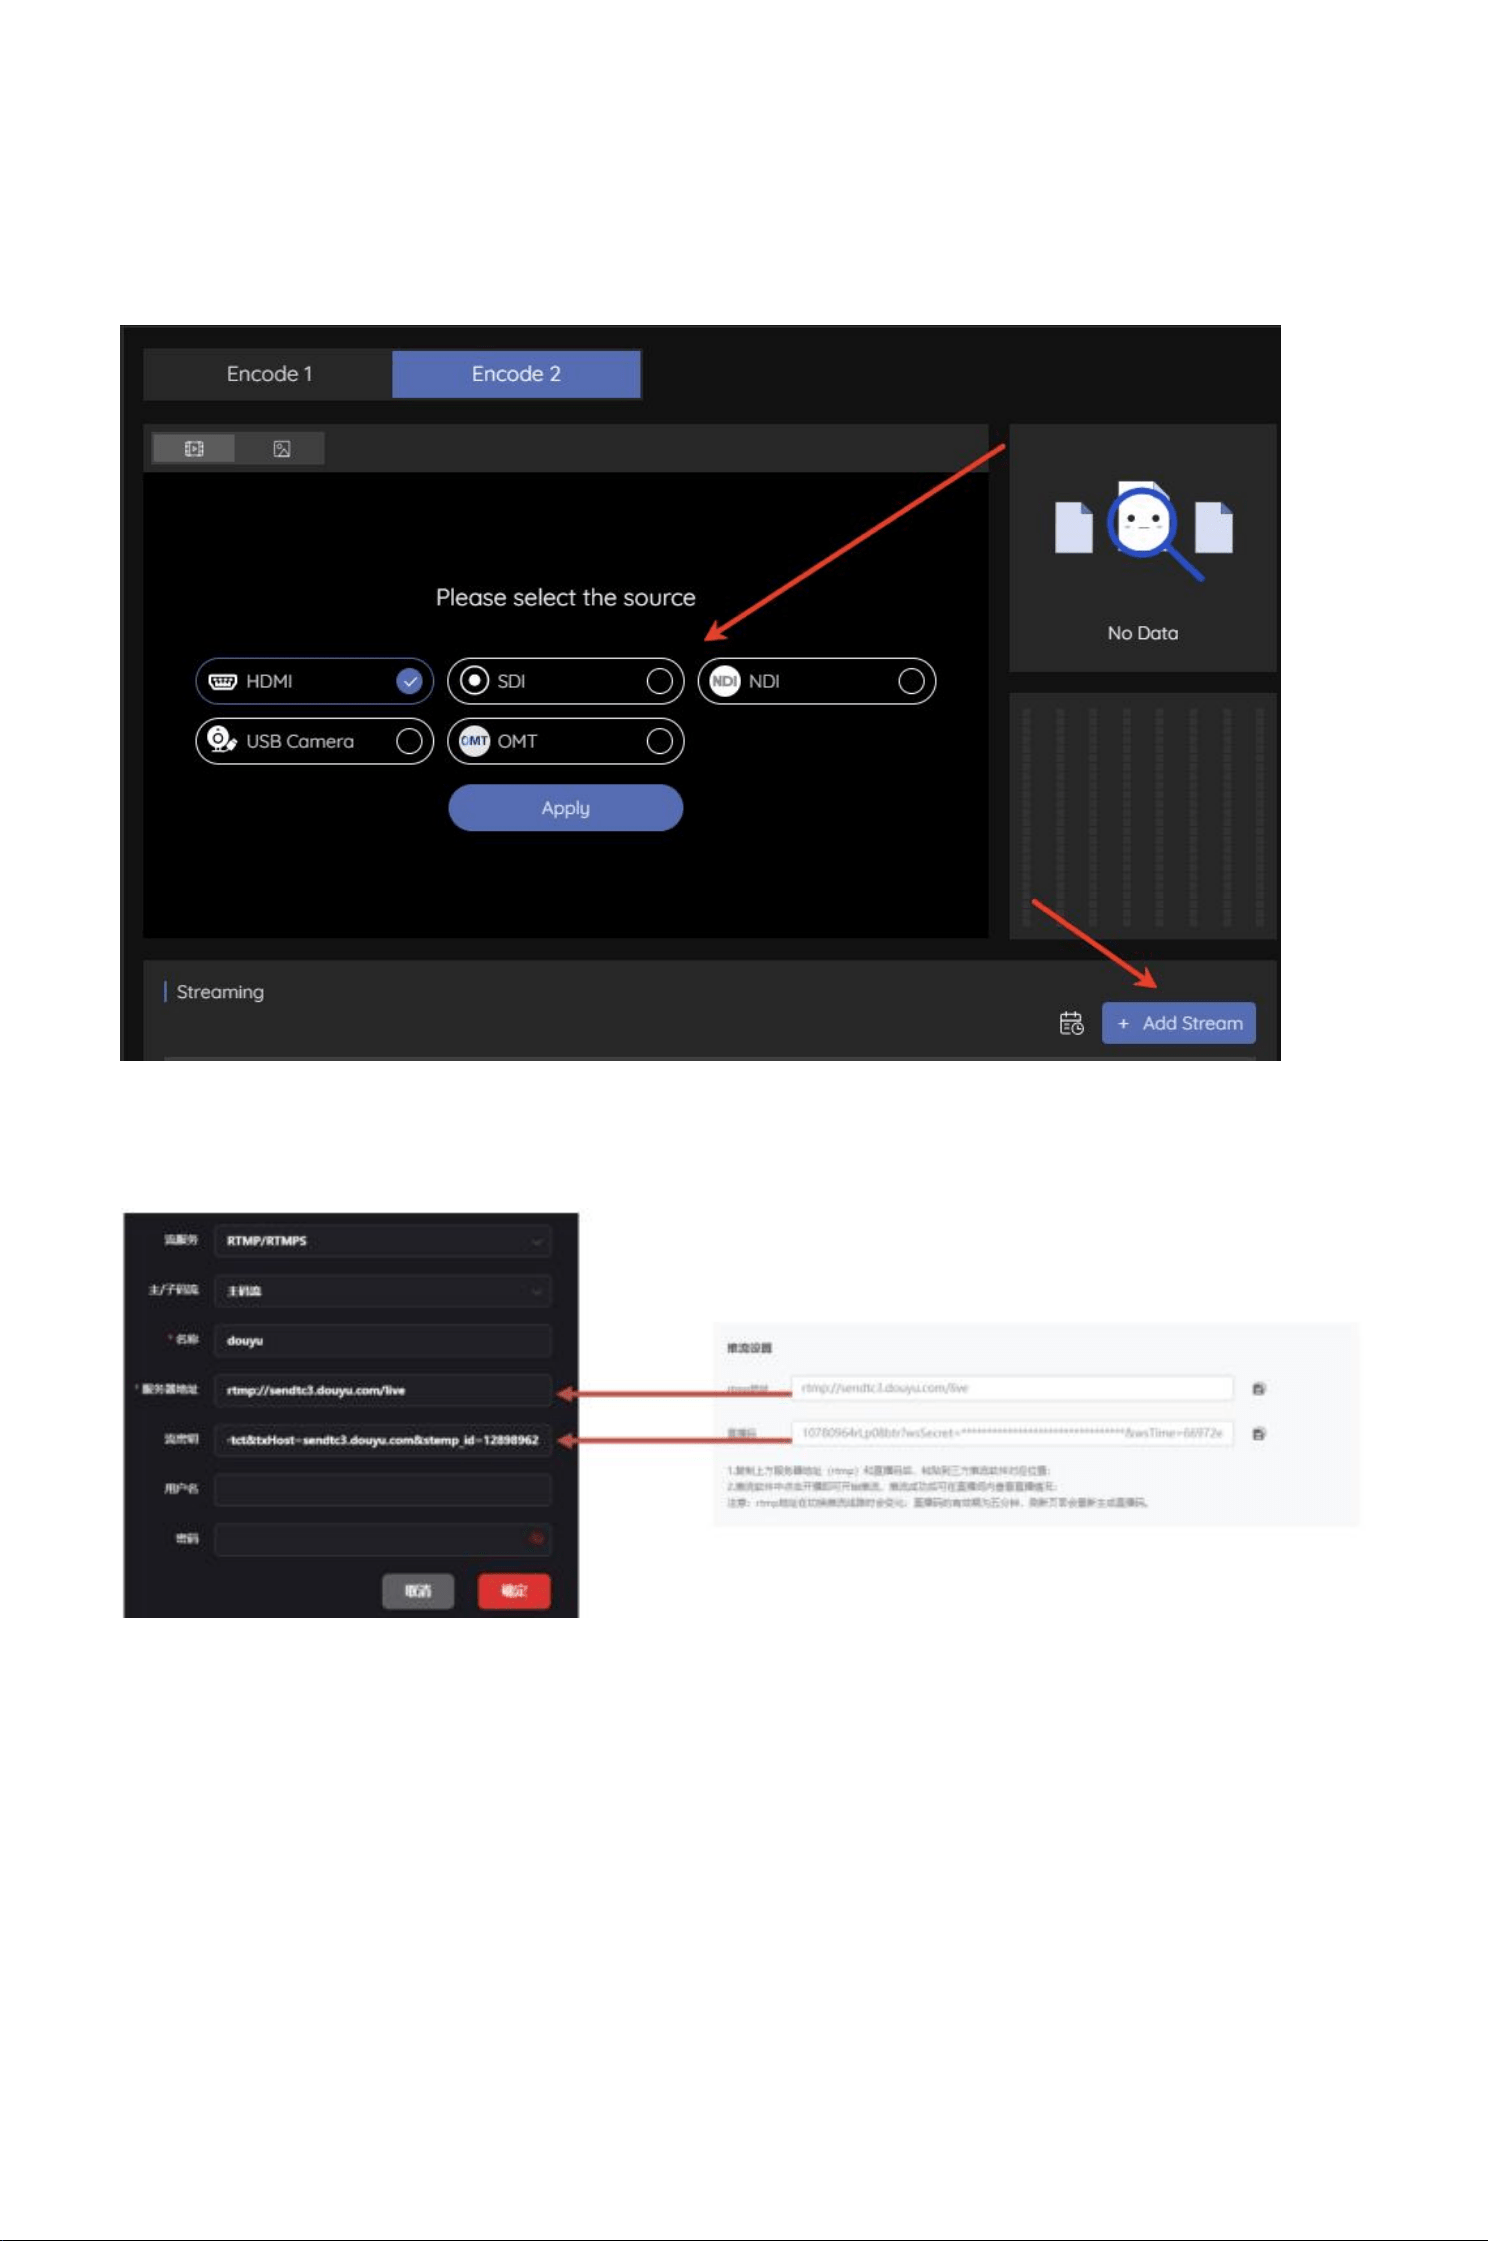
3.
.
配置输出流:在首页进入任意编码窗口,选择你的输入源,点击
“
添加推流
(Add Stream)”
选项,添加一个新的
RTMP
目
标
Configure the output stream: On the homepage, go to any encoding window, select your input source, click the "Add Stream"
option, and add a new RTMP target.
。
4
4.
.
填入参数:将斗鱼的
RTMP
地址和直播码组合(或分别填入指定字段)。根据网络情况设置视频编码格式(
H.264/H.265
)
和码率
Enter parameters: Combine Douyu's RTMP address and live stream code (or enter them separately in the designated fields). Set
the video encoding format (H.264/H.265) and bitrate based on network conditions.
。
5
5.
. 一键开播:点击启动按钮后,旁边出现连接速率即代表连接成功,此时斗鱼直播间即可看到推流画面
One-Click Broadcast Start: After Clicking the Start Button, the Connection Speed Displayed Next to It Indicates a Successful
Connection. At This Point, the Douyu Live Stream Will Display the Live Stream画面.
。
5
5 解码模式接线说
Decoding Mode Wiring Instructions
明
●
● 显示输出:将显示器、电视大屏或矩阵接入 V410 的 HDMI Out 或 3G-SDI Out 接口
Display Output: Connect the monitor, large TV screen, or matrix to the HDMI Out or 3G-SDI Out interface of the V410.
。
●
●
网络与供电:同编码模式,接入局域网网线(
PoE
)或连接
Wi-Fi 7
,确保设备能接收到网络视频流
Network and Power Supply: Use the same encoding mode and connect to a LAN cable (PoE) or Wi-Fi 7 to ensure the device
can receive network video streams.
。
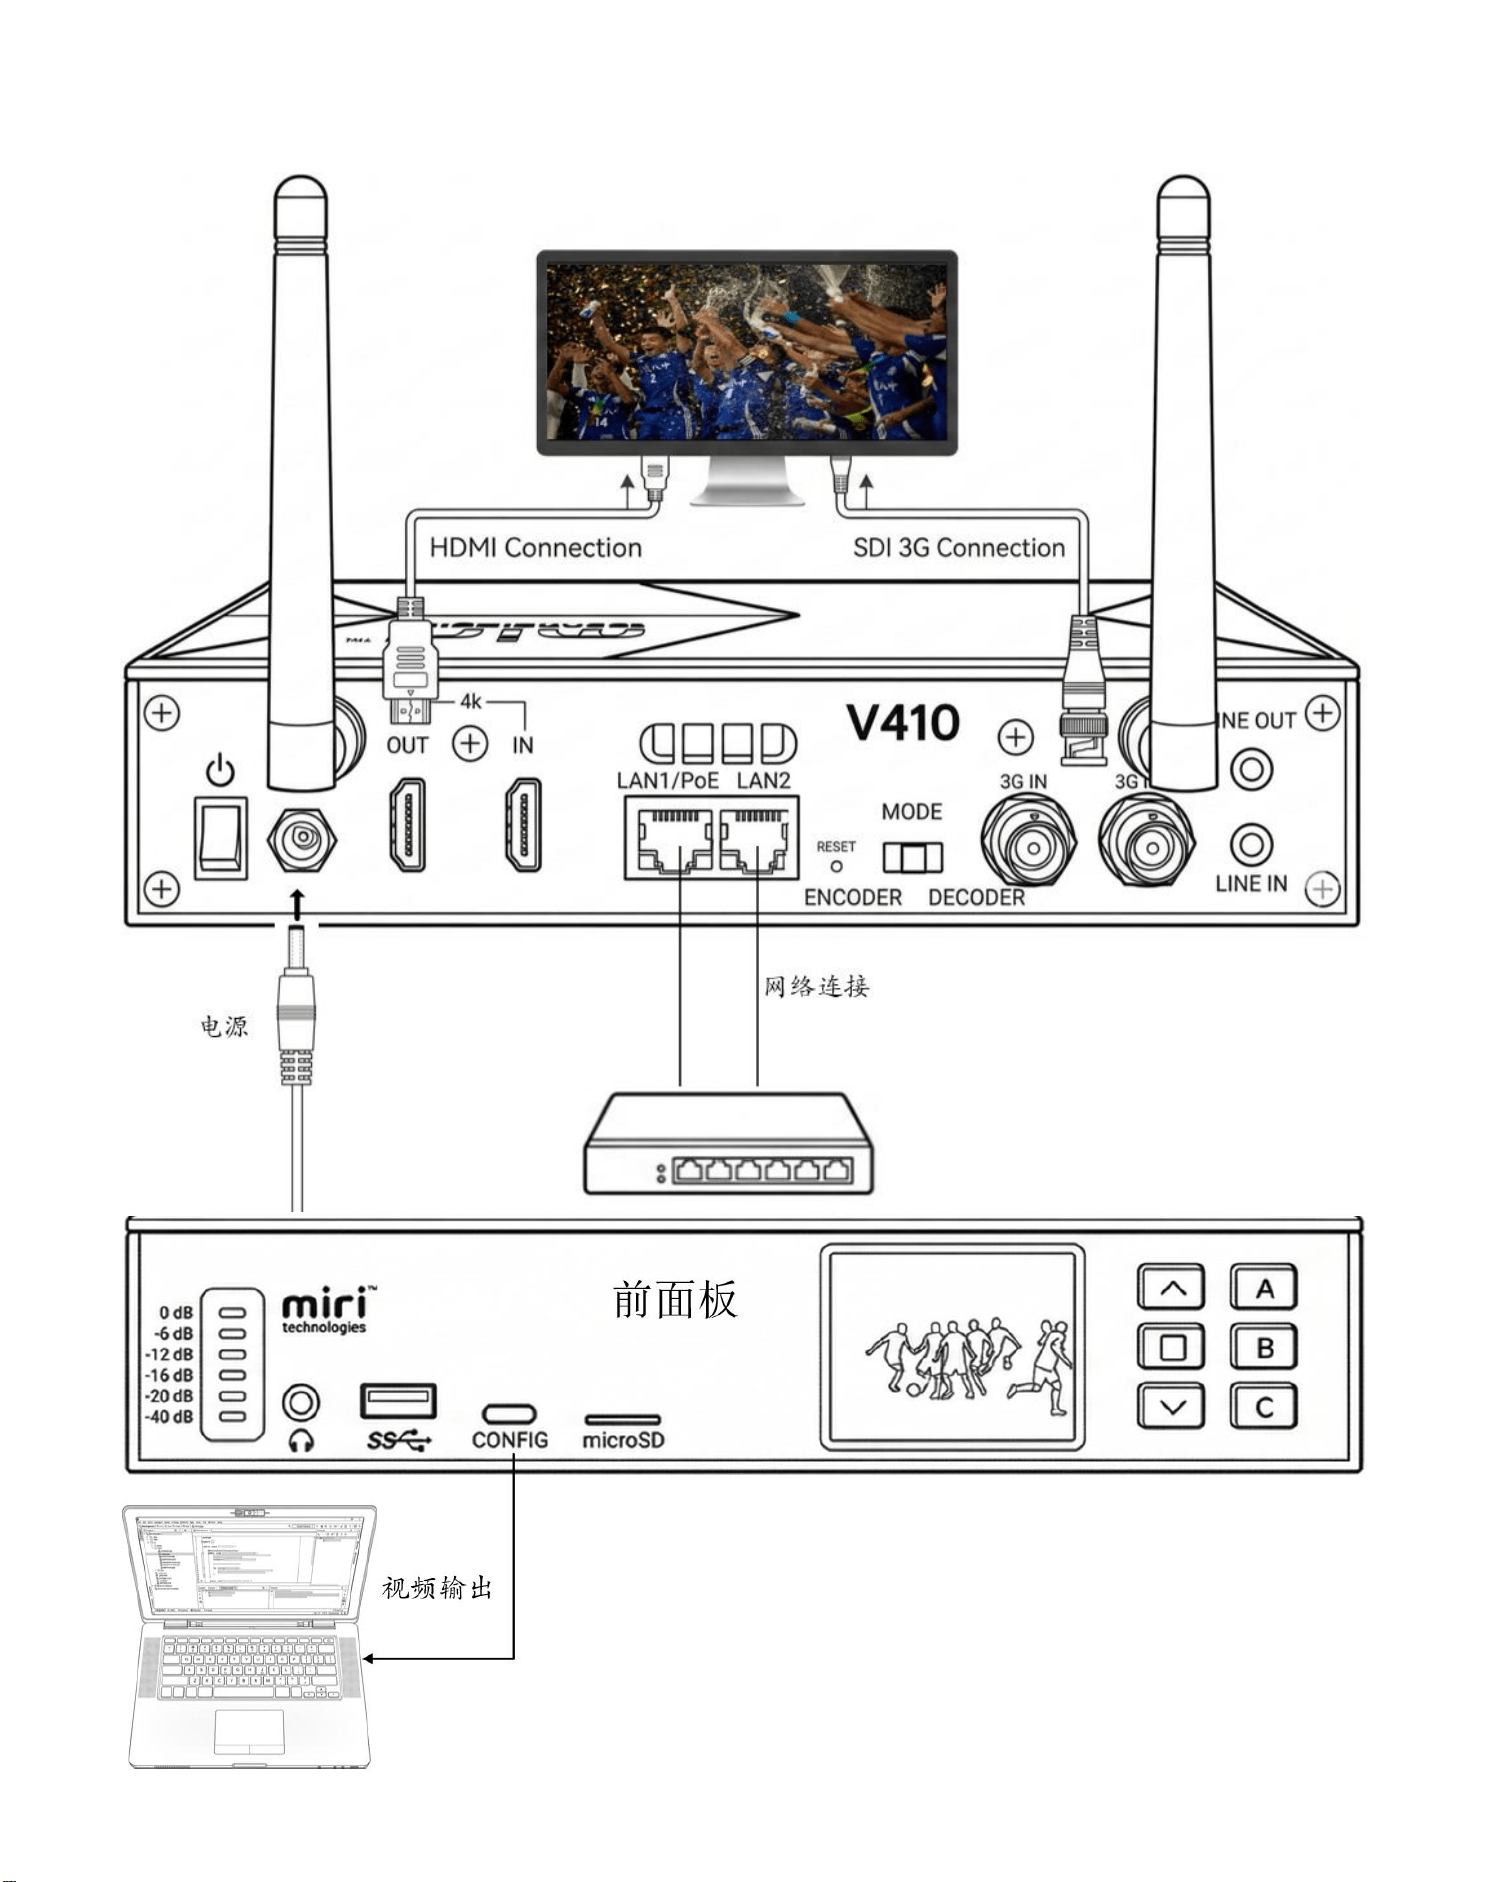
5
●
●
音频(可选):通过
3.5mm Line Out
将解嵌后的音频输出至外部音响或扩音系统
Audio (optional): Output the decoded audio to an external speaker or sound system via the 3.5mm Line Out.
。
6
如何快捷
NDI
解码输
How to quickly decode and output NDI
出
1
1.
.
确认模式:确保
V410
已切换至解码模式,并登录
Web UI
Confirm Mode: Ensure the V410 has switched to decoding mode and log in to the Web UI.
。
2
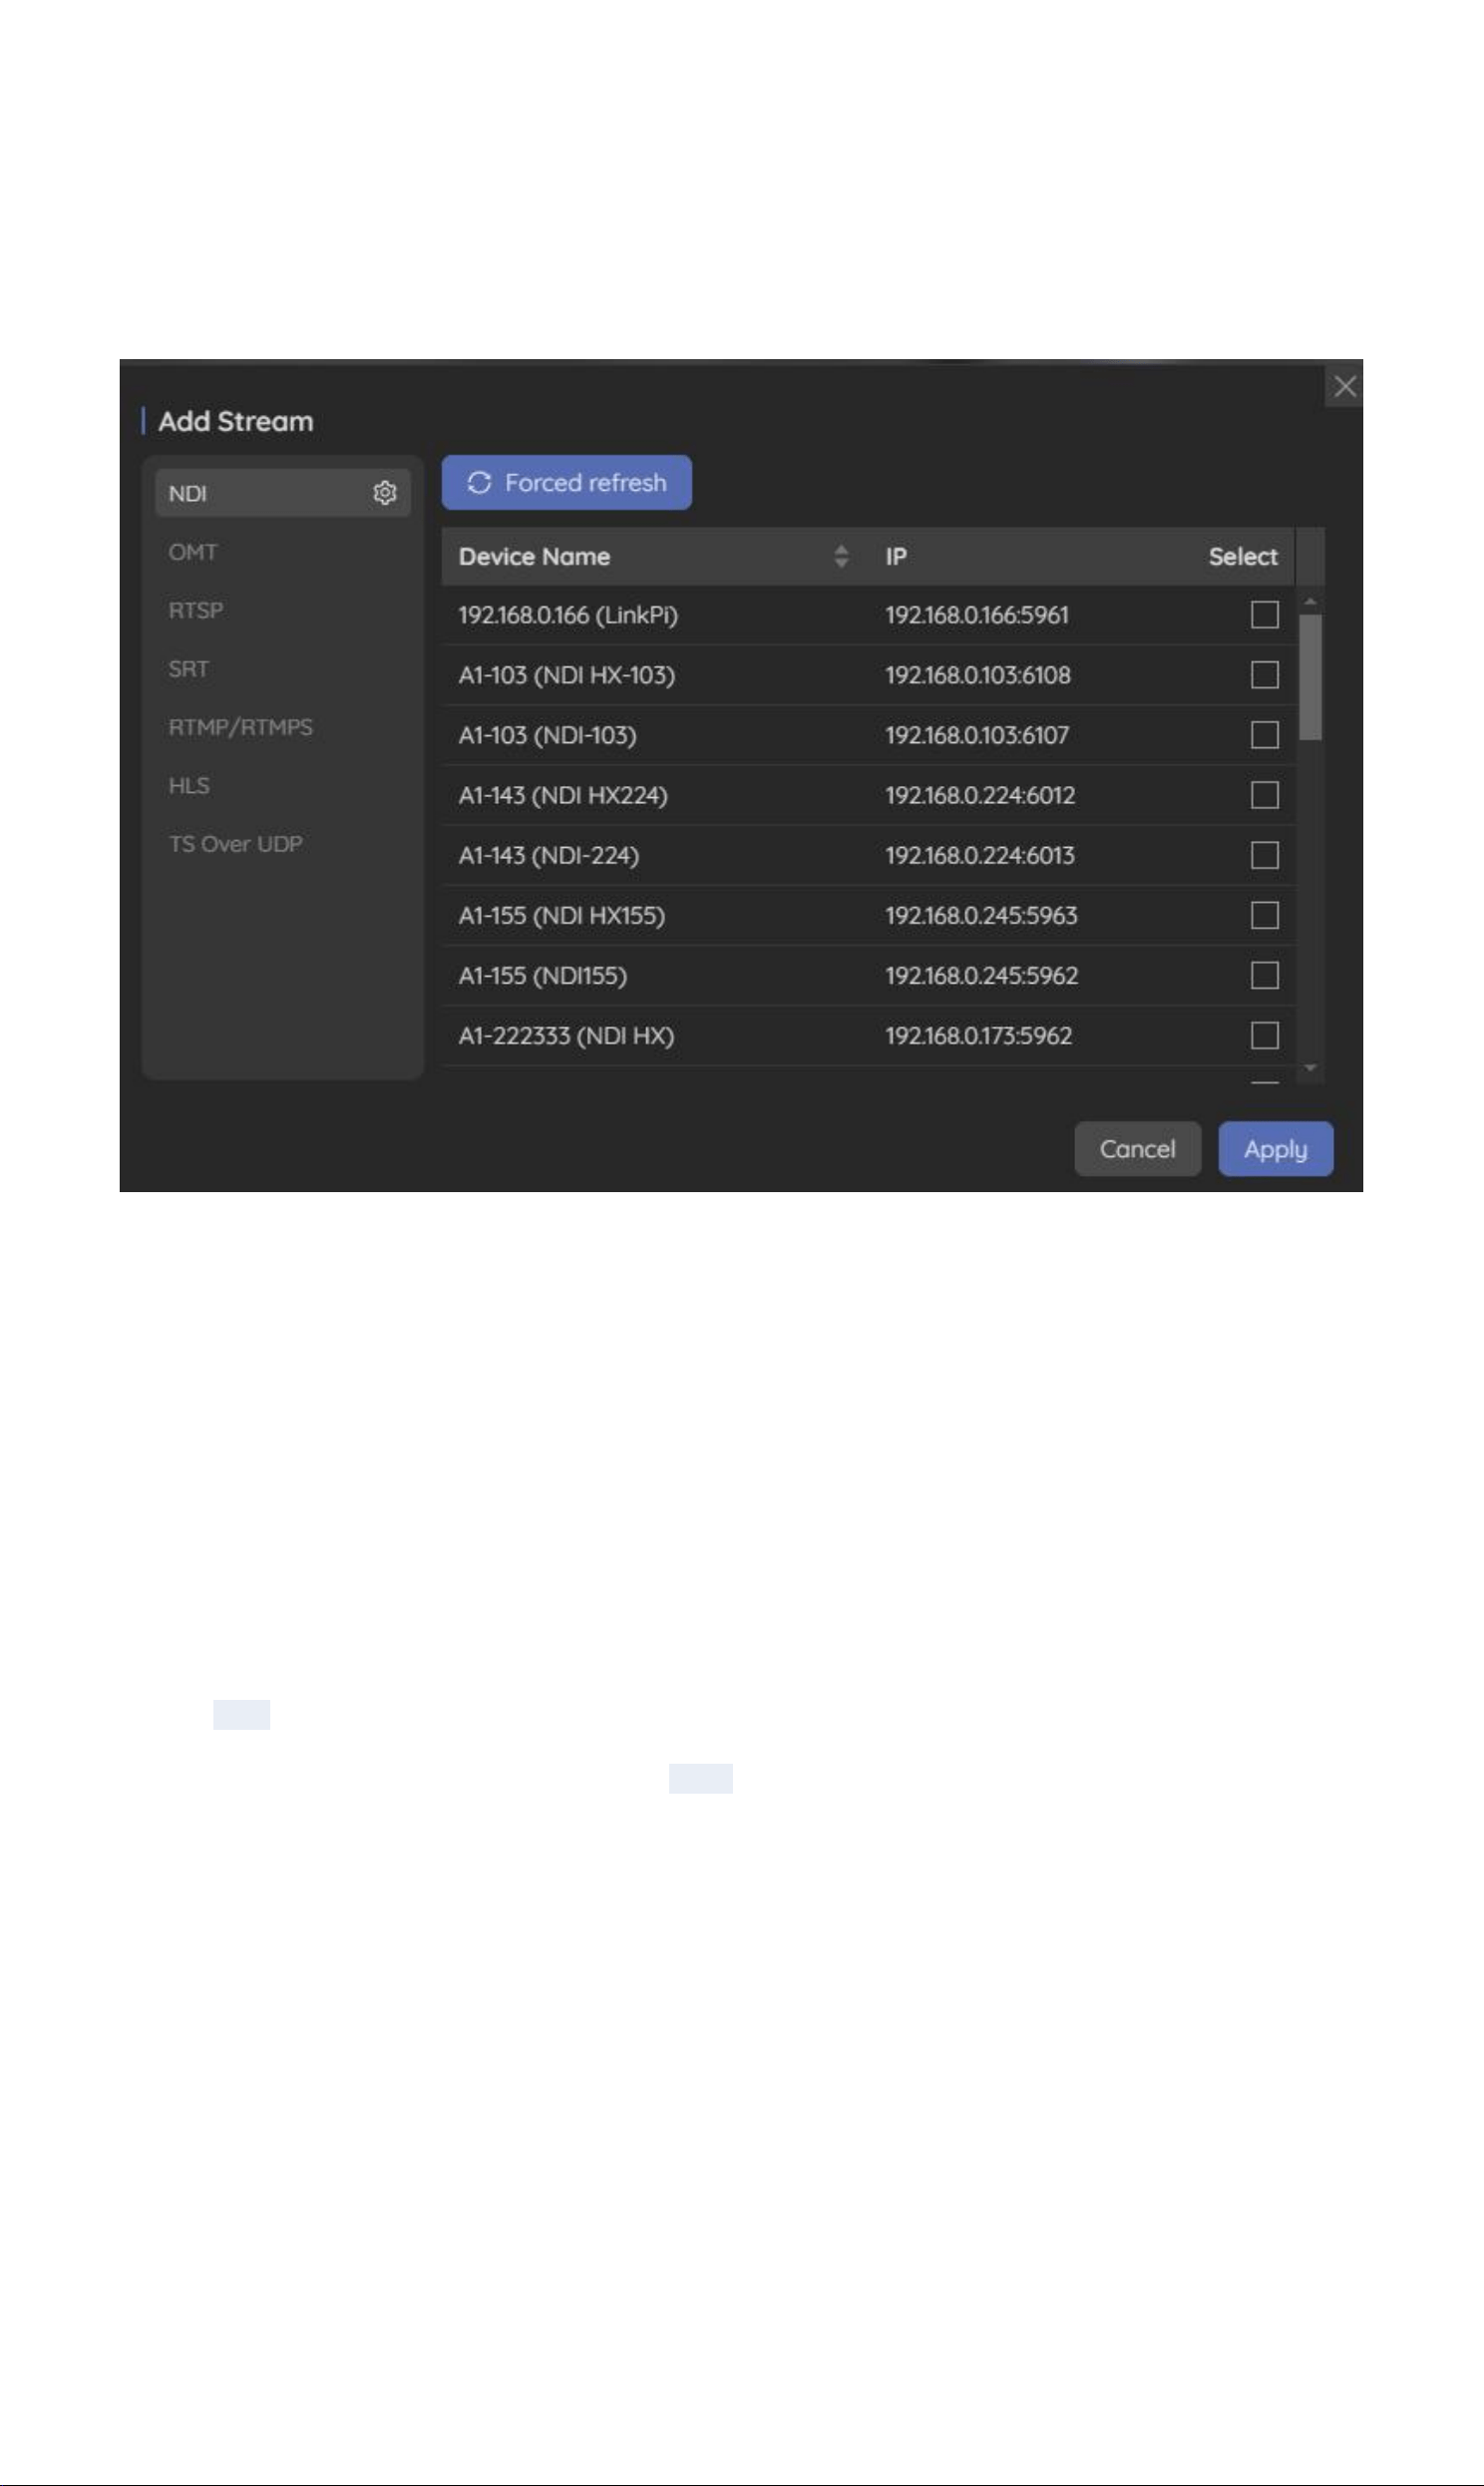
2.
.
发现信号:点击
“
添加源
(Add Stream)”
。由于
V410
内置完整的
NDI
支持(包括
NDI High Bandwidth
和
NDI HX2/HX3
),
它会自动扫描并列出局域网内可用的 NDI 源
Discovery Signal: Click "Add Stream". Since the V410 includes full NDI support (including NDI High Bandwidth and
NDI HX2/HX3), it automatically scans and lists all available NDI sources on the local area network.
。
3
3.
. 选择信号源:从列表中勾选你想要解码的 NDI 发送端(如某台摄像机或 vMix 电脑)
Select a Signal Source: Check the NDI Transmitter You Want to Decode from the List (e.g., a Camera or a VMix Computer).
。
4
4.
.
绑定输出接口:按住已添加的源,拖动到上方的
HDMI
或
SDI
窗口
Binding Output Interface: Hold the Added Source and Drag It to the HDMI or SDI Port Above.
。
5
5.
. 开始解码:屏幕上将立即开始连接并输出低延迟的高画质 NDI 画面
Begin Decoding: The Screen Will Immediately Establish a Connection and Output High-Quality NDI Video With Low Latency.
。
6
6.
. 系统维护与恢
System Maintenance and Recovery
复
●
● 固件升级:请定期登录 Web UI 的系统设置板块检查更新,升级过程中切勿断电,以免损坏系统引导区
Firmware Upgrade: Log in to the System Settings section of the Web UI periodically to check for updates. Do not power off
during the upgrade process to avoid damaging the system boot sector.
。
●
● 恢复出厂设置:当需要抹除所有网络及业务配置时,可长按机身 Reset 键 8 秒。系统重启后,IP 获取方式及登录凭
证(admin)将恢复至出厂初始状态
Restore factory settings: To erase all network and service configurations, hold the Reset button for 8 seconds. After the system
restarts, IP acquisition methods and login credentials (admin) will return to their factory defaults.
。
物理与环境参
Physical and Environmental Parameters
数
●
● 整机功耗:≤12
Total power consumption:≤12W
W
●
● 电源供应:DC 12V/2
Power Supply: DC 12V/2A
A
●
●
物理尺寸:
210 × 142 × 43.5 m
Physical dimensions:210 × 142 × 43.5 mm
m
●
● 设备重量:847
Device weight:847g
g
●
●
环境温湿度:工作温度
-10
℃
~ 45
℃;存储温度
-20
℃
~ 45
Environmental temperature and humidity: Operating temperature: -10°C to 45°C; Storage temperature: -20°C to 45°C
℃

FCC Statement
This device complies with part 15 of the FCC rules. Operation is subject to the following two conditions:
(1) this device may not cause harmful interference, and
(2) this device must accept any interference received, including interference that may cause undesired operation.
Changes or modifications not expressly approved by the party responsible for compliance could void the user's authority to operate
the equipment.
NOTE: This equipment has been tested and found to comply with the limits for a Class B digital device, pursuant to part 15 of the FCC
Rules.
These limits are designed to provide reasonable protection against harmful interference in a residential installation.
This equipment generates uses and can radiate radio frequency energy and, if not installed and used in accordance with the
instructions,
may cause harmful interference to radio communications. However, there is no guarantee that interference will not occur in a
particular installation.
If this equipment does cause harmful interference to radio or television reception, which can be determined by turning the
equipment off and on,
the user is encouraged to try to correct the interference by one or more of the following measures:
·Reorient or relocate the receiving antenna.
·Increase the separation between the equipment and receiver.
·Connect the equipment into an outlet on a circuit different from that to which the receiver is connected.
·Consult the dealer or an experienced radio/TV technician for help.
This equipment complies with FCC radiation exposure limits set forth for an uncontrolled environment.
This equipment should be installed and operated with minimum distance 20cm between the radiator & your body.