User Guide
Quality, Design and Innovation
home.liebherr.com/fridge-manuals
Contents
1 Appliance at a glance............................................ 2
1.1 Scope of supply............................................................ 2
1.2 Overview of appliance and equipment..................... 3
1.3 Special features........................................................... 3
1.4 Range of use of appliance.......................................... 3
1.5 Appliance noise emissions......................................... 3
1.6 Compliance................................................................... 3
1.7 EPREL database........................................................... 4
2 General safety instructions.................................. 4
3 Putting into operation........................................... 5
3.1 Installation conditions................................................ 5
3.2 Appliance dimensions................................................. 6
3.3 Transporting appliance............................................... 7
3.4 Removing packaging................................................... 7
3.5 Installing appliance..................................................... 8
3.6 Setting up the appliance so that it is level.............. 9
3.7 Installing multiple appliances.................................... 9
3.8 After installation.......................................................... 9
3.9 Disposing of packaging............................................... 9
3.10 Reversing the door hinge / removing the hinge..... 9
3.11 Aligning the door.......................................................... 12
3.12 Connecting appliance................................................. 13
3.13 Switching on appliance (first use)............................ 13
4 Storage.................................................................. 13
4.1 Information regarding storage................................... 13
4.2 Storage times............................................................... 13
5 Controls................................................................. 13
5.1 Control and display elements.................................... 13
5.1.1 Status display............................................................14
5.2 Functions....................................................................... 14
5.2.1 Switching appliance on and off..............................14
5.2.2 Changing temperature............................................. 14
5.2.2 Operating cycle......................................................... 14
5.2.3 Min. Max. temperature display................................14
5.2.4 Manual defrosting.....................................................14
5.3 Alarms............................................................................ 15
6 Features................................................................. 15
7 Maintenance.......................................................... 15
7.1 Defrosting appliance................................................... 15
7.2 Cleaning the appliance............................................... 15
8 Customer help....................................................... 16
8.1 Technical specifications............................................. 16
8.2 Technical fault.............................................................. 17
8.3 Customer Service......................................................... 17
8.4 Type plate...................................................................... 18
9 Shutting down....................................................... 18
10 Disposal................................................................. 18
10.1 Preparing appliance for disposal.............................. 18
10.2 Disposing of the appliance in an environmentally
friendly manner............................................................ 18
11 Additional information.......................................... 19
The manufacturer is continually working on the further
development of all types and models. Please be aware that
we reserve the right to make changes to the shape, equip‐
ment and technology.
Symbol
Explanation
Read instructions
Please read the information in these instruc‐
tions carefully to understand all of the benefits
of your new appliance.
Symbol Explanation
Full instructions on the internet
You can find detailed instructions on the
internet using the QR code on the front
of these instruction or by entering the
service number at home.liebherr.com/fridge-
manuals.
The service number can be found on the serial
tag:
Fig. Example illustration
Check appliance
Check all parts for transport damage. If you
have any complaints, please contact your
agent or customer service.
Differences
These instructions apply to a range of models,
so differences are possible. Sections that
apply to certain models only are marked with
an asterisk (*).
Instructions and results
Instructions are marked with a .
Results are marked with a .
Videos
Videos about the appliances are available on
the YouTube channels of Liebherr-Hausgeräte.
These operating instructions apply to:
PlugIn: Remote:
FRTSvg 75.. FFTSvg 75.. FRTSrg 75 FFTSrg 75..
1 Appliance at a glance
1.1 Scope of supply
Check all parts for transport damage. If you have any
complaints, please contact your dealer or Customer Service.
(see 8.3 Customer Service)
The delivery comprises the following parts:
-
Freestanding appliance
-
Equipment *
-
Installation materials *
-
Operating instructions
Appliance at a glance
2 * Depending on model and options
1.2 Overview of appliance and equip‐
ment
Fig. 1 Example illustration
(1)
Type plate (on the left
interior wall of the
appliance)
(4) Adjusting feet / castors
*
(2) Control elements and
temperature display
(5) Grid shelf *
(3) Drawers *
1.3 Special features
Note
Accessories are available via Customer Service
(see 8.3 Customer Service) and in the Liebherr-Hausgeräte-
Shop at https://home.liebherr.com.
1.4 Range of use of appliance
Intended use
This fridge is appropriate for the profes‐
sional storage of chilled foodstuffs. This
appliance is not intended for the presentation
or removal of foodstuffs by customers.*
This freezer is appropriate for the profes‐
sional storage of frozen foodstuffs. This
appliance is not intended for the presentation
or removal of foodstuffs by customers.*
The appliance is designed for use in indoor
spaces.
All other types of use are not permitted.
Foreseeable misuse
The following uses are expressly forbidden:
-
Storage and refrigeration of:
•
Chemically unstable flammable or corro‐
sive substances
•
Medications, blood plasma, laboratory
specimens or similar substances and
products which are the basis of medical
devices directive 2007/47/EC
-
Use in potentially explosive atmospheres
-
Use outdoors or in areas exposed to damp‐
ness and splashing water
Improper use of the appliances will result in
goods stored being damaged or spoiled.
Climate classes
The applicable climate class for your appli‐
ance is printed on the type plate.
Fig. 2 Type plate
(X)
The climate class
states the ambient
conditions in which the
appliance can be oper‐
ated safely.
Climate
class (X)
Max. room
temperature
in °C
Max. rel.
humidity in %
3 +25 60
4 +30 55
5 +40 40
7 +35 75
Note
The minimum permitted room temperature at
the place of installation is +10 °C.
Slight condensation may form at the limit
conditions on the glass door (depending on
the equipment) and on the side walls.
1.5 Appliance noise emissions
The A-weighted emission sound pressure level during oper‐
ation of the appliance is under 70 dB(A) (sound power rel.
1 pW).
1.6 Compliance
The refrigerant circuit has been tested for leaks. The appli‐
ance complies with the applicable safety regulations.
EU Declaration of Conformity
Manufacturer/issuer: LIEBHERR-HAUSGERÄTE LIENZ
GMBH
Address: A-9900 Lienz, Dr. Hans
Liebherr Straße 1
The designated product complies with the regulations of
the following European guidelines and directives:
Appliance at a glance
* Depending on model and options 3

EU Declaration of Conformity
(EU) 2019/2020
(EU) 2015/1095
(EU) 2015/1094
(EU) 2017/1369
2006/42/EC
2014/30/EU
2009/125/EC
2011/65/EU
The full text of the EU Declaration of Conformity is avail‐
able on the following website: www.Liebherr.com
1.7 EPREL database
Details about the labelling of energy consumption and
ecodesign requirements will be available on the European
Product Database (EPREL) from 1 March 2021. You can
access the product database at the following link: https://
eprel.ec.europa.eu/. You will be asked to enter the model
identification. The model identification can be found on the
type plate.
2 General safety instructions
Please keep these operating instructions in a
safe place so you can refer back to them at
any time.
If you pass the appliance on, please hand
these operating instructions to the next user.
Read these operating instructions carefully
before use to ensure safe and correct use of
the appliance. Follow the instructions, safety
instructions and warning messages included
at all times. They are important for ensuring
you can operate and install the appliance
safely and without any problems.
Danger for the user:
-
This device can be used by children aged 8
and above and people with impaired phys‐
ical, sensory or mental abilities or with a
lack of experience and knowledge provided
that they are supervised or have received
instruction in the safe use of this appli‐
ance, and about the resulting hazards. Chil‐
dren must not play with this appliance.
Cleaning and user maintenance work must
not be carried out by children without adult
supervision.
-
The socket must be easily accessible so
that the appliance can be disconnected
quickly from the electricity supply in an
emergency. It must not be located in the
area behind the appliance.
-
When disconnecting the appliance from the
supply, always take hold of the plug. Do not
pull the cable.
-
In the event of a fault pull out the mains
plug or deactivate the fuse.
-
WARNING: Do not damage the mains power
cable. Do not operate the appliance with a
defective mains power cable.
-
WARNING: Multiple sockets/distributors
and other electronic equipment (such as
halogen transformers) must not be placed
or operated at the rear of the appliance.
-
WARNING: Keep ventilation openings, in
the appliance enclosure or in the built-in
structure, clear of obstruction.
-
Repairs, interventions on the appliance and
the replacement of mains connection line
may only be carried out by AfterSales
Service or other suitably trained specialist
personnel.
-
Only assemble, connect and dispose of the
appliance according to the instructions.
Fire hazard
-
The coolant used (information on the model
plate) is ecofriendly but also flammable
Any leaking coolant may ignite.
•
WARNING: Do not damage refrigeration
circuit.
•
Do not handle ignition sources inside the
appliance.
•
WARNING: Do not use electrical appli‐
ances in the fridge compartment which
do not comply with the design recom‐
mended by the manufacturer.
•
If the refrigerant leaks: remove any naked
flames or ignition sources from the
vicinity of the leakage point. Properly air
the room. Inform customer services.
-
Do not operate the appliance close to
explosive gases.
-
Do not store or use petrol or other flam‐
mable gases and liquids close to the appli‐
ance.
-
Do not store any explosive substances,
such as aerosol containers with flammable
propellant gas, in the appliance. To iden‐
tify these spray cans, look for the list of
contents printed on the can, or a flame
symbol. Gases possibly escaping may ignite
due to electrical components.
-
Keep burning candles, lamps and other
items with naked flames away from the
appliance so that they do not set the appli‐
ance on fire.
-
Please be sure to store alcoholic drinks
or other packaging containing alcohol in
tightly closed containers. Any alcohol that
leaks out may be ignited by electrical
components.
General safety instructions
4 * Depending on model and options
Danger of tipping and falling:
-
Do not misuse the plinth, drawers, doors
etc. as a step or for support.
Danger of frostbite, numbness and pain:
-
Avoid prolonged skin contact with cold
surfaces or refrigerated/frozen goods or
take protective measures, e.g. wear gloves.
Danger of injury and damage:
-
WARNING: Do not use mechanical equip‐
ment or other methods to speed up the
defrosting process other than those recom‐
mended by the manufacturer.
-
WARNING: Risk of injury due to electric
shock! There are live electrical parts under
the cover.
Only have the LED interior lighting replaced
or repaired by customer service or other
suitably trained professionals.
-
NOTICE: Appliance must only be used using
original manufacturer accessories or using
accessories from other providers approved
by the manufacturer. The user bears the
risk of using accessories which are not
approved.
Risk of crushing
-
Do not hold the hinge when opening and
closing the door. Fingers may get caught.
Specialist personnel qualifications:
Specialist personnel are persons who, on
account of their specialist training, knowl‐
edge and experience as well as their knowl‐
edge of the relevant standards, are able to
assess and perform the work assigned to
them and identify potential hazards. They
must have training, instruction, and author‐
isation to work on the appliance.
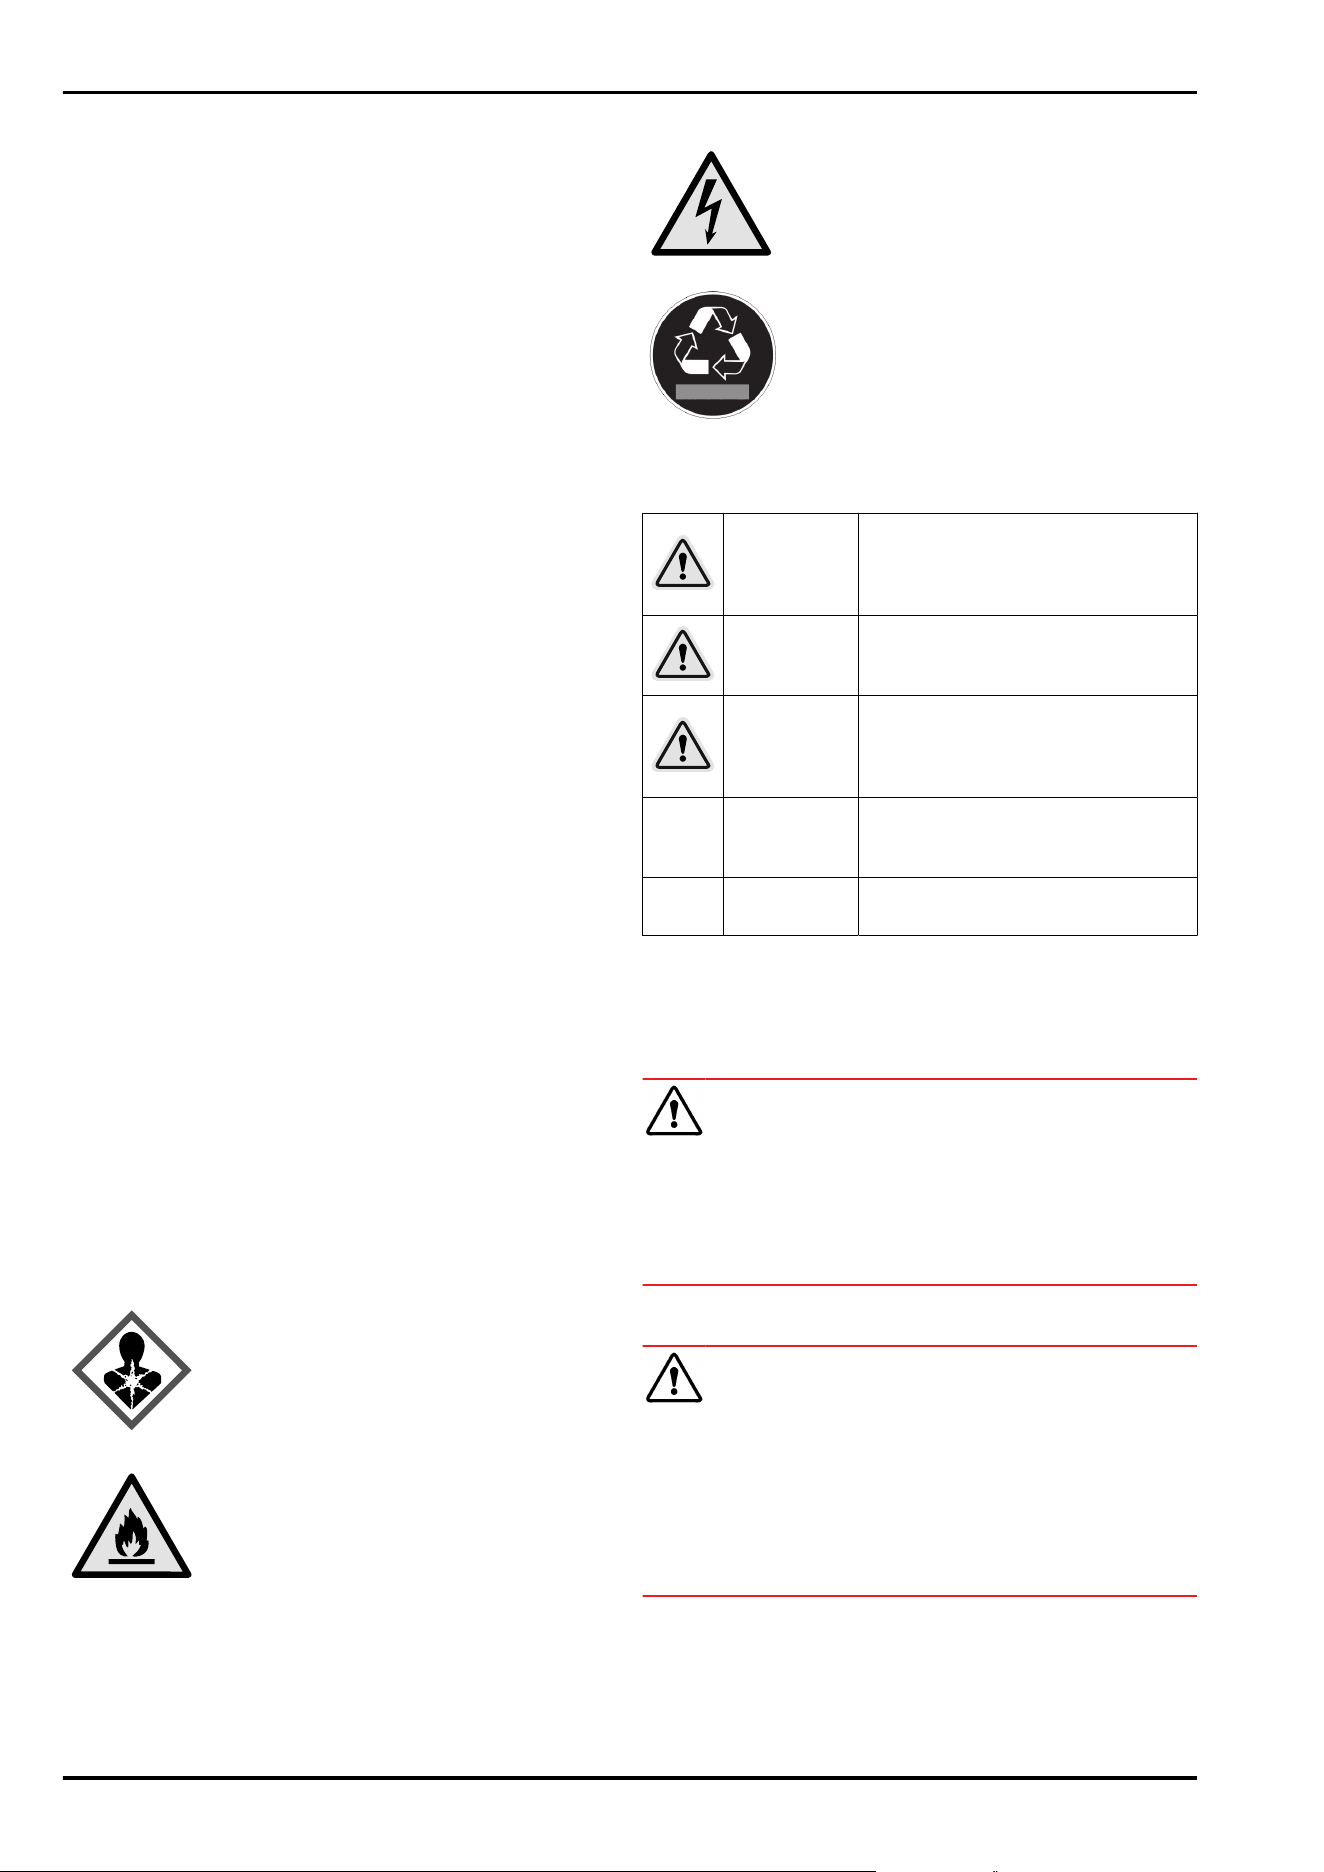
Symbols on the appliance:
This symbol may be located on the
compressor. It relates to the oil in the
compressor and makes reference to the
risk that:Swallowing or inhaling
can be fatal. This advice is only rele‐
vant to recycling. There is no danger in
normal operation.
WARNING: Danger of fire / flammable
materials. This symbol is located on the
compressor and indicates the danger of
flammable materials. Do not remove the
sticker.
The symbol is located on the back of
the appliance near the alarm relay and
indicates the following danger: Electric
shock! Even if an appliance is discon‐
nected from the mains there may still be
extraneous voltage. Do not remove sticker.
This or a similar sticker may be located
on the rear of the appliance. It refers to
the foamed-in panels in the door and/or
the housing. This advice is only relevant to
recycling. Do not remove sticker.
Please note the warning messages and other
specific advice in the other chapters:
DANGER
Indicates an immediately
hazardous situation which will lead
to death or serious injuries if it is
not avoided.
WARNING
Indicates a hazardous situation
which will lead to death or serious
injuries if it is not avoided.
CAUTION
Indicates a hazardous situation
which will lead to minor or
moderate injuries if it is not
avoided.
NOTICE
Indicates a hazardous situation
which may lead to damage to prop‐
erty if it is not avoided.
Note
Indicates useful instructions and
tips.
3 Putting into operation
3.1 Installation conditions
WARNING
Fire hazard due to dampness!
If live parts or the mains lead become damp this may cause
short circuits.
u
The appliance is designed for use in enclosed areas. Do
not operate the appliance outdoors or in areas where it is
exposed to splash water or damp conditions.
3.1.1 Installation location
WARNING
Leaking coolant and oil!
Fire. The coolant contained in the appliance is eco-friendly,
but also flammable. The oil contained in the appliance
is flammable. Escaping coolant and oil can ignite if the
concentration is high enough and in contact with an
external heat source.
u
Do not damage the pipelines of the coolant circuit and
the compressor.
-
Do not install appliance in direct sunlight, next to an
oven, radiator or similar.
-
The best place for installation is a dry and well ventilated
room.
-
If the appliance is installed in a very humid environment,
condensation can form on the outside of the appliance.
Putting into operation
* Depending on model and options 5
Always ensure good airflow and ventilation in the instal‐
lation location.
-
The more coolant there is in the appliance, the larger
the room must be in which the appliance is located. If
rooms are too small, any leak may create a flammable
mixture of gas and air. For every 8 g of coolant, the size
of the installation space must be at least 1 m
3
. Informa‐
tion regarding the coolant contained is on the type plate
inside the appliance.
-
The floor of the location must be horizontal and even.
-
The installation location must be able to withstand the
weight of the appliance plus weight when stocked to
maximum level. (see 8.1 Technical specifications)
3.1.2 Electrical connection
WARNING
Improper use!
Fire. If a mains cable/plug comes into contact with the back
of the appliance, the mains cable/plug can be damaged by
appliance vibrations and this may result in a short circuit.
u
Stand the appliance so that it is not touched by connec‐
tors or main cables.
u
Do not connect any appliances to sockets in the area of
the back of the appliance.
u
Multi-sockets/power distributors and other electronic
appliances (such as halogen transformers) may not be
placed and operated at the back of appliances.
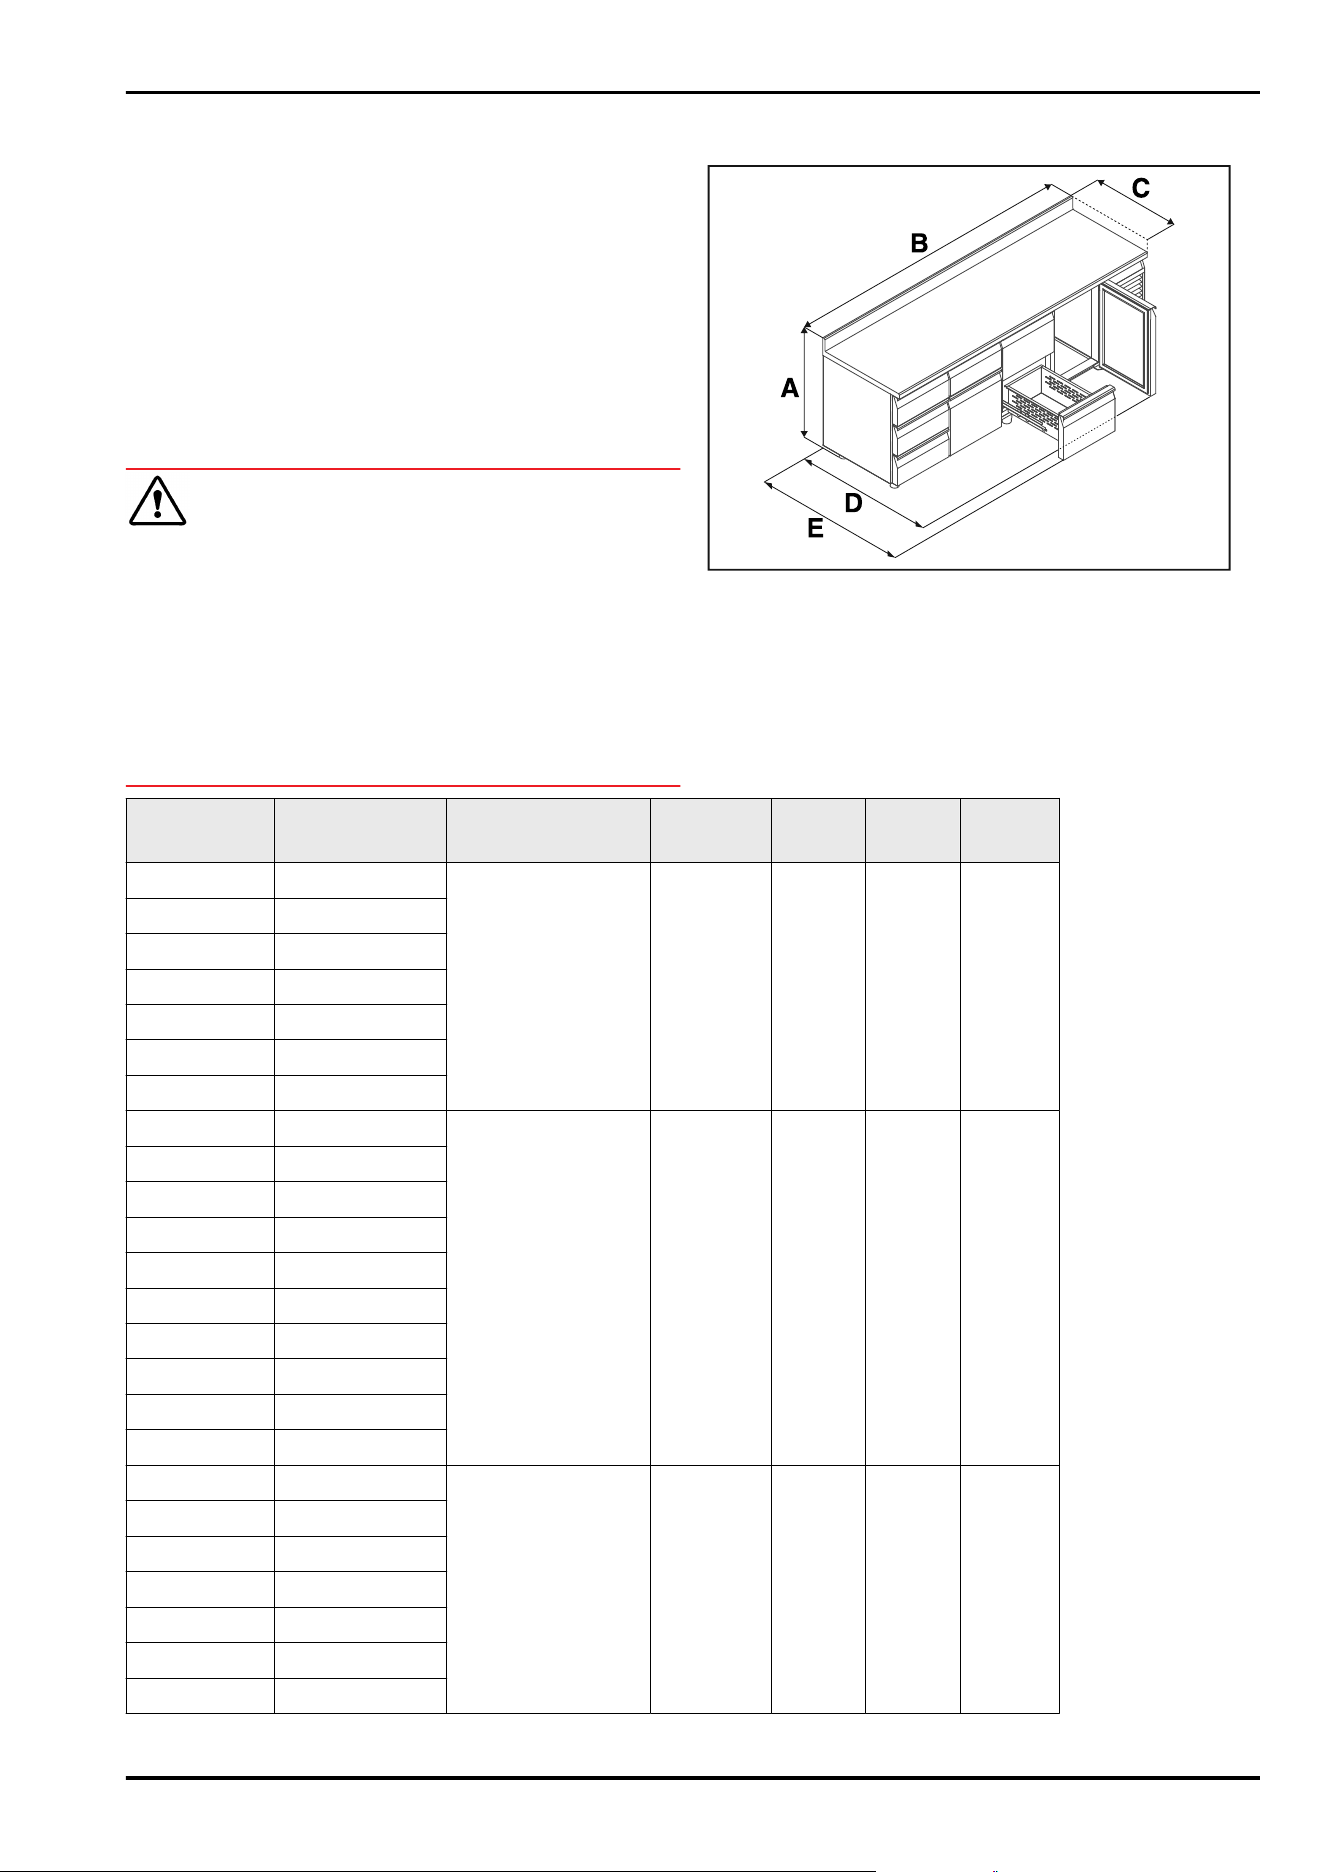
3.2 Appliance dimensions
Fig. 3 Example illustration
Model
Net capacity
A
mm
B
mm
C
mm
D
mm
E
mm
FR.... 7521 183 l
Variant 001: 810
Variant T01: 850
Variant S01: 950
v: 1300
r: 1160
700 1125 1280
FR.... 7550 158 l
FR.... 7551 164 l
FR.... 7552 162 l
FR.... 7522 132 l
FR.... 7523 136 l
FR.... 7524 140 l
FR.... 7531 275 l
Variant 001: 810
Variant T01: 850
Variant S01: 950
v: 1780
r: 1640
700 1125 1280
FR.... 7553 249 l
FR.... 7555 253 l
FR... 7556 224 l
FR.... 7559 230 l
FR.... 7561 234 l
FR.... 7532 198 l
FR.... 7563 202 l
FR.... 7565 206 l
FR.... 7566 208 l
FR.... 7541 366 l
Variant 001: 810
Variant T01: 850
Variant S01: 950
v: 2260
r: 2120
700 1125 1280
FR.... 7570 341 l
FR.... 7572 345 l
FR.... 7573 315 l
FR.... 7576 321 l
FR.... 7578 290 l
FR.... 7582 294 l
Putting into operation
6 * Depending on model and options
Model Net capacity
A
mm
B
mm
C
mm
D
mm
E
mm
FF.... 7521 183 l
Variant 001: 810
Variant T01: 850
Variant S01: 950
v: 1300
r: 1160
700 1125 1280
FF.... 7531 275 l
Variant 001: 810
Variant T01: 850
Variant S01: 950
v: 1780
r: 1640
700 1125 1280
FF.... 7541 366 l
Variant 001: 810
Variant T01: 850
Variant S01: 950
v: 2260
r: 2120
700 1125 1280
A = Appliance height (001 = without worktop, T01 = with straight worktop, S01 = with raised worktop)
B = Appliance width (v = PlugIn, r = Remote)
C = Appliance depth
D = Appliance depth with door open
E = Appliance depth with drawer open
3.3 Transporting appliance
u
Transport the appliance in its packaging.
u
Transport the appliance upright.
u
Use two people to transport the appliance.
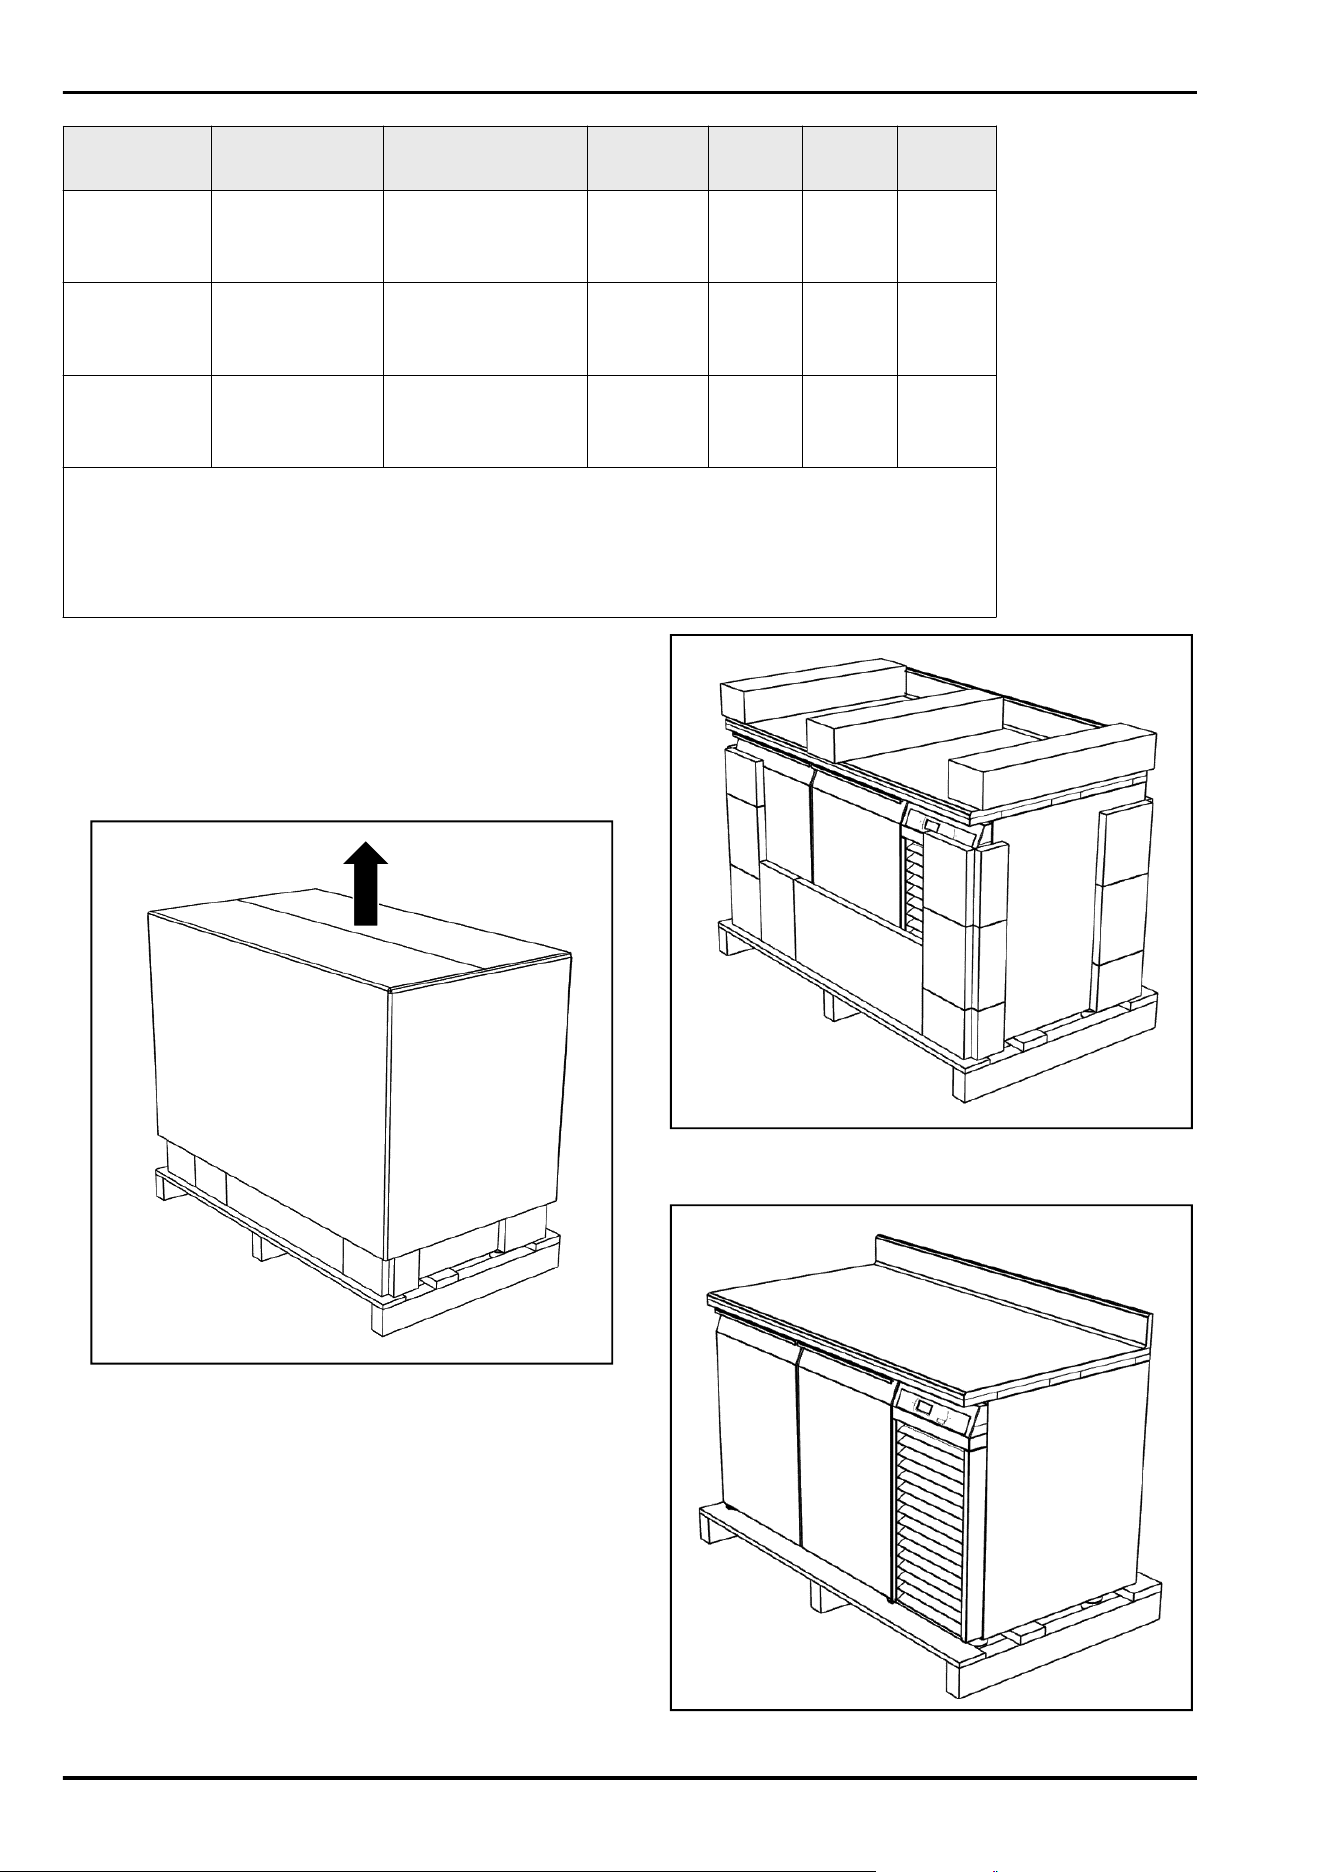
3.4 Removing packaging.
Fig. 4
u
Take the box off upwards.
Fig. 5
u
Remove corner protection and polyethylene plate.
Fig. 6
Putting into operation
* Depending on model and options 7
u
Remove PVC film.
3.5 Installing appliance
Note
Risk of damage!
u
Do not lift the appliance by the work surface or push with
it.
CAUTION
Risk of damage!
u
Do not climb on the drawers or use them as a ladder. This
can lead to damage or accidents.
WARNING
Risk of injury and damage!
u
Appliances may tip over if several drawers are opened at
the same time.
u
The back of the appliance floor may need to be equipped
with ballast.
u
Drawer appliances with feet should be mounted at the
wall.
WARNING
Risk of injury and damage!
u
Open the drawers with care. If they are not used, they
must be closed again.
u
If the drawers are full, the appliance may tip over.
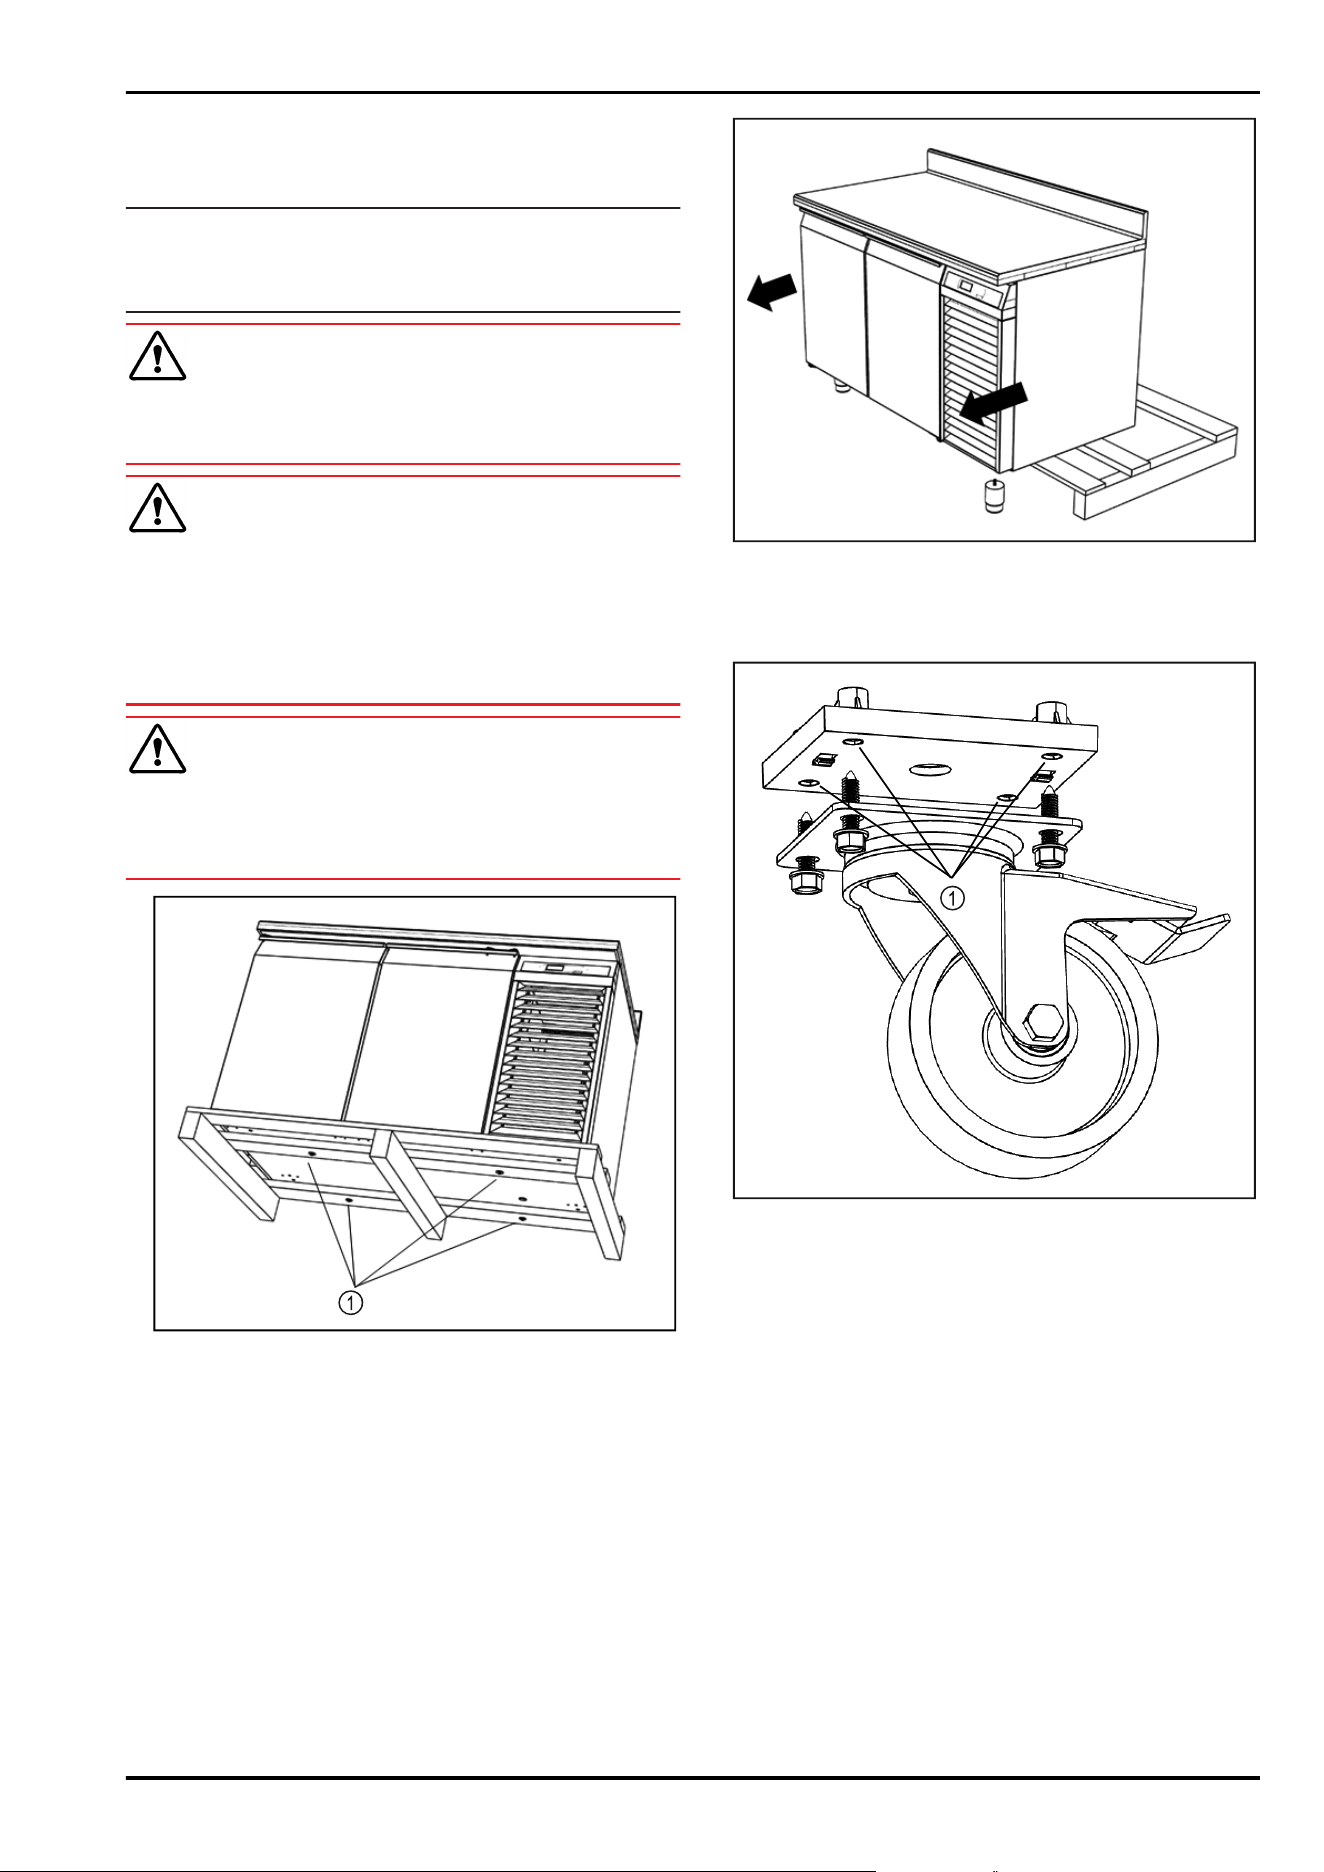
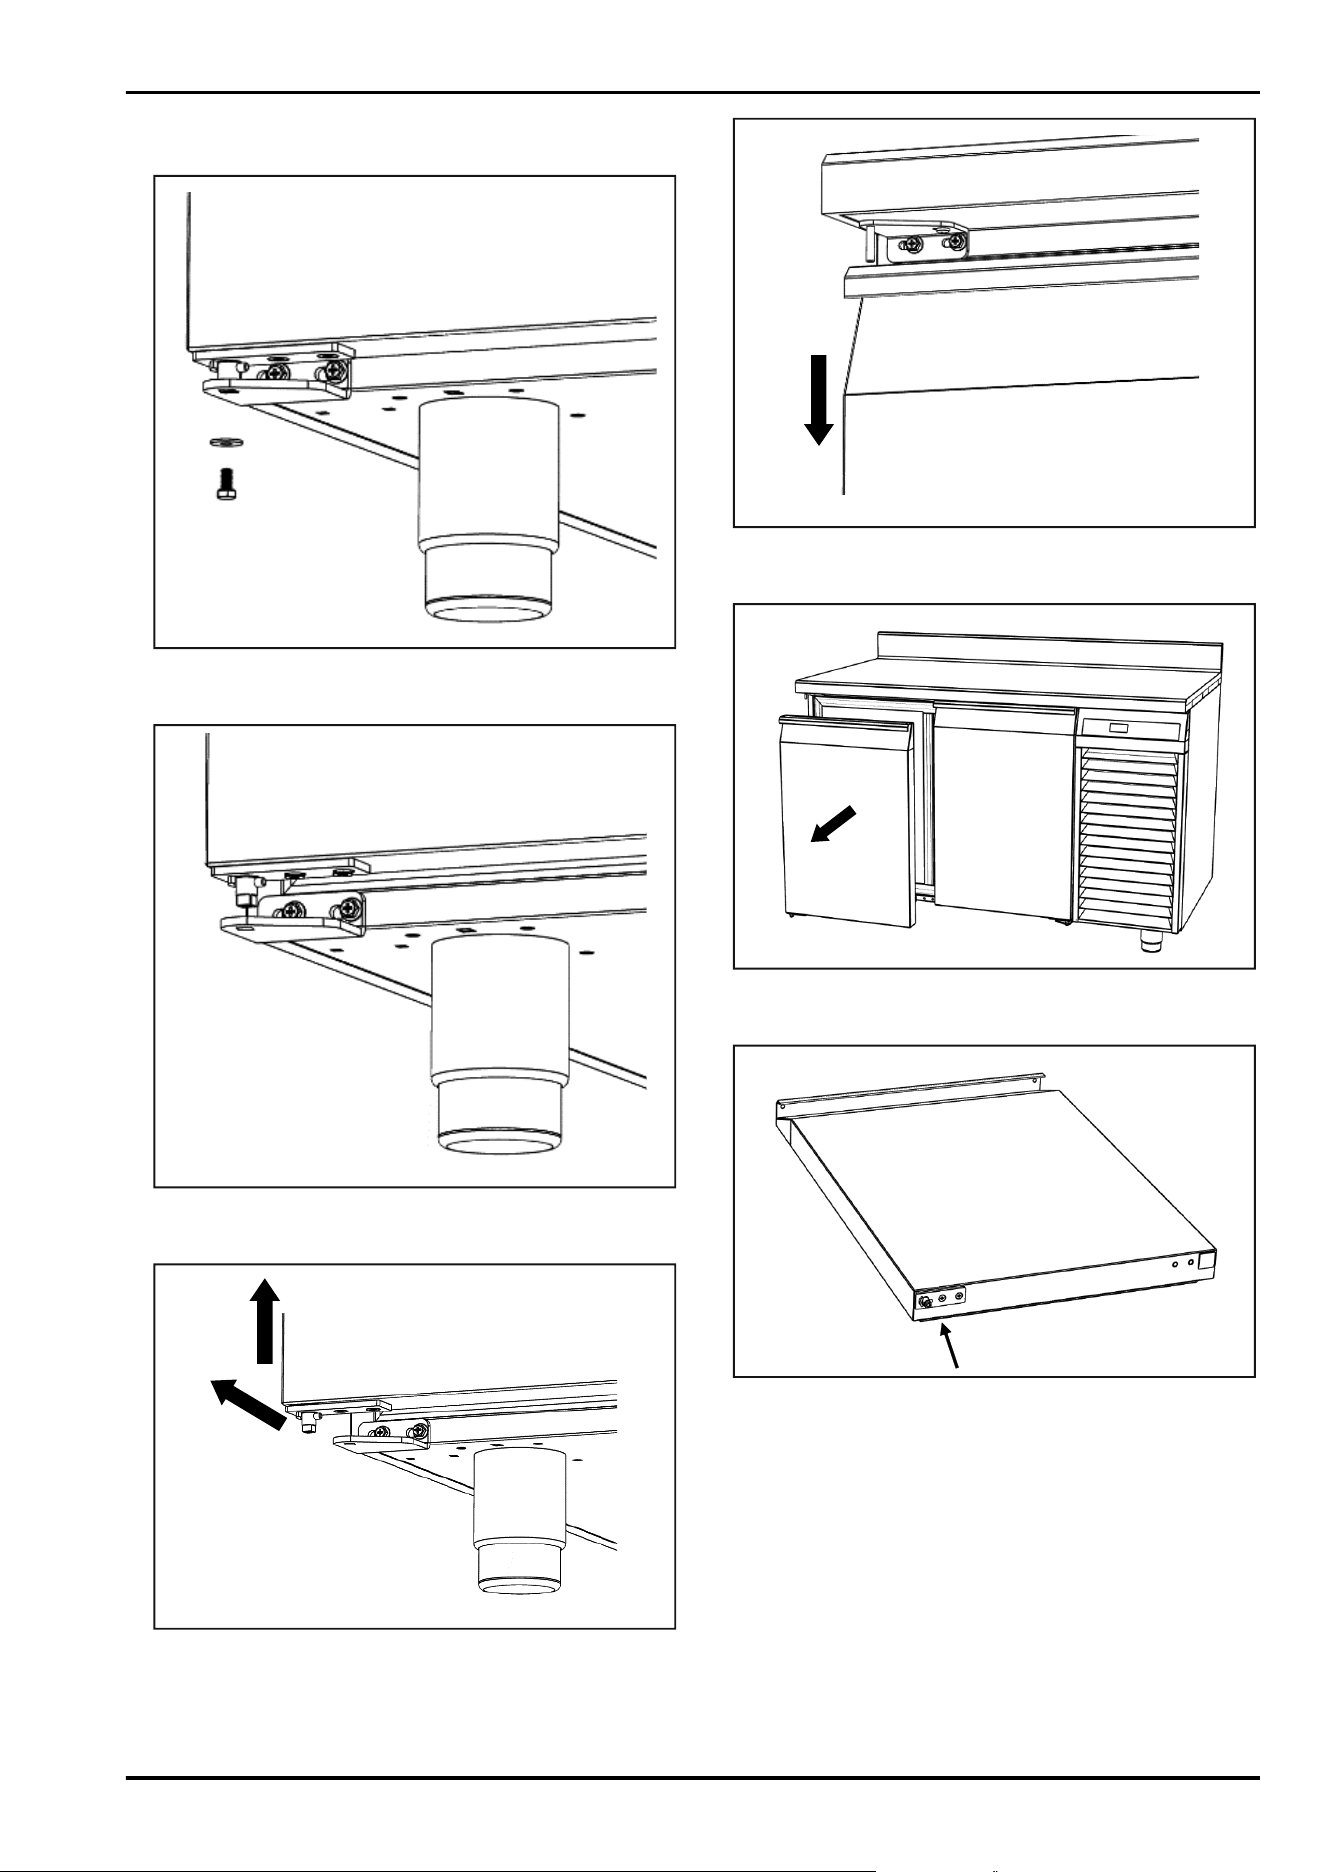
Fig. 7
u
Remove screws. Fig. 7 (1)
Fig. 8
u
After removing the screws, push the appliance forward
and mount the feet.
-or-
Fig. 9
u
Mount optional castors at the indicated places. Fig. 9 (1)
Putting into operation
8 * Depending on model and options

3.6 Setting up the appliance so that it is
level
Fig. 10
u
The appliance must be aligned horizontally and vertically.
If the appliance does not stand horizontally, the body
may become deformed, the doors and drawers may not
close properly and the condensate cannot flow properly
into the drip tray.
Fig. 11
u
The foot height can be set from 100 mm to 150 mm. To
adjust the height, turn the lower part of the foot.
3.7 Installing multiple appliances
CAUTION
Danger of slipping!
u
If appliances are installed next to each other in a very
humid environment, condensate can build up on the side
walls.
3.8 After installation
u
Take off the protective film from the exterior of the appli‐
ance.
u
Clean appliance. (see 7.2 Cleaning the appliance)
u
Retain the invoice so you have the appliance and dealer
information available if needed.
3.9 Disposing of packaging
WARNING
Danger of suffocation due to packing material and plastic
film!
u
Do not allow children to play with packing material.
The packaging is made of recyclable materials:
-
corrugated board/cardboard
-
expanded polystyrene parts
-
polythene bags and sheets
-
polypropylene straps
-
nailed wooden frame with polyethylene panel*
u
Take the packaging material to an official collecting
point.
3.10 Reversing the door hinge /
removing the hinge
3.10.1 Removing the door hinge with closing
spring
The L-shaped hinge is mounted on the inside of the lower
door corner.
Fig. 12 Example illustration of hinge positions
Fig. 13
Putting into operation
* Depending on model and options 9
u
The bearing pin is inserted in the lower bracket and
secured with a screw.
Fig. 14
u
Loosen the screw.
Fig. 15
u
Lift the door.
Fig. 16
u
Pull the door out slightly to the front.
Fig. 17
u
Pull the door down.
Fig. 18
u
Carefully place the door on a soft surface.
Fig. 19
Putting into operation
10 * Depending on model and options
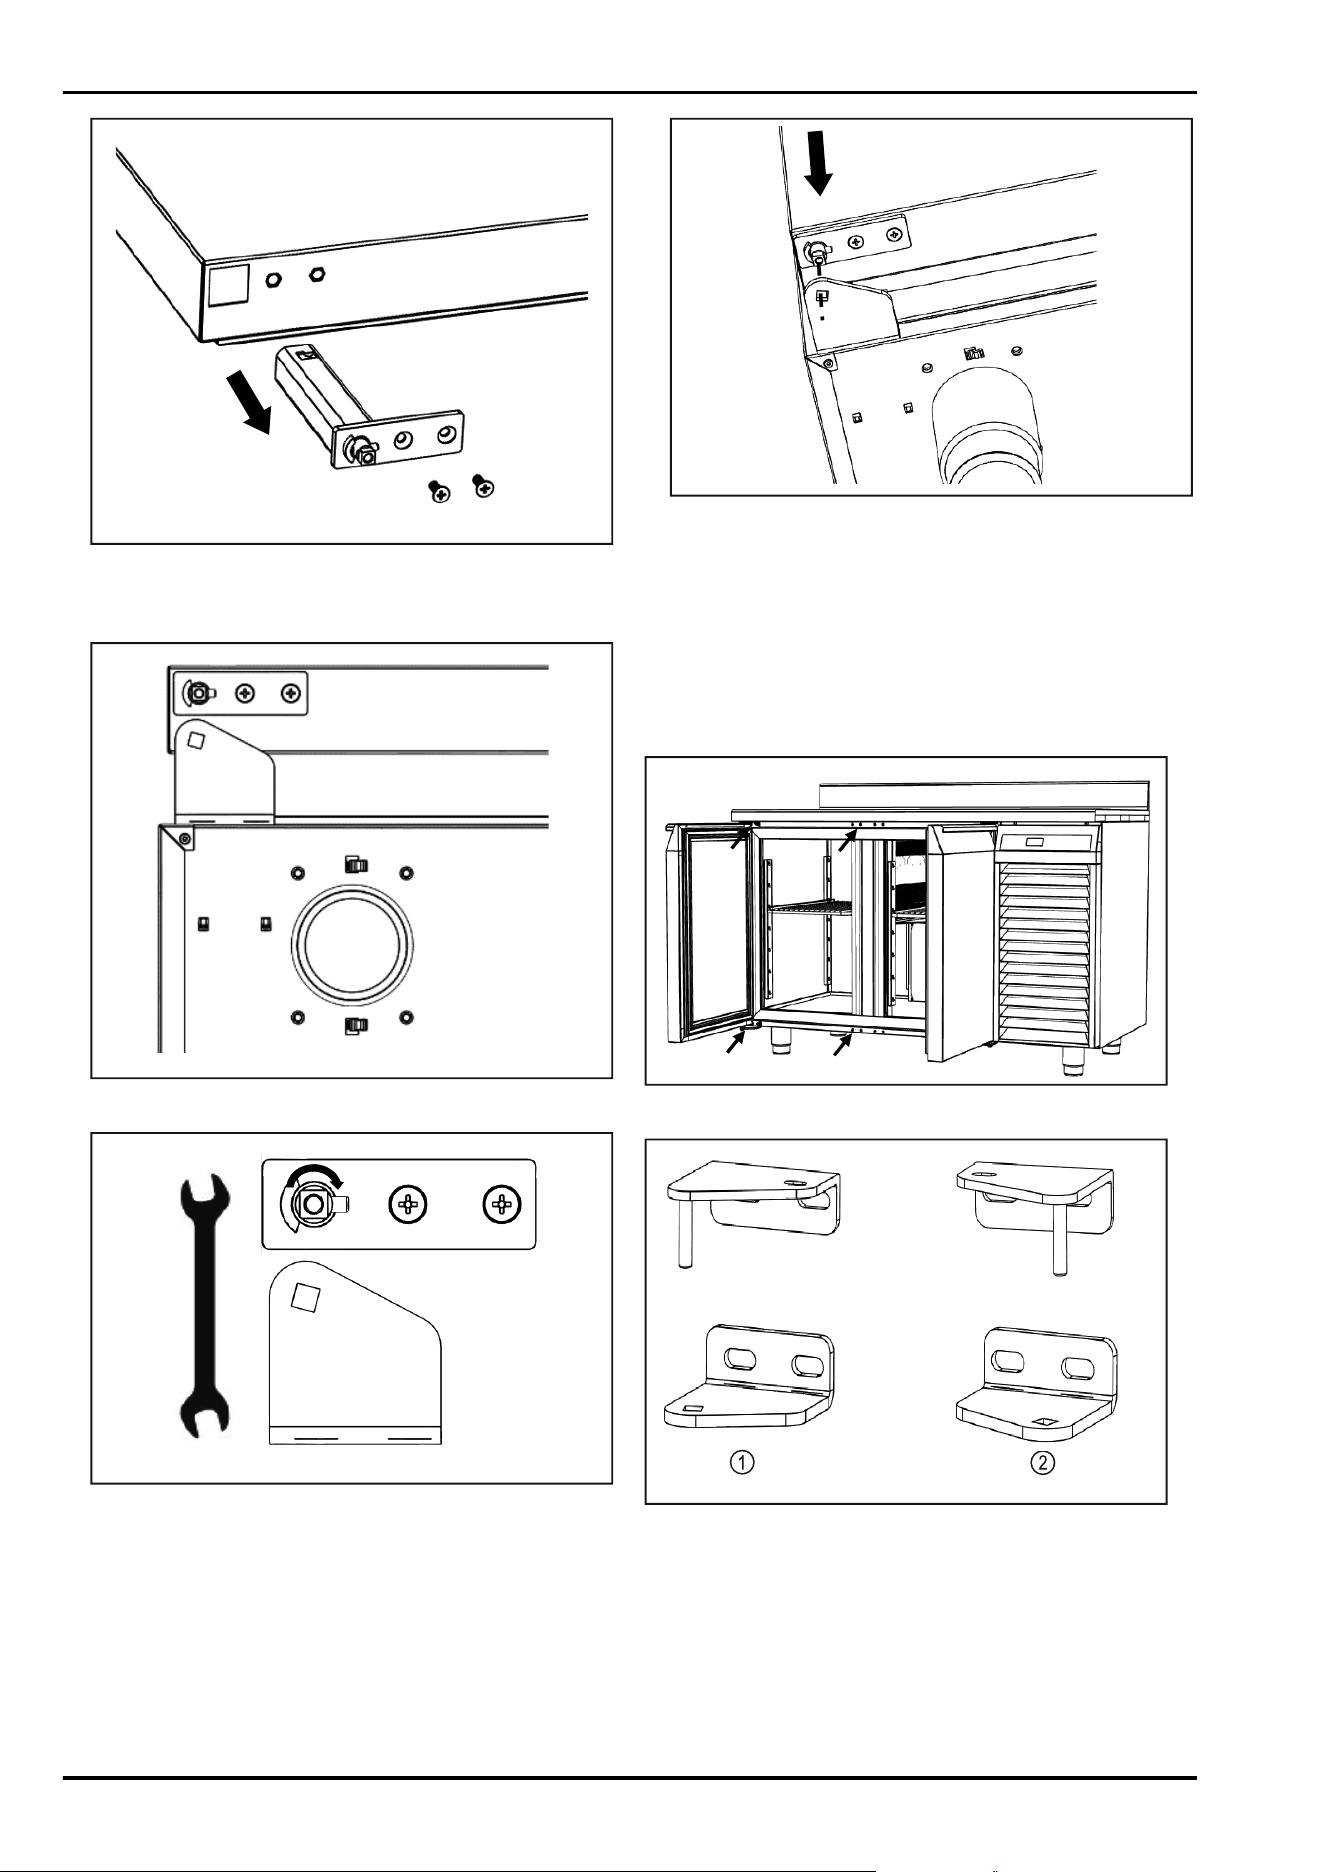
Fig. 20
u
Loosen the screws.
u
Remove the hinge bolt.
Fig. 21
Fig. 22
u
The square of the hinge bearing bolt must be adjusted
with a spanner in order to insert it into the square hole of
the bracket. (see Fig. 162)
Fig. 23
u
After exchanging the hinge, mount the door again in the
reverse order.
3.10.2 Reversing the door hinge
The appliance is prepared for door hinges on either side.
The hinge with closing spring can be used on both sides.
The door hinge can be changed by exchanging the two
bearing brackets (available as replacement parts).
Fig. 24 Example illustration
Fig. 25
(1)
Left bearing bracket (2) Right bearing bracket
Putting into operation
* Depending on model and options 11
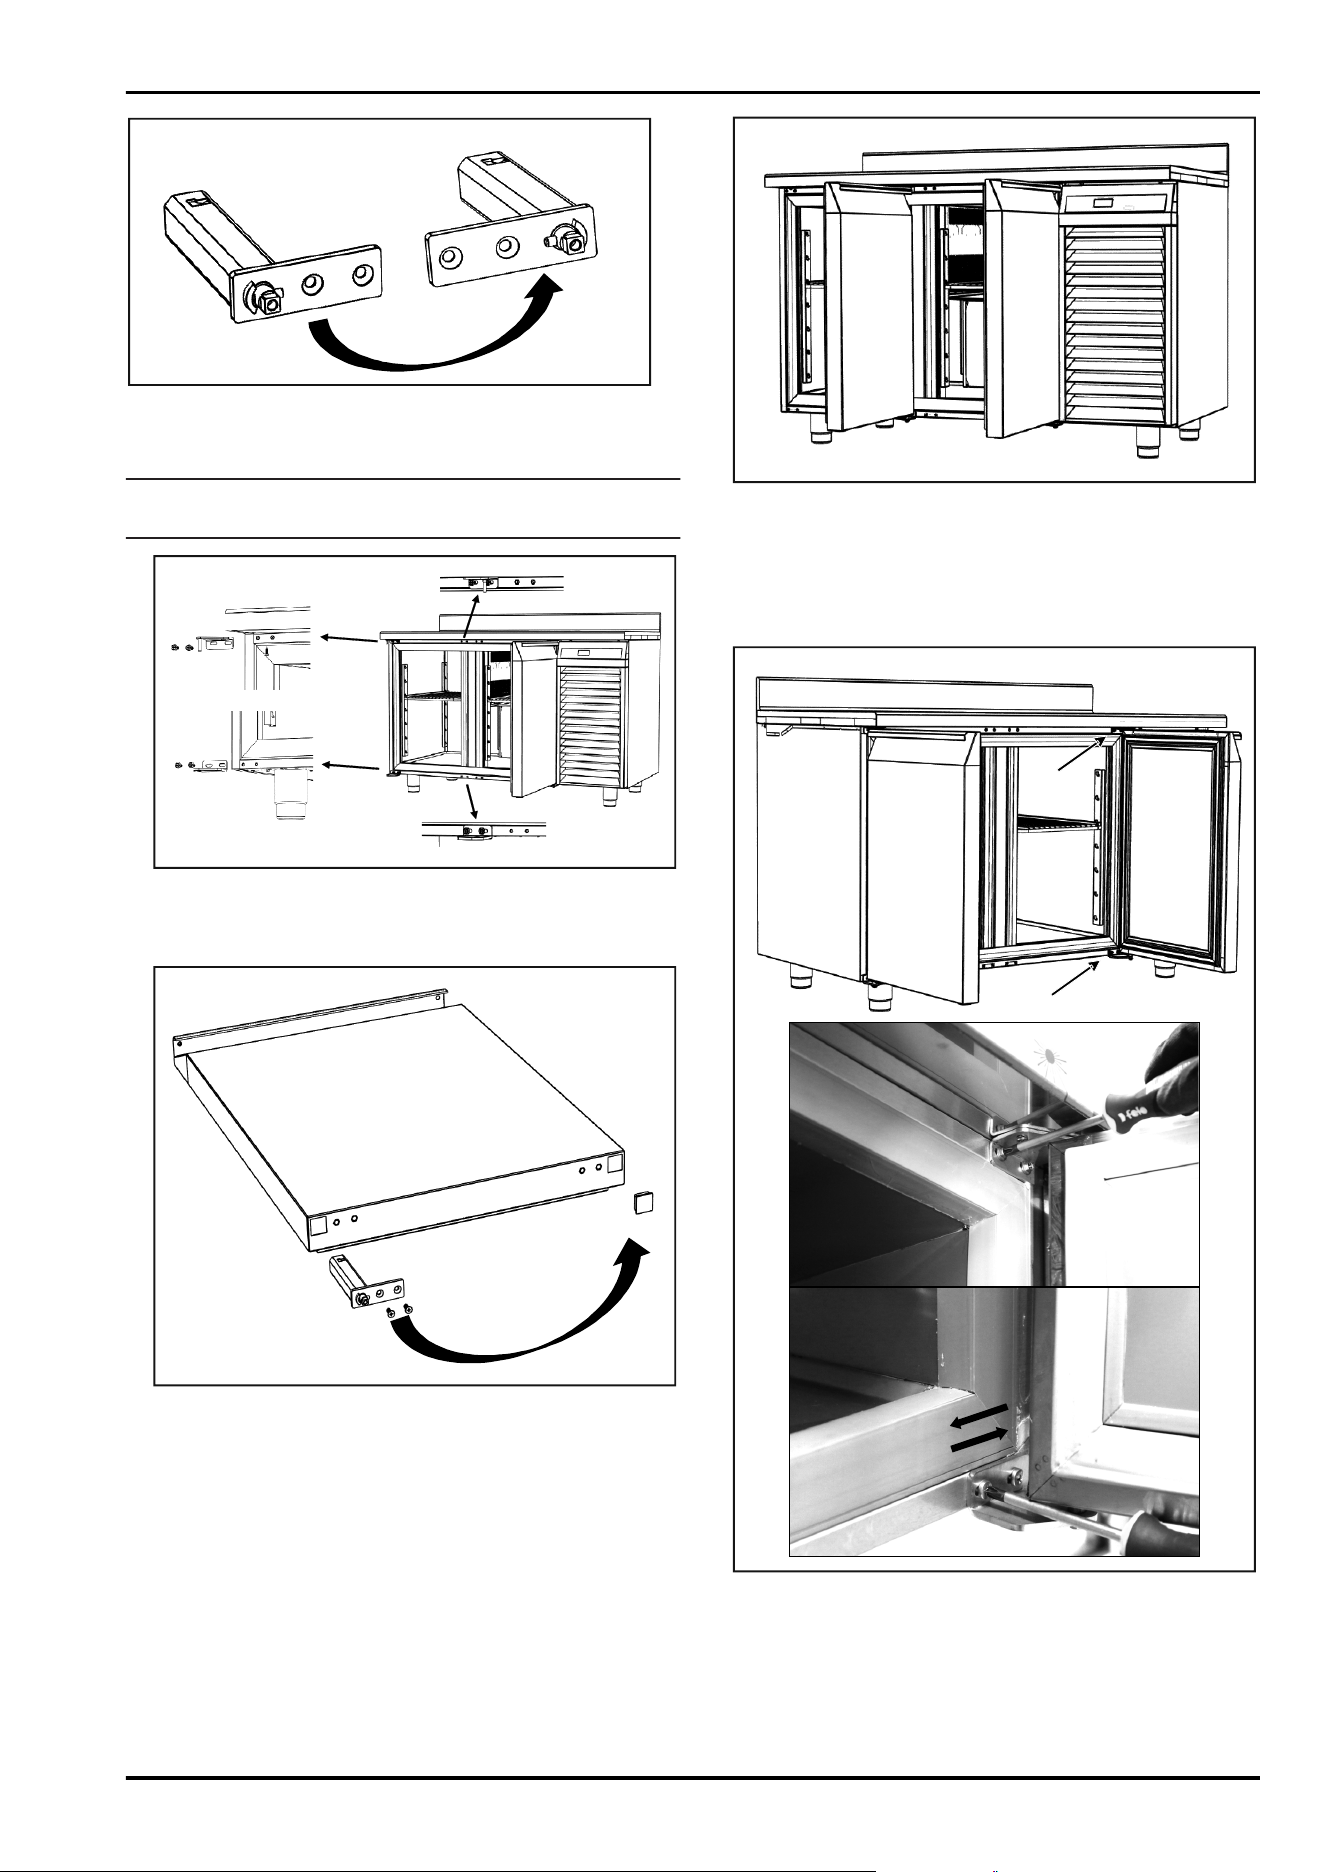
Fig. 26 Door hinge
u
Dismantle the door as described in the previous section
(see 3.10.1 Removing the door hinge with closing spring) .
Note
u
Before installing again, carry out the following steps.
Fig. 27
u
Remove the left bearing bracket and mount the right
bearing bracket.
Fig. 28
u
Remove the door hinge with closing spring.
(see 3.10.1 Removing the door hinge with closing spring)
u
Exchange the door hinge with closing spring and cover
cap.
Fig. 29
3.11 Aligning the door
If the door is not straight, you can adjust it on the lower and
upper hinge.
Fig. 30
u
Slightly undo the screws and move the door with the
hinge to the left or right.
u
Fully tighten the screws.
w
The door is now straight.
Putting into operation
12 * Depending on model and options
3.12 Connecting appliance
WARNING
Failure to connect properly
Fire hazard.
u
Do not use an extension cable.
u
Do not use distributor blocks.
NOTICE
Failure to connect properly
Damage to the electronics.
u
Do not connect the appliance to a stand-alone inverter,
e.g. solar power systems and petrol generators.
u
Do not use an energy saving plug.
Make sure the following prerequisites are met:
- The appliance is operated using alternating current only.
- The permitted voltage and frequency is printed on the
type plate. The type plate position can be seen in the
appliance overview chapter. (see 1.2 Overview of appli‐
ance and equipment)
- The socket is earthed according to the regulations and
fused.
- The fuse tripping current is between 10 A and 16 A.
- The socket is easily accessible.
u
Check the electrical connection.
u
Connect the mains plug to the power supply.
3.13 Switching on appliance (first use)
Make sure that the following requirements are fulfilled:
- Appliance is installed and connected.
- All adhesive strips, adhesive and protective films and
transport locks are removed from inside and outside the
appliance.
u
Press button .
w
The display shows the temperature in the appliance.
w
The LED flashes for a few minutes when the
compressor is switched off (compressor start delay).
w
The LED changes from flashing to continuous light,
the compressor starts and runs until the target tempera‐
ture in the appliance is reached.
w
During this phase, the LED may flash alternately
depending on the parameter setting of the fan start
temperature.
4 Storage
4.1 Information regarding storage
Note
Failure to follow these guidelines can lead to food becoming
spoiled.
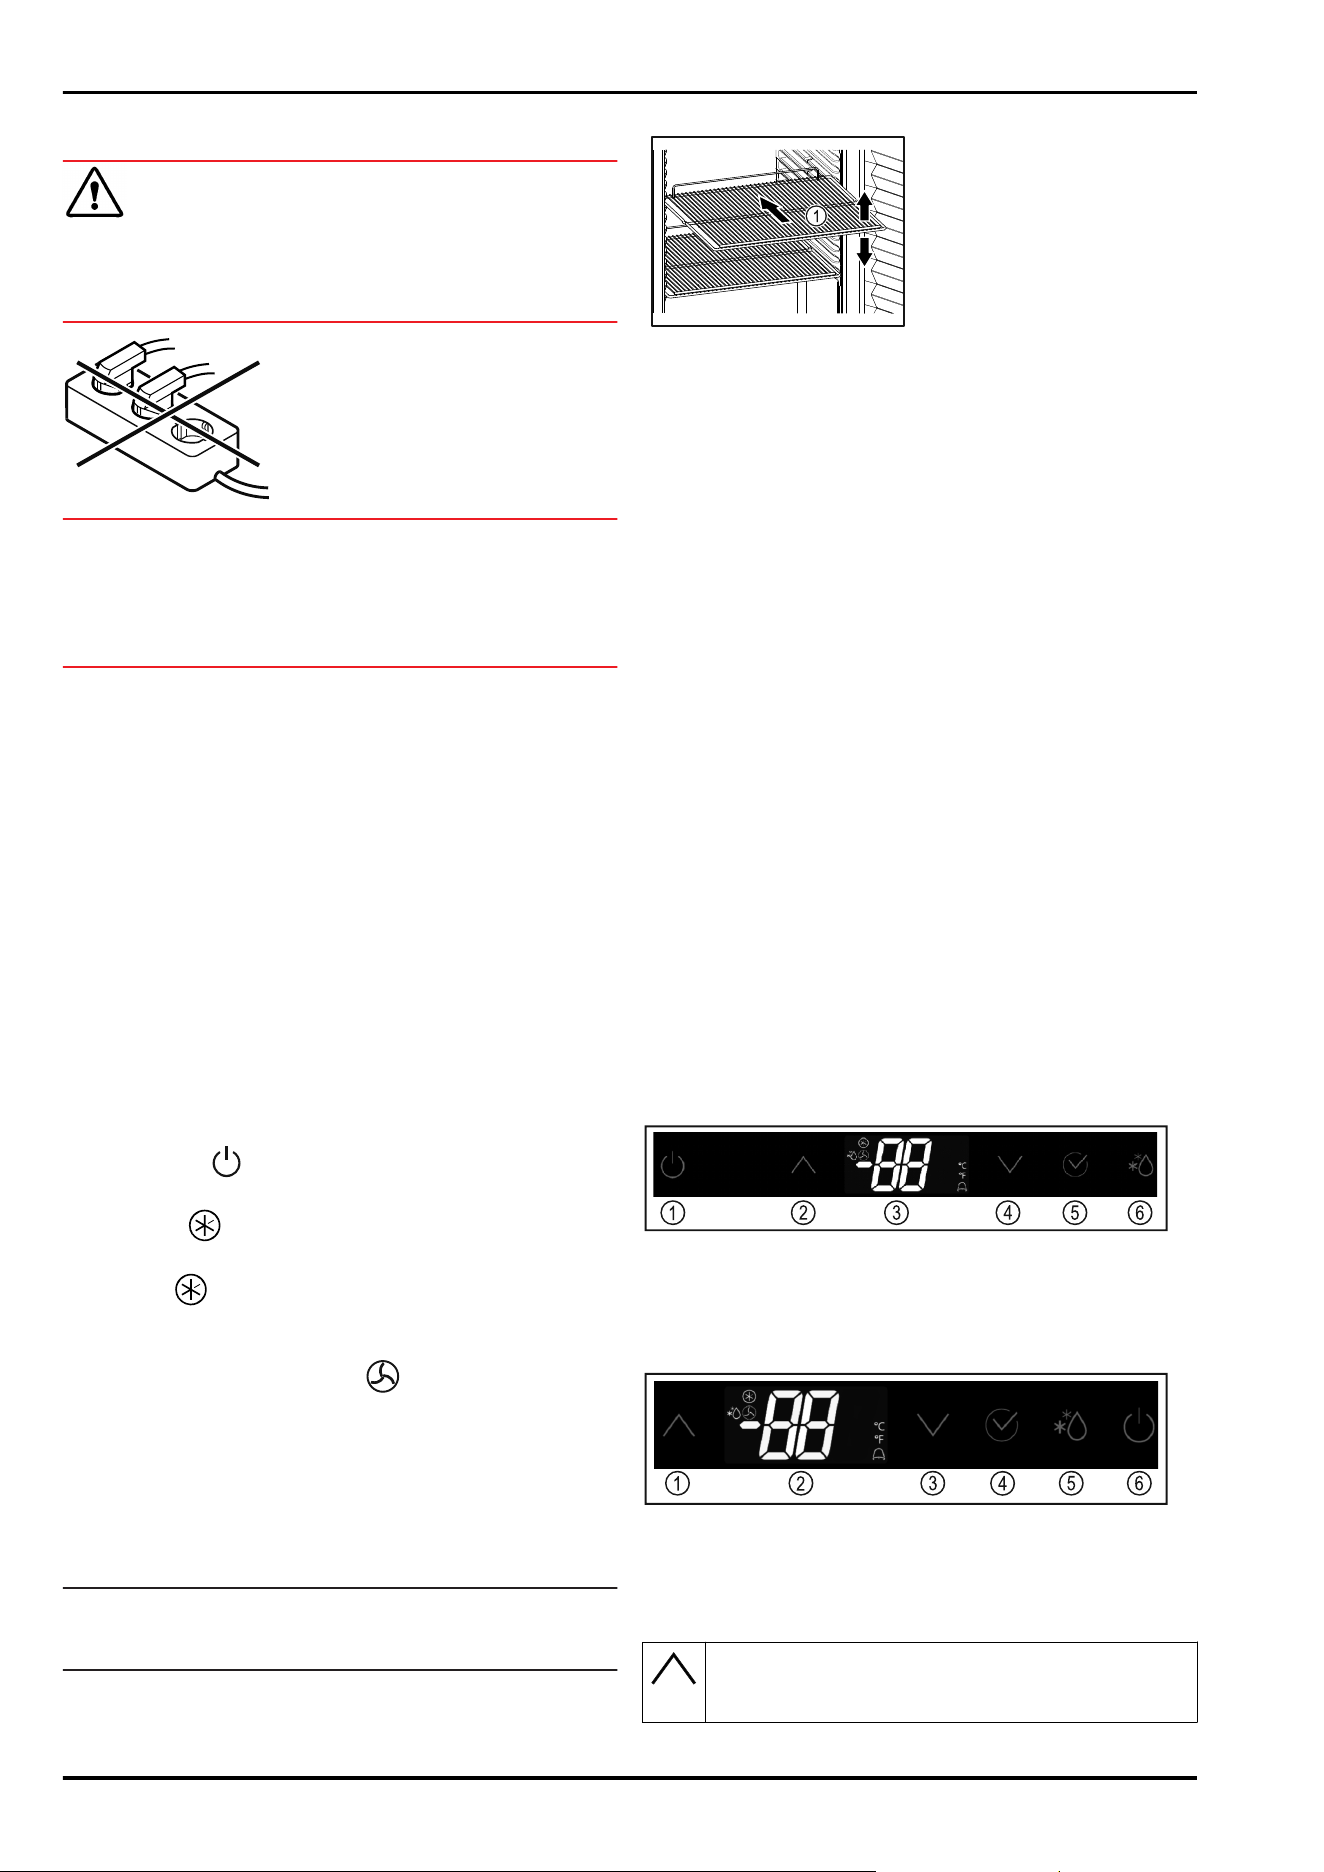
Fig. 31
When stocking observe the following:
q
Position gird shelves Fig. 31 (1) according to the height
required.
q
Observe maximum load. (see 8.1 Technical specifications)
q
Do not load appliance until storage temperature has been
reached (maintain cold chain).
q
Items for refrigeration must not come into contact with
the evaporator on the rear wall.
q
Keep liquids in closed containers.
q
Pack raw meat or raw fish in clean closed containers so
that they do not touch other food and cannot drip onto
other food.
q
Leave space when storing items for refrigeration to
ensure good air circulation.
4.2 Storage times
The best-before date specified on the packaging should be
used as the reference point for the storage time.
5 Controls
5.1 Control and display elements
The display provides a quick overview of the current appli‐
ance status, the temperature setting, the status of func‐
tions and settings as well as alarm and error messages.
It is operated using the navigation arrows and confirmation
symbol.
Functions can be activated or deactivated and setting
values can be changed.
Fig. 32 Display PlugIn
(1)
Switch appliance on or
off.
(4) Reduce value
(2) Increase value (5) Confirm
(3) Status display (6) Manual defrosting
Fig. 33 Display Remote
(1)
Increase value (4) Confirm
(2) Status display (5) Manual defrosting
(3) Reduce value (6) Switch appliance on or
off.
Pressing once displays the maximum saved temper‐
ature. During programming, the individual parame‐
ters are called up.
Storage
* Depending on model and options 13
Press briefly: Indicates the temperature of the evap‐
orator sensor for a few seconds. Press for a few
seconds: Starts manual defrosting.
Indicates any temperature alarm data. During
programming, the individual parameters are called
up.
Display or change target value. When programming,
select a parameter or value and confirm it.
Switch appliance on or off.
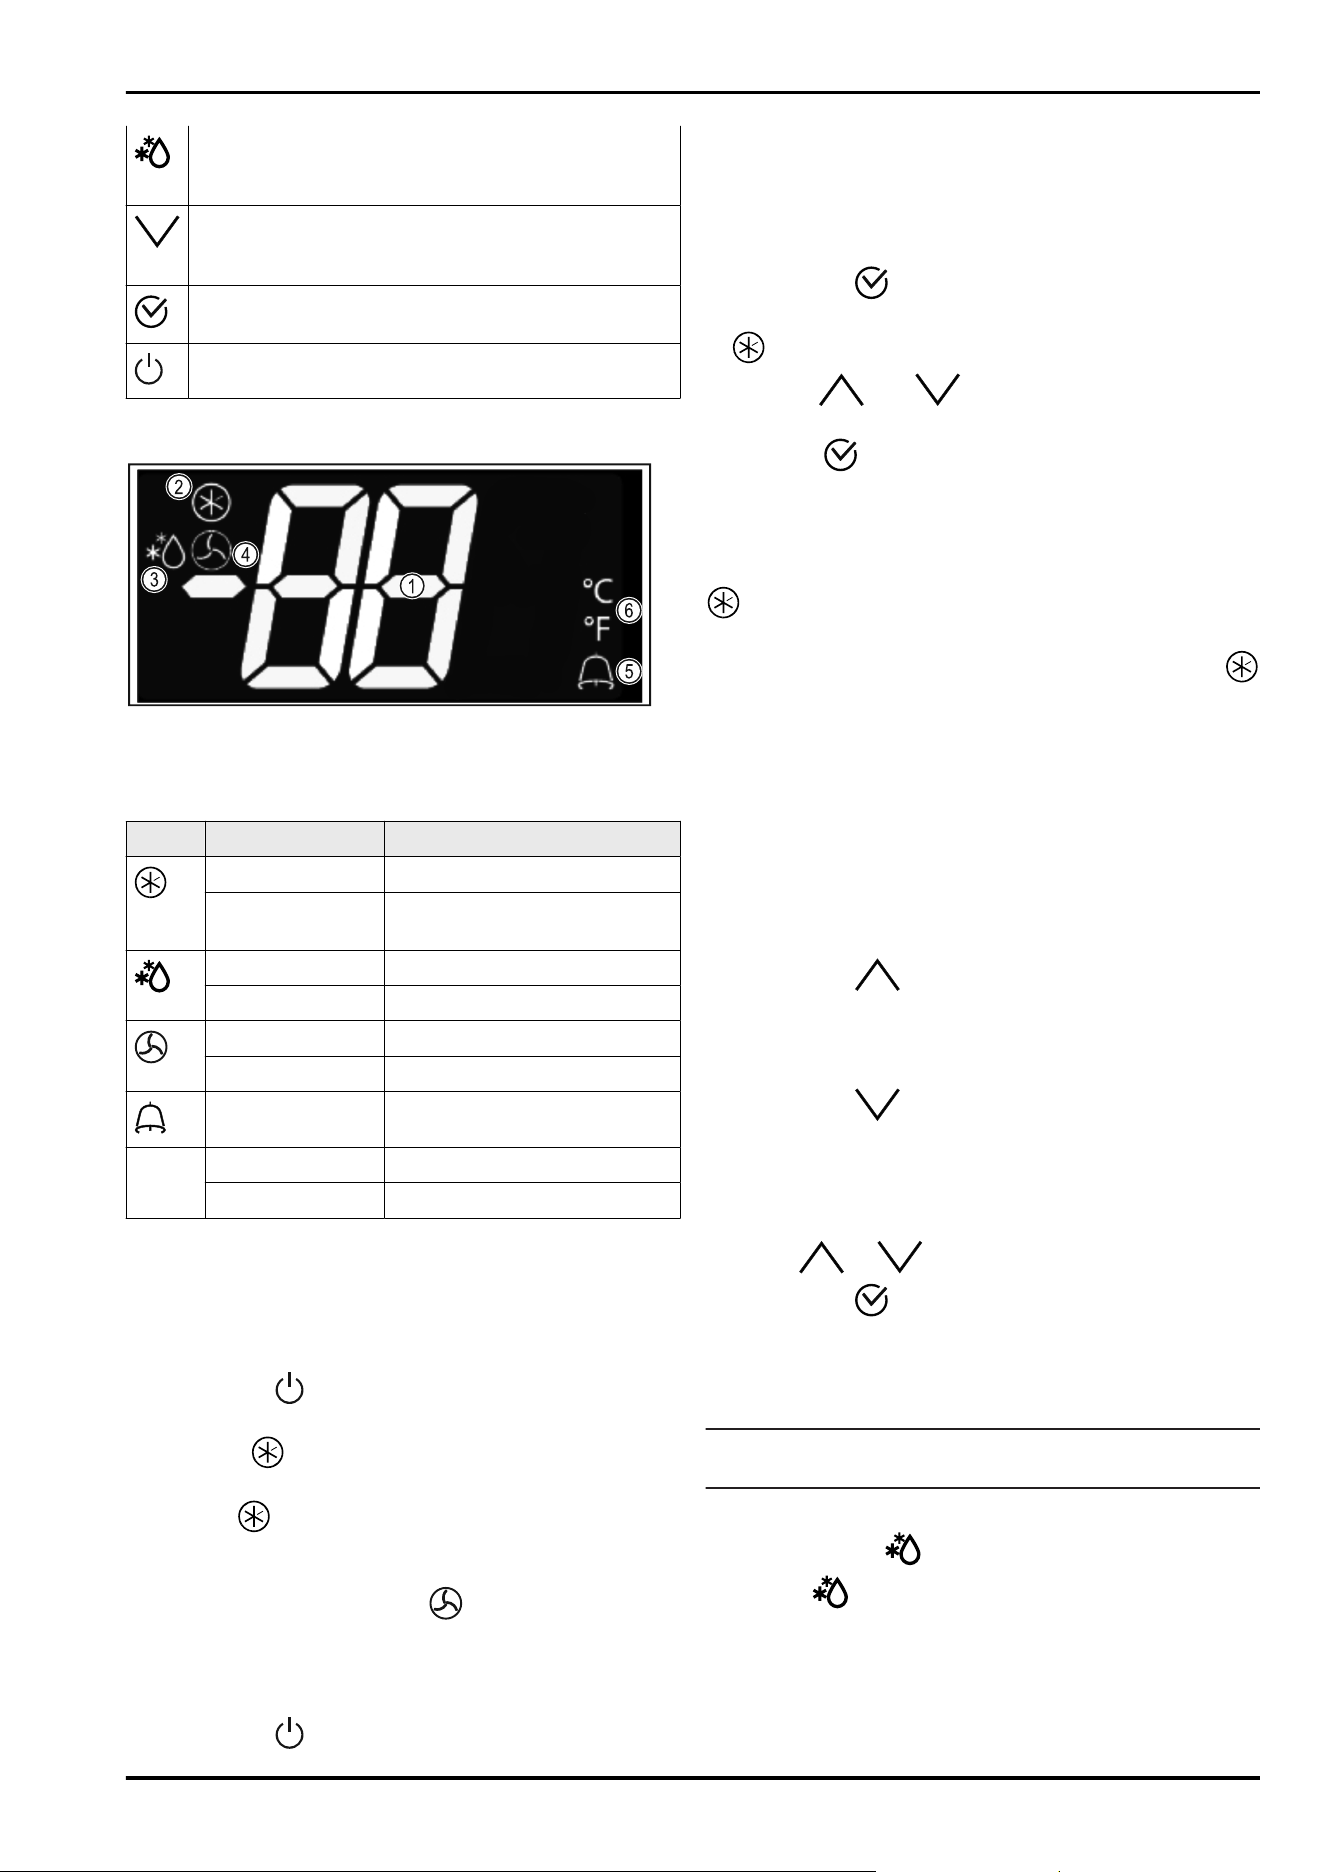
5.1.1 Status display
Fig. 34 Status display
(1)
Actual temperature (4) Fan
(2) Compressor (5) Alarm
(3) Defrosting (6) Temperature unit
LED OPERATING MODE MEANING
Is lit up Compressor is running
Flashes Start delay for the compressor
to avoid short starts
Is lit up Defrosting is running
Flashes Drip phase is running
Is lit up Fan is running
Flashes Delayed fan start
Is lit up Temperature alarm
°C / °F Is lit up Programming
Flashes Unit
5.2 Functions
5.2.1 Switching appliance on and off
Switching on appliance
u
Press button
.
w
The display shows the temperature in the appliance.
w
The LED flashes for a few minutes when the
compressor is switched off (compressor start delay).
w
The LED
changes from flashing to continuous light,
the compressor starts and runs until the target tempera‐
ture in the appliance is reached.
w
During this phase, the LED may flash alternately
depending on the parameter setting of the fan start
temperature.
Switching off appliance
u
Press button
.
w
“OFF” appears on the display.
w
The electronics switch to standby mode.
5.2.2 Changing temperature
The set temperature is the target temperature which the
appliance must reach and retain with a tolerance of +2 °C.
u
Press button .
w
The display shows the set temperature flashing. The LED
is flashing.
u
With the and buttons, increase or reduce the
value until the desired value is shown.
u
Press the
button and save the value.
w
Temperature is set.
5.2.2 Operating cycle
When the target temperature is reached, the LED goes out
and the compressor is switched off. The compressor
starts running again as soon as the target temperature in
the appliance interior is exceeded by +2 °C. The LED
lights up again and the cycle is repeated.
Example: If the target temperature is +2 °C, the compressor
switches on and off in order to keep the temperature
between +2 °C and +4 °C.
5.2.3 Min. Max. temperature display
The registered maximum or minimum temperature can be
displayed. This allows you to check that products are stored
correctly.
Displaying registered maximum temperature
u
Press button
.
w
The text “hi” appears, followed by the registered
maximum temperature value.
Displaying registered minimum temperature
u
Press button .
w
The text “Lo” appears, followed by the registered
minimum temperature value.
Deleting registered values
u
Display the maximum or minimum temperature with the
button
or .
u
Press button .
w
The text “rST” flashes 3 times to confirm the successful
deletion.
5.2.4 Manual defrosting
Note
Only use this function if automatic defrosting is insufficient.
Make sure the appliance is switched on.
u
Keep the button pressed for a few seconds.
w
The LED lights up.
w
The defrosting cycle is automatically ended. The duration
is dependent on the frost formation on the evaporator
surface.
w
After defrosting, the appliance automatically returns to
normal operation.
Controls
14 * Depending on model and options
5.3 Alarms
If an alarm is triggered, the LED on the display lights up
until the error is remedied.
In the case of an alarm, the display switches continuously
between alarm and temperature, except for “P1”, where the
display always flashes.
Message Cause Remedy
“P1” flashes;
Error in the fridge
temperature sensor.
Indicates an error in the fridge
temperature sensor or that it has
a faulty connection.
▸ Emergency operation is automatically activated, which
controls the compressor according to the values set in the
general parameters.
▸ If the alarm remains active, contact Technical Service.
“P2” flashes;
Error in evaporator
temperature sensor.
Indicates an error in the evaporator
temperature sensor or that it has a
faulty connection.
▸ If the alarm remains active, contact Technical Service.
“HA” flashes;
Overtemperature.
Indicates that the fridge tempera‐
ture has exceeded the permissible
value.
▸ The alarm ends automatically when the temperature
is normal again, if defrosting takes place or the door is
opened.
▸ If the alarm remains active, contact Technical Service.
“LA” flashes;
Undertemperature.
Indicates that the fridge tempera‐
ture has gone below the permis‐
sible value.
▸ The alarm ends automatically when the temperature
is normal again, if defrosting takes place or the door is
opened.
▸ If the alarm remains active, contact Customer Service.
“EE” flashes;
Memory error.
Faulty electronic data. ▸ To reset, turn the appliance on and off.
▸ If the alarm remains active, contact Customer Service.
6 Features
7 Maintenance
7.1 Defrosting appliance
7.1.1 Defrosting
During operation, frost forms on the evaporator surface
and reduces its effectiveness. Defrosting should remove the
frost and restore the optimal effectiveness.
7.1.2 Automatic defrosting
Defrosting occurs automatically at predefined intervals. The
evaporator sensor regulates the duration of defrosting,
depending on the frost/ice formation on the evaporator, and
ends the defrosting process when the defined evaporator
temperature is reached.
7.2 Cleaning the appliance
7.2.1 Preparing
WARNING
Short-circuit hazard due to live parts!
Electric shock or damage to the electronics.
u
Switch off the appliance.
u
Pull out mains plug or switch off fuse.
WARNING
Risk of fire
u
Do not damage the refrigeration circuit.
u
Empty the appliance.
u
Pull out the mains plug.
7.2.2 Cleaning housing
NOTICE
Improper cleaning!
Damage to the appliance.
u
Only use soft cleaning cloths and ph-neutral all-purpose
cleaners.
u
Do not uses abrasive sponges or steel wool which may
cause scratches.
u
Do not use any sharp or abrasive cleaning agents, nor
any that contain sand, chloride or acid.
WARNING
Risk of injury and damage as a result of hot steam!
Hot steam can lead to burns and can damage the surfaces.
u
Do not use any steam cleaners!
NOTICE
Risk of damage due to short circuit.
u
When cleaning the appliance, make sure no water gets
into the electrical components.
u
Wipe the housing down with soft, clean cloth. If very
dirty, use lukewarm water with a neutral cleaner. Glass
surfaces can also be cleaned with glass cleaner.
u
Clean condenser coil each year. If the condenser coil is
not cleaned, this significantly reduces the efficiency of
the appliance.
7.2.3 Cleaning interior
WARNING
Short-circuit hazard due to live parts!
Electric shock or damage to the electronics.
u
Switch off the appliance.
u
Pull out mains plug or switch off fuse.
Features
* Depending on model and options 15
WARNING
Risk of injury and damage as a result of hot steam!
Hot steam can lead to burns and can damage the surfaces.
u
Do not use any steam cleaners!
NOTICE
Improper cleaning!
Damage to the appliance.
u
Only use soft cleaning cloths and ph-neutral all-purpose
cleaners.
u
Do not uses abrasive sponges or steel wool which may
cause scratches.
u
Do not use any sharp or abrasive cleaning agents, nor
any that contain sand, chloride or acid.
Note
u
Defrost water drain (see 1.2 Overview of appliance and
equipment) : Remove deposits using a thin material (for
example a cotton bud).
Note
Do not damage or remove the type plate on the inside of the
appliance. The type plate is important for Customer Service.
u
Open the door.
u
Empty the appliance.
u
Clean interior and equipment parts with lukewarm water
and a little detergent. Do not use any gritty or acidic
cleaning agent or any chemical solvent.
7.2.4 After cleaning
u
Wipe appliance and equipment parts dry.
u
Connect and switch on appliance.
Once the temperature is sufficiently cold:
u
put in items for refrigeration goods.
u
Repeat cleaning regularly.
u
Clean and dust refrigerators with a heat exchanger
(metal grille on the rear of the appliance) once per year.
8 Customer help
8.1 Technical specifications
Temperature range
Cooling -2 °C to +8 °C
Freezing -10 °C to -20 °C
Maximum load per drawer
30 kg
Maximum load per storage rack
30 kg
Connection diagram FRTSvg / FFTSvg
Customer help
16 * Depending on model and options
Connection diagram FRTSrg / FFTSrg
8.2 Technical fault
Your appliance is designed and built to ensure it works reli‐
ably and has a long service life. In the unlikely event that
a fault occurs during operation, please check whether the
fault is due to an operating error. If this is the case, you will
be charged for the cost incurred even if this falls within the
warranty period.
You can fix the following faults yourself.
8.2.1 Appliance function
Defect Cause Remedy
The appliance is
not working.
→ The appliance is not switched on.
u
Switch on the appliance.
→ The mains plug is not properly
plugged into the socket.
u
Check the mains plug.
→ There is something wrong with the
fuse in the socket.
u
Check fuse.
→ Power cut
u
Keep the appliance closed.
u
Protect food: Lay cold storage accumulator on top of
the food or use another freezer if the power is off for
a prolonged period.*
u
Do not re-freeze defrosted food.*
Temperature is not
cold enough.
→ The appliance door is not closed
properly.
u
Close appliance door.
→ Ventilation is not sufficient.
u
Clear ventilation grille and clean it.
→ The ambient temperature is too
high.
u
Ensure the correct ambient conditions:
→ The appliance was opened too
many times or for too long.
u
Wait to see if the required temperature corrects itself.
If not, contact Customer Service (see 8.3 Customer
Service) .
→ The temperature is set incorrectly.
u
Set a colder temperature and check after 24 hours.
→ The appliance is too close to a heat
source (oven, radiator, etc).
u
Change where the appliance or the heat source are
located.
8.3 Customer Service
First check whether you can rectify the fault yourself . If you
cannot rectify the problem, contact Customer Service.
Please refer to the enclosed “Liebherr-Service” brochure for
the address.
Customer help
* Depending on model and options 17

WARNING
Unprofessional repair!
Injuries.
u
Have any repairs and action - not expressly specified -
on the appliance and mains cable carried out by service
personnel only. (see 7 Maintenance)
u
A damaged mains cable may only be replaced by the
manufacturer, the manufacturer’s Customer Service or a
similarly qualified person.
u
In the case of appliances with an IEC connector, the
change may be made by the customer.
8.3.1 Contacting Customer Service
Make sure you have the following appliance data at the
ready:
q
Appliance name (model and index)
q
Service no. (Service)
q
Serial no. (S no.)
u
Access the appliance information via the display .
-or-
u
Refer to the type plate for appliance information.
(see 8.4 Type plate)
u
Note down appliance information.
u
Notify Customer Service: Report errors and the appliance
information.
w
This will help us to provide a fast and focussed service.
u
Follow any further instructions provided by Customer
Services.
8.4 Type plate
The type plate is inside the appliance. See appliance over‐
view.
Fig. 35
(1)
Appliance designation (3) Serial No.
(2) Service No.
9 Shutting down
u
Empty the appliance.
u
Switch off the appliance.
u
Pull out the mains plug.
u
Clean appliance (see 7.2 Cleaning the appliance) .
u
Leave the door open so that no bad odours form.
Note
Damage to the appliance and malfunctions!
u
After shutting down, only store the appliance at the
permitted room temperature of between -10 °C and
+50 °C.
10 Disposal
10.1 Preparing appliance for disposal
Liebherr uses batteries in some of its appli‐
ances. In the EU, for environmental reasons,
legislation obliges the end user to remove
these batteries before disposing of old appli‐
ances. If your appliance contains batteries, a
corresponding notice is attached.
Lamps If you can remove the lamps yourself without
destroying them, also remove these before
disposal.
u
Take the appliance out of operation.
u
Appliances with batteries: remove the batteries. For
description, see Maintenance chapter.
u
If possible: remove lamps without destroying them.
10.2 Disposing of the appliance in an
environmentally friendly manner
The appliance still contains
valuable materials and must
be disposed of separately from
unsorted municipal waste.
Dispose of batteries separately
from the old appliance. To do
this, you can return the batteries
free of charge to retailers as
well as recycling centres and
collection centres for recyclable
materials.
Lamps Dispose of removed lamps
via the respective collection
systems.
For Germany: You can dispose of the appli‐
ance free of charge via the
class 1 collection containers
at the local recycling and
recyclable material collection
centres. When purchasing a new
fridge/freezer, if the sales area
> 400 m
2
, retailers will also take
back the old appliance free of
charge.
WARNING
Leaking coolant and oil!
Fire. The coolant contained in the appliance is eco-friendly,
but also flammable. The oil contained in the appliance
is flammable. Escaping coolant and oil can ignite if the
concentration is high enough and in contact with an
external heat source.
u
Do not damage the pipelines of the coolant circuit and
the compressor.
u
Transport the appliance without damaging it.
u
Dispose of batteries, lamps and the appliance according
to the above specifications.
Shutting down
18 * Depending on model and options


home.liebherr.com/fridge-manuals
Refrigerator and freezer
ORIGINAL OPERATOR'S MANUAL
Issue date: 20221011
Part number index: 7083350-00
Liebherr-Hausgeräte Ochsenhausen GmbH
Memminger Straße 77-79
88416 Ochsenhausen
Deutschland
