
© 2025 TP-Link 1910013892 REV3.8.130
Deco App Guide
Simple. Easy. Yet Powerful.

Contents
Get Started ·············································································· 1
About This Guide ······································································2
Introduction to Deco App ····················································3
Set Up ························································································ 5
Set Up Your Deco Network ·················································6
Network ··················································································10
Create a New Network ························································11
Switch Between Deco Networks ··································12
Add More Decos ····································································14
Replace Main Deco ······························································15
Manage Deco Network ······················································16
Manage Deco Units······························································17
Manage Network Clients ···················································18
Deco Smart Home ·······························································21
Add Smart Devices ······························································22
Quickly Do Tasks with Shortcut ·····································23
Automate Your Smart Devices ·······································25
Parental Controls ·································································27
Create Proles ·········································································28
Manage Your Kids' Activities ···········································29
View Online Usage Data ····················································35
Set Up Family Time ·······························································36
Grant Rewards ·········································································39
Network Protections ··························································41
Enable Security+ Protection ···········································42
Device Isolation ······································································46
Camera Security ····································································47
More Features ······································································50
Test Features at the Deco Lab ·······································51
Check Network Reports ····················································57
Wi-Fi Access Control···························································58
Change Wi-Fi Settings ························································61
Create a Guest Network ····················································63
Create a IoT Network ···························································66
WPS ······························································································67

Change Internet Settings ·················································68
Internet Backup ·····································································69
QoS ·······························································································82
Network Optimization ························································86
Create Static Routes ··························································87
Set Up VPN Server/Client ···············································89
Advanced Features ···························································111
Congure Connection Alerts ·······································116
Control the Light on Decos ··········································117
Upgrade Your Deco ···························································118
Reboot Your Deco ······························································119
Reboot Schedule ································································120
Client Identication ····························································121
Control Your Deco with Alexa ······································122
Enable App Notications ················································ 123
Change App Appearance ··············································124
Change Account Information ······································125
Add Managers ······································································126
Upgrade Your HomeShield ············································127
Subscribe to HomeShield Service····························128

Get Started
2
About This Guide
This guide provides a brief introduction to the Deco app.
Features available in Deco may vary by model and software version. Deco availability may also vary by region or ISP. All images, steps, and descriptions
in this guide are only examples and may not reect your actual Deco experience.
Conventions
In this guide, the following conventions are used:
Convention Description
Underline Hyperlinks are in teal and underlined. You can click to redirect to a website or a specic section.
Teal
Key information appears in teal, including management page text such as menus, items,
buttons and so on.
Note: Ignoring this type of note might result in a malfunction or damage to the device.
Tips: Indicates important information that helps you make better use of your device.
IoT Compatibility Disclaimer
IoT compatibility refers only to smart devices that can be controlled via the Deco app. Other wireless devices can still connect to Deco for normal Wi-Fi
use.
Seamless Roaming Disclaimer
Clients need to support 802.11k/v/r and may require additional set up. Performance may vary depending on the client device.
HomeShield Disclaimer
HomeShield includes the Free Basic Plan. Fees apply for the Pro Plan. Visit tp-link.com/homeshield/ for more information.

3
* Features available in Deco may vary by model and software version. Deco availability may also vary by region or ISP.
Introduction to Deco App
TP-Link Deco app is the perfect way to set up your Deco mesh Wi-Fi in minutes and control your whole-home network. You can monitor your home
Wi-Fi from anywhere, and make changes right from the palm of your hand.
Your network at-a-glance
Easily access what you use most
in the reorganized dashboard.
View the network topology and
status, manage clients, and more.
Safeguard your network
Power up your protection against
intrusions and attacks, stay
updated on security details, and
get network recommendations.
Maintain healthy digital habits
Easily control your kids' online
time and content. Receive intuitive
charts and detailed statistics
concerning your kids' online usage.
More features within reach
Test the in-development features
at the Deco Lab, receive intuitive
network reports, set up networks
for dedicated needs, and more.

4
* Features available in Deco may vary by model and software version. Deco availability may also vary by region or ISP.
Link for more exibility
Link your Deco with dierent
accouts for more exible
management.
Customize app settings
Get app versions and congure
basic app settings such as
notications and appearance.
Get help instantly
Find all ways in Support Center
to solve the problems you
encoutered.

5
* Features available in Deco may vary by model and software version. Deco availability may also vary by region or ISP.
Set Up
Before using your Deco devices, you need to set it up rst. Follow the quick setup process on the Deco app to set up your Deco and unlock various
features.
6
* Features available in Deco may vary by model and software version. Deco availability may also vary by region or ISP.
Set Up Your Deco Network
First let's start by setting up the Deco network. Get the TP-Link Deco app for iOS or Android, then follow the app to walk through the setup.
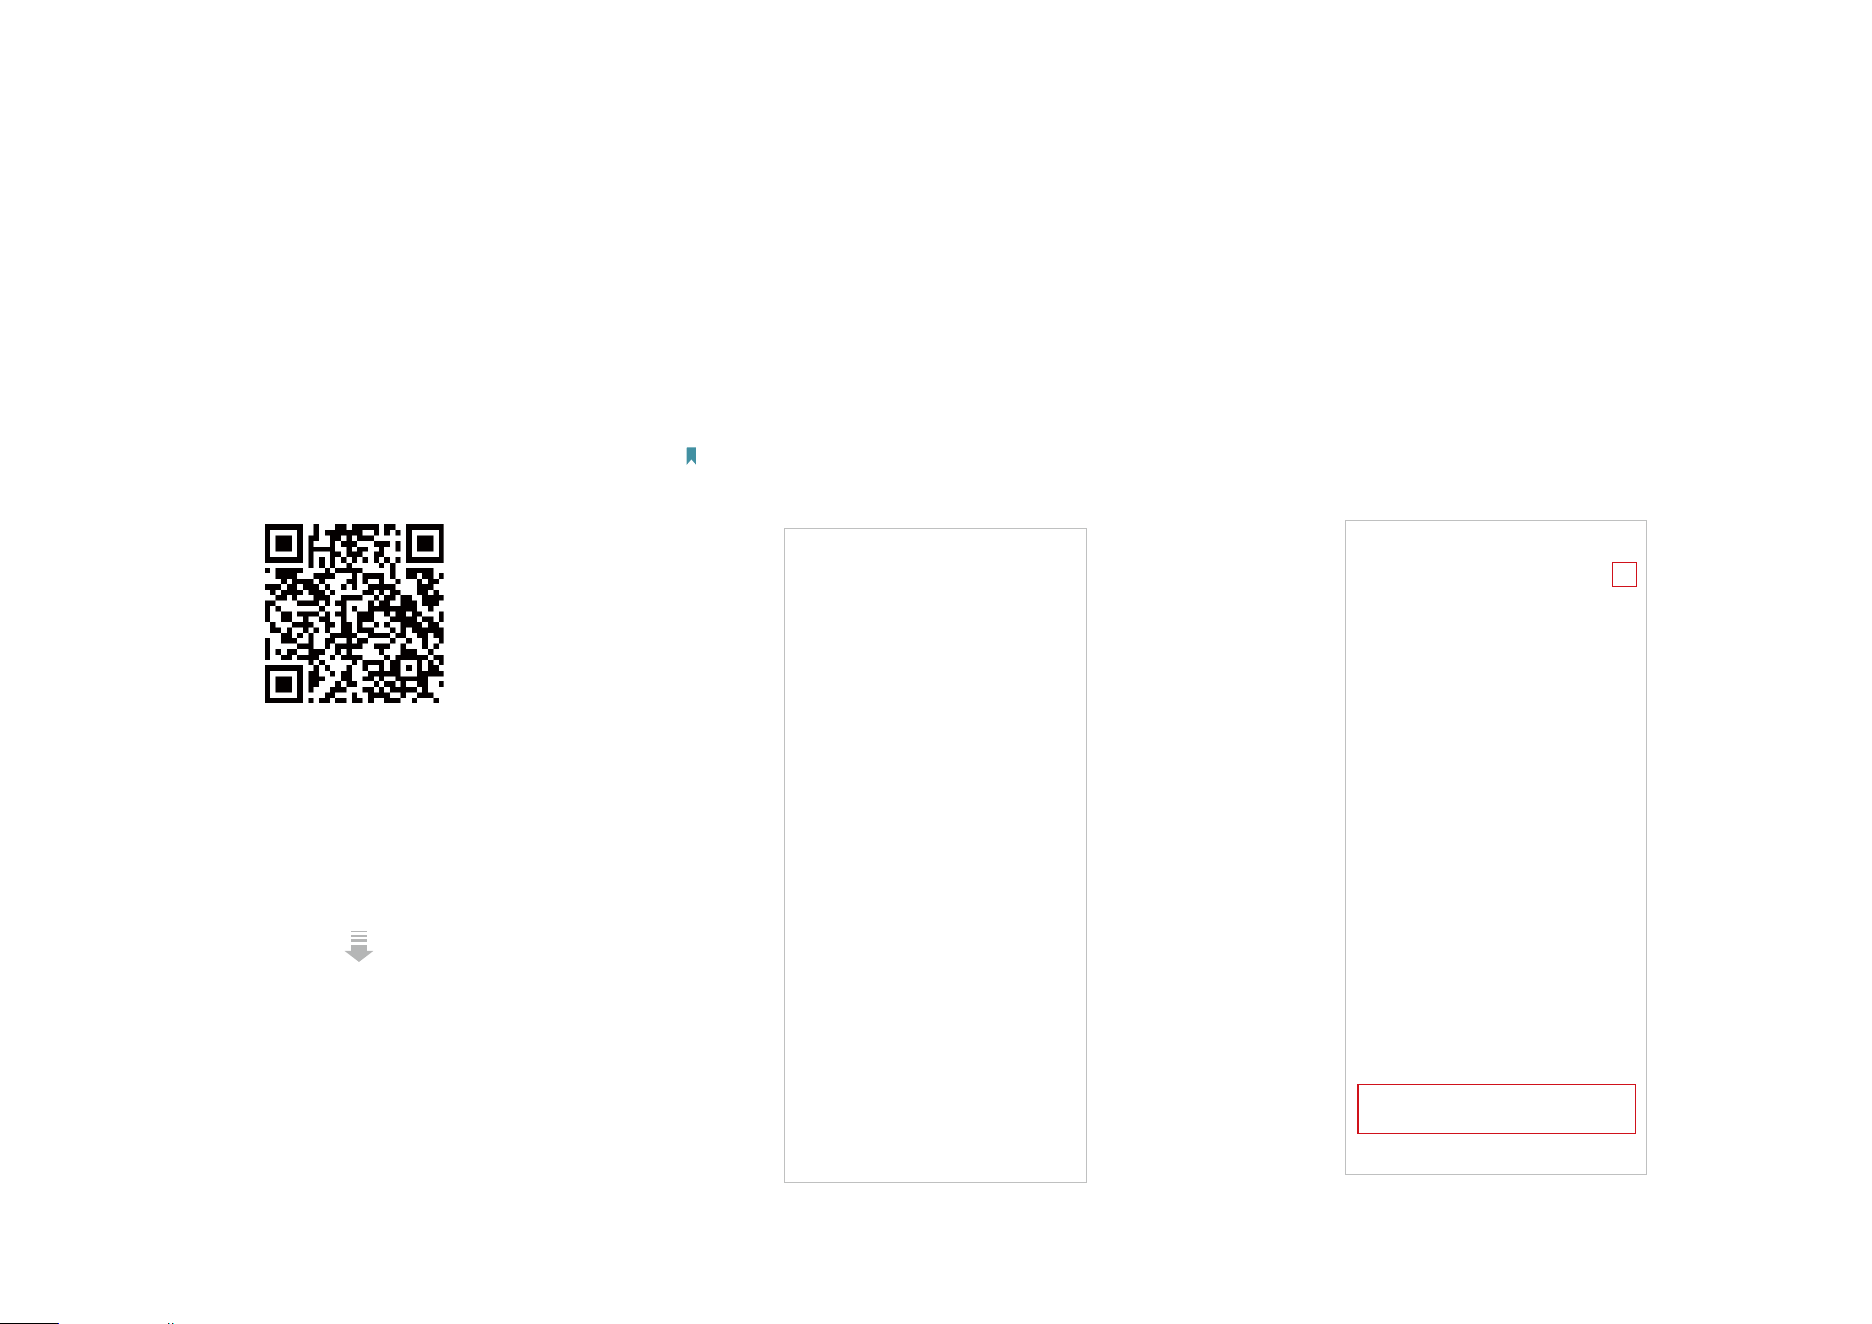
1. Get the Deco app
Scan the QR code below or go to Google
Play or the App Store to download the Deco
app. Install the app on your Android or iOS
smartphone or tablet.
or
2. Log in or sign up with TP-Link ID
Open the app and log in with your TP-Link ID. If
you don’t have a TP-Link ID, create one rst.
Note: If you forgot your login password, tap Forgot Password?.
The app will help you reset your password.
3. Create a Network
In the Deco app, tap the + button on the top
right corner of the homepage, then select
Create a Network.

7
* Features available in Deco may vary by model and software version. Deco availability may also vary by region or ISP.
5. Connect your Deco
Power o your modem. Connect your Deco to the modem and power it on.
If you don't have a modem, connect your Deco directly to the Ethernet outlet.
or
4. Plug in your Deco
Plug in your Deco and wait until your Deco's
LED pulses blue, then your phone/tablet
will connect to the Deco's default Wi-Fi
automatically.

8
* Features available in Deco may vary by model and software version. Deco availability may also vary by region or ISP.
8. Create your Wi-Fi network
Set a network name and a password. These
will be the name and password you use to
connect your devices to Wi-Fi.
7. Connect your Deco to the internet
Select the internet connection type and enter
the information. If you are not sure, contact
your internet service provider.
6. Specify your Deco's location
Select or custom a location for your Deco.
The location will be used as the name of your
Deco.

9
* Features available in Deco may vary by model and software version. Deco availability may also vary by region or ISP.
10. Setup complete
Your Deco network is now up. You can
connect your devices to the Deco network
for better connections.
11. Plug in other Decos (if any)
Place the other included Decos in a suitable position and
plug them on, and they will join the network automatically.
9. Keep your Deco up-to-date
Set auto update time. This allows your
Deco to automatically update to the latest
rmware which provides better network
experience.

Network
After setting up your Deco network, you can easily access what you use most in the dashboard. Create a new network, switch between networks, view
the network topology and status, manage clients, and more.
11
* Features available in Deco may vary by model and software version. Deco availability may also vary by region or ISP.
Create a New Network
In the Deco app, you can create different Deco networks with your TP-Link ID and manage them conveniently from the Deco app with one account.
Two methods are provided as below to create a new network.
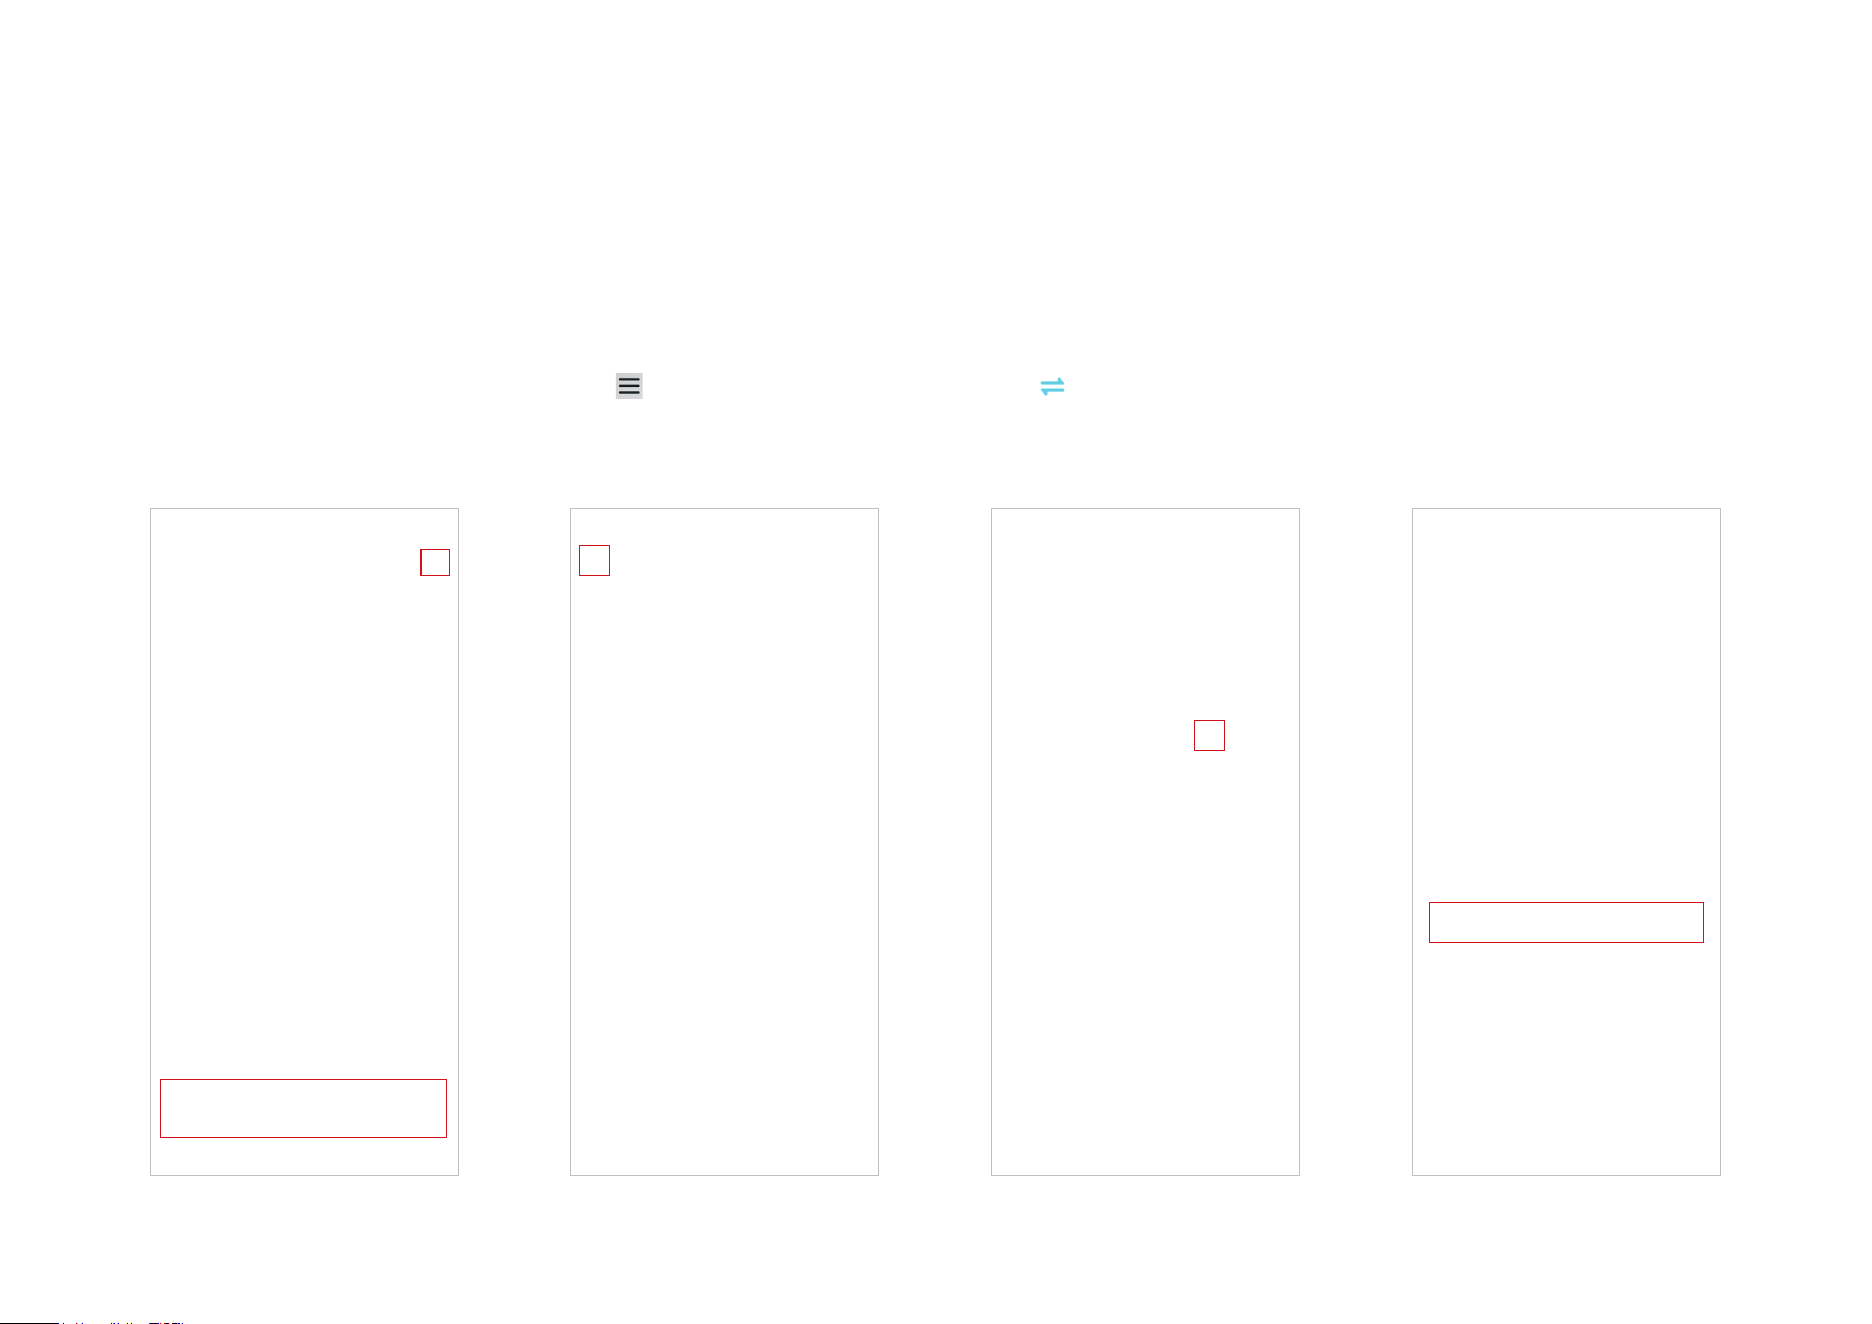
1. On the home page, tap + and
select Create a Network. Then
follow app instructions to
complete the setup.
Method 1. Via Home Page
1. Tap to open the side menu.
Method 2. Via Side Menu
2. Tap .
3. Tap Create New Network. Then
follow app instructions to
complete the setup.

12
* Features available in Deco may vary by model and software version. Deco availability may also vary by region or ISP.
Switch Between Deco Networks
If you have created multiple Deco networks with your TP-Link ID, you can switch between them conveniently on the Deco app.
1. On the home page, tap
Change Network.
2. Select a network to switch to.
Method 1. Via Home Page
13
* Features available in Deco may vary by model and software version. Deco availability may also vary by region or ISP.
1. Tap to open the side menu.
Method 2. Via Side Menu
2. Tap .
3. Select a network to switch to.

14
* Features available in Deco may vary by model and software version. Deco availability may also vary by region or ISP.
Add More Decos
After creating a Deco network, you can add more Decos to the network to expand the Wi-Fi coverage and manage them easily on your Deco app.
1. On the home page, tap + and
select Add a Deco Unit.
2. Search for and select your Deco model. Then follow app instructions to add the Deco.

15
* Features available in Deco may vary by model and software version. Deco availability may also vary by region or ISP.
Replace Main Deco
You can replace the current main Deco with a new Deco, and your internet conguration and Wi-Fi settings will remain unchanged.
Note: Make sure that the new Deco supports the operation mode of the current main Deco. Otherwise, the network may be unavailable.
1. On the home page, tap + and
select Replace Main Deco.
2. Follow instructions to complete the settings.
Note: When replacing your Deco, your network will be temporarilly unavailable.
16
* Features available in Deco may vary by model and software version. Deco availability may also vary by region or ISP.
Manage Deco Network
After setting up your Deco network, you can easily manage your whole-home network. Check the network status and speeds, reboot network, change
the network owner and main Deco, delete the network, and more.
1. On the home page, tap the
Network module.
2. Check the network status, speeds, and connected devices.
Tap to manage the network,

17
* Features available in Deco may vary by model and software version. Deco availability may also vary by region or ISP.
Manage Deco Units
You can easily manage the Deco units in your network. View Deco connections, check the clients of each Deco, edit the Deco's name, and reboot or
remove a Deco.
2. Tap a Deco to view device
details.
1. On the home page, tap the
Network module.
3. Tap to congure the Deco settings, like rebooting or removing the
Deco.

18
* Features available in Deco may vary by model and software version. Deco availability may also vary by region or ISP.
Manage Network Clients
You can manage each network client easily. Change the device name, check its connection status, add it to the profile of a family member, enable high
priority and Mesh Technology for it, and block the device.
1. On the home page, tap the
Clients module.
2. Tap a client to view the details. 3. Tap the device icon to congure
the device type and name.

19
* Features available in Deco may vary by model and software version. Deco availability may also vary by region or ISP.
4. Tap Family Member to check the
prole it belongs to.
5. Tap Connection Preference to
congure the preferred Deco
and Wi-Fi band for this client.
6. Enable Speed Limit for this client.

20
* Features available in Deco may vary by model and software version. Deco availability may also vary by region or ISP.
9. Enable Device Isolation to block
this device from communicating
with other devices on the network to
ensure the network security. Refer to
Device Isolation for more details.
10. Tap Block to prevent this
device from accessing to the
network.
8. Enable Mesh Technology for
this client to turn on seamless
roaming between Decos for this
device.
7. Enable High Priority for this
client.

Deco Smart Home
Deco works as a central controller to manage your smart devices such as smart bulbs, plugs, and switches. It allows you to access the devices in your
local area network (LAN) through the Deco app even when your home goes oine.

22
* Features available in Deco may vary by model and software version. Deco availability may also vary by region or ISP.
Add Smart Devices
After creating a Deco network, you can add your smart home devices to the network and manage them conveniently on your Deco app.
1. On the home page, swipe
up and tap the Smart Home
module.
2. Tap Get Started. 3. Select the brand of your device
and follow the instructions to
add it to your Smart Home.
4. When nished setup, you can
manage your smart devices
on Deco Smart Home.

23
* Features available in Deco may vary by model and software version. Deco availability may also vary by region or ISP.
Quickly Do Tasks with Shortcut
Shortcut lets you execute an action with a simple tap. For example, if you want to power o your living room light at one tap, follow the steps below.
Note: If you want to create shortcuts for your smart devices, refer to Add Smart Devices to add the them to your Deco network rst.
2. Tap + and select Add Shortcut. 3. Tap Add Action. 4. Choose the devices you'd like
to control.
1. On the home page, swipe up
and tap the Smart module.

24
* Features available in Deco may vary by model and software version. Deco availability may also vary by region or ISP.
6. Name the shortcut and choose
an icon for easy identication.
Now you can tap to execute the
action anytime you like.
5. Add an action to be executed
with a simple tap.

25
* Features available in Deco may vary by model and software version. Deco availability may also vary by region or ISP.
Automate Your Smart Devices
Automation allows you to set interactions between your devices by adding triggers and actions. For example, when you arrive home or when your
smartphone is connected to the Deco network (which is a trigger), the living room plug automatically turns on (which is an action). Then the kettle
plugged into the living room plug will start to boil water.
Note: If you want to create shortcuts for your smart devices, refer to Add Smart Devices to add the them to your Deco network rst.
2. Tap + and select Add
Automation.
3. Tap Add Trigger. 4. Set a time or device trigger to
activate this automation.
1. On the home page, swipe up
and tap the Smart module.

26
* Features available in Deco may vary by model and software version. Deco availability may also vary by region or ISP.
6. Name the automation. Now the action will be executed
when triggered.
5. Add an action to be executed
when triggered.

Parental Controls
Parental Controls helps your kids maintain healthy digital habits.
Easily control your kids' online time and content. Receive intuitive charts and detailed statistics concerning your kids' internet usage.

28
* Features available in Deco may vary by model and software version. Deco availability may also vary by region or ISP.
Create Proles
To use Parental Controls, let's start by creating proles for your kids.
1. On the home page, tap
Parental Controls and tap Get
Started.
2. Create a prole for your kid. 3. Select the devices belong to
your kid.
4. Follow the instrustions to
complete the settings, then a
prole will be created.
Note: Features with is for Advanced
Parental Controls users only.
29
* Features available in Deco may vary by model and software version. Deco availability may also vary by region or ISP.
Manage Your Kids' Activities
You can use Parental Controls features to manage your kids online activities such as online time and content. Some features are for HomeShield
Subscription Service users only. You need to upgrade to Advanced Parental Controls to use these features. Other features are free for use.
1. On the home page, tap
Parental Controls and select your
kid's prole.
2. Tap the icon .
3. Manage the online activities for your kids.
Note: Features with is for HomeShield Subscription Service users only. Please
upgrade to Advanced Parental Controls to unlock more exible settings.

30
* Features available in Deco may vary by model and software version. Deco availability may also vary by region or ISP.
• Filter impropriate content
Tap Content Filter. The categories selected
here will be blocked from accessing.
You can add accessible exception sites in
Manage Allowed Websites.
• Block specic websites
Tap Block Websites and enter the websites
you want to prevent the prole from accessing.
• Set "no internet" bedtime
Tap Bedtime and set a bedtime to prevent the
prole from accessing the internet.
To set a more exible bedtime, upgrade to
Advanced Parental Controls.
Note: Features with is for Advanced Parental Controls
users only.
Features for all:

31
* Features available in Deco may vary by model and software version. Deco availability may also vary by region or ISP.
More Flexible Settings for Advanded Parental Controls users only:
• Youtueb Restricted
Youtube Restricted Mode lters
out potentially mature videos
while leaving most videos
available.
• Safesearch
Safesearch helps you lter
explicit content from your results.
• Block specic apps
Tap Blocked Apps and select the categories or apps to prevent the
prole from accessing.
Note:
1. If you block an app category, new applications in that category after a rmware upgrade will also
be blocked.
2. Only apps displayed in the list can be blocked. Apps not on the list will be allowed to access.
3. If you block apps that have been previously added to App Time Limits, the rules you set in App
Time Limits will be ignored and these apps will be blocked.

32
* Features available in Deco may vary by model and software version. Deco availability may also vary by region or ISP.
• Always Allowed Apps
1. Tap Add Apps.
2. Select app categories or specic apps that the prole can access at all
times, regardless of whether they were previously added to Blocked Apps
or App Time Limits.

33
* Features available in Deco may vary by model and software version. Deco availability may also vary by region or ISP.
• App Time Limits
1. Tap Add Limits.
2. Select app categories or specic apps. 3. Set time limits for the selected apps and tap
Add to save the settings.
Note:
1. If you set time limits for apps that have been previously added
to Blocked Apps, these apps will be unblocked and follow the
rules you set in App Time Limits.
2. Time limits here refer to the time the device uses internet
trac. Activities that don’t use trac, such as single-player
gaming and video buering, are not included.

34
* Features available in Deco may vary by model and software version. Deco availability may also vary by region or ISP.
• Time Limits
1. Tap Add Limits.
2. Select apps you want to manage for the
prole.
3. Set time limits for the selected apps and tap
Add to save the settings.

35
* Features available in Deco may vary by model and software version. Deco availability may also vary by region or ISP.
• 1. On the home page, tap
Parental Controls.
• 2. Tap a prole to check the online usage data such as most visited websites and most
used apps, block history, and more.
View Online Usage Data
With the created proles, you can view intuitive charts and real-time detailed statistics concerning your kids' online usage.
Note: App usage data is for HomeShield Subscription Service users only. Upgrade to Advanced Parental Controls to see what apps your kids use and how much time they spend.

36
* Features available in Deco may vary by model and software version. Deco availability may also vary by region or ISP.
1. On the home page, swipe right
to open the menu and select
HomeShield.
2. Select a desired network to apply Advanced Parental Controls.
Set Up Family Time
Family time lets you enjoy a nice dinner, or share a fun movie with your family together by pausing the internet with one tap. Family Time is for
HomeShield Subscription Service users only.

37
* Features available in Deco may vary by model and software version. Deco availability may also vary by region or ISP.
3. Open Deco app. Go to the Parental Controls tab and tap + > Set up
Family Time. Then tap Set Up Now.
4. Add devices of the family member who you want to cut the internet
and then set the time duration you want to have your family together
without internet distractions.

38
* Features available in Deco may vary by model and software version. Deco availability may also vary by region or ISP.
5. Tap Start anytime you want to activate the family time. Tap Stop
anytime when nished.

39
* Features available in Deco may vary by model and software version. Deco availability may also vary by region or ISP.
1. On the home page, swipe right
to open the menu and select
HomeShield.
2. Select a desired network to apply Advanced Parental Controls.
Grant Rewards
You can add extra online time as a reward for you kid’ s good behavior. This feature is for HomeShield Subscription Service users only.

40
* Features available in Deco may vary by model and software version. Deco availability may also vary by region or ISP.
3. Go to the Parental Controls tab and
select a prole.
4. Tap Adjust and select the allowed time
you want to add for today.

Network Protections
Real-Time Protection is for HomeShield Security+ users only. After subscribing to HomeShield Security+, you can protect your network safe from
attacks by blocking malicious websites, identify potential threats, and blocking hackers from access your devices.

42
* Features available in Deco may vary by model and software version. Deco availability may also vary by region or ISP.
Enable Security+ Protection
Real-Time Protection is for HomeShield Security+ users only. Before using this, refer to Subscribe to HomeShield Service to update to HomeShield
Security+ Service.
1. In the homepage, swipe right
to open the menu and select
HomeShield.
2. Select a desired network to apply Security+.

43
* Features available in Deco may vary by model and software version. Deco availability may also vary by region or ISP.
3. Go to the Security tab. Your Deco will scan automatically. You can tap Scan Details to check the security
details such as wireless security or blocked threats and optimize the settings.
4. Upgrade to Security+ for more
protections as below.

44
* Features available in Deco may vary by model and software version. Deco availability may also vary by region or ISP.
Turn on Web Protection to block access to malicious websites to avoid
dangerous links and personal information disclosure.
You can add clients to Exceptions to opt out of the protection.
Turn on Intrusion Prevention to identify potential threats and keep your
network safe from attacks.
You can add clients to Exceptions to opt out of the protection.
• Web Protection • Intrusion Prevention

45
* Features available in Deco may vary by model and software version. Deco availability may also vary by region or ISP.
Turn on IoT Protection to block hackers from accessing your IoT
devices.
You can add clients to Exceptions to opt out of the protection.
• IoT Protection

46
* Features available in Deco may vary by model and software version. Deco availability may also vary by region or ISP.
Device Isolation
Isolating Your Devices will minimize the potential for potential third parties to gain access to data or devices on your network and will limit the impact
of a breach or malware to only some devices. Also, some IoT devices may often consume large portions of your network’s bandwidth. Isolating these
devices will prevent them from aecting the overall performance of the devices connected to your home network and will allow your router to better
allocate and manage bandwidths for the connections.
1. In the homepage, go to the
Security tab and tap Device
Isolation.
2. Enable Device Isolation. Then tap + to add the devices that you would like to be isolated from your main network.
Then the device will appear in the Isolated Devices list. While isolated, the devices can still access the internet and
are able to communicate with other isolated devices. However, isolated devices cannot transfer data with devices on
your home network, including managing gateway devices, accessing USB devices, etc.

47
* Features available in Deco may vary by model and software version. Deco availability may also vary by region or ISP.
Camera Security
Camera Security ensures your privacy at home by blocking your camera from accessing the internet at certain times or all the time.
1. In the homepage, go to the
Security tab and tap Camera
Security.
2. Choose a mode and add cameras to apply the mode.

48
* Features available in Deco may vary by model and software version. Deco availability may also vary by region or ISP.
Home Mode
Cameras in Home Mode cannot access the internet during block times. You can set block times in the following two ways:
• Set a Block Schedule: Set times when the cameras will be blocked from the internet.
• Block Upon Arrival: Set mobile phones that once connected to Deco’s Wi-Fi, the cameras will be blocked from accessing the internet.

49
* Features available in Deco may vary by model and software version. Deco availability may also vary by region or ISP.
Local Only Mode
Cameras in Local Only mode will only work on the local network and cannot access the internet all the time. You can turn it o at any time to let the
camera connect to the internet again.

More Features
More features are within reach. Test the in-development features at the Deco Lab, receive intuitive network reports, congure network and account
settings for dedicated needs, and more.
Tip: You can use the search box on the More page to quickly nd the features you need.

51
* Features available in Deco may vary by model and software version. Deco availability may also vary by region or ISP.
Test Features at the Deco Lab
Deco app includes a built-in Deco Lab, which is committed to trying experimental features. It keeps updating the lab according to the actual
performance to provide even better experiences.
1. Go to More > Deco Lab. 2. Check and test the in-development features. Now Wi-Fi Assistant and VPN Client are
available for use.

52
* Features available in Deco may vary by model and software version. Deco availability may also vary by region or ISP.
Wi-Fi Assistant
Use Wi-Fi Assistant for your Wi-Fi diagnotics and network device scan. You can also check how other Wi-Fi networks are impacting your Wi-Fi, the
surrounding cameras, the vendor information for a known MAC address, and ISP information for a known IP address.
• Wi-Fi Diagnostics: Run Wi-Fi Diagnostics to access your network
security and performance. The Deco app will automatically check
your network's signal strength, security, Ping result, wireless
interference, etc.
• Detect Camera: The Deco app can automatically scan all the
cameras in your network. You can also follow app instructions to
detect camera manually to check if there are any cameras in your
house.

53
* Features available in Deco may vary by model and software version. Deco availability may also vary by region or ISP.
• Scan for Devices: Let Deco app scan all the connected devices in
your network.
• Public IP Lookup: Query tool to query the network information of the
current network or the network information of a specic IP address.
You can type in a specic IP address to check the location and the ISP
information or click Lookup Current IP to check the information of your
network if the Internet address of your network is a public address. In
the upper right corner of this page, you can view the history.

54
* Features available in Deco may vary by model and software version. Deco availability may also vary by region or ISP.
• Ping Test: Ping test on the specied server to view real-time packet loss and latency data. In the upper right corner of this
page, you can set the send interval and packet size or view the history.

55
* Features available in Deco may vary by model and software version. Deco availability may also vary by region or ISP.
• MAC Lookup: Query tool for relevant vendor information based on
MAC address. You can type in a specic MAC address (rst six letters)
to check the vendor information of the device.
• Open Port Checker: You can type in a specic IP address to check
the opened ports of this server or click Scan Current Device to check
the opened ports of your router.

56
* Features available in Deco may vary by model and software version. Deco availability may also vary by region or ISP.
VPN Client
Get a top-class VPN and encrypt Deco’s VPN Client to enhance your network security.
Choose any of the VPN service provider and subscribe the services provided. You can also tap Set up now if you already have one. Customize your
own VPN service is also available. Refer to Set Up VPN Server/Client for more setup details.
Note: TP-Link does not provide any guarantee for the services of any third party.

57
* Features available in Deco may vary by model and software version. Deco availability may also vary by region or ISP.
Check Network Reports
The Deco app provides intuitive charts and detailed statistics to help you know your home network better.
1. Go to More > Reports. 2. Check the weekly and monthly reports of your network.

58
* Features available in Deco may vary by model and software version. Deco availability may also vary by region or ISP.
Wi-Fi Access Control
Wi-Fi Access Control is used to block or allow specific client devices to access your Deco’s Wi-Fi network based on a list of blocked devices (Block
List) or a list of allowed devices (Allow List).
1. Go to More > Wi-Fi Access
Control.
2. Tap Mode and choose a Wi-Fi access mode.

59
* Features available in Deco may vary by model and software version. Deco availability may also vary by region or ISP.
• Block List Mode
Add clients to the Block List to prevent them from accessing your Wi-Fi network. You can select clients directly or enter the MAC address of the device
you want to block. Then only clients on the Block List are prohibited from connecting to Deco’s Wi-Fi.

60
* Features available in Deco may vary by model and software version. Deco availability may also vary by region or ISP.
• Allow List Mode
Add clients to the Allow List to only allow them access to your Wi-Fi network. Then only devices on the Allow List are allowed to connect (except when
Guest Network Exception is enabled).
Guest Network Exception: When enabled, your guests can still connect to the Guest Network without being aected by the Allow List mode.
New Device Notication: When enabled, you can receive inquiry notications when new devices connect to the network. When disabled, all devices’
connection requests will be rejected by default without receiving notications.

61
* Features available in Deco may vary by model and software version. Deco availability may also vary by region or ISP.
Change Wi-Fi Settings
You can change the network name and password of your main network at any time and share the network easily with family and friends.
1. Go to More > Wi-Fi
Settings.
3. Select the Wi-Fi network and you can change the Wi-Fi
network name, password and security.
2. Tap Share to share this network to
others.

62
* Features available in Deco may vary by model and software version. Deco availability may also vary by region or ISP.
5. Select a preferred band to be
enabled in this network.
6. Select a preferred channel width for 5 GHz network. 7. Enable Hide Network to hide
this network from Wi-Fi list.
4. Tap Advanced for more
Wi-Fi settings as follow.

63
* Features available in Deco may vary by model and software version. Deco availability may also vary by region or ISP.
Create a Guest Network
You can create and share a separate network for guests to access the internet without revealing your main network, keeping your home Wi-Fi and
personal data safe.
1. Go to More > Guest Network. 2. Turn on Guest Network and
set a Wi-Fi network name and
password for it.
3. Select a Wi-Fi security protocol
for this network.
4. Select a preferred band to be
enabled in this network.

64
* Features available in Deco may vary by model and software version. Deco availability may also vary by region or ISP.
5. Tap Duration to set how long
the Guest Network works
before it automatically turns
o.
6. Tap Advanced to set more
settings as follow.
7. Enable Bandwidth Control and
set a download and upload
bandwidth for your network.
8. Enable Captive Portal to
customize a professional
captive portal within minutes.

65
* Features available in Deco may vary by model and software version. Deco availability may also vary by region or ISP.
• Authentication Type:
Set a password for newly
connected users to
authenticate the Captive
Portal. You can also leave it
blank if unnecessary.
• Time Limit: Select the allowed
duration of internet access
provided after successful
portal authentication.
• Redirect: Enter the webpage
that the newly connected user
sees after passing Captive
Portal authentication.
• Login Page: Customize the
login page including logo,
title, button, Terms of Use, and
more.

66
* Features available in Deco may vary by model and software version. Deco availability may also vary by region or ISP.
Create a IoT Network
Create a dedicated and wireless network to manage all your IoT devices, such as smart lights and camers.
1. Go to More > IoT Network. 2. Turn on IoT Network. Set a Wi-
Fi network name and password
for this network.
3. Select a Wi-Fi security protocol
for this network.
4. Select a preferred band to be
enabled in this network.

67
* Features available in Deco may vary by model and software version. Deco availability may also vary by region or ISP.
WPS
WPS (Wi-Fi Protected Setup) helps you to quickly and securely connect a client to the network with a tap without entering any password.
2. Tap the WPS icon on Deco app
and then on your client.
1. Go to More > WPS.

68
* Features available in Deco may vary by model and software version. Deco availability may also vary by region or ISP.
Change Internet Settings
You can change internet settings if needed.
2. Tap IPv4 for IPv4 settings. 3. Tap IPv6 and enable it for IPv6
settings.
4. Tap Firewall Rules to add rules
if you want to allow specic
devices to access specic
services.
1. Go to More > Internet
Connection.

69
* Features available in Deco may vary by model and software version. Deco availability may also vary by region or ISP.
Internet Backup
Internet Backup keeps your device always connected by connecting your Deco to a backup network when the original network is disconnected to
ensure normal internet access. When your main network is restored, it will automatically switch back. The following three backup modes are now
available for your Decos. Only one backup mode can be enabled at a time.
• Hotspot Backup Mode
Hotspot Backup Mode allows your Deco to connect to a hotspot backup network when your main network service fails.
1. Open your Deco app, and go to More > Advanced > Internet Backup.
Alternatively, go to More > Internet Connection > Internet Backup.
2. Enable Internet Backup. If multiple backup modes are available, select
Hotspot Backup.

70
* Features available in Deco may vary by model and software version. Deco availability may also vary by region or ISP.
3. Select one or more nearby hotspots for network backup.
Note: You can also add hotspot manually.
Note: When there are multiple hotspots, Deco will automatically connect to the
best one.
4. After adding a hotspot, you can test its network connection.
Note: The test may take times. Please make sure your hotspot is turned on
and can access the internet. Your Deco network may be unstable during the
test.

71
* Features available in Deco may vary by model and software version. Deco availability may also vary by region or ISP.
5. It is recommended to set a xed WAN port to ensure that wired clients can connect to the
internet when using the backup network.
Note: Tap set a xed WAN port or go to More > Advanced > WAN Port. Then disable Auto WAN Port and
set a xed WAN port for your Deco.
Setup complete!
When the original network fails, turn on your
hotspot and your Deco will automatically switch
to the hotspot backup network to keep your
network connected.

72
* Features available in Deco may vary by model and software version. Deco availability may also vary by region or ISP.
After enabling Hotspot Backup, you can further congure specic settings.
1. Add Hotspot
Tap Add to add multiple hotspots to the Hotspot List.
2. Switch Hotspot
When Hotspot Backup is in use for internet access, tap Switch Hotspot
to use another hotspot in the list as backup hotspot.

73
* Features available in Deco may vary by model and software version. Deco availability may also vary by region or ISP.
4. Access Permission
You can allow specic clients to access the internet by hotspot. Other clients will be
disconnected when your Deco is using hotspot Wi-Fi.
Note: You can add clients currently connected to the Deco network to the Client List or delete
clients from the list.
3. Speed Limit
You can limit the download speed and upload speed for
your Deco network to prevent trac overow.

74
* Features available in Deco may vary by model and software version. Deco availability may also vary by region or ISP.
• 4G/5G Backup Mode
When you have a 4G/5G Deco as the main Deco in your network, 4G/5G Backup Mode allows your Deco to connect to the backup mobile network
provided by the SIM card in the 4G/5G Deco when your main network service fails.
2. Choose 4G/5G Backup
.
Note: Make sure the backup Deco is inserted with an available SIM card.
1. Open your Deco app, and go to More > Advanced > Internet Backup.
Alternatively, go to More > Internet Connection > Internet Backup.

75
* Features available in Deco may vary by model and software version. Deco availability may also vary by region or ISP.
3. It is recommended to set a xed WAN port to ensure that wired clients
can connect to the internet when using the backup network.
Note: Go to More > Advanced > 4G/5G Backup > WAN Port and disable Auto
WAN Port.
Setup complete!
When the original network fails, your Deco will automatically connect to
the mobile network provided by the SIM card in the 4G/5G main Deco.

76
* Features available in Deco may vary by model and software version. Deco availability may also vary by region or ISP.
After enabling 4G/5G Backup, you can further congure specic settings.
1. Oine Detection
Select detection methods (Single Detection with DNS Lookup or Dual
Detection with DNS Lookup and Ping) which determine when the
network is disconnected and the backup takes eect.
2. Backup Settings
Congure internet settings, data settings and more for your SIM card.
Tap Internet to congure internet
settings for your SIM card or
check internet status.
Tap Data Settings to monitor or
limit the data usage.

77
* Features available in Deco may vary by model and software version. Deco availability may also vary by region or ISP.
Tap SMS to view, send and
receive messages for your SIM
card.
Tap PIN Management to set
a PIN code for your SIM card
to protect your SIM card from
embezzlement.
Enable External Antennas to
strengthen the 5G signals of your
Deco if you have installed 5G
external antennas on it.

78
* Features available in Deco may vary by model and software version. Deco availability may also vary by region or ISP.
• Hybrid Mesh Backup Mode
When you have a 4G/5G Deco as a satellite Deco in your network, Hybrid Mesh Backup Mode allows your Deco to connect to the backup mobile
network provided by the SIM card in the 4G/5G Deco when your main network service fails.
2. Choose Hybrid Mesh Backup.
Note: Make sure the backup Deco is inserted with an available SIM card.
1. Open your Deco app, and go to More > Advanced > Internet Backup.
Alternatively, go to More > Internet Connection > Internet Backup.

79
* Features available in Deco may vary by model and software version. Deco availability may also vary by region or ISP.
3. It is recommended to set a xed WAN port to ensure that wired clients
can connect to the internet when using the backup network.
Note: Go to More > Advanced > WAN Port and disable Auto WAN Port.
Setup complete!
When the original network fails, your Deco will automatically connect to
the mobile network provided by the SIM card in the 4G/5G satellite Deco.

80
* Features available in Deco may vary by model and software version. Deco availability may also vary by region or ISP.
After enabling 4G/5G Backup, you can further congure specic settings.
1. Oine Detection
Select detection methods (Single Detection with DNS Lookup or Dual
Detection with DNS Lookup and Ping) which determine when the
network is disconnected and the backup takes eect.
2. Backup Settings
Congure internet settings, data settings and more for your SIM card.
Tap Internet to congure internet
settings for your SIM card or
check internet status.
Tap Data Settings to monitor or
limit the data usage.

81
* Features available in Deco may vary by model and software version. Deco availability may also vary by region or ISP.
Tap SMS to view, send and
receive messages for your SIM
card.
Tap PIN Management to set
a PIN code for your SIM card
to protect your SIM card from
embezzlement.
Enable External Antennas to
strengthen the 5G signals of your
Deco if you have installed 5G
external antennas on it.

82
* Features available in Deco may vary by model and software version. Deco availability may also vary by region or ISP.
QoS
QoS (Quality of Service) allows you to prioritize specic devices and applications. Devices and apps set as high priority will run smoothly even when the
network is crowded.
1. Go to More > QoS. 2. Enable QoS. 3. Select an acceleration mode
and complete the settings.

83
* Features available in Deco may vary by model and software version. Deco availability may also vary by region or ISP.
• Scene Acceleration Mode
Select a scene that contains a batch of frequently used apps, and these apps will be prioritized for acceleration.
1. Select Scene Acceleration. 2. Set the total bandwidth
provided by your ISP.
3. Select up to 4 scenes where
speeds need acceleration.
4. Set priority between the
selected scenes.

84
* Features available in Deco may vary by model and software version. Deco availability may also vary by region or ISP.
5. When complete, you can tap each scene to adjust the applied apps.

85
* Features available in Deco may vary by model and software version. Deco availability may also vary by region or ISP.
• Client Acceleration Mode
Select the clients you need to accelerate. In the same scenario, the selected clients will be prioritized.
1. Select Client Acceleration. 2. Tap Add Clients. 3. Select the clients needed acceleration and save. Then the
selected clients will be prioritized.

86
* Features available in Deco may vary by model and software version. Deco availability may also vary by region or ISP.
Network Optimization
Network Optimization analyzes the quality of the Deco wireless network by scanning the interference signals in the environment and improves your
wireless experience by optimizing the Deco network's channel.
2. Tap Scan to detect network
security and performance.
3. Optimize the network if needed.1. Go to More > Network
Optimization.
87
* Features available in Deco may vary by model and software version. Deco availability may also vary by region or ISP.
Create Static Routes
Static routing is a form of routing that is congured manually by a network administrator or a user by adding entries into a routing table. The manually-
congured routing information guides the router in forwarding data packets to the specic destination.
1. Go to More > Advanced> Static Routing, and tap Add Static Route.

88
* Features available in Deco may vary by model and software version. Deco availability may also vary by region or ISP.
2. Fill in the necessary information.
• Description: Specify a description for the routing entry.
• Network Destination: The network destination is the address of the
network of host that you want to assign to a static route.
• Subnet Mask: The Subnet Mask divides the network portion and the
host portion of an IP address.
• Default Gateway: This is the IP address of the default gateway device
that allowing for the contact between the router and the network or
host.
• Interface: Select the interface to specify the type of the network
destination.
3. After you save the settings, if
the entry you have set appear
on the screen, the static
routing is set successfully.

89
* Features available in Deco may vary by model and software version. Deco availability may also vary by region or ISP.
Use VPN Client to Access a Remote VPN Server
VPN Client is used to create VPN connections for devices in your home network to access a remote VPN server.
To use the VPN feature, simply congure a VPN connection and choose your desired devices on your Deco router, then these devices can access the
remote VPN server. Please follow the steps below:
2. Tap Add VPN Server. 3. Select your VPN service and follow
instructions to complete the settings.
1. Go to More > VPN > VPN Client.
Set Up VPN Server/Client
Use WireGuard VPN, Open VPN, PPTP VPN, or L2TP/IPSec VPN to access your home network, and use VPN Client to access a remote VPN server.

90
* Features available in Deco may vary by model and software version. Deco availability may also vary by region or ISP.
4. Tap Custom and customize the VPN type. Then enter the VPN information provided by your VPN provider and save the settings.
• OpenVPN: Enter the VPN username and password if required by your VPN provider, otherwise simply leave them empty. Then import the
conguration le provided by your VPN provider.
• PPTP: Enter the VPN server address and the VPN username and password provided by your VPN provider.
• L2TP/IPSec: Enter the VPN server address, VPN username and password, and IPSec pre-shared key provided by your VPN provider.

91
* Features available in Deco may vary by model and software version. Deco availability may also vary by region or ISP.
5. Tap Client List and + to add devices that will use the VPN function
Done! Now the devices you specied can access the VPN server you enabled.
6. Tap Access Permission to
allow all devices connected
to your Deco to use the VPN
function or only allow devices
on the Client List to use VPN
function.

92
* Features available in Deco may vary by model and software version. Deco availability may also vary by region or ISP.
1. Go to More > VPN > VPN Server.
Use WireGuard VPN to Access Your Home Network
WireGuard VPN Server is used to create a Wire Guard VPN connection for remote devices to access your home network.
Follow the steps below to set up an WireGuard VPN connection.
2. Tap Add VPN Server and select WireGuard VPN.

93
* Features available in Deco may vary by model and software version. Deco availability may also vary by region or ISP.
3. Enter the necessary information and save the settings.
• Description: Enter a name for this WireGuard VPN.
• Tunnel IP Address and Listen Port: Usually automatically lled in. Do NOT change it unless necessary.
• Client Access: Select your client access type. Select Home Network Only if you only want the remote device to access your home network. Select
Internet and Home Network if you also want the remote device to access internet through the VPN server.
• (Optional) Advanced Settings: If DNS is turned on, the Deco will become the DNS server of the VPN client that establishes a connection with it.
Change the Persistent Keepalive time (25 seconds by default) to send out heartbeat regularly.

94
* Features available in Deco may vary by model and software version. Deco availability may also vary by region or ISP.
4. Tap Add Peer to create accounts that can be used by remote clients
to connect to the VPN server.
• Description: Enter a name for this account.
• Address: View the address of the virtual interface assigned to this
account. Do NOT change it unless necessary.
• Allowed IPs (Server): Trac sent from the WireGard VPN server to
the allowed IPs (server) will be transmitted through the tunnel. Do NOT
change it unless necessary.
• Allowed IPs (Client): Trac sent from the WireGard VPN client to the
allowed IPs (client) will be transmitted through the tunnel. By default, all
network trac from clients will be transmitted through the tunnel. Do
NOT change it unless necessary.
• Pre-shared Key: Enable or disable Pre-shared Key.
5. Save the settings and you can connect to the WireGuard Server.
• For mobile phones:
Download WireGuard App from Google Play or Apple Store, then use the
App to scan the QR Code to connect to this server.
• For other devices (e.g. TP-Link WireGuard VPN client):
Click Export Cong File to save the WireGuard VPN conguration le
which will be used by the remote device to access your Deco.

95
* Features available in Deco may vary by model and software version. Deco availability may also vary by region or ISP.
Use OpenVPN to Access Your Home Network
OpenVPN Server is used to create an OpenVPN connection for remote devices to access your home network.
To use the VPN feature, you need to enable OpenVPN Server on your Deco router, and install and run VPN client software on remote devices. Please
follow the steps below to set up an OpenVPN connection.
2. Tap Add VPN Server and select OpenVPN.
1. Go to More > VPN > VPN Server.

96
* Features available in Deco may vary by model and software version. Deco availability may also vary by region or ISP.
3. Enter the necessary information and save the settings.
• Description: Enter a name for this OpenVPN.
• Service Type: Select the service type (UDP/TCP) for OpenVPN.
• VPN Port: Enter a VPN service port to which a VPN device connect, and the port number should be between 1024 and 65535.
• VPN Subnet/Netmask: Enter the range of IP addresses that can be leased to the device by the OpenVPN server.
• Client Access: Select your client access type. Select Home Network Only if you only want the remote device to access your home network. Select
Internet and Home Network if you also want the remote device to access internet through the VPN server.

97
* Features available in Deco may vary by model and software version. Deco availability may also vary by region or ISP.
4. Tap the VPN you have saved and tap Export Cong File to save the
OpenVPN conguration le which will be used by the remote device to
access your router.
5. Now you need to congure OpenVPN connection on your remote
device.
(1) Visit https://openvpn.net/community-downloads/ to download the
OpenVPN software, and install it on your device where you want to run
the OpenVPN client utility.
Note: You need to install the OpenVPN client utility on each device that you plan to apply the
VPN function to access your Deco router. Mobile devices should download a third-party app from
Google Play or Apple App Store.
(2) After the installation, copy the le exported from your router to
the OpenVPN client utility’s “cong” folder (for example, C:\Program
Files\OpenVPN\cong on Windows). The path depends on where the
OpenVPN client utility is installed.
(3) Run the OpenVPN client utility and connect it to OpenVPN Server.

98
* Features available in Deco may vary by model and software version. Deco availability may also vary by region or ISP.
Use PPTP VPN to Access Your Home Network
PPTP VPN Server is used to create a PPTP VPN connection for remote devices to access your home network.
To use the VPN feature, you need to set up PPTP VPN Server on your Deco router, and congure the PPTP connection on remote devices.
Please follow the steps below to set up a PPTP VPN connection.
2. Tap Add VPN Server and select PPTP.1. Go to More > VPN > VPN Server.

99
* Features available in Deco may vary by model and software version. Deco availability may also vary by region or ISP.
3. Enter the necessary information and save the settings.
• Description: Enter a name for this VPN.
• Client IP Address: Enter the range of IP addresses (up to 10) that can be leased to the devices by the PPTP VPN server.
• Allow NetBIOS passthrough: Enable it to allow your VPN device to access your Samba server using NetBIOS name.
• Allow unencrypted connections: Enable it to allow unencrypted connections to your VPN server.
• Account List: Add the PPTP VPN connection account (user name and password) for the remote device. You can create up to 16 accounts.

100
* Features available in Deco may vary by model and software version. Deco availability may also vary by region or ISP.
4. Now you need to congure PPTP VPN on your remote device. The remote device can use the Windows built-in PPTP software or a third-party PPTP
software to connect to PPTP Server. Here we use the Windows built-in PPTP software as an example.
(1) Go to Start > Control Panel > Network and Internet > Network and
Sharing Center and select Set up a new connection or network.
(2) Select Connect to a workplace and click Next.

101
* Features available in Deco may vary by model and software version. Deco availability may also vary by region or ISP.
(3) Select Use my Internet connection (VPN). (4) Enter the internet IP address of the router in the Internet address eld.
Click Next.

102
* Features available in Deco may vary by model and software version. Deco availability may also vary by region or ISP.
(5) Enter the User name and Password you have set for the PPTP VPN
server on your router, and click Connect.
(6) Click Connect Now when the VPN connection is ready to use.

103
* Features available in Deco may vary by model and software version. Deco availability may also vary by region or ISP.
Use L2TP/IPSec VPN to Access Your Home Network
L2TP/IPSec VPN Server is used to create a L2TP/IPSec VPN connection for remote devices to access your home network.
To use the VPN feature, you need to set up L2TP/IPSec VPN Server on your Deco router, and congure the L2TP/IPSec connection on remote devices.
Please follow the steps below to set up the L2TP/IPSec VPN connection.
2. Tap Add VPN Server and select L2TP/IPSec.1. Go to More > VPN > VPN Server.

104
* Features available in Deco may vary by model and software version. Deco availability may also vary by region or ISP.
3. Enter the necessary information and save the settings.
• Description: Enter a name for this VPN.
• Client IP Address: Enter the range of IP addresses (up to 10) that can be leased to the devices by the L2TP/IPSec VPN server.
• IPSec Encryption/ IPSec Pre-Shared Key: Keep IPSec Encryption as Encrypted and create an IPSec Pre-Shared Key.
• Account List: Add the L2TP/IPSec VPN connection account (user name and password) for the remote device. You can create up to 16 accounts.

105
* Features available in Deco may vary by model and software version. Deco availability may also vary by region or ISP.
4. Now you need to congure L2TP/IPSec on your remote device. The remote device can use the Windows or Mac OS built-in L2TP/IPSec software or a
third-party L2TP/IPSec software to connect to L2TP/IPSec Server. Here we use the Windows built-in L2TP/IPSec software as an example.
(1) Go to Start > Control Panel > Network and Internet > Network and
Sharing Center and select Set up a new connection or network.
(2) Select Connect to a workplace and click Next.

106
* Features available in Deco may vary by model and software version. Deco availability may also vary by region or ISP.
(3) Select Use my Internet connection (VPN). (4) Enter the internet IP address of the router in the Internet address eld.
Select Don’t connect now; just set it up so I can connect later. Then click
Next.

107
* Features available in Deco may vary by model and software version. Deco availability may also vary by region or ISP.
(5) Enter the User name and Password you have set for the L2TP/IPSec
VPN server on your router, and click Connect.
(6) Click Close when the VPN connection is ready to use.

108
* Features available in Deco may vary by model and software version. Deco availability may also vary by region or ISP.
(7) Go to Network and Sharing Center and click Change Adapter
Settings.
(8) Find the VPN connection you created, then double-click it.

109
* Features available in Deco may vary by model and software version. Deco availability may also vary by region or ISP.
(9) Enter the Username and Password you have set for the L2TP/IPSec
VPN server on your router, and click Properties.
(10) Switch to the Security tab, select Layer 2 Tunneling Protocol with
IPsec (L2TP/IPSec) and click Advanced settings.

110
* Features available in Deco may vary by model and software version. Deco availability may also vary by region or ISP.
(11) Select Use preshared key for authentication and enter the IPSec
Pre-Shared Key you have set for the L2TP/IPSec VPN server on your
router. Then click OK.
(12) Switch to the Security tab, select Layer 2 Tunneling Protocol with
IPsec (L2TP/IPSec) and click Advanced settings.
Done! Click Connect to start VPN connection.

111
* Features available in Deco may vary by model and software version. Deco availability may also vary by region or ISP.
Advanced Features
The Deco app oers a list of advanced features to fulll diverse network needs.
Tip: You can use the search box on the More page to quickly nd the features you need.
Tap More > Advanced to access advanced features.
Note: Features available on this page are based on the current operation mode of the network.
Change the Operation Mode. Enable Auto WAN Port to
automatically devide and
switch the WAN and LAN ports
based on the Ethernet cable
connection.

112
* Features available in Deco may vary by model and software version. Deco availability may also vary by region or ISP.
Tip: You can use the search box on the More page to quickly nd the features you need.
Enable Internet Backup to
connect your Deco to a backup
network provided by a hotspot
or a SIM card in a 4G/5G Deco
when your original network fails
to ensure normal internet access.
Enable IPTV/VLAN mode to
support IPTV services.
Enable MAC Clone if your
ISP only allows specic MAC
addresses.
Create Static Routes to visit
multiple networks and servers at
the same time.

113
* Features available in Deco may vary by model and software version. Deco availability may also vary by region or ISP.
Tip: You can use the search box on the More page to quickly nd the features you need.
Register a TP-Link DDNS domain
name to access your Decos and
local resources over the internet.
Change DHCP Server settings.Modify LAN IP to avoid IP
address conflict.
Enable DoH & DoT to send DNS
requests in an encrypted and
secure way.

114
* Features available in Deco may vary by model and software version. Deco availability may also vary by region or ISP.
Tip: You can use the search box on the More page to quickly nd the features you need.
Reserve IP addresses for specic
devices to recognize and
manage them more easily.
Enable Beamforming to enhance
Wi-Fi signals for clients.
Set up Port Forwarding rules to
enable devices in your network
accessible over the internet with
safety.
Enable Fast Roaming to further
reduce roaming delays for your
wireless devices.

115
* Features available in Deco may vary by model and software version. Deco availability may also vary by region or ISP.
Enable SIP ALG to communicate
with SIP (Session Initiation
Protocol) servers via NAT.
Enable UPNP to allow your local
network to dynamically open
ports for applications like gaming.
Tip: You can use the search box on the More page to quickly nd the features you need.

116
* Features available in Deco may vary by model and software version. Deco availability may also vary by region or ISP.
Congure Connection Alerts
You can congure Connection Alerts so you can get alerts when new devices connect to your network or when the devices you care about go online
or oine.
Go to More > Connection Alerts to enable notications of new or known clients.

117
* Features available in Deco may vary by model and software version. Deco availability may also vary by region or ISP.
Control the Light on Decos
You can turn on or o the light on your Decos immediately or at specic period.
Go to More > LED Control to turn on or o the light on your Decos or specify a period during which the light will go o.

118
* Features available in Deco may vary by model and software version. Deco availability may also vary by region or ISP.
Upgrade Your Deco
TP-Link is dedicated to improving product features and providing a better customer experience. An up-to-date rmware provides better and more
stable network performance. Always update your Deco to the latest rmware version when prompted in the Deco app.
1. Go to More > System > Update Deco. 2. Download and install the latest
rmware (if any).
3. Enable Auto Update to allow your Deco to automatically
update to the latest rmware.

119
* Features available in Deco may vary by model and software version. Deco availability may also vary by region or ISP.
Reboot Your Deco
Reboot your Deco at any time when needed.
1. Go to More > System > Reboot Deco. 2. Select the Deco you need to reboot and tap Reboot. You will lose your
internet connection temporarily during the reboot.

120
* Features available in Deco may vary by model and software version. Deco availability may also vary by region or ISP.
Reboot Schedule
With Reboot Schedule, you can set when and how often the Deco reboots regularly, which may improve the network stability.
1. Go to More > System > Reboot Schedule. 2. Enable Reboot Schedule and set when and how often to reboot the
Deco regularly.

121
* Features available in Deco may vary by model and software version. Deco availability may also vary by region or ISP.
Client Identication
With Client Identification enabled, your client's information will be shared with third-party services for more accurate identication. Your private
information will not be saved.
Go to More > System > Client Identification to enable it.

122
* Features available in Deco may vary by model and software version. Deco availability may also vary by region or ISP.
Control Your Deco with Alexa
Alexa Integration allows you to control your Deco using Amazon’s Alexa voice service. You can control and customize your home network by giving
simple voice commands to Alexa, such as enabling the Guest Network, turning o your Deco LEDs, and more.
Follow the steps below to use Alexa voice commands to control your Deco network.
Note: This feature is currently available in English (US), English (UK), German and Japanese.
On the homepage, swipe right to open the side menu and tap Link Account > Alexa > TP-Link Router Skill, then follow the app instructions to complete
the setup.

123
* Features available in Deco may vary by model and software version. Deco availability may also vary by region or ISP.
Enable App Notications
You can enable notications of what you care most.
On the homepage, swipe right to open the side menu and tap App Settings > Notications to enable notications.

124
* Features available in Deco may vary by model and software version. Deco availability may also vary by region or ISP.
Change App Appearance
Deco app now support Dark Mode. You can easily change the appearance preference on the app.
On the homepage, swipe right to open the side menu and tap App Settings > Appearance. Select the preferred appearance for your app.

125
* Features available in Deco may vary by model and software version. Deco availability may also vary by region or ISP.
Change Account Information
More security methods such as Two-Step Verication and FACE ID are now supported on the Deco app. You can change your account information
easily on the app.
On the homepage, swipe right to open the side menu and tap View Account. Then you can check and edit your account settings.

126
* Features available in Deco may vary by model and software version. Deco availability may also vary by region or ISP.
Add Managers
The Owner creates the Deco network and has full authority to manage the network. The Owner can add one or multiple Managers to help manage the
network as permitted.
Add friends and family members to help manage your network. Each manager should have their own TP-Link ID.
Note: Managers cannot modify the Owner account, add other accounts, or set manager privileges.
1. Go to More > Managers.
3. Tap to set manager
privileges.
2. Tap Add a Manager to add another TP-Link ID account as Manager.

Upgrade Your HomeShield
HomeShield is a home networking protection kit that covers all security scenarios with its network security, parental controls, QoS, and comprehensive
reports. It provides two subscription options, Advanced Parental Controls and Security+.
• Advanced Parental Controls helps you manage your kids' online time and bedtime and regulate the content and apps they have access to, letting
them develop healthy digital habits.
• Security+ provides you with comprehensive and professional network security protection to protect your Wi-Fi network and all connected devices
from virus attacks.

128
* Features available in Deco may vary by model and software version. Deco availability may also vary by region or ISP.
Subscribe to HomeShield Service
HomeShield provides two subscription options, Advanced Parental Controls, Security+ and VPN. Subscribe to TP-Link HomeShield for more advanced
features.
1. In the homepage, swipe right
to open the menu and select
HomeShield.
2. In HomeShield Center, select the subscription service as needed and then follow app instructions to subscribe
to the service.
