
02
Preface
Riding Safety and Precautions
Safety Warning
About the Components
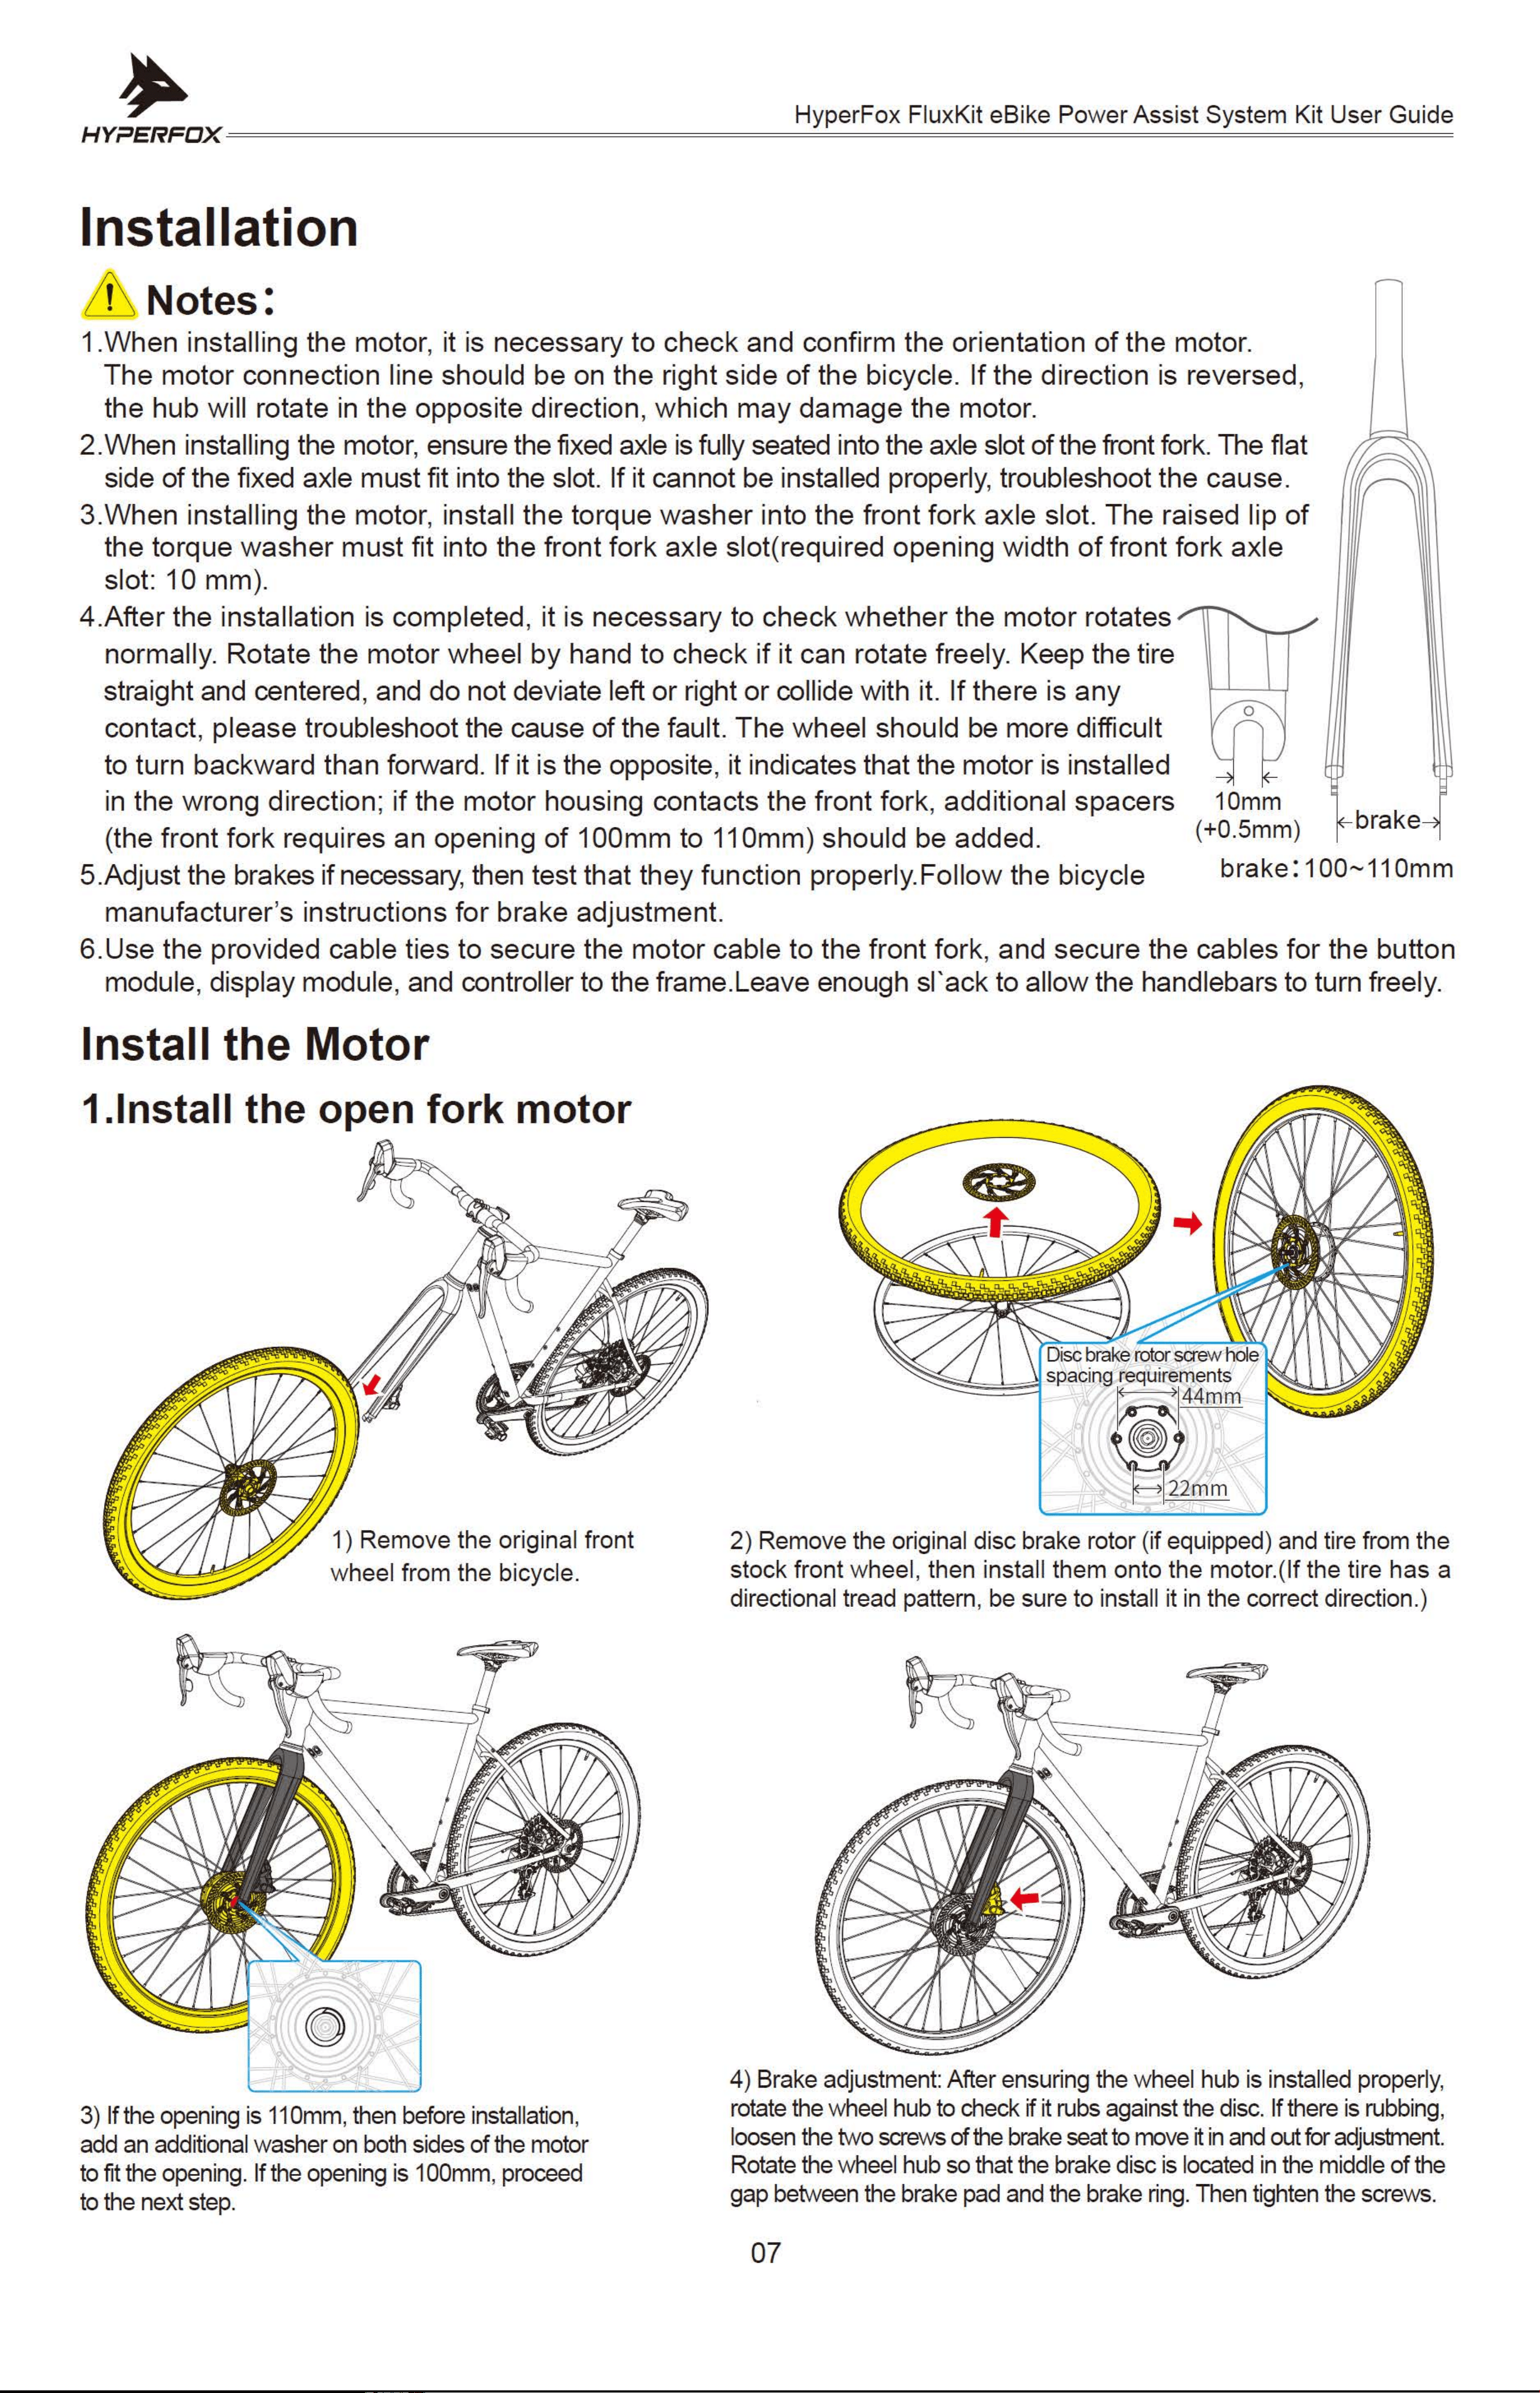
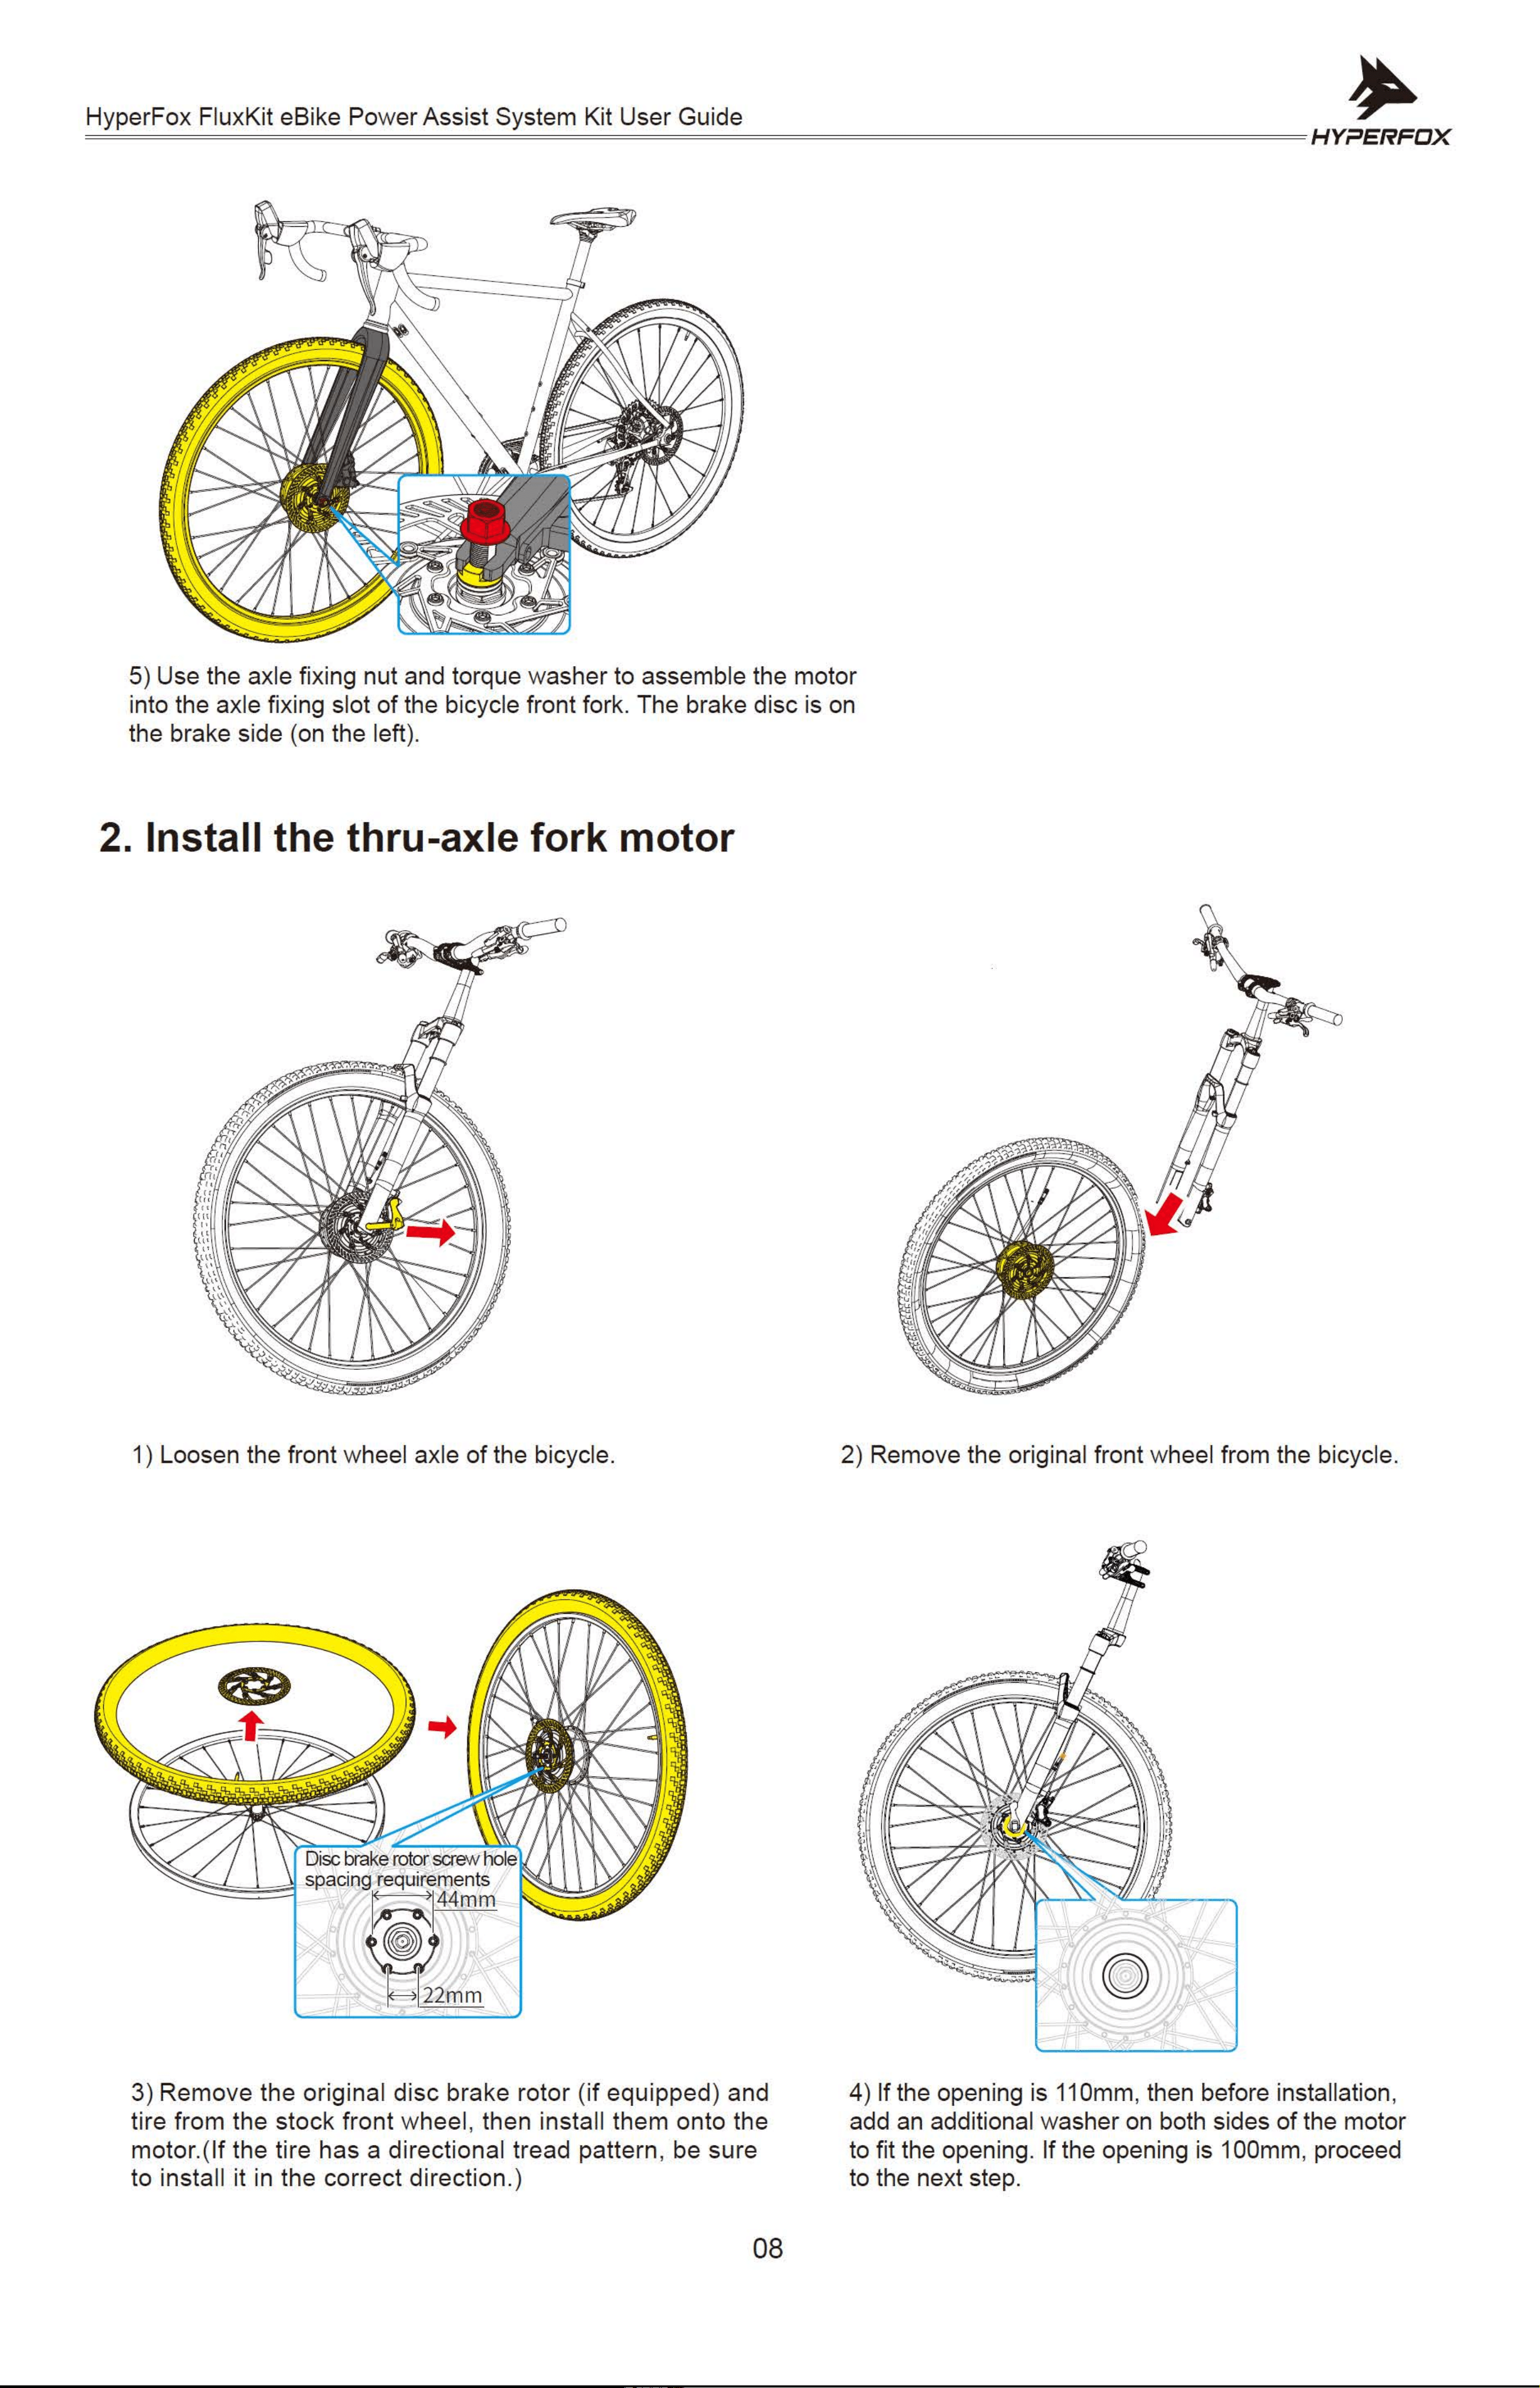
Installation
Install the Motor
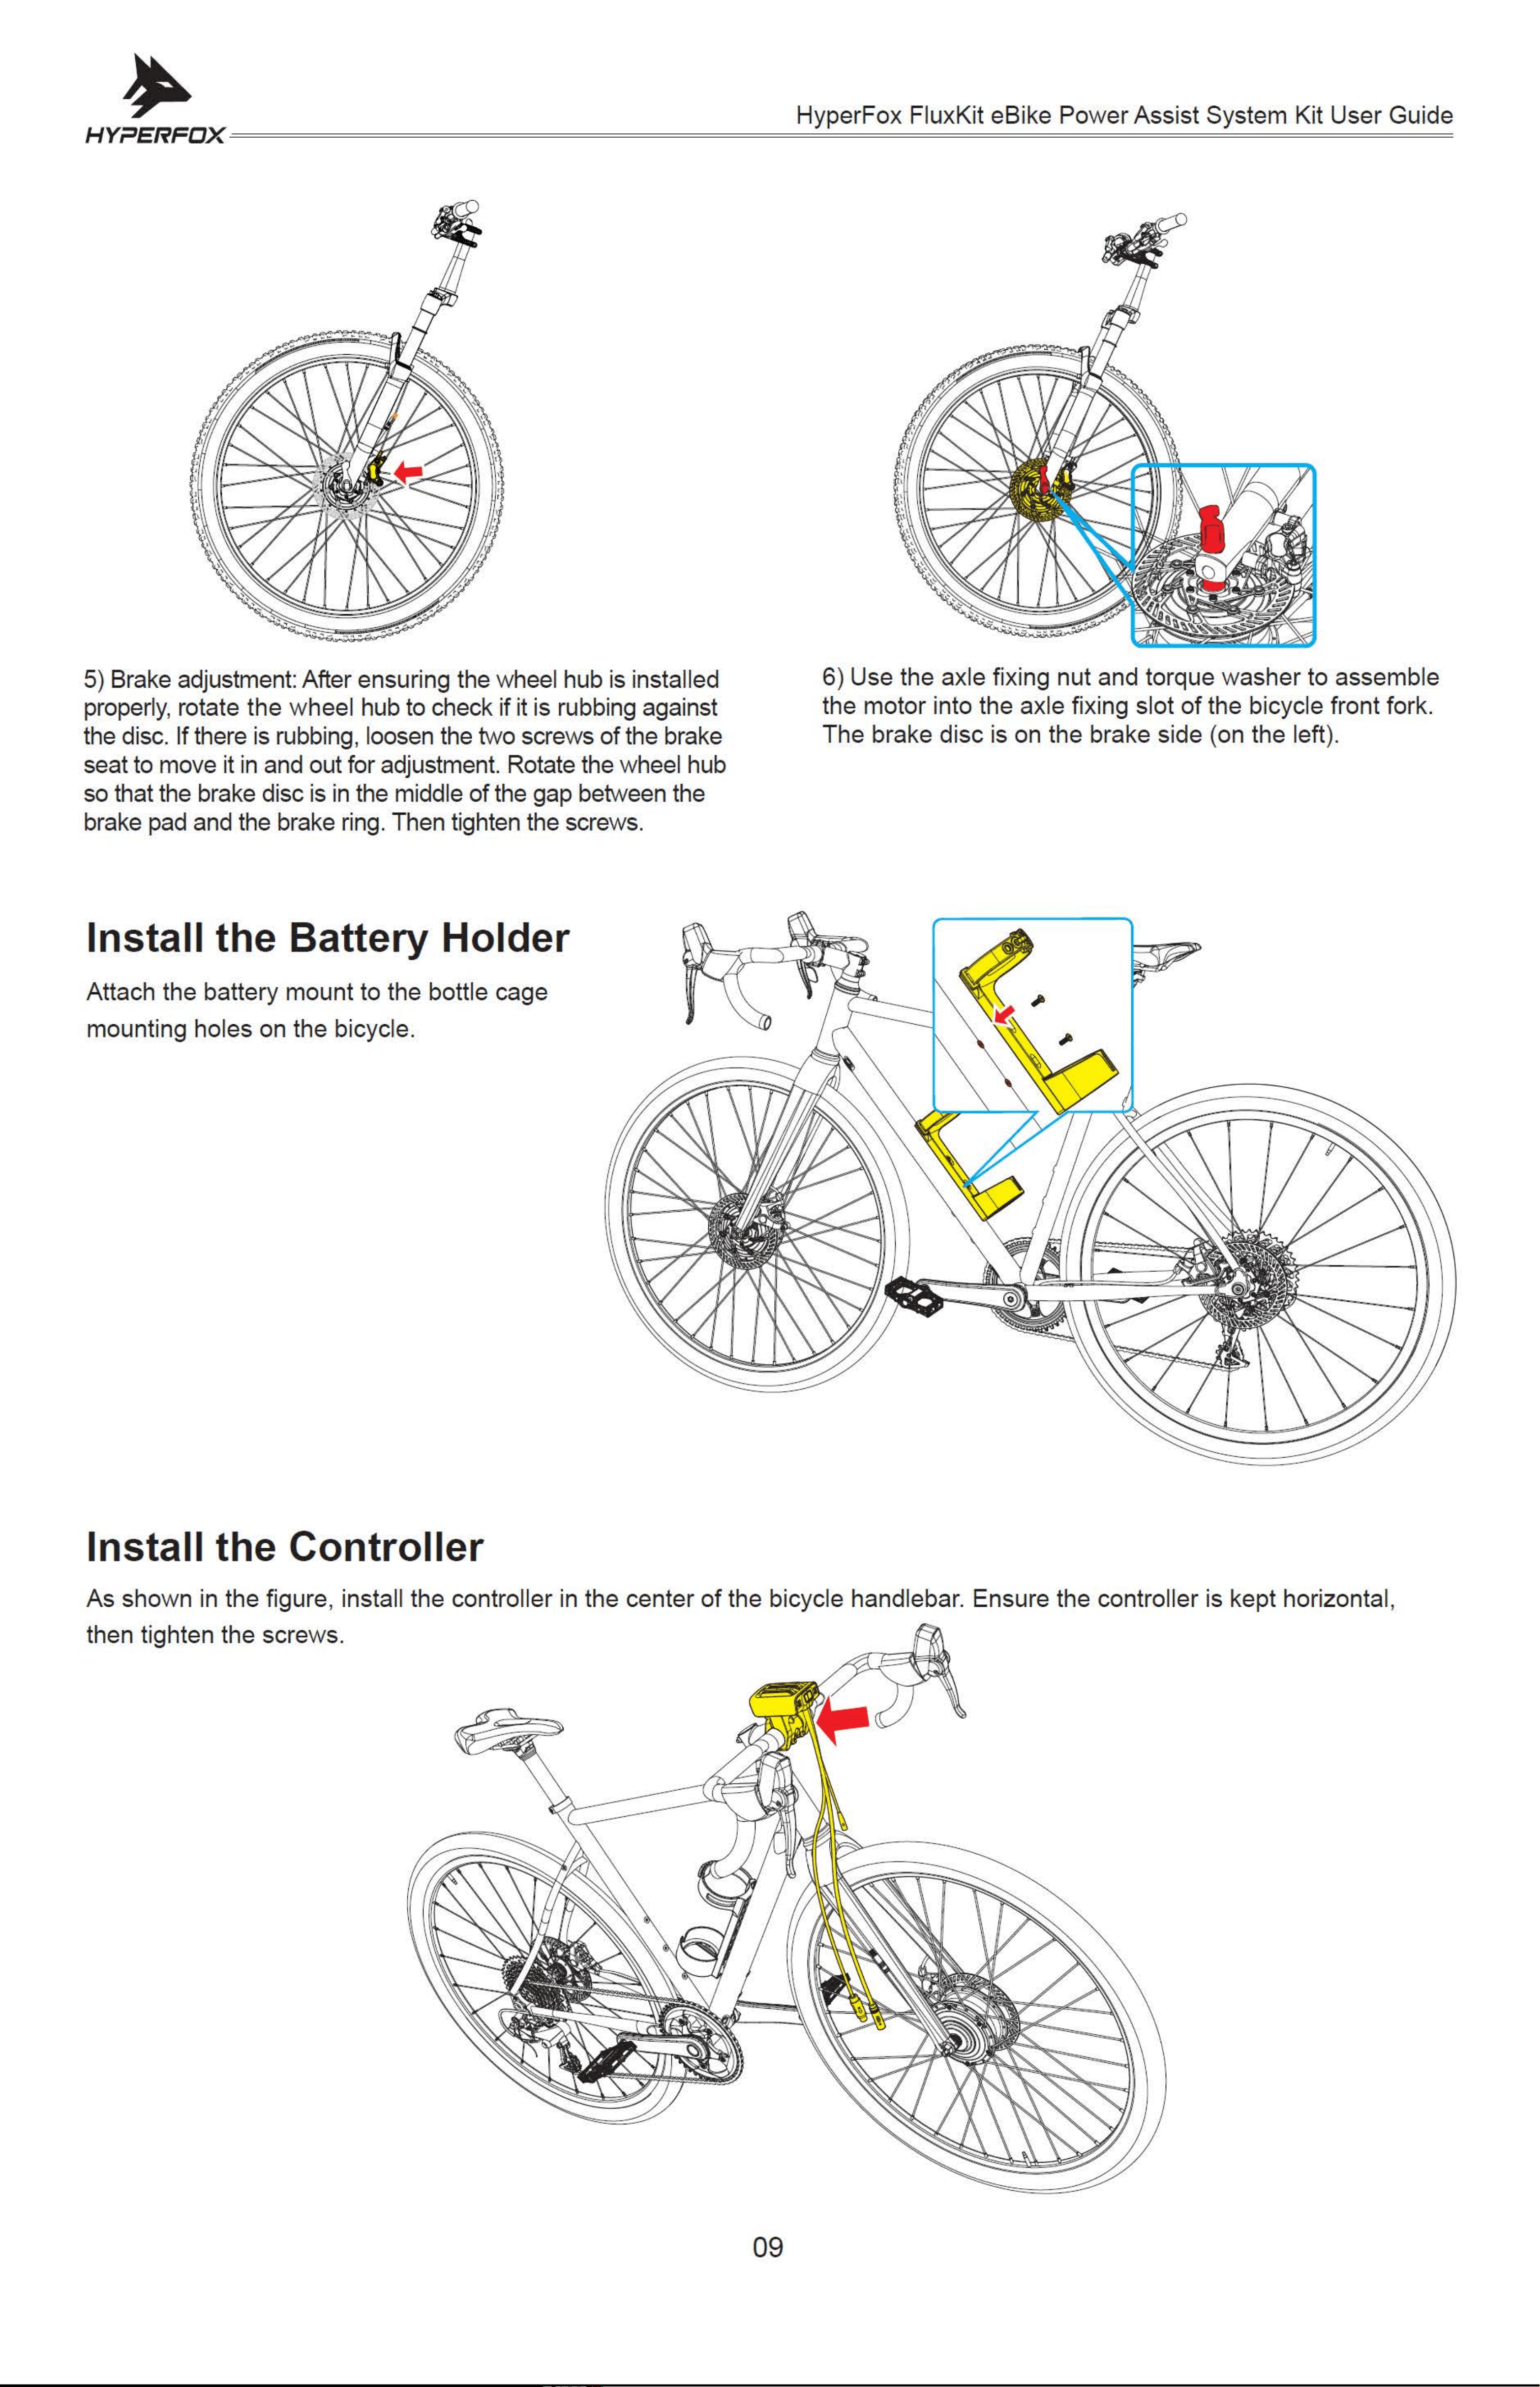
Install the Battery Holder
Install the Controller
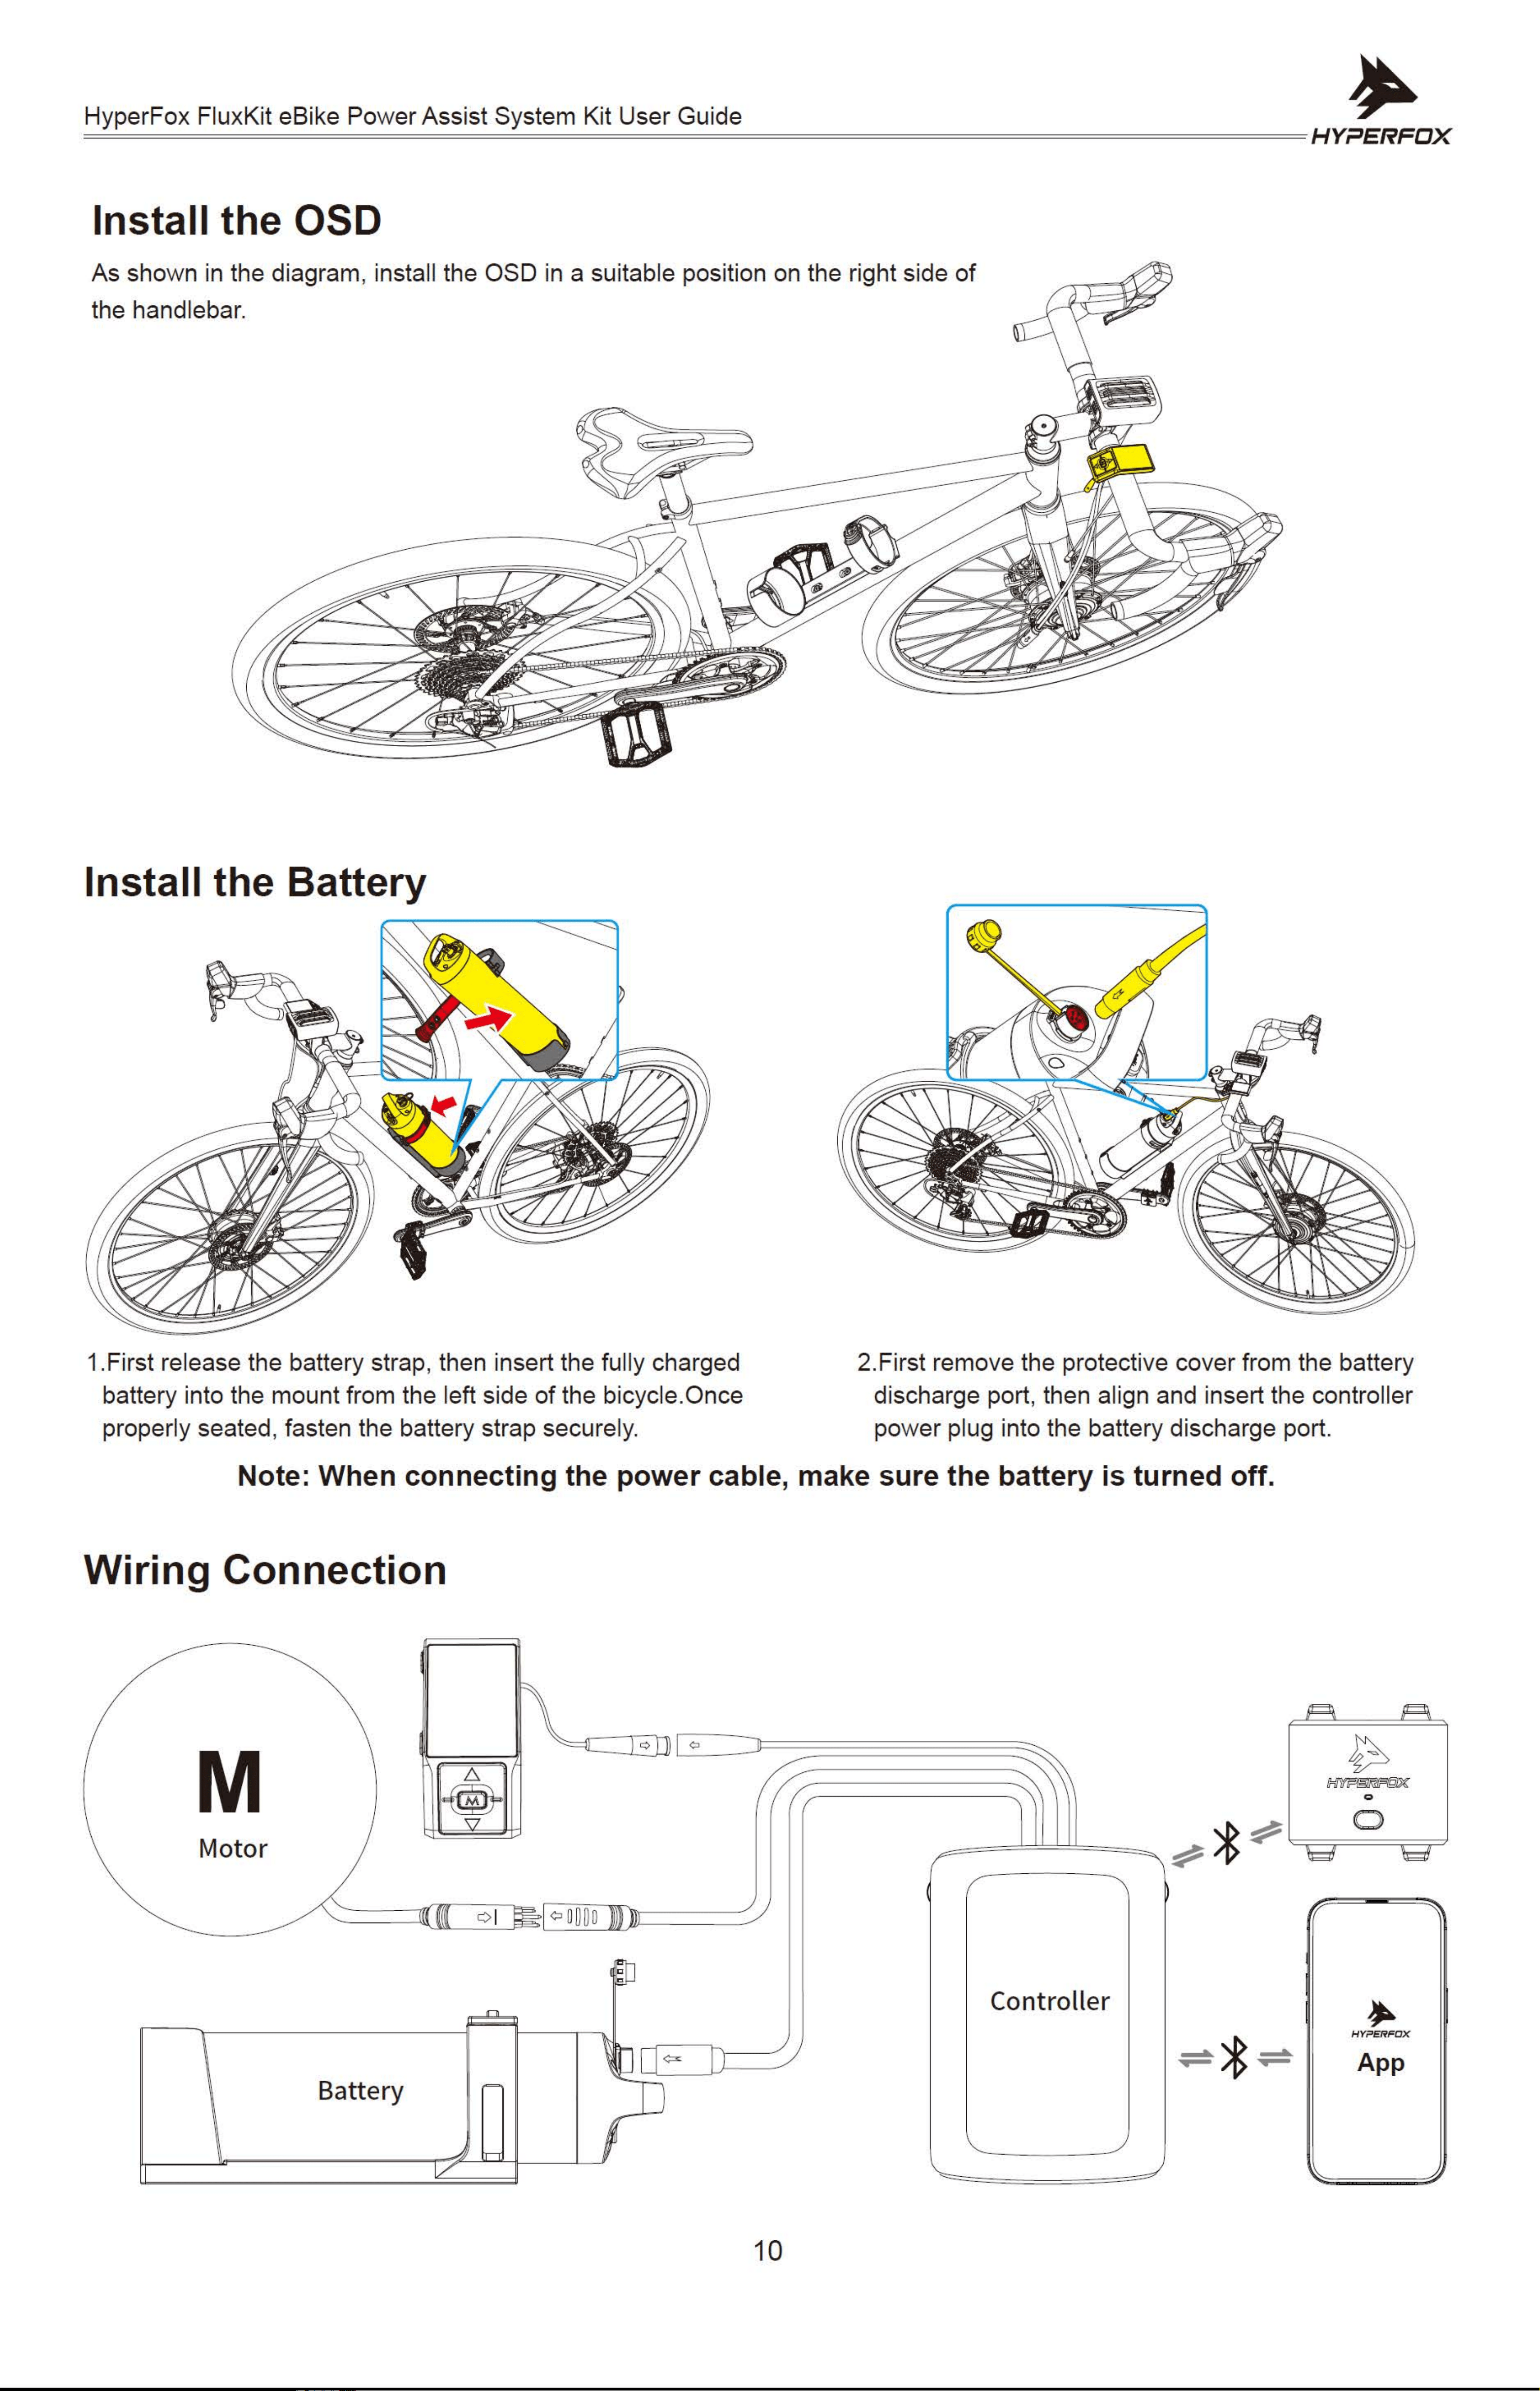
Install the OSD
Install the Battery
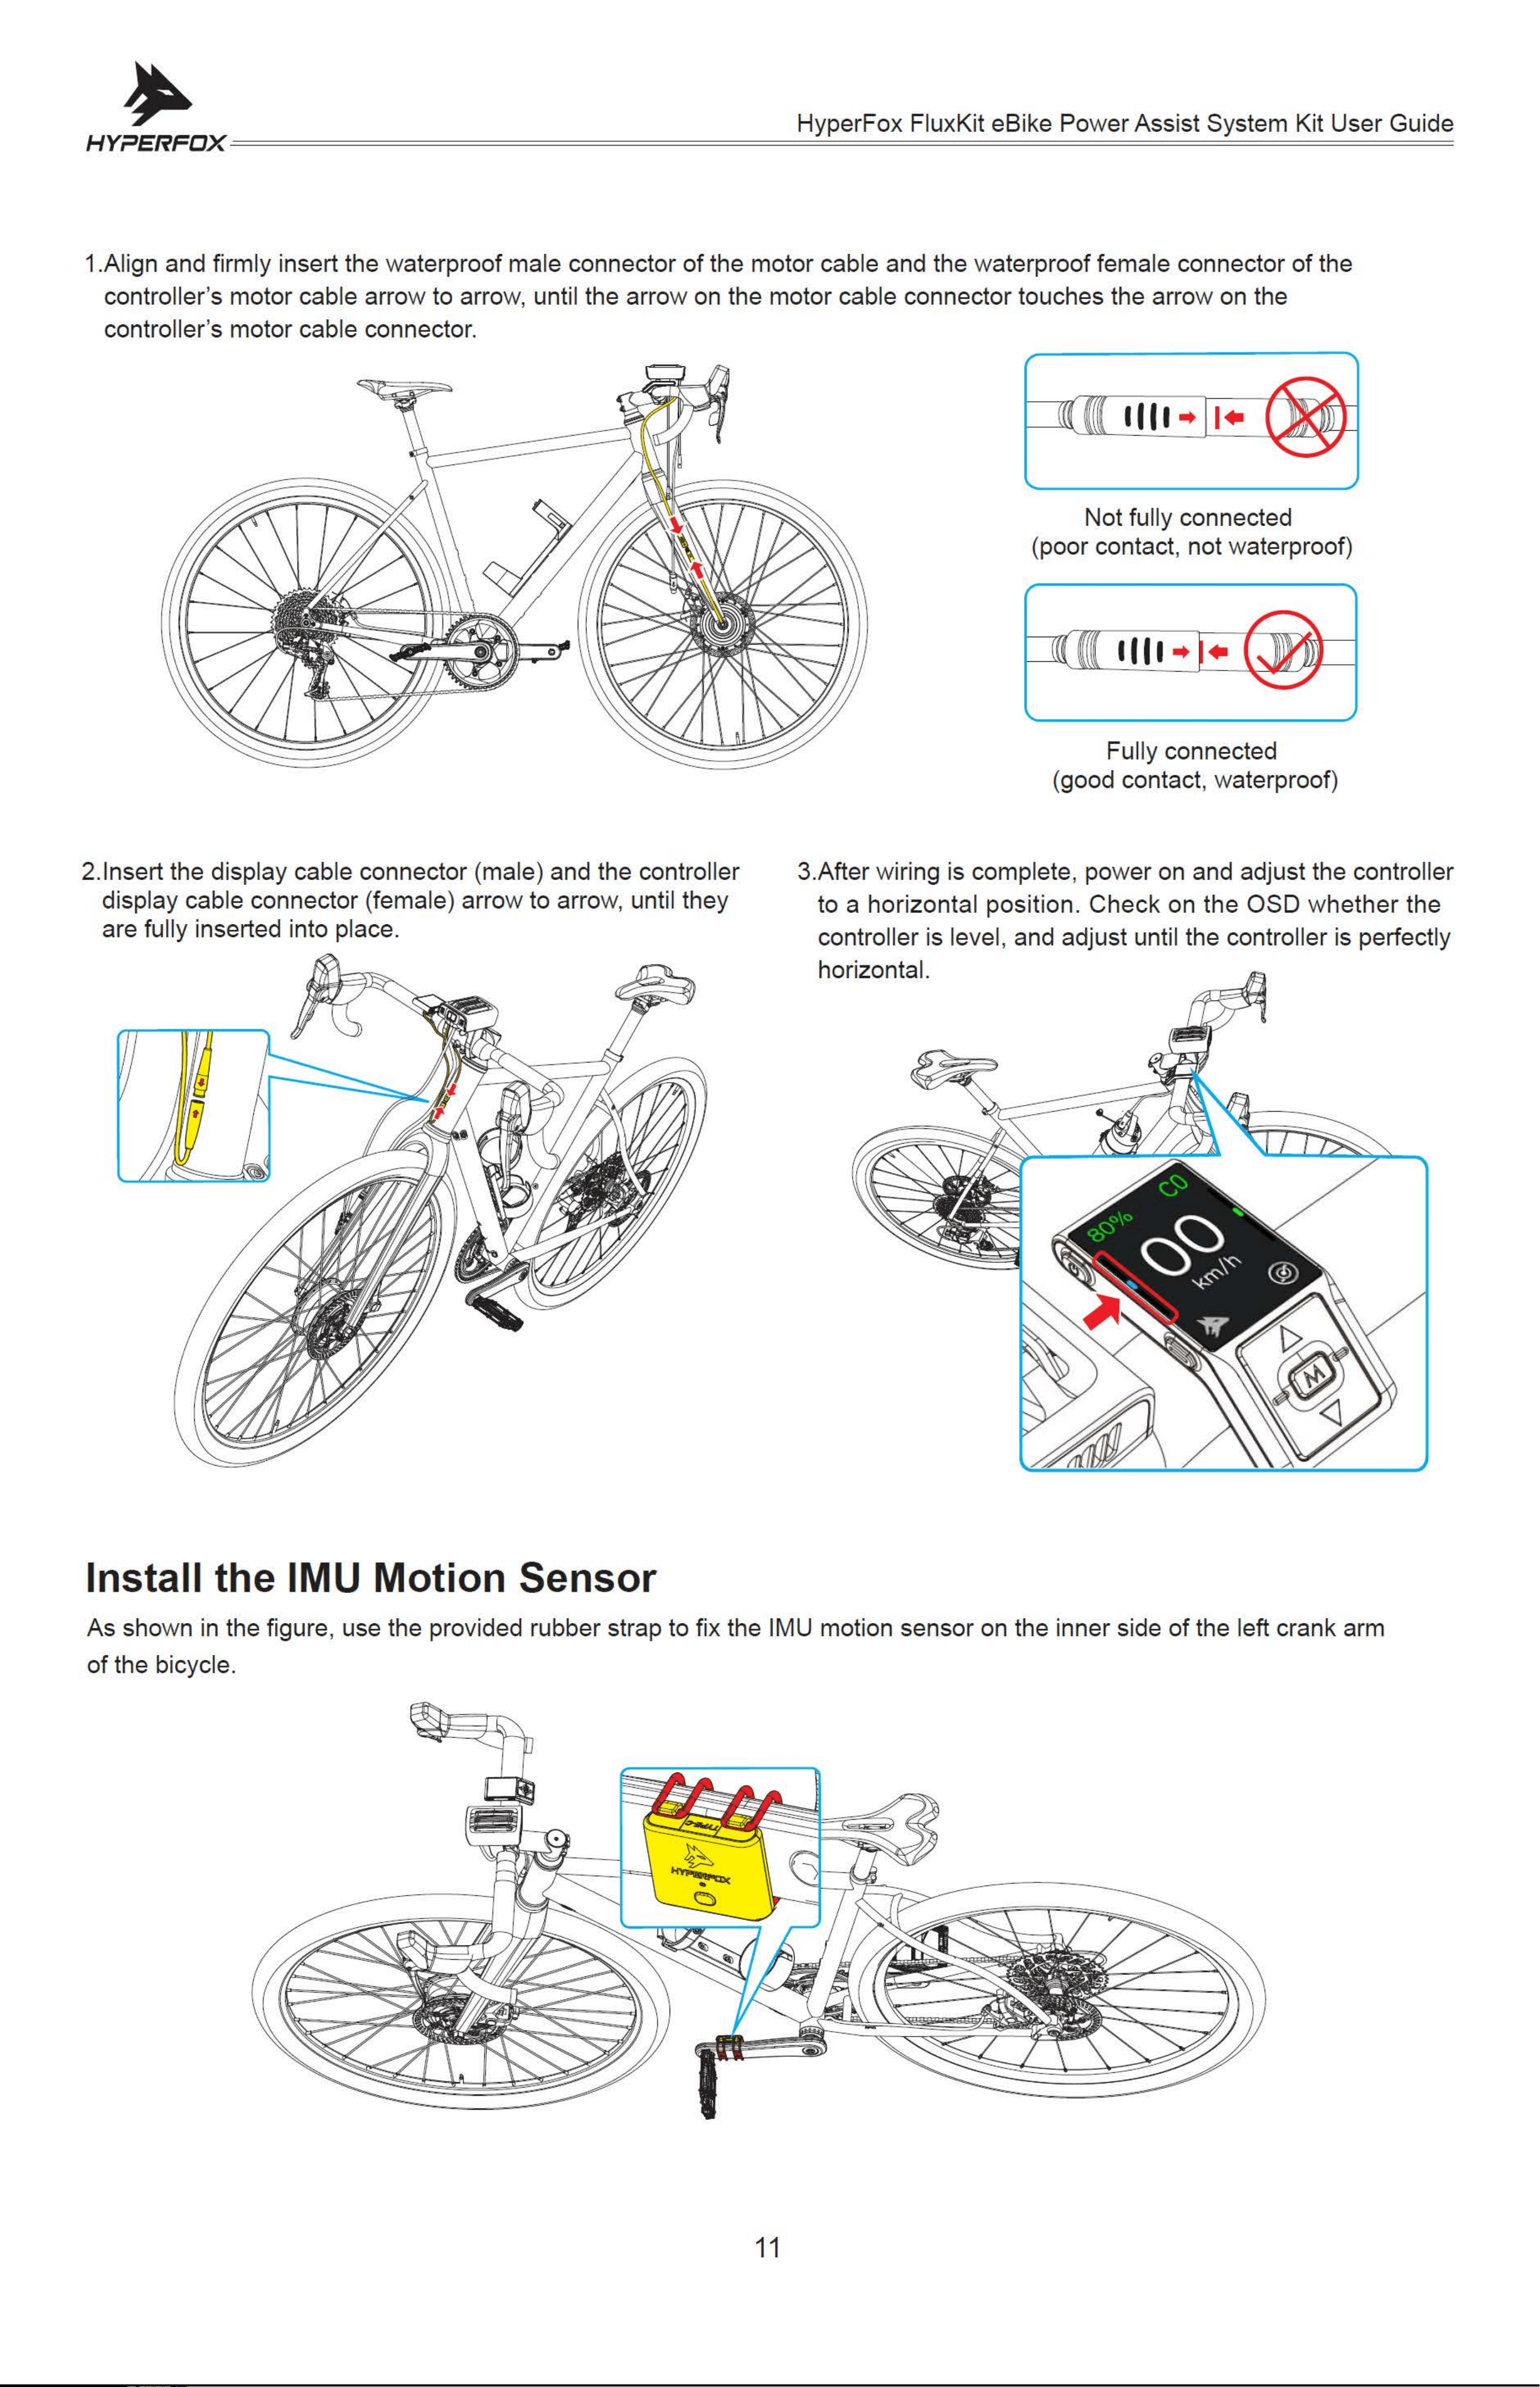
Wiring Connection
Install the IMU Motion Sensor
3
5
7-9
9
9
10
10
10-11
12
12-13
13
13-14
14
15
11
5-6
7-11
4
Contents
14
14
Bluetooth Pairing
Motor Calibration
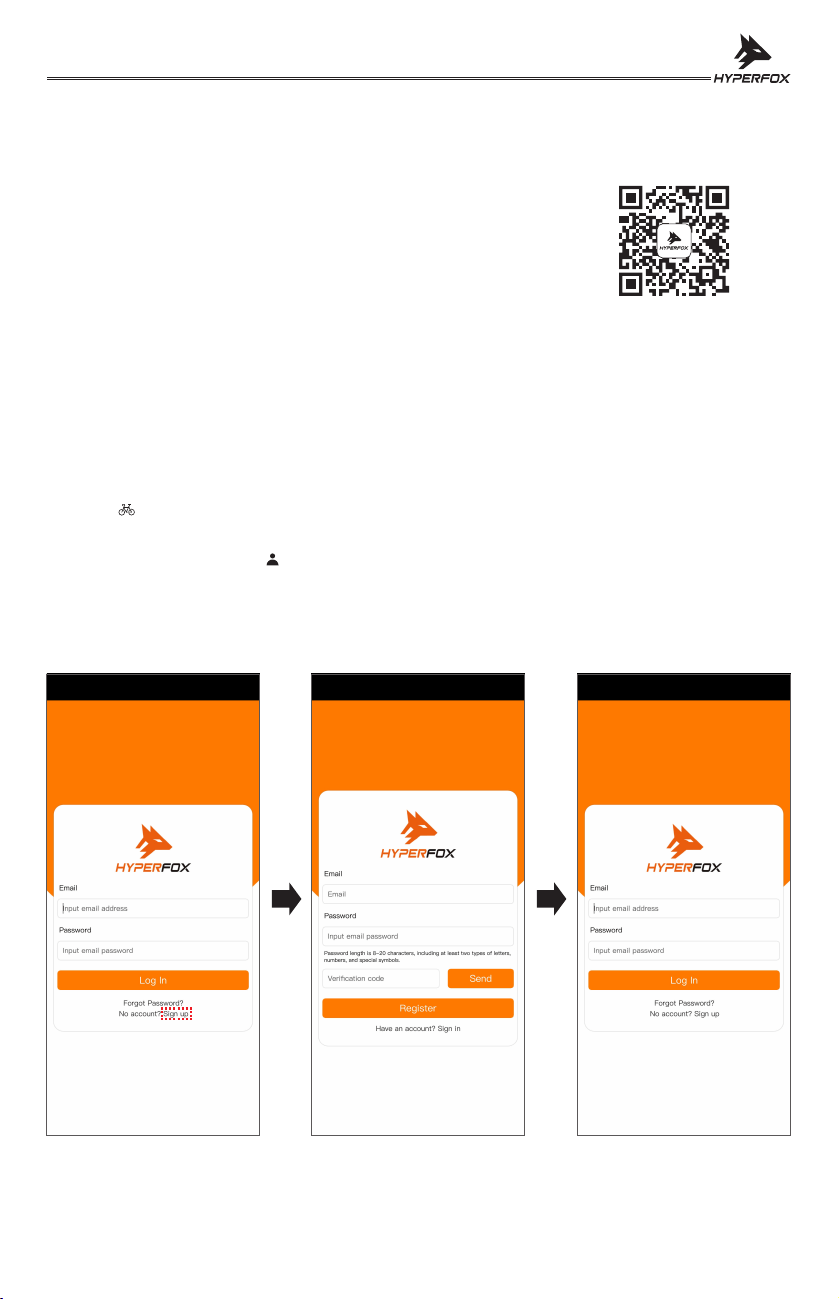
Download and install the HF Bikes App
Bind the Device
Usage Steps
Maintenance
Additional Notes
Component Parameters

03
Preface
Dear User,
First of all, we sincerely thank you for choosing the HyperFox bicycle assist system. We hereby
promise to provide you with excellent quality assurance and professional after-sales service,
and will continue to enrich our product line to bring you the endless joy of leisure and sports
cycling.
For your safety and benefit, please read this manual carefully before using the HyperFox bicycle.
assist system. We shall not be liable for any personal injury, property damage or other losses
caused by improper operation not in accordance with the requirements specified in this manual.
★ The copyright of this manual belongs to Nimbus Core Co., Ltd.
★ The illustrations in this manual are only for explaining the operation method or structure of
the same product. In case of any discrepancy with the actual product, the actual product
shall prevail.
★ This manual is only a general product description; please refer to the actual product for
details.
★ Nimbus Core Co., Ltd. reserves the right to interpret and revise this manual.
Thank you very much!
Hong Kong Nimbus Core Limited.

04
Purpose of Riding Safety
Different types of bicycles have different functions, performance, purposes and operating points, and there
are different safety factors during riding. However, no matter which model you ride, for your personal safety,
please always adhere to the principle of safety first.
Riding Safety Instructions
☆ Please abide by the traffic regulations of the country or region where you are.
☆ Stay focused, watch out for pedestrians and vehicles, and give way appropriately.
☆ Do not ride with both hands off the handlebars, do not speed, and avoid dangerous behavior.
☆ Do not hold onto other motor vehicles or non-motor vehicles while riding.
☆ Do not touch any other objects on the road with your feet while riding.
☆ It is recommended not to drive at high speed. The riding speed should generally not exceed 25 km/h.
When driving at high speed, braking should be done with intermittent application of the brakes.
Avoid sudden braking at all costs.
☆ Do not wear headphones or use a mobile phone while riding.
☆ Do not park or stand and rest randomly in the middle of the non-motorized vehicle lanes; it is recommended
not to ride on the motorized vehicle roads.
☆ At night, even with streetlights, the light intensity is less than 1/10 of daytime. Please reduce speed and
ride carefully.
☆ Do not ride against the direction of traffic.
☆ Follow traffic lights or signs when riding, turning and parking.
☆ Mountain biking and long-distance road trips involve risks and uncertainties; riders need to have a high
level of concentration and more professional cycling skills.
☆ It is recommended not to ride alone in remote areas. If unavoidable, prepare complete communication
tools, carry sufficient repair tools, spare parts, identification, cash, etc.
☆ When riding outdoors, stay away from all animals and watch for pedestrians. Wear proper safety gear.
When riding in the rain, fasten your rain poncho tightly to prevent it from being caught in the wheels or
by passing vehicles. Braking performance decreases in wet conditions, so brake earlier.
☆ When braking, use the rear brake first or both brakes together. Braking the front wheel first may lead to
serious consequences. The left brake lever controls the rear wheel; the right lever controls the front wheel.
Safety Tips During Cycling
☆ For your safety, you must wear a helmet, gloves and other necessary safety equipment.
☆ Always pay attention to traffic safety to avoid danger. Watch for vehicles, pedestrians, road conditions
and weather.
☆ If any abnormality is found during riding, stop and check immediately.
☆ Maintain and inspect your bicycle promptly after riding.
☆ If problems occur during riding, have them repaired by professionals as soon as possible.
HyperFox FluxKit eBike Power Assist System Kit User Guide
Riding Safety and Precautions
05
Safety Warning
To ensure safe use of the FluxKit bicycle assist system kit, please follow these guidelines:
1.Charge the battery fully before the first use.
Before installing the kit, make sure the battery is fully charged (When charged until the power indicator
light goes out).
2.Do not charge the battery unattended.
Avoid charging longer than necessary. Overcharging will shorten battery life.
3.When the battery power cable is connected to the controller's power input interface, make sure the
waterproof plug of the battery power cable is properly connected and fully plugged in, and ensure the
battery is installed correctly.
4.Before riding, make sure all components are securely fastened, all connection cables are properly
connected and tightened, and there is no looseness.
Before riding, make sure all nuts, screws and bolts are tightened. Any loose components may cause
damage to the motor during riding. Check and tighten the spokes once every 100 kilometers to ensure
the hub is firmly fixed.
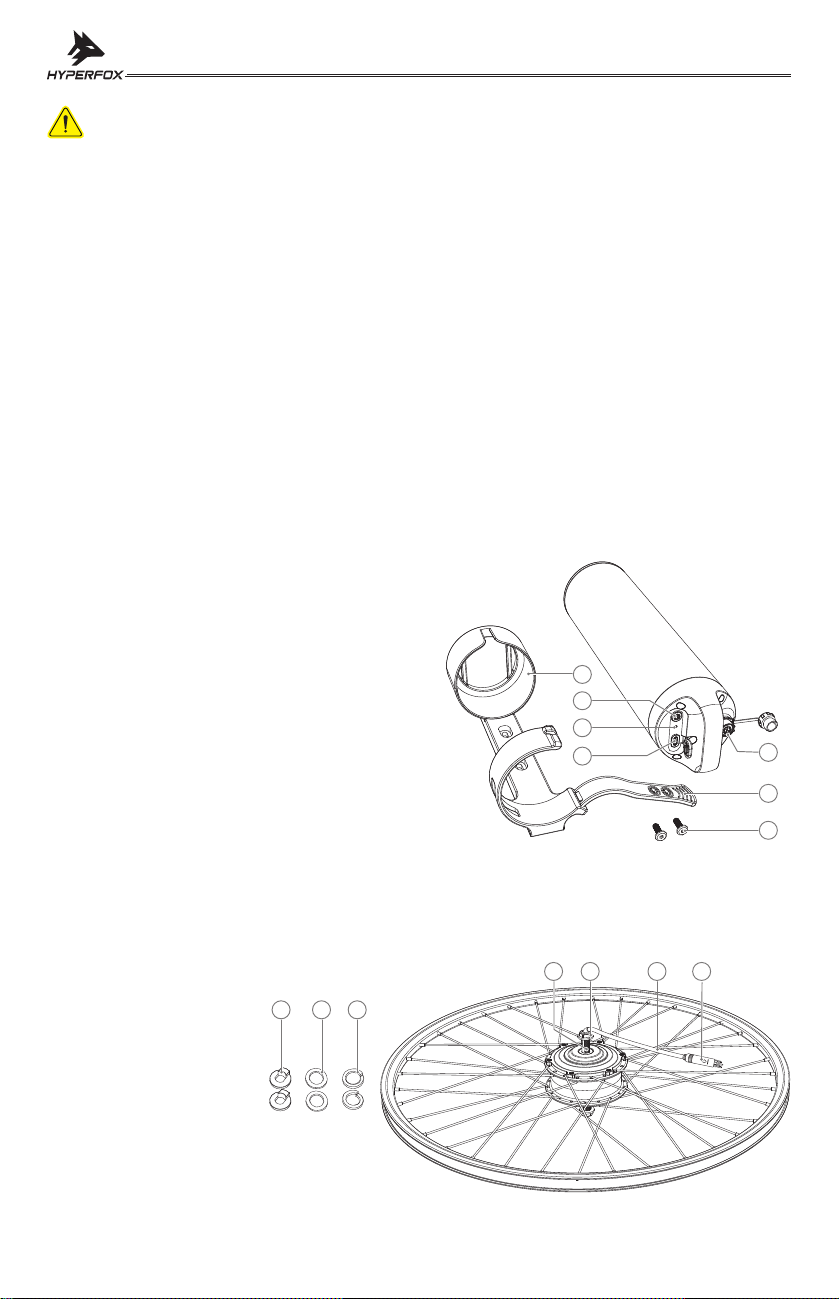
About the Components
Smart Battery
Motor
1.Torque washer
2.Washer
3.Spring washer
4.Fixed axle
5.Lock nut
6.Connecting cable (to controller)
7.Alignment mark
HyperFox FluxKit eBike Power Assist System Kit User Guide
2
3
1
6
7
5
4
1.Battery Mounting Bracket
2.Power Button: Long press for 3 seconds time
- to turn on/off the device.
3.Indicator Lights:
Red solid light — Battery ≤ 10%,
Yellow solid light — 10% < Battery < 50%,
Green solid light — Battery > 50%,
Red flashing light (charging) — Battery ≤ 10%,
Yellow flashing light (charging) — 10% < Battery < 50%,
Green flashing light (charging) — 50% < Battery < 100%,
4.Charging Port
5.Discharging Port (for connecting to controller power cable)
6.Mounting Strap
7.Mounting Screws
4
5
6
1 2 3
7
06
Tip: The device supports automatic wake-up via motion sensing. Frequent power on/off is not
required in daily use. It will automatically enter sleep mode after being idle for 10 minutes to
save power. When pedal movement is detected in sleep mode,the device will automatically
wake up and return to normal operating mode.
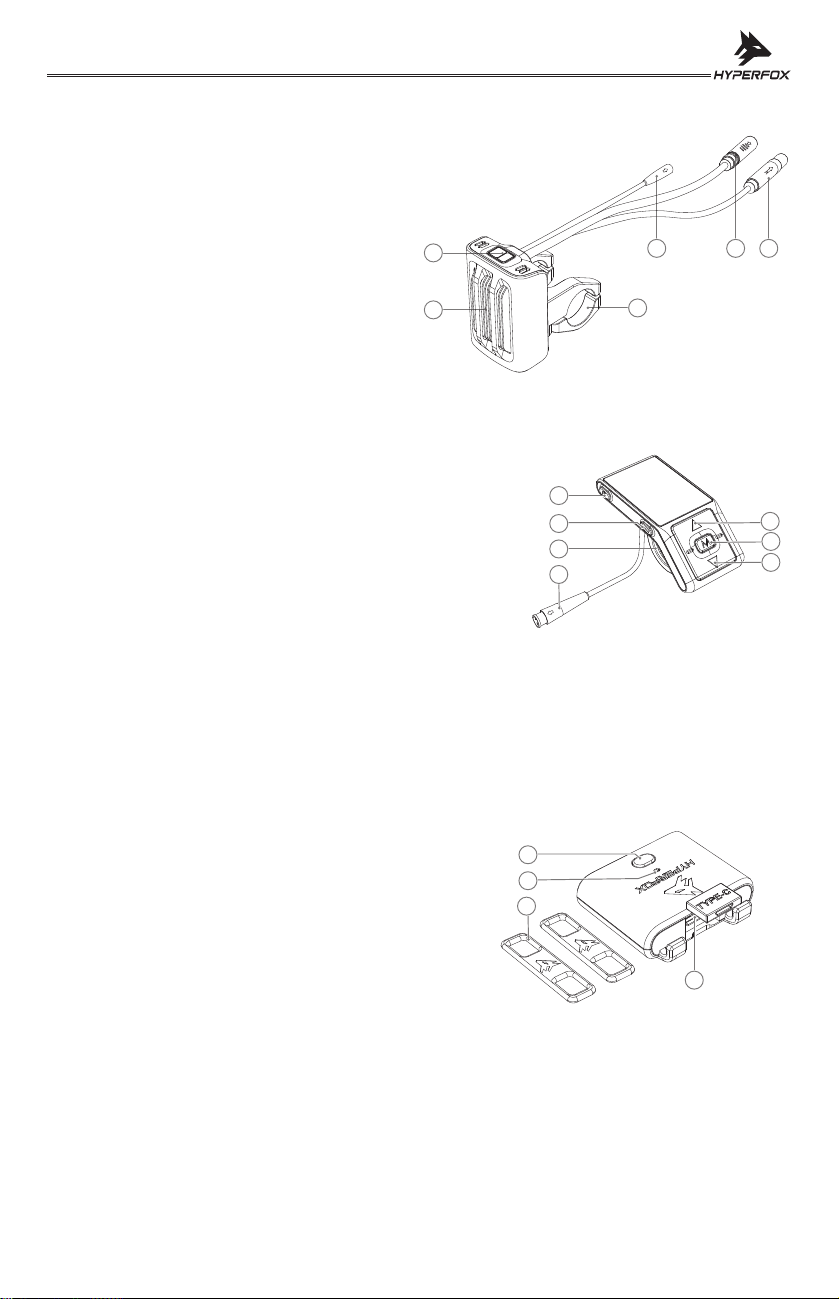
Controller
1.Forward obstacle avoidance radar
2.Heat dissipation grille
3.Mounting bracket
4.Display connector plug (male, for connecting to
the display)
5.Motor output plug (female, for connecting to the motor)
6.Power input plug (male, for connecting to the
battery discharge port)
OSD
1.Power button: Long press for 3 seconds time to turn on/off the device.
2.Function button: Short press — Switch OSD pages,
Double click — Adjust OSD brightness (cycle through 3 levels),
Triple click — Switch mileage unit (km/mile).
3.Mounting clamp
4.Connector plug (connects to OSD connector on controller)
5.Up button: Short press when powered on — Increase assist level.
6.Press the bottom key: In the powered-on state, briefly press the
— key to reduce the assist level.
7.M key: For pairing of the IMU motion sensor.
IMU Motion Sensor
1.Power button: Short press — Power on (green flashing: Bluetooth connected;
red solid: Bluetooth not connected); Long press for 3 seconds time — Power off;
Double-click — Enter pairing mode, indicator flashes red.
2.Status indicator: Red flashing — Pairing mode,
Green flashing — Bluetooth connected / Charging,
Green solid (charging) — Fully charged,
Red solid — Bluetooth not connected.
3. Mounting strap
4.Type C charging port
HyperFox FluxKit eBike Power Assist System Kit User Guide
1
2
4 5 6
3
1
2
3
7
6
5
4
4
1
2
3
12
Download and install the HF Bikes App
Bind the Device
For Android phones, open the browser and enter the URL: https://app.
hyperfoxbikes. com/ or scan the QR code on the right to download and
install the app. You can also seFluxKith for HF Bikes App on Google Play
to download and install it for your Android device.
1.Enable Bluetooth on your phone → Launch the HF Bikes App → Register your account information.
2.Turn on the battery and the display.
3.Long press the function button on the left side of the display until the QR code with the device serial number
appears on the screen.
4.Tap the icon at the bottom left of the HF Bikes App interface → Tap the "Bind Bike" button → Scan the QR
code (device serial number) shown on the display.The HF Bikes App will automatically connect and bind the
device. After binding, tap the button → You can adjust preferences, and configure/manage your bike in
Device Management.
5.Long press the function button on the left side of the display again until the QR code with the device
serial number appears on the screen.
Bike
When using the HF Bikes App for the first time, you need to register your information and add/bind the device.
General
Click "Register" Log inRegister via email
HyperFox FluxKit eBike Power Assist System Kit User Guide
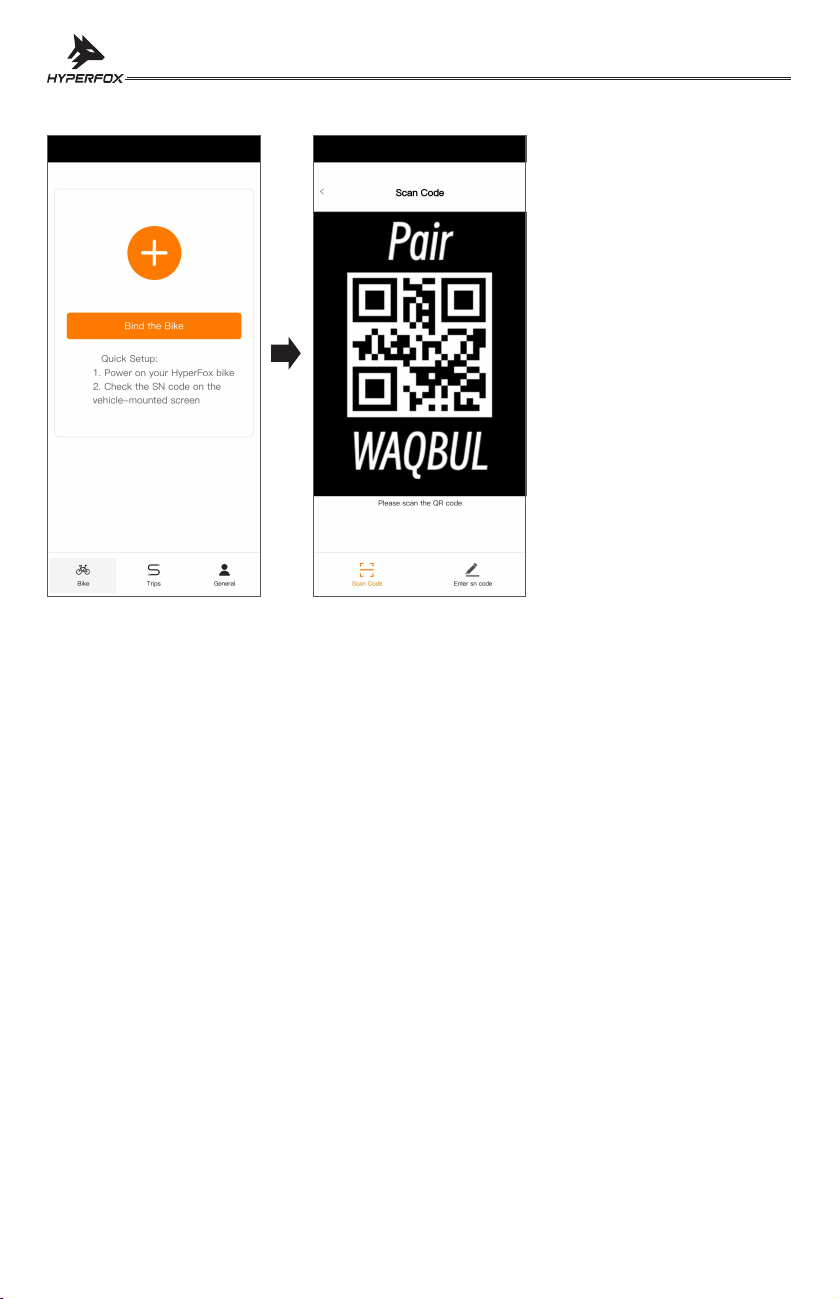
Click "Bind Bike"
Scan the QR code with the serial
number on the display to bind the bike
Maintenance
Usage Steps
1.Long press for 3 seconds time battery power button or the display power button to turn on the device.
2.Press the power button of the IMU motion sensor briefly to turn on the IMU motion sensor.
3.Turn on your phone's Bluetooth, launch the HF Bikes App. After successfully connecting to the device,
configure parameters such as speed limit, kinetic energy recovery switch and obstacle avoidance switch
with in the App.
4.Start riding. During riding, you can briefly press the up or down button on the display to switch assist gears.
There are 4 gears (0, 1, 2, 3) available: Gear 3: the fastest,Gear 1: the slowest,Gear 0: assist off.
5.After riding, Long press for 3 seconds time power button to turn off battery discharge.
6.If you need to remove the battery for charging: Hold the waterproof connectors of the battery power cable
and the controller battery cable respectively, then pull out the battery power connector firmly (do not pull by
holding the power cord). Loosen the rubber fixation strap of the battery from the clip, then pull the battery
out from the left side of the bicycle.
13
HyperFox FluxKit eBike Power Assist System Kit User Guide
1.After every ride
Check the battery level and charge it in a timely manner.
2.Every 20 hours of cycling or every 500 miles of riding
Clean the waterproof connection plugs of the battery power cable and the controller battery connection cable.
Check whether the fixing nuts of the motor axle and the IMU motion sensor are still firmly installed.
HyperFox FluxKit eBike Power Assist System Kit User Guide
14
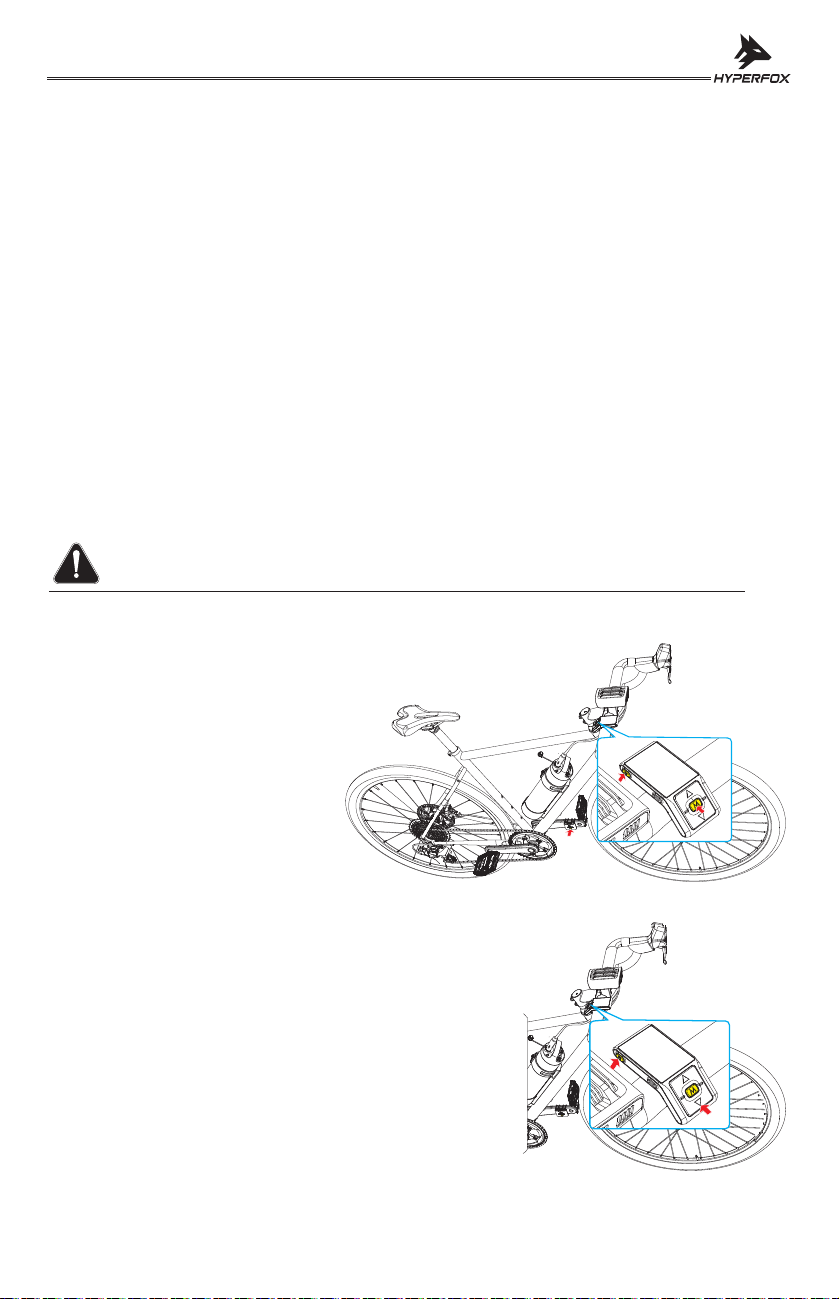
Note: The IMU motion sensor and controller need to be paired via Bluetooth once.
Operation:
1.Double-click the power button until the status indicator
of the IMU motion sensor flashes and then release.
2.When the device is powered off (display screen
turns off), hold down the M key and simultaneously
perform the operation of (Long press for 3 seconds
time the power button) to turn on the device. The
display will show a flashing red pedal pattern,
indicating that the IMU motion sensor and
controller have entered the Bluetooth pairing
mode. When the display shows the flashing red
pedal pattern, it means that the Bluetooth pairing
has been successful.
Bluetooth pairing
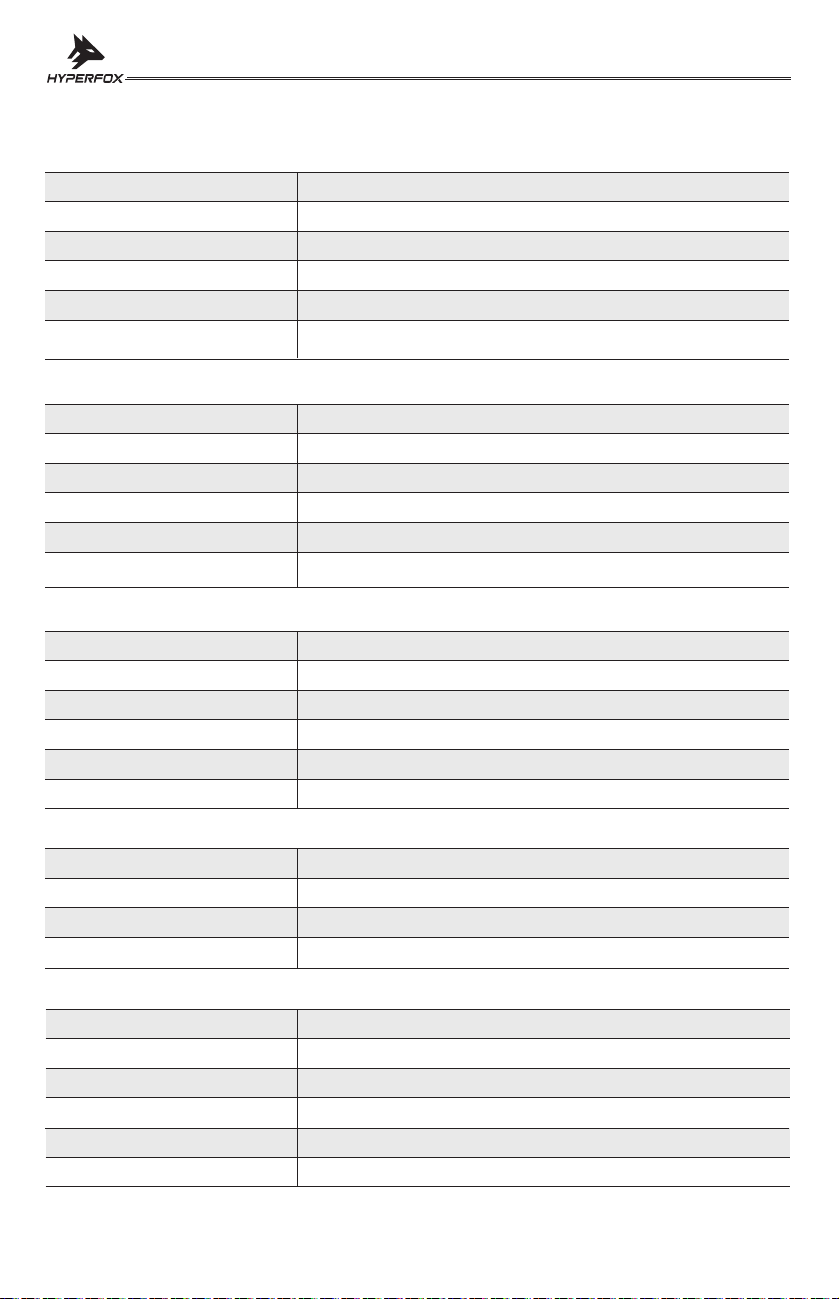
Motor Calibration
It is recommended to perform a motor parameter calibration.
During calibration, the motor must be suspended, and it will
rotate for approximately 10 seconds to complete the calibration.
Operation:
1.Mount and suspend the front-wheel motor.
2.With the device turned off (display screen off), press and hold
the down button, and at the same time perform the power-on action
(Long press for 3 seconds time the power button).
3.Wait for the motor to rotate for about 10 seconds until calibration is completed.
3.Every 6 months, or 100 riding hours, or 3,000 miles
Check the tension of the motor wheel spokes.
Check for loose connectors on all parts of the assist system.
Check that the IMU sensor and assist system are functioning normally.
Charge the battery once a month if storing it unused for 6 months.
4.Every 12 months, or 200 riding hours, or 6,000 miles
Check that the motor wheel runs smoothly and quietly.
Check for damage to the smart battery.
Check for damage to the waterproof connectors between the smart battery power cable and the
controller battery cable.
Charge the battery once a month if storing it unused for 12 months.
Additional Notes
Note: The device has been calibrated and paired upon factory production. No need for
self-calibration or re-pairing! Only when the motor is replaced, calibration is required;
and when the IMU motion sensor is replaced, re-pairing is necessary.
Main Controller
Motor control algorithms
Maximum input voltage
Rated input voltage
Maximum bus current
Continuous bus current
Maximum supported electrical speed
inductive FOC, non-inductive FOC
80V
50V
80A
20A
200000rpm
Hub Motor
Maximum instantaneous power
Maximum continuous power
Maximum output torque
Maximum no-load speed
Hub size
Frame and fork spacing requirements
700W
400W/350W/250W optional
70Nm
4000rpm on the shaft
18 to 26 inches mountain tires/road tires
V-brake: 8.8cm(+0.1cm)/ Disc brake: 10cm(+0.1cm) The opening spacing
of the axle fixing groove: 10mm(+0.5mm)
Component Parameters
Smart Battery
Voltage
Number of cells
Capacity
Battery capacity
Equilibrium
Protection
48V
12S
10000mAh
480 Wh
Active equilibrium
Overvoltage, lowvoltage, overcurrent, over-temperature, and long-term
fully charged storagecharged storage
Screen Display
Resolution
Light source
Size
Refresh rate
240*296
TFT-LCD
2 inches
30Hz
Protection grade
Angular velocity measurement range
Acceleration measurement range
Refresh rate
Battery capacity
Pure battery life
IPX6 water resistance
±2000dps
±24g
2000Hz
400mAh
Continuous use for 120 hours, standby for 160 days
IMU Motion Sensor
15
HyperFox FluxKit eBike Power Assist System Kit User Guide

Company: Nimbus Core Limited.
Address: No. 5, 17/F, Strand 50, 50 Bonham Strand, Sheung Wan, Hong Kong
Website: www.hyperfoxbikes.com
Email: [email protected]
The diagrams in this manual are for reference only, and the actual product shall prevail.
If the manual is updated, no further notice will be given.
FCC Warning
This device complies with Part 15 of the FCC Rules. Operation is subject to the following two conditions:
(1) This device may not cause harmful interference, and (2) this device must accept any interference received,
including interference that may cause undesired operation.
NOTE 1: This equipment has been tested and found to comply with the limits for a Class B digital device,
pursuant to part 15 of the FCC Rules. These limits are designed to provide reasonable protection against
harmful interference in a residential installation. This equipment generates, uses and can radiate radio
frequency energy and, if not installed and used in accordance with the instructions, may cause harmful
interference to radio communications. However, there is no guarantee that interference will not occur in a
particular installation. If this equipment does cause harmful interference to radio or television reception,
which can be determined by turning the equipment off and on, the user is encouraged to try to correct the
interference by one or more of the following measures:
- Reorient or relocate the receiving antenna.
- Increase the separation between the equipment and receiver.
-Connect the equipment into an outlet on a circuit different from that to which the receiver is connected.
-Consult the dealer or an experienced radio/TV technician for help.
NOTE 2: Any changes or modifications to this unit not expressly approved by the party responsible for
compliance could void the user's authority to operate the equipment.
The device has been evaluated to meet general RF exposure requirement. The device can be used in
portable exposure condition without restriction.