100%
recyclable
Separate
paper
from plastic
before
recycling
byjasco.com/recycle
paper made from 25%
post consumer waste
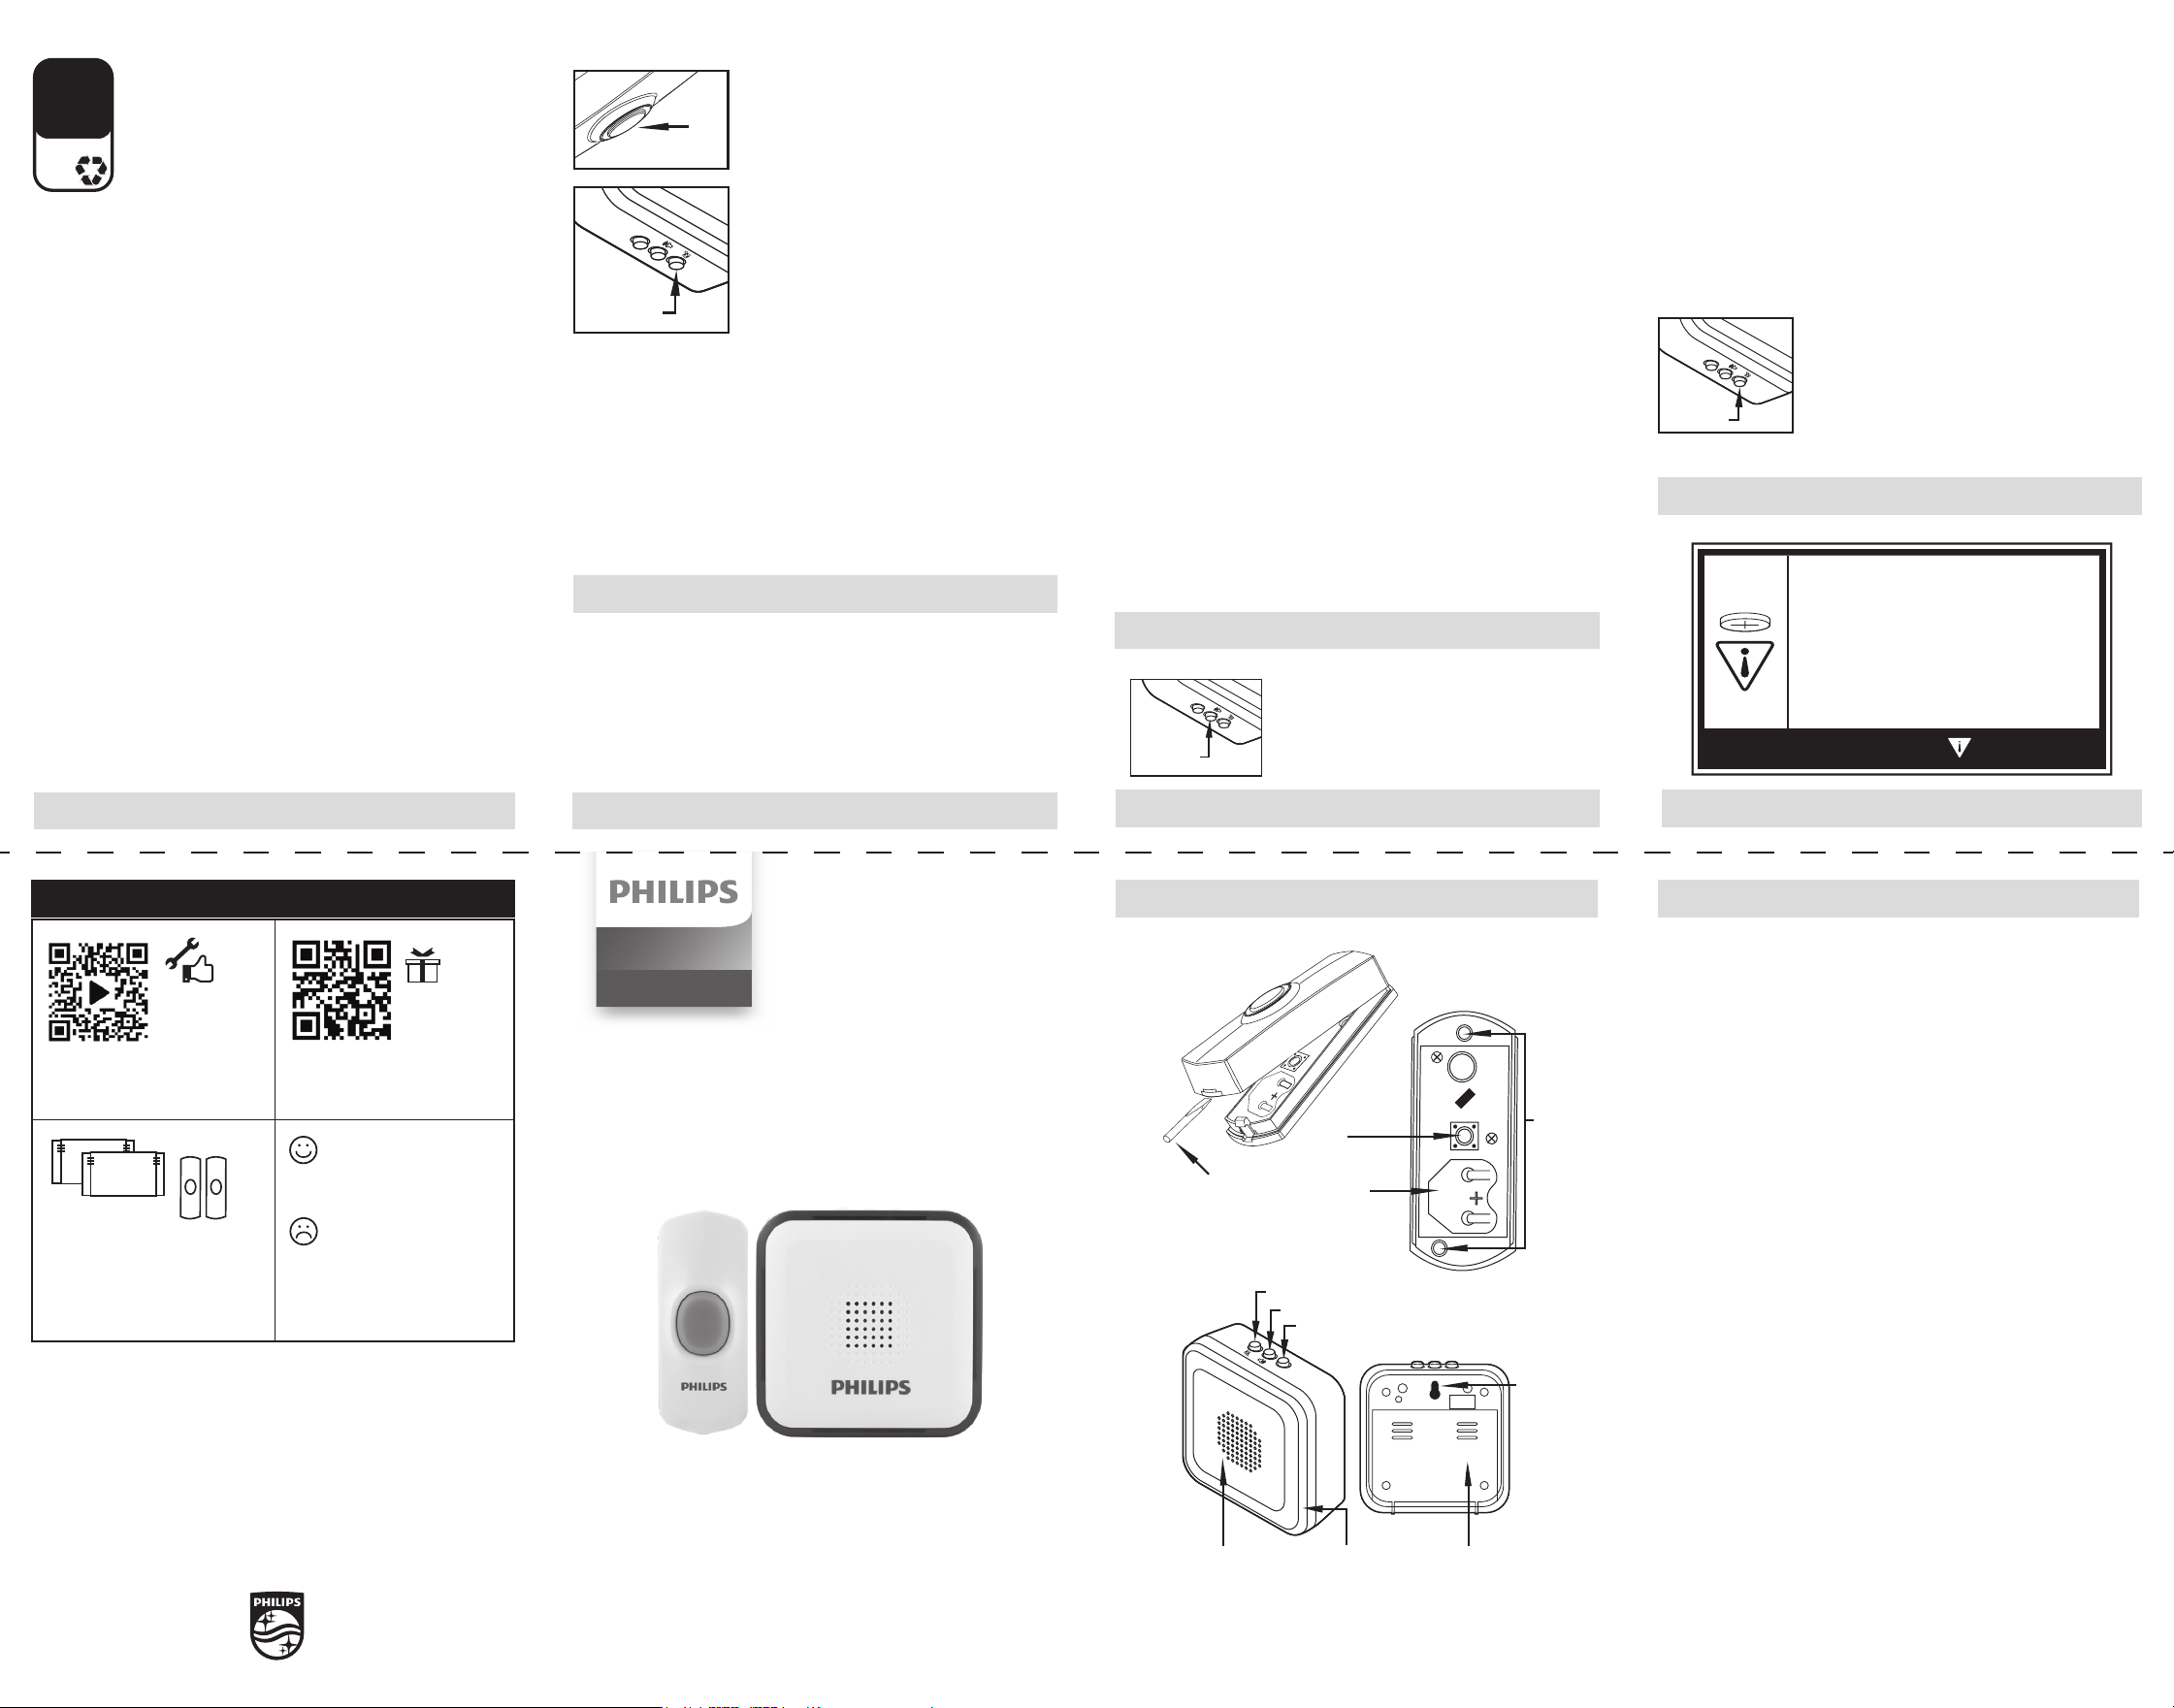
II. Battery installation
• #2 Phillips screwdriver
• Small at-blade screwdriver
• 1/16 in. and 3/32 in. drill bits
• Three AA batteries
Items required for installation and use (not included)
A. Doorbell (receiver)
1. Remove the cover of the doorbell battery compartment (Fig. 2) and install
three AA batteries (not included) noting correct polarity.
B. Push button (transmitter)
NOTE: Push button CR2032 battery is preinstalled — the battery isolation
tab must be removed prior to use.
1. Remove the front cover of the push button housing by pushing a at-blade
screwdrivier into the slot at the bottom of the push button housing. (Fig. 1)
2. Replace the CR2032 battery with the positive (+) side up. Note:
Keep the front cover o of the push button until melody selection
is complete.
The doorbell and push button(s) are electronically paired during production.
Once the batteries are installed in the push button and doorbell receiver, press
the push button(s) to ensure the push button(s) cause the doorbell to operate.
If doorbell chime does not sound when the batteries are installed and the
push button is pressed, see Troubleshooting section.
NOTE:
• Ensure the batteries are installed correctly according to polarity (+ and -).
• Do not mix old and new batteries, dierent brands or types of batteries, such
as alkaline, carbon-zinc or rechargeable batteries.
• Remove and immediately recycle or dispose of batteries from equipment not
used for an extended period of time according to local regulations.
• Always completely secure the battery compartment. If the battery
compartment does not close securely, stop using the product, remove the
batteries, and keep them away from children.
C. Included battery
• Battery type: CR2032, 3 V
• Remove and immediately recycle or dispose of used batteries according to
local regulations and keep away from children. Do NOT dispose of batteries
in household trash or incinerate.
• Even used batteries may cause severe injury or death.
• Call a local poison control center for treatment information.
• Non-rechargeable batteries are not to be recharged.
• Do not force discharge, recharge, disassemble, heat above 60° C (140° F) or
incinerate. Doing so may result in injury due to venting, leakage or explosion
resulting in chemical burns.
DES3140W/27
v4 9/25
Scan to watch a step-by-step
instructional video, or visit
https://byjasco.com/49022i.
Get exclusive, web-only deals and
more! Scan here, or visit
byjasco.com/deals.
Like our product?
Leave a review on your
favorite retailer website
or Amazon.com.
Having problems?
let us know how we can help.
call 1-844-816-0320, M-F.
Product
instructions
made easy
For additional Philips doorbell
receivers, push buttons and more,
visit our website!
byjasco.com/chimes
Need more
accessories?
Register
your Philips
product
THANK YOU FOR YOUR PURCHASE!
Doorbell
(Receiver)
Fig. 2
Push Button
(Transmitter)
Fig. 1
I. Doorbell kit components
Mountin
g
holes
Battery
compartment
Push at-blade
screwdriver into
the slot to open
the cover
Push
button
If the doorbell does not work:
• Make sure push button switch is pressed down and held for at least 1 second.
• Verify battery installation is correct (check polarity).
• Try a fresh battery in push button.
• Make sure doorbell is no farther than 150 feet away from the push button*.
• Ensure push button is not mounted on metal, near metal studs or near the floor.
• Try a new location for the doorbell.
• If the doorbell and push button(s) still do not operate, repeat the electronic
pairing process of the push button(s) to the doorbell listed below.
a. To clear settings: press and hold the chime melody button on the top of
the doorbell while installing the third battery.
b. Once the last battery is installed, release the
chime melody button.
c. Press and hold the chime melody button
again. You will hear the “ding dong” melody
twice, and then the double beep to alert you
the doorbell is ready to pair with the push
button. Release the chime melody button.
d. Press and release the push button. You will
hear one beep letting you know the doorbell
accepted the signal.
e. Wait 10 seconds, and you will hear the double
beep again to alert you the doorbell is now
paired with the push button.
f. Press the push button to test.
*
Functional range may be adversely affected by one or more of the following factors: weather, radio
frequency interference, low transmitter battery or obstructions between the transmitter and receiver.
VI. Troubleshooting
FCC Information
Suppliers Declaration of Conformity | Model #: DES3140W/27
Jasco Products Co., 10 E. Memorial Rd., Oklahoma City, OK 73114,
www.byjasco.com.
This device complies with Part 15 of the FCC standard. Operation is subject
to the following two conditions: (1) this device may not cause harmful
interference, and (2) this device must accept any interference received,
including interference that may cause undesired operation.
FCC NOTE: The manufacturer is not responsible for any radio or TV interference
caused by unauthorized modications to this equipment. Such modications
could void the user’s authority to operate the equipment.
NOTE: This equipment has been tested and found to comply with the limits
for a Class B digital device, pursuant to Part 15 of the FCC Rules. These limits
are designed to provide reasonable protection against harmful interference
in a residential installation. This equipment generates, uses and can radiate
radio frequency energy and, if not installed and used in accordance with
the instructions, may cause harmful interference to radio communications.
However, there is no guarantee that interference will not occur in a particular
installation. If this equipment does cause harmful interference to radio or
television reception, which can be determined by turning the equipment o
and on, the user is encouraged to try to correct the interference by one or
more of the following measures:
— Reorient or relocate the receiving antenna.
— Increase the separation between the equipment and receiver.
— Connect the equipment into an outlet on a circuit dierent from
that to which the receiver is connected.
— Consult the dealer or an experienced radio/TV technician for help.
A. Doorbell (receiver) mounting
This doorbell receiver is designed to be portable and can be used almost
anywhere within a 150 ft. range of the push button. Do not use in wet
locations. It can also be easily wall mounted.
Permanent installation
1. Select the location for mounting your doorbell receiver and drill one hole
with a 3/32 in. drill bit.
2. Insert the 3x25 mm screw included, into the hole, setting the
screw head extending about 1/4 in. from mounting surface.
3. Place the receiver’s keyhole slot over the screw and press down
rmly to secure it.
B. Push button (transmitter) mounting
NOTE: Avoid mounting on metal surfaces, as it may result in a reduced range
of transmission. Do not mount in an area exposed to direct rain. Push buttons
are typically mounted at the same height as the doorknob or handle (36-44 in.
above the oor).
Permanent installation
1. Remove the front cover of the push button (Fig. 1).
2. Before mounting, choose a mounting location within 150 ft. of the doorbell
unit location. Place the push button where you would like to mount and test
with the doorbell as close to its nal location as possible. If it works, continue
with mounting the button. If it does not work, see TROUBLESHOOTING.
3. Hold the back plate of the push button in the selected location with the
arrow on the back of the back plate pointing up.
4. Using a 1/16 in. drill bit, drill a hole through the back plate of the push
button (Fig. 1) and into the surface of the selected location.
5. Secure with the two screws provided.
6. Press front housing onto back cover.
7. Test operation. If doorbell does not work, see TROUBLESHOOTING.
V. Mounting instructions
V. Mounting instructions
III. Melody selection setting cont.
32 melody playlist:
1
Ding Dong-1
2
Westminster
3
3 Knocks
4
Ding Dong-2
5
Ding Dong-3
6
Cuckoo
7
Bell
8
Airport Notice
Sound
9
Fur Elise
10
Jingle Bells-1
11
Memory-1
12
William Tell
Overture
13
Turkish March-1
14
Titanic
15
Cuckoo Waltz
16
Ode an die
Freude
17
Jingle Bells-2
18
Childhood
Memory
19
Hungarian
Dances
20
Canon
21
Love Story
22
Turkish March-2
23
Merry Christmas
24
Waltz
25
Four Whistling
Swans
26
Sonata
27
Moscow Nights
28
Memory-2
29
Farewell
30
Happy Birthday
31
Overture
32
Dickens by the
Waterside
To select one of the four volume settings:
1. Press and release the Melody Select button to
play the melody.
2. While melody is playing, press and release the
Volume button to select the desired sound level.
IV. Volume adjustment
Fig. 4
TEST
Volume
TEST
Melody
selection
Push
button
Mounting
hole
locations
Battery
compartment
Melody
selection
button
Push
button
Push at blade screwdriver into
the slot to open the cover
Doorbell kit
Chimes
MADE IN CHINA
Philips and the Philips Shield Emblem are registered trademarks of Koninklijke
Philips N.V. and are used under license. This product has been manufactured
by and is sold under the responsibility of Jasco Products Company, and Jasco
Products Company LLC, 10 E. Memorial Rd., Oklahoma City, OK 73114 is the
warrantor in relation to this product.
This product has a 90-day limited warranty. Visit www.philips.com/support for
warranty details.
Questions? Contact our U.S.-based Consumer Care at 1-844-816-0320, M-F.
PATENTS/PATENTS PENDING WWW.BYJASCO.COM/PATENT
Push button
The chime has 32 melodies. To select the melody for your doorbell:
1. Push the Melody Selection Button on top of the
receiver. (Fig. 3)
2. Press and release the melody selection button
until you hear the desired melody. The last melody
played will be your selected doorbell melody.
Keyhole
mounting
slot
BATTERY
COMPARTMENT
TEST
Melody selection
Volume adjustment
Test (for chime settings)
Blue LED alert lights
when push button is
pressed
3 AA batteries
required
(not included)
95 dB-rated
audio output
• Ingestion hazard: This product contains
a button cell or coin battery.
• DEATH or serious injury can occur if ingested.
• A swallowed button cell or coin battery can
cause Internal Chemical Burns in as little as
2 hours.
• KEEP new and used batteries out of
reach of children.
• Seek immediate medical attention if a
battery is suspected to be swallowed or
inserted inside any part of the body.
WARNING
TEST
Melody
selection
Fig. 3
Temporary installation
1. Clean the mounting location for the push button with a mixture of 50%
water and 50% isopropyl alcohol.
2. Remove protective backing from one side of the adhesive pad and attach it
to the back plate of the push button.
3. Remove protective backing from the other side of the adhesive pad and
press the back plate to the cleaned mounting location. Hold in place for a
few seconds to allow for a secure bond.
II. Battery installation cont.
Oricios
de montaje
Compartimiento
de pilas
Empuje un
destornillador de
cabeza plana en la
ranura para abrir la tapa
Botón
táctil
Declaración de la FCC
Declaración de conformidad del proveedor | Model # DES3140W/27
Jasco Products Co., 10 E. Memorial Rd., Oklahoma City, OK 73114,
www.byjasco.com.
Este dispositivo cumple con la Parte 15 de la norma FCC. El funcionamiento
está sujeto a las siguientes dos condiciones: este dispositivo (1) puede causar
interferencia perjudicial y (2) debe aceptar cualquier interferencia recibida,
incluidas las interferencias que puedan causar un funcionamiento no deseado.
NOTA DE LA FCC: El fabricante no es responsable de las interferencias de radio
o televisión causadas por modicaciones no autorizadas al equipo. Dichas
modicaciones podrían anular la autoridad del usuario para usar el equipo.
NOTA: Este equipo se probó y se determinó que cumple con los límites de
un dispositivo digital de clase B, conforme al apartado 15 de las normas
FCC. Estos límites están diseñados para brindar protección razonable contra
interferencias perjudiciales en una instalación residencial. Este equipo genera,
usa y puede irradiar energía de radiofrecuencia y, si no se instala y usa según las
instrucciones, puede causar interferencia perjudicial a las radiocomunicaciones.
Sin embargo, no puede garantizarse que no se producirán interferencias
en una instalación dada. Si este equipo provoca interferencia perjudicial a
la recepción de radio o televisión, lo que puede determinarse encendiendo
y apagando el equipo, se recomienda que el usuario intente corregir la
interferencia por medio de la implementación de una o más de las
siguientes medidas:
— Reorientar o reubicar la antena receptora.
— Incrementar la separación entre el equipo y el receptor.
— Conectar el equipo a un tomacorriente de un circuito diferente
del circuito al que está conectado el receptor.
— Consultar al distribuidor o a un técnico con experiencia en radio
televisión para solicitar asistencia.
Receptor de
timbre
Fig. 2
Transmisor con
botón táctil
Fig. 1
I. Componentes del kit de timbre
Ranura tipo
cerradura
COMPARTIMIENTO
DE PILAS
TEST
Selección de melodía
Ajuste de volumen
Prueba (para la conguración del timbre)
Las luces de alerta
LED azules se iluminan
cuando se presiona el botón
Requiere 3 pilas
AA (no incluidas)
Sal
ida de audio
nominal de 95 dB
III. Conguración de Selección de melodía
Este timbre tiene 32 melodías diferentes. Para seleccionar
la melodía de su timbre:
1. Presione el botón de selección de melodía ubicado
en la parte superior del receptor. (Fig. 3)
2. Presione y suelte el botón de selección de melodía
hasta que escuche la melodía deseada. La última
melodía que suene será la seleccionada para el timbre.
Lista de 32 melodías:
1 Ding dong-1
2 Westminster
3 3 Golpes
4 Ding dong-2
5 Ding dong-3
6 Cucú
7 Campana
8 Sonido de aviso
de aeropuerto
9 Para Elisa
10 Jingle Bells-1
11 Memoria-1
12 Obertura de
Guillermo Tell
13 Marcha turca-1
14 Titanic
15 Vals del cucú
16 Himno de la
alegría
17 Jingle Bells-2
18 Recuerdo de
la infancia
19 Danzas
húngaras
20 Canon
21 Historia de amo
22 Marcha turca-2
23 Feliz Navidad
24 Vals
25 Cuatro cisnes
silbantes
26 Sonata
27
Noches de Moscú
28 Memoria-2
29 Despedida
30 Cumpleaños
feliz
31 Obertura
32 Dickens junto
al agua
Instrucciones de montaje
Instrucciones de montaje cont.
Si el timbre no funciona...
• Asegúrese de que el interruptor del botón táctil se presione y sostenga
durante, al menos, 1 segundo.
• Verique que las pilas estén colocadas correctamente
(revise los polos).
• Intente colocar una pila nueva en el botón táctil.
• Asegúrese de que el timbre esté a no más de 46 metros (150 pies) desde el
botón táctil*.
• Asegúrese de que el botón táctil no esté montado sobre metal, cerca de
travesaños metálicos o cerca del piso.
• Pruebe instalar el timbre en otra ubicación.
• Si el timbre y los botones táctiles siguen sin funcionar, repita el siguiente
proceso de emparejamiento electrónico de los botones táctiles con el timbre.
a. Para borrar la configuración: mantenga presionado
el botón de selección de melodia mientras coloca la
tercera pila.
b. Cuando se haya colocado la última pila, suelte el
botón de selección de melodia.
c. Nuevamente, mantenga presionado el botón de
selección de melodia. Escuchará la melodía “ding dong”
dos veces y, luego, el pitido doble que le avisará que el
timbre está listo para emparejarse con el botón táctil.
Suelte el botón de selección de melodia.
d. Presione y suelte el botón táctil. Escuchará un pitido
que le avisará que el timbre aceptó la señal.
VI. Solución de problemas
VI. Solución de problemas cont.
II. Colocación de las pilas II. Colocación de las pilas cont.
• Destornillador Phillips n. °2
• Destornillador pequeño de
cabeza plana
• Brocas de 1/16 pulg. y 3/32 pulg.
• Tres pilas AA
Elementos necesarios para la instalación y el uso (no incluidos)
A. Timbre (receptor)
1. Retire la tapa del compartimiento de las pilas del timbre (Fig. 2) y coloque
tres pilas AA (no incluidas) teniendo en cuenta la polaridad correcta.
B. Botón táctil (transmisor)
NOTE: La pila CR2032 [3 V] de botón está preinstalada. La lengüeta de
aislamiento de la batería debe retirarse antes de su uso.
1. Retire la tapa delantera del recinto del botón táctil empujando un
destornillador de cabeza plana en la ranura en la parte inferior del recinto
del botón táctil (Fig. 1).
2. Sustituya la pila CR2032 con el lado positivo (+) hacia arriba. Nota:
No vuelva a colocar la tapa delantera del botón táctil hasta terminar la
selección de la melodía.
El timbre y los botones táctiles se emparejaron electrónicamente durante
la producción. Cuando la pila esté colocada en el botón táctil y el receptor
del timbre, presione los botones táctiles para asegurarse de que los botones
táctiles hagan funcionar el timbre.
Si el timbre no suena aunque se hayan instalado las pilas y se presione el botón
táctil, consulte la sección de solución de problemas.
NOTA:
• Asegúrese de que las baterías estén instaladas correctamente según
polaridad (+ y -).
• No mezcle baterías viejas y nuevas, de diferentes marcas o tipos de baterías,
como alcalinas, de carbono-zinc o recargables.
• Retire y recicle o deseche inmediatamente las baterías de los aparatos que no
se usen durante un período prolongado de acuerdo con las normas locales.
• Siempre asegure completamente el compartimiento de la batería. Si el
compartimiento de la batería no cierra de forma segura, deje de usar el
producto, retire las pilas y manténgalas fuera del alcance de los niños.
C. Batería incluida
• Tipo de batería: CR2032, 3 V
• Retire y recicle o deseche inmediatamente las baterías usadas de acuerdo con
las normas locales y manténgalas fuera del alcance de los niños. NO deseche
las baterías en la basura doméstica ni las incinere.
• Incluso las baterías usadas pueden causar lesiones graves o la muerte.
• Llame a un centro local de control de intoxicaciones para obtener
información sobre el tratamiento.
• Las baterías no recargables no se deben recargar.
Fig. 3
TEST
Melody
selection
Selección
de melodía
TEST
Melody
selection
Push
button
Mounting
hole
locations
Battery
compartment
Melody
selection
button
Push
button
Push at blade screwdriver into
the slot to open the cover
Selección
de melodía
Botón
táctil
HECHO EN CHINA
Philips y el emblema de escudo Philips son marcas registradas de Koninklijke
Philips N.V. y se usan bajo licencia. Este producto ha sido fabricado y se
comercializa bajo responsabilidad de Jasco Products Company y Jasco Products
Company LLC, 10 E. Memorial Rd., Oklahoma City, OK 73114 es el garante en
relación a este producto.
Este prducto tiene una garantía limitada de 90 días. Visite
www.philips.com/support para conocer los detalles de la garantía.
¿Tiene preguntas? Comuníquese con nuestro servicio de atención al consumidor
de EE. UU. al 1-844-816-0320, de lunes a viernes.
PATENTES/PATENTES PENDIENTES WWW.BYJASCO.COM/PATENTS
Doorbell kit
Chimes
Escanee para ver un video instructivo
paso a paso o visite
https://byjasco.com/49022i.
Para ofertas exclusivas, que solo
encontrará en Internety ¡más! Escanee
o visite byjasco.com/deals.
¿Le gusta nuestro producto?
Déjenos una reseña en
Amazon.com o el sitio web
de su comercio favorito.
¿Tiene problemas y
necesita ayuda?
Llame a nuestros expertos
en los EE. UU., de lunes a
viernes,1-844-816-0320.
Instrucciones
fáciles
Para ver más receptores, botones
táctiles y muchos más productos Philips,
visite nuestro sitio web.
byjasco.com/chimes
¿Necesita más
accesorios?
Registre su
producto
Philips
Gracias Por Su Compra
e. Espere 10 segundos, y escuchará el pitido doble nuevamente para
avisarle que el timbre está ahora emparejado con el botón táctil.
f. Presione el botón táctil para probarlo.
*El rango funcional puede verse afectado negativamente por uno o más de
los siguientes factores: clima, interferencia de radiofrecuencia, pila con poca
carga u obstrucciones entre el transmisor y el receptor.
A. Montaje del timbre (receptor)
Este receptor de timbre está diseñado para ser portátil y se puede usar en casi
cualquier lugar dentro de 46 metros (150 pies). rango del pulsador. (No lo use
en lugares húmedos). También se puede montar fácilmente en la pared.
Instalación permanente
1. Seleccione la ubicación de montaje del timbre, y taladre un oricio con una
broca de 3/32 pulg. (Fig. 2)
2. Inserte en el oricio un tornillo de 3 x 25 mm que se incluyen, dejando el
cabeza de el tornillo asomada a 1/4 pulg. de la supercie de montaje. 3.
Coloque el ranura tipo cerradura de la unidad del timbre sobre el tornillo y
presione la unidad del timbre para jarla.
B. Montaje del botón táctil (transmisor)
NOTA: Evite realizar el montaje en supercies metálicas, ya que puede causar
una reducción del rango de transmisión. No monte en un área expuesta a
lluvia directa. Los botones táctiles se montan típicamente a la misma altura de
la perilla o manija de la puerta (entre 91 cm (36 pulg.) y 1.1 m (44 pulg.) sobre
el piso).
Instalación permanente
1. Retire la tapa del botón táctil (Fig. 1).
2. Antes de montar, elija una ubicación de montaje que esté a no más de 46
metros (150 pies) de la ubicación de la unidad de timbre. Coloque el botón
táctil donde desee montarlo y probarlo con el timbre tan cerca a su
ubicación nal como sea posible.
Si funciona, continúe el montaje del botón. Si no funciona, consulte la
SOLUCIÓN DE PROBLEMAS.
3. Sujete la placa posterior del botón táctil en la ubicación seleccionada con la
echa de la parte posterior apuntando
hacia arriba.
4. Con la broca de 1/16 pulg., taladre un oricio que traspase la placa
posterior del timbre (Fig. 1) y que perfore la supercie de la ubicación
seleccionada.
5. Ajuste con los dos tornillos provistos.
6. Presione el recinto delantero sobre la tapa posterior.
Instalación temporal
1. Limpie la ubicación de montaje del botón táctil con una mezcla de un 50 %
de agua y un 50 % de alcohol isopropílico.
2. Retire el papel protector de un lado de la almohadilla adhesiva y únala a la
placa posterior del botón táctil.
3. Retire el papel protector del otro lado de la almohadilla adhesiva y presione
Para seleccionar una de cuatro conguraciones:
1. Presione y suelte el botón de selección de melodía
para tocar la melodía. (Fig. 3)
2. Mientras suena la melodía, presione y suelte el
botón táctil para seleccionar el nivel de sonido
seleccionado. (Fig. 4)
Fig. 4
TEST
Volume
Volumen
IV. Ajuste de volumen
• No fuerce la descarga, no recargue, desmonte, caliente por encima de
60° C (140° F) ni incinere. Hacerlo puede provocar lesiones debido a la
ventilación, fugas o explosiones que provoquen quemaduras químicas.
• PELIGRO DE INGESTIÓN: Este producto
contiene una pila botón o de botón.
• Si se ingiere puede causar la MUERTE o
lesiones graves.
• La ingestión de una pila de botón o de botón
puede causar quemaduras químicas
internas en tan sólo 2 horas.
• MANTENGA las pilas nuevas y usadas fuera
del alcance de los niños.
• Busque atención médica inmediata si
sospecha que se ha tragado o introducido una
pila en cualquier parte del cuerpo.
ADVERTENCIA