the Control Freak
™
Home
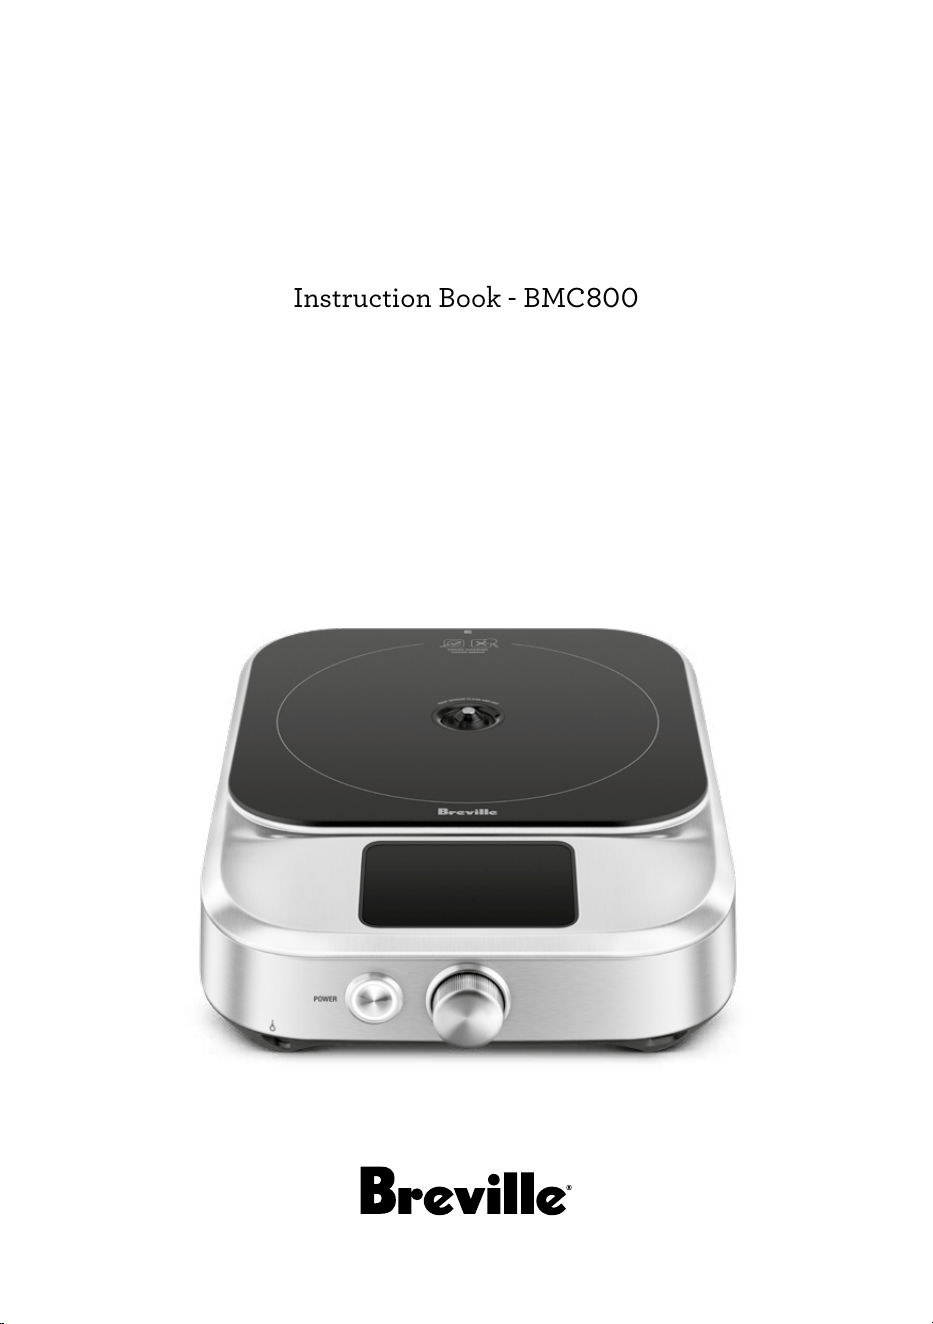
Instruction Book - BMC800

2
BREVILLE
RECOMMENDS
SAFETY FIRST
At Breville we are very safety
conscious. We design and
manufacture consumer
products with the safety of you,
our valued customer, foremost
in mind. In addition, we ask
that you exercise a degree of
care when using any electrical
appliance and adhere to the
following precautions.
IMPORTANT
SAFEGUARDS
READ ALL INSTRUCTIONS
BEFORE USE AND SAVE FOR
FUTURE REFERENCE
When using electrical appliances,
basic safety precautions should
always be followed including:
• Remove and safely discard
any packing materials and
promotional labels before
using the Control Freak™
Home induction cooker for
the first time.
• Always ensure the induction
cooker is properly assembled
before use. Follow the
instructions provided
in this book.
• This appliance is for household
use only. Do not use in any type
of moving vehicles. Do not use
the appliance outdoors, or for
anything other than its intended
use. Misuse can cause injury.
• Position the appliance at a
minimum distance of 8 inches
(20cm) away from walls, curtains
and other heat or steam sensitive
materials and provide adequate
space above and on all sides for
air circulation.
2 Breville recommends safety first
9 Components
10 Operation
17 Functions
20 Care, Cleaning & Storage
21 Troubleshooting
Contents

3
• Do not place the appliance near
the edge of a bench top, counter
or table during operation.
Ensure the surface is stable,
level, heat-resistant, clean
and free of water and other
substances.
• Do not use on a cloth-covered
surface, near curtains or other
flammable materials. A fire
may occur if the appliance is
covered or touches flammable
materials, including curtains,
draperies, walls, and the like,
when in operation.
• Do not use the appliance on
(or close to) a hot gas or electric
burner, or where it could touch
a heated oven or surface.
• Do not place the appliance on or
near a hot gas or electric burner,
or in a heated oven.
• Do not use this appliance on a
sink drain board.
• Do not move the appliance
during cooking or while a
saucepan remains on the
induction cooker.
CAUTION
Extreme caution must be used
when moving an appliance
containing hot oil or other
hot liquids.
• The use of accessory
attachments which are
not recommended by the
appliance manufacturer may
cause injuries.
• If the appliance is not in
use for an extended period,
disconnect the appliance from
the power outlet.
• Use only cooking saucepans
and pots suitable for use with
an induction cooker.
• Extreme caution must be used
when the appliance is in use.
• Do not operate appliance in
the vicinity of magnetically
sensitive objects (e.g.
magnetic cards).
• The appliance is not intended
to be operated by means of
an external timer or separate
remote-control system.
• The temperature of accessible
surfaces will be high when the
appliance is operating for some
time after use.
• Do not place anything on
top of the appliance surface
(except induction compatible
cookware) when in use and
when stored.

4
• Do not place metallic utensils,
non-compatible induction
cookware, lids, knives, forks,
spoons or other metallic
objects on the induction
cooker glass ceramic plate,
as these may be heated and
may become hot when the
appliance is switched on.
• Take care when operating the
appliance as rings, watches and
similar objects worn by user
could get hot when near the
cook top surface.
• Do not insert objects into the
ventilation system.
• To avoid overheating, do not
place any aluminum foil or
non-compatible induction
cookware on the appliance.
• Do not touch the hot surface
of the glass ceramic plate. The
induction cooker does not
heat up itself during cooking,
but the temperature of the
cookware heats up the glass
ceramic plate.
• Do not heat any opened
or unopened cans on the
induction cooker.
• Do not cook on broken
cook top. If cook-top should
break, cleaning solutions and
spillovers may penetrate the
cook-top and create a risk of
electric shock.
• Clean cook-top with caution. If
a wet sponge or cloth is used
to wipe spills on a hot cooking
area, be careful to avoid
steam burn, some cleaners
can produce noxious fumes if
applied to a hot surface.
• Before the power cord is
unplugged and the appliance
stored away, ensure the
appliance has completely
cooled down and the cooling
fan has turned o.
• Maximum weight of pot and
content should not exceed 13
pounds (6 kg).
• Only use pans and pots
that are made of induction
cooking compatible materials,
minimum pan diameter of pot
should not be smaller than 5.5
inches (14cm).
• Keep the glass ceramic cook
top surface and temperature
sensor clean at all times.
• After cooking has completed,
exit the cook on the screen to
ensure the induction cooker
has stopped cooking. Do not
rely on the pan detection
functionality to pause
the cooking.

5
SAFETY WITH CHILDREN
• To avoid choking hazard for
young children, remove and
safely dispose the protective
cover fitted on the power plug.
• This appliance can be used
by children aged from 8 years
and above and persons with
reduced physical, sensory
or mental capabilities or
lack of experience and
knowledge if they have
been given supervision or
instruction concerning use
of the appliance in a safe
way and understand the
hazards involved.
• Children shall not play with
the appliance.
• Cleaning and user
maintenance shall not be
made by children without
supervision.
• Keep the appliance and its cord
out of reach of children less
than 8 years.
• Close supervision is necessary
when the appliance is used by
or near children.
IMPORTANT
SAFEGUARDS FOR
ALL ELECTRICAL
APPLIANCES
When using electrical
appliances, basic safety
precautions should always be
followed including:
• Fully unwind the power
cord before use.
• To protect against electric
shock, do not immerse the cord,
plug or appliance in water or
any other liquid.
• Do not let the power cord hang
over the edge of a table or
counter, touch hot surfaces or
become knotted.
• It is recommended to regularly
inspect the appliance. To
avoid a hazard do not use
the appliance if the power
cord, power plug or appliance
becomes damaged in any
way. Immediately cease use
and call Breville Consumer
Support for examination, repair
or adjustment.
• For any maintenance other
than cleaning, contact Breville
Consumer Support.
• Do not use harsh abrasives,
caustic cleaners or oven
cleaners when cleaning
this appliance.

6
• Do not clean with metal
scouring pads. Pieces can
break o the pad and touch
electrical parts, creating a risk of
electric shock.
• The installation of a residual
current device (safety switch)
is recommended to provide
additional safety protection
when using electrical
appliances. It is advisable
that a safety switch with a
rated residual operating
current not exceeding 30mA
be installed in the electrical
circuit supplying the appliance.
See your electrician for
professional advice.
• The appliance must be used
on a properly grounded outlet.
If you are not sure if the power
outlets are properly grounded,
please consult your electrician.
• Do not, under any
circumstances, modify the
power plug or use an adapter.
• A 120-volt, 60 Hz, AC only,15-
20-amp electrical supply with a
fuse or circuit breaker is required
in accordance with all Federal,
State and Local governing codes
and ordinances.
• We also recommend a separate
circuit dedicated to serving only
this appliance.
WARNING
To prevent electric shock, unplug
before cleaning.
WARNING
• Before use, people with
electronic implants such
as pacemakers, etc., and or
other health issues should
consult their doctor, as the
induction cooker generates a
magnetic field.
• If the glass ceramic plate
surface is cracked, switch o the
appliance to avoid the possibility
of electric shock.
• Return the appliance to the
nearest authorized Breville
service center for repair.
• The induction cooker, after
being switched-o, will
continue to radiate residual
heat on the glass ceramic plate
heating surface.
• Do not use this induction cooker
within reach of young children.

7
DISPOSAL
(caring for the environment)
The symbol shown
indicates that this
appliance should not be
disposed of in normal household
waste. It should be taken to a
local authority waste collection
center designated for this
purpose or to a dealer providing
this service. For more
information, please contact your
local council oce.
SHORT CORD
INSTRUCTIONS
Your Breville appliance is fitted
with a short power supply cord
to reduce personal injury or
property damage resulting from
pulling, tripping or becoming
entangled with a longer cord.
• Longer detachable power
supply cords or extension
cords should not be used;
long cords may drape over
the countertop or table-top or
hang by the edge where it can
be pulled on by children or
tripped over unintentionally,
causing injuries.
• Do not use an extension cord.
If the power supply cord is
too short, have a qualified
electrician or serviceman install
an outlet near the appliance.
• A short power-supply cord is
supplied to reduce the risks
resulting from becoming
entangled in or tripping over a
longer cord.
FEDERAL
COMMUNICATION
COMMISSION
(FCC) STATEMENT
Any changes or modifications
not expressly approved by
the party responsible for
compliance could void the
user’s authority to operate
the equipment.
This device complies with Part
15 of the FCC Rules. Operation
is subject to the following two
conditions:
(1) this device may not cause
harmful interference, and
(2) this device must accept any
interference received, including
interference that may cause
undesired operation.
This equipment has been tested
and found to comply with the
limits for a Class B digital
device, pursuant to Part 15 of
the FCC Rules. These limits are
designed to provide reasonable
protection against harmful
interference in a residential
installation. This equipment

8
generates, uses, and can radiate
radio frequency energy, and
if not installed and used in
accordance with the instructions,
may cause harmful interference
to radio communications.
However, there is no guarantee
that interference will not occur
in a particular installation.
If this equipment does cause
harmful interference to radio or
television reception, which can
be determined by turning the
equipment o and on, the user is
encouraged to try to correct the
interference by one or more of
the following measures:
• Reorient or relocate the
receiving antenna.
• Increase the separation
between the equipment
and receiver.
• Connect the equipment into
an outlet on a circuit dierent
from that to which the receiver
is connected.
FOR HOUSEHOLD USE ONLY
SAVE THESE INSTRUCTIONS
• Consult the dealer or an
experienced radio/TV
technician for help.
This equipment complies with
FCC radiation exposure limits
set forth for an uncontrolled
environment. This equipment
should be installed and
operated with a minimum
distance of 8 inches (20cm)
between the radiator & your
body. This transmitter must
not be co-located or operating
in conjunction with any other
antenna or transmitter.
BREVILLE ASSIST
®
PLUG
Your Breville appliance comes
with a unique Breville Assist
®
Plug, conveniently designed
with a finger hole to ease
removal from the power outlet.
9
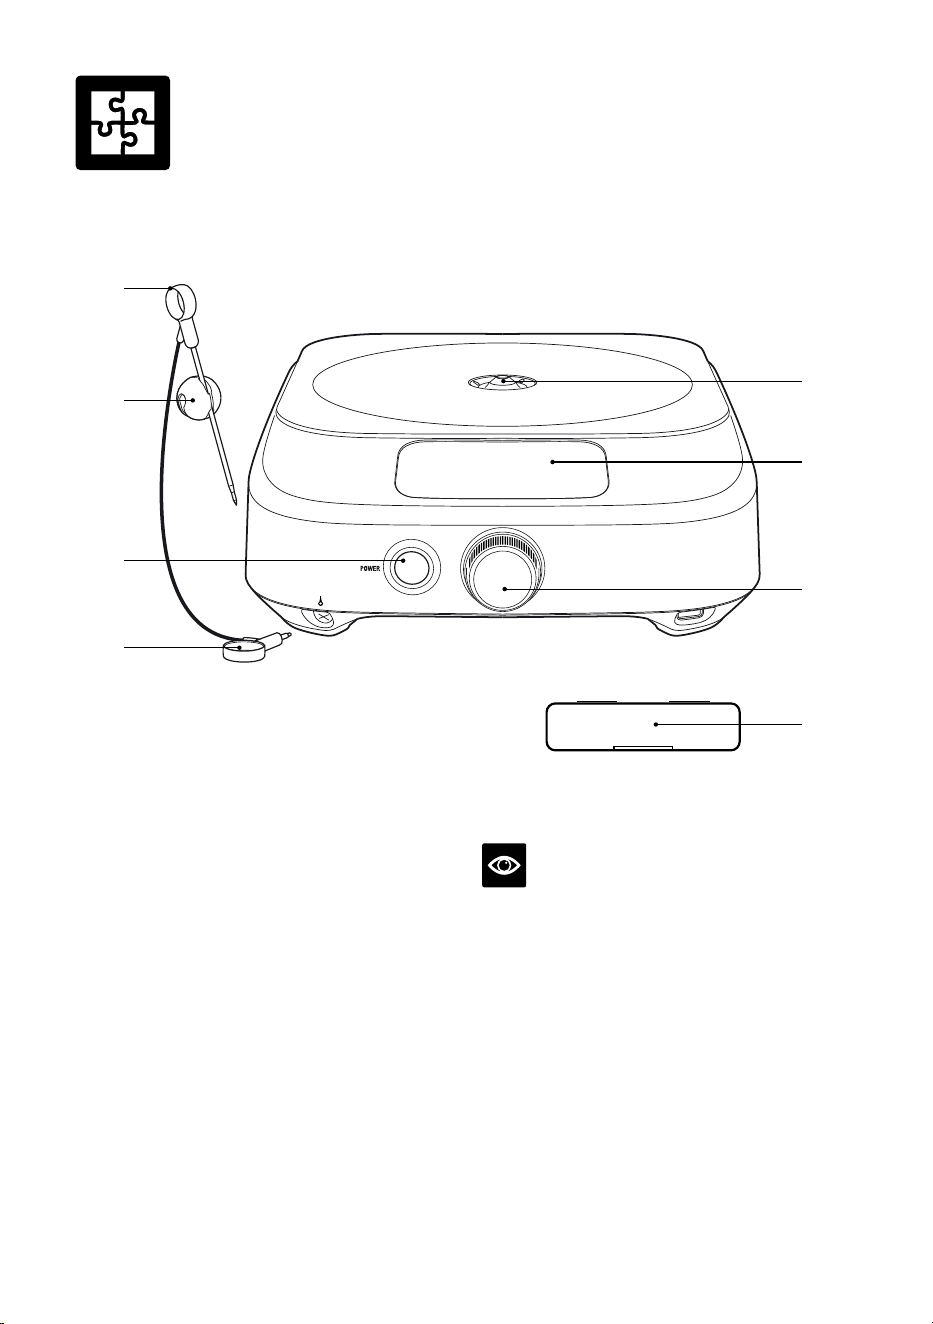
A. Probe Port - thermometer and
probe control
B. Probe Holder / Pot Clip
C. Power Button
D. Probe Jack
E. Pan Sensor - size of pan indicator
F. Optimized Touch Screen - cooking mode,
settings and screen navigation
G. Control Dial - temperature control and
screen navigation
H. Accessory Box
A
E
F
G
B
H
D
C
NOTE
Only use induction compatible cookware.
Aluminum, Copper and Stainless Steel pans
will not work with the product.
Components
10
WHAT IS INDUCTION COOKING?
An induction cooker creates an
electromagnetic field to heat the induction
compatible cooking saucepan/pot. Very little
energy is wasted heating the glass ceramic
plate, as most of the heat is transferred directly
to the food. As most of the heat is absorbed by
the saucepan/pot, the cooking
surface remains cooler to the touch than most
traditional cooktops making cooking fast, safe
and energy ecient.
BEFORE FIRST USE
Before using your Breville induction cooker,
remove and safely discard all packaging
materials and promotional labels. Wipe the
glass ceramic plate surface with a soft damp
cloth and dry thoroughly.
WARNING
Do not immerse the power cord, power plug
and any other part of the induction cooker in
water or any other liquid.
HOW TO USE YOUR
CONTROL FREAK™ HOME
1. Place the induction cooker on a dry, stable
and level surface.
2. Make sure there is at least 10cm free space
around the induction cooker to prevent
overheating.
3. Position an induction compatible
saucepan/pot in the center of the glass
ceramic plate surface; ensure liquid or food
is inside the saucepan/pot.
4. Insert the power plug into a 120V power
outlet and switch power outlet ‘On’.
WARNING
Never use the saucepan/pot when
empty; ensure liquid or food is inside the
saucepan/pot.
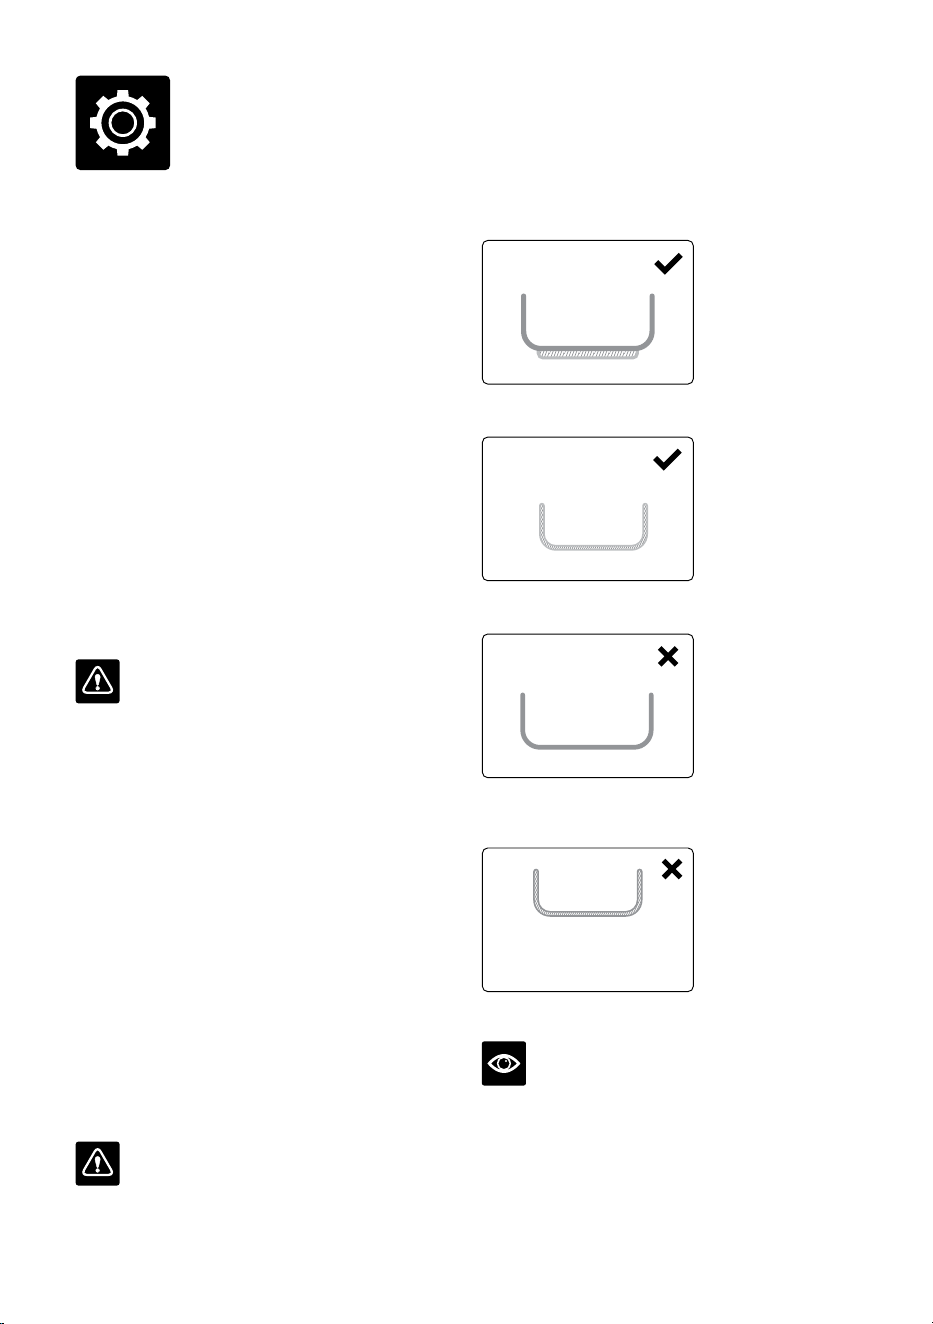
COOKWARE COMPATIBILITY
Stainless steel with base.
Cast iron.
Stainless steel single layer no
base (can distort easily).
Aluminum, copper.
TIP
If a magnet attracts firmly to the base of your
cookware, then it is suitable with the cooker.
Operation
11
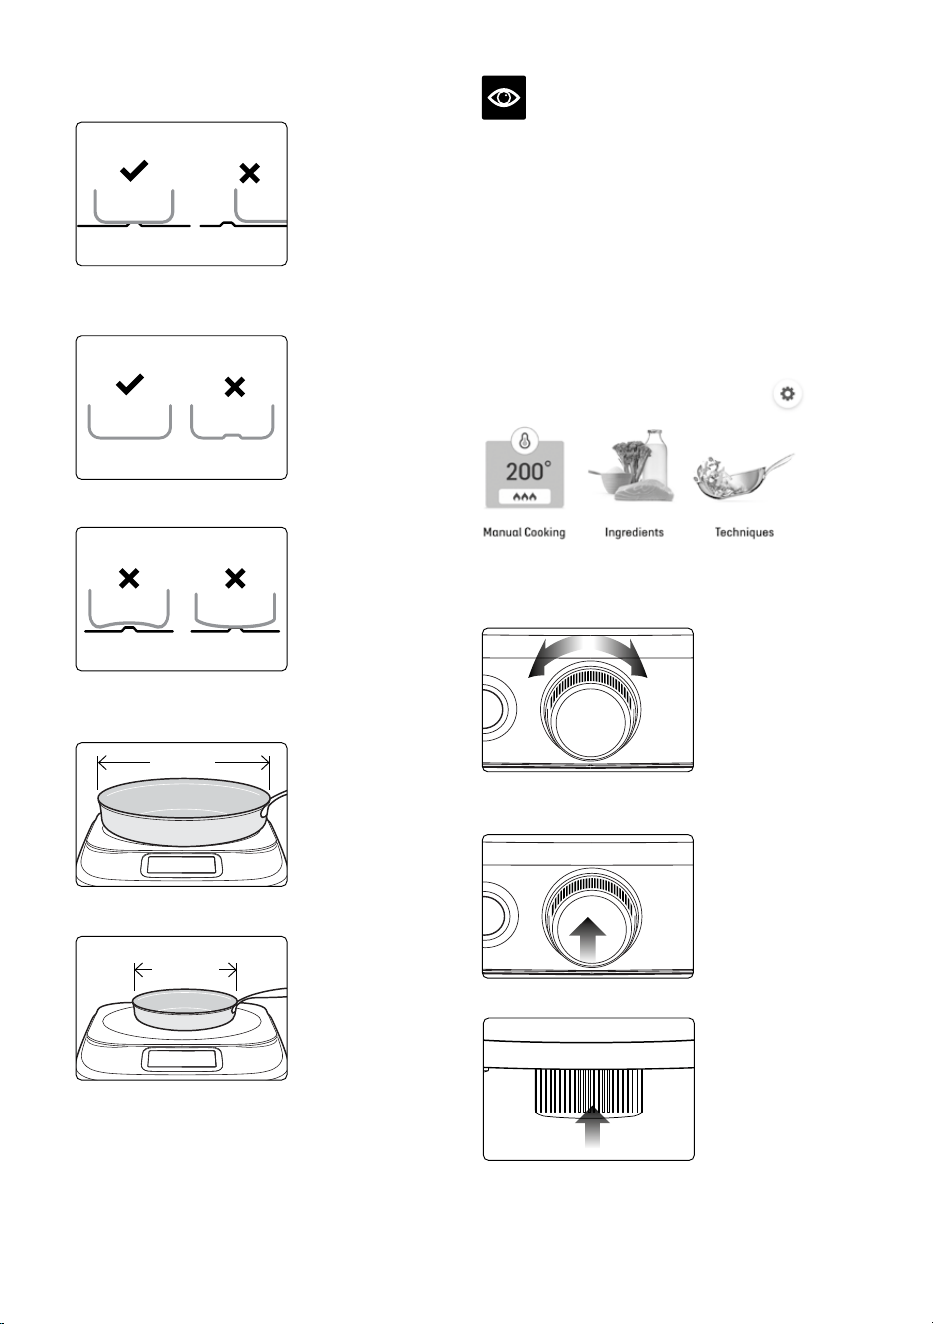
COOKWARE USAGE
Cookware must touch the sensor for correct
temperature control.
Cookware must have smooth clean bottom.
Do not use cookware with concave or convex
base. Sensor will not work.
For most even heating, max base 10"/30cm.
10"/30cm
Cookware smaller than 5.5"/14cm may not
work (material dependent).
5.5"/14cm
NOTE
To achieve maximum efficiency, it is essential
to use the correct type of saucepans/pot. Please
refer to the cooking vessel manufacturer to
confirm suitability for induction cooking.
HOME SCREEN MENU
Use the carousel to navigate the home screen.
• Swipe screen or rotate dial left or right to
navigate the carousel.
• Tap icon or press dial to select menu item.
CONTROL DIAL OPERATION
Use control dial to navigate to the menu
Rotate Control Dial to select temperature
and scroll through menu selections.
Press Control Dial to confirm menu selection.
Press Control Dial to confirm Start.
224
High
Sear
°
F
455°
02m00s
224°
12
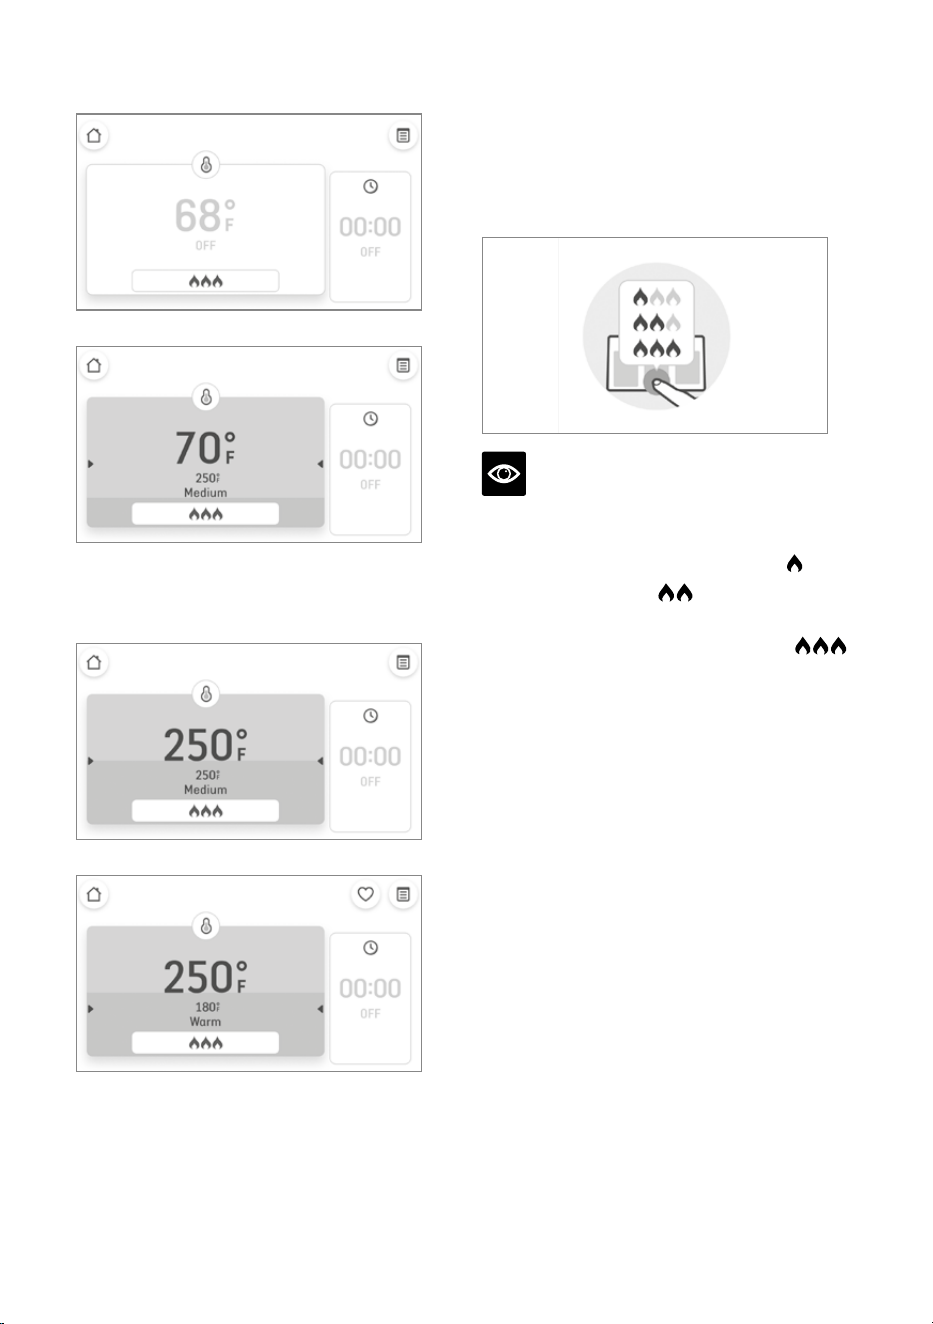
PAN TEMPERATURE CONTROL
Temperature – OFF mode
Heating to set temperature
70 °F – Pan Temperature
250 °F – Set Temperature
At temperature
Temperature decreased
INTENSITY
Heat intensity can be varied to control the
heating speed to the set temperature or to
control the vigor of a simmer.
The heat intensity can be changed by tapping
the flame icon.
NOTE
• The size of pan and the amount of food in the
pan will aect the heating speed.
• To avoid temperature overshoot, use
.
• To slow heat-up, use
.
• To get to temperature faster or if set
temperature is not being reached, use
.
13
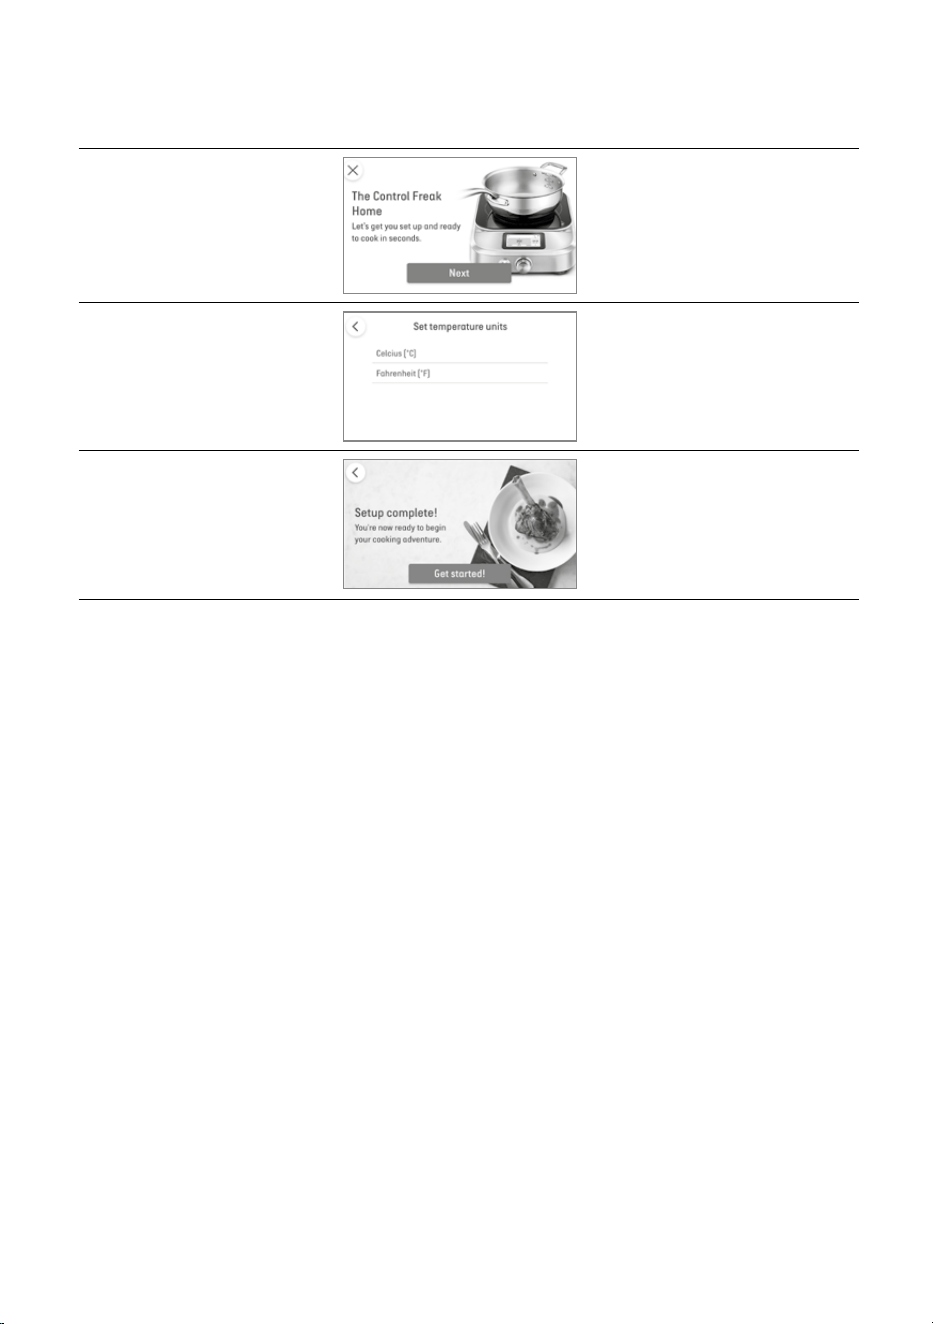
FIRST TIME USE
When using the cooker for the first time, select your desired temperature units.
Welcome Screen
Changing temperature ˚C / ˚F
Set up complete
14
COOKING WITH THE
CONTROL FREAK™ HOME
• Place induction compatible cookware on top
of the Control Freak™ Home.
• Turn the dial and press to select or swipe and
tap on the screen to select function mode.
• Follow on-screen instructions.
MANUAL COOKING
Control basic temperature, heating, time
settings and set alarms.
• Set temperature (set alarm)
• Connect the probe*
• Press Start to cook
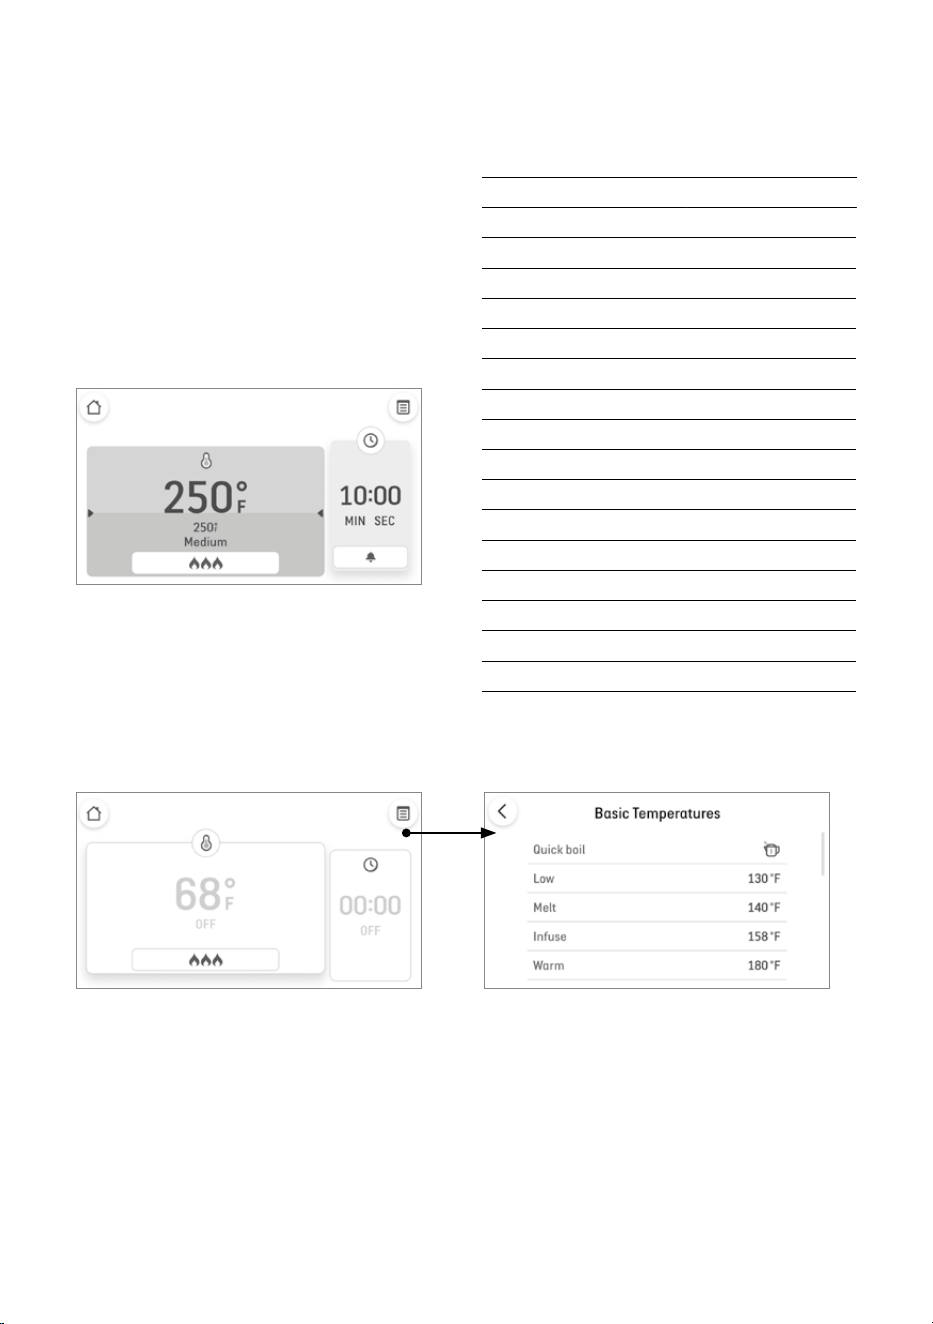
BASIC TEMPERATURE:
At any time during cooking; tap on the
thermometer symbol to access a quick
reference guide of basic temperatures.
Click thermometer symbol to display the
“Basic Temperatures” screen info
Basic Temperature Reference Guide
Low 130°F / 54°C
Melt 140°F / 60°C
Infuse 158°F / 70°C
Warm 180°F / 82°C
Scald 195°F / 90°C
Poach 200°F / 93°C
Simmer 205°F / 96°C
Boil 220°F / 104°C
Sweat 240°F / 115°C
Medium 300°F / 148°C
Shallow fry 375°F / 190°C
Sauté 375°F / 190°C
Brown 390°F / 198°C
Pan fry 390°F / 198°C
High 400°F / 204°C
Sear 450°F / 232°C
Stir fry 482°F / 250°C
*Probe is optional depending on selected cooking
technique.
15
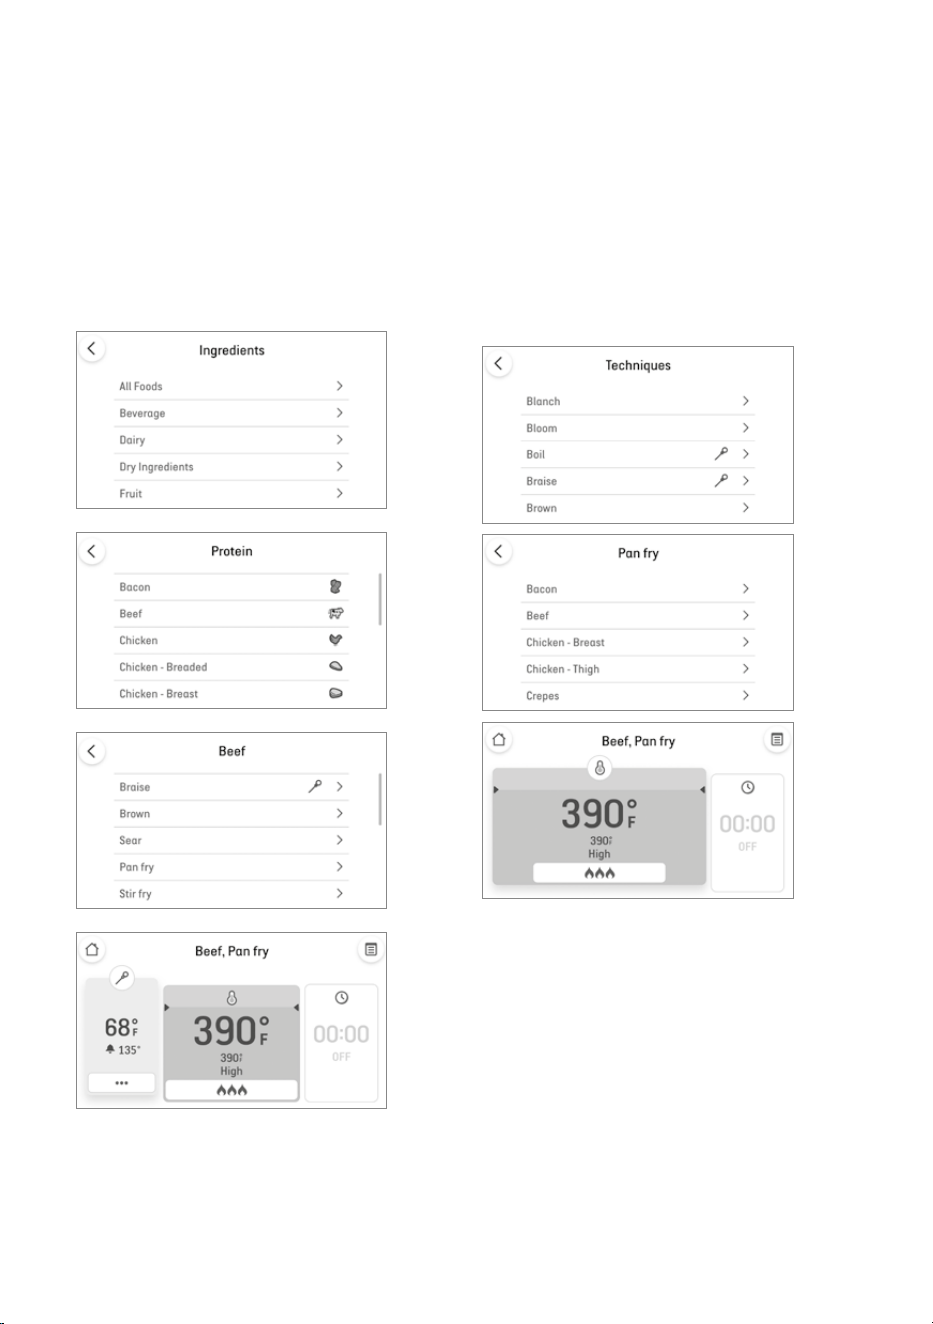
INGREDIENTS
• The Ingredients feature enables correct
temperature selection for a specific food type.
• Selection your food type followed by desired
cooking technique.
The Ingredients feature is to enable the correct
temperature to cook particular food.
E.g.
Protein | Beef | Pan fry
TECHNIQUES
• The Techniques feature enables
correct temperature selection for a
specific technique.
• Selection your desired technique followed by
the food type.
The Techniques feature is to enable the correct
temperature to cook particular technique.
E.g.
Saute | Beef |
*Probe is optional depending on
selected cooking technique.

16
MY PRESETS
This mode is where cooking programs can be
saved for later and is located from the home
screen. A preset can be set within the My
Presets or from within Manual Cook mode.
• Create multi-step preset to playback
automatically.
E.g. Boiling, simmering or timer for pancakes
• Modify presets without starting over.
Creating a New Preset:
1. New Preset
2. Set and add temperature
3. Set cooking intensity
, or .
Set and add timer
4. Set probe alarm (optional)
5. Type preset name (e.g. poached eggs)
6. Set Control (Pan, Probe)
7. Finish
Modify an Existing Preset
1. Tap the pencil icon
2. Follow on-screen instructions
3. Save.
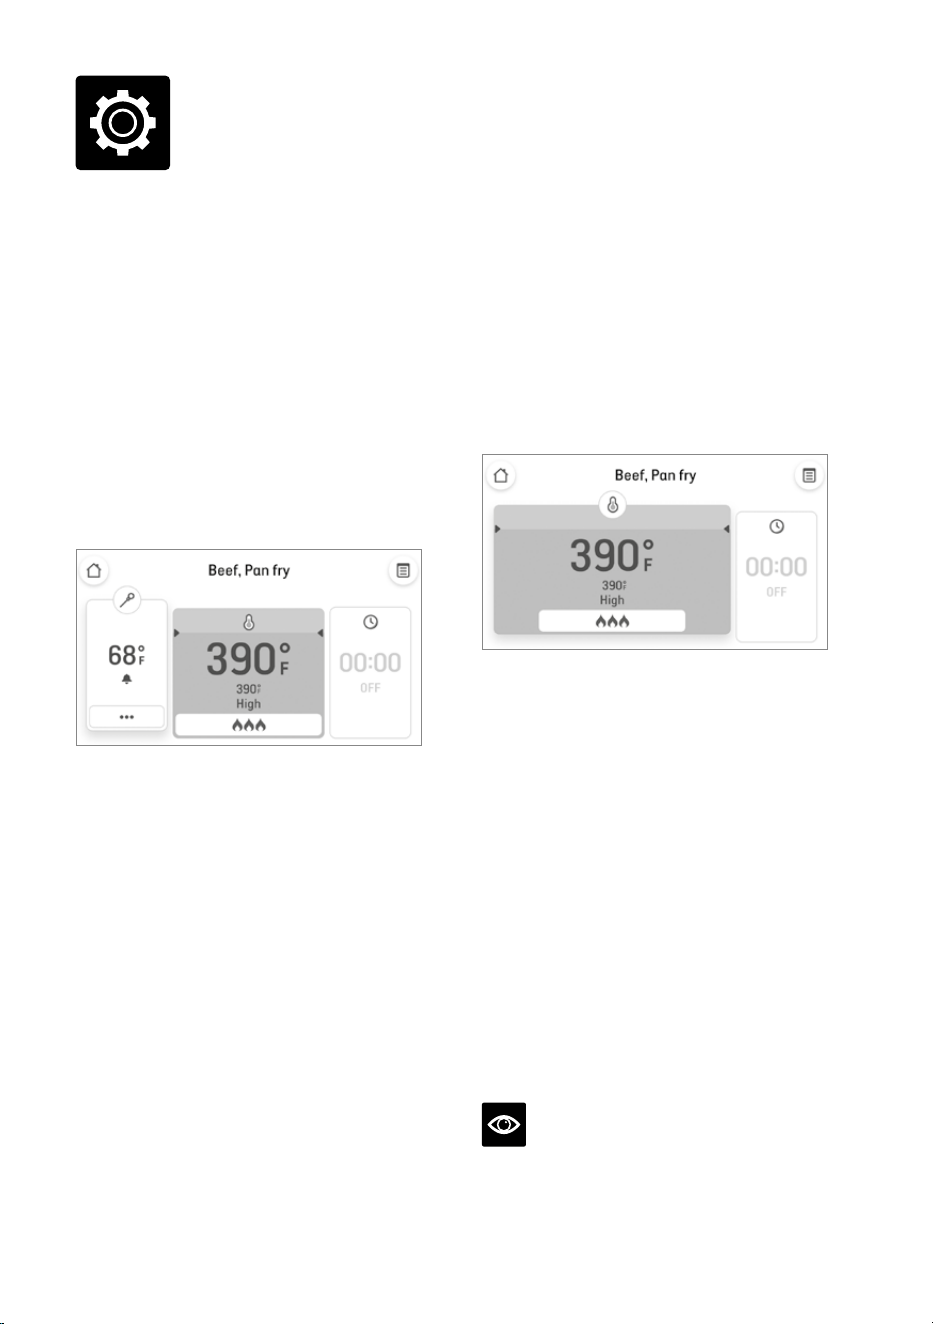
The settings mode can be accessed by
selecting the gear icon on the top right hand
side of the home menu screen.
To save Manual Cook as a Preset:
• Press the heart icon on the top right of the
screen during manual cooking.
• The current cooking parameters including
temperature, time, intensity etc will be saved
saved to My Presets.
• To change the preset name or cooking
parameters navigate to the My Presets mode
and select the pencil icon next to the newly
created preset.
SETTINGS
Adjusting Sound & Display
1. Select the gear icon for settings on the top
right hand side of the home screen
2. Use the toggles to turn o/on "Start up
sound" and "At temp sound"
3. Adjust product volume using the slider
4. Adjust screen brightness by using the slider
Changing Temperature - °C / °F
1. Select the gear icon for settings on the top
right hand side of the home screen
2. Select either Celsius (˚C ) or Fahrenheit (˚F )
from the list.
17
TIMER
The multi-functional timer can be used in a
number of dierent ways. It can be set to count-
up or count down. There are also multiple
options when the timer ends.
TIMER COUNT-UP
• Tap on timer for count-up to begin
• When timer is activated; press ‘Pause’ symbol
to pause timer
• When time is paused; either press the ‘Stop’
symbol to reset the timer or the ‘Play’ symbol
to resume the timer
TIMER COUNT DOWN
• Tap on timer
• Turn the dial to select count down time
• The count down will begin immediately
• Turn the dial clockwise or counterclockwise
to add or reduce time
CANCEL COOKING
• When cooktop is active.
• Press "PAUSE"
• Press "PAUSE" again to cancel
standby screen.
SCREEN LOCK
The screen can be locked to deactivate all
buttons and dials.
• To lock, swipe down (motion: swipe screen
from top to bottom)
• To unlock, swipe up (motion: swipe screen
from bottom to up)
• Cooking will continue as set when the
screen is locked.
WHEN TIMER ENDS OPTION
• After setting count down timer; tap on timer.
• When Timer Ends.
• Select and confirm one of the following:
• Continue Cooking
Timer will end but cooking will continue at
the set temperature.
• Stop Cooking
Timer will end and cooking will switch o
automatically.
• Keep Warm
Timer will end and set temperature will
automatically change to 60°C / KEEP
WARM. After 4 hours the cooking will stop.
You can modify the time remaining during
this period.
NOTE
Total elapsed time is the total time since
cooking has started.
Functions
18
PROBE
The Probe can be used in two ways. First, as a
thermometer to read the temperature. Second,
as probe control, which reads and accurately
control the liquid cooking temperature.
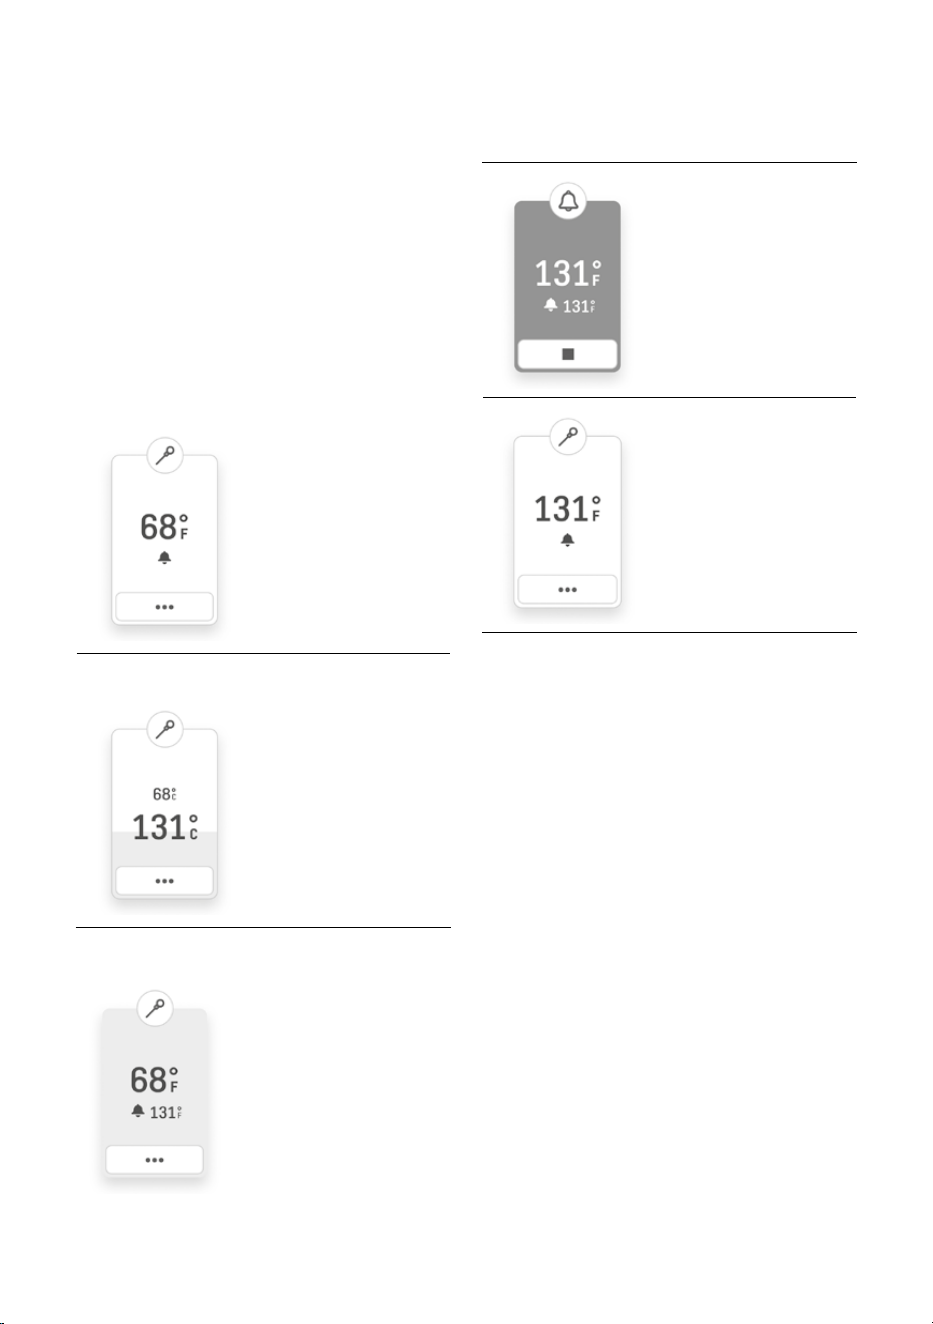
PROBE ALARM
It is possible to create and save a temperature
at which the alarm will sound.
1. Insert Probe.
2. Turn the dial to desired temperature
E.g.
Initial Temperature
Set Temperature
3. Set Alarm Temperature.
4. When Probe alarm temperature is reached.
Select to end the Probe.
NOTE:
Press stop button
to end probe.
NOTE:
Probe alarm
Temperature
reached display.
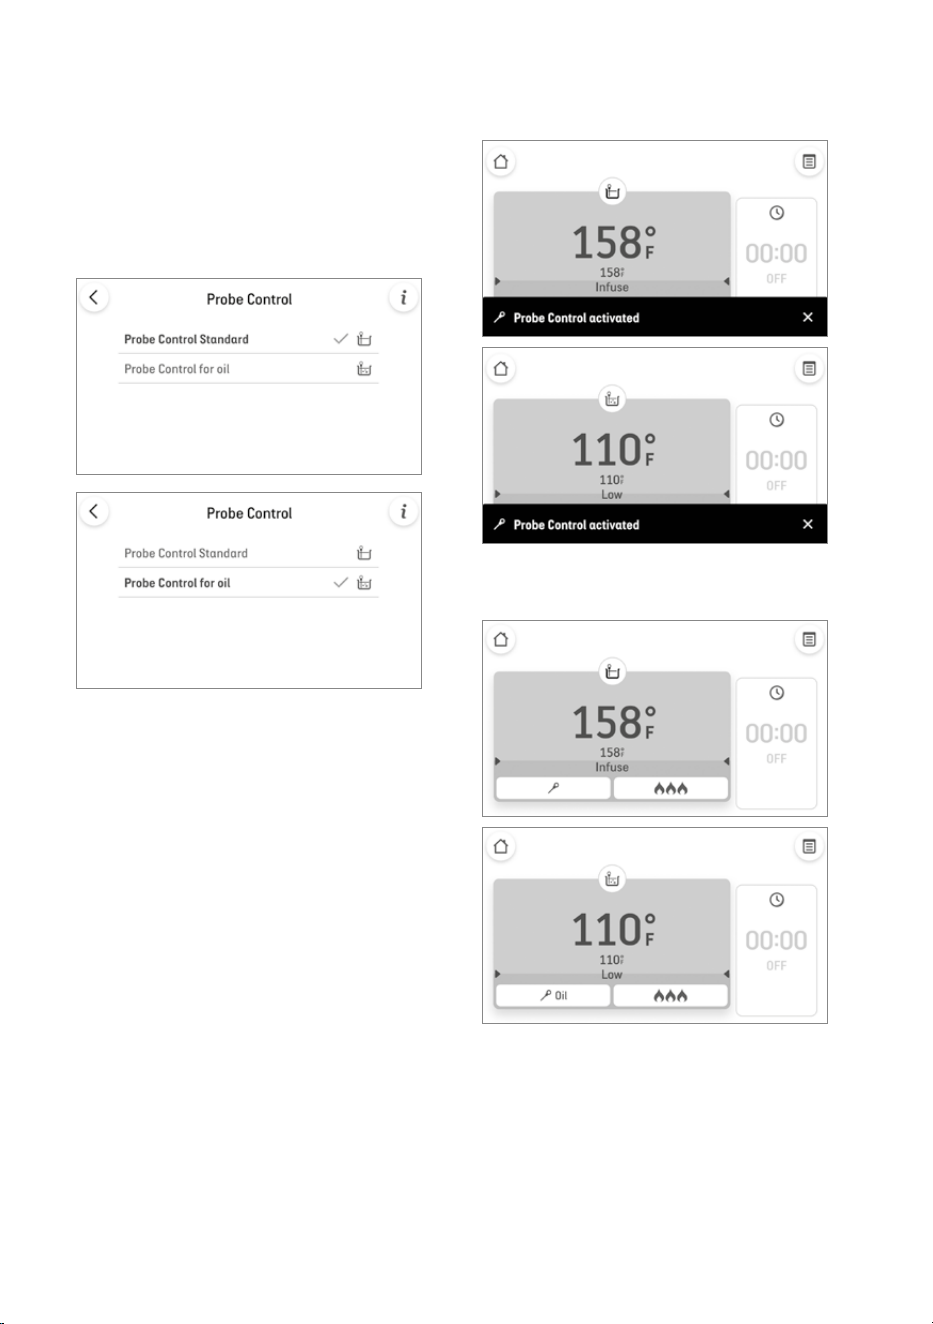
PROBE CONTROL FUNCTION
Probe Control enables temperature control
cooking with liquid ingredients. It uses the
Probe sensors to take the reading directly from
the ingredients enabling the cooker to control
the temperature with high precision.
Water based and Oil based liquids need to
be controlled dierently due to their varying
physical properties. Select the one that best
suits your needs.
PROBE CONTROL STANDARD
• For precisely controlling water-based cooking
such as sous vide, stocks, sauces.
PROBE CONTROL FOR OIL
• Use for precisely controlling oil-based liquids
from confit low temperatures to deep frying
at high temperatures.
• Note that 200˚C / 392˚F is the maximum
cooking temperature to avoid oil flash point.
19
PROBE CONTROL – START / STOP
1. Insert Probe
2. Place Probe in liquid.
3. Select Probe Control options at bottom
of Probe tile.
4. Select Probe Control Standard or Probe
Control for oil.
5. Set temperature with control dial.
6. To stop Probe Control, while continuing to
cook, select Probe.
7. Stop Probe Control.
8. Cooking continues, Probe Control inactive.

20
Before cleaning, ensure the induction cooker
has completely cooled down.
Switch power o at the power outlet and
unplug the power cord from the power outlet.
To clean the glass ceramic plate surface:
• Wipe with a slightly damp cloth using a mild
detergent, to remove any food residue.
• Dry thoroughly. Keep the pan sensor clean,
dry and free from oil build-up on and
around sensor.
• Do not place any part of the induction cooker
in the dishwasher.
• Do not use wet cloth to clean
underside of cooker.
• Do not use abrasive cleaner or abrasive
material on glass.
NOTE
Do not use harsh cleaning solutions or metal
scourer pads as these may scratch the glass
ceramic plate surface and make subsequent
cleaning more dicult.
WARNING
Do not immerse the induction cooker or
power cord and power plug in water or any
other liquid.
WARNING
To prevent damage to the appliance do not use
alkaline cleaning agents when cleaning, use a
soft cloth and mild detergent.
STORAGE
Before storage, ensure the induction cooker has
completely cooled down.
Switch o at the power outlet and unplug
power cord from the power outlet.
Ensure the appliance is completely cooled,
clean and dry. Store the appliance flat on the
bench or in a convenient cupboard.
Do not place anything on top of the appliance
during storage.
Care & Cleaning

21
POSSIBLE PROBLEM SOLUTION
Error requiring restart
Turn o and unplug the appliance. If this error persists after restarting the
appliance, contact Breville Support for assistance.
Small cookware detected Ensure the cookware is covering the sensor.
Appliance overheated
Leave the appliance plugged-in to allow the cooling fan to work. Wait 10
minutes before restarting.
Issue with probe
Check the probe connector is clean and dry. If this error persists, contact
Breville support for assistance.
Cannot identify cookware
The cookware you have placed is not induction compatible. Refer to the
Help section in the appliance Settings for more information.
User selects temperature >392F (200C)
whilst in probe control mode
The maximum temperature for probe control is 392F (200C). For higher
temperatures, switch to pan control.
If glass is hotter than 120F (50C) The glass is still hot. Let it cool down before handling.
Troubleshooting

22
Note

23
Note

Breville is a registered trademark of Breville Pty. Ltd. A.B.N. 98 000 092 928.
Copyright Breville Pty. Ltd. 2023.
Due to continued product improvement, the products illustrated/photographed in this booklet
may vary slightly from the actual product.
BMC800 US – H23
Breville Service Center
USA Mail: Breville USA
19400 S. Western Ave, Torrance CA
90501-1119
Phone: 1-866-273-8455
1-866-BREVILLE
Web: breville.com/us/support