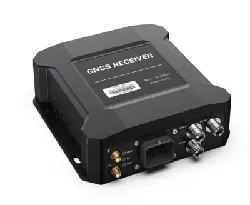

GNSS Receiver - R62
User Manual
Shanghai Allynav Navigation Technology Co., Ltd.
July 2024
Modification Record
Version Number
Revision staff
Revision History
Modified Date
V 1.0
Hong Junhui
New compilation
Disclaimer
This document provides information about the products of Shanghai Allynav Navigation
Technology Co., Ltd. This document does not transfer, by implication, estoppel, or otherwise, any
patent, trademark, copyright or proprietary right of our company or any third party or any right or
license thereunder.
Except for the responsibilities stated in the sales terms and conditions of its products by
Shanghai Allynav Navigation Technology Co., Ltd., the company does not assume any other
responsibilities. In addition, Shanghai Allynav Navigation Technology Co., Ltd. does not make any
express or implied warranties for the sale and/or use of its products, including the suitability of the
products for a specific purpose, merchantability, or infringement of any patent, copyright or other
intellectual property rights. The company is exempt from liability for problems caused by failure to
connect or operate according to the manual requirements. Shanghai Allynav Navigation Technology

Co., Ltd. may modify product specifications and product descriptions at any time without prior
notice.
Our products may contain certain design defects or errors, which will be included in the errata
once discovered, and may cause the product to differ from the published specifications. The latest
errata can be provided upon request.
Before ordering products, please contact us or your local distributor to obtain the latest
specifications.

Preface
information about the hardware features, performance indicators and usage of the Adaptive
Navigation R62 receiver.
Target audience
This User Manual is intended for technicians who have a certain understanding of the Android
system and G NSS receivers.
Document structure
This User Manual includes the following chapters:
1 Product Overview: Overview of product functions and features
2 Technical Features: Overview of receiver technical features
3 Product appearance: Provide appearance model and size
4 Technical parameters: Provide technical indicators related to the equipment
5 Instructions for use: Briefly introduce how to use the device

Table of contents
1 Product Overview......................................................................................................................................1
2 Technical Features .....................................................................................................................................1
3. Product Appearance................................................................................................................................. 2
3.1 Product Appearance ........................................................................................................................... 2
3.2 Product size........................................................................................................................................ 3
3.3 Product components ........................................................................................................................... 3
3.4 Connectors..........................................................................................................................................4
3.4.1 Appearance of connector .............................................................................................................4
3.4.2 Connector Definition...................................................................................................................4
3.5 Definition of indicator lights..............................................................................................................5
4 Technical parameters .................................................................................................................................5
5 Instructions................................................................................................................................................ 7
5.1 Desktop Screen Mirroring..................................................................................................................7
5.2 Software Installation...........................................................................................................................9
5.3 Serial port node ................................................................................................................................ 10
5.4 System firmware upgrade.................................................................................................................11
5.4.1 Wired Upgrade.......................................................................................................................... 11
5.4.2 OTA Upgrade ........................................................................................................................13

1
1 Product Overview
The R62 GNSS receiver is an Android platform high-performance receiver designed for
unmanned agricultural machinery solutions. It has built-in high-precision dual-antenna positioning
and directional board, attitude sensor, digital radio module, 4G, etc. The main control chip is an octa-
core processor with a maximum frequency of 2.0GHz , pre-installed with unmanned control
intelligent software, and the Android platform facilitates secondary development for customers to
meet the various needs of different customers.
The high-precision positioning and orientation functions meet many application scenarios such
as precision agriculture, digital engineering, intelligent driving, and unmanned driving. The IP67
protection level of the whole machine can adapt to harsh working environments.
2 Technical Features
a) Adopting BDS/GPS/GLONASS/Galileo/QZSS full-system full-frequency
high-precision RTK positioning module, it can ensure positioning accuracy in a
variety of complex environments;
b) Compatible with a variety of high-precision positioning and orientation boards,
and can realize single GNSS solution;
c) Built-in digital radio communication module, supports receiving TRIMATLK,
TRIMMARK3, TRANSEOT, joint adaptation protocol, CSS protocol, etc.
2
d) Wide voltage power supply, voltage range 12V DC, with positive and
negative reverse polarity protection;
e) Android system platform supports remote diagnosis and remote settings, which
is convenient for users to perform maintenance operations on the system remotely
and reduce user maintenance costs;
f) Supports multiple screen projection methods (network remote projection, USB
projection and W IFI projection), and operation and debugging are visualized,
convenient and faster;
g) Built-in high-precision gyroscope to achieve high-precision attitude
measurement , and the accuracy can be guaranteed in all terrains ;
3. Product Appearance
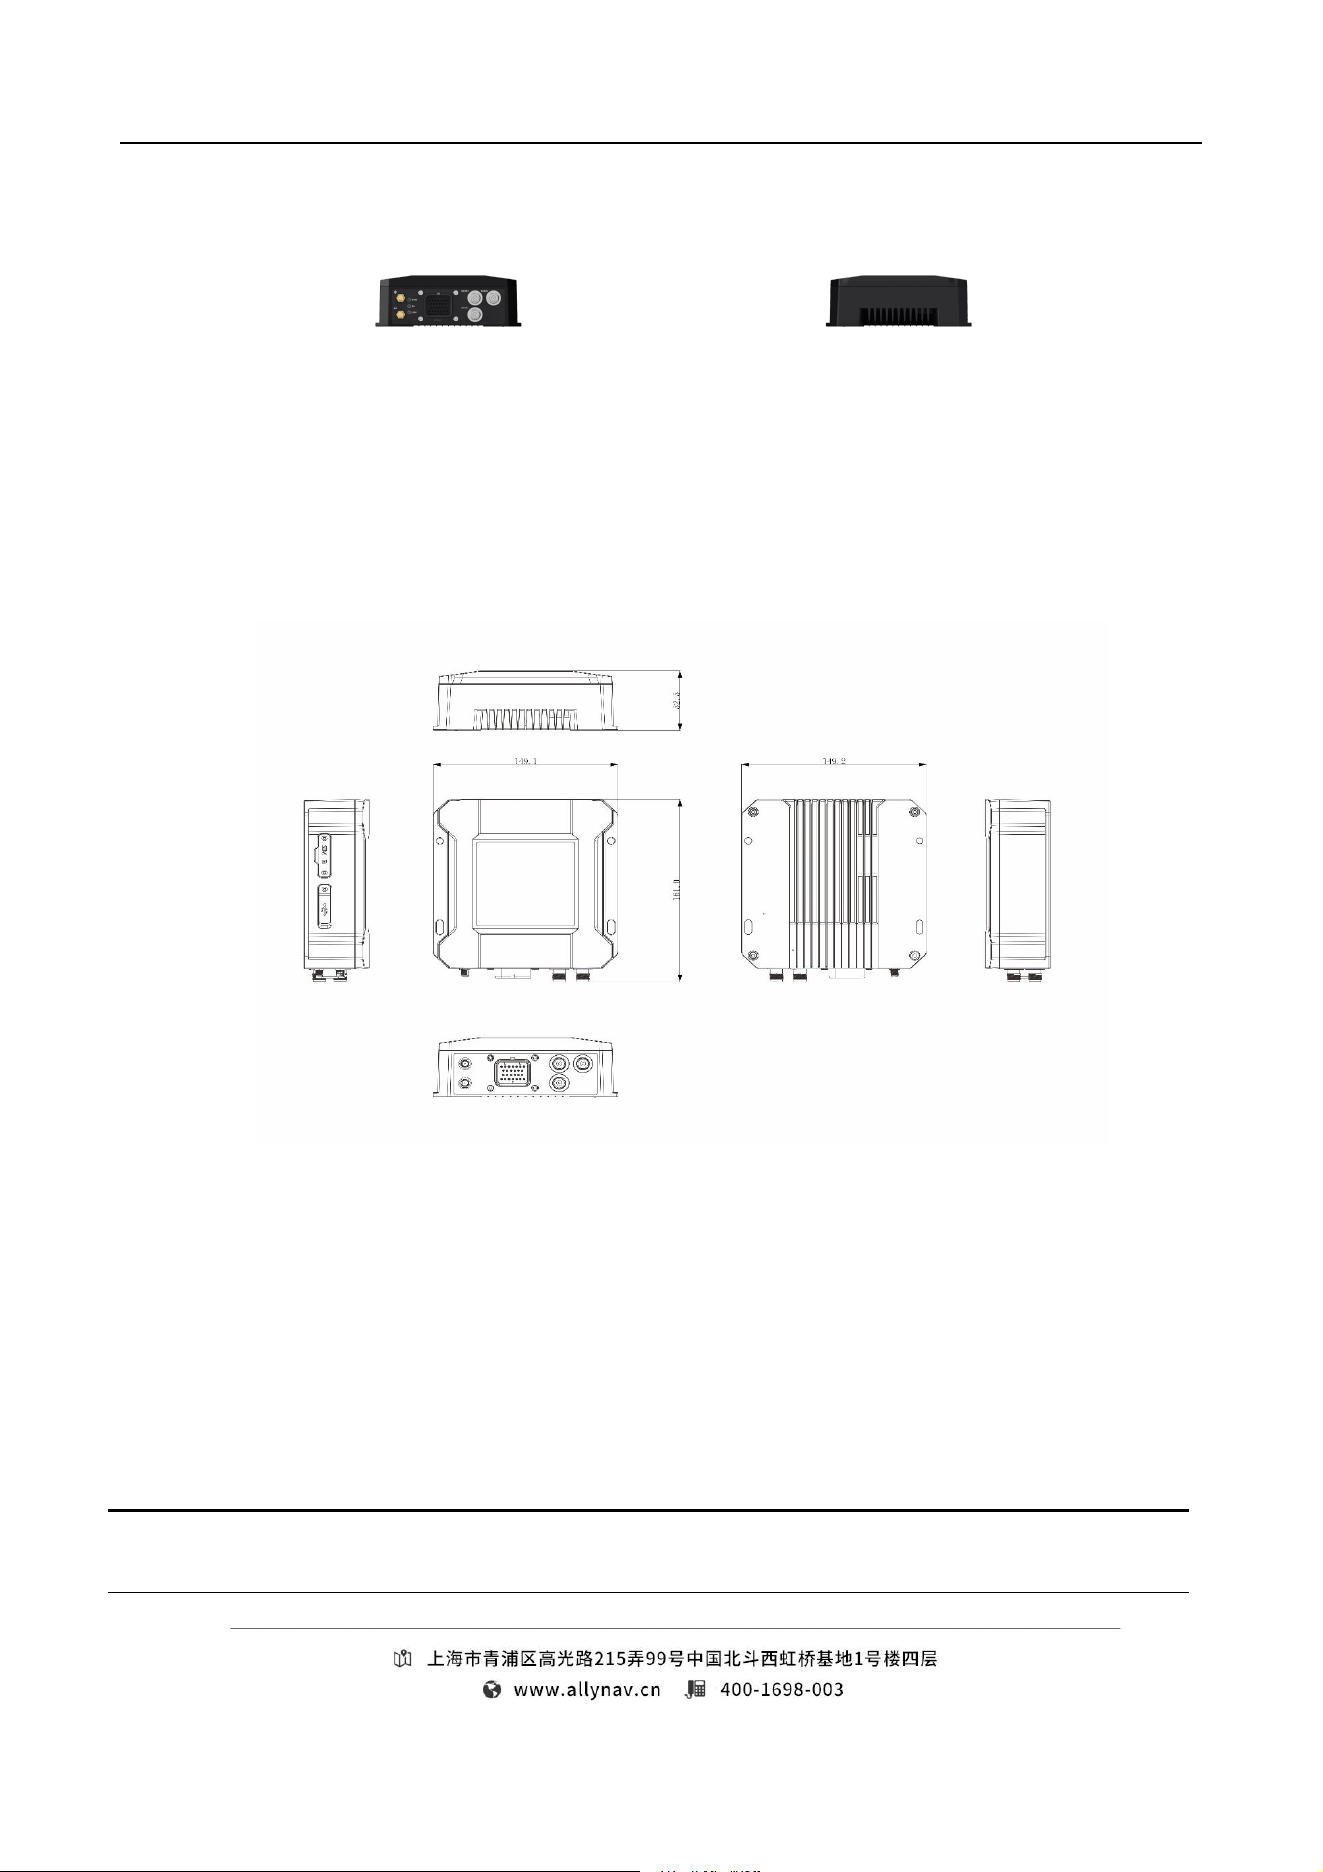
3.1 Product Appearance
3
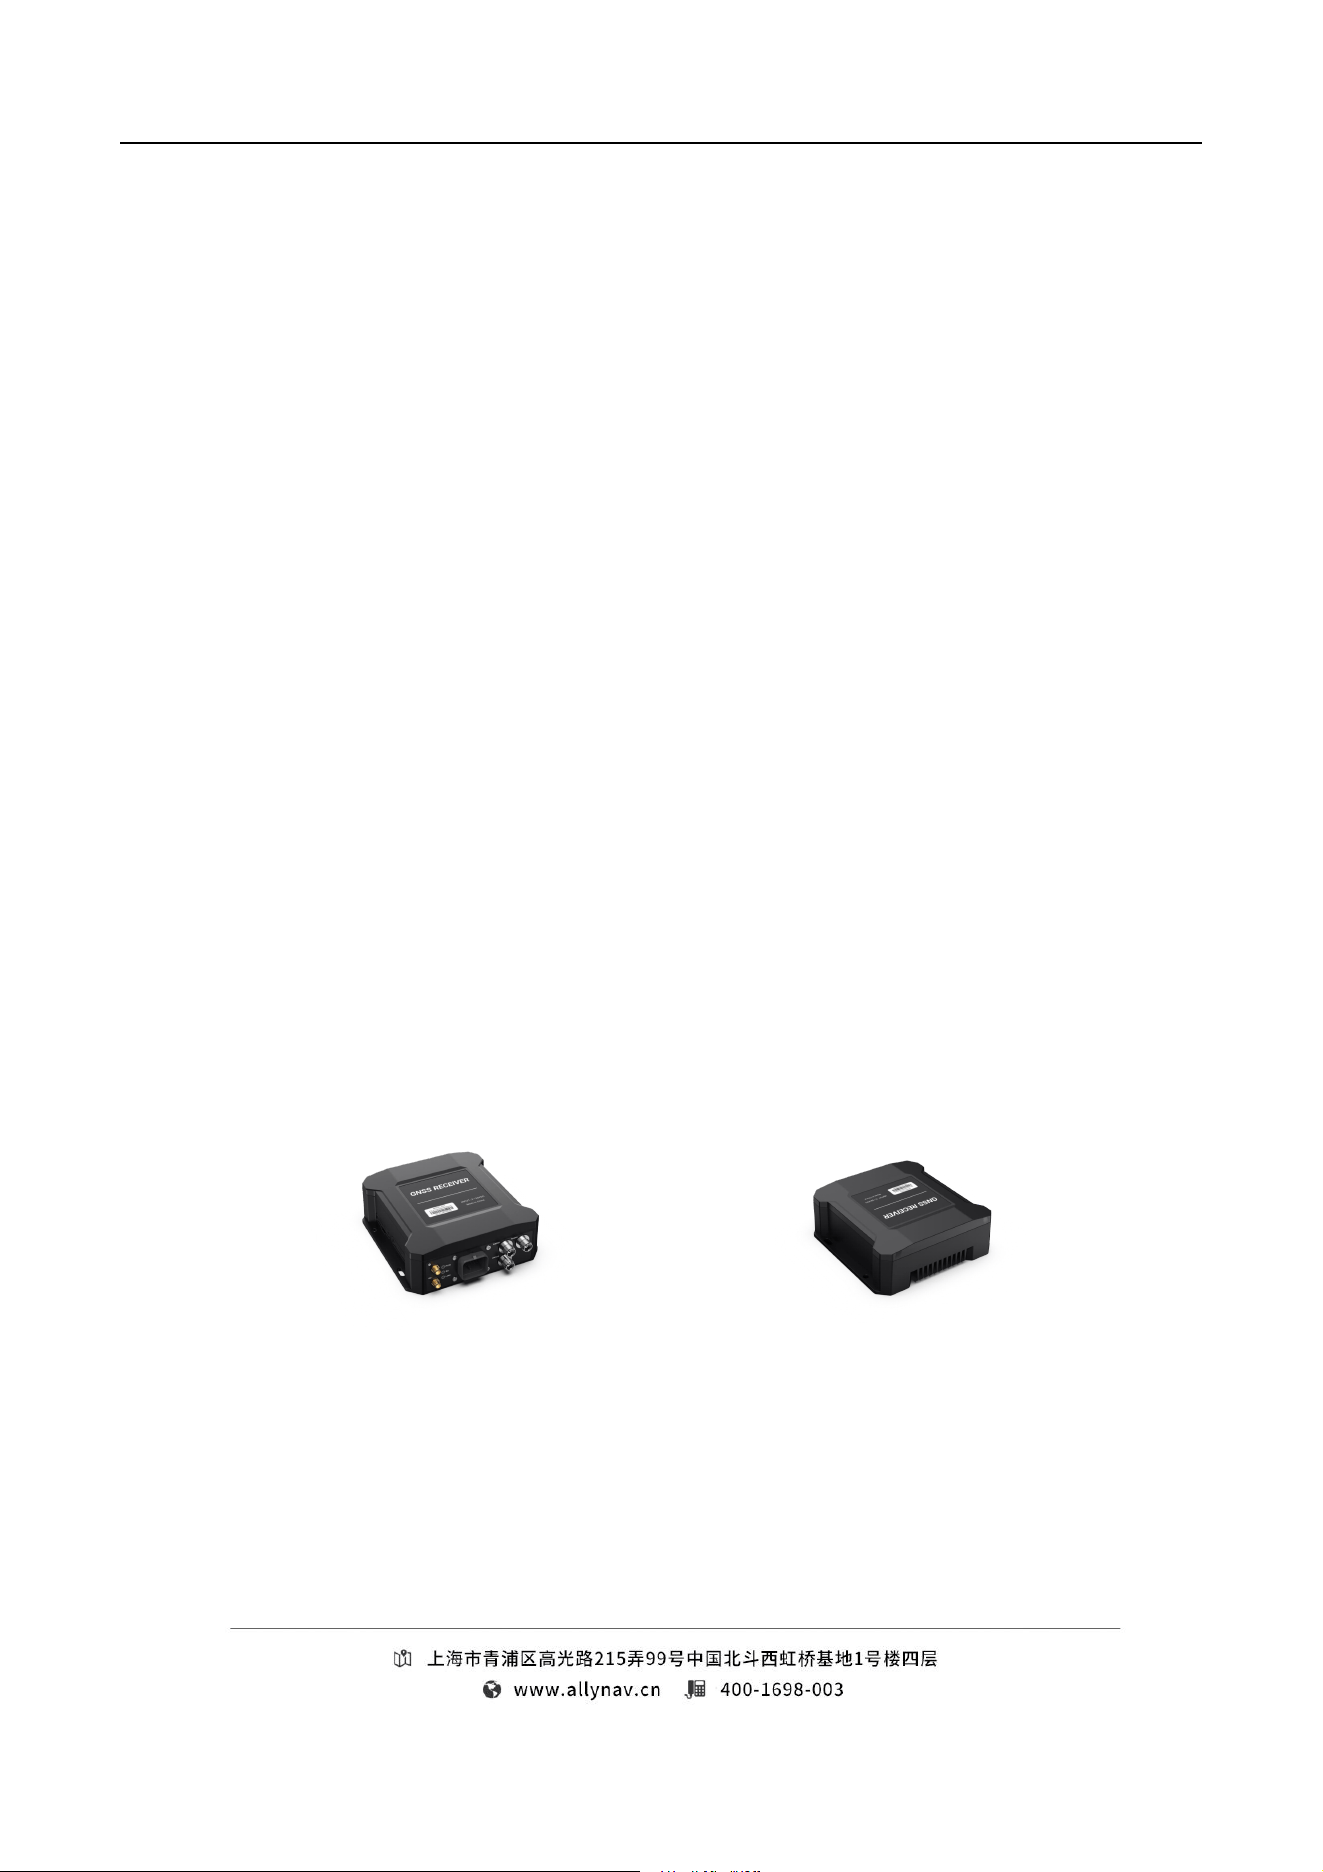
Figure 1 Schematic diagram of R62
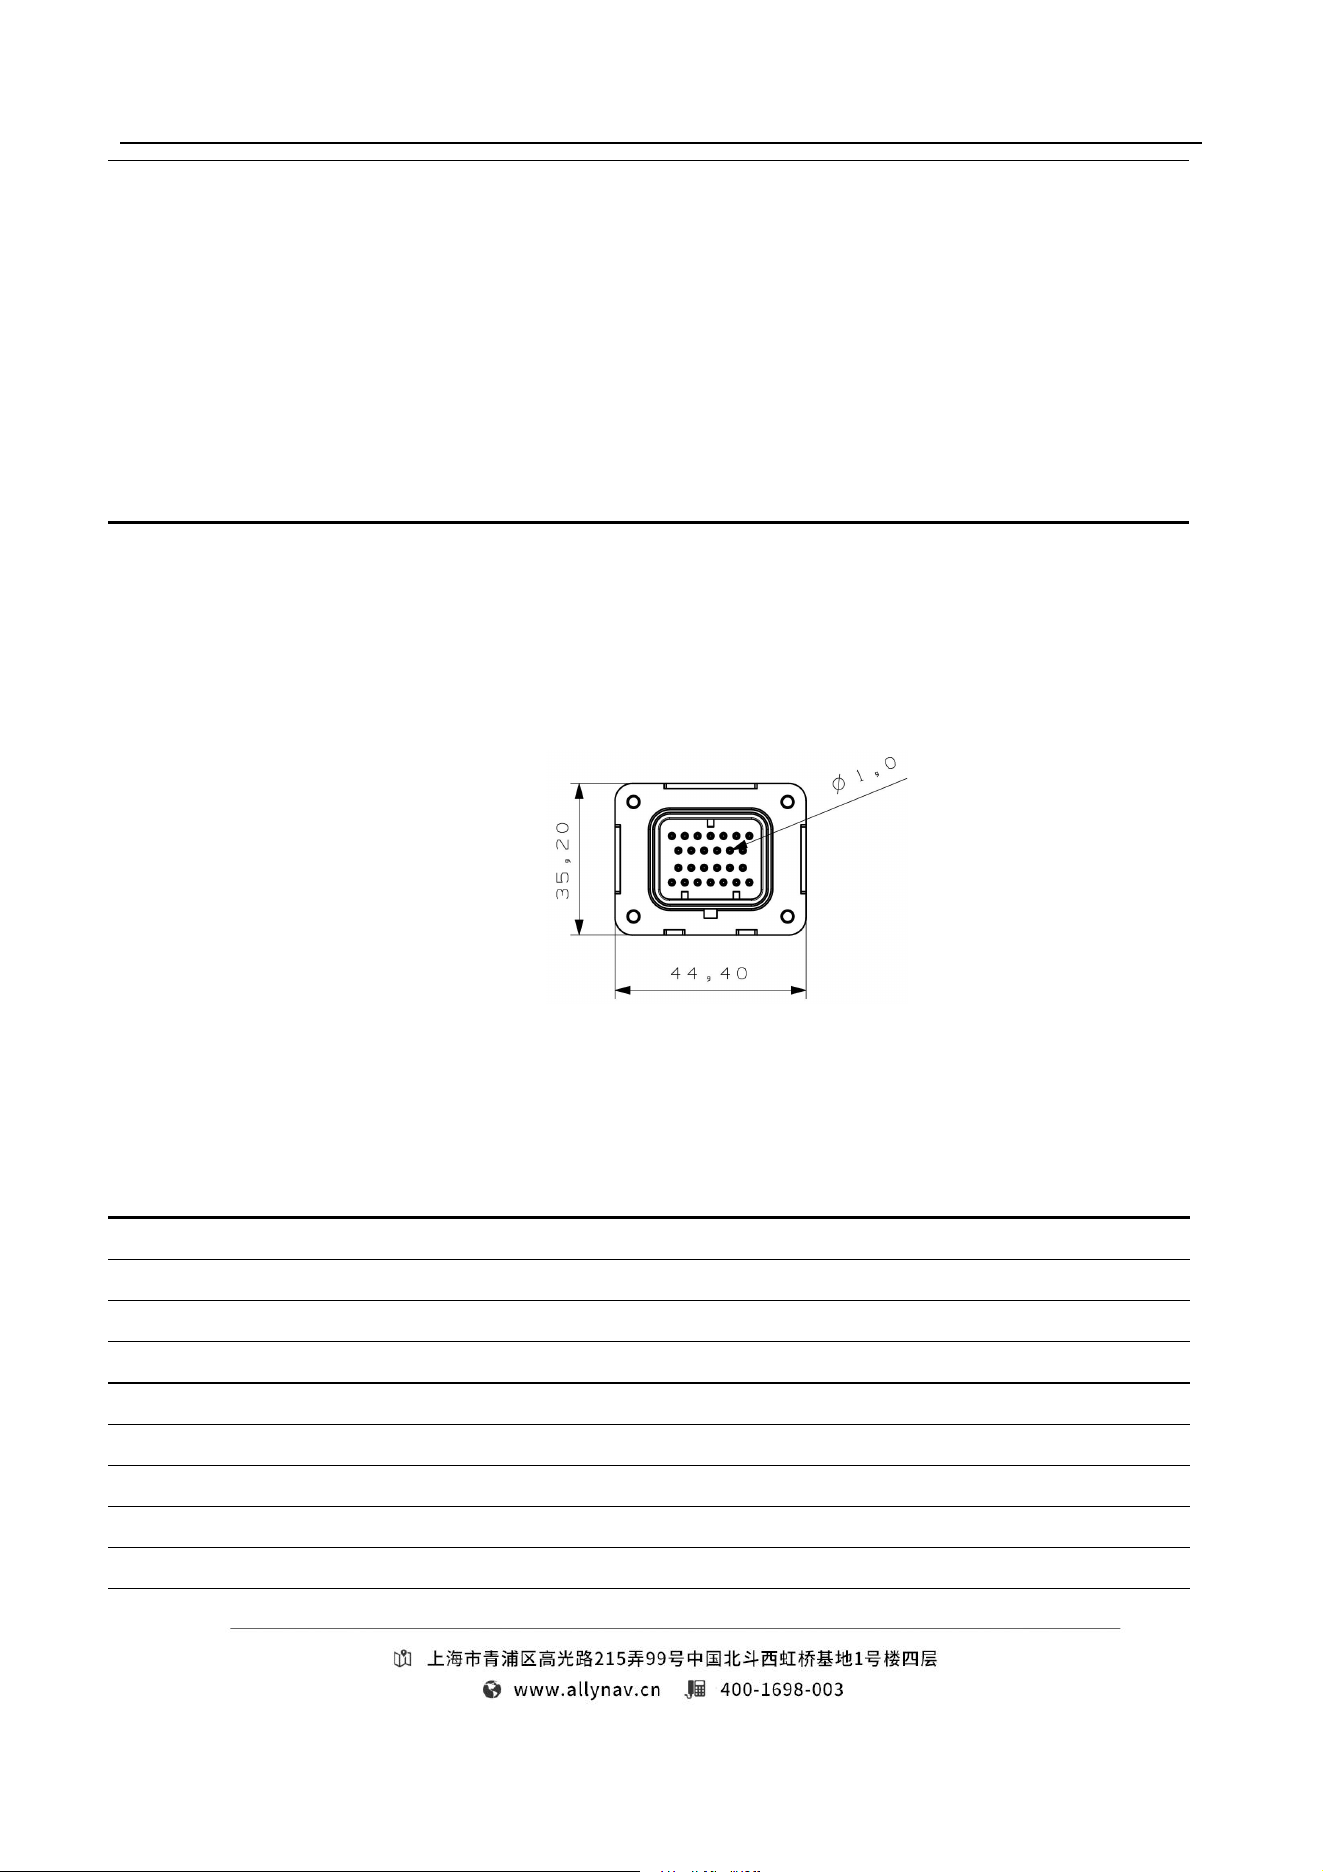
3.2 Product size
Figure 2 R62 Dimensions
3.3 Product components
Serial
number
Part Name
color
quantity
model
Remark
4
1
Host
black
1
R 62
2
Product Tags
/
1
/
Mark the SN number,
product model, etc.
3
Indicator Lights
/
3
/
4
Mounting holes
/
4
/
Adapt to M5 screws
5
SIM card slot
/
1
Standard SIM
6
USB socket
/
1
USB 2.0
7
T NC hole
/
3
G NSS/RADIO
8
S MA hole
/
2
4G /WIFI
3.4 Connectors
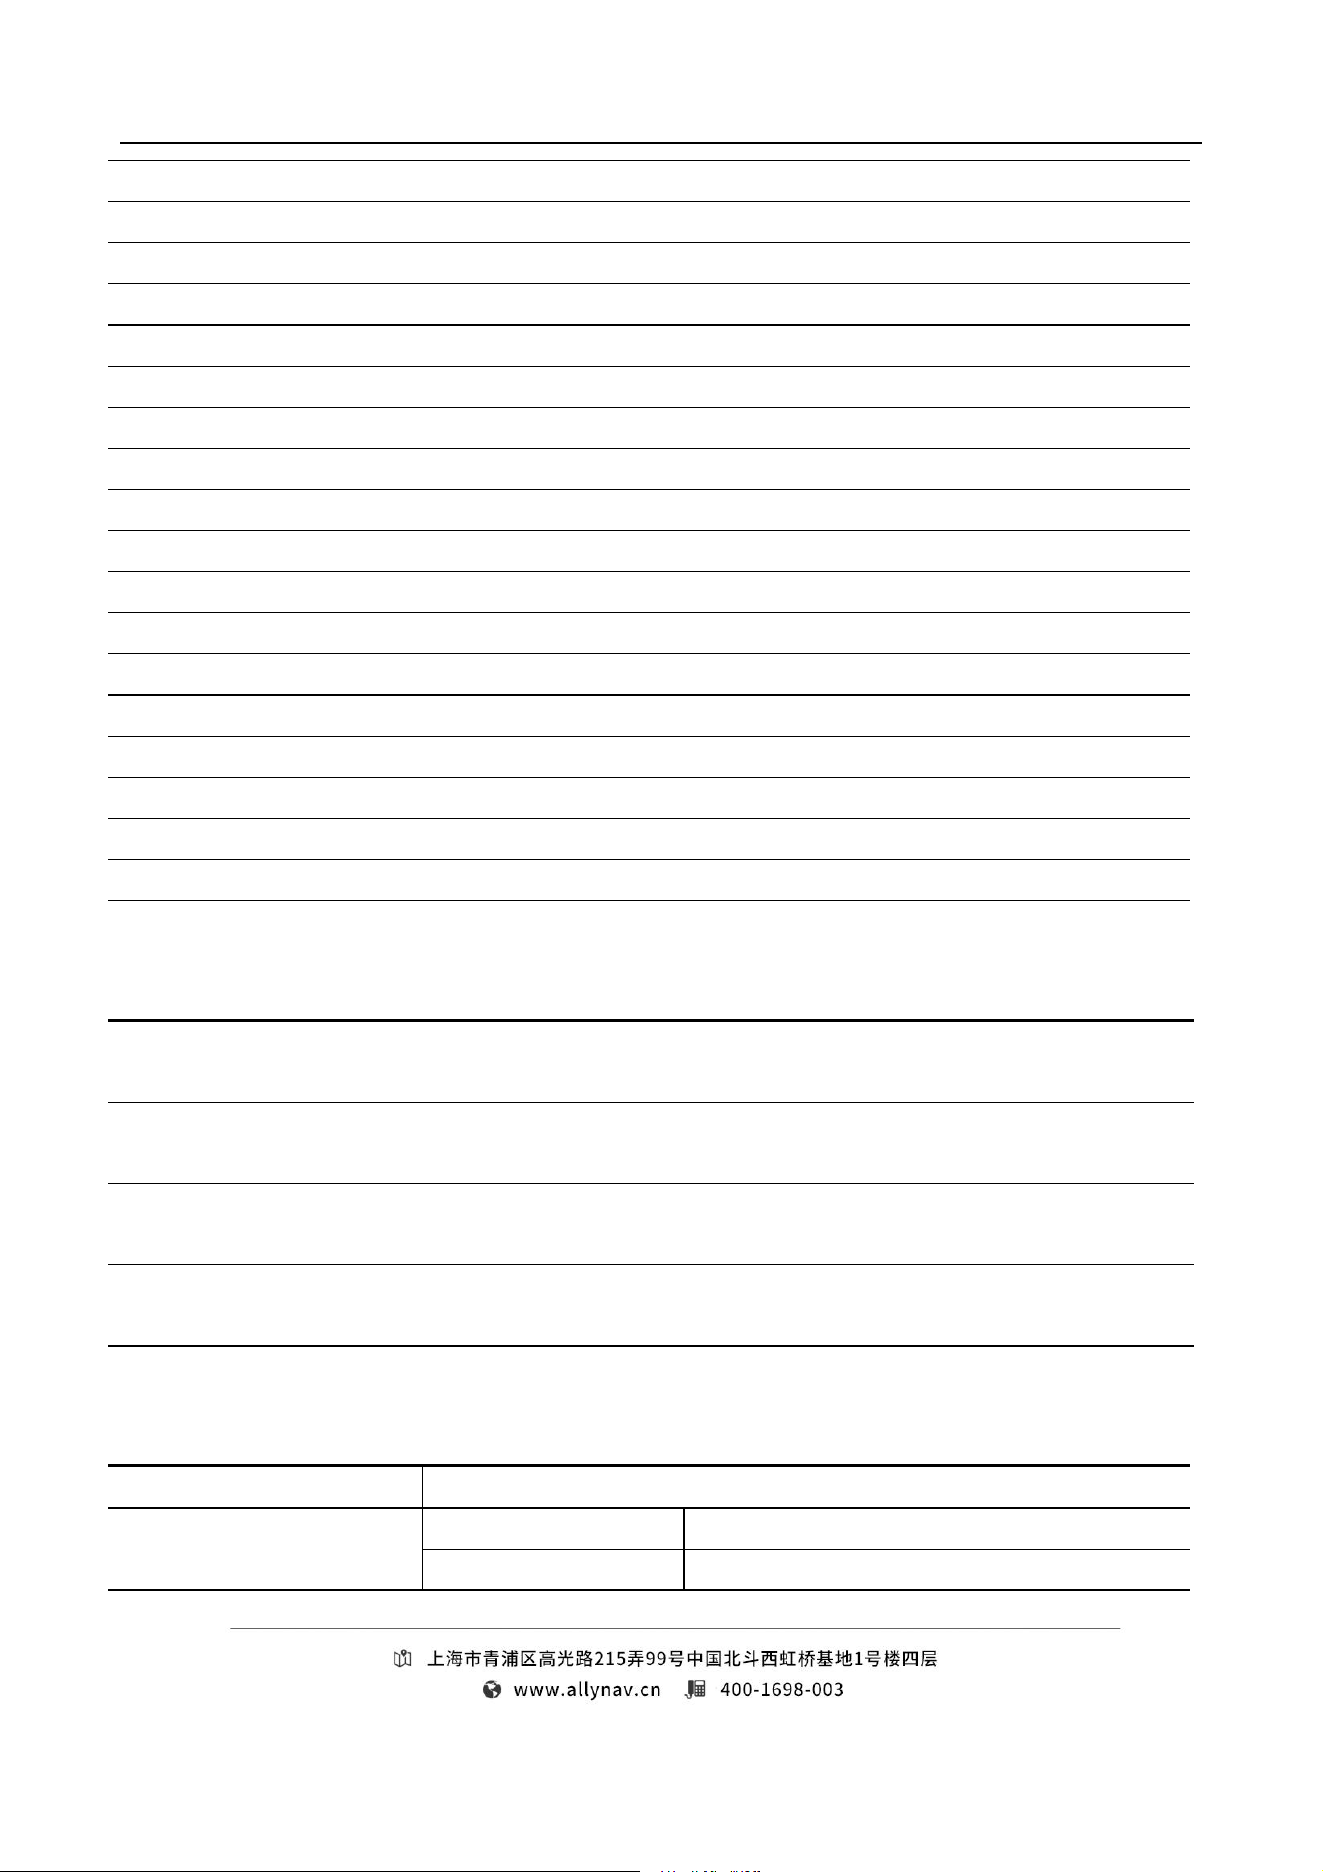
3.4.1 Appearance of connector
Figure 3 Schematic diagram of connector appearance
3.4.2 Connector Definition
Signal Definition
Pin Definition
Remark
B +
1
Power positive
B -
2
Negative power supply
ACC
3
CAN_1-H
4
CAN_1-L
5
12V-OUTPUT
6
CAMERA-CVBS_3
7
GND
8
Signal Ground
5
RS485-A
9
RS485-B
1 0
CAN_2-H
1 1
CAN_2-L
1 2
CAMERA-CVBS_2
1 3
RS232_1-TX
1 4
/
1 5
CAMERA-CVBS_1
1 6
RS232_2-RX
1 7
/
1 8
/
1 9
RS232_1-RX
2 0
/
twenty one
CAMERA-CVBS_0
twenty two
CAMERA-12V
twenty three
RS232_2-TX
twenty four
RS232_2-RXCAMERA
2 5
RS232_2-TXCAMERA
2 6
3.5 Definition of indicator lights
Serial
number
name
color
Indicator light
identification
Status Definition
1
POW
red
Power supply
status
Off: No power supply
Steady on: Power supply is normal
2
S A
red
RTK Status
Always off: Not fixed
Steady on: Fixed solution
3
L INK
red
Software Status
Support software customization
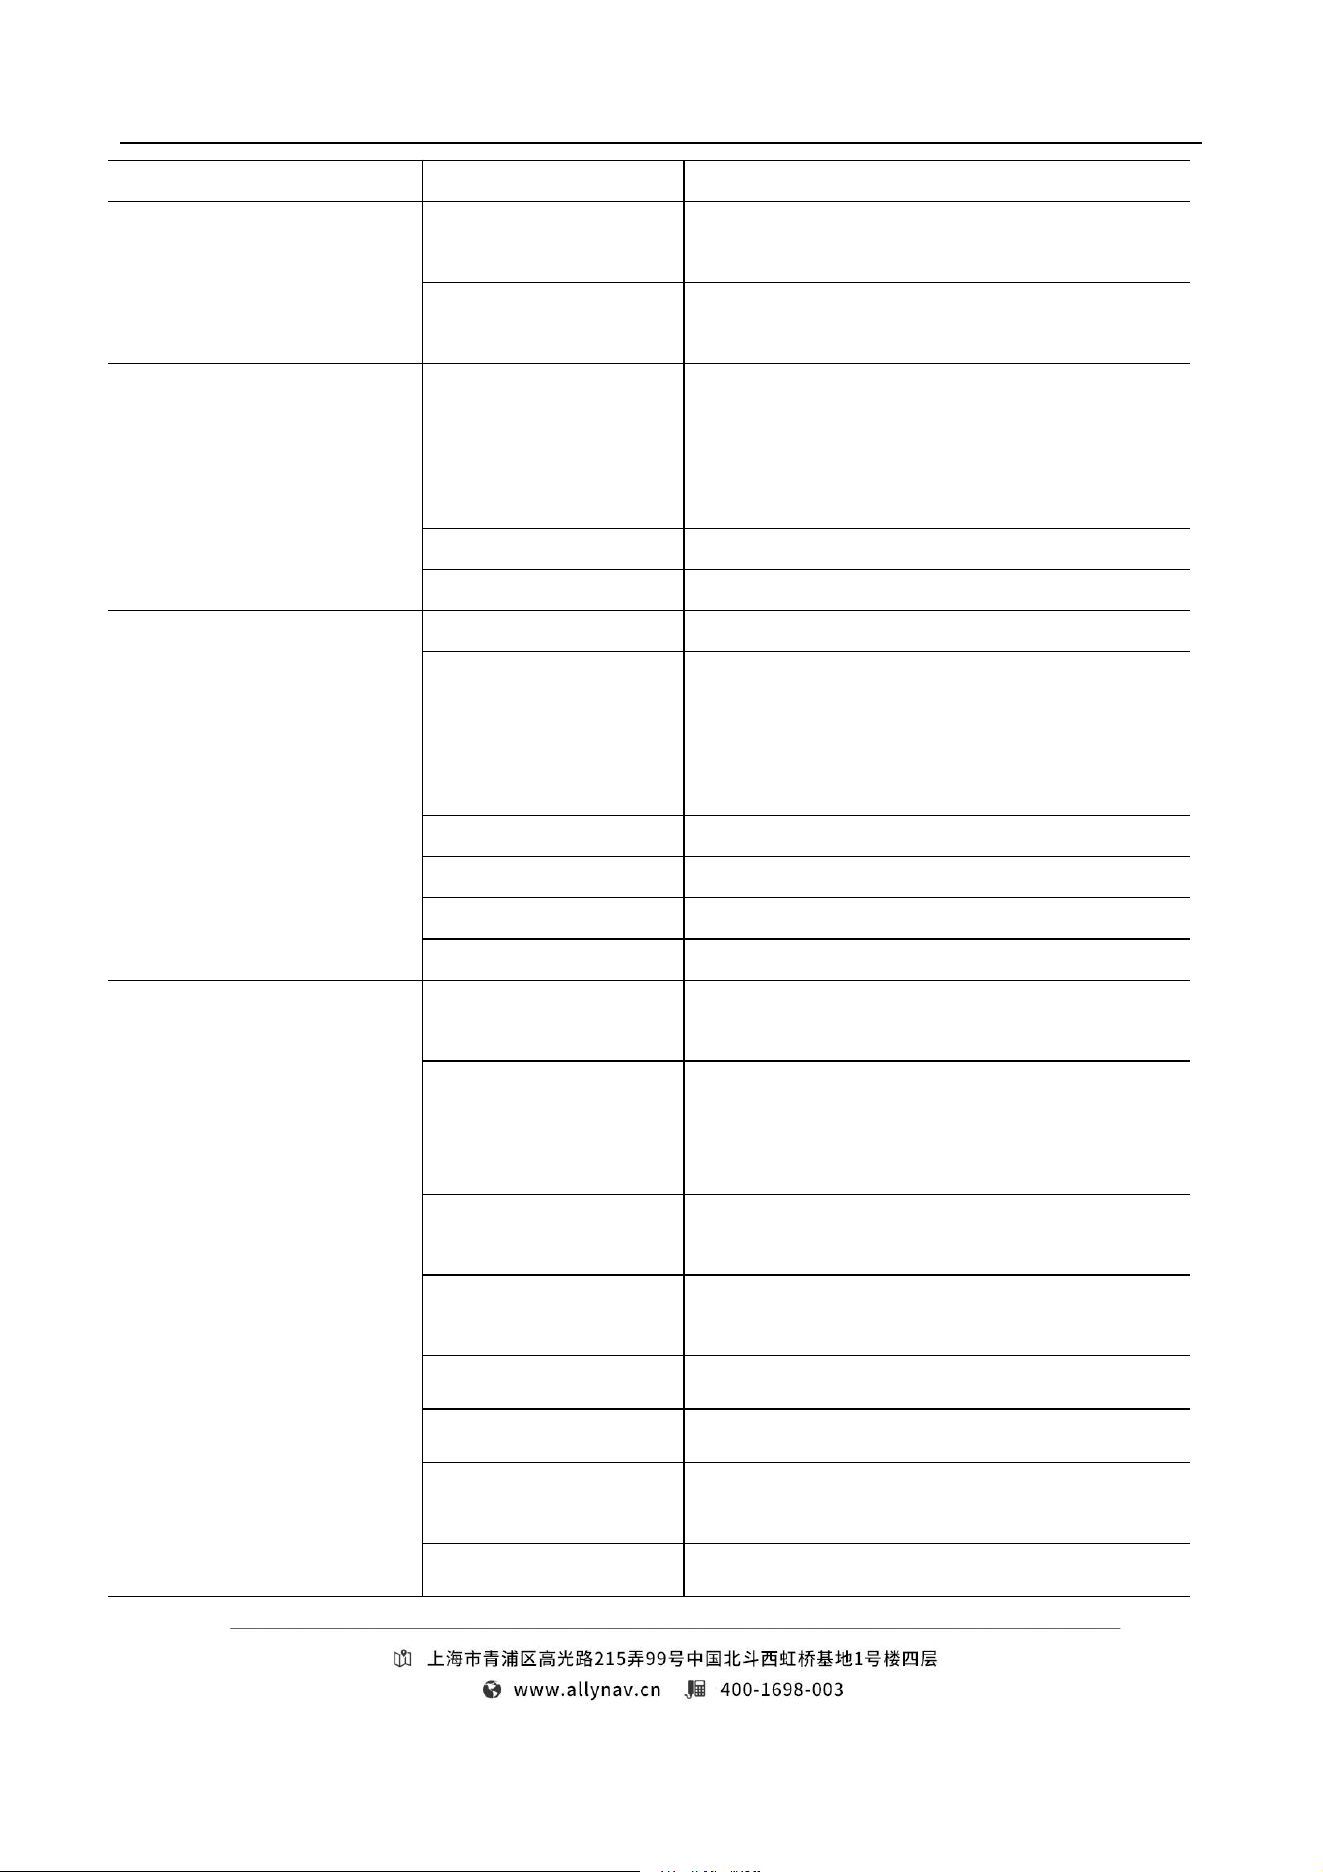
4 Technical parameters
Project Name
illustrate
System Parameters
system
Android 1 0
CPU
M T8768
6
Memory
2GB+32GB (maximum support 6GB +128GB )
power supply
Operating voltage
12V with reverse voltage and overvoltage
protection
Working current
<1A(12V DC)
Reference value: 0.5 A (12V DC)
communication
Network frequency band
LTE:B2/B4/B5/B12/B41
BT
BT5.0 backward compatible, supports BLE
WIFI
2.4G dual-band supports 802.11a/b/g/n/ac
Satellite positioning
aisle
1408 channels, based on NebulasIV
Signal
BDS B1I,B2I,B3I,B1C*,B2b*
GPS L1C/A,L2C,L2P(Y),L5
GLONASS G1,G2
Galileo E1,E5a,E5b,E6*
QZSS L1C/A,L2C,L5
Cold Start
<3 0 s
initialization
<5s(Typical value)
Recapture
< 1s
Data update frequency
1 ~20 Hz
Accuracy index
Single point positioning
Plane:
1.5m
Elevation:
2.5m
RTK positioning
accuracy
Plane: ±(8+1.0×10
-6
×D) mm
Note 1
Elevation: ± (15 + 1.0 × 10
-6
× D)
mm
D GPS ( RMS)
Plane: 0.4 m
Elevation: 0.8m
P PP(RMS)
Flat surface: 5 cm
Elevation : 10cm
Time accuracy ( RMS)
20 ns
Speed accuracy
0.03m/s
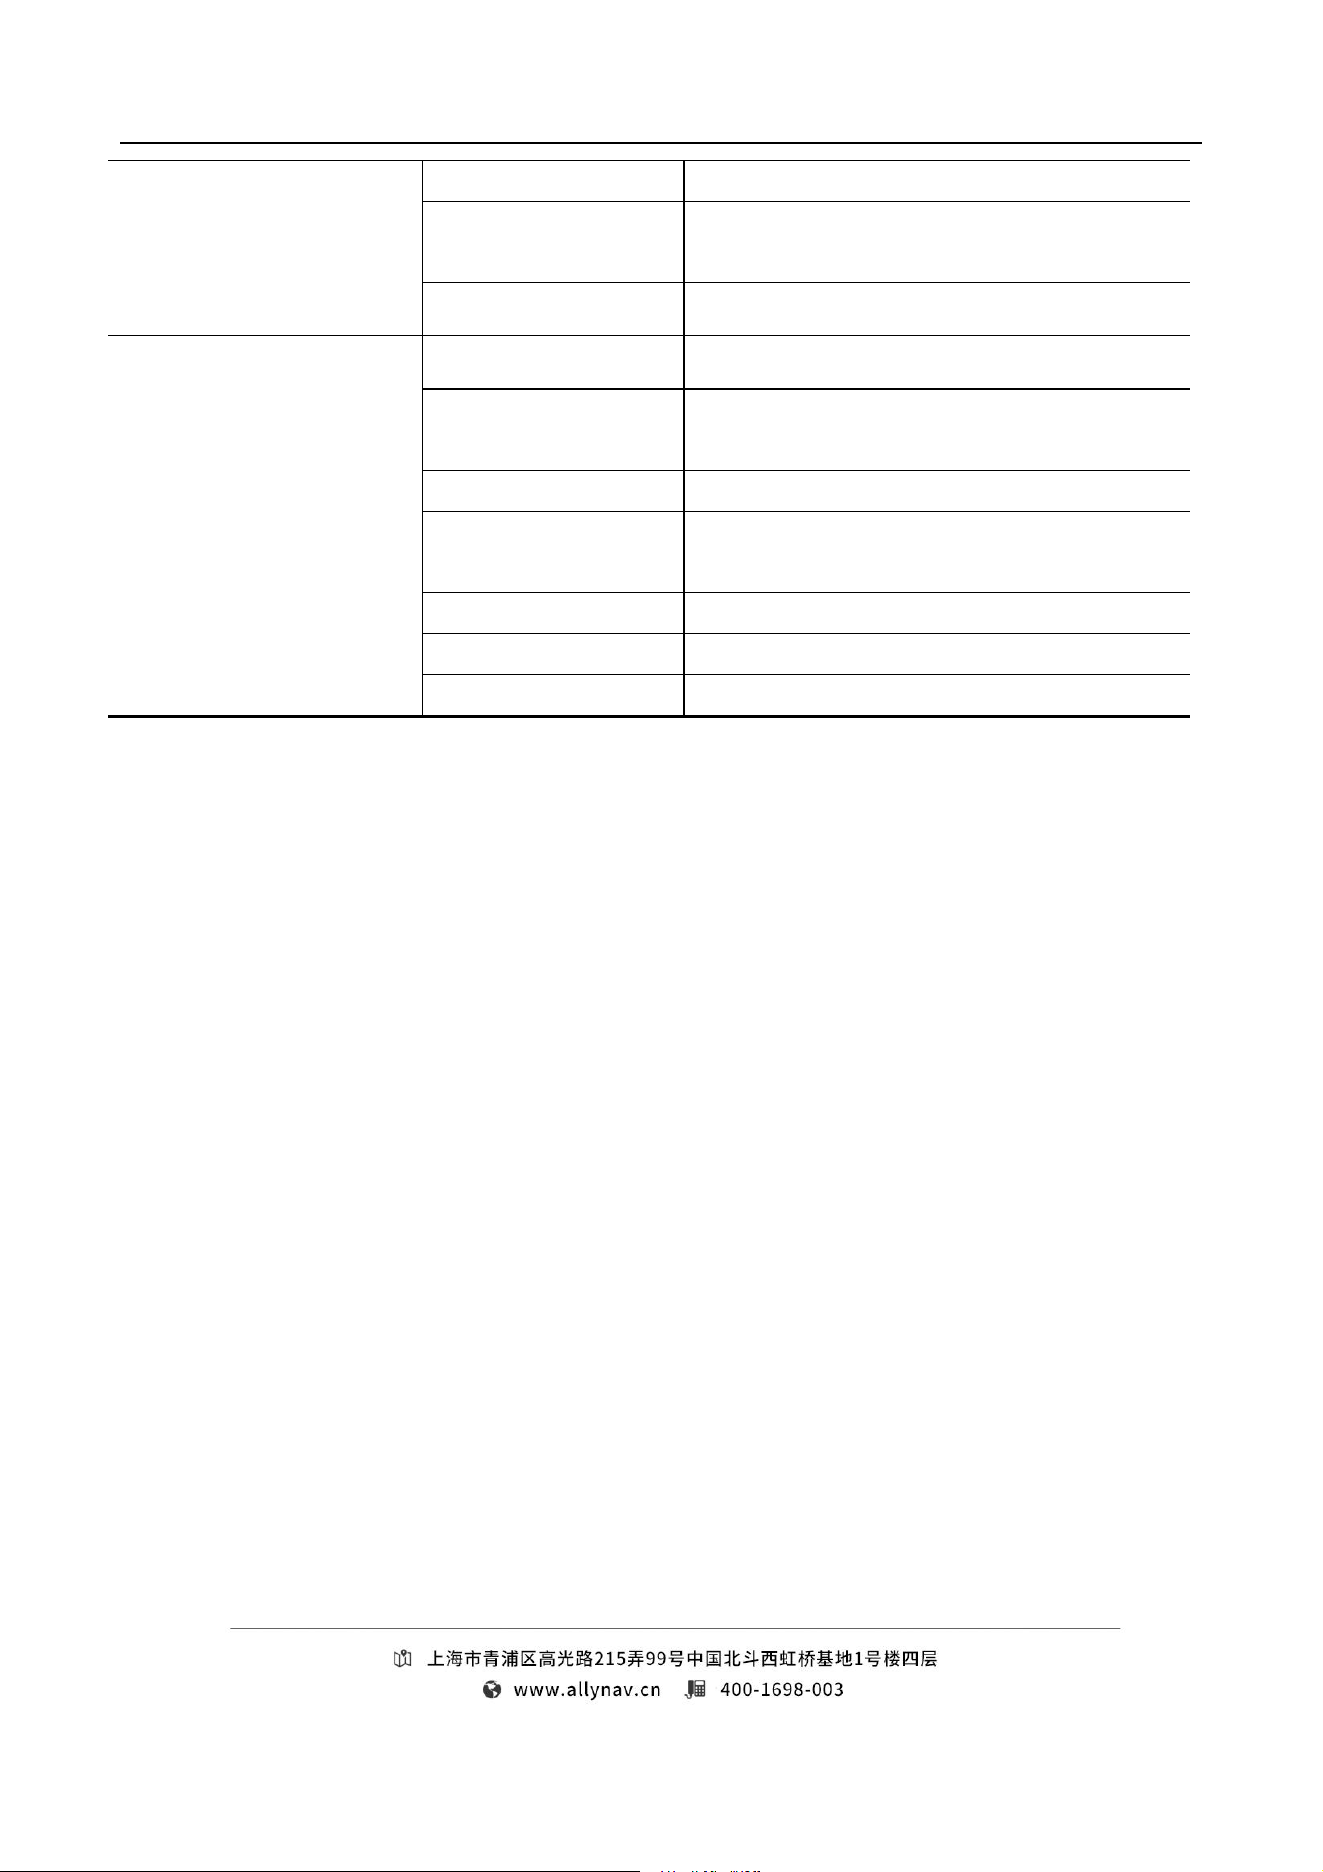
I MU and G NSS fusion
roll/pitch accuracy
0.4°
I MU and G NSS fusion
0.5°
7
heading accuracy
Angular velocity
measurement range
± 500 °/s
Acceleration range
± 6 g
Physical parameters
Protection level
I P67
Antenna interface
G NSS directional antenna interface* 1
RADIO antenna interface * 1
Internal antenna
G NSS , WIFI/BT , 4G
Physical Interface
A MP-26Pin*1
USB2.0*1
Shell size
1 81.4mm × 181.1mm × 70.4mm
Operating temperature
-20 ℃ ~ + 60 ℃
Storage temperature
-40 ℃ ~+85℃
5 Instructions
5.1 Desktop Screen Mirroring
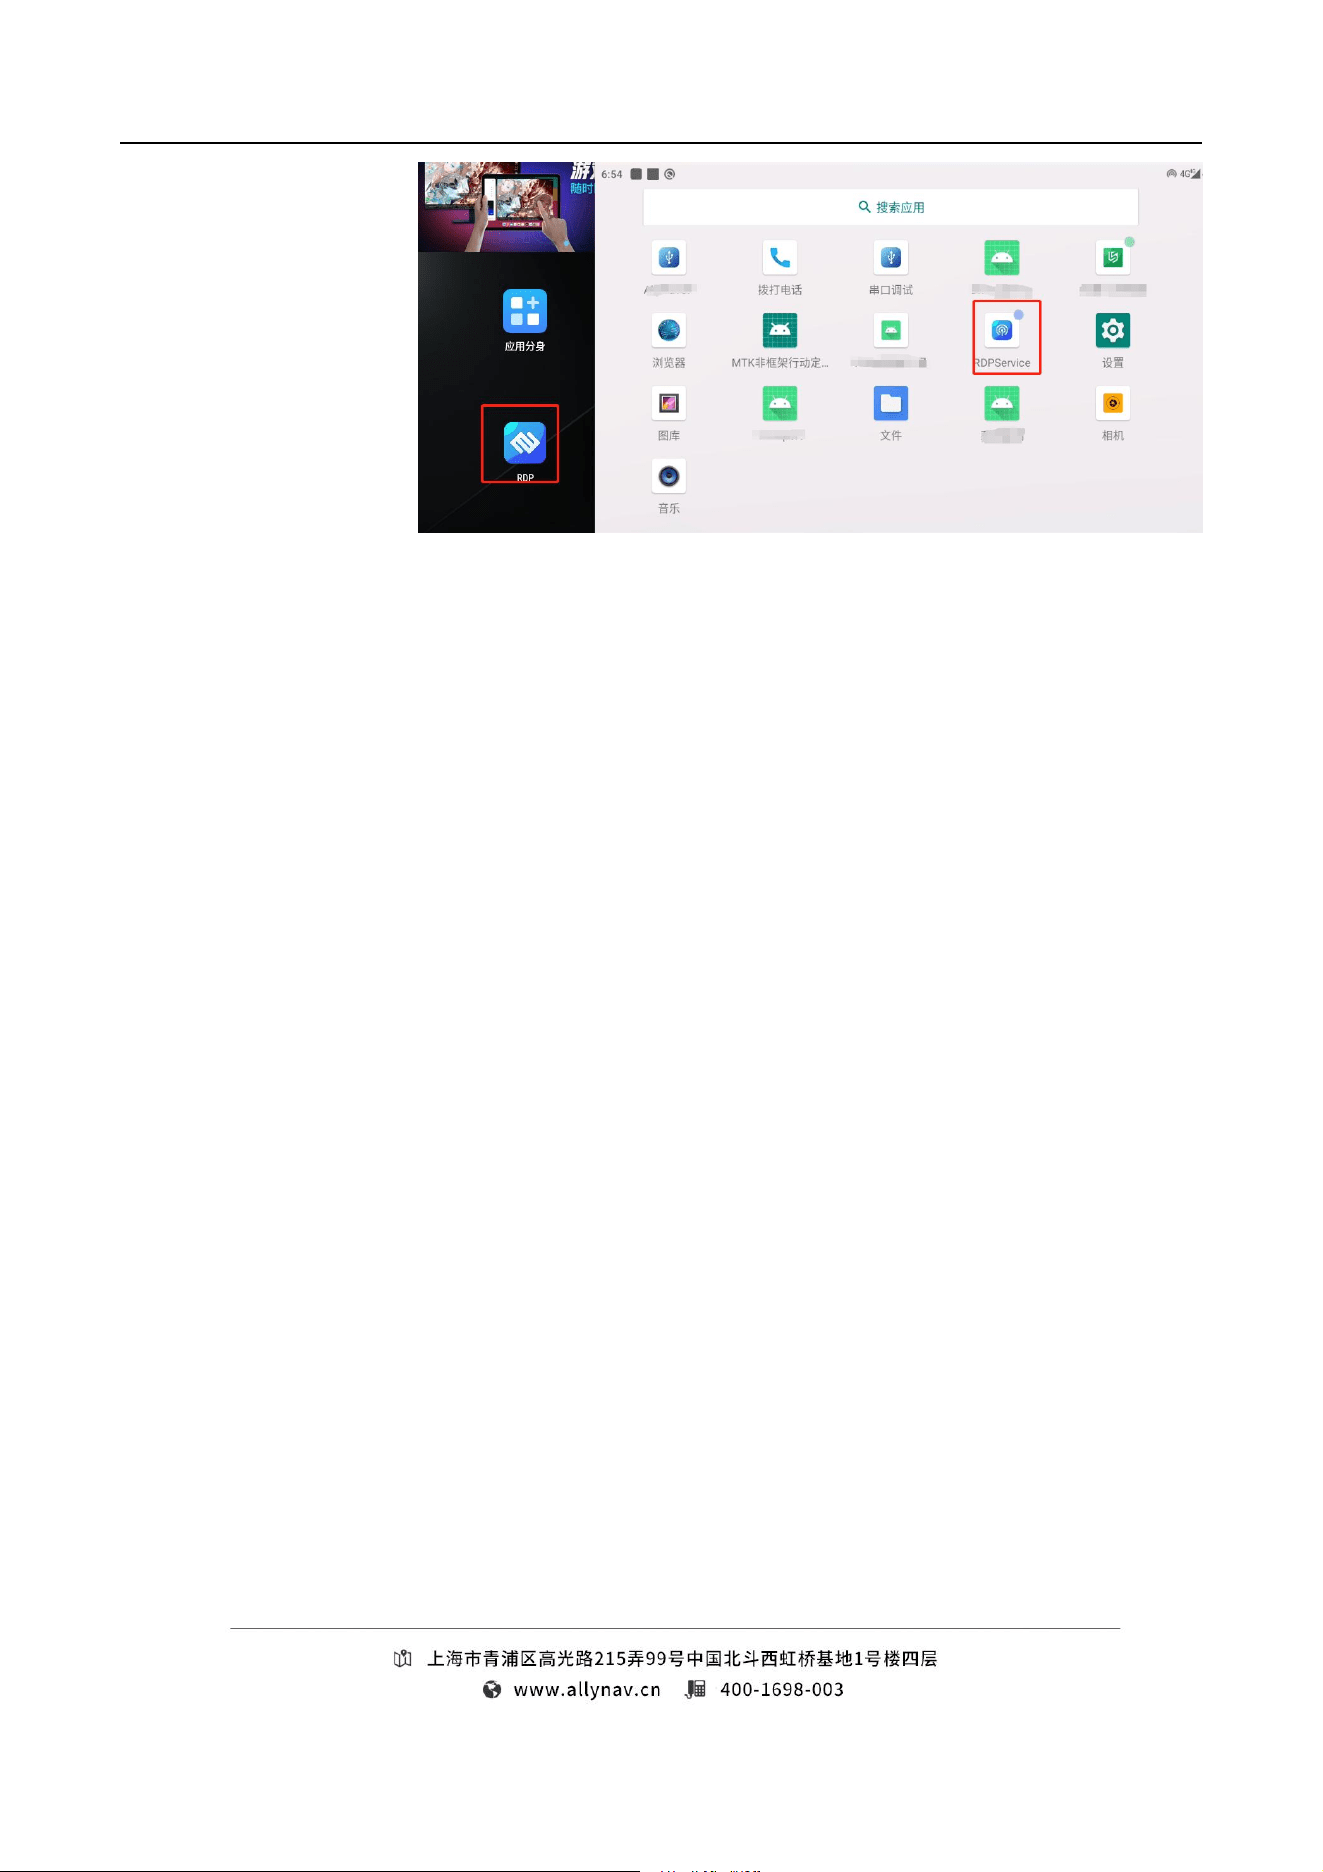
Method 1: Network screen projection
Device: R 62+ Android phone
Software: R DP+RDPService
How to use: Install R DPS er vice on the R 62 end and switch to the background after software
authorization. Use an Android phone to install R DP software and project the screen to the R 62
system desktop through network transmission for remote operation.
Note: You need to install a 4G antenna, otherwise the network signal will be poor and the speed
will be slow;
8
Method 2: W IFI screen projection
Device: R 62+ Android phone
Software: SinkControl ( need to open WIFI and positioning function )
How to use: Power on the R 62 receiver normally, use an Android phone to install the Sink
Control software, turn on the phone's WIFI and positioning switches, enter the software refresh, find
the column corresponding to the receiver's SN number and click it, and the R 62 system desktop will
be loaded ;
Note: You need to install a WiFi antenna , otherwise the WiFi signal will be weak and the
screen projection will not be smooth;
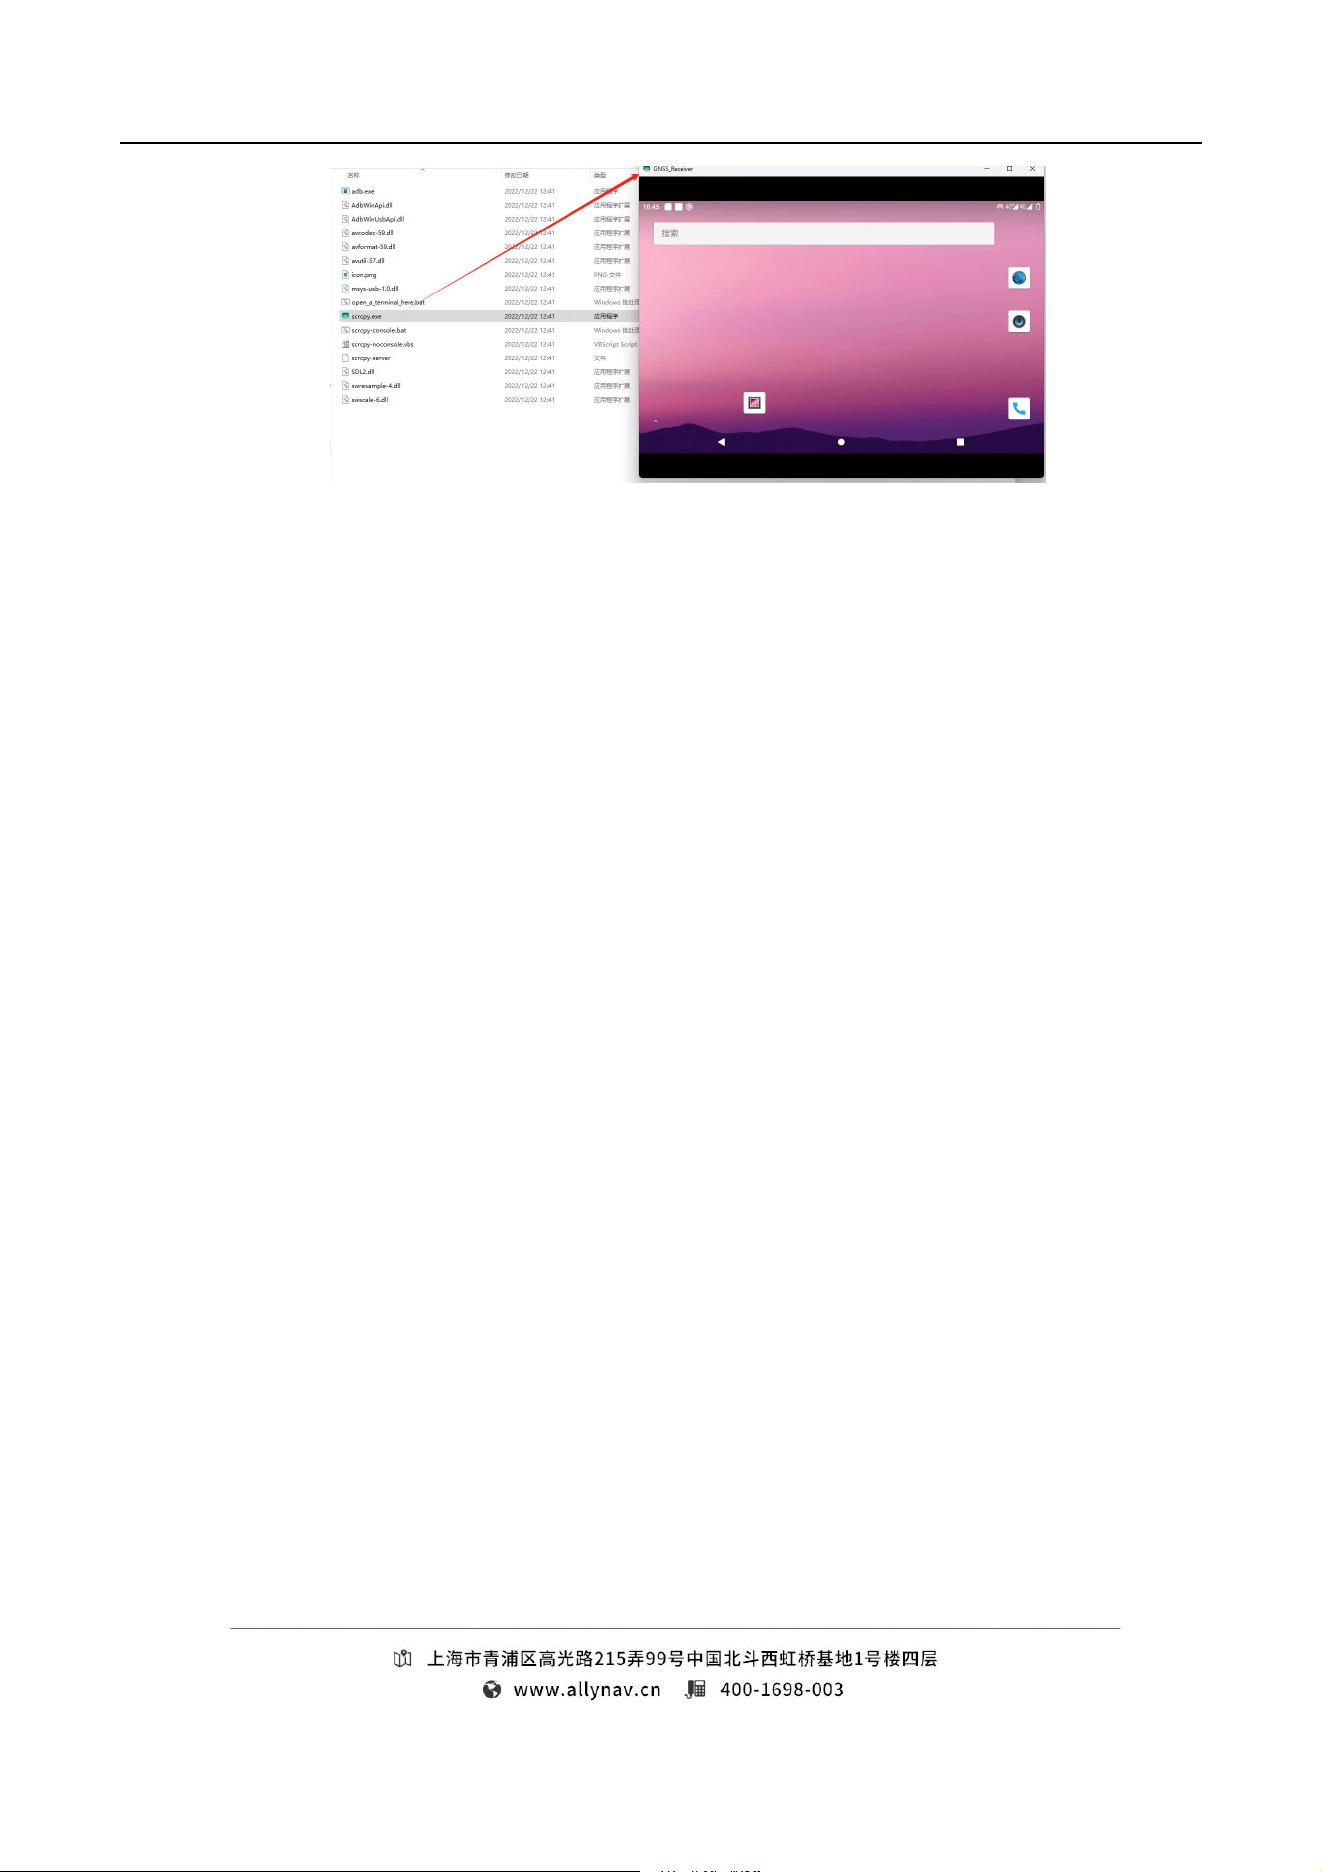
Method 3: PC screen projection
Equipment: R 62 + Windows computer, USB-A to A port cable
Software: scrcpy
crcpy software package on the computer , connect the computer to the R62 receiver using a
cable , and when the computer recognizes the storage disk of the receiver, click the s crcpy software
to enter the R 62 system desktop;
9
5.2 Software Installation
Method 1: USB flash drive
Copy the software to be installed to a USB flash drive, insert it into the R62 receiver, and
install it via wireless or network projection.
Method 2: Computer copy
R62 receiver to the computer via a USB -A to A port cable . The computer will
automatically read the receiver's memory drive letter and copy the software package to be installed to
the drive letter. You can directly use the s crcpy software to cast the screen on the computer for
installation.
Method 3: Browser link
You can package the software package to generate an online download link, enter the R 62
receiver desktop and find the browser to download and install (pay attention to whether the SIM card
is a directional card and whether the link not in the whitelist is available);
10
5.3 Serial port node
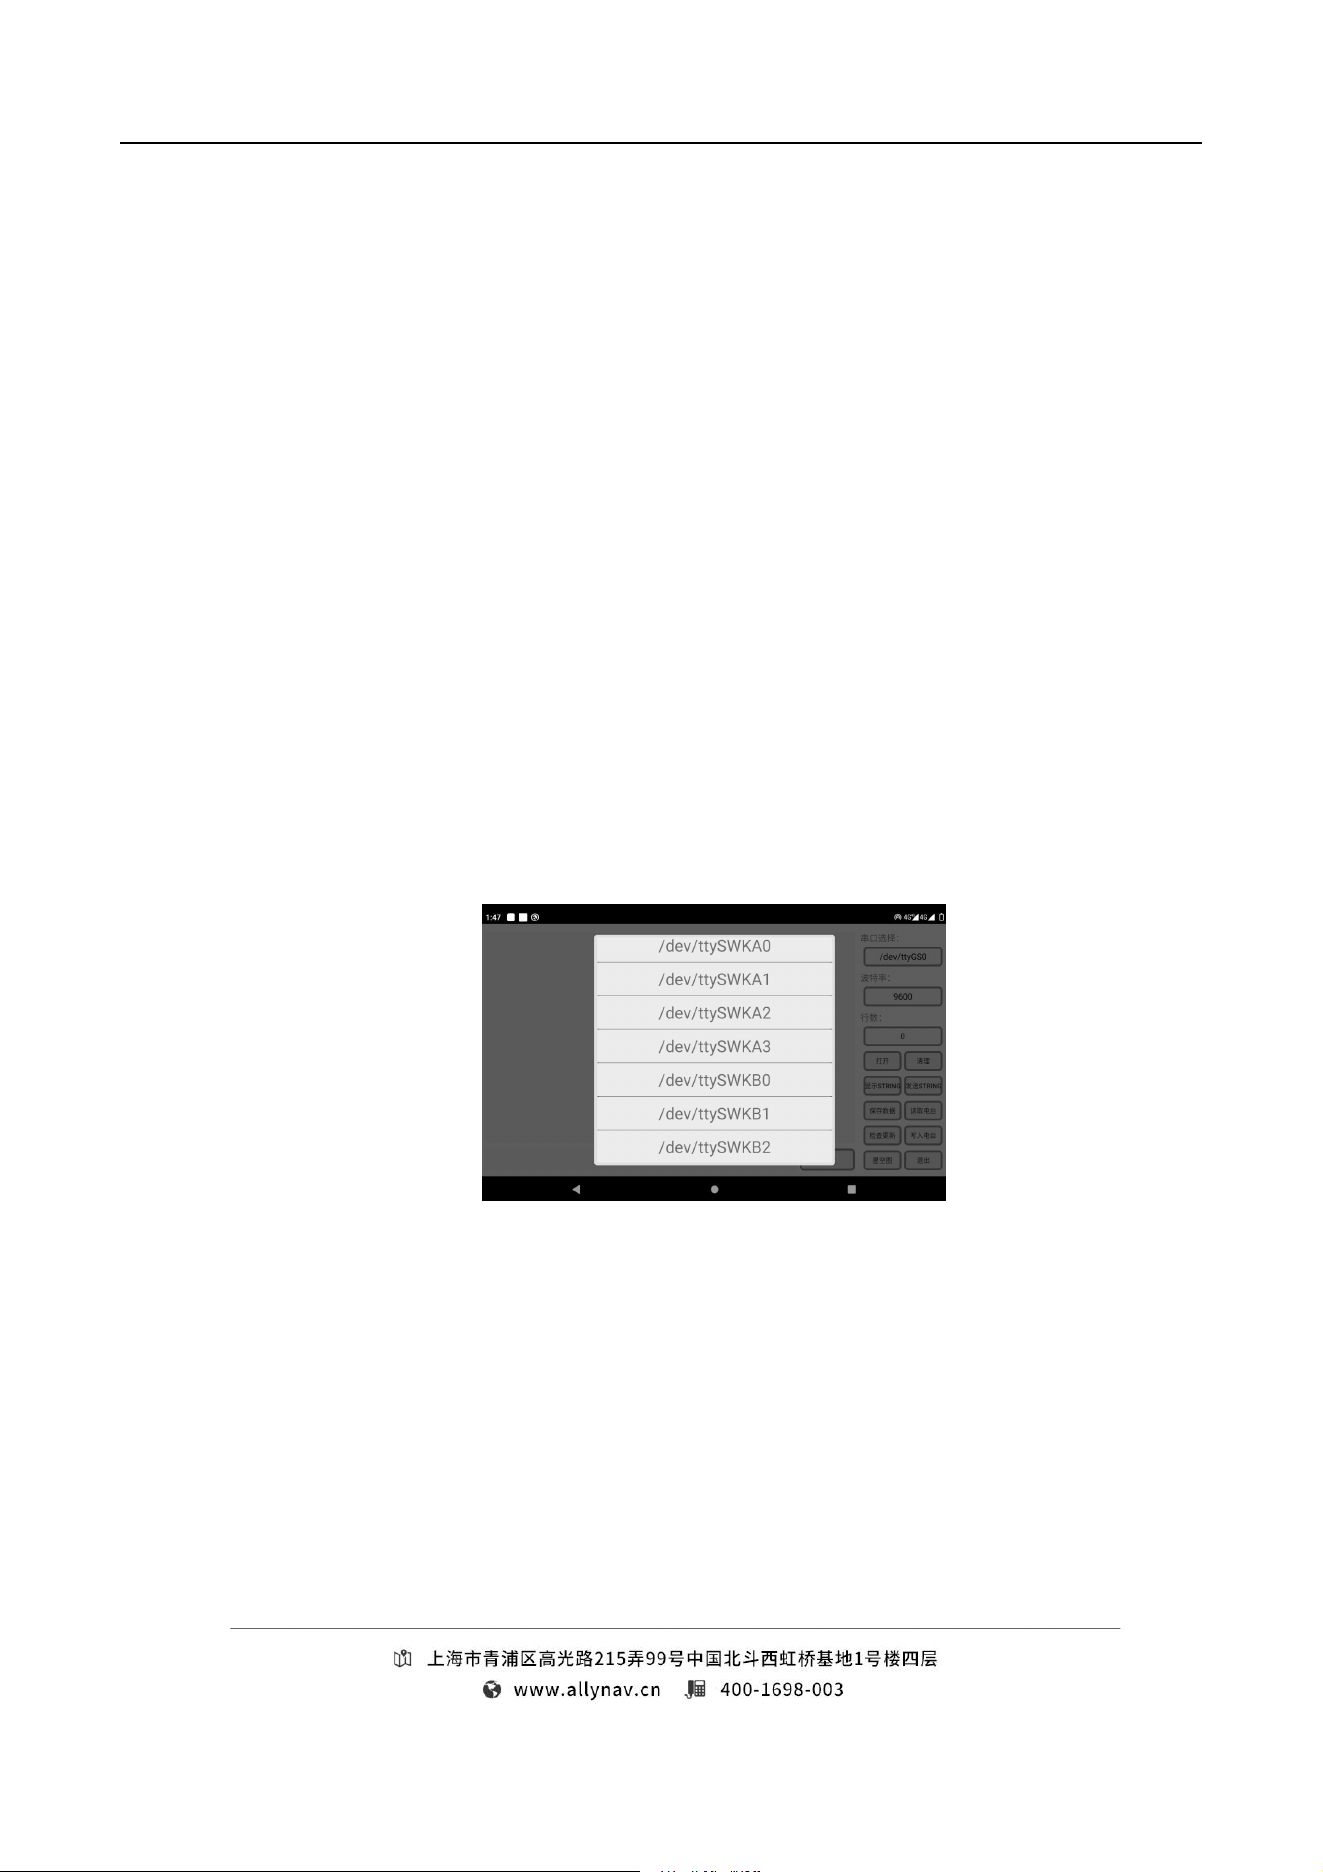
To view serial port data from inside the receiver, you need to use serial port debugging software.
The node description is as follows:
t ty SWKA0 → GNSS module (baud rate 1 15200 )
t ty SWKA1
→
External interface RS232-1
t ty SWKA2
→
External interface RS232-2
t ty SWKA3 → IMU module (baud rate 1 15200 )
t ty SWKB0
→
Radio module (baud rate 3 8400 )
t ty SWKB1 →Not used yet
t ty SWKB2 → External interface RS485
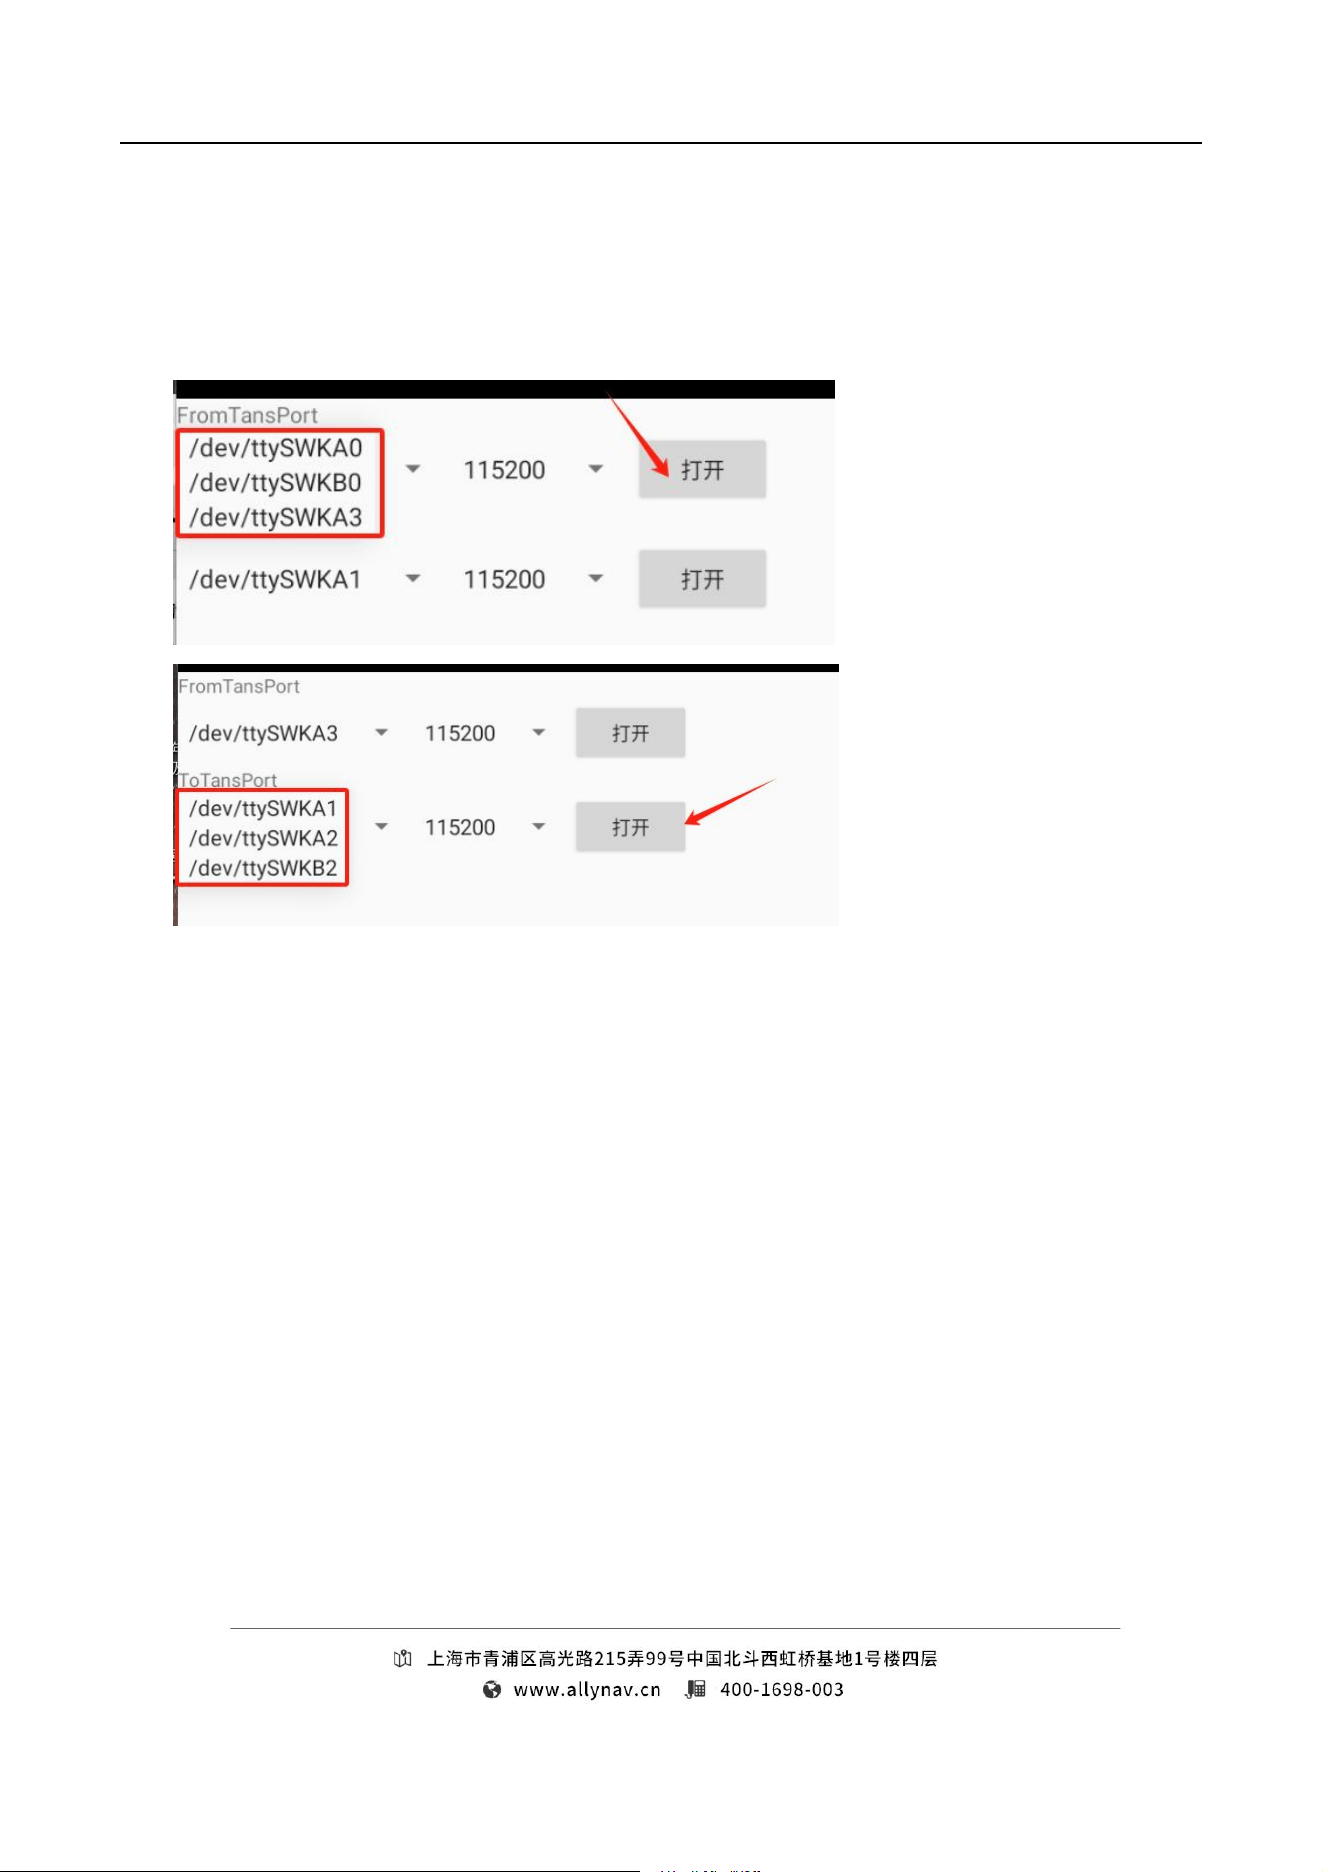
To view serial port data from the serial port software on the computer, you need to start the
forwarding software inside the receiver before you can see the data from the serial port on the
computer;
11
First, select which serial port data you want to view and which external interface you want to
transfer from. After selecting, click the punch button of the corresponding serial port. Once the
external serial port is connected to the computer, you can read the data.
5.4 System firmware upgrade
5.4.1 Wired Upgrade
Hardware: PC + R62 receiver + USB-A to A cable
Software: SP_F la sh_Tool_exe_Windows software + system upgrade firmware package
Steps:
2. Copy the software and system firmware package to the computer, and connect the
receiver to the computer using an adapter cable after the receiver is powered by 12V .
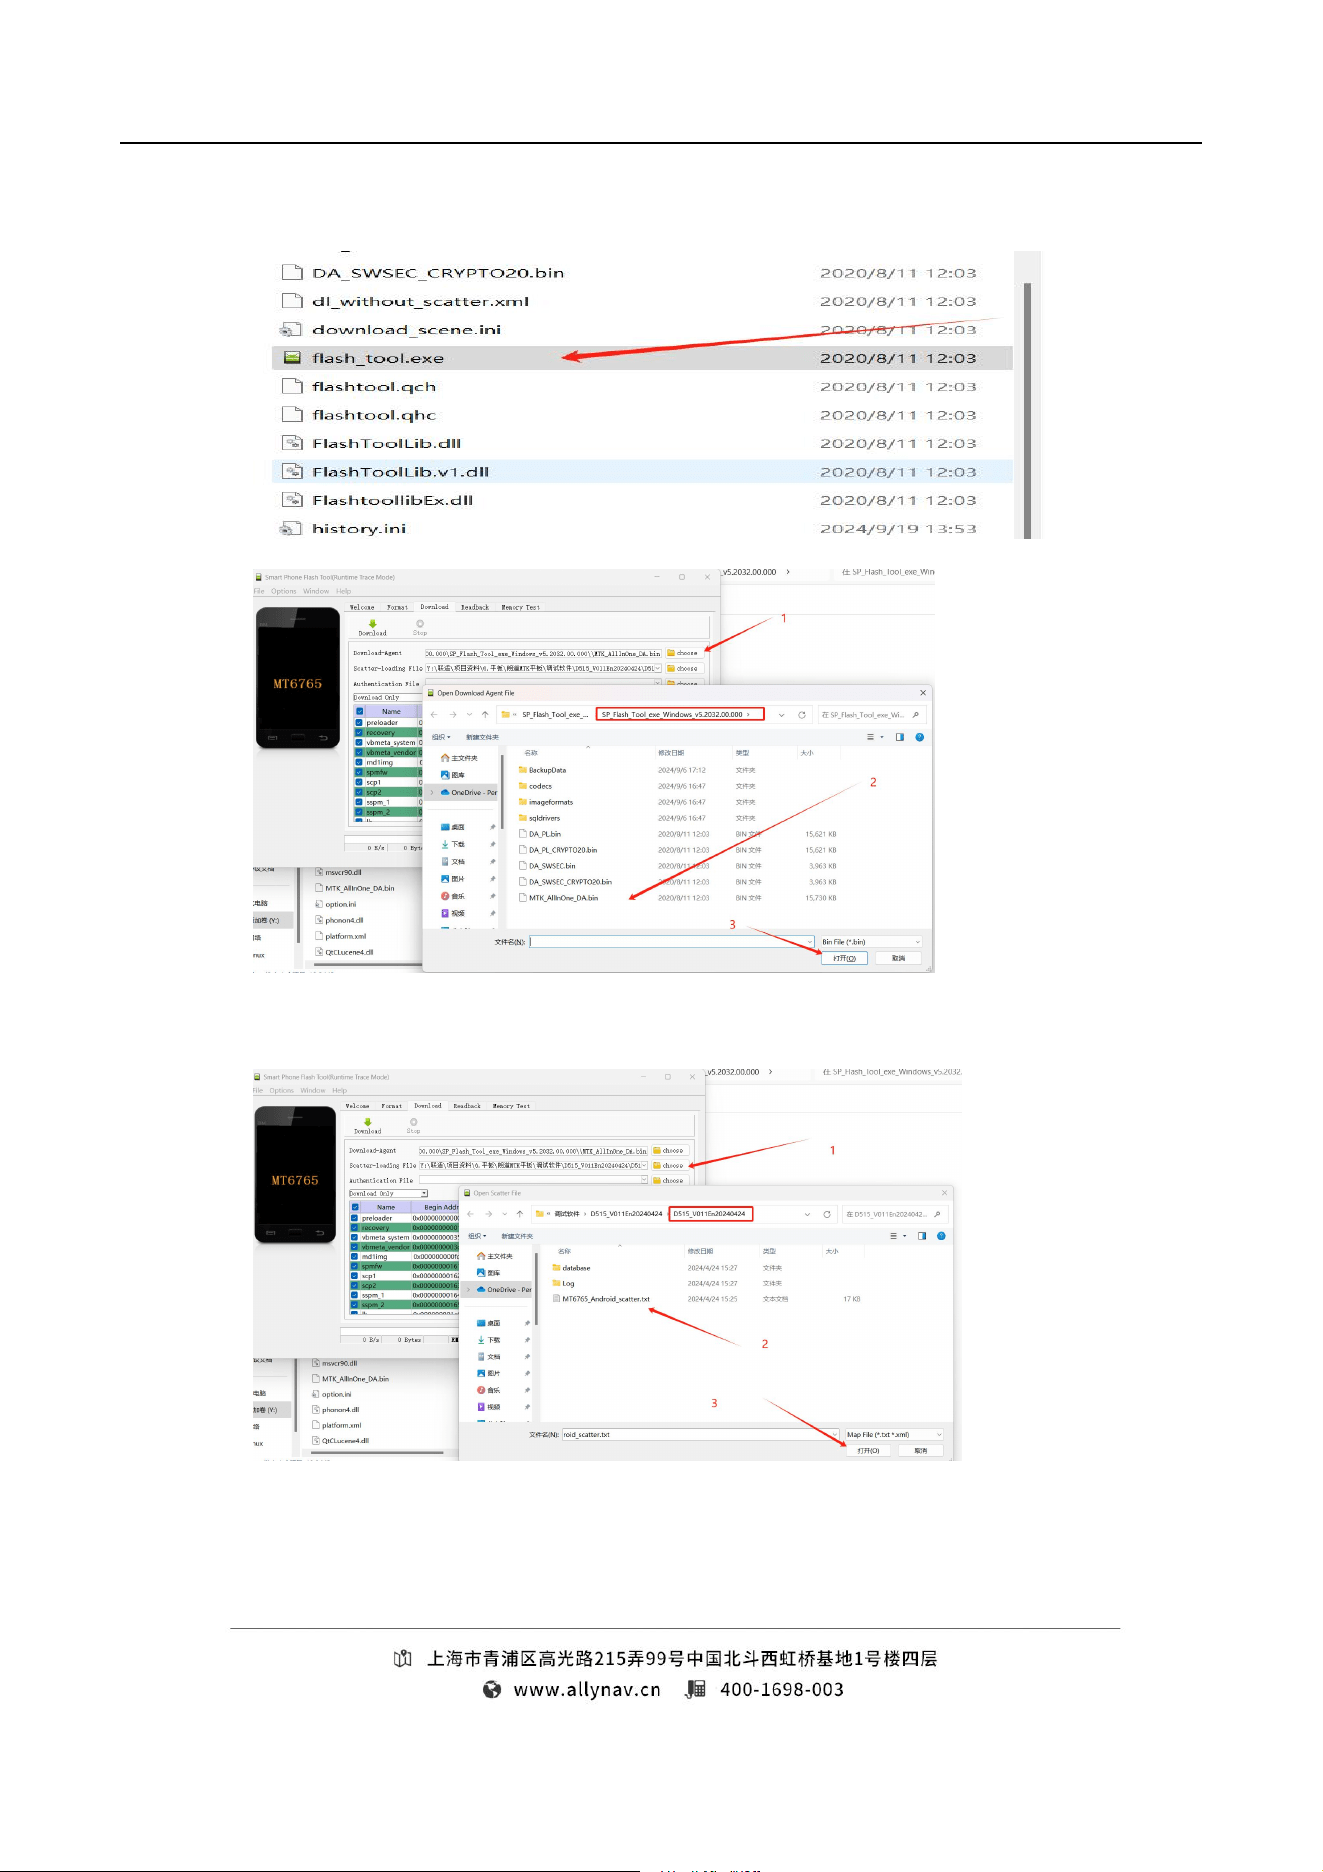
3. To upgrade the software, you need to select the corresponding file, as follows:
12
a) Open the software and select the bin file ;
b) Select the system software package that needs to be flashed;
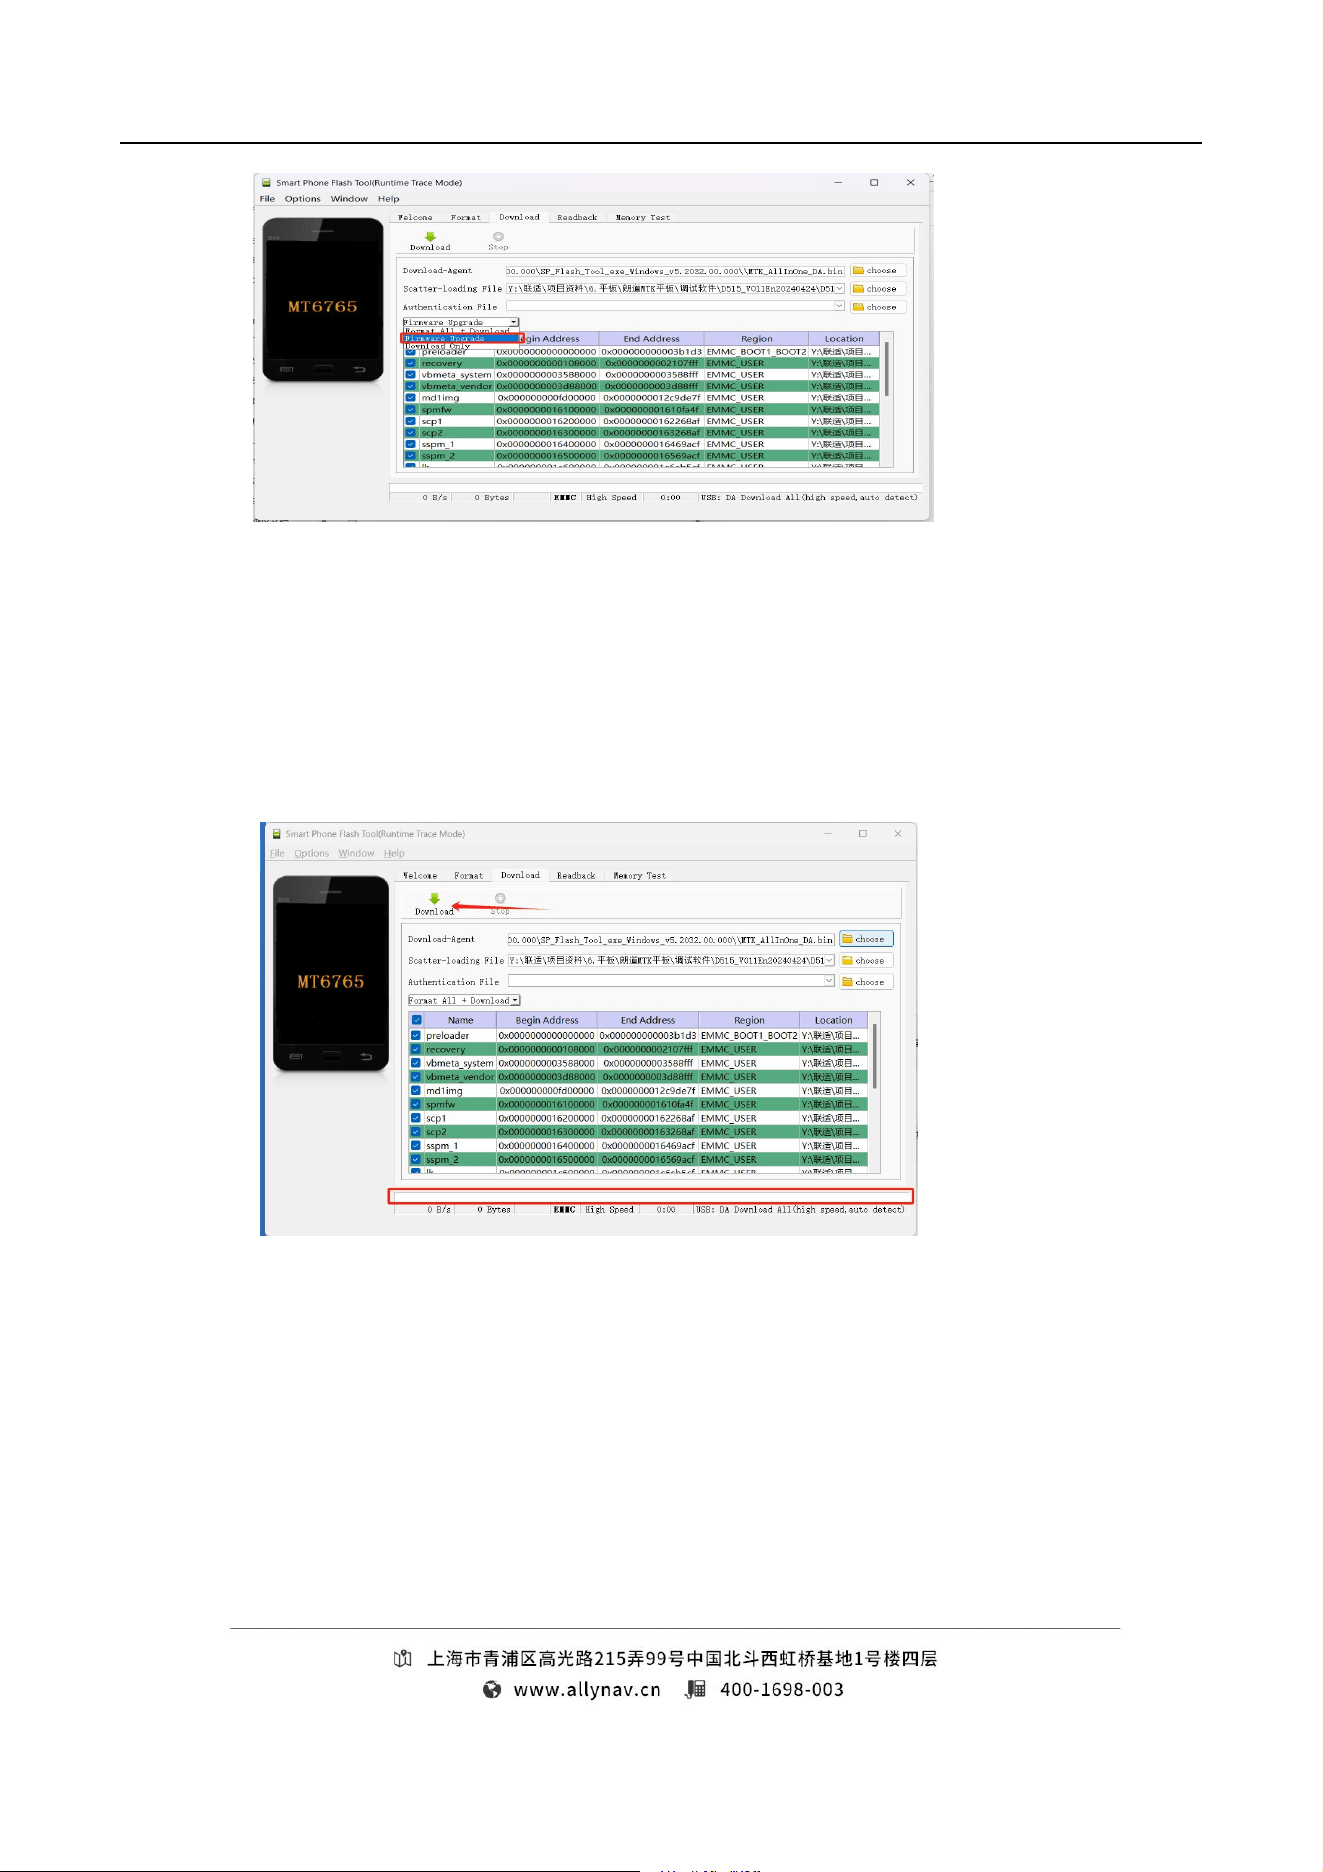
c) The download mode needs to select Firmware Upgrade. Note: Selecting for
mat ALL+Download and Download Only will clear the basic information;
13
d) clicking Download , the receiver's 12V power supply needs to be disconnected
and then powered on (USB does not need to be disconnected). If the progress bar
starts to move, it means the power off is effective and the system firmware upgrade
has begun;
can try installing the Driver.exe driver or moving the software to the desktop for use.
5.4.2 OTA Upgrade
Upgrade method: full package upgrade, differential package upgrade (special versions are
required for different versions)
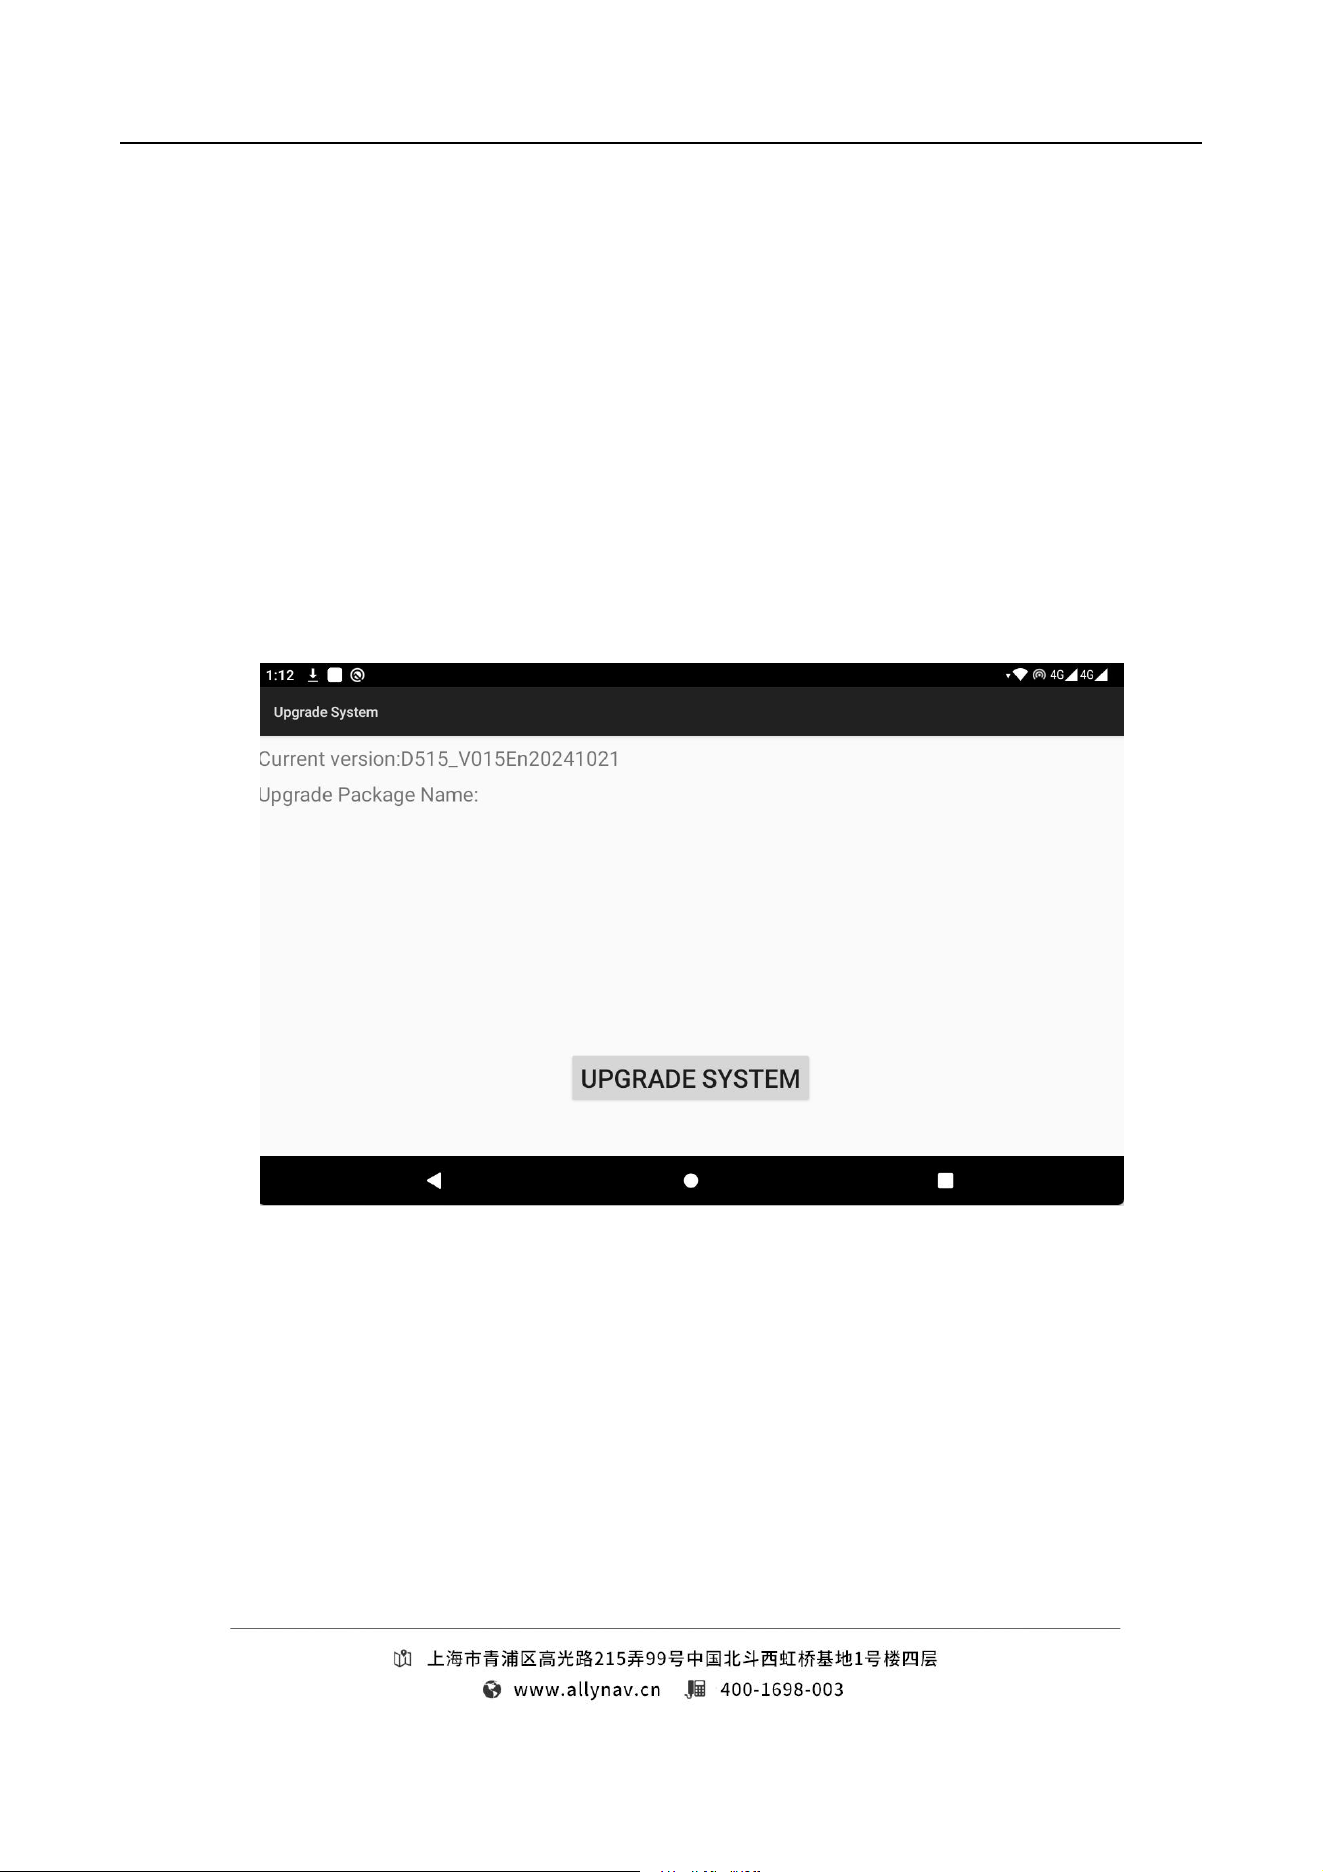
14
Steps:
a) the OTA firmware upgrade package to the receiver's internal storage, and use the
screen projection to enter the receiver's desktop to perform the upgrade.
b) You need to create a new folder "O ta " in the root directory and move the firmware
package to this folder;
c) System Settings
→
About Tablet
→
OTA Upgrade, click Upgrade after
detecting the firmware package;

FCC compliance statement:
This device complies with Part 15 of the FCC Rules. Operation is subject to the following two conditions:
(1) this device may not cause harmful interference, and (2) this device must accept any interference
received, including interference that may cause undesired operation.
Caution: The user is cautioned that changes or modifications not expressly approved by the
party responsible for compliance could void the user's authority to operate the equipment.
Note: This equipment has been tested and found to comply with the limits for a Class B digital device,
pursuant to part 15 of the FCC Rules. These limits are designed to provide reasonable protection against
harmful interference in a residential installation.
This equipment generates, uses and can radiate radio frequency energy and, if not installed and used in
accordance with the instructions, may cause harmful interference to radio communications. However,
there is no guarantee that interference will not occur in a particular installation. If this equipment does
cause harmful interference to radio or television reception, which can be determined by turning the
equipment off and on, the user is encouraged to try to correct the interference by one or more of the
following measures:
—Reorient or relocate the receiving antenna.
—Increase the separation between the equipment and receiver.
—Connect the equipment into an outlet on a circuit different from that to which the receiver is connected.
—Consult the dealer or an experienced radio/TV technician for help.
FCC RF Radiation Exposure Statement
To comply with FCC RF exposure compliance requirements, this grant is applicable to only Mobile
Configurations. The antennas used for this transmitter must be installed to provide a separation distance
of at least 20 cm from all persons and must not be co-located or operating in conjunction with any other
antenna or transmitter.