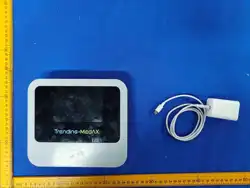

THS 1 Home HealthScan
USER MANUAL
Model: EQ-HS100

Notes
THS 1 Home HealthScan is a detection device based on Loop-Mediated Isothermal
Amplification (LAMP) reaction spectroscopy, specially developed for home health
monitoring.
We guarantee that the THS 1 Home HealthScan you use has passed comprehensive
testing and meets all the usage requirements specified in this manual.
The use of this instrument must comply with the guidelines and safety warnings provided
in this user manual; otherwise, any damage or malfunction will not be covered by the
product warranty.
Built-in Software: All software related to this product is provided to customers as a
service component, which is an essential tool for the normal operation of the instrument.
Software Ownership: We hold the exclusive copyright of the software and grant
customers a non-exclusive right to use the software.
Software Modification: To improve operational performance and reliability, we reserve
the right to modify software functions or designs with or without prior notice to
customers. We own all intellectual property rights of all modified software versions.
Responsibility: We shall not be liable for any direct, indirect or incidental damages
arising from failure to comply with the operating procedures in this manual or improper
use of the THS 1 Home HealthScan. Only our professional technical personnel or
authorized agencies can inspect or provide spare parts for the instrument. We shall not be
liable for any damages caused by unauthorized disassembly or replacement of spare parts
by users. Our liability is limited to repairing the instrument and replacing genuine
accessories. We shall not be responsible for interpreting test results or any consequences
arising from the application of such results. Please read this user manual carefully before
using the THS 1 Home HealthScan to ensure optimal test results.

CHAPTER 1 SAFETY PRECAUTIONS
Before using the THS 1 Home HealthScan (Model: EQ-HS100), users must carefully
read and follow all safety instructions!
1.1 Operational Requirements
The THS 1 Home HealthScan (Model: EQ-HS100) shall only be operated by trained and
proficient personnel.
► Strictly follow the safety instructions marked on the instrument.
► Only genuine spare parts and accessories provided by our company or authorized
agents can be used for replacement.
► Do not open the instrument during operation, as this will cause permanent damage to
the instrument.
► The instrument must be installed in a clean and well-ventilated indoor environment,
away from corrosive gases, strong magnetic interference, and direct sunlight or strong
light sources.
► Wear safety goggles and protective gloves when handling toxic, corrosive or
infectious substances.
► Before stopping the equipment for maintenance or handling, remove all samples and
disinfect the instrument surface thoroughly.
► Only professional technicians from the instrument manufacturer can perform
maintenance and repair work; users are not allowed to open the instrument or replace any
components without permission. Instrument damage caused by unauthorized operation is
not covered by the warranty.
► If dangerous substances leak onto the equipment surface or into the equipment interior,
take appropriate disinfection measures immediately. Do not use cleaning agents or
disinfectants that may react chemically with equipment components or internal materials
and cause danger. If you have any doubts about the compatibility of cleaning or
disinfection products with the equipment, please consult the manufacturer or its
authorized agent.
1.2 Electrical Safety
► The electrical safety protection class of the instrument is Class II (IEC standard).
► To prevent electric shock hazards, the instrument must be charged with a USB charger
that meets CCC certification standards.
► Do not allow the power cord to come into contact with the hot surfaces of the
instrument.

► Do not clean the instrument when it is powered on.
► Turn off the power when the instrument is not in use for an extended period.

CHAPTER 2 OVERVIEW
2.1 Product Name
THS 1 Home HealthScan
2.2 Model/Specification
EQ-HS100
2.3 Product Features
► Compact size and light weight for easy portability.
► Equipped with high-definition touch screen for simple and fast operation.
► Intuitive software interface with guided operation for ease of use.
2.4 Intended Use
Based on the Loop-Mediated Isothermal Amplification (LAMP) technology principle,
this product is used in conjunction with the matching LAMP test reagent card for
qualitative detection of target samples for home health monitoring.
2.5 Application Fields
► Home health monitoring
► Personal health indicator detection
2.6 Product Service Life
The service life of this product is 5 years, determined based on failure data analysis of
key components. During use, users shall maintain, service and repair the product in
accordance with the requirements of this manual. Products that can still maintain basic
safety and effectiveness after maintenance, service or repair can continue to be used
normally.
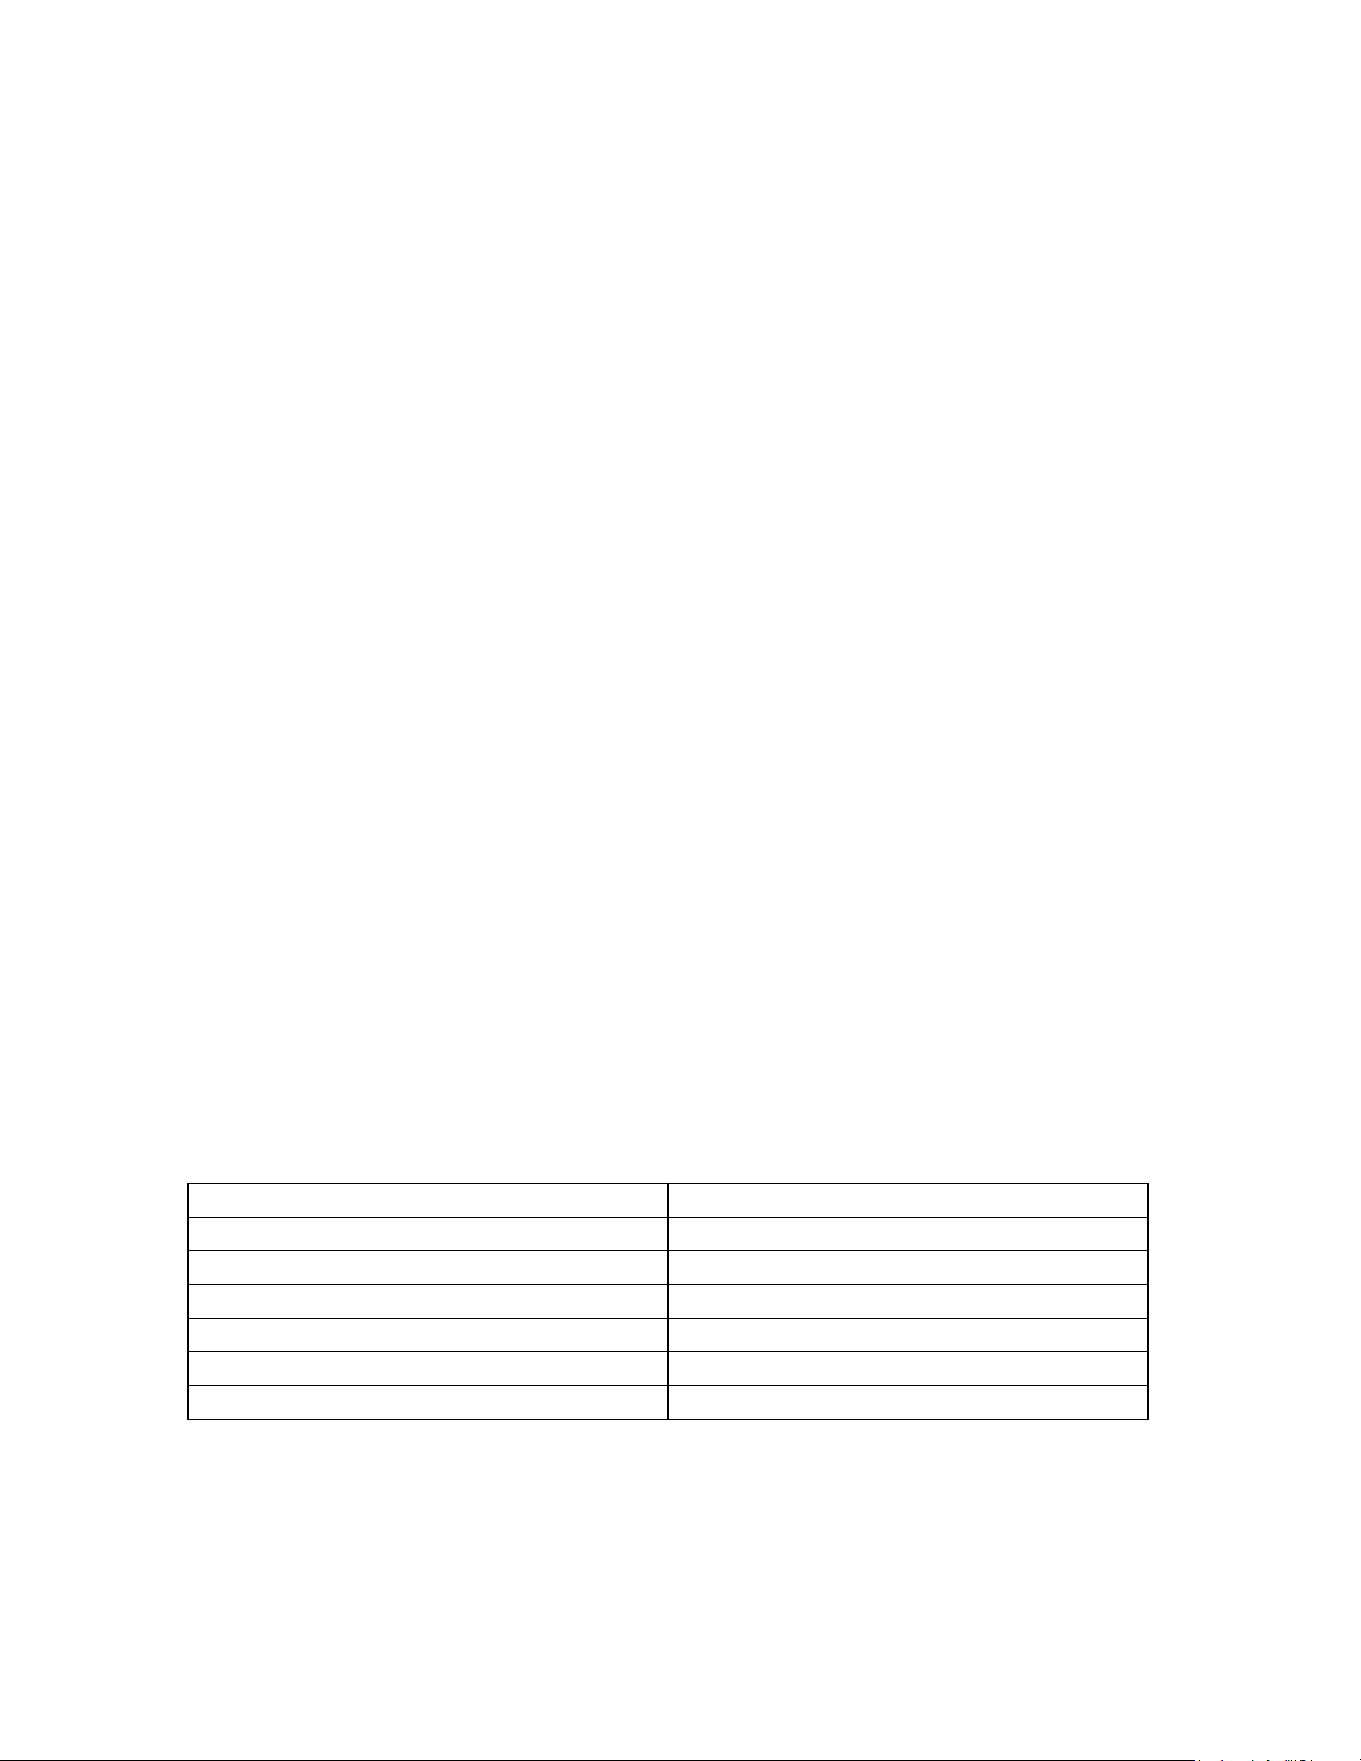
2.7 System Parameters
Basic Performance Parameters
Item
Parameter
Item
Parameter
Overall Dimensions
190×170×56mm
(L×W×H)
Weight
850g
Power Supply
Built-in lithium
battery 12V,
Noise Level
40 dB
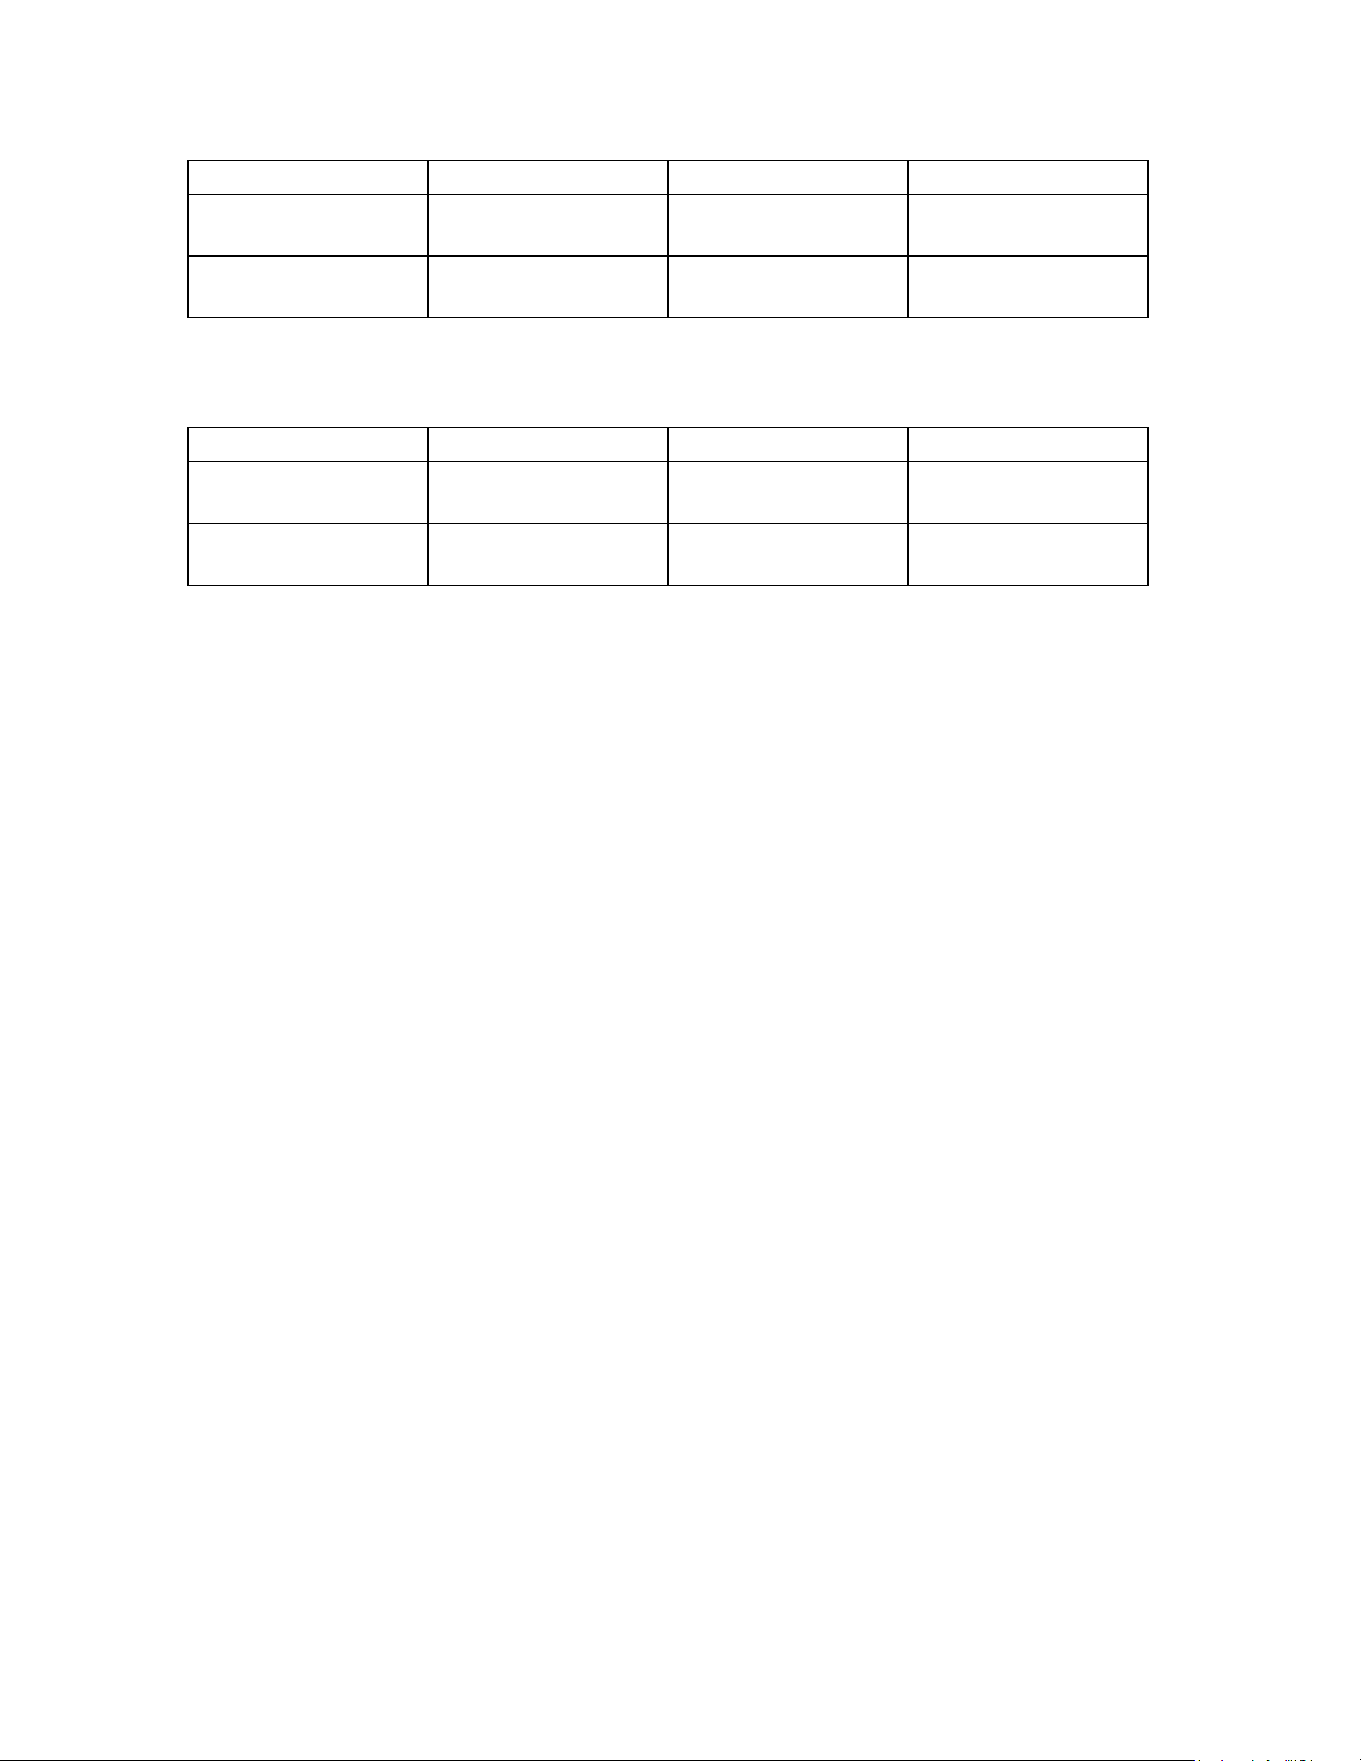
3000mAh
Input Interface
USB Type-C 12V,
15V
Communication
Interface
USB, WIFI,
Bluetooth
Throughput
2 channels
Display Screen
Touch screen,
800×480 resolution
Operating Environment Parameters
Item
Parameter
Item
Parameter
Operating
Temperature
0~40℃
Operating Relative
Humidity
≤85%
Transport & Storage
Temperature
-20
~
50℃
Transport & Storage
Relative Humidity
≤85%
CHAPTER 3 INSTRUMENT INSTALLATION
The installation of THS 1 Home HealthScan is simple and can be completed by
customers themselves with the following steps.
3.1 Transportation and Storage
► The product must be transported in its original packaging to prevent damage during
transit.
► The packaged product should be stored in an environment with temperature -
20℃~50℃, relative humidity ≤85%, and free of corrosive gases.
► The instrument is packed in a carton with horizontal fixation and pearl cotton
cushioning around to prevent vibration damage during transportation.
► The storage area should be clean, tidy, well-ventilated and moisture-proof.
3.2 Unpacking
► The product is packed in a carton with pearl cotton lining. After unpacking, first check
for missing or damaged items.
► After inspection, the instrument can be transported by hand or with a stable cart.
► Do not use the product if the outer packaging is obviously damaged during
transportation; contact the seller immediately.
► Check the completeness of accessories according to the packing list (included in the
manual).
► Inform the freight company and our customer service immediately if any instrument
or accessories are damaged or lost during transportation.
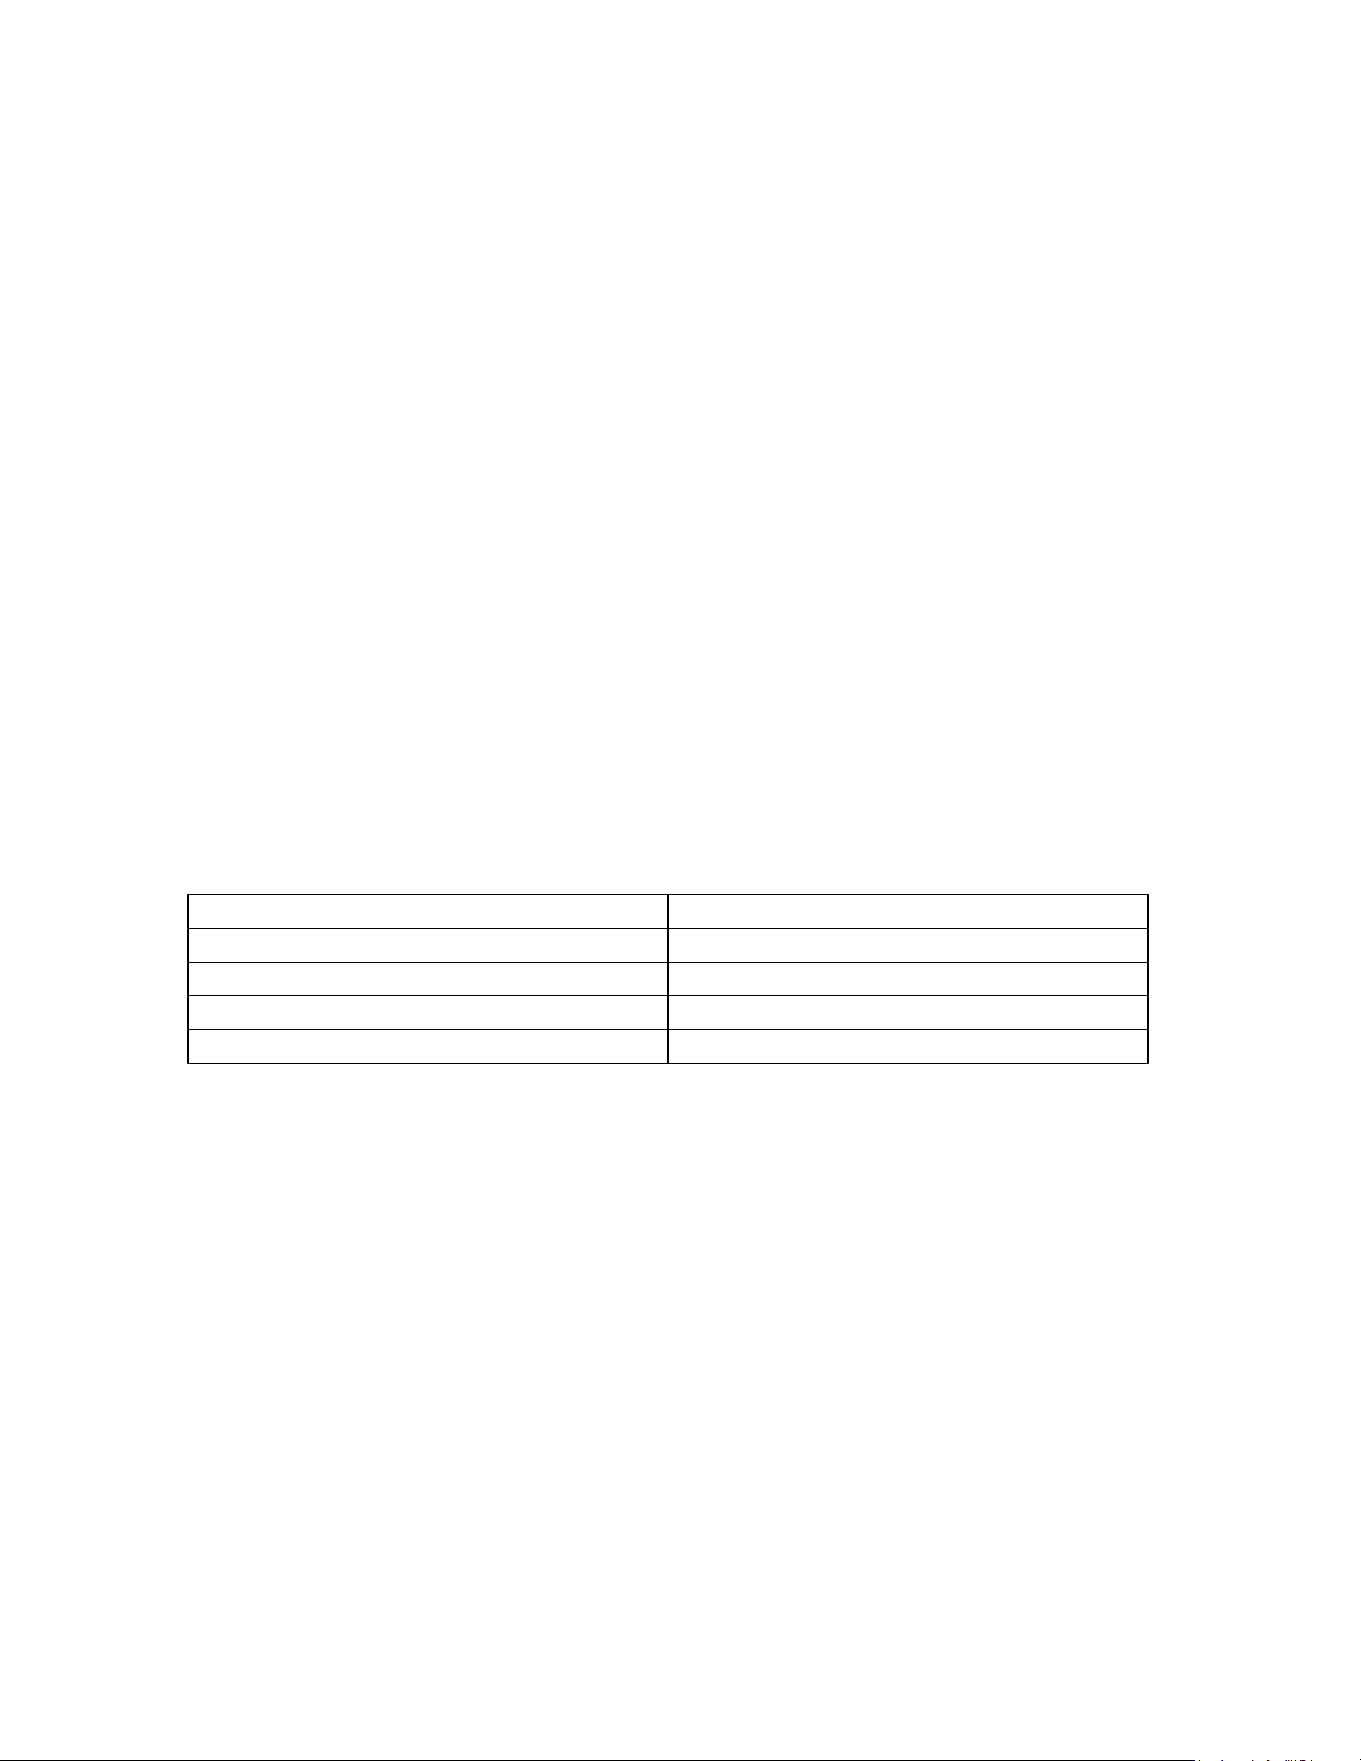
3.3 Item List
Name
Quantity
THS 1 Home HealthScan Main Unit
1 unit
Matching Magnet
1 piece
User Manual
1 copy
Certificate of Conformity
1 copy
USB Data Cable
1 piece
Packing List
1 copy
Contact the seller immediately if any items are missing or damaged.
3.4 Hardware Installation
► Place the THS 1 Home HealthScan on a stable horizontal surface to ensure stable
operation.
► Operating Conditions:
Ambient Temperature: 0℃~40℃ (Use air conditioning if temperature is not within
this range)
Relative Humidity: 20%~85% (to prevent condensation)
► Storage Conditions:
Ambient Temperature: -20℃ to 50℃
Relative Humidity: ≤85%
► Do not install the instrument in areas with excessive humidity, high temperature,
direct sunlight or drastic temperature changes, as these conditions may affect instrument
performance and lifespan.
3.5 Computer Configuration Requirements
THS 1 Home HealthScan is equipped with client software for exporting test records and
generating reports.
The computer for installing the software must meet the following minimum configuration
requirements:
System Requirement
Minimum Specification
Operating System
Windows 10 or later
Processor
Dual core or above
Memory (RAM)
1GB or above
Hard Disk Space
8GB or above
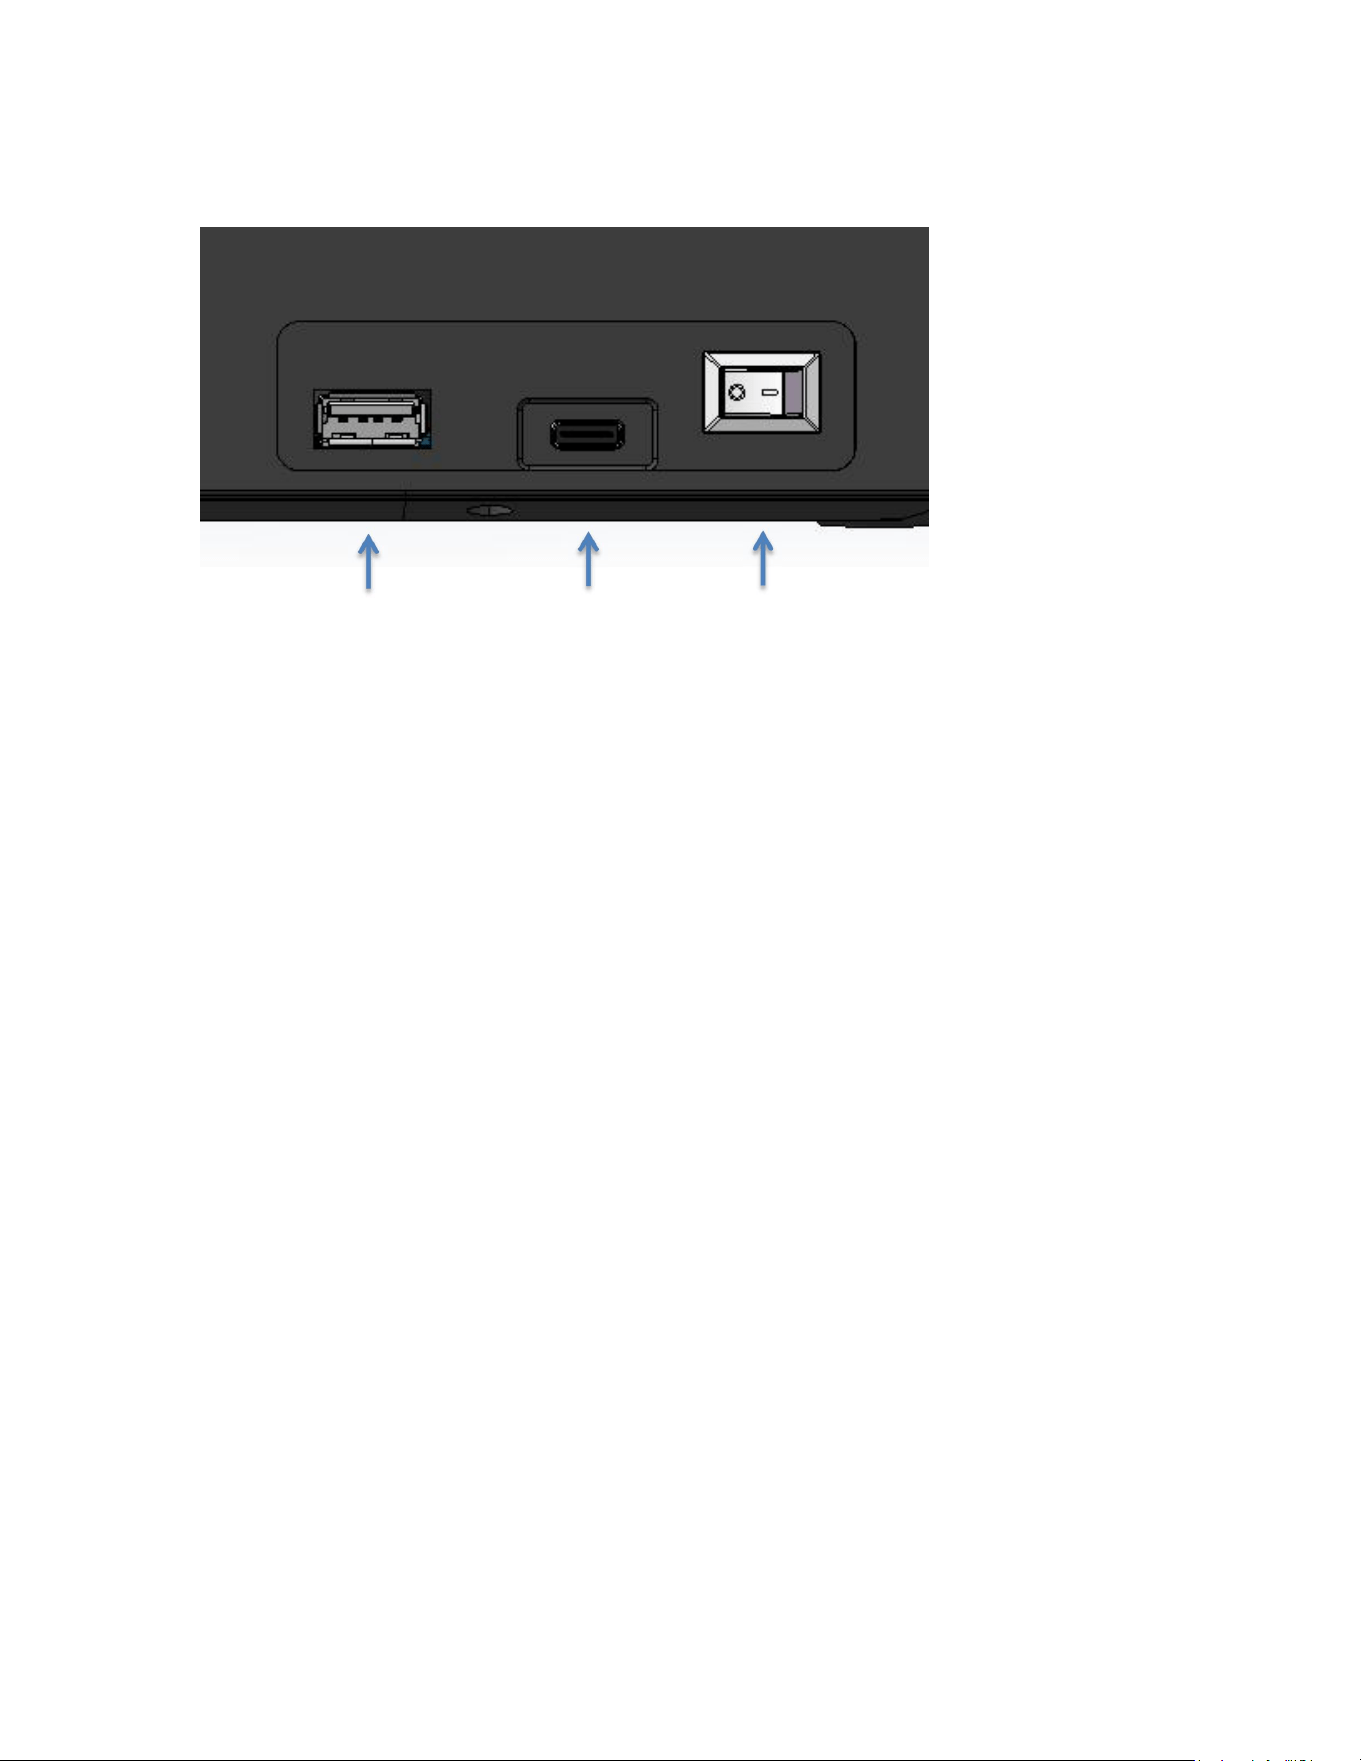
3.6 Device Interface Description
1 2 3
1. ► USB Interface: For connecting USB flash drive (data storage and export)
2. ► USB Type-C Interface: For device charging and data connection with computer
3. ► Power Switch: For power on/off operation
3.7 Instrument Operation Protection
Some samples processed by the instrument may contain potential biological hazards.
Handle all samples with care in accordance with relevant safety regulations. Wear
appropriate personal protective equipment including safety glasses, latex gloves and lab
coats when operating. Follow special environmental requirements if specified for sample
processing.
The user shall take necessary preventive measures to ensure safe operation and avoid
direct contact with potential infection sources.
Sample waste disposal must comply with all national, provincial and local health and
safety regulations. Infectious waste must be properly autoclaved before disposal at
designated locations.
3.8 Notes on Use
► Do not open the chamber door during the detection process!
► Connect the power charger for long-duration testing!
► Do not turn off the power switch directly during testing. To stop detection in advance,
click "Stop" on the touch screen and confirm before turning off the power.
► If the instrument runs continuously for 8 hours, it must be shut down and powered off
for 2 hours for cooling. Continuous 24-hour operation will significantly shorten the
instrument lifespan.
CHAPTER 4 INSTRUMENT OPERATION INSTRUCTIONS
4.1 Power On
After turning on the power, the boot screen will be displayed. The instrument will
initialize for about 5 seconds and then automatically jump to the main operation page.
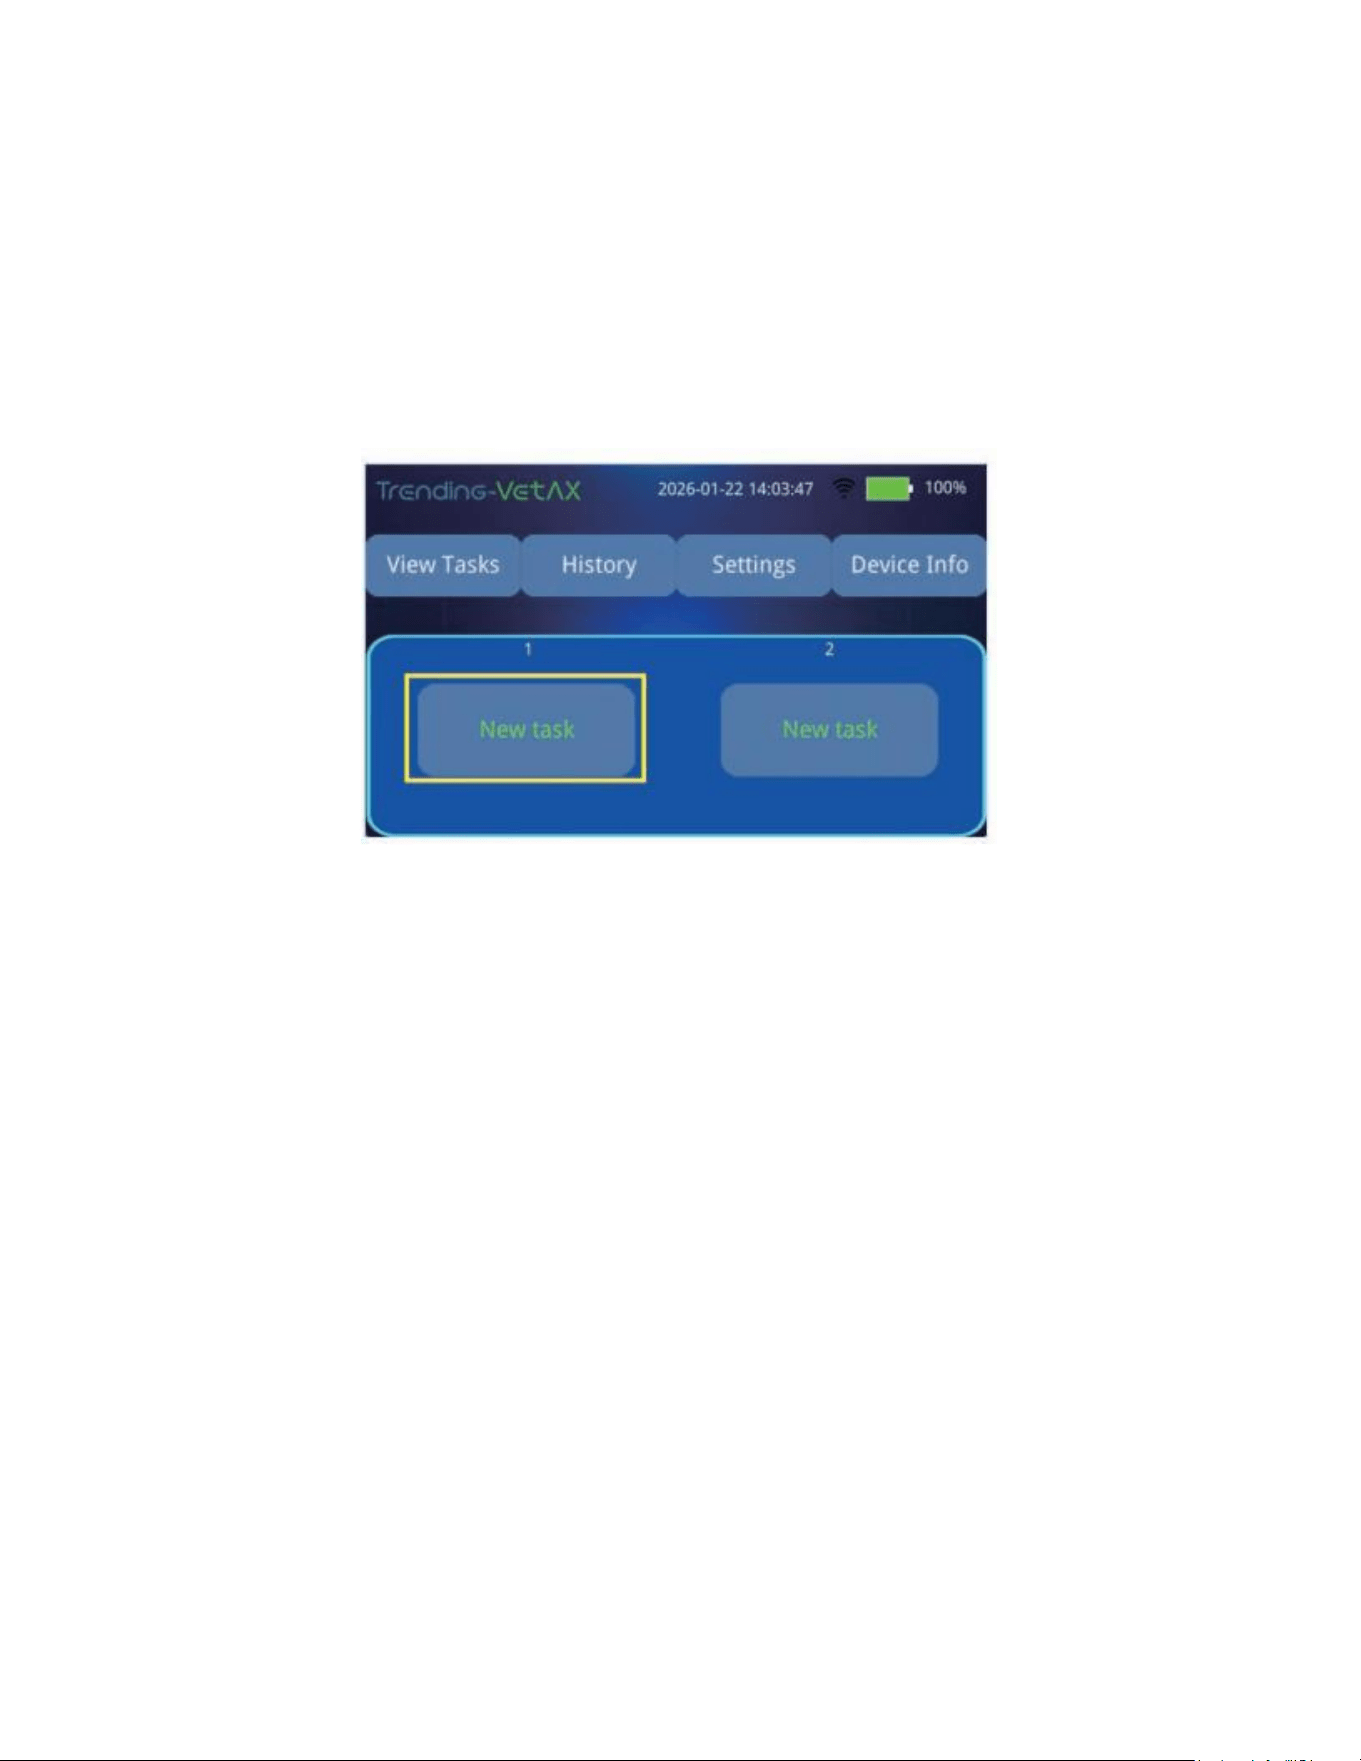
4.2 Main Page
There are 4 main function buttons at the top of the main page with the following
functions:
► View Tasks: View real-time information of ongoing tests on each channel
► History: View all completed test results and related information
► System Settings: Configure display language, system time, screen brightness and
standby time
► Device Information: View instrument model, serial number and software version
information
Two detection channels are displayed at the bottom of the main page, each with a "New
Task" button for initiating test operations.
4.3 Detection Operation Method
4.3.1 Insert the Reagent Card
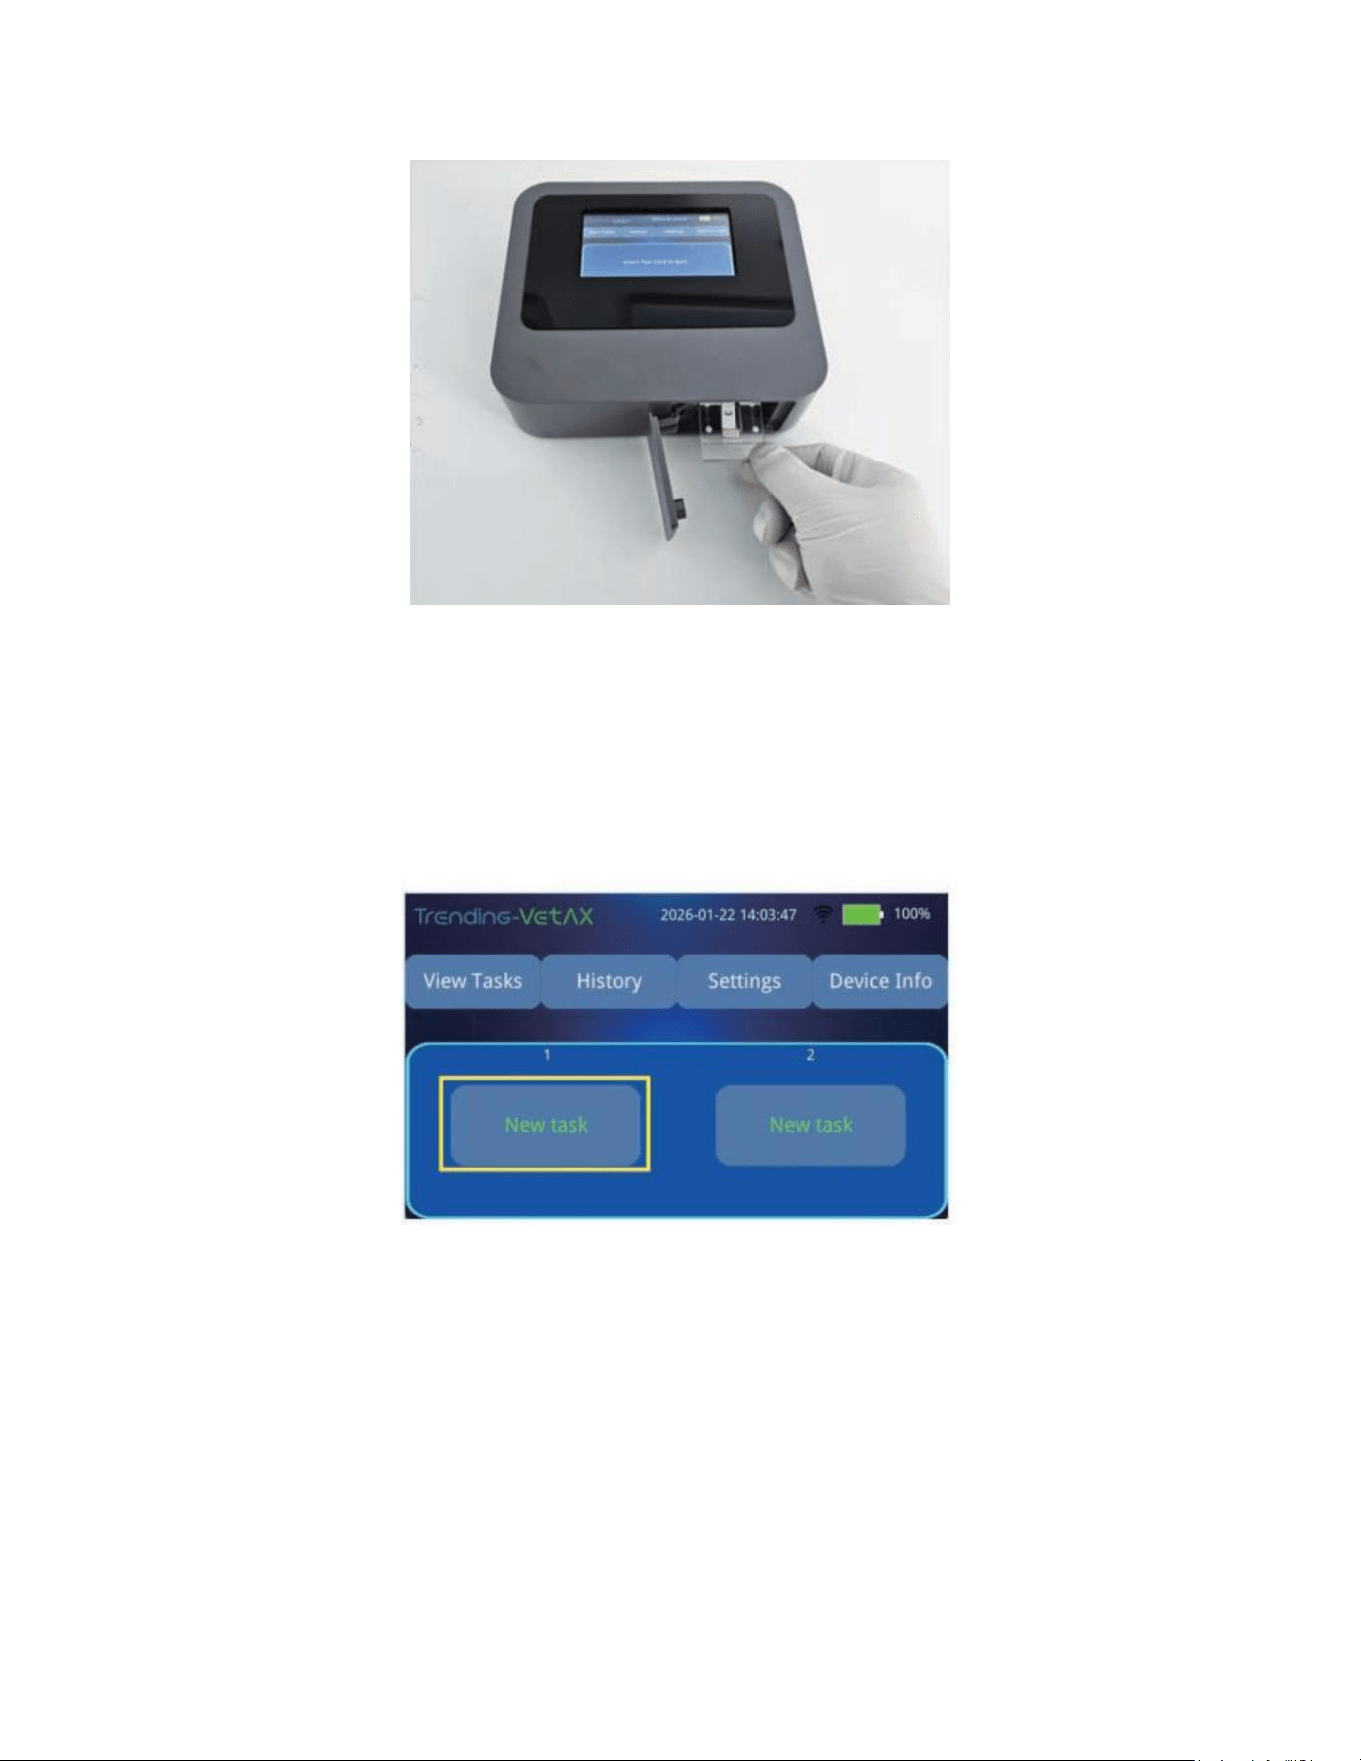
Before inserting the reagent card, ensure that the sample has been loaded and the
matching magnet has been correctly placed in the reagent card slot. Open the instrument
chamber door, insert the reagent card inward and press gently downwards until a "click"
sound is heard (indicating proper installation). The "New Task" button will appear on the
screen; click it to start setting up the detection task.
4.3.2 Create a New Detection Task
1. Click the "New Task" button. The screen will prompt you to confirm proper reagent
card insertion. Click "Yes" to enter the task editing page after confirmation.
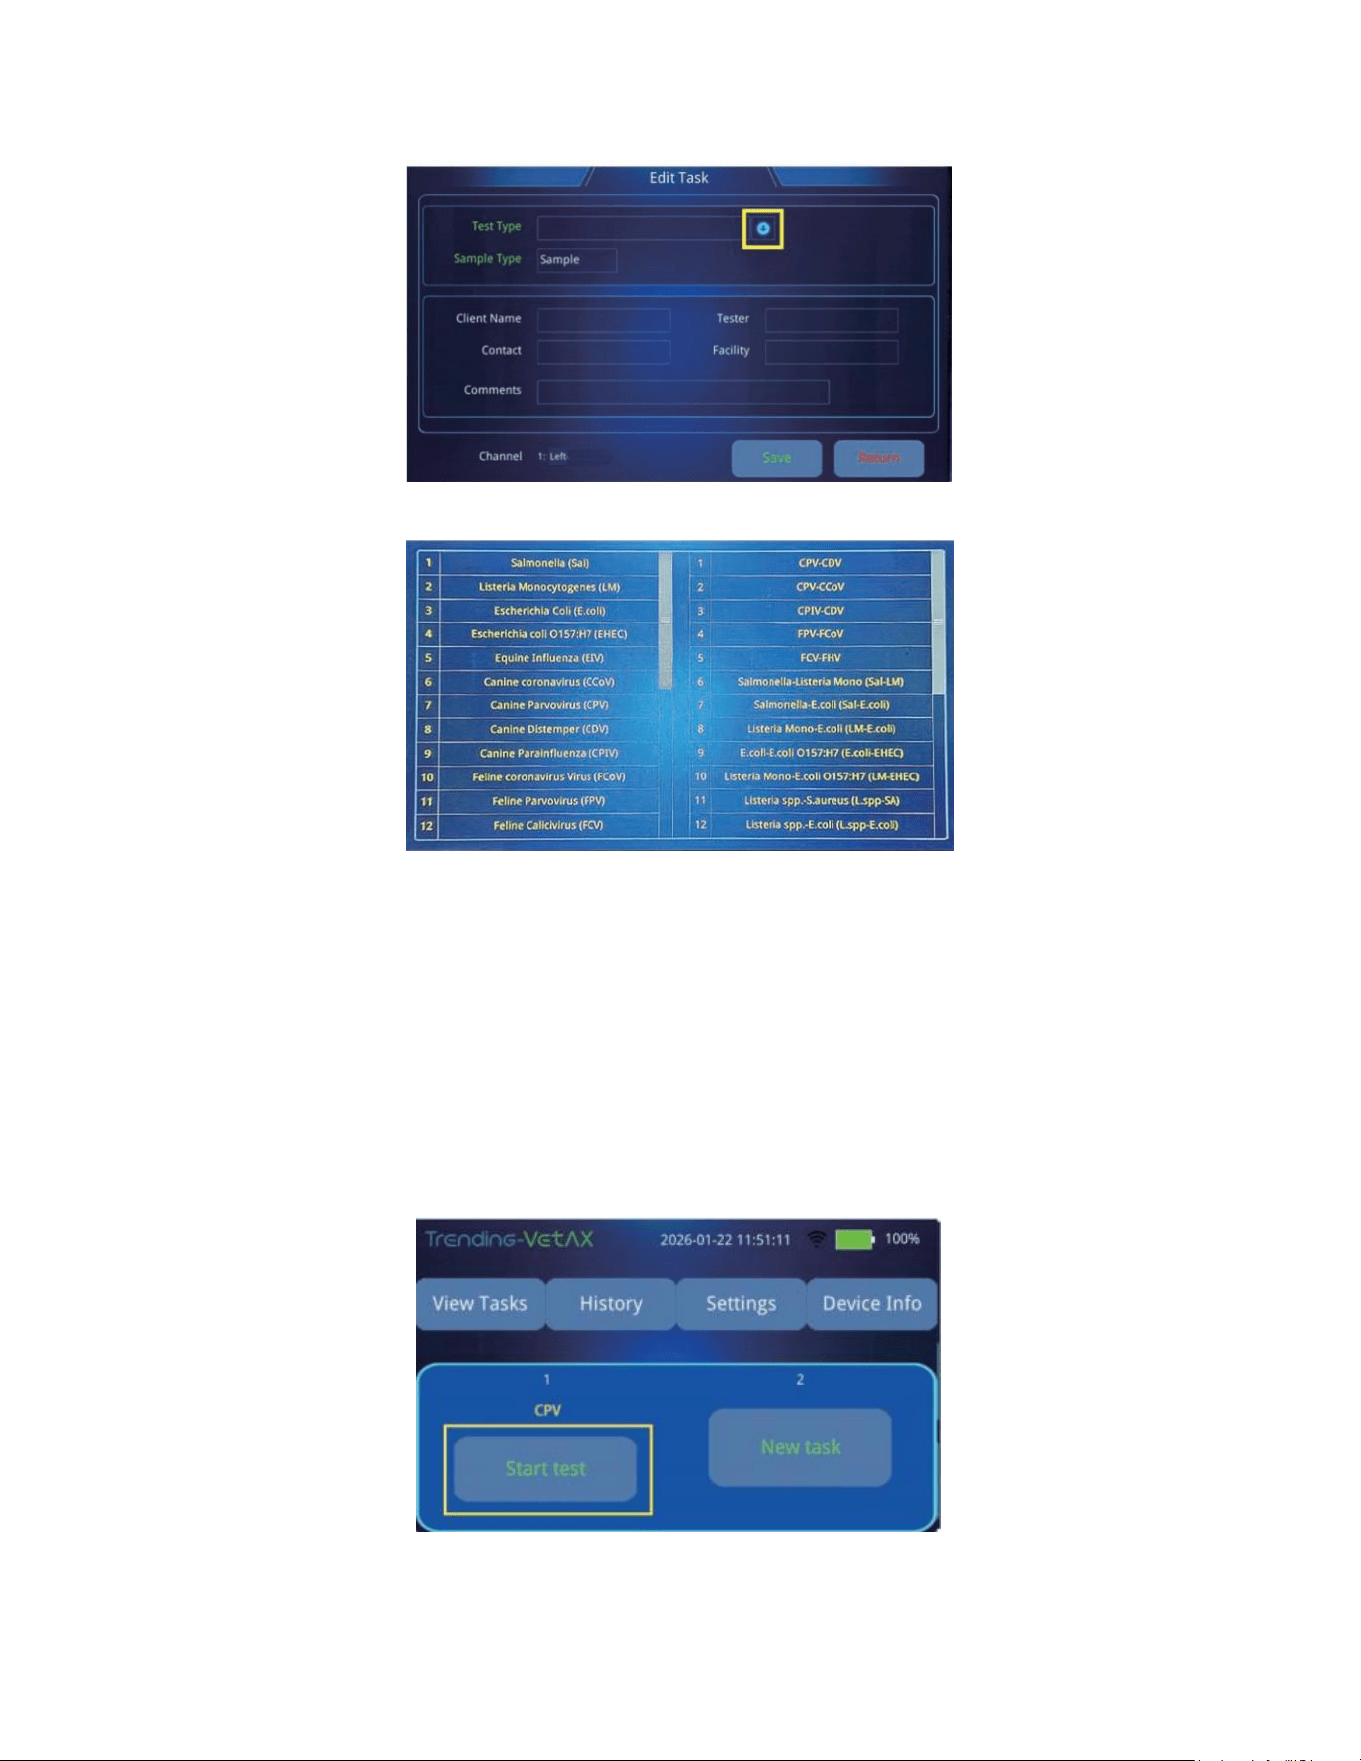
2. The following information can be set or filled in the task editing page:
► Test Type: Click the drop-down arrow to select test items (single test on left,
combined test on right). The screen will return to the editing page automatically after
selection.
► Sample Type: Click the drop-down arrow to select the appropriate sample type
(oral swab, fecal/anal swab, skin swab, blood, etc.)
► Additional Information: Fill in optional information such as tester name,
customer name, contact information, remarks, etc. as needed
3. Click the "Save" button after verifying all information to complete the task setup for
the selected channel.
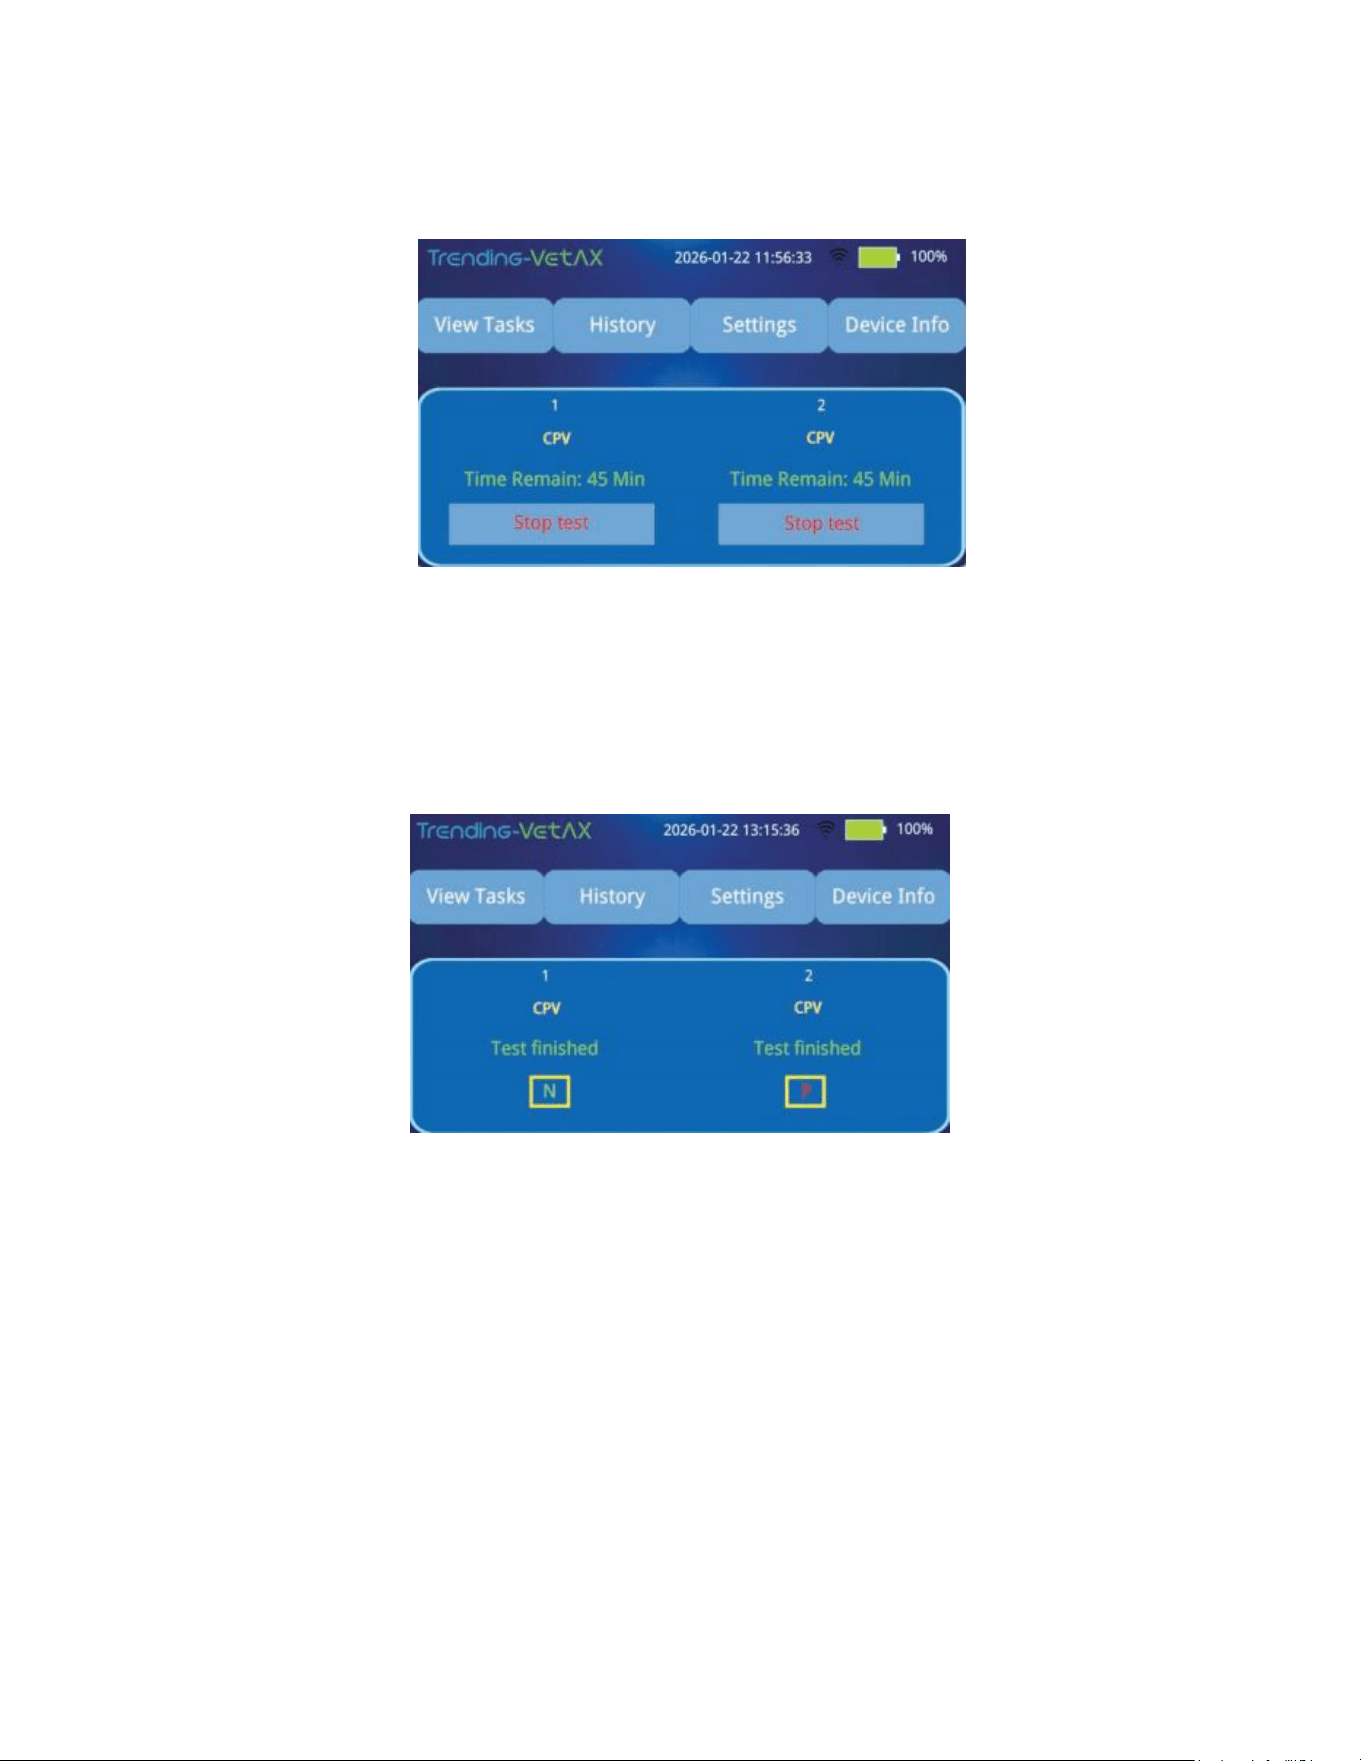
4. Repeat the above steps to set up the second channel if needed, then click "Start
Detection" to begin the test process.
5.
5. During testing, the screen displays the test item name and remaining time for each
channel. Do not move the instrument during the detection process to ensure accurate
results.
6. To stop an ongoing test, click the "Stop Detection" button for the corresponding
channel. A confirmation prompt will appear (note: canceling detection will render the
reagent card unusable). Confirm to cancel the test.
7. After completion, the screen automatically displays the test results for each channel.
Result interpretation: "P" means the target analyte is detected; "N" means the target
analyte is not detected.
8. After testing, remove the magnet from the reagent card for reuse and proper storage.
Used reagent cards and consumables are disposable and should be discarded properly in
accordance with biosafety regulations to prevent contamination.
4.3.3 Browse Ongoing Detection Task Information
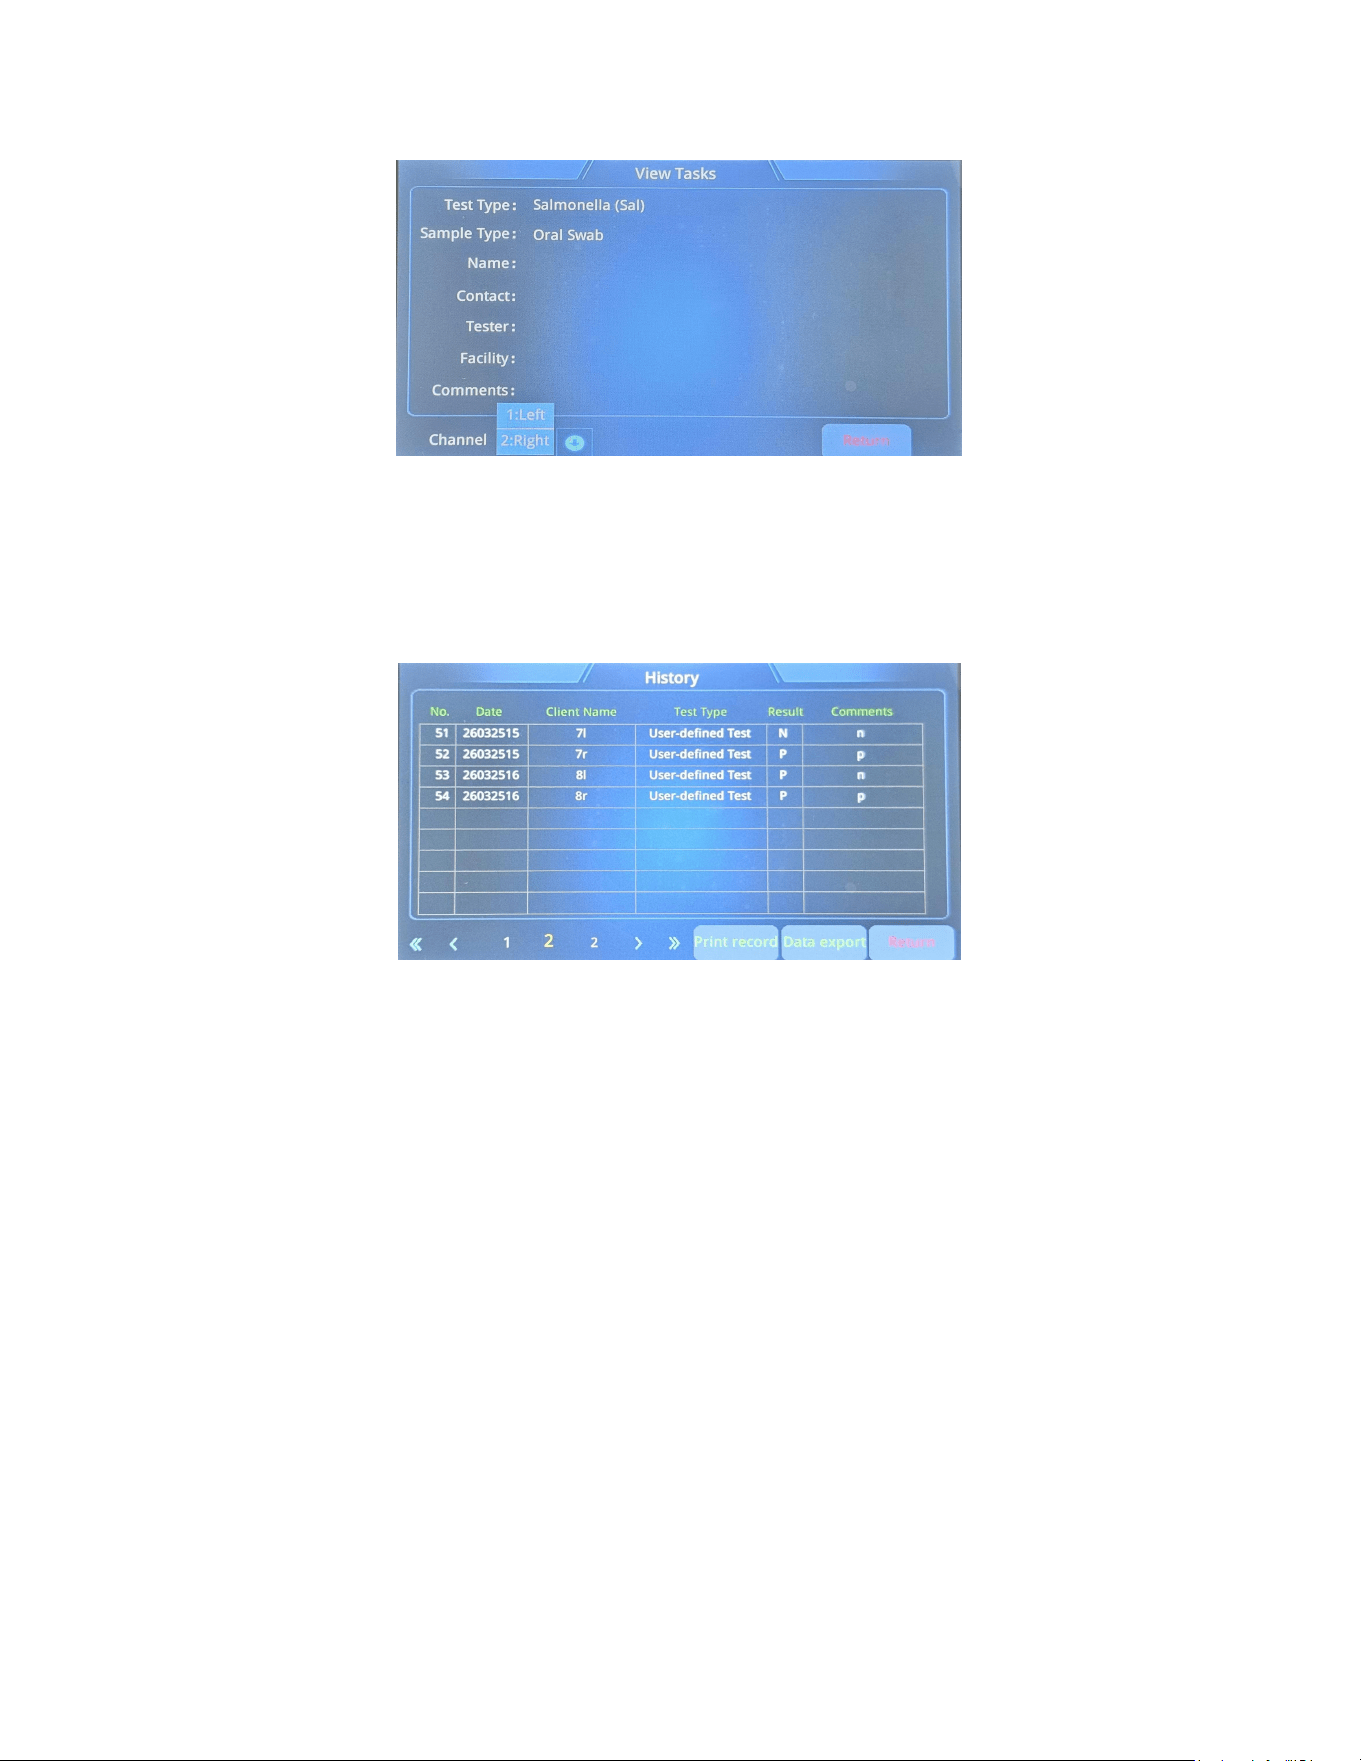
Click the "Task Browse" button on the main page to view detailed information of
ongoing tests. Click the "Channel" drop-down arrow at the bottom of the page to switch
between different detection channels and view their respective task information.
4.3.4 View Historical Records
Click the "Historical Records" button on the main page to view all completed test records,
including serial number, test date, customer information, test type, results and remarks.
Use the left/right arrows at the bottom of the page to navigate through multiple pages of
records.
With the matching "Home HealthScan Client Software", historical records can be
exported to a computer. The software also supports generating and printing formal test
reports from the historical data.
4.3.5 System Settings
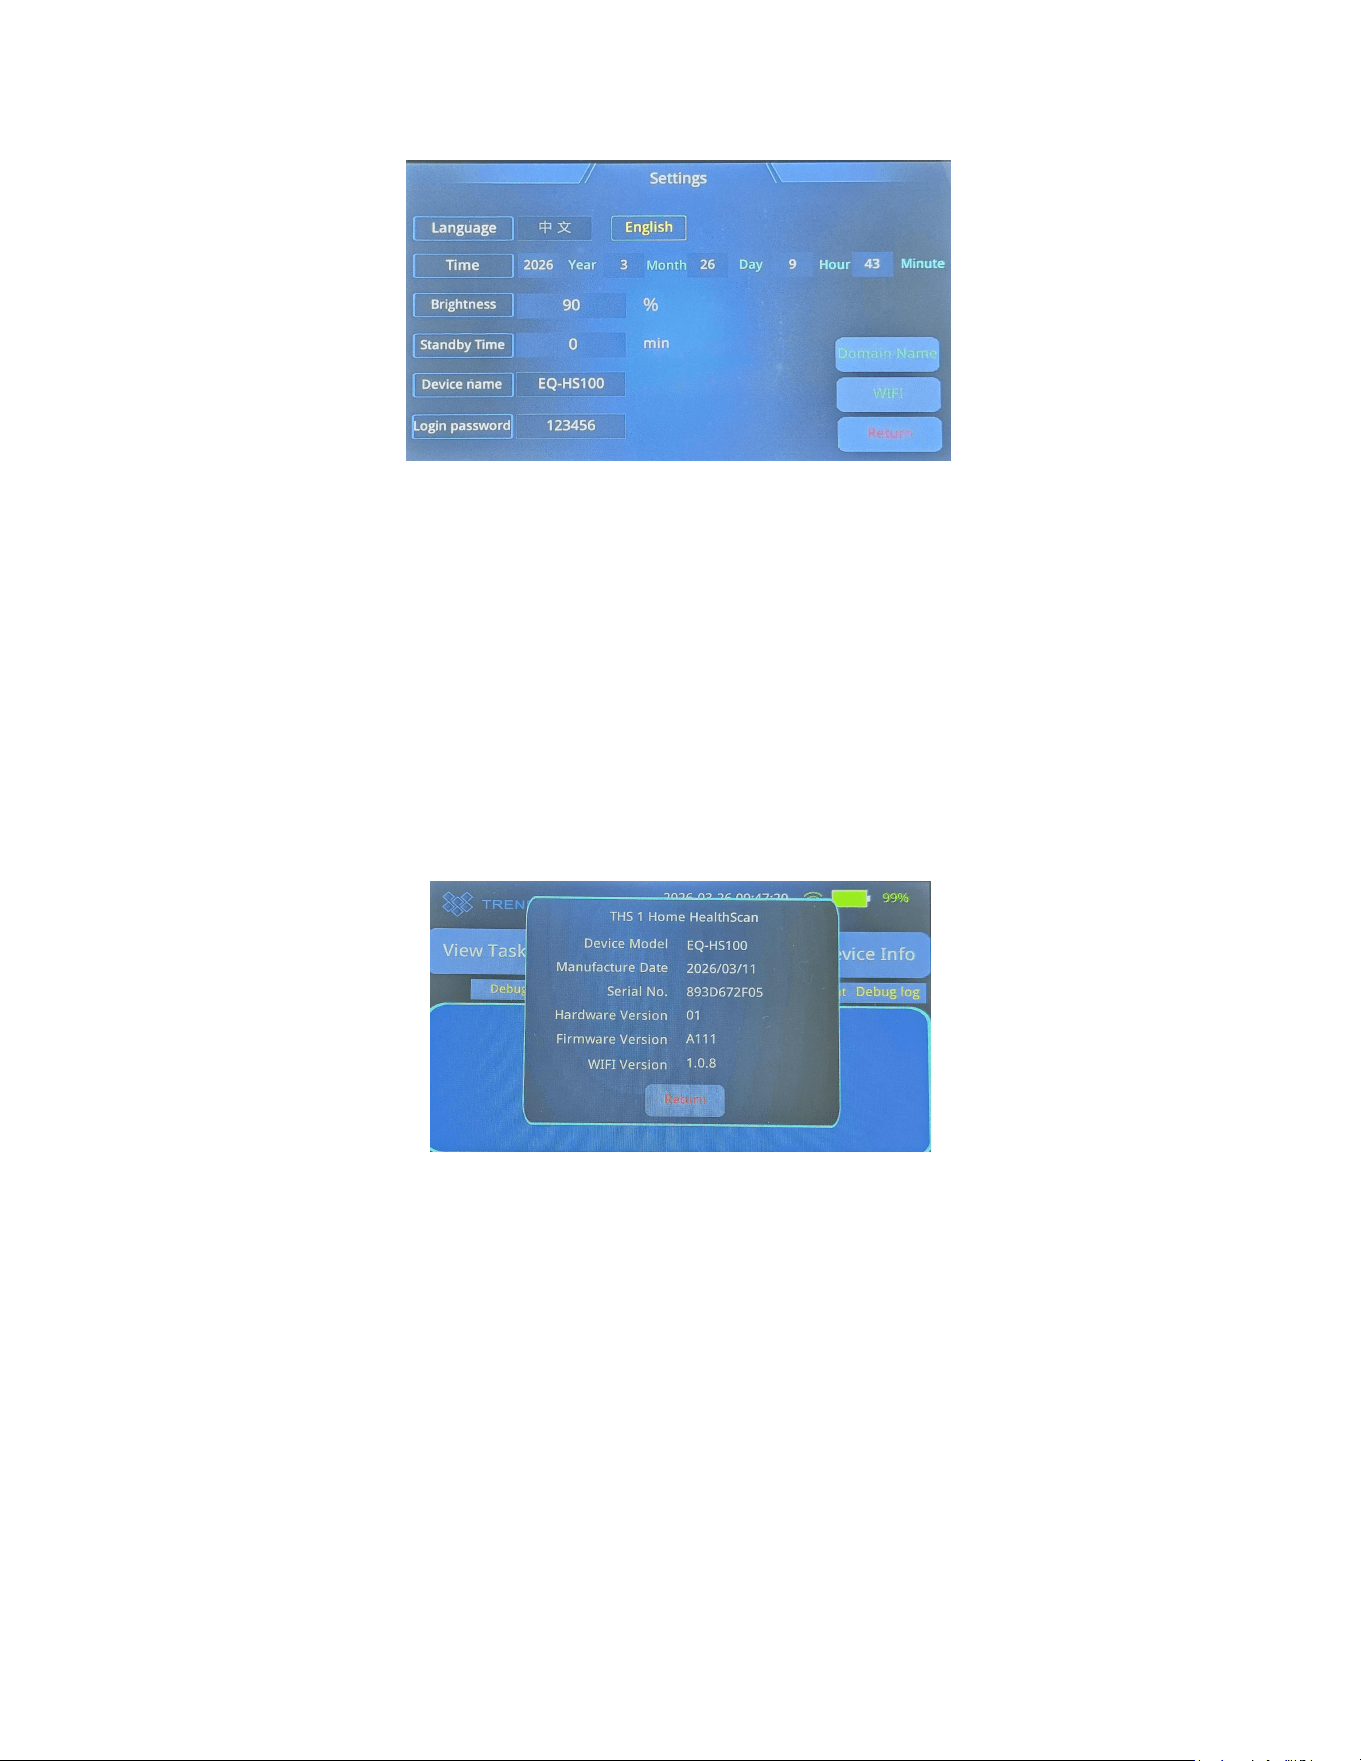
Click the "System Settings" button on the main page to configure the following
parameters:
► Language: Supports Chinese and English switching
►Time: Allows manual setting of year, month, day, hour and minute
► Brightness: Adjustable from 20% to 99% (lower brightness extends battery life)
► Standby Time: Adjustable from 0 to 10 minutes. The instrument will
automatically enter standby mode if no operation is performed within the set time when
no test is running. Setting to 0 minutes disables standby mode.
4.3.6 View Device Information
Click the "Device Information" button on the main page to view detailed instrument
information including model number, serial number, software version and hardware
specifications.

CHAPTER 5 INSTRUMENT MAINTENANCE AND NOTES
5.1 Instrument Cleaning
1. Surface Cleaning
Clean the instrument surface regularly with a soft cloth dampened with a small amount of
clean water. Gently wipe the surface and dry thoroughly with a clean soft cloth after
cleaning.
2. Cleaning Precautions
Always turn off the power and disconnect all external connections (data cables, USB
drives, charger) before cleaning to prevent electrical hazards and equipment damage.
5.2 Instrument Protection
1. Do not turn the instrument on and off frequently, as this may cause damage to
electrical components and shorten service life.
2. Contact our professional technical support immediately if the instrument malfunctions.
Do not attempt to disassemble or repair the instrument by yourself. Unauthorized
disassembly or repair will void the product warranty and may cause further damage.

FCC Caution.
This device complies with part 15 of the FCC Rules. Operation is subject to the following two
conditions:
(1) This device may not cause harmful interference, and
(2) this device must accept any interference received, including interference that may cause
undesired operation.
Any Changes or modifications not expressly approved by the party responsible for compliance
could void the user's authority to operate the equipment.
Note: This equipment has been tested and found to comply with the limits for a Class B digital
device, pursuant to part 15 of the FCC Rules. These limits are designed to provide reasonable
protection against harmful interference in a residential installation. This equipment generates uses
and can radiate radio frequency energy and, if not installed and used in accordance with the
instructions, may cause harmful interference to radio communications. However, there is no
guarantee that interference will not occur in a particular installation. If this equipment does cause
harmful interference to radio or television reception, which can be determined by turning the
equipment off and on, the user is encouraged to try to correct the interference by one or more of
the following measures:
-Reorient or relocate the receiving antenna.
-Increase the separation between the equipment and receiver.
-Connect the equipment into an outlet on a circuit different from that to which the receiver is
connected.
-Consult the dealer or an experienced radio/TV technician for help.
*RF warning for Mobile device:
This equipment complies with FCC radiation exposure limits set forth for an uncontrolled
environment. This equipment should be installed and operated with minimum distance 20cm
between the radiator & your body.

This device contains licence-exempt transmitter(s)/receiver(s) that comply with
Innovation, Science and Economic Development Canada’s licence-exempt
RSS(s). Operation is subject to the following two conditions:
1. This device may not cause interference.
2. This device must accept any interference, including interference that may
cause undesired operation of the device.
*RF warning for Mobile device:
This equipment complies with ISED radiation exposure limits set forth for an
uncontrolled environment. This equipment should be installed and operated
with minimum distance 20cm between the radiator & your body. A distance
between the surrounding area and the top surface of the device is greater than
20cm.
Cet appareil contient des émetteurs/récepteurs exemptés de licence qui sont
conformes aux RSS exemptés de licence d’innovation, sciences et
développement économique Canada. Le fonctionnement est soumis aux deux
conditions suivantes:
1.
Cet appareil ne peut pas causer d’interférences.
2. Cet appareil doit accepter toute interférence, y compris les interférences
qui peuvent causer un fonctionnement indésirable de l’appareil.
la distance entre l'utilisateur et le dispositif ne doit pas être inférieure à 20 cm