PD16
Portable Video Player with ATSC
V2
User Manual
*Please read the manual carefully before you use the product,
and keep the manual well after using.


Warm Tips
Register 2 Years Warranty For Free
by sending Amazon Order to
help@pofotovip.com
Email us: help@pofotovip.com

Customer Service
2 Years Free
Warranty
Free Accessories
Warranty
Email Us
Lifetime Customer
Support
60 Days Money-Back
Guarantee
Customer Support: help@pofotovip.com

Warranty and Support
WHAT IS COVERED BY THIS WARRANTY?
For help warranties the product hardware problem and accessories
contained in the original packaging against manufacturing defects for 2
Years from the date you bought your product
.
Warranty
Please send your Amazon Order to help@pofotovip.com to Register 2
Years Warranty .
WHAT IS NOT COVERED BY THIS WARRANTY?
This Warranty does not apply to damage caused by accidentabuse, misuse,
re, liquid contact, earthquake or any otherexternal cause.
Especially the cracked/broken screen that is damaged by theexternal
force is Not included in the warranty.


Contents
IMPORTANT SAFEGUARDS ........................................... 1
USEFUL TIPS ................................................................. 4
PACKAGE CONTENTS ....................................................7
BUTTON INTRODUCTION ............................................ 8
BUTTON AND PORT INTRODUCTION ........................................................................8
REMOTE CONTROL ........................................................................................................ 11
MENU OPERATION .......................................................................................................14
MODE OPERATIONS ....................................................19
DVD MODE ...................................................................................................................... 19
ATSC MODE ..................................................................................................................... 21
AV OUT MODE ................................................................................................................. 23
USB / CARD MODE ........................................................................................................23
MEMORY CARD OPERATION .................................................................................... 24
HD IN OPERATION ........................................................................................................25
FM RADIO ........................................................................................................................26
EASY ACCESS PROGRAMMING ...................................28
SPECIFICATION .......................................................... 30
TROUBLESHOOTING ................................................... 31
WARRANTY ................................................................. 34
Warning .......................................................................35
Regulatory Notices — FCC Part 15 (Class B) .................36

1
IMPORTANT SAFEGUARDS
• Always follow basic safety precautions when using electrical products.
• Install the device according to the operating instructions.
• Supervision is required when using around children.
• To avoid personal injury, risk of re or damage to the unit, ensure that the
voltage of the main power source matches that of the unit. Disconnect
immediately and contact us in case of unusual smell or noise.
• To avoid damage to the cornea, DO NOT look directly or expose yourself
to the DVD player laser lens or laser beam.
• To avoid damage to the player lens, ensure that the inserted disc isn't
broken, distorted or mended.
• Keep this device away from extremely hot or cold places. Do not expose
the DVD player or remote control to excessive and direct heat (sunshine,
re, etc.).
• To prevent the risk of electrocution, do not use in damp environments
such as bathtubs, kitchens, swimming pools, and the like.
• Do not touch with wet hands.
• Ensure that the device is not exposed to a risk of splashing and dripping
and that no objects lled with liquids is placed near or on the device.
• Do not expose to high humidity, dust or smoke.
• Do not place any naked ame sources, such as lighted candles, on the
apparatus.
• Do not place the DVD player near heat sources such as radiators, heaters,
stoves, or other apparatus(including ampliers) that produce heat.
• Do not drop or throw the device, or subject it to strong vibrations or
collisions. If the LCD screen were to break, DO NOT touch the screen
liquid and contact us immediately. If your skin accidentally touches the
LCD screen liquid, run your skin under water for at least 15 mins.
• Disconnect all cables before cleaning.
• Do not use polishing cloth, abstergents, any type of propellant or
chemical detergent (alcohol, benzene, etc.) to clean your device.

2
• The power cord should not be walked on or pinched, particularly where it
exits the device or where it connects to the plug.
• Do not block the ventilation holes.
• Unplug the product during lightning storms or when unused for long
periods of time.
• Do not operate this device with a damaged cord or plug, or after it
malfunctions or has been damaged in any manner.
• Keep magnetic objects, such as speakers, away from the unit.
• Please contact us immediately at help@pofotovip.com.net if any issues
arise or if you have any questions.
• To prevent re or electrocution, DO NOT use the power cord with an
extension cord, power cord strip or multi-plug wall mount outlet unless
the prongs can be fully inserted into the socket.
• Do not place on any objects that would completely block the ventilation
holes and cause the unit to overheat (such as sofa, bed, and other
fabrics).
• Store your discs in a cool area to avoid damage from heat.
• Keep batteries away from children and pets.
• Never throw batteries into a re or expose them to re or other heat
sources.
• Follow the battery safety and usage instructions.
• When using with earphones, ensure that the volume is at its lowest
prior to adjusting to your liking to avoid damaging your eardrum.It isn't
recommended listening to audio at a high volume level for extended
periods of time.
• This set features an optical laser beam system in the CD mechanism
designed with built-in safeguards. Do not attempt to disassemble.
Exposure to this invisible laser light beam may be harmful to the eye.
Use of controls, adjustments or procedures other than those specied
herein may result in hazardous laser light beam exposure. This compact
disc player should not be adjusted or repaired by anyone except qualied
service personnel.

3
• This user manual is for reference only. No further notice is available for
modications of the information contained therein. Features and design
of this device are subject to change without notice.
PLEASE NOTE: POFOTO does not accept liability for interference in the
unit caused by means of unauthorized modications. Tampering with the
internal systems by any means will void the warranty.
4
USEFUL TIPS
1. Battery
Please recharge the Battery for at least 6 hours before the initial use. lf you
connect this player with AC power, you can use it directly.
Note: The left indicator light will light up red when charging, and the red
light will turn off when the battery is fully charged. When the device is
turned on, the right indicator light will light up green.
2. Power switch
Slide the Power switch on the right side of the player to "ON" position to
turn on the player after connecting the mains power supply. Slide the Power
switch on the player to "OFF" position to turn off the player completely.
When the DVD player is turned off, the power indicator will go out.
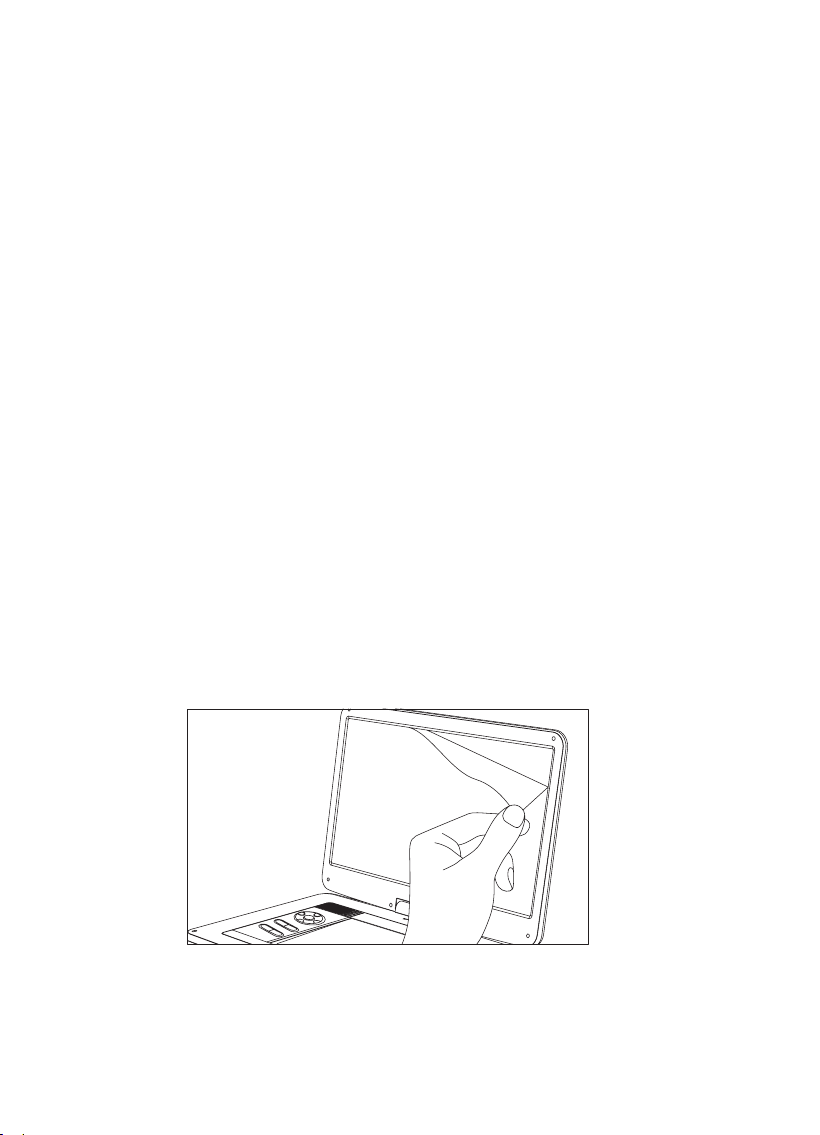
3. LCD Screen
lf you nd scratches on the screen, just remove the screen protector.
5
5. Disc Format
• Disc Format supported
File Supported Format
Compatible Disc
CD, DVD, DVD+R/-R, DVD+RW/-RW, VCD, SVCD, CD-R/
RW
Audio
MP3, OGG, MPEG1 Layer2, MPEG1 Layer3, WMA (Bit
rates 32-192kbps)
Video
AVI, MPG, VOB, MPEG1, MPEG 2, MPEG 4 (Resolution
must be within 720*480)
Picture JPG
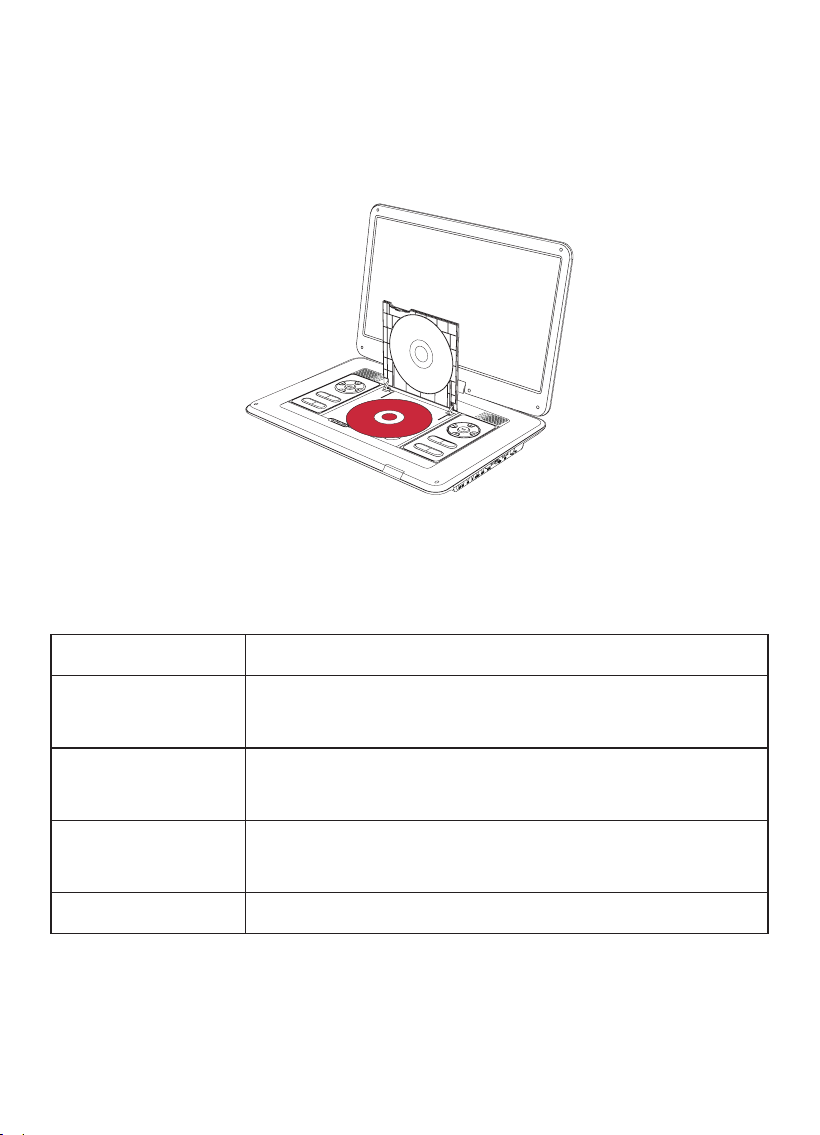
4. Laser Pickup
There is a card inside the player. Before you insert a disc, please remove the
card. Please DO NOT touch the laser pick up or other parts with your hand
Loading...
6
• Disc Format NOT Supported
Blu-ray, HD DVD, Discs recorded in the AVCHD format, DVD-Audio, Version
1.0 of DVD-RW, DVD-ROM, CD-ROM, CDV, CD-G, SACD, Photo CD, DVD-RAM
that cannot be removed from their cartridges, 2.6-GB and 5.2-GB DVD-
RAM, PAL discs.
• Language Settings
Press key [SET UP] [OSD Lang]
Change the display language. lt is the same procedure for Audio, Subtitles
and Menu.
• About the Maintenance
Wipe with a soft, dry cloth to clean this unit.
Use eyeglass cleaner to remove stubborn dirt from the LCD.
Do not use alcohol, paint thinner or benzine to clean it.
Do not press onto the LCD screen or drop the product from a high place.
This unit is not waterproof. To prevent getting wet, do not place any
container with liquid near this unit (such as a vase or ower pot) or
expose it to dripping, splashing, rain or moisture.
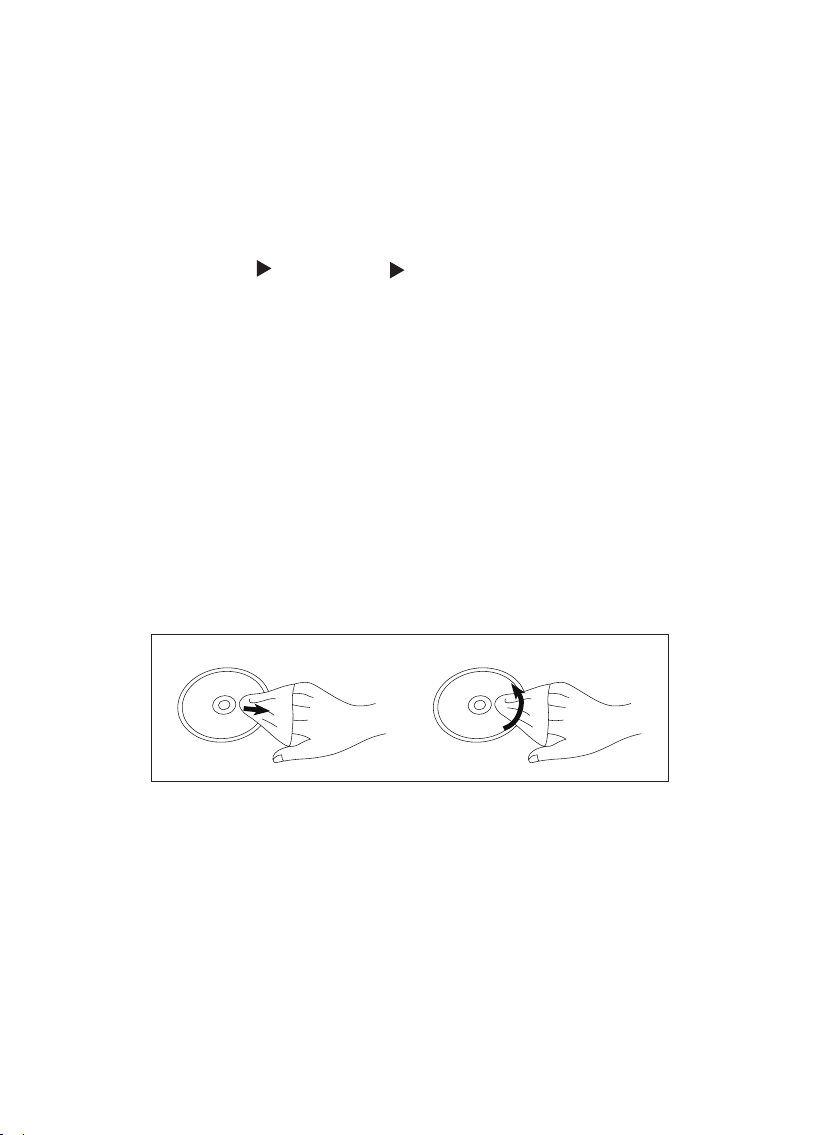
DO NOTDO
To clean discs, wipe with a damp cloth and then wipe dry.
Do not attach labels or stickers to any discs (This may cause disc warping,
making it unusable).
Do not write on the discs with a ball-point pen or any other writing
instrument.
To protect discs from scratches and dirt, please return them to their
cases or cartridges when hey are not in use.
Do not use discs that are badly warped or cracked, or irregularly shaped
discs, such as heart shapes.
7
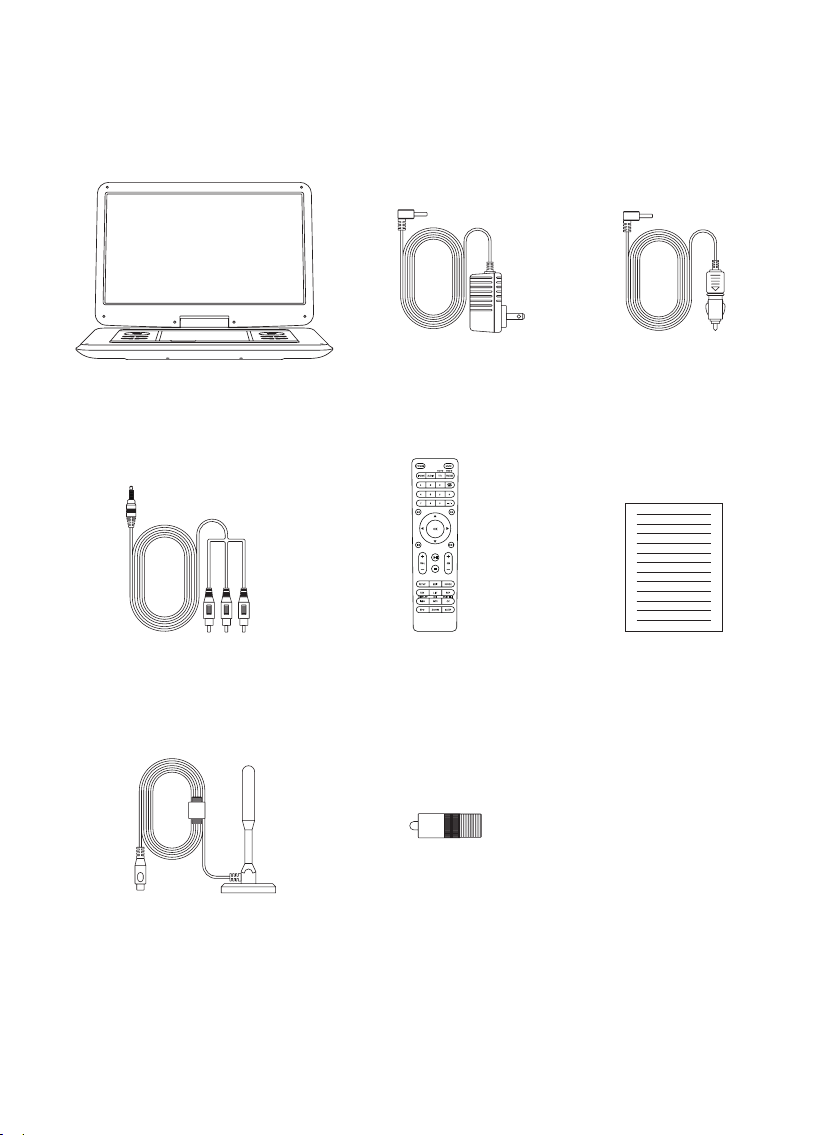
PACKAGE CONTENTS
Portable DVD Player
AV Cable
Active TV antenna
Car Charger
User Manual
AC Adapter
Remote Control
TV connector
RETURN
8
BUTTON INTRODUCTION
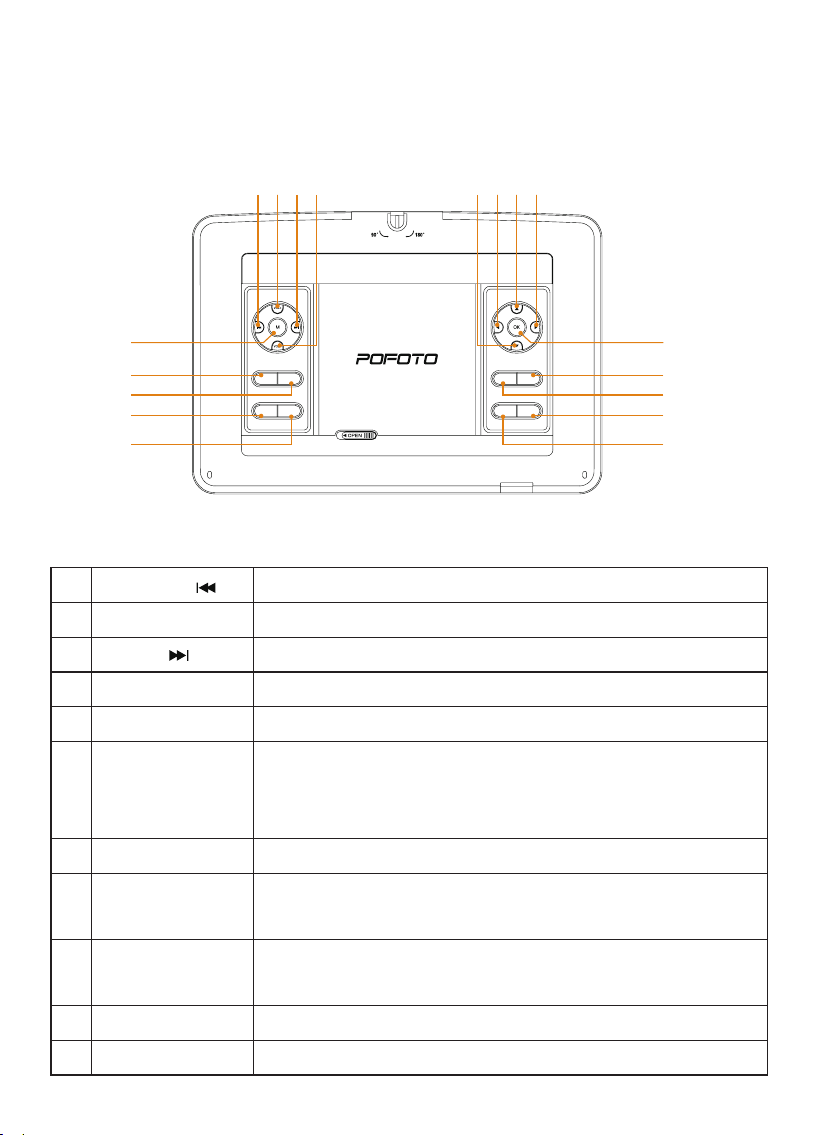
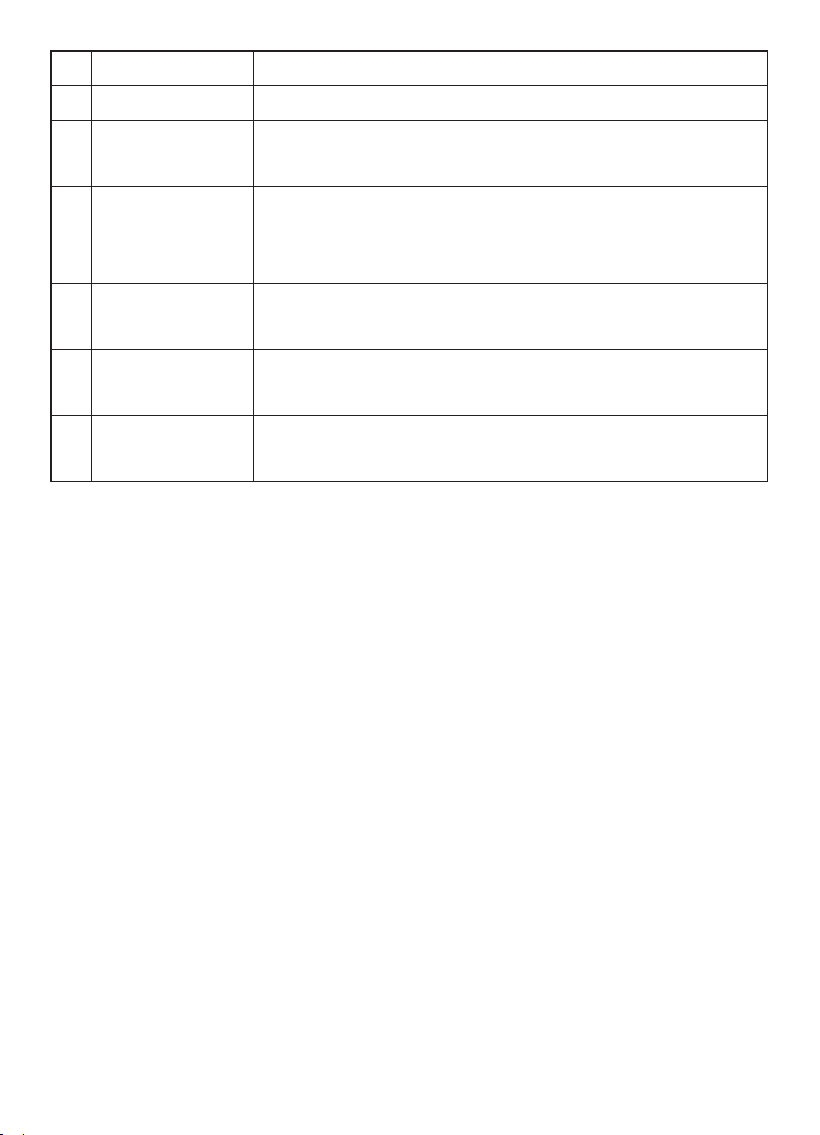
Button and Port Introduction
1
6
5
14
15
7
16
8
17
9
18
10
2
11
3
12
4
13
1 Previous Press to return to the previous chapter
2 VOL + Press to increase volume, maximum to 100
3 NEXT Press to enter to the next chapter
4 VOL - Press to decrease volume, minimum to 00
5 MENU Press to view the main menu on a loaded DVD
6 LCD
Turn on/off the LCD screen
(For complete power off, slide the side switch
from ON to OFF)
7 SUBTITLE Press to select subtitles in DVD mode
8 REV
Press to select the rewind speed, 2X, 4X, 8X, 20X,
press "OK" to cancel
9 FWD
Press to select the fast forward speed, 2X, 4X, 8X,
20X, press "OK" to cancel
10 DOWN Direction Keys, down; CH-
11 LEFT Direction Keys, left
LCD STOP
REV USB/C ARD
SUBTITLE MODE
FWD SETUP
9
12 UP Direction Keys, up; CH+
13 RIGHT Direction Keys, right
14 OK
Press once to pause the playing. Press again to
resume
15 MODE
Press to select among different input signal
sources:
ATSC/DVD/CARD/AV/HD IN/USB/FM Radio
16 STOP
Press to suspend current broadcast; stop TV
searching
17 SETUP
Press to enter the setup menu, then use the
direction keys and OK to set the system menu
18 USB/CARD
Press repeatedly to switch among the input of the
Disc, SD card, USB source
10
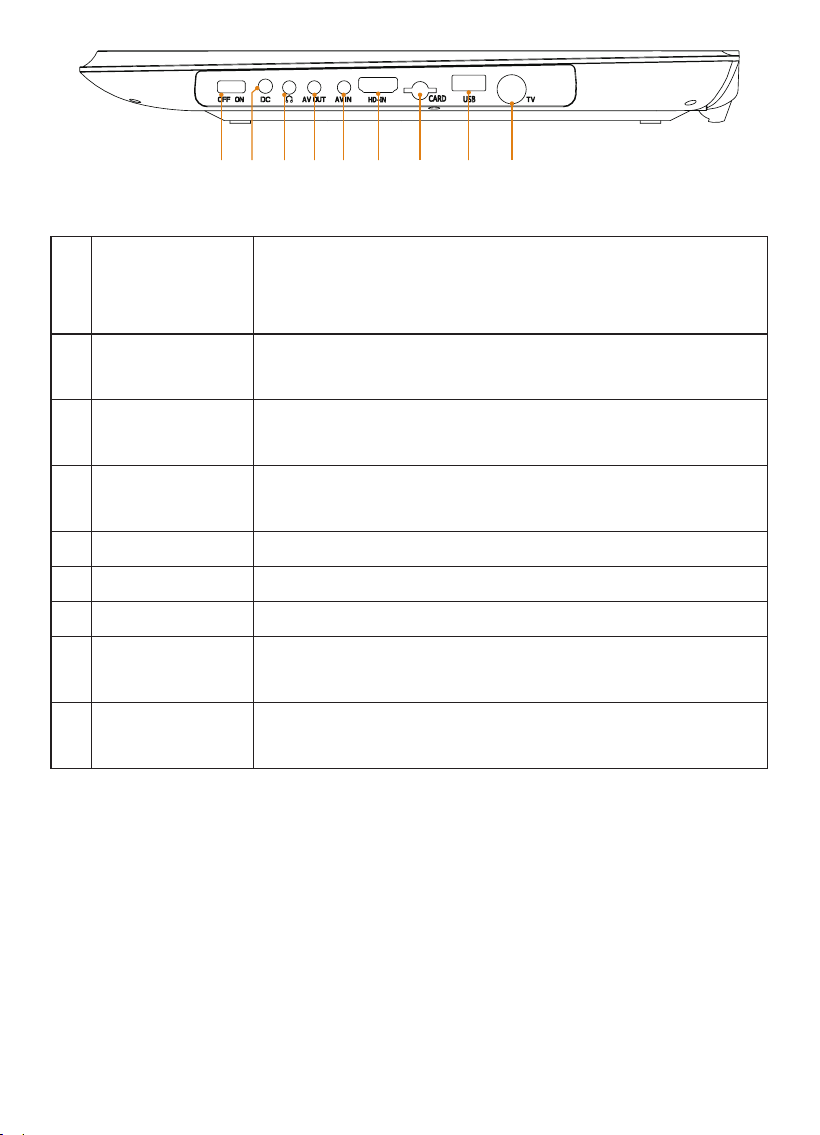
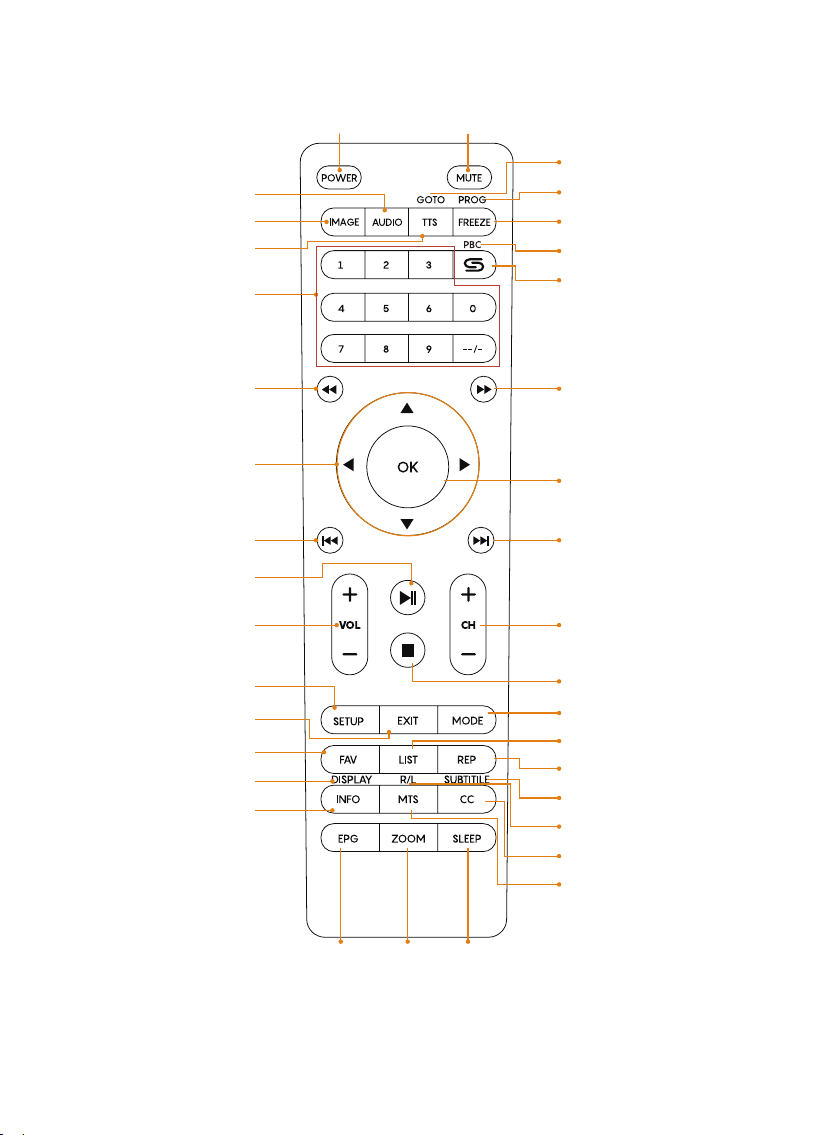
16 5789 234
1 TV
To connect to the aerial socket on the wall with the
RF coaxial cable. (When using ATSC and FM Radio
functions, please connect an antenna)
2 USB
Allows the insertion of a USB storage device to play
video, audio, photo and text les (Media mode)
3 CARD
Allows the insertion of a SD st orage device to play
video, audio, photo and text les
4 HD-IN
To connect to a High-Denition (HD) signal output
device, such as a Fire TV Stick
5 AV-IN AV IN by AV cable
6 AV OUT AV OUT by AV cable
7 SUBTITLE Press to select subtitles in DVD mode
8
Headphone
out
To connect to the earphones
9
POWER ON/
OFF
To turn on the machine and turn the machine off
11
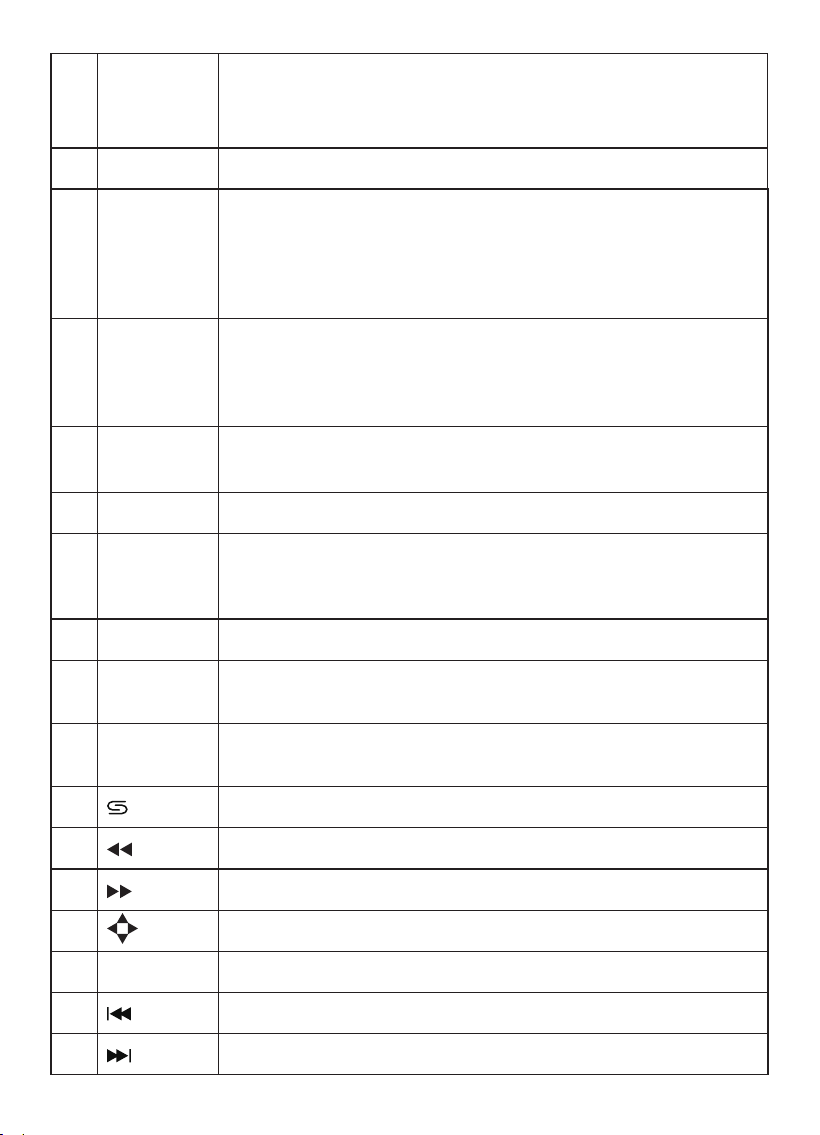
Remote Control
1
12
13
14
15
16
20
22
21
24
23
25
26
28
27
31
30
33
29
32
34 35 36
17
18
19
2
3
4
5
6
7
8
9
10
11
RETURN
12
1 Power
Turn on/off standby mode (low-power state)
For complete power off, slide the side switch from
ON to OFF
2 MUTE Enable/disable the sound output
3 AUDIO
Change the sound preset mode to standard, music,
movie, sports, user mode (expect FM Radio mode)
Press to close or open the display screen, and this
operation won't take affect on the FM Radio receiving
(only in FM Radio mode)
4 IMAGE
Change the picture preset mode (expect FM Radio
mode)
Press to scan and save the FM frequency channels
automatically (only in FM Radio mode)
5 GOTO
Reach the desired title/section, or play time. (only in
DVD mode)
6 PROG Programming the order in which chapters are played
7
TTS
(Text to
Speech):
Convert machine’s language text to speech. (only in
ATSC mode)
8 FREEZE Pause the video. (only in ATSC mode)
9
Channel
Keys
Use the number keypad to change the channel
10 PBC
View the main menu on a loaded DVD. (only in DVD
mode)
11 Return Go to the last viewed channel. (only in ATSC mode)
12 Fast rewind
13 Fast forward
14 Browse up/down/left/right in menu list
15 OK Conrm a selection
16 Go to the previous track
17 Skip to the next track
13
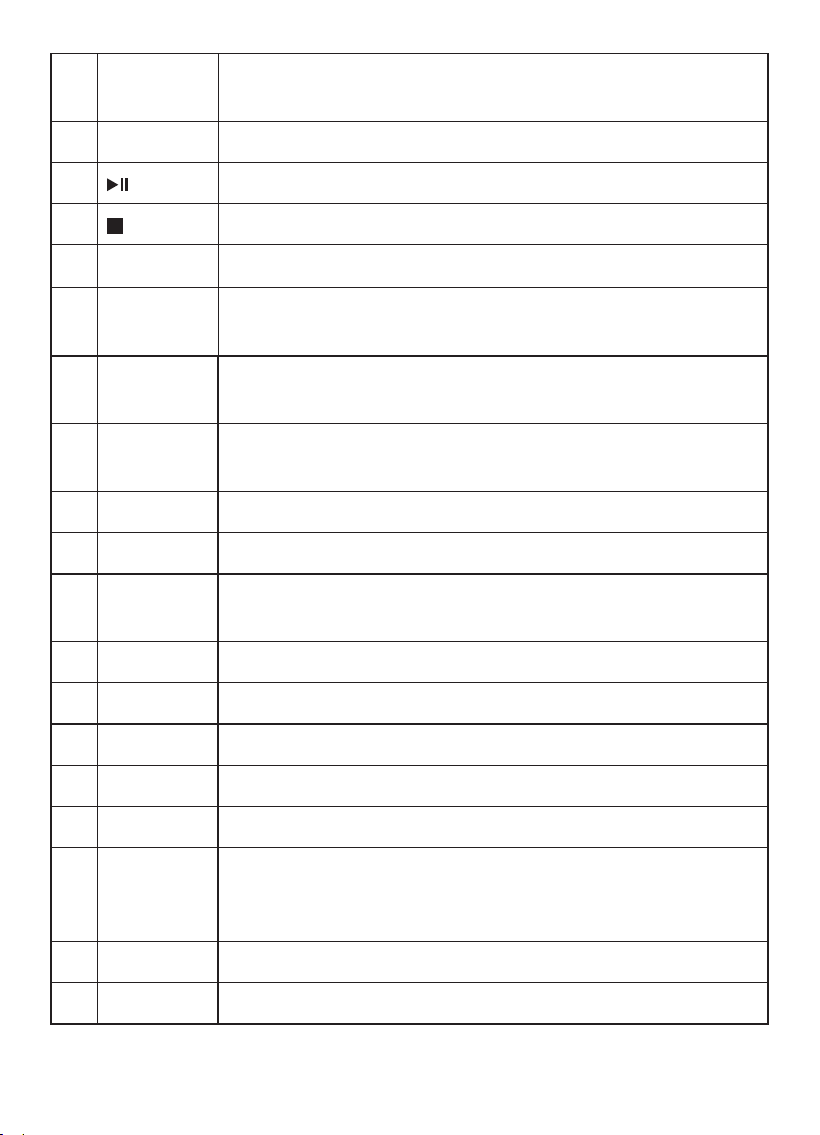
24 EXIT
Returns to the desktop. (DVD and ASTC mode)
Returns to the previous level. (CARD and USB mode)
25 FAV
View the channels in your favorites list. (only in ATSC
mode)
26 LIST View all the available channels. (only in ATSC mode)
27 REP Play music or video repeatedly
28 DISPLAY
Display the video information such as title, play time
(only in DVD mode)
29 R/L Switch left and right sound track
30 SUBTITLE Start/disable subtitle (DVD MODE)
31 INFO View program information (only in ATSC mode)
32 MTS Change the default audio language (only in ATSC mode)
33 CC Start/disable subtitle (ATSC mode)
34 EPG
If available, view program guide information from over-
the-air ATSC
TV broadcasts
35 ZOOM Change the size of the screen
36 SLEEP Set a sleep timer (max 240 minutes)
18
VOL+/
VOL-
Increase/decrease the volume level
19 CH+/CH- Change the channel up or down. (only in ATSC mode)
20 Start, pause, or resume playback
21 Stop playback
22 SETUP View the setup menu
23 MODE
Change the input source mode (ATSC, DVD, CARD, AV,
HD IN, USB, FM Radio)
14
Menu Operation
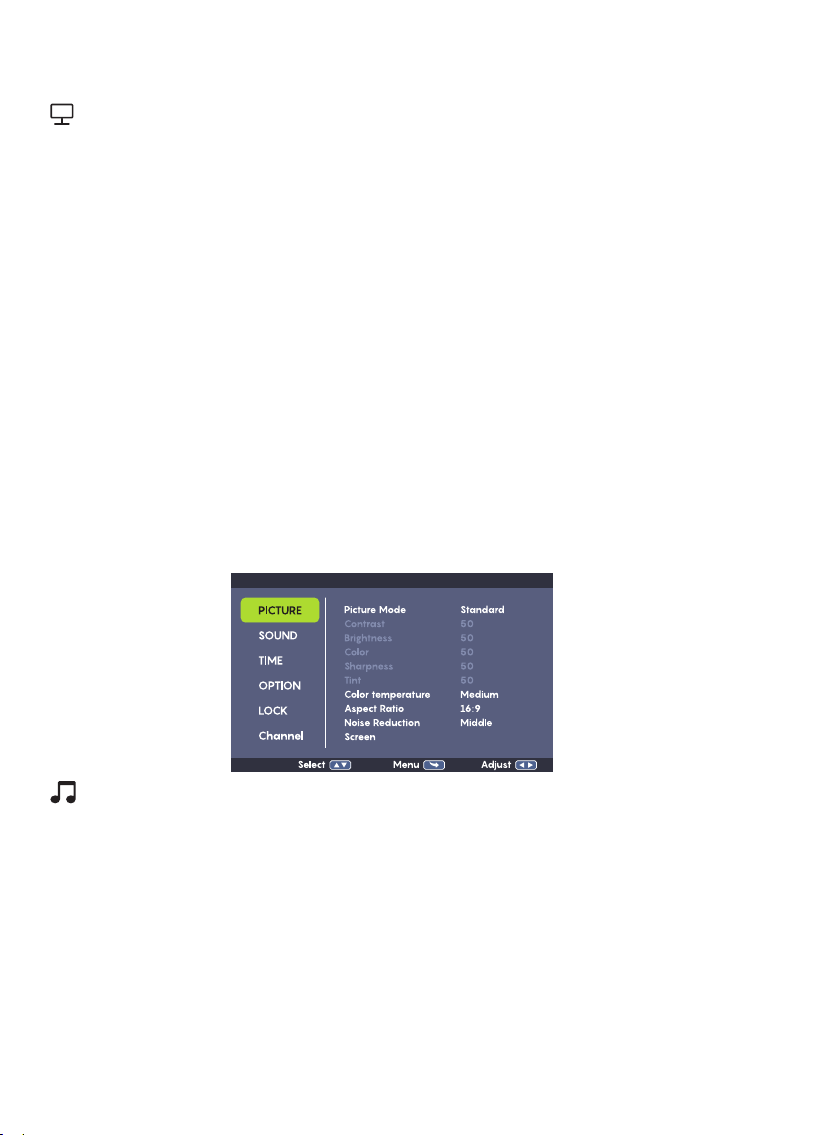
PICTURE
1. Picture mode: Select a picture preset that looks best (Standard, Soft,
user, and Vivid).
User mode:
• Contrast: Press left/right button to adjust 0 to 100
• Brightness: Press left/right button to adjust 0 to 100
• Color: Press left/right button to adjust 0 to 100
• Sharpness: Press left/right button to adjust 0 to 100
2. Color Temperature: Press "OK" then the Left/Right arrow keys to adjust
color to Warm, User or Cold.
3. Aspect Ratio: Adjust the screen width by pressing "OK" then UP/DOWN
arrows to select 16:9, 4:3, Auto, Panorma, Zoom2, Zoom1.
4. Noise Reduction: Press "OK" then the Left/Right arrow keys to select,
"close, low, middle, or high."
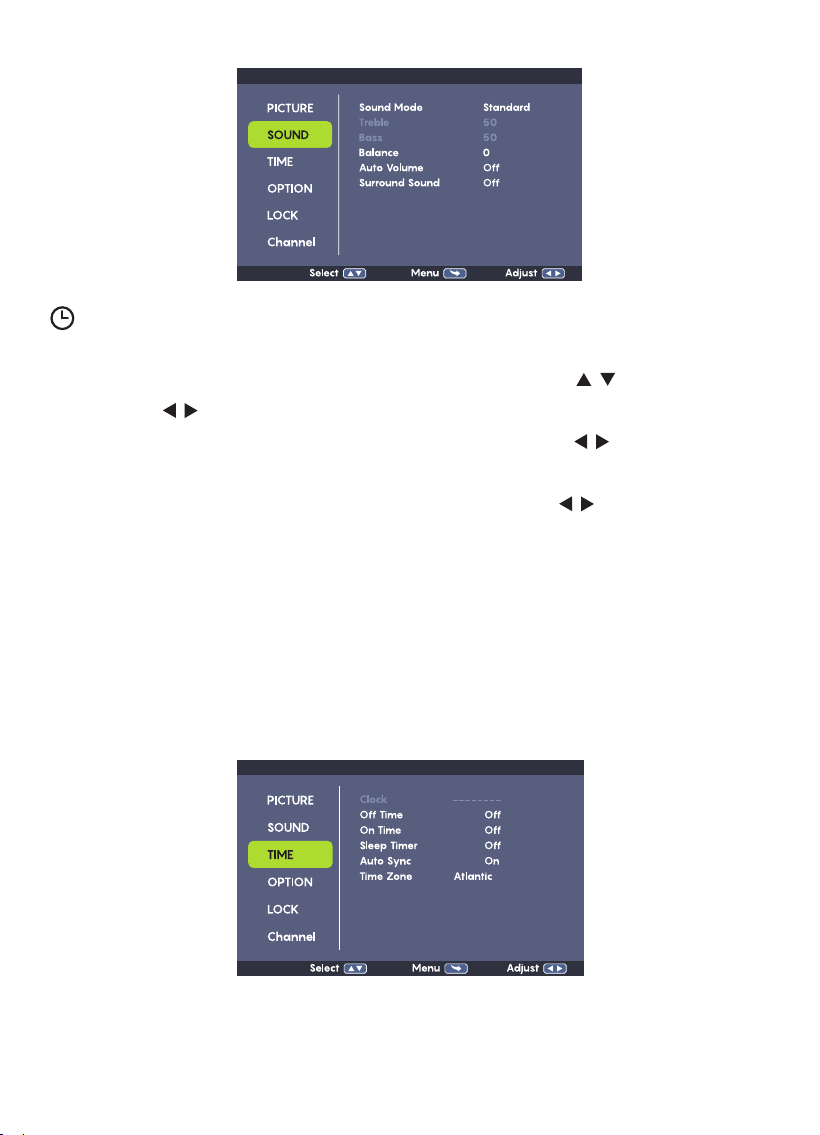
SOUND
1. Sound mode: Set a preset equalizer to match the type of program you are
watching from; standard, music, movie, sports, and user setting.
2. Balance: Press "OK" then the Left/Right arrow keys to adjust the audio
level from -50 to +50.
3. Auto Volume: Press the "OK" key to enter the menu and select Open or
Close to set Auto Vol.
4. Surround Mode: Press "OK" then the Up/Down arrow keys to select, "open
or close surround."
15
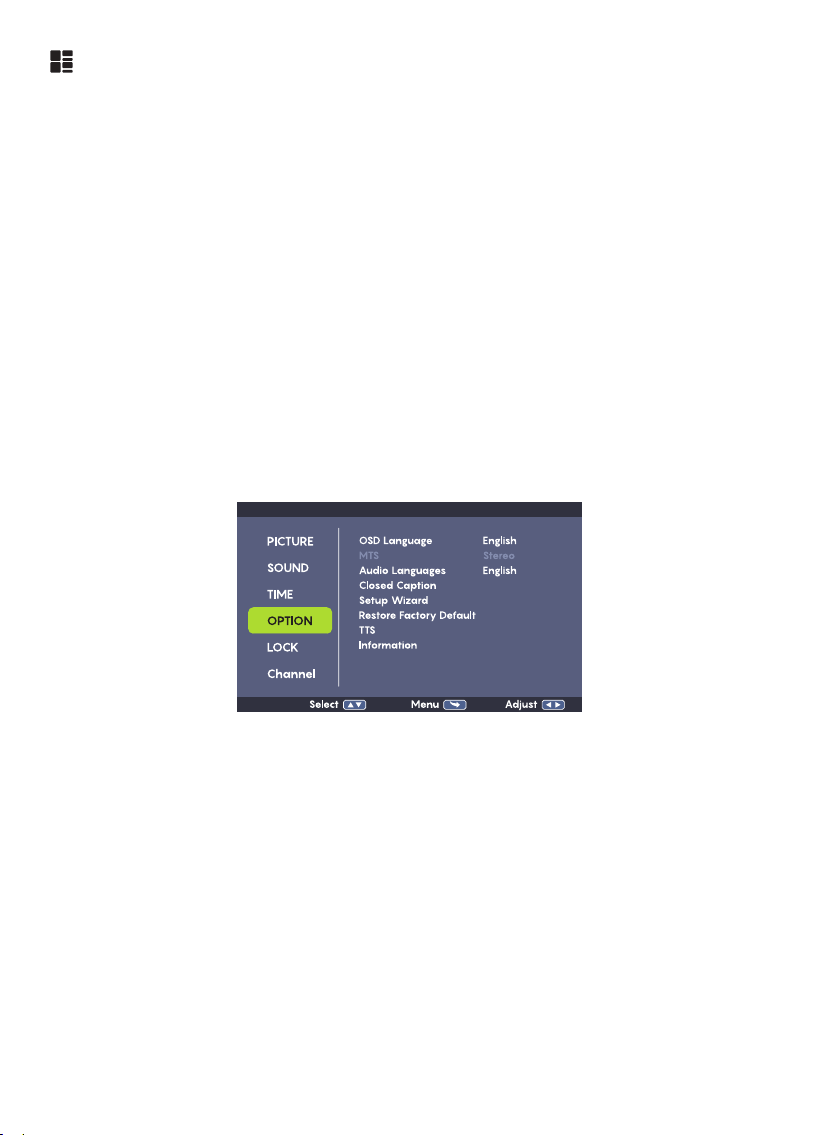
TIME
1. Clock: Press the "OK" key to enter the menu, then the / to select; then
press the / keys to adjust the current date and time.
2. Off Time: Press the "OK" key to enter the menu, then / arrow keys to
set a day and time to auto shut off the TV.
3. On Time: Press the"OK" key to enter the menu,then / arrow keys to set
a day and time to auto turn on the TV.
4. Sleep Timer: Set a timer. The TV will turn off automatically at the end of
the timer.
5. Auto Sync: Set the system time to match the time carried by the antenna
signal (cable or air). This option is not adjustable. The TV must be
connected to an antenna or cable system for Auto Sync to work.
6. Time Zone: Set the time zone adjustment to match your location.
16
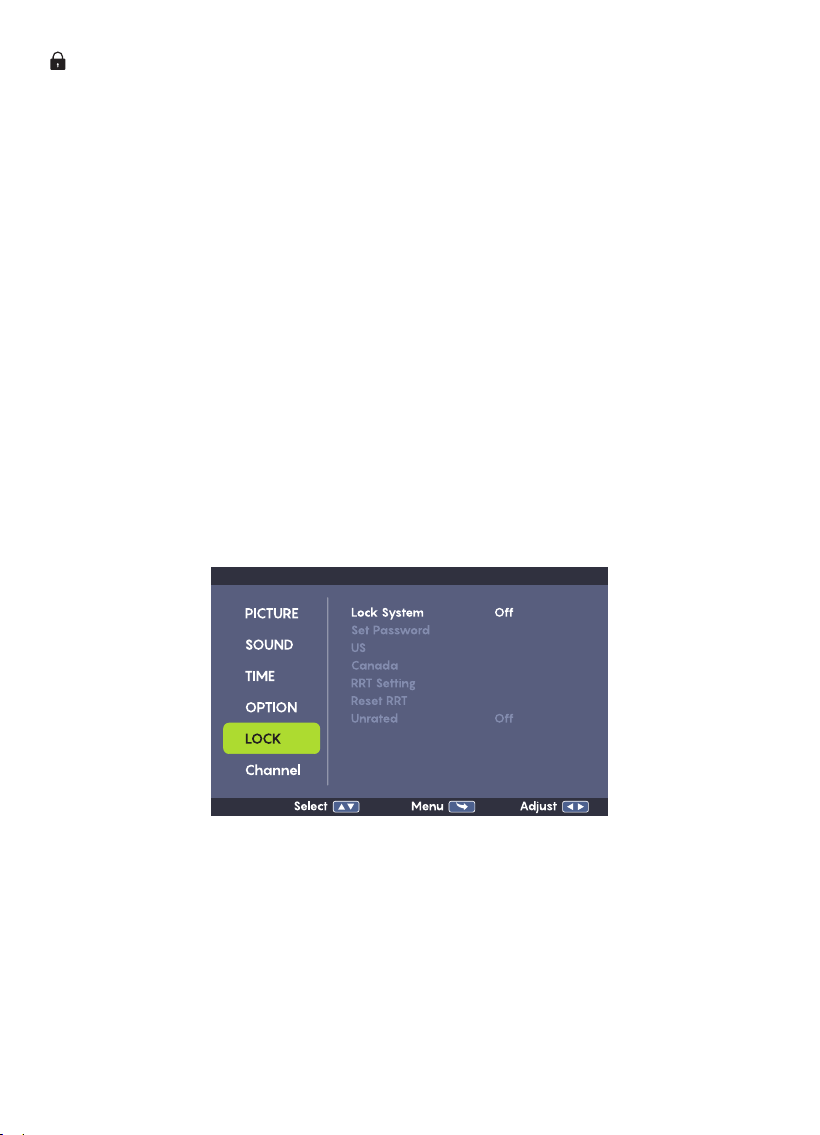
OPTION
1. OSD Language: Set the display language of the onscreen menus.
2. Closed Caption: When closed caption is available for a TV program, a
synchronized transcript of the program can be displayed on screen.
• Select Off to never display the closed caption information.
• Select On to always display the closed caption information.
• Select CC on Mute to only display the closed caption information when
MUTE is enabled.
3. Setup Wizard: An on-screen guide that will help you get your TV up and
running. Set the menu language, time zone, DST, and time format. Then it
scans all the channels to nd all stations within broadcast range.
4. Restore Factory Default: Return all options to their factory setting
5. TTS (Text to Speech): Convert machine’s language text to speech.
17
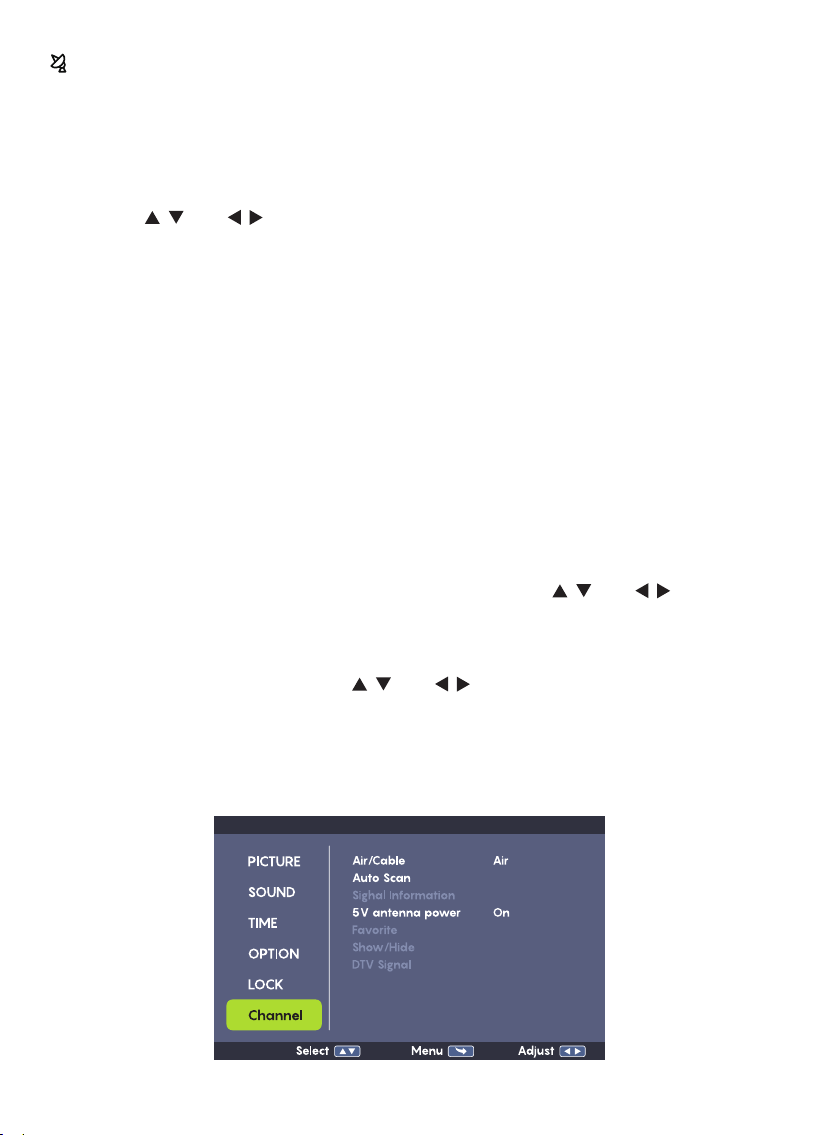
LOCK
Use the remote control to enter the default password (0000) to access
the Lock options.
1. Lock System: Enter the default password of (0000) to access the Lock Options
to enable or disable.
2. Set Password: Set a new password. When you change the password,
write it down and store it in a safe place. Resetting the factory options
will not reset the password.
3. US: Prevent programs from being viewed based on US TV or MPAA rating
guidelines.
4. Canada: Prevent programs from being viewed based on Canadian English or
French guidelines.
5. Reset RRT: Refresh the Rating Region Table if you are having problems
with the US or Canada rating guidelines.
6. Unrated: Enable or disable the ability to watch un-rated programs.
18
CHANNEL (ONLY IN ATSC MODE)
When using ATSC and FM Radio functions, please connect an antenna.
Press the MENU key on remote to access the menu list and then press the OK
key to enter the list.
Press the / and / key to move within the Menu, and then press the OK
key to conrm the change. To exit the menu, press the MENU key to back
out of all menu options.
1. Air/Cable: Set to Air if you are using an antenna like the ones provided to
receive over-the-air TV broadcasts. Set to cable if you are connecting to
a Cable TV system.
2. Auto Scan: Automatically nds all TV stations with a signal and saves them
to the channel list. Note: use this Auto Scan feature whenever you move the
TV to a different geographic location.
3. 5V antenna power: When the machine is connected to the TV antenna,
5V atenna power supply needs to be turned on to power the TV antenna
so that it can function properly.
4. Favorite: Add channels to the Favorites list. Press / and / to browse
the channel list, then press OK to mark/unmark a channel as a Favorite.
5. Show/Hide: Choose whether a channel will be select-able when tuning
with the CH+/CH- keys. Press / and / to browse the channel list,
then press OK to mark/unmark a channel as hidden.
You can still tune to a hidden channel directly with the numeric keypad.
6. DTV Signal: Displays the signal quality of the current channel.

19
MODE OPERATIONS
DVD MODE
DVD Operation
1. Slide the disc button to the left to open the disc door.
2. Place the disc, into the disc compartment and gently close the
compartment door.
3. Press the MODE button on the remote, select DVD and press OK to
conrm.
4. The system will automatically start to read the disc once in DVD mode.
5. Press the M button to access the DVD title menu (if applicable).
6. Use the playback controls as needed.
Ensure to hit the EXIT button prior to opening the disc compartment if
there is already a disc playing to avoid damaging the disc.
Ensure to handle all your discs with caution, grabbing them by the edges
to avoid scratching or damaging them and ensure optimal reading
capabilities.
DO NOT touch the laser lens at any time; This could result in damage of
the player and destroy its reading capabilities.
UNDERSTANDING THE SYSTEM SETUP ON THE DVD MODE
• Press the MENU button to access the menu and customize the setting to
you liking Use the up and down arrows to select the desired sub-menu,
and press the right arrow to access it.
• Use the left or right arrow to adjust the highlighted setting.
• Use the up or down arrow to go to the next or previous setting you would
like to adjust.
• Repeat steps 3 and 4 as needed.
• Press the MENU button to return to the main menu.
SYSTEM SETUP ON DVD MODE
• TV System: Select between AUTO/NTSC/PAL when outputting to a
bigger television screen with an AV cable.

20
NTSC format is usually standard in the US, while PAL is standard in
Europe .
• POWER RESUME: When turn on , the disc will start back to the last
playing position after a power outage.
• TV Type: Determines the height and width ratio of the
image(4:3PS/4:3LB/16:9).
• Password : Allows to access the RATING setting. Set a 4 digits password
when the padlock is in the open position.Once the padlock is in the
closed position, only the previously set password will enable the RATING
menu. The password can be changed whenever the padlock is on the
open position.
• Rating: When selecting a rating, the programs matching the locked
rating will not be available for viewing (only applicable to rated programs).
US MPAA RATING GUIDELINES
G: Suitable for all ages audiences
PG: Parental guidance suggested
PG13: Parents strongly cautioned, some material may be inappropriate for
children under 13
PG-R: Parental guidance is recommended; some content may be
inappropriate for children under 17.
R: Restricted, program contains some adult material inappropriate for
audiences under 17
NC-17: Program for audiences 17 and above
ADULT: Unsuitable for audiences under 21
SUBTITLE AND AUDIO LANGUAGE SETTING
• This player features subtitle and audio language selection whenever
supported by the DVD.
• Language selection can be made through the MENU menu or directly on
the remote. For optimal performance and easier access, we recommend
using the remote control whenever the audio and/or subtitle language
needs to be changed.

21
SUBTITLE LANGUAGE
• To activate and/or change the subtitle language, press the SUBTITLE
button on the remote.
• The selected subtitle language will appear at the top left corner of the
screen. Press the SUBTITLE button until the desired language has been
selected. The information about the language selected will disappear
after a few seconds.The subtitles on the chosen language will appear
either at the top or bottom of the screen, according to your DVD factory
settings.
AUDIO LANGUAGE
• To change the audio language, press the AUDIO button on the remote
control. The selected audio language will appear at the top left corner of
the screen.Press the AUDIO button until the desired language has been
selected. The information about the language selected will disappear
after a few seconds. The audio playback will change to the chosen
language.
• If the audio or subtitles language does not match the selected language,
this means that the language you have selected is not supported by the
DVD. Please ensure that the desired language is supported by the DVD
prior to adjusting the language settings.
(When using ATSC and FM Radio functions, please connect an antenna)
Search for TV Programs:
1. Press MODE key, select ATSC mode.
2. Press MENU key, select Channel.
3. Select Air/Cable, then go to Auto scan. Choose Yes start audio search
(DTV+ATV).
4. Press CH+/CH- key after auto scan is completed to select the desired
program.
ATSC MODE
• "MTS" audio language switching and "CC" subtitle language switching in
the remote control

22
ATTENTION! With this device, only free-to-air programs can be played! If
no or only a few stations are found, this can have several causes:
1. Bad reception. Move the antenna or the device to another location and
restart the search.
2. The connected antenna is not sucient for the current reception range
of the device.
3. Connect an outdoor or roof antenna to the device.
4. In the current reception area, no ATSC reception is possible.
5. Do not place the device or the antenna in the vicinity of possible sources
of interference.
6. e.g.microwaves, refrigerators. etc.
5. Favorite: Set your favorite programs from programs list.
ATSC Operation
• Connect the supplied antenna to the antenna socket on the right side of
the device. Set the antenna upright.
• Completing Auto Scan "ATSC".
• After all connections have been made properly, switch on the unit.
Press "MODE" and select with "CH- /CH+" the function "ATSC". Conrm
the selection with "OK". If you are using the function for the rst time or
restored to factory default, the Setup Wizard will appear on the display.
1. Select the "Menu Language" with " ," and press "OK" to conrm the
language.
2. Choose the "Time Zone" and "Time Format" with " " and conrm again
with "OK".
3. Choose "Air" to Scan for air channels, press OK to conrm, start scan.
4. When the scan is complete, you are now ready to watch TV.
TV Signal Compatibility (U.S. Only):
1. Supported Frequency Range: 473-863 MHz (UHF channels 14-69)
2. Channel Availability: Actual receivable channels vary by location
3. Check Local Channels: Visit FCC DTV Reception Maps:
www.fcc.gov/media/engineering/dtvmaps
23
AV OUT MODE
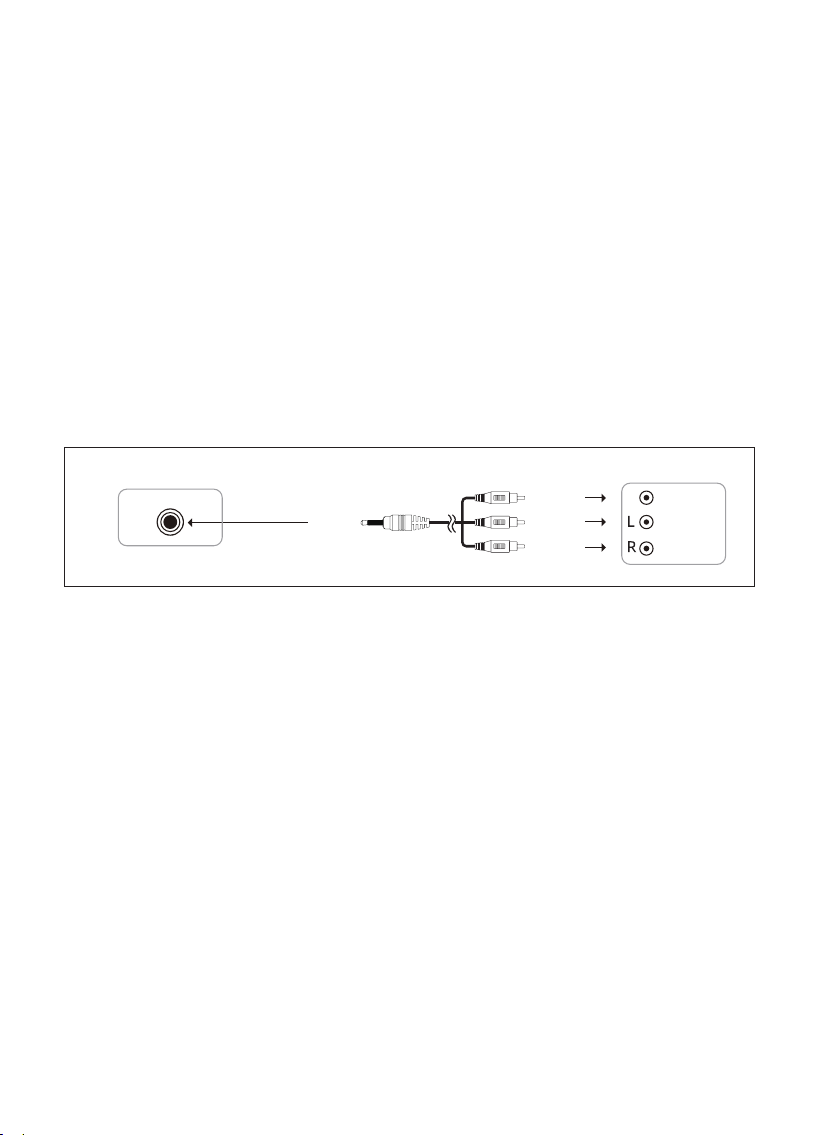
Your player comes equipped with an AV output jack. Use this feature to
connect the player's signal to external equipment (e.g. TV, monitor). Please
refer to the image as below to connect them.
1. Connect the 3.5mm-RCA Cable to the AV Output on the unit and the
audio/ video inputs on the Television (Red to Red, white to white, and
Yellow to Yellow).
2. Turn the unit on by switching the Power Button to the On position.
3. Change the television to the correct audio/video input setting.
4. Press [MODE] button on DVD player, choose "AV" mode.
Audio and the video played through the unit will now be seen and heard
on the connected television.
AV OUT
Right side of this player
Black
Audio/video cable (included)
Yellow
Television
VIDEO IN
AUDIO IN
White
Red
USB / CARD MODE
USB OPERATION
1. Insert the USB ash-drive into the USB port.
2. Press the MODE button, select USB and press OK to conrm. You can
also press the USB/CARD button on the unit to directly switch to the USB
mode.
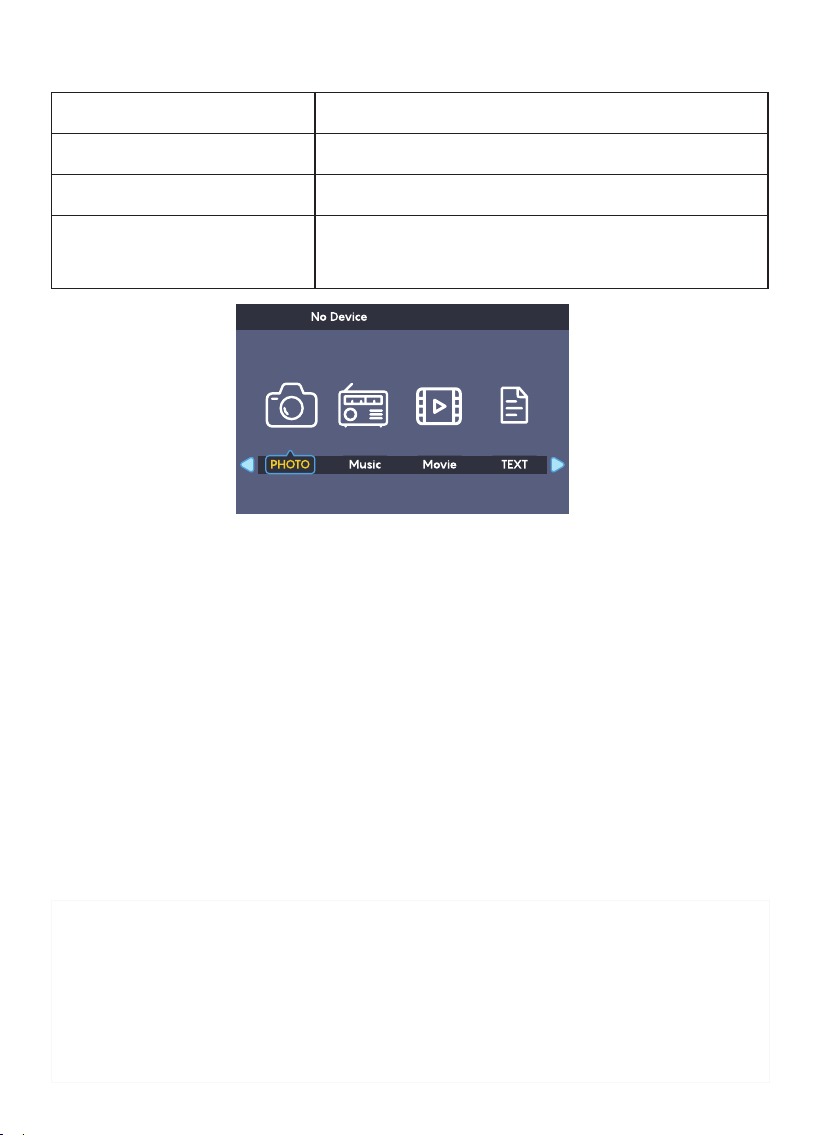
3. The USB mode main menu should appear on the screen. If you need
to access the main menu, press the EXIT button until the menu screen
appears.
4. Select the desired sub-menu (Photo, Music, movie, text) using the left
and right arrows.
5. Press OK to conrm.
6. Use the up and down arrows to select the desired le/folder and press OK
to conrm. Repeat as needed to locate a specic le.
7. Press the EXIT button to return to the previous level (folder or main menu).
24
Support format as follow:
Multimedia Support le
Photo jpg
Music MP3
Movie
MPEG, AVC, MP4, H.264, HEVC (H.265) FLV,
MKV
MEMORY CARD OPERATION
1. Insert the memory card into the reader.
2. Press the MODE button, select CARD and press OK to conrm.
3. In CARD mode, the audio les will be reader preferentially. If you want to
play your videos or images, Press EXIT button on the unit or the remote to
the main menu.
4. Select sub menu (Video: MPEG4/VOB/AVI, under 720 * 576, Audio: MP3,
WMA, Image: JPG. BMP)
5. Use the up and down keys to select the les and press OK to conrm.
Repeat as needed to locate a specic les.
6. Press the EXIT button to return to the previous level (folder or main
menu).
Important Notices
• USB Capacity Limit: Please ensure that the USB device used does not
exceed 32GB in capacity.
• File Format Requirement: This device supports .MP4 les; however,
please convert the le extension to AVI before use to ensure
compatibility.
25
IMAGE PLAYBACK
1. From the USB main menu, select the PHOTO sub-menu and press OK to
conrm.
2. Use the forward and backward arrows to select the desired le/folder
and press OK to conrm, Repeat as needed to locate a specic le.
3. The operation bar on the bottom, functions can be used to Play/Pause/
Repeat/Rotate/Zoom in/Zoom out the screen.
4. Use the / arrows to manually skip between pictures.
5. Choose STOP in the bar or press STOP button on the unit or the remote to
the main menu.
HD IN OPERATION
1. Please prepare the HD IN cable.
2. Use an HD IN cable to connect a device with HD IN output function to the
DVD player.
3. Press the MODE button, select HD IN and press OK to conrm.
PS: please make sure that your device has the HD IN out function.
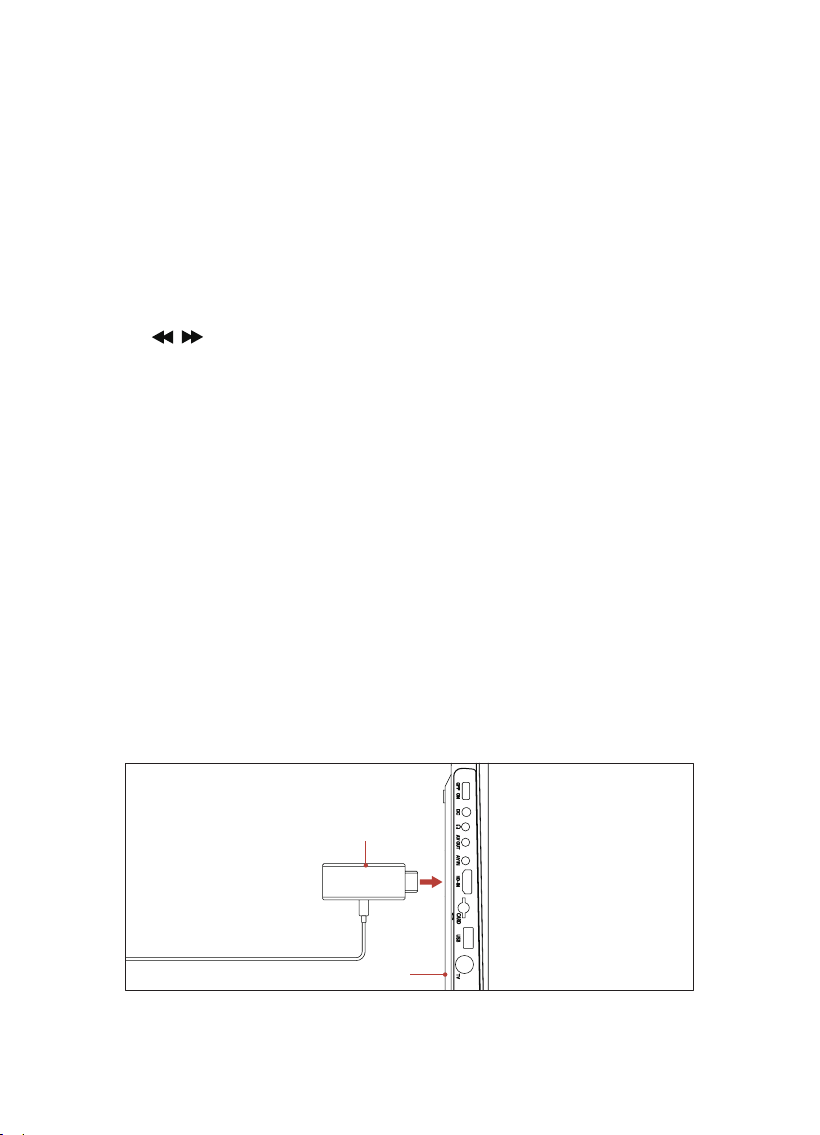
Use this feature to connect a Fire TV Stick
1. Plug the Fire TV stick into the HD-IN port
the Fire TV stick
Right side of the player
• Video and Image Resolution: Please refer to the SPECIFICATION page.
26
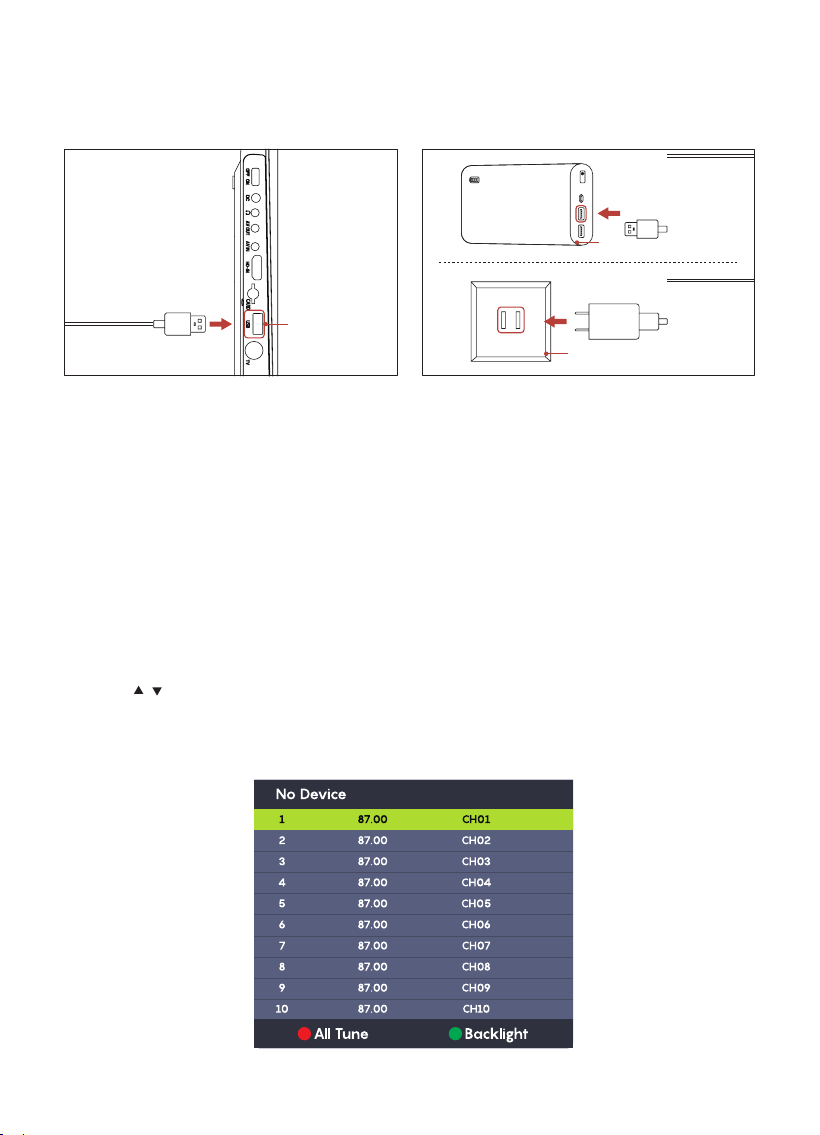
2. Power the Fire TV Stick, You can choose to power it internally, plug into
the USB port of DVD player, or externally, plug it into a power bank or a
wall outlet.
USB Port
Internal Power Supply External Power Supply
Wall Outlet
Power Bank
Note: Using a DVD player for power will accelerate battery usage.
FM RADIO
(When using ATSC and FM Radio functions, please connect an antenna)
FM Radio Receiving
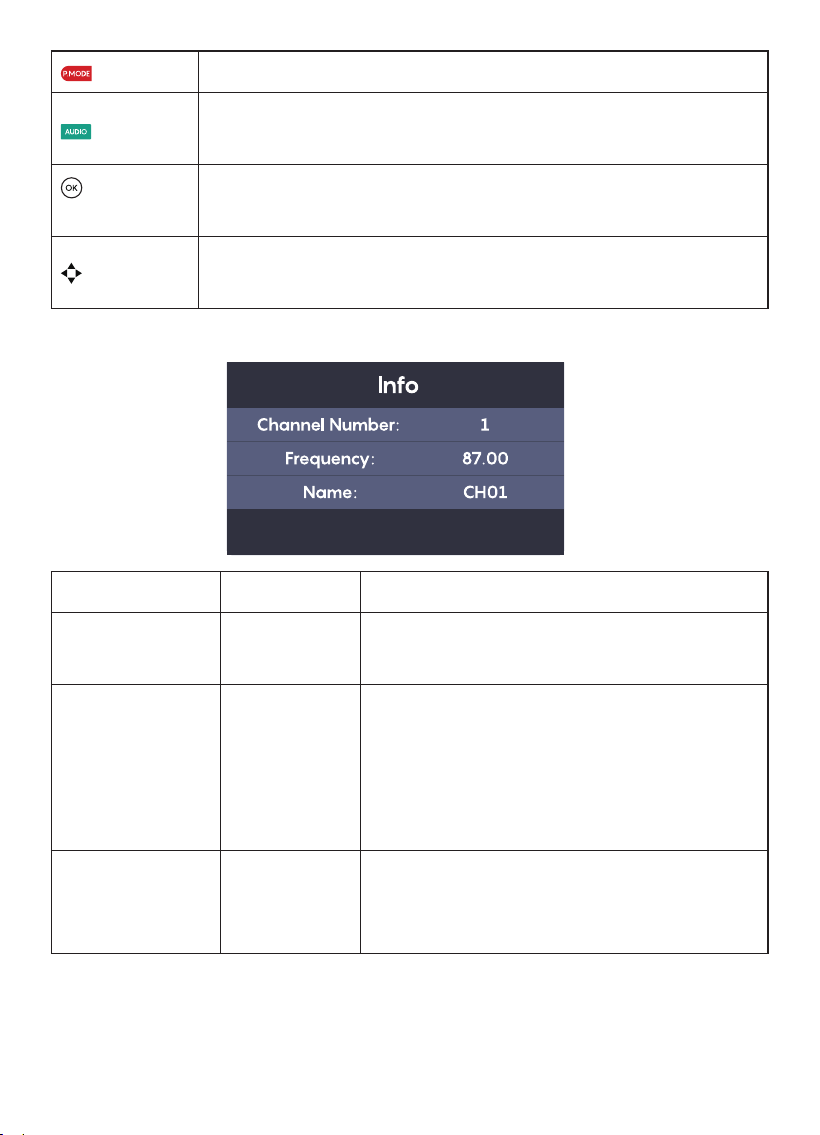
• Press "MODE" to select "FM Radio" mode and then press the red key
"IMAGE" on remote to scan and save the FM frequency channels
automatically.
• Press / to switch the FM channels.
• Press the green key “AUDIO” on remote to close or open the display
screen, and this operation won't take affect on the radio receiving.
27
All Tune Select (IMAGE) Red Button on Remote perform a FM Scan.
Backlight
Select (Audio) Green Button on Remote to Turn ON/OFF
TV backlight.
OK
Choose CH
Pree (OK) button on remote to select the Station you want
to listen to.
Use the down arrow key to go next station. press the up
arrow key to go to previous station.
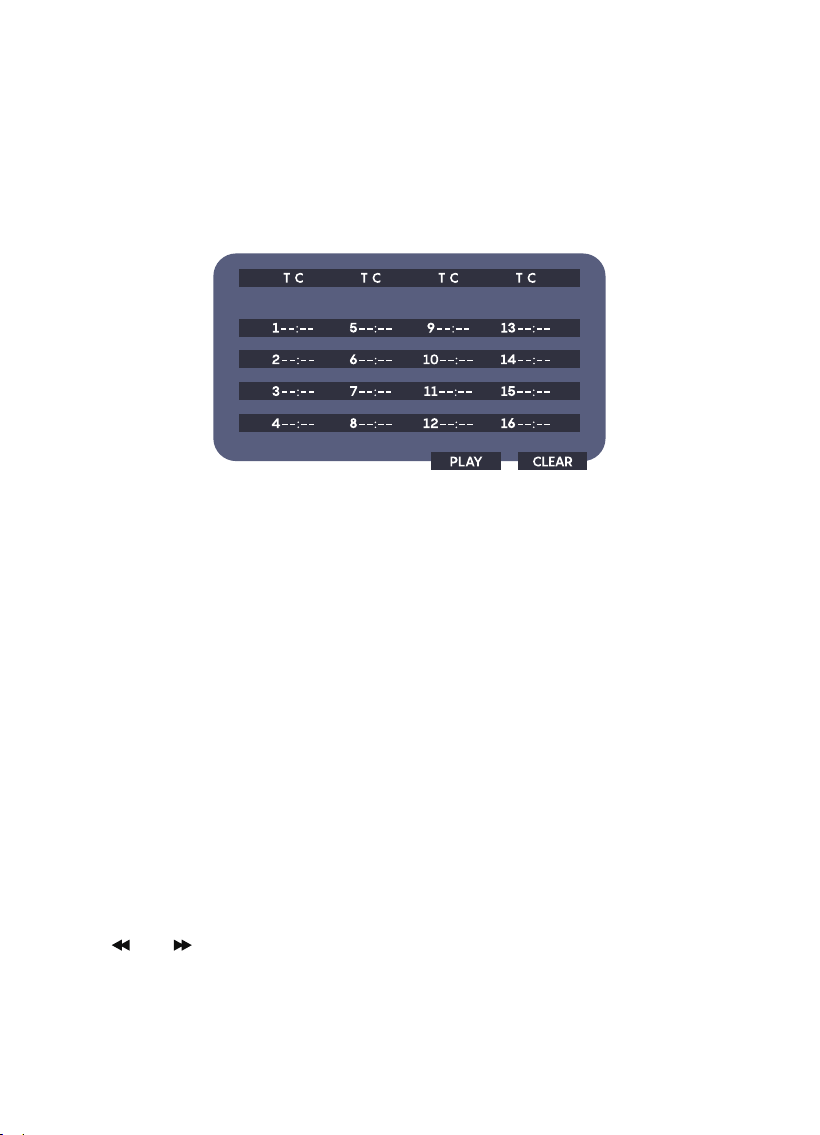
Info
Channel
Number: 1
FM CH
number
Frequency:
87.00
Frequency/
Station
You can change the FM Frequency by
pressing the (OK) button on remote.
press the (R) arrow key to single digits
press the (UP) arrow key for Next auto
frequency tuning.
Name: CH01
Channel
Name/
Number
Input the preset Channel number to go
to your desire CH FM station.
28
EASY ACCESS PROGRAMMING
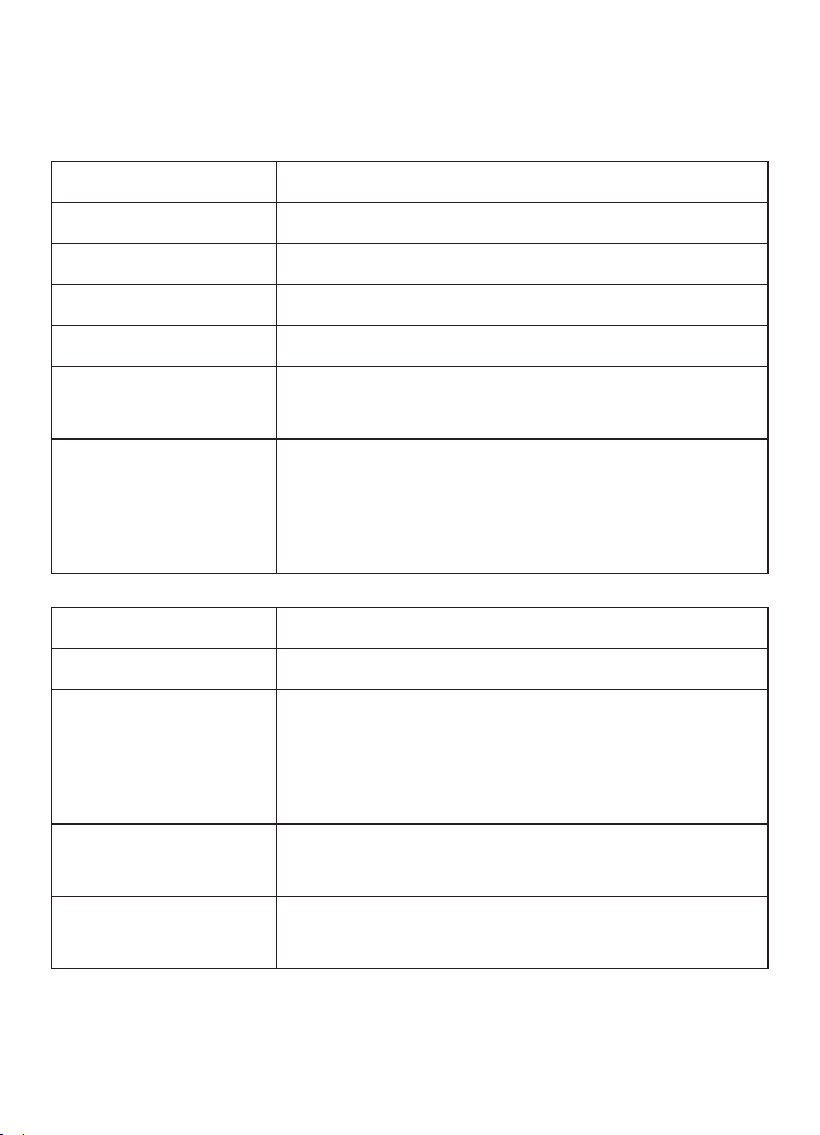
The player features a programming function for easy and quick access to
specic titles, chapters or les.
1. In DVD mode, during DVD playback, press the PROG button on the remote.
DVD TITLE/CHAPTER PROGRAMMING
2. On the pop-up screen, using the keypad, input the numerical values
corresponding to the Title (T) you wish to program for easy access.
3. Press the right arrow to go to the Chapter (C) eld. Using the keypad,
input the numerical value corresponding to the chapter you wish to
program for easy access.
4. Press the up, down, left or right arrows as needed to navigate through
the pop-up window and input the desired numerical values corresponding
to the title and chapter you wish to program for easy access.
5. When all the desired values have been inputted, use the arrows to
navigate and select "PLAY". Once "PLAY" is highlighted, press the OK
button on the remote control. If you wish to cancel the programming,
select "CLEAR' and press OK.
6. Once programming has been set, choose PLAY and press OK, press the
PROG button to exit the programming window.
7. Use and buttons to navigate through the programmed titles and
chapters.

29
1. In CARD or DVD mode, during playback, press the PROG button on the
remote.
2. The below pop-up screen will appear on the screen.
3. Use the up or down arrow to select the rst le you wish to add to the
programmed list. Press OK on the remote to conrm. The selected le
will appear in the programming pop-up screen.
4. Repeat for each le you wish to add to the list.
5. Once satised, press the left arrow until the rst le in the list is
highlighted.Press the left arrow once more until is highlighted.
6. Press OK on the remote control to conrm programming.
7. Once programming has been set, press the PROG button to exit the
programming window .
8. Use the and buttons to navigate through the programmed les.
9. To delete the les in the list, press the down arrow to select and press
OK ( do this step after step 5).
You will not be able to program different types off le at once. The
programming will only be available for the le type selected in the chosen
mode main menu (AUDIO, JPEG, GAME, VIDEO or TXT).
CARD/CD/DVD FILE PROGRAMMING
0/16
30
Screen 15.6 inches TFT-LCD Screen
Resolution 1600 x900
Battery Li-ion 7.4V/5000mAh
Solution Mstar3553
Lens Sanyo850
Power Source
AC 100-240V
DC 12V 1.5A
Discs & Formats
Supported
DVD Formats: DVD, DVD+R, DVD-R, DVD+RW,
DVD-RW, CD, CD+R, CD-R, CD+RW ,CD-RW, VCD
SVCD (Blu-Ray not Support)
Video Formats: VOB, AVI, MPEGI, MPEG2, XVID
SPECIFICATION
Audio Formats MP3, WMA
Image Formats JPG, JPEG
USB
MPEG-1/ MPEG2_HD / MPEG2 / MPEG4_HD /
MPEG4 / H.264 / MKV / AVI / MOV / VOB / FLV /
DAT/ MPEG/ MPG / MP4 / TS / TRP (Max capacity
32G) (Max resolution 1080P)
Memory Card
VOB, AVI, RMVB (Max capacity 32G) (Max
resolution 720*576)
Interface
DC, earphone, AV OUT, AV IN, HD IN, CARD, USB,
TV

31
TROUBLESHOOTING
• If you have any questions, please contact our customer service team:
help@pofotovip.com and we will provide a solution within 24 hours on
business days.
• You can also refer to the troubleshooting section below for assistance.
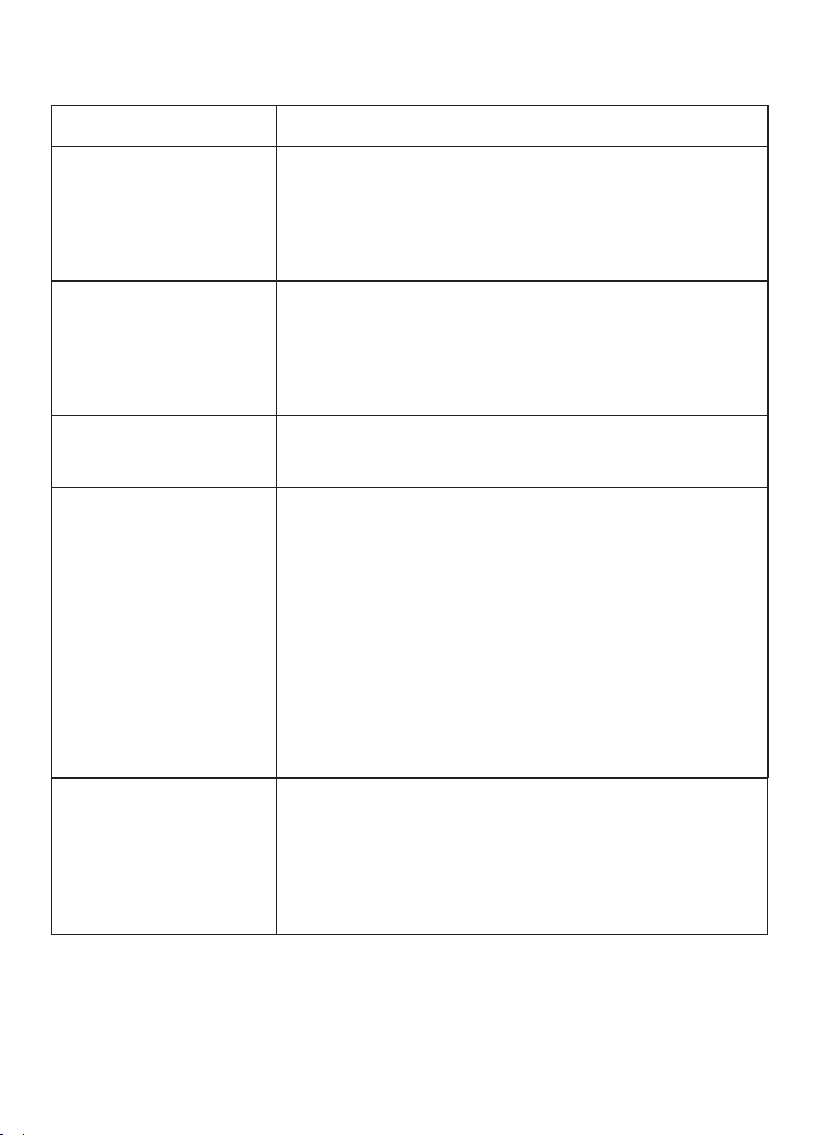
Quick Fix Guide
Problem First Steps Advanced Solution
No signal
(1) Check antenna/cable
connections
(2) Extend antenna fully
(1) Check antenna/cable
connections
Loud radio
noise
(1) Test different audio
mode
(2) Do not place the device
near interference
sources, such as
microwave ovens,
refrigerators, etc.
(1) Long press the "IMAGE"
button to search
channels again
(2) Choose channels with
best signal
Function
Failure
Restart your portable DVD
player
Restore factory settings
32
PROBLEM SOLUTION
No image and sound
(1) The AC adapter may not be plugged in the way.
(2) The unit may not be turned on.
(3) The outlet power supply/ voltage may not meet
the player power require requirements.
No sound
(1) The volume may be all the way down.
(2) Earphones may be plugged into the earphone jack.
(3) The mute may be enabled.
(4) Verify the audio setting.
Noise and
interferences
Remove nearby electronic causing equipment
interferences.
Remote control
unresponsive
(1) Ensure that the batteries are installed
correctly.
(2) The batteries may need to be replaced.Ensure
to point the remote control to the infrared
sensor.
(3) You may be further than 19 feet from the
player.
(4) Remove all obstacles between the remote
control and the infrared sensor.
Detailed Trouble Clearing
Unresponsive
controls
Disconnect the power adapter and reconnect
after a few seconds. The unit may not respond
due to lightning or static electricity. If you
suspect this is the case, disconnect the power
adapter until it is safe to reconnect.

33
No subtitles
The language/
subtitle chosen in
the menu does not
correspond to the
one being played by
the disc
(1) The subtitles may not have been turned on
Subtitles may not be supported by the disc
being played.
(2) The language/subtitle chosen in the menu may
not be supported by the disc being played.
The unit does not
recognize my USB
drive
(1) The device may not be inserted properly.
(2) Even though this unit has been tested with
the majority of ash-drives on the market, we
cannot guarantee full compatibility with all
brands available on the market.
(3) In case of a compatibility issue, try using a
lower capacity memory card.
The player doesn't
read MP4 on the USB
or TF card
(1) DVD player supports MP4 les in your USB
Drive/TF card, but you need to convert the
formats to AVI rst.
(2) You can download a converter, Format Factory,
to complete the conversion, Any questions
please contact customer service for more
help. (help@pofotovip.com)
The player can't read
discs
Please clean the laser and DVDs.
Ensure the disc is in the right format for our DVD
player. Our player doesn't support Dolby, pirate,
burnt and blu-ray DVDs.
Find your product order and email to:
help@pofotovip.com.

34
WARRANTY
Our company provides customers with a warrant of 2-YEAR from the date
of purchase. Please email us at help@pofotovip.com to activate.
Should you experience any problems not covered by the FAQ, please don't
hesitate to email us at help@pofotovip.com.
The warranty will not be valid if:
1. The product has not been installed, operated or maintained in
accordance with the manufacturers operating instructions provided
with the product.
2. The product has been used for purposes other than its intended function.
3. The product has been used for purposes other than household use.
4. The damage or malfunction of the product is caused by any of following
conditions.
• Incorrect voltage
• Accidents (including liquid or moisture damage)
• Misuse or abuse of the product
• Faulty or improper installation
• Mains supply problems including power spikes or lightning damage
• Infestation by insects
• Tampering or modication of the product by persons other than
authorized service person Exposure to abnormally corrosive materials
• Insertion of foreign objects into the unit
• Used with accessories not pre-approved.
WARRANTY EXCLUSION

35
Warning:
• English:
Please
do
not
expose
the
machine
to
the
sun
directly
or
close
to
the
re,
it
may
change
the
shape
of
the
machine
and
the
color
of
the
display.
It
isnormal
that
the
machine
goes
hot
after
using
for
a
period
of
time.
• French:
Veuillez
ne
pas
exposer
la
machine
directement
au
soleil
ou
près
d'un
feu,
cela
pourrait
déformer
la
machine
et
altérer
la
couleur
de
l'écran.
Il
est
normal
que
la
machine
chauffe
après
une
certaine
période
d'utilisation.
• German:
Bitte
setzen
Sie
die
Maschine
nicht
direktem
Sonnenlicht
oder
Feuer
aus,
da
dies
die
Form
der
Maschine
und
die
Farbe
des
Displays
verändern
kann.
Es
ist
normal,
dass
die
Maschine
nach
einer
gewissen
Nutzungsdauer
heiß
wird.
• Spanish:
Por
favor,
no
exponga
la
máquina
directamente
al
sol
ni
cerca
del
fuego,
ya
que
podría
deformarse
y
cambiar
el
color
de
la
pantalla.
Es
normal
que
la
máquina
se
caliente
después
de
un
tiempo
de
uso.
• Italian:
Si
prega
di
non
esporre
la
macchina
direttamente
al
sole
o
vicino
al
fuoco,
potrebbe
deformarsi
e
cambiare
il
colore
del
display.
È
normale
che
la
macchina
si
riscaldi
dopo
un
periodo
di
utilizzo.
• Japanese:
機械を直射日光や火のそばに置かないでください。機械の
形状やディスプレイの色が変わる可能性があります。使用後に機械が
熱くなるのは正常です。

36
Regulatory Notices — FCC Part 15 (Class B)
Note: This product includes a receive-only ATSC tuner and contains no
intentional RF transmitters (no Wi-Fi or Bluetooth).
1. FCC Part 15 Two-Condition Compliance Statement
This device complies with Part 15 of the FCC Rules. Operation is subject to
the following two conditions:
(1) This device may not cause harmful interference
(2) This device must accept any interference received, including
interference that may cause undesired operation.
2. FCC Part 15 Class B Interference Statement
NOTE: This equipment complies with the FCC Part 15 Class B limits for a
digital device, which are designed to provide reasonable protection against
harmful interference in a residential environment. This product generates,
uses, and can radiate radio frequency (RF) energy and, if not installed and
used in accordance with the instructions, may cause harmful interference
to radio communications.
There is no guarantee that interference will not occur in a particular
installation. If this device does cause interference to radio or television
reception—conrmed by turning the device off and on—try the following:
— Reorient or relocate the receiving antenna.
— Increase the separation between the equipment and receiver.
— Connect the equipment into an outlet on a circuit different from that to
which the receiver is connected.
— Consult the dealer or an experienced radio/TV technician for help.
3. Modication Warning
Changes or modications not expressly approved by the party responsible
for compliance could void the user’s authority to operate the equipment.