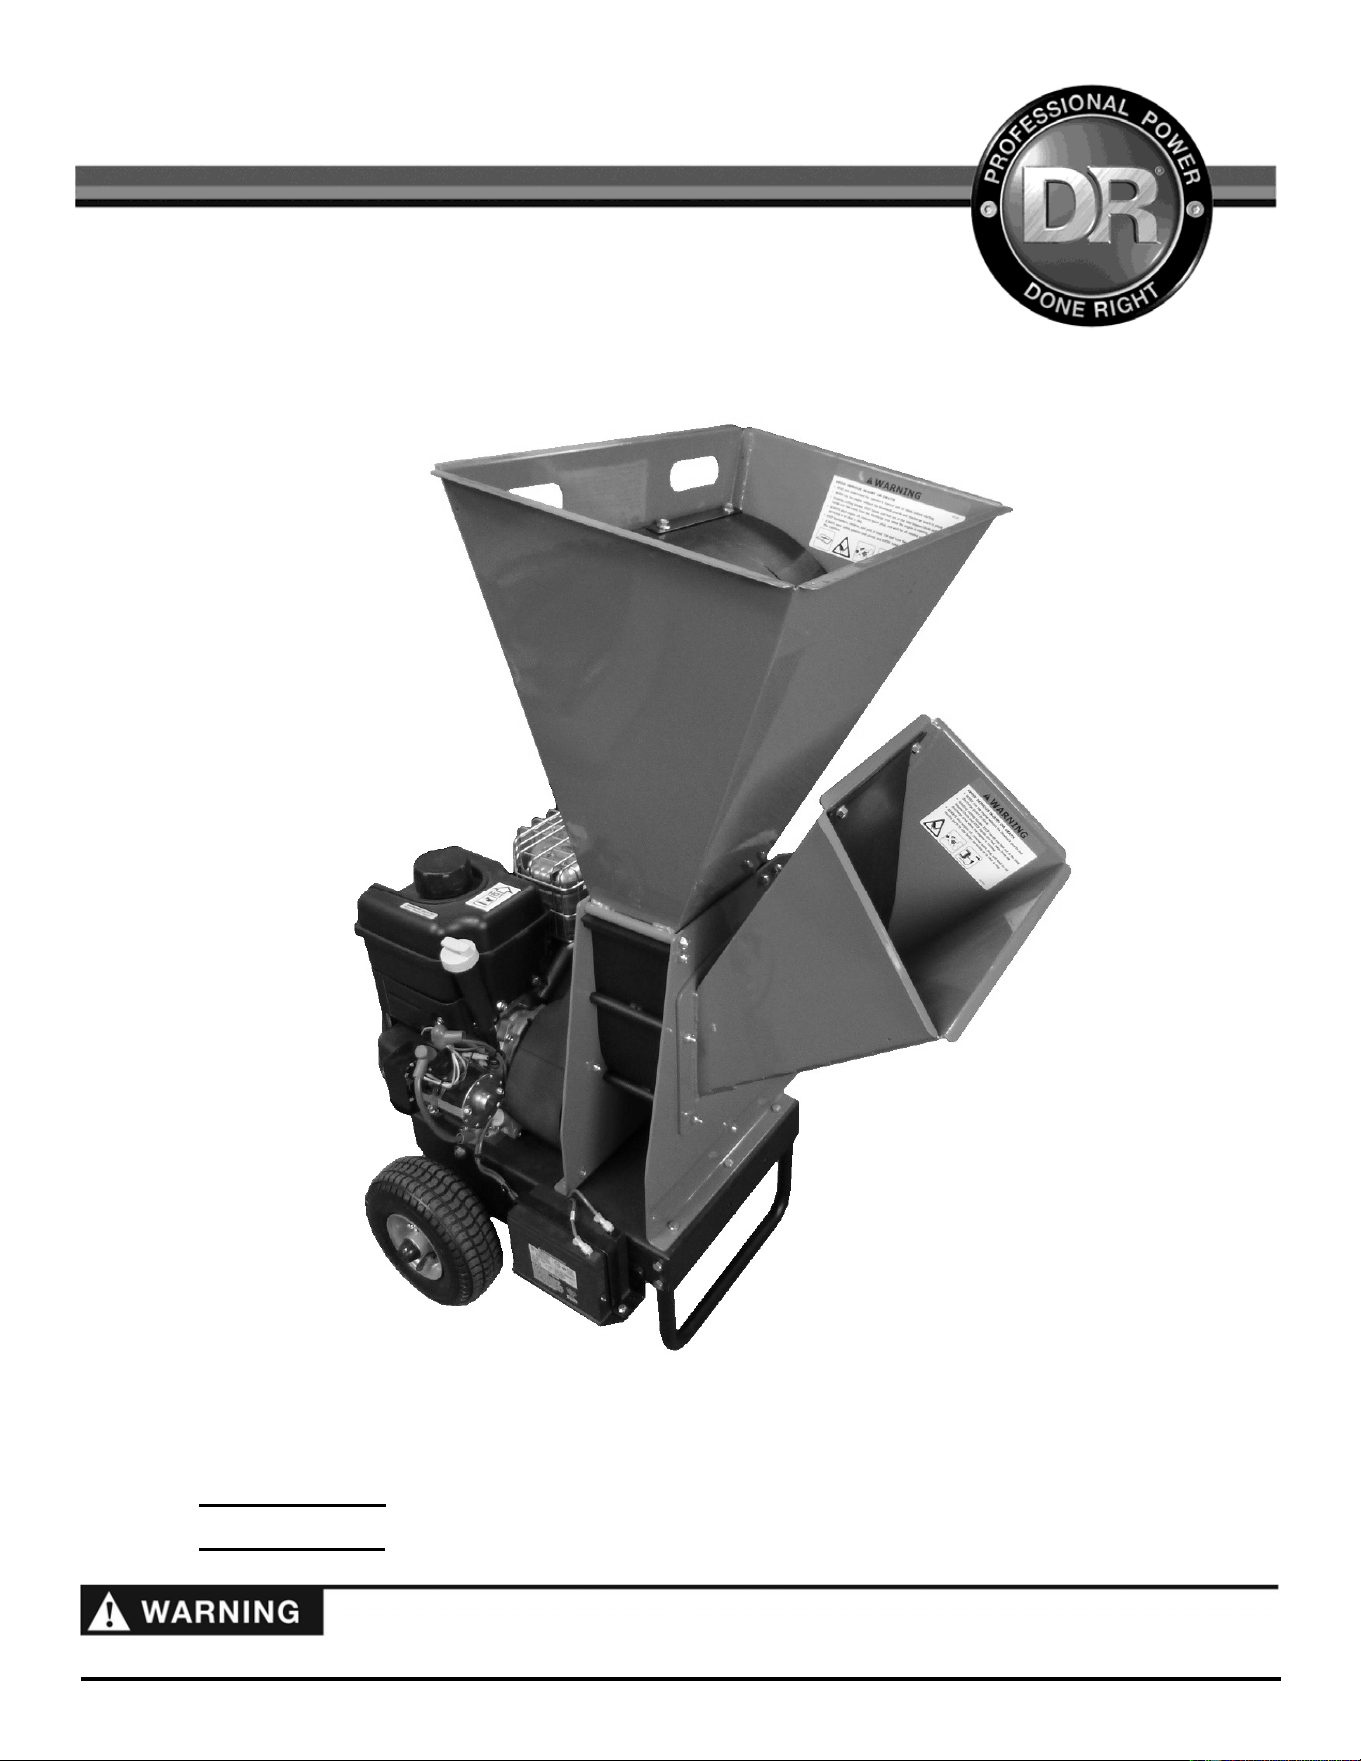
Read and understand this manual and all instructions before operating the DR 11.5 CHIPPER SHREDDER.
DR
®
11.5 CHIPPER SHREDDER
SAFETY & OPERATING INSTRUCTIONS
Serial No.
Order No.
DR Power Equipment
Toll-free phone: 1-800-DR-OWNER (376-9637)
Fax: 1-802-877-1213
Website: www.DRpower.com

2 DR
®
11.5 CHIPPER SHREDDER
CONTACT US AT www.DRpower.com 3
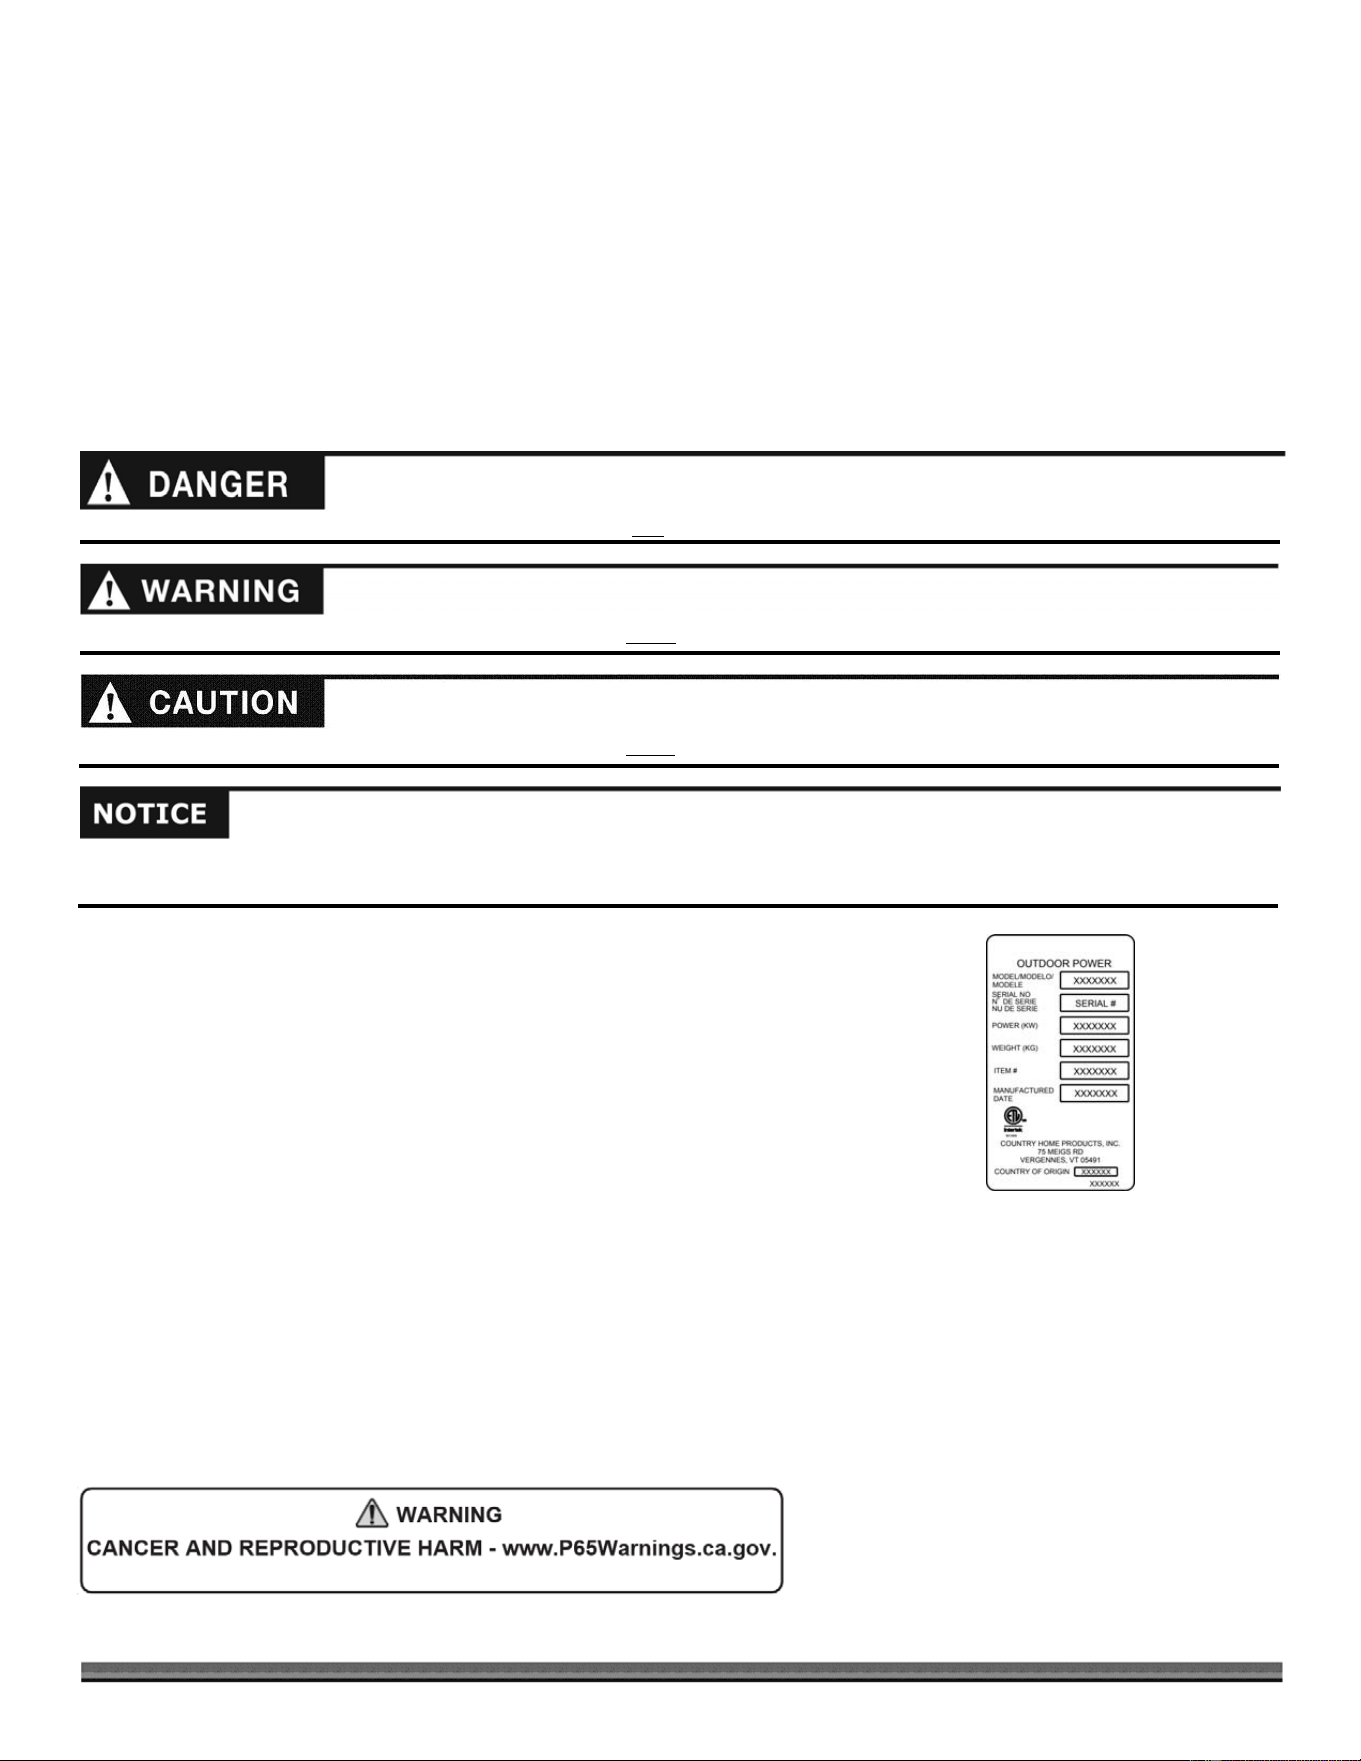
This indicates a hazardous situation, which, if not avoided, could result in death or serious injury.
Table of Contents
Chapter 1: General Safety Rules ............................................................................................................................................................ 4
Chapter 2: Setting Up the DR 11.5 CHIPPER SHREDDER .................................................................................................................. 8
Chapter 3: Operating the DR 11.5 CHIPPER SHREDDER ................................................................................................................... 13
Chapter 4: Maintaining the DR 11.5 CHIPPER SHREDDER ................................................................................................................ 17
Chapter 5: Troubleshooting .................................................................................................................................................................. 25
Chapter 6: Parts Lists and Schematic Diagrams .................................................................................................................................. 28
Conventions used in this manual
Serial Number and Order Number
A Serial Number is used to identify your machine and is located on the Serial
Number Label on your machine (Figure 1). An Order Number is used to check
and maintain your order history and is located on the upper left portion of your
packing slip. For your convenience and ready reference, enter the Serial
Number and Order Number in the space provided on the front cover of this
manual.
Additional Information and Potential Changes
DR Power Equipment reserves the right to discontinue, change, and improve its
products at any time without notice or obligation to the purchaser. The
descriptions and specifications contained in this manual were in effect at
printing. Equipment described within this manual may be optional. Some
illustrations may not be applicable to your machine.
California Proposition 65
This information is important in the proper use of your machine. Failure to follow this instruction could result in damage to
your machine or property.
This indicates a hazardous situation, which, if not avoided, could result in minor or moderate injury.
This indicates a hazardous situation, which, if not followed, will result in death or serious injury.
Figure 1
4 DR
®
11.5 CHIPPER SHREDDER
Read this Safety & Operating Instructions Manual before you use the DR 11.5 CHIPPER SHREDDER. Become familiar with the
operation, service, loading/unloading, and storage recommendations to ensure the best performance from your machine. If you
have any questions or need assistance, please contact us at www.DRpower.com or call Toll-Free 1-800-DR-OWNER (376-9637)
and one of our Technical Support Representatives will be happy to help you.
Chapter 1: General Safety Rules
Labels
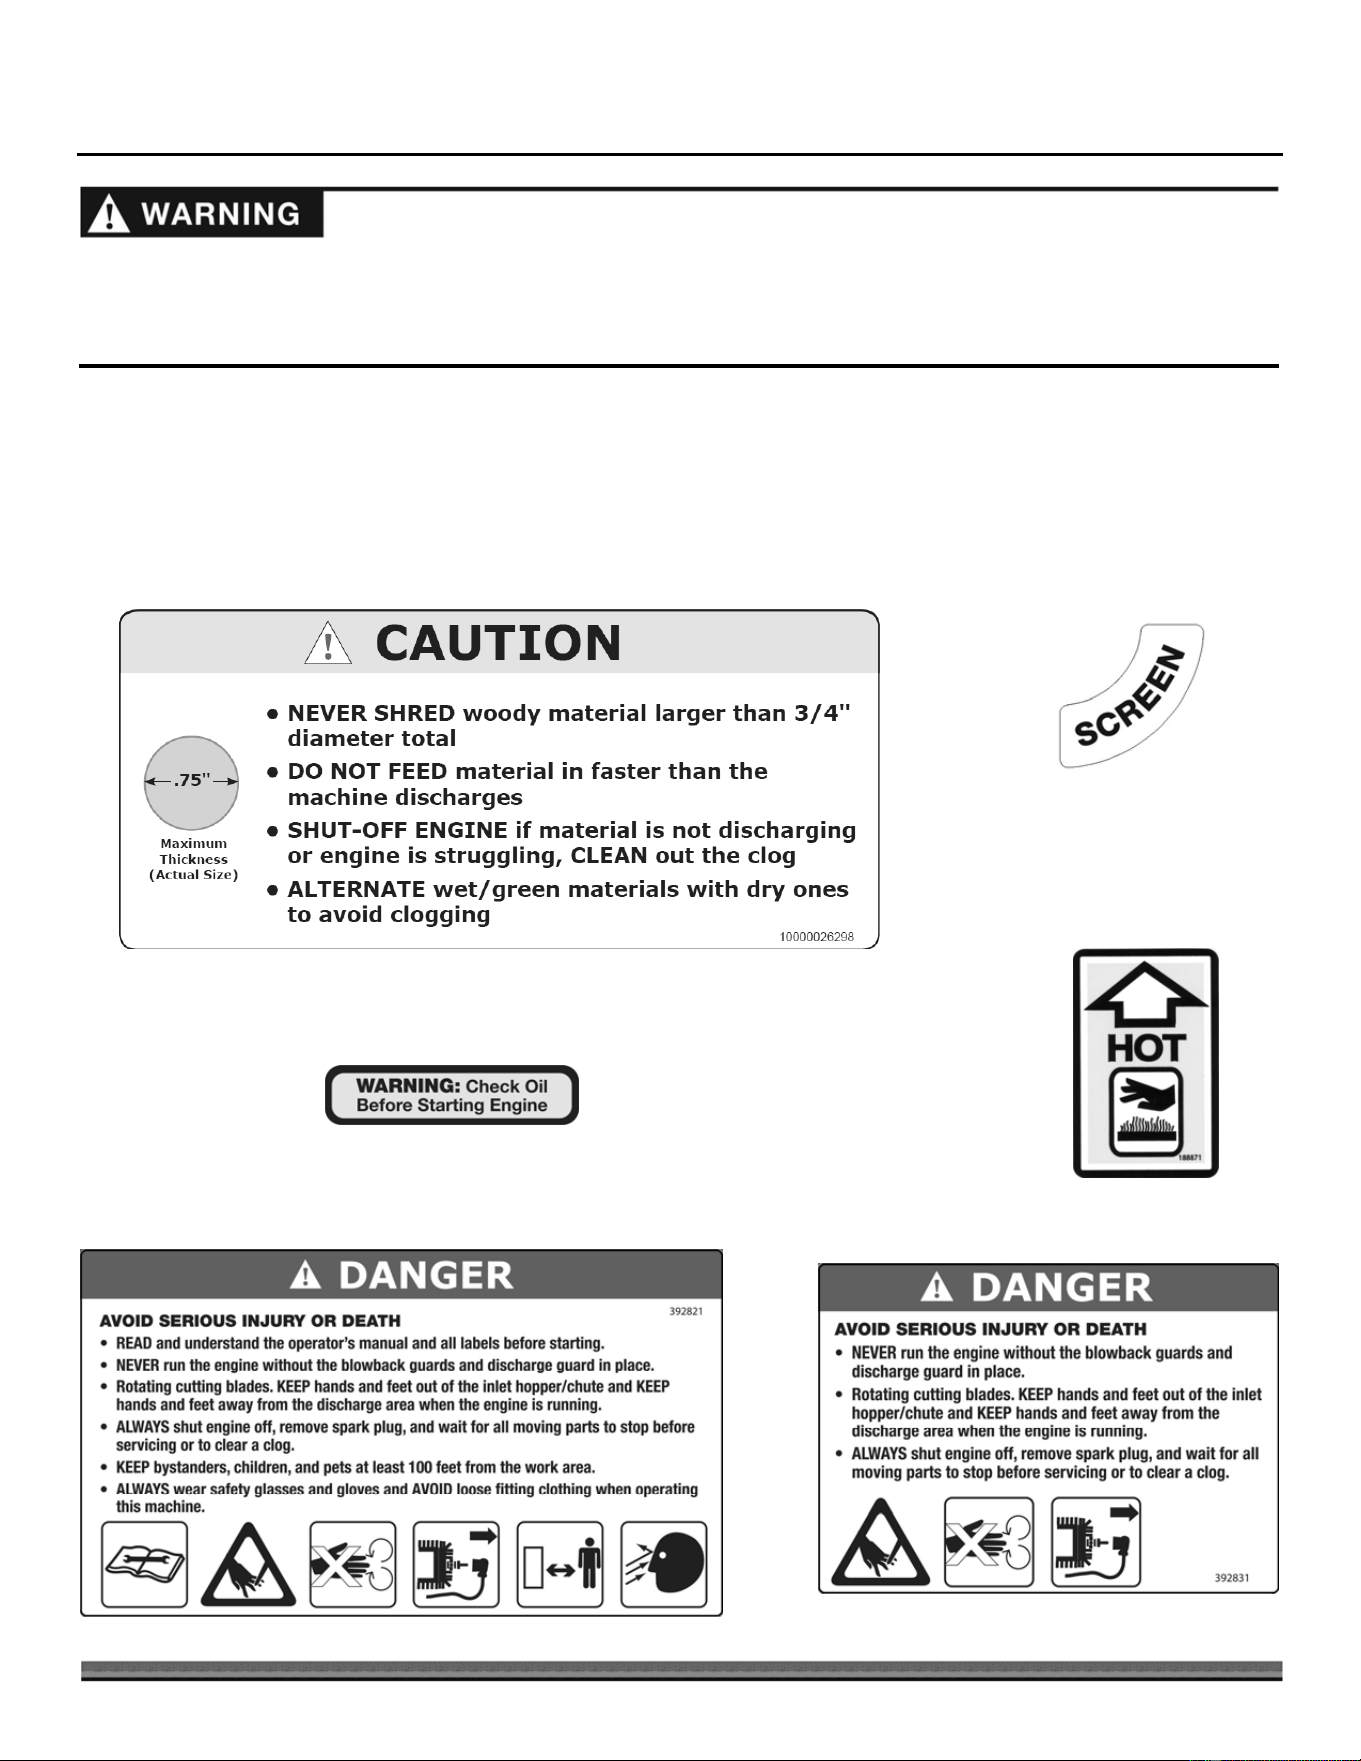
Your DR 11.5 CHIPPER SHREDDER carries prominent labels as reminders for its proper and safe use. Shown below are copies of
all the Safety and Information labels that appear on the equipment. Take a moment to study them and make a note of their
location on your CHIPPER SHREDDER as you set up and before you operate the unit. Replace damaged or missing Safety and
Information labels immediately.
#18887
#39282
#39283
#38669
#13758
#10000026298
CONTACT US AT www.DRpower.com 5
This is a high-powered machine, with moving parts operating with high energy. You must operate the machine safely. Unsafe
operation can create a number of hazards for you, as well as anyone else in the nearby area. This machine can crush, grind, cut,
and sever parts of your body if they enter the inlet or discharge area of your CHIPPER SHREDDER. Always take the following
precautions when using this machine:
Keep in mind that the operator or user is responsible for accidents or hazards occurring to other people, their property, and
themselves.
Always wear protective goggles or safety glasses with side shields while using the CHIPPER SHREDDER to protect your eyes
from possible thrown debris.
Avoid wearing loose clothing or jewelry, which can catch on moving parts or the material fed into the CHIPPER SHREDDER.
We recommend wearing gloves while using the CHIPPER SHREDDER. Be sure your gloves fit properly and do not have loose
cuffs or drawstrings.
Wear shoes with non-slip treads when using your CHIPPER SHREDDER. If you have safety shoes, we recommend wearing
them. Do not use the machine while barefoot or wearing open sandals.
Wear long pants while operating the CHIPPER SHREDDER.
Use ear protectors or earplugs rated for at least 20 dba to protect your hearing.
Keep bystanders at least 100 feet away from your work area. Stop the engine when another person or pet approaches.
Protecting Yourself and Those Around You
Safety for Children and Pets
Safety with Gasoline - Powered Machines
Tragic accidents can occur if the operator is not alert to the presence of children and pets. Children are often attracted to the
machine and the chipping/shredding activity.
Never
assume that children will remain where you last saw them. Always follow
these precautions:
Keep children and pets at least 100 feet from the working area and ensure they are under the watchful care of a responsible
adult.
Be alert and turn the machine off if children or pets enter the work area.
Never allow children to operate the CHIPPER SHREDDER.
Gasoline is a highly flammable liquid. Gasoline also gives off flammable vapor that can be easily ignited and cause a fire or
explosion. Never overlook the hazards of gasoline. Always follow these precautions:
Never run the Engine in an enclosed area or without proper ventilation as the exhaust from the Engine contains carbon
monoxide, which is an odorless, tasteless, and deadly poisonous gas.
Store all fuel and oil in containers specifically designed and approved for this purpose. Keep away from heat, open flames,
and out of the reach of children.
Replace rubber Fuel Lines and Grommets when worn or damaged and after 5 years of use.
Fill the Gasoline Tank outdoors with the Engine off and allow the Engine to cool completely first. Don't handle gasoline if you
or anyone nearby is smoking or if you're near anything that could cause it to ignite or explode. Reinstall the Fuel Tank Cap
and Fuel Container Cap securely.
If you spill gasoline, do not attempt to start the Engine. Move the machine away from the area of the spill and avoid creating
any source of ignition until the gas vapors have dissipated. Wipe up any spilled fuel to prevent a fire hazard and properly
dispose of the waste.
6 DR
®
11.5 CHIPPER SHREDDER
To safely store, allow the Engine to cool completely before moving into any enclosure. Never store a machine that has gas in
the tank, or a Fuel Container, near an open flame or spark such as a water heater, space heater, clothes dryer, or furnace.
Never make adjustments or repairs with the Engine running. Shut down the Engine and wait 5 minutes for parts to cool.
Disconnect the Spark Plug wire, keeping it away from the Spark Plug, to prevent accidental starting before making
adjustments or repairs.
Never tamper with the Engine’s Governor setting. The Governor controls the maximum safe operation speed and protects
the Engine. Over-speeding the Engine is dangerous and will cause damage to the Engine and to the other moving parts of the
machine. If required, see your authorized dealer for Engine governor adjustments.
Keep combustible substances away from the Engine when it is hot.
Never cover the machine while the Muffler is still hot.
Do not operate the Engine with the Air Cleaner or the Carburetor Air Intake Cover removed. Removal of such parts could
create a fire hazard. Do not use flammable solutions to clean the Air Filter.
The Muffler and Engine become very hot and can cause a severe burn; do not touch.
Operating this CHIPPER SHREDDER safely is necessary to prevent or minimize the risk of death or serious injury. Unsafe
operation can create a number of hazards for you. Always take the following precautions when operating this machine:
Your CHIPPER SHREDDER is a powerful tool, not a plaything. Exercise extreme caution at all times. The machine is
designed to chip wood and shred most organic materials. Do not use it for any other purpose.
Thoroughly inspect the area in which you will be working and remove all foreign objects. Look for rope, wire, etc., and remove
these objects before chipping/shredding. Inserting these objects into the CHIPPER SHREDDER Hopper could damage the
machine and/or cause injury.
Know how to stop the CHIPPER SHREDDER quickly; see “Stopping the Engine” in Chapter 3.
Never operate your unit on a slippery, wet, muddy, or icy surface. Exercise caution to avoid slipping or falling.
See manufacturer’s instructions for proper operation and installation of accessories. Only use accessories approved by DR
Power Equipment.
Never use the machine without ensuring that all guards and shields are in place.
Never, under any conditions, remove, bend, cut, fit, weld, or otherwise alter standard parts on the CHIPPER SHREDDER.
This includes all shields and guards. Modifications to your machine could cause personal injuries, property damage, and will
void your warranty.
Never use the machine with the Chipper Chute, Shredder Hopper, Blowback Guards, or Discharge Deflector removed.
Never place any part of your body in the Chipper Chute, Shredder Hopper, discharge opening, or near any moving part while
the machine is running. Keep the area of discharge clear of anything that will obstruct a clear discharge. Wind can also
change discharge direction, so be aware. If it becomes necessary to push material into the Chipper Chute or Shredder
Hopper, use a small diameter stick, NOT YOUR HANDS.
Keep your face and body back from the Chipper Chute and Shredder Hopper to avoid accidental bounce back of any material.
Do not allow an accumulation of processed material to build up in the discharge area as this will prevent proper discharge
and could result in kickback.
Allow only one person to operate the CHIPPER SHREDDER at any time.
Always operate the machine from the Operator Zone (see Figure 7
on page 13). Never pass or stand on the discharge side of
the machine when the Engine is running or the Flywheel is turning.
If the machine starts making an unusual noise or vibration, Shut down the Engine and wait 5 minutes for parts to cool,
disconnect the Spark Plug wire, keeping it away from the Spark Plug to prevent accidental starting before making adjustments
or repairs. Vibration is generally a warning of trouble. Check for damaged parts and clean, repair, and/or replace as
necessary.
Never tamper with safety devices. Check their proper operation regularly.
Safety with Gasoline - Powered Machines (Continued)
General Safety
CONTACT US AT www.DRpower.com 7
General Safety (continued)
A Note to All Users
Under California law, and the laws of some other states, you are not permitted to operate an internal combustion engine using
hydrocarbon fuels without an Engine Spark Arrester. This also applies to operation on US Forest Lands. All DR Chippers
w/Shredder shipped to California, New Mexico, and Washington State are provided with Spark Arresters. Failure of the owner or
operator to maintain this equipment in compliance with state regulations is a misdemeanor under California law and may be in
violation of other state and/or federal regulations. Contact your State Park Association or the appropriate state organization for
specific information in your area.
No list of warnings and cautions can be all-inclusive. If situations occur that are not covered by this manual, the operator must
apply common sense and operate this DR 11.5 CHIPPER SHREDDER in a safe manner. Contact us at www.DRpower.com or call
Toll Free: 1-800-DR-OWNER (376-9637) for assistance.
Never try to pick up, move, or transport the machine while the Engine is running or the Flywheel is turning.
For safe loading up ramps carefully PULL the machine with the Shredder Hopper hand holds. For safe unloading down
ramps, guide the machine from behind with the hand holds so it goes down the ramps and you follow.
Before performing any maintenance or inspection procedure on the CHIPPER SHREDDER, shut down the Engine, wait 5
minutes for machine to cool, remove the Spark Plug Wire keeping it away from the Spark Plug.
Never allow people who do not understand and/or have not read this Safety and Operating Instructions Manual to use the
CHIPPER SHREDDER. Allow only responsible individuals who are familiar with these rules of safe operation to use your
machine.
Never overload or attempt to Chip or Shred material beyond the manufacturer’s recommendation. Personal injury or damage
to the machine could result.
While using the CHIPPER SHREDDER, don't hurry or take things for granted. When in doubt about the equipment or your
surroundings, stop the machine and take the time to look things over.
Never operate the machine when under the influence of alcohol, drugs, or medication.
Use the machine only in daylight.
Stay alert for hidden hazards or traffic.
Keep all nuts and bolts tight and keep the equipment in good operating condition.
8 DR
®
11.5 CHIPPER SHREDDER
Figure 2
Chapter 2: Setting Up the DR 11.5 CHIPPER SHREDDER
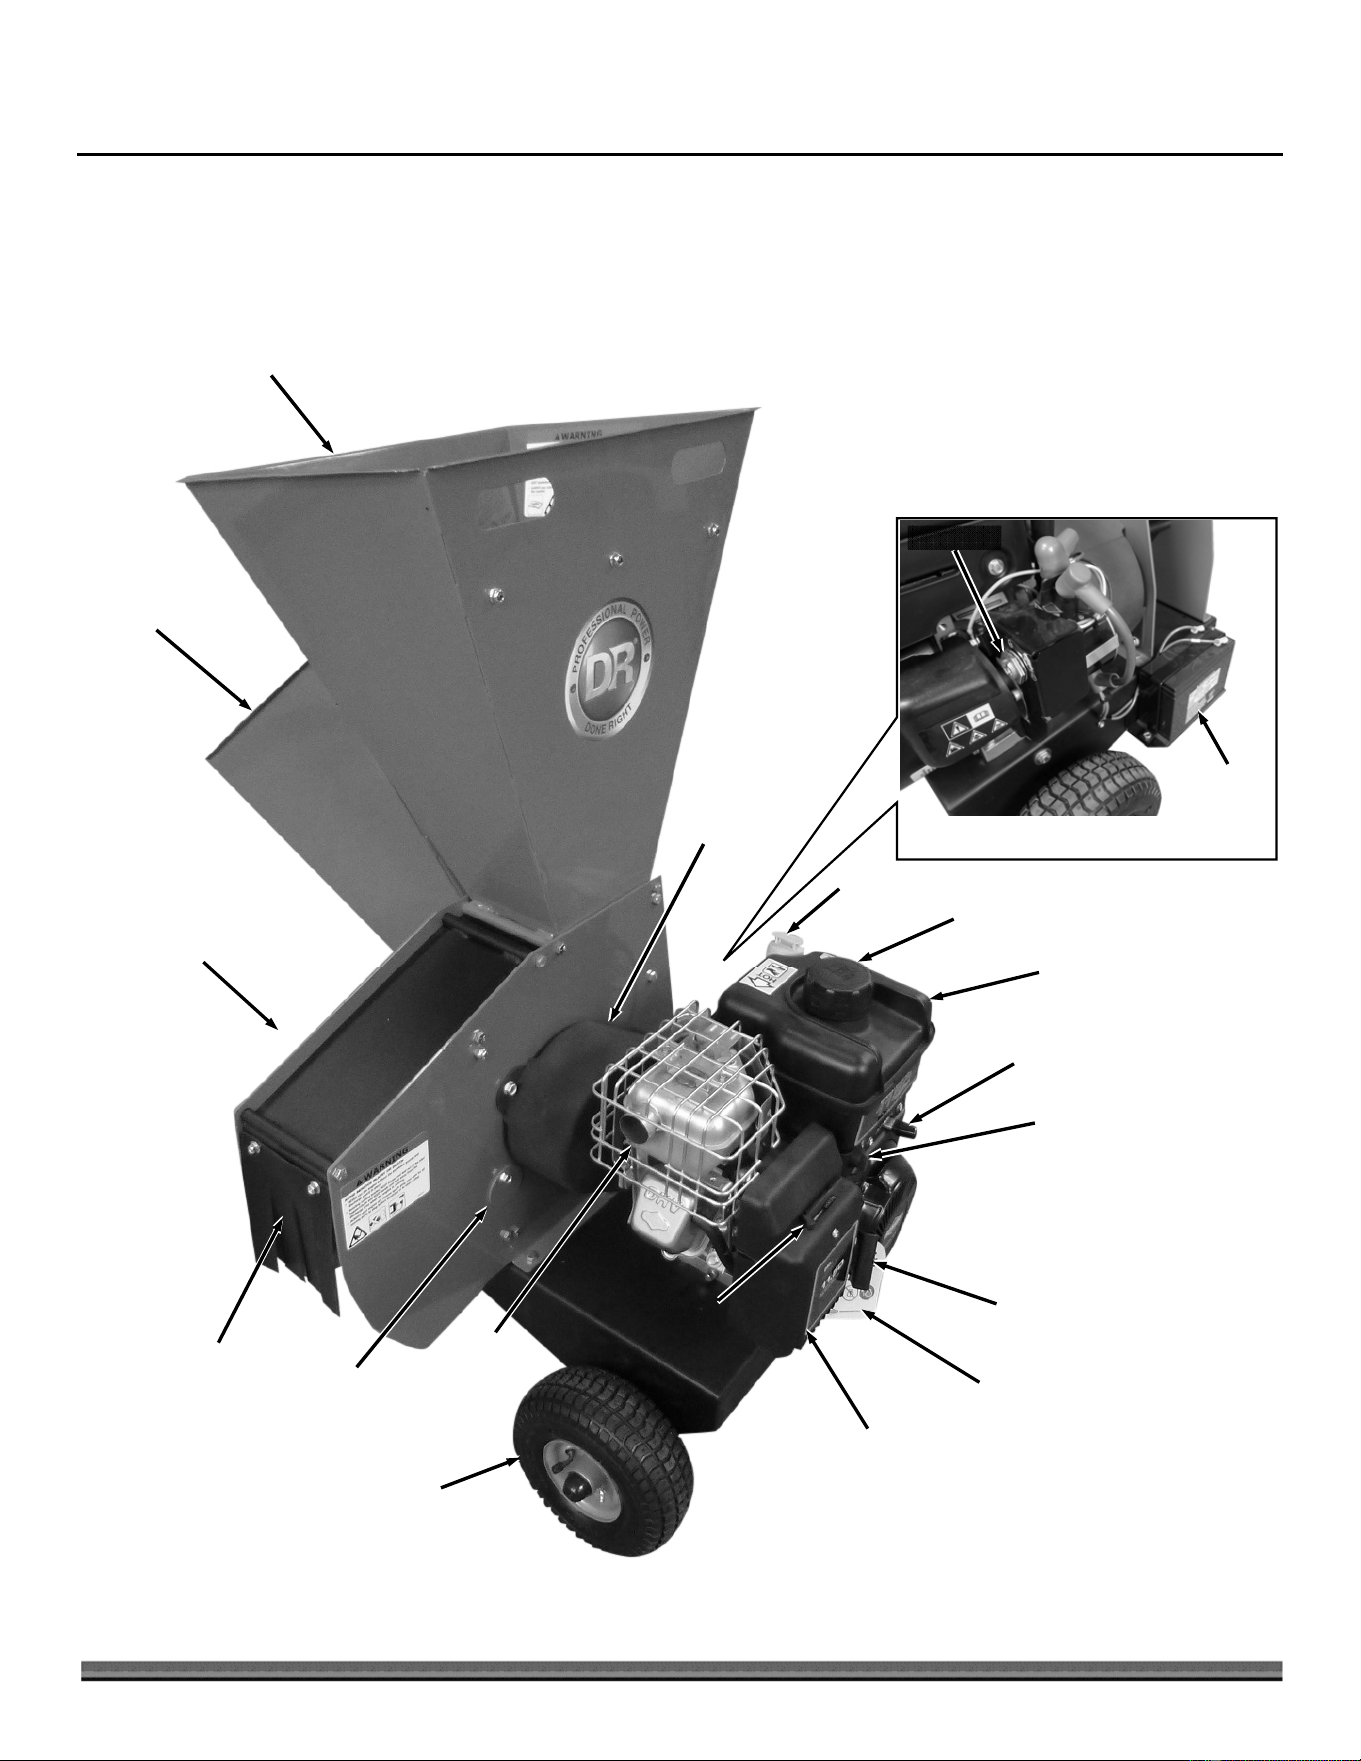
It may be helpful to familiarize yourself with the controls and features of your DR 11.5 CHIPPER SHREDDER as shown in Figure 2
before beginning these procedures. If you have any questions at all, please feel free to contact us at www.DRpower.com.
DR 11.5 CHIPPER SHREDDER Controls and Features
Pneumatic
Tire
s
Chipper Chute
Shredder
Hopper
11.5 FT-LBS Torque
Briggs & Stratton Engine
Starter Handle
Fuel Shut-Off Valve
Choke
Control
Lever
Throttle
Fuel Fil
l
Oil Drain
(Front of Engine Base)
Oil Fil
l
Muffle
r
A
ir Filte
r
Battery
Key Switch
Electric Start Model
Belt Cover
Discharge
Deflector
Hammer Shaft
A
ccess Plate
Chipper Knife
A
ccess Plate
(Located on
Chipper Side
Sideplate)
CONTACT US AT www.DRpower.com 9
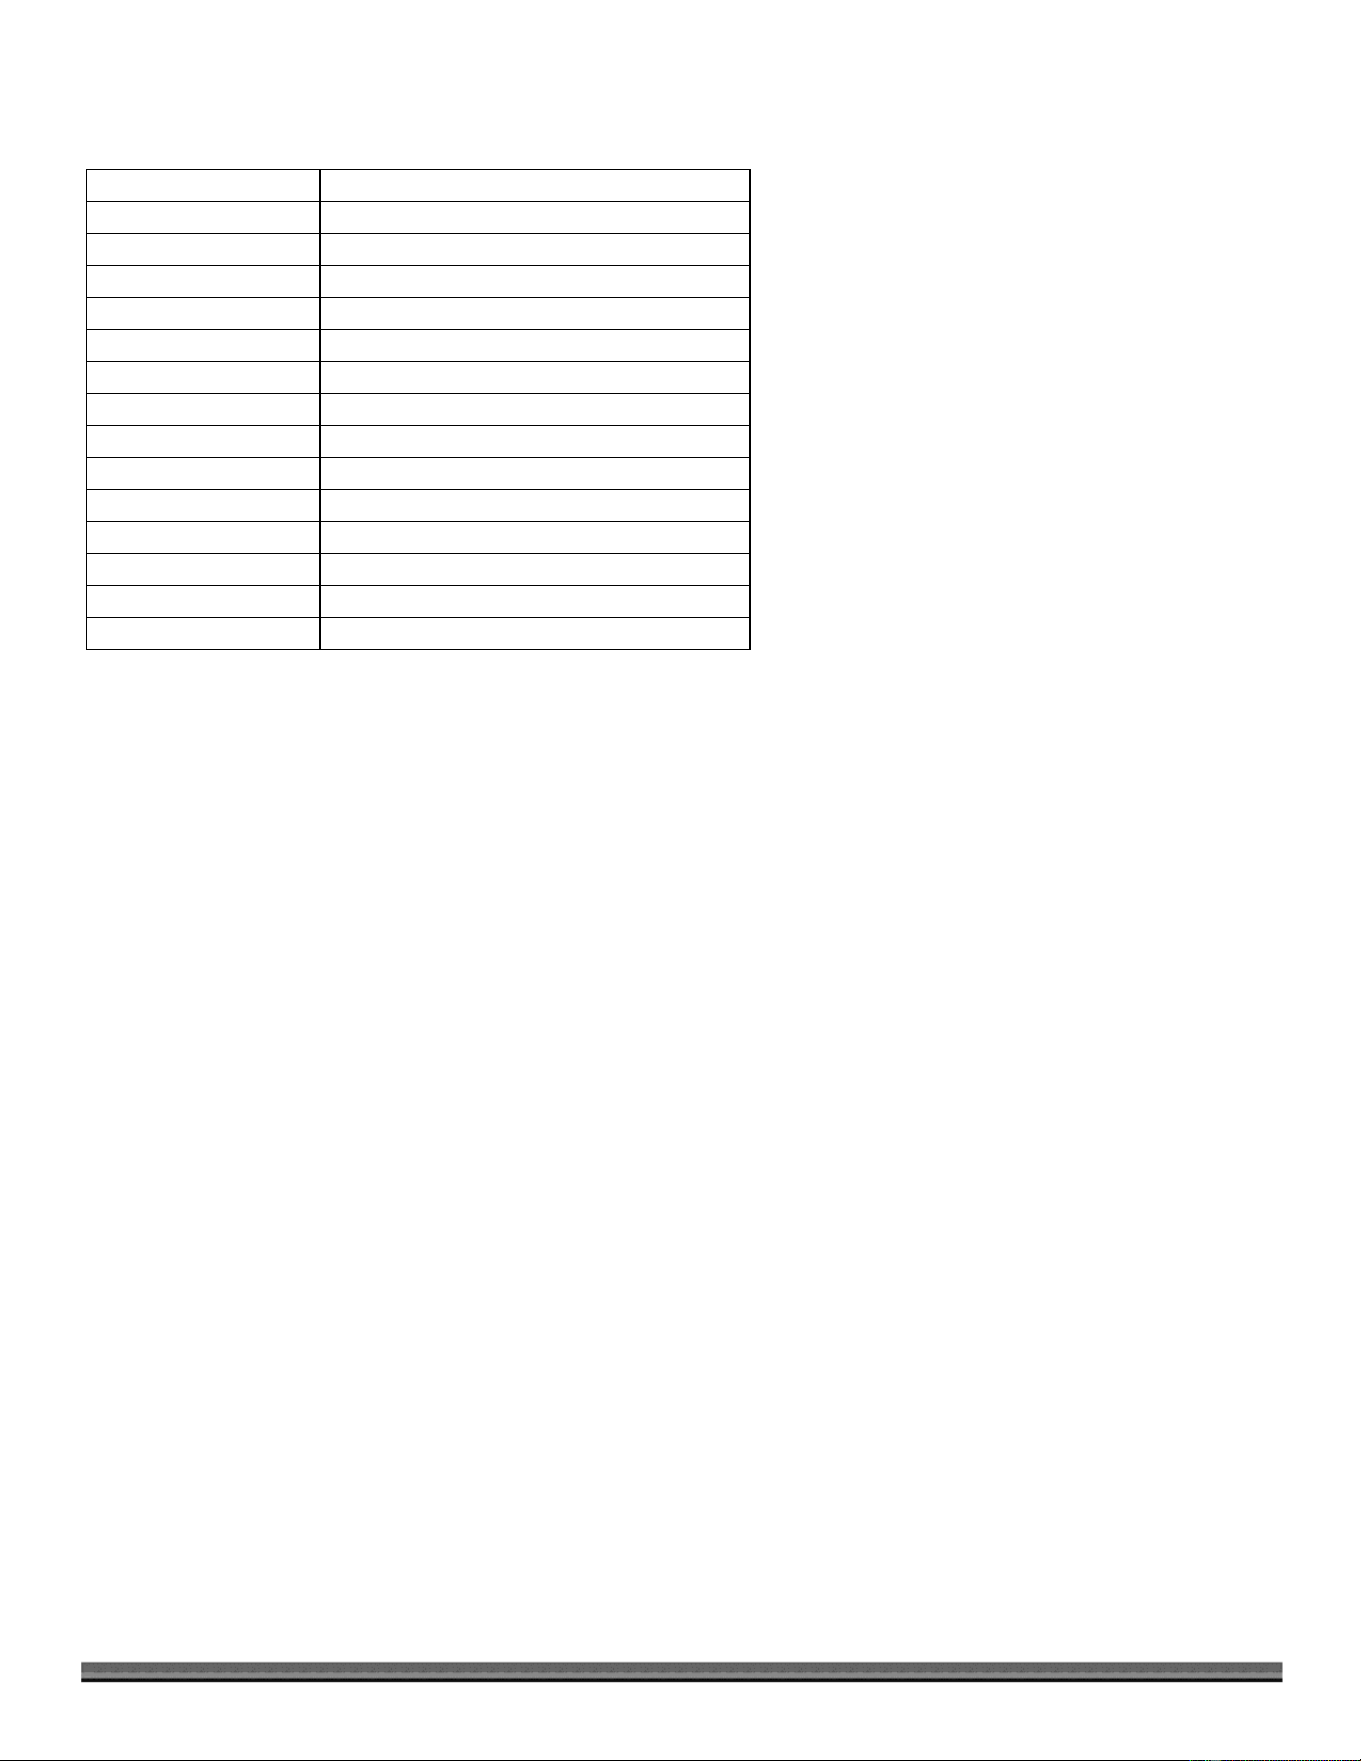
Specifications
Model 11.5 Chipper Shredder
Engine Briggs & Stratton (See engine manual.)
Gross Torque 11.50 Ft-Lbs
Starting Manual or Electric w/ Recoil Backup
RPM 3500
Chipping Capacity 4" Max Diameter Branches
Shredding Capacity 3/4" Max Diameter Woody Material
Chipper Knife Hardened Tool Steel, 4.75" x 1.25" x .28"
Shredding Hammers 12 Hardened Steel (8 Flat and 4 J)
Discharge Screen 1" Diameter Holes
Belt V-Belt, B27, Wrapped Construction
Wheels 9/3.5 x 4, Pneumatic, 4 Ply
Unit Weight 171 Lbs M/S, 186 Lbs E/S
Dimensions 34.5" L x 28.8" W x 46" H
Pin Hitch Towing Optional Accessory
10 DR
®
11.5 CHIPPER SHREDDER
Shredder
Hopper
Figure 3
Bolts and
Locknuts
Hand Hold
Cutouts
Assembly
Parts Supplied in Shipping Box:
- 11.5 CHIPPER SHREDDER Power Unit
- Shredder Hopper
- Product Pack:
--Safety and Operating Instructions Manual
--Engine Manual
--Hardware (listed below)
Hardware in Product Package:
Part# Description Qty
38640 .......... Bolt, HCS, 5/16-18 X 6", GR5, ZP ................... 2
11076 .......... Nut, Nylon Lock, 5/16-18, ZP .......................... 2
Tools needed:
Two 1/2" Wrenches
Attaching the Shredder Hopper
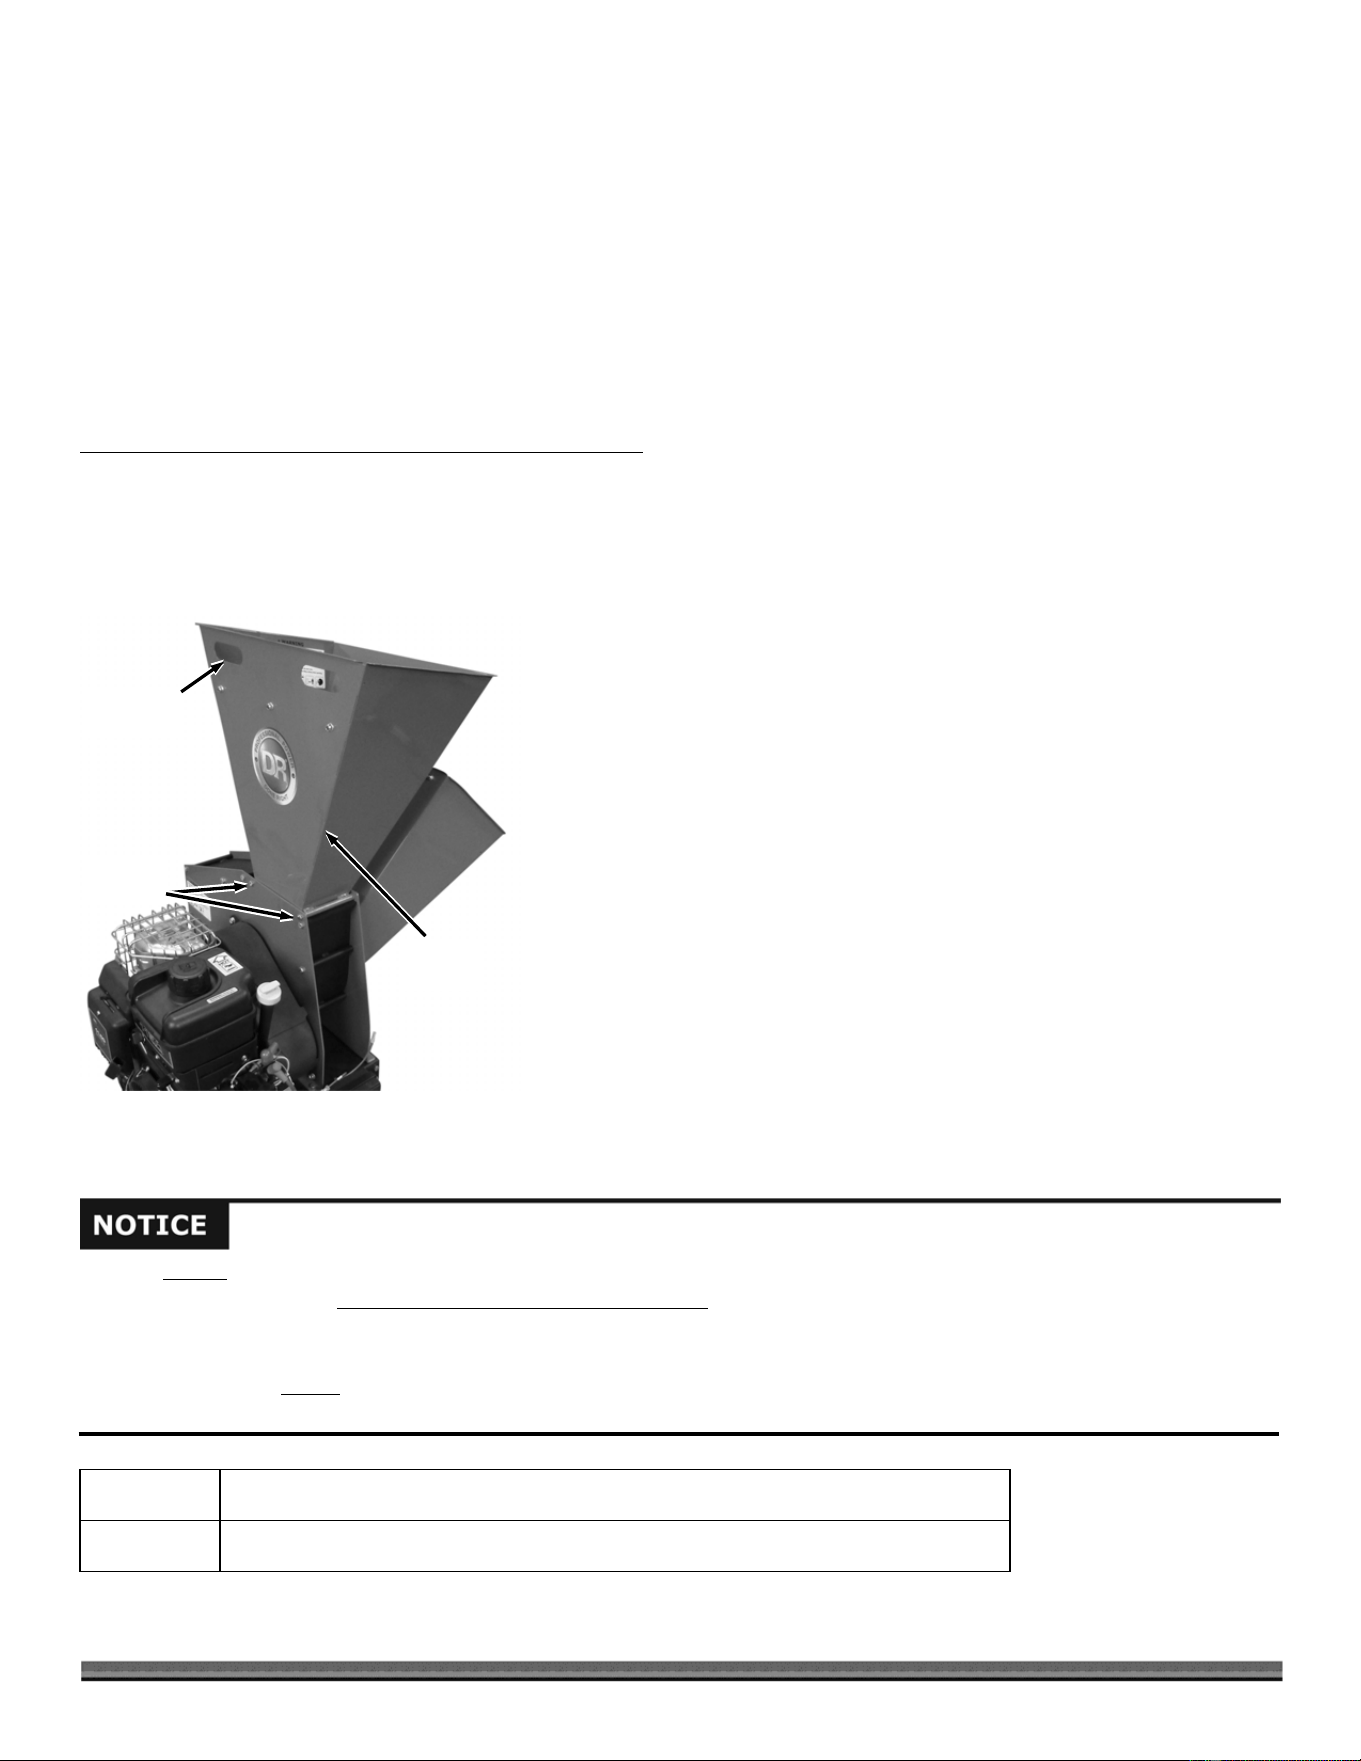
1. Position the Shredder Hopper onto the Power Unit with the hand hold
cutouts facing the engine side (Figure 3).
2. Secure the Shredder Hopper with the two 5/16-18 X 6" Bolts and Locknuts
from the Product Package using two 1/2"Wrenches.
Adding Oil and Gasoline
Engine Oil
SAE 30: above 50 degrees F; 10w-30: 10-90 degrees F; 5w-30: 30 degrees F or below
Fuel
Unleaded gasoline (See Engine Manual) Note: With no more than 10% Ethanol
You MUST add oil before starting the Engine. This machine is shipped without oil. Traces of oil may be in the reservoir from
factory testing, but you MUST add oil before starting the Engine. Fill the reservoir slowly, checking the level frequently to
avoid overfilling.
To get an accurate reading when checking the oil level:
- The Engine MUST be level.
- Refer to the Engine Manual for detailed information before performing the following procedures.
CONTACT US AT www.DRpower.com 11
Note: Use only the recommended high detergent Engine oil. Other types of oil
could cause problems operating your machine. Please refer to your Engine Owner’s
Manual for more detailed oil information.
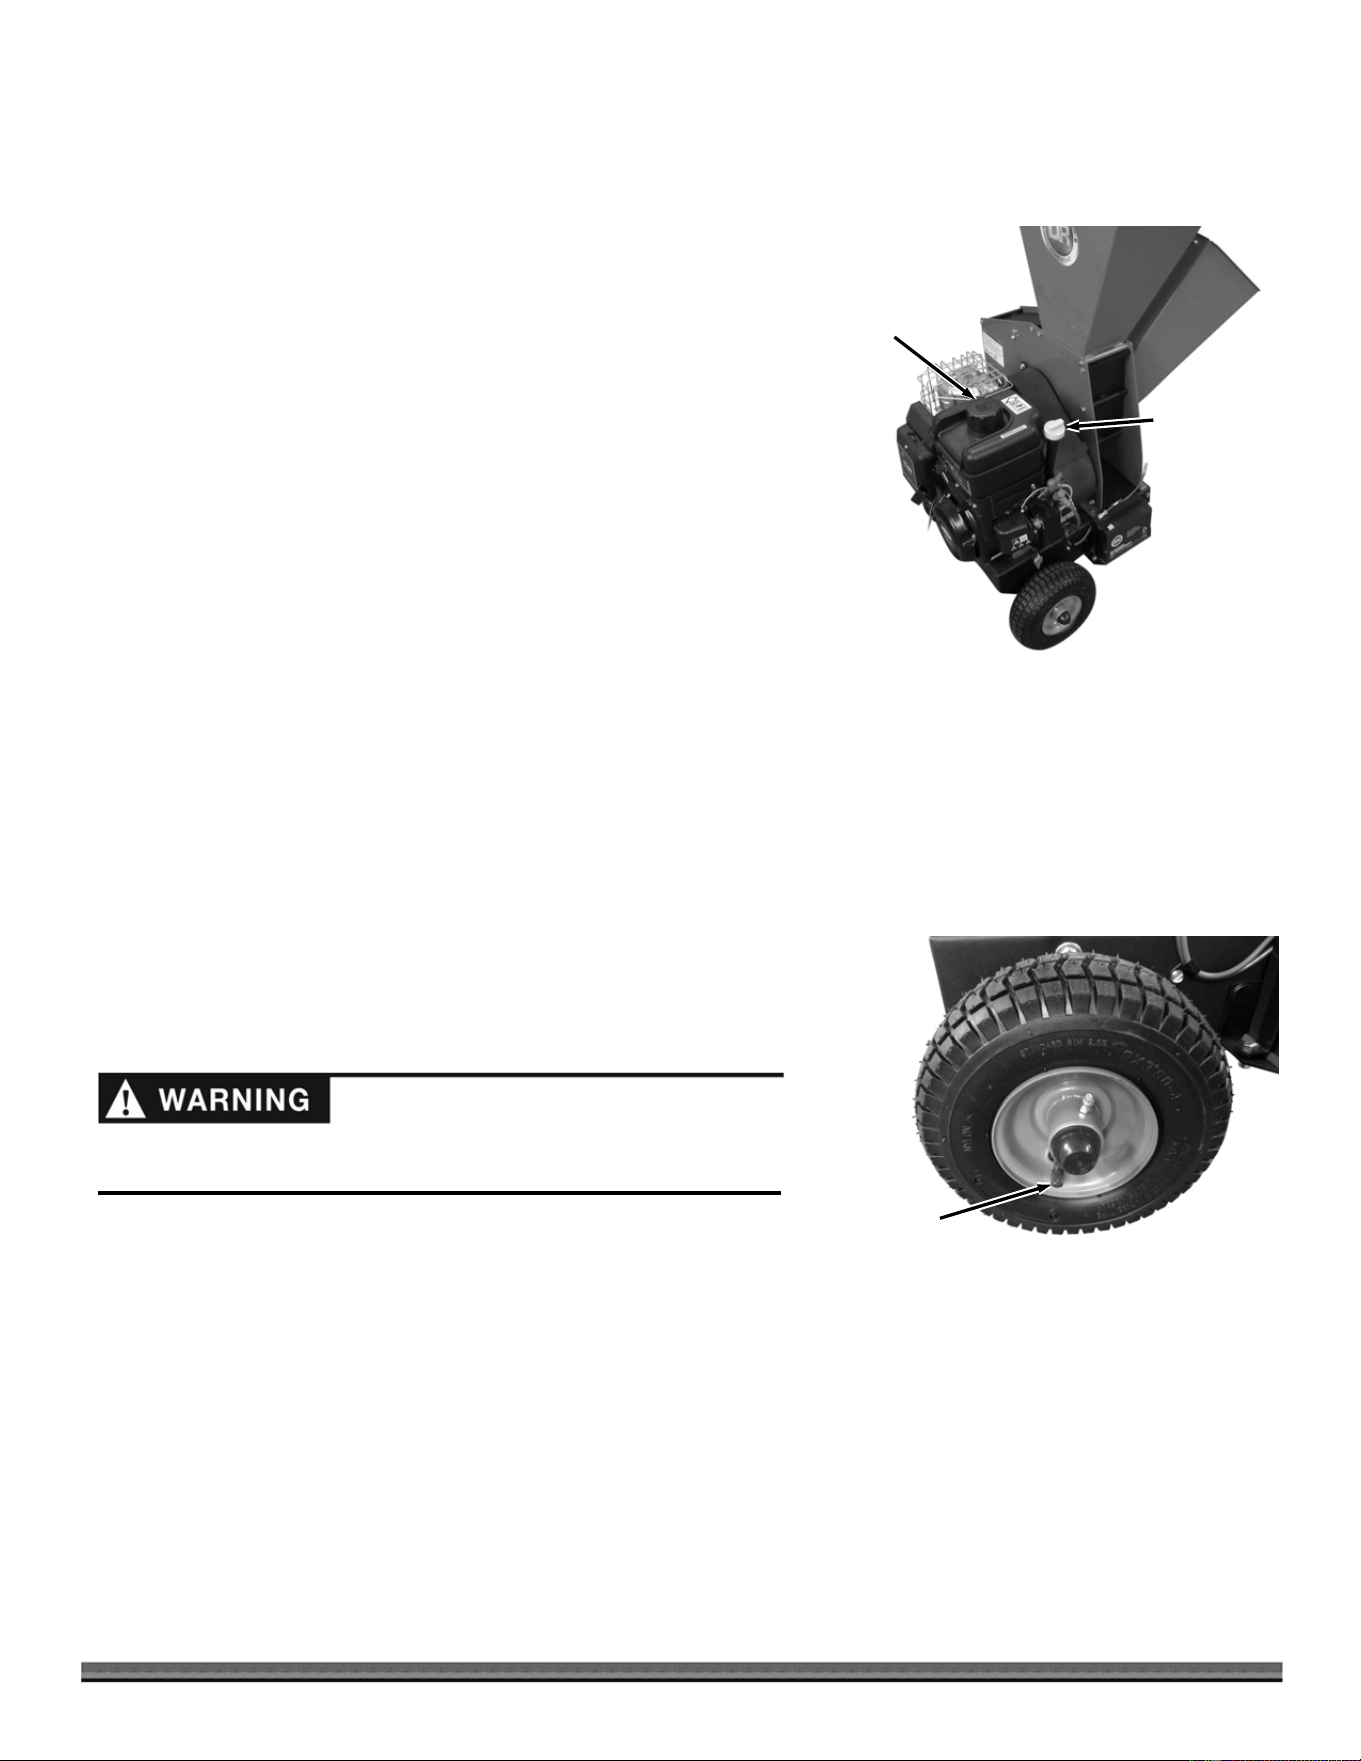
1. Position the machine so the Engine is level. Remove the Oil Fill/Dipstick
(Figure 4).
2. Initially add half of the oil recommended by the Engine Manufacturer. Wait
one minute for the oil to settle.
3. Check the Oil level on the Dipstick as described in the Engine Manual.
4. Continue adding a few ounces of oil at a time, rechecking the level until the
oil reaches the full level as indicated in the Engine Manual. Be careful not to
overfill.
5. Replace the Oil Fill/Dipstick when full.
6. Remove the Fuel Fill Cap and fill the Fuel Tank with fresh, unleaded gas
(with a minimum of 85 Octane) to approximately 1" to 1-1/2" below the top
of the Fill Neck to allow for Fuel expansion. Be careful not to overfill and
reinstall the Fuel Fill Cap before starting the Engine. See your Engine
Owner’s Manual for more detailed information.
Note: To refill the Fuel Tank, turn the Engine OFF, and let the Engine cool at least
five minutes before removing the Fuel Fill Cap.
Check the Tire Pressure
Tools Needed:
Tire Pressure Gauge
Air Compressor or Hand Pump
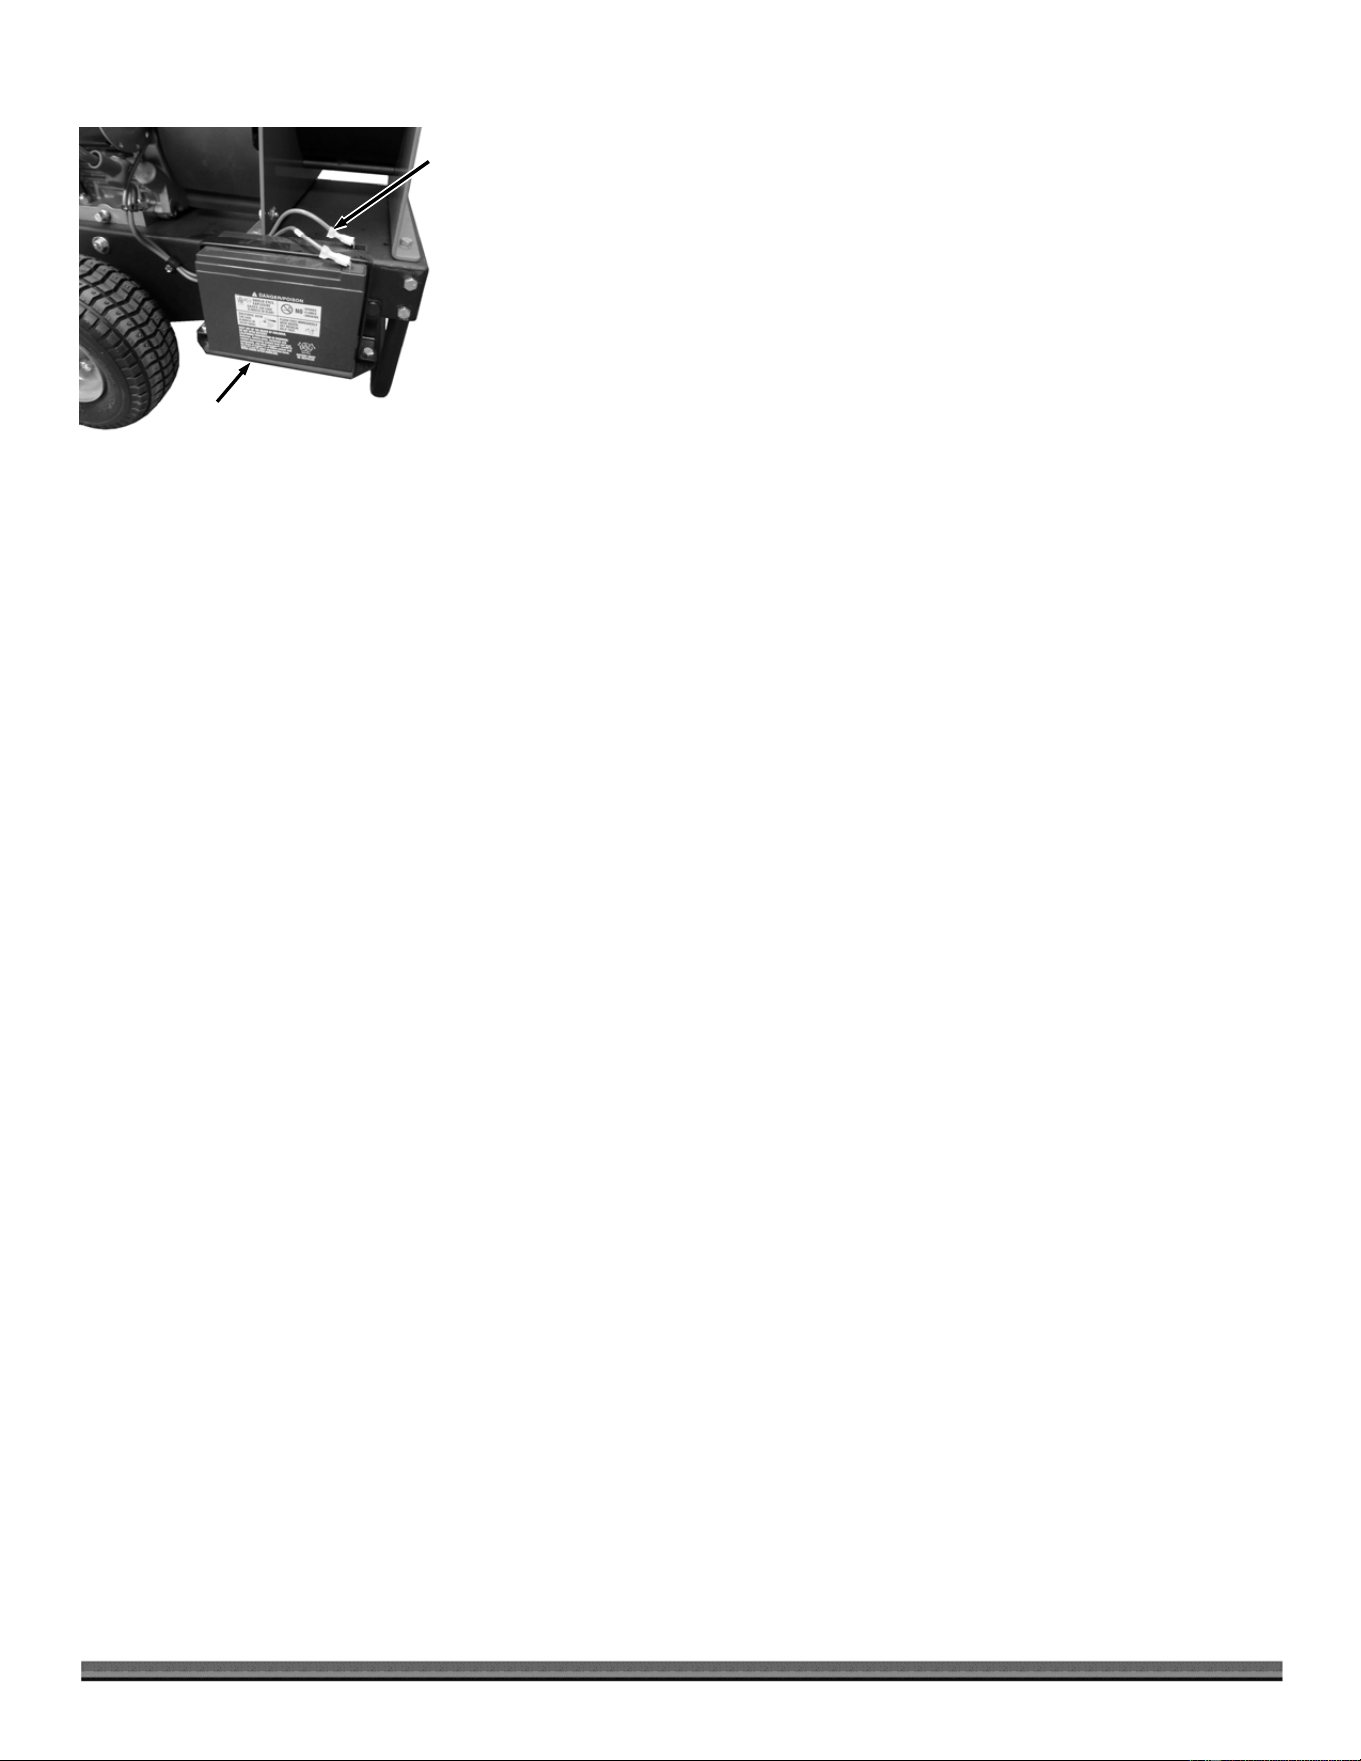
1. Remove the Valve Stem Protective Cap (Figure 5) and check the Tire
pressure with a Tire Pressure Gauge.
2. Check the manufacturers recommended pressure that is stamped on the
side of the Tire.
3. If the pressure is too low, add air through the Valve Stem with an Air
Compressor or Hand Pump.
4. Replace the Valve Stem Protective Cap when finished.
Valve Stem
Protective Cap
Figure 5
Fuel Fill
Oil
Fill
/
Di
p
stic
k
Figure 4
Do not over inflate the Tires. Inflate to the manufacturers recommended
pressure.
12 DR
®
11.5 CHIPPER SHREDDER
Connecting the Battery Wire (Electric Start Models)
We ship all Electric Start DR CHIPPER SHREDDERS with the green negative
terminal Battery Wire disconnected. This prevents the Battery from discharging
during shipment. Before using your DR CHIPPER SHREDDER, you must
connect the Battery Wire.
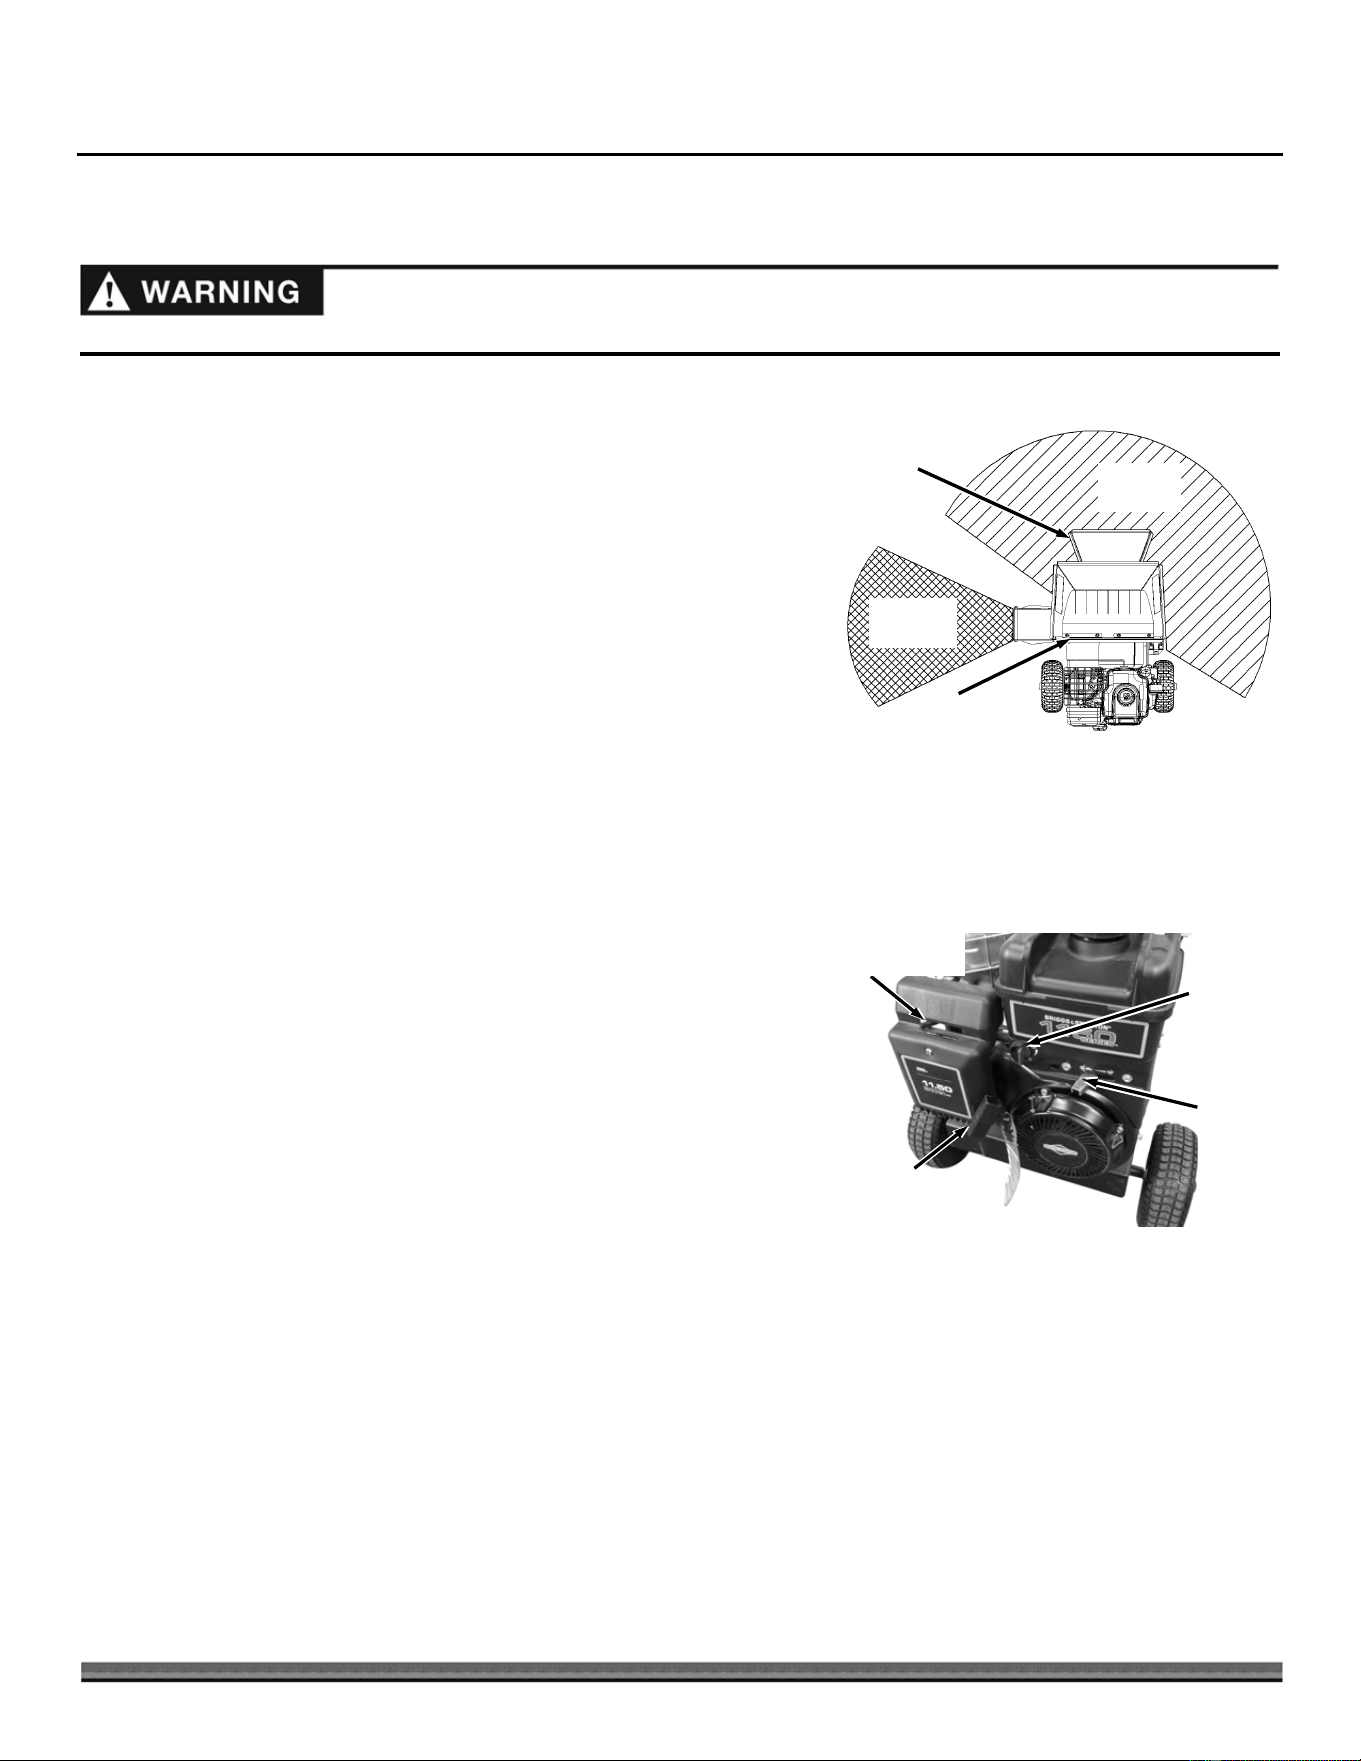
1. Remove the Protective Cap from the Negative Battery Terminal if one is
installed (Figure 6).
2. Insert the Negative Wire Connector onto the Negative Terminal of the
Battery.
Figure 6
Battery
Connect
Negative
Battery
Wire
CONTACT US AT www.DRpower.com 13
Read and understand the warnings listed in “Chapter 1 General Safety Rules” before operating this CHIPPER SHREDDER.
Chapter 3: Operating the DR 11.5 CHIPPER SHREDDER
This chapter covers the procedures for starting and stopping your new DR 11.5 CHIPPER SHREDDER and discusses basic
operation features. It may be helpful to better familiarize yourself with the features of your CHIPPER SHREDDER by reviewing
Figure 2 in Chapter 2 before beginning the steps outlined in this chapter.
Before You Begin
Visually check the Chipper Knife for damage each time you use the machine.
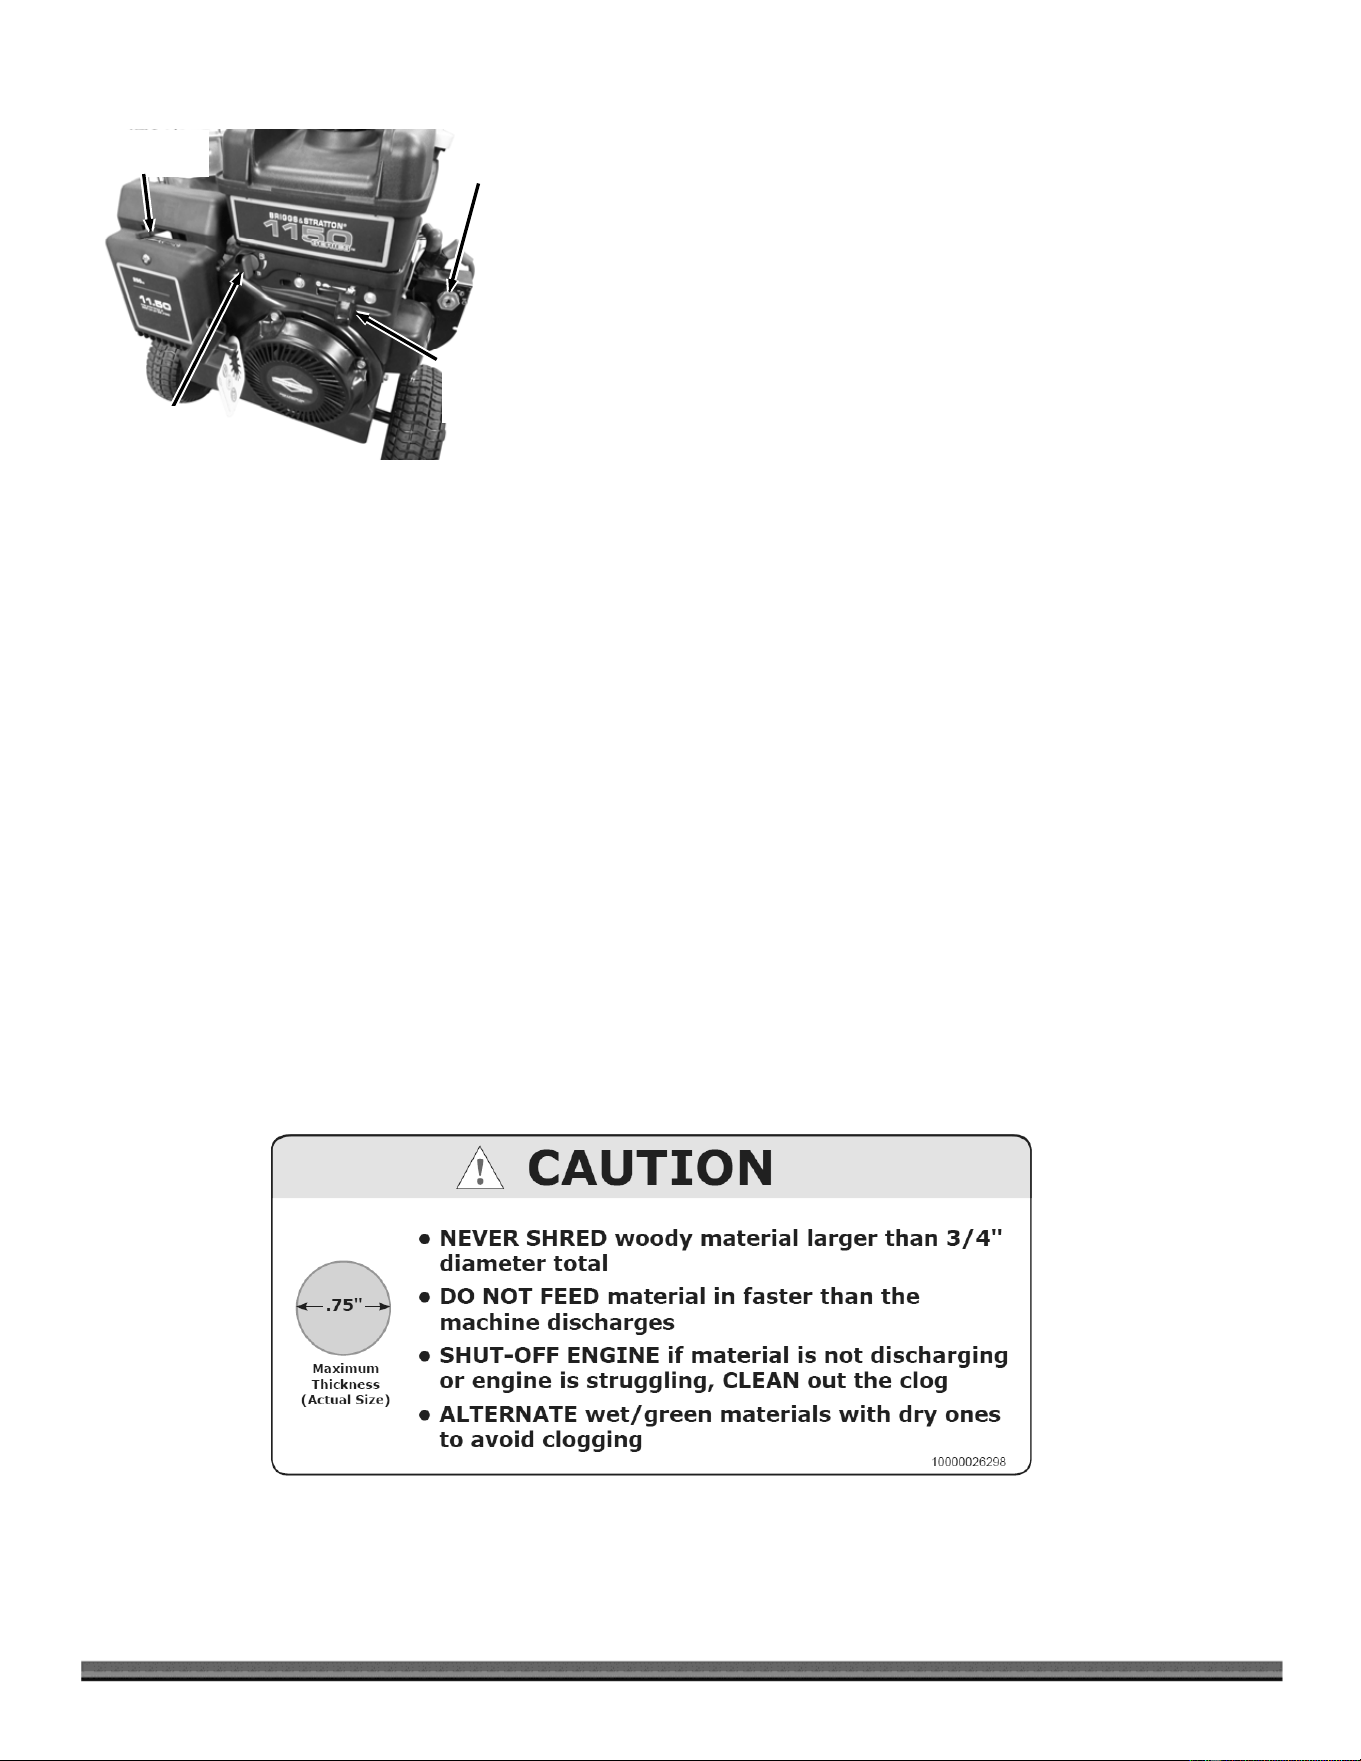
ALWAYS operate the DR 11.5 CHIPPER SHREDDER from the Operator
Zones (Figure 7).
When viewed from the Chipper Chute side the Flywheel turns in a clockwise
direction.
ALWAYS stop the Engine when leaving the Operating Zone or when moving
the machine.
Starting the Engine (Manual Start)
Note: See next page for electric start.
1. Check the Oil and Fuel level every time you use the DR 11.5 CHIPPER
SHREDDER.
2. Check the Shredder Hopper, Chipper Chute, and Discharge Guard and
remove any debris buildup from the machine as described on page 16.
3. Rotate the Fuel Shut-Off Valve counter clockwise to its OPEN position
(Figure 8).
4. Move the Choke Control Lever to the right to the Choke position (leave in
the Run position to the left if the Engine is already warm).
5. Move the Throttle Control Leaver to about half way between Slow (turtle)
and Fast (rabbit) Position.
6. Grasp the Recoil Starter Handle and slowly pull until you feel resistance,
then pull the cord rapidly to start the Engine. One or two pulls will usually
start the Engine.
7. As the Engine warms up, slowly adjust the Choke to the left towards the Run
position. Wait until the Engine runs smoothly before each Choke
adjustment.
8. When the Engine is warmed up and running smoothly, ensure that the
Choke is fully to the left and the Throttle Control Lever is fully to the Fast
(rabbit) Position for Chipping and Shredding.
Note: The Throttle should always be fully to the right when Chipping/Shredding.
Figure 8
Fuel
Shut-Of
f
Valve
Choke Control
Leve
r
Throttle
Control
Lever
Recoil Starter
Handle
Chipper
Chute
Figure 7
Discharge
A
rea
Shredder
Hopper
Operator
Zone
14 DR
®
11.5 CHIPPER SHREDDER
Starting the Engine (Electric Start)
1. Check the Oil and Fuel level every time you use the DR 11.5 CHIPPER
SHREDDER.
2. Check Inlet Hoppers and Discharge Chute and remove any debris buildup
from the machine by following the instructions on page 16.
3. Rotate the Fuel Shut-Off Valve counter clockwise to its OPEN position
(Figure 9).
4. Position the Choke Control Lever to the right so it is in the Choke position
(Leave it in the RUN position to the left is the Engine is already warm).
5. Move the Throttle Control Leaver to about half way between Slow (turtle)
and Fast (rabbit) Position.
6. Turn the Key to the START position until the Engine starts, then release. The
Key will snap back to the RUN position and the Engine will continue to run
Note: Electric Start Engines can also be started with the Recoil Starter Handle as described in the “Manual Start” section.
7. As the Engine warms up, slowly move the Choke to the left. Wait until the Engine runs smoothly before each Choke
adjustment.
8. When the Engine is warmed up and running smoothly, ensure that the Choke is fully to the left and the Throttle Control Lever
is fully to the Fast (rabbit) Position for Chipping and Shredding.
Note: The Throttle should always be fully to the right when Chipping/Shredding.
Stopping the Engine
Move the Throttle Control Lever all the way to the left past the SLOW (Turtle) position to the “STOP” position (manual start
models) or turn the Key to the off position (electric start models) (Figure 9).
Note: Close the Fuel Shut-Off Valve when transporting or storing the DR 11.5 CHIPPER SHREDDER.
Important Processing Information
Follow all Danger, Warning, Caution and Notice labels when using your machine. For best performance and safety, pay close
attention to the Caution Label on the inside of the Shredder Hopper (see below).
Fuel Shut-
Off Valve
Choke
Control Lever
Throttle
Control
Lever
Key
Switch
Figure 9
CONTACT US AT www.DRpower.com 15
The Hammers within the Shredding Chamber can tug suddenly at material fed into the Shredder Hopper. Wear Gloves and do
not hold on tightly to branches and vines and do not feed material straight down into the Hopper with your arm pointing
downward toward the opening. Instead, keep your arms parallel to the ground and several inches above the top edge of the
Hopper as you drop the material into the opening.
Using the Chipper Chute
The Chipper can chip twigs and branches ranging in size from 1/2" to 4" in diameter. Cut your materials into manageable lengths
before feeding them into the Chipper Chute. The revolving Chipper Knife mounted on a Flywheel turns branches fed into the
Chute into “chips”. NOTE: Use the Shredder Hopper as described in the next section for hard wood branches less than 3/4" in
diameter and softer organic material up to 4-1/2" in diameter.
Hold onto and slowly feed material into the Chipper Chute. Do not force material or allow material to be pulled too quickly into
the Chipper.
Larger diameter hardwood or extremely hard knots may not process as well as other materials. Discard larger diameter or
harder branch stubs before they become too short to control their feed rate.
Keep a moderate feed rate to prevent overloading the machine. Overloading the Chipper Chute will cause the Engine speed to
decrease and may result in clutch failure.
Your Chipper can process dry or green material. Green material will process quicker and easier than dry material. Soft wood
processes easier than hard wood.
If the machine does not chip well, the Chipper Knife may need sharpening or may need to be replaced.
It is best to trim off any side twigs from the main branch that you are chipping.
When chipping branches, sometimes a tail will remain at the end of a branch. To avoid this, rotate the branch while feeding it
into the Chipper Chute. Rotating the branch as you feed it into the machine will improve chipping performance.
Use caution with small diameter green saplings and branches less than 1" in diameter. Chip these grouped or bundled
together to provide support for each other. If the material is 1" or larger, feed only one at a time into the Chipper Chute.
Shred green or very leafy material smaller than 3/4" diameter (like pine boughs) through the Shredder Hopper instead of the
Chipper Chute.
Using the Shredder Hopper
The Shredder Hopper can process hard wood branches up to 3/4" in diameter and softer organic material up to 4-1/2" in
diameter. You can shred most organic materials. A Guard (flap) is attached to the Hopper. Material must go past this flap in
order to enter the main Shredding Chamber where revolving steel Hammers do the shredding. Use a Stick to push the material
past the flap if needed.
Due to the wide variety of materials that you can shred and their different physical characteristics, only feed limited quantities of
any material into the Shredder Hopper at first. Increase the amount and length of material if you find that the material is
processing without any difficulty. Your judgment and operator experience is very important.
ALWAYS pay attention to the discharge to confirm that material is exiting the machine at the same rate it is entering. If
material builds up inside the cutting chamber instead of discharging - stop feeding more material and wait for the material to
discharge. If the material does not discharge, see the “Removing a Clog” section of you DR Chipper Shredder Safety and
Operating Instruction manual.
Be sure not to overload the machine by feeding too much material into the Hopper at one time. If you hear the speed of the
Engine decreasing, stop feeding material into the machine at once. Do not resume feeding the machine until the Engine has
returned to full speed.
You can feed several small branches into the Shredder Hopper at once providing their combined diameter is less than 3/4".
Cut branches so they are shorter than 3 feet long to make them more manageable.
Allow green materials to dry before processing or alternate processing and discharging green/wet materials with dry materials
to avoid clogging. If wet materials begin to clog, shred a stick to clear the material through. If the clog still is not cleared, see
the “Removing a Clog” section on the next page.
16 DR
®
11.5 CHIPPER SHREDDER
Remove Bolt
and Locknut
Figure 10
MATERIALS BEST SUITED FOR SHREDDING
Leaves Flowers Corn Stalks Roots
Soil Palm frond tops Grass clippings Garden debris
Potato vines Straw and Hay Hedge clippings Tomato vines
Manure Kitchen Waste Branches smaller than 3/4"
General Warnings
Removing a Clog
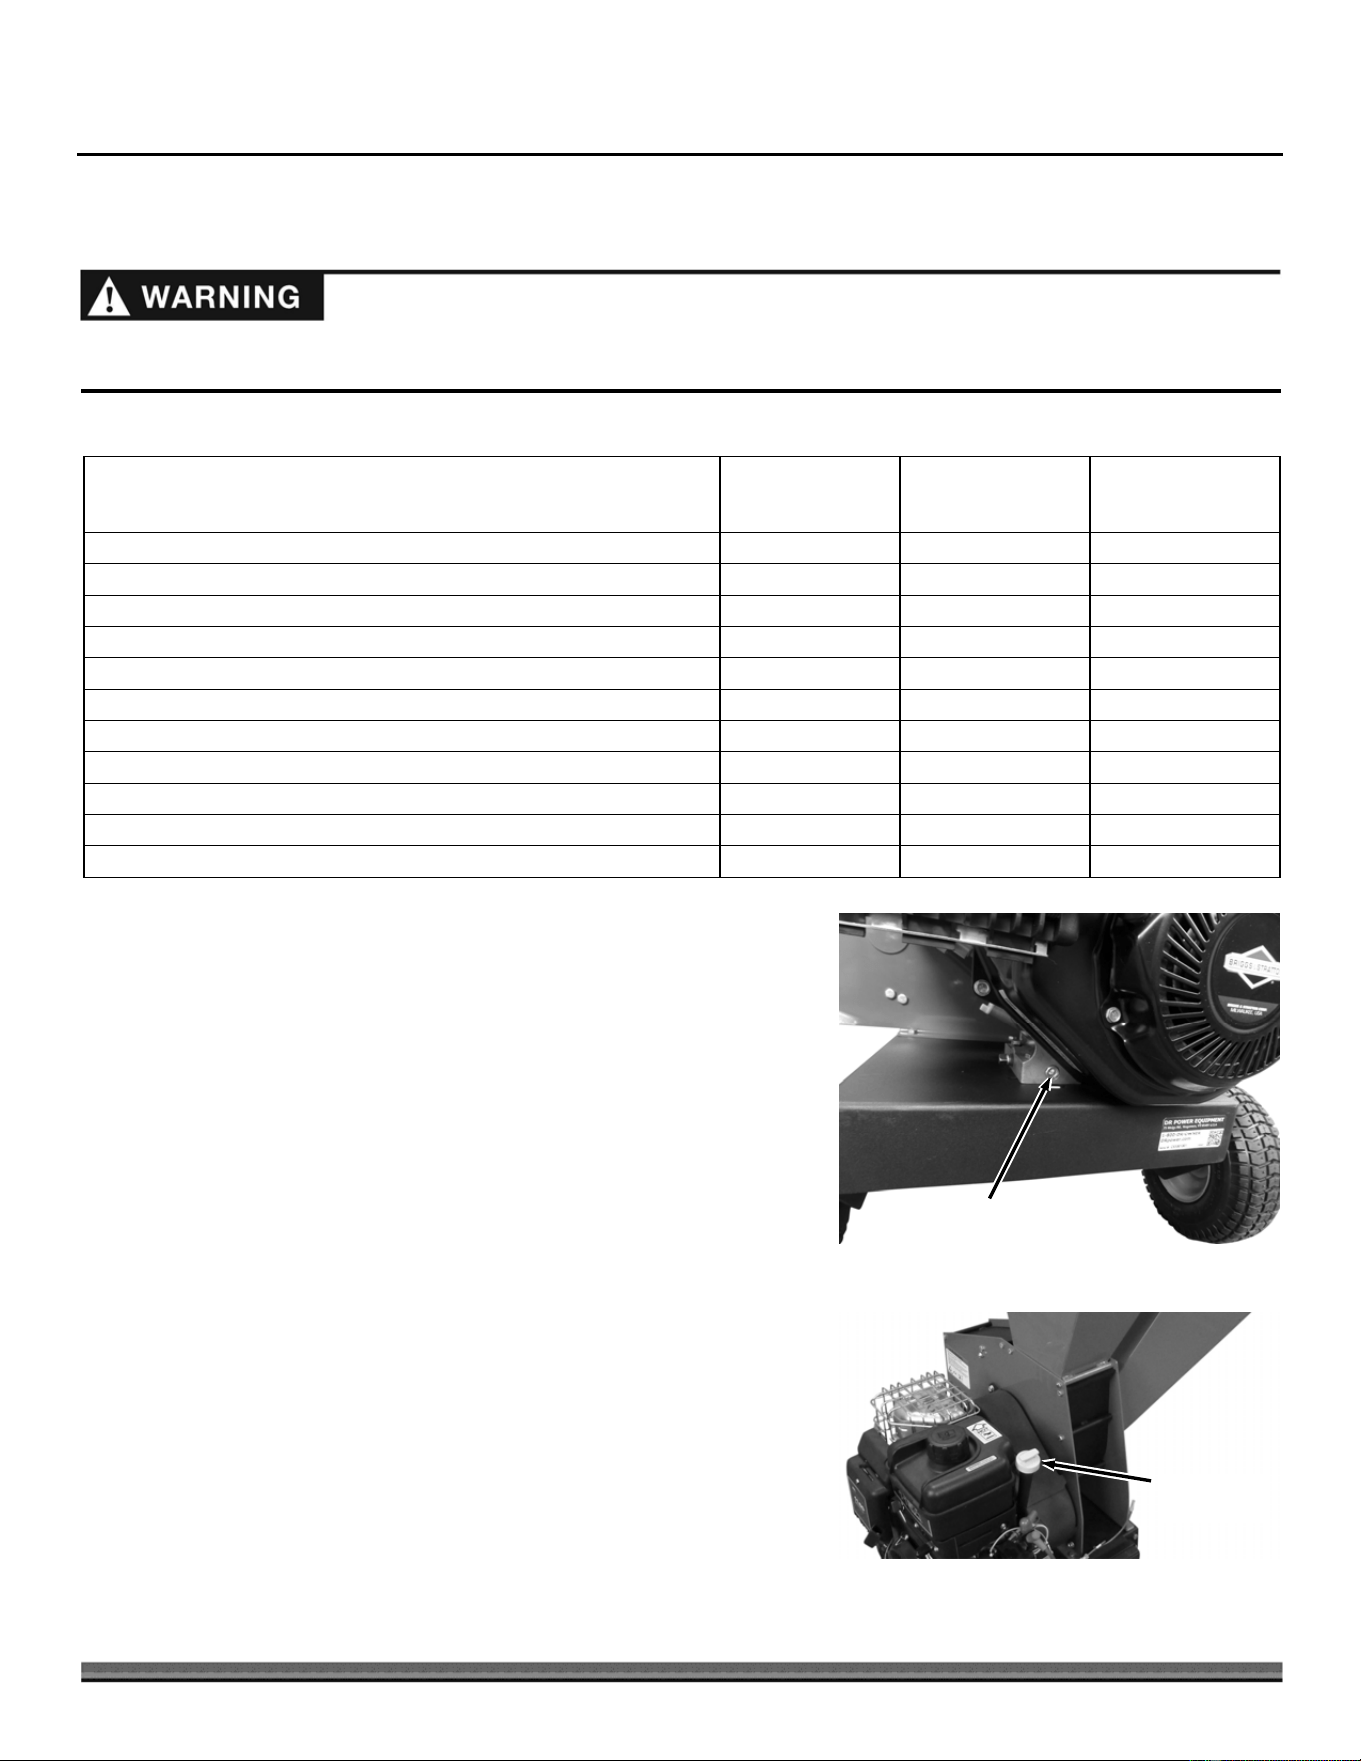
1. Remove any material left in the Chipper Chute and Shredder Hopper with a wooden stick.
2. Remove the top Screen Bolt and Locknut using two 1/2" Wrenches (Figure
10).
3. Rotate the Screen down to gain access to the cutting chamber (Figure 11).
Note: If the Screen will not rotate down freely, the nearby bolts can be loosened
slightly.
4. Clear all clogged material from the machine.
5. Rotate the Screen back into the operating position and reinstall the
hardware. Note: Make sure the bolt goes through the screen rather than just
behind it.
6. Start the machine and allow any remaining material to discharge.
7. If you have been shredding wet/green materials the clog may be near the
shredder housing inlet. Shred a wood stick of up to 1" diameter to clear the
clogged wet material.
8. If the clog does not clear repeat the above process.
9. Be certain the cutting chamber is clear before trying to process more
material.
NEVER allow processed material to build up within 3" of the Discharge opening. Move the DR 11.5 CHIPPER SHREDDER or
the pile as needed. Failure to do so could result in unnecessary jamming of the machine.
To move a pile of processed material, first shut off the Engine, and use a spade, rake, or long handle tool; NEVER use your
hands or feet!
Make sure the DR 11.5 CHIPPER SHREDDER finishes processing and discharging material before shutting the Engine off.
Before performing any maintenance procedure or inspection, stop the
Engine, wait five minutes to allow all parts to cool. Disconnect the Spark
Plug Wire, keeping it away from the Spark Plug.
Shredder
Screen
Figure 11
CONTACT US AT www.DRpower.com 17
Chapter 4: Maintaining the DR 11.5 CHIPPER SHREDDER
Regular maintenance is the way to ensure the best performance and long life of your machine. Please refer to this manual and the
Engine Manufacturer's Owner's Manual for maintenance procedures. Service intervals listed in the checklist below supersede
those listed in the Engine Manufacturer's Owner's Manual.
Regular Maintenance Checklist
PROCEDURE BEFORE EACH
USE
E
VERY 12 HOURS EVERY 25 HOURS
Check Engine Oil Level
Check General Equipment Condition
Clean Engine Exterior & Cooling Fins
Inspect Knife for damage and sharpness
Check Air Filter, Clean or Replace as Needed
Check Tire Pressure
Check Belt Tension & Adjust as Needed
1
st
time 5 hrs
Change Engine Oil
1
st
time 5 hrs
Check Knife Attachment Screws
Check Hammers/Spacers for Wear, Reverse or Replace as Needed
Inspect Spark Plug, Replace as Needed
Removing and Replacing the Engine Oil
Tools and Supplies Needed:
1/4" Allen Wrench
Rags and approved Container (for waste oil)
Engine Oil (see your Engine Manual for Oil specifications)
Note: Drain the oil when the Engine is warm; warm oil drains quickly and
completely.
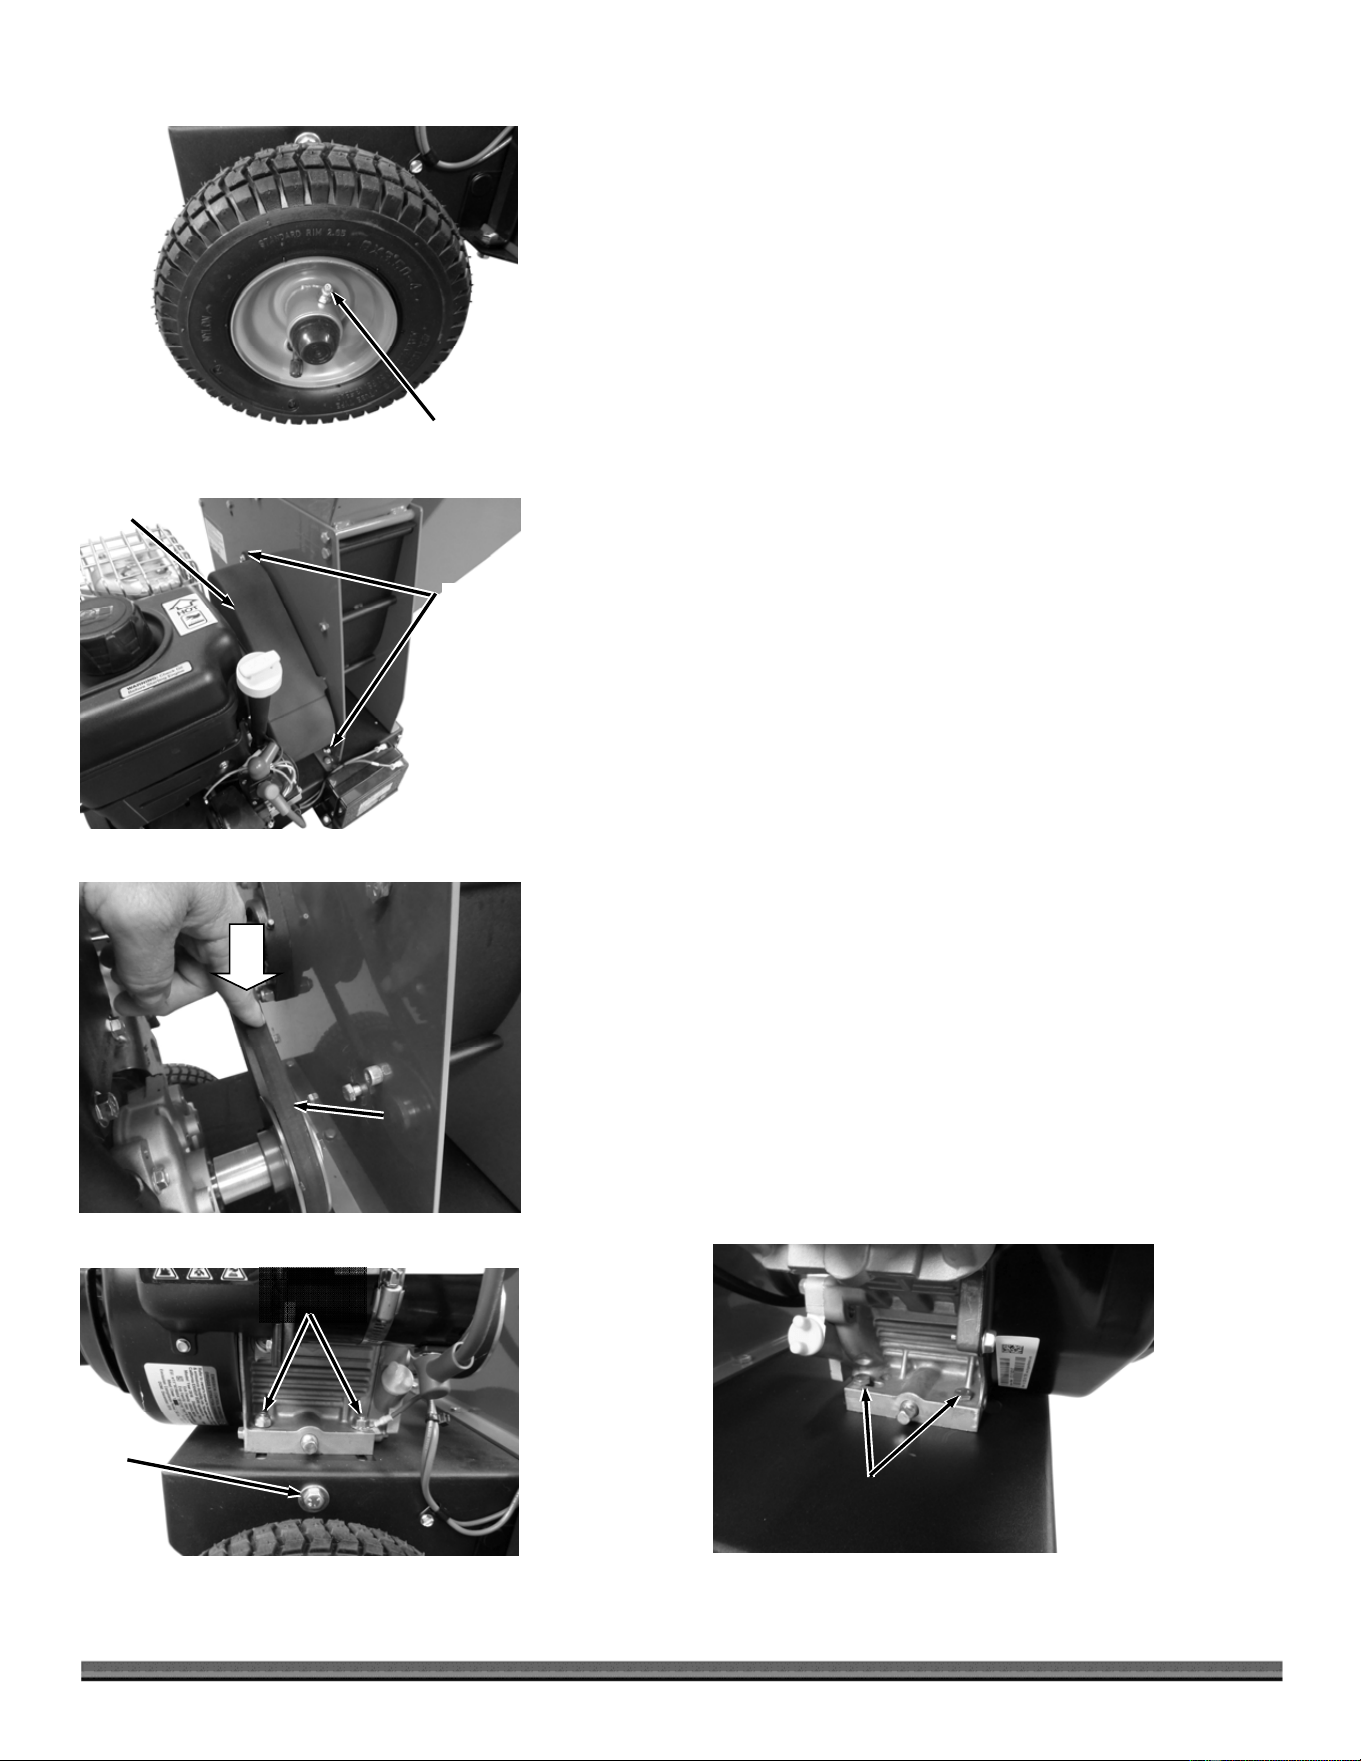
1. Set the machine on a level surface, place an approved Waste Oil Container
under the front of the unit between the wheels.
2. Remove the Oil Drain Plug at the front of the Engine using a 1/4" Allen
Wrench allowing the used oil to drain completely through the drain hole and
down into the Container (Figure 12).
3. Replace the Oil Drain Plug and refill with new oil through the Oil
Fill/Dipstick (Figure 13). See “Adding Oil and Gasoline” on page 10.
Note: Be sure to use environmentally safe disposal procedures in the disposing of the
used oil.
Oil
Fill/Dipstick
Figure 13
Oil Drain Plug
Figure 12
Before performing any maintenance procedure or inspection, stop the Engine, wait five minutes to allow all parts to cool.
Disconnect the Spark Plug Wire, keeping it away from the Spark Plug.
18 DR
®
11.5 CHIPPER SHREDDER
Greasing the Wheel Bearings
Tools and Supplies Needed:
Grease Gun
Lithium Grease
Clean Cloth
1. Wipe all dirt, etc., from the Grease Fittings on both Wheels with a clean cloth
(Figure 14).
2. Apply no more than three pumps of quality general-purpose lithium grease
with a hand-pumped Grease Gun to the Grease Fitting on each Wheel.
Checking and Adjusting Belt Tension
Tools and Supplies Needed:
Two 1/2" Wrenches
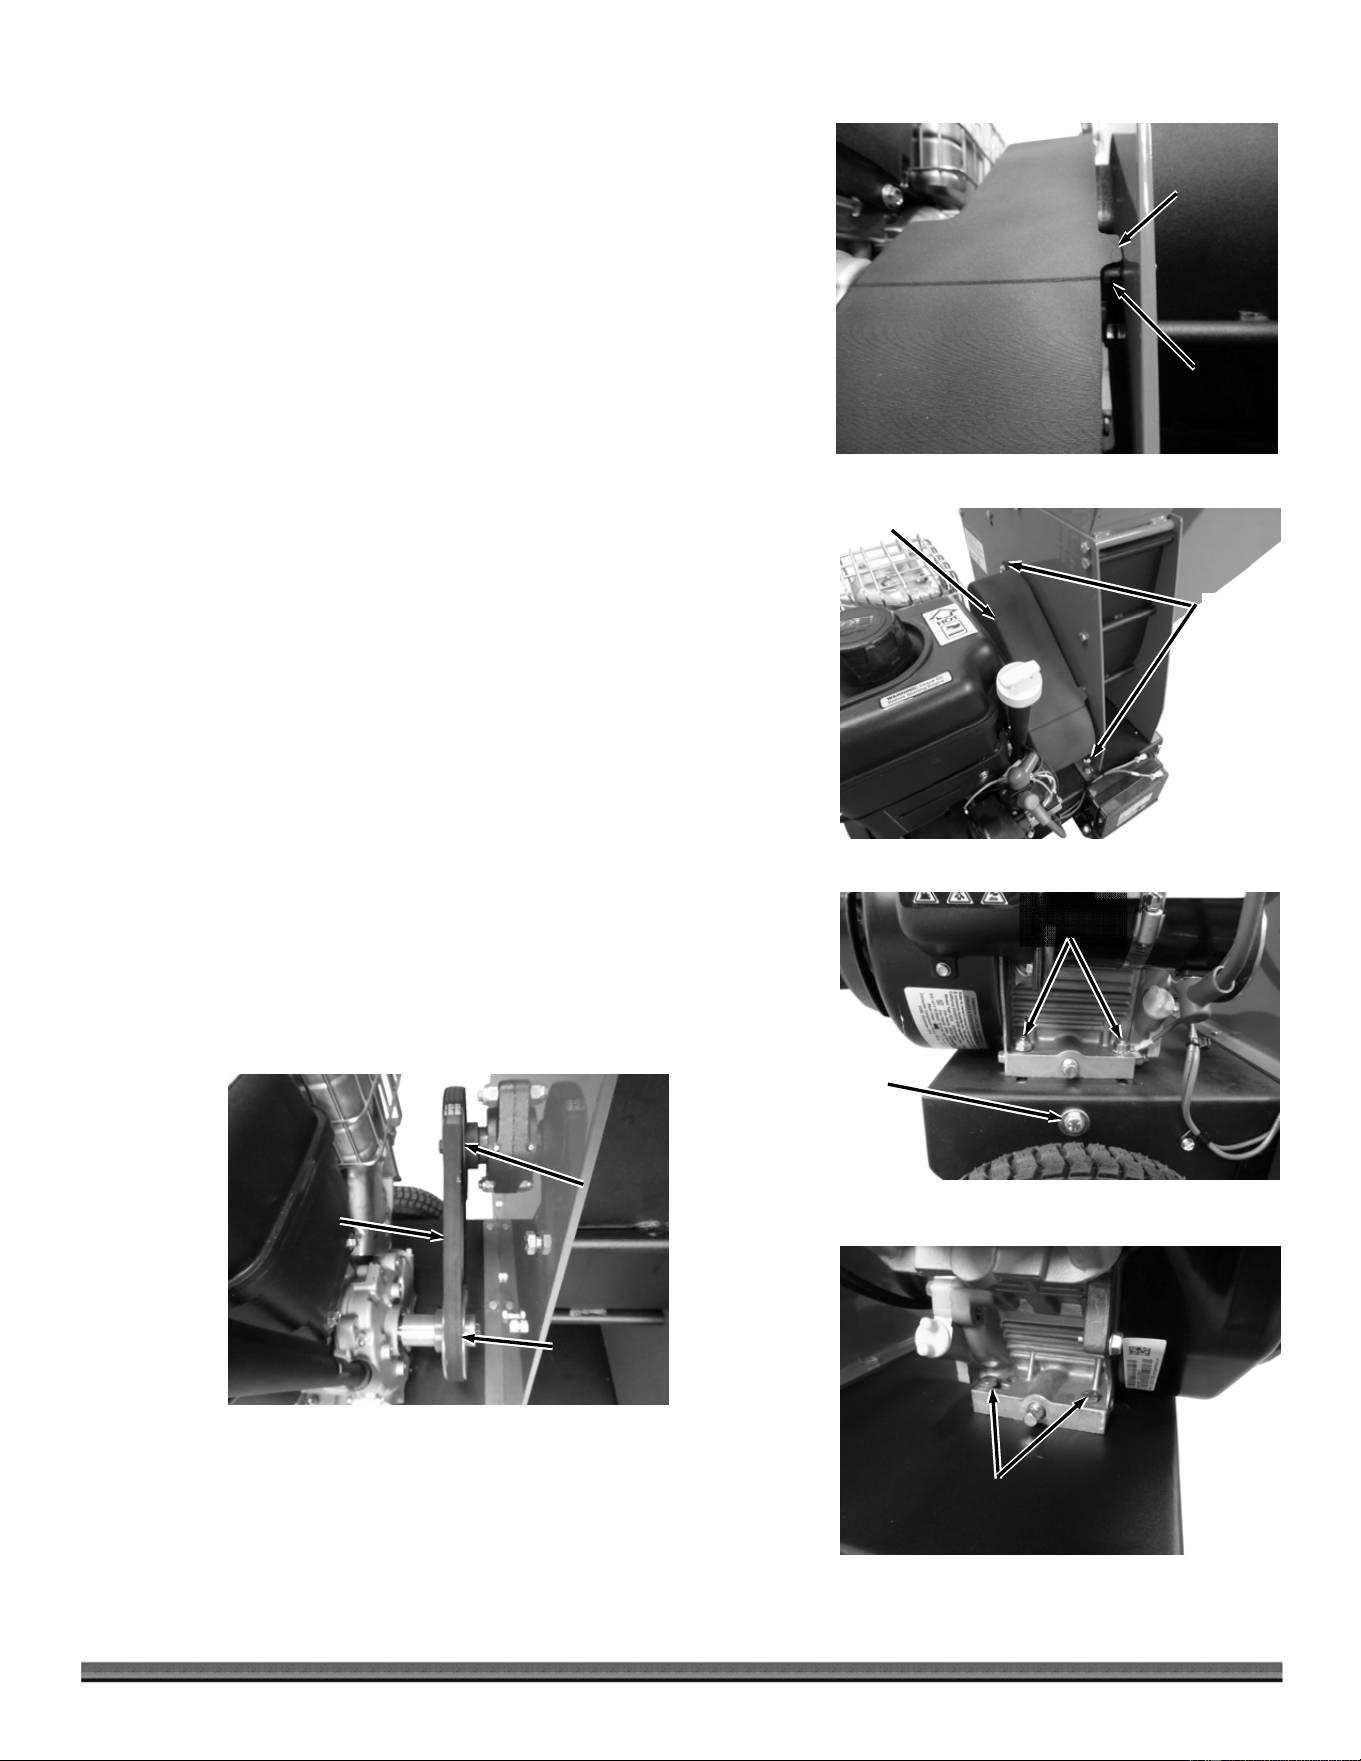
1. Remove the two Bolts and Washers securing the Belt Cover using a 1/2"
Wrench (Figure 15). Remove the Belt Cover.
2. Press down on belt with a finger to remove slack (Figure 16). This should
take about 3-5 pounds of force. The belt should move 1/4" to 1/2" when
tensioned properly. If the belt deflection is not within this range, follow
Steps 3-7 to adjust the belt tension.
3. Loosen the two, left side Engine Mount Locknuts using a 1/2" Wrench
(Figure 17).
4. Loosen the two, right side Engine Mount Bolts and Locknuts using two 1/2"
Wrenches (Figure 18).
5. Adjust the Tension Bolt using a 1/2" Wrench (Figure 17) until the belt is at
the correct tension as describe in Step 2.
Note: If the Tensioner Bolt has reached its limit and the Belt is still not tensioned
properly, the belt has stretched beyond its service limit and must be replaced. To
replace the belt, refer to the applicable steps in the following section “Replacing the
Belt”.
6. When the Belt tension adjustment is complete, tighten all four Engine Bolts,
then retighten the Tension Bolt about 1/8 turn.
Belt
Figure 16
Right Side
Engine Bolts
and Locknuts
Figure 18
Left Side
Engine Nuts
Figure 17
Tension
Bolt
Belt Cove
r
Figure 15
Bolts
Grease Fitting
Figure 14
CONTACT US AT www.DRpower.com 19
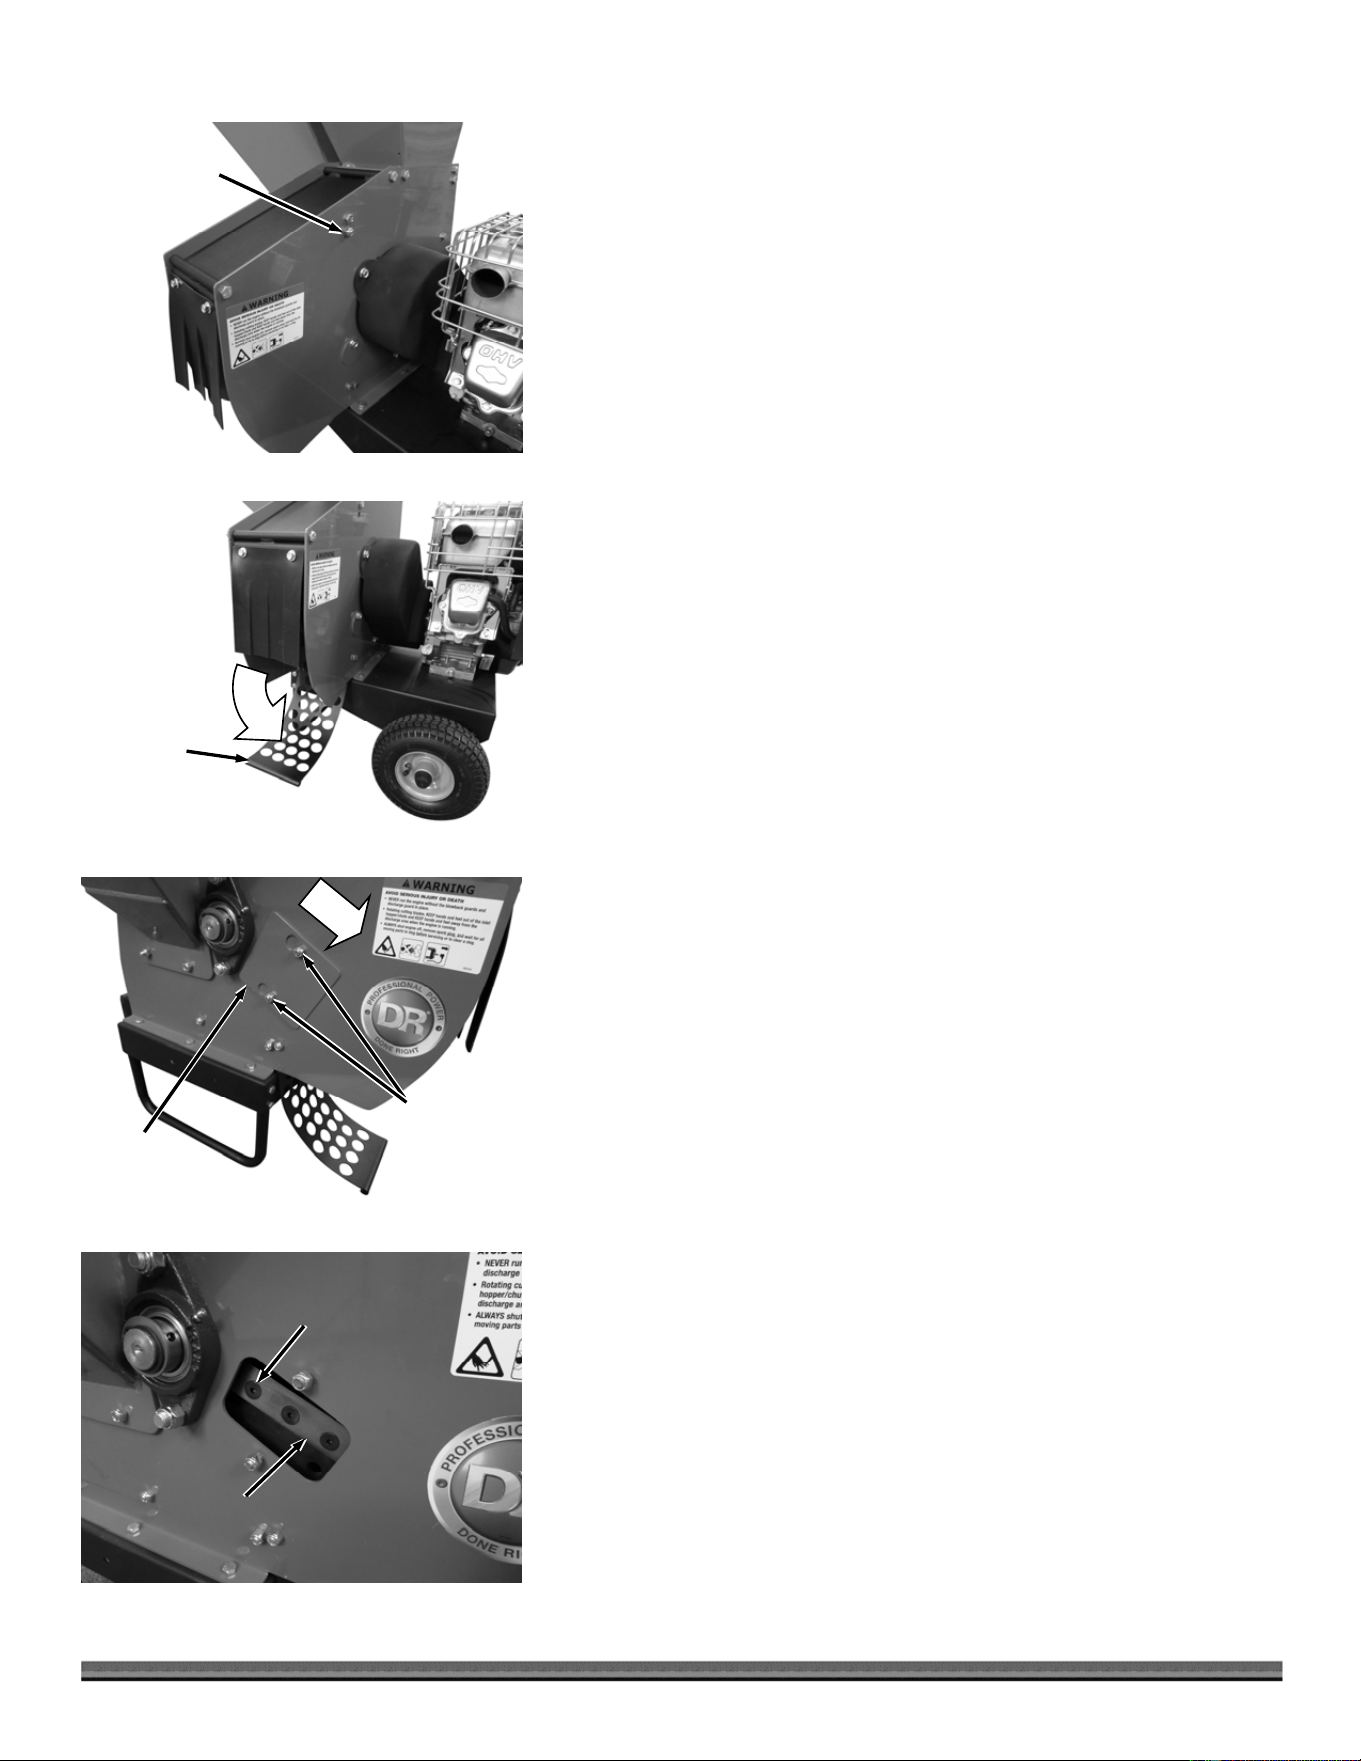
7. Reinstall the Belt Cover and secure with the two Bolts and Washers.
Note: Ensure the Belt Cover Tab is resting on top of the round Bolt Head and not
below it before securing the Cover (Figure 19).
Replacing the Belt
1. Remove the two Bolts and Washers securing the Belt Cover using a 1/2"
Wrench (Figure 20). Remove the Belt Cover.
2. Loosen the two, left side Engine Mount Locknuts using a 1/2" Wrench
(Figure 21).
3. Loosen the two, right side Engine Mount Bolts and Locknuts using two 1/2"
Wrenches (Figure 22).
4. Loosen the Tension Bolt using a 1/2" Wrench (Figure 21) until the belt can
be removed from the Pulleys.
5. Install the new Belt onto the Pulleys (Figure 23) and refer to the applicable
steps in the previous section “Checking and Adjusting Belt Tension” to
tension the Belt properly.
6. When the Belt tension adjustment is complete, tighten all four Engine Bolts,
then retighten the Tension Bolt about 1/8 turn.
7. Reinstall the Belt Cover and secure with the two Bolts and Washers.
Note: Ensure the Belt Cover Tab is resting on top of the round Bolt Head and not
below it before securing the Cover (Figure 19).
Belt
Figure 23
Flywheel
Pulley
Engine
Pulley
Figure 19
Tab
Round Bolt
Head
Belt Cover
Belt Cove
r
Figure 20
Bolts
Right Side
Engine Bolts
and Locknuts
Figure 22
Left Side
Engine Nuts
Figure 21
Tension
Bolt
20 DR
®
11.5 CHIPPER SHREDDER
Replacing the Chipper Knife
The DR 11.5 CHIPPER SHREDDER is shipped with a sharp Chipper Knife and
depending upon material being chipped we've found it can remain acceptably
sharp for 40 plus hours. When you notice diminished feeding, it is time to
replace the knife. You may also choose to have the knife sharpened instead as
described on the next page.
Tools and Supplies needed:
1/2" Wrench
3/16" Allen Wrench
Awl
Gloves
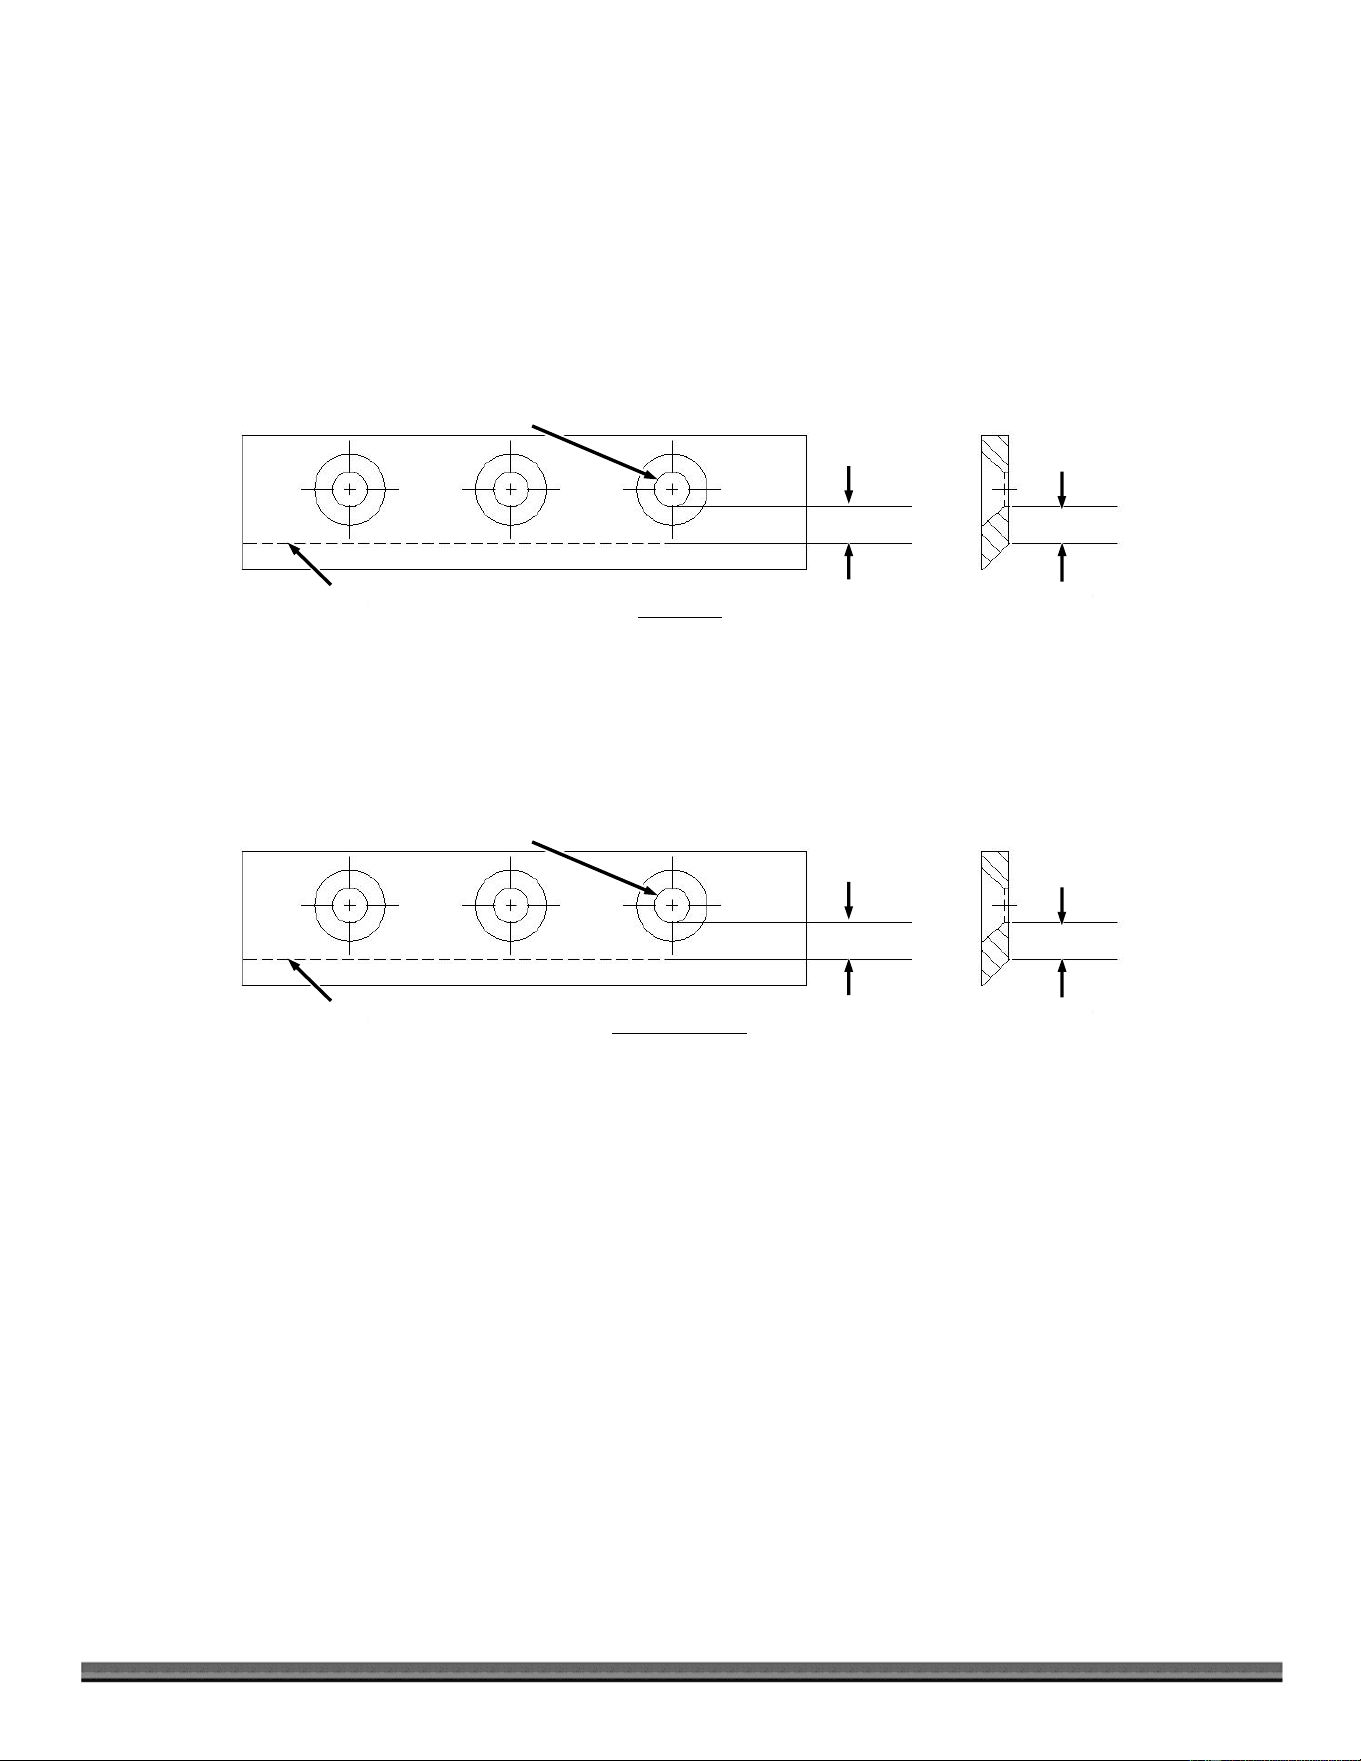
1. Remove the top Screen Bolt and Locknut using two 1/2" Wrenches (Figure
24).
2. Rotate the Screen down to gain access to the cutting chamber (Figure 25).
3. Loosen the Locknuts on the Access Plate and slide it to the side and remove
(Figure 26).
4. Rotate the Flywheel until the Knife is centered in the opening (Figure 27).
5. Clean out the heads of the Allen Screws with an awl or sharp tool.
6. Insert a 3/16” Allen wrench into the head of the screws and a 1/2" Wrench
on the Locknuts to remove the three Locknuts and Screws.
7. Carefully remove the dull or damaged Knife and visually inspect the Knife
mounting area and be sure they are clean. Metal burrs may need filing so
that the replacement Knife will be able to mount flush against the Flywheel.
8. Install a new or sharpened Knife and finger tighten the Allen Screws and
Locknuts.
Note: New Allen Screws and Locknuts are provided with each new Chipper Knife.
9. Using a 3/16" Allen Wrench on the Screw and a 1/2" Wrench on the
Locknut, tighten the hardware to secure the Chipper Knife.
10. Double-check all three Screws for tightness one more time.
11. Reinstall the Access Plate.
12. Rotate the Screen back into the operating position and reinstall the
hardware. Note: Make sure the bolt goes through the screen rather than just
behind it.
Knife
Figure 27
Screws
(Locknuts
on Inside)
Locknuts
A
ccess
Plate
Figure 26
Screen
Figure 25
Remove Bolt
and Locknut
Figure 24
CONTACT US AT www.DRpower.com 21
Knife Sharpening
You should never attempt to sharpen the Chipper Knife freehand; take the Knife to a machine shop for proper sharpening.
It is extremely important to consistently maintain the 45-degree angle for proper performance.
Excessive heat generated during the sharpening process will damage Knives and weaken the metal.
How many times a Knife can be sharpened is determined by how much material needs to be taken off to sharpen or to
compensate for dents or gouges.
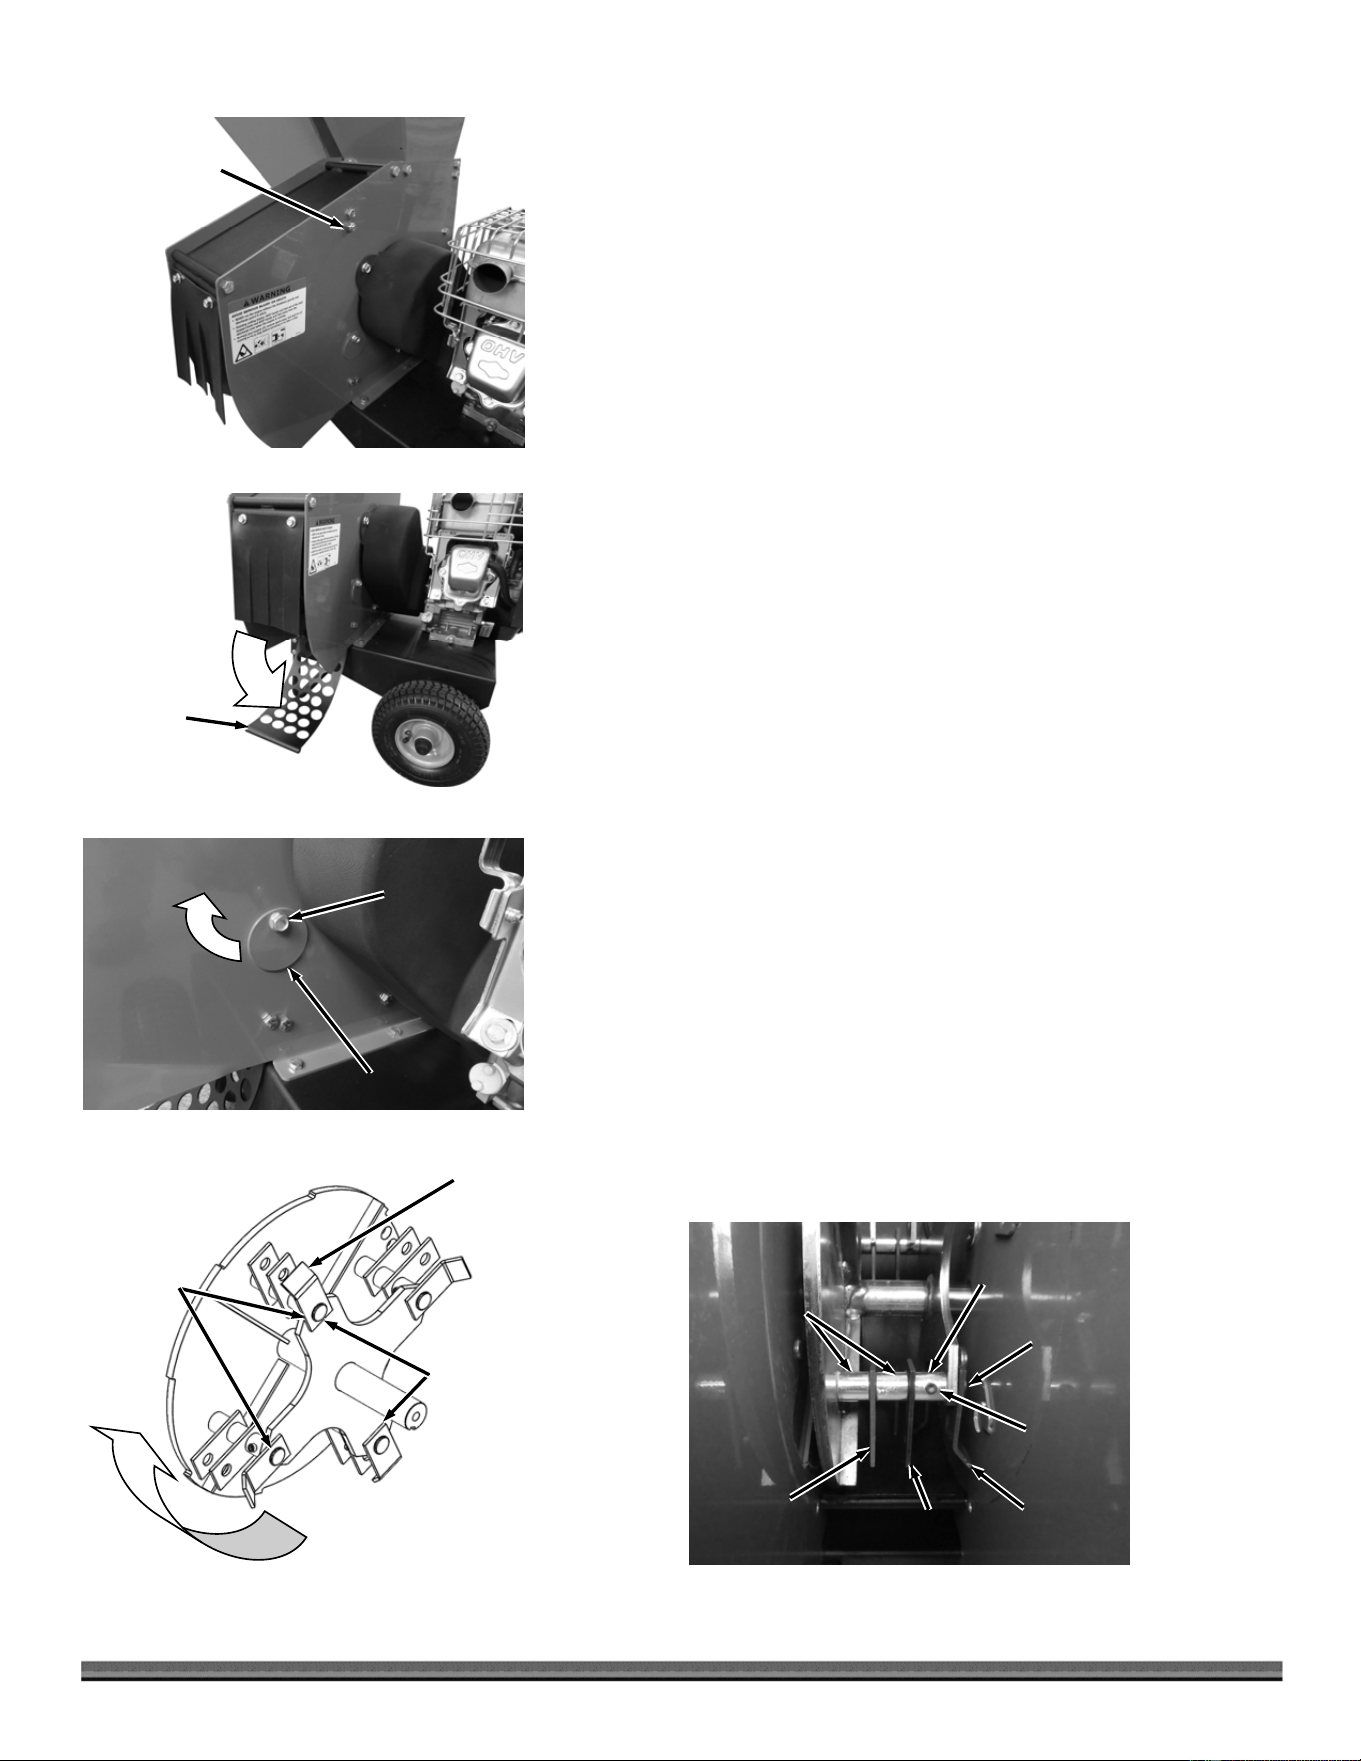
A new Chipper Knife has a 5/16" measurement between the short side bevel edge and the Knife mounting holes (Figure 28).
The knife should never be sharpened to the extent that more than 3/32" is taken off this measurement.
Once this measurement is below 7/32" (Figure 29), or if you are unable to remove dents or gouges with these guidelines,
replace the Knife.
Figure 28
New Knife
Short Side Beveled Edge
Knife Mounting Hole
5/16"
5/16"
Figure 29
Sharpened Knife
Short Side Beveled Edge
Knife Mounting Hole
7/32"
7/32"
22 DR
®
11.5 CHIPPER SHREDDER
Figure 33
Hammers
Worn Edge
on This Side
After Use
J Hammers on
Opposite
Hammer Shafts
Face Same
Direction
Direction of
Rotation
J Hammers on
Adjacent
Hammer Shafts
Face Opposite
Direction
Maintaining the Shredder Hammers
When the hardened steel Hammers become dull or round on the cutting edge,
they should be reversed or replaced.
Note: The Flat Hammers have four cutting edges and the J Hammers have two
cutting edges that may be used before replacement is necessary. To reverse the
Hammers, proceed as follows:
Tools and Part Required
1/2" Wrench
3/8" Wrench
5/32" Allen Wrench
1. Remove the top Screen Bolt and Locknut using two 1/2" Wrenches (Figure
30).
2. Rotate the Screen down to gain access to the Cutting Chamber (Figure 31).
3. Loosen the Bolt on the Access Plate using a 1/2" Wrench, rotate the Plate
out of the way and then tighten the Bolt to hold it in place (Figure 32).
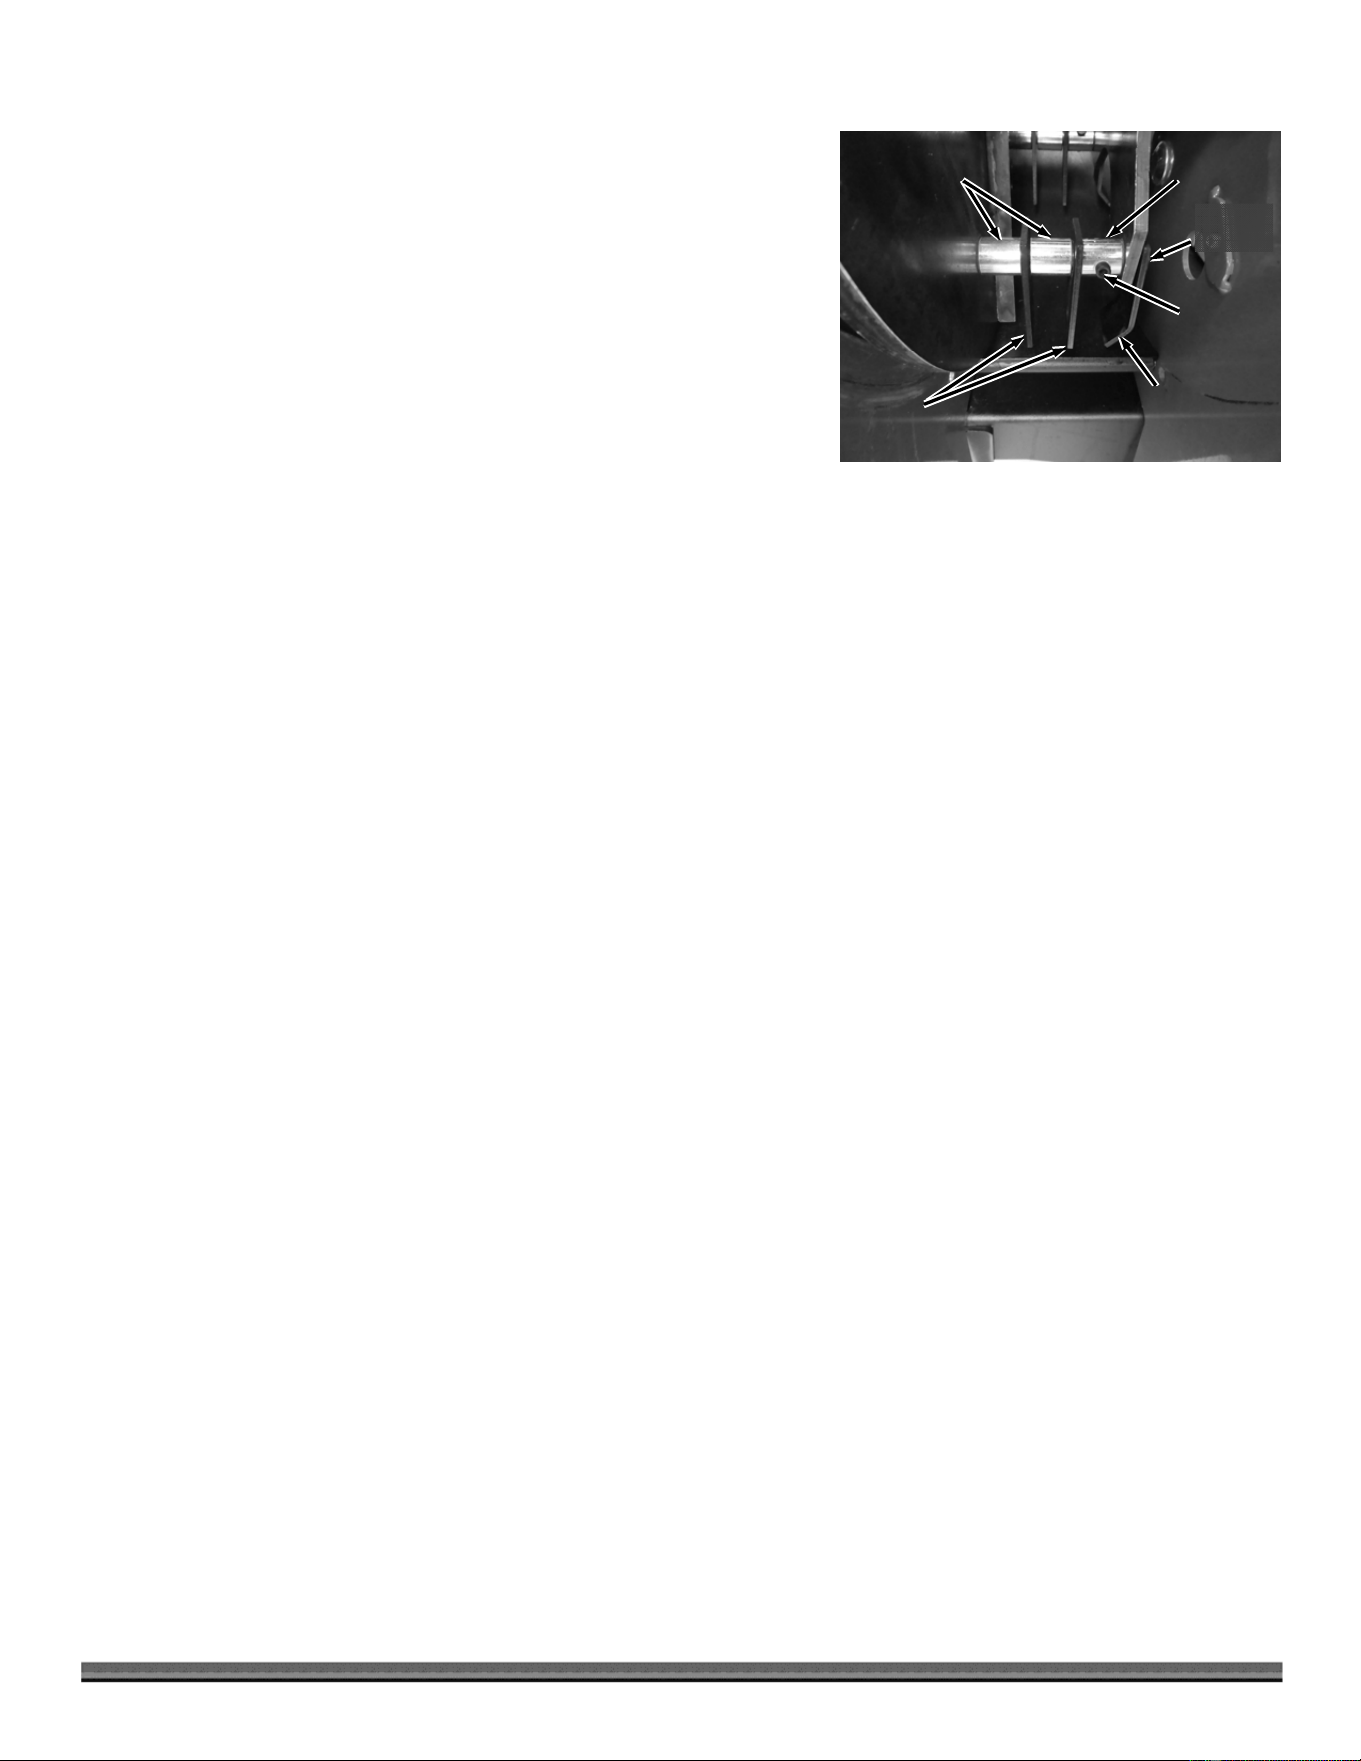
Note: There is 1 J Hammer and 2 Flat Hammers on each Hammer Shaft. J
Hammers are oriented in the opposite direction of those on adjacent Hammer
Shafts (Figure 33).
4. Align one of the Hammer Shafts with the Access Door opening (Figure 34).
Carefully note the orientation of each Hammer on the Hammer Shaft you
are working on.
5. Use a 5/32" Allen Wrench and a 3/8" Wrench to remove the Screw and
Locknut from the Spacer.
6. Remove the Hammer Shaft, Spacers, and Hammers.
Figure 34
Flat
Hamme
r
Spacer with
Hole
Screw and
Locknut
Hammer
Shaft
Plain
Spacers
J Hammer
Flat
Hamme
r
Screen
Figure 31
A
ccess Doo
r
Figure 32
Bolt
Remove Bolt
and Locknut
Figure 30
CONTACT US AT www.DRpower.com 23
7. Reinstall the parts, but with the orientation of the Hammers flipped to a
clean cutting edge. If your Hammer Shaft assembly looked like Figure 34
before then it should look like Figure 35 after. Or vice versa.
8. Reinstall the Screw and locknut through the Spacer and the Hammer Shaft.
Make sure the Locknut is fully tightened.
9. Repeat steps 4 through 8 for the other three sets of Hammers. Confirm that
Hammer orientations alternate as shown in Figure 33. Correct them if
needed.
10. Reposition and secure the Access Plate.
11. Rotate the Screen back into the operating position and reinstall the
hardware. Note: Make sure the bolt goes through the screen rather than just
behind it.
Figure 35
Flat
Hamme
r
Spacer
with Hole
Screw and
Locknut
Hammer
Shaft
Plain
Spacers
J Hammer

24 DR
®
11.5 CHIPPER SHREDDER
CONTACT US AT www.DRpower.com 25
Chapter 5: Troubleshooting
Most problems are easy to fix. Consult the Troubleshooting Table below for common problems and their solutions. If you
continue to experience problems, contact us at www.DRpower.com or call toll-free 1-800-DR-OWNER (376-9637) for support.
Troubleshooting Table
SYMPTOM POSSIBLE CAUSE
Engine Recoil will not
pull out or is difficult to
pull.
Remove un-processed material from the Chipper Chute and Shredder Hopper and remove
any built-up debris in the Discharge opening.
There may be an oil compression lock in the cylinder. Take out the Spark Plug; hold a rag
over the Spark Plug hole and pull the Recoil Cord several times to blow out any oil in the
Cylinder. Wipe off the Spark Plug and reinstall it.
Check the Engine oil level; the Engine may be seized.
The Recoil may be broken or jammed. Visit our website at www.DRpower.com.
The Engine will not
start.
(Please refer to the
Engine Owner’s Manual
for Engine-specific
procedures.)
Check the oil and gas level.
Make sure that the Fuel Shut-Off is in the ON position.
Check that the Spark Plug Wire is attached.
The Air Filter may be dirty; change it following the procedure in the Engine Owner’s Manual.
The gas may be old; change it if necessary. Use a fuel stabilizer if you keep gas longer than
one month.
Check the Throttle and Choke settings, adjustment and travel.
The Spark Plug may be dirty or cracked; change it if necessary. If it’s oily, leave it out, hold a
rag over the Plug Hole and pull the Recoil Cord several times to blow out any oil in the
Cylinder, then wipe off the Plug and reinsert it. Never use a cracked Spark Plug as serious
damage could result.
If your Engine still won’t start, visit our website at www.DRpower.com.
The Engine lacks power
or is not running
smoothly.
(Please refer to the
Engine Owner’s Manual
for engine-specific
procedures.)
Make sure the Choke Lever is all the way to the RUN position (right).
Make sure that the Throttle Lever is all the way to the right (FAST- Rabbit).
The Air Filter may be dirty; change it following the procedure in the Engine Owner’s Manual.
The Spark Plug may be dirty or cracked; change it if necessary. If it’s oily, leave it out, hold a
rag over the Plug Hole and pull the Recoil Cord several times to blow out any oil in the
Cylinder, then wipe off the Plug and reinsert it. Never use a cracked Spark Plug as serious
damage could result.
The gas may be old; change it if necessary. Use a fuel stabilizer if you keep gas longer than
one month.
The Engine oil may be dirty. Change it if necessary.
Check that the Cooling Fins are clean and free of debris. Clean as needed.
If your Engine still lacks power, visit our website at www.DRpower.com.
Shut down the Engine and wait 5 minutes for all parts to cool. Remove the Spark Plug Wire, keeping it away from the Spark Plug
to prevent accidental starting before performing any maintenance procedure or inspection on the CHIPPER SHREDDER.
26 DR
®
11.5 CHIPPER SHREDDER
Troubleshooting Table (Continued)
SYMPTOM POSSIBLE CAUSE
Engine smokes.
(Please refer to the
Engine Owner’s Manual
for engine-specific
procedures.)
Check the oil level and adjust as needed.
You may be operating the machine on too great an incline. The machine should be level.
The Air Filter may be dirty; change it following the procedure in the Engine Owner’s Manual.
You may be using the wrong oil - too light for the temperature. Refer to your Engine Owner’s
Manual for detailed information.
Check that the Cooling Fins are clean and free of debris. Clean as needed.
If your Engine still smokes, visit our website at www.DRpower.com.
Shredding and chipping
action seems too slow.
Check for a dull or damaged Knife; sharpen or replace the Knife.
Make sure that the Throttle Lever is all the way to the right (FAST- Rabbit).18
The machine has
excessive vibration.
Check for a dull or damaged Knife; sharpen or replace the Knife.
The Hammermill is out of balance. Check for any missing or broken Hammers or Spacers;
replace if necessary.
The Knife may not be seated properly. Loosen the Knife mounting screws, reset the Knife,
and tighten the screws.
If your machine still exhibits excessive vibration, visit our website at www.DRpower.com.
When chipping, the
branch seems to vibrate
excessively and
“hammers” my hands.
The Knife is dull; sharpen or replace it.
Debris builds up in the
cutting chamber
Alternate shredding dry material with wet/green material.
Shred a wood stick of up to 1" diameter to clean out the build-up.
Belt squeals, slips, or
smokes
Immediately stop the Engine and remove the Spark Plug Wire.
Turn the Flywheel/Hammer assembly with a wooden stick to be sure it turns freely.
Remove any built-up debris from the Chipper/Shredder Hopper Inlet(s) and Discharge Chute.
Check the Drive Belt Tension.
Shut down the Engine and wait 5 minutes for all parts to cool. Remove the Spark Plug Wire, keeping it away from the Spark Plug
to prevent accidental starting before performing any maintenance procedure or inspection on the CHIPPER SHREDDER.

CONTACT US AT www.DRpower.com 27

28 DR
®
11.5 CHIPPER SHREDDER
Chapter 6: Parts Lists and Schematic Diagrams
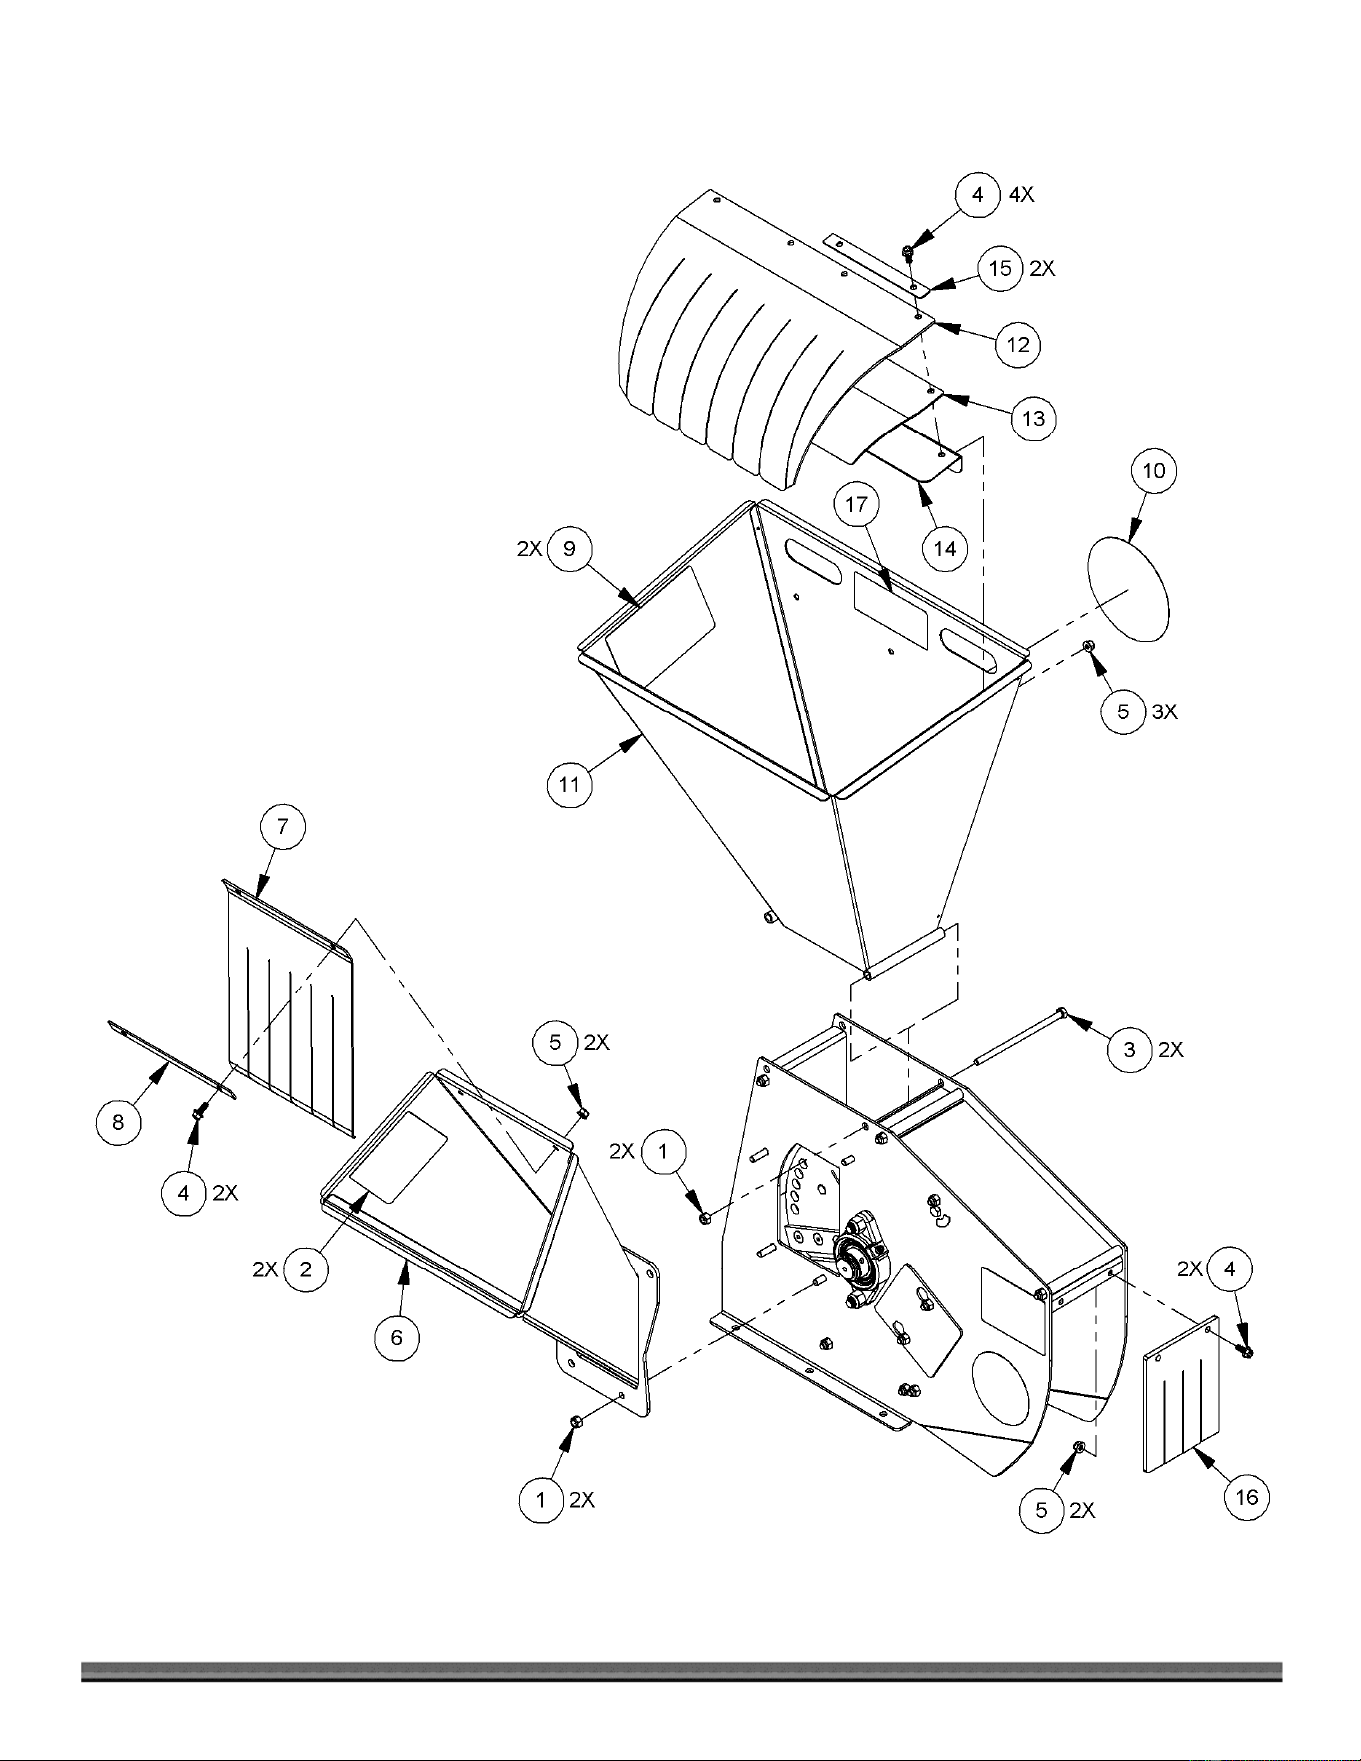
Parts List – Hopper, Chute and Discharge
Note: Part numbers listed are available through DR Power Equipment.
Ref# Part# Description
1 11076 Nut, Nylon Lock, 5/16-18, ZP
2 39283 Label, Danger, Discharge
3 38640 Bolt, HCS, 5/16-18 X 6", GR5, ZP
4 36521 Bolt, Hex Flange, 1/4-20 X 5/8", GR5, ZP
5 33331 Nut, Nylon Lock, Flanged, 1/4-20
6 38675 Chute w/Labels, Chipper
7 38648 Guard, Chipper
8 38647 Plate, Guard
9 39282 Label, Danger, Safety
Ref# Part# Description
10 34141 Label, DR Logo, 5.75" Silver
11 38676 Hopper w/Labels, Shredder
12 36525 Guard, Shredder
13 36544 Support, Guard, Hopper
14 36526 Support, Hopper Guard
15 36515 Plate, Blowback
16 38656 Deflector, Discharge
17 10000026298 Label, Operating
CONTACT US AT www.DRpower.com 29
Schematic – Hopper, Chute and Discharge

30 DR
®
11.5 CHIPPER SHREDDER
Parts List – Drive Assembly
Note: Part numbers listed are available through DR Power Equipment.
Ref# Part# Description
1 13443 Bolt, HCS, 5/16-18 X 1-1/2", GR5, ZP
2 11076 Nut, Nylon Lock, 5/16-18, ZP
3 15488 Nut, Push Cap, 5/8", Black
4 38629 Base, 11.5
5 38630 Support, Base
6 38644 Axle
7 36498 Spacer, Wheel
8 36520 Wheel, 9" X 3.5"
9 12321 Bolt, HCS, 5/16-18 X 3/4, GR5, ZP
10 11173 Bolt, Hex, 5/16-18 X .5", Trilobe
11 13758 Label, Check Oil, 2.75" X .63"
12 18887 Label, Hot Surface
13 11241 Washer, Flat, 5/16", USS, ZP
14 11250 Washer, Lock, 1/4", Ext Tooth (E/S only)
15 11069 Nut, Hex, 5/16-18, GR2 (E/S only)
16 38664 Bolt, Hex, 5/16-18 X 1-1/2", Tri
17 38643 Bracket, Belt Tension
18 38678 Engine, 11.50 B&S, E/S
38677 Engine, 11.50 B&S, M/S
19 27901 Washer, Flat, .385" X 1.25" X .25", ZP
20 16513 Bolt, HCS, 3/8-24 X 1-1/4", GR8 W/Patch
Ref# Part# Description
21 14232 Key, Square, 1/4" X 1"
22 10000034542 Spacer, Engine Shaft, 1" ID
23 10000036443 Belt, BP27, Wrapped
24 10000034513 Pulley, 4" OD 1" Bore
25 38653 Cover, Belt
26 11983 Bolt, HCS, 1/4-20 X 3/4", GR2, ZP
(E/S only)
27 33331 Nut, Nylon Lock, Flanged, 1/4-20, ZP
(E/S only)
28 13447 Battery, 12v, 9Ah (E/S only)
29 25862 Bracket, Battery (E/S only)
30 28697 Pad, Battery 2.5" X 6.12" (E/S only)
31 24230 Strap, Battery (E/S only)
32 38667 Wire Harness, Battery (E/S only)
33 29487 Boot, Terminal, Red (E/S only)
34 37340 Cable Clamp, 5/16", Nylon (E/S only)
35 31283 Nut, Lock, 1/4-20, Serrated Flange
(E/S only)
36 11170 Screw, 10-32 X 1/2", Type F, Hex, ZP
(E/S only)
37 10000034980 Spacer, Engine Shaft, 1" ID 0.25" L
38 12336 Bolt, HCS, 5/16-18 x 1-1/4", ZP
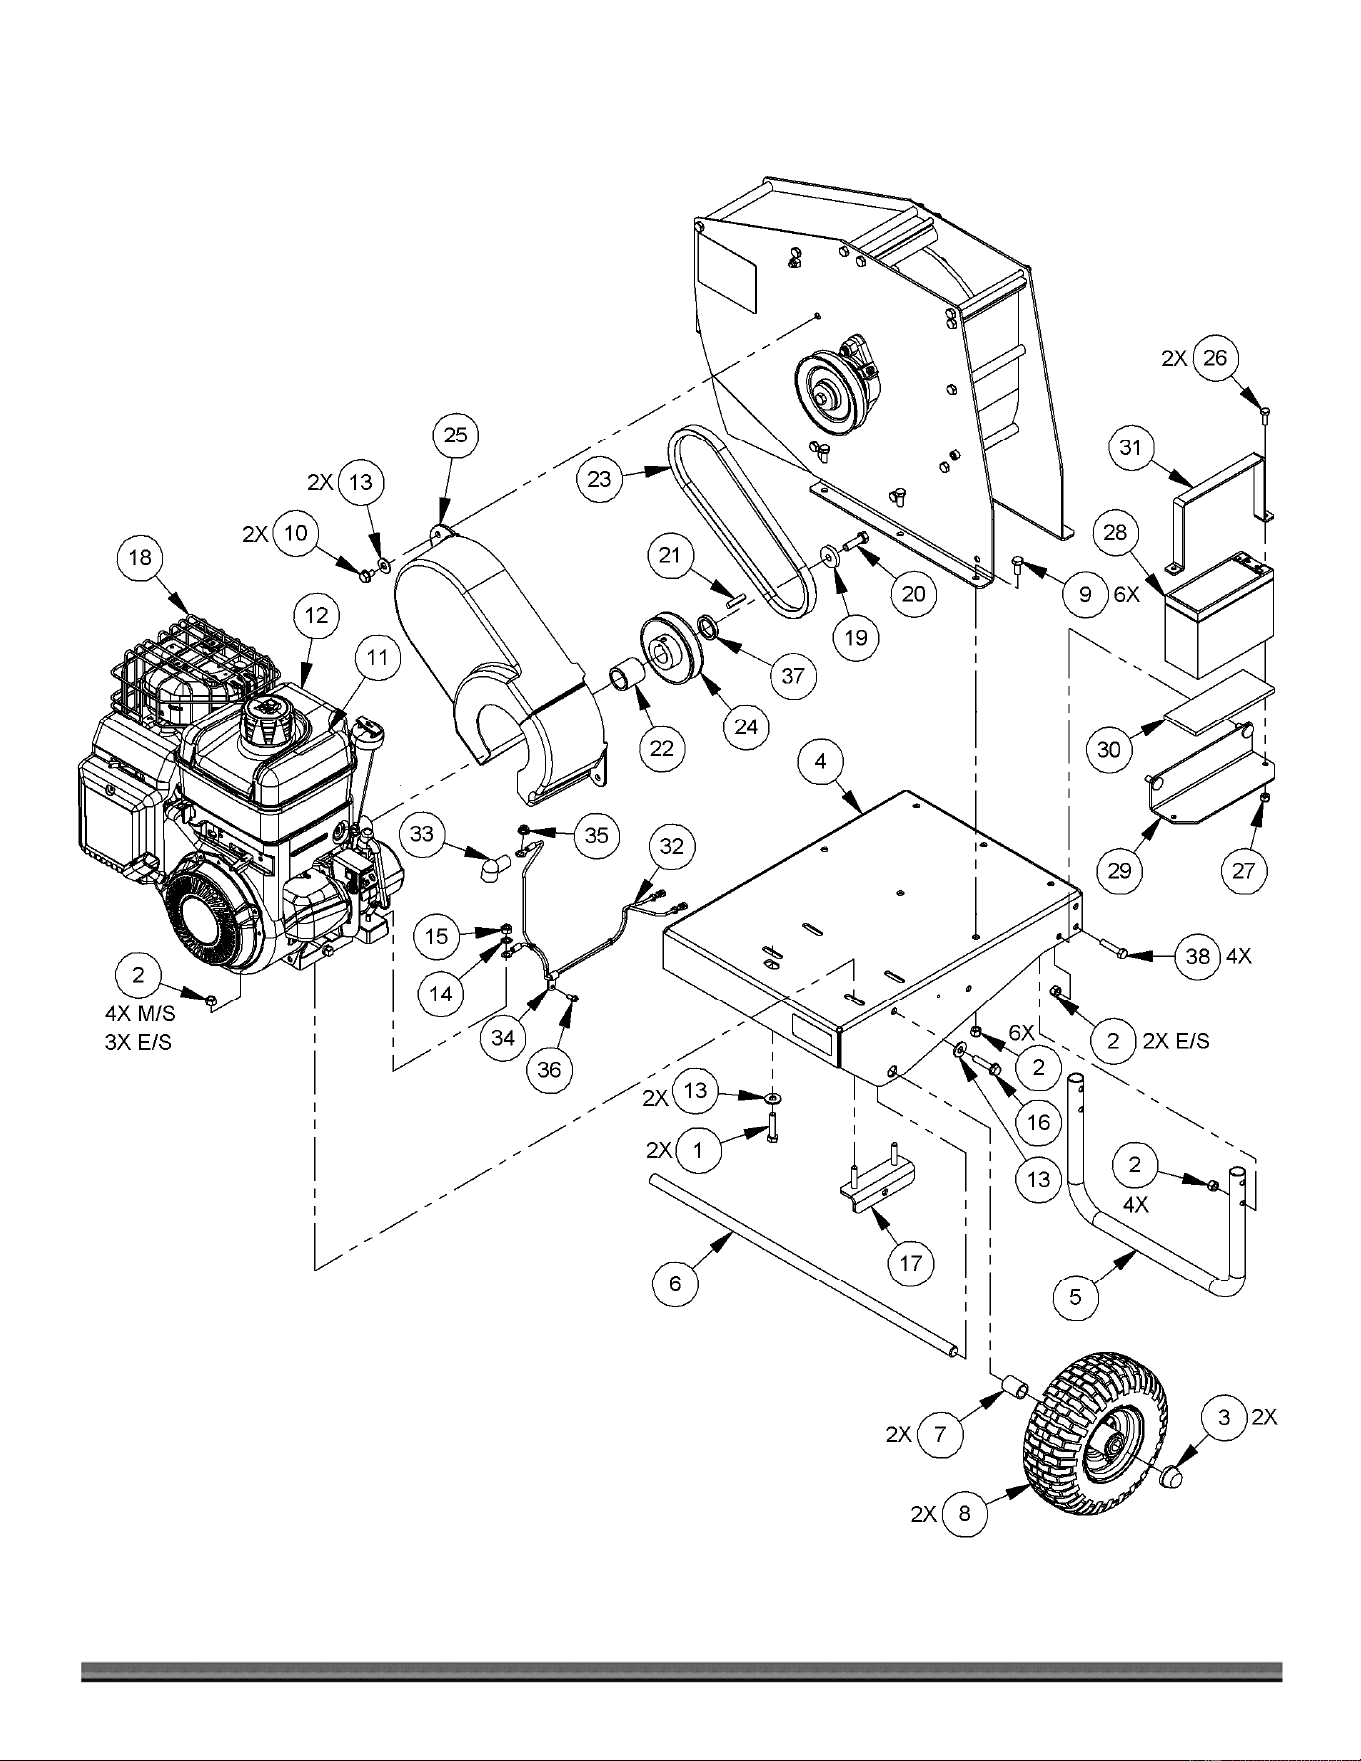
CONTACT US AT www.DRpower.com 31
Schematic – Drive Assembly

32 DR
®
11.5 CHIPPER SHREDDER
Parts List – Cutting Chamber
Note: Part numbers listed are available through DR Power Equipment.
Ref# Part# Description
1 11076 Nut, Nylon Lock, 5/16-18, ZP
2 38669 Label, Screen Bolt
3 39283 Label, Danger, Discharge
4 34140 Label, DR Logo, 4" Silver
5 38640 Bolt, HCS, 5/16-18 X 6", GR5, ZP
6 38650 Bolt, HCS, 5/16-18 X 6.5", GR5, ZP
7 38674 Sideplate w/Label, Drive Side,
8 38673 Sideplate w/Label, Chipper Side
9 38633 Scroll, Housing
10 38634 Housing, Top Scroll
11 38654 Bolt, Carr, 1/2-13 X 1-1/2", GR5, ZP
12 11072 Nut, Nylon Lock, 1/2-13, GR5, ZP
13* 25631 Bearing, Flange, 1-3/16" (See Note 1)
14 38655 Spacer, 1.190" X 1.62" X .062", ZP
15 18301 Ring, Retaining, 1-3/16"
16 38635 Flywheel, Balanced W/Knife
17 38651 Pulley, V-Belt, 4.75" OD
Ref# Part# Description
18 38663 Bolt, SHCS, 5/16-18 X 5/8", ZP
19 38646 Screen, 1" Holes
20 37307 Hammer, J
21 37306 Hammer, Flat
22 38637 Shaft, Hammer
23 38638 Spacer, Hammer, .865" Long
24 38639 Spacer, Hammer, .865" Long W/Hole
25 36510 Bolt, SHCS, 10-24 X 1.12", Alloy Blk
26 11873 Nut, Nylon Lock 10-24
27 11173 Bolt, Hex, 5/16-18 X .5", Tri-lobe
28 38641 Plate, Knife Access
29 38642 Plate, Hammer Shaft Access
30 16513 Bolt, HCS, 3/8-24 X 1-1/4", GR8
W/Patch
31 14229 Key, .25" X 1.25"
32 22887 Washer, .385" ID, 1.5" OD, .25"L, ZP
Not Shown
40524 Kit, Knife, 11.5 CS3
*Note: The Bearing (Ref# 13) is assembled to the machine without set screws. If you order this Bearing for replacement and the Set Screws are
present, remove them before installation. They are not needed for this application and will scratch the Shaft surface making it difficult to disassemble.
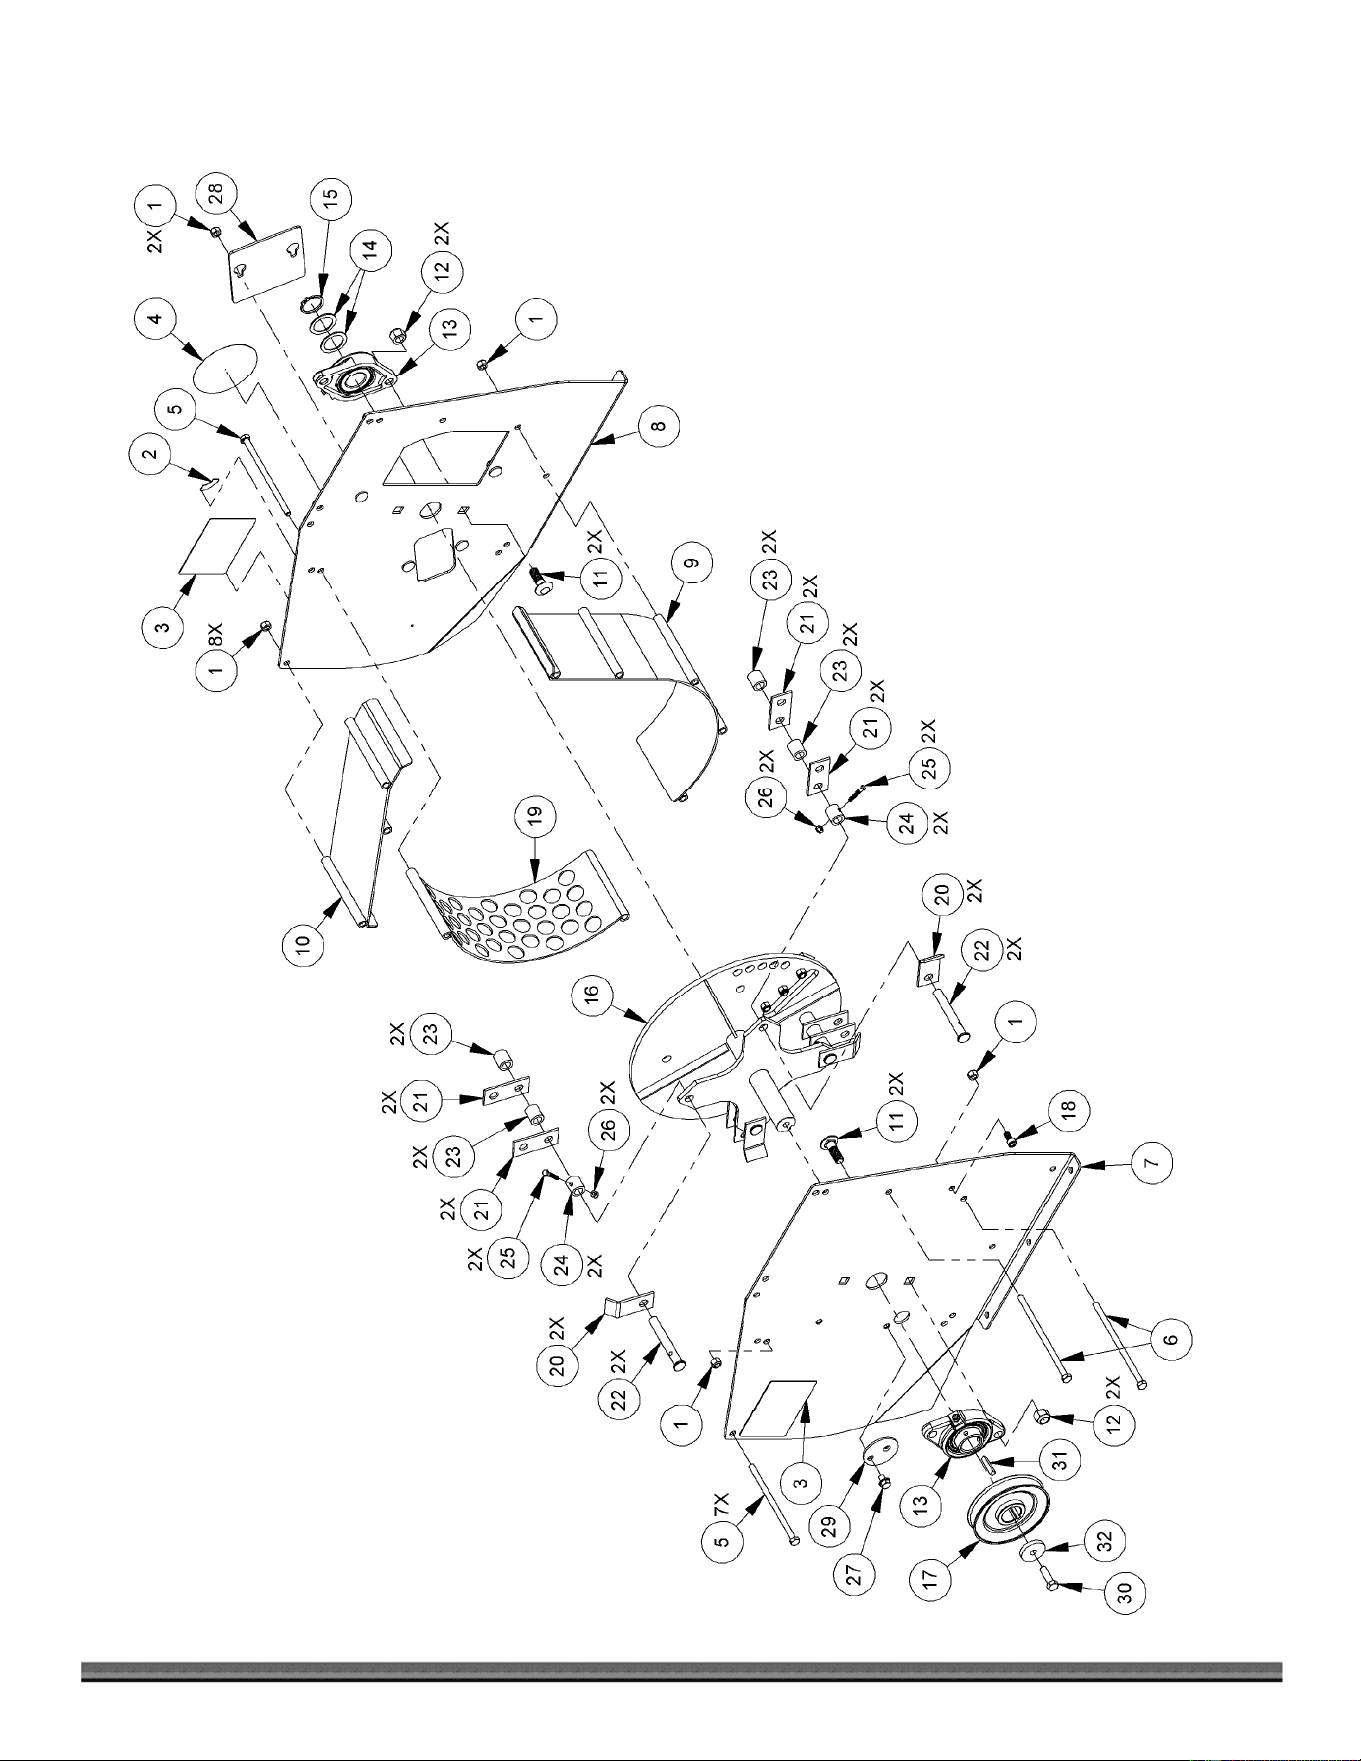
CONTACT US AT www.DRpower.com 33
Schematic – Cutting Chamber

34 DR
®
11.5 CHIPPER SHREDDER
Notes:
DR
®
11.5 CHIPPER SHREDDER
2-Year Limited Warranty
Terms and Conditions
The DR
CHIPPER SHREDDER is warranted for two (2) years against defects in materials or workmanship when put to
ordinary and normal consumer use; ninety (90) days for any other use.
For the purposes of all the above warranties, “ordinary and normal consumer use” refers to non-commercial residential
use and does not include misuse, accidents or damage due to inadequate maintenance.
DR Power Equipment certifies that the DR
CHIPPER SHREDDER is fit for ordinary purposes for which a product of
this type is used. DR Power Equipment however, limits the implied warranties of merchantability and fitness in duration
to a period of two (2) years in consumer use, ninety (90) days for any other use.
The 2-Year Limited Warranty on the DR
CHIPPER SHREDDER starts on the date the machine ships from our factory.
The 2-Year Limited Warranty is applicable only to the original owner.
The warranty holder is responsible for the performance of the required maintenance as defined by the manufacturer's
owner's manuals. The warranty holder is responsible for replacement of normally wearing parts such as the Belt, knife,
hammers, and hammer shafts. Attachments and accessories to the machine are not covered by this warranty.
During the warranty period, the warranty holder is responsible for the machine transportation charges, if required.
During the warranty period, warranty parts will be shipped by standard method at no charge to the warranty holder.
Expedited shipping of warranty parts is the responsibility of the warranty holder.
SOME STATES DO NOT ALLOW LIMITATIONS ON THE LENGTH OF IMPLIED WARRANTIES, SO THE ABOVE
LIMITATIONS MAY NOT APPLY TO YOU.
DR Power Equipment shall not be liable under any circumstances for any incidental or consequential damages or
expenses of any kind, including, but not limited to, cost of equipment rentals, loss of profit, or cost of hiring services to
perform tasks normally performed by the DR
CHIPPER SHREDDER.
SOME STATES DO NOT ALLOW THE EXCLUSION OR LIMITATION OF INCIDENTAL OR CONSEQUENTIAL
DAMAGES, SO THE ABOVE LIMITATIONS MAY NOT APPLY TO YOU.
THIS WARRANTY GIVES YOU SPECIFIC LEGAL RIGHTS, AND YOU ALSO HAVE OTHER RIGHTS, WHICH VARY
FROM STATE TO STATE.
75 MEIGS ROAD, P.O. BOX 25, VERGENNES, VERMONT 05491
©2018 Country Home Products, Inc. All rights reserved 10000036635_B
Daily Checklist for the DR 11.5 CHIPPER SHREDDER
To help maintain your DR 11.5 CHIPPER SHREDDER for optimum performance, we recommend you follow this checklist
each time you use your CHIPPER SHREDDER.
[ ] Check the Engine oil and Fuel Tank level.
[ ] Check that Engine is clean of debris.
[ ] Remove any unprocessed material from the Chipper Chute and Shredder Hopper.
[ ] Check the general condition of the CHIPPER SHREDDER, e.g.; nuts, bolts, welds, etc.
[ ] Check Tire Pressure and wear.
[ ] Check the Chipper Knife for tightness, nicks and wear.
[ ] Check the Blowback Guards and Discharge Guard for wear and damage.
End of Season and Storage
Change the Engine oil.
Clean or replace the Air Filter.
Check the Chipper Knife and Hammers for nicks and wear.
Remove any debris wrapped around the Hammers/Spacers.
If your DR 11.5 CHIPPER SHREDDER will be idle for more than 30 days, we recommend using a gas stabilizer. This will
prevent sediment from gumming up the Carburetor. If there is dirt or moisture in the gas or tank, remove it by draining the
tank. Completely fill the tank with fresh, unleaded gas and add the appropriate amount of stabilizer or gasoline additive.
Run the Engine for a short time to allow the additive to circulate. Close the Fuel Shut-Off Valve to prevent carburetor
overflow and leakage.
Clean the exterior of the unit to remove all dirt, grease, and any other foreign material. To prevent rust, touch up painted
surfaces that have been scratched or chipped.
Be sure all nuts, bolts, and screws are securely fastened.
Remove the Spark Plug and pour about 1 ounce of motor oil into the Cylinder hole. Replace the Plug and crank the Engine
over a couple of times using the Pull Cord. This will coat the piston and seat the valves to prevent moisture buildup.
If possible, store the CHIPPER SHREDDER in a dry, protected place. If it is necessary to store the machine outside, after
the DR 11.5 CHIPPER SHREDDER has cooled, cover the machine with a suitable protective cover that does not retain
moisture. Do not use plastic as this material cannot breathe; it also allows condensation to form, which will cause your
machine to rust.
Before performing any maintenance procedure or inspection, stop the Engine, wait five minutes to allow all parts to cool.
Disconnect the Spark Plug Wire, keeping it away from the Spark Plug.
Before performing any maintenance procedure or inspection, stop the Engine, wait five minutes to allow all parts to cool.
Disconnect the Spark Plug Wire, keeping it away from the Spark Plug.