

2
LIMITED LIFETIME WARRANTY
Baja Designs proudly offers a LIFETIME WARRANTY against manufacturer’s defect on all the products
that we manufacture.
These are comprehensive warranties; other than the exclusions below – you’re covered. If your LED
or HID bulb burns out, you’re covered. Additionally, cutting off our connector or changing your lenses
does not automatically void your warranty.
Exclusions:
Installation errors, abuse, misuse or crash damage. You must be the original owner of the product and
can supply proof of purchase.
Baja Designs manufactures its own products as well as resells products manufactured by others. Baja
Designs makes no express or implied warranties on products not manufactured by Baja Designs
including without limitation any warranties or merchantability and fitness for a purpose. We will,
however, pass on all warranties made by the manufacturer, who has sole responsibility for performing
such warranties.
Baja Designs will pay the freight if your product is less than 90 days old, otherwise defective products
must be returned to Baja Designs, Inc., freight prepaid. At our option, we will repair or replace items in
question and return them at no charge. If the identical product is no longer available, we will replace
with a similar product of equal value. Baja Designs Inc. will not be responsible for any indirect or
consequential damages in connection with defective merchandise.
Items purchased through a Baja Designs authorized dealer must be returned through the dealer. Only
available on LED auxiliary lights and product must be in sellable condition at MSRP. Product that has
been damaged in any way after the original purchase date will be excluded from this guarantee.
Indemnification:
Buyer hereby acknowledges off-roading, racing and driving at night are dangerous activities
and that the products and/or supplies purchased from Baja Designs are used in an inherently
dangerous activity that may endanger life and limb; and in no event shall the seller, or seller's
heirs and assigns, be held liable for consequential damages, nor shall seller's liability on any
claim for damages arising out of or connected with the sale, delivery, or use of purchased
products and/or supplies exceed the purchase price of the products and/or supplies
3
Toyota, Tacoma/4Runner/Tundra Squadron Fog Light Kit Instructions
Tools Required
- Phillip’s Head Screwdriver
- Trim Tool (Or Flathead Screwdriver)
- 10mm Socket Wrench
- Test light, or Multimeter
- 4mm Allen Wrench
- Scissors
Tacoma and 4Runner Only:
*(14+) 4Runner Limited instructions on next page*
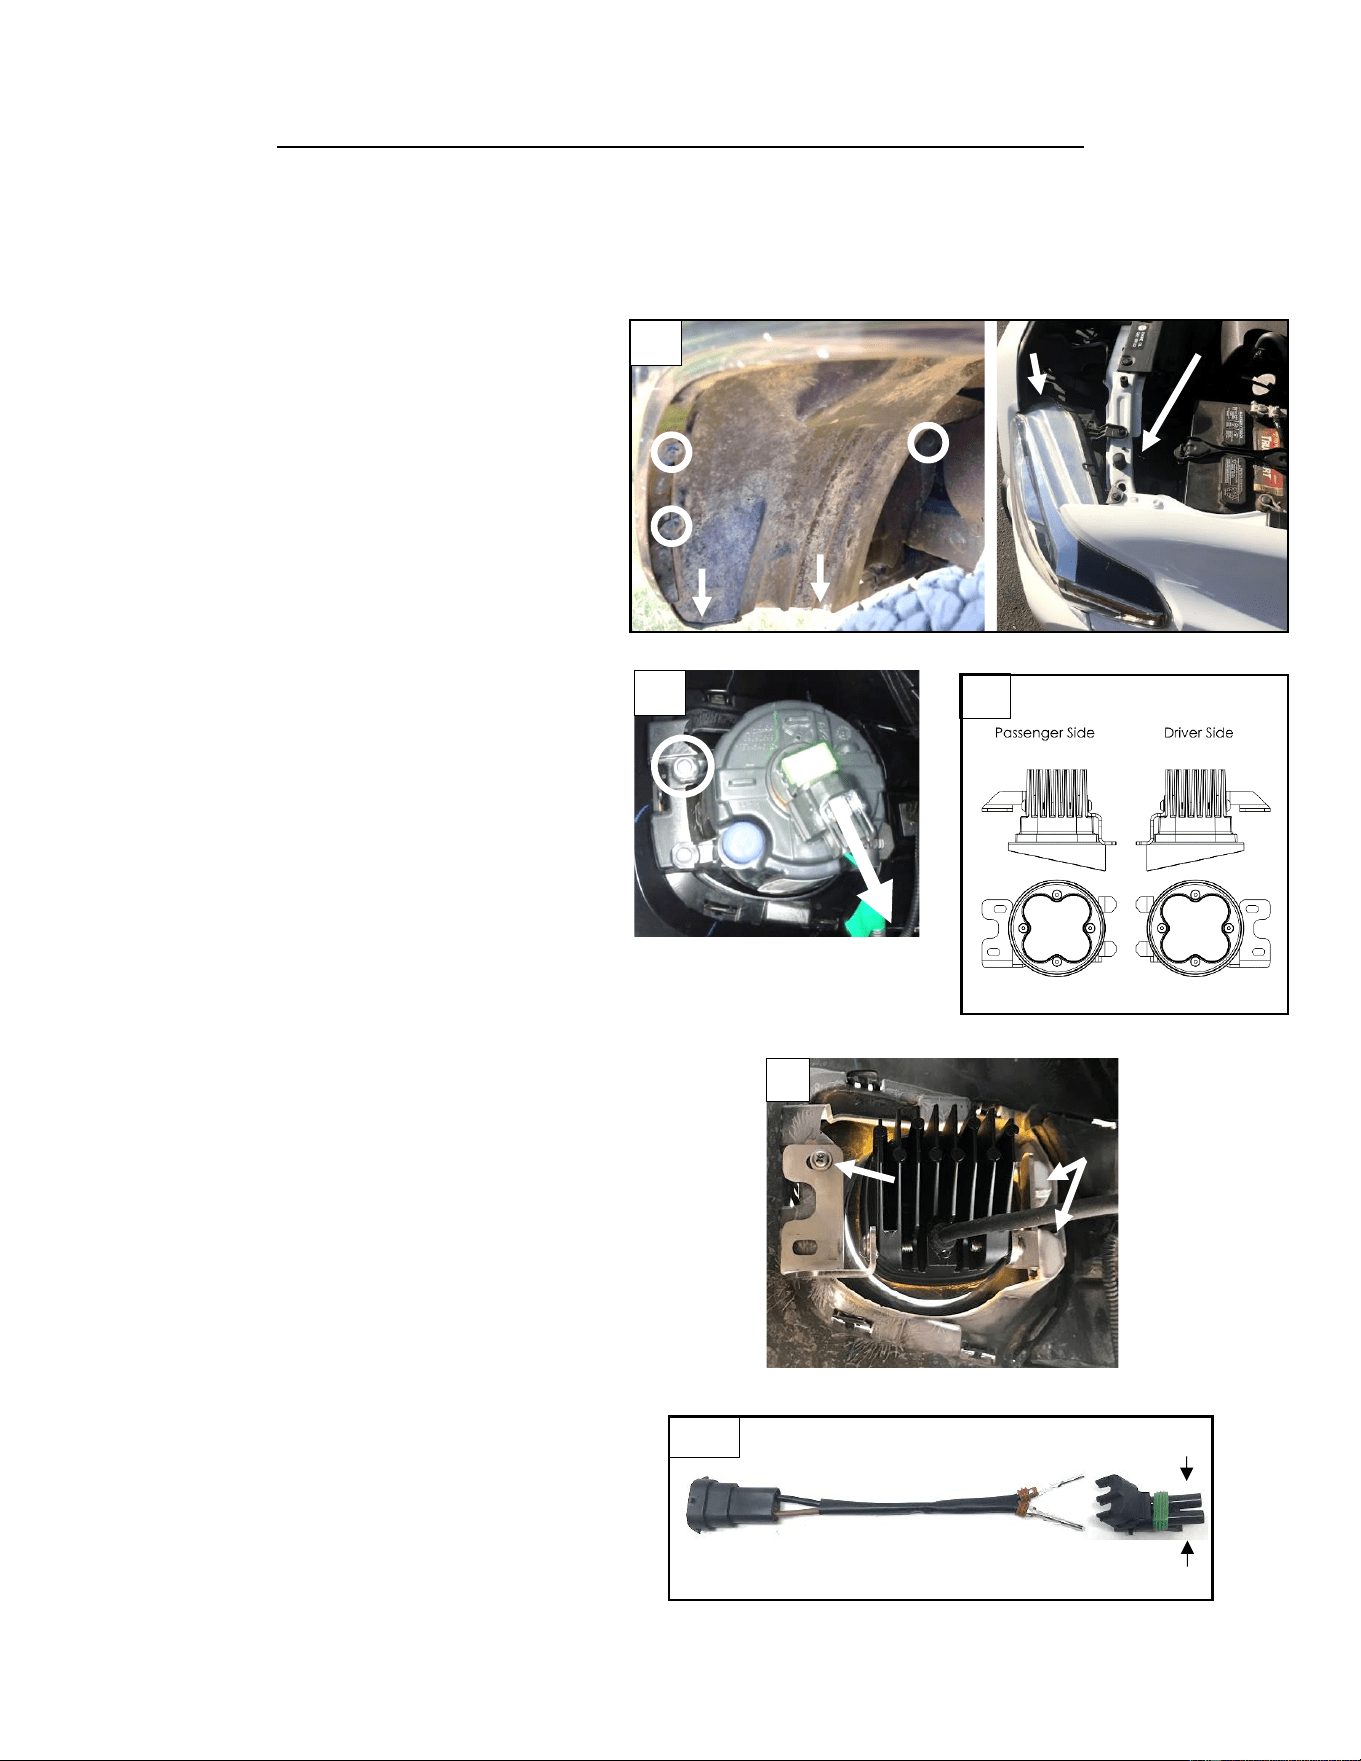
1. To begin, place vehicle into park with the ignition
off.
2. With the 10mm socket and trim tool (or flathead
screwdriver), remove all the inner fender fasteners
at the front of the wheel well to gain access to
behind the fog light. Alternatively, you may be able
to open the hood and reach behind the headlight
to access the inner fog light area. 4Runner
models will have a plastic core support cover. To
remove cover, use the flathead or trim tool to
unclip and pry out the plastic fasters. (2019
Tacoma shown, years/models vary)
3. Unplug the OEM fog light connector (Arrow). With
the Phillip’s Head screwdriver, remove the
mounting screw/screws (Circle) and place the light
aside.
4. With the provided hardware, mount the brackets
to the lights using the 4mm Allen wrench. Be sure
to place the serrated washers in between the
brackets and the lights. (Use image for reference).
5. Place the light assembly into the fog mounting
slots and place the screws into their holes and
tighten. OEM vehicle body tolerances can vary. If
there is play withing the slots and/or uneven gaps
between the OEM plastic bezel and the fog light
bezel, adhesive backed rubber pads are included
to be placed on the brackets within the slots to
create a tailored fit. Use scissors to trim the
excess rubber. (The passenger side of the
4Runner has a splash guard that needs to be
removed and left off. Use the flathead/trim tool
to pry the piece off the inside of the fog light.)
6. Locate the fog light plug ‘n play adapters. For a
moment, turn on the vehicle, headlights, and fog
lights. Determine which wire on the OEM fog light
connector has (+) voltage and which wire is
ground (-).
7. Turn vehicle off. Plug in the wiring adapters. The
(+) wire will need to be inserted into the provided
plug in the (B) pin location. The ground will then
be inserted into the (A) location.
8. Replace the fender well and all associated
fasteners. Repeat steps 1-8 for the opposite side.
Alternate Access
2
5
Slots
Screw
Driver’s Side shown
Driver’s Side shown
Harness Adapter
6-7
A
B
4
3

4
4Runner Limited (14+):
1. To begin, place vehicle into park with the ignition
off.
2. With the 10mm socket and trim tool (or flathead
screwdriver), remove all the inner fender fasteners
at the front of the wheel well to gain access to
behind the fog light. (Driver’s side shown)
3. Remove the white clip (arrow) and then use the
Philip’s head screwdriver to remove the screw
(circle)
4. Use the trim tool, or flathead screwdriver to pry up
and release the plastic fastener’s that hold the
plastic core support cover. Then pry out each
fastener and place core support cover aside.
5. Reach behind the top of the bumper to remove the
two remaining white clips that hold the fog light
shroud to the bumper. Unplug the fog light
connector. With the Phillip’s head screwdriver,
remove the OEM fog lights.
6. With the provided hardware, mount the brackets
to the lights using the 4mm Allen wrench. Be sure
to place the serrated washers in between the
brackets and the lights. (Use step 4 image on
page 3 for reference).
7. Place the light assembly into the fog mounting
slots and place the screws into their holes hand
tight. Tighten screws. OEM vehicle body
tolerances can vary. If there is play withing the
slots and/or uneven gaps between the OEM
plastic bezel and the fog light bezel, adhesive
backed rubber pads are included to be placed on
the brackets within the slots to create a tailored fit.
Use scissors to trim the excess rubber. (The
passenger side of the 4Runner has a splash
guard that needs to be removed and left off.
Use the flathead/trim tool to pry the piece off
the inside of the fog light.)
8. Locate the fog light plug ‘n play adapters. For a
moment, turn on the vehicle, headlights, and fog
lights. Determine which wire on the OEM fog light
connector has (+) voltage and which wire is
ground (-).
9. Turn vehicle off. Plug in the wiring adapters. The
(+) wire will need to be inserted into the provided
plug in the (B) pin location. The ground will then
be inserted into the (A) location.
10. Replace the fog light shroud, fender well, and all
associated fasteners. Repeat steps 1-9 for the
opposite side.
5
7
6-7
Harness Adapter
A
B
1
2
3
7
4
Core Support Cover
5
6-7
Harness Adapter
A
B
2
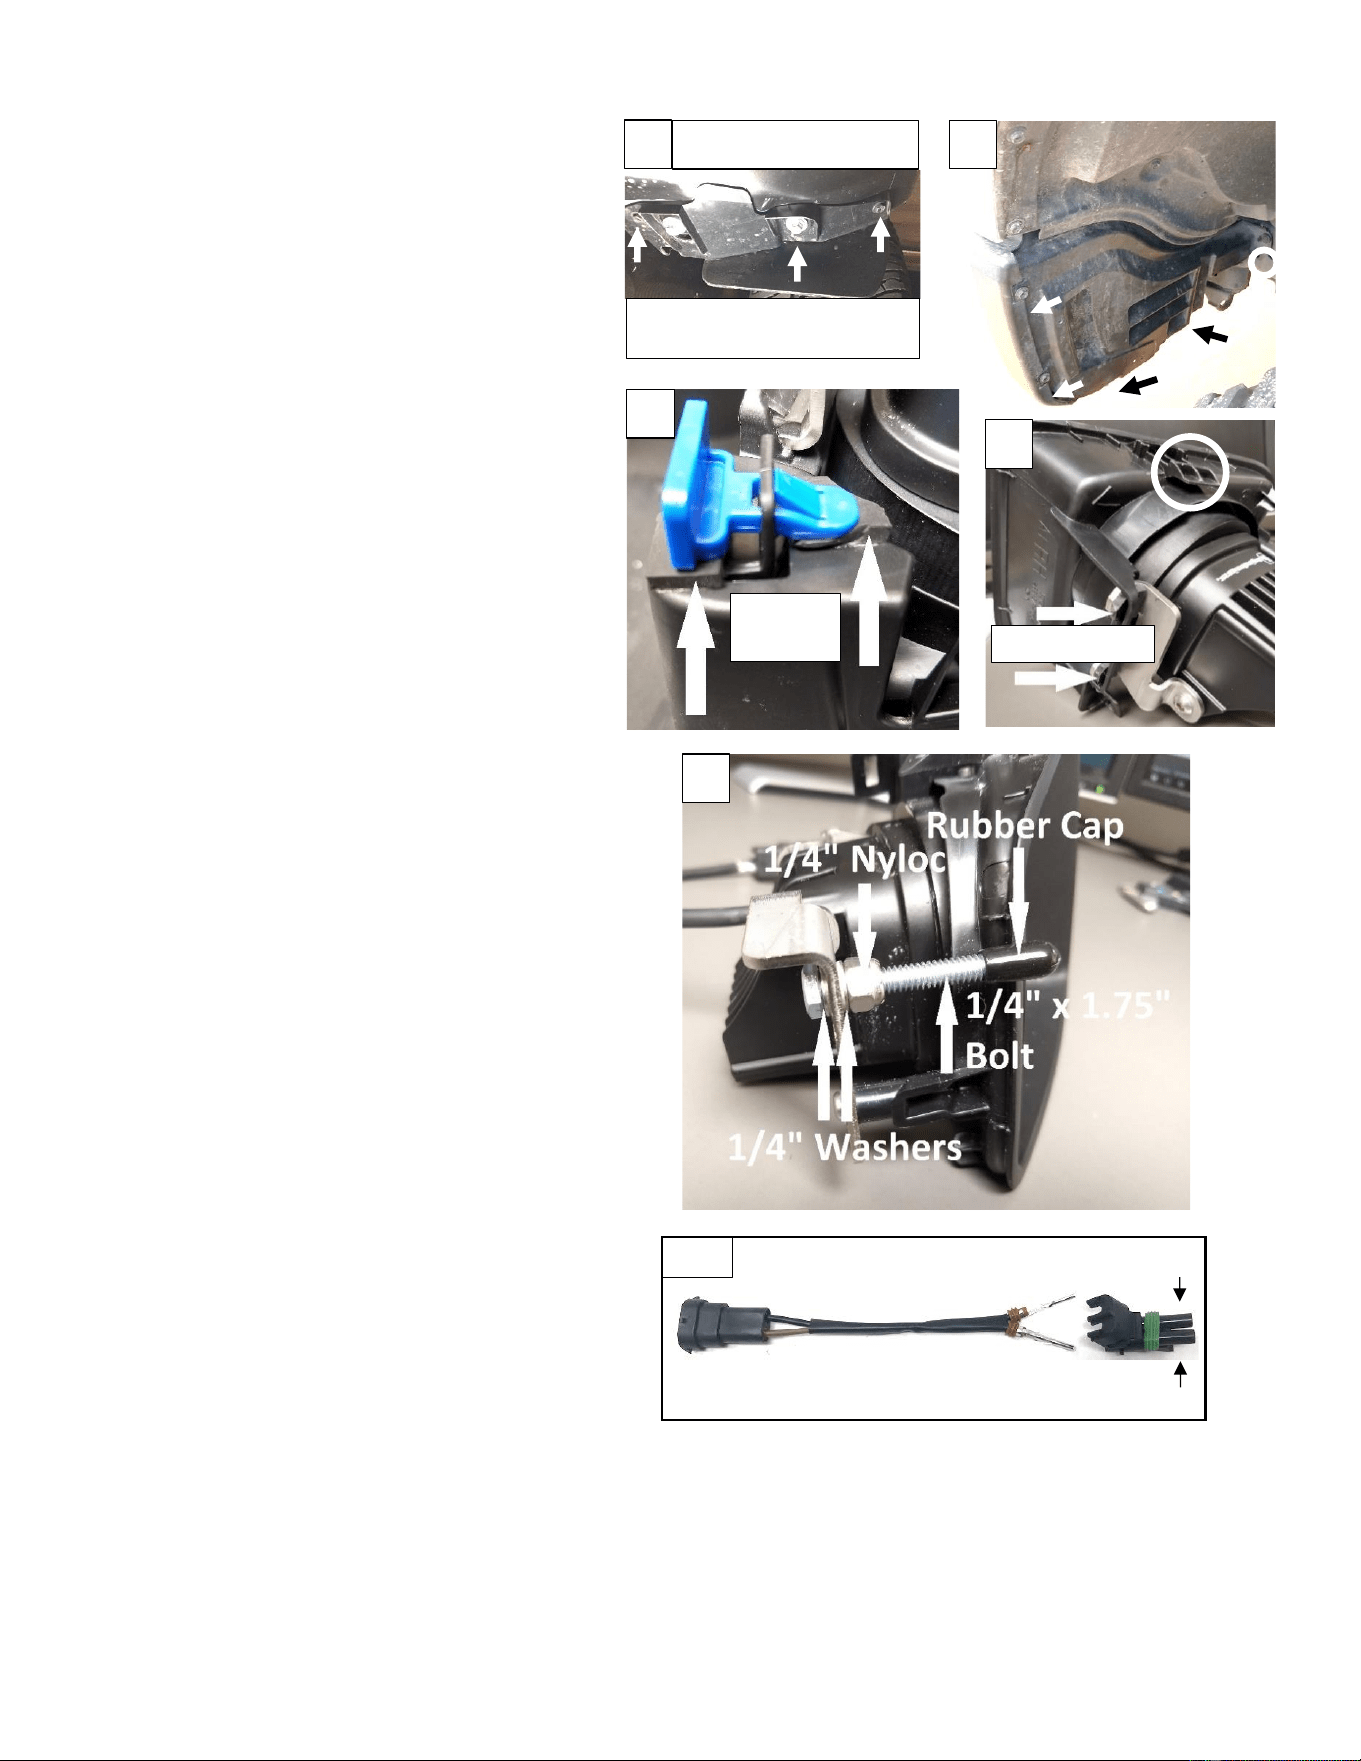
Tundra Only:
*12mm socket, 7/16” socket, and 7/16” wrench
needed in addition to the other tools listed.
1. To begin, place vehicle into park with the ignition
off.
2. With the 10mm socket, 12mm socket, and trim
tool (or flathead screwdriver) remove the lower
splash guard at the bottom edge of the front wheel
well. Then remove all the inner fender fasteners at
the front of the wheel well to gain access to
behind the fog light. (Driver’s side shown)
3. Unplug the fog light connector. Remove the blue
clip that locks the fog light assembly into the
bumper. Press the top detent (circled in second
image) of the fog light shroud to remove the OEM
fog light assembly. Place the included rubber pads
in the locations shown.
4. With the Phillip’s head screwdriver, remove the
OEM fog lights from the shrouds.
5. With the provided hardware, mount the brackets
to the lights using the 4mm Allen wrench. Be sure
to place the serrated washers in between the
brackets and the lights. (Use step 4 image on
page 3 for reference).
6. Place the light assembly into the fog mounting
slots and place the screws into their holes hand
tight. Tighten screws. With he provided ¼”
hardware, place it onto the fog light bracket as
shown in the remaining hole. Place rubber cap
over the end of the bolt. Re-install the fog light
assembly into the bumper and replace the blue
locking clip.
7. Locate the fog light plug ‘n play adapters. For a
moment, turn on the vehicle, headlights, and fog
lights. Determine which wire on the OEM fog light
connector has (+) voltage and which wire is
ground (-).
8. Turn vehicle off. Plug in the wiring adapters. The
(+) wire will need to be inserted into the provided
plug in the (B) pin location. The ground will then
be inserted into the (A) location.
9. Replace the fender well, splash guard, and all
associated fasteners. Repeat steps 2-9 for the
opposite side.
Splash Guard
Removed
2
Splash Guard
*Two bolts on the opposite side
not shown
3
3
Rubber
Pads
Rubber Pads
6
Re-torque all the fasteners after 100 miles.
Your install is now complete! Thank you for choosing
Baja Designs.