USER’S OPERATION MANUAL
Before operating this unit, please read this manual
thoroughly, and retain for future reference.
WD3G8043B*3
WD3S8043B*3/PL
WD3S8043B*3
WD3S8043B*
WD3S8043B*4
WD3S9043B*3
EN
English
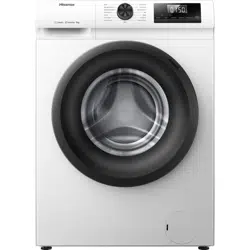
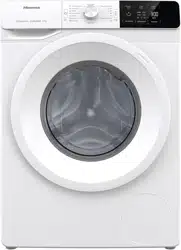
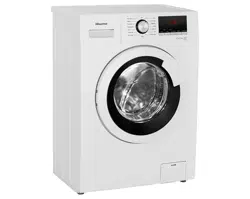
washer dryer
1
23
1
1
3
2
4
26
29
33
39
40
43
44
46
47
45
47
50
51
53
54
5
6
17
18
4
41
3
48
49
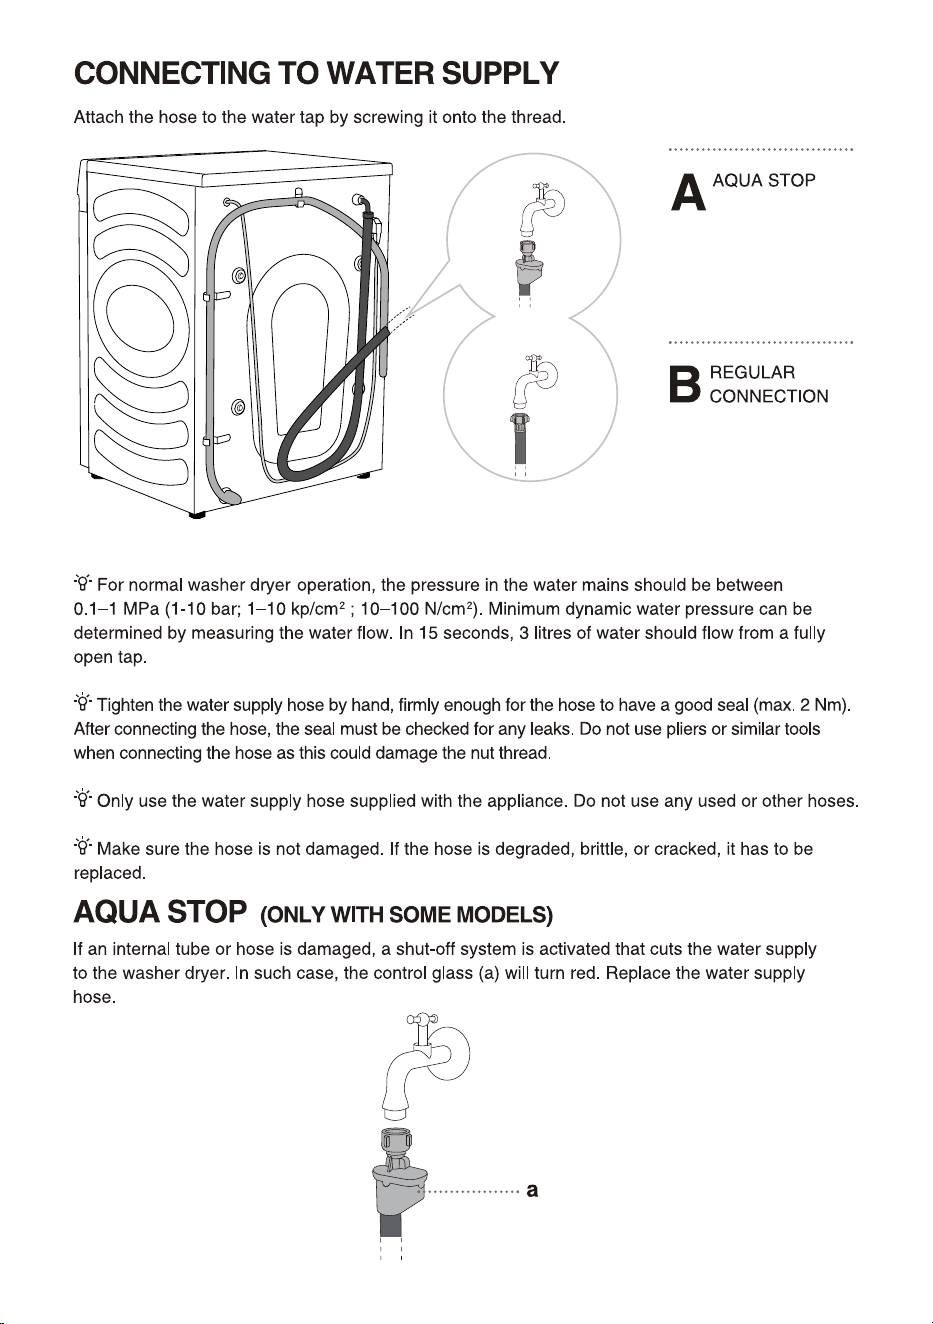
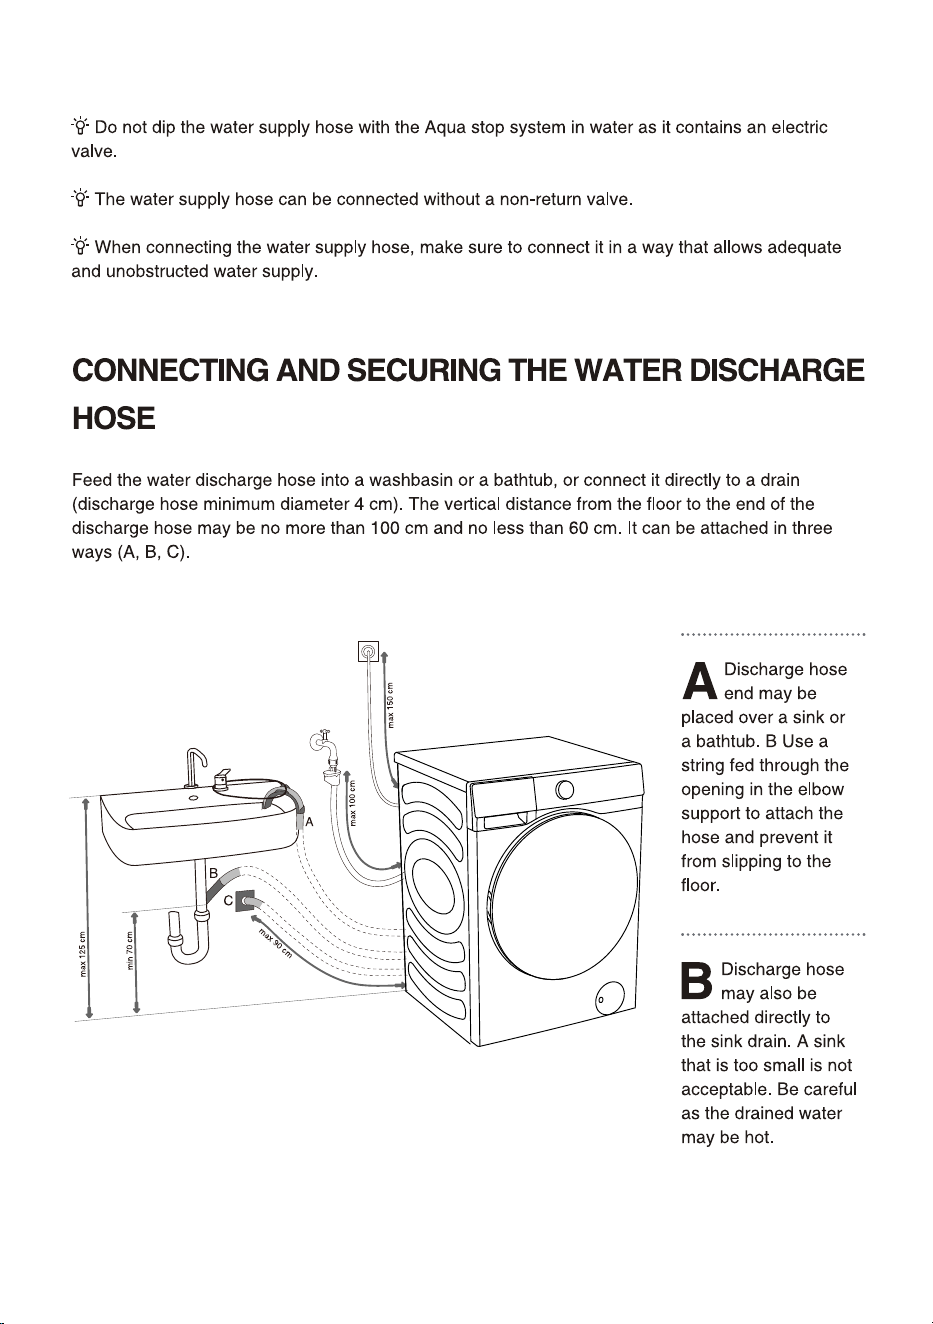
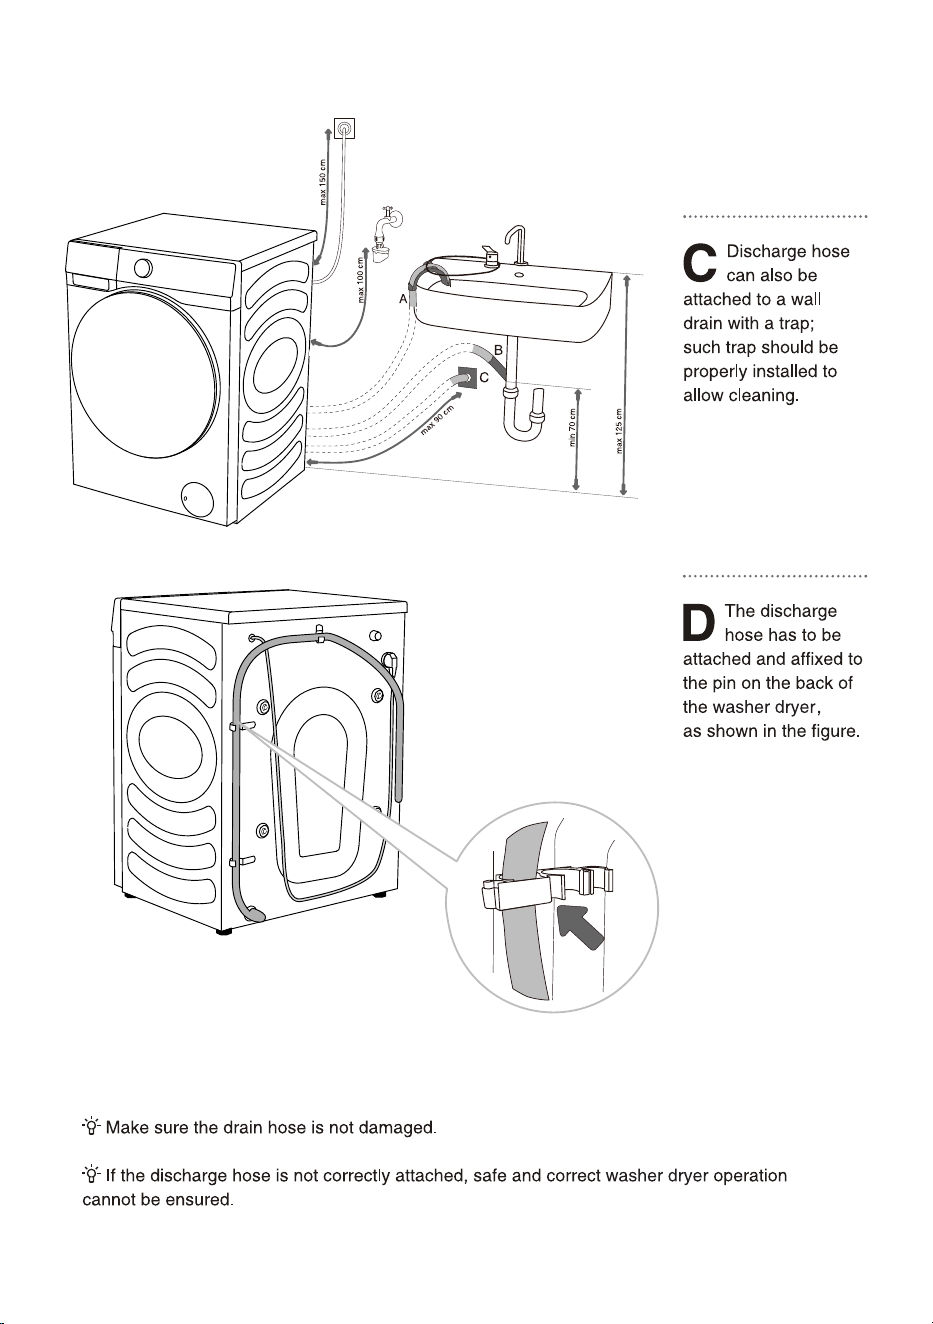
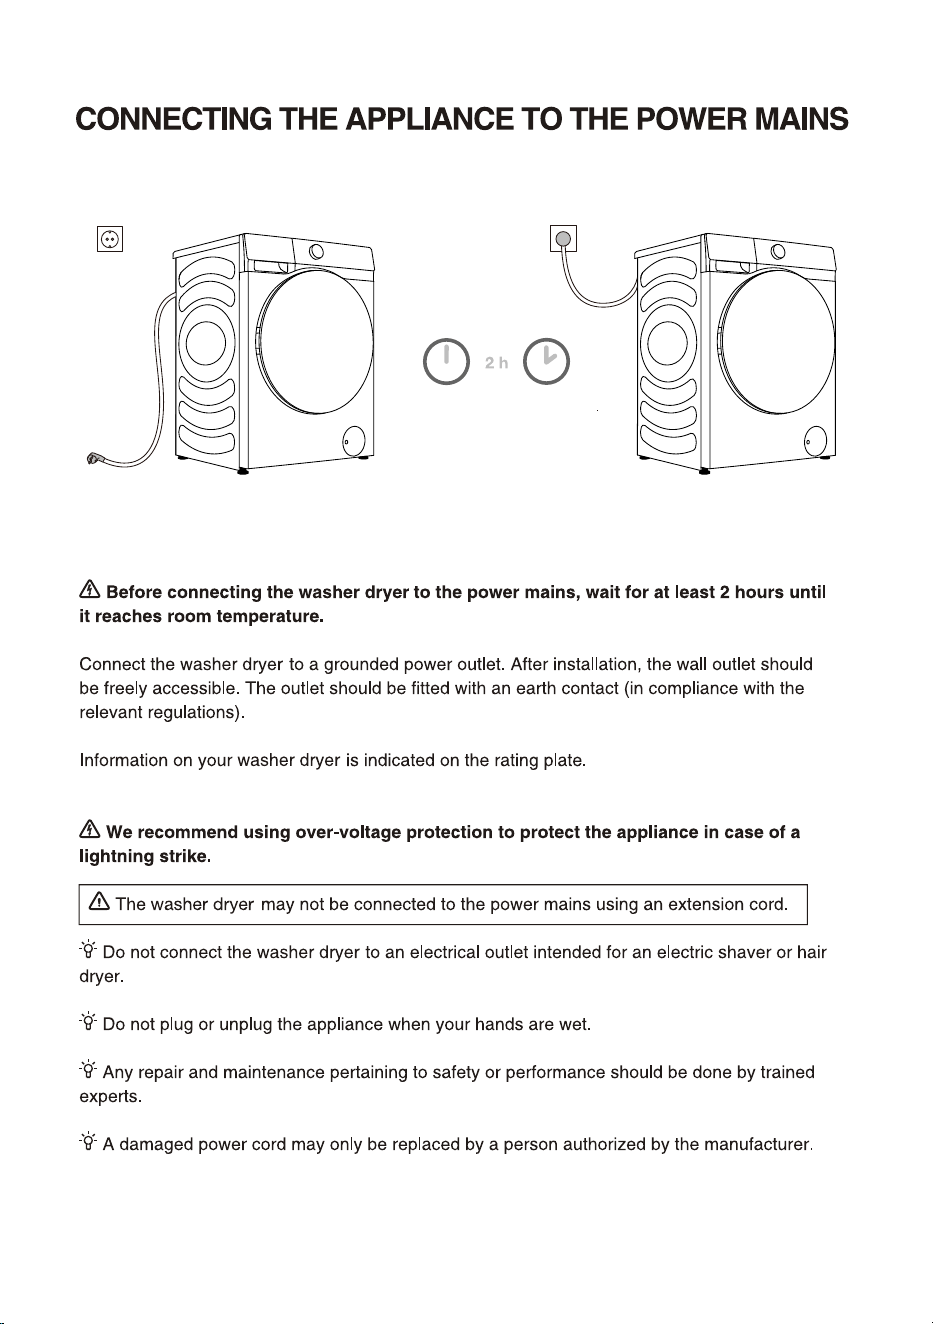
55 8J'JDPOOFDUJPO
17
1
6
4
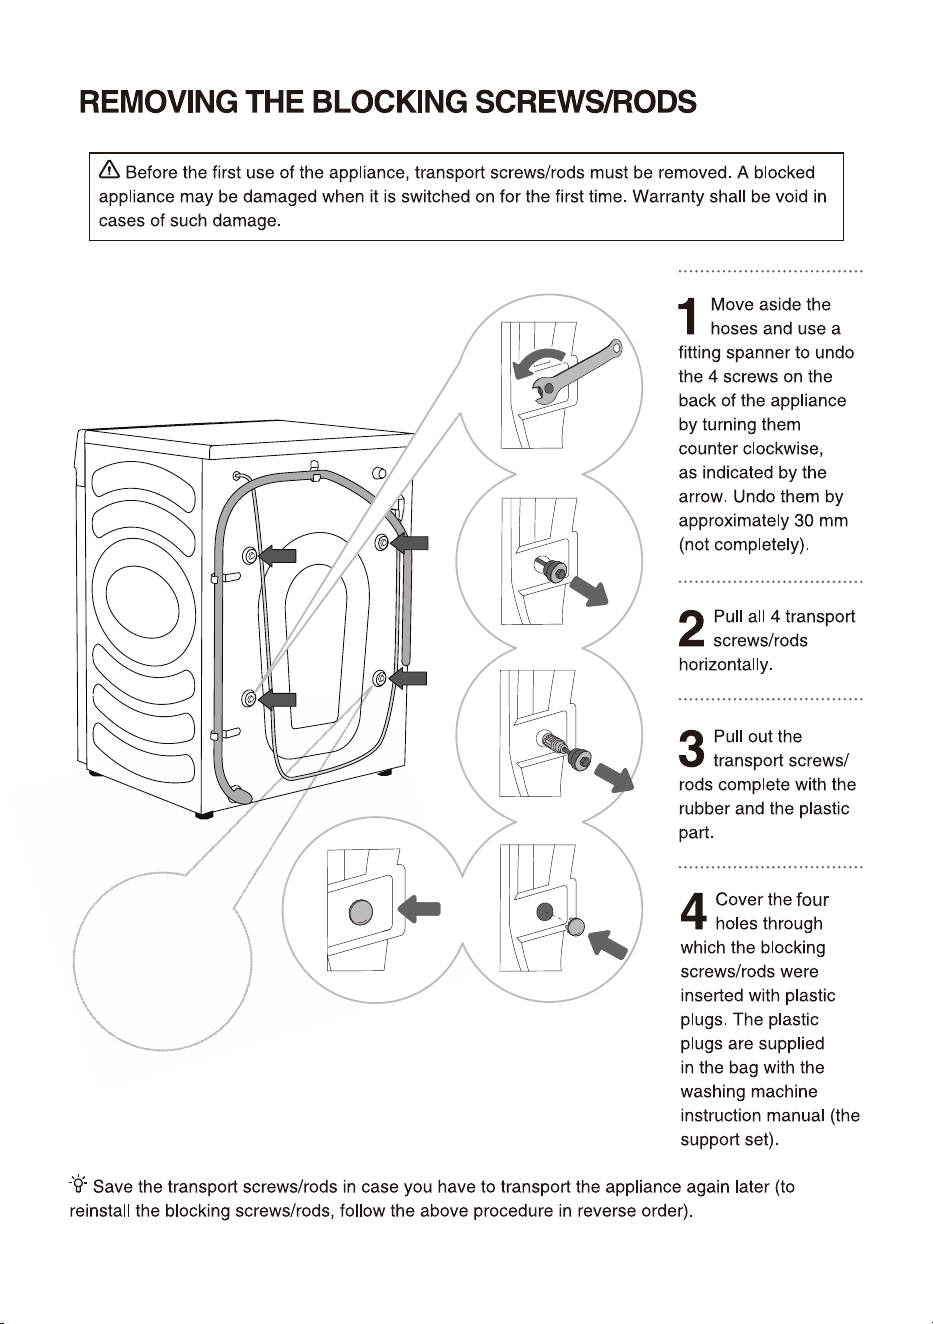
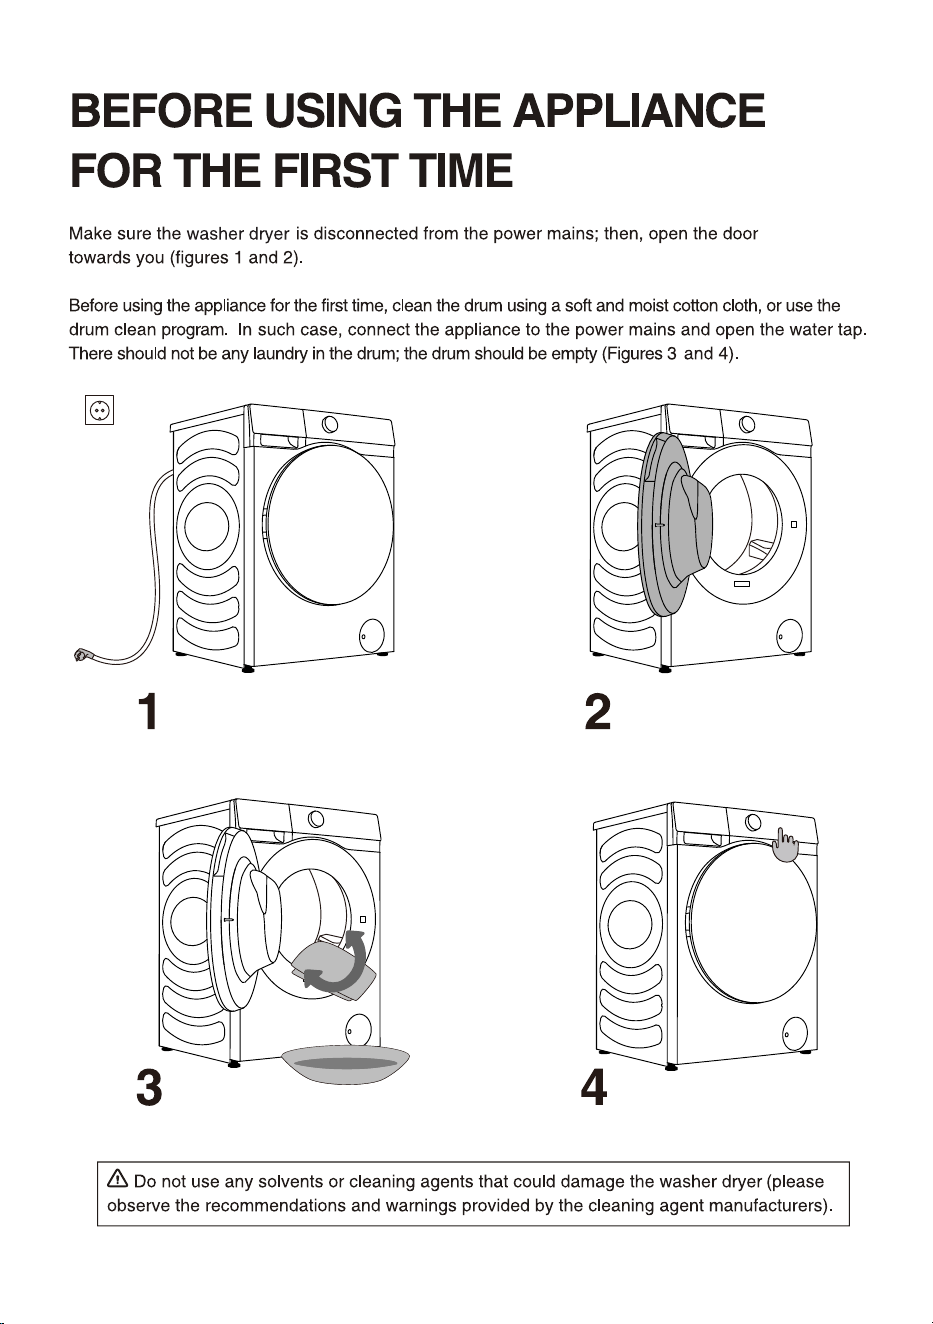
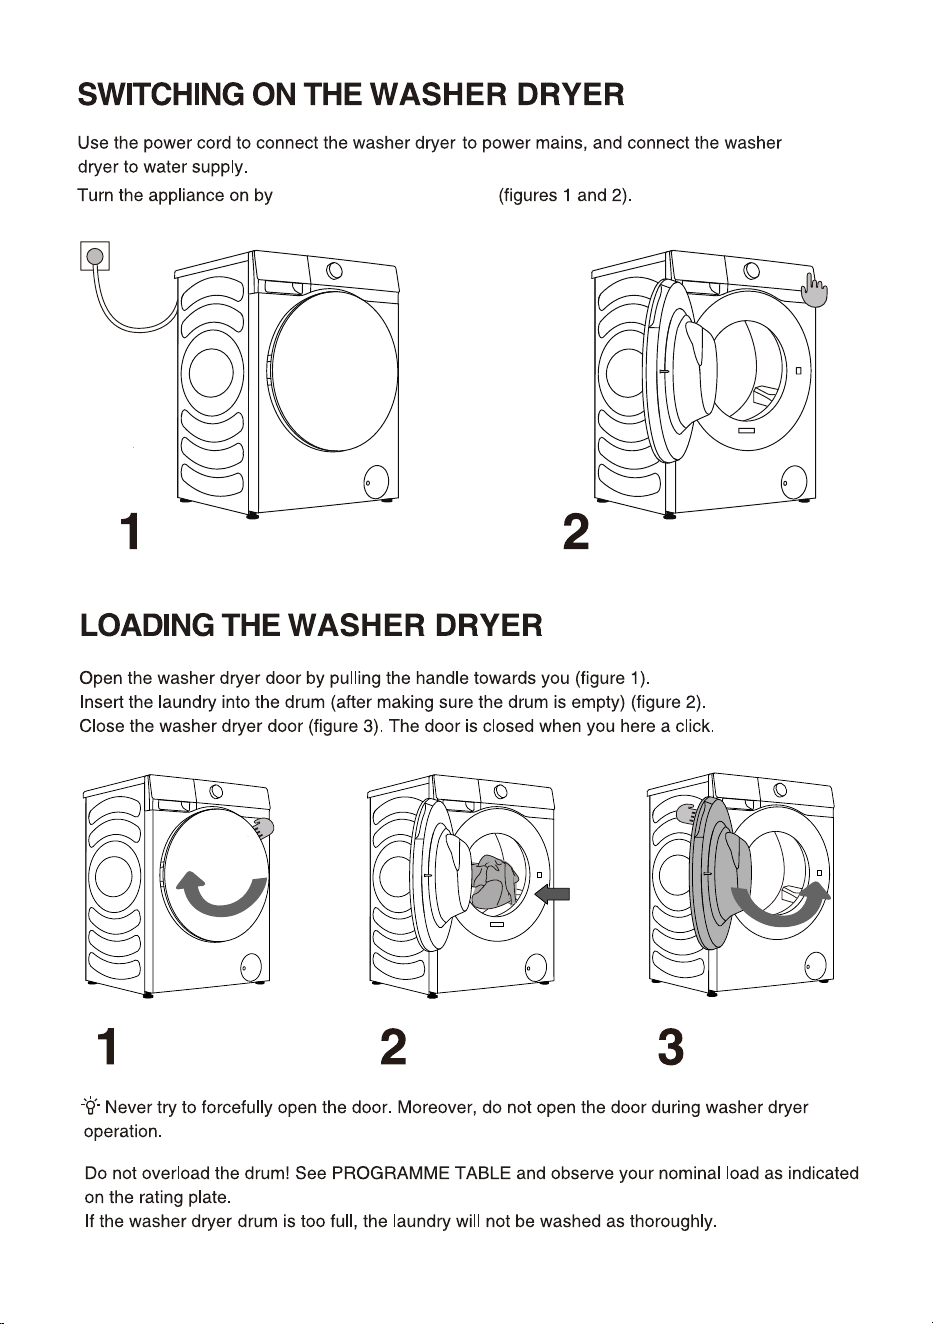
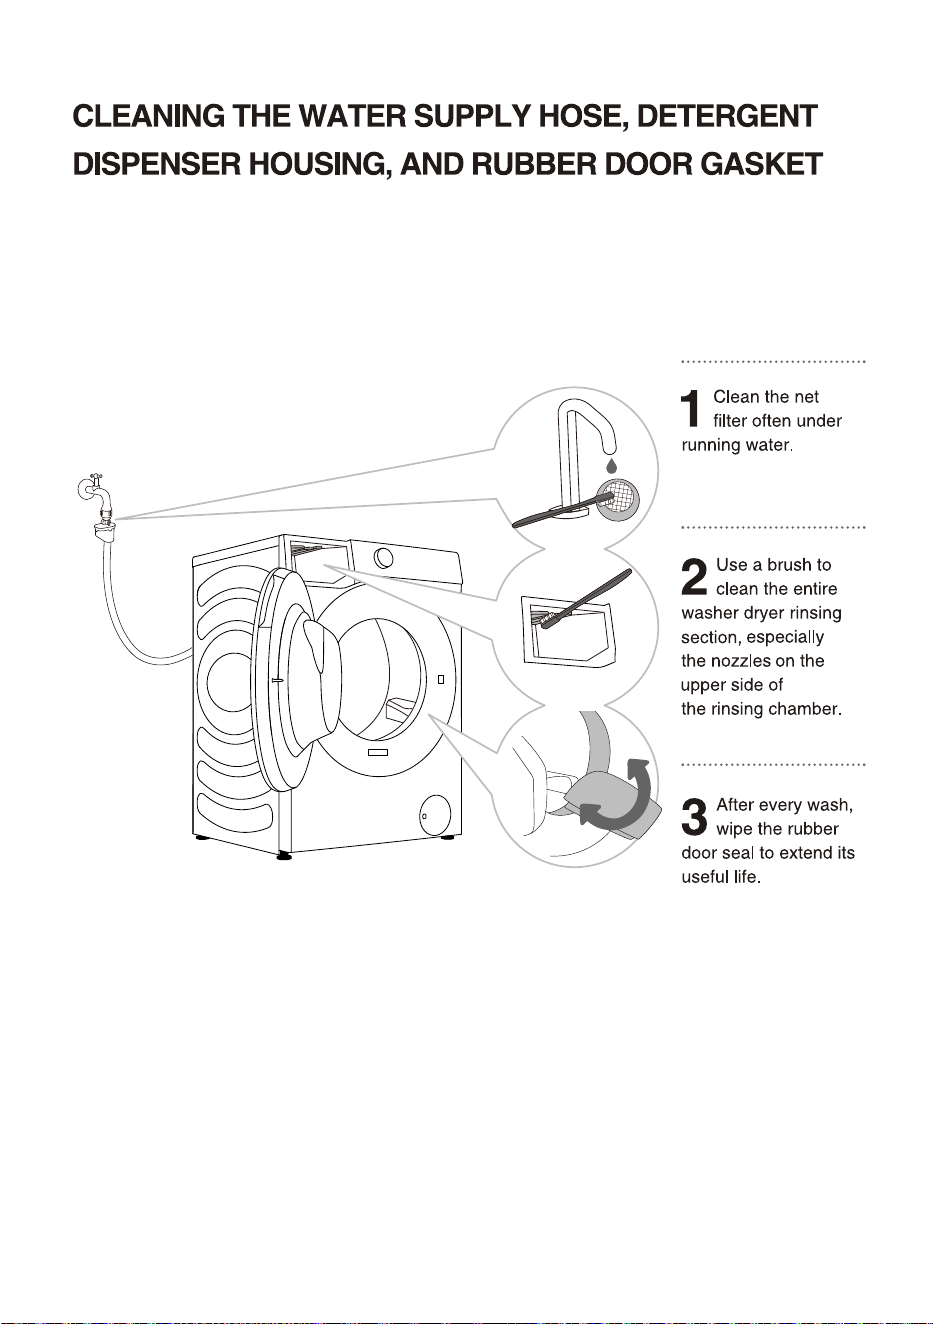
This appliance is intended to be used in household.
5
6
7
8
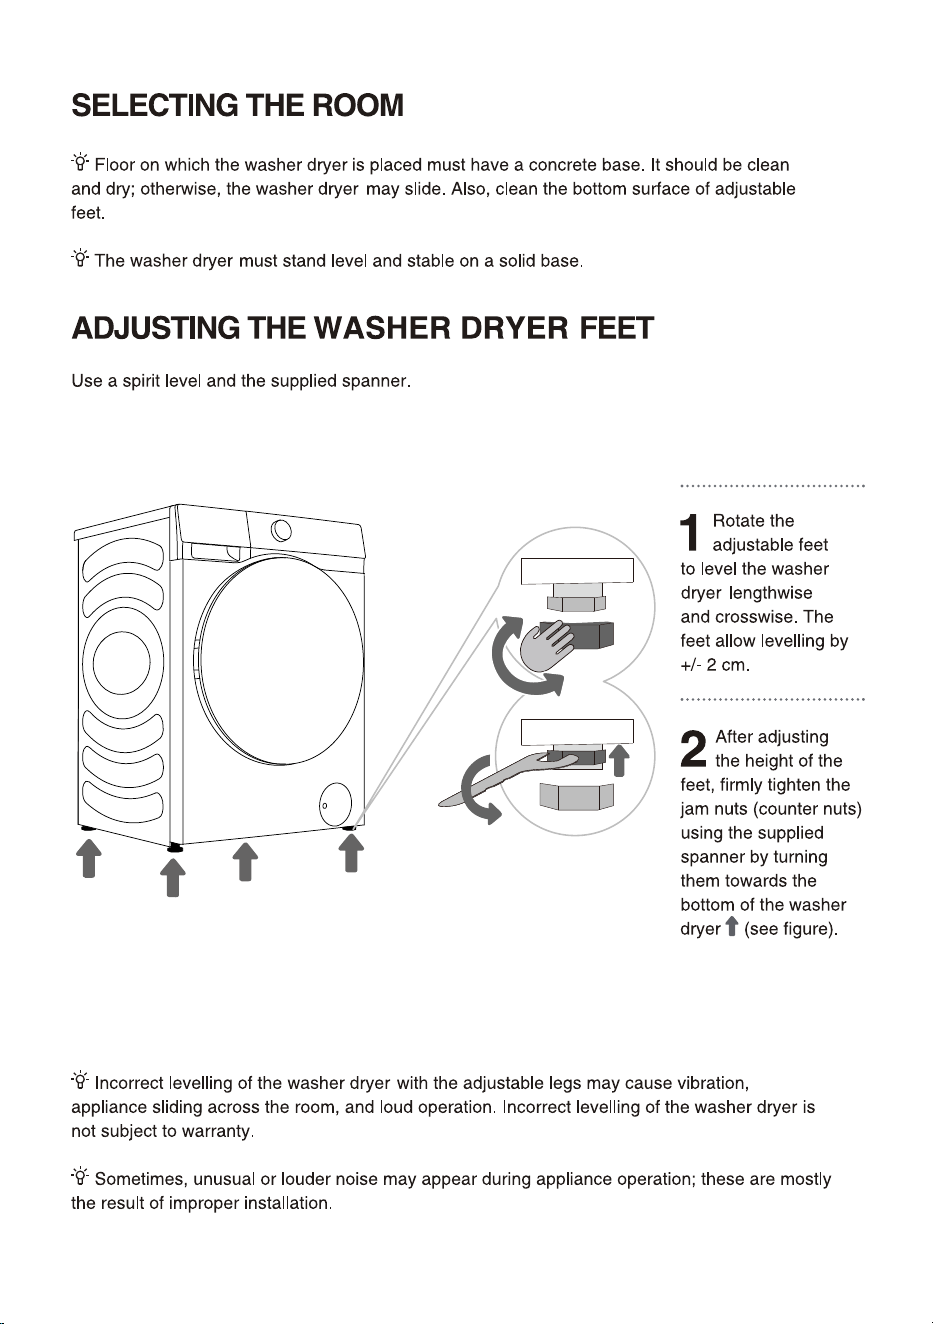
SELECTING
ADDITIONAL SETTINGS AND FUNCTIONS/CHILD LOCK
9
10
11
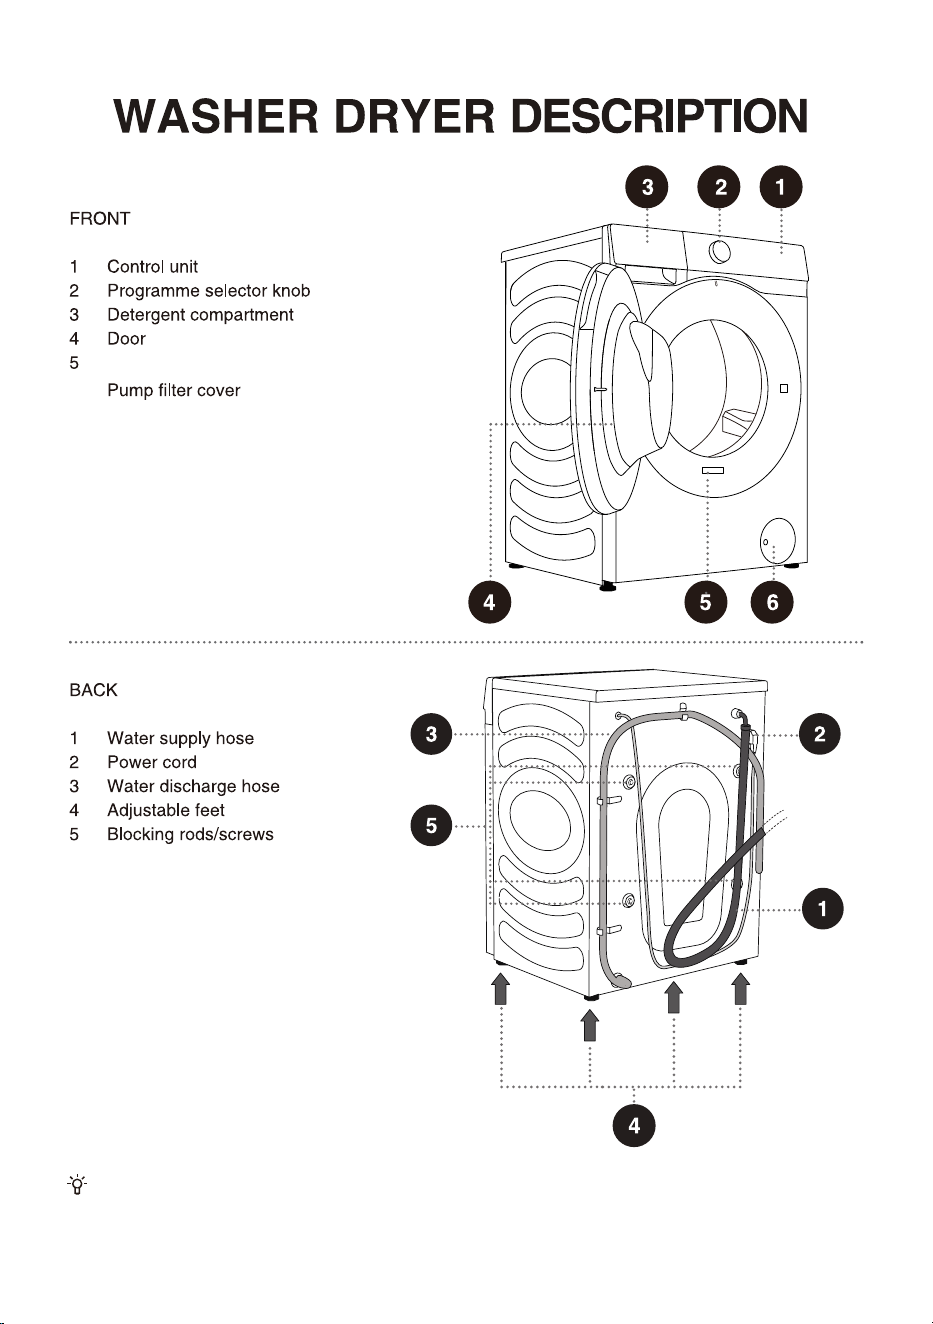
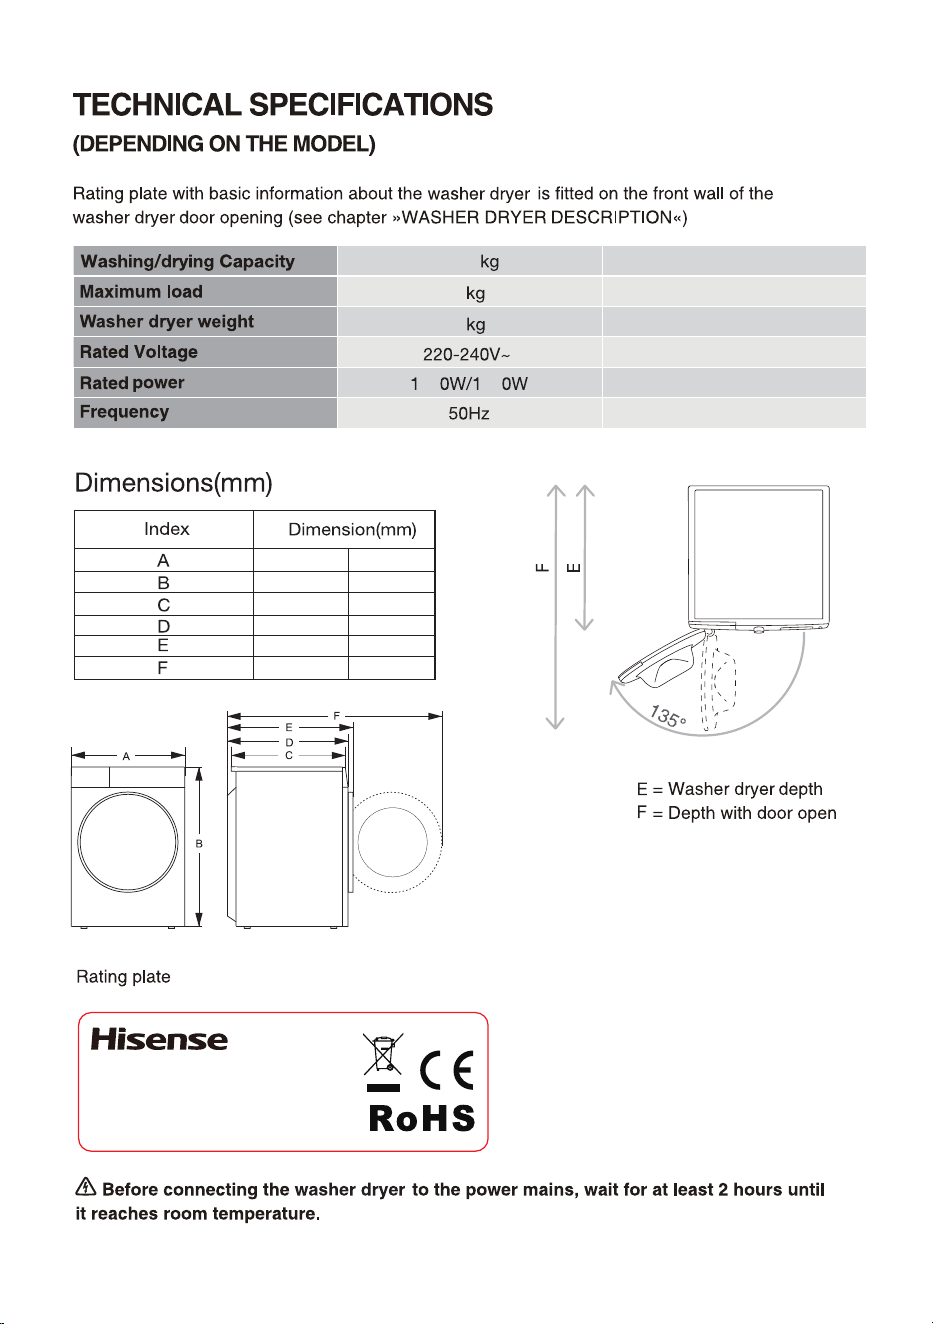
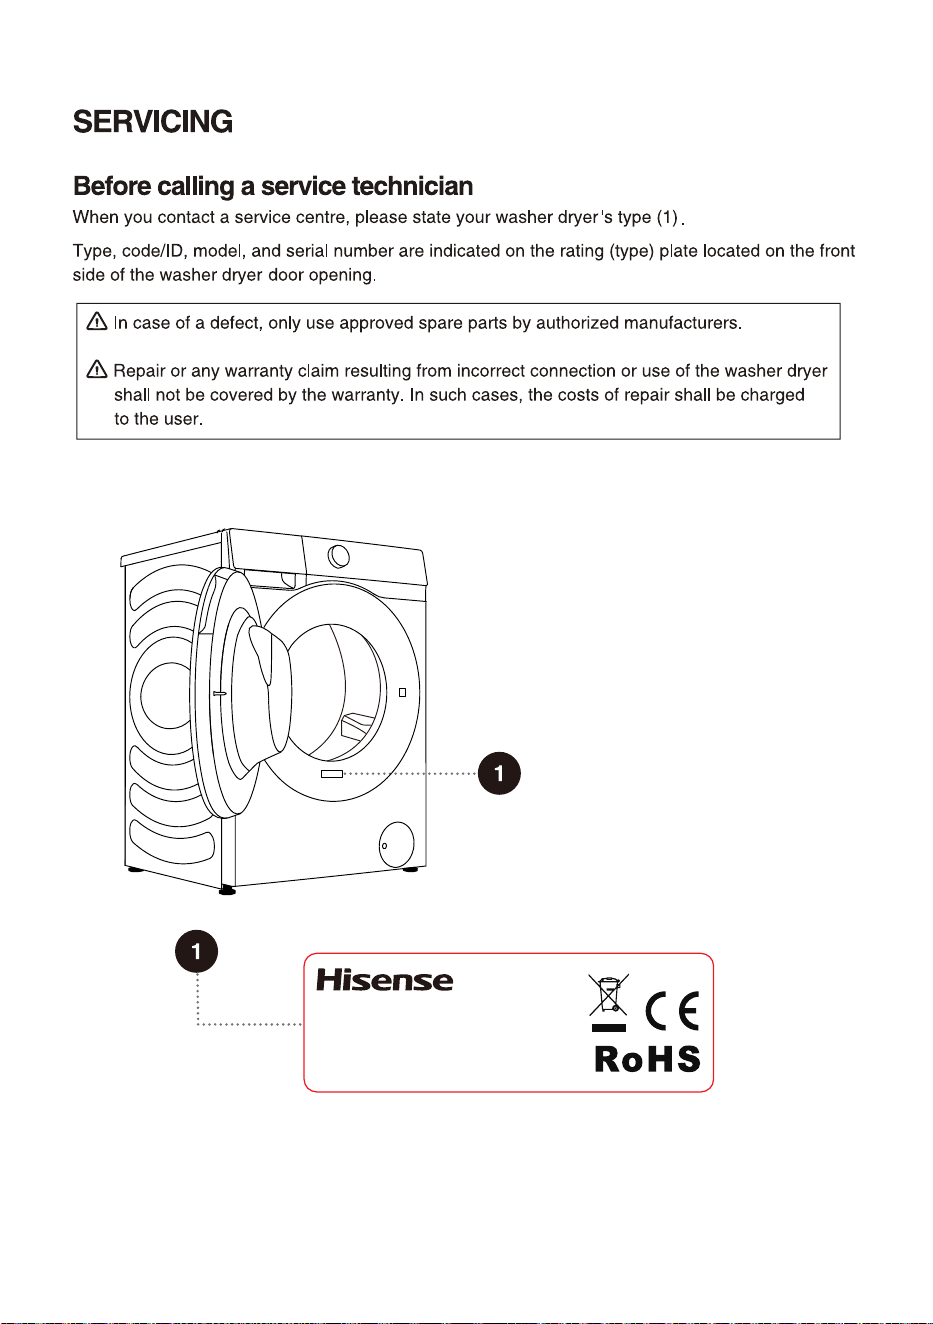
Rating plate
6
12
The illustrations in this manual are for reference purpose only. As our products are subject to
continual improvement, the appearance, color and functional parts of your actual product may vary
from the illustrations.
13
8kg/5
8
60
75 05
595
845
480
510
540
1020
;;;;;;;;;;
;;;;;;;;
;;;;;;
;!;;;;
\
9 kg / 6 kg
9 kg
65 kg
220-240 V~
1600 W / 1200 W
50 Hz
595
845
500
550
590
1060
14
The accessories included with this device include one or more of the following:
• User Manual
• 4 transport screw covers;
• Water inlet hose
• Water drain hose bracket
• Wrench;
• Noise reduction board/sponge strip/none (subject to the actual model).
Different models have different configurations, and the accessories included with this device are
subject to the actual configuration of the model.
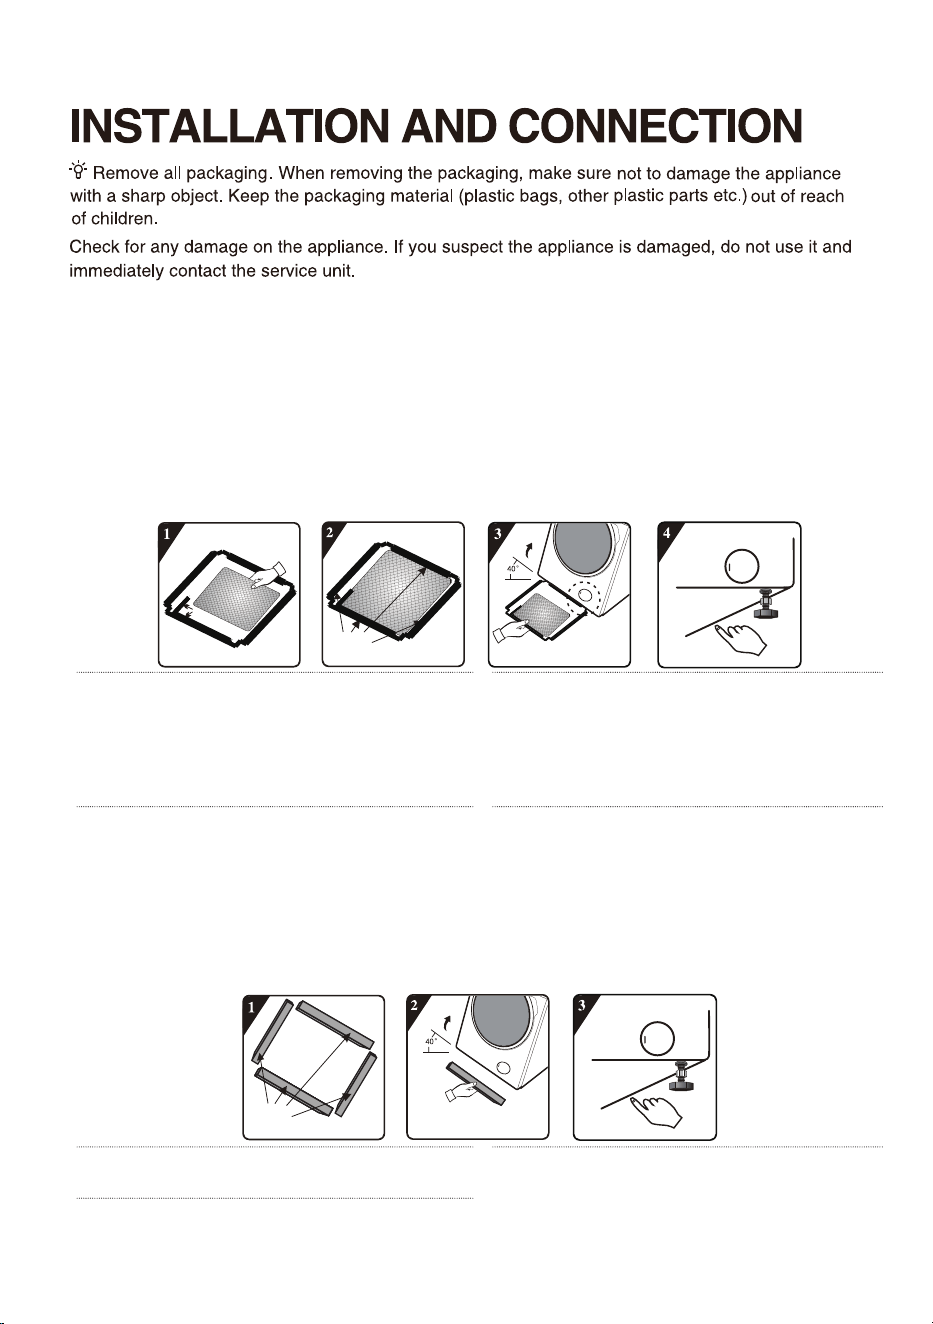
How to install the noise reduction board:
Right-angle impression
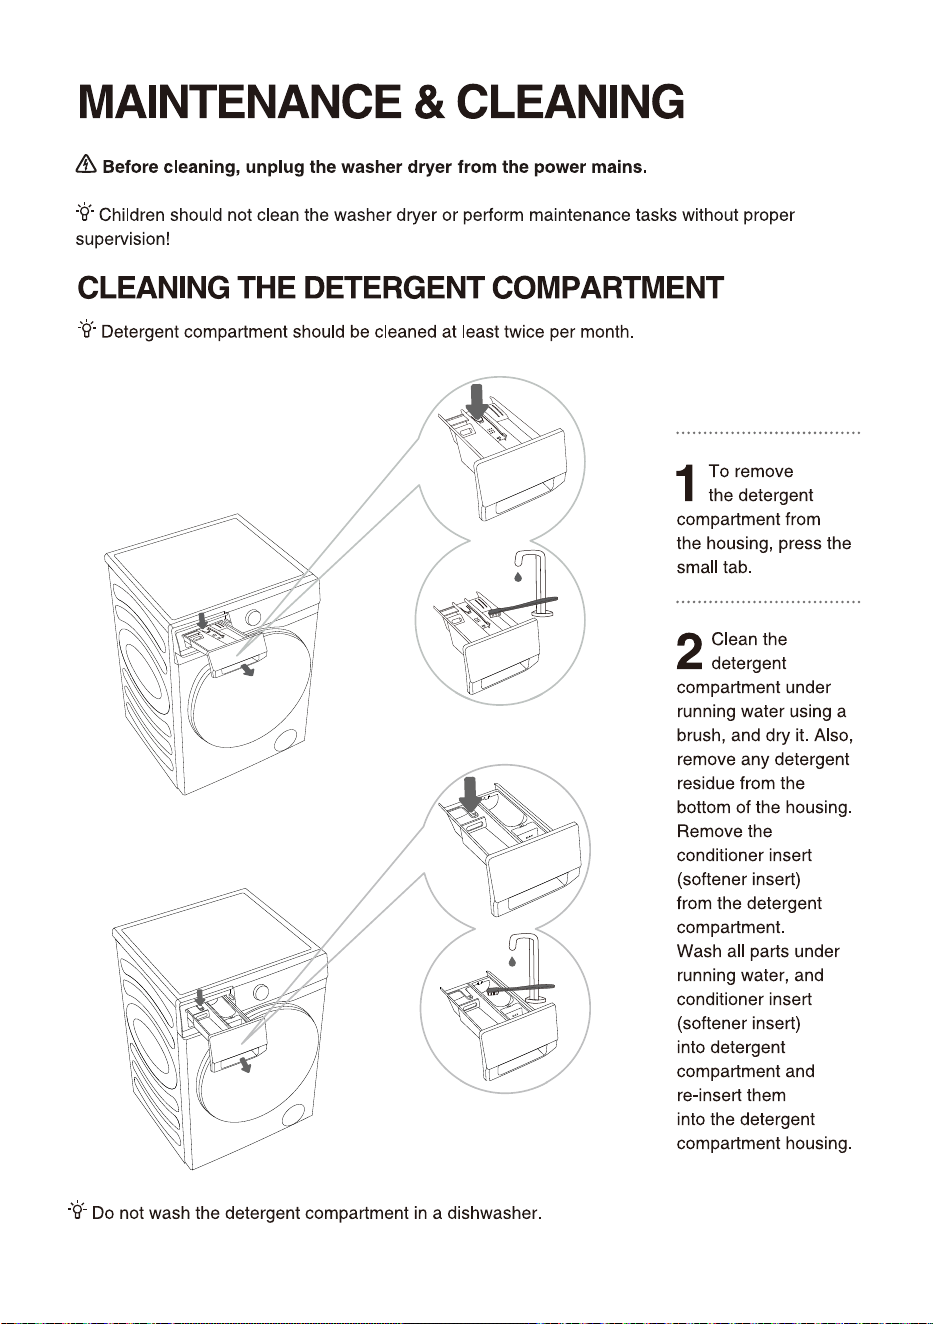
Remove the
release paper from
the double-sided
adhesive tape around
the edges
1
Before installing the noise reduction
baseboard, please align and stick the
sound-absorbing cotton along the right-angle
impression on the bottom cover (this step can
be omitted for some models without sound-
absorbing cotton).
2
Remove the release paper from the double-
sided adhesive tape around the bottom
cover.
3
Tilt the device at a 40° angle, with the edge
that has a right-angle notch facing the front
of the device as shown in the figure, insert the
edge with the oblique notch between the two foot
screws at the rear of the device until it is fully
inserted, and then close the baseboard so that it
fits tightly against the bottom of the device.
4
Press the double-sided adhesive tape
around the edges with your hands to
ensure that the noise reduction board is firmly
attached to the box.
How to install the sponge strip:
Remove the
release paper from
the double-sided
adhesive tape
1
Remove the release paper from the double-
sided adhesive tape on the sponge strips.
2
Tilt the device at a 40° angle, stick 2 long
sponge strips on the front and rear support
positions at the bottom of the box, and stick 2
short sponge strips on the left and right support
positions.
3
Press the sponge strips by hand to make
them stick firmly.
15
A power cord clip
is provided here,
which should also
be removed.
16
17
18
19
20
21
22
23
24
1 6
25
Leather and fur products
(Deformation may be
caused)
Hats with hard material
(It will damage the
washing machine and
cause faults)
Cushions, pillows, articles
with cotton wadding, foam
and other sponge materials,
carpet cover (Damage or fault
may be caused)
Rayon and its blended
products (Discoloration or
deformation may be caused)
Large thick rubber cushions with
carbamate on the back (Damage
or fault may be caused)
Others:
Wrinkled or embossed clothes;
crepe fabrics;
Easily deformed clothes (suits,
jackets, ties and dresses, etc.);
Easily fluffing clothes (velvet,
velveteen).
Any of clothes marked
by graphic (Clothes may
be damaged)
Woolen clothes
(Shrinkage and fur
loss may be caused)
Tights, stockings
(Damage or deformation
may be caused)
Sizing clothes
Cushions or clothes with
furs (Damage or fault may
be caused)
Quilt (Damage or
fault may be caused)
Clothes with lace and
embroidery, new synthetic
fiber (very fine fiber)
(Deformation may be caused)
Silk
Non washable dry/non-dry clothes include but not limited to the above clothes.
The wet clothes still dripping are not suitable for drying, which may cause the machine to alarm!
If it is used to dry cushions and clothes with furs, it may lead to drain pipe blockage.
Note
NON WASHABLE • DRY
/NON-DRY CLOTHES
Clothes that can neither be washed nor dried
NON-DRY CLOTHES
26
softener
softener
softener
softener
softener
Max indicated level.
(
The detergent compartment style depends on the model)
Style ①
Style
②
washer dryer
27
press the button "POWER"
28
function by short press.
Washer dryer network
control by long press.
Select the dry time and
additional functions of dry
by short press.
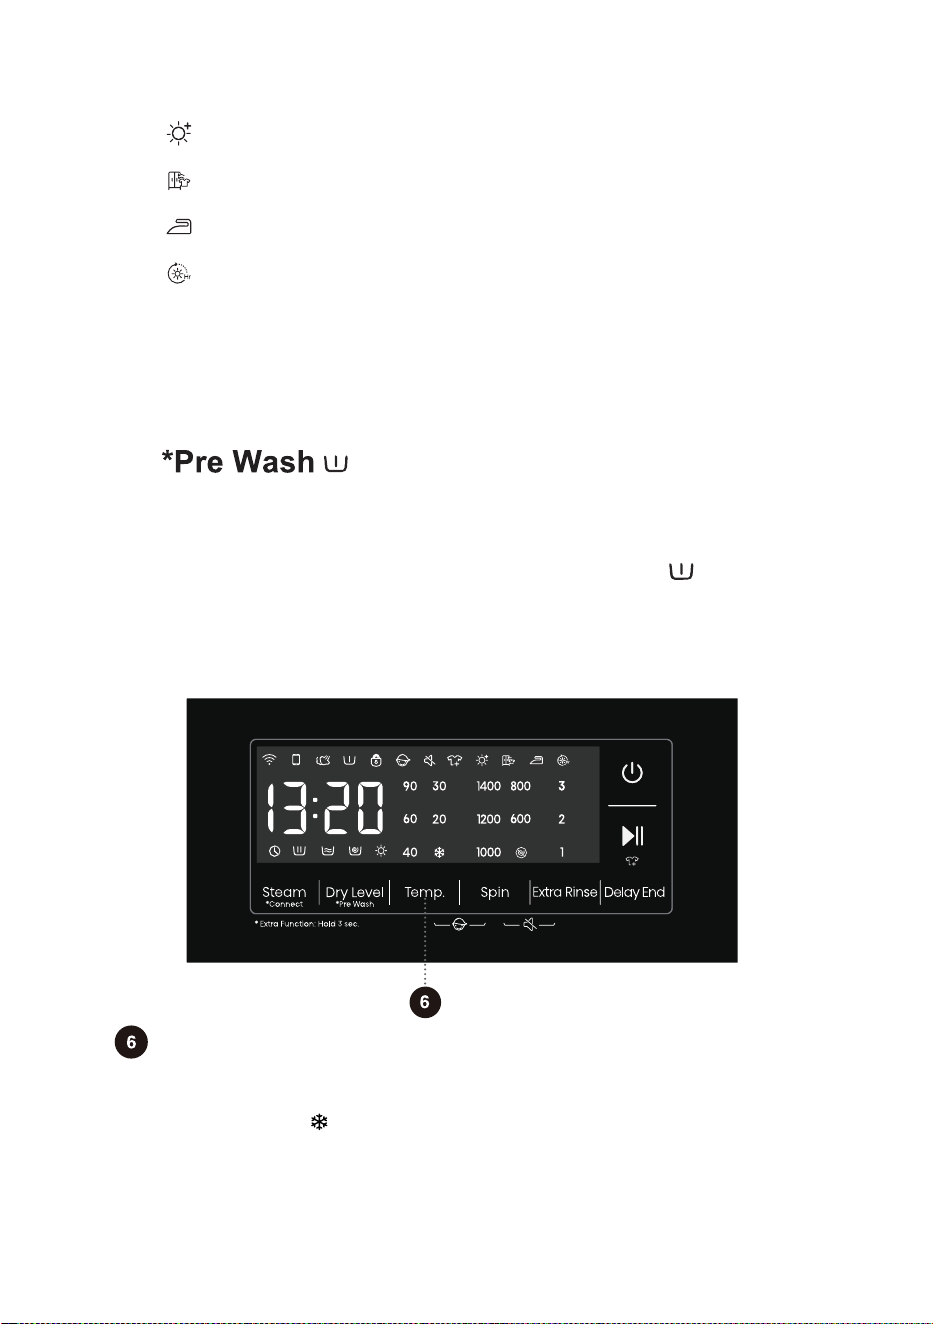
Add pre wash function by
long press.
*PRE WASH
DRY LEVEL
washer dryer.
EXTRA RINSE
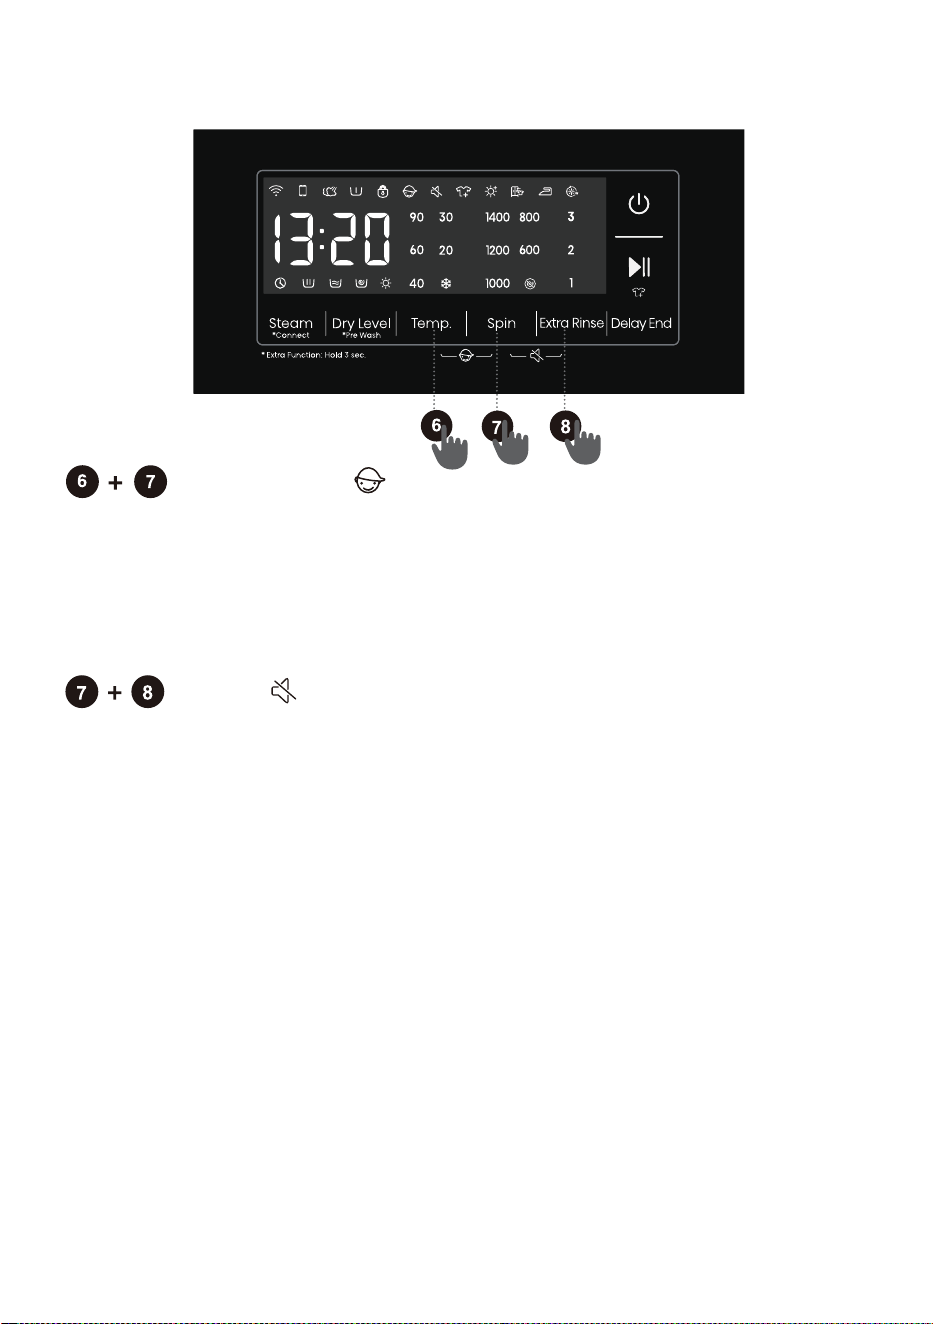
For extra function:Press and
hold for 3 seconds.
Press these two keys at the
same time to switch off or
restore the acoustic signals.
Press to change the rinse
count for current cycle.
29
programme
See programme table.
(1)
600
30
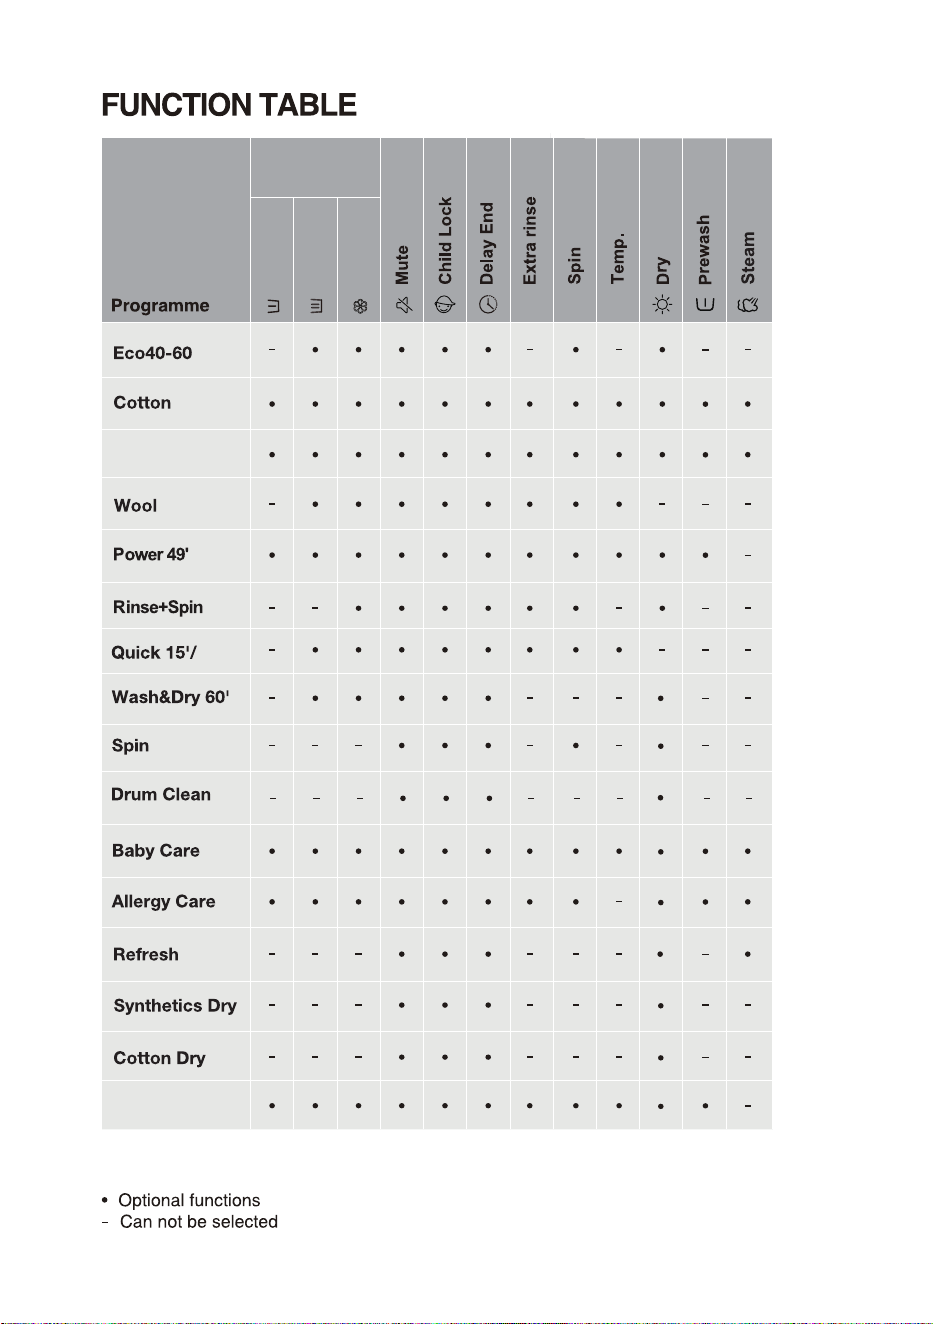
Functions
W
WD
1400
W
WD
1400
W
WD
1400
W
W
W
WD
1400
1400
Spin
S
SD
1400
Drum Clean
800
Baby Care
1400
W
WD
WĠWash
DĠDry
SĠSpin
SDĠSpin and Dry
WDĠWash and Dry
5kg
2kg
3kg
8kg
5kg
8kg
4kg
4kg
5kg
5kg
2kg
2kg
8kg
8kg
WD
3kg
-
1kg
Quick 15'
Wash&Dry 60'
W
800
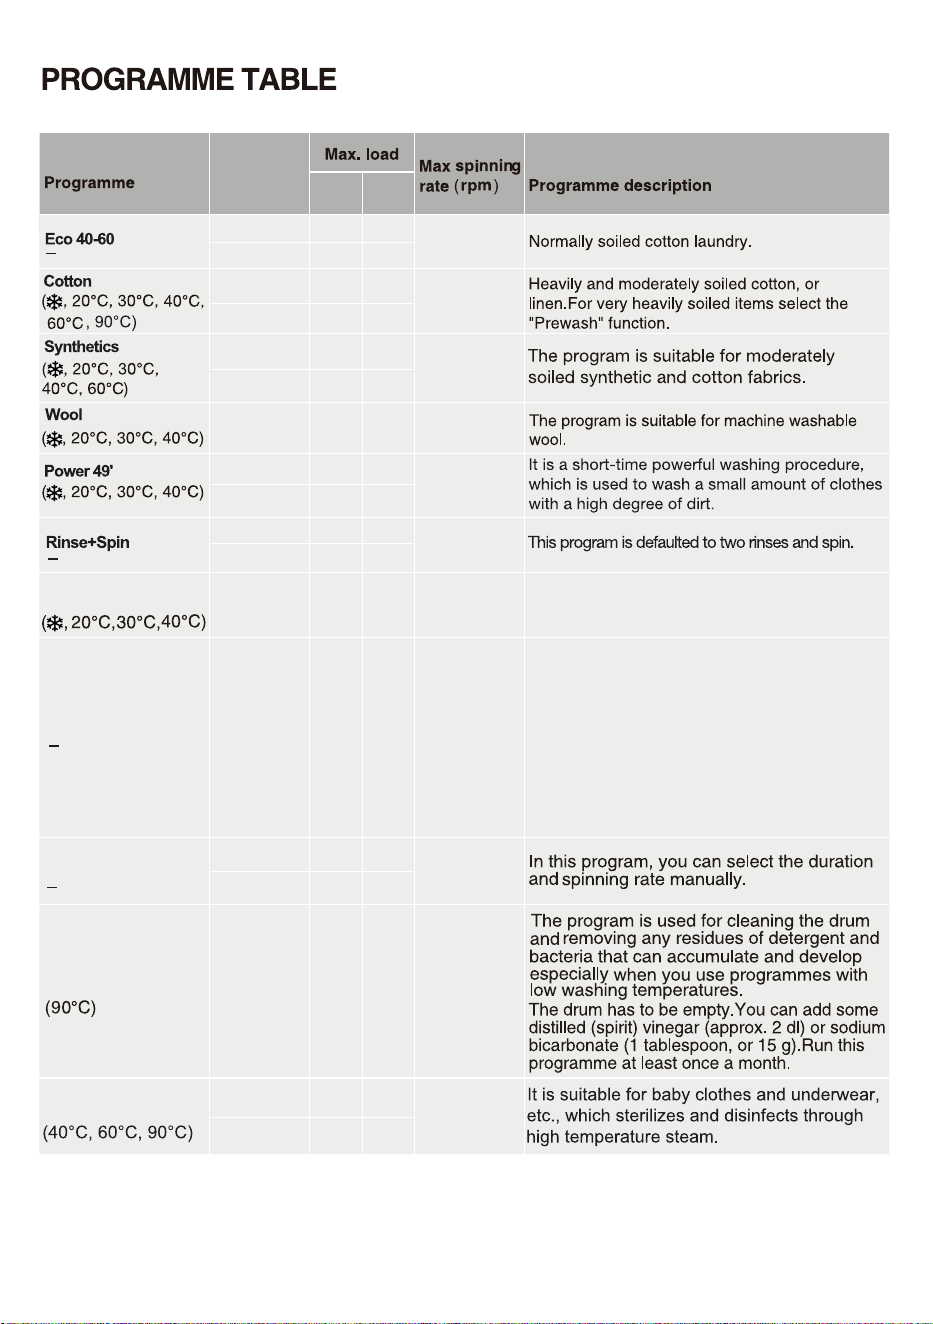
Cotton, mixed fabrics. Items worn for a short
time or newly bought.
The wash and dry process within 60 minutes,
is suitable for wash and dry the clothing with
light dirty at once, such as the T-shirts, shirts
and skirts that should be changed daily. It is
recommended that no more than 3 pieces of
skirts should be washed at a time. Select the
function key"Dry Level" to complete the
conversion of the Quick 15' and Wash&Dry
60' programs.
WD
1kg
1400
WD
6kg
2kg
3kg
9
kg
6kg
9
kg
4.5kg
4.5
kg
6kg
6kg
2kg
2kg
9
kg
9
kg
3kg
-
1kg
1kg
8kg
9
kg
31
/05&
8BUFS5FNQFSBUVSF4FMFDUUIFBQQSPQSJBUFXBUFSUFNQFSBUVSFGPSDIPTFOXBTIQSPHSBNNF"MXBZT
GPMMPXHBSNFOUNBOVGBDUVSFShTDBSFMBCFMPSJOTUSVDUJPOTXIFOXBTIJOHUPBWPJEEBNBHFUPDMPUIFT
"DUVBMXBUFSUFNQFSBUVSFNBZEJGGFSGSPNUIFEFDMBSFEDZDMFUFNQFSBUVSF
5IFwashing effect EFQFOEPOXBUFSQSFTTVSFXBUFSIBSEOFTTXBUFSJOMFUUFNQFSBUVSFSPPNUFNQFSBUVSF
UZQFBOEBNPVOUPGMPBEEFHSFFPGTPJMJOHVUJMJ[
FEEFUFSHFOUGMVDUVBUJPOTJOUIFNBJOFMFDUSJDUZTVQQMZBOE
DIPTFOBEEJUJPOBMPQUJPOT
/FUVSBMOPOTVETJOHEFUFSHFOUJTSFDPNNFOEFE
5HPRWH&RQWURO
-
Refresh
D
-
Synthetics Dry
D
-
Cotton Dry
D
-
W
Auto
1400
WD
1400
washer dryer.
-
Functions
-
2kg
4.5kg
6kg
5kg
5kg
W
1400
Allergy Care
WD
1400
2kg
2
kg
)(
WĠWash
DĠDry
SĠSpin
SDĠSpin and Dry
WDĠWash and Dry
-
2kg
4kg
5kg
5kg
5kg
2kg
2
kg
9kg8kg
32
33
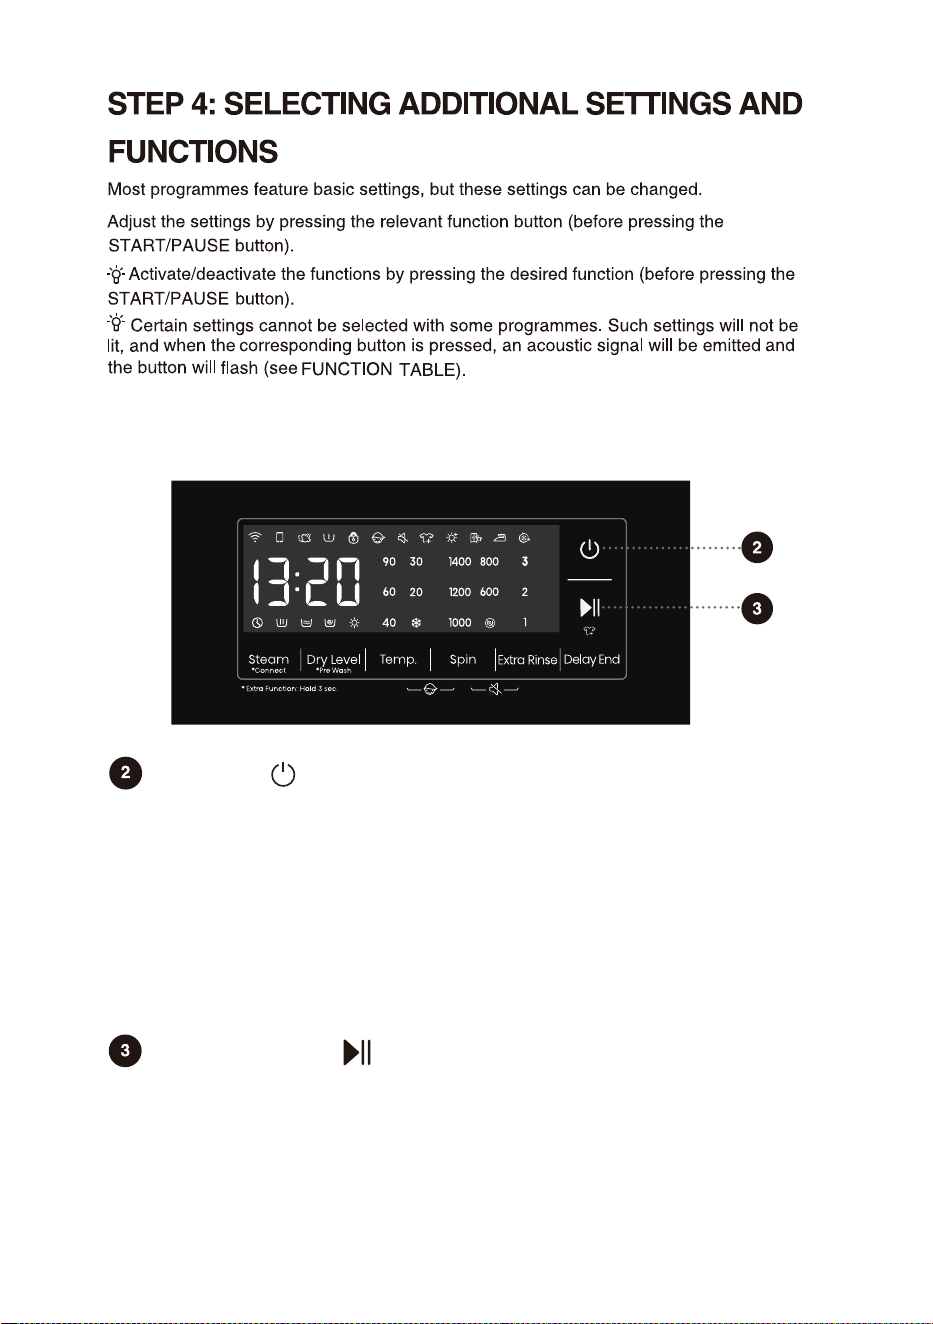
Power
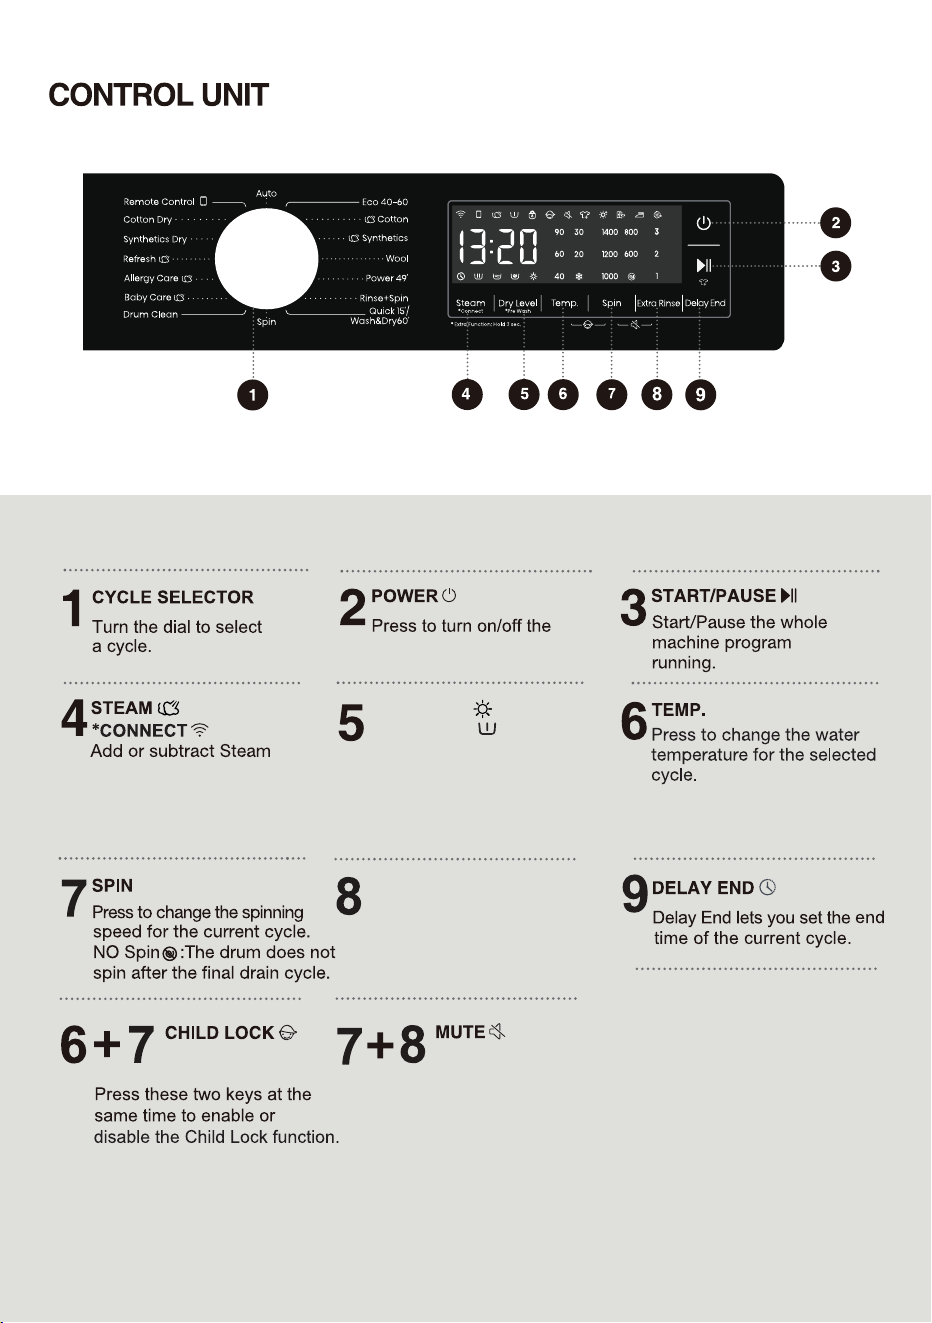
For powering on/off the washer dryer.
When the washer dryer is in standby, or after the screen displays the program
end interface, press and hold the Power key to enter the power-off state.
In standby mode, or in the program end interface or Wash retry reminder
interface, if no operation is performed within 10min, the washer dryer will shut
down automatically.
In power-off state, all displays and outputs will be off, and remote startup is not
supported.
Start/Pause
For starting a program, or suspending a running program.
If the machine door isn't closed or the door lock is not engaged, the washer dryer
will not start, and an alarm will be displayed on the screen.
After a program is started, or when the pause state is selected, the set
functions and parameters cannot be changed.Press and hold the Power button
to turn off the machine, and then restart it to reset the parameter.
The additional settings and functions can only be set in the standby mode of the applicable
program, that is, before the program starts running, and cannot be selected after the
program runs.
34
The washer dryer can sense the weight of clothes to adjust the dry time
automatically except for the function of Time Dry. Before drying, please confirm
whether the clothes can be dried. If the clothes with different materials are dried
together, the dry effect may be affected. So it is recommended to classify the
clothes before drying.
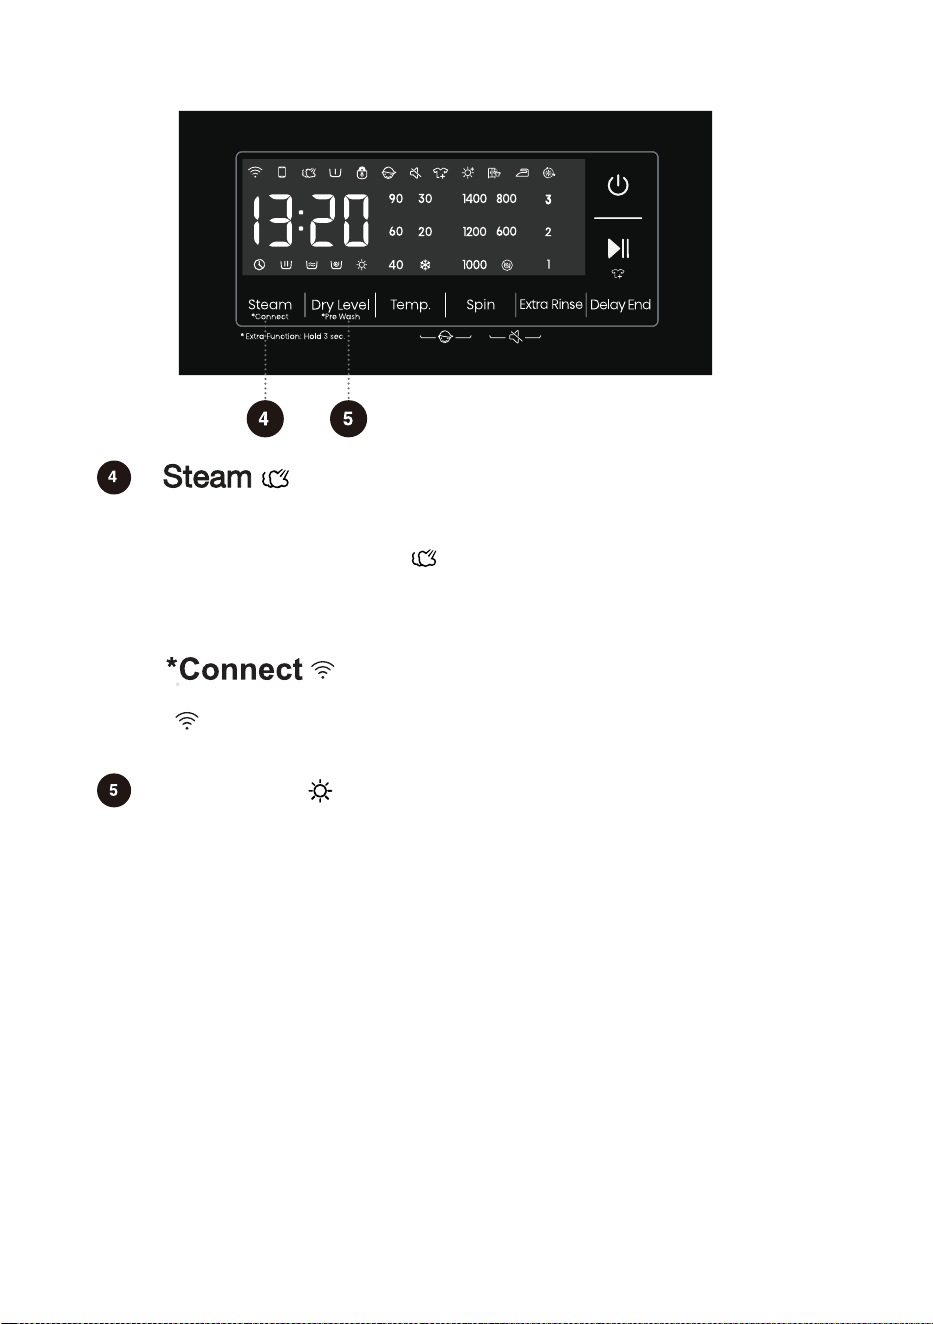
Programs with the steam icon " " can use the steam function. The Allergy
Care and Baby Care programs come with the steam function by default and it
cannot be deactivated. When the steam function is chosen, the corresponding
steam icon will light up.
Dry Level
Short press the "Dry Level" button to select the dry time and additional functions
of dry. After selecting the corresponding function, the corresponding icon will
light up.
Press briefly: Add "Steam" function, press twice to cancel the function, and cycle
in sequence.
Press and hold: Connect the Wi-Fi of the washer dryer, the control panel symbol
" " flashes, and then conduct the networking operation. See the networking
description for the specific networking method.
Before starting to dry, make sure that the tap is open and the cold water is in
place. If the hand-washing clothes requires for drying, before drying, please
select the spin with high speed as possible according to the clothes types.
At the end of dry, the washer dryer will run for a period of time according to a
certain rhythm to loosen the clothes and reduce the wrinkle.The wall attachment
of excessive and dehydrated cotton clothes may aftect the dry effect, please take
the dehydrated clothes out from the drum, and put it into the drum after making it
loose.
Short press this button to cycle between Extra Dry,
Cupboard,Iron and Time
Dry.
Temp.
35
Changing the temperature for the selected program.
Each program has a preset temperature that can be changed by pressing the
position TEMP. ( indicates cold wash).
The temperature is displayed on the display unit above the button.
[Iron] function owns the effect that the clothes with little water can be ironed
after being dried.
[Cupboard] function owns the effect that the clothes can be worn instantly
after being dried.
[Extra Dry] function owns the effect that the clothes can be stored up
after being dried.
[Time Dry] function refers to dry the clothes for a specified time.
Users press the "Dry Level" button to select any type of dry time with 6 types,
including 30 minutes, 1 hour, 1.5 hours, 2 hours, 3 hours, and 4 hours. Please
select a reasonable dry time.
Otherwise, the clothes will not be dried fully if the dry time is too short.
Note:The wet clothes still dripping are not suitable for drying,which may cause
the machine to alarm!
When this function is selected,the pre-wash function indicator " " is always on
from the beginning to the end of the program.
Press and hold: Increase the "Pre Wash" function, long press twice to cancel
the function,and cycle in sequence.
Select this function to add a Pre Wash program before the Main Wash stage.
When selecting the Pre Wash function, please add detergent to the prewash
compartment of the detergent dispenser.

Delay End
36
If the Delay End function was chosen before starting a program, it can be
canceled by pressing any other function key. Once the program has started, you
need to press and hold the Power button to turn off and restart the machine to
cancel the Delay End function.
When the Delay End function is being selected (set), the Clock icon" "is always on;
When the Delay End programme is running, the Clock icon" "flashes.
Use this feature to schedule washing at a convenient time.
Press this key to set the Delay End time.This key is only valid in standby mode.
After the Delay End function is selected, each time the Delay End key is pressed,
the time increases by 1h. The maximum selectable time range is 24 hours.
The Delay End time is the end time, that is, it includes the washing time, so the
Delay End time must be greater than the washing time.Based on your settings, the
start time of the cycle will be determined by the machine's internal logic.Press to
choose a preset unit of hours.
Spin
Extra Rinse
Use this to adjust the spinning rate. With preset or selected spinning rate,
the selected spinning rate will be lit on the display unit.
If you select draining without spinning, the " " will appear on the display unit.
In the standby state, after Extra Rinse is selected, the number of Extra Rinse is
shown,which may be used a maximum of three times. In addition, the default
rinsing times plus the number of Extra Rinse cannot exceed five times. After the
program is started, the indicator is always on.
37
Mute
Use this to switch off or restore the acoustic signals.
When the machine is in the state of holding, pause or operation, press "Spin
+Extra Rinse" buttons for 2 seconds, The display will show mute function icon.
All the buzzing will be turned off except the alarms.
When the machine is in the mute state, press "Spin+Extra Rinse" buttons for
2 seconds until mute function icon light off. All the buzzing will be activated.
Child Lock
This is a safety feature. To activate it, simultaneously press the positions Temp.
and Spin, and hold them for at least 2 seconds, Child Lock icon will light up, and
then Child Lock is set up.Repeat the same operation, the Child Lock will be
released.
When the Child Lock is set, all function buttons will be shielded except the Power
button.
After completing program, child lock will automatically unlock.
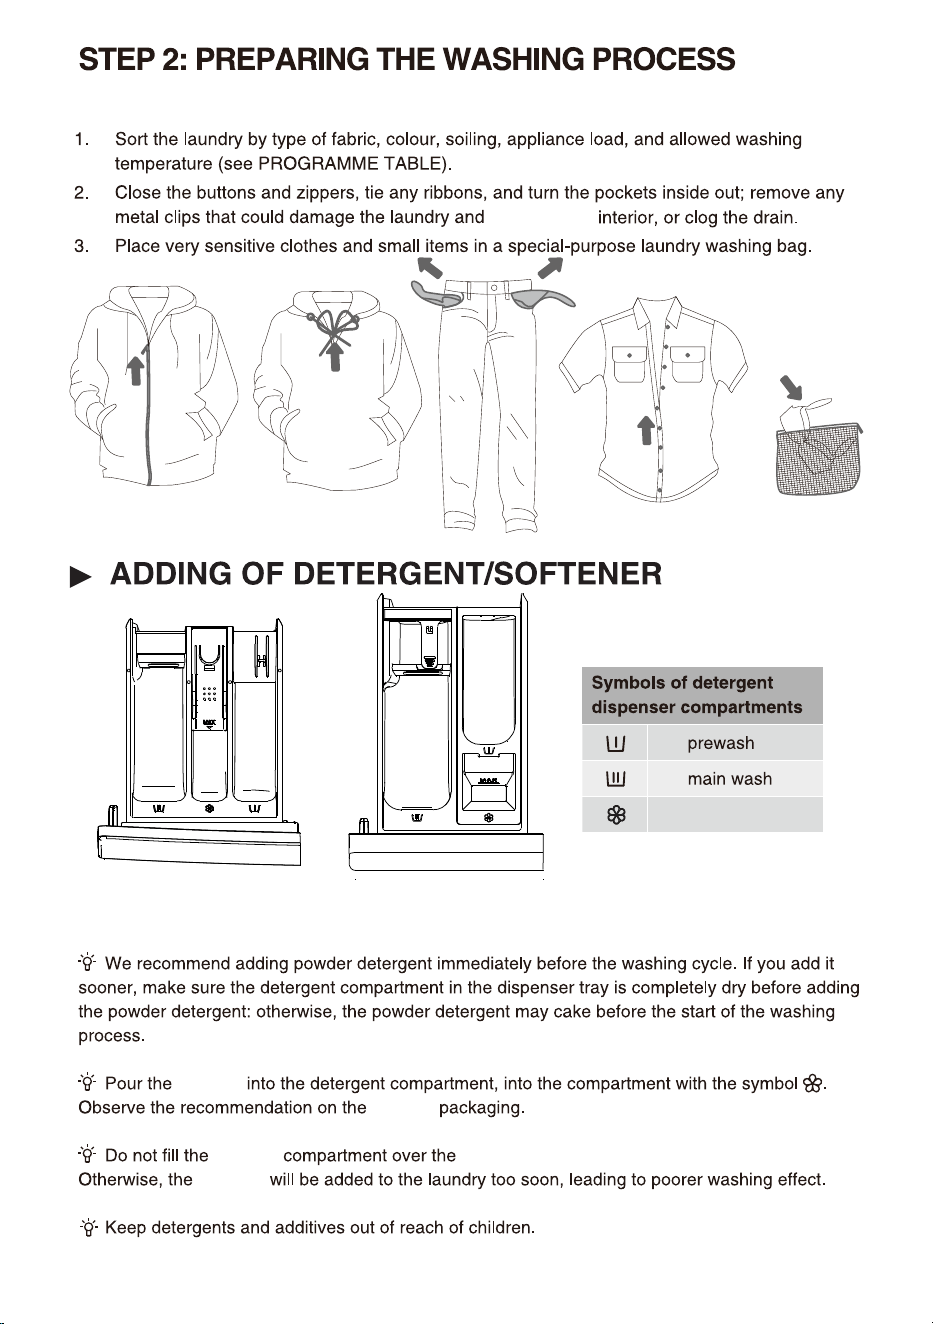
Detergent
Compartment
Synthetics
Auto
38
Prewash
Main wash
Softener
Level
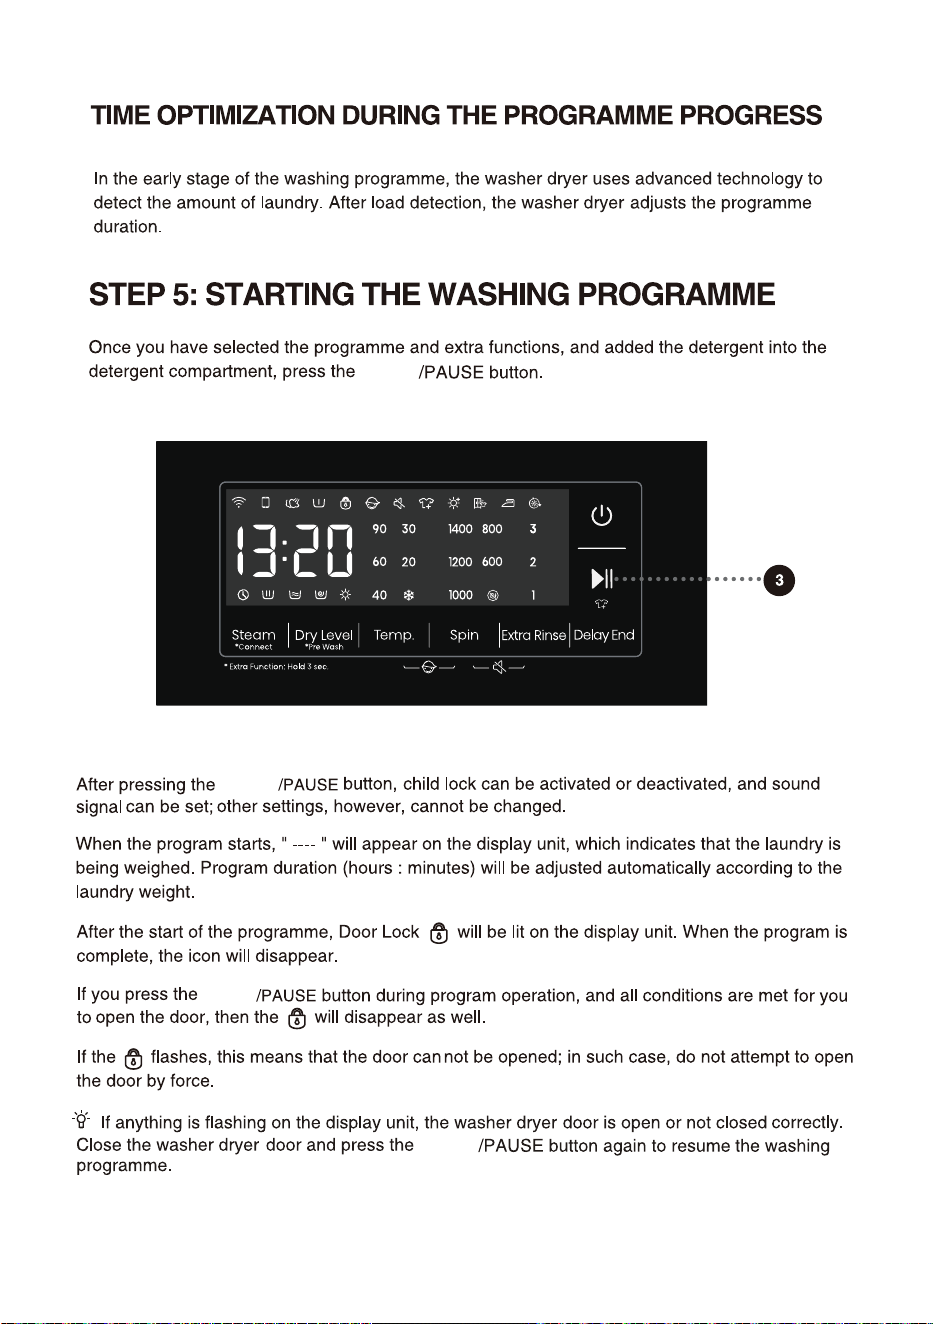
START
39
START
START
" "
" "
" "
START
40
41
PAUSE
To stop and cancel a washing programme,
temporarily paused
I
During a pause, the time on the display will blink. If the "Add Clothes" icon " " lights up, it
indicates that the door can be opened. The door lock will automatically release, allowing you
to add clothes. If the "Add Clothes" icon isn't lit, pressing pause won't unlock the door, and it
cannot be opened.
When the program is suspended in spin state and then restarted, it will run again from the initial
state of spin.
START
2
CHANGE OF WASHING PROGRAMME
To stop and cancel a washing programme,
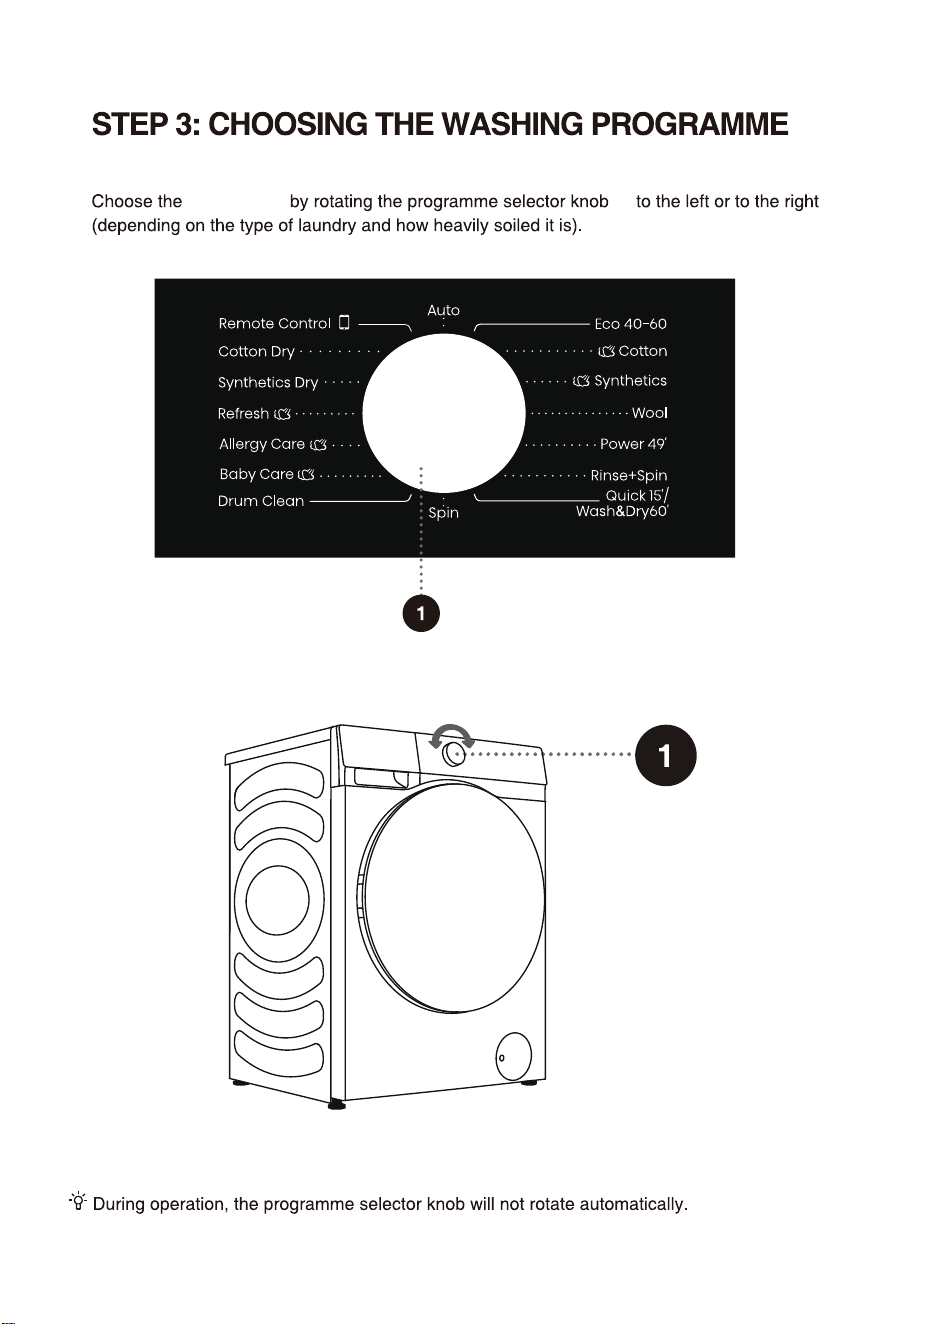
To select a new programme, choose the programme by rotating the knob and select extra functions.
Press the start/pause button, without adding the detergent again.
After adding clothes midway, press start/pause button and the washing program will resume
running.
2
42
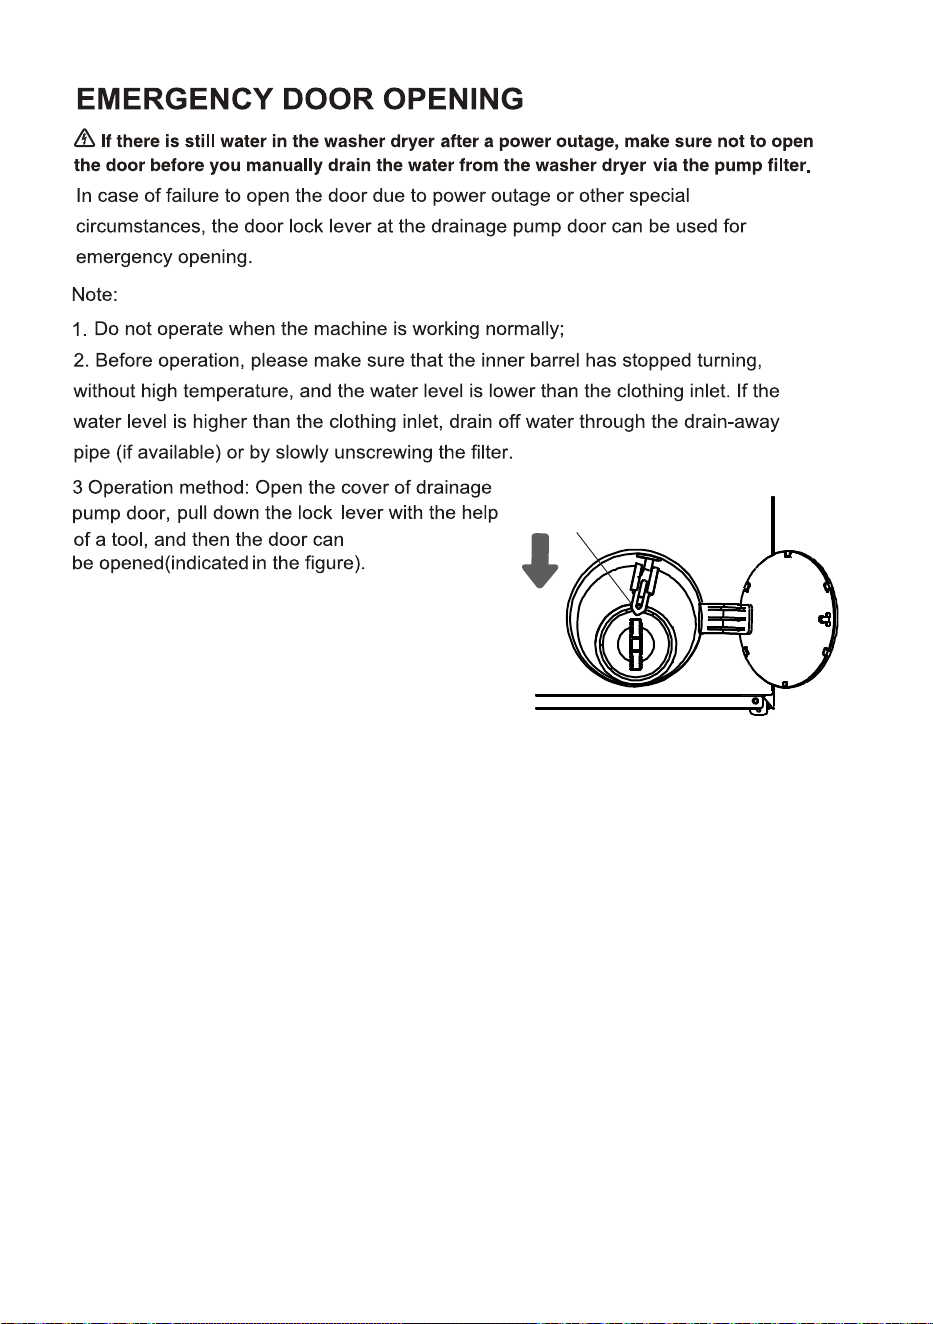
.
Door lock lever
43
Style ①
Style
②
44
45
a emergency drain
pipe, pull out emergency
drain pipe of machine.
Put end of emergency
drain pipe into a
container.
If the machine doesn't
have a emergency drain
pipe, place a container
under the pump filter.
The style depends on the
model.
Rotate emergency drain
pipe plug and remove it
after it becomes loose Until
water runs off naturally.
Reinstall emergency drain
pipe plug.
5
If the machine has
Style1: Press the door cover
and automatically pop open.
Style2: Open the pump filter
cap using a suitable tool.
The style depends on the
model.
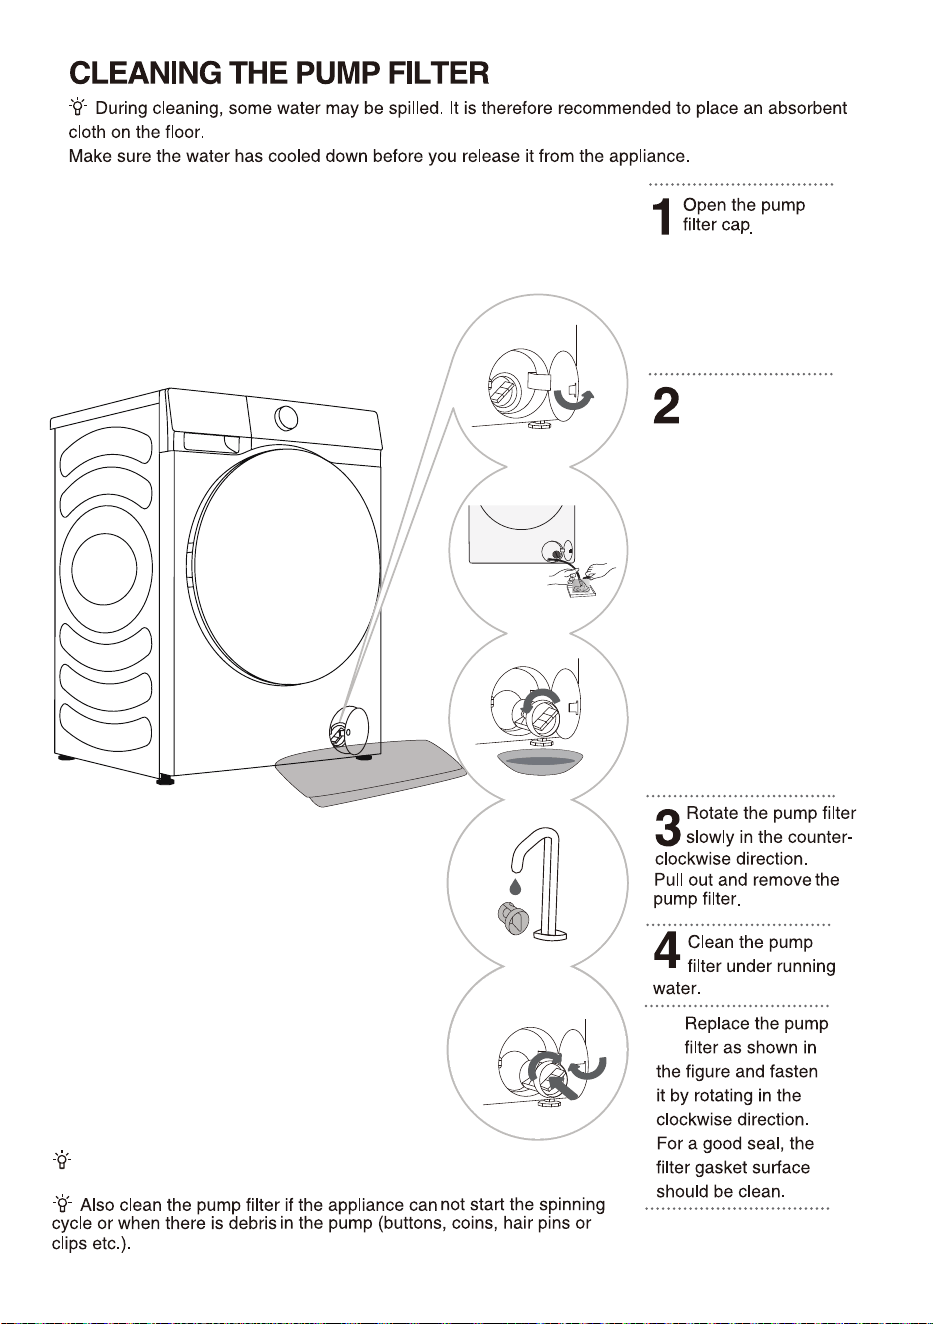
The pump filter must be timely cleaned, especially after
washing very fleecy, woolly, or very old laundry.
46
)
47
48
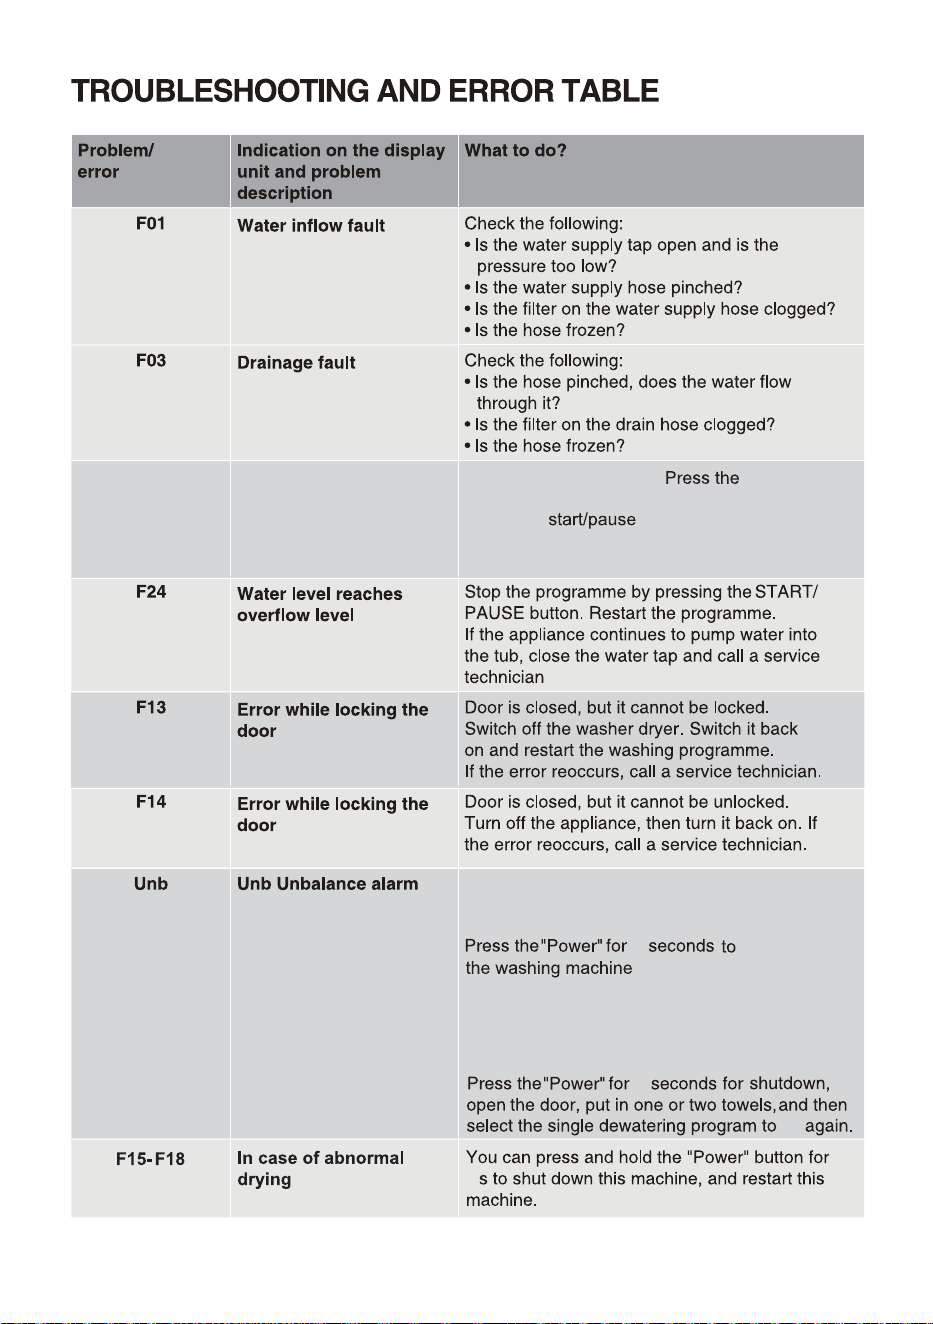
F04/F05/F06/
F07/F23
Electronic module fault
6OCBMBODFBMBSNTIBMMCFTPMWFECZUIFGPMMPXJOH
NFUIPET
-BVOESZXJOEJOH
2
TIVUEPXO
PQFOUIFEPPSTIBLFUIF
DMPUIFTBOEQVUUIFNCBDLJOUPUIFXBTIJOH
NBDIJOFUIFOTFMFDUUIFTJOHMFEFXBUFSJOH
QSPHSBNUPtSZBHBJO
5PPMJHIUXFJHIUFEMBVOESZ
2
1SFTTUIF"
"CVUUPOBHBJO*GUIF error
SFPDDVSTDBMMBTFSWJDFUFDIOJDJBO
4XJUDIPGGUIFBQQMJBODF
for 2 seconds.
"Power"
try
2
49
;;;;;;;;;;
;;;;;;;;
;;;;;;
;!;;;;
\
50
51
52
53
54
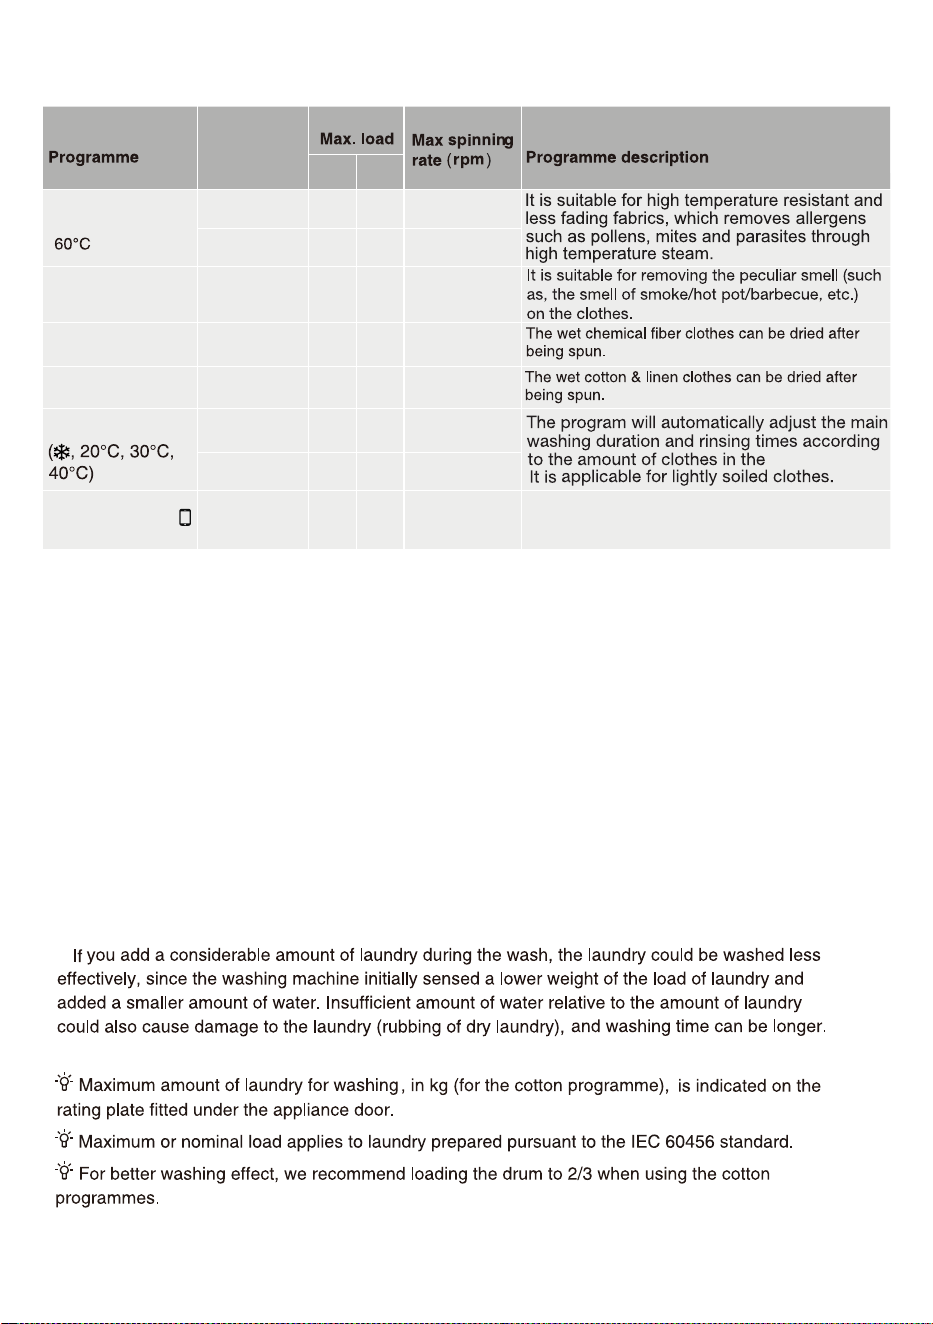
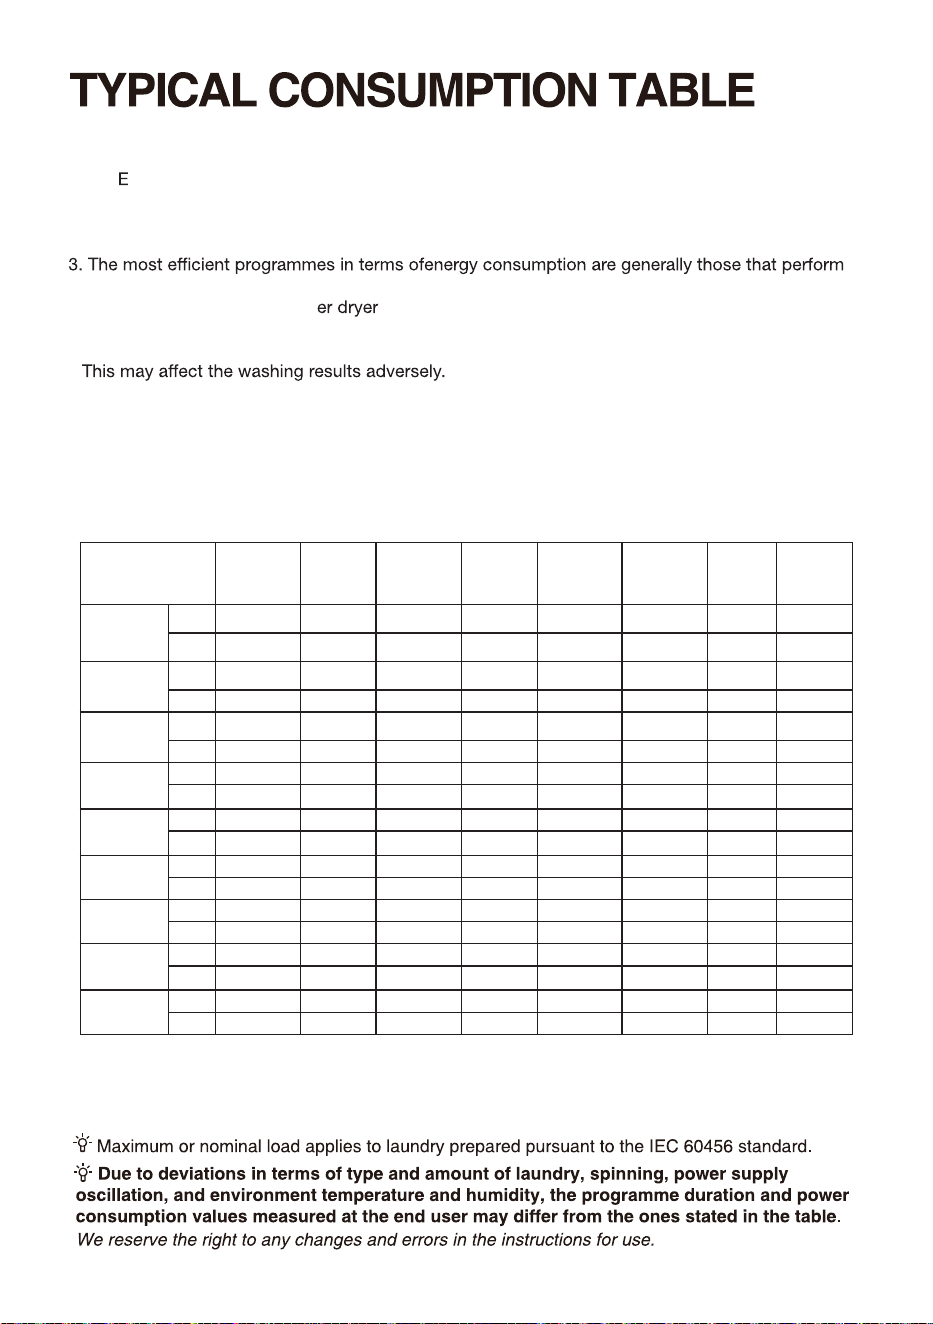
Programme Instructions
1.The co 40-60 programme is able to clean normally soiled cotton laundry declared to be
washable about 40°C to 60°C together in the same cycle, and that this programme is used to
assess the compliance with the EU ecodesign legislation.
2. The power consumption of the o-mode is 0.49W.
at lower temperatures and longer duration.
4. Loading the household wash up to the capacity indicated by the manufacturer for the
respective programmes will contribute to energy and water savings.
Selected Rated Maximum Program Energy Water Remaining Maximum
Temperature Capacity temperature duration consumption consumption moisture speed
Program
(°C) (kg) in drum (°C) (h:min) (kWh/cycle) (litres/cycle) content (%) reached (rpm)
Eco40-60
8 kg - 8,0 28 3:38 0,470 47,0 53,90 1400
full load
9 kg - 9,0 32 3:48 0,800 49,0 53,90 1400
Eco40-60
8 kg - 4,0 27 2:48 0,355 35,0 53,90 1400
half load
9 kg - 4,5 27 2:54 0,480 38,0 53,90 1400
Eco40-60
8 kg - 2,0 25 2:03 0,160 26,0 53,90 1400
1/4 load
9 kg - 2,5 24 2:00 0,233 30,0 53,90 1400
Wash and
8 kg - 5,0 28 7:59 3,195 92,0 - 1400
Dry full load
9 kg - 6,0 28 7:59 3,876 102,0 - 1400
Wash and
8 kg - 2,5 22 5:29 1,850 63,0 - 1400
Dry half load
9 kg - 3,0 24 5:29 1,872 70,0 - 1400
8 kg 20 8,0 20 2:15 0,290 105,0 55,00 1400
Cotton
9 kg 20 9,0 20 2:09 0,280 118,0 55,00 1400
8 kg 60 8,0 58 3:38 1,600 105,0 55,00 1400
Cotton
9 kg 60 9,0 56 3:29 1,900 118,0 55,00 1400
8 kg 40 4,0 40 2:19 0,790 60,0 35,00 1400
Synthetics
9 kg 40 4,5 40 2:35 0,910 85,0 35,00 1400
8 kg 20 1,0 20 0:15 0,038 18,0 75,00 800
Quick 15'
9 kg 20 1,0 20 0:15 0,037 20,0 75,00 800
The values given for programmes other than the Eco 40-60 programme and the wash and dry cycle
are indicative only.
The entry mode of wash and dry cycle is to select the Eco 40-60 programme, and press the dry
level button once.
5.Correct use of detergent, softeners and other additives. Do not apply excessive detergent.
6. Periodic cleaning,including optimal frequency, and limescale prevention and procedure.
7.
Noise and remaining moisture content are influenced by the spinning speed: the higher the
spinning speed in the spinning phase the higher the noise and the lower the remaining moisture
content.
8. The product information and QR code are reflected in the energy consumption labelthe product
registration information can be obtained by scanning the QR code.
9. The information of standard programmes.
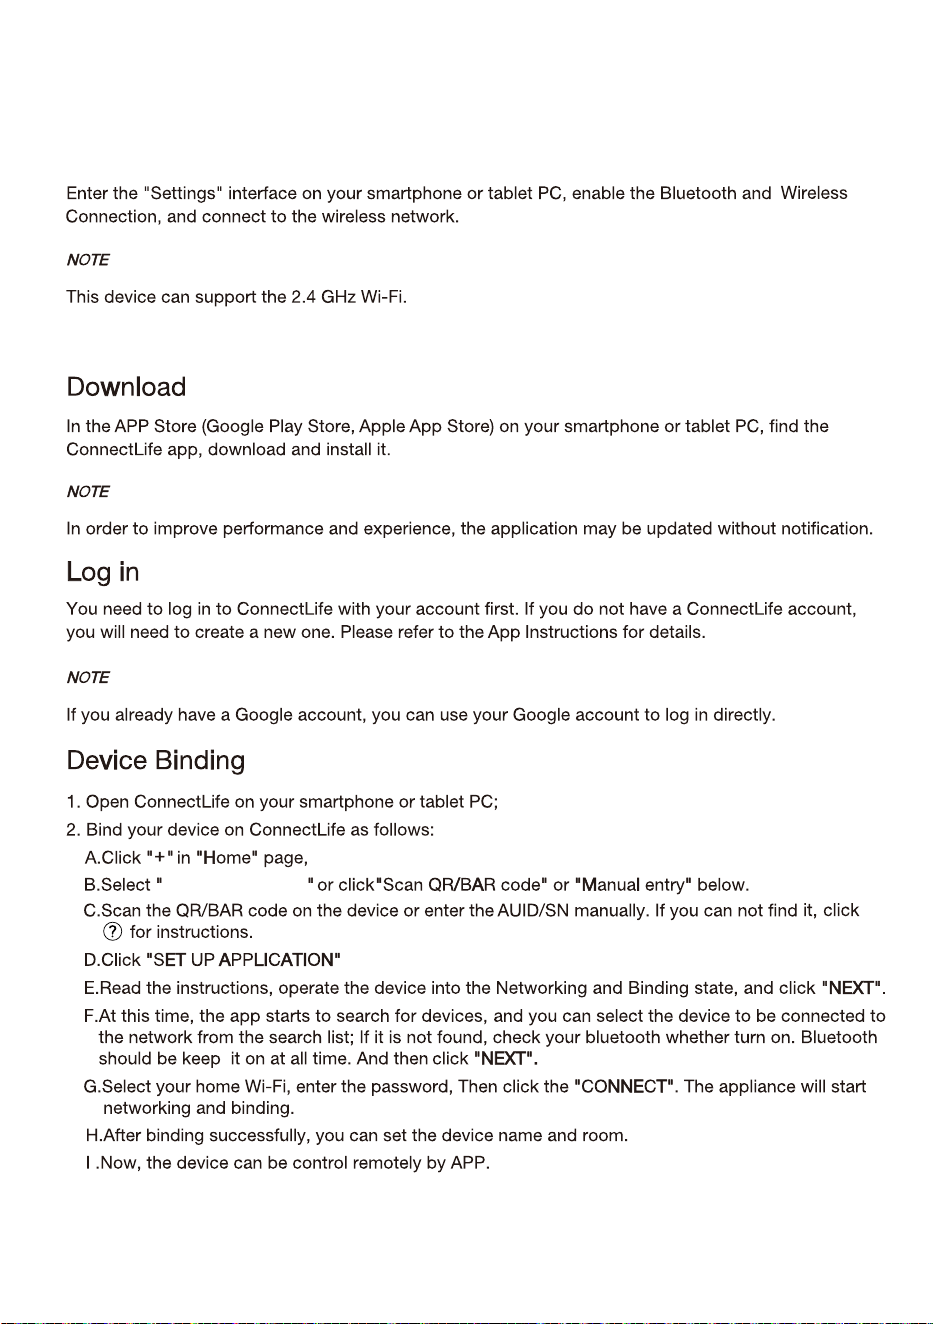
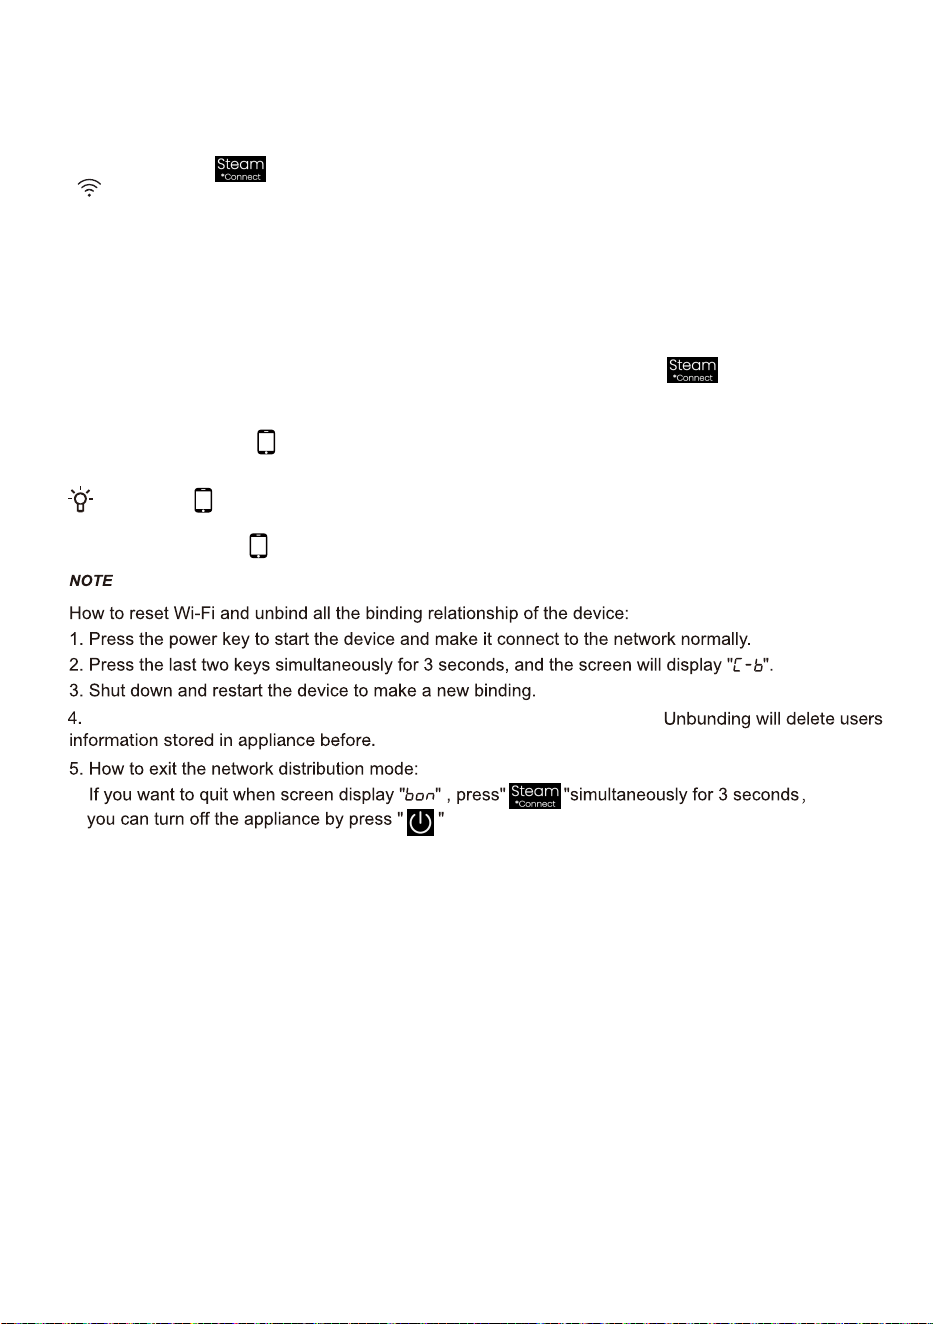
Wi-Fi CONNECTION
8IFOUIF8J'JGVODUJPOJTUVSOFEPOUIFNBDIJOFhTFOFSHZDPOTVNQUJPOXJMMJODSFBTF#VUUIF8J'J
QPXFSJTKVTUMFTTUIBO8TPJUIBTOPFGGFDUPOUIFNBDIJOFhTFOFSHZFGGJDJFODZSBUJOH
:DVKLQJ0DFKLQH
FKRRVH$GGGHYLFHRU6FDQ
55
When the "
" display light on the display window is not on, you cannot remotely control
UIFNBDIJOFUISPVHIUIFNPCJMFQIPOF5PFOBCMFUIJTGVODUJPOSPUBUFUIFLOPCUP3FNPUF
$POUSPMVOUJMUIFEJTQMBZMJHIUPOUIFEJTQMBZBHBJO
)PXUPBDUJWFUIF8J'JGVODUJPO
/RQJSUHVVWKH EXWWRQWRFRQQHFWWKH:L)LRIWKHDSSOLDQFHXQWLOWKHFRQWUROSDQHOV\PERO
IODVKHV
/RQJSUHVV7HPSDQG\RXFDQVHH%RQRQWKHGLVSOD\
$IWHUWKHDERYHVWHSV\RXUDSSOLDQFHLVUHDG\WRFRQQHFWWRWKH,QWHUQHWDQGWKHQ\RXFDQIROORZWKH
JXLGHRQ\RXU$33
2WKHUZLVH\RXFDQWXUQRIIWKHDSSOLDQFHDQGVWDUWIURPWKH¿UVWVWHS
)PXUPBDUJWFUIF3FNPUF$POUSPM
7XUQWKHSURJUDPPHVHOHFWRUNRQEWR5HPRWH&RQWUROWRSRZHURQWKH5HPRWH&RQWUROPRGXOH
5HPRWH&RQWUROLFRQLVRQWKHUHPRWHFRQWUROLVVHWVXFFHVVIXOO\DQGWKHGRRULVORFNHG5HPRWH
&RQWUROLFRQLVRIIWKHUHPRWHFRQWUROLVFORVHG
WRWXUQRQWKH:L)L9HULI\WKDWWKH:L)LVZLWFKLVRQ,IWKH:L)LVZLWFKLVQRWRQORQJSUHVV
QHWZRUN
$IWHUXQELQGLQJWKHGHYLFHPXVWEHUHVWDUWHGRUWKHQH[WELQGLQJZLOOIDLO
56

2423362-X08063294D