
MON
KEY
Manual
MONKEY is an ultra-portable and versatile 2-octave Bluetooth MIDI keyboard.
For further support, please email us or
join our discord server
.
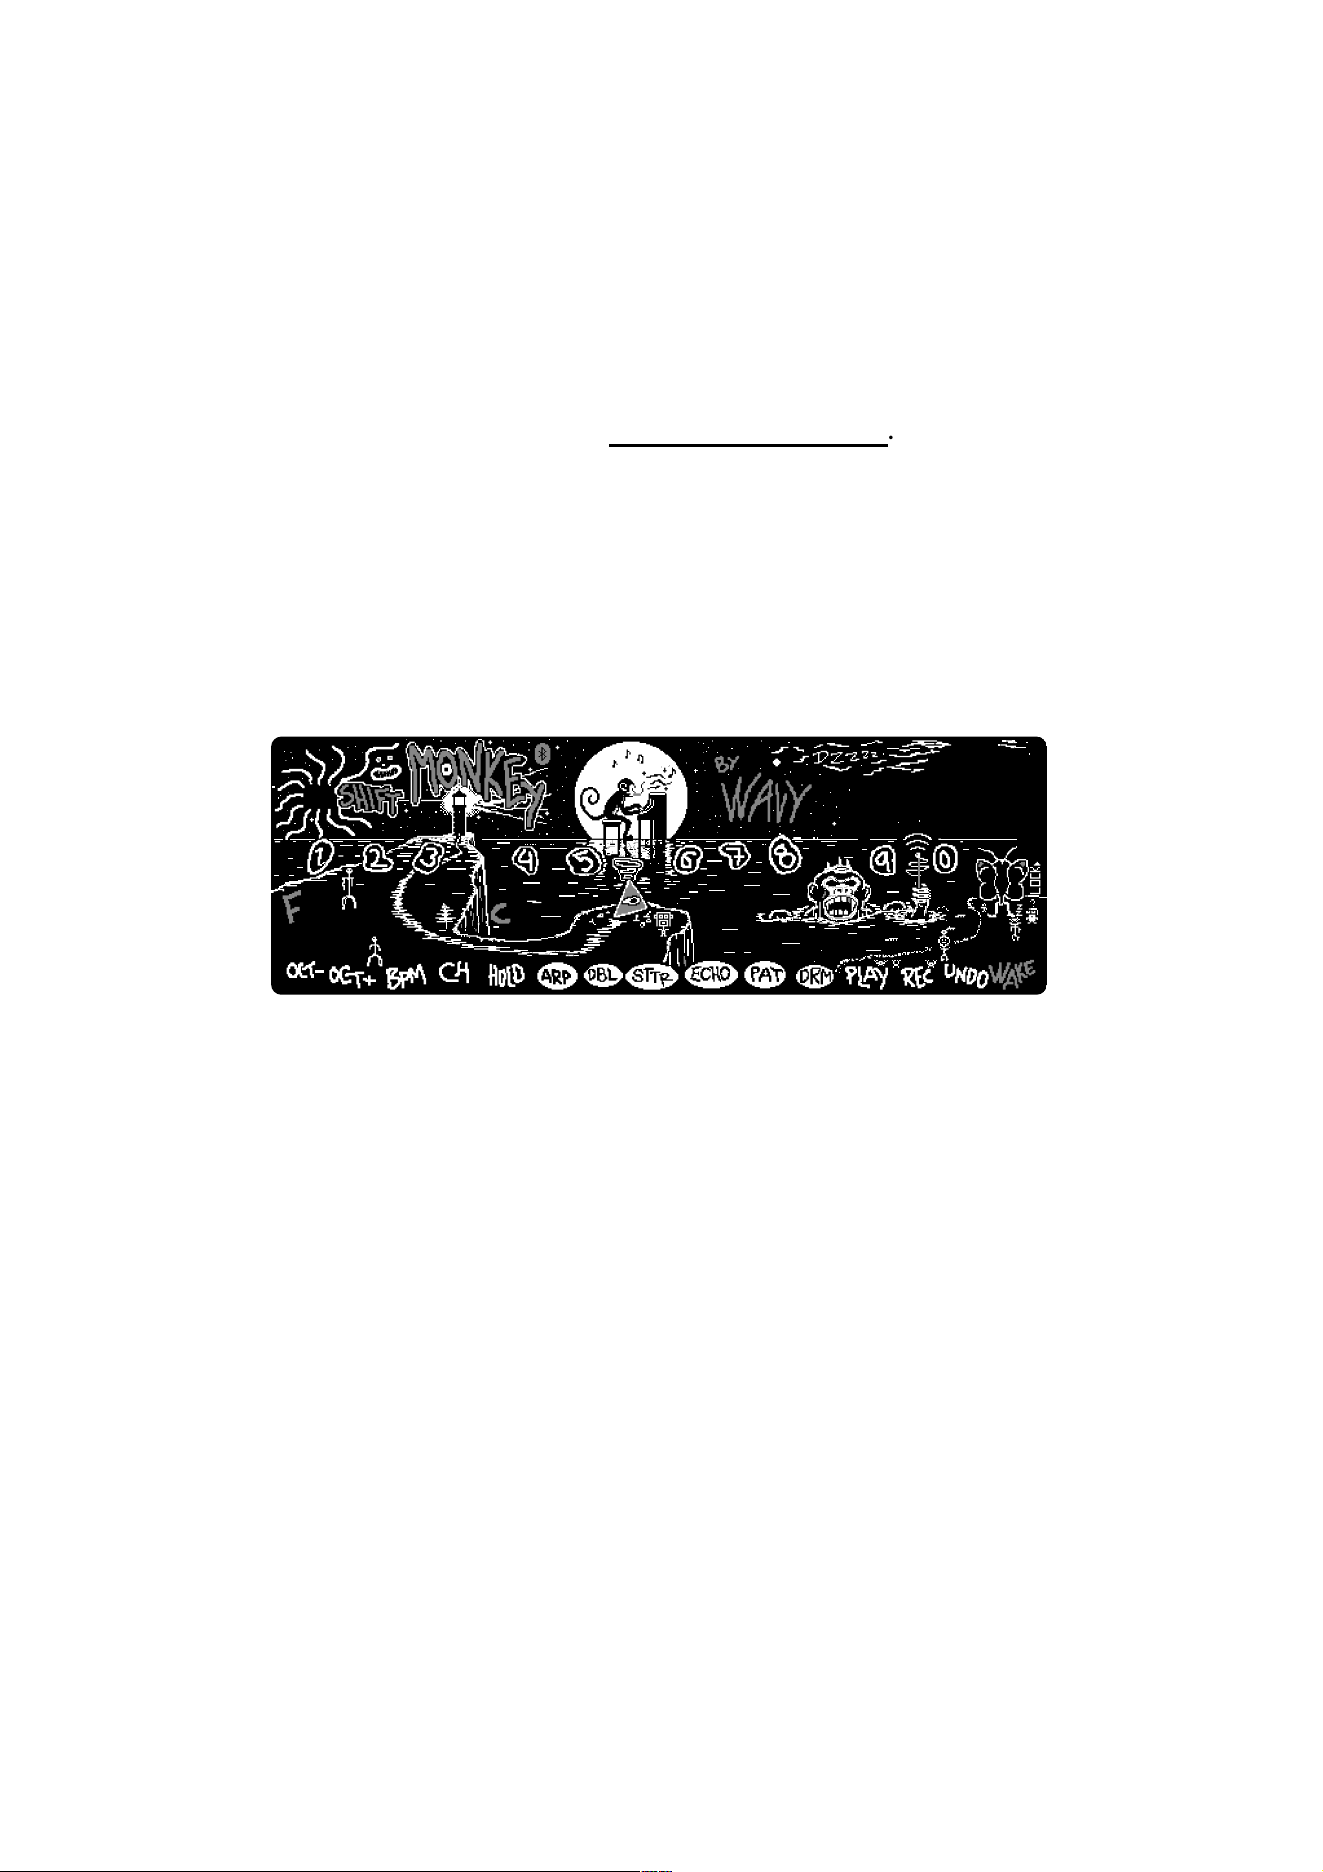
Hardware overview
MONKEY features a 2-octave keybed starting on the F-key. Play it as a typical MIDI
keyboard, or access its extended capabilities through the SHIFT key.
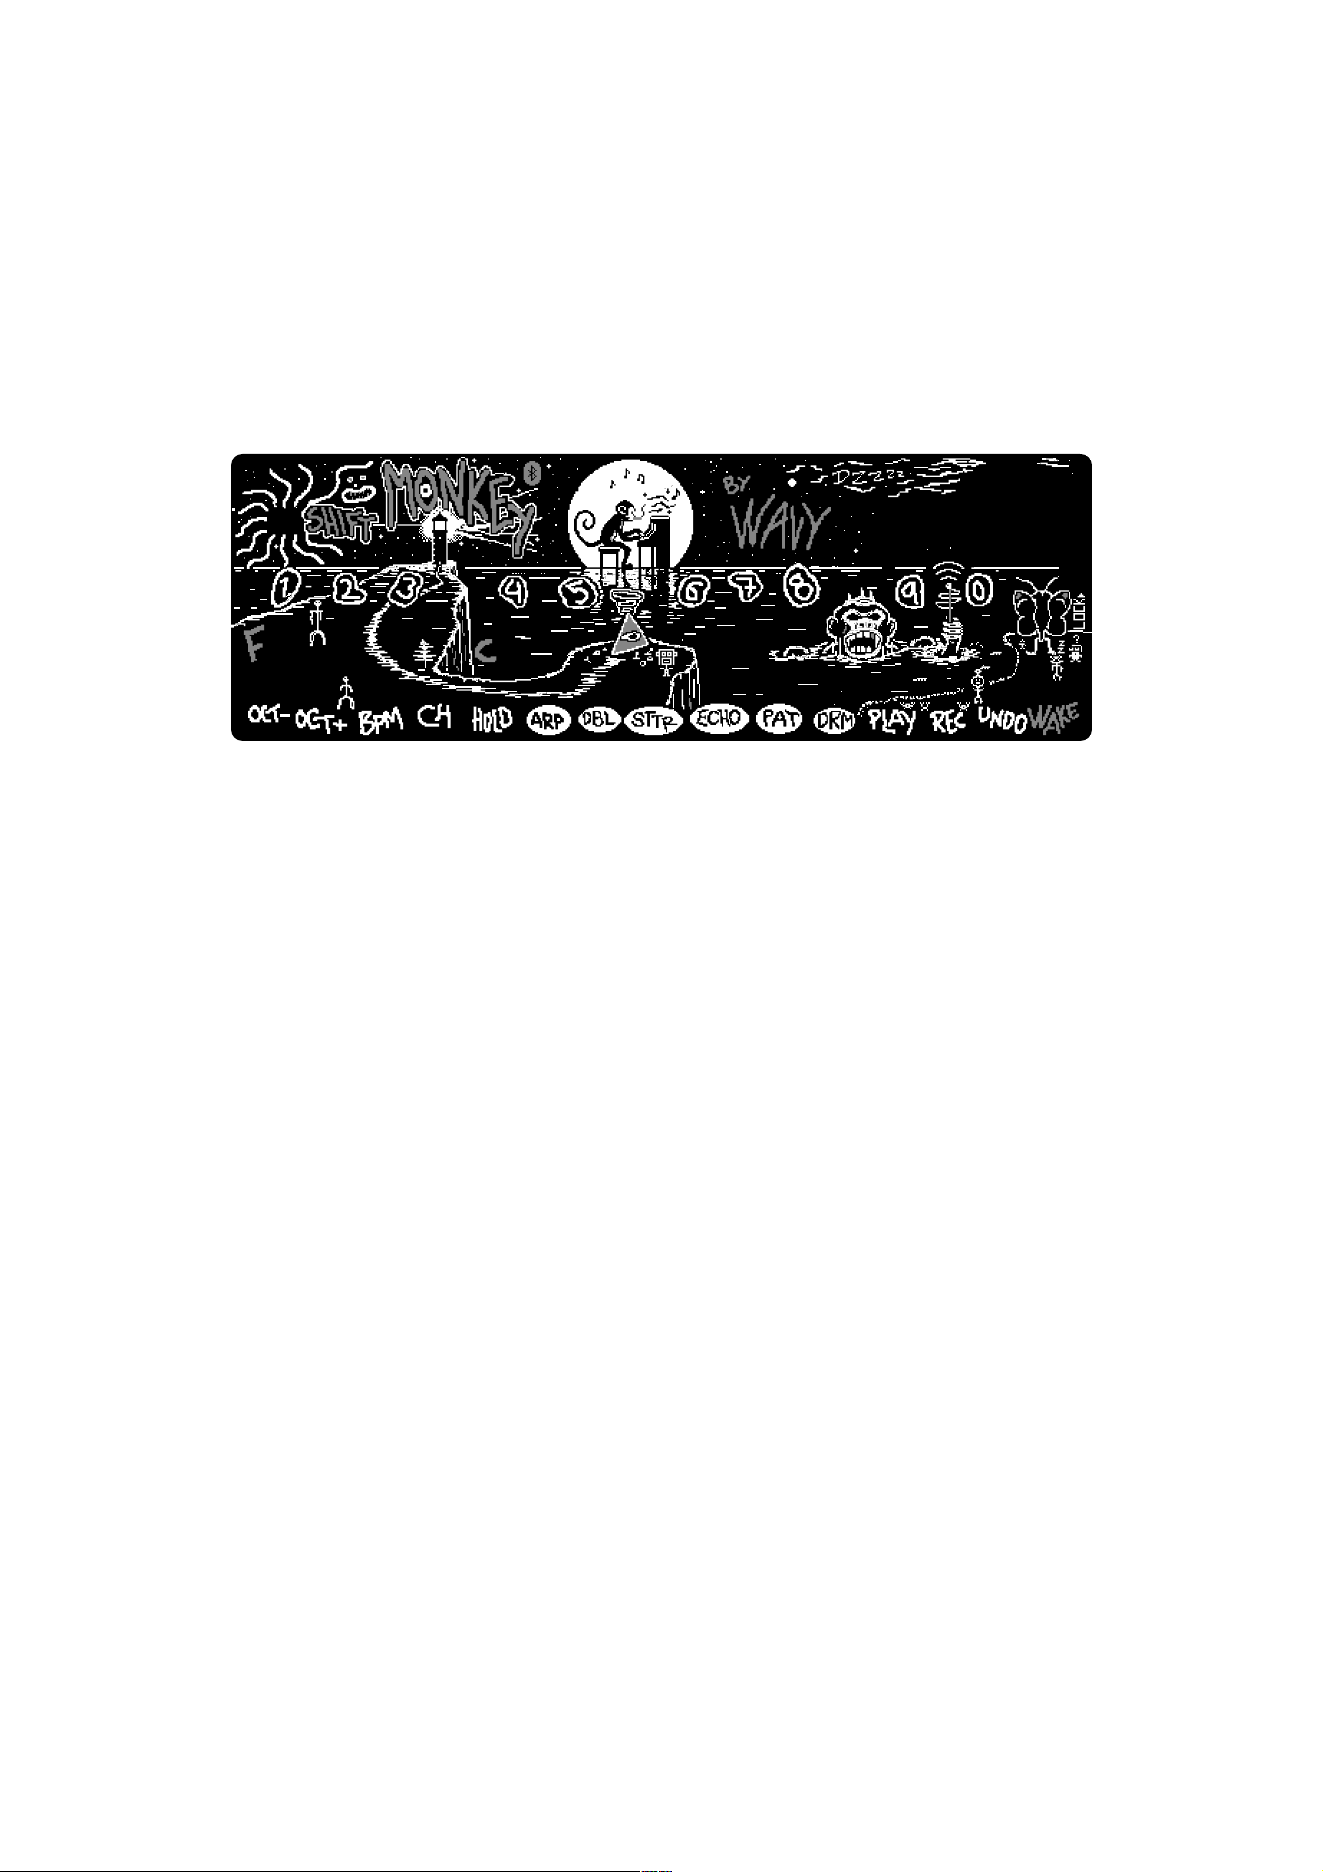
Functions
The functions are organized into groups. The functions highlighted with a white circle
are the MIDI effects, going from ARP to DRM. The functions to the left of these effects
are general settings, and to the right, we have the loop recorder + WAKE.
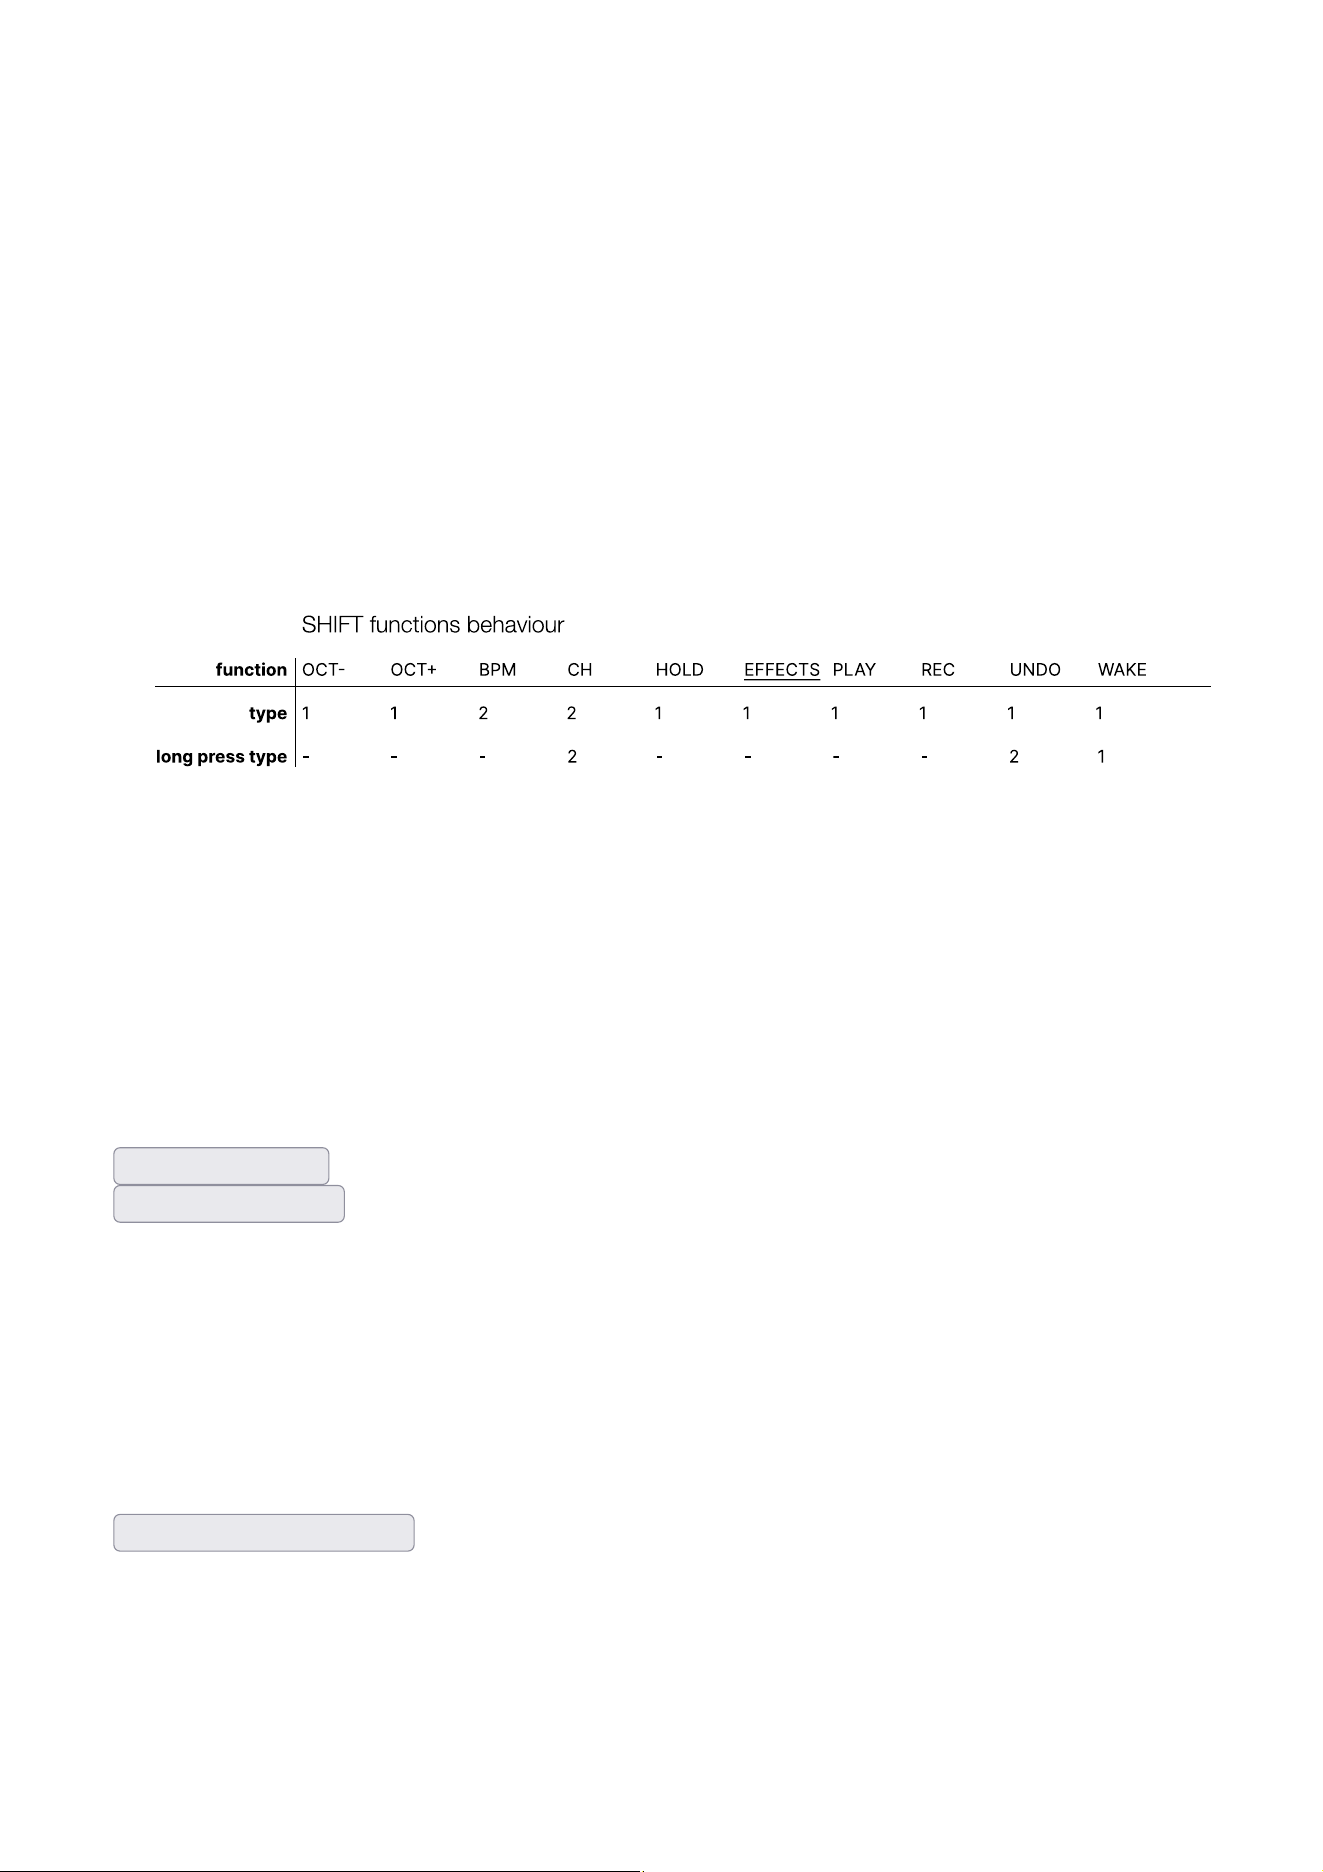
Each of the functions has a simple interface. There are two types of functions:
1.
Function is directly applied by pressing the key
2.
Function is applied after pressing the key followed by a sequence of numbers
using the numbered keys
Furthermore each function might also have a long press function. When prompted to
type in numbers for a long press function, the light tower will blink but with a different
blink pattern than with a normal press blink pattern. This way you can distinguish
whether you are about to do a normal press action or a long press action. The long
press action is activated if you keep a function key pressed for more than 1 second.
Below you can see a table of how each of the functions behave, according to the two
function types listed above.
The light tower will directly indicate what you should do or what happened. For the
function which toggle (HOLD and the effects) the light tower will blink once when
activating and blink twice when deactivating.
WAKE
The first function you should get familiar with is the WAKE key. Pressing
SHIFT
+
WAKE
will reset the device, and
SHIFT
+
long pressing WAKE
reboots the device. If
you ever get lost, use WAKE to quickly reset the device state back to it’s default state.
Show - reset demo
Show - reboot demo
OCT- and OCT+
OCT- and OCT+ are the most straightforward functions as they only change the octave
range of the keybed. OCT- decrements the current octave while OCT+ increments the
current octave. The light tower will blink once when you change the octave. When you
hit the octave limits it will blink 4 times indicating it is unable to increment or
decrement any further.
Show - octave select demo
BPM
BPM stands for
beats per minute
and lets you change the global tempo of MONKEY.
WHile pressing SHIFT, press BPM followed by typing your desired BPM using the
numbered keys.

By default the BPM on MONKEY is 120.
Show - BPM select demo
CH
To use MONKEY with multiple instruments at the same time, you can configure each
instrument to receive notes on different channels. Then you can use the CH function
on MONKEY to change between these instruments.
While pressing SHIFT, press CH followed by your desired channel. Selecting 0
corresponds to MIDI channel 10.
CAUTION
: Make sure to distinguish between a short press and long press on CH key.
Long pressing CH allows you to mute/unmute specific MIDI channels. Use the
numbered keys to select the channels which you would like to mute/unmute. This is
useful paired together with the loop recorder, muting parts of your loop.
Show - channel select demo
HOLD
Toggle note hold using the HOLD function. Notice the light tower LED blinking once if
the function was enabled and twice if it was disabled.
Show - hold demo
MIDI effects
MONKEY has in total 6 MIDI effects each with 10 presets. Similarly to HOLD, the effects
are toggled on and off. Only one effect might be enabled at once.
•
If you enable a new effect and a previous effect was enabled, this new effect will
be enabled and the previous disabled.
•
If you press on the effect which is already enabled, it will disable and no effects
will be enabled.
Once an effect is enabled, you can change its preset. This is simply done by directly
pressing the numbered keys while in SHIFT mode.
Show - effect select demo
Show - effect preset select demo
ARP
Arpeggio effect. Presets change the arpeggio algorithm.
DBL
Double effect. For each key you press, this effect will add extra notes. The presets
change which notes are added and with what delay.

STTR
Stutter effect. Plays the notes which are pressed in a rhythmic pattern. The presets
change the pattern.
ECHO
The echo effect will repeat the notes you play in a feedback loop. The behavior of
each preset is varied and unconventional by design. Some presets have an infinite
feedback loop where the note is not removed from the loop until the velocity of the key
reaches 0.
PAT
Pattern effect. Pre-made note patterns. Preset changes the swing.
DRM
Drum effect. The bottom keys are drum loops and the upper keys are drum modifiers.
Manage and edit your drum loops through our device utility page.
Loop recorder
The loop recorder is your playground to combine recordings from multiple instruments
into an idea. Currently, the loop recorder is fixed with a length of 16 beats. The loop
recorder uses the following keys:
•
PLAY: Toggle on and off loop playback. The monkey LEDs will blink in tempo
during playback.
•
REC: Toggle on and off loop recording. The behavior of this key depends on if the
loop is currently playing or not. If it is not playing, it will toggle on and off “arm to
record.” The monkey LEDs will then be solid. As soon as you start playing on the
keys, the looper will start playing and recording. If the looper is already playing,
then recording will be toggled on and off. Notice how the monkey LEDs blink
differently between only playback and playback with recording. When recording,
the LEDs will remain lit longer.
•
UNDO: Every time you stop recording, a new record checkpoint is generated.
Pressing UNDO will erase the last checkpoint. Long pressing UNDO will allow you
to select an entire MIDI channel to erase. After SHIFT + long press UNDO, while
keeping SHIFT pressed, select the MIDI channel to erase by pressing a
corresponding numbered key. As always, the number 0 is MIDI channel 10 and is
reserved for the drums.
Recommendations
It’s a good idea to record something rhythmical initially so that you keep track of the
tempo and know when the loop recorder loops back on itself. If you don’t want to have
rhythmical elements in your loop, you might first record something rhythmical such as
drums. Then, when you have recorded something on top of the drums, erase the
drums from the loop (UNDO long press).

It is also possible to create a simple arrangement using the
channel mute
functionality
(CH long press). Record various elements on different MIDI channels. Then you can
arrange your idea by changing which channels are muted and not.
When recording something periodic such as drums, you do not need to time releasing
the key just as the looper loops back on itself. When exactly the same notes are
repeated on top of each other, the looper will notice and not record the notes on top of
each other.
FCC Warning Statement
Changes or modifications not expressly approved by the party responsible for compliance could void
the user’s authority to operate the equipment. This equipment has been tested and found to comply
with the limits for a Class B digital device, pursuant to Part 15 of the FCC Rules. These limits are
designed to provide reasonable protection against harmful interference in a residential installation.
This equipment generates uses and can radiate radio frequency energy and, if not installed and used
in accordance with the instructions, may cause harmful interference to radio communications.
However, there is no guarantee that interference will not occur in a particular installation. If this
equipment does cause harmful interference to radio or television reception, which can be determined
by turning the equipment off and on, the user is encouraged to try to correct the interference by one
or more of the following measures:
‐‐ Reorient or relocate the receiving antenna.
‐‐ Increase the separation between the equipment and receiver.
‐‐ Connect the equipment into an outlet on a circuit different from that to which the receiver is
connected.
‐‐ Consult the dealer or an experienced radio/TV technician for help.
FCC Radiation Exposure Statement
The device has been evaluated to meet general RF exposure requirement. The device can be used
in portable exposure condition without restriction.
This device complies with Part 15 of the FCC Rules. Operation is subject to the following two
conditions:
(1)This device may not cause harmful interference, and
(2)This device must accept any interference received, including interference that may cause
undesired operation.