Scan to register
bellakitchenware.com
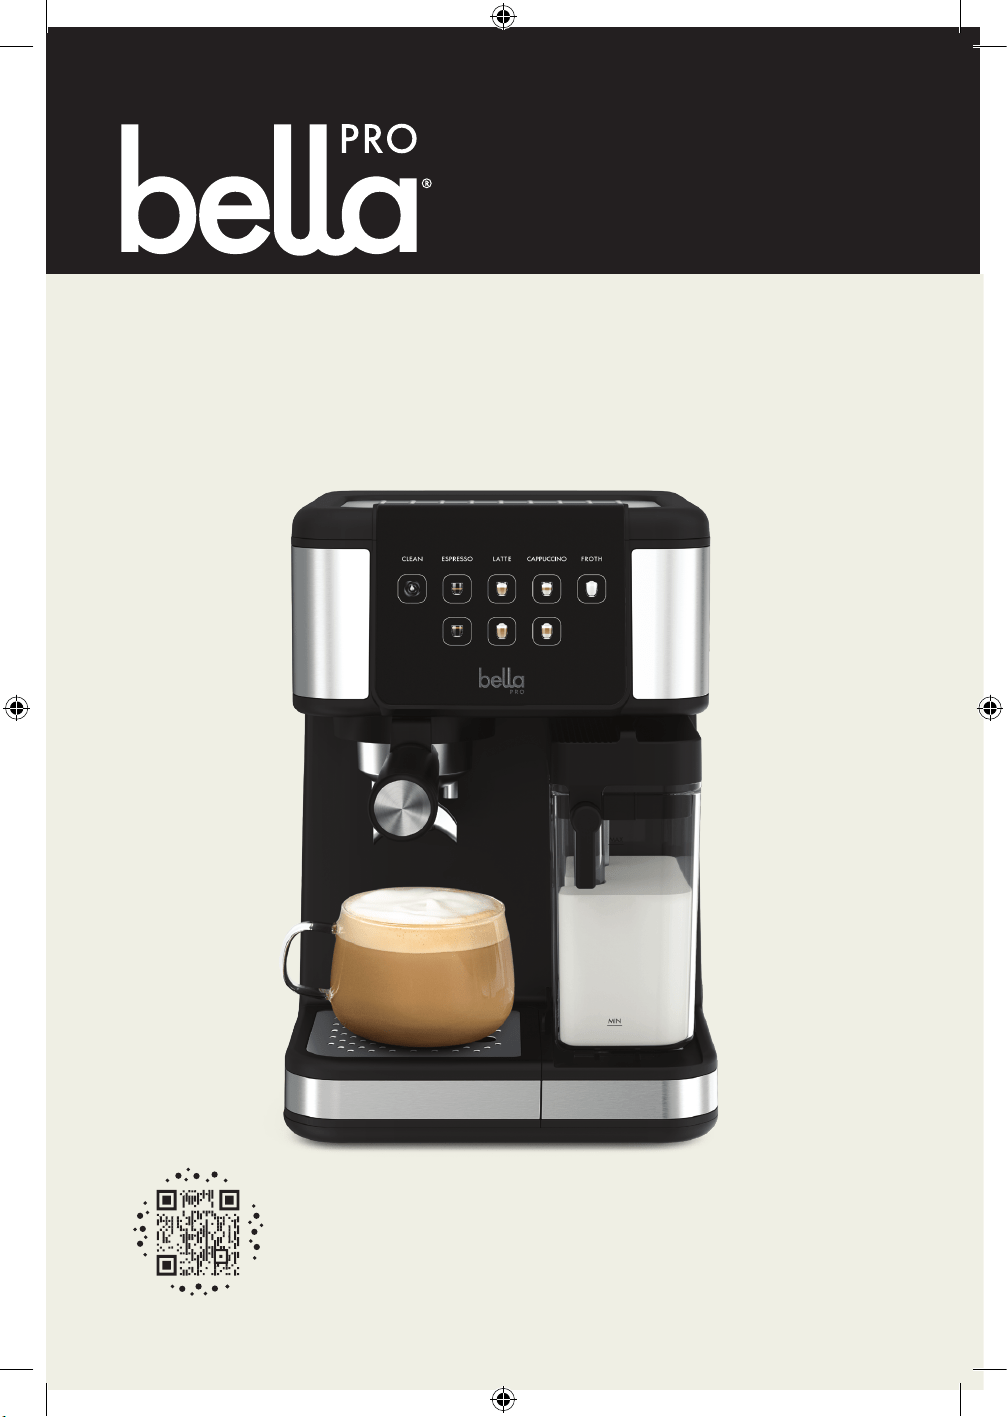
Barista Elite Espresso Drink Station+
Instruction Manual
90277_90278_BellaPro_BaristaEliteEspressoDrinkStation_IM_V1_R0.indd 190277_90278_BellaPro_BaristaEliteEspressoDrinkStation_IM_V1_R0.indd 1 2025-07-11 12:40 PM2025-07-11 12:40 PM

2
TABLE OF CONTENTS
IMPORTANT SAFEGUARDS ....................................................................................................................................................3
ADDITIONAL IMPORTANT SAFEGUARDS ........................................................................................................................4
NOTES ON THE PLUG ..............................................................................................................................................................5
NOTES ON THE CORD.............................................................................................................................................................5
ELECTRIC POWER ......................................................................................................................................................................5
GETTING TO KNOW YOUR DRINK STATION + ........................................................................................................... 6
TOUCH-ACTIVATED DISPLAY CONTROL PANEL ........................................................................................................... 7
BEFORE FIRST USE .....................................................................................................................................................................8
BREWING COFFEE DRINKS ...................................................................................................................................................8
CLEANING & MAINTENANCE ............................................................................................................................................ 9
STORING INSTRUCTIONS ...................................................................................................................................................10
TROUBLESHOOTING .............................................................................................................................................................10
LIMITED TWO-YEAR WARRANTY .......................................................................................................................................11
90277_90278_BellaPro_BaristaEliteEspressoDrinkStation_IM_V1_R0.indd 290277_90278_BellaPro_BaristaEliteEspressoDrinkStation_IM_V1_R0.indd 2 2025-07-11 12:40 PM2025-07-11 12:40 PM

3
IMPORTANT SAFEGUARDS
When using electrical appliances, basic safety precautions shouldalways
be followed, including the following:
1. READ ALL INSTRUCTIONS.
2. Do not touch hot surface. Use handles or knobs.
3. When in use, the appliance is under pressure and should never be left unattended.
4. To protect against fire, electric shock and injury to persons, do not place cord,
plugs, or appliance in water or other liquid.
5. This appliance is not intended for use by persons (including children) with
reduced physical, sensory or mental capabilities, or lack of experience and
knowledge, unless they have been given supervision or instruction concerning
use of the appliances by a person responsible for their safety.
6. Close supervision is necessary when any appliance is used by or near children.
7. Unplug from outlet when not in use and before cleaning.
8. Allow Espresso Maker to cool before putting on or taking off parts, and before
cleaning the appliance.
9. Do not operate any appliance with a damaged cord or plug or after the
appliance malfunctions or has been damaged in any manner. Contact
Consumer Service for examination, repair or adjustment.
10. The use of any accessory not evaluated for use with this appliance and not
recommended by the appliance manufacturer may cause fire, electric shock or
injuries to persons.
NOTE: Do not attempt to repair the unit yourself. This will void the warranty.
11. Do not use outdoors.
12. Do not let cord hang over edge of table or counter, or touch hot surfaces.
13. Do not place on or near a hot gas or electric burner, or in a heated oven.
14. If this appliance begins to malfunction during use, press the POWER Button.
Then immediately unplug the cord. Do not use or attempt to repair the
malfunctioning appliance.
15. Never use the appliance without water.
16. Do not use this appliance for other than its intended use.
17. Be certain lids are securely in place before operating appliance.
18. Scalding may occur if the lids are removed during the brewing cycle.
19. To disconnect, press the POWER button to turn the unit off. Then remove plug
from wall outlet.
20. WARNING: To avoid the risk of injury, do not open the brew chamber during
the brew process.
21. It is recommended to use a heat-resistant trivet or cutting board underneath
this appliance to avoid possible heat damage to the countertop.
FOR HOUSEHOLD USE ONLY
90277_90278_BellaPro_BaristaEliteEspressoDrinkStation_IM_V1_R0.indd 390277_90278_BellaPro_BaristaEliteEspressoDrinkStation_IM_V1_R0.indd 3 2025-07-11 12:40 PM2025-07-11 12:40 PM

4
ADDITIONAL IMPORTANT
SAFEGUARDS
WARNING: This appliance generates heat and escaping steam during use.
Proper precautions must be taken to prevent the risk of burns, fires, or other
injury to persons or damage to property.
CAUTION: The Espresso Maker must be allowed to cool down sufficiently before
adding more water to avoid splattering.
1. All users of this appliance must read and understand this Instruction Manual
before operating or cleaning this appliance.
2. The cord to this appliance should be plugged into a 120V AC electrical outlet only.
3. Use water only in this appliance! Do not put any other liquids or food products in
this appliance. Do not mix or add anything to the water placed in this appliance,
except as instructed in the Descaling section of this Instruction Manual.
4. DO NOT attempt to move an appliance containing hot liquids. Allow
appliance to cool completely before moving.
5. Keep appliance at least 4 inches away from walls or other objects during operation.
6. Place the appliance on a surface that is resistant to heat.
7. Prior to connecting or disconnecting plug from wall outlet, press the POWER
button. If this appliance falls or accidentally becomes immersed in water or any
other liquid, unplug it immediately. Do not reach into the water! Do not use this
appliance after it has fallen into or has become immersed in water. Contact
Consumer Service for examination and repair.
9. Always use fresh, cool water in your appliance. Warm water or other liquids,
except as described in the descaling section, may cause damage to the
Espresso Maker.
SAVE THESE INSTRUCTIONS
90277_90278_BellaPro_BaristaEliteEspressoDrinkStation_IM_V1_R0.indd 490277_90278_BellaPro_BaristaEliteEspressoDrinkStation_IM_V1_R0.indd 4 2025-07-11 12:40 PM2025-07-11 12:40 PM

5
NOTES ON THE PLUG
This appliance has a polarized plug (one blade is wider than the other). To reduce
the risk of electric shock, this plug will fit in a polarized outlet only one way. If the
plug does not fit fully into the outlet, reverse the plug. If it still does not fit, contact a
qualified electrician. Do not modify the plug in any way.
NOTES ON THE CORD
A. A short power-supply cord (or detached power-supply cord) is provided to reduce
the risk resulting from becoming entangled in or tripping over a long cord.
B. Longer detachable power-supply cords or extension cords are available and
may be used if care is exercised in their use.
C. If a long detachable power-supply cord or extension cord is used:
1. The marked electrical rating of the cord set or extension cord should be at
least as great as the electrical rating of the appliance.
2. If the appliance is of the grounded type, the cord set or extension cord
should be a grounding-type 3-wire cord.
3. The longer cord should be arranged so that it will not drape over the
countertop or tabletop where it can be pulled on by children or tripped
over unintentionally.
ELECTRIC POWER
If the electrical circuit is overloaded with other appliances, your appliance may
not operate properly. It should be operated on a separate electrical circuit from
other appliances.
90277_90278_BellaPro_BaristaEliteEspressoDrinkStation_IM_V1_R0.indd 590277_90278_BellaPro_BaristaEliteEspressoDrinkStation_IM_V1_R0.indd 5 2025-07-11 12:40 PM2025-07-11 12:40 PM
6
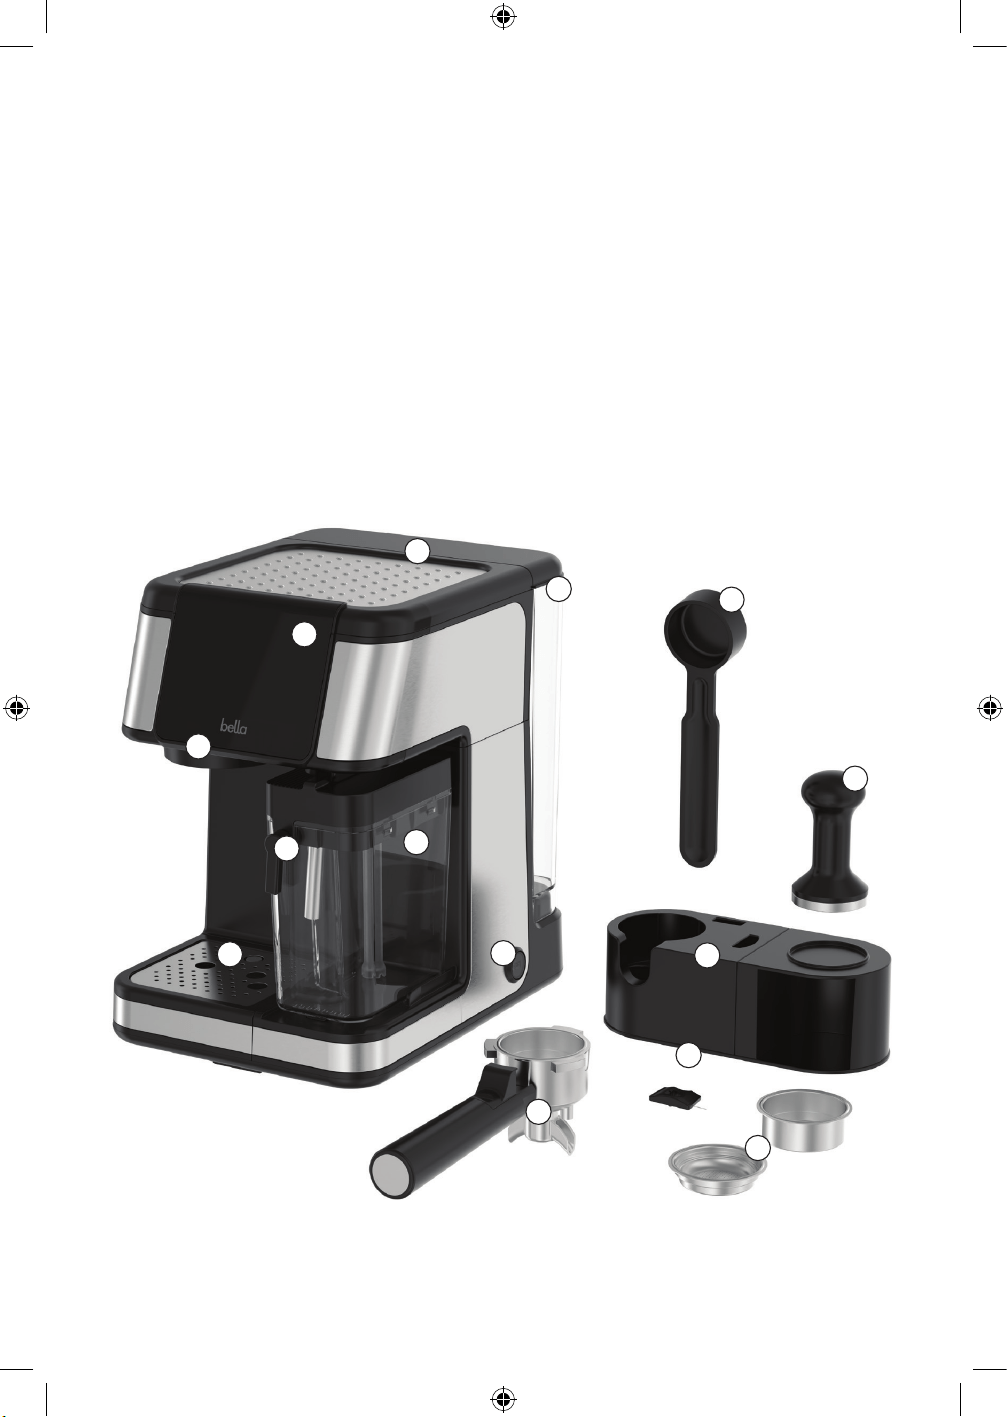
GETTING TO KNOW YOUR DRINK STATION +
Product may vary slightly from illustration.
1. Removable 54oz (1.6L) Water Tank
2. 20 oz (0.6L) Milk Frothing Container with Lid
3. Frothing Spout (Milk Dispensing Tube)
4. Dual spout portafilter with filter retainer clip
5. Brew Head
6. Control Panel (Drink & Cleaning Buttons)
7. Removable Drip Tray with Full Indicator
8. Power Button
9. Heated Top Plate
10. Stainless Steel Filter Baskets (Single/Double)
11. Measuring Scoop
12. Tamper
13. Cleaning pin
14. Accessory storage container (Assembly Required)
1
2
3
4
5
6
7
8
9
10
11
12
13
14
90277_90278_BellaPro_BaristaEliteEspressoDrinkStation_IM_V1_R0.indd 690277_90278_BellaPro_BaristaEliteEspressoDrinkStation_IM_V1_R0.indd 6 2025-07-11 12:40 PM2025-07-11 12:40 PM
7
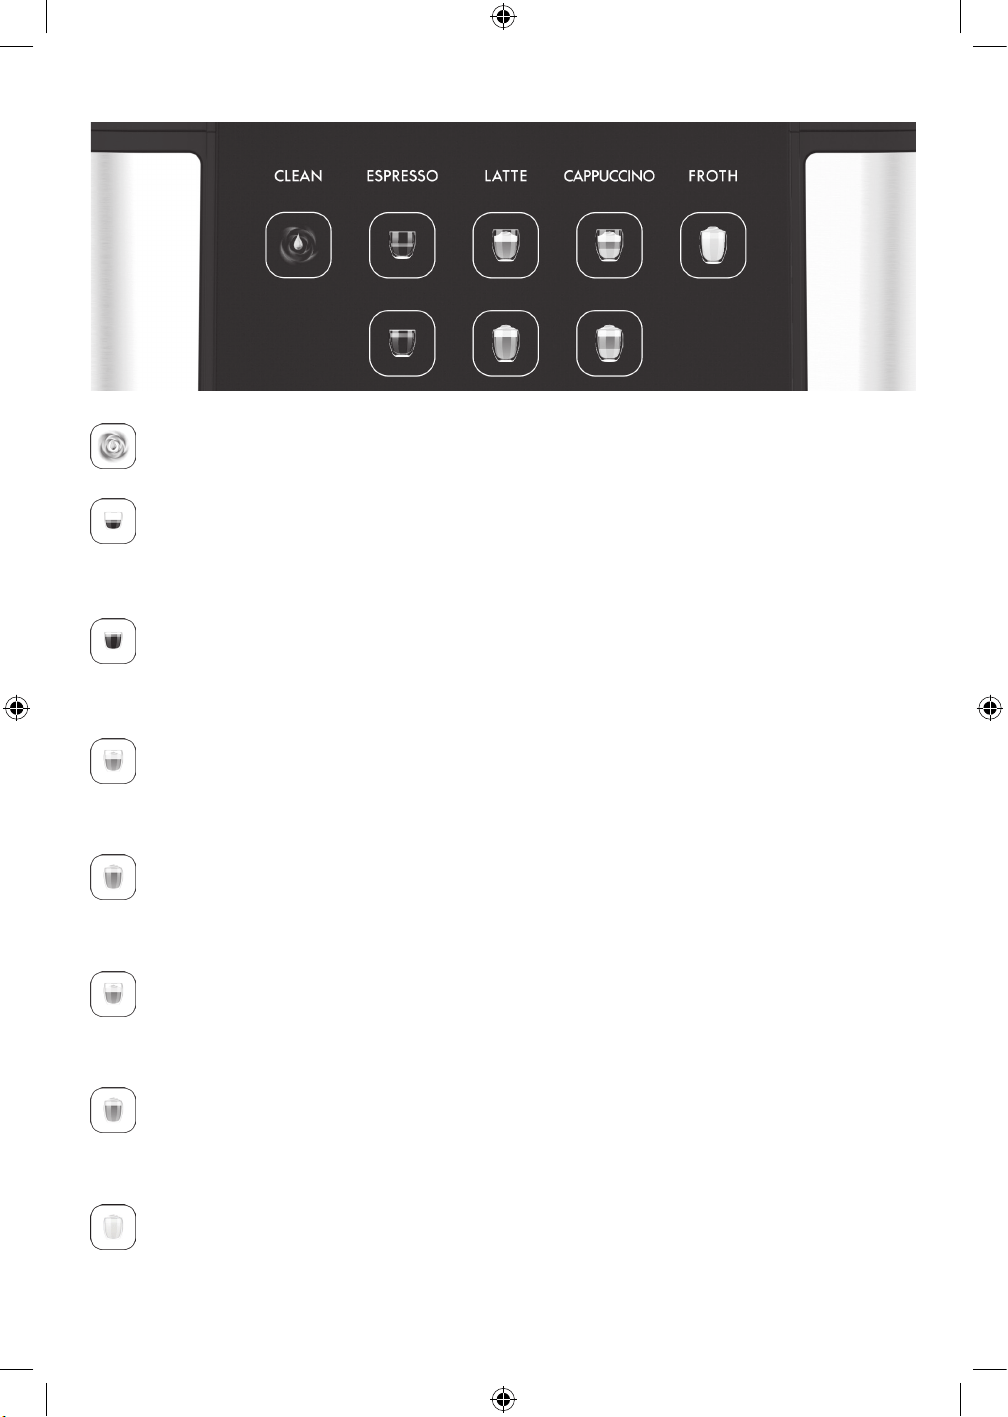
TOUCH-ACTIVATED DISPLAY CONTROL PANEL
CLEAN
• Press the CLEAN button to descale the machine and let it run the full cleaning cycle.
SINGLE ESPRESSO
• Press to brew a single espresso shot. Brewed volume will be between 0.8oz-1.3oz.
• The button will flash while brewing.
• Press and hold the SINGLE ESPRESSO button for 3 seconds to reprogram the shot volume size.
DOUBLE ESPRESSO
• Press to brew a double espresso shot. Brewed volume will be between 1.7oz-2.3oz.
• The button will flash while brewing.
• Press and hold the DOUBLE ESPRESSO button for 3 seconds to reprogram the shot volume size.
SINGLE LATTE
• Press to brew a single latte. Brewed espresso volume will be between 0.8oz-1.3oz and frothed milk volume will
be between 5.4oz-6.7oz.
• The button will flash while brewing.
DOUBLE LATTE
• Press to brew a double latte. Brewed espresso volume will be between 1.7oz-2.3oz and frothed milk volume will
be between 6.7oz-8.4oz.
• The button will flash while brewing.
SINGLE CAPPUCCINO
• Press to brew a single cappuccino. Brewed espresso volume will be between 0.8oz-1.3oz and frothed milk
volume will be between 2.7oz-4oz.
• The button will flash while brewing.
DOUBLE CAPPUCCINO
• Press to brew a double cappuccino. Brewed espresso volume will be between 1.7oz-2.3oz and frothed milk
volume will be between 3.7oz-5oz.
• The button will flash while brewing.
FROTH
• Press to froth milk only. Frothed milk volume will be between 6.7oz-8.4oz.
• Press the button again at any time to stop frothing.
90277_90278_BellaPro_BaristaEliteEspressoDrinkStation_IM_V1_R0.indd 790277_90278_BellaPro_BaristaEliteEspressoDrinkStation_IM_V1_R0.indd 7 2025-07-11 12:40 PM2025-07-11 12:40 PM
8
BEFORE FIRST USE
1. Remove all packaging and stickers.
2. Wash the portafilter, filter baskets, milk container, water tank, and drip tray with warm, soapy water.
Rinse and dry.
3. To assemble the accessory storage container align the two pieces so that the tabs and slots line up correctly.
Press the pieces together firmly until you hear a click, indicating they are securely snapped into place.
4. Fill the water tank with cold water up to the MAX line.
5. Plug in the machine.
6. Press the POWER button on the side of the unit to turn it on.
7. The unit will begin pre-heating and all buttons will flash except for the clean button.
8. Once ready to use, all drink buttons will be lit up solid.
9. Fill milk container if using. If the milk container is not fit into place only the espresso buttons will show.
BREWING COFFEE DRINKS
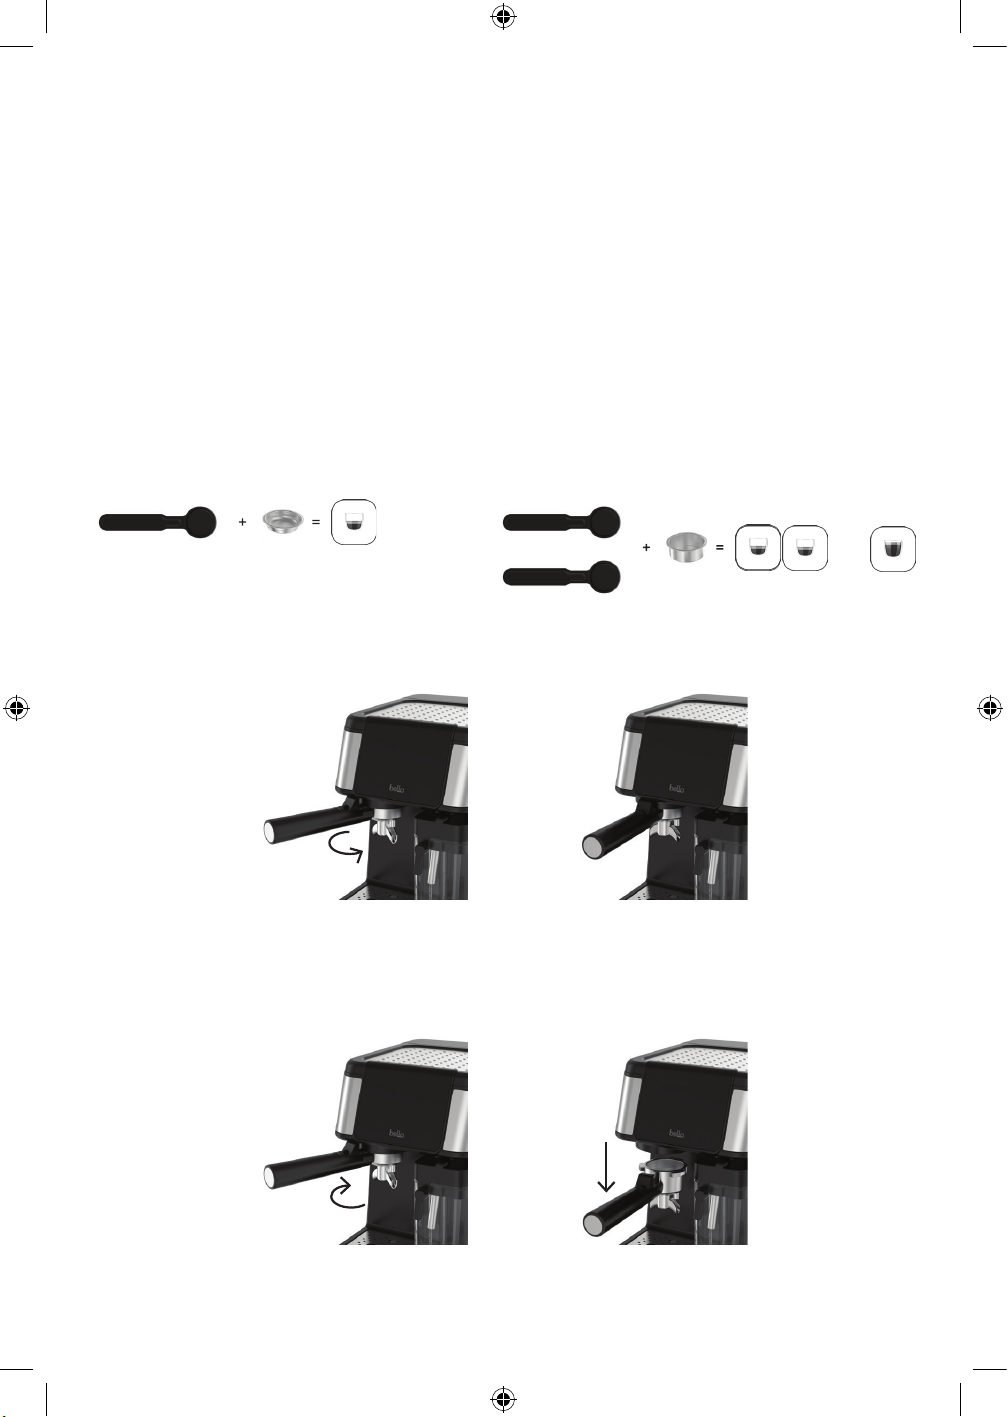
BREW ESPRESSO (SINGLE OR DOUBLE):
1. Insert a filter basket (single or double) into the portafilter.
2. Fill with ground espresso: about 1 tbsp (7g) for a single, 2 tbsp (14g) for a double. Use the 1-cup filter for a single
espresso (Figure 1), the 2-cup filter for a double espresso or 2 single espressos at the same time (Figure 2).
Figure 1
OR
Figure 2
3. Press down firmly with the tamper. Wipe off any loose coffee from the rim.
4. Turn the handle counterclockwise (to the right) until the portafilter handle is facing front and lined up
with the lock. Make sure the portafilter is sealed and locked securely into the brewing head (Figures 3 and 4) .
Figure 3 Figure 4
5. Place a cup or shot glasses under the spouts.
6. Press the SINGLE or DOUBLE ESPRESSO button.
7. The button will flash while brewing.
8. Remove the portafilter from the brew head. Turn the handle clockwise (to the left) to unlock (Figure 5).
The portafilter will drop down the brew head (Figure 6).
Figure 5 Figure 6
9. The unit will enter sleep mode if there is no operation within 30 minutes. When in sleep mode touch the screen to
activate the unit and continue using it.
10. If all double buttons flash during brewing it indicates that the water tank is empty and needs to be filled. Press
any button to return to standby mode once the tank is filled.
90277_90278_BellaPro_BaristaEliteEspressoDrinkStation_IM_V1_R0.indd 890277_90278_BellaPro_BaristaEliteEspressoDrinkStation_IM_V1_R0.indd 8 2025-07-11 12:40 PM2025-07-11 12:40 PM
9
DIAL IN SINGLE OR DOUBLE SHOT VOLUME:
1. The espresso maker consistently dials in the perfect brew water temperature and measure the perfect volume
for every shot.
2. To adjust volumes for further shots, press and hold the SINGLE or DOUBLE shot programmable button for 3
seconds to adjust and to dial in further single or double shot volumes.
EXAMPLE: To change the volume on single shot—press and hold the SINGLE shot for 3 second, water will begin
to flow. Once you have the desired amount, release the SINGLE shot button to stop water flow. The new volume is
now set and can be re-programmed at any time.
NOTE: The SINGLE shot button cannot be held for more than 30 seconds.
3. To reset the coffee volume to factory setting: during standby mode, press and hold both the SINGLE & DOUBLE
shot buttons for 3 seconds, then the SINGLE and DOUBLE shot buttons will flash 5 times. This indicates that the
coffee volume has been reset, and the unit will then return to the standby mode.
LATTE OR CAPPUCCINO (SINGLE OR DOUBLE):
1. Follow steps 1-3 from Brew Espresso above.
2. Fill the milk container with cold milk up to the MAX line. Attach it to the machine.
3. Aim the frothing spout over the center of your cup or mug.
4. Press the LATTE or CAPPUCCINO button (single or double).
5. For lattes the machine will brew espresso and will then add the correct amount of steamed and frothed milk to the
mug. For cappuccinos the machine will first froth the milk into the mug, and then brew the espresso over it.
FROTH MILK ONLY:
1. Fill and insert the milk container into place.
2. Place your mug under the frothing spout.
3. Press the FROTH button to start frothing milk.
4. Press the button again at any time to stop the milk from frothing.
FROTHING & MILK TIPS
• Use cold milk straight from the fridge.
• Whole milk creates the richest foam.
• Plant-based milks work, but results vary.
• Always clean the milk container after each use.
NOTE: You can store the milk container in the fridge with any leover milk until your next use.
CLEANING & MAINTENANCE
BREW HEAD & PORTAFILTER:
1. Let the machine cool down for 1 minute after use.
2. Unlock and remove the portafilter.
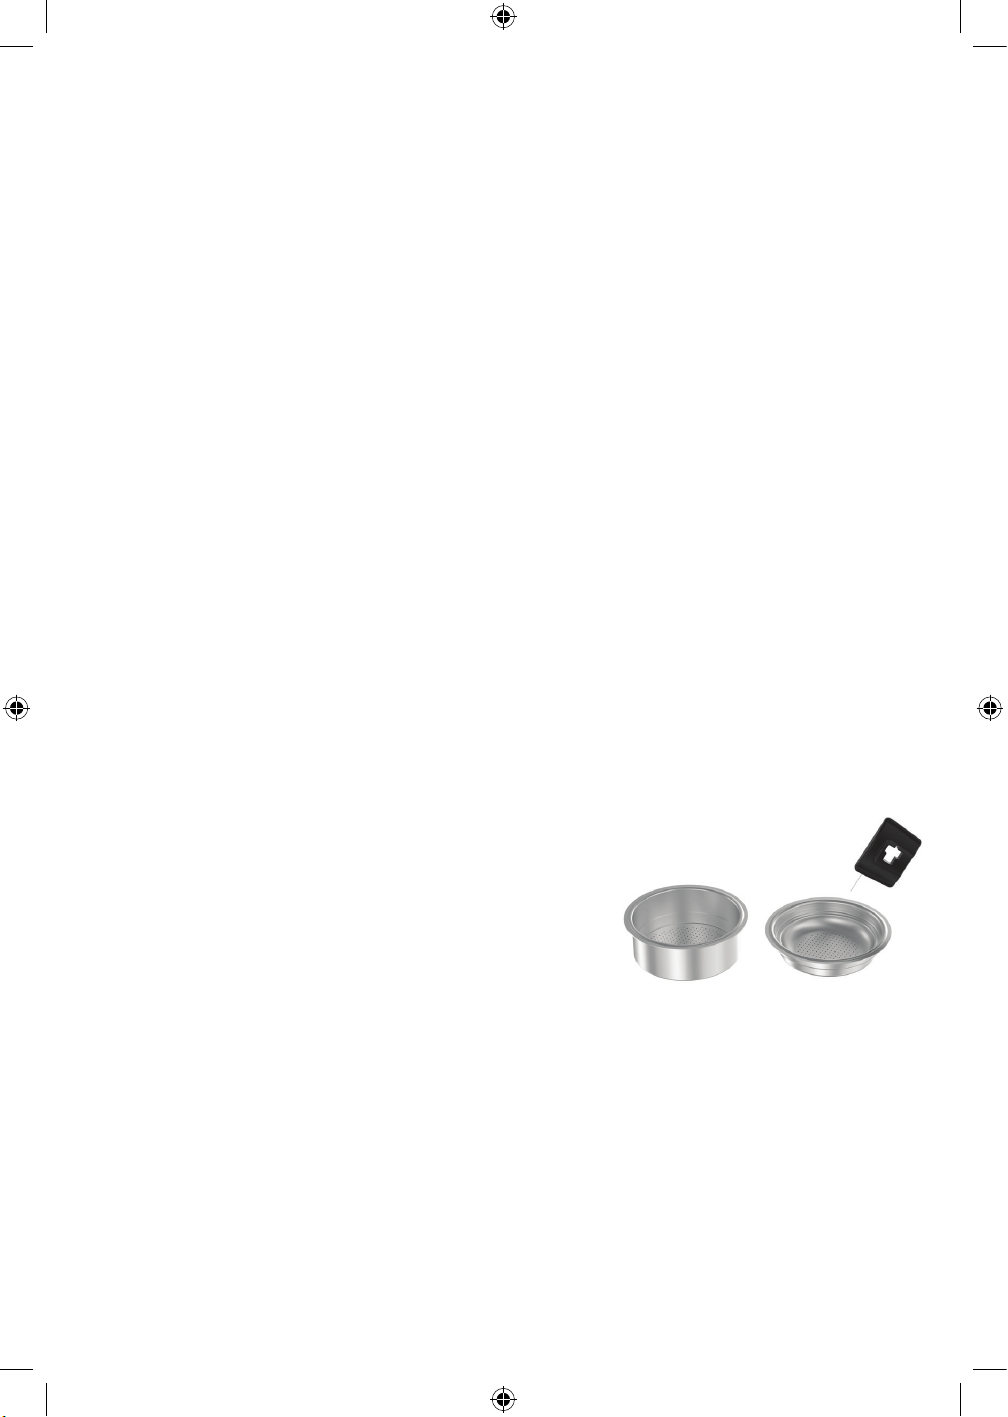
3. To empty the used coffee; hold the portafilter handle with your hand
and push the clip forward with your finger until it reaches the end.
At this point, the filter is secured by the clip, allowing you to tap and
dispose of the coffee grounds. After cleaning the coffee grounds,
simply pull the clip back in the opposite direction with your finger.
WARNING: Keep the clip away from the filter during brewing.
4. Rinse the basket and portafilter. Wipe the brew head with a damp cloth.
5. To clear a blocked espresso filter, use the provide cleaning pin tool to
remove the block. After clearing, rinse thoroughly. (Figure 7)
NOTE: Use caution while using the sharp cleaning pin tool.
CLEANING THE MILK FROTHER (WEEKLY OR AS NEEDED):
1. Remove the milk container and take apart the lid, milk tube and frothing spout.
2. Wash all parts by hand with warm soapy water.
3. Reassemble the container and add fresh cool water into the milk tank.
4. Attach the container back on to the unit.
5. Place a large empty cup under frothing spout.
6. Press the FROTH button. Hot water & steam will come out and clean the milk tank.
7. After the cycle ends, dispose of the water in cup and any water left in the milk tank.
8. Repeat the cycle again if necessary.
DEEP CLEANING THE MILK FROTHER:
1. Remove the milk tube from the milk frother.
2. Push the frothing tube upwards to take out the frothing tube (Figure 8)
Figure 7
90277_90278_BellaPro_BaristaEliteEspressoDrinkStation_IM_V1_R0.indd 990277_90278_BellaPro_BaristaEliteEspressoDrinkStation_IM_V1_R0.indd 9 2025-07-11 12:40 PM2025-07-11 12:40 PM

10
3. Push the milk tank lid upwards, there is a step between the lid and the milk frother. Remove the lid from the milk
frother for deep cleaning (Figure 9).
4. To remove a blockage from the milk container, use the provided cleaning pin tool (Figure 10).
5. To clear a blockage from the steam channel, disassemble the milk container, and use the provided cleaning pin
tool (Figure 11).
6. To clean a blockage of the air inlet channel, disassemble the milk container, and use the provided the cleaning
pin tool (Figure 12).
7. After deep cleaning the milk frother, assemble the lid back onto the milk frother by placing the lid on the milk frother.
8. Push down the lid to fix the lid into place, you will hear a click sound when assembled correctly.
9. Replace the milk tube and frothing tube back onto the milk frother.
Figure 8
Figure 9
Figure 10 Figure 11
Figure 12
DESCALING (EVERY 2–3 MONTHS):
1. Fill the water tank with a mix of 1 part white vinegar and 3 parts water.
2. Insert the empty portafilter. Place a large mug under the spouts & frothing spout.
3. Press CLEAN and let the machine run a full cycle.
4. Repeat the process twice with fresh water to rinse.
STORING INSTRUCTIONS
1. Make sure unit is unplugged and fully cooled before storing.
WARNING: Never store Espresso Maker while it is hot or still plugged in.
2. Do not put any stress on cord where it enters unit, as this could cause cord to fray and break.
3. Store the Espresso Maker in its box, in a clean, dry area.
TROUBLESHOOTING
PROBLEM WHAT MIGHT BE WRONG HOW TO FIX IT
No coffee flows Water tank is empty Fill the water tank
Coffee leaks around edge Portafilter not locked in tightly Reattach firmly and evenly
Froth not dispensing Spout is clogged Clean the spout and frother parts
Weak espresso Grind is too coarse or too little coffee Use finer grind and more coffee
Coffee brews too fast Grind is too coarse Use a finer grind
90277_90278_BellaPro_BaristaEliteEspressoDrinkStation_IM_V1_R0.indd 1090277_90278_BellaPro_BaristaEliteEspressoDrinkStation_IM_V1_R0.indd 10 2025-07-11 12:40 PM2025-07-11 12:40 PM

11
LIMITED TWO-YEAR WARRANTY
SENSIO Inc. dba Made by Gather™ hereby warrants that for a period of TWO YEARS
from the date of delivery, this product will be free from mechanical defects in material and
workmanship, and for 90 days in respect to non-mechanical parts. At its sole discretion,
SENSIO Inc. dba Made by Gather™ will either repair or replace the product found to be
defective, or issue a refund on the product during the warranty period.
The warranty is only valid for the original retail purchaser from the date of the initial
delivery and is not transferable. Keep the original sales receipt, as proof of purchase
is required to obtain warranty validation, which commences on the date of delivery. Retail
stores selling this product do not have the right to alter, modify, or in any way revise the
terms and conditions of the warranty.
EXCLUSIONS:
The warranty does not cover normal wear of parts or damage resulting from any
of thefollowing: negligent use of the product, use of improper voltage or current, improper
routine maintenance, use contrary to the operating instructions, disassembly, repair, or
alteration by anyone other than qualified SENSIO Inc. dba Made by Gather™ personnel.
Also, the warranty does not cover Acts of God such as fire, floods, hurricanes, or tornadoes.
SENSIO Inc. dba Made by Gather™ shall not be liable for any incidental or consequential
damages caused by the breach of any express or implied warranty. Apart from the extent
prohibited by applicable law, any implied warranty of merchantability or fitness for a
particular purpose is limited in time to the duration of the warranty. Some states, provinces
or jurisdictions do not allow the exclusion or limitation of incidental or consequential
damages, or limitations on how long an implied warranty lasts, and therefore, the above
exclusions or limitations may not apply to you. The warranty covers specific legal rights
which may vary by state, province and/or jurisdiction.
HOW TO OBTAIN WARRANTY SERVICE:
You must contact Customer Service at our toll-free number: 1-866-832-4843.
A Customer Service Representative will attempt to resolve warranty issues over thephone.
If the Customer Service Representative is unable to resolve the problem,
you will be provided with a case number and asked to return the product to SENSIO Inc.
dba Made by Gather™. Attach a tag to the product that includes: your name, address,
daytime contact telephone number, case number, and description of the problem.
Also, include a copy of the original sales receipt. Carefully package the tagged product
with the sales receipt, and send it (with shipping and insurance prepaid) to SENSIO Inc.
dba Made by Gather™’s address. SENSIO Inc. dba Made by Gather™ shall bear no
responsibility or liability for the returned product while in transit to SENSIO Inc. dba
Made by Gather™ Customer Service Center.
90277_90278_BellaPro_BaristaEliteEspressoDrinkStation_IM_V1_R0.indd 1190277_90278_BellaPro_BaristaEliteEspressoDrinkStation_IM_V1_R0.indd 11 2025-07-11 12:40 PM2025-07-11 12:40 PM
For customer service questions or comments
1-866-832-4843 / help@bellahousewares.com
Sensio Inc.
dba Made by Gather
TM
New York, NY 10016/USA
90277, 90278 R0
90277_90278_BellaPro_BaristaEliteEspressoDrinkStation_IM_V1_R0.indd 1290277_90278_BellaPro_BaristaEliteEspressoDrinkStation_IM_V1_R0.indd 12 2025-07-11 12:40 PM2025-07-11 12:40 PM