
Technical Support and E-Warranty Certificate
www.vevor.com/support
Electrical Enclosure
Product Description
Material: Cold Rolled Steel
We continue to be committed to provide you tools with competitive price.
"Save Half", "Half Price" or any other similar expressions used by us only represents an
estimate of savings you might benefit from buying certain tools with us compared to the major
top brands and does not necessarily mean to cover all categories of tools offered by us. You
are kindly reminded to verify carefully when you are placing an order with us if you are
actually saving half in comparison with the top major brands.


- 1 -
Electrical Enclosure
Material:Cold Rolled Steel
NEED HELP? CONTACT US!
Have product questions? Need technical support? Please feel free to
contact us:
Technical Support and E-Warranty Certificate
www.vevor.com/support
This is the original instruction, please read all manual instructions
carefully before operating. VEVOR reserves a clear interpretation of our
user manual. The appearance of the product shall be subject to the
product you received. Please forgive us that we won't inform you again if
there are any technology or software updates on our product.

- 2 -
Warning-To reduce the risk of injury, user must read instructions
manual carefully.
MATTERSNEEDATTENTION
Warning
Enclosure enclosure/Cabinet is only coating but NOT insulated. ONLY a
qualified electrician could deal with the inside circuits and electrical parts.
Warning Labels or other signs could be posted according to relative laws or
codes if necessary.
DO NOT Permit children to play with this item.
The Electrical Enclosure enclosure could be waterproof ONLY all the holes
have been sealed by a soft gasket or plug. For the holes cut by customer,
please use an IP66 Grade Gasket or equivalent parts to keep waterproof.
This item MUST BE GROUNDED. Please refer to the "Body
installation-Assembly the earth wire".
Tips
Any damage on the finish coating could lead to rust, and tiny surface
damage could be repaired by re-painting. But it is not recommended when
painting on large scale damages.
The working temperature should be lower than 80°C, otherwise, it could
lead to damage to the painting surface and the failure of sealing.

FEATURESOF PRODUCTS
- 3 -
PU foaming sealing strip ensures a protection grade of IP66 to
enclosure body.
Bosses of various types and sizes allow easy installation of inlet/outlet
lines.
Galvanized mounting plate can also be used for wiring outside the
enclosure.
Multiple protection grooves are designed at the enclosure opening that
can not only reinforce the structure but also prevent the entry of dirt or
water when the door is opened.
Professional lock system with double-teeth cylinder allows easy
locking/unlocking.
SPECIFICATION DATA
Color
RAL7035(White Gray)/RAL2000(Orange)
Body Material
Cold Rolled Steel
Inner plate
2.0mm Galvanized Plate
Finish
Powder Coating
Construction
Continuously Welded
Ambient Temperature
-40~+55°C
Gasket Material
Seamless Foam/Nylon(washers or plugs)
Certification
CE ROHS UL50
Ratings
NEMA 4/NEMA 4X
Protection Grade
IP66 IK10

- 4 -
Model
Height*Width*Depth (mm)
Material
SPT-UL-202015
200*200*150
Cold Rolled Steel
SPT-UL-252015
250*200*150
SPT-UL-302015
300*200*150
SPT-UL-302020
300*200*200
SPT-UL-302515
300*250*150
SPT-UL-303015
300*300*150
SPT-UL-303020
300*300*200
SPT-UL-403015
400*300*150
SPT-UL-403020
400*300*200
SPT-UL-404015
400*400*150
SPT-UL-404020
400*400*200
SPT-UL-503025
500*300*250
SPT-UL-504015
500*400*150
SPT-UL-504020
500*400*200
SPT-UL-504025
500*400*250
SPT-UL-505015
500*500*150
SPT-UL-505015-O
500*500*150
SPT-UL-604020
600*400*200
SPT-UL-604025
600*400*250
SPT-UL-604030
600*400*300
SPT-UL-606020
600*600*200
SPT-UL-606030
600*600*300
SPT-UL-705020
700*500*200
INSTALLATION STEPS
- 5 -
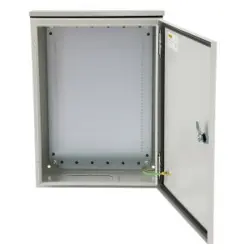
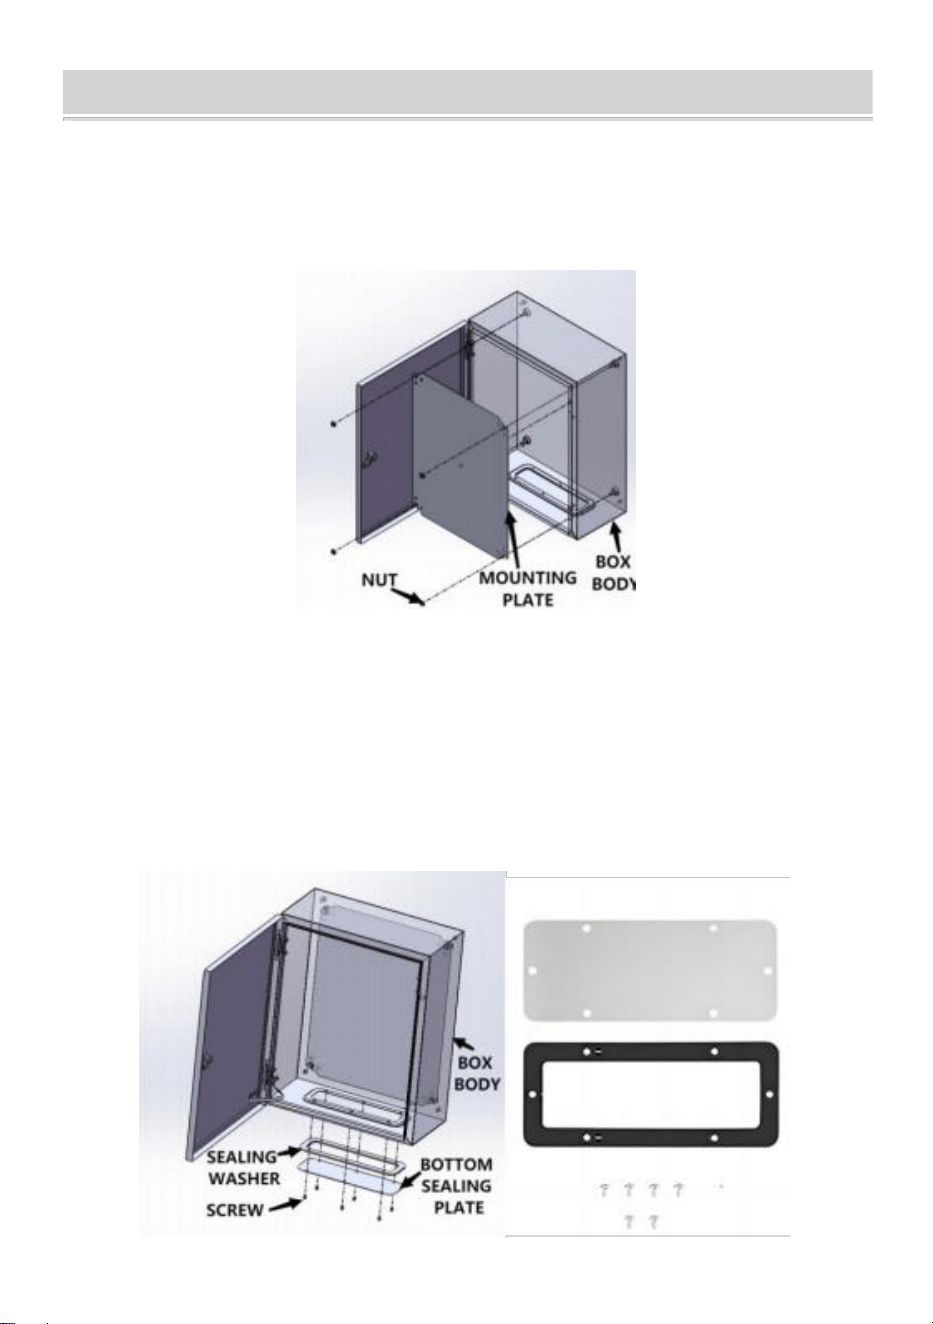
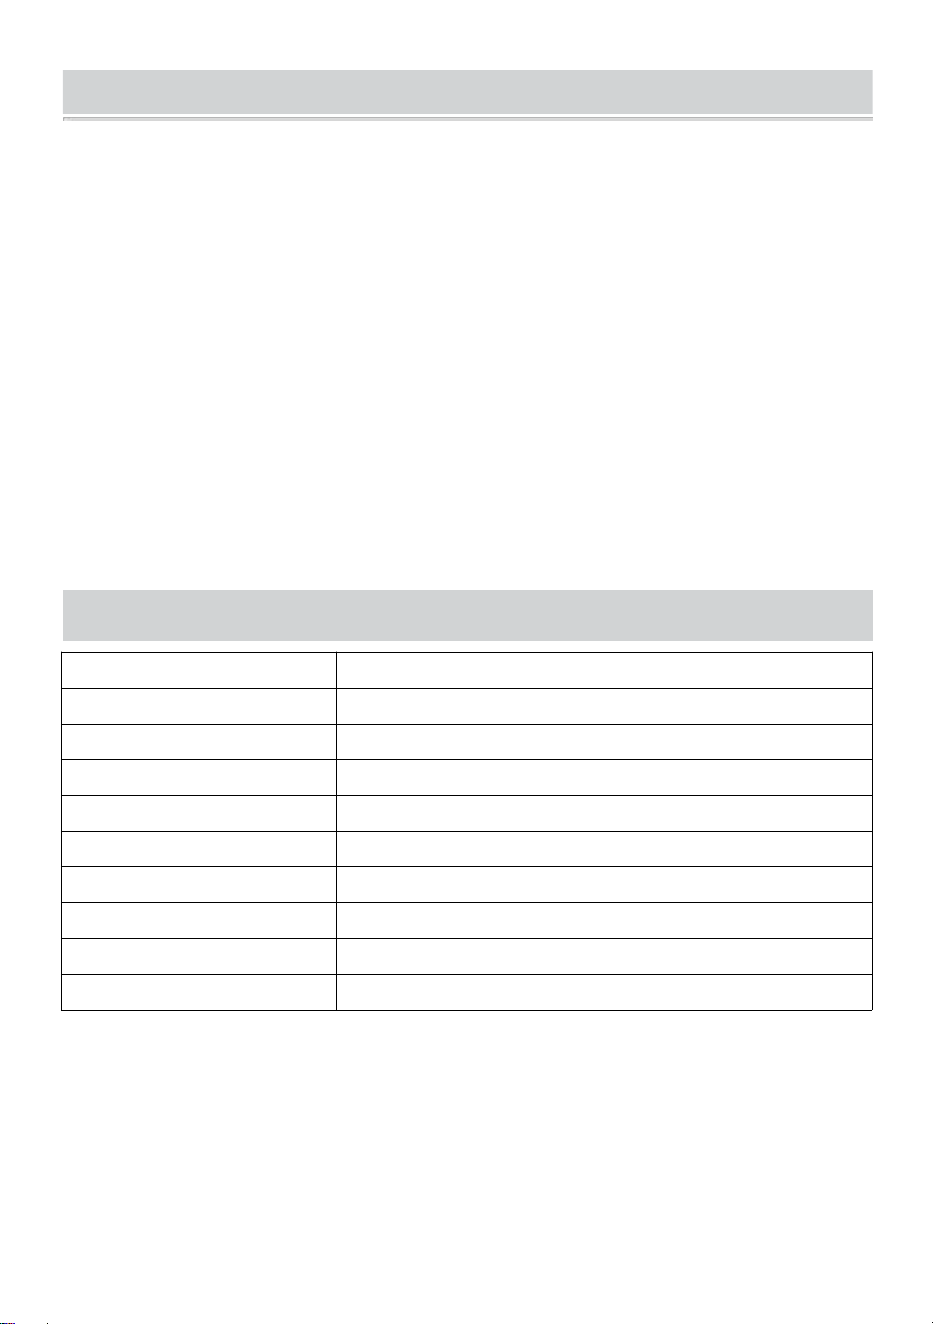
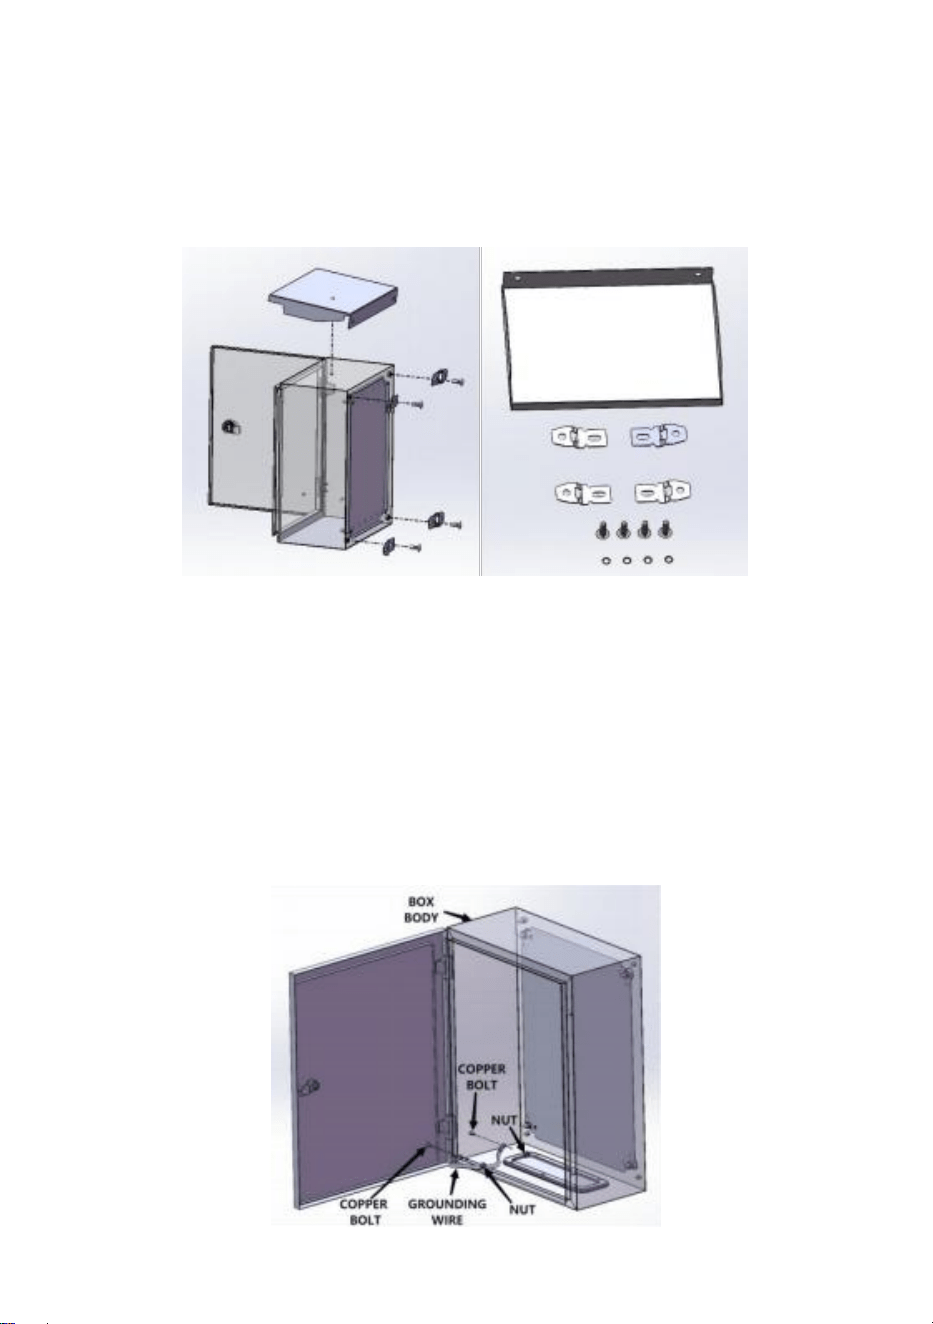
A:Mounting Plate Installation
Adopts 4pcs M8 hex head flange nut assembly mounting plate with
enclosure body. See Figure 1.
Notice:already assembled on enclosure body when ex-factory.
Figure 1
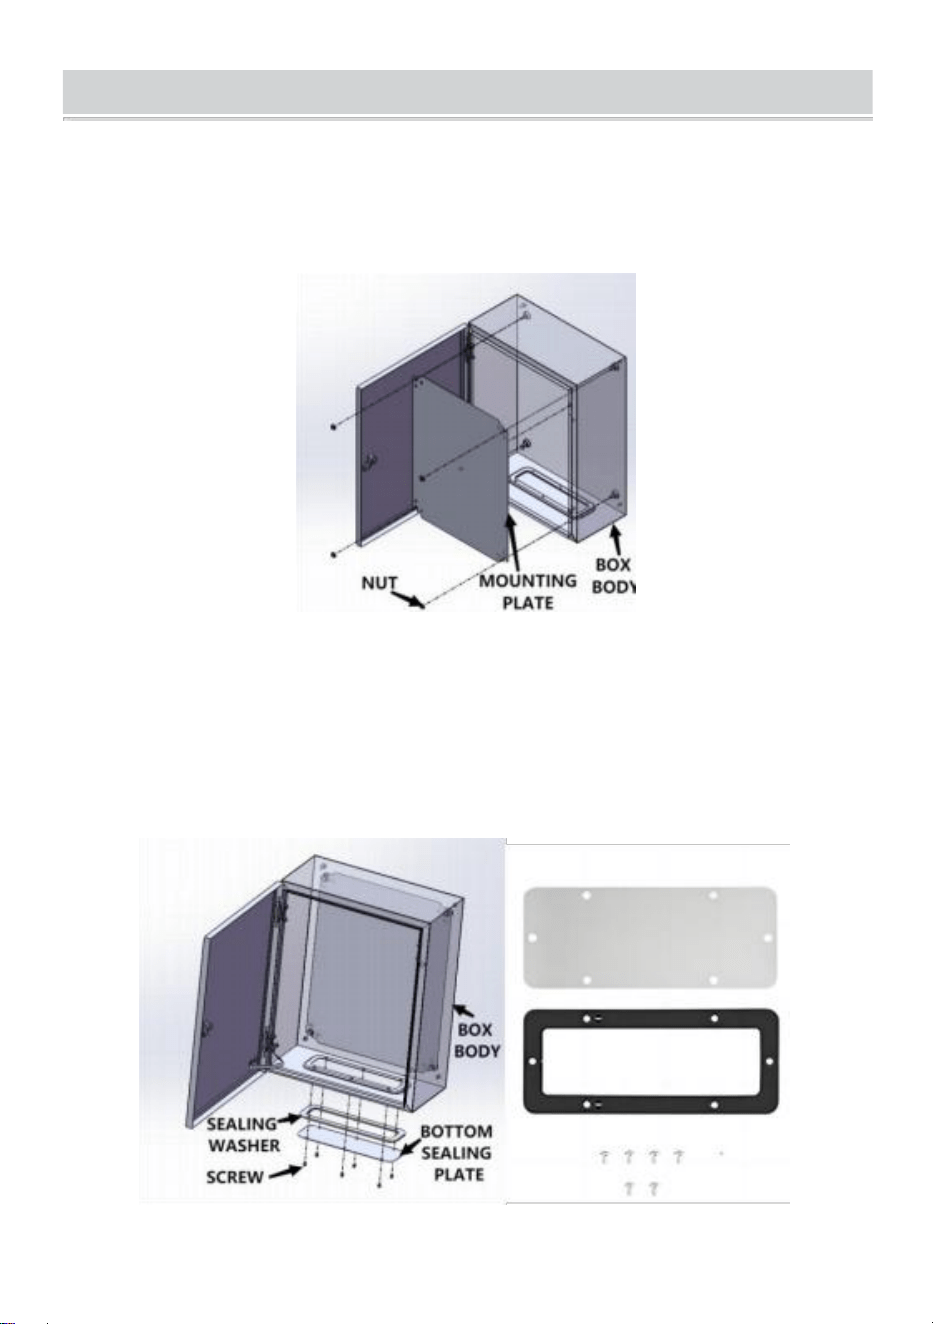
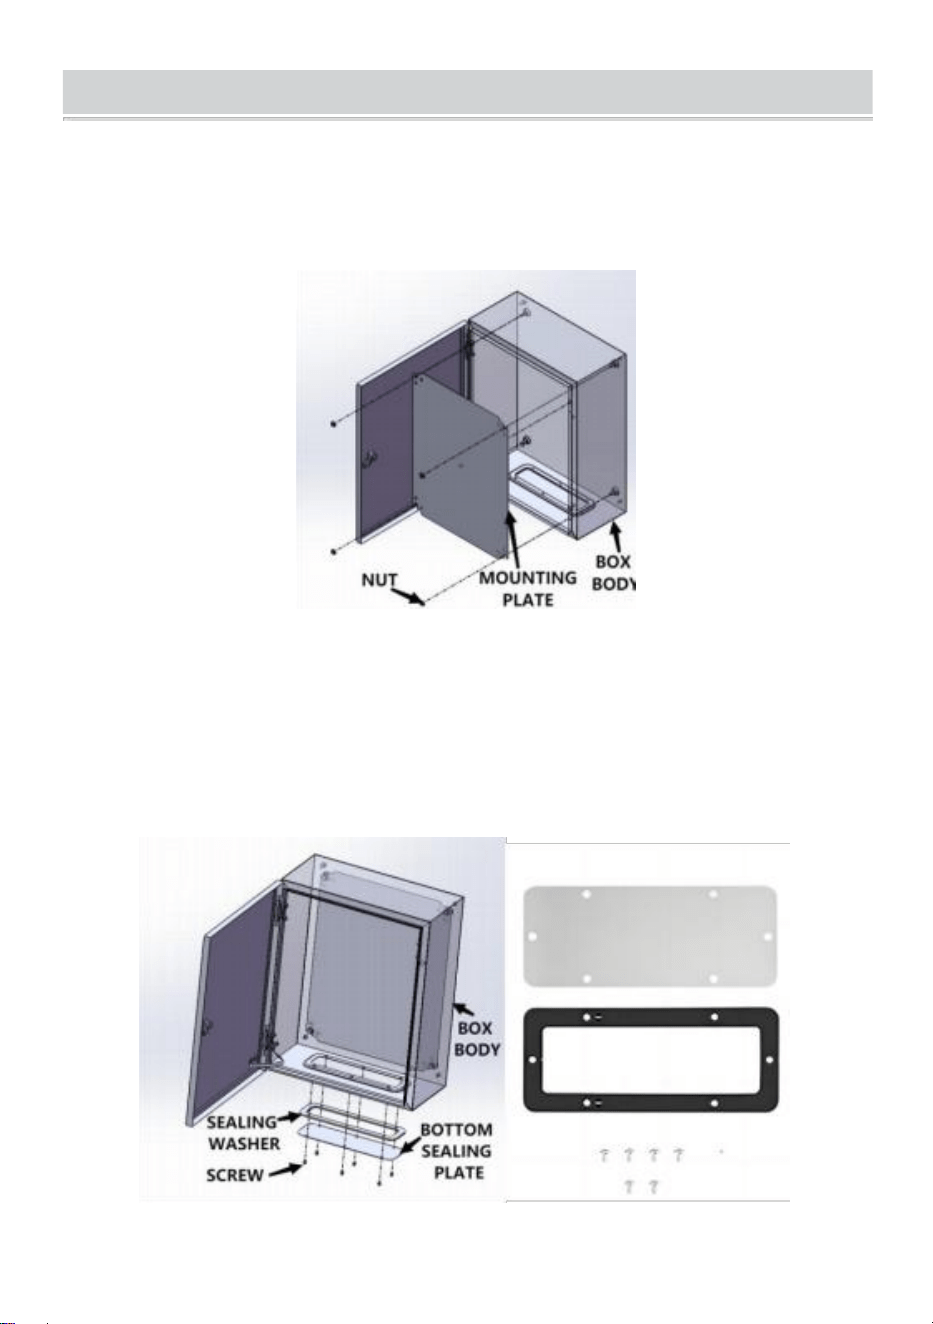
B:Bottom Sealing Plate Installation
Adopts M5*10mm cross self-tapping screws assembly sealing
washer,bottom sealing plate with enclosure body. See Figure 2.
According to your usage requirement to mount it or not.
Figure 2
- 6 -
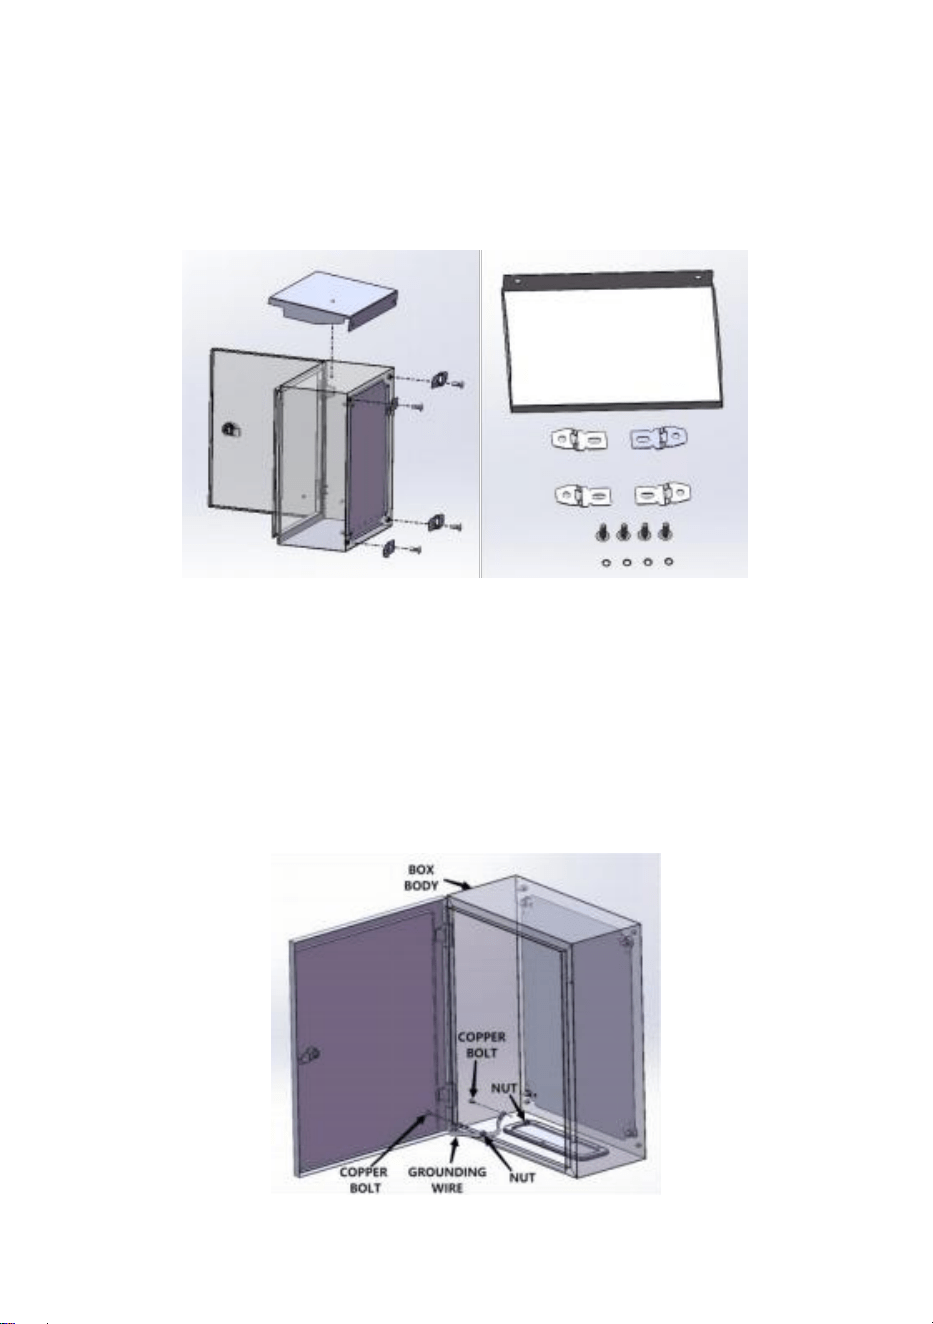
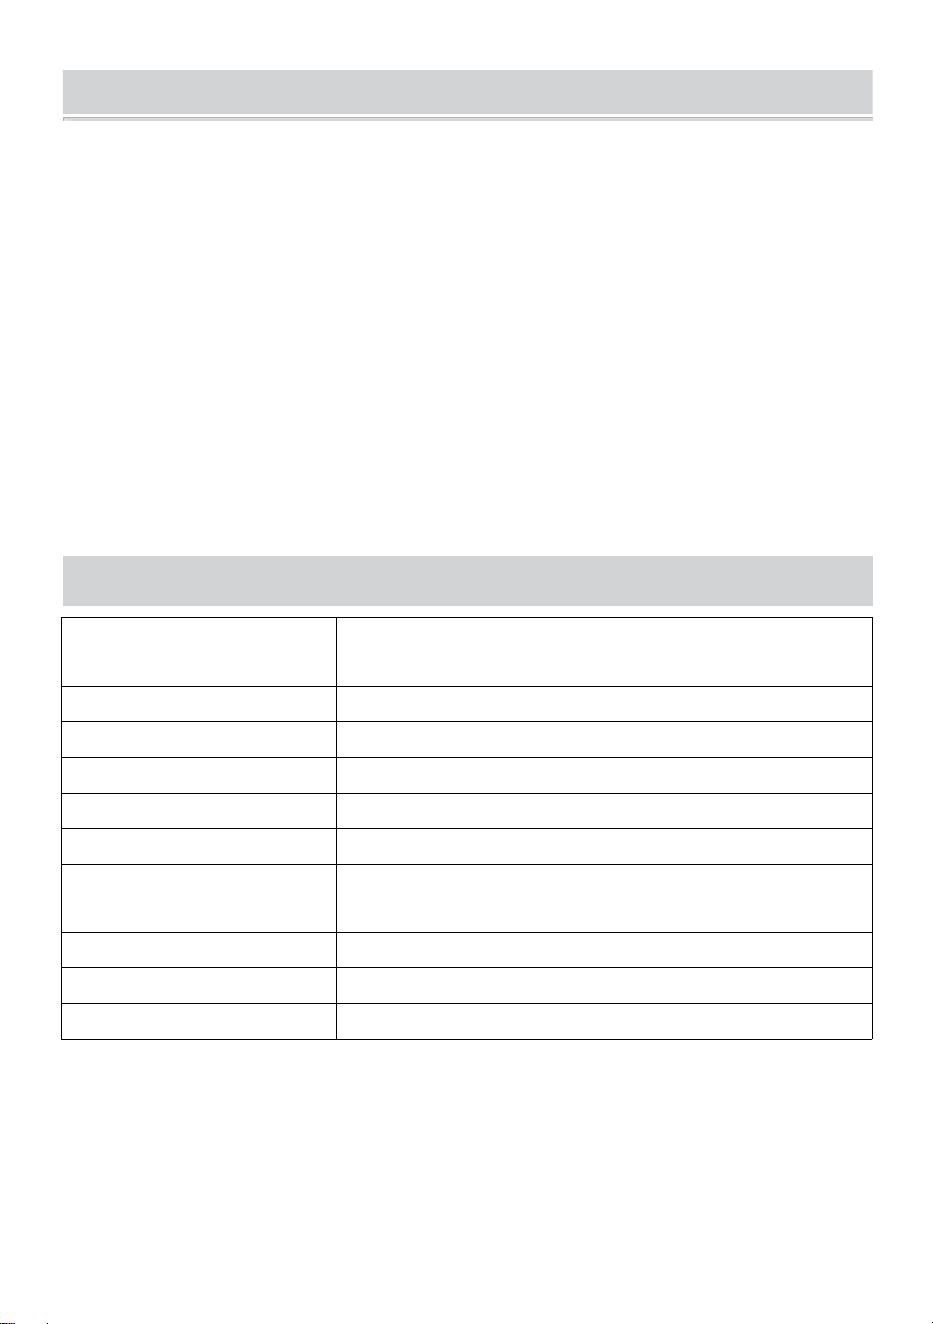
C:Rain Cap and Wall Mounting Brackets Installation
First align the rain cap hole with the enclosure backside holes,Adopts 4pcs
M8*16mm hex head bolt,M8 O-ring,M8 nuts fix the rain cap and 4pcs wall
mounting brackets on the enclosure,then fix the enclosure on the wall via
the 4pcs wall mounting brackets. See Figure 3.
Figure 3
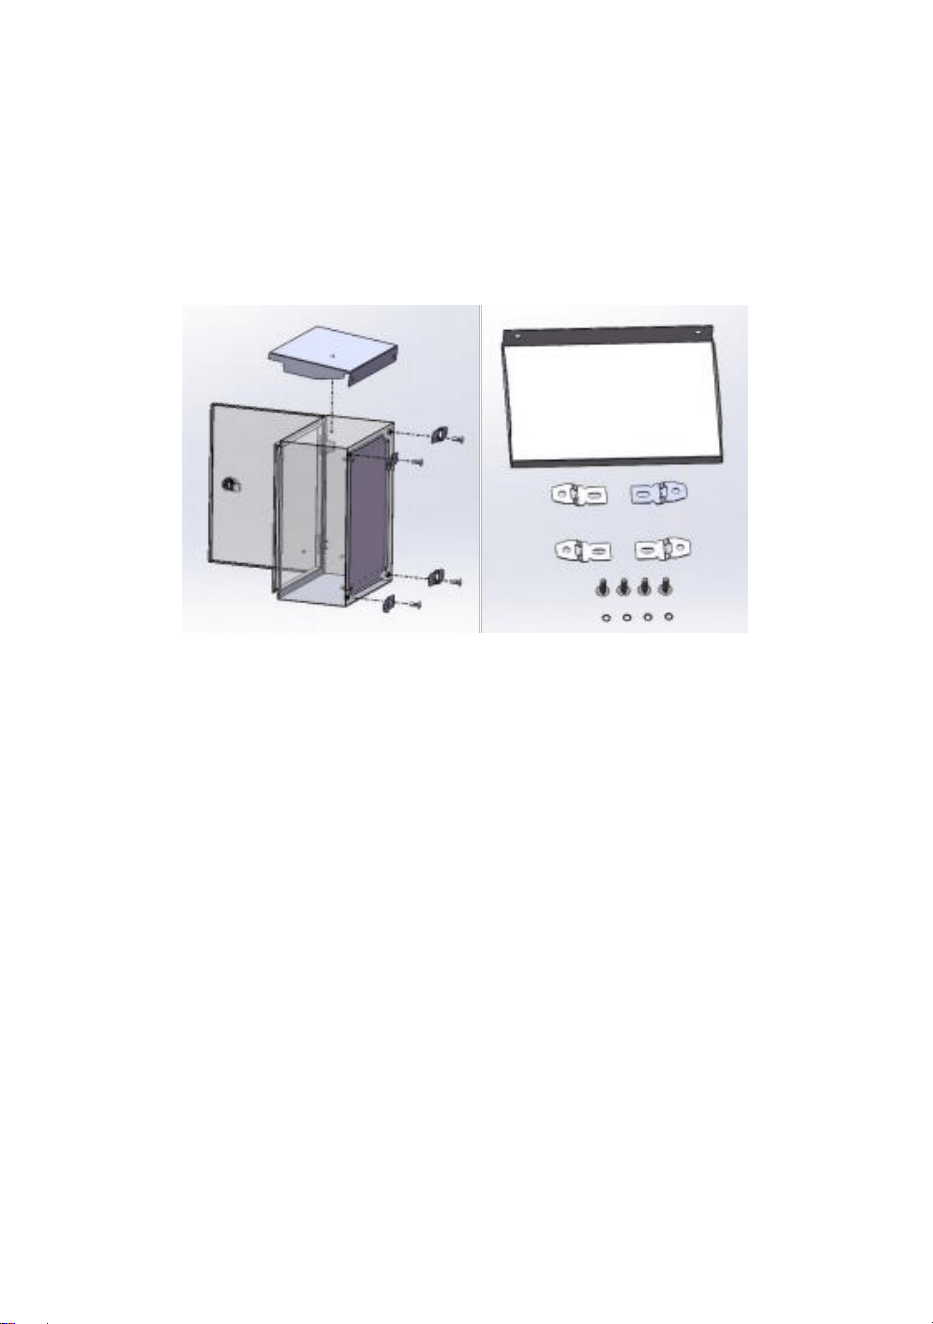
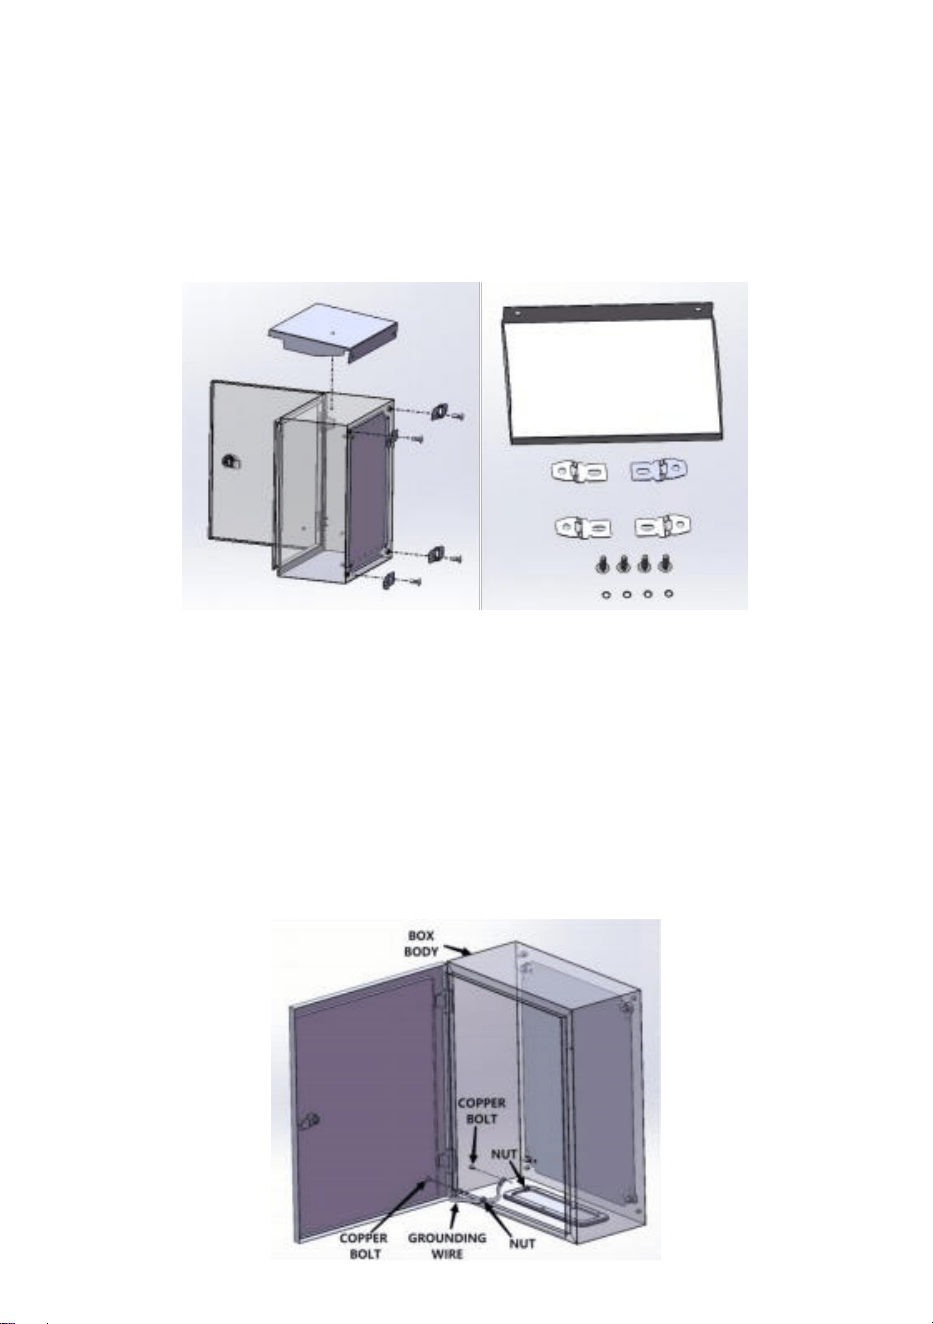
D:Grounding Wire Installation
Adopts 2pcs M6 hex head flange nut assembly grounding wire on
M6*12mm copper bolt of enclosure do or and enclosure body.
See Figure 4.
Notice:already assembled on enclosure body when ex-factory.
Figure 4
- 7 -
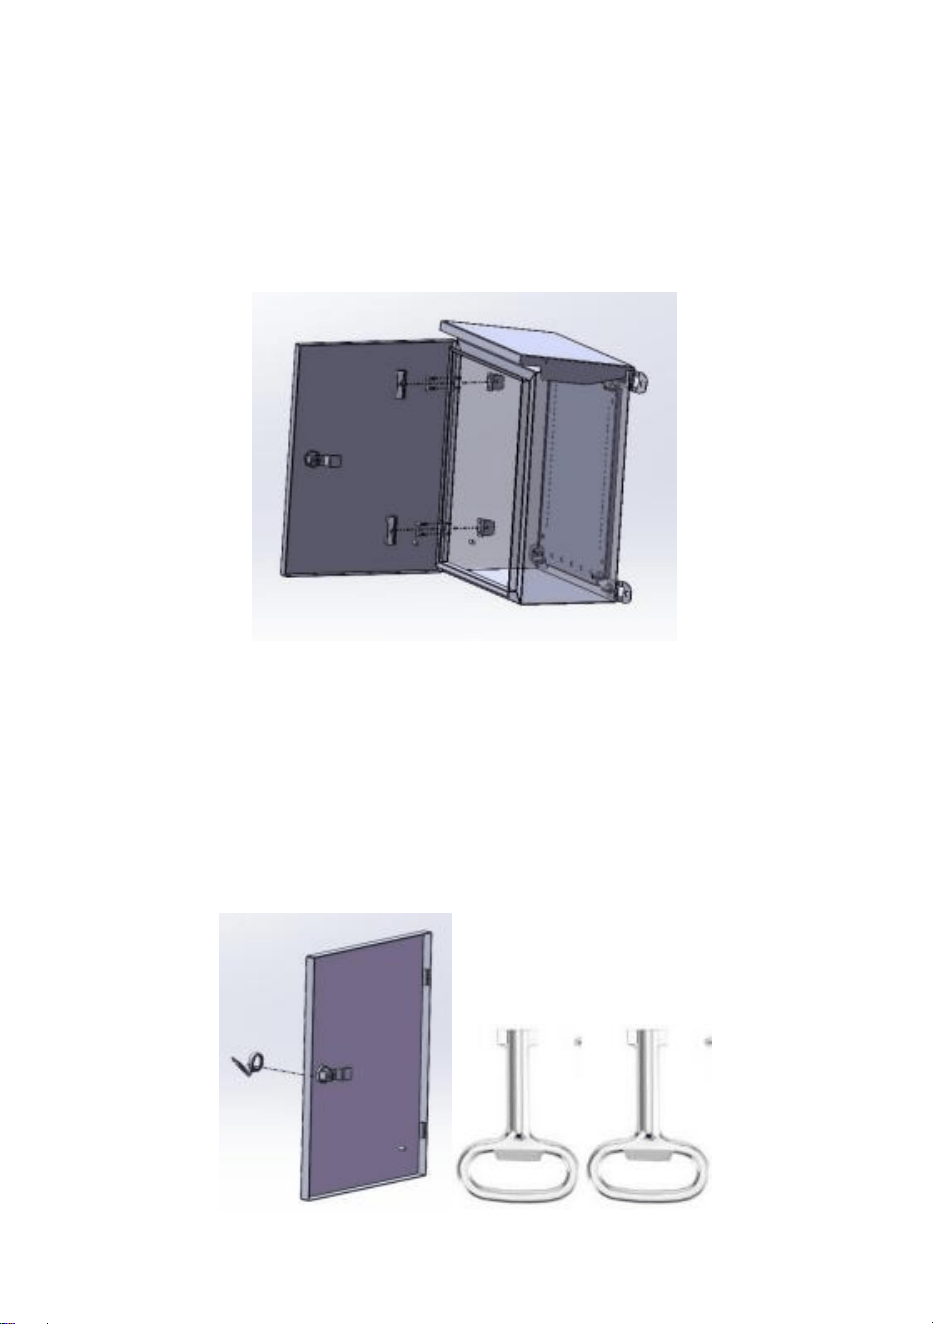
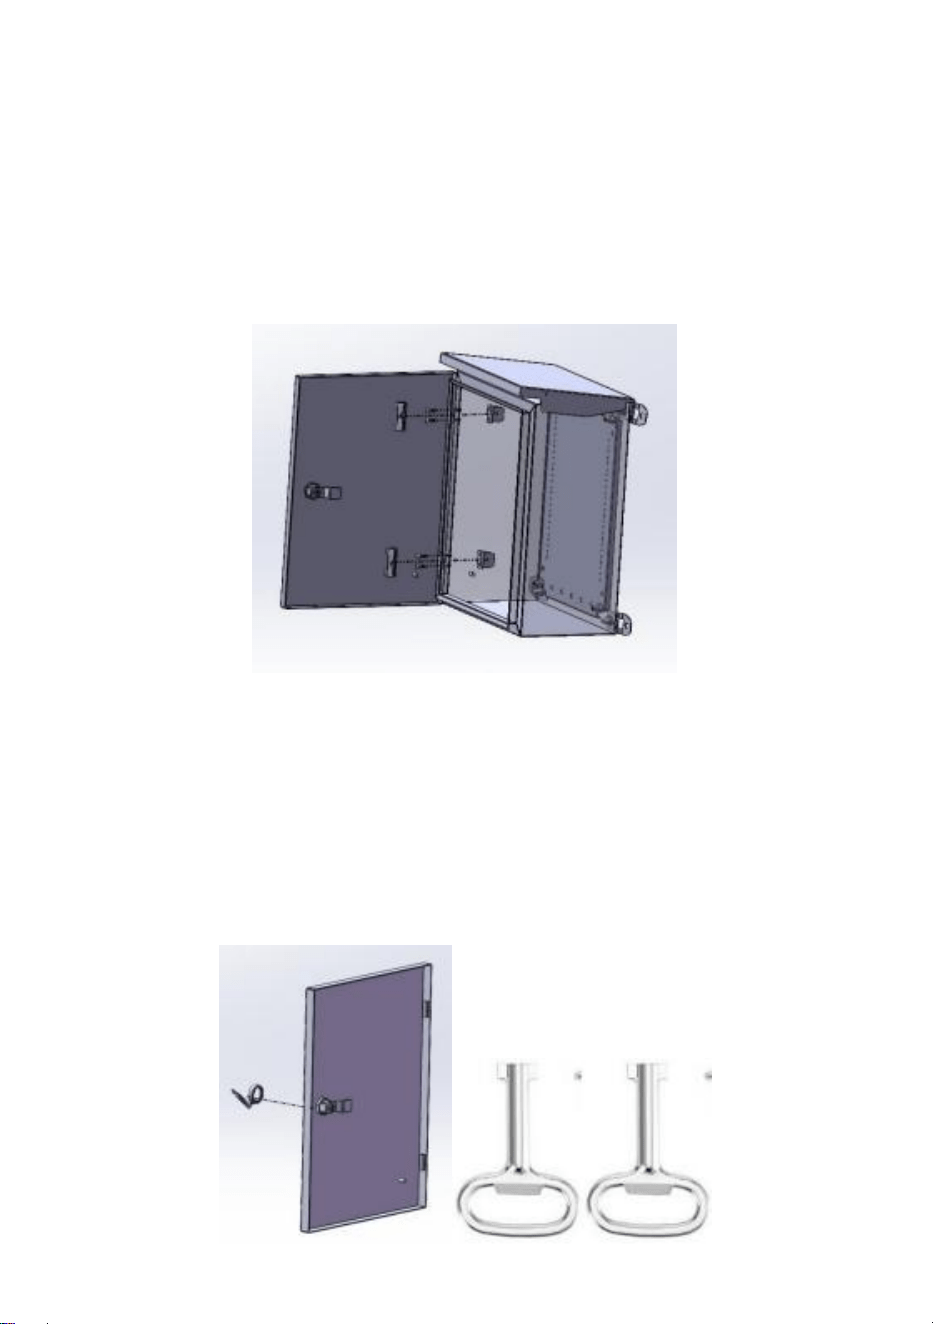
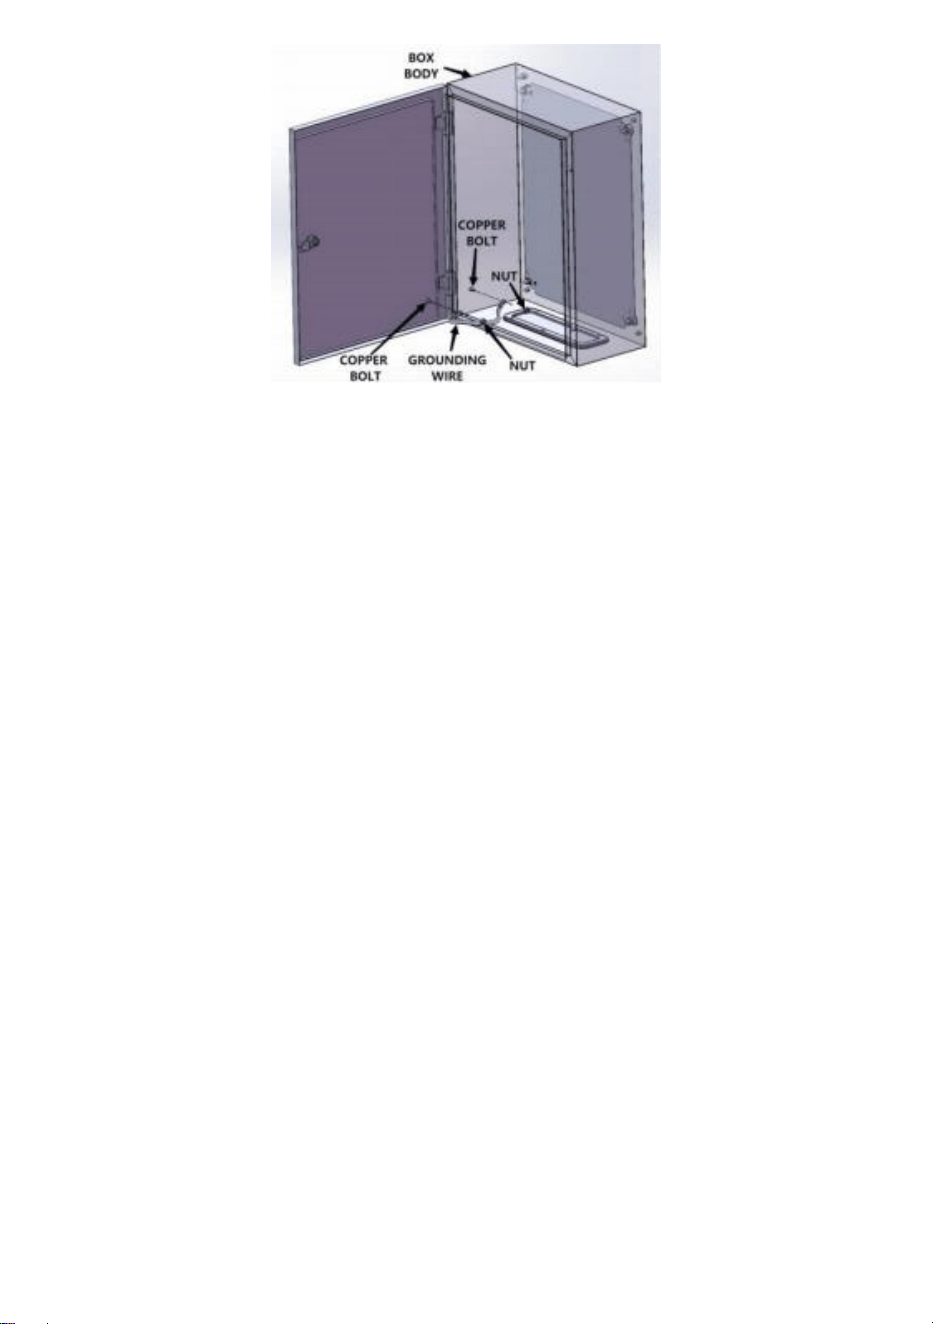
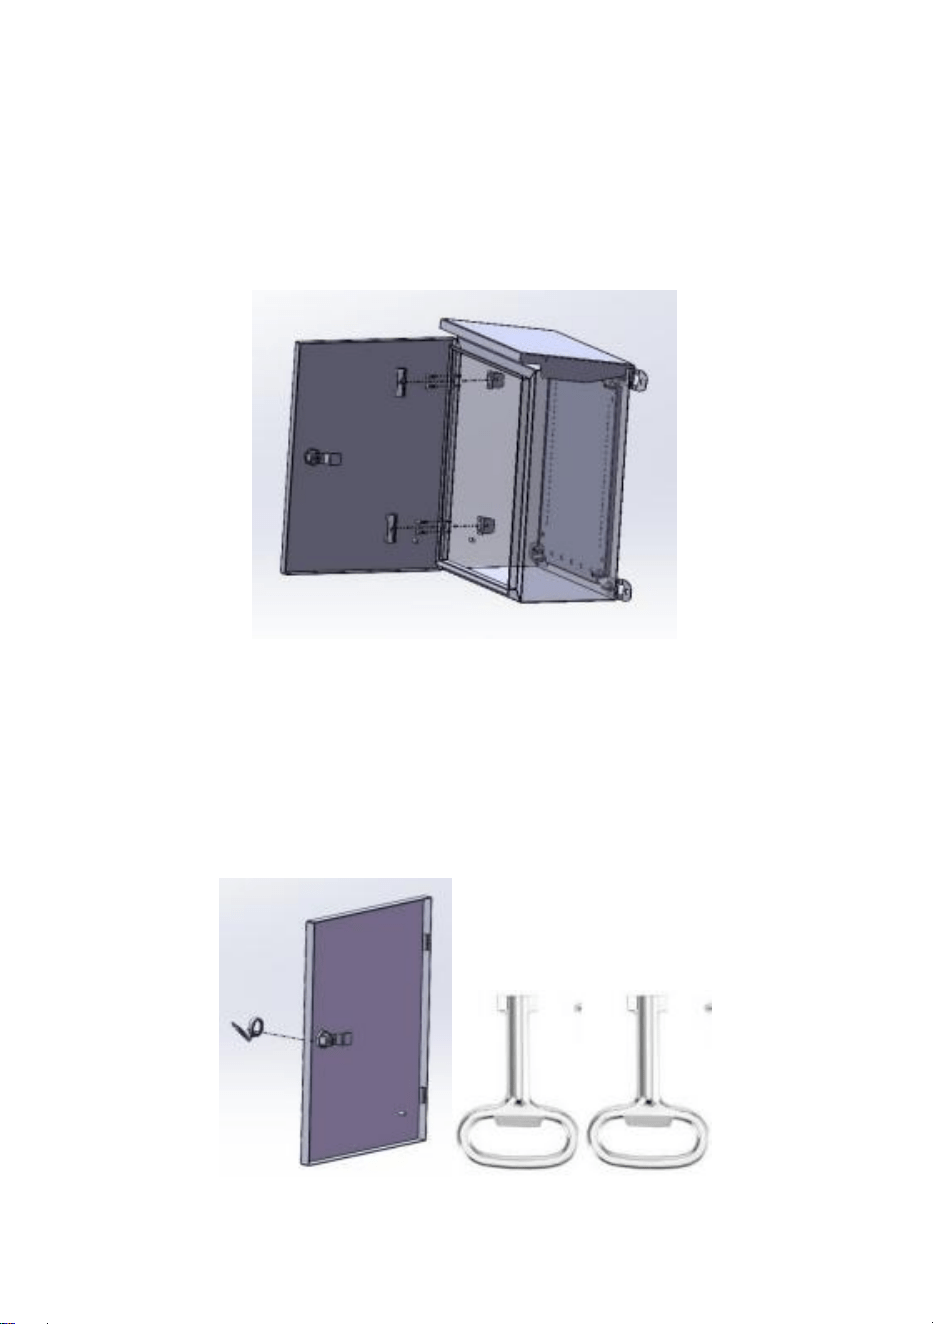
E:Enclosure Door Installation
The hinges are secured to the enclosure with M4*16 cross countersunk
screws and hinge plastic parts,then the door is secured with latches on the
hinges.Adopts fixed pin assembly enclosure door on hinge. See Figure 5.
Notice:Enclosure door already assembled on enclosure body when
ex-factory.
Figure 5
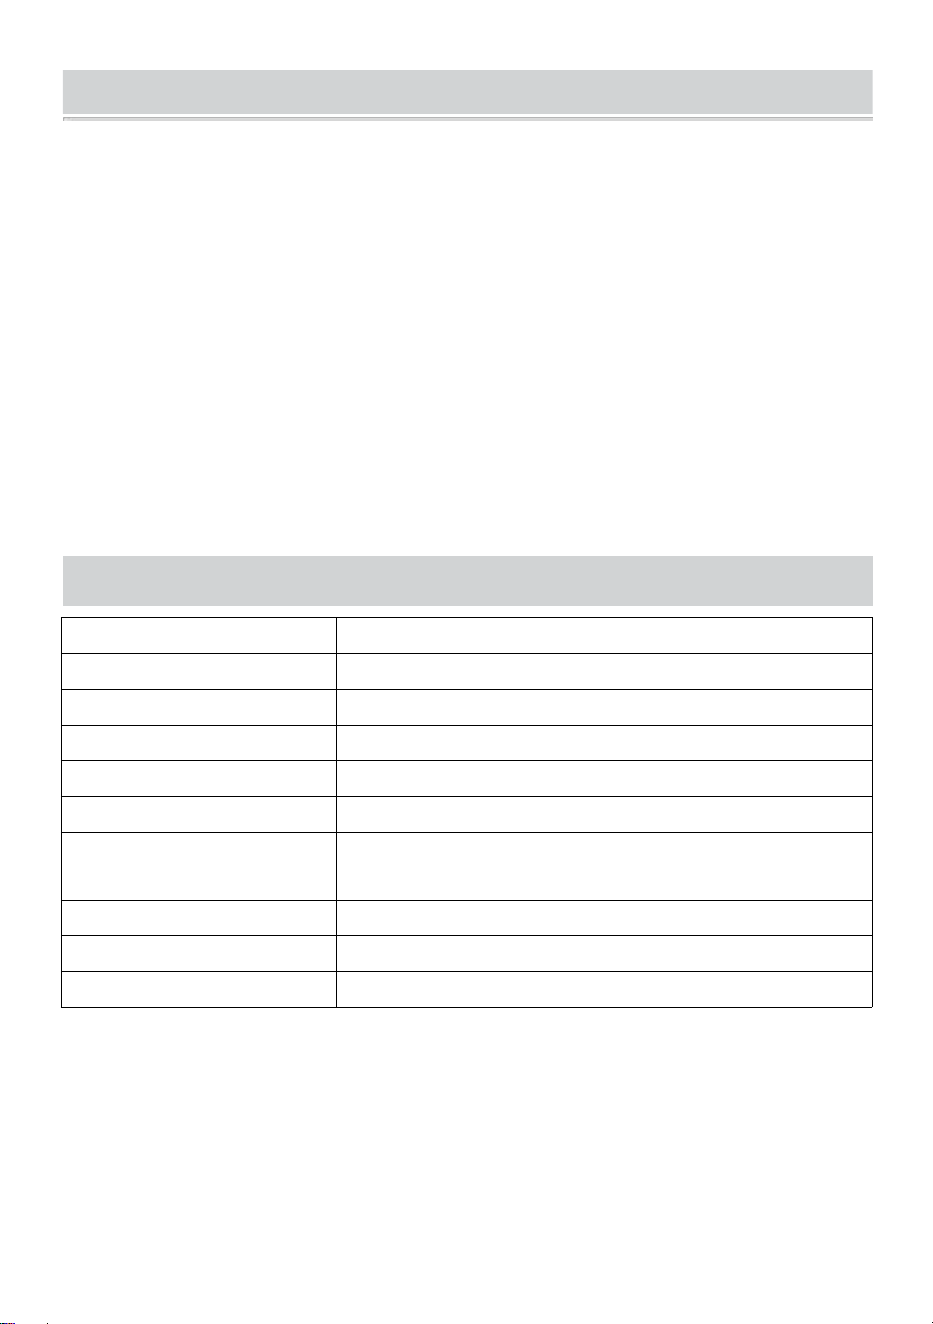
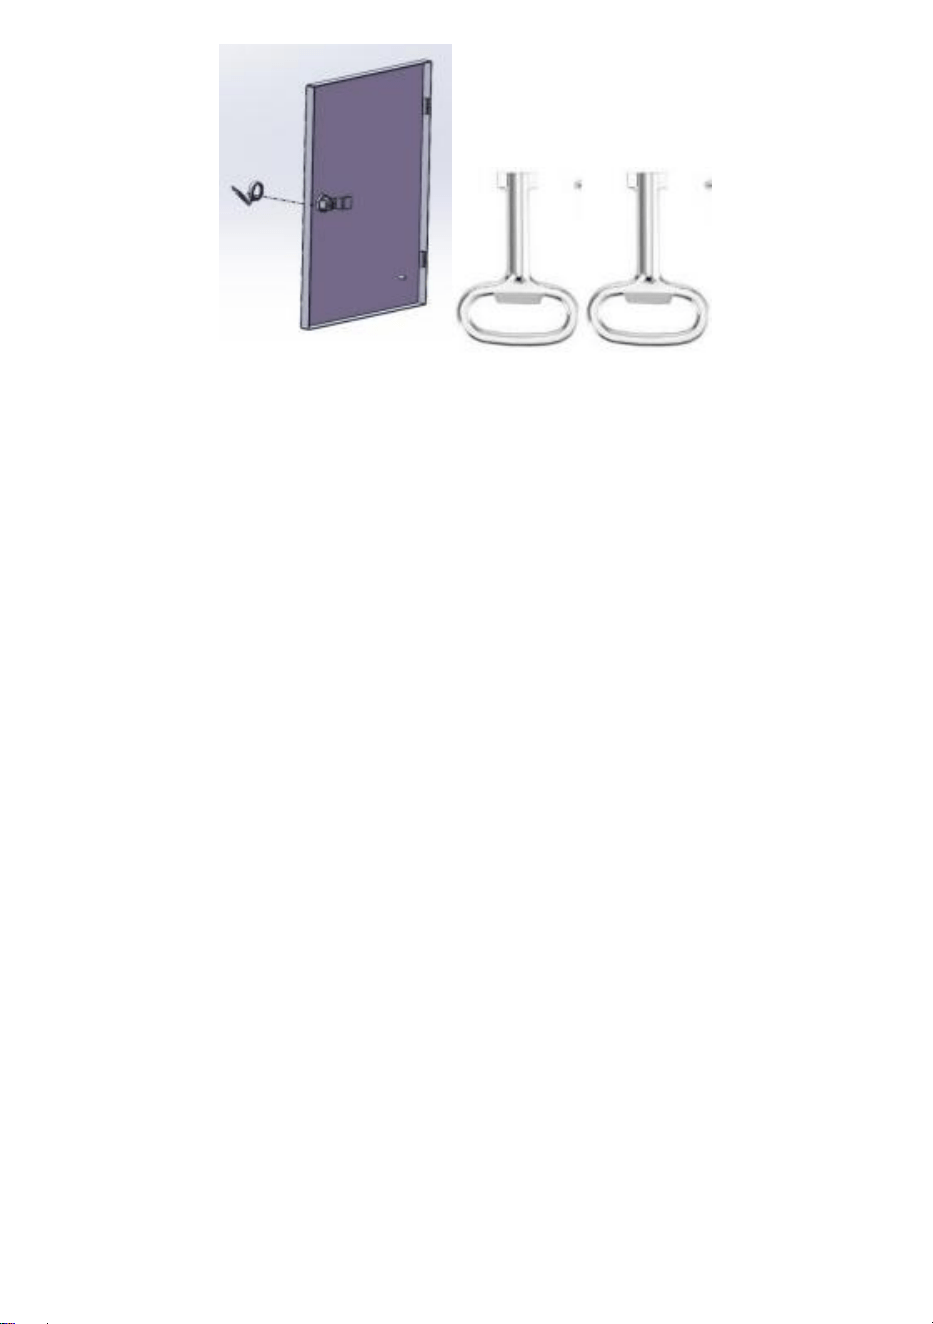
F:Door Lock Installation
Adopts lock nuts assembly enclosure lock and lock cover on enclosure
door. Adopts a matched key to meet the enclosure door opening and
closing.
See Figure 6.
Notice:already assembled on enclosure body when ex-factory.
Figure 6

- 8 -
Warning:when locking the enclosure door,please turn lock core 90°
from vertical direction to horizontal direction,make sure to meet best
protection level.


Support technique et Garantie électronique
Certificat www.vevor.com/support
Électrique Enceinte
Produit Description
Matière : Froid Acier laminé
Nous continuons à nous engager à vous fournir des outils avec compétitif prix.
"Sauvegarder "Moitié", "Moitié Prix " ou toute autre expression similaire utilisé par nous
seulement représente un
estimation des économies que vous pourriez réaliser en achetant certains outils chez nous
par rapport aux principaux
grandes marques et fait pas nécessairement signifie couvrir toutes les catégories des outils
proposés par nous. Toi
nous vous rappelons de bien vouloir vérifier attentivement lorsque vous êtes placement
un commander avec nous si tu sont
en fait, je sauve la moitié par rapport au top grandes marques.


- 1 -
Electrical Enclosure
Matériau : Acier laminé à froid
BESOIN DE L'AIDE? CONTACT NOUS!
Avoir produit Des questions ? Besoin technique soutien? S'il te
plaît sentir gratuit à contact nous:
Assistance technique et certificat de garantie
électronique
www.vevor.com/support
C'est l'original instruction, s'il vous plaît lisez tout manuel instructions
soigneusement avant de l'utiliser. VEVOR se réserve une interprétation
claire de notre manuel d'utilisation. L'apparence du produit doit être
soumis à la
produit vous reçu. S'il te plaît, pardonne nous que nous ne le ferons pas
je vous informe à nouveau s'il existe une technologie ou un logiciel
mises à jour sur notre produit.

- 2 -
Avertissement - Pour réduire le risque de blessure, l'utilisateur
doit lire les instructions Lisez attentivement le manuel.
LESQUESTIONSNÉCESSITENTUNEATTENTION
PARTICULIÈRE
Avertissement
Le boîtier/l'armoire n'est qu'un revêtement mais PAS isolé.
SEULEMENT un électricien qualifié pourrait s'occuper des circuits
intérieurs et électrique parties. Des étiquettes d'avertissement ou d'autres
panneaux pourraient être affichés conformément aux lois relatives ou
codes si nécessaire.
FAIRE PAS Permettre aux enfants de jouer avec cela article.
Le Le boîtier électrique peut être étanche UNIQUEMENT tous les trous
avoir été scellé par un joint souple ou prise. Pour le trous couper par client,
s'il te plaît utiliser un Joint de qualité IP66 ou équivalent pièces à garder
imperméable f.
Ce l'article DOIT SOYEZ TERRIFIÉ. Veuillez vous référer à
la " Montage de la carrosserie - Assemblage le Terre fil ".
Conseils
Tout dommage sur le revêtement de finition pourrait conduire à la rouille,
et minuscule surface
les dégâts pourraient être réparé en repeignant. Mais il est pas
recommandé lorsque peinture sur dommages à grande échelle.
La température de travail doit être inférieure à 80°C, sinon, elle pourrait
endommager la surface de la peinture et entraîner sa défaillance de
scellement.

FEATURESOF PRODUCTS
- 3 -
La bande d'étanchéité en mousse PU assure une protection
grade de IP66 à corps de l'enceinte.
Patrons de divers types et tailles permettre facile installation de
entrée/sortie lignes.
Galvanisé montage plaque peut aussi être utilisé pour le câblage
en dehors de lui enceinte.
Multiple rainures de protection sont conçu à la enceinte ouverture que
ne peut pas seulement renforcer la structure mais aussi prévenir le
entrée de saleté ou de l'eau lorsque la porte est ouvert.
Professionnel système de verrouillage avec cylindre à double
denture permet un verrouillage facile verrouillage/déverrouillage.
DONNÉES DESPÉCIFICATION
Couleur
RAL7035 (blanc gris)/RAL2000 (orange)
Corps Matériel
Froid Acier laminé
Intérieur plaque
Galvanisé 2,0 mm Plaque
Finition
Revêtement en poudre
Construction
Soudé en continu
Température ambiante
-40~+55°C
Joint d'étanchéité
Matériel
Sans couture Mousse/Nylon (rondelles ou
bouchons)
Certification
CE Directive RoHS UL50
Notes
NEMA 4/NEMA 4X
Niveau de protection
IP66 IK10

- 4 -
Modèle
Hauteur*Largeur*Profondeur
(mm)
Matériel
SPT-UL-202015
200*200*150
Froid Acier laminé
Norme SPT-UL-
252015
250*200*150
Norme SPT-UL-
302015
300*200*150
Norme SPT-UL-
302020
300*200*200
SPT-UL-302515
300*250*150
Norme SPT-UL-
303015
300*300*150
SPT-UL-303020
300*300*200
Norme SPT-UL-
403015
400*300*150
SPT-UL-403020
400*300*200
Norme SPT-UL-
404015
400*400*150
SPT-UL-404020
400*400*200
SPT-UL-503025
500*300*250
Norme SPT-UL-
504015
500*400*150
Norme SPT-UL-
504020
500*400*200
SPT-UL-504025
500*400*250
Norme SPT-UL-
505015
500*500*150
SPT-UL-505015-O
500*500*150
Norme SPT-UL-
604020
600*400*200
Norme SPT-UL-
604025
600*400*250
Norme SPT-UL-
604030
600*400*300
Norme SPT-UL-
606020
600*600*200
Norme SPT-UL-
606030
600*600*300
Norme SPT-UL-
705020
700*500*200

- 4 -

INSTALLATION STEPS
- 5 -
A : Installation de la plaque de montage
Adopte 4 pièces M8 bride à tête hexagonale montage d'écrou
plaque avec corps de l'enceinte. Voir Chiffre 1.
Remarque : déjà assemblé sur le corps du boîtier à la sortie d'usine.
Chiffre 1
B : Plaque d'étanchéité inférieure Installation
Adopte M5*Vis autotaraudeuses cruciformes de 10 mm,
rondelle d'étanchéité d'assemblage, étanchéité inférieure
plaque avec corps de boîtier. Voir Figure 2. Selon vos besoins
d'utilisation monter il ou pas.

INSTALLATION STEPS
- 5 -
Figure 2

- 6 -
C : Capuchon de pluie et mur Installation des supports de montage
Alignez d'abord le trou du capuchon anti-pluie avec le boîtier. arrière trous,
adopte 4 pièces M8*Tête hexagonale de 16 mm boulon, M8 joint torique,
M8 les noix fixent le chapeau de pluie et 4 pièces montage mural supports
sur le boîtier, puis fixez le boîtier sur le mur via le mur 4 pièces montage
crochets. Voir Figure 3.
Chiffre 3
D : Installation du fil de terre
Adopte 2 pièces M6 bride à tête hexagonale écrou de montage fil
de mise à la terre sur M6*Boulon en cuivre de 12 mm pour boîtier
ou et enclos corps.
Voir Figure 4.
Remarque : déjà assemblé sur le corps du boîtier à la sortie d'usine.

- 6 -
Figure 4

- 7 -
E : Installation de la porte de l'enceinte
Le les charnières sont fixées au boîtier avec M4*16 cruciformes fraisées
vis et pièces en plastique de charnière, puis le porte est sécurisé avec
loquets sur le charnières.Adopte fixe porte de boîtier d'assemblage de
goupille sur charnière. Voir Chiffre 5.
Remarque : la porte du boîtier est déjà assemblée sur le corps du
boîtier lorsque départ usine.
Chiffre 5
F : Serrure de porte Installation
Adopte un boîtier d'assemblage de contre-écrous verrouiller et
verrouillage couverture sur porte d'enceinte . Adopte un clé assortie
pour correspondre à l'ouverture de la porte de l'enceinte et clôture.
Voir Figure 6.
Remarque : déjà assemblé sur le corps du boîtier à la sortie d'usine.

- 7 -
Chiffre 6

- 8 -
Avertissement : lors du verrouillage de la porte du boîtier, veuillez
tourner le noyau de verrouillage de 9 à 0 ° de la direction verticale à
la direction horizontale, assurez -vous de respecter meilleur niveau
de protection.


Technischer Support und E-Garantie
Zertifikat www.vevor.com/support
Elektrisch Gehäuse
Produkt
Beschreibung
Material: Kalt Walzstahl
Wir sind weiterhin bestrebt, Ihnen Werkzeuge zur Verfügung zu stellen mit
wettbewerbsfähig Preis.
"Speichern Halb", "Halber Preis " oder andere ähnliche Ausdrücke gebraucht von uns nur
repräsentiert ein
Schätzung der Ersparnisse, die Sie durch den Kauf bestimmter Werkzeuge bei uns
gegenüber den großen Werkzeugen erzielen können.
Top-Marken und tut nicht unbedingt bedeutet, alle Kategorien abzudecken der angebotenen
Werkzeuge von uns. Sie
Wir möchten Sie bitten, sorgfältig zu prüfen, wenn Sie Platzierung ein Bestellen mit uns
wenn du Sind
tatsächlich sparen Hälfte im Vergleich zur Spitze große Marken.


- 1 -
Electrical Enclosure
Material : Kaltgewalzter Stahl
BRAUCHEN HILFE? KONTAKT UNS!
Haben Produkt Fragen? Brauchen technisch Unterstützung? Bitte
fühlen frei Zu Kontakt uns:
Technischer Support und E-Garantie-
Zertifikat www.vevor.com/support
Dies ist das Original Anweisung, bitte alles lesen Handbuch
Anweisungen
sorgfältig vor dem Betrieb. VEVOR behält sich eine klare Auslegung
unserer Bedienungsanleitung vor. Das Aussehen des Produkts soll
unterliegen dem
Produkt Sie erhalten. Bitte verzeihen Sie uns, dass wir nicht informiere
euch nochmal wenn es Technologien oder Software gibt Updates auf
unserer Produkt.

- 1 -

- 2 -
Warnung - Um das Verletzungsrisiko zu verringern , muss der
Benutzer Anleitung lesen Lesen Sie das Handbuch sorgfältig
durch.
AngelegenheitenbenötigenAufmerksamkeit
Warnung
Gehäuse Gehäuse/Schrank ist nur Beschichtung aber NICHT isoliert.
NUR Ein qualifizierter Elektriker kann sich um die Innenschaltung
kümmern und elektrisch Teile. Warnschilder oder andere Zeichen können
gemäß den geltenden Gesetzen angebracht werden oder Codes, wenn
notwendig.
TUN NICHT Erlauben Sie Kindern, mit diesem Artikel.
Der Das Gehäuse des elektrischen Gehäuses könnte NUR alle Löcher
wasserdicht sein haben durch eine weiche Dichtung abgedichtet oder
Stecker. Für die Löcher schneiden von Kunde, Bitte verwenden Sie eine
Dichtung der Schutzklasse IP66 oder gleichwertig Teile zu wasserdicht
halten f.
Das Artikel MUSS Seien Sie geerdet. Bitte beachten Sie die
" Karosseriemontage - Montage Die Erde Draht ".
Tipps
Eventuelle Beschädigungen der Deckschicht können führen zu rost, Und
winzig Oberfläche
Schäden könnten durch Neulackierung ausgebessert . Aber Es Ist nicht
empfohlen, wenn Malerei auf Schäden großen Ausmaßes.
Die Arbeitstemperatur sollte unter 80°C liegen , sonst kann zu einer
Beschädigung der Lackoberfläche und zum Ausfall führen der
Versiegelung.

FEATURESOF PRODUCTS
- 3 -
PU-Schaumdichtband sorgt für Schutz Grad von IP66 bis
Gehäusekörper.
Bosse von verschiedenen Arten Und Größen erlauben einfach
Installation von Einlass/Auslass Linien.
Verzinkt Montage Platte dürfen Auch Sei Wird für die Verdrahtung
verwendet außerhalb des Gehäuse.
Mehrere Schutzrillen Sind entworfen am Gehäuse Öffnung Das
kann nicht nur die Struktur zu stärken, sondern auch verhindern Die
Eintrag von Schmutz oder Wasser, wenn die Tür geöffnet.
Professional Schließsystem mit Doppelzahnzylinder ermöglicht
einfaches Ver-/Entriegeln.
SPEZIFIKATIONSDATEN
Farbe
RAL7035 (Weißgrau)/RAL2000 (Orange)
Körper Material
Kalt Walzstahl
Innere Platte
2,0 mm verzinkt Platte
Beenden
Pulverbeschichtung
Konstruktion
Durchgehend geschweißt
Umgebungstemperatur
-40~+55°C
Dichtung Material
Nahtlos Schaumstoff/Nylon (Unterlegscheiben
oder Stopfen)
Zertifizierung
CE ROHS UL50
Bewertungen
NEMA 4/NEMA 4X
Schutzgrad
IP66 IK10

- 4 -
Modell
Höhe*Breite*Tiefe (mm)
Material
SPT-UL-202015
200*200*150
Kalt Walzstahl
SPT-UL-252015
250*200*150
SPT-UL-302015
300*200*150
SPT-UL-302020
300*200*200
SPT-UL-302515
300*250*150
SPT-UL-303015
300*300*150
SPT-UL-303020
300*300*200
SPT-UL-403015
400*300*150
SPT-UL-403020
400*300*200
SPT-UL-404015
400*400*150
SPT-UL-404020
400*400*200
SPT-UL-503025
500*300*250
SPT-UL-504015
500*400*150
SPT-UL-504020
500*400*200
SPT-UL-504025
500*400*250
SPT-UL-505015
500*500*150
SPT-UL-505015-O
500*500*150
SPT-UL-604020
600*400*200
SPT-UL-604025
600*400*250
SPT-UL-604030
600*400*300
SPT-UL-606020
600*600*200
SPT-UL-606030
600*600*300
SPT-UL-705020
700*500*200

INSTALLATION STEPS
- 5 -
A: Installation der Montageplatte
Nimmt 4 Stück an M8 Sechskantflansch Mutter Montage Montage
Platte mit Gehäusekörper. Sehen Figur 1.
Hinweis: Ab Werk bereits am Gehäusekorpus montiert .
Figur 1
B: Untere Dichtungsplatte Installation
Adoptiert M5*10mm Kreuzschlitz Blechschrauben Montage
Dichtscheibe,Bodendichtung Platte mit Gehäusekörper. Siehe
Abbildung 2. Entsprechend Ihrer Nutzungsanforderung
montieren Es oder nicht.

INSTALLATION STEPS
- 5 -
Abbildung 2

- 6 -
C: Regenkappe und Wand Installation der Montagehalterungen
Richten Sie zunächst das Loch für die Regenkappe mit dem Gehäuse aus
Rückseite Löcher, Nimmt 4 stücke M8*16 mm Sechskantkopf Schraube,
M8 O-Ring, M8 Nüsse fixieren die Regenkappe und 4Stk
Wandmontage Halterungen am Gehäuse anbringen und das Gehäuse
dann mit die 4-teilige Wand Montage Klammern. Siehe Abbildung 3.
Figur 3
D: Installation des Erdungskabels
Nimmt 2 stücke an M6 Sechskantflansch Mutter Montage
Erdungskabel auf M6*12mm Kupferbolzen des Gehäuses do
oder und Gehäuse Körper.
Sehen Abbildung 4.
Hinweis: Ab Werk bereits am Gehäusekorpus montiert .

- 6 -
Abbildung 4

- 7 -
E: Installation der Gehäusetür
Der Scharniere werden mit M4*16 Kreuzsenkkopf
Schrauben und Scharnier-Kunststoffteile, dann die Tür Ist gesichert mit
Verriegelungen auf der Scharniere. Nimmt fest Stiftbaugruppe Gehäusetür
am Scharnier. Siehe Figur 5.
Hinweis: Die Gehäusetür ist bereits am Gehäusekorpus montiert,
wenn ab Werk.
Figur 5
F: Türschloss Installation
Nimmt das Gehäuse für die Kontermutternmontage an sperren und
sperren Abdeckung An Gehäusetür . Nimmt eine passender Schlüssel
für die Gehäusetüröffnung Und Schließen.
Sehen Abbildung 6.
Hinweis: Ab Werk bereits am Gehäusekorpus montiert .

- 7 -
Figur 6

- 8 -
Achtung: Beim Verriegeln der Gehäusetür drehen Sie den
Schlosskern um 9 0° von der vertikalen in die horizontale Richtung.
Achten Sie dabei auf am besten Schutzniveau.


Supporto tecnico e Garanzia elettronica
Certificato www.vevor.com/support
Elettrico Allegato
Prodotto
Descrizione
Materiale: Freddo Acciaio laminato
Continuiamo a impegnarci per fornirti strumenti con competitivo prezzo.
"Salva Metà", "Metà prezzo " o altre espressioni simili usato di solo noi rappresenta UN
stima del risparmio che potresti ottenere acquistando determinati utensili con noi rispetto ai
principali
i migliori marchi e fa non necessariamente significa coprire tutte le categorie di strumenti
offerti di noi. Tu
si ricorda gentilmente di verificare attentamente quando si è collocamento UN ordina con
noi se tu Sono
effettivamente risparmiando metà rispetto alla parte superiore grandi marchi.

- 1 -
Electrical Enclosure
Materiale : acciaio laminato a freddo
BISOGNO AIUTO? CONTATTO NOI!
Avere prodotto domande? Bisogno tecnico supporto? Per favore
Tatto gratuito A contatto noi:
Supporto tecnico e certificato di garanzia
elettronica
www.vevor.com/support
Questo è l'originale istruzione, per favore leggi tutto manuale istruzioni
accuratamente prima di operare. VEVOR si riserva una chiara
interpretazione del nostro manuale utente. L'aspetto del prodotto deve
essere soggetto al
prodotto tu ricevuto. Per favore perdonami noi che non lo faremo
informarti di nuovo se ci sono tecnologie o software aggiornamenti sul
nostro prodotto.

- 2 -
Attenzione: per ridurre il rischio di lesioni , l'utente deve leggere
le istruzioni manuale con attenzione.
LEQUESTIONI RICHIEDONOATTENZIONE
Avvertimento
Il contenitore/armadietto è solo un rivestimento ma NON isolato.
SOLTANTO un elettricista qualificato potrebbe occuparsi dei circuiti
interni e elettrico parti. Etichette di avvertimento o altri segnali potrebbero
essere affissi in base alle leggi pertinenti o codici se necessario.
FARE NON Permettere ai bambini di giocare con questo articolo.
IL L'involucro elettrico potrebbe essere impermeabile SOLO tutti i fori
Avere è stato sigillato da una guarnizione morbida o tappo. Per il buchi
taglio di cliente, Per favore utilizzare un Guarnizione di grado IP66 o
equivalente parti a mantenere impermeabile .
Questo l'articolo DEVE RIMANI CON PUNTO TERZO. Si
prega di fare riferimento al " Installazione carrozzeria -
Montaggio IL terra filo ".
Suggerimenti
Eventuali danni al rivestimento di finitura potrebbero portare alla ruggine, E
minuscolo superficie
il danno potrebbe essere riparato mediante riverniciatura. Ma Esso È non
consigliato quando dipingere su danni su larga scala.
La temperatura di lavoro dovrebbe essere inferiore a 80°C, altrimenti
potrebbe causare danni alla superficie della vernice e il fallimento di
sigillatura.

FEATURESOF PRODUCTS
- 3 -
La striscia di tenuta in schiuma PU garantisce una protezione
grado Di IP66 a corpo del recinto.
boss di vario tipo E dimensioni permettere facile installazione Di
ingresso/uscita linee.
zincato montaggio piatto Potere Anche Essere utilizzato per il
cablaggio fuori dal allegato.
Multiplo scanalature di protezione Sono progettato al allegato apertura
Quello non può solo rinforzare la struttura ma anche impedire IL
iscrizione di sporcizia o acqua quando la porta è aperto.
Professionale il sistema di chiusura con cilindro a doppia
dentatura consente una facile bloccaggio/sbloccaggio.
DATISPECIFICI
Colore
RAL7035 (grigio bianco)/RAL2000 (arancione)
Corpo Materiale
Freddo Acciaio laminato
Interno piatto
2,0 mm zincato Piatto
Fine
Verniciatura a polvere
Costruzione
Saldato in continuo
Temperatura ambiente
-40~+55°C
Guarnizione Materiale
Senza soluzione di continuità Schiuma/Nylon
(rondelle o tappi)
Certificazione
CE Direttiva RoHS UL50
Valutazioni
NEMA 4/NEMA 4X
Grado di protezione
Grado di protezione IP66 IK10

- 4 -
Modello
Altezza*Larghezza*Profondit
à (mm)
Materiale
Italiano:
200*200*150
Freddo Acciaio
laminato
Certificato SPT-UL-
252015
250*200*150
Certificato SPT-UL-
302015
300*200*150
Certificato SPT-UL-
302020
300*200*200
Certificato SPT-UL-
302515
300*250*150
Certificato SPT-UL-
303015
300*300*150
Certificato SPT-UL-
303020
300*300*200
Certificato SPT-UL-
403015
400*300*150
Certificato SPT-UL-
403020
400*300*200
Certificato SPT-UL-
404015
400*400*150
Certificato SPT-UL-
404020
400*400*200
Certificato SPT-UL-
503025
500*300*250
Certificato SPT-UL-
504015
500*400*150
Certificato SPT-UL-
504020
500*400*200
Certificato SPT-UL-
504025
500*400*250
Certificato SPT-UL-
505015
500*500*150
SPT-UL-505015-O
500*500*150
Certificato SPT-UL-
604020
600*400*200
Certificato SPT-UL-
604025
Dimensioni: 600*400*250
Certificato SPT-UL-
604030
Dimensioni: 600*400*300
Certificato SPT-UL-
606020
600*600*200

- 4 -
Certificato SPT-UL-
606030
600*600*300
Certificato SPT-UL-
705020
700*500*200
INSTALLATION STEPS
- 5 -
A: Installazione della piastra di montaggio
Adotta 4 pezzi M8 flangia a testa esagonale montaggio del gruppo
dado piatto con corpo del recinto. Vedere Figura 1.
Nota: già assemblato sul corpo della custodia in fabbrica.
Figura 1
B:Piastra di tenuta inferiore Installazione
Adotta M5*Viti autofilettanti a croce da 10 mm, rondella di
tenuta, guarnizione inferiore piastra con corpo contenitore.
Vedere Figura 2. In base alle tue esigenze di utilizzo montare
Esso O non.

INSTALLATION STEPS
- 5 -
Figura 2

- 6 -
C:Cappuccio antipioggia e muro Installazione delle staffe di
montaggio
Per prima cosa allineare il foro del tappo antipioggia con la custodia
didietro fori, adotta 4 pezzi M8*Testa esagonale da 16 mm bullone, M8 O-
ring, M8 i dadi riparano il berretto antipioggia e 4 pezzi montaggio a parete
staffe sul contenitore, quindi fissare il contenitore sulla parete tramite il
muro da 4 pezzi montaggio parentesi. Vedere Figura 3.
Figura 3
D: Installazione del filo di messa a terra
Adotta 2 pezzi La M6 flangia a testa esagonale gruppo dado filo
di messa a terra su M6*Bullone di rame da 12 mm per il fissaggio
della custodia recinto corpo.
Vedere Figura 4.
Nota: già assemblato sul corpo della custodia in fabbrica.

- 6 -
Figura 4
- 7 -
E: Installazione della porta della cabina
IL le cerniere sono fissate al contenitore con M4*16 croce svasata
viti e parti in plastica della cerniera, quindi il porta È protetto con
chiavistelli sul cerniere.Adotta fisso porta del contenitore del gruppo perno
sulla cerniera. Vedere Figura 5.
Nota: la porta dell'involucro è già assemblata sul corpo
dell'involucro quando ex fabbrica.
Figura 5
F: Serratura della porta Installazione
Adotta il contenitore di assemblaggio dei dadi di bloccaggio bloccare e
serratura copertina SU porta di chiusura . Adotta un chiave abbinata
per soddisfare l'apertura della porta della custodia E chiusura.
Vedere Figura 6.
Nota: già assemblato sul corpo della custodia in fabbrica.

- 7 -
Figura 6

- 8 -
Attenzione: quando si blocca la porta della custodia, ruotare il
nucleo della serratura di 90 ° dalla direzione verticale alla direzione
orizzontale, assicurarsi di soddisfare migliore livello di protezione.


Soporte técnico y Garantía electrónica
Certificado
www.vevor.com/support
Eléctrico Recinto
Producto
Descripción
Material: Frío Acero laminado
Seguimos comprometidos a brindarle herramientas con competitivo precio.
"Ahorrar Mitad", "mitad de precio " o cualquier otra expresión similar usado por Sólo
nosotros representa un
Estimación de los ahorros que podría obtener al comprar ciertas herramientas con nosotros
en comparación con las principales
Las mejores marcas y hace no necesariamente significa cubrir todas las categorías de
herramientas ofrecidas por Nosotros. Tú
Se les recuerda que deben verificar cuidadosamente cuando estén colocación un
Ordenar con a nosotros si usted son
realmente ahorrando La mitad en comparación con la parte superior
Grandes marcas.


- 1 -
Electrical Enclosure
Material : acero laminado en frío
NECESIDAD ¿AYUDA? CONTACTO ¡A
NOSOTROS!
Tener producto ¿preguntas? Necesidad técnico ¿apoyo? Por favor
sentir gratis a contacto a nosotros:
Soporte técnico y certificado de garantía
electrónica
www.vevor.com/support
Este es el original instrucción, Por favor lea todo manual instrucciones
con cuidado antes de operar. VEVOR se reserva una interpretación
clara de nuestro manual de usuario. La apariencia del producto debe
estar sujeto a la
producto tu recibió. Por favor perdona nosotros que no lo haremos
informarle nuevamente Si hay alguna tecnología o software
actualizaciones sobre nuestro producto.

- 2 -
Advertencia: Para reducir el riesgo de lesiones, el usuario debe
Lea las instrucciones Lea el manual con cuidado.
ASUNTOS QUENECESITAN ATENCIÓN
Advertencia
El gabinete/carcasa es solo un revestimiento pero NO aislado. SOLO
Un electricista calificado podría ocuparse de los circuitos internos y
eléctrico regiones. Se podrán colocar etiquetas de advertencia u otros
carteles de acuerdo con las leyes o códigos si necesario.
HACER NO Permita que los niños jueguen con esto artículo.
El El gabinete eléctrico puede ser impermeable SOLO todos los orificios
tener sido sellado por una junta blanda o enchufar. Para el agujeros cortar
por cliente, por favor utiliza un Junta de grado IP66 o equivalente partes a
mantener a prueba de agua f.
Este El artículo DEBE ESTAR CONECTADO A TIERRA.
Por favor consulte la " Instalación de la carrocería - Montaje
el tierra cable ".
Consejos
Cualquier daño en el revestimiento de acabado podría conducir al óxido, y
diminuto superficie
El daño podría ser reparado mediante nueva pintura. Pero él es no
Recomendado cuando pintura en Daños a gran escala.
La temperatura de trabajo debe ser inferior a 80°C, de lo contrario,
Podría provocar daños en la superficie de la pintura y la falla. de
sellado.
FEATURESOF PRODUCTS
- 3 -
La tira de sellado de espuma de PU garantiza una
protección calificación de IP66 a Cuerpo del recinto.
Jefes De varios tipos y tamaños permitir fácil instalación de
entrada/salida pauta.
Galvanizado montaje lámina poder también ser utilizado para
cableado Fuera de el recinto.
Múltiple ranuras de protección son diseñado al recinto apertura eso
no solo puede reforzar la estructura pero también prevenir el entrada
de suciedad o agua cuando la puerta esta abierto.
Profesional Sistema de bloqueo con cilindro de doble
dentado que permite un fácil bloqueo/desbloqueo.
DATOSDE ESPECIFICACIÓN
Color
RAL7035 (gris blanco)/RAL2000 (naranja)
Cuerpo Material
Frío Acero laminado
Interno lámina
2,0 mm galvanizado Lámina
Finalizar
Recubrimiento en polvo
Construcción
Soldadura continua
Temperatura ambiente
-40 ~ +55 °C
Empaquetadora
Material
Sin costura Espuma/nailon (arandelas o
tapones)
Proceso de dar un título
CE RoHS UL50
Calificaciones
NEMA 4/NEMA 4X
Grado de protección
IP66 IK10

- 4 -
Modelo
Alto*Ancho*Profundidad
(mm)
Material
SPT-UL-202015
200*200*150
Frío Acero laminado
SPT-UL-252015
250*200*150
SPT-UL-302015
300*200*150
SPT-UL-302020
300*200*200
SPT-UL-302515
300*250*150
SPT-UL-303015
300*300*150
SPT-UL-303020
300*300*200
SPT-UL-403015
400*300*150
SPT-UL-403020
400*300*200
SPT-UL-404015
400*400*150
SPT-UL-404020
400*400*200
SPT-UL-503025
500*300*250
SPT-UL-504015
500*400*150
SPT-UL-504020
500*400*200
SPT-UL-504025
500*400*250
SPT-UL-505015
500*500*150
SPT-UL-505015-O
500*500*150
SPT-UL-604020
600*400*200
SPT-UL-604025
600*400*250
SPT-UL-604030
600*400*300
SPT-UL-606020
600*600*200
SPT-UL-606030
600*600*300
SPT-UL-705020
700*500*200

INSTALLATION STEPS
- 5 -
A: Instalación de la placa de montaje
Adopta 4 piezas M8 brida de cabeza hexagonal montaje del
conjunto de tuercas plato con Cuerpo del recinto. Ver Cifra 1.
Nota: ya viene montado en el cuerpo del gabinete cuando sale de fábrica.
Cifra 1
B: Placa de sellado inferior Instalación
Adopta M5*Conjunto de tornillos autorroscantes en cruz de 10
mm , arandela de sellado, sellado inferior placa con cuerpo
envolvente. Ver Figura 2. Según sus necesidades de uso
montar él o no.

INSTALLATION STEPS
- 5 -
Figura 2

- 6 -
C: Tapa de lluvia y pared Instalación de soportes de montaje
Primero alinee el orificio de la tapa de lluvia con el gabinete. trasero
agujeros, adopta 4 piezas M8*Cabeza hexagonal de 16 mm perno, M8
junta tórica, M8 Las nueces arreglan el problema gorro de lluvia y 4 piezas
montaje en pared soportes en el gabinete, luego fije el gabinete en la
pared mediante La pared de 4 piezas montaje soportes. ver Figura 3.
Cifra 3
D:Instalación del cable de puesta a tierra
Adopta 2 piezas M6 brida de cabeza hexagonal conjunto de
tuercas cable de conexión a tierra M6*Perno de cobre de 12 mm
para la caja o el marco. Adjunto cuerpo.
Ver Figura 4.
Nota: ya viene montado en el cuerpo del gabinete cuando sale de fábrica.

- 6 -
Figura 4

- 7 -
E:Instalación de la puerta del recinto
El Las bisagras están aseguradas al gabinete con M4*16 avellanado en
cruz
tornillos y piezas de plástico de la bisagra, luego el puerta es asegurado
con pestillos en el Bisagras.Adopta fijas Conjunto de pasadores para
puerta de caja con bisagra. Ver Cifra 5.
Aviso: La puerta del gabinete ya está ensamblada en el cuerpo
del gabinete cuando ex-fábrica.
Cifra 5
F: Cerradura de puerta Instalación
Adopta una carcasa de conjunto de tuercas de seguridad bloquear y
cerrar cubrir en Puerta del recinto . Adopta una Llave adaptada para
adaptarse a la apertura de la puerta del gabinete. y cierre.
Ver Figura 6.
Nota: ya viene montado en el cuerpo del gabinete cuando sale de fábrica.

- 7 -
Cifra 6

- 8 -
Advertencia: al bloquear la puerta del gabinete, gire el núcleo de la
cerradura 9 0° desde la dirección vertical a la dirección horizontal,
asegúrese de cumplir mejor nivel de protección.


Wsparcie techniczne i E-gwarancja Certyfikat
www.vevor.com/support
Elektryczny
Załącznik Produkt
Opis
Materiał: Zimny Stal walcowana
Nadal staramy się dostarczać Ci narzędzia z konkurencyjny cena.
"Ratować Połowa", "Połowa ceny " lub jakiekolwiek inne podobne wyrażenia używany
przez tylko my reprezentuje jakiś
Szacunkowe oszczędności, jakie możesz uzyskać kupując u nas niektóre narzędzia w
porównaniu do innych dużych firm
najlepsze marki i robi nie koniecznie oznacza objęcie wszystkich kategorii oferowanych
narzędzi przez nas. Ty
uprzejmie przypominamy o dokładnym sprawdzeniu, kiedy umieszczanie jakiś zamów z
nas jeśli ty Czy
faktycznie oszczędzając połowa w porównaniu z górą główne marki.


- 1 -
Electrical Enclosure
Materiał : Stal walcowana na zimno
POTRZEBOWAĆ POMOCY? KONTAKT NAS!
Mieć produkt pytania? Potrzebować techniczny wsparcie? Proszę
czuć bezpłatny Do kontakt nas:
Wsparcie techniczne i certyfikat e-gwarancji
www.vevor.com/support
To jest oryginał instrukcja, proszę przeczytać wszystko podręcznik
instrukcje
ostrożnie przed uruchomieniem. VEVOR zastrzega sobie prawo do
jednoznacznej interpretacji naszej instrukcji obsługi. Wygląd produktu
powinien podlegać
produkt ty otrzymane. Proszę wybaczyć nas, że nie będziemy
poinformuję cię ponownie jeśli istnieje jakaś technologia lub
oprogramowanie Aktualizacje na naszym produkt.

- 1 -

- 2 -
Ostrzeżenie: Aby zmniejszyć ryzyko obrażeń , użytkownik musi:
przeczytaj instrukcje instrukcję uważnie.
SPRAWYWYMAGAJĄCE UWAGI
Ostrzeżenie
Obudowa/szafka to tylko powłoka, ale NIE bezludny. TYLKO
wykwalifikowany elektryk może poradzić sobie z obwodem wewnętrznym
i elektryczny strony. Etykiety ostrzegawcze lub inne znaki mogą być
umieszczane zgodnie z odpowiednimi przepisami lub kody jeśli niezbędny.
DO NIE Pozwól dzieciom bawić się tym przedmiot.
Ten Obudowa elektryczna może być wodoodporna TYLKO we wszystkich
otworach Posiadać uszczelnione miękką uszczelką lub wtyczka. Dla
dziury cięcie przez klient, Proszę użyj Uszczelka klasy IP66 lub
równoważna części do utrzymuj wodoodporność f.
Ten pozycja MUSI BĄDŹ UZIEMIONY. Proszę zapoznać
się z „ Montaż nadwozia – montaż ten ziemia drut ".
Porady
Jakiekolwiek uszkodzenie powłoki wykończeniowej może prowadzić do
rdzy, I malutki powierzchnia
uszkodzenie może być naprawiono poprzez ponowne malowanie. Ale To
Jest nie zalecane kiedy malowanie na szkody na dużą skalę.
Temperatura pracy powinna być niższa niż 80°C, w przeciwnym razie
może spowodować uszkodzenie powierzchni malarskiej i awarię
uszczelnienia.
FEATURESOF PRODUCTS
- 3 -
Uszczelniająca taśma piankowa PU zapewnia ochronę
stopień z IP66 do korpus obudowy.
Szefowie różnych typów I rozmiary umożliwić łatwy instalacja z
wlot/wylot kwestia.
Ocynkowany montowanie płyta Móc Również Być używany do
okablowania poza nim załącznik.
Wielokrotny rowki ochronne Czy zaprojektowany w załącznik otwór To
nie może tylko wzmocnić konstrukcję, ale także zapobiegać ten
wejście z brudu lub wody, gdy drzwi są otwarte otwierany.
Profesjonalny system blokowania z podwójnym cylindrem
zębatym umożliwia łatwe blokowanie/odblokowywanie.
DANESPECYFIKACYJNE
Kolor
RAL7035 (Biały Szary)/RAL2000
(Pomarańczowy)
Ciało Tworzywo
Zimno Stal walcowana
Wewnętrzny płyta
2,0 mm ocynkowane Płyta
Skończyć
Malowanie proszkowe
Budowa
Spawane w sposób ciągły
Temperatura otoczenia
-40~+55°C
Uszczelka Tworzywo
Bezszwowy Pianka/Nylon (podkładki lub
zatyczki)
Orzecznictwo
CE RoHS-y UL50
Oceny
Certyfikat NEMA 4 4X
Stopień ochrony
IP66 IK10

- 4 -
Model
Wysokość*Szerokość*Głębo
kość (mm)
Tworzywo
SPT-UL-202015
200*200*150
Zimno Stal
walcowana
SPT-UL-252015
250*200*150
SPT-UL-302015
300*200*150
SPT-UL-302020
300*200*200
SPT-UL-302515
300*250*150
SPT-UL-303015
300*300*150
SPT-UL-303020
300*300*200
SPT-UL-403015
400*300*150
SPT-UL-403020
400*300*200
SPT-UL-404015
400*400*150
SPT-UL-404020
400*400*200
SPT-UL-503025
500*300*250
SPT-UL-504015
500*400*150
SPT-UL-504020
500*400*200
SPT-UL-504025
500*400*250
SPT-UL-505015
500*500*150
SPT-UL-505015-O
500*500*150
SPT-UL-604020
600*400*200
SPT-UL-604025
600*400*250
SPT-UL-604030
600*400*300
SPT-UL-606020
600*600*200
SPT-UL-606030
600*600*300
SPT-UL-705020
700*500*200

INSTALLATION STEPS
- 5 -
A: Instalacja płyty montażowej
Przyjmuje 4 sztuki M8 kołnierz z łbem sześciokątnym montaż
nakrętki montażowej talerz z korpus obudowy. Widzieć Postać 1.
Uwaga: elementy są już zamontowane na obudowie w fabryce.
Postać 1
B: Dolna płyta uszczelniająca Instalacja
Przyjmuje M5*Montaż śrub samogwintujących krzyżowych 10
mm , podkładka uszczelniająca, uszczelnienie dolne płyta z
korpusem obudowy. Zobacz Rysunek 2. Zgodnie z Twoimi
wymaganiami użytkowania uchwyt To Lub nie.

INSTALLATION STEPS
- 5 -
Rysunek 2
- 6 -
C:Czapka przeciwdeszczowa i ściana Montaż wsporników
montażowych
Najpierw wyrównaj otwór w osłonie przeciwdeszczowej z obudową tyłek
otwory, przyjmuje 4 sztuki M8*16mm łeb sześciokątny śruba,M8 O-ring,M8
orzechy naprawiają czapka przeciwdeszczowa i 4szt. montaż na ścianie
uchwyty na obudowie, a następnie zamocuj obudowę na ścianie za
pomocą ściana 4szt montowanie nawiasy. Zobacz Rysunek 3.
Postać 3
D: Instalacja przewodu uziemiającego
Przyjmuje 2 sztuki M6 kołnierz z łbem sześciokątnym nakrętka
montażowa przewód uziemiający na M6*12mm miedziana śruba
obudowy lub załączyć ciało.
Widzieć Rysunek 4.
Uwaga: elementy są już zamontowane na obudowie w fabryce.
- 6 -
Rysunek 4
- 7 -
E:Montaż drzwi obudowy
Ten Zawiasy są przymocowane do obudowy za pomocą M4*16 stożkowo-
krzyżowe
śruby i plastikowe części zawiasów, a następnie drzwi Jest zabezpieczone
za pomocą zatrzaski na Zawiasy.Przyjmuje stałe montaż kołka drzwi
obudowy na zawiasie. Zobacz Postać 5.
Uwaga: Drzwi obudowy są już zamontowane na korpusie obudowy
w momencie montażu. ex-fabryka.
Postać 5
F: Zamek drzwi Instalacja
Przyjmuje obudowę montażową z nakrętkami zabezpieczającymi
zamknij i zamek okładka NA drzwi obudowy . Przyjmuje dopasowany
klucz do otworu drzwi obudowy I zamknięcie.
Widzieć Rysunek 6.
Uwaga: elementy są już zamontowane na obudowie w fabryce.
- 7 -
Postać 6

- 8 -
Ostrzeżenie: podczas blokowania drzwi obudowy należy obrócić
rdzeń zamka o 9 0° z kierunku pionowego do poziomego,
upewniając się, że spełnione są następujące wymagania: to, co
najlepsze poziom ochrony.


Technische ondersteuning en E-Garantie
Certificaat www.vevor.com/support
Elektrisch
Behuizing Product
Beschrijving
Materiaal: Koud Gewalst staal
Wij blijven ons inzetten om u de tools te bieden die u nodig hebt competitief prijs.
"Redden Half", "Half Price " of andere soortgelijke uitdrukkingen gebruikt door alleen wij
vertegenwoordigt een
schatting van de besparingen die u kunt behalen door bepaalde gereedschappen bij ons te
kopen in vergelijking met de belangrijkste r
topmerken en doet niet noodzakelijkerwijs betekent dat alle categorieën worden gedekt van
de aangeboden hulpmiddelen door wij. Jij
Wij herinneren u eraan om zorgvuldig te controleren wanneer u plaatsen een bestellen
met ons als je Zijn
Eigenlijk besparen de helft in vergelijking met de bovenkant grote merken.


- 1 -
Electrical Enclosure
Materiaal : Koudgewalst staal
BEHOEFTE HULP? CONTACT ONS!
Hebben product vragen? Behoefte technisch steun? Alsjeblieft
gevoel vrij naar contact ons:
Technische ondersteuning en e-
garantiecertificaat
www.vevor.com/support
Dit is het origineel instructie, lees alles alstublieft handmatig instructies
voorzichtig voor gebruik. VEVOR behoudt zich een duidelijke
interpretatie van onze gebruikershandleiding voor. Het uiterlijk van het
product moet onderworpen zijn aan de
product jij ontvangen. Vergeef me alsjeblieft ons dat we niet zullen u
opnieuw informeren als er technologie of software is updates over onze
product.

- 2 -
Waarschuwing - Om het risico op letsel te verkleinen, moet de
gebruiker: lees instructies handleiding zorgvuldig door.
ZAKENHEBBEN AANDACHTNODIG
Waarschuwing
Behuizing behuizing/kast is alleen coating maar NIET geïsoleerd.
ALLEEN een gekwalificeerde elektricien kan de binnencircuits
behandelen en elektrisch onderdelen. Waarschuwingslabels of andere
borden kunnen worden geplaatst volgens de relatieve wetten of codes als
nodig.
DOEN NIET Laat kinderen hiermee spelen item.
De Elektrische behuizing behuizing kan alleen waterdicht zijn als alle
gaten hebben verzegeld door een zachte pakking of plug. Voor de gaten
snee door klant, Alsjeblieft gebruik een IP66-klasse pakking of
gelijkwaardig onderdelen naar waterdicht houden f.
Dit item MOET BLIJF GEARBD. Zie de "Carrosserie -
installatie - Montage de aarde draad ".
Tips
Eventuele schade aan de afwerklaag kan leiden tot roest, En klein
oppervlak
schade zou kunnen zijn gerepareerd door opnieuw te schilderen. Maar
Het is niet aanbevolen wanneer schilderen op grootschalige schade.
De werktemperatuur moet lager zijn dan 80°C, anders is het kan leiden
tot schade aan het schilderoppervlak en het falen van verzegeling.
FEATURESOF PRODUCTS
- 3 -
PU-schuimafdichtingsstrip zorgt voor een bescherming
cijfer van IP66 tot behuizing.
Bazen van verschillende typen En maten toestaan eenvoudig
installatie van inlaat/uitlaat lijnen.
Gegalvaniseerd montage bord kan Ook zijn gebruikt voor
bedrading buiten de omheining.
Meervoudig beschermingsgroeven Zijn ontworpen bij de behuizing
opening Dat kan niet alleen de structuur versterken maar ook
voorkomen de binnenkomst van vuil of water als de deur open is
geopend.
Professioneel sluitsysteem met dubbele tandcilinder maakt
eenvoudig vergrendelen/ontgrendelen.
SPECIFICATIEGEGEVENS
Kleur
RAL7035 (witgrijs)/RAL2000 (oranje)
Lichaam Materiaal
Koud Gewalst staal
Binnen bord
2,0 mm gegalvaniseerd Bord
Finish
Poedercoating
Bouw
Doorlopend gelast
Omgevingstemperatuur
-40~+55°C
Pakking Materiaal
Naadloos Schuim/nylon (ringen of pluggen)
Certificering
CE ROHS UL50
Beoordelingen
NEMA 4/NEMA 4X
Beschermingsgraad
IP66 IK10

- 4 -
Model
Hoogte*Breedte*Diepte
(mm)
Materiaal
SPT-UL-202015
200*200*150
Koud Gewalst staal
SPT-UL-252015
250*200*150
SPT-UL-302015
300*200*150
SPT-UL-302020
300*200*200
SPT-UL-302515
300*250*150
SPT-UL-303015
300*300*150
SPT-UL-303020
300*300*200
SPT-UL-403015
400*300*150
SPT-UL-403020
400*300*200
SPT-UL-404015
400*400*150
SPT-UL-404020
400*400*200
SPT-UL-503025
500*300*250
SPT-UL-504015
500*400*150
SPT-UL-504020
500*400*200
SPT-UL-504025
500*400*250
SPT-UL-505015
500*500*150
SPT-UL-505015-O
500*500*150
SPT-UL-604020
600*400*200
SPT-UL-604025
600*400*250
SPT-UL-604030
600*400*300
SPT-UL-606020
600*600*200
SPT-UL-606030
600*600*300
SPT-UL-705020
700*500*200
INSTALLATION STEPS
- 5 -
A: Montageplaatinstallatie
Neemt 4 stuks aan M8 zeskantige kopflens moer montage
montage bord met behuizing. Zien Figuur 1.
Let op: af-fabriek reeds gemonteerd op de behuizing .
Figuur 1
B: Onderste afdichtplaat Installatie
Adopteert M5*10mm kruis zelftappende schroeven montage
afdichtingsring , bodemafdichting plaat met behuizing. Zie
Figuur 2. Afhankelijk van uw gebruiksvereiste berg Het of niet.
Figuur 2
- 6 -
C:Regenkap en muur Montagebeugels Installatie
Lijn eerst het gat van de regenkap uit met de behuizing achterkant gaten,
4 stuks goedgekeurd M8*16mm zeskantkop bout,M8 O-ring,M8 noten
repareren de regenkap en 4 stuks wandmontage beugels op de
behuizing en bevestig de behuizing vervolgens aan de muur via de 4st
muur montage haakjes. Zie Figuur 3.
Figuur 3
D: Installatie van aardingsdraad
Neemt 2 stuks aan M6 zeskantige kopflens moer montage
aardingsdraad op M6*12mm koperen bout van behuizing do of
en omhulsel lichaam.
Zien Figuur 4.
Let op: af-fabriek reeds gemonteerd op de behuizing .

- 6 -
Figuur 4

- 7 -
E: Installatie van de behuizingdeur
De scharnieren worden met behulp van M4*16 kruisverzonken
schroeven en scharnier kunststof onderdelen, dan de deur is beveiligd met
grendels op de scharnieren.Kan vast worden gebruikt penmontage
behuizing deur op scharnier. Zie Figuur 5.
Let op: De behuizingsdeur is al gemonteerd op de
behuizingsbehuizing wanneer af-fabriek.
Figuur 5
F: Deurslot Installatie
Neemt de behuizing van de borgmoerenmontage aan slot en slot
omslag op behuizing deur. Neemt een bijpassende sleutel om de
deuropening van de behuizing te ontmoeten En sluiten.
Zien Figuur 6.
Let op: af-fabriek reeds gemonteerd op de behuizing .

- 7 -
Figuur 6

- 8 -
Waarschuwing: wanneer u de deur van de behuizing vergrendelt,
dient u de slotkern 9 0° van de verticale naar de horizontale richting
te draaien. Zorg ervoor dat u de juiste vergrendelingsrichting
aanhoudt. best beschermingsniveau.


Teknisk support och E-garanti Certifikat
www.vevor.com/support
Elektrisk Inhägnad
Produkt
Beskrivning
Material: Kall Valsat stål
Vi fortsätter att vara engagerade i att förse dig med verktyg konkurrenskraftig pris.
"Spara Hälften", "Halv Pris " eller andra liknande uttryck begagnad av bara oss
representerar en
uppskattning av besparingar du kan dra nytta av att köpa vissa verktyg hos oss jämfört med
de stora
toppmärken och gör inte nödvändigtvis innebär att täcka alla kategorier verktyg som erbjuds
av oss. Du
påminns vänligt om att verifiera noggrant när du är placering en beställa med oss om du
är
faktiskt sparar hälften i jämförelse med toppen stora varumärken.


- 1 -
Electrical Enclosure
Material : Kallvalsat stål
BEHOV HJÄLP? KONTAKTA USA!
Ha produkt frågor? Behov tekniskt stöd? Behaga känsla gratis till
kontakta oss:
Teknisk support och e-garanticertifikat
www.vevor.com/support
Detta är originalet instruktion, snälla läs allt manuell instruktioner
försiktigt före drift. VEVOR reserverar sig för en tydlig tolkning av vår
användarmanual. Produktens utseende ska vara föremål för
produkt dig mottagen. Snälla förlåt oss att vi inte gör det informera dig
igen om det finns någon teknik eller programvara uppdateringar på vår
produkt.

- 2 -
Varning-För att minska risken för i jury måste användaren läs
instruktionerna handbok noggrant.
ÄRendenBEHÖVERUPPMÄRKSAMHET
Varning
Kapsling kapsling/skåp är endast beläggning men INTE isolerade.
ENDAST Y en kvalificerad elektriker kan ta itu med den inre kretsen
elektrisk delar. Varningsetiketter eller andra skyltar kan sättas upp enligt
relativa lagar eller koder om nödvändig.
DO INTE Låt barn leka med detta punkt.
De Elektrisk kapsling kan vara vattentät ENDAST alla hål ha förseglats
med en mjuk ga -skiss eller plugg. För den hål skära av kund, behaga
använd en IP66-klassad packning eller motsvarande delar till hålla
vattentät f.
Detta föremål MÅSTE VARA JORDAD. Vänligen se "
Krossinstallation - Montering de jorden tråd ".
Tips
Eventuella skador på ytbeläggningen kan leda till rost, och mycket liten yta
skada kan vara repareras genom ommålning. Men det är inte
rekommenderas när måla på storskaliga skador.
Arbetstemperaturen bör vara lägre än 80°C, annars är det kan leda till
skador på målningsytan och fel av tätning.

FEATURESOF PRODUCTS
- 3 -
PU-skummande tätningslist ger ett skydd kvalitet av IP66 till
höljeskropp.
Chefer av olika slag och storlekar tillåta lätt installation av
inlopp/utlopp rader.
Galvaniserad montering tallrik burk också vara används för
ledningar utanför han inhägnad.
Flera skyddsgr ooves är utformad vid inhägnad öppning att kan inte
bara förstärka strukturen men också förhindra de inträde av smuts
eller vatten när dörren är öppnad.
Professionell låssystem med dubbla tänder cylinder gör enkelt
låsning/upplåsning.
SPECIFIKATIONSDATA
Färg
RAL7035(Vit Grå)/RAL2000(Orange)
Kropp Material
Kall Valsat stål
Inre tallrik
2,0 mm galvaniserad Tallrik
Avsluta
Pulverlackering
Konstruktion
Kontinuerligt svetsad
Omgivningstemperatur
-40~+55°C
Packning Material
Sömlös Skum/nylon (brickor eller pluggar)
Certifiering
CE ROHS UL50
Betyg
NEMA 4/NEMA 4X
Skyddsgrad
IP66 IK10

- 4 -
Modell
Höjd*Bredd*Djup (mm)
Material
SPT-UL-202015
200*200*150
Kall Valsat stål
SPT-UL-252015
250*200*150
SPT-UL-302015
300*200*150
SPT-UL-302020
300*200*200
SPT-UL-302515
300*250*150
SPT-UL-303015
300*300*150
SPT-UL-303020
300*300*200
SPT-UL-403015
400*300*150
SPT-UL-403020
400*300*200
SPT-UL-404015
400*400*150
SPT-UL-404020
400*400*200
SPT-UL-503025
500*300*250
SPT-UL-504015
500*400*150
SPT-UL-504020
500*400*200
SPT-UL-504025
500*400*250
SPT-UL-505015
500*500*150
SPT-UL-505015-O
500*500*150
SPT-UL-604020
600*400*200
SPT-UL-604025
600*400*250
SPT-UL-604030
600*400*300
SPT-UL-606020
600*600*200
SPT-UL-606030
600*600*300
SPT-UL-705020
700*500*200

INSTALLATION STEPS
- 5 -
A: Installation av monteringsplatta
Adopterar 4st M8 sexkantshuvudfläns montering av mutter tallrik
med höljeskropp. Se Figur 1.
Observera: redan monterad på höljeskroppen från fabrik.
Figur 1
B: Botten tätningsplatta Installation
Adopterar M5*10 mm tvärgående självgängande skruvar
montering tätningsbricka , bottentätning plåt med
kapslingskropp. Se Figur 2. Enligt ditt användningskrav till
montera det eller inte.

INSTALLATION STEPS
- 5 -
Figur 2
- 6 -
C: Regnmössa och vägg Montering av monteringsfästen
Rikta först in regnlockets hål med höljet baksida hål, antar 4st M8*16 mm
sexkantshuvud bult,M8 O-ring,M8 muttrar fixa regnmössa och 4 st
väggmontering fästen på kapslingen, fäst sedan kapslingen på väggen
via den 4 st väggen montering parenteser. Se Figur 3.
Figur 3
D: Installation av jordledning
Adopterar 2st M6 sexkantshuvudfläns mutterenhetens jordkabel
på M6*12 mm kopparbult av kapsling do eller och inhägnad ang
kropp.
Se Figur 4.
Observera: redan monterad på höljeskroppen från fabrik.
Figur 4
- 7 -
E: Installation av kapslingsdörr
De gångjärn fästs i kapslingen med M4*16 tvärförsänkt
skruvar och gångjärnsplastdelar, sedan dörr är säkrad med spärrarna på
gångjärn.Antar fast stiftmonteringshöljesdörr på gångjärn. Se Figur 5.
Obs: Kapslingsdörren redan monterad på kapslingens kropp när fd
fabrik.
Figur 5
F: Dörrlås Installation
Antar kapsling för låsmuttrar lås och låsa täcka på höljesdörr . Antar
en matchad nyckel för att möta skåpets dörröppning och stängning.
Se Bild 6.
Observera: redan monterad på höljeskroppen från fabrik.
Figur 6

- 8 -
Varning: när du låser skåpets dörr, vrid låskärnan 9 0° från vertikal
riktning till horisontell riktning, se till att möta bäst skyddsnivå.


