
Technical Support and E-Warranty Certificate www.vevor.com/support
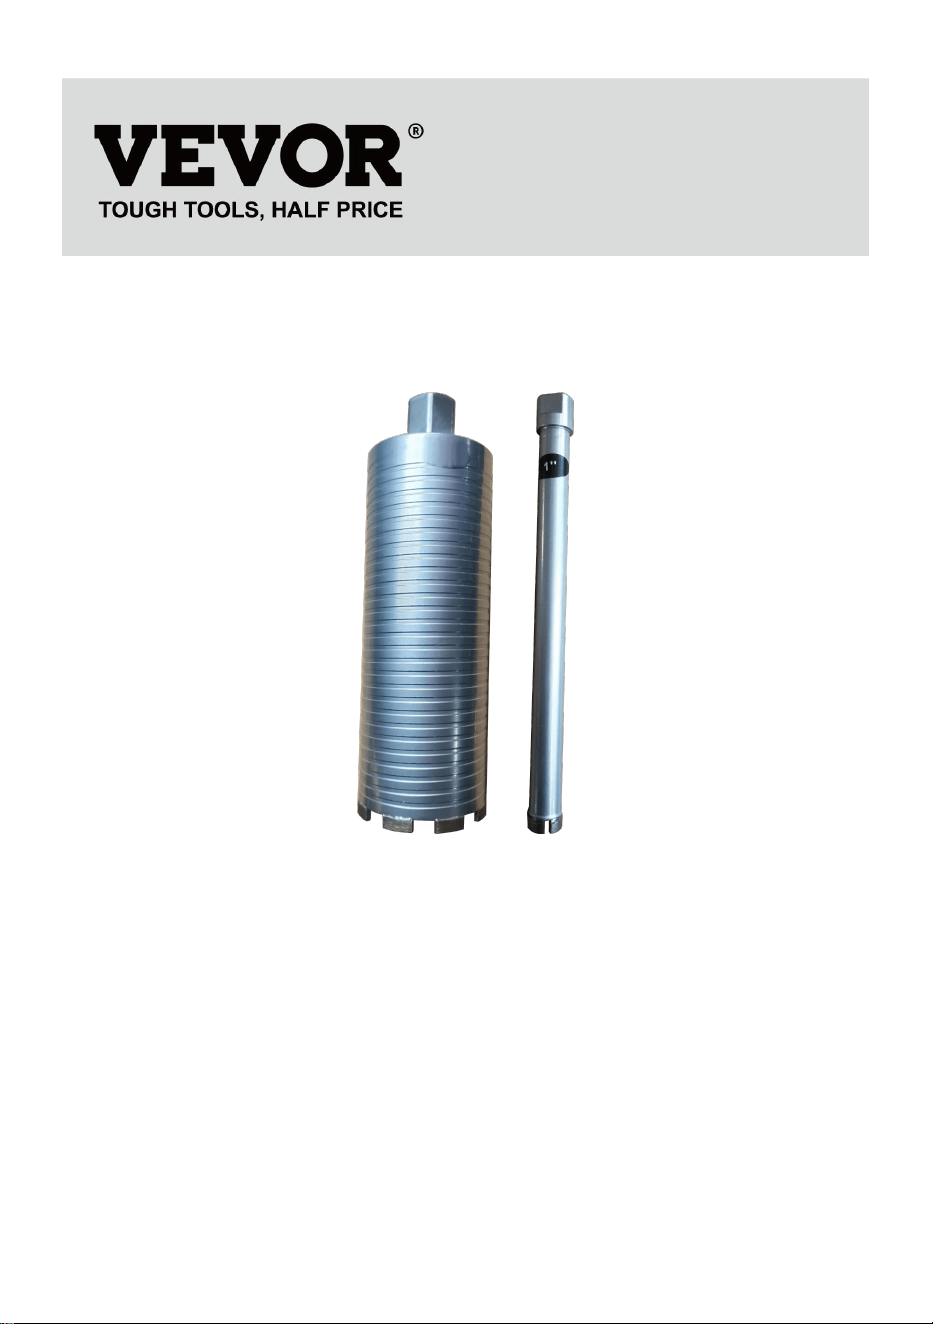
DRILL CORE BITS USER MANUAL
We continue to be committed to provide you tools with competitive price.
"Save Half", "Half Price" or any other similar expressions used by us only represents an
estimate of savings you might benefit from buying certain tools with us compared to the major
top brands and does not necessarily mean to cover all categories of tools offered by us. You
are kindly reminded to verify carefully when you are placing an order with us if you are
actually saving half in comparison with the top major brands.
- 1 -
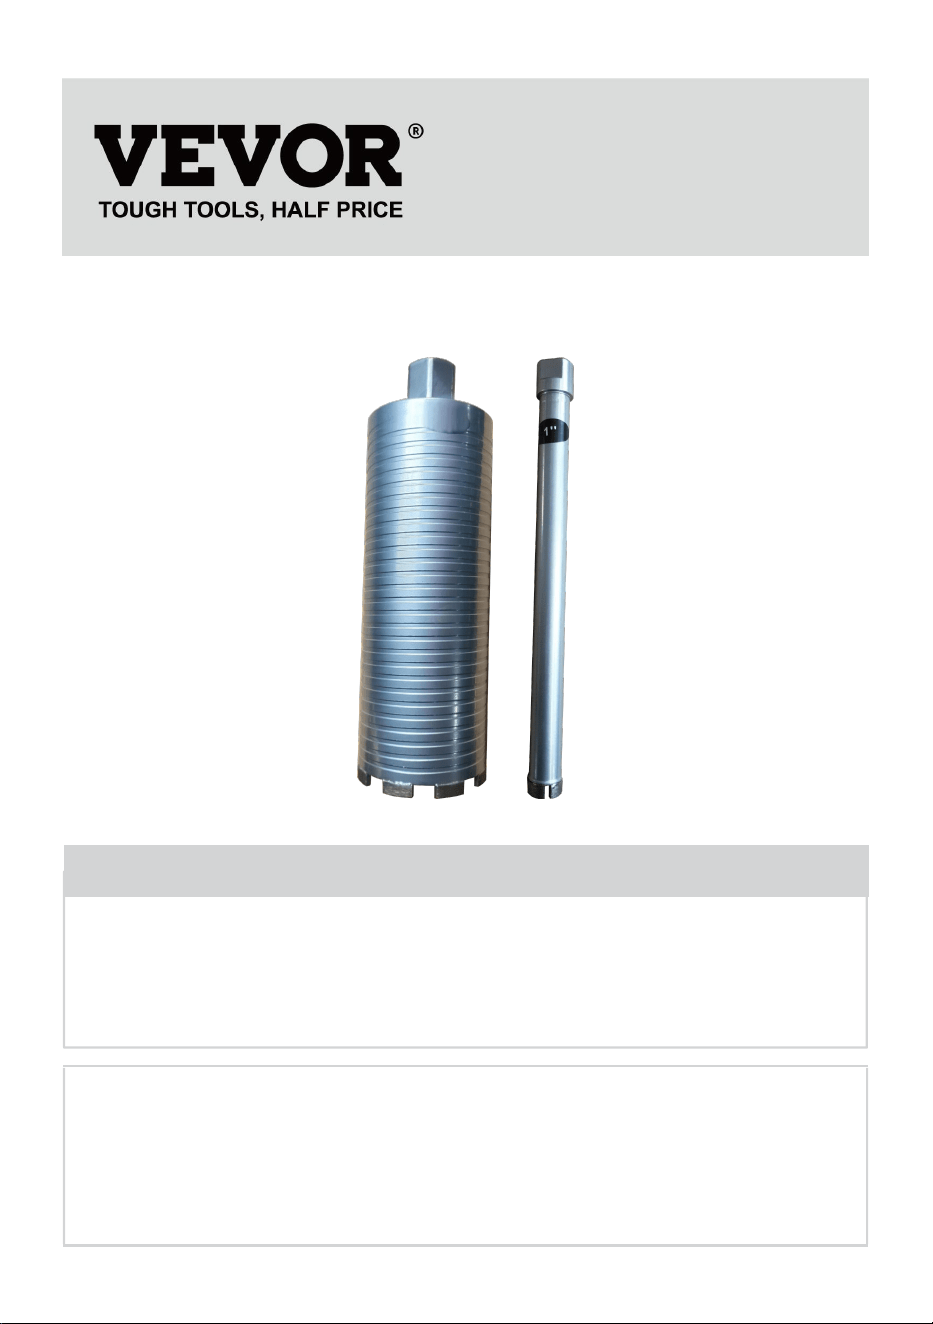
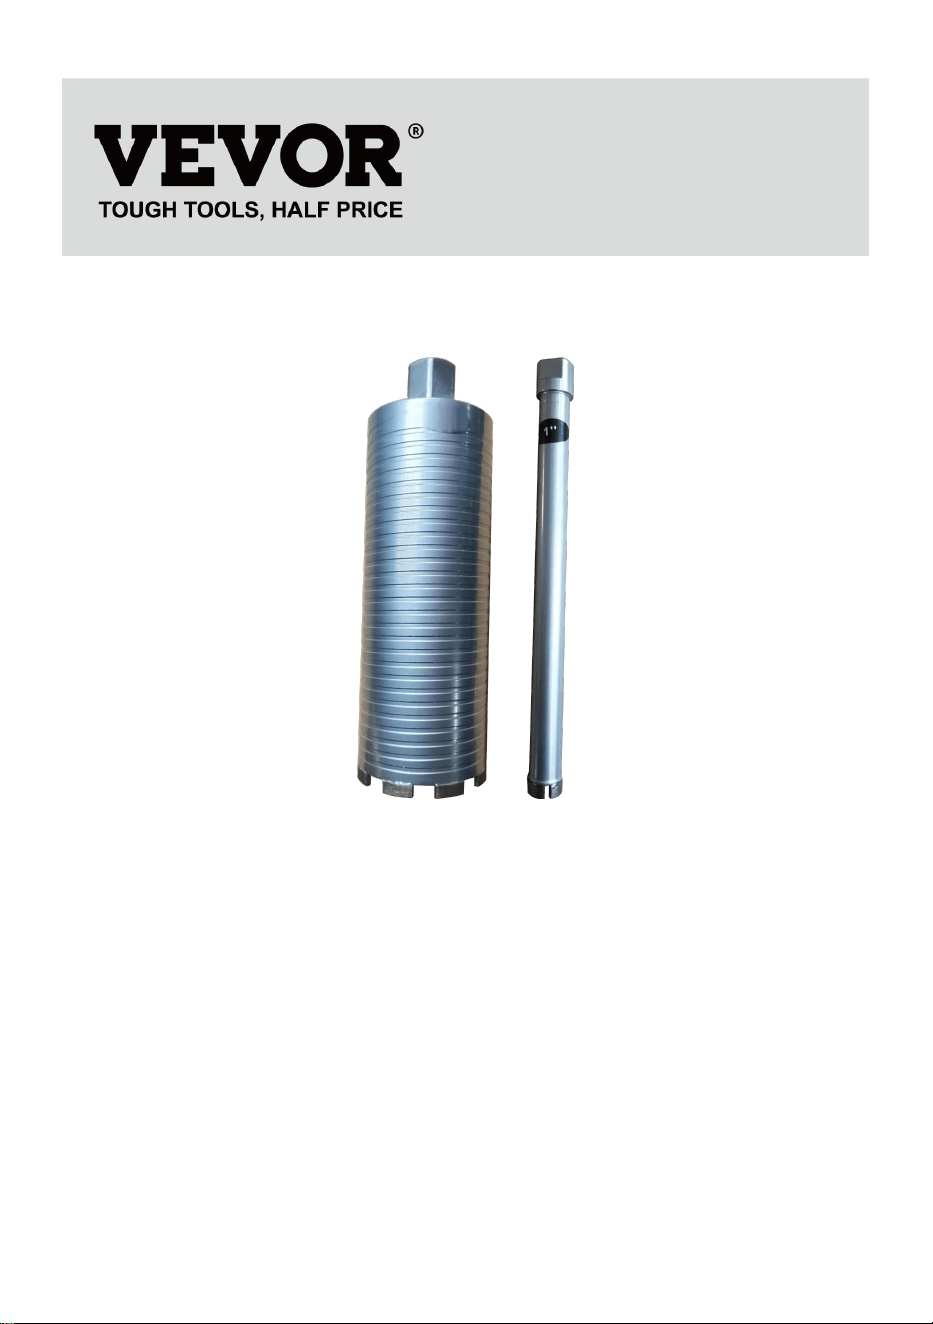
MODEL: 107300AA/102300AA/63300AA/108400BC/25400AC/32400AC/
50400BC
(The picture is for reference only, please refer to the actual object)
Have product questions? Need technical support? Please feel free to
contact us:
Technical Support and E-Warranty Certificate
www.vevor.com/support
NEED HELP? CONTACT US!
This is the original instruction, please read all manual instructions
carefully before operating. VEVOR reserves a clear interpretation of our
user manual. The appearance of the product shall be subject to the
product you received. Please forgive us that we won't inform you again if
there are any technology or software updates on our product.
DRILL CORE BITS

- 2 -
SAFETY INSTRUCTION AND PRECAUTIONS
WARNING:
Read this material before using this product. Failure to do so can
result in serious injury.
1. This product is not a toy. Do not allow children to play with this
item.
2. Use as intended only.
3. Work area safety:Keep the workplace clean and bright. Chaos and
dark places can cause an accident.
4. Personal safety:Be alert, pay attention to the operation and stay
awake when operating the power tool. Do not operate the power tool
with fatigue, medication, alcohol, or therapeutic response.
5. Use safety devices. Always wear goggles. Safety devices, such as
dust masks under suitable conditions, non-slip safety shoes, helmets,
hearing protection and other devices can reduce personal injury.
6. Dress properly. Do not wear loose clothing or wear jewelry. Keep
your hair, clothes and sleeves away from moving parts. Loose clothing,
ornaments or long hair may be involved in moving parts.

- 3 -
OPERATION AS BELOW
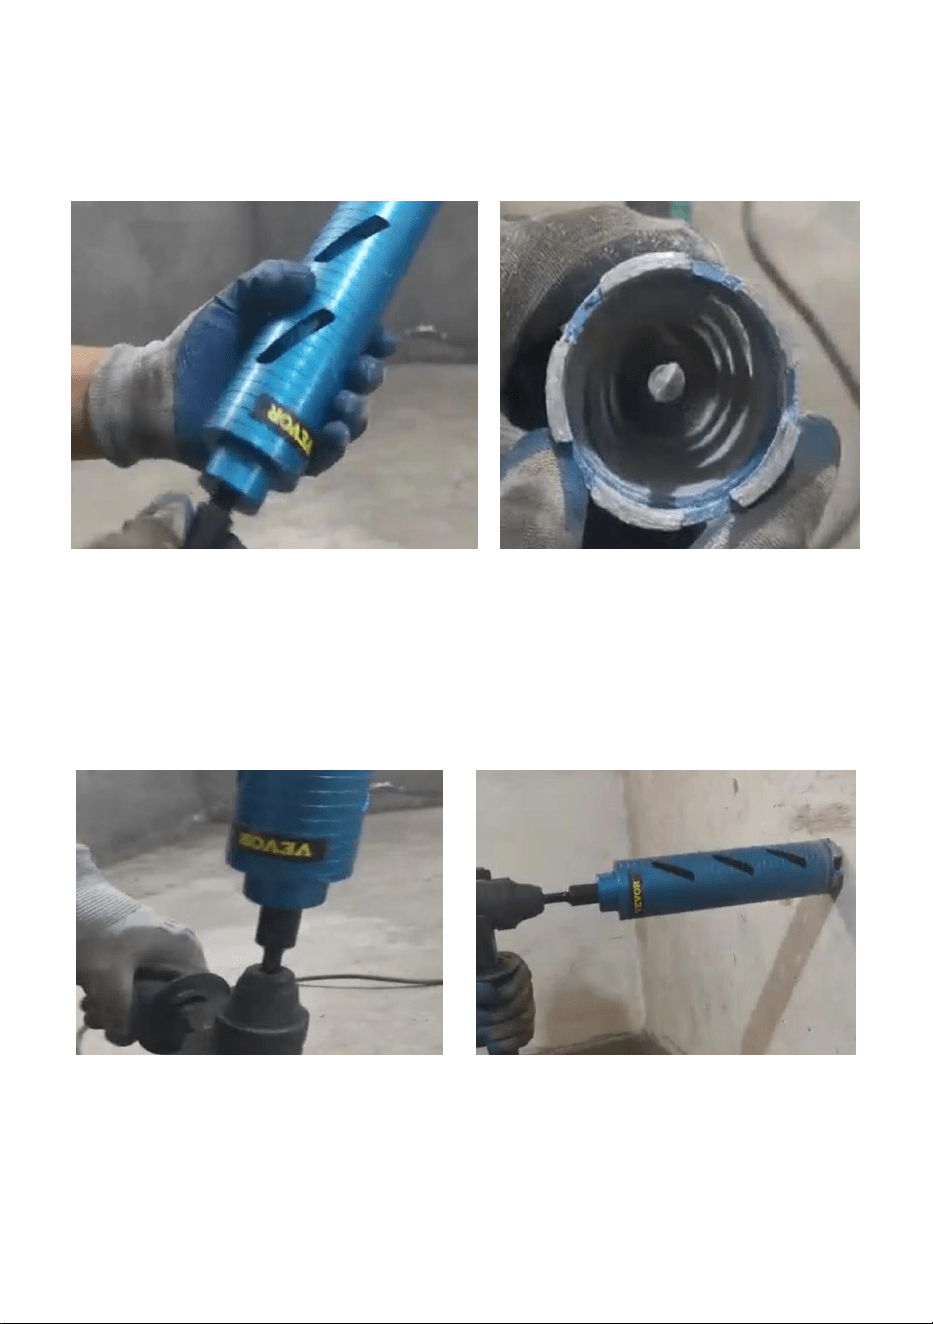
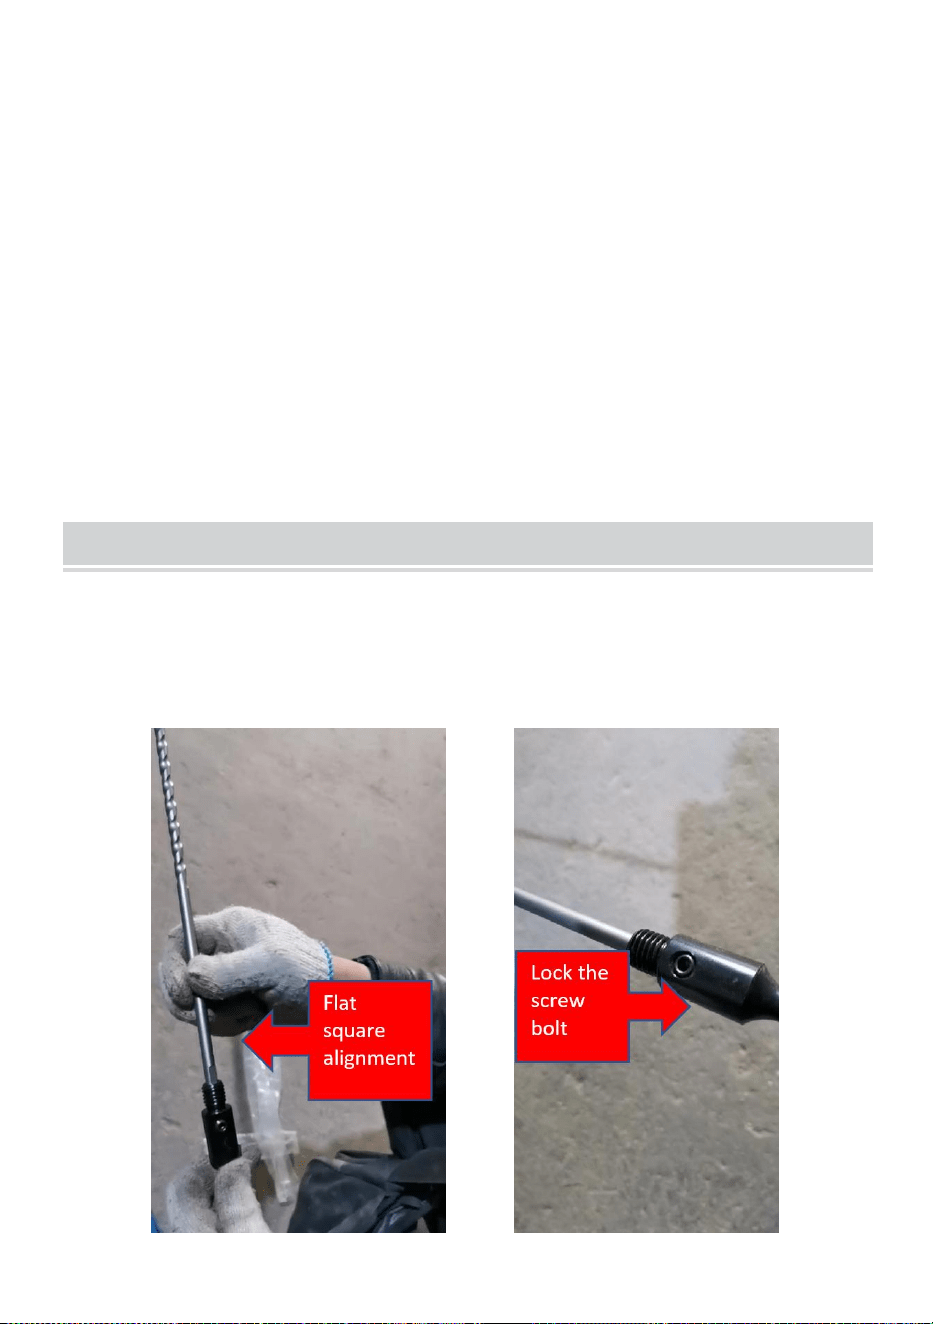
hand held electric drill
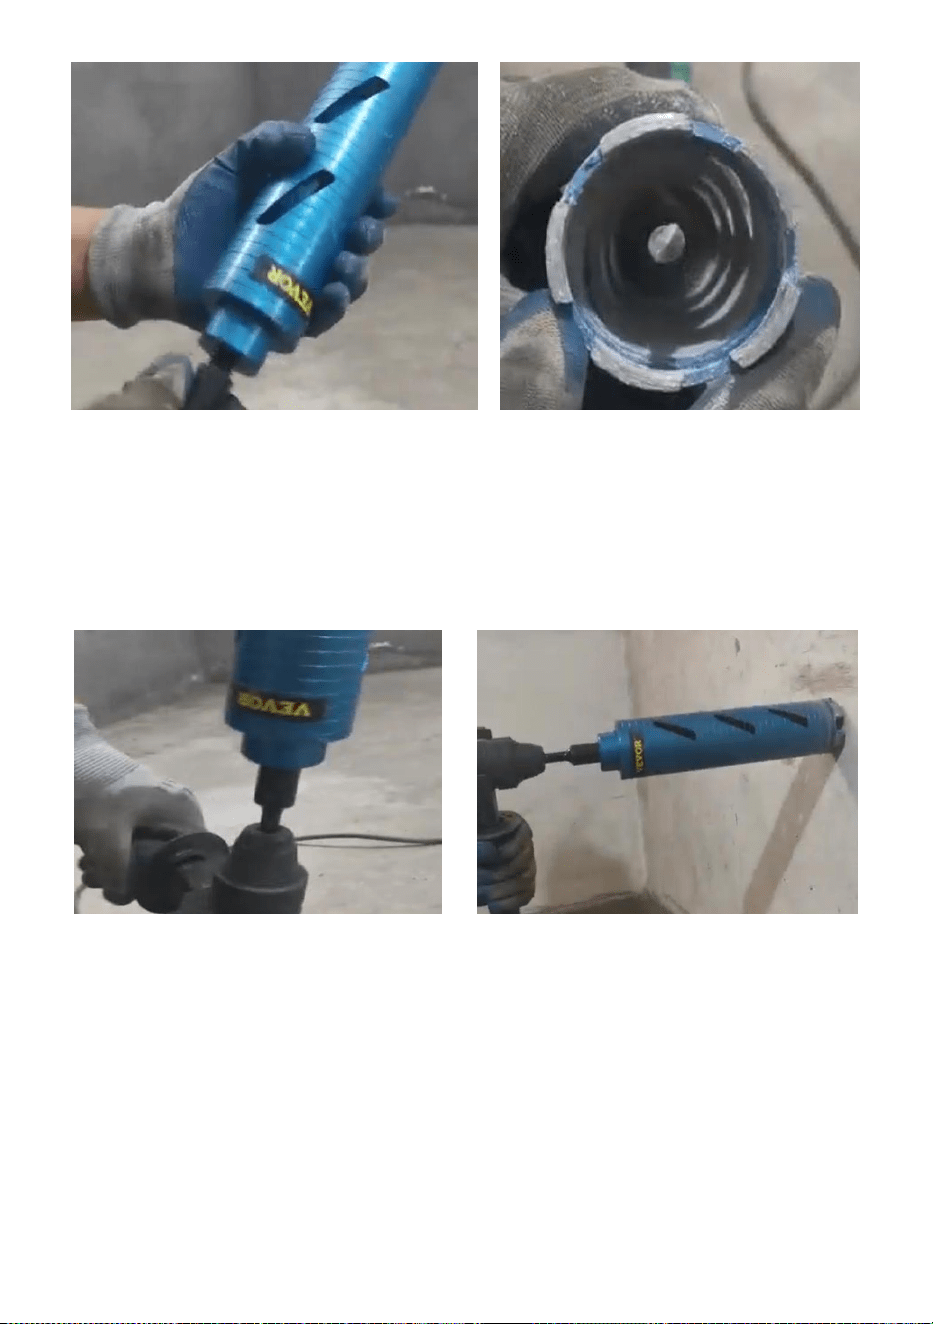
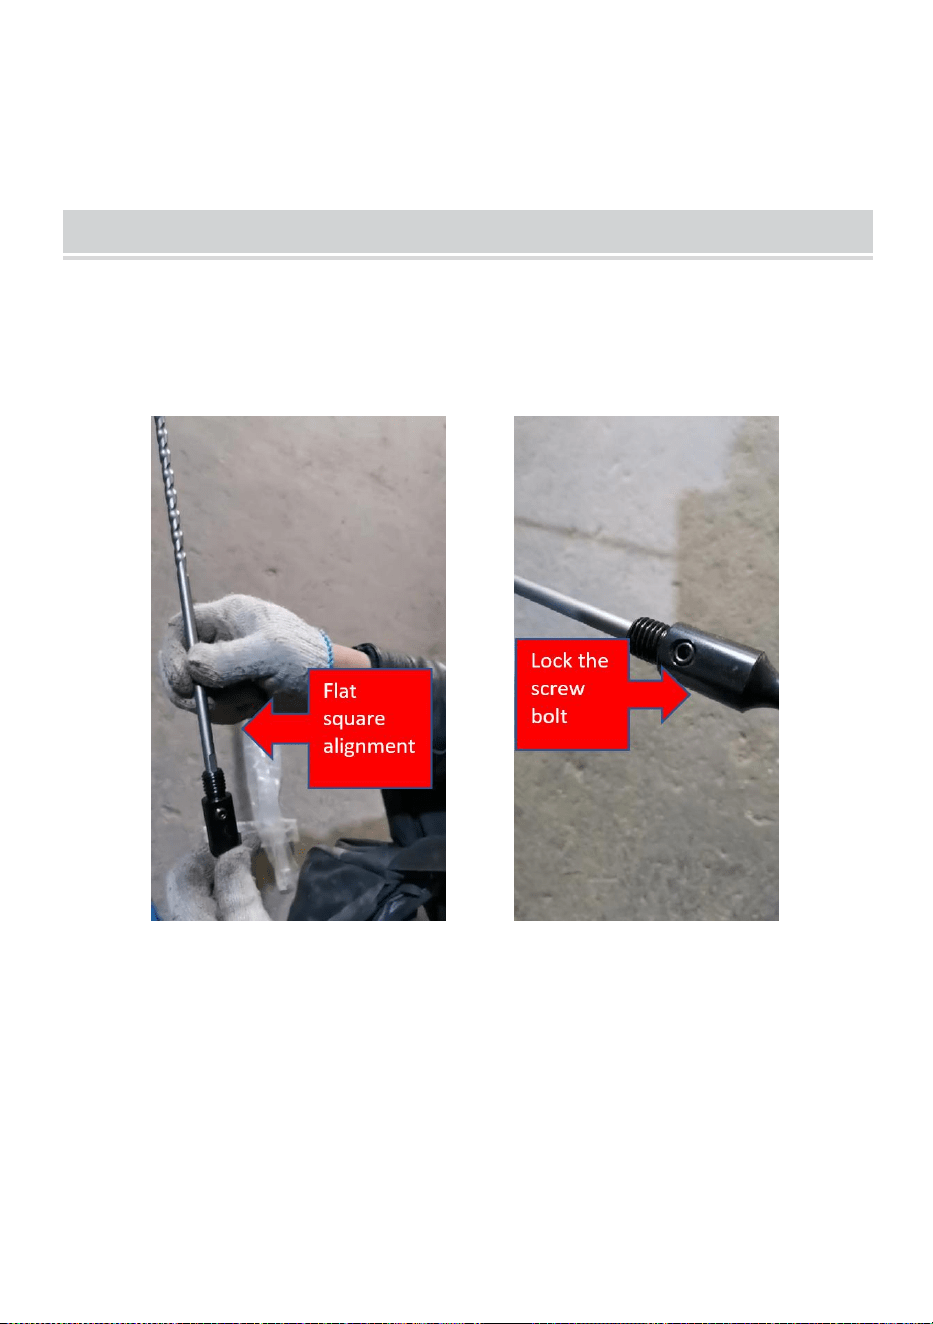
1. Insert the drill bit into the adapter, make sure the incline of the drill bit is the
same angle as the adapter bolt hole, and lock the screw. (Figure 1-2)
( Figure 1) ( Figure 2)
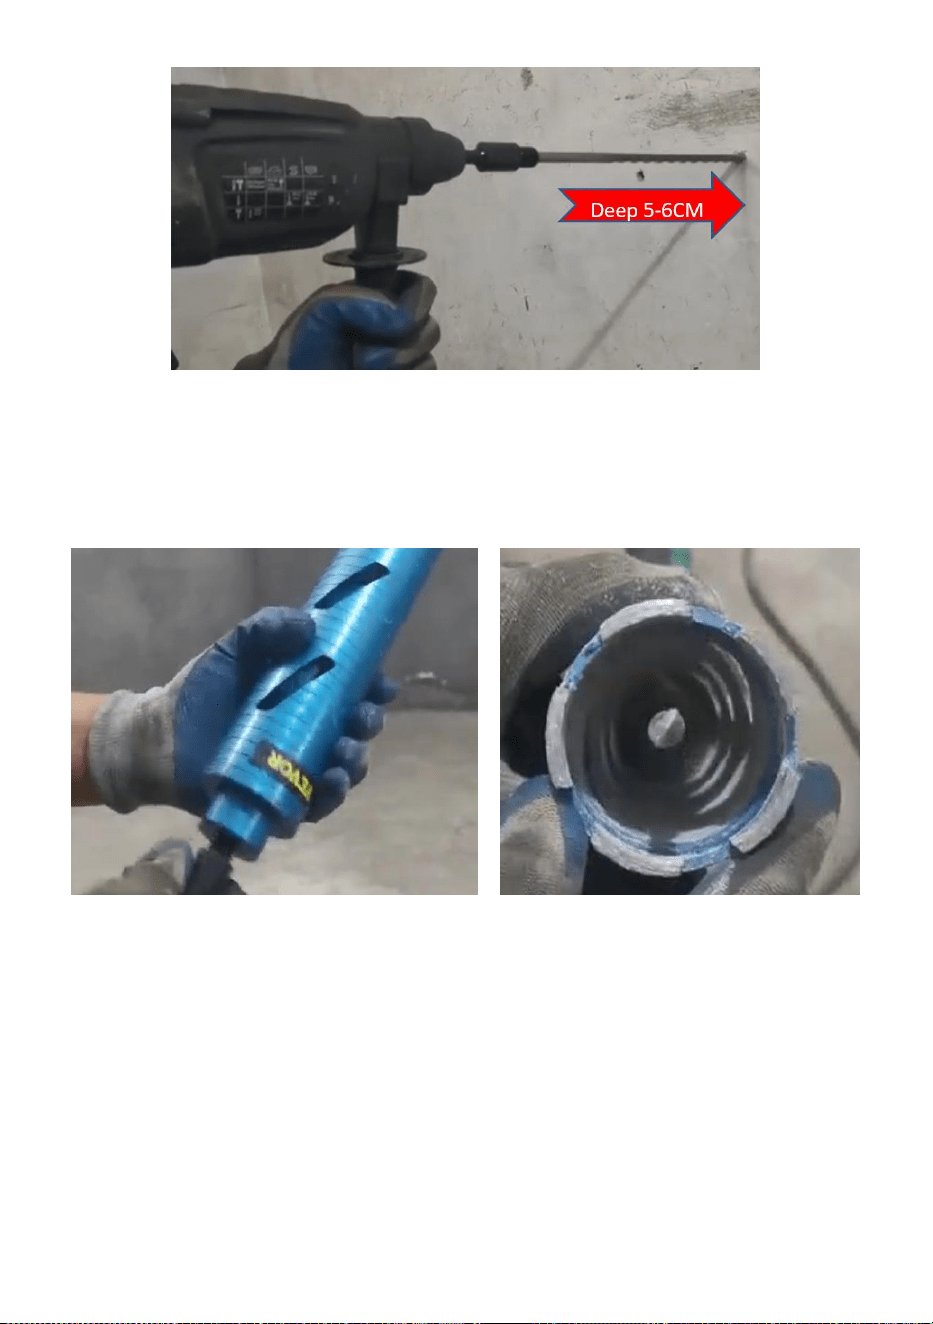
2. Select the correct matching electric hammer to drill a hole about 5-6cm deep,
and insert the adaptor into the drill bit. (Figure 3)
(Figure 3)
- 4 -
3. Insert the adaptor into the drill bit and rotate it to be tight(Figure 4). The center
bit must be the center of the drill bit, and the center deviation must not be greater
than 1mm(Figure 5).
(Figure 4) (Figure 5)
4. Insert the adaptor into the machine connection, and check to see if it is in place
(Figure 6). Make sure there is no inclination between the drill bits and wall in
drilling(Figure 7).
(Figure 6) (Figure 7)
- 5 -
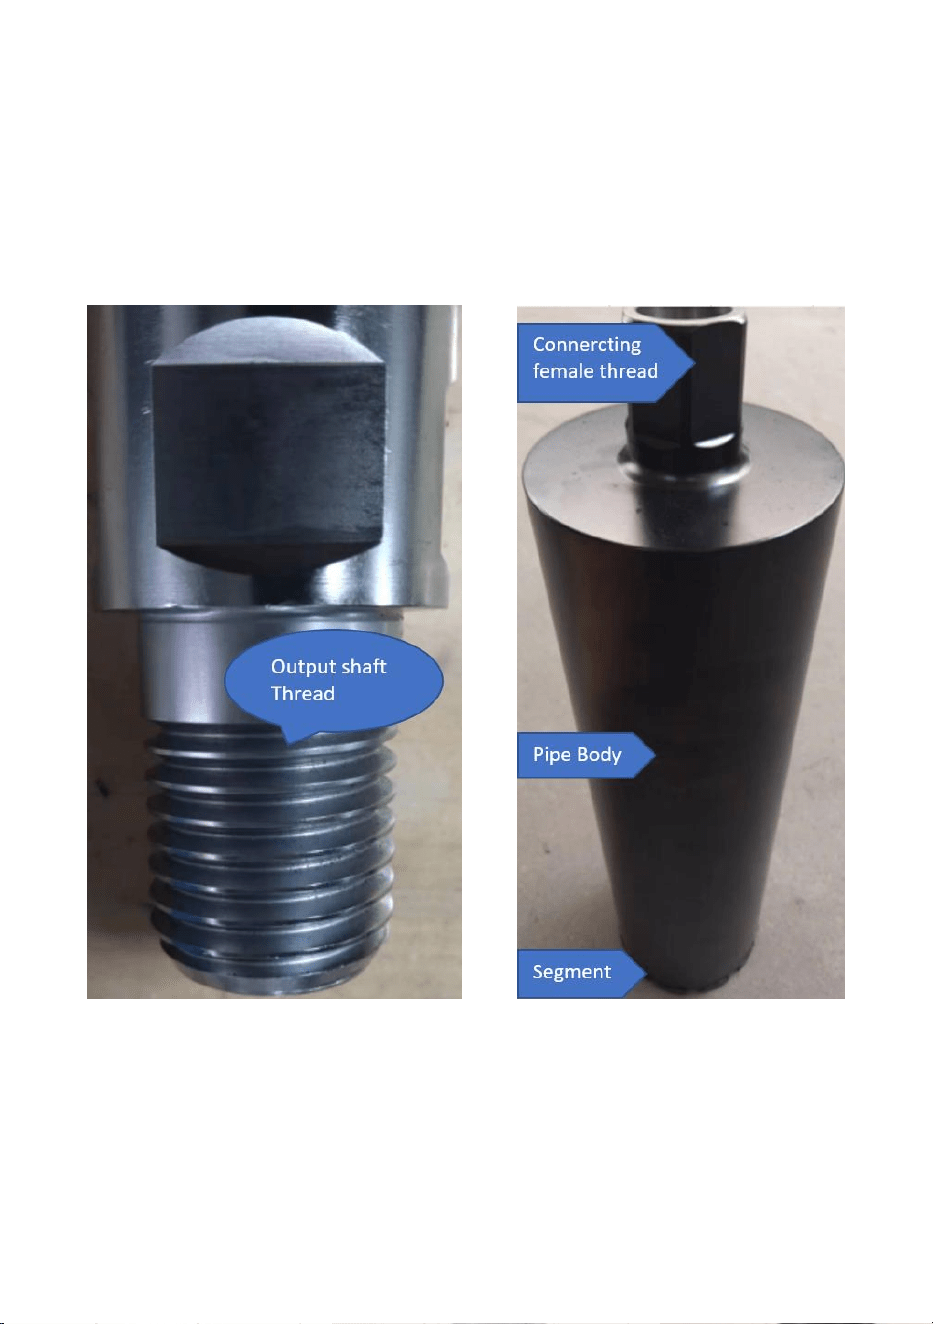
Bench drilling machine and core drill machine
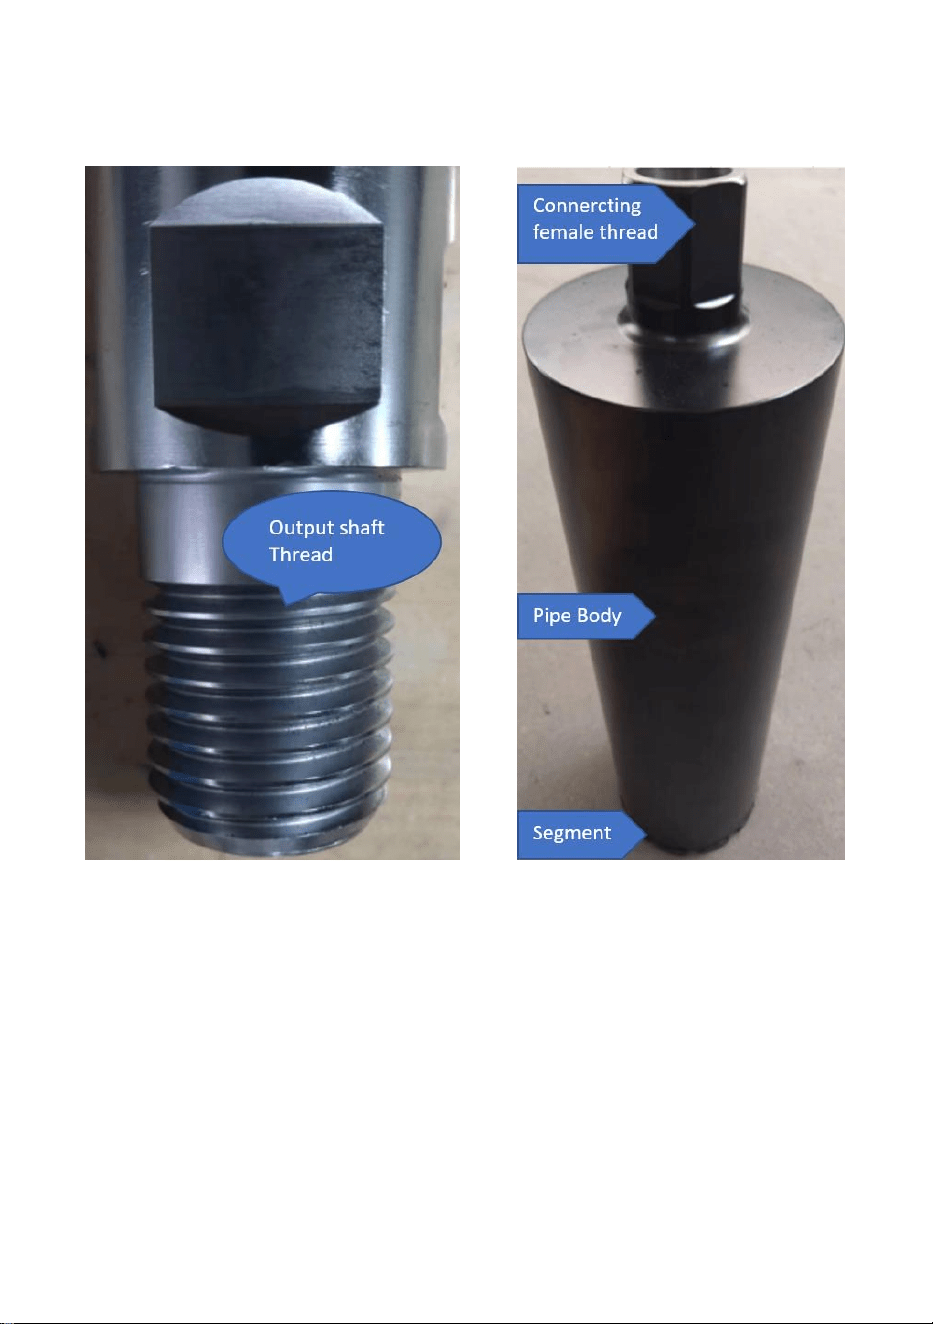
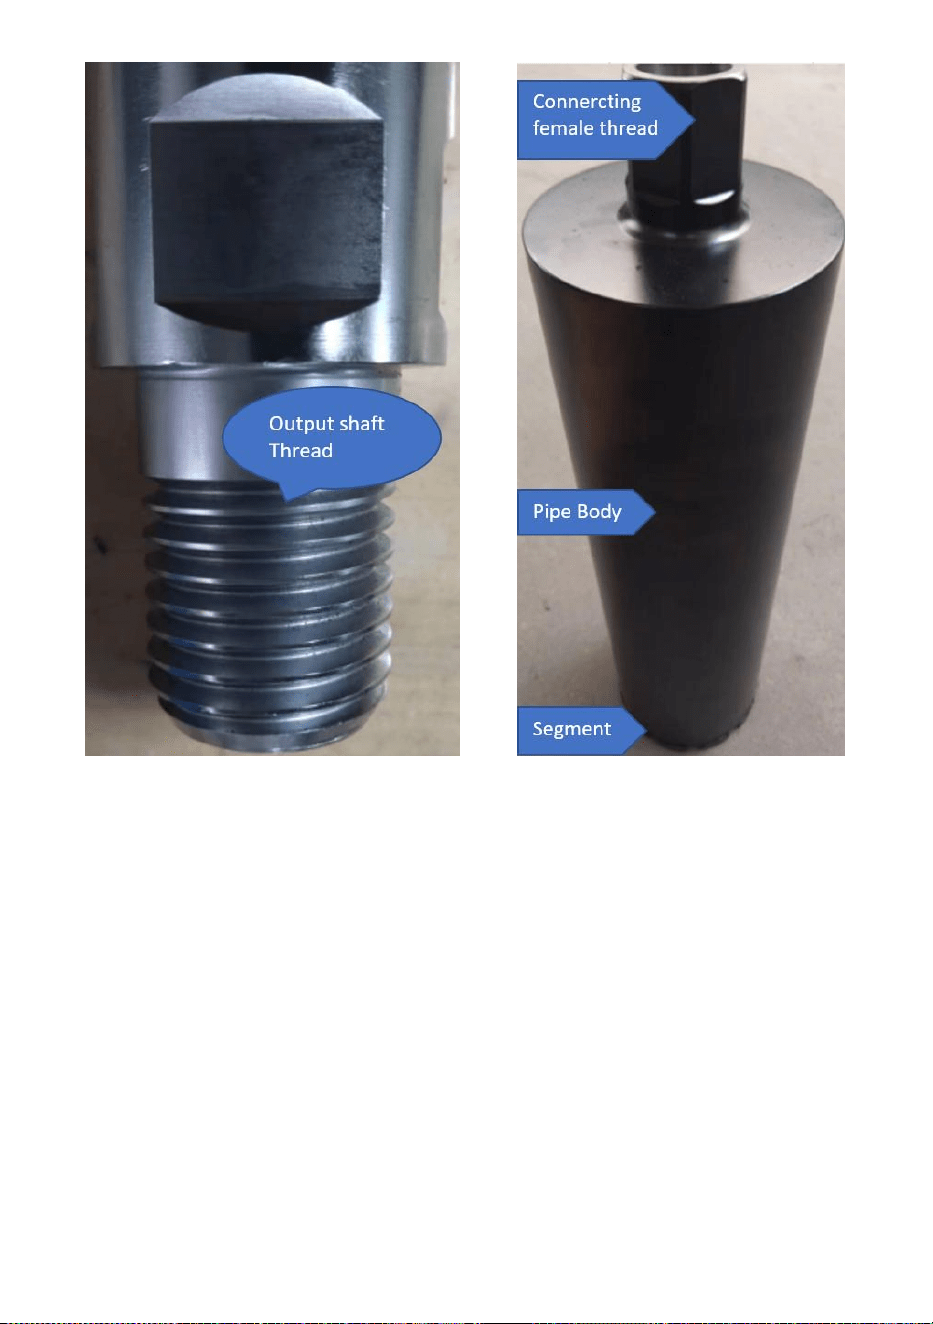
1. Check whether the thread matches the drill output shaft thread before use.
(Figure 8)
2. Check whether the drill specifications are correct and the tool teeth are
deformed and exhausted. (Figure 9)
(Figure 8) (Figure 9)
- 6 -
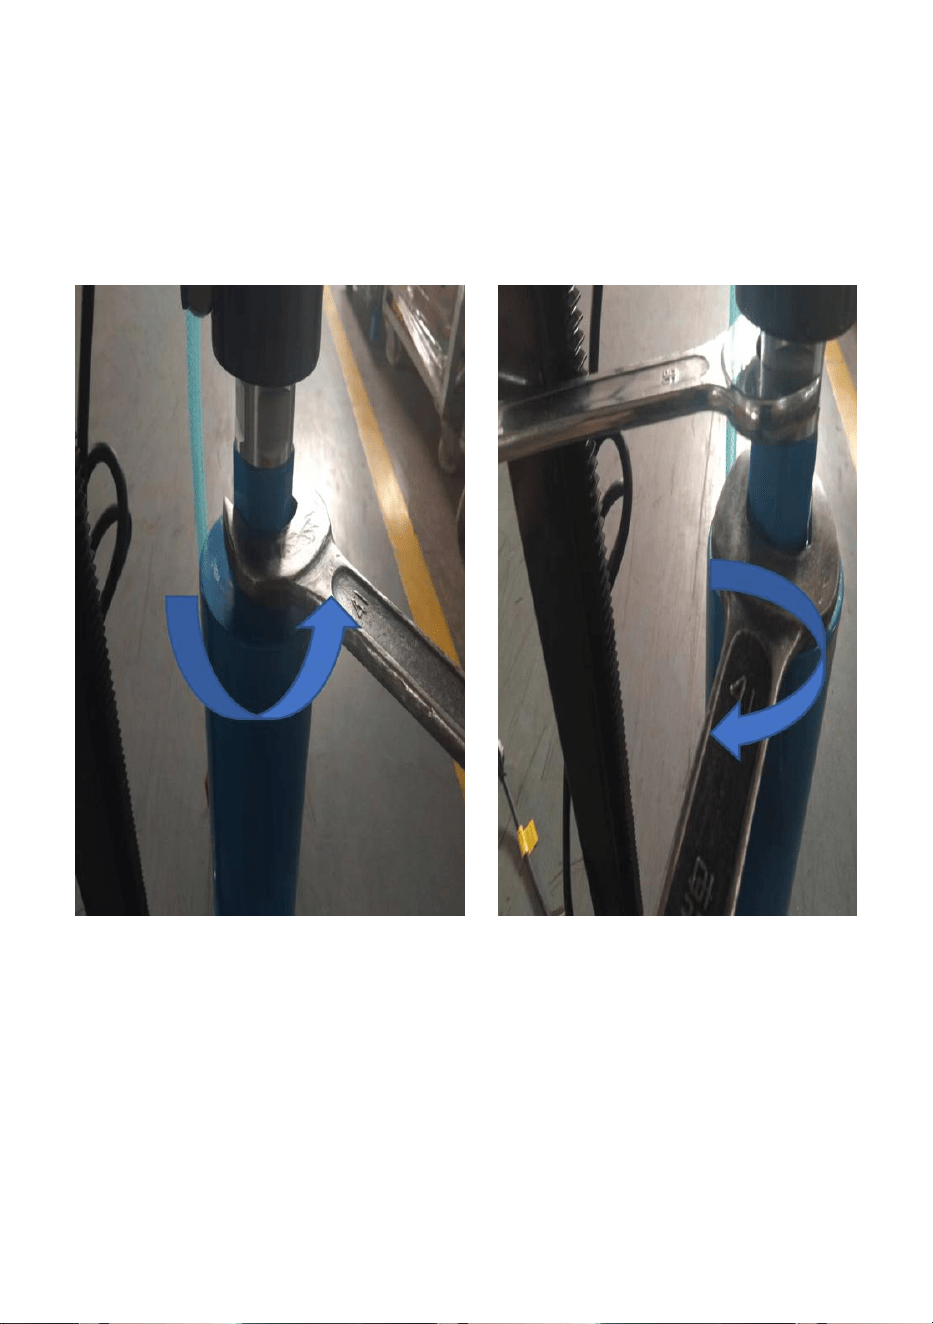
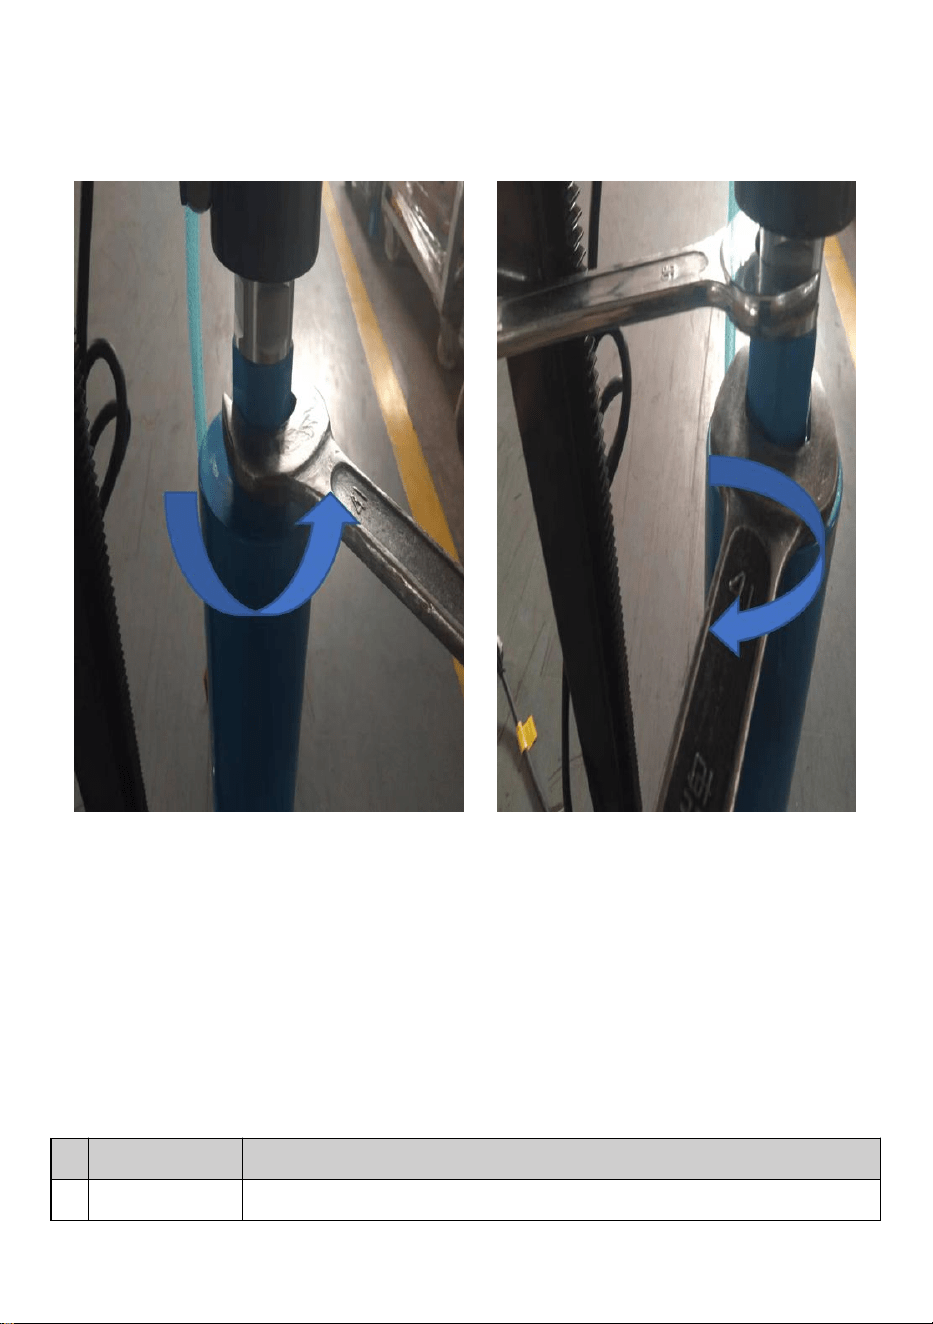
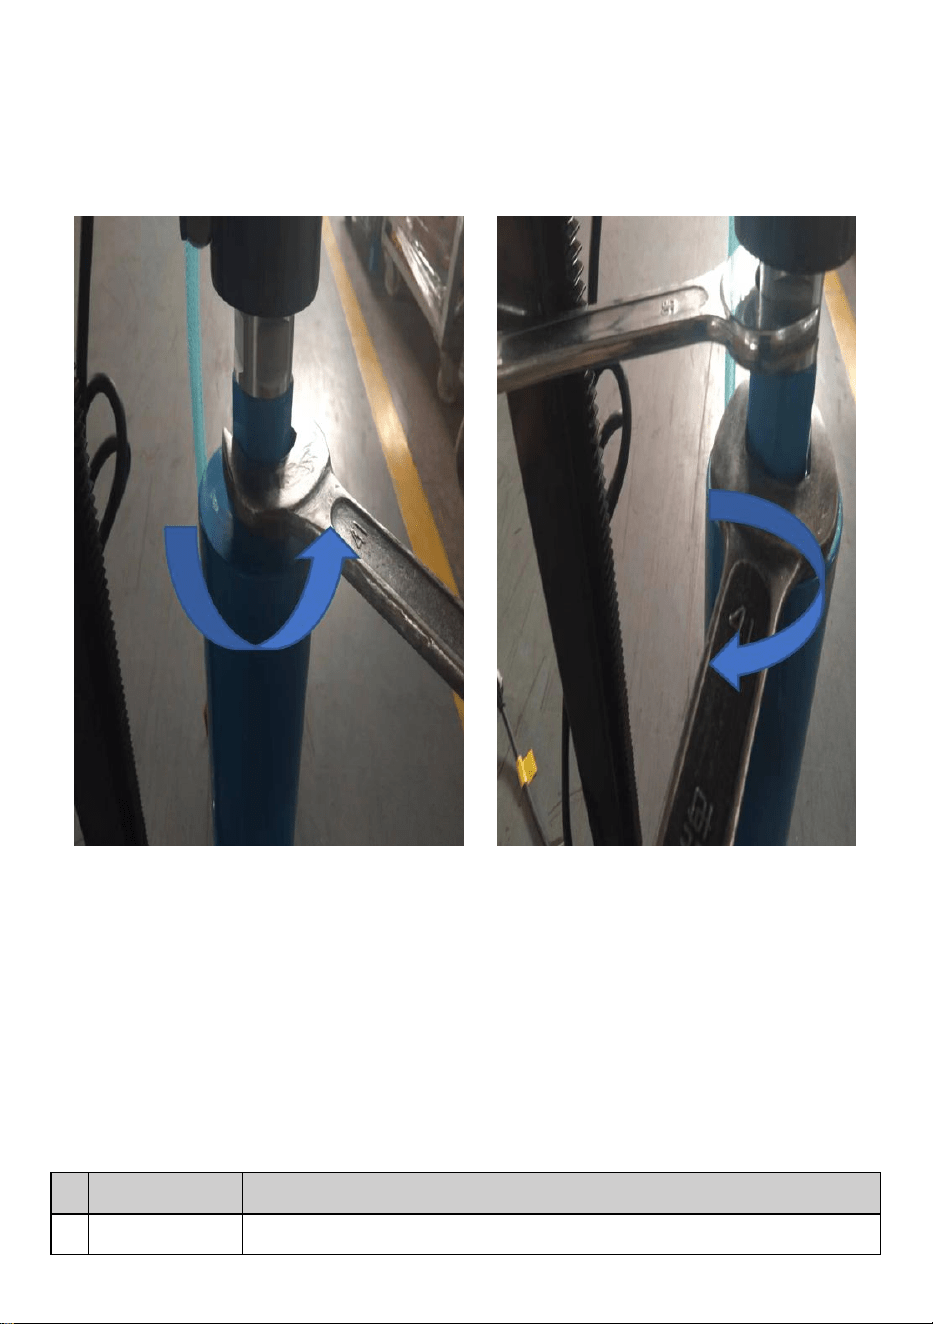
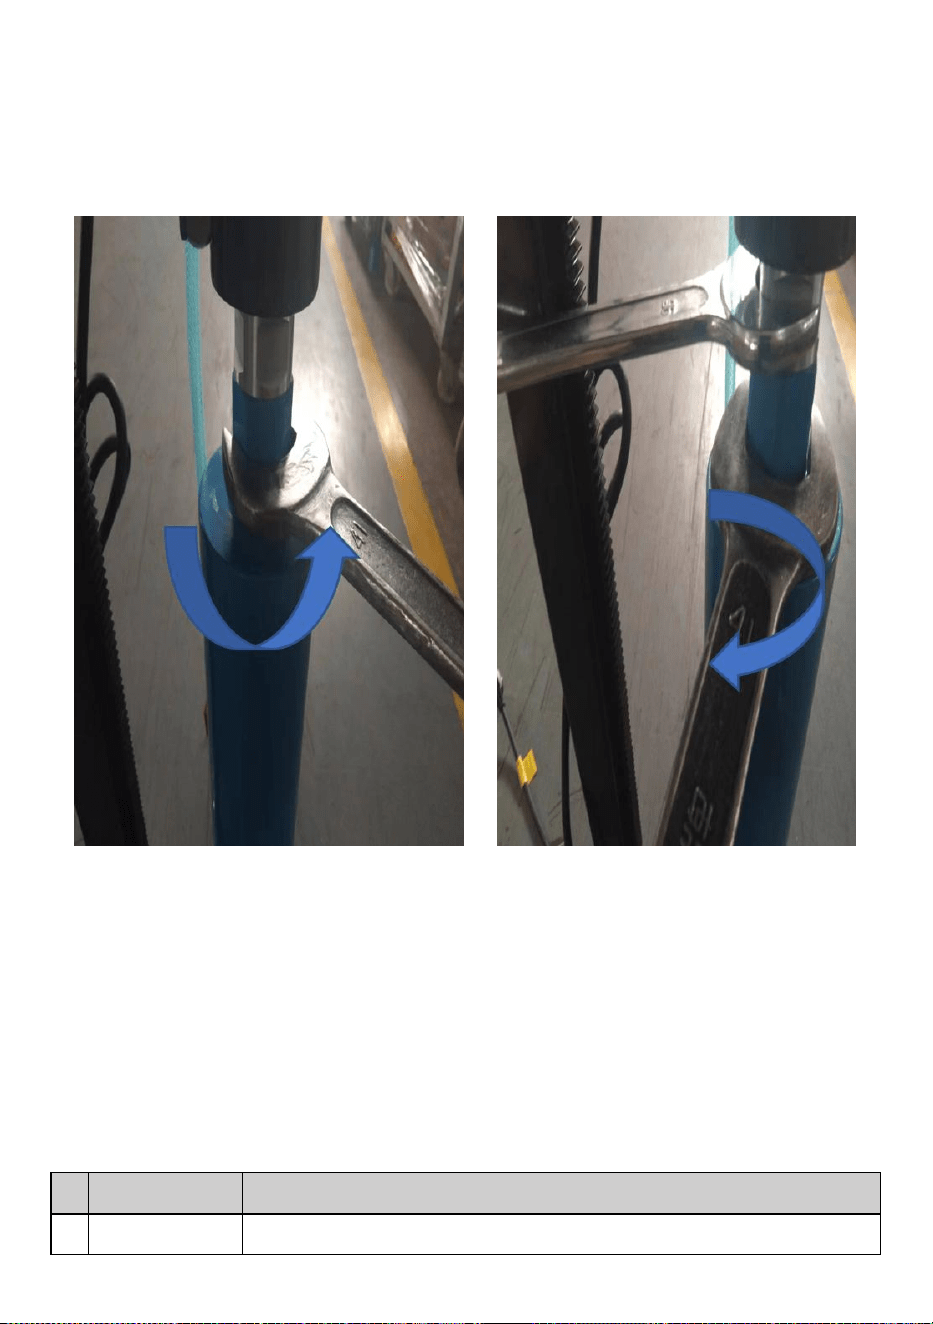
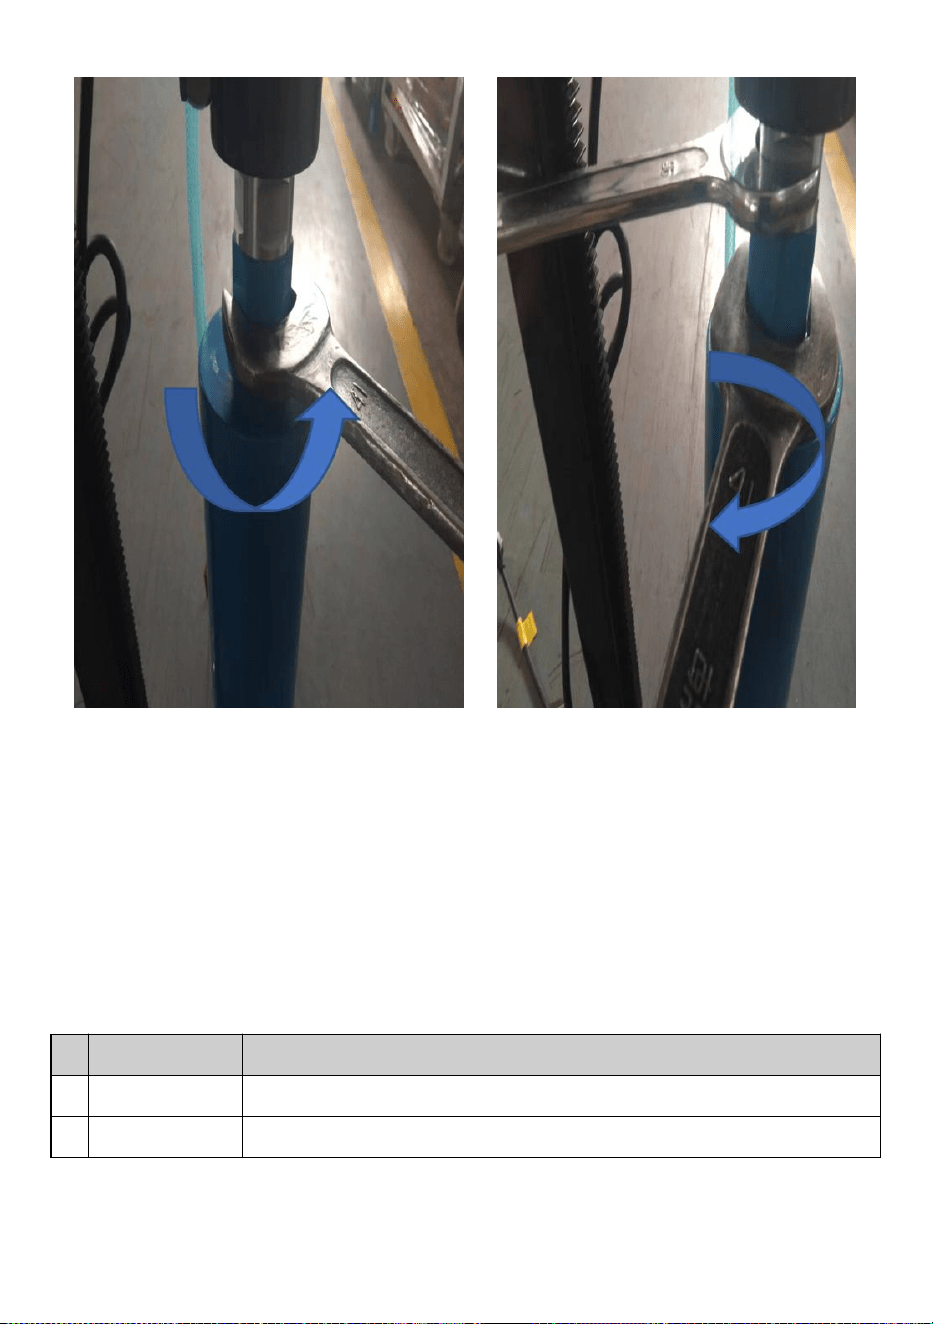
3. Tighten the bit by turning the wrench clockwise, and check that the bit swings
no more than 0.5mm. (Figure 10)
4. Replacing the drill bit: Using wrenches to hold the output shaft and the bit
connector, then turns counterclockwise the bottom wrench. (Figure 11)
(Figure 10) (Figure 11)

- 7 -
Items
Description
1
Name
Drill Core Bits
2
Model
107300AA
3
Parameter
Gauge of bit:Φ4.25"(Φ108mm)
Max coring depth:9.5"(241.3mm)
Joint dimension:5/8"-11
Tactic form:wet and dry dual use
Items
Description
1
Name
Drill Core Bits
2
Model
102300AA
3
Parameter
Gauge of bit:Φ4"(Φ101.6mm)
Max coring depth:9.5"(241.3mm)
Joint dimension:5/8"-11
Tactic form:wet and dry dual use
Items
Description
1
Name
Drill Core Bits
2
Model
63300AA
3
Parameter
Gauge of bit
:Φ
2.5"(
Φ
63.5mm)
Max coring depth
:
9.5"(241.3mm)
Joint dimension
:
5/8"-11
Tactic form
:
wet and dry dual use

- 8 -
Items
Description
1
Name
Drill Core Bits
2
Model
108400BC
3
Parameter
Gauge of bit
:Φ
4.25"(
Φ
108mm)
Max coring depth
:
14"(355mm)
Joint dimension
:
1-1/4"-7
Tactic form
:
wet-type
Items
Description
1
Name
Drill Core Bits
2
Model
25400AC
3
Parameter
Gauge of bit:Φ1"(Φ25.4mm)
Max coring depth:14"(355mm)
Joint dimension:5/8"-11
Tactic form:wet-type
Items
Description
1
Name
Drill Core Bits
2
Model
32400AC
3
Parameter
Gauge of bit:Φ1-1/4"(Φ32mm)
Max coring depth:14"(355mm)
Joint dimension:5/8"-11
Tactic form:wet-type
- 9 -
Items
Description
1
Name
Drill Core Bits
2
Model
50400BC
3
Parameter
Gauge of bit:Φ2"(Φ50.8mm)
Max coring depth:14"(355mm)
Joint dimension:1-1/4"-7
Tactic form:wet-type
Address: Baoshanqu Shuangchenglu 803long 11hao 1602A-1609shi Shanghai
Imported to AUS: SIHAO PTY LTD. 1 ROKEVA STREETEASTWOOD NSW 2122
Australia
Imported to USA: Sanven Technology Ltd. Suite 250, 9166 Anaheim Place,
Rancho Cucamonga, CA 91730
REP
EC
SHUNSHUN GmbH
Römeräcker 9 Z2021, 76351
Linkenheim-Hochstetten, Germany
REP
UK
Pooledas Group Ltd
Unit 5 Albert Edward House, The
Pavilions Preston, United Kingdom
Made In China

- 1 -


- 4 -
We continue to be committed to provide you tools with competitive price.
"Save Half", "Half Price" or any other similar expressions used by us only represents an
estimate of savings you might benefit from buying certain tools with us compared to the major
top brands and does not necessarily mean to cover all categories of tools offered by us. You
are kindly reminded to verify carefully when you are placing an order with us if you are
actually saving half in comparison with the top major brands.
- 1 -
MODELO:
107300AA/102300AA/63300AA/108400BC/25400AC/32400AC/
50400 AC
( La imagen es solo de referencia, consulte el objeto real)
DRILL CORE BITS

- 2 -
Have product questions? Need technical support? Please feel free to
contact us:
Technical Support and E-Warranty Certificate
www.vevor.com/support
NEED HELP? CONTACT US!
This is the original instruction, please read all manual instructions
carefully before operating. VEVOR reserves a clear interpretation of our
user manual. The appearance of the product shall be subject to the
product you received. Please forgive us that we won't inform you again if
there are any technology or software updates on our product.
SAFETY INSTRUCTION AND PRECAUTIONS
ADVERTENCIA:
Lea este material antes de usar este producto. De lo contrario, se
pueden producir lesiones graves.
6. Este producto no es un juguete. No permita que los niños
jueguen con este artículo.
7. Úselo únicamente según lo previsto.
8. Seguridad en el área de trabajo: Mantenga el lugar de trabajo
limpio y brillante. El caos y los lugares oscuros pueden provocar un
accidente.
9. Seguridad personal: Esté alerta, preste atención al
funcionamiento y permanezca despierto cuando opere la herramienta
eléctrica. No opere la herramienta eléctrica si siente fatiga,
medicamentos, alcohol o respuesta terapéutica.

- 3 -
10. Utilice dispositivos de seguridad. Utilice siempre gafas protectoras.
Los dispositivos de seguridad, como máscaras contra el polvo en
condiciones adecuadas, calzado de seguridad antideslizante, cascos,
protección auditiva y otros dispositivos, pueden reducir las lesiones
personales.
6. Vístete apropiadamente. No use ropa holgada ni use joyas.
Mantenga el cabello, la ropa y las mangas alejados de las piezas
móviles. Ropa suelta, adornos o pelo largo pueden estar involucrados
en las piezas móviles.
OPERATION AS BELOW
taladro eléctrico de mano
1 . Inserte la broca en el adaptador, asegúrese de que la inclinación de la broca
tenga el mismo ángulo que el orificio del perno del adaptador y bloquee el tornillo.
(Figura 1-2)

- 4 -
( Figura 1) ( Figura 2)
2 . Seleccione el martillo eléctrico adecuado para perforar un agujero de unos 5-6
cm de profundidad. e inserte el adaptador en la broca. (Figura 3)
(Figura 3)
5. Inserte el adaptador en la broca y gírelo para que quede apretado (Figura 4) .
La broca central debe ser el centro de la broca y la desviación central no debe ser
superior a 1 mm (Figura 5).

- 5 -
(Figura 4) (Figura 5)
6. Inserte el adaptador en la conexión de la máquina y verifique si está en su
lugar (Figura 6) . Asegúrese de que no haya inclinación entre las brocas y la pared
al perforar (Figura 7).
(Figura 6) (Figura 7)
Perforadora de banco y perforadora de núcleos
5. Compruebe si la rosca coincide con la rosca del eje de salida del taladro antes
de usar. (Figura 8)

- 6 -
6. Compruebe si las especificaciones del taladro son correctas y si los dientes de
la herramienta están deformados y agotados. (Figura 9)
(Figura 8) (Figura 9)
7. Apriete la broca girando la llave en el sentido de las agujas del reloj y verifique
que la broca no oscile más de 0,5 mm. (Figura 10)
- 7 -
8. Reemplazo de la broca: use llaves para sujetar el eje de salida y el conector de
la broca, luego gire en sentido antihorario la llave inferior. (Figura 11)
(Figura 10) (Figura 11)
Elementos
Descripción
1
Nombre
Brocas de perforación

- 8 -
2
Modelo
107300AA
3
Parámetro
Calibre de la broca:
Φ
4.25"(
Φ
108mm)
Profundidad máxima de perforación: 9.5"(241.3mm)
Dimensión de la junta: 5/8"-11
Forma táctica: doble uso húmedo y seco
Elementos
Descripción
1
Nombre
Brocas de perforación
2
Modelo
102300AA
3
Parámetro
Calibre de la broca: Φ4"(Φ101.6mm)
Profundidad máxima de perforación: 9.5"(241.3mm)
Dimensión de la junta: 5/8"-11
Forma táctica: doble uso húmedo y seco
Elementos
Descripción
1
Nombre
Brocas de perforación
2
Modelo
63300AA
3
Parámetro
Calibre de la broca: Φ2.5"(Φ63.5mm)
Profundidad máxima de perforación: 9.5"(241.3mm)
Dimensión de la junta: 5/8"-11
Forma táctica: doble uso húmedo y seco
Elementos
Descripción
1
Nombre
Brocas de perforación

- 9 -
2
Modelo
108400 aC
3
Parámetro
Calibre de la broca: Φ4.25"(Φ108mm)
Profundidad máxima de perforación: 14"(355mm)
Dimensión de la junta: 1-1/4"-7
Forma táctica: tipo húmedo
Elementos
Descripción
1
Nombre
Brocas de perforación
2
Modelo
25400AC
3
Parámetro
Calibre de la broca:
Φ
1"(
Φ
25,4 mm)
Profundidad máxima de perforación: 14"(355 mm)
Dimensión de la junta: 5/8"-11
Forma táctica: tipo húmedo
Elementos
Descripción
1
Nombre
Brocas de perforación
2
Modelo
32400AC
3
Parámetro
Calibre de la broca:
Φ
1-1/4"(
Φ
32mm)
Profundidad máxima de extracción de muestras: 14"(355 mm)
Dimensión de la junta: 5/8"-11
Forma táctica: tipo húmedo
Elementos
Descripción
1
Nombre
Brocas de perforación

- 10 -
2
Modelo
50400 aC
3
Parámetro
Calibre de la broca: Φ2"(Φ50,8 mm)
Profundidad máxima de perforación: 14"(355 mm)
Dimensión de la junta: 1-1/4"-7
Forma táctica: tipo húmedo
Dirección: Baoshanqu Shuangchenglu 803long 11hao 1602A-1609shi Shanghai
Importado a AUS: SIHAO PTY LTD. 1 ROKEVA STREET ASTWOOD NSW 2122
Australia
Importado a EE. UU.: Sanven Technology Ltd. Suite 250, 9166 Anaheim Place,
Rancho Cucamonga, CA 91730
REP
EC
SHUNSHUN GmbH
Römeräcker 9 Z2021, 76351
Linkenheim-Hochstetten, Germany
REP
UK
Pooledas Group Ltd
Unit 5 Albert Edward House, The
Pavilions Preston, United Kingdom
Hecho en china

- 1 -


- 3 -
Supporto tecnico e certificato di garanzia elettronica www.vevor.com/support
PUNTE DA TRAPANO MANUALE D'USO
We continue to be committed to provide you tools with competitive price.
"Save Half", "Half Price" or any other similar expressions used by us only represents an
estimate of savings you might benefit from buying certain tools with us compared to the major
top brands and does not necessarily mean to cover all categories of tools offered by us. You
are kindly reminded to verify carefully when you are placing an order with us if you are
actually saving half in comparison with the top major brands.

- 1 -
MODELLO:
107300AA/102300AA/63300AA/108400BC/25400AC/32400AC/
50400 A.C
( L'immagine è solo di riferimento, fare riferimento all'oggetto reale)
DRILL CORE BITS

- 2 -
Have product questions? Need technical support? Please feel free to
contact us:
Technical Support and E-Warranty Certificate
www.vevor.com/support
NEED HELP? CONTACT US!
This is the original instruction, please read all manual instructions
carefully before operating. VEVOR reserves a clear interpretation of our
user manual. The appearance of the product shall be subject to the
product you received. Please forgive us that we won't inform you again if
there are any technology or software updates on our product.
SAFETY INSTRUCTION AND PRECAUTIONS
AVVERTIMENTO:
Leggere questo materiale prima di utilizzare questo prodotto. In caso
contrario si potrebbero causare lesioni gravi.
11. Questo prodotto non è un giocattolo. Non permettere ai bambini
di giocare con questo oggetto.
12. Utilizzare solo come previsto.
13. Sicurezza dell'area di lavoro: mantenere il luogo di lavoro pulito e
luminoso. Il caos e i luoghi bui possono causare incidenti.
14. Sicurezza personale: prestare attenzione, prestare attenzione al
funzionamento e rimanere svegli quando si utilizza l'utensile elettrico.
Non utilizzare l'utensile elettrico in caso di stanchezza, farmaci, alcol o
risposta terapeutica.

- 3 -
15. Utilizzare dispositivi di sicurezza. Indossa sempre gli occhiali. I
dispositivi di sicurezza, come maschere antipolvere in condizioni
adeguate, scarpe di sicurezza antiscivolo, caschi, protezioni per l'udito
e altri dispositivi possono ridurre le lesioni personali.
6. Vestirsi adeguatamente. Non indossare abiti larghi né indossare
gioielli. Tenere i capelli, i vestiti e le maniche lontani dalle parti in
movimento. Abiti larghi, ornamenti o capelli lunghi potrebbero essere
coinvolti nelle parti in movimento.
OPERATION AS BELOW
trapano elettrico portatile
1 . Inserire la punta del trapano nell'adattatore, assicurarsi che l'inclinazione della
punta del trapano abbia lo stesso angolo del foro del bullone dell'adattatore e
bloccare la vite. (Figura 1-2)

- 4 -
( Figura 1) ( Figura 2)
2 . Seleziona il martello elettrico corrispondente per praticare un foro profondo
circa 5-6 cm, e inserire l'adattatore nella punta del trapano. (Figura 3)
(Figura 3)
7. Inserire l'adattatore nella punta del trapano e ruotarlo per fissarlo (Figura 4) . La
punta centrale deve essere il centro della punta del trapano e la deviazione dal
centro non deve essere maggiore di 1 mm (Figura 5).

- 5 -
(Figura 4) (Figura 5)
8. Inserire l'adattatore nella connessione della macchina e verificare se è in
posizione (Figura 6) . Assicurarsi che non ci sia inclinazione tra le punte del
trapano e il muro durante la perforazione (Figura 7).
(Figura 6) (Figura 7)
Trapano da banco e carotatrice
9. Controllare se la filettatura corrisponde alla filettatura dell'albero di uscita del
trapano prima dell'uso. (Figura 8)
- 6 -
10. Controllare se le specifiche della punta sono corrette e i denti dell'utensile
sono deformati ed esausti. (Figura 9)
(Figura 8) (Figura 9)
11. Stringere la punta ruotando la chiave in senso orario e verificare che la punta
non oscilli più di 0,5 mm. (Figura 10)

- 7 -
12. Sostituzione della punta del trapano: utilizzare le chiavi per tenere fermo
l'albero di uscita e il connettore della punta, quindi ruotare in senso antiorario la
chiave inferiore. (Figura 11)
(Figura 10) (Figura 11)
Elementi
Descrizione
1
Nome
Punte da trapano

- 8 -
2
Modello
107300AA
3
Parametro
Calibro della punta:
Φ
4,25" (
Φ
108 mm)
Profondità massima di carotaggio: 9,5" (241,3 mm)
Dimensione del giunto: 5/8" -11
Forma tattica: doppio uso bagnato e asciutto
Elementi
Descrizione
1
Nome
Punte da trapano
2
Modello
102300AA
3
Parametro
Calibro della punta: Φ4" (Φ101,6 mm)
Profondità massima di carotaggio: 9,5" (241,3 mm)
Dimensione del giunto: 5/8" -11
Forma tattica: doppio uso bagnato e asciutto
Elementi
Descrizione
1
Nome
Punte da trapano
2
Modello
63300AA
3
Parametro
Calibro della punta: Φ2,5" (Φ63,5 mm)
Profondità massima di carotaggio: 9,5" (241,3 mm)
Dimensione del giunto: 5/8" -11
Forma tattica: doppio uso asciutto e bagnato
Elementi
Descrizione
1
Nome
Punte da trapano

- 9 -
2
Modello
108400 a.C
3
Parametro
Calibro della punta: Φ4,25" (Φ108 mm)
Profondità massima di carotaggio: 14" (355 mm)
Dimensione del giunto: 1-1/4" -7
Forma tattica: tipo bagnato
Elementi
Descrizione
1
Nome
Punte da trapano
2
Modello
25400AC
3
Parametro
Calibro della punta:
Φ
1" (
Φ
25,4 mm)
Profondità massima di carotaggio: 14" (355 mm)
Dimensione del giunto: 5/8" -11
Forma tattica: tipo bagnato
Elementi
Descrizione
1
Nome
Punte da trapano
2
Modello
32400AC
3
Parametro
Calibro della punta:
Φ
1-1/4" (
Φ
32 mm)
Profondità massima di carotaggio: 14" (355 mm)
Dimensione del giunto: 5/8" -11
Forma tattica: tipo bagnato
Elementi
Descrizione
1
Nome
Punte da trapano

- 10 -
2
Modello
50400 a.C
3
Parametro
Calibro della punta: Φ2" (Φ50,8 mm)
Profondità massima di carotaggio: 14" (355 mm)
Dimensione del giunto: 1-1/4" -7
Forma tattica: tipo bagnato
Indirizzo: Baoshanqu Shuangchenglu 803long 11hao 1602A-1609shi Shanghai
Importato in AUS: SIHAO PTY LTD. 1 ROKEVA STREETEASTWOOD NSW
2122 Australia
Importato negli Stati Uniti: Sanven Technology Ltd. Suite 250, 9166 Anaheim
Place, Rancho Cucamonga, CA 91730
REP
EC
SHUNSHUN GmbH
Römeräcker 9 Z2021, 76351
Linkenheim-Hochstetten, Germany
REP
UK
Pooledas Group Ltd
Unit 5 Albert Edward House, The
Pavilions Preston, United Kingdom
Made in China

- 1 -


- 3 -
Wsparcie techniczne i certyfikat e-gwarancji www.vevor.com/support
WIERTŁA RDZENIOWE INSTRUKCJA OBSŁUGI
We continue to be committed to provide you tools with competitive price.
"Save Half", "Half Price" or any other similar expressions used by us only represents an
estimate of savings you might benefit from buying certain tools with us compared to the major
top brands and does not necessarily mean to cover all categories of tools offered by us. You
are kindly reminded to verify carefully when you are placing an order with us if you are
actually saving half in comparison with the top major brands.
- 1 -
MODEL: 107300AA/102300AA/63300AA/108400BC/25400AC/32400AC/
50400 P.N.E
( Zdjęcie ma wyłącznie charakter poglądowy, proszę zapoznać się z
rzeczywistym obiektem)
DRILL CORE BITS

- 2 -
Have product questions? Need technical support? Please feel free to
contact us:
Technical Support and E-Warranty Certificate
www.vevor.com/support
NEED HELP? CONTACT US!
This is the original instruction, please read all manual instructions
carefully before operating. VEVOR reserves a clear interpretation of our
user manual. The appearance of the product shall be subject to the
product you received. Please forgive us that we won't inform you again if
there are any technology or software updates on our product.
SAFETY INSTRUCTION AND PRECAUTIONS
OSTRZEŻENIE:
Przeczytaj ten materiał przed użyciem tego produktu.
Niezastosowanie się do tego może spowodować poważne
obrażenia.
16. Ten produkt nie jest zabawką. Nie pozwalaj dzieciom bawić się
tym przedmiotem.
17. Używaj wyłącznie zgodnie z przeznaczeniem.
18. Bezpieczeństwo w miejscu pracy: Utrzymuj miejsce pracy w
czystości i jasności. Chaos i ciemne miejsca mogą być przyczyną
wypadku.
19. Bezpieczeństwo osobiste: Podczas obsługi elektronarzędzia
należy zachować czujność, zwracać uwagę na pracę i nie zasnąć. Nie
używaj elektronarzędzia w przypadku zmęczenia, przyjmowania leków,
alkoholu lub reakcji terapeutycznej.

- 3 -
20. Używaj urządzeń zabezpieczających. Zawsze noś okulary.
Urządzenia zabezpieczające, takie jak maski przeciwpyłowe
stosowane w odpowiednich warunkach, antypoślizgowe obuwie
ochronne, kaski, ochronniki słuchu i inne urządzenia mogą zmniejszyć
obrażenia ciała.
6. Ubierz się odpowiednio. Nie noś luźnej odzieży ani biżuterii. Trzymaj
włosy, ubranie i rękawy z dala od ruchomych części. Luźne ubrania,
ozdoby lub długie włosy mogą znajdować się w ruchomych częściach.
OPERATION AS BELOW
ręczna wiertarka elektryczna
1 . Włóż wiertło do adaptera, upewnij się, że nachylenie wiertła jest pod tym
samym kątem, co otwór na śrubę adaptera, i zablokuj śrubę. (Rysunek 1-2)

- 4 -
( Rysunek 1) ( Rysunek 2)
2 . Wybierz odpowiedni pasujący młot elektryczny, aby wywiercić otwór o
głębokości około 5-6 cm, i włóż adapter do wiertła. (Rysunek 3)
(Rysunek 3)
9. Włóż adapter do wiertła i obróć go, aż do dokręcenia (Rysunek 4) . Wiertło
środkowe musi znajdować się w środku wiertła, a odchylenie środka nie może być
większe niż 1 mm (Rysunek 5).

- 5 -
(Rysunek 4) (Rysunek 5)
10. Włóż adapter do złącza maszyny i sprawdź, czy jest na swoim miejscu
(Rysunek 6) . Podczas wiercenia upewnij się, że pomiędzy wiertłami a ścianą nie
ma nachylenia (Rysunek 7).
(Rysunek 6) (Rysunek 7)
Wiertarka stołowa i wiertarka rdzeniowa
13. Przed użyciem sprawdź, czy gwint pasuje do gwintu wału wyjściowego
wiertarki. (Cyfra 8)

- 6 -
14. Sprawdź, czy specyfikacje wiertła są prawidłowe, a zęby narzędzia są
zdeformowane i zużyte. (Rysunek 9)
(Rysunek 8) (Rysunek 9)
15. Dokręć wiertło, obracając klucz w kierunku zgodnym z ruchem wskazówek
zegara i sprawdź, czy wiertło wychyla się nie więcej niż o 0,5 mm. (Rysunek 10)

- 7 -
16. Wymiana wiertła: Za pomocą kluczy przytrzymaj wał wyjściowy i złącze wiertła,
a następnie obróć dolny klucz w kierunku przeciwnym do ruchu wskazówek
zegara. (Rysunek 11)
(Rysunek 10) (Rysunek 11)
Rzeczy
Opis
1
Nazwa
Wiertła rdzeniowe

- 8 -
2
Model
107300AA
3
Parametr
Średnica wiertła:
Φ
4,25" (
Φ
108 mm)
Maksymalna głębokość wgłębna: 9,5" (241,3 mm)
Wymiar złącza: 5/8"-11
Forma taktyczna: podwójne zastosowanie na mokro i na sucho
Rzeczy
Opis
1
Nazwa
Wiertła rdzeniowe
2
Model
102300AA
3
Parametr
Średnica wiertła: Φ4"(Φ101,6 mm)
Maksymalna głębokość wgłębna: 9,5" (241,3 mm)
Wymiar złącza: 5/8"-11
Forma taktyczna: podwójne zastosowanie na mokro i na sucho
Rzeczy
Opis
1
Nazwa
Wiertła rdzeniowe
2
Model
63300AA
3
Parametr
Średnica wiertła: Φ2,5" (Φ63,5 mm)
Maksymalna głębokość wgłębna: 9,5" (241,3 mm)
Wymiar złącza: 5/8"-11
Forma taktyczna: podwójne zastosowanie na mokro i na sucho
Rzeczy
Opis
1
Nazwa
Wiertła rdzeniowe

- 9 -
2
Model
108400 p.n.e
3
Parametr
Rozstaw wiertła: Φ4,25" (Φ108 mm)
Maksymalna głębokość wgłębna: 14" (355 mm)
Wymiar złącza: 1-1/4"-7
Forma taktyczna: typu mokrego
Rzeczy
Opis
1
Nazwa
Wiertła rdzeniowe
2
Model
25400AC
3
Parametr
Rozstaw wiertła:
Φ
1" (
Φ
25,4 mm)
Maksymalna głębokość wgłębna: 14" (355 mm)
Wymiar złącza: 5/8"-11
Forma taktyczna: typu mokrego
Rzeczy
Opis
1
Nazwa
Wiertła rdzeniowe
2
Model
32400AC
3
Parametr
Rozmiar wiertła:
Φ
1-1/4"(
Φ
32mm)
Maksymalna głębokość wgłębna: 14"(355mm)
Wymiar złącza: 5/8"-11
Forma taktyczna: typu mokrego
Rzeczy
Opis
1
Nazwa
Wiertła rdzeniowe

- 10 -
2
Model
50400 p.n.e
3
Parametr
Średnica wiertła: Φ2" (Φ50,8 mm)
Maksymalna głębokość wgłębna: 14" (355 mm)
Wymiar złącza: 1-1/4"-7
Forma taktyczna: typu mokrego
Adres: Baoshanqu Shuangchenglu 803long 11hao 1602A-1609shi Szanghaj
Import do AUS: SIHAO PTY LTD. 1 ROKEVA STREETEASTWOOD NSW 2122
Australia
Import do USA: Sanven Technology Ltd. Suite 250, 9166 Anaheim Place, Rancho
Cucamonga, CA 91730
REP
EC
SHUNSHUN GmbH
Römeräcker 9 Z2021, 76351
Linkenheim-Hochstetten, Germany
REP
UK
Pooledas Group Ltd
Unit 5 Albert Edward House, The
Pavilions Preston, United Kingdom
Wyprodukowano w Chinach

- 1 -


- 3 -
Technischer Support und E-Garantiezertifikat www.vevor.com/support
BOHRKRONEN BENUTZERHANDBUCH
We continue to be committed to provide you tools with competitive price.
"Save Half", "Half Price" or any other similar expressions used by us only represents an
estimate of savings you might benefit from buying certain tools with us compared to the major
top brands and does not necessarily mean to cover all categories of tools offered by us. You
are kindly reminded to verify carefully when you are placing an order with us if you are
actually saving half in comparison with the top major brands.

- 1 -
MODELL:
107300AA/102300AA/63300AA/108400BC/25400AC/32400AC/
50400 V. CHR
( Das Bild dient nur als Referenz, bitte beziehen Sie sich auf das tatsächliche
Objekt)
DRILL CORE BITS

- 2 -
Have product questions? Need technical support? Please feel free to
contact us:
Technical Support and E-Warranty Certificate
www.vevor.com/support
NEED HELP? CONTACT US!
This is the original instruction, please read all manual instructions
carefully before operating. VEVOR reserves a clear interpretation of our
user manual. The appearance of the product shall be subject to the
product you received. Please forgive us that we won't inform you again if
there are any technology or software updates on our product.
SAFETY INSTRUCTION AND PRECAUTIONS
WARNUNG:
Lesen Sie dieses Material, bevor Sie dieses Produkt verwenden.
Andernfalls kann es zu schweren Verletzungen kommen.
21. Dieses Produkt ist kein Spielzeug. Erlauben Sie Kindern nicht,
mit diesem Artikel zu spielen.
22. Nur bestimmungsgemäß verwenden.
23. Sicherheit am Arbeitsplatz: Halten Sie den Arbeitsplatz sauber
und hell. Chaos und dunkle Orte können zu Unfällen führen.
24. Persönliche Sicherheit: Seien Sie wachsam, achten Sie auf die
Bedienung und bleiben Sie wach, wenn Sie das Elektrowerkzeug
bedienen. Betreiben Sie das Elektrowerkzeug nicht bei Müdigkeit,
Medikamenten, Alkohol oder therapeutischer Reaktion.

- 3 -
25. Verwenden Sie Sicherheitsvorrichtungen. Tragen Sie immer eine
Schutzbrille. Sicherheitsvorrichtungen wie Staubmasken unter
geeigneten Bedingungen, rutschfeste Sicherheitsschuhe, Helme,
Gehörschutz und andere Geräte können Personenschäden
reduzieren.
6. Kleide dich richtig. Tragen Sie keine lockere Kleidung und tragen Sie
keinen Schmuck. Halten Sie Haare, Kleidung und Ärmel von
beweglichen Teilen fern. Lose Kleidung, Schmuck oder lange Haare
können von beweglichen Teilen betroffen sein.
OPERATION AS BELOW
handgeführte elektrische Bohrmaschine
1 . Setzen Sie den Bohrer in den Adapter ein, stellen Sie sicher, dass die Neigung
des Bohrers im gleichen Winkel wie das Loch im Adapterbolzen ist, und verriegeln
Sie die Schraube. (Abbildung 1-2)

- 4 -
( Abbildung 1) ( Abbildung 2)
2 . Wählen Sie den passenden Elektrohammer aus, um ein etwa 5–6 cm tiefes
Loch zu bohren. und stecken Sie den Adapter in den Bohrer. (Figur 3)
(Figur 3)
11. Setzen Sie den Adapter in den Bohrer ein und drehen Sie ihn, bis er fest sitzt
(Abbildung 4) . Der Mittelbohrer muss der Mittelpunkt des Bohrers sein und die
Mittenabweichung darf nicht größer als 1 mm sein (Abbildung 5).

- 5 -
(Abbildung 4) (Abbildung 5)
12. Stecken Sie den Adapter in den Maschinenanschluss und prüfen Sie, ob er
richtig sitzt (Abbildung 6) . Stellen Sie sicher, dass beim Bohren keine Neigung
zwischen den Bohrern und der Wand besteht (Abbildung 7).
(Abbildung 6) (Abbildung 7)
Tischbohrmaschine und Kernbohrmaschine
17. Überprüfen Sie vor der Verwendung, ob das Gewinde mit dem Gewinde der
Bohrausgangswelle übereinstimmt. (Abbildung 8)

- 6 -
18. Überprüfen Sie, ob die Bohrerspezifikationen korrekt sind und die
Werkzeugzähne deformiert und erschöpft sind. (Abbildung 9)
(Abbildung 8) (Abbildung 9)
19. Ziehen Sie den Bit fest, indem Sie den Schraubenschlüssel im Uhrzeigersinn
drehen, und stellen Sie sicher, dass der Bit nicht mehr als 0,5 mm schwingt.
(Abbildung 10)
- 7 -
20. Auswechseln des Bohrers: Halten Sie die Abtriebswelle und den
Bohreranschluss mit Schraubenschlüsseln fest und drehen Sie dann den unteren
Schraubenschlüssel gegen den Uhrzeigersinn. (Abbildung 11)
(Abbildung 10) (Abbildung 11)
Artikel
Beschreibung
1
Name
Bohrkronen

- 8 -
2
Modell
107300AA
3
Parameter
Bohrerstärke:
Φ
4,25" (
Φ
108 mm)
Max. Kerntiefe: 9,5" (241,3 mm)
Gelenkabmessung: 5/8"-11
Taktikform: nass und trocken, doppelte Verwendung
Artikel
Beschreibung
1
Name
Bohrkronen
2
Modell
102300AA
3
Parameter
Bohrerstärke: Φ4" (Φ101,6 mm)
Max. Kerntiefe: 9,5" (241,3 mm)
Gelenkabmessung: 5/8"-11
Taktikform: nass und trocken, doppelte Verwendung
Artikel
Beschreibung
1
Name
Bohrkronen
2
Modell
63300AA
3
Parameter
Bohrerstärke: Φ2,5" (Φ63,5 mm)
Maximale Kerntiefe: 9,5" (241,3 mm)
Gelenkabmessung: 5/8"-11
Taktikform: nass und trocken, doppelte Verwendung
Artikel
Beschreibung
1
Name
Bohrkronen

- 9 -
2
Modell
108400 v. Chr
3
Parameter
Bohrerstärke: Φ4,25" (Φ108 mm)
Max. Kerntiefe: 14" (355 mm)
Gelenkabmessung: 1-1/4"-7
Taktikform: Nassausführung
Artikel
Beschreibung
1
Name
Bohrkronen
2
Modell
25400AC
3
Parameter
Bohrerstärke:
Φ
1" (
Φ
25,4 mm)
Max. Kerntiefe: 14" (355 mm)
Gelenkabmessung: 5/8"-11
Taktikform: Nassausführung
Artikel
Beschreibung
1
Name
Bohrkronen
2
Modell
32400AC
3
Parameter
Bohrerstärke:
Φ
1-1/4" (
Φ
32 mm)
Max. Kerntiefe: 14" (355 mm)
Gelenkabmessung: 5/8"-11
Taktikform: Nassausführung
Artikel
Beschreibung
1
Name
Bohrkronen

- 10 -
2
Modell
50400 v. Chr
3
Parameter
Bohrerstärke: Φ2" (Φ50,8 mm)
Max. Kerntiefe: 14" (355 mm)
Gelenkabmessung: 1-1/4"-7
Taktikform: Nassausführung
Adresse: Baoshanqu Shuangchenglu 803long 11hao 1602A-1609shi Shanghai
Importiert nach AUS: SIHAO PTY LTD. 1 ROKEVA STREETEASTWOOD NSW
2122 Australien
In die USA importiert: Sanven Technology Ltd. Suite 250, 9166 Anaheim Place,
Rancho Cucamonga, CA 91730
REP
EC
SHUNSHUN GmbH
Römeräcker 9 Z2021, 76351
Linkenheim-Hochstetten, Germany
REP
UK
Pooledas Group Ltd
Unit 5 Albert Edward House, The
Pavilions Preston, United Kingdom
In China hergestellt

- 1 -


- 4 -
We continue to be committed to provide you tools with competitive price.
"Save Half", "Half Price" or any other similar expressions used by us only represents an
estimate of savings you might benefit from buying certain tools with us compared to the major
top brands and does not necessarily mean to cover all categories of tools offered by us. You
are kindly reminded to verify carefully when you are placing an order with us if you are
actually saving half in comparison with the top major brands.

- 1 -
MODÈLE:
107300AA/102300AA/63300AA/108400BC/25400AC/32400AC/
50400 AVANT JC
( L'image est à titre de référence seulement, veuillez vous référer à l'objet réel)
DRILL CORE BITS

- 2 -
Have product questions? Need technical support? Please feel free to
contact us:
Technical Support and E-Warranty Certificate
www.vevor.com/support
NEED HELP? CONTACT US!
This is the original instruction, please read all manual instructions
carefully before operating. VEVOR reserves a clear interpretation of our
user manual. The appearance of the product shall be subject to the
product you received. Please forgive us that we won't inform you again if
there are any technology or software updates on our product.
SAFETY INSTRUCTION AND PRECAUTIONS
AVERTISSEMENT:
Lisez ce document avant d'utiliser ce produit. Ne pas le faire peut
entraîner des blessures graves.
26. Ce produit n'est pas un jouet. Ne laissez pas les enfants jouer
avec cet article.
27. Utiliser uniquement comme prévu.
28. Sécurité de la zone de travail : Gardez le lieu de travail propre et
lumineux. Le chaos et les endroits sombres peuvent provoquer un
accident.
29. Sécurité personnelle : Soyez vigilant, faites attention au
fonctionnement et restez éveillé lorsque vous utilisez l'outil électrique.
N'utilisez pas l'outil électrique en cas de fatigue, de médicaments,
d'alcool ou de réponse thérapeutique.

- 3 -
30. Utilisez des dispositifs de sécurité. Portez toujours des lunettes.
Les dispositifs de sécurité, tels que les masques anti-poussière dans
des conditions appropriées, les chaussures de sécurité antidérapantes,
les casques, les protections auditives et autres dispositifs, peuvent
réduire les blessures corporelles.
6. Habillez-vous correctement. Ne portez pas de vêtements amples ni
de bijoux. Gardez vos cheveux, vos vêtements et vos manches
éloignés des pièces mobiles. Des vêtements amples, des ornements
ou des cheveux longs peuvent être impliqués dans les pièces mobiles.
OPERATION AS BELOW
perceuse électrique à main
1 . Insérez le foret dans l'adaptateur, assurez-vous que l'inclinaison du foret est du
même angle que le trou du boulon de l'adaptateur et verrouillez la vis. (Figure 1-2)

- 4 -
( Figure 1) ( Figure 2)
2 . Sélectionnez le marteau électrique correspondant pour percer un trou d'environ
5 à 6 cm de profondeur, et insérez l'adaptateur dans le foret. (Figure 3)
(Figure 3)
13. Insérez l'adaptateur dans le foret et faites-le tourner pour le serrer (Figure 4) .
Le foret central doit être le centre du foret et l'écart central ne doit pas être
supérieur à 1 mm (Figure 5).
- 5 -
(Figure 4) (Figure 5)
14. Insérez l'adaptateur dans la connexion de la machine et vérifiez s'il est en
place (Figure 6) . Assurez-vous qu'il n'y a pas d'inclinaison entre les forets et le
mur lors du perçage (Figure 7).
(Figure 6) (Figure 7)
Perceuse d'établi et carotteuse
21. Vérifiez si le filetage correspond au filetage de l'arbre de sortie du foret avant
utilisation. (Figure 8)

- 6 -
22. Vérifiez si les spécifications du foret sont correctes et si les dents de l'outil
sont déformées et épuisées. (Figure 9)
(Figure 8) (Figure 9)
23. Serrez l'embout en tournant la clé dans le sens des aiguilles d'une montre et
vérifiez que l'embout ne oscille pas de plus de 0,5 mm. (Figure 10)
- 7 -
24. Remplacement du foret : à l'aide de clés pour maintenir l'arbre de sortie et le
connecteur de foret, puis tournez dans le sens inverse des aiguilles d'une montre
la clé inférieure. (Figure 11)
(Figure 10) (Figure 11)
Articles
Description
1
Nom
Trépans de forage

- 8 -
2
Modèle
107300AA
3
Paramètre
Jauge du foret
:Φ
4,25"(
Φ
108 mm)
Profondeur de carottage maximale
:
9,5"(241,3 mm)
Dimension du joint
:
5/8"-11
Forme tactique
:
double usage humide et sec
Articles
Description
1
Nom
Trépans de forage
2
Modèle
102300AA
3
Paramètre
Jauge du foret:Φ4"(Φ101,6 mm)
Profondeur de carottage maximale:9,5"(241,3 mm)
Dimension du joint:5/8"-11
Forme tactique:double usage humide et sec
Articles
Description
1
Nom
Trépans de forage
2
Modèle
63300AA
3
Paramètre
Calibre du foret:Φ2,5"(Φ63,5 mm)
Profondeur de carottage maximale:9,5"(241,3 mm)
Dimension du joint:5/8"-11
Forme tactique:double usage humide et sec
Articles
Description
1
Nom
Trépans de forage

- 9 -
2
Modèle
108400 avant JC
3
Paramètre
Calibre du foret:Φ4,25"(Φ108mm)
Profondeur de carottage maximale:14"(355mm)
Dimension du joint:1-1/4"-7
Forme tactique:type humide
Articles
Description
1
Nom
Trépans de forage
2
Modèle
25400AC
3
Paramètre
Jauge du foret
:Φ
1"(
Φ
25,4 mm)
Profondeur de carottage maximale
:
14"(355 mm)
Dimension du joint
:
5/8"-11
Forme tactique
:
type humide
Articles
Description
1
Nom
Trépans de forage
2
Modèle
32400AC
3
Paramètre
Calibre du foret
:Φ
1-1/4"(
Φ
32mm) Profondeur
de carottage maximale
:
14"(355mm)
Dimension du joint
:
5/8"-11
Forme tactique
:
type humide
Articles
Description
1
Nom
Trépans de forage

- 10 -
2
Modèle
50400 avant JC
3
Paramètre
Calibre du foret:Φ2"(Φ50,8 mm)
Profondeur de carottage maximale:14"(355 mm)
Dimension du joint:1-1/4"-7
Forme tactique:type humide
Adresse : Baoshanqu Shuangchenglu 803long 11hao 1602A-1609shi Shanghai
Importé en Australie : SIHAO PTY LTD. 1 ROKEVA STREETASTWOOD NSW
2122 Australie
Importé aux États-Unis : Sanven Technology Ltd. Suite 250, 9166 Anaheim
Place, Rancho Cucamonga, CA 91730
REP
EC
SHUNSHUN GmbH
Römeräcker 9 Z2021, 76351
Linkenheim-Hochstetten, Germany
REP
UK
Pooledas Group Ltd
Unit 5 Albert Edward House, The
Pavilions Preston, United Kingdom
Fabriqué en Chine

- 1 -


- 3 -
Technische ondersteuning en e-garantiecertificaat www.vevor.com/support
BOOR KERNBEITELS HANDLEIDING
We continue to be committed to provide you tools with competitive price.
"Save Half", "Half Price" or any other similar expressions used by us only represents an
estimate of savings you might benefit from buying certain tools with us compared to the major
top brands and does not necessarily mean to cover all categories of tools offered by us. You
are kindly reminded to verify carefully when you are placing an order with us if you are
actually saving half in comparison with the top major brands.

- 1 -
MODEL: 107300AA/102300AA/63300AA/108400BC/25400AC/32400AC/
50400 V.CHR
( De afbeelding is alleen ter referentie, raadpleeg het werkelijke object)
Have product questions? Need technical support? Please feel free to
contact us:
Technical Support and E-Warranty Certificate
www.vevor.com/support
NEED HELP? CONTACT US!
This is the original instruction, please read all manual instructions
carefully before operating. VEVOR reserves a clear interpretation of our
user manual. The appearance of the product shall be subject to the
product you received. Please forgive us that we won't inform you again if
there are any technology or software updates on our product.
DRILL CORE BITS

- 2 -
SAFETY INSTRUCTION AND PRECAUTIONS
WAARSCHUWING:
Lees dit materiaal voordat u dit product gebruikt. Als u dit niet doet,
kan dit leiden tot ernstig letsel.
31. Dit product is geen speelgoed. Laat kinderen niet met dit artikel
spelen.
32. Alleen gebruiken zoals bedoeld.
33. Veiligheid op de werkplek: Houd de werkplek schoon en helder.
Chaos en donkere plekken kunnen ongelukken veroorzaken.
34. Persoonlijke veiligheid: Wees alert, let op de bediening en blijf
wakker tijdens het gebruik van het elektrische gereedschap. Gebruik
het elektrisch gereedschap niet bij vermoeidheid, medicatie, alcohol of
therapeutische reacties.
35. Gebruik veiligheidsvoorzieningen. Draag altijd een veiligheidsbril.
Veiligheidsvoorzieningen, zoals stofmaskers onder geschikte
omstandigheden, antislipveiligheidsschoenen, helmen,
gehoorbescherming en andere apparaten kunnen persoonlijk letsel
verminderen.
6. Kleed je goed. Draag geen losse kleding en draag geen sieraden.
Houd uw haar, kleding en mouwen uit de buurt van bewegende delen.
Losse kleding, sieraden of lang haar kunnen in bewegende delen
terechtkomen.
- 3 -
OPERATION AS BELOW
draagbare elektrische boormachine
1 . Steek de boor in de adapter, zorg ervoor dat de helling van de boor dezelfde
hoek heeft als het boutgat van de adapter en vergrendel de schroef. (Figuur 1-2)
( Figuur 1) ( Figuur 2)
2 . Selecteer de juiste bijpassende elektrische hamer om een gat van ongeveer
5-6 cm diep te boren, en steek de adapter in de boor. (Figuur 3)
- 4 -
(Figuur 3)
15. Steek de adapter in de boor en draai deze vast (Figuur 4) . De middelste boor
moet het midden van de boor zijn en de middenafwijking mag niet groter zijn dan 1
mm (Figuur 5).
(Figuur 4) (Figuur 5)
16. Steek de adapter in de machineaansluiting en controleer of deze op zijn plaats
zit (Figuur 6) . Zorg ervoor dat er tijdens het boren geen helling is tussen de boren
en de muur (Figuur 7).

- 5 -
(Figuur 6) (Figuur 7)
Tafelboormachine en kernboormachine
25. Controleer voor gebruik of de schroefdraad overeenkomt met de schroefdraad
van de uitgaande as van de boor. (Figuur 8)
26. Controleer of de boorspecificaties kloppen en of de gereedschapstanden
vervormd en uitgeput zijn. (Figuur 9)
- 6 -
(Figuur 8) (Figuur 9)
27. Draai het bit vast door de sleutel met de klok mee te draaien en controleer of
het bit niet meer dan 0,5 mm uitzwaait. (Figuur 10)
28. De boor vervangen: gebruik sleutels om de uitgaande as en de bitconnector
vast te houden en draai vervolgens de onderste sleutel tegen de klok in. (Figuur
11)

- 7 -
(Figuur 10) (Figuur 11)
Artikelen
Beschrijving
1
Naam
Boor kernbeitels
2
Model
107300AA

- 8 -
3
Parameter
Maat van bit:
Φ
4,25"(
Φ
108 mm)
Max. kerndiepte: 9,5" (241,3 mm)
Gewrichtsafmeting: 5/8"-11
Tactische vorm: nat en droog voor tweeërlei gebruik
Artikelen
Beschrijving
1
Naam
Boor kernbeitels
2
Model
102300AA
3
Parameter
Maat van bit:
Φ
4"(
Φ
101,6 mm)
Max. kerndiepte: 9,5" (241,3 mm)
Gewrichtsafmeting: 5/8"-11
Tactische vorm: nat en droog voor tweeërlei gebruik
Artikelen
Beschrijving
1
Naam
Boor kernbeitels
2
Model
63300AA
3
Parameter
Maat van bit: Φ2,5"(Φ63,5 mm)
Max. kerndiepte: 9,5" (241,3 mm)
Gewrichtsafmeting: 5/8"-11
Tactische vorm: nat en droog voor tweeërlei gebruik
Artikelen
Beschrijving
1
Naam
Boor kernbeitels
2
Model
108400 v.Chr

- 9 -
3
Parameter
Maat van bit: Φ4,25"(Φ108 mm)
Max. boordiepte: 14" (355 mm)
Gewrichtsafmeting: 1-1/4"-7
Tactische vorm: nat type
Artikelen
Beschrijving
1
Naam
Boor kernbeitels
2
Model
25400AC
3
Parameter
Maat van bit:
Φ
1"(
Φ
25,4 mm)
Max. boordiepte: 14" (355 mm)
Gewrichtsafmeting: 5/8"-11
Tactische vorm: nat type
Artikelen
Beschrijving
1
Naam
Boor kernbeitels
2
Model
32400 AC
3
Parameter
Maat van bit: Φ1-1/4"(Φ32 mm)
Max. boordiepte: 14" (355 mm)
Gewrichtsafmeting: 5/8"-11
Tactische vorm: nat type
Artikelen
Beschrijving
1
Naam
Boor kernbeitels
2
Model
50400 v.Chr

- 10 -
3
Parameter
Maat van bit:
Φ
2"(
Φ
50,8 mm)
Max. kerndiepte: 14" (355 mm)
Gewrichtsafmeting: 1-1/4"-7
Tactische vorm: nat type
Adres: Baoshanqu Shuangchenglu 803long 11hao 1602A-1609shi Shanghai
Geïmporteerd naar AUS: SIHAO PTY LTD. 1 ROKEVA STREETEASTWOOD
NSW 2122 Australië
Geïmporteerd naar de VS: Sanven Technology Ltd. Suite 250, 9166 Anaheim
Place, Rancho Cucamonga, CA 91730
REP
EC
SHUNSHUN GmbH
Römeräcker 9 Z2021, 76351
Linkenheim-Hochstetten, Germany
REP
UK
Pooledas Group Ltd
Unit 5 Albert Edward House, The
Pavilions Preston, United Kingdom
Gemaakt in China

- 1 -


- 3 -
Teknisk support och e-garanticertifikat www.vevor.com/support
BORRKÄRNOR ANVÄNDARMANUAL
We continue to be committed to provide you tools with competitive price.
"Save Half", "Half Price" or any other similar expressions used by us only represents an
estimate of savings you might benefit from buying certain tools with us compared to the major
top brands and does not necessarily mean to cover all categories of tools offered by us. You
are kindly reminded to verify carefully when you are placing an order with us if you are
actually saving half in comparison with the top major brands.

- 1 -
MODELL:
107300AA/102300AA/63300AA/108400BC/25400AC/32400AC/
50400 F.KR
( Bilden är endast för referens, se det faktiska objektet)
DRILL CORE BITS

- 2 -
Have product questions? Need technical support? Please feel free to
contact us:
Technical Support and E-Warranty Certificate
www.vevor.com/support
NEED HELP? CONTACT US!
This is the original instruction, please read all manual instructions
carefully before operating. VEVOR reserves a clear interpretation of our
user manual. The appearance of the product shall be subject to the
product you received. Please forgive us that we won't inform you again if
there are any technology or software updates on our product.
SAFETY INSTRUCTION AND PRECAUTIONS
VARNING:
Läs detta material innan du använder denna produkt. Underlåtenhet
att göra det kan resultera i allvarliga skador.
36. Denna produkt är inte en leksak. Tillåt inte barn att leka med
detta föremål.
37. Använd endast som avsett.
38. Säkerhet på arbetsplatsen: Håll arbetsplatsen ren och ljus. Kaos
och mörka platser kan orsaka en olycka.
39. Personlig säkerhet: Var uppmärksam, var uppmärksam på driften
och håll dig vaken när du använder elverktyget. Använd inte elverktyget
med trötthet, medicinering, alkohol eller terapeutisk respons.
40. Använd säkerhetsanordningar. Använd alltid skyddsglasögon.
Säkerhetsanordningar, såsom dammmasker under lämpliga
- 3 -
förhållanden, halkfria skyddsskor, hjälmar, hörselskydd och andra
anordningar kan minska personskador.
6. Klä dig ordentligt. Bär inte löst sittande kläder eller bär smycken. Håll
ditt hår, kläder och ärmar borta från rörliga delar. Lösa kläder,
prydnadsföremål eller långt hår kan vara inblandade i rörliga delar.
OPERATION AS BELOW
handhållen elektrisk borrmaskin
1 . Sätt i borrkronan i adaptern, se till att lutningen på borrkronan är i samma vinkel
som adapterbultens hål och lås skruven. (Figur 1-2)

- 4 -
( Figur 1) ( Figur 2)
2 . Välj rätt matchande elektrisk hammare för att borra ett hål på cirka 5-6 cm djupt,
och sätt in adaptern i borrkronan. (Figur 3)
(Figur 3)
17. Sätt i adaptern i borrspetsen och vrid den så att den blir tät ( Figur 4) .
Mittskäret måste vara mitten av borrkronan, och mittavvikelsen får inte vara större
än 1 mm (Figur 5).
(Figur 4) (Figur 5)
18. Sätt i adaptern i maskinanslutningen och kontrollera om den är på plats (Figur
6) . Se till att det inte finns någon lutning mellan borrkronorna och väggen vid
borrning (Figur 7).

- 5 -
(Figur 6) (Figur 7)
Bänkborrmaskin och kärnborrmaskin
29. Kontrollera om gängan stämmer överens med borraxelns gänga före
användning. (Figur 8)
30. Kontrollera om borrspecifikationerna är korrekta och att verktygets tänder är
deformerade och utmattade. (Figur 9)

- 6 -
(Figur 8) (Figur 9)
31. Dra åt borret genom att vrida skiftnyckeln medurs och kontrollera att borret
inte svänger mer än 0,5 mm. (Figur 10)
32. Byte av borr: Använd skiftnycklar för att hålla fast den utgående axeln och
bitskontakten och vrid sedan den nedre skiftnyckeln moturs. (Figur 11)
- 7 -
(Figur 10) (Figur 11)
Föremål
Beskrivning
1
namn
Borrkärnor
2
Modell
107300AA

- 8 -
3
Parameter
Spetsmått
:Φ
4,25"(
Φ
108mm)
Max kärndjup
:
9,5"(241,3mm)
Fogdimension
:
5/8"-11
Taktisk form
:
våt och torr dubbel användning
Föremål
Beskrivning
1
namn
Borrkärnor
2
Modell
102300AA
3
Parameter
Spetsmått
:Φ
4"(
Φ
101,6mm)
Max kärndjup
:
9,5"(241,3mm)
Fogdimension
:
5/8"-11
Taktisk form
:
våt och torr dubbel användning
Föremål
Beskrivning
1
namn
Borrkärnor
2
Modell
63300AA
3
Parameter
Spetsmått:Φ2,5"(Φ63,5mm)
Max kärndjup:9,5"(241,3mm)
Fogdimension:5/8"-11
Taktisk form:våt och torr dubbel användning
Föremål
Beskrivning
1
namn
Borrkärnor
2
Modell
108400 f.Kr

- 9 -
3
Parameter
Spetsmått:Φ4,25"(Φ108mm)
Max kärndjup:14"(355mm)
Fogdimension:1-1/4"-7
Taktisk form:våt typ
Föremål
Beskrivning
1
namn
Borrkärnor
2
Modell
25400AC
3
Parameter
Spetsmått
:Φ
1"(
Φ
25,4mm)
Max kärndjup
:
14"(355mm)
Fogdimension
:
5/8"-11
Taktisk form
:
våt typ
Föremål
Beskrivning
1
namn
Borrkärnor
2
Modell
32400AC
3
Parameter
Spetsmått:Φ1-1/4"(Φ32mm)
Max kärndjup:14"(355mm)
Fogdimension:5/8"-11
Taktisk form:våt typ
Föremål
Beskrivning
1
namn
Borrkärnor
2
Modell
50400 f.Kr

- 10 -
3
Parameter
Spetsmått
:Φ
2"(
Φ
50,8mm)
Max kärndjup
:
14"(355mm)
Fogdimension
:
1-1/4"-7
Taktisk form
:
våt typ
Adress: Baoshanqu Shuangchenglu 803long 11hao 1602A-1609shi Shanghai
Importerad till AUS: SIHAO PTY LTD. 1 ROKEVA STREETEASTWOOD NSW
2122 Australien
Importerad till USA: Sanven Technology Ltd. Suite 250, 9166 Anaheim Place,
Rancho Cucamonga, CA 91730
REP
EC
SHUNSHUN GmbH
Römeräcker 9 Z2021, 76351
Linkenheim-Hochstetten, Germany
REP
UK
Pooledas Group Ltd
Unit 5 Albert Edward House, The
Pavilions Preston, United Kingdom
Tillverkad i Kina