


- 1 -
Techniczny Wsparcie i certyfikat gwarancji elektronicznej www.vevor.com/support
BRAMKA LACROSSE
MODELKA : YC-SS-LCN00 3
We continue to be committed to provide you tools with competitive price.
"Save Half", "Half Price" or any other similar expressions used by us only represents an
estimate of savings you might benefit from buying certain tools with us compared to the major
top brands and does not necessarily mean to cover all categories of tools offered by us. You
are kindly reminded to verify carefully when you are placing an order with us if you are
actually saving half in comparison with the top major brands.

- 2 -
MODELKA : YC-SS-LCN00 3
Have product questions? Need technical support? Please feel free to
contact us:
Technical Support and E-Warranty Certificate
www.vevor.com/support
NEED HELP? CONTACT US!
This is the original instruction, please read all manual instructions
carefully before operating. VEVOR reserves a clear interpretation of our
user manual. The appearance of the product shall be subject to the
product you received. Please forgive us that we won't inform you again if
there are any technology or software updates on our product.
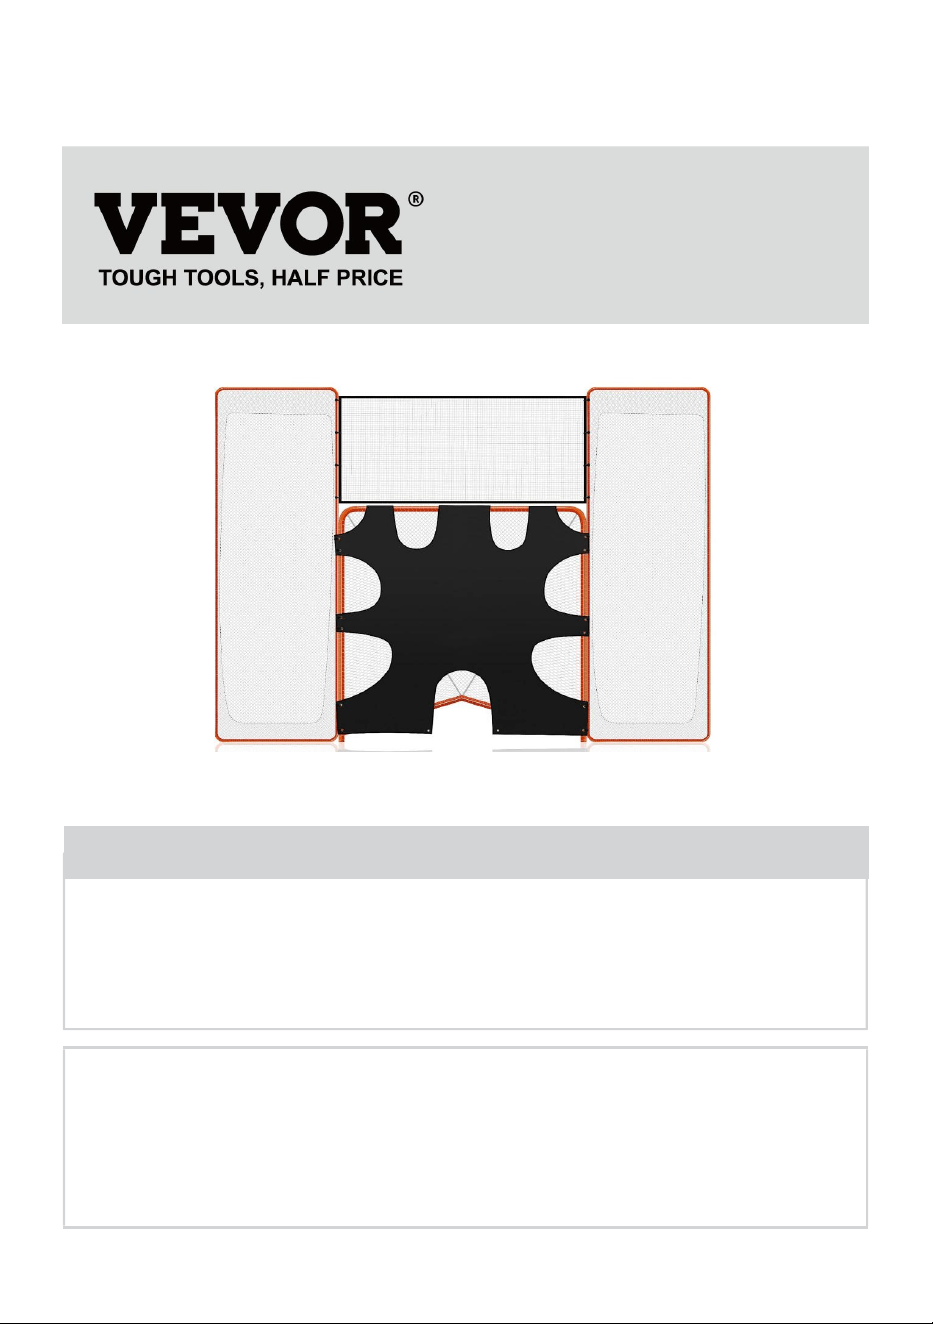
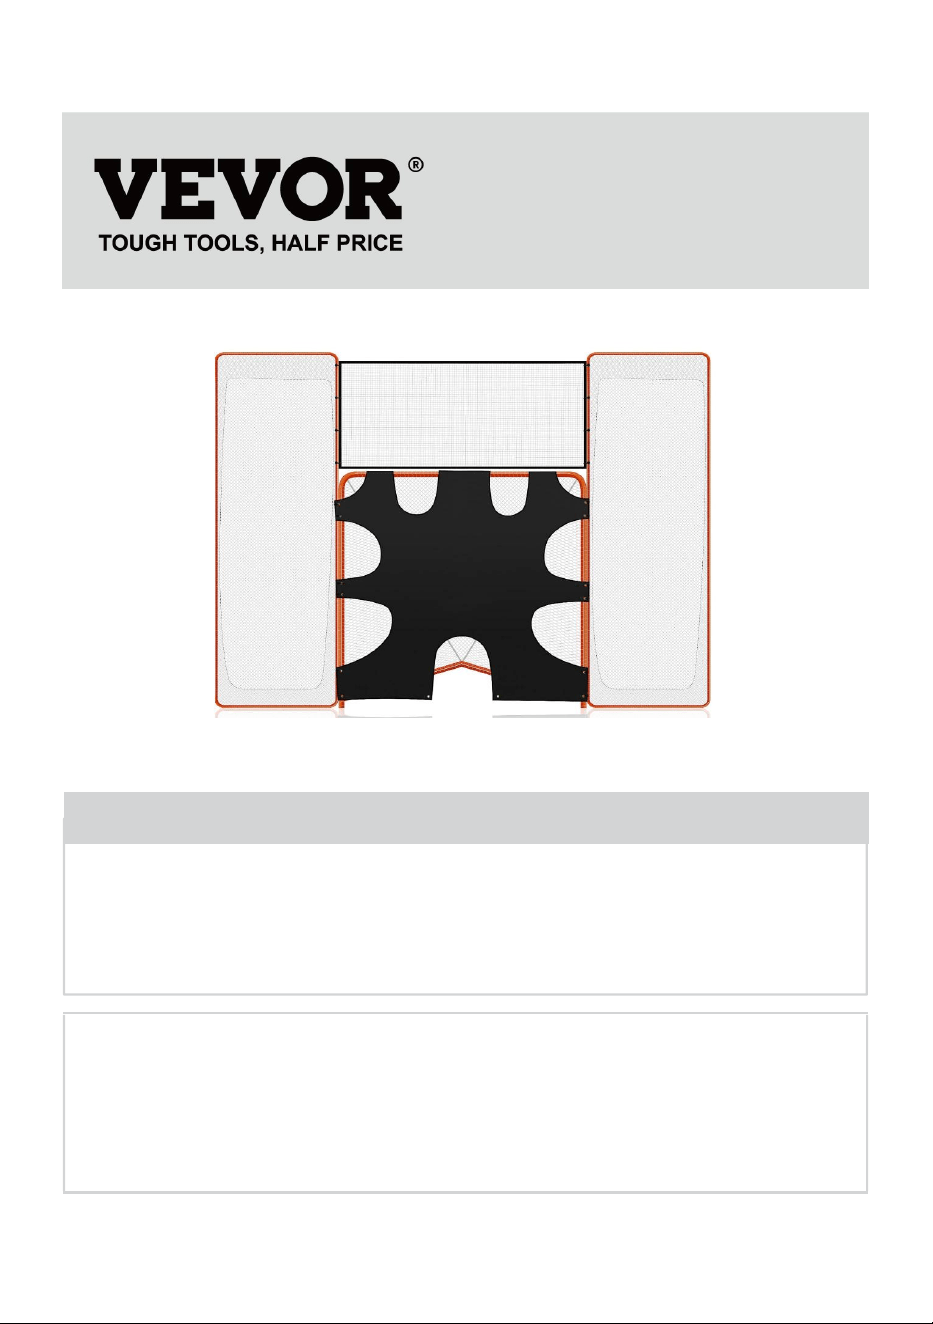
LACROSSE GOAL

- 3 -
Dziękujemy bardzo za wybranie tego Cel Lacrosse . Przed użyciem przeczytaj
wszystkie instrukcje. Informacje pomogą Ci osiągnąć najlepsze możliwe rezultaty.
SAFETY ADVICE
BEZPIECZNE PRAKTYKI PRACY
► Przed użyciem należy zawsze sprawdzić, czy słupki bramki i siatka nie mają
uszkodzeń i wymienić uszkodzone części.
► Nie używaj bramki z uszkodzonymi częściami.
► Bramka musi być zawsze przymocowana do podłoża. Ciężarki
należy stosować na twardych powierzchniach, kotwy gruntowe
na trawie.
► Nigdy nie wspinaj się na siatkę lub konstrukcję bramki. Bramki
nie wolno używać bez założonej siatki. Zawsze przestrzegaj
instrukcji bezpieczeństwa.
► Przed przeprowadzką lub demontaż bramki. Nie należy używać
bramki przy wietrznej pogodzie.
► Nie należy używać bramki w temperaturach poniżej zera.
Zalecamy nadzór osoby dorosłej podczas montażu i
użytkowania. Nie należy upuszczać ciężkich przedmiotów na
rury.
► Podczas demontażu bramki upewnij się, że wszystkie elementy są
schowane i żadne z nich nie jest uszkodzone . pozostawione na
powierzchni gry.
OSTRZEŻENIE:
Regularnie sprawdzaj, czy kołki są dobrze zamocowane. Luźne kołki
mogą spowodować obrażenia . Należy zachować ostrożność
podczas używania młotka, ponieważ niewłaściwe użycie może
spowodować obrażenia.

- 4 -
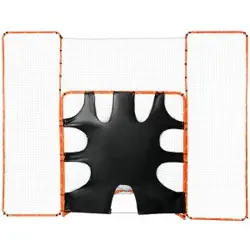
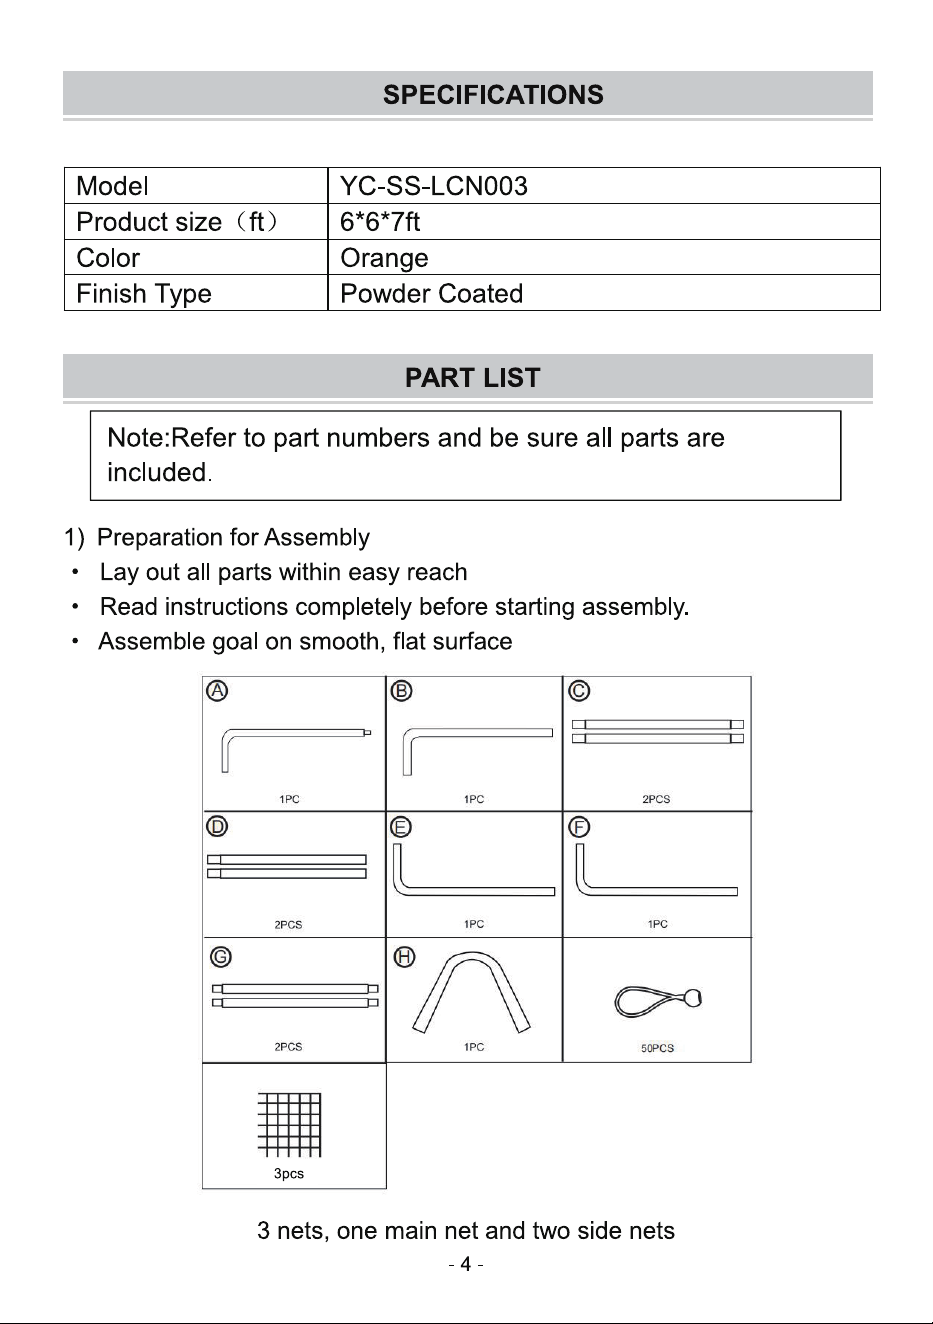
SPECIFICATIONS
Model
YC-SS-LCN003
Rozmiar produktu
( ft )
6*6* 7 stóp
Kolor
Pomarańczowy
Rodzaj wykoń
czenia
Malowane proszkowo
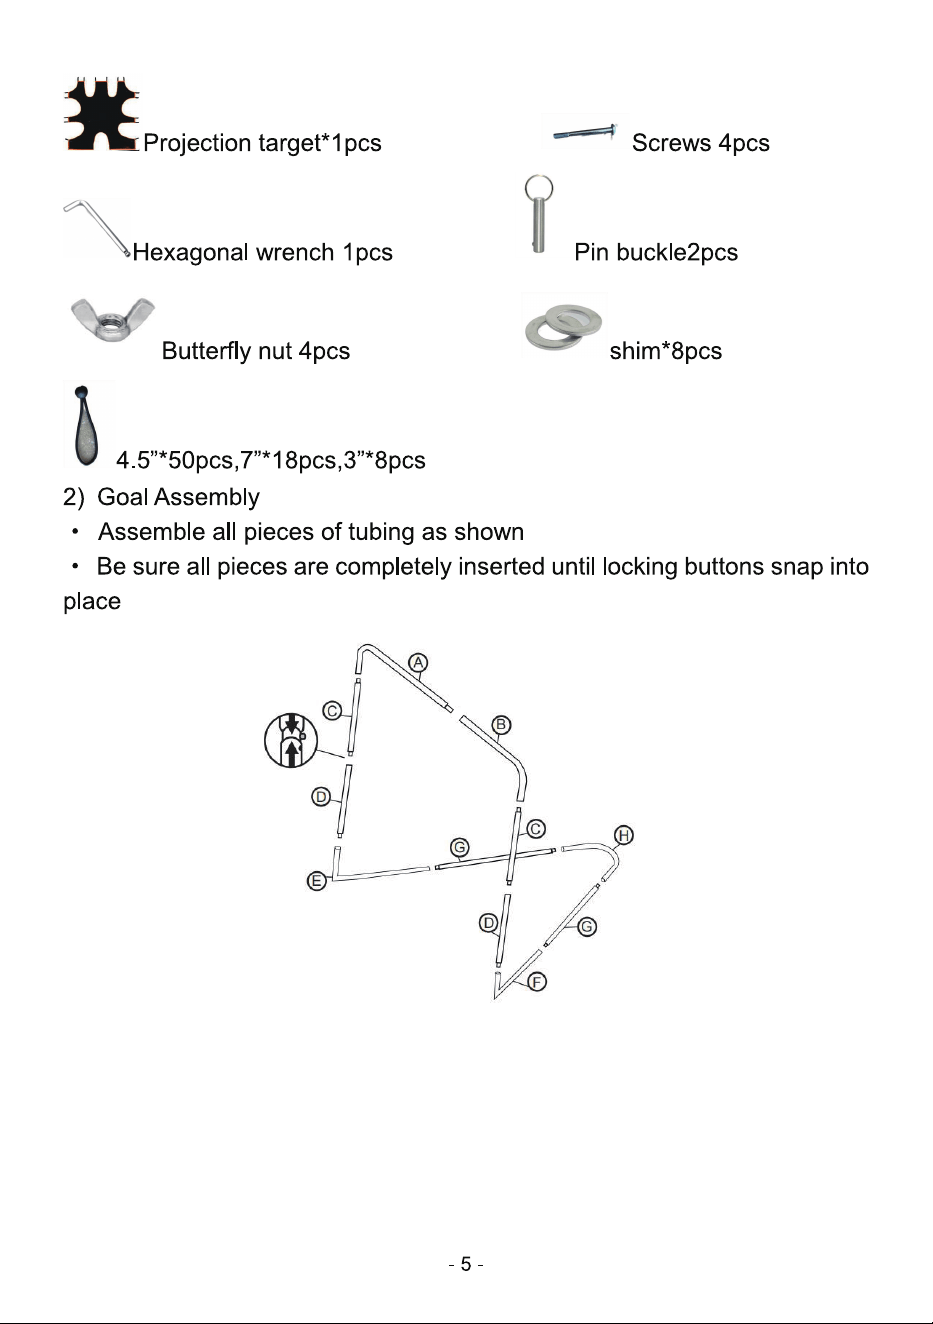
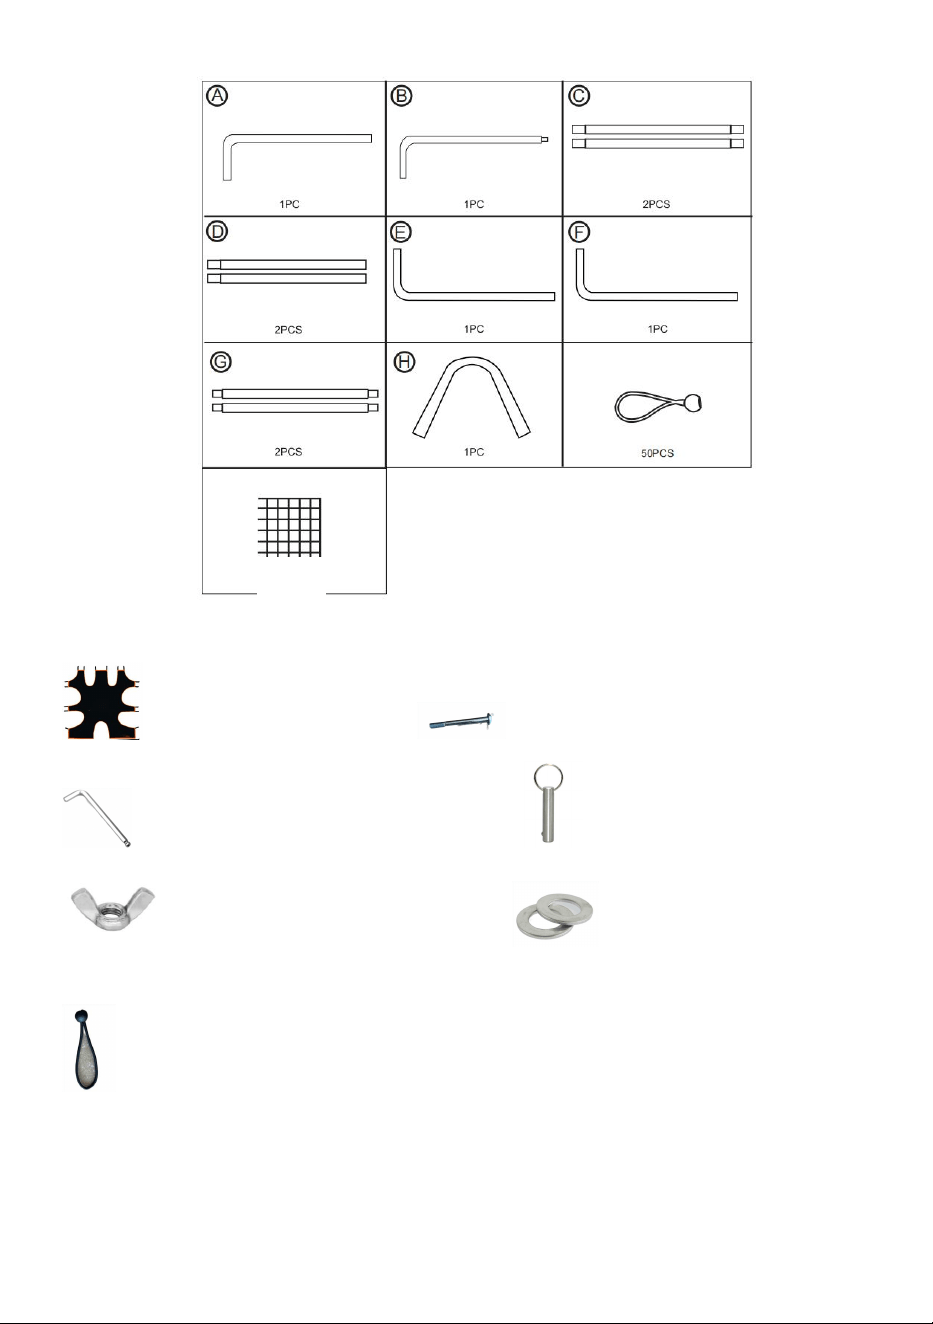
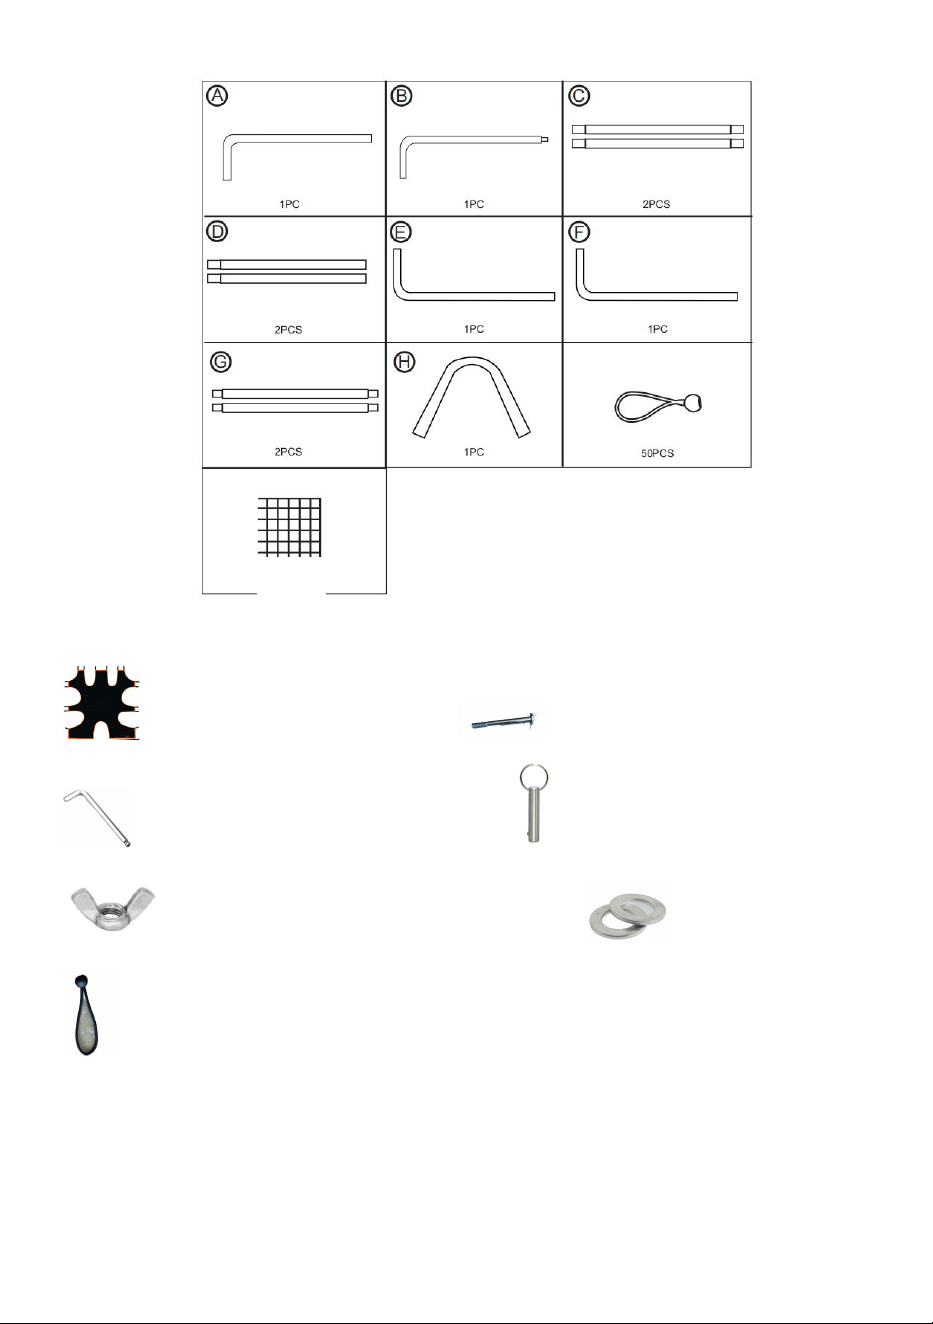
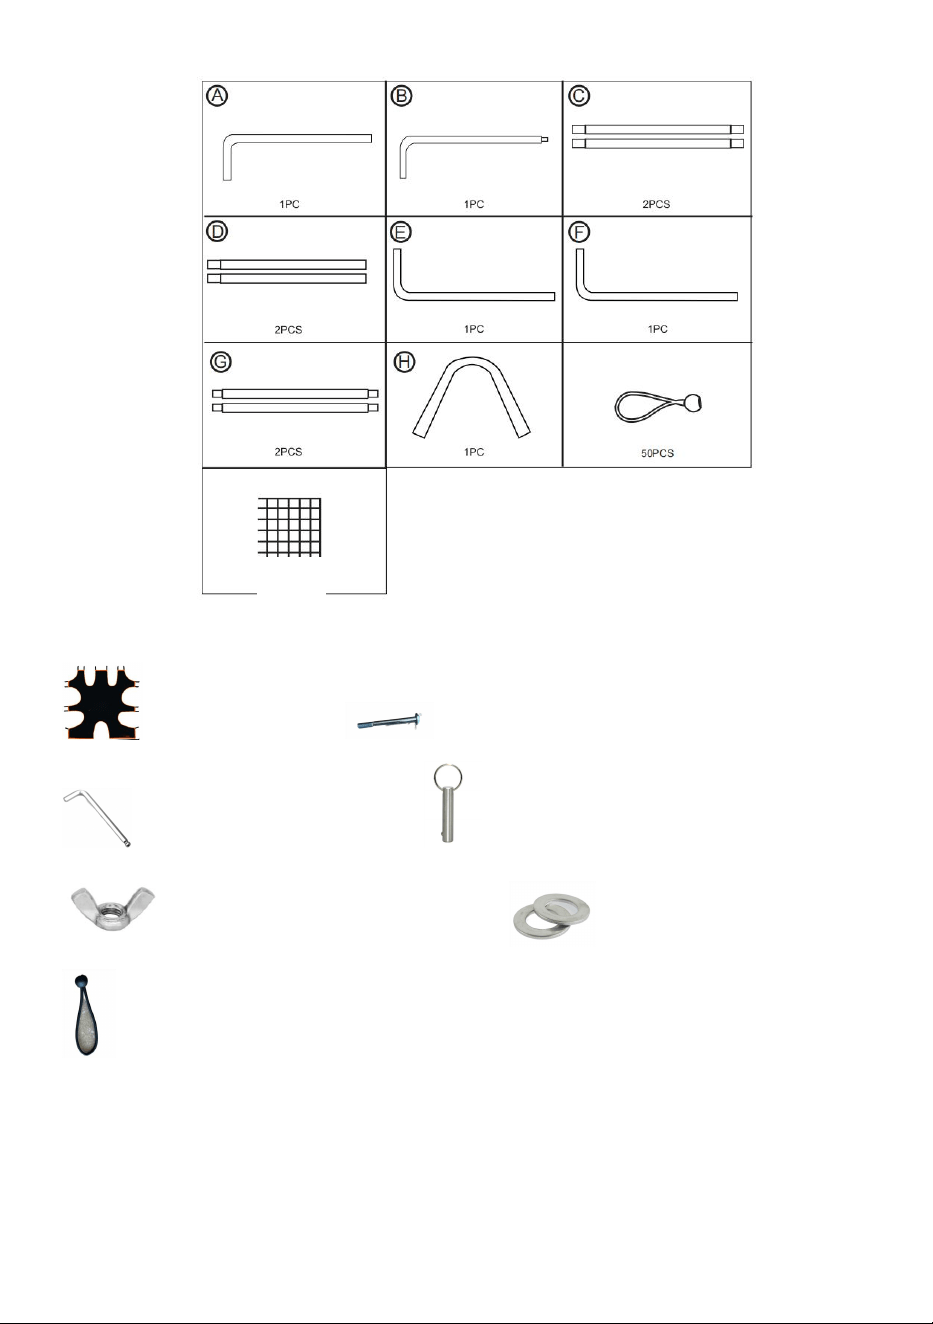
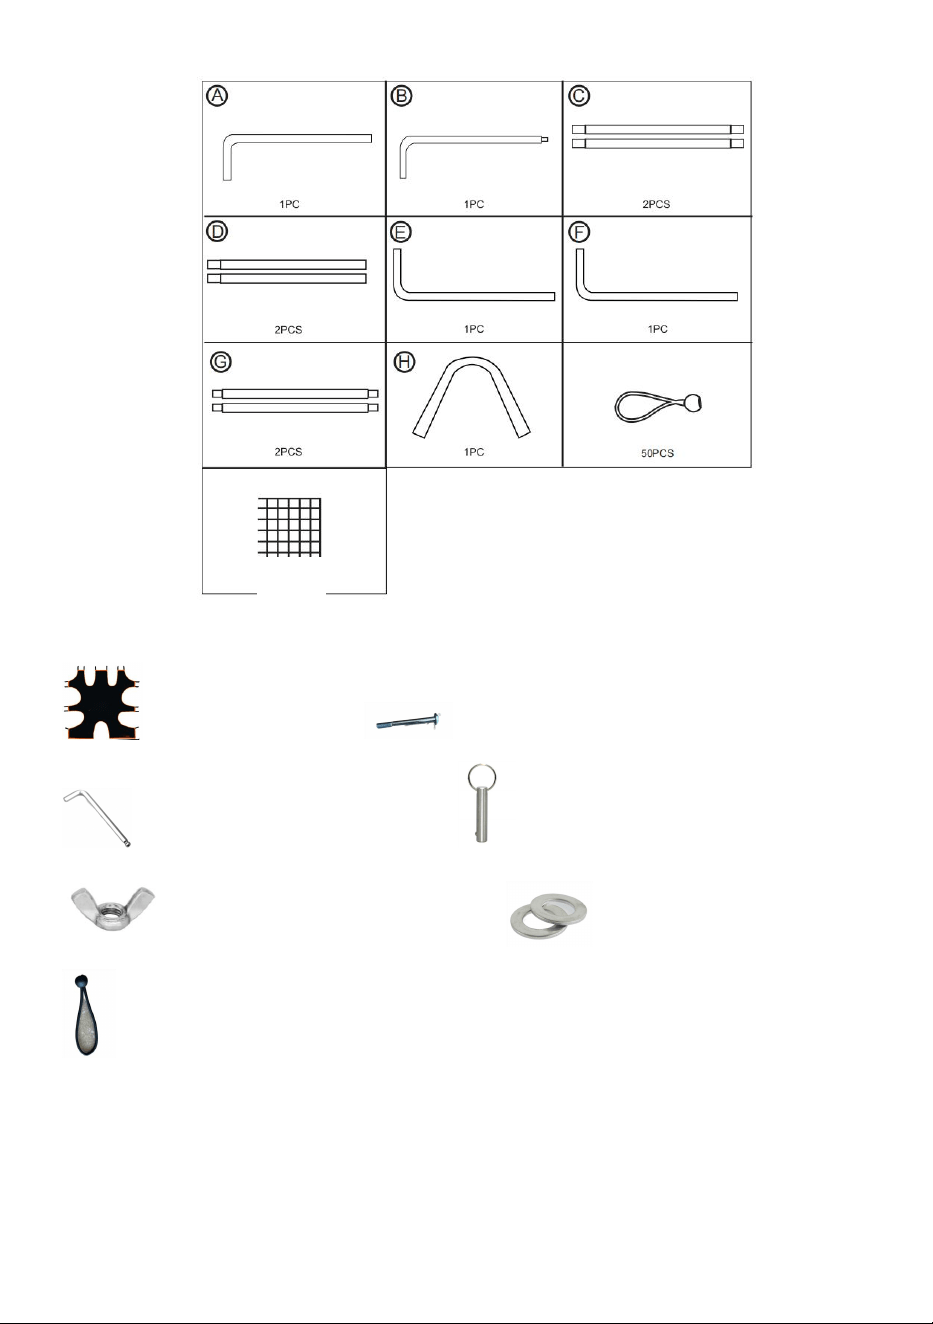
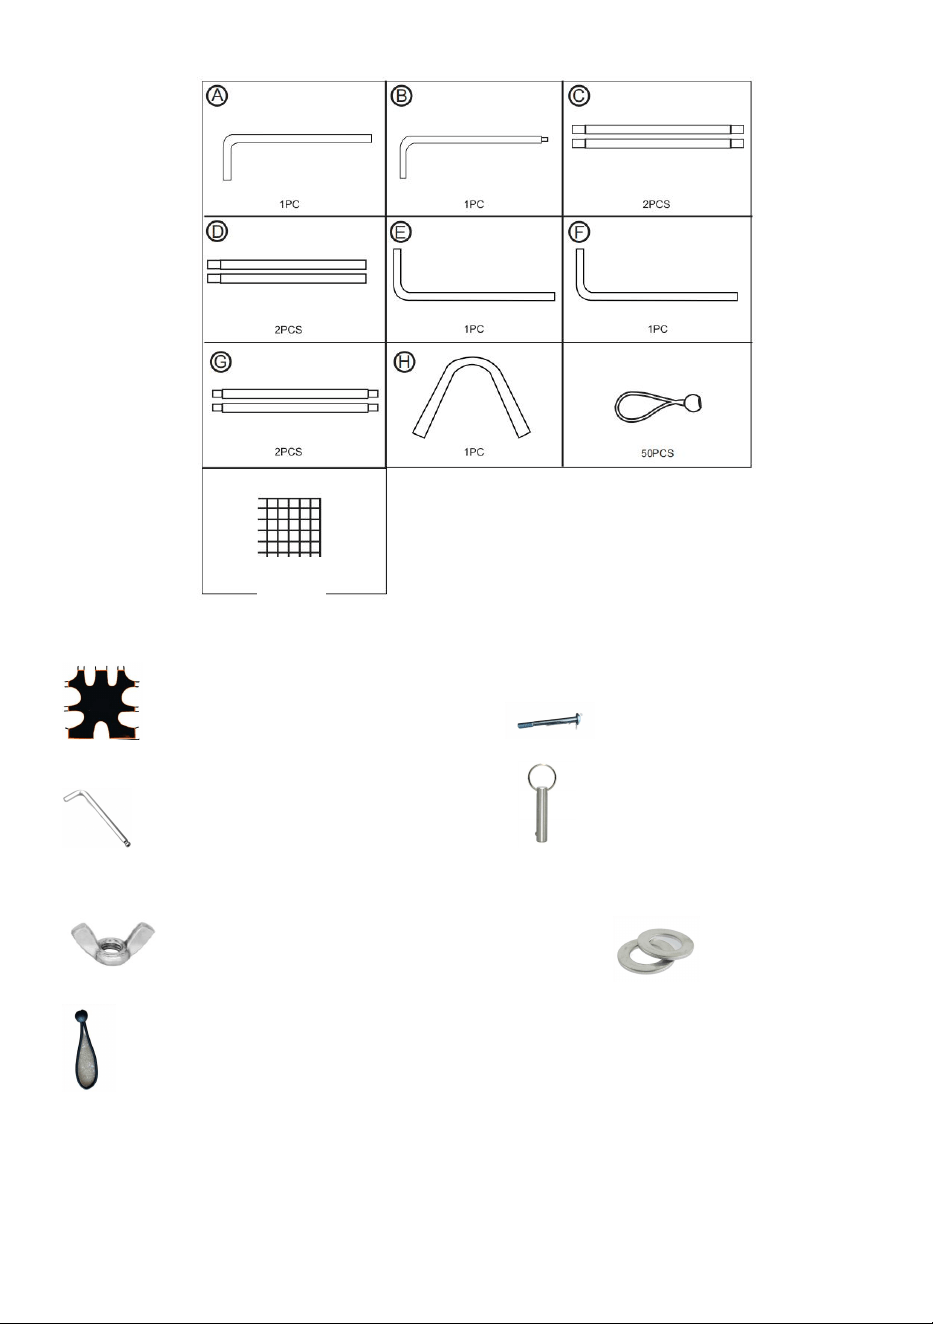
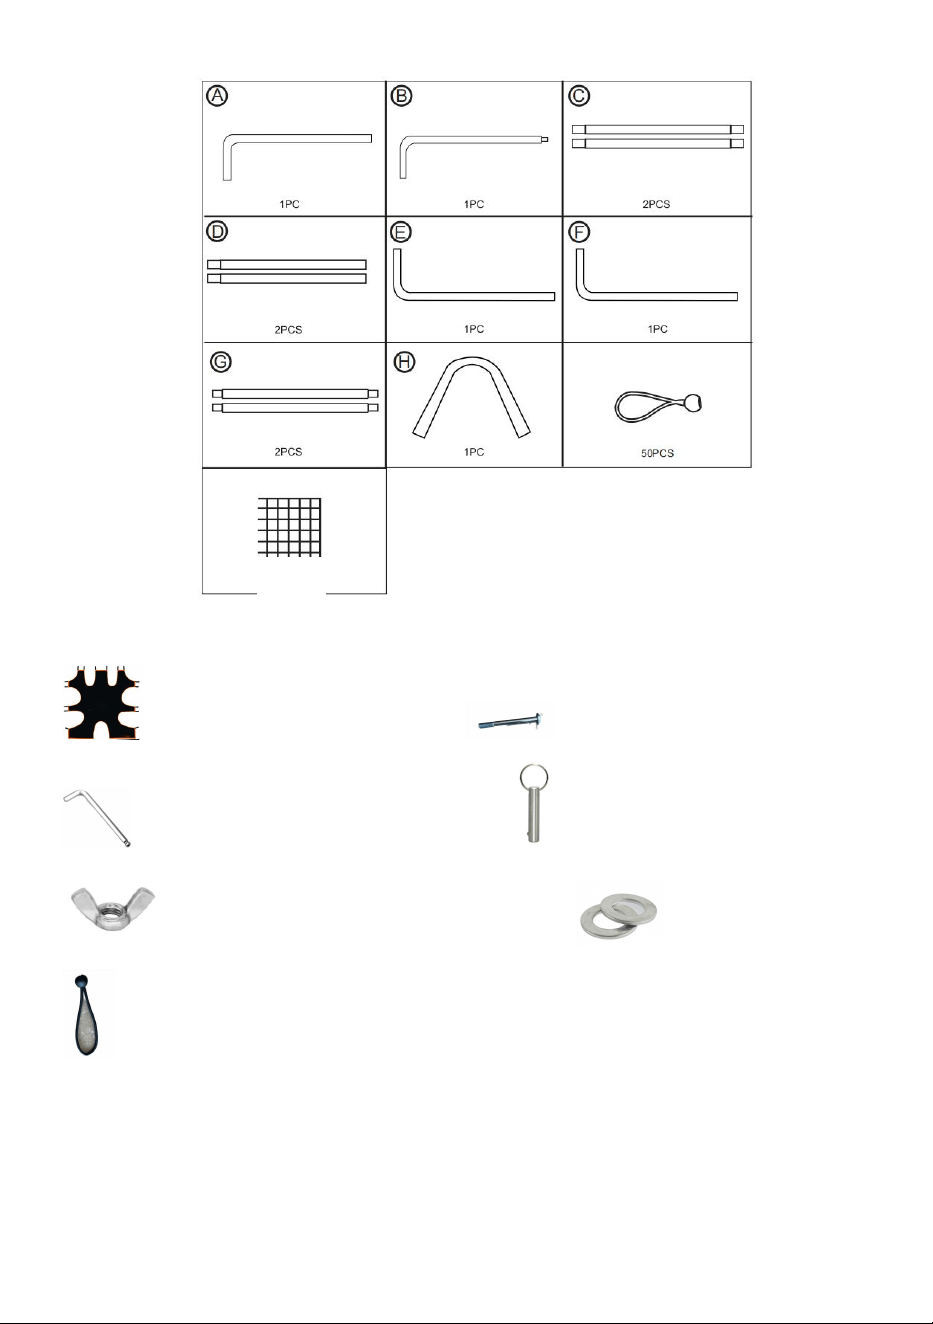
PART LIST
1) Przygotowanie do montażu
· Rozłóż wszystkie części w miejscu łatwo dostępnym
· Przed rozpoczęciem montażu należy dokładnie przeczytać instrukcję .
· Złóż bramkę na gładkiej, płaskiej powierzchni
Note:Refer to part numbers and be sure all parts are
included.
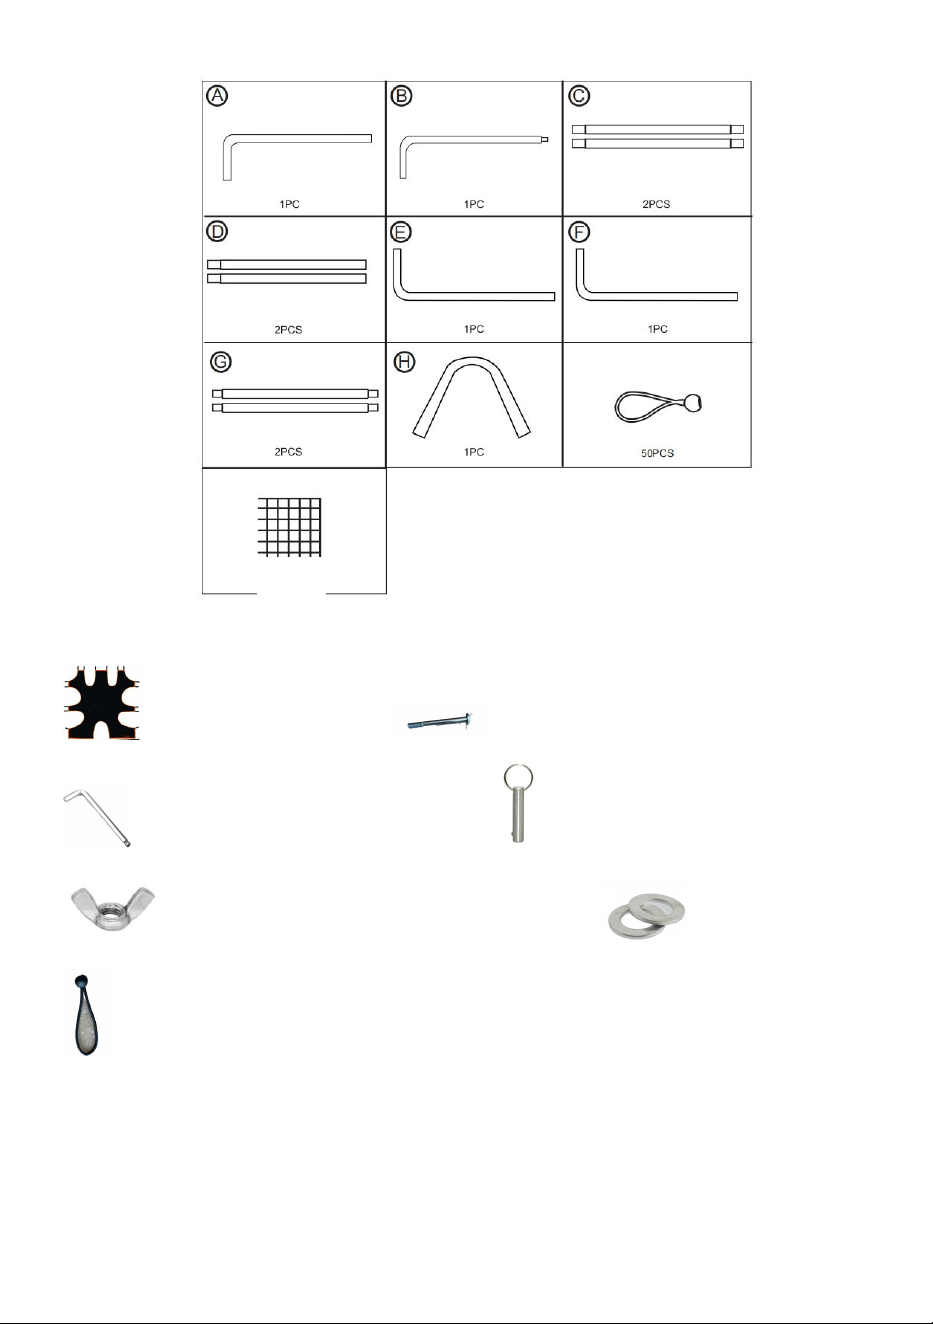
- 5 -
3 siatki, jedna główna i dwie boczne
Cel projekcyjny *1 szt. Śruby 4 szt.
Klucz imbusowy 1 szt. Sprzączka szpilkowa 2 szt.
Nakrętka motylkowa 4szt podkładka *8szt
4,5 ” *50szt., 7 ” *18szt., 3 ” *8szt.
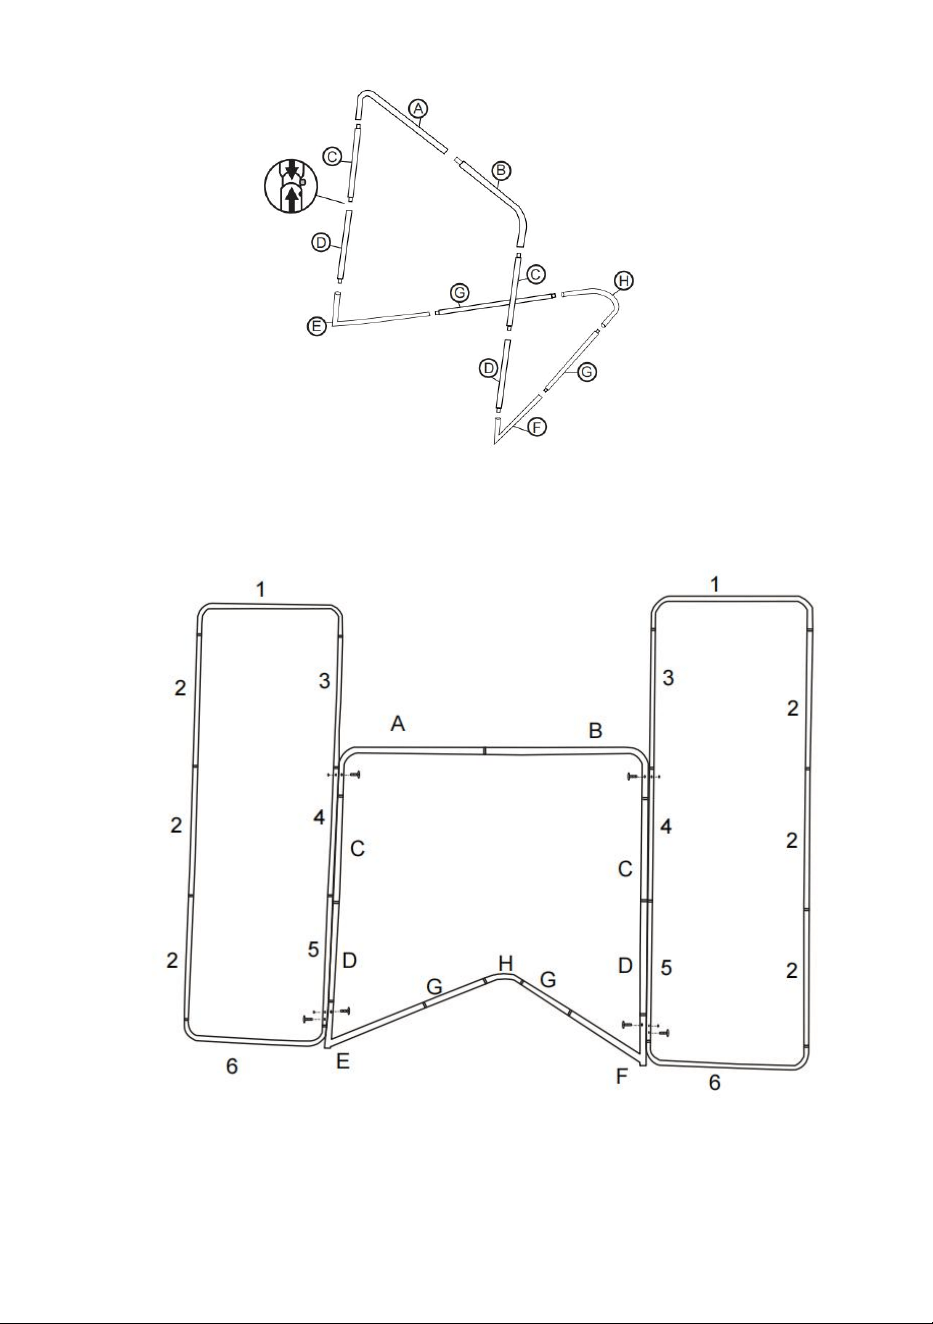
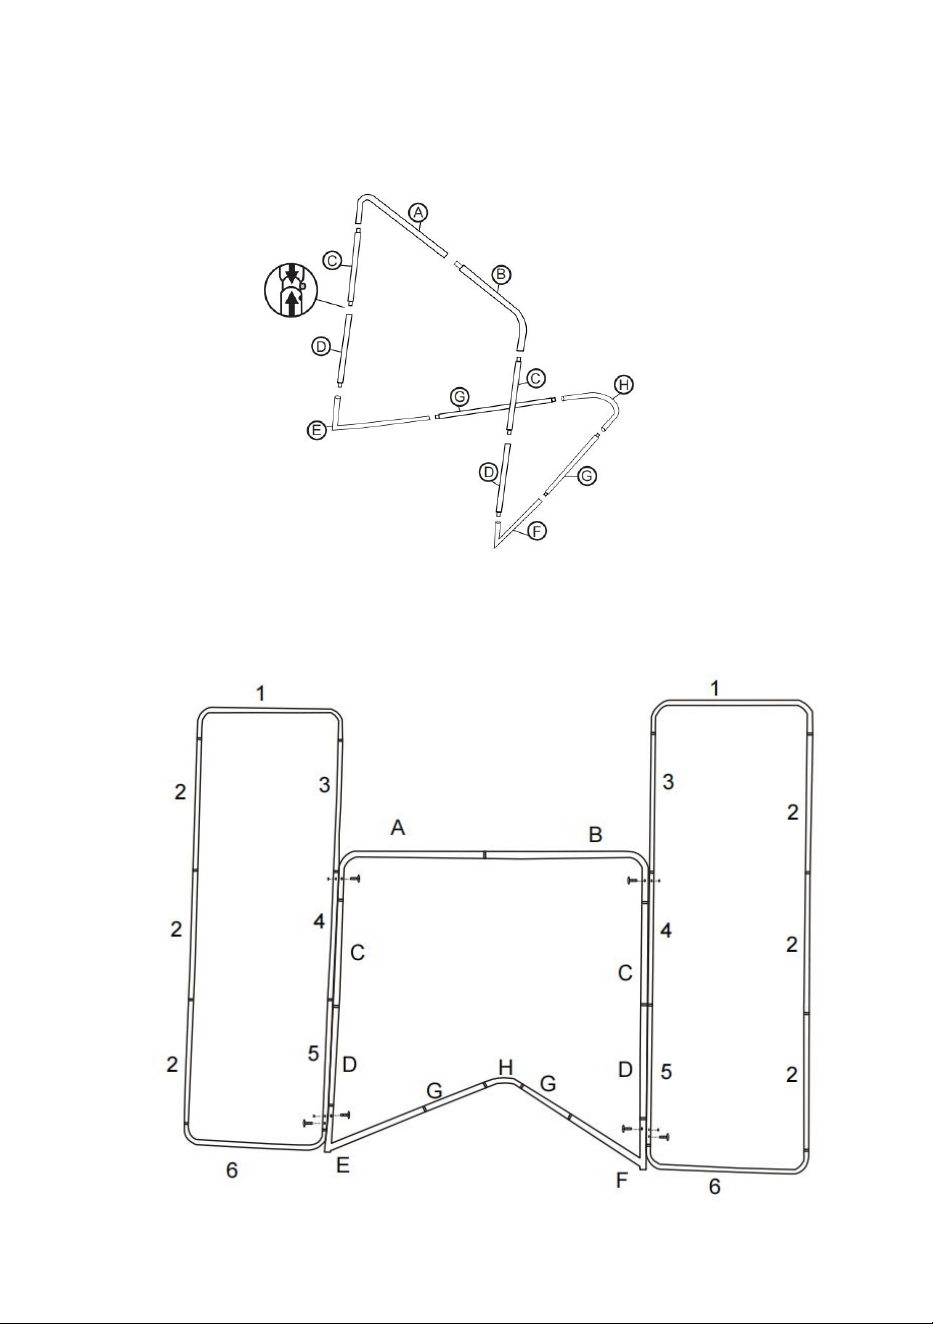
2) Zgromadzenie Celów
· Złóż wszystkie części rurki, jak pokazano na rysunku.
· Upewnij się, że wszystkie części są całkowicie włożone, aż przyciski
3pcs
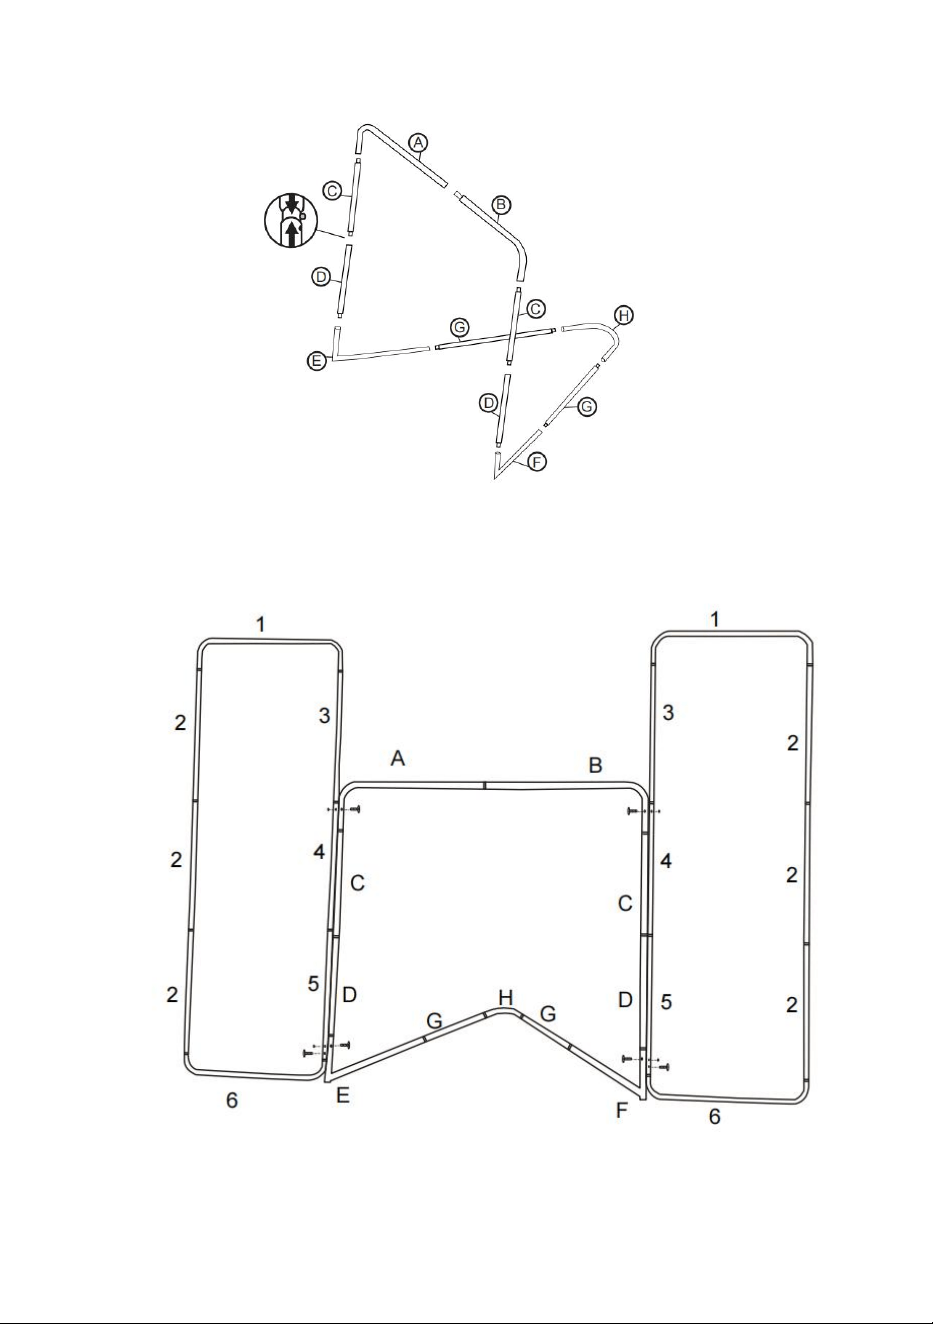
- 6 -
blokujące zatrzasną się na swoim miejscu.
Instalacja :
1. Wybierz stosunkowo płaski trawnik lub teren
2. Złóż elementy mocujące słupek kuli AF zgodnie z powyższym

- 7 -
schematem.
3. Po złożeniu bramki wyjmij białą siatkę na piłki i połóż ją płasko na ziemi.
4. Najpierw należy zacisnąć cztery punkty nad słupkiem drzwi za pomocą
elastycznej klamry.
5. Połącz siatkę do lacrosse’a ze słupkiem bramki za pomocą
elastycznych klamer i dokręcaj słupek bramki co 3–5 oczek.
6. Bramka hokejowa jest składana, co ułatwia przechowywanie.
CLEANING AND MAINTENANCE
► Wyczyść stojak wilgotnym ręcznikiem, siatkę można zdjąć do
prania i pozostawić do naturalnego wyschnięcia.
Adres: Baoshanqu Shuangchenglu 803long 11hao 1602A-1609shi
Szanghaj
Importowane do AUS: SIHAO PTY LTD, 1 ROKEVA
STREETEASTWOOD NSW 2122 Australia
Importowane do USA: Sanven Technology Ltd., Suite 250, 9166 Anaheim
Place, Rancho Cucamonga, CA 91730

- 8 -
REP
UK
Pooledas Group Ltd
Unit 5 Albert Edward House, The Pavilions
Preston, United Kingdom
REP
EC
SHUNSHUN GmbH
Römeräcker 9 Z2021, 76351
Linkenheim-Hochstetten, Germany


- 1 -
Technisch Support und E-Garantie-Zertifikat www.vevor.com/support
LACROSSE-TOR
MODELL : YC-SS-LCN00 3
We continue to be committed to provide you tools with competitive price.
"Save Half", "Half Price" or any other similar expressions used by us only represents an
estimate of savings you might benefit from buying certain tools with us compared to the major
top brands and does not necessarily mean to cover all categories of tools offered by us. You
are kindly reminded to verify carefully when you are placing an order with us if you are
actually saving half in comparison with the top major brands.

- 2 -
MODELL : YC-SS-LCN00 3
Have product questions? Need technical support? Please feel free to
contact us:
Technical Support and E-Warranty Certificate
www.vevor.com/support
NEED HELP? CONTACT US!
This is the original instruction, please read all manual instructions
carefully before operating. VEVOR reserves a clear interpretation of our
user manual. The appearance of the product shall be subject to the
product you received. Please forgive us that we won't inform you again if
there are any technology or software updates on our product.
LACROSSE GOAL

- 3 -
Vielen Dank für die Wahl dieses Lacrosse-Tor . Bitte lesen Sie vor der Verwendung
alle Anweisungen. Die Informationen helfen Ihnen, die bestmöglichen Ergebnisse
zu erzielen.
SAFETY ADVICE
SICHERE ARBEITSPRAXIS
► Überprüfen Sie Torpfosten und Netz vor dem Gebrauch unbedingt auf Defekte
und ersetzen Sie beschädigte Teile.
► Verwenden Sie das Tor nicht mit defekten Teilen.
► Das Tor muss immer am Boden befestigt werden. Auf harten
Oberflächen sind Gewichte zu verwenden, auf Gras
Bodenanker.
► Steigen Sie niemals auf das Netz oder den Torrahmen. Das Tor
darf nie ohne montiertes Netz benutzt werden. Beachten Sie
unbedingt die Sicherheitshinweise.
► Entfernen Sie alle Gewichte und Anker, bevor Sie das Gerät
bewegen oder Abbau des Tores. Benutzen Sie das Tor nicht bei
windigem Wetter.
► Verwenden Sie das Tor nicht bei Temperaturen unter Null. Wir
empfehlen eine Aufsicht durch Erwachsene während der
Montage und Verwendung. Lassen Sie keine schweren
Gegenstände auf die Rohre fallen.
► Beim Abbau des Tores ist darauf zu achten , dass alle Beschläge
verstaut sind und keine auf der Spielfläche belassen.
WARNUNG:
Überprüfen Sie regelmäßig, ob die Heringe fest sitzen. Lose Heringe
können Verletzungen verursachen . Gehen Sie bei der Verwendung
eines Hammers vorsichtig vor, da ein unsachgemäßer Gebrauch zu
Verletzungen führen kann.

- 4 -
SPECIFICATIONS
Modell
YC-SS-LCN003
Produktgröße ( ft )
6*6* 7 Fuß
Farbe
Orange
Ausführung
Pulverbeschichtet
PART LIST
1) Vorbereitung für die Montage
· Legen Sie alle Teile griffbereit bereit
· Lesen Sie die Anleitung vollständig durch, bevor Sie mit der Montage
beginnen .
· Tor auf glatter, ebener Fläche aufbauen
Note:Refer to part numbers and be sure all parts are
included.
- 5 -
3 Netze, ein Hauptnetz und zwei Seitennetze
Projektionsziel * 1 Stück Schrauben 4 Stück
Sechskantschlüssel 1Stk Dornschließe 2Stk
Flügelmutter 4St Unterlegscheibe * 8
Stück
4,5 Zoll * 50 Stück, 7 Zoll * 18 Stück, 3 Zoll * 8 Stück
2) Torversammlung
· Alle Rohrstücke wie gezeigt zusammenfügen
3pcs

- 6 -
· Stellen Sie sicher, dass alle Teile vollständig eingesteckt sind, bis die
Verriegelungsknöpfe einrasten
Installation :

- 7 -
1. Wählen Sie einen relativ ebenen Rasen oder Boden
2. Montieren Sie die Kugelpfostenbeschläge von AF gemäß der obigen
Abbildung.
3. Nach dem Zusammenbau des Torrahmens das weiße Ballnetz
herausnehmen und flach auf den Boden legen
4. Ziehen Sie zunächst die vier Punkte über der Türsäule mit der
elastischen Schnalle fest.
5. Binden Sie das Lacrosse- Netz und den Torpfosten mit elastischen
Schnallen zusammen und ziehen Sie den Torpfosten alle 3–5 Gitter fest.
6. Das Hockeytor ist zur einfacheren Lagerung zusammenklappbar.
CLEANING AND MAINTENANCE
► Reinigen Sie den Ständer mit einem feuchten Handtuch. Das Netz
kann zum Waschen abgenommen und an der Luft trocknen gelassen
werden.
Adresse: Baoshanqu Shuangchenglu 803long 11hao 1602A-1609shi
Shanghai
Nach AUS importiert: SIHAO PTY LTD, 1 ROKEVA
STREETEASTWOOD NSW 2122 Australien
Importiert in die USA: Sanven Technology Ltd., Suite 250, 9166 Anaheim

- 8 -
Place, Rancho Cucamonga, CA 91730
REP
UK
Pooledas Group Ltd
Unit 5 Albert Edward House, The Pavilions
Preston, United Kingdom
REP
EC
SHUNSHUN GmbH
Römeräcker 9 Z2021, 76351
Linkenheim-Hochstetten, Germany


- 1 -
Technique Certificat d'assistance et de garantie électronique
www.vevor.com/support
BUT DE CROSSE
MODÈLE : YC-SS- LCN00-3
We continue to be committed to provide you tools with competitive price.
"Save Half", "Half Price" or any other similar expressions used by us only represents an
estimate of savings you might benefit from buying certain tools with us compared to the major
top brands and does not necessarily mean to cover all categories of tools offered by us. You
are kindly reminded to verify carefully when you are placing an order with us if you are
actually saving half in comparison with the top major brands.
- 2 -
MODÈLE : YC-SS- LCN00-3
Have product questions? Need technical support? Please feel free to
contact us:
Technical Support and E-Warranty Certificate
www.vevor.com/support
NEED HELP? CONTACT US!
This is the original instruction, please read all manual instructions
carefully before operating. VEVOR reserves a clear interpretation of our
user manual. The appearance of the product shall be subject to the
product you received. Please forgive us that we won't inform you again if
there are any technology or software updates on our product.
LACROSSE GOAL

- 3 -
Merci beaucoup d'avoir choisi ceci But de crosse . Veuillez lire toutes les
instructions avant de l'utiliser. Ces informations vous aideront à obtenir les
meilleurs résultats possibles.
SAFETY ADVICE
PRATIQUES DE TRAVAIL SÉCURITAIRES
► Inspectez toujours le poteau de but et le filet pour détecter d'éventuels défauts
avant utilisation et remplacez les pièces endommagées.
► N'utilisez pas l'objectif avec des pièces défectueuses.
► Le but doit toujours être fixé au sol. Poids à utiliser sur surfaces
dures, ancrages au sol sur gazon.
► Ne jamais grimper sur le filet ou sur le cadre du but. Le but ne
doit jamais être utilisé sans le filet installé. Veuillez toujours
respecter les consignes de sécurité.
► Retirez tous les poids et ancrages avant de déplacer ou
démontage du but. Ne pas utiliser le but par temps venteux.
► N'utilisez pas le but à des températures inférieures à zéro. Nous
conseillons la surveillance d'un adulte pendant l'assemblage et
l'utilisation. Ne laissez pas tomber d'objets lourds sur les tubes.
► Lors du démontage du but , assurez-vous que tous les accessoires
sont emballés et qu'aucun n'est laissé sur la surface de jeu.
AVERTISSEMENT:
Vérifiez régulièrement que les piquets sont bien fixés. Des piquets
desserrés peuvent provoquer des blessures . Soyez prudent lorsque
vous utilisez un maillet, car une mauvaise utilisation peut provoquer
des blessures.

- 4 -
SPECIFICATIONS
Modèle
YC-SS-LCN003
Taille du produit
( ft )
6*6* 7 pieds
Couleur
Orange
Type de finition
Revêtement en poudre
PART LIST
1) Préparation pour l'assemblage
· Disposer toutes les pièces à portée de main
· Lisez entièrement les instructions avant de commencer l'assemblage .
· Assembler le but sur une surface lisse et plane
Note:Refer to part numbers and be sure all parts are
included.
- 5 -
3 filets, un filet principal et deux filets latéraux
Cible de projection * 1 pièce Vis 4 pièces
Clé hexagonale 1 pièce Boucle à ardillon 2 pièces
Écrou papillon 4 pièces cale *8 pièces
4,5 ” * 50 pièces, 7 ” * 18 pièces, 3 ” * 8 pièces
2) Assemblée des objectifs
· Assemblez tous les morceaux de tubes comme indiqué
· Assurez-vous que toutes les pièces sont complètement insérées jusqu'à
3pcs

- 6 -
ce que les boutons de verrouillage s'enclenchent
Installation :
1. Choisissez une pelouse ou un terrain relativement plat
2. Assemblez les ferrures de poteau à rotule d'AF selon le schéma

- 7 -
ci-dessus.
3. Après avoir assemblé le cadre du but, sortez le filet à balles blanc et
posez-le à plat sur le sol
4. Tout d’abord, serrez les quatre points au-dessus du montant de la porte
avec la boucle élastique.
5. Attachez le filet de crosse et le poteau de but ensemble avec des
boucles élastiques et serrez le poteau de but toutes les 3 à 5 grilles.
6. Le but de hockey est pliable pour un rangement plus facile.
CLEANING AND MAINTENANCE
► Nettoyez le support avec une serviette humide, le filet peut être
retiré pour le laver et laissé sécher naturellement.
Adresse : Baoshanqu Shuangchenglu 803long 11hao 1602A-1609shi
Shanghai
Importé en Australie : SIHAO PTY LTD, 1 ROKEVA STREET, ASTWOOD
NSW 2122 Australie
Importé aux États-Unis : Sanven Technology Ltd., Suite 250, 9166
Anaheim Place, Rancho Cucamonga, CA 91730

- 8 -
REP
UK
Pooledas Group Ltd
Unit 5 Albert Edward House, The Pavilions
Preston, United Kingdom
REP
EC
SHUNSHUN GmbH
Römeräcker 9 Z2021, 76351
Linkenheim-Hochstetten, Germany


- 1 -
Technisch Ondersteuning en E-garantiecertificaat www.vevor.com/support
LACROSSE-DOELPUNT
MODEL : YC-SS-LCN00 3
We continue to be committed to provide you tools with competitive price.
"Save Half", "Half Price" or any other similar expressions used by us only represents an
estimate of savings you might benefit from buying certain tools with us compared to the major
top brands and does not necessarily mean to cover all categories of tools offered by us. You
are kindly reminded to verify carefully when you are placing an order with us if you are
actually saving half in comparison with the top major brands.

- 2 -
MODEL : YC-SS-LCN00 3
Have product questions? Need technical support? Please feel free to
contact us:
Technical Support and E-Warranty Certificate
www.vevor.com/support
NEED HELP? CONTACT US!
This is the original instruction, please read all manual instructions
carefully before operating. VEVOR reserves a clear interpretation of our
user manual. The appearance of the product shall be subject to the
product you received. Please forgive us that we won't inform you again if
there are any technology or software updates on our product.
LACROSSE GOAL

- 3 -
Hartelijk dank dat u hiervoor heeft gekozen Lacrosse Goal . Lees alle instructies
voordat u het gebruikt. De informatie zal u helpen de best mogelijke resultaten te
behalen.
SAFETY ADVICE
VEILIGE WERKPRAKTIJK
► Controleer de doelpaal en het net altijd op gebreken voordat u het gebruikt en
vervang beschadigde onderdelen.
► Gebruik het doel niet met defecte onderdelen.
► Het doel moet altijd aan de grond worden vastgemaakt.
Gewichten moeten op harde oppervlakken worden gebruikt,
grondankers op gras.
► Klim nooit op het net of het doelframe. Het doel mag nooit
worden gebruikt zonder dat het net is bevestigd. Houd u altijd
aan de veiligheidsinstructies.
► Verwijder alle gewichten en ankers voordat u gaat verplaatsen of
het demonteren van het doel. Gebruik het doel niet bij winderig
weer.
► Gebruik het doel niet bij temperaturen onder het vriespunt. Wij
adviseren toezicht van volwassenen tijdens de montage en het
gebruik. Laat geen zware voorwerpen op de buizen vallen.
► Zorg er bij het demonteren van het doel voor dat alle onderdelen
zijn opgeborgen en dat er geen onderdelen zijn op het speelveld
achtergelaten.
WAARSCHUWING:
Controleer regelmatig of de pennen goed vastzitten. Losse pennen
kunnen letsel veroorzaken . Wees voorzichtig bij het gebruik van een
hamer, want verkeerd gebruik kan letsel veroorzaken.

- 4 -
SPECIFICATIONS
Model
YC-SS-LCN003
Productgrootte ( ft )
6*6* 7 voet
Kleur
Oranje
Afwerkingstype
Poeder gecoat
PART LIST
1) Voorbereiding voor de montage
· Leg alle onderdelen binnen handbereik neer
· Lees de instructies volledig door voordat u met de montage begint .
· Monteer het doel op een glad, vlak oppervlak
Note:Refer to part numbers and be sure all parts are
included.
- 5 -
3 netten, één hoofdnet en twee zijnetten
Projectiedoel *1st Schroeven 4st
Inbussleutel 1st Speld gesp 2st
Vleugelmoer 4st vulplaatje *8st
4,5 ” * 50 stuks, 7 ” * 18 stuks, 3 ” * 8 stuks
2) Doelstelling Montage
· Monteer alle stukken buis zoals afgebeeld
· Zorg ervoor dat alle onderdelen volledig zijn ingebracht totdat de
3pcs

- 6 -
vergrendelingsknoppen op hun plaats klikken
Installatie :
1. Kies een relatief vlak gazon of grond
2. Monteer de kogelomloopstutten van AF volgens het bovenstaande

- 7 -
schema.
3. Nadat u het doelframe hebt gemonteerd, haalt u het witte ballennet eruit
en legt u het plat op de grond
4. Maak eerst de vier punten boven de deurstijl vast met de elastische
gesp.
5. Maak het Lacrosse- net en de doelpaal vast met elastische gespen en
trek de doelpaal om de 3-5 rasters strak.
6. Het hockeydoel is opvouwbaar en daardoor eenvoudig op te bergen.
CLEANING AND MAINTENANCE
► Maak de standaard schoon met een natte handdoek. Het net kan
verwijderd worden om te wassen en kan dan op natuurlijke wijze
drogen.
Adres: Baoshanqu Shuangchenglu 803long 11hao 1602A-1609shi
Shanghai
Geïmporteerd naar AUS: SIHAO PTY LTD, 1 ROKEVA
STREETEASTWOOD NSW 2122 Australië
Geïmporteerd naar de VS: Sanven Technology Ltd., Suite 250, 9166
Anaheim Place, Rancho Cucamonga, CA 91730

- 8 -
REP
UK
Pooledas Group Ltd
Unit 5 Albert Edward House, The Pavilions
Preston, United Kingdom
REP
EC
SHUNSHUN GmbH
Römeräcker 9 Z2021, 76351
Linkenheim-Hochstetten, Germany


- 1 -
Teknisk Support och e-garanticertifikat www.vevor.com/support
LACROSSE MÅL
MODELL : YC-SS-LCN00 3
We continue to be committed to provide you tools with competitive price.
"Save Half", "Half Price" or any other similar expressions used by us only represents an
estimate of savings you might benefit from buying certain tools with us compared to the major
top brands and does not necessarily mean to cover all categories of tools offered by us. You
are kindly reminded to verify carefully when you are placing an order with us if you are
actually saving half in comparison with the top major brands.

- 2 -
MODELL : YC-SS-LCN00 3
Have product questions? Need technical support? Please feel free to
contact us:
Technical Support and E-Warranty Certificate
www.vevor.com/support
NEED HELP? CONTACT US!
This is the original instruction, please read all manual instructions
carefully before operating. VEVOR reserves a clear interpretation of our
user manual. The appearance of the product shall be subject to the
product you received. Please forgive us that we won't inform you again if
there are any technology or software updates on our product.
LACROSSE GOAL

- 3 -
Tack så mycket för att du valde detta Lacrosse mål . Läs alla instruktioner innan du
använder den. Informationen hjälper dig att uppnå bästa möjliga resultat.
SAFETY ADVICE
SÄKER ARBETSPRAKSIS
► Inspektera alltid målstolpen och nätet för defekter före användning och byt ut
skadade delar.
► Använd inte målet med defekta delar.
► Målet måste alltid vara säkrat i marken. Vikter för användning på
hårda ytor, slipade ankare på gräs.
► Klättra aldrig på nätet eller målramen. Målet får aldrig användas
utan att nätet är monterat. Följ alltid säkerhetsinstruktionerna.
► Ta bort alla vikter och ankare innan du flyttar eller demontering
av målet. Använd inte målet i blåsigt väder.
► Använd inte målet vid minusgrader. Vi rekommenderar att vuxen
övervakas under montering och användning. Tappa inga tunga
föremål på rören.
► Vid demontering av målet se till att alla beslag packas bort , och
ingen är det kvar på spelytan.
VARNING:
Kontrollera regelbundet att pinnarna är säkra. Lösa pinnar kan
orsaka skada . Försiktighet bör iakttas när du använder en klubba
eftersom felaktig användning kan orsaka skada.
SPECIFICATIONS

- 4 -
Modell
YC-SS-LCN003
Produktstorlek
( ft )
6*6* 7 fot
Färg
Orange
Finish Typ
Pulverlackerad
PART LIST
1) Förberedelse för montering
· Lägg ut alla delar inom bekvämt räckhåll
· Läs hela instruktionerna innan montering påbörjas .
· Montera målet på en slät, plan yta
Note:Refer to part numbers and be sure all parts are
included.
- 5 -
3 nät, ett huvudnät och två sidonät
Projektionsmål *1st Skruvar 4st
Sexkantnyckel 1 st Stiftspänne 2st
Fjärilsmutter 4st shim *8st
4,5 ” *50st,7 ” *18st,3 ” *8st
2) Målförsamling
· Montera alla delar av slangen enligt bilden
· Se till att alla delar är helt insatta tills låsknapparna snäpper på plats
3pcs
- 6 -
I nstallation :
1. Välj en relativt platt gräsmatta eller mark
2. Montera kulstolpsbeslagen från AF enligt diagrammet ovan.
3. Efter montering av målramen, ta ut det vita bollnätet och lägg det plant

- 7 -
på marken
4. Dra först åt de fyra punkterna ovanför dörrstolpen med det elastiska
spännet.
5.Knyt ihop lacrossenätet och målstolpen med elastiska spännen, och dra
åt målstolpen var 3-5:e galler.
6. Hockeymålet är hopfällbart för enklare förvaring.
CLEANING AND MAINTENANCE
► Rengör stativet med en våt handduk, nätet kan tas bort för tvätt och
tillåtas torka naturligt.
Adress: Baoshanqu Shuangchenglu 803long 11hao 1602A-1609shi
Shanghai
Importerad till AUS: SIHAO PTY LTD, 1 ROKEVA STREETEASTWOOD
NSW 2122 Australien
Importerad till USA: Sanven Technology Ltd., Suite 250, 9166 Anaheim
Place, Rancho Cucamonga, CA 91730

- 8 -
REP
UK
Pooledas Group Ltd
Unit 5 Albert Edward House, The Pavilions
Preston, United Kingdom
REP
EC
SHUNSHUN GmbH
Römeräcker 9 Z2021, 76351
Linkenheim-Hochstetten, Germany


- 1 -
Técnico Soporte y certificado de garantía electrónica www.vevor.com/support
PORTERÍA DE LACROSSE
MODELO : YC-SS-LCN00 3
We continue to be committed to provide you tools with competitive price.
"Save Half", "Half Price" or any other similar expressions used by us only represents an
estimate of savings you might benefit from buying certain tools with us compared to the major
top brands and does not necessarily mean to cover all categories of tools offered by us. You
are kindly reminded to verify carefully when you are placing an order with us if you are
actually saving half in comparison with the top major brands.

- 2 -
MODELO : YC-SS-LCN00 3
Have product questions? Need technical support? Please feel free to
contact us:
Technical Support and E-Warranty Certificate
www.vevor.com/support
NEED HELP? CONTACT US!
This is the original instruction, please read all manual instructions
carefully before operating. VEVOR reserves a clear interpretation of our
user manual. The appearance of the product shall be subject to the
product you received. Please forgive us that we won't inform you again if
there are any technology or software updates on our product.
LACROSSE GOAL

- 3 -
Muchas gracias por elegir este Portería de lacrosse . Lea todas las instrucciones
antes de utilizarla. La información le ayudará a lograr los mejores resultados
posibles.
SAFETY ADVICE
PRÁCTICAS LABORALES SEGURAS
► Inspeccione siempre el poste de la portería y la red para detectar defectos
antes de su uso y reemplace las piezas dañadas.
► No utilice el objetivo con piezas defectuosas.
► La portería debe estar siempre fijada al suelo. Se utilizarán
pesos en superficies duras y anclajes al suelo en césped.
► No subirse nunca a la red ni al marco de la portería. La portería
nunca debe utilizarse sin la red colocada. Respete siempre las
instrucciones de seguridad.
► Retire todos los pesos y anclajes antes de mover o Desmontaje
de la portería. No utilice la portería en condiciones climáticas
ventosas.
► No utilice el objetivo en temperaturas bajo cero. Recomendamos
la supervisión de un adulto durante el montaje y el uso. No deje
caer objetos pesados sobre los tubos.
► Al desmontar la portería, asegúrese de que todos los accesorios
estén guardados y que no quede ninguno . dejado en la
superficie de juego.
ADVERTENCIA:
Compruebe periódicamente que las clavijas estén bien sujetas. Las
clavijas sueltas pueden provocar lesiones . Se debe tener cuidado al
utilizar un mazo, ya que el uso incorrecto puede provocar lesiones.

- 4 -
SPECIFICATIONS
Modelo
YC-SS-LCN003
Tamaño del
producto ( pies )
6*6* 7 pies
Color
Naranja
Tipo de acabado
Recubierto de polvo
PART LIST
1) Preparación para el montaje
· Coloque todas las piezas al alcance de la mano.
· Lea las instrucciones completamente antes de comenzar el montaje .
· Montar la portería sobre una superficie lisa y plana.
Note:Refer to part numbers and be sure all parts are
included.
- 5 -
3 redes, una red principal y dos redes laterales
Objetivo de proyección * 1 pieza Tornillos 4 piezas
Llave hexagonal 1 pieza Hebilla de pasador 2
piezas
Tuerca mariposa 4 piezas cuña *8 piezas
4,5 ” *50 piezas, 7 ” *18 piezas, 3 ” *8 piezas
2) Asamblea de objetivos
· Ensamble todas las piezas de tubería como se muestra
3pcs
- 6 -
· Asegúrese de que todas las piezas estén completamente insertadas
hasta que los botones de bloqueo encajen en su lugar.
Instalación :

- 7 -
1. Elija un césped o terreno relativamente plano.
2. Monte los accesorios del poste de bola de AF de acuerdo con el
diagrama anterior.
3. Después de ensamblar el marco de la portería, saque la red de pelota
blanca y colóquela plana en el suelo.
4. Primero, apriete los cuatro puntos sobre el pilar de la puerta con la
hebilla elástica.
5. Ate la red de lacrosse y el poste de la portería con hebillas elásticas y
ajuste el poste de la portería cada 3 a 5 cuadrículas.
6.La portería de hockey es plegable para facilitar su almacenamiento.
CLEANING AND MAINTENANCE
► Limpie el soporte con una toalla húmeda, la red se puede quitar
para lavarla y dejar secar naturalmente.
Dirección: Baoshanqu Shuangchenglu 803long 11hao 1602A-1609shi
Shanghai
Importado a AUS: SIHAO PTY LTD, 1 ROKEVA STREETEASTWOOD
NSW 2122 Australia
Importado a EE. UU.: Sanven Technology Ltd., Suite 250, 9166 Anaheim
Place, Rancho Cucamonga, CA 91730

- 8 -
REP
UK
Pooledas Group Ltd
Unit 5 Albert Edward House, The Pavilions
Preston, United Kingdom
REP
EC
SHUNSHUN GmbH
Römeräcker 9 Z2021, 76351
Linkenheim-Hochstetten, Germany


- 1 -
Tecnico Supporto e certificato di garanzia elettronica www.vevor.com/support
OBIETTIVO DI LACROSSE
MODELLO : MODELLO YC-SS-LCN00 3
We continue to be committed to provide you tools with competitive price.
"Save Half", "Half Price" or any other similar expressions used by us only represents an
estimate of savings you might benefit from buying certain tools with us compared to the major
top brands and does not necessarily mean to cover all categories of tools offered by us. You
are kindly reminded to verify carefully when you are placing an order with us if you are
actually saving half in comparison with the top major brands.
- 2 -
MODELLO : MODELLO YC-SS-LCN00 3
Have product questions? Need technical support? Please feel free to
contact us:
Technical Support and E-Warranty Certificate
www.vevor.com/support
NEED HELP? CONTACT US!
This is the original instruction, please read all manual instructions
carefully before operating. VEVOR reserves a clear interpretation of our
user manual. The appearance of the product shall be subject to the
product you received. Please forgive us that we won't inform you again if
there are any technology or software updates on our product.
LACROSSE GOAL

- 3 -
Grazie mille per aver scelto questo Obiettivo Lacrosse . Si prega di leggere tutte le
istruzioni prima di utilizzarlo. Le informazioni ti aiuteranno a ottenere i migliori
risultati possibili.
SAFETY ADVICE
PRATICHE DI LAVORO SICURE
► Prima dell'uso, ispezionare sempre la porta e la rete per individuare eventuali
difetti e sostituire le parti danneggiate.
► Non utilizzare la porta con parti difettose.
► La porta deve essere sempre fissata al terreno. Pesi da utilizzare
su superfici dure, ancoraggi a terra su erba.
► Non salire mai sulla rete o sulla struttura della porta. La porta
non deve mai essere utilizzata senza la rete montata. Rispettare
sempre le istruzioni di sicurezza.
► Rimuovere tutti i pesi e gli ancoraggi prima di spostare o
smontare la porta. Non utilizzare la porta in caso di vento.
► Non utilizzare la porta a temperature inferiori allo zero. Si
consiglia la supervisione di un adulto durante il montaggio e l'uso.
Non far cadere oggetti pesanti sui tubi.
► Quando si smonta l'obiettivo , assicurarsi che tutti gli accessori siano
imballati e nessuno sia lasciati sulla superficie di gioco.
AVVERTIMENTO:
Controllare regolarmente che i pioli siano ben saldi. Pioli allentati
possono causare lesioni . Prestare attenzione quando si usa un
martello, poiché un uso improprio può causare lesioni.

- 4 -
SPECIFICATIONS
Modello
Codice articolo: YC-SS-LCN003
Dimensioni del
prodotto ( piedi )
6*6* 7 piedi
Colore
Arancia
Tipo di finitura
Verniciato a polvere
PART LIST
1) Preparazione per l'assemblaggio
· Disporre tutte le parti in modo che siano facilmente accessibili
· Leggere attentamente le istruzioni prima di iniziare il montaggio .
· Montare l'obiettivo su una superficie liscia e piana
Note:Refer to part numbers and be sure all parts are
included.
- 5 -
3 reti, una rete principale e due reti laterali
Obiettivo di proiezione * 1 pz Viti 4 pz
Chiave esagonale 1 pz. Fibbia ad ardiglione 2 pezzi
Dado a farfalla 4 pezzi spessore *8pz
4,5 " *50 pezzi, 7 " *18 pezzi, 3 " *8 pezzi
2) Assemblaggio dell'obiettivo
· Assemblare tutti i pezzi di tubo come mostrato
· Assicurarsi che tutti i pezzi siano completamente inseriti fino a quando i
3pcs

- 6 -
pulsanti di bloccaggio non scattano in posizione
Installazione :
1. Scegli un prato o un terreno relativamente pianeggiante
2. Montare i raccordi del montante sferico AF secondo lo schema sopra.

- 7 -
3. Dopo aver assemblato la struttura della porta, estrarre la rete bianca e
adagiarla a terra
4. Per prima cosa, stringere i quattro punti sopra il montante della portiera
con la fibbia elastica.
5. Legare insieme la rete da lacrosse e il palo della porta con fibbie
elastiche e stringere il palo della porta ogni 3-5 griglie.
6. La porta da hockey è pieghevole per poterla riporre più facilmente.
CLEANING AND MAINTENANCE
► Pulire il supporto con un panno umido; la rete può essere rimossa
per il lavaggio e lasciata asciugare naturalmente.
Indirizzo: Baoshanqu Shuangchenglu 803long 11hao 1602A-1609shi
Shanghai
Importato in AUS: SIHAO PTY LTD, 1 ROKEVA STREETEASTWOOD
NSW 2122 Australia
Importato negli USA: Sanven Technology Ltd., Suite 250, 9166 Anaheim
Place, Rancho Cucamonga, CA 91730

- 8 -
REP
UK
Pooledas Group Ltd
Unit 5 Albert Edward House, The Pavilions
Preston, United Kingdom
REP
EC
SHUNSHUN GmbH
Römeräcker 9 Z2021, 76351
Linkenheim-Hochstetten, Germany