Contents
About This Watch
General Guide
Indicators
Navigating Between Modes
Charging
Viewing the Face in the Dark
Time Adjustment
Time Correction Using a Time Signal
Overview
Appropriate Signal Reception Location
Time Signal Reception Ranges
Auto Time Signal Receive
Enabling and disabling Auto Receive
Manual Time Signal Receive
Receive Level Indicator
Checking the Last Time Correction Result
Signal Reception Precautions
Using Watch Operations to Adjust the Time
Setting
World Time
Checking World Time
Specifying a World Time City
Swapping Your Home City Time and World
Time
Alarm
Configuring Alarm Settings
Turning the Hourly Time Signal On or Off
Stopping an Alarm or the Hourly Time Signal
Stopwatch
Measuring Elapsed Time
Measuring a Split Time
Timing the First and Second Place Finishers
Timer
Setting a Start Time
Using the Timer
Other Settings
Changing the Date Display Format
Specifying the Day of the Week Language
Enabling the Button Operation Tone
Configuring Power Saving Function Settings
Specifications
Other Information
City Table
Summer Time Table
Troubleshooting
Precautions
Operating Precautions
User Maintenance
Battery
Watch Operation Guide 3584
1
MA2609-EA © 2026 CASIO COMPUTER CO., LTD. Published: 9/2026
About This Watch
This section provides an overview of the watch
and introduces convenient ways it can be
used.
●
Watch Features
●
Solar Charging
Sunlight and artificial light generate
electricity for watch operation as it charges.
●
Time Signal Reception
The watch receives a radio signal
containing time information and uses it to
keep its time setting accurate.
●
World Time
Displays the current time in any one of 38
cities around the globe and UTC. You can
select up to five cities in the World Time
Mode.
●
Alarm
An alarm sounds whenever a time specified
by you is reached.
●
Stopwatch
The stopwatch measures elapsed time in
units of one second (1/100 second for the
first hour) up to 24 hours.
●
Timer
Countdown from a start time specified by
you. An alarm sounds when the countdown
reaches zero.
Note
●
The illustrations included in this
operation guide have been created to
facilitate explanation. An illustration
may differ somewhat from the item it
represents.
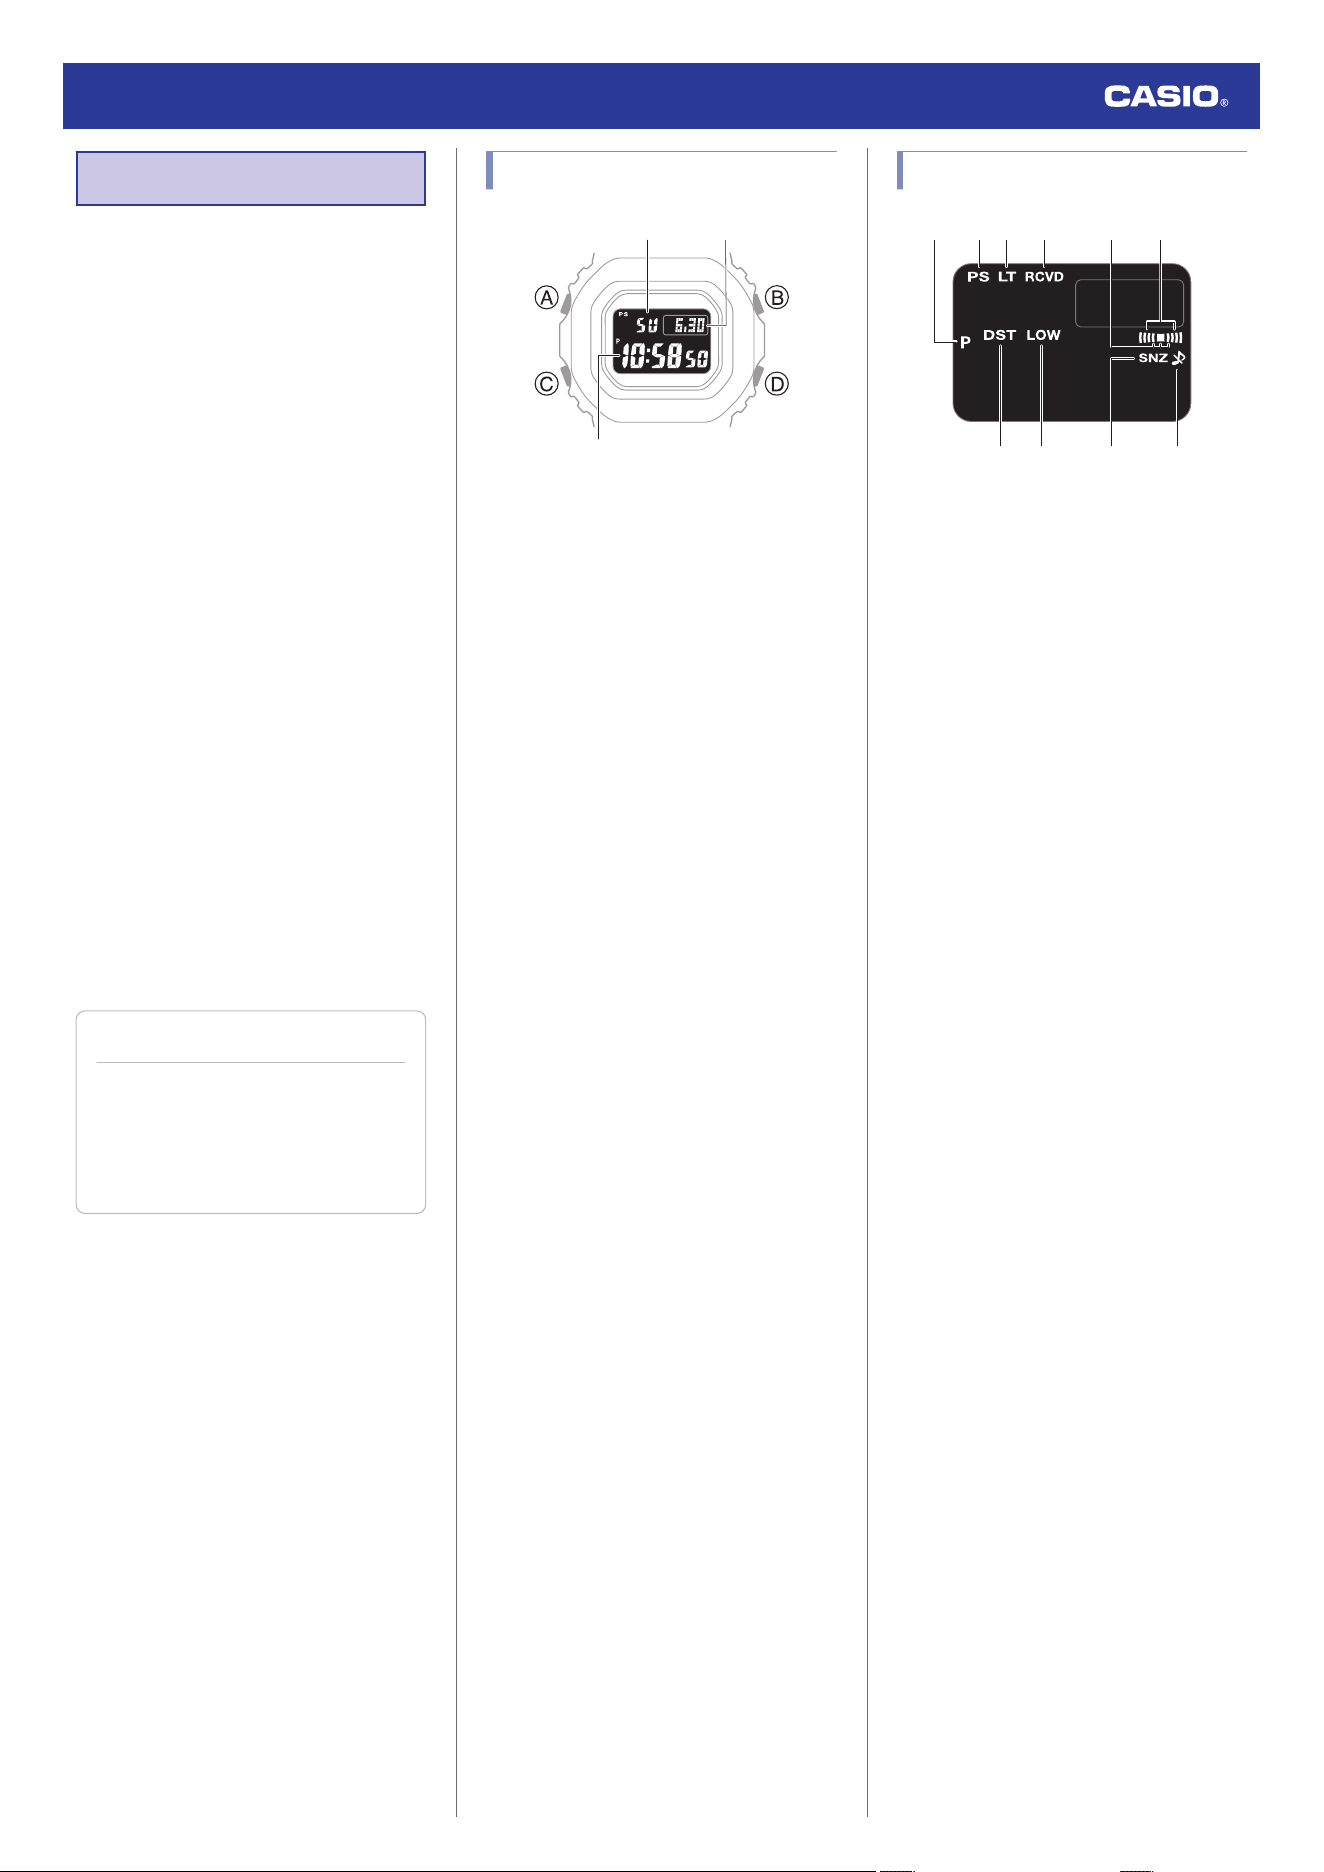
General Guide
③
① ②
A Day of the week
B Month, day
C Hour, minute, second
A button
Holding down this button for at least two
seconds in any mode displays the setting
screen.
B button
Press to turn on illumination.
Pressing this button while any setting screen
is displayed changes the setting.
C button
Each press cycles between watch modes.
D button
Pressing this button while any setting screen
is displayed will change the setting.
Indicators
⑦⑨⑧⑩
① ⑤⑥②③ ④
A Displayed during p.m. times while 12-hour
timekeeping is being used.
B Displayed while Power Saving is enabled.
C Displayed while Full Auto Light is enabled.
D Appears when the time signal receive
operation is successful.
E Displayed while the hourly time signal is
enabled.
F Displayed while an alarm is turned on.
G Displayed while the watch is indicating
summer time.
H Flashes when battery power is low.
I Displayed while the snooze alarm is
turned on.
J Displayed while the button operation tone
is disabled.
Watch Operation Guide 3584
2
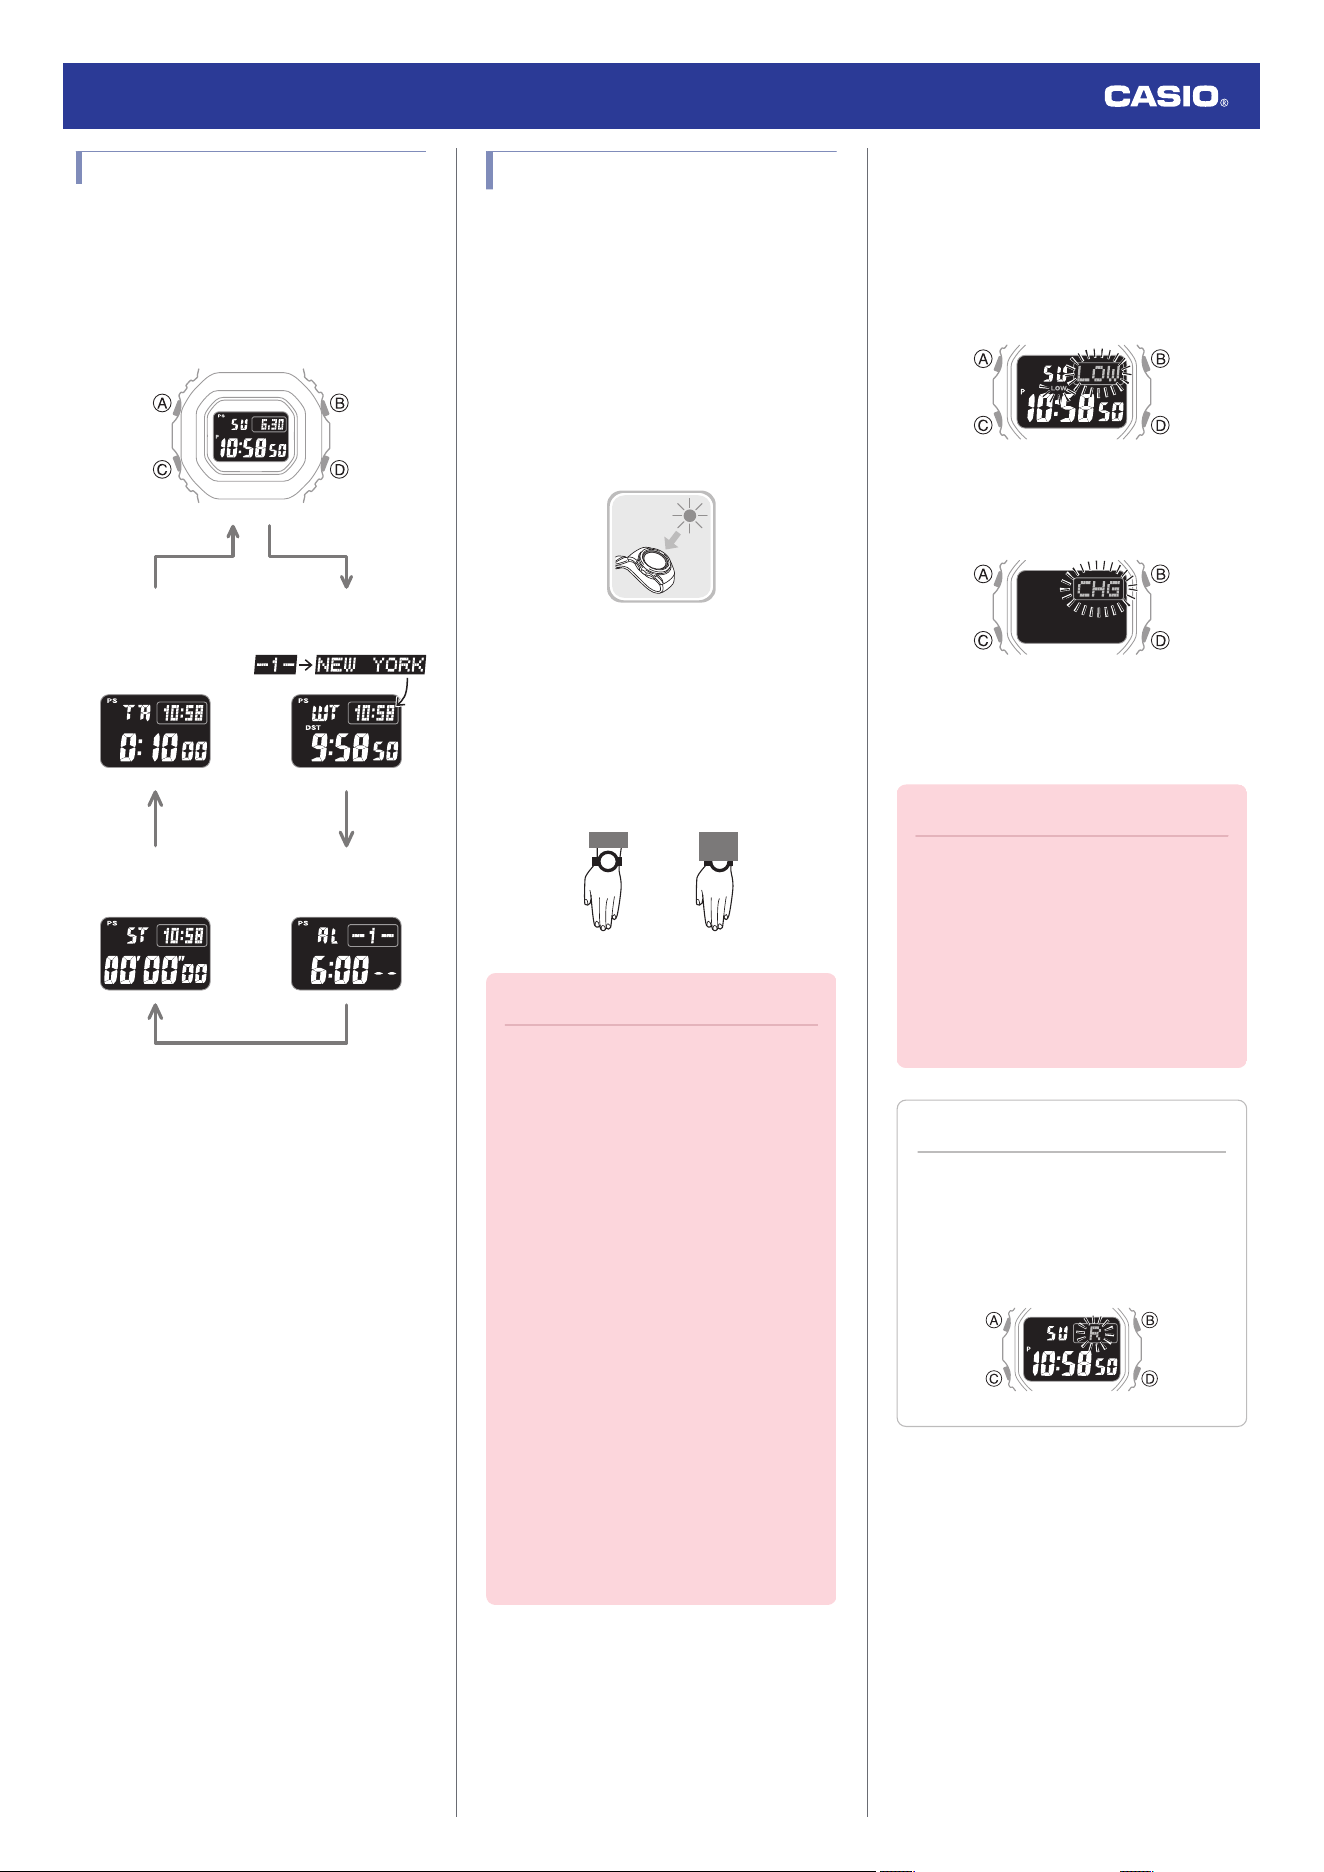
Navigating Between Modes
Each press of (C) cycles between watch
modes.
●
In any mode, hold down (C) for at least one
second to return to the Timekeeping Mode.
CC
C
CC
World Time ModeTimer Mode
Alarm Mode
Timekeeping Mode
Stopwatch Mode
Charging
This watch runs on power supplied from a
rechargeable (secondary) battery that is
charged by a solar panel. The solar panel is
integrated into the face of the watch, and
power is generated whenever the face is
exposed to light.
●
Charging the Watch
When you are not wearing the watch, put it in
a location where it is exposed to bright light.
While you are wearing the watch, make sure
that its face (solar panel) is not blocked from
light by the sleeve of your clothing. Power
generation efficiency is reduced even when
the face of the watch is blocked only partially.
NOYES
Important!
●
Some light sources and environments
can cause the watch to become
extremely hot during charging, which
creates the risk of burn injury and
damage to internal watch
components.
Avoid charging the watch under
conditions like the ones described
below, where the temperatures may
exceed 60 °C (140 °F).
ー
On the dashboard of a vehicle
parked in the sun
ー
Near incandescent lamps, camera
lights, halogen lamps, or other
sources of heat
ー
In locations exposed to direct
sunlight for long periods and other
hot locations
●
The display panel may become white
under very high temperatures. This is
temporary, and the display will return
to normal at lower temperatures.
●
Low Battery
A low battery will cause [LOW] to flash and will
disable the functions below.
●
Time signal reception
●
Illumination
●
Sounds (alarm, etc.)
If the charge level drops even further, [CHG]
will flash. If this happens, all functions are
disabled.
●
Dead Battery
The digital display will go blank if the battery
goes dead. This also clears all data.
Important!
●
Should the battery go low or go dead,
expose the face (solar panel) to light as
soon as possible.
●
After the battery runs out, exposing the
watch to light causes [CHG] to appear
after a short while. Keep the watch
exposed to light until the current time
appears on the display.
Note
●
If [R] is flashing, it means that all
functions, except for timekeeping, are
disabled due to high momentary
battery power consumption.
l
[R] is flashing on the display.
Watch Operation Guide 3584
3
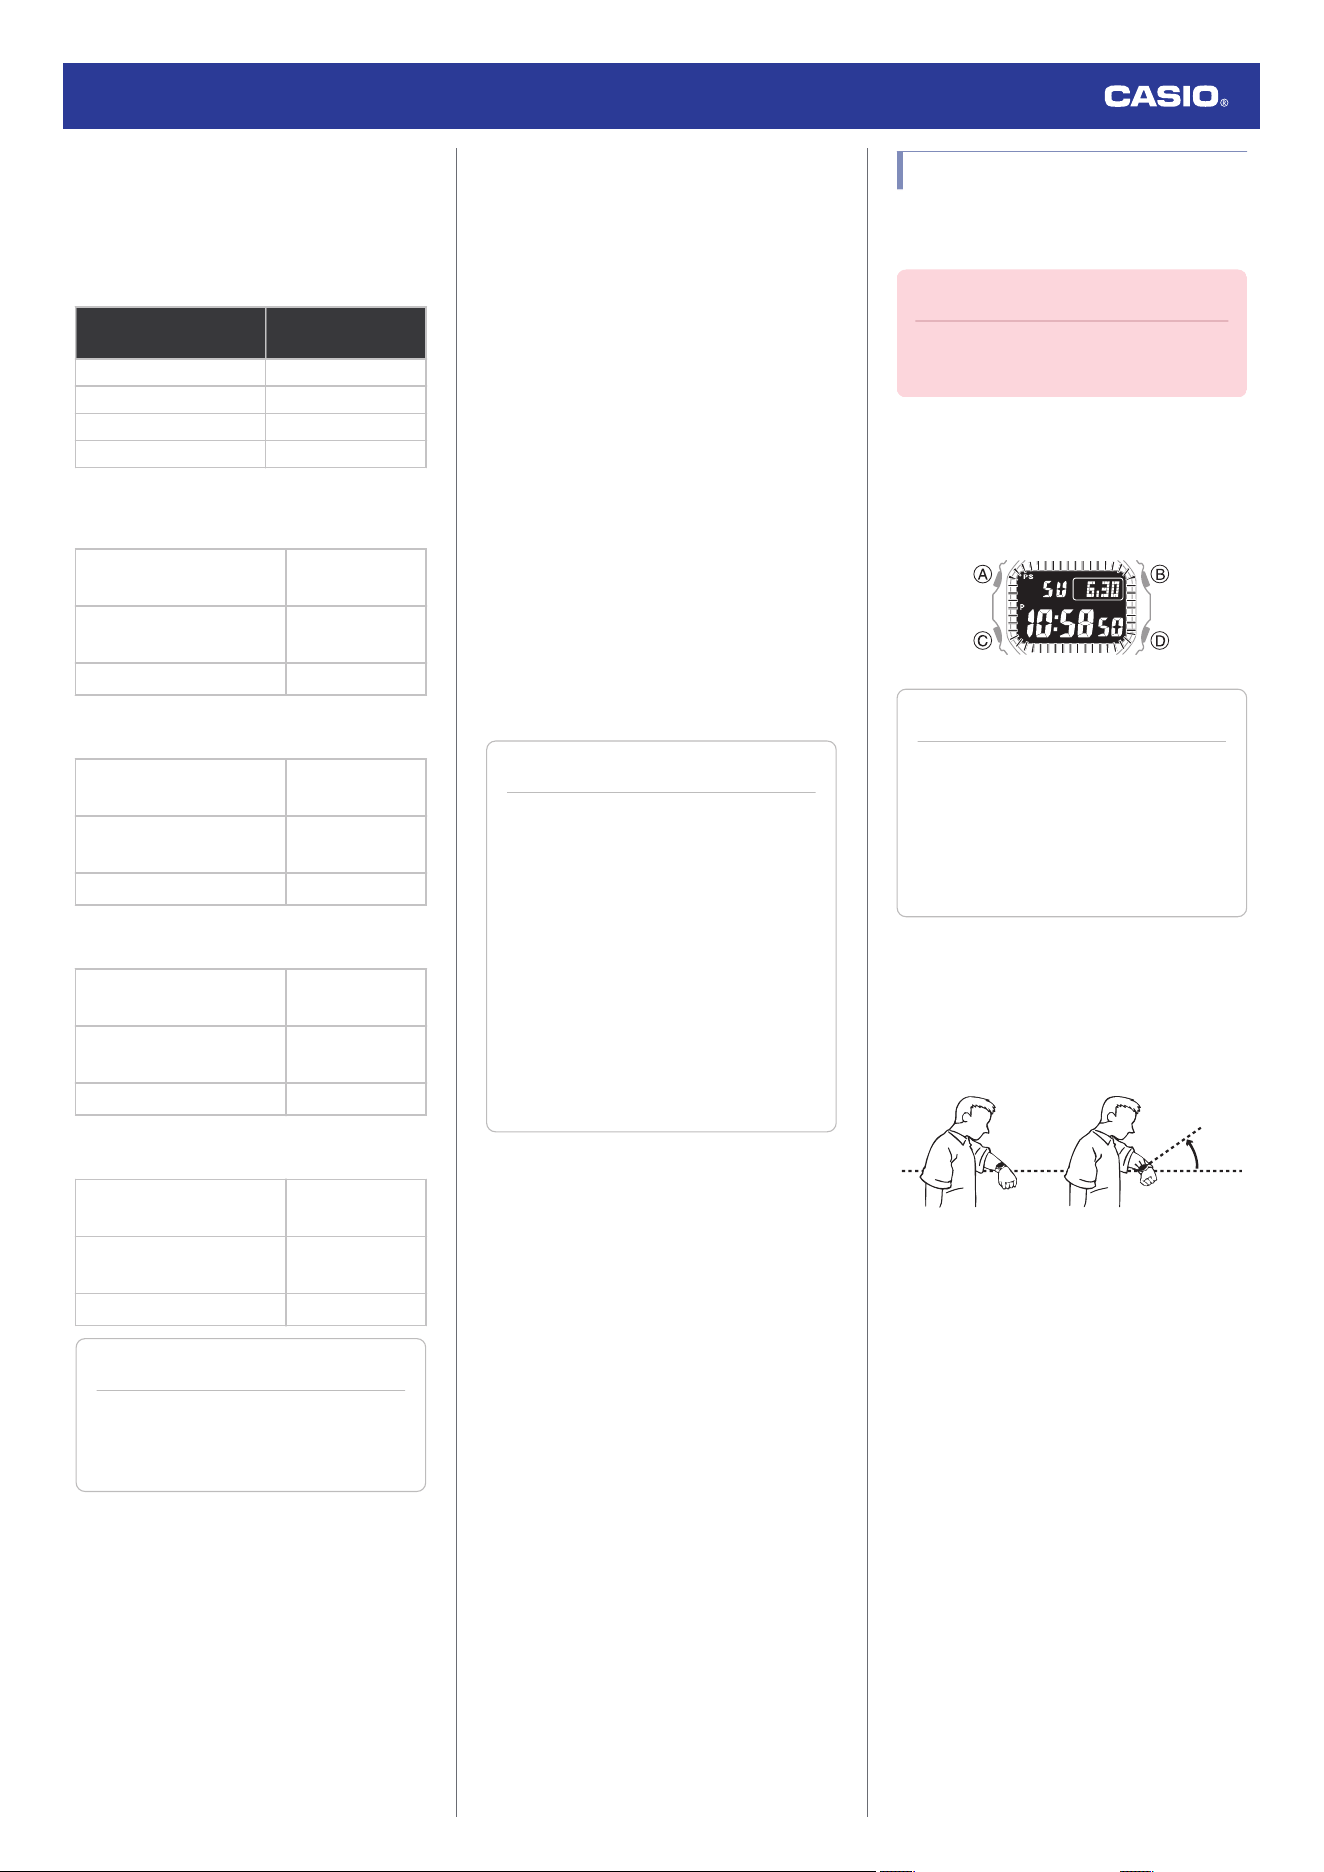
●
Charging Time Guidelines
The table below shows guidelines for
approximate charging times.
Charging Times Required for 1 Day of
Operation
Light Level (Lux)
Approximate
Charging Time
50,000 5 minutes
10,000 24 minutes
5,000 48 minutes
500 8 hours
Charge Recovery Times
●
Sunny day, outdoors (50,000 lux)
Dead battery
n
Medium
charge
2 hours
Medium charge
n
High
charge
21 hours
High charge
n
Full charge
6 hours
●
Sunny day, near a window (10,000 lux)
Dead battery
n
Medium
charge
8 hours
Medium charge
n
High
charge
107 hours
High charge
n
Full charge
29 hours
●
Overcast day, near a window (5,000 lux)
Dead battery
n
Medium
charge
16 hours
Medium charge
n
High
charge
216 hours
High charge
n
Full charge
58 hours
●
Indoor fluorescent lighting (500 lux)
Dead battery
n
Medium
charge
212 hours
Medium charge
n
High
charge
-
High charge
n
Full charge
-
Note
●
Actual charging time depends on the
charging environment, watch settings,
and other factors.
●
Power Saving Function
Leaving the watch in a dark location for about
one hour between the hours of 10 p.m. and 6
a.m. will cause the display to go blank, and the
watch to enter Level 1 power saving. If the
watch is left in this condition for six or seven
days, the watch will enter Level 2 power
saving.
Power Saving Level 1 :
Digital display goes blank to save power.
Power Saving Level 2 :
Digital display goes blank to save power. All
functions are disabled.
Recovering from Power Saving Operation
Use one of the operations below to exit power
saving.
●
Press any button.
●
Move the watch to a bright location.
●
Trigger Full Auto Light by angling the watch
towards your face.
Note
●
The watch will not enter power saving
in the cases below.
ー
While in the Stopwatch Mode
ー
While in the Timer Mode
●
You can enable or disable Power
Saving.
l
Configuring Power Saving
Function Settings
●
Note that the watch also may enter
power saving if its face is blocked from
light by your sleeve while you are
wearing it.
Viewing the Face in the Dark
The watch has a light that illuminates the face
for viewing in the dark.
Important!
●
Frequent use of illumination runs down
the battery.
●
To illuminate the face manually
Press (B) to turn on illumination.
●
Illumination turns off automatically if an
alarm starts to sound.
Note
●
Display illumination is disabled when
any one of the conditions below exists.
ー
While an alarm, timer alert, or other
beeper is sounding
ー
While a time signal receive
operation is in progress
●
To illuminate the face when Auto Light
is enabled
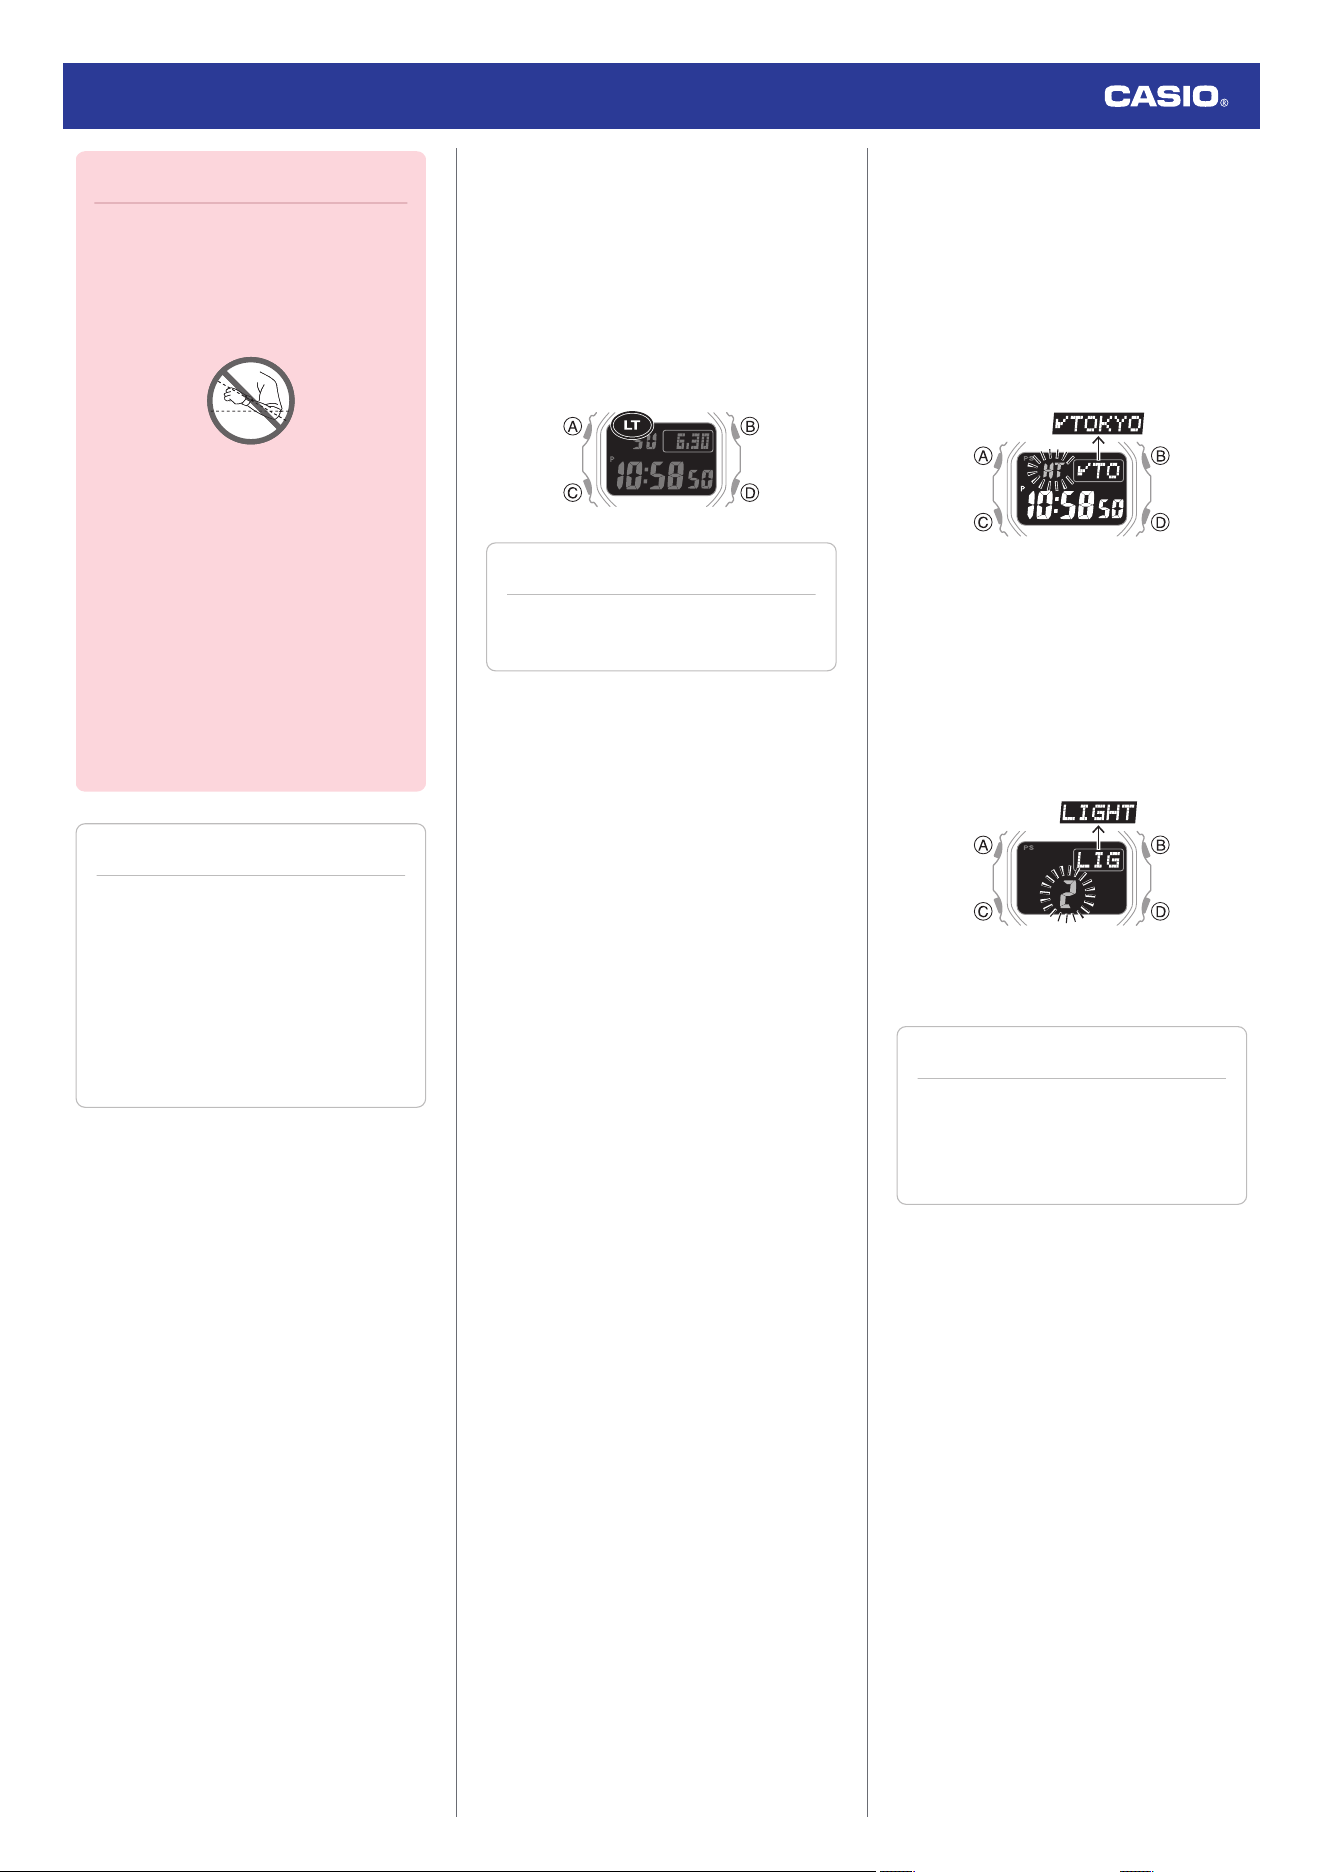
If Full Auto Light is enabled, face illumination
turns on automatically whenever the watch is
positioned at an angle of 40 degrees or more.
40
degrees
or more
Watch Operation Guide 3584
4
Important!
●
Auto Light may not operate properly
when the watch is at a horizontal angle
of 15 degrees or greater from
horizontal as shown in the illustration
below.
●
Auto Light may operate unintentionally
and run down the battery if the watch
is blocked from light by your sleeve.
●
Electro-static charge or magnetism
can interfere with proper Full Auto Light
operation. If this happens, try lowering
your arm and then angle it towards
your face again.
●
When moving the watch you may note
a slight rattling sound. This is the sound
of Full Auto Light switch operation and
does not indicate malfunction.
Note
●
Auto Light does not operate when
available lighting is bright.
●
Full Auto Light is disabled when any
one of the conditions below exists.
ー
While an alarm, timer alert, or other
beeper is sounding
ー
While a time signal receive
operation is in progress
●
Configuring the Full Auto Light Setting
1. Enter the Timekeeping Mode.
l
Navigating Between Modes
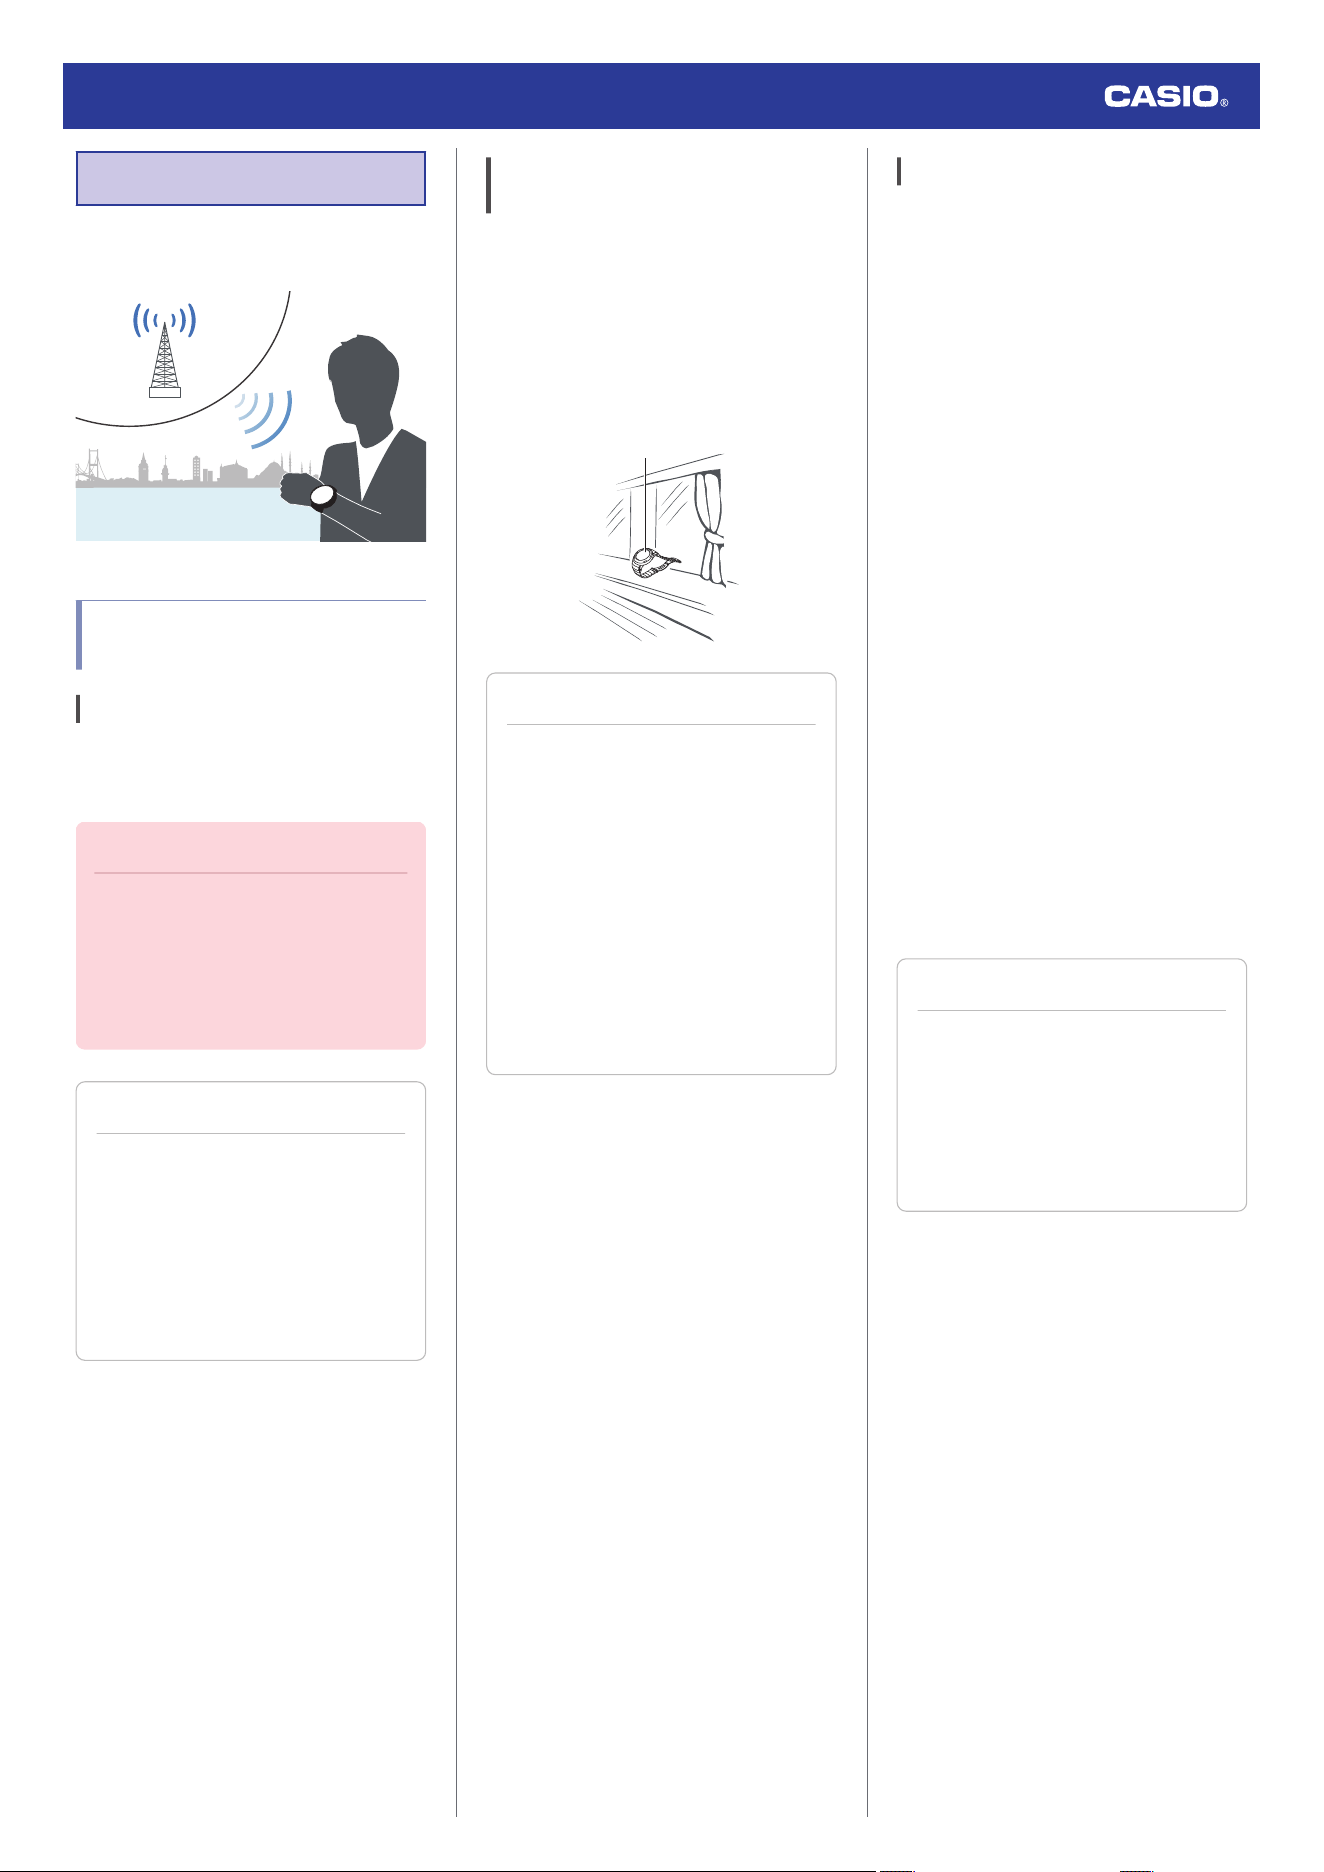
2. Hold down (B) for at least three seconds
to toggle Full Auto Light between enabled
and disabled.
●
[LT] is displayed while Full Auto Light is
enabled.
Note
●
Full Auto Light is disabled while [CHG]
is flashing on the display.
●
Specifying the Illumination Duration
You can select either two seconds or four
seconds as the illumination duration.
1. Enter the Timekeeping Mode.
l
Navigating Between Modes
2. Hold down (A) for at least two seconds.
Release the button when [HT] starts to
flash.
3. Press (C) 12 times.
This causes [2] or [4] to flash on the
display.
4. Press (D) to select an illumination
duration.
[2]: 2-second illumination
[4]: 4-second illumination
5. Press (A) to complete the setting
operation.
Note
●
While the setting is being configured,
the watch will exit the setting operation
automatically after about two or three
minutes of non-operation.
Watch Operation Guide 3584
5
Time Adjustment
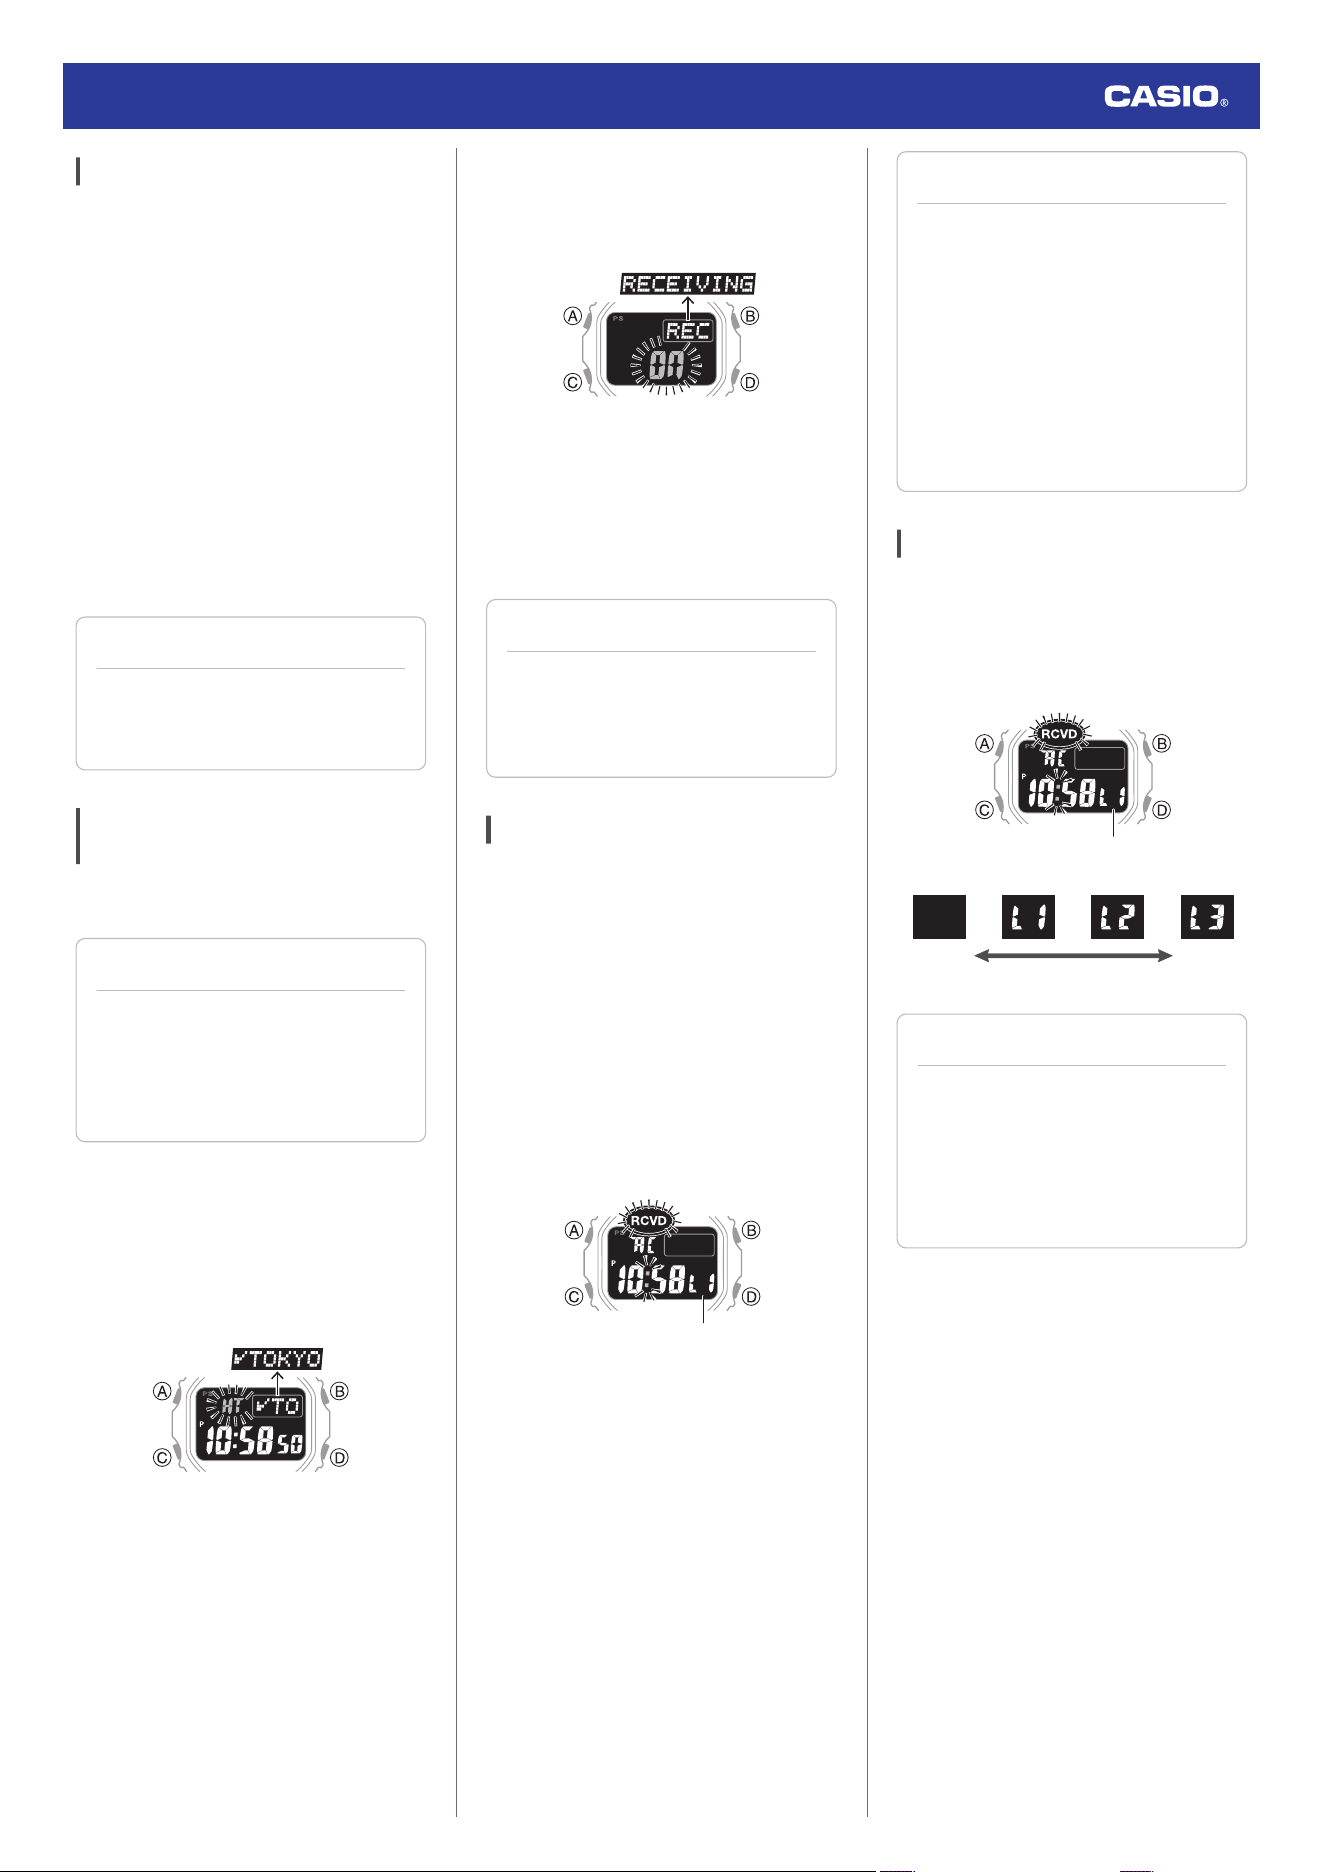
Your watch can receive time calibration
signals and correct its date and time setting.
Time Correction Using a
Time Signal
Overview
The watch’s time and day settings can be
configured in accordance with a received time
calibration signal.
Important!
●
In order to make it possible for the
current time setting to be corrected
based on time calibration signal
reception, you need to specify the area
where you are using the watch.
l
Setting a Home City
Note
●
Areas where time signal reception is
supported are limited. When you are
using the watch in an area where time
calibration signal reception is not
possible, adjust time and day settings
manually.
l
Using Watch Operations to
Adjust the Time Setting
Appropriate Signal Reception
Location
A time calibration signal can be received while
the watch is near a window.
●
Position the watch so its 12 o’clock side is
facing the window.
●
Keep metal objects away from the watch.
●
Do not move the watch.
●
Do not perform any operation on the watch.
12 o'clock
Note
●
You may experience time calibration
signal reception problems in the areas
described below.
ー
Among or near buildings
ー
While riding in a vehicle
ー
Near household appliances, office
machines, mobile phones, etc.
ー
On a construction site, in an airport,
or any other location where radio
wave interference occurs
ー
Near high-voltage lines
ー
In mountainous areas or behind a
mountain
Time Signal Reception Ranges
●
Japan (JJY)
The Japan time signal radio stations are
located on Mt. Otakadoya in Fukushima and
Mt. Hagane in Fukuoka/Saga.
The reception range of the Japanese time
signals is approximately 1,000 km from each
transmission station.
●
China (BPC)
The China time signal radio station is located
in Shangqiu, Henan Province, China.
The reception range of the Chinese time
signal is approximately 1,500 km from the
transmission station.
●
United States (WWVB)
The United States time signal radio station is
located in Fort Collins, Colorado.
The reception range of the U.S. time signal is
approximately 3,000 km from the transmission
station.
●
U.K. (MSF)/Germany (DCF77)
The U.K. time signal radio station is located in
Anthorn, Cumbria.
The German time signal radio station is
located in Mainflingen, southeast of Frankfurt.
The reception range of the U.K. and German
time signals is approximately 1,500 km from
each transmission station.
Note
●
Even if you are within the normal
reception range of a time calibration
signal, reception may be made
impossible by the following factors:
geographic contours, weather, the
season, the time of day, wireless
noise.
Watch Operation Guide 3584
6
Auto Time Signal Receive
An automatic time calibration signal receive
operation is performed and the time and day
settings are corrected between midnight and
5:00 a.m. Once a signal receive operation is
successful, no more auto receive operations
are performed that day.
1. Place the watch near a window or some
other location appropriate for signal
reception.
●
[RCVD] flashes while time signal
reception is in progress.
●
When the receive operation is
successful, the time and day settings
are corrected automatically, and the
[RCVD] indicator appears.
Note
●
Reception takes anywhere from about
two minutes to about 10 minutes. It
can take as long as 20 minutes.
Enabling and disabling Auto
Receive
You can stop auto receive by disabling the
Auto Receive setting.
Note
●
While the Home City setting is one
where time signal reception is
possible, you can enable or disable
auto receive as required.
l
Time Signal Reception Ranges
1. Enter the Timekeeping Mode.
l
Navigating Between Modes
2. Hold down (A) for at least two seconds.
Release the button when [HT] starts to
flash.
3. Press (C) 13 times.
This causes [On] or [OFF] to flash on the
display.
4. Press (D) to toggle between on and off.
[On]: Auto Receive enabled.
[OFF]: Auto Receive disabled.
5. Press (A) to complete the setting
operation.
Note
●
While the setting is being configured,
the watch will exit the setting operation
automatically after about two or three
minutes of non-operation.
Manual Time Signal Receive
1. Place the watch near a window or some
other location appropriate for time signal
reception.
2. Enter the Timekeeping Mode.
l
Navigating Between Modes
3. Hold down (D) for at least two seconds
until [RCVD] flashes.
This indicates that the receive operation
has started. After the receive operation is
complete, the watch’s time and day
settings will be corrected accordingly.
Receive level indicator
●
The level indicator shows the signal
level ([L1], [L2], [L3]) while a receive
operation is in progress.
l
Receive Level Indicator
Note
●
The receive operation takes
anywhere from about two minutes to
about 10 minutes. It can take as long
as 20 minutes.
●
Time calibration signal reception is
better at night than during the day.
●
A time calibration signal cannot be
received while the city selected as
your Home City is one that does not
support signal reception.
Receive Level Indicator
While a receive operation is in progress, its
current status is indicated on the display as
shown below. Use the receive level indicator
to find a location where signal reception is
stable.
Receive level indicator
Stable
Unstable
Note
●
It takes about 10 seconds for time
signal reception conditions to
stabilize.
●
Reception conditions are affected by
weather, the time of day, the
surrounding environment, etc.
Watch Operation Guide 3584
7
Checking the Last Time Correction
Result
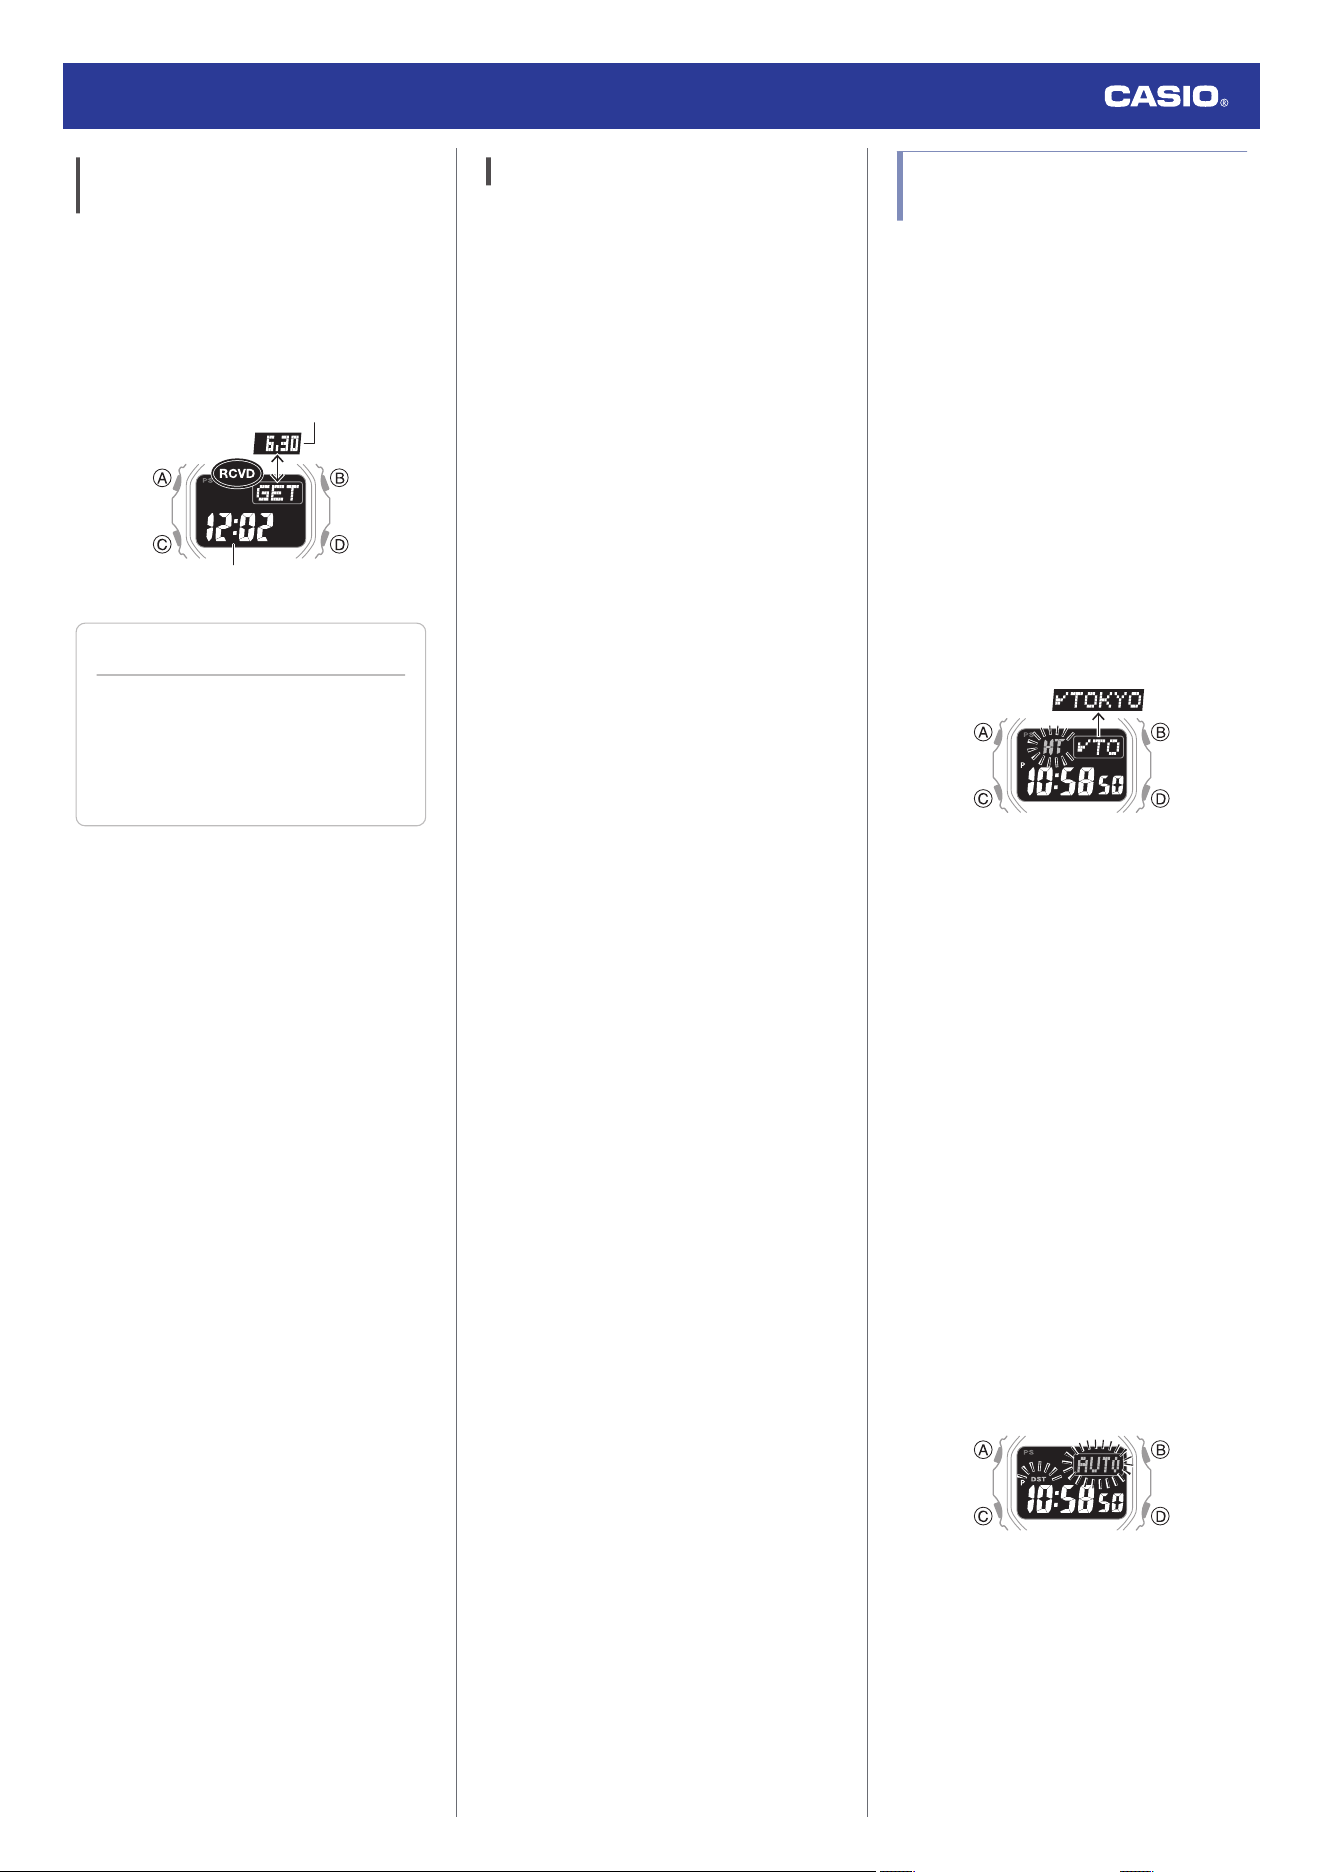
1. Enter the Timekeeping Mode.
l
Navigating Between Modes
2. Press (D).
This displays the date and time of the last
successful receive operation.
Receive month and day
Receive time
Note
●
Even if there was a successful receive
operation, [RCVD] will not be
displayed if you subsequently
adjusted the time and/or date setting
manually.
Signal Reception Precautions
●
When the watch is unable to correct its time
in accordance with a calibration signal for
some reason, average timekeeping
accuracy is within ±15 seconds per month.
●
Note that an internal decoding process the
watch performs after it receives a signal
may cause the time setting to be slightly off
(by less than one second).
●
Time calibration signal reception is not
possible under the conditions described
below.
ー
While battery power is low
ー
In any mode besides the Timekeeping
Mode or World Time Mode
ー
When the watch is at Level 2 power
saving
ー
While a timer countdown operation is in
progress
ー
While the Home City area setting is one
where time signal reception is not
possible
ー
While the watch is outside the time signal
reception range
●
When the receive operation is successful,
the time and/or day settings will be
corrected automatically. Summer time will
not be applied correctly in the case
described below.
ー
When the summer time start date and
time, end date and time, or other rules are
changed by authorities
Using Watch Operations to
Adjust the Time Setting
If, for some reason, you cannot use time signal
reception to adjust the current time setting,
you can adjust date, time, and Home City
settings manually using watch button
operations.
●
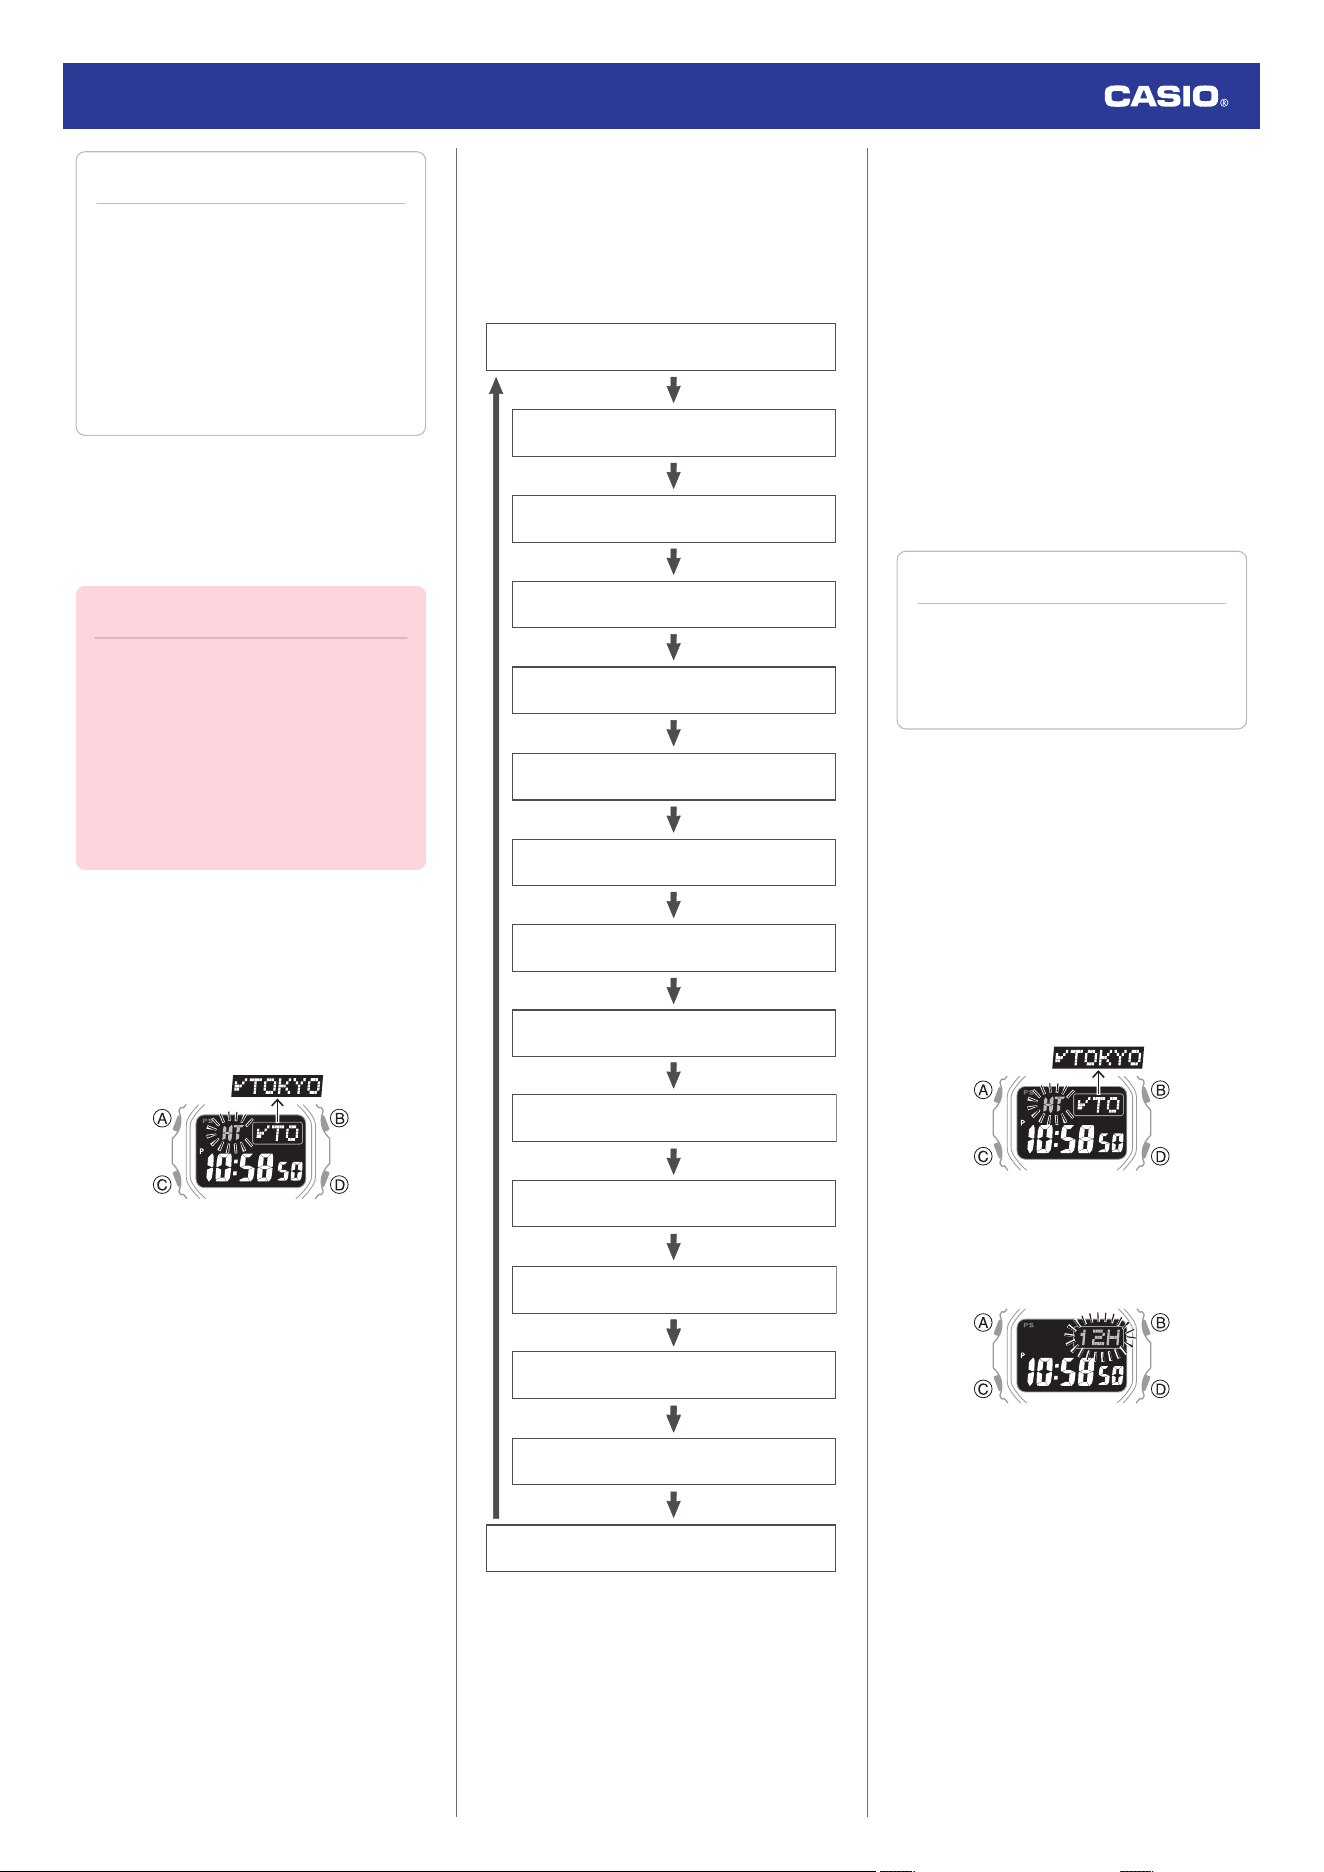
Setting a Home City
Use the procedure in this section to select a
city to use as your Home City. If you are in an
area that observes summer time, you can also
configure a summer time setting.
1. Hold down (C) for at least one second to
enter the Timekeeping Mode.
2. Hold down (A) for at least two seconds.
Release the button when [HT] starts to
flash.
3. Use (B) and (D) to change the Home City
setting.
●
Holding down (B) or (D) scrolls through
settings at high speed.
●
For details refer to the information
below.
l
City Table
4. Press (C).
5. Use (D) to select a summer time setting.
Each press of (D) cycles through available
settings in the sequence shown below.
●
[AUTO]
The watch switches between standard
time and summer time automatically.
●
[OFF]
The watch always indicates standard
time.
●
[ON]
The watch always indicates summer
time.
6. Press (A) to complete the setting
operation.
Watch Operation Guide 3584
8
Note
●
The [AT (AUTO)] summer time setting
is valid only when the watch’s Home
City is in an area where a time signal
can be received.
●
While the setting is being configured,
the watch will exit the setting operation
automatically after about two or three
minutes of non-operation.
●
Setting the Time/Date
You can use the procedure below to adjust the
time and date settings when using the watch
where signal reception is not possible.
Important!
●
If you are using the watch in an area
where signal receive operations are
possible, time and date settings using
the time signal is recommended.
●
Configure the Home City setting before
changing the current time and date
settings.
l
Setting a Home City
1. Hold down (C) for at least one second to
enter the Timekeeping Mode.
2. Hold down (A) for at least two seconds.
Release the button when [HT] starts to
flash.
3. Keep pressing (C) until the setting you
want to change is flashing.
●
Each press of (C) moves the flashing to
the next setting in the sequence shown
below.
Summer time
Home City
Ye a r
Day
Month
Minutes
Hours
Seconds
Date display format
12/24-hour timekeeping
Day of the week language
Auto Receive
Operation tone enable/disable
Illumination duration
Power Saving
4. Configure the date and time settings.
●
To reset the seconds to 00: Press (D).
1 is added to the minutes when the
current count is between 30 and 59
seconds.
●
For all the other settings, use (B) and (D)
to change the flashing setting.
Holding down (B) or (D) scrolls through
settings at high speed.
5. Repeat steps 3 and 4 to select time and
date settings.
6. Press (A) to complete the setting
operation.
Note
●
While the setting is being configured,
the watch will exit the setting operation
automatically after about two or three
minutes of non-operation.
●
Switching between 12-hour and 24-
hour Timekeeping
You can specify either 12-hour format or 24-
hour format for the time display.
1. Hold down (C) for at least one second to
enter the Timekeeping Mode.
2. Hold down (A) for at least two seconds.
Release the button when [HT] starts to
flash.
3. Press (C) eight times.
This causes [12H] or [24H] to flash on the
display.
Watch Operation Guide 3584
9
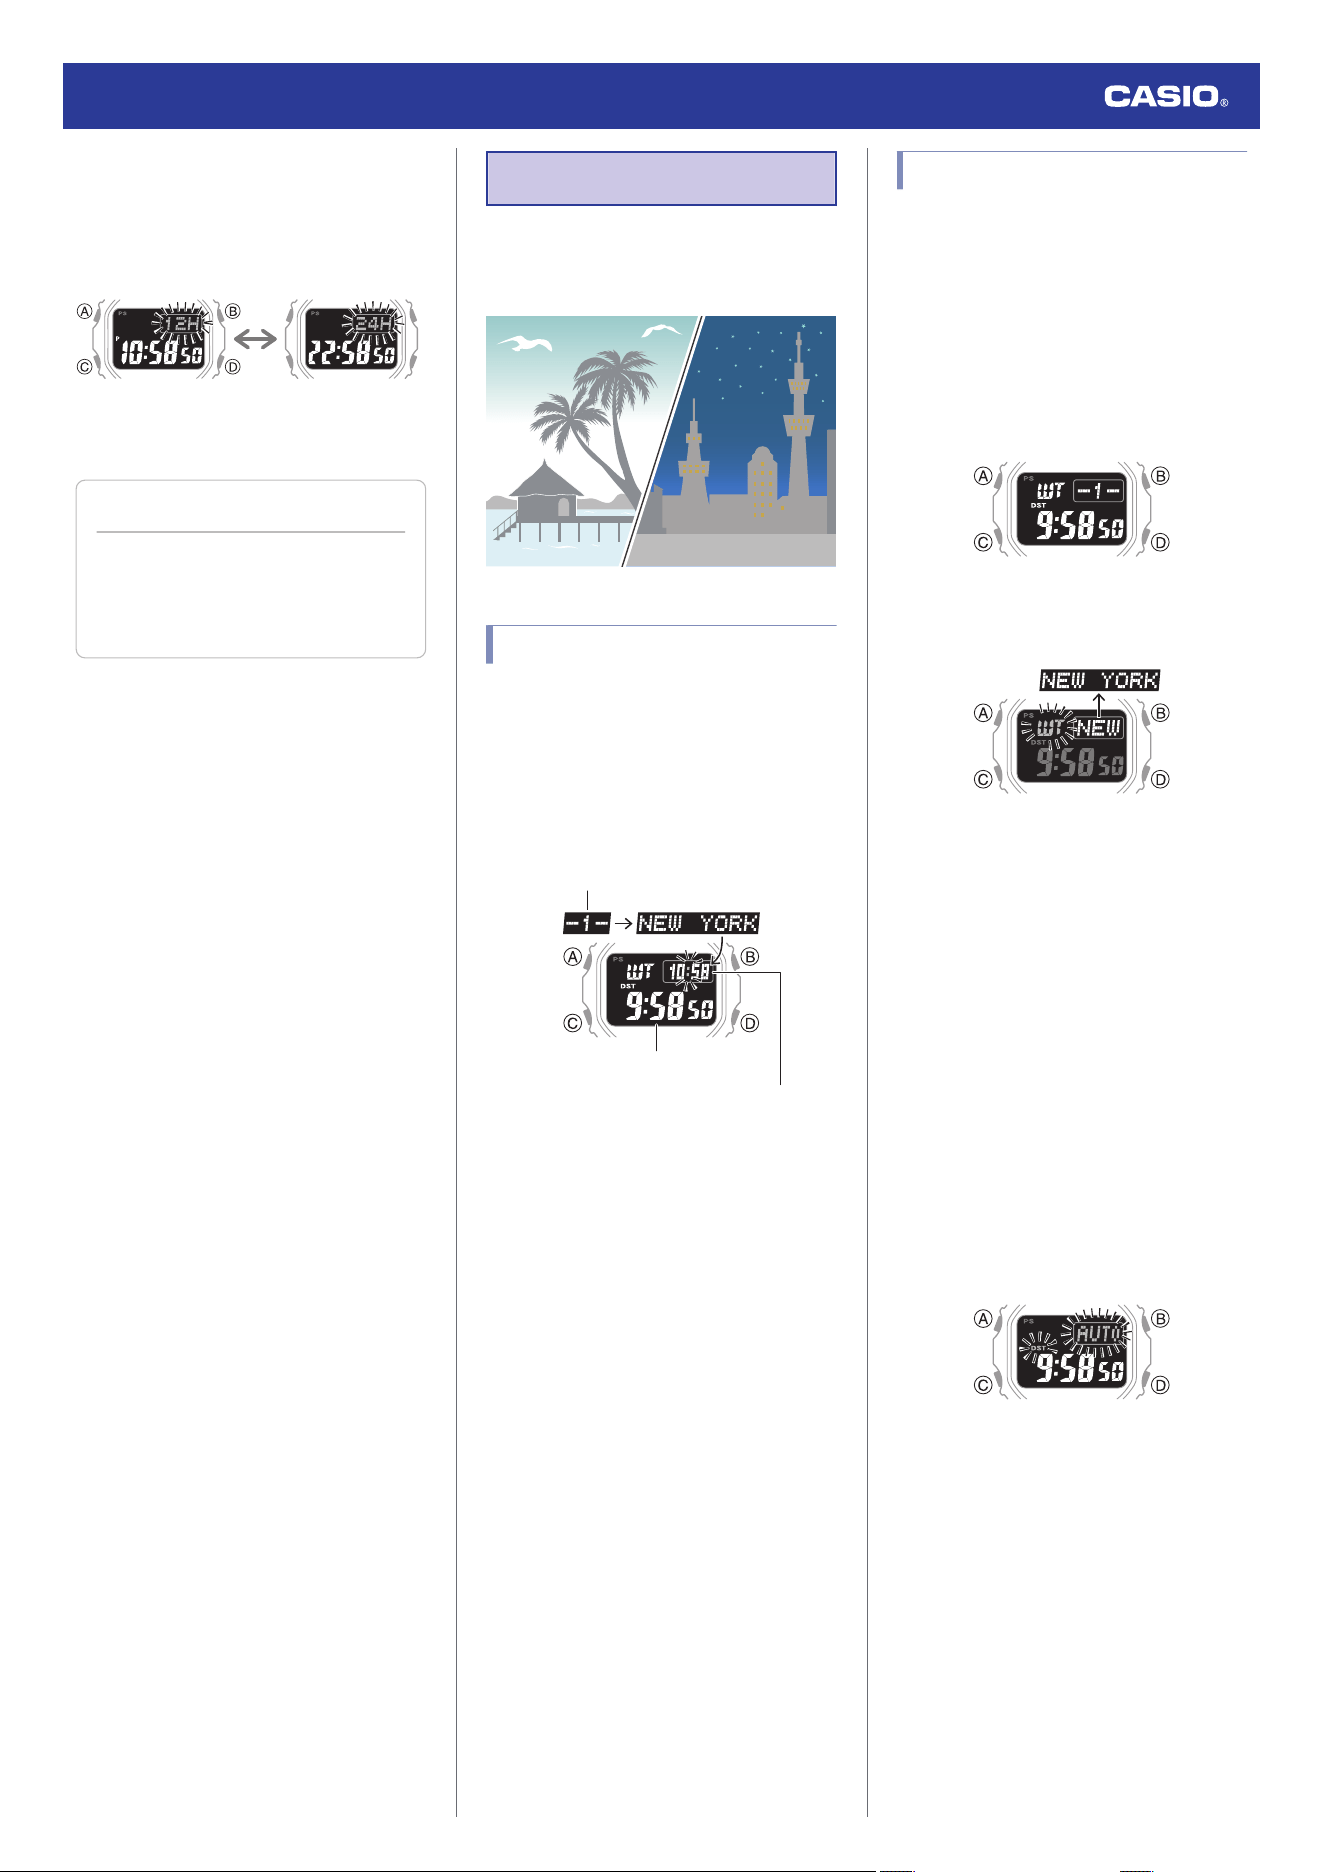
4. Press (D) to toggle the setting between
[12H] (12-hour timekeeping) and [24H]
(24-hour timekeeping).
24-hour timekeeping12-hour timekeeping
5. Press (A) to complete the setting
operation.
Note
●
While the setting is being configured,
the watch will exit the setting operation
automatically after about two or three
minutes of non-operation.
World Time
World Time lets you look up the current time
in any one of 38 cities around the globe, and
UTC (Coordinated Universal Time).
Checking World Time
1. Enter the World Time Mode.
l
Navigating Between Modes
Entering the World Time Mode causes a
World Time number and city name to
appear first. After that, the display will
appear as shown below.
Home City time
World Time
World Time number
●
To change the selected World Time
city, press (D).
Specifying a World Time City
You can specify up to five cities as your World
Time favorites. If you are in an area that
observes summer time, you can also enable
or disable summer time.
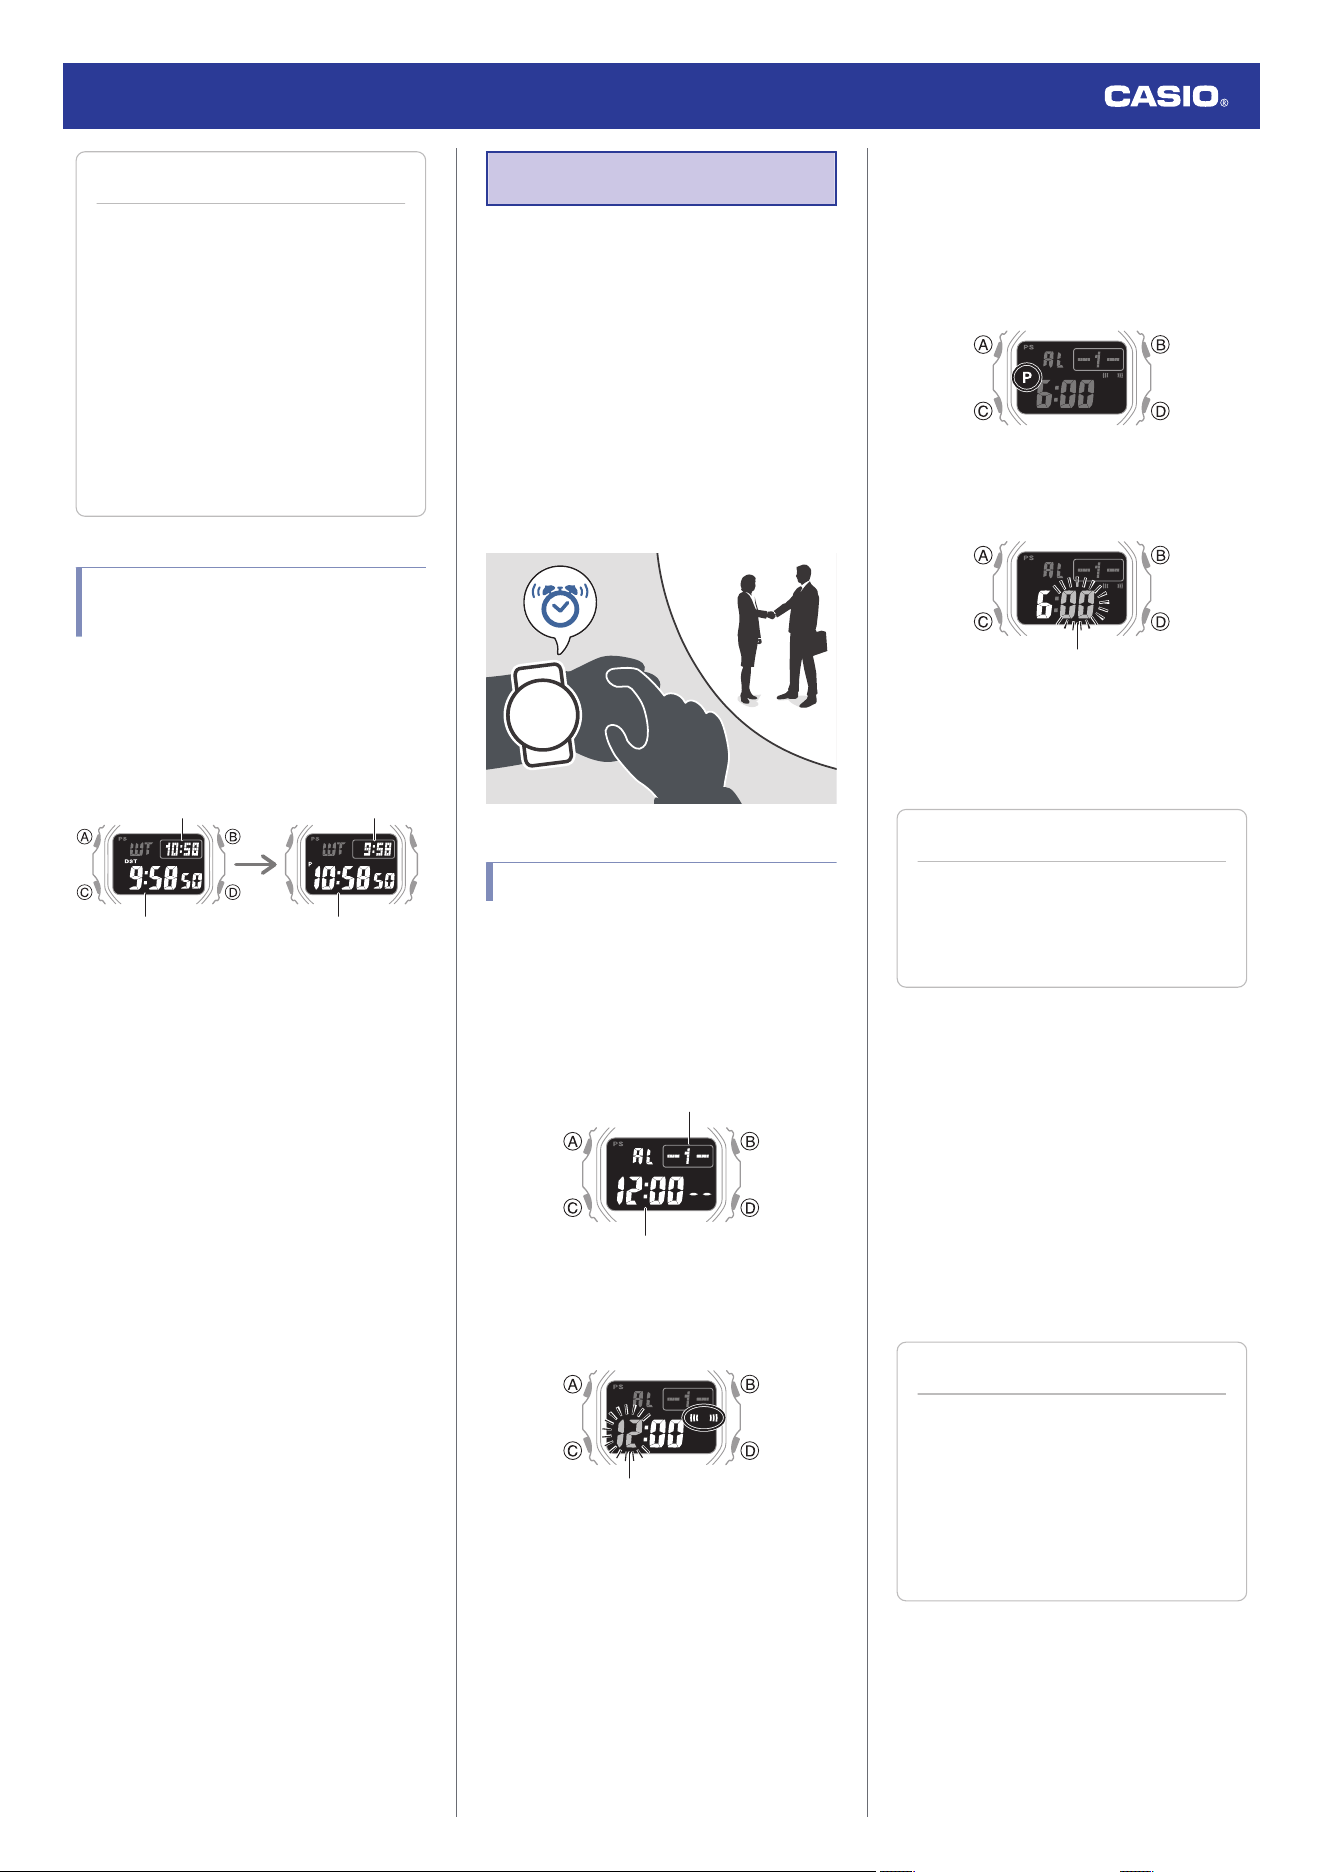
1. Enter the World Time Mode.
l
Navigating Between Modes
2. Use (D) to display the World Time number
whose setting you want to configure.
3. Hold down (A) for at least two seconds.
This causes [WT] to flash on the display.
4. Use (B) and (D) to display the city you want
to specify as a World Time City.
●
Holding down (B) or (D) scrolls through
settings at high speed.
5. If you want to change the summer time
setting, press (C).
6. Use (D) to select a summer time setting.
●
[AUTO]
The watch switches between standard
time and summer time automatically.
●
[OFF]
The watch always indicates standard
time.
●
[ON]
The watch always indicates summer
time.
7. Press (A) to complete the setting
operation.
Watch Operation Guide 3584
10
Note
●
While the setting is being configured,
the watch will exit the setting operation
automatically after about two or three
minutes of non-operation.
●
While [UTC] is selected as the city,
you will not be able to change or check
the summer time setting.
●
The summer time setting you
configure is applied to the currently
selected city only. It does not affect
other cities.
Swapping Your Home City
Time and World Time
In the World Time mode, press (A) and (B) at
the same time to swap your Home City time
with your World Time.
After swapping
Before swapping
Home City Time
World Time
World TimeHome City Time
Alarm
The watch will beep when the alarm time is
reached. You can configure up to four
standard daily alarms, and one daily alarm
with snooze. The hourly time signal causes the
watch to beep every hour on the hour.
●
Snooze causes the alarm to sound up to
seven times, at five-minute intervals.
●
The alarm sound is muted in the cases
described below.
ー
When battery power is low
ー
When watch is at Level 2 power saving
l
Power Saving Function
Configuring Alarm Settings
1. Enter the Alarm Mode.
l
Navigating Between Modes
2. Press (D) to scroll through alarms ([1] to
[4], [SNZ]) until the one you want to
configure is displayed.
Alarm number
Alarm time
3. Hold down (A) for at least two seconds.
This causes the hours digits to flash.
Alarm hour
4. Use (B) and (D) to change the hour setting.
●
Holding down (B) or (D) scrolls through
settings at high speed.
●
If you are using 12-hour timekeeping,
[P] indicates p.m.
5. Press (C).
This causes the minutes digits to flash.
Alarm minute
6. Use (B) and (D) to set the minute setting.
7. Press (A) to complete the setting
operation.
Note
●
While the setting is being configured,
the watch will exit the setting operation
automatically after about two or three
minutes of non-operation.
●
Testing the alarm
In the Alarm Mode, hold down (D) to sound the
alarm.
●
To stop the alarm
To stop the alarm after it starts to sound when
an alarm time is reached, press any button.
Snooze causes the alarm to sound up to seven
times, at five-minute intervals. To cancel a
snooze alarm, turn [SNZ] off.
l
Stopping an Alarm or the Hourly Time
Signal
Note
●
A beeper will sound for 10 seconds to
let you know when the alarm time is
reached.
●
The watch will automatically return to
the Timekeeping Mode from the Alarm
Mode after two or three minutes of
non-operation.
Watch Operation Guide 3584
11
Turning the Hourly Time
Signal On or Off
1. Enter the Alarm Mode.
l
Navigating Between Modes
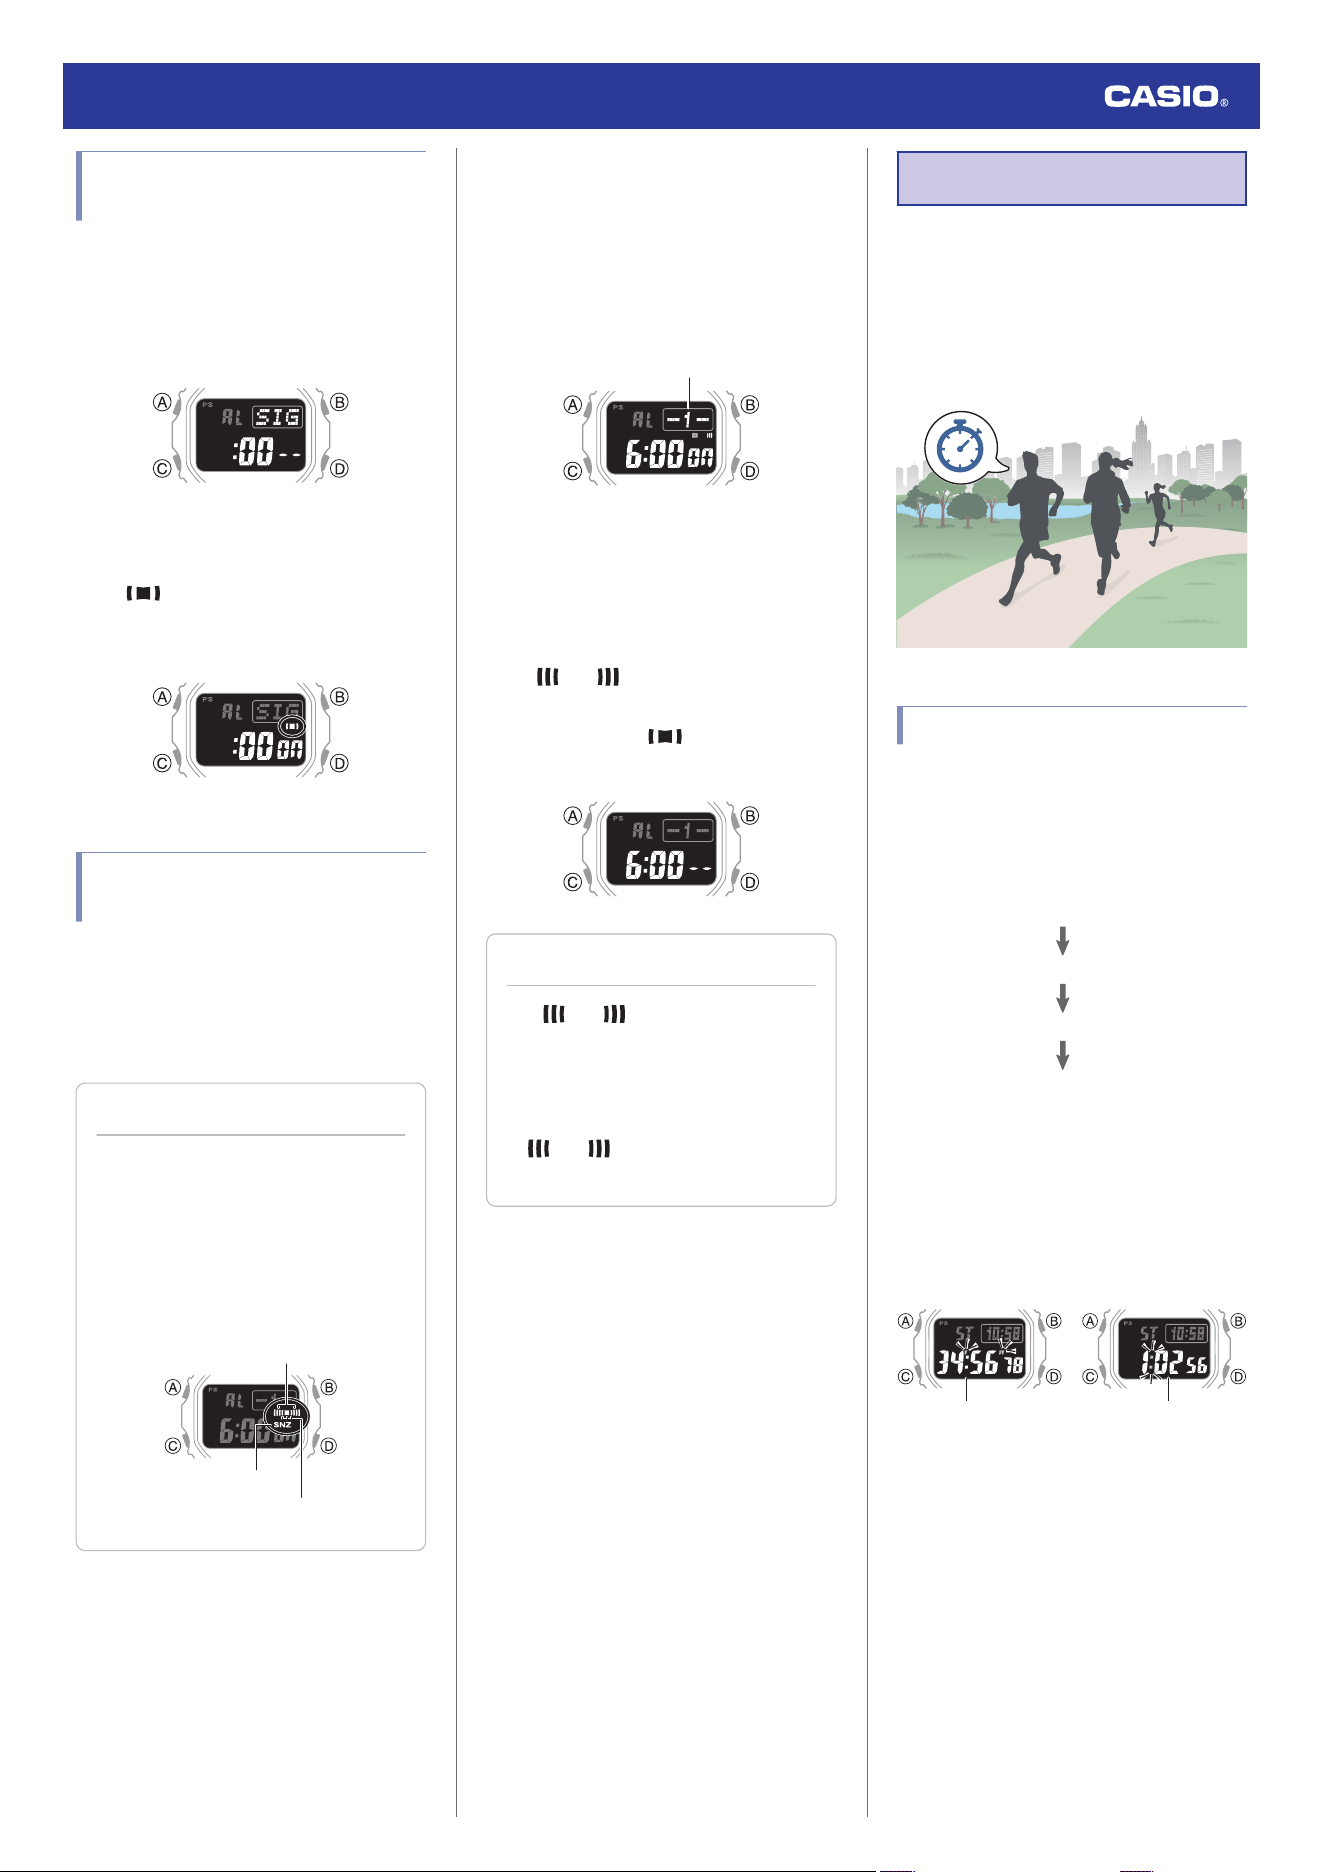
2. Use (D) to display the hourly time signal
screen ([SIG]).
3. Press (A) to toggle the hourly time signal
between enabled and disabled.
●
(hourly time signal) is shown on
the display while the hourly time signal
is enabled.
Stopping an Alarm or the
Hourly Time Signal
To stop an alarm or the hourly time signal from
sounding, perform the steps below to turn it
off.
●
To have an alarm or hourly time signal
sound again, turn it back on.
Note
●
Indicators are displayed while any of
the alarms or the hourly time signal is
turned on.
●
The applicable indicators are not
displayed while all of the alarms are
turned off and/or the hourly time signal
is turned off.
Snooze
Hourly time signal
Alarm
1. Enter the Alarm Mode.
l
Navigating Between Modes
2. Press (D) to scroll through alarm ([1] to [4],
[SNZ]) and hourly time signal ([SIG])
screens until the one you want to configure
is displayed.
Alarm number or hourly time signal
3. Press (A) to turn off the displayed alarm or
the hourly time signal.
●
Each press of (A) toggles between ON
and OFF.
●
Turning off an alarm causes
(alarm) to disappear from
the display. Turning off the hourly time
signal causes (hourly time signal)
to disappear.
Note
●
If (alarm) is still displayed
after you turn off an alarm, it means
that at least one of the other alarms is
still turned on. To turn off all of the
alarms, repeat steps 2 and 3 until the
(alarm) indicator is no
longer displayed.
Stopwatch
The stopwatch can measure elapsed time up
to 23 hours, 59 minutes, 59 seconds (24
hours).
When this maximum limit is exceeded,
elapsed time measurement returns to 0 and
timing continues from there.
Measuring Elapsed Time
1. Enter the Stopwatch Mode.
l
Navigating Between Modes
2. Use the operations below to measure
elapsed time.
D
D
D
D
Stop
Resume
Stop
Start
●
Elapsed time is shown in 1/100-second
units for the first hour of the
measurement. After the first hour,
elapsed time is shown in one-second
units.
After first hour
First hour
Hour, minute, second
Minutes, seconds,
1/100 seconds
3. Press (A) to reset the measurement time
to all zeros.
Watch Operation Guide 3584
12
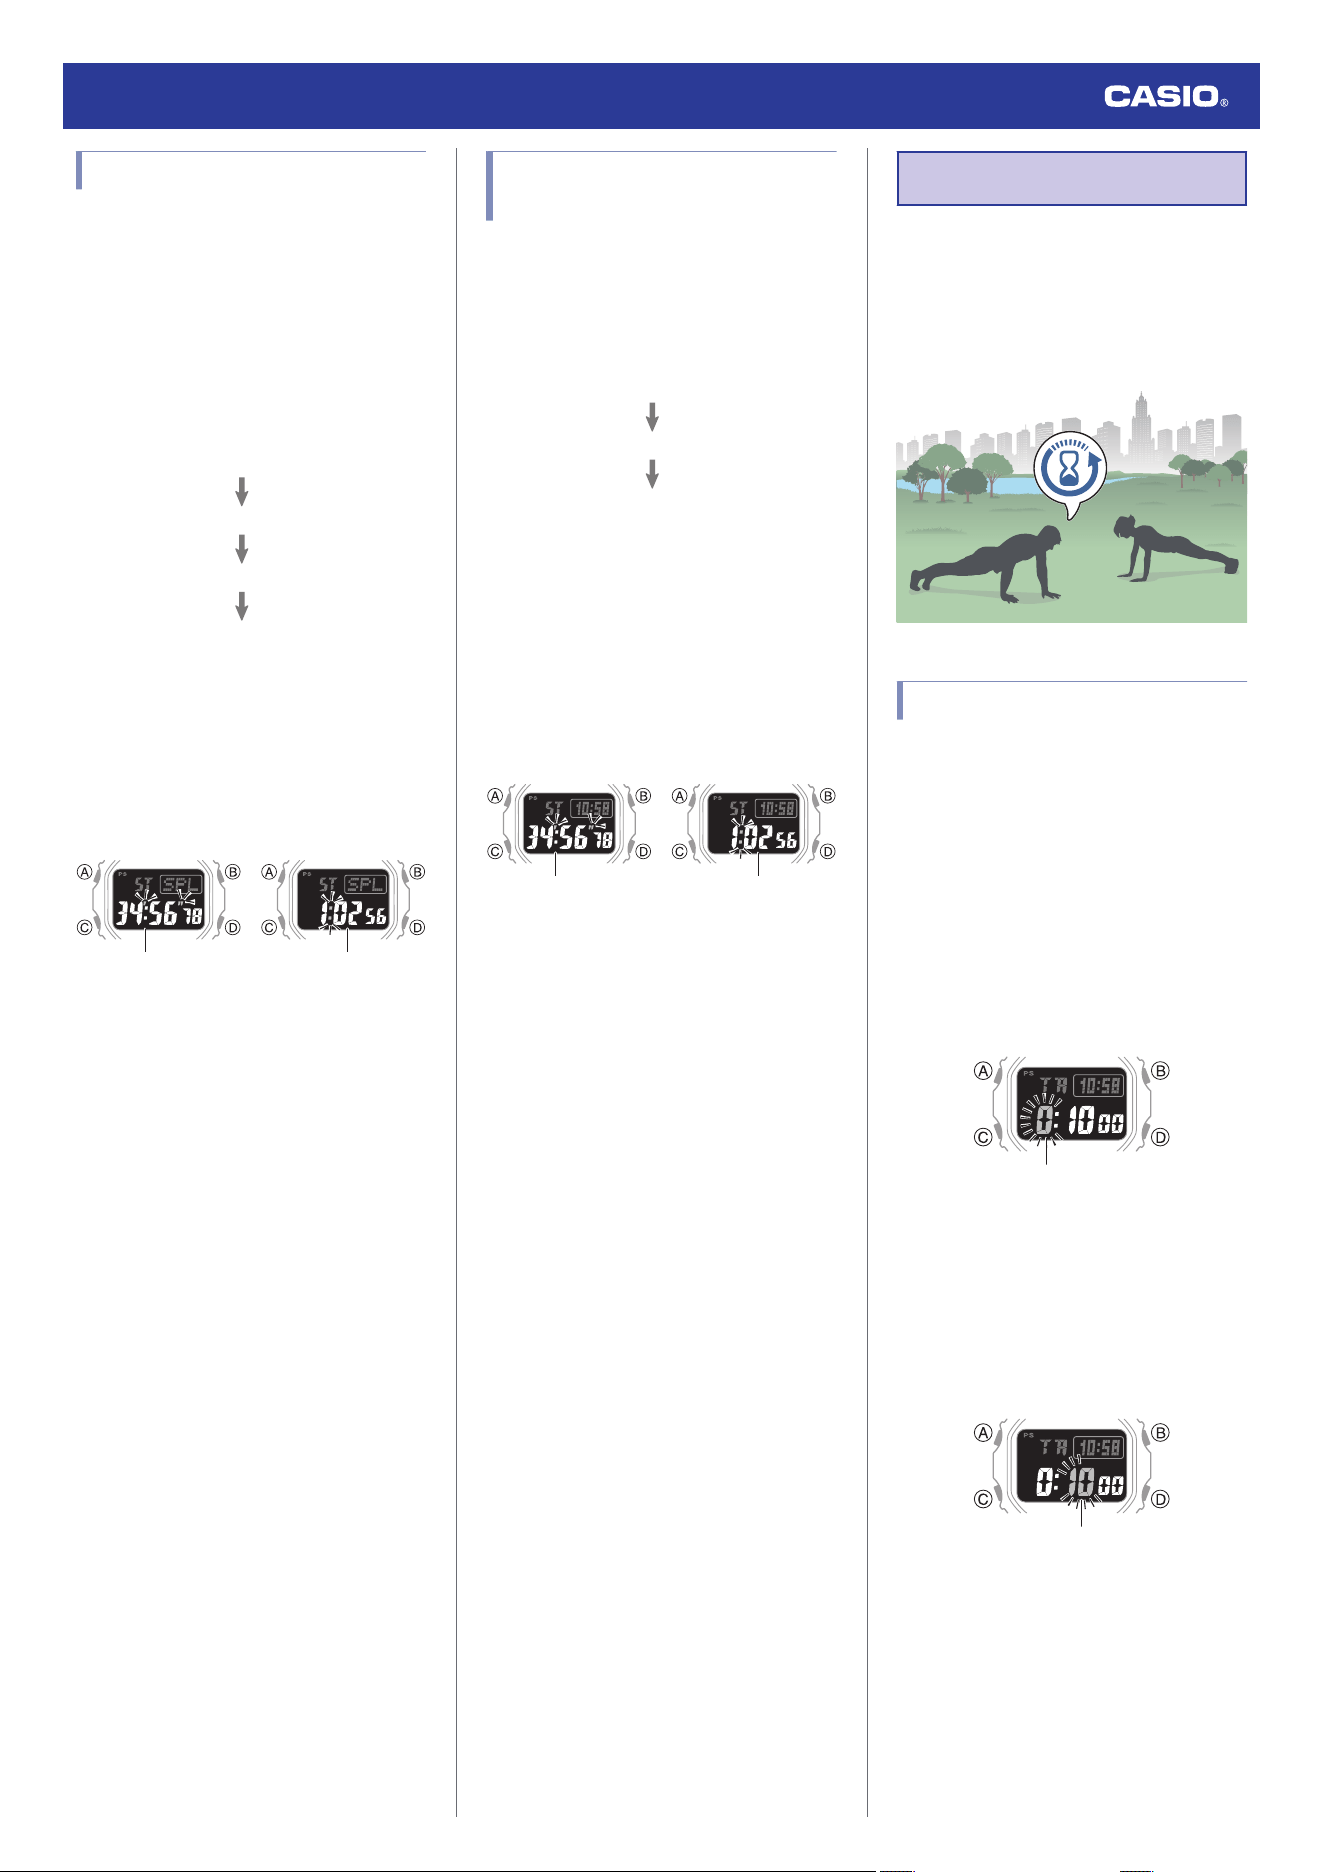
Measuring a Split Time
1. Enter the Stopwatch Mode.
l
Navigating Between Modes
2. Use the operations below to measure
elapsed time.
●
Pressing (A) displays the elapsed time
from the start of a race up to the point
when you pressed the button (split
time).
D
A
A
D
Stop
Split release
Split
Start
●
Elapsed time is shown in 1/100-second
units for the first hour of the
measurement. After the first hour,
elapsed time is shown in one-second
units.
After first hour
First hour
Hour, minute, second
Minutes, seconds,
1/100 seconds
3. Press (A) to reset the measurement time
to all zeros.
Timing the First and Second
Place Finishers
1. Enter the Stopwatch Mode.
l
Navigating Between Modes
2. Use the operations below to measure
elapsed time.
D
A
D
2nd Finisher*
1st Finisher*
Start
* This displays the time of the first
finisher.
●
Elapsed time is shown in 1/100-second
units for the first hour of the
measurement. After the first hour,
elapsed time is shown in one-second
units.
After first hour
First hour
Hour, minute, second
Minutes, seconds,
1/100 seconds
3. Press (A) to display the time of the second
finisher.
4. Press (A) to reset the measurement time
to all zeros.
Timer
The timer counts down from a start time
specified by you. A beeper sounds when the
end of the countdown is reached.
●
The beeper is muted when battery power is
low.
Setting a Start Time
The countdown start time can be set in 1-
second units up to 24 hours.
●
If a timer countdown operation is in
progress, reset the timer to its current start
time before performing this operation.
l
Using the Timer
1. Enter the Timer Mode.
l
Navigating Between Modes
2. Hold down (A) for at least two seconds.
This causes the hours digits to flash.
Hours
3. Use (B) and (D) to change the timer hours
setting.
●
Holding down (B) or (D) scrolls through
settings at high speed.
4. Press (C).
This causes the minutes digits to flash.
Minutes
5. Use (B) and (D) to change the timer
minutes setting.
Watch Operation Guide 3584
13
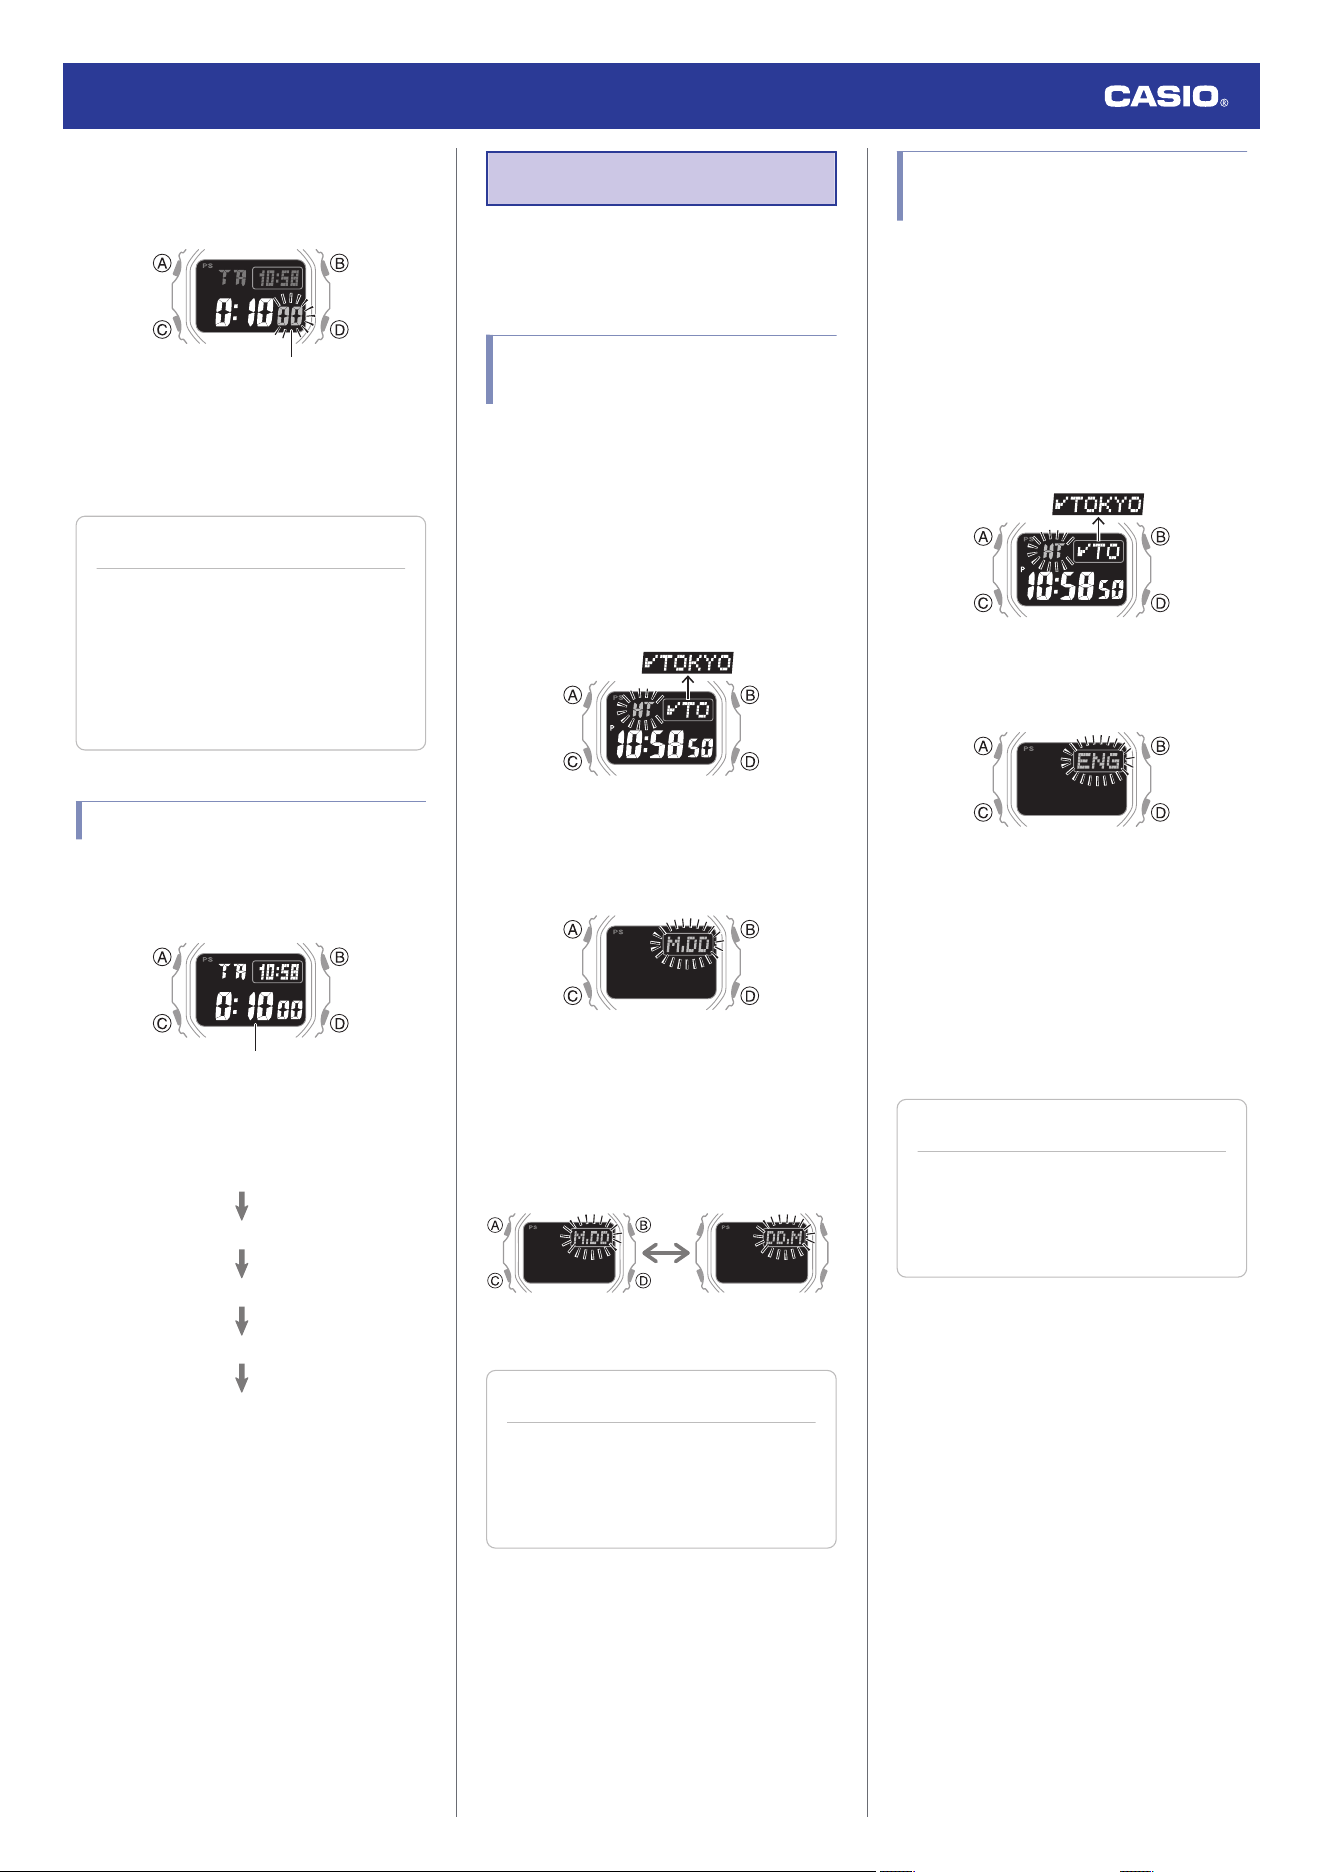
6. Press (C).
This causes the seconds digits to flash.
Seconds
7. Use (B) and (D) to change the seconds
setting.
8. Press (A) to exit the setting screen.
Note
●
While the setting is being configured,
the watch will exit the setting operation
automatically after about two or three
minutes of non-operation.
●
Setting a start time of [0:00 00] will
perform a countdown of 24 hours.
Using the Timer
1. Enter the Timer Mode.
l
Navigating Between Modes
Hour, minute, second
2. Use the operations below to perform a
timer operation.
D
D
D
(Time up)
Resume
Pause
(Countdown starts)
Start
●
A beeper will sound for 10 seconds to
let you know when the end of a
countdown is reached.
●
To reset a paused countdown to the
start time, press (A).
3. Press any button to stop the tone.
Other Settings
This section explains other watch settings you
can configure.
Changing the Date Display
Format
You can select either month/day or day/month
as the date display format.
1. Enter the Timekeeping Mode.
l
Navigating Between Modes
2. Hold down (A) for at least two seconds.
Release the button when [HT] starts to
flash.
3. Press (C) nine times.
This displays a screen for selecting the
date display format.
4. Use (D) to select a date display format.
[M.DD]: Month, day
[DD.M]: Day, month
Day, month
Month, day
5. Press (A) to exit the setting screen.
Note
●
While the setting is being configured,
the watch will exit the setting operation
automatically after about two or three
minutes of non-operation.
Specifying the Day of the
Week Language
You can select any one of six languages for
the day of the week display in the Timekeeping
Mode.
1. Enter the Timekeeping Mode.
l
Navigating Between Modes
2. Hold down (A) for at least two seconds.
Release the button when [HT] starts to
flash.
3. Press (C) 10 times.
This causes the language setting to flash.
4. Use (D) to select a language.
[ENG]: English
[ESP]: Spanish
[FRA]: French
[DEU]: German
[ITA]: Italian
[PyC]: Russian
5. Press (A) to exit the setting screen.
Note
●
While the setting is being configured,
the watch will exit the setting operation
automatically after about two or three
minutes of non-operation.
Watch Operation Guide 3584
14
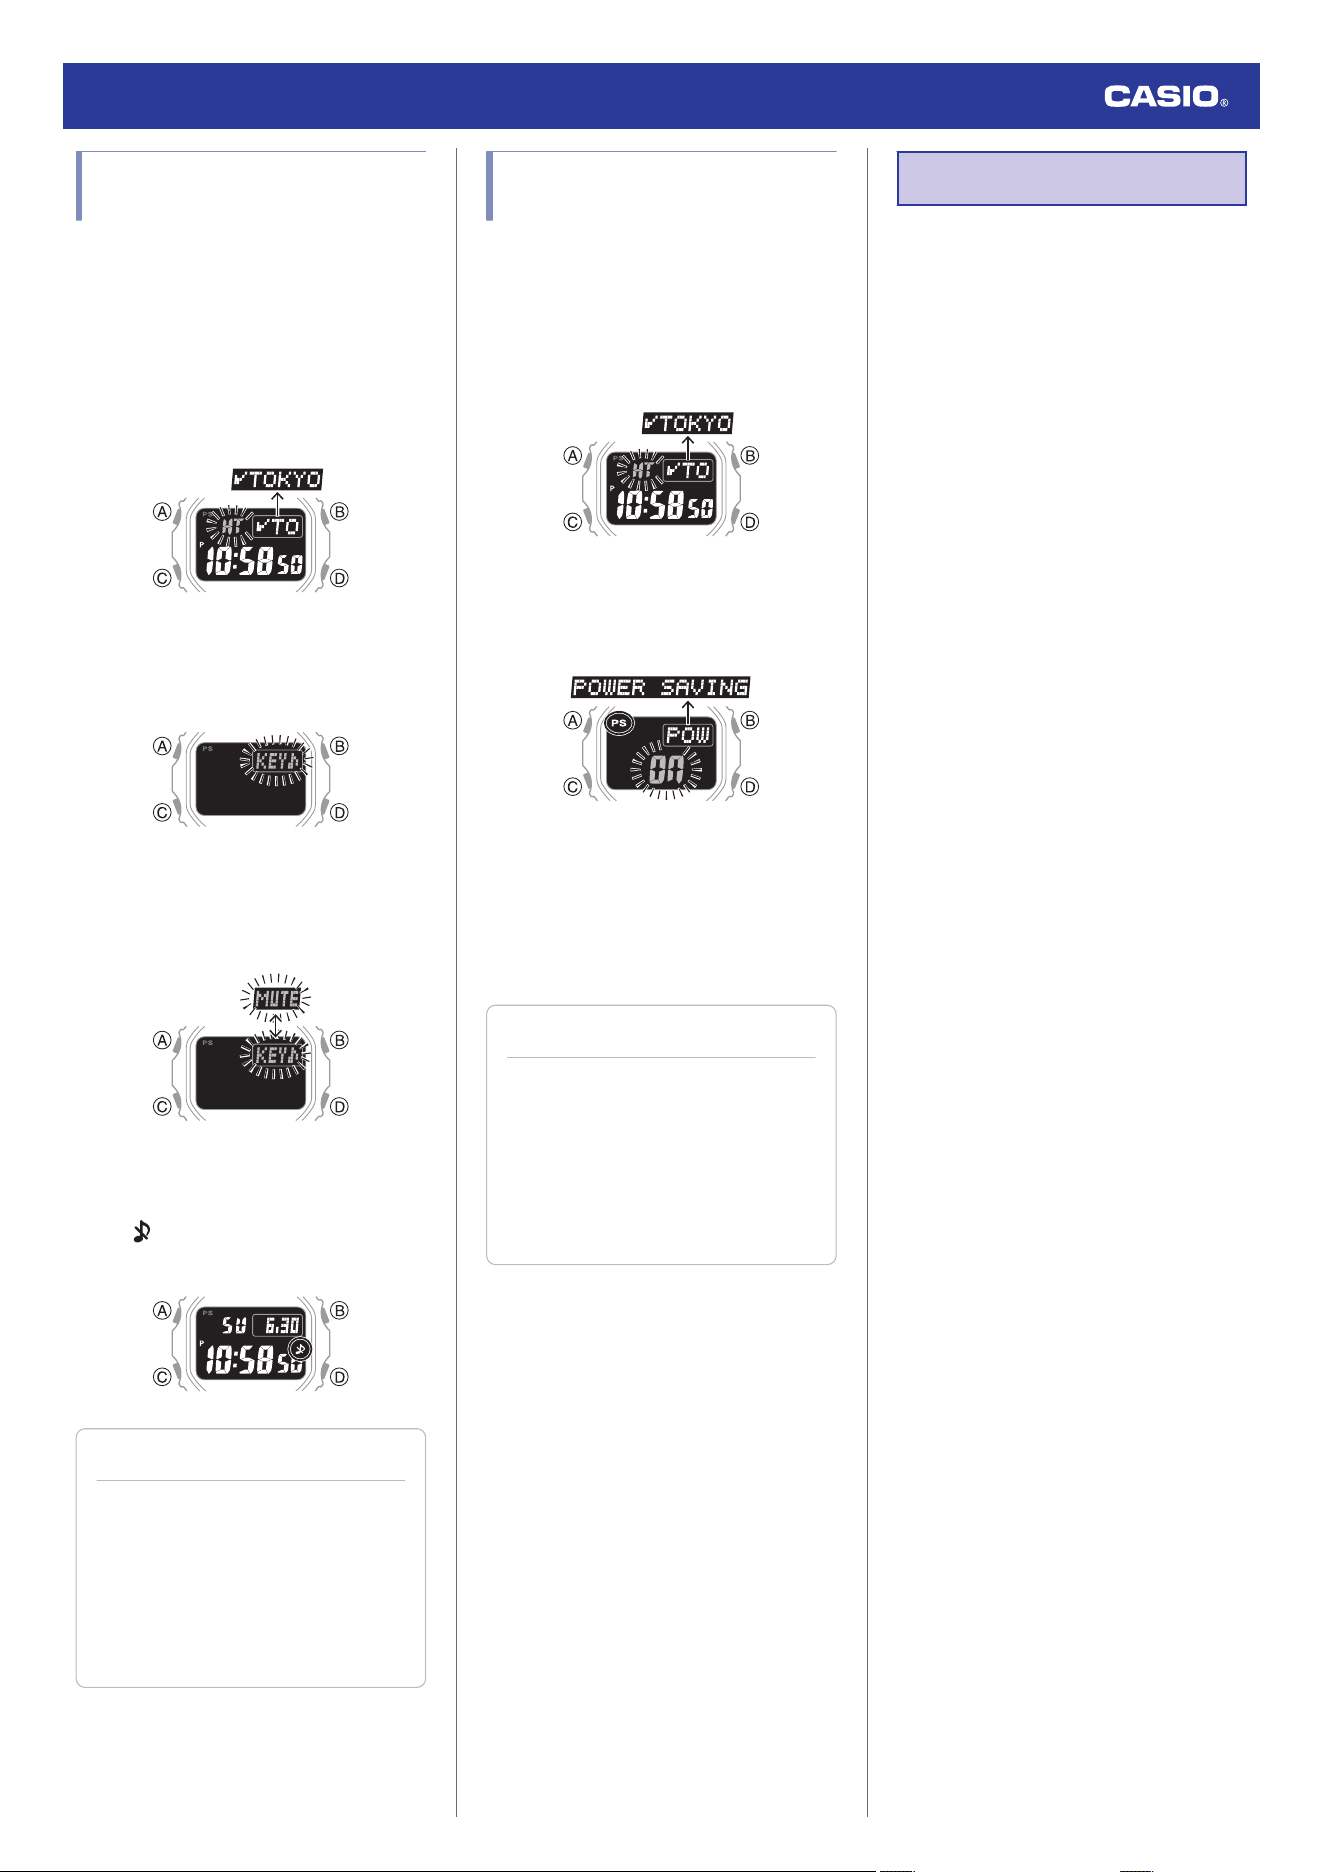
Enabling the Button
Operation Tone
Use the procedure below to enable or disable
the tone that sounds when you press a button.
1. Enter the Timekeeping Mode.
l
Navigating Between Modes
2. Hold down (A) for at least two seconds.
Release the button when [HT] starts to
flash.
3. Press (C) 11 times.
This causes [KEY♪] or [MUTE] to flash on
the display.
4. Press (D) to select [KEY♪] or [MUTE].
[KEY♪]: Operation tone enabled.
[MUTE]: Operation tone disabled.
5. Press (A) to complete the setting
operation.
●
[ ] is displayed while the operation
tone is muted.
Note
●
While the setting is being configured,
the watch will exit the setting operation
automatically after about two or three
minutes of non-operation.
●
Note that alarm and timer tones still
sound even while the operation tone is
muted.
Configuring Power Saving
Function Settings
1. Enter the Timekeeping Mode.
l
Navigating Between Modes
2. Hold down (A) for at least two seconds.
Release the button when [HT] starts to
flash.
3. Press (C) 14 times.
This causes [On] or [OFF] to flash on the
display.
4. Press (D) to toggle between on and off.
[On]: Power Saving enabled.
[OFF]: Power Saving disabled.
5. Press (A) to complete the setting
operation.
Note
●
While the setting is being configured,
the watch will exit the setting operation
automatically after about two or three
minutes of non-operation.
●
For details about Power Saving, refer
to the information below.
l
Power Saving Function
Specifications
Accuracy at normal temperature :
±15 seconds per month when time
correction using signal reception is not
possible.
Timekeeping :
Hour, minute, second, month, day, day of
the week
a.m./p.m.(P)/24-hour timekeeping
Full Auto Calendar (2000 to 2099)
Summer Time
Signal Receive Functions :
Auto receive, manual receive
Auto transmitter selection (for JJY, MSF/
DCF77)
Receivable call signs:
JJY (40 kHz/60 kHz), WWVB (60 kHz), MSF
(60 kHz), DCF77 (77.5 kHz), BPC (68.5
kHz)
Automatic and manual switching between
standard time and summer time.
World Time :
38 cities (38 time zones) and Coordinated
Universal Time (UTC)
Summer time
Home City/World Time City swapping
Alarm :
Daily alarm
Alarms: 5 (with one snooze alarm)
Setting units: Hours, minutes
Alarm tone duration: 10 seconds
Hourly time signal: Beep every hour on the
hour
Stopwatch :
Measurement units:
1/100 seconds (first hour); 1 second
(after first hour)
Measuring range:
23 hours, 59 minutes, 59 seconds (24
hours)
Measurement Functions:
Elapsed time, split times, 1st and 2nd
place finisher times
Timer :
Measuring unit: 1 second
Countdown range: 24 hours
Setting unit: 1 second
Time up: 10-second beeper
Watch Operation Guide 3584
15
Other :
LED backlight (Full Auto Light, Super
Illuminator, afterglow with selectable 2 or 4-
second duration), Power Saving, operation
tone enable/disable, selectable date
format, selectable day of the week
language, auto time adjustment enable/
disable
Power Supply :
Solar panel and one rechargeable battery
(Type: CTL1616)
Battery nominal voltage: 2.3V
Battery operating time: Approximately 11
months
Conditions:
Not exposed to light under the conditions
below.
●
Time signal reception: 4 minutes/day
●
Illumination: Once (1.5 seconds)/day
●
Alarm: Once (10 seconds)/day
●
Power Saving: 6 hours/day
Specifications are subject to change without
notice.
Other Information
This section provides non-operational
information you also need to know. Refer to
this information as required.
City Table
City Offset
UTC
Coordinated
Universal Time
0
LONDON *1 London 0
PARIS *1 Paris +1
ATHENS *1 Athens +2
JEDDAH Jeddah +3
TEHRAN Tehran +3.5
DUBAI Dubai +4
KABUL Kabul +4.5
KARACHI Karachi +5
DELHI Delhi +5.5
KATHMANDU Kathmandu +5.75
DHAKA Dhaka +6
YANGON Yangon +6.5
BANGKOK Bangkok +7
HONG KONG *1 Hong Kong +8
EUCLA Eucla +8.75
TOKYO *1 Tokyo +9
ADELAIDE Adelaide +9.5
SYDNEY Sydney +10
LORD HOWE
ISLAND
Lord Howe
Island
+10.5
NOUMEA Noumea +11
WELLINGTON Wellington +12
CHATHAM
ISLAND
Chatham
Islands
+12.75
NUKU’ALOFA Nuku’alofa +13
KIRITIMATI Kiritimati +14
BAKER ISLAND Baker Island -12
PAGO PAGO Pago Pago -11
HONOLULU *1 Honolulu -10
MARQUESAS
ISLANDS
Marquesas
Islands
-9.5
ANCHORAGE *1 Anchorage -9
LOS ANGELES
*1
Los Angeles -8
DENVER *1 Denver -7
CHICAGO *1 Chicago -6
NEW YORK *1 New York -5
HALIFAX *1 Halifax -4
ST. JOHN’S *1 St. John’s -3.5
RIO DE JANEIRO Rio de Janeiro -3
FERNANDO DE
NORONHA
Fernando de
Noronha
-2
PRAIA Praia -1
*1
Time zones where time calibration signal
reception is possible.
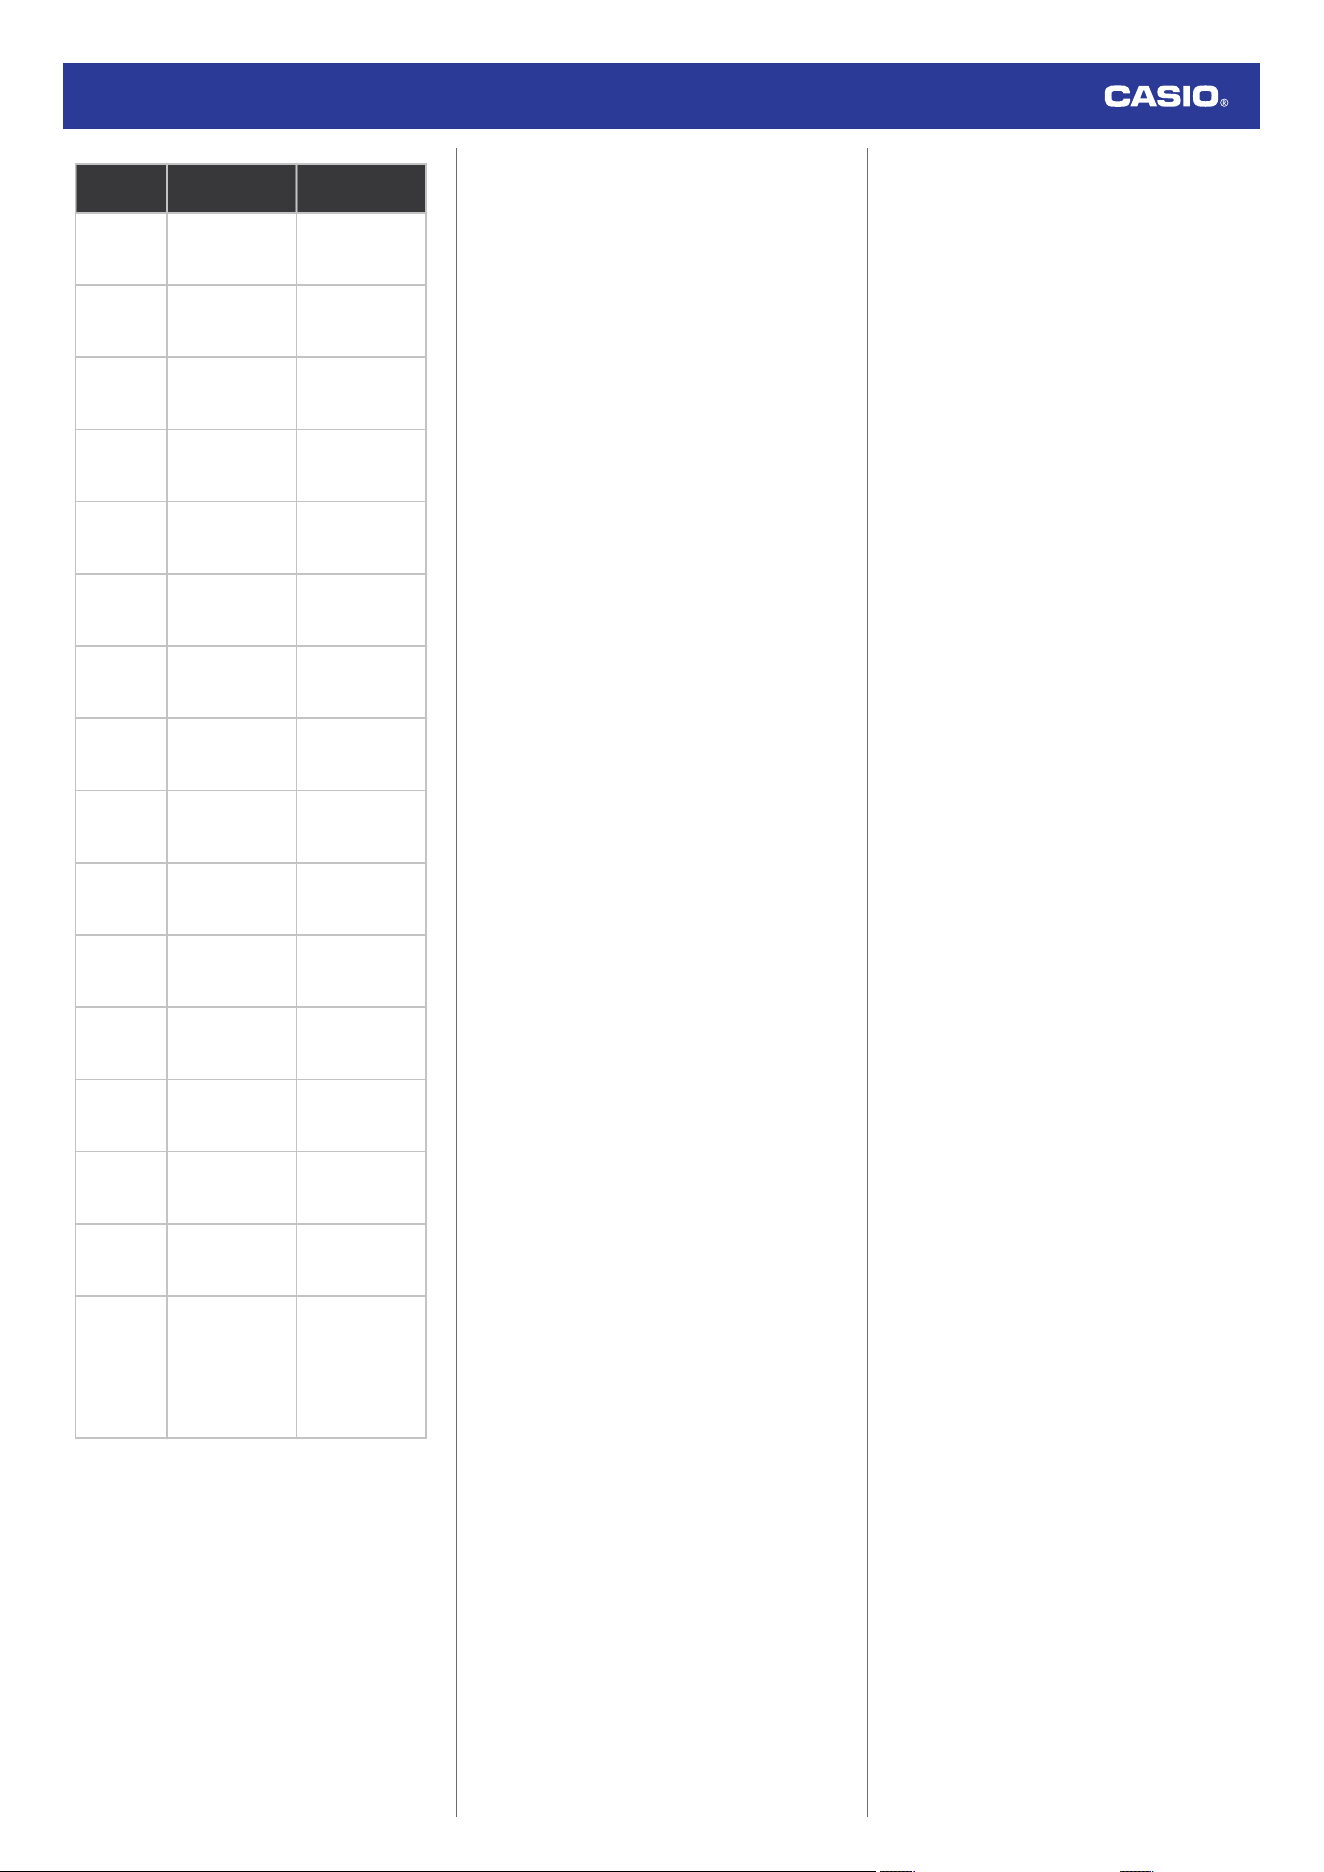
Summer Time Table
When [AUTO] is selected for a city that
observes summer time, switching between
standard time and summer time will be
performed automatically at the timing shown
in the table below.
Note
●
Actual summer time start and end
dates may differ from those shown in
the City Table due to changes to the
schedule, etc. In that case, manually
switch the summer time setting as
needed.
Watch Operation Guide 3584
16
City Name
Summer Time
Start
Summer Time
End
London
01:00, last
Sunday in March
02:00, last
Sunday in
October
Paris
02:00, last
Sunday in March
03:00, last
Sunday in
October
Athens
03:00, last
Sunday in March
04:00, last
Sunday in
October
Tehran*2
00:00, March 22
or 21
00:00,
September 22 or
21
Sydney,
Adelaide
02:00, first
Sunday in
October
03:00, first
Sunday in April
Lord Howe
Island
02:00, first
Sunday in
October
02:00, first
Sunday in April
Wellington
02:00, last
Sunday in
September
03:00, first
Sunday in April
Chatham
Islands
02:45, last
Sunday in
September
03:45, first
Sunday in April
Anchorage
02:00, second
Sunday in March
02:00, first
Sunday in
November
Los
Angeles
02:00, second
Sunday in March
02:00, first
Sunday in
November
Denver
02:00, second
Sunday in March
02:00, first
Sunday in
November
Chicago
02:00, second
Sunday in March
02:00, first
Sunday in
November
New York
02:00, second
Sunday in March
02:00, first
Sunday in
November
Halifax
02:00, second
Sunday in March
02:00, first
Sunday in
November
St. John’s
02:00, second
Sunday in March
02:00, first
Sunday in
November
Rio de
Janeiro*3
Midnight, first
Sunday in
November
00:00, third
Sunday in
February or
00:00, fourth
Sunday in
February
*2
Though summer time was discontinued in
Tehran as of January 2025, this watch does
not reflect this change.
*3
Though summer time was discontinued in Rio
de Janeiro as of January 2025, this watch
does not reflect this change.
Watch Operation Guide 3584
17
Troubleshooting
Signal Reception (Time
Calibration Signal)
Q1
The watch cannot perform a receive
operation.
Is the watch’s battery charged?
Signal reception is not possible while
battery power is low. Keep the watch
exposed to light until it recharges
sufficiently.
l
Charging
Is the watch in the Timekeeping Mode or
World Time Mode?
Time signal receive is not possible unless
the watch is in the Timekeeping Mode or
World Time Mode. Enter the Timekeeping
Mode or World Time Mode.
l
Navigating Between Modes
Is your Home City setting correct for your
location?
The watch will not indicate the correct time
if the Home City setting is wrong. Change
your Home City setting so it correctly
reflects your location.
l
Setting a Home City
After checking the above, the watch still
cannot perform a receive operation.
Time calibration signal reception is not
possible under the conditions described
below.
●
When watch is at Level 2 power saving
●
Timer countdown operation in progress
If successful reception is not possible for
some reason, you can adjust the time and
day settings manually.
Q2
The signal receive operation always
fails.
Is the watch in a location that is appropriate
for signal reception?
Check your surroundings and move the
watch to a location where signal reception
is better.
l
Appropriate Signal Reception Location
Did you avoid touching the watch while the
receive operation was in progress?
Minimize movement of the watch and do
not perform any watch operation while a
receive operation is in progress.
Is there an alarm configured to sound
during the same period that the signal
receive operation is performed?
Receive stops if an alarm operation starts
while it is being performed. Disable the
alarm.
l
Stopping an Alarm or the Hourly Time
Signal
Is the signal transmitter in your area
transmitting a signal?
The transmitter of the time calibration may
not be transmitting a signal.
Try again later.
Q3
Signal reception should have been
successful, but the watch’s time and/
or day is wrong.
Adjust time and day settings manually.
l
Using Watch Operations to Adjust the Time
Setting
World Time
Q1
The time for a World Time City is not
correct.
The summer time setting (standard time/
summer time) is wrong.
l
Specifying a World Time City
Alarm and Hourly Time
Signal
Q1
An alarm does not sound.
Is the watch’s battery charged?
Keep the watch exposed to light until it
recharges sufficiently.
l
Charging
Other than the above.
The alarm’s settings may not be
configured. Configure the alarm settings.
l
Configuring Alarm Settings
Q2
The hourly time signal does not
sound.
Is the watch’s battery charged?
Keep the watch exposed to light until it
recharges sufficiently.
l
Charging
Other than the above.
The hourly time signal may be disabled.
Enable the hourly time signal.
l
Turning the Hourly Time Signal On or
Off
Watch Operation Guide 3584
18
Charging
Q1
The watch does not work even
though it is exposed to light.
The watch stops operating whenever the
battery goes dead. Keep the watch exposed
to light until it recharges sufficiently.
l
Dead Battery
Q2
[R] is flashing on the display.
The watch is in the charge recovery mode.
Wait until the recovery process is complete
(about 15 minutes). The watch recovers more
quickly if you place it in a brightly lit location.
●
If an alarm, hourly time signal, illumination
and/or other power-intensive functions are
used within a short period of time, the
charging capacity of the battery will drop
and cause the watch to go into a charge
recovery mode. Function availability is
temporarily limited, but functionality returns
after the battery recovers.
l
Dead Battery
Q3
[LOW] is flashing on the display.
The charge level of the watch is extremely low.
Immediately expose the watch to light to
charge it.
l
Low Battery
Other
Q1
I can’t find the information I need
here.
Visit the website below.
https://world.casio.com/support/
Watch Operation Guide 3584
19
Precautions
Operating Precautions
●
Water Resistance
●
The information below applies to watches
with WATER RESIST or WATER
RESISTANT marked on the back cover.
Water Resistance Under Daily Use
Marking on watch front or on
back cover
No BAR
mark
Example of Daily Use
Hand washing, rain Yes
Water-related work, swimming No
Windsurfing No
Skin diving No
Enhanced Water Resistance Under Daily
Use
5 Atmospheres
Marking on watch front or on
back cover
5BAR
Example of Daily Use
Hand washing, rain Yes
Water-related work, swimming Yes
Windsurfing No
Skin diving No
10 Atmospheres
Marking on watch front or on
back cover
10BAR
Example of Daily Use
Hand washing, rain Yes
Water-related work, swimming Yes
Windsurfing Yes
Skin diving Yes
20 Atmospheres
Marking on watch front or on
back cover
20BAR
Example of Daily Use
Hand washing, rain Yes
Water-related work, swimming Yes
Windsurfing Yes
Skin diving Yes
●
Do not use your watch for scuba diving or
other types of diving that requires air tanks.
●
Watches that do not have WATER RESIST
or WATER RESISTANT marked on the
back cover are not protected against the
effects of sweat. Avoid using such a watch
under conditions where it will be exposed to
large amounts of sweat or moisture, or to
direct splashing with water.
●
Even if a watch is water resistant, note the
usage precautions described below. Such
types of use reduce water resistance
performance and can cause fogging of the
glass.
ー
Do not operate the crown or buttons while
your watch is submersed in water or wet.
ー
Avoid wearing your watch while in the
bath.
ー
Do not wear your watch while in a heated
swimming pool, sauna, or any other high
temperature/high humidity environment.
ー
Do not wear your watch while washing
your hands or face, while doing
housework, or while performing any other
task that involves soaps or detergents.
●
After submersion in seawater, use plain
water to rinse all salt and dirt from your
watch.
●
To maintain water resistance, have the
gaskets of your watch replaced periodically
(about once every two or three years).
●
A trained technician will inspect your watch
for proper water resistance whenever you
have its battery replaced. Battery
replacement requires the use of special
tools. Always request battery replacement
from your original retailer or from an
authorized CASIO service center.
●
Some water-resistant watches come with
fashionable leather bands. Avoid
swimming, washing, or any other activity
that causes direct exposure of a leather
band to water.
●
The inside surface of the watch’s glass may
fog when the product is exposed to a
sudden drop in temperature. No problem is
indicated if the fogging clears up relatively
quickly.
Sudden and extreme temperature changes
(such as coming into an air conditioned
room in the summer and standing close to
an air conditioner outlet, or leaving a heated
room in the winter and allowing your watch
to come into contact with snow) can cause
it to take longer for glass fogging to clear up.
If glass fogging does not clear up or if you
notice moisture inside of the glass,
immediately stop using your watch and take
it to your original retailer or to an authorized
CASIO service center.
●
Your water-resistant watch has been tested
in accordance with International
Organization for Standardization
regulations.
Watch Operation Guide 3584
20
●
Band
●
Tightening the band too tightly can cause
you to sweat and make it difficult for air to
pass under the band, which can lead to skin
irritation. Do not fasten the band too tightly.
There should be enough room between the
band and your wrist so you can insert your
finger.
●
Deterioration, rust, and other conditions can
cause the band to break or come off of your
watch, which in turn can cause band pins to
fly out of position or to fall out. This creates
the risk of your watch falling from your wrist
and becoming lost, and also creates the risk
of personal injury. Always take good care of
your band and keep it clean.
●
Immediately stop using a band if you even
notice any of the following: loss of band
flexibility, band cracks, band discoloration,
band looseness, band connecting pin flying
or falling out, or any other abnormality. Take
your watch to your original retailer or to a
CASIO service center for inspection and
repair (for which you will be charged) or to
have the band replaced (for which you will
be charged).
●
Temperature
●
Never leave your watch on the dashboard
of a car, near a heater, or in any other
location that is subject to very high
temperatures. Do not leave your watch
where it will be exposed to very low
temperatures. Temperature extremes can
cause your watch to lose or gain time, to
stop, or otherwise malfunction.
●
Leaving your watch in an area hotter than
+60 °C (140 °F) for long periods can lead to
problems with its LCD. The LCD may
become difficult to read at temperatures
lower than 0 °C (32 °F) and greater than
+40 °C (104 °F).
●
Impact
●
Your watch is designed to withstand impact
incurred during normal daily use and during
light activity such as playing catch, tennis,
etc. Dropping your watch or otherwise
subjecting it to strong impact, however, can
lead to malfunction. Note that watches with
shock-resistant designs (G‑SHOCK,
BABY‑G, G‑MS) can be worn while
operating a chain saw or engaging in other
activities that generate strong vibration, or
while engaging in strenuous sports
activities (motocross, etc.)
●
Magnetism
●
Though a digital watch normally is not
affected by magnetism, very strong
magnetism (from medical equipment, etc.)
should be avoided because it can cause
malfunction and damage to electronic
components.
●
Electrostatic Charge
●
Exposure to very strong electrostatic
charge can cause your watch to display the
wrong time. Very strong electrostatic
charge even can damage electronic
components.
●
Electrostatic charge may cause temporary
blotching in blank areas of the LCD.
●
Chemicals
●
Do not allow your watch to come into
contact with thinner, gasoline, solvents,
oils, or fats, or with any cleaners, adhesives,
paints, medicines, or cosmetics that contain
such ingredients. Doing so can cause
discoloration of or damage to the resin
case, resin band, leather, and other parts.
●
Storage
●
If you do not plan to use your watch for a
long time, thoroughly wipe it free of all dirt,
sweat, and moisture, and store it in a cool,
dry place.
●
Resin Components
●
Allowing your watch to remain in contact
with other items or storing it together with
other items for long periods while it is wet
can cause color on resin components to
transfer to the other items, or the color of the
other items to transfer to the resin
components of your watch. Be sure to dry
off your watch thoroughly before storing it
and make sure it is not in contact with other
items.
●
Leaving your watch where it is exposed to
direct sunlight (ultraviolet rays) for long
periods or failure to clean dirt from your
watch for long periods can cause it to
become discolored.
●
Friction caused by certain conditions
(strong external force, sustained rubbing,
impact, etc.) can cause discoloration of
painted components.
●
If there are printed figures on the band,
strong rubbing of the printed area can cause
discoloration.
●
Leaving your watch wet for long periods can
cause fluorescent color to fade. Wipe the
watch dry as soon as possible after it
becomes wet.
●
Semi-transparent resin parts can become
discolored due to sweat and dirt, and if
exposed to high temperatures and humidity
for long periods.
●
Daily use and long-term storage of your
watch can lead to deterioration, breaking, or
bending of resin components. The extent of
such damage depends on usage conditions
and storage conditions.
Watch Operation Guide 3584
21
●
Leather Band
●
Allowing your watch to remain in contact
with other items or storing it together with
other items for long periods while it is wet
can cause the color of the leather band to
transfer to the other items or the color of the
other items to transfer to the leather band.
Be sure to dry off your watch thoroughly with
a soft cloth before storing it and make sure
it is not in contact with other items.
●
Leaving a leather band where it is exposed
to direct sunlight (ultraviolet rays) for long
periods or failure to clean dirt from a leather
band for long periods can cause it to
become discolored.
CAUTION:
Exposing a leather band to rubbing or dirt
can cause color transfer and discoloration.
●
Metal Components
●
Failure to clean dirt from metal components
can lead to formation of rust, even if
components are stainless steel or plated. If
metal components exposed to sweat or
water, wipe thoroughly with a soft,
absorbent cloth and then place the watch in
a well-ventilated location to dry.
●
Use a soft toothbrush or similar tool to scrub
the metal with a weak solution of water and
a mild neutral detergent, or with soapy
water. Next, rinse with water to remove all
remaining detergent and then wipe dry with
a soft absorbent cloth. When washing metal
components, wrap the watch case with
kitchen plastic wrap so it does not come into
contact with the detergent or soap.
●
Bacteria and Odor Resistant Band
●
The bacteria and odor resistant band
protects against odor generated by the
formation of bacteria from sweat, which
ensures comfort and hygiene. In order to
ensure maximum bacteria and odor
resistance, keep the band clean. Use an
absorbent soft cloth to thoroughly wipe the
band clean of dirt, sweat, and moisture. A
bacteria and odor resistant band
suppresses the formation of organisms and
bacteria. It does not protect against rash
due to allergic reaction, etc.
●
Liquid Crystal Display
●
Display figures may be difficult to read when
viewed from an angle.
●
Sapphire Components
●
This watch uses sapphire material for some
of its components. Certain usage
conditions may cause sapphire material to
break or become damaged.
Note that CASIO Computer Co., Ltd.
assumes no responsibility for any
damage or loss suffered by you or any
third party arising through the use of your
watch or its malfunction.
User Maintenance
●
Caring for Your Watch
Remember that you wear your watch next to
your skin, just like a piece of clothing. To
ensure your watch performs at the level for
which it is designed, keep it clean by
frequently wiping with a soft cloth to keep your
watch and band free of dirt, sweat, water and
other foreign matter.
●
Whenever your watch is exposed to sea
water or mud, rinse it off with clean fresh
water.
●
For a metal band or a resin band with metal
parts, use a soft toothbrush or similar tool to
scrub the band with a weak solution of water
and a mild neutral detergent, or with soapy
water. Next, rinse with water to remove all
remaining detergent and then wipe dry with
a soft absorbent cloth. When washing the
band, wrap the watch case with kitchen
plastic wrap so it does not come into contact
with the detergent or soap.
●
For a resin band, wash with water and then
wipe dry with a soft cloth. Note that
sometimes a smudge like pattern may
appear on the surface of a resin band. This
will not have any effect on your skin or
clothing. Wipe with a cloth to remove the
smudge pattern.
●
Clean water and sweat from a leather band
by wiping with a soft cloth.
●
Not operating a watch crown, buttons, or
rotary bezel could lead to later problems
with their operation. Periodically rotate the
crown and rotary bezel, and press buttons
to maintain proper operation.
●
Dangers of Poor Watch Care
Rust
●
Though the metal steel used for your watch
is highly rust-resistant, rust can form if your
watch is not cleaned after it becomes dirty.
ー
Dirt on your watch can make it impossible
for oxygen to come into contact with the
metal, which can lead to breakdown of
the oxidization layer on the metal surface
and the formation of rust.
●
Rust can cause sharp areas on metal
components and can cause band pins to fly
out of position or to fall out. If you ever notice
any abnormality immediately stop using
your watch and take it to your original
retailer or to an authorized CASIO service
center.
●
Even if the surface of the metal appears
clean, sweat and rust in crevasses can soil
the sleeves of clothing, cause skin irritation,
and even interfere with watch performance.
Premature Wear
●
Leaving sweat or water on a resin band or
bezel, or storing your watch an area subject
to high moisture can lead to premature
wear, cuts, and breaks.
Skin Irritation
●
Individuals with sensitive skin or in poor
physical condition may experience skin
irritation when wearing a watch. Such
individuals should keep their leather band
or resin band particularly clean. Should you
ever experience a rash or other skin
irritation, immediately remove your watch
and contact a skin care professional.
Watch Operation Guide 3584
22
Battery
●
The special rechargeable battery used by
your watch is not intended to be removed or
replaced by you. Use of a rechargeable
battery other than the special one specified
for your watch can damage your watch.
●
The rechargeable (secondary) battery is
charged when the solar panel is exposed to
light, so it does not require regular
replacement as the primary battery
requires. Note, however, that long use or
operating conditions can cause the
capacity or charging efficiency of the
rechargeable battery to deteriorate. If you
feel that the amount of operation provided
by charging is too short, contact your
original retailer or CASIO service center.
Watch Operation Guide 3584
23

