Model: VEFBF2411RISL
24inch BM Refrigerator Freezer

1
SUMMARY
SAFETY INFORMATION
.......................................................................
2
SCRAPPING OLD APPLIANCES
........................................................
6
Energy Saving
........................................................................................
7
Before first use
......................................................................................
7
Fridge use
................................................................................................
8
Freezer use
.............................................................................................
9
Chiller Zone drawer
.............................................................................
9
Storage
....................................................................................................
10
Control panel
........................................................................................
11
Instructions for Ice Maker;Water connection.............. 13
LED light replacement instructions
.......................................
14
Care and Cleaning;Defrosting
..................................................
15
Troubleshooting
....................................................................................
16
Installation preparation
.................................................................
17
Ventilation
.......................................................................................
18
Reversing the appliance doors
........................................................
19
2
Thank you for purchasing this product.
Before using your refrigerator, please carefully read this instruction manual
in order to maximize its performance. Store all documentation for
subsequent use or for other owners. This product is intended solely for
household use or similar applications such as:
The kitchen area for personnel in shops, offices and other
working environments On farms, by clients of hotels, motels
and other environments of a residential type At bed and
breakfasts(B&B)
For catering services and similar applications not for retail sale.
This appliance must be used only for purposes of storage of food, any other
use is considered dangerous and the manufacturer will not be responsible
for any omissions. Also, it is recommended that you take note of the
warranty conditions.
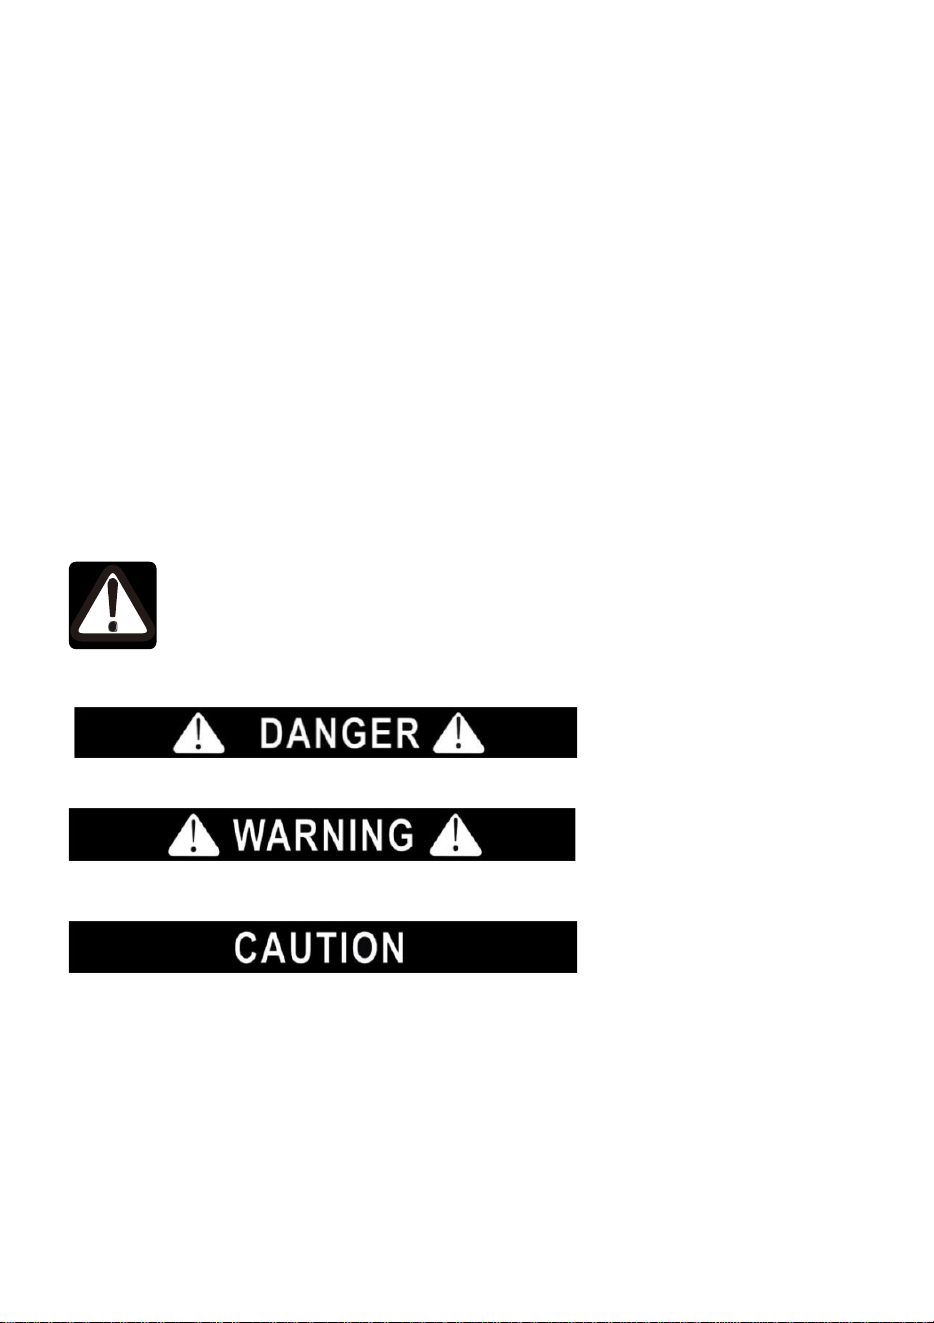
SAFETY INFORMATION
This is the Safety Alert Symbol. This symbol alerts you to potential
hazards that can kill or injure you and others. All safety messages will follow the
Safety Alert Symbol and either the words” DANGER”, “WARNING” or “CAUTION”.
Danger means that failure to heed this safety statement may result in severe
personal injury or death.
Warning means that failure to heed this safety statement may result in extensive
product damage, serious personal injury, or death.
Cauon means that failure to heed this safety statement may result in minor or
moderate personal injury, or property or equipment damage.
All safety messages will alert you to what the potential hazard is, tell you how to
reduce the chance of injury, and let you know what can happen if the instructions
are not followed.

3
If the supply cord is damaged, it must be replaced by the manufacturer, its service
agent or similarly qualified persons in order to avoid a hazard.
This appliance is not intended for use by persons (including children) with reduced
physical, sensory or mental capabilities, or lack of experience and knowledge, unless
they have been given supervision or instruction concerning use of the appliance by a
person responsible for their safety.
Children should be supervised to ensure that they do not play with the appliance.
This appliance can be used by children aged from 8 years and above and persons
with reduced physical sensory or mental capabilities or lack of experience and
knowledge if they have been given supervision or instruction concerning use of the
appliance in a safe way and understand the hazards involved. Children shall not play
with the appliance. Cleaning and user maintenance shall not be made by children
without supervision.(EU)
Keep the appliance and its cord out of reach of children less than 8 years.(EU).
Do not store explosive substances such as aerosol cans with a flammable propellant
in this appliance.
The max. loading of shelve is 22 lbs(10kg).
The appliance shall be used at an ambient temperature listed according to it’s
climate class:
89 °F(32℃)± 35 °F(2℃) on appliances of climatic class 0,1,2,3,4,6 or 8;
109 °F (43°C)± 35 °F(2℃)Con appliances of climatic class 5 or 7.
The appliance use flammable insulation blowing gas C5H10, disposal of the
appliance shall in accordance with the regulations of local authorities.
The appliance provided with double-capped fluorescent lamps, the lamp has to be
replaced by identical lamps only.
The key for appliance electric box should be safe kept by qualified persons in order
to avoid a hazard
Based on business order(s) to EU market, give true EU authorized representative
information on the label with full business name and full EU address in the marking
plate.
If the appliance use flammable refrigerant, such as R600a, R290:

4
Warning; Risk of fire / flammable materials
WARNING: Keep ventilation openings, in the appliance enclosure or in the built-in
structure, clear of obstruction.
WARNING: Do not use mechanical devices or other means to accelerate the
defrosting process, other than those recommended by the manufacturer.
WARNING: Do not damage the refrigerant circuit.
WARNING: Do not use electrical appliances inside the food storage compartments
of the appliance, unless they are of the type recommended by the
manufacturer.
WARNING: When positioning the appliance, ensure the supply cord is not trapped or
damaged.
WARNING: Do not locate multiple portable socket-outlets or portable power supplies
at the rear of the appliance.
WARNING:Do not store explosive substances such as aerosol cans with a
flammable propellant in this appliance.
WARNING:To avoid a hazard due to instability of the appliance, it must be fixed in
accordance with the instructions
Handling, moving, and use of the refrigerator or freezer to avoid either damaging the
refrigerant tubing, or increasing the risk of a leak
L’opération, le mouvement et l’utilisation du réfrigérant ou le congélateur doivent
éviter les dommages du tuyau réfrigérant ou le rique de la fuite.
Caution – Risk of Fire or Explosion due to Flammable Refrigerant Used. Follow
Handling Instructions Carefully in Compliance with U.S. Government Regulations
Component parts shall be replaced with like components and that servicing shall be
done by factory authorized service personnel, so as to minimize the risk of possible
ignition due to incorrect parts or improper service.
Les pièces de rechange doivent être remplacées par les components relatifs et les
opérations doivent être faites par les professionnels afin de minimaliser le risque
d’allumage à cause des parts incorrects ou des opérations impropres.
CAUTION – Risk Of Fire Or Explosion Due To Puncture Of Refrigerant Tubing;
Follow Handling Instructions Carefully. Flammable Refrigerant Used

5
DANGER: Risk of child entrapment. Before you throw away your old refrigerator or
freezer:Take off the doors Leave the shelves in place so that children may not easily
climb inside.
DANGER:If the LED lamp is damaged, it must be replaced by the manufacturer, its service
agent or similarly qualified persons in order to avoid a hazard
DANGER-Risk Of Fire or Explosion.Flammable Refrigerant Used. Do Not Use
Mechanical Devices To Defrost Refrigerator.Do Not Puncture Refrigerant Tubing.
Danger-rique de feu ou explosion. Les articles inflammbles réfrigérants utilisés. Ne
pas utiliser les appareils mécaniques pour décongeler le réfrigérant.
DANGER-Risk Of Fire Or Explosion.Flammable Refrigerant Used. To Be Repaired
Only By Trained Service Personnel.Do Not Puncture Refrigerant Tubing.
Danger-rique de feu ou explosion. Les articles inflammbles réfrigérants utilisés.Il faut
être réparé par les professionnels seuls. Ne pas crever le tuyau réfrigérant.
CAUTION-Risk Of Fire Or Explosion.Flammable Refrigerant Used. Consult Repair
Manual/Owner's Guide Before Attempting To Service This Product. All Safety
Precautions Must be Followed.
Attention-rique de feu ou explosion. Les articles inflammbles réfrigérants
utilisés.Consultez la specification de réparation/le guideavant d'essayer de utiliser ce
produit.Toutes les précautions en sécurité doivent être respectées.
CAUTION-Risk Of Fire Or Explosion.Dispose Of Property In Accordance With
Federal Or Local Regulations. Flammable Refrigerant Used
Attention-rique de feu ou explosion. Détnlire la propriété selon les regulations
fédérales ou locales. Les articles inflammbles réfrigérants utilisés.
CAUTION-Risk Of Fire Or Explosion DueTo Puncture Of Refrigerant Tubing;Follow
Handling Instructions Carefully.Flammable Refrigerant Used
A
ttention-rique de feu ou explosion. Il faut crever le tuyau réfrigérant selon
I'instruction d'opérations. Les articles inflammbles réfrigérants utilisés.

6
This appliance is intended to be used in household and similar applications such as
– staff kitchen areas in shops, offices and other working environments;
– farm houses and by clients in hotels, motels and other residential type
environments;
– bed and breakfast type environments;
– catering and similar non-retail applications.
Disposal of Old Appliance
Dispose of your appliance packaging properly. Refrigeration equipment must be
properlydisposed of in a way which protects the environment. This applies to your old
appliance and to your newunit once it has reached the end of its service life.
Please according to local regulations regarding disposal of the appliance for its
flammable refrigerant and blowing gas.
WARNING:
Please ensure that old, worn appliances are rendered unusable before
disposal by removing the plug, cutting the power cable, and removing or destroying
any snap fastenings or bolts. You will thus prevent children from locking themselves
in the appliance during play (risk of suffocation) or endangering their lives in any other
way.
The appliance must not be disposed with normal household waste collection.
The coolant circuit, particularly the heat exchange at the back/bottom of the unit,
must not be damaged.
The symbol on the product or its packaging indicates that this product is not to be
handled as normal household waste but is to be taken to a recycling collection point
for electrical and electronic goods. By correctly disposing of this product you are
contributing to the protection of the environment. Improper disposal endangers health
and the environment. Further information about the recycling of the product may be
obtained from your town hall or local waste collection department.

7
Energy Saving
For beer energy saving we suggest :
Installing the appliance away from heat sources and not exposed to direct sunlight and in a
well venlated room.
Avoid pung hot food into the refrigerator to avoid increasing the internal temperature
and therefore causing connuos funconaling of the compressor.
Do not excessively stuff foods so as to ensure proper aircirculaon.
Defrost the appliance in case there is ice to facilitate the transfer of cold.
In case of absence of electrical energy, it is advisable to keep the refrigerator doorclosed.
Open or keep the doors of the appliance open as lile aspossible
Avoid adjusng the seng to temperatures too cold.
Remove dust present on the rear of theappliance
Before first use
You must allow the fridge to sele for at least four hours prior to switching the
power on.
It is recommended that you clean the interior of the appliance prior to first use, using a
soluon of bicarbonate of soda and warm water and then thoroughly drying the interior.
The fridge may have an odor to it at first use. This will disappear as the appliance cools.
Please note:
The appliance will start 41 °F (5°C) for fridge and -0.5 °F(-18℃) for freezer and work
connuously unl it comes down to the correct temperature. If the appliance is switched
off, you should allow five minutes before switching it on again to prevent unnecessary
damage to the compressor. Never store inflammable or explosive items and strong
corrosive acids or alkalis in the appliance. This fridge cools your food by making the inside
back of the cavity cold. It is normal for frost to build up on this surface; it then dissipates
and drains through a small drain at the boom, where it evaporates harmlessly. The
presence of frosng at the back is not a malfuncon of the fridge.

8
Fridge use
Never put liquids in the refrigerator uncovered.
Never put hot foods in the refrigerator. Warm food should be allowed to cool
to room temperature before being put into the refrigerator.
Nothing should rest against the rear wall of the refrigerator, as this will
cause frost and possible condensaon problems which will be difficult to
remove.
Make sure food is clean and any extra water is wiped away before pung
into the fridge.
Wrap or cover food before pung into the fridge. This will help prevent the loss of
moisture, keep food fresh and avoid unpleasant odors.
Sort foods prior to storing. Any foods to be used soon should be stored at the
front of the shelf to prevent deterioraon caused by the door being open for
prolonged periods.
Do not overfill the fridge. There should be sufficient space between the
foods to allow the cool air to circulate.
Thawing frozen foods in the fridge compartment will help to keep the
temperature low and save energy.
Never store raw meats on shelves above cooked meats or other produce. This
will help to prevent juices from raw meat contaminang otherfoodstuffs.

9
Freezer use
The freezer compartments are designed to store only frozen food.
Never put hot or warm foods in the freezer, allow them to cool fully before
pung them into the freezer.
Follow the instrucons on the food packaging for storage of frozen food. If
no informaon is provided, foods should not be stored for more than
three months aer the purchase date.
Store food in small packages (ideally less than 2.2 lbs (1kg) ).This reduces
the freezing me and improves the quality of the food aer thawing.
Wrap food before pung into the freezer. To stop the wrapping
scking together, ensure it is dry.
Label the food before freezing with informaon including type of food and
dates of storage and expiry.
Once food is thawed, it must not be refrozen. Only defrost as much food as
is required to prevent wastage.
Boled or canned drinks should not be stored in the freezer
compartments as they could explode.
The maximum amount of fresh food that can be frozen within a 24 hour
period is 5.8lbs ( 2.6kg).
Do not aempt to freeze more than the maximumamount.
Chiller Zone drawer
The temperature inside the Chiller Zone drawer can be regulated fr
om
37°F(3°C) to 26°F (-3°C). This is the ideal drawer to store meat and fish. .
10
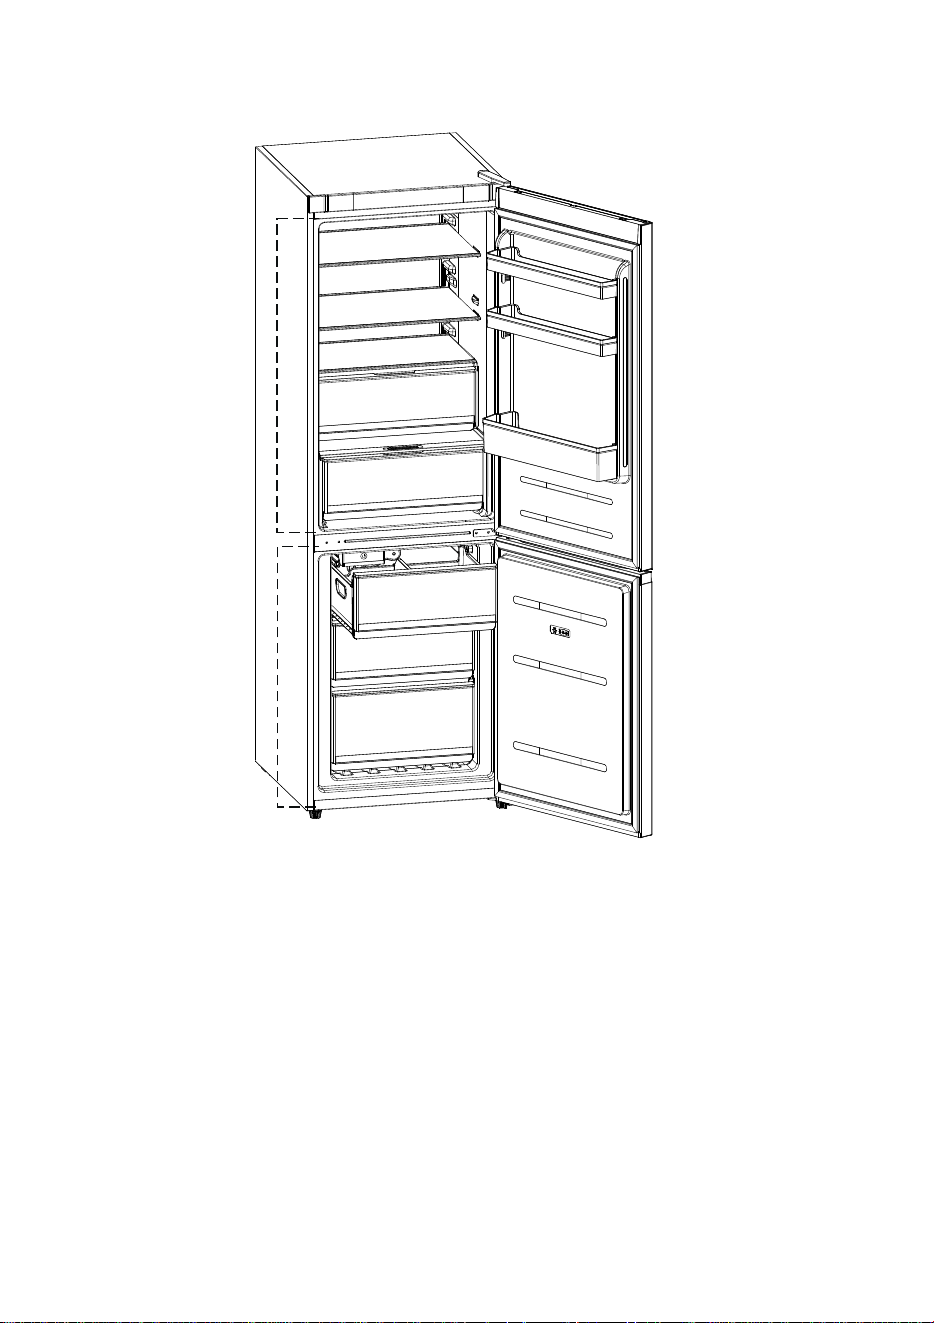
Storage
10
1- Fridge compartment
2- Bottom Freezer
3- Display/indicator panel
4- Butter & cheese section
5- FlexiLift Door Shelves
6-
Bottle shelf
7- Deli Drawer
8- Crispers
9- Adjustable glass shelf
10-
11-
Fan Cover
12-
Ice container
Freezer Drawer
Figures in this user manual are schematic and may not match the product exactly.
2
*3
*4
*5
*6
*7
*11
*8
*9
1
*12
lf the subject partsare not included in the product you have purchased, then those
parts are only valid for other models

11
Control panel
1. First me of switching on the appliance, this appliance always works at sengs: 41 °F (5°C) for
fridge, 32°F (0°C) for My Zone 0.5 °F(-18℃). If you want to adjust the temperature or funcons
manually, pres and -s the buon to conduct the operaons. Temperature ranges of adapt zone
from 37°F(3°C) to 26°F (-3°C).
2. Fridge temperature adjustment –press buon on le part of control panel to achieve
different temperatures from 35°F (2℃) to 46°F ( 8℃).
3. Freezer temperature adjustment –press buon on right part of control panel to
achieve different temperatures from 5°F(-15)℃ to-15°F(-25℃).
4. Chiller Zone drawer adjustment funcon: this buon controls temperature. By
pressing on this buon, the digit will go from 37°F(3°C) to 26°F (-3°C). This funcon can be
on/off by connuously pressing for three seconds (shows OFF).
5. Fast cooling funcon –Press buon , light of buon illumines and fast cooling funcon is
turned on, fridge starts to work automacally at temperature seng 35°F(2℃) and quits aer 24
hours, light of symbol eliminates.
6. Holiday funcon–Press buon , light of buon illumines, holiday funcon is turned on and
whole appliance starts to work automacally at sengs: fridge at 62°F(17℃) and freezer at -
0.5°F(-18℃).
7. Eco funcon – Press buon on control panel, eco funcon isturned on and buon
illuminates, fridge compartment works at seng 41°F (5°C) and freezer compartment works at
seng of-0.5°F(-18℃).The adapt zone works at seng of 37°F(3°C).
8. Fast freezing funcon – Press buon , light of buon illumines and freezer start to
work at fast freezing funcon, temperature seng -15°F(-25℃). Aer 24 hours, fast freezing
funcon quits automacally.
9. Press buon for 3 seconds to switch off your appliance and the buon illumines, power is cut
off. Internal lamps eliminate, compressor stops working. Pressthe buon for 3 seconds to
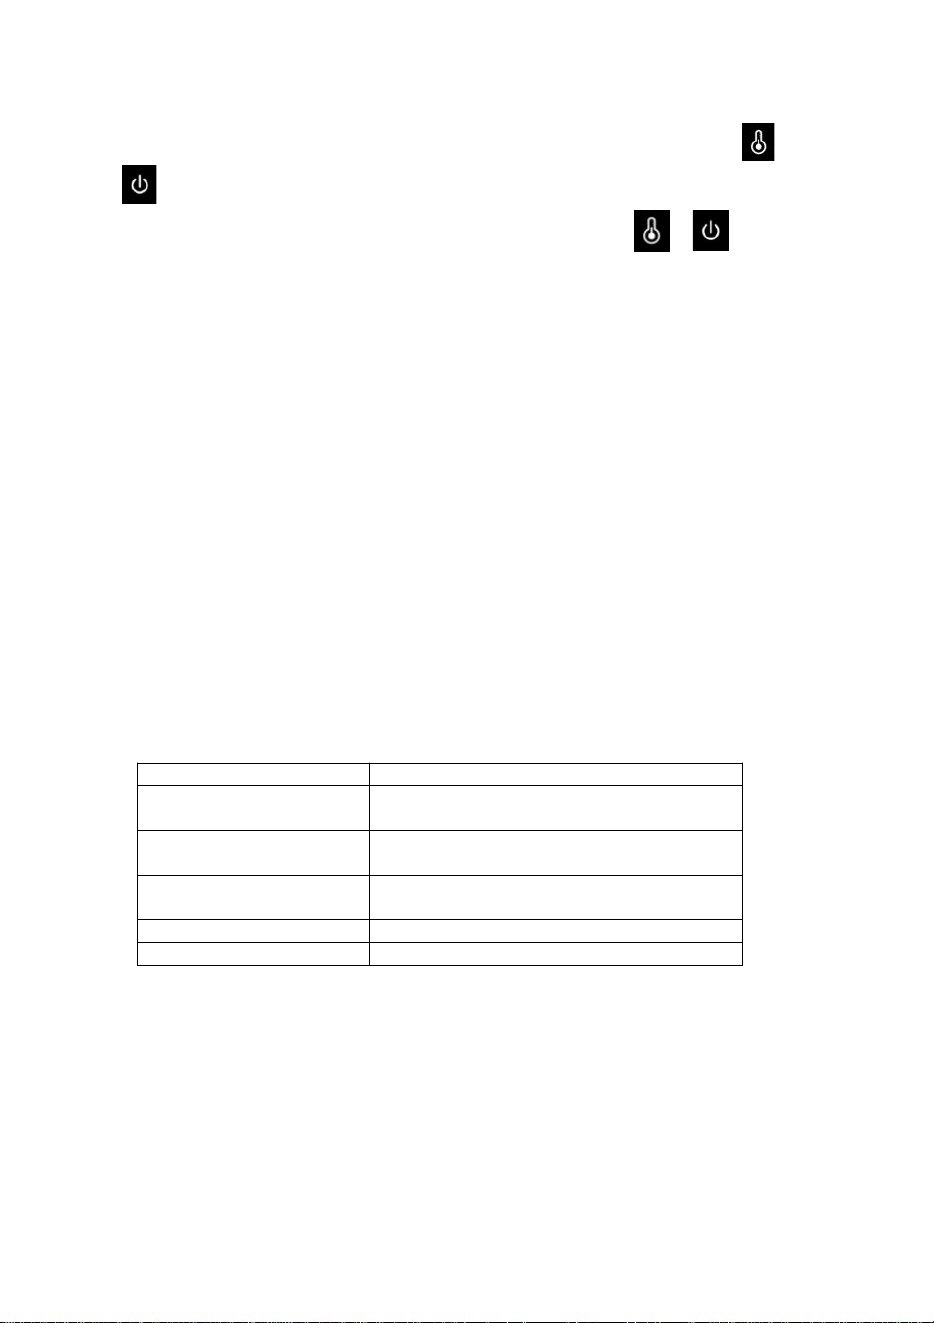
12
switch on your appliance, the symbol illumined and power is connected again.
10. On the no frost models, there is a funcon: compulsive defrosng. Press the buons
+ for 5 seconds to switch on the compulsive defrosng funcon to clean the freezer
evaporator and digitals of freezer temperature shine. Press the buon + 3 seconds
to switch off the compulsive defrosng funcon , and the digitals of freezer temperature
eliminate.
10 Fault display
This appliance has ‘fault display & alarm’ funcon. Once the sensors got fault, there are alarms
displayed on the temperature displaying, the appliance sll cools but professional service engineer
should be called and check the appliance.
F2 – Sensor of chiller zone
F3 – Sensor of fridge apartment
F4 – Sensor of freezer
compartment
F5 – Sensor of defrosng
2E – Fault of fan/motor in freezer
CE– Communicaon fault between main panel and display panel.
The above Errors only show on display, no voice
Over temperature alarm in freezer: aer freezer temperature arrives at the set
temperature, aer that, if the temperature rises to >77°F (-1 °C), the alarm
will start, accompany with flash of freezer temperature digit. Press any buon to
cancel the voice alarm. The flash will remain unl the temperature is <77°F (-
1 °C).
PS: Main board locates in compressor compartm
POSITION CONDITIONS
41 °F (5°C) - -0.5 °F(-18℃)
Summer or ambient temperature between
77°F(25°C) - 95°F ( 35 °C)
41 °F (5°C) - -0.5 °F(-18℃)
Spring or ambient temperature between
59°F(15°C) - 77°F ( 25 °C)
41 °F (5°C) - -0.5 °F(-18℃)
Winter or ambient temperature between
41°F(5°C) - 59°F ( 15 °C)
Super freezing funcon Quick freeze
Super cooling funcon Super cooling
13
Instructions for IceMaker
Keyoperation instructions.
1. Shortpress the button, the icemachine state forswitching on or off.
2. In the on state,press and hold the button for 10seconds for manualde-icing.
Lamp status description:
1. Switchon state:the light will fadeon and then fade off ---->Breathing
state
2. Switch off state:the light is not on.
3. Icefull state:alwayson
4. Drawer removal: slow flash 0.5seconds flashonce (1HZ)
Fault status.
1. Ice jam: Fast flash1 time 200ms
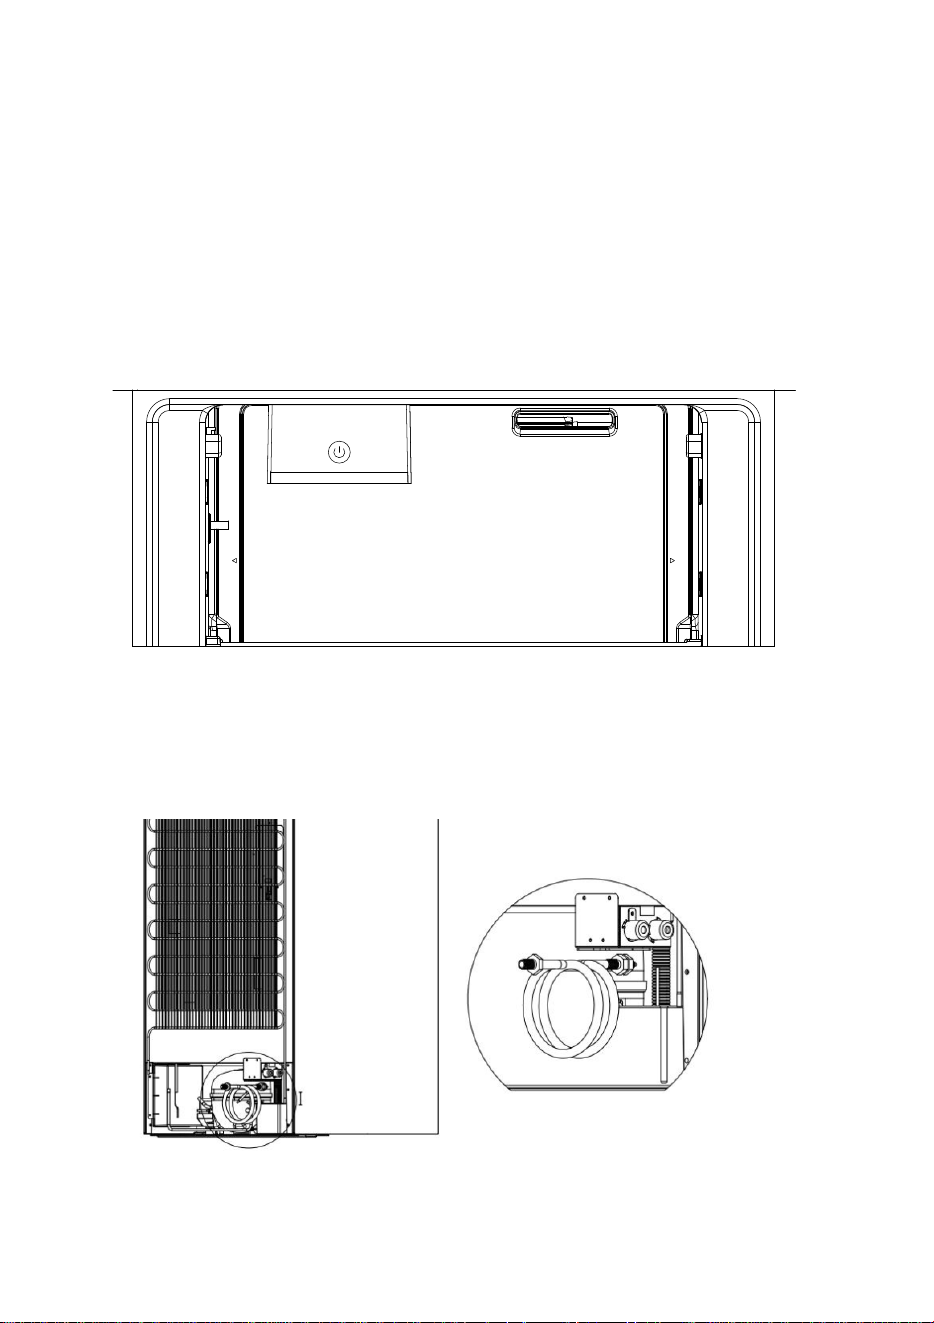
Water connection
Beforeinstallingtherefrigerator,connectthewaterpipeintherearcabintothewaterpipe
inyourhome, thecabinisequippedwithM11 sizeconnectingwaterpipeasshown below.
Ice Maker Switch
Ice Maker
Key operation instructions.
1. Short press the button, the ice maker status for switching on or off
2. In the power on state, long press the button for 10 seconds, for manual de-icing
Lamp status description:
1. Switch on state: the light will fade on and then fade off ---->Breathing state
2. Switch off state: the light is not on.
3. Ice full state: always on
4. Drawer removal: slow flash 0.5 seconds flash once (1HZ)
Fault status.
1. Ice jam.Fast flash 1 time 200ms
Water connection
Before installing the refrigerator, connect the water pipe in the rear cabin to the water pipe
in your home, the cabin is equipped with M11 size connecting water pipe as shown below.
14
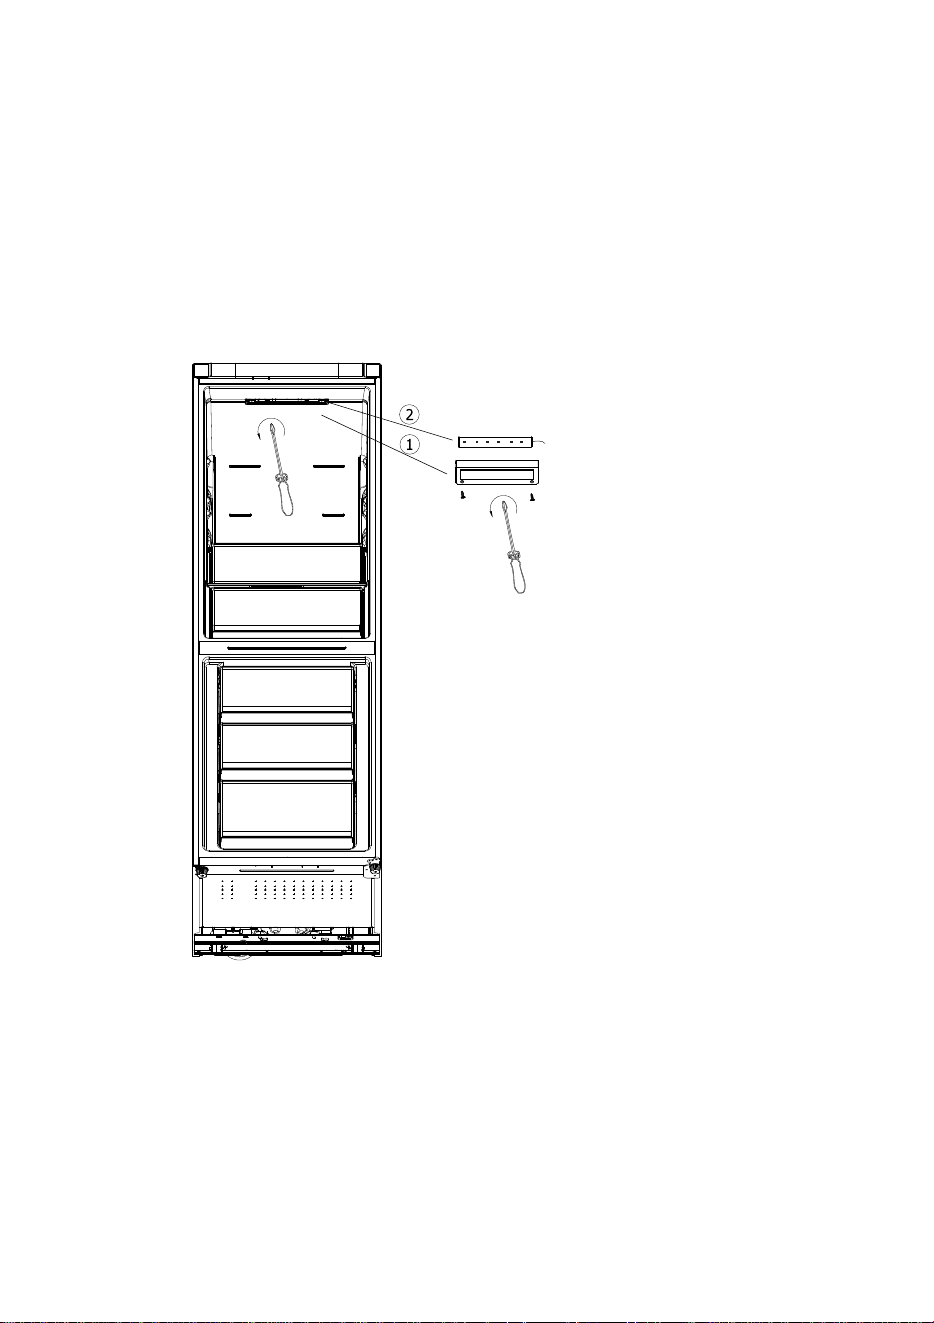
LED light replacement instructions
Note: the LED light is set to be non replaceable by the user and needs to be replaced
by professionals.
Lighng parameters: 12V /
2W
1. Unplug the power plug.
2. Remove the screws securing the top light cover. Steps ① and ② are shown below
3. Replace the spare LED light board.

15
Care and Cleaning
Always disconnect the appliance from the power supply before any cleaning or
maintenance.
The fridge and freezer secons should be cleaned using a soluon of bicarbonate of
soda and lukewarm water. Do not use abrasive products or detergents. Aer washing,
rinse and dry thoroughly.
Clean the shelves and balconies separately by hand with a mild soluon of washing up
liquid and water. Do not put them in the dishwasher.
If the appliance is not to be used for prolonged periods of me, unplug and clean the
appliance. The doors should be le slightly ajar to prevent the formaon of mildew and
unpleasant odors.
Defrosting
The product has a no frost system which is designed to prevent the heavy build up of ice.
Under normal use, there should be no need to regularly defrost the freezer system.
Please note: If you are regularly finding a heavy build up of ice, or pools of water, in the
freezer secon then it is likely that the door is not sealing properly. This could be due to a
defecve door seal or an incorrectly fied, or overly heavy, decor door. For more
informaon see the troubleshoong secon about ice.

16
Troubleshooting
If you have any problems with your appliance, you should check the troubleshoong prior to calling
Customer Care.
If the appliance is not working, check:
That there is power to the appliance.
The house fuses are intact and the fuse in the plug has notblown.
The fridge has not been turned off.
The plug socket is funconing fine. To check this, plug another
electrical appliance in to see if the socket is faulty.
If the appliance is working, but not very well, check:
The appliance is not overloaded.
The thermostat is set to an appropriate temperature.
The doors are closing properly.
The cooling system at the rear of the appliance is clean and free of
dust, and not touching the rear wall.
There is enough venlaon at the side and rearwalls.
If the appliance is noisy, check:
The appliance is level and stable.
The side and rear walls are clear, and there is nothing resng on the
appliance.
Note: The cooling gas in the refrigerator may make a slight bubbling or
gurgling noise, even when the compressor is notrunning.
If the appliance is beeping, check:
That the doors are closed. An alarm will sound aer 60seconds of a
door being open.
If ice has formed on the back wall of the fridge:
It is normal forsome icedroplets to formon theback wall of thefridge.
This does not constute a fault with the appliance.
Ensure that no items inside the fridge are in contact with the back
wall.

17
Check that there is some resistance when opening the door of the
appliance. If it opens at the slightest touch it may mean that the door
seal needs to be replaced.
Check the door seal for any kinks, debris or damage. If you noce any,
and are unable to resolve the issue yourself, contact Customer Care so
that the seal can be replaced.
This can be due to the decor door(s) not being properly fied. If you
are at all unsure, ask your fier to check the décordoors.
If excessive ice has formed in the freezer:
Check that there is some resistance when opening the door of the
appliance. If it opens at the slightest touch it may mean that the door
seal needs to be replaced.
Check the door seal for any kinks, debris or damage. If you noce any,
and are unable to resolve the issue yourself, contact Customer Care so
that the seal can be replaced.
This can be due to the decor door(s) not being properly fied. If you are at all unsure,
ask your fier to check the decor doors.
If one or more of the LED units within the appliance is not working:
Contact Customer Care to arrange a servicevisit.
Installation preparation
This appliance must never be installed close to heat sources, e.g. heang elements
or cookers, nor in damp places.
Seek the help of another individual, or two, when installing this appliance. This
appliance may have sharp edges. Wear adequate PPE for the task and
environment.
To ensure the appliance is level, you should use the height
adjustable feet at the front of theappliance.
The cooling system at the rear of the appliance must not
touch the rear wall. The greater the gap, thebeer.
The appliance must be installed with adequate venlaon.
Ensure that there is clearance above the appliance to allow
air to escape and that there is space between the rear of the
appliance and the wall.
18
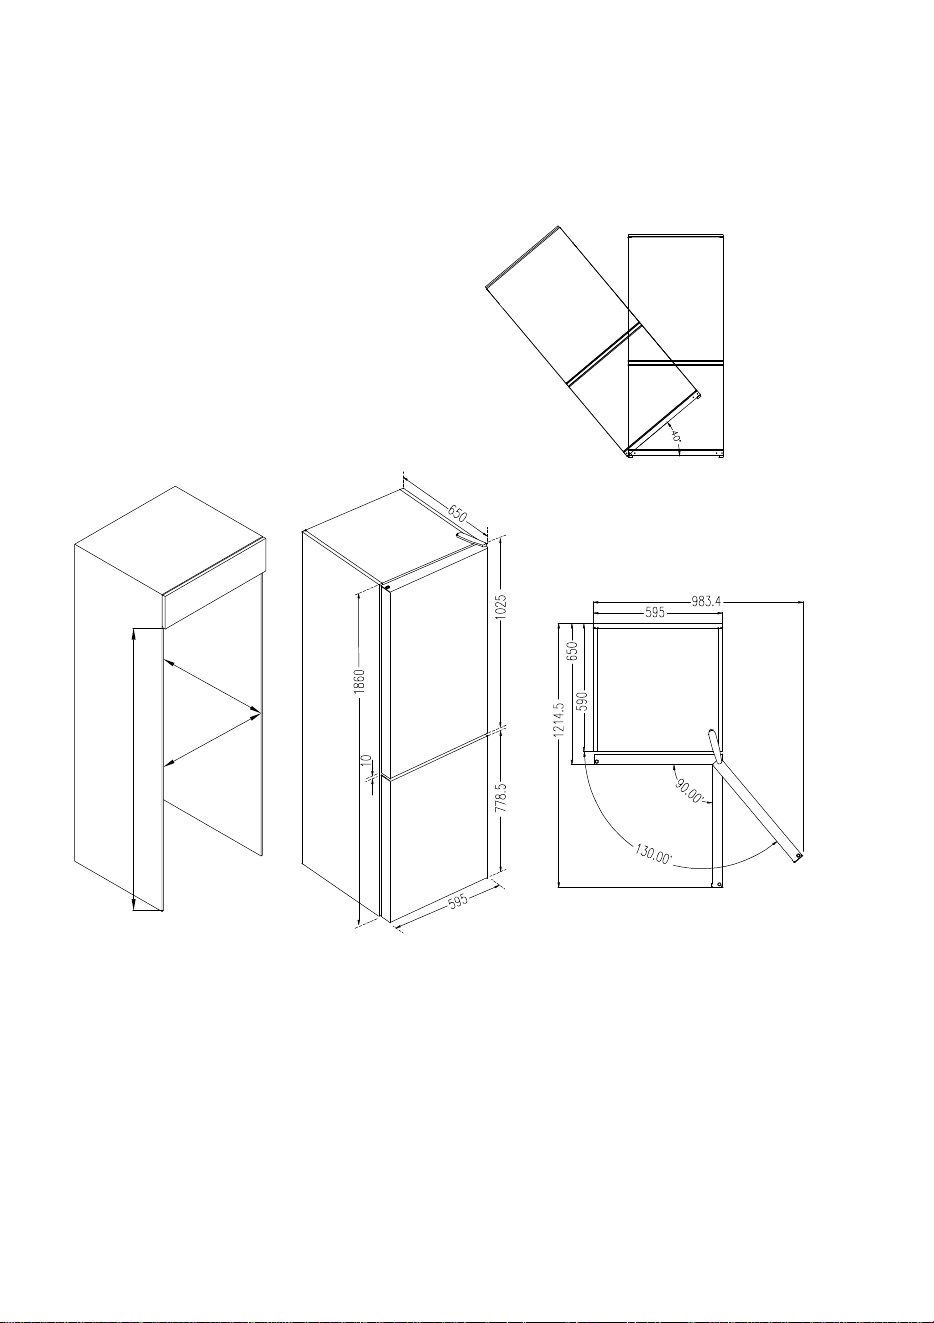
Ventilation
The main consideraon when installing
any refrigeraon unit into a fied kitchen
is venlaon. The heat removed from the
cooling compartment needs to be
dissipated into the atmosphere. Incorrect
venlaon can lead to premature
compressor failure, excessive power
consumpon, total system failure and
may invalidate the warranty provided
with the appliance. For products intended
to be installed into a tall housing unit, the
following requirements need to be met:
Do not lt beyond 40°
m
i
n
6
0
0
≥ 1960
m
i
n
6
0
5
As above the fridge can fit in the cupboard, the top of the cupboard needs to have at least 100mm
of venlaon clearance from the fridge
19
1
2
4
3
6
8
7
5
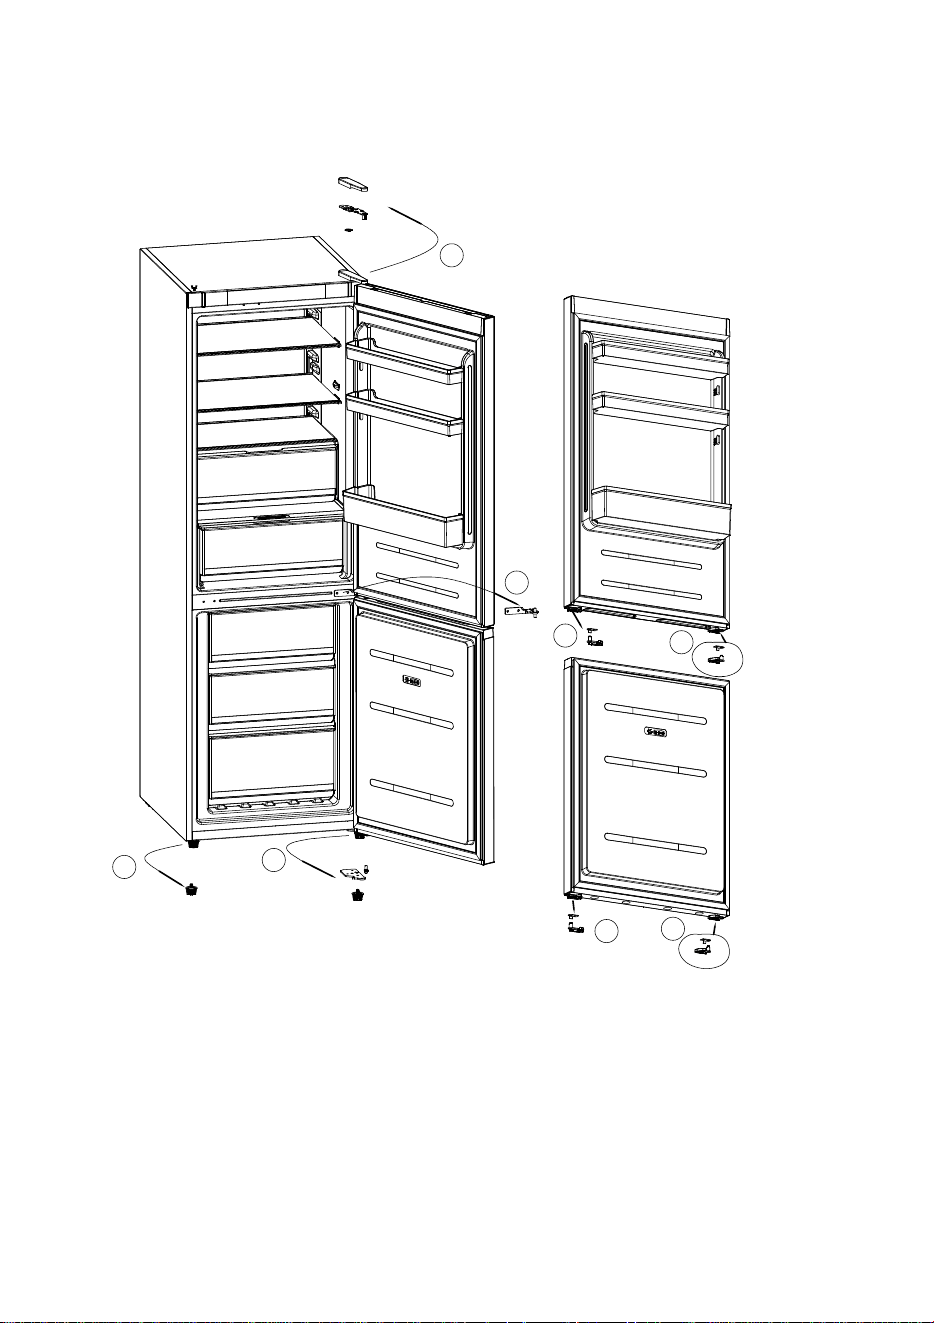
Reversing the appliance doors
As shown in the above figure, interchange the doors according to steps ① - ⑫.
①, disassemble the upper hinge cover and upper hinge, and remove the upper door
②, Remove the center hinge and remove the freezer door.
③ Remove the le boom leg
④, remove the right boom foot and lower hinge, and install the hinge sha in reverse 180°.
⑤-⑧ Remove and hinge sha sleeve assembly and remove the spare reverse sha sleeve fing
from the accessory and install it on the other side of the door.
20
9
10
11
12
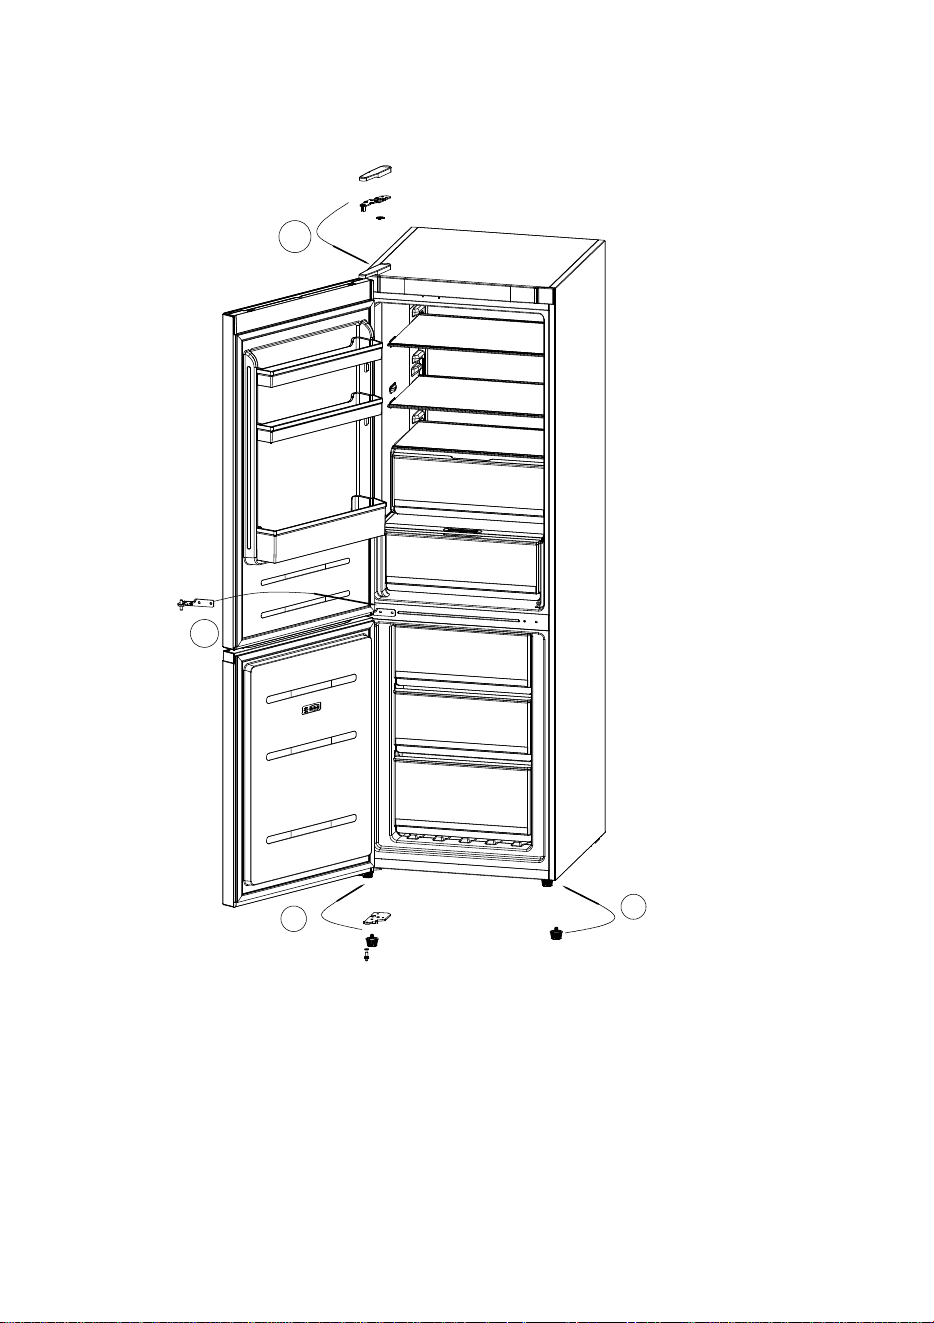
Reversing the appliance doors
⑨ - ⑩, install feet and lower hingesTo display, install the lower door
and secure the center hinge
⑫, install the upper door and fix the upper hinge and hinge cover

21
Ensuring the door seals correctly:
It is normal for the seal to be compressed aer the door has been reversed. With the door
closed, use a hair dryer to expand the seal and fill the gap between the door and the body
of the appliance. Take care not to use the hair dryer too close to the appliance, which could
damage the seal. A distance of approximately 10cm should be adequate. When completed,
allow the seal and door to cool before touching them. Once done, the seal should remain
in posion.
pg. 1
TWO Year Limited Warranty
Thank you for choosing a Verona appliance for your home.
EuroChef warrants to the original purchaser (“Purchaser”) of this product (the “Product”,) for a period of two (2) years
(except for certain components identied below) from the date of original purchase, that the Product is free from
defects in workmanship and materials. This warranty covers all parts and labor required to repair or replace any part
of the Product that proves to be defective under normal residential use. To be eligible for this warranty, the Product
must be: (i) sold to Purchaser as new product to the original owner by an authorized distributor, retailer, dealer, or
service center of Verona Appliances and (ii) installed in the United States. The warranties provided in this statement
are not transferable and are valid from the date of purchase.
This limited warranty is valid only provided that written notication of a defect, as well as a copy of the original receipt
for the defective Product, is received by EuroChef from Purchaser within thirty (30) days of identication of the defect.
EuroChef (who may appoint 3
rd
party agents to act on its behalf in connection with any Product inspection or provision
of warranty services hereunder) reserves the right to inspect the Product and its installation. The purchaser is
responsible for providing EuroChef authorized service providers and/or representatives with access to the premises
at which the Product is installed, and such other information and materials as EuroChef may request, shall be a
condition to any claim hereunder. If EuroChef determines that a defect in the Product is covered by this limited
warranty, it will, at its expense and as its sole and exclusive obligation for breach of this limited warranty, and
Purchaser’s sole and exclusive remedy, repair or replace the defective Product. If EuroChef determines that an
alleged defect in the Product is not covered by this limited warranty, it shall not have any obligation to repair or
replace the Product.
EuroChef will initially attempt to repair any defect in its Products. Only if a Product cannot be repaired after 3 attempts
for the same issue by a EuroChef authorized service provider may the Product be replaced with a new Product from
EuroChef. In the event EuroChef determines that a defective Product must be replaced, the original retailer on the
bill of sale will be contacted to process a replacement order. In the event that EuroChef determines a Product is
irreparable, replacement approval may take up to 30 days.
For instances where a Product is installed in a remote area outside of EuroChef’s authorized network of service
providers, Purchaser is responsible for the travel expenses and associated out-of-pocket costs of EuroChef’s
authorized service provider. In the event that a product installed in a remote location is deemed to need replacement,
the Purchaser is responsible for all delivery costs and risk of loss associated with transportation of the Product to the
Purchaser’s location.
The Purchaser is responsible for establishing that the appliance has been installed in accordance with all directions
and installation instructions included with the Product’s accompanying materials at time of purchase. EuroChef shall
have no obligation to render any services to correct issues caused by an Installer’s failure to follow all directions and
instructions. Any expense of repair deemed to be caused by faulty installation shall be payable by Purchaser at
EuroChef’s then current rates.
pg. 2
A Products’ exterior paint and/or lacquer must be cared for according to the instructional materials provided with the
Product at time of purchase. If those instructional materials are not followed or harsh chemicals are used, any
damages and subsequent repairs to a Product’s paint and/or lacquer are not covered by this warranty.
Component Warranty Periods:
Any components of eligible products showing cosmetic defects, whether in material or workmanship, are covered by
this warranty for a period of thirty (30) days from the product’s delivery date. Coverage* is provided for:
· Scratches
· Stains
· Surface Imperfections (ONLY stainless steel)
· Paint & Porcelain Imperfections
* Excludes slight dierences in color due to materials and painting/enameling technologies.
Photo/video proof required to be submitted to service@veronaappliances.com in order to be reviewed.
Gaskets are covered by this warranty for a period of ninety (90) days from the product’s installation date.
Replacement of glass components and light bulbs are covered by this warranty for a period of thirty (30) days after
delivery.
Exclusions to Warranty Coverage: This Limited Warranty will not apply
to any of the following:
· Any service, including repair service to correct damage caused by services performed on the Product by anyone
other than an authorized EuroChef service provider, or the use of parts not authorized by EuroChef.
· Defects or damage caused by improper storage, cleaning and maintenance of the Product, including any failure to
comply with Manufacturer’s written instructions and documentation regarding same.
· Service calls to connect, convert, or otherwise repair the electrical wiring and/or gas line to properly use the Product.
· Replacement of components prone to wear and tear.
· Defects and damage arising from transportation of the Product to the home of the owner, by the dealer/retailer or
a hired delivery/logistics provider.
· Defects and damage arising from external forces beyond the control of EuroChef such as re, ood, earthquakes,
and other acts of God
· Accidental or intentional damage.
· Use of improper pans, containers, or accessories that cause damage to the Product.

pg. 3
Warranty Void: This Limited Warranty will be void in any of the following
circumstances:
· The Product is used on a commercial, rental, or leased basis
· The serial plate for the Product is defaced
· The Product is altered by anyone other than an authorized EuroChef service provider
· The Product is not used according to Manufacturer’s written instructions and documentation regarding same.
THE REMEDIES DESCRIBED ABOVE FOR EACH WARRANTY ARE THE ONLY ONES THAT EUROCHEF WILL PROVIDE,
EITHER UNDER THIS WARRANTY OR UNDER ANY WARRANTY ARISING BY OPERATION OF LAW. EUROCHEF WILL
NOT BE RESPONSIBLE FOR ANY CONSEQUENTIAL OR INCIDENTAL DAMAGES ARISING FROM THE BREACH OF
THIS WARRANTY OR ANY OTHER WARRANTY, WHETHER EXPRESS, IMPLIED OR STATUTORY
This warranty gives you specic legal rights and you may have others which vary from state to state.
For questions, concerns or to start a warranty claim, please contact us at:
PHONE: 631.254.3434
WEB: www.veronaappliances.com/service-verona
MAILING ADDRESS:
EuroChef
41 Mercedes Way, Suite 25
Edgewood, NY 11717