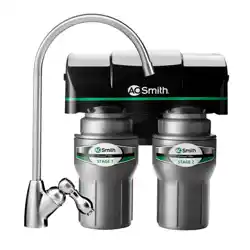
2-STAGE WATER FILTER
AO-US-200
BAJO EL FREGADERO | FILTRO DE AGUA DE 2 ETAPAS
Owner's Manual | El manual del proprietario
IF YOU NEED HELP OR HAVE A QUESTION, WE’VE GOT YOU COVERED. GIVE US A CALL AT 877.333.7108
SI NECESITA AYUDA O TIENE ALGUNA CONSULTA, NOSOTROS NOS ENCARGAMOS. LLÁMENOS AL 877.333.7108.
NEED HELP? GIVE US A CALL 877.333.7108
Congratulations on your new purchase. This water lter has been engineered
to provide you with optimally clean water. The 2-Stage Water Filter features
Claryum
®
ltration technology that reduces harmful contaminants and bad
taste and odor while retaining benecial minerals. Whatever your water needs
— from hydration to cooking and more — A. O. Smith has you covered.
Keep this owner’s manual to reference installation, troubleshooting and lter
replacement information.
If you need help or have a question, give us a call at 877.333.7108.
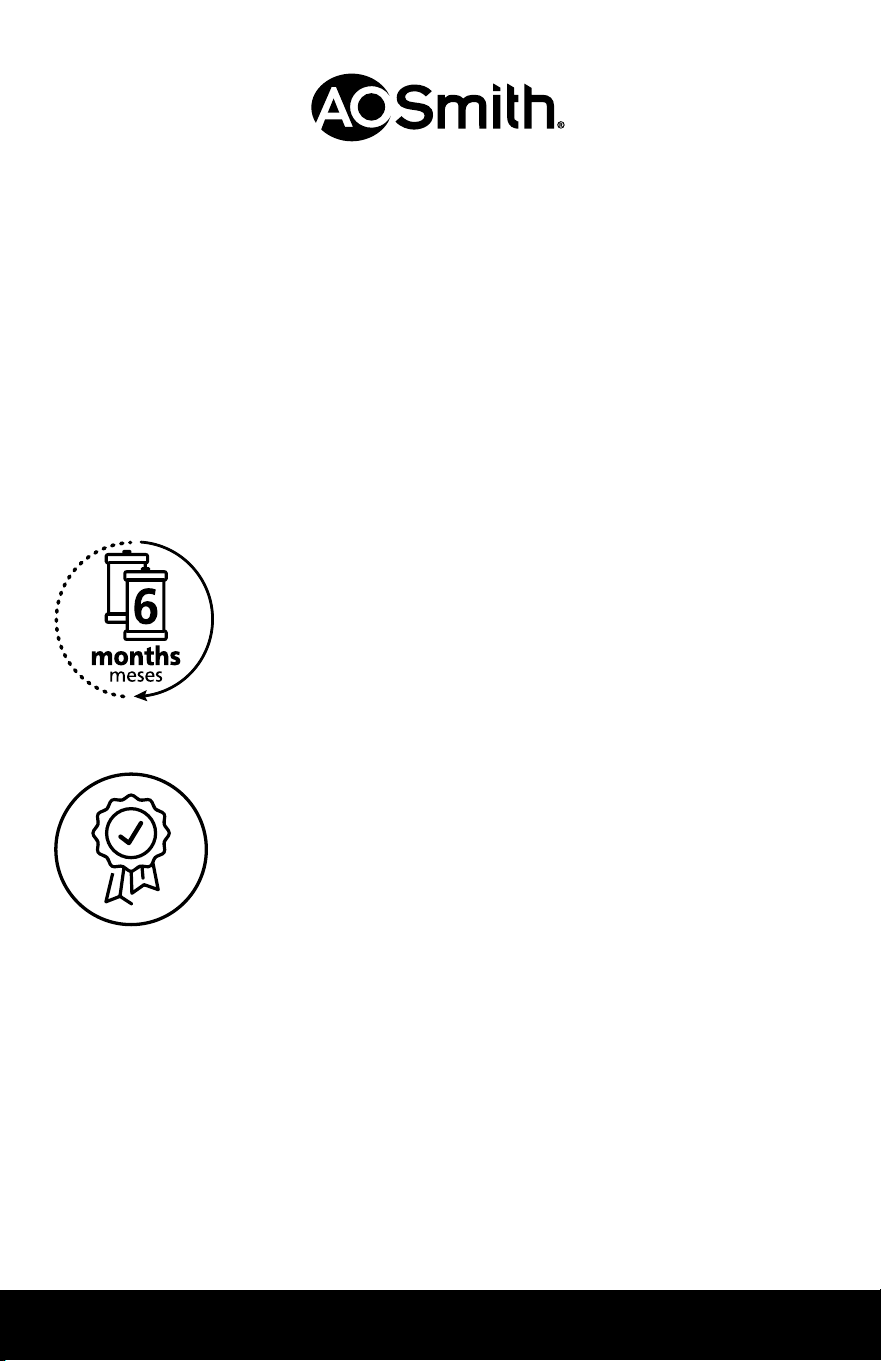
The recommended replacement
frequency for the AO-US-200 is every
6 months or every 500 gallons of use.
Use only certified, genuine A. O. Smith replacement filters
for continued contaminant removal and system performance.

NEED HELP? GIVE US A CALL 877.333.7108
TABLE OF CONTENTS
Box Contents ............................................................................................................1
Installation Guide ................................................................................................. 2-5
Care & Safeguards ....................................................................................................5
Performance & Certications ..................................................................................6
Warranty ...................................................................................................................7
Spanish/Español .................................................................................................. 8-16
2-STAGE WATER FILTER
Under Sink
Scan to view the AO-US-200 installation video.
NEED HELP? GIVE US A CALL 877.333.7108
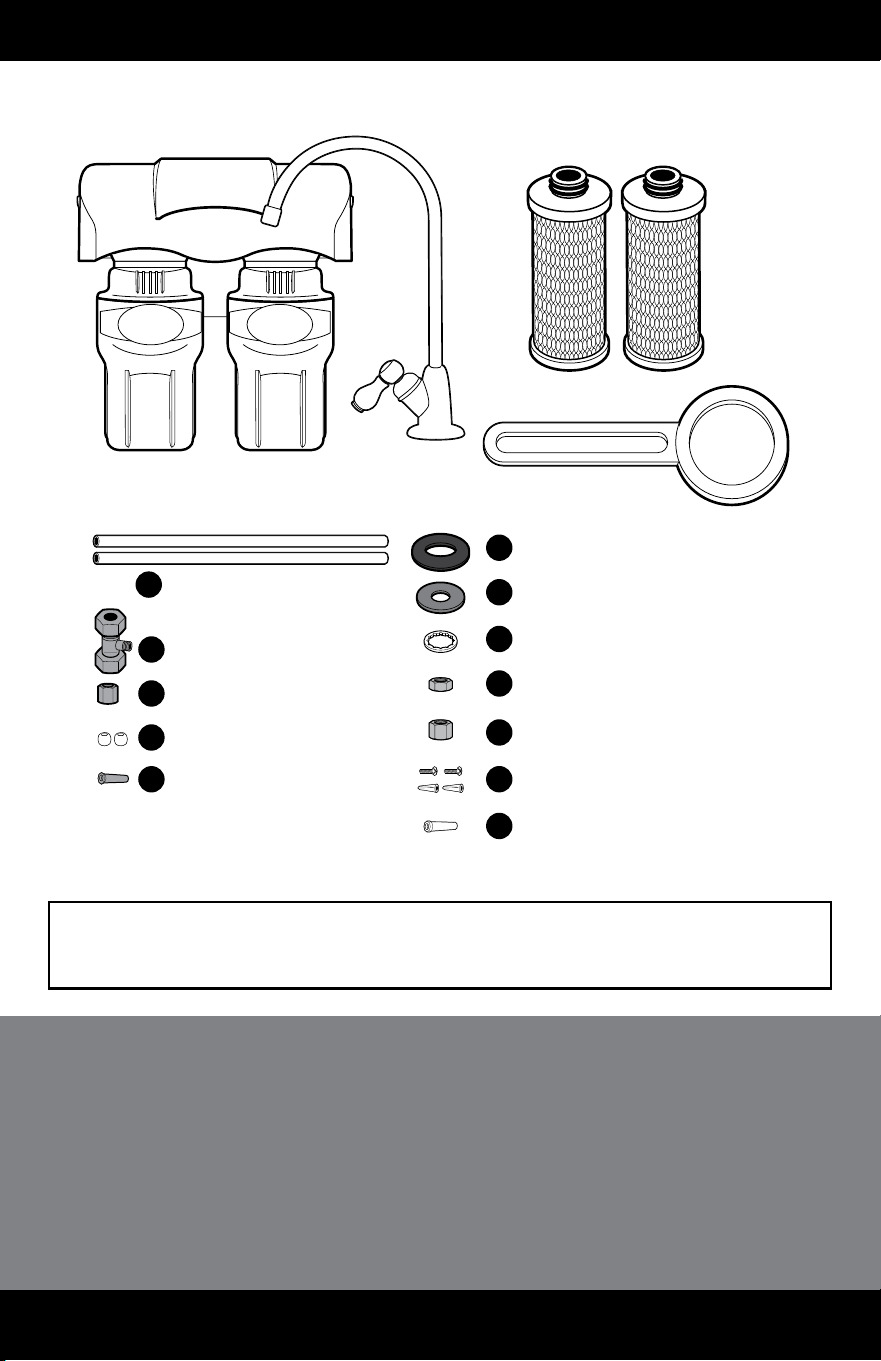
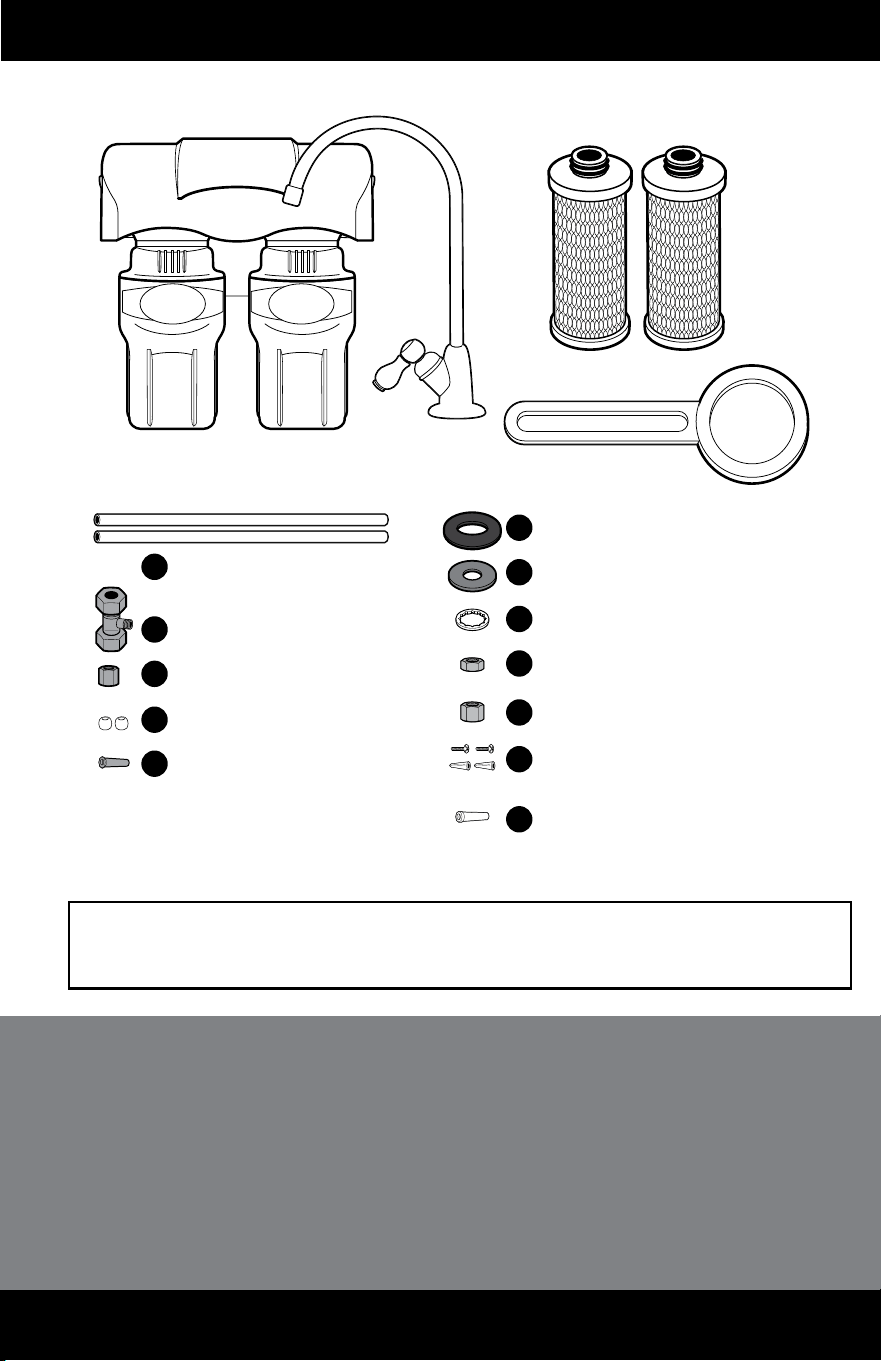
BOX CONTENTS
1
Please read entire manual and ensure all parts listed are present before installation.
If any part is missing or damaged let us know by calling 877.333.7108.
Do not attempt to install the lter.
• Variable speed drill w/ 7⁄32" bit
• Adjustable wrench
• Measuring tape
• Bucket
• Phillips head screwdriver
• Hammer
Faucet may be mounted on sink using an
existing hole for a sprayer nozzle or soap
dispenser, or by drilling a hole no more than
1/2" in diameter. Ensure location of faucet
allows spout to extend slightly
past the edge of sink.
Tools recommended for installation:
Note: We recommend using a professional if pipe cutting or drilling is required.
FILTER SYSTEM
SUMP 1 SUMP 2
FAUCET RUBBER WASHER
FAUCET SPACER
FAUCET WASHER
FAUCET NUT
CHROME NUT
SCREWS WITH PLASTIC ANCHORS (2)
PLASTIC TUBE INSERT
3' X 1/4" WHITE TUBING (2)
1/4" BRASS TEE
BRASS NUT
PLASTIC COLLAR (2)
BRASS TUBE INSERT
WRENCH
B
A
C
D
E
H
F
G
I
J
K
L
FAUCET
FILTER CARTRIDGES (2)
(PRE-INSTALLED IN SUMPS)
NEED HELP? GIVE US A CALL 877.333.7108
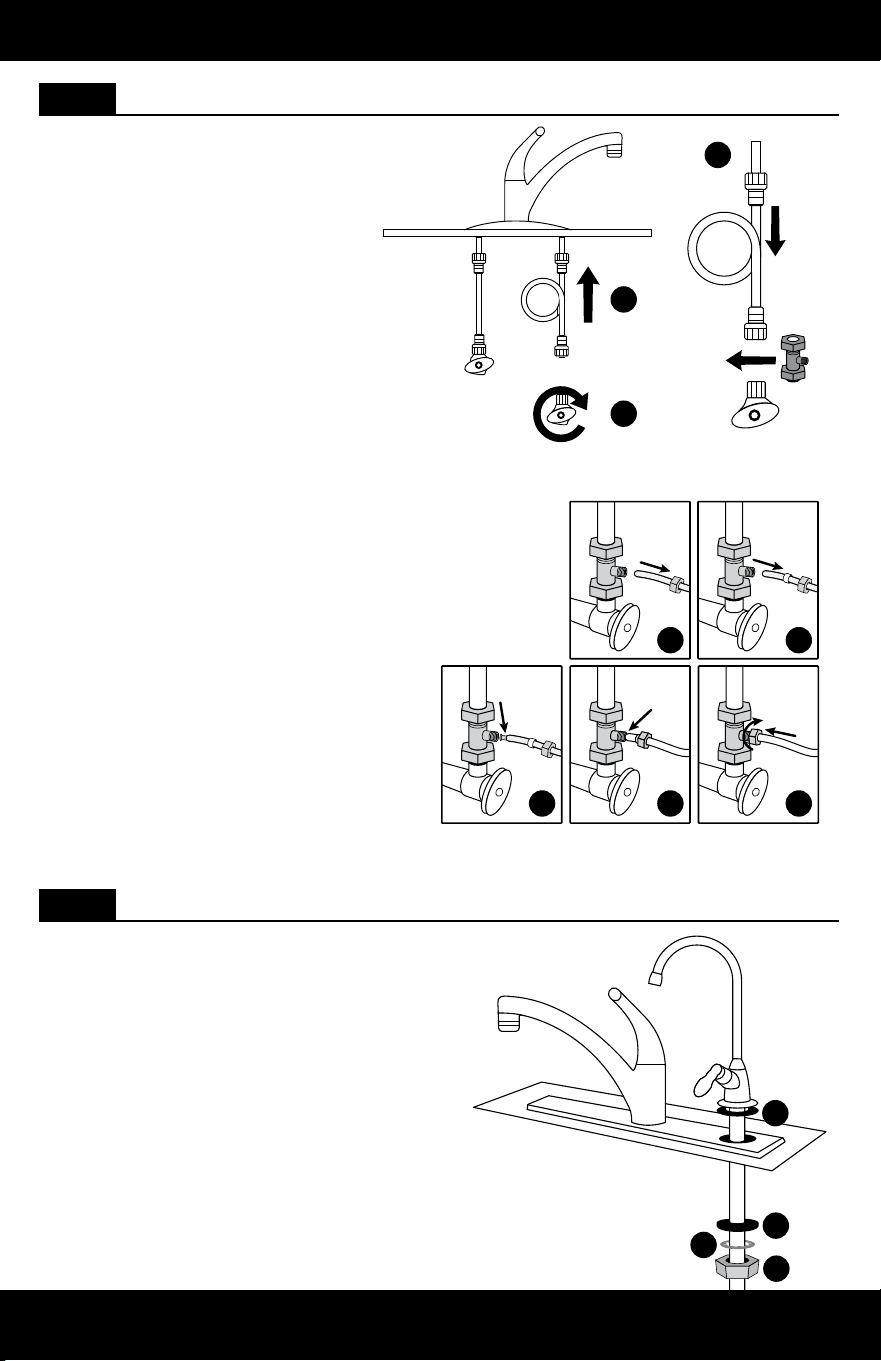
Connect Tubing
1. Attach white tube (A) to the brass tee
(B). Slide brass nut (C) onto the tubing
with threads of nut facing end of tube.
2. Slide one plastic collar (D) onto the tube.
3. Place brass tube insert (E) into opening
of tube.
4. Push tip of tube into opening of
brass tee.
5. While holding tube in place, tighten
brass nut to compress plastic collar
and create a seal.
INSTALLATION GUIDE
2
Install Brass Tee
1. Turn off COLD water supply.
2. With an adjustable wrench,
disconnect water line.
3. Attach brass tee (B) to shutoff
valve and re-attach COLD
water line to brass tee.
1
3
2
Faucet Installation
Place faucet rubber washer (F) between
faucet and sink. Under the sink, thread
the faucet spacer (G), faucet washer (H),
and faucet nut (I) onto the tubing. Tighten
faucet nut to secure faucet to sink.
Note: Avoid over-tightening.
F
G
H
I
STEP 1 Install Brass Tee and Connect Tubing
STEP 2 Faucet Installation and Connection
1 2
3 4 5

NEED HELP? GIVE US A CALL 877.333.7108
INSTALLATION GUIDE
3
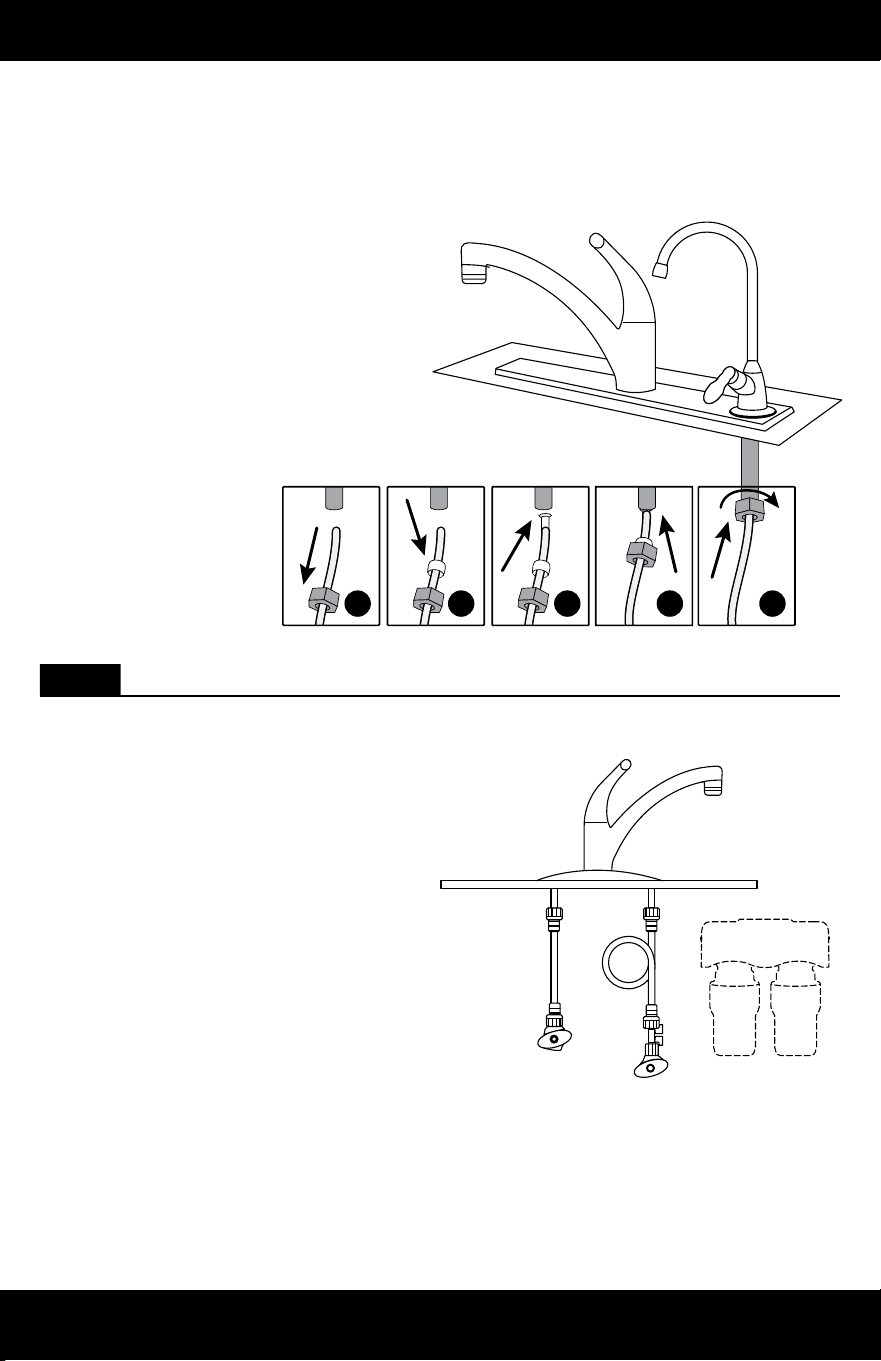
Faucet Connection
1. Connect tubing to base of faucet. Slide
chrome nut (J) onto the tubing with
threads of nut facing end of tube.
2. Slide the second plastic collar (D)
onto tube.
3. Place plastic tube insert (L) into
opening of tube.
4. Push tip of tube into faucet base.
5. While holding tube in place,
use wrench to tighten brass nut
to create a seal.
Note: Avoid over-tightening.
Install Filter System
1. Select a space under sink that is at least
12" from the bottom of your cabinet for
lter replacements and easy access to cold
water supply. Use mounting holes located
on back of lter unit to mark wall
screw placements.
Note: Distance between holes is 2.55".
2. Use a 7/32" drill bit to drill holes for plastic
anchors (K). Carefully tap anchors into
drilled hole with a hammer. Mount unit
to wall using screws. Pull protective plastic
strip from the battery compartment. Red
LED should ash and beep ve (5) times to
indicate that battery is installed correctly.
1 2 3 4 5
STEP 3 Install Filter System and Connect Supply Lines
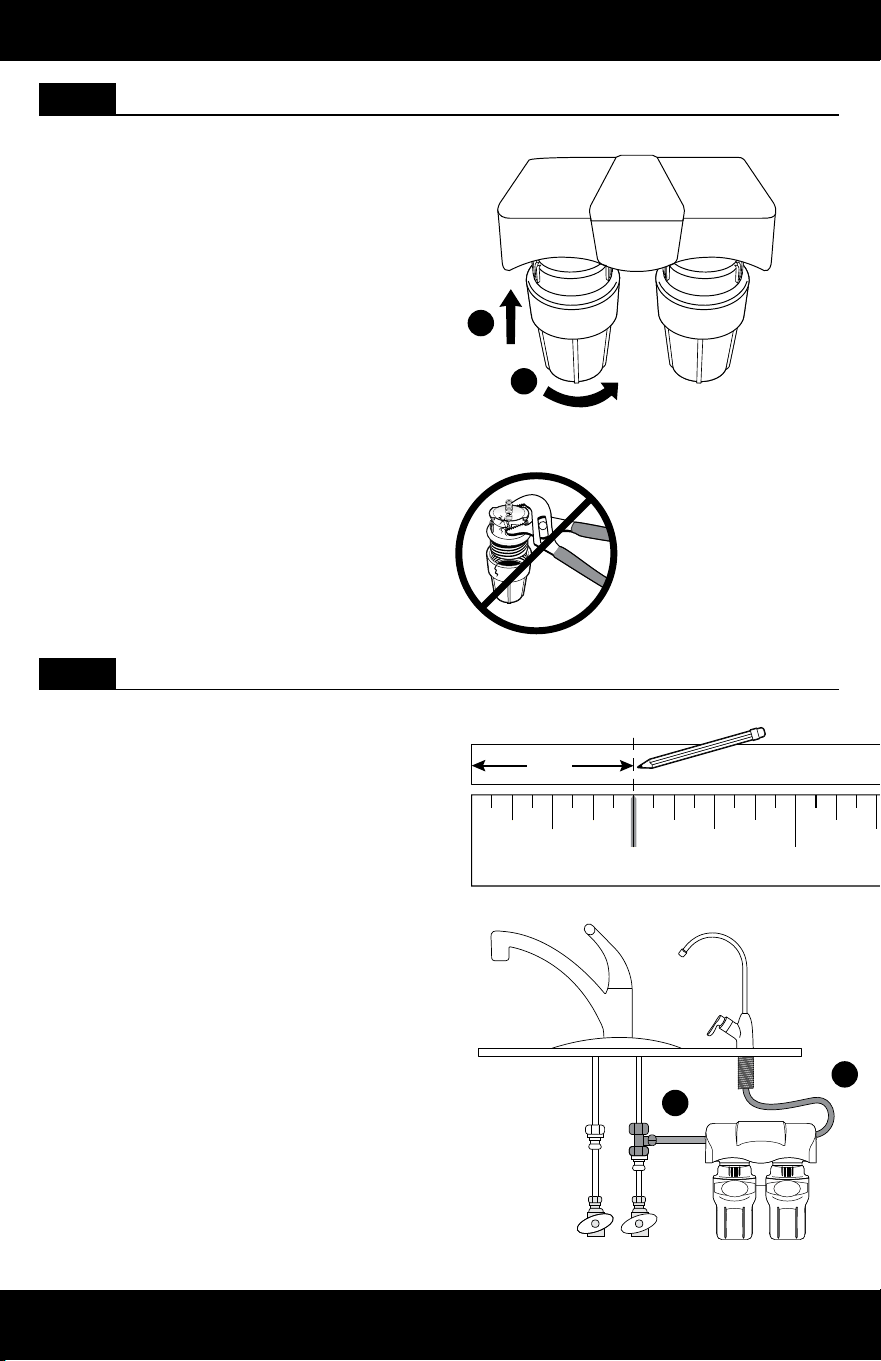
NEED HELP? GIVE US A CALL 877.333.7108
1
2
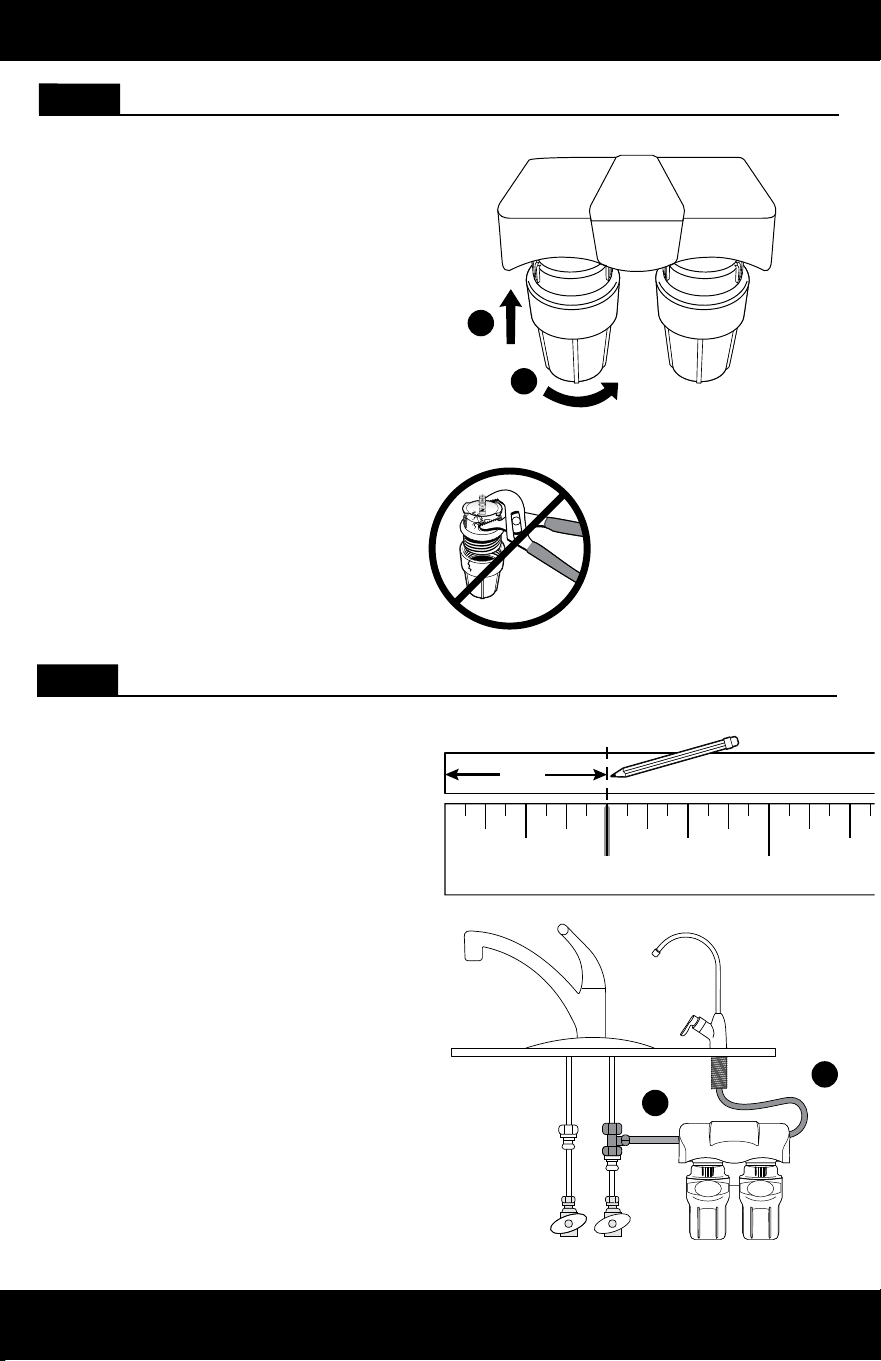
1. Attach each sump to bottom of
unit housing. Align connection
points, push sump up and turn to
the right until you feel a 'click.'
2. Ensure all sumps are attached
and locked into place. Ensure
the sumps are not on an angle
while attaching. This may result
in damage to the o-ring. Do not
lubricate the o-ring.
Note: If your system was purchased
before 2024, you may not hear the
click while attaching sumps.
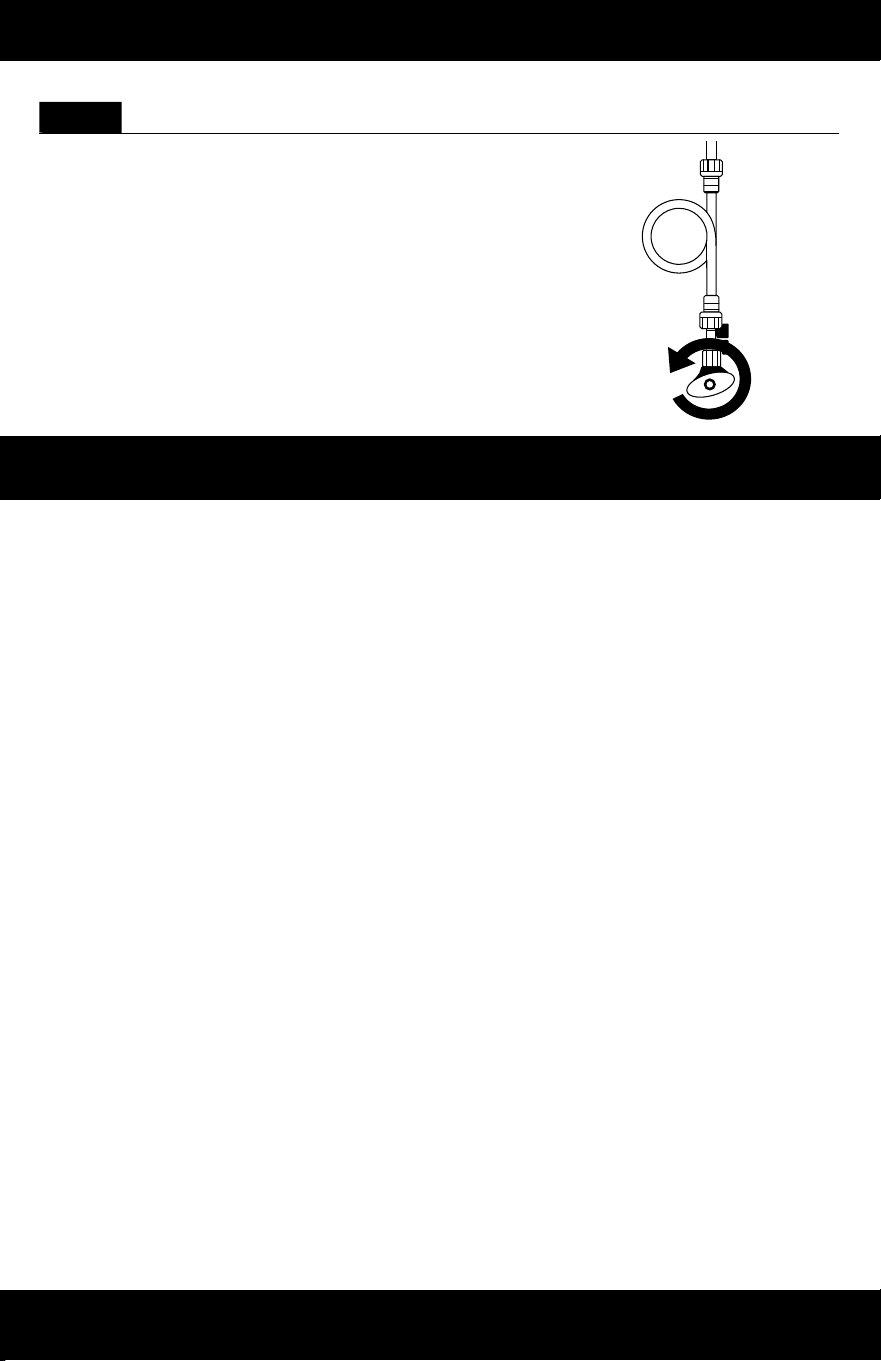
1. Connect tubing from brass tee into
inlet side of lter unit.
2. Connect tubing from faucet into
outlet side of lter unit.
Note: Use diagram to check tubing depth.
It is VERY IMPORTANT to insert tubing
completely (1") to prevent leaking.
INSTALLATION GUIDE
4
1
2
1 2
3
1”
Depth to insert 2 stage tubing
Diagram is actual size.
Tips
• Insert tubing completely (1") to
prevent leaking.
• Wet end of tubing for easy installation
into inlets and outlets.
• Cut excess tubing to prevent crimping,
kinks, loops or folds.
WARNING Do not use tools to remove or tighten
sumps. Over-tightening can cause damage and
result in leaking. HAND TIGHTEN ONLY.
STEP 4 Install Filter Sumps
STEP 5 Connect Supply Lines
NEED HELP? GIVE US A CALL 877.333.7108
INSTALLATION GUIDE
CARE & SAFEGUARDS
5
Care
To clean your lter system, wipe down the exterior with a damp cloth.
Once lters are at 95% capacity (about every 6 months), the battery alarm will
sound and ash red when water is owing and will continue for 15 seconds
once water is turned off. Change the battery every time you replace your lters.
The battery is included with the lter replacement cartridges.
NOTICE
Safeguards
• If you experience a hose connection leak, disconnect and re-set the hose.
• Do not install this system where the line pressure may exceed 80 psi. The operating
pressure range for this system is between 20-80 psi.
• Install on COLD water lines only (40°F - 90°F).
• Use caution when installing the system manifold on a cabinet wall that backs up to a
dishwasher. Screws may exceed cabinet width.
• It is recommended that your system be installed inside and out of direct sunlight. The
system must be protected from both direct sunlight and freezing temperatures.
• System and installation shall comply with applicable state and local laws.
• Do not operate without the lters installed.
• Must replace housing every 5 years or risk property damage from leaks. Call
800.821.2017 to order.
• Do not use with water that is microbiologically unsafe or of unknown water quality
without adequate disinfection before or after the system.
• Systems certied for cyst reduction may be used on disinfected waters that may
contain lterable cysts.
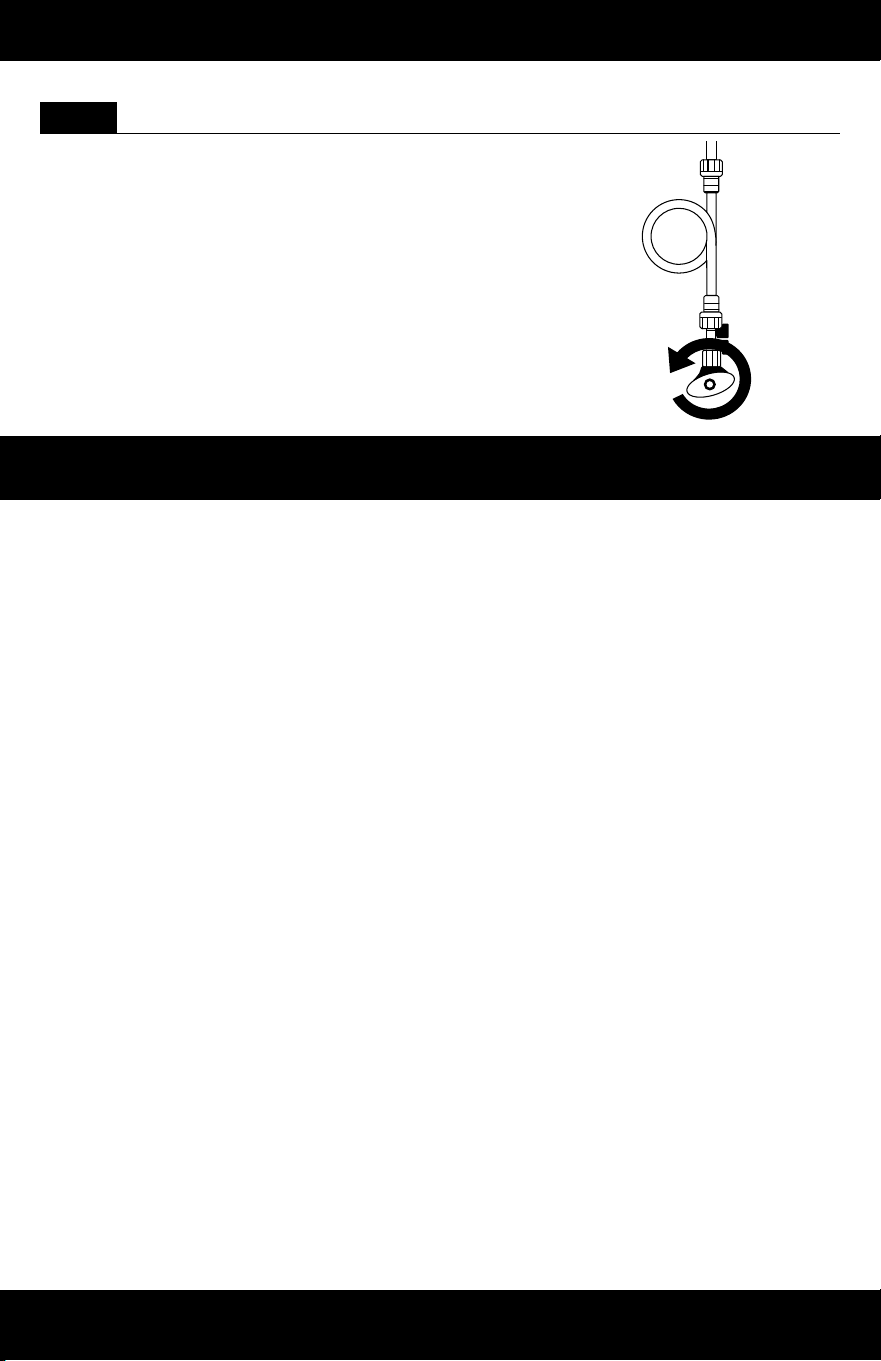
Turn on COLD water supply. Turn on dedicated faucet
and check for leaks. Leave water running to ush
cartridge for 10 minutes or until water is clear of carbon
nes. While the system is ushing, check for leaks. Once
system is ushed, turn off dedicated faucet.
Note: Do not drink flushed water.
STEP 6 Check for Leaks and Proper Installation

NEED HELP? GIVE US A CALL 877.333.7108
6
PERFORMANCE & CERTIFICATIONS
Models Replacement Rated capacity Operating temp. range Rated ow
AO-US-200
AO-US-200-R 500 gallons
1892 Liters
40-90° F
4.44-32.2° C
0.5 gpm
1.89 lpm
Manufactured by: A. O. Smith Corporation 11270 W Park Pl #170, Milwaukee, WI 53224 | 877.333.7108
System tested and certied by WQA to NSF/ANSI Standards
42, 53, and 401 for the reduction of the claims specied on
the Performance Data Sheet and at www.WQA.org.
For the full list of contaminants ltered,
scan to view the AO-US-200 Performance
Data Sheet.

3
Who is covered:
A. O. Smith and its suppliers, (herein collectively referred to as
“Manufacturer”) warrants to the original owner who purchased and
installed the system (hereinafter “Owner”).
What is covered:
This Warranty covers defects in materials or workmanship during the
limited Warranty period of your of your A.O. Smith Water Filtration System
including sub-components purchased with original system (may or may
not include faucet and ttings), except as provided below. The water
lter is warranted only when it is installed, operated and maintained in
accordance with the instructions accompanying the water lter found on
aosmithatlowes.com. A water lter should be installed in such a manner
that, if the system or any connection thereto should leak, the resulting
ow of water will not cause damage to the area in which it is installed. For
detailed instructions read the manual accompanying the water lter and
review drawings in the manual.
For how long:
This Warranty runs for 12 months (365 days) from the date of purchase by
a consumer (hereinafter “Warranty Period”). No Warranty coverage will
be provided if the claimant is unable to provide proof of purchase from
an authorized A.O. Smith reseller. Estimated lifespan of products is for
information only and is based on usage approximations. Water conditions
and use rates may limit the functional lifespan of your lter. This Limited
Warranty does not extend to the full estimated life span of the system.
What A.O. Smith will do:
1. If necessary, the Manufacturer will provide a replacement that fullls
the remaining estimated lifespan/capacity of your original purchase and
send it to you with installation instructions. If industry standards, product
improvements or product obsolescence prohibit Manufacturer from
furnishing an identical model replacement water lter under this Warranty,
the Owner will be furnished with a new water lter of comparable
remaining capacity and functionality; however, the Owner will be charged
for the additional value of the item(s) which Manufacturer has incorporated
in the replacement water lter. The Warranty period for any replacement
will run for the balance of the original 365 days.
2. Component Part – If any component part proves to Manufacturer’s
satisfaction to be defective in material or workmanship within the Warranty
period listed on the data plate label, the Manufacturer will furnish the
Owner with a replacement for the defective part(s).
3. Return of Defective Water Filter and Component Parts – Manufacturer
reserves the right to examine the alleged defect in the water lter or component
part(s), and it will be the Owner’s obligation to return the water lter and/
or component part(s) to the Manufacturer at the Manufacturers request.
a. When returning a water lter, it must include all component parts.
b. When returning component part(s), they must be individually tagged and
identied with the water lter’s model number, date of purchase, and date
of installation.
What is not covered:
1. This Warranty does not cover lter cartridges and any systems that were
not installed in compliance with the instructions or that have been abused
or operated incorrectly.
2. This Warranty applies only to products purchased from authorized A. O.
Smith resellers.
3. The Limited Warranty stated herein is in lieu of any and all warranties,
express or implied (whether written or oral), including, but not limited to, the
implied warranties of merchantability and tness for a particular purpose.
4. Manufacturer shall not be liable for any incidental, consequential,
special, punitive, or contingent damages or expenses, arising, directly or
indirectly, from any defect in the water lter or the use of the water lter,
including but not limited to water damage.
5. Manufacturer shall not be liable for any water damage arising, directly
or indirectly, from any defect in the water lter or component part(s) or
from its use.
6. Manufacturer shall not be liable for any damage or product failures
caused by any of the following:
• The water lter or any of its component parts have been subject to
misuse, alteration, neglect or accident.
• The water lter has not been installed in accordance with the applicable
local plumbing and/or building code(s) and/ or regulations or in their absence.
• The water lter is not installed, operated and maintained in accordance
with the printed Manufacturer’s instructions, including if the water lter has
any additional aftermarket equipment introduced into the sealed system
not approved by the manufacturer.
• The water lter is exposed to highly corrosive conditions.
• The water lter is not continuously supplied with potable water.
• The water lter is not operated within the factory calibrated temperature limits.
• The water lter is installed in direct sunlight or exposed to freezing temperatures.
• The water lter or any of its component parts fail due to sediment build-up.
• Clogging due to purchaser’s failure to replace the lter cartridges.
• Damage caused by re, ood or acts of God.
• Damage caused by over-pressurization in the water line.
7. Manufacturer shall not be liable for any claims related to excessive noise,
smell, or taste of water.
8. This Warranty does not cover damage caused by the use of parts that
are not genuine A.O. Smith parts. This includes, but is not limited to
replacement lters, faucets, and/or diverter valves.
9. Except when specically prohibited by the applicable state law, the
Owner, and not the Manufacturer, shall be liable for and shall pay for
all charges for labor or other expenses incurred in the removal, repair or
replacement of the water lter or any component part(s) claimed to be
defective or any expense incurred to remedy any defect in the product. Such
charges may include, but are not necessarily limited to:
a. All freight, shipping, handling and delivery costs of forwarding a new
water lter or replacement part(s) to the owner.
b. All costs necessary or incidental in removing the defective water lter
or component part(s) and installing a new water lter or component part(s).
c. Any material required to complete, and/or permits required for,
installation of a new water lter or replacement part(s), and
d. All costs necessary or incidental in returning the defective water lter or
component part(s) to a location designated by the Manufacturer.
How to get service:
To receive service under this Warranty, you must contact A. O. Smith at
1-877-333-7108 within the Warranty Period to describe the problem to a
customer service representative who will verify that the product is under
Warranty and determine whether a part or the system will be replaced and
whether you must send back the unit. You will be required to provide proof of
purchase from an authorized A.O. Smith reseller and proof of proper installation.
Warranty registration:
Warranty registration is not required for coverage under the A.O. Smith Limited
Warranty. If you purchased from a retailer or an authorized reseller, please complete
the online Warranty registration form at www.aosmithatlowes.com/register.
Proof of purchase from an A.O. Smith authorized dealer is required. Once
registered online, we will have a record of your purchase.
How state law applies:
This Warranty gives you specic rights and you may have other rights
which vary from state to state. Some states do not allow the exclusion or
limitation of incidental or consequential damages, so the above limitation
or exclusion may not apply to you.
LIMITED WARRANTY
1
YEAR
7
8
La frecuencia de reemplazo recomendada
para el AO-US-200 es cada 6 meses o cada
1,892litros (500galones) de uso.
Solo use filtros de repuesto originales A.O.Smith
y certificados para eliminación de contaminantes y
rendimiento del sistema constantes.
Felicidades por su nueva compra. Este ltro de agua se ha diseñado para
proporcionarle agua óptimamente limpia. El ltro de agua de 2 etapas cuenta
con tecnología de ltración Claryum® que reduce los contaminantes dañinos
y el mal sabor y el olor, mientras que conserva los minerales beneciosos.
Cualquiera sea su necesidad de agua, desde hidratación a cocción y más,
A.O.Smith lo tiene cubierto.
Conserve este manual del propietario como referencia para la instalación,
resolución de problemas e información de reemplazo del ltro.
Si necesita ayuda o tiene alguna consulta, llámenos al 877.333.7108
¿NECESITAS AYUDA? LLÁMANOS AL 877.333.7108
¿NECESITAS AYUDA? LLÁMANOS AL 877.333.7108
TABLA DE CONTENIDO
Contenido de la caja ..............................................................................................10
Guía de instalación ........................................................................................... 11-14
Cuidado y resguardos ............................................................................................14
Rendimiento y certicaciones ...............................................................................15
Garantía ..................................................................................................................16
FILTRO DE AGUA
DE 2 ETAPAS
Bajo el fregadero
Escanee para ver el video de instalación de AO-US-200.
¿NECESITAS AYUDA? LLÁMANOS AL 877.333.7108
10
CONTENIDO DE LA CAJA
Lea todo el manual antes de la instalación y asegurase de que todas las piezas indicadas
estén presentes.
Si falta una pieza o alguna está dañada, llámenos para avisarnos al 877.333.7108.
No intente instalar el ltro.
• Taladro de velocidad variable con
una broca de 7/32"
• Llave ajustable
• Cinta métrica
• Cubeta
• Destornillador Phillips
• Martillo
La llave se puede montar en el fregadero
en un oricio existente para una boquilla
pulverizadora o un dispensador de jabón
o puede perforar un oricio de no más de
1.3cm (1/2") de diámetro. Asegúrese de
que la ubicación de la llave permita que el
conducto se extienda levemente más allá del
borde del fregadero.
Herramientas recomendadas para la instalación:
Nota: Recomendamos llamar a un profesional si se requiere cortar o perforar tuberías.
SISTEMA DE FILTRADO
SUMIDERO 1 SUMIDERO 2
ARANDELA DE GOMA DE LA LLAVE
SEPARADOR DE LA LLAVE
ARANDELA DE LA LLAVE
TUERCA DE LA LLAVE
TUERCA DE CROMO
TORNILLOS CON ANCLAJES
DE PLÁSTICO (2)
INSERTO DE PLÁSTICO DEL TUBO
TUBO BLANCO DE
0.9M X 0.6CM (3' X 1/4") (2)
T DE LATÓN DE 0.6CM (1/4") (1)
TUERCA DE LATÓN
COLLARÍN PLÁSTICO (2)
INSERTO DE LATÓN
DEL TUBO
LLAVE AJUSTABLE
B
A
C
D
E
H
F
G
I
J
K
L
LLAVE CARTUCHOS DE FILTRO (2)
(INSTALADOS PREVIAMENTE
EN LOS SUMIDEROS)
¿NECESITAS AYUDA? LLÁMANOS AL 877.333.7108
9
GUÍA DE INSTALACIÓN GUÍA DE INSTALACIÓN
11
Conexión del Tubo
1. Conecte el tubo blanco (A) a la T de
latón (B). Deslice la tuerca de latón (C)
en el tubo con las roscas de la tuerca
orientadas hacia el extremo del tubo.
2. Deslice el collarín de plástico (D)
en el tubo.
3. Coloque el inserto de latón del
tubo (E) en la abertura del tubo.
4. Empuje la punta del tubo hacia la
abertura de la T de latón.
5. Mientras sostiene el tubo en su
lugar, apriete la tuerca de latón
para comprimir el collarín de
plástico y crear un sello.
Instalación de la T de latón
1. Cierre el suministro de agua FRÍA.
2. Con una llave ajustable, desconecte
la tubería de agua.
3. Conecte la T de latón (B) a la
válvula de cierre y vuelva a
conectar la tubería de agua
FRÍA a la T de latón.
Instalación de la llave
Coloque la arandela de goma de la llave
(F) entre la llave y el fregadero. Debajo del
fregadero, atornille el separador de la llave
(G), la arandela de la llave (H) y la tuerca
de la llave (I) en el tubo. Apriete la tuerca
de la llave para jar la llave al fregadero.
Nota: Evite apretar demasiado.
PASO 1 Instalación de la T de latón y conexión del tubo
PASO 2 Instalación y conexión de la llave
1
3
2
1 2
3 4 5
F
G
H
I
¿NECESITAS AYUDA? LLÁMANOS AL 877.333.7108
1 2 3 4 5
12
GUÍA DE INSTALACIÓN
Conexión de la llave
1. Conecte el tubo a la base de la llave.
Deslice la tuerca de cromo (J) en el tubo
con las roscas de la tuerca orientadas
hacia el extremo del tubo.
2. Deslice el segundo collarín
de plástico (D) en el tubo.
3. Coloque el inserto de plástico del
tubo (L) en la abertura del tubo.
4. Empuje la punta del tubo hacia
la base de la llave.
5. Mientras mantiene el tubo es su lugar,
apriete la tuerca de latón con la llave
ajustable para crear un sello.
Nota: Evite apretar
demasiado.
Instalación del sistema de filtrado
1. Seleccione un espacio debajo del
fregadero que esté al menos a 30cm
(12") desde la parte inferior del
gabinete para reemplazos del ltro y
acceso fácil al suministro de agua fría.
Use los oricios de montaje ubicados
en la parte posterior de la unidad de
ltrado para marcar en la pared las
ubicaciones de los tornillos.
Nota: La distancia entre los orificios
es de 6.5cm (2.55").
2. Use una broca de 7/32" para perforar
oricios para los anclajes de plástico (K).
Con cuidado, golpee los anclajes con un
martillo en el oricio perforado. Monte
la unidad a la pared con tornillos. Tire
de la banda plástica de protección del
compartimiento de la batería. La luz
LED de color rojo debe parpadear y
sonar cinco (5) veces para indicar que
la batería está instalada correctamente.
PASO 3 Instalación del sistema de filtrado y conexión de las tuberías de suministro
¿NECESITAS AYUDA? LLÁMANOS AL 877.333.7108
GUÍA DE INSTALACIÓN
13
1 2
3
1”
Profundidad para insertar
las tuberías de 2 pasos
El diagrama tiene la dimensión real.
1. Conecte el tubo de la T de latón en
la entrada de la unidad de ltrado.
2. Conecte el tubo de la llave en la
salida de la unidad de ltrado.
Nota: Use el diagrama para verificar
la profundidad del tubo. Es MUY
IMPORTANTE insertar el tubo por
completo (2.5cm [1"]) para
que no haya fugas.
Consejos
• Inserte el tubo completamente (2.5cm
[1"]) para evitar las fugas.
• Humedezca el extremo de los tubos
para instalar fácilmente en las entradas
y salidas.
• Corte el exceso de los tubos para evitar
grietas, torceduras, curvas o pliegues.
1
2
1
2
PASO 4 Instalación de los sumideros del filtro
PASO 5 Conexión de las tuberías de suministro
1. Fije cada sumidero en la parte inferior
de la carcasa de la unidad. Alinee los
puntos de conexión, empuje el sumidero
hacia arriba y gírelo hacia la derecha
hasta que sienta un ‘clic’.
2. Asegúrese de que todos los sumideros
estén instalados y bloqueados.
Asegúrese de que los sumideros no
estén en ángulo mientras los instala.
Esto puede provocar daños en la junta
tórica. No lubrique la junta tórica.
Nota: Si compró su sistema antes de 2024,
es posible que no escuche el clic al colocar
los sumideros.
ADVERTENCIA No use herramientas para retirar
o apretar los sumideros. Apretar en exceso
puede causar daños y generar fugas. SOLO
APRIETE CON LA MANO.
¿NECESITAS AYUDA? LLÁMANOS AL 877.333.7108
GUÍA DE INSTALACIÓN
14
PASO 6 Revisión de fugas e instalación sea correcta
Cuidado
Para limpiar el systema de ltrado, limpie el exterior con un paño húmedo.
Cuando los ltros estén en un 95% de su capacidad (cada 6 meses aproximadamente),
la alarma de la batería sonará y parpadeará una luz roja cuando se esté derramando el
agua y seguirá por 15 segundos hasta que se cierre el agua. Cambie la batería cada vez
que reemplace los ltros. La batería viene incluida con los cartuchos de ltro de repuesto.
AVISO
Resguardos
• Si tiene una fuga en la conexión de la manguera, desconéctela y vuelva a jar la
manguera.
• No instale este sistema donde la presión de la tubería pueda superar los 551.6kPa
(80psi). El rango de presión de funcionamiento para este sistema es entre 137.9kPa
y 551.6kPa (20psi y 80psi).
• Instale solo en tuberías de agua FRÍA (4.4 a 32.2°C [40 a 90°F]).
• Tenga cuidado cuando instale el colector del sistema en una pared del gabinete que
se apoya en un lavavajillas. Los tornillos pueden sobrepasar el ancho del gabinete.
• Se recomienda que instale su sistema en el interior y lejos de la luz solar directa.
El sistema debe estar protegido de la luz solar directa y de las temperaturas de
congelamiento.
• El sistema y la instalación debe cumplir con las leyes estatales y locales aplicables.
• No lo utilice sin los ltros instalados.
• Se debe cambiar la carcasa cada 5 años o cuando haya riesgo de daños a la
propiedad por fugas. Llame al 800.821.2017 para realizar el pedido.
• No usar con agua que no sea microbiológicamente segura o cuya calidad sea
desconocida sin la desinfección adecuada antes o después de usarla en el sistema.
• Es posible usar sistemas certicados para la reducción de quistes en aguas
desinfectadas que puedan tener quistes ltrables.
Abra el suministro de agua FRÍA. Abra la llave dedicada y
vuelva a revisar si hay fugas. Deje el agua corriendo para
lavar el cartucho durante 10 minutos o hasta que el agua
no tenga partículas nas de carbón. Mientras se está
enjuagando el sistema, revise si hay fugas. Una vez que el
sistema se enjuague, cierre la llave dedicada.
Nota: No beba el agua de lavado.
CUIDADO Y RESGUARDOS
Modelos Repuesto Capacidad nominal Rango de temp. de funcionamiento Flujo nominal
AO-US-200
AO-US-200-R 1,892 litros
500 galones
4.44-32.2° C
40-90° F
1.89 lpm
0.5 gpm
Fabricado por: A. O. Smith Corporation 11270 W Park Pl #170, Milwaukee, WI 53224 | 877.333.71088
RENDIMIENTO Y CERTIFICACIONES
15
Sistema probado y certicado por WQA International según
las normas NSF/ANSI 42, 53 y 401 para la reducción de
las declaraciones especicadas en la Hoja de datos de
rendimiento y en www.WQA.org.
Para conocer la lista completa de los
contaminantes ltrados, escanee para ver la
hoja de datos de rendimiento de AO-US-200.
¿NECESITAS AYUDA? LLÁMANOS AL 877.333.7108

GARANTÍA LIMITADA
1
A Ñ O
16
Quién está cubierto:
A.O.Smith y sus proveedores (en adelante, mencionados en conjunto como el
“Fabricante”) garantizan al propietario original que compró e instaló el sistema
(en adelante, el “Propietario”).
Lo que está cubierto:
Esta garantía cubre defectos en materiales o mano de obra durante el período
de garantía limitada del sistema de ltración de agua de A.O.Smith, lo que
incluye subcomponentes comprados con el sistema original (puede o no incluir
llaves y conectores), excepto según se dispone a continuación. El ltro de agua
tiene garantía solo cuando se instala, opera y mantiene de acuerdo con las
instrucciones que se incluyen con el ltro de agua, las que se encuentran en
aosmithatlowes.com. Un ltro de agua se debe instalar de manera tal que, si el
sistema o alguna conexión del mismo tuviera fugas, el ujo resultante de agua no
cause daños al área en el que se instaló. Para obtener instrucciones detalladas, lea
el manual que se incluye con el ltro de agua y revise los planos del manual.
Duración:
Esta Garantía dura 12 meses (365 días) a partir de la fecha de compra por parte
del consumidor (en adelante, el “Período de garantía”). No se proporcionará
cobertura de Garantía si el solicitante no puede proporcionar un comprobante
de compra de un revendedor autorizado de A.O.Smith. La vida útil estimada de
los productos es solo con nes informativos y se basa en aproximaciones de uso.
Las condiciones del agua y la tasa de uso pueden limitar la vida útil funcional
de su ltro. Esta Garantía limitada no se extiende por toda la vida útil estimada
del sistema.
Lo que hará A.O.Smith:
1. Si es necesario, el Fabricante proporcionará un repuesto que cumpla con la
vida útil/capacidad estimada restante de su compra original y se lo enviará con
instrucciones de instalación. Si las normas de la industria, mejoras en productos u
obsolescencia de productos impiden que el Fabricante proporcione un repuesto de
modelo idéntico del ltro de agua conforme a esta Garantía, el Propietario recibirá
un nuevo ltro de agua con una funcionalidad y capacidad restante comparables;
sin embargo; se le cobrará al Propietario por el valor adicional de los elementos
que haya incorporado el Fabricante en el ltro de agua de repuesto. El período de
Garantía para cualquier repuesto durará el resto de los 365 días originales.
2. Pieza componente: Si se demuestra, a la satisfacción del Fabricante, que
cualquier pieza componente tiene defectos de materiales o mano de obra dentro
del período de Garantía indicado en la etiqueta de la placa de datos, el Fabricante
proporcionará al Propietario un repuesto de las piezas defectuosas.
3. Devolución de ltro de agua y piezas componentes defectuosos: El Fabricante
se reserva el derecho de examinar el supuesto defecto en el ltro de agua o piezas
componentes, y será la obligación del Propietario devolver el ltro de agua o las
piezas componentes al Fabricante cuando lo solicite.
a. Cuando devuelva un ltro de agua, debe incluir todas las piezas componentes.
b. Cuando devuelva piezas componentes, deben estar etiquetadas e identicadas
individualmente con el número de modelo del ltro de agua, la fecha de compra
y la fecha de instalación.
Lo que no está cubierto:
1. Esta Garantía no cubre cartuchos de ltro y ningún sistema que se haya
instalado sin cumplir con las instrucciones o que se haya usado u operado de
manera incorrecta.
2. Esta Garantía se aplica solo a productos comprados de revendedores
autorizados de A.O.Smith.
3. La Garantía limitada que se indica en este documento reemplaza cualquiera y
todas las garantías, expresas o implícitas (ya sea por escrito o en forma oral), lo
que incluye, entre otras, las garantías implícitas de comerciabilidad e idoneidad
para un propósito en particular.
4. El Fabricante no será responsable por cualquier daño o gasto incidental,
emergente, especial, punitivo o contingente, que surja, de manera directa o
indirecta, de cualquier defecto en el ltro de agua o por el uso del ltro de agua,
lo que incluye, entre otros, daños por agua.
5. El Fabricante no será responsable por ningún daño por agua que surja, de
manera directa o indirecta, por ningún defecto en el ltro de agua o pieza
componente o por su uso.
6. El Fabricante no será responsable por ningún daño o fallas de producto
provocados por cualquiera de los siguientes:
• El ltro de agua o alguna de sus piezas componentes han estado sujetos a uso
indebido, alteración, negligencia o accidente.
• El ltro de agua no se ha instalado de acuerdo con los códigos o reglamentos
locales de plomería o edicación, o se instaló sin estos.
• El ltro de agua no se instaló, operó ni recibió mantenimiento de acuerdo con
las instrucciones impresas del Fabricante, lo que incluye si el ltro de agua tiene
repuestos introducidos al sistema sellado que no hayan sido aprobados por el
fabricante.
• El ltro de agua está expuesto a condiciones altamente corrosivas.
• El ltro de agua no recibe continuamente agua potable.
• El ltro de agua no funciona dentro de los límites de temperatura calibrados
en la fábrica.
• El ltro de agua está instalado a la luz solar directa o está expuesto a
temperaturas de congelamiento.
• El ltro de agua o cualquiera de sus piezas componentes falla debido a
acumulación de sedimentos.
• Obstrucciones debido a que el comprador no reemplaza los cartuchos del ltro.
• Daño producto de incendios, inundaciones o casos fortuitos.
• Daño causado por la sobrepresurización de la tubería de agua.
7. El Fabricante no será responsable por reclamaciones relacionadas con ruido
excesivo, olor o sabor del agua.
8. Esta Garantía no cubre daños causados por el uso de piezas que no sean
originales de A.O.Smith. Esto incluye, entre otros, ltros de repuesto, llaves o
válvulas decambio.
9. Excepto cuando lo prohíba especícamente la ley estatal correspondiente, el
Propietario, y no el Fabricante, será responsable y deberá pagar todos los costos
de mano de obra u otros gastos en los que se incurra con la extracción, reparación
o reemplazo del ltro de agua o cualquier pieza componente que se reclame que
está defectuosa, o cualquier gasto en el que se incurra para solucionar cualquier
defecto en el producto. Dichos cargos pueden incluir, entre otros, los siguientes:
a. Todos los costos de ete, envío, manipulación y entrega de reenviar un nuevo
ltro de agua o repuestos al propietario.
b. Todos los costos necesarios o incidentales por la extracción del ltro de agua
o piezas componentes defectuosos y la instalación de un ltro de agua o piezas
componentes nuevos.
c. Cualquier material necesario para completar, o los permisos exigidos para, la
instalación de un nuevo ltro de agua o repuesto, y
d. Todos los costos necesarios o incidentales por la devolución del ltro de agua o
piezas componentes defectuosos al lugar designado por el Fabricante.
Cómo obtener el servicio:
Para recibir el servicio conforme a esta garantía, debe comunicarse con A.O.Smith
al 1-877-333-7108 dentro del Período de garantía para describir el problema a un
representante de servicio al cliente, el que vericará que el producto esté cubierto
por la Garantía y determinará si se reemplazará una pieza o el sistema y si es que
debe devolver la unidad. Deberá proporcionar un comprobante de compra de un
revendedor autorizado de A.O.Smith y un comprobante de instalación correcta.
Registro de la garantía:
No es necesario registrar la garantía para la cobertura conforme a la Garantía
limitada de A.O.Smith. Si realizó la compra a través de un minorista o un
revendedor autorizado, complete el registro de la Garantía en línea en www.
aosmithatlowes.com/register. Se requiere un comprobante de compra de un
distribuidor autorizado de A.O.Smith. Una vez registrado en línea, tendremos un
registro de su compra.
Cómo se aplica la ley estatal:
Esta Garantía otorga derechos especícos y es posible que tenga otros derechos
que varían según el estado. Algunos estados no permiten la exclusión o limitación
de daños indirectos o emergentes, por lo que es posible que la limitación anterior
no lecorresponda.
This lter system is designed and tested for use with genuine A. O. Smith parts, including replacement lters, faucet and all
hardware. Use of parts from other manufacturers may result in loss of contaminant reduction performance, system damage or
failure. Use of parts from other manufacturers will also void your warranty. Please visit aosmithatlowes.com for replacement
parts. Installation must comply with state and local ordinances.
A. O. Smith is not liable for consequential or incidental damages due to improper installation.
Este sistema de ltrado está diseñado y probado para ser usado con piezas originales de A. O. Smith, lo que incluye los ltros, la llave y todas las piezas
metálicas de repuesto. El uso de piezas de otros fabricantes puede generar una pérdida en el rendimiento de la reducción de contaminantes, dañar el
sistema o causar fallas. El uso de piezas de otros fabricantes también anulará su garantía. Visite aosmithatlowes.com para pedir repuestos.
La instalación debe cumplir con las ordenanzas estatales y locales.
A. O. Smith no se hace responsable por daños indirectos o emergentes a causa de una instalación incorrecta.
System tested and certied by WQA to NSF/ANSI Standards 42, 53, and 401 for the
reduction of the claims specied on the Performance Data Sheet and at www.WQA.org.
Sistema probado y certicado por WQA International según las normas NSF/ANSI 42, 53 y 401 para la
reducción de las declaraciones especicadas en la Hoja de datos de rendimiento y en www.WQA.org.
WARNING
• INGESTION HAZARD: This product contains a button cell or coin battery.
• DEATH or serious injury can occur if ingested.
• A swallowed button cell or coin battery can cause Internal Chemical Burns in as little as 2 hours.
• KEEP new and used batteries OUT OF REACH of CHILDREN.
• Seek immediate medical attention if a batter is suspected to be swallowed or inserted inside
any part of the body.
NOTICES
• Compatible battery type: CR2450 Lithium Coin Battery
• Compatible battery voltage: 3V
• Ensure battery is installed correctly according to polarity (+ and -).
• Do not mix old and new batteries, different brands or types of batteries, such as
alkaline, carbon-zinc, or rechargeable batteries.
• Non-rechargeable batteries are not to be recharged.
• Do not force discharge, recharge, disassemble, heat above 90°F, or incinerate. Doing
so may result in injury due to venting, leakage, or explosion resulting in chemical
burns.
• Remove and immediately recycle or dispose of batteries from equipment not used
for an extended period of time according to local regulations.
• Always completely secure the battery compartment. If the battery compartment
does not close securely, stop using the product, remove the batteries, and keep them
away from children.
• Remove and immediately recycle or dispose of used batteries according to local
regulations and keep them away from children. Do NOT dispose of batteries in
household trash or incinerate them.
• Even used batteries may cause injury or death.
• Call a local poison control center for treatment information.
A. O. Smith Corporation 11270 W Park Pl #170, Milwaukee, WI 53224 | 877.333.7108
AO-US-200_install_Oct2025
