User Manual of Product 1:
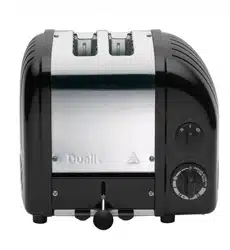
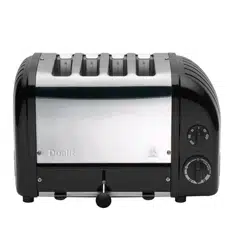
Dualit Architect 4 Slice Toaster | Stainless Steel with Grey
Trim|Extra-Wide Slots–Peek and Pop Function–Patented
Perfect Toast Technology–Matching Kettle and Sandwich Cage
Available | 46526
User Manual of Product 2:
Dualit Architect Kettle | 1.5 L 2.3 KW Stainless Steel | Rapid
Boil and Patented Pure Pour Non-Drip Spout | Measuring
Window with Cup Level Indicators | 72905, Black Trim Brushed
Body
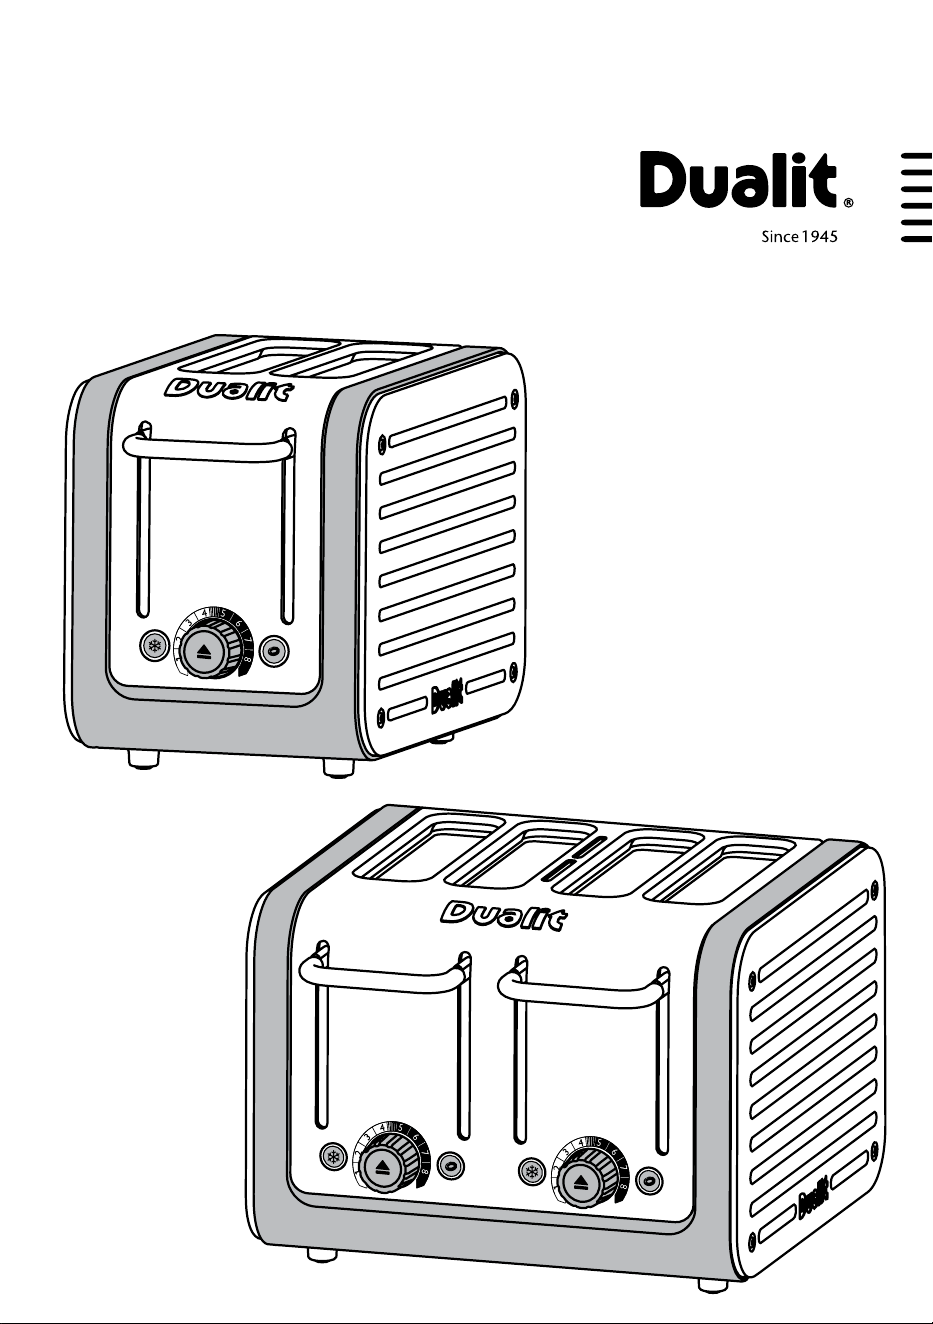
Architect Toaster
Instruction Manual & Guarantee
CAT2
CAT4
02 03
CONTENTS
Safety precautions 04
Know your Toaster 06
Setting up 08
Toasting tips 09
Toasting bread 10
Bagel & bun toasting 11
Toasting frozen bread 12
4 slot toasting 13
Stop toasting 14
Sandwich cage 14
Cleaning & care 15
Troubleshooting 16
Guarantee 17
YOUR ARCHITECT TOASTER
The perfect slice of toast is an essential part of breakfast and the Architect
toaster is designed to deliver every time. With extra wide slots for the
chunkiest of bread, defrost option and patented Peek and Pop
®
function, you
will be serving superior toast, bagels and buns to change the way you breakfast.
Each Architect toaster features interchangeable panels with a wide variety
of colours available, allowing you to update the colour of your toaster if you
move house, update your kitchen, or simply to suit your mood.
Unpack the box with care, keeping all the packaging materials until you are satised everything
is present and in working order. Once satised remove any tags from the toaster body and
recycle the packaging appropriately. Do not remove tags from the cord where appropriate.
You may wish to keep the box to store your toaster.
All illustrations are for representation only; your model may vary from illustrations shown.
Patent application: GB1315591.6, P11363GB, GB1315591.6 Patent No. GB2453812, AU2008202836, US2009223382, GB2516476,
AU2014101058 Reg No. 2600265 Trade Mark; WE00001115203
DON’T FORGET TO
REGISTER YOUR TOASTER
WWW.DUALIT. COM/REGISTER
OR BY POST

04 05
READ ALL
INSTRUCTIONS
BEFORE USING THE TOASTER KEEP
THESE INSTRUCTIONS FOR FUTURE
REFERENCE
IMPORTANT
SAFEGUARDS
• THIS IS AN ATTENDED
APPLIANCE. Do not leave
unattended during use, unplug after
each use (risk of re if an unattended
appliance is left operating).
• This appliance must not be used by children
younger than 8 years old and persons with very
extensive and complex disabilities. Children
aged 8-14 years and persons with reduced
physical, sensory or mental capabilities or lack
of experience and knowledge shall not use this
appliance, unless they are supervised and have
been given instruction concerning the use of
the appliance in a safe way and understand the
hazards involved. Children shall not play with
the appliance. Cleaning and user maintenance
shall not be made by children unless they are
older than 8 and supervised. Keep the appliance
and its cord out of reach of children less than 8
years old.
• This appliance is intended for indoor
household use only. If the appliance is used
improperly or for professional or semi-
professional purposes or if it is not used
according to these instructions the Guarantee
becomes invalid and Dualit refuses any liability
for damage caused.
Electrical safety
• Before plugging in, check that the voltage on
the rating label is the same as the mains supply.
• We recommend that the toaster is plugged
into a socket that has no other appliance
connected to it. Failure to do this may cause an
overload, trip a circuit breaker or blow a fuse.
Preferably the socket outlet should be protected
by a Residual Current device (RCD).
• Unplug from outlet when not in use and before
cleaning. Allow to cool before putting on or
taking off parts.
• Should any of the lights remain
illuminated after using the appliance,
unplug the toaster immediately and call
service centre.
• The toaster is not intended to be operated by
means of an external timer or separate remote-
control system.
• To protect against electric shock, do not
immerse any part of this product in water or
other liquid.
• NOTE: Any plug cut from power supply cord
should be disposed of immediately. Inserting
any cut off plug into a 13A socket-outlet is
hazardous.
• Do not operate any appliance with a damaged
lead or plug, or after the appliance malfunctions
or has been damaged, cracked or dropped in
any manner.
• If the power cord is damaged it must, for safety
reasons, be replaced by Dualit or an authorised
Dualit repairer.
• Never use the plug without the fuse cover
tted. Ensure replacement fuse is the same
current value as original.
• Replacement fuses should be ASTA approved
to BS 1362.
• WARNING: This appliance must be earthed.
General safety
• Bread may burn. Therefore toasters must
not be used near or below curtains and other
combustible materials.
• When in use a re may occur if the toaster is
covered or touching ammable material.
• Do not place on or near a hot gas or electric
burner, or in a heated oven.
• Do not attempt to dislodge bread when the
toaster is plugged in.
• Crumb tray must be in place during toasting.
• Crumb tray should be regularly cleaned. A
build up of crumbs can burn or cause a re.
• Do not allow cable to touch hot surfaces, or
to hang over edge of a table or counter top.
• Keep the appliance and its cord out of reach
of children.
• Do not use appliance for any purpose other
than the intended use.
• Do not store or use toaster in an appliance
garage or under cupboards.
• Do not put a pan ontop of the toaster or
warming rack.
• Do not use if dropped, cracked or damaged.
• Accessible surfaces of the toaster may get hot
during use. Therefore use handles or knobs.
• Do not use scouring pad or abrasive cleaner
on the toaster body.
• The use of accessory attachments not
recommended by Dualit may result in re,
electric shock or injury to persons.
• Never use the toaster without the
interchangeable panels correctly assembled.
Architect toasters only.
SAVE THESE
INSTRUCTIONS
In the interest of improving products, Dualit Ltd.
reserves the right to change the product specication
without prior notice.
All illustrations are for representation only, your
model may vary from illustrations shown.
INSTRUCTIONS ON ENVIRONMENT
PROTECTION
Do not dispose this product in the
usual household garbage at the end
of its life cycle. Please hand it over to
a collection point for the recycling of
electrical and electronic appliances.
The symbol on the product, the instruction of
use or the packaging will inform you about the
methods of disposal. The materials are recyclable
as mentioned on its marking. By recycling,
material recycling or other forms of re-utilization
of old appliances you are making an important
contribution to protect our environment. Please
enquire at the community administration for the
authorised disposal location.
IMPORTANT: BEFORE
FIRST USE
• Read this instruction manual before you start
using the toaster. It gives you important safety
information and will ensure you get the most
out of your Dualit toaster.
• Keep this manual and your proof of purchase
in a safe place.
• Before you use your toaster for the rst
time, wash all parts according to the cleaning
instructions.
• Position the toaster according to the safety
precautions.
• Make sure the toasting lever is in the raised
position when you put the plug into the wall
socket.
• The toasting lever will only engage when the
toaster is plugged in with the power on.
• The cancel button will illuminate to show that
the toaster is heating.
• When you turn the toaster on for the rst
time, a “new” smell/or smoke may be given
off, this will dissipate after a few uses. Clean all
parts in contact with food before using for the
rst time.
IMPORTANT SAFETY PRECAUTIONS
06 07
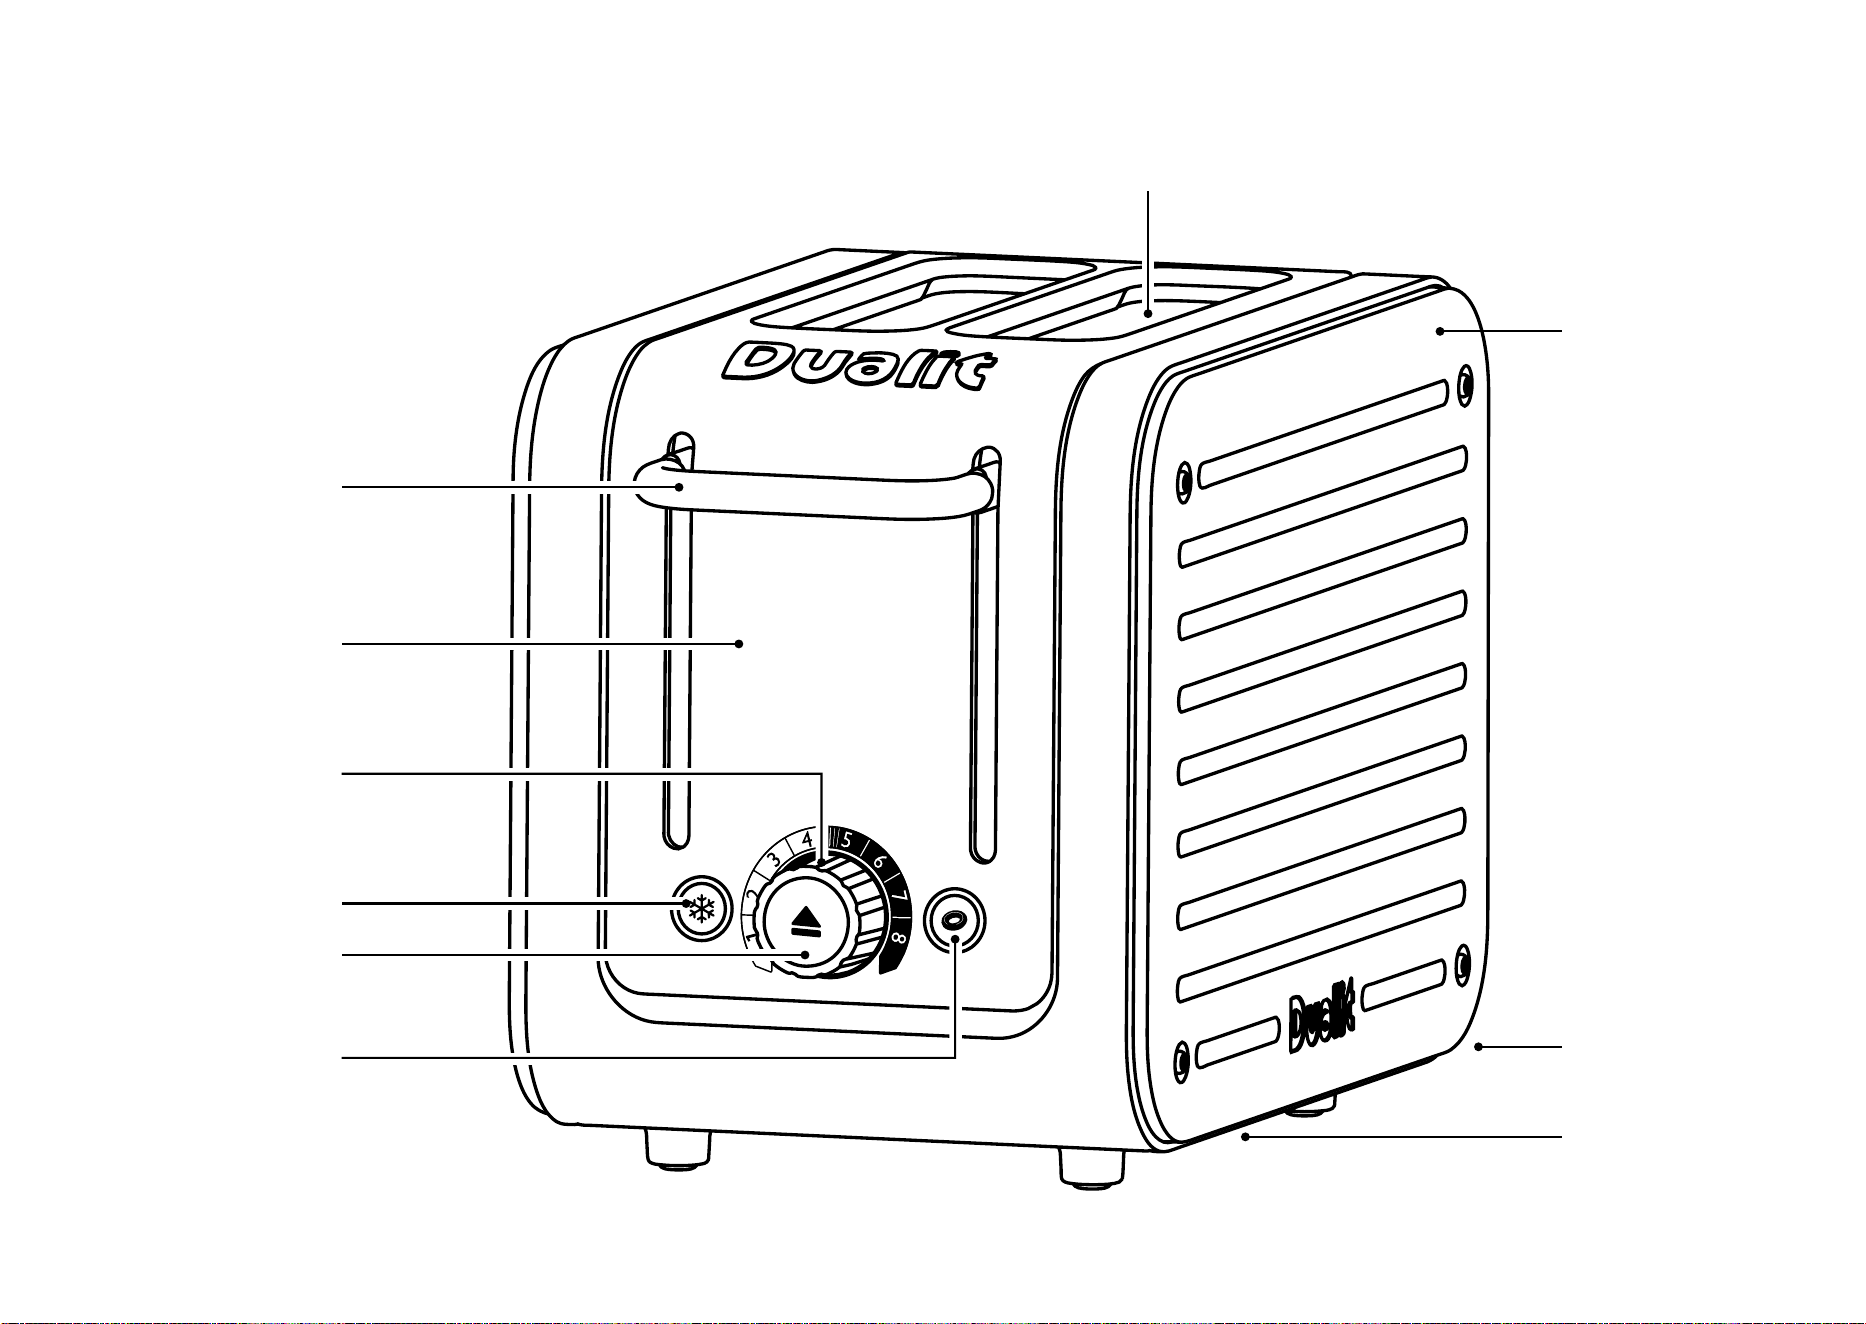
KNOW YOUR TOASTER
WIDE SLOTS
TOASTING LEVER
STAINLESS STEEL
COVER
BROWNING
CONTROL
DEFROST BUTTON
CANCEL BUTTON
CRUMB TRAY
CABLE TIDY
INTERCHANGEABLE
PANELS
BAGEL BUTTON
08 09
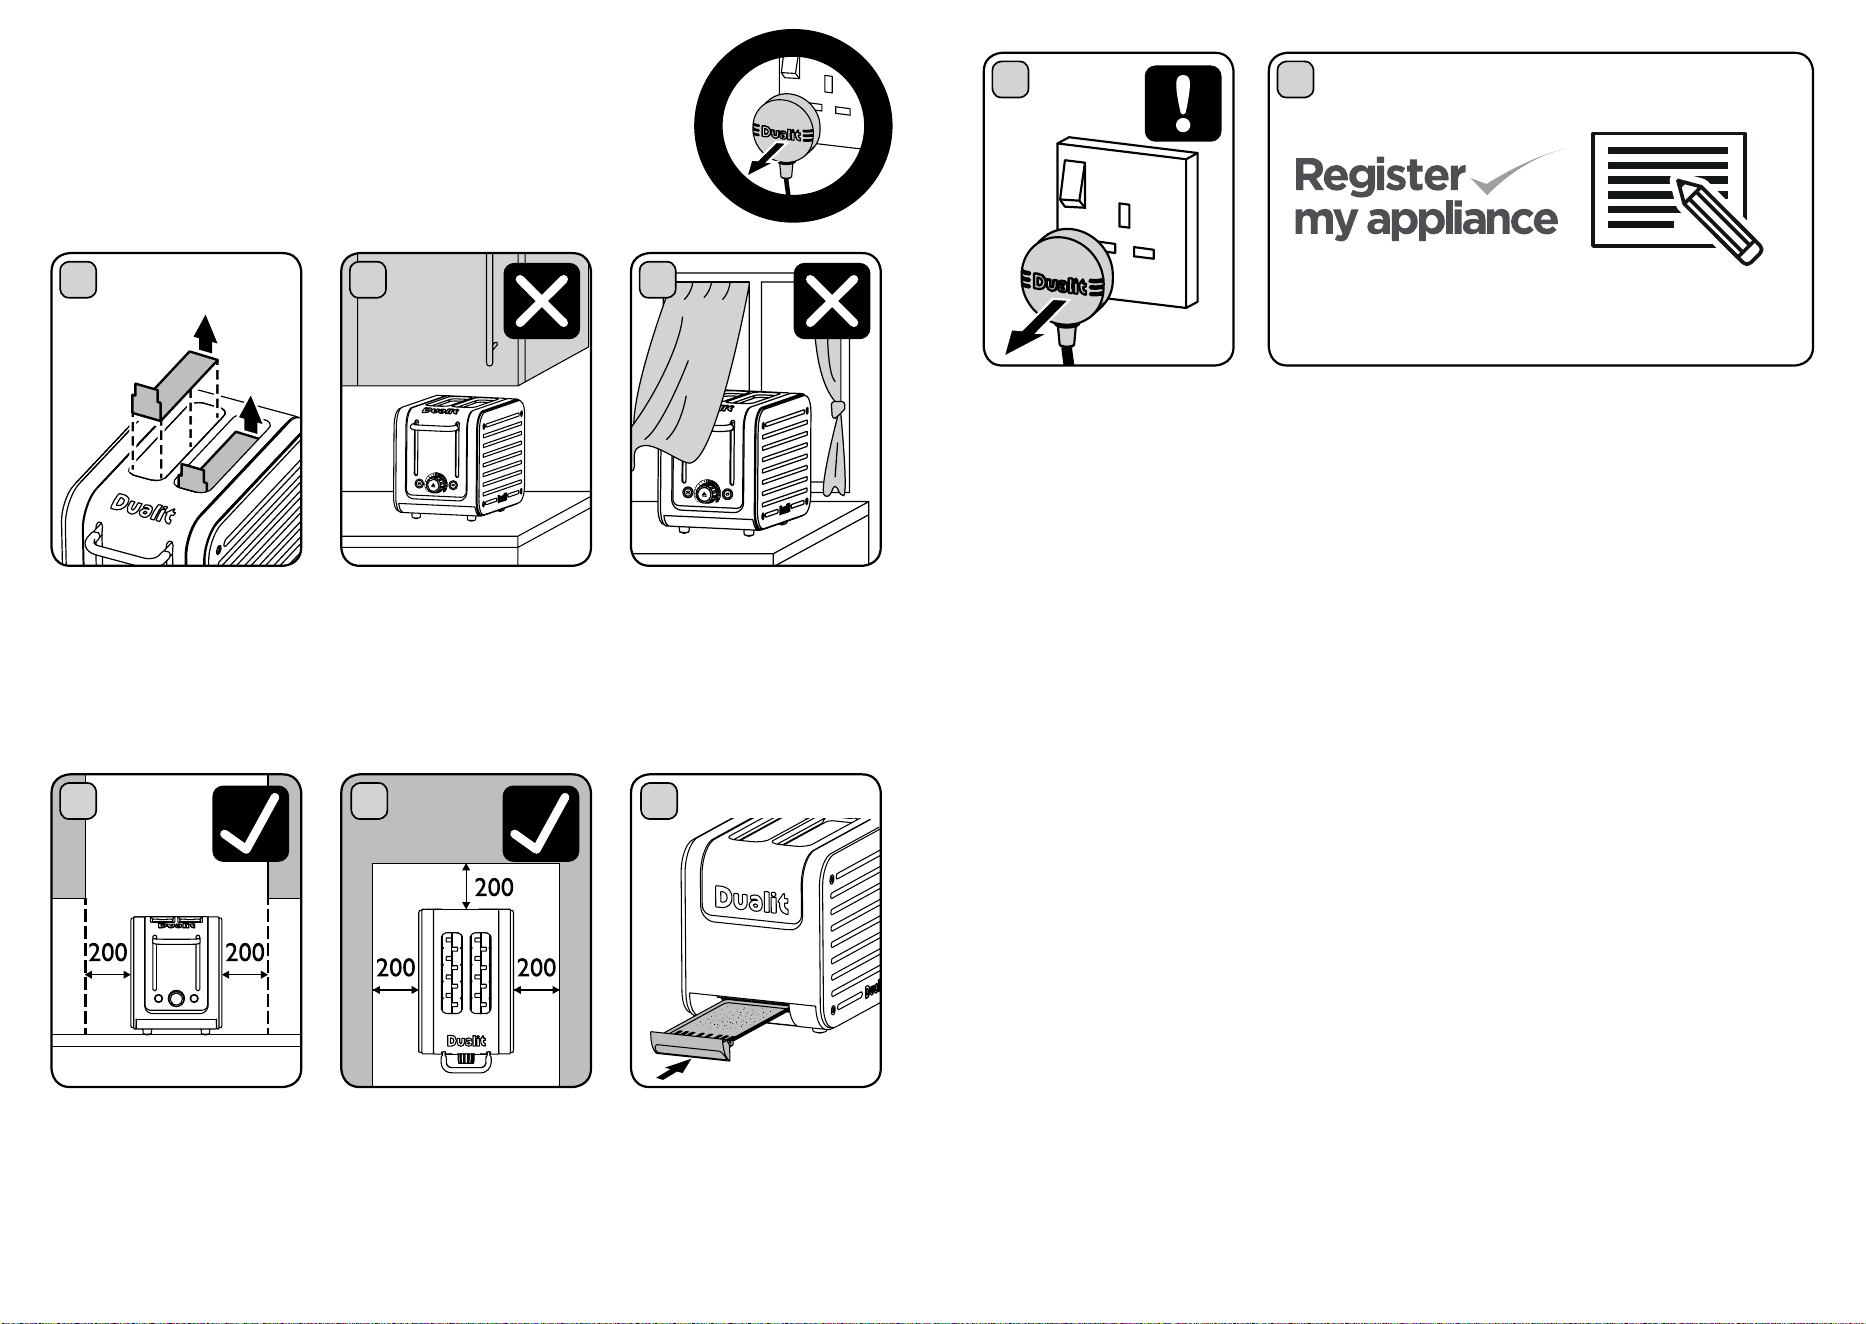
1
REMOVE BEFORE
FIRST USE
2
Ensure your toaster is
unplugged and cool.
REMOVE CARDBOARD
INSERTS FROM THE
SLOTS BEFORE FIRST USE.
A re may occur if incorrectly
positioned.
DO NOT STORE OR USE
YOUR TOASTER IN AN
APPLIANCE GARAGE OR
UNDER CUPBOARDS. A
re may occur if incorrectly
positioned.
3
DO NOT STORE OR USE
YOUR TOASTER CLOSE
TO CURTAINS OR
FLAMMABLE MATERIAL.
A re may occur if
incorrectly positioned.
4 5
Place the toaster on an
open level surface. Ensure
the toaster is positioned at
least 200mm CLEAR FROM
ANY OVERHANGING
CUPBOARDS OR WALLS.
Ensure the toaster
is positioned at least
200mm CLEAR FROM
ANY OVERHANGING
CUPBOARDS OR WALLS.
SETTING UP
Read and follow these instructions before using your toaster.
U
N
P
L
U
G
W
H
E
N
N
O
T
I
N
U
S
E
CRUMB TRAY MUST
BE IN PLACE DURING
TOASTING.
TOASTING TIPS
Here are a few tips to help get the best out of your toaster.
• Different breads will toast at different rates, wholemeal bread takes longer than white bread,
fresh bread will take longer than day old bread. Remember to adjust your browning control
to allow for your particular type of bread.
• After the rst round of toast, the elements and toaster body will be heated up, subsequent
rounds will take less time to toast.
• At any time during the toasting cycle you can lift the toasting lever and check the progress
of the toasting.
• Use the bagel setting to toast burger buns, bagels, mufns or tea cakes, this setting toasts
one side whilst gently warming the other.
• The thickest slice of bread that will t in your toaster is 36mm thick. Forcing bread which is
too thick or too long into the slots will be difcult to eject once toasted.
• You may nd it easier to use a ‘sandwich cage’ to toast smaller items. Inserting and removing
items will be easier (sold separately).
• When hand cutting a fresh loaf, cut the slices as evenly as possible. Uneven slices will toast
unevenly.
• Keep elements free from breadcrumbs and broken pieces of bread. If left these may burn
out the elements. With the toaster unplugged use a soft brush to clean inside your toaster,
do not use a knife!
• To reheat recently made toast set the browning control to 1.
• Cancel toasting manually at any time by pressing the cancel button on the browning control
knob.
7
UNPLUG
UNPLUG WHEN NOT IN
USE.
6
THE CRUMB TRAY
8
DON’T FORGET TO REGISTER YOUR TOASTER AT
WWW.DUALIT.COM/REGISTER OR BY POST
WWW.DUALIT.COM/REGISTER
10 11
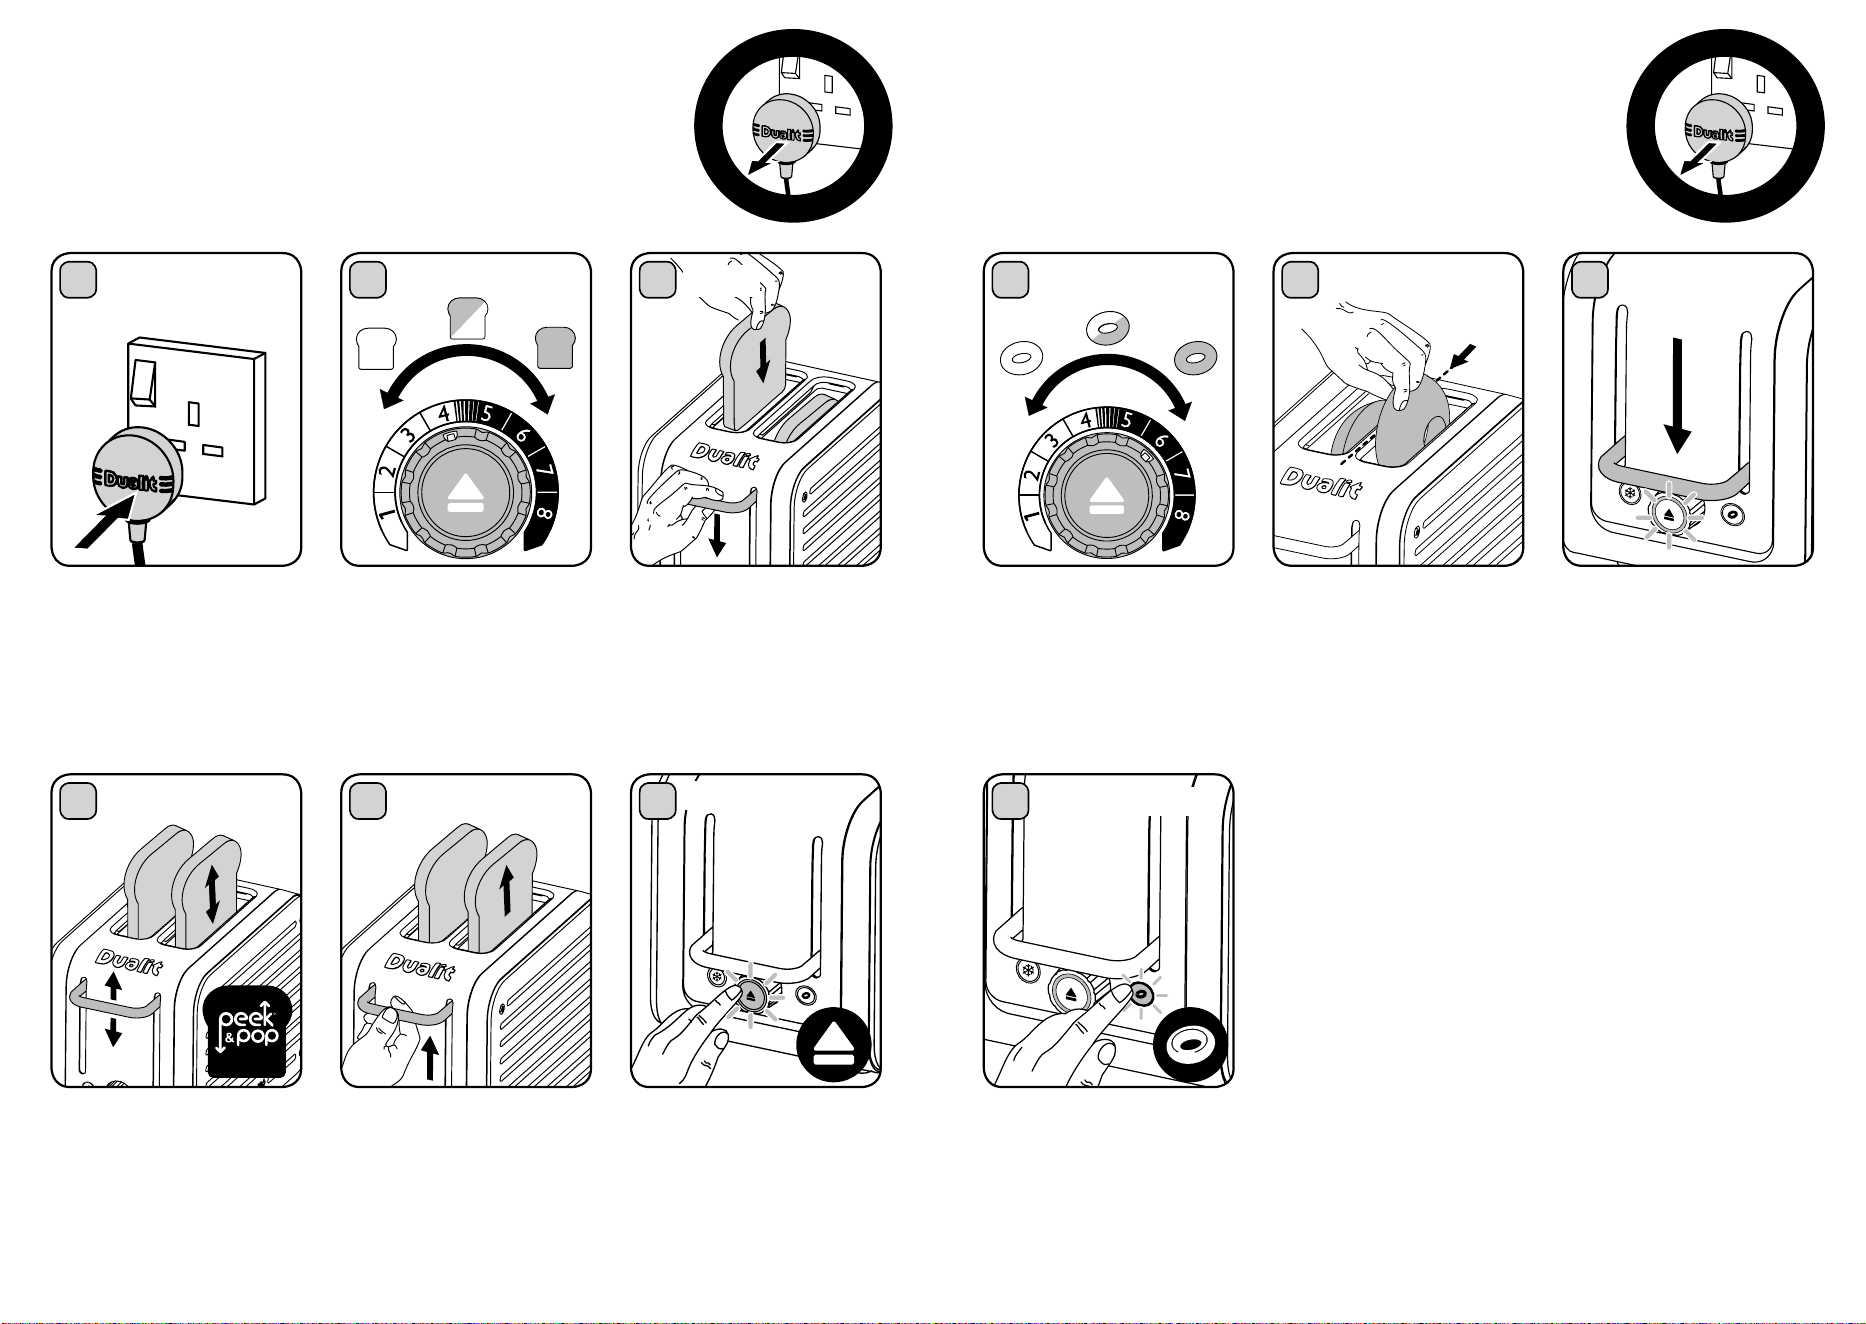
1
PLUG IN
2
SET
The toaster will only engage
when the power is switched
on. Plug the toaster into the
wall power socket and turn
power on at socket.
To toast, set the desired
browning level by means
of the browning control (1
is the lightest and 8 is the
darkest setting).
3
Place the bread into the
slots and press the toasting
lever down until it engages.
The browning control will
be illuminated blue for the
duration of the toasting.
4
PEEK & POP
65
HIGH LIFT
At any time during the toasting
cycle you can lift the toasting
lever and check the progress
of the bread. If you remove
the toast before the cycle
is complete, press the
cancel button and unplug.
To immediately stop toasting,
press the cancel button.
After cancelling if neon
light remains illuminated
after use immediately
unplug the toaster & call
service centre.
When toasted the toast will
pop up automatically. If the
slices are difcult to remove
safely, lift the toasting lever up
manually for extra high lift.
TOASTING BREAD
THIS IS AN ATTENDED APPLIANCE. Do not leave unattended
during use, unplug after each use (risk of re if an
unattended appliance is left operating).
U
N
P
L
U
G
W
H
E
N
N
O
T
I
N
U
S
E
1
SET
ON
2
INSERT
Select the desired browning
level. (1 is the lightest and 8 is
the darkest setting).
Slice bagel into two equal
halves before toasting. Insert
bagel so both ‘cut’ sides are
facing inwards to the centre
element.
3
ENGAGE
Press the toasting lever
down until it engages. The
browning control will be
illuminated blue.
BAGEL & BUN TOASTING
Perfectly toast bagels or other bread products such as buns, English
mufns or teacakes. This feature gently warms the outside of the item
and toasts the inside to perfection. To cancel toasting see page 13.
U
N
P
L
U
G
W
H
E
N
N
O
T
I
N
U
S
E
R
INSERT
STOP TOASTING
4
As soon as the bagel is
lowered, immediately press
the bagel button. The
button will be illuminated
blue and only the centre
element will heat up.
BAGEL BUTTON
12 13
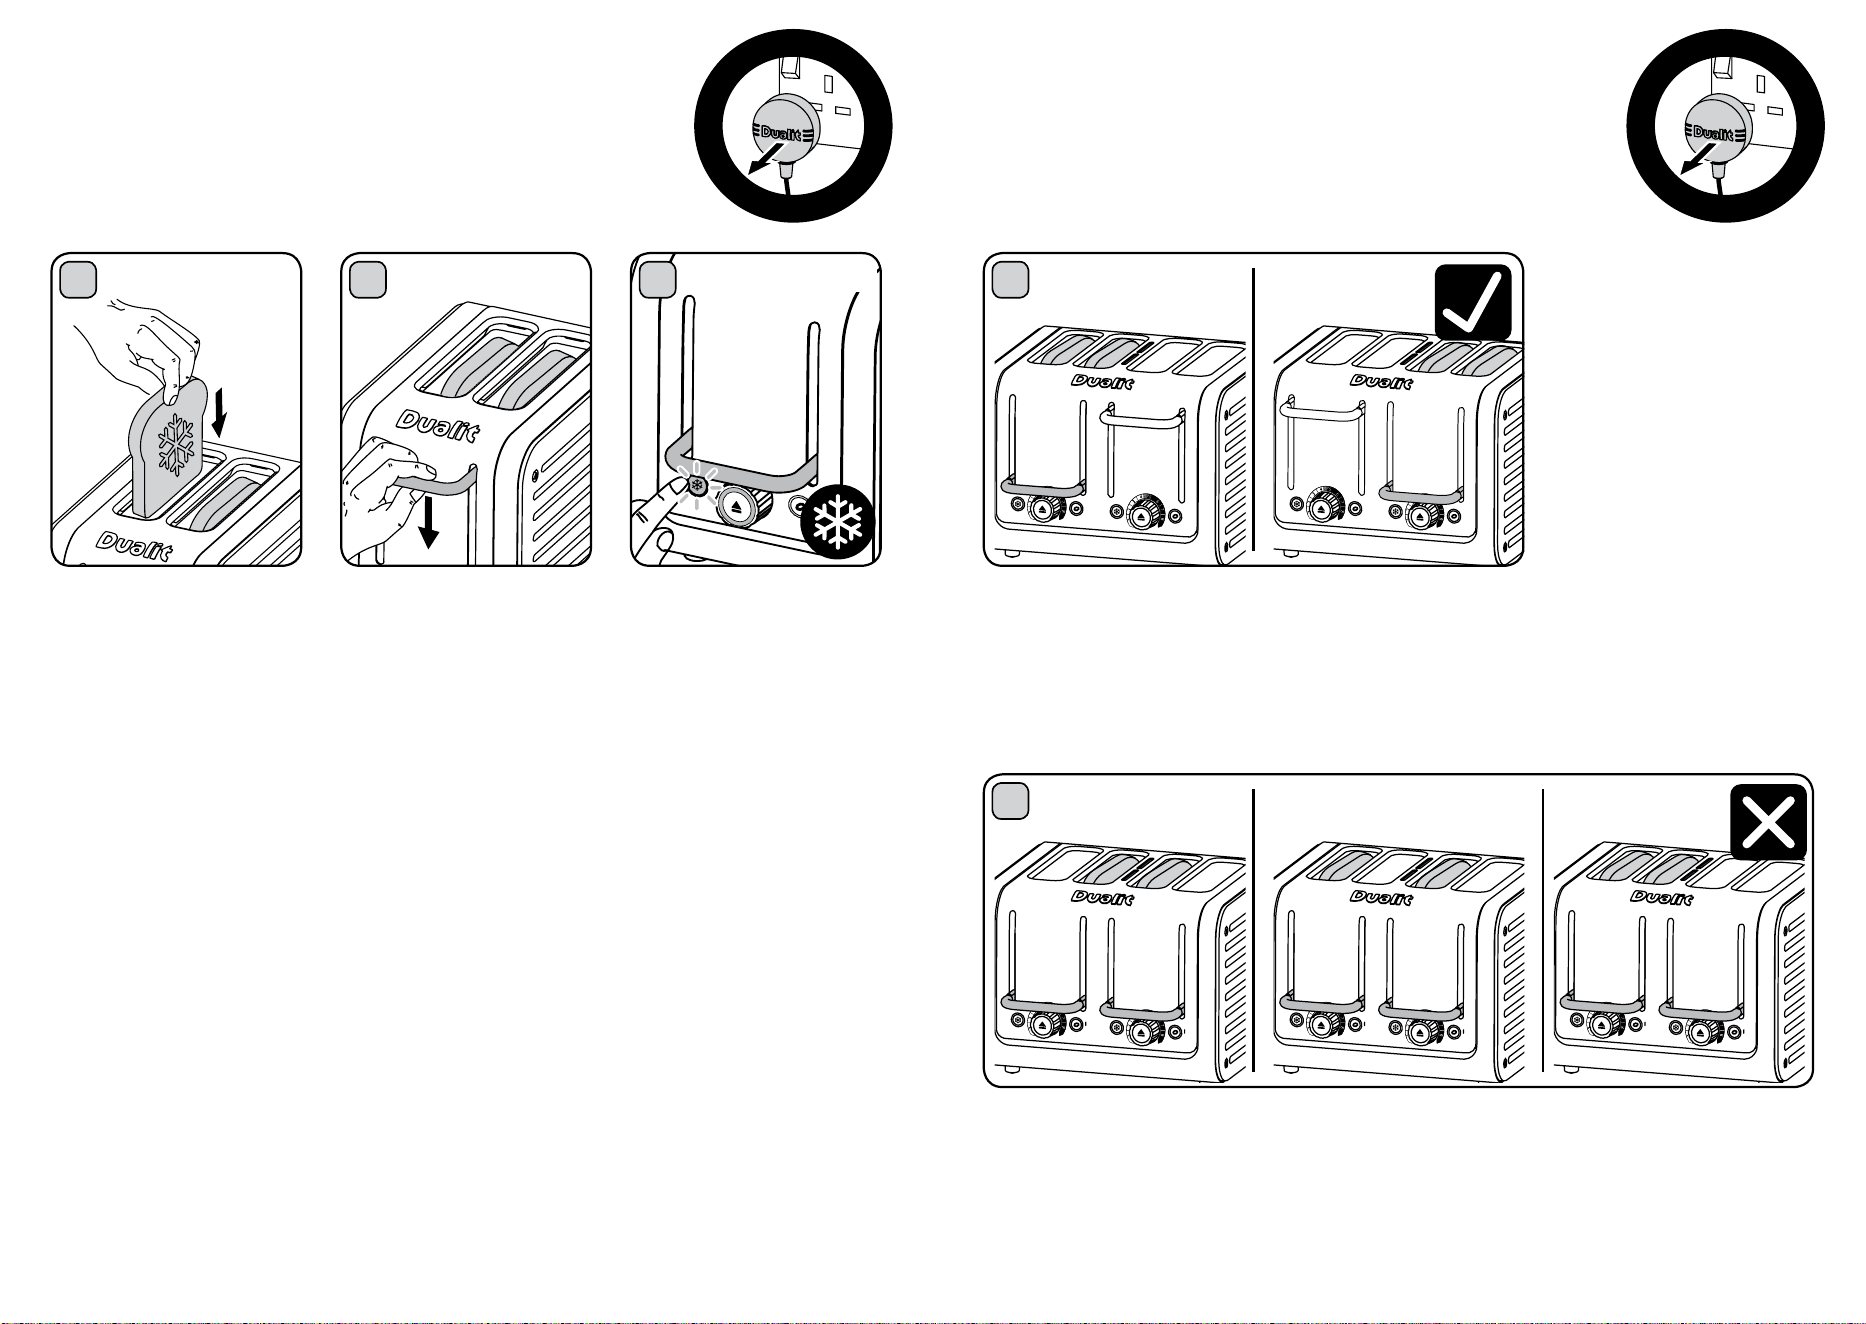
1
INSERT
2
ENGAGE
To toast frozen bread, place
the bread into the slots.
Press the toasting lever
down until it engages.
3
Immediately press the
defrost button. The button
will be illuminated blue.
To toast frozen bagels or
buns, engage the toasting
lever then press both
defrost and bagel buttons.
TOASTING FROZEN BREAD
When ‘defrost’ is activated, the toaster automatically adjusts the settings
to defrost and then toast frozen bread.
To cancel toasting see page 13.
U
N
P
L
U
G
W
H
E
N
N
O
T
I
N
U
S
E
DEFROST BUTTON
1
If you want to toast 2 pieces of bread only LOAD AND
ENGAGE one side of the toaster.
4 SLOT TOASTING
To cancel toasting see page 13.
U
N
P
L
U
G
W
H
E
N
N
O
T
I
N
U
S
E
2
DO NOT LOAD AND ENGAGE BOTH SIDES OF THE TOASTER TO TOAST 2 PIECES
OF BREAD.
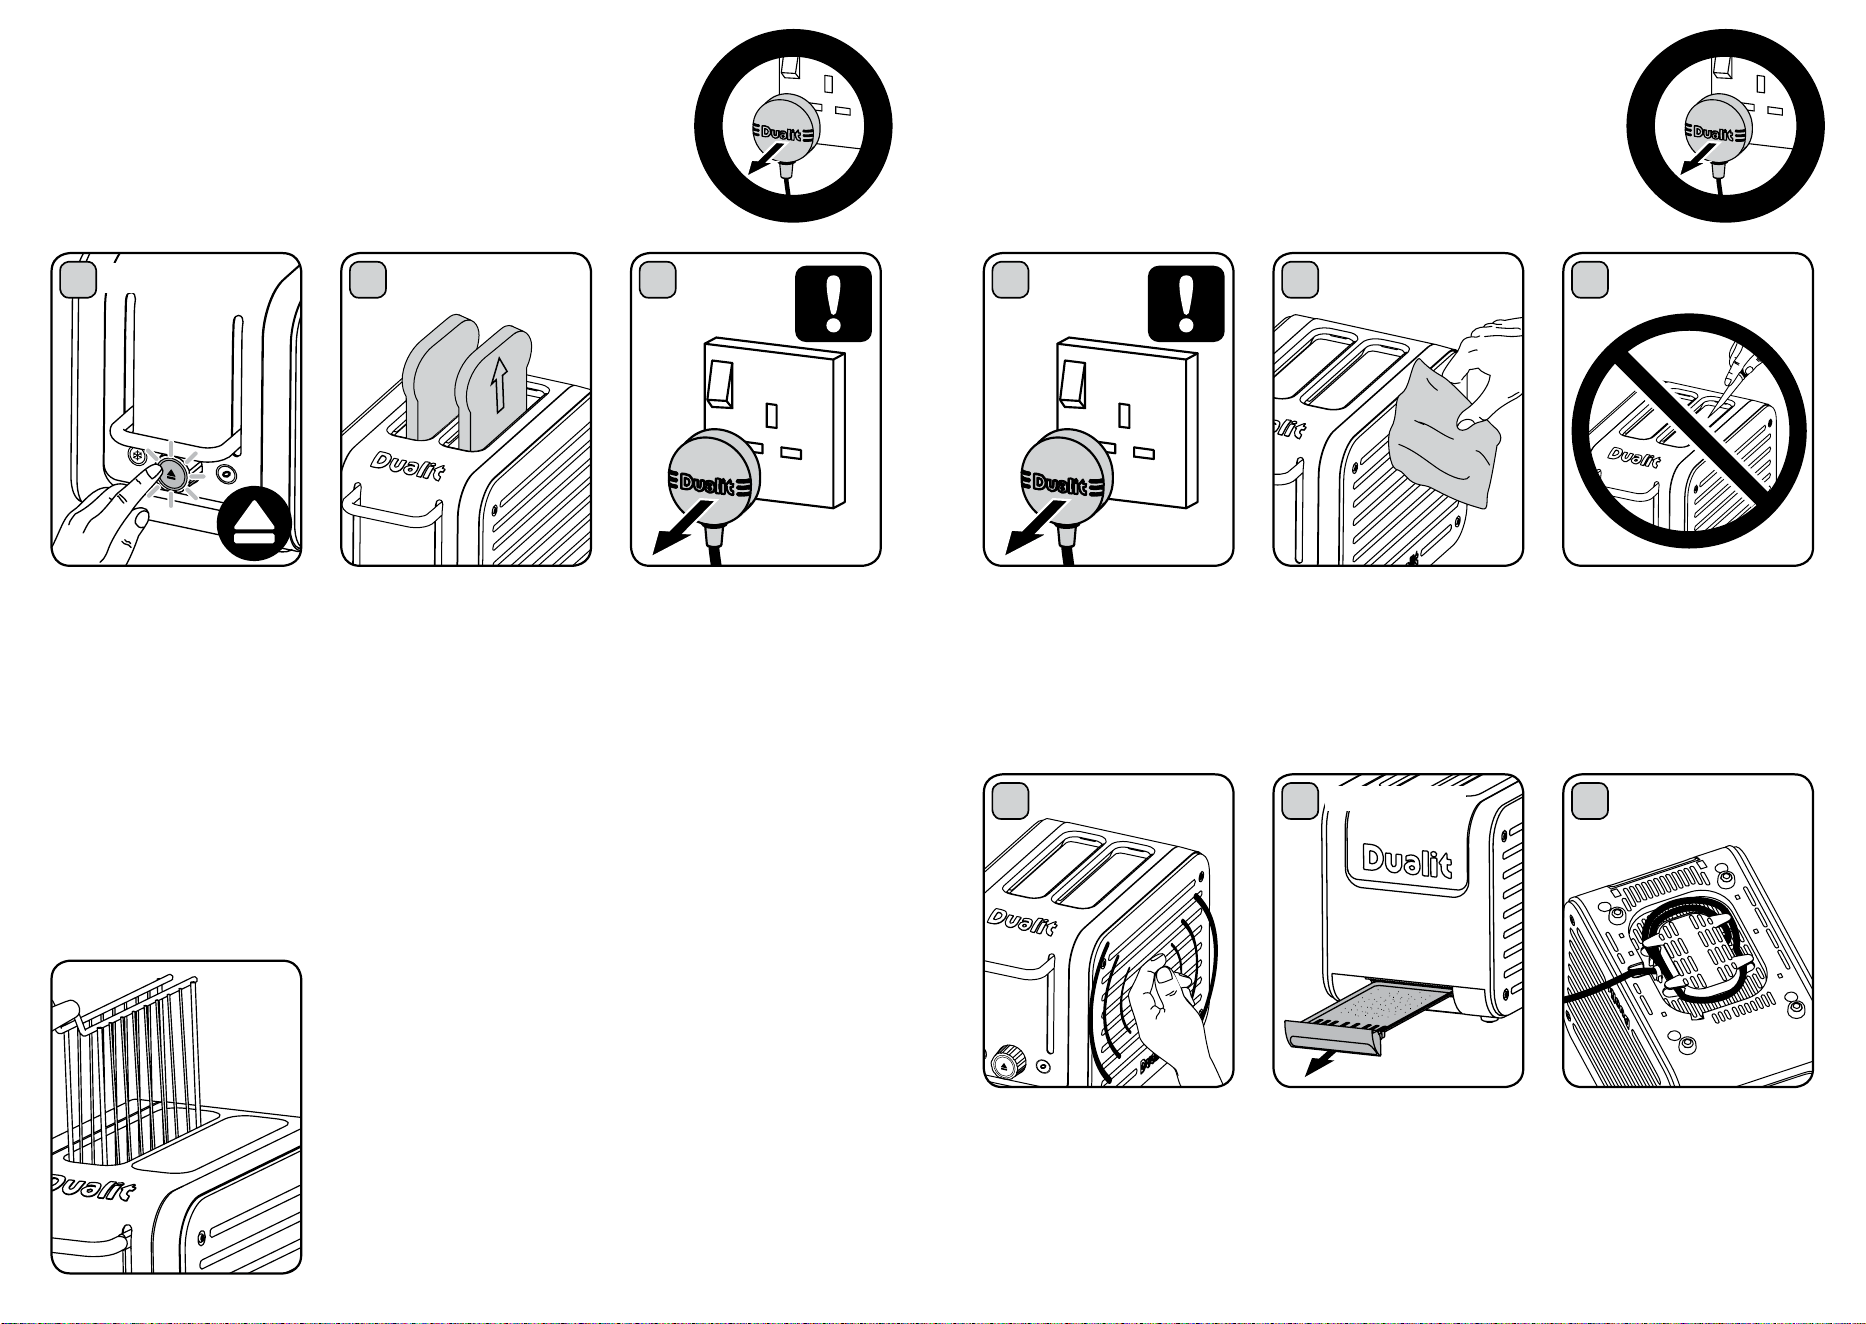
14 15
1
UNPLUG
2
WIPE
Switch toaster off, remove
the plug from the wall socket
and let the toaster cool down
before you start cleaning it.
Wipe the outside of the
toaster with a moist cloth
and dry it with another
cloth. Do not use a
scouring pad or abrasive
cleaner.
3
CAUTION
Use a soft brush to clean
inside your toaster.
Do not insert any metallic
or sharp utensils in to the
toaster.
4
LIGHTLY TAP
6
CORD TIDY
5
When the toaster has
cooled completely, tap the
sides of the toaster lightly to
dislodge any crumbs caught
in the toasting chamber.
Store the cleaned toaster
unplugged with the cord
wrapped round the cord
tidy on the base of the
toaster.
Crumbs will accumulate in the
crumb tray and could catch
re if the tray is not emptied
frequently. Pull out the crumb
tray and wipe clean using a
damp cloth.
CLEANING & CARE
U
N
P
L
U
G
W
H
E
N
N
O
T
I
N
U
S
E
CRUMB TRAY
1 2
POP UP
Press the cancel button
located on the end of the
browning control.
The toaster will immediately
stop and the items being
toasted will pop up.
The neon will go out.
After cancelling if
neon light remains
illuminated after use
immediately unplug the
toaster & call service
centre.
3
UNPLUG
THIS IS AN ATTENDED
APPLIANCE. Do not
leave unattended during
use, unplug after each
use (risk of re if an
unattended appliance
is left operating).
STOP TOASTING
The toasting cycle will automatically stop and the toast will pop up,
but if required you can cancel at any time.
U
N
P
L
U
G
W
H
E
N
N
O
T
I
N
U
S
E
STOP BUTTON
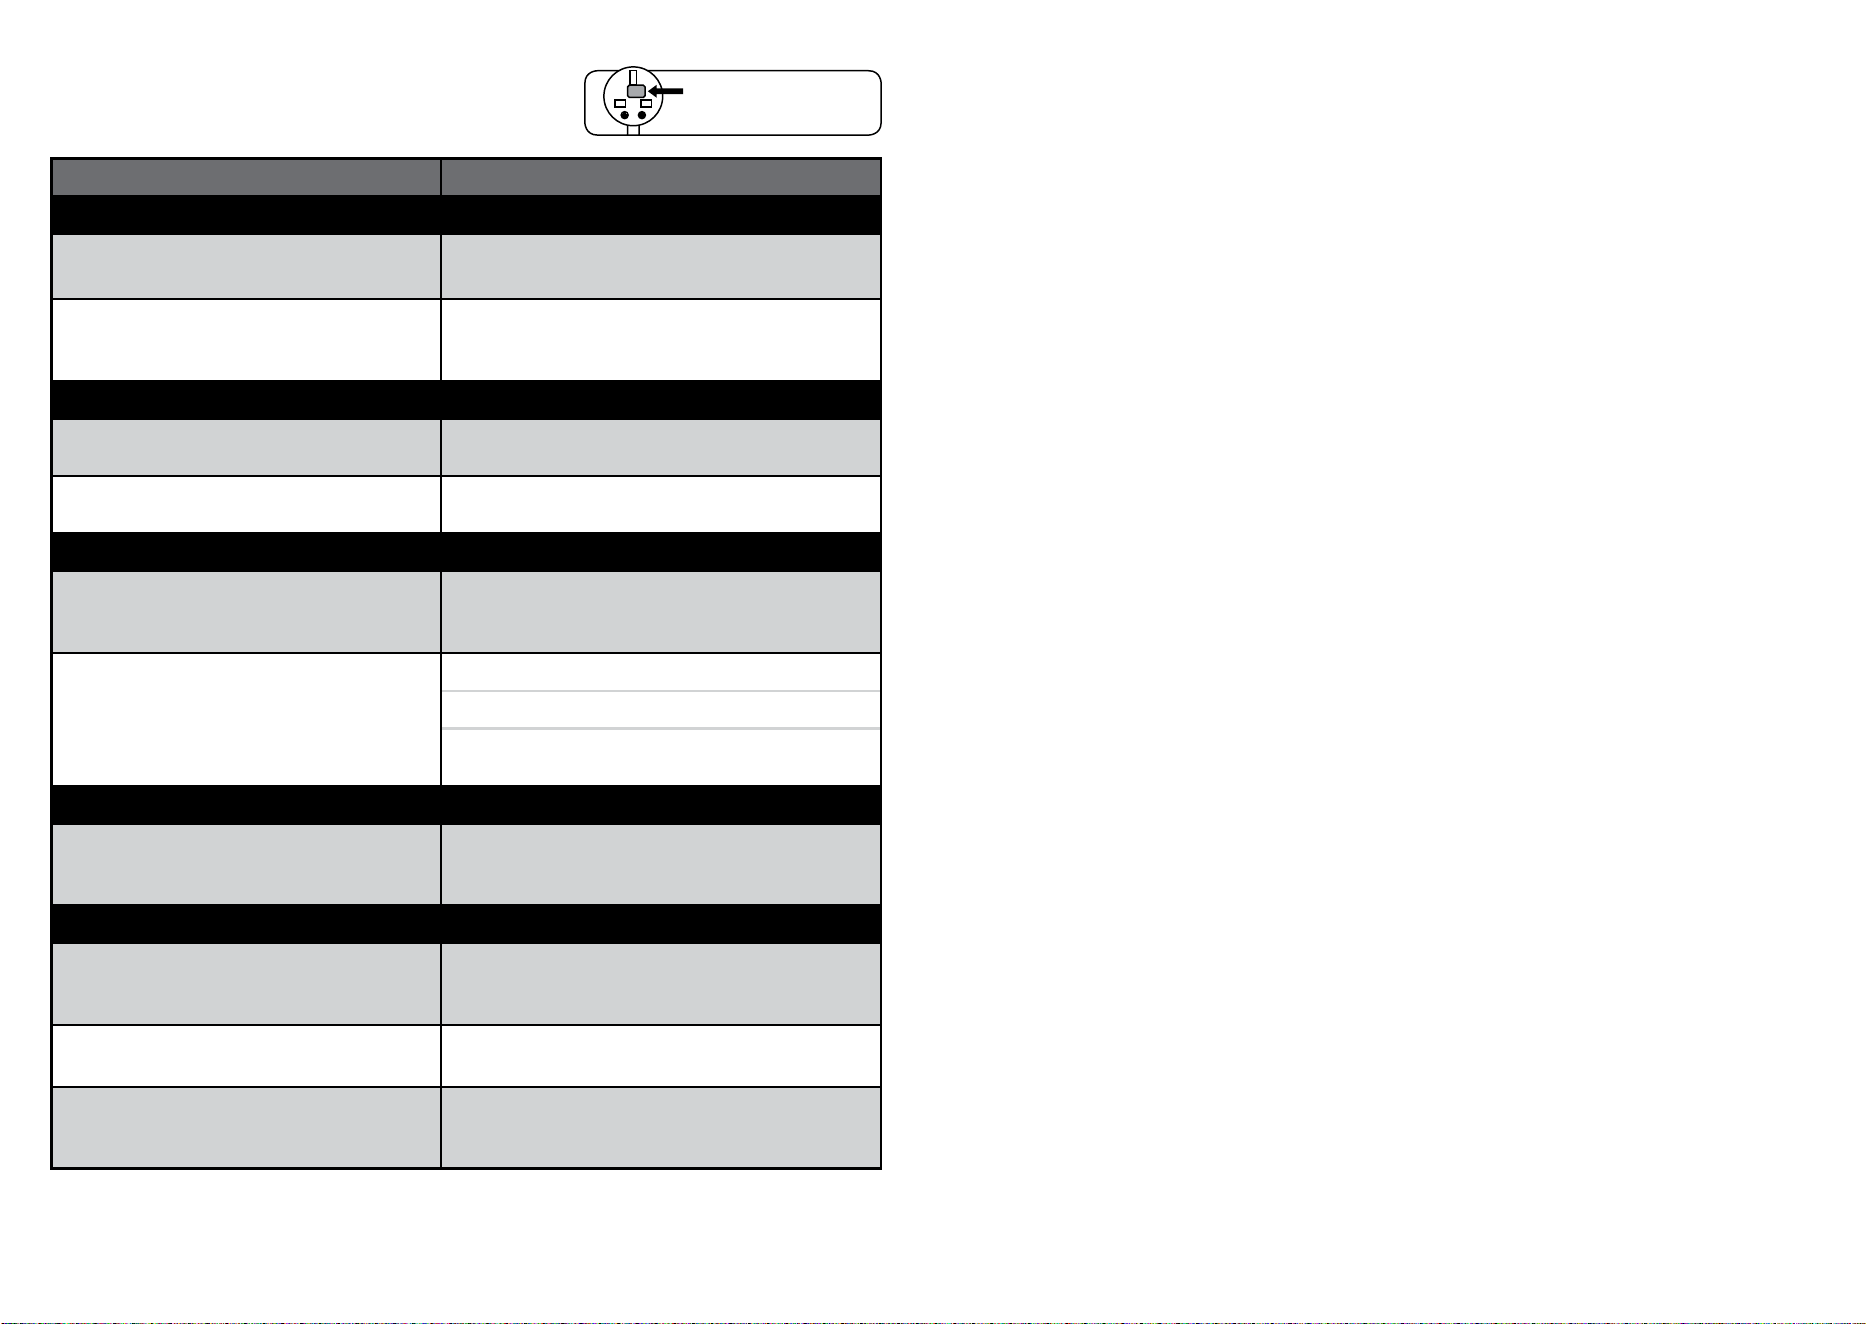
SANDWICH CAGE OPTIONAL EXTRA
The sandwich cage provides you with the option of making
toasted sandwiches in your Architect toaster. It is also useful for
toasting smaller items like buns, bagels and teacakes. Each pack
includes a free cookbook with a range of ideas for deep lled
toasted sandwiches that make good use of the extra-wide slots
of your Architect toaster.
AVAILABLE AT: WWW.DUALIT.COM/ARCHITECT
16 17
TROUBLESHOOTING
POSSIBLE CAUSE(S) SOLUTION(S)
MY TOASTER IS NOT WORKING:
1. The toaster may not be properly
connected to the power supply.
1. Check the plug is in the socket and the switch
in turned on.
2. If your lever is not staying down. 2. Check if the ‘neon’ is glowing blue.
If yes, unplug the toaster and call service centre
If no, your plug fuse may have blown.
I GET UNEVEN TOASTING:
1. Different bread types and sizes have
been used at the same time.
1. Ensure size and type of bread being toasted
is the same.
2. End elements take a little longer to
warm up than centre elements.
2. Once toaster is at optimum operating
temperature this will no longer occur.
MY TOAST DOESN’T POP UP WHEN THE TOASTER HAS FINISHED:
1. There may be a fault with the toaster. 1. If the power neon remains illuminated,
immediately unplug the toaster and call service
centre.
2. Your bread may be too thick 2.1 Slices thicker than 36mm will get stuck.
2.2 Hand cut slice must be cut evenly.
2.3 Using a ‘sandwich cage’ can make toasting
thicker items easier.
ONE SIDE OF MY BREAD IS NOT TOASTING
1. If set to Bagel setting only one side will
toast.
1. Press the bagel button to cancel the setting.
Remember to insert bread from the very left
hand slot.
SMOKE COMING OUT OF THE SLOTS
1. If this is the rst time using your toaster,
this is normal, your elements are being
conditioned.
1. This will dissipate after a few uses.
2. The crumb tray might be full. A build up
of crumbs can burn or cause a re.
2. Empty the crumb tray.
3. Some crumbs or pieces of bread may
be stuck in the toaster.
3. Unplug, remove the crumb tray then turn
the toaster upside down over a sink or bin and
gently shake the crumbs out.
GUARANTEE
This appliance is of excellent quality and construction. However, if any defects in materials or
workmanship do appear during the relevant guarantee period, we will, at our discretion, either
repair or replace the defective parts, free of charge, subject to the terms and conditions of our
Guarantee shown below.
This Guarantee covers both parts and labour.
Carriage is not included.
Your Guarantee period is as follows:
• 1 year
This Guarantee provides benets which
are additional to, and do not affect, your
statutory rights. This Guarantee does not
cover the cost of returning the product to
the dealer from whom it was purchased or
to ourselves. This Guarantee applies only to
products sold and located in mainland Great
Britain. It does not cover liability in respect of
or replacement of plugs, cables or fuses and
also does not cover defects due to:
• Failure to use or maintain product in
accordance with Dualit’s instructions.
• The product being connected to an
unsuitable electricity supply.
• Accidental damage to or abuse or misuse
of the product.
• product modication, except by Dualit or
approved agent.
• Dismantling of or interference with the
product.
• Theft or attempted theft of the product.
Before returning any product under this
Guarantee, please check that:
• You have followed the product instructions
correctly.
• Your mains electricity supply is functional.
• The defect is not due to a blown fuse.
If you wish to claim under this guarantee you
should:
• Send the product, postage or carriage paid,
to the dealer from whom it was purchased
or to Dualit direct.
• Ensure that the product is clean and
packed carefully (preferably in its original
carton).
• Enclose details of your name, address and
telephone number and when and where
the product was purchased, together with
proof of purchase (e.g. a till receipt).
• Give exact details of the nature of the
defect.
This Guarantee does not cover any other
claims whatsoever, including, without
limitation, any liability for incidental, indirect
or consequential damage, nor does it cover
any claims for conversion or modication
or for the costs of repair carried out by any
third party without the prior consent of
Dualit. If replacement parts are tted to the
product this will not extend the period of
the Guarantee.
For further advice contact the Dualit
customer helpline on +44 (0)1293 652 500
(09:00 to 17:00 Monday to Friday).
Alternatively, email Dualit at [email protected]
or visit www.dualit.com
Do not throw away the appliance with the
normal household waste at the end of its life,
but hand it in to an ofcial collection point
for recycling. By doing this you help preserve
the environment.
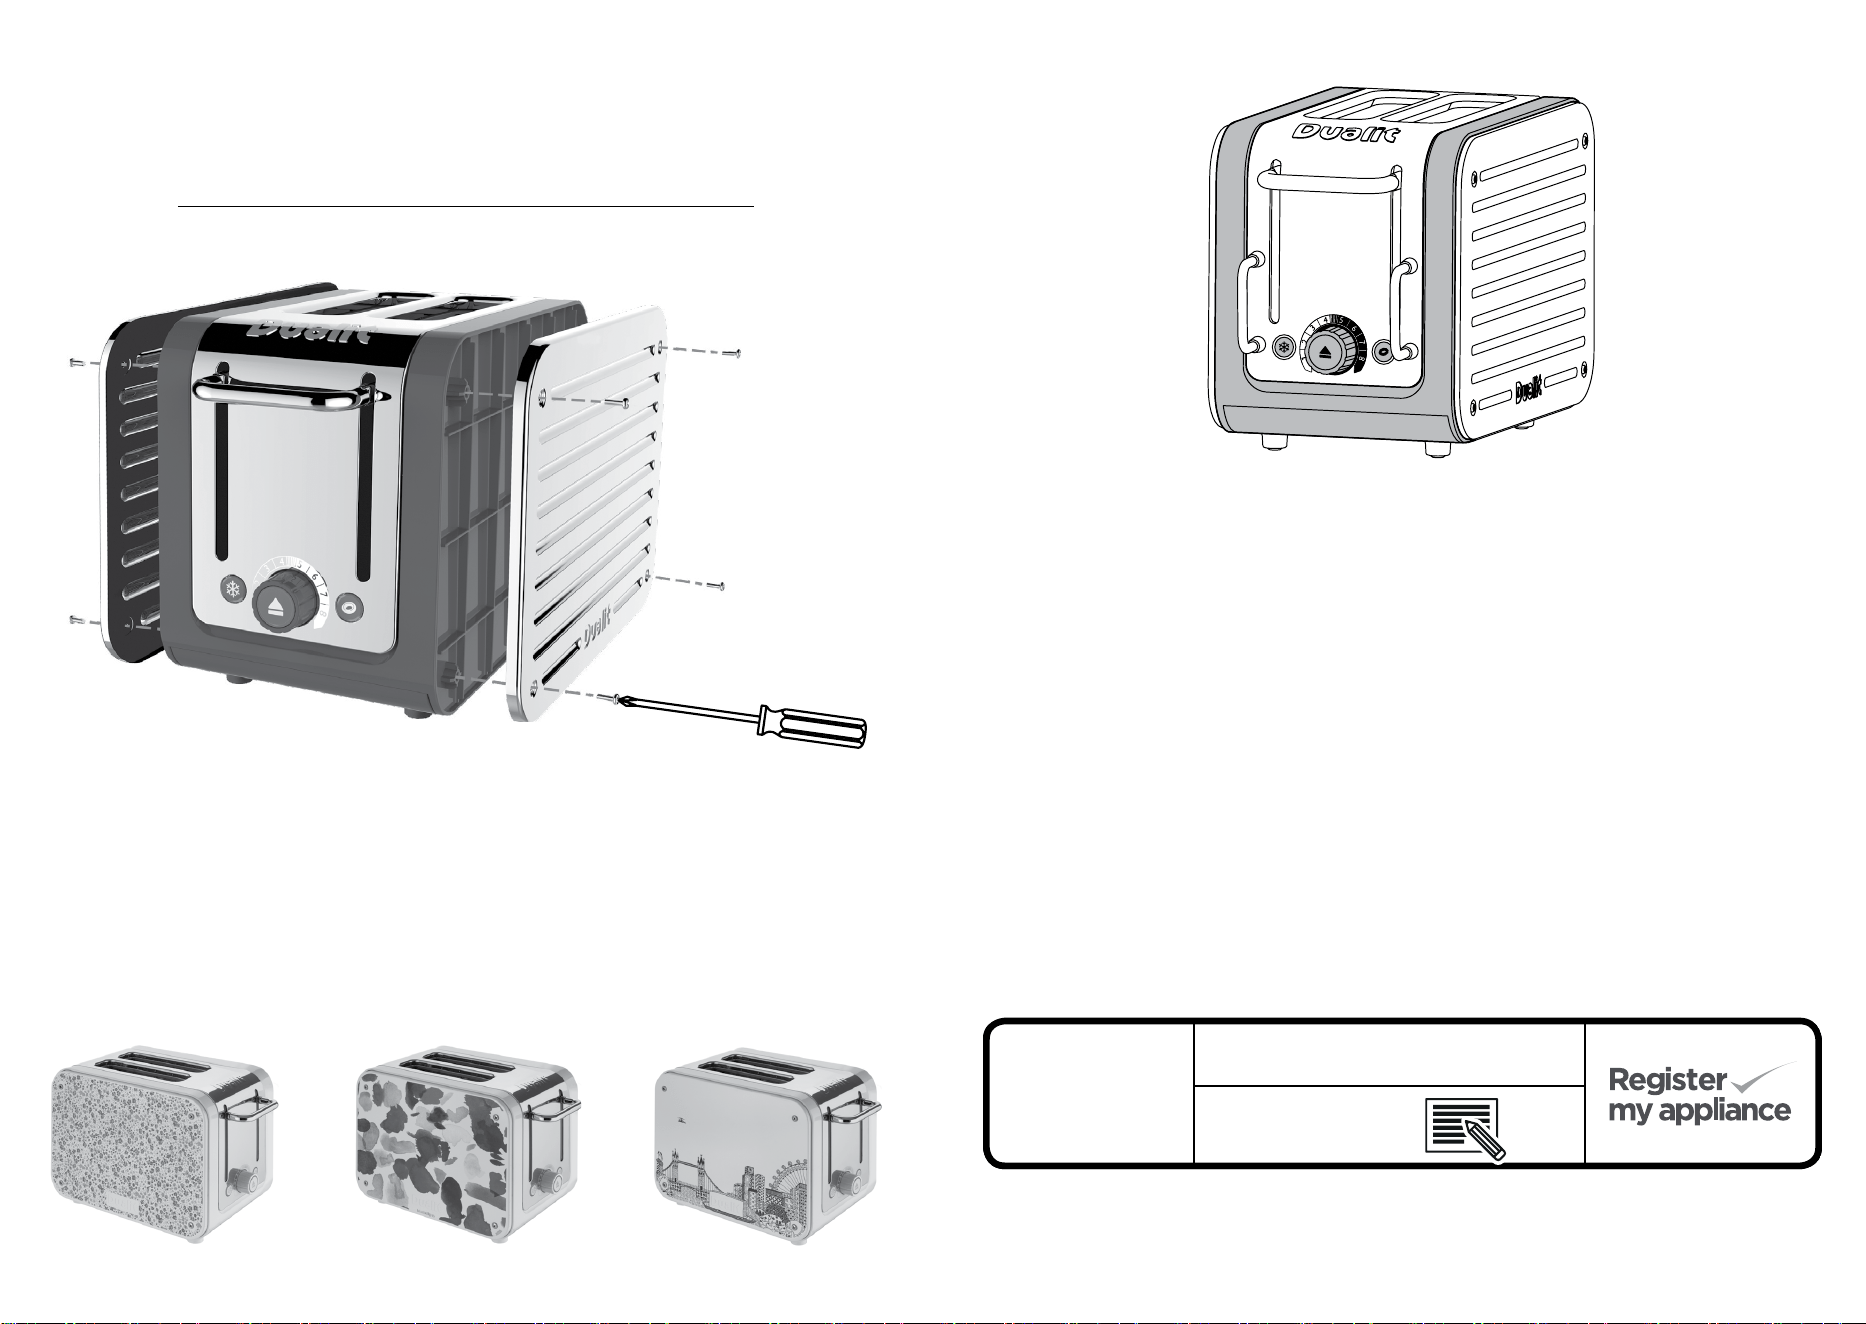
TO REPLACE FUSE,
REMOVE SILVER LABEL
TO ACCESS SCREW.
18 19
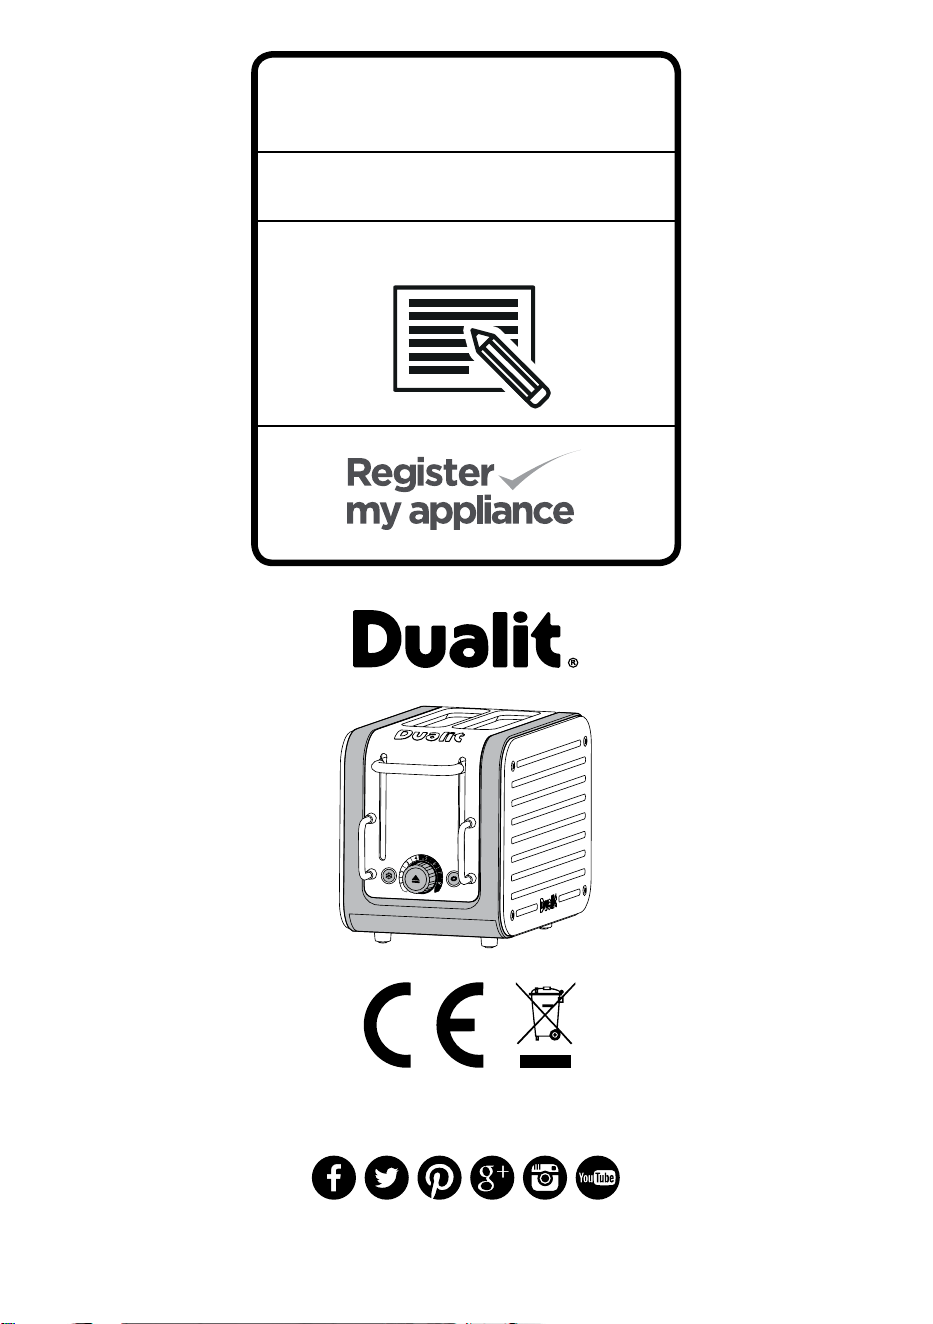
INTERCHANGEABLE PANELS
Change your panels at:
WWW.DUALIT.COM/ARCHITECT
DON’T FORGET
TO REGISTER
YOUR PRODUCT
WWW. DUALIT.COM/REGISTER
OR BY POST
REGISTER YOUR PRODUCT
1. Fast and efficient customer service and access to manuals
and product information should you require assistance with
your purchase.
2. Access to a library of mouth-watering recipes and regular articles
on Dualit products, events, competitions and much more.
3. Be the first to receive the latest news about exciting new
Dualit products.
Add a splash of colour with our range of innovative,
interchangeable panels for your toaster. Select and swap shades
according to your mood or for house moves, renovations, or even
just your latest colour craving. Each pack includes two toaster
panels. Panels are also available for the Architect Kettle.
Dualit Limited County Oak Way Crawley West Sussex RH11 7ST
t: +44(0)1293 652 500 f: +44(0)1293 652 555 e: [email protected] www.dualit.com
GB/AU-J
Architect toasters comply with Australian Deviation AS/NZS 60335.2.9 2009 (A1) requirement.
DON’T FORGET TO
REGISTER YOUR TOASTER
WWW.DUALIT. COM/REGISTER
OR BY POST
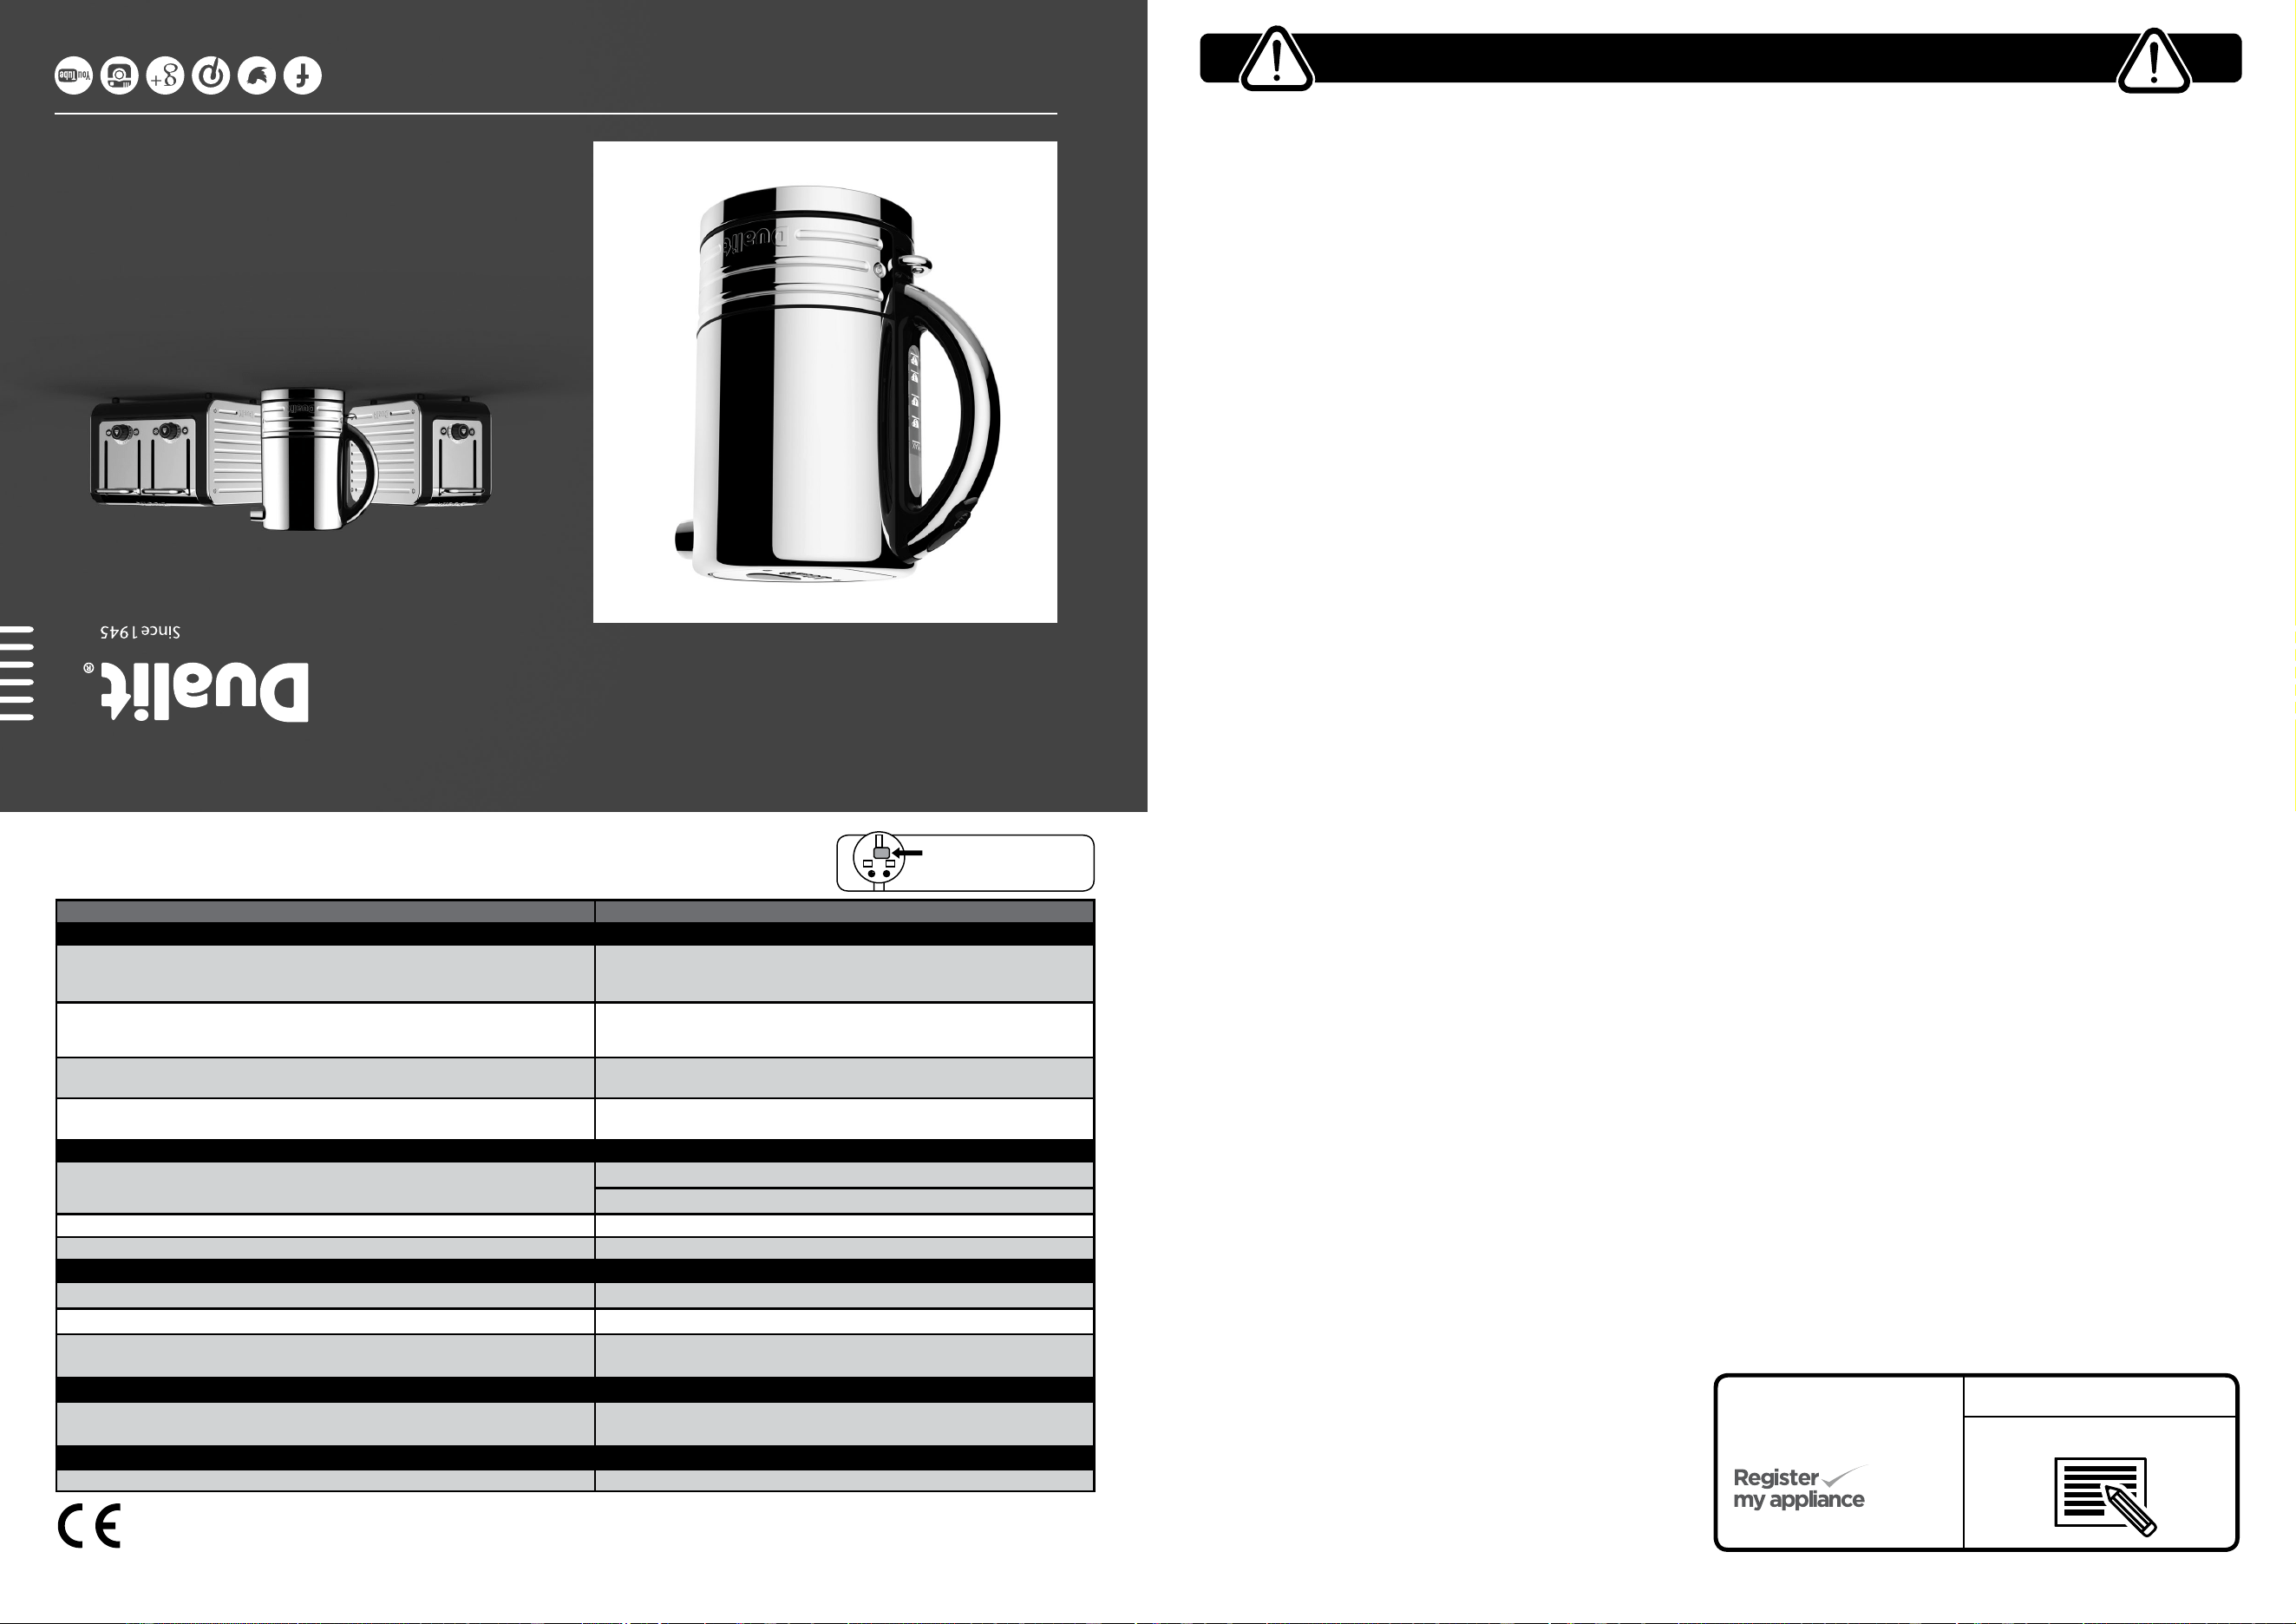
Architect Kettle
Instruction manual
You may also like the matching
Architect toaster
Change your panels at:
WWW.DUALIT.COM/ARCHITECT
IMPORTANT SAFETY PRECAUTIONS
When using electrical appliances, basic safety precautions should always be
followed, including the following:
READ ALL INSTRUCTIONS
BEFORE USING THE KETTLE KEEP THESE
INSTRUCTIONS FOR FUTURE REFERENCE
• THIS IS AN ATTENDED APPLIANCE
D
o not leave appliance unattended during use, unplug after each
use (risk of re if an unattended appliance is left operating or plugged in).
• This appliance must not be used by children younger than 8 years old and
persons with very extensive and complex disabilities. Children aged 8-14
years and persons with reduced physical, sensory or mental capabilities or
lack of experience and knowledge shall not use this appliance, unless they
are supervised and have been given instruction concerning the use of the
appliance in a safe way and understand the hazards involved. Children shall
not play with the appliance. Cleaning and user maintenance shall not be
made by children unless they are older than 8 and supervised. Keep the
appliance and its cord out of reach of children less than 8 years old.
• This appliance is intended for indoor household use only. If the appliance
is used improperly or for professional or semi-professional purposes or if it
is not used according to these instructions the Guarantee becomes invalid
and Dualit refuses any liability for damage caused.
Electrical safety
• Before plugging in, check that the voltage on the rating label is the same as
the mains supply.
• A short power-supply cord is to be provided to reduce risks resulting
from becoming entangled in or tripping over a longer cord.
• Do not operate any appliance with a damaged lead or plug, or after the
appliance malfunctions or has been damaged, cracked or dropped in any
manner.
• In order to avoid a hazard, if the power cord is damaged it must, for safety
reasons, be replaced by Dualit or an authorised Dualit repairer. Call Dualit’s
Customer Helpline on +44 (0)1293 652 500
• Do not let cord hang over edge of table or counter, or touch hot surfaces.
• To disconnect, turn any control to off, then remove plug from wall outlet.
• Unplug the power base from the wall socket when not in use, or before
moving and cleaning.
• Ensure that the kettle is correctly positioned on the power base before
switching on.
• To be protected against electrical hazards, re and injury to persons, do
not immerse the mains lead, plug, power base or kettle in water or any
other liquid.
• Use the kettle only with the power base supplied and vice versa.
• Do not move the kettle while it is switched on.
• Extension cords are available and may be used if care is exercised in
their use. If extension cord is used:
1.
The marked electrical rating of the cord set or extension cord
should be at least as great as the electrical rating of the appliance;
and
2.
The cord should be arranged so that it will not drape over the
countertop or tabletop where it can be pulled on by children or
tripped over unintentionally.
• Avoid spillage on the connector.
General safety
• NOTE: when you lift the kettle from the base, you will see drops of
moisture on the surface of the power base. This is the steam used to
switch the kettle off automatically, which then condenses and escapes
through vents in the underside of the kettle. This is perfectly normal,
and should not be cause for alarm or returning the kettle.
• Do not operate the kettle unless the water lter is correctly in position.
• This appliance should only be operated in a dry well ventilated area.
• Do not operate without closing the lid.
• Do not ll via the spout.
• When lling hold kettle upright (maximum 15° incline)
• Do not operate the kettle unless it contains at least 250ml of water and
the oor of the kettle is covered.
• Do not place the kettle, power base or mains lead on or near any hot surface,
hot hob, gas burner or in a heated oven.
• Do not use the kettle for any purpose other than heating water. Otherwise,
this may result in an injury caused by misuse.
• Do not ll above the bottom of the ‘max’ mark on the water
level indicator.
• Do not operate the kettle on an inclined plane.
• Remove the kettle from its power base before lling or pouring.
• Do not remove or open the lid while the water is boiling.
• Use handles or knobs – do not touch hot surfaces.
• If the kettle is overlled, boiling water may be ejected.
• When boiling, hot steam will be emitted from the kettle. Scalding
may occur if you are within 400mm of the spout.
• Ensure that the kettle spout is pointing away from any electrical plug or socket.
• Take care when pouring – pour slowly and do not over-tilt the kettle.
• Water will remain hot for a considerable time after boiling and can present
a scald hazard. Keep the kettle, power base and the mains lead away from the
edge of worktops and out of the reach of children.
• Allow the kettle to cool down completely before cleaning and storing.
• Do not store or use in an appliance garage or under cupboards.
• Do not use in bathroom or outdoors.
• Ensure that the lid is fully closed before switching the kettle on, otherwise it
may not properly switch off.
• Do not use if dropped, cracked or damaged.
• The use of accessory attachments not recommended by Dualit may
result in re, electric shock or injury to persons.
• Do not use scouring pad or abrasive cleaner on the kettle body.
• CAUTION: to prevent damage to the appliance, do not use alkaline cleaning
agents. When cleaning, use a soft cloth and a mild detergent.
• Scalding may occur if the lid is opened during the boiling cycle and the body of
the kettle will get hot.
• Avoid the steam venting from the spout during and after operation.
Risk of scalding.
• Do not boil the kettle if lled with descaling solution.
• Never use the kettle without the panels correctly assembled.
SAVE THESE
INSTRUCTIONS
In the interest of improving products, Dualit Ltd. reserves the right to change the
product specication without prior notice.
IMPORTANT: BEFORE
FIRST USE
• Read this instruction manual before you start using the kettle. It gives you
important safety information and will ensure you get the most out of your
Dualit kettle.
• Keep this manual and your proof of purchase in a safe place.
• Unpack the box with care, keeping all the packaging materials until you are
satised everything is present and in working order. Once satised, remove
any tags from the appliance body and recycle the packaging appropriately. Do
not remove tags from the cord. You may wish to keep the box to store your
appliance.
• Before using the kettle for the rst time, or if it has been out of use for a long
time, ll to the ‘max’ mark and boil, then discard the boiled water and rinse the
kettle out with fresh cold water.
Dualit Limited County Oak Way Crawley West Sussex RH11 7ST
Telephone: +44(0)1293 652 500 Facsimile: +44(0)1293 652 555
Email: [email protected] Web: www.dualit.com
GB-E
TROUBLESHOOTING GUIDE
POSSIBLE CAUSE(S) SOLUTION(S)
THE KETTLE DOES NOT TURN ON
1. The kettle may not be properly connected to the power supply or the fuse may
have failed.
1. Check the plug is in the socket and the switch is turned on. Replace the fuse
if necessary. Note: in order to open the plug, remove the label to reveal the
screw.
2. Boil dry feature may have been activated. If the kettle is accidently switched on
without water, the boil-dry device will switch off the heating element to prevent
damage to the kettle.
2. Wait approximately 10 minutes for the kettle to cool down, lift and rell as
normal. The kettle is now ready to use again. NOTE: if discolouration of the
heating plates has occurred, this can be easily removed by descaling your kettle.
3. The element may have broken if the power neon illuminates but the kettle does not
boil
.
3. The element cannot be replaced. For further assistance call customer services
on 01293 652500.
4. The kettle does boil but the power neon does not illuminate. 4. The power neon may have blown, and cannot be replaced. For further
assistance call customer services on 01293 652500.
THE KETTLE IS SPUTTERING OUT OF THE SPOUT
1. You may have over lled the kettle. 1.1 Only ll to the max mark (1.5L).
1.2 Wait 10 seconds to allow the boiling water to settle before pouring.
2. The kettle may have descaling solutions remaining inside the body. 2. Follow the instructions from the cleaning & care section and rinse throughly.
3. The lter may not be in position. 3. Ensure the lter is in position. For spare lters call Dualit on 01293 652500.
MY KETTLE IS NOT SWITCHING OFF
1. Limescale may have built up inside the kettle. 1. Descale your kettle regularly (see cleaning & care).
2. The Lid may not be fully closed or limescale may have built up on the lid lip. 2. Check the lid is rmly closed during use. If necessary descale lid lip.
3. Water may have gone down the steam tube whilst lling. You may have overlled,
tilted the kettle when lling or lled through the spout.
3. Leave the kettle for 24 hours to fully dry.
MARKS HAVE APPEARED IN THE KETTLE
1. Small brown spots can build up inside the kettle. This is not rust, small deposits of
scale which contain iron can build up inside the kettle.
1. Descale regularly (see cleaning & care).
WATER DROPLETS COLLECTS ON TOP THE POWER BASE
1. This is condensation and perfectly normal. 1. Dry with non abrasive cloth.
DON’T FORGET TO
REGISTER YOUR
KETTLE
WWW. DUALIT.COM/REGISTER
OR BY POST
Follow us on:
If none of the below points apply call customer services on 01293 652500.
TO REPLACE FUSE,
REMOVE SILVER LABEL
TO ACCESS SCREW.
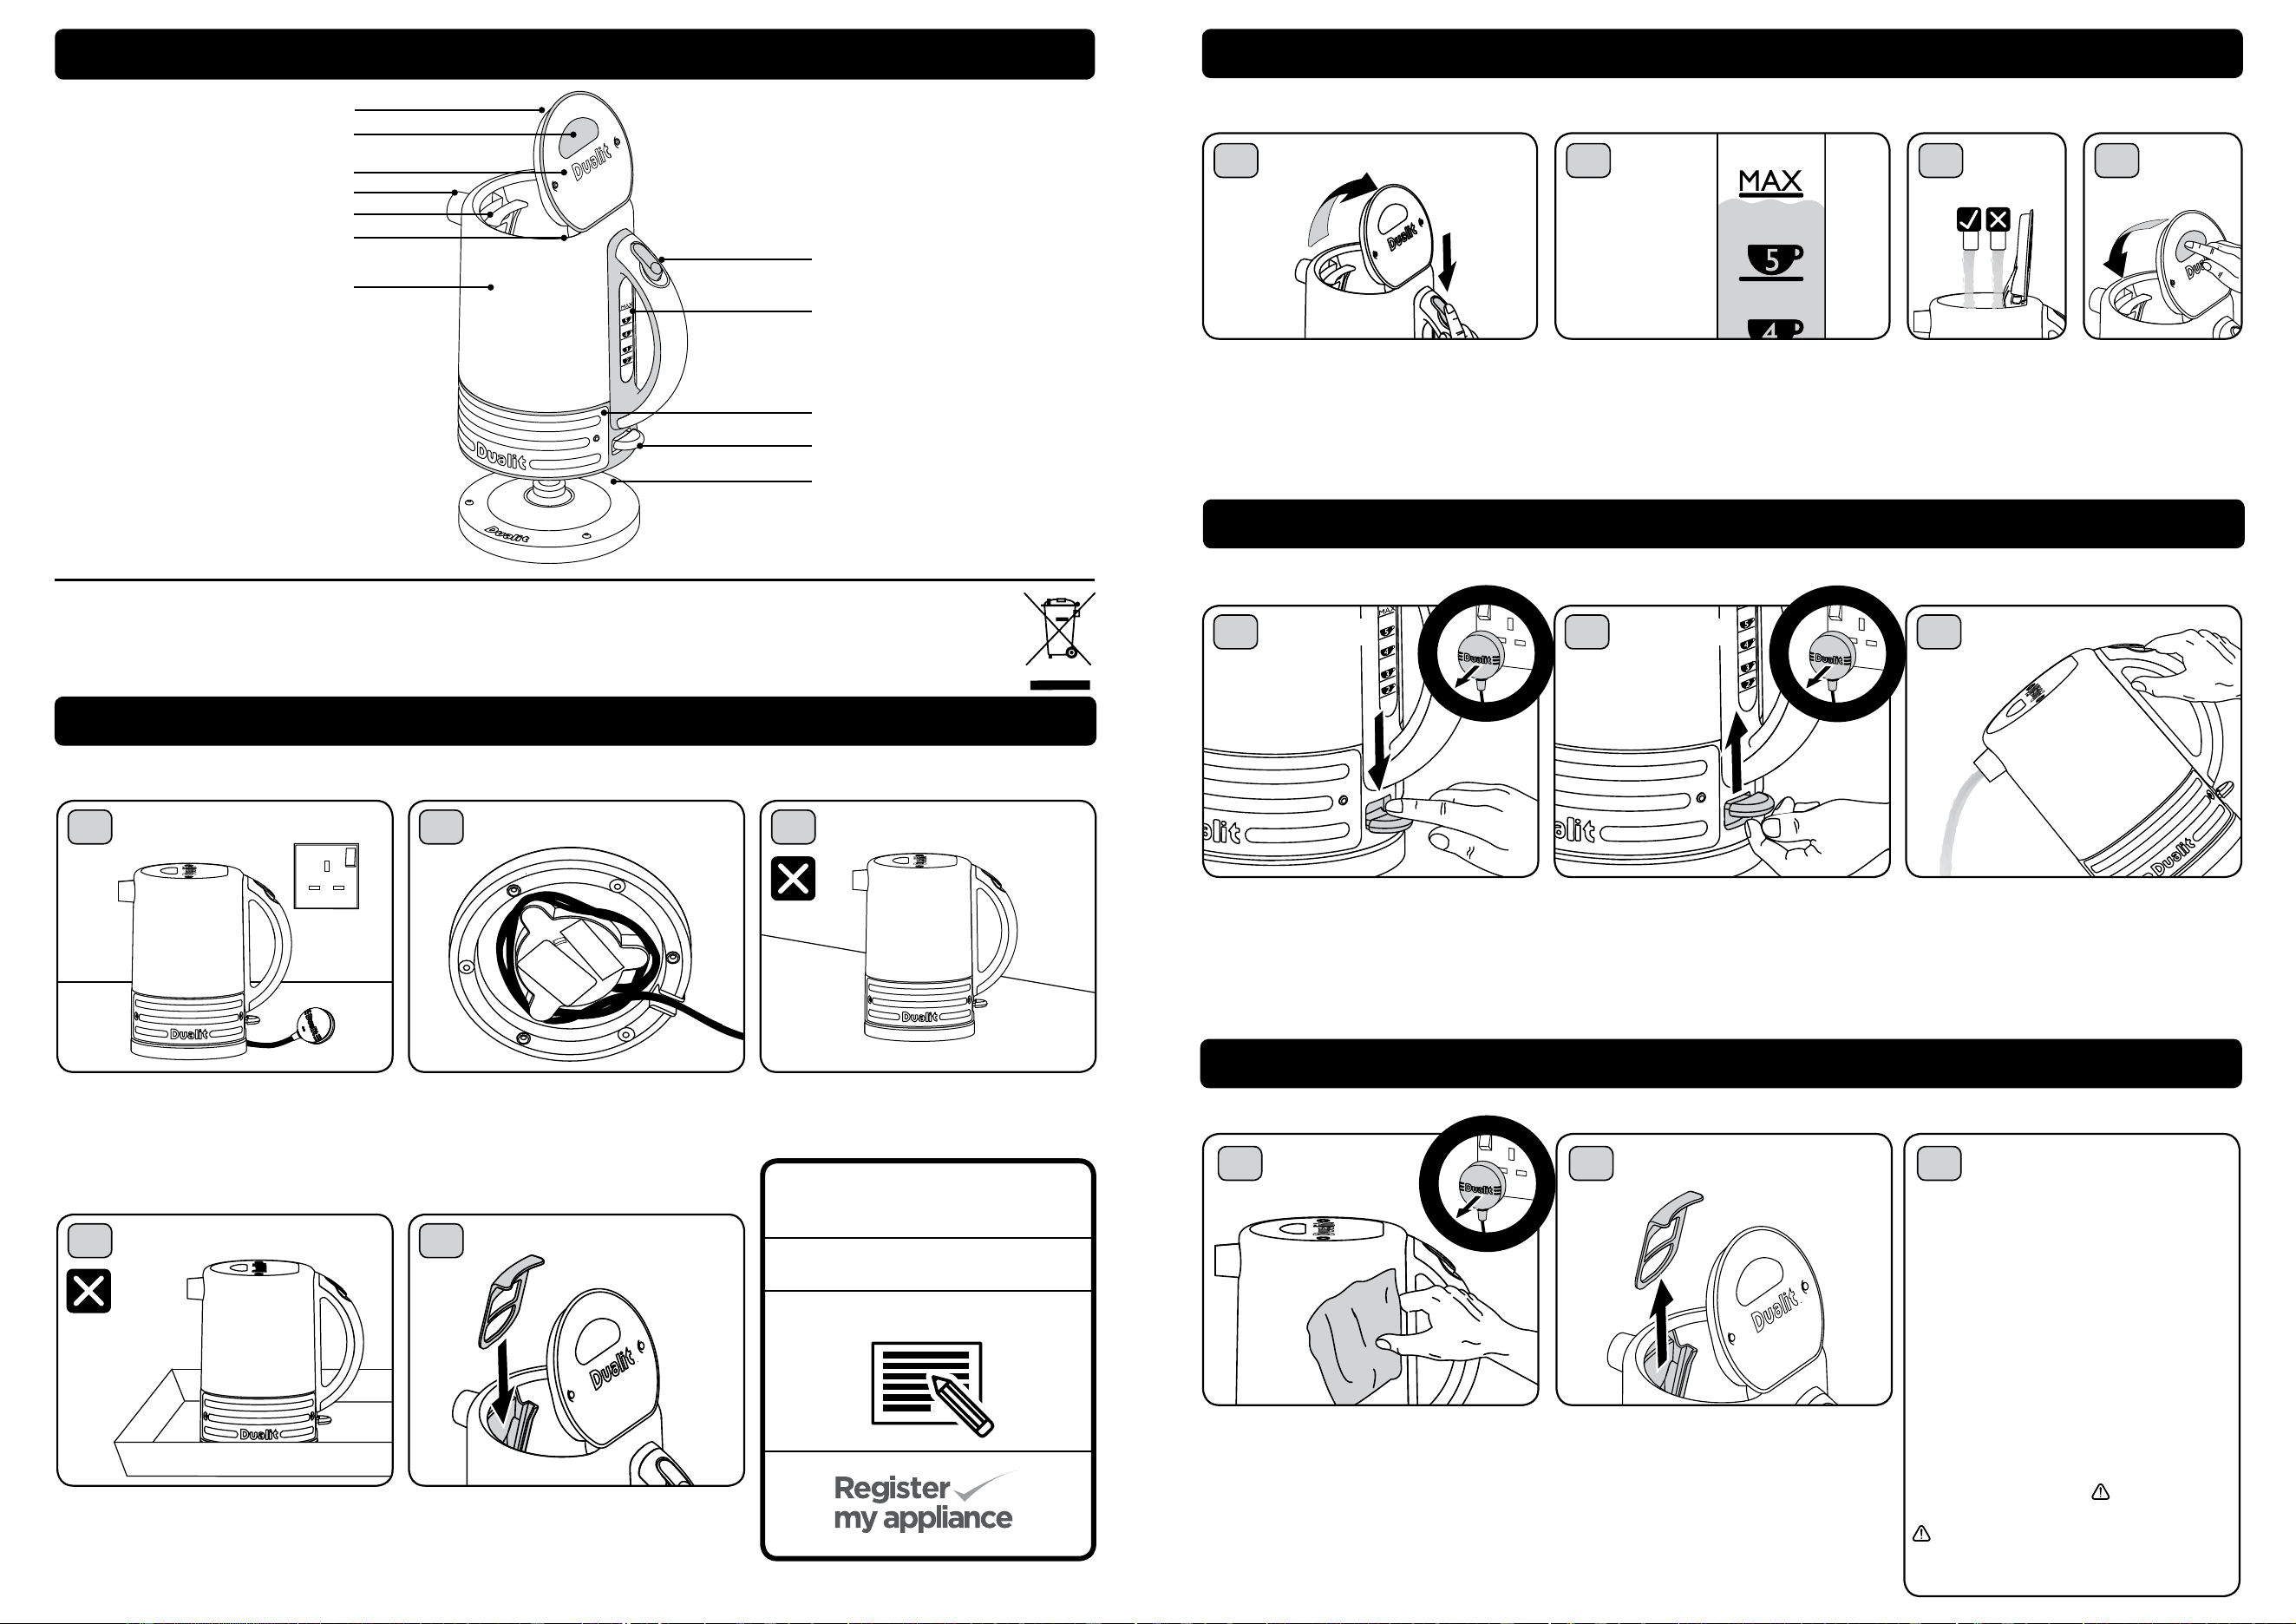
KNOW YOUR KETTLE
SETTING UP
All illustrations are for representation only, your
model may vary from the illustrations shown.
In the interest of improving products, Dualit Ltd. reserves the
right to change the product specication without prior notice.
A
D
B
G
C
E
L
K
J
I
H
A.
B.
C.
D.
E.
F.
G.
H.
I.
J.
K.
L.
LID
TOUCH PAD
LID PANEL
SPOUT
WATER FILTER
STEAM TUBE
STAINLESS STEEL BODY
LID RELEASE
VIEWING WINDOW
BODY PANEL
ON/OFF SWITCH
POWERBASE
CLEANING & CARE
1 3
Unplug and let the kettle cool down completely
before cleaning. Remove the kettle from the
power base.
Wipe the outside and inside surfaces of the
kettle with a damp cloth. Ensure that all
connectors and sockets are kept dry. Do not
immerse the kettle or power base in water or
any other liquid. Do not use harsh or abrasive
cleaners or solvents.
Unplug and let the kettle cool. Open the lid.
Hold the top of the lter, pull up and out of
the kettle. Rinse under a tap while carefully
brushing it with a soft brush. Rinse the kettle
out with fresh water. To replace, align the lter
with the grooves in the lter holder, insert and
push back into place. DO NOT OPERATE
KETTLE UNLESS THE WATER FILTER
IS CORRECTLY IN POSITION.
Use descaling products suitable for kitchen
appliances, these are readily available online or
from most supermarkets or department stores.
Use as per instructions on the packet.
Follow these few simple steps to minimise
scale build up in your kettle: Empty the kettle
after each use; do not allow water to stand in
the kettle overnight. Use ltered water instead
of tap water. Descale the kettle regularly, at
least once a month. If you live in a hard water
area you may need to descale more often.
When descaling has nished, empty the kettle
and rinse it out a minimum of 3 times with
fresh water, then rell with fresh water, boil,
then discard boiled water. FAILURE
TO DO SO CAN CAUSE INJURY.
DO NOT BOIL KETTLE WITH
DESCALING SOLUTION IN IT.
THE BODY
2
WATER FILTER DESCALE REGULARLY
U
N
P
L
U
G
W
H
E
N
N
O
T
I
N
U
S
E
BOILING WATER
1
Plug the kettle into the power socket. Press the
‘On/Off’ switch down. The power neon will
illuminate and the kettle will start to heat up.
If the kettle is accidentally switched on with no
water inside, the boil-dry device will switch off the
heating element to prevent damage to the kettle.
The kettle will automatically turn off after the
water has boiled and the neon light will go out.
To turn off before the water has boiled lift the
‘On/Off’ switch up.
Always unplug the kettle after each use.
Remove kettle from the power base. When lling
or carrying the kettle, do not tilt it backwards, as this
may allow water to pass through the steam tube
onto the control area. Should this happen, the kettle
must be allowed to dry before re-using. To avoid the
risk of splashing, once the kettle has boiled wait 10
seconds then pour slowly. Do not over-tilt the kettle.
TURN ON
3
POURING
2
TURN OFF
U
N
P
L
U
G
W
H
E
N
N
O
T
I
N
U
S
E
WARNING: IF THE KETTLE HAS JUST BOILED, IT WILL BE FULL OF STEAM, WHICH WILL ESCAPE AS SOON AS
THE LID IS OPENED.
U
N
P
L
U
G
W
H
E
N
N
O
T
I
N
U
S
E
1 32
FILLING YOUR KETTLE
Ensure the kettle is unplugged. Remove the
kettle from the power base. Pull the knob up
and towards the handle to open the lid. The lid is
hinged for easy opening and closing.
WARNING: IF THE KETTLE HAS JUST
BOILED, THE LID WILL BE HOT. USE
THE KNOB TO CLOSE THE LID.
WARNING: IF THE KETTLE HAS JUST BOILED, IT WILL BE FULL OF STEAM, WHICH WILL ESCAPE AS SOON AS
THE LID IS OPENED.
Fill the kettle through the lid opening. Use at least
one cup of water (250ml). The water level must
stay below the ‘max’ mark. Save energy, only boil
what you require. Keep kettle upright and level at
all times when lling (maximum 15
o
incline). Do
not tilt kettle backwards. DO NOT OVERFILL
OR FILL THROUGH THE SPOUT.
CAUTION when
lling to ensure
water does not go
down steam tube,
preventing the
kettle from correct
operation.
OPEN LID FILLING STEAM
TUBE
3
Push the lid down
using the knob to
close. Check that it is
fully in place, otherwise
the kettle may not
switch off when boiling.
CLOSE
LID
F
WARNING: IF THE KETTLE HAS JUST BOILED, IT WILL BE FULL OF STEAM, WHICH WILL ESCAPE AS SOON AS
THE LID IS OPENED.
4
Do not operate in a tray. Ensure water lter is in place. DO NOT
OPERATE KETTLE UNLESS THE
WATER FILTER IS CORRECTLY IN
POSITION.
NOT IN A TRAY
5
WATER FILTER
1
Place the kettle as close to the wall socket as
possible. When in use ensure the kettle is not
placed under kitchen cabinets. DO NOT
STORE OR USE YOUR KETTLE IN
AN APPLIANCE GARAGE OR UNDER
CUPBOARDS.
Use the shortest cord possible. Wrap excess
cord round the cord tidy on the base of the
kettle.
POSITION
3
INCLINED PLANE
2
CORD TIDY
Do not operate on an inclined plane.
DON’T FORGET TO
REGISTER YOUR KETTLE
WWW.DUALIT. COM/REGISTER
OR BY POST
Any other servicing should be performed by authorized service representative.
INSTRUCTIONS ON ENVIRONMENT PROTECTION
Do not dispose this product in the usual household garbage at the end of its life cycle. Please hand it over to a collection point for the recycling of
electrical and electronic appliances. The symbol on the product, the instruction of use or the packaging will inform you about the methods of disposal.
The materials are recyclable as mentioned on its marking. By recycling, material recycling or other forms of re-utilization of old appliances you are
making an important contribution to protect our environment. Please enquire at the community administration for the authorised disposal location.