1/2USER’S GUIDE (Basics)
USER’S GUIDE (Basics)
Please keep all information for future reference.
Be sure to read the separate “Safety Precautions” and use the Digital Piano correctly.
• When the Digital Piano is being operated on battery power only, notes may sound distorted when
performing or playing back a song at maximum volume. This is due to the difference between AC adaptor
power and battery power, and does not indicate Digital Piano malfunction. If you notice distortion, switch to
AC adaptor power or lower the volume level.
These instructions provide general information about Digital Piano
operations. For more detailed information, refer to the User’s
Guide available on the CASIO website. Also refer to the “Keyboard
Function List”, “Wireless MIDI & audio adaptor, Audio and
Computer Connection Guide”, and “MIDI Implementation” on the
website.
https://support.casio.com/global/en/emi/manual/CGP-S555/
CGP-S555
EN
✔ 18 tones for keyboard play
☞THESE INSTRUCTIONS: “Selecting a Tone”
✔ Adjustable Touch Response
☞THESE INSTRUCTIONS: “Changing Keyboard
Response to Touch Pressure (Touch Response)”
✔ Hall simulator and surround effects
☞THESE INSTRUCTIONS: “Using the Sound Mode”
✔ Metronome to guide practice
☞THESE INSTRUCTIONS: “Using the Metronome”
✔ Duet Mode
☞THESE INSTRUCTIONS: “Splitting the Keyboard for
Duet Play”
✔ Built-in tune playback and practice
☞THESE INSTRUCTIONS: “Listening to Demo Play”,
“Listening to Songs (Music Library)”
✔ Keyboard play recording
☞THESE INSTRUCTIONS: “Recording and Playing
Back Performances (MIDI Recorder)”
✔ Smart device linking for enhanced function
☞THESE INSTRUCTIONS: “Linking with a Smart Device
(APP Function)”
✔ Using the Digital Piano’s speakers to sound
playback from a smart device connected
using Bluetooth
®
wireless technology.
☞THESE INSTRUCTIONS: “Using the Included Wireless
MIDI & audio adaptor”
✔ Other useful features
• Keyboard pitch adjustment (Transpose, Tuning,
Octave Shift)
• Effects (Chorus, Brilliance)
• Acoustic piano sound characteristic adjustment
(Acoustic Simulator)
• 17 scales including equal temperament (Scale
Tuning)
• Connection to a computer for performance
information (MIDI data) exchange
✔ Troubleshooting
☞CASIO WEBSITE: User’s Guide
Supported Operations
■ Preparing the Music Stand
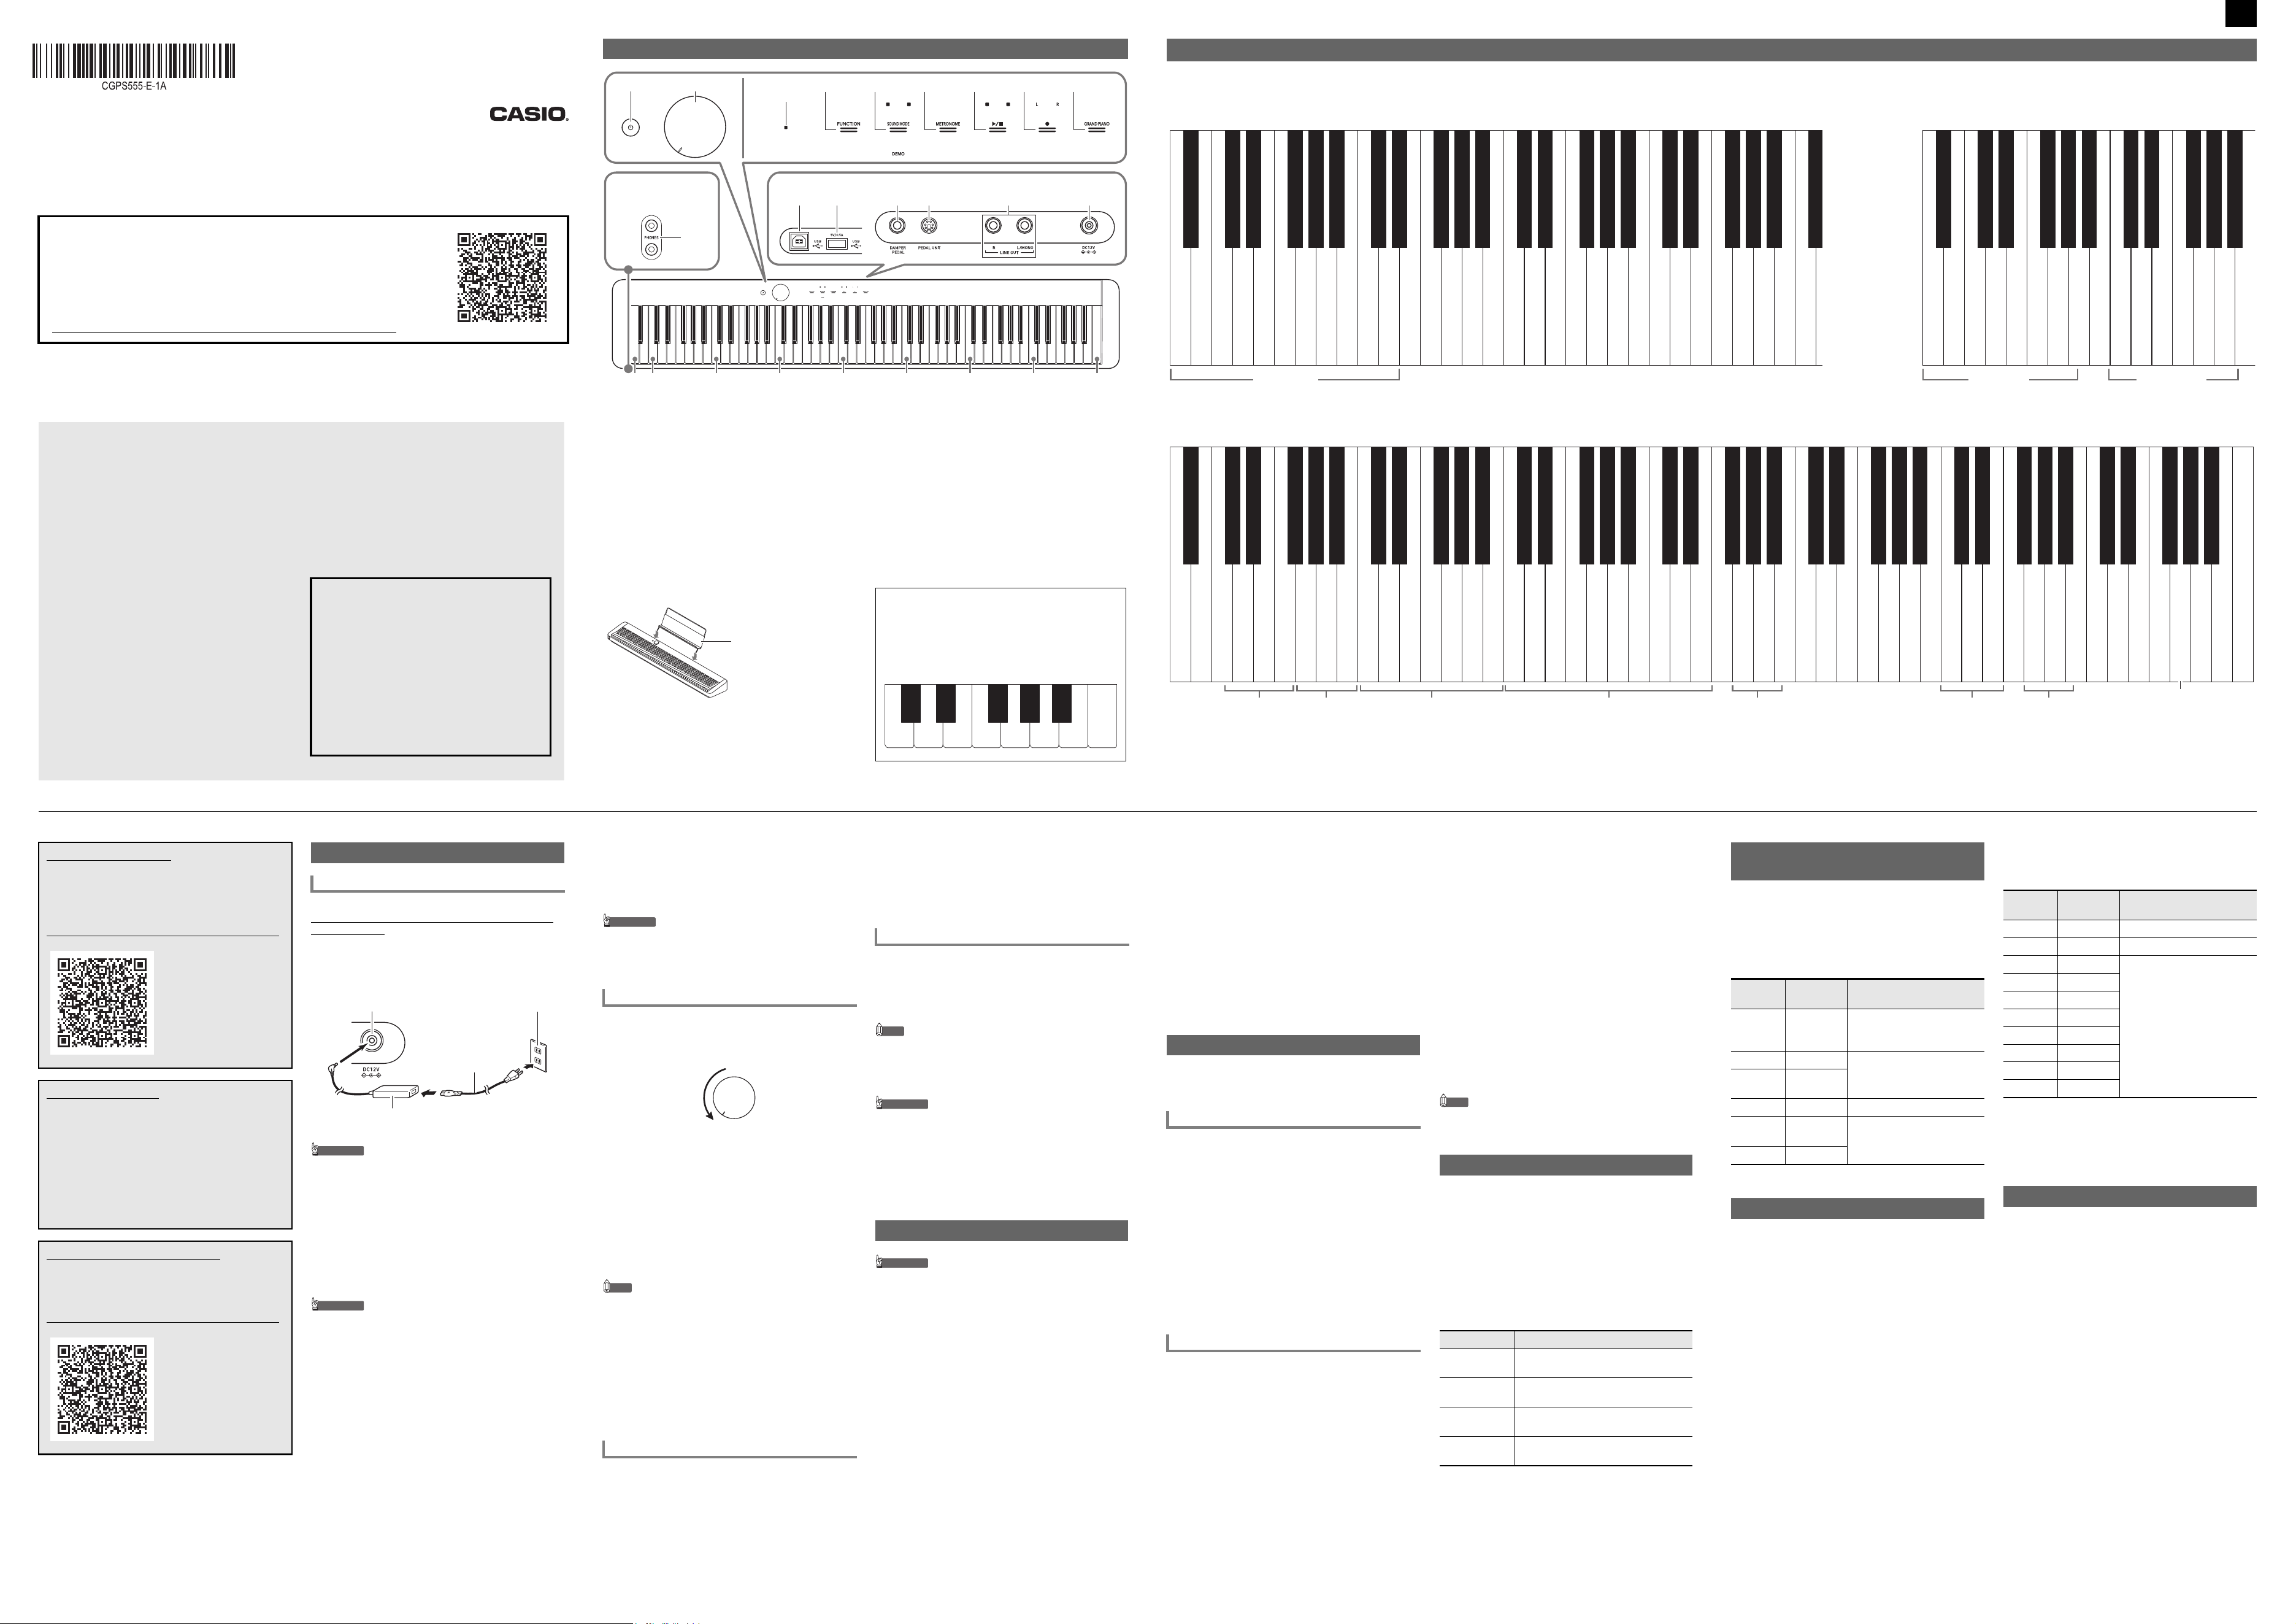
General Guide
1P (Power) button
2Volume knob
3FUNCTION button
4SOUND MODE button
5METRONOME button
6a button
70 (REC) button
8GRAND PIANO button
9PHONES jacks
bkUSB Type B port
blUSB Type A port
bmDAMPER PEDAL jack
bnPEDAL UNIT jack
boLINE OUT R, L/MONO jacks
bpDC 12V terminal
C1 C2 C3 C4 C5 C6 C7 C8A0
bk
bl
bm bn bpbo
9
345678
12
Front Rear
Bluetooth
Indicator
Music stand
■ Keyboard note names and pitches
The keyboard note names and pitches used in these
instructions follow the international standard. Middle C
is C4, the lowest C is C1, and the highest C is C8. The
illustration below shows keyboard key note names from
C4 through C5.
C4 D4 E4 F4 G4 A4 B4 C5
C{4E}4F{4A}4B}4
■ Using the AC Adaptor
Make sure that you use only the AC adaptor specified for
this Digital Piano. Use of a different type AC adaptor can
cause smoking or malfunction.
IMPORTANT!
• Never connect the AC adaptor (JEITA Standard, with
unified polarity plug) that comes with this Digital
Piano to any other device besides this Digital Piano.
Doing so creates the risk of malfunction.
• Be sure to turn off Digital Piano power before
connecting or disconnecting the AC adaptor.
• The AC adaptor will become warm to the touch after
very long use. This is normal and does not indicate
malfunction.
■ Using Batteries
IMPORTANT!
• Be sure to turn off power before loading batteries.
• It is up to you to prepare six commercially available
alkaline batteries.
• Note the following precautions while the Digital Piano
is turned upside down to load batteries.
− Take care to avoid injury due to pinching your
fingers under the Digital Piano.
− Do not allow the Digital Piano to tip over or
otherwise be subjected to strong impact. Impact
can damage the volume knob and keyboard keys.
1.
Open the battery cover on the bottom of the Digital
Piano.
2.
Load six AA-size batteries into the battery
compartment.
Make sure the positive + and negative - ends of the
batteries are facing as marked on the Digital Piano.
3.
Insert the tabs of the battery cover into the holes on
the side of the battery compartment, and close the
cover.
About Music Score data
You can download music score data as a PDF file from the
CASIO website. You will then be able to view music scores
on your smart device. You can jump from the PDF file table
of contents directly to the music score you want, and you
can print out scores as needed.
https://support.casio.com/global/en/emi/manual/CGP-S555/
Included Accessories
● Music Stand
● AC adaptor
● Power cord
● Headphones
● Wireless MIDI & audio adaptor
● Leaflets
• READ THIS! Sheet
• Other (Warranty, etc.)
Items included as accessories are subject to change
without notice.
Separately Available Accessories
You can get information about accessories that are
separately available for this product from the CASIO
catalog available from your retailer, and from the CASIO
website.
https://support.casio.com/global/en/emi/manual/CGP-S555/
Getting Ready
Preparing a Power Supply
Specified AC Adaptor: AD-A12150LW
(JEITA Standard plug)
AC adaptor
bp DC 12V
Power cord
Household power outlet
■ Low Battery Indicator
Low power is indicated when the lights of all the touch
buttons, except for the 3 FUNCTION, start to flash. When
this happens, try lowering the volume level. If this does not
stop the flashing, replace the batteries with new ones.
IMPORTANT!
• Continued use with low batteries will cause Digital
Piano power to turn off automatically. This can cause
data stored in Digital Piano memory to be corrupted
or lost.
1.
Before turning on power, rotate the 2 volume
knob as far as it will go in the direction shown in the
illustration below.
2.
Press the 1P (Power) button to turn on power.
Turning on power will cause the lights of the front panel
touch button to light in sequence from left to right
(3 FUNCTION to 8 GRAND PIANO). The Digital
Piano is ready to play when all touch button lights are
lit.
3.
Use the 2 volume knob to adjust volume.
4.
To turn off power, hold down the 1P (Power)
button until all lit touch button lights turn off.
NOTE
• Power may not turn on if you press the 1P (Power)
button too lightly. This does not indicate malfunction. If
this happens, apply more pressure when you press the
1P (Power) button.
• Pressing the 1P (Power) button to turn off power
actually puts the Digital Piano into a standby state.
Minute amounts of current continue to flow within the
Digital Piano in the standby state. If you do not plan to
use the Digital Piano for a long time or if there is a
lightning storm in your area, be sure to unplug the AC
adaptor from the power outlet.
■ DAMPER PEDAL Jack
Connect the separately available SP-3 pedal to the
bm DAMPER PEDAL jack. This pedal functions as a
damper pedal under the initial Digital Piano default settings.
For details about how to assign functions to this pedal, refer
to the User’s Guide that is available on the CASIO website.
■ PEDAL UNIT Jack
You can connect the optionally available 3-Pedal Unit (SP-
34) to the bn PEDAL UNIT jack on the back of the Digital
Piano. You can then use the pedals for expression that is
similar to that available on an acoustic piano.
☞CASIO WEBSITE: User’s Guide
Using headphones cuts off output from the built-in speakers,
which means you can practice playing even late at night
without disturbing others.
• Be sure to turn down the volume level before connecting
headphones to the 9 PHONES jack.
NOTE
• Headphones do not come with the Digital Piano.
• Use commercially available headphones. See
“Separately Available Accessories” for information about
options.
IMPORTANT!
• Do not listen to very high volume output over
headphones for long period. Doing so creates the
risk of hearing damage.
• If you are using headphones that require an adaptor
plug, make sure you do not leave the adaptor
plugged in when you unplug the headphones. If you
do, nothing will sound from the speakers when you
play.
IMPORTANT!
• When operating a touch button, touch it firmly with a
bare finger. Touch buttons will not respond if you
touch them while wearing gloves.
■ Touch Button Only Operations
Touching a touch button firmly and immediately releasing it
will perform the operation assigned to the button. For
example, touching 8 GRAND PIANO selects the GRAND
PIANO tone, while touching 5 METRONOME starts (or
stops) the metronome.
■ Touch Button + Keyboard Key Combinations
A number of different Digital Piano settings can be
configured by using a touch button (except for the 70
(REC) button) in combination with a keyboard key.
As an example, the procedure below shows how to select
the JAZZ ORGAN tone.
1.
Hold down 8 GRAND PIANO.
• Until you release 8 GRAND PIANO in step 3
below, you can use keyboard keys to select tones
and to configure other settings. For information
about what operations you can perform while
8 GRAND PIANO is depressed, see the
“Keyboard Function List”.
Turning Power On or Off
Using a Pedal
Using Headphones
Touch Button Operations
2.
Press the B1 keyboard key.
This selects the JAZZ ORGAN tone and causes the
confirmation tone to sound using the JAZZ ORGAN
tone.
3.
Release 8 GRAND PIANO.
• Now you can play on the keyboard with the JAZZ
ORGAN tone.
■ Touch Button Light Auto Off (Panel Light
Setting)
To save power, you can configure a setting that will turn off
all button lights, except for 3 FUNCTION, after a certain
period of non-operation.
☞CASIO WEBSITE: User’s Guide
Your Digital Piano comes with 17 tones that are assigned to
the entire keyboard range, plus one bass tone that can be
assigned to lower range only.
■ To select a tone using keyboard keys
1.
While holding down 8 GRAND PIANO, press a
keyboard key from A0 through C{2.
• For example, pressing the F{1 keyboard key will
select the HARPSICHORD tone and will sound the
confirmation tone using the HARPSICHORD tone.
• For information about the tone assigned to each
keyboard key, see the “GRAND PIANO Button +
Keyboard Key” entry in the “Keyboard Function List”.
2.
Release 8 GRAND PIANO.
■ To select a tone with the touch buttons
Touching 8 GRAND PIANO selects the GRAND PIANO
CONCERT tone.
You can configure the keyboard to play two different tones
at the same time across its entire range (Layer), or to play
different tones in the left and right ranges (Split).
■ To layer two tones
1.
Use the procedure under “Selecting a Single Tone”
to select the Upper1 tone.
2.
Keep 8 GRAND PIANO depressed until step 5,
below.
3.
Press the C4 keyboard key to enable layering.
• Each press of C4 toggles layering between enabled
and disabled.
4.
Press a keyboard key within the range of A0
through C{2 to sound both tones at the same time.
• For information about the tone assigned to each
keyboard key, see the “GRAND PIANO Button +
Keyboard Key” entry in the “Keyboard Function List”.
5.
Release 8 GRAND PIANO.
• Now when you press a keyboard key to play, the two
tones you selected will sound at the same time.
■ To use split to play bass notes in the lower
range
1.
Use the procedure under “Selecting a Single Tone”
to select the upper range tone.
2.
While holding down 8 GRAND PIANO, press the
D2 keyboard key.
This assigns the bass tone to the lower range.
3.
Release 8 GRAND PIANO.
NOTE
• Touching 8 GRAND PIANO selects the tone assigned
to the touch button, and unlayers and unsplits the
keyboard.
1.
Hold down 3 FUNCTION.
This causes the 3 FUNCTION and DEMO lights to
flash, and the 4 SOUND MODE light to turn light.
2.
Touch 4 SOUND MODE.
This will cause the 6a and DEMO lights to light,
and starts playback of the one demo song (and the
lights of touch buttons except for 6a to turn off).
After demo song playback is complete, it will continue
with playback of Music Library songs.
• The operations below are supported during demo
play.
* For details about built-in songs, see the “Music
Library List”.
Selecting a Tone
Selecting a Single Tone
Layer and Split
Listening to Demo Play
To do this: Perform this operation:
Skip forward to
the next song
While holding down 6a, press the
B0 keyboard key.
Skip back to the
previous song
While holding down 6a, press the
B}0 keyboard key.
Jump to a
specific song
While holding down 6a, press a
keyboard key from C2 through B6.*
Stop demo
song playback
Touch 6a.
Touch Response alters tone volume in accordance with
keyboard pressure (speed). This provides you some of the
same expressivity you get on an acoustic piano.
■ To change touch response sensitivity
1.
While holding down 8 GRAND PIANO, press a
keyboard key from F{3 through B3.
2.
Release 8 GRAND PIANO.
The metronome sounds a regular beat to mark time. Use the
metronome when you want to practice playing at a regular
tempo.
■ To start or stop the metronome
1.
Touch 5 METRONOME.
This starts the metronome.
• LEDs above 6a button flash yellow (first beat)
and red (remaining beats) in time with the
metronome beats.
2.
To turn off the metronome, touch the
5 METRONOME again.
■ To change the metronome beat
1.
While holding down 5 METRONOME, press a
keyboard key from C2 through A2.
• For the location of each metronome setting
keyboard key, see the “METRONOME Button +
Keyboard Key” entry of the “Keyboard Function
List”.
2.
Release 5 METRONOME.
When using the metronome or when playing back a Music
Library song, you can specify a tempo setting within the
range of 20 to 255 beats per minute.
For the location of each tempo setting keyboard key, see the
“METRONOME Button + Keyboard Key” entry of the
“Keyboard Function List”.
■ To input a tempo setting value
1.
While holding down 5 METRONOME, use
keyboard keys B0 to A}1 to input a tempo value.
• Input three digits for the tempo value. To specify a
value that has fewer than three digits, input zero (0)
for the unused leading digit. For example, to specify
a tempo of 80 bpm, press keyboard keys in the
following sequence: B0 (0) 3 G1 (8) 3 B0 (0).
The end tone will sound when you input the third
digit.
• Here, you could use the A0 (–) or B}0 (+) keyboard
key to raise or lower the tempo by 1 with each press.
2.
After the setting is the way you want, release
5 METRONOME.
Changing Keyboard Response to
Touch Pressure (Touch Response)
Pressing
this key:
Selects this
setting:
Which does this:
F{3 Off Disables Touch Response.
Sound volume is fixed,
regardless of key press speed.
G3 1: Light Makes production of a louder
sound easier, so touch feels
lighter than “Normal”.
A}32: Medium
Light
A3 3: Normal Specifies normal sensitivity.
B}34: Medium
Heavy
Makes production of a louder
sound more difficult, so touch
feels heavier than “Normal”.
B3 5: Heavy
Using the Metronome
Pressing
this key:
Selects this
setting:
Which does this:
C2 Off Sounds a click for all beats.
C{2 1 Sounds a bell for all beats.
D2 2
These keys specify a beat
setting of 2 to 9.
The first beat of each measure
is a bell sound, while the
remaining beats are clicks.
E}23
E2 4
F2 5
F{26
G2 7
A}28
A2 9
Specifying the Tempo
Continued on the back
Function settings can be configured by holding down a touch button as you press a keyboard key. For more information refer to the Keyboard Function List available from the CASIO website.
Keyboard Function List
A0
B
}0
B0
C1
C
{1
D1
E
}1
E1
F1
F
{1
G1
A
}1
A1
B
}1
B1
C2
C
{2
D2
E
}2
E2
F2
F
{2
G2
A
}2
A2
B
}2
B2
C3
C
{3
D3
E
}3
E3
F3
F
{3
G3
A
}3
A3
B
}3
B3
C4
C
{4
D4
E
}4
E4
F4
F
{4
G4
A
}4
A4
B
}4
B4
C5
C
{5
D5
E
}5
E5
F5
F
{
5
G5
A
}5
A5
B
}5
B5
C6
C
{6
D6
E
}6
E6
F6
F
{6
G6
A
}6
A6
B
}6
B6
C7
C8
C
{7
D7
E
}7
E7
F7
F
{7
G7
A
}7
A7
B
}7
B7
C{ E} F{ A} B}
CD EFGAB
Save SMF
Load
Format
Save MRF
Delete
Scale Tuning selectionScale Tuning base noteWireless MIDI &
audio adaptor
DuetTuning MIDI settings
(Off/5 seconds/30 seconds/60 seconds/120 seconds)
Panel Lock disable/enable/Auto
Notification Tone Set selection
Notification Tone Volume (–)
Panel Light setting
Speaker Out disable/enable/Auto
Touch Button Sensitivity (
+
)
Touch Button Luminosity
Pedal Function
Keyboard Channel (
+
)
Local Control on/off
Song Type MIDI
Right-side Keyboard Octave Shift (
+
)
Left-side Keyboard Octave Shift (
+
)
Duet Mode (off/on/pan)
Bluetooth Audio Center Cancel
enable/disable
Bluetooth Audio Volume (–)
Audio Song Volume (
+
)
Audio Song Volume (–)
MIDI Song Volume (–)
Keyboard Volume (–)
Tuning (440.0Hz)
Tuning (–0.1Hz)
Stretch tuning on/off
Charukeshi
Gurjari Todi
Chahargah
Dashti
Hijaz
Rast
Werckmeister
Kirnberger 3
Pure Minor
Equal Temperament
Delete Connection History
Connection Notification Tone Volume
(
+
)
Wireless Function off/on
Execution
Factory Reset
Notification Tone Volume (
+
)
Auto Resume enable/disable
Power On Alert enable/disable
Touch Button Sensitivity (–)
Hi-Reso V
elocity MIDI OUT enable/
disable
Keyboard Channel (–)
Song Type Audio
Right-side Keyboard Octave Shift (–)
Left-side Keyboard Octave Shift (–)
Bluetooth Audio Volume (
+
)
Audio Song Center Cancel on/off
MIDI Song Volume (
+
)
Keyboard Volume (
+
)
Tuning (442.0Hz)
Tuning (+0.1Hz)
Chandrakauns
Segah
Saba
Bayati
Mean-Tone
Pythagorean
Pure Major
Connection Notification Tone Volume
(–)
Bluetooth Audio Pairing
Auto Power Off enable/disable
USB Flash
Drive
ROCK PIANO
ELEC.PIANO
DIGITA L E.PIANO 2
60’S E.PIANO
VIBRAPHONE
STRINGS 2
ELEC.ORGAN 1
GRAND PIANO CONCERT
GRAND PIANO MELLOW
JAZZ ORGAN
A0
B}0
B0
C1
C
{1
D1
E}1
E1
F1
F{1
G1
A}1
A1
B}1
B1
C2
C
{2
D2
E}2
E2
F2
F{2
G2
A}2
A2
B}2
B2
C3
C
{3
D3
E}3
E3
F3
F{3
G3
A}3
A3
B}3
B3
C4
C
{4
D4
E}4
E4
F4
F{4
G4
A}4
A4
B}4
B4
C5
C
{5
JAZZ PIANO
DIGITAL E.PIANO 1
HARPSICHORD
STRINGS 1
PIPE ORGAN
ELEC.ORGAN 2
GRAND PIANO BRIGHT
Lower Damper enable/disable
Lower Detune (
+
)
Lower V
olume (
+
)
Upper2 Damper enable/disable
Upper2 Detune (–)
Upper2 Octave Shift (
+
)
Upper2 Volume (
+
)
Layer enable/disable
T
ouch Response (Heavy)
Touch Response (Normal)
Touch Response (Light)
Transpose (
+
)
Transpose (–)
Upper1 Octave Shift (–)
Upper1 Volume (–)
Bass (lower range)
Lower Detune (–)
Lower V
olume (–)
Upper2 Detune (
+
)
Upper2 Octave Shift (–)
Upper2 Volume (–)
T
ouch Response (Medium heavy)
Touch Response (Medium light)
Touch Response (off)
Upper1 Octave Shift (
+
)
Upper1 Volume (
+
)
Tone Selection
■ GRAND PIANO Button + Keyboard Key
■ FUNCTION Button + Keyboard Key
■ METRONOME Button + Keyboard Key
A0
B}0
B0
C1
C
{1
D1
E}1
E1
F1
F{1
G1
A}1
A1
B}1
B1
C2
C
{2
D2
E}2
E2
F2
F{2
G2
A}2
A2
B}2
B2
10(−)
35 6 8 245 79
24 79 13 68
(+)
Tempo setting
Off
Metronome Volume (
+
)
Metronome Volume (–)
Metronome Beat
CGP-S555_A2_EN.fm 1 ページ 2026年4月20日 月曜日 午前10時38分
2/2USER’S GUIDE (Basics)
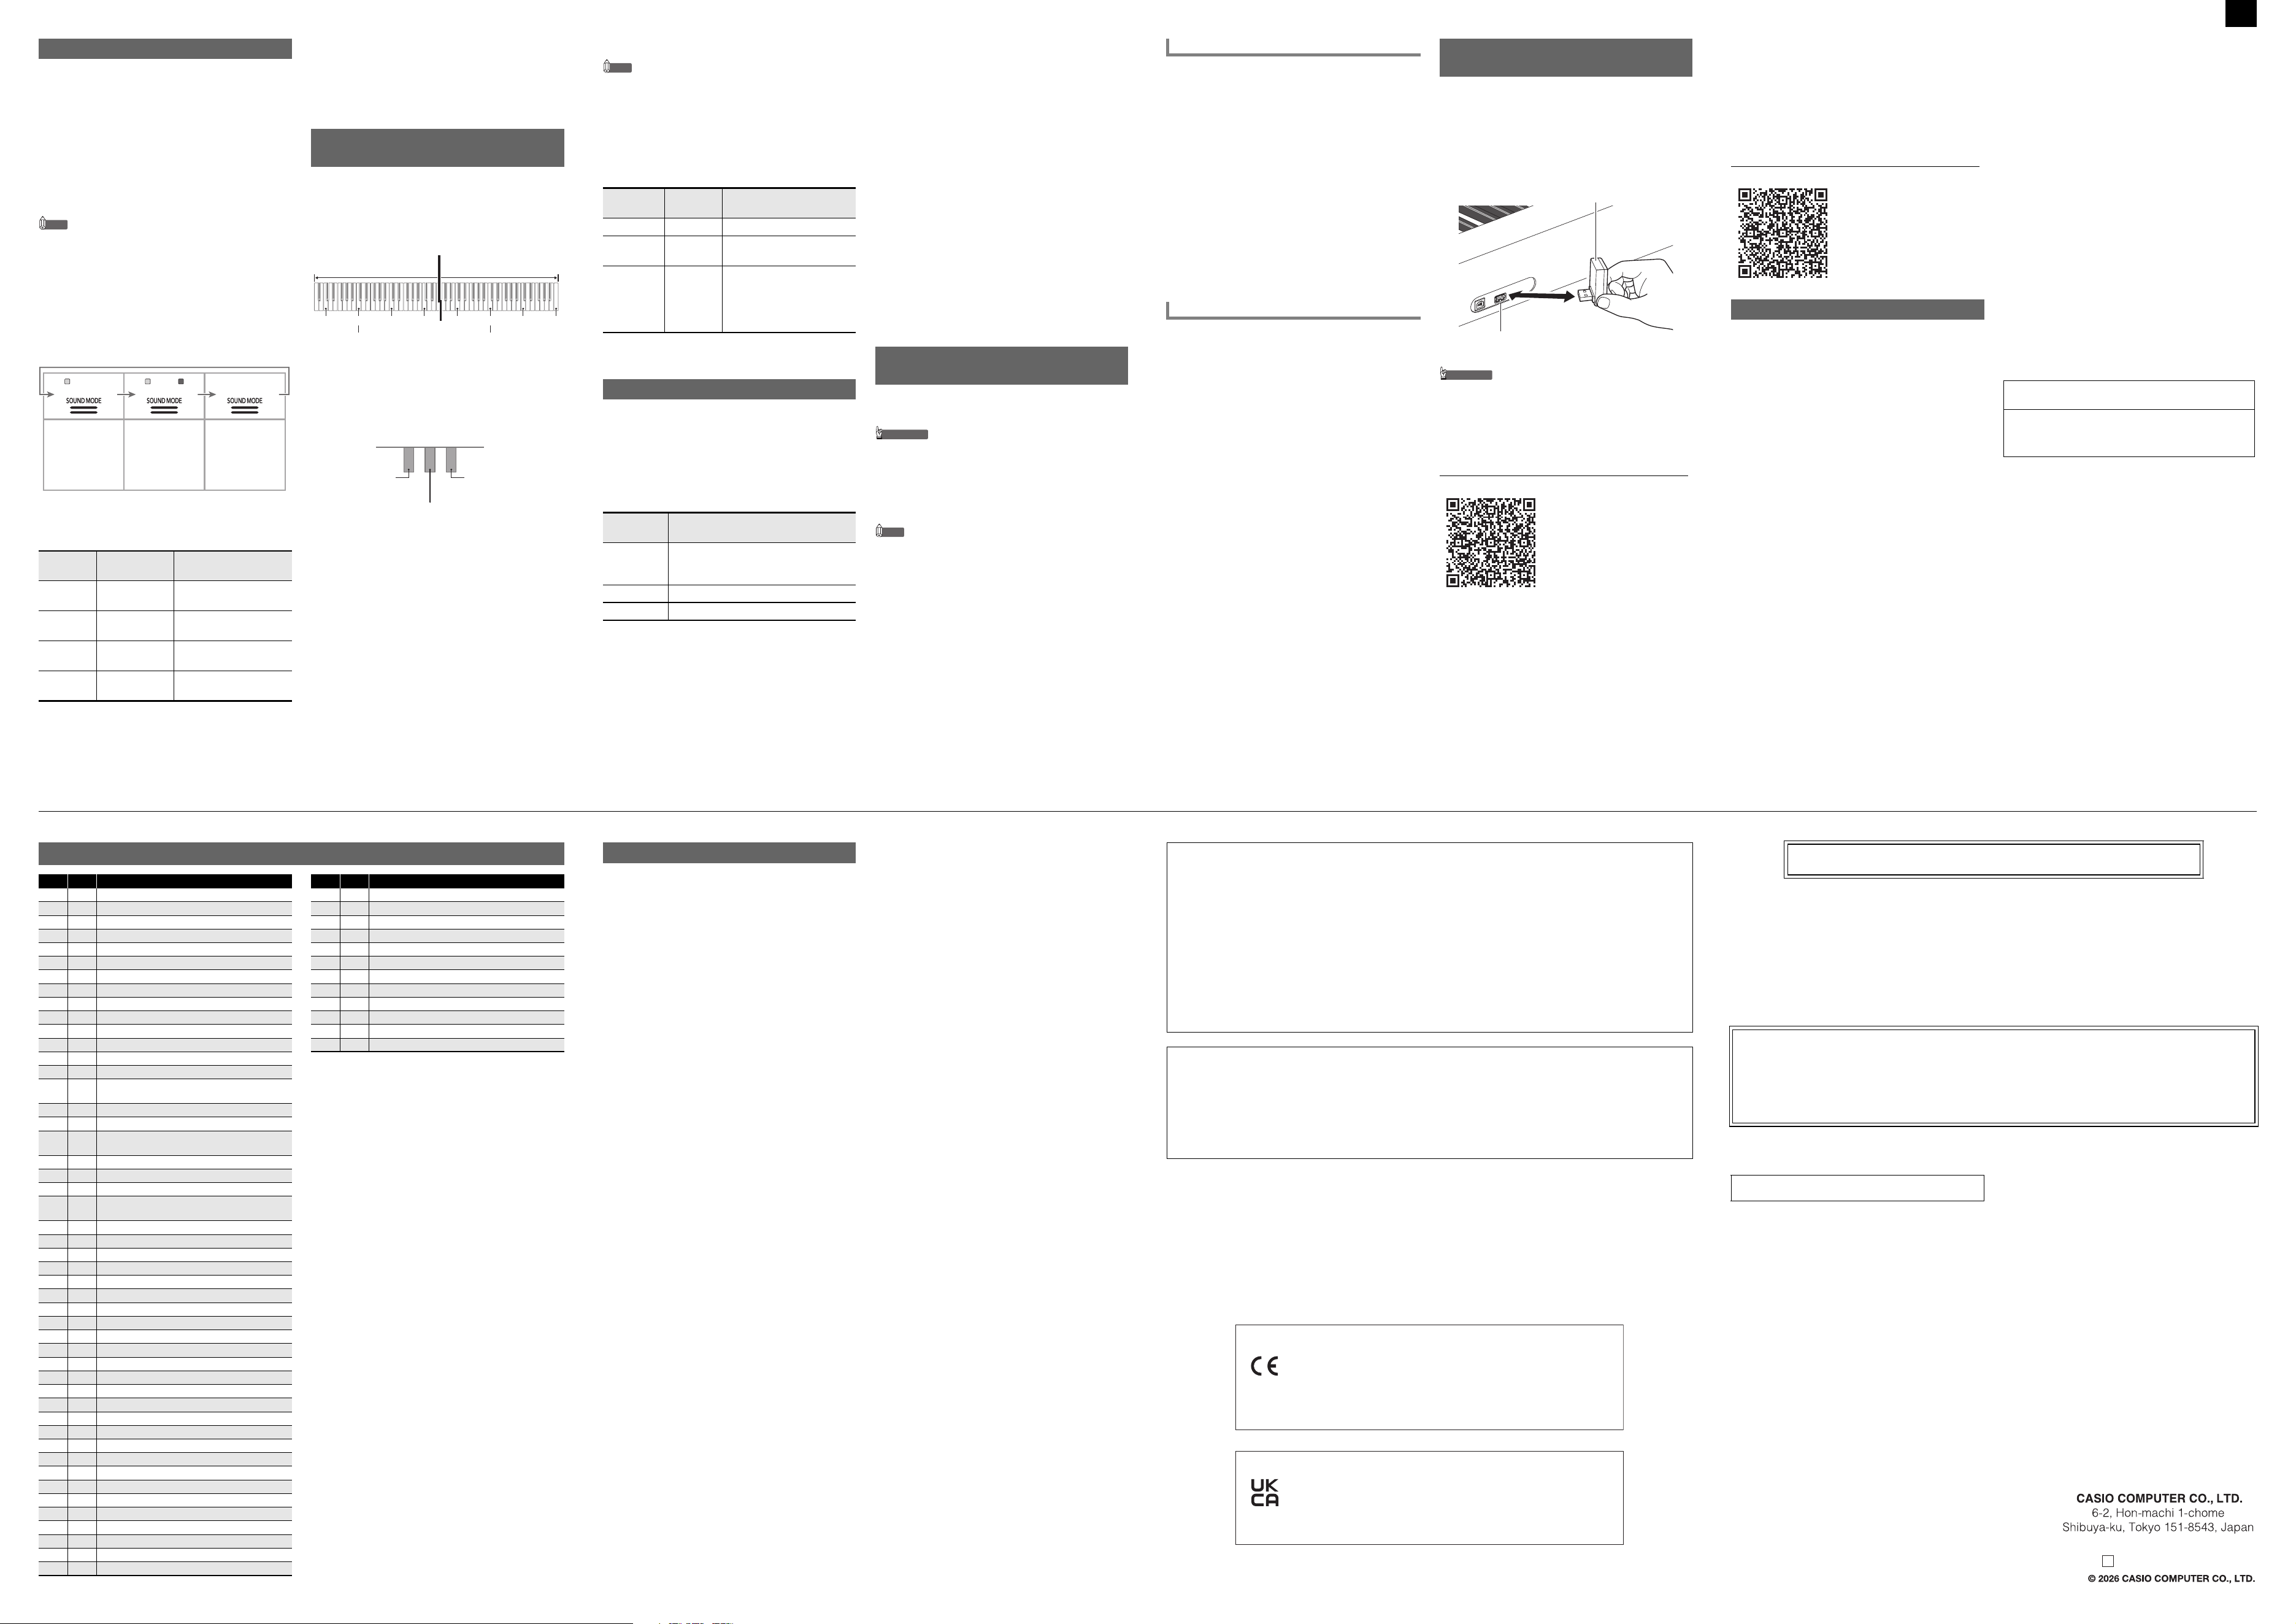
You can use 4 SOUND MODE to enable and disable the
effects described below.
● Hall Simulator
The hall simulator effect simulates the rich clarity,
unconstrained brilliance, and other distinctive acoustic
characteristics of world-famous concert halls and structures.
You can also adjust the depth of the hall simulator effect.
● Surround
The Surround effect creates acoustics that make the sound
from the speakers seem like it is coming from multiple
directions (virtual surround).
NOTE
• The Surround effect is not applied to the output from the
Digital Piano’s 9 PHONES jack or bo LINE OUT R,
L/MONO jacks.
■ To enable or disable the Hall Simulator and
Surround effects
1.
Touch 4 SOUND MODE.
• Each touch will cycle between the settings, and the
current setting is indicated by the LED lights as
shown below.
■ To specify the Hall Simulator type
1.
While holding down 4 SOUND MODE, press a
keyboard key from A0 through C1.
2.
Release 4 SOUND MODE.
■ To specify the Surround type
1.
While holding down 4 SOUND MODE, press the
F1 (Surround Type 1) or F{1 (Surround Type 2)
keyboard key.
2.
Release 4 SOUND MODE.
You can split the keyboard in the center for duet play so the
left and right sides have the same ranges.
The Duet Mode is the perfect way to conduct lessons, with
the teacher playing on the left side as the student plays the
same song on the right side.
■ Pedal Operation when Playing a Duet
• If you are using the separately available SP-34 Pedal
Unit, the left outer pedal is the left keyboard damper
pedal, while the right outer pedal is the right keyboard
damper pedal. Only the damper pedal for the right
keyboard supports half-pedal operations.
• If you are using the separately available SP-3 pedal,
connecting it to the bm DAMPER PEDAL jack allows it
to be used as a damper pedal for both left and right
keyboards. Half-pedal operation is not supported in this
case.
Using the Sound Mode
Pressing
this key:
Selects this
setting:
Description
A0 1: STANDARD
HALL
Standard concert hall
B}0 2: OPERA
HALL
Uniquely shaped Sydney
Concert Hall
B0 3: BERLIN
HALL
Berlin arena type classic
concert hall
C1 4: BRITISH
STADIUM
Large outdoor stadium in
the London suburbs
Hall Simulator
enabled
Surround disabled
(Initial default)
Hall Simulator
enabled
Surround enabled
Hall Simulator
disabled
Surround disabled
Splitting the Keyboard for Duet
Play
C3 C4 C5 C6 C3 C4 C5
C6
Split point
Left keyboard Right keyboard
(middle C) (middle C)
Left side damper
pedal
Left and right side
damper pedal
Right side damper pedal
(Half-pedal operation
supported)
■ To use the Duet Mode
NOTE
• For the location of the keyboard key used to configure the
setting below, see the “FUNCTION Button + Keyboard
Key” entry of the “Keyboard Function List”.
1.
While holding down 3 FUNCTION, press the C6
keyboard key.
Each time the C6 keyboard key is pressed to change
this setting, a notification tone sounds to indicate the
newly selected setting.
2.
After the setting is the way you want, release
3 FUNCTION.
The Digital Piano comes with a Music Library of well-known
piano pieces you can play back for your listening enjoyment.
You can also turn off the left-hand part or right-hand part of
a built-in song and play along on the keyboard.
■ To listen to Music Library songs
1.
While holding down 6a, press one of the
keyboard keys below to select the song you want.
• For information about the relationship between
keyboard keys, song numbers, and song titles, see
the “Music Library List”.
2.
After selecting a song, release 6a.
3.
To start song playback, touch 6a.
• Playback will stop automatically when the end of the
song is reached. To stop song playback, touch
6a.
■ To select a playback part and play a song
1.
Perform steps 1 and 2 under “To listen to Music
Library songs” to select the song you want to
practice.
2.
As required, perform the procedure under
“Specifying the Tempo” to specify the tempo of the
song.
3.
Select the playback part (left-hand or right-hand
part).
(1) While holding down 6a, press keyboard key A0
(leftmost white key).
Each press of the A0 keyboard key cycles through
the settings shown below.
L only lit: Left-hand part played, right-hand part
muted.
R only lit: Right-hand part played, left-hand part
muted.
LR both lit: Both left- and right-hand parts played.
(2) Release 6a.
4.
To start song playback, touch 6a.
• Play the muted part along with the playback.
Your Digital Piano can record what you play on the
keyboard and play it back when you want.
IMPORTANT!
• CASIO COMPUTER CO., LTD. takes no responsibility
for any damages, lost profits, or claims by third
parties arising from the deletion of recorded data due
to malfunction, repair, or for any other reason.
• Should power fail during recording, all of the data in
the track you are recording will be deleted.
NOTE
• The Digital Piano’s MIDI recorder can record the left hand
track and right hand track individually, and then the two
tracks can be combined into a single song. Here we will
present a simple operation that records the left-hand part
track only. For details about the recording operation, refer
to the User’s Guide that is available on the CASIO
website.
• Up to approximately 10,000 notes (total of two tracks) can
be recorded for a single song.
• Select MIDI for the song type. While holding down
3 FUNCTION, press the F6 keyboard key.
Notification
Tone
Setting Description
Off tone Off Duet Mode exited.
Option tone
× 1
On Duet Mode entered.
Option tone
× 2
Pan Left-side keyboard notes
output from the left speaker,
right-side keyboard notes
output from the right speaker
while in the Duet Mode.
Listening to Songs (Music Library)
Pressing
this key:
Does this:
C2 to B6 Selects the built-in song (Song numbers 1
to 60) that corresponds to the pressed
keyboard key.
B0 Selects the next song number.
B}0 Selects the previous song number.
Recording and Playing Back
Performances (MIDI Recorder)
1.
Touch 70 (REC) so it lights white.
This enters record standby, which is indicated by
flashing 70 (REC) (red) and 6a (white) lights.
2.
To start recording, play something on the keyboard.
This causes the 70 (REC) (red) light to change from
flashing to lit, which indicates that recording is in
progress.
• If, during a recording operation, the number of
remaining recordable notes is 100 or fewer, the L
indicator will start to flash more quickly. Recording
stops automatically when the number of remaining
recordable notes becomes 0.
3.
When you are finished recording, touch 70 (REC)
or 6a.
This makes 70 (REC) light white again.
4.
To replay the recording, touch 6a.
1.
While holding down 6a, press the B}7
keyboard key.
2.
Release 6a.
3.
To start playback, touch 6a.
• Playback will stop automatically when the end of the
recording is reached. To stop playback manually,
touch 6a.
The operations described below are enabled while the
Wireless MIDI & audio adaptor is plugged into the bl USB
Type A port.
• Sound playback of a Bluetooth-connected smart device
through the Digital Piano’s speakers
• Use MIDI functions over a Bluetooth Low Energy
connection
• Use a smart device app
IMPORTANT!
• Turn off the Digital Piano before disconnecting the
Wireless MIDI & audio adaptor.
■ Connecting with External Devices
Refer to “Wireless MIDI & audio adaptor, Audio and
Computer Connection Guide” in the User’s Guide, which you
can access at the CASIO website.
https://support.casio.com/global/en/emi/manual/CGP-S555/
To record keyboard play
To perform playback
Using the Included Wireless MIDI
& audio adaptor
bl USB Type A port
Wireless MIDI & audio adaptor
■ Linking with a Smart Device (APP Function)
Connecting the Digital Piano with a smart device makes it
possible to use an app to perform Digital Piano operations
(Piano Remote Controller function), and to use various other
app functions.
• For details about operations, refer to the user
documentation of each app.
Download the smart device app from the CASIO website
and install it on the smart device you want to use.
https://support.casio.com/global/en/emi/manual/CGP-S555/
Model: CGP-S555
Keyboard: 88-key piano keyboard; Duet: Adjustable tone
range (–2 to +2 octaves); Transpose: –12 to 0 to +12
semitones; Octave shift: –2 to 0 to +2 octaves
Sound Source: Number of Tones: 18 (17 full-keyboard
tones + 1 low-range bass tone); Layer (excluding bass
tone); Split (bass tone only in low range); Maximum
polyphony: 192 notes; Touch Response (5 sensitivity
levels, Off); Tuning: 415.5Hz to 440.0Hz to 465.9Hz
(0.1Hz units); Temperament: Equal temperaments plus 16
other types
Acoustic Simulator: Hammer response, Key off response,
String resonance, Damper resonance, Damper noise, Key
on action noise, Key off action noise
Sound Mode: Hall simulator (4 types), Surround (2 types)
Other Effects: Chorus (4 types), DSP, Brilliance (–3 to 0 to
3)
Demo Song: 1
Music Library: Built-in Songs: 60, User Songs: 10 (Up to
approximately 90KB per song, approximately 900KB for
10 songs)*; Song volume: Adjustable (Setting also affects
MIDI recorder song playback.); Part On/Off: L, R
* Based on 1KB = 1024 bytes, 1MB = 1024
2
bytes
MIDI Recorder: Functions: Real-time recording, playback;
Number of Song: 1; Number of Tracks: 2; Capacity:
Approximately 10,000 notes total; Recorded Data
Protection: Built-in flash memory; MIDI recorder volume:
Adjustable (Setting also affects Music Library song
playback.)
Audio Recorder: Real-time recording and playback as
audio data; Number of songs: 99 (files); File format: WAV
(linear PCM, 16bit, 44.1kHz, stereo); Maximum recording
time: Approximately 25 minutes per file; Recording
medium: USB Flash Drive
Metronome: Beat bell: Off, 1 to 9 (beats); Tempo Range: 20
to 255; Metronome Volume Level: Adjustable
Pedals: When the separately available SP-3 pedal is used:
Damper (off, on), sostenuto (off, on), soft (off, on),
metronome (start, stop), tempo setting; Separately
available SP-34 pedal unit: Damper (off, half, on),
sostenuto (off, on), soft (off, on)
Other Functions: Auto Resume; Operation Lock;
Notification tones (Selectable sets 1, 2, 3; Adjustable
volume)
MIDI: 16-channel multi-timbre receive
Inputs/Outputs: PHONES jacks: Stereo mini jacks (3.5mm)
× 2; Power: 12V DC; LINE OUT R, L/MONO jacks:
Standard jacks (6.3mm) × 2 (Output impedance: 600Ω,
Output voltage: 1.3V (RMS) MAX); USB port: Type A,
Type B; DAMPER PEDAL jack: Standard jack (6.3mm);
PEDAL UNIT jack: Proprietary jack
Acoustics: Amp output: 8W + 8W; Speakers: 16cm × 8cm
(oval) × 2
Power Supply: 2-way
Batteries: 6 AA-size alkaline batteries
Continuous Operation: Approximately 4 hours
Playback of built-in demo tunes on alkaline batteries
Actual continuous operation time may be shorter due to bat-
tery type and performance type.
AC Adaptor: AD-A12150LW
Auto Power Off: Approximately 20 minutes (under AC adap-
tor power) or six minutes (under battery power) after last
operation, can be disabled.
Power Consumption: 12V = 10W
Dimensions: 132.2 (W) × 23.2 (D) × 10.2 (H) cm (52 1/16 ×
9 1/8 × 4 inch)
Weight: Approximately 11.2kg (24.7 lbs) (without batteries)
• Specifications and designs are subject to change without
notice.
Product Specifications
Important Notice
If Auto Power Off is set to Off, the Digital Piano
does not automatically turn off and continues to
use power.
*1 Keyboard Key Note Name
Music Library List
No. *1 Title
1 C2 Nocturne Op.9-2
2 C{2 Fantaisie-Impromptu Op.66
3 D2 Étude Op.10-3 “Chanson de l’adieu”
4 E}2 Étude Op.10-5 “Black Keys”
5 E2 Étude Op.10-12 “Revolutionary”
6 F2 Étude Op.25-9 “Butterflies”
7F{2 Prélude Op.28-7
8 G2 Valse Op.64-1 “Petit Chien”
9A}2 Valse Op.64-2
10 A2 Moments Musicaux 3
11 B}2 Impromptu Op.90-2
12 B2 Marche Militaire 1 (Duet)
13 C3 Frühlingslied [Lieder Ohne Worte Heft 5]
14 C{3 Fröhlicher Landmann [Album für die Jugend]
15 D3
Von fremden Ländern und Menschen
[Kinderszenen]
16 E}3 Träumerei [Kinderszenen]
17 E3 Tambourin
18 F3
Menuet BWV Anh.114
[Clavierbüchlein der Anna Magdalena Bach]
19 F{3 Inventio 1 BWV 772
20 G3 Inventio 8 BWV 779
21 A}3 Inventio 13 BWV 784
22 A3
Praeludium 1 BWV 846
[Das Wohltemperierte Klavier 1]
23 B}3 Le Coucou
24 B3 Gavotte
25 C4 Sonatina Op.36-1 1st Mov.
26 C{4 Sonatine Op.20-1 1st Mov.
27 D4 Sonate K.545 1st Mov.
28 E}4 Sonate K.331 3rd Mov. “Turkish March”
29 E4 Rondo K.485
30 F4 Für Elise
31 F{4 Marcia alla Turca
32 G4 Sonate Op.13 “Pathétique” 1st Mov.
33 A}4 Sonate Op.13 “Pathétique” 2nd Mov.
34 A4 Sonate Op.13 “Pathétique” 3rd Mov.
35 B}4 Sonate Op.27-2 “Moonlight” 1st Mov.
36 B4 Rhapsodie 2
37 C5 Waltz Op.39-15 (Duet)
38 C{5 Liebesträume 3
39 D5 Blumenlied
40 E}5 La Prière d’une Vierge
41 E5 Csikos Post
42 F5 Humoresque Op.101-7
43 F{5 Melodie [Lyrische Stücke Heft 2]
44 G5 Sicilienne Op.78
45 A}5 Berceuse [Dolly] (Duet)
46 A5 Arabesque 1
47 B}5 La Fille aux Cheveux de Lin [Préludes]
48 B5 Passepied [Suite bergamasque]
49 C6 Gymnopédie 1
50 C{6 Je Te Veux
51 D6 Salut d’Amour
52 E}6 The Entertainer
53 E6 Maple Leaf Rag
54 F6 L’arabesque [25 Etüden Op.100]
55 F{6 La Styrienne [25 Etüden Op.100]
56 G6 Ave Maria [25 Etüden Op.100]
57 A}6 Le retour [25 Etüden Op.100]
58 A6 La chevaleresque [25 Etüden Op.100]
59 B}6 No.13 [Études de Mécanisme Op.849]
60 B6 No.26 [Études de Mécanisme Op.849]
No. *1 Title
Be sure to read and observe the following operating
precautions.
Location
Avoid the following locations for this product.
• Areas exposed to direct sunlight and high humidity
• Areas subjected to temperature extremes
• Near a radio, TV, video deck, or tuner
The above devices will not cause malfunction of the
product, but the product can cause interference in the
audio or video of a nearby device.
To prevent the formation of mold, set up the product in a
well-ventilated location where the temperature and humidity
ranges shown below are maintained.
• Recommended temperature range: 15 to 25°C
• Recommended humidity range: 40 to 60% RH
User Maintenance
• Wipe the product with a soft, dry cloth. Do not use a
tissue, which can cause scratching.
• When soiling is more serious, moisten a soft cloth with a
weak solution of water and a mild neutral detergent, wring
out all excess moisture from the cloth, and then wipe the
product. After that, wipe again with a separate soft dry
cloth.
• Do not use any cleaning agents, chlorine disinfectants,
sanitizing wipes, or other items that include benzene,
organic solvents, alcohol, or other solvents for cleaning.
Doing so can cause discoloration, deformation, paint
peeling, cracking, etc.
Sterilization and Disinfection
• After wiping the product two or three times with a non-
alcohol sanitizing wipe, use a soft, dry cloth to wipe it dry.
• Note that failure to wipe the product dry can cause
streaks to remain.
• If the product is used by multiple parties, hand
disinfection before each use is recommended.
Included and Optional Accessories
Use only accessories that are specified for use with this
product. Use of unauthorized accessories creates the risk of
fire, electric shock, and personal injury.
Weld Lines
Lines may be visible on the exterior of the product. These
are “weld lines” that result from the plastic molding process.
They are not cracks or scratches.
Musical Instrument Etiquette
Always be aware of others around you whenever using this
product. Be especially careful when playing late at night to
keep the volume at levels that do not disturb others. Other
steps you can take when playing late at night are closing the
window and using headphones.
AC Adaptor Handling Precautions
• Never insert metal, pencils, or any other objects into the
product’s DC12V terminal. Doing so creates the risk of
accident.
• Do not try to use the power cord that comes with the
product with another device.
• Use a power outlet that is easily accessible so you can
unplug the AC adaptor when a malfunction occurs or
whenever else you need to do so.
• The AC adaptor is intended for indoor use only. Do not
use it where it might be exposed to splashing or moisture.
Do not place any container, such as a flower vase, that
contains liquid on the AC adaptor.
• Never cover the AC adaptor with newspaper, a table
cloth, a curtain, or any other similar item.
• Unplug the AC adaptor from the power outlet if you do not
plan to use the Digital Piano for a long time.
• The AC adaptor cannot be repaired. If your AC adaptor
malfunctions or becomes damaged, you need to
purchase a new one.
• AC adaptor operating environment
Temperature: 0 to 40°C
Humidity: 10% to 90% RH
• Output polarity:
&
Operating Precautions
Important!
Please note the following important information before using this product.
• Before using the AD-A12150LW Adaptor to power the unit, be sure to check the AC Adaptor for any damage first.
Carefully check the power cord for breakage, cuts, exposed wire and other serious damage. Never let children use an
AC adaptor that is seriously damaged.
• The product is not intended for children under 3 years.
• Use only CASIO AD-A12150LW adaptor.
• The AC adaptor is not a toy.
• Be sure to disconnect the AC adaptor before cleaning the product.
NOTICE
This equipment has been tested and found to comply with the limits for a Class B digital device, pursuant to Part 15 of
the FCC Rules. These limits are designed to provide reasonable protection against harmful interference in a residential
installation. This equipment generates, uses and can radiate radio frequency energy and, if not installed and used in
accordance with the instructions, may cause harmful interference to radio communications. However, there is no
guarantee that interference will not occur in a particular installation. If this equipment does cause harmful interference
to radio or television reception, which can be determined by turning the equipment off and on, the user is encouraged
to try to correct the interference by one or more of the following measures:
• Reorient or relocate the receiving antenna.
• Increase the separation between the equipment and receiver.
• Connect the equipment into an outlet on a circuit different from that to which the receiver is connected.
• Consult the dealer or an experienced radio/TV technician for help.
FCC CAUTION
Changes or modifications not expressly approved by the party responsible for compliance could void the user’s
authority to operate the equipment.
Declaration of Conformity
Model Number: CGP-S555
Trade Name: CASIO COMPUTER CO., LTD.
Responsible party: CASIO AMERICA, INC.
Address: 570 MT. PLEASANT AVENUE, DOVER, NEW JERSEY 07801
Telephone number: 973-361-5400
This device complies with Part 15 of the FCC Rules, Operation is subject to the following two conditions:
(1) This device may not cause harmful interference, and (2) this device must accept any interference received,
including interference that may cause undesired operation.
Manufacturer:
CASIO COMPUTER CO., LTD.
6-2, Hon-machi 1-chome, Shibuya-ku, Tokyo 151-8543, Japan
Responsible within the European Union:
Casio Europe GmbH
Casio-Platz 1, 22848 Norderstedt, Germany
www.casio.com
E-mail address: [email protected]
Manufacturer:
CASIO COMPUTER CO., LTD.
6-2, Hon-machi 1-chome, Shibuya-ku, Tokyo 151-8543, Japan
Responsible within the United Kingdom:
Casio Electronics Co. Ltd.
10 Norwich Street, London, EC4A 1BD, U.K.
www.casio.co.uk
■ About the AC adaptor that comes with the Digital Piano
Note the following important precautions to avoid damage to the AC adaptor and power cord.
• Never pull on the cord with excessive force.
• Never repeatedly pull on the cord.
• Never twist the cord at the base of the plug or connector.
• Before moving the Digital Piano, be sure to unplug the AC adaptor from the power outlet.
• Loop and bundle the power cord, but never wind it around the AC adaptor.
Company and product names used in this manual may be registered trademarks of others.
• Any reproduction of the contents of this manual, either in part or its entirety, is prohibited. Except for your own, personal
use, any other use of the contents of this manual without the consent of CASIO is prohibited under copyright laws.
• IN NO EVENT SHALL CASIO BE LIABLE FOR ANY DAMAGES WHATSOEVER (INCLUDING, WITHOUT
LIMITATION, DAMAGES FOR LOSS OF PROFITS, BUSINESS INTERRUPTION, LOSS OF INFORMATION)
ARISING OUT OF THE USE OF OR INABILITY TO USE THIS MANUAL OR PRODUCT, EVEN IF CASIO HAS BEEN
ADVISED OF THE POSSIBILITY OF SUCH DAMAGES.
• The contents of this manual are subject to change without notice.
A labels rating is affixed to the bottom of the product.
MA2605-A
Printed in China
Published: 5/2026
C
Continued on sheet 3/4
[Continued below left]
CGP-S555_A2_EN.fm 2 ページ 2026年4月20日 月曜日 午前10時38分

