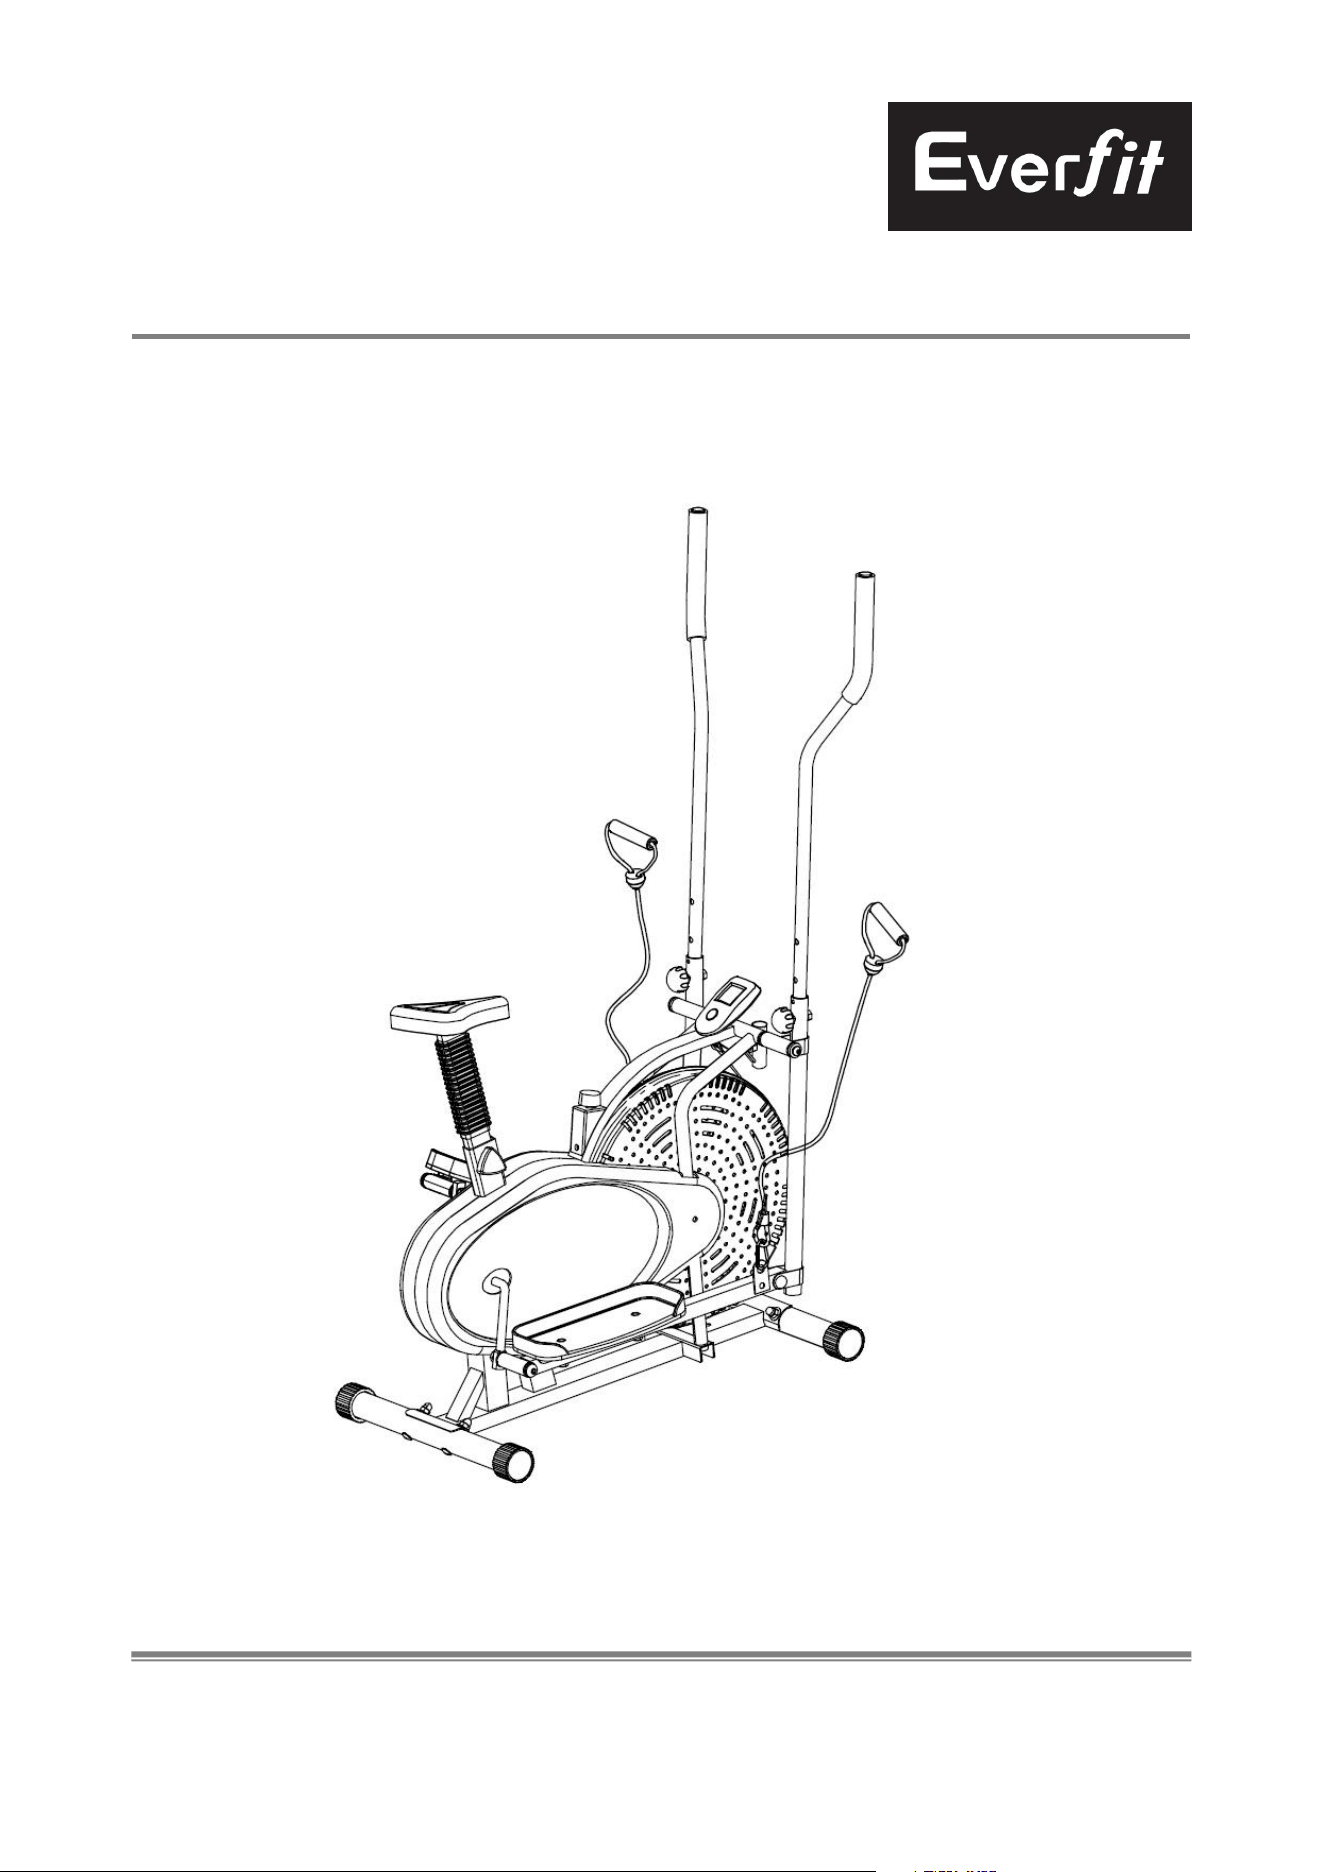
ELLIPTICAL
ELLIPTICAL
TRAINER
TRAINER
OWNER’S MANUAL
IMPORTANT !
Please read all instructions carefully before using this product.
Retain this manual for future reference.
The specifications of this product may vary slightly from the illustrations and are

1
subject to change without notice.
IMPORTANT SAFETY NOTICE:
NOTE THE FOLLOWING PRECAUTION BEFORE ASSEMBLING OR OPERATING
THE MACHINE.
1. Assemble the machine exactly as the descriptions in the instruction manual.
2. Check all the screws, nuts and other connections before using the machine for the first time and
ensure that the trainer is in the safe condition.
3. Set up the machine in a dry level place and leave it away from moisture and water.
4. Place a suitable base (e.g. rubber mat, wooden board etc.) beneath the machine in the area of
assembly to avoid dirt and etc…
5. Before beginning training, remove all objects within a radius of 2 meters from the machine.
6. DO NOT use aggressive cleaning articles to clean the machine, Only use the supplied tools or
suitable tools of your own to assemble the machine or repair any parts of machine. Remove
drops of sweat from the machine immediately after finishing training.
7. Your health can be affected by incorrect or excessive training. Consult a doctor before beginning
a training program. He can define the maximum setting (Pulse. Watts. Duration of training etc) to
which you may train yourself and can get precise information during training. This machine is not
suitable for therapeutic purpose.
8. Only do training on the machine when it is in correct working way. Use only original spare parts
for any necessary repairs.
9. This machine can be used for only one person’s training at a time.
10. Wear training clothes and shoes which are suitable for fitness training with the machine. Your
training shoes should be appropriate for the trainer.
11. If you have a feeling of dizziness, sickness or other abnormal symptoms, please stop training
and consult a doctor asap.
12. People such as children and handicapped persons should only use the machine in the presence
of another person who can give aid and advice.
13. The power of the machine increases with increasing the speed, and the reverse. The machine is
equipped with adjustable knob which can adjust the resistance. Reduce the resistance by turning
the adjusting knob for the resistance setting towards stage -. Increase the resistance by turning
the adjusting knob for the resistance setting towards stage +.
14. Please remove the tri-knob first, and then adjust the saddle post to the height that suitable for
you. At last fix the saddle post with the tri-knob.
15. The STOP marking is printed on the left and right handlebars. When you adjust the handlebar,
please pay attention to the marking.
16. The Maximum user’s weight is 120KG.
17. Keep children and pets away from the machine, because they maybe get injured without
properly fitted guarded.
18. Designed for adult use only.
2
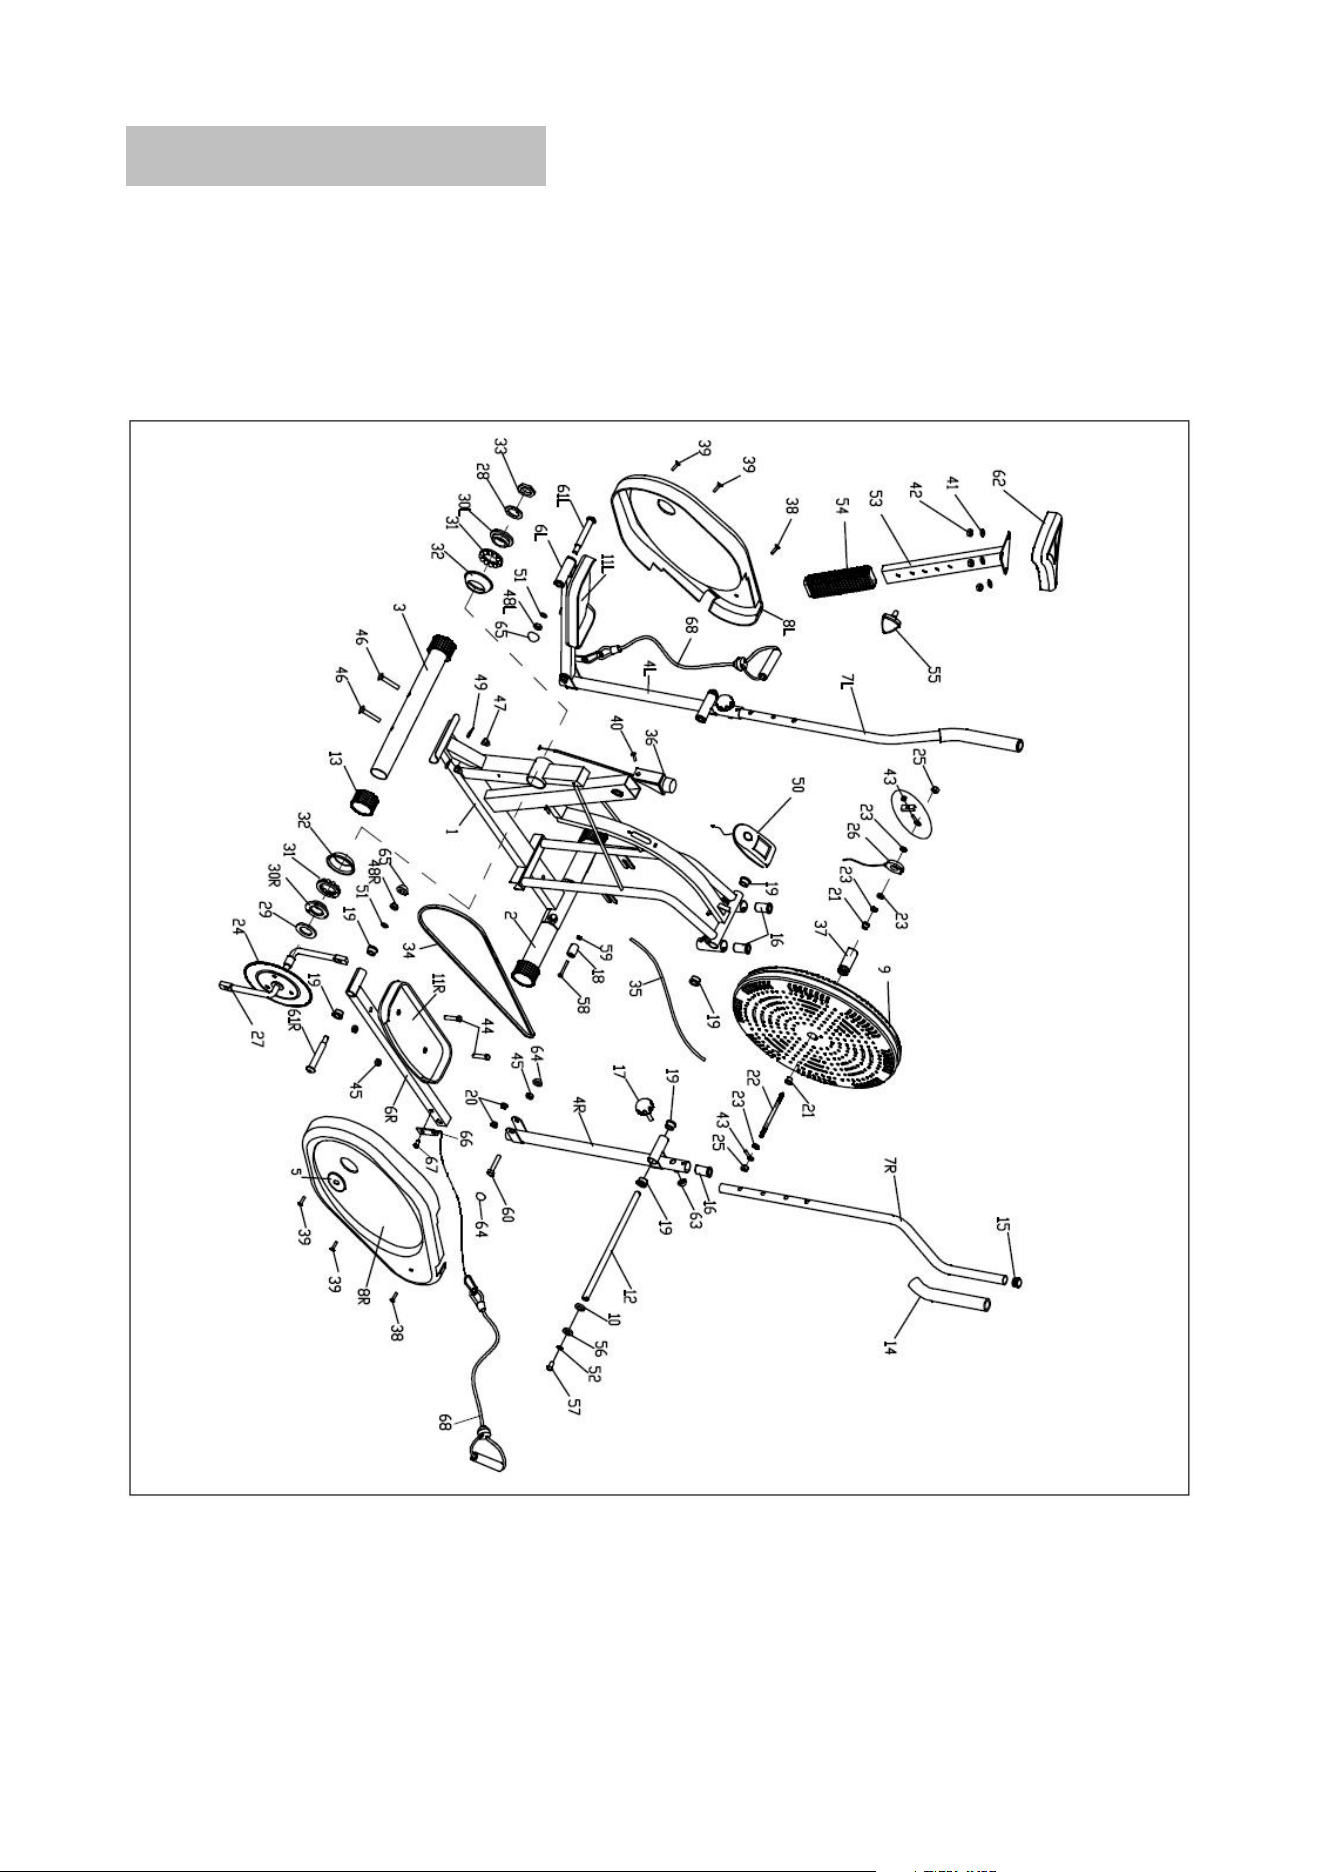
EXPLODED DIAGRAM

3
PARTS LIST
Parts No.
Description
Quantity
Parts No.
Description
Quantity
1
Main Frame
1
35
Friction Belt
1
2
Front Stabilizer
1
36
Tension Controller
1
3
Rear Stabilizer
1
37
Gear
1
4 L/R
Rocking Arm
1 each
38
Phillips Tapping Screw
M5x15
2
5
Plastic Seal Cover
2
39
Phillips Tapping Screw
M5x45
7
6 L/R
Pedal Arm
1 each
40
Countersunk Head Screw
1
7 L/R
Handlebar
1 each
41
Flat Washer
3
8 L/R
Chain Cover
1 pair
42
Nylon Nut
3
9
Fan Wheel
1
43
Chain Adjusting Kit
2
10
Flat washer
1
44
Hex Bolt
4
11 L/R
Pedal
1 pair
45
Nylon Nut
6
12
Handlebar Shaft
1
46
Carriage Bolt
4
13
Stabilizer End Cap
4
47
Acorn Nut
4
14
Foam Grip
2
48
Nylon Nut
2
15
Round Cap φ1”
6
49
Arc Washer
4
16
Handlebar Bushing
4
50
Monitor
1
17
Umbrella Knob
2
51
Spring Washer
2
18
Transport Roller
2
52
Spring Washer
13φx8.5φx2.5
2
19
Alloy Bushing φ5/8”
10
53
Seat Post
1
20
Alloy Bushing φ3/8”
4
54
Seat Post Sleeve
1
21
Brass Bushing
2
55
Tri-Locking Knob
1
22
Fan Wheel Axle
1
56
D-Shaped Washer
2
23
Hex Thin Nut
4
57
Allen Bolt
2
24
Sprocket
1
58
Hex Bolt
2
25
Flange Nut
2
59
Nylon Nut
2
26
Sensor
1
60
Hex Bolt
2
27
Crank
1
61 L/R
Pedal Hinge Bolt
1 pair
28
Washer
1
62
Saddle
1
29
Flat Washer
1
63
Nut Cap
S13
2
30 L
2-Slot Nut
1
64
Nut Cap
S16
4
30 R
3-Slot Nut
1
65
Nut Cap
S18
2
31
Collar Ball
2
66
Connecting plate
2
32
Collar Housing
2
67
Allen bolt
2
33
Hex Nut
1
68
Rope
2
34
Chain
1
4
NOTE:
Most of the listed assembly hardware has been packaged separately, but some
hardware items have been preinstalled in the identified assembly parts. In these
instances, simply remove and reinstall the hardware as assembly is required.
Please reference the individual assembly steps and make note of all preinstalled
hardware.
ASSEMBLY INSTRUCTION
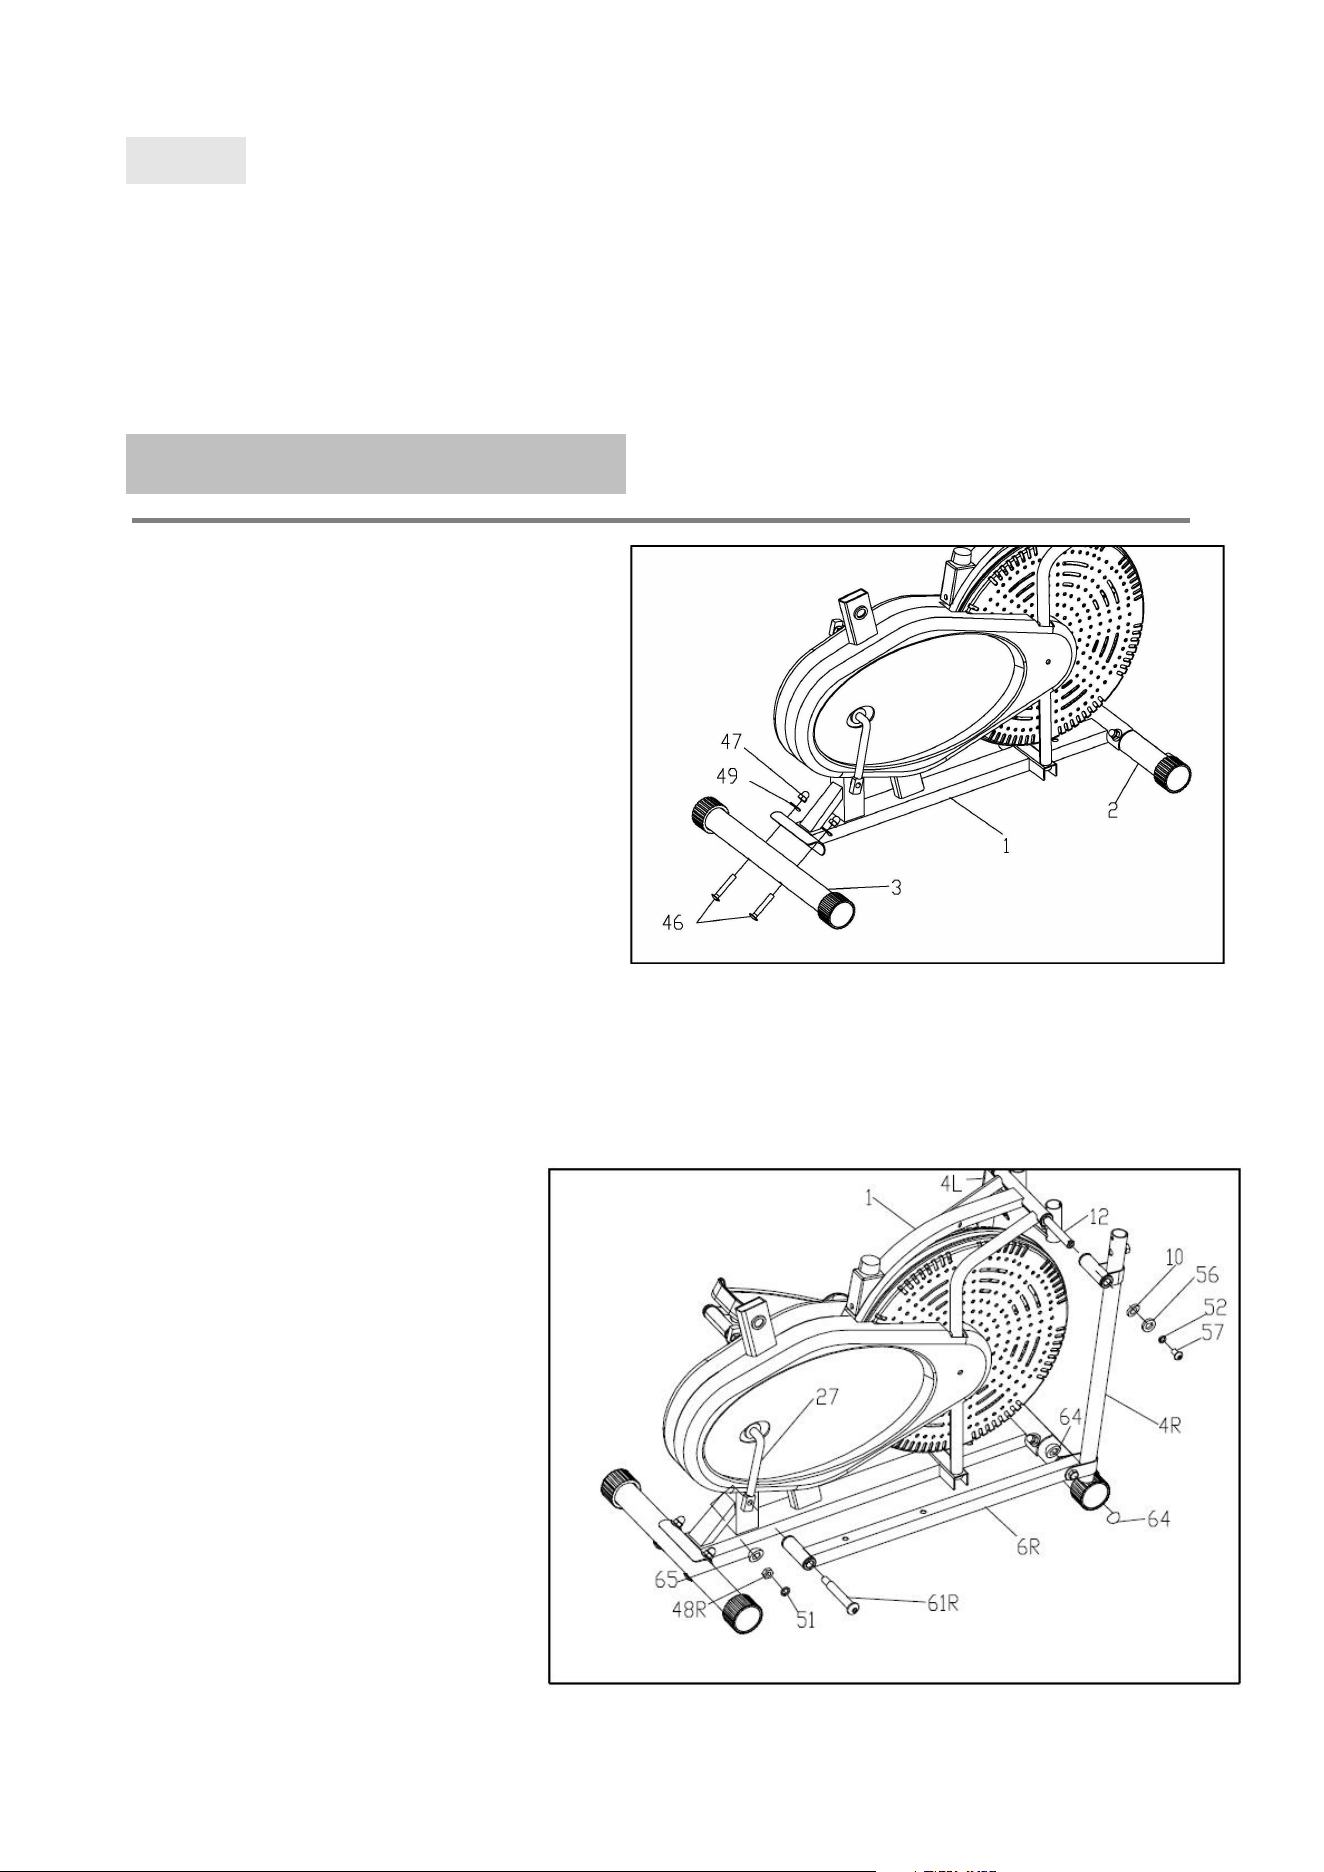
STEP 1.
Attach the Front Stabilizer (2) and the Rear
Stabilizer (3) to the Main Frame (1),
secured with the Carriage Bolts (46), Arc
Washers (49), and Nylon Nuts (47) as
shown.
STEP 2.
A: Tighten Rocking Arm (4 L/R) to the Main Frame (1) with Handlebar Shaft (12), Allen Bolt (57),
Spring Washer (52), D-shaped Washer (56) and Flat washer (10) as shown.
B: Fit the Pedal Arms (6L/R) to the
Crank (27), secured with the Pedal
Hinge Bolts (61L/R), Spring
Washers (51) and Nylon Nuts (48
L/R), and then cover the Nut Caps
(65 & 64).
Note: Both Pedal Hinge Bolts are
labeled L FOR LEFT and R FOR
RIGHT.
To tighten turn the left bolt
COUNTERCLOCKWISE and the
right bolt CLOCKWISE.
Move the Crank to a proper angle
for easily tightening the Bolts.
5
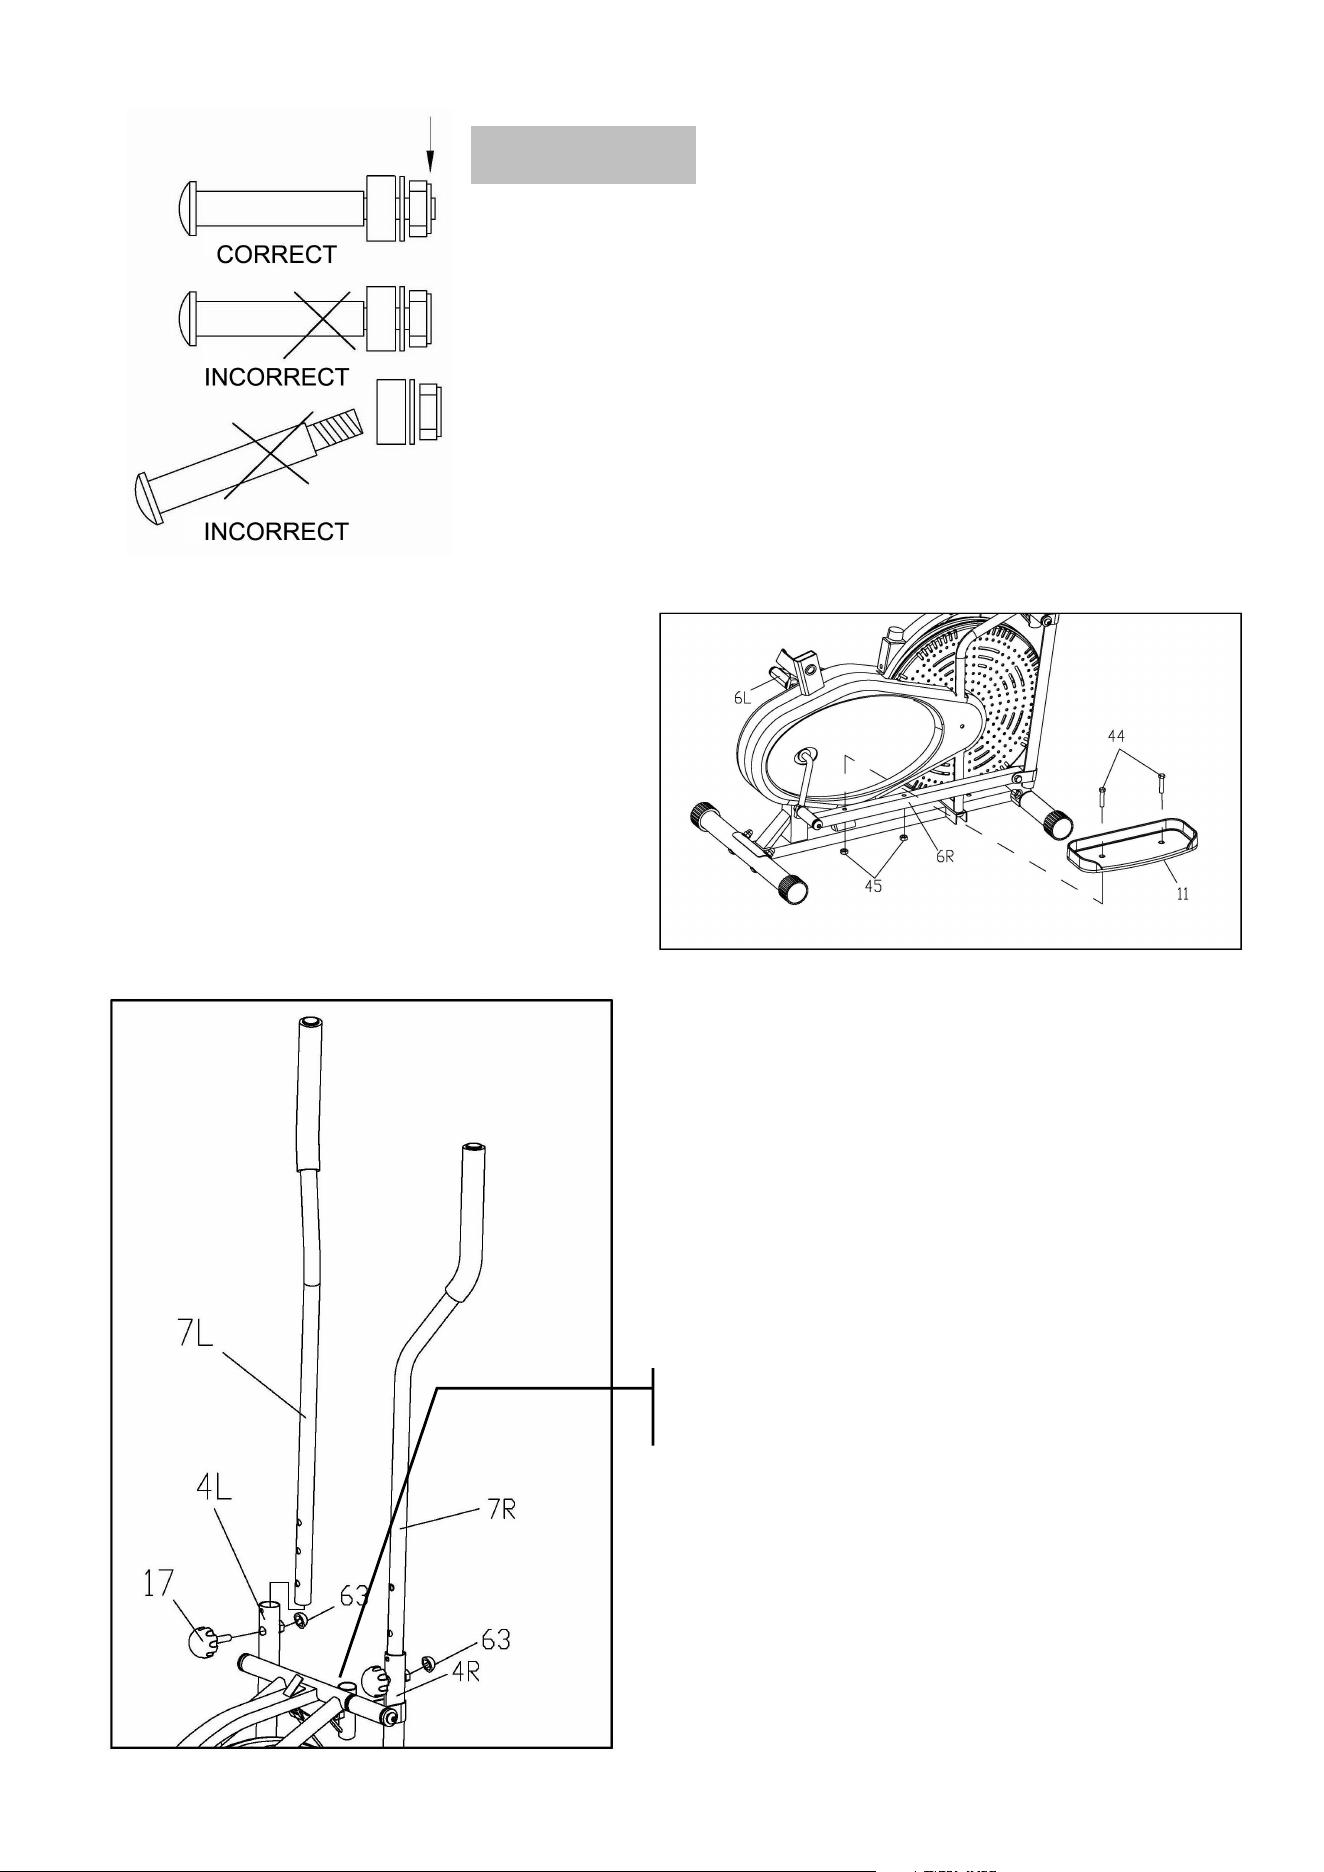
ATTENTION:
The Right and Left Hinge Bolt (No.61R/L) must fully penetrate
the nylon ring inside the Pedal Arm Joint and the Crank. This will
ensure the stability and durability of your Elliptical Trainer.
In order to install hinge bolt properly, keep it perfectly straight as
the bolt goes through the pedal arms and the crankshaft. If the
hinge bolt is connected to the crankshaft at an angle, damage to
both the hinge and the crankshaft may occur.
STEP 3.
Tighten the both sides of Pedal Hinge Bolts
(61L/R) before assembling the pedals. Attach
the Pedals (11) to their respective Pedal Arms
(6L/R) using the Hex Bolts (44) and Nylon
Nuts (45).
Note: Both Pedals are labeled L FOR LEFT
and R FOR RIGHT.
STEP 4.
Attach the Handlebar (7L/R) to the Rocking Arm
(4L/R) respectively, select a height setting that is
comfortable to the user and make sure both
Handlebars are set at the same height.
Lock each Handlebar in place with
Umbrella-Knobs (17), and then cover the Nut
Caps (63) as shown.
Note: You can easily switch your Handlebars
(7L/R) between the dual-action mode and the
fixed mode during your workout.
DUAL ACTION MODE: To allow the handlebars
to move along with the pedals.
FIXED MODE: To keep the handlebars stationary
while you workout.
DUAL ACTION
ATTACH HERE
FOR FIXED MODE
6
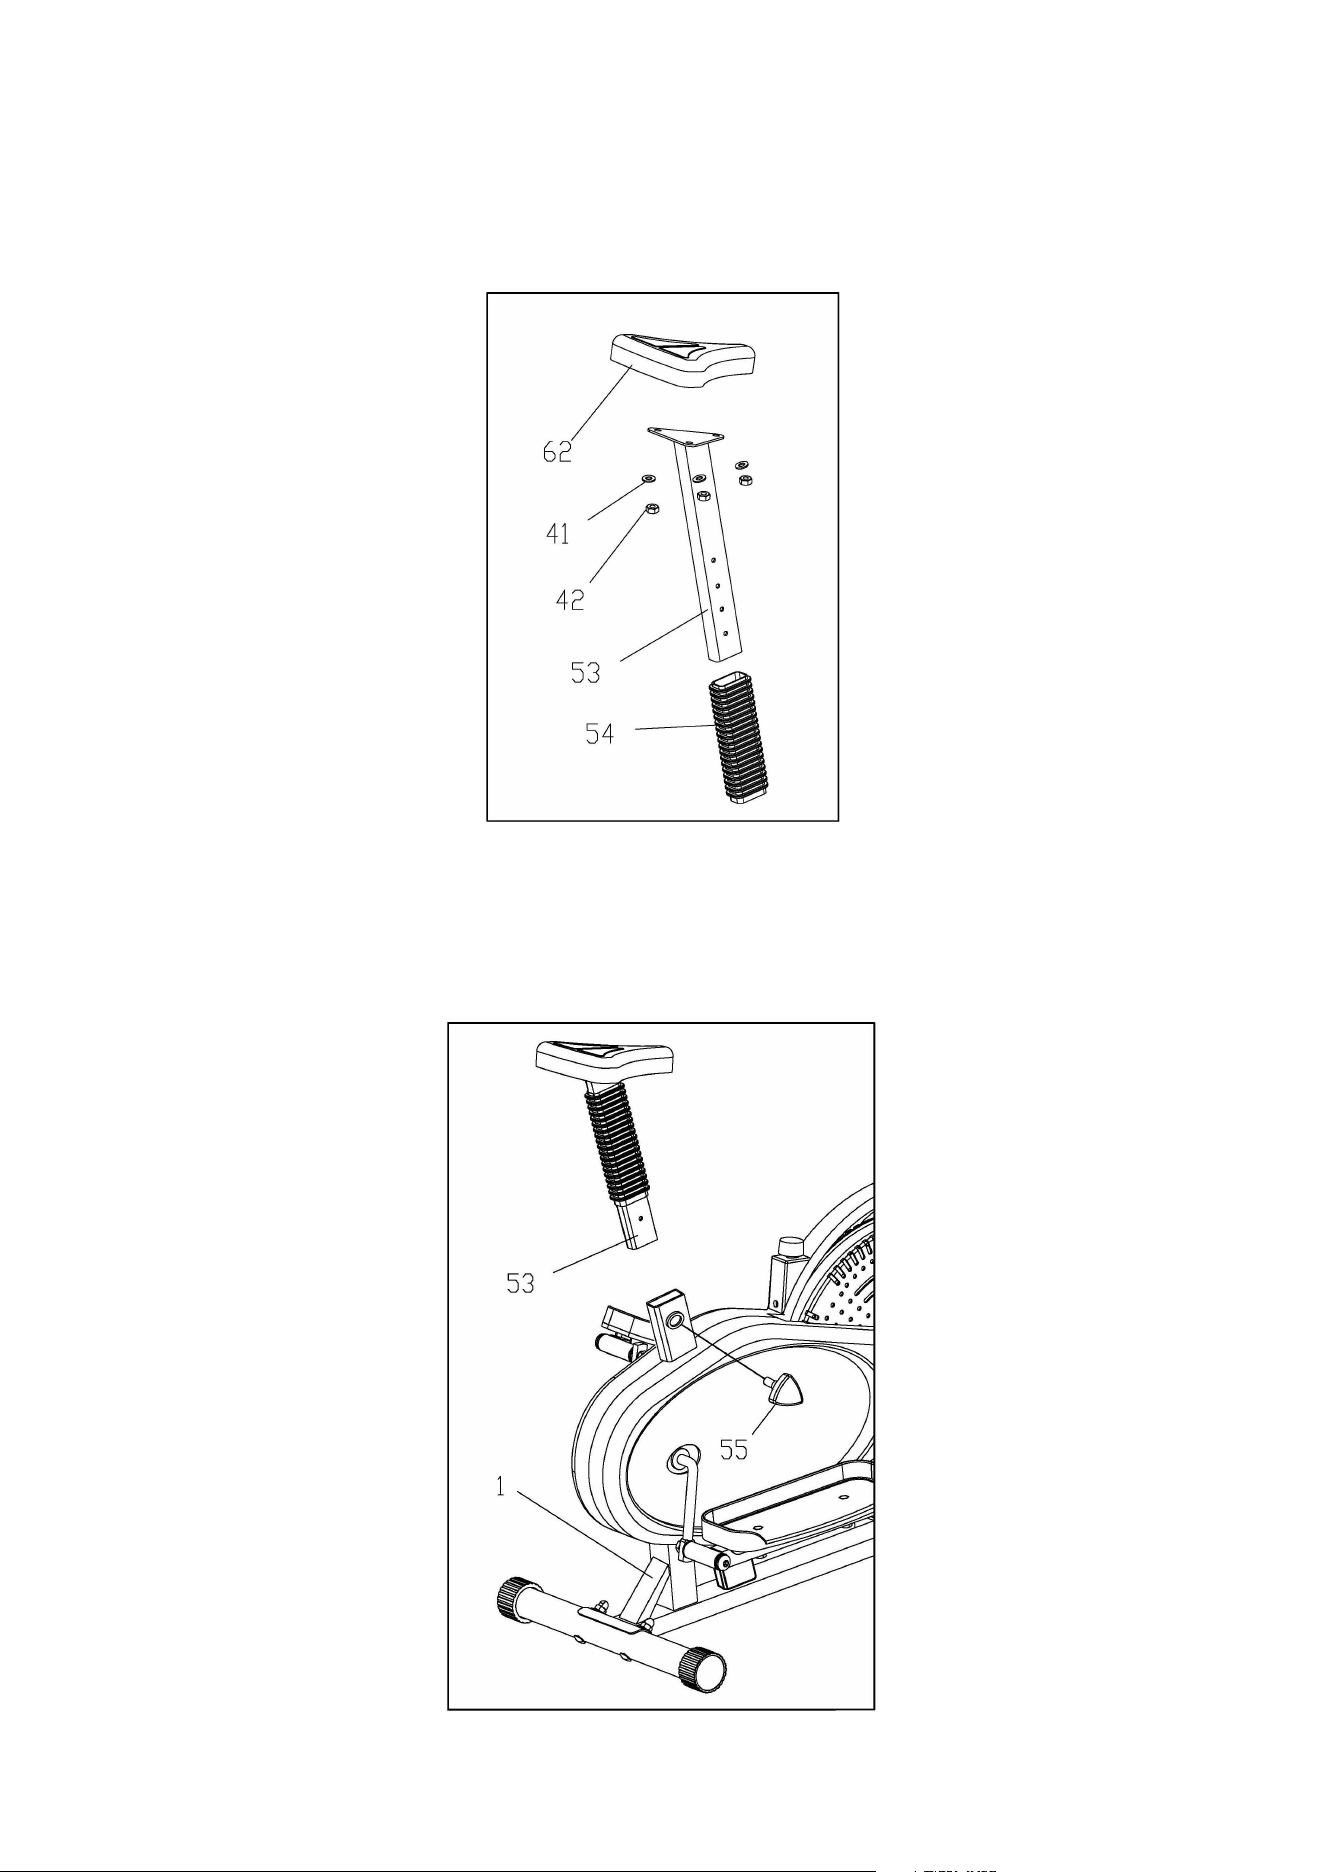
STEP 5.
Attach the Saddle (62) to the Seat Post (53) with Flat Washers (41) and Nylon Nuts (42)
provided; Slide the Sleeve (54) onto the Seat Post (53).
STEP 6.
Insert the Seat Post (53) with Saddle into the Frame Section (1) and lock at desired height with
Tri-Locking Knob (55).
7
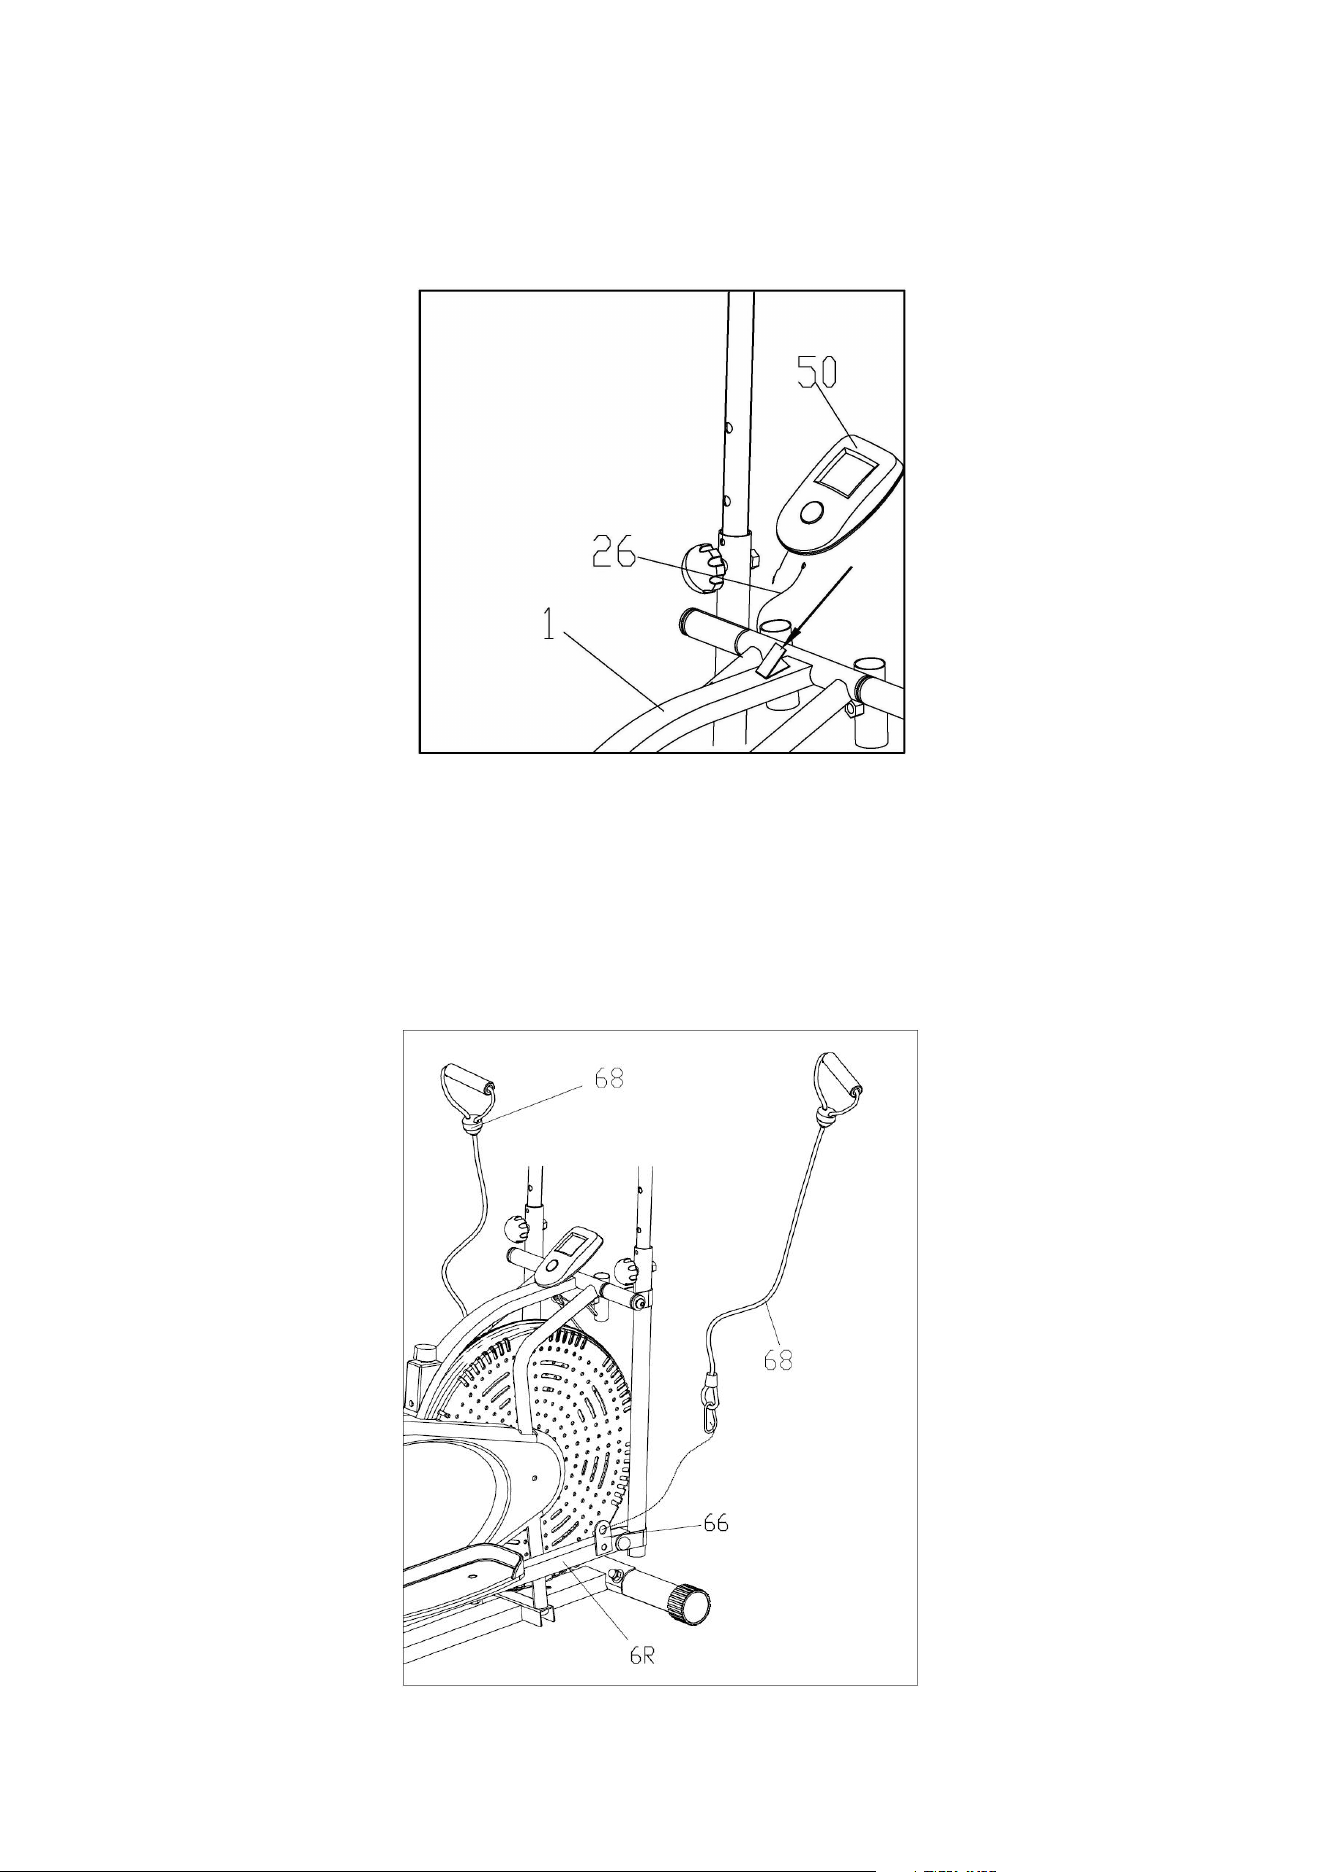
STEP 7.
Connect the Sensor Wire (26) to the Monitor (50), and then insert the Monitor onto the Bracket
as shown.
STEP 8.
Attach the Rope (68) to the connecting plate (66) of the Pedal Arm (6L/R)
8
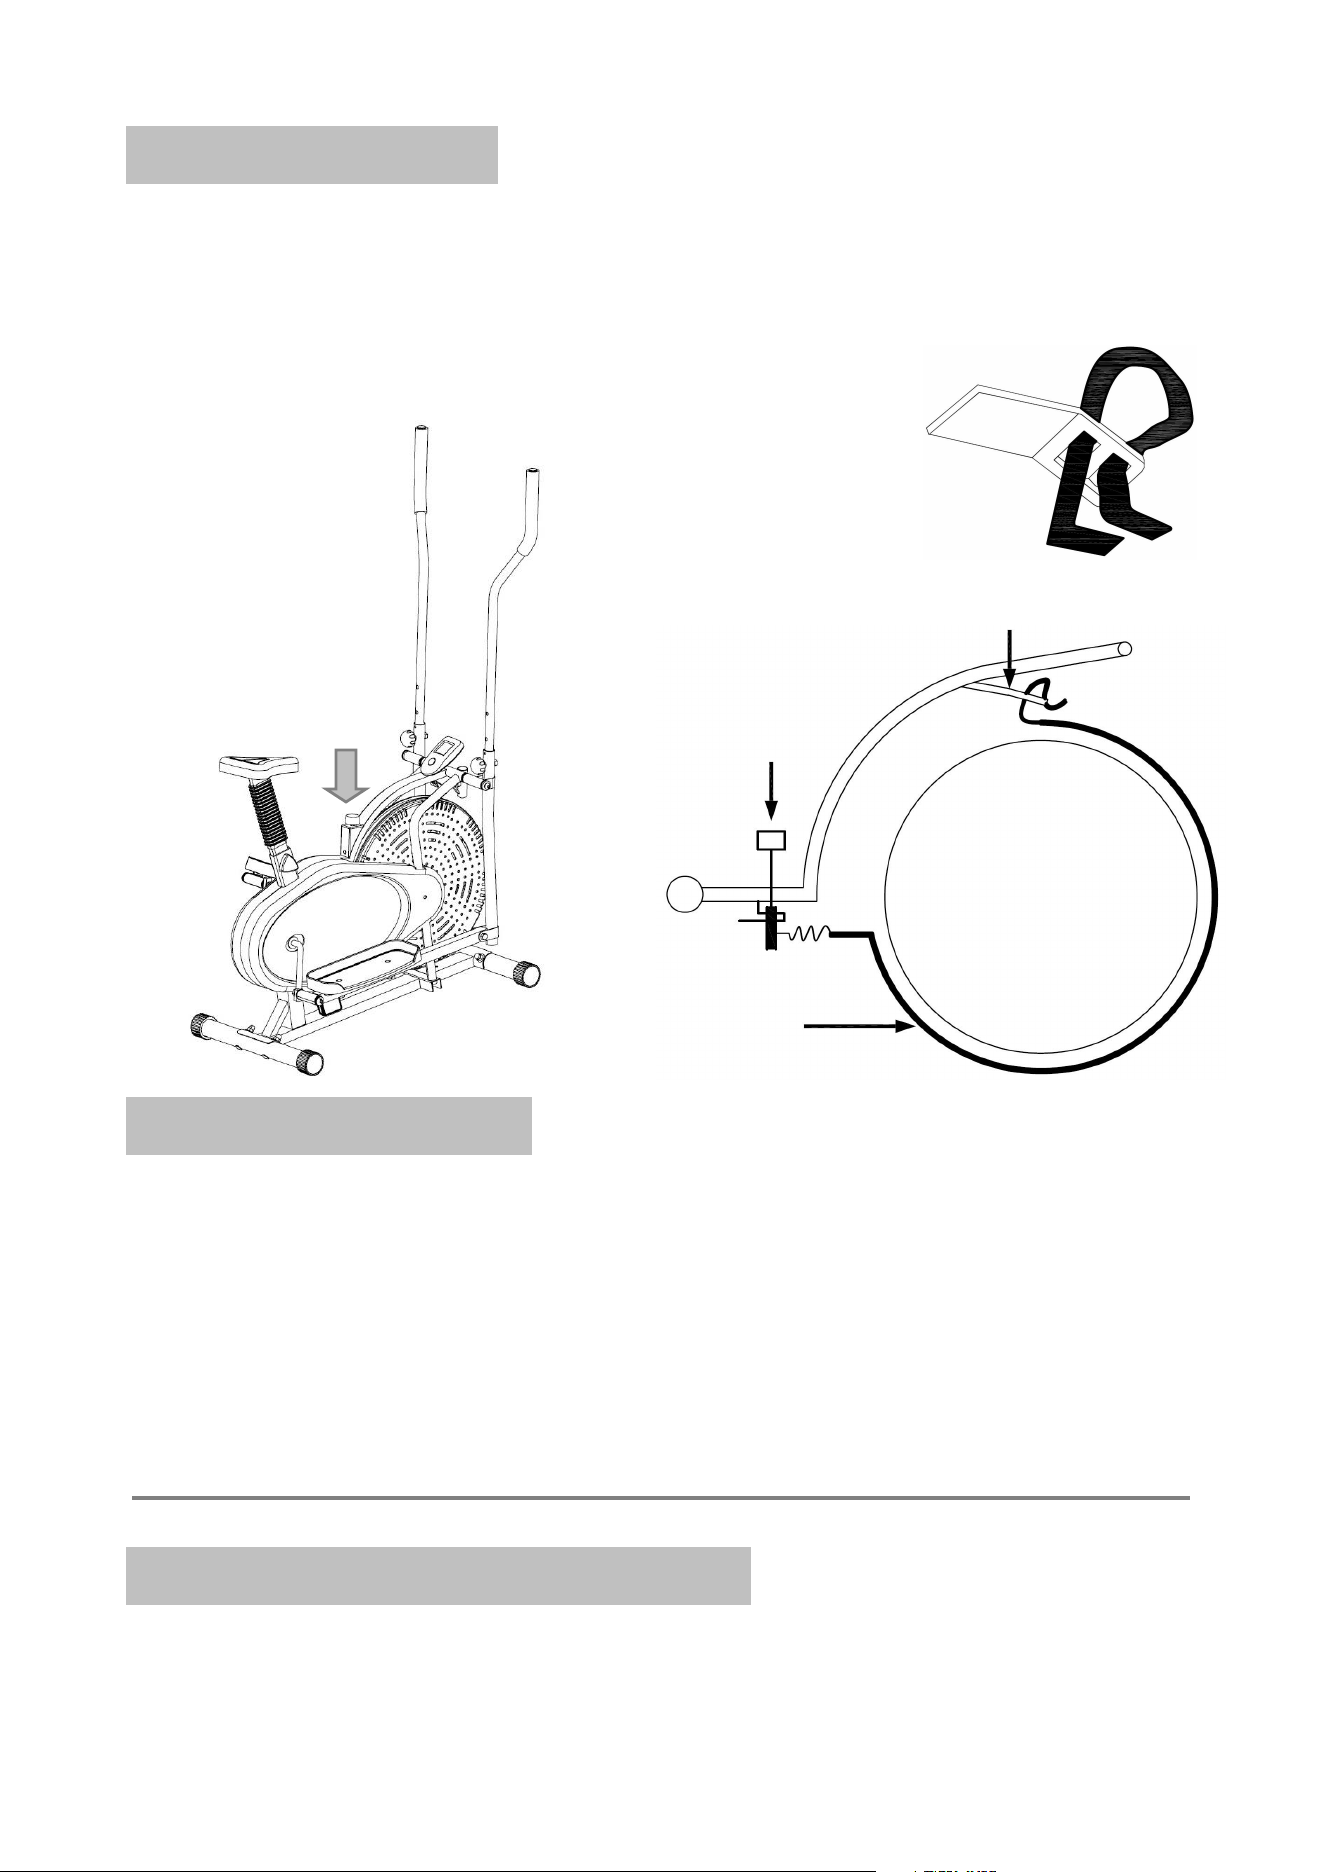
Tension adjustment
The assembly of your Elliptical Trainer is now complete. As you try your exercises for the first
time, you should adjust the tension to the correct level before you begin your full workout.
Turning the adjustment knob allows you to change the tension level and vary the intensity of
your workout as you exercise.
To increase tension turn the tension knob to the right and to decrease
tension turn the tension knob to the left.
Reversible movement
Remember, your Elliptical Trainer has REVERSIBLE movement!
Forward pedaling exercises your quadriceps (front thigh muscles), while backward pedaling
targets your hamstrings (back thigh muscles). Take advantage of these facts to make your
workout less fatiguing and more fun.
CAUTION: MAKE SURE YOU HAVE TIGHTENED ALL THE BOLTS AND NUTS WELL BEFORE
BEGINNIG YOUR WORKOUT!
USING YOUR ELLIPTICAL TRAINER
Using your Elliptical Trainer will provide you with several benefits. It will improve your physical
fitness, tone your muscles and in conjunction with a calorie controlled diet, help you lose
weight.
The more tightly the
friction belt wraps
around the fan wheel,
the harder it is
for you to pedal
(more tension)
Friction Belt Buckle
Friction Belt
Tension
Adjustment Knob
Note:
Re-adjust the
Tension knob after
you finished
re-strapping.