
Technical Support and E-Warranty Certificate
www.vevor.com/support
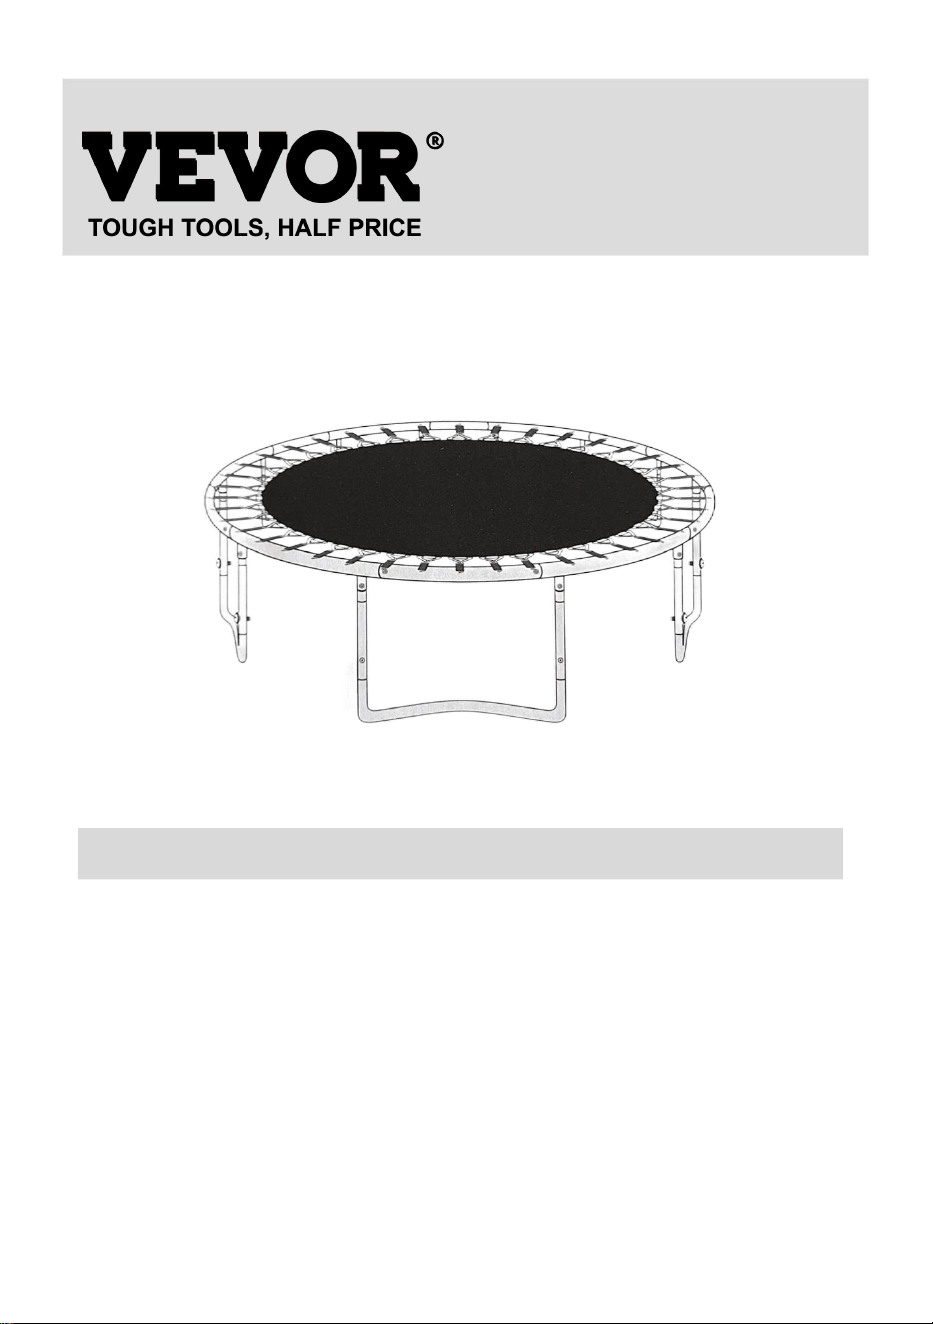
TRAMPOLINE MAT ASSEMBLY
MODEL: SDKC20240628CGQ \ SDKC2024Q40628CGQ \
SDKC202406YY28CGQ \ SDKC2024XT0626QGQ \
SDKC2024Y06U58CGQ \ SDKC0628QYL42P0 \
SDKC202369CCZECGG
We continue to be committed to provide you tools with competitive price.
"Save Half", "Half Price" or any other similar expressions used by us only
represents an estimate of savings you might benefit from buying certain tools
with us compared to the major top brands and does not necessarily mean to cover
all categories of tools offered by us. You are kindly reminded to verify carefully
when you are placing an order with us if you are actually Saving
Half in comparison with the top major brands.


1
MODEL: SDKC20240628CGQ \ SDKC2024Q40628CGQ \
SDKC202406YY28CGQ \ SDKC2024XT0626QGQ \ SDKC2024Y06U58CGQ \
SDKC0628QYL42PO \ SDKC202369CCZECGG
TYPES-ROUND
NEED HELP? CONTACT US!
Have product questions? Need technical support? Please feel free to
contact us:
Technical Support and E-Warranty Certificate
www.vevor.com/support
This is the original instruction, please read all manual instructions
carefully before operating. VEVOR reserves a clear interpretation of our
user manual. The appearance of the product shall be subject to the
product you received. Please forgive us that we won't inform you again if
there are any technology or software updates on our product.
TRAMPOLINE MAT
ASSEMBLY
2
Thank you for choosing Our TRAMPOLINE MAT ASSEMBLY for all your
trampoline and trampoline replacement needs!
Simply follow the assembly and safety instructions in this manual and you will
soon be starting your exercise program for a happier,healthier and more fun
lifestyle!
Before you Begin to install your new Jumping Mat,please verify that the mat
you purchased is the correct size for your trampoline.To ensure that the
trampoline mat you bought is the right size,Please follow the steps below:
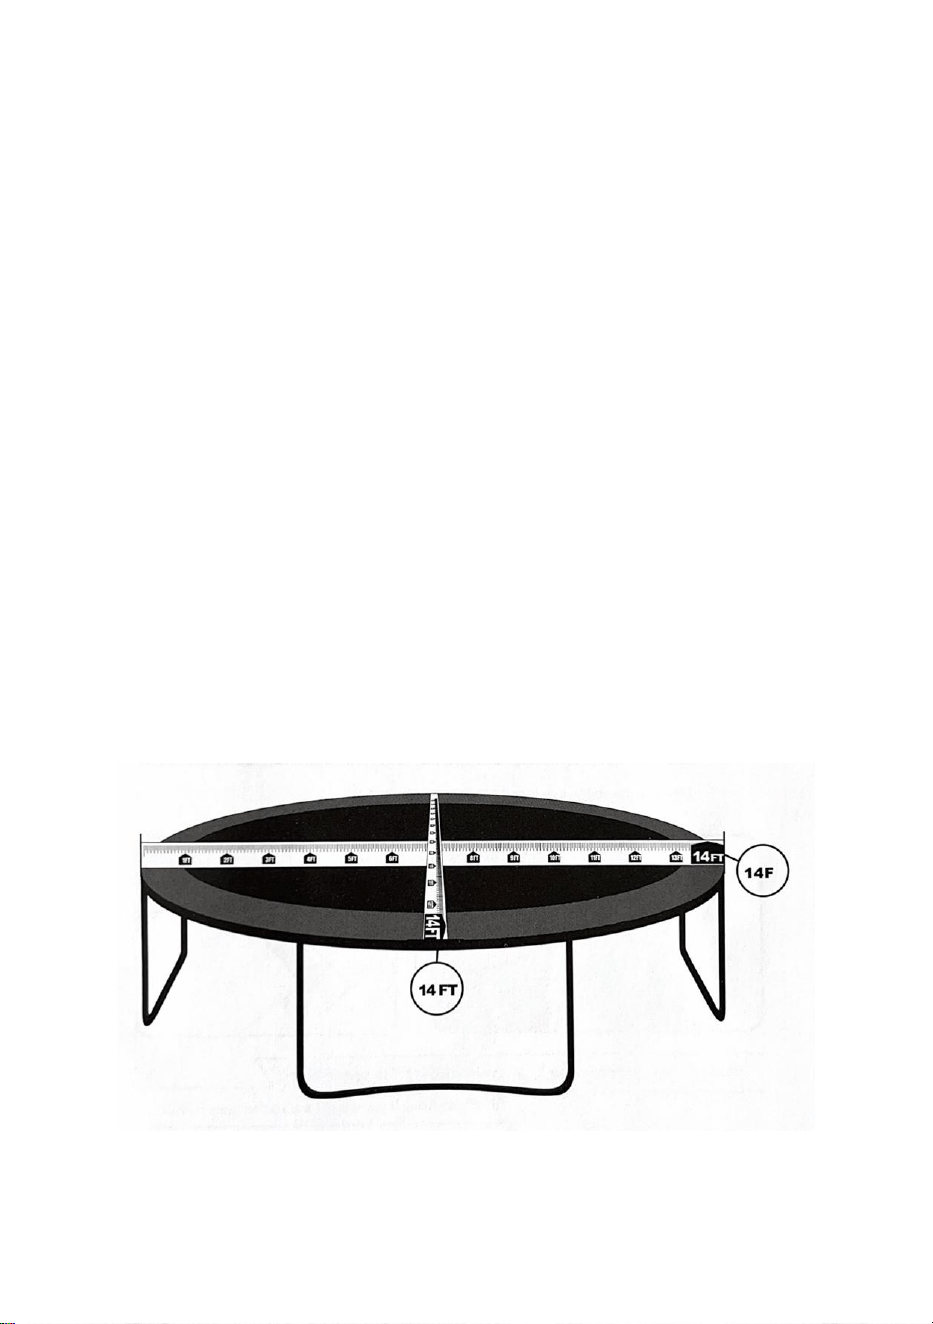
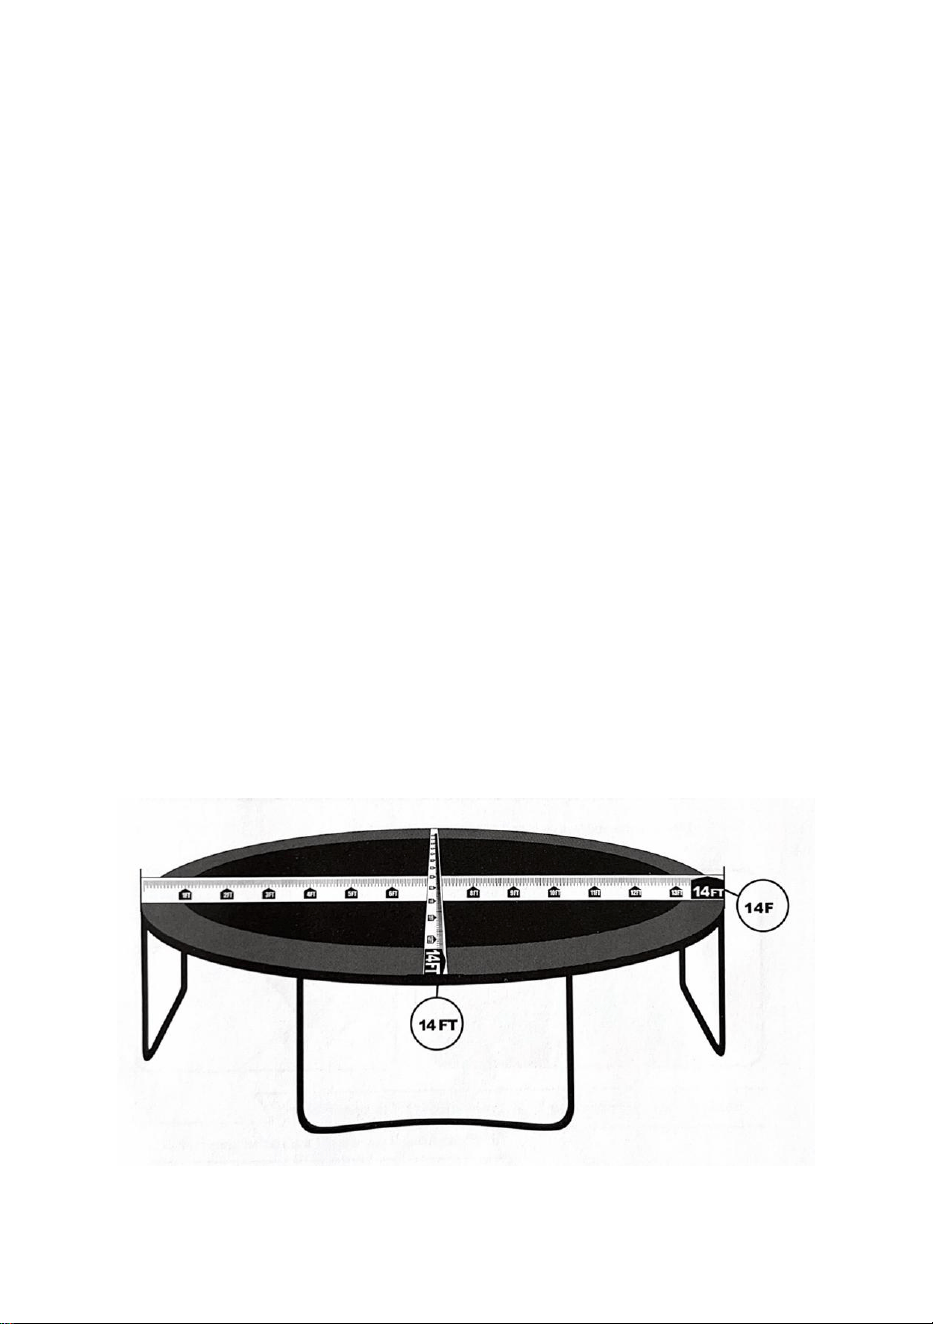
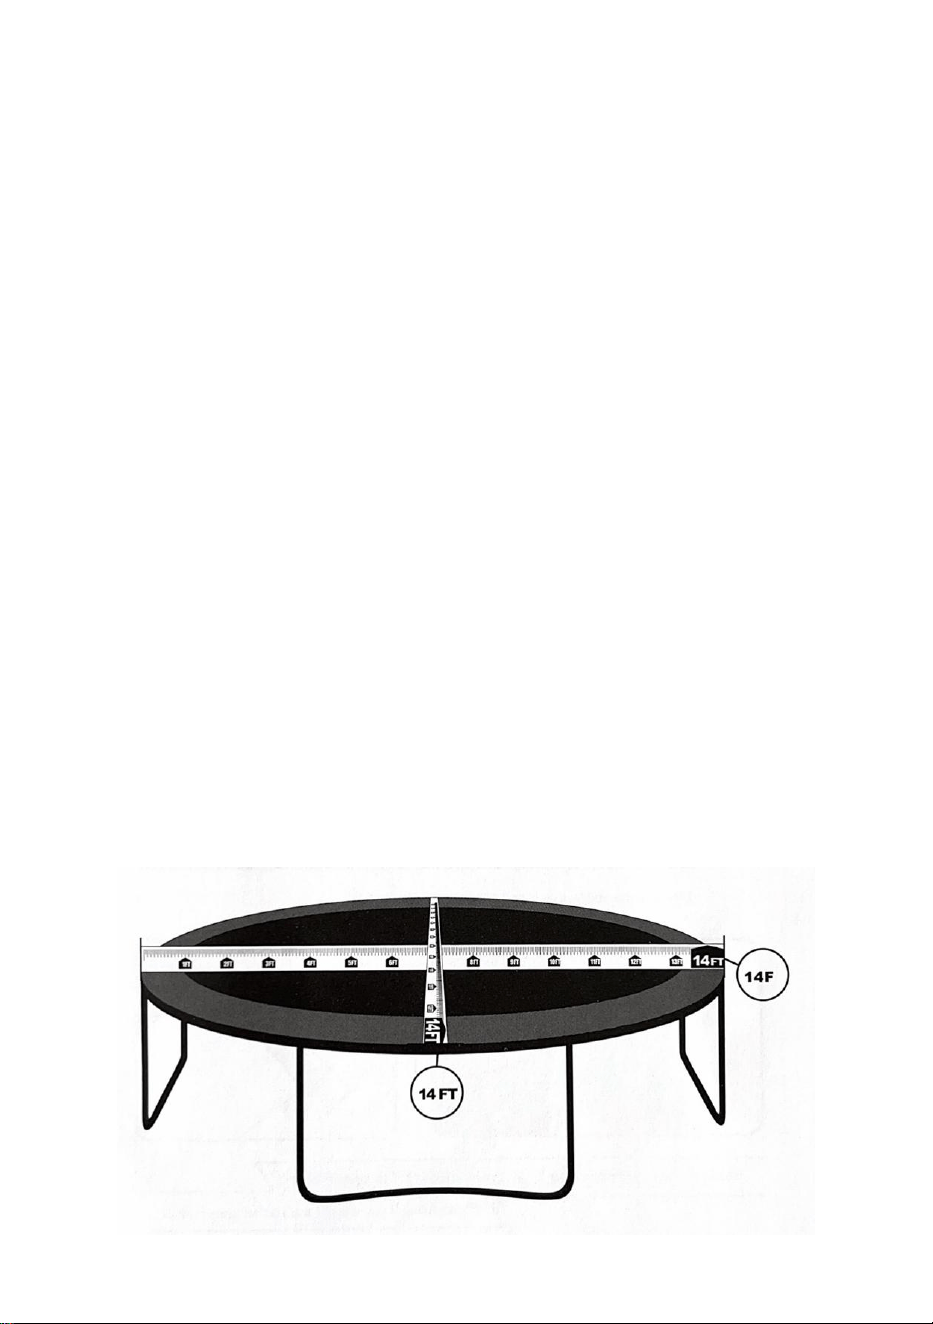
Measuring Tips for Jumping Mat
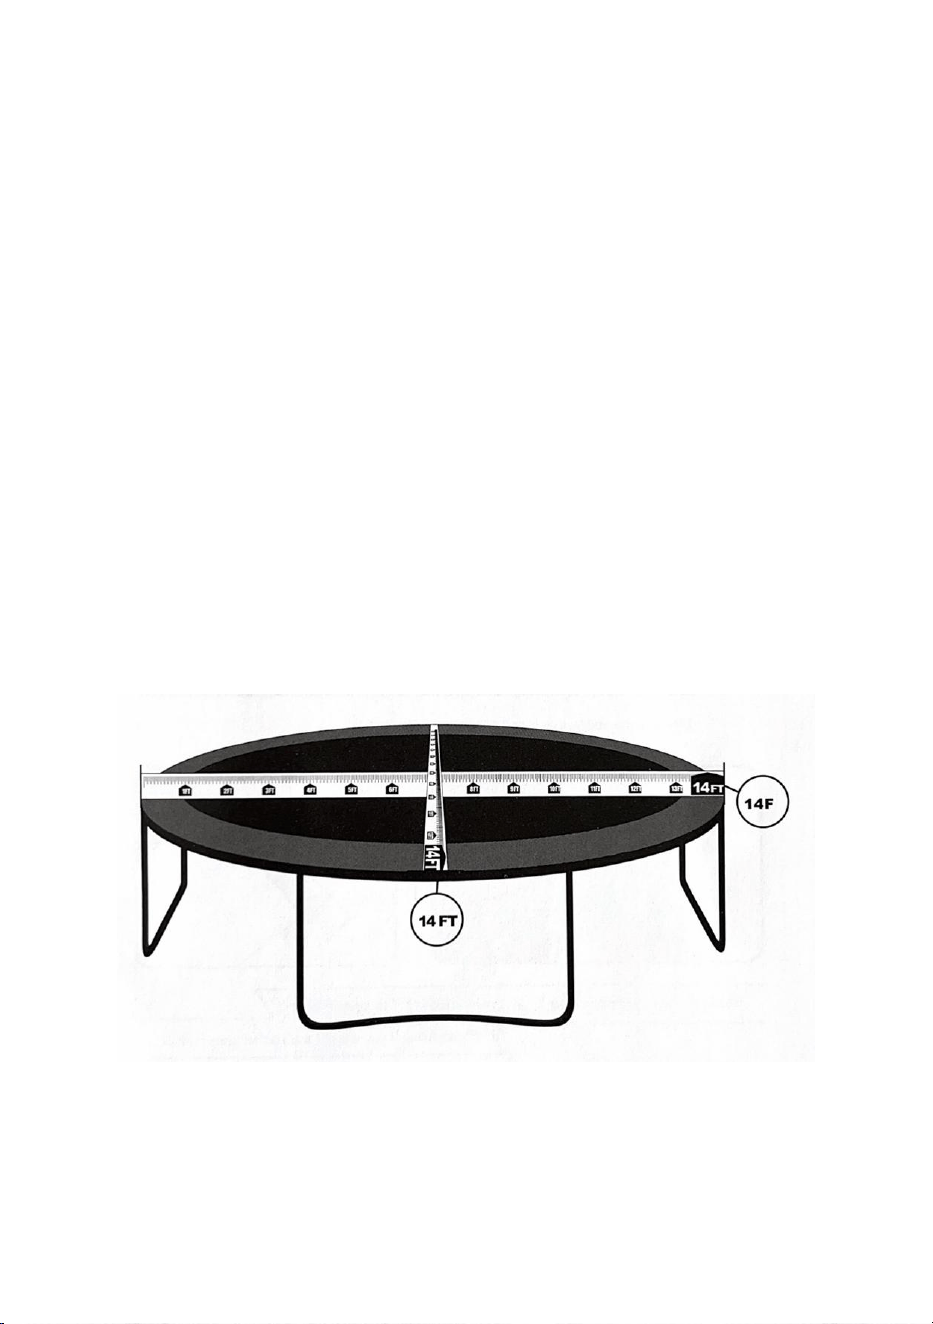
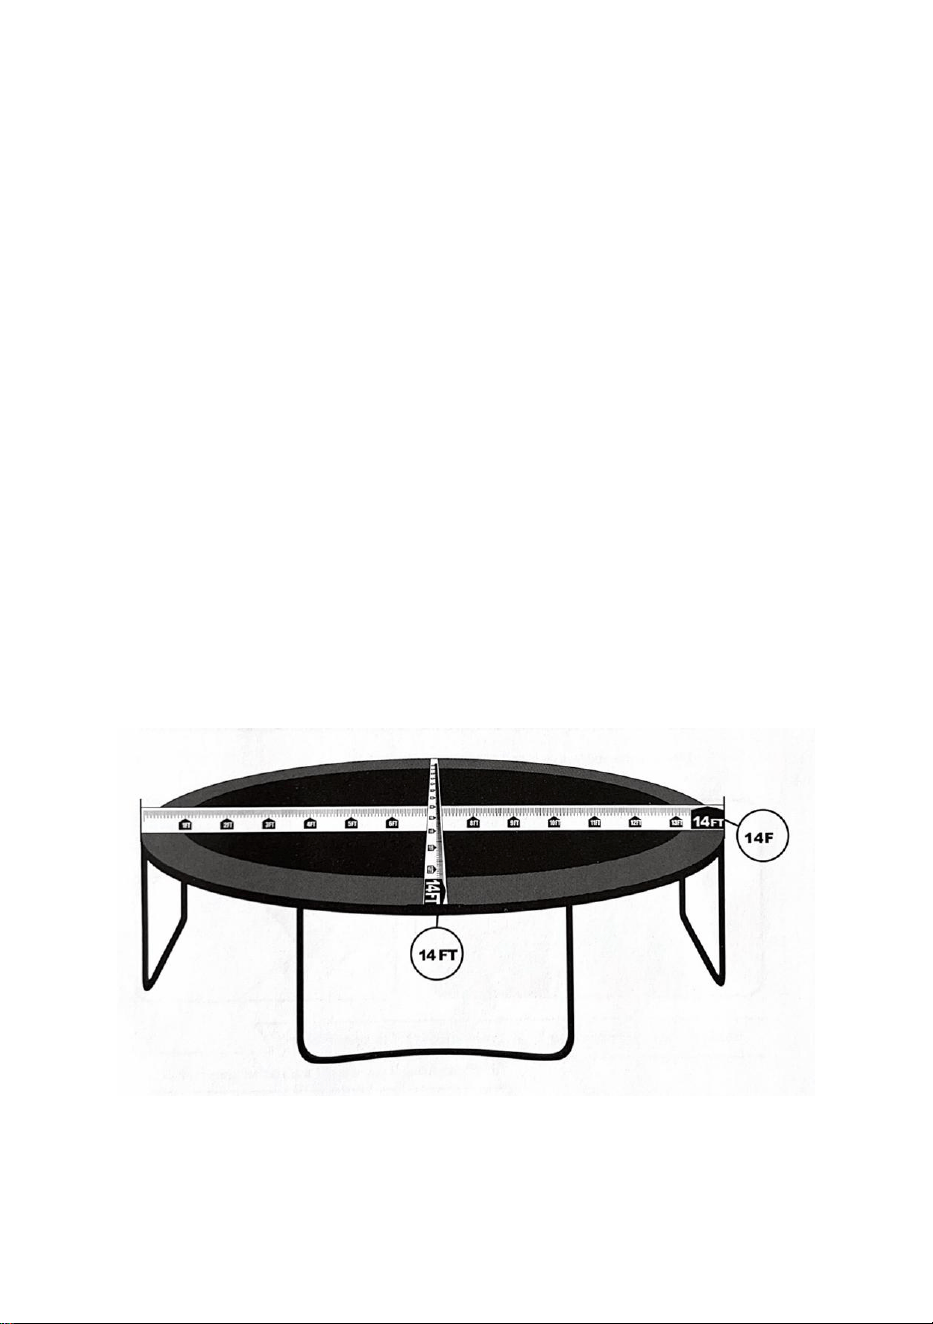
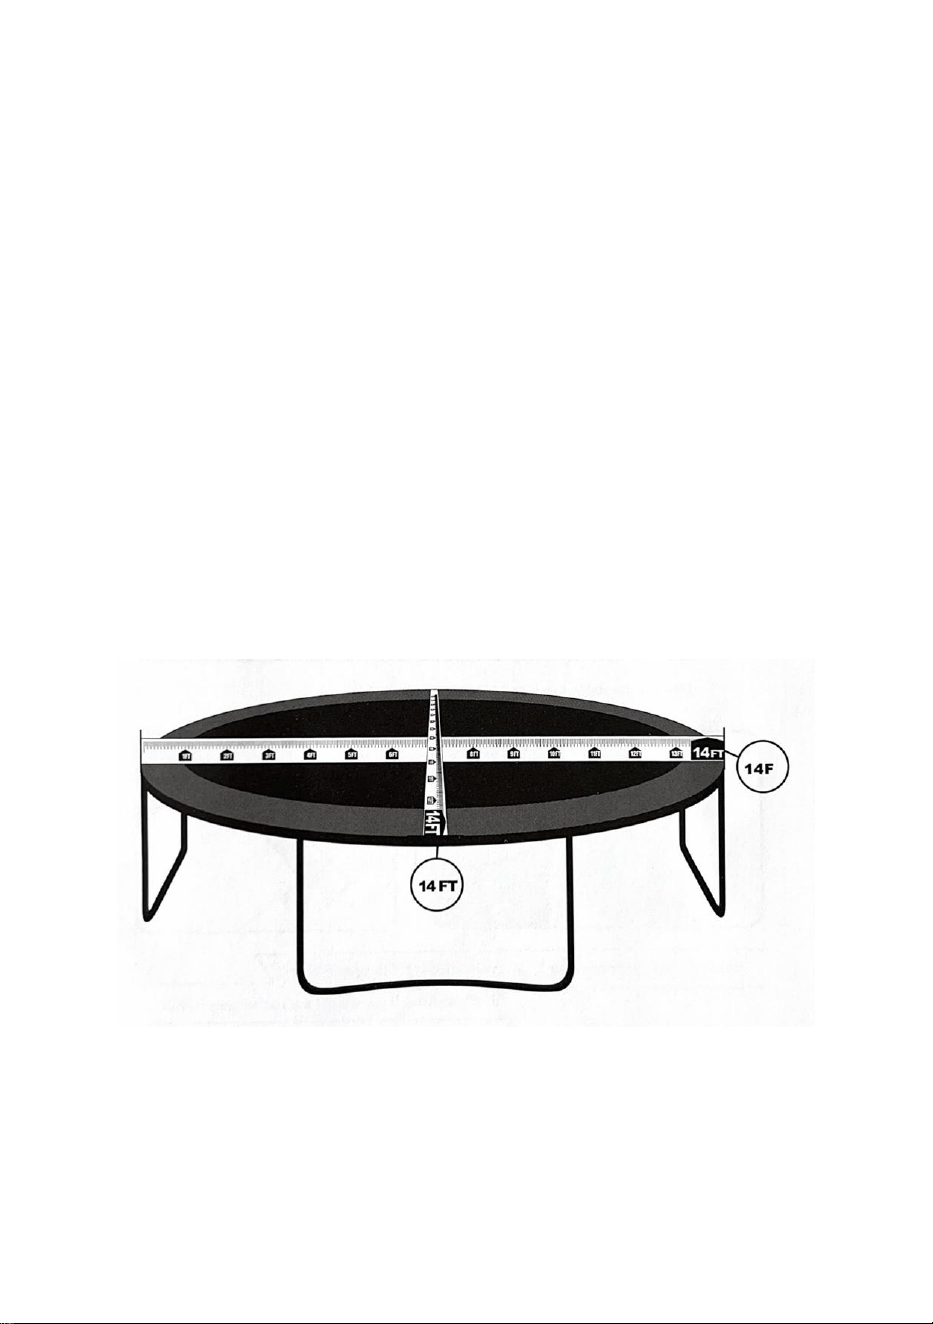
Step1. FRAME SIZE
Measure your frame from one outer edge to the other with a measuring
tape. Do this Both vertically and horizontally across the center of the
trampoline.Make sure it is From the outer edge so that you get the correct
measurements.
3
Step2. AMOUNT OF SPRING HOLES
Count the amount of spring holes on your trampoline frame.
Step3. SIZE OF THE SPRINGS
Measure the spring size from hook to hook unstretched.
Based on the
1) Frame Size 2) Spring Amount 3) Spring Size
Determine if you bought the correct jumping mat.

4
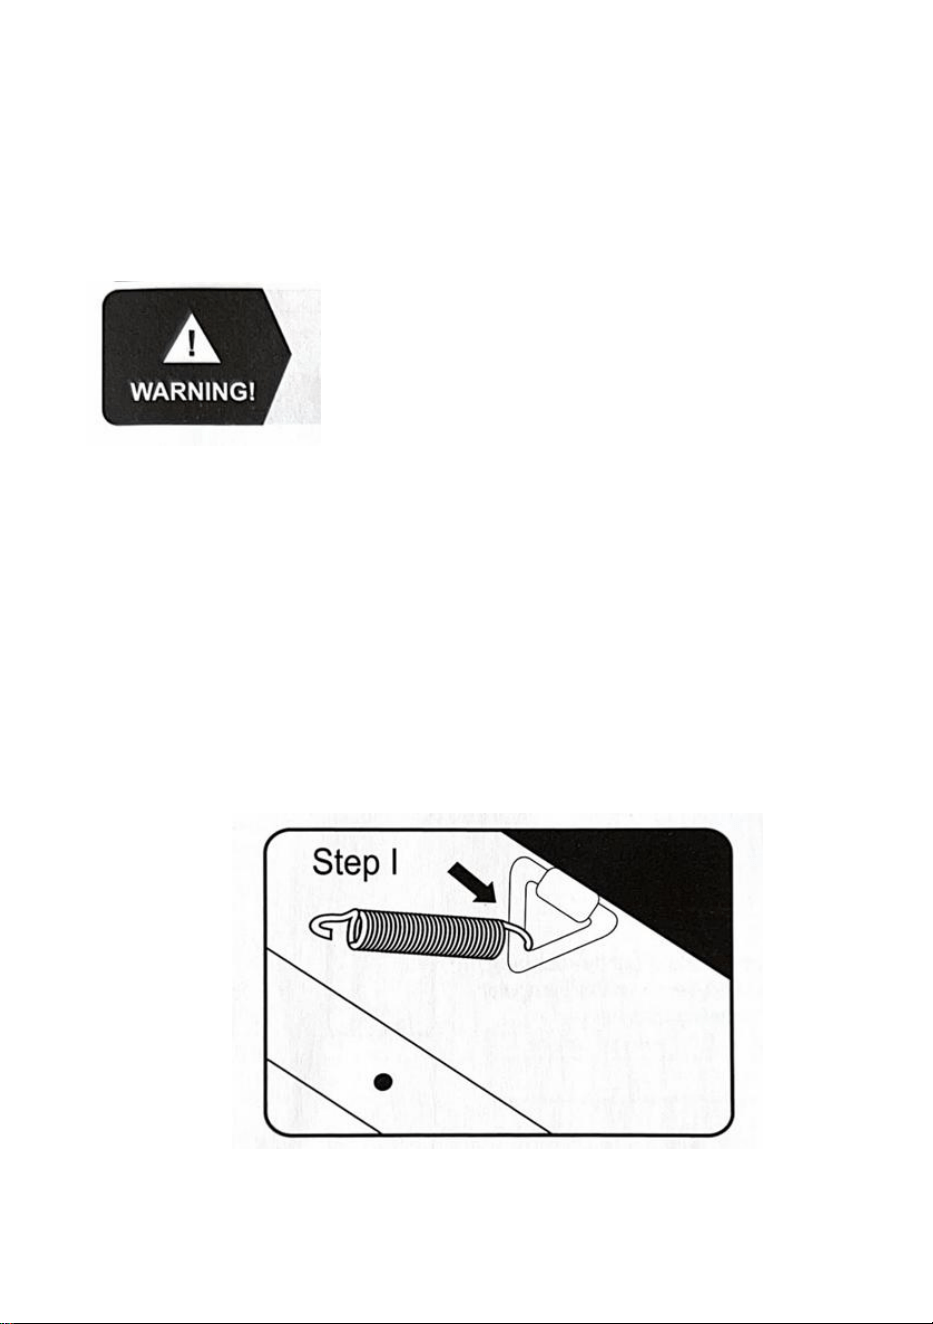
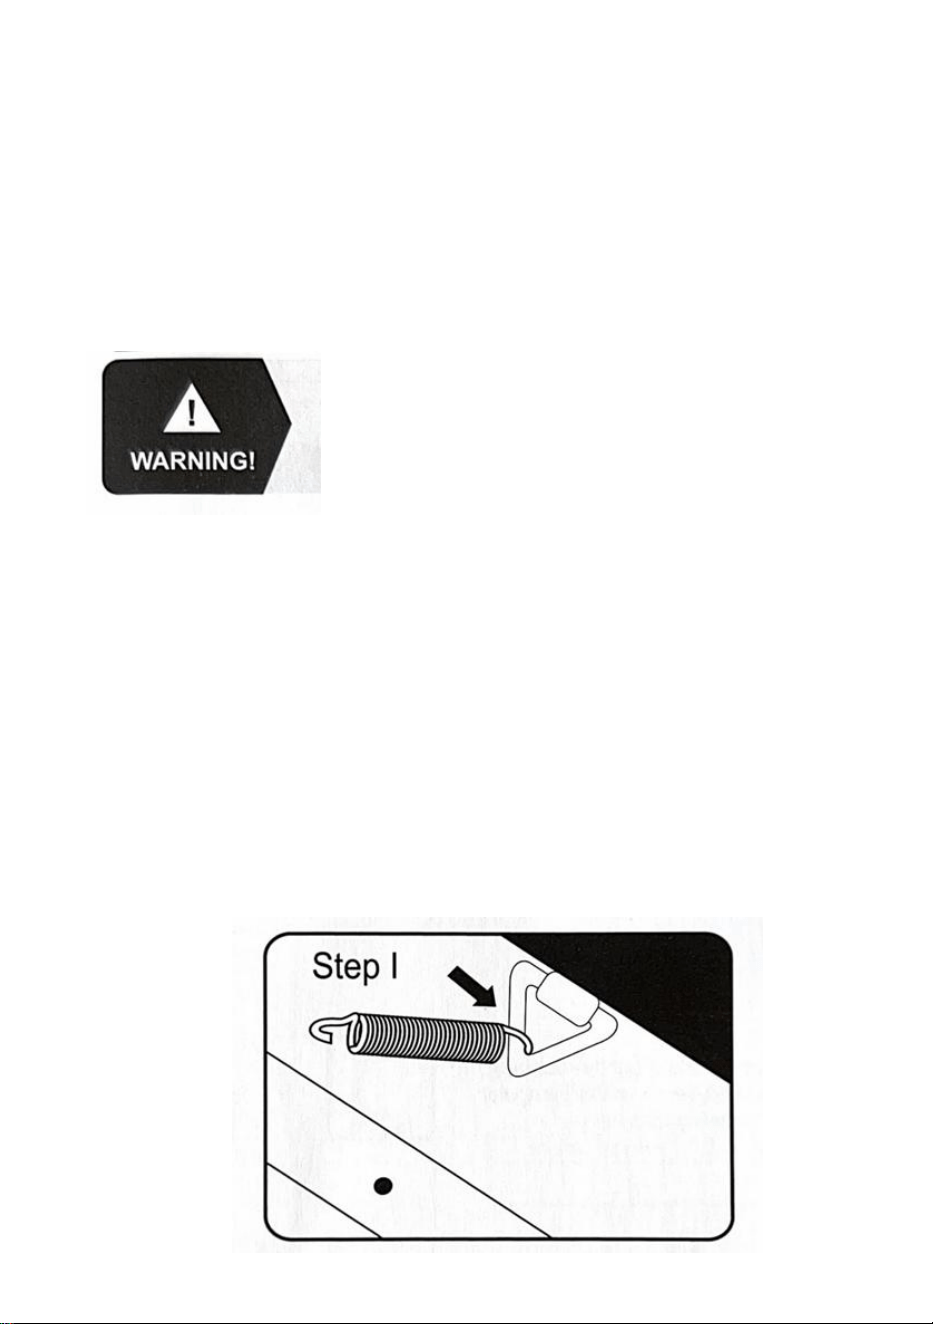
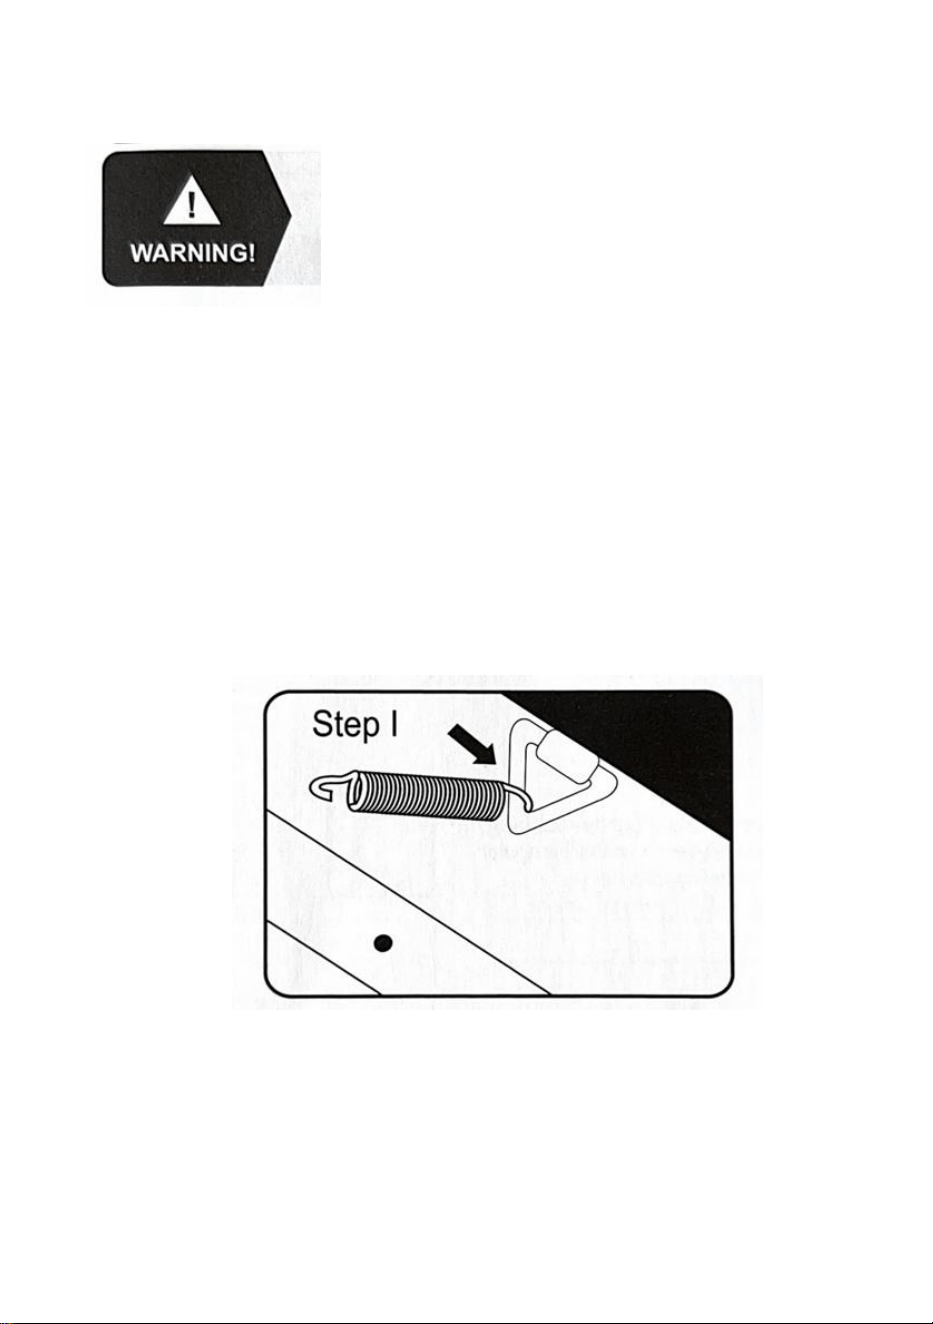
IMPORTANT NOTICE
1.Be careful where you place your hands during
spring spring assembly as connector points can
pinch!
2.We recommend at least 2 people participate in
assembling the Jumping Mat.
NOTE:
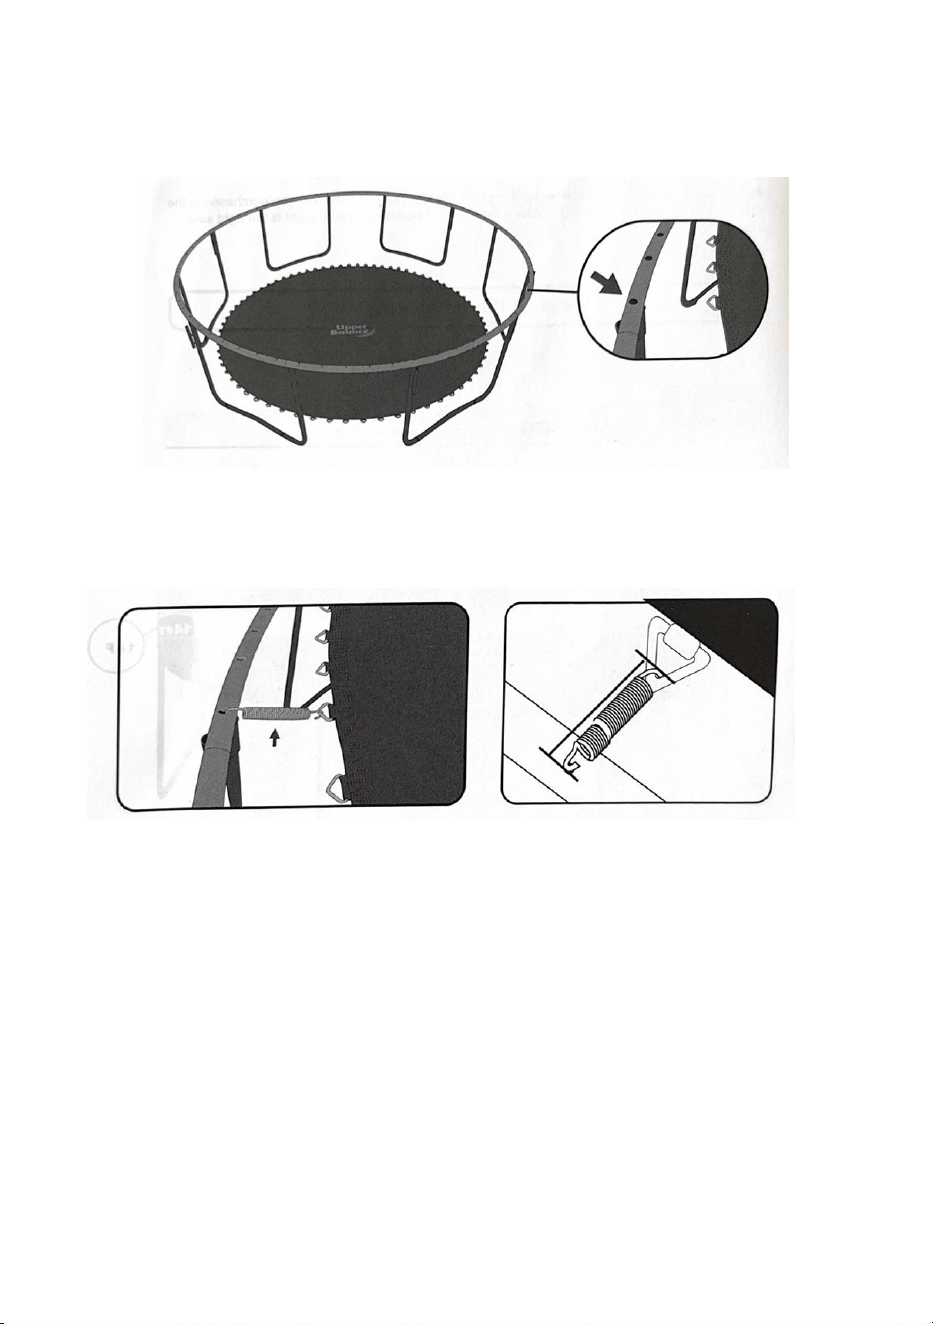
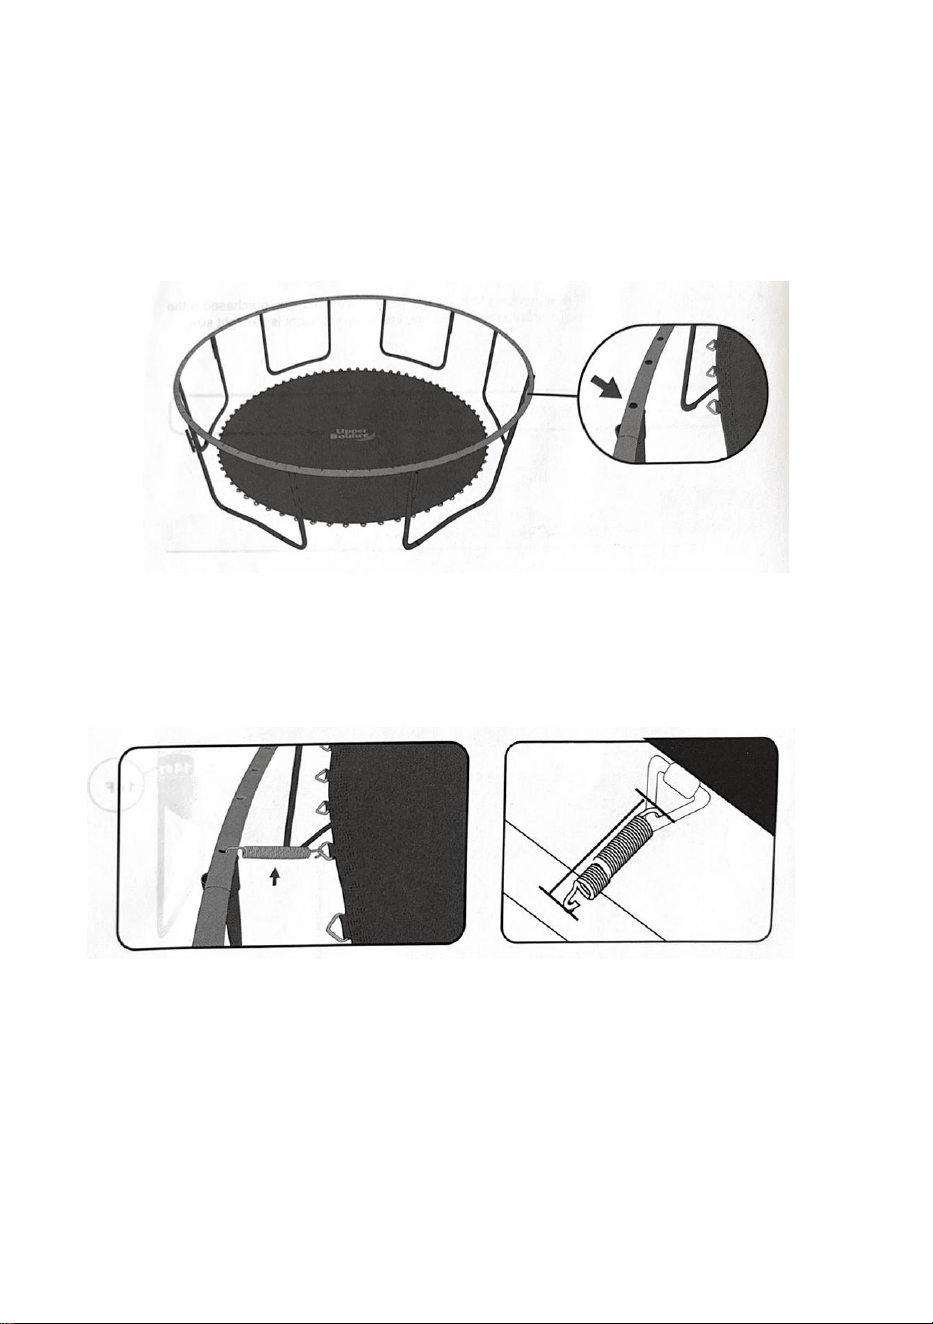
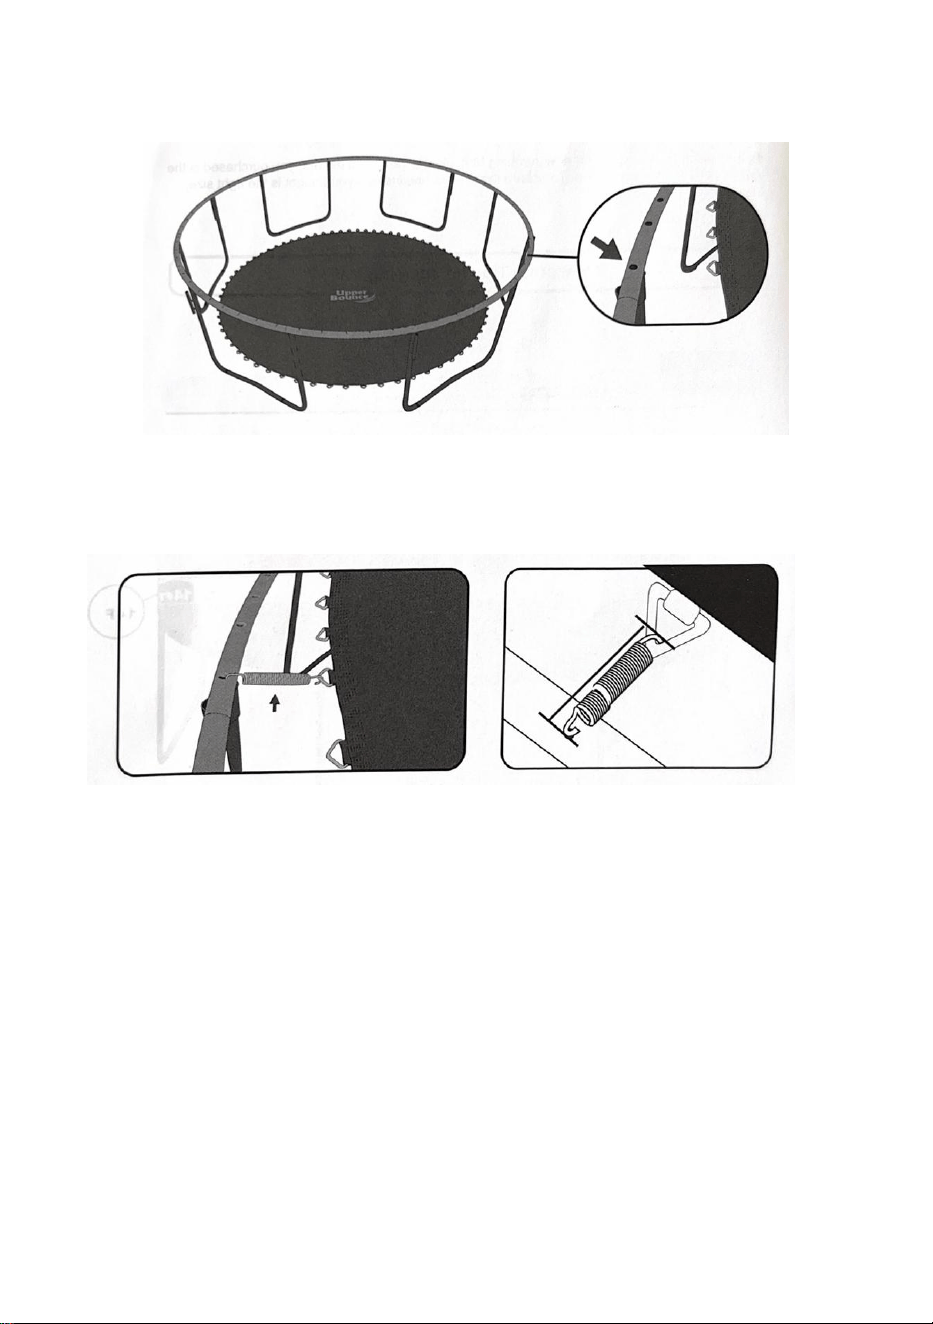
You will need to have a Spring tool To help you install the springs For this mat
to the frame (Included in the package).
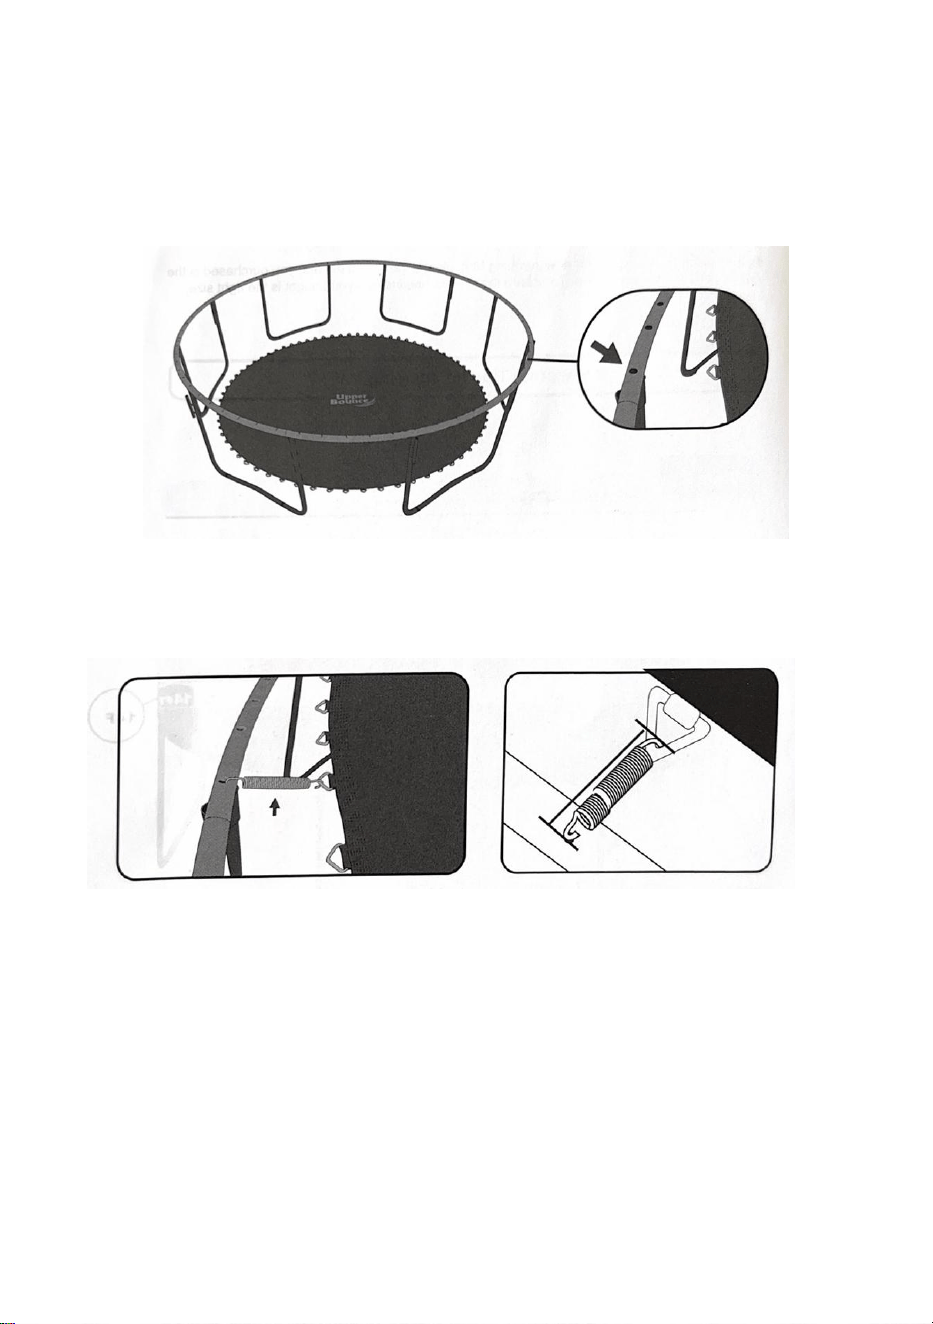
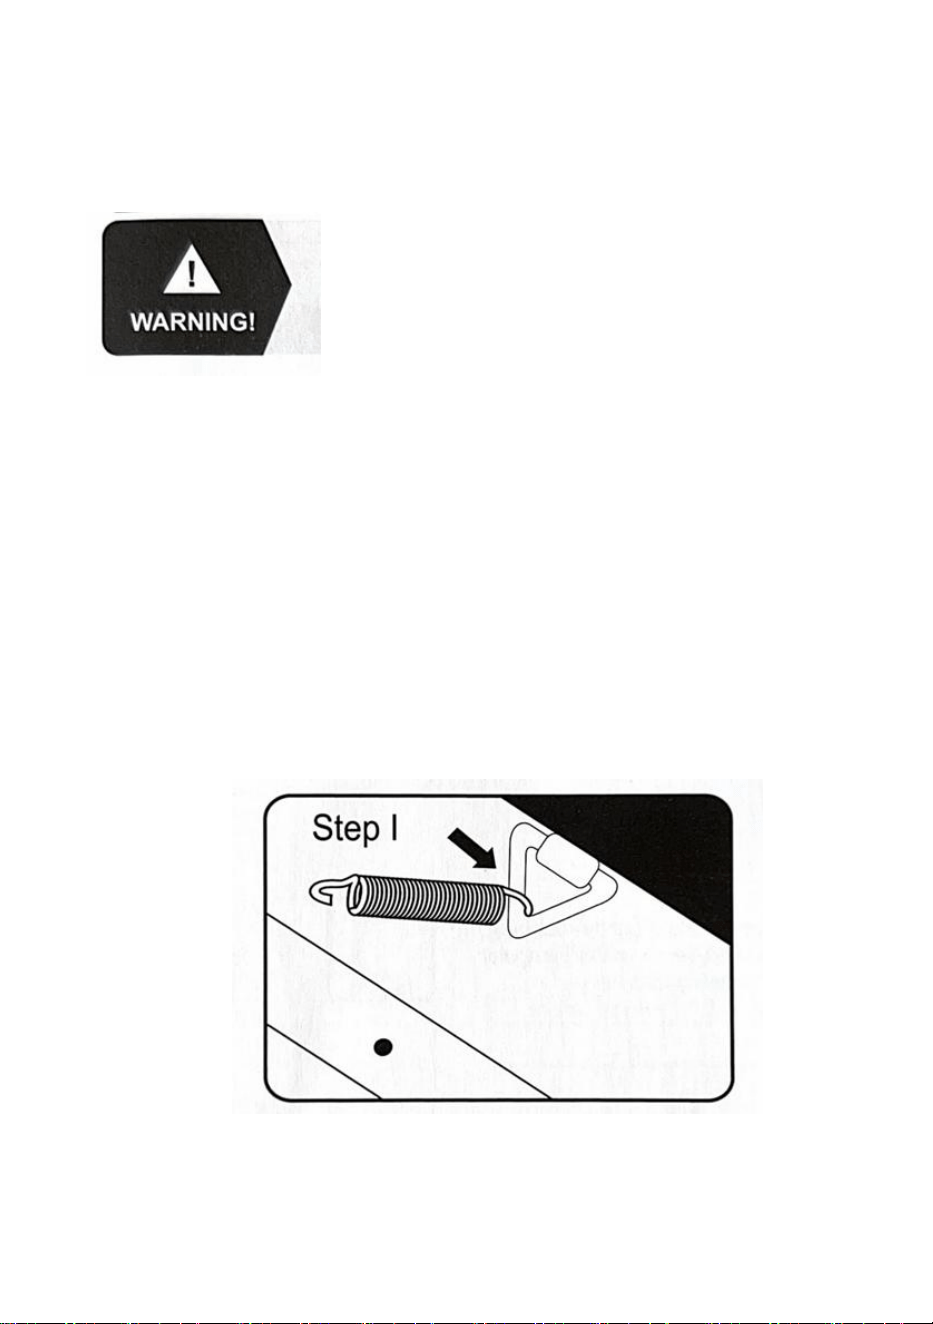
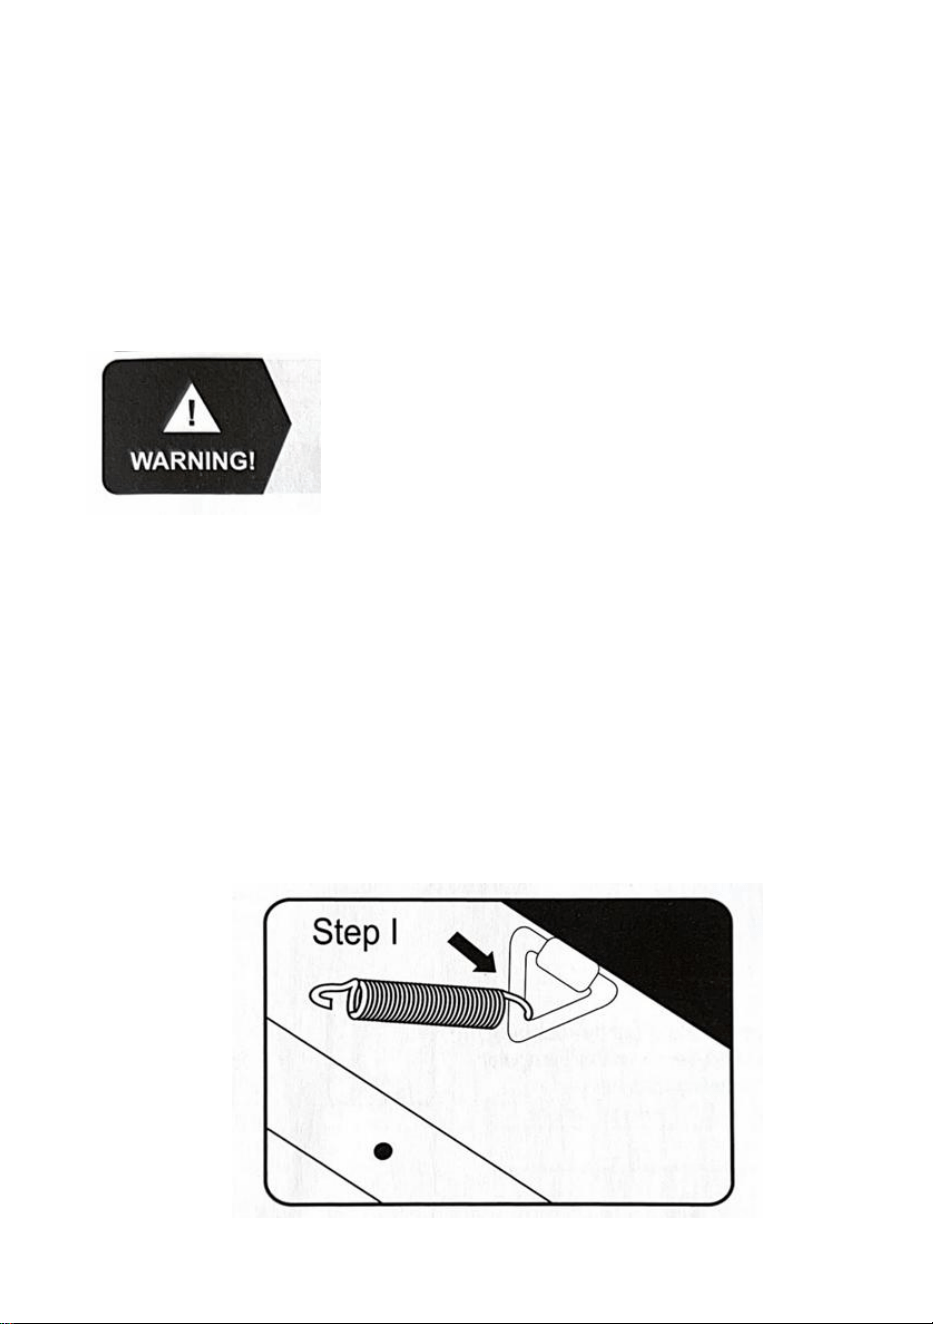
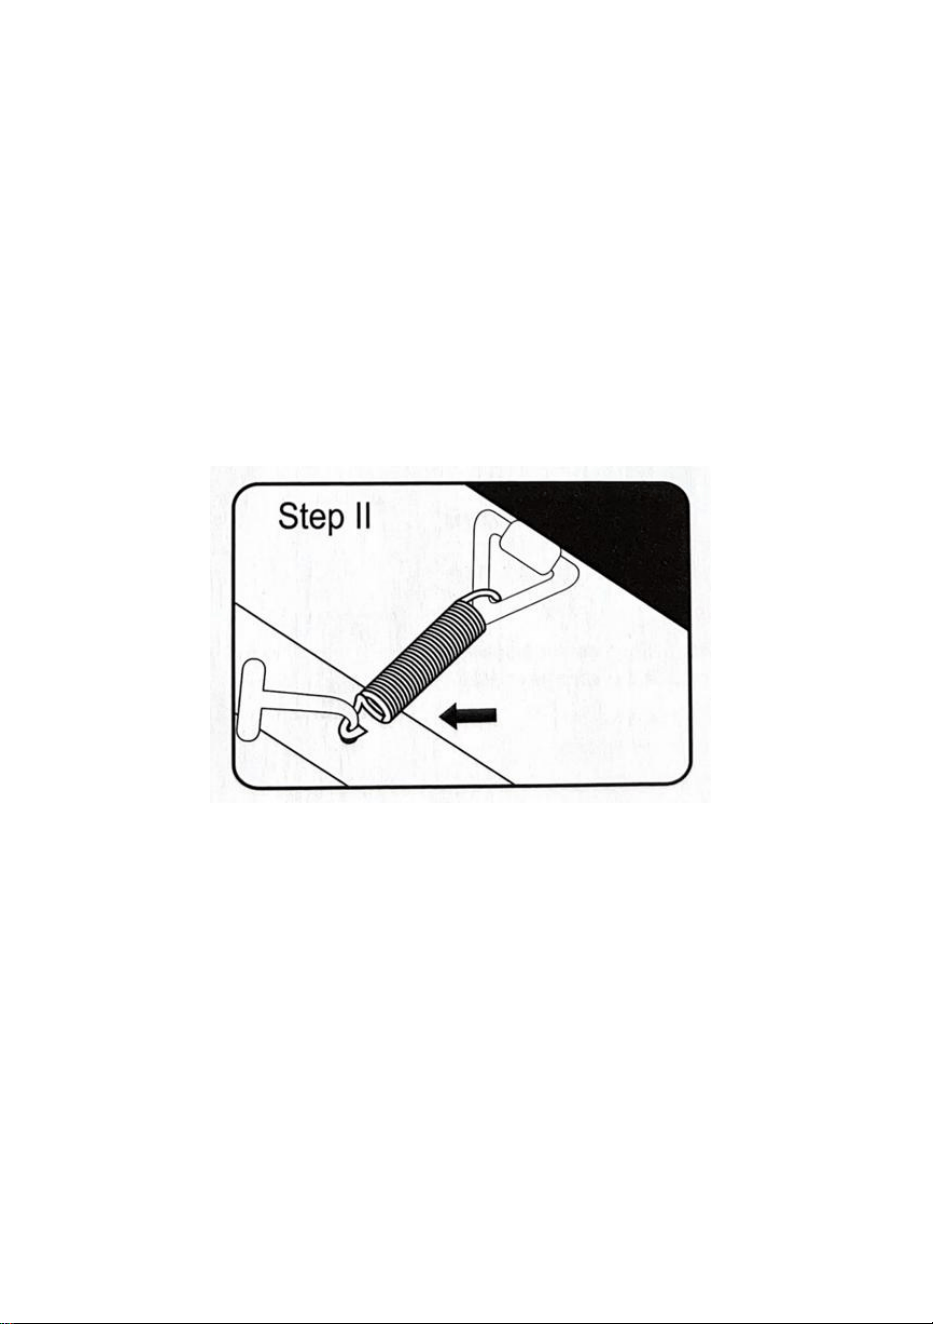
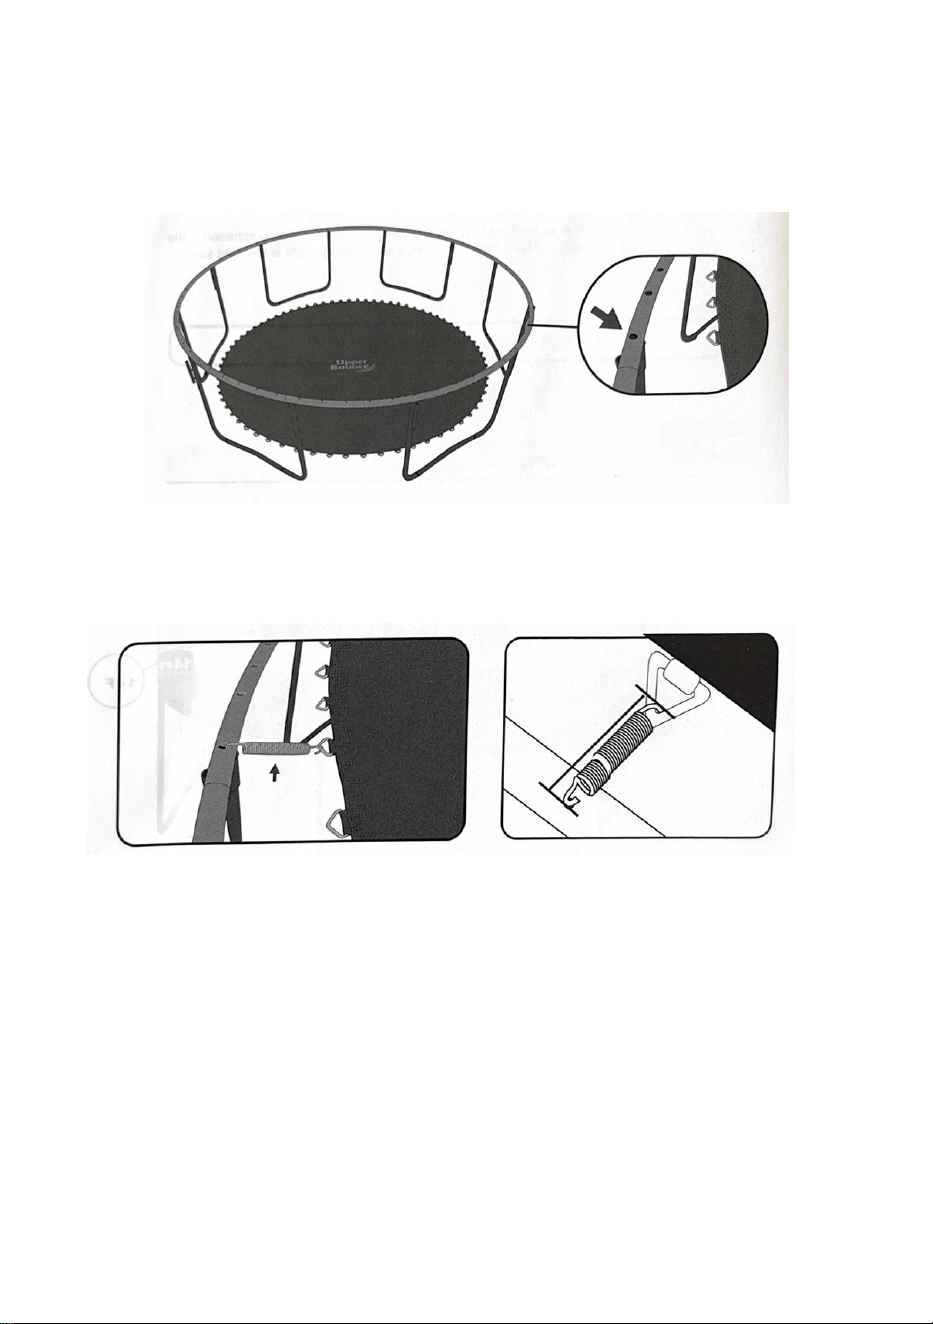
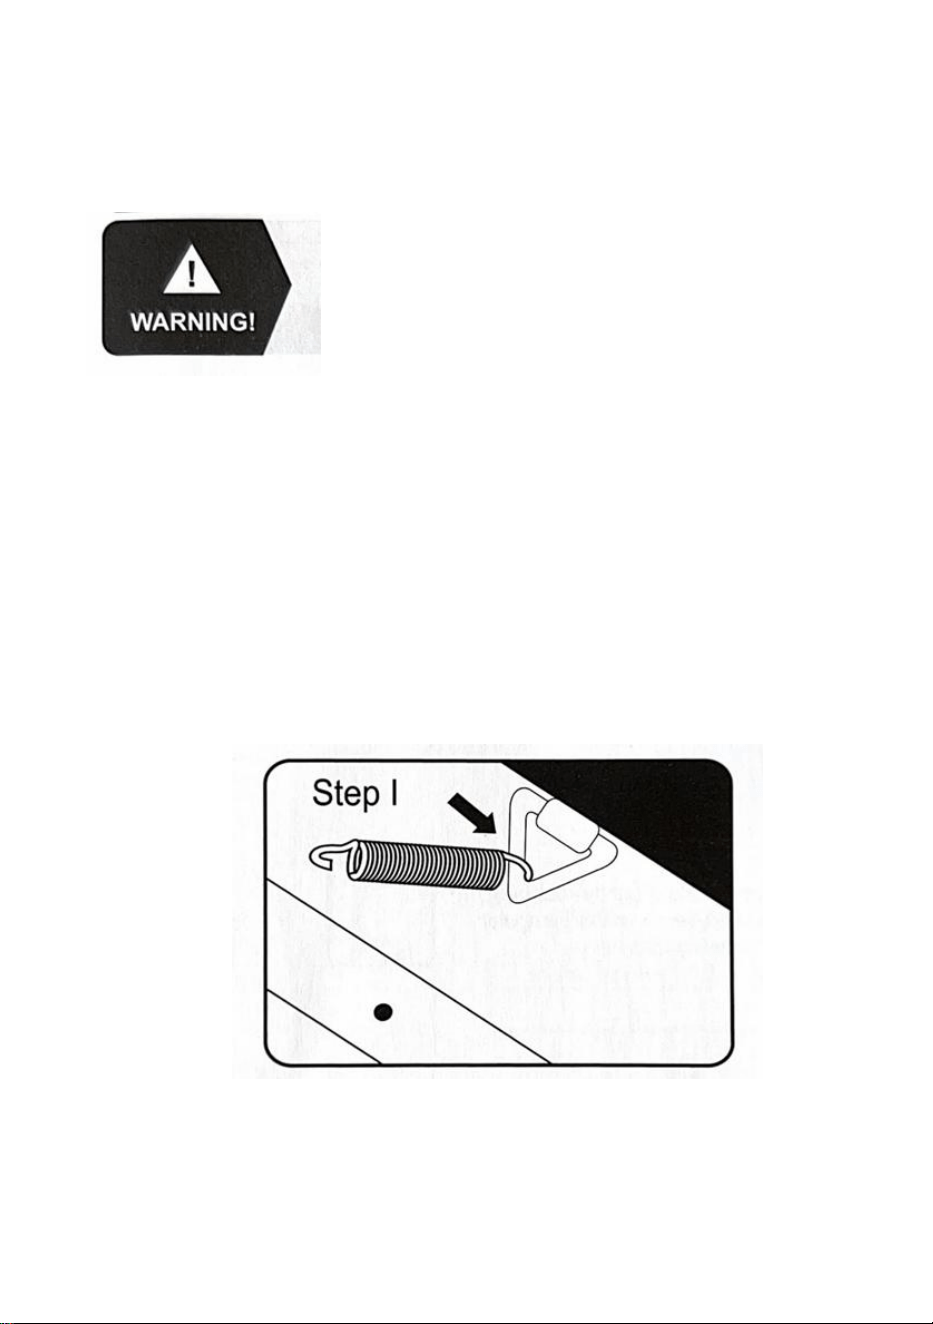
How to use the spring pulling tool
Step1: Hook the more rounded end of the spring onto the trampoline mat’s
triangular rings.
5
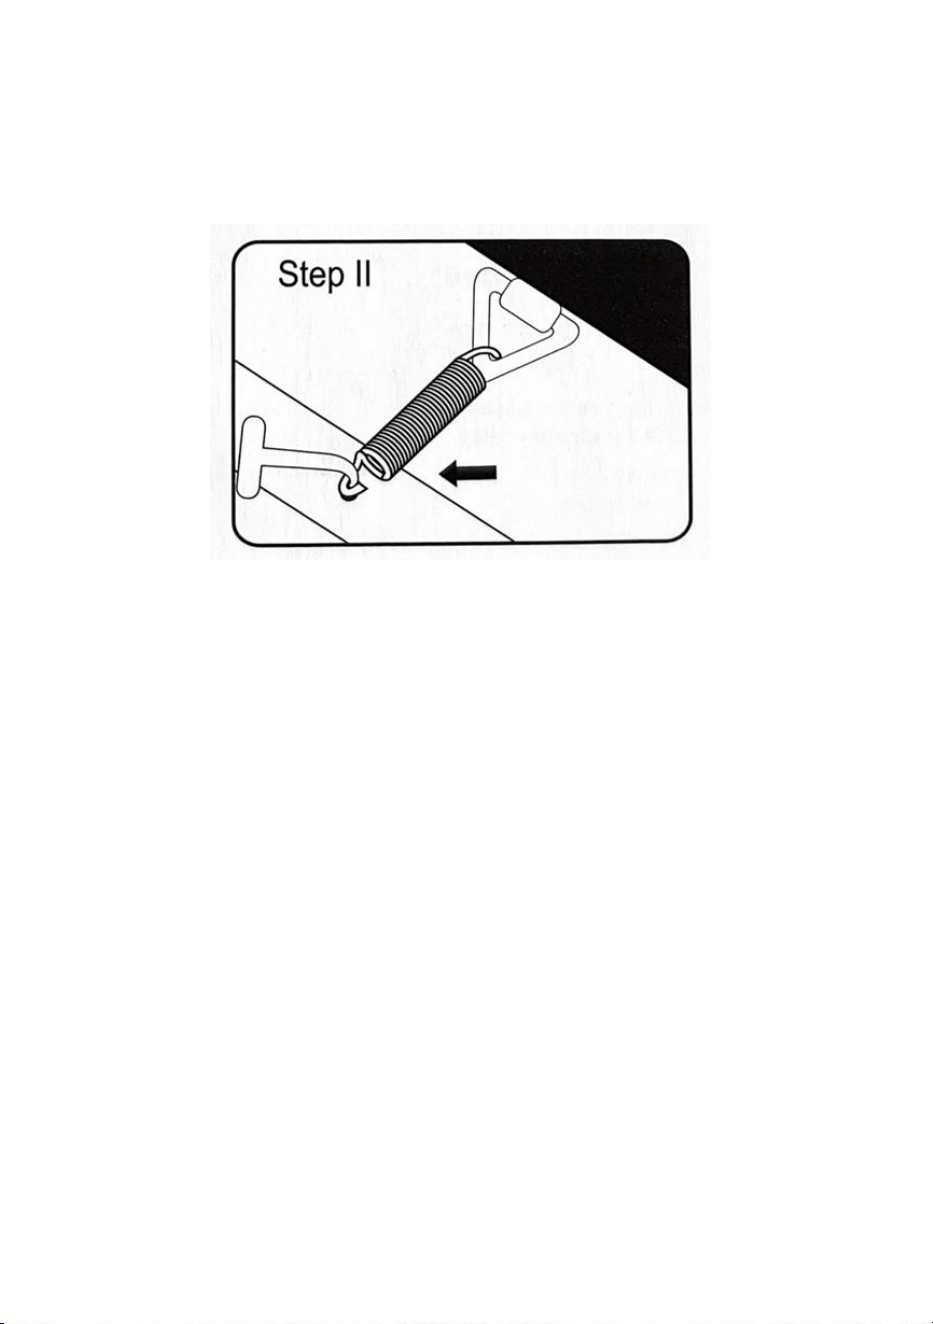
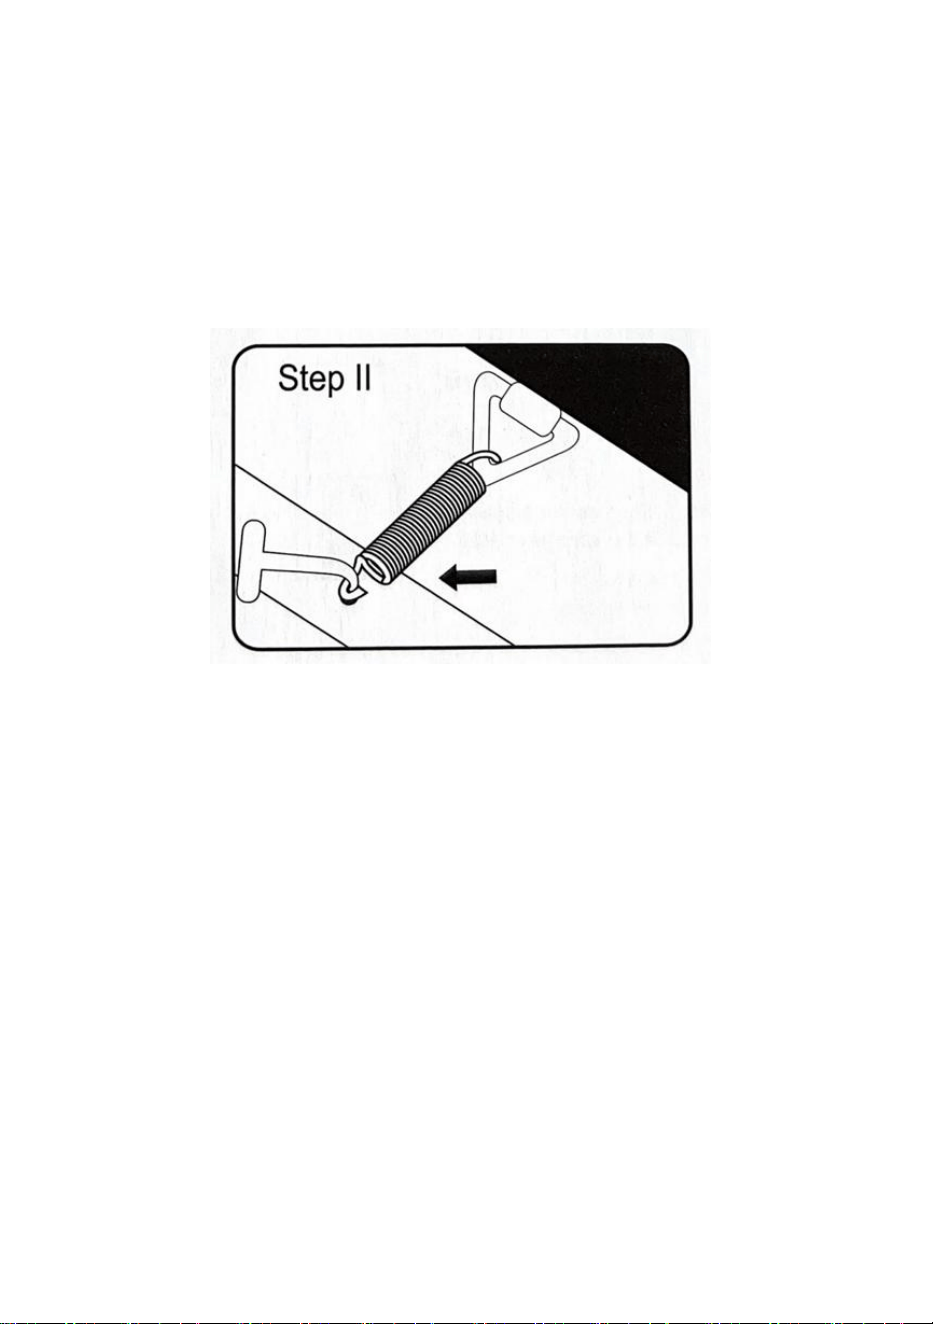
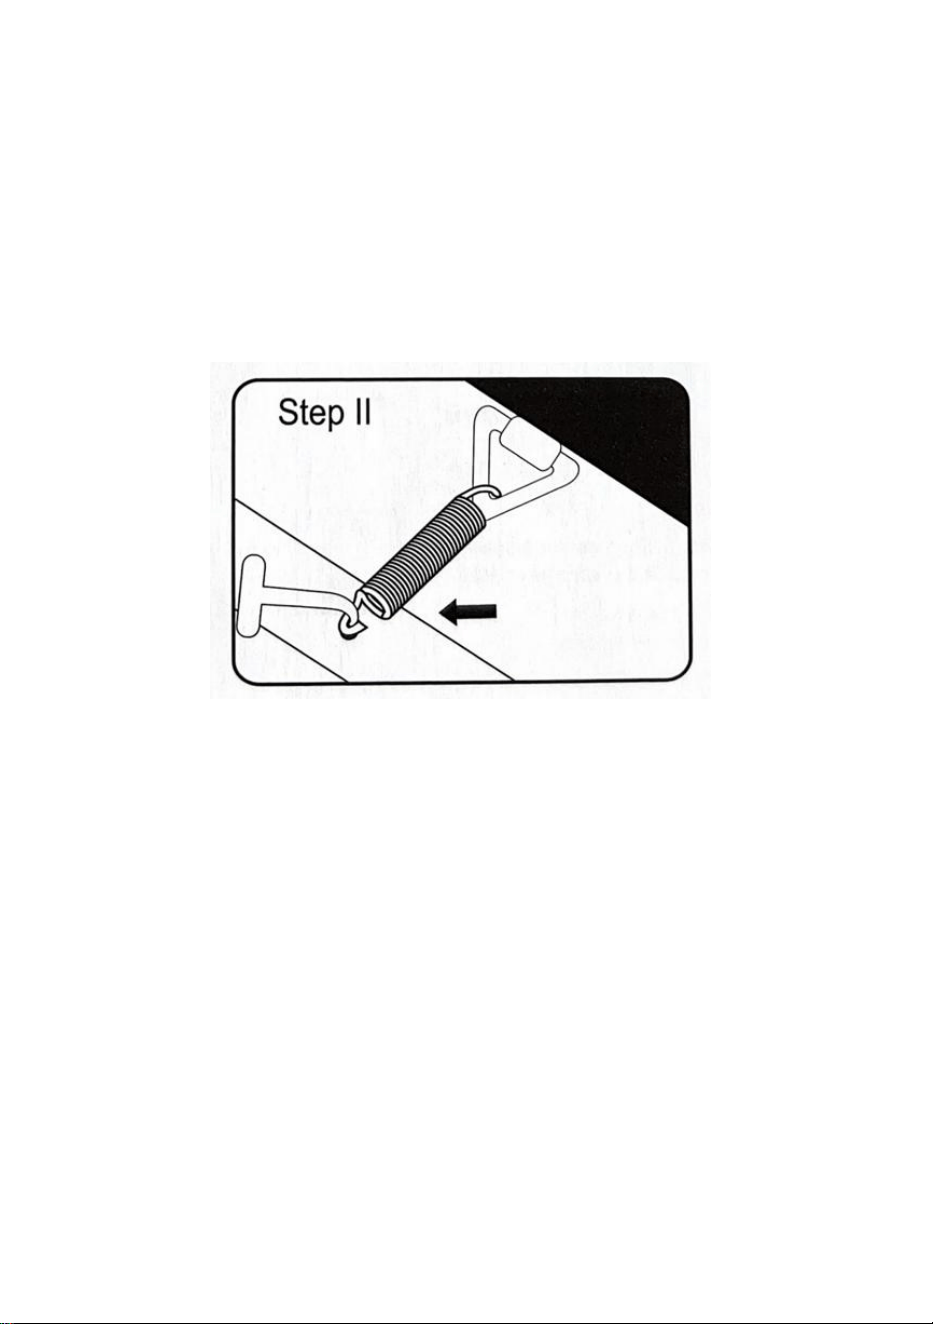
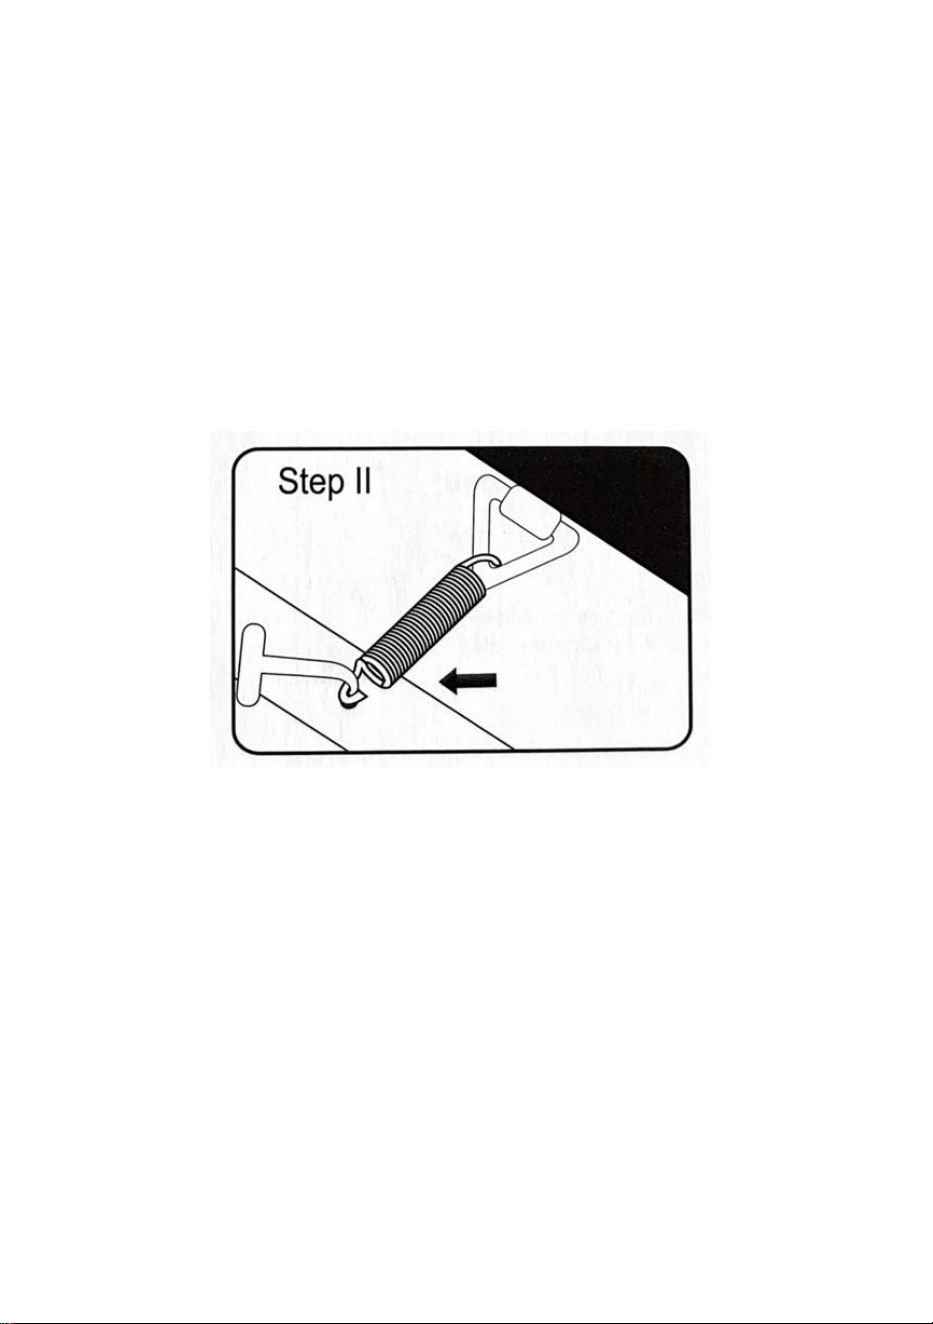
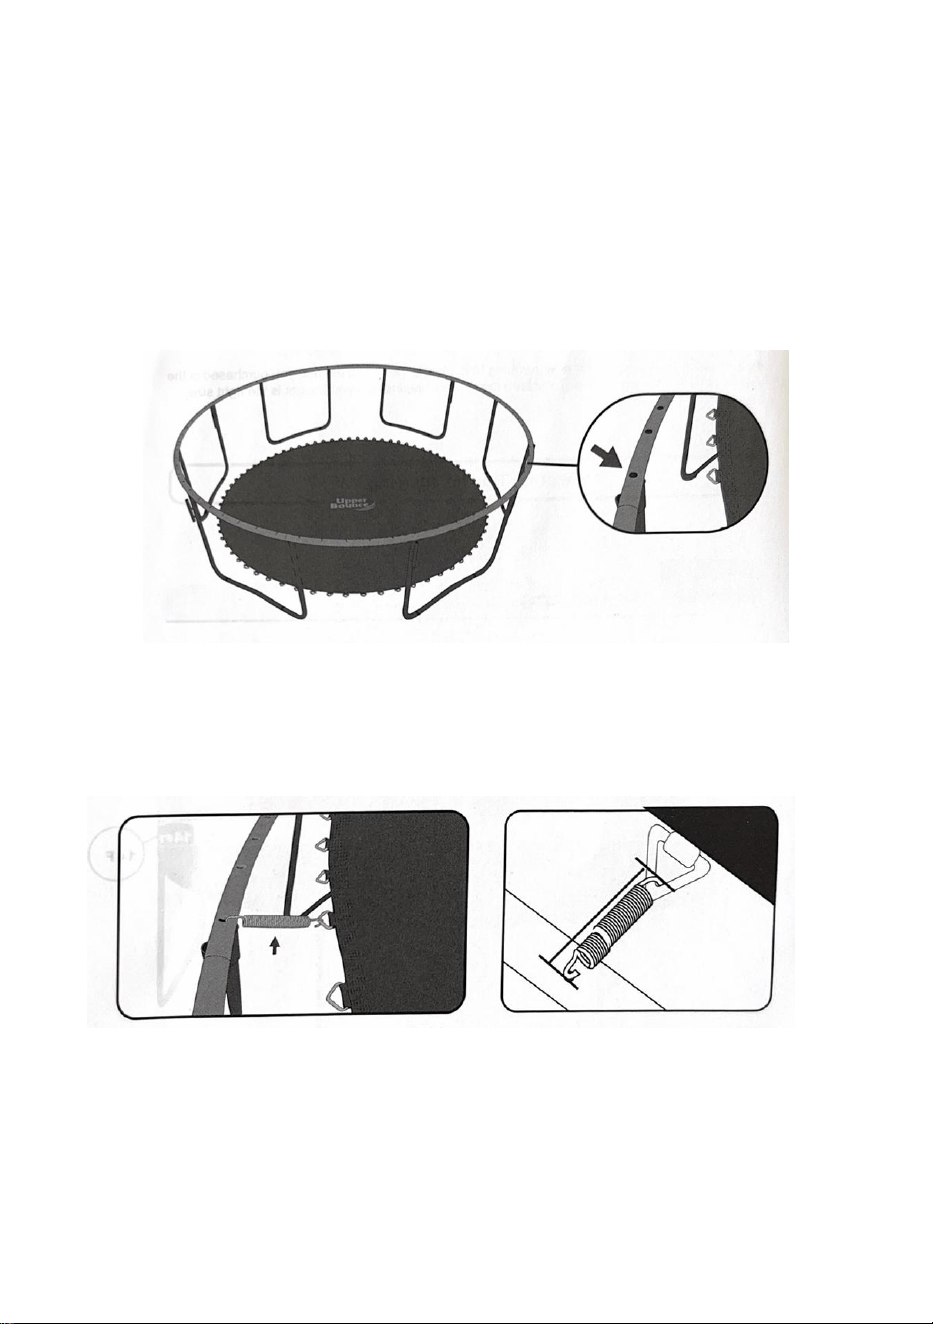
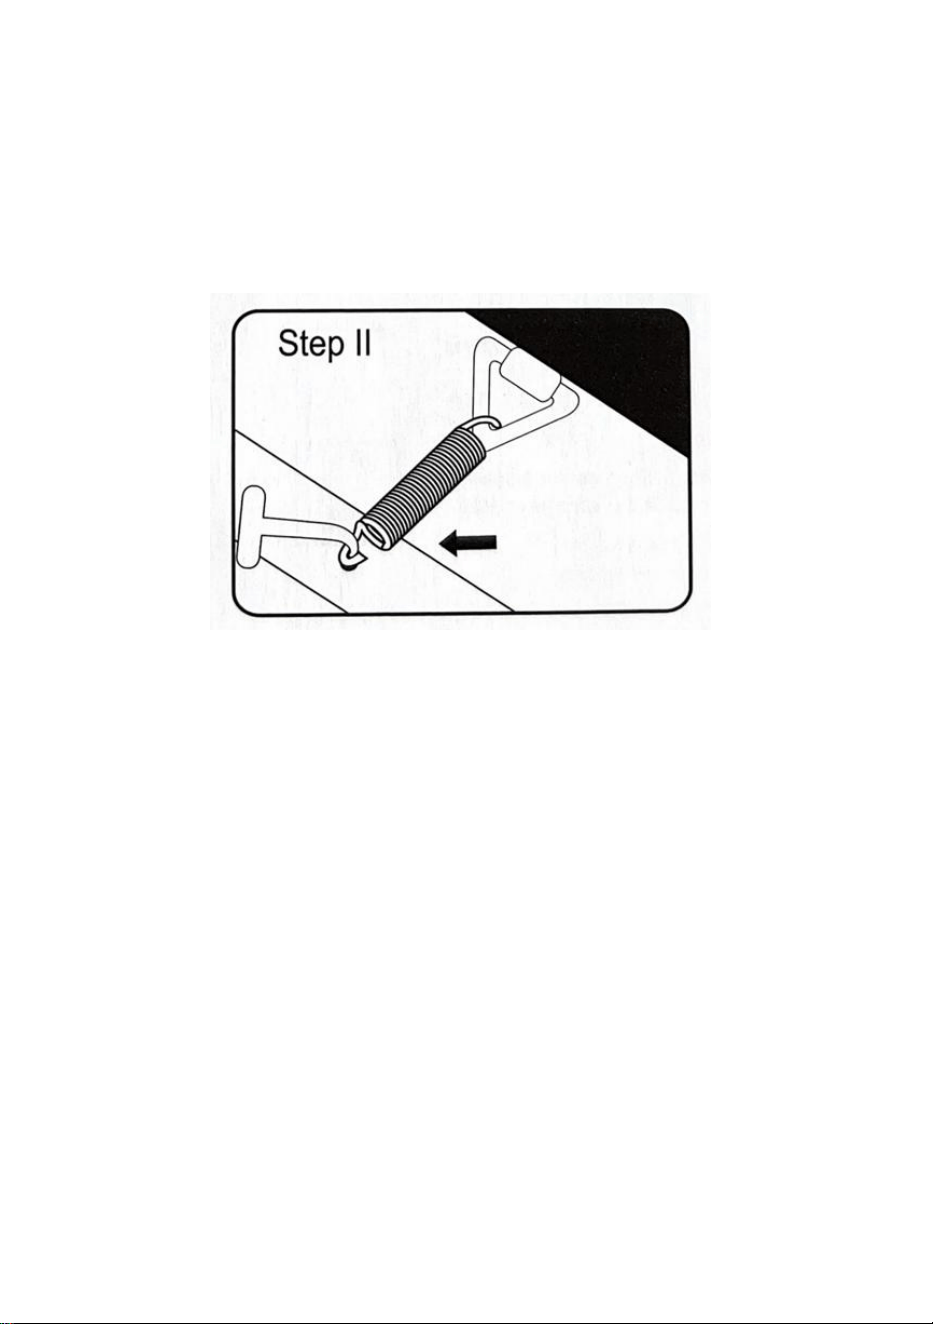
Step2: Extend the spring pull tool and link it up with the other end of the
spring.Pull the tool In the direction of the trampoline frame until the spring head
is lined up with the hole in.
The trampoline frame.Slide the spring end into the hole as you remove the
tool.
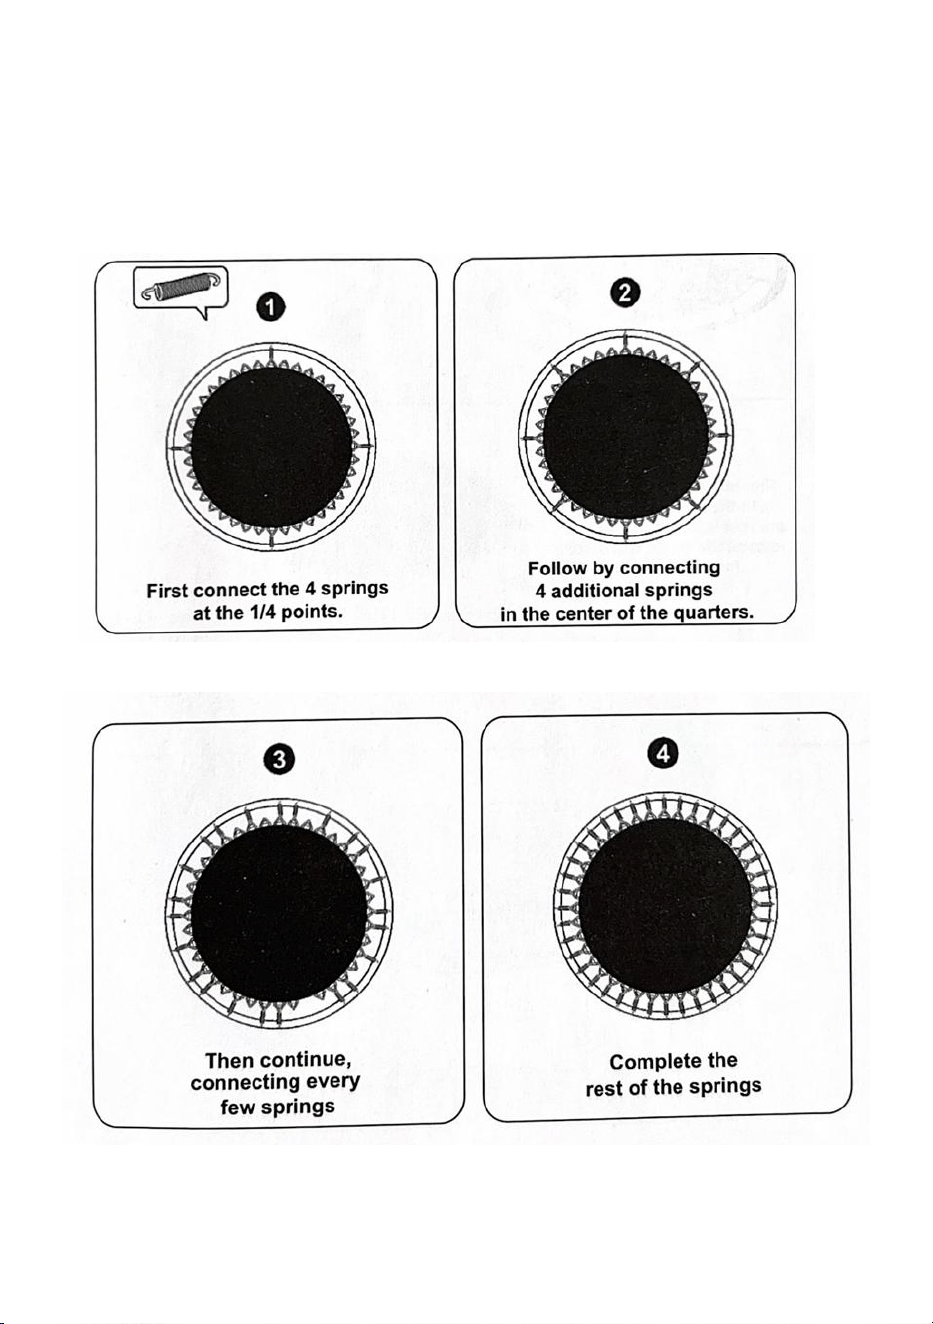
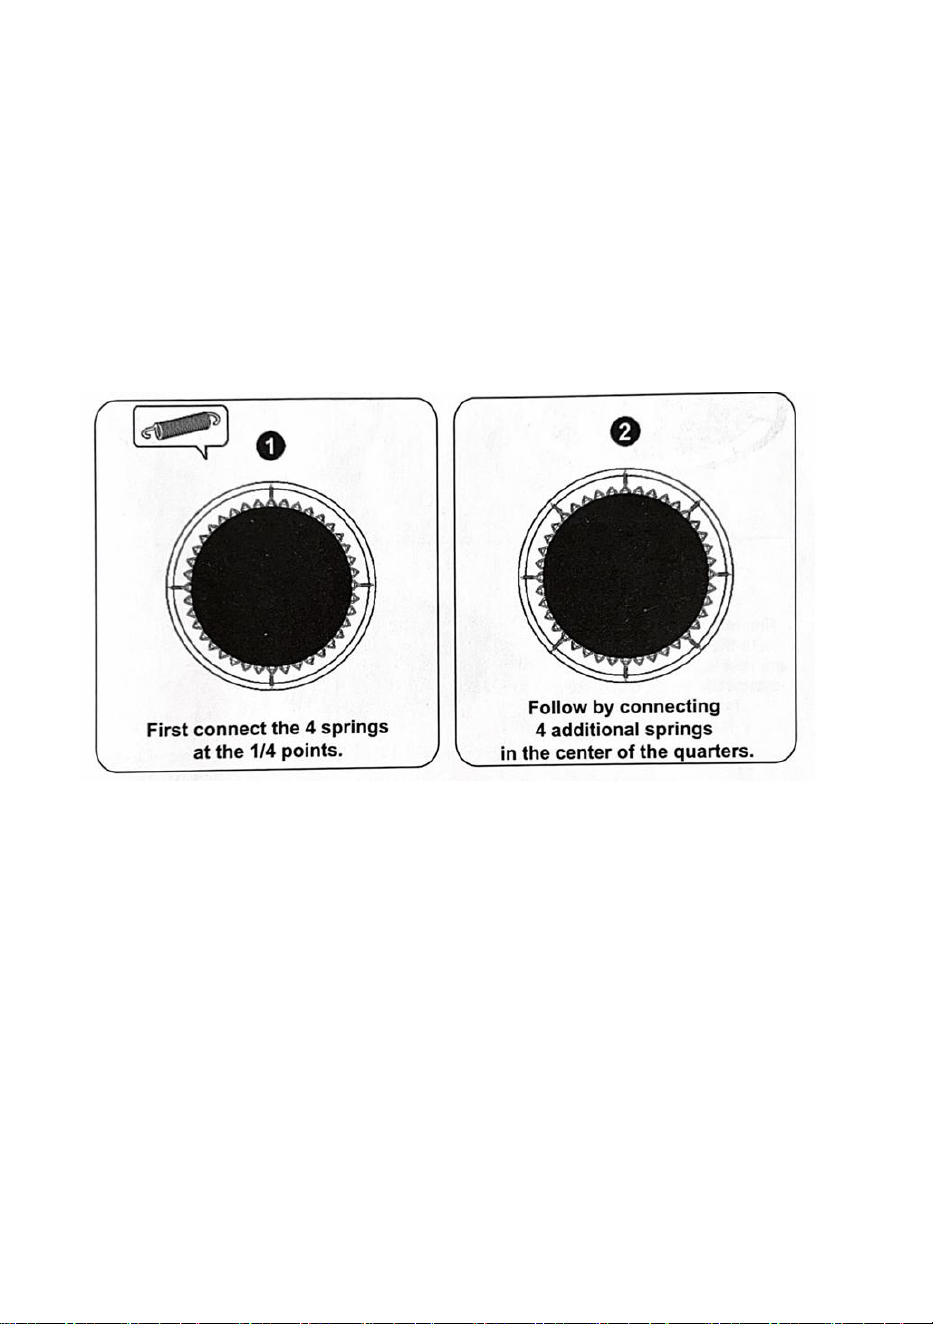
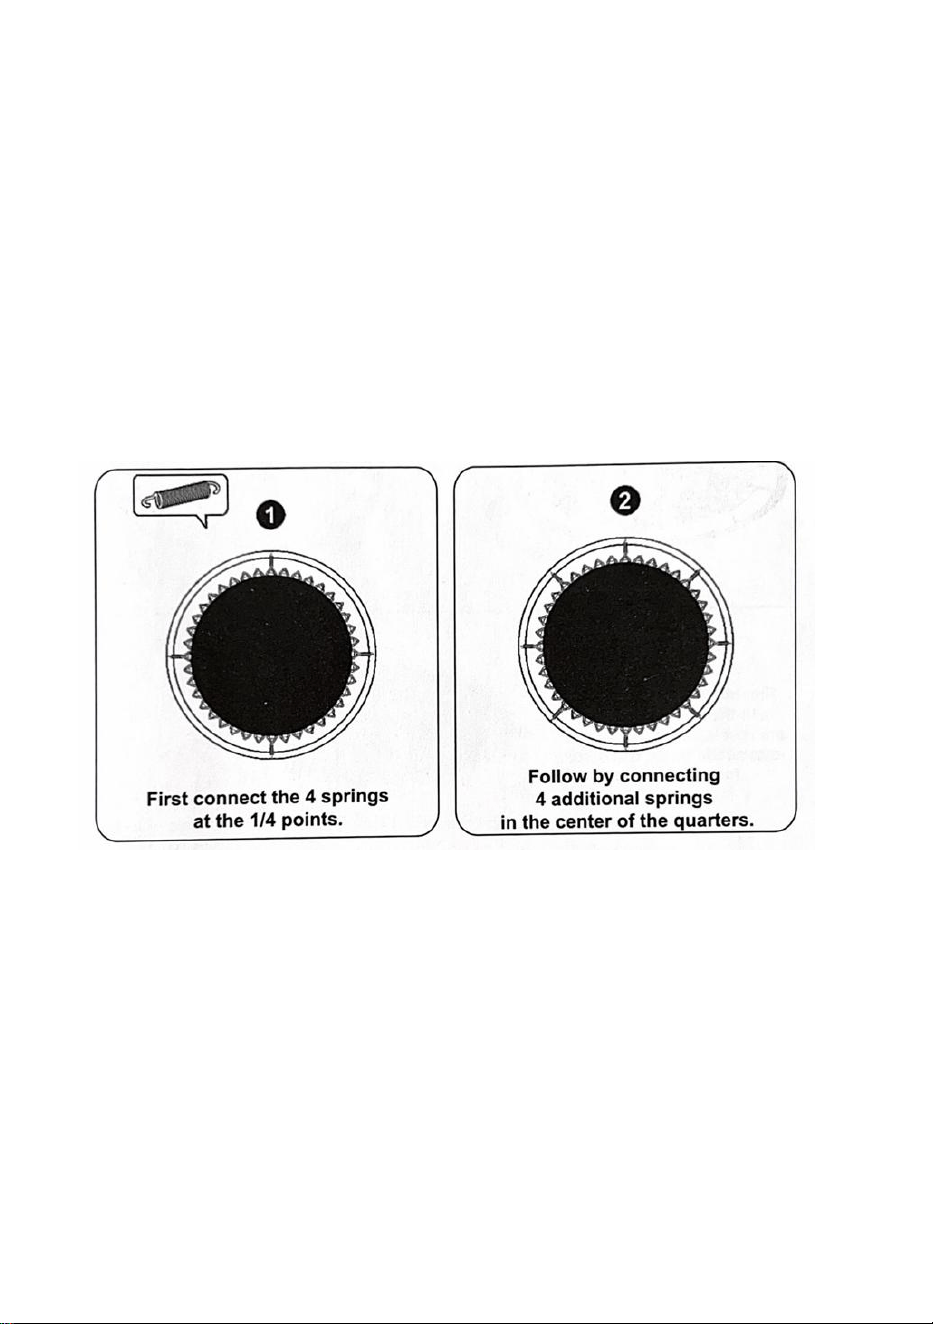
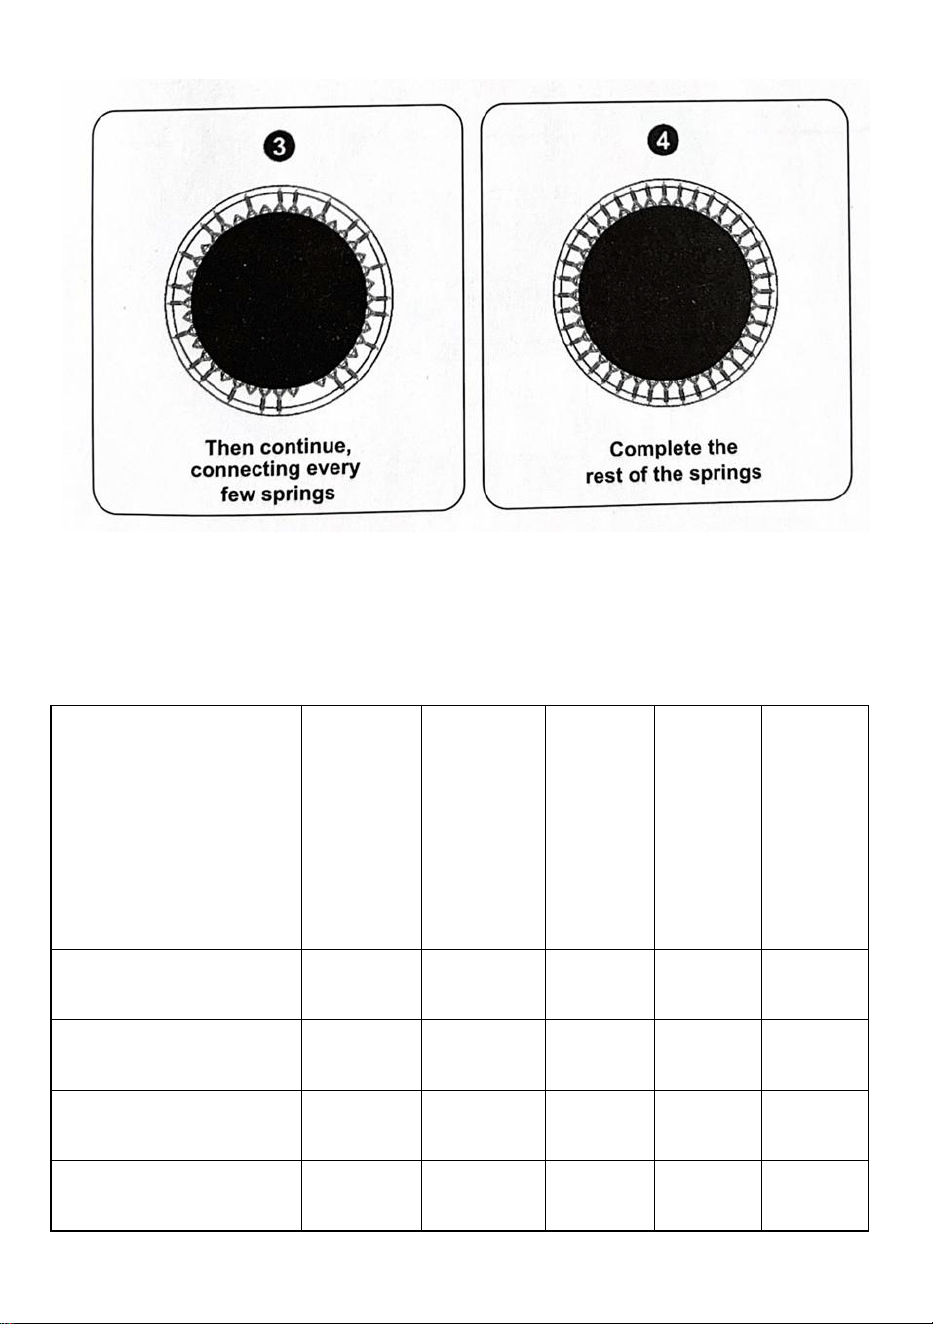
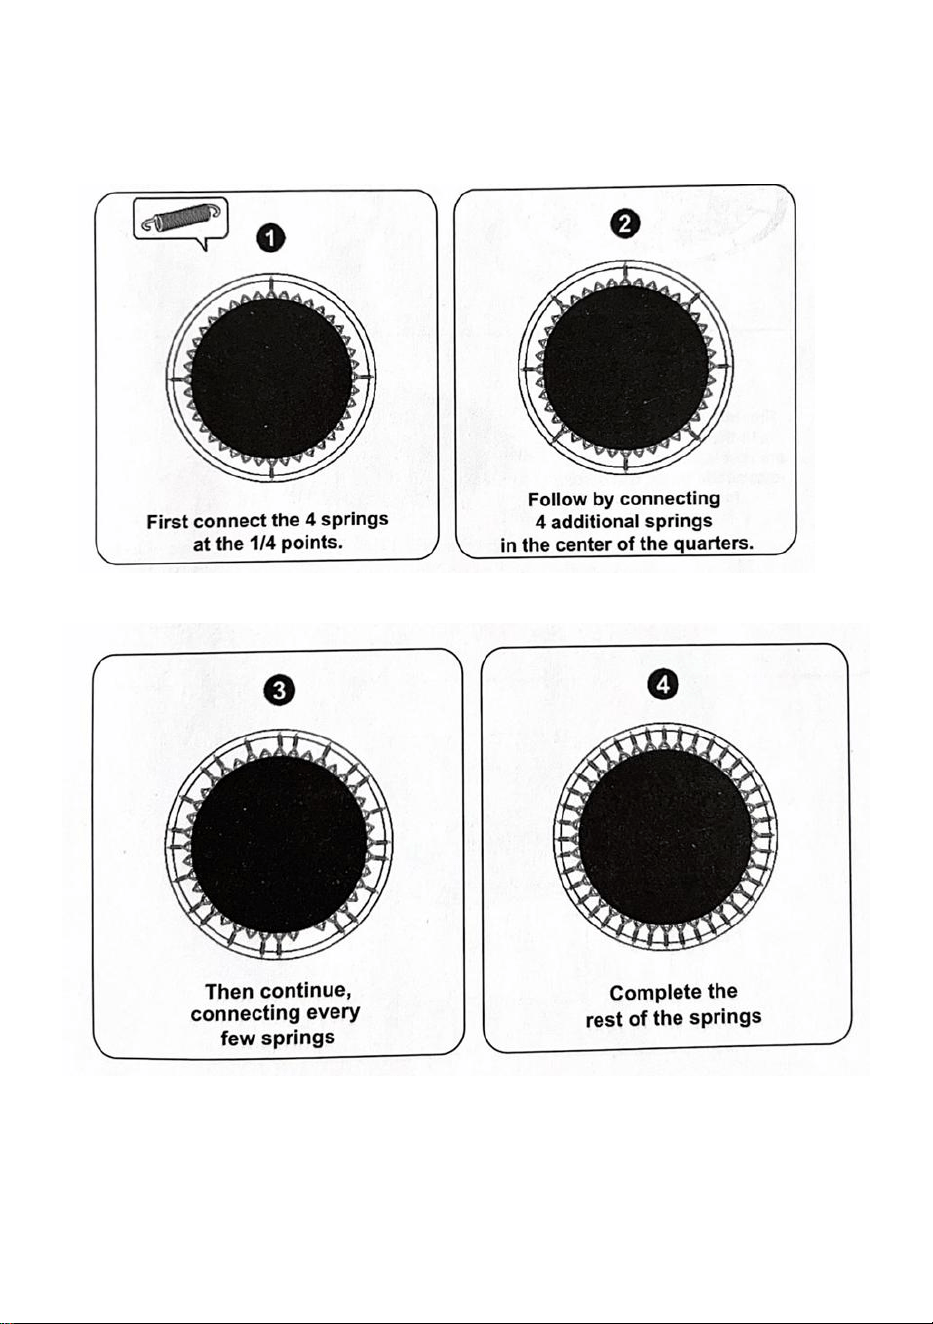
See below the Pattern of the springs assembly according to
your frame style
6
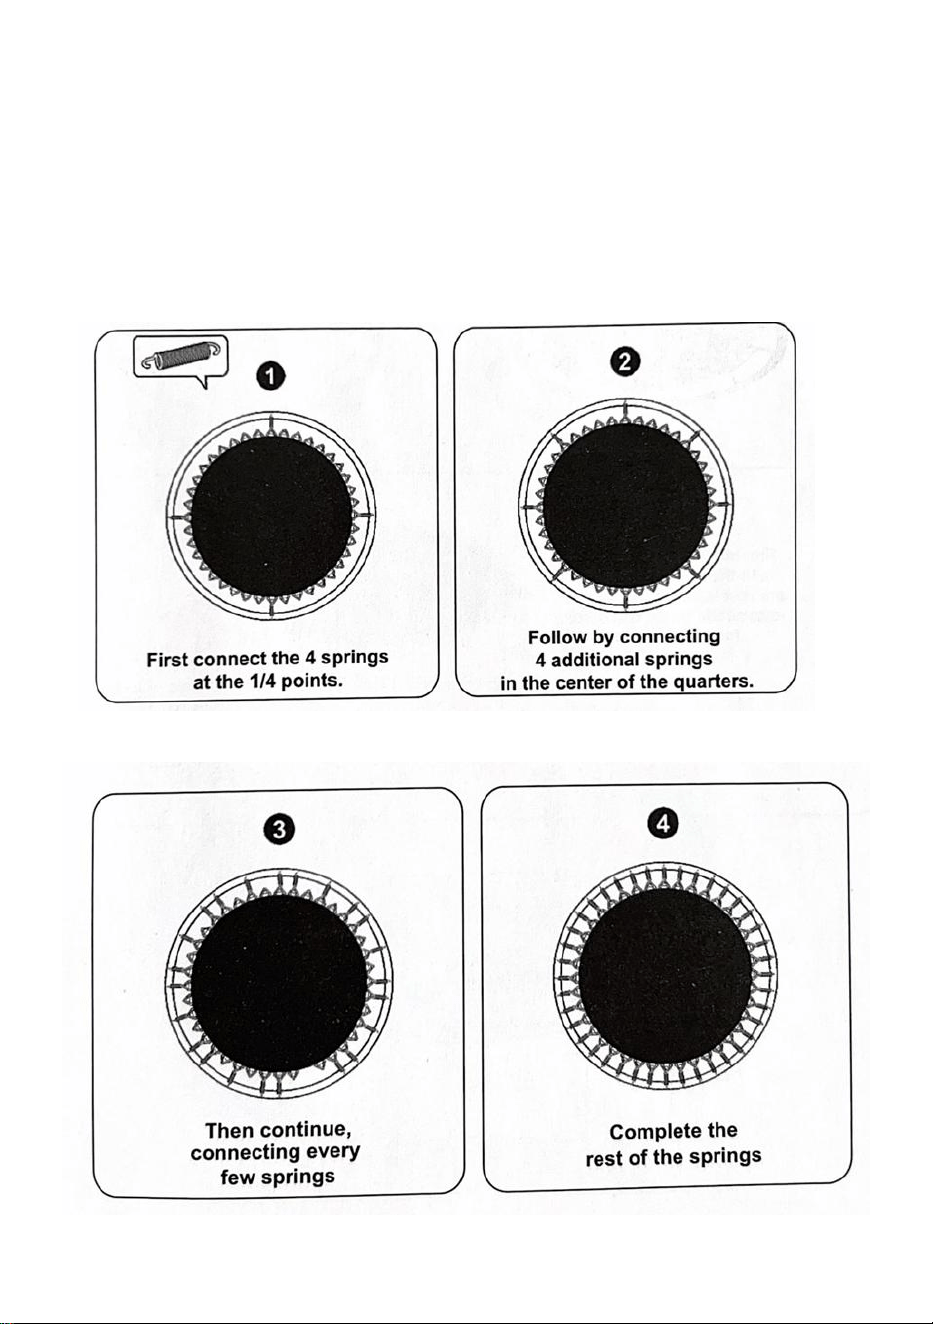
SPRING ASSEMBLY PATTERN
ROUND/OVAL
Note: Make sure the v-rings between the springs matches the number of holes
in the frame between the springs.

7
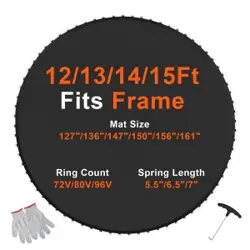
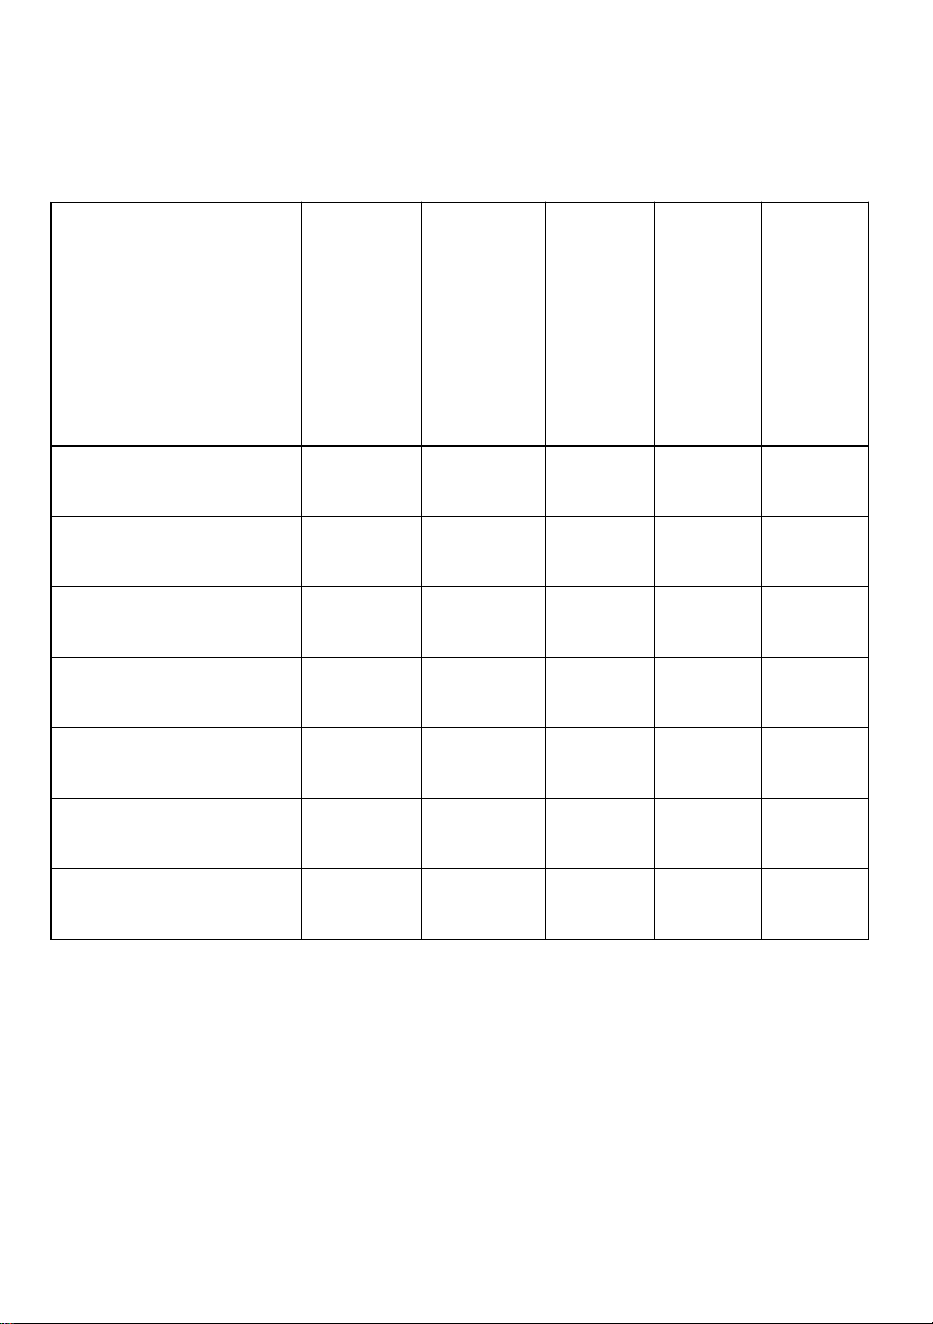
Parameters
padded
jumping
diameter
(inch)
Adapted to
the outer
diameter of
the
trampoline
frame (ft)
Adapted
spring
length
(inch)
V-Ring
Material
Number
of
V-rings
(pcs)
SDKC20240628CGQ
127
12
5.5
mild
steel
72
SDKC2024Q40628CGQ
136
13
7
mild
steel
80
SDKC202406YY28CGQ
150
14
5.5
mild
steel
72
SDKC2024XT0626QGQ
147
14
6.5-7
mild
steel
72
SDKC2024Y06U58CGQ
147
14
7
mild
steel
96
SDKC0628QYL42PO
161
15
6.5
mild
steel
96
SDKC202369CCZECGG
159
15
7
mild
steel
96
Our Customer Service Department staff are trained in the details of all
trampolines and will help you find the right part to get you bouncing again.
We never forget our goal... Get the Upper Bounce!

1
Manufacturer: Shandong Kaicheng’s Sport Goods Co.,Ltd
Address: Town of Sishili, Yishui County,Linyi City, Shandong
Province,China
Imported to AUS: SIHAO PTY LTD. 1 ROKEVA STREETEASTWOOD
NSW 2122 Australia
Imported to USA: Sanven Technology Ltd. Suite 250, 9166 Anaheim
Place, Rancho Cucamonga, CA 91730
REP
UK
YH CONSULTING LIMITED. C/O YH Consulting
Limited Office 147, Centurion House, London
Road, Staines-upon-Thames, Surrey, TW18 4AX
REP
EC
E-CrossStu GmbH
Mainzer Landstr.69,
60329 Frankfurt am Main.

2


4
Technique Certificat d'assistance et de garantie électronique
www.vevor.com/support
ASSEMBLAGE DU TAPIS DE
TRAMPOLINE
MODÈLE: SDKC20240628CGQ \ SDKC2024Q40628CGQ \
SDKC202406YY28CGQ \ SDKC2024XT0626QGQ \
SDKC2024Y06U58CGQ \ SDKC0628QYL42P0 \
SDKC202369CCZECGG
Nous continuons à nous engager à vous fournir des outils à des prix compétitifs.
« Économisez la moitié », « Moitié prix » ou toute autre expression similaire utilisée par
nous uniquement
représente une estimation des économies dont vous pourriez bénéficier en achetant
certains outils
avec nous par rapport aux grandes marques et ne signifie pas nécessairement couverture
toutes les catégories d'outils que nous proposons. Nous vous rappelons de bien vouloir
vérifier soigneusement
lorsque vous passez une commande chez nous si vous êtes réellement Économie

5
Moitié par rapport aux plus grandes marques.

1
MODÈLE : SDKC20240628CGQ \ SDKC2024Q40628CGQ \
SDKC202406YY28CGQ \ SDKC2024XT0626QGQ \ SDKC2024Y06U58CGQ \
SDKC0628QYL42PO \ SDKC202369CCZECGG
TYPES-RONDS
BESOIN D'AIDE? CONTACTEZ-NOUS!
Vous avez des questions sur nos produits ? Vous avez besoin d'une
assistance technique ? N'hésitez pas à nous contacter :
Assistance technique et certificat de garantie électronique
www.vevor.com/support
Il s'agit de la notice d'utilisation d'origine. Veuillez lire attentivement toutes
les instructions du manuel avant de l'utiliser. VEVOR se réserve le droit
d'interpréter clairement notre manuel d'utilisation. L'apparence du produit
dépend du produit que vous avez reçu. Veuillez nous excuser, nous ne
vous informerons plus si des mises à jour technologiques ou logicielles
sont disponibles sur notre produit.
TRAMPOLINE MAT
ASSEMBLY
2
Merci d'avoir choisi notre ASSEMBLAGE DE TAPIS DE TRAMPOLINE
pour tous vos besoins de trampoline et de remplacement de trampoline !
Suivez simplement les instructions de montage et de sécurité de ce manuel et
vous serez bientôt prêt à démarrer votre programme d'exercice pour un mode
de vie plus heureux, plus sain et plus amusant !
Avant de commencer à installer votre nouveau tapis de saut, veuillez vérifier
que le tapis que vous avez acheté est le taille correcte pour votre trampoline.
Pour vous assurer que le tapis de trampoline que vous avez acheté est de la
bonne taille, veuillez suivre les étapes ci-dessous :
Conseils de mesure pour le tapis de saut
Étape 1. TAILLE DU CADRE
Mesurez votre cadre d'un bord extérieur à l'autre avec un ruban à mesurer.
Faites-le à la fois verticalement et horizontalement au centre du trampoline.
Assurez-vous qu'il est à partir du bord extérieur afin d'obtenir les mesures
correctes.
3
Étape 2. NOMBRE DE TROUS DE RESSORTS
Comptez le nombre de trous à ressort sur le cadre de votre trampoline.
Étape 3. TAILLE DES RESSORTS
Mesurez la taille du ressort d'un crochet à l'autre, sans l'étirer.
Basé sur le
2) Taille du cadre 2) Montant du ressort 3) Taille du ressort
Déterminez si vous avez acheté le bon tapis de saut.
4
AVIS IMPORTANT
1. Faites attention à l'endroit où vous placez vos
mains pendant l'assemblage du ressort, car les
points de connexion peuvent pincer !
2. Nous recommandons qu'au moins 2 personnes
participent à l'assemblage du tapis de saut.
NOTE:
Vous aurez besoin d'un outil à ressort pour vous aider à installer les ressorts
de ce tapis sur le cadre (Inclus dans le package) .
Comment utiliser l'outil de tirage de ressort
Étape 1 : Accrochez l
’
extrémité la plus arrondie du ressort sur les anneaux
triangulaires du tapis du trampoline .
5
Étape 2 : Étendez l'outil de traction du ressort et reliez-le à l'autre extrémité du
ressort.Tirez l'outil dans la direction du cadre du trampoline jusqu'à ce que la
tête du ressort soit alignée avec le trou .
Le cadre du trampoline. Faites glisser l'extrémité du ressort dans le trou
pendant
que vous
retirez
l'outil.
Voir ci-dessous le schéma de montage des ressorts selon votre
style de cadre
6
MODÈLE D'ASSEMBLAGE DE RESSORT
ROND/OVALE
Note: Assurez-vous que les anneaux en V entre les ressorts correspondent au
nombre de trous dans le cadre entre les ressorts.

7
Paramètres
diamètre
du saut
rembourré
( pouce )
Adapté au
diamètre
extérieur
du cadre
du
trampoline
( ft )
Longueu
r de
ressort
adaptée
( pouce )
Matériau
du joint
en V
Nombre
de joints
V-ring
(pièces)
SDKC20240628CGQ
127
12
5.5
acier
doux
72
SDKC2024Q40628CGQ
136
13
7
acier
doux
80
SDKC202406YY28CGQ
150
14
5.5
acier
doux
72
SDKC2024XT0626QGQ
147
14
6.5-7
acier
doux
72

8
SDKC2024Y06U58CGQ
147
14
7
acier
doux
96
SDKC0628QYL42PO
161
15
6.5
acier
doux
96
SDKC202369CCZECGG
159
15
7
acier
doux
96
Notre personnel du service clientèle est formé aux détails de tous trampolines
et vous aidera à trouver la bonne pièce pour vous permettre de rebondir à
nouveau.
Nous n'oublions jamais notre objectif... Obtenez le Upper Bounce !
1
Fabricant : Shandong Kaicheng's Sport Goods Co., Ltd
Adresse : Ville de Sishili, comté de Yishui, ville de Linyi, province du
Shandong, Chine
Importé en Australie : SIHAO PTY LTD. 1 ROKEVA
STREETEASTWOOD
NSW 2122 Australie
Importé aux États-Unis : Sanven Technology Ltd. Suite 250, 9166
Anaheim
Lieu, Rancho Cucamonga, CA 91730
REP
UK
YH CONSULTING LIMITED. C/O YH Consulting
Limited Office 147, Centurion House, London
Road, Staines-upon-Thames, Surrey, TW18 4AX
REP
EC
E-CrossStu GmbH
Mainzer Landstr.69,
60329 Frankfurt am Main.

2

3
Technique Certificat d'assistance et de garantie électronique


5
Technisch Support und E-Garantie-Zertifikat
www.vevor.com/support
Montage der Trampolinmatte
MODELL: SDKC20240628CGQ \ SDKC2024Q40628CGQ \
SDKC202406YY28CGQ \ SDKC2024XT0626QGQ \
SDKC2024Y06U58CGQ \ SDKC0628QYL42P0 \
SDKC202369CCZECGG
Wir sind weiterhin bestrebt, Ihnen Werkzeuge zu wettbewerbsfähigen Preisen anzubieten.
"Sparen Sie die Hälfte", "Halber Preis" oder andere ähnliche Ausdrücke, die wir nur
verwenden
stellt eine Schätzung der Einsparungen dar, die Sie durch den Kauf bestimmter Werkzeuge
erzielen können
mit uns im Vergleich zu den großen Top-Marken und bedeutet nicht unbedingt, Abdeckung
alle von uns angebotenen Werkzeugkategorien. Wir möchten Sie bitten, zu überprüfen
sorgfältig
wenn Sie bei uns eine Bestellung aufgeben, wenn Sie tatsächlich Speichern
Hälfte im Vergleich mit den Top-Großmarken.


1
MODELL: SDKC20240628CGQ \ SDKC2024Q40628CGQ \
SDKC202406YY28CGQ \ SDKC2024XT0626QGQ \ SDKC2024Y06U58CGQ \
SDKC0628QYL42PO \ SDKC202369CCZECGG
TYPEN-RUND
Brauchen Sie Hilfe? Kontaktieren Sie uns!
Sie haben Fragen zu unseren Produkten? Sie benötigen technischen
Support? Dann kontaktieren Sie uns gerne:
Technischer Support und E-Garantie-Zertifikat
www.vevor.com/support
Dies ist die Originalanleitung. Bitte lesen Sie alle Anweisungen sorgfältig
durch, bevor Sie das Gerät in Betrieb nehmen. VEVOR behält sich eine
klare Auslegung unserer Bedienungsanleitung vor. Das Erscheinungsbild
des Produkts richtet sich nach dem Produkt, das Sie erhalten haben. Bitte
verzeihen Sie uns, dass wir Sie nicht erneut informieren, wenn es
Technologie- oder Software-Updates für unser Produkt gibt .
TRAMPOLINE MAT
ASSEMBLY
2
Vielen Dank, dass Sie sich für unsere TRAMPOLINMATTEN-MONTAGE
für all Ihre Trampoline und Trampolinersatzbedürfnisse entschieden
haben!
Befolgen Sie einfach die Montage- und Sicherheitshinweise in dieser Anleitung
und schon bald können Sie mit Ihrem Trainingsprogramm für einen
glücklicheren, gesünderen und unterhaltsameren Lebensstil!
Bevor Sie mit der Installation Ihrer neuen Sprungmatte beginnen, überprüfen
Sie bitte, ob die von Ihnen gekaufte Matte die Richtige Größe für Ihr Trampolin.
Um sicherzustellen, dass die von Ihnen gekaufte Trampolinmatte die richtige
Größe hat, befolgen Sie bitte die folgenden Schritte:
Messtipps für Sprungmatten
Schritt 1. RAHMENGRÖSSE
Messen Sie Ihren Rahmen mit einem Maßband von einer Außenkante zur
anderen. Tun Sie dies sowohl vertikal als auch horizontal über die Mitte des
Trampolins. Stellen Sie sicher, dass es von der Außenkante aus gemessen
wird, damit Sie die richtigen Maße erhalten.
3
Schritt 2. Anzahl der Federlöcher
Zählen Sie die Anzahl der Federlöcher auf Ihrem Trampolinrahmen.
Schritt 3. GRÖSSE DER FEDERN
Messen Sie die Federgröße im ungedehnten Zustand von Haken zu
Haken.
Basierend auf dem
3) Baugröße 2) Federbetrag 3) Federgröße
Sie fest, ob Sie die richtige Sprungmatte gekauft haben.
4
WICHTIGER HINWEIS
1.Passen Sie bei der Federmontage auf, wohin Sie
Ihre Hände legen, da die Anschlusspunkte
eingeklemmt werden können!
2. Wir empfehlen, dass mindestens 2 Personen am
Aufbau der Sprungmatte beteiligt sind.
NOTIZ:
Sie benötigen ein Federwerkzeug, das Ihnen beim Einbau der Federn für
diese Matte in den Rahmen hilft. (Im Paket enthalten) .
So verwenden Sie das Federziehwerkzeug
Schritt 1 : Haken Sie das abgerundete Ende der Feder in die dreieckigen
Ringe der Trampolinmatte ein .
5
Schritt 2 : Ziehen Sie das Federzugwerkzeug heraus und verbinden Sie es
mit dem anderen Ende der Feder. Ziehen Sie das Werkzeug in Richtung des
Trampolinrahmens, bis der Federkopf mit dem Loch in ausgerichtet ist .
Der Trampolinrahmen. Schieben Sie das Federende in das Loch, während Sie
das
Werkzeug
entfernen.
Siehe unten das Muster der Federmontage nach Ihrem
Rahmenstil

6
FEDERMONTAGEMUSTER
RUND/OVAL
Notiz: Stellen Sie sicher, dass die Anzahl der V-Ringe zwischen den Federn
mit der Anzahl der Löcher im Rahmen zwischen den Federn übereinstimmt.

7
Parameter
Durchmes
ser
gepolstert
er Sprung
( Zoll )
Angepasst
an den
Außendurc
hmesser
des
Trampolinr
ahmens
( ft )
Angepas
ste
Federlän
ge
( Zoll )
V-Ring-
Material
Anzahl
der
V-Ringe
(Stück)
SDKC20240628CGQ
127
12
5.5
Weichsta
hl
72
SDKC2024Q40628CGQ
136
13
7
Weichsta
hl
80
SDKC202406YY28CGQ
150
14
5.5
Weichsta
hl
72

8
SDKC2024XT0626QGQ
147
14
6,5-7
Weichsta
hl
72
SDKC2024Y06U58CGQ
147
14
7
Weichsta
hl
96
SDKC0628QYL42PO
161
15
6.5
Weichsta
hl
96
SDKC202369CCZECGG
159
15
7
Weichsta
hl
96
Die Mitarbeiter unserer Kundendienstabteilung sind in den Einzelheiten aller
Trampoline und helfen Ihnen, das richtige Teil zu finden, damit Sie wieder in
Schwung kommen.
Wir vergessen unser Ziel nie ... Hol dir den Upper Bounce!

1
Hersteller: Shandong Kaicheng's Sport Goods Co.,Ltd
Adresse: Stadt Sishili, Kreis Yishui, Stadt Linyi, Provinz Shandong, China
Nach AUS importiert: SIHAO PTY LTD. 1 ROKEVA
STREETEASTWOOD
NSW 2122 Australien
Importiert in die USA: Sanven Technology Ltd. Suite 250, 9166 Anaheim
Ort, Rancho Cucamonga, CA 91730
REP
UK
YH CONSULTING LIMITED. C/O YH Consulting
Limited Office 147, Centurion House, London
Road, Staines-upon-Thames, Surrey, TW18 4AX
REP
EC
E-CrossStu GmbH
Mainzer Landstr.69,
60329 Frankfurt am Main.

2


4
Tecnico Supporto e certificato di garanzia elettronica
www.vevor.com/support
MONTAGGIO DEL TAPPETINO
TRAMPOLINO
MODELLO: CODICE ARTICOLO: SDKC20240628CGQ \
SDKC2024Q40628CGQ \ ITALIANO:
SDKC202406YY28CGQ \ SDKC2024XT0626QGQ \
SDKC2024Y06U58CGQ \ SDKC0628QYL42P0 \
SDKC202369CCZECGG
Continuiamo a impegnarci per fornirvi strumenti a prezzi competitivi.
"Risparmia la metà", "Metà prezzo" o altre espressioni simili utilizzate solo da noi
rappresenta una stima dei risparmi che potresti ottenere acquistando determinati strumenti
con noi rispetto ai principali marchi top e non significa necessariamente copertina
tutte le categorie di strumenti da noi offerti. Ti ricordiamo cortesemente di verificare
accuratamente
quando effettui un ordine con noi se sei effettivamente Risparmio
Metà rispetto ai marchi più importanti.

5

1
MODELLO: SDKC20240628CGQ \ SDKC2024Q40628CGQ \ ITALIANO:
SDKC202406YY28CGQ \ SDKC2024XT0626QGQ \ SDKC2024Y06U58CGQ \
SDKC0628QYL42PO \ SDKC202369CCZECGG
TIPI-ROTONDO
HAI BISOGNO DI AIUTO? CONTATTACI!
Hai domande sui prodotti? Hai bisogno di supporto tecnico? Non
esitare a contattarci:
Supporto tecnico e certificato di garanzia elettronica
www.vevor.com/support
Questa è l'istruzione originale, si prega di leggere attentamente tutte le
istruzioni del manuale prima di utilizzare. VEVOR si riserva una chiara
interpretazione del nostro manuale utente. L'aspetto del prodotto sarà
soggetto al prodotto ricevuto. Vi preghiamo di perdonarci se non vi
informeremo di nuovo se ci sono aggiornamenti tecnologici o software sul
nostro prodotto.
TRAMPOLINE MAT
ASSEMBLY

2
Grazie per aver scelto il nostro ASSEMBLAGGIO TAPPETINI PER
TRAMPOLINO per tutte le tue esigenze relative al trampolino e alla sua
sostituzione!
Basta seguire le istruzioni di montaggio e di sicurezza contenute in questo
manuale e presto potrai iniziare il tuo programma di esercizi per uno stile di
vita più felice, più sano e più divertente!
Prima di iniziare a installare il tuo nuovo tappeto elastico, verifica che il tappeto
che hai acquistato sia quello giusto. dimensione corretta per il tuo trampolino.
Per assicurarti che il telo del trampolino che hai acquistato sia della
dimensione giusta, segui i passaggi sottostanti:
Suggerimenti per la misurazione del tappeto
elastico
Fase 1. DIMENSIONE DEL TELAIO
Misura il tuo telaio da un bordo esterno all'altro con un metro a nastro.
Fallo sia verticalmente che orizzontalmente attraverso il centro del trampolino.
Assicurati che sia Dal bordo esterno in modo da ottenere le misure corrette.

3
Fase 2. NUMERO DI FORI PER MOLLA
Conta il numero di fori per le molle presenti sulla struttura del tuo
trampolino.
Fase 3. DIMENSIONE DELLE MOLLE
Misurare la dimensione della molla da un gancio all'altro, senza allungarla.
Sulla base del
4) Misura del telaio 2) Quantità primaverile 3) Dimensioni della molla
C ontrolla se hai acquistato il tappeto elastico corretto.
4
AVVISO IMPORTANTE
1. Fare attenzione a dove si mettono le mani
durante l'assemblaggio delle molle, perché i punti
di collegamento potrebbero schiacciarsi!
2. Si consiglia la partecipazione di almeno 2
persone al montaggio del tappeto elastico.
NOTA:
Avrai bisogno di uno strumento a molla per aiutarti a installare le molle per
questo tappetino sul telaio (Incluso nella confezione) .
Come utilizzare l'utensile per estrarre le molle
Fase 1 : Agganciare l'estremità più arrotondata della molla agli anelli
triangolari del tappeto elastico .
5
Fase 2 : Estendi l'utensile di estrazione della molla e collegalo all'altra
estremità della molla. Tira l'utensile nella direzione del telaio del trampolino
finché la testa della molla non è allineata con il foro in .
Telaio del trampolino. Fai scorrere l'estremità della molla nel foro mentre
rimuovi
l'utensile.
Vedi sotto il modello del gruppo molle in base al tuo stile della
cornice

6
MODELLO DI MONTAGGIO DELLA MOLLA
TONDO/OVALE
Nota: Assicurarsi che il numero degli anelli a V tra le molle corrisponda al
numero dei fori presenti nel telaio tra le molle.

7
Parametri
diametro
di salto
imbottito
( pollici )
Adattato al
diametro
esterno del
telaio del
trampolino
( ft )
Lunghez
za della
molla
adattata
( pollice )
Materiale
dell'anell
o a V
Numero
di anelli
a V
(pz)
Codice articolo:
SDKC20240628CGQ
127
12
5.5
acciaio
dolce
72
Codice articolo:
SDKC2024Q40628CGQ
136
13
7
acciaio
dolce
80
Codice articolo:
SDKC202406YY28CGQ
150
14
5.5
acciaio
dolce
72
Codice articolo:
SDKC2024XT0626QGQ
147
14
6.5-7
acciaio
dolce
72

8
Codice articolo:
SDKC2024Y06U58CGQ
147
14
7
acciaio
dolce
96
Codice articolo:
SDKC0628QYL42PO
161
15
6.5
acciaio
dolce
96
SDKC202369CCZECGG
159
15
7
acciaio
dolce
96
Il nostro personale del servizio clienti è formato nei dettagli di tutti trampolini e
ti aiuterà a trovare il punto giusto per farti tornare a rimbalzare.
Non dimentichiamo mai il nostro obiettivo... Ottieni l'Upper Bounce!
1
Produttore: Shandong Kaicheng's Sport Goods Co.,Ltd
Indirizzo: Città di Sishili, Contea di Yishui, Città di Linyi, Provincia di
Shandong, Cina
Importato in AUS: SIHAO PTY LTD. 1 ROKEVA STREETEASTWOOD
Nuovo Galles del Sud 2122 Australia
Importato negli USA: Sanven Technology Ltd. Suite 250, 9166 Anaheim
Luogo, Rancho Cucamonga, CA 91730
REP
UK
YH CONSULTING LIMITED. C/O YH Consulting
Limited Office 147, Centurion House, London
Road, Staines-upon-Thames, Surrey, TW18 4AX
REP
EC
E-CrossStu GmbH
Mainzer Landstr.69,
60329 Frankfurt am Main.

2


4
Técnico Certificado de soporte y garantía electrónica
www.vevor.com/support
MONTAJE DE COLCHONETA PARA
TRAMPOLÍN
MODELO: SDKC20240628CGQ \ SDKC2024Q40628CGQ \
SDKC202406YY28CGQ\SDKC2024XT0626QGQ\SDKC2024Y06U
58CGQ\SDKC0628QYL42P0\SDKC202369CCZECGG
Seguimos comprometidos a brindarle herramientas a precios competitivos.
"Ahorra la mitad", "mitad de precio" o cualquier otra expresión similar utilizada únicamente
por nosotros
Representa una estimación de los ahorros que podría obtener al comprar ciertas
herramientas.
con nosotros en comparación con las principales marcas líderes y no significa
necesariamente cubrir
Todas las categorías de herramientas que ofrecemos. Le recordamos que debe verificar
con cuidado
Cuando realiza un pedido con nosotros, si realmente está Ahorro
Medio en comparación con las principales marcas líderes.

5


1
MODELO: SDKC20240628CGQ \ SDKC2024Q40628CGQ \
SDKC202406YY28CGQ\SDKC2024XT0626QGQ\SDKC2024Y06U58CGQ\SDKC
0628QYL42PO\SDKC202369CCZECGG
TIPOS-REDONDOS
¿NECESITAS AYUDA? ¡CONTÁCTANOS!
¿Tiene preguntas sobre el producto? ¿Necesita asistencia técnica? No
dude en ponerse en contacto con nosotros:
Soporte técnico y certificado de garantía electrónica
www.vevor.com/support
Estas son las instrucciones originales, lea atentamente todas las
instrucciones del manual antes de utilizar el producto. VEVOR se reserva
una interpretación clara de nuestro manual de usuario. La apariencia del
producto estará sujeta al producto que recibió. Perdónenos por no
informarle nuevamente si hay actualizaciones de tecnología o software
en nuestro producto.
TRAMPOLINE MAT
ASSEMBLY

2
¡
Gracias por elegir nuestro CONJUNTO DE COLCHONETA PARA
TRAMPOLÍN para todas sus necesidades de trampolín y reemplazo de
trampolín!
Simplemente siga las instrucciones de montaje y seguridad de este manual y
pronto estará listo para comenzar.
¡
Programa de ejercicios para un estilo de
vida más feliz, saludable y divertido!
Antes de comenzar a instalar su nueva colchoneta para saltar, verifique que la
colchoneta que compró sea la adecuada. Tamaño correcto para su trampolín.
Para asegurarse de que la colchoneta para trampolín que compró sea del
tamaño correcto, siga los pasos a continuación:
Consejos de medición para la lona de salto
Paso 1. TAMAÑO DEL MARCO
Mida el marco desde un borde exterior hasta el otro con una cinta métrica.
Haga esto tanto vertical como horizontalmente a lo largo del centro del
trampolín. Asegúrese de que esté a 100 metros del borde exterior para
obtener las medidas correctas.

3
Paso 2. CANTIDAD DE AGUJEROS PARA RESORTES
Cuente la cantidad de orificios para resortes en el marco de su trampolín.
Paso 3. TAMAÑO DE LOS MUELLES
Mida el tamaño del resorte de gancho a gancho sin estirar.
Basado en el
5) Tamaño del marco 2) Cantidad de primavera 3) Tamaño del resorte
Determine si compró la lona de salto correcta.
4
AVISO IMPORTANTE
1.
¡
Tenga cuidado donde coloca sus manos
durante el montaje del resorte, ya que los puntos
de conexión pueden pellizcar!
2. Recomendamos que al menos 2 personas
participen en el montaje de la lona de salto.
NOTA:
Necesitará tener una herramienta de resorte para ayudarlo a instalar los
resortes de este tapete en el marco. (Incluido en el paquete) .
Cómo utilizar la herramienta para extraer resortes
Paso 1 : Enganche el extremo más redondeado del resorte en los anillos
triangulares de la lona del trampolín .

5
Paso 2 : Extienda la herramienta de tracción del resorte y conéctela con el
otro extremo del resorte. Tire de la herramienta en dirección al marco del
trampolín hasta que la cabeza del resorte esté alineada con el orificio en .
El marco del trampolín. Deslice el extremo del resorte en el orificio mientras
retira la
herramienta.
Vea a continuación el Patrón del montaje de resortes según su
estilo de marco
6
PATRÓN DE ENSAMBLAJE DE RESORTE
REDONDO/OVALADO
Nota: Asegúrese de que los anillos en V entre los resortes coincidan con la
cantidad de orificios en el marco entre los resortes.

7
Parámetros
Diámetro
de salto
acolchado
( pulgadas
)
Adaptado
al diámetro
exterior del
marco del
trampolín
( ft )
Longitud
de
resorte
adaptada
( pulgada
)
Material
del anillo
en V
Número
de
anillos
en V
(piezas)
SDKC20240628CGQ
127
12
5.5
acero
dulce
72
SDKC2024Q40628CGQ
136
13
7
acero
dulce
80
SDKC202406YY28CGQ
150
14
5.5
acero
dulce
72
SDKC2024XT0626QGQ
147
14
6.5-7
acero
dulce
72

8
SDKC2024Y06U58CGQ
147
14
7
acero
dulce
96
SDKC0628QYL42PO
161
15
6.5
acero
dulce
96
SDKC202369CCZECGG
159
15
7
acero
dulce
96
Nuestro personal del Departamento de Atención al Cliente está capacitado en
los detalles de todos trampolines y te ayudará a encontrar la pieza adecuada
para que puedas rebotar nuevamente.
Nunca olvidamos nuestro objetivo... ¡Conseguir el rebote superior!

1
Fabricante: Shandong Kaicheng's Sport Goods Co., Ltd.
Dirección: Ciudad de Sishili, condado de Yishui, ciudad de Linyi, provincia
de Shandong, China
Importado a Australia: SIHAO PTY LTD. 1 ROKEVA
STREETEASTWOOD
Nueva Gales del Sur 2122 Australia
Importado a EE. UU.: Sanven Technology Ltd. Suite 250, 9166 Anaheim
Lugar, Rancho Cucamonga, CA 91730
REP
UK
YH CONSULTING LIMITED. C/O YH Consulting
Limited Office 147, Centurion House, London
Road, Staines-upon-Thames, Surrey, TW18 4AX
REP
EC
E-CrossStu GmbH
Mainzer Landstr.69,
60329 Frankfurt am Main.

2


4

5
Techniczny Wsparcie i certyfikat e-gwarancji
www.vevor.com/support
MONTAŻ MAT DO TRAMPOLINY
MODEL: SDKC20240628CGQ \ SDKC2024Q40628CGQ \
SDKC202406YY28CGQ \ SDKC2024XT0626QGQ \
SDKC2024Y06U58CGQ \ SDKC0628QYL42P0 \
SDKC202369CCZECGG
Nadal staramy się oferować Państwu narzędzia w konkurencyjnych cenach.
„Oszczędź połowę”, „Połowa ceny” lub jakiekolwiek inne podobne wyrażenia używane
wyłącznie przez nas
przedstawia szacunkowe oszczędności, jakie możesz uzyskać kupując określone
narzędzia
z nami w porównaniu do głównych, najlepszych marek i niekoniecznie oznacza to okładka
wszystkie kategorie narzędzi oferowanych przez nas. Przypominamy o sprawdzeniu
ostrożnie
gdy składasz u nas zamówienie, jeśli faktycznie Oszczędność
Połowa w porównaniu z wiodącymi markami.


1
MODELE: SDKC20240628CGQ \ SDKC2024Q40628CGQ \
SDKC202406YY28CGQ \ SDKC2024XT0626QGQ \ SDKC2024Y06U58CGQ \
SDKC0628QYL42PO \ SDKC202369CCZECGG
TYPY-OKRĄGŁE
POTRZEBUJESZ POMOCY? SKONTAKTUJ SIĘ Z NAMI!
Masz pytania dotyczące produktu? Potrzebujesz wsparcia
technicznego? Skontaktuj się z nami:
Wsparcie techniczne i certyfikat e-gwarancji
www.vevor.com/support
To jest oryginalna instrukcja, przed użyciem należy uważnie przeczytać
wszystkie instrukcje. VEVOR zastrzega sobie jasną interpretację naszej
instrukcji obsługi. Wygląd produktu będzie zależał od produktu, który
otrzymałeś. Prosimy o wybaczenie, że nie poinformujemy Cię ponownie,
jeśli w naszym produkcie pojawią się jakiekolwiek aktualizacje
technologiczne lub oprogramowania.
TRAMPOLINE MAT
ASSEMBLY
2
Dziękujemy za wybranie naszego zespołu mat do trampolin, aby
zaspokoić wszystkie Twoje potrzeby związane z trampolinami lub ich
wymianą!
Wystarczy postępować zgodnie z instrukcjami montażu i bezpiecze
ń
stwa
zawartymi w niniejszej instrukcji, a wkrótce będziesz mógł rozpocząć pracę.
program ćwicze
ń
dla szczęśliwszego, zdrowszego i przyjemniejszego życia!
Przed rozpoczęciem instalacji nowej maty do skakania należy sprawdzić, czy
zakupiona mata jest odpowiednia. właściwy rozmiar dla Twojej trampoliny. Aby
mieć pewność, że zakupiona mata do trampoliny ma właściwy rozmiar,
wykonaj poniższe czynności:
Wskazówki dotyczące pomiaru maty do skakania
Krok 1. ROZMIAR RAMKI
Zmierz ramę od jednej zewnętrznej krawędzi do drugiej za pomocą miarki
krawieckiej. Zrób to zarówno pionowo, jak i poziomo przez środek trampoliny.
Upewnij się, że mierzysz od zewnętrznej krawędzi, aby uzyskać prawidłowe
pomiary.
3
Krok 2. LICZBA OTWORÓW SPRĘŻYNOWYCH
Policz liczbę otworów na sprężyny w ramie trampoliny.
Krok 3. ROZMIAR SPRĘŻYN
Zmierz rozmiar sprężyny od haczyka do haczyka w stanie
nierozciągniętym.
Na podstawie
6) Rozmiar ramy 2) Wiosna Ilość 3) Rozmiar sprężyny
S twierdz, że kupiłeś właściwą matę do skakania.

4
WAŻNA INFORMACJA
1. Uważaj, gdzie kładziesz ręce podczas montażu
sprężyn, ponieważ punkty łącznikowe mogą zostać
ściśnięte!
2. Zalecamy, aby w montażu maty do skakania
uczestniczyły co najmniej 2 osoby.
NOTATKA:
Będziesz potrzebować narzędzia do sprężyn, które pomoże Ci zamontować
sprężyny. Do tej maty przymocuj ją do ramy (W zestawie) .
Jak używać narzędzia do wyciągania sprężyn
Krok 1 : Zaczep bardziej zaokrąglony koniec sprężyny o trójkątne pierścienie
maty trampoliny .
5
Krok 2 : Rozciągnij narzędzie do naciągania sprężyny i połącz je z drugim ko
ń
cem sprężyny. Pociągnij narzędzie w kierunku ramy trampoliny, aż główka
sprężyny ustawi się w jednej linii z otworem w .
Rama
trampoliny.
Wsu
ń
ko
ń
cówkę
sprężyny w
otwór i wyjmij
narzędzie.
Poniżej znajduje się wzór montażu sprężyn według Twojego styl
ramki

6
WZÓR MONTAŻU SPRĘŻYNY
OKRĄGŁY/OWALNY
Notatka: Upewnij się, że liczba pierścieni V pomiędzy sprężynami odpowiada
liczbie otworów w ramie pomiędzy sprężynami.
7
Parametry
średnica
wyściełan
ego
miejsca do
skoku
( cale )
Dostosowa
ny do
zewnętrzn
ej średnicy
ramy
trampoliny
( ft )
Dopasow
ana
długość
sprężyny
( cal )
Materiał
pierścien
ia V
Liczba
pierścien
i V
(szt.)
SDKC20240628CGQ
127
12
5.5
stal
miękka
72
SDKC2024Q40628CGQ
136
13
7
stal
miękka
80
SDKC202406YY28CGQ
150
14
5.5
stal
miękka
72
Zestaw
SDKC2024XT0626QGQ
147
14
6,5-7
stal
miękka
72

8
SDKC2024Y06U58CGQ
147
14
7
stal
miękka
96
SDKC0628QYL42PO
161
15
6,5
stal
miękka
96
SDKC202369CCZECGG
159
15
7
stal
miękka
96
Pracownicy naszego Działu Obsługi Klienta są przeszkoleni w zakresie
szczegółów wszystkich trampoliny i pomożemy Ci znaleźć odpowiednią część,
dzięki której znów będziesz mógł skakać.
Nigdy nie zapominamy o naszym celu... Zdobyć Upper Bounce!

1
Producent: Shandong Kaicheng's Sport Goods Co.,Ltd
Adres: Miasto Sishili, powiat Yishui, miasto Linyi, prowincja Shandong,
Chiny
Importowane do AUS: SIHAO PTY LTD. 1 ROKEVA
STREETEASTWOOD
NSW 2122 Australia
Importowane do USA: Sanven Technology Ltd. Suite 250, 9166 Anaheim
Miejsce, Rancho Cucamonga, CA 91730
REP
UK
YH CONSULTING LIMITED. C/O YH Consulting
Limited Office 147, Centurion House, London
Road, Staines-upon-Thames, Surrey, TW18 4AX
REP
EC
E-CrossStu GmbH
Mainzer Landstr.69,
60329 Frankfurt am Main.

2


4

5
Technisch Ondersteuning en E-garantiecertificaat
www.vevor.com/support
MONTAGE VAN DE TRAMPOLINEMAT
MODEL: SDKC20240628CGQ \SDKC2024Q40628CGQ\
SDKC202406YY28CGQ \ SDKC2024XT0626QGQ \
SDKC2024Y06U58CGQ \ SDKC0628QYL42P0 \
SDKC202369CCZECGG
Wij streven er voortdurend naar om u gereedschappen tegen concurrerende prijzen te
leveren.
"Bespaar de helft", "halve prijs" of andere soortgelijke uitdrukkingen die alleen door ons
worden gebruikt
geeft een schatting van de besparingen die u kunt behalen door bepaalde gereedschappen
te kopen
bij ons vergeleken met de grote topmerken en betekent niet per se dat omslag
alle categorieën van tools die wij aanbieden. U wordt vriendelijk verzocht om te verifiëren
voorzichtig
wanneer u een bestelling bij ons plaatst, als u daadwerkelijk Besparing
Half in vergelijking met de grote topmerken.


1
MODEL: SDKC20240628CGQ \ SDKC2024Q40628CGQ \
SDKC202406YY28CGQ \ SDKC2024XT0626QGQ \ SDKC2024Y06U58CGQ \
SDKC0628QYL42PO \ SDKC202369CCZECGG
TYPES-RONDE
HULP NODIG? NEEM CONTACT MET ONS OP!
Heeft u vragen over het product? Heeft u technische ondersteuning
nodig? Neem dan gerust contact met ons op:
Technische ondersteuning en e-garantiecertificaat
www.vevor.com/support
Dit is de originele instructie, lees alle handleidingen zorgvuldig door
voordat u het product gebruikt. VEVOR behoudt zich een duidelijke
interpretatie van onze gebruikershandleiding voor. Het uiterlijk van het
product is afhankelijk van het product dat u hebt ontvangen. Vergeef ons
dat we u niet opnieuw zullen informeren als er technologie- of
software-updates voor ons product zijn .
TRAMPOLINE MAT
ASSEMBLY
2
Bedankt dat u voor onze TRAMPOLINE MAT ASSEMBLY hebt gekozen
voor al uw trampoline- en vervangingsbehoeften!
Volg eenvoudig de montage- en veiligheidsinstructies in deze handleiding en u
kunt binnenkort aan de slag met uw trainingsprogramma voor een gelukkiger,
gezonder en leuker leven!
Voordat u begint met het installeren van uw nieuwe springmat, controleer dan
of de mat die u hebt gekocht de juiste is. juiste maat voor uw trampoline. Om
er zeker van te zijn dat de trampoline mat die u hebt gekocht de juiste maat
heeft, volgt u de onderstaande stappen:
Meettips voor springmatten
Stap 1. FRAMEGROOTTE
Meet uw frame van de ene buitenrand tot de andere met een meetlint. Doe
dit zowel verticaal als horizontaal over het midden van de trampoline. Zorg
ervoor dat het vanaf de buitenrand is, zodat u de juiste metingen krijgt.
3
Stap 2. AANTAL VEERGATEN
Tel het aantal veergaten in het frame van uw trampoline.
Stap 3. MAAT VAN DE VEREN
Meet de veermaat van haak tot haak, zonder rek.
Gebaseerd op de
7) Framemaat 2) Lentebedrag 3) Veermaat
Controleer of u de juiste springmat hebt gekocht.
4
BELANGRIJKE MEDEDELING
1. Wees voorzichtig waar u uw handen plaatst
tijdens het monteren van de veren, want de
verbindingspunten kunnen bekneld raken!
2. Wij adviseren om minimaal 2 personen mee te
helpen bij het monteren van de springmat.
OPMERKING:
U hebt een veergereedschap nodig om u te helpen de veren voor deze mat
aan het frame te installeren (Inbegrepen in het pakket) .
Hoe gebruik je de veertrektool
Stap 1 : Haak het ronde uiteinde van de veer vast aan de driehoekige ringen
van het trampolinekleed .
5
Stap 2 : Trek het gereedschap voor het trekken van de veer uit en verbind het
met het andere uiteinde van de veer. Trek het gereedschap in de richting van
het trampolineframe totdat de veerkop op één lijn ligt met het gat in .
Het trampolineframe. Schuif het uiteinde van de veer in het gat terwijl u het
gereedschap
verwijdert.
Zie hieronder het patroon van de verenmontage volgens uw
framestijl
6
PATROON VOOR MONTAGE VAN VEREN
ROND/OVAAL
Opmerking: Zorg ervoor dat de V-ringen tussen de veren overeenkomen met
het aantal gaten in het frame tussen de veren.
7
Parameters
gewatteer
de
springdia
meter
( inch )
Aangepast
aan de
buitendiam
eter van
het
trampolinef
rame ( ft )
Aangepa
ste
veerlengt
e
( duim )
V-ringma
teriaal
Aantal
V-ringen
(stuks)
SDKC20240628CGQ
127
12
5.5
zacht
staal
72
SDKC2024Q40628CGQ
136
13
7
zacht
staal
80
SDKC202406YY28CGQ
150
14
5.5
zacht
staal
72
SDKC2024XT0626QGQ
147
14
6.5-7
zacht
staal
72
SDKC2024Y06U58CGQ
147
14
7
zacht
staal
96
SDKC0628QYL42PO
161
15
6.5
zacht
staal
96
SDKC202369CCZECGG
159
15
7
zacht
staal
96
Onze medewerkers van de afdeling Klantenservice zijn getraind in de details
van alle trampolines en helpen je het juiste onderdeel te vinden, zodat je weer
kunt springen.
Wij vergeten nooit ons doel... Pak de Upper Bounce!
1
Fabrikant: Shandong Kaicheng's Sport Goods Co.,Ltd
Adres: Stad Sishili, Yishui County, Linyi City, provincie Shandong, China
Geïmporteerd naar AUS: SIHAO PTY LTD. 1 ROKEVA
STREETEASTWOOD
NSW 2122 Australië
Geïmporteerd naar de VS: Sanven Technology Ltd. Suite 250, 9166
Anaheim
Plaats, Rancho Cucamonga, CA 91730
REP
UK
YH CONSULTING LIMITED. C/O YH Consulting
Limited Office 147, Centurion House, London
Road, Staines-upon-Thames, Surrey, TW18 4AX
REP
EC
E-CrossStu GmbH
Mainzer Landstr.69,
60329 Frankfurt am Main.

2


4

5
Teknisk Support och e-garanticertifikat
www.vevor.com/support
MONTERING AV STRAMPOLINEMATTA
MODELL: SDKC20240628CGQ \ SDKC2024Q40628CGQ \
SDKC202406YY28CGQ \ SDKC2024XT0626QGQ \
SDKC2024Y06U58CGQ \ SDKC0628QYL42P0 \
SDKC202369CCZECGG
Vi fortsätter att vara engagerade i att ge dig verktyg till konkurrenskraftiga priser.
"Spara hälften", "Halva priset" eller andra liknande uttryck som endast används av oss
representerar en uppskattning av besparingar du kan dra nytta av att köpa vissa verktyg
med oss jämfört med de stora toppmärkena och betyder inte nödvändigtvis att täcka
alla kategorier av verktyg som erbjuds av oss. Du påminns vänligen om att verifiera
försiktigt
när du gör en beställning hos oss om du faktiskt gör det Sparande
Halv i jämförelse med de främsta varumärkena.


1
MODELL: SDKC20240628CGQ \ SDKC2024Q40628CGQ \
SDKC202406YY28CGQ \ SDKC2024XT0626QGQ \ SDKC2024Y06U58CGQ \
SDKC0628QYL42PO \ SDKC202369CCZECGG
TYPER-RUND
BEHÖVER HJÄLP? KONTAKTA OSS!
Har du produktfrågor? Behöver du teknisk support? Kontakta oss
gärna:
Teknisk support och e-garanticertifikat
www.vevor.com/support
Detta är den ursprungliga instruktionen, läs alla instruktioner noggrant
innan du använder den. VEVOR reserverar sig för en tydlig tolkning av vår
användarmanual. Utseendet på produkten är beroende av den produkt du
fått. Ursäkta oss att vi inte kommer att informera dig igen om det finns
någon teknik eller mjukvaruuppdateringar på vår produkt.
TRAMPOLINE MAT
ASSEMBLY
2
Tack för att du valde Vår STRAMPOLINEMATTA MONTERING för alla dina
behov av byte av studsmatta och studsmatta!
Följ bara monterings- och säkerhetsinstruktionerna i denna manual så
kommer du snart att starta din träningsprogram för en gladare, hälsosammare
och roligare livsstil!
Innan du börjar installera din nya hoppmatta, kontrollera att mattan du köpte är
den rätt storlek för din studsmatta.Följ stegen nedan för att säkerställa att
trampolinmattan du köpt har rätt storlek :
Mättips för hoppmatta
Steg 1. RAMSTORLEK
Mät din ram från den ena ytterkanten till den andra med ett måttband. Gör
detta Både vertikalt och horisontellt över mitten av studsmattan. Se till att den
är från ytterkanten så att du får rätt mått.
Steg 2 . MÄNGD FJÄDERHÅL
3
Räkna mängden fjäderhål på din studsmattas ram.
Steg 3 . STORLEK PÅ FJÄDRAR
Mät fjäderstorleken från krok till krok osträckt.
Baserat på
8) Ramstorlek 2) Vårbelopp 3) Vårstorlek
Ta reda på om du köpt rätt hoppmatta.
4
VIKTIGT MEDDELANDE
1.Var försiktig med var du placerar händerna under
fjädermonteringen eftersom kopplingspunkter kan
klämma!
2.Vi rekommenderar att minst 2 personer deltar i
monteringen av hoppmattan.
NOTERA:
Du måste ha ett fjäderverktyg som hjälper dig att installera fjädrarna för
denna matta på ramen (Ingår i paketet) .
Hur man använder fjäderdragverktyget
Steg 1 : Haka fast den mer rundade änden av fjädern på trampolinmattans
triangulära ringar.

5
Steg 2 : Förläng fjäderdragverktyget och koppla ihop det med fjäderns andra
ände. Dra verktyget i riktning mot studsmattasramen tills fjäderhuvudet är i
linje med hålet i .
Trampolinramen. Skjut in fjäderänden i hålet när du tar bort verktyget.
Se nedan
mönstret
på fjädrarnas montering enligt din ram stil
FJÄDERMONTERINGSMÖNSTER
6
RUND/OVAL
Notera: Se till att v-ringarna mellan fjädrarna matchar antalet hål i ramen
mellan fjädrarna.
Parametrar

7
vadderad
hoppdiam
eter ( tum )
Anpassad
till
trampolinra
mens
ytterdiamet
er ( ft )
Anpassa
d
fjäderlän
gd
( tum )
V-ring
material
Antal
V-ringar
(st)
SDKC20240628CGQ
127
12
5.5
mjukt
stål
72
SDKC2024Q40628CGQ
136
13
7
mjukt
stål
80
SDKC202406YY28CGQ
150
14
5.5
mjukt
stål
72
SDKC2024XT0626QGQ
147
14
6,5-7
mjukt
stål
72
SDKC2024Y06U58CGQ
147
14
7
mjukt
stål
96
SDKC0628QYL42PO
161
15
6.5
mjukt
stål
96
SDKC202369CCZECGG
159
15
7
mjukt
stål
96
Personalen på vår kundtjänstavdelning är utbildad i alla detaljer studsmattor
och hjälper dig att hitta rätt del för att få dig att studsa igen.
Vi glömmer aldrig vårt mål... Få den övre studsen!

Tillverkare: Shandong Kaicheng's Sport Goods Co.,Ltd
Adress: Staden Sishili, Yishui County, Linyi City, Shandong-provinsen,
Kina
Importerad till AUS: SIHAO PTY LTD. 1 ROKEVA STREETEASTWOOD
NSW 2122 Australien
Importerad till USA: Sanven Technology Ltd. Suite 250, 9166 Anaheim
Place, Rancho Cucamonga, CA 91730
REP
UK
YH CONSULTING LIMITED. C/O YH Consulting
Limited Office 147, Centurion House, London
Road, Staines-upon-Thames, Surrey, TW18 4AX
REP
EC
E-CrossStu GmbH
Mainzer Landstr.69,
60329 Frankfurt am Main.


