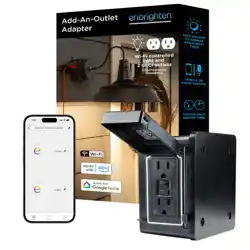
This adapter features two GFCI outlets for lights and pass-through power for
fixtures — both controlled with the Enbrighten app.
Add-An-Outlet Adapter
80750, 80753
Model:
Thank you for your purchase!
Instructions
made easy
Register your
product
Discover more innovative
lighting at
www.enbrightenme.com.
Like our product?
Leave a review on your
favorite retailer website
or amazon.com.
Having problems?
Let us know how
we can help.
Call 1-800-654-8483,
M-F, 7AM-8PM
Central Time
Read instructions or watch
an easy-to-follow video.
Scan code or visit
byjasco.com/80750i.
Receive exclusive deals and
register your product.
Scan code or visit
byjasco.com/deals.
WARRANTY
SAFETY INSTRUCTIONS
SPECIFICATIONS
CARE AND CLEANING
Jasco Products Company warrants this product to be free from manufacturing defects for five years from the original
date of consumer purchase. This warranty is limited to the repair or replacement of this product only and does not extend
to consequential or incidental damage to other products that may be used with this product. This warranty is in lieu of
all other warranties, expressed or implied. Some states do not allow limitations on how long an implied warranty lasts or
permit the exclusion or limitation of incidental or consequential damage, so the above limitations may not apply to you.
This warranty gives you specific rights and you may also have other rights which vary from state to state. Please contact
our U.S.-based Consumer Care at 1-800-654-8483 (option 1), M-F, 7AM-8PM Central Time or www.byjasco.com if the unit
should prove defective within the warranty period.
• DO NOT spray the product with a hose or power washer.
• To prolong the original appearance, clean only with clean water and a soft, damp cloth.
1. Read all SAFETY INSTRUCTIONS and USER MANUAL before attempting to install or operate.
2. Install in accordance with all local and national electrical codes. Consult a local licensed electrician or
electrical contractor if you are not sure about the installation.
3. For use only in a circuit protected by a fuse or circuit breaker.
4. Must be properly grounded.
5. DO NOT ATTEMPT TO INSTALL PRODUCT WITH THE POWER ON. Ensure electricity is TURNED OFF
at the main circuit breaker or fuse box. All wiring connections must be made with the POWER OFF to
avoid personal injury and/or damage to the fixture. Verify power is OFF at the junction box using AC
voltage tester before installation.
6. Double-check all connections to be sure they are tight and correct and no wires are pinched.
7. Account for small parts and dispose of packaging material, as these may be hazardous to children.
8. If installed OUTDOORS, mount to a WATERPROOF surface mount or recessed electrical junction box
with a 120VAC power source. Seal all gaps behind mounting plate with waterproof caulk.
9. NOTICE: DO NOT connect Wi-Fi product to a dimmer switch or timer.
10. Wear well-fitted safety glasses during the entire installation procedure.
11. DO NOT EXCEED ELECTRICAL RATINGS.
12. DO NOT exceed 50lb connected light fixture.
Model #: 80750, 80753
Input Power Requirements: 120VAC, 60Hz
GFCI Outlets: 15A, 1800W, 120VAC
Connected Light Max Load: 600W, 5A
Connected Light Max Weight: 50LBS
Wi-Fi: 2.4GHz, 150ft.
For product patent information, visit
ww.byjasco.com/patents.
All brand names shown are trademarks
of their respective owners.
App Store is a service mark of Apple
Inc. Google, Google Play and Google
Home are trademarks of Google LLC.
Amazon, Alexa and all related logos
are trademarks of Amazon.com, Inc.
or its aliates.
WARNINGS TO REDUCE THE RISK OF ELECTRIC SHOCK, FIRE OR INJURY:
MADE IN CHINA
10 E. Memorial Rd., Oklahoma City, OK 73114.
This Jasco product has a 5-year limited warranty.
Visit www.byjasco.com for warranty details.
Questions? Contact our U.S.-based Consumer
Care at 1-800-654-8483, M-F, 7AM-8PM Central Time.
©JASCO 2024 | 80750, 80753 | 11/28/23 v2
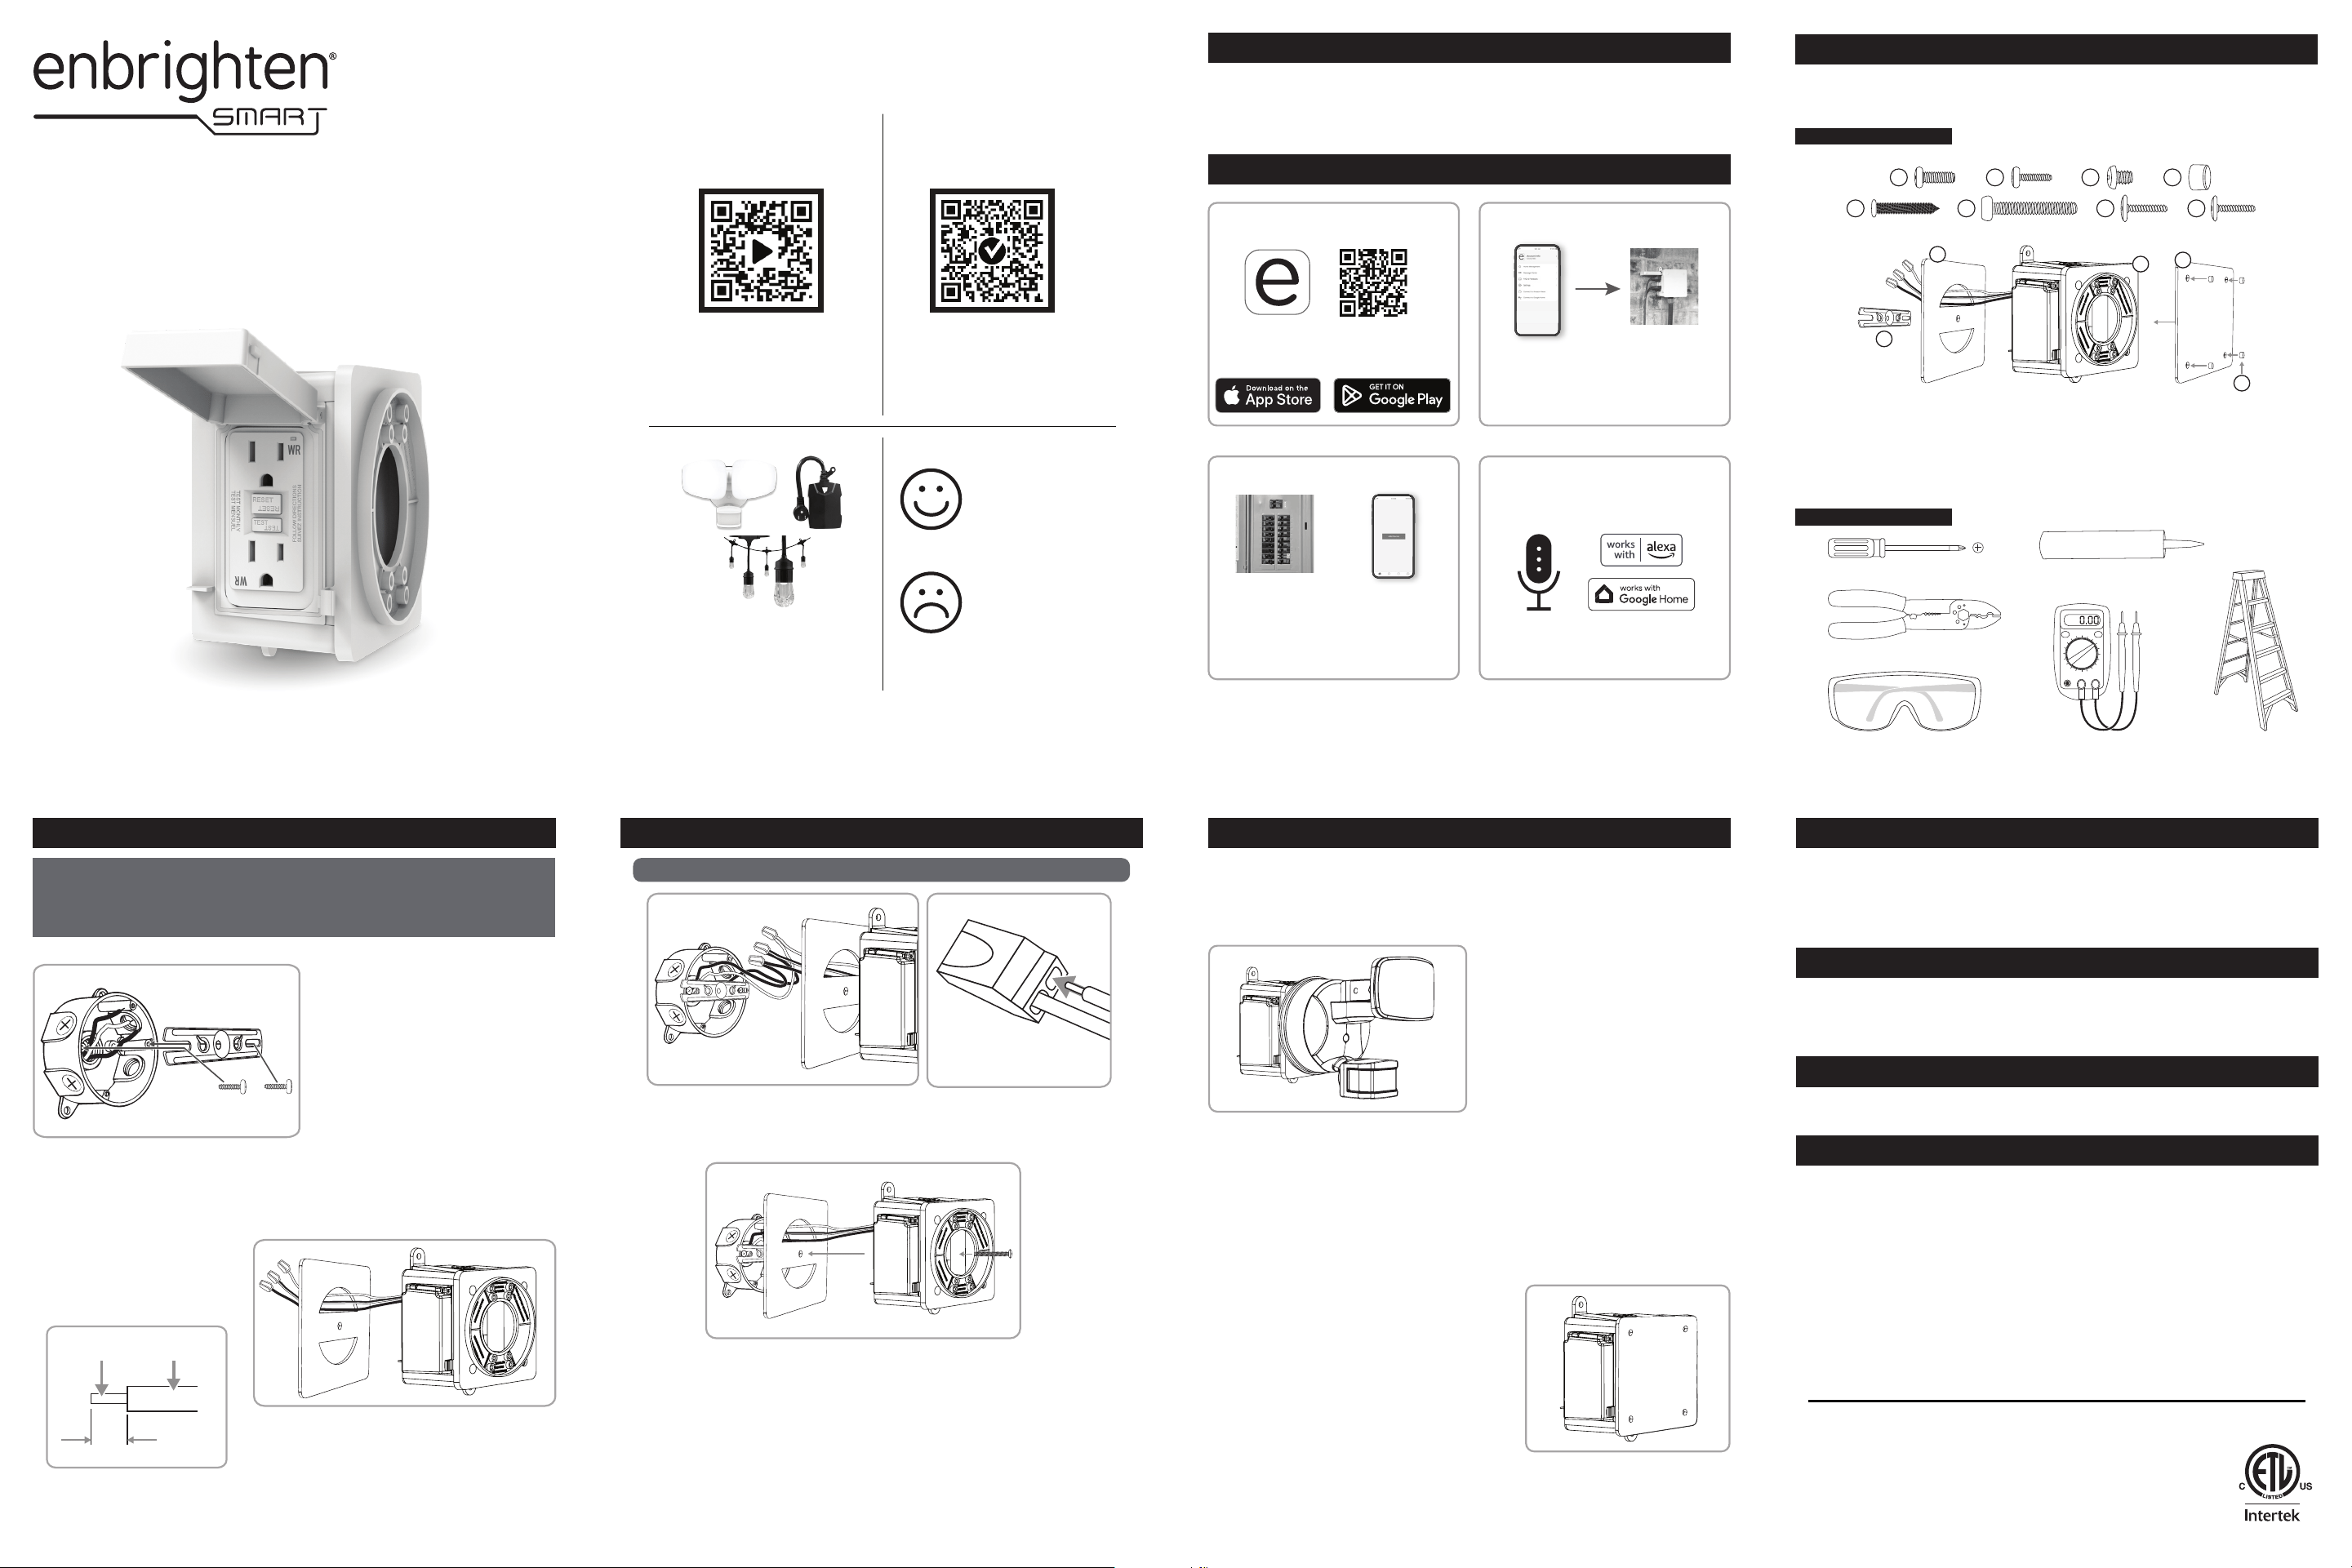
INSTALLATION
Follow these steps to properly install your adapter to the junction
box. After the adapter is installed, follow Option 1: Adding a Light
Fixture or Option 2: Using Without a Light Fixture.
WARNING: BE SURE POWER IS OFF BEFORE PROCEEDING.
JUNCTION BOX
FRONT
Step 1: Install Mounting Bracket
Hold the mounting bracket (D)
to the junction box with the
“front side” facing you. Use the
appropriately sized screws (A,
B or C) to securely attach the
bracket to the junction box.
NOTE: Installation is the same
for a recessed or surface-mount
junction box.
Route the “House” wires
through the gasket (E).
Step 2: Route and Connect Wiring
Hold the adapter over the now installed mounting bracket. If the
mounting bracket blocks the adapter’s “House” wires, carefully move
them to the other hole. DO NOT attach adapter to the bracket yet.
3/8in.-7/16in.
Exposed
wire
Insulated
wire
Use the wire strippers to strip your
home’s AC power supply wires to
expose 3/8in. (9.5mm) of wire.
NOTE: The adapter’s mounting plate may be removed to make wiring and installation easier
by removing the four rubber plugs and loosening the four mounting plate screws. Be sure to
replace rubber plugs before attaching a light fixture to the mounting plate.
INSTALLATION (CONT.)
• WARNING: Ensure power is OFF.
• For light fixtures greater than 25lbs., secure adapter with
screws to two outer mounting tabs.
• Follow the instructions for the light fixture you wish to connect
to the mounting plate. For electrical connections, use the wires
from the adapter labeled “Light Load,” “Light Neutral” and
“Light Ground.”
NOTE:
If needed, you can use the light fixture screws (K, L) to secure your light
fixture to the mounting plate.
OPTION 1: Adding a Light Fixture
You can use the mounting plate
on your adapter (I) to mount a
separately purchased light fixture.
It provides a mounting interface
of a standard 4in. round electrical
junction box, supports weight up
to 50lbs. and a maximum 600W
electrical load.
OPTION 2: Using Without Light Fixture
If you are only using the GFCI outlet
feature of the light adapter, follow these
instructions to mount the cover.
Step 4: Waterproofing
Apply weatherproof exterior caulk sealant to any gaps behind the
adapter, junction box and mounting surface to prevent any water
leakage into the product.
• WARNING: Ensure power is OFF.
• Remove the four rubber plugs (H)
from the mounting plate.
• Unscrew the four screws and
remove the mounting plate. The
screws will not fall out.
• Arrange all wiring inside the adapter.
• Install the cover (J), ensuring the plastic tab is facing the
GFCI outlets and tighten pre-installed screws to secure cover.
• Replace the four rubber plugs (H) in mounting plate.
INSTALLATION (CONT.)
WARNING: BE SURE POWER IS OFF BEFORE WIRING
3/8in.-7/16in.
Exposed
wire
Insulated
wire
FRONT
Push your home AC power supply wires into the wire connectors
with matching colors (black – “House Hot,” white – “House
Neutral,” green/yellow – “House Ground”). Neatly arrange the
wires so they do not stick outside of the junction box.
Step 3: Install Adapter
• Position the adapter (I) and gasket (E) over
mounting bracket (D).
• Insert the mounting bolt (F) through the center hole in
the back of the adapter and through the gasket before
threading it into the mounting bracket.
• Tighten the mounting bolt with a Phillips-head screwdriver.
DO NOT overtighten.
• If the mounting plate was removed, reinstall the mounting plate,
tighten the four screws with a Phillips-head screwdriver, and
replace the four rubber plugs (H).
FRONT
CONNECTION SETUP
OPERATION
NOTE:
The app controls ON/OFF power to the connected light or the entire GFCI unit —
the outlets do not operate independently of each other. The pairing button can also be used
as a manual ON/OFF for both the GFCI and mounted apparatus.
Remotely operate your smart adapter with the easy-to-use
Enbrighten app. Follow the available instructions and resources to
set up your smart device.
Scan the QR code or search Enbrighten on
the Apple App Store or on Google Play
Download the app
Create an account in
the
Enbrighten app
1. 2.
Setup and installation
Install the smart
adapter following the
manual's instructions
Voice control
Voice control works with Amazon
Alexa or Google Assistant
Select "Support" in the Enbrighten app or follow
the steps in the Amazon Alexa or Google Home
app to connect your Enbrighten account
Once installed, supply
power to the smart
adapter
1.
2.
Setup and installation
Add devices, control
the smart adapter from
anywhere and create
schedules
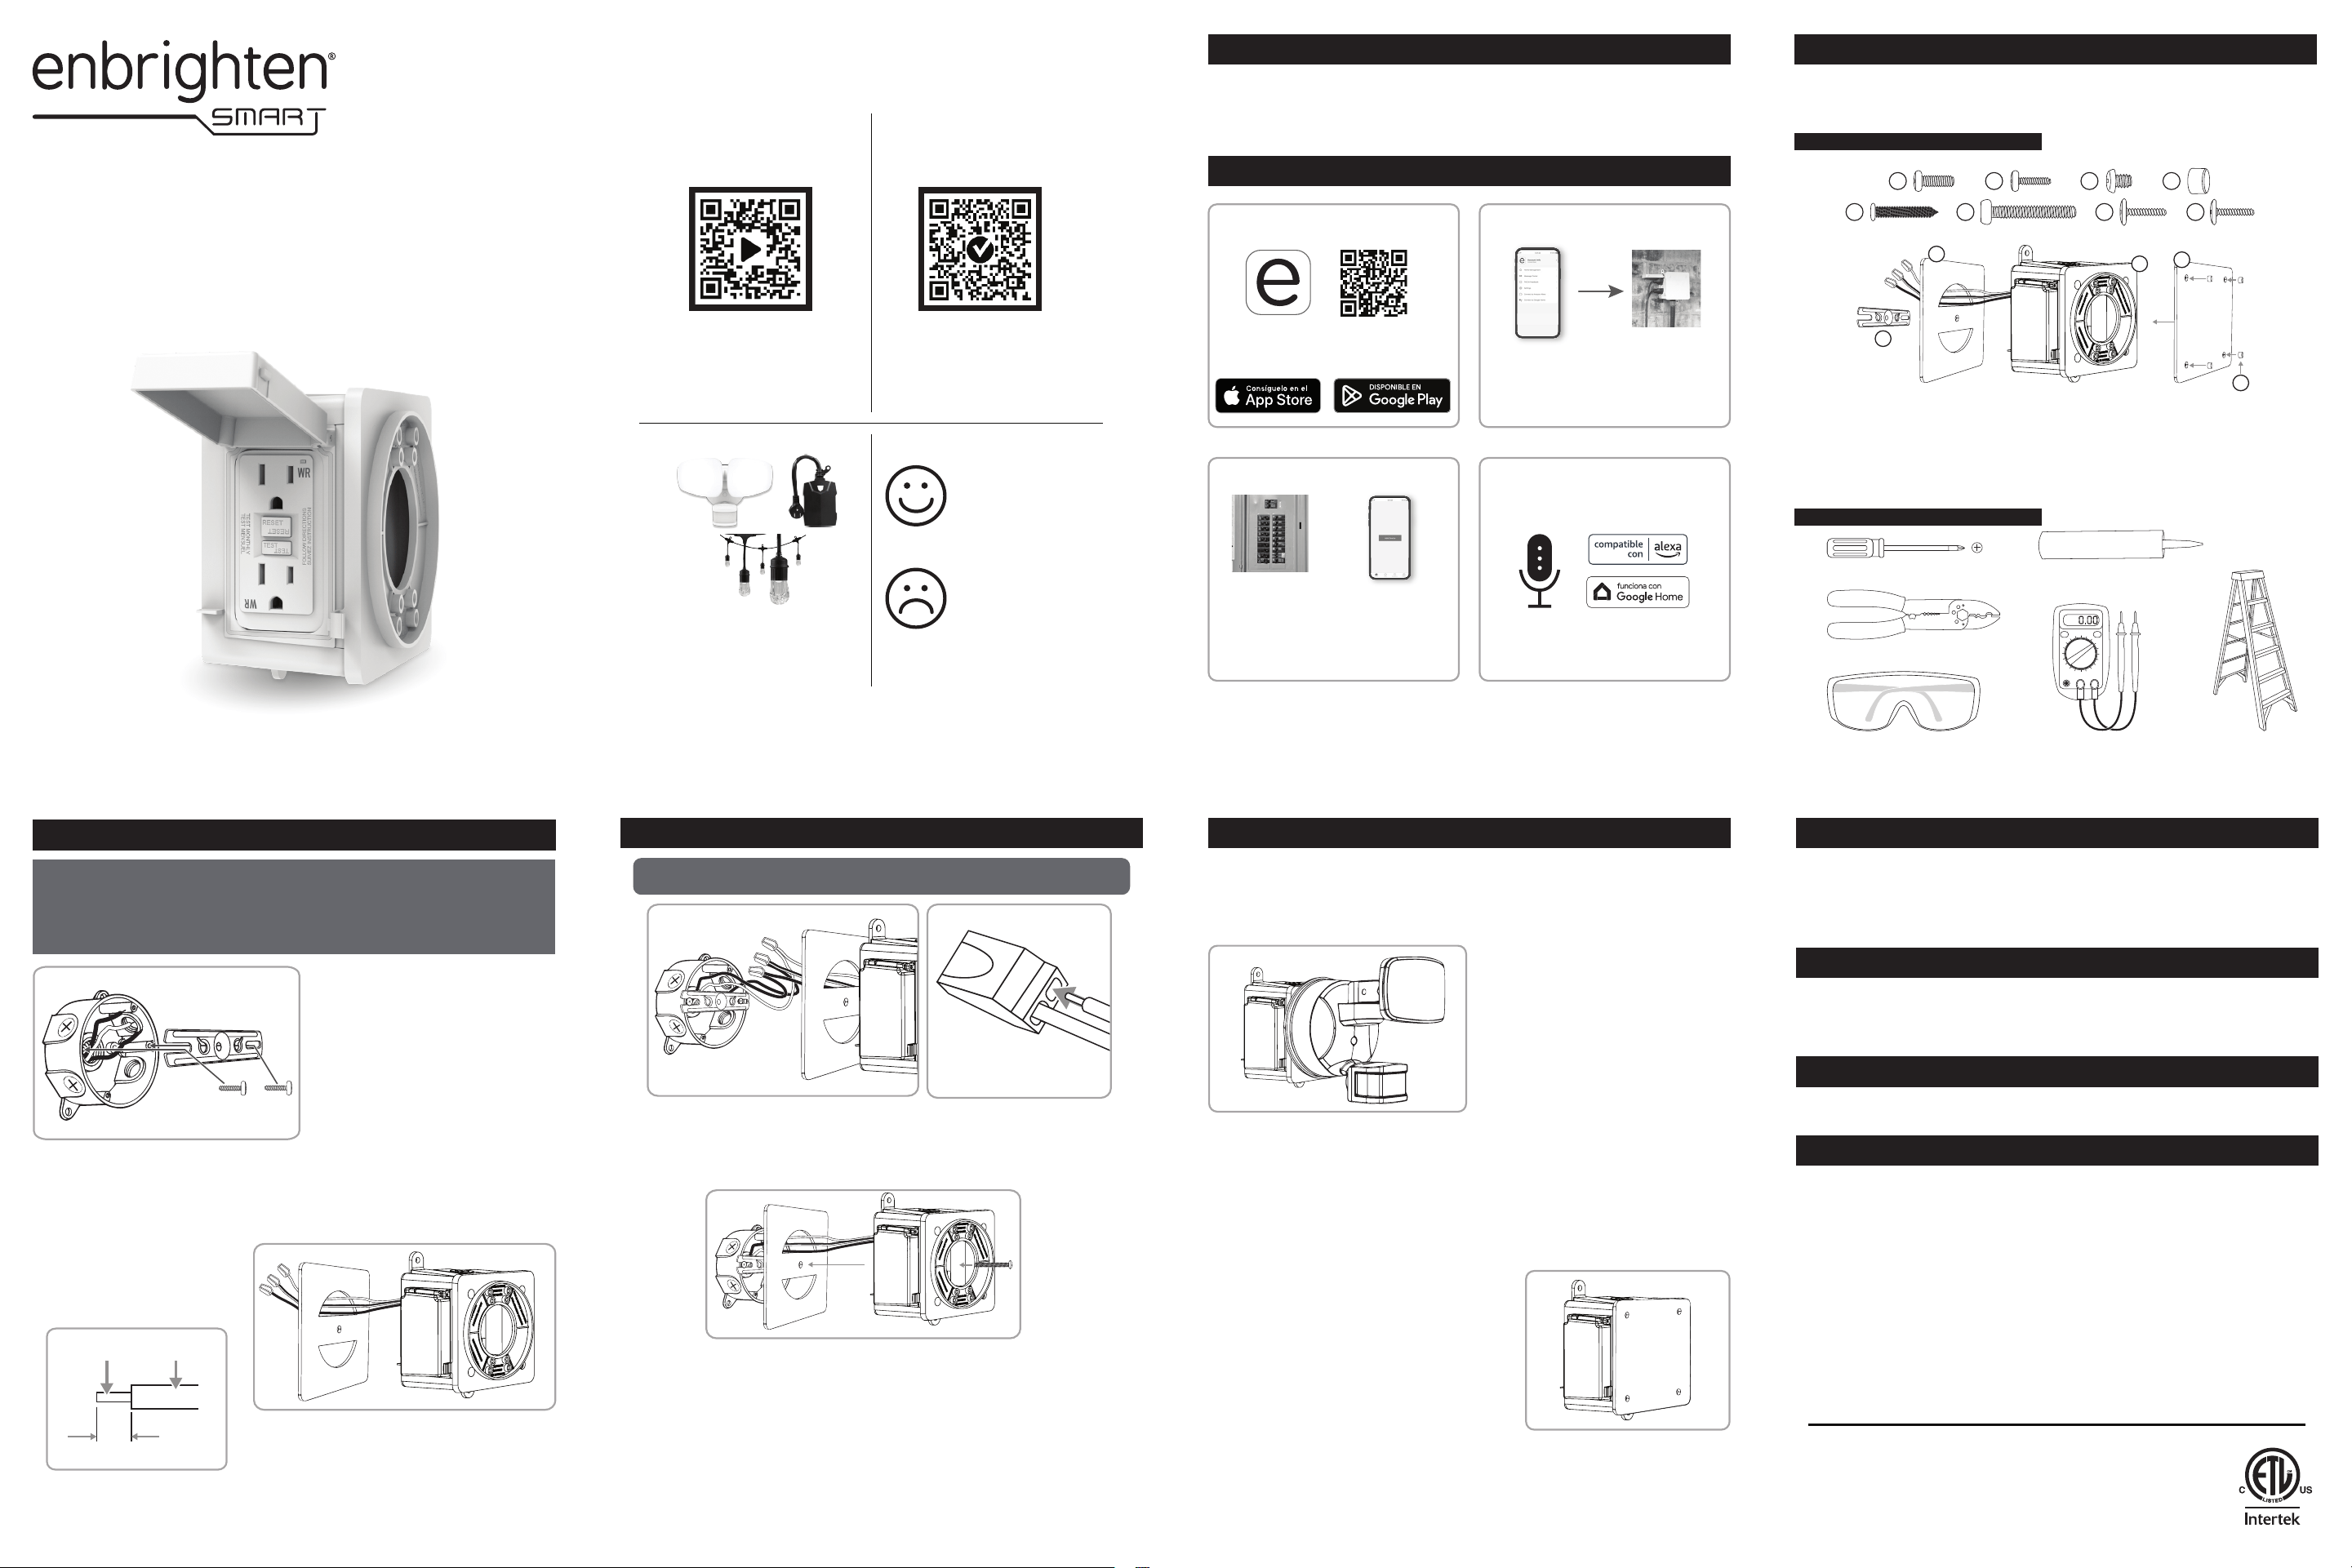
SETTING UP
Please read this entire manual and all safety warnings. Ensure all
parts are present and test the 2.4GHz Wi-Fi signal with your phone
at the junction box before installing. Save these instructions for later.
A, B, C. Mounting bracket screws
D. Mounting bracket
E. Gasket
F. Mounting bolt
G. Mounting plate/cover screws
(pre-installed)
H. Rubber screw hole plugs
I. Adapter with
mounting plate
J. Light adapter cover (optional)
K, L. Light fixture screws
(optional)
INSIDE THE BOX
TOOLS NEEDED
Phillips-head screwdriver
Wire strippers/cutters
Safety goggles AC voltage tester Ladder
Exterior caulk sealant
A
x2
B
x2
C
x2
H
x8
F K LG
x1 x2 x2x8
D
H
FRONT
E
J
I
Este adaptador cuenta con dos salidas GFCI para luces y alimentación de paso
para accesorios, ambas controladas con la aplicación Enbrighten.
Adaptador para agregar
una salida
80750, 80753
Modelo:
¡Gracias por su compra!
Instrucciones
fáciles
Registre su
producto
Descubre más iluminación
innovadora en
www.enbrightenme.com.
¿Le gusta nuestro
producto?
Deje una reseña en el sitio
web de su distribuidor
favorito o en amazon.com.
¿Tiene algún
problema?
Díganos cómo
podemos ayudar.
Llame al 1-800-654-8483,
de lunes a viernes, de
7 a. m. y las 8 p. m.,
hora central.
Lea las instrucciones o mire el
video con el paso a paso.
Escanee el código o visite
byjasco.com/80750i.
Recibe ofertas exclusivas y
registra tu producto.
Escanee el código o visite
byjasco.com/deals.
GARANTÍA
INSTRUCCIONES DE SEGURIDAD
ESPECIFICACIONES
CUIDADO Y LIMPIEZA
Jasco Products garantiza que este producto está libre de defectos de fabricación durante un periodo de cinco años a
partir de la fecha original de compra por parte del consumidor. Esta garantía se limita a la reparación o sustitución de este
producto solamente y no se extiende a daños derivados o accidentales causados a otros productos que se usen con esta
unidad. Esa garantía remplaza a todas las demás garantías expresas o implícitas. Algunos estados no autorizan limitaciones
en cuanto a la duración de una garantía implícita ni permiten la exclusión o limitación por daños accidentales o derivados;
por lo tanto, puede que las anteriores limitaciones no apliquen en su caso. Esta garantía le da a usted derechos específicos,
y otros que usted puede tener y que varían según el estado en el que usted reside. Si la unidad resultare defectuosa dentro
del periodo de garantía, comuníquese por favor con Atención al Cliente en el 1-800-654-8483 entre 7 y 20 h, Hora del
Centro, o a través de nuestro sitio de internet (www.byjasco.com).
• NO rocíe la producto con una manguera o una máquina de lavado de alta presión.
• A fin de prolongar la apariencia original, limpie solamente con agua limpia y un paño suave humedecido.
1. Lea todas las INSTRUCCIONES DE SEGURIDAD y el MANUAL DEL USUARIO antes de la instalación u operación.
2. Instale de acuerdo con todos los códigos eléctricos locales y nacionales. Consulte a un electricista profesional
local o contratista electricista local si no está seguro de la instalación.
3. Para uso exclusivo en un circuito protegido por un fusible o disyuntor.
4. Debe estar conectado a tierra adecuadamente.
5. NO INTENTE INSTALAR LA PRODUCTO CON LA ELECTRICIDAD CONECTADA. Asegúrese de que la electricidad
esté DESCONECTADA en el disyuntor principal o la caja de fusibles. Todas las conexiones de los cables deben
hacerse con la ELECTRICIDAD DESCONECTADA para evitar lesiones personales o daños a la lámpara. Compruebe
que la electricidad esté APAGADA en la caja de conexiones con un voltímetro de CA antes de la instalación.
6. Verifique todas las conexiones para asegurarse de que estén ajustadas y correctas, sin cables pellizcados.
7. Contabilice las piezas pequeñas y destruya el material de empaque, ya que pueden ser peligrosos para los niños.
8. Si hace la instalación en el EXTERIOR, monte en una superficie IMPERMEABLE o en una caja de conexiones
empotrada con una fuente de alimentación de 120VCA. Selle todos los huecos detrás de la placa de montaje con
sellador resistente al agua.
9. AVISO: NO conecte un producto wifi a un interruptor regulador de intensidad o un temporizador.
10. Use gafas de seguridad que le ajusten bien durante el procedimiento de instalación completo.
11. NO SOBREPASE LOS VALORES ELÉCTRICOS NOMINALES.
12. NO se deben superar los 22.6kg (50lb) con la lámpara conectada.
Modelo n.º: 80750, 80753
Requisitos de potencia de entrada: 120VCA, 60Hz
Tomacorrientes GFCI: 15A, 1800W, 120VCA
Carga máxima de luz conectada: 600W, 5A
Peso máximo de luz conectada: 22.6KG (50LB)
Wifi: 2.4GHz, 45.7m (150ft.)
Visite www.byjasco.com/patents para información
sobre la patente del producto.
Todos los nombres de marcas son marcas
comerciales de sus respectivos propietarios.
App Store es una marca de servicio de Apple
Inc. Google, Google Play y Google Home son
marcas comerciales de Google LLC. Amazon,
Alexa y todos los logotipos relacionados
son marcas registradas de Amazon.com, Inc.
o sus filiales.
ADVERTENCIAS PARA REDUCIR EL RIESGO DE DESCARGA ELÉCTRICA,
INCENDIO O LESIONES:
HECHO EN CHINA
Distribuido por Jasco Products Company LLC,
10 E Memorial Rd., Oklahoma City, Oklahoma 73114.
Este producto de Jasco tiene una garantía limitada
de 5 años. Visite www.byjasco.com para conocer los
detalles de la garantía.
¿Tiene preguntas? Comuníquese con nuestro servicio de
atención al consumidor de EE. UU. al 1-800-654-8483,
de lunes a viernes, de 7AM a 8PM (hora central).
INSTALACIÓN (CONT.)
• ADVERTENCIA: Asegúrese de que la alimentación esté APAGADA.
• Para lámparas de más de 11.3kg (25lb), fije el adaptador con
tornillos a dos lengüetas de montaje externas.
• Siga las instrucciones de la lámpara que desea conectar a la placa
de montaje. Para las conexiones eléctricas, use los cables del
adaptador etiquetados “Light Load” (carga luz), “Light Neutral”
(neutro luz) y “Light Ground” (a tierra luz).
NOTA:
Si es necesario, puede usar los tornillos para lámpara (K, L) para fijar la
lámpara a la placa de montaje.
OPCIÓN 1: Agregar una lámpara
Puede usar la placa de montaje
en su adaptador (I) para montar
una comprada por separado.
Proporciona una interfaz
de montaje de una caja de
conexiones eléctrica redonda
estándar de 10.1cm (4in.) que
soporta un peso de hasta 22.6kg
(50lb) y una carga eléctrica
máxima de 600W.
OPCIÓN 2: Uso sin una lámpara
Si solo utilizará la función de tomacorriente
GFCI del adaptador, siga estas instrucciones
para montar la cubierta.
Paso 4: Impermeabilización
Aplique sellante exterior impermeable en todos los huecos detrás
del adaptador, la caja de conexiones y la superficie de montaje para
prevenir una fuga de agua hacia el interior del producto.
• ADVERTENCIA: Asegúrese de que la
alimentación esté APAGADA.
• Retire los cuatro tapones de goma
(H) de la placa de montaje.
• Quite los cuatro tornillos y retire la
placa de montaje. Los tornillos no se caerán.
• Acomode todos los cables dentro del adaptador.
• Coloque la tapa (J), asegurándose de que la lengüeta de plástico
está orientada hacia los tomacorrientes GFCI y apriete los
tornillos preinstalados para sujetar la tapa.
• Vuelva a colocar los cuatro tapones de goma (H) en la placa
de montaje.
INSTALACIÓN (CONT.)
ADVERTENCIA: ASEGÚRESE DE QUE LA ELECTRICIDAD ESTÉ
DESCONECTADA ANTES DE INSTALAR EL CABLEADO
3/8in.-7/16in.
Exposed
wire
Insulated
wire
FRONT
Inserte los cables de alimentación de CA de su casa dentro
de los conectores para cables con los mismos colores (negro:
“energizado de la casa,” blanco: “neutro de la casa” y verde/
amarillo: “conexión a tierra de la casa”). Acomode bien los cables
para que no queden fuera de la caja de conexiones.
Paso 3: Instalar adaptador
• Ubique el adaptador (I) y la junta (E) sobre el soporte de
montaje (D).
• Inserte el perno de montaje (F) a través del orificio central en
la parte trasera del adaptador y a través de la junta antes de
roscarlo en el soporte de montaje.
• Apriete el perno de montaje con un destornillador Phillips. NO
apriete demasiado.
• Si se quitó la placa de montaje, vuelva a instalar la placa de
montaje, apriete los cuatro tornillos con un destornillador de cabeza
Phillips y vuelva a colocar los cuatro tapones de goma (H).
FRONT
PREPARACIÓN
Lea este manual completo y todas las advertencias de seguridad. Asegúrese
de que todas las piezas estén presentes y pruebe la señal Wi-Fi de 2,4 GHz
con su teléfono en la caja de conexiones antes de la instalación. Guarde
estas instrucciones para más adelante.
A, B, C. Tornillos del soporte de
montaje
D. Soporte de montaje
E. Junta
F. Perno de montaje
G. Tornillos de la placa de
montaje/tapa (preinstalado)
H. Tapones de goma para los
orificios de tornillos
I. Adaptador con placa de
montaje
J. Tapa del adaptador (opcional)
K, L. Tornillos de montura
(opcional)
D
H
FRONT
E
J
I
DENTRO DE LA CAJA
HERRAMIENTAS NECESARIAS
Destornillador Phillips
Cortacables/pelacables
Gafas de seguridad Voltímetro de CA Escalera
Sellante de silicona exterior
A
x2
B
x2
C
x2
H
x8
F K LG
x1 x2 x2x8
CONNECTION SETUP
OPERACIÓN
NOTA:
La app controla la alimentación de encendido y apagado a la lámpara conectada o
la unidad GFCI completa; los tomacorrientes no funcionan de manera independiente el uno
del otro. El botón de emparejamiento también puede usarse como encendido y apagado
manual para el GFCI y el aparato montado.
Opere de forma remota su adaptador inteligente con la aplicación
Enbrighten fácil de usar. Siga las instrucciones y los recursos
disponibles para configurar su dispositivo inteligente.
Escanee el código QR o busque
Enbrighten en App Store de Apple o en
Google Play
Descargue la app
Cree una cuenta en
la app
Enbrighten
1. 2.
Instalación y configuración
Instale el adaptador
inteligente siguiendo
las instrucciones del
manual
Una vez instalado,
suministre energía al
adaptador inteligente
1. 2.
Instalación y configuración
Agregue dispositivos,
controle el adaptador
inteligente para agregar
una toma de corriente
desde cualquier lugar y
cree horarios
Control por voz
El control por voz funciona con
Amazon Alexa o Google Assistant
Seleccione "Soporte" en la aplicación
Enbrighten o siga los pasos en la aplicación
Amazon Alexa o Google Home para conectar
su cuenta
Enbrighten
INSTALACIÓN
Siga estos pasos para instalar correctamente su adaptador en la caja
de conexiones. Después de instalar el adaptador, siga la Opción 1:
Agregue una lámpara o la Opción 2: Uso sin una lámpara. Asegúrese
ADVERTENCIA: DE QUE LA ELECTRICIDAD ESTÉ DESCONECTADA
ANTES DE CONTINUAR.
CAJA DE CONEXIONES
FRONT
Paso 1: Instale el soporte de
montaje
Fije el soporte de montaje (D)
a la caja de conexiones con el
“lado del frente” hacia usted.
Use los tornillos del tamaño
adecuado (A, B o C) para fijar
firmemente el soporte a la caja
de conexiones.
Dirija los cables de la “casa”
a través de la junta (E).
Paso 2: Guíe y conecte los cables
Sostenga el adaptador sobre el soporte de montaje ahora instalado. Si
el soporte de montaje bloquea los cables “domésticos” del adaptador,
muévalos con cuidado al otro orificio. NO conecte el adaptador al
soporte todavía.
9.5mm-11.1mm
(3/8in.-7/16in.)
Cable
expuesto
Cable
aislado
Use los pelacables para pelar los cables
de alimentación de CA de su hogar para
exponer 3/8 pulg. (9,5 mm) de alambre.
NOTA: La instalación es la misma para
una caja de conexiones empotrada o
de montaje en superficie.
NOTA: La placa de montaje del adaptador se puede quitar para facilitar el cableado y la
instalación quitando los 4 tapones de goma y aflojando los 4 tornillos de la placa de montaje.
Asegúrese de reemplazar los tapones de goma antes de colocar una lámpara en la placa de
montaje.