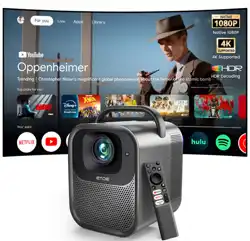
Seal Pro Projector
User Manual

DE
EN
01 - 14
IT
15 - 28
FR
29 - 42
ES
43 - 56
57 - 70
Catalog
English
Deutsch
Español
Français
Italiano
PL
71 - 84
Katalog

Safety Instructions
Read all instructions before you use this device. Do not make any changes
that are not described in this manual. If physical injury, loss of data, or damage
is caused by failure to follow instructions, the warranty does not apply.
Setup
• To reduce the risk of fire and/or electric shock, do not expose the device to
rain or moisture, and objects filled with liquids, such as vases, should not
be placed on the device.
• Do not place the device in areas susceptible to excessive dust and dirt or
near any appliance generating a strong magnetic field.
• To prevent overheating, do not block or clog the ventilation openings.
Never place the device in a confined space. Always leave enough
space around the device for ventilation.
• Protect the device against direct sunlight, heat, large temperature
fluctuations and moisture.
• When the device runs for a long period of time and the surface
becomes hot, shut it down and unplug the power cord.
Resume operation only after the device has cooled.
• Always handle the device with care. Avoid touching the lens.
• Never place heavy or sharp objects on the device or the power cord.
To avoid electric shock, do not disassemble.
• Only use attachments or accessories specified by the manufacturer.
Avoid extreme vibration. It may damage the internal components.
Do not allow children to handle the device without supervision.
• Under the following conditions, a layer of moisture can appear inside
the device which can lead to malfunctions:
To avoid any moisture, seal the device in a plastic bag before moving it
to another room, and wait for one to two hours before you take it out of
the bag.
• Do not place the device on soft surfaces such as tablecloths or carpets
as doing so could be a fire-hazard.
a) if the device is moved from a cold to a warm area;
b) after a cold room is heated;
c) when the device is placed in a damp room.
EN
01
EN
01

Power Supply
• Use only the provided power adapter.
• Power off the device before removing the power supply from the socket.
• Protect the power cord from being walked on or pinched, particularly
at plugs, convenience receptacles, and the point where they exit from
this device.
• Unplug this device if there are lightning storms or when unused for a
long period of time.
• Where the power plug or an appliance coupler is used as the
disconnect device, the disconnect device shall remain readily
operable.
• Before you make or change any connections, ensure that all devices
are disconnected from the power outlet.
• Do not touch the power cable or the power connector with wet hands.
Hearing Safety
• To avoid hearing damage, do not listen for extended periods at high volume.
Set the volume at a safe level.
Cleaning
• Power off the device and remove it from the power supply before cleaning
the surface.
• Use a soft, lint-free cloth. Never use liquid, gaseous, or easily flammable
cleansers (like sprays, abrasives, polishes, and alcohol). Wipe over the
surfaces gently. Be careful that you do not scratch the surfaces.
• Do not use any liquid cleaning agents to clean the lens as they may
damage the protective coating on the lens. Use lens cleaning paper
to clean the lens of the projector.
Repairs
• Do not make any repairs to the device by yourself. Only have your device
repaired by an authorized service center.
• Improper maintenance can result in injuries or damage to the device.
• Refer all servicing to qualified service personnel.
Caution
• Do not stare at operating beam, the bright light may hurt your eyes.
EN
02
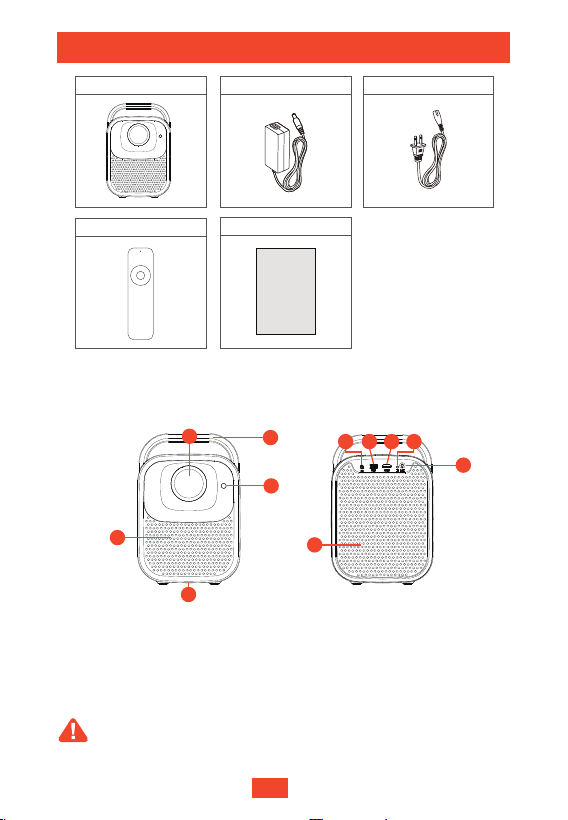
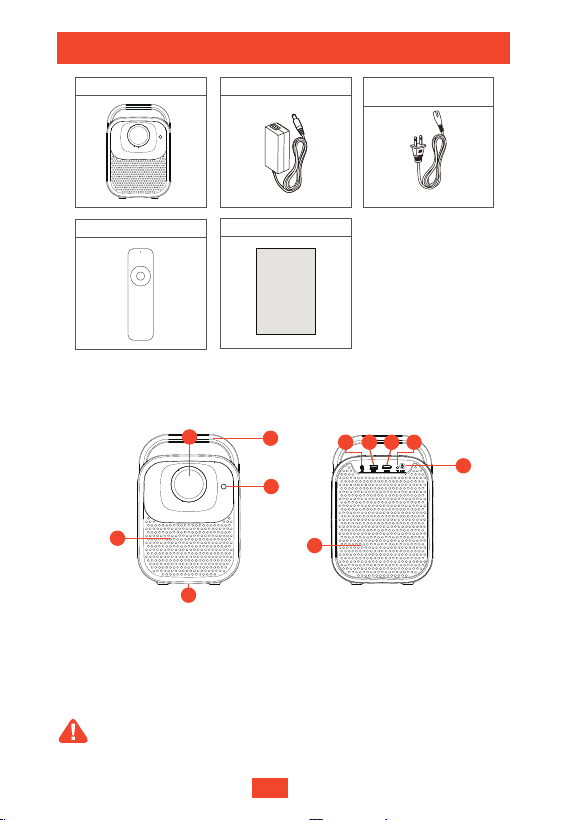
User manual x 1
Adapter x 1
Remote control x1
Projector x 1 Adapter AC cord x 1
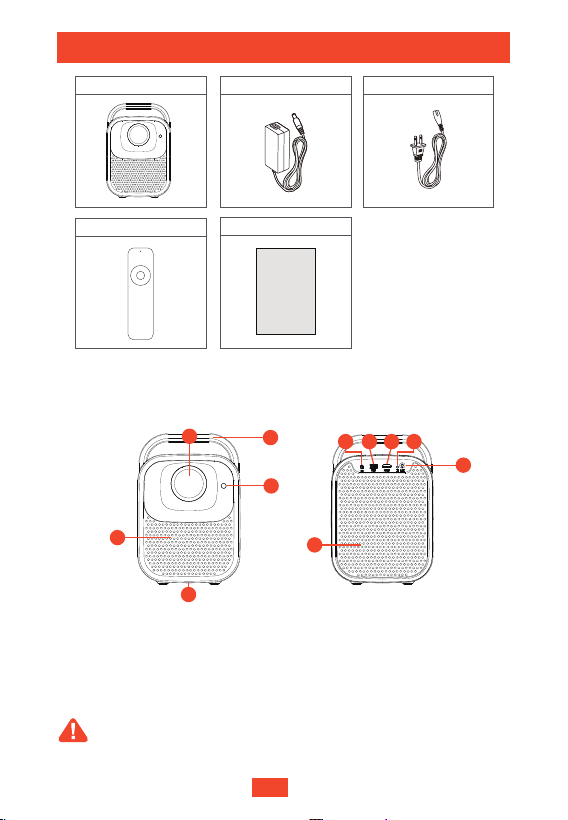
Overview
Projector
Air ventilation(Outlet)
Tof (Auto focus)
Tripod screw hole
DC -in
Lens
USB port
HDMI Port
IR receiver
①
②
③
Handle
⑩
④
⑤
⑥
Aux Port
⑨
⑦
⑧
Front View Rear View
• Please do not look into the lens directly to avoid harm for your eyes.
• Please do not block the air ventilation(Outlet).
Attention:
User Manual
What’s Included
65 7 8
9
10
1
2
3
1
4
EN
03
1
2
3
4
5
8
9
11
12
13
6
7
10
14
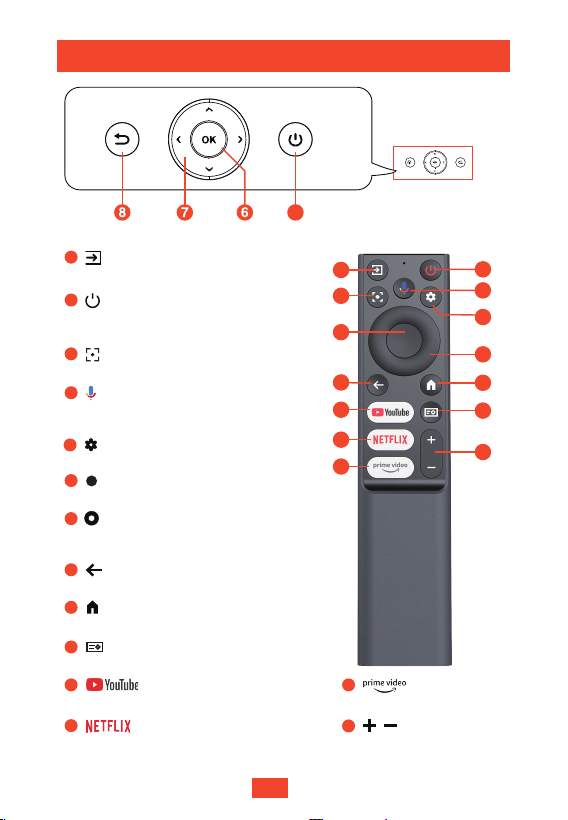
Preset YouTube button
13
Preset Prime Video button
Preset Netflix button
Signal source
2
Projector Button & Remote Control
3
Go to homepage
9
10
Quick settings
12
Press to confirm a selection or entry
6
Activate Google assistant, Google's
voice-powered virtual assistant
4
Settings
5
Return to the previous page
8
Adjust the focus
14
Volume up/down
11
Navigate through menus or adjust
selected content
7
1
• Press and hold: Power off
• Press once: Power on/Sleep
2
EN
04
1.5m
4.1m
40"
150"
Getting Started
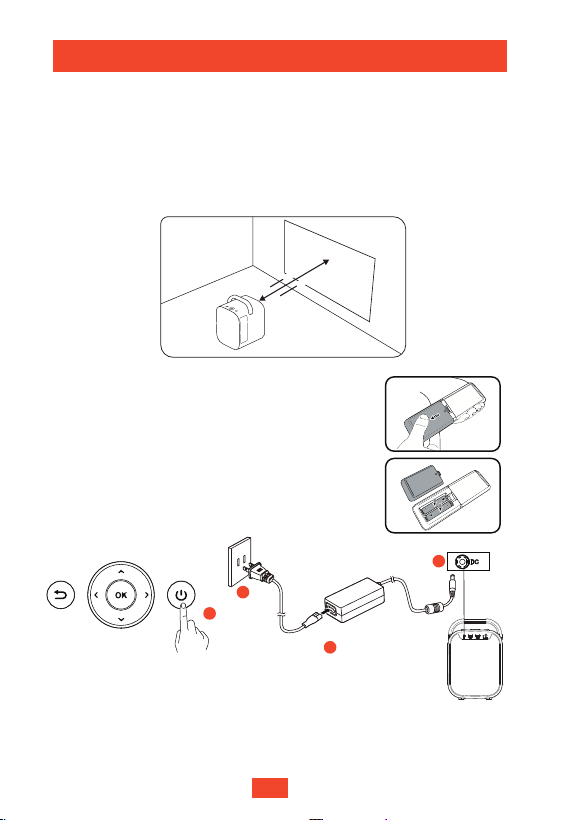
Placement
① Position the projector so that it is facing toward the projection
surface to get a rectangular picture.
②
The distance between the projector and the projection surface
will determine the size of the picture.
③
Check the projection distance and screen size in the Specifications section.
Prepare the Remote Control
① Insert the remote control batteries
(not included).
②
Press and open the battery cover, as illustrated.
③
Power On
4
2
1
3
Make sure there are no obstacles within 30 cm/11.8" blocking the vents.④
The distance between the remote and the
projector should not exceed 10 m / 33 ft.
• Plug in the power cord, wait for five seconds,
then press the power button once to power on.
• Press and hold the power button to power off.
• The indicator will turn red when the power cord
is connected to the outlet.
• The indicator will turn white when the projector is powered on.
EN
05
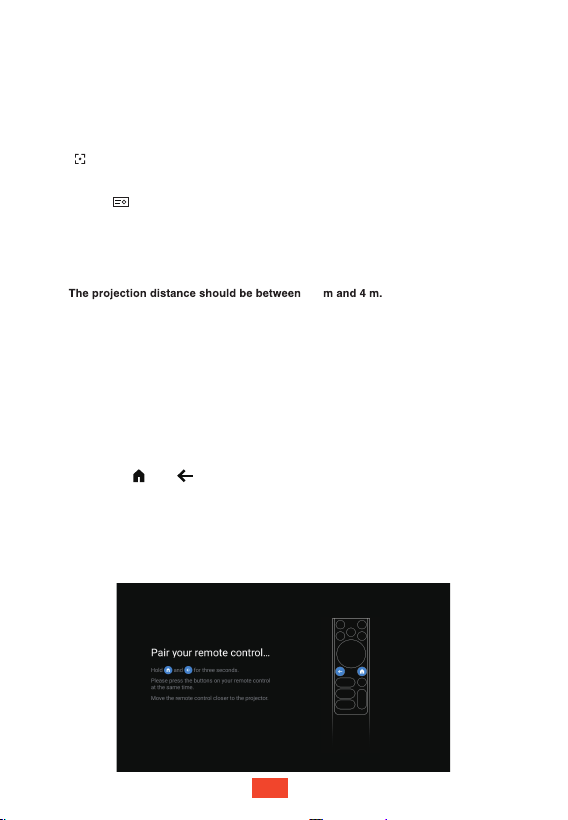
You can also focus the image manually using the remote control. Press and hold
the button on the remote control until the picture is clear and sufficiently focused.
Focus
Pair the Remote Control
Auto Focus
Manual Focus
Note:
Advanced
Press the button on the remote control and select Focus -> Advanced for
advanced settings. For example:
Pairing the remote control will improve the operating experience:
Auto Focus at Startup: Automatically adjusts image clarity at startup.
Auto Focus After Movement: Automatically adjusts image clarity after the device is moved.
•
•
•
•
Wipe the TOF sensor lens with a soft cloth to improve the Auto Focus effect.
1.5
(For TOF positioning instructions, see the Overview section)
•
An uneven projection surface may make the Auto Focus effect appear worse.
If this happens, you can use Manual Focus to make the picture clearer.
•
If the projector is placed in a fixed position, we recommend turning off the
[Auto Focus at Startup] and [Auto Focus After Movement] options.
① Hold the remote control near the projector.
② Press the and buttons at the same time for about ten seconds.
③ "Successful" will appear on the screen when your remote control has
paired with the projector.
Note:
•
If you do not pair the remote control, the pairing page will appear every
time you switch on the projector.
•
Google Assistant will only work if the remote control is paired.
Position the projector so that it is facing toward a suitable projection surface
or wall. The projector will automatically focus the image.
EN
06
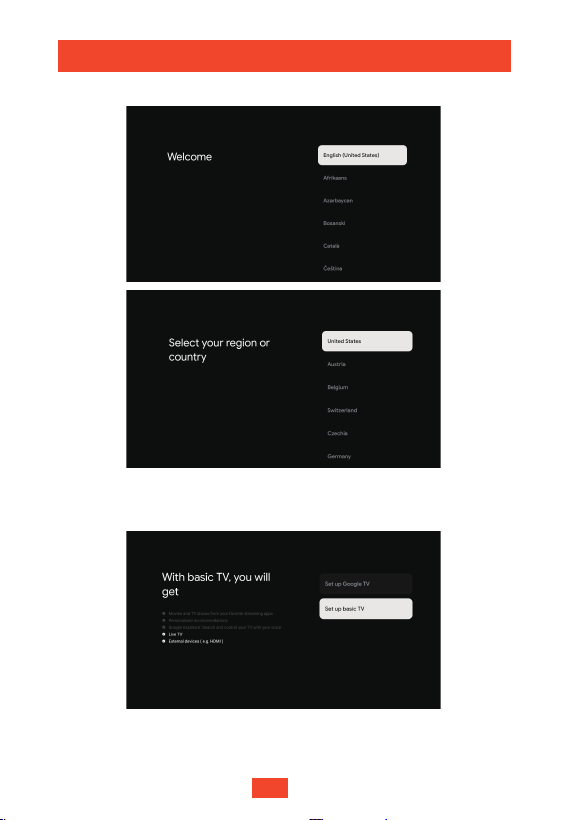
Basic TV:
There are two TV types to choose from:
Select Your TV Type
With Basic TV, you will get
• Live TV
• External devices (e.g. HDMI)
Select Your Language and Region/Country
Set Up Your TV
EN
07
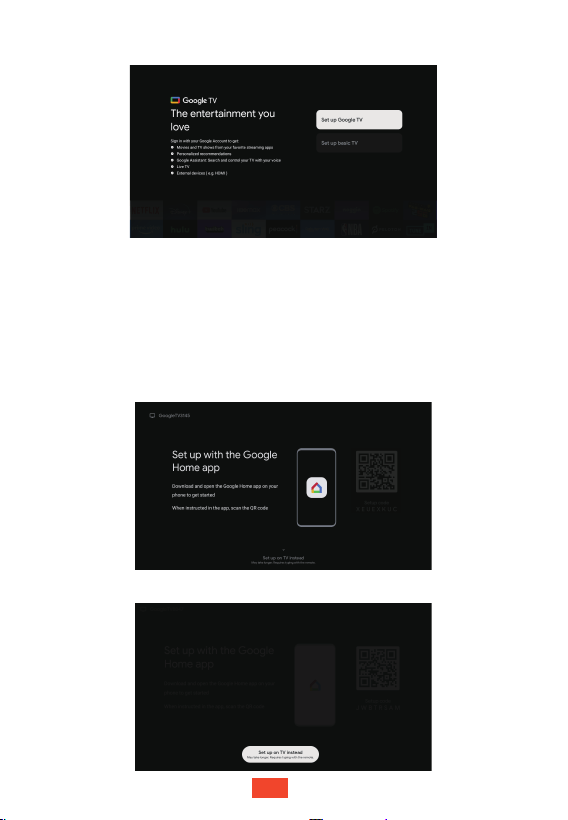
Google TV
TM
:
Set up with the Google Home app on your phone
Sign in with your Google Account to get
• Movies and TV shows from your favorite streaming apps
• Personalized recommendations
• Google Assistant: Search and control your TV with your voice
• Google Assistant will only work if the remote control is paired
• Live TV
• External devices (e.g. HDMI)
Set up on the TV
EN
08
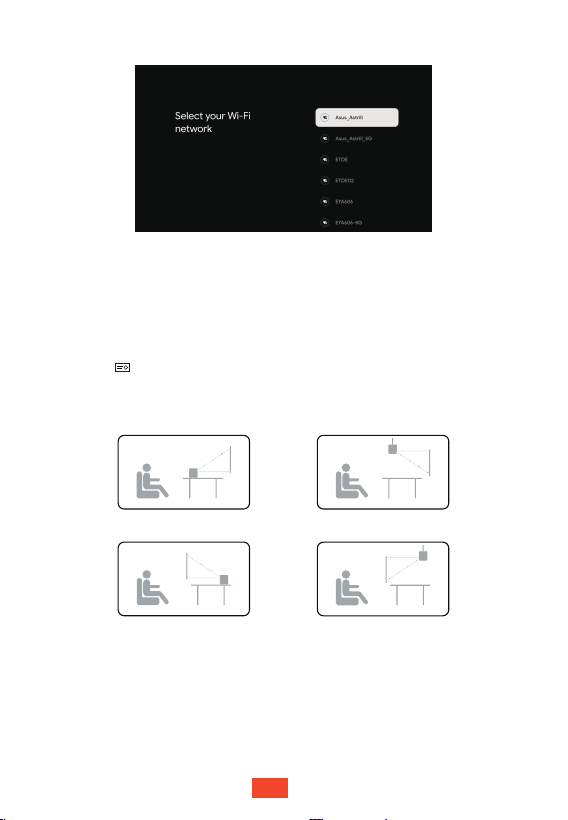
Wi-Fi Connection
Final Steps
Follow the on-screen prompts to finish setting up Google TV
Projector Settings
Personalize your projector according to your preferences.
Projection Mode
Press the button on the remote control and select Advanced Settings
-> Projection Mode .
Projection Mode
Front Front Ceiling
Rear
Rear Ceiling
Image Correction
Auto Keystone Correction
Position the projector so that it is facing toward a suitable projection surface
or wall. The projector will adjust the image automatically.
EN
09
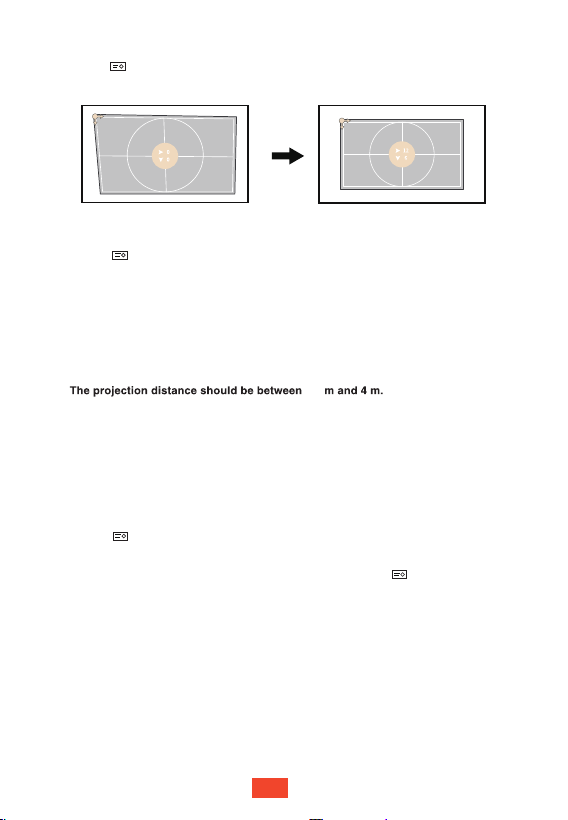
Manual Keystone Correction
Press the button on the remote control and select Image Correction
-> Manual Keystone Correction to adjust the image.
Advanced
Press the button on the remote control and select Image Correction
-> Advanced for advanced settings. For example:
•
•
Auto Keystone Correction at Startup: Automatically corrects image deformation at startup.
Auto Keystone Correction After Movement: Automatically corrects image deformation after
the device is moved.
Note
:
•
•
Wipe the TOF sensor lens with a soft cloth to improve the correction effect.
(For TOF positioning instructions, see the Overview section)
•
Auto Keystone Correction only works when the projection angle is ±30 degrees.
•
If the projector is placed in a fixed position, we recommend turning off the
[Auto Keystone Correction at Startup] and [Auto Keystone Correction After
Movement] options.
Image Zoom & Image Reposition
Press the button on the remote control and select Image Correction -> Image
Adaption -> Zoom to zoom in/out.
You can reposition the image by zooming out. Press the button on the
remote control and select Image Correction -> Image Adaption -> Image
Reposition to reposition the image.
1.5
EN
10
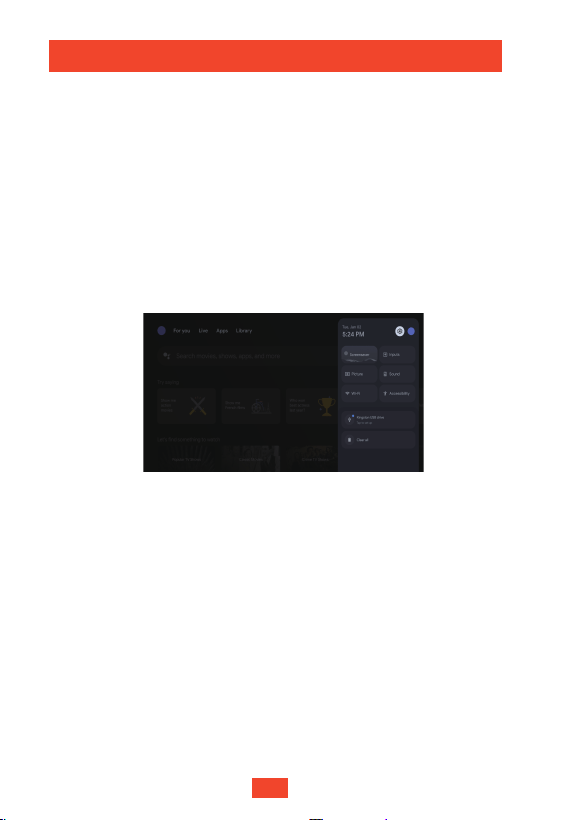
Explore Your TV
Basic TV
In Basic TV mode, you can use basic features such as HDMI, Netflix,
YouTube and Prime Video.
We recommend logging in to your Google Account to enjoy the full Google TV
experience.
Google TV
Google TV brings together movies, shows, live TV and more from across your
apps and subscriptions and organizes them just for you.
Library
View your purchases, rentals and watchlist online or from your TV or mobile.
Dashboard
View messages and quickly launch functions such as:
• Screensaver • Input
• Picture
• Accessibility
• Sound
• Wi-Fi
Settings
Adjust common settings such as:
• Projector
• Display & Sound
• Network & Internet
• Accessibility
• System
• Remotes & Accessories
EN
11
Google Assistant
Google TV comes with Google Assistant built-in, which can be used
by pressing the button on the remote control.
Note:
Google Assistant will only work if the remote control is
paired and there is a valid network connection.
USB Connection
This projector can also be used with external USB devices. To use this feature:
① Install a file management app such as "File manager" on the Apps page.
② Open the file management app and insert the USB device.
③ Follow the prompts from the file management app to connect to the USB device.
HDMI Connection
This projector supports connections with various HDMI playback devices,
including PCs, TV sticks, TV boxes, DVD players, set-top boxes (STB)
and game consoles.
① Connect the projector to an HDMI playback device using an HDMI cable
(not included).
② Press the button on the remote control and select HDMI.
Bluetooth Accessories
This projector supports connections with various Bluetooth devices,
including remote controls, speakers, keyboards and computer mouses.
① Press the button on the remote control and select .
② Select Remotes & Accessories -> Pair Accessory to pair your Bluetooth device.
Bluetooth Speaker Mode
Our product also works as a Bluetooth speaker. To use this feature:
① Press the button on the remote control and select Bluetooth Speaker
Mode .
② Connect your playback device to "Projector Atom" via Bluetooth.
③ Play music on your device and adjust the volume using the remote control.
④ Press and hold the button for two seconds to exit Bluetooth Speaker Mode.
EN
12
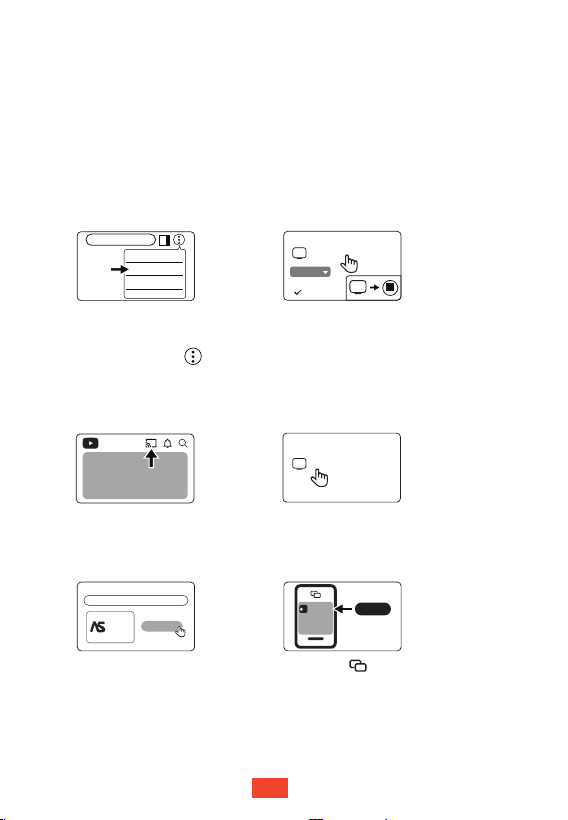
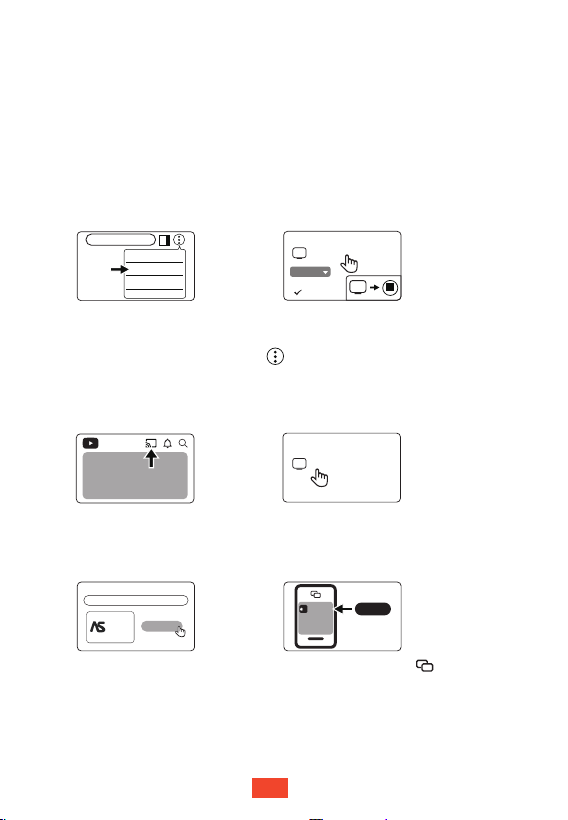
Google Cast™
ETOE projectors come with Google Cast.Simply tap the Cast button
from apps you already know and love to stream entertainment from
your phone, tablet or laptop to the TV.
Google Cast-enabled TV devices
Make sure devices are connected to the same Wi-Fi network.
①
Click the Cast button and select A1363.
②
Google Cast-enabled iOS Device
TV
Select
AirScreen - AirPlay & Cast
AirScreen
Install
Install AirScreen in the
projector from the Apps page.
①
Open the AirScreen app on the
projector and follow the on-screen
instructions.
②
③
Click the button on your iOS
device and select A1363.
Google Cast-enabled Sites/Apps
Click on the Cast button
on the website/app.
①
Select A1363.
②
Cast to
YouTube
Google Cast-enabled computer
www.xxxx.com
Cast...
Print...
Find...
Cast
Available
Sources
Cast tab
Cast screen
Install Google Chrome on
your computer and open it.
①
Select A1363.
③
Click "Cast" in the , menu on the top right,
then go to the Sources menu and choose whether
you want to cast a tab or the whole screen.
②
A����
A����
A����
EN
13
Warranty
30-Day Money-Back Guarantee
If you return your undamaged product within 30 days of the date of
purchase for any reason, you will receive a full refund.
The buyer is responsible for shipping costs for warranty claims that
are not related to quality issues.
12-Month Warranty
Every ETOE product comes with one year of coverage for quality-related
issues. If you submit a claim to our support team via email, ETOE will,
at your discretion:
1.Replace the ETOE product with a product of the same model and cover
any return shipping costs.
2.Issue a full refund of the purchase price in exchange for the ETOE product.
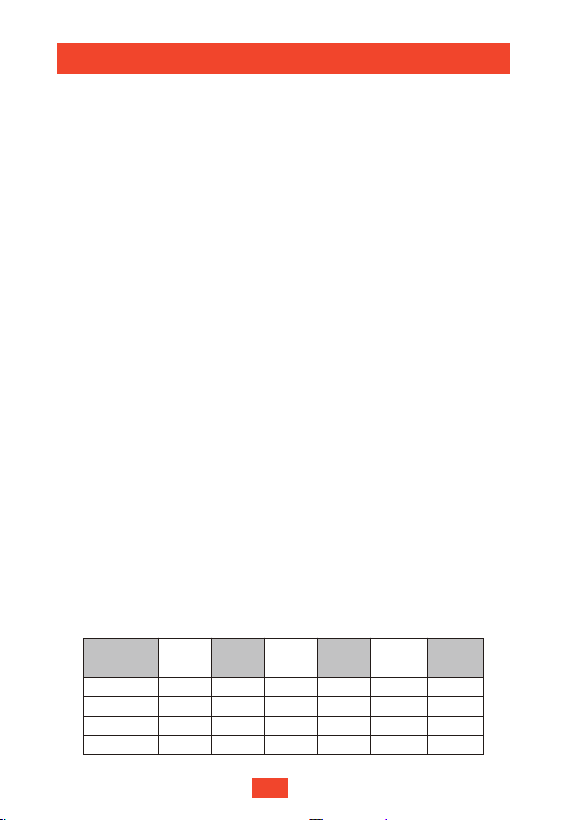
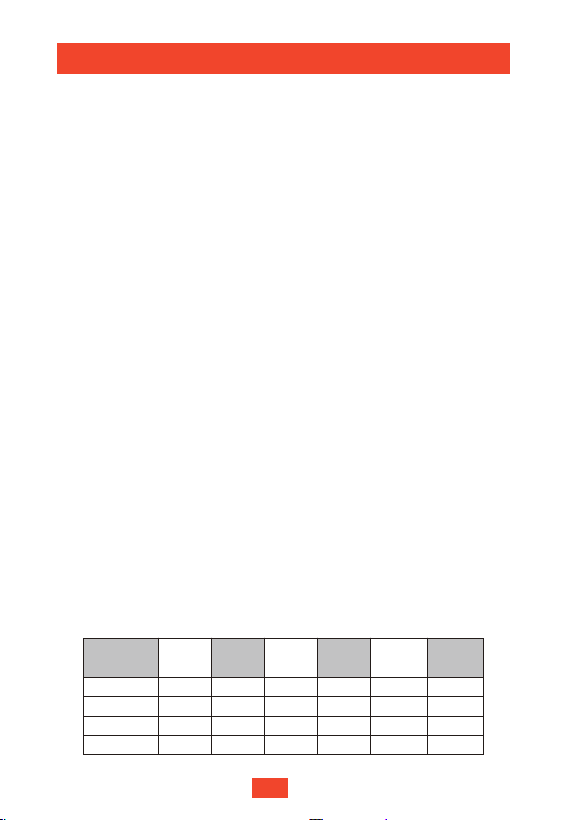
Projection Distance and Screen Size
Screen size
(inch)
3.5 108.049.819.688.634.940
5.3 162.174.729.4132.852.360
7.1 216.199.639.2177.169.780
8.9 270.1124.549.0221.487.2100
Width
(inch)
Width
(cm)
Height
(cm)
Distance
(cm)
Distance
(ft)
Height
(inch)
Specifications
CPU: ARM Quad 64-bit Cortex-A53
Bluetooth: Bluetooth 5.1
Wi-Fi: 2.4 GHz / 5 GHz 802.11a/b/g/n/ac
Native resolution: 1920 × 1080
Throw ratio: 1.22
Aspect ratio: 16:9 / 4:3 Adaptive
Speakers: 10 W stereo speaker × 2
Connection ports: HDMI × 1; USB × 1; AUX × 1
Zoom: 50%–100%
Keystone correction: ±30°, Auto keystone support
Recommended ambient temperature: 41°F - 95°F / 5°C - 35°C
Relative humidity : 15%–85% (non-condensing)
Specifications
EN
14

Lesen Sie alle Anweisungen, bevor Sie dieses Gerät verwenden. Nehmen
Sie keine Änderungen vor, die nicht im vorliegenden Benutzerhandbuch
beschrieben sind. Wenn Körperverletzungen, Datenverluste oder Schäden
durch Nichtbeachtung der Anweisungen verursacht werden, gilt die
Garantie nicht.
Einstellung
• Um die Gefahr eines Brandes und/oder elektrischen Schlages zu
minimieren, darf das Gerät weder Regen noch Feuchtigkeit ausgesetzt
werden, und stellen Sie keine mit Flüssigkeiten gefüllten Gegenstände
wie z. B. Vasen auf das Gerät.
• Stellen Sie das Gerät nicht auf weiche Oberflächen wie z. B.
Tischdecken oder Teppiche, weil dies eine Brandgefahr darstellen
könnte.
• Platzieren Sie das Gerät nicht an Orten, wo es übermäßig staub- und
schmutzempfindlich ist, oder in der Nähe von Geräten, die ein starkes
Magnetfeld erzeugen.
•Um eine Überhitzung zu vermeiden, dürfen die Lüftungsöffnungen nicht
blockiert oder verstopft werden.
Platzieren Sie das Gerät niemals in einem geschlossenen Raum. Lassen
Sie um das Gerät herum stets genügend Platz für die Belüftung.
• Schützen Sie das Gerät vor direkter Sonneneinstrahlung, Hitze, großen
Temperaturschwankungen und Feuchtigkeit.
• Wenn das Gerät über eine längere Zeit im Einsatz ist und die Oberfläche
heiß wird, schalten Sie es aus und ziehen Sie den Netzstecker ab.
Nehmen Sie den Betrieb erst wieder auf, wenn das Gerät abgekühlt ist.
• Bei der Bedienung des Geräts ist stets Vorsicht geboten. Sie dürfen das
Objektiv nicht berühren.
• Stellen Sie niemals schwere oder scharfe Gegenstände auf das Gerät
oder das Netzkabel.
Das Gerät darf nicht zerlegt werden, ansonsten könnte es zum
elektrischen Schlag führen.
• Verwenden Sie ausschließlich die vom Hersteller angegebenen
Anbaugeräte und Zubehörteile.
Vermeiden Sie extreme Vibrationen. Ansonsten könnten die internen
Komponenten beschädigt werden.
Kindern dürfen das Gerät nicht unbeaufsichtigt bedienen.
• Unter den folgenden Umständen könnte sich im Inneren des Geräts eine
Feuchtigkeitsschicht bilden, die zu Fehlfunktionen führen könnte:
a) wenn das Gerät von einer kalten in eine warme Umgebung gebracht
worden ist;
b) nachdem ein kalter Raum beheizt wird;
c) wenn das Gerät in einem feuchten Raum platziert wird.
Um jegliche Feuchtigkeit zu vermeiden, versiegeln Sie das Gerät in einer
Sicherheitsanweisungen
DE
15

Plastiktüte, bevor Sie es in einen anderen Raum bringen, und warten Sie ein
bis zwei Stunden, bevor Sie das Gerät aus der Tüte nehmen.
Stromversorgung
• Verwenden Sie ausschließlich den mitgelieferten Netzadapter.
• Schalten Sie das Gerät aus, bevor Sie das Netzteil aus der Steckdose
ziehen.
• Schützen Sie das Netzkabel davor, dass jemand darauf tritt oder es
eingeklemmt wird, insbesondere an Steckern, Steckdosen und an den
Stellen, an denen es aus dem Gerät austritt.
• Trennen Sie das Gerät bei Gewitter oder im Falle eines längeren Stillstands
vom Stromnetz.
• Wenn der Netzstecker oder ein Gerätestecker als Trennvorrichtung
verwendet wird, muss die Trennvorrichtung leicht bedienbar bleiben.
• Vergewissern Sie sich vor der Herstellung oder Änderung von Anschlüssen,
dass alle Geräte von der Stromversorgung getrennt sind.
• Berühren Sie das Netzkabel oder den Netzstecker niemals mit nassen
Händen.
Gehörschutz
Um Gehörschäden zu vermeiden, sollen Sie nicht über einen längeren
Zeitraum mit hoher Lautstärke hören.
Stellen Sie die Lautstärke auf einen sicheren Wert ein.
Reinigung
• Vor der Reinigung der Oberfläche schalten Sie das Gerät aus und trennen
Sie es von der Stromversorgung.
• Verwenden Sie ein weiches, fusselfreies Tuch. Verwenden Sie niemals
flüssige, gasförmige oder leicht entflammbare Reinigungsmittel (wie z. B.
Sprays, Schleifmittel, Polituren und Alkohol). Wischen Sie vorsichtig über die
Oberflächen. Achten Sie darauf, dass Sie die Oberflächen nicht zerkratzen.
• Verwenden Sie zur Reinigung des Objektivs keine flüssigen Reinigungsmit-
tel, weil diese die Schutzschicht des Objektivs beschädigen könnten.
Verwenden Sie Linsenreinigungspapier, um die Linse des Projektors zu
reinigen.
Reparaturen
• Nehmen Sie keine Reparaturen am Gerät selbst vor. Lassen Sie Ihr Gerät nur
von einem autorisierten Service-Center reparieren.
• Unsachgemäße Wartung könnte zu Körperverletzungen oder Schäden am
Gerät führen.
• Alle Wartungsarbeiten müssen ausschließlich von qualifiziertem
Servicepersonal durchgeführt werden.
Vorsicht
• Blicken Sie nicht in den eingeschalteten Scheinwerfer. Das helle Licht könnte
Augenverletzungen verursachen
DE
16
Benutzerhandbuch x 1
Adapter x 1
Fernbedienung x1
Projektor x 1 Netzkabel für den
Adapter x 1
Übersicht
Projektor
Belüftungsöffnung (Abluft)
①
Linse
②
ToF (Autofokus)
③
Handhaben
⑩
Schraubenloch des Stativs
④
DC-Eingang
⑤
USB-Anschluss
⑥
AUX-Anschluss
⑨
HDMI-Anschluss
⑦
IR-Empfänger
⑧
Vorderansicht Rückansicht
• Blicken Sie nicht direkt in die Linse, da dies zu Augenschäden
führen kann.
• Blockieren Sie die Belüftungsöffnung (Abluft) nicht.
Vorsicht:
User Manual
Lieferumfang
65 7 8
9
10
1
2
3
1
4
DE
17
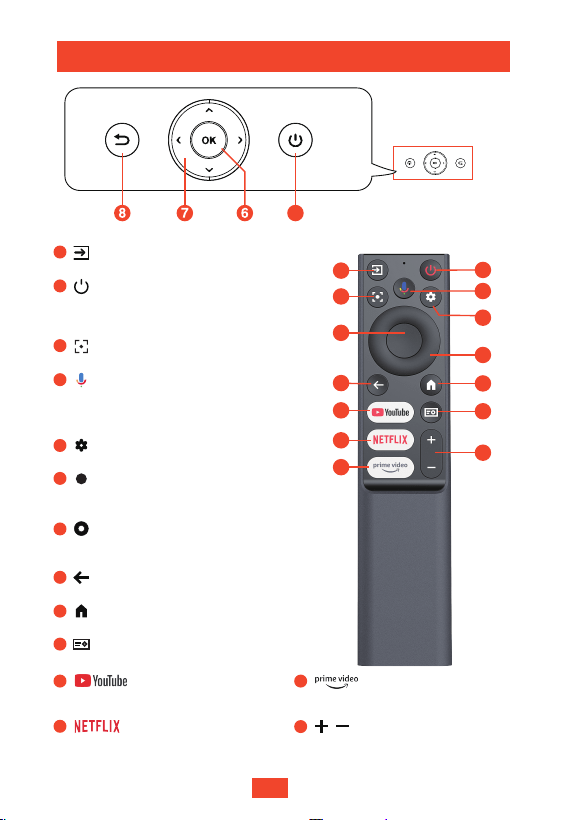
1
2
3
4
5
8
9
11
12
13
6
7
10
14
13
Voreingestellte Prime-Video-Taste
Projektortaste und Fernbedienung
Zur Startseite
9
Voreingestellte Netflix-Taste
12
Drücken, um eine Auswahl oder
Eingabe zu bestätigen
6
Google Assistant aktivieren, den
sprachbasierten virtuellen
Assistenten von Google
4
Einstellungen
5
Zurück zur vorherigen Seite
8
14
Lauter / leiser
Voreingestellte YouTube-Taste
11
Navigieren durch Menüs oder Anpassen
ausgewählter Inhalte
7
Signalquelle
1
• Gedrückt halten: Ausschalten
2
• Einmal drücken: Einschalten/Ruhezustand
3
Fokus anpassen
10
Schnelleinstellungen
2
DE
18
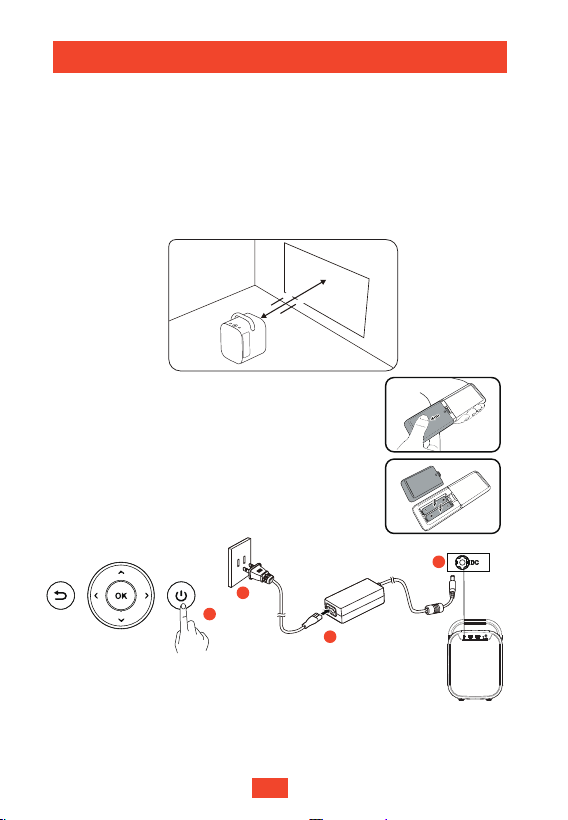
1.5m
4.1m
40"
150"
Erste Schritte
Positionierung
①
Positionieren Sie den Projektor so, dass er zur Projektionsfläche zeigt,
um ein rechteckiges Bild zu erhalten.
②
Der Abstand zwischen Projektor und Projektionsfläche bestimmt die
Größe des Bildes.
③
Prüfen Sie den Projektionsabstand und die Bildschirmgröße anhand des
Abschnitts „Technische Daten“.
Vorbereitung der Fernbedienung
①
Legen Sie Batterien (nicht im Lieferumfang
enthalten) in die Fernbedienung ein.
②
Drücken Sie dafür auf die Batteriefachabdeckung
und öffnen Sie diese (siehe Abbildung).
Einschalten
4
2
1
3
Stellen Sie sicher, dass sich in einem Abstand von 30 cm / 11.8" um
die Belüftungsöffnungen herum keine Hindernisse befinden.
④
③
Der Abstand zwischen der Fernbedienung und dem
Projektor sollte 10 m nicht überschreiten.
• Schließen Sie das Netzkabel an, warten Sie fünf Sekunden und
drücken Sie dann einmal die Ein-/Aus-Taste, um das Gerät
einzuschalten.
• Halten Sie die Ein-/Aus-Taste gedrückt, um das Gerät auszuschalten.
• Die Anzeige leuchtet rot, wenn das Netzkabel an die Steckdose
angeschlossen ist.
• Die Anzeige leuchtet weiß, wenn der Projektor eingeschaltet ist.
DE
19
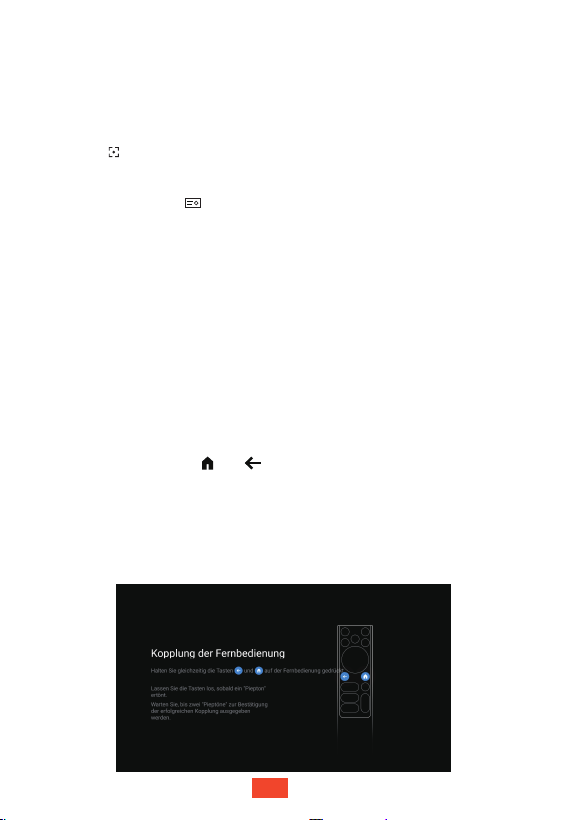
Sie können das Bild auch manuell über die Fernbedienung fokussieren. Halten Sie
die Taste auf der Fernbedienung gedrückt, bis das Bild klar und fokussiert
dargestellt wird.
Fokus
Kopplung der Fernbedienung
Autofokus
Manueller Fokus
Hinweis:
Erweitert
Drücken Sie die Taste auf der Fernbedienung und wählen Sie Fokus
-> Erweitert aus, um erweiterte Einstellungen vorzunehmen. Beispiel:
Die Kopplung der Fernbedienung verbessert das Nutzungserlebnis:
Autofokus beim Einschalten: Automatische Einstellung der Bildschärfe beim Einschalten.
Autofokus nach Bewegen: Automatische Einstellung der Bildschärfe nach dem Bewegen des Geräts.
•
•
•
•
Wischen Sie die ToF-Sensorlinse mit einem weichen Tuch ab, um den Autofokuseffekt zu
verbessern. (Anweisungen zur ToF-Positionierung finden Sie im Abschnitt „Übersicht“.)
Der Projektionsabstand sollte zwischen 1,1 m und 4 m liegen.
•
Eine unebene Projektionsfläche kann dazu führen, dass der Autofokuseffekt schlechter
wirkt. In diesem Fall können Sie den manuellen Fokus verwenden, um das Bild klarer
einzustellen.
•
Wenn sich der Projektor in einer festen Position befindet, empfehlen wir, die Optionen
[Autofokus beim Start] und [Autofokus nach Bewegung] zu deaktivieren.
① Halten Sie die Fernbedienung in die Nähe des Projektors.
② Halten Sie die Tasten und etwa zehn Sekunden lang gleichzeitig
gedrückt.
③ Wenn die Fernbedienung mit dem Projektor gekoppelt wurde, wird auf
dem Bildschirm die Meldung „Erfolgreich“ angezeigt.
Hinweis:
•
Wenn Sie die Fernbedienung nicht koppeln, wird die Kopplungsseite nach jedem
Einschalten des Projektors angezeigt.
•
Google Assistant funktioniert nur, wenn die Fernbedienung gekoppelt ist.
Positionieren Sie den Projektor so, dass er zu einer geeigneten Projektionsfläche
oder zur Wand zeigt. Der Projektor fokussiert das Bild automatisch.
DE
20
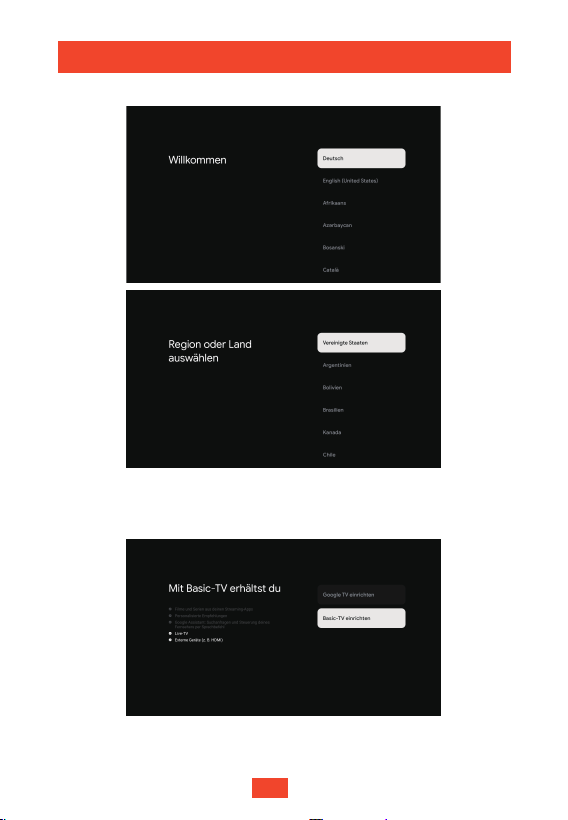
Basic-TV einrichten
Es stehen zwei Fernsehertypen zur Auswahl:
Auswahl Ihres Fernsehertyps
Mit einem klassischen Fernseher haben Sie folgende Optionen:
• Externe Geräte (z. B. HDMI)
Auswahl von Sprache und Land/Region
Einrichten Ihres Fernsehers
DE
21
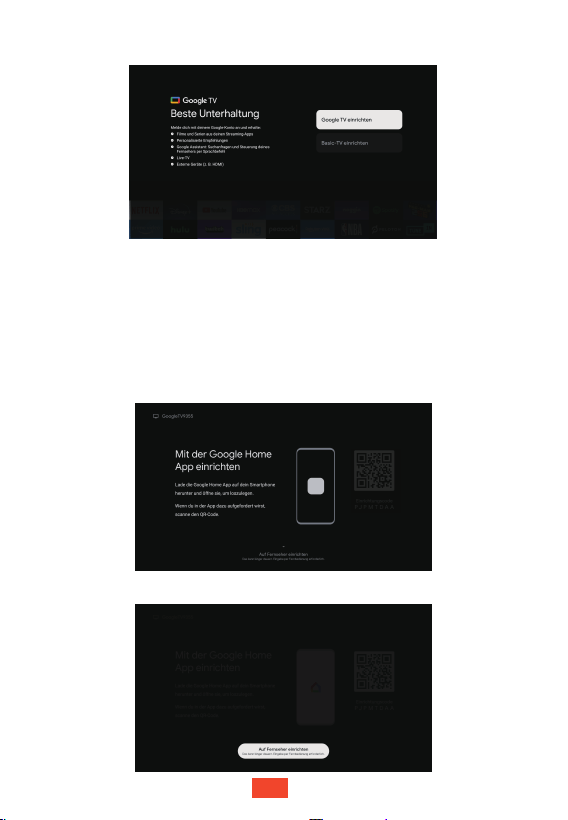
Google TV
TM
einrichten:
Mit der Google HomeApp einrichten
Melden Sie sich mit Ihrem Google-Konto an, um folgende Optionen
zu erhalten:
• Filme und Serien aus deinen Streaming-Apps
• Personalisierte Empfehlungen
• Google Assistant: Suchanfragen und Steuerung deinesFernsehers per
Sprachbefehl
• Google Assistant funktioniert nur, wenn die Fernbedienung gekoppelt ist
• Externe Geräte (z. B. HDMI)
Auf Fernseher einrichten
DE
22
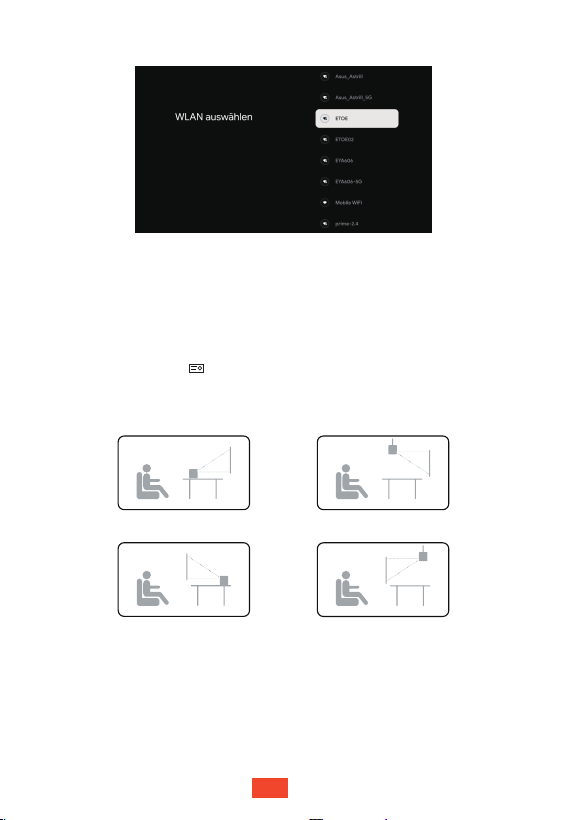
WLAN auswählen
Letzte Schritte
Befolgen Sie die Anweisungen auf dem Bildschirm, um die Einrichtung
Ihres Google TV abzuschließen.
Projektoreinstellungen
Personalisieren Sie Ihren Projektor nach Ihren Wünschen.
Projektionsmodus
Drücken Sie die Taste auf der Fernbedienung und wählen Sie
Erweiterte Einstellungen -> Projektionsmodus. .
Projektionsmodus
Frontprojektion Deckenfrontprojektion
Rückprojektion
Deckenrückprojektion
Bildkorrektur
Automatische Trapezkorrektur
Positionieren Sie den Projektor so, dass er zu einer geeigneten
Projektionsfläche oder zur Wand zeigt. Der Projektor passt das Bild
automatisch an.
DE
23
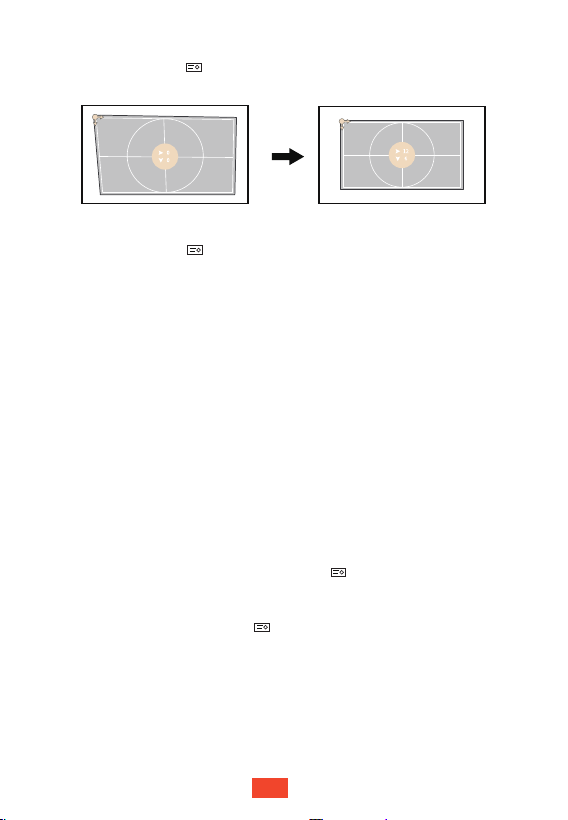
Manuelle Trapezkorrektur
Drücken Sie die Taste auf der Fernbedienung und wählen Sie
Bildkorrektur -> Manuelle Trapezkorrektur, um das Bild anzupassen.
Erweitert
Drücken Sie die Taste auf der Fernbedienung und wählen Sie
Bildkorrektur -> Erweitert, um erweiterte Einstellungen vorzunehmen.
Beispiel:
•
•
Auto-Keystone-Korrektur beim Start: Bild beim Start automatisch auf eine rechteckige
From anpassen.
Automatische Trapezkorrektur nach Bewegung des Gerät:Automatische Anpassung zu
rechteckigem Bild nach dem Bewegen des Geräts.
Hinweis:
•
•
•
Die automatische Keystone-Korrektur funktioniert nur, wenn der Projektionswinkel
± 30 Grad beträgt.
•
Wenn sich der Projektor in einer festen Position befindet, empfehlen wir, die
Optionen [Auto-Keystone-Korrektur beim Start] und [Automatische Trapezkorrektur
nach Bewegung des Gerät] zu deaktivieren.
Zoom & Bild-Neupositionierung
Drücken Sie auf der Fernbedienung die Taste und wählen Sie Bildkorrektur
-> Bildanpassung -> Zoom, um das Bild zu Vergrößern/Verkleinern.
Sie können das Bild neu positionieren, indem Sie es verkleinern. Drücken Sie
auf der Fernbedienung die Taste und wählen Sie Bildkorrektur ->
Bildanpassung -> Bild-Neupositionierung, um das Bild neu zu positionieren.
Der Projektionsabstand sollte zwischen 1,1 m und 4 m liegen.
Wischen Sie die ToF-Sensorlinse mit einem weichen Tuch ab, um den Autofokuseffekt zu
verbessern. (Anweisungen zur ToF-Positionierung finden Sie im Abschnitt „Übersicht“.)
DE
24
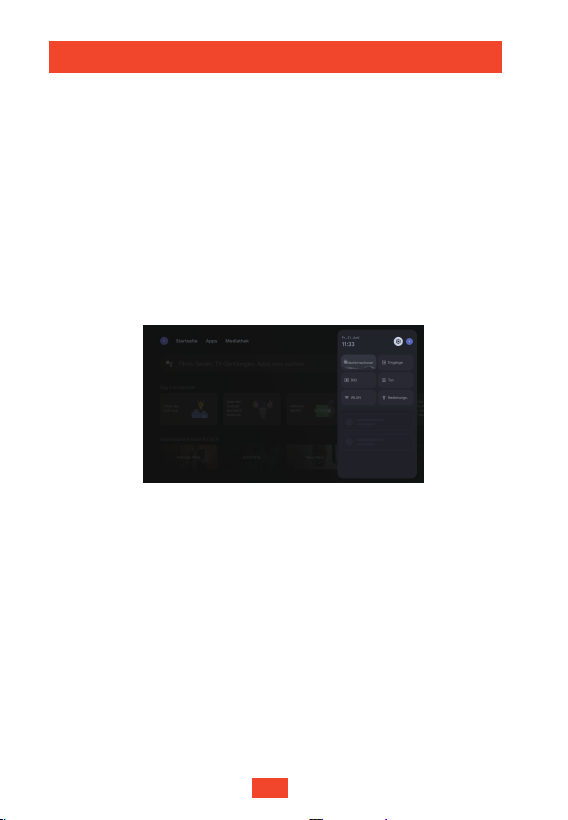
TV-Funktionen
Basic-TV
Im Modus „Basic-TV“ können Sie grundlegende Funktionen wie HDMI, Netflix,
YouTube und Prime Video nutzen.
Wir empfehlen Ihnen, sich bei Ihrem Google-Konto anzumelden, um von allen
Google TV-Funktionen zu profitieren.
Google TV
Filme und Fernsehsendungen aus Ihren Lieblings-Streaming-Apps.
Mediathek
Ihre gekauften und geliehenen Inhalte und Ihre Watchlist online, über Ihren
Fernseher oder Ihr Mobiltelefon anzeigen.
Armaturenbrett
Nachrichten anzeigen und Schnellstart von Funktionen, z. B.:
• Bildschirmschoner • Eingänge
• Bild
• Bedienungshilfen
• Ton
• WLAN
Einstellungen
Allgemeine Einstellungen anpassen, z. B.:
• Projektor
• Display & Ton
• Netzwerk & Internet
• System
• Fernbedienungen & Zubehör
DE
25
Google Assistant
Google TV verfügt über den integrierten Google Assistant, der durch Drücken
der Taste auf der Fernbedienung verwendet werden kann.
Hinweis:
Google Assistant funktioniert nur, wenn die Fernbedienung
gekoppelt ist und eine funktionierende Netzwerkverbindung
besteht.
USB-Verbindung
Dieser Projektor kann auch zusammen mit externen USB-Geräten verwendet
werden. So verwenden Sie die Funktion:
① Installieren Sie auf der Seite „Apps“ eine Dateiverwaltungs-App wie
„Dateimanager“.
② Öffnen Sie die Dateiverwaltungs-App und schließen Sie das USB-Gerät an.
③ Befolgen Sie die Anweisungen der Dateiverwaltungs-App, um eine
Verbindung zum USB-Gerät herzustellen.
HDMI-Verbindung
Dieser Projektor unterstützt Verbindungen mit verschiedenen
HDMI-Wiedergabegeräten, darunter PCs, TV-Sticks, TV-Boxen, DVD-Player,
Set-Top-Boxen (STB) und Spielkonsolen.
① Schließen Sie den Projektor über ein HDMI-Kabel (nicht im Lieferumfang
enthalten) an ein HDMI-Wiedergabegerät an.
② Drücken Sie die Taste auf der Fernbedienung und wählen Sie HDMI aus.
Bluetooth-Zubehör
Dieser Projektor unterstützt Verbindungen mit verschiedenen Bluetooth-Geräten,
darunter Fernbedienungen, Lautsprecher, Tastaturen und Computermäuse.
① Drücken Sie die Taste auf der Fernbedienung und wählen Sie aus.
② Wählen Sie Fernbedienungen & Zubehör -> Zubehör koppeln, um Ihr
Bluetooth-Gerät zu koppeln.
Bluetooth-Lautsprechermodus
Unser Produkt kann auch als Bluetooth-Lautsprecher genutzt werden. So
verwenden Sie die Funktion:
② Verbinden Sie Ihr Wiedergabegerät über Bluetooth mit „Projector Atom“.
③ Geben Sie Musik auf Ihrem Gerät wieder und passen Sie die Lautstärke
mit der Fernbedienung an.
④ Halten Sie die Taste zwei Sekunden lang gedrückt, um den
Bluetooth-Lautsprechermodus zu beenden.
① Drücken Sie die Taste auf der Fernbedienung und wählen Sie
Bluetooth-Lautsprechermodus aus.
DE
26
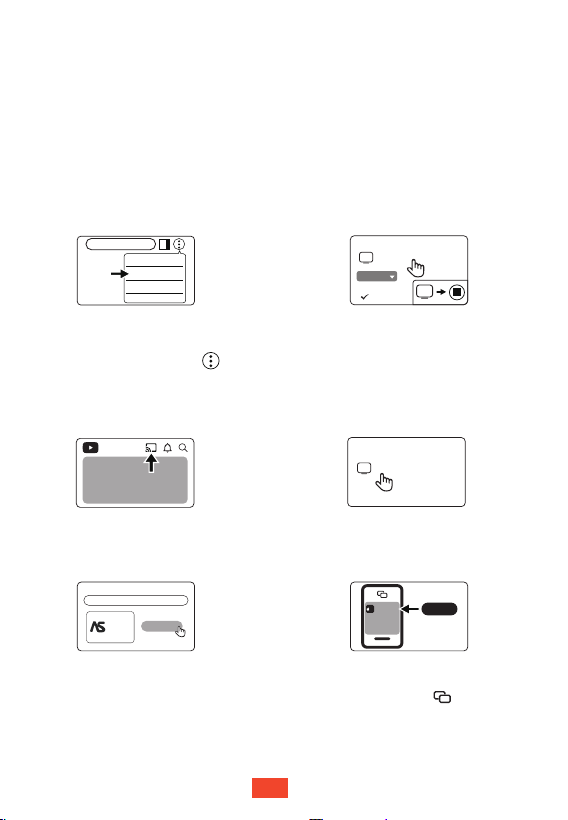
Google Cast™
ETOE-Projektoren sind mit Google Cast ausgestattet. Tippen Sie einfach
auf die Cast-Schaltfläche der Apps, die Sie bereits kennen und lieben, um
Unterhaltung von Ihrem Telefon, Tablet oder Laptop auf den TV zu streamen.
Google Cast-fähige TV-Geräte
Stellen Sie sicher, dass die Geräte mit demselben WLAN-Netzwerk
verbunden sind.
①
Klicken Sie auf die Schaltfläche „Cast“ und wählen Sie A1363 aus.
②
Google Cast-fähiges iOS-Gerät
AirScreen - AirPlay & Cast
AirScreen
Install
Installieren Sie AirScreen auf dem
Projektor über die Seite Apps.
①
Öffnen Sie die App AirScreen auf
dem Projektor und befolgen Sie die
Anweisungen auf dem Bildschirm.
②
Google Cast-fähige Websites/Apps
Klicken Sie auf der Website/App auf
die Schaltfläche Streamen.
①
YouTube
Google Cast-fähiger Computer
www.xxxx.com
Cast...
Print...
Find...
Cast
Available
Sources
Cast tab
Cast screen
Installieren Sie Google Chrome auf Ihrem
Computer und öffnen Sie das Programm.
①
Wählen Sie A1363 aus.
③
Klicken Sie im Menü oben rechts auf „Streamen“, gehen Sie dann
zum Menü „Quellen“ und wählen Sie aus, ob Sie einen Tab oder den
gesamten Bildschirm übertragen möchten.
②
A����
Wählen Sie A1363 aus.
②
Cast to
A����
TV
Select
③
Klicken Sie auf Ihrem
iOS-Gerät auf die
Schaltfläche und
wählen Sie A1363 aus.
A����
DE
27
Garantie
30-Tage-Geld-zurück-Garantie
Wenn Sie Ihr unbeschädigtes Produkt aus einem beliebigen Grund innerhalb
von 30 Tagen ab dem Kaufdatum zurückgeben, erhalten Sie eine vollständige
Rückerstattung.
Im Falle von Garantieansprüchen, die nicht in Zusammenhang mit
Qualitätsproblemen stehen, trägt der Käufer die Versandkosten.
12-monatige Garantie
Jedes ETOE-Produkt wird mit einem Jahr Garantie in Bezug auf qualitätsbezogene
Problemen geliefert. Wenn Sie per E-Mail einen Garantieanspruch an unser
Support-Team senden, wird ETOE nach Ihrem Ermessen:
1. das ETOE-Produkt durch ein Produkt desselben Modells ersetzen und alle
Versandkosten für die Rücksendung tragen.
2. den Kaufpreis im Austausch gegen das ETOE-Produkt vollständig
zurückerstatten.
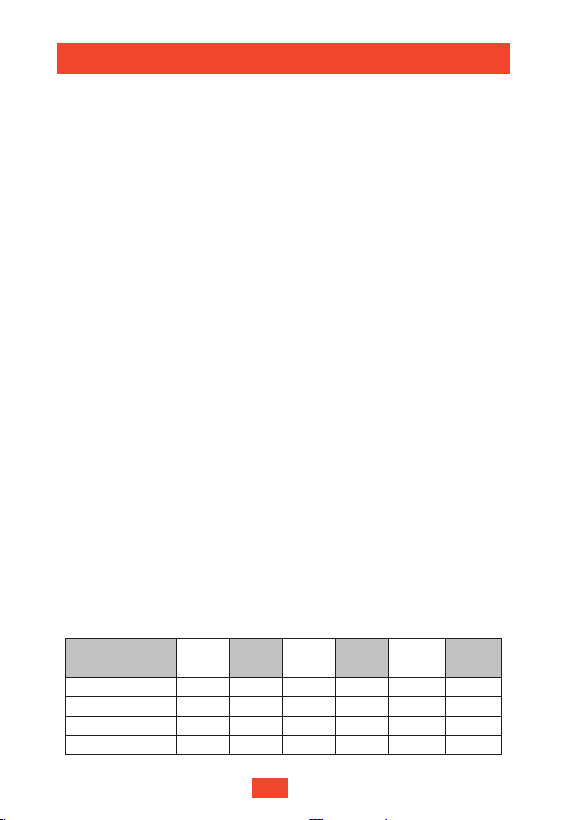
Projektionsabstand und Bildschirmgröße
Bildschirmgröße
3.5 108.049.819.688.634.9
5.3 162.174.729.4132.852.3
7.1 216.199.639.2177.169.7
8.9 270.1124.549.0221.487.2
(inch)
40
60
80
100
Breite
(inch)
Breite
(cm)
Höhe
(cm)
Abstand
(cm)
Abstand
(ft)
Höhe
(inch)
Spezifikationen
CPU: ARM Quad 64-bit Cortex-A53
Bluetooth: Bluetooth 5.1
WLAN: 2.4 GHz / 5 GHz 802.11a/b/g/n/ac
Native Auflösung: 1920 × 1080
Wurfverhältnis: 1.22
Seitenverhältnis: 16:9 / 4:3 adaptiv
Lautsprecher: 10 W × 2 Stereo-Lautsprecher
Anschlüsse: HDMI × 1; USB × 1; AUX × 1
Vergrößern/Verkleinern: 50%–100%
Keystone-Korrektur: ± 30°, Unterstützung der automatischen Keystone-Korrektur
Empfohlene Umgebungstemperatur: 41°F - 95°F / 5°C - 35°C
Relative Luftfeuchtigkeit:15%–85% (nicht kondensierend)
Spezifikationen
DE
28

Leggere e comprendere tutte le istruzioni prima di utilizzare questo
dispositivo. Non apportare modifiche che non siano descritte in questo
manuale. La garanzia non si applica in caso di lesioni personali, perdita o
danneggiamento dei dati a causa della mancata osservanza delle istruzioni.
Configurazione
• Per ridurre il rischio di incendio e/o scosse elettriche, non esporre il
dispositivo a pioggia o umidità e non posizionare oggetti pieni di liquidi,
come vasi, sul dispositivo.
• Non posizionare il dispositivo su superfici morbide come tovaglie o
tappeti, poiché ciò potrebbe costituire un pericolo di incendio.
• Non posizionare il dispositivo in aree soggette a polvere e sporco
eccessivi o vicino a qualsiasi apparecchio che genera un forte campo
magnetico.
• Per evitare il surriscaldamento, non bloccare o ostruire le aperture di
ventilazione. Non posizionare mai il dispositivo in uno spazio ristretto. Si
prega di lasciare sempre uno spazio sufficiente intorno al dispositivo per
la ventilazione.
• Si prega di proteggere il dispositivo dalla luce solare diretta, dal calore,
da forti sbalzi di temperatura e dall’umidità.
• Quando il dispositivo funziona per un lungo periodo di tempo e la
superficie si surriscalda, si prega di spegnerlo e scollegare il cavo di
alimentazione. Riprendi il funzionamento solo dopo che il dispositivo si è
raffreddato.
• Si prega di maneggiare sempre il dispositivo con cura. Evita di toccare
l’obiettivo.
• Non appoggiare mai oggetti pesanti o appuntiti sul dispositivo o sul cavo
di alimentazione. Per evitare scosse elettriche, non smontare il dispositivo.
• Si prega di utilizzare solo attacchi o accessori specificati dal produttore.
Si prega di evitare vibrazioni estreme, il che potrebbe danneggiare i
componenti interni. Non consentire ai bambini di maneggiare il dispositivo
senza supervisione.
• Nelle seguenti condizioni, all’interno del dispositivo può formarsi uno
strato di umidità che può portare a malfunzionamenti:
a) Se il dispositivo viene spostato da una zona fredda a una calda;
b) Dopo il riscaldamento di una camera fredda;
c) Quando il dispositivo è collocato in un ambiente umido.
Per evitare l’umidità, si prega di sigillare il dispositivo in un sacchetto di
plastica prima di spostarlo in un’altra stanza e attendere una o due ore
prima di estrarlo dal sacchetto.
.
Istruzioni di sicurezza
IT
IT
29

Alimentazione elettrica
• Si prega di utilizzare solo l’adattatore di alimentazione fornito.
• Si prega di spegnere il dispositivo prima di rimuovere l’alimentatore dalla
presa.
• Si prega di proteggere il cavo di alimentazione dall’essere calpestato o
schiacciato, in particolare in corrispondenza di spine, prese multiple e nel
punto in cui escono da questo dispositivo.
• Si prega di scollegare questo dispositivo in caso di temporali o se non
viene utilizzato per un lungo periodo di tempo.
• Laddove la spina di alimentazione o un dispositivo di accoppiamento
viene utilizzato come dispositivo di disconnessione, il dispositivo di
disconnessione deve rimanere prontamente operativo.
• Prima di effettuare o modificare qualsiasi connessione, si prega di
assicurarsi che tutti i dispositivi siano scollegati dalla presa di corrente.
• Non toccare mai il cavo di alimentazione o il connettore di alimentazione
con le mani bagnate.
Sicurezza dell’udito
Per evitare danni all’udito, non ascoltare per lunghi periodi ad alto volume.
Imposta il volume a un livello sicuro.
Pulizia
• Si prega di spegnere il dispositivo e rimuoverlo dall’alimentazione prima di
pulire la superficie.
• Si prega di utilizzare un panno morbido e privo di lanugine. Non utilizzare
mai detergenti liquidi, gassosi o facilmente infiammabili (come spruzzo,
abrasivi, lucidanti e alcol). Si prega di passare delicatamente sulle
superfici. Fai attenzione a non graffiare le superfici.
• Non utilizzare detergenti liquidi per pulire l’obiettivo poiché potrebbero
danneggiare il rivestimento protettivo dell’obiettivo. Si prega di utilizzare
carta per la pulizia dell’obiettivo per pulire l’obiettivo del proiettore.
Riparazioni
• Non effettuare da soli alcuna riparazione al dispositivo. Si prega di far
riparare il dispositivo solo da un centro di assistenza autorizzato.
• Una manutenzione impropria può provocare lesioni o danni al dispositivo.
• Si prega di affidare tutte le operazioni di manutenzione a personale di
assistenza qualificato.
Attenzione
• Non fissare il raggio in funzione. La luce intensa può ferire i tuoi occhi.
IT
30
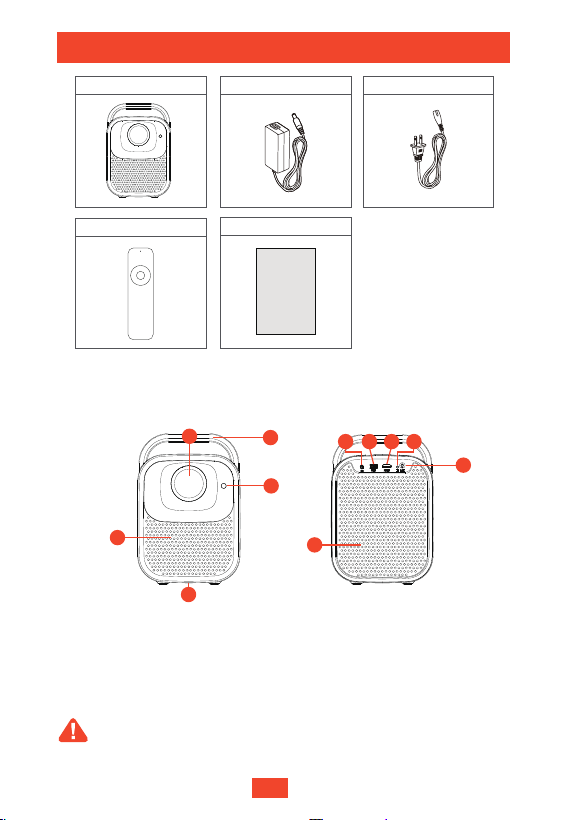
Manuale dell'utente x 1
Adattatore x 1
Telecomando x1
Proiettore x 1 cavo di alimentazione x 1
Panoramica
Proiettore
Presa d'aria (scarico)
ToF(messa a fuoco
automatica)
Foro per vite del treppiede
INGRESSO CC
Lente
Porta USB
Porta HDMI
Ricevitore IR
①
②
③
Maniglia
⑩
④
⑤
⑥
Porta AUX
⑨
⑦
⑧
Vista frontale Vista posterior
• Non guardare direttamente la lente per evitare di danneggiare gli occhi.
• Non ostruire la presa d'aria (uscita).
Attenzione:
User Manual
Contenuto della confezione
65 7 8
9
10
1
2
3
1
4
IT
31
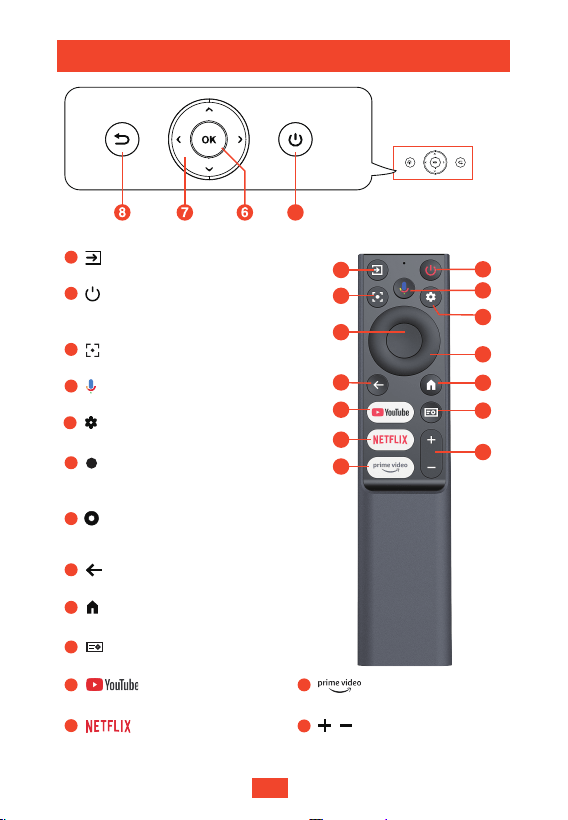
1
2
3
4
5
8
9
11
12
13
6
7
10
14
Pulsante YouTube preimpostato
13
Pulsante Prime Video preimpostato
Pulsante Netflix preimpostato
Sorgente del segnale
2
Pulsante e telecomando del proiettore
3
Pagina iniziale
9
10
Impostazioni rapide
12
Premere per confermare una selezione
o un inserimento
6
Attiva l'Assistente Google
4
Impostazioni
5
Torna alla pagina precedente
8
Regola la messa a fuoco
14
Volume su/giù
11
Consente di spostarsi tra i menu o di
impostare il contenuto selezionato
7
1
• Tenere premuto: spegnimento
• Premere una volta: accensione/sospensione
2
IT
32
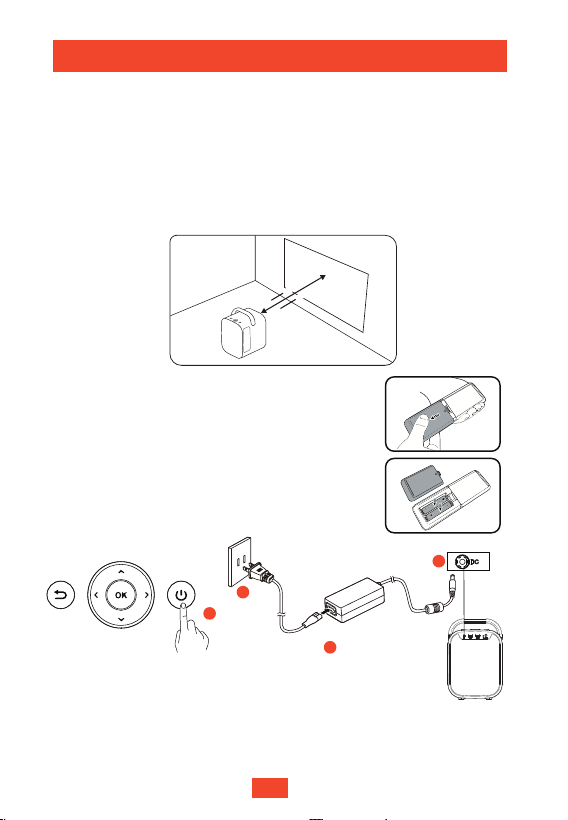
1.5m
4.1m
40"
150"
Operazioni preliminari
Posizionamento
① Posizionare il proiettore in modo che sia rivolto verso la superficie di
proiezione per ottenere un'immagine rettangolare.
②
La distanza tra il proiettore e la superficie di proiezione determina le
dimensioni dell'immagine.
③
Controllare la distanza di proiezione e le dimensioni dello schermo nella
sezione Specifiche.
Preparazione del telecomando
① Inserire le batterie del telecomando (non incluse).
②
Premere e aprire il coperchio del vano batterie,
come illustrato.
③
Accensione
4
2
1
3
Assicurarsi che non vi siano ostacoli entro 30 cm (11,8") che blocchino
le prese d'aria.
④
La distanza tra il telecomando e il proiettore non
deve superare i 10 m (33 piedi).
• Collegare il cavo di alimentazione, attendere cinque secondi,
quindi premere una volta il pulsante di accensione per
accendere il proiettore.
• Tenere premuto il pulsante di accensione per spegnere.
• L'indicatore diventa rosso quando il cavo di alimentazione
è collegato alla presa.
• L'indicatore diventa bianco quando il proiettore è acceso.
IT
33
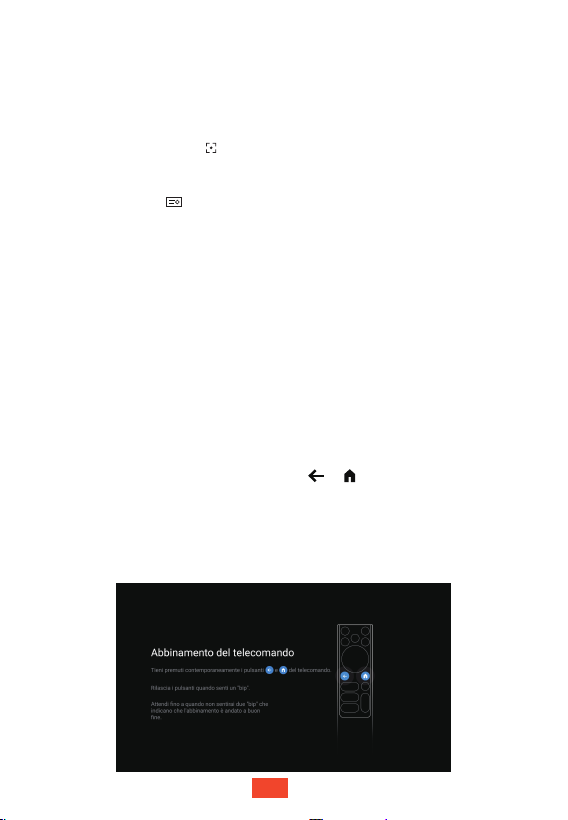
È possibile mettere a fuoco l'immagine anche manualmente utilizzando il telecomando.
Tenere premuto il pulsante sul telecomando finché l'immagine non risulta chiara e
sufficientemente messa a fuoco.
Messa a fuoco
Associazione del telecomando
Messa a fuoco automatica
Messa a fuoco manuale
Nota:
Impostazioni avanzate
Premere il pulsante sul telecomando e selezionare Messa a fuoco -> Avanzate
per le impostazioni avanzate. Ad esempio:
L'associazione del telecomando migliora l'esperienza per l'utente:
Messa a fuoco automatica all'avvio: regola automaticamente la nitidezza dell'immagine all'avvio.
Messa a fuoco automatica dopo lo spostamento: regola automaticamente la nitidezza dell'immagine
dopo lo spostamento del dispositivo.
•
•
•
•
Pulire la lente del sensore della messa a fuoco automatica (TOF) con un panno morbido per migliorare
l'effetto della messa a fuoco automatica.
La distanza di proiezione deve essere compresa tra 1,5 m e 4 m.
•
Una superficie di proiezione non uniforme può peggiorare l'effetto della messa a fuoco automatica.
In questo caso, è possibile utilizzare la messa a fuoco manuale per un'immagine più nitida.
•
Se il proiettore è posizionato in una posizione fissa, si consiglia di disattivare le opzioni
[Messa a fuoco automatica all'avvio] e [Messa a fuoco automatica dopo lo spostamento].
① Tenere il telecomando vicino al proiettore.
② Premere contemporaneamente i pulsanti e per circa dieci secondi.
③ Quando il telecomando è associato al proiettore, sullo schermo viene
visualizzato il messaggio "Operazione riuscita".
Nota:
•
Se non si associa il telecomando, la pagina di associazione viene visualizzata
ogni volta che si accende il proiettore.
•
L'Assistente Google funziona solo se il telecomando è associato.
Posizionare il proiettore in modo che sia rivolto verso una superficie di proiezione
o una parete idonea. Il proiettore metterà automaticamente a fuoco l'immagine.
IT
34
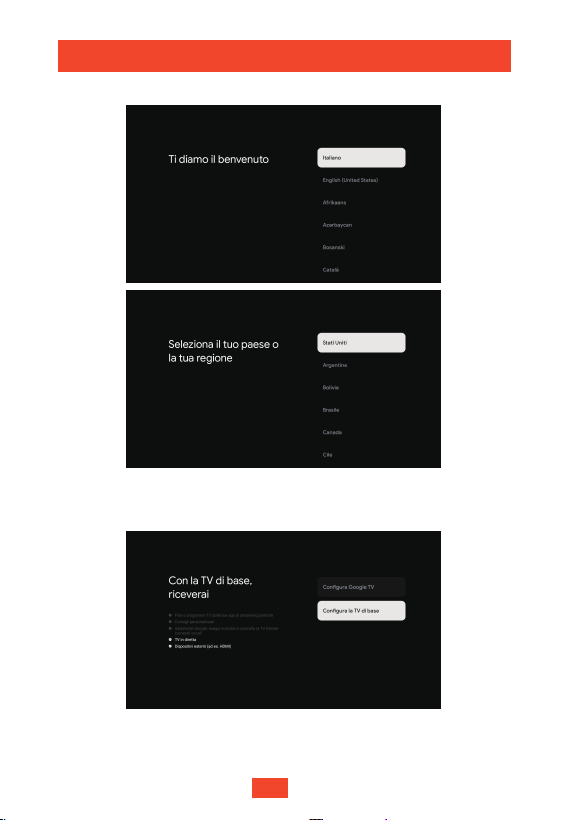
TV base:
È possibile scegliere tra due tipi di TV:
Selezione del tipo di TV
Con TV base, si ottiene
• TV in diretta
• Dispositivi esterni(ad es. HDMI)
Selezione della lingua e della regione o Paese
Configurazione della TV
IT
35
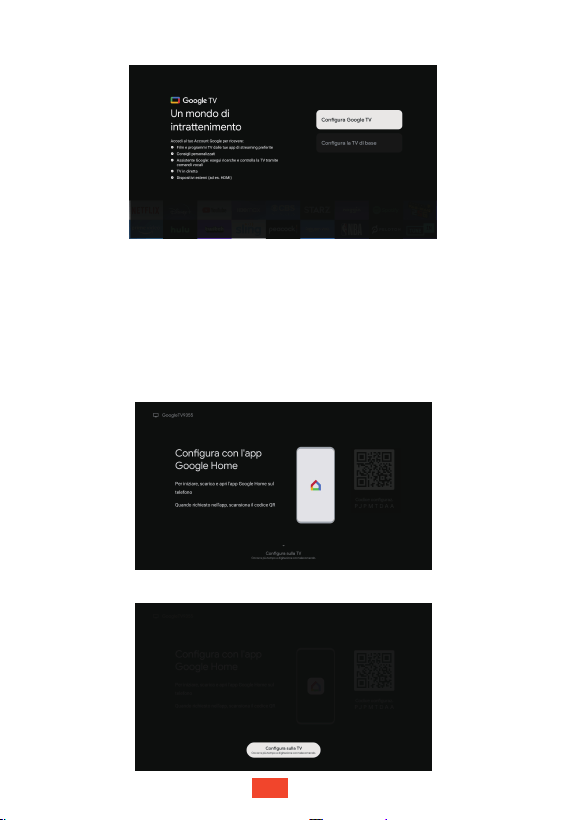
Google TV
TM
:
Configura con l'app Google Home
Accedere con il proprio account Google per ottenere
• Film e programmi TV dalle tue app di streaming preferite
• Consigli personalizzati
• Assistente Google: esegui ricerche e controlla la TV tramite comandi vocali
• Assistente Google funziona solo se è associato il telecomando
• TV in diretta
• Dispositivi esterni(ad es. HDMI)
Configura sulla TV
IT
36
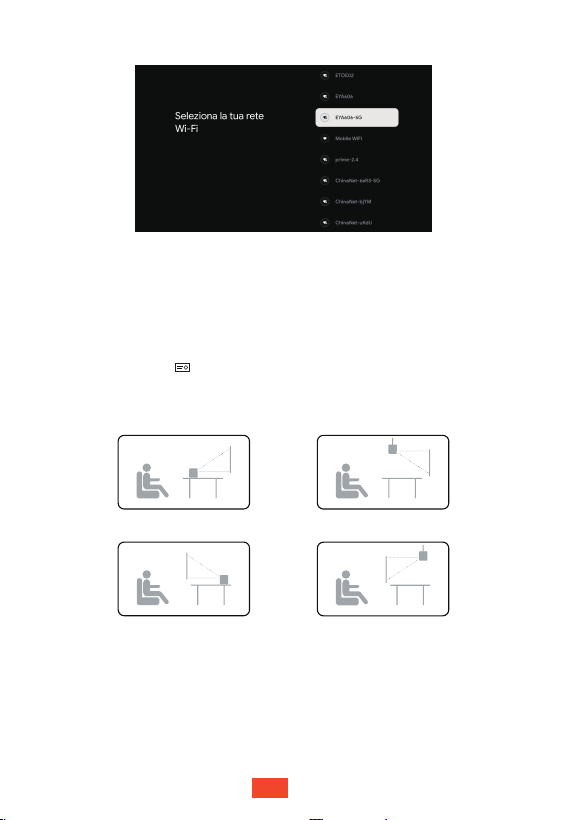
Seleziona la tua rete Wi-Fi
Passaggi finali
Seguire le istruzioni visualizzate sullo schermo per completare la
configurazione di Google TV.
Impostazioni del proiettore
Personalizzare il proiettore in base alle proprie preferenze.
Modalità di proiezione
Premere il pulsante sul telecomando e selezionare Impostazioni
avanzate -> Modalità di proiezione.
Modalità di proiezione
Frontale Soffitto frontale
Posteriore
Soffitto Posteriore
Correzione dell'immagine
Correzione Keystone automatica
Posizionare il proiettore in modo che sia rivolto verso una superficie
di proiezione o una parete idonea. Il proiettore regolerà
automaticamente l'immagine.
IT
37
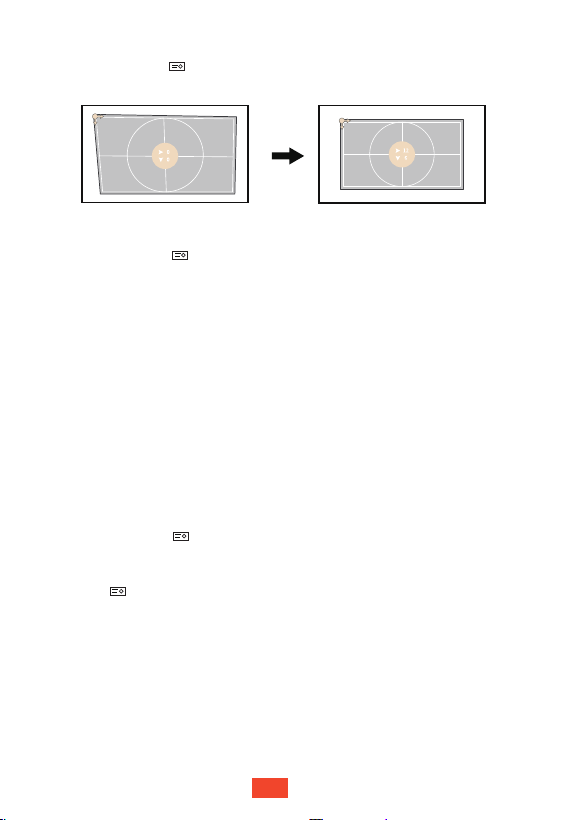
Correzione Trapezoidale manuale
Premere il pulsante sul telecomando e selezionare Correzione
dell’immagine -> Correzione Trapezoidale manuale per regolare l'immagine.
Avanzate
Premere il pulsante sul telecomando e selezionare Correzione
dell’immagine -> Avanzate per le impostazioni avanzate. Ad esempio:
•
•
Correzione Keystone automatico all'avvio: All’avvio,regola automaticamente l’immagine
in una forma rettangolare.
Correzione automatica della distorsione trapezoidale dopo il movimento: Regola automaticamente
l’immagine in forma rettangolare dopo aver spostato il dispositivo.
Nota
:
•
•
Pulire la lente del sensore della messa a fuoco automatica (TOF) con un panno
morbido per migliorare l'effetto della messa a fuoco automatica.
La distanza di proiezione deve essere compresa tra 1,5 m e 4 m.
•
La correzione Keystone automatica funziona solo quando l'angolo di proiezione
è ±30 gradi.
•
Se il proiettore è posizionato in una posizione fissa, si consiglia di disattivare
le opzioni [Correzione Keystone automatico all'avvio] e [Correzione automatica
della distorsione trapezoidale dopo il movimento].
Zoom immagine e riposizionamento immagine
Premere il pulsante sul telecomando e selezionare Correzione
dell’immagine -> Adattamento immagine -> Zoom per ingrandire/ridurre.
È possibile riposizionare l'immagine tramite lo zoom indietro. Premere il
pulsante sul telecomando e selezionare Correzione dell’immagine ->
Adattamento immagine -> Riposizionamento dell’immagine per riposizionare
l'immagine.
IT
38
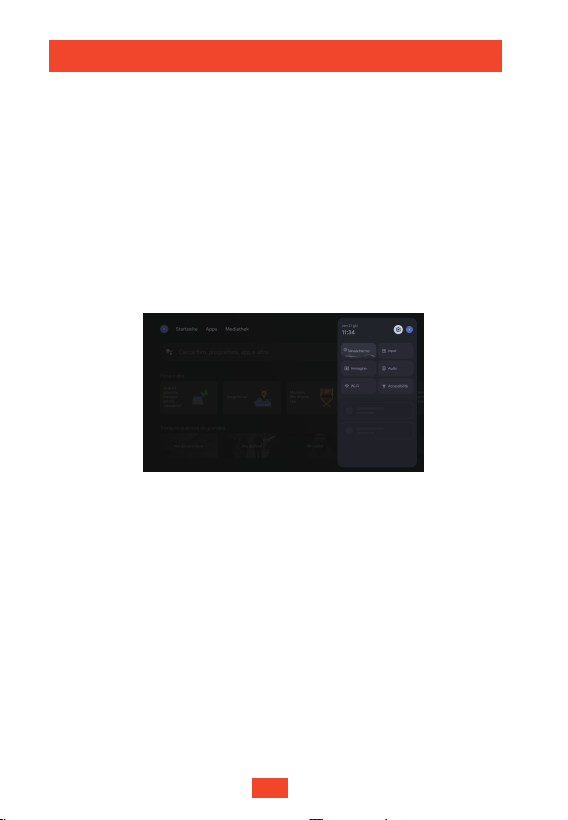
Esplorazione della TV
TV base
In modalità TV base, è possibile utilizzare funzioni di base come HDMI,
Netflix, YouTube e Prime Video.
Si consiglia di accedere al proprio account Google per usufruire di tutte le
funzionalità di Google TV.
Google TV
È possibile guardare film e programmi TV dalle proprie app di streaming
preferite.
App
Aprire o installare qualsiasi app da qui.
Dashboard
Consente di visualizzare i messaggi e avviare rapidamente funzioni come:
• Salvaschermo • Input
• Immagine
• Accessibilità
• Audio
• Wi-Fi
Impostazioni
Consente di regolare le impostazioni comuni come:
• Proiettore
• Display e audio
• Rete e internet
• Accessibilità
• Sistema
• Telecomandi e accessori
IT
39
Assistente Google
Google TV viene fornita con l'Assistente Google integrato, che può essere
utilizzato premendo il tasto sul telecomando.
Nota:
l'Assistente Google funziona solo se il telecomando è
associato ed è disponibile una connessione di rete valida.
Collegamento USB
Questo proiettore può essere utilizzato anche con dispositivi USB esterni.
Per utilizzare questa funzione:
① Installare un'app di gestione file come "IMPlayer" nella pagina App.
② Aprire l'app di gestione dei file e inserire il dispositivo USB.
③ Seguire le istruzioni dell'app di gestione file visualizzate per collegarsi
al dispositivo USB.
Collegamento HDMI
Questo proiettore supporta i collegamenti con vari dispositivi di riproduzione
HDMI, tra cui PC, chiavette TV, TV box, lettori DVD, decoder (STB) e console
di gioco.
① Collegare il proiettore a un dispositivo di riproduzione HDMI utilizzando
un cavo HDMI (non incluso).
② Premere il pulsante sul telecomando e selezionare HDMI.
Accessori Bluetooth
Questo proiettore supporta le connessioni con vari dispositivi Bluetooth, tra
cui telecomandi, altoparlanti, tastiere e mouse per computer.
① Premere il pulsante sul telecomando e selezionare .
② Selezionare Telecomandi e accessori -> Accoppia l’accessorio per
associare il proprio dispositivo Bluetooth.
Modalità altoparlante Bluetooth
Il nostro prodotto funziona anche come altoparlante Bluetooth. Per utilizzare
questa funzione:
① Premere il pulsante sul telecomando e selezionare Modalità
altoparlante Bluetooth.
② Collegare il dispositivo di riproduzione a "Proiettore Atom" tramite Bluetooth.
③ Riprodurre la musica sul dispositivo e regolare il volume utilizzando il
telecomando.
④ Tenere premuto il pulsante per due secondi per uscire dalla
Modalità altoparlante Bluetooth.
IT
40
Google Cast™
I proiettori ETOE sono dotati di Google Cast. Basta toccare il pulsante
Cast dalle app che già conosci e ami per trasmettere in streaming
l'intrattenimento dal tuo telefono, tablet o laptop alla TV.
Dispositivi TV abilitati per Google Cast
Assicurati che i dispositivi siano connessi alla stessa rete Wi-Fi.
①
Fare clic sul pulsante Trasmetti e selezionare A1363.
②
Dispositivo iOS abilitato per Google Cast
TV
Select
AirScreen - AirPlay & Cast
AirScreen
Install
Installa AirScreen nel proiettore
dalla pagina App.
①
Aprire l'app AirScreen sul
proiettore e seguire le istruzioni
visualizzate sullo schermo.
②
③
Fai clic sul pulsante sul tuo
dispositivo iOS e seleziona A1363.
Siti/app abilitati per Google Cast
Fare clic sul pulsante Trasmetti
sul sito web/app.
①
Selezionare A1363.
②
Cast to
YouTube
Computer abilitato per Google Cast
www.xxxx.com
Cast...
Print...
Find...
Cast
Available
Sources
Cast tab
Cast screen
Installa Google Chrome sul
tuo computer e aprirlo.
①
Selezionare A1363.
③
Fai clic su "Trasmetti" nel menu in alto a destra, quindi vai al menu
Sorgenti e scegli se vuoi trasmettere una scheda o l'intero schermo.
②
A����
A����
A����
IT
41
Garanzia
Garanzia soddisfatti o rimborsati entro 30 giorni
Se si restituisce il prodotto non danneggiato entro 30 giorni dalla data di
acquisto per qualsiasi motivo, si riceverà un rimborso completo.
L'acquirente è responsabile dei costi di spedizione per le richieste di
rimborso in garanzia che non siano correlate a problemi di qualità.
Garanzia di 12 mesi
Ogni prodotto ETOE viene fornito con un anno di copertura per problemi
di qualità. Se si invia una richiesta al nostro team di assistenza via e-mail,
ETOE, a sua discrezione:
1.Sostituirà il prodotto ETOE con un prodotto dello stesso modello e sosterrà
eventuali costi di spedizione per la restituzione.
2.Emetterà un rimborso completo del prezzo di acquisto in cambio del
prodotto ETOE.
Distanza di proiezione e dimensioni dello schermo
Dimensioni dello
schermo (pollici)
Dimensioni dello
schermo (pollici)
Dimensioni dello
schermo (cm)
Altezza
(pollici)
Distanza
(piedi)
Distanza
(cm)
Altezza
(cm)
3.5 108.049.819.688.634.940
5.3 162.174.729.4132.852.360
7.1 216.199.639.2177.169.780
8.9 270.1124.549.0221.487.2100
Specifiche
CPU: ARM Quad Cortex-A53 a 64 bit
Bluetooth: Bluetooth 5.1
Wi-Fi: 2,4 GHz / 5 GHz 802.11a/b/g/n/ac
Risoluzione nativa: 1920 × 1080
Rapporto proiezione: 1.22
Proporzioni: 16:9 / 4:3 adattivo
Altoparlanti: altoparlante stereo da 10 W × 2
Porte di collegamento: HDMI × 1; USB × 1; AUX × 1
Zoom: 50%–100%
Correzione Keystone: ±30°, supporto Keystone automatico
Temperatura ambiente consigliata: 41°F - 95°F / 5°C - 35°C
Umidità relativa: 15%–85% (senza condensa)
Specifications
IT
42

Veuillez lire et comprendre toutes les instructions avant d’utiliser cet
appareil. N’apportez pas de modifications non décrits dans ce manuel.
Toute blessure corporelle, perte de données ou dommage causé par le
non-respect des instructions ci-dessous n’est pas couvert par la garantie.
Installateur
• Pour réduire le risque d’incendie et/ou de choc électrique, n’exposez pas
l’appareil à la pluie ou à l’humidité et ne placez pas d’objets remplis de
liquides, tels que des vases, sur l’appareil.
• Ne placez pas votre appareil sur des surfaces molles telles que des
nappes ou des tapis, car cela pourrait provoquer un incendie.
• Ne placez pas votre appareil dans une zone sensible à la poussière et à
la saleté excessives ou à proximité d’un appareil qui génère un fort champ
magnétique.
• Pour éviter la surchauffe, ne bloquez pas les trous de ventilation. Ne
placez jamais l’appareil dans un espace confiné. Laissez toujours
suffisamment d’espace autour de l’appareil pour la ventilation.
• Protégez l’appareil de la lumière directe du soleil, des températures
élevées, des fluctuations de température et de l’humidité.
• Lorsque l’appareil fonctionne pendant une longue période et que la
surface devient chaude, éteignez l’appareil et débranchez le cordond’ali-
mentation. Les opérations ne peuvent pas être reprises tant que l’appareil
n’a pas refroidi.
• Assurez-vous d’utiliser l’appareil avec précaution. Évitez de toucher
l’objectif.
• Ne placez jamais d’objets lourds ou tranchants sur l’appareil ou le cordon
d’alimentation. Pour éviter les chocs électriques, ne pas démonter.
• Seuls les annexes ou accessoires spécifiés par le fabricant doivent être
utilisés. Évitez les vibrations extrêmes. Il peut endommager les pièces
internes. Les enfants ne sont pas autorisés à utiliser l’appareil sans
surveillance
• Une couche d’humidité peut apparaître à l’intérieur de l’appareil dans les
situations suivantes, ce qui peut provoquer des dysfonctionnements:
a) si l’équipement est déplacé d’une zone froide vers une zone chaude;
b) après le chauffage de la chambre froide;
c) lorsque l’appareil est placé dans une pièce humide.
Pour éviter l’humidité, scellez l’appareil dans un sac en plastique avant de
le transférer dans une autre pièce et attendez une à deux heures avant de
le retirer.
.
Instructions de sécurité
43
FR

Alimentation électrique
• Utilisez uniquement l’adaptateur secteur fourni.
• Avant de retirer l’alimentation de la prise, éteignez l’appareil.
• Protégez les cordons d’alimentation contre les marches ou les
compressions, en particulier dans les prises, les prises de commodité et à
la prise d’où ils proviennent de l’appareil.
• Débranchez cet appareil s'il y a un orage ou s'il n'est pas utilisé pendant
une longue période.
• Si la fiche d’alimentation ou le coupleur de l’appareil est utilisé comme
sectionneur, l’unité de déconnexion doit rester facile à utiliser.
• Avant d’établir ou de modifier des connexions, assurez-vous que tous les
périphériques sont déconnectés d’une prise de courant.
• Ne touchez jamais le cordon d’alimentation ou le connecteur d’alimenta-
tion avec une main mouillée.
Sécurité auditive
Pour éviter la perte auditive, n’écoutez pas à des volumes élevés pendant
de longues périodes. Réglez le volume à un niveau sûr.
Nettoyage
• Avant de nettoyer la surface, éteignez l’appareil et retirez-le du bloc
d’alimentation.
• Utilisez un chiffon doux et non pelucheux. N’utilisez jamais de liquides, de
gaz ou de nettoyants inflammables (tels que des sprays, des abrasifs, des
vernis et de l’alcool). Essuyez doucement la surface. Veillez à ne pas
gratter la surface.
• Ne nettoyez pas l’objectif avec un nettoyant liquide, car elles pourraient
endommager le revêtement protecteur de l’objectif. Utilisez du papier
nettoyant pour nettoyer l’objectif du projecteur.
Réparation
• N’effectuez aucune réparation de l’appareil vous-même. Votre appareil ne
peut être réparé que par un centre de service agréé.
• Un mauvais entretien peut entraîner des blessures ou des dommages à
l’équipement.
• Veuillez laisser tous les travaux de réparation à du personnel d’entretien
qualifié.
Attention
• Ne fixez pas la poutre de travail. Une forte lumière peut blesser vos yeux.
44
FR
Manuel de l'utilisateur x 1
Adaptateur x 1
Télécommande x 1
Projecteur x 1 Cordon secteur x 1
Vue d'ensemble
Projecteur
Bouche d'aération (évacuation)
TOF (mise au point
automatique)
Trou de vis pour trépied
Entrée de CC DC-IN
Lentille
Port USB
Port HDMI
Récepteur IR
①
②
③
Poignée
⑩
④
⑤
⑥
Port Aux
⑨
⑦
⑧
Vue de face Vue arrière
• Ne regardez pas directement dans la lentille, cela pourrait
endommager vos yeux.
• N'obstruez pas la bouche d'aération (sortie d'air).
Attention:
User Manual
Contenu
65 7 8
9
10
1
2
3
1
4
45
FR
1
2
3
4
5
8
9
11
12
13
6
7
10
14
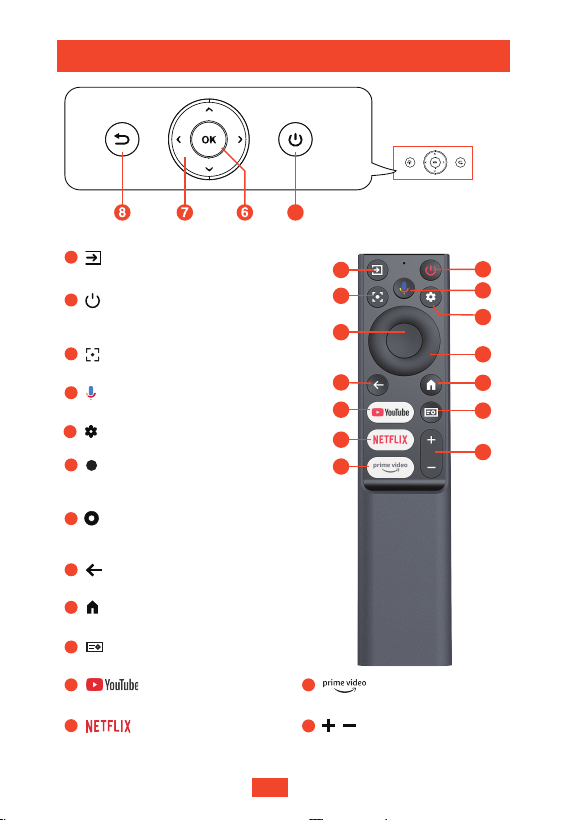
Bouton YouTube prédéfini
13
Bouton Prime Video prédéfini
Bouton Netflix prédéfini
Source du signal
2
Bouton du projecteur et télécommande
3
Accéder à la page d'accueil
9
10
Réglages rapides
12
Appuyer pour confirmer une sélection
ou une saisie
6
Activer l'assistant vocal Google Assistant
4
Paramètres
5
Revenir à la page précédente
8
Réglage de la mise au point
14
Augmentation/diminution du volume
11
Naviguer dans les menus ou ajuster le
contenu sélectionné
7
1
• Appuyer et maintenir: arrêter
• Appuyer une fois sur le bouton: mise sous tension
2
46
FR
1.5m
4.1m
40"
150"
Mise en route
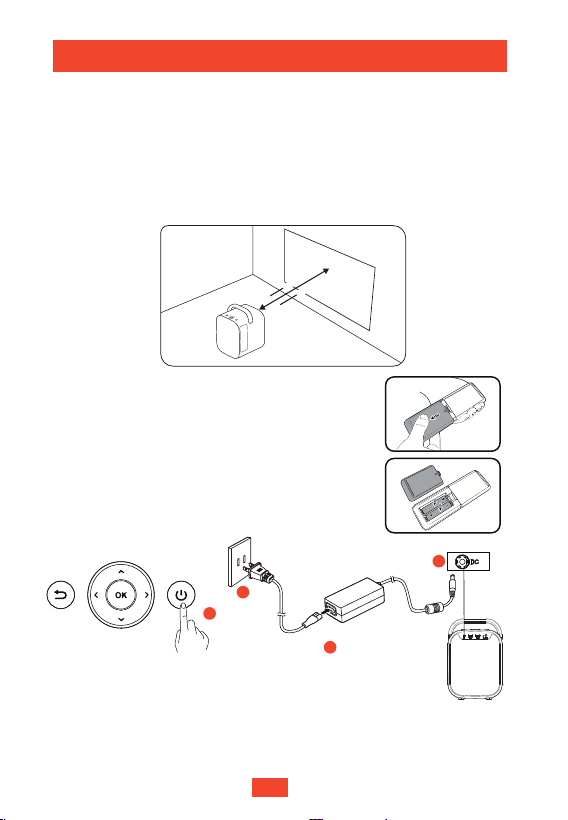
Positionnement
① Positionnez le projecteur de manière à ce qu'il soit orienté vers la surface
de projection pour obtenir une image rectangulaire.
②
La distance entre le projecteur et la surface de projection détermine la
taille de l'image.
③
Vérifiez la distance de projection et la taille de l'écran dans la section
Caractéristiques techniques.
Préparation de la télécommande
① Insérez les piles de la télécommande (non fournies).
②
Appuyez sur le couvercle du compartiment à piles
et ouvrez-le, comme illustré.
③
Mise sous tension
4
2
1
3
Assurez-vous qu'il n'y a pas d'obstacle à moins de 30 cm des bouches
d'aération.
④
La distance entre la télécommande et le projecteur
ne doit pas dépasser 10m / 33ft.
• Branchez le cordon d'alimentation, attendez cinq secondes,
puis appuyez une fois sur le bouton d'alimentation pour mettre
le projecteur sous tension.
• Appuyez sur le bouton d'alimentation et maintenez-le enfoncé
pour mettre le projecteur hors tension.
• Le voyant devient rouge lorsque le cordon d'alimentation est branché à la prise.
• Le voyant devient blanc lorsque le projecteur est sous tension.
47
FR
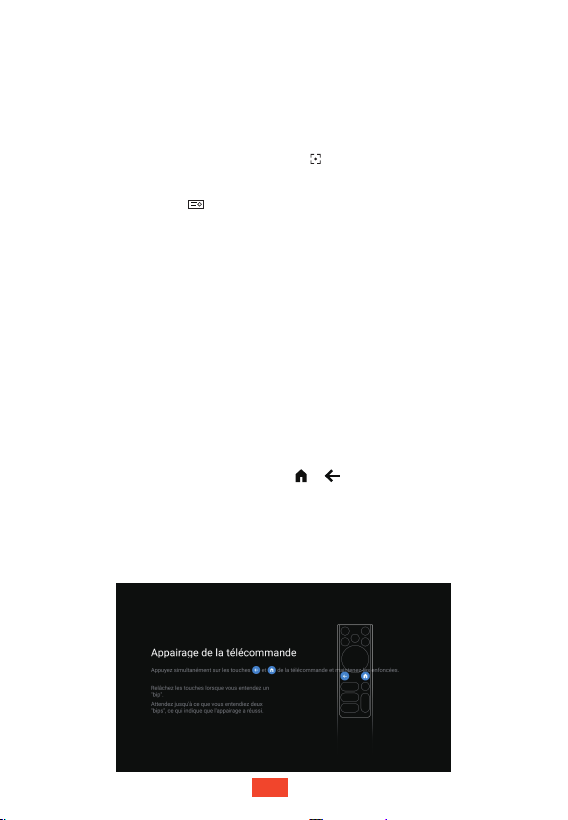
Vous pouvez également effectuer la mise au point manuellement à l'aide de la
télécommande. Maintenez enfoncé le bouton de la télécommande jusqu'à ce
que l'image soit suffisamment nette.
Mise au point
Coupler la télécommande
Mise au point automatique
Mise au point manuelle
Remarque
:
Avancée
Appuyez sur le bouton de la télécommande et sélectionnez Mise au point
-> Avancé pour accéder aux paramètres avancés. Par exemple :
Le couplage de la télécommande améliore l'expérience d'utilisation:
Mise au point automatique au démarrage: Réglage automatique de la clarté de l'image au démarrage.
Mise au point automatique après um mouvement: Réglage automatique de la clarté de l'image
après avoir déplacé l'appareil.
•
•
•
•
Essuyez la lentille du capteur TOF avec un chiffon doux pour améliorer la mise au
point automatique.
La distance de projection doit être comprise entre 1,5 m et 4 m.
•
Une surface de projection inégale peut dégrader la mise au point automatique. Dans
ce cas, vous pouvez utiliser la mise au point manuelle pour rendre l'image plus nette.
•
Si le projecteur est en position fixe, nous vous recommandons de désactiver les
options [Mise au point automatique au démarrage] et [Mise au point automatique après
um mouvement].
① Approchez la télécommande du projecteur.
② Appuyez simultanément sur les boutons et pendant environ dix secondes.
③ Le message « Réussi » s'affiche à l'écran lorsque votre télécommande est
couplée au projecteur.
Remarque:
•
Si vous ne couplez pas la télécommande, la page de couplage s'affiche chaque fois
que vous allumez le projecteur.
•
L'Assistant Google ne fonctionne que si la télécommande est couplée.
Positionnez le projecteur de manière à ce qu'il soit orienté vers une surface de
projection appropriée ou un mur. Le projecteur effectue automatiquement la mise
au point de l'image.
48
FR
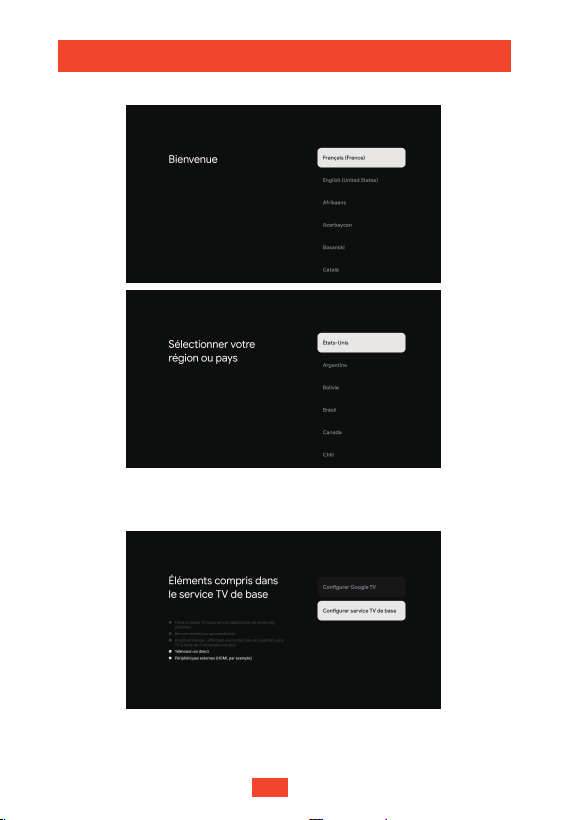
Téléviseur classique :
Deux types de téléviseur sont disponibles :
Sélectionnez votre type de téléviseur
Un téléviseur classique vous offre :
• Télévision en direct
• Périphériques externes (HDMI, par exemple)
Sélectionnez votre langue et votre région/pays
Configuration de votre téléviseur
49
FR
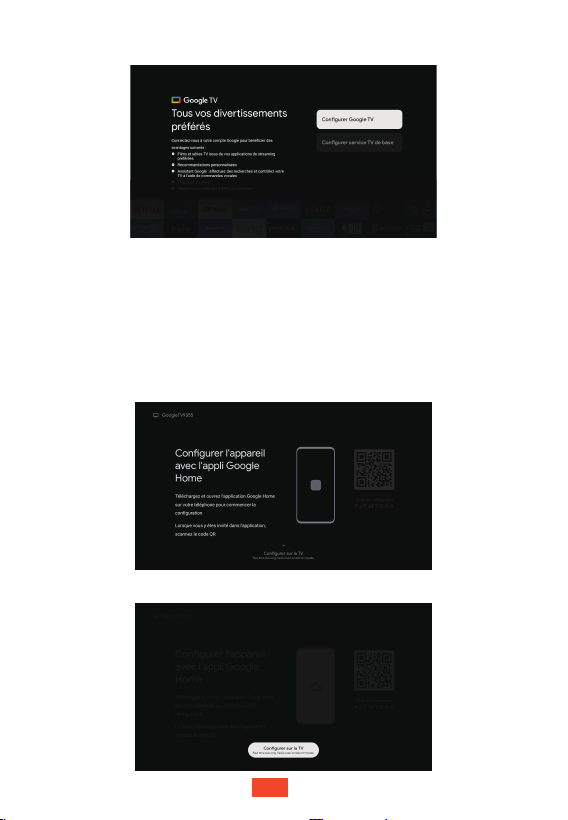
Google TV
TM
:
Configurer l'appareil avec l'appli Google Home
Connectez-vous avec votre compte Google pour obtenir ce qui suit:
• Films et séries depuis vos applications de streaming préférées
• Recommandations personnalisées
• Assistant Google: faites des recherches et contrôlez votre téléviseur avec votre voix
• L'Assistant Google ne fonctionne que si la télécommande est couplée
• Télévision en direct
• Périphériques externes (HDMI, par exemple)
Configurer sur la TV
50
FR
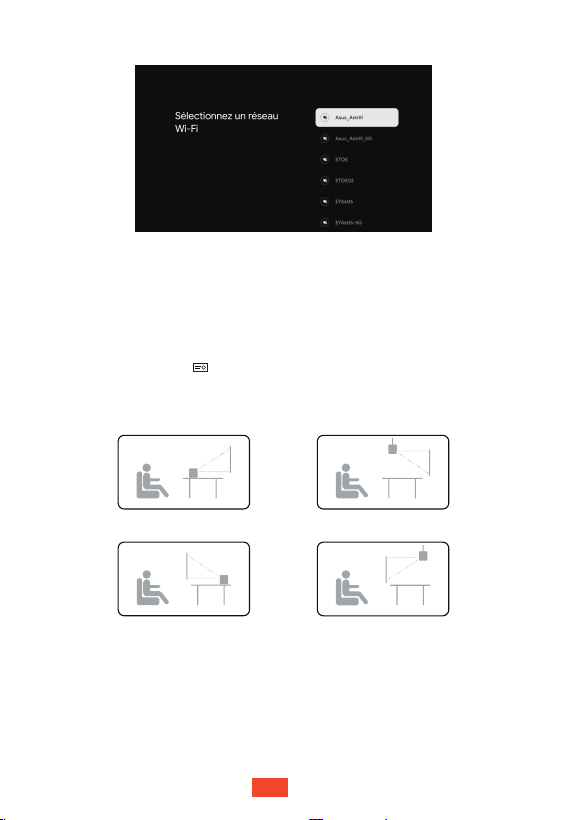
Connexion Wi-Fi
Étapes finales
Suivez les instructions à l'écran pour terminer la configuration de Google TV.
Paramètres du projecteur
Personnalisez votre projecteur en fonction de vos préférences.
Mode de projection
Appuyez sur le bouton de la télécommande et sélectionnez Paramètres
avancés -> Mode de projection.
Mode de Projection
Avant Plafond avant
Arrière
Plafond arrière
Correction d'image
Correction automatique de la distorsion trapézoïdale
Positionnez le projecteur de manière à ce qu'il soit orienté vers une surface
de projection appropriée ou un mur. Le projecteur ajuste automatiquement
l'image.
51
FR
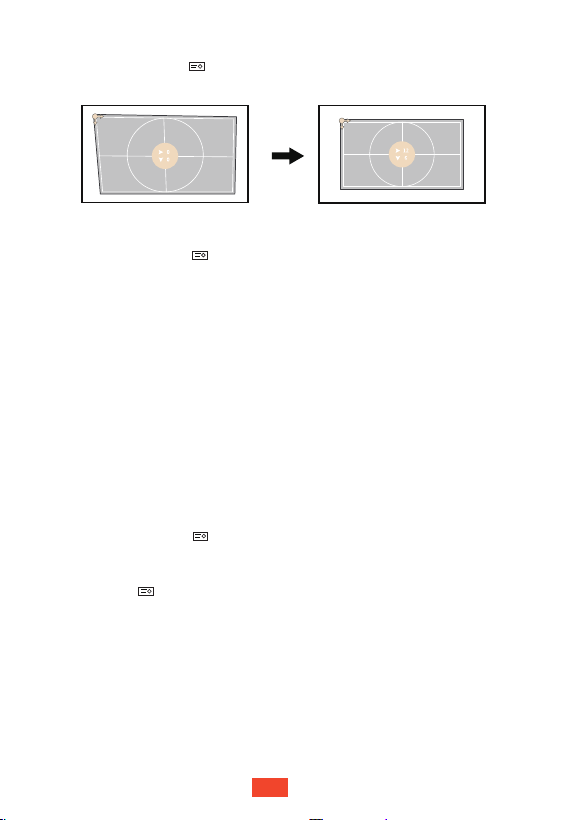
Correction manuelle de la distorsion trapézoïdale
Appuyez sur le bouton de la télécommande et sélectionnez Correction
d'image -> Correction manuelle de la distorsion trapézoïdale pour régler l'image.
Avancé
Appuyez sur le bouton de la télécommande et sélectionnez Correction
d'image -> Avancé pour accéder aux paramètres avancés. Par exemple:
•
•
Correction du Keystone automatique au démarrage: Ajuste automatiquement l'image à
une forme rectangulaire au démarrage.
Correction automatique de la distorsion trapézoïdale après un mouvement: Ajuste
automatiquement l'image sur une forme rectangulaire après avoir déplacé l'appareil.
Remarque:
•
•
Essuyez la lentille du capteur TOF avec un chiffon doux pour améliorer la
correction de l'effet.
La distance de projection doit être comprise entre 1,5 m et 4 m.
•
La correction automatique de l'effet trapèze ne fonctionne que lorsque l'angle
de projection est de ±30 degrés.
•
Si le projecteur est en position fixe, nous vous recommandons de désactiver
les options [Correction du Keystone automatique au démarrage] et [Correction
automatique de la distorsion trapézoïdale après un mouvement].
Zoom et repositionnement de l'image
Appuyez sur le bouton de la télécommande et sélectionnez Correction
d'image -> Adaptation de l'image -> Zoom pour effectuer un zoom avant/arrière.
Vous pouvez repositionner l'image en effectuant un zoom arrière. Appuyez
sur le bouton de la télécommande et sélectionnez Correction d'image ->
Adaptation de l'image -> Repositionnement de l'image pour repositionner
l'image.
52
FR
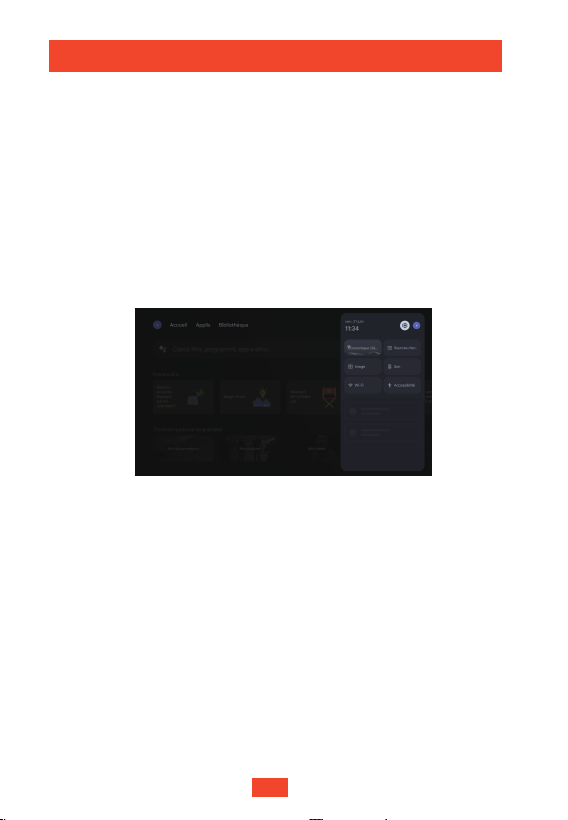
Découvrez votre téléviseur
Téléviseur classique
En mode téléviseur classique, vous pouvez utiliser des fonctionnalités de
base telles que HDMI, Netflix, YouTube et Prime Video.
Nous vous recommandons de vous connecter à votre compte Google pour
profiter pleinement de l'expérience Google TV.
Google TV
Regardez des films et des séries depuis vos applications de streaming préférées.
Applis
Ouvrez ou installez n'importe quelle application ici.
Tableau de bord
Affichez les messages et lancez rapidement des fonctions telles que:
• Économiseur d'écran • Sources d’entrée
• Image
• Accessibilité
• Son
• Wi-Fi
Paramètres
Réglez les paramètres courants tels que:
• Projecteur
• Affichage et son
• Réseau et Internet
• Accessibilité
• Système
• Télécommandes et accessoires
53
FR
Google Assistant
Google TV est fourni avec l'Assistant Google intégré, qui peut être utilisé en
appuyant sur le bouton de la télécommande.
Remarque:
l'Assistant Google ne fonctionne que si la télécommande
est couplée et qu'un réseau valide est disponible.
Connexion USB
Ce projecteur peut également être utilisé avec des périphériques USB
externes. Pour utiliser cette fonction:
① Installez une application de gestion de fichiers telle que «IMPlayer» sur
la page Applications.
② Ouvrez l'application de gestion de fichiers et insérez le périphérique USB.
③ Suivez les instructions de l'application de gestion de fichiers pour vous
connecter au périphérique USB.
Connexion HDMI
Ce projecteur prend en charge les connexions avec divers périphériques
de lecture HDMI, y compris les ordinateurs, les clés TV, les box TV, les
lecteurs DVD, les décodeurs et les consoles de jeux.
① Connectez le projecteur à un périphérique de lecture HDMI à l'aide d'un
câble HDMI (non fourni).
② Appuyez sur le bouton de la télécommande et sélectionnez HDMI.
Accessoires Bluetooth
Ce projecteur prend en charge les connexions avec divers périphériques
Bluetooth, y compris les télécommandes, les haut-parleurs, les claviers et
les souris d'ordinateur.
① Appuyez sur le bouton de la télécommande et sélectionnez .
② Sélectionnez Télécommandes et accessoires -> Associer un accessoire
pour coupler votre appareil Bluetooth.
Mode haut-parleur Bluetooth
Notre produit fonctionne également comme un haut-parleur Bluetooth. Pour
utiliser cette fonction :
① Appuyez sur le bouton de la télécommande et sélectionnez Mode
haut-parleur Bluetooth.
② Connectez votre périphérique de lecture au «Projecteur Atom» via Bluetooth.
③ Lancez votre musique sur votre appareil et réglez le volume à l'aide de la
télécommande.
④ Appuyez sur le bouton et maintenez-le enfoncé pendant deux secondes
pour quitter le mode haut-parleur Bluetooth.
54
FR
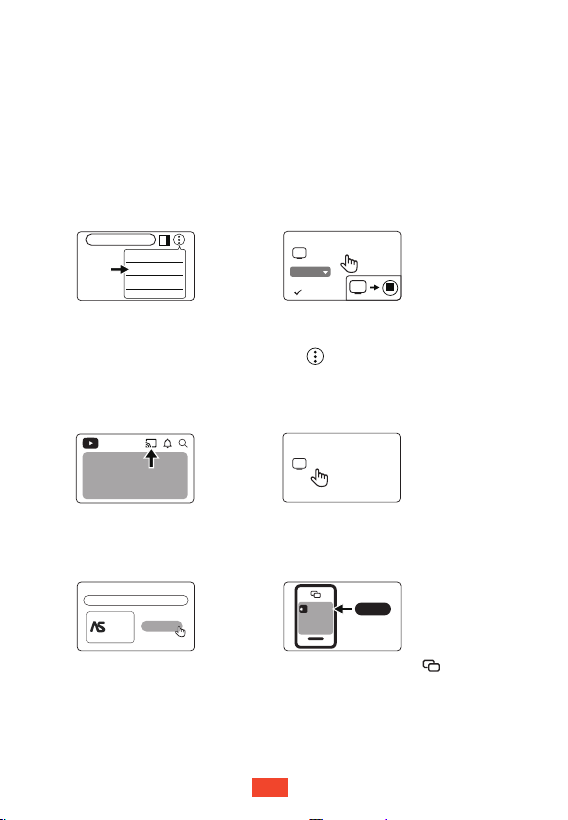
Google Cast™
Les projecteurs ETOE sont livrés avec Google Cast. Appuyez simplement
sur le bouton Cast des applications que vous connaissez et aimez déjà
pour diffuser du divertissement depuis votre téléphone, tablette ou ordinateur
portable vers le téléviseur.
Appareils TV compatibles avec Google Cast
Assurez-vous que les appareils sont connectés au même réseau Wi-Fi.
①
Cliquez sur le bouton Cast et sélectionnez A1363.
②
Appareil iOS compatible avec Google Cast
TV
Select
AirScreen - AirPlay & Cast
AirScreen
Install
Installez AirScreen sur le projecteur
depuis la page Applications.
①
Ouvrez l'application AirScreen
sur le projecteur et suivez les
instructions à l'écran.
②
③
Cliquez sur le bouton sur
votre appareil iOS et sélectionnez
A1363.
Sites/applications compatibles avec Google Cast
Cliquez sur le bouton Cast
sur le site Web/l'application.
①
②
Cast to
YouTube
Ordinateur compatible Google Cast
www.xxxx.com
Cast...
Print...
Find...
Cast
Available
Sources
Cast tab
Cast screen
Installez Google Chrome sur
votre ordinateur et ouvrez-le.
①
Sélectionnez A1363.
Sélectionnez A1363.
③
Cliquez sur « Diffuser » dans le menu en haut à droite, puis
allez dans le menu Sources et choisissez si vous souhaitez diffuser
un onglet ou l'écran entier.
②
A����
A����
A����
55
FR
Garantie
Garantie satisfait ou remboursé de 30 jours
Si vous retournez votre produit non endommagé dans les 30 jours suivant
la date d'achat, quelle que soit la raison, vous serez intégralement remboursé.
L'acheteur est responsable des frais d'expédition pour les réclamations au
titre de la garantie qui ne sont pas liées à des problèmes de qualité.
Garantie de 12 mois
Chaque produit ETOE bénéficie d'une garantie d'un an pour les problèmes
liés à la qualité. Si vous soumettez une demande à notre équipe d'assistance
par e-mail, ETOE pourra, à votre discrétion:
1.Remplacer le produit ETOE par un produit du même modèle et prendre en
charge tous les frais de retour.
2.Effectuer un remboursement intégral du prix d'achat en échange du produit
ETOE.
Distance de projection et taille de l'écran
3.5 108.049.819.688.634.940
5.3 162.174.729.4132.852.360
7.1 216.199.639.2177.169.780
8.9 270.1124.549.0221.487.2100
Caractéristiques techniques
CPU: ARM Quad 64-bit Cortex-A53
Bluetooth: Bluetooth 5.1
Wi-Fi: 2,4 GHz / 5 GHz 802.11a/b/g/n/ac
Résolution native: 1920 × 1080
Rapport de projection: 1,22
Format d'image: 16:9 / 4:3 adaptatif
Haut-parleurs: haut-parleur stéréo 10 W × 2
Ports de connexion: HDMI × 1; USB × 1; AUX × 1
Zoom: 50%–100%
Correction de l'effet trapèze: ±30°, prise en charge de la correction
automatique de l'effet de trapèze
Température ambiante recommandée: 41°F - 95°F / 5°C - 35°C
Humidité relative: 15%–85% (sans condensation)
Caractéristiques techniques
Taille de l’écran
(pouces)
Largeur
(pouces)
Hauteur
(pouces)
Distance
(pieds)
Distance
(cm)
Hauteur
(pouces)
Largeur
(cm)
56
FR

Lea todas las instrucciones antes de usar este dispositivo. No realice
ningún cambio que no se describa en este manual. Si la lesión física, la
pérdida de datos o los daños son causados por no seguir las instrucciones,
la garantía no se aplica.
Configuración
• Para reducir el riesgo de incendio y / o descarga eléctrica, no exponga el
dispositivo a la lluvia ni a la humedad, y no debe colocar objetos llenos de
líquido, como jarrones, sobre el dispositivo.
• No coloque el dispositivo sobre superficies blandas como los manteles o
las alfombras, ya que al hacerlo podría representarse un riesgo de
incendio.
• No coloque el dispositivo en áreas susceptibles a un exceso de polvo y
suciedad ni cerca de ningún aparato que genere un fuerte campo
magnético.
• Para evitar el sobrecalentamiento, no bloquee ni obstruya las aberturas
de ventilación. Nunca coloque el dispositivo en un espacio cerrado. Deje
siempre suficiente espacio alrededor del dispositivo para ventilarlo.
• Proteja el dispositivo contra la luz solar directa, el calor, las grandes
fluctuaciones de temperatura y la humedad.
• Cuando el dispositivo funciona durante un período prolongado y la
superficie se calienta, apáguelo y desenchufe el cable de alimentación.
Reanude el funcionamiento solo después de que el dispositivo se haya
enfriado.
• Manipule siempre el dispositivo con cuidado. Evite tocar la lente.
• Nunca coloque objetos pesados o afilados sobre el dispositivo o sobre el
cable de alimentación. Para evitar descargas eléctricas, no desarme el
equipo.
• Utilice únicamente aditamentos o accesorios especificados por el
fabricante. Evite las vibraciones extremas. Puede dañar los componentes
internos. No permita que los niños manipulen el dispositivo sólo sin
supervisión.
• En las siguientes condiciones, puede aparecer una capa de humedad
dentro del dispositivo, lo que puede provocar un mal funcionamiento del
equipo:
a) si el dispositivo se traslada de una zona fría a una cálida;
b) después de calentar una habitación fría;
c) cuando el dispositivo se coloca en una habitación húmeda.
Para evitar la humedad, selle el dispositivo en una bolsa de plástico antes
de trasladarlo a otra habitación y espere una a dos horas antes de sacarlo
de la bolsa.
.
Instrucciones de Seguridad
ES
57

Suministro de energía
• Utilice únicamente el adaptador de corriente proporcionado por el
fabricante.
• Apague el dispositivo antes de quitar la fuente de alimentación del
enchufe.
• Proteja el cable de alimentación para que no se pise ni se pellizque,
especialmente en los enchufes, receptáculos de conveniencia y el punto
por donde salen de este dispositivo.
• Desenchufe este dispositivo si hay tormentas eléctricas o si no se utiliza
durante un período prolongado.
• Cuando se utilice el enchufe de alimentación o un acoplador de
electrodomésticos como dispositivo de desconexión, el dispositivo de
desconexión deberá permanecer fácilmente operativo.
• Antes de realizar o cambiar cualquier conexión, asegúrese de que todos
los dispositivos estén desconectados de la toma de corriente.
• Nunca toque el cable de alimentación o el conector de alimentación con
las manos mojadas.
Seguridad auditiva
Para evitar daños auditivos, no escuche durante períodos prolongados a un
volumen alto. Fije el volumen a un nivel seguro.
Limpieza
• Apague el dispositivo y aléjalo de la fuente de alimentación antes de
limpiar la superficie.
• Utilice un paño suave que no suelte pelusa. Nunca use limpiadores
líquidos, gaseosos o fácilmente inflamables (como aerosoles, abrasivos,
abrillantadores y alcohol). Limpia las superficies suavemente. Tenga
cuidado de no rayar las superficies.
• No utilice agentes de limpieza líquidos para limpiar la lente, ya que
pueden dañar la capa protectora de la lente. Utilice papel de limpieza de
lentes para limpiar la lente del proyector.
Reparaciones
• No realice ninguna reparación en el dispositivo por usted mismo. Solo
haga que su dispositivo sea reparado por un centro de servicio
autorizado.
• Un mantenimiento inadecuado puede provocar lesiones o daños al
dispositivo.
• Encarga todas las reparaciones a personal de servicio calificado.
Precaución
• No mire fijamente a la viga operativa. La luz brillante puede dañar sus
ojos.
ES
ES
58
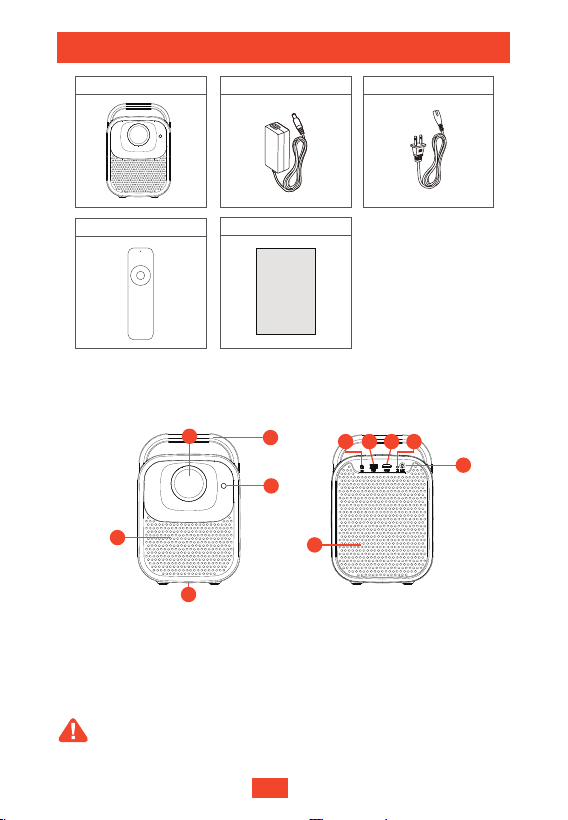
Manual de usuario x 1
Adaptador x 1
Control remoto x 1
Proyector x 1
Cable adaptador de CA x 1
Descripción general
Proyector
Rejilla de ventilación (salida)
TOF (enfoque automático)
Orificio roscado para trípode
Entrada de CCLente
Puerto USB
Puerto HDMI
Receptor de infrarrojos
①
②
③
Manejar
⑩
④
⑤
⑥
Puerto AUX
⑨
⑦
⑧
Vista frontal Vista trasera
• No mires directamente a la lente; podrías dañarte la vista.
• No obstruyas la rejilla de ventilación (salida).
Precaución:
User Manual
Qué incluye
65 7 8
9
10
1
2
3
1
4
ES
59
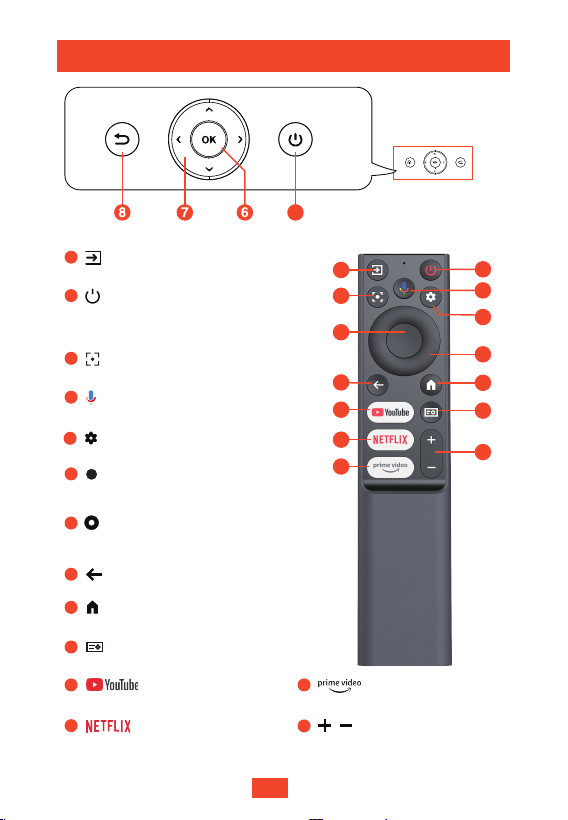
1
2
3
4
5
8
9
11
12
13
6
7
10
14
Botón de YouTube predefinido
13
Botón de Prime Video predefinido
Botón de Netflix predefinido
Fuente de señal
2
Botón del proyector y mando a distancia
3
Vuelve a la página de inicio
9
10
Ajustes rápidos
12
Púlsalo para confirmar una selección o
una entrada
6
Activa el Asistente de Google
4
Ajustes
5
Vuelve a la página anterior
8
Ajusta el enfoque
14
Sube/baja el volumen
11
Navega a través de menús o ajusta el
contenido seleccionado
7
1
• Presione y mantenga presionado el
botón: apagar
• Pulsar el botón una vez: encendido
2
ES
60
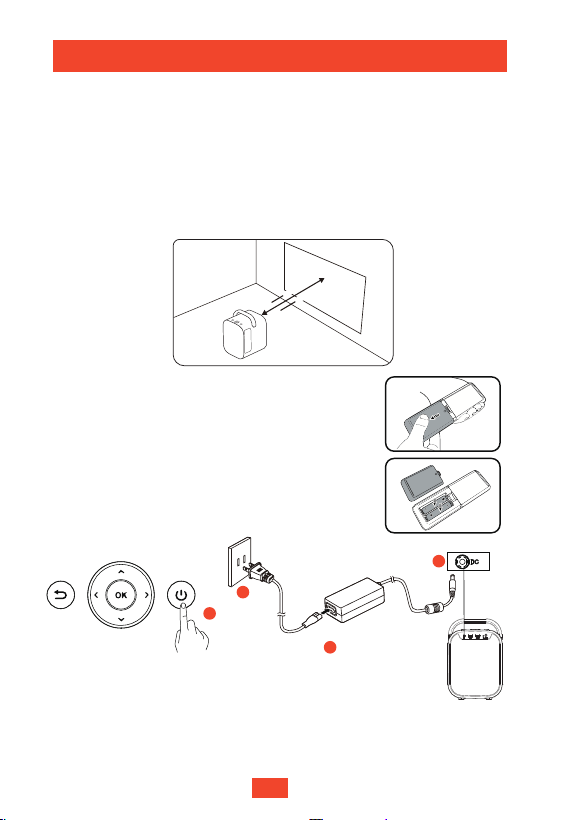
1.5m
4.1m
40"
150"
Primeros pasos
Colocación
① Coloca el proyector de forma que quede orientado hacia la superficie de
proyección para obtener una imagen rectangular.
②
La distancia entre el proyector y la superficie de proyección determinará
el tamaño de la imagen.
③
Consulta la distancia de proyección y el tamaño de pantalla en la sección
Especificaciones.
Preparación del mando a distancia
① Inserta las pilas (no incluidas) en el mando a
distancia.
②
Pulsa y abre la cubierta del compartimento de
las pilas, como se muestra en la imagen.
③
Encender
4
2
1
3
Asegúrate de que no haya obstáculos que puedan bloquear la rejilla de
ventilación a 30 cm/11,8" o menos.
④
La distancia entre el mando y el proyector no debe
superar los 10 m/33 ft.
• Enchufa el cable de alimentación, espera 5 segundos y pulsa
el botón de encendido una vez para encender el proyector.
• Mantén pulsado el botón de encendido para apagarlo.
• El indicador se iluminará en rojo cuando el cable de alimentación
esté enchufado a la corriente.
• El indicador se iluminará en blanco cuando el proyector esté encendido.
ES
61
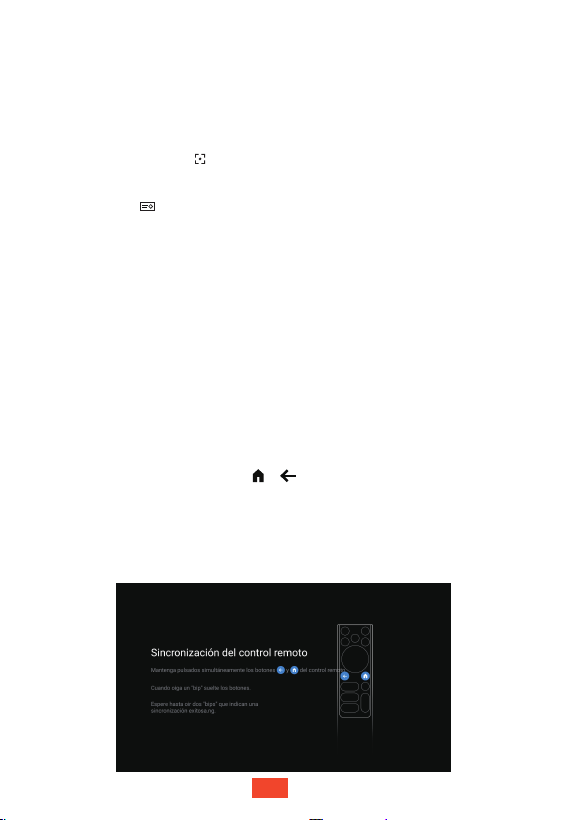
También puedes enfocar la imagen manualmente usando el mando a distancia.
Mantén pulsado el botón del mando a distancia hasta que la imagen se vea nítida
y esté suficientemente enfocada.
Enfoque
Emparejamiento del mando a distancia
Enfoque automático
Enfoque manual
Nota:
Avanzado
Pulsa el botón del mando a distancia y selecciona Enfoque -> Avanzado
para acceder a los ajustes avanzados. Por ejemplo:
Para mejorar la experiencia de uso, empareja el mando a distancia:
Enfoque automático al inicio: Ajuste automático de la Claridad de la imagen al encender.
Enfoque automático después del movimiento: Ajuste automático de la claridad de la imagen
después de mover el dispositivo.
•
•
•
•
Limpia la lente del sensor TOF con un paño suave para mejorar el efecto de
enfoque automático.
La distancia de proyección debe ser de entre 1,5 m (3,6 ft) y 4 m (13,1 ft).
•
Es posible que una superficie de proyección irregular haga que el efecto de enfoque
automático se vea peor. En ese caso, puedes usar el Enfoque manual para hacer que
la imagen se vea más nítida.
•
Si el proyector está en una posición fija, recomendamos desactivar las opciones
[Enfoque automático al inicio] y [Enfoque automático después del movimiento].
① Acerca el mando a distancia al proyector.
② Mantén pulsados los botones y a la vez durante unos 10 segundos.
③ Una vez que el mando a distancia se haya emparejado con el proyector,
aparecerá el mensaje "Completado" en pantalla.
Nota:
•
Si no emparejas el mando a distancia, la pantalla de emparejamiento aparecerá
cada vez que enciendas el proyector.
•
El Asistente de Google solo funcionará si se empareja el mando a distancia.
Coloca el proyector de forma que quede orientado hacia una pared o una superficie
de proyección adecuadas. El proyector enfocará la imagen automáticamente.
ES
62
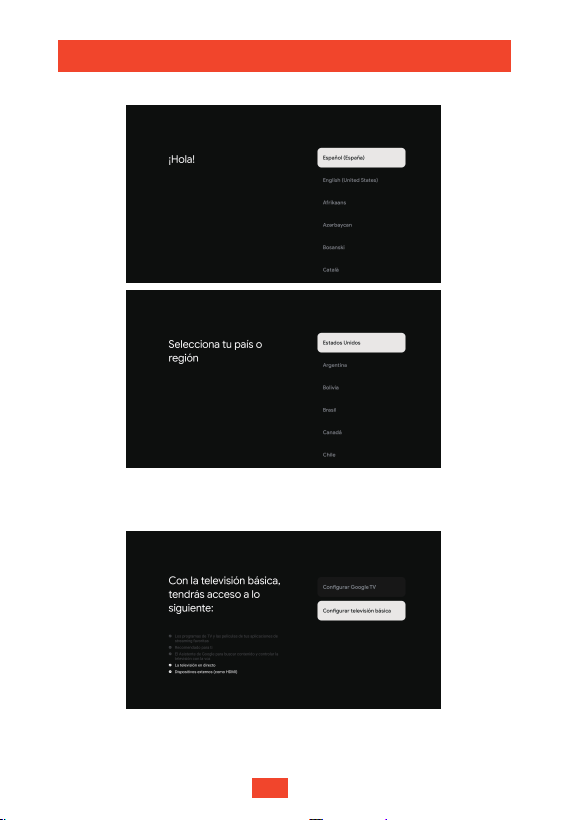
TV básica:
Puedes elegir entre dos tipos de TV:
Selección del tipo de TV
Con TV básica, podrás acceder a:
• La televisión en directo
• Dispositivos externos (como HDMI)
Selección de idioma y región/país
Configuración de la TV
ES
63
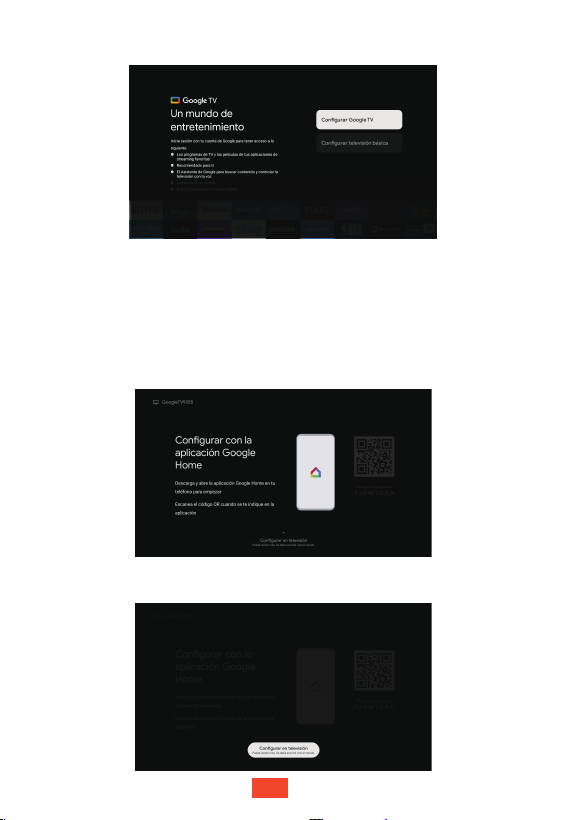
Google TV
TM
:
Configurar con la aplicación Google Home
Inicia sesión con tu cuenta de Google para tener acceso alo siguiente:
• Los programas de TV y las peliculas de tus aplicaciones de streaming favoritas
• Recomendado para ti
• Asistente de Google: realiza búsquedas y controla el televisor con la voz
• El Asistente de Google solo funcionará si se empareja el mando a distancia
• Dispositivos externos (como HDMI)
Configurar en televisión
ES
64
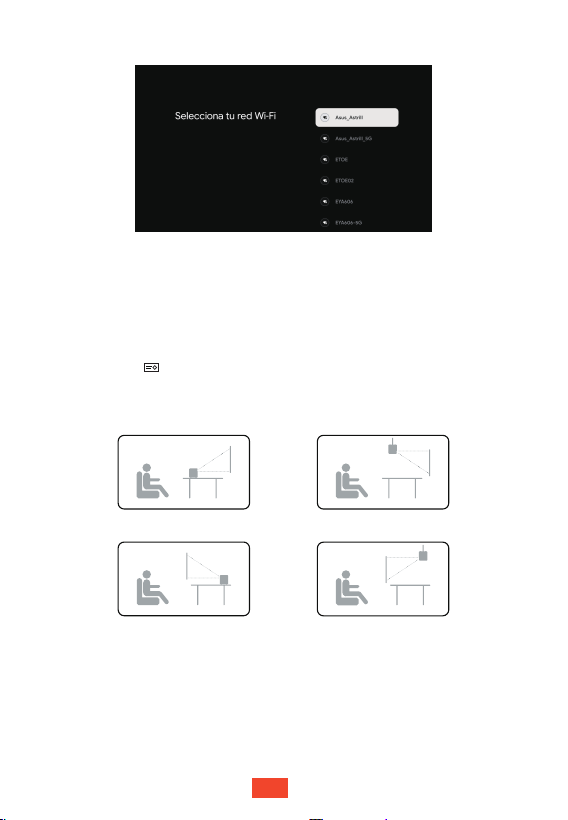
Conexión Wi-Fi
Pasos finales
Sigue las indicaciones en pantalla para completar la configuración de tu
Google TV.
Ajustes del proyector
Personaliza el proyector según tus preferencias.
Modo de proyección
Pulsa el botón del mando a distancia y selecciona Configuración
avanzada -> Modo de proyección.
Modo de proyección
Frontal Frontal superior
Posterior
Posterior superior
Corrección de imagen
Corrección trapezoidal automática
Coloca el proyector de forma que quede orientado hacia una pared o una
superficie de proyección adecuadas. El proyector ajustará la imagen
automáticamente.
ES
65
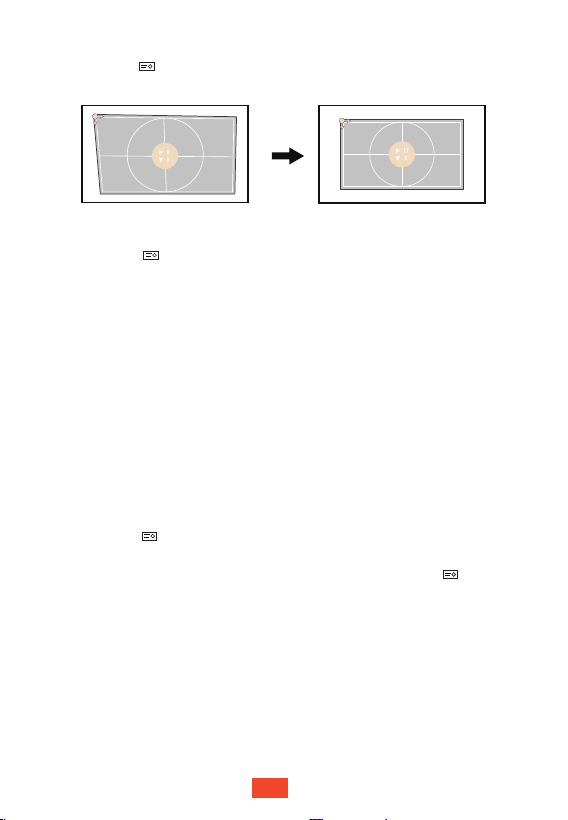
Corrección trapezoidal manual
Pulsa el botón del mando a distancia y selecciona Corrección de imagen
-> Corrección trapezoidal manual para ajustar la imagen.
Avanzado
Pulsa el botón del mando a distancia y selecciona Corrección de imagen
-> Avanzado para acceder a los ajustes avanzados. Por ejemplo:
•
•
Corrección Keystone automática al inicio: Ajuste automático la imagen a una forma
rectangular al inicio.
Corrección trapezoidal automática después del movimiento: Ajuste automático de la imagen
a forma rectangular después de mover el dispositivo.
Nota
:
•
•
Limpia la lente del sensor TOF con un paño suave para mejorar el efecto de
corrección.
La distancia de proyección debe ser de entre 1,5 m (3,6 ft) y 4 m (13,1 ft).
•
Corrección trapezoidal automática solo funciona cuando el ángulo de proyección
es de ±30°.
•
Si el proyector está en una posición fija, recomendamos desactivar las opciones
[Corrección Keystone automática al inicio] y [Corrección trapezoidal automática
después del movimiento].
Zoom y reposicionar imagen
Pulsa el botón del mando a distancia y selecciona Corrección de imagen
-> Adaptar imagen -> Zoom para acercar o alejar el zoom.
Puedes reposicionar la imagen alejando el zoom. Pulsa el botón del mando
a distancia y selecciona Corrección de imagen -> Adaptar imagen ->
Reposicionar imagen para reposicionar la imagen.
ES
66
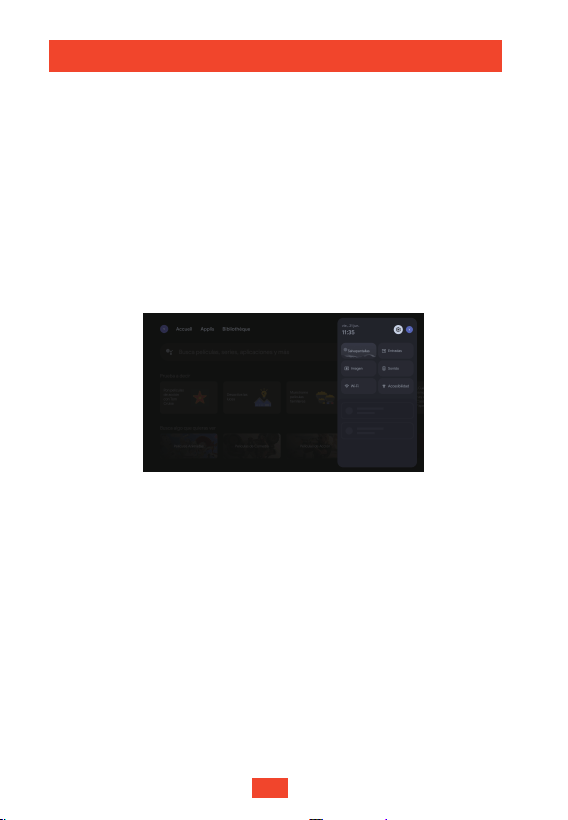
Exploración de la TV
TV básica
En el modo TV básica, puedes utilizar funciones básicas como HDMI, Netflix,
YouTube y Prime Video.
Te recomendamos que inicies sesión en tu cuenta de Google para disfrutar
de la experiencia completa de Google TV.
Google TV
Disfruta de películas y programas de TV de tus aplicaciones de streaming
favoritas.
Applis
Abre o instala cualquier aplicación desde aquí.
Panel de control
Accede a mensajes y funciones de inicio rápido, como:
• Salvapantallas • Entradas
• Imagen
• Accesibilidad
• Sonido
• Wi-Fi
Ajustes
Configura ajustes comunes, como:
• Proyector
• Imagen y sonido
• Redes e Internet
• Accesibilidad
• Sistema
• Mandos y accesorios
ES
67
Asistente de Google
Google TV incluye el Asistente de Google, que puede usarse pulsando el
botón del mando a distancia.
Nota:
El Asistente de Google solo funcionará si se empareja el
mando a distancia y hay una conexión de red válida.
Conexión USB
Este proyector también puede utilizarse con dispositivos USB externos.
Para utilizar esta función:
① Instala una aplicación de gestión de archivos como "IMPlayer" en la
página Aplicaciones.
② Abre la aplicación de gestión de archivos e inserta el dispositivo USB.
③ Sigue las indicaciones de la aplicación de gestión de archivos para
conectarte al dispositivo USB.
Conexión HDMI
Este proyector admite la conexión de diversos dispositivos de reproducción
por HDMI, como ordenadores TV sticks, TV boxes, reproductores de DVD,
decodificadores (STB) y videoconsolas.
① Conecta el proyector a un dispositivo de reproducción HDMI con un
cable HDMI (no incluido).
② Pulsa el botón del mando a distancia y selecciona HDMI.
Accesorios Bluetooth
Este proyector admite la conexión de diversos dispositivos Bluetooth, como
mandos a distancia, altavoces, teclados y ratones.
① Pulsa el botón del mando a distancia y selecciona .
② Selecciona Mandos y accesorios -> Emparejar accesorio para emparejar
tu dispositivo Bluetooth.
Modo de altavoz Bluetooth
Nuestro producto también funciona como altavoz Bluetooth. Para utilizar
esta función:
① Pulsa el botón del mando a distancia y selecciona Modo de altavoz
Bluetooth.
② Conecta el dispositivo de reproducción a "Projector Atom" mediante
Bluetooth.
③ Reproduce música en el dispositivo y ajusta el volumen con el mando a
distancia.
④ Mantén pulsado el botón durante dos segundos para salir del modo
de altavoz Bluetooth.
ES
68
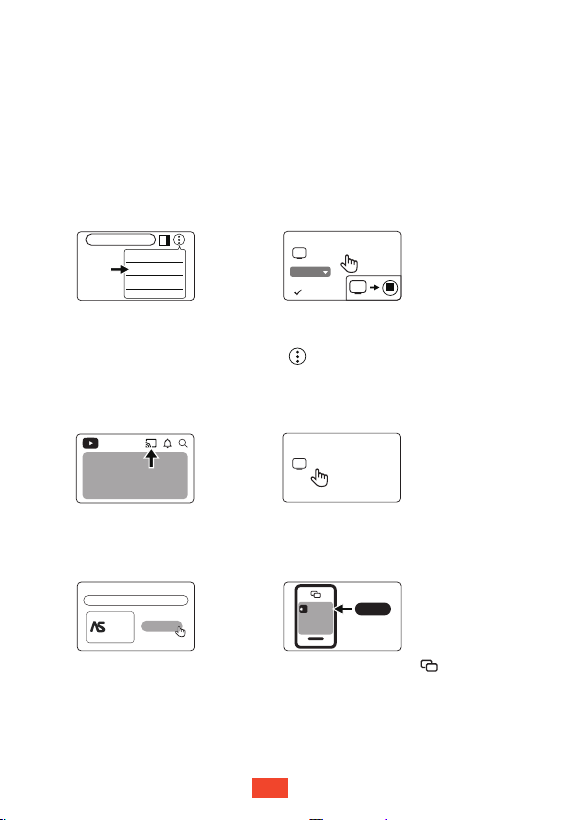
Google Cast™
Los proyectores ETOE vienen con Google Cast. Simplemente toque el
botón Cast desde las aplicaciones que ya conoce y ama para transmitir
entretenimiento desde su teléfono, tableta o computadora portátil al televisor.
Dispositivos de TV compatibles con Google Cast
Asegúrese de que los dispositivos estén conectados a la misma red Wi-Fi.
①
Haga clic en el botón Transmitir y seleccione A1363.
②
Dispositivo iOS compatible con Google Cast
TV
Select
AirScreen - AirPlay & Cast
AirScreen
Install
Instale AirScreen en el proyector
desde la página de Aplicaciones.
①
Abra la aplicación AirScreen en el
proyector y siga las instrucciones en pantalla.
②
③
Haga clic en el botón en su
dispositivo iOS y seleccione A1363.
Sitios y aplicaciones compatibles con Google Cast
Haga clic en el botón Transmitir
en el sitio web/aplicación.
①
Seleccione A1363.
②
Cast to
YouTube
Computadora con Google Cast habilitado
www.xxxx.com
Cast...
Print...
Find...
Cast
Available
Sources
Cast tab
Cast screen
Instale Google Chrome en su
computadora y ábralo.
①
Seleccione A1363.
③
Haz clic en "Transmitir" en el menú en la parte superior
derecha, luego ve al menú Fuentes y elige si quieres transmitir
una pestaña o la pantalla completa.
②
A����
A����
A����
ES
69
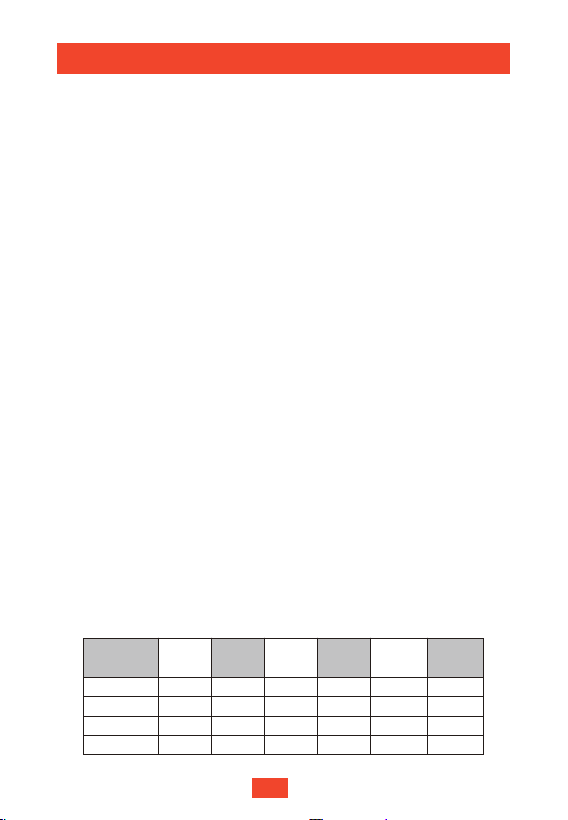
Garantía
Garantía de reembolso en 30 días
Si devuelves un producto intacto por cualquier motivo en un plazo de 30
días desde la fecha de compra, recibirás un reembolso completo.
El comprador será responsable de los gastos de envío en las reclamaciones
de garantía que no estén relacionadas con problemas de calidad.
Garantía de 12 meses
Todos los productos ETOE incluyen un año de cobertura para problemas
de calidad. Si envías una reclamación a nuestro equipo de atención al
cliente por correo electrónico, según lo que solicites, ETOE:
1.Sustituirá el producto ETOE por un producto del mismo modelo y cubrirá
cualquier gasto de devolución.
2.Te reembolsará el importe de compra íntegro a cambio del producto ETOE.
Distancia de proyección y tamaño de pantalla
3.5 108.049.819.688.634.940
5.3 162.174.729.4132.852.360
7.1 216.199.639.2177.169.780
8.9 270.1124.549.0221.487.2100
Especificaciones
CPU: ARM Quad 64-bit Cortex-A53
Bluetooth: Bluetooth 5.1
Wi-Fi: 2,4 GHz / 5 GHz 802.11a/b/g/n/ac
Resolución nativa: 1920 × 1080
Relación de proyección: 1,22
Relación de aspecto: 16:9 / 4:3 adaptable
Altavoces: 2 altavoces estéreo de 10 W
Puertos de conexión: HDMI × 1; USB × 1; AUX × 1
Zoom: 50%–100%
Corrección trapezoidal: ±30°, admite corrección trapezoidal automática
Temperatura ambiente recomendada: 41°F - 95°F / 5°C - 35°C
Humedad relativa: 15%–85% (sin condensación)
Especificaciones
Tamaño de la
pantalla (pulgadas)
Ancho
(pulgadas)
Ancho
(cm)
Altura
(pulgadas)
Distancia
(pie)
Distancia
(cm)
Altura
(cm)
ES
70

Instrukcje Bezpieczeństwa
Przeczytaj wszelkie instrukcje przed skorzystaniem z urządzenia. Nie dokonuj
żadnych zmian nieopisanych w tym podręczniku. Jeśli nastąpią urazy fizyczne,
utrata danych lub szkody na skutek nieprzestrzegania instrukcji, gwarancja nie
przysługuje.
Konfiguracja
• Aby obniżyć ryzyko pożaru i/lub porażenia prądem, nie wystawiaj urządzenia
na deszcz ani wilgoć, ani nie stawiaj na urządzeniu przedmiotów wypełnionych
płynem, np. wazonów.
• Nie umieszczaj urządzenia w miejscach podatnych na nadmierny kurz i brud
lub w pobliżu urządzeń generujących silne pole magnetyczne.
• Aby zapobiec przegrzaniu, nie blokuj ani nie zapychaj otworów wentylacyjnych.
Nigdy nie stawiaj urządzenia w ograniczonej przestrzeni. Zawsze pozostawiaj
wokół urządzenia dość przestrzeni wentylacyjnej.
• Chroń urządzenie przed bezpośrednim światłem słonecznym, gorącem,
dużymi wahaniami temperatury i wilgocią.
• Kiedy urządzenie pracuje przez długi czas i powierzchnia się nagrzewa,
wyłącz je i odepnij kabel zasilający. Przywróć działanie dopiero po
ostygnięciu urządzenia.
• Zawsze obchodź się z urządzeniem delikatnie. Unikaj dotykania soczewki.
• Nigdy nie kładź ciężkich lub ostrych przedmiotów na urządzeniu lub kablu
zasilającym. Aby uniknąć porażenia prądem, nie demontuj urządzenia.
• Używaj tylko dodatków lub akcesoriów określonych przez producenta.
Unikaj ekstremalnych wibracji. Może to uszkodzić komponenty wewnętrzne.
Nie pozwalaj dzieciom posługiwać się urządzeniem bez nadzoru.
• W następujących warunkach wewnątrz urządzenia może się pojawić warstwa
wilgoci, która może prowadzić do uszkodzenia:
b) po ogrzaniu zimnego pokoju;
a) jeśli urządzenie zostało przemieszczone z zimnego do ciepłego obszaru;
c) kiedy urządzenie umieszczone jest w wilgotnym pokoju.
Aby uniknąć wilgoci, umieść urządzenie w szczelnym plastikowym worku przed
przeniesieniem go do innego pokoju i odczekaj godzinę albo dwie przed
wyciągnięciem go z torby.
• Nie umieszczaj urządzenia na miękkich powierzchniach, np. obrusach czy
dywanach, gdyż może to stwarzać zagrożenie pożarowe.
PL
71

Zasilanie
• Używaj tylko załączonego zasilacza.
• Wyłącz urządzenie przed odłączeniem zasilacza z gniazdka.
• Chroń kabel zasilający przed deptaniem lub ściskaniem, zwłaszcza w
okolicy wtyczek, gniazdek oraz miejsc, w których wychodzą z urządzenie.
• Odłącz to urządzenie w razie burzy lub nieużywania przez dłuższy okres czasu.
• Kiedy wtyczka zasilająca lub złącze urządzenia stosowane są jako urządzenie
rozłączające, urządzenie rozłączające pozostanie gotowe do pracy.
• Zanim coś podłączysz lub zmienisz podłączenie, upewnij się czy wszystkie
urządzenia są odłączone od gniazdka elektrycznego.
• Nie dotykaj kabla zasilającego lub złącza zasilania mokrymi rękami.
Bezpieczeństwo Słuchu
• Aby uniknąć uszkodzenia słuchu, nie słuchaj przez dłuższy czas przy dużej
głośności. Ustaw głośność na bezpiecznym poziomie.
Czyszczenie
• Wyłącz urządzenie i odłącz je od zasilania przed czyszczeniem powierzchni.
• Użyj miękkiej szmatki niestrzępiącej. Nigdy nie stosuj płynnych, gazowych
ani łatwopalnych środków czyszczących (jak spraye, środki ścierne, lakiery
i alkohole). Delikatnie wytrzyj powierzchnię. Uważaj, aby nie zarysować
powierzchni.
• Nie używaj płynnych środków czyszczących do czyszczenia soczewki,
gdyż mogą uszkodzić warstwę ochronną soczewki. Użyj papieru do
czyszczenia soczewek w celu wyczyszczenia soczewki projektora.
Naprawy
• Nie dokonuj samodzielnie jakichkolwiek napraw urządzenia. Urządzenie
naprawiaj tylko w autoryzowanym centrum serwisowym.
• Nieprawidłowa konserwacja może skutkować urazami i uszkodzeniem urządzenia.
• Wszelkie serwisowanie powierz wykwalifikowanemu personelowi serwisowemu.
Uwaga
• Nie patrz w aktywny promień, jasne światło może uszkodzić Twoje oczy.
PL
72
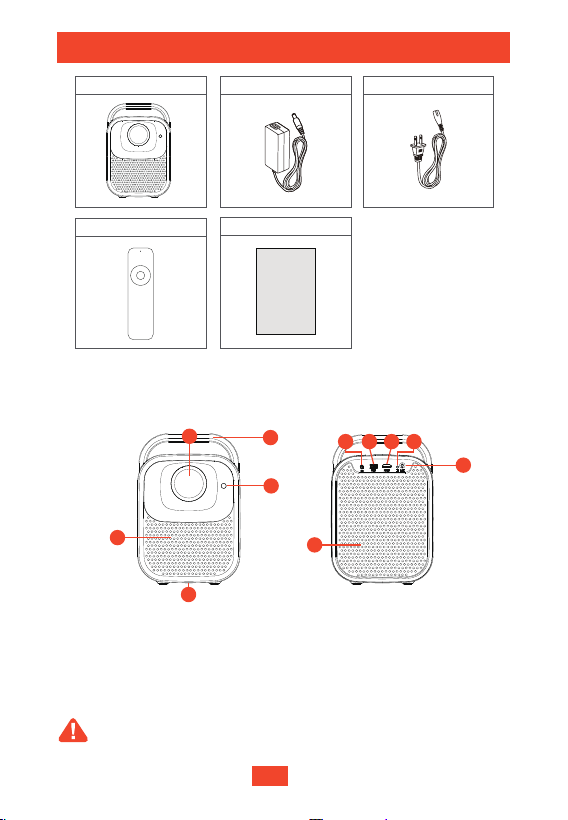
Podręcznik użytkownika x 1
Adapter x 1
Pilot zdalnego sterowania x1
Projektor x 1 Adapter Przewód zasilający x 1
Przegląd
Projektor
Wentylacja (Wyjście)
ToF (Auto fokus)
Otwór śruby trójnogu
DC -in
Soczewka
Port USB
Port HDMI
Odbiornik IR
①
②
③
Rączka
⑩
④
⑤
⑥
Port Aux
⑨
⑦
⑧
Widok Przedni
Widok Tylny
• Proszę nie zaglądać bezpośrednio do soczewki, aby uniknąć urazu oczu.
• Proszę nie blokować wentylacji (wyjścia).
Uwaga:
User Manual
Zawartość Zestawu
65 7 8
9
10
1
2
3
1
4
PL
73
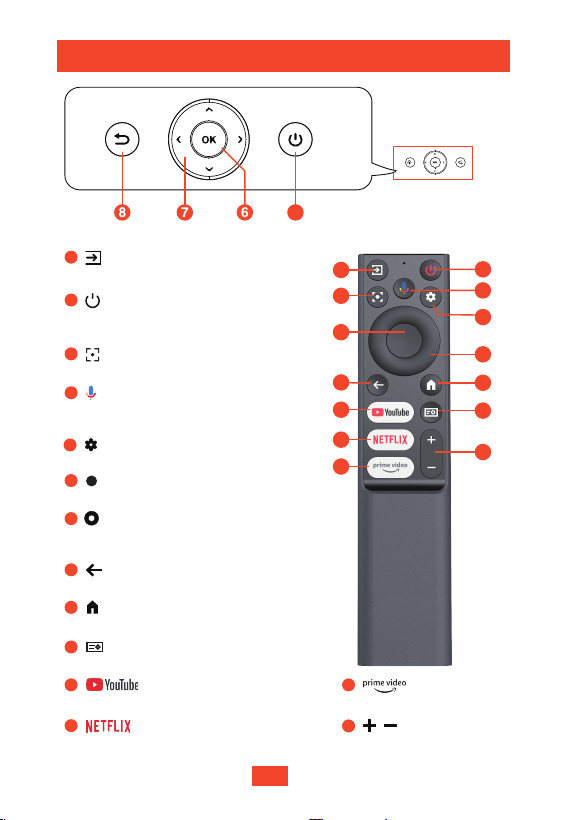
1
2
3
4
5
8
9
11
12
13
6
7
10
14
Przycisk YouTube
13
Przycisk Prime Video
Przycisk Netflix
Źródło sygnału
2
Przycisk Projektora & Pilot
3
Przejdź do strony głównej
9
10
Szybkie ustawienia
12
Naciśnij, aby potwierdzić wybór lub wpis
6
Aktywuj Google Assistant,
wirtualnego asystenta od Google
4
Ustawienia
5
Powróć na poprzednią stronę
8
Adjust the focus
14
Głośniej/ciszej
11
Nawiguj po menu lub dostosuj
wybrane treści
7
1
• Naciśnij i przytrzymaj: Wyłącz Reguluj fokus
• Naciśnij raz: Włączenie/Uśpienie
2
PL
74
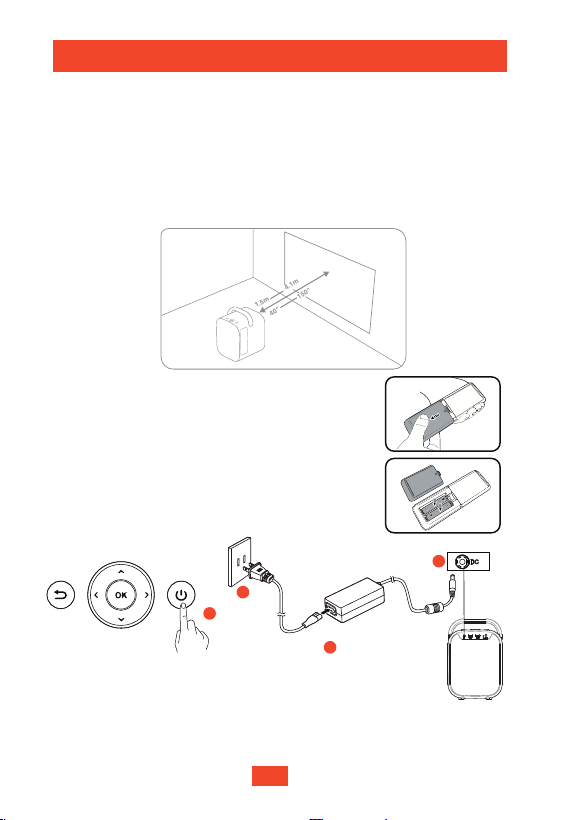
1.5m
4.1m
40"
150"
Rozpoczęcie
Umieszczenie
① Umieść projektor tak, aby skierowany był w stronę powierzchni projekcyjnej,
aby zyskać prostokątny obraz.
②
Odległość między projektorem i powierzchnią projekcji zadecyduje o
rozmiarze obrazu.
③
Sprawdź odległość projekcji i rozmiar ekranu w sekcji Specyfikacji.
Przygotuj Pilota
① Włóż baterie do pilota (brak w zestawie).
②
Wciśnij i otwórz pokrywę baterii, jak na obrazku.
③
Włącz
4
2
1
3
Upewnij się, czy nie ma przeszkód w zasięgu 30 cm / 11,8 cali blokujących
otwory wentylacyjne.
④
Odległość od pilota do projektora nie powinien
przekraczać 10m / 33 stóp.
• Podłącz kabel zasilający, odczekaj pięć sekund,
po czym wciśnij przycisk zasilania raz celem włączenia.
• Wciśnij i przytrzymaj przycisk zasilania, aby wyłączyć.
• Dioda zapali się na czerwono, gdy kiedy kabel zasilający
jest podłączony do gniazdka.
• Dioda zapali się na biało, kiedy projektor jest włączony.
PL
75
PL
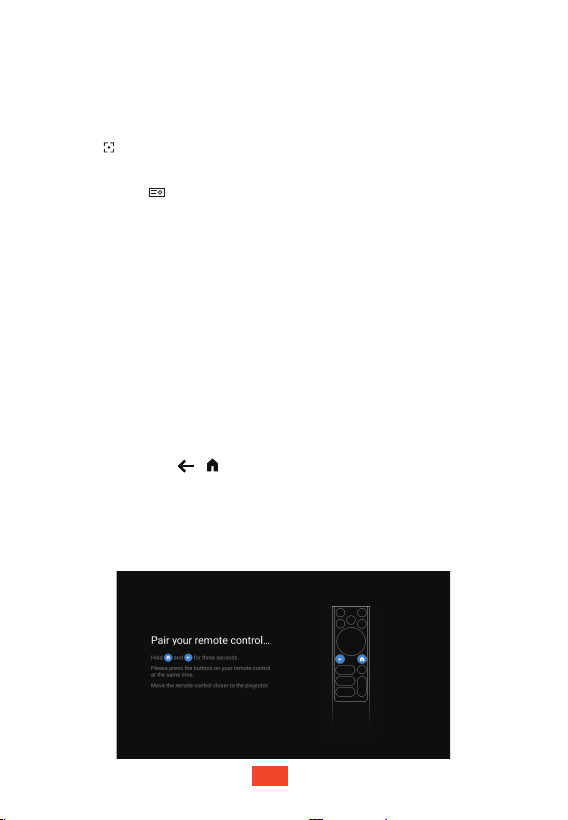
Możesz również skupić obraz ręcznie przy pomocy pilota. Naciśnij i przytrzymaj
przycisk na pilocie, aż obraz będzie wyraźny i wystarczająco skupiony.
Fokus
Sparuj Pilot
Auto Fokus
Ręczny Fokus
Uwaga::
Zaawansowane
Wciśnij przycisk na pilocie i wybierz Fokus -> Zaawansowane, aby wybrać
ustawienia zaawansowane. Przykładowo:
Parowanie pilota poprawi obsługę urządzenia:
Auto Fokus przy Starcie: Automatycznie reguluje ostrość obrazu przy starcie.
Auto Fokus po Przesunięciu: Automatycznie reguluje ostrość obrazu po przesunięciu urządzenia.
•
•
•
•
Wytrzyj soczewkę czujnika ToF miękką szmatką, aby poprawić efekt Auto Fokusa.
(Instrukcje pozycjonowania ToF znajdziesz w sekcji Przegląd)
Odległość projekcji powinna wynosić od 1,5 m do 4 m.
•
Nierówna powierzchnia projekcji może pogorszyć efekt Auto Fokusu. W takiej
sytuacji możesz użyć Ręcznego Fokusu celem poprawy obrazu.
•
Jeśli projektor umieszczony jest w stałej pozycji, zalecamy wyłączyć opcje
[Auto Fokus przy Starcie] i [Auto Fokus przy Przemieszczaniu].
① Przytrzymaj pilota w pobliżu projektora.
② Wciśnij przyciski i równocześnie na jakieś dziesięć sekund.
③ Na ekranie pojawi się napis "Zakończono powodzeniem", kiedy pilot
zostanie sparowany z projektorem.
Uwaga:
•
Jeśli nie sparujesz pilota, strona parowania będzie się wyświetlać przy
każdym włączeniu projektora.
•
Google Assistant będzie działać tylko wtedy, gdy pilot jest sparowany.
Umieść projektor tak, aby skierowany był ku odpowiedniej powierzchni projekcji
lub ścianie. Projektor automatycznie skupi obraz.
PL
76
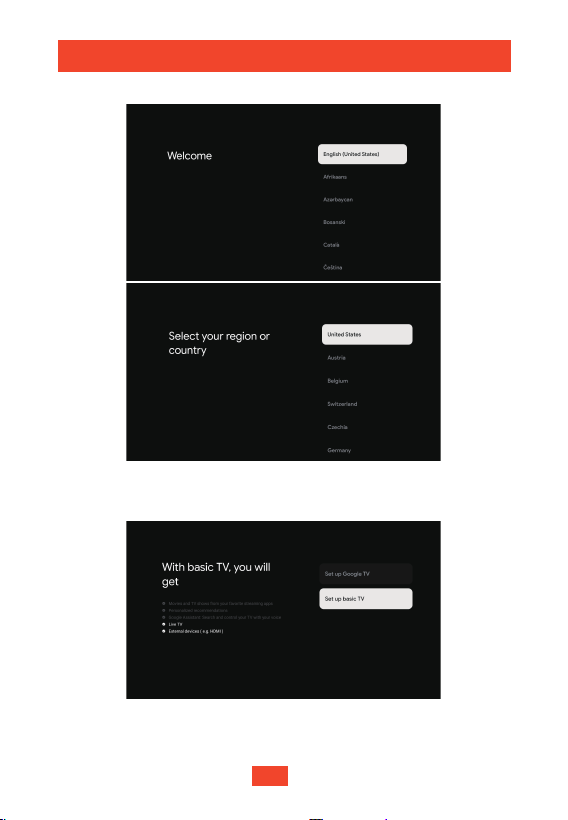
Podstawowe TV::
Do wyboru są dwa typy telewizorów:
Wybierz Swój Typ Telewizora
W przypadku Podstawowego TV masz dostęp do
• TV na żywo
• Urządzeń zewnętrznych (np. HDMI)
Wybierz Swój Język i Region/Kraj
Skonfiguruj Telewizor
PL
77
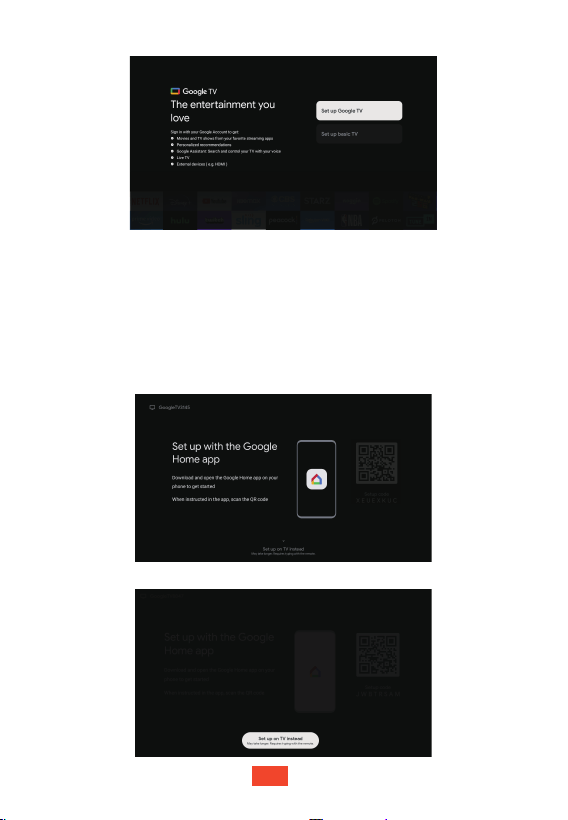
Google TV
TM
:
Skonfiguruj aplikacją Google Home na telefonie
Zaloguj się do swojego Konta Google, a uzyskasz
• Filmy i seriale z ulubionych aplikacji streamingowych
• Spersonalizowane rekomendacje
• Google Assistant: Szukaj i steruj telewizorem głosowo
• Google Assistant działa tylko, gdy pilot jest sparowany
• TV na żywo
• Urządzenia zewnętrzne (np. HDMI)
Skonfiguruj w telewizorze
PL
78
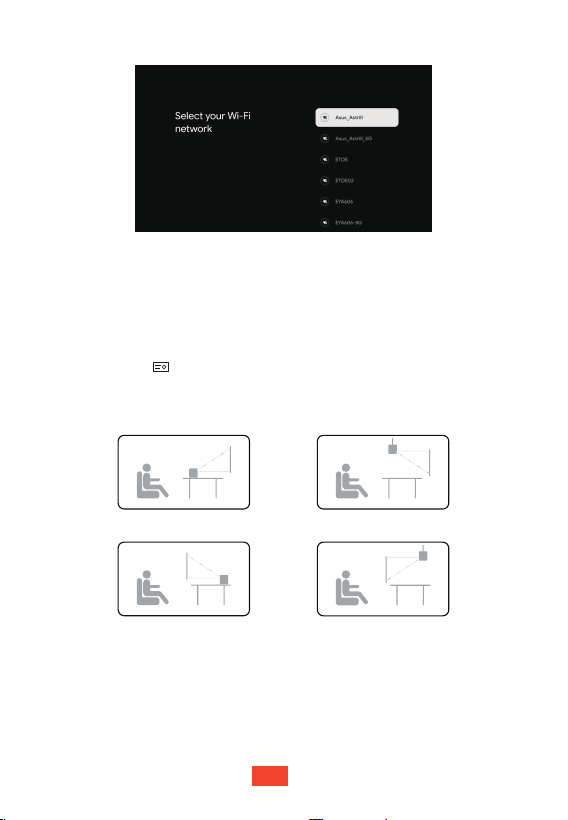
Połączenie WiFi
Kroki Końcowe
Wykonuj polecenia na ekranie, aby zakończyć konfigurację Google TV
Ustawienia Projektora
Spersonalizuj swój projektor wedle swoich preferencji.
Tryb Projekcji
Wciśnij przycisk na pilocie i wybierz Ustawienia Zaawansowane
-> Tryb Projekcji.
Tryb Projekcji
Przednia
Przednia Sufitowa
Tylna Tylna Sufitowa
Korekta Obrazu
Auto Korekta Keystone
Umieść projektor tak, aby zwrócony był w stronę odpowiedniej powierzchni
projekcyjnej lub ściany. Projektor dostosuje obraz automatycznie.
PL
79
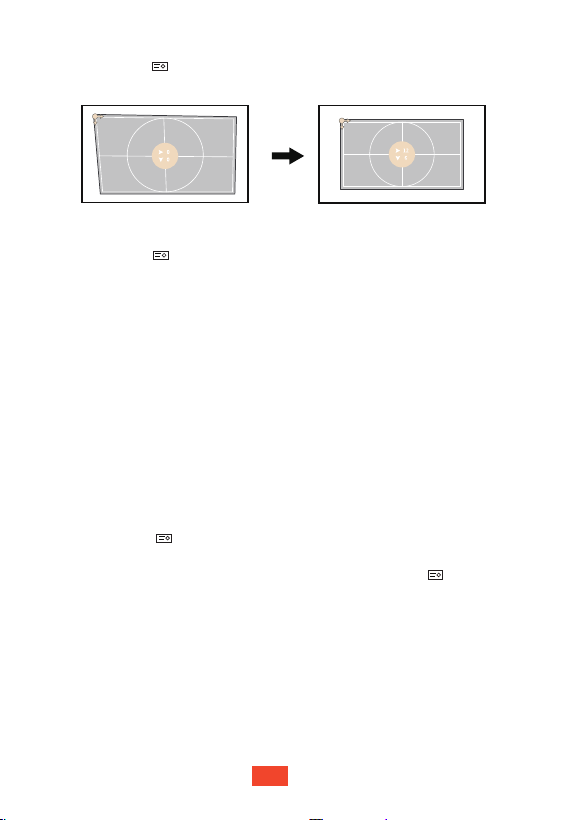
Ręczna Korekta Keystone
Wciśnij przycisk na pilocie i wybierz Korekta Obrazu
-> Ręczna Korekta Keystone celem dostosowania obrazu.
Zaawansowane
Wciśnij przycisk na pilocie i wybierz Korekta Obrazu
-> Zaawansowane, aby wybrać ustawienia zaawansowane. Przykładowo:
•
•
Auto Korekta Keystone przy Starcie: Automatycznie koryguje deformację obrazu przy starcie.
Auto Korekta Keystone po Przesunięciu: Automatycznie koryguje deformację obraz po
przesunięciu urządzenia.
Uwaga:
:
•
•
Wytrzyj soczewkę czujnika ToF miękką szmatką celem poprawy efektu korekty.
(Instrukcje pozycjonowania ToF znajdziesz w sekcji Przegląd)
Odległość projekcji powinna wynosić od 1,5m do 4m.
•
Auto Korekta Keystone działa tylko, gdy kąt projekcji wynosi ±30 stopni.
•
Jeśli projektor umieszczony jest w stałej pozycji, zalecamy wyłączyć opcje
[Auto Korekta Keystone przy Starcie] i [Auto Korekta Keystone po Przesunięciu].
Zoom Obrazu & Przesunięcie Obrazu
Wciśnij przycisk na pilocie i wybierz Korekta Obrazu -> Adaptacja
Obrazu -> Zoom aby przybliżyć/oddalić.
Możesz przesunąć obraz poprzez oddalenie. Wciśnij przycisk na
pilocie i wybierz Korekta Obrazu -> Adaptacja Obrazu -> Przesunięcie
Obrazu celem przesunięcia obrazu.
PL
80
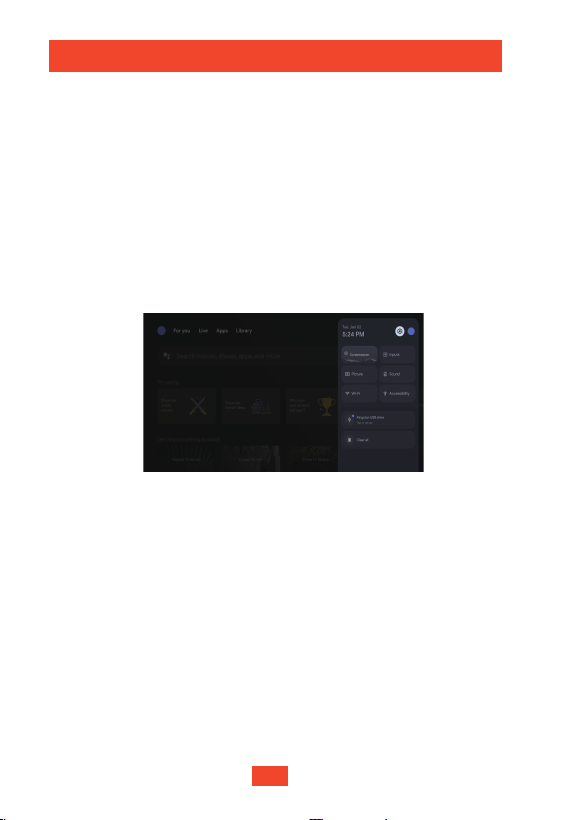
Eksploruj Swój Telewizor
Podstawowe TV
W trybie Podstawowe TV możesz użyć funkcji podstawowych takich,
jak HDMI, Netflix, YouTube i Prime Video.
Zalecamy zalogować się na swoje Konto Google, aby cieszyć się pełnym
doświadczeniem Google TV.
Google TV
Google TV łączy w sobie filmy, seriale, TV na żywo i nie tylko z Twoich
aplikacji i subskrypcji i organizuje je specjalnie dla Ciebie.
Biblioteka
Przeglądaj swoje zakupy, wynajęcia i listy obserwowanych online lub ze
swojego telewizora lub telefonu.
Panel Nawigacyjny
Wyświetlaj wiadomości i szybko uruchamiaj funkcje takie jak:
• Wygaszacz ekranu • Wejście
• Obraz
• Dostępność
• Dźwięk
• Wi-Fi
Ustawienia
Reguluj ustawienia ogólne, takie jak:
• Projektor
• Wyświetlanie & Dźwięk
• Sieć & Internet
• Dostępność
• System
• Piloty & Akcesoria
PL
81
Google Assistant
Google TV posiada wbudowany Google Assistant, którego można
użyć wciskając przycisk na pilocie.
Uwaga:
Google Assistant działa tylko wtedy, gdy pilot jest
sparowany i istnieje prawidłowe połączenie sieciowe.
Połączenie USB
Projektor ten może również być używany z zewnętrznymi urządzeniami USB.
Aby skorzystać z tej funkcji:
① Zainstaluj aplikację do zarządzania plikami, taką jak "Menadżer Plików"
na stronie Aplikacji.
② Otwórz aplikację do zarządzania plikami i włóż urządzenie USB.
③ Wykonuj polecenia aplikacji do zarządzania plikami celem połączenia
się z urządzeniem USB.
Połączenie HDMI
Projektor ten obsługuje połączenia z różnymi urządzeniami multimedialnymi
HDMI, w tym pecetami, wtyczkami TV, skrzynkami TV, odtwarzaczami DVD,
dekoderami (STB) i konsolami do gier.
① Podłącz projektor do urządzenia multimedialnego HDMI przy pomocy
kabla HDMI (brak w zestawie).
② Wciśnij przycisk na pilocie i wybierz HDMI.
.
Akcesoria Bluetooth
Projektor ten obsługuje połączenia z różnymi urządzeniami Bluetooth,
takimi jak piloty, głośniki, klawiatury i myszy komputerowe.
① Wciśnij przycisk na pilocie i wybierz .
② Wybierz Piloty & Akcesoria -> Paruj Akcesoria aby sparować swoje
urządzenie Bluetooth.
Tryb Głośnika Bluetooth
Nasz produkt działa również jako głośnik Bluetooth. Aby skorzystać z tej funkcji:
① Wciśnij przyciskna pilocie i wybierz Tryb Głośnika Bluetooth.
② Połącz swoje urządzenie multimedialne z "Projector Atom" przez Bluetooth.
③ Odtwarzaj muzykę na swoim urządzeniu i reguluj głośność pilotem.
④ Naciśnij i przytrzymaj przycisk na dwie sekundy, aby wyjść z Trybu
Głośnika Bluetooth .
PL
82
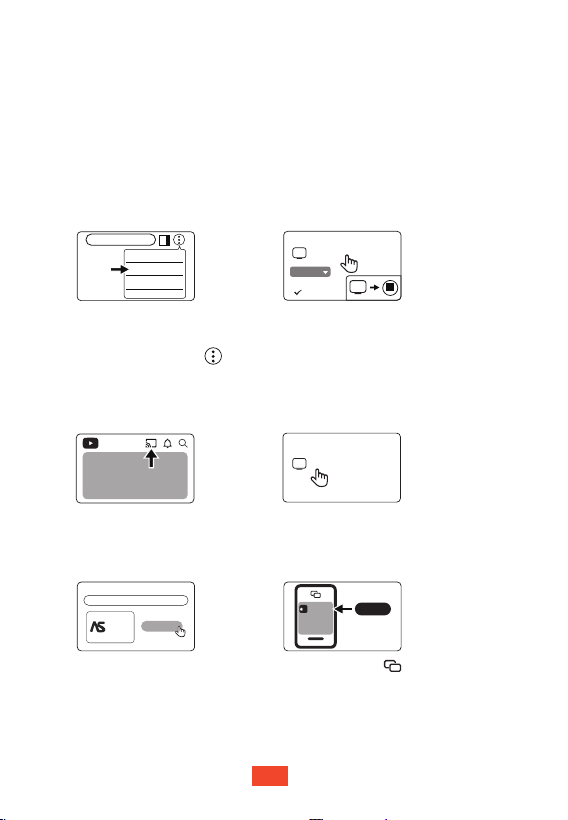
Google Cast™
Projektory ETOE wyposażone są w Google Cast. Wystarczy wcisnąć przycisk
Cast w aplikacjach, które już znasz i uwielbiasz, aby streamować rozrywkę z
telefonu, tabletu lub laptopa na telewizor.
Urządzenia telewizyjne z Google Cast
Upewnij się, że urządzenia są podłączone do tej samej sieci WiFi.
①
Wciśnij przycisk Cast i wybierz A1363. Komputer z Google Cast
②
Urządzenie iOS z Google Cast
TV
Select
AirScreen - AirPlay & Cast
AirScreen
Install
Zainstaluj AirScreen na
projektorze ze strony Aplikacji.
①
Otwórz aplikację AirScreen na
projektorze i postępuj zgodnie
z instrukcjami wyświetlanymi na ekranie.
②
③
Kliknij przycisk na swoim
urządzeniu iOS i wybierz A1363.
Witryny/Aplikacje z Google Cast
Kliknij przycisk Cast
w witrynie/aplikacji.
①
Wybierz A1363.
②
Cast to
YouTube
Komputer z obsługą Google Cast
www.xxxx.com
Cast...
Print...
Find...
Cast
Available
Sources
Cast tab
Cast screen
Zainstaluj Google Chrome
na komputerze i otwórz.
①
Wybierz A1363.
③
Kliknij "Cast" w menu w prawym górnym rogu, po czym
przejdź do menu Źródła i wybierz, czy rzutować zakładkę
czy cały ekran.
②
A����
A����
A����
PL
83
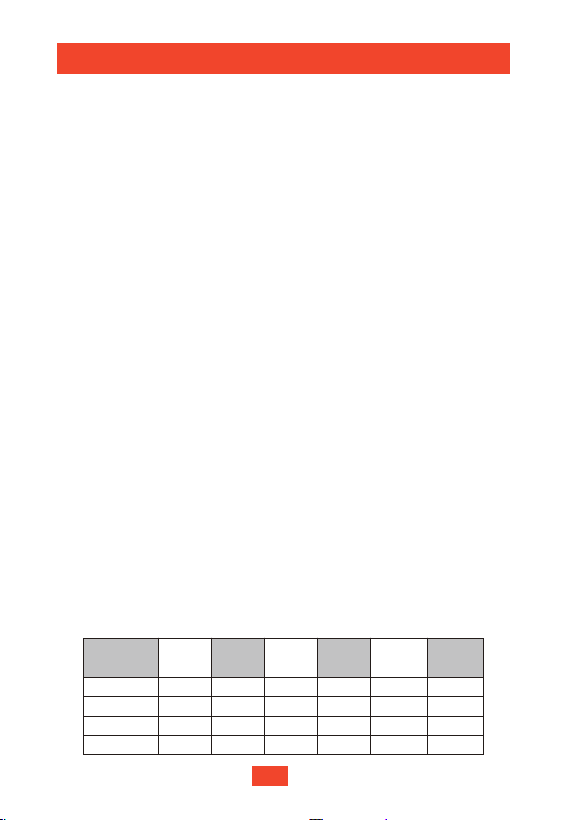
Gwarancja
30-dniowa Gwarancja Zwrotu Pieniędzy
Jeśli z dowolnego powodu zwrócisz nieuszkodzony produkt w ciągu 30 dni od
daty zakupu, otrzymasz pełen zwrot pieniędzy.
Nabywca ponosi odpowiedzialność za koszty wysyłki za roszczenia gwarancyjne
niezwiązane z problemami z jakością.
12-miesięczna Gwarancja
Każdy produkt ETOE objęty jest jednym rokiem gwarancji na problemy związane
z jakością. Jeśli prześlesz roszczenie naszemu zespołowi wsparcia e-mailem,
wówczas ETOE , wedle własnego uznania:
1.Wymieni produkt ETOE na produkt tego samego modelu i pokryje wszelkie
koszty przesyłki zwrotnej.
2.Dokona pełnego zwrotu ceny zakupu w zamian za produkt ETOE.
Odległość Projekcji i Rozmiar Ekranu
Rozmiar
ekranu
(cale)
3,5 108,049,819,688,634,940
5,3 162,174,729,4132,852,360
7,1 216,199,639,2177,169,780
8,9 270,1124,549,0221,487,2100
Szerokość
(cale)
Szerokość
(cm)
Wysokość
(cale)
Wysokość
(cm)
Odległość
(stopy)
Odległość
(cm)
Specyfikacja
Procesor:
ARM Quad 64-bit Cortex-A53
Bluetooth: Bluetooth 5.1
Wi-Fi: 2,4 GHz / 5 GHz 802.11a/b/g/n/ac
Rozdzielczość natywna: 1920 × 1080
Współczynnik rzutu: 1.22
Współczynnik proporcji: 16:9 / 4:3 Adaptacyjny
Głośniki:
Głośniki stereo 10W × 2
Porty łączności: HDMI × 1; USB × 1; AUX × 1
Zoom: 50%–100%
Korekta Keystone: ±30°, Auto obsługa Keystone
Zalecana temperatura otoczenia: 41°F - 95°F / 5°C - 35°C
Wilgotność względna:
15%–85% (bez kondensacji)
Specyfikacja
PL
84

FCC Notice
This device complies with the FCC rules, Part 15. Operation is subject to the
following two conditions: (1) This device may not cause harmful interference,
and (2) This device must accept any interference received, including
interference that may cause undesired operation.
RF Exposure Warning Statements
This equipment complies with FCC radiation exposure limits set forth for an
uncontrolled environment. This equipment should be installed and operated
with minimum distance 20cm between the radiator & your body.
Warning:
Changes or modifications not expressly approved by the partly
responsible for compliance could void the user’s authority to operate the
equipment.
Note: This equipment has been tested and found to comply with the limits
for a Class B digital device, pursuant to part 15 of the FCC Rules.
These limits are designed to provide reasonable protection against harmful
interference in a residential installation.
This equipment generates, uses and can radiate radio frequency energy
and, if not installed and used in accordance with the instruction energy
and, if not installed and used in accordance with the instruction manual,
may cause harmful interference to radio communications.
However, there is no guarantee that interference will not occur in a particular
installation. If this equipment does cause harmful interference to radio or
television reception, which can be determined by turning the equipment off
and on, the user is encouraged to try to correct the interference by one or
more of the following measures:
• Reorient or relocate the receiving antenna.
• Increase the separation between equipment and receiver.
• Connect the equipment into an outlet on a circuit different from that to
which the receiver is connected.
• Consult the dealer or an experienced radio / TV technician for help.
• Google TV is the name of this device's software experience and a
trademark of Google LLC. Google, Google Home, Google Chrome,
Google Cast and other marks are trademarks of Google LLC.
• Netflix is a trademark of Netflix, Inc.
• Manufactured under license from Dolby Laboratories. Dolby,
Dolby Audio and the double-D symbol are trademarks of Dolby
Laboratories Licensing Corporation.
• The terms HDMI, HDMI High-Definition Multimedia
Interface, HDMI Trade dress and the HDMI Logos are trademarks
or registered trademarks of HDMI Licensing Administrator, Inc.
Copyright Notice
• All brands contained herein are trademarks of their respective owners.

Product name: ETOE Seal Pro Projector
Model: A1363
Manufacturer: HUNAN ETOE Technology Co., Ltd
Address: Room 2003-2, Junda Building, 1599 Fenglin 3rd Road, Leifeng Street,
Xiangjiang District, Hunan.
E-mail: [email protected]
All rights reserved. ETOE and the ETOE logo are trademarks of HUNAN ETOE Technology
Co., Ltd, which is registered in the United States and other countries. All other
trademarks are the property of the irrespective owners.

