DNVS-14 Pro User Manual V1.3.2
www.infitacusa.com
DNVS-14Pro
Digital Night Vision
User Manual
Join Our Community
Discover new tips and tricks from our experienced pros.
Visit
www.infitacusa.com

DNVS-14 Pro User Manual V1.3.2
www.infitacusa.com
Warnings and Precautions
WARNING
!
ITAR REQUIREMENTS
These products may be subject to export and foreign trade control laws of the United States
and may not be exported without prior approval of the U.S. Department of State.
Learn more at www.infitacusa.com.
WARNING: CHOKING HAZARD
Children under 3 years old can choke or suffocate on small parts of this product. This product
is not a toy; keep out of reach of children.
Precautions
- The lens is an important optical component. When installing and using it, avoid contamination
and damage to the lens surface from oil and various chemicals.
- Do not use chemical solvents or diluents to clean the surface of the device shell. You can use a
clean, soft, dry cloth to wipe it.
- Remove the battery when the device is not in use, and store the device in its provided
protective case. For long-term storage, keep the device in a dry, well-ventilated environment.
- Do not expose the device to temperatures below -4℉ or above +122℉ for extended periods.
- If the device malfunctions or is damaged, please send it to our after-sales service department
for repair. Unauthorized disassembly, modification, or repair by anyone other than authorized
INFITAC personnel is prohibited.
- If you need to make a product warranty claim, please keep the product packaging and
warranty card.
DNVS-14 Pro User Manual V1.3.2
www.infitacusa.com
1. OVERVIEW
The INFITAC DNVS-14 Pro Night Vision Monocular is designed with a high-resolution 100Hz
CMOS sensor and a wide 45º field of view through a 22mm F1.1 lens, delivering crystal-clear
imaging under near zero or low light conditions. DNVS-14 Pro is equipped with an advanced IoT
wireless interconnection in its smart battery pack, which enables to transmit images from the
Thermal Sight (IOTS) to its own display screen for real-time image and data sharing, as well as
support for photo, video, audio recording, and storage functions. Housed within a durable,
IP67-rated design, the DNVS-14 Pro ensures operation in various environmental conditions.
Powered by two replaceable 18650 batteries, the DNVS-14 Pro offers extended operational
readiness, making it a top choice for home defense, and tactical training.
2. FEATURES
The second generation of high-sensitivity CMOS sensor
World's First 100Hz Helmet Mounted Night Vision Device
IoT Wireless Interconnection
Ultra Compact & Lightweight
Multimedia Capture System with 32GB internal storage
Flexible Helmet Mounting with a Standard Wilcox Interface
Multi Color Palettes: Origin / White / Green
3. TECHNICAL SPECIFICATIONS
Model
DNVS-14 Pro
Digital Detector Specifications
Sensor type
DG1802 CMOS
Min ambient illumination
0.0001 Lx
Visible spectrum
400-1100nm
Frame Rate
50Hz / 100Hz
Optical Specifications
Objective Lens
22mm/F1.1
Field of View
45°Diagonal(37°Horizontal x 28°Vertical)
Magnification
1x
Diopter
-5D~ +2D
Focus Range
0.5yds~∞
Display Type
0.6inch 800×600 AMOLED
Battery Power Supply
Battery Pack
2 x 18650
Max. Operation Time (at t=71.6℉)
20h (at 100Hz)
DNVS-14 Pro User Manual V1.3.2
www.infitacusa.com
External Power Supply
5V USB
Functions
E-zoom
1x、2x、4x
IoT Wireless
support
Photo/Video Recorder
support
Memory Capacity
32GB
Physical Specifications
Material
AL6063-T6
IP Rating
IP67
Operating Temperature
-4~+122℉(-20 ~ +50ºC)
Weight(Battery pack not included)
≤7.4oz(210g)
Dimension (Eyeguard not included)
≤3.6×2.66×1.77 inch (91.5×67.5×45mm)
Smart Battery Pack Specifications
IP Rating
IP67
Operating Temperature
-4~+122℉(-20 ~ +50ºC)
Weight (Batteries not included)
≤6.0 oz(170g)
Dimension
≤4.1×3.3×1.6 inch (105×84.5×40 mm)
*The actual working time depends on the use intensity of the product.
Improvements may be made to the design and software of this product to enhance its features
without prior notice.
You can download this User Manual at our official website: www.infitacusa.com.
4. ACCESSORIES
- DNVS-14 Pro Night Vision Monocular
- Smart Battery Pack
- Portable bag
- Rechargeable 18650 Batteries x 2
- Main data cable
- USB cable
- Lens Cloth
- Rubber Eyeguard
- Objective lens cap
- Dovetail Binocular Bridge Mount
- Helmet Flip-up NVG Mount
- INFITAC Brand Sticker
- INFITAC Hook and Loop Fastener
- User Manual
- Warranty Card
Note: The helmet flip-up NVG mount and the dovetail bridge mount included with the package
can connect the helmet to the device, the mounts are compatible with the vast majority tactical
DNVS-14 Pro User Manual V1.3.2
www.infitacusa.com
helmets with Wilcox interface.
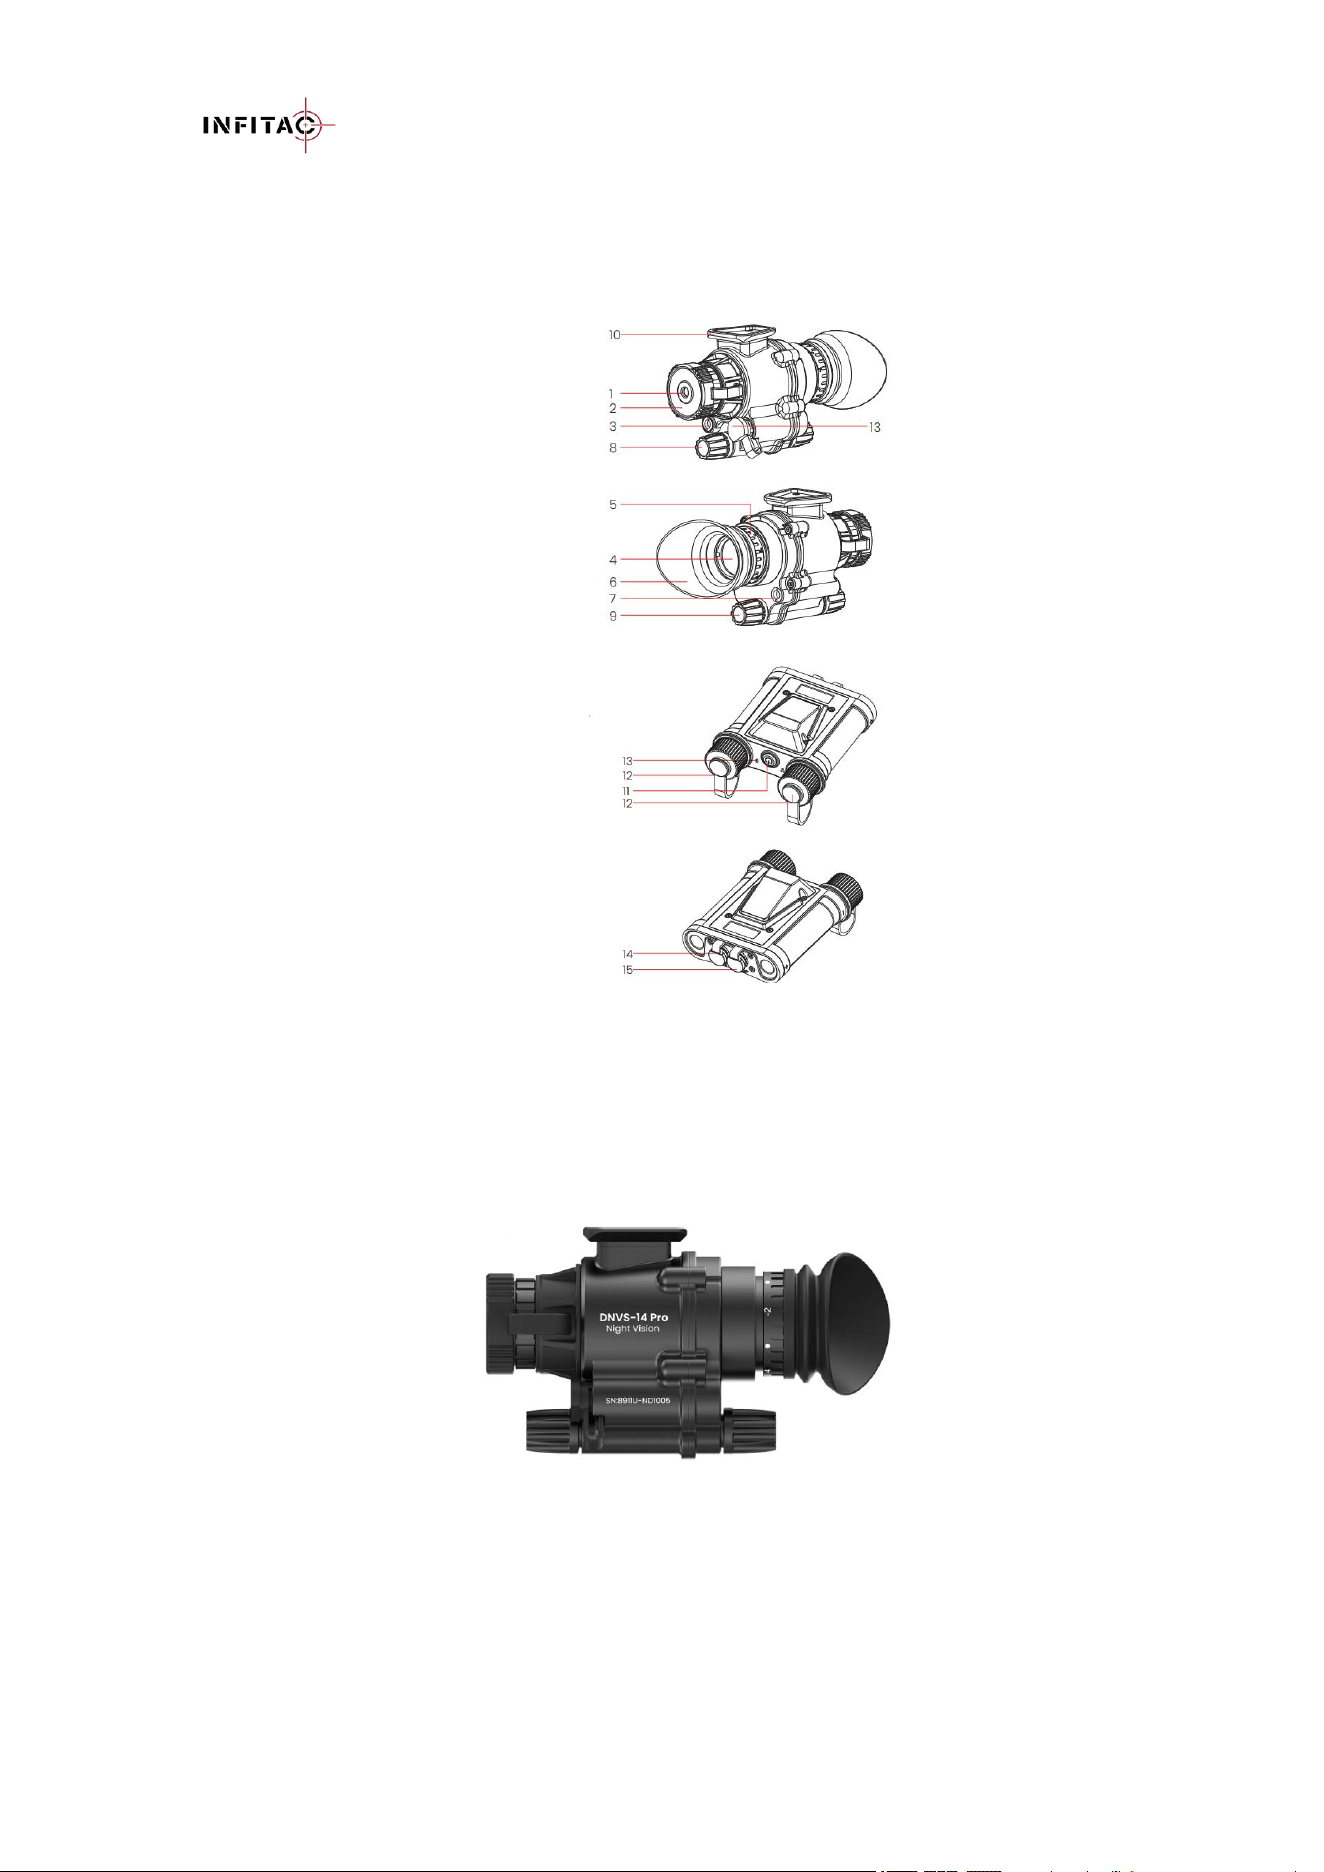
5. COMPONENTS AND CONTROLS
1. Objective Lens
2. Objective lens cap
3. IR Illuminator
4. Eyepiece
5. Diopter adjustment ring
6. Rubber Eyeguard
7. Light Sensor
8. Menu Button
9. Photo Button
10. Standard wilcox interface
11. Power Button
12. Battery Compartment Cover
13. Battery Indicator light
14. Data port
15. USB port
5.1 Models
You can find the product model and SN information on the DNVS-14 Pro monocular ’s body.
DNVS-14 Pro Monocular
You can also enter information menu according to the instructions in Chapter 12 to view the
product model and SN information.
DNVS-14 Pro User Manual V1.3.2
www.infitacusa.com
6. COMPONENTS AND CONTROLS
Perform a technical inspection to check the following items each time before you use the device.
- Device Appearance: The shell should be free of visible cracks and damage.
- Lens Condition: The lens surface should be free of cracks, oil, stains, or other sediments.
- Device Installation Status: The device's main data cable is correctly connected and securely
installed on the helmet, with no signs of looseness.
- Battery Status: The battery is fully charged and there is no foreign matter in the battery
compartment.
- The device can be turned on and used normally.
- The device image is clear and free of interference.
- Check that the device's imaging settings are correct.
7. INSTALLATION AND USAGE
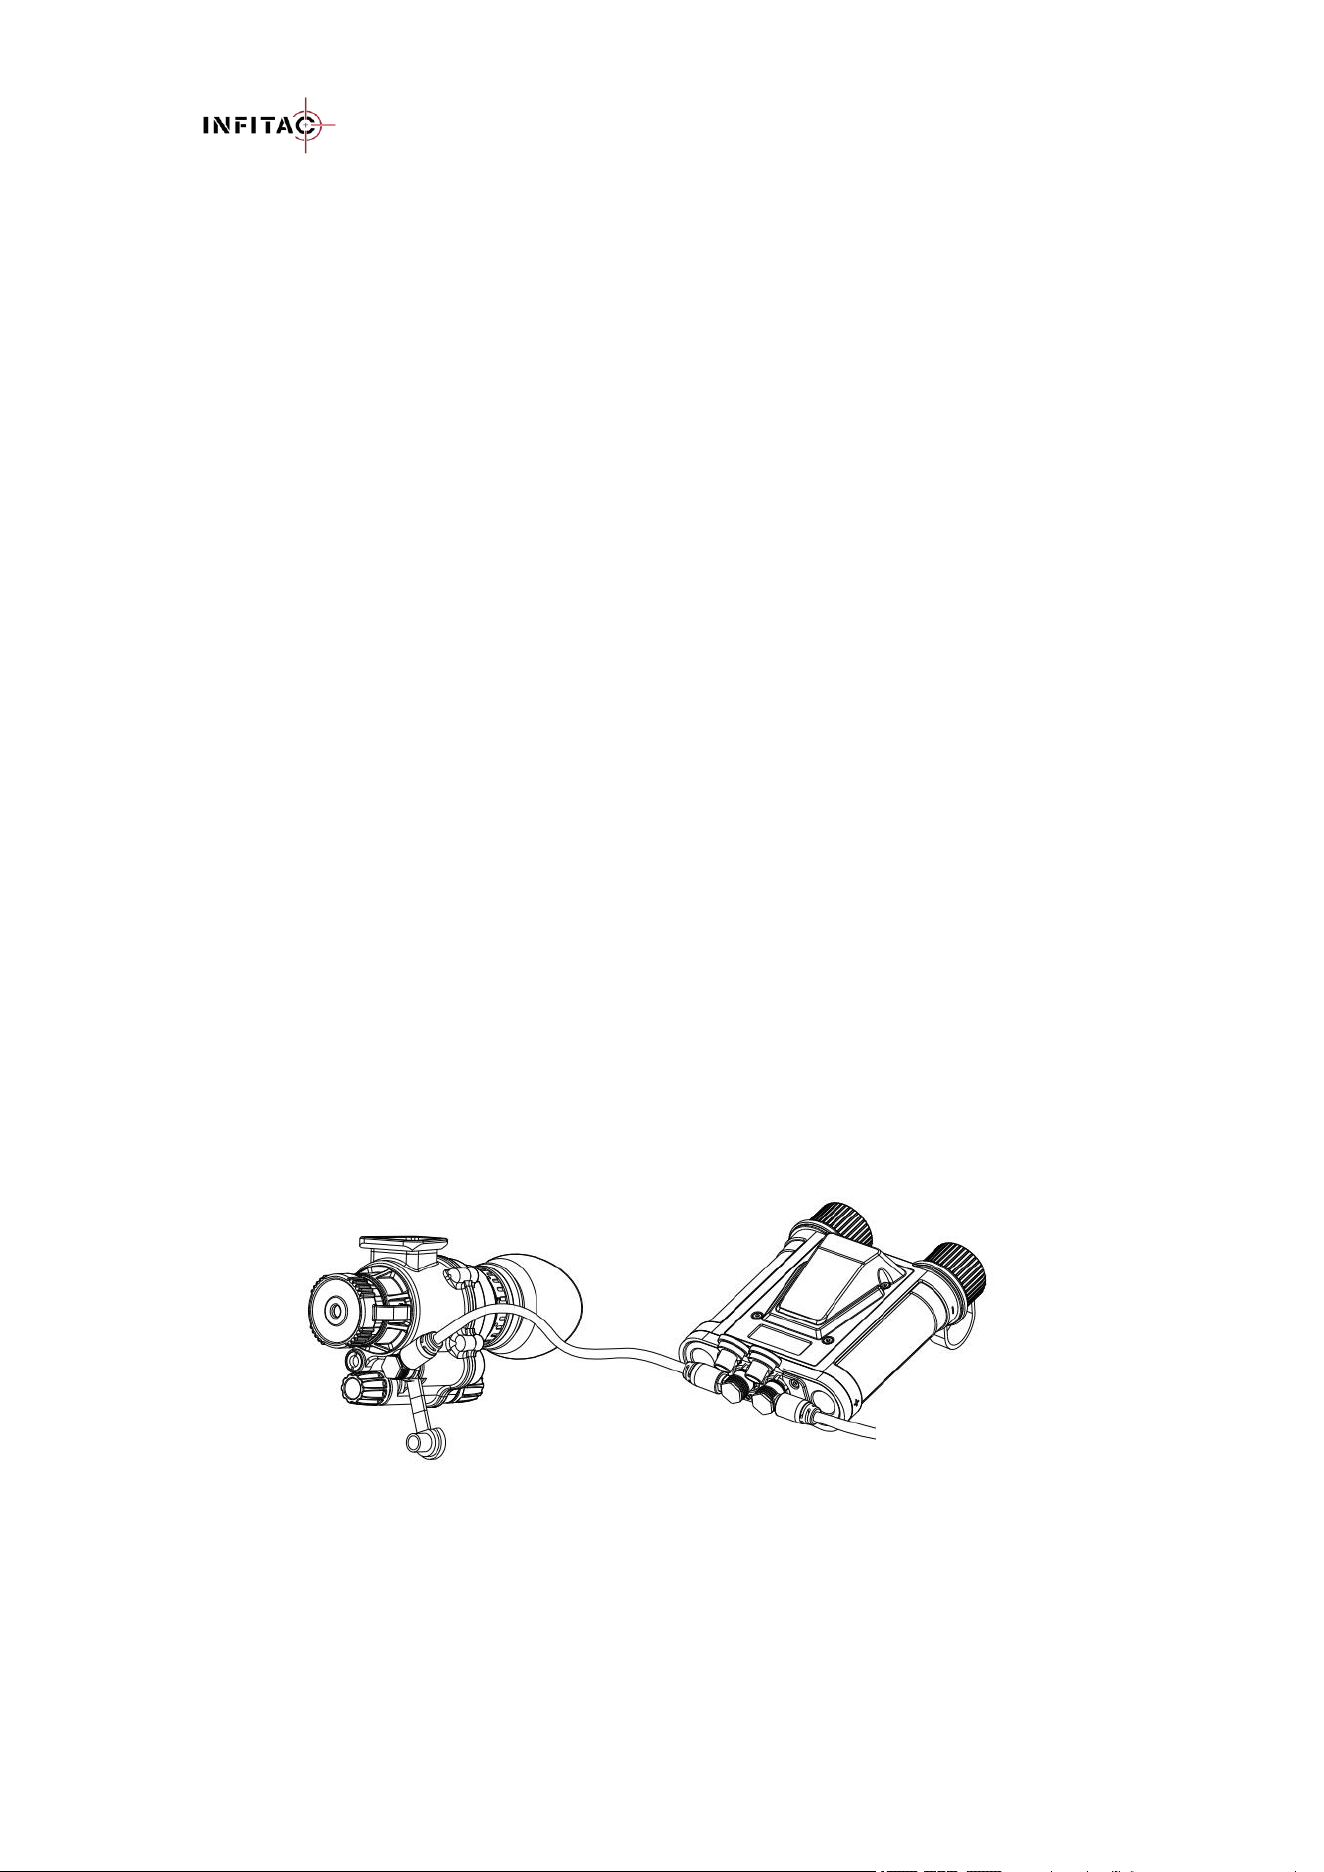
7.1 Device Connection
1. Use the included main data cable, connect one end to the data port on the night vision device
and the other end to the data interface on the battery pack.
2. Unscrew the battery compartment covers on the battery pack, insert two fully-charged 18650
batteries, and tighten the covers.
3. Long press the power button on the battery pack for 2 seconds to power it on. The battery
indicator will flash, and then the night vision device will power on. The INFITAC logo will
appear on the display.
Note:
If the main data cable is connected to the USB port of the battery pack instead of the data port, the
DNVS-14 Pro monocular can still power on after holding the battery pack’s power button for 2
seconds. However, in this case, the device will not be able to communicate with the battery pack,
and functions such as IoT, audio recording, photo capture, video recording, and file management
will be unavailable. Some menu options will also be reduced accordingly.
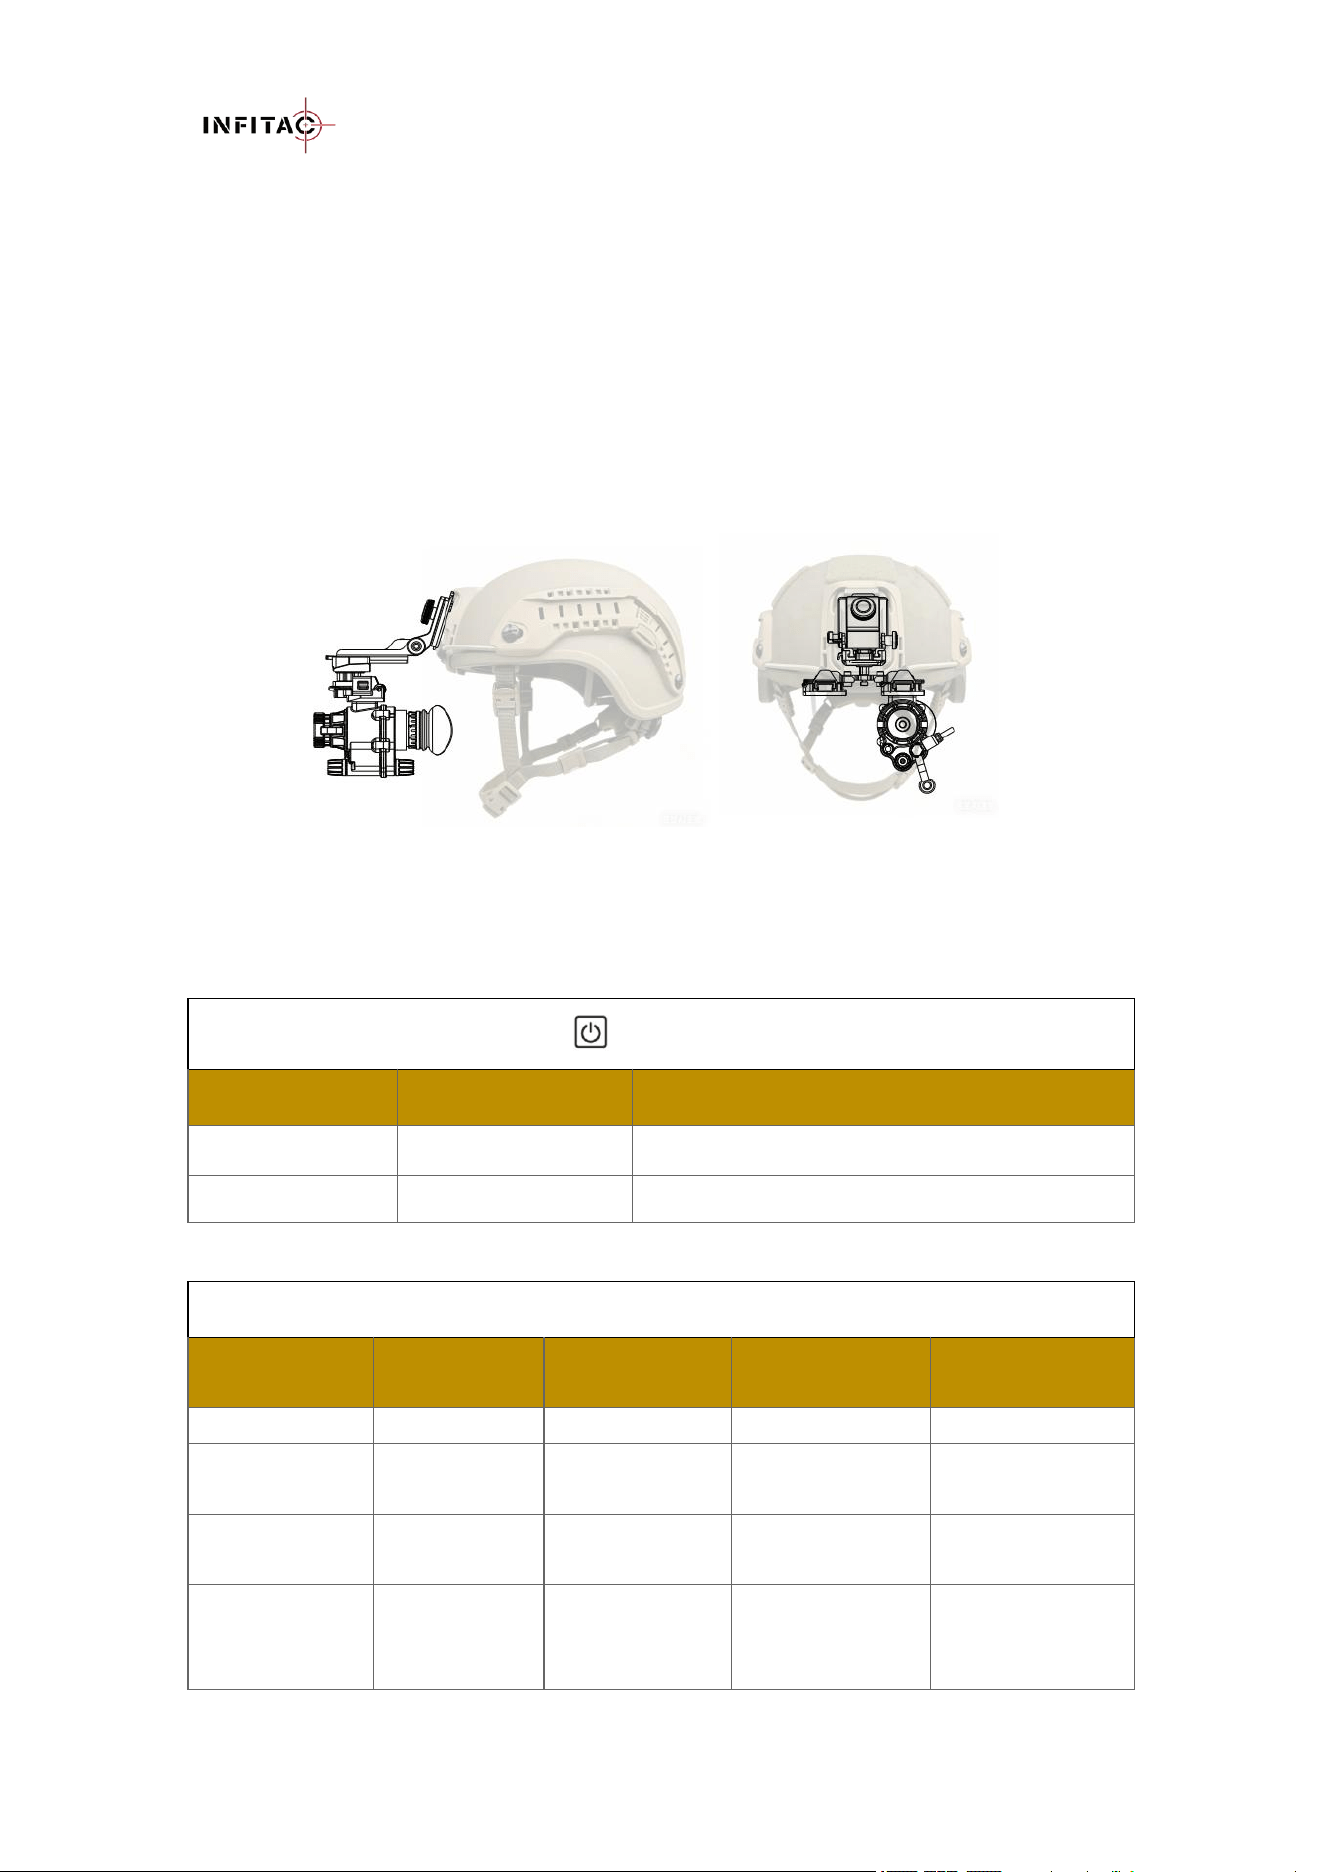
7.2 Helmet Installation
Before installation, please ensure that your helmet is equipped with a Flip-up NVG Mount
interface.
Installation steps:
Check that the helmet mounting hole (usually located centrally above the forehead) is clean
and free of debris.
DNVS-14 Pro User Manual V1.3.2
www.infitacusa.com
Install the included helmet flip-up NVG mount into the helmet mounting hole.
Insert the included helmet bridge mount into the dovetail slot of the helmet flip-up mount.
Engage the Wilcox interface of the DNVS-14 Pro monocular into either dovetail slot of the
bridge mount.
Neatly route the cable along the helmet and secure the battery pack to the rear of the helmet
using the hook-and-loop fastener.
Verify that both the DNVS-14 Pro monocular and battery pack are securely installed.
Adjust the bridge mount and flip-up mount until you can see a clear and comfortable image
on the display.
8. BUTTONS AND FUNCTIONS
The DNVS-14 Pro is controlled by the power button of the smart battery pack, and other
operations are controlled by its own multi-function buttons (Menu and Photo button).
Power Button
Current Status
Short Press
Long Press
Device Off
/
Power On(Battery Pack and then the DNVS)
Home Screen
Display battery level
Power Off(DNVS and then the battery pack)
Menu Button(Objective lens side)
Current Status
Short Press
Long Press
Clockwise Rotate
Counterclockwise
Rotate
Standby mode
Exit standby
/
/
/
Home Screen
Enter Standby
mode
Enter Menu
Screen
1x/4x/2x/1x
1x/2x/4x/1x
Menu Screen
Enter next
menu
Return home
screen
Move cursor right
Move cursor left
Parameter
interface
Confirm
Save and return
to previous
menu
Move cursor right
/ Increase the
parameter
Move cursor left/
Decrease the
parameter

DNVS-14 Pro User Manual V1.3.2
www.infitacusa.com
Photo Button(Eyepiece side)
Current Status
Short Press
Long Press
Rotate
Home Screen
Take a Photo
Start/Stop
video
recording
Switch the working mode:
NV Mode / Interconnect Mode(PIP)/
Interconnect Mode(FULL)
Menu Screen
Parameter
interface
Note: When the DNVS-14 Pro is not connected to the IOTS device, there is no response while
rotating the Photo button.
9. BATTERY
The DNVS-14 Pro are powered by two 18650 batteries, providing up to 20+ hours of normal
operation. Before first use, please insert two new or fully charged 18650 batteries.
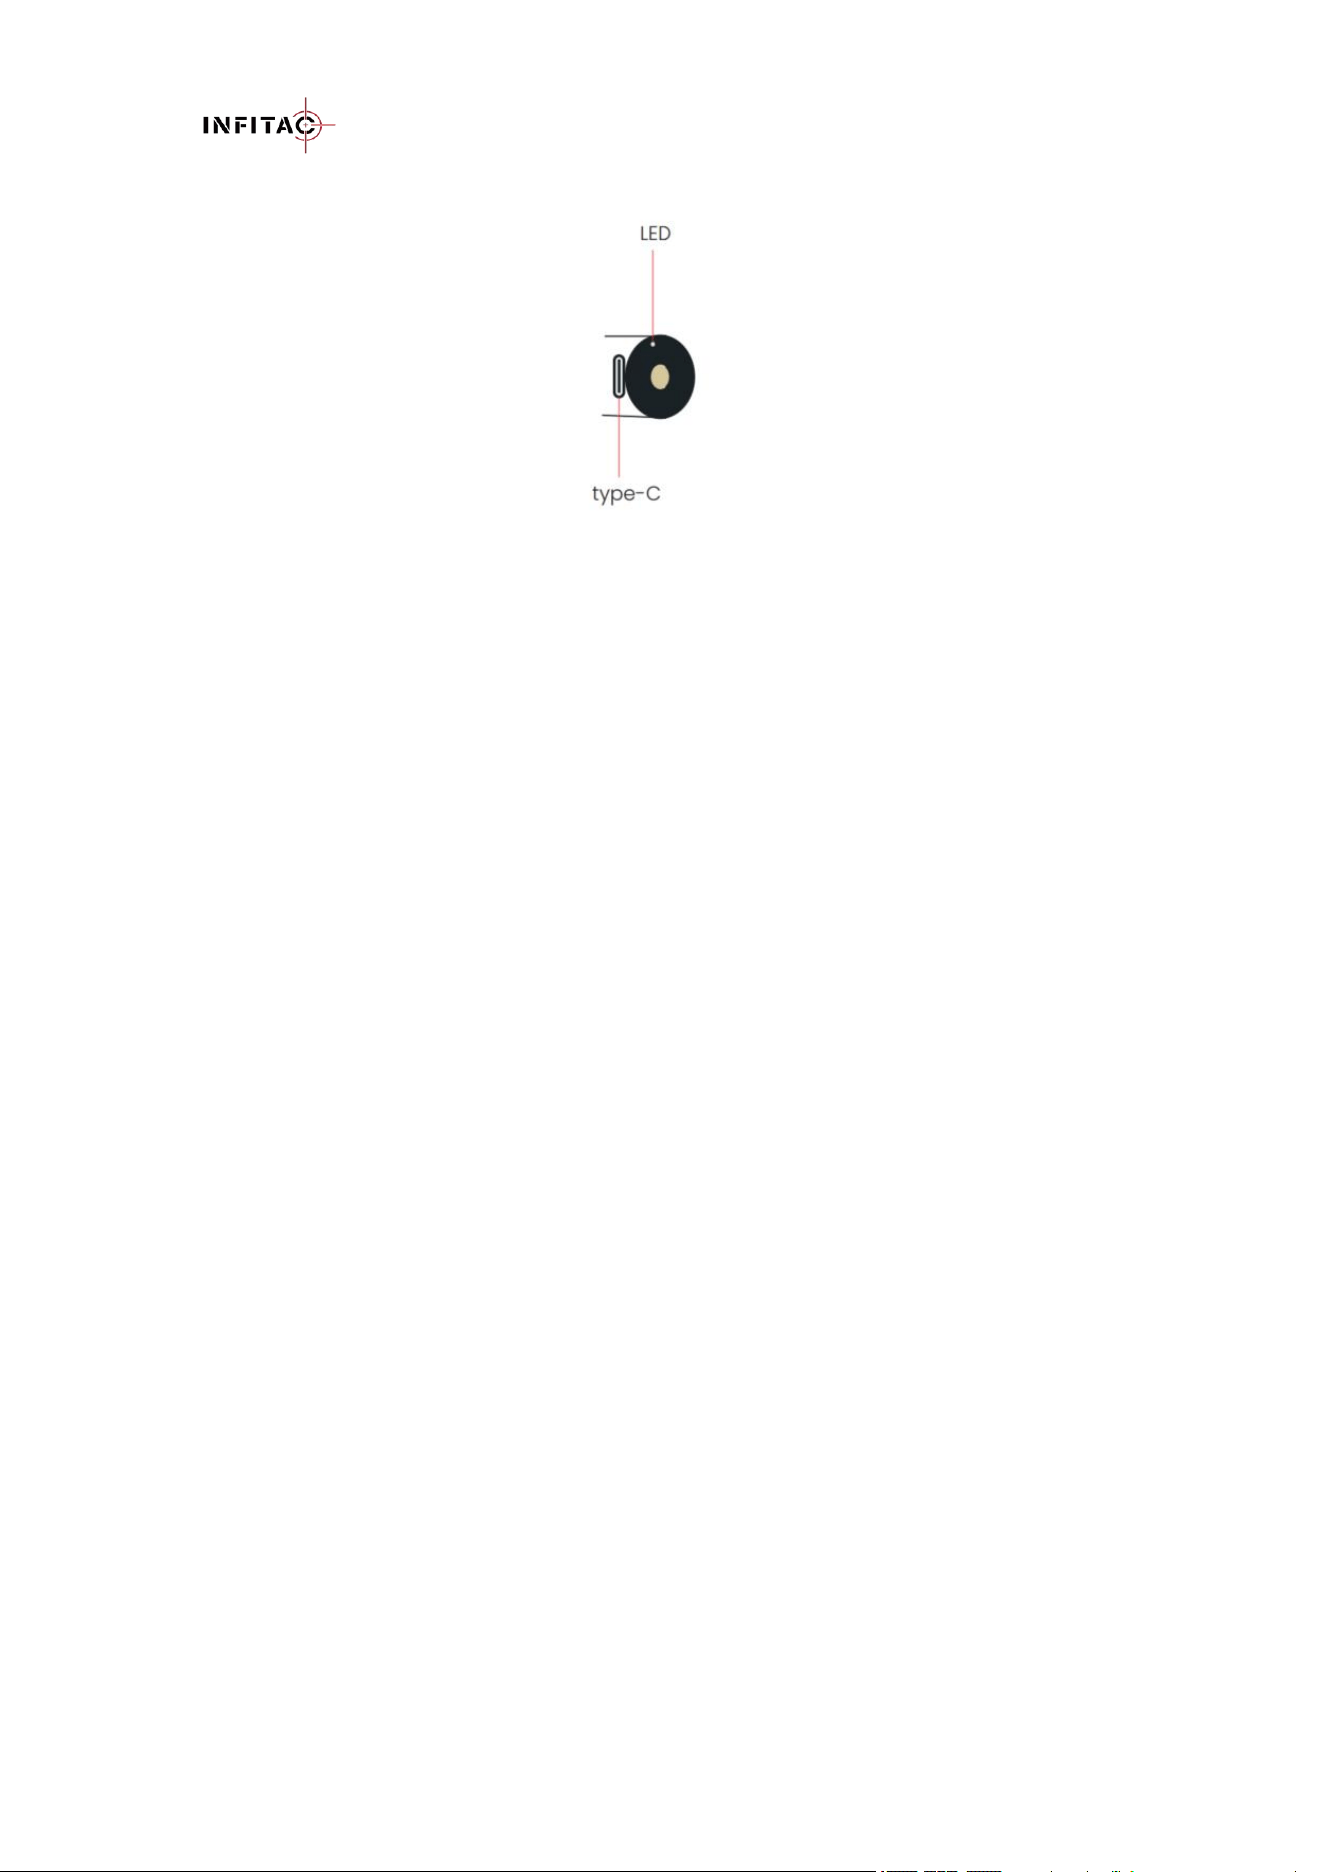
After turning on the battery pack, short press the power button. The LED light will stay on for 2
seconds, indicating the battery level. A red light indicates less than 20% battery remaining, while a
green light indicates more than 20%.
9.1 Battery Installation and Replacement
- Make sure that the battery pack is turned off.
- Remove the two battery covers by turning them counterclockwise.
- Insert two 18650 batteries into the two battery covers, following the polarity note (positive
end inwards).
- Replace the battery covers.
WARNING:
Use only INFITAC-approved 18650 batteries.
Using any other battery may cause irreparable damage to the smart battery
pack or cause a fire.
Any damage from using an improper battery will not be covered by warranty.
9.2 Remove The Battery
To remove the battery from the DNVS-14 Pro:
Remove the battery cover by turning it counterclockwise.
Remove the battery and replace the battery cover.
9.3 Charging the Battery
The DNVS-14 Pro comes with two 18650 lithium-ion batteries, each equipped with a built-in
USB Type-C port..
- For charging, please use a standard certified mobile power charger (5V/2A) and a USB cable.
- Insert the USB connector into the USB type-C port of the positive terminal of the 18650
battery, then connect it to the power adapter. During charging, the LED indicator at the
positive end of the battery will turn red and switch to green once fully charged.
DNVS-14 Pro User Manual V1.3.2
www.infitacusa.com
9.4 Battery Safety Warnings
WARNINGS:
Replacement of a battery with an incorrect type that can defeat a safeguard (for example, in
the case of some lithium battery types).
Disposal of a battery into fire or a hot oven, or mechanically crushing or cutting of a battery
that can result in an explosion.
Leaving a battery in an extremely high temperature surrounding environment that can result
in an explosion or the leakage of flammable liquid or gas, and a battery subjected to
extremely low air pressure that can result in an explosion or the leakage of flammable liquid
or gas.
If the device is not in use for a long time, the battery shall be taken out of the device and
stored in a dry place.
The battery compartment is equipped with battery reverse connection protection, but it is best
to avoid incorrect installation.
Do not expose the battery to high temperatures or flames, and do not immerse in water.
Do not leave the battery unattended while charging.
Disconnect the battery promptly after it is fully charged. Charging time should not exceed 24
hours.
Keep the battery pack out of the reach of children and pets.
The battery is equipped with short-circuit protection. However, any situation that may cause
short-circuiting should be avoided.
Do not disassemble, modify, hit, or drop the battery pack.
Do not connect the battery to any external device with an electrical current that exceeds
permitted levels.
To maintain optimal battery capacity and service life:
Avoid storing a fully charged or discharged battery for long periods. Partial charging of the
battery is necessary if the battery will be stored for an extended period.
Do not charge an extremely cold battery without bringing it into a warm environment. Let the
battery warm up for 45 minutes before charging.
Charge the battery at a temperature range from 32 °F to 113 °F, otherwise, the service life of
the battery may be reduced.
The recommended operating temperature range is -4 °F to 122 °F. Avoid using the battery
DNVS-14 Pro User Manual V1.3.2
www.infitacusa.com
above the maximum or below the minimum recommended temperature range as this may
decrease the battery capacity or service life.
When the device is used under sub-zero temperatures, the battery capacity drops. This is
normal and does not indicate a defect.
10. EXTERNAL POWER SUPPLY
The DNVS-14 Pro supports external power supply, such as using a phone charger (5V) or a
computer USB interface.
Steps for Use:
- Connect the external power source to the battery pack USB port using the USB cable.
- If the device is powered on, it will automatically switch to the external power supply and stop
using the battery.
- When the external power is turned off or disconnected, the device will switch to the battery
for the power supply.
Precautions:
- When the USB interface is used for the power supply, the default power will come from the
power supply, and the internal battery power will be stopped.
- Using a USB interface for power will not charge the battery inside the device.
- Do not leave the device unattended for extended periods when using an external power
supply.
11. OPERATION INSTRUCTION
11.1 Power On
- Refer to Chapter 7 to connect the monocular to the battery pack.
- Long press the Power button of the battery pack for 2 seconds, the battery pack powers on,
and the indicator light flashes for 3 seconds. Then the DNVS-14 Pro monocular starts up, and
the INFITAC logo will appear on the display.
Note:
- If the battery pack is not properly connected to the DNVS-14 Pro monocular, long press the
power button will only power on the battery pack, but the monocular will not power on.
- If the battery pack is still not connected to the monocular within 60 seconds, the battery pack
will automatically power off.
11.2 Power Off
Long press the Power button for 2 seconds, the DNVS 14-Pro powers off, and then the battery
pack powers off.
11.3 Standby Mode
You can manually enter the Standby mode to save battery power.
DNVS-14 Pro User Manual V1.3.2
www.infitacusa.com
- On the home screen, short press the Menu button. The display will turn black, and the device
will enter Standby mode.
- Short press the Menu button again to exit Standby mode.
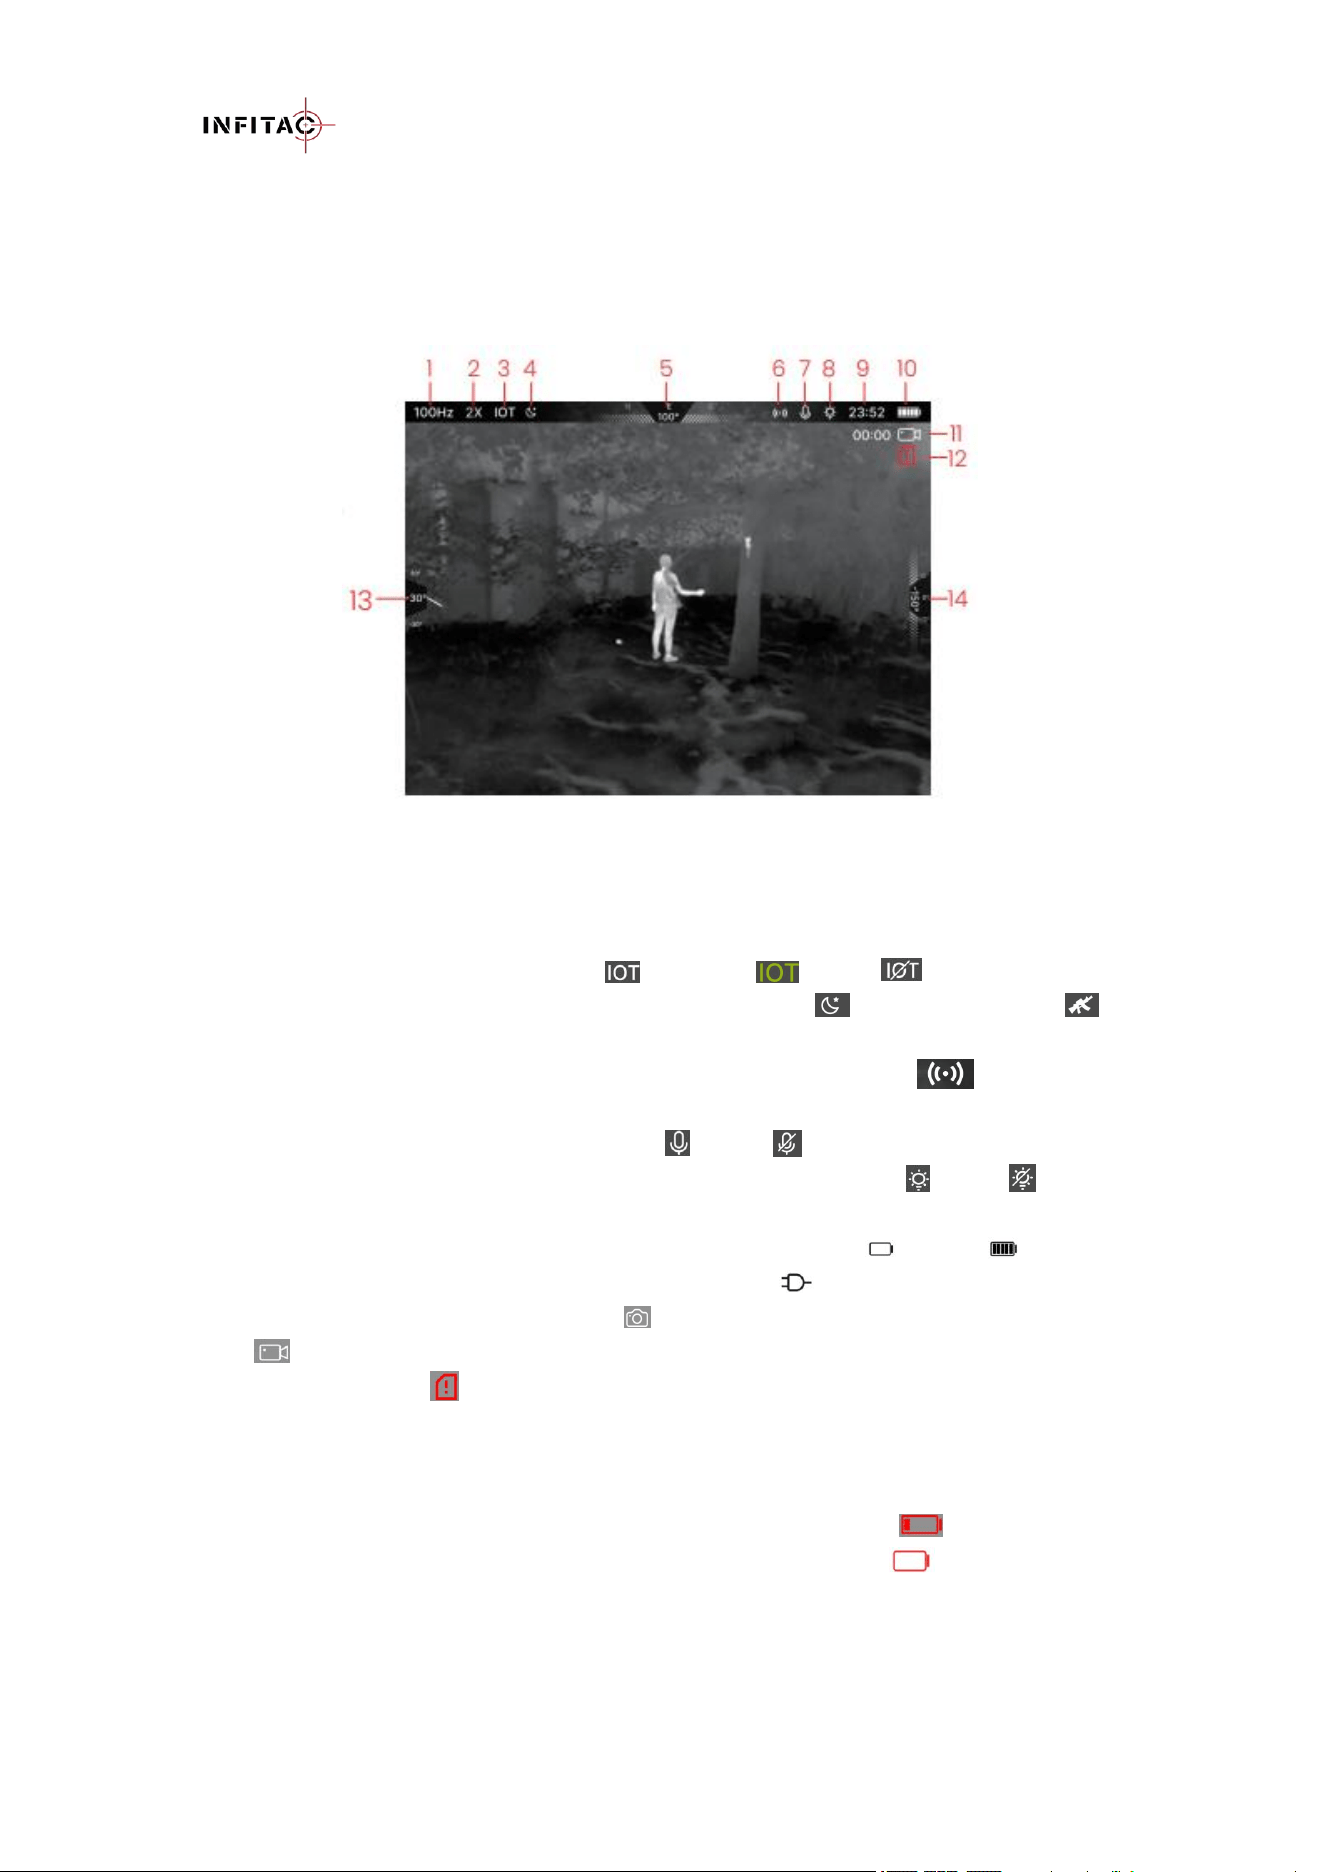
11.4 Status Bar Overview
The status bar is located at the top of the screen and displays the information related to the
current operating status of the DNVS-14 Pro.
1 Refresh Rate: Shows the current refresh rate, 50Hz or 100Hz
2 Digital Zoom: Shows the current image amplification, 1x, 2x, or 4x
3 IoT: Shows the current IoT status, ON , Connected , or OFF
4 Working Mode: Shows the current working mode, NV Mode , or Interconnect Mode
5 Digital Compass: The digital compass displays at the top of the screen when turned on.
6 IoT AP: Shows the current Wi-Fi Access Point status. IoT AP Icon briefly appears
When it enabled.
7 Microphone: Shows the microphone status,ON or OFF .
8 IR Illumination Status: Shows the current IR illumination status. ON or OFF .
9 Time: Shows the current time in 24-hour format.
10 Battery: Shows the current battery status, 1–100% , from 0 bars to 5 bars . When an
external power source is connected, the USB connection icon will be displayed.
11 Camera and Video Icon: Camera Icon briefly appears when taking a photo. Recording
icon appears during video recording.
12 Storage Full Icon: Appears when the device storage space is insufficient.
13 Tilt Angle: The tilt angle displays when the compass is turned on.
14 Pitch Angle: The pitch angle displays when the compass is turned on.
Note: When the battery icon shows more than 2 bars, it indicates the battery level is above
20% and sufficiently charged. When the battery icon shows 1 bar in red , it indicates low
battery, please replace the battery. When the battery icon flashes in red , it indicates
critically low battery and imminent power off.
11.5 Working Mode
The DNVS-14 Pro supports two working modes: NV Mode(Night Vision Mode) and Interconnect
DNVS-14 Pro User Manual V1.3.2
www.infitacusa.com
Mode.
NV Mode: Displays the monocular’s night-vision image. The NV mode icon appears in
the status bar.
Interconnect Mode: Displays the image from the connected device (e.g., IOL25) in either PIP
(Picture-in-Picture) or FULL(Full Screen) display mode. And the interconnect mode icon
appears in the status bar
When the DNVS-14 Pro is successfully connected to an IOTS device, you can rotate the photo
button to switch current working mode(NV Mode → Interconnect Mode (PIP) → Interconnect
Mode (FULL)).
If the DNVS-14 Pro is not connected to an IOTS device, only the NV Mode is available.
11.6 Digital Zoom
To adjust the digital zoom on NV Mode or Interconnect Mode(PIP):
From the home screen, rotate the menu button toggle through the digital zoom levels, with the
real-time amplified factor (1x, 2x, or 4x) shown on the left side of the status bar.
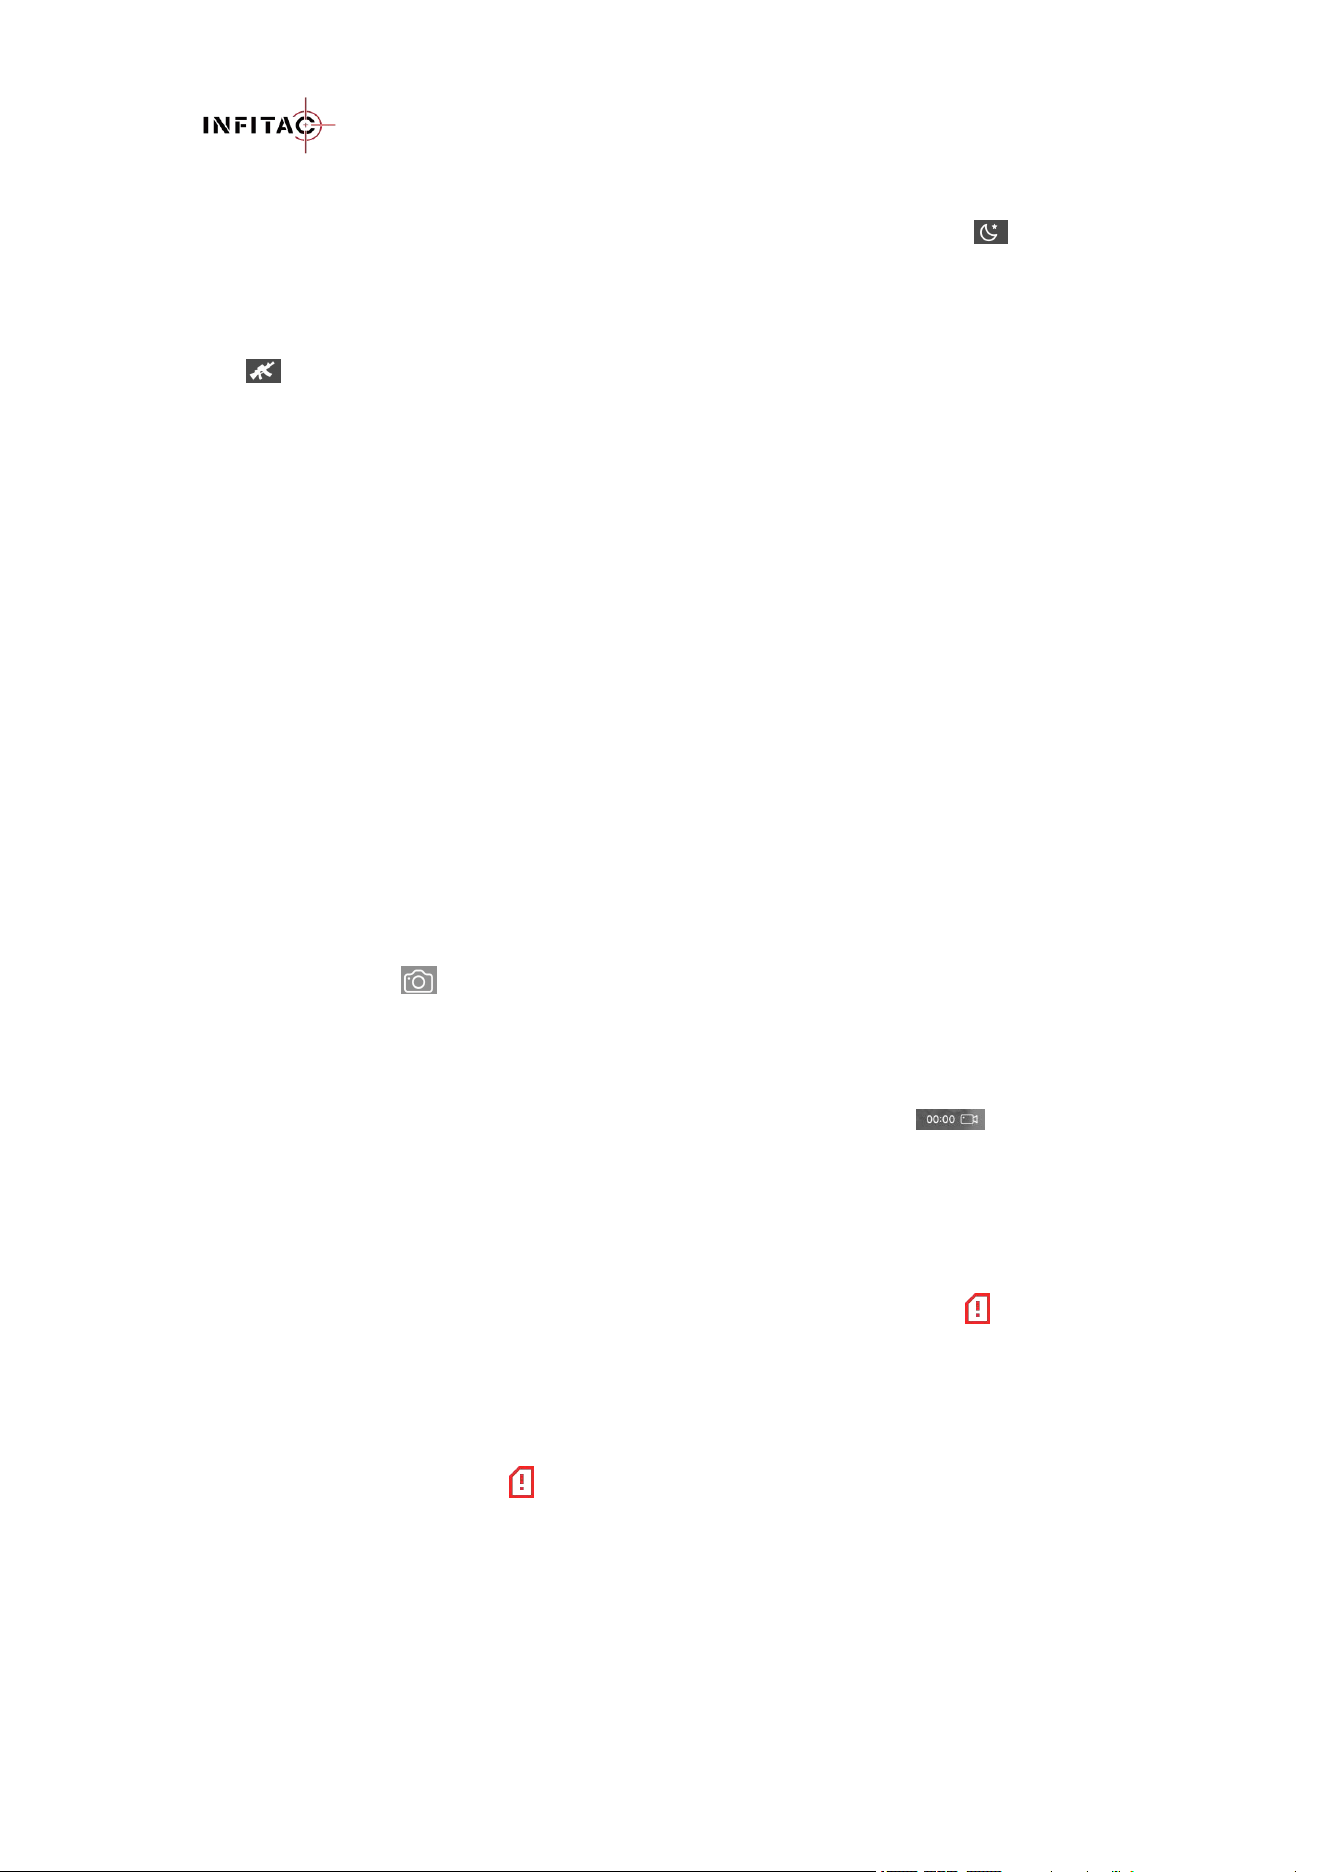
11.7 Photography and Video Recording
DNVS-14 Pro supports video recording and image capture functions. All videos and photos are
automatically saved to the built-in 32 GB memory storage.
Note: Photo and video files are named with the time and date, therefore, it is recommended to set
the date and time before using the photo and video functions.
Photography
- On the home screen, short press the Photo button to take a photo.
- The camera icon will appear on the right side of the screen.
Video Recording
- Long press the Photo button to start a video recording. Turn on the microphone in the setting
menu if desired.
- When the video recording starts, the video icon and the recording timer appear on the
right side of the screen.
- When recording, short press the Photo button to take a photo.
- Long press the Photo button to stop and save the video recording.
Note
- If the available storage space is less than 500M, the insufficient storage icon appears in the
upper right corner of the image. It will disappear only when the storage space is cleared and
exceeds 500M.
- If the available storage space is less than 50M, when starting photography or video recording,
the insufficient storage icon will flash for 3 seconds, and a prompt "Storage full, unable to
record video!" will appear in the center of the screen.
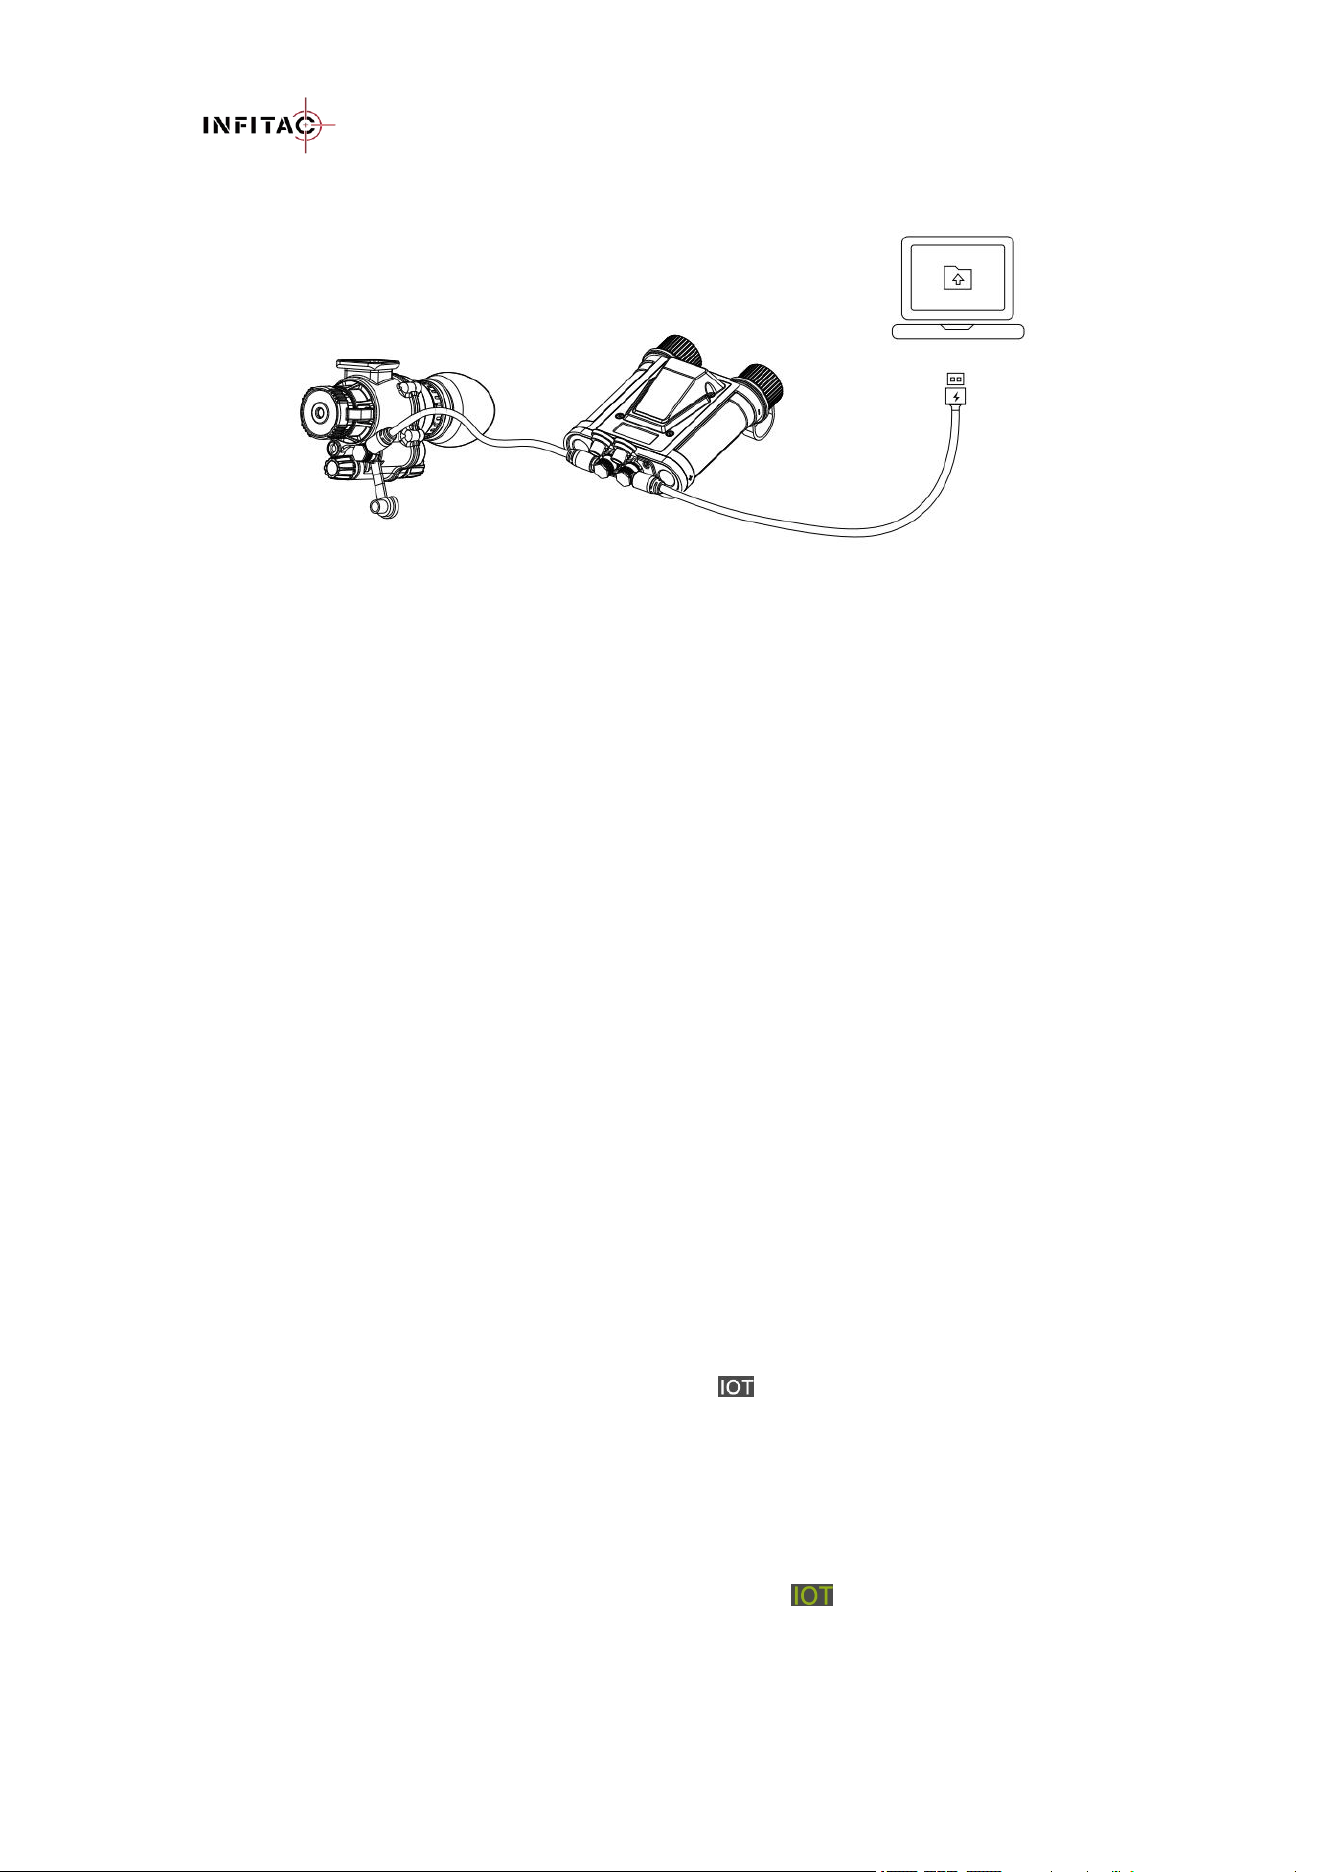
11.8 Accessing the Internal Memory
When the DNVS-14 Pro and the battery pack is turned on and connected to a computer via the
included USB cable, it is recognized by the computer as a flash memory (USB) drive. This allows
the user to access the saved multimedia files and copy or delete any desired files.
DNVS-14 Pro User Manual V1.3.2
www.infitacusa.com
To access the internal memory
- Turn on the smart battery pack.
- Connect the USB cable to the USB port of the battery pack.
- Connect the standard USB end of the USB cable to your computer.
- Double-click My Computer on your computer desktop.
- Double-click to open the device named DNVS to access the internal memory. Recorded photos
and videos are separated into PHOTOS subfolders by date.
- Select the desired files or folders to copy or delete.
Notes:
The number of recorded files is limited only by the capacity of the internal memory.
Regularly check the available memory storage space and move video footage and images to
other storage media to free up space on the memory card.
The internal memory may be reformatted in the advanced settings menu.
Do not use a formatting application or tool to format the internal storage.
11.9 IoT Connection
DNVS-14 Pro supports IoT wireless connectivity via Wi-Fi, allowing it to connect to an IOTS
device for wireless image transmission. Once connected successfully, the DNVS-14 Pro
monocular can display the live image from the IOTS sight.
Operation Steps:
- On the IOTS device, turn on the IoT function;
- On the DNVS-14 Pro, enter the main menu, select the IoT option, rotate the Menu button to
turn on the IoT function, then short press the Menu button to confirm and return to the
previous menu. When IoT is enabled, the IoT icon appears in the status bar.
- Select the IoT settings menu, then choose Search to automatically scan for nearby IoT
devices..
- After scanning, available devices will be listed at the top of the menu..
- Rotate the Menu button to select the target device (e.g., IOL25-XXXX) and connect.
- When the IoT connection is successful, the DNVS-14 Pro will automatically switch to the
interconnect image view, and the IoT icon will change to .
- Rotate the photo button to switch between PIP and FULL interconnect display modes.
DNVS-14 Pro User Manual V1.3.2
www.infitacusa.com
11.10 IoT AP Connection
The DNVS-14 Pro supports the IoT AP (Access Point) wireless hotspot feature, allowing mobile
devices (such as smartphones or tablets) to connect directly to the DNVS-14 Pro via Wi-Fi. Once
the IoT AP connection is established, you can view the DNVS live image and operate the device
through the INFITAC APP.
Operation Steps:
1. Enter the Advanced Settings menu, select IoT AP, rotate the Menu button to turn on the IoT
AP function, then short-press the Menu button to confirm and return to the previous menu.
When IoT AP is enabled, the corresponding IoT AP icon will appear in the status bar.
2. On your mobile device, search for Wi-Fi networks and select DNVS-14-Pro-XXXX (XXXX
represents a 4-digit number). Enter the password 12345678 to connect.
3. Once connected, you can view the DNVS live image on your mobile device using the
INFITAC APP.
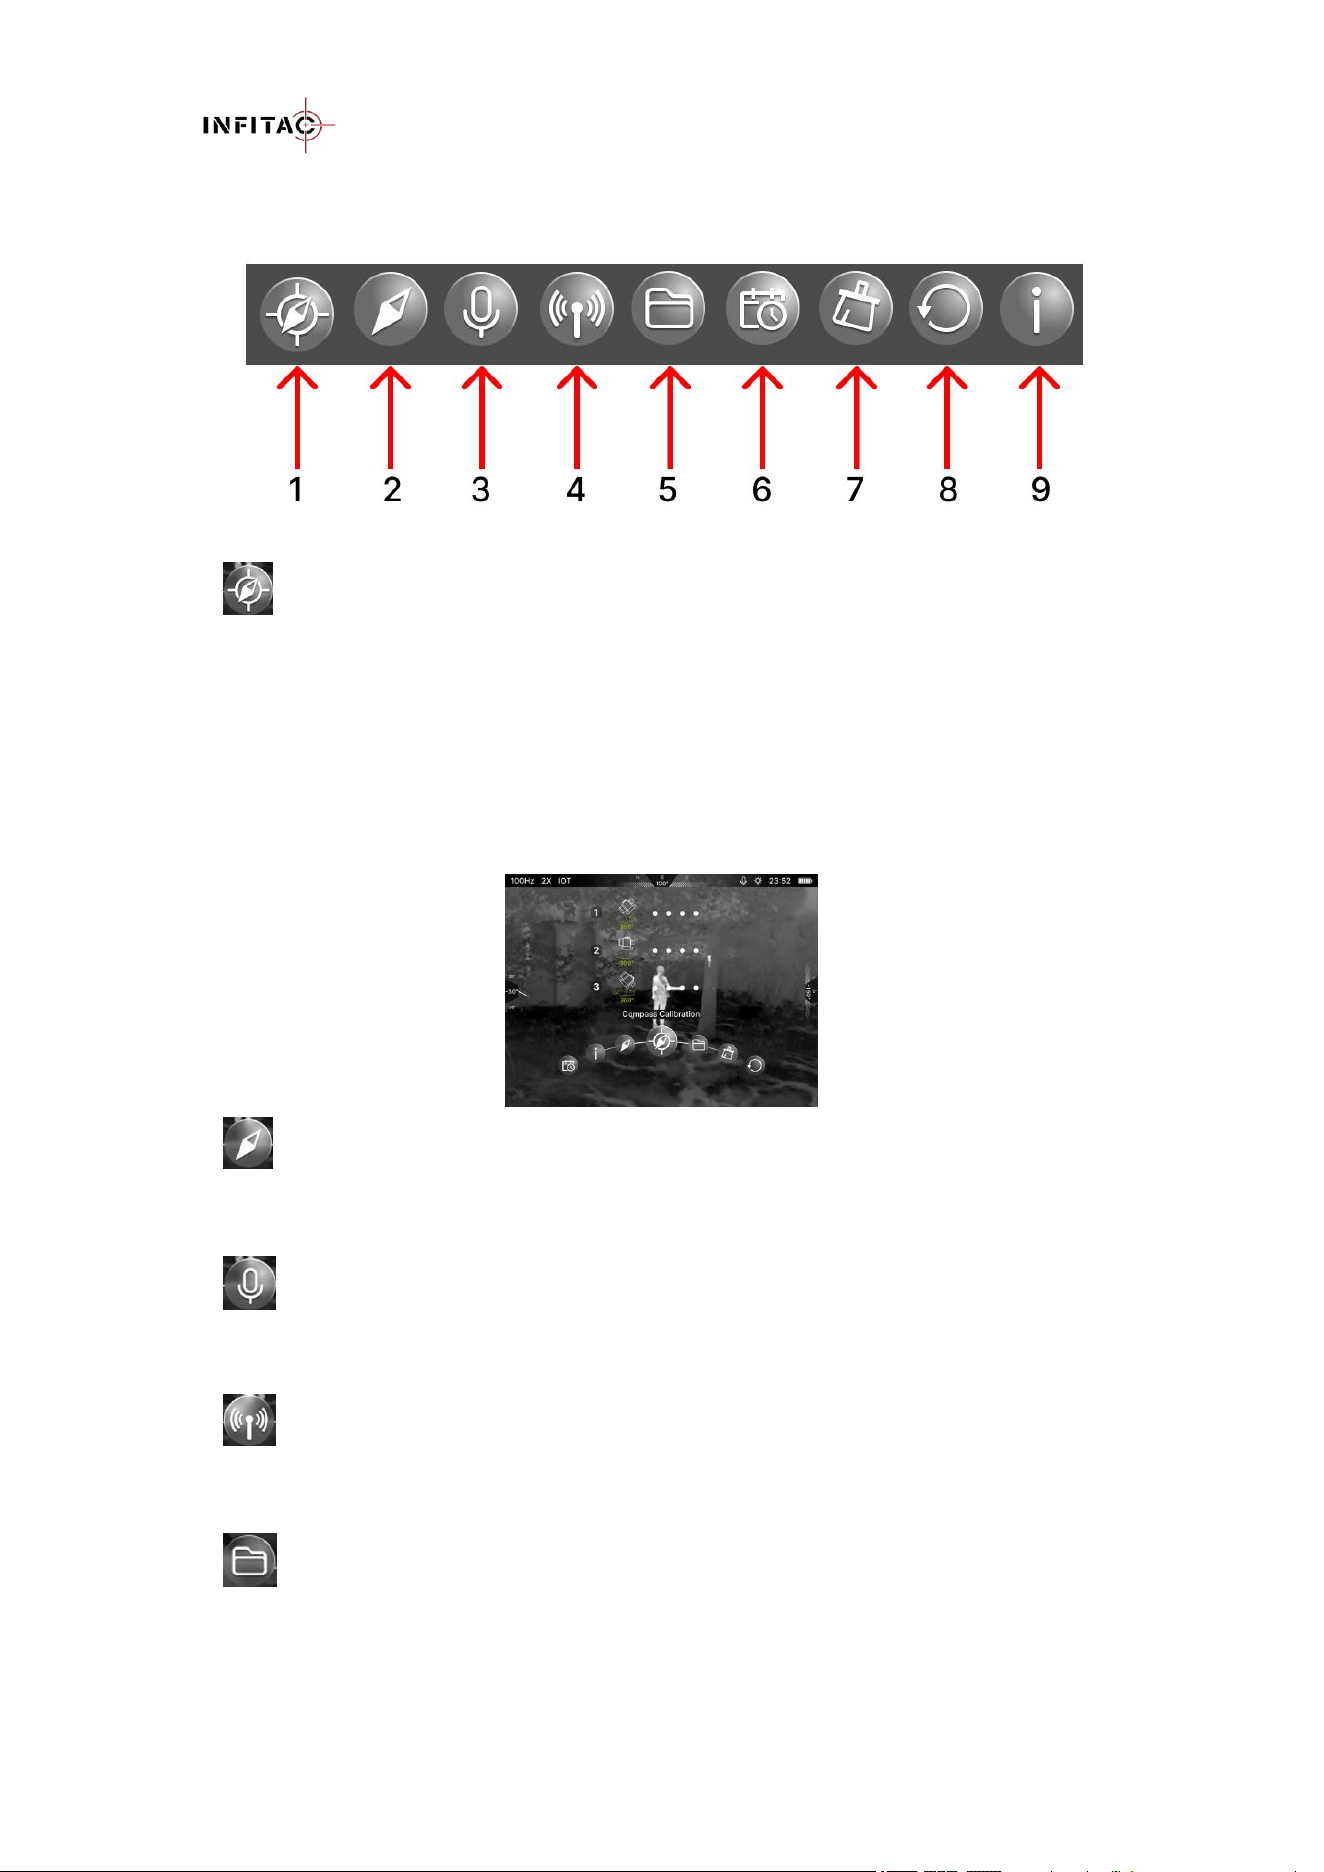
12. MENU
On the home screen, long press the Menu button to enter the main menu.
In all menu interfaces:
Rotate the Menu button to switch menu options.
Short press the Menu button to adjust the parameters of the current menu or enter the
subsequent parameter menu.
Long press the Menu button to save changes and return to the previous menu.
Notes: If no operation is performed within 60 seconds in certain menus, the device will
automatically return to the home screen without saving parameter changes.
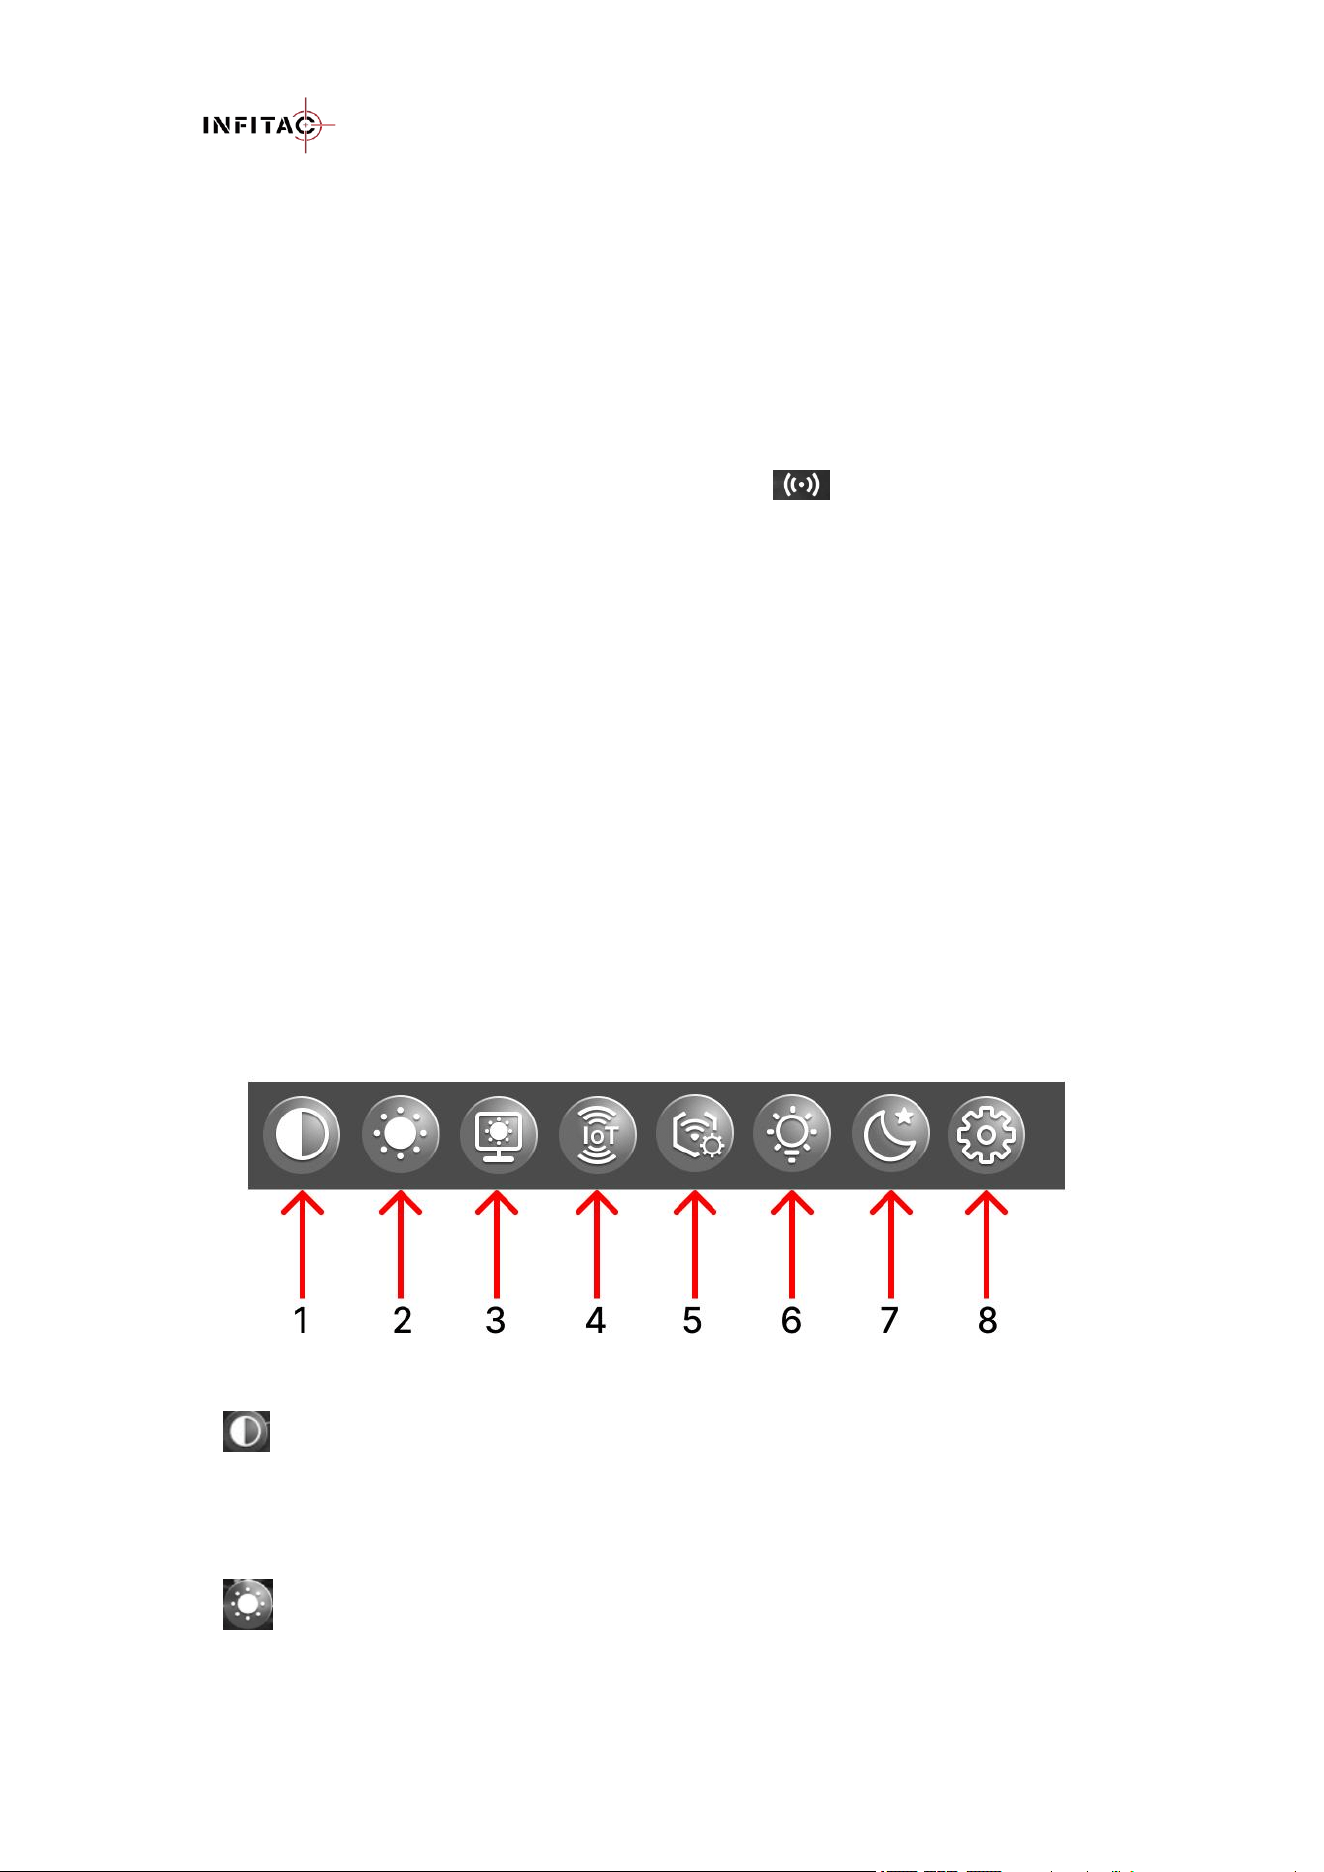
12.1 Main Menu
1 Contrast
In the Contrast menu, you can adjust the image contrast level:
- There are ten levels available: 0, 1, 2, 3, 4, 5, 6, 7, 8, 9.
- The default is 5.
2 Image Brightness
In the Image Brightness menu, you can adjust the image brightness level.
- There are ten levels available: 0, 1, 2, 3, 4, 5, 6, 7, 8, 9.
DNVS-14 Pro User Manual V1.3.2
www.infitacusa.com
- The default is 5.
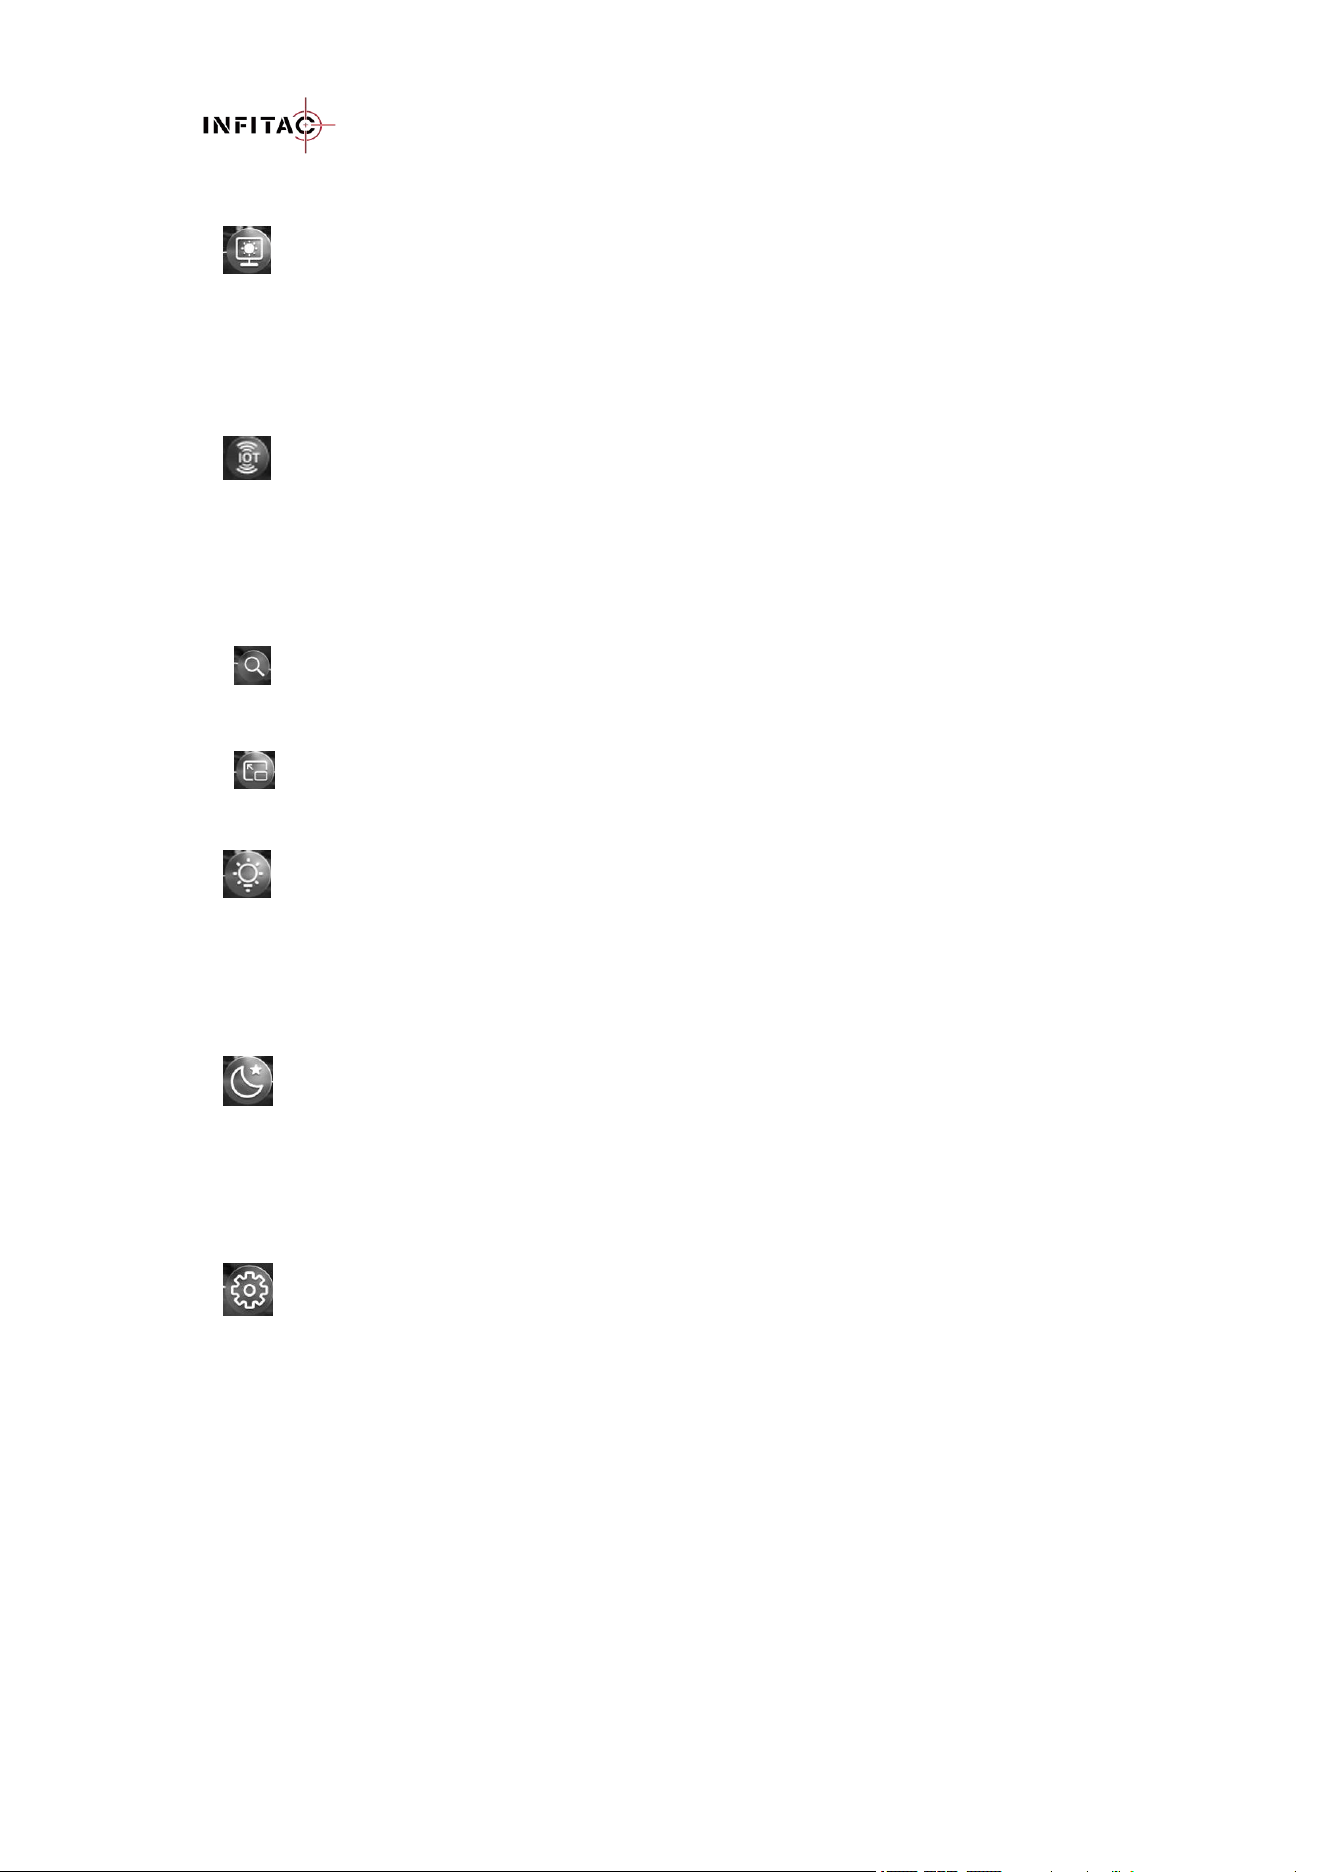
3 Screen Brightness
In the Screen Brightness menu, you can adjust the screen brightness level:
- There are ten levels available: Auto 1, 2, 3, 4, 5, 6, 7, 8, 9. Auto allows the screen brightness to
adjust automatically.
- The default is Auto.
4 IoT
In the IoT menu, you can switch the IoT function ON or OFF.
The default is OFF.
5 IoT Setting
In the IoT Setting menu, you can search the IoT device and adjust the interconnect display mode.
- Search: Search and connect the IoT devices. You can refer to the Chapter10.9 to connect to
an IoT device.
- Display Mode: PIP (Picture-in-Picture) or FULL(Full Screen) display mode. The default is
PIP display mode.
6 Fill-in Light
In the Fill-in Light menu, you can turn on or off the IR illumination light, and adjust the brightness
level.
- There are six levels, OFF, 1, 2, 3, 4, 5. When the level is on the 1-5, the light is on.
- The default is OFF
7 Low-light Mode
In the Low-light Mode menu, you can adjust the low-light image polarity
- There are three image polarities, Origin(original image), Green(Green phosphor image), or
White(white phosphor image).
- The default is Origin.
8 Advanced Settings
Enter the Advanced Settings menu to adjust additional parameters.
DNVS-14 Pro User Manual V1.3.2
www.infitacusa.com
12.2 Advanced Settings Menu
1 Compass Calibration
Enter Compass Calibration menu, you can calibrate the compass's parameters.
Follow the on-screen prompt: place the device at +45° tilt, 0° level, and –45° tilt, and rotate it
horizontally in each position for a full circle (more than 360°).
After successful calibration, the system automatically saves the parameters and returns to the
previous menu with the message “Compass Calibration Successful!”.
If calibration is not completed or exit by long-pressing the Menu button, the parameters will not
be saved.
2 Compass
In the Compass menu, you can turn the digital compass ON or OFF.
The digital compass is ON by default.
3 Audio Recording
In the Recording menu, you can turn the microphone ON or OFF.
The audio recording is OFF by default.
4 IoT AP
In the IoT AP menu, you can switch the IoT AP function ON or OFF.
The default is OFF.
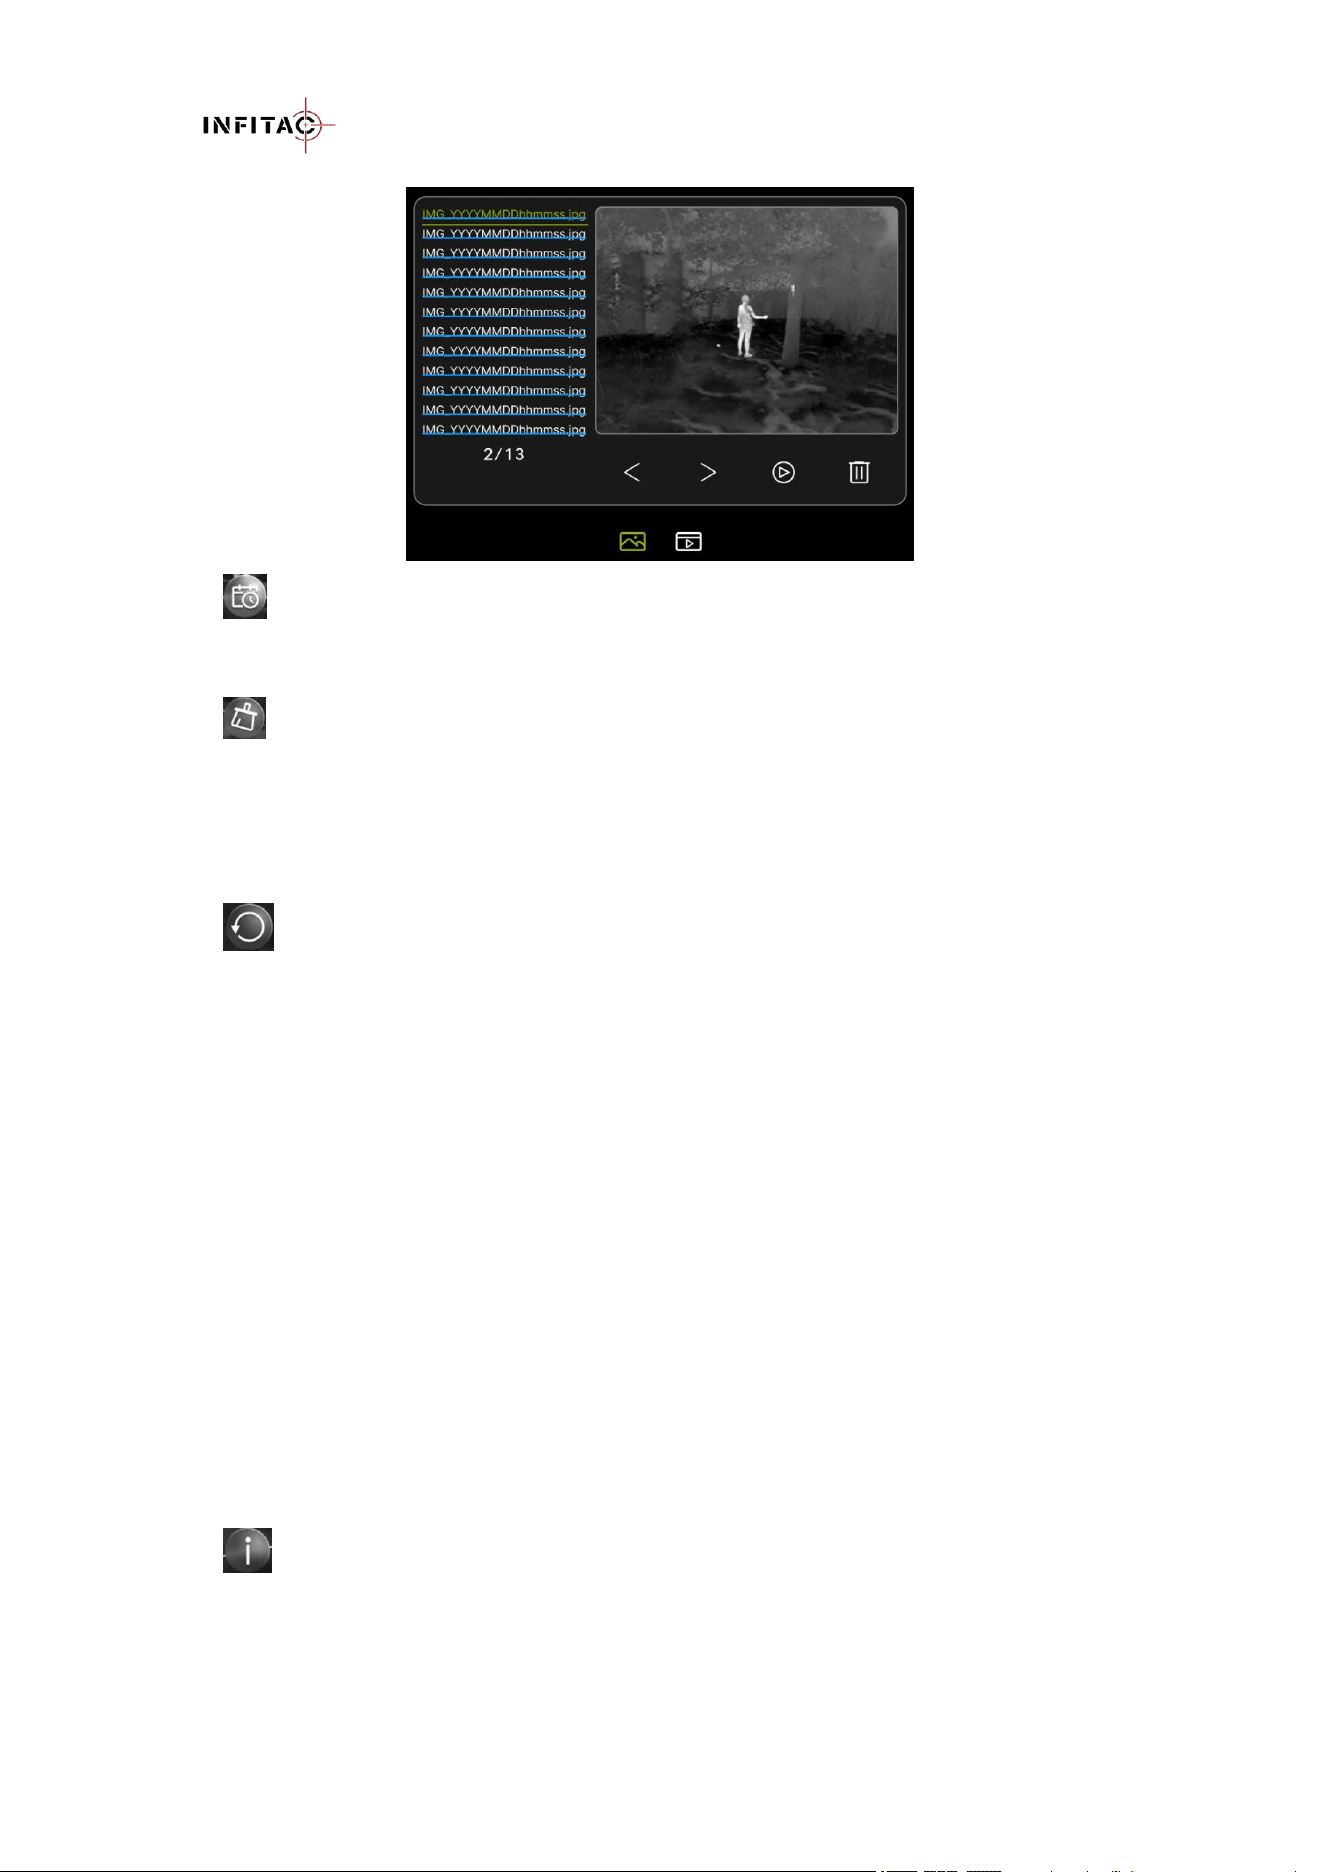
5 File Management
In the File Management menu, you can preview or delete pictures and video files from the internal
storage.
DNVS-14 Pro User Manual V1.3.2
www.infitacusa.com
6 Date and Time Settings
In the Date and Time Settings menu, you can set the current date and time.
7 Formatting
In the Formatting menu, you can erase the internal memory card.
WARNING: Before formatting, make sure to back up any photos and videos you want to keep.
All files saved on the internal memory card will be permanently deleted.
8 Factory Reset
In the Factory Reset menu, you can reset all device parameters to factory defaults.
Note : Settings reset cannot be undone. The settings listed below will be reset to the factory
defaults:
- Digital zoom: 1x
- Screen brightness: Auto
- Image brightness: 5
- Contrast: 5
- Working mode: NV mode
- Image polarity: Origin
- IoT: OFF
- IoT Display Mode: PIP
- IoT AP: OFF
- Compass: ON
- IR Illumination: OFF
- Recording: OFF
9 Information
In the Device information menu, you can view the relevant information of the current device
(device model, storage capacity, PN, SN, software version, hardware version and IoT
information).
DNVS-14 Pro User Manual V1.3.2
www.infitacusa.com
13. USING THE INFITAC APP
The DNVS-14 Pro can be operated by using the INFITAC App when connected to a tablet or
smartphone.
Install the APP
- Download and install the INFITAC APP for free from the App Store or Google Play.
- Visit www.infitacusa.com for the latest download links.
Connect your mobile device to DNVS-14 Pro
- Turn on the IoT AP function in Settings menu.
- On your mobile device, search for Wi-Fi networks and select DNVS-14-Pro-XXXX
- Enter the password 12345678 to connect.(See Chapter 11.10.)
After the APP connects to the DNVS-14 Pro, you can:
- View the DNVS-14 Pro real-time image and take photos and videos.
- View, download, share, and delete photos and videos saved on the DNVS-14 Pro.
- Adjust DNVS-14 Pro settings such as the image polarity and digital zoom level.
- Synchronize the date and time from the mobile device.
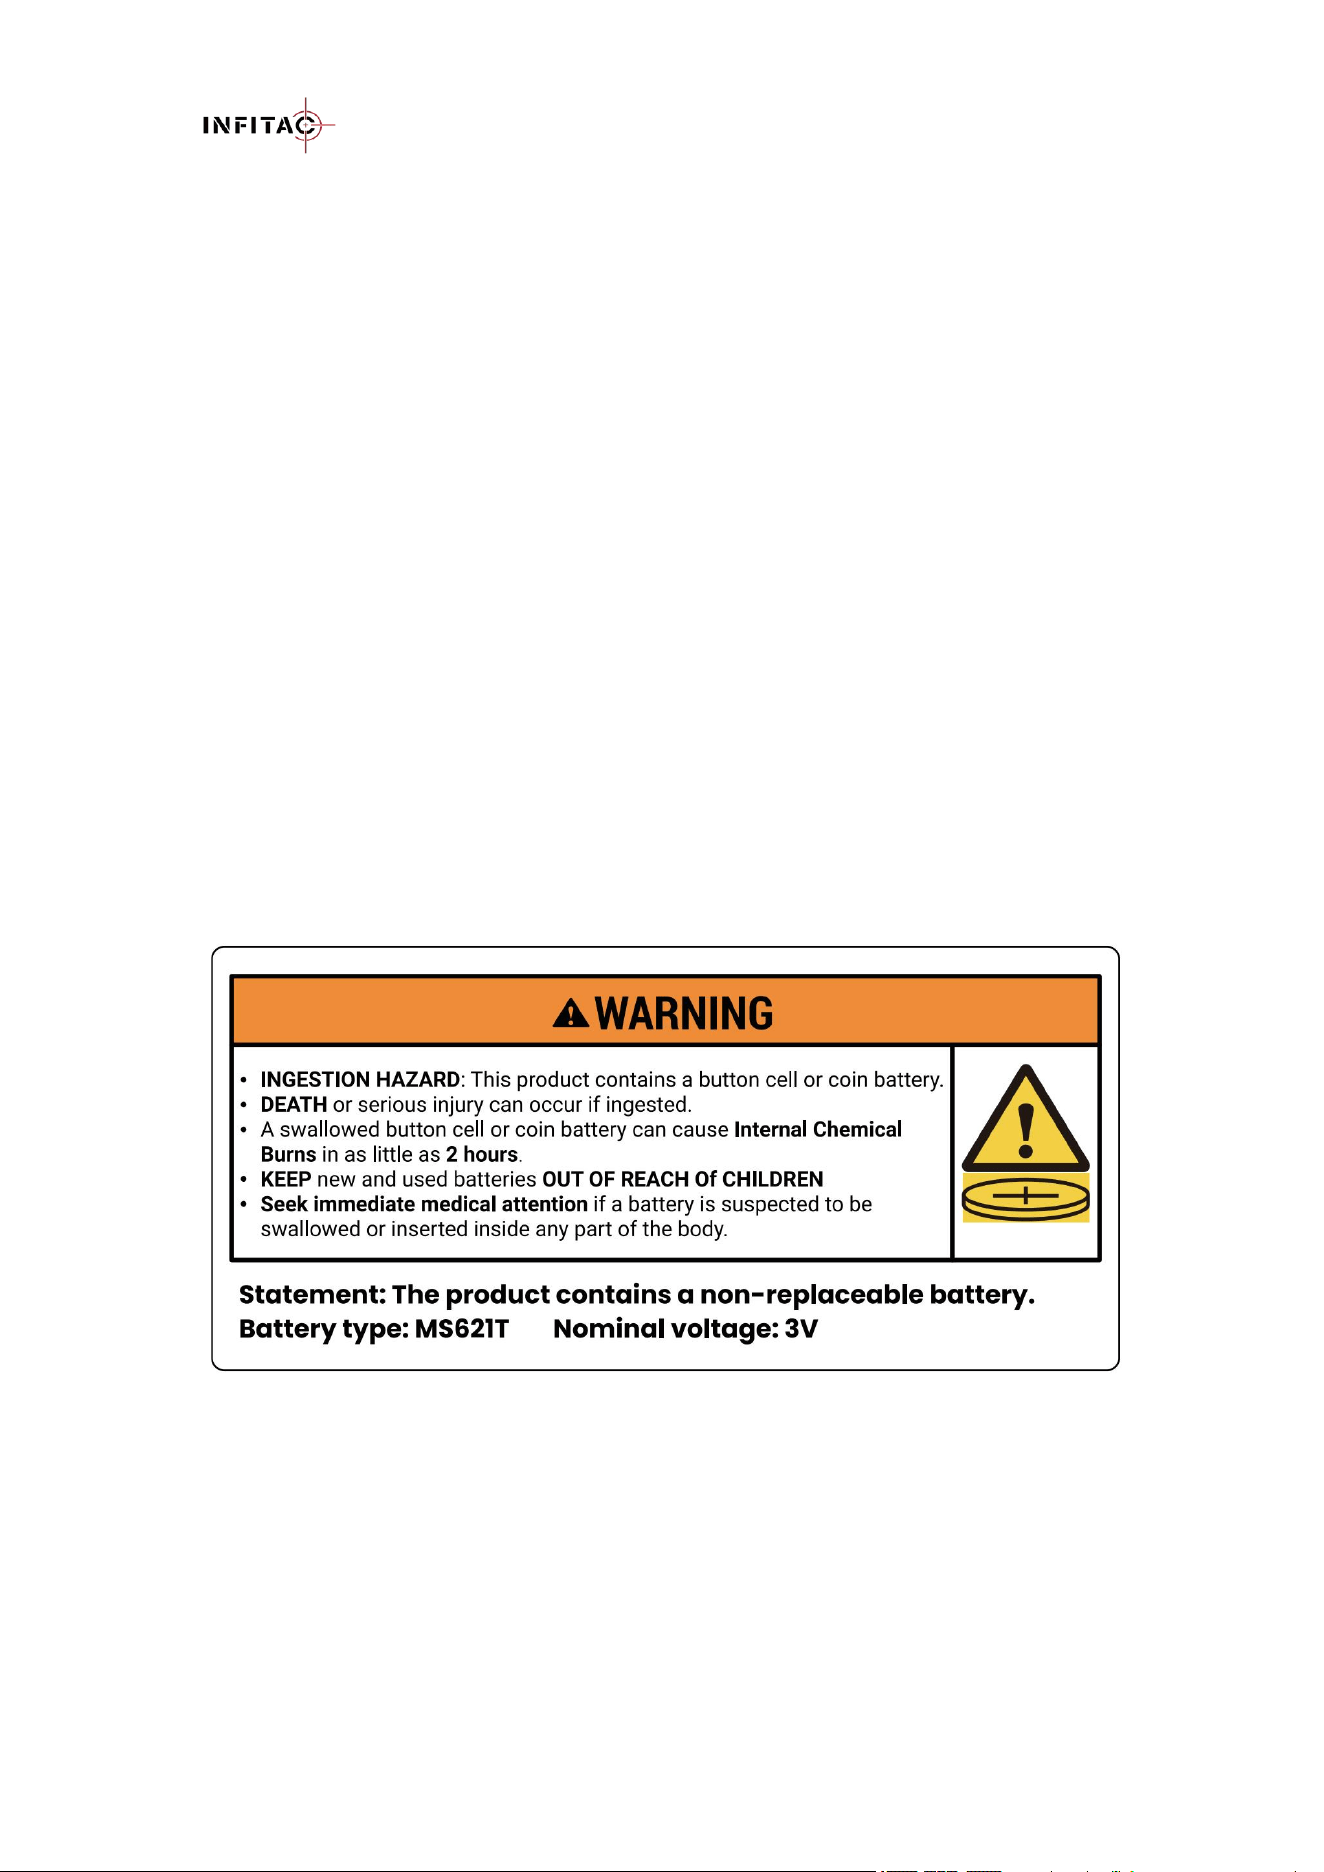
14. BUTTON CELL BATTERY WARNINGS
- Remove and immediately recycle or dispose of used batteries according to local regulations
and keep away from children. Do NOT dispose of batteries in household trash or incinerate.
- Even used batteries may cause severe injury or death.
- Call a local poison control center for treatment information.
- Compatible battery type MS621T. Nominal battery voltage 3.0V.
- Non-rechargeable batteries are not to be recharged.
- Do not force discharge, recharge, disassemble, heat above (manufacturer's specified
temperature rating) or incinerate. Doing so may result in injury due to venting, leakage or
explosion resulting in chemical burns.

DNVS-14 Pro User Manual V1.3.2
www.infitacusa.com
- The product contains a non-replaceable battery.
15. FCC REGULATIONS
FCC ID: 2BRRE-DNVSM1
This device complies with part 15 of the FCC Rules. Operation is subject to the following two
conditions: (1) This device may not cause harmful interference, and (2) this device must accept
any interference received, including interference that may cause undesired operation.
NOTE: This equipment has been tested and found to comply with the limits for a Class B digital
device, pursuant to part 15 of the FCC Rules. These limits are designed to provide reasonable
protection against harmful interference in a residential installation. This equipment generates, uses
and can radiate radio frequency energy and, if not installed and used in accordance with the
instructions, may cause harmful interference to radio communications. However, there is no
guarantee that interference will not occur in a particular installation. If this equipment does cause
harmful interference to radio or television reception, which can be determined by turning the
equipment off and on, the user is encouraged to try to correct the interference by one or more of
the following measures:
- Reorient or relocate the receiving antenna.
- Increase the separation between the equipment and receiver.
- Connect the equipment into an outlet on a circuit different from that to which the receiver
is connected.
- Consult the dealer or an experienced radio/TV technician for help.
CAUTION: Any changes or modifications to this device not expressly approved by INFITAC for
compliance could void the user’s authority to operate the equipment.
16. CLEANING & GENERAL CARE
The maintenance should be carried out at least twice a year and includes the following steps:
- Use a clean, soft, dry cotton cloth to wipe the external surfaces of the product's metal and
plastic parts, removing dust and dirt.
- Clean the electric contact and battery slots on the device using a non-greasy organic solvent.
- Check the glass surface of the eyepiece and lens. If necessary, clear off the dust and sand on
the lens (it is perfect to use a non-contact method). Use a specialized wiping tool and solvent
to clean the optical surfaces.
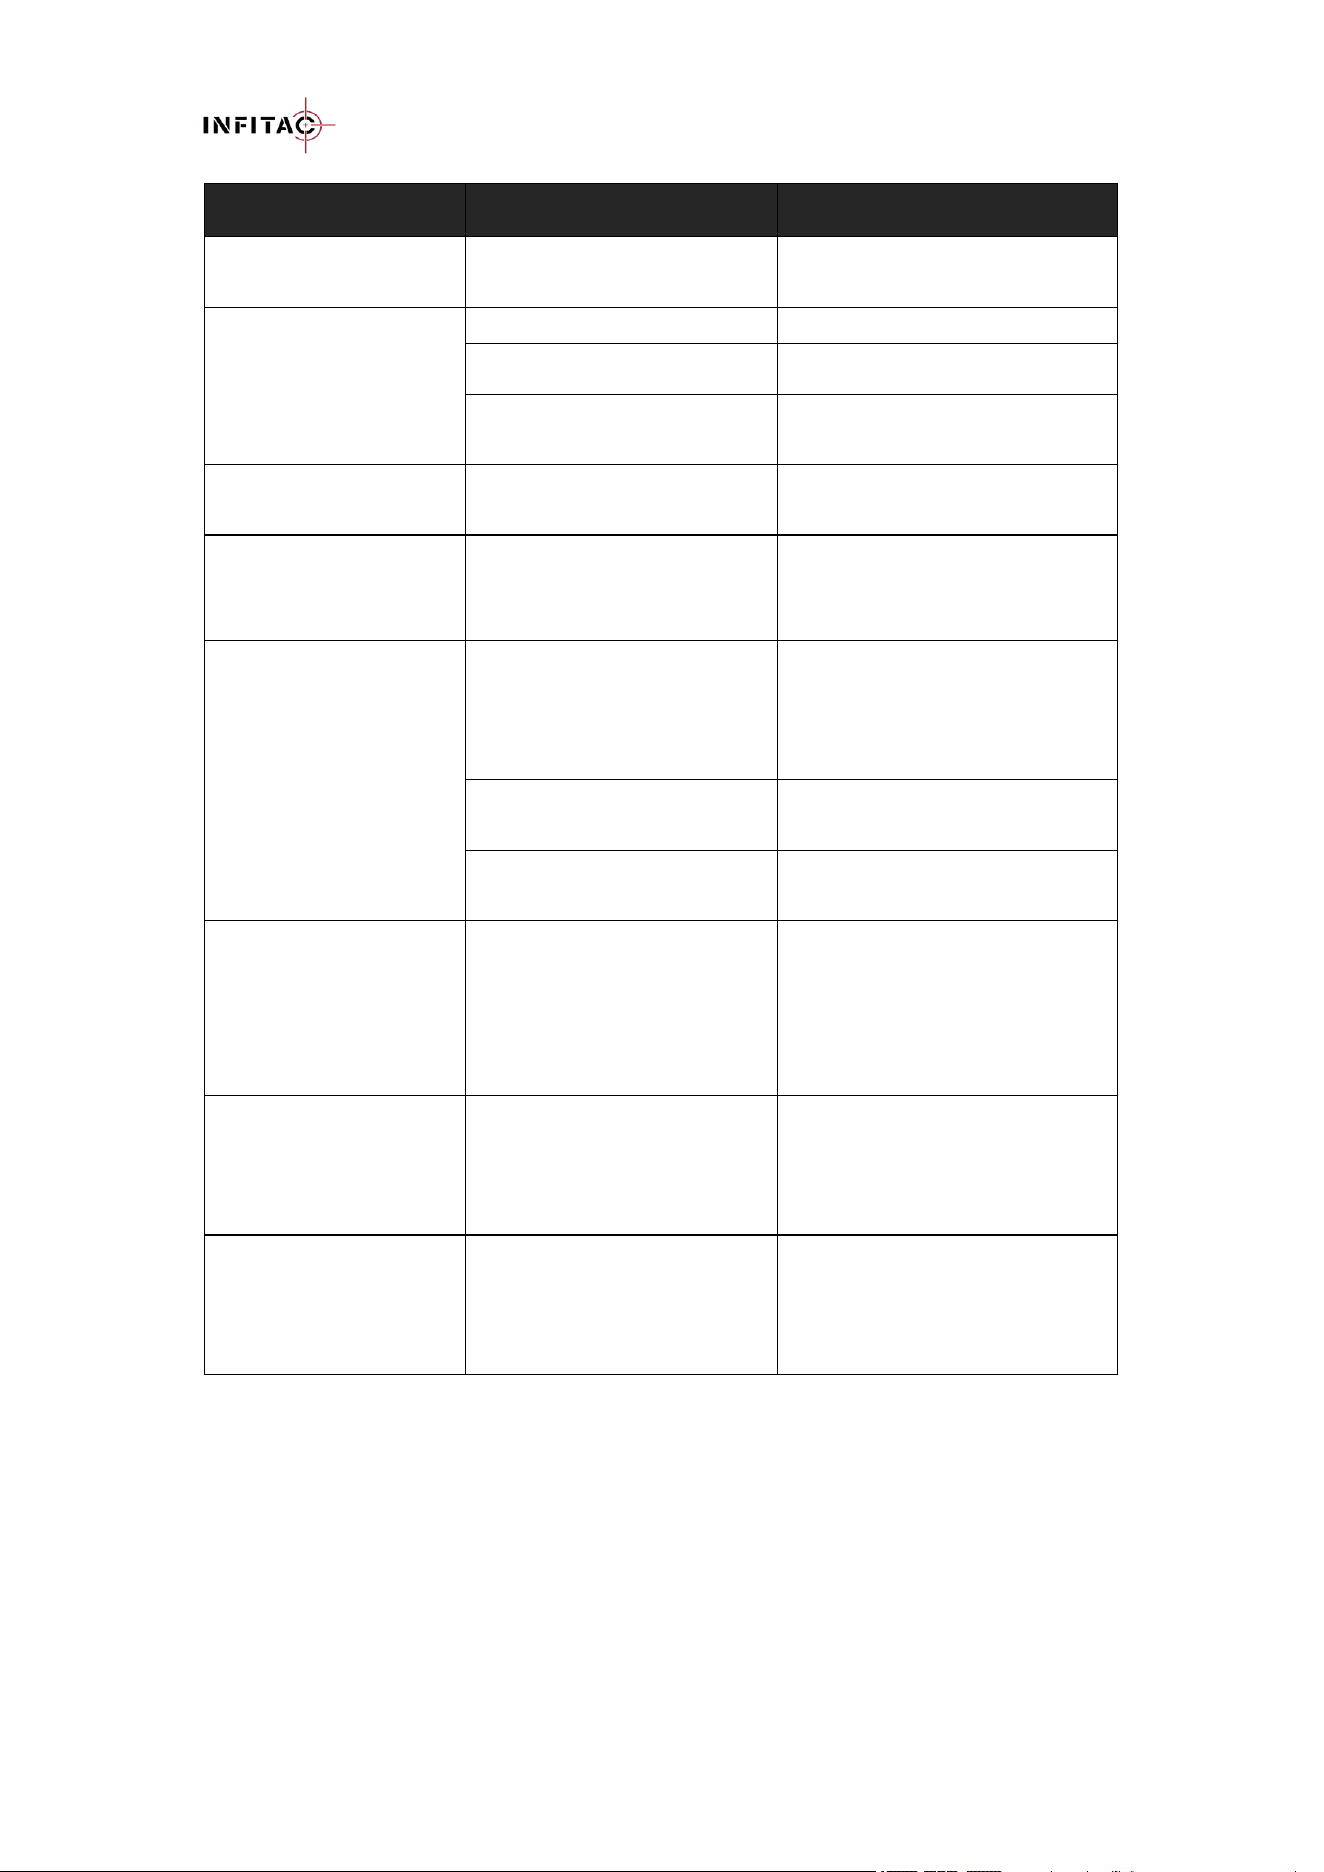
17. GENERAL TROUBLESHOOTING
The following table lists some potential issues when operating the device and their corresponding
solutions. If you encounter these issues while using the product, please follow the suggestions and
solutions in the table to troubleshoot and fix them. If the issue persists or an unlisted fault occurs
that cannot be self-repaired, contact the supplier for factory repair immediately. You can also visit
www.infitacusa.com for solutions to your product problems, or email us at
support@infitacusa.com for more detailed information. Do not disassemble and repair it yourself
or have it repaired by a third party not authorized by INFITAC, as this will void your product
warranty.
DNVS-14 Pro User Manual V1.3.2
www.infitacusa.com
Fault
Possible Causes
Solutions
The DNVS-14 Pro
cannot turn on.
The battery is low or
completely discharged.
Charge the battery.
The DNVS-14 Pro
cannot connect to a
computer or external
power supply.
The USB cable is damaged.
Replace the USB cable.
The computer is turned off.
Power on the computer.
The external power supply is
insufficient.
If necessary, check the external
power supply.
The image is too dark.
The screen brightness is
insufficient.
Adjust the screen brightness in
the main menu.
The icons are clear but
the image is fuzzy.
There is dust or ice on the
exterior optical surfaces of the
lens.
Check the objective lens surface
and wipe off dust or frost with a
soft cloth.
The DNVS-14 Pro
cannot connect to mobile
device (smartphone or
tablet).
IoT AP function is not turned
on in DNVS-14 Pro.
On the DNVS-14 Pro device,
enter the Settings menu, select
the IoT AP menu, and turn on
IoT AP. Refer to Chapter 12.2.
Wi-Fi password is not entered
correctly in mobile phone.
Enter correct password
12345678.
Too many Wi-Fi signals
around the device.
Move the device to an area with
no or fewer Wi-Fi signals.
Wi-Fi signal has been
lost or interrupted.
Smartphone or tablet is out of
range of a strong Wi-Fi signal,
or there are obstacles between
the device and the
smartphone.
Try again when the Wi-Fi signal
is stable. Relocate the mobile
device closer to the DNVS-14
Pro.
IoT / Recording / Photo /
Video Recording / File
management function
are unavailable
The main data cable was
mistakenly plugged into the
battery pack’s USB port.
Plug the main data cable into the
battery pack’s data port.
Files Cannot Be
Exported
The USB cable was
incorrectly connected to the
battery pack’s data port.
Use the included USB cable to
connect the battery pack’s USB
port to the computer.
18. WARRANTY POLICY
Under normal use and maintenance conditions, if this product experiences performance
failure due to material, workmanship, or manufacturing issues within the warranty period, we
promise to provide warranty service.
Our warranty follows the product. During the announced warranty period, at our sole
discretion, INFITAC will repair or replace products found defective under normal use without
charge, excluding any delivery costs, which will be born by purchaser. We will not be liable for

DNVS-14 Pro User Manual V1.3.2
www.infitacusa.com
incidental, consequential, or special damages arising out of or in any connection with the use or
performance of this product.
Our warranty covers only normal use and does not include normal wear and tear of the
device's appearance, theft, loss, intentional damage, any force majeure, or any situation
arising from unexpected use. Visit www.infitacusa.com for the latest complete warranty
information and other conditions.
19. TRADEMARKS
is trademark owned by INFITAC. For more details, visit www.infitacusa.com.
20. CONTACT
INFITAC LLC
www.infitacusa.com
Address: 190 E Stacy Rd, Ste 306358, Allen, Texas 75002, United States
Email: support@infitacusa.com
Tel: +18885594166