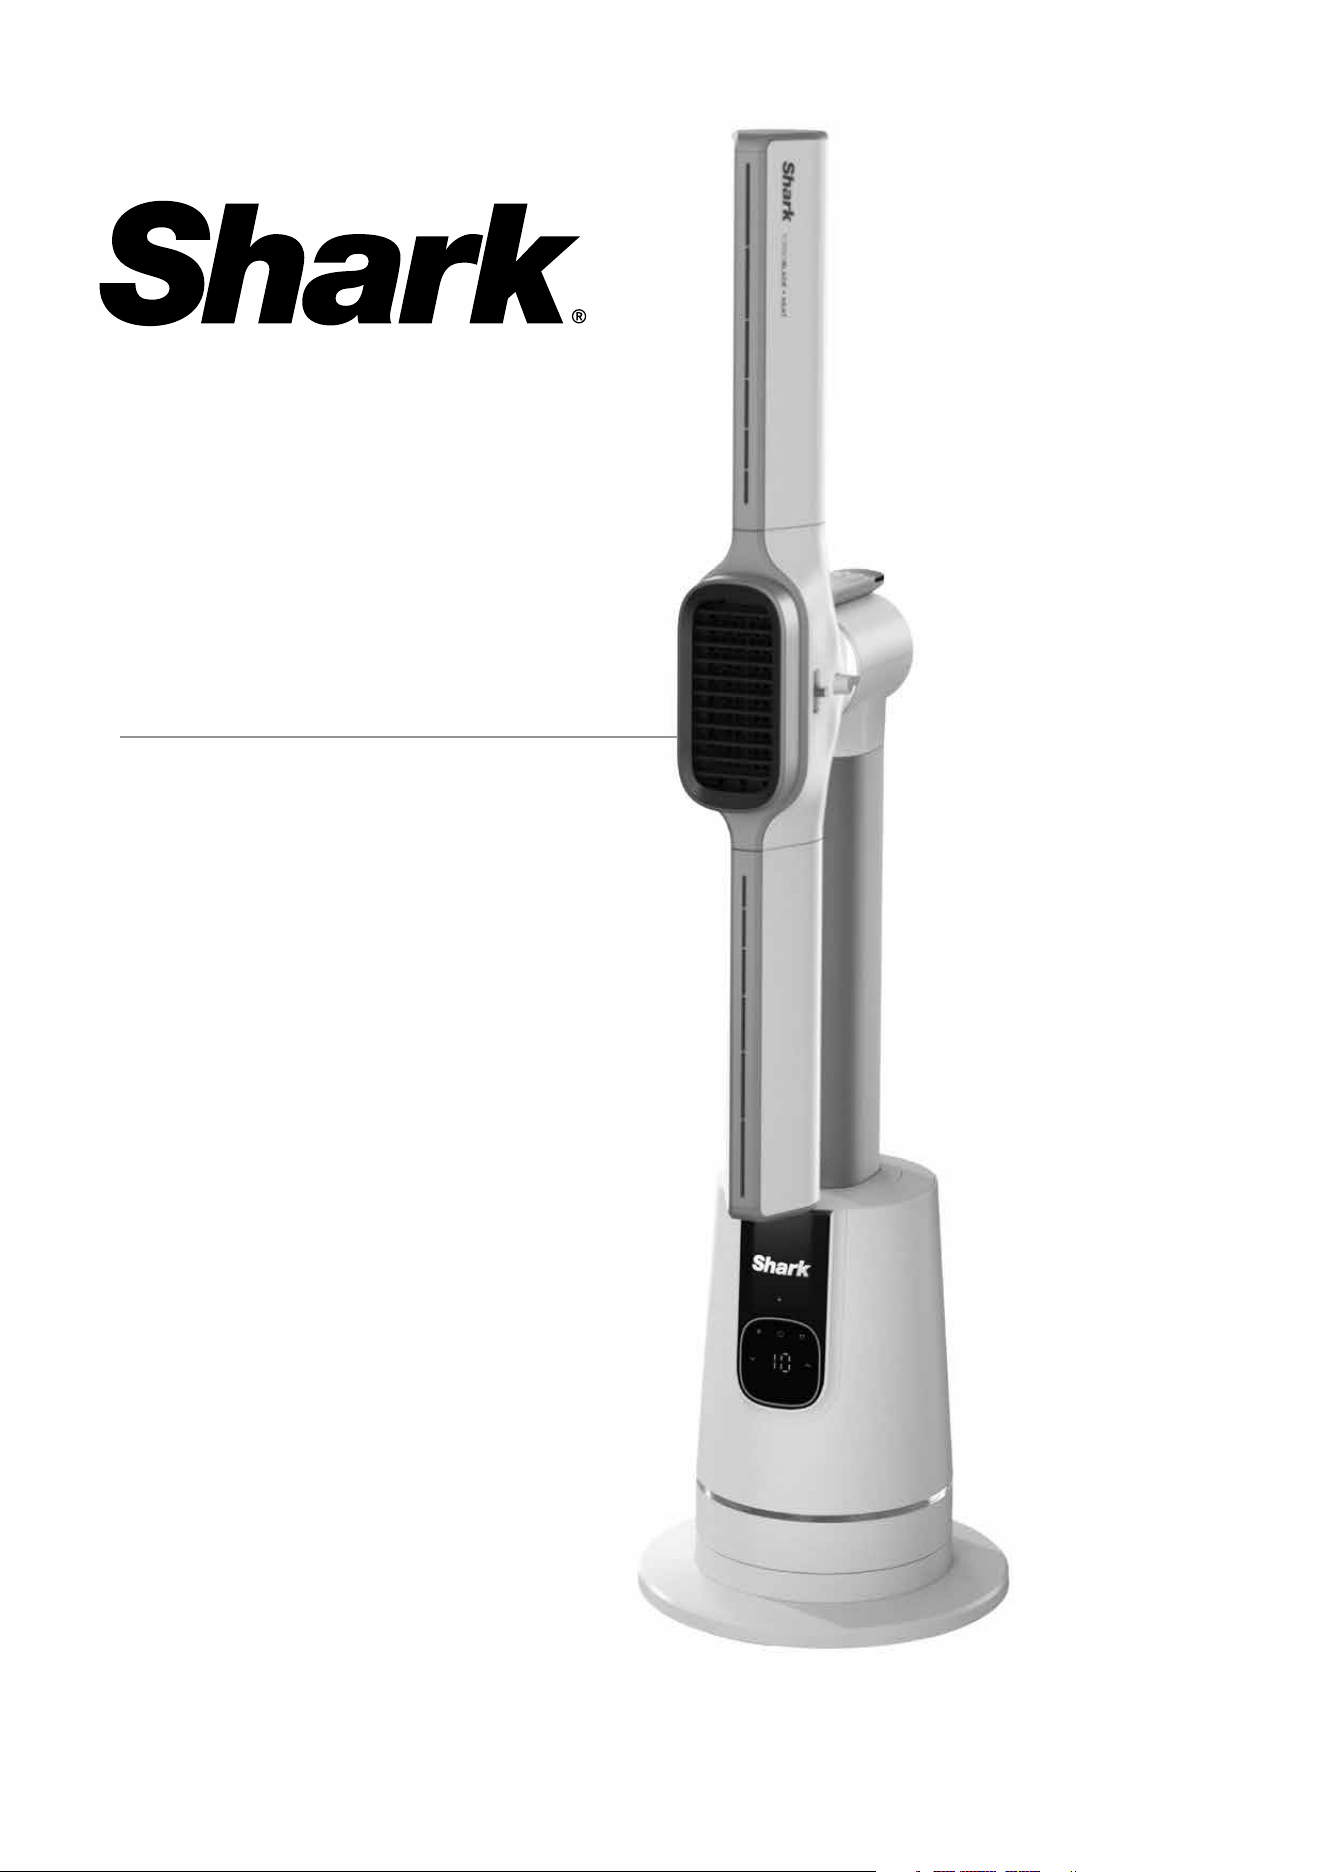
OWNER'S GUIDE
HEATER / FAN
TH200UK
Unit may vary in features, size, and colour
TH200UK_Series_MP_IB_Mv7
© 2025 SharkNinja Operating LLC. SHARK is a registered trademark in the United Kingdom.
IMPORTANT SAFETY INSTRUCTIONS
SUITABLE FOR HOUSEHOLD USE ONLY.
READ AND SAVE THESE INSTRUCTIONS
WARNING
TO REDUCE THE RISK OF FIRE, ELECTRIC SHOCK, INJURY AND HYPERTHERMIA: READ ALL THESE INSTRUCTIONS BEFORE
USE.
1. Read all instructions before use.
2. This appliance has a polarised plug. To reduce the risk of electric shock, this plug
is intended to fit in a polarised socket only one way. Do not attempt to defeat this
safety feature. Unplug or disconnect the appliance from the power supply before
servicing.
3. DO NOT operate any appliance with a damaged cord or plug. Discard appliance or
return to an authorised service facility for examination and/or repair.
4. DO NOT run cord under carpeting. DO NOT cover cord with throw rugs, runners,
or similar coverings. DO NOT route cord under furniture or appliances. Keep cord
away from high traffic areas and place cord where it will not be tripped over.
5. If the power cord is damaged, it must be replaced by the manufacturer,
its service agent, or similarly qualified persons in order to avoid a hazard.
6. This appliance is not intended for use by anyone (including children) with reduced
physical, sensory or mental capabilities, or lack of experience and knowledge,
unless they have been given supervision or instruction concerning use of the
appliance by a person responsible for their safety.
7. Children should be supervised to ensure that they DO NOT play with the
appliance.
8. Cleaning and user maintenance shall not be made by children
without supervision.
9. Prior to cleaning or other maintenance, the appliance must be unplugged from the
electrical socket.
10. DO NOT handle plug or appliance with wet hands.
11. DO NOT use without filter in place.
12. Only use Shark branded filters and accessories.
13. DO NOT damage the power cord:
a) DO NOT pull or carry appliance by the cord or use the cord as a handle.
b) DO NOT unplug by pulling on cord. Grasp the plug, not the cord.
c) DO NOT stand the appliance on the power cord, close a door on the cord, pull
the cord around sharp corners, or leave the cord near heated surfaces.
14. DO NOT use with any opening blocked; keep free of dust, lint, hair, and anything
that may reduce airflow.
15. DO NOT use if airflow is restricted. If the air paths become blocked, turn the
appliance off and unplug from electrical socket. Remove all obstructions before you
plug in and turn on the unit again.
16. DO NOT use if appliance is not working as it should, or has been dropped,
damaged, left outdoors, or dropped into water.
17. DO NOT place appliance on unstable surfaces such as chairs or
other furniture.
18. DO NOT use in the following areas:
a) Wet or damp surfaces
b) Outdoor areas
c) Spaces that are enclosed and may contain explosive or toxic fumes or
vapour (lighter fluid, petrol, kerosene, paint, paint thinners, mothproofing
substances, or flammable dust)
19. Turn off all controls before unplugging the appliance.
20. Unplug from electrical socket when not in use and before any maintenance or
cleaning.
21. Hand wash with soapy water only. Washing with cleaning chemicals could damage
the unit.
22. Make sure filter is in place after routine maintenance.
23. Not suitable for use with solid-state speed controls
BATTERY REMOVAL AND DISPOSAL
This remote control uses a AAA battery. When the remote battery no longer has
a charge, it should be removed from the remote and recycled. DO NOT incinerate
or compost the product with its integral battery or the remote battery. When your
remote battery needs to be replaced, dispose of it or recycle it in accordance with local
ordinances or regulations. In some areas, it is illegal to place spent batteries in the trash
or in a municipal solid waste stream.
Return spent battery to an authorised recycling centre or to retailer for recycling. Contact
your local recycling centre for information on where to drop off the spent battery.
POWER SUPPLY SAFETY
1. Read and follow all instructions that are on the product or provided with the product.
2. Do not use an extension cord.
3. Do not use within 3m of pool or other body of water, and do not use in a bathroom.
IMPORTANT INSTRUCTIONS
24. This heater is hot when in use. To avoid burns, do not let bare skin touch hot
surfaces. If provided, use handles when moving this heater. Keep combustible
materials, such as furniture, pillows, bedding, papers, clothes, and curtains at least
3 feet (1m) from the front of the heater and keep them away from the sides and rear.
25. Clearance distance is to be determined in accordance with 67.13 or 67.14.
26. Extreme caution is necessary when any heater is used by or near children or disabled
person and whenever the heater is left operating and unattended.
27. Always unplug heater when not in use
28. This heater is not intended for use in bathrooms, laundry areas and similar indoor
locations. Never locate heater where it may fall into a bathtub or other water
container.
29. DO NOT insert or allow foreign objects to enter any ventilation or exhaust opening
as this may cause an electric shock or fire or damage the heater.
30. To prevent a possible fire, DO NOT block air intakes or exhaust in any manner. Do not
use on soft surfaces, like a bed, where openings may become blocked.
31. A heater has hot and arcing or sparking parts inside. DO NOT use it in areas where
petrol, paint, or flammable liquids are used or stored.
32. Use this heater only as described in this manual. Any other use not recommended by
the manufacturer may cause fire, electric shock, or injury to persons.
33. Always plug heaters directly into a wall socket/receptacle. Never use
with an extension cord or relocatable power tap (socket/power strip).
34. Hyperthermia can result in death. Symptoms of hyperthermia include high body
temperature, headache, nausea, vomiting, tiredness, dizziness, fainting, and rapid
pulse. If you begin to experience symptoms related to hyperthermia, turn off the
heater and seek medical attention.
35. To avoid excessive room temperatures which can cause hyperthermia: DO NOT
leave product running unattended in a confined space around infants, or individuals
with reduced physical, sensory, or mental capabilities.
CAUTION - High temperature. Keep electrical cords, drapery, and other furnishings
at least 3 feet (0.9m) from the front of the heater and away from the side and rear.
WARNING - Risk of hyperthermia.
CAUTION: Risk of fire - Do not operate without base attached.
WARNING: DO NOT COVER
WARNING: HOT SURFACE
WARNING: In order to avoid overheating, do not cover the heater.
DO NOT use this heater in the immediate surroundings of a bath, a shower or a
swimming pool.
DO NOT use this heater if it has been dropped;
DO NOT use if there are visible signs of damage to the heater;
USE this heater on a horizontal and stable surface, or fix it to the wall, as
applicable.
WARNING: Do not use this heater in small rooms when they are occupied by
persons not capable of leaving the room on their own, unless constant supervision
is provided.
WARNING: To reduce the risk of fire, keep textiles, curtains, or any other flammable
material a minimum distance of 1 m from the air outlet.
1 32
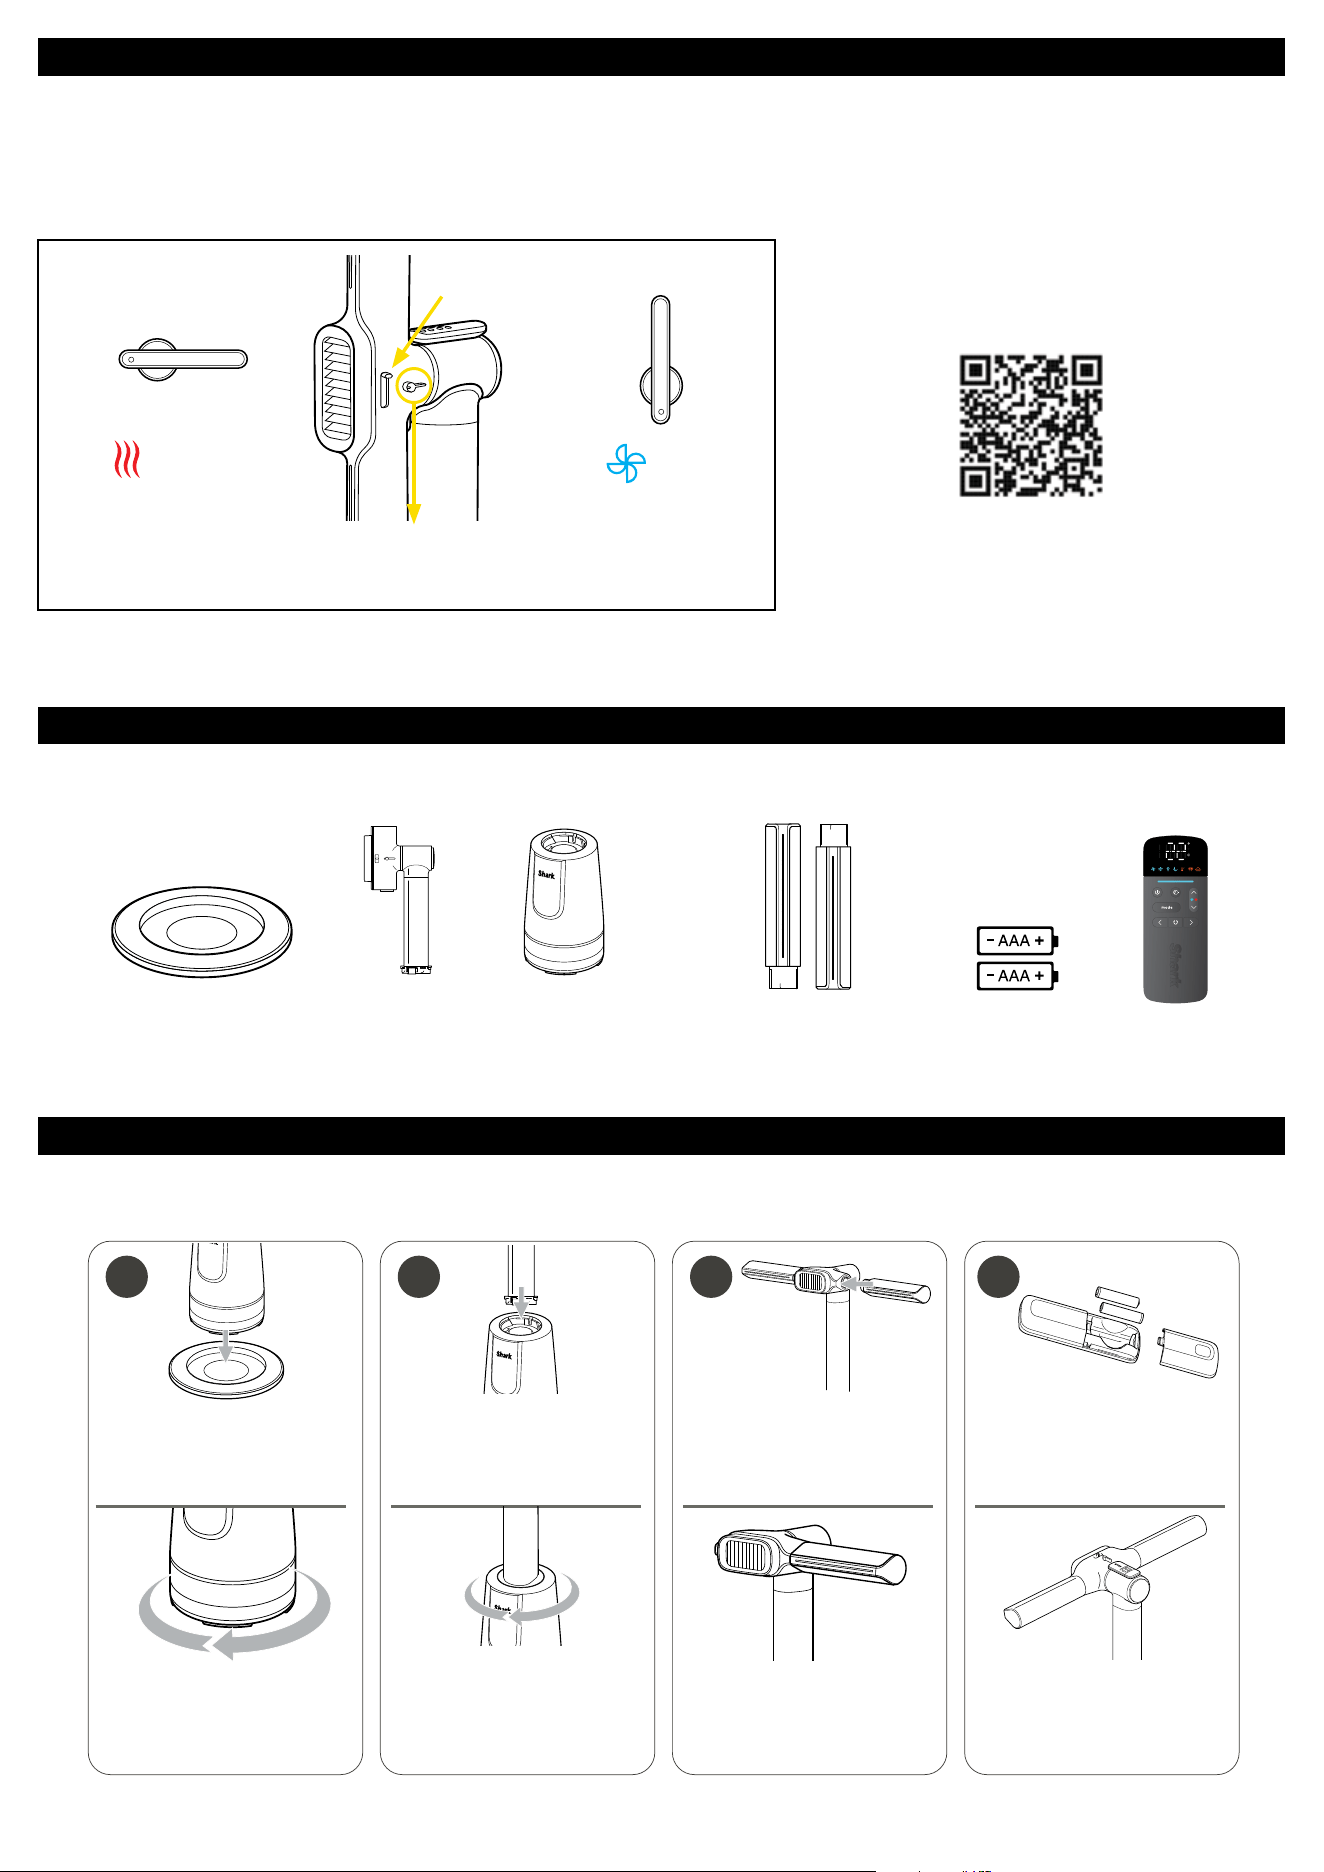
Use the red guide markings
to align the Base onto the
Base Plate.
Rotate the base clockwise
until it clicks into place.
Remove assembly tape and
cardboard from Pole. Line up
the printed red arrows on the
Blade with the red arrows on
the inner Pole.
Press the Blade firmly into the
Pole until it clicks into place.
Repeat on other side.
Align the guide mark printed
on the Pole with the guide
mark printed on the Base.
Twist the Pole clockwise until
it clicks, to lock.
Remove tape after assembly.
Install the 2 AAA batteries
in the remote. Make sure the
batteries are installed with the
correct polarity (+ and -).
Store the remote on the
magnetic mount on the back
of the Pole.
4
Base Plate
Pole
Base
Blade (2x)
Remote
Batteries (2x)
visit qr.sharkclean.uk/TH200series or
SCAN HERE
USING YOUR SMARTPHONE CAMERA
FOR FULL INSTRUCTIONS OR
TO PURCHASE REPLACEMENT PARTS.
Please be sure to read and save the warnings above prior to using your unit.
INCLUDES
ASSEM B LY
QUICK START GUIDE
Heat/Fan Dial
Rotate the dial on the pole to
switch between heat or fan.
Vent Slider to
adjust air direction
HEAT
FAN
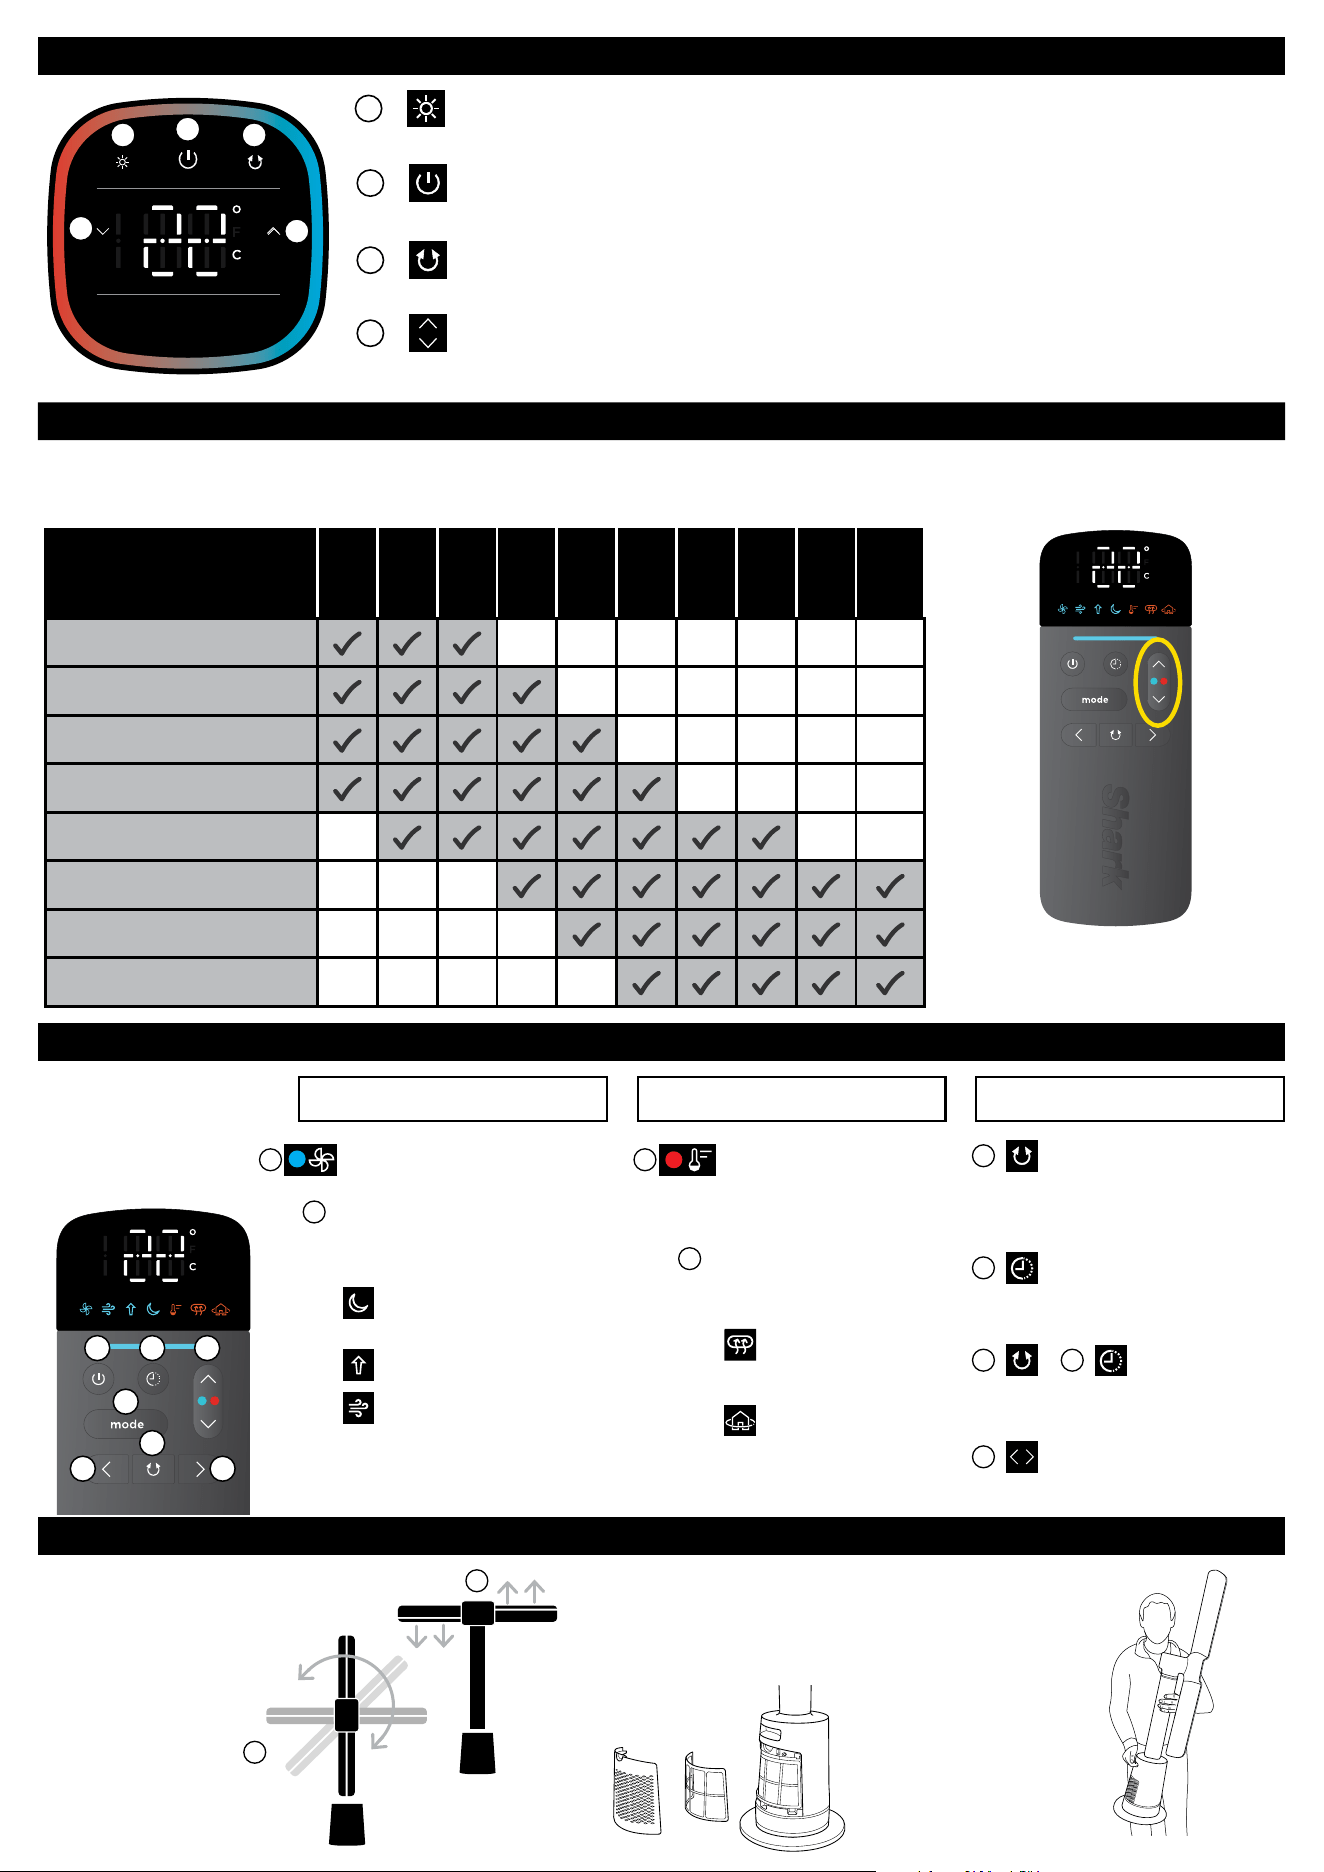
THERMO IQ MODE
Press up and down arrows
to set desired temperature.
The heater will automatically
adjust based on your selection.
HEAT MODES remote only
Press the mode button
or cycle between Comfort,
Focus and Thermo IQ modes.
COMFORT MODE:
Soothing warmth for
sustained use.
FOCUS MODE:
Powerful, focused
heating.
C
D
G
F
E E
B
C
F
F
A
B
PRODUCT TIPS
ON-UNIT DISPLAY
REMOTE
DUST DEFENCE Panel on the
rear of the unit collects the
dust to make cleaning easier.
Recommended to clean every
6 months or as needed.
PIVOT AND TILT: Manually adjust
the fan blade's orientation (1) and
tilt (2) to personalise your airflow.
NOTE: The blade only
rotates anti-clockwise
up to 90 degrees.
CARRYING POSITION:
Carry the unit by the
handle on the base
while supporting the
air duct.
2
1
BRIGHTNESS
Press to adjust the brightness of the display panel. Choose between 4 levels
of brightness.
POWER
Press to power unit on or o. It may take a moment for the unit to cool down
after the heat has been turned o.
OSCILLATION
Press the oscillation button to cycle through oscillation range options. Setting 1 is
45 degrees, setting 2 is 90 degrees, and setting 3 is 180 degrees.
FAN / THERMO IQ ARROWS
When in Fan mode, press arrows to adjust fan speed up or down. When in
Heat mode, press the arrows to adjust the thermostat temperature.
A
B
C
F
F
F
OSCILLATION
Press the oscillation button to
cycle through oscillation range
options. Setting 1 is 45 degrees,
setting 2 is 90 degrees, and
setting 3 is 180 degrees.
TIMER
Press the timer button to
cycle through timer settings.
Automatically turns o power
after 1, 2, 4, or 8 hours.
MUTE CHIME
Press and hold
oscillation and timer buttons
for 5 seconds to mute chimes.
Repeat to re-enable.
ANGLE ADJUST
Press the left and right arrows
to slightly adjust the direction
of fan.
C
C
E
Sleep mode: Mute chimes,
dim lights, and switch to an
ideal fan speed for sleep.
BreezeBoost: For a powerful
burst of airflow.
Natural Breeze: Varying
airflow patterns to simulate
natural wind.
D
+
G
G
FAN HEAT SHARED FUNCTIONS
D
SPEED ADJUST
Press up and down arrows to scroll
between fan speeds 1-10.
FAN MODES
Press to cycle between
Sleep, BreezeBoost, and Natural
Breeze settings.
FAN SPEEDS
Press the fan speed arrows on the remote or hold down the power button on the base to switch between
fan speeds 1-10.
Recommended
Speeds
1 2 3 4 5 6 7 8 9 10
Nursery
Quiet Sleep
Working From Home
Watching TV
Ambient Noise Sleep
Cooking
Exercise
Hot Day Cool Down
• Before first use, insert 2 AAA
batteries.
• To replace the battery in the
remote, use 2 AAA batteries.
See “MAINTENANCE” for
battery replacement
instructions.
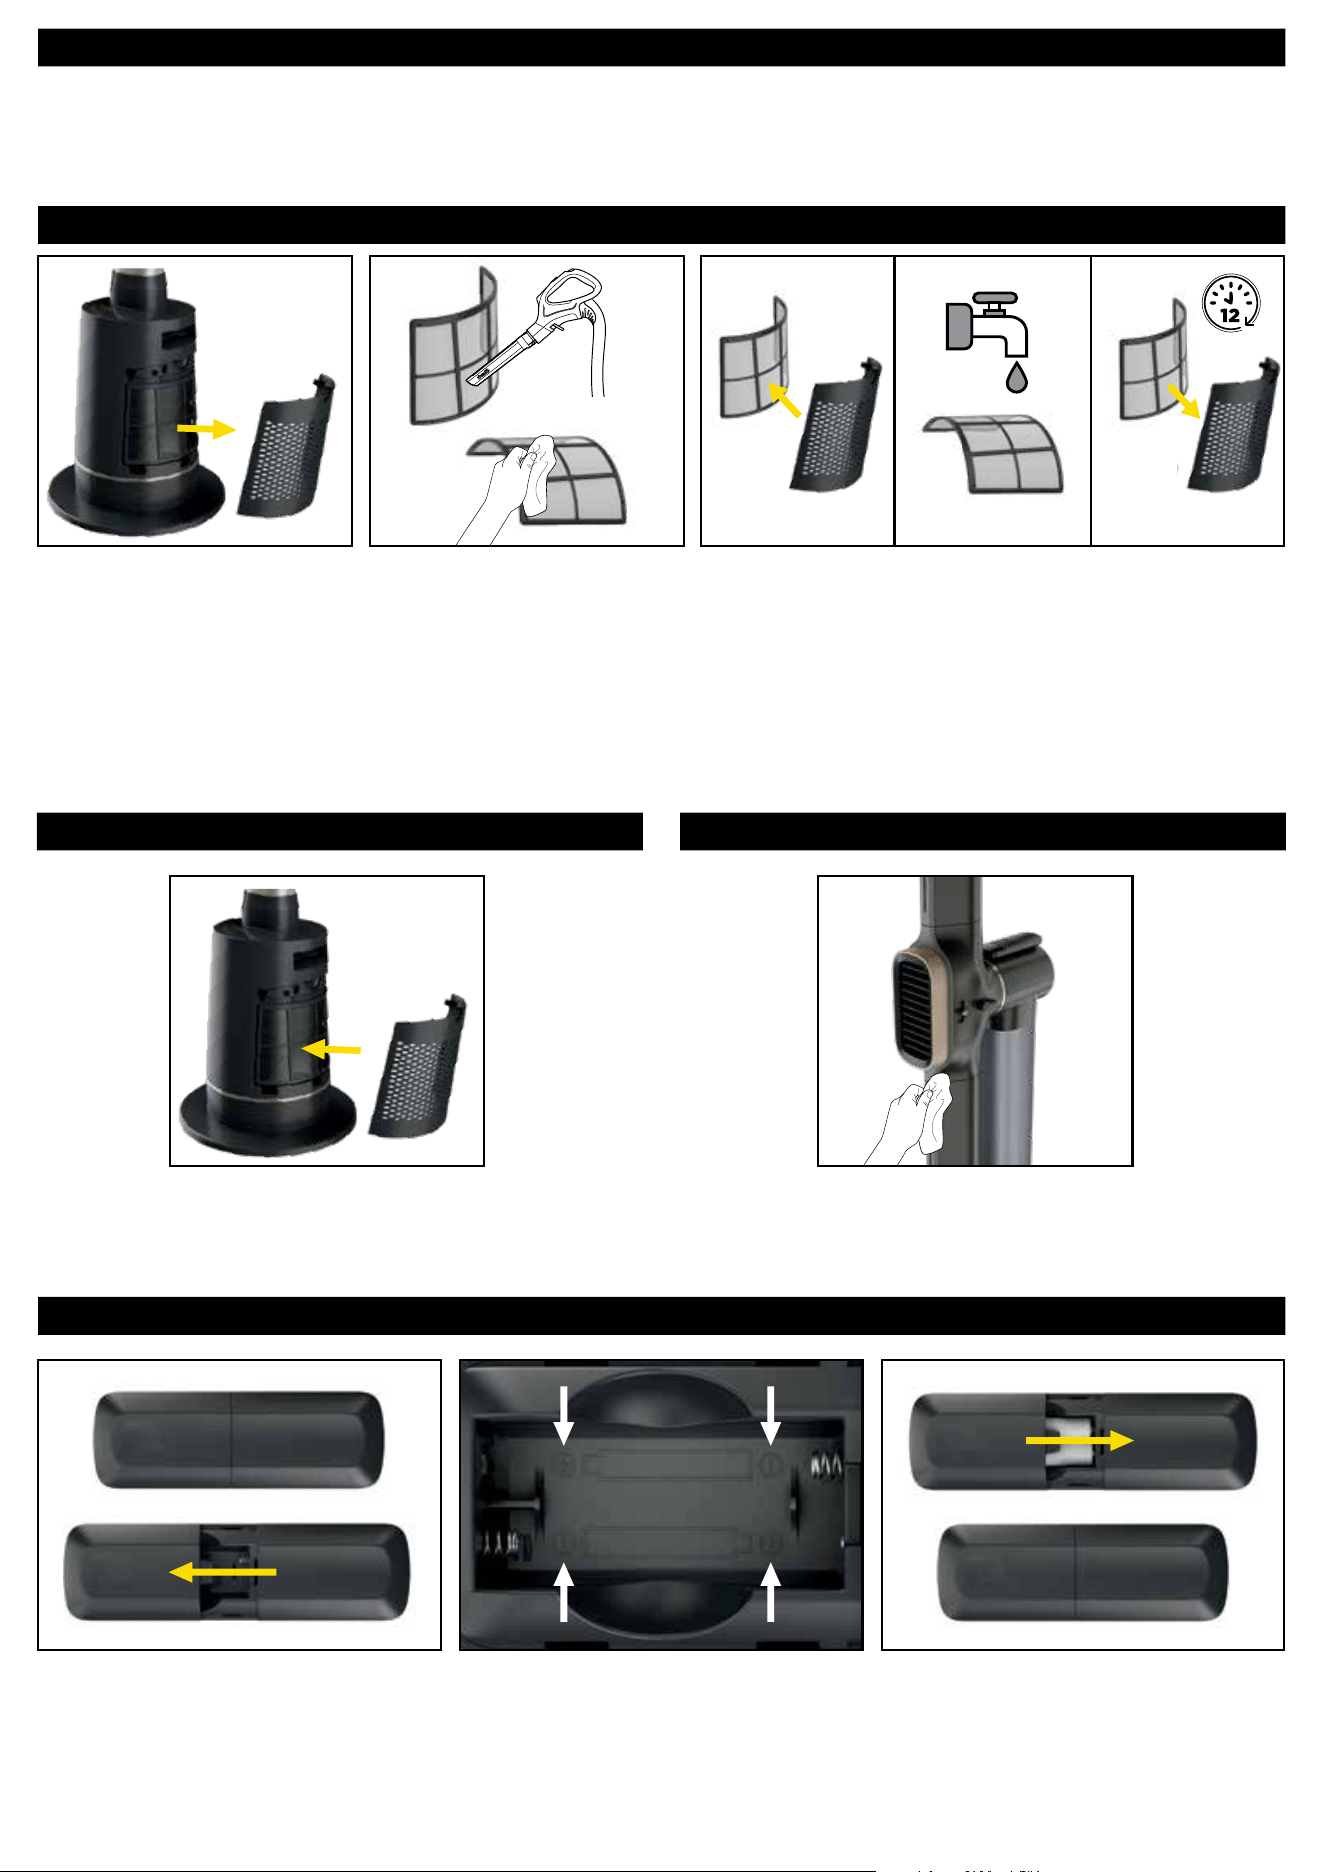
MAINTENANCE
DUST DEFENCE
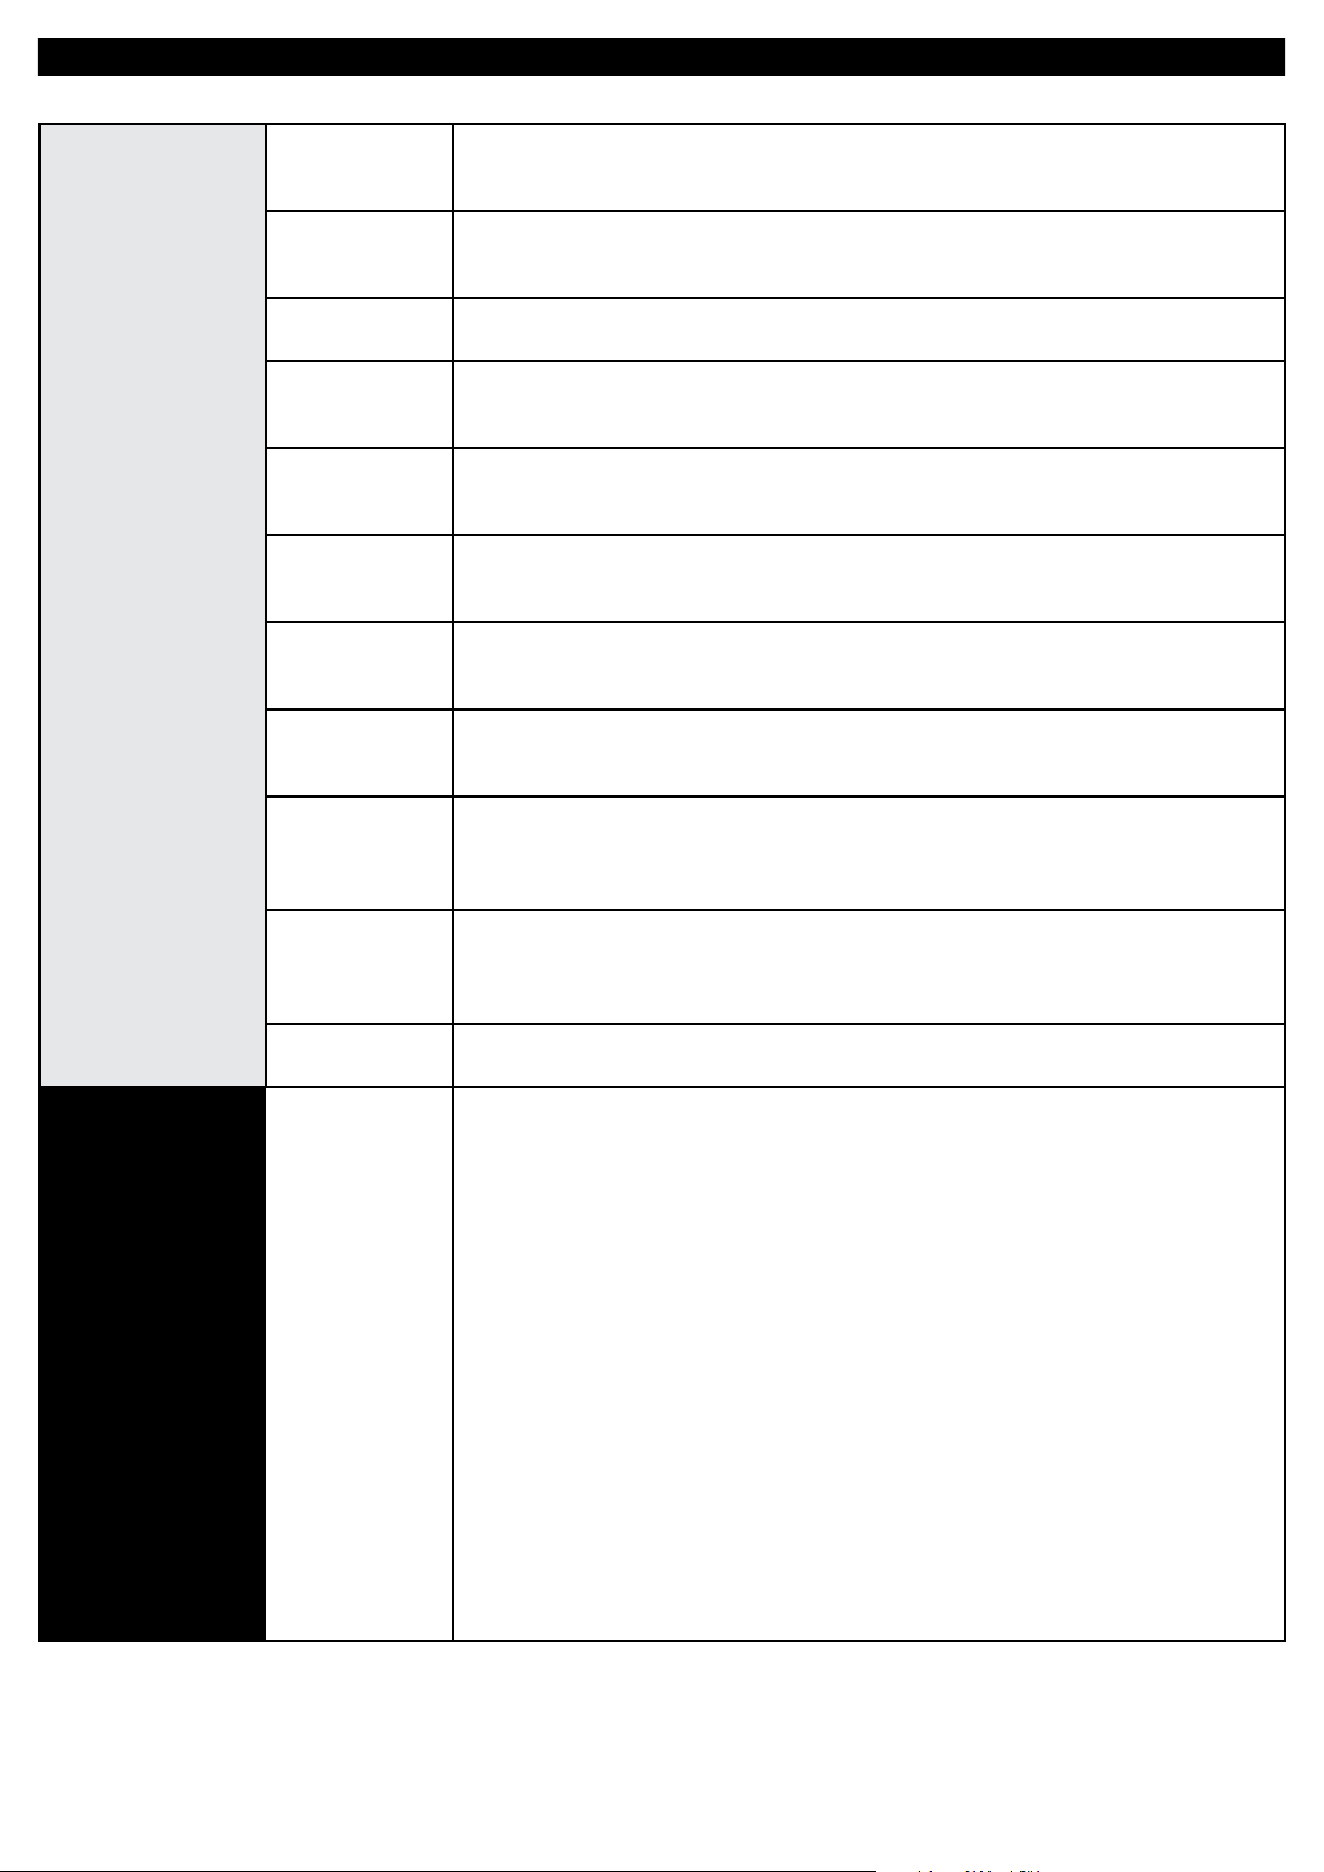
REPLACING THE BATTERIES IN THE REMOTE
DUST DEFENCE (CONTINUED) EXTERNAL CLEANING
• Unplug the fan before doing any cleaning or maintenance.
• We recommend cleaning the fan every 6 months, or as needed.
• We recommend changing the batteries in the remote control every 12 months, or as needed.
1. Remove the Dust Defence
panel from the unit by gently
pulling on the finger tab.
Note: the mesh filter does
not need to be removed from
the Dust Defence panel.
1. To access the batteries, push down
gently on the battery door on the back
of the remote, then slide the door
o. Remove the batteries from the
chamber and follow local ordinances
for battery disposal.
2. Insert 2 new AAA batteries into the
remote. Make sure the batteries are
installed in correct orientation as
shown in the battery chamber.
3. Slide the battery door back into place
on the back of the remote.
2. Use a vacuum cleaner on
low speed with a soft brush
attachment OR a cloth/towel
to remove debris from the
Dust Defence panel and
the internal mesh screen.
Do NOT use abrasive
chemical cleaners.
3. OPTIONAL: If debris is stuck between the mesh filter
and the Dust Defence panel, the filter can be removed
by gently pulling it out of the tabs on the panel. Rinse
the filter and the panel with room-temperature tap
water. Allow both the filter and the panel to air-dry for
12 hours before reinstalling. DO NOT use the fan when
the mesh filter is wet.
4. Replace the Dust Defence panel by inserting the tabs on
the bottom of the panel into the indents on the unit and
pushing the panel in until it clicks into place.
To clean the exterior of the fan, wipe it down with a microfiber
cloth dampened with warm, soapy water. To prevent damage,
do not use abrasive chemical cleaners or too much water.
TROUBLESHOOTING AND FREQUENTLY ASKED QUESTIONS
PRODUCT
SPECIFICA-
TIONS
What is the
weight of the
unit?
The weight of the unit is 21.85lbs (9.91kg).
What are the
dimensions of
the unit?
The dimensions of the unit are 45.9" H x 13.8" W x 11.8" D (116.7cm H x 35cm W x
30cm D).
What is the volt-
age of the unit?
The voltage of the unit depends on the region it was purchased in. For North
America it is 120V and for United Kingdom and Europe it is 220-240V~.
What is the
wattage of the
unit?
The wattage of the unit depends on the region it was purchased in. For North
America it is 1400W and for United Kingdom and Europe it is 2200W.
What is the
amperage of the
unit?
The amperage of the unit is 10A.
What is the
frequency of the
unit?
The frequency of the unit depends on the region it was purchased in. For North
America it is 60Hz and for United Kingdom and Europe it is 50-60Hz.
How many
speeds does the
unit have?
The unit has 10 fan speeds.
How long is the
product guaran-
tee?
This products comes with a 2-year guarantee. Please refer to the Guarantee /
Warranty section in Instruction Booklet for detailed information on activation and
duration, as it may vary by region.
How many os-
cillation angles
does the unit
have?
Depending on the unit purchased, it will either have 1 or 3 dierent oscillation
angles. Please refer to the On-Unit Display section in the Quick Start Guide for
detailed information.
What is the
maximum oscil-
lation angle of
the unit?
The maximum oscillation angle is 180°.
What is the air-
flow of the unit?
The maximum airflow of the unit is 1180CFM.
GENERAL USE
How and where
should I set up
my unit?
Do not place appliance on unstable surfaces such as chairs or other furniture,
and do not use in the following areas: a) Wet or damp surfaces b) Outdoor areas
c) Spaces that are enclosed and may contain explosive or toxic fumes or vapors
(lighter fluid, gasoline, kerosene, paint, paint thinners, mothproofing substances,
or flammable dust). This heater is not intended for use in bathrooms, laundry ar-
eas, or similar indoor locations. Never locate heater where it may fall into a bath-
tub or other water container. Please read the Safety Instructions in the Instruction
Booklet for details about where the unit should and should not be set up.
1) To set up your unit, start by assembling the Base to the Base Plate by aligning
the red symbols on each and rotating the base until it clicks into place.
2) Next, align the arrow printed on the pole with the symbol printed on the Base.
Twist the Pole clockwise until you hear it click. Now you can remove the tape on
the bottom of the Base.
3) Remove the assembly tape and cardboard from the Pole. Line up the red arrow
on the Blade with the one on the inner Pole. Press the Blade firmly into the Pole
until it clicks into place.
4) Install the 2 AAA batteries in the remote. Make sure that they are installed with
the correct polarity ( + and -). Store the remote on the magnetic mount on the
back of the Pole.
You are now all set!
TROUBLESHOOTING AND FREQUENTLY ASKED QUESTIONS
GENERAL USE
What fan and
heat settings
does the unit
have?
Depending on the unit purchased, settings may dier. Please refer to the Quick
Start Guide for detailed information.
Fan functions
SPEED ADJUST Press up and down arrows to scroll between fan speeds 1-10.
FAN MODES Press to cycle between Sleep, BreezeBoost and Natural
Breeze settings.
Heat functions
THERMO IQ Press up and down arrows to set desired temperature.
The heater will automatically adjust based on your selection.
HEAT MODES (remote only) Press the mode button to cycle between
Comfort and Focus settings.
How do I take
apart my unit?
We do not recommend taking your unit apart as it is only safe to operate when
fully assembled. However it is possible to disassemble if you need to ship it back
to us. You will need a screwdriver.
1) Start by removing the blades. Make sure the blade is pointing forward,
then give a strong tug on the blade and it should come out. It is normal for
this to require a fair amout of force.
2) Next, remove the pole from the base; you will need your screwdriver.
Rotate the unit all the way counter-clockwise. Once it is fully rotated, slot the
screwdriver into the opening behind the pole to unclip it, then rotate the pole
Counter-Clockwise to remove it.
3) Finally to remove the base plate, locate the clip on the underside and insert
your screwdriver to unclip it. The plate will easily rotate o.
How do I switch
from fan to
heat?
To switch from fan to heat, use the dial on the side of the unit. There is a guide on
the unit to indicate which orientation is fan and which is heat. When it has been
switched, the lights on the on-unit display and remote will change to red when the
unit is on heat, or blue when the unit is on fan.
Why are the fan
blades not mov-
ing / tilting?
Make sure that the blade has been firmly placed onto the unit. While keeping the
other side of the fan stable, push the blade against the pole until there is no gap
between the blade and the pole. You should hear a click when the blade has been
fully inserted correctly.
Why is the fan
unsteady?
Make sure the fan has been assembled correctly and that all parts have been
completely clicked into place. Check the connection points where the base
meets the base plate, and where the pole connects to the base. If the fan is still
unsteady, disconnect the parts, then reassemble them, making sure they all click
securely into place. Please see question "how do I take apart my unit" if you need
help disconnecting any parts
Why has the air-
flow gotten less
powerful over
time?
To make sure you are getting the optimal airflow from your TH200 series,
make sure the fan is positioned at least 6 feet (1.83m) away. If you are too close
to the fan you may not feel the airflow as strongly.
You may need to clear out the Dust Defense filter - excessive Dust Defense debris
could result in an impact to performance. For cleaning instructions, see the
"How do I clean my fan?" FAQ.
How do I carry
the unit?
Carry the unit by the handle on the base while supporting the air duct.
TROUBLESHOOTING AND FREQUENTLY ASKED QUESTIONS
UI / SETTINGS
Where do I put
the remote?
You can magnetically store the remote on the top of the pole where the sticker
has an outline of the remote.
Why is my
fan changing
speeds on its
own?
The fan may be in Natural Breeze mode, which changes automatically to simulate
natural wind. To deactivate a fan specialty mode, press change the fan speed or
the Specialty mode button on the remote.
Why is my re-
mote / on-unit
screen not lit
up?
Firstly, please check that the batteries are correctly installed in the remote and
that the unit is correctly plugged into an outlet.
If this occurs during use, note that the lights on your screen and remote will turn
o after 20 seconds. To wake them up you can press any button on the remote
or screen.
Why is my
heater changing
speeds on its
own?
The heater may be in Thermo IQ mode, which adjusts heater output based on
the current room temperature. Thermo IQ will operate by producing heat until it
reaches the temperature that you set on the unit. To change the set temperature,
use the arrows on the remote or on-unit display.
Why are the
lights dim?
The fan may be in Sleep Mode, which dims the lights. To deactivate, press the
Specialty mode button on the remote until Sleep Mode is turned o. The dimness
can also be adjusted with the Brightness icon on the on-unit display.
Why does my
fan not beep/
chime when I
press buttons?
Your fan may be on silent mode. Hold down the timer and oscillation buttons on
the remote for 3 seconds to disable the feature.
Why is the heat
output low?
This product has three dierent heat modes, optimised for dierent scenarios.
You can change between them using the "mode" button. The lowest is Comfort
mode, and this is meant to be used at close range, for longer periods of time.
The middle mode is Focus, and that is meant to warm a personal space from
further away. The hottest mode is ThermoIQ. Here you can set the temperature
you wish you achieve and the fan will output the highest amount of heat to
achieve and sustain that temperature. When the dial on the unit is set to HEAT
setting, you can use the MODE button to cycle through these three heat modes.
How do I
disable beeping
/ chiming?
Hold down the timer and oscillation buttons on the remote at the same time for
3 seconds to disable chiming. Repeat to re-enable.

MANUFACTURER’S GUARANTEE
The Shark Guarantee
When a consumer buys a product in the UK and ROI, they get the benefit of legal rights relating to the quality of the product
(your “legal rights”). You can enforce your legal rights against your retailer, including Shark if you bought your Shark product
from sharkclean.co.uk. However, at Shark we are so confident about the quality of our products that we give the owner an
additional, free parts and labour manufacturer’s guarantee of up to 2 years.
The guarantee it comes with is an important consideration - and reflects how much confidence the manufacturer has in its
product and manufacturing quality.
The manufacturer’s guarantee does not aect your legal rights.
How long are new Shark products guaranteed for?
Our manufacturer’s guarantee lasts for one year from the date of purchase as standard, or for 2 years if you register your
purchase with us within 28 days.
How do I register my Shark guarantee?
If you have purchased your Shark product directly from sharkclean.co.uk your guarantee is registered automatically. If you
bought it from anywhere else in the UK or ROI, you can register your guarantee online within 28 days of purchase.
• To register online, please visit www.sharkclean.co.uk/register-guarantee or scan the QR code in your instruction booklet.
• Keep a note of the date you purchased the Shark product.
IMPORTANT:
• Keep your receipt if you bought your Shark product from anywhere except sharkclean.co.uk. You will need it to claim under
your guarantee.
• The free Shark guarantee is only valid in the country where the product was purchased.
What are the benefits of registering my free Shark guarantee?
When you register your guarantee, you will get an extra 1 year of cover. We’ll also have your details to hand if we ever need to
get in touch. If you further agree to receive communications from us, you can also receive tips and advice on how to get the
best out of your Shark product and hear the latest news about new Shark technology and launches.
What is covered by the free Shark guarantee?
Repair or replacement (at Shark’s discretion) of your Shark product, including all parts and labour.
What is not covered by the free Shark guarantee?
• Normal wear and tear.
• Accidental damage or faults caused by negligent use or care, misuse, neglect, careless operation or handling of the Shark
product which is not in accordance with the Shark Operating Manual supplied with your product.
• Damage caused by use of the Shark product for anything other than normal domestic household purposes.
• Damage caused by use of parts not assembled or installed in accordance with the operating instructions.
• Damage caused by use of parts and accessories which are not Shark Genuine Components
• Faulty installation (except where installed by Shark).
• Repairs or alterations carried out by parties other than Shark or its agents.
How can I claim under the free Shark guarantee?
Contact our customer service helpline on 0808 109 1166 in the UK or 1-800 849 055 in the ROI. For service hours please visit
our website under ‘Contact Us’. It’s free to call, and you’ll be put straight through to a Shark representative. You’ll also find
online support at https://support.sharkclean.co.uk/. The Shark representative will go through some troubleshooting with you,
and if we conclude that the item has failed, we will send you a replacement part or a returns label to send the defective item
back to us free of charge. When you have delivered the defective product to us, we will send you a replacement.
Please remember that the item will need to be boxed when you return it to us. It can be any suitable box, it does not have to
be the original packaging.
Where can I buy genuine Shark spares and accessories?
Shark spares and accessories are developed by the same engineers who developed your Shark product. You’ll find a full range
of Shark spares, replacement parts and accessories for all Shark products at www.sharkclean.co.uk. Please remember that
damage caused by the use of non-Shark spares may not be covered under your guarantee.
REGISTER YOUR PURCHASE
sharkclean.uk/register-guarantee
Scan QR code using mobile device.
TIP:
You can find the model and serial numbers on the QR code
located on the back of your unit.
RECORD THIS INFORMATION
Model Number:
Serial Number:
Date of Purchase (Keep receipt):
Store of Purchase:
TECHNICAL SPECIFICATIONS
Voltage: 220-240V 50-60Hz / 3A
Watts: 2200W
Standby Power Consumption: 0.6W
O Power Consumption: 0.0W
Benefits of registering your product and creating an
account:
• Get easier, faster product support and access to
warranty information
• Access troubleshooting and product care instructions
• Be among the first to know about exclusive product
promotions
SharkNinja Europe Ltd,
1st/2nd Floor Building 3150,
Thorpe Park, Century Way,
Leeds, England, LS15 8ZB
sharkclean.co.uk
SharkNinja Germany GmbH,
Rotfeder-Ring 9,
60327 Frankfurt am Main,
Germany
sharkclean.eu
PLEASE READ CAREFULLY AND KEEP FOR FUTURE REFERENCE.
This Instruction Guide is designed to help you get a complete understanding of your new Shark® Fan.
Illustrations may dier from actual product. We are constantly striving to improve our products; therefore the specifications contained
herein are subject to change without notice.
© 2025 SharkNinja Operating LLC. SHARK is a registered trademark in the United Kingdom of SharkNinja Operating LLC.
IMPORTANT INFORMATION
@sharkhomeUK
TH200UK_Series_MP_IB_Mv7 (LL)