SCW1**–**
SCW2**–**
PREMIUM A CSTPA0
PREMIUM B CSTPB0
Manual
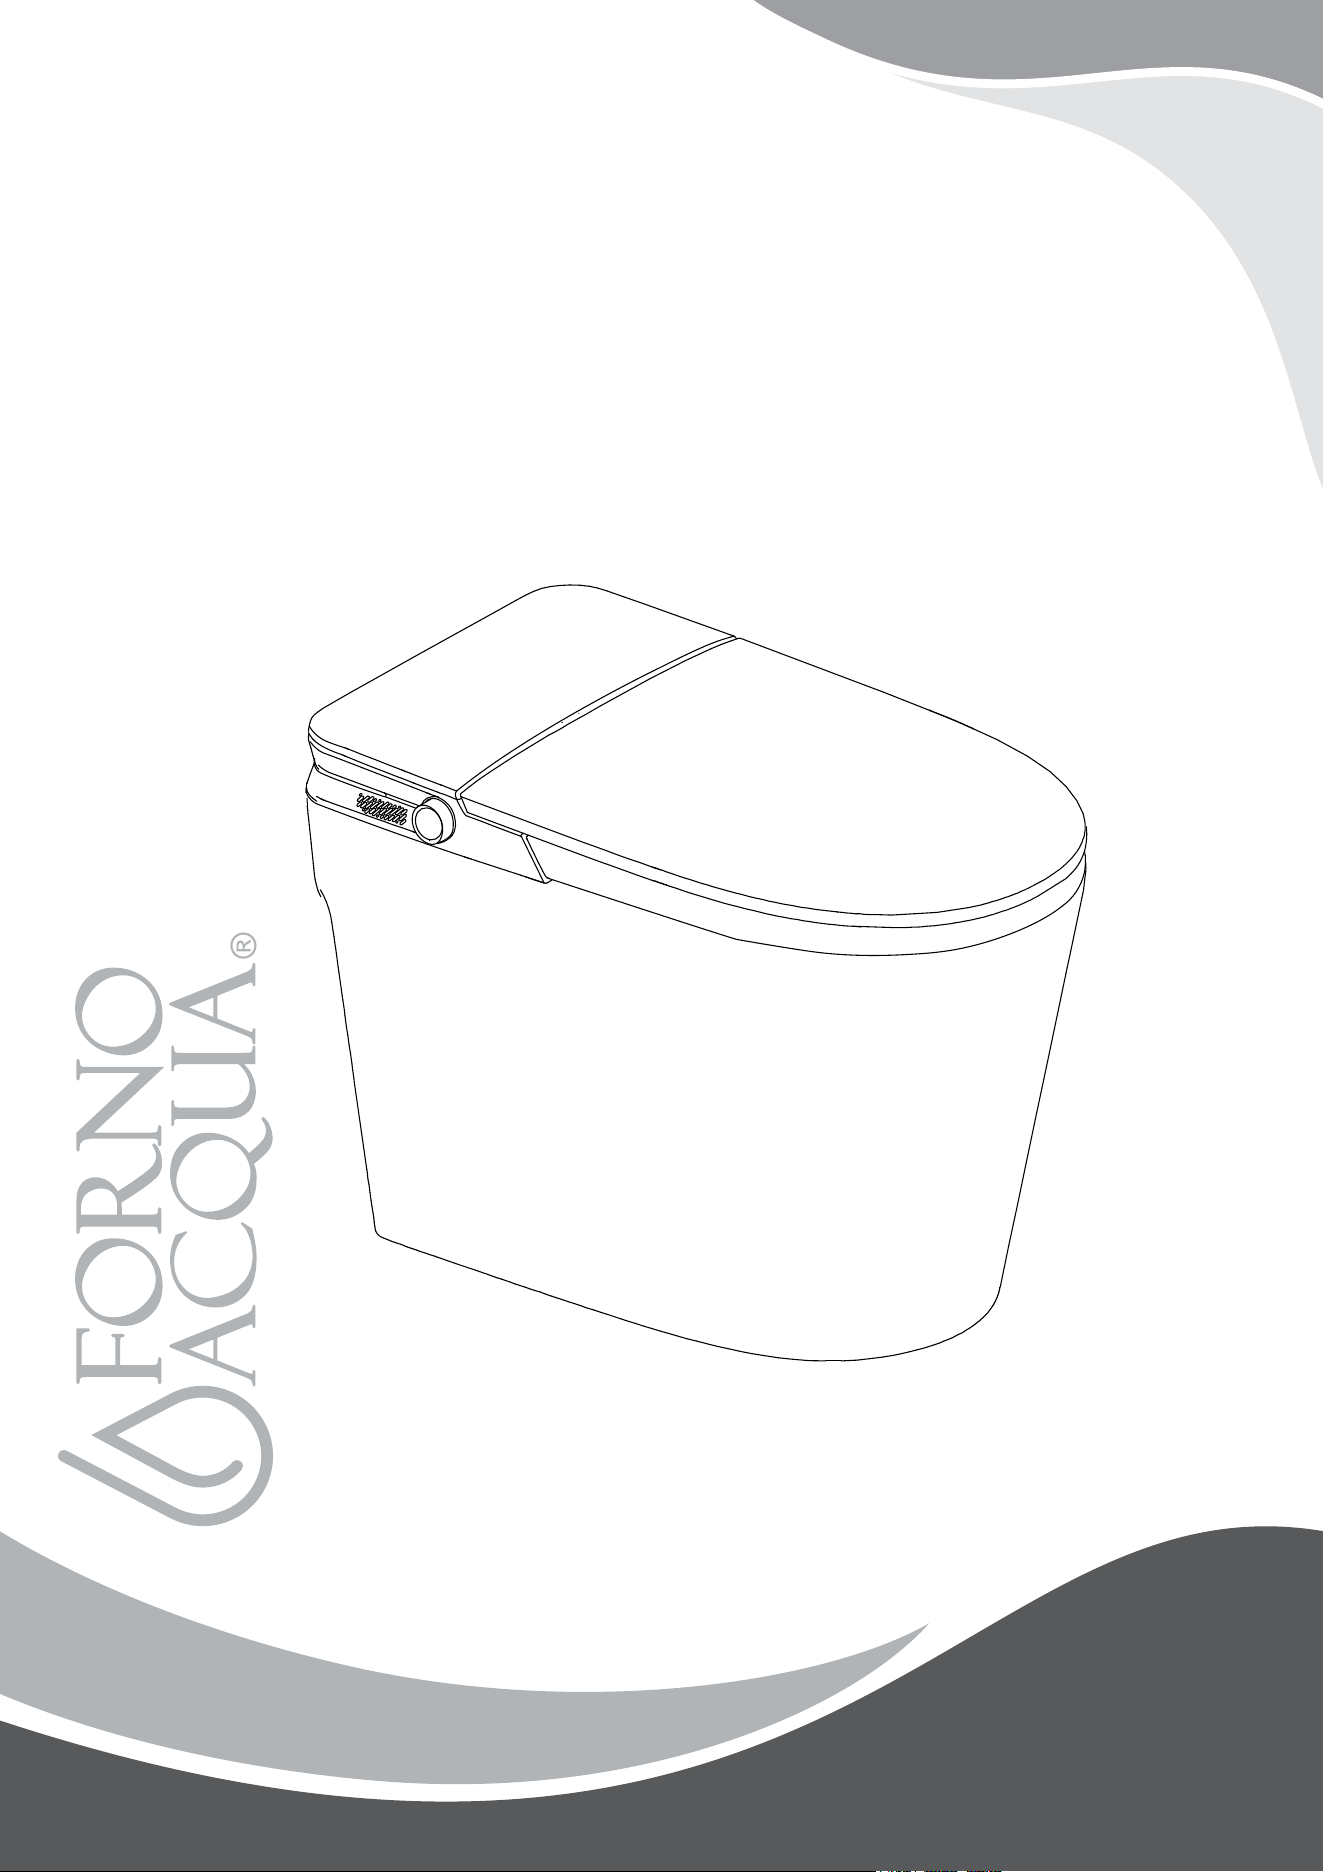
Smart Toilet
1. Close supervision is necessary when this product is used by, or near children or disabled people.
2. Use this product only for its intended use as described in this manual. Do not use attachments not
recommended by the manufacturer.
3. Never operate this product if it has a damaged cord or plug, if it is not working properly, if it has been
dropped or damaged or dropped into water. Call Customer Care or return the product to a service center for
examination and repair.
4. Keep the cord away from heated surfaces.
5. Never block the air openings of the product or place a soft material on top of it, such as a towel, clothes or a
pillow, where the air openings may be blocked. Keep the air openings free of lint, hair and the like.
6. Never use while sleeping or drowsy.
7. Never drop or insert any object into any opening or hose.
8. Do not use outdoors or operate where aerosol (spray) products are being used or where oxygen is being
administered.
9. Connect this product to a properly grounded outlet only. See Grounding Instructions.
WARNING - To reduce the risk of burns, electrocution, fire or injury to persons
DANGER - To reduce the risk of electrocution:
When using electrical products, especially when children are present, basic safety precautions should always
be followed, including the following.
READ ALL INSTRUCTIONS BEFORE USING
!
Important Safeguards.............................. 2
Grounding Instructions............................ 3
Tools Required......................................... 3
Precautions............................................. 4
Overall Major Components..................... 6
Exploded View and Package Contents... 7
Smart Toilet Installation........................... 8
Testing After Installation.......................... 9
Functions................................................. 10
Cleaning and Maintenance...................... 12
Troubleshooting................................... 13
Technical Data......................................... 13
Communication Device Caution.............. 14
Warranty...................................................15
Customer Care........................................ 16
2
1.Do not use while bathing.
2.Do not place or store product where it can fall or be pulled into a tub or sink.
3.Do not place in or drop into water or other liquid.
4.Do not reach for a product that has fallen into water. Unplug immediately.
TABLE OF CONTENTS
!
IMPORTANT SAFEGUARDS
SAVE THESE INSTRUCTIONS
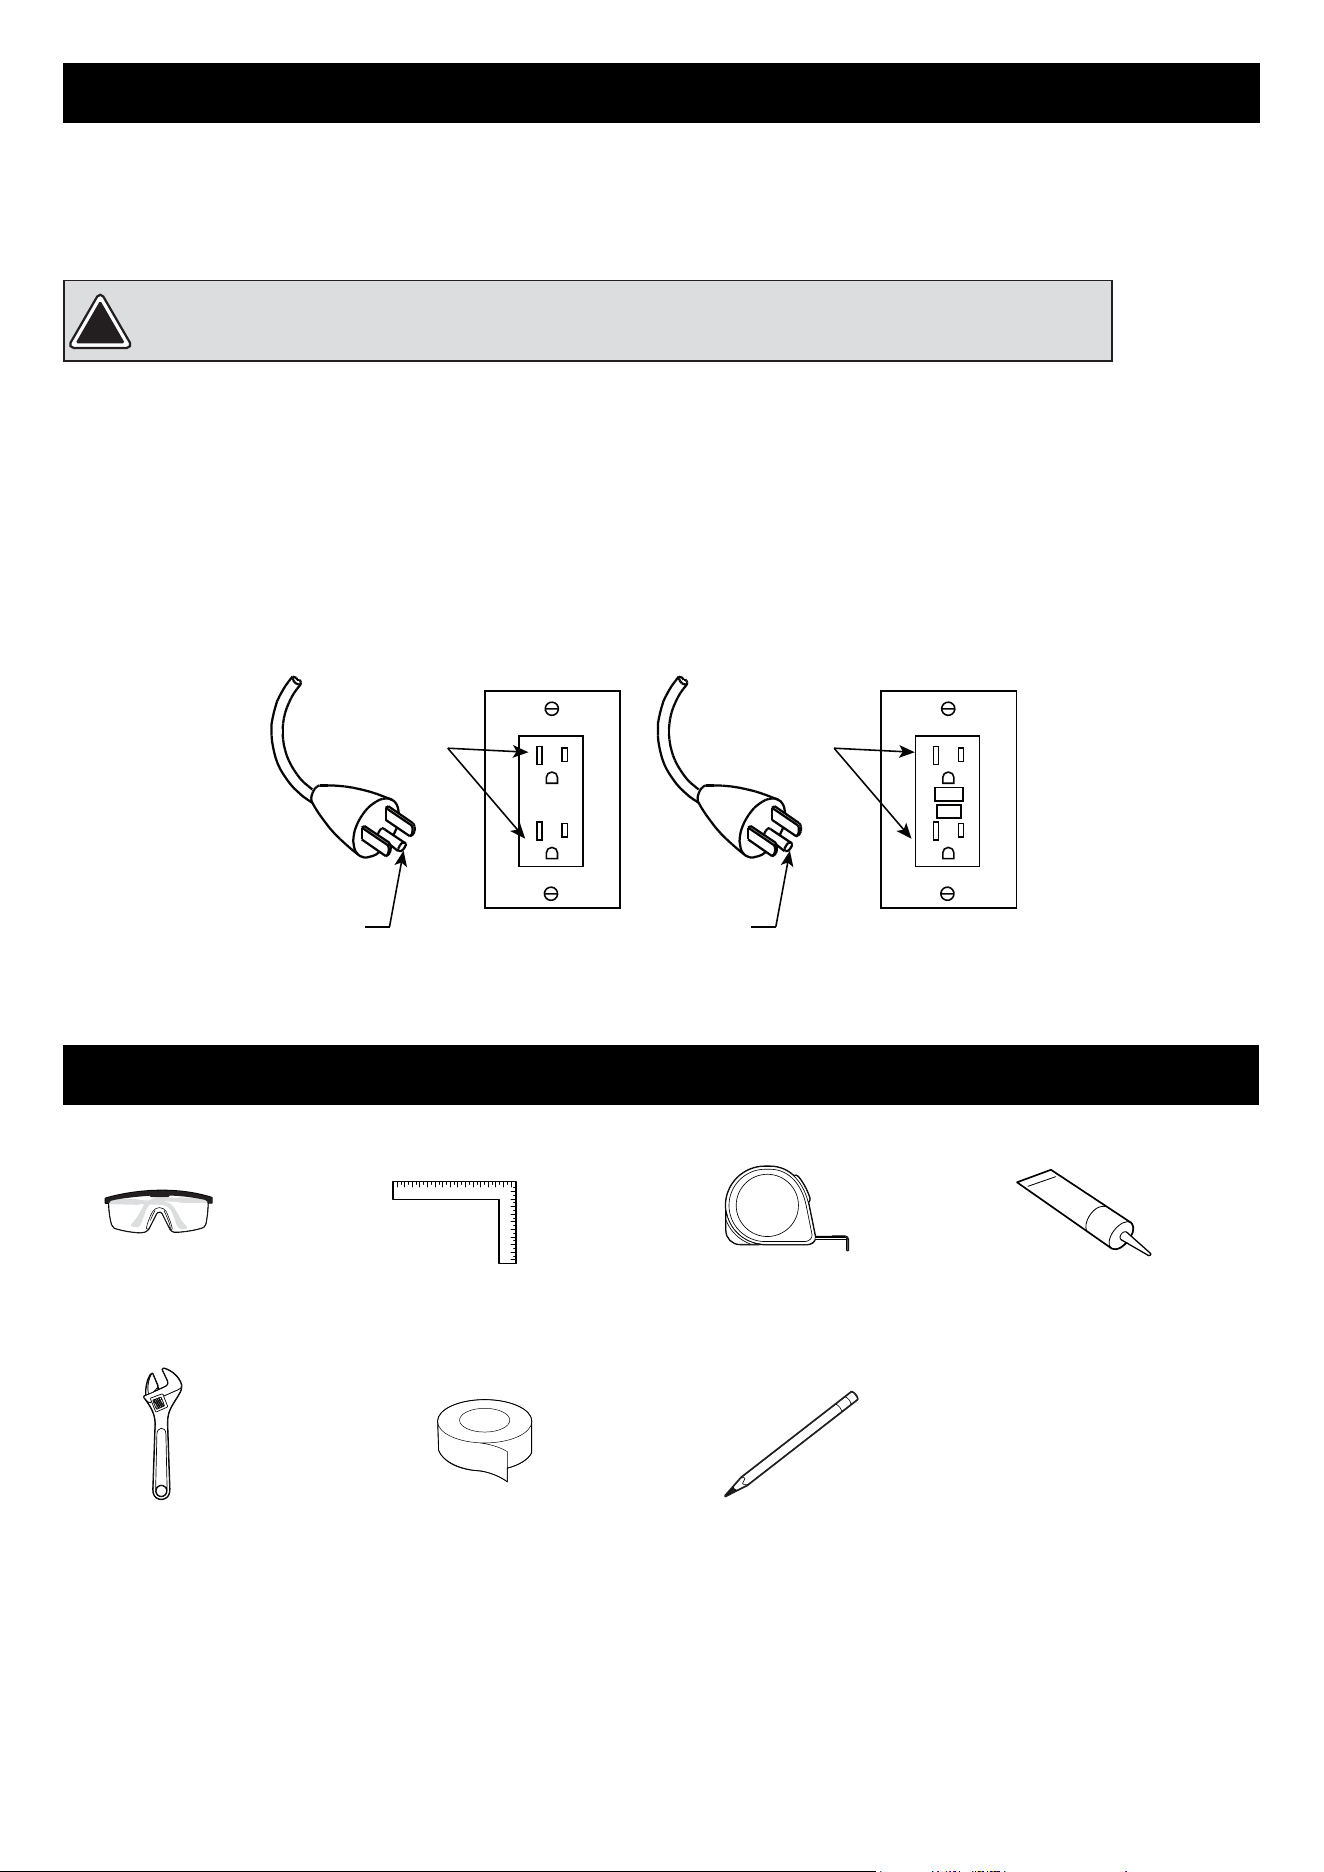
(A) (B)
GROUNDING
PIN
GROUNDED
OUTLET
In a GFCl
Protected Circuit
GFCl Receptacle
GROUNDING
PIN
GROUNDED
OUTLET
Grounding Methods
If repair or replacement of the cord or plug is necessary, do not connect the grounding wire to either flat blade
terminal. The wire with insulation having an outer surface that is green with or without yellow stripes is the
grounding wire. Check with a qualified electrician or serviceman if the grounding instructions are not
completely understood, or if in doubt as to whether the product is properly grounded.
This product is for use on a nominal 120 V circuit, that has a grounding plug that looks like the plug illustrated
in diagram A and is protected by a GFCl circuit breaker or with a GFCl receptacle as the one illustrated in
diagram B.
This product should be grounded. In the event of an electrical short circuit, grounding reduces the risk of
electric shock by providing an escape wire for the electric current. This product is equipped with a cord that
has a grounding wire with a grounding plug. The plug must be plugged into an outlet that is properly installed,
grounded and GFCl protected.
DANGER - Improper use of the grounded plug can result in risk of electric shock
!
GROUNDING INSTRUCTIONS
3
!
Safety Goggles Carpenter’s Square Measuring Tape Silicone Sealant
Wrench Telfon Tape Pencil
TOOLS REQUIRED
Compulsory
!
Not Allowed
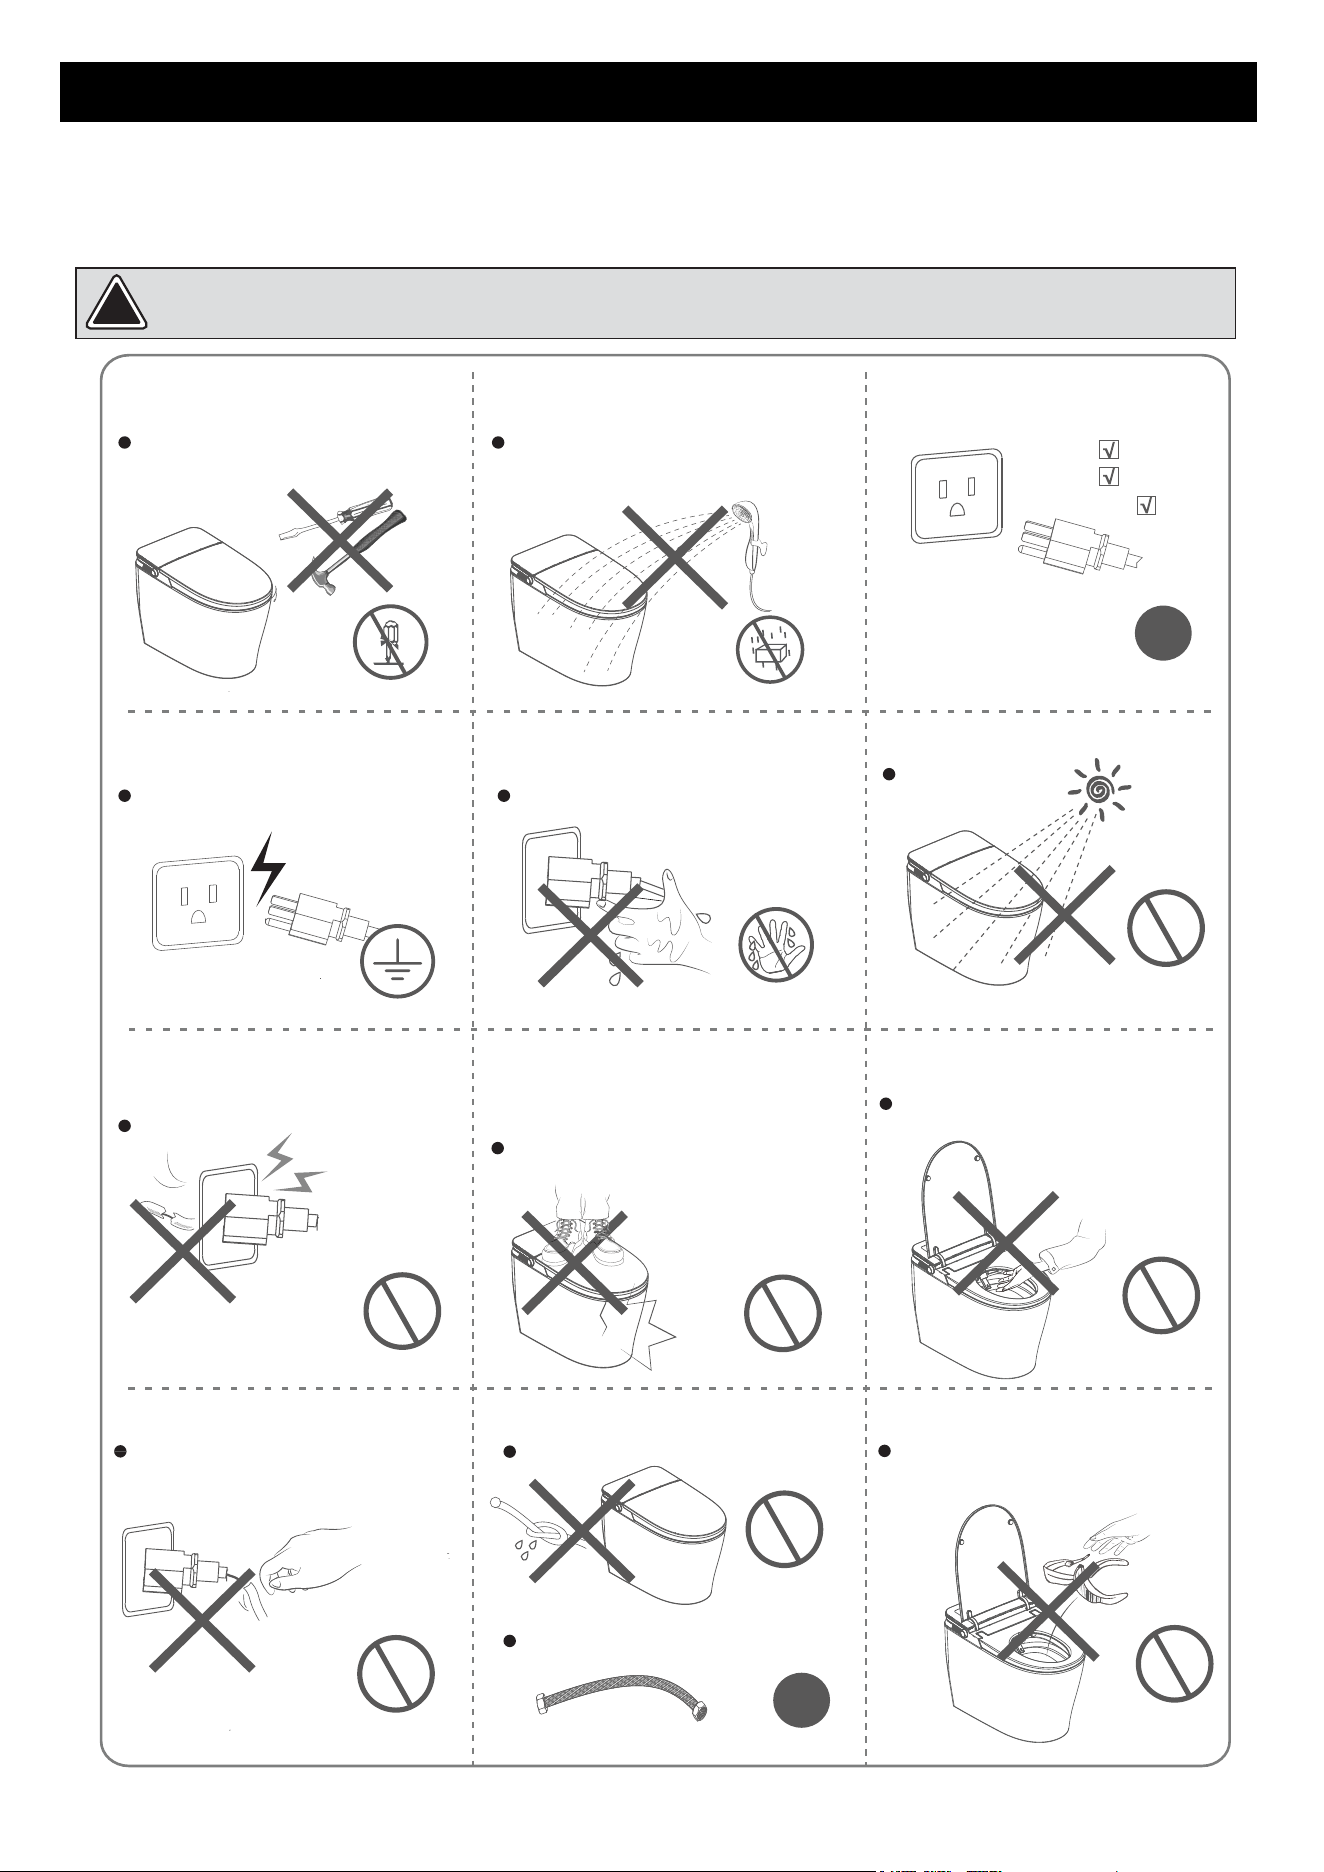
Do not flush foreign objects
it may lead to clogging of the toilet and
overflow of sewage.
Not Allowed
Do not put fingers or other objects in
the nozzle.
May cause electric shock or malfunction.
Not Allowed
Avoid direct sunlight.
The toilet may change
color and work
incorrectly.
Use an AC120V,60Hz 15A receptacle.
120V
60Hz
Above15A
Not Allowed
Not Allowed
Do not remove or replace power cord.
If the power cord is damaged, it must be
replaced by a licensed electrician.
Do not twist or break supply line.
Otherwise it may cause a leak.
Please use new (included) Supply line
Old Supply Line will cause the product to
malfunction.
Do not Fix
Do not soak
Do not touch
with wet hands
Not Allowed
Grounded
Not Allowed
Do not use a receptacle that is loose or
faulty.
May cause fire or electric shock.
Do not disassemble, repair or transform
the product yourself
Do not pour water or detergent on the
product or power plug
It may cause fire, electric shock and
other accidents or injuries.
It may cause fire, electric shock and
other accidents or injuries.
Do not place heavy objects or stand on the
cover of the toilet seat. Do not hit the
product.
Product breakage can result in personal
injury.
Ground connection: Pease ensure that
the power receptacle is grounded.
Non-grounded receptacle may pose an
electric shock hazard.
Do not use wet hands to plug or
unplug the power.
May cause an electric shock.
Compulsory
!
4
• Read this manual carefully, so that you can use the product correctly. Read through all the precautions
listed here, they are important content related to safety.
• Failure to install the product in accordance with this manual or failure to use the specified components
during the installation may cause fatal injuries or accidents.
PRECAUTIONS
Children should only use this product supervised.
Temperature settings should be set on low or off when children or elderly people are using this toilet.
!
5
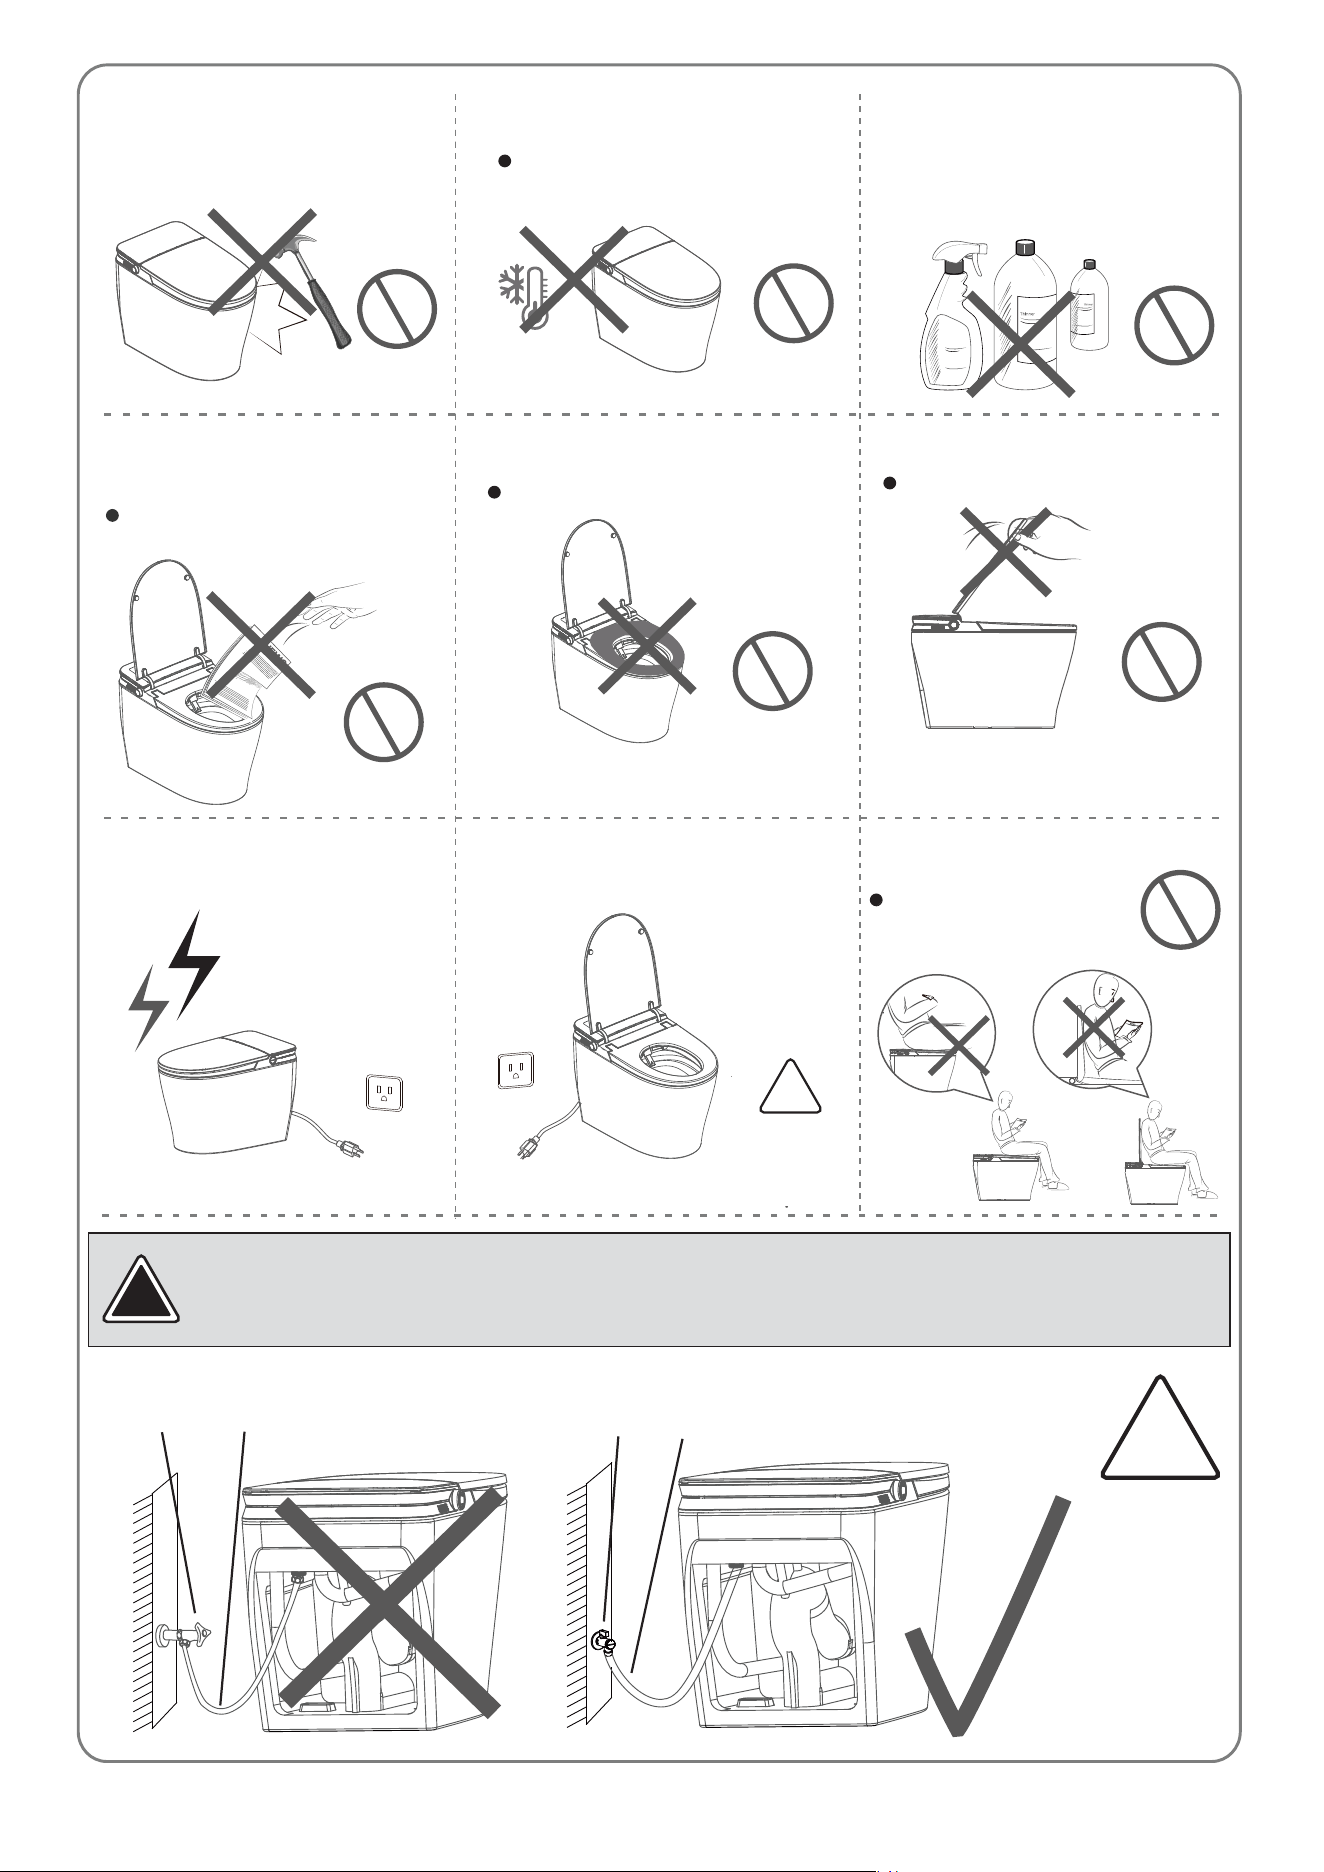
Not Allowed
Please do not sit or put objects on the
lid when it is closed, and do not lean
on the lid when it is open.
lt may damage the lid or it
may cause a malfunction.
Unplug the unit if the toilet
is backed up.
Unplug from receptacle for
protection against power surges
during thunder storms.
Not Allowed
The product may be damaged.
Do not force the lid or seat closed.
Not Allowed
Please do not use cloth cover or
cushion on seat.
Will cause toilet malfunction.
Not Allowed
Do not flush newsprint, sanitary pads
and other articles that may clog the
toilet.
It may lead to clogging of the toilet and
overflow of sewage.
(0°C)
32°F
°C
°F
Not Allowed
Only use non-abrasive dish washing
detergent for cleaning toilet.
Do not use cleaning chemicals for
toilets, volatile agents, abrasice
cleaners,etc.
Not Allowed
Do not use below 32 (0 ).
Please refer to the instructions on
long-term storage or winterizing
below 32°F(0°C).
Not Allowed
Do not hit the ceramic with metallic
objects to prevent leakage from
damage.
Attention
!
For proper flushing performance, Toilet MUST be installed using the supplied high performance
angle valve and supply line included in the package. Regular angle valves and supply lines
do not have the water flow performance to allow this toilet to work properly. Warranty will be
void if supplied high performance angle valve and suppy line included are not used.
!
Standard (Old)
Angle Valve
Standard (Old)
Supply Line
High Performance
(Supplied)
Angle Valve
High Performance
(Supplied)
Supply Line
Attention
!
Foot sensor
area
Compulsory
!
Do not damage the power cord.
1. Avoid exposing the power cord to damage, wear, or excessive heat;
2. Do not bend, kink or pull power cord;
3. Do not place heavy objects or sharp objects on the power cord. Using the toilet with a damaged power cord may result in fire, short circuit, electric
shock and other dangerous conditions.
Freezing temperatures will cause water in the supply line and in the
toilet to freeze causing damage and water leakage.
In case of leakage, close the Angle valve.
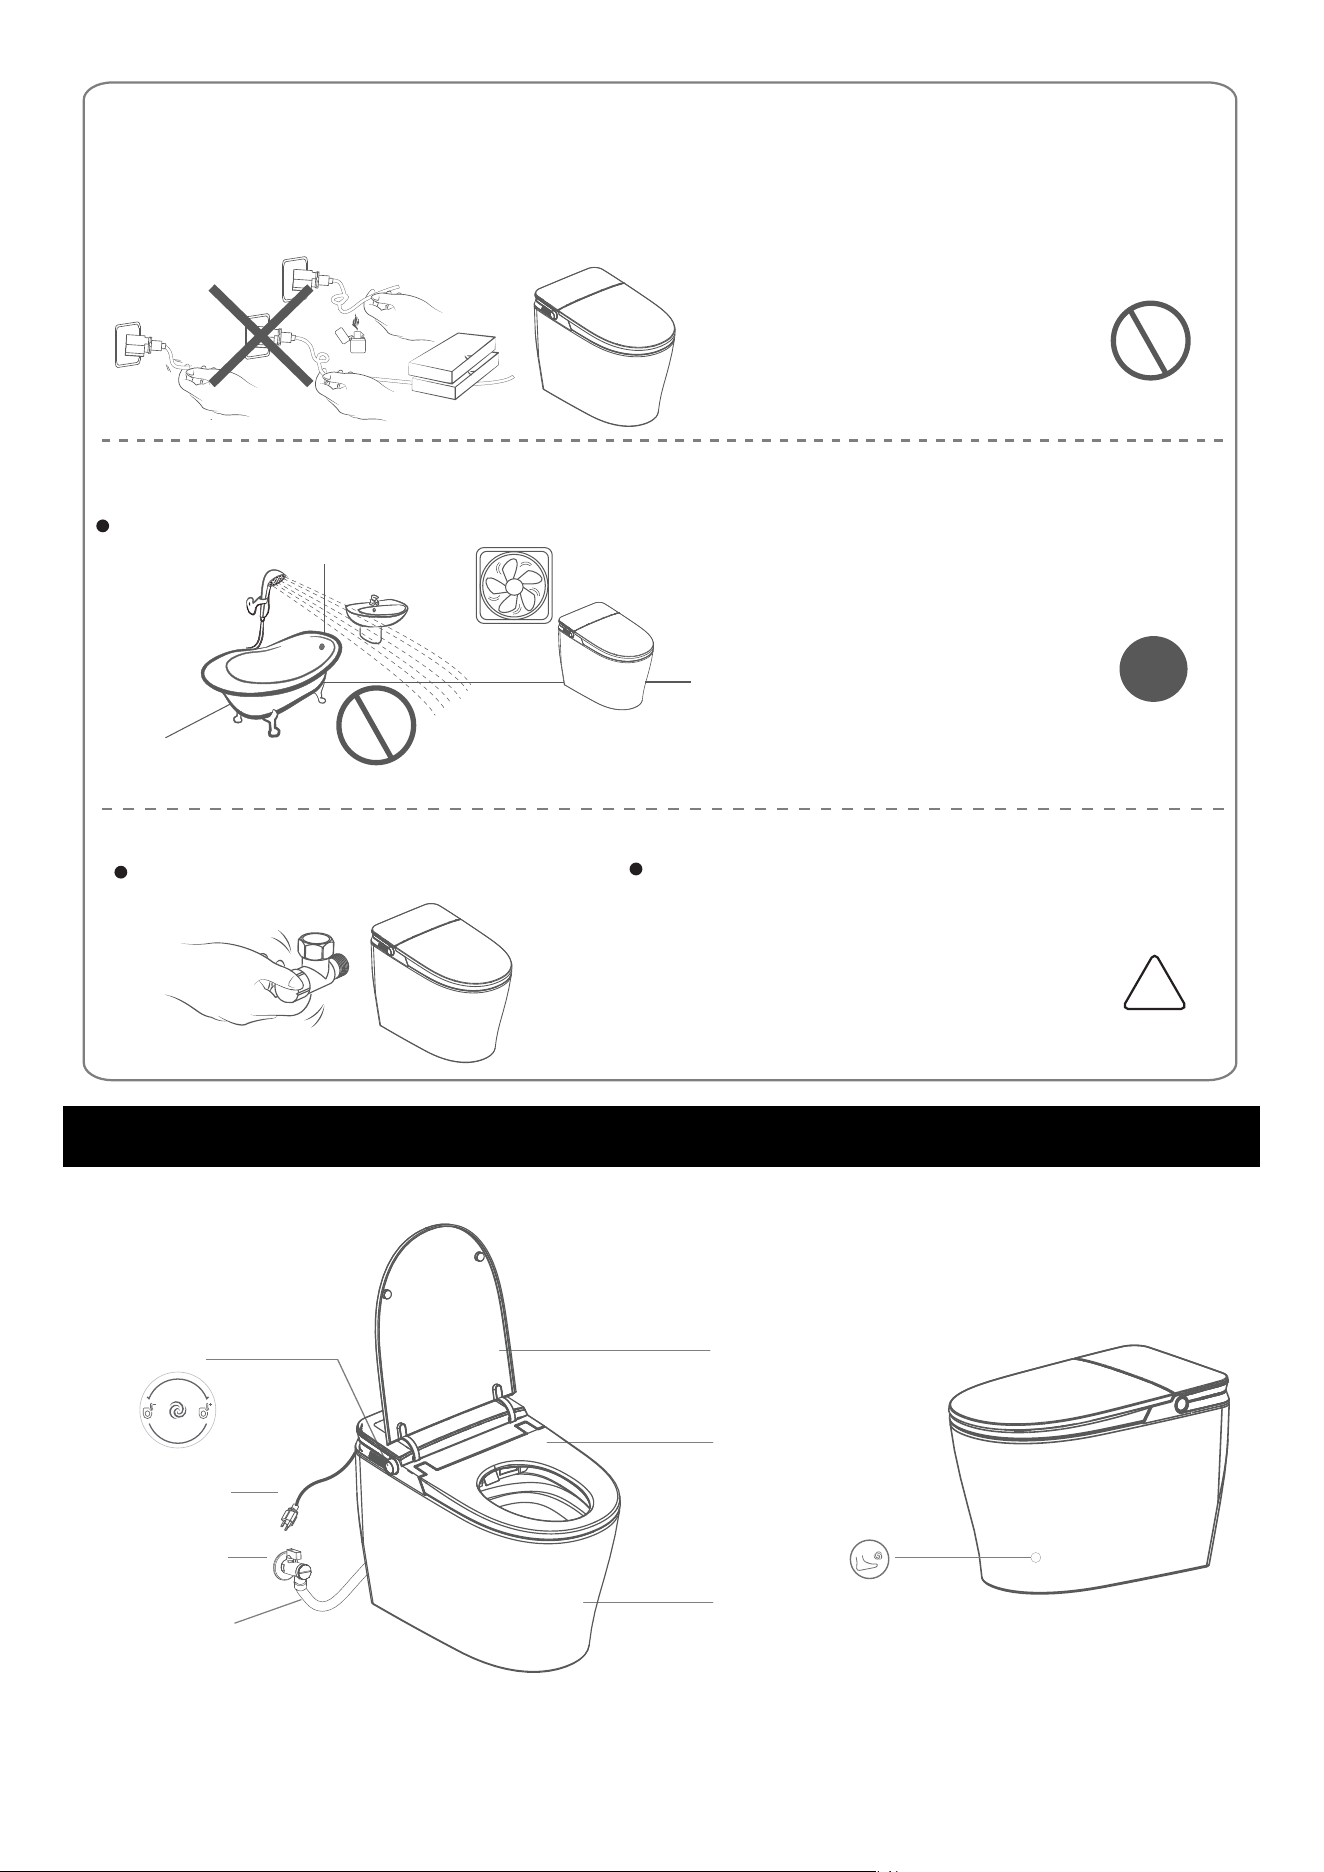
This is an electronic product, avoid places of high humidity and direct water splashing. Please install a bathroom fan to maintain
good ventilation in the bathroom.
Otherwise it could lead to malfunction, fire or electric shock.
Prevent damage caused by freezing.
Avoid flooding, slipping or electric shock.
Not Allowed
Not Allowed
Attention
!
OVERALL MAJOR COMPONENTS
6
Lid
Seat
Ceramic
Power Cord
Supply Line
Angle valve
Knob
Package Contents
7
If you find any part missing, please call: (866) 231 8893
Or email us at: [email protected]
Please do not return this Smart Toilet to the store before calling
EXPLODED VIEW & PACKAGE CONTENTS
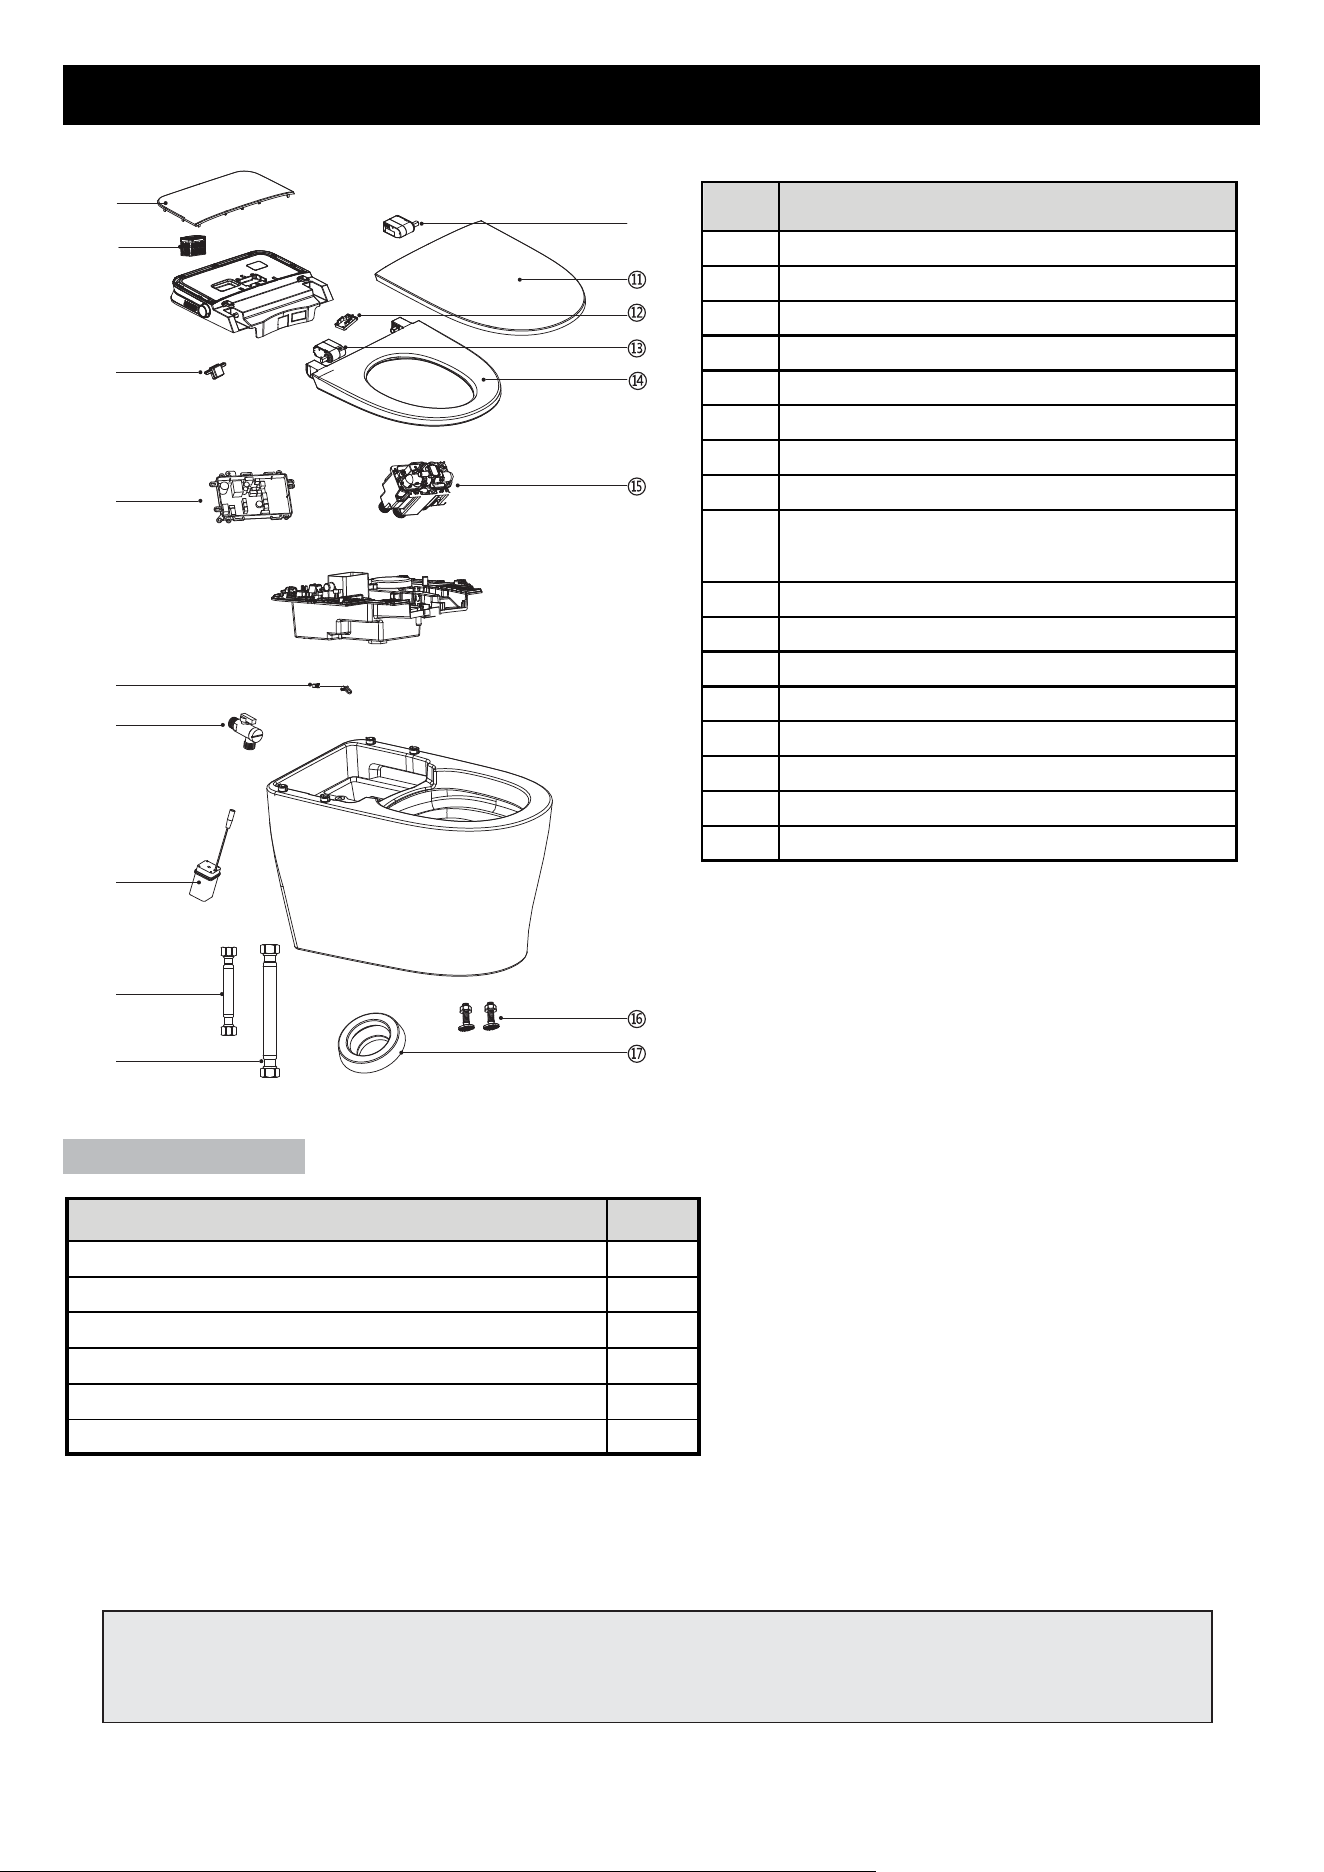
①
⑩
②
③
④
⑤
⑥
⑦
⑧
⑨
Description Qty
Wax Ring 1
Angle Valve 1
Battery Pack (4 X AA Batteries not included) 1
Floor Fixing Bolts & Screws 2
Stainless Steel Hose 23" (580mm) 1
Stainless Steel Hose 28" (720mm) 1
No. Description
1 Decorative Cover
2
Deodorization Filter
3
Microwave Module
4 Main PCB
5 Night Light
6 Angle Valve
7
Battery Pack
8 23" (580mm) Hose (Pre-assembled)
9
28" (720mm) Supply Line
(Pre-assembled)
10 Gearbox for Lid
11 Lid
12 Gearbox PCB
13 Gearbox for Seat
14 Seat Rim
15 Flush Valve
16 Floor Fixing Bolts & Screws
17 Wax Ring
(1) Do not spray water on the toilet.
(2) If toilet is below 50 F (10℃), place it in a warm room for 2 hours before installing.
(3) Failure to comply with the recommendations in the installation manual may lead to
personal injury, electric shock or other accidents. Read and follow ALL the manual
instructions.
120V
60Hz
15A Above
The power cord must be plugged into a
GFCI receptacle or a receptacle in a
GFCI protected circuit
complying with: 120V 60Hz and 15A.
Minimum necessary water pressure: 20psi (0.14Mpa). Minimum flow
rate: 4.75gpm (18L/min). The product will not work properly if the
pressure or flow rate cannot be reached. (Please refer below if no
water pressure test device is available).
!
SMART TOILET INSTALLATION
Confirm Power Supply
Check the Minimum Necessary Water Pressure and Flow Rate
8
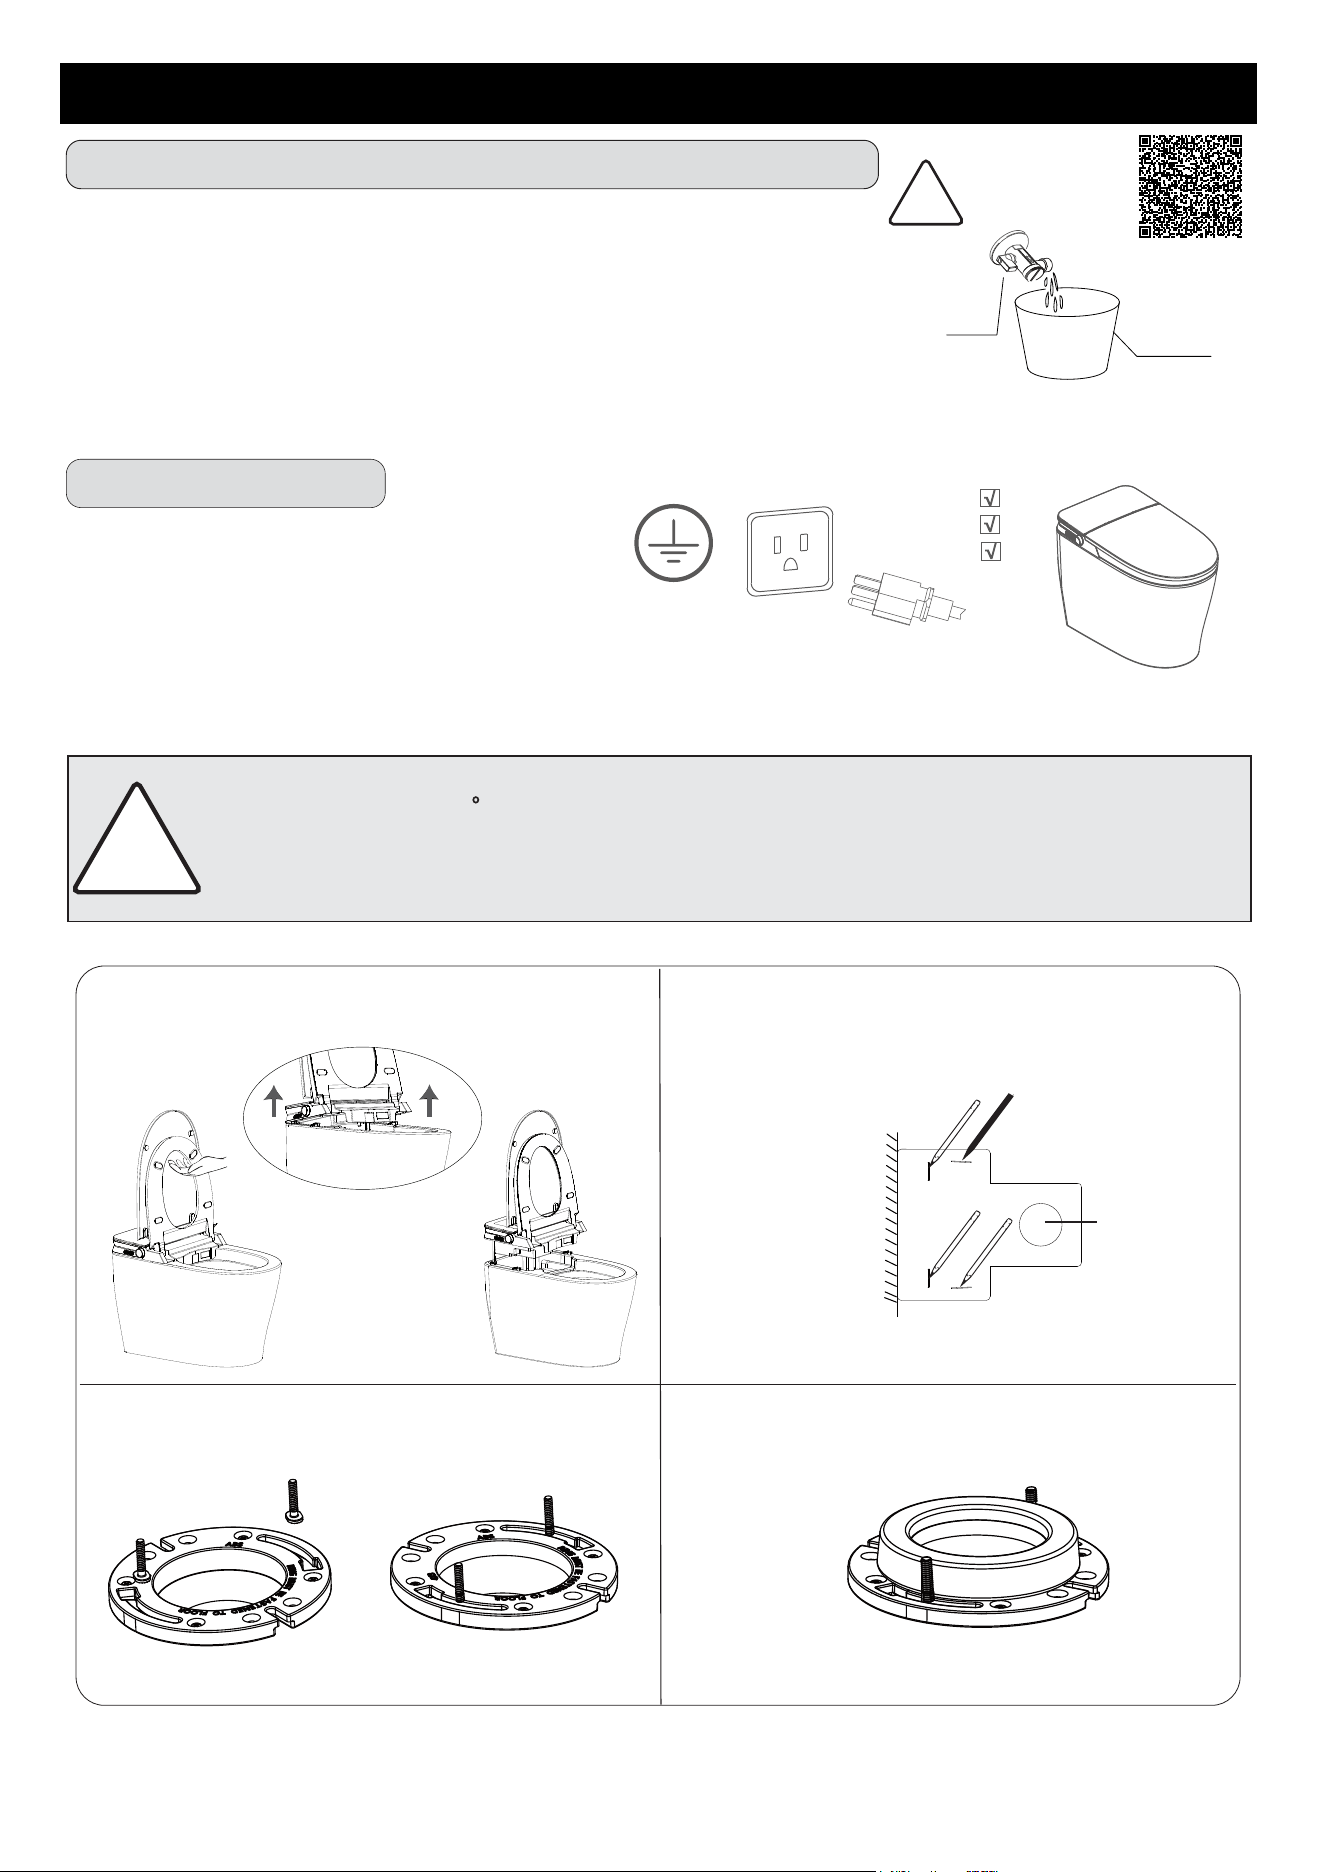
Bucket
New Angle valve
Remove old angle valve and install supplied angle valve. Open new
angle valve for 10 seconds. Check water volume. It should be higher
than 0.8 Gallons (3 Litres) for the toilet to work properly.
3.Place the bolts into the flange grooves.
2. Place the installation template as shown below.
Confirm rough in pipe. Trace the toilet back and
side profile using the hollowed lines on template.
1.Open the lid and the seat. Holding firmly from the
seat pull upwards to disengage the cover from the
holding clips.
Rough in
4.Install wax ring centering it on the flange.
Watch Video
Attention
!
9
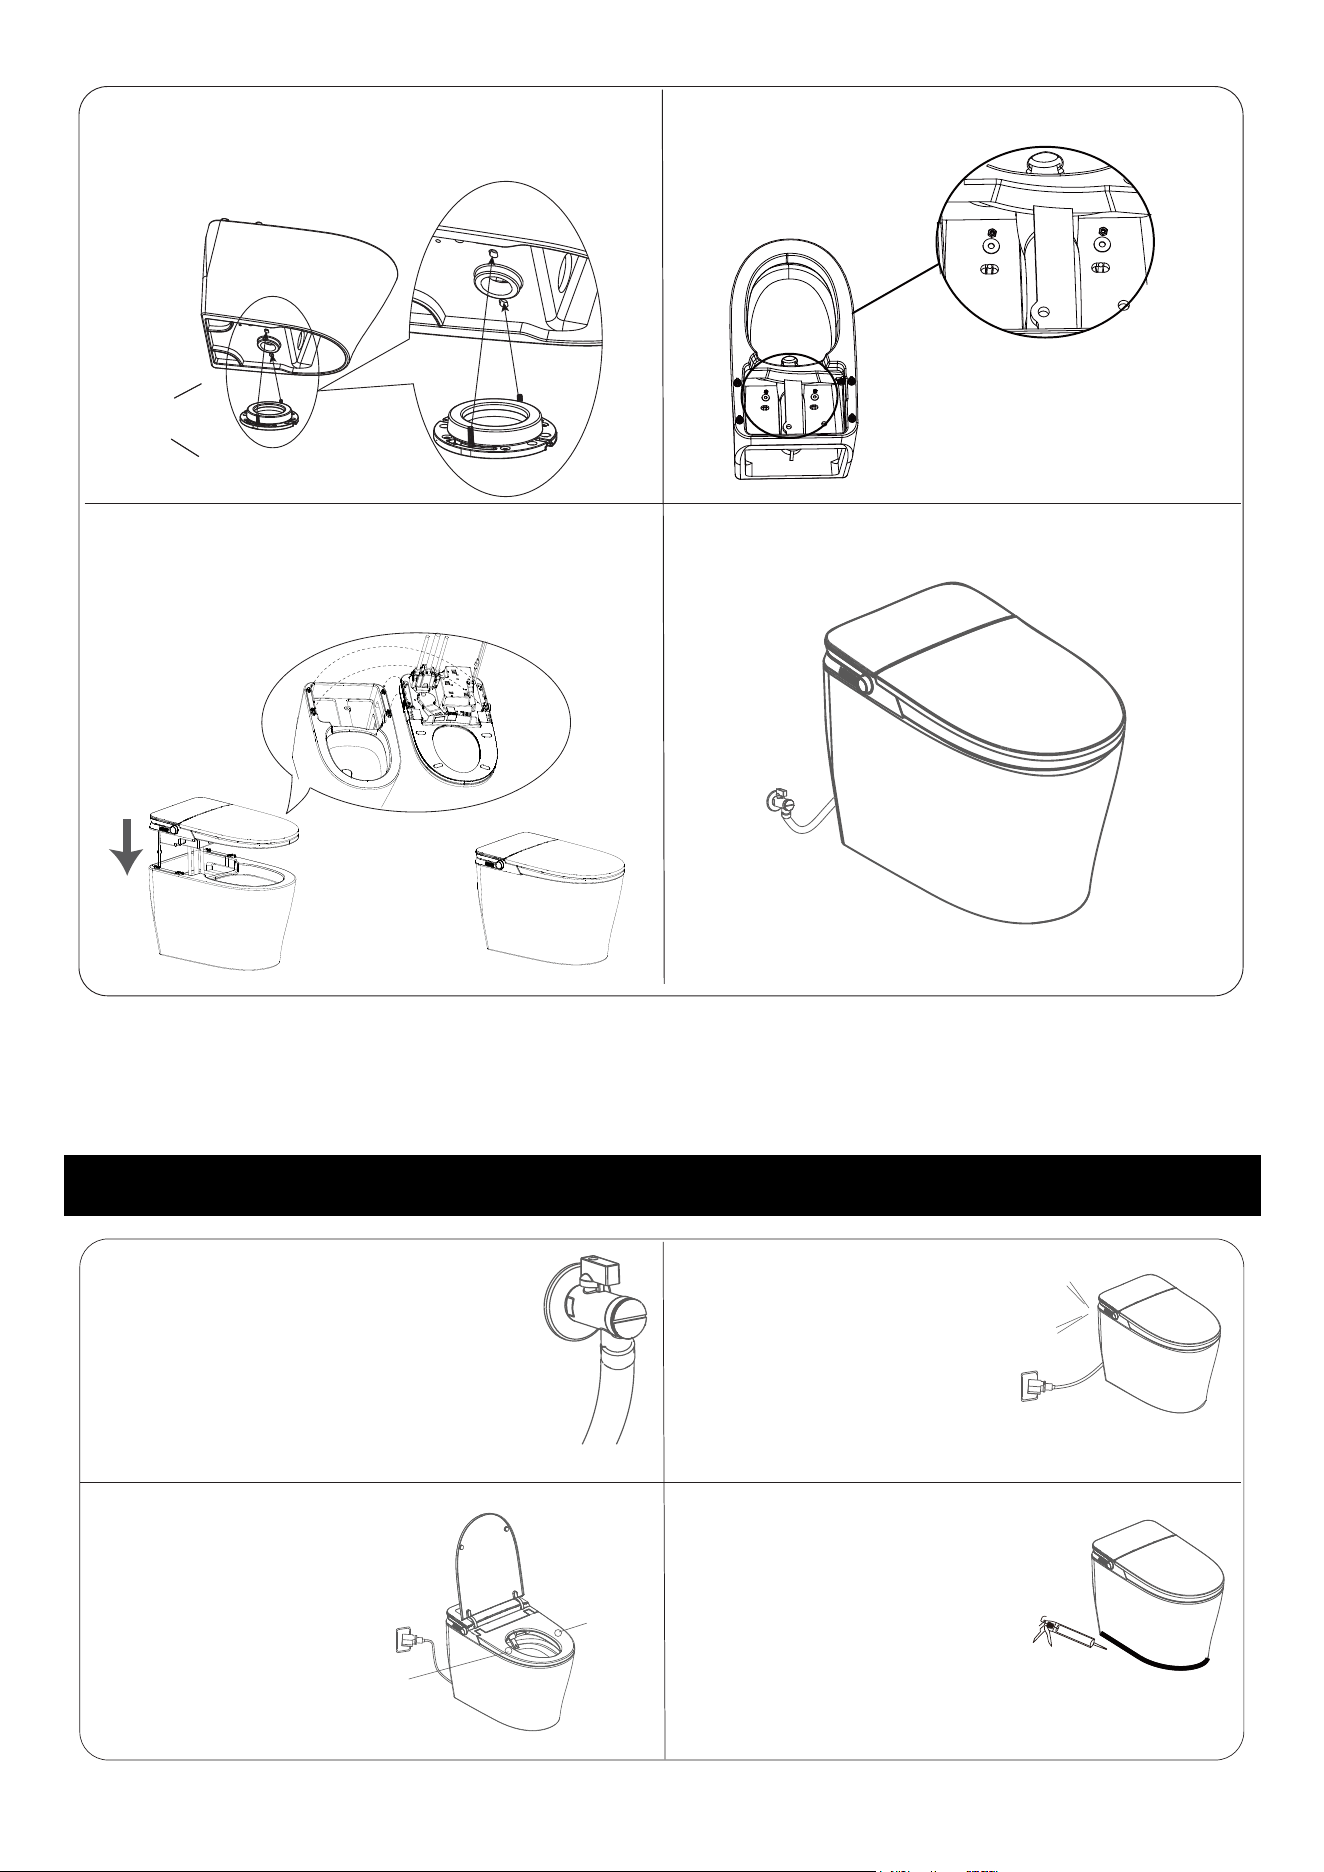
Before applying the caulking,
please flush the toilet several
times to see if there is any
leakage in the ceramic. After
inspection caulk around the
ceramic. Make sure that the
ceramic is sealed in place.
4.Drainage inspection
Press the flush button on
the knob to flush the
toilet.
Sensor
3.Flushing test
After connecting to the power
supply, the toilet will give a
"beep" sound. Knob light will
go on indicating the
completion of self-diagnosis.
2.Product self-diagnosis
Beep!
Open the angle valve a little bit. Check
for leaks.
Open the valve completely after
checking everything is dry.
1.Turn on the angle valve
TESTING AFTER INSTALLATION
Sensor
6.Install the washers and locking nuts securing the
toilet to the flange.
8.Connect the supply line to the angle valve.
5.Install the ceramic aligning it to the contour lines
you traced. (Note: the fixing bolts need to pass
through the holes at the bottom of the ceramic.)
7.Align 4 holding clips in the ceramic with the holes
in the back part of the cover and push down.
1. Each time the toilet is plugged in, all lights will go on, a “beep” will sound and all functions will be reset to
factory settings.
2. Seat temperature will default to 91°F (33°C).
Power-on Self-check
FUNCTIONS
10
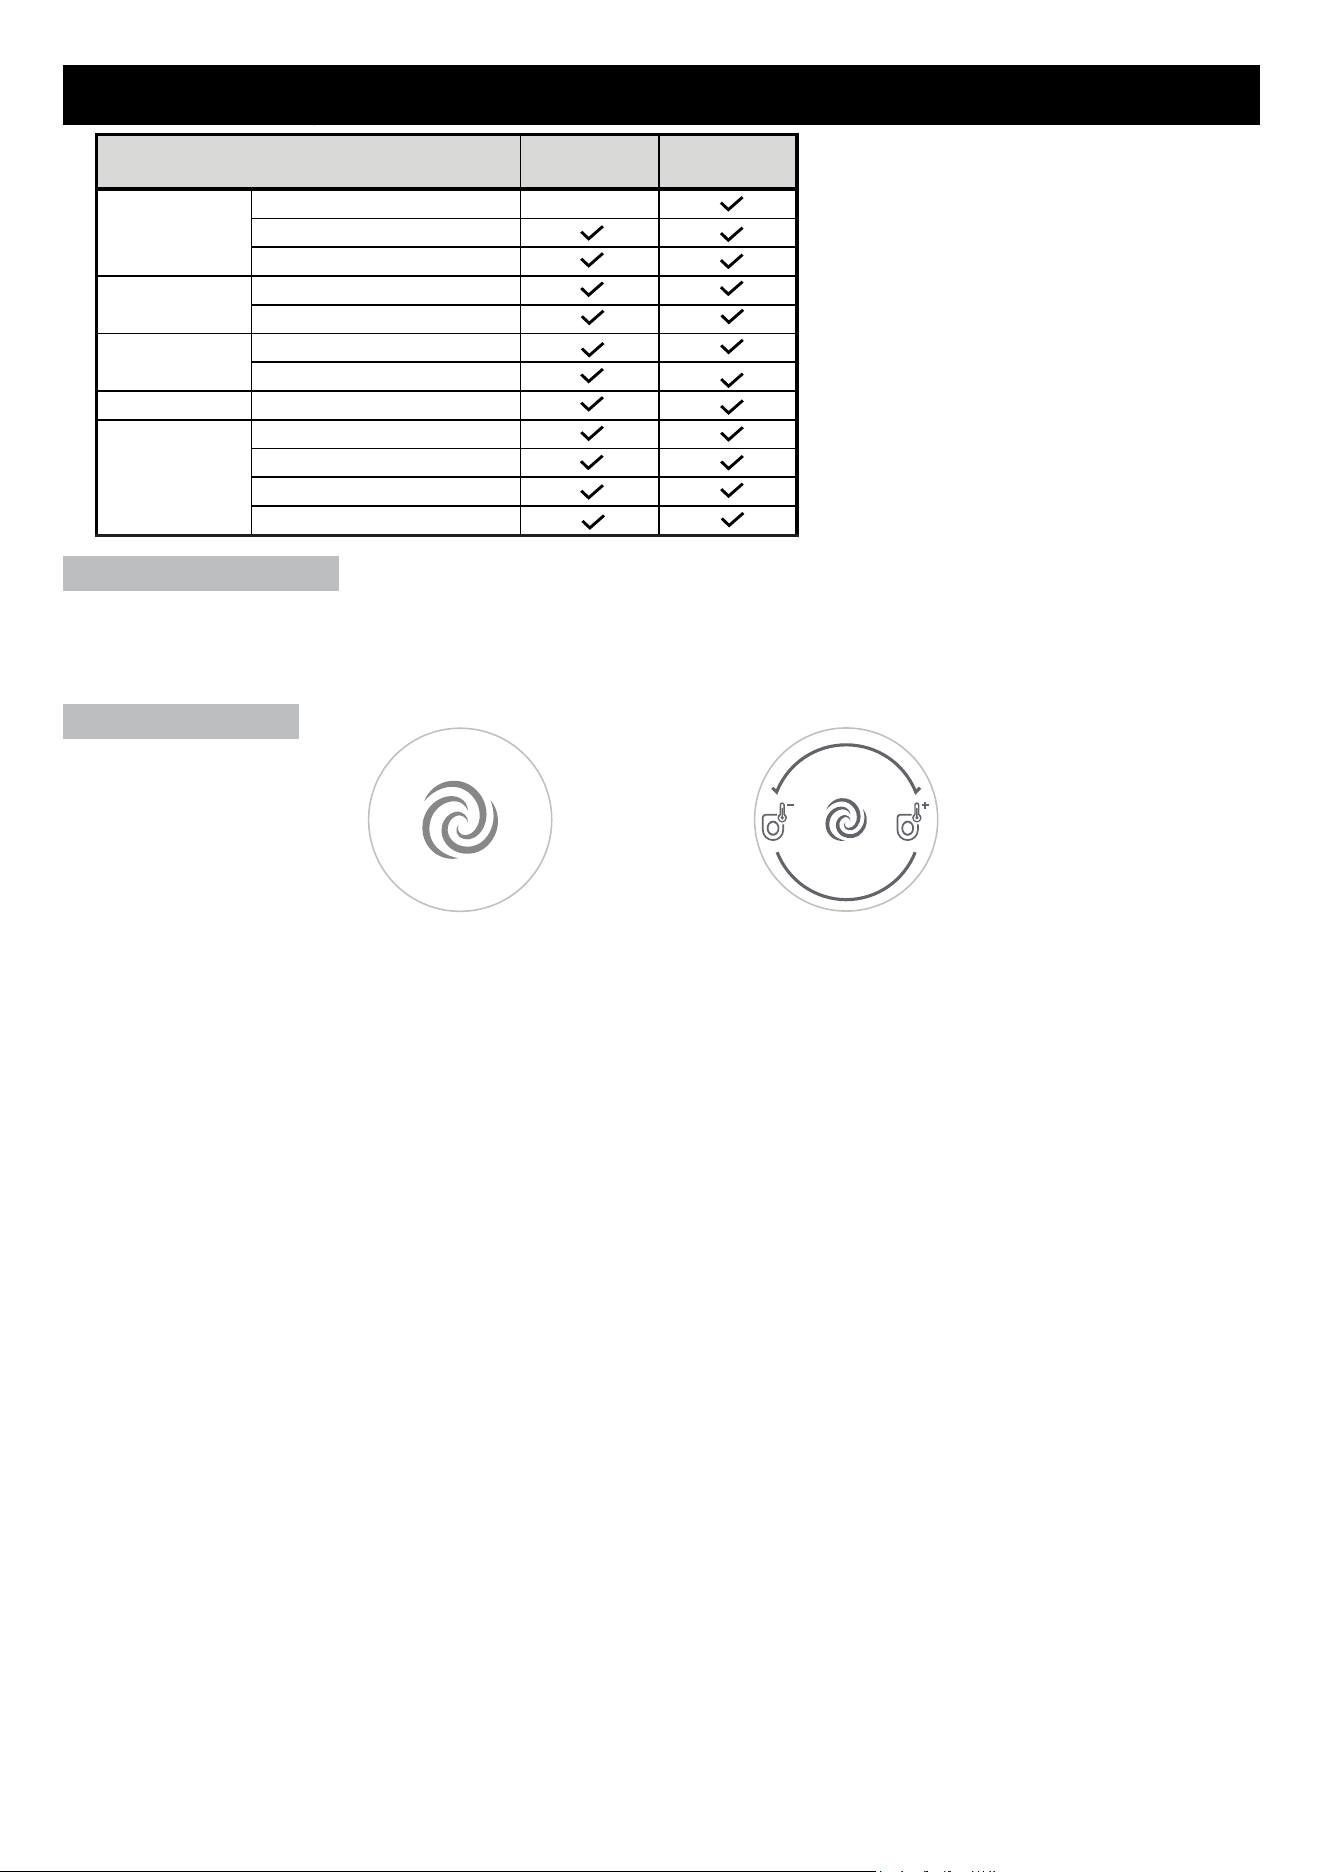
Knob Operation
1. Short press the knob to start a big flush.
6. (Only for Premium B CSTPB0)
Turn the knob clockwise to raise the seat temperature. Turn the knob counterclock wise to lower the seat
temperature.
• Prompt sound "didi" indicates highest temperature level has been reached.
• Prompt sound "di" indicates one level of temperature lower.
• Prompt "long beep" indicates seat heating is off.
2. When nobody is seated, long press the knob for 3 seconds to enter the setting mode: the white light
flashes
(a) Rotate clockwise to set to silent mode, you will hear a long “beep”; rotate clockwise again to turn off
silent mode, you will hear a short “beep”.
(b) Rotate counterclockwise to turn off the night light, you will hear a long “beep”; rotate counterclockwise
again to turn on the night light, you will hear a short “beep”.
3. In the setting mode, long press the button again to turn on the microwave distance setting, the white light
will flash. Each time you turn the knob clockwise the range will change:
• The default range is 0.2~0.4m “beep” for Level 1
• 0.2~0.8m “beep, beep” for Level 2
• 0.2~1.2m “beep beep, beep” for Level 3
• Turn off the microwave “long beep”
4. If no operation is performed within 10 seconds, the last setting will be saved and the unit will exit setting
mode.
5. There is always prompting sound while setting mode.
Premium A
CSTPA0
Premium B
CSTPB0
Adjustable Seat Temp.
X
Anti-Bacterial
Sensor
Auto Lid Open
Foot Sensor Lid/Seat
Night Light
Knob Light
Deodorization Catalyst Deodorization
Off Seat Auto Flush
Power Off Flush
Foot Sensor Flush
Side Knob Flushing
Function
Seat
Seat &
Cover Open
Light
Flushing
Premium A
CSTPA0
Premium B
CSTPB0
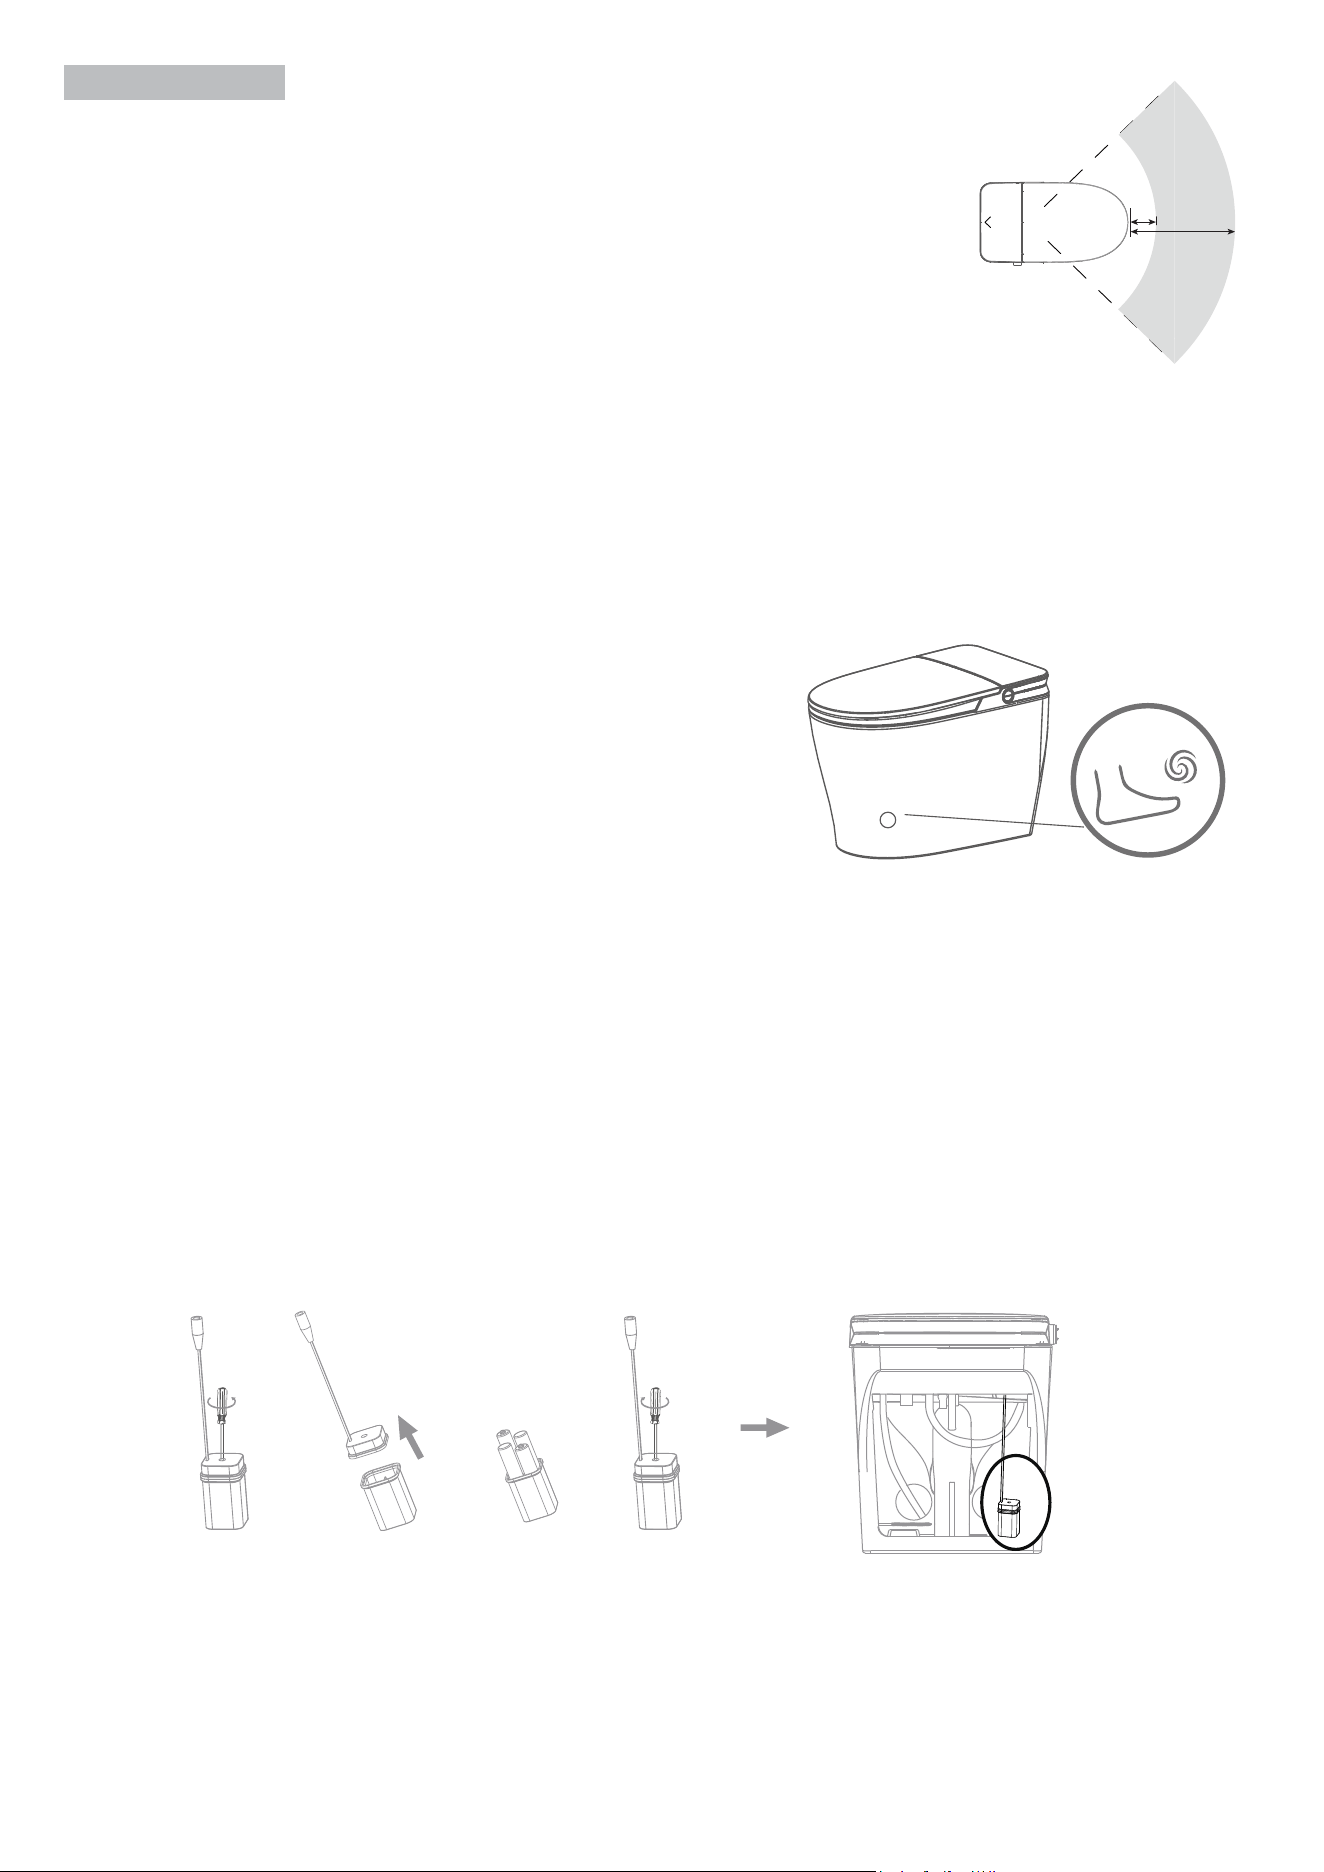
Foot sensor area
(d) If someone who has been sitting in the seat for under 2 min.
touches the foot sensor, the lid will close and a small flush will start.
(e) If someone who has been sitting in the seat for over 2 min.
touches the foot sensor, the lid will close and a large flush will start.
3. Foot sensor lid/seat open and flushing function
(a) When both the lid and seat are closed, the lid will open automatically once the user touches the foot sensor
area.
(b) When the lid is open and seat is closed, the seat will open automatically once the user touches the foot
sensor area.
(c) When the lid and seat are open, both of them will close and start a small flush once the user touches the
foot sensor area.
2. Auto lid open function
(a) When a person walks to the toilet and into the sensing area, the lid will open
automatically.
(b) The lid will close automatically 1 minute after a person leaves the sensing area.
1. Seat temperature scald prevention function
After sitting down, the system will enter into a seat scald prevention mode automatically.
Other functions
11
Sensing
Area
8”
(0.2m)
16”
(0.4m)
4. Automatic flush
The toilet will close seat, close lid and flush automatically 1 minute after a person leaves the toilet sensing area
(If a flush is executed before the lid is closed, the toilet will not flush automatically again.)
5. Automatic Deodorization
When the device is in the powered-on state and a person is seated, the deodorization fan will automatically
turn on. When a person leaves the seat, the deodorization fan will remain on and automatically turn off after
one minute. When the flushing is working, the deodorization fan will stop.
6. Power off flush function
When power is off, the battery pack will take over. Short press the knob to flush. No other function will work.
The batteries should last for 100 flushes.
Changing / Inserting Batteries:
(a) Open the battery pack with a Phillips screwdriver.
(b) Remove the battery tray.
(c) Following recommendations in Battery Reminder below, load 4 size AA batteries (not supplied) into the
battery tray being careful with the polarity of the batteries.
(d) Re-assemble the battery pack and install in the toilet.
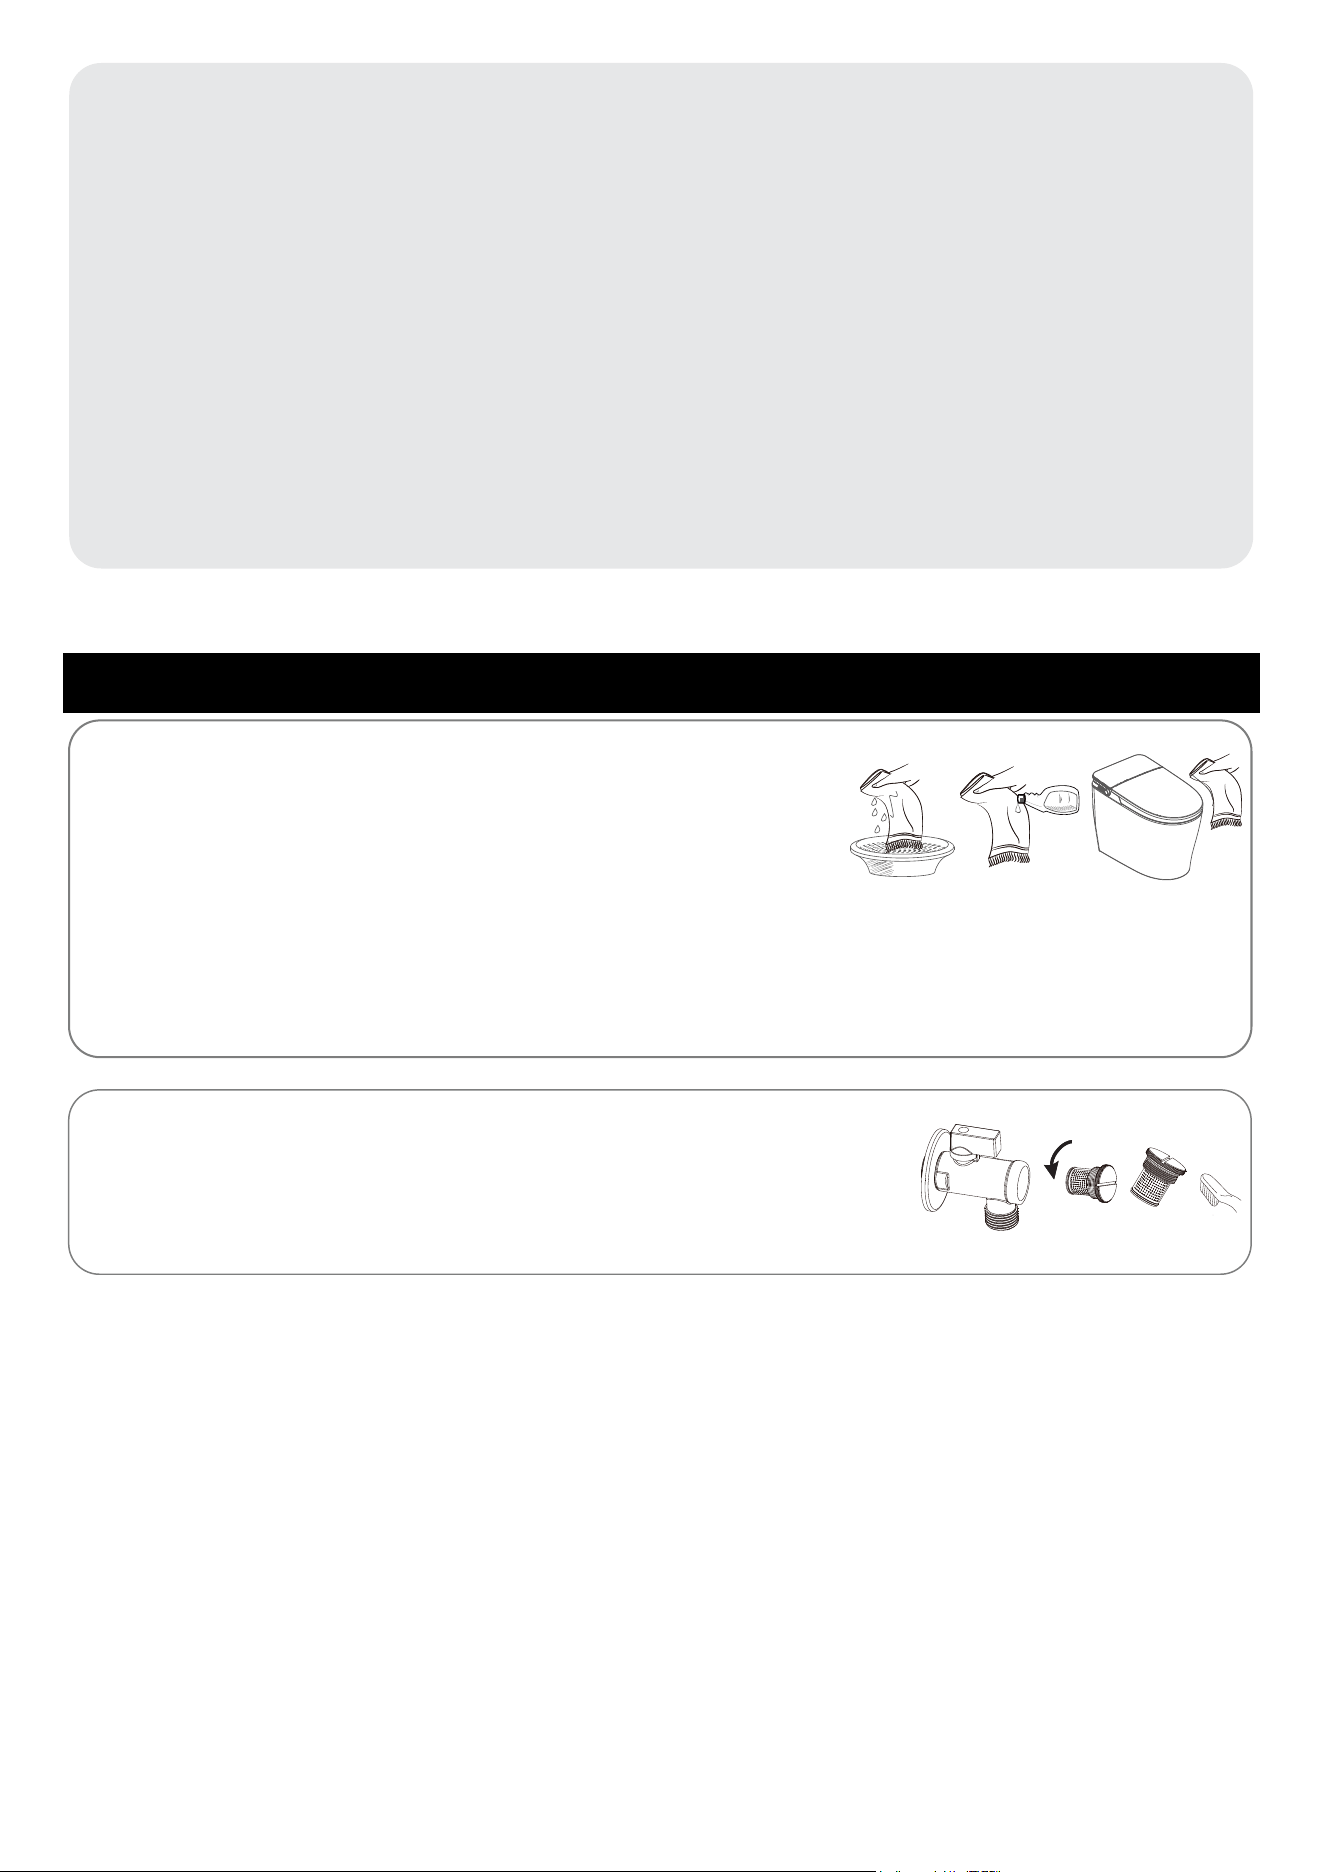
12
(3) Be sure to wipe off any detergent after cleaning to avoid residue at the gap between the main ceramic
body and the cover.
Product surface cleaning
Wet a soft cloth with water, wring it, and then wipe the product. If the toilet is dirty, you can use a soft
cloth with a little diluted neutral detergent to clean it. Then use a clean damp cloth to wipe it clean.
The detachable accessories can be removed before maintenance.
Note before maintenance:
(1) Make sure the power supply is disconnected.
(2) Do not let water enter the product during the maintenance
process.
1.Maintenance of product surface and ceramics
CLEANING AND MAINTENANCE
(1) Turn off the angle valve. Unscrew the filter screen cap at the front of
the valve with a straight screwdriver.
(2) Use a small brush to scrub the filter screen, and flush away debris
with clean water.
(3) Reinstall the filter on to the angle valve and tighten it.
2.Maintenace of valve if water performance is low
1. This toilet is designed to flush using batteries only during a power outage. Check batteries at least once
a year to ensure they are in good working condition.
2. Strictly follow the "+" and "-" signs in the battery pack when inserting batteries. Reverse connecting
batteries may cause battery damage and safety hazards such as explosion or combustion.
3. Only size recommended batteries should be used. Old and new batteries should not be mixed. Different
models and brands of batteries should not be mixed. When replacing batteries, all of them should be
replaced at the same time.
4. Clean the battery contacts and also those of the device prior to battery installation.
5. Remove batteries from equipment that is not to be used for an extended period of time.
6. Remove used batteries promptly.
7. Handle battery pack with care. After replacing the batteries, make sure the battery pack is securely
locked and sealed to prevent bathroom moisture from entering the compartment (this could cause battery
corrosion and damage).
8. When replacing batteries, disconnect the battery compartment from the main unit.
9. DO NOT USE RECHARGEABLE BATTERIES.
BATTERY REMINDER
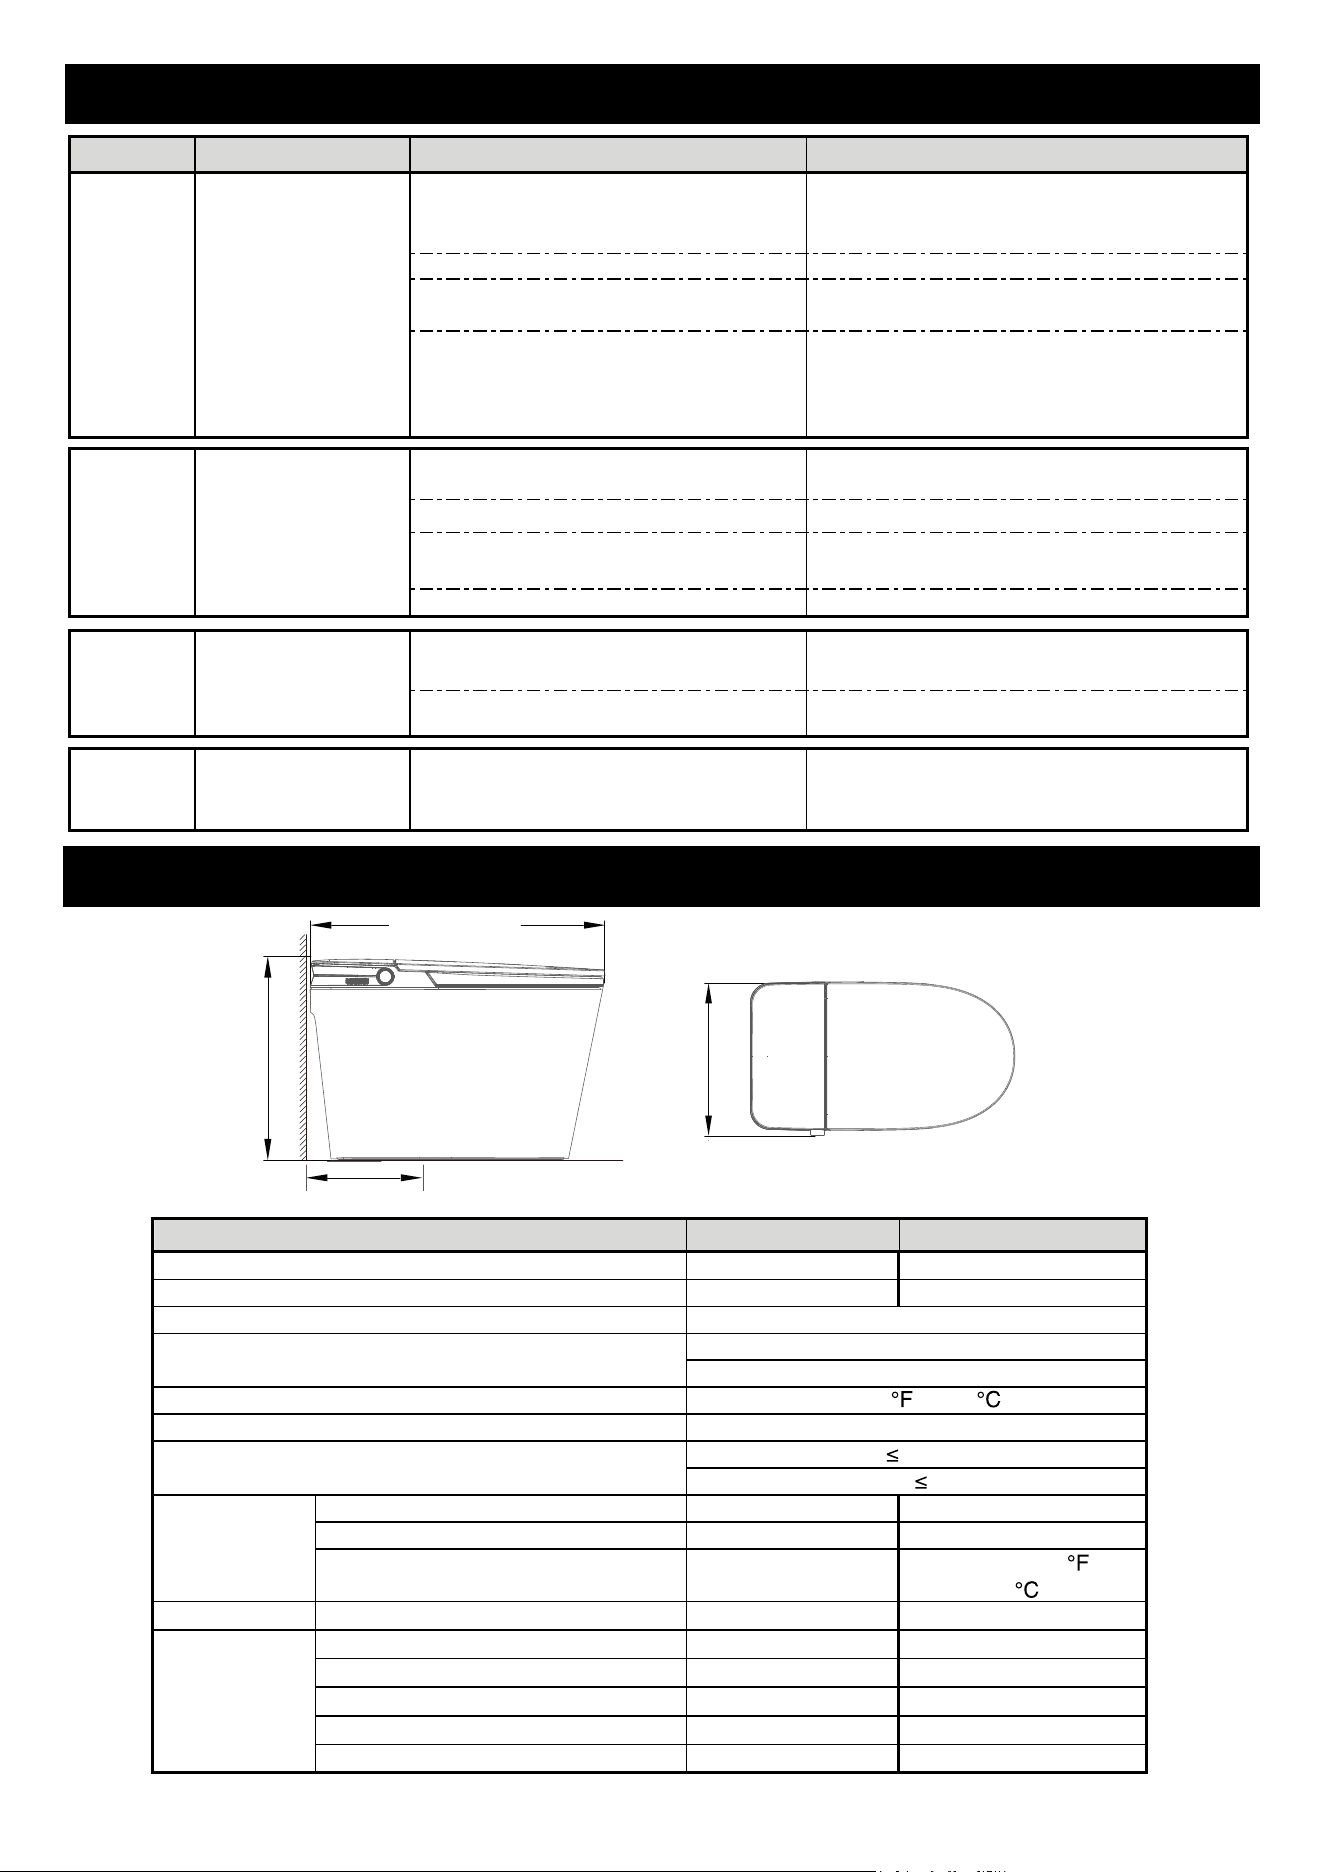
Rough-in: 12"
27"(685mm)
19"(485mm)
15.6" (396mm)
TECHNICAL DATA
TROUBLESHOOTING
ISSUE PROBLEM CHECK SOLUTION
Check whether cloth covers, cushions,
etc. are being used on the seat sensing
area.
Remove cloth covers, cushions or any other
items.
Check if there is a power outage. Wait for power supply recovery.
Check if the plug is loose or making poor
contact.
Plug in to ensure good power supply.
Check if there has been electricity
leakage (the GFCI receptacle indicator
light is off or the GFCI breaker has
tripped).
Unplug the power plug. Press the reset
button on the GFCI receptacle or reset the
GFCI breaker. If it still does not work, contact
customer service.
Check if High Performance Angle Valve
& Supply Line (supplied) have been used
Have High Performance Angle Valve and
Supply Line
Check if Angle Valve is fully open Open Fully Angle Valve
Check if Main House Cold Water Valve is
fully open
Open Fully Main House Water Supply Valve
Filter is blocked Refer to Maintenance of the Valve.
Check if the seat temperature is set to
low or off.
Reset the seat temperature using the seat
temperature knob.
Check if there is power outage. Wait for power supply recovery.
The toilet does not
work
1. General
The toilet does
not flush or does not
flush properly
2. Flushing
3. Seat
(Only for
Premium B
CSTPB0)
Contact Customer Service.4. Lights
Toilet light and knob
light does not work.
The seat is not
heating
Check if the fault still exists after
doing a reset by unplugging, waiting 20
seconds and re-plugging unit.
Premium A CSTPA0 Premium B CSTPB0
120V ~ 60Hz 120V ~ 60Hz
9.5W 55W
Heater power N/A 50W
Safety equipment N/A Thermostat + fuse
Surface temperature N/A
3 levels: 91/100 /OFF
(33/38 /OFF)
Deodorization Deodorization method Catalyst Catalyst
Antibacterial material Seat ring Seat ring
Low temperature scald protection N/A Available
Prompt for abnormalities Alarm sound Alarm sound
Seat sensing Available Available
Lighting control Available Available
Full Flush 1.11 gal (4.2L)
Reduced Flush 1.10 gal (3.8L)
Min. Dynamic Pressure: 20PSI (0.14MPa)
Max. Static Pressure: 110PSI (0.75MPa)
41~95 (5~35 )
IPX4
35.83" (0.91M)
Items
Others
Rated Voltage
Rated Power
Power Cord Length
Water Supply Pressure
Water Supply Temperature
Waterproof Level
Seat Ring
Heating
Toilet Flush
13

14
The FCC and the IC require for us to place the following warnings in the manuals of every communication
device that is tested to meet their standards:
FCC Compliance
Warning: Changes or modifications to this unit not expressly approved by the party responsible for
compliance could void the user’s authority to operate the equipment.
NOTE: This equipment has been tested and found to comply with the limits for a Class B digital device,
pursuant to Part 15 of the FCC Rules. These limits are designed to provide reasonable protection against
harmful interference in a residential installation. This equipment generates, uses and can radiate radio
frequency energy and, if not installed and used in accordance with the instructions, may cause harmful
interference to radio communications.
However, there is no guarantee that interference will not occur in a particular installation. If this equipment
does cause harmful interference to radio or television reception, which can be determined by turning the
equipment off and on, the user is encouraged to try to correct the interference by one or more of the
following measures:
* Reorient or relocate the receiving antenna.
* Increase the separation between the equipment and receiver.
* Connect the equipment into an outlet on a circuit different from that to which the receiver is connected.
* Consult the dealer or an experienced radio/TV technician for help.
This device complies with Part 15 of the FCC Rules. Operation is subject to the following two conditions:
1. This device may not cause harmful interference, and
2. This device must accept any interference received, including interference that may cause undesired
operation.
Caution: To maintain compliance with the FCC’s RF exposure guidelines, place the product at least 20cm
from nearby persons.
IC Compliance
This device has been tested to meet Industry Canada technical specifications. This device contains
licence-exempt transmitter(s)/receiver(s) that comply with Innovation, Science and Economic Development
Canada’s licence-exempt RSS(s). Operation is subject to the following two conditions:
1. This device may not cause interference.
2. This device must accept any interference, including interference that may cause undesired operation of the
device.
To maintain compliance with the RF exposure guidelines, place the product at least 20cm from nearby
persons.
Complies with: CAN ICES-003 (B) / NMB-003 (B)
COMMUNICATION DEVICE CAUTIONS

15
CTM Maison Elite Inc. grants this limited warranty to the original purchaser of this Smart Toilet
from the date of purchase. Proof of purchase is required when requesting any warranty
assistance.
Limited Two Years: CTM Maison Elite Inc. warrants that all parts, to be free from defects in
workmanship and material at the time of manufacture for a period of two years. We agree to send
a replacement part without charge or at our option replace it with a comparable or superior part
at our sole discretion.
To the extent permitted by law, CTM Maison Elite Inc. disclaims any and all warranties, including
but not limited to those of merchantability and fitness for a particular purpose. There is no other
express warranty. The duration of any implied warranty which cannot be disclaimed is limited to
the period specified in the express warranty. Some states do not allow a limitation on how long
an implied warranty lasts. The time limitation may not apply to you. Some states do not allow the
exclusion of incidental or consequential damages, so the above limitation may not apply to you.
This warranty gives specific legal rights. You may also have other rights which vary from state to
state. The retailer shall not be liable for incidental, consequential, or damages arising out of or in
connection with product use or performance except as may otherwise be accorded by law.
This limited warranty is non-transferable and only to the original purchaser of this
Smart Toilet and
will be void if unit is removed from its original installation.
This warranty does not cover: ordinary wear and tear, minor cosmetic blemishes, refurbished
units, ceramic toilets that are not owned by the original purchaser, acts of God, changes in finish
including rusting, pitting, corroding, tarnishing, or peeling.
Damage to any part by accident, misuse, abuse, improper installation, dents and/or scratches
incurred during shipping, handling, or installation, bends or warping caused by forced
connections, over-tightened fittings, and/or inadequate support during installation, improper care
and maintenance, failure to follow the instructions in the enclosed manual or any modification to
the unit are not covered by this warranty.
All costs of shipping parts, removing, repair labour and reinstalling the product are not covered by
this warranty. Please do not ship your stainless steel sink or any parts to CTM Maison Elite Inc.
Shipment will not be accepted.
This warranty supersedes all prior warranties.
Warranty

Customer Care
Thank you for purchasing a FORNO ACQUA product. Please read the entire instruction manual before
operating your new Smart Toilet for the first time. Whether you are an occasional user or an expert, it will
be beneficial to familiarize yourself with the safety practices, features, operation and care
recommendations of your Smart Toilet. Both the model number and serial number are listed on the
product. For warranty purposes, you will also need the date of purchase. Record this information below
for future reference.
SERVICE INFORMATION
Model Number
__________________________________________________
Serial Number
__________________________________________________
___________________________________________________
___________________________________________________
Use these numbers in any correspondence or
service calls concerning your Smart Toilet.
If you received a damaged Smart Toilet,
immediately contact the dealer (or builder) that
sold you the Smart Toilet.
Date of Purchase
Purchase Address & Phone
Save time and money. Before you call for
service, check the Troubleshooting Guide. It
lists the causes of minor operating problems
that you can correct yourself.
CUSTOMER SERVICE
Keep the instruction manual handy to answer your questions. If you don’t understand something or
you need more assistance, please call our Customer Service: 1-866-231-8893
Or email: [email protected]
Our contact: CTM Maison Elite Inc.
11420 Albert Hudon, Montréal, Québec H1G 3J6, Canada
The instruction manual can be downloaded from www.fornoworld.com
Made in China
26-3
16