SteamChef
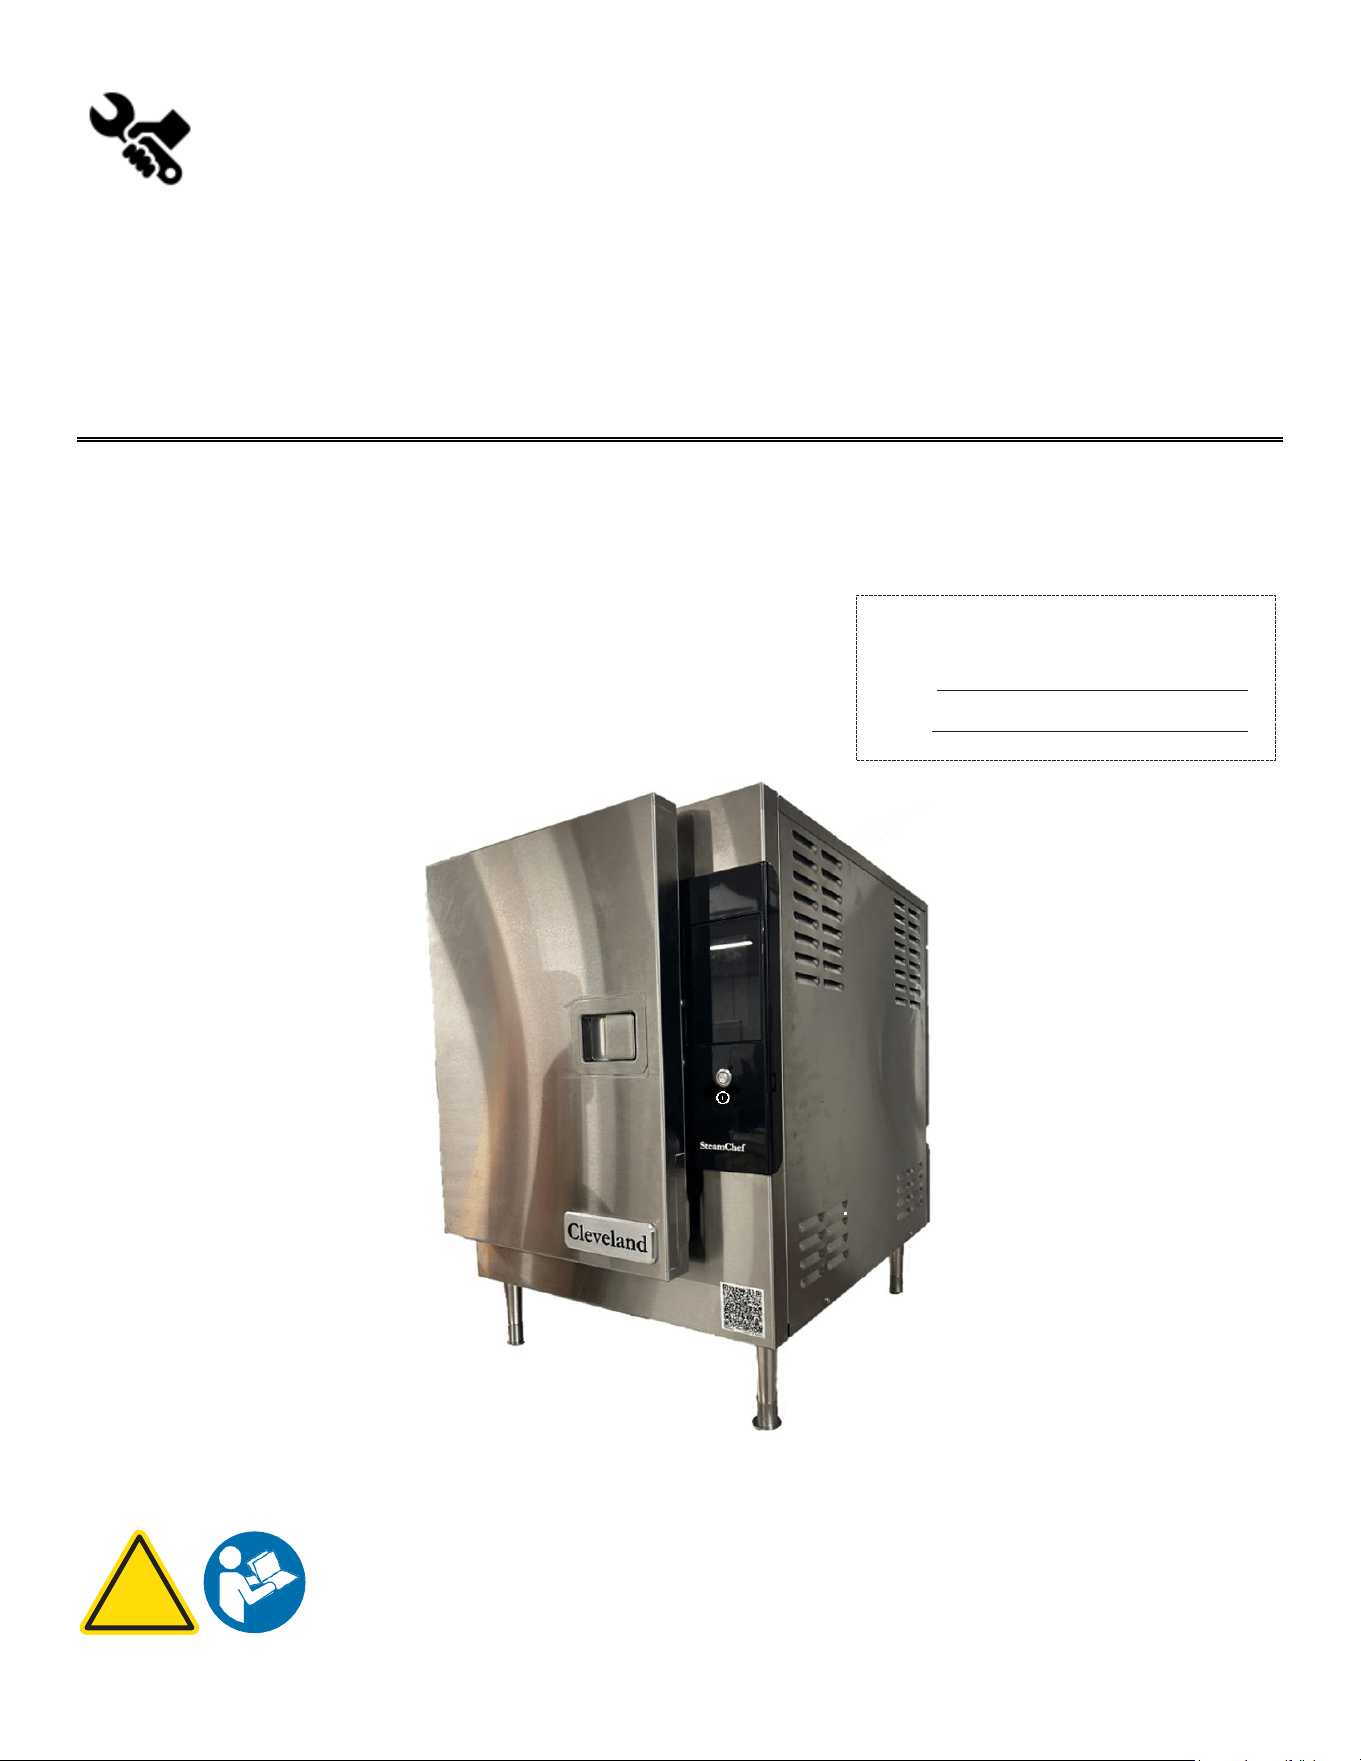
Electric Convection Steamers with Easy Touch
Operation, Installation & Maintenance Manual
This manual is updated as new information and models are released. Visit our website for the latest manual.
MODELS:
22CET6.2
Visit www.clevelandrange.com to locate a
service or sales representative in your area.
For your future reference.
Model #
Serial #
!
Read the manual thoroughly.
Improper installation, operation or
maintenance can cause property
damage, injury, or death.
Part # KE004358-2 Rev A
June 2025
Cleveland

1
STATEMENT OF RESPONSIBILITIES /
DÉCLARATION DES RESPONSABILITÉS /
DECLARACIÓN DE RESPONSABILIDADES
This document is for use by experienced and
trained Qualified Cleveland Range, LLC
Authorized Service Representatives who are
familiar with both the safety procedures, and
equipment they service. Cleveland Range,
LLC assumes no liability for any death,
injury, equipment damage, or property
damage resulting from use of, improper use
of, or failure to use the information contained
in this document. Cleveland Range, LLC has
made every effort to provide accurate
information in this document but cannot
guarantee that this document does not
contain unintentional errors and omissions.
The information in this document may be
subject to technical and technological
changes, revisions, or updates. Cleveland
Range, LLC assumes no liability or
responsibility regarding errata, changes,
revisions, or updates.
Qualified Cleveland Range, LLC Authorized
Service Representatives are obligated to
follow industry standard safety procedures,
including, but not limited to, OSHA
regulations, and disconnect / lock out / tag
out procedures for all utilities including
steam, and disconnect / lock out / tag out
procedures for gas, electric, and steam
powered equipment and / or appliances.
All utilities (gas, electric, water and steam)
should be turned OFF to the equipment and
locked out of operation according to OSHA
approved practices during any servicing of
Cleveland Range equipment.
Qualified Cleveland Range, LLC Authorized
Service Representatives are obligated to
maintain up-to-date knowledge, skills,
materials, and equipment.
Ce document est destiné à l’usage des
Représentants de Service qualifiés et
autorisés de Cleveland Range, LLC qui
possèdent l’expérience et la formation ainsi
que la bonne connaissance des mesures de
sécurité et du matériel qu’ils entretiennent.
Cleveland Range, LLC décline toute
responsabilité pour tout cas de décès,
blessure, dommage matériel ou dommage
aux biens résultant de l'utilisation, de la
mauvaise utilisation ou du manquement
d’utilisation des renseignements contenus
dans ce document.
Cleveland Range, LLC s’est efforcé à fournir
des renseignements précis dans ce
document mais ne peut garantir que ce
document soit exempt d’erreurs et
d’omissions non intentionnelles.
Les renseignements contenus dans ce
document peuvent être assujettis à des
changements techniques et technologiques,
des révisions ou des mises à jour.
Cleveland Range, LLC décline toute
obligation ou responsabilité concernant les
errata, modifications, révisions ou mises à
jour.
Les Représentants de Service qualifiés et
autorisés de Cleveland Range, LLC sont
tenus de se conformer aux mesures de
sécurité normalisées de l’industrie, y
compris, mais sans s'y limiter, les
réglementations de l'OSHA, les procédures
de débranchement / verrouillage / étiquetage
relatives à tous les services publics, dont
l’approvisionnement en vapeur, et les
procédures de débranchement / verrouillage
/ étiquetage relatives aux équipements et/ou
appareils fonctionnant au gaz, à l’électricité
et à la vapeur.
Au cours de tout entretien d’un appareil
Cleveland Range, tous les services publics
(gaz, électricité, eau et vapeur) doivent être
FERMÉS au niveau de l’appareil et le
dispositif de fonctionnement doit être
verrouillé suivant les pratiques approuvées
de l’OSHA.
Les Représentants de Service qualifiés et
autorisés de Cleveland Range, LLC sont
tenus d’actualiser en permanence leurs
connaissances, compétences, matériel et
équipement.
Este documento está destinado para el uso
de los Representantes de Servicio
calificados y autorizados de Cleveland
Range, LLC quienes cuentan con la
experiencia y la capacitación, así como el
buen conocimiento de las medidas de
seguridad y de los equipos que mantienen.
Cleveland Range, LLC, declina toda
responsabilidad en caso de cualquier
fallecimiento, lesiones, daños al equipo o
daños a la propiedad resultantes de la
utilización, del uso indebido o de la falta de
utilización de la información provista en este
documento.
Cleveland Range, LLC se ha esforzado en
suministrar información precisa en este
documento, pero no puede garantizar que
este documento esté exento de errores y de
omisiones no intencionales.
La información contenida en este
documento podría estar sujeta a cambios
técnicos o tecnológicos, revisiones o
actualizaciones. Cleveland Range, LLC
declina toda obligación o responsabilidad
con respecto a erratas, modificaciones,
revisiones o actualizaciones.
Los Representantes de Servicio calificados
y autorizados de Cleveland Range, LLC
tienen la obligación de seguir los
procedimientos estándar de seguridad de la
industria; los cuales incluyen pero no se
limitan a los reglamentos de la OSHA (La
Administración de la Seguridad y Salud
Ocupacionales), los procedimientos de
desconexión, cierre y etiquetado relativos a
todos los servicios públicos incluyendo el
suministro de vapor y los procedimientos de
desconexión, cierre y etiquetado para los
equipos y/o aparatos que funcionan a base
de gas, electricidad o vapor.
Cuando se esté dando servicio o
mantenimiento a un aparato de Cleveland
Range, todos los servicios públicos (gas,
electricidad, agua y vapor) deben estar
APAGADOS para el equipo en cuestión y
se debe seguir el procedimiento de cierre
de operaciones de acuerdo con las
prácticas aprobadas por la OSHA.
Los Representantes de Servicio calificados
y autorizados de Cleveland Range, LLC
tienen la obligación de actualizar
constantemente sus conocimientos,
destrezas, materiales y equipamiento.

Cleveland Range Ltd.
8251 Keele Street
Concord, Ontario
L4K 1Z1
T 905 660 4747
www.clevelandrange.com
2
WARRANTY DISCLAIMER
Our Kettles, Mixers, Skillets, and Steamers are designed for commercial kitchen environments. To ensure
optimal performance, longevity, and safety, the following conditions must be maintained:
• Humidity & Moisture: The equipment is designed to operate within standard commercial kitchen
humidity levels of 40% to 65% relative humidity. Prolonged exposure to humidity levels exceeding
65% may compromise electrical components, cause condensation-related issues, and reduce
equipment lifespan. Proper ventilation is essential to maintaining safe conditions.
• Steam, Condensate & Water Exposure: While the equipment can withstand occasional water
splashes and steam exposure, direct and prolonged contact with high-pressure steam or continuous
water spray may cause damage and void the warranty. Effective ventilation is required to manage
steam buildup.
• Ambient Temperature: The recommended operating temperature range is 13°C (55°F) to 39°C
(102°F). Exposure to temperatures beyond this range may impact performance, lead to malfunctions, or
pose safety risks.
• Ventilation Requirements: Proper ventilation must be maintained to prevent excessive heat and
humidity buildup, which can lead to overheating, reduced efficiency, and premature wear. Gas-fired
equipment must only be installed under a ventilation hood in a room with adequate makeup air. Always
consult local regulations to ensure compliance with ventilation standards.
• Water Quality: Follow Cleveland Range's water quality guidelines to ensure optimal equipment
performance. Softening hard water reduces deposits, and filtration removes corrosive elements.
Regular descaling, as recommended, prevents scale buildup. Consult a water treatment specialist and
follow local regulations for proper management.
• Installation and Preventive Maintenance: Follow Cleveland Range's installation and preventive
maintenance guidelines to ensure proper functioning and longevity of the units. Regular upkeep
prevents issues and ensures optimal performance. Failure to follow the schedule may lead to reduced
efficiency and breakdowns.
• Drainage System: Failure to follow Cleveland Range specifications may result in damage. Do not
place a drain beneath the unit, as excessive moisture can shorten the lifespan of electrical and gas
components, leading to potential malfunctions or hazards.
Failure to adhere to these conditions may result in decreased efficiency, equipment damage, or safety hazards
and may void the manufacturer’s warranty

3
FOR YOUR SAFETY / POUR VOTRE SÉCURITÉ /
PARA SU SEGURIDAD
FOR YOUR SAFETY
Do not store or use gasoline or any
other flammable liquids and vapours
in the vicinity of this or any other
appliance.
POUR VOTRE SÉCURITÉ
Ne pas entreposer ou utiliser
d'essence ou d'autres liquides ou
vapeurs inflammables à proximité
de cet appareil ou de tout autre
appareil.
PARA SU SEGURIDAD
No guarde ni use gasolina o
cualesquiera otros líquidos o
vapores inflamables en las
cercanías de éste o cualquier
otro aparato.
WARNING: Improper installation,
operation, adjustment, alteration,
service, or maintenance can cause
property damage, injury or death.
Read the installation and operating
instructions thoroughly before
installing, operating, or servicing
this equipment.
AVERTISSEMENT : Toute mauvaise
pratique en matière d’installation, de
fonctionnement, de réglage, de
modification, d’entretien ou de
maintenance peut causer des
dommages matériels, des blessures
ou la mort. Lisez la totalité des
instructions d’installation et
d’utilisation avant d’installer,
d’utiliser ou d’entretenir cet
équipement.
ADVERTENCIA: La indebida
instalación, operación, ajuste,
modificación, servicio o
mantenimiento puede ocasionar
daños a la propiedad, lesiones o
muerte. Lea detenidamente las
instrucciones de instalación y de
operación antes de instalar,
poner a funcionar o dar servicio a
este equipo.
Do not spray aerosols in the vicinity of
this appliance while it is in operation.
This appliance is not to be used by
persons with reduced physical,
sensory, or mental capabilities, or lack
of experience and knowledge, unless
they have been given supervision or
instruction concerning use of the
appliance by a person responsible for
their safety.
This appliance is not for use by
children, and they must be supervised
not to play with it.
Retain this manual for your reference.
Ne pas pulvériser des aérosols dans le
voisinage de cet appareil alors qu'il est
en fonctionnement.
Cet appareil ne doit pas être utilisé par
des personnes dont les capacités
physiques, sensorielles ou mentales
sont réduites, ou des personnes
dénuées d'expérience ou de
connaissance, sauf si elles ont pu
bénéficier, par l'intermédiaire d'une
personne responsable de leur sécurité,
d'une surveillance ou d'instructions
préalables concernant l'utilisation de
l'appareil.
Conservez ce manuel pour votre
référence.
No pulverice aerosoles en las
proximidades de este aparato
mientras está en funcionamiento.
Este aparato no debe ser utilizado
por personas con capacidades
físicas, sensoriales o mentales
reducidas, o que no tengan la
experiencia y los conocimientos
adecuados, a menos que estas
personas hayan recibido
supervisión e instrucciones en
cuanto al uso del aparato por la
persona responsable de la
seguridad de ellas.
Guarde este manual para su
referencia.
4
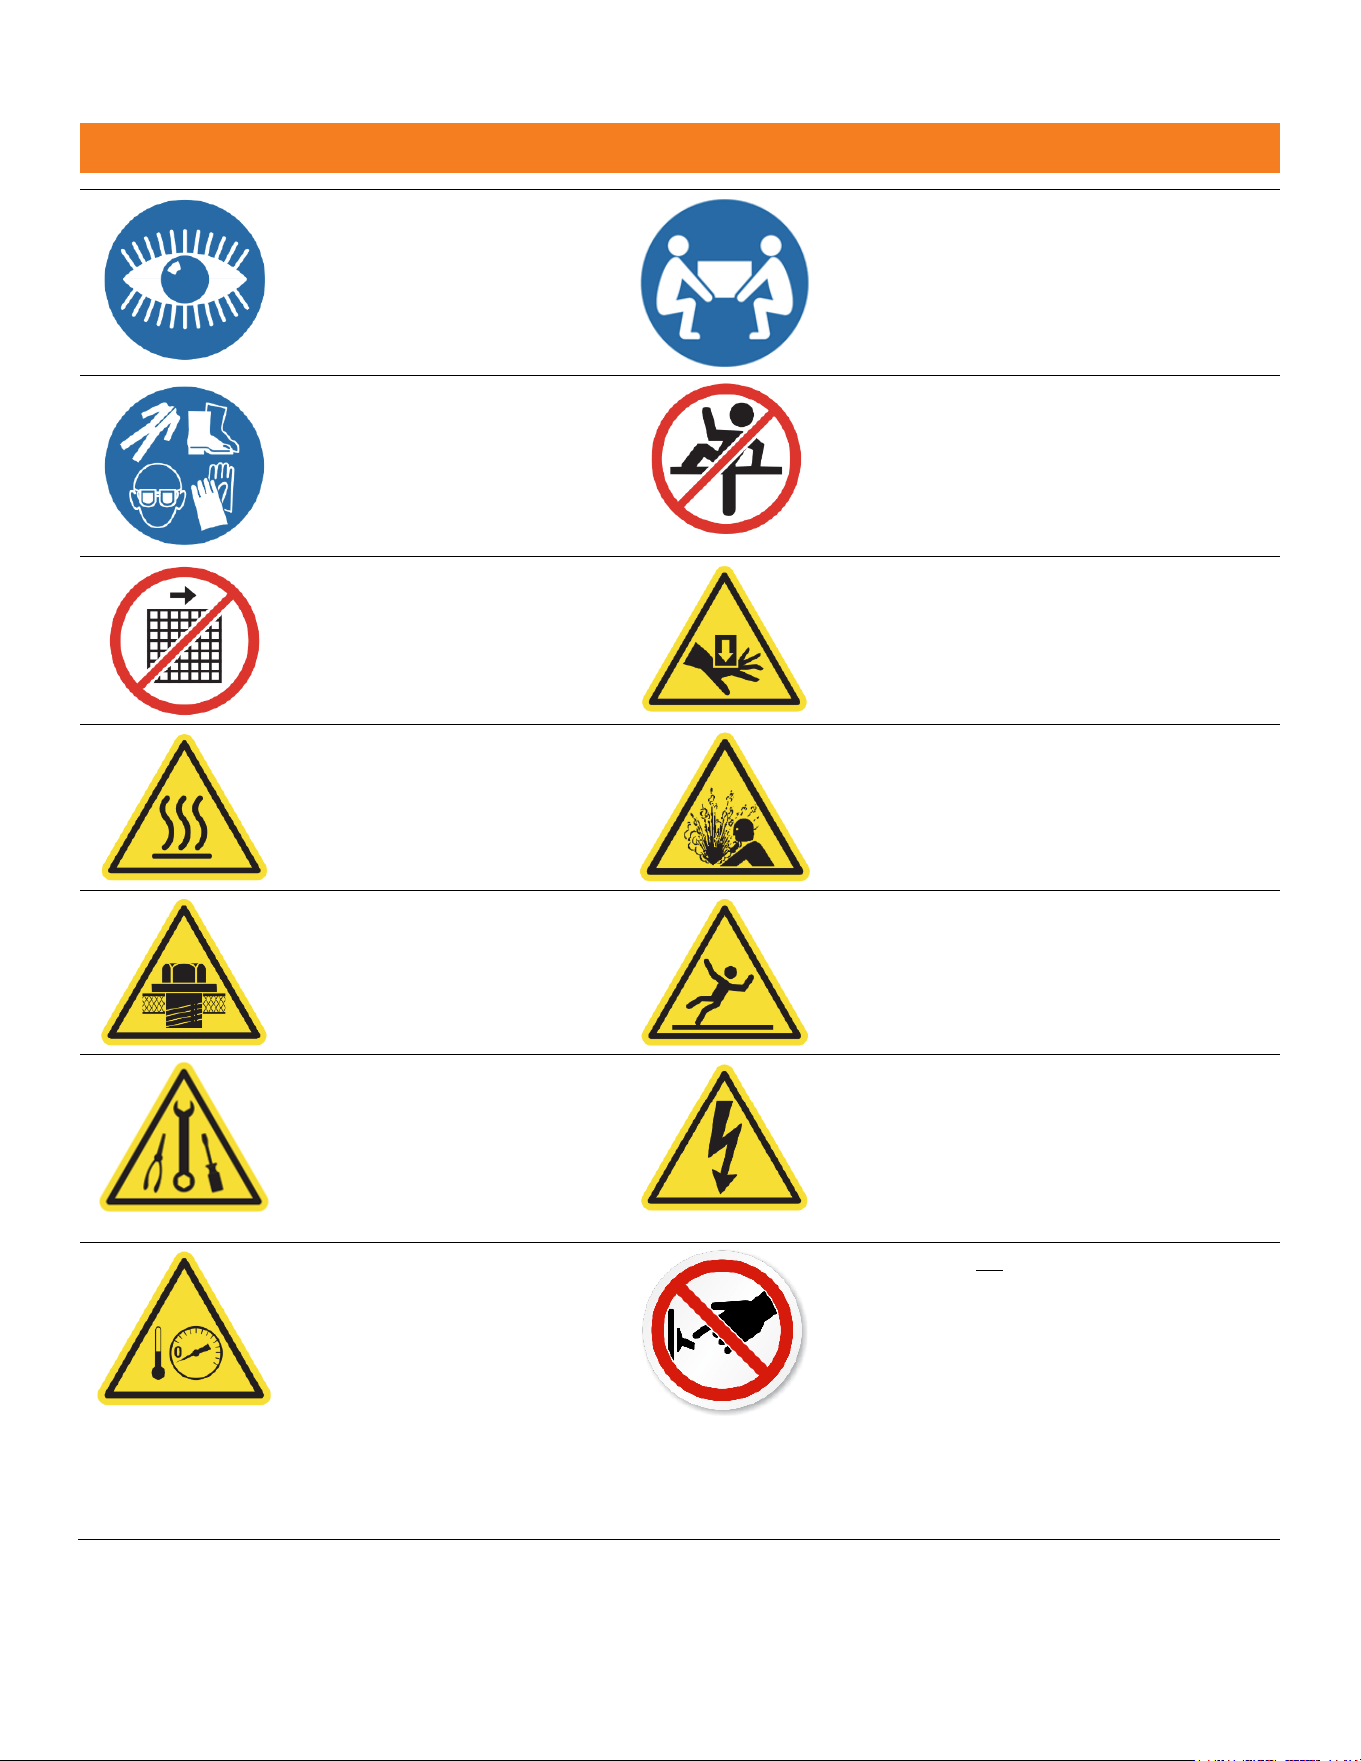
WARNING / AVERTISSEMENT / ADVERTENCIA
Inspect unit daily for proper
operation. / Inspecter le bloc
quotidiennement pour garantir le
fonctionnement normal. /
Inspeccione diariamente el
funcionamiento correcto de la
unidad.
Heavy. / Lourd. / Pesado.
Team or mechanical lift. / Levage en équipe ou
mécanique. / Levantamiento en equipo o
mecánico.
Surfaces may be extremely hot! Use
protective equipment. / Les surfaces
peuvent être extrêmement chaudes
! Utiliser des équipements de
protection. / ¡Las superficies pueden
estar muy calientes! Utilice equipo
protector.
Do not climb, sit, or stand on equipment. / Il ne
faut pas monter, s'asseoir ni se tenir debout sur
l'équipement. / No subirse, ni sentarse ni pararse
sobre el equipo.
Do not remove guards or operate
without them. / Ne pas supprimer les
gardes ou fonctionner sans eux. /
No retire los guardias ni funcionar
sin ellos.
Keep hands away from moving parts and pinch
points. / Tenir les mains à l’abri des pièces
mobiles et des angles. / Mantenga las manos lejos
de las piezas movibles y los puntos de presión.
Hot product and surfaces. / Produit
et surfaces chaudes. / Producto y
superficies calientes.
Do not touch. / Ne pas toucher. / No
la toque.
Keep clear of pressure discharge. / Se tenir hors
de portée de la purge des soupapes de
surpression. / Manténgase alejado de la descarga
de presión.
Unit must be anchored as per
manual. / Unité doit être ancrée
selon les directives du manuel. /
Unidad debe estar fijado según el
manual.
Floor may become slippery from product spillage. /
Déversement de produit peut causer de plancher à
être glissante. / Derrame de producto puede
causar piso a ser resbaladizo.
Have a qualified service technician
maintain your equipment. /
Demandez à un technicien en
entretien et en réparation qualifié
d’effectuer l’entretien de votre
équipement. / Haga que un técnico
de servicio calificado mantenga su
equipo.
Shut off power at main fuse disconnect prior to
servicing. / Couper l’alimentation sur le principal
fusible sectionneur avant l‘entretien. / Apague la
alimentación eléctrica en el fusible desconectador
principal antes de darle servicio.
Ensure equipment is at room
temperature and pressure gauge is
showing zero or less prior to
removing any fittings. / S’assurer
que le chaudron se trouve dans une
température ambiante et que le
manomètre affiche zéro ou moins
avant de déposer les raccords. /
Asegúrese de que la marmita está a
temperatura ambiente y el
manómetro está mostrando cero o
menos antes de quitar cualquier
accesorio.
Appliance must not be supplied through an
external switching device that is regularly switched
on and off. / L'appareil ne doit pas être alimenté
par un interrupteur externe régulièrement allumé
et éteint. / El aparato no debe ser alimentado a
través de un dispositivo de conmutación externo
que se encienda y apague periódicamente.

5
OPERATION, INSTALLATION & MAINTENANCE MANUAL STEAMCHEF MODELS
22CET6.2
Table of Contents
CHAPTER 1 GENERAL INFORMATION ............................................................................................. 6
A. Laws, Codes, and Regulations ...................................................................................................... 6
B. Operational Safety ......................................................................................................................... 6
C.Inspection for Shipping Damage .................................................................................................... 6
CHAPTER 2 PRODUCT INFORMATION ............................................................................................ 7
A. Product Information................................................................................................................... 7
B. Model Numbers and Serial Numbers ........................................................................................ 7
C. Product Information Plate.......................................................................................................... 7
D. Product Views ........................................................................................................................... 7
CHAPTER 3 INSTALLATION PROCEDURE ..................................................................................... 10
A. Select a Location .................................................................................................................... 10
B. Installation of a SteamChef 22CET6.2 .................................................................................... 10
C. Install the Legs ........................................................................................................................ 11
D. Position and Level .................................................................................................................. 11
E. Install the KleanShield
TM
......................................................................................................... 12
F. Install the Fan Guard and Air Diverter ..................................................................................... 12
G. Install the Slide Racks ............................................................................................................. 13
H. Install the Slide Racks ............................................................................................................. 13
I. Connect the Free Air Vented Drain Line ................................................................................. 13
J. Water Supply Requirements and Installation........................................................................... 15
K. Electric Power Supply ............................................................................................................. 16
L. Installation Checklist ............................................................................................................... 18
CHAPTER 4 COOKING WITH THE SteamChef .................................................................................. 19
A. Cooking Procedure: ................................................................................................................ 19
B. Rethermalization: .................................................................................................................... 20
CHAPTER 5 EASY TOUCH OPERATING INSTRUCTIONS ................................................................. 21
A. Main External Power Switch ................................................................................................... 22
B. Inspect the Cooking Compartment .......................................................................................... 22
C. Power ON (Auto Water Fill / Automatic Preheat) ..................................................................... 22
D. Preheat Steamer ..................................................................................................................... 25
E. High Limit Reset ..................................................................................................................... 25
CHAPTER 6 SHUTDOWN AND CLEANING PROCEDURE ................................................................. 27
CHAPTER 7 OPERATING TESTS AND FINAL CHECKOUT PROCEDURES ................................... 29
A. Startup Procedure ................................................................................................................... 29
B. Drain Rinse Inspection (continue from Startup Procedure)...................................................... 29
C. Operating Tests and Final Checkout Procedure (Continue from Drain Rinse Inspection) ........ 29
D. Shutdown (Continue from Operating Tests and Final Checkout Procedure) ........................... 31
CHAPTER 8 PREVENTIVE MAINTENANCE ..................................................................................... 32
A. Maintenance ........................................................................................................................... 32
B. Descaling Water Reservoir ..................................................................................................... 33
CHAPTER 9 TROUBLESHOOTING GUIDE ....................................................................................... 35

6
CHAPTER 1 GENERAL INFORMATION
A. Laws, Codes, and Regulations
This equipment should be installed only by qualified, professional plumbers, pipe fitters, and electricians.
1. The installation of this appliance must conform with:
a) The National Electrical Code, ANSI/NFPA 70 (latest edition), or the Canadian Electrical Code, CSA C22.2,
or local codes, as applicable.
• When installed, the appliance must be electrically grounded in accordance with the above.
• NOTE: This appliance is not GFI (GFCI) compatible.
b) The Food Code (latest edition) of the Food and Drug Administration (FDA).
2. This equipment is to be installed to comply with the applicable federal, state, or local plumbing codes.
3. Installation instructions must be read in their entirety before starting installation of this appliance.
4. Install this appliance according to the policies and procedures outlined in this manual.
5. Installation must comply with all local fire and health codes.
⚠ DANGER
Improper installation, adjustment, alteration, service, or maintenance of this appliance, or installation of a
damaged appliance can result in DEATH, INJURY, EQUIPMENT DAMAGE, and void the warranty.
NEVER install damaged appliances, equipment, or accessories.
ALWAYS have installation and service performed by qualified Cleveland Range authorized personnel.
B. Operational Safety
The Operational Safety section outlines minimum safety policies and procedures for operating one or more
Cleveland Range appliances.
1. Do not store anything on top and underneath the appliance.
2. KEEP THE APPLIANCE AREA FREE AND CLEAR OF COMBUSTIBLES.
3. Proper air supply for ventilation is REQUIRED for and CRITICAL to safe, efficient operation of this appliance.
4. Place non-slip draining anti-fatigue mats rated for use in wet, greasy, or dry work areas on the floor in front of
the appliance and other locations as needed. Obtain the best mats for your needs from your local supplier.
5. Wear BOOTS appropriate to the work area to help protect feet, and to help prevent slips and falls.
6. Allow only qualified Cleveland Range authorized service representatives to service the appliance.
7. Use only factory authorized repair parts.
8. Maintain written records of appliance service, maintenance, and repair. See Chapter 8.
⚠ DANGER
Operating this appliance out of level can cause DEATH, INJURY, and EQUIPMENT DAMAGE.
This appliance must be level both front-to-back and side-to-side in all installations.
NEVER operate this appliance out of level.
If this appliance is suspected to be out of level, shut it down at once and call your qualified Cleveland Range
authorized service agency immediately.
C. Inspection for Shipping Damage
If the appliance is damaged or damage is suspected:
1. Submit a Damage Claim to the shipper and inform your dealer immediately.
2. Inform Cleveland Range in writing within three (3) days.
7
CHAPTER 2 PRODUCT INFORMATION
A. Product Information
• This manual covers the operation of 22CET6.2 SteamChef Steam Cookers (steamers), and their
standard features and options.
• Other than selection of options, there are presently no significant design, parts, or operating
differences among appliances with these model numbers.
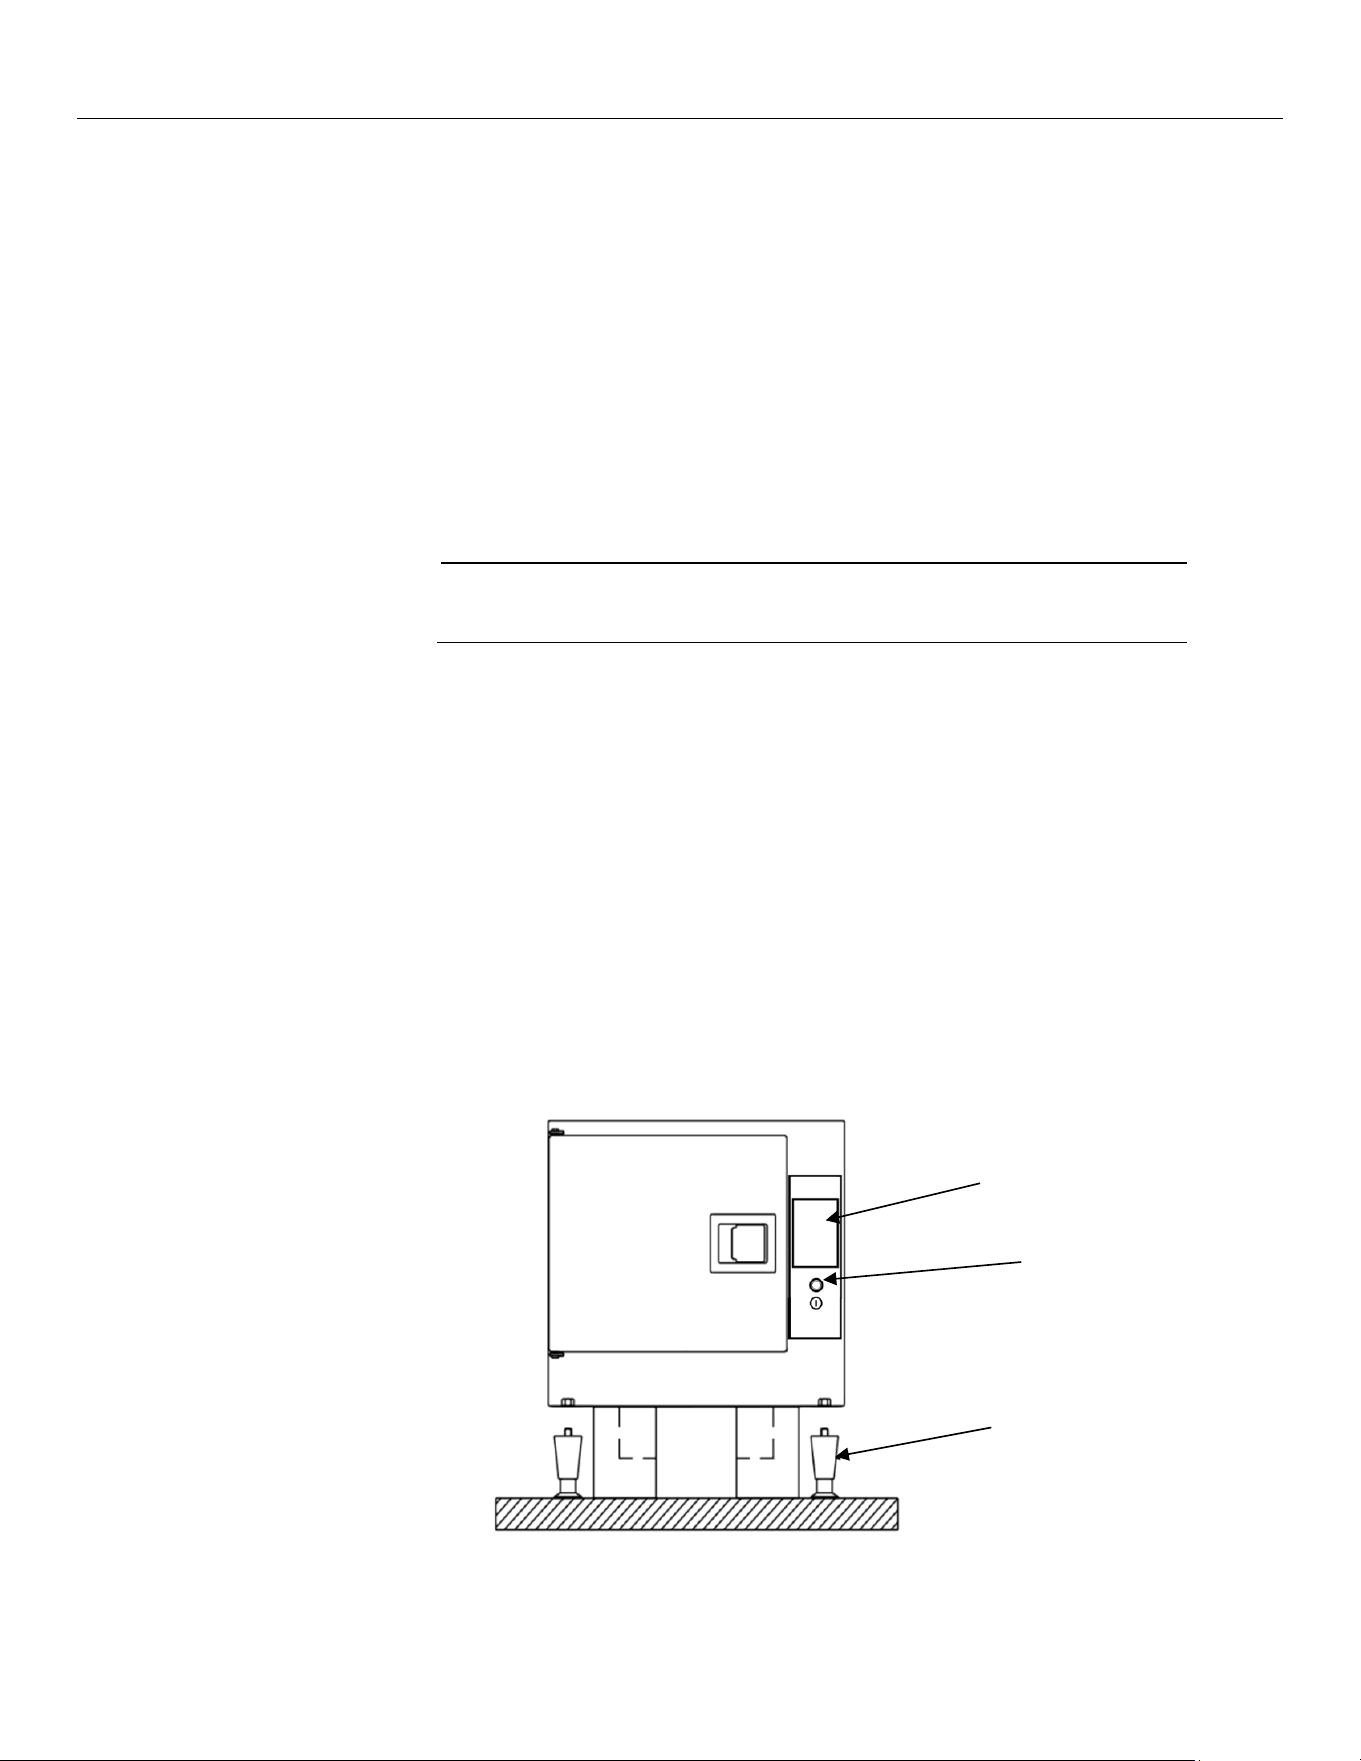
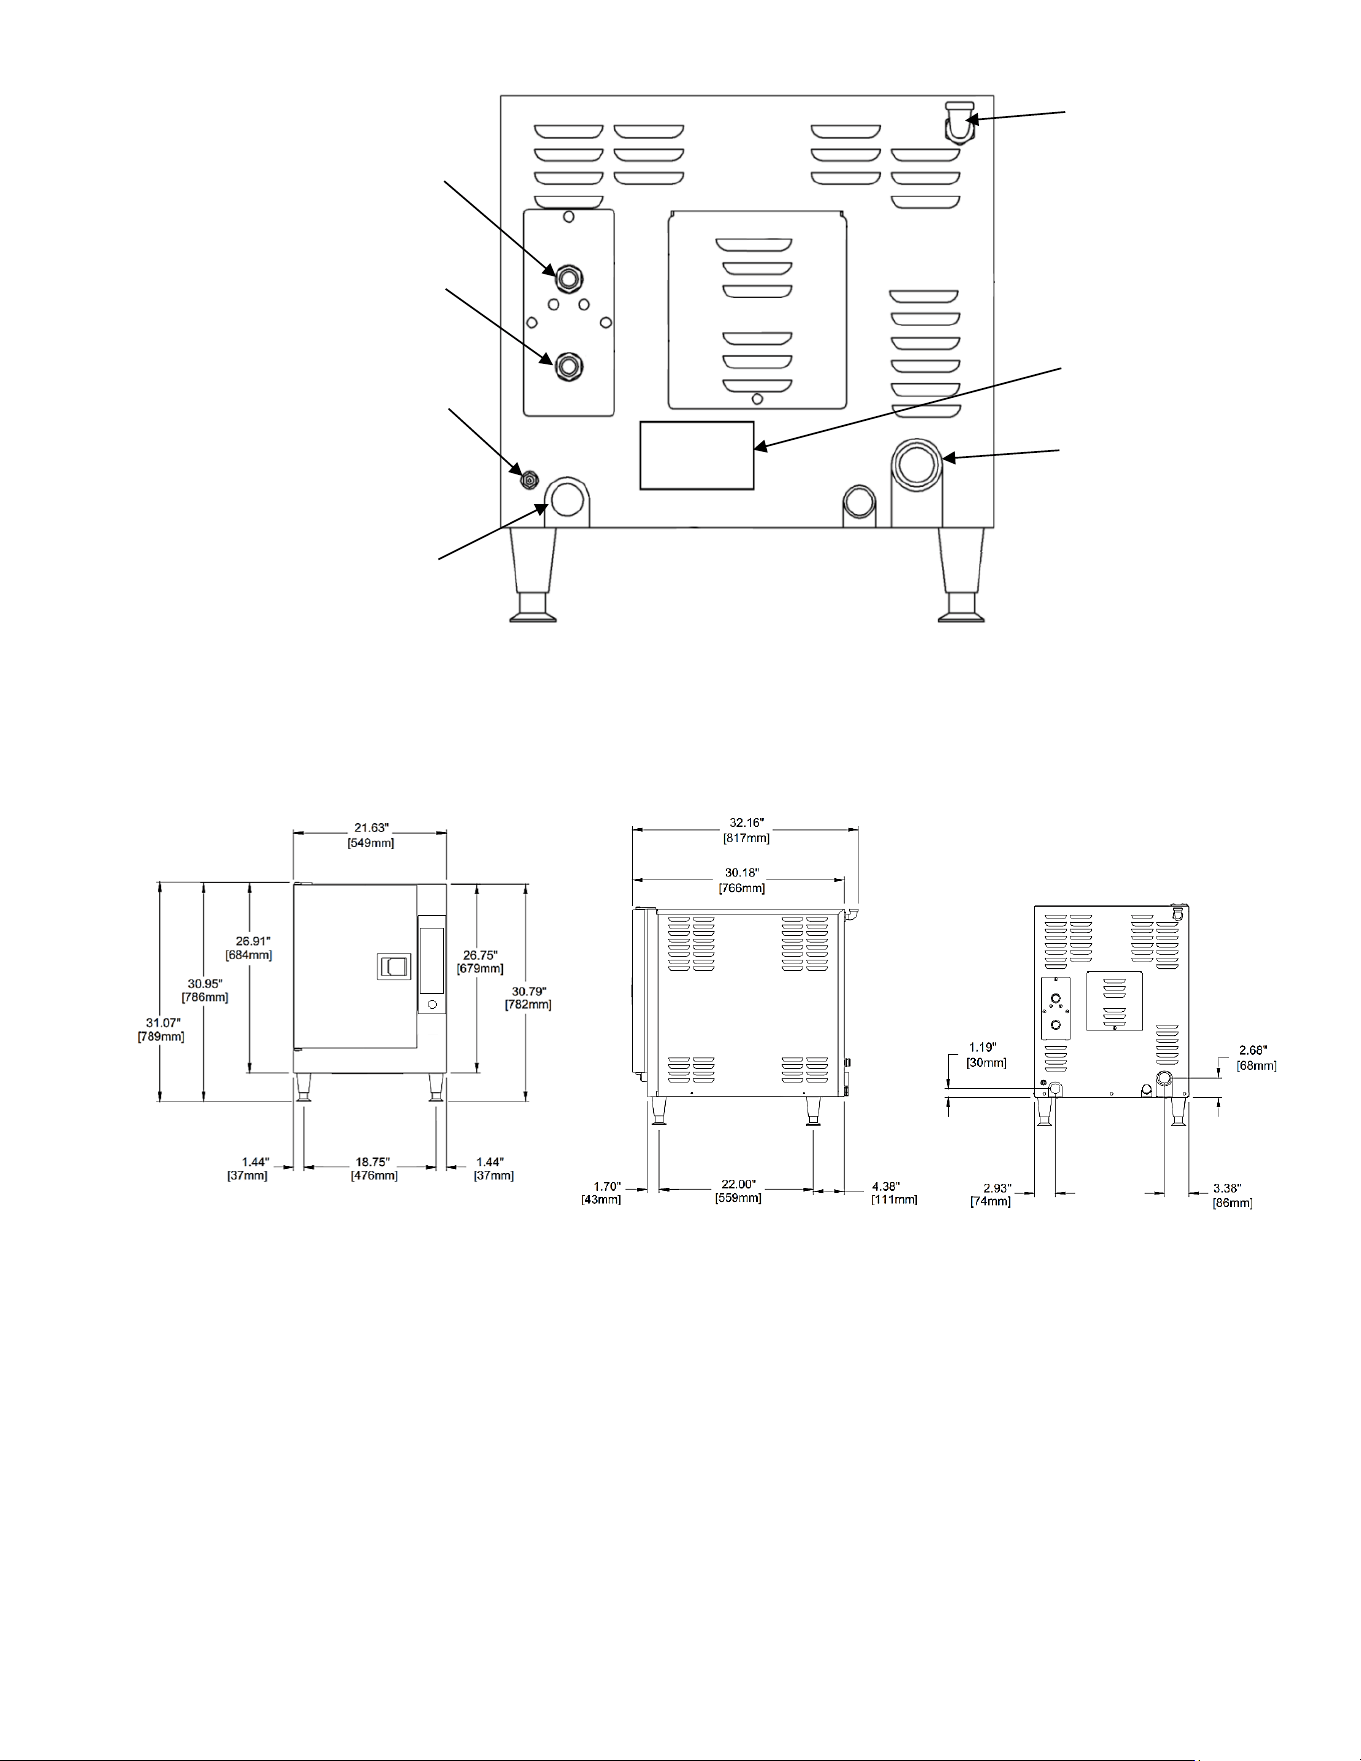
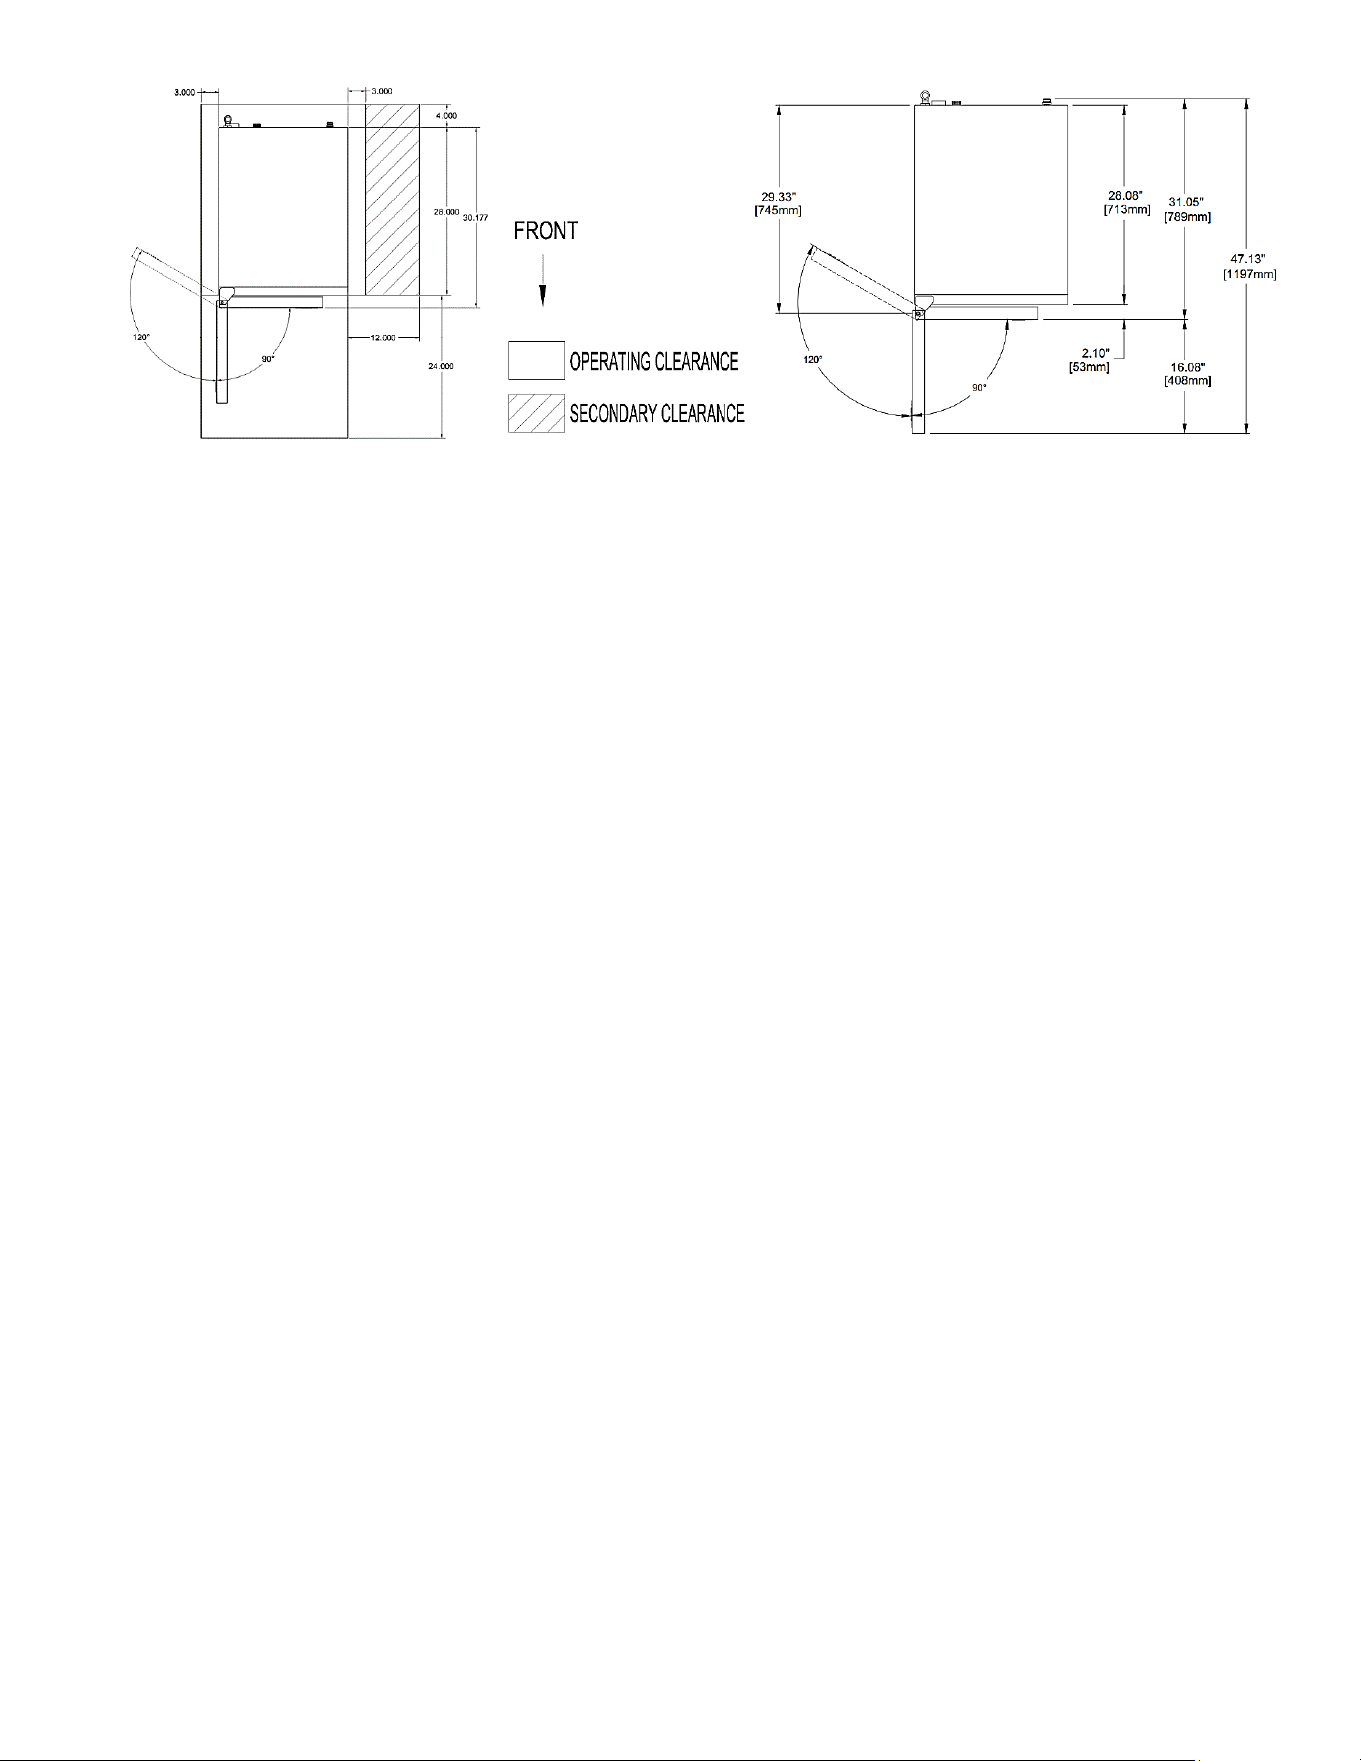
• Figures 2-1, 2-2, and 2-3 illustrate the dimensions, clearances, and major external features of
22CET
B. Model Numbers and Serial Numbers
1. Cleveland Range, LLC assigns two product identification numbers to each appliance: a model
number and a serial number.
2. Please provide this information when you contact Cleveland Range or a qualified Cleveland
Range authorized service representative:
•
Model Number
(Write the Model Number of your appliance here)
•
Serial Number
(Write the Serial Number of your appliance here)
C. Product Information Plate
The Product Information Plate on the back of the appliance lists:
• Model
• Serial Number
• Power and Wiring Requirements
D. Product Views
ON/OFF Push Button Switch
• When the power switch is pressed inward, the unit will turn ON, indicated by the "I" symbol and a green LED
light surrounding the power switch
• When the power switch is pressed again, it will spring back out, turning the unit completely OFF, as indicated
by the “O” symbol.
Figure 2-1 SteamChef
TM
Electric Steam Cooker Front View
(Model 22CET6.2 Shown)
Easy Touch
Control Screen
ON/OFF Push
Button Switch
Adjustable Legs
8
Figure 2-2 SteamChef
TM
Electric Steam Cooker Rear View
Figure 2-3 SteamChef
TM
Electric Steam Cooker - Front-, Right- and Rear-View Dimensions
Vent
Product
Information Plate
Drain Outlet
Opening for Electrical
Conduit Connection
Water Fill Connection
Condenser Connection
Circuit Breaker Reset
Button
9
Figure 2-3 SteamChef
TM
Electric Top-View Dimensions and Clearances

10
CHAPTER 3 INSTALLATION PROCEDURE
⚠ DANGER
Operating this appliance out of level can cause DEATH, INJURY, and EQUIPMENT DAMAGE. This appliance
must be level both front-to-back and side-to-side in all installations.
NEVER operate this appliance out of level.
If this appliance is suspected to be out of level, shut it down at once and call your qualified Cleveland Range
authorized service agency immediately.
A. Select a Location
For safe and efficient operation:
1. Installation must comply with all local fire and health codes.
2. The location selected must be capable of supporting this appliance.
• The operating weight of 22CET6.2 is 350 pounds.
3. Position the appliance so it will not tip or slide.
4. The operating surface must be level enough to allow leveling with the adjustable legs. This appliance MUST
be level both front to back and side to side before operation.
5. A suitable drain must be available within 12 feet of this appliance. Do NOT install the appliance directly over a
drain.
6. The location must include space for Operating and Service/Secondary Clearances and the Vent. See Figures
2-3.
⚠ WARNING
All clearance requirements above, below, and around this appliance are the same for non-combustible
locations as for combustible locations.
Failure to maintain required clearances and additional distances as needed can result in INJURY and
EQUIPMENT DAMAGE.
Consult manufacturers’ literature, and sales and service agencies as needed.
7. KEEP THE APPLIANCE AREA FREE AND CLEAR OF COMBUSTIBLES.
8. Proper air supply for ventilation is REQUIRED for and CRITICAL to safe, efficient operation of this appliance.
9. Make sure the air vents of this appliance are not blocked with or by anything.
10. Allow for sufficient extra distance if a "high heat source," e.g., a broiler, is located next to this appliance.
Contact Cleveland Range for recommendations.
11. Do NOT install this appliance directly over a drain. Steam rising out of the drain will adversely affect
operation, hamper cooling air circulation, and damage electrical and electronic components.
B. Installation of a SteamChef 22CET6.2
⚠ DANGER
Improper lifting can cause DEATH, INJURY, and EQUIPMENT DAMAGE.
Use enough workers with experience to lift heavy equipment to place the appliance on the supporting surface.
1. 22CET’s are typically installed with four adjustable legs.
2. The appliance must be level both front-to-back and side-to-side.
3. The operating surface must be level enough to allow leveling of the appliance using the adjustable legs of the
appliance or the stand.
11
4. The counter area selected must be capable of supporting an operating weight of:
• 350 pounds for a SteamChef 6.2.
5. If a satisfactory counter location is not available, use an equipment stand:
• UNISTAND 34 for one 22CET6.2.
• Model No. ES263044 Stacking Stand for two 22CET6.2’s, one on top of the other.
⚠ WARNING
Attempting to operate an improperly installed or out of level steamer or shifting the steamer while
operating can cause injury and equipment damage.
Do NOT shift or move the steamer while it is operating.
Do NOT operate an improperly installed steamer. Use enough workers with experience lifting heavy
equipment to place the appliance on the supporting surface.
C. Install the Legs
1. The legs must be used unless the 22CET is installed on a Cleveland Range stand.
2. To safely assemble the legs onto the 22CET without damage, follow this procedure:
a) Check that the feet are fully retracted into the legs. Do not tighten. The feet should easily screw in and out
using fingers only.
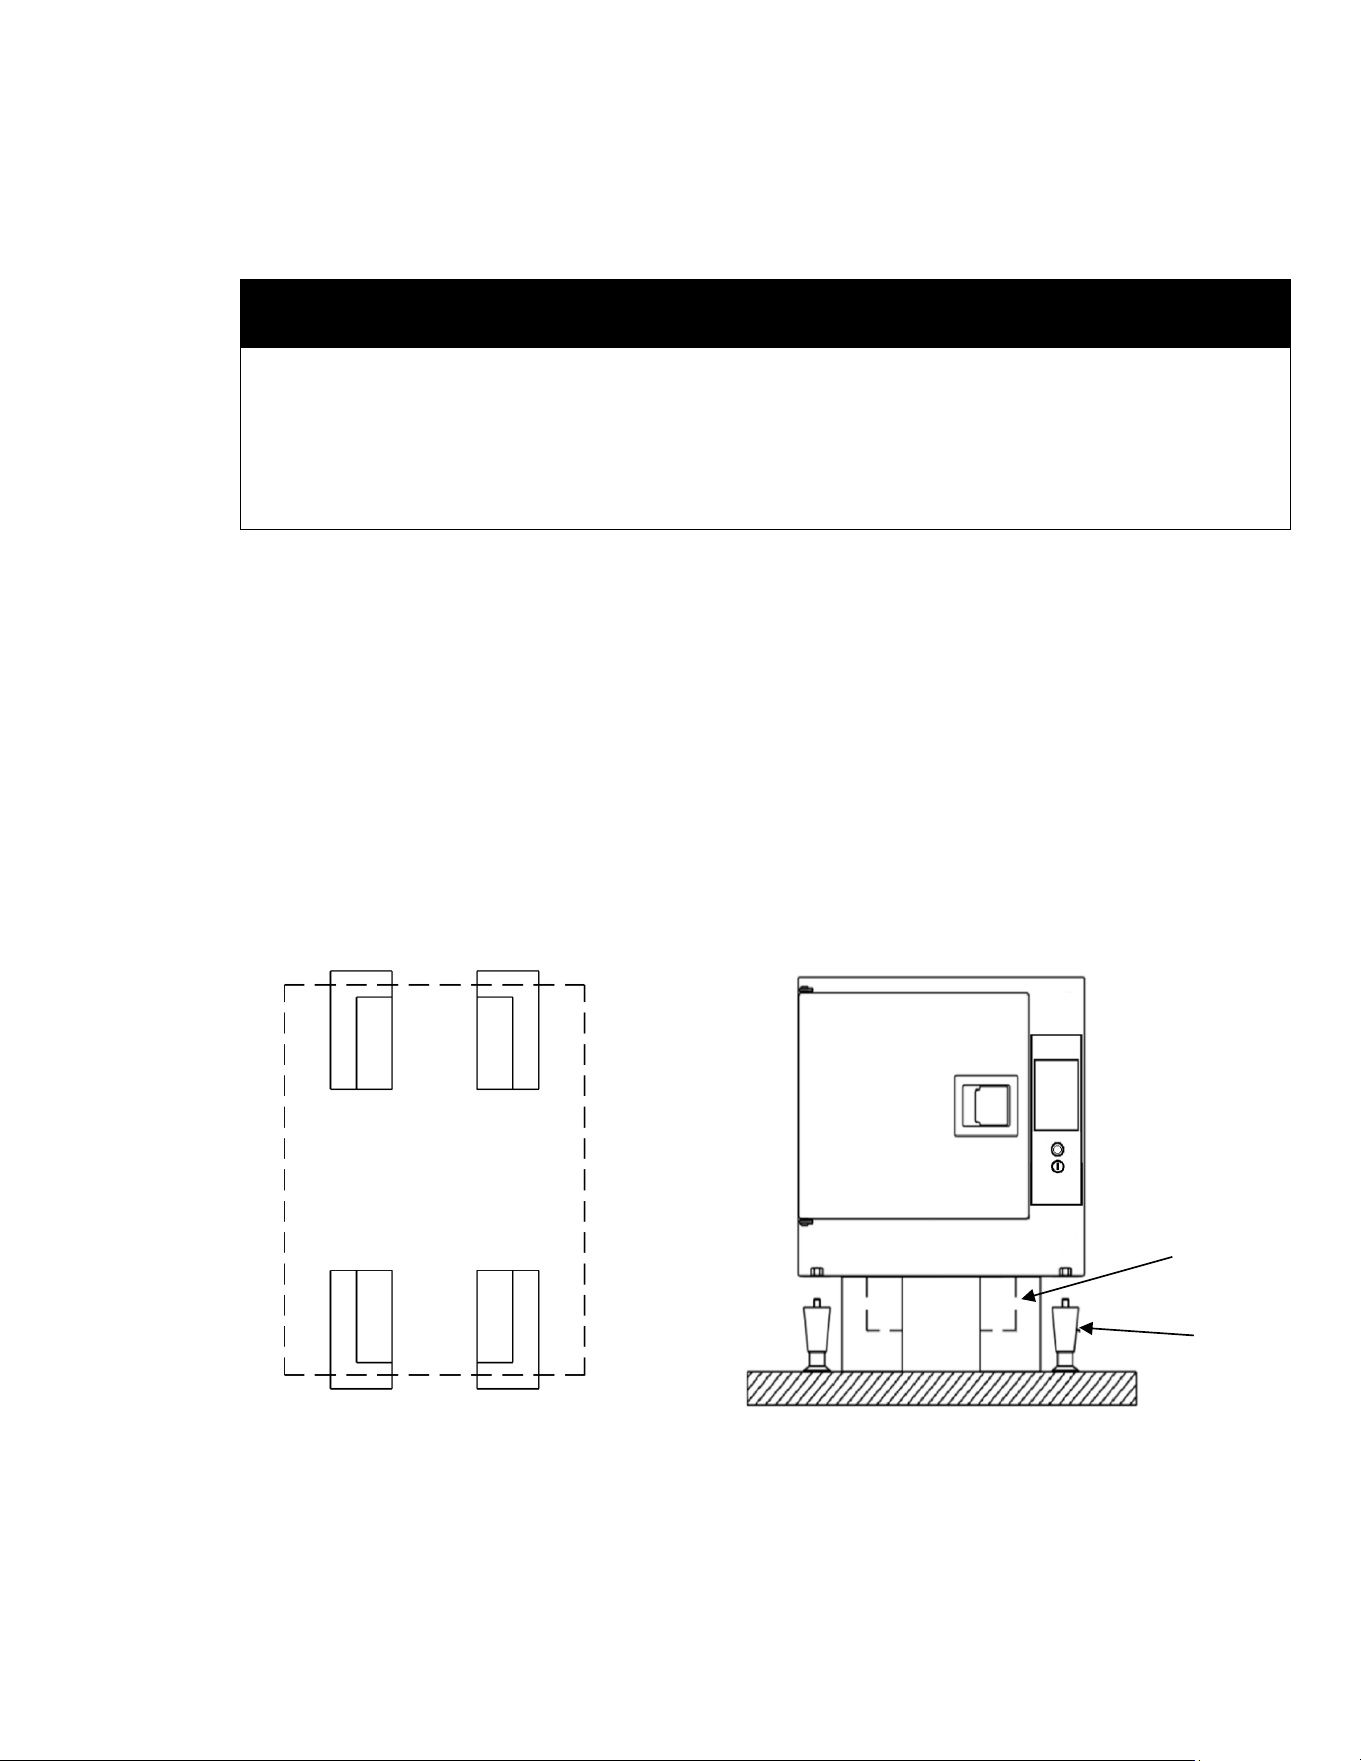
b) Remove the four foam packing blocks from the upper packing assembly and position them on a flat
surface (e.g., the floor) as shown in Figure 3-1.
c) Center the steamer on the blocks as shown in Figure 3-1 and 3-2.
d) Screw the four legs into the mounting holes. All four legs must be used for proper installation of a 22CET.
e) Lift the 22CET off the blocks and move it to its installed location.
f) Discard the foam packing blocks.
Figure 3-1 Top View Steamer
on Foam Blocks
Figure 3-2 Front View Steamer
on Foam Blocks
D. Position and Level
1. Move the 22CET to its installed location.
2. Using a level, adjust the legs of the 22CET or the legs of the Cleveland Range stand until the 22CET is level
front-to-back and side-to-side.
Leg
Foam
Block
12
E. Install the KleanShield
TM
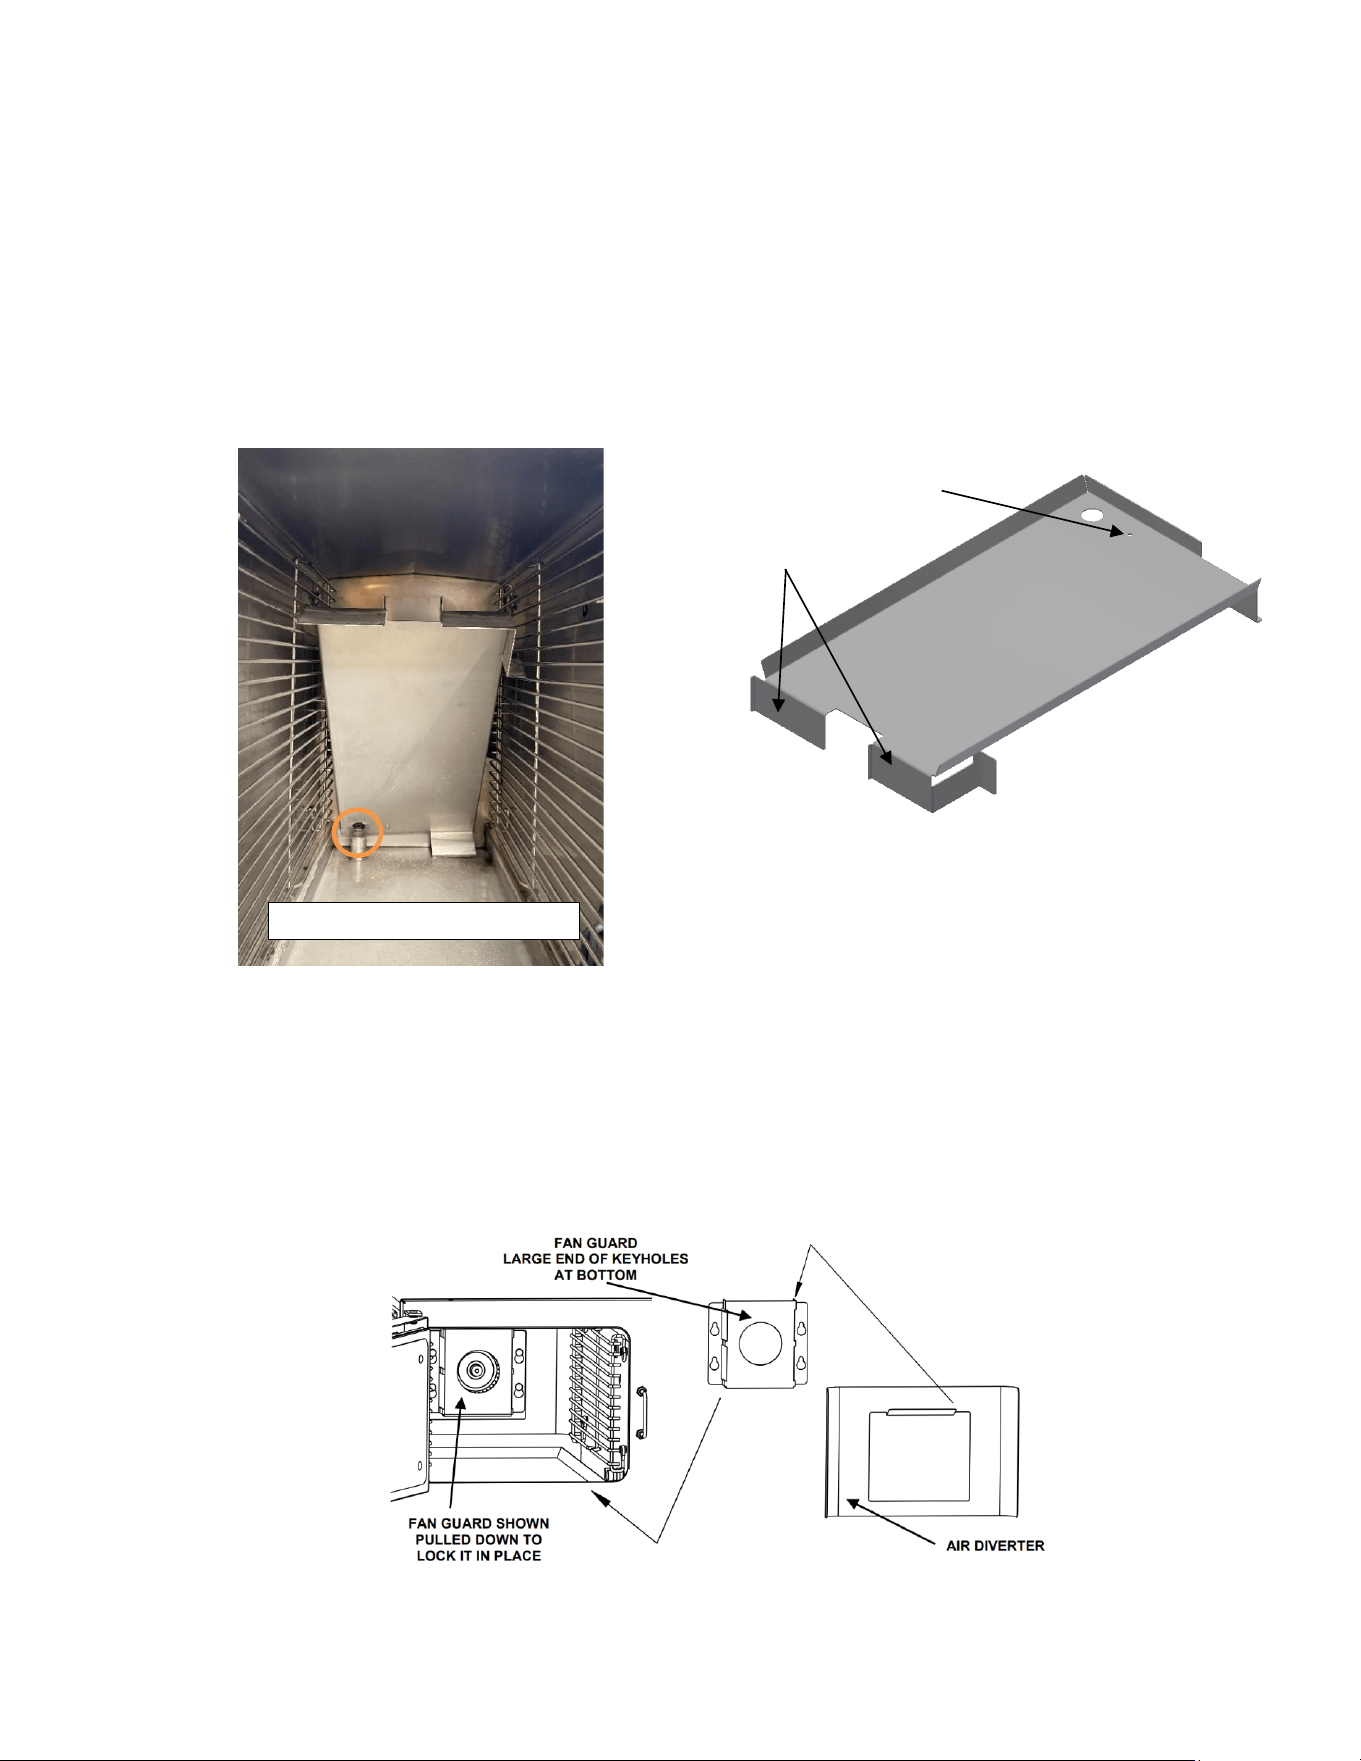
1. Never operate a SteamChef Steamer without a properly installed KleanShield
TM
.
2. To install the KleanShield
TM
:
a) Remove the slide pan racks.
b) Place the KleanShield
TM
into the steamer with the drain to the back of the cooking compartment and the
pipe extension facing down.
c) Set the KleanShield
TM
in place over the corresponding pipe extending out of the bottom of the steamer
reservoir. See Figure 3-3.
d) Fit the pipe from the KleanShield
TM
into the corresponding pipe in the bottom of the steamer.
e) KleanShield
TM
legs must be flush against the bottom of the steamer. See Figure 3-4.
Figure 3-3 KleanShield
TM
Installation
Figure 3-4 KleanShield
TM
F. Install the Fan Guard and Air Diverter
1. Hold the fan guard so that the large ends of the keyhole slots are towards the bottom of the steamer.
2. Place all four large end openings of the keyholes over the mounts located on the rear wall of the steamer.
3. Pull it down so that the narrow ends of the slots are pulled tight over the mounts. See Figure 3-5.
4. Place the air diverter onto the fan guard as shown.
Figure 3-5 Fan Guard Installation
Legs
Drain
FIT UP OF KLEINSHIELD™ PIPE
13
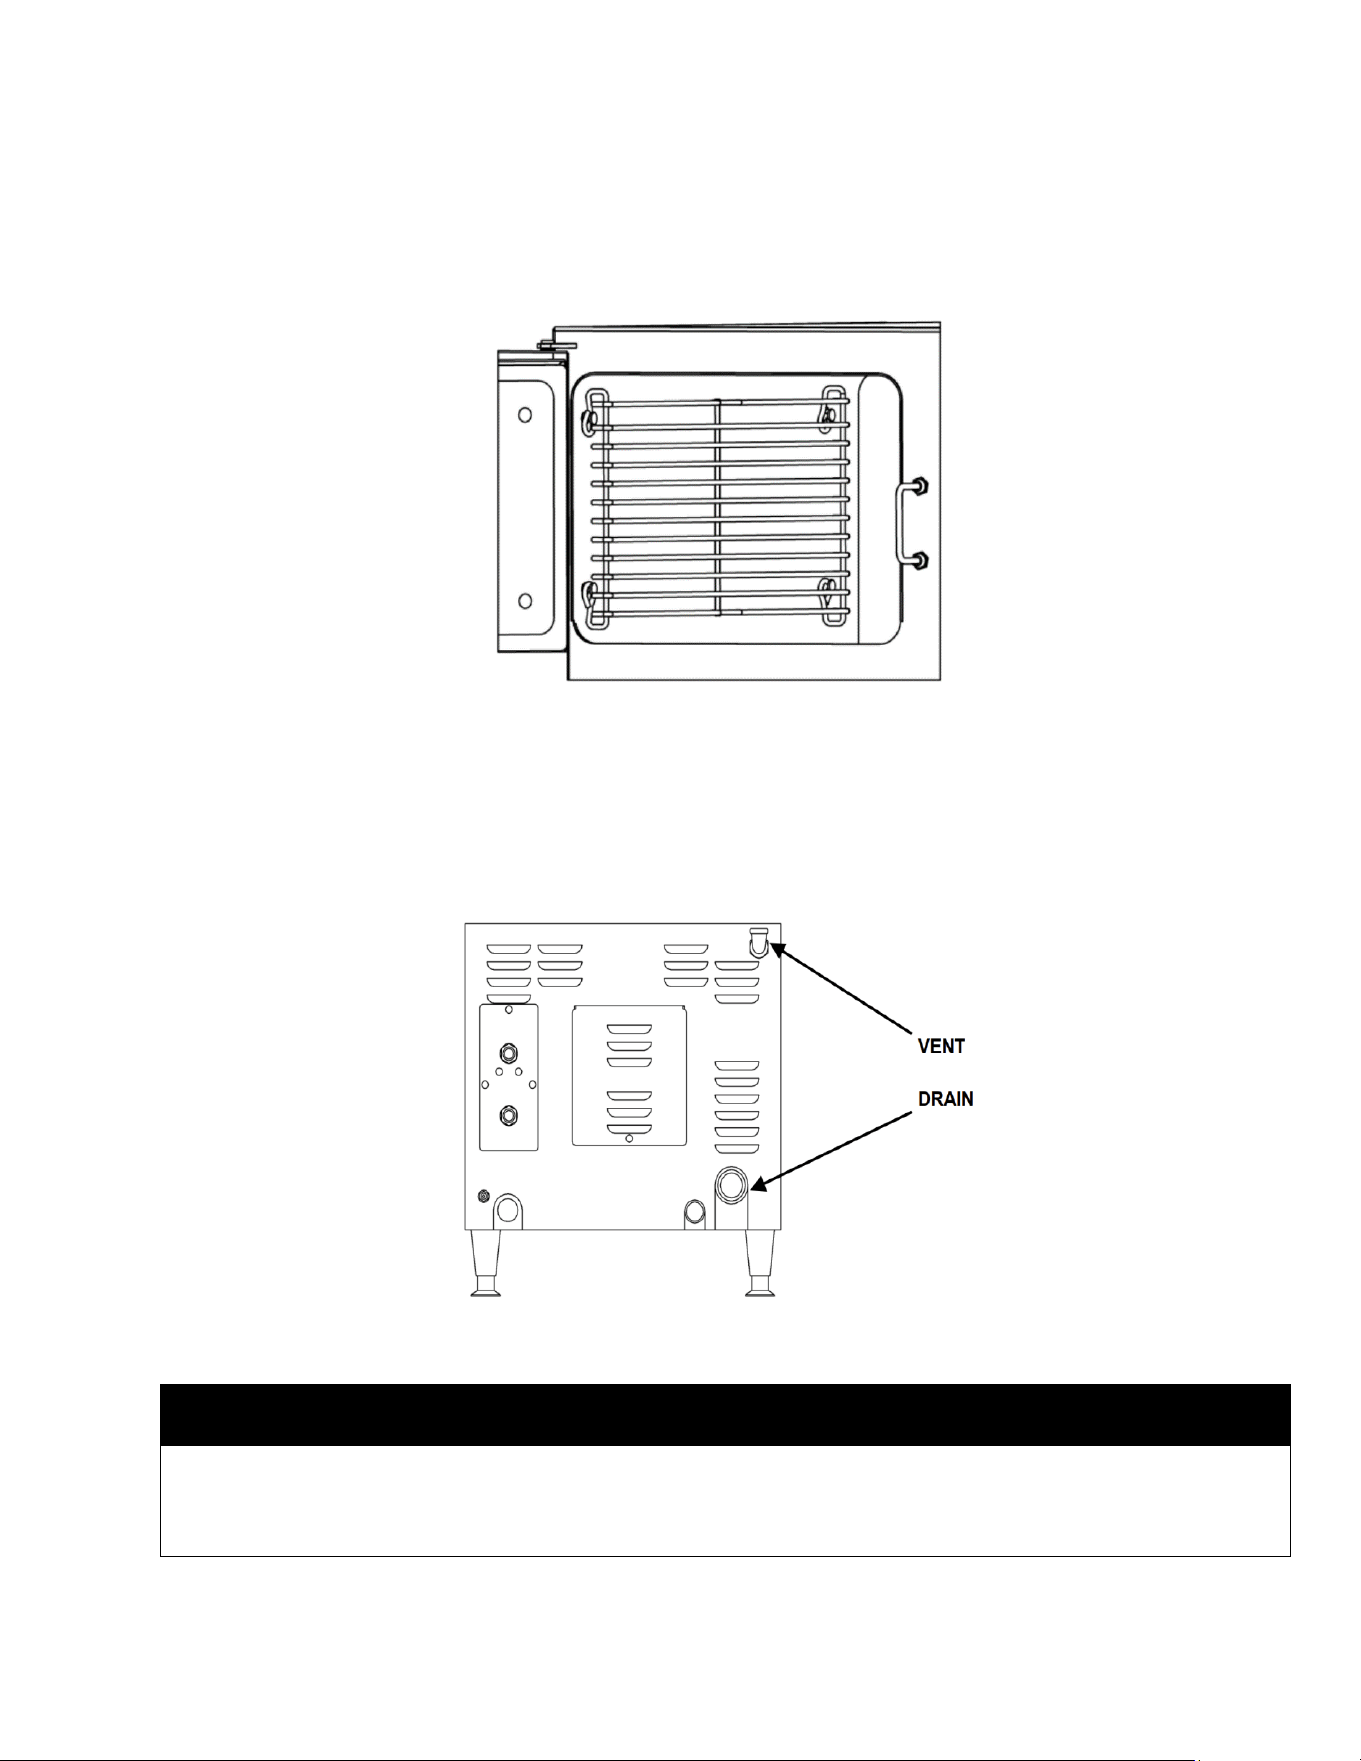
G. Install the Slide Racks
Each rack has four loops: two at the top and two at the bottom. See Figure 3-6.
1. Hold the slide rack so the ends of the hanger loops are toward the side of the cooking compartment.
2. Slide one rack into the compartment with loops toward one side.
3. Hook the loops over the top and bottom pins.
4. Repeat steps 1 to 3 for the other racks.
Figure 3-6 Slide Rack
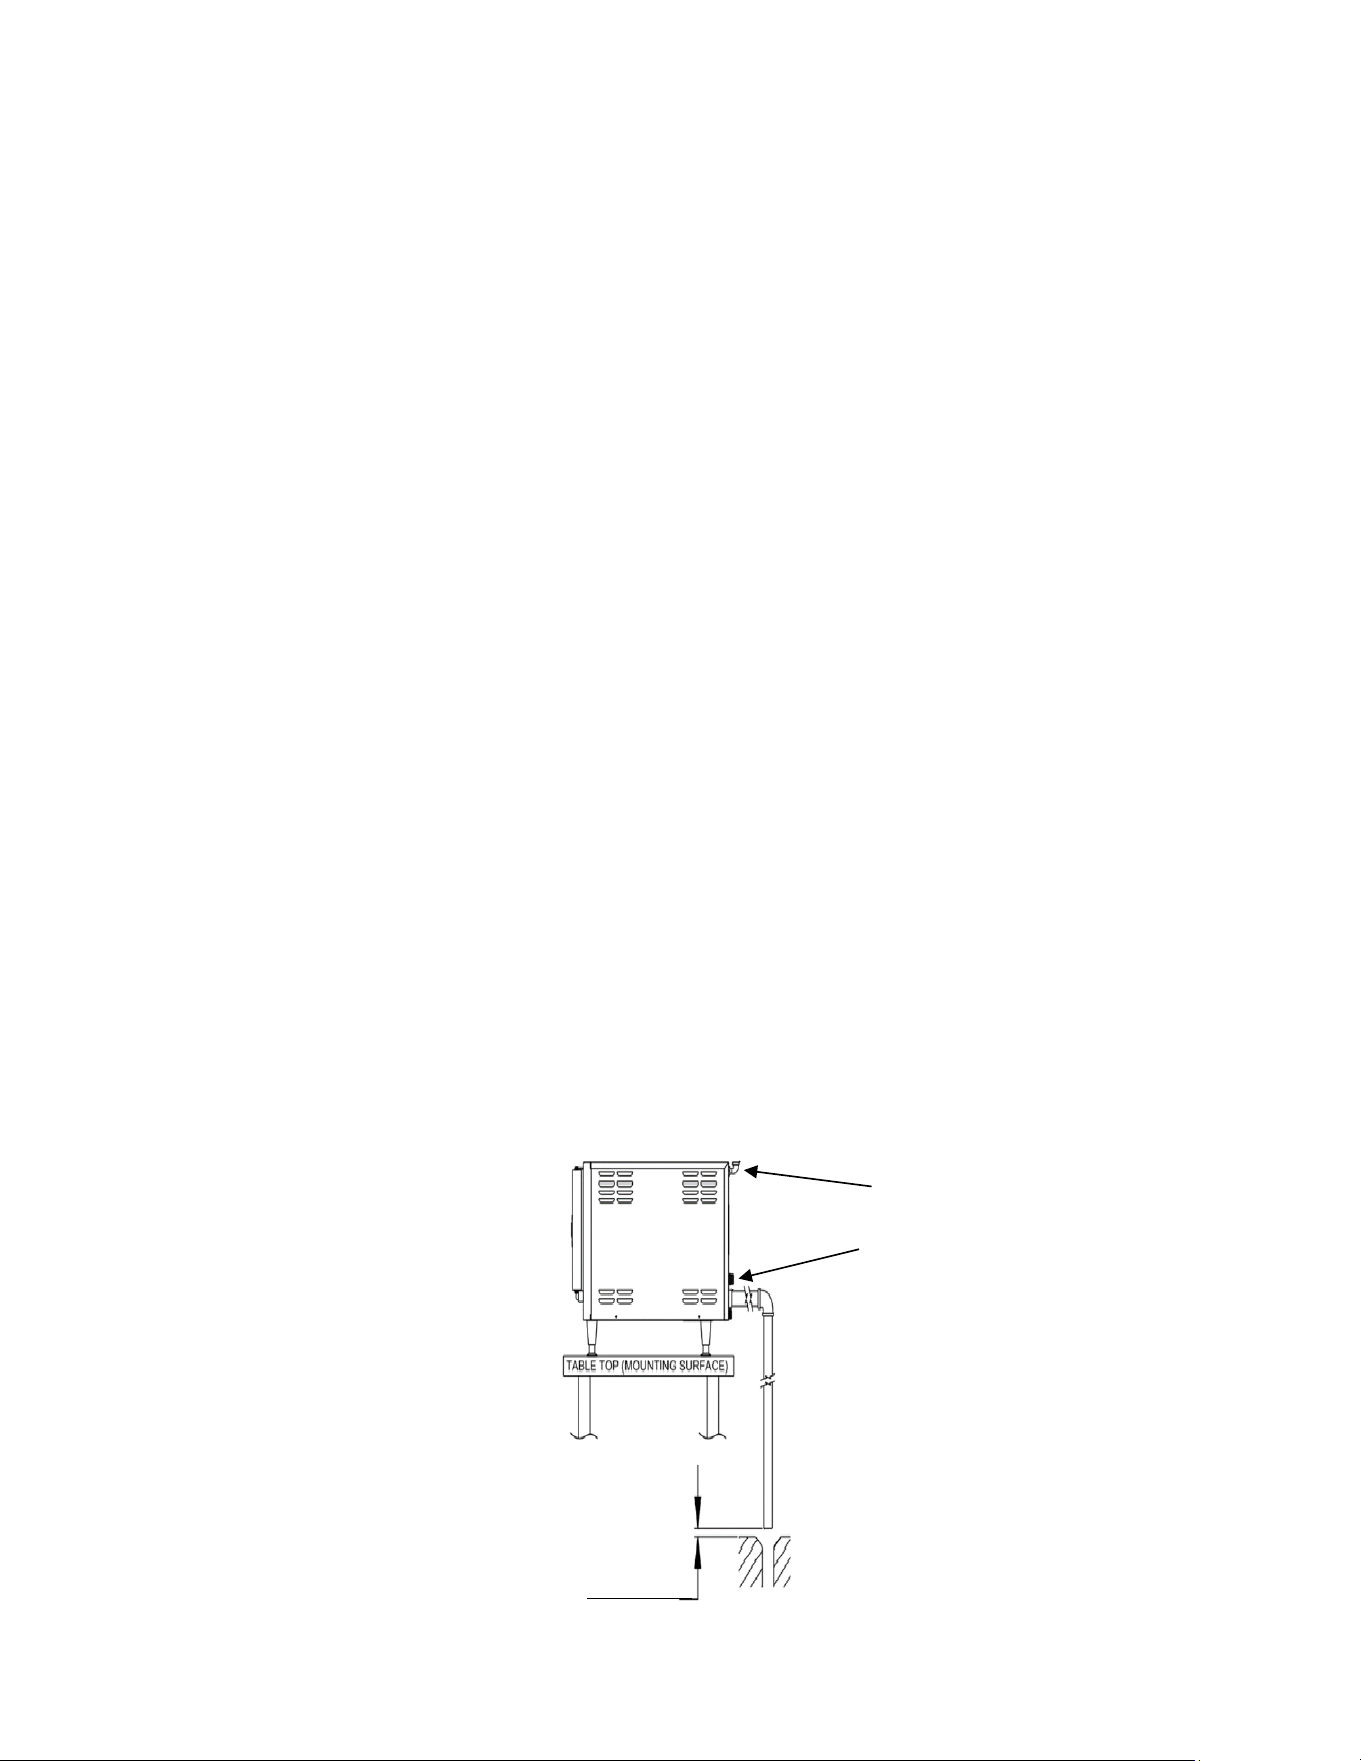
H. Install the Rear Vent
For 22CET’s not on stacking stands:
1. Using pipe thread sealant (not provided), install the brass street elbow into the bulkhead fitting on the rear of
the 22CET. See Figure 3-7.
2. Connect the drain to a free air vented drain line. See Figure 3-8.
Figure 3-7 Steam Vent
I. Connect the Free Air Vented Drain Line
⚠ DANGER
DEATH, INJURY, EQUIPMENT and PROPERTY DAMAGE will result from improper installation of drain outlet
lines.
Install free air vented drain lines as described in this manual.
NOTICE: Furnishing and installing drain lines and drainpipe is the responsibility of the Installer/Owner.
14
The following restrictions and requirements are critical to the safety of personnel and equipment, and
must not be violated under any circumstances:
1. The drain lines must be installed in compliance with the Food Code (latest edition) of the Food and Drug
Administration (FDA), and any other applicable national, state, or local codes and regulations.
2. The drain line must be free air vented, have gravity flow from the appliance, and terminate outside the
perimeter of the appliance.
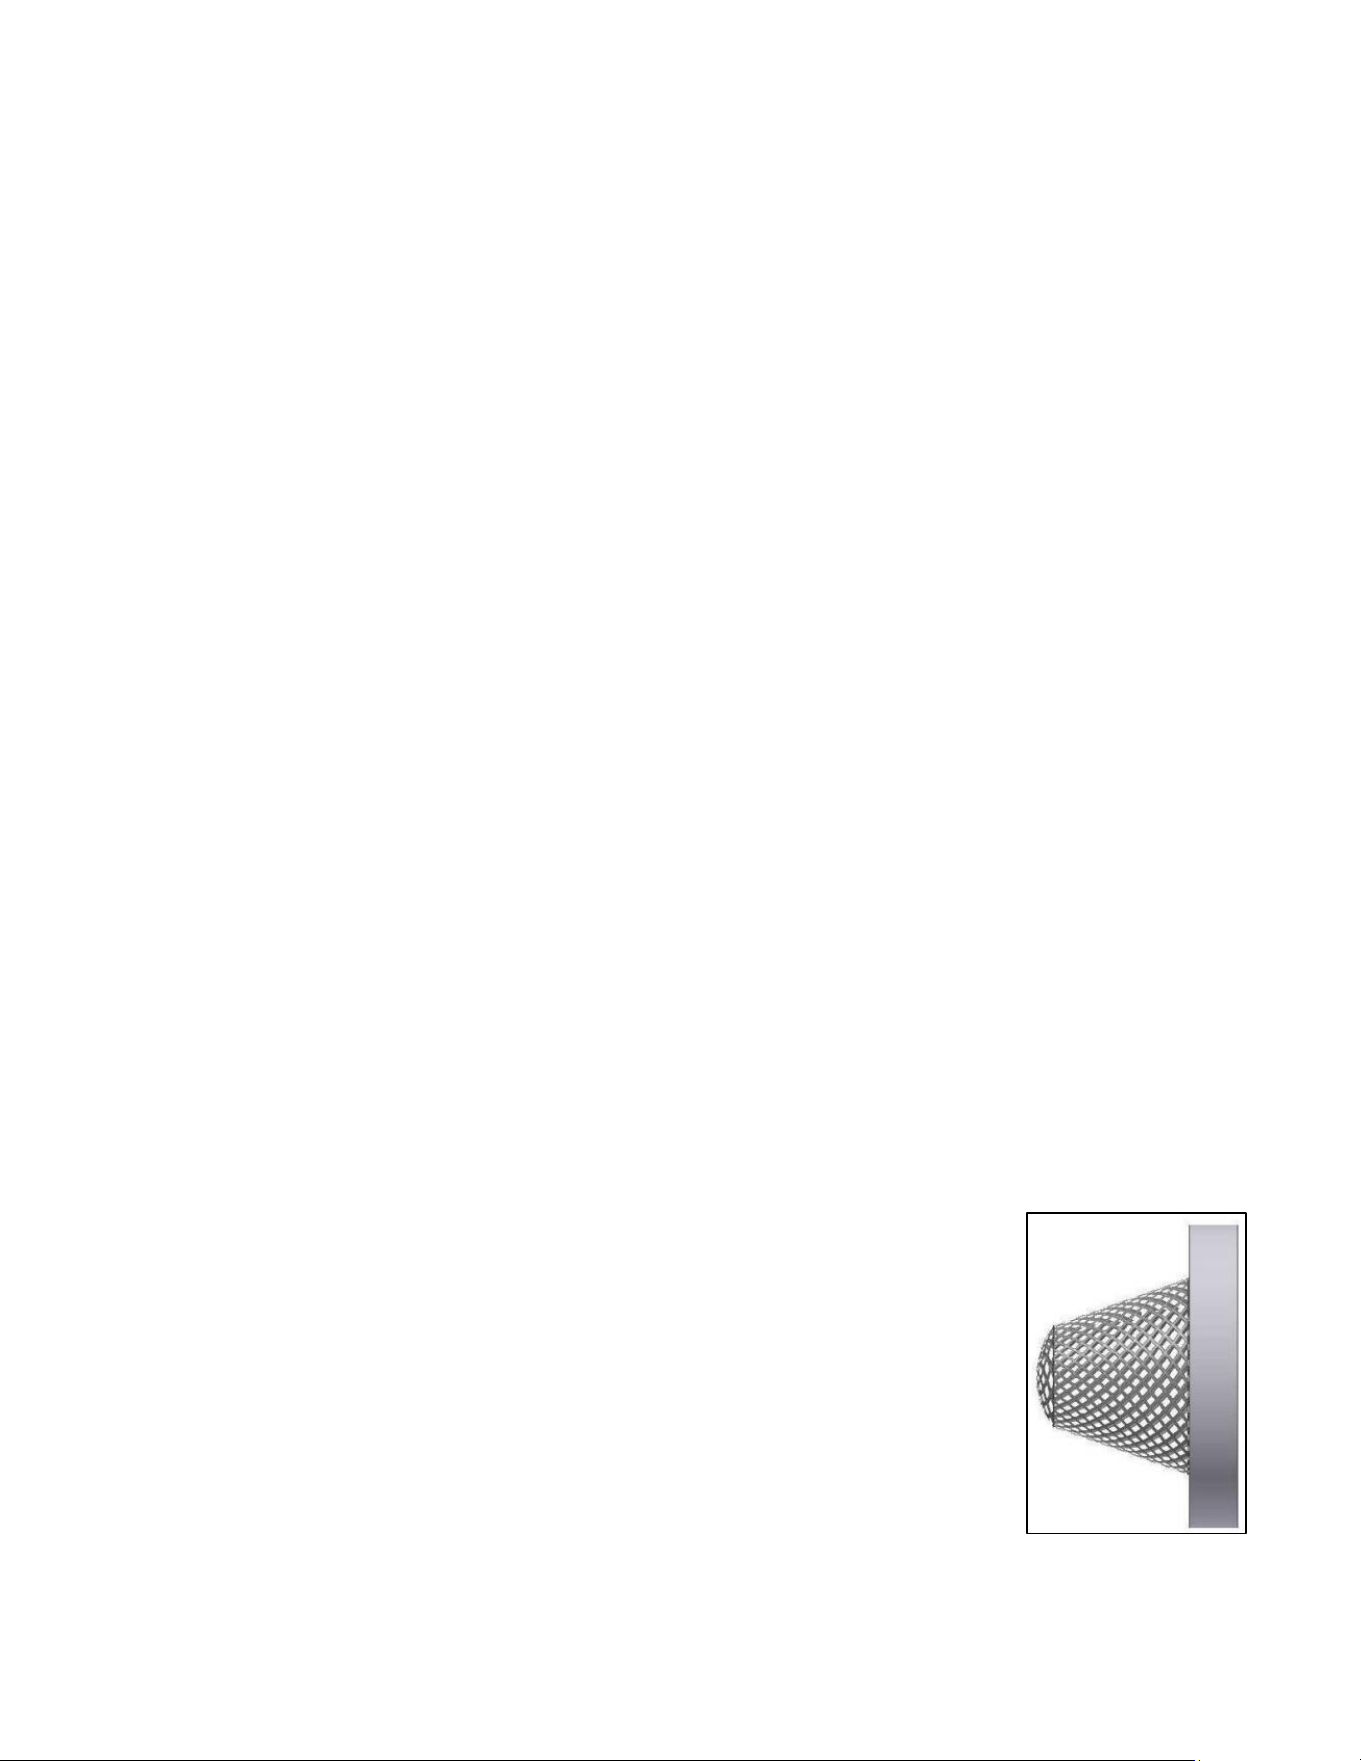
3. Free air venting requires a minimum 1” clearance between the end of the drain line and the top of the floor
drain. See Figure 3-8.
4. Do NOT install the appliance directly over a drain. Steam rising out of the drain will adversely affect operation,
hamper cooling air circulation, and damage electrical and electronic components.
5. Do NOT connect the appliance’s drain connection to any drain material that cannot sustain 140° F.
6. Do NOT connect any other drain from any other equipment to the drain line of this appliance.
7. Do NOT connect the drain outlet extension line directly into a floor drain or a sewer line.
8. Do NOT connect this appliance’s drain directly to drains or to the plumbing of any other equipment. (Except
when using a Cleveland Range Stacking Stand.)
9. Do NOT install a trap or shutoff in the drain line.
10. Drainpipe Size and Length Guidelines:
• Do NOT make a drainpipe outlet extension more than 12 feet long.
• Do NOT use more than three elbows.
• Up to 6’ pipe: 1 1/2-inch pipe and fittings are acceptable.
• Up to 2 elbows: 1 1/2-inch pipe and fittings are acceptable.
• 6’ to 12’ pipe: 2-inch pipe and fittings are required.
• 3 elbows on any extension: 2-inch pipe and fittings are required.
11. Connect the drain to the appliance. See Figure 3-8.
• The steamer is supplied with a 1 1/4-inch pipe connection at the bottom of the drain tee. Do not reduce
pipe size.
• Make sure the drainpipe is the correct size. See Item 10.
• While assembling the pipes and fittings of the drain outlet extension, use non-hardening pipe thread
sealant.
• Thread fittings together FINGER TIGHT ONLY! DO NOT USE A WRENCH!
Figure 3-8 Typical Drain Connection
Vent
Drain
connection
1” Clearance
Minimum
15
J. Water Supply Requirements and Installation
1. Water Supply Requirements
a) Water Quality
• Unlike most steam cooking equipment, water quality can vary without major loss of performance of a
SteamChef steamer. Even hard water will not affect the operation of a SteamChef Steamer if it is
cleaned with vinegar daily.
b) Water Supply System
• A potable water supply system must be available providing a minimum dynamic pressure of 35 psi
and a maximum static pressure of 60 psi.
• If the static pressure is above 60 psi, a pressure regulator must be used and set at approximately 50
psi. Pressure above 60 psi can damage the solenoid valves.
2. Install the Water Supply Lines
Installation Requirements:
• The Garden Hose Thread (GHT) connector used must be NSF rated for food grade service.
• Do NOT apply pipe thread sealant to NHT or GHT connections.
• Apply non-hardening pipe thread sealant to all other threaded connections.
• Install a manual water shut-off valve (Main Water Shutoff Valve) (not provided) between the cold-
water supply line(s) and the appliance.
• The National Sanitation Foundation (NSF) requires installation of a check valve (or other approved
anti-backflow / anti-siphon device) (not provided) in all supply lines in accordance with and as
required by local, state, and national health, sanitation, and plumbing codes.
• Flush the water supply lines before connecting the lines to the appliance.
a) Connect the Water Supply Lines
• The Installer/Owner is responsible for the water connection of this appliance.
• This appliance is to be installed to comply with all applicable federal, state, or local plumbing codes.
• Connect this appliance to COLD WATER The condenser system and steam generator will not work
properly if they are connected to HOT or WARM water.
b) Water supply must have a minimum dynamic (flow) pressure of 35 psi and a maximum static pressure of
60 psi.
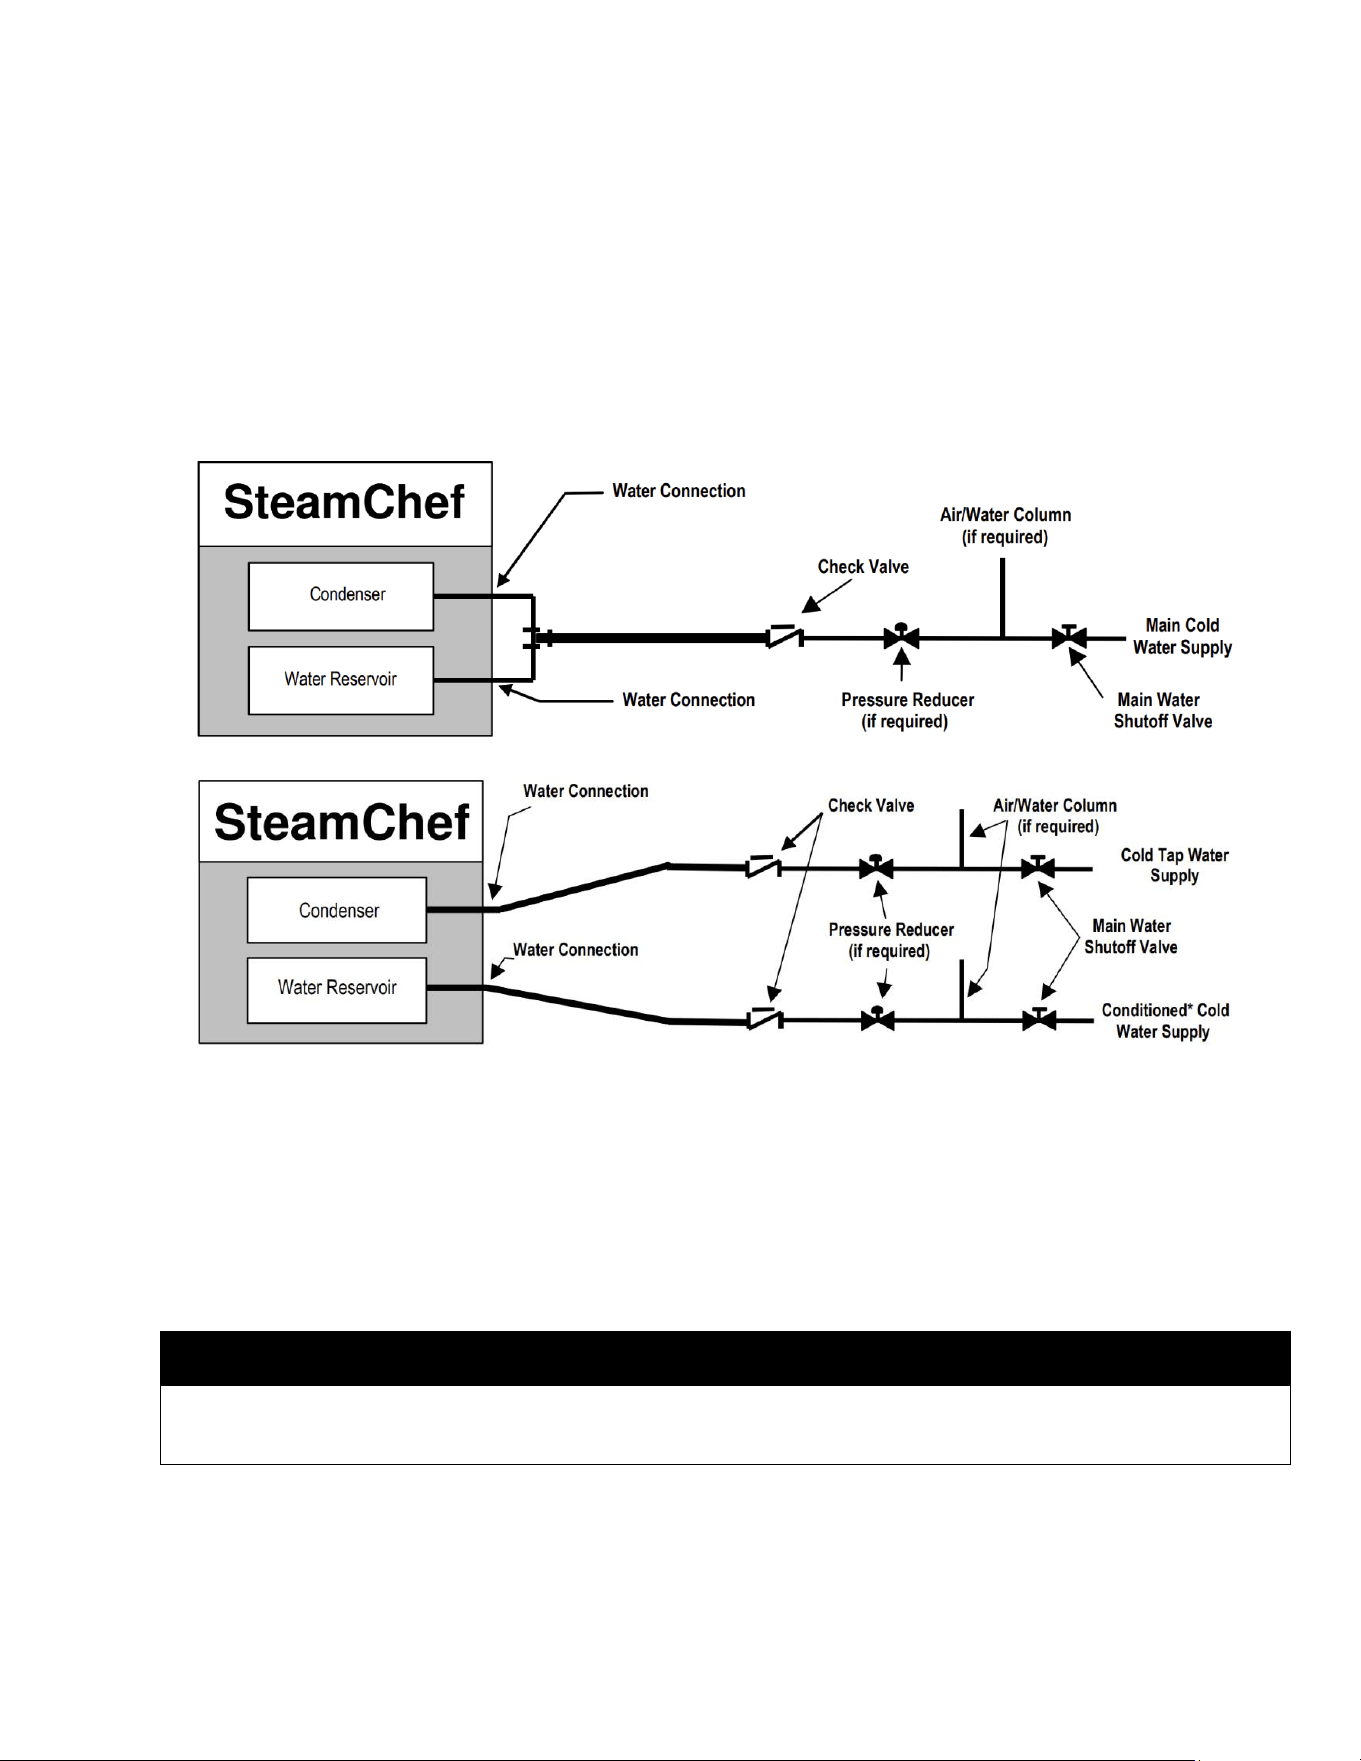
c) If the static pressure is above 60 psi, a pressure regulator must be used and set at approximately 50 psi.
Pressure above 60 psi can damage solenoid valves. See Figures 3-10 and 3-11.
d) Install a manual water valve between the main cold-water supply line(s) and the steamer supply lines.
e) The National Sanitation Foundation (NSF) requires installation of a check-
valve (or other approved anti-backflow / anti-siphon device) (not provided)
in all supply lines in accordance with and as required by local, state, and
national health, sanitation, and plumbing codes.
• Check local codes to determine exactly what type of anti-backflow /
anti-siphon device is necessary to meet local requirements.
f) Design the water supply line(s) so the unit can be moved for service.
g) If the supply of water meets the requirements shown in the Warranty, then
the Single Water Supply Arrangement shown in Figure 3-10 may be used.
• If using the single water supply arrangement: The supply piping to the
tee fitting must be at least the next larger size of pipe than the
connection provided on the appliance.
h) Although 22CET’s are very tolerant of hard water, the owner may want to
use conditioned water to supply the reservoir. To use a separate
conditioned water supply, use the layout shown in Figure 3-11.
Figure 3-9 Filter Washer
(P/N 110987)
16
i) The steamer has two 3/4-inch GHT fittings, one for the water reservoir and one for the condenser. See
Figures 2-1 and 2-2.
A Filter Washer (dirt filter) is supplied installed in each of the water inlets. See Figure 3-9.
• Construct all supply lines up to the 3/4-inch NHT fittings.
• Flush the water supply lines before connecting them to the 3/4-inch fittings.
3. Test Water Supply Lines
a) Check all connections for proper tightness.
b) Remove the control side panel to inspect water connections inside the steamer.
c) Open the water supply valves.
d) Check all lines and connections for leaks, both inside and outside the steamer.
Figure 3-10 Cleveland Range Single Water Supply Arrangement
Figure 3-11 Cleveland Range Separate Water Supply Arrangement when Using Separate Conditioned*
Feed Water Supply
* “Conditioned” indicates water that has been filtered or treated by a Cleveland Range approved method to meet
or exceed the water quality standards listed in the Warranty
K. Electric Power Supply
• The electric supply must match all electrical and wiring requirements specified on the rating plate.
• NOTE: This appliance is NOT Ground Fault Interrupter (GFI or GFCI) compatible.
• The Electrical Diagram is located on the back of the control-side cover.
⚠ WARNING
This appliance is not GFI (GFCI) compatible. Do not use a GFI (GFCI) circuit.
Using a GFI (GFCI) circuit can result in INJURY, EQUIPMENT and PROPERTY DAMAGE.
The connection must be made as follows:
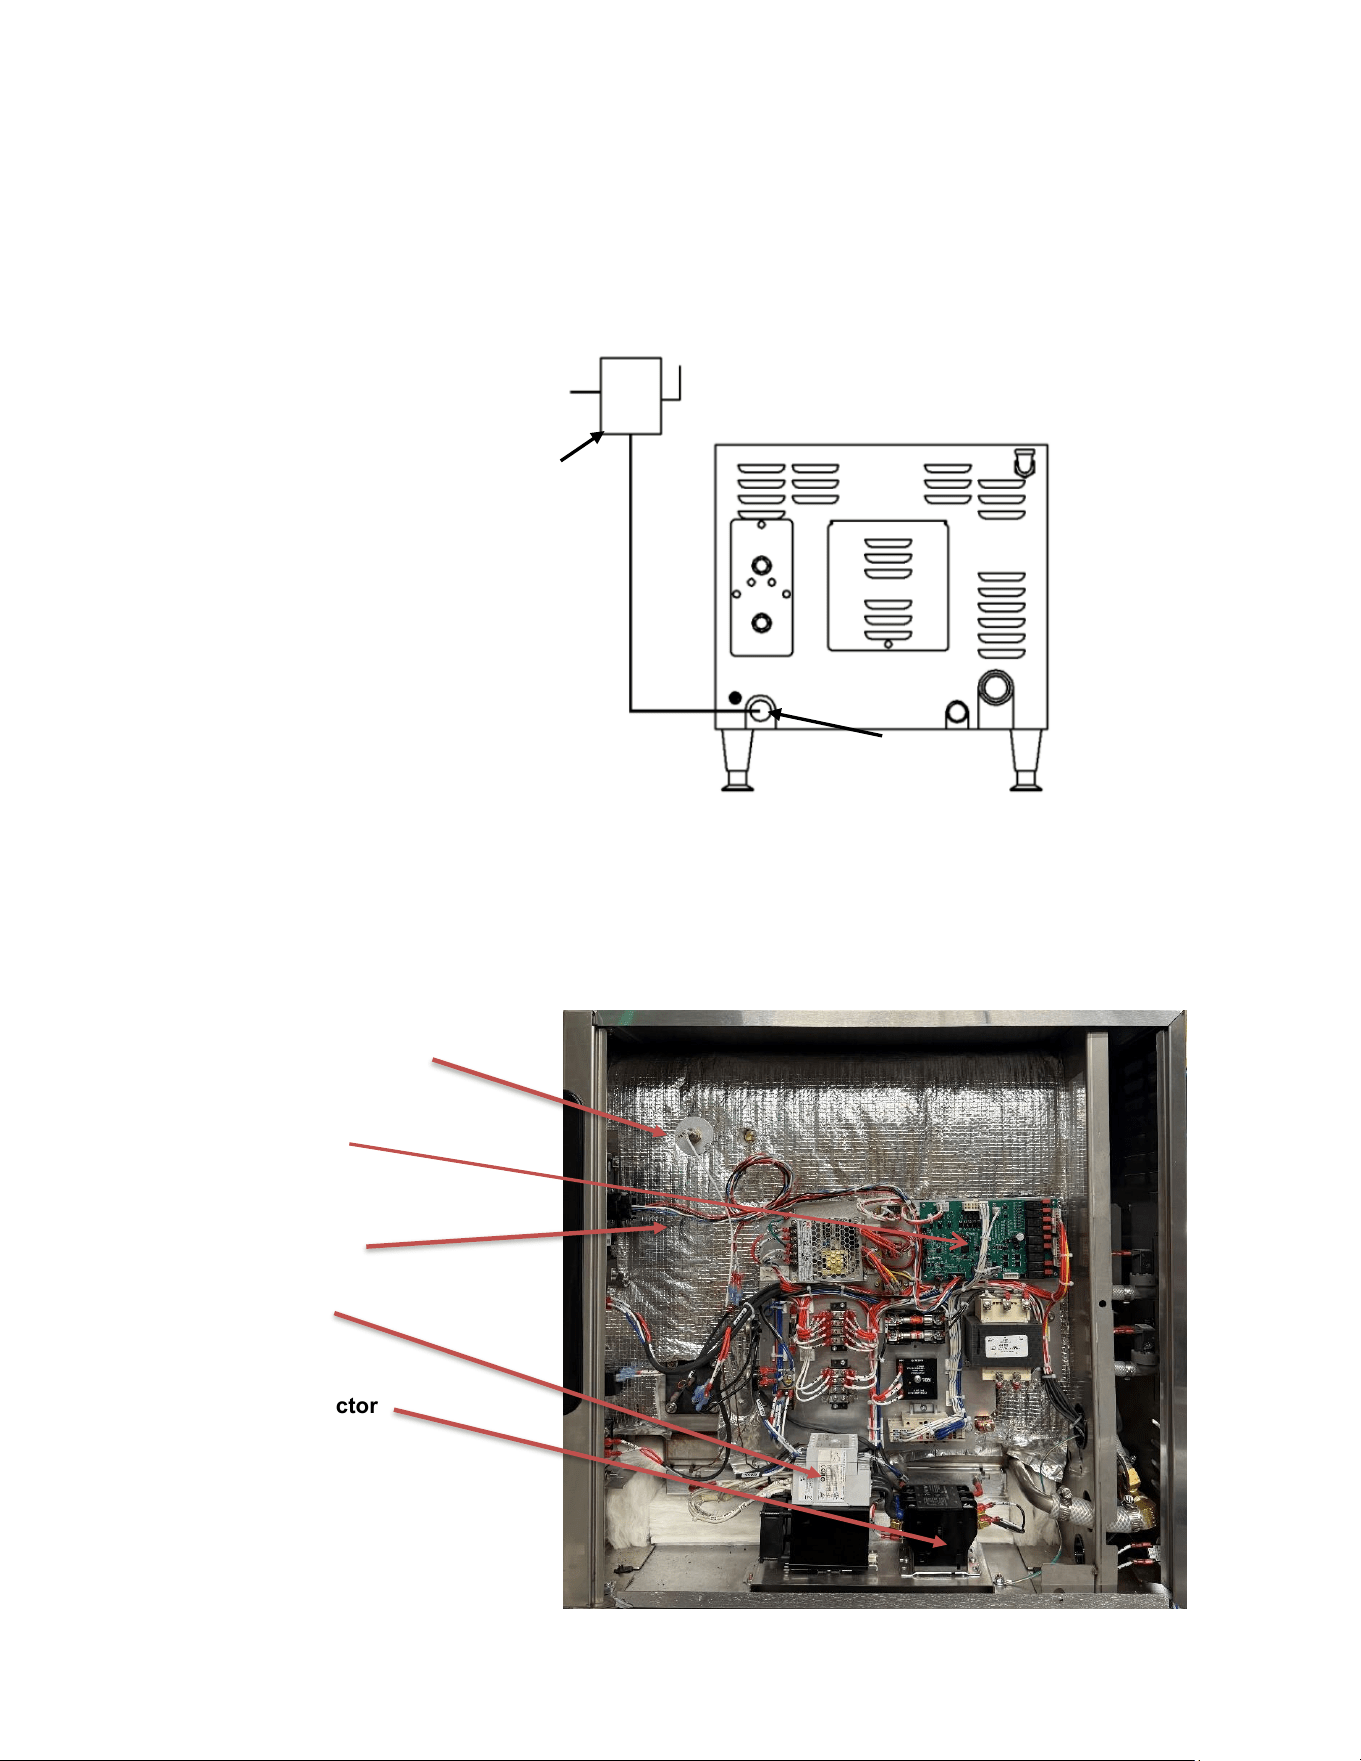
1. Install a main disconnect switch and a separate fuse or breaker for this appliance as shown in Figure 3-12.
The fused disconnect switch is called the “Main External Power Switch.”
2. Do not use a GFI (GFCI) circuit. This appliance is not GFI compatible.
3. Do NOT use a power cord.
17
4. Make the electrical connection using flexible conduit, per local code.
5. There should be a sufficient length of flexible conduit between the steamer and the wall so the appliance can
be moved for service.
6. Mechanically secure the flexible conduit to the electrical access hole found at the rear of the appliance. See
Figure 3-12.
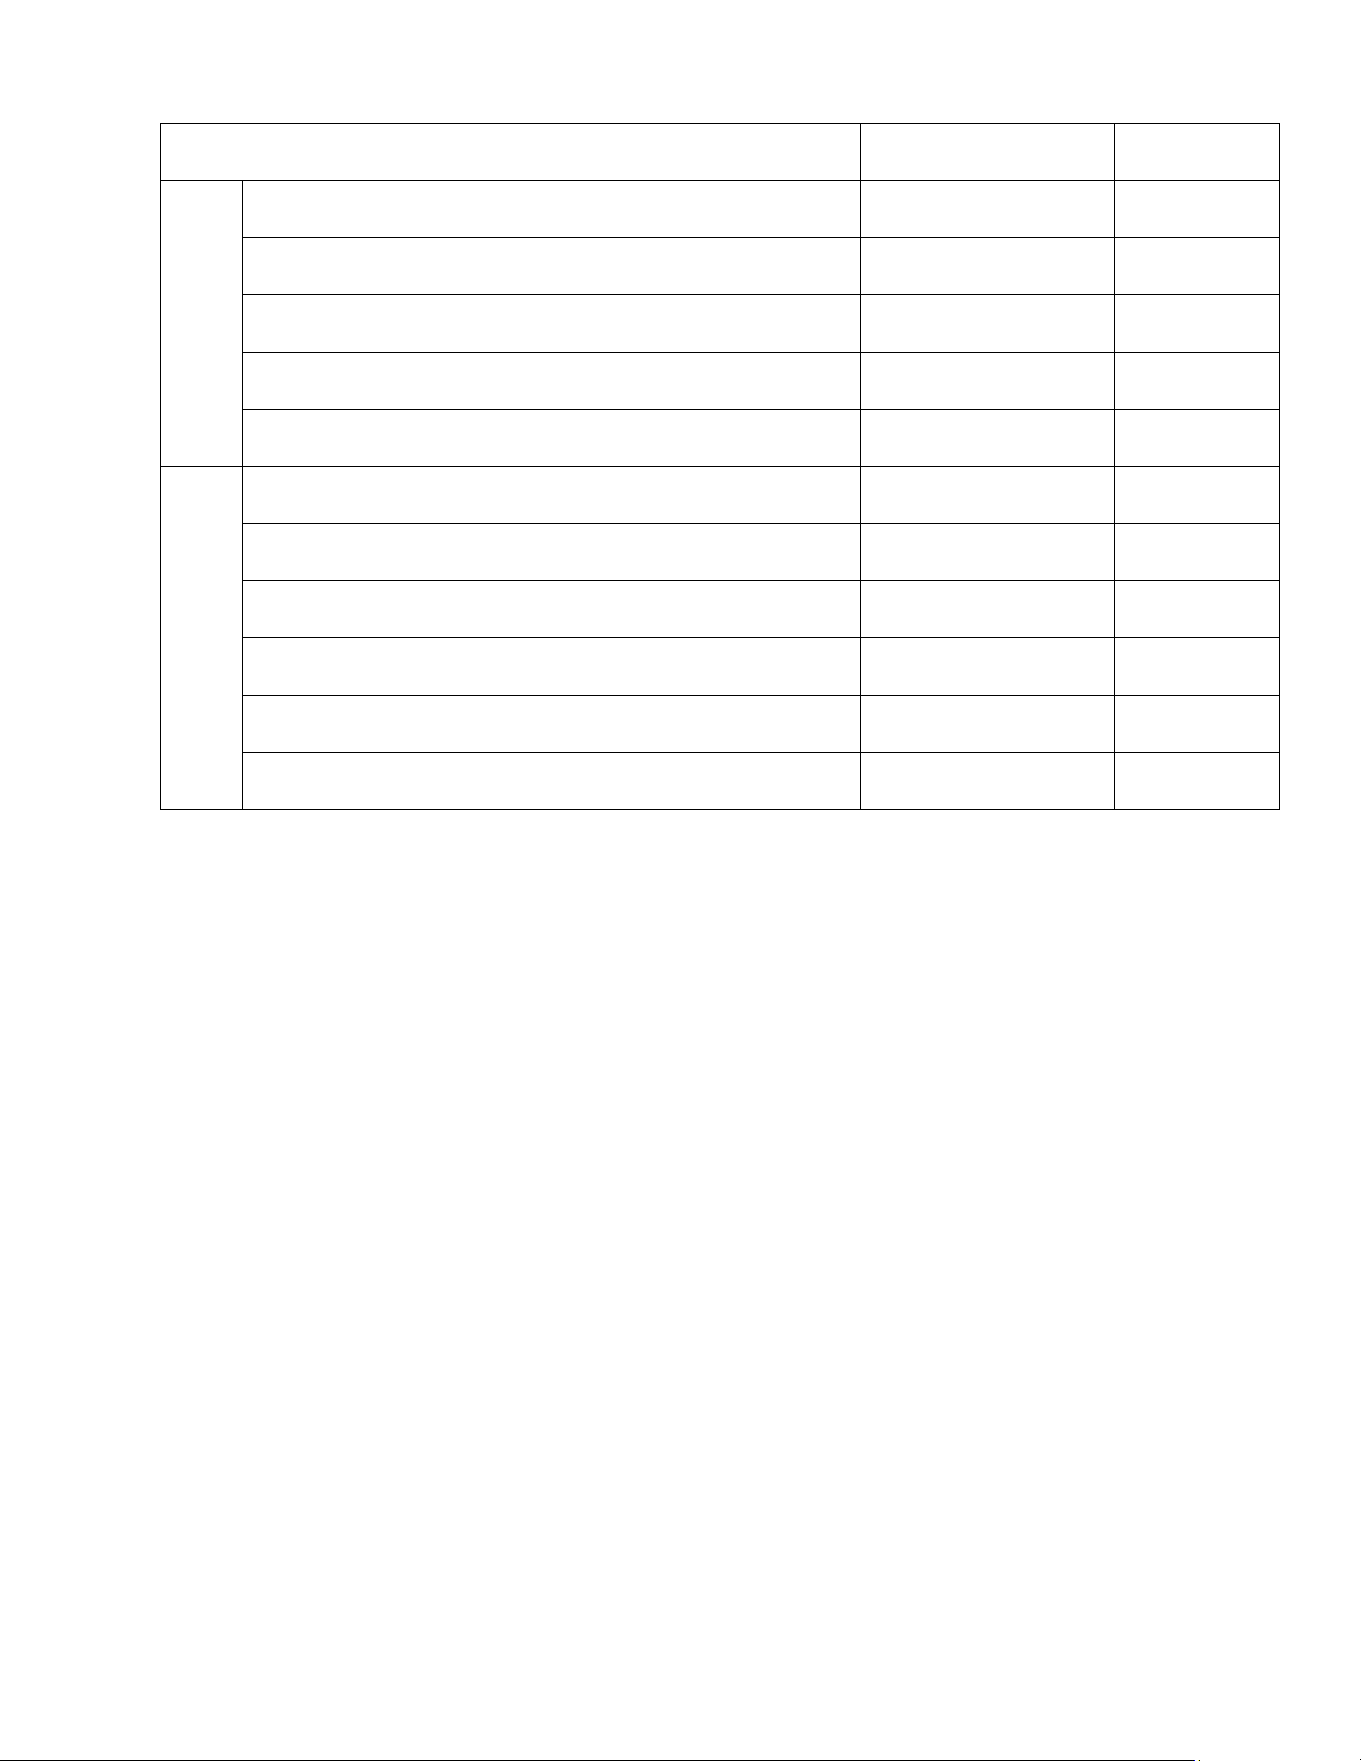
7. Refer to the wiring diagrams and Figure 3-14. Connect the wires to the contactor, side control panel, and
ground plug.
8. The appliance must be electrically grounded by the installer.
Figure 3-12 Electrical Main Power Switch and Access Hole
Figure 3-13 Electrical Connections
Main External
Power Switch
Electrical
Access Hole
IO Board
Resistance Temperature
Detector (RTD)
Communication
Cable to VI
Solid State
Relay (SSR)
Safety Contactor
18
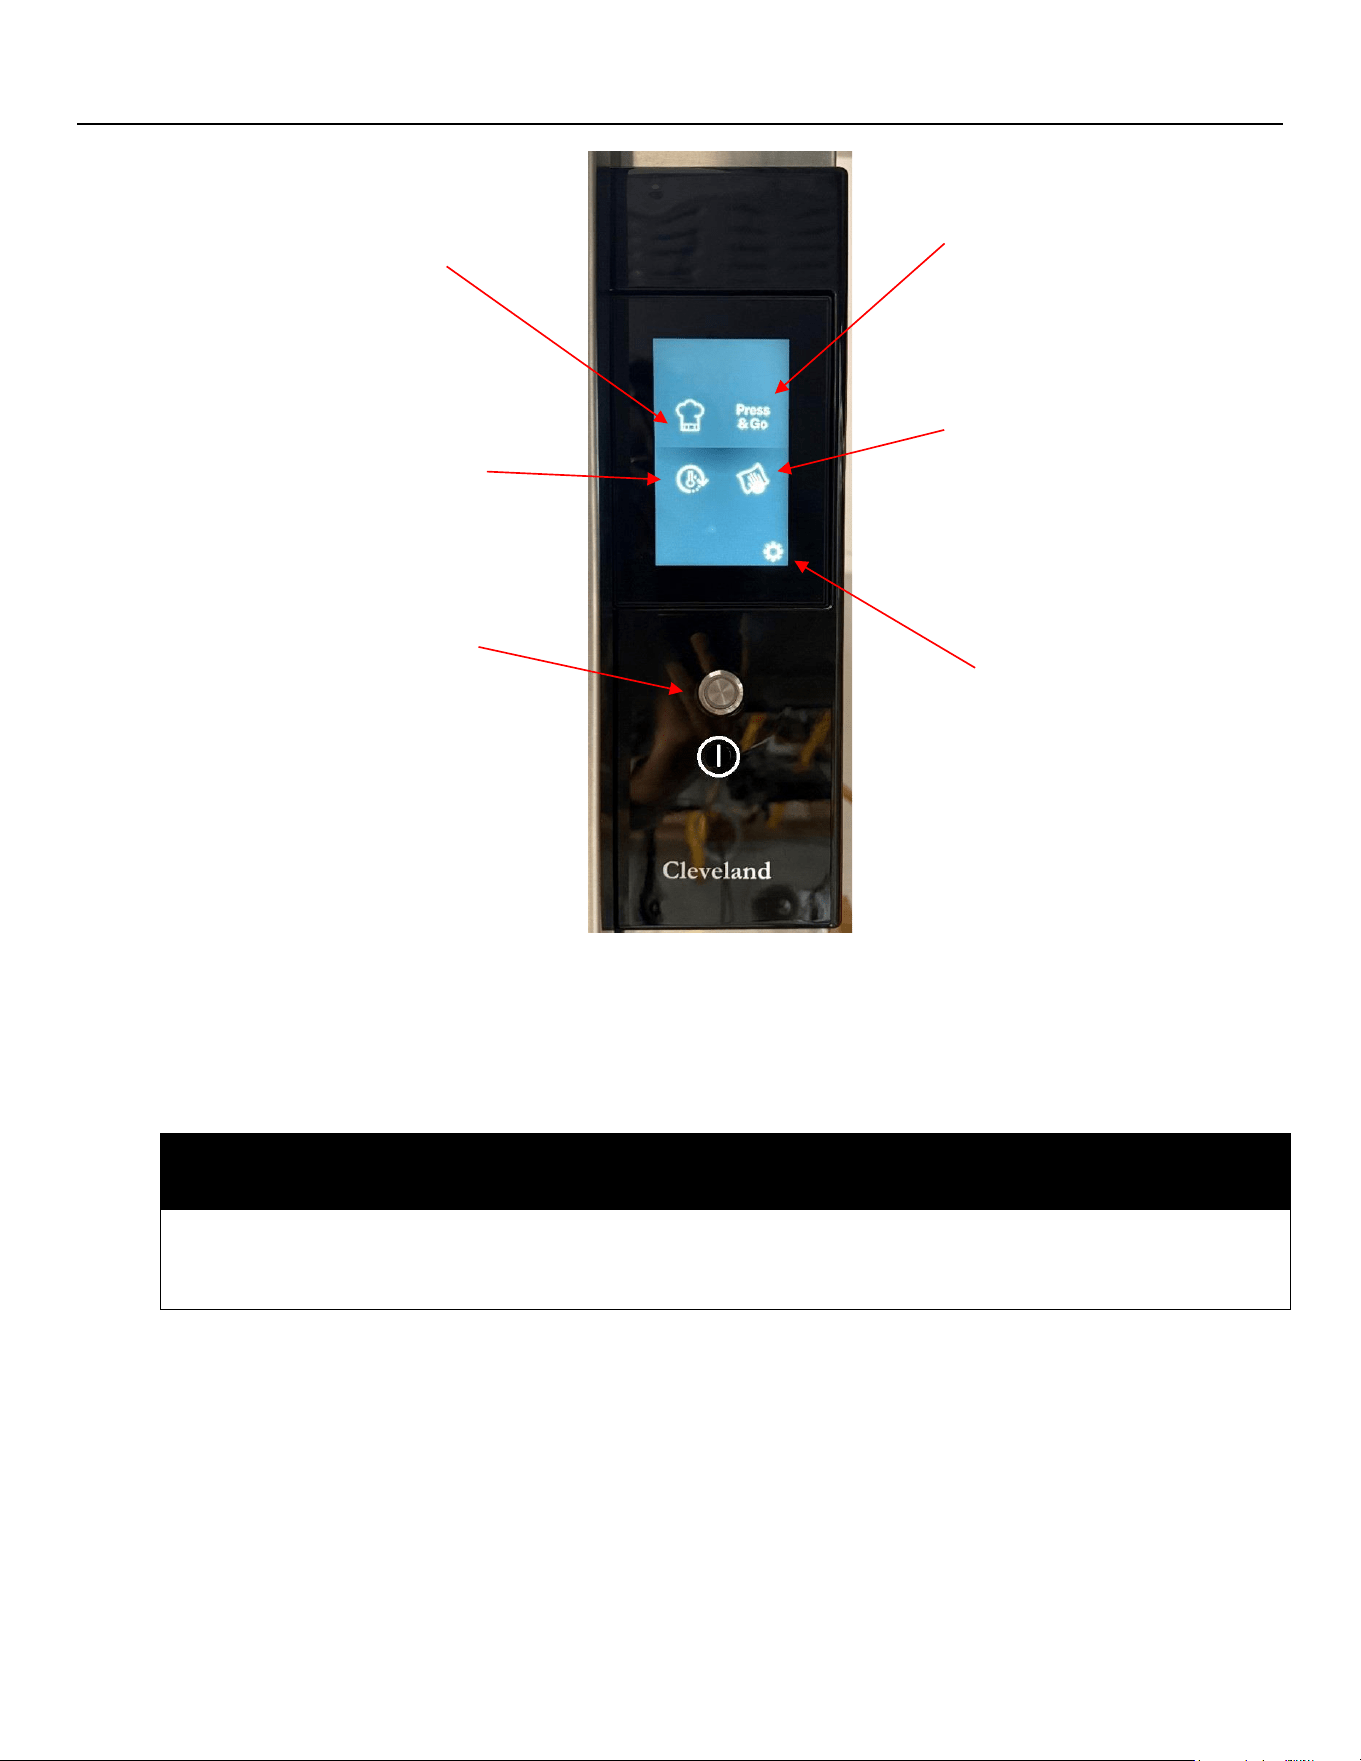
L. Installation Checklist
TASK
REFERENCE
COMPLETED
Preparation
Make Sure Electric Power Requirements Are Met
Chapter 3 Section K
Check Operating Location Clearances
Chapter 2 Section D
Make Sure Location and Vent Requirements Are Met
Chapter 3 Section A
Check Field Assembly of the 22CET
Chapter 3 Section B
Check Field Assembly of Stand (If Used)
Chapter 3 Section B
Installation
Make Sure 22CET Is Level
Chapter 3 Section D
Check Drain Line Connection
Chapter 3 Section I
Check Water Supply Connection
Chapter 3 Section J
Leak Test Water Supply Lines
Chapter 3 Section J
Check Electrical Line Connection
Chapter 3 Section K
Perform Operating Tests
Chapter 7 Section C

19
CHAPTER 4 COOKING WITH THE SteamChef
⚠ DANGER
Do NOT breathe steam, hot air or condensate. DEATH or INJURY will result.
⚠ WARNING
Hot air, steam, and condensate will cause burns and scalds.
To help prevent burns and scalds when opening steamer doors: always stand to the hinge side and back from
the doors, slowly open the door, and wait for the steam and heat to dissipate before reaching into the steamer.
The SteamChef Steamer is a continuously operating appliance, so parts are ALWAYS HOT when the
Main External Power Switch or the POWER ON/OFF button is ON
When the POWER ON/OFF button is pressed to turn ON, the SteamChef will remain HOT for some time.
Contact with hot surfaces and steam can cause burns and scalds. Avoid contact with hot surfaces and steam.
If the steamer door is stuck shut: DO NOT force the door open.
The door stuck shut may indicate a blocked drain. Hot water can fill the cooking compartment and spill out if the
door is forced open causing injury and equipment damage.
If the SteamChef door is stuck shut:
• Turn OFF the steamer.
• Call a qualified Cleveland Range authorized service technician.
• Wait for the steamer to cool before servicing.
⚠ CAUTION
Some food drips juices. Use a solid catch pan under perforated pans when cooking food that drips juices.
Dripping juices can cause burns and clog the drain and KleanShield
TM
.
Do NOT use oven racks that are bent or damaged in any way.
DO insert pans and accessories LEVEL and INSIDE the oven racks.
Pans and accessories placed in damaged or out of level racks, or outside racks can tip and spill, causing burns,
injuries and/or equipment damage.
A. Cooking Procedure:
NOTE: The condenser water does not flow until the cooking compartment reaches the minimum cooking
temperature to reduce steam loss and condenser water use.
If condenser flow starts before the cooking compartment reaches cooking temperature, turn OFF the steamer and
call your qualified Cleveland Range authorized service representative.
1. Before Cooking or Rethermalizing
a. Inspect the cooking compartment, drain, KleanShield
TM
, and clean as required BEFORE turning ON the
SteamChef. It will be too hot to inspect and clean safely after turning ON. See Chapter 6.
b. Turn ON and fill the SteamChef. See Chapter 5.

20
c. Preheat the cooking compartment. See Chapter 5.
d. Slide the pans of food into the slide racks inside the SteamChef. Do not place pans or anything else on
the bottom of the compartment or on the KleanShield
TM
.
e. For best results, use 2-1/2-inch-deep, perforated pans without covers. These give the best heat transfer
and shortest cooking time.
f. Close the cooking compartment door.
2. Refer to Easy Touch Operating Instructions in Chapter 5 to start cooking.
• While cooking, occasionally check the water in the reservoir for food particles and oils. If the water is dirty
or cloudy, change the water. See Chapter 8.
• The steamer compartment of the SteamChef Steamer is equipped with an automatic door interlock
switch that turns off the heating elements and shuts off the convection fan and condenser when the door
to the compartment is opened.
⚠ WARNING
Burn and Scald Hazard
Even though the heat shuts off as soon as the door is opened, it may take up to a minute for production
of steam to end and residual steam in the system to clear from the cooking compartment.
To help avoid injury, always wait until the residual steam clears and the convection fan stops before
reaching into the cooking compartment, and always wear dry heatproof gloves when reaching into the
cooking compartment. Wet or damp gloves conduct heat and can cause burns when touching hot
items.
3. After Cooking or Rethermalizing
a) Carefully open the cooking compartment door and remove the pans from the slide racks.
b) If the SteamChef will not be used again, perform the Cleaning Procedure in Chapter 6.
B. Rethermalization:
• The SteamChef may also be used to reheat/re-thermalize previously cooked and/or refrigerated foods to
serving temperature.
• Depending on initial food temperature and density, most foods will rethermalize to their safe serving
temperature in 10 to 40 minutes.
• Always check the internal temperature of food with a thermometer to determine that it has been rethermalized
to its safe serving temperature.
21
CHAPTER 5 EASY TOUCH OPERATING INSTRUCTIONS
⚠ CAUTION
Press switch and button with fingertips only.
INJURY and EQUIPMENT DAMAGE can result from pressing switches and buttons with anything else.
Cook Mode. Single
timer, multi-timer,
and manual modes
available.
Hold Mode. Keeps food
warm at a set temperature.
Allows individual timing for
up to 6 trays.
Press and Go.
Quickly start cooking with
pre-programmed recipes for
fast and easy operation.
Descale. Reminds you to
descale every 31 days.
Follow the prompts to
remove parts and descale as
needed.
Power ON – I; OFF – O
Button
Settings. Access
configuration options
and preferences.
22
A. Main External Power Switch
Usually, the Main External Power Switch is left ON.
To turn ON the Main External Power Switch:
• Press the POWER ON/OFF button until turned OFF.
• Turn ON the Main External Power Switch. See Figure 5-1.
B. Inspect the Cooking Compartment
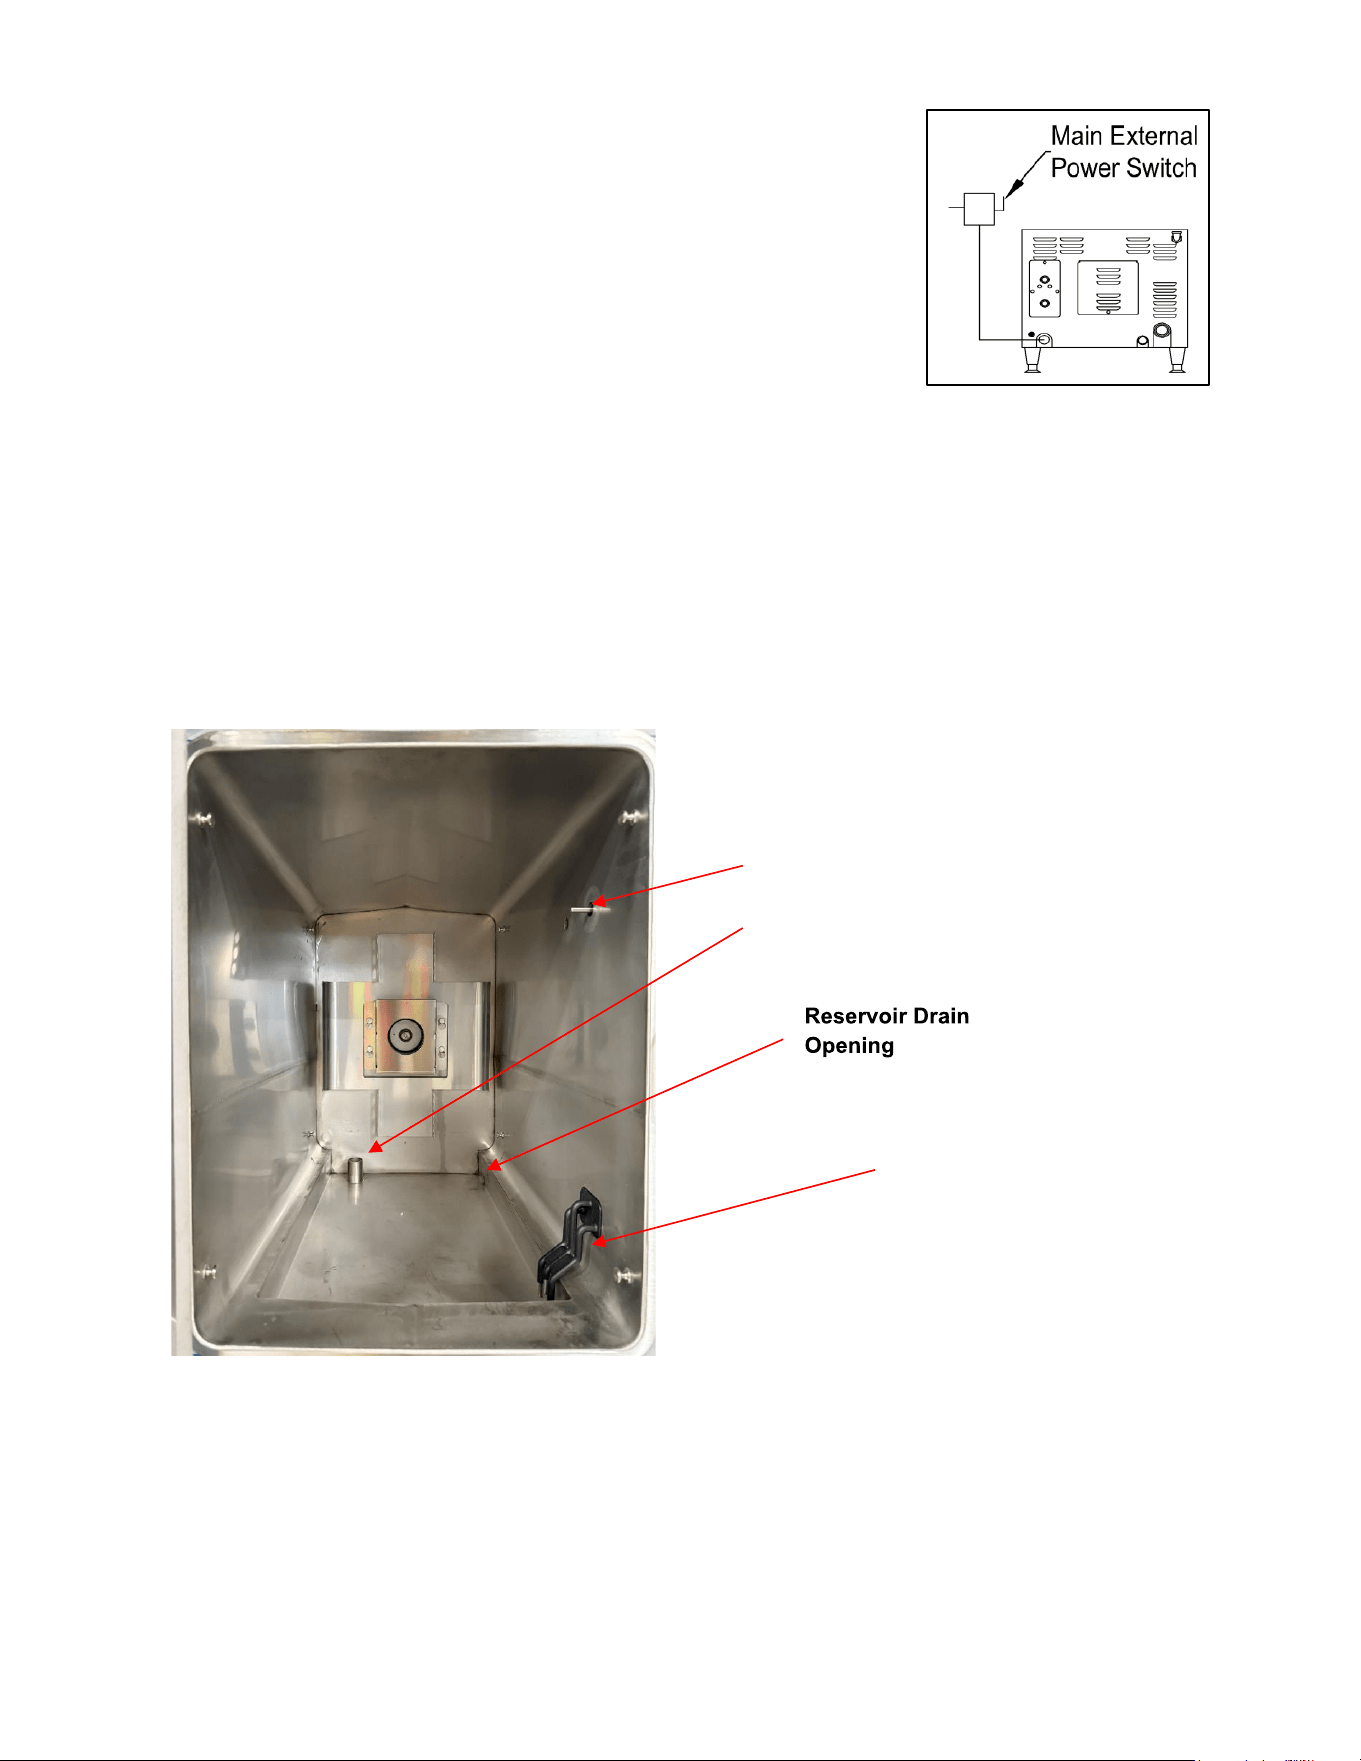
1. Inspect the cooking compartment while the steamer is cold. After the
steamer is turned on, it will be too hot to inspect or clean safely.
2. Before pressing the power on the button of the SteamChef steamer
make sure the inside of the steamer is clean. See Chapter 6 for
complete cleaning instructions.
3. Remove the door gasket assembly, pan racks, backplate, fan guard, and KleanShield
TM
, and make sure all
surfaces are clean and drain openings and the water level sensors are clean and free of any residue or
debris. See Figure 5-2.
4. Make sure that the KleanShield
TM
drain is clear by pouring about a quart of water through the KleanShield
TM
drain. Make sure that the water flows out of the steamer drain.
Figure 5-2 Inspecting Compartment Drains
C. Power ON (Auto Water Fill / Automatic Preheat)
1. Open the water supply valves to the steamer.
2. Turn ON power to the steamer by pressing the POWER ON/OFF BUTTON. The screen will turn on and the
water reservoir fills. The door must be closed to use the Easy Touch screen.
Figure 5-1
Main External Power Switch
Overflow Drain
Reservoir Drain
Water Level
Sensor
Temperature Sensor
23
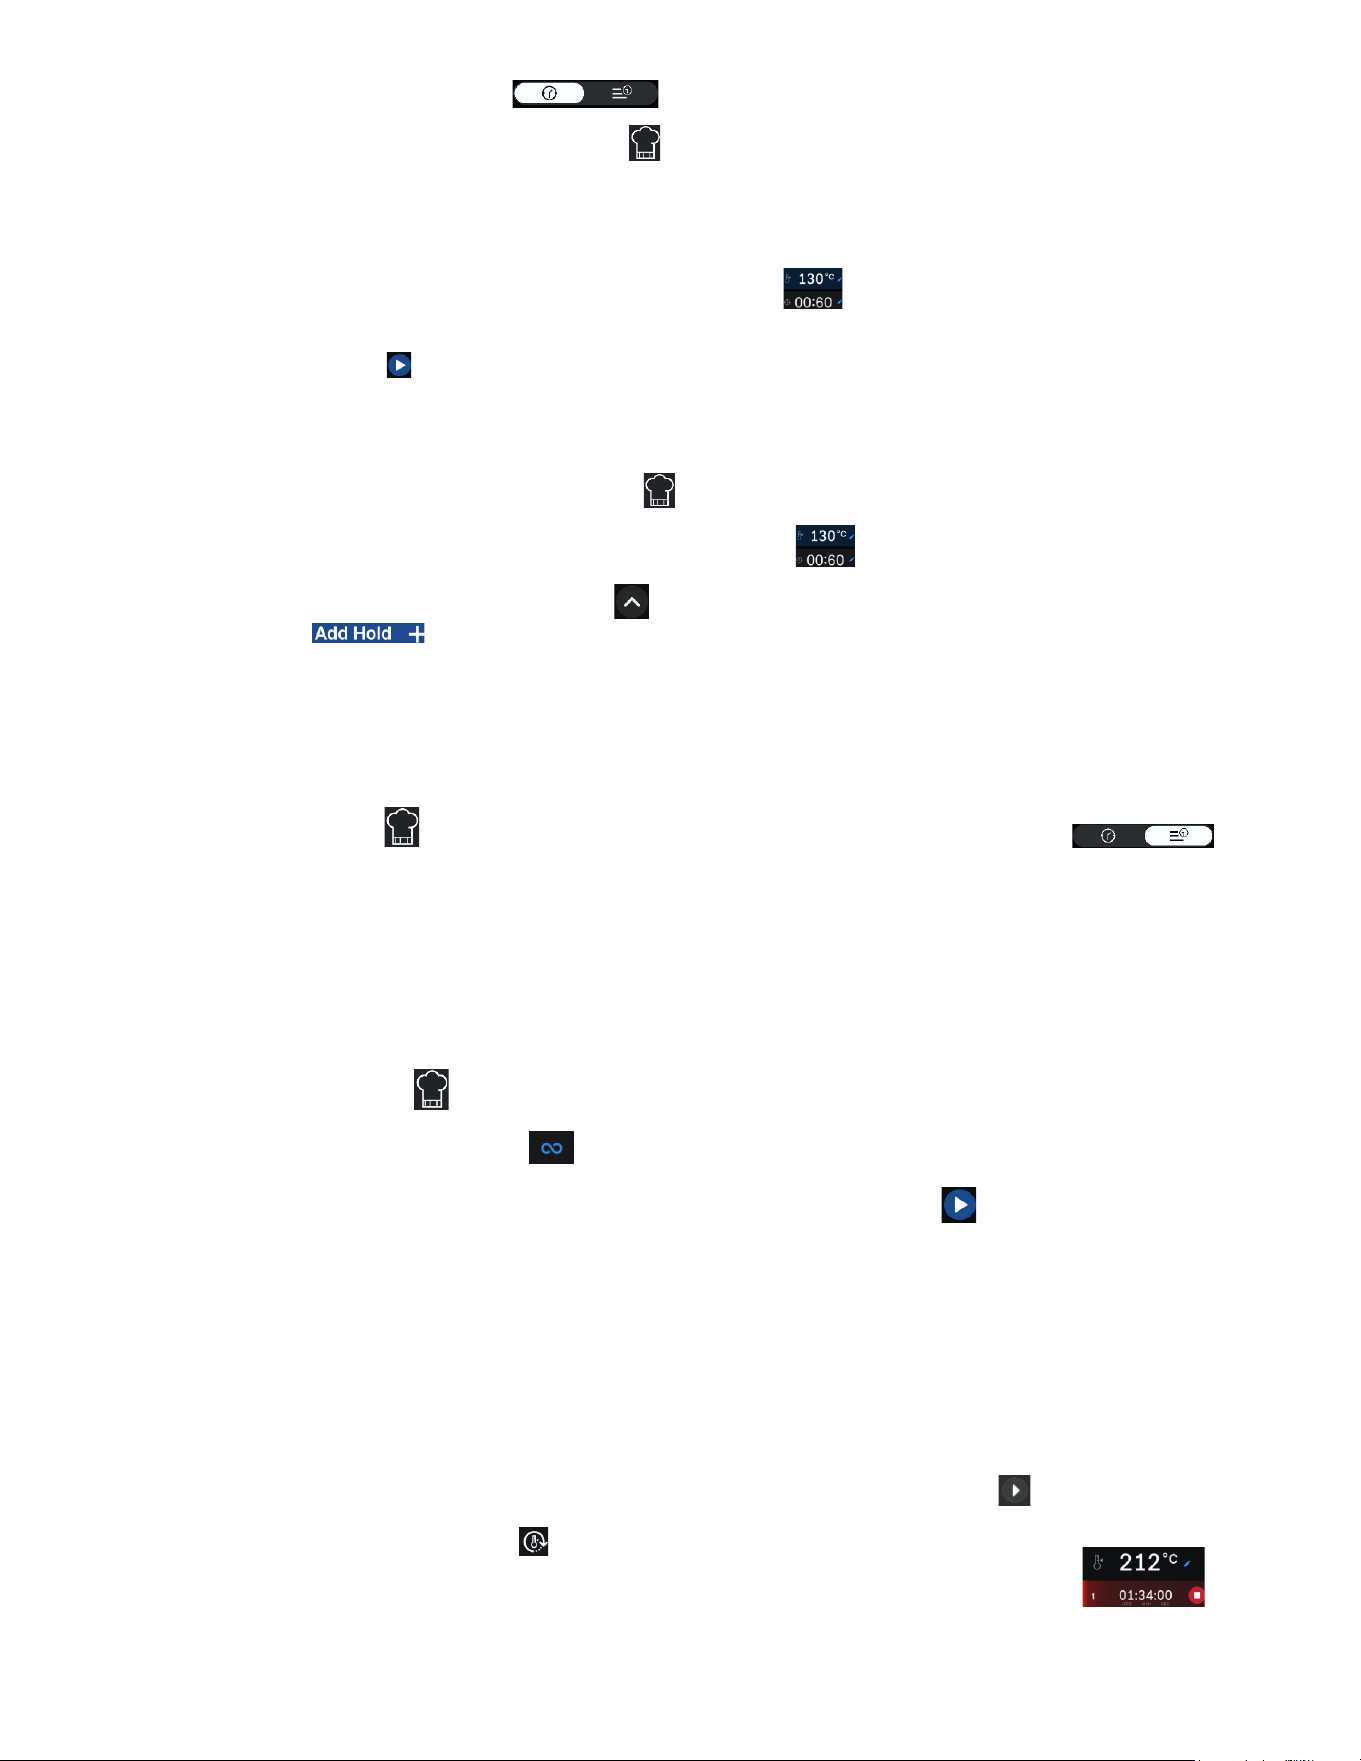
3. Cook Mode with Single Timer
a. Enter cook mode by pressing the Cook icon. Select the single timer option from the two tabs at the
top (If not selected from default)
b. Once cook mode is selected from the main menu, the steamer will start to heat at standby temperature
range of 173°F-193°F
c. Set the desired temperature and enter the cooking time The default display temperature is shown
180°F.
d. Press the play button to start the heating and timer for the cooking
e. Once the timer counts down to 00:00, the cooking cycle ends, and the screen goes back to cook mode.
4. Cook + hold mode
a. Enter cook mode by pressing the “Cook” icon
b. Set the desired temperature and enter the cooking time.
c. Hold can be added by pressing arrow button at the bottom-right side of the screen and selecting “Add
Hold+”
d. Set a holding temperature.
e. Press play to engage both heat and time. Once the timer reaches 00:00:00, the holding temperature will
be held indefinitely.
5. Cook Mode with Multi-Timer
a. In Cook mode select the multi-Timer tab from the two options at the top (2
nd
tab)
b. Set the desired cooking temperature.
c. Assign a timer to each tray, specifying how long each tray should cook at the set temperature.
d. Once a tray's timer reaches 00:00, cooking for that tray has been completed. The remaining trays will
continue cooking until the process is stopped manually, or all times for the six trays reach 00:00.
6. Manual Mode (Continuous Steaming)
a. Enter cook mode from the main menu and set the desired temperature you want to cook at infinity for.
b. Next select the infinity option to switch the device to manual mode (Infinity mode).
c. In manual mode after selecting the infinity option, press the play button to start cooking.
d. A stopwatch will begin counting upward, with a default time display of one hour.
e. When cooking is complete, a prompt will appear with the options “Continue” or “Stop Cooking”.
i. Selecting “Continue” will place the unit in Standby Mode, maintaining a temperature between
173°F and 193°F for a default duration of 1 hour, up to a maximum of 12 hours.
ii. Selecting “Stop Cooking” will exit Standby Mode and return the unit to the Home Screen.
7. Hold Mode: This feature allows the user to set a holding temperature for the cabinet to keep for warm and
individually time up to 6 different holding trays by simply pressing the play button for each tray.
a) Press the thermometer icon to view the options for the six holding trays
b) Set the desired time for each tray and holding temperature (Holding temperature is
common).
24
c) Press play to start the timers. Each tray's timer will begin counting from 00:00.
d) The cabinet maintains the selected holding temperature, ensuring consistent heat throughout the holding
period.
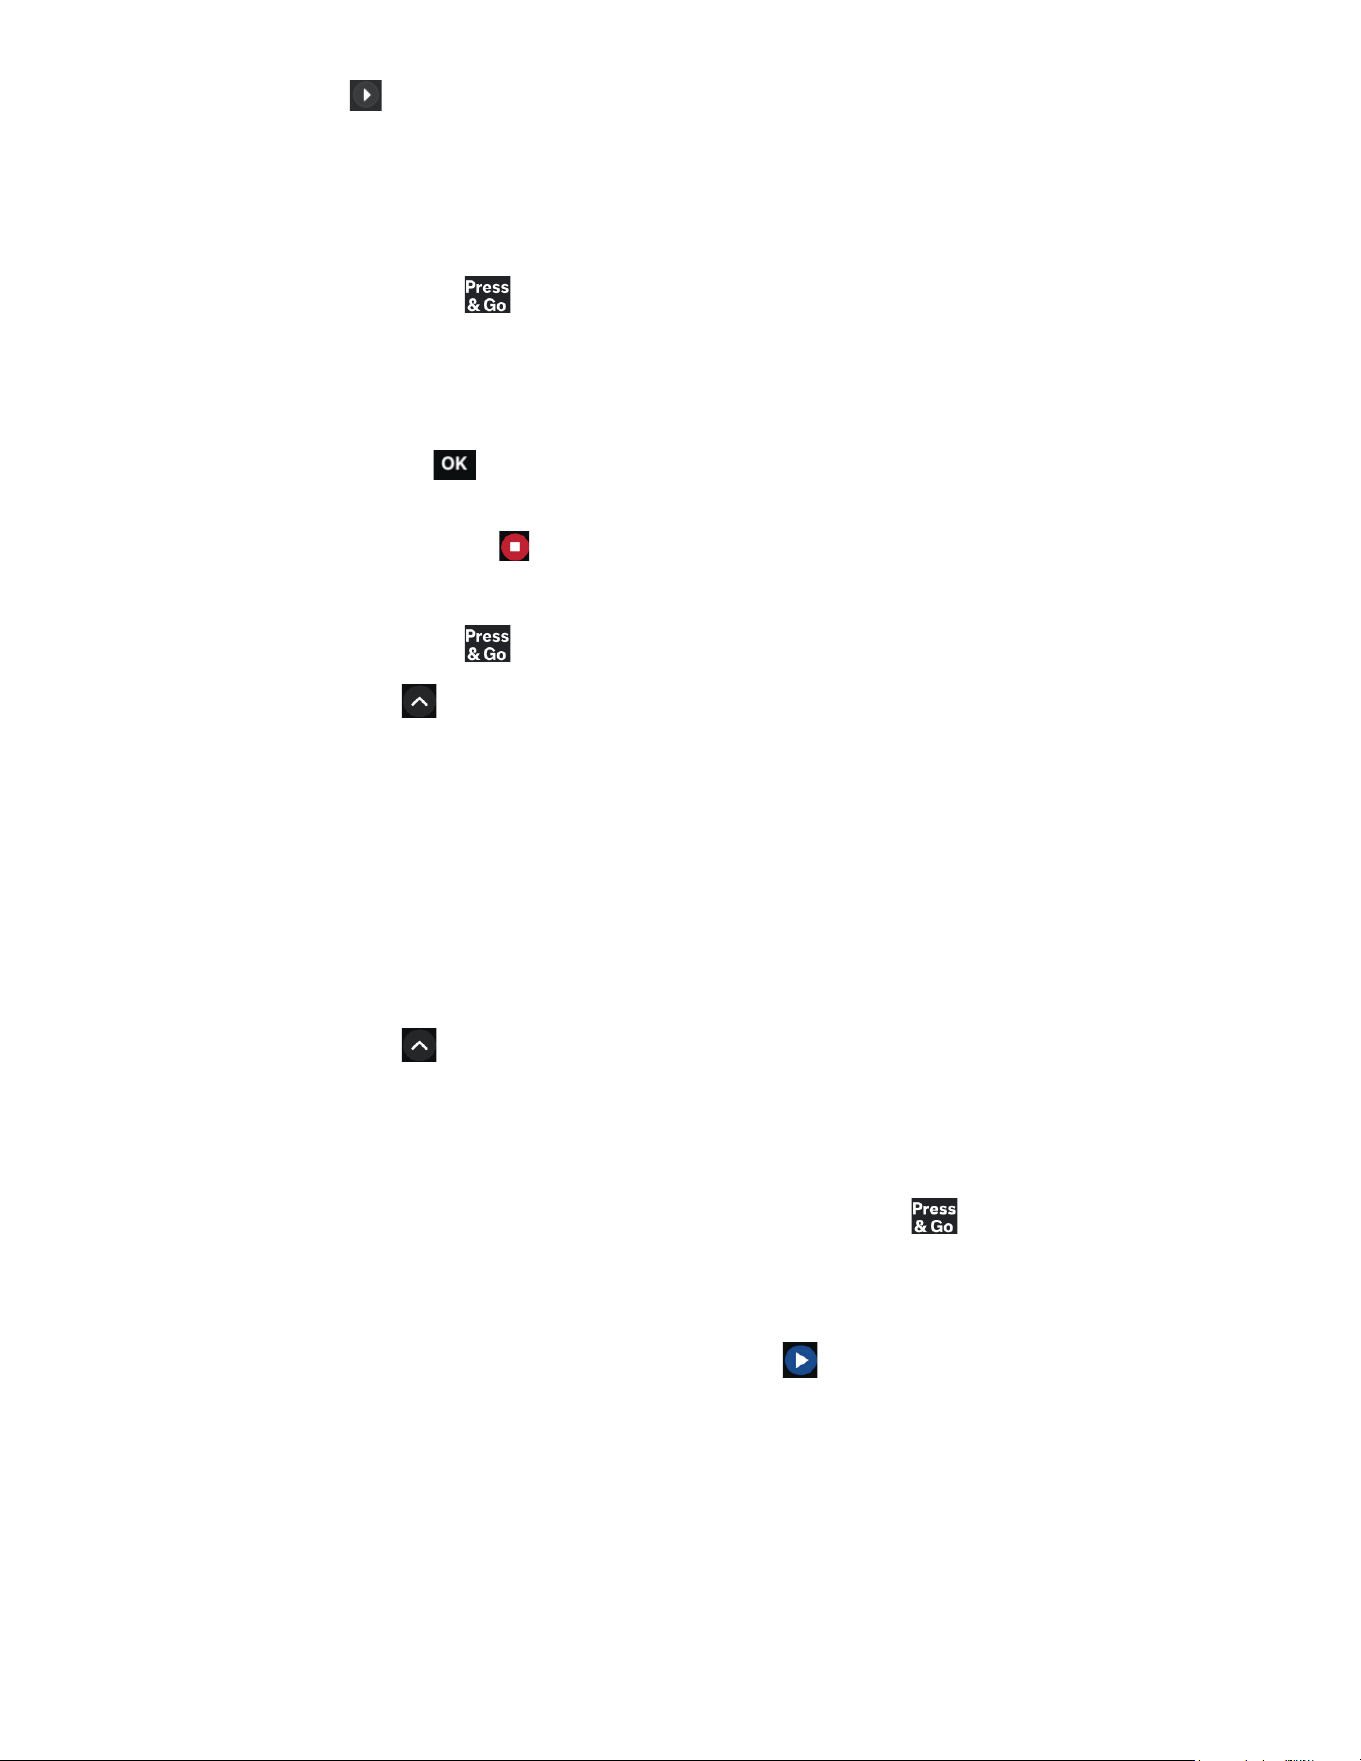
8. Press and Go: Use the Press and Go option to quickly start cooking from a selection of pre-programmed
recipes, making operation fast and easy.
a. Select “Press and Go” from the Easy Touch screen.
b. Follow the prompt and select the food you’d like to cook (making sure it is already inside the steamer)
c. Press play to start the process. The steamer will start off by preheating.
d. Once preheating is complete, a prompt will appear asking you to confirm that the food is inside the
steamer. Click 'OK' to continue, and the pre-set time and temperature will begin automatically.
e. Once the timer has reached 00:00, the cooking will be complete, or can be manually stopped at any time
by clicking the “Stop icon”
9. Edit a Recipe
a. Select “Press and Go” from the Easy Touch screen.
b. Press the arrow button at the bottom-right side of the screen. Two options will show up, “Cookbook”
and “Edit Favorites”
i. The Cookbook option displays all stored pre-programmed recipes. You can add up to 8 favorites
for quick access. If you try to add more, you'll be prompted to replace an existing favorite.
ii. Edit Favorites allows you to organize your favorite recipes, as well as add new ones or swap
them with others.
10. Add and Delete a Custom Recipe
a. On the EasyTouch screen, select Cook Mode, then enter the desired temperature and time for your
custom recipe.
b. Press the arrow at the bottom-right corner of the screen, then select “Save Recipe.”.
c. Enter a name for your recipe, then press the checkmark button. Choose an icon for the recipe and press
the checkmark again to confirm.
d. Using or deleting custom recipe
i. Go to the EasyTouch Home Screen, then tap Press and Go
ii. Tap the arrow button at the bottom-right corner and select “Cookbook.”
iii. Scroll to find your custom recipe and tap it.
1. To use the recipe: Tap the Play button to begin cooking with the saved temperature
and time.
2. To delete the recipe: Tap the Delete button at the bottom-right corner. A confirmation
prompt will appear — follow the instructions to complete the deletion.
11. “Descale” Notification
a) Easy Touch comes with 31 days operation for “Descaling Notification.”
b) After 31 days, “DESCALE” appears on digital display for 5 seconds and will re-appear every 5 minutes.
25
c) Select the cleaning icon from the Easy Touch screen.
d) If descaling is required, the descaling notification will be appeared Click the move forward
arrow in the bottom right side of the screen to continue
i. Remove the Pan racks, KleanShield, fan guard, and wipe down all parts and cavity with vinegar.
ii. Click “DONE” and enter the set default password “3333” to confirm and start the descaling
process
e) If descaling is not required, the notification will display how many hours remain until the next descaling is
needed
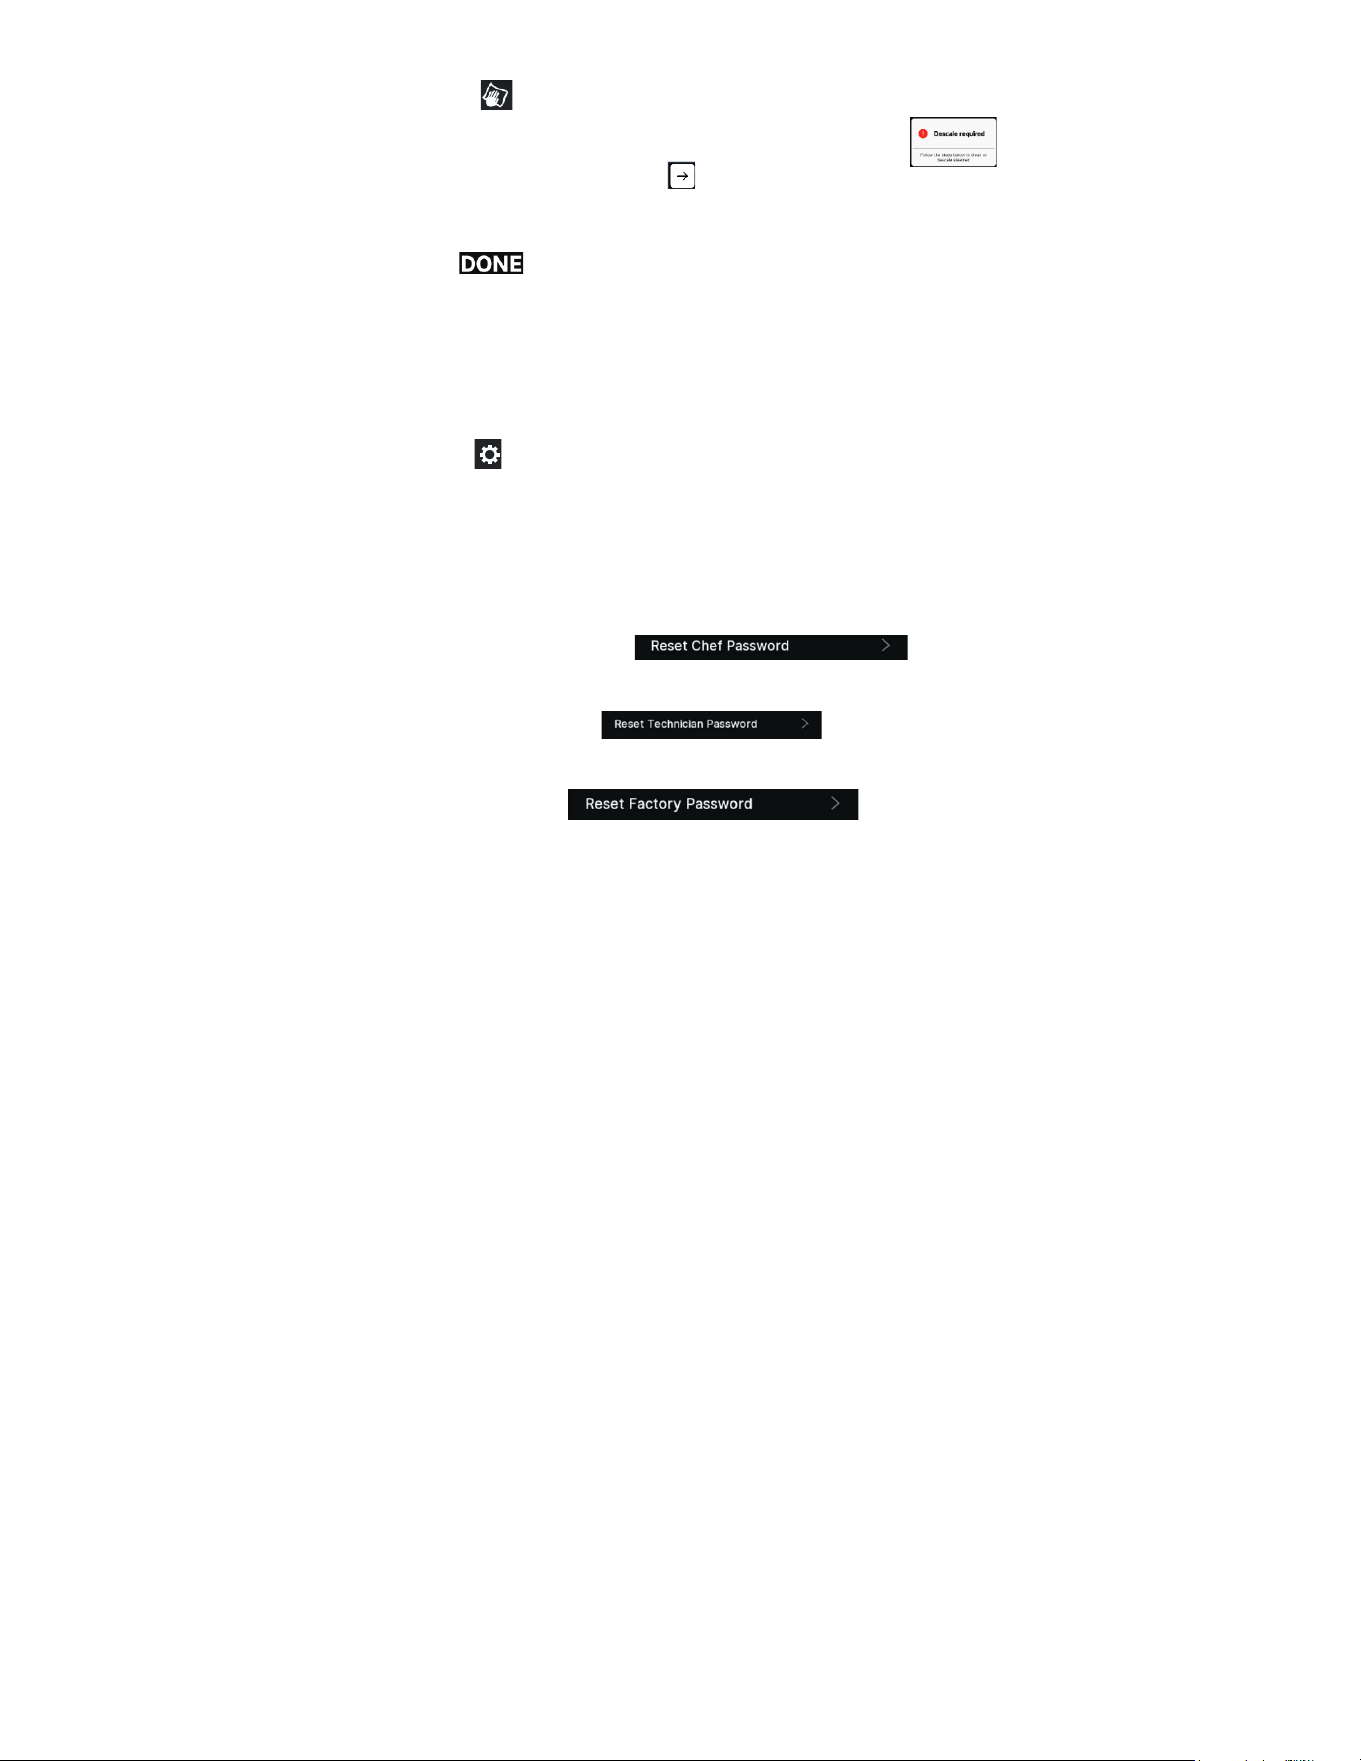
12. Password Reset in Settings
a. Select the settings icon from the Easy Touch screen.
b. General information and setting options will appear.
c. Scroll to the end of the settings menu and select Password Reset where three options will be given
i. The Chef Password is used by operators to set parameters and editing how often descaling
notification pops up. The default password is '3333' and can be changed by selecting the first
option, 'Reset Chef Password,' and following the on-screen
instructions.
ii. Reset Technician Password is intended for service technicians and cannot
be changed by the user.
iii. Reset Factory Password is reserved for factory personnel involved
in building or configuring the steamer and is not accessible to end users.
D. Preheat Steamer
Preheat steamer to ensure productivity and consistency. BEFORE PREHEATING: Inspect and clean the
compartment. After preheating, the compartment will be too hot to inspect and clean safely.
To preheat the SteamChef Steamer:
1. Close the steamer door and turn the steamer ON 15 minutes before cooking.
2. The steamer will heat to the standby temperature.
E. High Limit Reset
This steamer has a high limit lockout to protect the unit from overheating.
If the high limit lockout temperature is reached:
1. A buzzer will sound continuously.
2. The heater will shut OFF.
3. The steamer must be reset before cooking can continue.
To reset the high limit:
1. Turn OFF the power to the steamer by pressing the ON/OFF button. Check whether the green light turns off.
2. Wait 15 minutes for the steamer to cool.
3. Make sure the water probes are clean.
4. Refill with water and restart according to the Power ON instructions (Chapter 5).
5. If the problem repeats, see the Operators Troubleshooting Guide (Chapter 9).

26

27
CHAPTER 6 SHUTDOWN AND CLEANING PROCEDURE
⚠ WARNING
The steamer stays hot for a long time. To help avoid burns, allow the steamer to cool completely before cleaning
or servicing.
Do NOT use hoses, power cleaners, or pressure washers on or in the SteamChef Steamer. Doing so can
cause electric shock and/or damage electrical and electronic components.
A clogged or slow drain can cause hot water to collect in the oven compartment and spill out when the
door is opened causing injury and equipment damage.
Never push food debris or scale down the steamer drain, or through the KleanShield
TM
opening. Debris and scale
can build up in the drain system and clog or slow the drain and lead to additional maintenance and service
problems.
Always remove any solid matter from the inside of the steamer with a rag or spatula before rinsing cleaning water
down the drain.
⚠ WARNING
When cleaning: do NOT pick up or tilt the SteamChef. If it is necessary to move a SteamChef for cleaning, turn
OFF power at the Main External Power Supply and at the Easy Touch screen to drain the water from the
SteamChef.
INJURY and EQUIPMENT DAMAGE can result from shifting the SteamChef out of level while the power is
ON at the Main External Power Supply and/or water is in the SteamChef.
The steamer MUST BE LEVEL BOTH FRONT TO BACK AND SIDE TO SIDE in all mounting arrangements before
operation. Check level front to back and side to side before restoring power as described in the Installation Manual
after moving the SteamChef.
This procedure should be performed at the end of each day or shift, or more frequently if the water supply does not
meet the Minimum Water Quality Requirements in the Warranty.
1. Press the POWER ON/OFF button and the steamer will turn OFF to de-energize all controls and drain the
steamer. The appliance will begin a 3-minute drain rinse cycle to clean the drain system.
2. Open the cooking compartment door and allow the steamer to cool.
3. Remove any spilled food from the surface of the KleanShield
TM
.
• Never push food scraps down the KleanShield
TM
opening or the reservoir drain opening.
4. Remove the slide racks, fan guard and KleanShieldTM. Wash and rinse slide racks, fan guard, and KleanShield
TM
separately or clean them in a dishwasher according to health requirements.
5. Remove any spilled food from inside compartment and clear any residue from the drain valve and the
KleanShield
TM
drain opening.
• Do not push food debris or scale down the steamer drain, or through the KleanShield
TM
drain.
6. Clean the interior of the compartment thoroughly, removing all food particles and scale from the steamer.
7. Wipe down the interior of the cooking compartment with half water and half white household vinegar solution. Use
a spray bottle of the same vinegar solution to rinse the convection fan located at the back of the cooking
compartment.
28
• When done daily, this will help prevent the buildup of calcium and other mineral deposits left over from the
boiling of water, and prevent scale buildup in the steamer, helping prevent more costly maintenance and
service on the steamer.
• Cleveland Range does not recommend the use of detergent, but if detergent has been used to clean the
inside of the steamer, be sure to rinse off the probe assembly with the vinegar solution. If detergent residue is
not completely rinsed from the probe assembly, then the residue can prevent the water level control from
operating.
8. Use a soft bristle brush to clean the water sensor, temperature probe, and fan and to remove stubborn food
particles.
9. Do not use abrasive cleaning compounds or steel wool.
10. Rinse the inside of the steamer compartment and drain valve thoroughly with clean water.
11. Inspect the probe assembly and clean it with a soft bristle brush or similar non-abrasive cleaning means.
12. Clean the door assembly.
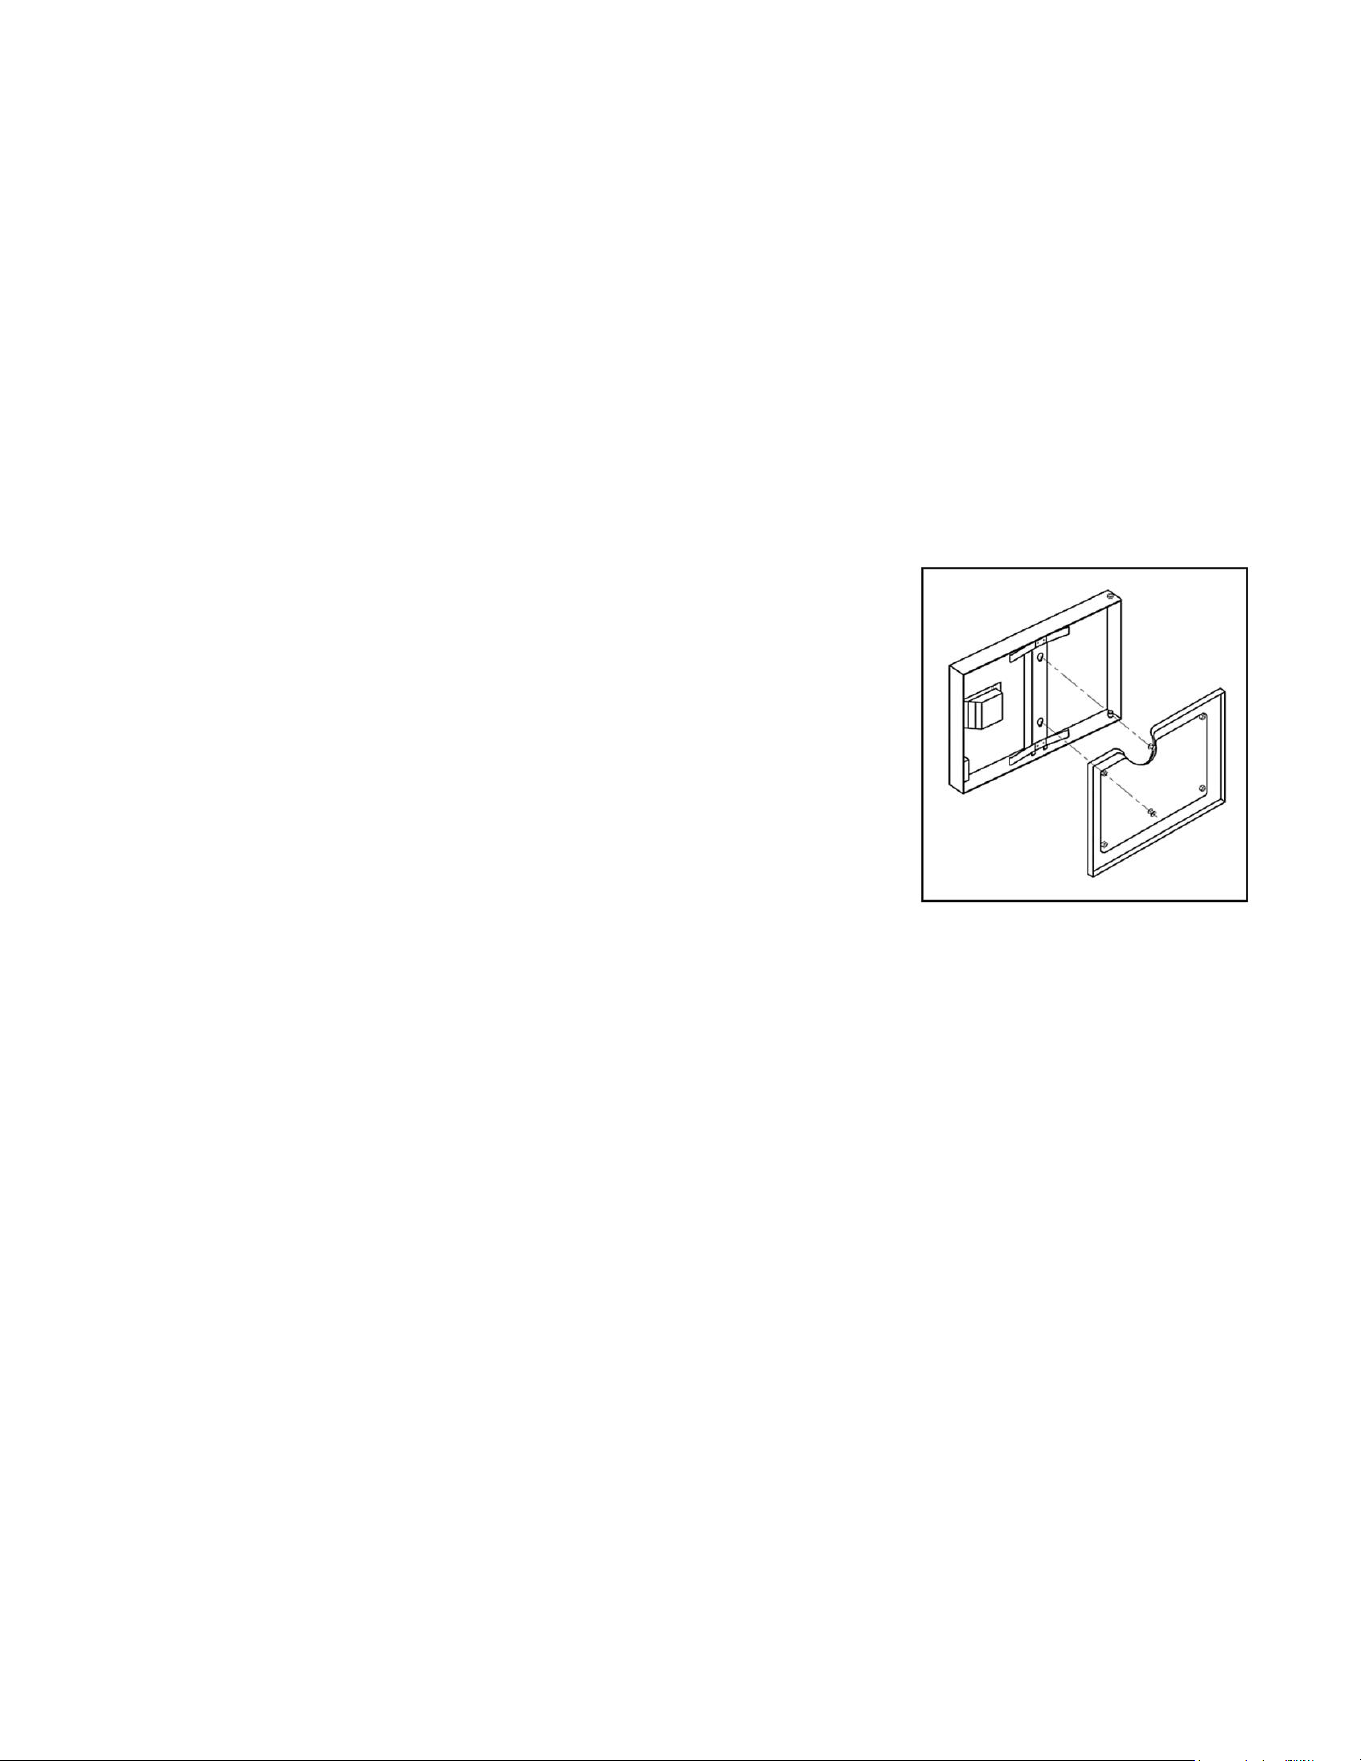
a) Remove the door gasket assembly (see Figure 6-1).
b) Note the keyhole slots on the door and the retaining pins on the
gasket assembly. Grasp the gasket assembly at the sides and lift
towards you to remove the assembly.
c) Clean all surfaces of the gasket assembly, as well as the inside of
the door, by wiping with a damp cloth.
d) Rotate the liner assembly 180° and replace the gasket assembly by
sliding the retaining pins into the keyhole slots. Either long edge of
the gasket assembly can be positioned at the top. Periodic rotating
of the door assembly will help increase the door gasket life.
13. Replace the cleaned KleanShield
TM
, slide racks and fan guard. (See
Chapter 3).
14. Wipe the exterior with damp cloth only.
15. NEVER HOSE DOWN THE STEAMER. Electrical components inside the unit will not function correctly if wet or
damp and may cause a shock hazard.
16. After cleaning, leave the steamer door open until the next steamer operation. This prevents compartment odor
buildup and helps increase gasket life.
Figure 6-1 Door Gasket Assembly
(Model 22CET3.1 Shown)

29
CHAPTER 7 OPERATING TESTS AND FINAL CHECKOUT PROCEDURES
This procedure must be performed by a qualified Cleveland Range Authorized Service Representative.
• Complete the Startup Procedure before starting the actual operating tests.
• Read and understand all steps of this procedure before starting.
• This procedure evaluates the function of the major operating controls of a SteamChef.
• This procedure is for SteamChefs equipped with an Easy Touch control panel.
A. Startup Procedure
1. Press the ON/OFF POWER button until the steamer is OFF and open the steamer door. There should be no
water in the steamer.
2. Make sure that the KleanShield
TM
and reservoir drains are clear. See Figure 3-3.
3. Check for proper installation of the KleanShield
TM
, fan guard, backplate, slide racks (See Figure 3-5), and
door gasket assembly.
4. Make sure the Main External Power Switch is OFF.
5. Make sure the fuses or breakers are the proper size.
6. Remove the control side access cover.
7. Check the internal wiring and make sure there are no loose or disconnected wires.
8. Make sure the supply wiring is the correct size.
9. Check that the appliance is properly grounded.
10. Correct any deficiencies.
B. Drain Rinse Inspection (continue from Startup Procedure)
1. Turn OFF the steamer with the POWER ON/OFF button.
2. Turn ON the water supply to the steamer.
3. Turn ON the Main External Power Switch.
4. The 3-minute drain rinse cycle starts.
5. The drain flushes with fresh water.
6. Stop the drain rinse cycle before it is complete by turning the steamer on with the ON/OFF POWER button.
7. Drain rinse stops.
8. The operating control circuits energize.
9. The digital display turns ON.
10. The reservoir begins to fill with water.
11. Restart the drain rinse cycle by pressing the ON/OFF POWER button until the steamer is OFF.
12. During the drain rinse cycle, make the following checks:
a)
The steamer must be OFF by pressing the ON/OFF button to start the drain rinse cycle.
b)
Look at the one-inch vent gap between the steamer drainpipe and the floor drain. A steady stream of
water drains from the steamer.
c)
Check for plumbing leaks.
d)
After about 3 minutes, the cycle is complete.
e)
Look at the one-inch vent gap between the steamer drainpipe and the floor drain. No more water drains
from the steamer.
C. Operating Tests and Final Checkout Procedure (Continue from Drain Rinse Inspection)
1. Turn ON the Main External Power Switch.
2. Turn ON the steamer by pressing the ON/OFF button.

30
3. The reservoir begins to fill with water.
4. As the reservoir fills with water, check that the digital display is ON.
5. As the water level in the compartment reservoir rises:
a)
No water flows from the drain opening.
b)
Check for plumbing leaks in the control compartment.
6. When the water in the reservoir reaches the level of the lower probe, the heating elements and the convection
fan turn ON and the steamer heats to the standby temperature.
7. Open the door; the heating elements and convection fan turn OFF.
a)
The water level in the reservoir continues to rise.
b)
The water in the reservoir stops rising when water reaches the upper probe.
• If the water level continues to rise above the tip of the higher probe, turn OFF the steamer and see
the Operators Troubleshooting Guide.
• If the problem persists, shut down the appliance and call a qualified Cleveland Range authorized
service representative.
8. Close the compartment door.
a)
The door interlock circuit closes.
b)
The heating elements and the convection fan turn ON.
c)
The cooking compartment heats until the standby temperature is reached.
d)
When the standby heat temperature is reached, the convection fan, and the heating elements turn OFF.
e)
Leave the steamer in timed cooking mode for a few minutes.
• Heating elements and convection fan cycle ON and OFF as the controls maintain the standby
temperature in the cooking compartment.
9. Switch to manual mode (∞).
a)
The steaming cycle starts.
b)
Check the following functions:
•
The heating elements and convection fan turn ON.
•
The water heats to steam.
•
After a few minutes, the cooking compartment reaches a steaming temperature.
•
The heating elements and convection fan will stay ON as long as the steamer remains in MANUAL
mode (or ON for ON/OFF models). The condenser water will cycle to maintain a drain temperature
below 140°F.
•
After several minutes of steaming, check for steam leaks around the door gasket.
10. As the appliance continues to steam in Manual Mode, test the no-water/low water safety circuit.
a)
Close the manual water supply valve(s).
b)
When the water level drops below the lower water safety cutoff point (the lower probe). The heating
elements, the condenser water flow and convection fan will automatically shut off, and the production of
steam will cease.
c)
Open the manual water supply valve(s). The reservoir refills with water to the safety level and steaming
resumes.
11. Open the cooking compartment door and allow the compartment to cool for 3 minutes, then close the door
and continue testing.
12. Switch to SINGLE TIMER mode.
13. Set the Timer for 10 minutes.
14. As soon as the Timer is set, the steam generating cycle starts. This is the same sequence observed in

31
manual mode, except:
a)
The Timer controls the cycle.
b)
The elapsed time to produce steam is shorter the cooking compartment is already hot.
c)
The cooking compartment returns to Standby temperature after the Timer counts down to zero.
15. After timed operation starts, check the following:
a)
The heating elements and convection fan turn on immediately.
b)
As steam is generated, the water level fluctuates, and the solenoid makes a clicking sound when it opens
and closes the fill valve.
c)
Check for steam leaks around the door.
d)
When the timer counts down to zero, the heating elements, the condenser flow and convection fan turn
OFF, and the buzzer sounds for 3 seconds.
e)
After about 30 seconds steam stops being produced.
16. Go to step D, “Shutdown.”
D. Shutdown (Continue from Operating Tests and Final Checkout Procedure)
1. Turn the steamer OFF by pressing the ON/OFF button until the display is off
a)
The digital display turns OFF.
b)
The 3-minute automatic drain rinse cycle starts.
2. When the drain rinse is complete, turn the steamer OFF at the main external power switch.
3. Replace the side panels and secure them with their screws.
4. After completing the Startup, Drain Rinse Inspection, and the Operating Tests and Final Checkout Procedure,
the appliance is ready for service.
32
CHAPTER 8 PREVENTIVE MAINTENANCE
A. Maintenance
Maintenance on the steamer must be performed on a regular basis to keep it running properly and efficiently. By
following the maintenance instructions in this chapter and cleaning the equipment regularly as outlined in Chapter
6, problems with the steamer will be kept to a minimum. The frequency of steamer maintenance may need to be
increased, depending on equipment usage and water quality. If problems occur, refer to the Troubleshooting
Guide. For more information on product and services, contact your sales representative.
1. Maintenance Records
Make a file for maintenance and repair records only. Keep a written record of daily, weekly, monthly, and
yearly maintenance. These records will help protect warranty coverage, help schedule maintenance
procedures, help keep the SteamChef cooking properly, and assist service personnel.
2. Daily Maintenance
a) Checking and Changing Water
When using the SteamChef Steamer frequently check the water, especially if cooking with perforated
pans. Although most food drippings will be caught by the KleanShield, the water may become dirty from
spills falling over the edge of pans when loading, cooking, and emptying the steamer. Change the water
(see below) when the water becomes cloudy or contaminated with food particles.
NOTICE
Change the water in the SteamChef steamer at least every day to maintain food quality and keep
the steamer sanitary.
It may be necessary to change the water several times a shift, especially if cooking strong-flavored
foods or using perforated pans.
b) To Change the Water in the Reservoir:
i. Press the POWER ON/OFF button until the display is OFF to de-energize all controls and drain the
steamer. Wait 3 minutes to allow drain cycle to complete.
ii. Open the steamer door and allow steamer to cool.
iii. Remove the KleanShield. Remove any food particles and rinse the KleanShield with clean water.
iv. Remove any spilled food from inside compartment and rinse any residue from the drain valve and the
KleanShield drain.
v. Replace the KleanShield. See Chapter 3.
vi. Press the POWER ON/OFF button until the display turns on and the steamer will automatically begin
filling with water to the normal operating level after going into cook mode and pressing play
c) Cleaning the Steamer
Clean interior and exterior of the steamer according to the Shutdown and Cleaning Instructions in Chapter
6 at least once a day or at the end of each shift.
3. Yearly Maintenance
Clean the water line strainers at least once a year.
NOTE: When the steamer is first installed, check the strainer more frequently to find out how often the
strainer must be cleaned.
a) Press the POWER ON/OFF button to the OFF position.
b) Turn OFF power to the steamer at the Main External Power Switch.
c) Close the valves in the steamer water supply lines.
d) Unscrew the hoses from the inlet fittings located on the rear of the steamer.
e) Remove the filter washers from the outlet of the hoses and wash them with clean water. See Figure 3-9.

33
f) Check the filter washer for wear and replace it if necessary.
g) Put the filter washers into each of the water inlets and reconnect the hoses to the back of the steamer.
h) If treated water is used to supply water to the reservoir, make sure that it is connected to the left inlet at
the rear of the steamer. See Figure 2-2.
i) Open water supply valve(s) and check for water leaks.
j) Turn power back on to the steamer at the Main External Power Switch.
NOTE: The appliance will perform the automatic 3-minute drain rinse cycle.
B. Descaling Water Reservoir
Only qualified Cleveland Range authorized technicians or trained onsite maintenance personnel may
perform this procedure.
1. Is Descaling Necessary?
a) Although a SteamChef should not normally require this procedure, the use of “hard” water or failure to
follow the cleaning procedures in Chapter 6 may cause the accumulation of scale in the SteamChef.
b) Scale can deposit in the bottom of the SteamChef reservoir and/or in its drain. Descaling can help prevent
a costly service call if scale buildup begins to impair the SteamChef’s operation.
c) Descaling is not normally required on a SteamChef. Frequency will depend on water quality, and the
frequency of shutdown and cleaning of the water reservoir.
d) The frequency of descaling must be determined by the owner and performed by qualified Cleveland
Range authorized technicians or trained onsite maintenance personnel.
2. If descaling is necessary, Cleveland Range recommends the use of DISSOLVE® Descaler Solution,
Cleveland Range Part No. 106174. No other system of descaling should be used.
NOTE: Part No. 106174 is the part number for a case (6 1-gallon containers) of DISSOLVE® descaler.
3. Follow the instructions included with the DISSOLVE® Descaler Solution. Call Cleveland Range at 216-481-
4900 or 1-800-338-2204 if there are any questions.
MODEL 22CET6.2 DESCALING PROCEDURE (For DISSOLVE® Descaler Solution P/N 106174)
• This procedure takes about 1 hour 30 minutes to complete.
• Repeat this procedure as needed for heavy scale buildup.
• Regular cleaning of the steamer with vinegar per the instructions found in the Shutdown and Cleaning
Instructions may help reduce need for descaling. See Chapter 6.
• Sides, back, and top of steam compartments may be descaled with a vinegar solution and a soft brush.
See Chapter 6.
1. Open the door to the cooking compartment.
2. Press the ON/OFF POWER button until the steamer is OFF.
• The 3-minute drain cycle starts.
3. Remove the Pan Racks and KleanShield
TM
from inside the steamer.
• Heavily scaled pan racks and KleanShield
TM
may be descaled by soaking them in a solution of 1-part
Dissolve® and 4-parts water, rinsing thoroughly with cold water, and washing them in a dishwasher.
4. Remove any loose scale from the bottom of the steamer.
5. When the drain cycle is done, press the ON/OFF POWER button for 5 seconds, and display will turn ON to
refill the unit.
6. Do not start the timer.
7. Leave the door open.
NOTE: DO NOT HEAT THE STEAMER DURING DESCALING.
8. While the reservoir is filling with water, pour 1 to 1 ½ quarts (about a third of a 1-gallon bottle) of DISSOLVE®
descaler solution into the water reservoir.

34
• While adding DISSOLVE® descaler to the reservoir, pour it in slowly to avoid splashing the liquid or
overflowing the reservoir.
9. After automatic fill ends, turn OFF the Main External Power Switch..
10. Leave the door open and let the DISSOLVE® work for 1 hour.
11. At the end of 1 hour, press the ON/OFF button until turned OFF.
12. Turn the power ON at the Main External Power Switch.
13. After the 3-minute drain cycle completes, turn steamer back ON.
NOTE: If the reservoir does not fill, dry off the water probe assembly.
14. After filling stops, add 1/2 gallon of water to the reservoir. Do not overflow the reservoir.
15. Press the POWER ON/OFF button until the steamer is OFF to start the drain cycle.
16. After the reservoir drains, press the POWER ON/OFF button until the display turns on to refill the reservoir.
17. Close the cooking compartment door and set the timer for 20 minutes. The steamer heats to normal operating
temperature.
18. After 20 minutes turn the steamer OFF.
19. The 3-minute drain cycle starts.
• This is the final rinse of the reservoir.
20. If the reservoir drains slowly even after being descaled, turn OFF the steamer and clean the drains with an
NSF approved drain cleaner.
21. Once the scale is removed and the drain flows freely, the steamer is ready for normal operation.
⚠ DANGER
The liquid solution in Cleveland Range Descaler Solution Part No. 106174 can be harmful if not handled
properly. Follow these basic safety rules for handling and using this product. Instructions and
warnings on container labels supersede all other warnings and instructions.
Wear protective clothing when mixing or applying chemical cleaners.
Wear rubber gloves, and OSHA approved eye protection when descaling
Avoid breathing fumes.
If liquid contacts skin: wash with soap and water.
If chemical contacts eyes: flush with water and seek medical attention.
If chemical is swallowed or ingested: drink 1 or 2 glasses of water and seek medical attention.
Failure to do so can cause DEATH or INJURY.
⚠ CAUTION
Do not use any other product or method of descaling other than the DISSOLVE® Descaler method
using part number 106174.
Failure to do so can cause DEATH or INJURY.
35
CHAPTER 9 TROUBLESHOOTING GUIDE
Error Code
Error Name
Error Description
UI or I/O
E101
Heater Error
In 32F-122F ( 0C-50C), if we don't see a 5F/Min increase, trigger
this alarm. In this condition, check the heating system, SSR,
Safety contactor, Elements, and Water probes.
NOTE: The " 5F" and " 1 Minute" are inaccurate. CLR may change
them later.
UI
E102
Hi-Limit Safety
Switch (350 F)
Error
Error for when the Hi-Limit safety thermostat(350 F) is
engaged.Lockout of heating system should occur in this
scenario.
I/O
E103
Safety TS
Switch (320 F)
Error
Error for when the safety thermostat(320 F) is engaged. Lockout
of heating system should occur in this scenario.
I/O
E104
Door Open
Error
The Heating process is stopped because the Door is open. It is
not valid if E103 is occurred.
I/O
E105
Lack of Water
The Heating process is stopped because there is not enough
water.
I/O
E106
SSR
Temperature
Alarm
The Heating process is stopped because the SSR is overheating.
I/O
E701
Cavity Sensor
Error
Cavity Probe is non operable or outside of permissible
calibration. Lockout of heating system should occur in this
scenario.
I/O
E702 (Phase 2)
Product Sensor
Error
Product Probe is non operable or outside of permissible
calibration. Lockout of heating system should occur in this
scenario.
I/O
E201
Water Fill Error
Water Fill system is inoperable. Full lockout of the unit should
occur, and no subsystem should be operable.
NOTE: the "5 minutes" is not accurate. It will be determined by
CLR later.
UI
E202
Water Full
Level probe
Error Or Heater
Error
Water Full level probe or Heating system is inoperable. Full
lockout of the unit should occur, and no subsystem should be
operable.
NOTE: The " 175F" and "20 Minutes" are not accurate. CLR will
determine this later.
UI
E203
Water Heating
Level probe
Error
Water Heating level probe is inoperable. Full lockout of the unit
should occur, and no subsystem should be operable.
I/O

36
E010
I/O Board over
temperature
Error
I/O Board overheat error if the I/O board temperature exceeds
safe operating temperature. Full lockout of the unit should
occur, and no subsystem should be operable.
I/O
E011
Communication
Error
There is no communication between UI and I/O Board. Full
lockout of the unit should occur, and no subsystem should be
operable.
I/O
37
Cleveland
Cleveland Range, LLC
760 Beta Drive, Unit D
Mayfield Village, Ohio 44143
216.481.4900
800.338.2204
©2016 Welbilt Foodservice except where explicitly stated otherwise. All rights reserved. Continuing product improvement may necessitate change of specifiations without notice.
To learn how Welbilt Foodservice and its leading brands can equip you, visit our global web site at
www.welbilt.com, then discover the regional or local resources available to you.
KitchenCare
Every new piece of Welbilt Foodservice equipment comes with KitchenCare® and you choose the level of service that meets
your operational needs from one restaurant to multiple locations
StarCare – Warranty & lifetime service, certified OEM parts, global parts inventory, performance audited
ExtraCare — CareCode, 24/7 Support, online/mobile product information
LifeCare – Install & equipment orientation, planned maintenance, KitchenConnect , MenuConnect®
Talk with KitchenCare® • 1-844-724-CARE • www.mtwkitchencare.com